How To Change Outlook Password [3 Quick Ways]

A wide range of users has reported encountering the error message Something went wrong and Outlook couldn’t update your password.

This error seems to have appeared with the interface change for the password recovery option inside Outlook 365.

Why can’t I change my Outlook password?

The recover password option has transformed into ‘repair’. Even though this was intended to simplify the process of changing the password in Outlook 365, because of some conflict, it actually made the problem worse.

Users who hit the Repair option and then choose Let me repair my account manually, are then met by the error mentioned above.

This can be because some updates are pending or because Outlook met a bug during the sign in process.

It can be extremely frustrating, as you end up being forced not to use any of your email addresses connected to your Outlook account.

In today’s guide, we will discuss the best way to deal with this issue and solve it once and for all. Please read on to find out how to do it.

What to do if Outlook couldn’t update your password?

1. Check for any updates to your operating system

    For a worthwhile solution to work out Outlook password issues, follow the steps below to update your Windows OS.

  1. 1. Click on the search box and type in Update. Choose the first option from the top.

    outlook-couldnt-update-password
  2. 2. Inside the Windows Update window, click on Check for updates.

    Updates Windows 10 - Something went wrong and outlook couldn't update your password
  3. 3. Wait for the search process to complete, and install any available updates.

  4. 4. Follow the on-screen instructions and restart your PC (if required).

  5. 5. Check Outlook to see if the issue persists.

2. Download the official Support and Recovery Assistant for Office 365

  1. Click this link to download the application.
  2. Run and install the application to your PC by following the on-screen instructions.Install troubleshooter Microsoft - Something went wrong and outlook couldn't update your password
  3. After the installation process is completed, the app will start automatically.
  4. Follow the on-screen instructions to try and fix the Outlook 365 app.
  5. Try to see if this fixed the Outlook not updating password issue.

3. Change the password by accessing Microsoft Outlook settings

Note: This method will enable you to access the same account setup form that was used in the previous versions of Outlook. Update your password inside that form and everything will synchronize perfectly after.

  1. Open up Microsoft Outlook.
  2. Click on File from the top-left menu.
  3. Select Account Settings -> Manage Profiles.
  4. Click on the Email option -> select the Email tab -> select the email address you want to change the password to.
  5. Follow the on-screen instructions and set a new password.

In today’s article, we explored some of the best methods to deal with the Something went wrong and Outlook couldn’t update your password error message on Windows 10.

As you can see, it’s easy to change your Outlook password, and this can be helpful if Outlook keep asking for password, or it can help you fix other issues.

After updating the password in Outlook, it’s a good idea to also refresh it across your Microsoft 365 account for consistent access. See the steps in How to Change Microsoft 365 Password.

Please feel free to let us know if this guide helped you change your Outlook password, by using the comment section below.

An update to support this game may be available error [FIX]

If you’re using Xbox 360, you may receive the An update to support this game may be available message when you attempt to play certain Xbox games.

Now, this could mean a host of things but for the most part, it’s one of the following:

  • The game you’re attempting to play isn’t supported on your Xbox 360.
  • You’re using another storage device but the standard Xbox 360 Hard Disk.
  • You have not installed all the required software updates for your Xbox 360 console.
  • You’re attempting to transfer a game you saved from an old Xbox console to your Xbox 360 console.

The good news is that this is an issue you can resolve by following the simple instructions below.

An update to support this game may be available on Xbox 360

Solution 1: Check your game’s compatibility and update appropriately

  1. Go to this Xbox 360 console games compatibility list
  2. Click backward compatibility.
  3. Select Play original games on Xbox 360.
  4. A huge list of compatible games will be displayed. Scroll through and check if the game you’re attempting to load has been included.An update to support this game may be available

If you are looking for the simplest way to connect the Xbox 360 controller to Windows, check these guides.


How to update your Xbox console software from Xbox Live

  1. On your controller, press on the Guide button and then go to Settings.
  2. While there, select System Settings then press A to access the settings menu.
  3. Choose Network Settings and again press A.
  4. If prompted, choose Wired Network or where applicable, your Wi-Fi’s name then press A.
  5. Click Test Xbox Live Connection then press A.
  6. If prompted, click Yesto commence the update.

The error message ‘an update to support this game may be available’ disappears after this in most cases for compatible games (those listed above).


Solution 2: Switch to an official Xbox 360 Hard Drive

  1. Using the included data transfer cable and CD, copy your data from the Xbox 360 to the new hard drive. You should only install once sure that the data has been successfully copied.We've written extensively on xxxx issues. Check out these guides for more information.
  2. To install, turn off your console and remove your Xbox 360‘s side panel.
  3. You then locate the current hard drive’s cover (at the back of your console).
  4. Next, you remove the cover then slide out the hard drive
  5. You then plug the new hard drive into the vacated slot then replace the cover.
  6. Press your new hard drive firmly until it clicks into place.
  7. Turn on your console and check if your game can play.

RELATED STORIES YOU SHOULD CHECK OUT:

Windows 10 news recap: Microsoft hired someone called “Mac Book” to praise Surface Laptop 2, May 2019 Update on 11.4% of devices according to AdDuplex, and more

Welcome back to our Windows 10 news recap, where we go over the top stories of the past week in the world of Microsoft’s flagship operating system.

Microsoft hires someone named Mac Book to praise Surface Laptop 2 in leaked ad

A leaked ad has shown that Microsoft has hired someone named “Mac Book” to help promote the Surface Laptop 2.

https://twitter.com/h0x0d/status/1156573268960317440

Limited-time Microsoft sale cuts prices on Surface Pro 6 bundles, $100 off Surface Book 2

Prices for the Surface Pro 6 bundles have been cut in a limited-time sale, as well as the Surface Book 2 having $100 cut off of its price tag.

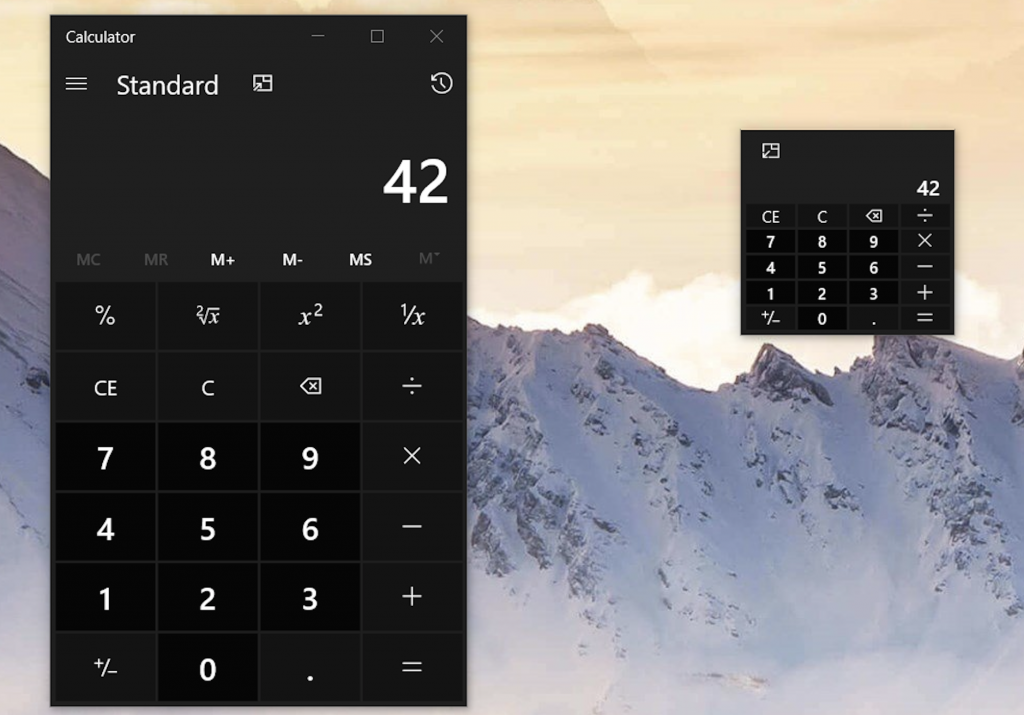
Windows 10 Calculator app will soon get new Always on top mode

In an upcoming update, the Windows 10 Calculator app will be able to be stuck on top of other apps, allowing the calculator to always be in view.

AdDuplex: Windows 10 May 2019 Update now on 11.4% of surveyed PCs

According to AdDuplex’s statistics, the Windows 10 May 2019 Update is now installed on 11.4% of PCs included in their data. This shows a growth of 5% month-on-month.

That’s it for this week. We’ll be back next week with more Windows 10 news!

Microsoft news recap: Twitch streamer Ninja moves to Mixer, Xbox Getting 60 new games over the next 40 days, and more

Microsoft news recap is a weekly feature highlighting the top Microsoft news stories of the past week. Sit back, grab some coffee, and enjoy the read!

Samsung could soon pre-install Microsoft phone apps as the two companies expand their partnership

As Microsoft and Samsung look to expand their partnership, it has been revealed that Samsung could begin to pre-install Microsoft’s suite of apps on its devices. Next week is Samsung’s Unpacked event, in which it is thought Microsoft could be taking the stage.

Bombshell: Twitch superstar Ninja is going to stream exclusively on Mixer

In a large boost for Microsoft’s streaming service, Mixer, one of Twitch’s biggest streamers, Ninja, is switching to Mixer to stream exclusively.

https://twitter.com/WatchMixer/status/1156970299520212993

Microsoft’s social learning platform Flipgrid gets a major revamp

Flipgrid, a social learning platform acquired by Microsoft in June, is receiving a major revamp. It brings a bunch of new features including the Flipgrid Camera, which offers the ability to enhance videos with Live Inking, Stickers, and more.

Microsoft’s Xbox One is getting 60 new video games over the next 40 days, New promotion announced

Over the next 40 days, Xbox One is set to receive 60 new video games. During the release window, Microsoft has announced the Summer Spotlight promotion which gives the opportunity to earn bonus Microsoft Rewards points and win prizes.

Xbox One Summer Spotlight

That’s it for this week. We’ll be back next week with more Microsoft news.

Sorry we’re having a problem finding files in this folder [FIX]

The error Sorry, we’re having a problem finding files in this folder, try opening the folder again arises commonly for OneDrive users. When you try to save files to your OneDrive account locally, the PC returns the message. This error might appear for a variety of reasons, including

Fortunately, it’s an issue you can easily solve by following some simple steps.

Why can’t I save files in the OneDrive folder?

Method 1: Reset your OneDrive account

  1. Right-click on the OneDrive icon in the notification area and open Settings.
  2. Select the Account tab.Sorry we're having a problem finding files in this folder
  3. Click on the Unlink this PC button.
  4. Sign in with your credentials.
  5. Select the location of the OneDrive folder.

We’ve written extensively on OneDrive issues. Check out these guides for more information.


Method 2: Run the dedicated troubleshooter

  1. Download the OneDrive Troubleshooting tool here.
  2. Run the tool and choose Next.Sorry we're having a problem finding files in this folder
  3. Wait for the troubleshooter to finish and restart your PC.
  4. Try deleting the file again.

Method 3: Reinstall OneDrive

UWP version

  1. In the Windows Search, type Add and open Add or remove programs.
  2. Under the Apps & features, search for OneDrive.
  3. Highlight the app and Uninstall it.Sorry we're having a problem finding files in this folder
  4. Open the Microsoft Store and install OneDrive again.
  5. Sign in and look for changes.

Desktop client

  1. Press Windows key + I to open Settings.
  2. Open Apps
  3. Open Apps & features in the left pane.
  4. In the Search bar, type One and expand OneDrive.
  5. Uninstall OneDrive.
  6. Now, follow this path:
    • CUsersYour UsernameAppDataLocalMicrosoftOneDriveUpdate
  7. Double-click the OneDriveSetup.exe file and run the installer.
  8. After the installation completes, log in and look for changes.

Alternatively, you can always rely on the web-based client and that’s where a good browser comes into play. With UR Browser’s enhanced download technology, you can download OneDrive files and store them locally much faster. Add the privacy-oriented nature that this browser brings to the table, we are sure you’ll find it more than welcome improvement over Chrome.

Get UR Browser today and see how it works firsthand.

If all goes well, your OneDrive full functionality should be restored and the error eliminated.

RELATED STORIES YOU SHOULD CHECK OUT:

Sorry You Can’t Access YouTube for Mobile Web [Fix]

YouTube is the biggest video hosting site, but many reported Sorry you can’t access youtube for mobile web with your account while using it.

Unfortunately, this isn’t the only issue with the service, and many reported that YouTube is freezing or crashing. However, we fixed this issue in its own guide, so you should check it out.

That said, the issue can be resolved easily with a minimum of effort, so let’s get started.

Why is my access blocked from YouTube?

  • Temporary issues with your account. In most cases, a quick sign-in and sign-out will fix it.
  • YouTube isn’t properly enabled in your domain.
  • Network issues can prevent you from accessing YouTube.

How can I fix YouTube if it says Sorry you can’t access YouTube for mobile web with your account?

1. Sign out and sign back in

  1. Sign out of your Google account on the device where you get the error message.
  2. After that, sign back in afresh and see if you are able to access youtube.com.
  3. You can also log in via a different account and see if the issue still persists.

After that, check if the Sorry, youtube.com isn’t available for this account message is gone.

2. Get YouTube turned on by your domain admin

  1. Check with your domain administrator if youtube.com is enabled for your domain.
  2. If not, request the admin to act accordingly so that you can add youtube.com as a service.
  3. Also, check if you are not among the select few countries or regions where YouTube is yet to be formally launched. It won’t be available if YouTube is pending launch in your location or country.

After doing that, check if Sorry you can’t access youtube for mobile web with your account error message is gone.

3. Get in touch with the network admin or ISP

  1. You might also have to contact the network admin or the Internet Service Provider to ensure YouTube hasn’t been blocked.
  2. If so, pursue with the authorities to get the block lifted.
  3. Alternatively, try using VPN.

This should be all you need to do if you are getting the Sorry you can’t access YouTube for mobile web with your account.

If you’re having further problems, check our guide on YouTube not working in Edge for more solutions.

What method did you use to fix this error? Let us know in the comments below.

Update Error Code 0xc00000fd on Windows 10/11 [FIX]

Windows 10 update error code 0xc00000fd is an error that a wide range of users have reported on their PCs.

It seems that in some cases, the issue is caused by a Windows update package that is causing a conflict and thus stops you from being able to run the update wizard.

This issue can be extremely annoying, and it can also pose a serious security threat, therefore it’s important to fix it as soon as possible, and in this article, we’re going to show you how to do that.

How can I fix Windows 10 update error code 0xc00000fd?

1. Run the update wizard on Windows 10

  1. Click on Cortana search box -> type Update.
  2. Click on the first option from the top called Update Settings.
    update in cortana search - Windows 10 update error code 0xc00000fd

  3. Inside the Update window -> select Check for updates.
  4. Windows will now start the scan.
  5. If you find any updates, please install them. If this method doesn’t work, try the next one.

2. Troubleshoot Windows Update to fix error code 0xc00000fd

  1. Click on Cortana search box -> type Troubleshoot.
  2. Click on the first option from the top called Troubleshoot Settings.
  3. Inside the Troubleshoot window, scroll down -> select Windows Update -> Run the troubleshooter.Windows update troubleshoot - Windows 10 update error code 0xc00000fd
  4. Wait for the process to complete.

3. Restore your Windows 10 to a time before the update

  1. Click on Cortana search box in your toolbar -> type in Restore.
  2. Select the first option from the top of the list called Restore Settings.
  3. A new System Properties window will open.
  4. Under the System Protection tab -> click on the System Restore button.System restore - Windows 10 update error code 0xc00000fd
  5. Follow the on-screen instructions and select the last restore point before the update occurred.
  6. Restart your PC and check to see if the issue is resolved.

4. Use PowerShell and taskkill command

  1. Press Win+X keys -> select PowerShell (Admin).
  2. Inside the PowerShell window -> type each of the following commands, and press Enter after each one:
    • taskkill /f /fi “SERVICES eq wuauserv” 
    • net stop cryptSvc ; net stop bits 
    • net stop msiserver 
    • ren C:\Windows\SoftwareDistribution 
    • SoftwareDistribution.old 
    • rmdir C:\Windows\SoftwareDistribution\DataStore 
    • C:\Windows\SoftwareDistribution\Download
  3. After the process is completed -> hit Enter -> restart your PC.

5. Use PowerShell with net stop command

  1. Press Win+X keys -> select PowerShell (Admin).
  2. Inside the PowerShell window -> type each of the following commands, and press Enter after each one:
    • Net Stop bits 
    • Net Stop wuauserv 
    • Net Stop appidsvc 
    • Net Stop cryptsvc 
    • Ren %systemroot%\SoftwareDistribution SoftwareDistribution.bak 
    • Ren %systemroot%\system32\catroot2 catroot2.bak 
    • Net Start bits 
    • Net Start wuauserv 
    • Net Start appidsvc 
    • Net Start cryptsvc
  3. After running these commands, try to see if your issue is resolved.

In this article we explored some of the best methods to deal with the error code 0xc00000fd on Windows 10.

Please feel free to let us know if this guide helped you solve your problem by using the comment section below.

We’re having trouble determining if PC can run Windows 10/11

The annoying error Sorry we’re having trouble determining Windows 10 typically crops up when you’re attempting to upgrade your older Windows to Windows 10.

And it could be triggered by the system failing to properly interpret your existing hard drive partitions, especially if you’re running both Linux and Windows on your PC.

But there are two ways to fix it and will discuss them in this article.

We’re having trouble determining if your PC can run Windows 10

1. Tweak your BIOS Settings

  1. Restart the PC and as it’s powering on, press the applicable key to take you to BIOS. For the most part, the keys “F2” and “Delete” redirects you to BIOS. If none works, observe your PC closely when it first restarts for the message indicating the BIOS keyboard key.
  2. Now that BIOS Window has loaded, use your keyboard’s arrow keys to navigate around the myriad options. Your interest is the BIOS menu showing the various drive options.  Look around until you locate the Hardware menu and move your arrow there.
  3. Under the Hardware menu, you will notice a list of installed Hard Drives. Select the unwanted drive (the one with Linux ) and disable it by selecting as directed by the hints on the screen. In most case, you’re supposed to select Disabled or None using your arrow keys and then press Enter.
  4. Exit the BIOS and remember to answer Yes when asked ‘Save settings and exit?’. You may also press F10 in most PCs to save BIOS changes.
  5. Now reboot your PC and attempt the upgrade.

2. Change the Active partition

  1. Press the keys WIN+R to launch the Windows RUN dialog box.
  2. Type diskmgmt.msc then press Ok.
  3. The PC takes you to the Disk Management You now only require to Right-click on the disk partition where your Windows is then select Mark partition as active from the subsequent options. This is traditionally Drive C:Sorry we're having trouble determining windows 10
  4. Lastly, restart the PC and carry out the upgrade.

We recommend using third-party software that has the capability to perform various types of partition management operations automatically. It’s a time-saving solution that can help optimize your entire OS.

Alternatively, you can go for the clean install. Learn how to do that by following the instructions in this article.

PS4 controller Exclusive Mode not working on Windows 10/11

A large number of users have reported that their PS4 Exclusive Mode in Windows 10 has stopped working after a Windows update.

This can be extremely frustrating, as you might find yourself in a situation in which you can not play your favorite PS4 games with the settings that you’ve set.

This issue is most likely caused by interference between the updated files of Windows 10 and the registry setup for the Exclusive Mode inside DS4Windows application.

For these reasons, in this article, we will explore the best way to deal with this issue and get back to your gaming asap. Follow the steps closely to achieve that.


How to fix PS4 controller Exclusive Mode problems?

1. Get the latest HIDGuardian

laptop on desk with coffee - PS4 controller Windows 10 exclusive mode

  1. Click here to download the latest InputMapper HIDGuardian.
  2. Run the downloaded software and follow the on-screen instructions in order to complete the setup.
  3. After the process is completed, follow the next method.

2. Change properties for your controller

controller on table - PS4 controller windows 10 exclusive mode

  1. Click on Cortana search button -> type in Control Panel.
  2. Inside the Control Panel -> select Hardware and Sound -> Devices and Printers.
  3. Right-click your controller -> select Properties.
  4. Inside the Hardware tab -> select HID-compliant game controller -> click Properties.
  5. In the Detail tab -> select Hardware IDs from the drop-down menu.
  6. Copy the first three strings of text in a notepad file (we will need this information later).

Want to use PS4 Remote Play on your PC? Here’s how to set it up quickly!


3. Use Registry Editor to modify values

  1. Press Win+R keys on your keyboard to start the run window.
  2. Inside the Run window -> type regedit -> press Enter.regedit - PS4 controller windows 10 exclusive mode
  3. Navigate to the following location inside the Registry Editor: HKEY_LOCAL_MACHINE\SYSTEM\CurrentControlSet\Services\HidGuardian\Parameters
  4. Right-click the value AffectedDevices -> select Modify.
  5. Copy and paste the code lines you saved in Notepad earlier inside the Value data list.
  6. Press Ok and then restart your PC.

Note: Please make sure that the code lines you are pasting inside the AffectedDevices value data box are using one line per line of text, and make sure the last line is left blank.


4. Make sure your antivirus/firewall is not blocking access

hacker on pc - PS4 controller Windows 10 exclusive mode

  1. Click on Cortana search box -> type in Firewall -> choose the first option from the top.
  2. Inside the Firewall settings -> choose to Allow an app or service through the firewall.
  3. Search for the DS4Windows application on the list.
  4. Make sure all connections are allowed (both incoming and outgoing).
  5. Save the settings and try to see if the issue persists.

Note: If you’re using a third-party antivirus, you’ll need to change the settings form that application as well.


In this article, we explored some of the best methods to deal with the PS4 controller Exclusive Mode not working on Windows 10.

Please let us know if this guide helped you solve your issue by using the comment section found below.

[wl_navigator]

Failed to join game – Not enough room in the lobby for your squad [FIX]

Call of Duty is a popular multiplayer online game and the popularity means tons of users are trying to access the server every second. At times, it can create issues with the game and you may get Failed to join the game. Not enough room in the lobby for your squad error while trying to join the Call of Duty Black Ops as explained by some users in the Reddit Community Forum.

Have been getting constant issue with joining friends lobbies. You accept the invite, join and for your friend it shows that you join but in your screen it says something along the lines that the session is no longer available and then you drop from the lobby. Has been happening constantly the past week or so and for multiple people on my friends list.

This can also happen with CS:Go, as well. Follow the steps give in this article to fix this error on your Steam client.

Why can’t I join the lobby with my squad in Call of Duty?

1. Logout and Login to Steam

  1. If you haven’t tried already, users have reported that they were able to join the lobby and play the game after a simple sign out and sign in attempt.
  2. Launch Steam client.
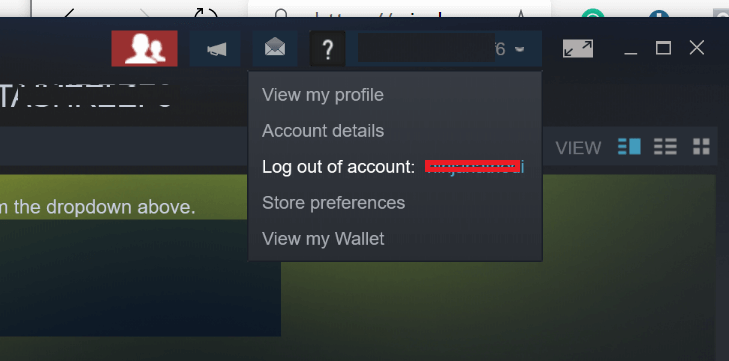
  3. From the top-right corner, click on your username (email ID) drop-down menu.
  4. From the options, select “Log out of Account“.
    failed to join game not enough room in the lobby for your squad
  5. Close the Steam client and launch it again.
  6. Sign in with your user ID and check for any improvements.

We’ve written extensively on Steam connection issues. Check out these guides for more information.


2. Verify Game Cache

  1. Launch the Steam client on your system.
  2. From the Library section, right-click on the problematic game and select Properties.
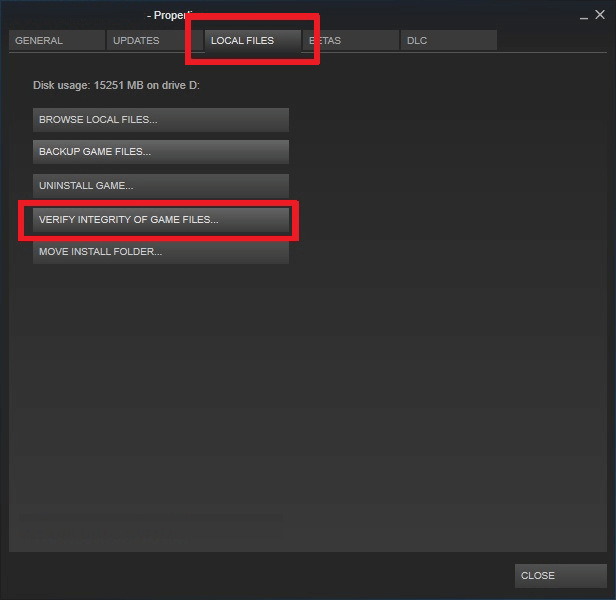
  3. In the properties window, click on the Local Files tab.
  4. Click on “Verify Integrity of Game Files” button.
    failed to join game not enough room in the lobby for your squad
  5. Steam will now verify the game‘s files and fix any issues if found.
  6. Once the process is complete, try to open the game again and check for any improvements.

3. Force Close Steam Process

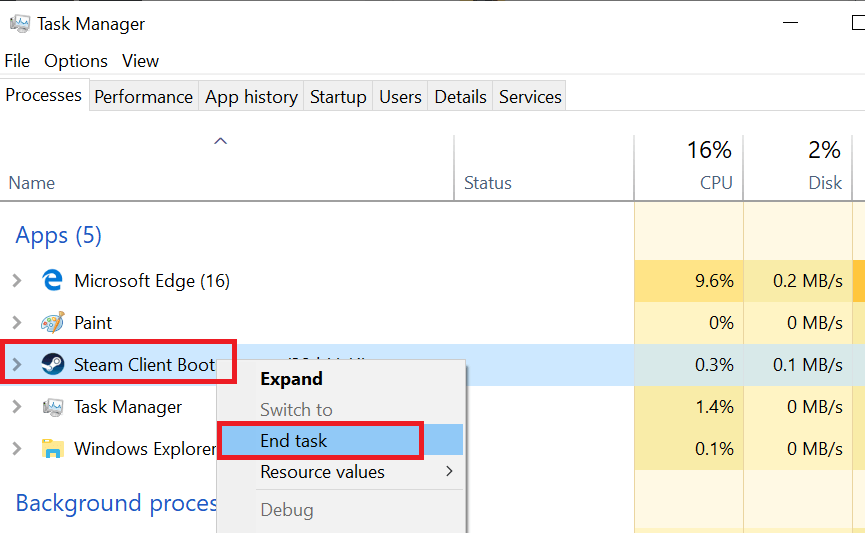
  1. If the issue persists, force closing the steam process in the task manager can help you resolve the issue.
  2. Leave your Steam client running.
  3. Open the Task Manager by right-clicking on the taskbar.
  4. In the Process tab, sort the process through Name.
  5. Now right-click on the Steam client and select “End task“.
    failed to join game not enough room in the lobby for your squad
  6. Close the task manager and relaunch Steam. Try to join the game and check for any improvement.

RELATED STORIES YOU MAY LIKE:

Intel’s 10th Gen processors improve performance on Windows 10

Intel just launched its first 10th Gen “Ice Lake” core processors.

These new processors are using Intel’s new 10nm process technology and architecture design and you will see them in sleek 2 in 1’s and laptops in just a couple of months.

Multitasking on Windows 10 just got easier with Intel’s 10th Gen CPU’s

This means not only that Windows 10 will run faster and you’ll be able to do more tasks, but also the next generation of Windows 10 PCs could be thinner and have a better thermal design.

Here’s what Chris Walker, Intel corporate vice president and general manager of Mobility Client Platforms in the Client Computing Group stated:

These 10th Gen Intel Core processors shift the paradigm for what it means to deliver leadership in mobile PC platforms. With broad-scale AI for the first time on PCs, an all-new graphics architecture, best-in-class Wi-Fi 6 (Gig+) and Thunderbolt 3 – all integrated onto the SoC, thanks to Intel’s 10nm process technology and architecture design – we’re opening the door to an entirely new range of experiences and innovations for the laptop.

It seems like the company bets heavily on AI and thin and lite laptops this year, so we may expect to see the new CPU‘s in the next Surface devices.

Here are some new 10th Gen features:

  • Intel® Deep Learning Boost, a new, dedicated instruction set that accelerates neural networks on the CPU for maximum responsiveness in scenarios such as automatic image enhancements, photo indexing and photorealistic effects.
  • Up to 1 teraflop of GPU engine compute for sustained, high-throughput inference applications like video stylization, analytics and real-time video resolution upscaling.
  • Intel® Gaussian & Neural Accelerator (GNA) delivers a dedicated engine for background workloads such as voice processing and noise suppression at ultra-low power, for maximum battery life.

10th Gen Intel Core processors with Intel Iris Plus graphics come with doubled the graphics performance, 1080p gaming, and 4k video editing.

  • These are the first GPUs from Intel to support VESA’s Adaptive Sync* display standard, which enables a smoother gaming experience across games like Dirt Rally 2.0* and Fortnite*.
  • Based on Intel’s Gen11 graphics architecture, they are also the industry’s first integrated GPU to incorporate variable rate shading for improved rendering performance.
  • With support for the BT.2020* specification, watch 4K HDR video in a billion colors.

So if you’re interested in a performance boost on your Windows 10 PC or if you’re in the market for a sleek 2 in 1 with 10th Gen Intel Core processor, get your wallet ready for this holiday season.

We can’t sync your data with the cloud right now [FIX]

If you bought Forza Horizon 4 for PC, you may encounter We cant sync your data with the cloud right now while trying to play the game online at some point. This error is reported by many Forza Horizon 4 PC users in the Microsoft Community as well as Reddit community forums.

I am having a very frustrating issue that I wanted to see if it was shared.
Basically, I launch the game, it begins to sign in for a second, then it suddenly tells me that “We can’t sync your data with the cloud right now”. It then gives me the option of trying again or playing offline. Trying again doesn’t work, so I press play offline. It then tells me that the sign-in profile has changed and it has to close.

If you are also troubled this error, here is how to fix it on your Windows computer.

Why can’t I sync data to cloud on Forza Horizon 4?

1. Sign into Xbox App

  1. The “we can’t sync your data with the cloud right now” issue can occur if you are not logged into your Xbox app in the PC. Users have reported that the error was resolved after they login to their Xbox App.
  2. Launch the Xbox App on your PC by searching for it in the search bar.
    we can't sync your data with the cloud right now
  3. After launching the app, it will ask you to enter your Microsoft account details. You may also have to enter the password or PIN for your computer.
  4. Keep the Xbox app running and launch Forza Horizon 4 on your PC. This time the game should sync all your data and let you play without any error.

We’ve written extensively on Xbox sync issues. Check out these guides for more information.


2.  Check Email Aliases for Xbox Live Account

  1. If you have changed the aliases for your Xbox Live account then you will be automatically signed into the aliases account on Microsoft Store as well resulting in the aforementioned error.
  2. To fix this, you need to revert the changes and remove the aliases. Here is how to do it.
  3. Sign in to your Microsoft Account.
  4. Click on Your Info at the top of the page.
  5. Select “Manage how you sign in to Microsoft” option. Enter the password for your account if prompted.
    we can't sync your data with the cloud right now
  6. On the “Manage your account aliases” page, click on Remove next to the alias that you added earlier.
  7. Now follow the instructions given on-screen.
  8. After the aliases are removed, restart the system.
  9. Launch Forza Horizon 4 on your PC and check if the error is resolved.

3. Connect to your Mobile Hotspot

  1. Several users have reported that disconnecting from their ethernet / WiFi connection and connecting to their Mobile WiFi hotspot has resolved the error.we can't sync your data with the cloud right now
  2. On your Android phone, you can easily create a WiFi hotspot.
  3. After turning on the Hotspot, connect your PC to the Mobile Hotspot.
  4. Launch Forza Horizon 4 and check for any improvements.

RELATED STORIES YOU MAY LIKE:

Why am I seeing ads on Xbox Gold? How can I remove them?

Most web-connected services generate revenue through the use of ads that are more or less targeted.

But what happens when you pay for a premium version of a service precisely to get rid of them, and you still get them?

That’s precisely the case with Xbox Gold users that still see various ads on their dashboards.

Some users don’t mind the ads at all, since they seem to be rather small, to the point of being unnoticeable.

Many forum posts revealed that most users aren’t pleased about the expected ads:

Gotta love the adds on Xbox. You pay for the console, you pay for gold, yet you still get ads. I miss the old days.

While this doesn’t seem to be an issue that everyone is experiencing, not all of you may be pleased to see ads. 

If you’re tired of them, you could consider following the steps listed in this forum post and you’ll get rid of those annoying ads in no time.

How to remove ads from Xbox One home screen

  1. Access Settings
  2. Go to Network
  3. Select Advancedxbox Network settings
  4. Enter DNS
  5. Select Manual input
    • Set the primary DNS as 198.101.242.72
    • Set the secondary DNS as 198.101.242.72

You should no longer be seeing any ads anymore, not even on Microsoft Edge or on YouTube.


Still seeing ads on Twitch with AdBlock? This is how you can get rid of them.


Are there any risks when using this workaround?

Because this solution involves the use of an alternate DNS with an Xbox, some users may seem skeptical, some even stating that:

Interesting solution to use that alternate DNS with an Xbox, although I’m not sure I’d trust that particular service run by who knows for other devices (with regards to privacy and security.)

However, these DNS addresses seem to be provided by one of the top DNS service providers currently on the market.

More so, using their services is completely free of charge.

Consider following the steps listed above if you too are annoyed by ads that appear on your Xbox’s dashboard, especially if you have an Xbox Gold subscription.

RELATED XBOX POSTS TO CHECK OUT:

Windows Media Player not syncing all music [FIXED]

A wide range of users reported that Windows Media Player isn’t syncing all music on their PC. This error was encountered with different MP3 players, and also when trying to sync the Windows Media Player to an external USB storage device.

Here is what one user had to say about this issue on Microsoft Answers:

My Win 10 media player is no longer syncing podcast files to my sony mp3 player. Also it will not remove podcasts already on the sony device. Can anyone help?

However, there’s a way to deal with this error, and in today’s article, we’ll show you how to do it.


How can I fix Windows Media Player sync errors?

1. Run Windows Media Player troubleshooter

  1. Click on Cortana search box inside your taskbar -> type Control Panel – click on it to open it.
  2. Select Troubleshooting from the Control Panel.Control Panel troubleshooting - Windows Media Player sync erorr
  3. Click the View all option from the left-side menu.
  4. Find the Windows Media Player in the list and troubleshoot it by following the on-screen instructions.
  5. Check to see if the issue persists after the above process is completed. If it does, try the next method.

2. Check the sync options inside Windows Media Player

vynil player - Windows Media Player sync error

  1. Connect your device by USB to your computer.
  2. Open the Windows Media Player library -> select Sync options.
  3. Follow the on-screen instructions to complete the setup.

Need a Windows Media Player alternative? Try one of these great cross-platform solutions!


3. Rebuild WMP database

vynil player on table - Windows Media Player sync error

  1. Press Win+R key to open the Run box.
  2. Type %userprofile% and press Enter. Navigate to Local Settings > Application Data > Microsoft > Media Player.
  3. Delete all the files found in the opened folder, but do not modify the folders in any way.
  4. Restart Windows Media Player for the process of rebuilding the database to start.
  5. If this method didn’t solve your sync issue, please follow the next method.

4. De-activate and re-install WMP

  1. Press Win+R keys to open the Run dialog box.
  2. Type optionalfeatures -> press Enter.optionalfeatures command in Run dialog box - Windows Media Player sync error
  3. Inside the newly opened window expand the folder Media Features.
  4. Remove the checkbox next to Windows Media Player.
  5. Click Yes when the window warning you about applying these changes pops up.
  6. Click OK, and wait for the process to be completed.
  7. Restart your computer.
  8. After the restart is completed, follow the steps from this method again but check the box next to Windows Media Player.

In this article, we explored some of the best techniques to apply if Windows Media Player isn’t syncing all music.

Please let us know if this guide helped you by using the comment section below.
READ ALSO:

Printer is Printing Horizontal Lines: 3 Ways to Fix it

Many reported that their printer prints horizontal lines. This can be a problem and affect the quality of the printed document.

This isn’t the only issue, many reported that photos have lines after printing, so it’s important to tackle this issue as soon as possible.

In this article, we look at the best ways to troubleshoot this issue, so let’s get started.

Why is my printer printing horizontal lines?

  • Low ink levels can sometimes cause issues and lead to horizontal lines.
  • If you’re using low print quality, you might sometimes get horizontal lines.
  • A printer that is not adjusted correctly can sometimes cause this problem.
  • The dirty printhead can lead to smudges and lines while printing.

How do I fix horizontal lines in my printer?

1. Check Ink Level

Check Ink Level from Control Panel

  1. Press the setup button  (wrench icon) on the printer control panel.
  2. When the Setup Menu appears, press the down arrow button on the printer to select Tools.
  3. Press the OK button to select the option.
  4. In the Tools menu, press the down arrow button and select Display Estimated Ink Levels. Press OK to select the option.
  5. The printer will display the Ink level on the control panel.
  6. If the printer is low on ink, you need to replace it with a new one. If not, check the other fixes below.

Check Ink Level from HP Support Solution

  1. Type HP Solution Center in the search bar.
  2. Open the app from the list of options.
  3. Click on the Settings icon.
  4. Under Print Settings, click the Printer Toolbox.
  5. Click on the Estimated Ink Level tab.
  6. Now check if any of the cartridges are low on ink. If low, you may need to replace them. If not, proceed with other steps.

2.  Check Print Quality

  1. Open the page you want to print and click on File and select Print.
  2. Select your printer if more than one is connected.
  3. Click on the Properties button. If you don’t see Properties, check for Options, Printer Setup, Printer or Preferences option.
  4. Now click the Features tab.
  5. In the Print Quality drop-down menu, select the highest available quality settings like Best or Maximum DPI.

  6. Click OK. Click OK again to close the properties window.
  7. Now try to print and check for any improvements.

Align the printer

  1. Load a clean white paper in the input tray.
  2. Press the Setup button (wrench icon) on the printer.
  3. From the Setup Menu, select Tools option using the down arrow Buton.
  4. Now select Align Printer option using the down arrow button.
  5. Press OK.
  6. After the Alignment is successful, press the Back button.
  7. Now try to print the document again and check for any improvements.

This is a simple solution and it can help with horizontal lines on Samsung laser printer, so be sure to give it a try.

3. Clean the printheads

  1. Make sure you have loaded a white clean paper in the input tray.
  2. Press Setup key (wrench icon) on the printer to open the Setup Menu.
  3. Press the down arrow key to select Tools and press OK.
  4. Again press the down arrow button to select Clean Printhead option.
  5. Wait for the cleaning process to complete. The printer will now print a test page. Check the page for any quality issues.

These are just a couple of solutions you can use if the printer prints horizontal lines.

This isn’t the only issue, and many reported that printer is skipping lines when printing, but we covered that issue in a separate guide.

What method did you use? Share it with us in the comments below.

How to add commas to numbers in Power BI [QUICK GUIDE]

Power BI is a tool that could bring the best out of any project, but sometimes, this great Microsoft product is plagued by little but important issues.

For example, many users don’t know how to add commas to numbers in Power BI, because this option is not as obvious as it should have been.

One user opened a thread on the official forum and said the following:

I’m starting to learn Power BI to gauge it’s possible used for my company. I’ve been looking around and find tutorials to understand some of the inner workings. Current I’m following the tutorial here. The issue I’m having is when I create card visualizations the numbers appear unformatted without commas. How can I get them to format with commas?

commas numers power bi
So, the numbers appear without any commas, but this is not what the OP intended.

Fortunately, this issue can be solved without any difficulty.

Steps to add commas to numbers

Select the option from the Modelling tab

  1. Go to the Modelling tab.
  2. At Formatting, select the format you want, in this case, the comma symbol (,).

power bi formatting commas
Along with commas, you can select other symbols for your numbers such as percentage or currency.


Learn more about Power BI by reading this guide.


Conclusion

To add commas to your numbers is pretty simple. It is an option in the Modelling tab which you can select with just one click.

So, there you have it, a simple solution for an important question!

How do you format numbers in Power BI? Do let us know in the comment section below!

RELATED STORIES YOU NEED TO CHECK OUT:

Google Drive multiple copies of the same file [FIX]

Google Drive is a popular cloud storage client for Windows users. It allows you to sync all the files from your PC with your Google Drive account without having to upload them manually. However, some users have reported that they are seeing multiple copies of the same file with a different name in their Google Drive account.

This issue is mostly caused by a glitch in the Google Drive app that reuploads already existing files and renames them. If you are also troubled by this issue, here are a couple of troubleshooting tips to resolve it.

How do I prevent duplicates on Google Drive?

1. Disconnect Google Drive Account and Reconnect

  1. Right-click on the Backup and Sync from Google icon in the taskbar.
  2. Click on Settings (three dots).
  3. Click on “Preferences”.
    Fix Google drive multiple copies of same file
  4. From the left pane, click on the Settings tab.
  5. Now click on Disconnect Account and then click on Disconnect.
    Fix Google drive multiple copies of same file
  6. This will disconnect your Google Account from the Drive Client.
  7. Now you need to reconnect your Google Account with Backup and Sync. Repeat the steps to reconnect your account.
  8. This should sync any pending files without renaming them again.

2. Update Google Drive

  1. Google Drive client updates itself automatically. However, if for some reason your version is not working properly, check if the latest updates are installed.
  2. Go to Google Drive Release Note page.
  3. Check if a new version of Google Drive is released. Also, check the release note to understand if the new update contains any fixes for your problem.
  4. Right-click on the Google Drive icon in your taskbar and click on Settings (three dots) menu.
    Fix Google drive multiple copies of same file
  5. Click on About and check if you have the latest version of the Google Drive installed.
  6. If not, you may want to download and install the latest version manually.
  7. First, right-click on Backup and Sync from Google icon in the taskbar and select Quit.
  8. Press Windows Key + R to open Run.
  9. Type control and press OK.
  10. In the Control Panel, go to Programs > Programs and Features.
  11. Uninstall Backup and Sync from Google.
    Uninstall Google Drive Client Fix Google drive multiple copies of same file
  12. Now go to the Google Drive page and download the latest version and install it.
  13. After the installation, check if Google Drive exhibits similar behavior of uploading duplicate copies.

Alternatively, you can use the web-based Google Drive client by logging in with your Google Account in the web browser. Now, the obvious choice for the job is Google’s own Chrome, but we beg to disagree. The best Chromium-based browser you will find now is Opera.

Check it out below and try logging into Google Drive through Opera browser and convince yourself.

⇒ Get Opera

Conclusion

By following the steps listed in this article you should be able to fix the Google Drive duplicate files issue. However, if the issue persists, try to contact Google Support or ask in the Google Community Forums.

Microsoft’s social learning platform Flipgrid gets a major revamp

Flipgrid, the video-based social learning platform that Microsoft acquired back in June is getting a major update today. This “all new Flipgrid” comes with several new features including the Flipgrid Camera, allowing students to enhance their videos with Live Inking, Stickers, and “Style” filters.

There’s also the new Shorts Camera feature, which is is a variation of the Flipgrid Camera tailored for educators. Shorts video can be easily on the web or Microsoft Teams, and educators can also print out a Flipgrid QR code for their videos to share them in the real world.

The Flipgrid platform has also been redesigned to make it easier to navigate. “Your Pinned Topic is now the homepage of the Grid with the inspiring prompt, responses from peers, and a green plus camera button at the ready. The new Flipgrid Topic menu makes navigating between your Topics a breeze,” the team explained today. Flipgrid is also leveraging Azure to provide close captions on all Flipgrid response videos.

The Flipgrid apps for iOS and Android are being updated today, with more updates coming later this fall.

Windows 10 v1903 update prevents games from running in classic fullscreen

Windows 10 May update came with a lot of problems, but Microsoft managed to solve some of them through future patches.

Games are affected by input lag and performance issues

Now, another annoying problem emerged, and this time it concerns Windows 10 gamers. It seems like many users can’t get their games to run in classic exclusive fullscreen.

Here’s how one user is describing the issue:

Windows 10 1903 will now ignore the “Disable Fullscreen Optimizations” checkbox for some games. I noticed that in Insurgency Sandstorm I still had the volume OSD even though I checked the box and was in fullscreenmode. Fortnite also exhibits this behavior from what I’ve read.

This is a fairly widespread problem that affects a lot of users.

To understand it better, when you run a game in exclusive fullscreen mode, the image goes from the game directly to your screen. After the update, the game is first rendered, then goes through Windows Desktop, and then to the screen.

This leads to input lag and performance issues in many games.

What can I do to run games in exclusive fullscreen mode?

Fortunately, there are some confirmed fixes that will solve the problem. If you’re in the same boat, changing some registry key values will help you run in fullscreen. To do that, follow the steps:

  1. In your Windows Search box type regedit and click on the first result.
  2. When Registry Editor opens, go to HKEY_CURRENT_USER\System\GameConfigStore.
  3. Now find and change the following keys:
  • GameDVR_FSEBehaviour > change value to 2
  • GameDVR_FSEBehaviourMode > change value to 2
  • GameDVR_HonorUserFSEBehaviourMode > change value to 1
  • GameDVR_DXGIHonorFSEWindowsCompatible > change value to 1

Can’t access the Registry Editor? Things aren’t as scary as they seem. Check out this guide and solve the issue quickly.


Alternatively, you can create a .reg file that will have the same effect:

  1. Open a text editor.
  2. In a new file, paste the following:Windows Registry Editor Version 5.00 [HKEY_CURRENT_USER\System\GameConfigStore] “GameDVR_FSEBehaviorMode”=dword:00000002 “GameDVR_HonorUserFSEBehaviorMode”=dword:00000001 “GameDVR_FSEBehavior”=dword:00000002 “GameDVR_DXGIHonorFSEWindowsCompatible”=dword:00000001
  3. Save the file and make sure to change its extension to .reg.

It’s worth mentioning that you’ll also have to disable the Origin in-game overlay.

How to Safely Uninstall Nvidia Drivers From Your PC

The power of your Nvidia GPU heavily depends on the associated software, namely, the drivers. Issues might arise, an update might go awry, and you would, occasionally, need to uninstall Nvidia drivers and install a different (newer) version manually.

Thus, we made sure to explain how to safely uninstall Nvidia drivers from your PC. Without risking any further issues and more critical ones, for that matter.

How do I uninstall Nvidia drivers on Windows 10?

1. Use DDU (Display Driver Uninstaller)

  1. Download DDU (Display Driver Uninstaller). Extract it to your desktop.
  2. We would highly suggest creating a system restore point now. Type restore point in the Windows Search bar and open Create a restore point.
  3. Click on the Create button and follow instructions to create a restore point.
    how to safely uninstall nvidia drivers
  4. Run Display Driver Uninstaller.exe.
  5. We also suggest that you go for the recommended, Safe Mode launch option.
    how to safely uninstall nvidia drivers
  6. Click Reboot to Safe mode and follow the instructions to uninstall Nvidia drivers completely.

2. Uninstall drivers from Control Panel

  1. In the Windows Search bar, type Control, and open Control Panel.
  2. Choose Uninstall a program.
  3. On the program list, locate all installed entries related to Nvidia. These include Nvidia Control Panel, Nvidia Experience, even Nvidia Audio.
  4. Uninstall all of them and reboot your PC.
  5. If you want to install a new driver, we suggest installing the Nvidia Experience, here. This official utility will provide you with up-to-date drivers at all times.
  6.  Alternatively, you can prevent Windows 10 from updating drivers on its own. You can do so by navigating to Search > type Advanced system > open View advanced system settings. Select the Hardware tab and choose Device Installation Settings. In the dialog box, select No and save changes.
    how to safely uninstall nvidia drivers

If you’re planning to reinstall drivers for older models, such as the NVIDIA GT 210 1GB, you can follow this GT 210 1GB driver download guide to get the correct package and set it up properly.

3. Use a third-party uninstaller

If you want to uninstall Nvidia drivers from your PC faster and more efficiently, we recommend using third-party software created specifically for this action.

A standard uninstall performed manually leaves behind unnecessary files and data that clog your system and affect the performance of your PC. This tool uninstalls software without leaving any traces behind and has other functionalities that keep your Windows OS clean and safe.

⇒ Get Revo Uninstaller

That’s it! We hope that by performing the solutions above, you managed to uninstall the Nvidia drivers safely on your PC.

We also recommend reading our guide on how to roll back Nvidia drivers in case you installed the wrong one.

If you know any other solutions, feel free to comment in the dedicated section below.

How to install and use Chocolatey, a tasty package manager for Windows 10

Picture this: you need to install some new software to your Windows PC. Chances are, you’ll be heading to a website, trying not to click the junk on the page, and then clicking through a graphical installer, most likely using the default settings.

It’s a routine you’re probably familiar with as it’s barely changed over Windows’ lifetime, since software began to be distributed online. Unix systems have an alternative approach though, with software installs handled by package managers which require minimal user input and are often controlled through the command line. There’s now growing interest in bringing these benefits across to Windows, through the use of third-party package managers.

We recently took a look at Scoop, which is a simple and approachable package manager solution. That article also contains further discussion of the advantages of terminal package managers over Windows’ graphical installers, so we encourage you to read it if you’re still new to the concept. Today, we’ll explore Chocolatey, which is an alternative Windows package manager with a slightly stronger focus on user-facing desktop applications.

Chocolatey is primarily controlled from the command line. Don’t worry if you’re new to console applications – type commands as shown in the documentation and you shouldn’t run into any issues. Chocolatey also has an optional graphical interface which we’ll explore later.

Installing Chocolatey

To install Chocolatey, open PowerShell from the Start menu. Next, copy and paste the following line of script and press enter:

Set-ExecutionPolicy Bypass -Scope Process -Force;
iex ((New-Object System.Net.WebClient).DownloadString('https://chocolatey.org/install.ps1'))

Screenshot of using Chocolatey package manager

This will configure PowerShell to allow external scripts to run, before downloading and running Chocolatey’s installation script. For more details about this process, you should refer to Chocolatey’s own documentation. If you’re concerned about what the script does, you should inspect it manually before running the command.

Installing programs with Chocolatey

Chocolatey’s core feature is the ability to install Windows software with a single command. Instead of having to visit a website and manually click through an installer, you can launch PowerShell and type something like the following:

choco install vlc

Screenshot of using Chocolatey package manager

This will download and install VLC Media Player to your system, without requiring any action on your part. You’ll see progress information displayed in your console as VLC is added to your system. You’ll then find it in your Start menu as if you’d run the installer yourself.

Some programs may prompt you to run scripts during their installation. Type “A” for “Yes for all” into the console and then press enter to acknowledge this prompt and complete the installation.

Screenshot of using Chocolatey package manager

Chocolatey supports thousands of different programs. You can see what’s available by browsing the Chocolatey package repository. Some of the most popular options include Chrome, Adobe Reader, Firefox, WinRAR and Skype. The package repository displays the name to append to the “choco install” command to install each item.

Updating installed programs

Chocolatey makes it simple to update the programs you’ve installed. Run the following command to upgrade every outdated Chocolatey package on your system:

choco upgrade all

You can also pass an app’s name to update a single program:

choco ugprade vlc

Chocolatey will check if updates are required and automatically install the new version. If you want to see if updates are available, without installing them, run “choco outdated” instead.

Further commands

There’s a few other Chocolatey commands which you’re likely to find useful.

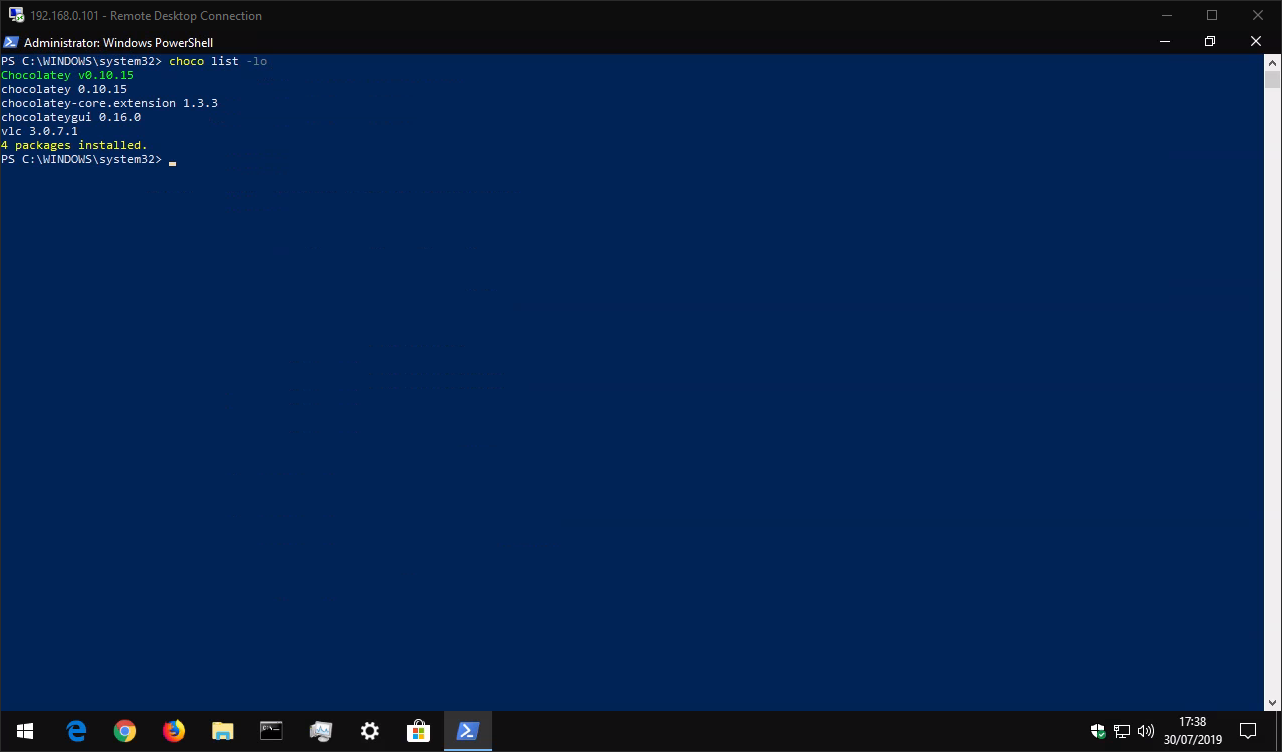
Running “choco list -lo” will display a list of all the programs you’ve installed. You can run “choco search query” to search the package repository for “query” and display all the matching programs, so you don’t even need a web browser to find new software.

Screenshot of using Chocolatey package manager

When it comes to removing a program, use the “choco uninstall” command, appending the program’s name. Chocolatey also does its best to keep track of apps removed in other ways – if you install a program with Chocolatey but then remove it from Windows’ Settings app or Control Panel, it should automatically disappear from Chocolatey too.

Chocolately is very powerful and we’ve only scratched the surface of its features with this article. There are plentiful configuration options for advanced users, as well as the option of running local proxies, caches and package repositories. Chocolately also has paid options for business and organisational use.

Chocolatey’s UI

Finally, it’s worth noting that Chocolatey has an optional graphical interface that helps you interact with your packages and install new ones. As you may expect, installing the UI is done through Chocolatey itself!

Screenshot of using Chocolatey package manager

Run “choco install chocolateygui” to install the GUI. You’ll then be able to launch the GUI from your Start menu.

Screenshot of using Chocolatey package manager

This gives you a simple graphical interface to view your installed packages, check for updates and customise Chocolatey settings. You can browse the Chocolatey catalogue by clicking “chocolatey” in the left sidebar. Here, you can search for new programs and install them with a single click, avoiding further use of PowerShell if console apps aren’t quite your thing.

New features, security enhancements: Here’s what’s new in Microsoft 365 in July

The month of July is now over, and that means it is time to turn back and have a look at what was new in Microsoft 365 for the seventh month of the year 2019. As always, Microsoft is constantly improving on its services, and July delivered the addition of updates to Azure Active Directory, Microsoft Defender Advanced Threat Protection, Outlook, and more. Here’s some of what was new across Microsoft 365 in July.

New features for Teams, Outlook, Yammer, Microsoft To-Do

Leading the list of new features added to Microsoft 365, are some enhancements to core products like Teams, Outlook, Yammer, and Microsoft To-Do.

As we’ve previously discussed, Microsoft added several features to Teams in July. These include priority notifications, the ability to tag someone in Teams without “@” them and also calling, meeting, and live events features. All of these features are designed to improve collaboration and productivity in Teams.

With Outlook, Microsoft added a new ability to add polls to emails, and book meeting rooms with Outlook on the web.  The ability to add polls comes via an add-in, and booking rooms will be available when creating a meeting.

Next up, is Yammer. In July, Microsoft added an ability to make questions in Yammer stand out from general discussions. They now feature unique styling, and post author and group admins have a new option to mark “best Answers.” The changes will be coming later this summer and are in a private preview.

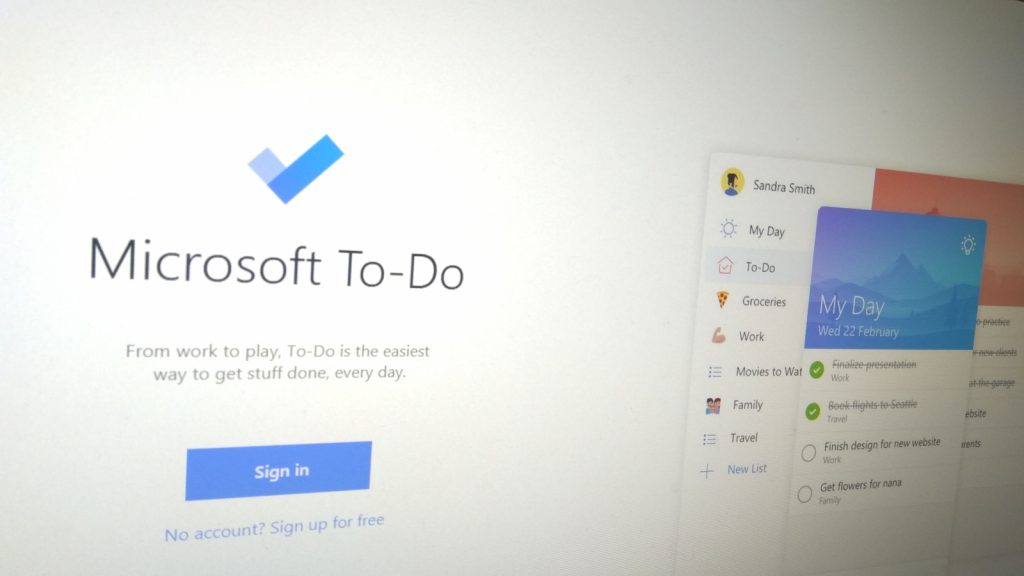
Finally, in Microsoft To-Do, working and assigning tasks are now easier. New in July was the ability to assign tasks to users on a shared To-Do list. Similar to Teams, the features works by “@” a user.

Assignments in Microsoft To-Do

Other changes and features

Elsewhere in Microsoft 365 in July were some new additions for improving IT management. These include a public preview of Desktop Analytics in the Configuration Manager console and a new ability to improve Office experiences in virtual environments. Other notable changes to Microsoft 365 range from the removal of the “Online” branding on Office web apps, and the announcement of OneDrive Personal Vault.

Office Online

Security enhancements

The final items on the list of new features in Microsoft 365 are some security enhancements. In July, Microsoft announced a public preview of FIDO2 security key support for Azure Active Directory. That allows more seamless and safe logins into Azure AD apps and services. Also falling under the same category is the addition of Microsoft Threat & Vulnerability Management to the Microsoft Defender ATP portal. This feature is all about real-time risk-based vulnerability management.

How to create sub-tasks in Microsoft To-Do

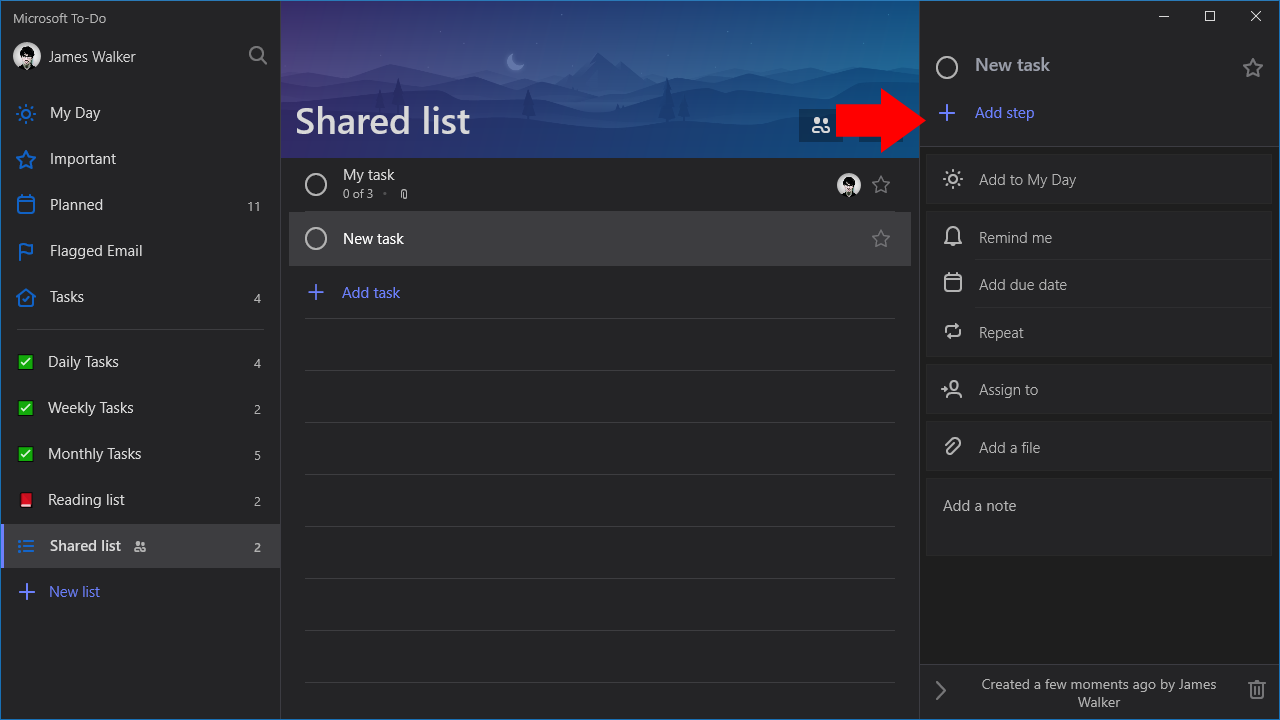
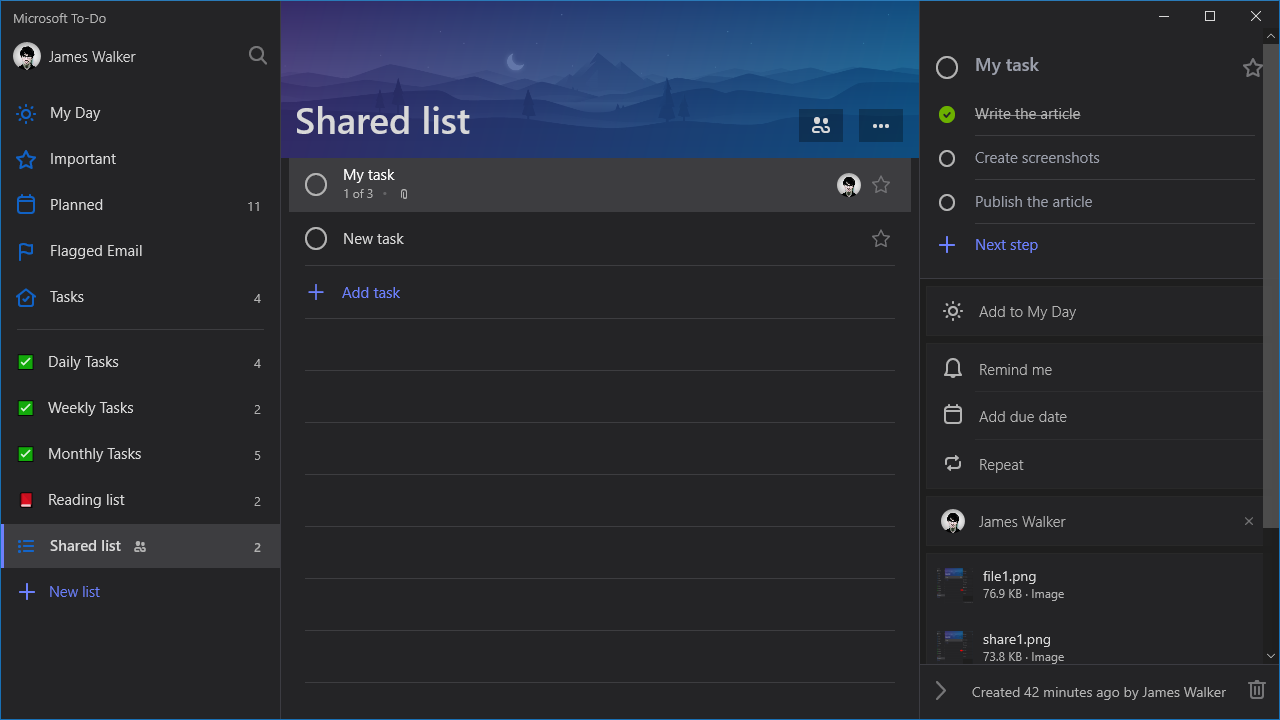
Here’s a simple To-Do tip which you may have overlooked. Sub-tasks, also known as steps, allow you to break tasks down into multiple distinct stages, each with their own completion status. This enables you to track entire processes within a single task, avoiding the need to clutter lists with multiple related tasks.

Screenshot of Microsoft To-Do shared lists

Every To-Do task can contain steps. To add a step to a task, click the task’s name to reveal its details pane. Then, click “Add step” at the top of the panel and type a description for the step. You can add as many steps as you need.

Screenshot of Microsoft To-Do shared lists

Once you’ve added some steps, it’s time to start completing them! Check off each step as you complete it, so you can track progress and see how much work is remaining. Back on the main task list, you’ll see the number of completed and pending steps is shown below each task, to give you an at-a-glance view of the remaining steps. Don’t forget to mark the task itself as completed once you’ve checked off all the steps.

Steps can be especially powerful when paired with some other task options. For example, steps are included when a task is set to recur, so you can quickly set up tasks which define processes to be completed on a daily, weekly or monthly basis. Without steps, you’d have to create multiple tasks – one for each step – which would clutter your list and require you to configure the recurrence on each one.

Intel launches 10nm “Ice Lake” processors for laptops and 2-in-1s

Intel is officially launching today its first 10th Gen “Ice Lake” Core processors, which use the chip maker’s new 10nm process technology and architecture design. The 11 Ice Lake processors that Intel is launching today are for laptops and 2-in-1 devices, and you can expect to find these chips in new PCs being released during the holiday season.

These 10th Gen Core processors come with Intel Iris Plus graphics that double graphics performance according to Intel, and the new chips also bring integrated Thunderbolt 3 with up to 4 ports, as well as Wi-Fi 6 (Gig+) connectivity based on the 802.11ax standard. The new processors also include Intel Deep Learning Boost, a new dedicated instruction set providing high-performance AI to PCs at scale.

You can check out all the details about Intel’s first 11 Ice Lake ships below:

“These 10th Gen Intel Core processors shift the paradigm for what it means to deliver leadership in mobile PC platforms. With broad-scale AI for the first time on PCs, an all-new graphics architecture, best-in-class Wi-Fi 6 (Gig+) and Thunderbolt 3 – all integrated onto the SoC, thanks to Intel’s 10nm process technology and architecture design – we’re opening the door to an entirely new range of experiences and innovations for the laptop,” said Chris Walker, Intel corporate vice president and general manager of Mobility Client Platforms in the Client Computing Group.

How to attach a file to tasks in Microsoft To-Do

Microsoft To-Do now supports task attachments, so you can store relevant files with your to-dos. After a limited initial rollout, attachments are now available to all users across all platforms, including for shared lists.

Screenshot of Microsoft To-Do shared lists

To add a file to a task, click the task to open its details pane. At the bottom of the pane, above the notes field, click the “Add a file” button to select the files to add.

You can attach multiple files to each task, although there is an individual size limit of 25MB per file. As the files upload, you’ll get a preview of the progress within the task’s details pane.

Screenshot of Microsoft To-Do shared lists

The main task list displays a “Files attached” message beneath tasks with attachments. Clicking the details pane will show the task’s file list. Click a file to preview or download it. You can always add more files by clicking the “Add a file” button.

Combined with other To-Do features such as shared lists and task assignees, file attachments allow you to keep everything related to a task within To-Do. If the assignee won’t be able to complete a task without access to a particular file, attach it directly to the task to ensure it’s available when required.

Halo: Reach on Xbox One gets delayed as 343 Industries deals with memory issues

After 343 Industries shipped the first Halo: Reach Insider flight on PC a month ago, we were wondering when Halo Insiders on Xbox One would be able to test the remastered version of Halo: Reach. Unfortunately, the first Xbox flight has been delayed as 343 Industries is currently working on memory issues affecting the Xbox One version of Halo: MCC.

In the latest MCC Development update published on Halo Waypoint yesterday, 343 Industries explained that the work being done with Unreal Engine 4 to create new character customization options as well as the new progression system is really pushing the Xbox One to its limits. As a result, flighting on Xbox will be delayed until the developers manage to solve some unexpected memory issues.

You can read the team’s detailed explanation below:

As has been stated previously, making any game is hard, let alone where you’re dealing with 11 game engines and 7 complete games under the roof of one title sharing the same hardware resources.

One key goal that has been a part of bringing Halo: Reach into MCC is that for Xbox One, the team has been attempting to bring UE4 online for new character customization options on Xbox. You can read more about the progression system in the May and June development updates. This however has proved to be quite challenging as MCC was already close to memory limits running on the original Xbox One consoles. Bringing the entire progression and customization system into MCC also requires memory to be used to run the additional UE4 engine. Currently, a lot of progress has been made in getting it up and running, but the title still is not within memory constraints to properly run on the Xbox One. In order to flight on Xbox One, we need to be within these limits, otherwise instability will be an issue.

Until the team has an adequate solve for this unique issue, flighting on the Xbox One will continue to be delayed. That being said, the team is pushing hard on a solution as they want to flight the Xbox One build as soon as possible. Until then though flighting will continue to remain solely on the PC build.

As we’re nearing the end of this console generation, the Xbox One hardware is definitely starting to show its age. To be fair, Halo: MCC is quite an exception as it bundles together seven Halo games using different engines, and the Xbox One anthology has been plagued by issues since launch. Expectations about the PC version of Halo: MCC are also very high, and 343 Industries is now readying the next PC flight which will include the game’s campaign. There’s still no ETA for the next PC Insider build, but the team promised to share more details soon.

Microsoft’s Xbox One is getting 60 new video games over the next 40 days, New promotion announced

From now until September 9th, at least 60 new video game titles will launch on Microsoft’s Xbox One console.

To build hype for all of these new Xbox One games, Microsoft has announced a special Summer Spotlight promotional campaign which will last for the entire release window.

The main two aspects of the Summer Spotlight promotion are:

  • Xbox One owners will earn 4,000 bonus Microsoft Rewards points if they spend over $40 on new games.
  • Participants will have the chance to win bundles containing new Xbox One S consoles, controllers, and all 60 titles.

The 4,000 Microsoft Rewards points will be calculated all automatically, however, to win one of the Xbox bundles, interested parties will need to enter via a specific form on this webpage here.

Currently, not all 60 games have been announced yet but they will be gradually revealed on the Summer Spotlight website here. The games currently revealed are Pawarumi, Hoggy2, Furwind, Mighty Switch Force! Collection, Tetsumo Party, The Blackout Club, Super Wiloo Demake, The Tower of Beatrice, Solo: Islands of the Heart, The Church in the Darkness, Meow Motors, Metal Wolf Chaos XD, Age of Wonders: Planetfall, Wreckfest, and Blair Witch.

Several of these are already available on Xbox One after launching earlier this week while others are due out over the coming days or weeks.

Are you excited to learn more about these 60 new games? Let us know what ones interest you the most in the comments below and then follow us on Pinterest for more Xbox gaming content.

Today’s new Edge Dev channel build (77.0.230.2) adds inking and other new features to the browser

Build 77.0.230.2 is now available for Edge Insiders on the Dev channel. This latest build adds ink functionality to the test browser’s screenshots, prevents banned Chrome extensions from being installed, and also added a feature that can import settings from the current Edge browser.

Here’s the full release notes with all of the changes and improvements:

New features and behavior:

  • Added the ability to mark up screenshots with ink.
  • Prevented extensions that are banned from the Chrome extensions store from being installed.
  • Added messaging to better help users for some cases when Internet Explorer mode fails to start.
  • Added the ability to import settings from the original version of Edge.
  • Added additional text to identify when a window is InPrivate or Guest.

Fixes for improved reliability and stability:

  • Fixed a crash when pressing Tab.
  • Fixed a crash when pressing F6.
  • Fixed an issue where the Downloads page sometimes didn’t render.
  • Fixed an issue where Netflix was slow when playing 4K video.
  • Fixed a crash when installing extensions.
  • Fixed a hang when playing certain types of videos.
  • Fixed some hangs when opening Application Guard windows.
  • Fixed an issue where the popup blocker would sometimes fail to work in Internet Explorer mode.
  • Fixed an issue where Read Aloud sometimes fails to start properly.
  • Fixed some issues where opening certain PDF files sometimes failed.

Fixes for improved behavior:

  • Fixed an issue where SafeSearch couldn’t be turned on.
  • Fixed an issue where selecting all text in a PDF didn’t work.
  • Fixed an issue where the Apps page occasionally shows duplicate entries.
  • Fixed an issue where languages were getting added to edge://settings/languages when they shouldn’t have been.
  • Fixed an issue where PDF form fields sometimes don’t appear properly.
  • Fixed an issue where tab icons are occasionally the wrong color.
  • Fixed an issue where address bar icons are occasionally the wrong color.
  • Fixed an issue where certain icons weren’t displaying correctly in certain countries.
  • Fixed an issue where the correct start page wasn’t appearing in some countries.
  • Fixed an issue where Application Guard windows sometimes didn’t display in the proper language.

As always, thanks for being an insider, and keep sending us all of your valuable feedback and suggestions!

The Dev channel updates on a weekly basis with new builds of Microsoft’s upcoming revamped Edge browser for Edge Insiders to test. Recent builds added a data privacy feature and a dark mode.

Are you excited for the new Edge browser? Let us know in the comments below and then follow us on Twitter for more Microsoft news.

Is my printer RGB or CMYK? [WE ANSWER]

RGB (red, green, and blue) and CMYK (cyan, magenta, yellow, and key, which is otherwise black) are two alternative color models. They are two alternative models of representing colors. Some users might wonder what the distinction between them is and which of those color models printers utilize for printing.

CMYK is a subtractive color model that mixes cyan, magenta, yellow, and black to produce more colors. It does that by masking colors on white paper. Thus, it essentially subtracts lightness by mixing colors together.

The RGB model is the antithesis of CMYK as that forms more colors by adding them together. Thus, the RGB is an additive color model. Instead of mixing colors on plain white, the RGB model adds red, green, and blue together and mixes them on dark backgrounds.

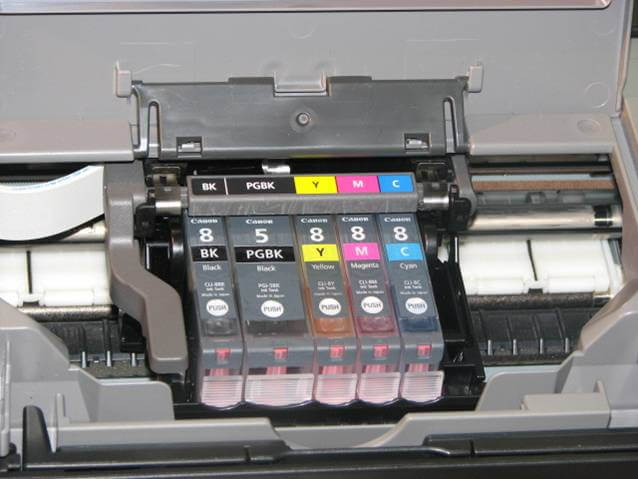
Almost all printers utilize the CMYK color model for printed output. That’s why they print on plain white printing paper. Ink cartridges consist of the cyan, magenta, yellow, and black CMYK colors for printing.

A CMYK ink cartridge is my printer rgb or cmyk

Some companies have started to experiment with RGB printing. Merck KgaA has developed a new RGB printing technique. However, few companies have yet to embrace RGB printing as a viable alternative to CMYK. So, RGB printers aren’t available on Amazon just yet!

RGB is a device color model widely utilized by VDUs (Visual Display Units). Thus, monitors are based on the RGB model that mixes colors on dark backgrounds. RGB can display a wider variety of colors than CMYK.

Consequently, Adobe Photoshop and other software typically save images with an RGB color format. Printing RGB images with CMYK printers can generate some color disparity between the image and its printed output. Although this doesn’t generate a drastic difference, there can often be a slight color mismatch between the CMYK printed output and the RGB image.

1. How Users can Convert RGB Images to CMYK

  1. Users can convert RGB images to the CMYK color model before printing to ensure there’s no color disparity. Open the rgb2cmyk page in a browser.rgb2cmyk converter page is my printer rgb or cmyk
  2. Click Choose file to select the RGB image file to convert.
  3. Then click the Select Output format drop-down menu to choose an image output format.
  4. Press the Start button.
  5. Thereafter, click the CMYK file link to download the converted image.
  6. Then users can open the new CMYK file in an image editor to print it.

Looking for the best photo-editing software to soft proof images before printing? Check these solutions.


2. Convert RGB Files to CMYK With ReaConverter

  1. Alternatively, users can convert RGB images to CMYK with the reaConverter software. Click Download Lite on the software’s download page.
  2. Install reaConverter with its setup wizard, and open the software’s window.
  3. Click the add files button to select the RGB file to convert.
  4. Select the image thumbnail to convert in ReaConverter.
  5. Click Menu > Saving Settings > Format saving settings to open the window shown directly below.Format saving settings window is my printer rgb or cmyk
  6. Select the JPG file format tab on the window.
  7. Then select CMYK on the Color model drop-down menu, and click the OK button.
  8. Select to convert the picture to JPG, and click the Start button.

So, that’s how users can convert their RGB images to CMYK alternatives before editing and printing. That will ensure there is no color disparity between the image and its printed output.

RELATED STORIES YOU SHOULD CHECK OUT:

How to Fix ADB Driver Not Installing on Windows (Full Guide)

When the ADB driver is not installing, your Android phone won’t connect properly to your PC for debugging or APK installation. This can break essential tasks like listing devices via adb devices or using ADB install to specific device.

Follow these native solutions to resolve ADB driver not installed errors.

How to Fix ADB Driver Not Installing

Enable USB Debugging and Use the Right USB Mode

  1. Open your phone settings
  2. Go to About phone > Tap “Build number” 7 times to unlock Developer options
  3. Return to Settings > Developer options
  4. Enable USB Debugging
  5. Connect the phone to your PC with a data-capable cable
  6. On your phone, tap Allow USB debugging when prompted
  7. Change the USB mode to File Transfer (MTP)

Manually Install Android ADB Interface in Device Manager

  1. Press Win + X, select Device Manager
  2. Find your device under “Other devices”, “Unknown device”, or “Portable Devices”
  3. Right-click it → Update driver
  4. Select Browse my computer for drivers
  5. Choose Let me pick from a list of available drivers on my computer
  6. Select Android Device > Android ADB Interface
  7. Click Next and confirm the installation

If you’re using Windows 11 and running into compatibility issues, here’s a guide specifically for installing ADB drivers on Windows 11.

Install Google USB Driver (for Pixel or Stock Android Phones)

  1. Download the driver from Google’s official site:
    👉 https://developer.android.com/studio/run/win-usb
  2. Extract the ZIP file
  3. Open Device Manager
  4. Right-click your device → Update driver
  5. Browse to the extracted folder and complete installation

You can also follow this guide on how to install Google USB driver on Windows by checking this install Google USB driver resource for phones that rely on stock Android drivers.

Disable Driver Signature Enforcement

Unsigned drivers may be blocked by Windows. Disable signature enforcement before retrying installation:

  1. Hold Shift and click Restart from the Start menu
  2. Navigate to:
    Troubleshoot > Advanced Options > Startup Settings > Restart
  3. On the boot screen, press 7 to disable driver signature enforcement
  4. Try the manual driver install again via Device Manager

Try a Different USB Port or Cable

  • Use a built-in USB port (not a hub)
  • Try USB 2.0 ports instead of USB 3.0
  • Swap the cable with an original or certified data cable

For additional troubleshooting on connection issues, you can also check our guide on fixing Media Transfer Protocol errors. This might help resolve file transfer problems between your phone and PC.

Test on Another PC

If the driver still fails, test your device on a different Windows PC to determine if the issue is:

  • OS-specific
  • Due to corrupted USB drivers
  • Caused by software like Samsung SmartSwitch or Huawei HiSuite

Reinstall ADB and Platform Tools

  1. Download the latest version of ADB tools:
    👉 https://developer.android.com/studio/releases/platform-tools
  2. Extract the ZIP file
  3. Open Command Prompt inside the extracted folder
  4. Run the following command:
    • adb devices

If your phone shows up, the driver is working correctly.

If the command fails, follow this fix for the “ADB command not found” error to make sure your system paths are properly configured.

Final Check: Test ADB Connection

In the platform-tools folder, open Command Prompt and run:

  • adb devices

You should see something like:

  • List of devices attached
  • XXXXXXXXXX device

That confirms your ADB setup is working, and you’re ready to use it for development or commands like ADB install APK to device.

Conclusion

You don’t need third-party tools to fix ADB driver installation issues. Most cases can be resolved by configuring your phone properly, using Device Manager, or installing Google’s official USB drivers.

FAQ

How do I install the ADB driver?

Open Device Manager, locate your device, and manually install Android ADB Interface by browsing available drivers.

Why is ADB not installed?

ADB may fail to install due to missing USB debugging permissions, an incompatible cable, improper USB mode, or driver signature enforcement.

How do I install Android ADB Interface on Windows?

Use Device Manager > Update Driver > Let me pick from a list > Android ADB Interface > Install.

How to add a secondary axis in Power BI [EASY STEPS]

Creating charts in Power BI Desktop is one of the main features of this tool, but quite a few users are encountering issues in creating the Y-axis (secondary axis).

One user reported the following on the official Power BI forum:

Currently using Power BI Desktop (just downloaded last week). I’m trying to create chart with secondary axis (Y-axis). However, in the tool, when I select from Visualization pane, ‘Y-Axis’ then ‘Show secondary’, nothing happens. In the video, I see that underneath that option when it is selected, there are other options to select like position it on ‘right’ side.

So, when trying to create a chart with a secondary axis (the vertical axis of the chart) through the usual method, nothing happens. Fortunately, the issue has a very easy solution.

Steps to add a secondary axis in Power BI

Add a metric to the line values

To solve the issue quickly, you simply add a metric to the line values.

power bi line values metric

  1. Click on Favorite Count.
  2. Select the metric you prefer for your axis.

Conclusion

So, that’s about it. Adding a metric to Y-axis will allow you to create a chart with a secondary axis.

Leave your answer along with any other questions in the comments section below.

RELATED STORIES YOU NEED TO CHECK OUT:

Your Browser is Not Supported For Private Mode [We Answer]

If your PC has multiple users, using private mode has many benefits. Every browser has it, and it’s usually quite simple to access it.

However, some users reported getting a specific error from certain websites while using Private mode: the Your browser is not supported for private mode prompt or something like that.

We heard you out and will try to provide you with an answer as best as we can below.

Why is the browser private mode not supported on some websites?

First, let’s start by explaining what private (incognito) modes do. First, there’s no caching or loading of any previously locally stored data.

In their standard mode, browsers will keep the cache from the visited websites locally in a JSON file. Not in private mode.

This prevents revisited websites from identifying your activity and the following user from tracking your online activity.

Your browser Is not supported for private mode

There are also things like log-in details, browsing history (obviously), and cookies that won’t load, and everything you’ve done during that private session is immediately deleted afterward.

Just keep in mind that Private mode is made to keep your privacy uncompromised locally (for other users), not online. There are ways that websites or services will track you even in a private mode.

Also, you can open blocked sites and avoid geo-restrictions with one of these impeccable browsers. You’ll like the first pick.

How to resolve issues with private mode and third-party websites?

So, once we got that out of the table, let’s answer why some websites give you the Your browser is not supported for private mode. All websites have a way to identify the browser that you use to visit them.

Some will require you to disable your ad block, others will ask to accept cookies, while the minority won’t accept Private mode.

It’s their right to put certain criteria and it’s your right to go with it or just switch to an alternative website. Simple as that.

The way to avoid this is quite self-explanatory. Just disable private mode or try using private mode but in an alternative browser.

Some websites have issues with Internet Explorer so switching to Chrome, Firefox, or our favorite, UR Browser is maybe the right thing to do.

Here are the best PIM software solutions for Windows 10

As the name suggests, Product Information Management software (PIM) allows you to store every bit of information that involves your business products – description, pricing, shipping setup, logistics, etc.

This type of software is also known by other names – Product Lifecycle Management (PLM), Product Resource Management (PRM), Master Data Management (MDM), and others.

The most important thing to consider when choosing a PIM software is to make sure that it can easily store entire ranges of product information, under one easy to understand and access hub.

This allows you to streamline the process of product management, promotion, and also configuration.

In this article, we will explore some of the best PIM software available on the market in 2019.

What’s the best PIM software for Windows 10 PC?

IBM InfoSphere MDM

IBM InfoSphere MDM - PIM software

IBM InfoSphere MDM is a great software option that gives you complete control over the way your business data is managed, without needing to be an expert in the field.

This software helps you always keep your business’s values and terms in accordance with the specific rules set in that domain, data management, and all the policies found in your establishment.

Because this is a hybrid application, your data will always be stored online and can be easily accessed from anywhere in the world, by simply using a Windows 10 PC connected to the Internet.

Because of its customizable structure, this software can adapt to any environment and makes it easy for your IT team to modify it if needed.

Here are some of the best features found in IBM InfoSphere MDM:

  • Great built-in domain patterns covering a wide range of industries
  • Advanced management tools – self-service access, analytical graphs, etc.
  • Easy to understand user interface
  • Option to use the service entirely online at a lower cost
  • Real-time sharing of information across all departments of your company

Try IBM InfoSphere MDM


Looking for automated chat software? Be sure to try one of these tools!

Product 360

Product 360 - PIM software

Product 360 is another great software option that offers you access to all the tools you need in order to manage every aspect of your products for your business.

You can also buy and publish up to date information about any product in your online store, offering your customers the ability to choose the best product, while also saving your company valuable time.

One of the best features found in Product 360 is its ability to automatically collect and store all the data from your ERP (Enterprise Resource Planning) and CRM ( Customer Relations Manager) software, but also from the data stored on your PC – images, videos, texts, data polls, etc., and then manage the entire data package in accordance to your company’s requirements.

Managing all the aspects of data processing allows you to offer your clients up to date information about the products they are interested in, allows your company to find out valuable information about the client’s preferences, and adapt accordingly.

Here are some of the best features found in Product 360:

  • Great overview of all customer data
  • Allows collaboration over the web for retailers, distributors, suppliers, etc.
  • Can be used to embed digital assets for your marketing department
  • Automated data processing
  • Great data storage quality and business process management

Try Product 360

Salsify

Salsify - PIM software

Salsify is another great software option that can help you manage every aspect of your product platform, from customer preferences to the way you present your product-related information on the web.

Because of its high-performance engines, this software can gather all the information relating to the way your customer reached your website, giving you valuable information about how you can make the process more efficient.

Salsify can also take the capability of product management from your IT team, and adapt it so it can be easily understandable by anyone in your company, while also offering you the tools to modify any aspect of your product management and client data storage.

These tools allow you to always keep in touch with your client’s preferences, and gives you comprehensive results regarding the level of completion for each of your product’s dataset.

Here are some of the best features found in Salsify:

  • Uses SaaS databases with applied machine learning
  • Can generate recommendations about your digital catalogs and products
  • Can easily import product data from any software
  • Retailers that use your platform can inform you in real-time about their preferences
  • Automatically sorts data that can and can’t be used for your products
  • Perfectly integrates with a wide range of APIs
  • Connects seamlessly to analytics providers, content agencies, distributor channels, retailer and distributor portals, etc.
  • Very powerful machine learning that can adapt your business’s platform automatically based on the data received
  • Scalable to any size
  • Security features – single sign-on, data encryption, user roles, and permissions, etc.

Try Salsify

Conclusion

In this article, we explored some of the best PIM (Product Information Management) software options that give you the power to manage every aspect of the way you present, sell and manage data for your business.

The wide range of features found in the software presented in this list offer you all the tools you need for a fast, and more efficient data management.

Using these features to your advantage allows you not to worry about the compartmentalization of information, and assures a more streamlined way of dealing with updating product information for customers while adapting to your customer’s needs.

Please feel free to let us know what software option you chose from this list by using the comment section below.

READ ALSO:

Microsoft releases 20H1 build 18950, confirms you’ll soon be able to reinstall Windows 10 from the cloud

Microsoft has just released the Windows 10 20H1 build 18950 for Windows Insiders on the Fast Ring, which brings improvements for the new Japanese IME and the Snip & Sketch app. This new build is a minor update overall, but the most interesting bit from the release notes is that Microsoft confirmed that it will soon be possible to reinstall Windows 10 from the cloud, though the feature isn’t live yet in the build 18950

In case you missed it, this Cloud download feature was first mentioned by Twitter user WalkingCat a couple of days ago:

https://twitter.com/h0x0d/status/1155811201604915200

Being able to download Windows 10 from the cloud should make it much easier to reinstall the OS, and it’s worth noting that this is a feature Apple already implemented in recent versions of macOS. The Windows Insider team said today that it will soon announce when Windows Insiders can try this new feature, and we’ll let you know as soon as we get more details. In the meantime, here are the full release notes for the build 18950:

What’s new in Build 18950

Japanese IME Improvements

Thank you everyone who’s shared feedback so far about the new Japanese IME. The development team has been working on improving the quality based on your feedback. Here are some improvements that you can try out in this build:

  • Prediction Candidate window key navigation: We fixed an issue where the focus inside prediction candidate window wouldn’t move when using the Up Arrow key.
  • Key customization: We’ve improved the discoverability of key assignment settings. Also, based on feedback, we’ve updated the default assigned value of Ctrl + Space to be “None”. Ctrl + Space can still be used for toggling IME-on/off by changing the value through its setting.

Showing the improved key assignment settings in the Key & touch customization on the Japanese IME settings.

Please don’t hesitate to continue sharing your thoughts with us about typing in Windows – our ears are open and we’d love to hear from you.

Other Updates for Insiders

Snip & Sketch improvements headed your way

Thanks everyone who’s shared feedback so far for our updated snipping experience! We really appreciate it and are starting to roll out some more improvements based on what you’ve told us:

  • Single window mode: Do you tend to retake snips multiple times in order to get the perfect screenshot? We’re updating the New button to now open new snips in your current app window, so you don’t end up with a ton of open snips (that you then need to close.) If you’d rather keep all snips open in separate windows. the option is now a toggle in settings, so you can decide which mode you prefer.

Showing the setting where you can choose whether or not to open snips in separate windows. 

  • Zoom: Need we say more? You can now zoom in on your screenshots if they’re a bit too small for you to annotate on (and yes, CTRL+Plus, CTRL+Minus and Ctrl+Mouse wheel are supported!). We’ll also zoom out to make sure the whole snip fits in the Snip & Sketch window. If you want to see the snip at its original size, click the Zoom button and then “Actual Size”.
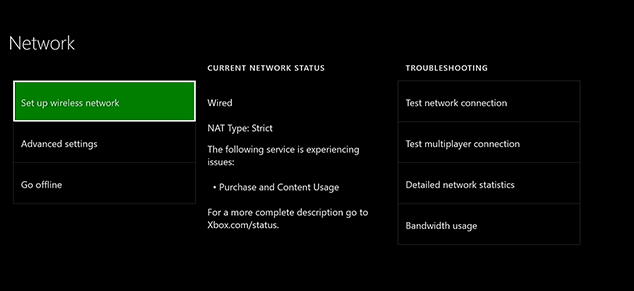
Showing the new Zoom options in action.
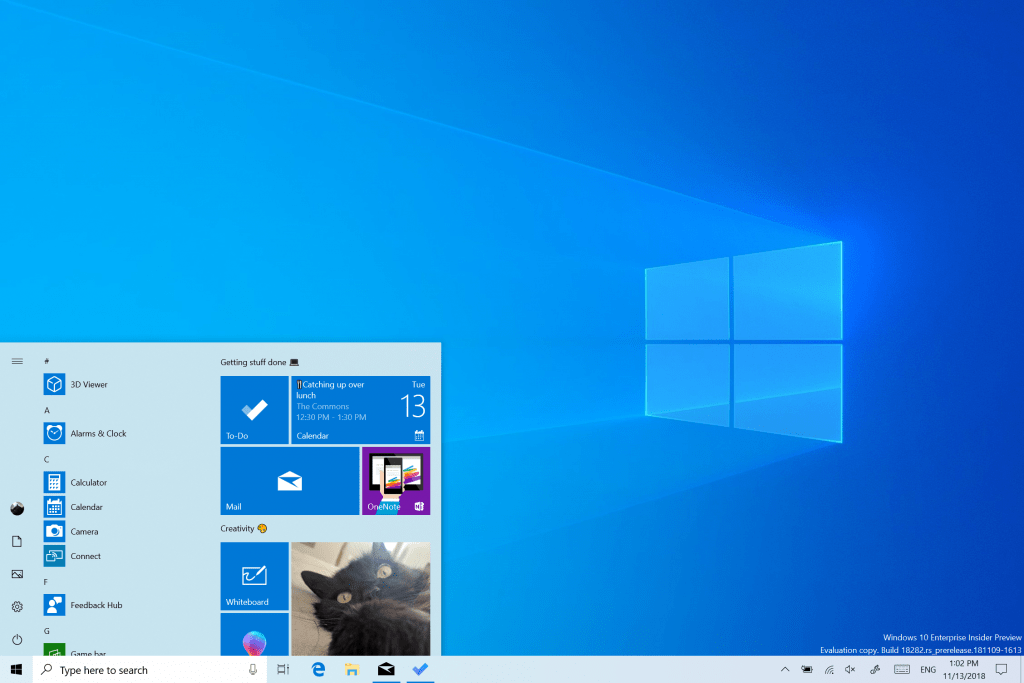
  • Improving WIN+Shift+S discoverability: You mentioned you loved learning about using WIN+Shift+S to take new snips any time and we thought others would too! If you haven’t taken a snip yet, we’ll now use the canvas space in Snip & Sketch to help you learn how to start a snip without needing to open the app first.

These changes are currently available for a portion of Insiders in the Fast ring as we evaluate the quality before continuing the rollout. Note the rollout for each change mentioned above is being handled separately, with separate random populations in the initial rollout, so seeing one of the changes with app version 10.1907.2064.0 doesn’t necessarily mean you’ll see all three.

General changes, improvements, and fixes for PC

  • Insiders may notice some references to “Cloud download” relating to PC reset or refresh. This feature isn’t available and working quite yet. We’ll let you know once it is, so you can try it out!
  • We fixed an issue where ctfmon.exe might crash if clicking the input mode indicator in the taskbar to switch the Japanese IME between modes.
  • We fixed an issue where pasting from clipboard history (WIN+V) wouldn’t work when using the Bopomofo IME.
  • We fixed an issue resulting in hanja conversion not working for the updated Korean IME when typing in certain apps.
  • We fixed an issue that could result in the OneNote app intermittently acting as if the Ctrl key was pressed when it wasn’t.

Known Issues

  • There has been an issue with older versions of anti-cheat software used with games where after updating to the latest 19H1 Insider Preview builds may cause PCs to experience crashes. We are working with partners on getting their software updated with a fix, and most games have released patches to prevent PCs from experiencing this issue. To minimize the chance of running into this issue, please make sure you are running the latest version of your games before attempting to update the operating system. We are also working with anti-cheat and game developers to resolve similar issues that may arise with the 20H1 Insider Preview builds and will work to minimize the likelihood of these issues in the future.
  • Some Realtek SD card readers are not functioning properly. We are investigating the issue.
  • Tamper Protection may be turned off in Windows Security after updating to this build. You can turn it back on. In August, Tamper Protection will return to being on by default for all Insiders.
  • Occasionally, the candidate selection in prediction candidate window for the Japanese IME doesn’t match with the composition string. We are investigating the issue.

The Windows Insider webcast will also make a comeback on Mixer tomorrow at 2PM PDT, and this episode will have special guests from the FX Amplify team. This should be a good opportunity to learn more about the state of the 19H2 and 20H1 updates, especially since the 20H1 update still seems to get more attention from the Windows Insider team these days.

Project xCloud Test Game for Xbox One shows up on the Microsoft Store

As Microsoft is now gearing up for the Project xCloud public beta coming in October, Microsoft watcher WalkingCat spotted an xCloud Test Game for Xbox One on the Microsoft Store today. The store listing has no description and a placeholder image, but the fact that this is targeting the Xbox One is quite surprising.

https://twitter.com/h0x0d/status/1156491354832113664

Back at E3 2019, Microsoft made it pretty clear that it was initially focusing on smartphones with Project xCloud, and all the public demos we’ve seen so far were done on smartphones. Google will be exploring a different road with its own Stadia game streaming service, which will be available on TVs with a Chromecast Ultra, PCs with Google’s Chrome web browser, and select Google Pixel smartphones.

We don’t yet if the full-fledged Project xCloud service will eventually be available on Xbox One consoles, but Microsoft announced at E3 that it was working on a separate console streaming feature that will allow Xbox One owners to stream Xbox games they own to mobile devices. This feature is expected to launch later this year, and it has yet to make its way to Xbox Insider builds.

We hope to get more details about Project xCloud at gamescom next month, as the event will be the first time Microsoft lets the general public go hands on with the game streaming service. With pre-orders for the Google Stadia Founders Edition already opened, Microsoft shouldn’t wait too long before revealing the business model for Project xCloud and other important details to help gamers choose between the two services later this Fall.

Windows 10 Calculator app will soon get new Always on top mode

Earlier this year, Microsoft announced that it was open sourcing the Windows Calculator app, opening the doors for some new community-built features. Well, this is already giving some interesting results as a new Always on top mode will soon be implemented in the app, allowing users to pin Calculator on top of other windows.

Dave Grochocki, Senior Program Manager working on Notepad and Windows Calculator at Microsoft, shared a GIF showing the new Always on Top mode yesterday (via Thurrott.com). “This is our second-highest customer feedback request in Feedback Hub with some users reporting their only alternative is to pay for an app which is sticky,” Grochocki wrote on the project’s GitHub page.

As you can see in the GIF, pinning the Calculator window initiates a new compact view that hides some advanced features, but keeps basic Calculator functionality. It’s not clear when this new Always on Top mode will be generally available, but it will likely come to Windows Insiders first. Now that Windows Calculator has been open sourced, it will be interesting to see if the app will continue to get new features inspired by user feedback.