Ignite 2018: Microsoft introduces Cortana Skills for Enterprise

At Ignite 2018 today, Microsoft announced a new Cortana Skills Kit for Enterprise. The Ignite press release explains:

Microsoft is bringing customizable Cortana experiences and skills with the new Cortana Skills Kit for Enterprise. The end-to-end solution allows enterprises to build custom skills and agents, test them with users, and fully manage deployment to their organization. Developed with the Microsoft Bot Framework and Azure Cognitive Services Language Understanding service, the platform will help enterprises effectively use Cortana to improve workforce productivity. This is currently available by invite only and more broadly in the near future where companies and developers will be able to request an invitation.

The Cortana Skills is developed with the Microsoft Bot Framework and Azure Cognitive Services Language and should help boost Cortana’s usage across workforces. Microsoft is also promising that the platform should help enterprises use Cortana to improve their workflows and productivity.

Currently, Cortana Skills for Enterprise is available on an invite-only basis and will become more widely available in the near future.

Ignite 2018: Microsoft announces Secure Score, vows to end the era of passwords

Microsoft has long been looking to make the world more secure with features like Windows Hello, and the firm today is taking another big step in that direction. On stage at Ignite 2018, Microsoft is announcing Secure Score and a series of other new offerings which aim to protect and save businesses and enterprises from security and password worries.

First off, there is Microsoft Threat Protection. This new solution brings together Microsoft’s threat protection solutions across emails, PCs, identities, combined into a single integrated experience. Microsoft promises that this solution should help save security analysts thousands of hours by helping detect cyber threats and remediate their ever changing effects.

Next up, there is new support for password-less login in the Microsoft Authenticator app for Azure Active Directory. Familiar to most consumers, this app removes passwords and combines the phone’s fingerprint, face or PIN for a secure, multi-factor login. With Authenticator, Microsoft is declaring “an end to the era of passwords.”  It’s coming to Azure Active Directory accounts and is available today.

Finally, there is Microsoft Secure Score, which is being called the “only dynamic report card for cybersecurity.” Designed for large organizations, the solution gives a dynamic enterprise report card for cybersecurity. Microsoft promises that this service will give organizations assessments and recommendations, to help them reduce their changes at breaches by “30-fold.” Secure Score is available now for IT professionals, and you can learn more by checking here.

These are just three of the big security-related announcements from Ignite 2018. Microsoft also revealed a public preview of Azure confidential computing, Modern compliance enhancements, and an expansion of their work through the Cybersecurity Tech Accord.

Ignite 2018: LinkedIn integration is coming to Microsoft 365

It’s been over two years now since Microsoft first acquired LinkedIn, and the tech giant is continuing to integrate the professional network across its services and offerings. In the latest, at Ignite 2018, the company has just announced that LinkedIn integration will be coming to Microsoft 365.

Soon, Microsoft 365 users will be able to coauthor Word, Excel, and PowerPoint documents with people in their LinkedIn network. Users will also be able to send emails to people in their LinkedIn network directly from Outlook. “This brings your corporate directory and your LinkedIn network together, so you never lose touch with the contacts who can help you succeed, inside or outside your organization,” explained Microsoft.

Capping off the features of the new LinkedIn integration is the ability for users to see LinkedIn highlights about the people in Outlook meeting invites. This all means users should have an improved workflow, with big focus on seeing what’s important.

Microsoft says the integrations will be coming soon, in a staged rollout. Best to keep tuned for more in the weeks ahead.

Ignite 2018: Microsoft Search is a “supercharged” consistent search experience across Edge, Bing, Windows, and Office apps

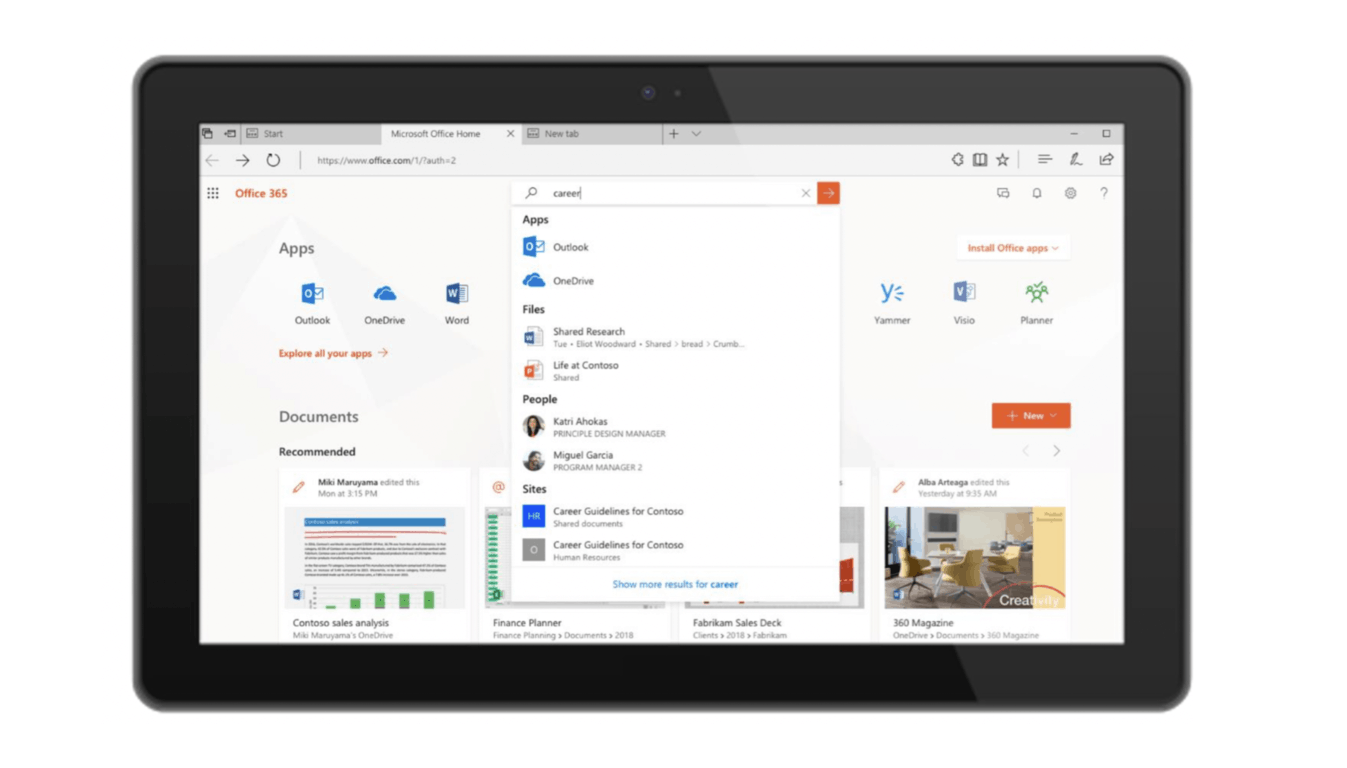
Microsoft is consolidating its various search capabilities into Microsoft Search, a new omniscient search box that will be available across Bing, Office, and more Microsoft properties. The Microsoft Search announcement was made today at the company’s Ignite conference in Orlando, where Microsoft revealed new capabilities in Microsoft 365 for achieving more in the modern workplace.

Microsoft Search will be powered by the Microsoft Graph and AI technology from Bing, and it will exist as a simple search box available across Edge, Bing, Windows, and Office apps. Microsoft Search will be able to pull data from Office 365, and also leverage AI technology to help you find what you need when you need it. Search will become a much more seamless experience across Windows and Microsoft 365:

Over the next few months you’ll experience these first steps:

  • Search will move to a prominent consistent place across the apps you work with every day. From Outlook to PowerPoint, Excel to Sway, OneNote to Microsoft Teams, Office.com to SharePoint, the search bar will be in the same place—across desktop, mobile, and web.
  • Personalized results as soon as you click in the search box, such as people you share with the most and documents you were working on recently. No query is required to get suggestions.
  • The search box itself will also command the application where you are working. For example, begin typing ‘acc’ in Word to get list of suggested actions such as Accept Revision or Accessibility Checker. You no longer need to hunt through toolbars to look for a command.
  • Search results will include results from across your organization. For example, within Word, you can find not only other Word documents, but also a presentation you were working on. You can navigate straight to that presentation or you can choose to incorporate slides from that file directly into your document.
  • Extending that same organizational search experience wherever you are working—in Bing.com (when signed in with your Office 365 account), Edge or Windows. Search wherever you want to and get the same experience.
  • Unified administration of your organizational search results, including admin curated results such as bookmarks.

“We’re pulling together the power of the Microsoft Graph and AI technology from Bing to deliver future experiences that are more relevant to what you are working on,” explained Ron Markezich, CVP, Microsoft 365 Commercial. “This will include automatically answering questions such as “Can I bring my wife and kids on a work trip?” by using machine reading comprehension that takes knowledge of the world and pairs it with understanding of your organization’s documents,” he continued.

This all sounds pretty exciting and Microsoft Search is available in preview today on Bing.com, Office.com (including app start pages) and the SharePoint mobile app. Microsoft plans to bring this new capability to Edge, Windows, and the Office apps at a later date.

Microsoft is kicking off Ignite 2018 with its Vision Keynote, watch it here

This week in Orlando, Florida, Microsoft is taking the wraps off news about Azure, Microsoft 365, AI, cybersecurity, and a lot more. Microsoft is webcasting the keynote live, and you can watch it here, below:

Remember that you can create a Tech Community account and watch breakout and community theater sessions either live or on demand, and remember too to stay tuned to OnMSFT for all the latest from Ignite and beyond.

How to fix Windows 10 Wi-Fi lag spike issues for good

One issue Windows 10 users have often been vocal about is the Wi-Fi lag that often tends to spike beyond appreciable limits, leading to a below-par internet browsing experience each time that happens. That again is something that is very inherent to the way Windows update works given that it uses a peer2peer method of propagating the update among the masses.

That way, your PC might very well serve as a download location for other users to be provided the update. However, any drop in upload or download speeds might not be too perceptible with a fast internet connection though things can truly become a chore during days when your internet connection isn’t at optimum.

However, like with most other problems, there sure is a solution to the issue. And it’s simple and quick too. So, let’s get started right away.

Ways to deal with Wi-Fi lag spikes in Windows 10

1. Turnoff peer2peer system

As has been stated above, the peer2peer system is the reason Wi-Fi lag spikes. So the most logical method to deal with it will obviously be to turn it off. Here is how you do it.

  1. Go to Settings > Update & Security.
  2. In the Windows Update page that you are led to, select Advanced Options.
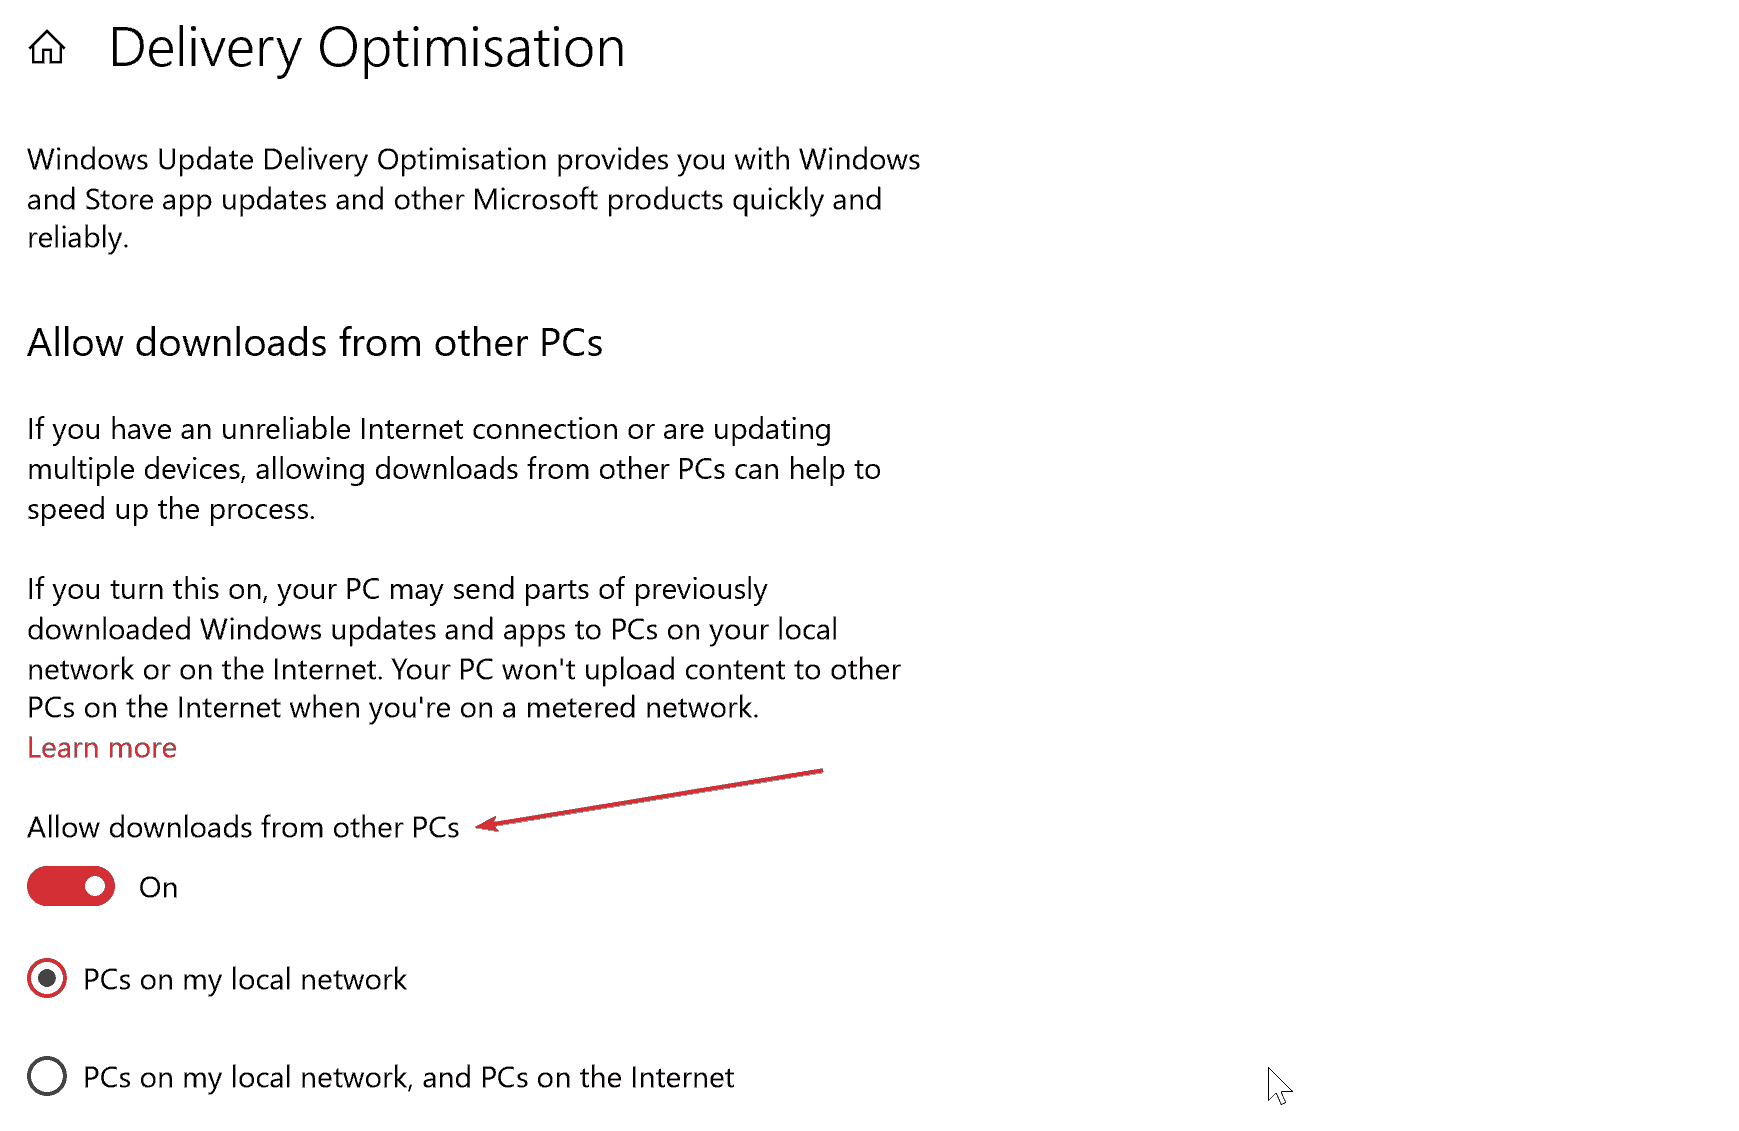
  3. In the Advanced Options page, select Delivery Optimization along the bottom of the page.
  4. Here, toggle Allow downloads from other PCs to Off.

While the above process has been designed to ensure you get your updates over even an unreliable internet connection, or when speeds aren’t that great, toggling the above setting off will still make sense if you find yourself at the receiving end of the above phenomenon.

— RELATED: FIX: WiFi Stopped Working after Update to Windows 10

2. Turn off Background Intelligent Transfer System

Just in case the above failed to realise the desired outcome, here is another method that disables Windows Update as a whole. Hence, this makes for a reliable method of dealing with the Wi-Fi lag spikes though what also needs to be kept in mind is that this will deprive the PC of key updates that Microsoft makes available from time to time to patch critical vulnerabilities. As such, it is advisable to install updates manually from time to time when BITS is turned off.

Here are the steps:

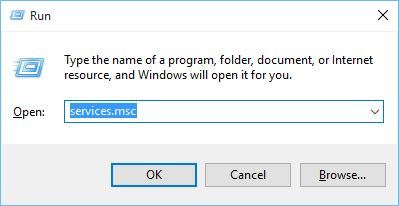
  1. Open msc. You can do this just by typing services in the Cortana search box and select from the results provided.
  2. In the Services app, locate Background Intelligent Transfer System.
  3. Right-click on it and select Properties.
  4. Under the General tab, click on Stop for the process to be stopped.
  5. For Startup type, select Disabled from the dropdown box.
  6. Under the Recovery tab, for First failure and Second failure, select Take No Action.
  7. Click OK for the changes to take effect

This should effectively kill BITS forever so that the service won’t start again even when the PC restarts. However, as has been stated above, the user’s discretion is advised when turning off BITS. Also, downloading the updates manually is highly recommended to ensure protection against all emerging vulnerabilities.

3. Uninstall Autodesk Application Manager

The Autodesk Application Manager aims to provide you information with all the latest updates and solutions available pertaining to the apps installed on your device. However, the same has also been found to be another reason Wi-Fi lag spikes and the solution here is to uninstall the software. Here is how you do it.

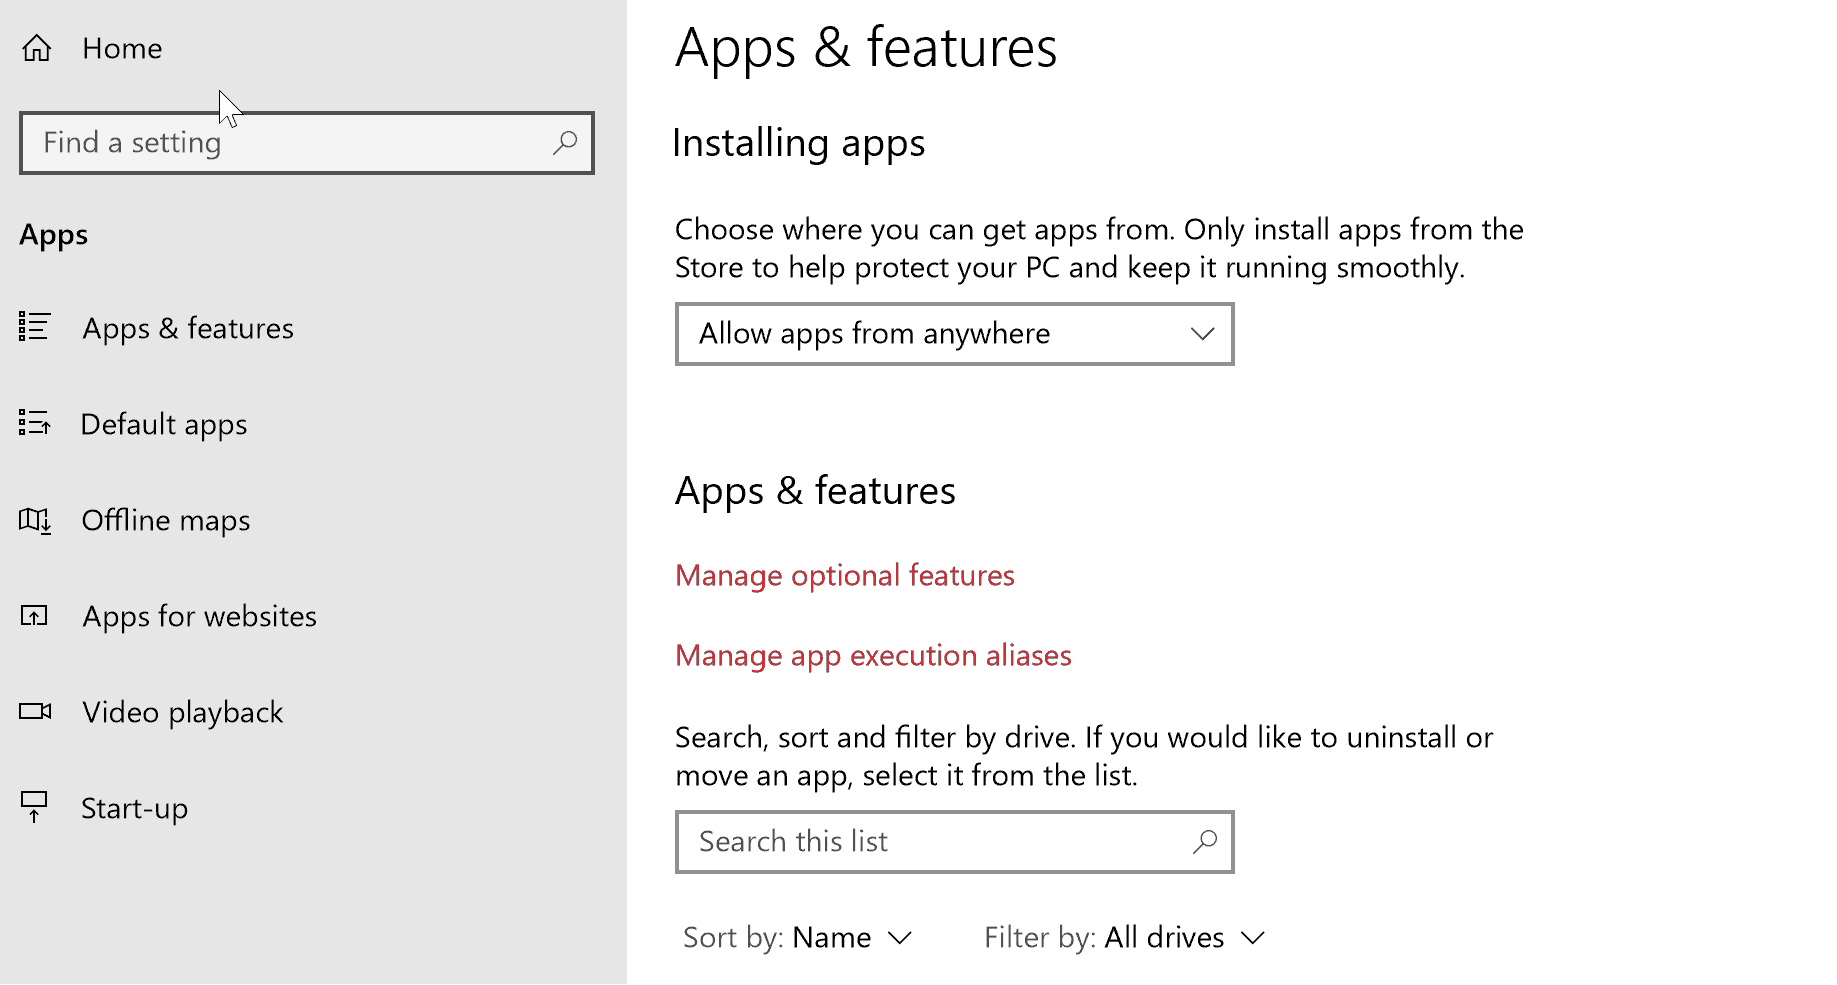
  1. Go to Settings > App.
  2. In the Apps & features page, scroll down to locate Autodesk Application Manager. Select the same.
  3. You will be provided the option to Uninstall the software. Click on it.
  4. Follow on-screen instruction to complete the uninstallation process.


— RELATED: How to fix poor WiFi signal on Windows 10, 8.1, 8

4. Disable IPv6

Any error with IPv6 can be a reason for Wi-Fi lag spikes. And one way to deal with it is to disable the same. Here is how you do it.

  1. Locate the Network/Wi-Fi icon at the bottom right corner of the taskbar and right-click on it.
  2. From the options provided, select Open Network and Internet settings.
  3. In the Settings window that shows up, select Change adapter options.
  4. In the next window that opens, you will get to see all the network adapters relevant for your PC.
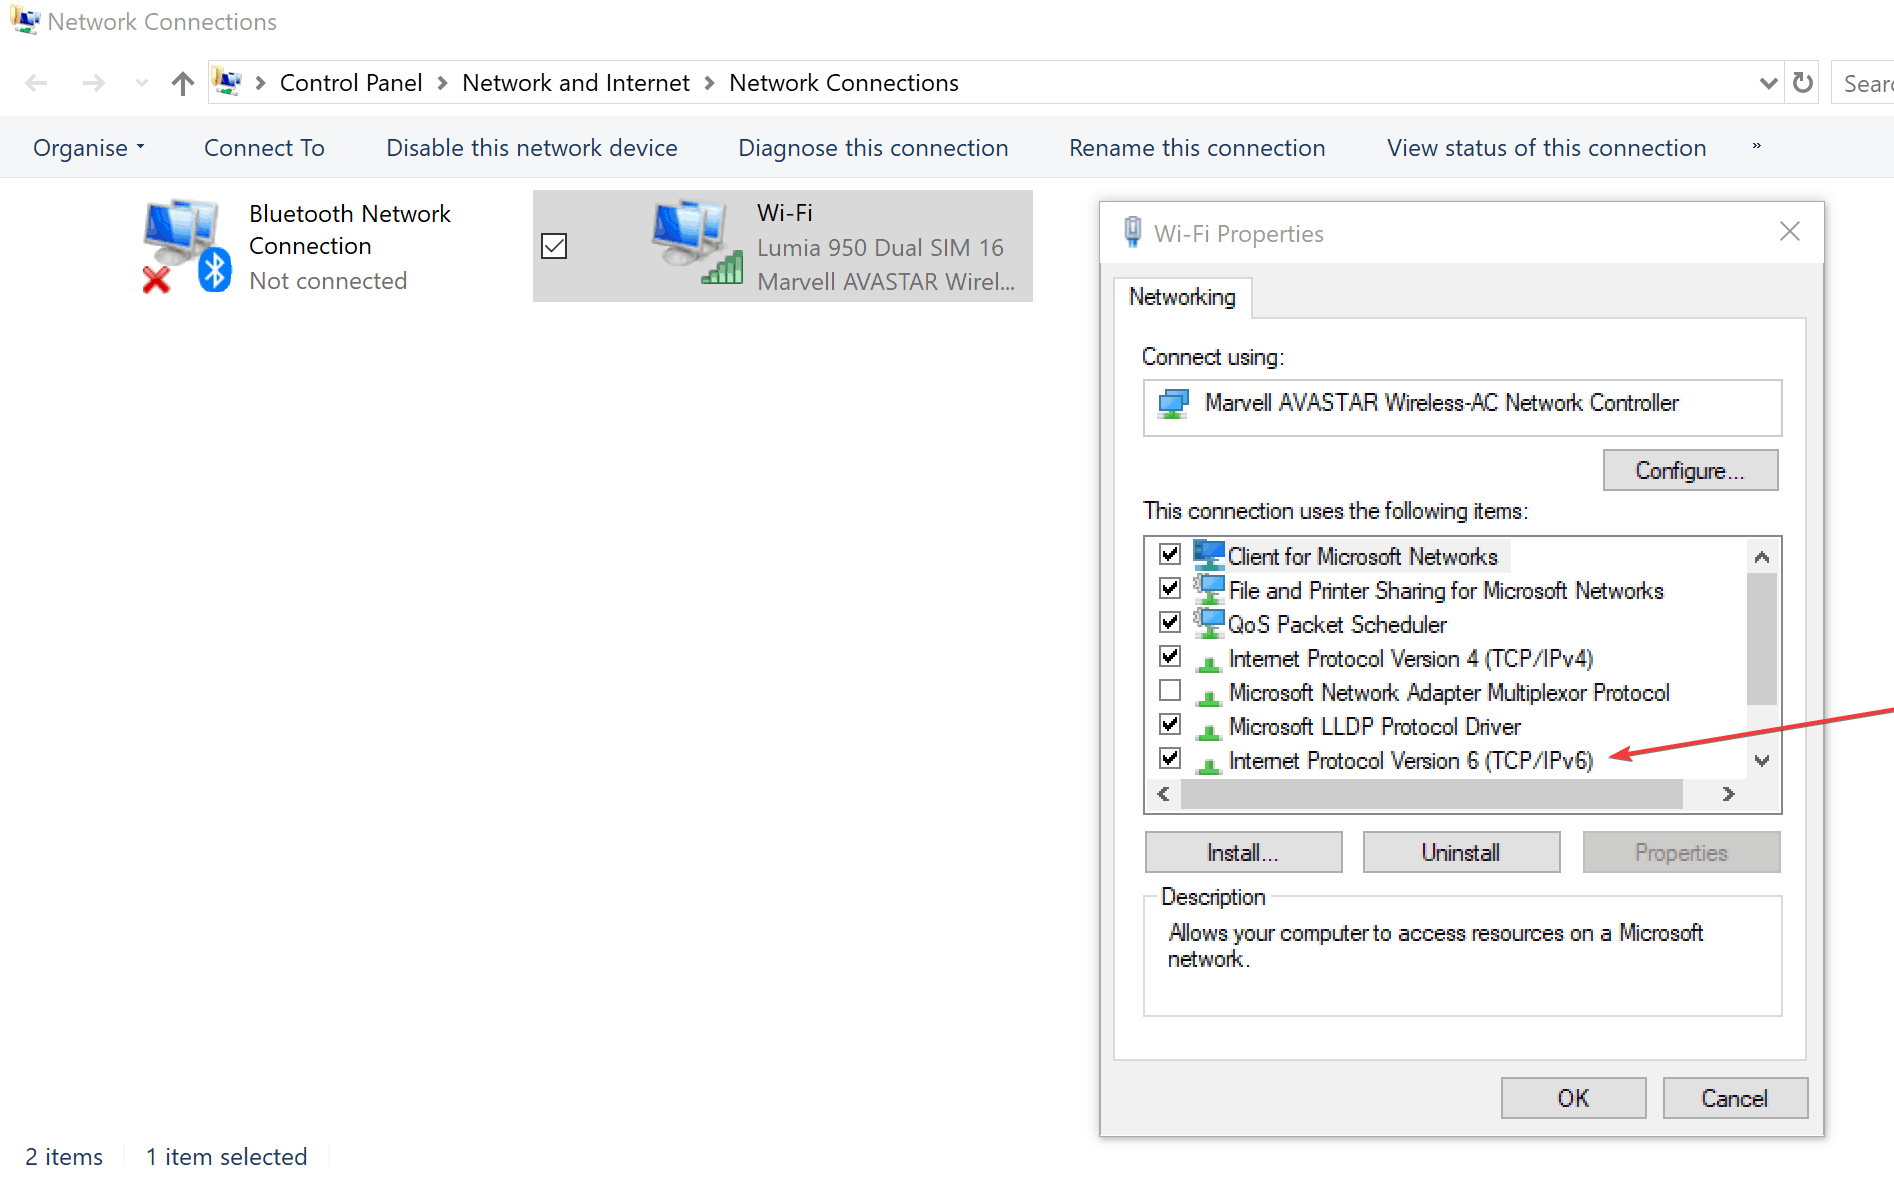
  5. Right-click on the active network adapter, the one used to connect to the internet and select Properties.
  6. In the Properties window, locate Internet Protocol Version 6 (TCP/IPv6) and un-check the checkbox for the same.
  7. Click on OK and re-start your PC for the changes to take effect.

5. Disable Connected User Experience and Telemetry service

That sure is a bit of a mouthful though, in simple terms, it refers to the controversial Microsoft practice of collecting Windows 10 usage info and passing it back to the company servers. Microsoft claims that it is done to improve the Windows 10 experience though many have claimed it to be just spying in another name and form. And the same also eat up our bandwidth as well. Here is how you can stop it.

  1. Launch Services You can do that by pressing Windows + R > type services.msc and press enter. Or simply type Services in the taskbar search box.
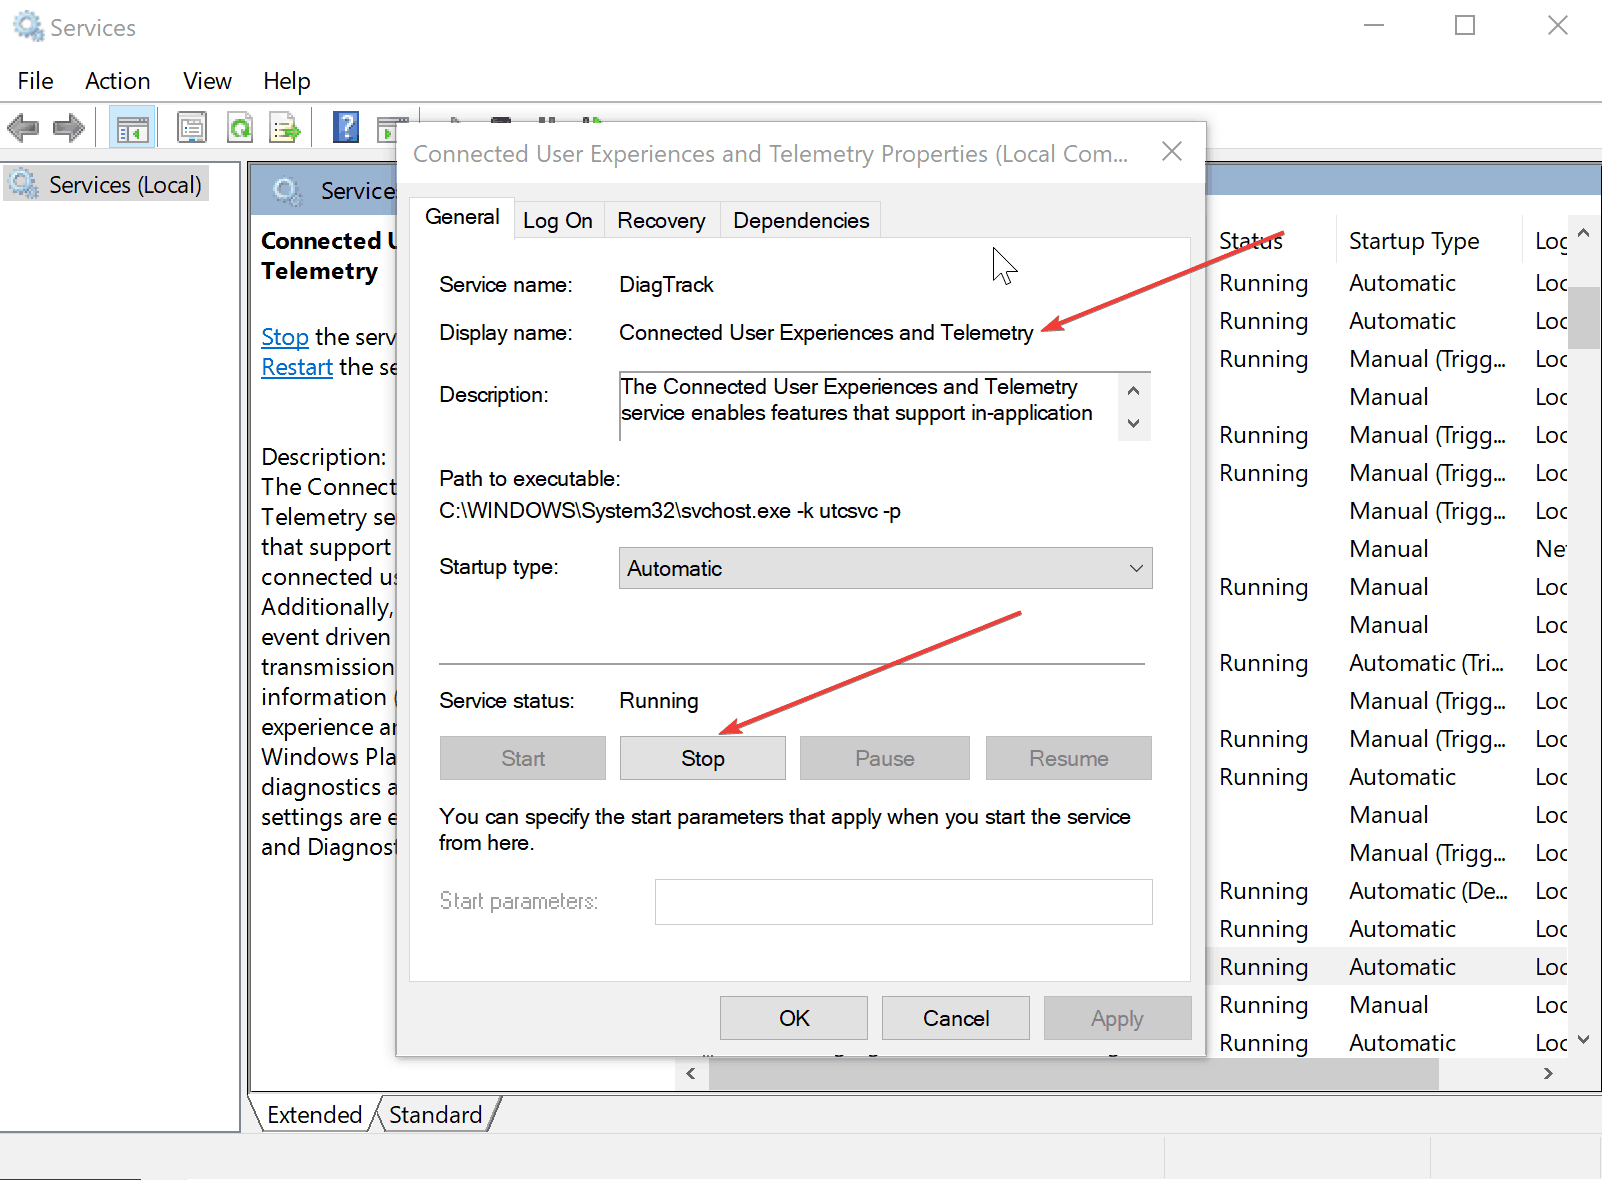
  2. Here, under ‘Services (Local)’, locate Connected User Experiences and Telemetry and double-click on it.
  3. In the Connected User Experiences and Telemetry properties window, under General tab, click on Stop in the Service Status.

  4. For Startup type, select Disabled from the drop-down menu.
  5. Click on OK and that’s it.

— RELATED: Fix: Windows 10 WiFi not connecting automatically

6. Disable Cortana

Cortana can be beneficial when it comes to getting some of your mundane or repetitive tasks done. However, the service also requires an active internet connection for it to get its job done. And that is how it might also end up contributing to your Wi-Fi lag spikes. That also makes it a wise choice to disable the service if its drawback far outstrips the benefit it comes with. Here are the steps (it applies to Windows 10 Home).

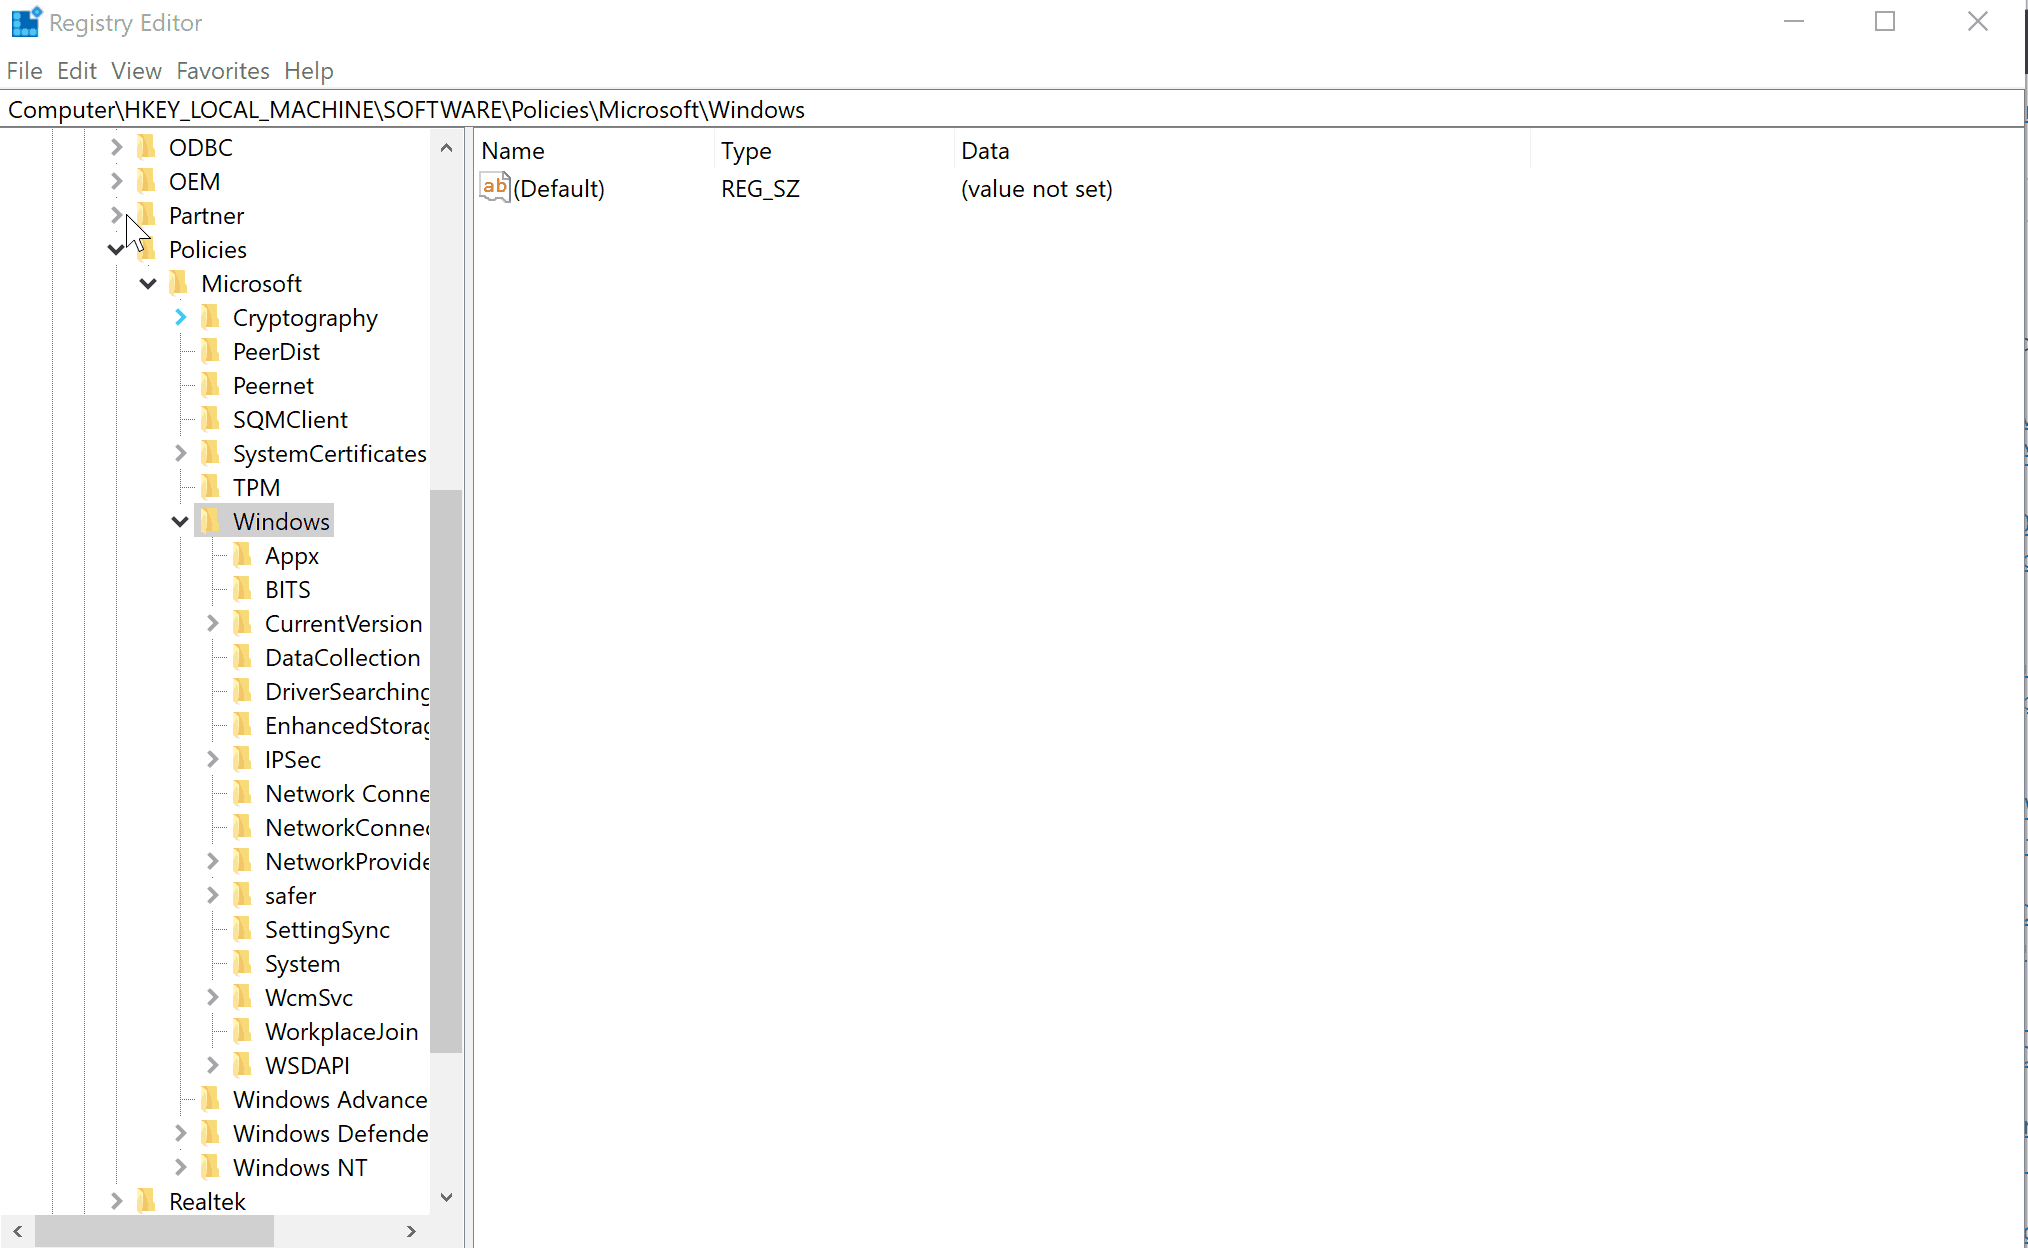
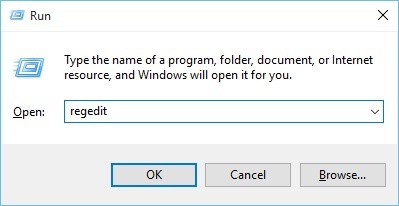
  1. Launch Registry Editor. You can do that by simply typing regedit in the taskbar searchbox. Or you can also press Windows + R and typing regedit.
  2. On the left panel, search for HKEY_LOCAL_MACHINE\SOFTWARE\Policies\Microsoft\Windows\Windows Search.
  3. On the right panel, right-click on the empty space and select New > DWORD (32-bit) Value.
  4. Give it a name, say YesCortana. Give it the Value – 0.
  5. Click on OK and this will save the new key.
  6. This, in turn, will disable Cortana, saving you some bandwidth.

7. Disable OneDrive

OneDrive is Microsoft’s cloud storage solution that you can fall back on to store files that you might need across multiple devices. However, that might also consume a lot of your data if you deal with voluminous files each time. However, if OneDrive isn’t part of your daily diet, you might as well turn it off for better internet experience. Here is how you do it.

  1. Press Windows key + R to launch the Run command windows.
  2. Type gpedit.msc in the Run box and click on OK to launch Local Group Policy Editor windows.
  3. Here, select the Administrative Template from the left panel.
  4. Double click on Windows Components folder in the right panel.
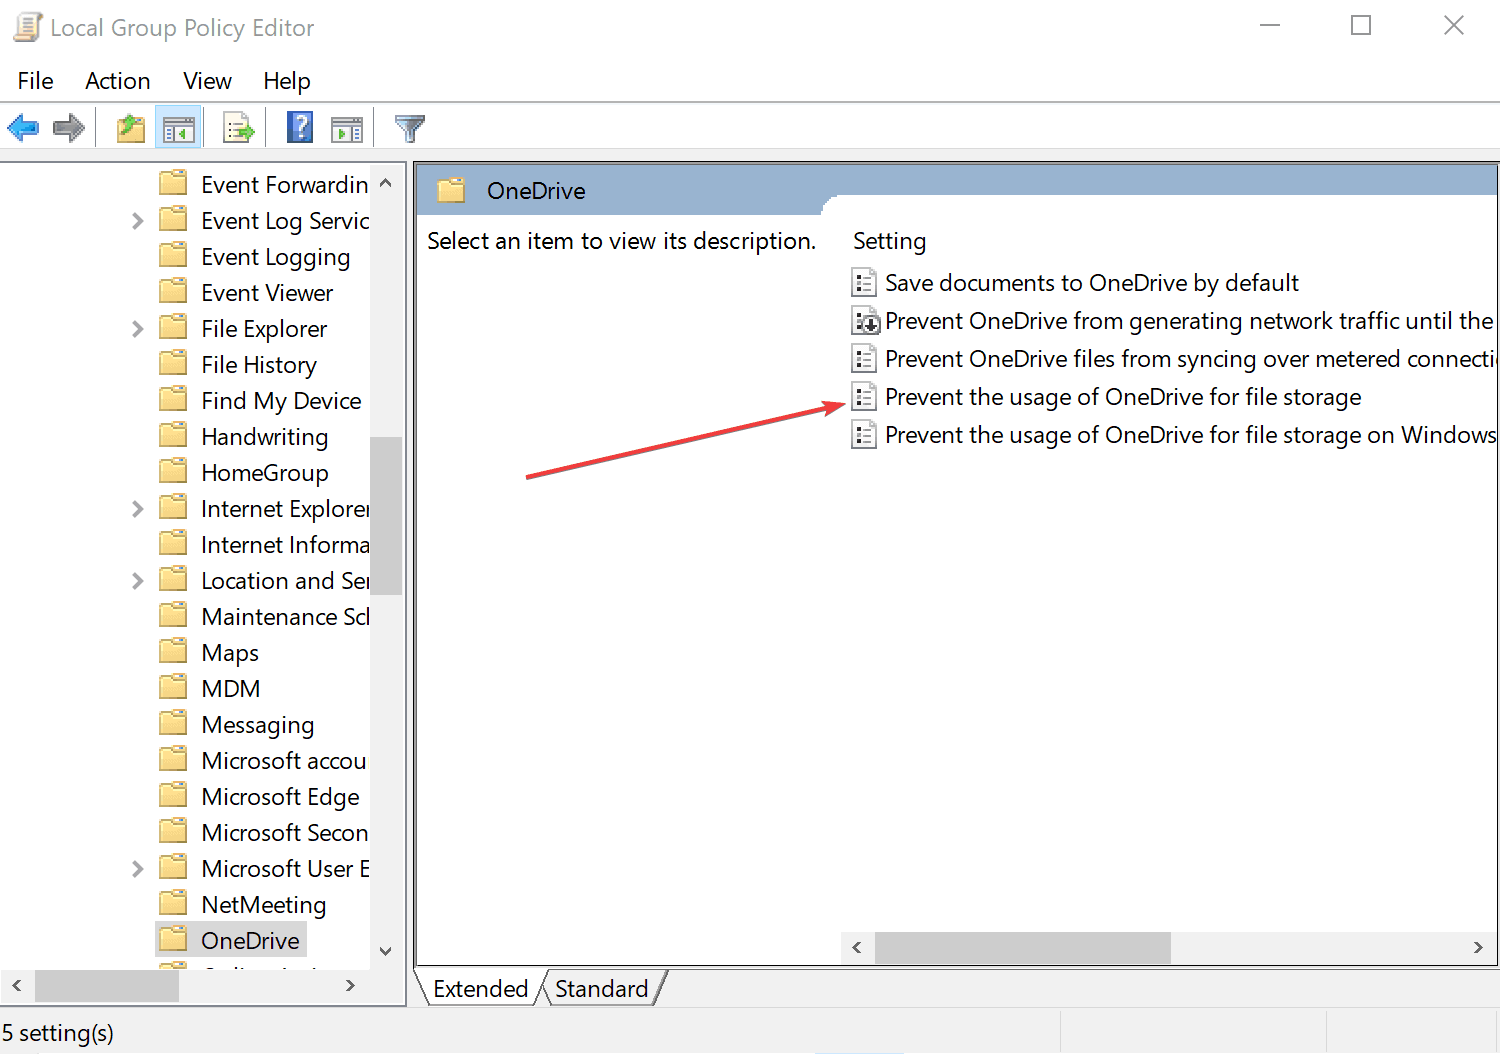
  5. Next, double-click on the OneDrive
  6. Double-click on Prevent the usage of OneDrive for file storage.
  7. In the separate window that opens up, select Disabled and click on OK.


This should shut out OneDrive on your device.

— RELATED: How to fix OneDrive access issues on Windows

8. Disable GameDVR

Disabling GameDVR has also helped many overcome Wi-Fi lag spike issues though this applies more to those who are into serious gameplay. Nonetheless, these are the steps to shut out GameDVR on their Windows 10 computers.

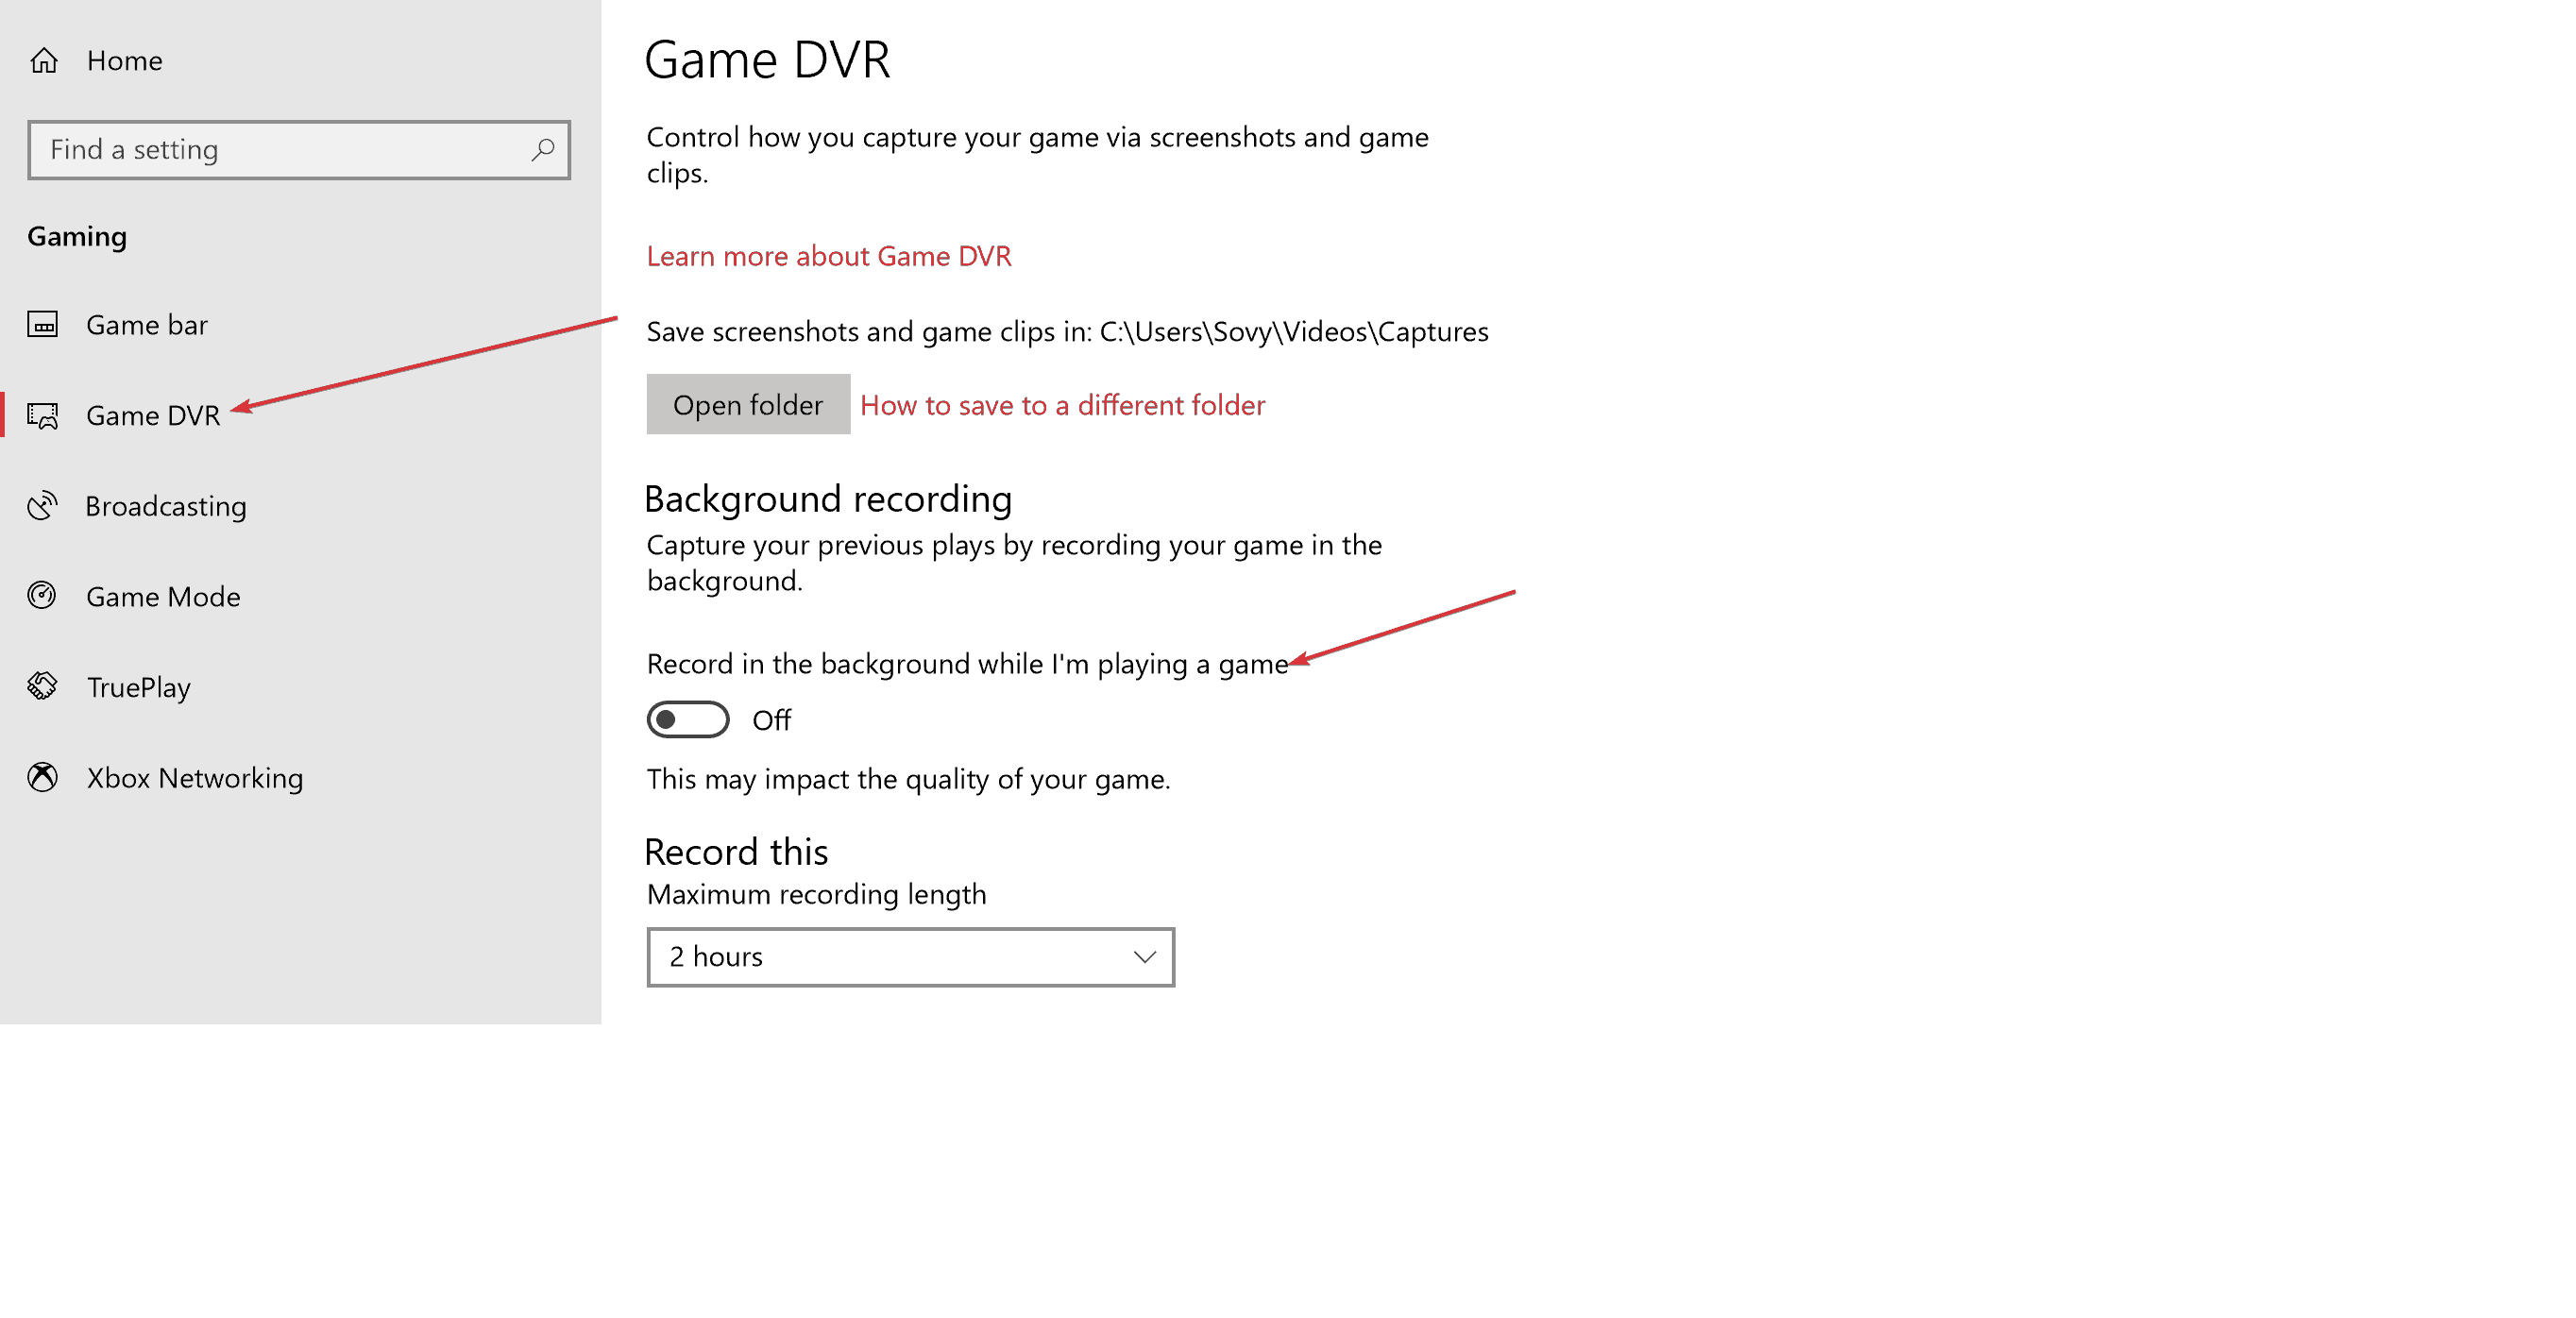
  1. Launch the Settings app and click on Gaming.
  2. Select GameDVR from the left panel.
  3. There, under the Background recording section, make sure the Record in the background while I’m playing a game is set to off.

This will prevent all back-end recording process.

So, this should make for a comprehensive list of all that might be contributing to Wi-Fi lag spikes. However, shutting off all might lead to a less than optimum Windows 10 experience. As such, users can exercise their individual discretion at switching off a particular feature so that they have the best of both worlds, getting to most out of the latest Windows platform with Wi-Fi too performing within appreciable limits.

Meanwhile, here is some related info that might be of interest to you.

These features are out for good with Windows 10 version 1809

Microsoft is all set to launch its next big update, Windows 10 version 1809 in October.

While that should be a nice piece of news for current Windows 10 users, Microsoft has also announced the upcoming update will annul several features while several more will be ticked off the development cycle, meaning those are next in line for abandonment.

The company, however, has stated any feature that is being canceled won’t create a void as such since those have either been replaced with something better or are in the process of being so.

That said, all apps or more specifically, the code that depends on the features being annulled will henceforth be rendered junk.

Features no longer supported on the Windows 10 October 2018 Update

The features that are set to get the boot to include Business Scanning (also called Distributed Scan Management or DSM) and FontSmoothing setting in unattend.xml as both have become obsolete.

Trusted Platform Module (TPM) management console to is on the way out, with the info that used to be available in the console now being available in the Device security page in the Windows Defender Security Center.

Further, limpet.exe that allows for TPM access for Azure connectivity is being made open source from now on. Hence that too is on the list of expendable features right now.

These apart, Microsoft has also made it known they won’t be introducing any new updates to the WEDU server.

What that means is there won’t be any new updates for Windows Embedded Standard 8 and Windows Embedded 8 Standard via Windows Embedded Developer Update.


Which is the latest version of Windows 10? Find out from our constantly updated article!


Instead, users can source relevant updates from the Microsoft Update Catalog.

The Hololens app too will cease to exist, with the Mixed Reality Viewer taking its place instead. Same is the case with the Phone Companion app that will cease to exist post the version 1809 update.

Instead, there is going to be the new Phone page under Settings that would have largely similar functionality, that of syncing your mobile with the Windows 10 PC.

Similarly, the features that are not being developed any further include OneSync service, Companion device dynamic lock APIS and Snipping Tool.

RELATED STORIES TO CHECK OUT:

Error reading from file when installing new software on PC [FIXED]

Computer errors can appear at any time, but some errors such as Error reading from file usually appear while you install new software on your Windows 10 PC.

This error can prevent you from installing new applications, therefore it’s crucial to know how to fix it.

But first, here are some more examples of this problem:

  • Ableton Live 10 error reading from a file – This error usually appears when working with a music production software, Ableton.
  • Error reading from file verify that the file exists
  • Uppercut error reading from a file – Users of mobile utility software, Uppercut have also reported this issue.
  • Ableton Live 9 source file not found – The problem is as common in Ableton Live 9, as it is in Ableton Live 10.
  • Error reading file Maya – The problem also appears when working with AutoDesk’s modeling software, Maya.

Steps to fix error reading from file

  1. Reset your security permissions
  2. Download and install basic drivers
  3. Add Full control for SYSTEM
  4. Move the setup file to a different directory
  5. Be sure to extract all files from the archive
  6. Make sure that Read-only option isn’t enabled
  7. Delete installation folders from ProgramData
  8. Check if your setup file is encrypted
  9. Create a Downloads folder on your system drive
  10. Create a download folder and move vumclient.zip to it

Fix – Error reading from file

Solution 1 – Reset your security permissions

This error can occur while installing VIPRE software, and according to users, the issue is caused by your security permissions. If your security permissions are modified, you might experience issues while installing certain software, therefore you need to reset those permissions.

Several folders can be affected by this issue, and the list of affected folders includes the following:

  • C:ProgramData
  • C:ProgramDataGFI Software
  • C:ProgramDataGFI SoftwareAntimalware
  • %UserProfile%AppData
  • %UserProfile%AppDataRoaming
  • %UserProfile%AppDataRoamingGFI Software
  • %UserProfile%AppDataRoamingGFI SoftwareAntimalware

To fix this issue you’ll need to check security permissions for these folders on a working PC and alter them on your PC. Keep in mind that some folders on the list are related to VIPRE software, therefore if you’re installing a different application you’ll need to change the security permissions for different folders.

Solution 2 – Download and install basic drivers

Users reported that an Error reading from file message appears while trying to install HP printer software on their PC. This can be a big problem because it can prevent you from installing your printer, but there’s a simple way to solve this problem.

If you can’t install HP printing software, you can still install a basic printer driver that doesn’t include the printing software. To do that, simply visit HP’s website and navigate to the download section. Locate your printer and choose the basic driver option.

After you download the basic driver, install it and you should be able to use your printer without any problems.

Update drivers automatically

If you don’t want the hassle of searching for drivers on your own, you can use a tool that will do this for you automatically. Of course, as you’re not able to connect to the internet at the moment, this tool won’t be useful.

However, once you get online, it will help you to keep all your drivers up to date, so you won’t be in this situation anymore.

An automatic driver updater tool will help you update drivers automatically and prevent PC damage caused by installing the wrong driver versions. After several tests, our team concluded that this is the best-automatized solution.

That being said, you can as well make use of dedicated driver update software that will install the latest drivers without any other issues.

⇒ Get Fortect Driver Updater

Solution 3 – Add Full control for SYSTEM

As we already mentioned, Error reading from file message can appear if your system doesn’t have the necessary privileges over a certain folder. Many applications store their files in the Temp folder during the installation, but if your system doesn’t have Full control over that folder you might experience all sorts of errors during the installation process.

To fix this problem, you need to give Full Control to the SYSTEM user over the Temp folder. You can do that by following these steps:

  1. Navigate to C:UsersusernameAppDataLocal folder. If you can’t find this folder, be sure to go to the View tab in File Explorer and check Hidden items checkbox.
  2. Locate Temp folder, right click it and choose Properties.
  3. Go to Security tab. Check if SYSTEM is available in Group or user names section. Also check if SYSTEM has Full control over this folder. If SYSTEM isn’t available at all, click the Edit button.
    error-reading-from-file-edit-1
  4. Now click the Add button.
    error-reading-from-file-edit-2
  5. Select Users or Groups window will appear. In the Enter the object names to select field enter SYSTEM and click Check Names. If your input is valid, click OK to add it.
    error-reading-from-file-edit-3
  6. SYSTEM will now be added to the Group or user names section. Select SYSTEM and be sure to check Full control in the Allow column.
    error-reading-from-file-edit-4
  7. After doing that, click Apply and OK to save changes.
  8. After giving Full control to the SYSTEM over the Temp folder, try to install the software again.

Instead of giving the Full control over the Temp folder, some users are suggesting giving Full control to your user account or to the Users group over the installation directory, so you might want to try that as well.

Solution 4 – Move the setup file to a different directory

Sometimes this problem can occur due to the location of your setup file. Windows Installer has a limit of 256 characters, and if the path to your setup file or the designation path contains more than 256 characters you’ll encounter this error. One of the simplest ways to fix this problem is to move the setup file to C: and try to run it from there.

Solution 5 – Be sure to extract all files from the archive

It’s not uncommon for setup files to be stored in an archive, but before running the setup file, be sure to extract all the files from the archive. After that, try running the setup file from the extraction folder.

In addition, be sure that the path to the extraction folder doesn’t contain more than 256 characters. You can avoid this problem simply by creating a new folder in C: and extracting the installation files to it.

Solution 6 – Make sure that the Read-only option isn’t enabled

If you’re getting an Error reading from file message, you might want to check if the Read-only option is enabled. This option can sometimes cause errors, therefore it’s best that you disable it. To do that, follow these steps:

  1. Locate the problematic file and right click it. Choose Properties from the menu.
  2. Navigate to the General tab and be sure that Read-only option isn’t checked.
    error-reading-from-file-read-only-1
  3. Click Apply and OK to save changes.
  4. After disabling Read-only option, check if the problem is resolved.

Solution 7 – Delete installation folders from ProgramData

Users reported this error while trying to install Family Tree Maker software, and in order to fix this problem, you need to remove Family Tree Maker directories from the ProgramData folder. To do that, follow these steps:

  1. Open File Explorer and navigate to C:.
  2. Look for ProgramData folder. If you can’t find the folder, go to View tab and check Hidden items option.
  3. Once you enter ProgramData folder, look for Family Tree Maker folder and delete it. Sometimes this folder can be located inside different folders in ProgramData, therefore be sure to check all folders that have random array of numbers and letters as their name.
  4. After deleting Family Tree Maker folders, try to install the software again.

Although this solution works for Family Tree Maker software, you can apply a similar method to fix problems with other applications as well. If the application that you’re trying to install has some files in the ProgramData directory, be sure to delete them and try to install the software again.

Solution 8 – Check if your setup file is encrypted

Sometimes this error can appear if you’re trying to run a setup file that is encrypted by your PC. Users reported that their download folder was set to encrypt all downloaded files, and that caused the problem with the installation process.

To fix this issue, you need to move the setup file to a different folder and decrypt it. Alternatively, you can download the setup file to a folder that isn’t encrypted by your PC. After doing that, run the setup file and your application should install without any problems.

Solution 9 – Create a Downloads folder on your system drive

Error reading from file message can appear if you don’t have a Downloads folder on your C drive. According to users, they moved the Downloads folder to a different drive in order to preserve space, but that caused this error to appear.

Apparently, if you run the setup file from a non-default Downloads folder you might get this error while installing certain applications. To fix this problem, you need to create a temporary Downloads folder on your C drive and move the setup file to it.

After doing that, you should be able to use the setup file and install the application without any problems.

Solution 10 – Create a download folder and move vumclient.zip to it

According to users, this error occurs when you try to install VMware vCenter Update Manager. This problem can be easily solved by creating a new Download folder and moving the vumclient.zip file to it. To do that, follow these steps:

  1. Mount the vCenter Server installation media.
  2. Navigate to the UpdateManager_Install_Locationdocrootvcidownloads and rename the Download folder to Download.old.
  3. Now create a new Download folder.
  4. Open the installation media and navigate to the rr_moved directory.
  5. Locate the vumclient.zip file and copy it to the new Download folder that you created in previous step.
  6. After doing that, try to install vCenter Update Manager again.

Error reading from file message can affect almost any application, and in most cases, you can fix the problem by changing your security permissions or by changing the location of the setup file.

KB4458469 brings install issues and black screen errors

This season is full of surprises from the Redmont tech team, and yet, some common issues do not tend to disappear. Microsoft released quite a surprising number of patches this week only, and we need to draw your attention on some reported issues.

KB4458469 was recently released for Windows 10 version 1803 users, and you can read all about the changelog and how to download in our news article: KB4458469 fixes Bluetooth and update issues on Windows 10.

How to fix KB4458469 issues

This patch brings a long list of fixes and improvements. While Microsoft is not currently aware of any issues with this update, many users have reported some errors.

  • Install issues

First of all, users have encountered difficulties installing the patch on their Windows 10 laptop. A fellow user from Germany reported this issue on the Community Forums:

windows encountered a problem while installing the updates. We’ll try again later. error 0x800706be

Sometimes a quick restart will solve the issue. Also, a good solution is to repeat the process. With some updates, users have managed to install it after 6 attempts.

  • Black screen error

Black screen issues have also been reported on the community forums.

..when starting the PC as it was requested, I had black screen with HP logo and after no better. The screen remains black.
I have turned off and restart several times and the screen is still black.
I made another attempt to reboot but I got a message that Windows could not start normally and had to be repaired.

Here is an effective troubleshooting guide to Fix Black Screen Issues in Windows 10.

We’ll update this post as soon as we find out more news about KB4458469 issues from Windows 10 users. Let us know how was your experience with the recent security updates in the comments below.

[wl_navigator]

Windows 7 KB4457139 makes it easier to upgrade to Windows 10

Microsoft released a new Windows 7 update to the general public.

Update KB4457139 is actually a preview of the upcoming monthly rollup update and allows users to test the upcoming fixes and improvements in advance.

This patch brings four fixes to the OS. The most important one is an update compatibility improvement that should help Windows 7 users to download and install the newest Windows 10 OS version without any issues.

Addresses an issue with evaluating the compatibility status of the Windows ecosystem to help ensure application and device compatibility for all updates to Windows.

Update KB4457139 comes quite handy for all the Windows 7 users who are planning to install the Windows 10 October 2018 Update as soon as it’s available.

As always, our piece of advice to all our readers is to wait for a few days before installing new Windows updates.

Oftentimes, the latest updates bring issues of their own and Microsoft needs time to identify and fix them.


Learn everything there is to know about Windows 7 updates from our detailed article!


Apart from these OS update improvements, KB4457139 also brings three more fixes:

  • Addresses an issue with the diagnostic pipeline for devices enrolled in Windows Analytics when the CommercialID registry key, “HKLMSoftwareMicrosoftWindowsCurrentVersionPoliciesDataCollection” is present.
  • Addresses a memory leak issue that occurs when a device with a multilingual UI calls the LoadString API.
  • Addresses an issue in which all Guest Virtual Machines running Unicast dual NIC NLB fail to respond to NLB requests after the Virtual Machines restart.

Download KB4457139

The update is provided as an Optional update on Windows Update. You can also download it directly from the Microsoft Update Catalog.

KB4457139 issues

Before hitting the update button, you should know that this patch may break your interface controller, as Microsoft warns:

After you apply this update, the network interface controller may stop working on some client software configurations. This occurs because of an issue related to a missing file, oem<number>.inf. The exact problematic configurations are currently unknown.

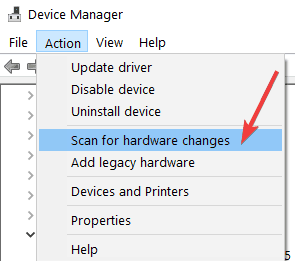
In order to fix this problem, you need to launch the Device Manager and automatically rediscover the NIC and install drivers. Go to the Action menu and select Scan for Hardware Changes.

device manager scan for hardware changes
You can also install the drivers for the network device by right-clicking on the respective device and choosing Update.

RELATED STORIES TO CHECK OUT:

Microsoft Surface Pro Fan Always Running: How to Fix it

Surface Pro owners have reported various problems, and overheating is a primary concern. But for some, the Microsoft Surface Pro fan is always running, even when the temperature is normal.

A Microsoft representative stepped in and explained why the Surface fan was always running:

I understand that your device is heating up after installing Windows 10 using VM. I like to inform you that the laptop fan works to reduce the machine’s heat. If the fan is working continuously then the issue must be occurring due to the overheating. Usually, overheating occurs due to hardware issue.

You may first check if any process is running high. Task Manager displays the programs, processes, and services that are currently running on your computer. You can use Task Manager to monitor your computer’s performance.

What can I do if the fan is always running on Microsoft Surface?

1. Terminate non-critical programs

  1. While on the desktop, right-click the taskbar, and select Task Manager.
  2. Go to the Processes tab, identify processes that are consuming high resources, select them, and click on End task.terminate programs

2. Install the latest Windows updates

When terminating programs didn’t help, you are likely running an outdated version of Windows. Remember, it’s critical to update the OS, and install the latest version, whenever one is released.

With each update, Microsoft releases several new features and patches for previously known bugs. So, make sure to install all the Windows updates.

3. Reset Windows

Another possible solution that will rule out all hardware-related problems behind the Microsoft Surface fan always running is to reset Windows to factory defaults. When you do that, all the installed apps and stored files will be wiped clean.

The PC would be in a similar state as when you purchased it. Start fresh, and check whether fan issues in Surface Pro are resolved. Also, this will help fix overheating in Microsoft Surface.

4. Check for hardware issues

If nothing works, it’s likely a hardware issue to blame when the Microsoft Surface fan is always running. And in this case, it’s recommended that you get the device inspected by a professional.

A safer approach would be to contact Microsoft and get them to repair or replace the faulty component.

Before you leave, find out what to do when your Microsoft Surface is overheating.

Tell us which fix worked for you in the comments section below.

Microsoft begins counting some LinkedIn revenues under “Commercial Cloud”

Microsoft investors will see a nice bump in “Commercial Cloud” revenue reporting as the company will seemingly pad its stats with the inclusion of large portions of its recent LinkedIn acquisition.

According to a report from Mary Jo Foley over at ZDNet, Microsoft is no longer keeping LinkedIn at arms length during its quarterly financial reporting but, instead “…now including the “commercial” portion of LinkedIn’s business in its Commercial Cloud metrics, and is restating its FY18 numbers to include LinkedIn’s commercial business.”

While outwardly, it may seem like a sleight of hand reporting practice for business looking to bolster an otherwise stagnant financial bracket, Microsoft is defining the portions of “commercial” LinkedIn as LinkedIn Recruiter, Sales Navigator, Premium business subscriptions and “other.”

What is not being counted are marketing services and consumer subscriptions, understandably.

The move makes practical sense as LinkedIn largely remains a cloud-based social networking platform aimed at the intersection of Microsoft’s enterprise and cloud customer. Similar to Office 365, LinkedIn offers subscription-based options for digital services.

For investors who may be understandably skittish about the new reporting, it’s being reported that Microsoft will also break out LinkedIn revenue growth as a new transparency metric. LinkedIn’s revenue growth reporting will be applied to both the commercial and consumer aspects of the platform.

Ghost Recon Wildlands & Super Bomberman R now free to play on Xbox One

Tom Clancy’s Ghost Recon Wildlands and Super Bomberman R are now free to play on Xbox One consoles for Xbox Live Gold subscribers.

This free play period will run from today until September 23rd and, like in previous free play weekend campaigns, gamers will be able to play the full versions of each game, unlock Xbox Achievements, and save their progress for continuing at a later date should they ever choose to buy them in the future.

Ghost Recon Wildlands is an action-packed military shooter title while Super Bomberman R is more of a family-friendly action puzzle game. Let us know which one you’ll be playing this weekend in the comments below and then follow us on Pinterest for more Xbox content.


SUPER BOMBERMAN R
SUPER BOMBERMAN R

Plex for Xbox One adds chapter select and preview thumbnails

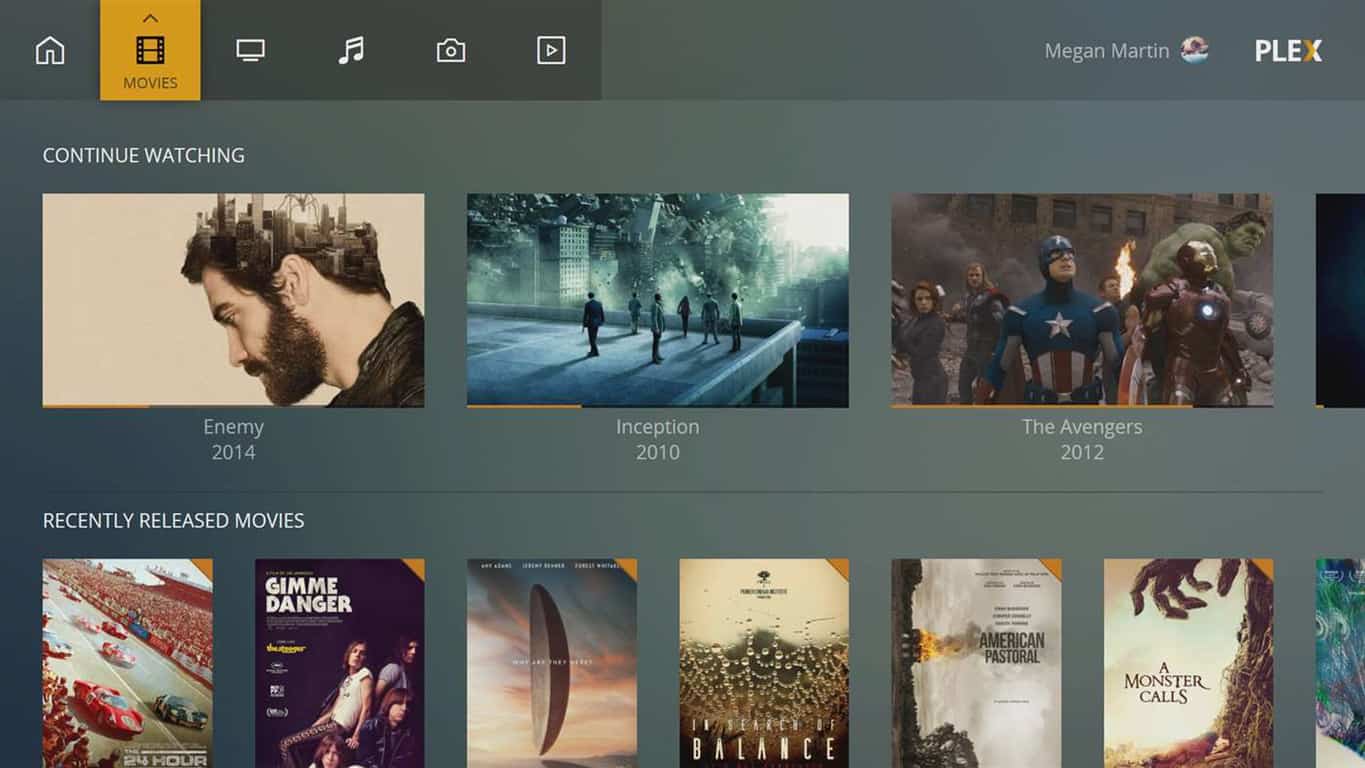
The Plex for Xbox has updated with a variety of bug fixes and new features. Amongst some of the cooler new additions are new chapter titles, preview thumbnails, and a new music mini player.

Here’s the full release notes for this latest Plex for Xbox update:

NEW​

  • Added chapter titles to the chapter selection
  • Added the ability to focus the progress bar and move the playhead to seek more accurately
  • Added preview thumbnails while seeking (when available)
  • Adjusted rewind and fast-foward behavior to move the playhead automatically at 1x, 2x or 3x speed
  • Added new music mini player
  • Added new user button design in the application header

​FIXED

  • ​Fixed missing ‘Collections’ and ‘Albums’ link from dashboards
  • Fixed shuffle commands received from companion apps not being recognized
  • Fixed dashboard hubs sometimes failing to load when switching between Home users
  • Fixed advancing to the same item as the one currently playing putting the player in a broken state
  • Fixed focus not being restored when returning to playlists list page
  • Fixed missing placeholder for chapter selection preview thumbnails
  • Fixed broken focus behaviour when pressing right twice quickly on settings
  • Avoid forced transcodes for HDR content on SDR displays

Plex for Xbox is an all-in-one media consumption app that allows users to stream video, photos, and music and even record live TV, essentially giving the Xbox One consoles DVR functionality.

Do you have Plex for Xbox on your gaming console? Let us know what features you use most in the comments below and then follow us on Pinterest for more Xbox content.

Plex
Plex
Developer:
Plex
Price:
Free

Microsoft is live streaming every keynote, breakout and community theater session from Ignite, here’s how to watch

Microsoft Ignite is coming up next week, and there’s sure to be a lot of Azure and Microsoft 365 news to go around. Though we’ll be covering the event live, Microsoft just revealed you can also live stream every keynote, breakout, community theater session live and for free online.

All sessions will be available on this website, where you can browse through all the sections by day. You have full control over what sessions you want to see, and you can sort by topic, solution, product, and level. You even can explore more about the speakers in said sessions. However, please be aware you’ll need to create a Tech Community Account to view sessions if you’re not registered for the event.

Our own Kareem Anderson will be on the ground at Microsoft Ignite, so be sure to keep it locked right here to OnMSFT all week next week for all your Ignite news and information.

How to download Windows 10 ISOs without the Media Creation Tool

There are plenty of ways to download a Windows 10 ISO, but it’s usually through a website that’s not supported by Microsoft. You can also download the Windows Media Creation Tool if you are looking for the simplest way to install Windows 10.

However, I discovered an easier way to download a Windows 10 ISO file without using the Windows Media Creation Tool. Turns out, all you need is Microsoft Edge.

There are a number of uses for a Windows ISO file. If you own a Mac, you can use it to install Windows 10 or set up Windows 10 in a virtual machine application. Either way, you’ll need a Windows 10 ISO file.

However, just having the free Windows 10 ISO file is not a free Windows license. Mac users, custom PC builders, and anyone installing on a virtual machine will need a Windows product key to legally install Windows 10.

If you need to buy a Windows 10 product key, you can buy a physical copy or digital download from the Microsoft Store. Here are the prices for a Windows 10 product key:

  1. Windows 10 Home $139.00
  2. Windows 10 Pro $199.99
  3. Windows 10 Pro for Workstations $309.00

With that out of the way, here are the steps to download a Windows 10 ISO file using Microsoft Edge.

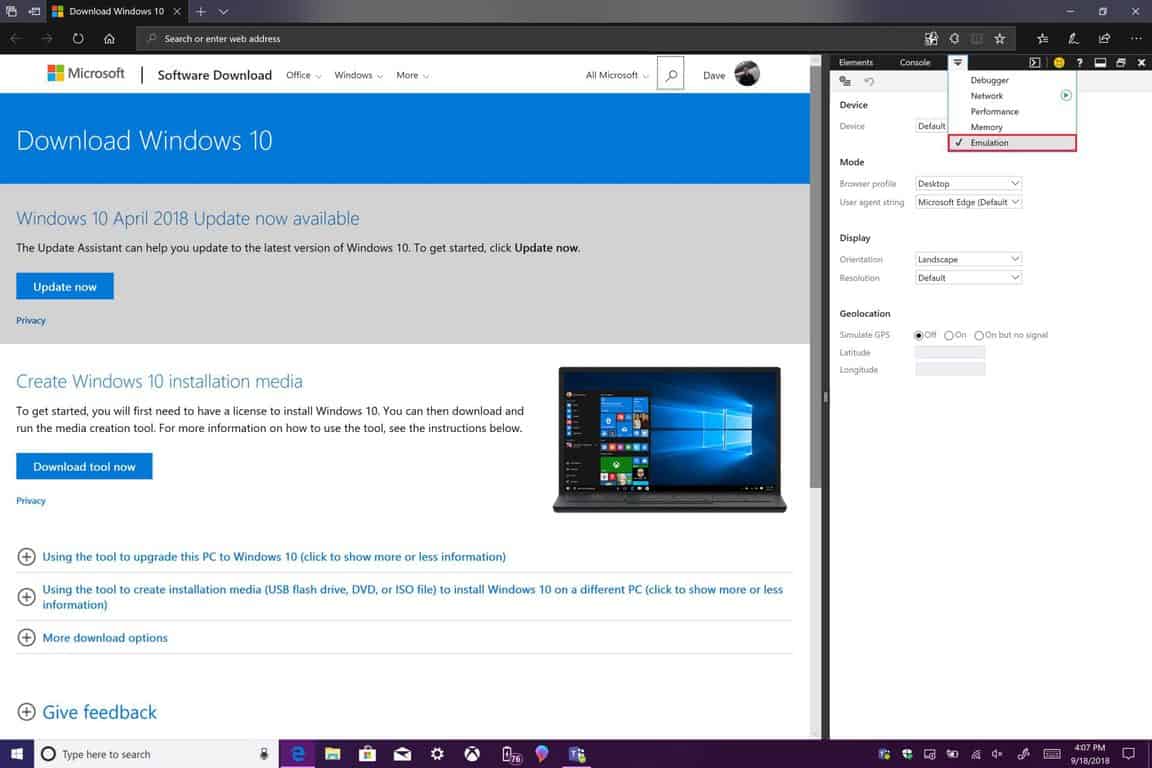
1. Open Microsoft Edge.
2. Go to https://www.microsoft.com/en-us/software-download/windows10.
3. Open Microsoft Edge Menu.
4. Open Developer Tools


Microsoft, Microsoft Edge, Edge, Windows 10
5. Open Emulation Tab.Microsoft, Microsoft Edge, Edge, Windows 10

6. Select useragent string “Apple Safari (iPad).” Wait a moment for the webpage to reload.

Microsoft, Microsoft Edge, Edge, Windows 10

7. Select Windows 10 and your language settings. Download the 64-bit or 32-bit version of Windows 10. Please note: The download link expires after 24 hours.

By setting your useragent to Apple Safari (iPad), you are spoofing the download website into thinking that you are not on Windows, thus you can completely bypass using the Media Creation Tool.

Another thing to consider is the Windows 10 ISO that you download is the Windows 10 April Update and does not include any of the new updates, including the June Update (KB4284835), so you will have to use Windows Update to keep your PC up-to-date.

Also, the Windows Media Creation Tool ISO version is approximately 500 MB smaller, if you have concerns about file size. Alternatively, if you are a Windows Insider, you can also download the latest Windows Insider Preview build ISOs too.

Updated: 4/29/2023

Open source dev gets Win32 apps running on Xbox One

One of the cool elements that come with owning an Xbox One is getting select Microsoft Store apps from your PC on your gaming console. Powered by Microsoft Universal Windows Platform, this is really a great feature for developers, but one open source champion, who has chosen to remain anonymous, has found a way to unlock the true power of Xbox by getting CLI Win32 apps running on the console (via Piunika Web.)

The entire codebase and tool for this project is available on GitHub, and a brief getting started post from the developer is here. Simple as that post may sound, things might still be a bit out of reach for the average user. An SSH/telnet client and Visual Studio 2015 or 2017 are prerequisites, and you’ll need to pay up to switch your console to developer mode to get started. After that is done, you’ll have access to the Xbox Shell and you’ll be able to use the codebase tool to write and then dispatch or run vanilla Win32 CLI apps on Xbox One.

As the developer notes, though this is a rather technical process, it is not an exploit or breakthrough. This method is rather taking advantage of the debugging features of the Xbox One developer mode. It should also be noted that this is a proof-of-concept, and is not homebrew, or the other “hacking” offerings which people usually want.

There is plenty of room for others to better on the code and dive deeper and improve, but it does seem a bit limited for now. Considering that the Xbox One already runs Windows 10, this could eventually become a rather killer little trick to turn the console in a PC for developers.

Full Fix: Asked to Join a Nonexistent Homegroup on Windows 10, 7

Homegroups and file sharing between computers in your local network is important, but some users report that they are being asked to join a nonexistent homegroup on Windows 10. This is a strange problem, but fortunately for you, there’s a solution available.

Users report that they are being asked to join a nonexistent homegroup after they have reinstalled their operating system or after upgrading to Windows 10. However, it’s not possible to join a Homegroup that doesn’t exist and at the same time you cannot delete that Homegroup. So how can you fix this issue?

Nonexistent Homegroup in Windows 10, how to fix it?

Nonexistent Homegroup can be a problem, and speaking of Homegroups, here are some issues that you might encounter:

  • Can’t join Homegroup Windows 10 – This can be a big problem, but you should be able to fix it simply by deleting the idstore.sset file from your PC.
  • Homegroup not working – If Homegroup isn’t working at all on your PC, you might be able to fix the problem by running the Homegroup troubleshooter.
  • Phantom Homegroup Windows 10 – If you’re having problems with phantom Homegroup, the cause might be MachineKeys directory. Simply rename it and check if that solves the problem.
  • Can’t find Homegroup Windows 10 – If you’re using a wireless network, the problem might be your SSID. To fix the issue, change the name of your wireless network and try to find the Homegroup again.

Solution 1 – Leave Homegroup on all computers and set up a new Homegroup

If you’re asked to join a nonexistent Homegroup, one way to fix this issue is to completely leave the Homegroup on all your PC. This is quite simple to do, and you just need to do the following:

  1. The easiest way to do this is to turn off all of your computers that are connected to your Homegroup.
  2. Now you need to start one of your computers and create a new Homegroup on it.
  3. Then turn on other computers one by one and go to the Control Panel and you’ll be asked to join the newly created Homegroup using a new password. In some cases, you might have to leave Homegroup on all computers manually and then turn off all of your computers in order to create a new Homegroup.

After doing that, the problem with Homegroup should be completely resolved and everything should start working again.


Solution 2 – Delete the idstore.sset file

Your Homegroup is closely related to idstore.sset file, and if you’re being asked to join a nonexistent Homegroup, the issue might be this file. To fix the problem, users are suggesting to find and remove this file on all PCs that are having Homegroup problems.

To do that, just follow these simple steps:

  1. Press Windows Key + R and enter %appdata% now press Enter or click OK.
    Homegroup not working
  2. Navigate to PeerNetworking directory and delete idstore.sset file from it.

After doing that, the issue should be completely resolved. Keep in mind that you need to remove this file on all PCs that are affected by this issue. Once you remove the file, the issue should be completely resolved.

Some users are also suggesting to restart Homegroup related services after you delete the required files. To do that, just follow these steps:

  1. Press Windows Key + R and enter services.msc. Now press Enter or click OK.
    Can't join Homegroup Windows 10
  2. Now locate the following services and restart them:
  • Homegroup Listener
  • Homegroup Provider
  • Peer Network Identity Manager
  • Peer Network Grouping
  • Peer Name Resolution Protocol

After doing that, the problem should be completely resolved.


Solution 3 – Change your SSID

According to users, if you’re getting asked to join a nonexistent Homegroup, the problem might be related to your SSID. Several users reported that their PCs on the wireless network were asked to join a specific Homegroup that doesn’t exist.

It turns out that the cause of the problem was their SSID, but they managed to fix the problem simply by changing the name of their wireless network. To see how to do that, be sure to check your router instruction manual or contact your network administrator.

Once you change your network name, the issue should be resolved. This is an unusual solution, but several users reported that it works, so you might want to try it out.

If you’re using a dual-band or triple band router, you might be able to fix the problem simply by connecting to a different SSID and creating a new Homegroup.


Solution 4 – Rename the MachineKeys directory

If you keep getting asked to join a nonexistent Homegroup on your PC, the problem might be MachineKeys directory. To fix this issue, users are suggesting to leave the Homegroup on all PCs on your network.

In addition to that, be sure to delete all files from the PeerNetworking directory. You can do that by following instructions from the Solution 2.

After doing that, you need to rename the MachineKeys directory. This might be a bit complicated since the file is protected by your system, so if you want to modify it, you’ll need to change permissions. To modify this file, you need to do the following:

  1. Go to the C:ProgramDataMicrosoftCryptoRSA directory.
  2. Locate MachineKeys folder and rename it to MachineKeys_old.
    Can't find Homegroup Windows 10
  3. You’ll be asked to provide administrator permission. Click Continue.
    Phantom Homegroup Windows 10

After renaming this directory, go to Control Panel and locate the Homegroup troubleshooter. Once the troubleshooter is finished, the issue should be permanently resolved.


Solution 5 – Modify the registry

If you’re getting asked to join a nonexistent Homegroup, the problem might be your registry. According to users, it seems that a couple of values in your registry are causing this problem, and in order to fix it, it’s advised to make several changes.

First off, you need to contents of PeerNetworking and MachineKeys directories. We already explained how to do that in our previous solutions. After doing that, your next step would be to remove the problematic entries from your registry. To do that, follow these steps:

  1. Press Windows Key + R and type regedit. Now press Enter or click OK.
    Homegroup not working
  2. Before making any changes, it’s always a good idea to make a backup of your registry just in case. To do that, right-click the keys before you modify them and choose Export from the menu. In case anything goes wrong, you can restore your registry simply by running the exported files.
  3. In the left pane, navigate to HKEY_LOCAL_MACHINESYSTEMCurrentControlSetServicesHomeGroupProvider. Delete the contents of ServiceData and LocalUserMembership.
    Phantom Homegroup Windows 10
  4. After doing that, go to HKEY_LOCAL_MACHINESYSTEMCurrentControlSetServicesHomeGroupListener and delete the contents of the ServiceData.

After doing that, restart your PC and try to join the Homegroup again. If that doesn’t work, try running Homegroup troubleshooter a couple of times.


Solution 6 – Try using cloud storage instead

Can't join Homegroup Windows 10

Microsoft has discontinued the Homegroup feature from the latest version of Windows 10, but if you’re still using Windows 8.1 or 7, the Homegroup should still be there. If you’re using the latest version of Windows 10, there are a couple of alternatives that you can try out.

You can still share your files over the network, just like before, so that hasn’t changed. On the other hand, Microsoft is working hard on cloud storage, and if you already haven’t, maybe it’s time to try OneDrive.

OneDrive is Microsoft’s cloud storage service, and it comes enabled with Windows 10, so it’s a solid replacement for Homegroup. If you don’t want to use OneDrive, you can also use any other cloud storage service.

As you can see, asking to join a nonexistent Homegroup can be a big problem if you rely on Homegroups for sharing files with other users on your local network, but this fix should be able to help you out. If this fix doesn’t work we have recently covered what to do if you cannot set up a Homegroup on Windows 10, so this might be helpful to you since most of that solutions can be applied to fixing issues with nonexisting Homegroups.

We hope that our solutions were helpful to you and that you have managed to resolve the issue that you had with nonexistent Homegroup.


READ ALSO:

Red Dead Online video game announced for Xbox One, free for RDR 2 players

Game studio, Rockstar Games, today announced an upcoming online experienced called, Red Dead Online. This new online video game will be based within the world established in Red Dead Redemption 2 and will encourage both solo and multiplayer gameplay.

“Red Dead Online is planned for launch in November 2018, initially as a public beta, with more news to come soon,” the official announcement reads. “As with most online experiences of this size and scale, there will inevitably be some turbulence at launch.  We look forward to working with our amazing and dedicated community to share ideas, help us fix teething problems and work with us to develop Red Dead Online into something really fun and innovative.”

In a move that should please many gamers, Red Dead Online will be completely free for anyone who has purchased Red Dead Redemption 2. Red Dead Redemption 2 is due for release on Xbox One on October 26th and digital pre-orders are currently open. More details on Red Dead Online should be revealed soon.

Are you excited for Red Dead Online are will you just be happy playing Red Dead Redemption 2 on your Xbox One? Let us know in the comments below and then like us on Facebook for more Xbox news.

Don’t Have Microsoft Office? Download Free Word Viewer for .Docx Files

download word viewer

Albeit I’m a supporter of Windows and have been using it for the past few years, I have a laptop that doesn’t have Microsoft Office on it. And while we have so many solutions like Google Drive, Libre Office, and others, there’s a free tool from Microsoft to help you view .doc files.
Microsoft’s Office products are almost ubiquitous and chances are that the majority of your friends use it. So when you receive a .doc or .docx file that you need to view or, even worse, to edit, you have to resort to third-party solutions, in case you don’t have the full version of Microsoft Word installed.

And then it will take quite a while until you figure out which converting website is worth trying and which not. But there’s a free tool from Microsoft that allows you to view, print and copy Microsoft Word documents, even if you don’t have Word installed.

It is simply called ‘Word Viewer’ (follow this safe link to download it) and it replaces Word Viewer 2003 and all the other previous Word Viewer versions. By using it, you will be able to open Word documents which have been saved in the following formats:

  • Word Document (.docx)
  • Word Macro-Enabled Document (.docm)
  • Rich Text Format (.rtf)
  • Text (.txt)
  • Web Page formats (.htm, .html, .mht, .mhtml)
  • WordPerfect 5.x (.wpd)
  • WordPerfect 6.x (.doc, .wpd)
  • Works 6.0 (.wps)
  • Works 7.0 (.wps)
  • XML (.xml)

You need to know that you cannot edit an open document, save a document, or create a new document by using this software. Also, if the document you want to view is stored on OneDrive, you don’t need to download a viewer since OneDrive includes Word Online. If it won’t work after you download and run it, maybe you need to try and install the Compatibility Pack, as well.

Microsoft Office alternatives you should consider

For many users, Office is not the ultimate tool to work with, However, an office suite is useful, especially if you work on a PC on a daily basis. WPS Office 2016 (try the free version) is a great tool that will help you edit different types of documents, including text, tables, and presentations. Another great tool is Apache OpenOffice which lets you edit all these documents but with a smaller range of features. You can find more information about them in our top 5 Office alternatives article.

READ ALSO: Windows 10 S users can now download Office Desktop apps

Can’t Print on A3 Paper: How to Properly Fix it

Many users have asked themselves why can’t they print in A3 format on their PC. This is a temporary glitch, and it can be fixed easily.

If you have a printer that is connected but not printing, then this short guide will help you solve that issue permanently on your PC.

Why can’t I print A3 paper?

  • Your printer isn’t properly configured, thus causing the problem.
  • There are glitches with your printer and the operating system.
  • These glitches are related to the Terminal Service Easy Print feature.

Can my printer print A3 paper?

This depends solely on the printer. Most printers are designed to work with A4 format. In fact, you won’t even be able to fit A3 paper in an A4 printer.

However, if your printer can support A3 paper, it should be able to print on it as well. To confirm this, always check your printer specifications.

What can I do if I’m unable to print in A3 format?

Install the missing updates

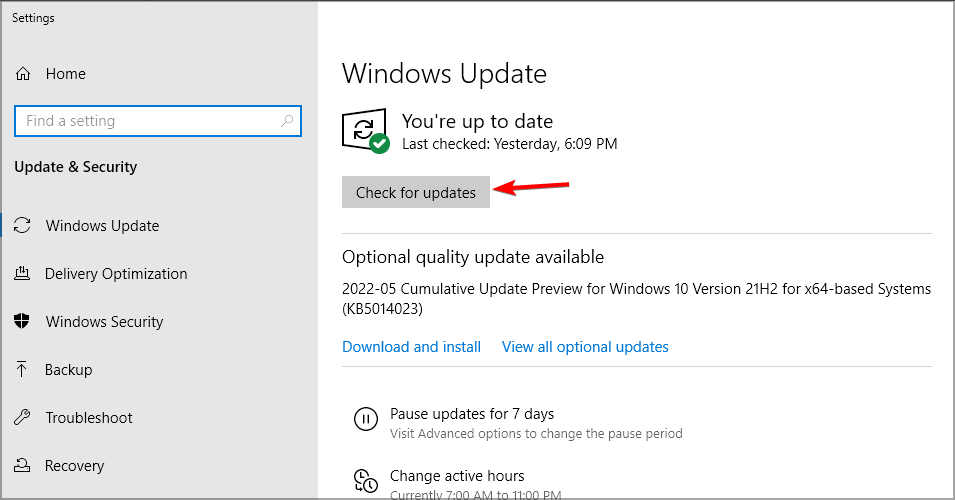
  1. Press Windows key + I to open the Settings app.
  2. Next, navigate to Update & Security section.
  3. Lastly, click on Check for updates button.
  4. Wait while Windows downloads and installs the latest updates.

Once your system is up to date, check if the issue is gone. A hotfix fixed this issue in the past, but now Microsoft recommends using the Windows Update instead since it’s more reliable.

Printer errors are somewhat common, and many reported that printer is not printing full page, but we covered that issue in a separate guide.

We hope you found this short guide informative and that you managed to fix any issues you had with your printer.

Did you ever experience this issue, and how did you fix it? Share your thoughts with us in the comments section below.

Score one of these custom Xbox One consoles and help Make-A-Wish

Are you feeling lucky, and want to bid on some truly unique Xbox One Consoles? Well, you might want to check out Team Xbox’s latest charity auction, which teams up with some of the biggest sports, entertainment, and internet figures.

Titled 2018 “Consoles for Kids” this new auction benefits the Make-a-Wish Foundation. It includes some custom Xbox One X consoles signed big names like Post Malone, Ronda Rousey, iJustine, Dwayne Johnson, Charlie Puth, and Carmelo Anthony. Team Xbox also teamed up with some game developers like 343 Industries, Bethesda, and Mojang, with the Xbox One X consoles being signed by lead members on those studios. Check the links below for more on each of these consoles:

The auction will be hosted from September 19 to October 3 via the links above, and 100% of the proceeds go to the Make A Wish Foundation. This is not the first time Microsoft has done something like this, as in 2007, the Xbox team ran a “Konsoles for Kids” promotion in Australia, which aimed to raise $30,000 for Make-A-Wish.

Fixed: You Cannot Open the Windows Store Without an Internet Connection

Usually, Windows owners just perform the latest updates and don’t get informed on what exactly these updates are. Here we try to break down individual updates so that you know what’s being fixed. This time we’re talking about.
windows store doesn't connect
As part of the most recent update roll-up, Microsoft has also brought some improvements to the functionality of the Windows Store. This specific update we’re talking about today is part of file KB 3008279 and you have received it if you performed the latest Windows Update check.

Microsoft fixed Windows Store won’t open without an internet connection

The official problem is called ‘you cannot open the Windows Store without an Internet connection in Windows 8.1 or Windows Server 2012 R2′ and here’s how the symptoms that lead to this are described:

You change the display language to Arabic (Saudi Arabia) on a computer that is running Windows 8.1, Windows RT 8.1, or Windows Server 2012 R2.
You restart the computer, and then you disable all Internet connections.
You try to run the Windows Store.
In this scenario, the Windows Store exits immediately.

So, we can see that this specific fix seems to be solving problems for those who have set the display language to Arabic (Saudi Arabia), but I’ve been hearing reports from our readers that this specific update brought improvements for other languages, as well.

Related Windows Store issues

Not only the lack of Internet Connection may cause Windows (Microsoft) Store not to open. This may be because of a failed update of Windows Store. Hopefully, we have detected the most used solutions and have managed to create a guide on how to fix Windows Store not opening in Windows 10 and another article for Windows Store not opening in Windows 8.1. Try to fix this issue and let us know what solution helped you. If you have already the update installed and the problem fixed, then you won’t have any worries.

This update applies to all version of Windows Server 2012 R2 and all versions of Windows 8.1 and Windows RT 8.1. Leave your comment below and let us know if you’re still getting the error.

READ ALSO: How to Disable Animations in Windows 10

Fixed: Windows 8.1 Apps Cause Memory Usage to Become High

As part of the most recent update roll-up, Microsoft has deployed a good deal of improvements for all its products. In this article’we going to discuss the improvements that file KB 3004540 is bringing.
windows memory high apps
The official KB 3004540 update file is bringing some improvements to how Windows apps are affecting the memory usage in Windows 8 or Windows 8.1. This problem has been affecting a good number of users, so it’s really nice to see that a fix has been provided by Microsoft.

Microsoft fixes memory usage problems related to Windows 8.1 apps

Here’s how the issue has been described as:

When you run an application that uses a datagram (UDP) socket to send and receive data in Windows 8.1, Windows RT 8.1, Windows Server 2012 R2, Windows 8, Windows RT, or Windows Server 2012, a memory leak may occur.

This specific update is part of the rollup that is dated November 2014 and is marked as KB 3000853. So, you just need to make sure that you’re not overlooking it, and get it from Windows Update. Microsoft hasn’t gone in too many details with this specific update, but if you know you have been affected, this is another reason to make the latest Windows Update.

This KB file applies to all version of Windows Server 2012, Windows 8.1, Windows 8 and Windows RT. This is just our first story describing all the improvements in the November update roll-up, so stay tuned for even more.

Other high memory usage issues

Not only Windows 8.1 apps will overload your memory. When you face increasing memory usage and do not know the cause, you might want to check our dedicated article on how to fix high memory usage in Windows 8.1, Windows 10. Sometimes, installed elements may create this memory tweak, like, for example, Firefox browser may use too much memory.  Anyway, try to find the cause of the problem first, and then try to find a fix for it.

READ ALSO: Windows 10 Allows to Pin Local Folders to the File Explorer Home Screen

Thronebreaker: The Witcher Tales is coming to Xbox One consoles in December

The single-player story mode for Gwent: The Witcher Card Game will finally launch on Microsoft’s Xbox One consoles on December 4th this year. Given that Gwent is an Xbox Play Anywhere title, it’s assumed that the Windows 10 version will also get this mode on the same day.

Named, Thronebreaker: The Witcher Tales, this game mode will use the main Gwent card gameplay mechanics to explore new areas of the fantasy world while telling an original story revolving around Meve, a queen.

“Thronebreaker is a single player role-playing game set in the world of The Witcher that combines narrative-driven exploration with unique puzzles and card battle mechanics. The game spins a truly regal tale of Meve, a war-veteran queen of two Northern Realms — Lyria and Rivia. Facing an imminent Nilfgaardian invasion, Meve is forced to once again enter the warpath, and set out on a dark journey of destruction and revenge,” the official announcement reads. “Throughout the adventure, players will explore new and never-before-seen parts of The Witcher world, embark on thought-provoking quests featuring rich, multidimensional characters. All while gathering resources to expand their army and engaging in epic story battles powered by the skill-based battle system known from Gwent: The Witcher Card Game.”

Gwent: The Witcher Card Game is a free-to-play digital card game based on the popular The Witcher video game franchise. The game features impressive animated artwork on its cards and numerous sound effects recorded by the main series’ voice actors.

Are you a fan of Qwent and are you excited for this new mode to launch? Share your thoughts with the community in the comments below and then follow us on Pinterest for more Xbox One content.

GWENT: The Witcher Card Game

Windows Media Player Plays MKV Files in Windows 10/11

Here’s some great news – you will be able to play MKV files in Windows 10 without the need of third-party players. The good old Windows Media Player will be able to play MKV files with no issues.
mkv files windows media player
MKV stands for Matroska Multimedia Container and it’s an open standard free container format, a file format that can hold an unlimited number of video, audio, picture, or subtitle tracks in one file. Or, in other words, and as many know it – it usually stands for videos that have a high quality.

Windows 10 comes with support for MKV files

And what many of us did in order to play .mkv files was to make use of a third-party media player, one of the most commonly used being VLC Player or BS Player. But now the good news is that Windows 10 will come with MKV support out-of-the-box, which means Window Media Player will be able to play this kind of files with no problems, at all.

So, if you are already on the first preview of Windows 10, you just need to download an MKV file, then select Windows Media Player; ignore the warning which says that the player does not support this file. Just click ‘Yes’, and you will see that the file will then play with no lags whatsoever.

However, we know that this is just the first technical preview of Windows 10, so if it doesn’t work for you, then it means that there are still some glitches and bugs behind the curtain that needs to be fixed. Nonetheless, this is some great news to hear and share with you!

MKV files issues in Windows 10

Windows Media Player is the most used player out there as it is the default Windows 10 player. However, even if it plays MKV videos, it might have some errors that we will list below, as well as the solutions in order to fix them (check the articles for step-by-step solutions). Here they are:

Here it is, all you need to know about Windows Media Player playing MKV files in Windows 10, and how to fix some related errors. Let us know in the comment section how do you play your MKV files on your PC.

READ ALSO: Download Free Microsoft Band App for Desktop Windows 7, 8, 10

Fix: ‘Regsvr32.exe has an Incorrect Version, Please Replace the File With a Genuine Copy’ in Windows 10

Those who have already downloaded the first preview of Windows 10 are already being plagued by countless errors. One that we’re going to discuss about today is regsvr32.exe and the problems that it causes.
Regsvr32.exe has an Incorrect Version, Please Replace the File With a Genuine Copy' in Windows 10
Recently, on the official Windows Insider forums, many have started complaining about an issue related to the regsvr.exe functionality. The thread has quickly started getting more views, which obviously hints to the fact that the problem is affected more and more users. Here’s what one of them has been saying:

Trying to install K-Lite codec pack for media player and keep getting an error popup saying “The file C:WindowsSysWOW64regsvr32.exe has an incorrect version (6.4.9841.0). Please replace the file with a genuine copy. Setup will now abort. Tried installing with compatability mode for XP, 7, and 8 with no success.

And what you need to do in order to get rid of this problem is incredibly easy. You just need to make sure that you have downloaded the new version that is compatible with the Windows 10, as well. Here’s how the official changelog of the latest software version sounds like:

  • Updated MPC-HC to version 1.7.6.279
  • Updated LAV Filters to version 0.62-58-gd8d8713
  • Updated ffdshow to version 1.3.4533
  • Compatible with Windows 10 Technical Preview

If it won’t work for you, then you will have to wait until K-Lite gets an update to support newer Windows 10 builds, just in case the one you have is not yet supported.

2018 update: This issue can be fixed using the newest K-Lite codec pack (14.4.7 update). All that counts, is that you uninstall all your previous codecs and leftovers as they can interfere with this pack and give you some errors. In order to be sure that your PC is clean of every codec you have installed previously, we recommend you to use IObit uninstaller (free download), a great tool that will let you remove independently all that you need on your PC.

READ MORE: Quick Fix: ‘no Boot Device Available” Error in Windows

Special Inside Xbox episode announced for September 25 with lots of Forza Horizon 4 action and a “few big surprises”

Microsoft’s Inside Xbox monthly show will be back on September 25 with a special episode focused on Forza Horizon 4. And because the open world racing game is set in the British countryside, the Xbox team will be live from the beautiful Goodwood House in West Sussex, England.

“We’ll be celebrating the upcoming launch of Forza Horizon 4 with exclusive news and interviews on the game, but of course, we’ll have much more to report,” wrote Will Tuttle on Xbox Wire. The Inside Xbox livestream will kick off at 1:00 p.m. PT/4 p.m. ET on Mixer, Twitch and other platforms, and it will by preceded by a pre-show featuring gameplay streams and “a few big surprises.”

Forza Horizon 4 will be released on October 2 on Xbox One and Windows 10, but owners of the game’s Ultimate Edition will have early access on September 28. A free demo is already available on the Microsoft Store, and those of you who preordered the full game can also pre-load it today ahead of launch.

Forza Horizon 4
Forza Horizon 4
Developer:
Microsoft Studios
Price:
Free

Brütal Legend and Greg Hastings Paintball 2 join the Xbox One Backward Compatibility catalog

In keeping with Tuesday tradition, Microsoft’s Major Nelson today announced that Brütal Legend and Greg Hastings Paintball 2 have joined the Xbox One Backward Compatibility catalog. Though these again are two rather strange titles, there are more than a few people out there who will enjoy.

Greg Hastings Paintball 2 was originally released back in 2011 and puts players on the ground in new terrains from 12 exciting paintball locations across the US and Europe. The game doesn’t seem to be available digitally, but it retails online for around $12.99.  Brütal Legend, meanwhile, was released back in 2014 and is an action game following the story of Eddie Riggs, a roadie chosen by the Rock Gods. You can find that game here for $14.99.

Last week the Xbox One Backward Compatibility catalog received the addition of Zone of the Enders HD Collection and Rumble Roses XX. You can check out the full list of backward compatible games right here on Major Nelson’s blog.

Microsoft releases both Fast (17763) and Slow (17758.1004) Windows 10 Insider RS5 builds

Windows Insiders, it’s time to get your PCs ready for action for new Redstone 5 releases! Microsoft has just pushed build 17763 to the Fast ring, and Cumulative Update build 17758.1004 to the Slow ring. Here’s what you need to know.

First off, there is the Fast build 17763. Again, this build is fairly minor and doesn’t back any new features. It is instead focused on fixing issues with Bluetooth, OneNote, and Powershell. There are also known issues with this time around, covering Task Manager and Background processes. Here’s what you need to know.

General changes, improvements, and fixes for PC:

  • The build watermark at the lower right-hand corner of the desktop is no longer present in this build. This doesn’t mean we’re done…
  • We fixed an issue where touching a Flash element in Microsoft Edge with two or more fingers could result in the tab crashing.
  • We fixed an issue where thumbnails and icons might not be rendered if there were any video files saved to the desktop.
  • We fixed an issue where certain Bluetooth audio devices wouldn’t play sound in apps that also used the microphone.
  • We fixed an issue resulting in an unexpectedly increased use of battery recently when using certain apps like OneNote.
  • We fixed an issue in PowerShell where it wasn’t displaying characters correctly in Japanese.
  • We fixed an issue resulting in display scaling factors not being applied correctly (so the UI was smaller than expected) when viewing a full screen remote desktop window on a monitor set to certain display scalings.

Known Issues:

  • Task Manager is not reporting accurate CPU usage.
  • Arrows to expand “Background processes” in Task Manager are blinking constantly and weirdly.

Next up, there is the Slow ring Cumulative Update Build 17758.1004. There’s nothing much to note here, as this release includes all the releases from build 17760, which was just pushed out last week. That mainly helps address issues with .NET, PDFs, and other issues in Edge. We recapped those issues right here, so feel free to check it out.

Both these builds dropped right as Microsoft’s monthly Windows Insider webcast is underway. Feel free to give that a watch while your new builds download, and drop us a comment below once you’re running the latest releases to let us know how it is working for you.

Kingston Pendrive is Not Working or Cannot be Detected [Fix]

Earlier, pen drives could not hold more than a hundred megabytes, but as the technology gets increasingly complex, a pen drive can easily store up to 120 GB though problems remain! Some users are reporting that the Kingston pendrive is not working.

Kingston is one of the largest suppliers of flash memory because they are affordable, high-capacity, and totally portable. However, your Kingstone flash drive might get corrupted. If you’re dealing with this situation, here’s what might help!

How do I fix a Kingston pendrive that’s not detected?

Before we head to the slightly complex solutions, try these quick ones first:

  • Restart the computer.
  • Connect the pendrive to another USB port.
  • Connect the Kingston pendrive to another PC and verify whether it’s now working. If that’s the case, it’s a problem with the earlier computer to blame.

In case none work, move to the fixes listed next.

1. Change the drive letter

  1. Connect your Kingstone pen drive to the computer.
  2. Right-click on This PC.
  3. Click Manage in the drop-down menu.
  4. Click Disk Management on the left side and wait for a few seconds so that Windows can load the Virtual disk service.
  5. Right-click on your Kingstone pen drive and click Change Drive Letter and Paths.change drive letter
  6. Click the drive letter and click Change.
  7. Select the drive letter from the drop-down list. Click OK.assign letter

Sometimes your computer is unable to assign drive letters (like C, D, E) to your Kingstone pen drive. Due to this reason, the files on it cannot be accessed. To solve this issue, you can assign the drive letter to your device.

2. Use CHKDSK command

  1. Right-click on the Start button and click Command Prompt (Admin).
  2. Now type the following command and hit Enter where K: is the drive letter assigned to the drive: chkdsk /X /f K:

Alternatively, a good solution to repair your corrupted Kingston pen drive is to run the CHKDSK command. Just wait for the process to get complete, and then you should find your Kingston pen drive working as well as new.

3. Use diskpart

  1. Connect your corrupted pen drive to the computer and open Command Prompt as admin.
  2. Type the following command and press Enter:diskpart
  3. Paste this and hit Enter:list disklist disk
  4. Now type the following command where X is the number assigned to the drive and press Enter:select disk X
  5. Paste this command and press Enter:clean
  6. Next, execute these commands individually: create partition primary active select partition 1 format fs=fat32

If the Kingston pen drive is not recognized by the computer, running the Diskpart utility should help.

4. Format the Kingston pendrive

  1. Open This PC.
  2. Right-click on your corrupted Kingstone drive pen.
  3. Click Format in the drop-down menu.format USB
  4. Click Start to begin the format process. You can uncheck the Quick format option for a deep scan of the pen drive, but this will take time. Our suggestion is to uncheck it only if you fail on the first attempt.format usb drive
  5. Click OK in the next dialog box, which will warn you that the data will be lost.

When the Kingston USB drive is not working or recognized in Windows 10, formatting it should do the trick.

5. Repair the corrupted pen drive without formatting

  1. Insert the pen drive into the USB port of your system.
  2. Go to This PC and right-click on the Kingston pen drive, and select Properties.usb properties
  3. Go to the Tools tab and then click the Check button.

Once done, verify whether the Kingston pendrive is now working. Also, running a quick check will help when the Kingston pen drive is not formatting

6. Reinstall the drivers

There are times when the drivers that run your pen drive get corrupted. To fix this, find the particular model of the Kingston pen drive, head to the manufacturer’s website, and manually install the latest drivers.

A driver issue also results in Kingston pen drive not showing data and reinstalling them should get things fixed.

All in all, that is how you can fix a Kingston pendrive when it’s not working. Before you leave, do check some quick tips to increase the data transfer rate for USB 3.0.

Tell us which fix worked for you in the comments section.

Failed to Connect to a Windows Service: How to Fix it

Services are a crucial part of every Windows 10. However, some service-related issues can occur from time to time. Many reported the Failed to connect to a Windows service error message on Windows 10.

It affects a wide range of services and can lead to issues with the automatic startup, thus affecting the related functionality. So, let’s find out how you can get things up and running when a Windows service failed to start.

How do I fix Failed to connect to a Windows service error?

Before we head to the slightly complex solutions, try these quick ones first:

  • Restart the computer. If a quick reboot doesn’t do it, disconnect the headphones or earphones and then try again.
  • Disable UAC in Windows and verify whether the Windows could not connect to the System Event Notification Service error disappears.
  • Turn off fast startup and check for any improvements.
  • If you have Soluto or Bing Bar, uninstall the programs.
  • Boot Windows into Safe Mode. In case the Failed to connect to a Windows service error is fixed, it’s a third-party program, driver, or service triggering the issue. Identify the problematic one and take the necessary action.

If none work, head to the fixes listed next.

1. Use netsh winsock reset command

  1. Press Windows + X and choose Command Prompt from the menu.
    command-prompt-start-menu
  2. Type the following command and press Enter:netsh
  3. Now, execute the following command: winsock reset
    cmd-netsh-winsock-reset
  4. Once done, restart your computer and check if the issue is resolved.

To fix the Failed to connect to a Windows service error in Windows 7 or Windows 10, you need to reset the network settings and configuration. This could be done both via Settings and the Command Prompt.

2. Modify the Registry

  1. Press Windows + R, type regedit, and then click OK.
    regedit
  2. Now, navigate the following path: HKEY_LOCAL_MACHINE\SYSTEM\CurrentControlSet\Services\gpsvc
    regedit-gpsvc
  3. Locate the ImagePath string, double-click on it, and check the Value data. If it’s set to svchost.exe -k netsvcs, this means that svchost and netsvcs keys are in charge of this service.
  4. On the left pane, navigate to:HKEY_LOCAL_MACHINE\SOFTWARE\Microsoft\Windows NT\CurrentVersion\SvcHost
  5. Locate netsvcs on the right pane and double-click it.
    svchost
  6. Check the Value data field. If gpsvc is missing, make sure to add it. Do not delete anything from the list, just add gpsvc if it’s missing.
    gpsvc
  7. If the netsvcs key is not available under the SvcHost in the left pane, you need to create it manually. Right-click on SvcHost, choose New, select Key, and name it netsvcs.
    new-key
  8. Select the netsvcs key you just created, right-click on empty space, hover the cursor over New, select DWORD (32-bit) Value, and name it CoInitializeSecurityParam.
  9. Double-click the DWORD, set the Value data to 1, and click OK to save the changes.
    reg-value-1
  10. Create another DWORD value, name it CoInitializeSecurityAllowLowBox, and set its Value data to 1.
    reg-value-2
  11. Create a new 32-bit DWORD, name it AuthenticationCapabilities, and set its Value data to 3020.
    reg-value-3
  12. Also, create a CoInitializeSecurityAllowInteractiveUsers DWORD and set its Value data to 1.
  13. Close Registry Editor and restart your computer.

When you get a Windows service start failure error in Windows 10, modifying the registry and adding the missing keys should get things up and running in no time.

3. Stop the Windows Font Cache Service

  1. Press Windows + R, type services.msc, and press Enter.
    run-services
  2. Locate Windows Font Cache Service, right-click on it, and choose Stop.
    services-stop
  3. Press Windows + R, type %localappdata%, and click OK.
    localappdata-run
  4. Locate and delete the FontCache.dat files.
  5. Go back to Services, right-click Windows Font Cache Service, and choose Start from the menu.
    services-start

According to users, Windows Font Cache Service can sometimes cause issues with other services. Therefore, you need to re-enable the service and delete the FontCache.dat files to fix the Failed to connect to a Windows service. This problem prevents standard users error.

Before you leave, find out the services you can disable in Windows and get a better performance out of your PC.

Tell us which fix worked for you in the comments section below.

Microsoft could be considering a second NYC flagship store in SoHo

Microsoft made a Manhattan foray into the brick and mortar store world when they opened their flagship store in NYC back in 2015, but the company might not be done expanding its presence in the Big Apple just yet. Noted by The Real Deal, the firm could possibly be considering opening a second store location in SoHo NYC, just a short 6.5 miles from their first retail store on 5th Ave (via MSPoweruser.)

According to the report, Microsoft is looking into leasing a property at 300 Lafayette Street. Currently, this space in SoHo is being developed by Related Companies and LargaVista Companies. Negotiations are apparently in the early stages, but the building is designed includes both 50,000-square-feet of office space and 30,000-square-feet of retail space.

It’s not 100% clear if this property will be a new store or just office space, but Microsoft’s interest does make some sense. Apple already has ten retail locations across three boroughs in NYC and a second store location in SoHo could help Microsoft appeal to more consumers, and the tourists who visit the popular NYC neighborhood.

We answer: What is OneDrive in Windows 10 and how to use it?

Over the last few years, we saw a massive expansion and development of cloud storage services. Cloud services are great if you need to back up your data and collaborate with others, and since OneDrive is integrated with Windows 10, we decided to make make this guide and teach you a thing or two about it.

OneDrive was first introduced as SkyDrive in August 2007, and it went through some massive changes over the years. In 2011 Microsoft did an overhaul of SkyDrive and rebuilt its web version by using the latest HTML5 technologies. The revamped version of SkyDrive offered new features such as caching, HTML5 video and improved visual design. In February 2014, due to a lost lawsuit, Microsoft had to rebrand SkyDrive as OneDrive.

Here’s all you need to know about OneDrive on Windows 10

In addition to its name, OneDrive also changed the amount of free space that it offers to users. According to Microsoft, free users were abusing the OneDrive service by backing up movie collections and therefore OneDrive storage space was reduced to 5GB for free users. Of course, you can still increase OneDrive storage from 5GB to 15GB by referring your friends. In addition, you can also expand your storage by selecting a package and paying a monthly fee.

OneDrive pricing

  • OneDrive Basic 5GB (storage only) – FREE
  • OneDrive 50 Gb (storage only) – $1,99/month
  • Premium OneDrive Features with Office 365 Personal for $6,99/month – storage 1Tb – or with Office 365 Home for $9.99/month – storage 5Tb.

OneDrive access

To access OneDrive on your PC, you need to do the following:

  1. Press Windows Key + S and enter OneDrive. Select OneDrive from the list of results.
    one-drive
  2. Enter your Microsoft account username and password to log in to OneDrive.

After you log in with your Microsoft Account, OneDrive will be enabled on your PC. OneDrive will offer you to sync your Documents folder, and you can choose to Sync all files and folders or to sync only specific folders.

sync-choose

OneDrive account and login

OneDrive collaboration features

OneDrive is designed as a collaboration tool for wide range of platforms, and you can access OneDrive from your Mac computer, Xbox console, Android device, Windows Phone or iPhone, as long as you have the required app.

OneDrive allows you to simultaneously edit documents with other users. This is a great feature if you are working on a specific project with your colleague or classmate since both of you can make changes in real time.

OneDrive allows you to save documents right to it directly from any Office tool, but you can also visit OneDrive website and edit any of your documents or notes by using Microsoft Office Online. Even if you don’t use any of the Office tools, you can create Office documents right from the OneDrive simply by clicking the New button and choosing what type of document you wish to create.

new-onedrive

Regarding file upload, you can upload any file to OneDrive, simply by dragging and dropping in to the OneDrive web application. You can also use the Upload menu to select files and folders manually from your PC.

upload-onedrive

If you prefer, you can also upload and edit files on your PC and they will be automatically synced and added to OneDrive. To do that, simply access OneDrive folder on your PC, and create new files or folders in it to add them to OneDrive. Since your files are in sync, you can simply make changes from OneDrive web app and your files in OneDrive folder on your PC will be automatically changed and vice versa.

OneDrive for business

Sharing is also rather straightforward in OneDrive, and in order to share a file or folder, you just need to do the following:

  1. Right click the file or folder you want to share in OneDrive web app and choose Share from the menu.
    share-onedrive
  2. Now you can select the permissions for that document and allow users to edit it or just view it.
    share-options
  3. Copy the link and share it with others in order to share your document.
  4. Optional: If you prefer, you can also share file or folder via email, and allow users to just view or edit the document.
    share-email
  5. Optional: There’s also an ability to share files or folders using social media, but we advise you to be careful while using this option.

In addition to sharing, there’s also an option available to embed your documents on a web page, but if you choose to use this option bear in mind that everybody will be able to view your embedded documents.

OneDrive photos

OneDrive is one of the best cloud services, and it can be great if you want to collaborate with others, or if you simply want to store your files online for backup. Now that you know how OneDrive works on Windows 10, make sure you give it a try.

If you experience any issues at all, check out the following guides. We’d love to hear about your experience with OneDrive, so feel free to leave us a comment below.

OneDrive sync issues

Related stories:

How to turn off OneDrive

One of the FAQ is: can I remove OneDrive from my computer?

The short answer will be: no, but there’s a workaround. You can’t uninstall it like an app because OneDrive is built into Windows 10. However, you can hide it and stop syncing OneDrive files to your PC.

Follow these guides to Turn off, disable, or unsync OneDrive on your device:

[wl_faceted_search title=”Related articles on OneDrive”]

The Windows Insider webcast is coming back today at 10AM PST, watch it here

We’ve yet to get any new Windows 10 builds this week, but the Windows Insider team would like you to know that they’ve still got a webcast coming up. Be sure to tune into the Windows Insider Webcast today on September 18 at 10 AM PST to hear more from the Flighting and Servicing teams.

As always, this webcast will be streamed on Mixer, and you will have the chance to ask the Insider team any of your burning questions. You can expect to hear more about Slow Ring builds, and how builds are serviced, and other cool Insider facts.

We’re hoping that we might get a new build during this webcast, but there’s no telling if that will happen. Anyway, there was plenty of Windows Insider action last week, with the release of build 17760 to the Fast ring, 17758 to the Slow ring, and 18237 to Skip Ahead. Here’s to more action this week!

October 2018 Update will remove several features from Windows 10

The October 2018 Update (AKA Windows 10 version 1809) will remove several features from Windows 10. As noted in a report from Neowin, Microsoft has published a list showing all the Windows 10 features that will soon be “removed or depreciated.” Let’s start the features that will be removed:

  • Business Scanning, also called Distributed Scan Management (DSM): We’re removing this secure scanning and scanner management capability – there are no devices that support this feature.
  • FontSmoothing setting in unattend.xml: The FontSmoothing setting let you specify the font antialiasing strategy to use across the system. We’ve changed Windows 10 to use ClearType by default, so we’re removing this setting as it is no longer necessary. If you include this setting in the unattend.xml file, it’ll be ignored.
  • Hologram app: We’ve replaced the Hologram app with the Mixed Reality Viewer. If you would like to create 3D word art, you can still do that in Paint 3D and view your art in VR or Hololens with the Mixed Reality Viewer.limpet.exe: We’re releasing the limpet.exe tool, used to access TPM for Azure connectivity, as open source.
  • Phone Companion When you update to Windows 10, version 1809, the Phone Companion app will be removed from your PC. Use the Phone page in the Settings app to sync your mobile phone with your PC. It includes all the Phone Companion features.
  • Trusted Platform Module (TPM) management console: The information previously available in the TPM management console is now available on the Device security page in the Windows Defender Security Center.
  • Future updates through Windows Embedded Developer Update for Windows Embedded Standard 8 and Windows Embedded 8 Standard: We’re no longer publishing new updates to the WEDU server. Instead, you may secure any new updates from the Microsoft Update Catalog.

Next, there are a couple of features that will still be there in the October 2018 update, but Microsoft will no longer be actively developing them. The list includes the Windows 10 Snipping tool, a legacy desktop app that Microsoft intends to replace with its new Snip & Sketch UWP app. You can get more details below:

  • Companion device dynamic lock APIS: The companion device framework (CDF) APIs enable wearables and other devices to unlock a PC. In Windows 10, version 1709, we introduced Dynamic Lock, including an inbox method using Bluetooth to detect whether a user is present and lock or unlock the PC. Because of this, and because third party partners didn’t adopt the CDF method, we’re no longer developing CDF Dynamic Lock APIs.
  • OneSync service: The OneSync service synchronizes data for the Mail, Calendar, and People apps. We’ve added a sync engine to the Outlook app that provides the same synchronization.
  • Snipping Tool: The Snipping Tool is an application included in Windows 10 that is used to capture screenshots, either the full screen or a smaller, custom “snip” of the screen. In Windows 10, version 1809, we’re introducing a new universal app, Snip & Sketch, that provides the same screen snipping abilities, as well as additional features. You can launch Snip & Sketch directly and start a snip from there, or just press WIN + Shift + S. Snip & Sketch can also be launched from the “Screen snip” button in the Action Center. We’re no longer developing the Snipping Tool as a separate app but are instead consolidating its functionality into Snip & Sketch.

Many of the features that are being removed or no longer developed should not come as a big deal for the majority of Windows 10 users. Last year, Microsoft made headlines by announcing that the legacy MS Paint app would be killed off with the Fall Creators Update, but a bad buzz eventually led the company to backtrack. Just like Paint, the legacy Snipping Tool still has its fans and Microsoft is right not to force Windows 10 users to a new UWP solution. Otherwise, the upcoming October 2018 Update will bring some exciting new features such as the new Cloud Clipboard and Your Phone app, and we’ll have more to share when it starts rolling out in the coming weeks.