How to fix Google Chrome not working with Symantec Endpoint

In October 2019, users started posting on the Symantec support forum about an Aw Snap error that arises in Chrome when they start the browser.

The Aw Snap crash error isn’t something new. However, in this case, it occurs because Chrome 78 and 79 are not compatible with Symantec Endpoint Security software versions.

The incompatibility issue arises on any Windows platform that includes a Symantec Endpoint version that predates 14.2 RU2 MP1.

The issue largely pertains to Windows 2016 and Windows 10 RS1 platforms with SEP and Google Chrome browsers installed. Note, however, that Edge Chromium 78 and 79 are also incompatible with Symantec Endpoint Protection.


How can I fix Chrome’s incompatibility with Symantec Endpoint?

1. Update Symantec Endpoint Protection

Symantec’s official fix for SEP’s Chrome incompatibility is to update Symantec Endpoint to the latest 14.2 version.

You can get the latest patch update for Endpoint Protection (build 5569) from the RU2 MP1 client-only patches page. That page includes instructions for how you can download the latest patch and update the software with it.

SEP update download page google chrome not working with symantec


2. Deactivate Chrome’s renderer code

  1. Right-click Google Chrome’s desktop shortcut and select Properties.
  2. Select the Shortcut tab.
  3. Then enter the following line in the Target text box as shown directly below:
    • -disable-features=RendererCodeIntegrity Shortcut tab google chrome not working with symantec
  4. Select the Apply option.
  5. Click the OK button.

If you’re tired of Google Chrome’s incompatibilities, check out this article for some good alternatives


3. Edit the registry

  1. Press the Windows key + R hotkey, which opens Run.
  2. Input ‘regedit’ in the Open box and press Enter to open the Registry Editor.Registry Editor google chrome not working with symantec
  3. Go to this registry key: HKLM > Software > Policies > Google Chrome.
  4. Double-click the RendererCodeIntegrityEnabled DWORD on the right of the window.
  5. Change its value to 0 in the Edit Dword window.
  6. Click the OK option.

If you have issues opening the Registry Editor, check out this detailed guide for some quick fixes.


4. Launch Chrome with no sandbox

  1. Right-click a shortcut icon for Chrome on the desktop and select Properties.
  2. Click the Shortcut tab on the window that opens.
  3. Then add –no-sandbox to end of the Target box as belowTarget text box google chrome not working with symantec
  4. Select the Apply option.
  5. Click the OK button.

Edit Chrome’s exe file title

  1. Launch File Explorer with the Windows key + E keyboard shortcut.
  2. Open the folder that includes Chrome’s EXE file.
  3. Right-click Chrome’s EXE and select Rename.Rename option google chrome not working with symantec
  4. Enter Chrome as the new file title, but don’t change the EXE format at the end.

Those are a few of the resolutions confirmed to fix Google Chrome’s Aw Snap incompatibility error with Symantec Endpoint.

Remember, however, that you can always switch to browsers that don’t have any compatibility issues with Endpoint Protection, such as Firefox or Opera.

Which one of the many solutions listed above fixed the issue for you? Let us know by leaving a message in the comment scetion below.

[wl_navigator]

How to fix Battle.net startup crashes

The Battle.net app is one of the most important tools for Blizzard’s fans. Thanks to this app, you can log in faster, communicate with other players, and strike off the task of updating your games – Battle.net does it for you.

There are also instances when the Battle.net app doesn’t properly work or stops working altogether. In this article, we’re going to focus on such an issue and offer you a quick workaround to fix Battle.net startup crashes. Battle.net crashes are very annoying because they prevent players from logging in. Usually, no error code appears, the app just freezes and then glitches out.

Here’s how one user describes this issue:

“After windows 10 loads afresh battle.net crashes at startup with an error until I manually launch C:ProgramDataBattle.netAgentAgent.5269Agent.exe
It started after the latest battle.net update i guess”

Battle.net crashes on startup [FIX]

  1. Change the intro configuration
  2. Clear cache
  3. Reinstall the Battle.net client

Solution 1 – Change the intro configuration

1. Type %AppData% in the Search menu > hit Enter
2. Navigate to the “Battle.net” folder usually located at this address: C:UsersUSERNAMEAppDataRoamingBattle.net
3. Open the file Battle.net.config using any text editor
4. Locate this line: “ShowIntroBalloon”: “false”,
5. Change it to: “ShowIntroBalloon”: “true”,
6. Save the config file > close it.

Solution 2 – Clear cache

1. Type run in the Search menu
2. Type %appdata% > hit Enter
3. Delete the Battle.net folder
4: Do the same for %localappdata%
5. Launch Task manager and disable all Battle.net-related processes. Go to Task Manager > Processes > “Battle.net.exe” and “Battle.net Helper.exe” > right-click and disable both
6. Login to Battle.net again.

Solution 3 – Reinstall the Battle.net client

  1. In the Windows Search bar, type Control and open Control Panel.
  2. Choose Uninstall a program.
  3. Uninstall the Battle.net client.
  4. Navigate to AppData and LocalAppData and delete everything associated to Battle.net.
  5. Navigate here and download the latest iteration of the Battle.net client.
  6. Install the client and check for improvements.

If the workarounds listed above didn’t help you, try to manually open the Battle.net app through the folder. If this works, this means that the launcher is the element that’s causing the crashing.

[wl_navigator]

Microsoft reportedly cancels Build 2020, will become a virtual event (update: confirmed)

While so far nothing is official, Paul Thurrott is reporting that Build 2020 has been cancelled.

Quick update: a Microsoft spokesperson has confirmed to the Verge (via Mary Jo Foley) that Build is indeed cancelled:

“The safety of our community is a top priority. In light of the health safety recommendations for Washington State, we will deliver our annual Microsoft Build event for developers as a digital event, in lieu of an in-person event. We look forward to bringing together our ecosystem of developers in this new virtual format to learn, connect and code together. Stay tuned for more details to come.”

The event, scheduled for May 19-20th in Seattle, will go on as a virtual “digital experience,” according to Thurrott. So far, there’s been no official word, and as of this writing the Build 2020 website still says “In light of the global health concerns due to the novel coronavirus (COVID-19), Microsoft is monitoring public health guidance in relation to in-person events.” However, it would be more surprising if Microsoft were to hold Build, especially in Seattle, hard hit by the Coronavirus. Microsoft has already cancelled the MVP Summit and has the vast majority of its employees working remotely, and in the past 24 hours the NBA and NHL have suspended play, the NCAA has cancelled “March Madness,”, Major League Baseball has cancelled the rest of spring training and delayed the start of the baseball season by 2 weeks, and Disney and Universal Studios theme parks have been shut down, along with scores of schools and businesses.

Build is already a virtual event for many developers and enthusiasts, with keynotes and sessions live-streamed, so it makes sense to just pull the plug on the live event. This has been a momentous couple of weeks, with unfortunately more turmoil to come. We urge our readers to take the threat of the Coronavirus seriously, continue to wash your hands and keep yourself safe, and avoid close social contact if you can.

Users decry multiple update KB4540673 bugs

Patch Tuesday updates should typically address Windows 10 security concerns and a host of quality issues, including bugs caused by previous upgrades. Update KB4540673 fixes many such problems, but it also introduces numerous unexpected PC complications, according to multiple user complaints posted on Reddit.

Update causes the Blue Screen of Death

When Microsoft rolled out the KB4540673 update, it only acknowledged a single issue. Using Windows Server containers with the March 10, 2020 patch could cause problems with win 32-bit apps and processes, the company warned.

Emerging user reports suggest that the update may also cause your onboard graphics to malfunction. In a Windows Subreddit post, one user claimed that updating their OS resulted in the BSoD error.

I installed the new update (everything was working fine moments earlier), and now using onboard causes a BSoD.

The update did not break the user’s graphics processing unit (GPU), though.

Flickering screen

Another user posted a video to the Windows 10 Subreddit showing a flickering PC screen after installing the latest Windows 10 update.

Can somebody help me after I installed the new Windows 10 update this keeps happening and I can’t log in to my pc anymore.

The user has since marked the issue as solved. The bug had locked them out of their system, and it is not clear if the fix came from reinstalling Windows 10 via USB instead.

A graphics driver problem can cause you such frustrations after upgrading your OS, especially if you are unable to log into your PC to update it.

Update stalling

For some users, the update is taking ages to install. It did not go beyond 1%, one user claimed.

Another reported the error code 0x800f0922 after attempting to update.

I keep getting an error whenever trying to install this update, so I guess I’ll just skip this one out.

The KB4540673 security patch is not necessarily the cause of the 0x800f0922 bug, and there are several ways you can try to fix it at home.

Until Microsoft finds a way to deliver perfect OS fixes and improvements, you can always count on Windows 10 updates to bring a mixed bag of goodies and some not-so-pleasant surprises.

Why not back up since you do not know when the next upgrade bug may hit your PC? It is a better contingency plan than not attempting to install critical security patches at all.

Fix: Battle.net Payment Autorization errors on PC

Online gaming and the digital market are bound to each other. Everything you need related to games and in-game purchases is available online and through specific clients. We all know how well Blizzard uses online payment methods, so users can get themselves all kinds of additional content.

No one likes pay-to-win systems, but we think that Blizzard is still not crossing the line. However, even though it is a well-oiled machine, issues may occur from time to time. One that is the most common with customers is Payment Authorization error. In this article, we’ll tell you why this error occurs in the first place and how to fix it.

Sorry, we’re unable to complete your payment Blizzard error

  1. Check the available funds
  2. Change the payment method
  3. Check your credentials
  4. Use a card from your region

Solution 1 – Check the available funds

The first step would be to check your available funds. However, you should look out not only for Battle.net Account Ballance. If you are using a debit card, make sure your funds are transferred to Battle.net balance. If you are using PayPal, login to your account and check the transfer history. Some transactions may be restrained for various reasons.

On the other hand, if you can confirm that there are available funds, chances are something else is causing the issue at hand. We advise you to move to the next step and follow the instructions.

Solution 2 – Change the payment method

If you can’t manage to pay for in-game purchases with one way and have an alternative, consider changing your payment method. For example, if the card won’t function for the unapparent reason, try another card, PayPal or Battle.net Balance. Moreover, have in mind that some transactions include additional expenses.

Also, it’s well worth trying to remove your current payment method and re-assigning it again. Some users managed to resolve the issue with this simple procedure. In case you’re unsure how to do it, follow the steps below:

  1. Open the Battle.net web-based client, here.
  2. Sign in with your credentials.
  3. Choose My Account and then Account Settings.
  4. Open Payment methods and delete your current credentials.
  5. Add the old payment method and enter your address along with credentials again (PayPal or card).
  6. Save changes and try making a purchase again.

Solution 3 – Check your credentials

Foremost, your credentials should be spot on. Make sure your inputs are correct and valid. If your card is near its expiration date, make sure you renew it. Your billing address should be the same as the one registered to the card in order for purchases to work.

Solution 4 – Use a card from your region

One last advice is concerning your region. You wouldn’t be able to register the foreign card to your native region. For example, it is not possible to pay with the card that is not referring to the same credentials in your account. Have that in mind.

We hope you’ll manage to overcome the given issue and purchase freely from the Battle.net shop. If you have some suggestions or additional workarounds, please share them in the comments.

[wl_navigator]

WOW has no Sound: 4 Easy Ways to Turn the Sound Back On

Gaming has long been a massive part of our daily lives. Top names like World of Warcraft, among many others, have become easy favorites.

However, as you may know, tech does not come entirely free of hiccups. And so we will explore the best way to get sound back on the game.

But first, let us explore possible triggers so that you know what you should avoid in the future.

Why can I hear only music in WoW?

We have interacted with a few users and have come up with the following possible triggers of no sound in WoW.

  • Settings-related issues – The sound issue could be related to something as simple as a wrong or incorrect audio setting.
  • Driver issues – For a few users, it is linked to an outdated driver. Other driver issues, such as missing or corrupt drivers, may also cause the problem.
  • Bad game files – You may have sound issues if your files are corrupt or missing.
  • PC hardware issues – The sound issue you experience may be due to some underlying hardware problem on your computer.

Note that WoW users may face no sound using a cable, no sound effects, or only music sound. Regardless of the problem, you would solve it using the solutions we will not explore.

What can I do if WoW has no sound?

Before trying any complicated fixes, you should do the following:

  • Check your speakers – Make sure your speakers or headphones are turned on and properly connected to your computer.
  • Try alternatives – Use a different audio cable to test for a bad cable problem. This may prompt getting a replacement.
  • Disconnect other devices – You may try disconnecting your headphones when using your speakers to reduce the chance of interference.

1. Install Windows updates

  1. Press Windows + I to open the system Settings.
  2. Click on Update & Security.
    wow no sound
  3. Select Windows update from the left pane and choose Check for updates.
    wow no sound

Windows will check for available updates and try to download them automatically in the background. Once the updates are downloaded, they’ll be installed as they’ll restart your PC.

Once your system is updated, check if the problem is resolved.

2. Update drivers

  1. Hit the Windows key, type Device Manager, and click on the first result.
    wow no sound
  2. Expand the Sound, video, and game controllers section, right-click on the needed driver, and choose to Update driver.
  3. Select Search automatically for drivers.

Your OS will now scan for any available options and notify you accordingly.

The above steps are the easiest to update your sound drivers manually, but they still might consume much more time than an automatic solution.

There is an efficient tool that you can use to update and fix any of your drivers, just like a pro. You can take care of the essential elements that help you enjoy the smoothest gaming experience with one click.

This software automatically scans your drivers and searches only for reliable solutions from its vast database.

3. Run a hardware scan

  1. Press Windows + R, type cmd, and hit Ctrl + Shift + Enter.
    wow no sound
  2. Type the script below and hit Enter.
    sfc /scannow
  3. Wait for the scan to run and restart your computer.

Scans like the SFC are important fixes, especially if a corrupt system file triggers the error.

4. Verify game files

  1. Click on All Games, and select World of Warcraft.
  2. Click the Settings icon at the bottom left and select Scan and repair.
  3. Select Begin Scan.
  4. Wait for all your files to be verified and repaired, then see if it has resolved the problem.

That is how you may fix no sound on WoW. You must note that we have not mentioned these solutions in any particular order. In the end, you should try what seems the most appropriate.

As a last resort, you may have to reinstall the game, but we do not recommend this because you usually will lose some of your essential data.

If you cannot get WoW to start in the first place, you may want to read our comprehensive guide on fixing launch problems with World of Warcraft.

Contact us in the comments section if you have any further questions.

How to fix Battle.net installation and patch issues

The Battle.net desktop app is a very useful tool for gamers, allowing them to install and patch Blizzard games  faster. Thanks to this app, all your games are in one place, you only need to log in once, and all game updates are downloaded automatically.

The Battle.net desktop app relies on a process called Agent to install and patch Blizzard games. In case Agent can’t download data or install game files, follow the troubleshooting steps listed below to fix this problem.

Solutions to fix Battle.net installer

  1. Restart your computer. This simple action allows you to close the Agent process and lets the desktop app update it. Sometimes, a simple solution as this one is enough to fix the problem. However, if the problem persists, go to the next solution.
  2. Use a wired connection. Wired connections are more stable than wireless connections. When using wireless connections, the dropped data packets can slow down the install or update process and even cause various errors. Make sure your internet connection is working at top parameters.
  3. Disable or temporarily remove your security software. Sometimes, your antivirus may prevent you from downloading new files. The same is valid for firewall solutions and anti-malware tools. So, go ahead and temporarily disable your security software to check if this solves the problem.
  4. Make sure you’ve installed the latest updates available for your operating system. Also, install the latest OS version on your machine. Microsoft regularly rolls out new features and improvements for gamers so do check for updates from time to time if you haven’t enable automatic updates.
  5. Make sure the Windows Secondary Logon service is enabled for Agent to run.
  6. Run a full system scan to detect potential malware infections. Malicious programs may interfere with the Battle.net Agent.
  7. Disable specific add-ons for particular games. For example, World of Warcraft addon managers can prevent Agent from updating game files. Disable the addons, restart your computer, and try again.
  8. Agent files may be corrupted from a previous installation attempt. For this reason, delete the Battle.net Tools folder and open the Battle.net desktop app again to download a new Agent version.
  9. Temporarily disable your proxy settings.
  10. Make sure both your internet browser and Adobe Flash Player are up to date. Running outdated versions of these tools can prevent Battle.net Agent’s from connecting.
  11. Manually update the Battle.net Agent.
  12. If the steps listed above didn’t help you, uninstall and reinstall the game.

If you used other solutions to fix Battle.net installation and patch issues and they worked, feel free to list the steps to follow in the comments below.

[wl_navigator]

Overwatch update stuck at 0 b/s: This is how we fixed the issue

Online first-person shooters are nowadays the most popular game genre. Blizzard, vastly known for World of Warcraft and Dota, expanded its user-base with Overwatch last year, as the game gained amazing popularity in no time. And that was a hard task since the competition is rather stiff.

Nevertheless, even though the game is a gem, there are some issues that can prove as quite a challenge for a considerable player population. One of the repeating issues is when the download is stuck while updating to the latest version.

It appears that the download meter reports 0 bs whole the time. We tried to address the problem and prepared a few possible solutions for this issue.

What to do if Overwatch update doesn’t work

  1. Bug with the download speed monitor
  2. Disable/remove interfering programs
  3. Check connection settings
  4. Run Overwatch repair tool in the client
  5. Delete Battle.net desktop client cache
  6. Use VPN to change location
  7. Uninstall PTR (Public Test Region)
  8. Reinstall Battle.net desktop client and Overwatch
  9. Turn off your firewall and antivirus software
  10. Renew IP and flush DNS
  11. Uninstall Overwatch

1. Bug with the download speed monitor

Some of the users reported a malfunction of the download speed monitor. Namely, even though the counter shows 0 b/s, the update is still being downloaded. So, leave the process be and give it approximate time to finish.

The time it usually takes to install the previous patch. Restart the Battle.net app and try out the game. If the patch failed to install, move on to the next steps.

2. Disable/remove interfering programs

Programs that are known for interrupting updates are the ones known for slowing down the game. With special emphasis on antivirus and firewall software. Be sure to disable your antivirus and firewall while updating/playing Overwatch.

That goes for Windows Defender, as well. The one application, that rose before others, problem-wise, is the Norton Antivirus solution. Moreover, any other background processes that takes on your bandwidth should be paused.  Have that in mind and move on.

3. Check connection settings

Next step must be the connection status. As we are well aware, the online games and faulty connectivity are not the best dynamic duo ever. So, in order to address fundamentals, please check out your connection first by following these few simple steps:

  • Make sure you are using wired instead of wireless connection.
  • Reset your modem/router.
  • Disable resource hogging background apps. Especially, the ones that use the connection.
  • Make sure your router ports are open.

4. Run Overwatch repair tool in the client

Due to some malware or even its opposing side, antivirus software, some game files can get corrupted or incomplete. That leads to game or update malfunctions. You should use Battle.net clients a built-in tool to scan and repair those files. The procedure goes like this:

  1. Open your  Battle.net desktop app.
  2. Select Overwatch.
  3. Choose Settings just above the title.
  4. Click Scan and Repair.Scan and Repair overwatch game

Restart the app and try updating.

5. Delete Battle.net desktop client cache

As the game files can get corrupted, the same goes for the cache data of the client itself. Additionally, the cache files can get outdated and therefore pose as an obstruction for new updates. You can delete the cache by following these instructions:

  1. Close Battle.net app.
  2. Right-click on Taskbar and open Task Manager.
  3. Find agent.exe and choose End Process.
  4. Go to the system partition and open Program Data. The folder is hidden by default so you should enable Show Hidden in View tab.
  5. Find Blizzard Entertainment folder and delete it. You may need the administrator permissions.
  6. Start the Battle.net back again.

After that, the update should start. If that is not the case, move on to the next steps.

6. Use VPN to change location

Some of the users reported interesting workaround for the update fail issue. For an unknown reason, at the given time the patch can’t be installed from some locations. Crafty folks tried out VPN tools to change their virtual location and the installation process unexpectedly started.

So, if you are in possession of any VPN software, be sure to try it out.

Crafty folks tried out VPN to change their virtual location and the installation process unexpectedly started. So, if you are in possession of any VPN software, be sure to try it out.

7. Uninstall PTR (Public Test Region)

PTR or Public Test Region is supporting test-game that lets you test Overwatch updates before their official release. It is a good way to learn about new features and changes. However, on some occasions, it can interfere with the standard game and its updates.

Few users uninstalled it and the update process started right away. So, this may prove as a valid solution for you. Go to Control Panel > Add or remove programs > Overwatch Test > choose Uninstall.

However, on some occasions, it can interfere with the standard game and its updates. Few users uninstalled it and the update process started right away. So, this may prove as a valid solution for you. Go to Control Panel > Add or remove programs > Overwatch Test > choose Uninstall.

8. Reinstall Battle.net desktop client and Overwatch

If the problem is persistent and your tolerance limits are shattered, reinstallation is the last solution. We advise you to first try reinstalling the client prior to the game. It is greater chance that the client is the core of the issue. To reinstall the client, do as followed:

  1. The easiest way is with Add remove programs in Control Panel. Also, you can do it manually,
  2. Go to default installation folder. The default is C:Program files or C:Program file (x86).
  3. Delete the whole folder and go to already mention Program Data and delete apps cache.
  4. Download installer from BattleNet, and install the client.
  5. If Overwatch is not shown as available, go to Settings.
  6. Choose Game Install/Update and select Scan for Games.
  7. Overwatch should be available now.

9. Turn off your firewall and antivirus software

Oftentime, security software may block game updates. To solve this problem, you can temporarily disable your antivirus and firewall software. Then install the latest game updates. Don’t forget to turn on antivirus and firewall protection as soon as soon as you’re done to keep your system protected.
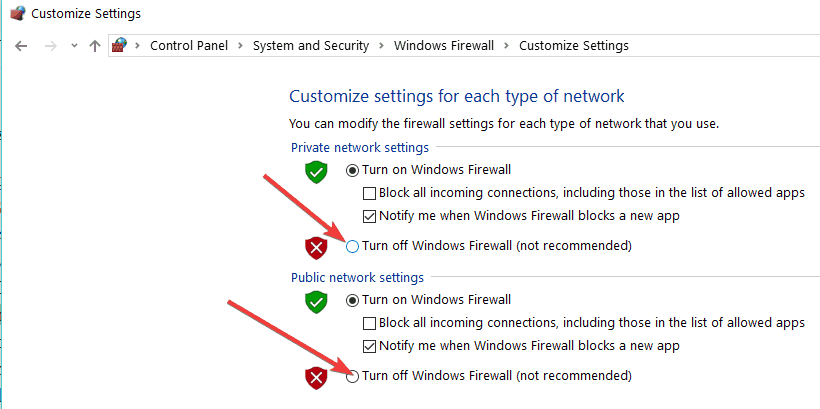
Turn off Windows firewall

10. Renew IP and flush DNS

  1. Launch a Run windows and type inetcpl.cpl > hit Enter to access Internet Properties
  2. Go to the Connections tab > Never dial a connection (if the option is available).
  3. Go  to LAN settings > uncheck Use a proxy server for your LAN as well as Automatically detect settings.Sticky Notes crashing in Windows 10
  4. Now, it’s time to flush your DNS by launching Command Prompt as administrator
  5. Type ipconfig /release  and wait until the IP address has been released.
  6. Type ipconfig /renew and wait until the IP address has been re-established.
  7. Type ipconfig /flushdns > close CMD and check if you can update the game now.

11. Uninstall Overwatch

If the update is still stuck with the 0 b/s, the game reinstallation is next reasonable step. Go to Battle.net client and select Overwatch. In the Settings, you should find Uninstall. The installation process is as simple just as uninstall was. Just enter Battle.net and choose Overwatch. Install option will be visible.

The Bottom Line

Unlike all offline games, you can’t play Overwatch without the latest update. So this gruesome update stuck is a devastating problem. However, we are sure that you’ll find the use of some of the proposed solutions and get yourself back in the battle. Give us a shout out if you solved it in the comments.

Give us a shout out if you solved it in the comments.

[wl_navigator]

Your Margins Are Pretty Small Keeps Popping up [Fix]

While printing many reported that Your margins are pretty small message keeps popping up.

This can be a big issue, especially if your printer couldn’t print, so it’s important to fix it as soon as possible.

If you too are frequently encountering this error message, follow the steps listed in this detailed guide and you will get rid of it in no time.

Why does Your margins are pretty small keeps popping up?

  • Unprintable area isn’t defined properly in printer settings.
  • Printable area isn’t configured in your settings.
  • Page size isn’t properly configured.
  • Alignment and wrapping options aren’t set.

Feel free to read our guide on troubleshooting Word margins where you will find solutions to all possible issues.

How do I fix pretty small margins?

1. Redefine the unprintable area

  1. Open the printer settings.
  2. Now locate the margin setting.
    Print dialog
  3. Set it to the minimum possible value for your printer. That’s about 0.17 inches.

2. Use the automatic adjustment of the margins

  1. In case of not knowing your printer’s minimum margins value, let the program take care of this task for you.
  2. You only need to click Fix and you’ll further notice the position of text shifting on the document.
  3. As stated by other users, they find the adjustments as being very small, barely noticeable.

However, if you don’t like the result, feel free to use to undo the change, or simply close the file without saving that change.

This is the simplest solution if Your margins are pretty small keeps popping up, do don’t hesitate to try it.

3. Set Printable area to Maximum

  1. Open the Printer properties.
  2. Under the Advanced tab, and select the option that says Compatibility.
  3. Here you’ll see a selection for Printable area. Don’t hesitate to change it from Standard to Maximum.

4. Change file size to A4

  1. Conduct a search by typing Control Panel into the search box and typing Enter.
  2. Click on Devices and Printers. You should get a series of icons identifying the printers for which you have installed drivers, along with the default printer.
  3. Select Printing Preferences which houses a wealth of settings for print quality, layout, profile presets, and more.
  4. While here, just change the original size to A4.
  5. Finally, click on Apply.

When you are still getting this annoying message, a simple readjustment of the file size could become effective and nothing will cut off again.

This is a quick solution, so use it if Your margins are pretty small keeps popping up.

5. Save the file as PDF file

  1. Save the file as a PDF.
    PDF file
  2. Open it in Adobe Reader.
  3. Print it from Adobe Reader.

Printing to a PDF is a bit of a hassle indeed, but this helps you clear up all previous issues.

6. Configure Alignment and Wrapping options

  1. Enter into Table Tools and choose Layout then Properties and lastly Table.
  2. You should now see Alignment & Wrapping options.
    configure Alignment and Wrapping to remove error
  3. Change the table’s wrap format to Around, center-aligned.
  4. Then, make the left and right margins equal-sized.

Increasing the paper size a little is another trick described as possibly working while trying to use a different driver for the printer is also recommended.

Start with the most recent one provided by the manufacturer. If this makes no difference, go further back to an older one.

This isn’t the only issue, and many reported that printer is not printing full page, so be sure to check our guide that covers that subject.

If the Your margins are pretty small small keeps popping up, you can fix it in few minutes. If all these solutions are inefficient, seek professional help from the printer manufacturer.

FIX: Activation Error 0x004f074 on Windows 10 [4 Quick Ways]

You finally decided to switch from your old Windows OS to the newer version, Windows 10. However, when you try to activate your new operating system, an unexpected activation error 0x004f074 appears.

Don’t worry, as Windows 10 upgrade issues are nothing out of the ordinary. Even if you enter the valid product key after you installed the fresh copy of your new Windows operating system, you still get this error.

That’s a sign that the Key Management Service couldn’t be contacted during the activation procedure.

There are all sorts of speculations regarding the causes of the activation error 0x004f074, but most likely it appears to be triggered by conflicts with antivirus or firewall utilities, compromised Windows upgrades, wrong edition choices, and similar.

Luckily, we prepared a couple of workarounds to help you get rid of this error. If you’re ready to fix it, try the following solutions right away.

How can I fix Windows 10 activation error 0x004f074?

1. Execute Slmgr.vbs command

execute Slmgr.vbs command
  1. Go to Search and type cmd.
  2. Right-click on Command Prompt and select Run as administrator.
  3. In the Command Prompt, enter the following line and press Enter:
    slmgr.vbs –ipk xxxxx-xxxxx-xxxxx-xxxxx-xxxxx (Xs represent digits of your product key).
  4. After that, enter this line and press Enter:
    slmgr.vbs –ato
  5. Close Command Prompt.
  6. Restart your computer and see if the activation error 0x004f074 is fixed.

First, you should try to eliminate this error using the Command Prompt with administrative rights. You may easily use this guide to make yourself an administrator in case of not being one already.

Then, the first command usually replaces the product key. The second one is finally used to force Windows to attempt an online activation.

2. Use the System File Checker tool

use System File Checker
  1. Press Windows + R keys simultaneously to open the Run prompt.
  2. Type cmd inside the text box and press Ctrl + Shift + Enter to open up a Command Prompt.
  3. When prompted, click Yes to run with elevated privileges.
  4. Type sfc/scannow and press Enter to initiate an SFC scan.
  5. The command operation may take a while, so be patient, and wait until it’s finished.
  6. When the SFC process completes, restart your computer and see if the Windows 10 activation error 0x004f074 is gone as well.

Lots of people confirm that they have managed to work around activation error 0x004f074 by running the System File Checker tool. You may try the same by applying the above steps.

3. Disable/uninstall antivirus or firewall utilities

uninstall firewall
  1. Log into Windows as a user with administrator permissions and make sure no other application is running on your PC.
  2. Right-click the Windows Start button and select Apps & Features from the menu.
  3. While in Apps & Features, you will be presented with a list of all the programs installed on your computer.
  4. Select the one you wish to uninstall, then right-click on it and click on Uninstall.
  5. Follow the on-screen steps.
  6. Lastly, restart your computer to complete the uninstallation.

If you’re running an antivirus or firewall program, this might prevent your OS from licensing files over the Internet. You can try to disable it for a short while and see if this solves your problem.

If it doesn’t, just follow the steps given above to uninstall the tool. If you don’t want to struggle with manual techniques, be sure to check out this amazing list with the best uninstaller software you can use right now.

4. Activate your Windows by phone

The machine is permanently activated
  1. Press Windows key + R keyboard shortcut to open Run command.
  2. Enter slui 4.
  3. Select your country and click Next.
  4. On the next page, you’ll see phone numbers you should call. Make a call and enter the Installation ID when you are asked to.
  5. After that, enter the confirmation ID provided by the Microsoft Product Activation call center operator and then, click on Activate.

If you still get the same error, try to activate your Windows by phone. This is also a convenient way to activate Microsoft Windows and it requires calling the Microsoft Activation Center to exchange activation information.

That would be all. After performing one of these steps, you should be able to activate your Windows normally and get that prompt stating The machine is permanently activated.

If you have any questions or suggestions, please leave your comments at the bottom.

[wl_navigator]

NASCAR Heat 4, Verdun, and Overwatch are free to play with Xbox Live Gold this weekend

Another weekend of Free Play Days has begun with another trio of Xbox One games available to play for free. As noted in a post on Xbox Wire, Xbox Live Gold and Xbox Game Pass Ultimate subscribers are eligible to play NASCAR Heat 4, Verdun, and Overwatch for free this weekend, from Thursday, March 12 at 12:01 a.m. PST until Sunday, March 15 at 11:59 p.m. PDT.

Xbox Game Pass Ultimate and Xbox Live Gold members can download all three games via Xbox.com or via the Microsoft Store on your console. If you want to continue playing a game after the Free Play Days weekend is over, you can purchase the Xbox One game for a reduced price. Any game progress or gamerscore will be carried over once you purchase the game.  Here’s a look at discounted prices of all three Xbox One games on sale this week as part of Xbox Free Play Days.

The third game, Overwatch, is the only game that I could not find a sale price for. Overwatch Origins Edition is available for download for free to me as I am an Xbox Game Pass Ultimate subscriber.  However, Overwatch: Legendary Edition is still in the Microsoft Store showing its original price of $59.99, with no sale price included.

If you are an Xbox Live Gold or Xbox Game Pass Ultimate subscriber, Free Play Days are another excellent way to get a chance to play Xbox One games for free on Xbox Live. Not a member? Join Xbox Live Gold or Xbox Game Pass today using the links below.

Join Xbox Live Gold

Join Xbox Game Pass  

What game will you be playing this weekend? Let us know in the comments!

Here’s how schools and colleges can use Microsoft products and services for remote learning

The classroom or lecture hall is the hub of learning, and nothing beats face-to-face, student-to-teacher interaction. With the spread of Coronavirus, though, more colleges, universities, and schools across America have been turning to online classes as a method of keeping students safe. As a parent or teacher, you might be wondering how that all works. That’s why, in this guide, we’ll cut through the jargon and give you a look at how Microsoft technology is being used to support remote learning.

The Basics

As part of remote learning, many schools can use Microsoft Office 365. As we’ve explained before, schools and universities often offer Office 365 for free to students and teachers. The best example of this is the City University of New York, which gives access to Microsoft Office 365 for Education to students at participating colleges via the Microsoft Office in Education program. In most cases, the licenses remain active until a student or teachers leave the University.

This means that most educators and students can get access to the core Microsoft Office apps for free, without paying a monthly or yearly subscription fee. That includes access to web-based Office apps through Office.com, as well as Word, Excel, PowerPoint, OneNote, and Microsoft Teams. It even has access to cloud storage on OneDrive and emailing on Outlook, where files for learning can be stored or shared. The desktop versions of Office 365 apps can also be installed on teacher and student laptops and desktops easily by visiting Office.com and signing in using a school or university’s email account. These apps stay up to date automatically and have plenty of collaboration features, as we explain next.

The collaboration features of Office 365

The core experience of Microsoft’s Office 365 offers a lot of collaboration experiences that can be used in remote learning. As one example, teachers can upload specific documents on to OneDrive, share a link, and have students access it via Office.com or open it on Office on their computer. This skips out on the need to email files with Outlook, as more than one student can collaborate on the document at the same time. As our guide explained, once the link is shared, teachers and students can use an @mention with someone’s name in a comment on documents, and even direct them to a specific place. There’s Microsoft Forms, too, which can be used to create quizzes and other assignments.

Microsoft Teams and virtual lessons

While collaborating on documents with Office documents is one small way that Microsoft services can be used in remote learning, Microsoft Teams is the biggest way. In fact, Microsoft has an education-specific version of Teams known as Teams for Education. Using Microsoft Teams, teachers can create certain “Channels” or “Teams” for classes and groups, and for fellow educators to meet in virtually. Microsoft Teams also let students and educators chat via text or video chat from any device. Other ways Teams can be used in the classroom can be seen below.

  • Allows to schedule online meetings with Teams Calendar
  • Allows students or educators to @ mention each other to get attention and start conversations
  • Allows teachers to create annocuments so everyone can be informed on the same page
  • Allows teachers and students to meet in a channel to turn a class into a lesson or presentation
  • Allows students to chat privatley or in groups

Microsoft Teams also goes beyond virtual meetings or chats, though. When a “Team” is created in Microsoft Teams, files can be shared in a channel. Anyone in that channel can then read the file, or comment on it. Additionally, important class files can be uploaded to Teams in a Class Materials folder. Meetings can also be recorded, and a teacher can share his or her screen through Teams for an enhanced learning experience. There are even options to create Assignments in Teams, and Track progress and give feedback in the Grades tab in Teams.

OneNote

OneNote is another Microsoft service that can be used in remote learning. It’s often already used by students as a note-taking app, but OneNote has a feature known as a “Class Notebook” which is useful for education. This is essentially a personal workspace for every student, a content library for handouts, and a collaboration space for lessons and creative activities.

The Class Notebook can be accessed through the OneNote app on Windows 10, MacOS, or on the web and even Microsoft Teams.  In fact, each class team in Microsoft Teams comes with its own linked OneNote Class Notebook. As noted by Microsoft, Teams will deliver on Class Notebooks in three different ways:

  • Student Notebooks: A private space shared between the teacher and each individual student. Teachers can access every student notebook, while students can only see their own.
  • Content Library : A read-only space where teachers can share handouts with students.
  • Collaboration Space: A space where everyone in your class can share, organize, and collaborate.

Finally, OneNote can also be used to create assignments with Class Notebook pages. This is a great way to distribute homework or virtual handouts, and it easily can be done right from the Assignments tab in OneNote Class Notebooks. Once something is assigned, each student will have a copy of the page inside their Class Notebooks. They can also open and edit the page directly from the assignment card in Microsoft Teams.

Other ways Microsoft products and services for remote learning

These are just a couple of the top ways that Microsoft products and services for remote learning. There’s another few which are worth mentioning, too. For instance, Teachers can create interactive presentations on PowerPoint, and also creative projects on Microsoft Sway. Microsoft also has a virtual chalkboard that students and teachers can use during Teams meetings and access on Windows and the web, known as Microsoft Whiteboard. Teachers can even Invite experts to drop into virtual classroom sessions on Teams or via Skype to help make learning more interesting.

Microsoft is here to help

Microsoft is here to help teachers and educators transition to remote learning. The company has a dedicated education-specific website where you can find resources and other training guides dedicated to Office 365. These range from resources that can help IT admins set a school up for remote learning, a quick start guide for teachers, best practices for students, and a guide for parents. We’d also remind you that Microsoft has a support line for teachers, parents, and IT admins who may be concerned.

FIX: eM Client doesn’t show images

eM Client is a popular email client compatible with the Windows platform. However, several users have reported eM Client not showing images issue in Windows.

By default, most email clients block remote images in an email if they determine it to be unsafe. While the email clients usually block images that are not from the contacts, it can also block it from a known sender.

To resolve this issue, check the setting in the email client to make sure that the images are allowed to display. In this article, we show you how to fix eM Client not showing images issue in Windows 10.


How do I fix eM Client not showing images?

1. Display unsafe contents

eM Client now showing images

  1. Start eM Client.
  2. Click on Menu.
  3. Go to Tools and select Settings.
  4. From the left pane, expand the Mail tab.
  5. Select the Privacy tab
  6. Under the Unsafe Content section, check  the Display unsafe content from people in your contact list option.
  7. Click OK to save the changes.

1.1 On the older version of eM Client

  1. Launch eM Client.
  2. Click on Tools and select Settings.
  3. From the left pane, select the Read tab.
  4. In the right pane, scroll down to the Unsafe Content section.
  5. Check Display unsafe content from people in your contact list option.
  6. Click on Apply to save the changes.
  7. Exit and relaunch eM Client.

Now the images in the email messages from your client should appear without any issues.

Enabling the Display unsafe content in messages from people in the contact list option can help you resolve the eM Client not showing images issue.

However, if you want to view images from all the emails, then use the Display unsafe content in all messages option. Note that enabling this option will increase the spam emails that you receive.


Looking for an alternative email client? Check out this article for our top picks.


2. Repair eM Client

eM Client now showing images

  1. Press Windows Key + R to open Run.
  2. Type control and click OK to open the Control Panel.
  3. Go to Programs > Programs and Features.
  4. Select eM Client from the list of installed apps.
  5. Click on the Repair option from the toolbar.
  6. Follow the on-screen instructions to repair the eM client.
  7. Apply any changes recommended by the troubleshooter and restart the computer.
  8. Launch eM Client and check for any improvements.

The eM Client not showing images issue can occur if the email client detects an email to be spam. Follow the steps in this article to download images from your contacts.

Alternatively, you can also download the images manually after opening the email and clicking on the download pictures option.

Moreover, you can add the sender to the trusted list by clicking on Always download pictures from this sender option in the email.

Which one of these methods helped you bypass this issue? Let us know which method worked best for you by leaving a message in the comments section below.

[wl_navigator]

What to Do if Google Drive Offline Doesn’t Work

Google introduced a new offline mode for Google Drive in 2019. That offline mode enables users to edit Docs, Slides, or Sheets files offline. Those files are synced with Google Drive to be saved automatically when users are online.

However, some users can’t get Google Drive’s offline feature working. They can’t view or edit their Docs, Sheets, and Slides files offline.

How can I fix Google Drive offline when it’s not working?

1. Check the Offline option is selected

  1. Open your Google Drive page in Chrome.
  2. Click the Settings button.
    Settings button google drive offline not working
  3. Click Settings on the menu.
  4. Select the Offline check box shown directly below.Offline option google drive offline not working
  5. If you don’t have the Google Docs Offline extension, you’ll be prompted to install that. Click the Install button.
  6. Press the Done button.

2. Check the Offline mode is enabled for each app

Check the Offline option is enabled within the Docs, Slides, and Sheets web apps. To do that, follow these steps:

  1. Open the homepage for one of those apps.
  2. Click the Main menu button at the top left of the web app.
    The Main Menu button google drive offline not working
  3. Click Settings to open the options shown directly below.
  4. Then toggle the Offline option on.
    Offline option google drive offline not working
  5. Repeat those steps for both the other two Google web apps.

3. Turn Off Chrome Extensions

  1. Click Customize and Control Google Chrome to open the browser’s menu.
  2. Select More tools and Extensions to open the tab in the snapshot directly below.Chrome's extensions tab google drive offline not working
  3. Turn off, or remove, all the extensions except the Google Docs Offline extension.
  4. Click the toggle buttons on the extensions to turn them off.
  5. Alternatively, delete extensions you don’t need by clicking the Remove button.

4. Set up a new Chrome profile

  1. Set up a new profile by clicking the Chrome profile button at the top right of the browser’s window.Profile button google drive offline not working
  2. Click Add to open the window shown directly below.Add profile window google drive offline not working
  3. Enter a user profile in the text box, and select an image for it.
  4. Press the Add button.
  5. Thereafter, click the profile button again.
  6. Select the new user profile you just set up.
  7. A new browser window will open for that profile. Log in to your Google Account again with that profile.

5. Don’t use Incognito Mode

Google Drive offline doesn’t work in Chrome’s incognito mode, as that turns off the Google Docs Offline extension.

So, don’t utilize Chrome in incognito mode. Remove the– incognito switch from Chrome’s target path if you’ve configured the browser to start in incognito mode.

incognito mode google drive offline not working

If Google Chrome is behind your Google Drive issues, check out this article for some great alternative browsers.

6. Reset Chrome

  1. Open Google Chrome
  2. Input chrome://settings/ in Chrome’s URL bar, and press the Enter key.
  3. Click the Advanced button to expand the Settings tab.
  4. Scroll down to the Restore settings button.
  5. Click the Restore Settings to their original defaults option.
    Restore settings button google drive offline not working
  6. Click Reset settings to confirm.
  7. After resetting Chrome, turn the Google Docs Offline extension back on.

So, that’s how you can fix Google Drive offline when it’s not working. Note that you’ll also need to select an Available offline option for specific files to save them for offline utilization.

You can do that in Google Drive by right-clicking files and selecting the Available offline option.

You might also be interested in reading our guide on enabling Offline files on Windows 11 because it might help.

If you know of any other methods to fix this Google Drive issue we may have missed, leave us a message in the comments section below.

Fix: No sound in Hearthstone on Windows PC

Hearthstone is the most popular collectible card game at the moment. By utilising the full potential of the enormous Warcraft universe, Hearthstone set a high bar for the genre: The one that will be hard to overcome in years to come.

Additionally, the game-play has also lost static demeanour of previous games, with active turn-based matches.

However, as the case proved so many times, even the best optimised, undemanding games have some issues. This game is not an exception.

Hearthstone PC players have reported various issues but the one that is beyond annoyance is a sound issue. Namely, the in-game sound is totally non-existent.

So, in case you can’t hear anything while playing Hearthstone, we’ve prepared some possible workarounds for the problem.

How to fix Hearthstone sound issues

  1. Check your system sound settings
  2. Check in-game sound settings
  3. Reset in-game options
  4. Repair the game trough Battle.net client
  5. Reinstall Hearthstone

1. Check your system sound settings

The first logical step would be verifying your system sound settings. That way you can uncover possible malfunctions without interfering with in-game settings. And most of the time, the issue revolves around simple things. So, we advise you to try out these steps:

  • Check your speaker‘s cables and all-around functionality.
  • If possible, try using your speakers/headphones with another system to confirm that everything works properly.
  • Try out the sound in other games.
  • Run the game in windowed mode and open Volume Mixer. Hearthstone should be visible beside System Sounds and Speakers. Make sure it is not muted.
  • Update drivers for the sound card. Use manufacturers drivers instead of generic ones.
  • Try rebooting PC.
  • Disable Allow applications to take exclusive control of this device in Playback Devices > Properties > Advanced Tab.
  • Disable background applications that can interfere with the in-game sound.
  • Disable Compatibility mode. You can do so by right-clicking Hearthstone.exe > Properties > Compatibility > uncheck Run this program in compatibility mode box.
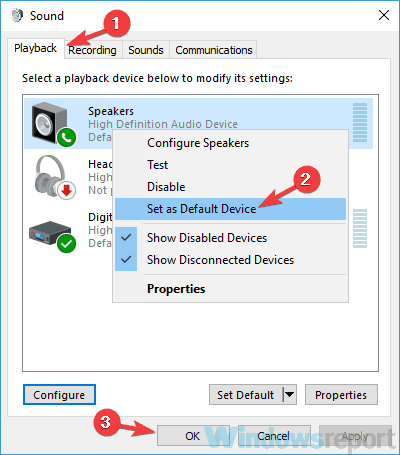
  • Select preferred playback device as default. You can do so by right-clicking on the Sound icon in notification area and opening Playback devices. In the presented list, highlight preferred device and click Set As Default.

If the problem is persistent, move on to the in-game sound settings.

2. Check in-game sound settings

If your system settings are on point for all other applications except Hearthstone, the game is the probable reason for the issue.

You should check out in-game sound settings. Do that by following these instructions:

  1. Open the Battle.net desktop app.
  2. Start Hearthstone.
  3. Open the Game Menu from bottom right corner.
  4. Choose Options.
  5. Make sure that both Master Volume and Music Volume are enabled.

Additionally, you may want to check certain shortcuts. Maybe you accidentally muted the sound. While playing, press Ctrl + S or Ctrl + M to try and reverse the selection.

3. Reset in-game options

According to Blizzard technicians and various players, this is a viable option. In some cases, especially after updates, unexpected issues can occur. To reset your in-game options, do as follows:

  1. Go to Battle.net desktop app.
  2. Open the menu in the top left corner.
  3. Choose Settings.
  4. Select Game Settings.
  5. Click Reset in-Game Options.
  6. Try starting the game again.

If the sound issues are still there, move up to the next solutions.

4. Repair the game trough Battle.net client

On some occasions, due to malware, the game files can get corrupted or incomplete. This can invoke a plenitude of issues and the in-game sound is one of them.

Luckily, you can use Battle.net client to repair damaged files. To repair Hearthstone files, follow these instructions:

  1. Open Battle.net desktop app.
  2. Click on the game options placed above the game title.
  3. Choose Scan and Repair.
  4. After the process is finished, start the game.

5. Reinstall Hearthstone

Final solution and the last resort for all the players facing this issue is reinstalling. Moreover, you’ll probably want to use some kind of registry cleaner to clear all previous registry inputs.

To reinstall the game, follow these instructions:

  1. Go to the Battle.net client and choose options above the game title.
  2. Click Uninstall game.
  3. After the process is finished, close the client.
  4. Use registry cleaner (CCleaner, for example) to clear registry.
  5. Reboot your PC and install the game from Battle.net client.

If the sound problems are still present, we advise you to send a ticket to some of the Blizzard forums. But, to be honest, we doubt that would be helpful.

Do you have some other solutions we overlooked? Please be free to tell us in the comment section below.

Heroes of the Storm Your System Does Not Support Higher Settings [FIX]

The battle arena game installment by Blizzard has been with us for quite some time. The hero brawler, Heroes of the Storm is an action packed with numerous game modes, and a plethora of heroes to choose from, ranging from Jim Raynor to Diablo.

So embrace the chance to play as your favorite character from Blizzard’s franchises.

But in all things that are intended to offer the most in a 20 minute match, some issues might arise. Some users have experienced the “Your system does not support higher graphics” message. What now?

In most cases this is related to the game not having full access to your machine’s memory, and this error occurs. But fret not, we’ve got a few solutions to this. So let’s get crafting, shall we?

How can I fix Heroes of the Storm higher settings issues

  1. Set your default graphic card
  2. Try Compatibility Mode
  3. Play in Windowed Mode
  4. Virtual Memory Tweak

1. Set your default graphic card

Something might have gone wrong at a certain point, but we’re going to set your dedicated graphics card as the default device for this game. In order to do this, follow these steps:

  1. Open you NVIDIA Control Panel.
  2. Go to 3D Settings, and select Manage 3D Settings.manage 3d settings make emulators faster
  3. In the tab Global settings select Preferred Graphics Processor.
  4. Now select High performance NVIDIA processor.
  5. Save changes and exit.

2. Try Compatibility Mode

To fix this issue from happeining again we first suggest that you right click on your game shortcut or exe. file and run the game in Windows Compatibility Mode.

Secondly, if that didn’t work, open your Nvidia Control Panel and Select Manage 3D Settings and select HOTS from the Program Settings and next you’re going to set the Power Management to Prefer Maximum Power.

3. Play in Windowed Mode

Make sure to keep your graphic card up to date. A solution would be disabling vertical sync, since it can reduce graphical tearing. If after this, you are facing tearing while playing Heroes of the Storm, we suggest you toggle vertical sync to back on in your game settings.

Alternately, you can try going into Windowed Mode if the game is acting up, it works to solve black screen issues aswell:

  1. Start your game.
  2. Press “ALT + ENTER” to make the game go into windowed mode.
  3. Access video settings in the game and adjust its resolution to your screen’s resolution.
  4. Save changes, you can now play the game in fullscreen mode.

4. Virtual memory tweak

Go to your Control Panel and select System and Security and then click on System. Now you’re going to click on Advanced System Settings, select the Virtual Memory window, uncheck automatically manage paging file size for all drives. Select a value that would help you in running the game smoothly.

Tips for smooth Heroes of the Storm gaming sessions on PC

Always whitelist your game through the Windows Firewall and keep your graphic drivers updates.

Run Heroes of the Storm on recommended settings.

Heroes of the Storm minimum specs required:

  • Operating System: Windows XP / Windows Vista (latest Service Pack)
  • Processor: Intel Core 2 Duo or AMD Athlon 64 X2 5600+
  • Video: GeForce 7600 GT
  • Memory: 2 GB RAM
  • Storage: 10 GB available hard drive space

Heroes of the Storm recommended specs:

  • Operating System: Windows 7 / Windows 8 / Windows 10 64-bit (latest Service Pack)
  • Processor: Intel Core i5 or AMD FX Series Processor or better
  • Video: GeForce GTX 650 or better
  • Memory: 4 GB RAM
  • Storage: 10 GB available hard drive space

[wl_navigator]
Sharp Maintenance Code VK: 2 Ways to Fix it

All sorts of maintenance codes end up being displayed on your printer’s operation panel occasionally. There’s no need to worry when seeing, for example, the Maintenance required: Code VK on your Sharp printer.

These maintenance codes are there for a purpose. They alert you of a consumable item nearing its maintenance or replacement interval or let you know that the interval has already been reached.

Just as always, there are ways to tackle the issue effectively. Let’s see what your next steps should be!

How do I fix Maintenance code VK on a Sharp printer?

Before we head to the slightly complex solutions, here are a few quick ones to try:

  • Restart the computer.
  • Turn off the Sharp printer, unplug the power cord, wait a minute, and then power it on. Now, try printing from it.

If none work, move to the fixes listed next.

1. Run the troubleshooter

  1. Press Windows + I to open Settings, and click on Troubleshoot on the right in the System tab.troubleshoot to fix sharp maintenance code vk
  2. Click on Other troubleshooters.
  3. Locate the Printer entry, and click the Run button next to it.printer
  4. Follow the on-screen instructions to complete the process.

Often, issues like the Sharp Maintenance required: Code VK can be fixed by the built-in Printer troubleshooter if it has to do with misconfigured settings.

2. Let your service provider know of the error

let your service provider know of the error

If your Sharp printer displays the VK error code, see it as a heads-up for replacing the black developer. The maintenance counter for the developer has reached 90% of the maximum value, and a service interval is recommended shortly.

So, your next move is to let your service provider know of it. The engineers will reset the counters, and the operation panel will no longer display this error code.

In the meantime, your printer should continue to print normally. However, some users report occasional copy quality loss issues on their printed pages. There are also cases in which the printer may be set to stop printing when codes such as VK, VC, VM, or VY are displayed.

These are our recommended solutions when you are looking for a way to clear the Maintenance required: Code VK error on a Sharp printer.

Before you leave, do check the best printer management software for seamless operations and get one today!

Feel free to let us know of any other tips that could get your Sharp printer back on track until the service provider steps in.

FIX: World of Warcraft Won’t Start in Windows 10/11


6 solutions to fix WoW launch issues

  1. Use a local account
  2. Close background programs
  3. Delete the Battle.net Cache and Battle.net Files
  4. Delete your add-ons
  5. Uninstall recent Windows 10 updates
  6. Disable Game DVR

World of Warcraft is a massive multiplayer online role playing game from Blizzard. If you’re not familiar with these types of games, these games usually require a monthly fee and a lot of time to complete.

Some would say that such games don’t even have an end, so you can play them almost forever. Since World of Warcraft has been released way back in 2004 and it had several expansions, millions of people have spent hundreds or even thousands of hours playing their favorite game.
world of warcraft windows 10
With the release of Windows 10, some World of Warcraft players are complaining that they can’t start World of Warcraft on Windows 10.

Imagine spending hundreds of dollars and hours on a video game that you cannot start anymore and how frustrating that can be.

However, there are a few solutions that might help you go back to your favorite game. This is a strange and frustrating problem, and it’s caused by your Windows Live account.

What to do if World of Warcraft won’t open

Solution 1: Use a local account

So in order to fix this, you need to login to your computer using your local account. Logging in to Windows 10 using your Windows Live account is rather useful, you can keep your settings and Start screen synced across all Windows 10 devices.

In addition, you can access your OneDrive files anywhere and with ease just like on your personal computer, but it seems logging in with your Windows Live account is preventing you from playing World of Warcraft. Worry not, because there is a simple solution. All you need to do is to switch to your local account:

  1. First, open Settings, and click on the Accounts icon
  2. In Your account, you need to click the Sign in with a local account instead linkWindows 10 sign in options not showing
  3. Switch to a local account screen will appear and it will ask you to enter password for your Microsoft account
  4. Now you just need to type your username for a local account, password and password hint
  5. Press Next, and you’ll see a window saying that you’ve successfully created a local account.
  6. Press Sign out and finish button
  7. Now you can sign in to Windows 10 with local account instead of Windows Live account.

Solution 2: Close background programs

If you can’t launch a particular app or program on your Windows 10 computer, oftentimes, another programs is actually preventing you from launching it. The quickest method to solve this problem is to clean boot your computer. In this manner, you machine will start with the minimum set of drivers and programs it needs.

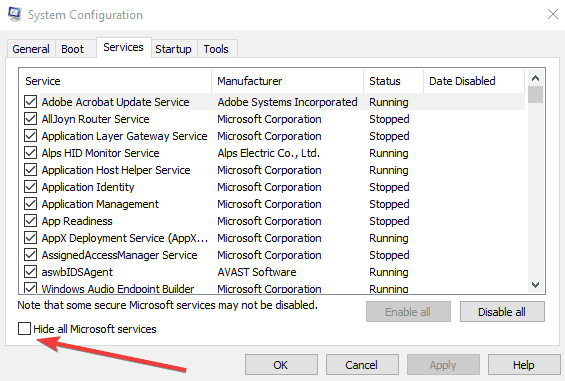
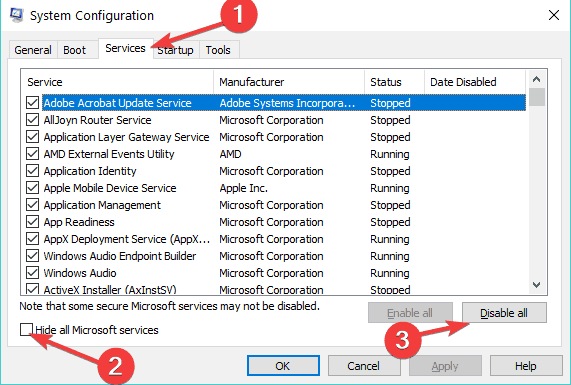
  1. Go to Start > type msconfig > hit Enter
  2. Go to System Configuration > Services > Hide all Microsoft services > click Disable allhide all microsoft services
  3. Go to the Startup tab > Open Task Manager
  4. Select each startup item > click Disabledisable startup programs
  5. Close Task Manager > reboot your computer > launch WoW.

Solution 3: Delete the Battle.net Cache and Battle.net Files

Blizzard’s support agents also suggest clearing your Battle.net cache as well as Battle.net files. Here are the steps to follow:

  1. Close your Blizzard app and processes > Open Task Manager
  2. Click the Processes tab > select all the Agent, Blizzard, and game processes > End Task
  3. Go to the Battle.net directory (you should find it on the drive where you installed the game)
  4. Delete the Battle.net folder.
  5. Launch the Blizzard Battle.net app > install the latest game updates.

— RELATED: Fix: World of Warcraft error BLZBNTAGT00000BB8

Solution 4: Delete your add-ons

If you’re using add-ons, try to clear your UI. Remove absolutely all the add-ons that you have, including your add-on manager if you have one.

Solution 5: Uninstall recent Windows 10 updates

If you’re familiar with this website, you’ve noticed that one of the first solutions that we recommend using to fix your computer issues is to install the latest OS updates. Well, sometimes, the latest updates may break your games.

Some WoW players confirmed that uninstalling the latest Windows cumulative updates and rolling back their drivers fixed the problem. Of course, this solution applies if your WoW launch problems started after updating your OS.

Solution 6: Disable Game DVR

As Blizzard notes, disabling the Game DVR app may help if you can’t launch WoW especially after updating Windows 10. Keep in mind that new Windows 10 updates automatically turn this feature on, even if you previously disabled it.

These solutions helped some users, but if you still can’t start World of Warcraft on Windows 10, you might want to contact Microsoft and Blizzard. We assume it’s just an optimization issue that will be fixed with upcoming Windows 10 or World of Warcraft patch.

If you have any other Windows 10-related issues you can check for the solution in our Windows 10 Fix section.

[wl_navigator]

FIX: adcjavas.inc file corrupted in Windows 10

Some people reported that they’re experiencing the corrupted adcjavas.inc file problem since the upgrade to Windows 10. If you’re one of them as well, you’ve come to the right place, as we have a couple of solutions for you.

Before getting to that, adcjavas.inc is a system file that contains ADO constants used for scripting in Windows. However, if this file is corrupted you won’t be able to grant permission, at least until you restart your computer.

This tutorial contains step by step instructions to resolve the corrupted adcjavas.inc file issue, so check them out one by one.

How can I fix adcjavas.inc file corrupted in Windows 10?

1. Scan your PC for any viruses

scan PC to fix adcjavas.inc file corrupted

Lots of people have confirmed that scanning their computer for any malicious software solved the adcjavas.inc file corrupted issue they were facing.

Properly scanning your PC for viruses and other malware is easy and effective, so this should be your first troubleshooting step.


Looking to change your current antivirus with a better one? Here’s a list with our top picks.


2. Run DISM and SFC Scans

run system scan to fix adcjavas.inc file corrupted

  1. Start by typing cmd in the search bar and right-click Command Prompt.
  2. Then, click Run as administrator.
  3. If you are prompted for an administrator password or for a confirmation, don’t hesitate to type the password, or click Allow.
  4. You may now type the following command and then press Enter: Dism.exe /online /cleanup-image /restorehealth.
  5. It may take several minutes for the command operation to be completed. Wait patiently, then restart your computer.
  6. Open Command Prompt as an administrator again.
  7. Type sfc /scannow in the window and press Enter to start the SFC scan.
  8. Leave the Command Prompt window open until the command is completed.
  9. If you happen to get a message saying Windows Resource Protection found corrupt files but was unable to fix some of them, try restarting your PC in Safe Mode and running the command again.

There are many people reporting that they have fixed the adcjavas.inc file corrupted issue by running DISM and SFC scans. DISM uses Windows Update to provide the files that are required to fix and creates a log file that captures all issues that the tool found or fixed.

You shouldn’t normally have to run both commands. However, if the DISM command fails to run properly, System File Checker may further help you to fix the adcjavas.inc corruption error.

scannow command has stopped before the process finished? Don’t worry, we’ve got an easy fix for you.


Don’t know what to do when DISM failed? Check out this quick guide and get rid of the worries.


3. Keep your system up to date

  1. Go to the Windows Start menu.
  2. Go to Settings > Update & Security > Windows Update.
  3. Here you’ll see any available updates.
  4. If you find any unapplied updates listed, simply install them now.
  5. Lastly, restart your computer in order to complete the update process.

Many forms of file corruptions as seemingly related to not having the most recent updates installed on your computer. Windows 10 offers you the choice of how to get the latest updates to keep your PC running securely.

To manage your options and update the system, follow the above steps.

Having trouble updating your Windows? Check out this guide that will help you solve them in no time.

Most users who faced the problem with adcjavas.inc have reported that one of these solutions solved the problem, and we hope they’ll be useful to you, too.

If you have any questions, comments, or suggestions, please reach for the comments section below.

[wl_navigator]

Windows 10/11 just got a brand new File Explorer design

Fluent design elements have been a part of the Windows 10 experience ever since it was first introduced back in 2017.

Groove Music, Mail & Calendar, Movies & TV, Calendar, and other Windows 10 features have since received tweaks and modifications, and it seems that now the File Explorer is getting a shot at it.

The new design focuses on OneDrive integration and simplicity

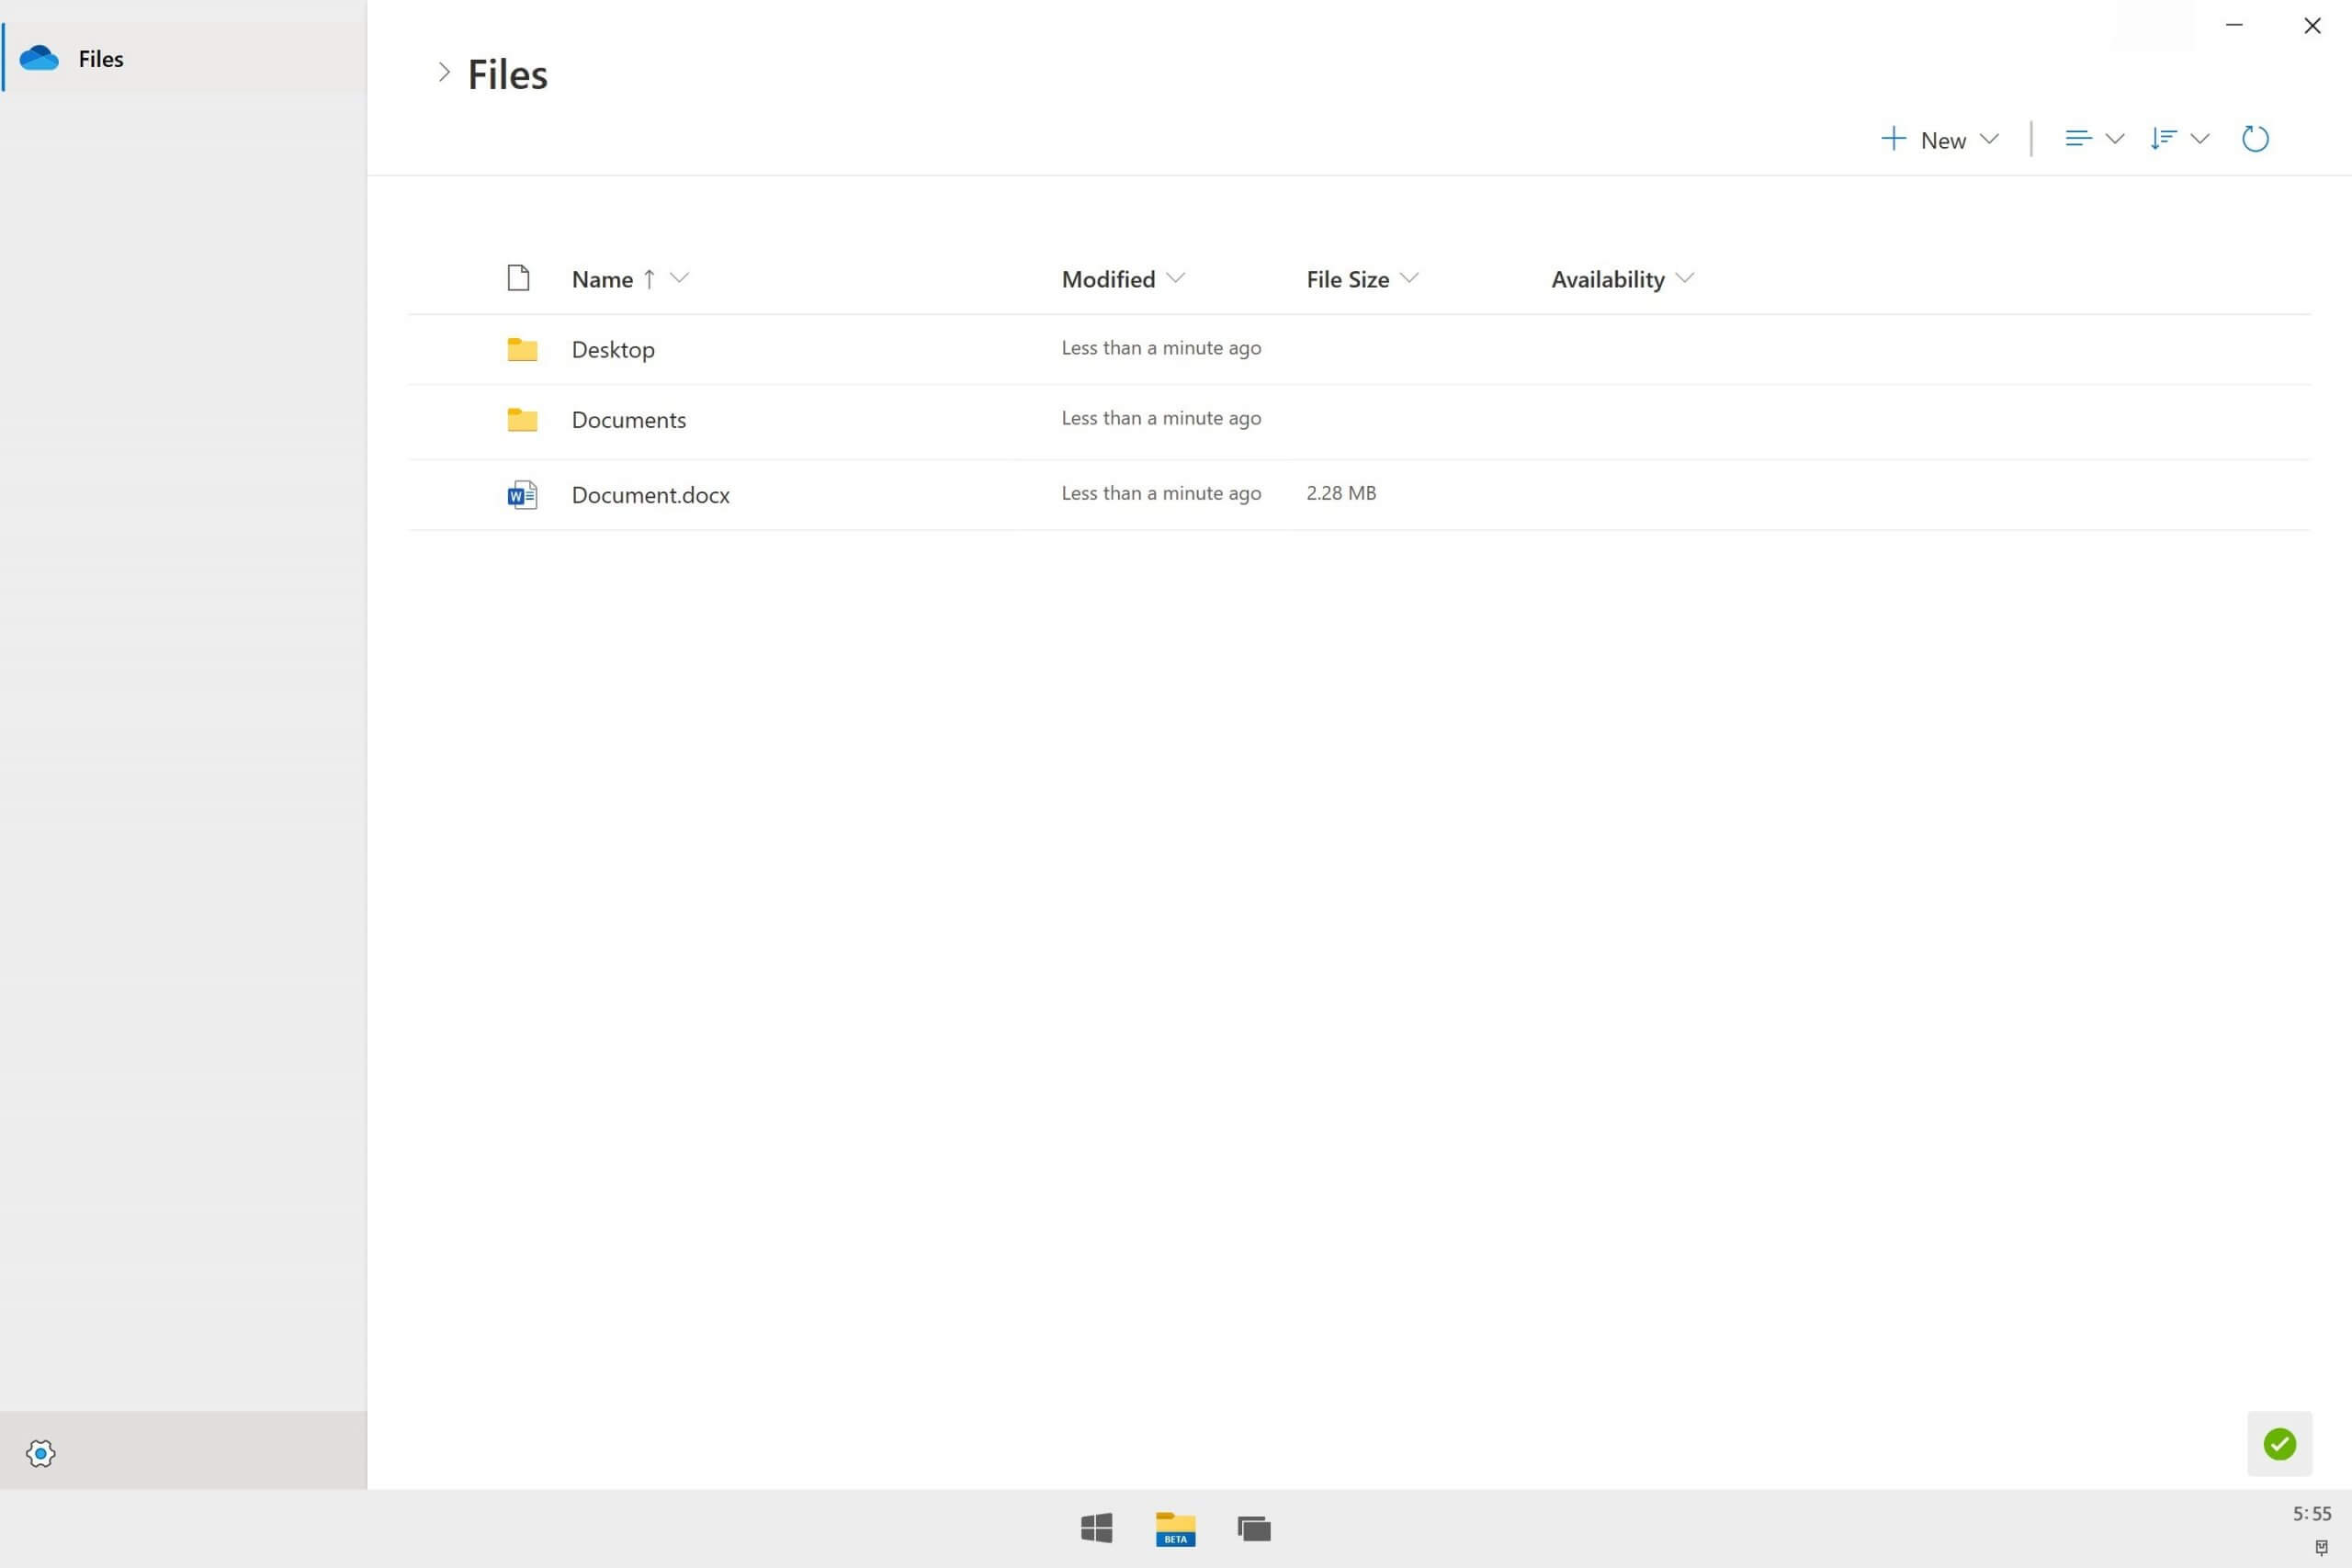
Microsoft is designing a new File Explorer that will be released with Windows 10X later in the year.

The design focuses on keeping OneDrive at its heart, with the new Windows 10X File Explorer becoming a lightweight solution that will enable users to browse through and move their files between the cloud and local PC.

The new design now makes it look more like a web app, but it has deep integration with the OS.

According to the folks from WindowsCentral:

….(The new File Explorer) web app, with a few OS integration hooks here and there…..

The new File Explorer doesn’t come with a sidebar or other tools that you may be used to seeing. It boasts a completely redesigned interface that favors foldable devices and even traditional laptops that might be launched by the end of 2021.

What do you think about the new File Explorer design and its OneDrive integration? give us your feedback by leaving us a message in the comments section below.

[wl_navigator]

Microsoft says that 91% of large US companies use MS Teams

If you work in a large corporate environment, then you most likely know the importance of instant messaging tools, emails, file sharing programs and more.

Of course, those of you that value efficiency above else know that there is a category of programs that incorporate all of the above, namely collaborative tools.

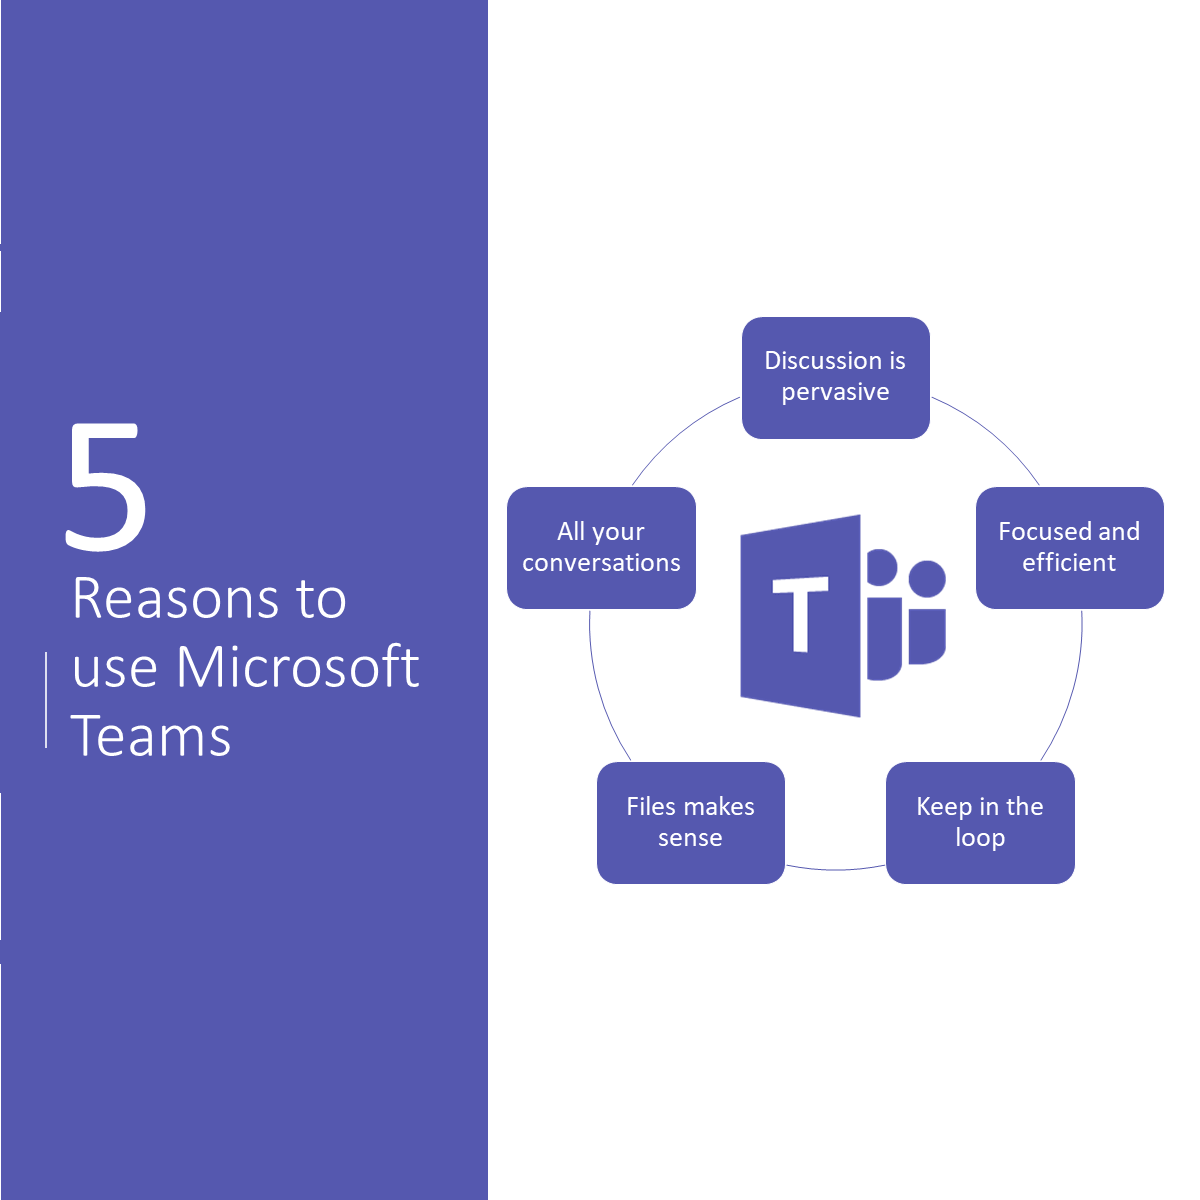
One such program is Microsoft Teams, a Microsoft product that is part of the Office 365 suite, but it can also be acquired separately, and it is 100% free.

These advantages are precisely what made Microsoft Teams one of the most popular programs used in large US companies.


How MS Teams grew as a company as time passed by

Today, Microsoft has revealed an unprecedented stat regarding MS Teams:

91 of the U.S.’s 100 largest companies is now using Microsoft Teams.


If you too are interested in using Microsoft Teams, then check out these handy guides that will get you started right away:


Slack claims it is better than MS Teams

On the flip side, Microsoft Teams’ main competitor, Slack announced in October 2019 that it has 12 million active users.

In an attempt to alleviate the monopoly of Microsoft teams in the collaborative software market, Slack revealed that it is far more engaging compared to MS Teams:

  • Slack has over 5 billion actions during a normal work week
  • Slack’s paid customers spend more than 9 hours daily connected to their service
    • This includes spending about 90 minutes daily actively using Slack.
  • 87% of sU.S.-based users aid that Slack improved collaboration and communication inside their organization.

This news comes in light of the COVID19 phenomena where companies ask more and more of their employees to work from home whenever possible. That being said, having a good collaborative tool that will supplement the lack of human interaction is more crucial than ever.

This eventually leads to an increase in popularity for communication tools like MS Teams, Zoom, Hangouts, Slack, and others.

 What’s your take on Microsoft Teams’ increased popularity? Share your thoughts in the comments section below and we’ll continue the talk.

[wl_navigator]

Here’s how to fix PostScript error VMerror

When you print an Adobe Illustrator file to a PostScript printer, this VMerror PostScript error might occur. The message you’re seeing Virtual Memory has been exhausted, job is too complex is a sign that your printer doesn’t have enough memory to process the job.

Therefore, the printer blinks repeatedly or begins to print the document only to reset itself before it finishes. In the happiest scenario, it does print documents, but it takes ages for that to happen.

The PostScript VMerror issue is also related to documents with many pages, text parts, clipping paths, linked or embedded raster images, compound paths, pattern or gradient fills whose complexity requires more memory than the printer is capable to offer.

Even so, these are no excuses to keep on getting this error. When looking for a way to avoid it, don’t hesitate to check our tested solutions.

What can I do if getting PostScript error VMerror?

1. Perform a quick restart

the default printer is checked

Before thinking that this memory-related PostScript error means compromising some of your complex effects and elements, do a quick shutdown of both your computer and printer.

Restart the PC. Wait approximately 30 seconds, then turn the printer back on as well. Make sure that the printer is set as default (the default printer is always checked) and try printing again.

By the way, in Windows 10, your default can be the printer you last used. To turn on this mode, select the Start button, and then Settings. Go to Devices > Printers & scanners and simply select the checkbox beside Let Windows manage my default printer.


Settings app won’t open in Windows 10? Take a look at this guide to find a solution!


2. Change the stacking order

stacking order

Your next step is to make some changes to the stacking order. Don’t hesitate to move complex elements to the back of the current layer or to a different layer.

PostScript handles image elements from the back layer to the front layer, one layer at a time. When getting the VMerror and only a portion of the document prints, the next element or layer that should have printed is most likely the element that exceeded the printer‘s available memory.


3. Manage gradients

Compatible Gradient and Gradient Mesh Printing

Files with gradients and multiple color blends can be difficult for some printers to print smoothly or at all. If the document you’re trying to print contains gradients, select Compatible Gradient and Gradient Mesh Printing in the Graphics section.

Additionally, convert gradient fills into masked blends using the Expand command. At first, make a backup copy of the document, select the gradient object, then choose Object > Expand. In the Expand Gradient dialog box, type 255 in the Specify Objects text box. Finally, click OK.

No less important, try print to an output device that supports PostScript Language Level 3. It’s a tad more difficult for Postscript Language Level 2 printers to handle the job.


4. Do a cleanup

remove items

You should also try to eliminate all extra software that adds to the complexity of the printing job. You may delete stray points, unpainted objects, and empty text paths. For that, enter into Object > Path > Cleanup. After checking all three options in the Cleanup dialog box, confirm by clicking OK.

Do the same and remove patterns, custom colors, brushes, styles, symbols, and gradients that aren’t a must. Try to reduce the number of fonts used in the document too.


5. Change the print resolution

print sizes

A low-resolution photo often looks great on your computer screen or smartphone because you’re looking at a small version of the image. The fewer pixels there are, the less crisp and clear your printed images will be, yet sometimes a lower resolution is the compromise that fixes this error.

If you’re willing to accept that, keep in mind that when you print a low-resolution photo, the smaller the print size, the sharper it will look.


6. Hook up an external disk

hard disk

Are you sure that you have plenty of hard disk space available? Print drivers usually create temporary files when printing, and store these files on the computer’s hard disk.

If that’s the issue, remember that some printers come with a SCSI-connector that lets you hook up an external disk. An old disk laying around would turn out to be a gold mine this time. You could also try to free up some hard disk space.

Other viable solutions are to avoid using multiple screen rulings, or extremely high or low rulings in a single document and to print only one page or even one-color at the time, instead of sending the entire document in one go. As a last resort, you could buy more RAM for your printer.

We can only hope that you managed to fix this annoying problem using one of these solutions.

READ ALSO:

Microsoft appoints Eric Horvitz as Chief Scientist, unifies research groups

Last November, Microsoft announced that Harry Shum was stepping away from the company (he left officially last month), and today, word is out that the company is consolidating its scientific and research efforts by appointing a new Chief Scientist, according to CNBC. Kevin Scott, Microsoft’s Chief Technical Officer, had taken over as head of AI and research from Shum. Microsoft Technical Fellow Eric Horvitz will assume that role, the first time Microsoft has had a single chief science officer. Peter Lee, who has been the CVP for Microsoft Healthcare, will now also be in charge of Microsoft Research, as efforts in healthcare are being more closely aligned with research.

Microsoft told CNBC through a spokesperson that

As Chief Scientist, Eric will provide cross-company leadership on advances and trends on scientific matters, and on issues and opportunities rising at the intersection of technology, people and society. He and his org will be responsible for advising on Microsoft’s scientific directions and capabilities, including standing up new initiatives, providing guidance on company priorities and assessing important areas for investment in science and technology.

It’s pretty obvious on a day that the Coronavirus, or COVID-19, has been declared a pandemic by the World Health Organization, but health is becoming a much bigger concern for technology companies (along with everyone else). The White House is reportedly calling in leaders from tech companies, including Microsoft, to discuss ways to better deal with the now pandemic.


Microsoft to hold Xbox digital event in lieu of now cancelled E3

Now that E3 has been officially cancelled due to concerns about the ongoing coronavirus outbreak, video games companies are now actively looking for alternatives. In a statement, the Entertainment Software Association said today that it was “exploring options with our members to coordinate an online experience to showcase industry announcements and news in June 2020,” but Microsoft was apparently one of the first to announce its plans today.

A couple of minutes ago, Xbox head Phil Spencer announced that Microsoft will “celebrate the next generation of gaming” in an upcoming Xbox digital event. There are no more details yet, but the Xbox team is now used to digital events with its ongoing series of Inside Xbox livestreams. Unlike Sony, Microsoft has already revealed the designs and specs of its new console, the Xbox Series X. Some important details have yet to be revealed including pricing and launch dates, and those could be revealed during this upcoming digital event. We also hope to see Microsoft reveal Xbox Series X gameplay footage, especially since this new console generation should be a much more significant leap compared to the last one.

Microsoft likely won’t be the only game publisher to hold a digital event in replacement for their E3 presence this year. Kotaku Editor in Chief Stephen Totilo pointed out today that Nintendo had a forward-thinking approach with its online shows during E3, and so does Sony with its much-anticipated “State of Play” livestreams.

With a new console generation incoming, the cancellation of E3 2020 is really unfortunate for the video games industry, and we shouldn’t underestimate the business side of the annual trade show with many game studios meeting with publishers and making deals during the event. It will be interesting to see if the Entertainment Software Association will be able to bring back E3 next year, but big game publishers may well decide to do their own thing going forward.


These tips and tricks will make you a pro at OneNote on Windows 10

Microsoft OneNote is a powerful digital notebook. You can use it to take notes, organize your thoughts into a journal, and then view them across all your different devices. Microsoft has continuously updated the app with plenty of new features, and it has become the defacto note-taking app for many.

In this guide, we’ll take a look at some of our favorite tips and tricks which can help turn you into a OneNote Pro. Keep in mind, though, we’ll be talking about the OneNote app downloaded through the Microsoft Store, and not OneNote 2016.

Tip 1: Use some keyboard shortcuts

Like the other Office 365 apps, OneNote depends heavily on using a ribbon for navigation. You can save your time in your busy day though, and try out some keyboard shortcuts to avoid having to constantly click on the ribbon for common tasks. Some of our favorite keyboard shortcuts can be seen below.

TaskKeyboard Shortcut
Add a new page at the end of the selected sectionCtrl+N
Open a notebookCtrl+O
Create a new page below the current page tab on the same levelCtrl+Alt+N
Move or copy the current pageCtrl+Alt+M
Open the Home tabAlt+H
Open the Insert tabAlt+N
Open the Draw tabAlt+D
Open the ribbonAlt
Start a math equation or convert selected text to a math equationAlt+=

There are many other shortcuts that you can use in OneNote which we didn’t mention above. These range from formatting, adding items to a page, selecting notes and objects, tagging notes, and more. You can see the complete list of shortcuts here at Microsoft.

New to OneNote and want the basics first? Read our step by step how to use OneNote guide to set up notebooks, add sections and pages, and start capturing notes with confidence.

Tip 2: Change your paper style and color

By default, OneNote gives you a blank white canvas to work on. However, if you go to the view menu, you can choose from different paper types. This will be more useful for different situations, be it inking up a graph, or just taking traditional notes in a lined notebook. By going to view and then choosing Page Color you can swap out between different page colors. You also can add lines or a grid to your page as well for various types of notebooks, say for graphing or taking actual notes. Just choose the Rule Lines option from the View bar to do this.

Tip 3: Use Dark Mode

Staring at a white screen when taking notes and using OneNote can be hard on the eyes. Like the other apps in Windows 10, OneNote supports a Dark Mode. This will make many elements of the OneNote user interface easier to read and navigate. Your pages will turn dark, and so will the navigation bar. You can turn it on in Windows 10 by clicking the . . . Settings and More menu at the top right corner of the screen, and choosing the Settings option followed by Options. There will be an option for Dark mode, and you’ll want to choose that.

Tip 4: Password protect your sections

Nothing is more horrible than someone peeking at your personal notes or your super-secret documents. Much like with Word and PowerPoint documents, you can protect your OneNote sections to keep the spies away. You can do this by right-clicking the name of a section in the sidebar, choosing Password Protection and then selecting Add Password. You will then have to enter your password twice, to confirm it. We talk more about password protection in our other OneNote guide here, so be sure to give it a read.

Tip 5: Split up two sessions of OneNote into two windows

Multi-tasking is a great way to save time during your busy day. You already can do it with the other Office 365 apps like PowerPoint and Word by opening up two sessions of the same program side-by-side. But, you can also do this in OneNote too. All it takes is to head to the View tab and click the New Window button at the top left corner of this screen. This will open up a new instance of OneNote, and allow you to stack two versions of the app side by side and get more work done. it’s particularly useful if you’re copying notes, or looking at a graph and want to still take notes in OneNote.

Tip 6: Use OneNote for solving tricky math problems

One area where OneNote is better than competing services like Evernote is its support for math problems. With OneNote, you can write out a math question and even have the app solve it and graph it for you. Of course, OneNote is no substitute for a math teacher, but it can really help out by giving you step by step instructions. To get started with this, all you have to do is begin by writing out an equation, either by ink with a pen or by typing it out.

When you’re done, you’ll want to click the Draw tab and select the Lasso tool and draw a circle around the equation. You can then click again on the Draw tab and choose Math. When done, you can select an action to solve or graph. Solving will give you a step by step solution, and graphing will give you an option to insert it on the page for examination or inking.

Tip 7: Use OneNote to insert printouts of Word documents, PDFs

If you’re looking to mark up a PDF file for your own personal use, say, perhaps a textbook, OneNote can help. With the insert printout feature, OneNote will insert a file as a picture. You can’t physically edit the printout, but you can draw on top of it, and keep the original formatting. You also can move it anywhere on the page.

To do this, click where you want to insert the file printout. Then, go to Insert followed by File Printout. You can then click the file you want to insert, and click insert. When done, you can ink on the image as you please. You also can copy text from the printout if you want, by right-clicking the image and then choosing Copy Text from this Page of the Printout. 

How do you use OneNote?

These are just our top 7 tricks for OneNote. There are many other ways you can use the app to your productivity advantage, especially if you’re sporting OneNote 2016. Check out our OneNote news hub for more, and let us know in the comments below how you use OneNote!

E3 2020 conference is reportedly being canceled over coronavirus fears (update: it’s official)

Update: it’s official, E3 is cancelled. Here’s the statement from E3:

“After careful consultation with our member companies regarding the health and safety of everyone in our industry – our fans, our employees, our exhibitors, and our longtime E3 partners – we have made the decision to cancel E3 2020, scheduled for June 9-11 in Los Angeles.

Following increased and overwhelming concerns about the COVID-19 virus, we felt this was the best way to proceed during such an unprecedented global situation. We are very disappointed that we are unable to hold this event for our fans and supporters. But we know it’s the right decision based on the information we have today.

Our team will be reaching out directly to exhibitors and attendees with information about providing full refunds.

We are also exploring options with our members to coordinate an online experience to showcase industry announcements and news in June 2020. Updates will be shared on E3Expo.com.

We thank everyone who shared their views on reimagining E3 this year. We look forward to bringing you E3 2021 as a reimagined event that brings fans, media, and the industry together in a showcase that celebrates the global video game industry.”

As the fear of the coronavirus (COVID-19) spread continues to shut down conferences throughout the US, one of the biggest video game conferences of the year may be at risk of being called off. As noted in a report by Bloomberg, The Electronic Entertainment Expo (E3) taking place in the Los Angeles Convention Center in June 2020, is about to be canceled.

“The cancellation is planned to be announced at 9:30 am Los Angeles time on March 11 by the Entertainment Software Association (ESA), according to a person familiar with the matter. The ESA, which organizes the show commonly known as E3, wrote in a private memo to partners on Tuesday that it is ‘exploring options for an online E3 event this summer.’”

Along with gamescom in Europe, E3 is one of the biggest events for the video games industry, where we often see new games and hardware announcements. The event was expected to be pretty special this year with the upcoming launch of Microsoft’s Xbox Series X and Sony’s PlayStation 5 in holiday 2020, though Sony announced that it would skip E3 for the second time in a row this year. It’s also worth noting that Microsoft wasn’t on the E3 show floor in recent times, opting last year to hold its own E3 event at Microsoft Theater and the Xbox Plaza at LA. The software giant has yet to share its E3 plans for this year, though if E3 2020 is indeed cancelled, it is likely that Microsoft will follow up.

Previously, E3 organizers said they were “monitoring and evaluating the situation daily” using guidance from the CDC (Centers for Disease Control and Prevention) and the WHO (World Health Organization). There is no official comment by the ESA yet, but stay tuned for the formal announcement at 9:30 AM PDT (12:30 PM EST).

How to use Microsoft Teams chat commands to save time and stay on top of your tasks

Microsoft Teams’ growing feature set and customisable channel tabs can make for a fairly heavy interface experience. You can quickly cut to what matters using keyboard text commands, which can help you jump between unrelated sections of the app.

Chat commands are accessed via the central search box at the top of the Microsoft Teams window. Click within the search box to focus it. You can then type a “/” character to view the full list of available commands. Once you’ve found a command to run, type it (prefixed with “/”) and then press enter.

Microsoft Teams chat commands

An even quicker way is to use the Ctrl+E keyboard shortcut to focus the searchbar. You can then start typing a command without having to use the mouse at all. The command list can be viewed using the Alt+K keyboard shortcut.

Teams supports a wide range of commands which cover the most commonly used actions. You can get the full list over on the Teams support site. We’ll highlight some of the most useful ones here.

  • /available – Use this to set your status to Available. Similar commands are available for “Away”, “Busy” and “Do not Disturb” (use “/dnd” in the latter case).
  • /call – Start a new call. This only works if your Teams plan allows calling and your user account is configured for it. Type the command followed by a phone number or Teams contact name to call.
  • /goto – Perhaps one of the most useful commands, it allows you to quickly navigate around the app without using the mouse. After typing the command, add a team or channel name to visit (Teams will autocomplete options as you type).
  • /mentions – Immediately navigate to the “Activity” tab and filter it to include messages which mentioned you.
  • /saved – See all your saved messages.
  • /testcall – Check whether Teams calls are working properly.
  • /unread – Open the Activity tab and display all unread activity which you haven’t previously reviewed.

“Slash” commands (prefixed with “/”) aren’t the only command type you can use. The search box lets you quickly send a message to a contact by using an at-mention command (“@” instead of “/”). You’ll need to select or type a contact name, then enter the message you’d like to send. You can do this from anywhere in the app, without navigating to the Chat tab.

You can invoke apps in the same way. Try installing an app like News and then typing “@News” into the searchbar. You’ll get the latest news without having to leave Teams, or even your current screen.

It can take a little time to learn all the available commands but doing so is often worth the investment. Changing your status is a 3-click procedure using the profile icon; you can do it in a few keystrokes with a chat command. To avoid typing long commands, press the “tab” key as soon as the one you want is highlighted. Teams will autocomplete the command name so you can press enter to run it.

Using apps in the Microsoft teams searchbar

Finally, don’t forget the most basic property of the serch bar: search! You can use it to unearth anything you’ve added to Teams, whether that’s a message, person, document or something from an app.

You can get the most from Teams by making effective use of the searchbar. Finding, creating and reviewing content can all be achieved with just a few keystrokes, while minimising navigation changes. This helps you find information more quickly and avoid the overhead of context switching.

Adding apps to Teams takes this experience even further: with a few choice apps you can use the searchbar as a centralised information hub, capable of surfacing chat threads, OneDrive business documents, Planner tasks or trending social media content. The single most important command is the most basic: use “/” to view the list of available commands and keep checking it as you add more apps.

Ori and the Will of the Wisps is now live on Windows 10 and Xbox One, Are you playing?

Ori and the Will of the Wisps is finally live and playable on Xbox One consoles and Windows 10 devices and can also be accessed in full for free as part of an Xbox Game Pass subscription.

The game is a sequel to Ori and the Blind Forest and is also a 2D platformer with a similar artful design aesthetic and soulful music.

Here’s the official game description:

The little spirit Ori is no stranger to peril, but when a fateful flight puts the owlet Ku in harm’s way, it will take more than bravery to bring a family back together, heal a broken land, and discover Ori’s true destiny. From the creators of the acclaimed action-platformer Ori and the Blind Forest comes the highly anticipated sequel. Embark on an all-new adventure in a vast world filled with new friends and foes that come to life in stunning, hand-painted artwork. Set to a fully orchestrated original score, Ori and the Will of the Wisps continues the Moon Studios tradition of tightly crafted platforming action and deeply emotional storytelling.

Ori and the Will of the Wisps has been receiving extremely positive reviews from players and the media and will likely be one of the biggest Xbox console exclusive titles released this year. It’s been getting a rather large promotional push on the official Xbox social media channels with products ranging from a real Ori bonsai to limited edition Ori and the Will of the Wisps hoodies and onesies.

Have you played Ori and the Will of the Wisps yet? Share your impressions with the community in the comments below and then follow us on Pinterest and Twitter for more Xbox gaming content.

KB4540673 in Windows 10 v1909 and 1903 fixes OS update issues

The March Patch Tuesday Updates are finally here, and Microsoft has prepared plenty of new security patches and feature updates for users to try out. Cumulative updates are available for all versions of Windows 10, and installing them is done in the same way as typical updates.

Third-party programs will no longer interfere with OS updates

One of the highlights of this round of patches is a cumulative update released for Windows 10 v1909 and v1903 users called KB4540673 

As a general idea, KB4540673 contains security updates to Windows App Platform and Frameworks, Windows Media, Windows Silicon Platform, and more.

However, what makes this update stand out is a fix for an issue that many users have been complaining about.

More precisely, KB4540673 addresses an issue that prevents certain users from upgrading the OS because of corrupted third-party assemblies.

As you can imagine, having certain programs installed that had nothing to do with Microsoft could cause interferences with the OS update process. This included slow downloads, installations getting stuck halfway through, error messages, and more.

However, KB4540673 supposedly fixes all that, and now users can enjoy a smoother update experience.


Get KB4540673 as soon as possible

Those that run Windows 10 version 1909 and 1903 can get the latest Patch Tuesday updates via the typical methods you would get any other type of update.

This means using methods like the Windows Update Catalog, using the Windows ServerUpdate Services (WSUS), or using the built-in Windows Update feature.

Keep in mind that Patch Tuesday Updates are generally very important, as they usually contain major feature improvements and security patches.

Note: It is important that you always have a backup of all of your data before performing a big set of updates like the ones on Patch Tuesday.

Editor’s Note: If you want to know everything there is to know on Patch Tuesday, check out this in-depth guide.

[wl_navigator]

KB4540705 fixes Credential Guard domain errors

Microsoft just released the March Patch Tuesday updates and it seems that they bring plenty of functionality improvements as well as some fixes and security updates.

These updates are available to all versions of Windows 10, ranging from version 1909 to 1507. However, one of these updates, namely KB4540705 for Windows 10 version 1703 fixes an issue that prevents machines that have Credential Guard enabled from joining a domain.

Those with Credential Guard activated could not join domains

According to KB4540705’s official homepage, the error message is the following:

The server’s clock is not synchronized with the primary domain controller’s clock.

Not being able to join domains had the potential to severely hinder work and functionality, as such the fix will most likely be well-received.

This issue is singular in nature since it affects only one version of Windows 10, however, this has all been fixed without any further issues.

This KB also addresses an issue that might cause Microsoft browsers to bypass proxy servers, along with another issue that might prevent icons and cursors from appearing as expected.

These fixes are something that KB4540705 shares with all the other cumulative updates released during the March Patch Tuesday round of updates.

As far as issues go, Microsoft is not currently aware of any issues with this update.


How to get the latest Patch Tuesday updates

The first step to installing Patch Tuesday updates is understanding why they are so important. Once you’ve done that, you can go ahead and read up on the best practices to follow when applying them.

If you too want to get your hand on the latest fixes and updates, then you should get the latest Patch Tuesday updates as soon as they are available to you.

These are the most common means through which one could download the latest Patch Tuesday updates:

  • Windows Update
  • Windows Server Update Services (WSUS)

However, if you are interested in downloading only certain cumulative updates, your best bet would be the Windows Update Catalog.

Note: It is important that you always have a backup of all of your data before performing a big set of updates like the ones on Patch Tuesday.

Editor’s Note: If you want to know everything there is to know on Patch Tuesday, check out this in-depth guide.

[wl_navigator]

You can now annotate live video in Microsoft Stream

A new Microsoft Stream feature lets you annotate live footage captured via your Android or iOS smartphone. It is one of the latest major enhancements to the app, which helps users get the most out of their phones’ video cameras.

A powerful Office 365 video service

Microsoft Stream is an Office 365 tool that enables enterprises to collaborate with video. The additional ability to annotate video in real time suits the app to numerous use cases, such as peer-to-peer information sharing in a learning application.

So, while capturing live video with Stream, you can now insert text comments, perhaps to mark notable events or provide brief notes. According to the update release notes on the App Store, you may also annotate your footage before or after recording.

Camera flipping

The ability to switch between front and rear cameras while recording video with Stream has been elusive for some time.

Now that Microsoft has added the camera-flipping feature to Stream, there will be a button you can tap to swap between the two smartphone cameras without interrupting your recording session.

Enterprise server integration

Stream lets you store your videos in the cloud, thanks to its integration with Microsoft 365. The app now allows you to retrieve all uploaded footage from your company server.

Other new Stream features are:

make stickers from photos

view clips in chronological order

drag-n-drop any clip to your recording to stitch into a new order

trim to shorten the overall length

Currently, there is no Windows 10 app with the video recording capabilities of Stream. Maybe Microsoft is considering building a tool like that for its upcoming dual-screen devices, especially the Surface Neo, which will run on Windows 10X?

Still, there is no technical reason why Stream should not support the Surface Duo, an Android device.  If the gadget comes with more than two cameras, it will be interesting to see how Microsoft optimizes the video recording app for the futuristic mobile form factor.

You can go to the Google Play store to download Microsoft Stream for Android.

Battle.net launcher links break your browser: what to do

The Battle.net client is necessary for running and managing just about any game developed by Blizzard. However, occasional troubles with the client are present, which definitely spoils the experience for some players.

One of the most annoying problems with the Battle.net client, which has been present for a couple of years now, is the bug with opening links from the launcher. According to many reports, as soon as some people try to open a link, their browser (mostly Chrome and Firefox) fails to load it and crashes immediately.

“If I click on any of the battle.net launcher links, such as in News for the D3 Patch 2.2, it will launch Chrome and then just get stuck trying to load the page. It breaks my Chrome so badly that I can’t even open up other sites like youtube or anything in new tabs. I have to close Chrome completely to use Chrome again“, said one user of the Battle.net forum.

Unfortunately, a sure solution hasn’t been confirmed yet, as players are dealing with this issue to this very day. However, folks from Blizzard suggest one solution that might be helpful.

Namely, it is advised to have your web browser already open, before you try to access a link from the launcher. Reportedly, the browser won’t crash in that case, and everything should work normally.

“This is a known issue with some browsers and how they interact with links passed from the Desktop App (usually this happens with Chrome rather than others but can happen in some rare cases to others). Occasionally with no open browser window the links from the Desktop App will cause issues such as the one you’ve seen. You can, as you’ve discovered, have an open browser window available before following any links to workaround the issue. Thanks!”

Since we were unable to test this solution, we can’t confirm whether it’s really helpful or not. But if you’re experiencing this kind of issue, you should definitely try this workaround.

Set Opera as your default browser to avoid issues with external links

Unlike Chrome, Opera is a rather stable and well-optimized browser. You’ll avoid all those strange issues caused by opening links from a variety of sources by simply switching to another effective browser.

The main focus of this browser is privacy and security, but reliability and overall speed are hardly being sacrificed. It comes with a built-in ad blocker and a free VPN integrated with the browser.

We’re talking about a highly-customizable browser built on the basis of the Chromium project. Opera is, simply put, Chrome on steroids, with a versatility that meets every user’s need.

Therefore, if you require a proficient browser without constraints regarding links or interaction with other programs, confidently choose this one.

⇒ Get Opera

If this indeed helps, let us know in the comments. If not, and you know some other solution, by chance, once again, please reach the comments section below.

Windows 10 March Patch Tuesday [DIRECT DOWNLOAD LINKS]

The third round of major updates for the year 2020 are here, and they are called the March Patch Tuesday updates. As it is common with all Patch Tuesday updates, they target all major versions of Windows 10.

Additionally, this marks the first real round of Patch Tuesday Updates where Windows 7 no longer receives any more updates, as all major fixes have been fixed in prior updates and patches.

Cumulative updates included in March Patch Tuesday Updates


Windows 10, version 1909

Windows 10 version 1909 and versions 1903  share a common core operating system and an identical set of system files. As a result, all major changes that apply to one version will be present in the other.

Cumulative update name:

Improvements and fixes 

  • Addresses an issue that prevents certain users from upgrading the OS because of corrupted third-party assemblies.
  • Security updates to Windows App Platform and Frameworks, Windows Media, Windows Silicon Platform, Microsoft Edge, Internet Explorer, Windows Fundamentals, Windows Authentication, Windows Peripherals, Windows Update Stack, and Windows Server.

Known Issues

  • When using Windows Server containers with the March 10, 2020 updates, you might encounter issues with 32-bit applications and processes.

[DIRECT DOWNLOAD LINK]


Windows 10, version 1903

Windows 10 version 1909 and versions 1903  share a common core operating system and an identical set of system files. As a result, all major changes that apply to one version will be present in the other.

Cumulative update name:

Improvements and fixes

  • Same as Windows 10, version 1909

Known Issues

  • Same as Windows 10, version 1909

[DIRECT DOWNLOAD LINK]


Windows 10, version 1809

Windows 10, version 1809 gets an update as well, bumping the build number to 17763.1098. One of the highlights of this build are some security improvements towards security when using Microsoft Edge and Internet Explorer.

Cumulative update name:

Improvements and fixes

  • Security updates to Microsoft Scripting Engine, Windows App Platform and Frameworks, Windows Media, Windows Silicon Platform, Microsoft Edge, Internet Explorer, Windows Fundamentals, Windows Authentication, Windows Kernel, Windows Core Networking, Windows Storage and Filesystems, Windows Peripherals, Windows Update Stack, and Windows Server.

Known Issues

  • After installing KB4493509, devices with some Asian language packs installed may receive the error, “0x800f0982 – PSFX_E_MATCHING_COMPONENT_NOT_FOUND.”
  • When using Windows Server containers with the March 10, 2020 updates, you might encounter issues with 32-bit applications and processes.

[DIRECT DOWNLOAD LINK]


Windows 10, version 1803

Windows 10 version 1803 is also getting an update that takes the build to OS Build 17134.1365. Among the many new improvements, one thing worth mentioning is the update to improve security when using external devices (such as game controllers, printers, and web cameras).

Cumulative update name:

Improvements and fixes

  • Security updates to Microsoft Scripting Engine, Windows App Platform and Frameworks, Windows Graphics, Windows Media, Windows Silicon Platform, Microsoft Edge, Internet Explorer, Windows Fundamentals, Windows Authentication, Windows Kernel, Windows Core Networking, Windows Storage and Filesystems, Windows Peripherals, Windows Update Stack, and Windows Server.

Known Issues

  • There are no known issues

[DIRECT DOWNLOAD LINK]


Windows 10, version 1709

Windows 10, version 1709, reached the end of service on April 9, 2019, for devices running Windows 10 Home, Pro, Pro for Workstation, and IoT Core editions. As such, these devices will longer receive monthly security and quality updates.

If you desire to keep working efficiently and safely, Microsoft recommends that you update to the latest version of Windows 10.

Cumulative update name:

Improvements and fixes

  • Addresses an issue that might prevent icons and cursors from appearing as expected.
  • Security updates to Microsoft Scripting Engine, Windows App Platform and Frameworks, Microsoft Graphics Component, Windows Media, Windows Silicon Platform, Microsoft Edge, Internet Explorer, Windows Fundamentals, Windows Authentication, Windows Cryptography, Windows Kernel, Windows Core Networking, Windows Storage and Filesystems, Windows Peripherals, Windows Network Security and Containers, Windows Update Stack, and Windows Server.

Known Issues

  • There are no known issues

[DIRECT DOWNLOAD LINK]


Windows 10, version 1703

Windows 10, version 1703 has reached end of service for all editions. If you want to continue receiving security and quality updates, Microsoft recommends updating to the latest version of Windows 10.

Cumulative update name:

Improvements and fixes

  • Addresses an issue that might cause Microsoft browsers to bypass proxy servers.
  • Addresses an issue that might prevent icons and cursors from appearing as expected.
  • Addresses an issue that prevents machines that have Credential Guard enabled from joining a domain. The error message is “The server’s clock is not synchronized with the primary domain controller’s clock.”
  • Addresses an issue with evaluating the compatibility status of the Windows ecosystem to help ensure application and device compatibility for all updates to Windows.
  • Security updates to Microsoft Scripting Engine, Windows App Platform and Frameworks, Microsoft Graphics Component, Windows Media, Windows Silicon Platform, Microsoft Edge, Internet Explorer, Windows Fundamentals, Windows Authentication, Windows Cryptography, Windows Kernel, Windows Core Networking, Windows Storage and Filesystems, Windows Peripherals, Windows Network Security and Containers, Windows Update Stack, and Windows Server.

Known Issues

  • There are no known issues

[DIRECT DOWNLOAD LINK]


Windows 10, version 1607

Windows 10, version 1607, reached the end of service on April 10, 2019, for devices running Windows 10 Home, Pro, Pro for Workstation, and IoT Core editions. This means that the devices running this version will no longer receive monthly security and quality updates.

Cumulative update name:

Improvements and fixes

  • Addresses an issue that might prevent icons and cursors from appearing as expected.
  • Security updates to Microsoft Scripting Engine, Windows App Platform and Frameworks, Microsoft Graphics Component, Windows Media, Windows Silicon Platform, Microsoft Edge, Internet Explorer, Windows Fundamentals, Windows Authentication, Windows Cryptography, Windows Kernel, Windows Core Networking, Windows Storage and Filesystems, Windows Peripherals, Windows Network Security and Containers, Windows Update Stack, and Windows Server.

Known Issues

  • After installing KB4467684, the cluster service may fail to start with the error “2245 (NERR_PasswordTooShort)” if the group policy “Minimum Password Length” is configured with greater than 14 characters.
  • When using Windows Server containers with the March 10, 2020 updates, you might encounter issues with 32-bit applications and processes.

[DIRECT DOWNLOAD LINK]


Windows 10, version 1507

This update stands out compared to those of other builds, since they include the most fixes, albeit they are rather minor.

These include changes Updates an issue that might prevent icons and cursors from appearing as expected, updates to improve security when using Microsoft Office products, and more.

Cumulative update name:

Improvements and fixes

  • Addresses an issue that might cause Microsoft browsers to bypass proxy servers.
  • Addresses an issue that might prevent icons and cursors from appearing as expected.
  • Security updates to the Microsoft Scripting Engine, Windows App Platform and Frameworks, Microsoft Graphics Component, Windows Media, Windows Silicon Platform, Microsoft Edge, Internet Explorer, Windows Fundamentals, Windows Authentication, Windows Cryptography, Windows Kernel, Windows Core Networking, Windows Storage and Filesystems, Windows Peripherals, Windows Network Security and Containers, and Windows Server.

Known Issues

  • There are no known issues

[DIRECT DOWNLOAD LINK]


Patch Tuesday list of CVEs

If you want to learn more about this month’s list of common vulnerabilities and exposures, you can check out the list below. Keep in mind that this is not the full list. If you want to know about this month’s 115 CVEs, you can check out this article.

How do I get the latest updates?

The most common and secure method of installing the updates is via Windows 10‘s Windows Update feature. The latest updates should appear as available there as soon as they are released.

However, if you are only interested in a specific update, then all you need to do is visit the Windows Update Catalog, and enter the specific KB number. The download should start immediately, and you can then manually install the updates that you desire.

Other viable sources for updates include:

  • Microsoft Update
  • Windows Server Update Services (WSUS)

Note: Don’t forget to always have a backup of all of your data before performing a big set of updates like the ones on Patch Tuesday.

Editor’s Note: If you want to know everything there is to know on Patch Tuesday, check out this in-depth guide.

[wl_navigator]

The latest Patch Tuesday updates bring fixes to 115 CVEs

The third major round of updates for Microsoft Windows 10 and are here, and they are called the March Patch Tuesday Updates. As a whole, they bring improvement and fixes for several features, including:

  • Microsoft Patches
  • Fixes for 115 CVEs

Strangely enough, this month’s round of Patch Tuesday Updates contains no updates for Adobe Products. In February, Adobe had multiple releases, so it’s very likely security patches will be released at some point in March. We will update this article accordingly as soon as this happens.

115 CVEs were found and fixed this month

Out of the 115 total CVEs,, 26 are listed as Critical, while 88 are listed as Important, and one is listed as Moderate in severity. Additionally, none of the bugs being patched are listed as being publicly known or under active attack at the time of release.


Microsoft patches

The March security release consists of security updates that fixed 115 different CVEs for the following software:

  • Microsoft Windows
  • Microsoft Edge (EdgeHTML-based)
  • Microsoft Edge (Chromium-based)
  • ChakraCore
  • Internet Explorer
  • Microsoft Exchange Server
  • Microsoft Office and Microsoft Office Services and Web Apps
  • Azure DevOps
  • Windows Defender
  • Visual Studio
  • Open Source Software
  • Azure
  • Microsoft Dynamics

Which were some of the most severe CVEs?

Some of the most important CVEs, out of which some were also exploited to a certain degree, are the following:

CVE-2020-0852

  • Microsoft Word Remote Code Execution Vulnerability

CVE-2020-0905

  • Dynamics Business Central Remote Code Execution Vulnerability

CVE-2020-0684

  • LNK Remote Code Execution Vulnerability

CVE-2020-0872

  • Remote Code Execution Vulnerability in Application Inspector

These are the most important CVEs covered by Microsoft during the March 2020 round of Patch Tuesday Updates. For the next set of updates, users will have to wait until April 14.

How do I get the latest updates?

The most common and secure method of installing the updates is via Windows 10‘s Windows Update feature.

However, if you are only interested in a specific update, then all you need to do is visit the Windows Update Catalog, and enter the specific KB number.

The download should start immediately, and you can then manually installed the updates that you desire.

Other ways you can update Windows 10 include using any of the following:

  • Windows Update
  • Microsoft Update
  • Windows Server Update Services (WSUS)

If you have any other questions or suggestions, don’t hesitate to reach for the comments section below.

Editor’s Note: If you want to know everything there is to know on Patch Tuesday, check out this in-depth guide.

[wl_navigator]

Fix Overwatch voice chat problems [GAMER’S GUIDE]

Blizzard hit the jackpot with Overwatch. In a group of average, to below-average online multiplayer shooters, this title achieved instant stardom since introduced. Adrenaline-rushed team battles, a variety of selectable heroes and visual experience are obvious reasons for that.

The Windows 10 player base is growing larger and the developers are doing a great job of patching annoying bugs and glitches. However, as it turns out, there are some technical issues that keep showing up after every update.

One of the issues players reported is concerning team voice chat. We all know that without a chat, any competitive online game is almost unplayable. So, we’ll try to address this problem and offer possible solutions.

What can I do if my voice chat is not working in Overwatch? The easiest thing you could do is to check your audio defaults. In many cases, the issue is caused by some inconsistent settings. Then, you can check your VoIP and router ports or disable background applications.

For more details on how to do that, keep reading.overwatch voice chat not working in windows 10

How to fix voice chat problems in Overwatch on Windows 10

  1. Check your default audio devices
  2. Disable application exclusive control for audio devices
  3. Check VoIP and router ports
  4. Disable background applications
  5. Disable firewall
  6. Check your in-game audio settings
  7. Reinstall the game client

Solution 1 – Check your default audio devices

In this matter, the first thing you should do is check your hardware. That way you’ll be sure hardware isn’t core of the problem.

You should check both playback and recording devices. To do so, follow these steps:

  1. Right-click on the Volume icon in the system tray.
  2. Open Sounds and go to Playback tab.overwatch voice chat problem
  3. Choose the device you want to use in-game.
  4. Make the preferred device default.overwatch voice chat doesn't work
  5. Repeat the process for the Recording device, as well.

Additionally, you should probably check your drivers. You can do that by following these instructions:

  1. Right-click on This PC/My Computer icon on your desktop.
  2. Open Properties.
  3. Select Device Manager.
  4. In the list, find Sound, video and game controllers.Sound, Video and Game Controllers overwatch voice chat issues
  5. If the audio device is enabled and working, that’s one problem less.
  6. However, most of the time Windows 10 installs generic drivers. To be sure that your drivers are on point, you should search for them out on the manufacturers’ site.

Solution 2 – Disable application exclusive control for audio devices

Disabling application exclusive control is reported as a frequent solution for the voice-related issues. By disabling it, the system won’t prioritise any active applications that interfere with the audio devices.

You can do that by following these instructions:

  1. Right-click Volume icon in the system tray.
  2. Click Sounds.voice chat not working overwatch windows 10
  3. Select your default device that is used in the game and open its Properties.
  4. Go to the Advanced tab.overwatch audio issues
  5. Disable Allow applications to take exclusive control of this device.
  6. Repeat the process for the Recording devices, as well.

-READ ALSO: FIX: USB Microphone not Working in Windows 10, 8.1

Solution 3 – Check VoIP and router ports

Some internet providers limit or even disable VoIP in certain areas. Make sure that VoIP is enabled.

Additionally, you’ll want to check if certain ports are opened, in order to make the in-game sound function flawlessly. These are the ports you should review:

  • Ports 1119, 3724, 6113, 80 – TCP – for Overwatch.
  • Ports 6250, 5062 and 5060 – UDP – for voice control signals.
  • Ports 12000-64000 – UDP – for voice media.
  • Ports 3478 and 3479 – UDP – to aid in setting up voice.

-READ ALSO: Top 6 VoIP software for gaming you should use right now

Solution 4 – Disable background applications

In some occasions, the background applications can interfere with the in-game audio. This is especially the case with the ones that are audio-related like Skype, TeamSpeak, Discord, Wire, Curse, Mumble, and others.

To prevent potential conflicts, be sure to disable them before you start Overwatch.

Solution 5 – Disable firewall

Firewall is an important security measure and disabling it is not advised. On the other hand, there are some reports that the game is malfunctioning because firewall blocks or slows down some of its features.

So, you should try to disable the firewall, to see if that makes any difference. To disable your Windows Firewall, follow the path:

  1. Go to Control Panel.
  2. Choose System and Security.voice chat bugs overwatch
  3. Click Windows Firewall.
  4. Select Turn Windows Firewall on or off.disable Windows firewall overwatch not working windows 10
  5. You’ll need administrator privileges to interact.
  6. Turn it off.

-READ ALSO: Overwatch patch for Xbox One and Windows PC introduces bug fixes and new gameplay

Solution 6 – Check your in-game audio settings

After you’ve reviewed all of the possible hardware/software cause of audio disturbance, move on to the in-game settings. You should check out these settings:

  1. Open Options.
  2. Go to the Sound tab.
  3. Turn up both microphone and speaker sound.
  4. Set Group/Team chat to Auto-join.
  5. Try out switching between Default device and Comms if the option is available.
  6. Save settings.

Solution 7 – Reinstall the game client

The last resort for malfunctioning software of any kind is reinstalling. The game client lets you do it simply, but you can do it manually if thorough clean up is your cup of tea.

To reinstall Overwatch from your PC using a desktop app, do as follows:

  1. Open the Battle.net Desktop App.
  2. Choose the game you want to uninstall.
  3. Click Options.
  4. Select Uninstall.
  5. After the process is finished, restart your PC.
  6. To install the game again, run Battle.net Desktop App.
  7. Choose Overwatch.
  8. Click Install.

To reinstall the game in an old-fashioned way, follow these steps:

  1. Open Control Panel.
  2. Click Uninstall a program.overwatch voice chat issues in windows 10
  3. Right-click the game icon and select Uninstall.
  4. After uninstalling, there may be game files remaining on your computer. You can use a cleaning tool to clear the registry and to prevent interference with the fresh install.
  5. To install the game again, run Battle.net Desktop App.
  6. Choose Overwatch.
  7. Click Install.

-READ ALSO: How to fix Overwatch FPS issues in Windows 10

These were our possible solutions for this issue. We hope they’ll help you resolve voice chat issues in Overwatch. However, if your problem is persistent, some of the upcoming patches may solve it.

Do you have some additional ideas how to address the problem, maybe? Feel free to share them with us in the comments section below along with any other questions you may have.

[wl_navigator]

[wl_navigator]

Fix Diablo 3 Error: There Was a Problem Joining the Game

The essence of many games lies in the multiplayer mode, where players can join their friends and share the gaming experience. However, there seems to be a widespread issue with Diablo 3 on all supported devices. Namely, users are getting the There was a problem joining the game error.

This completely prevents them from joining certain games while the others work without issues. Blizzard responded to the problem since the first reports and allegedly solved it, but the error is still bothering users nonetheless.

To fix this, follow the steps below.

How can I fix Diablo 3 error: There was a problem joining the game?

1: Update the game

  1. Primarily, reboot your PC or console and try again.
  2. If the problem occurred on the PC, navigate to the Battle.net client.
  3. The client should automatically update the game.
  4. Alternatively, if you are stuck with the problem on consoles, navigate to the game and update it from the menu.
  5. After that, check for the console firmware updates, too, and reboot your console.There was a problem joining the game

We’ve written extensively on Diablo 3 issues on Windows 10. Check out these guides for more information.


2. Check the connection

  • Since the problem is mostly related to connection issues, try resetting your router and modem.
  • Stick to wired connection instead of wireless.There was a problem joining the game
  • Open Ports on your router that are required for the game to work seamlessly online. For Diablo 3, you’ll need to ensure that these ports are open: TCP PORTS
    80, 1119UDP PORTS
    1119, 6120
  • Change region settings to ALL.
  • Restore your router or modem to factory settings.
  • Disable IPv6 and stick to IPv4 solely in network settings.

3. Reinstall the game

  1. Navigate to Battle.net client and select the game from the Main menu.There was a problem joining the game
  2. Uninstall the game.
  3. Navigate to the installation folder and delete all remaining files.
  4. Get back to Battle.net client and install the game again.

This is just one of many issues that you can encounter, and many have also encountered Diablo 3 Code 1 during their gaming sessions. Speaking of issues, if you’re playing the latest game, you should know that many are dealing with Diablo 4 error code 395002, but we have a guide that will show you how to fix it.