How to upgrade from Hyper-V Server 2008 R2

Microsoft ceased support for Windows 7 earlier this year. Not only that, but Windows Server 2008 and Windows Server 2008 R2 is also being discontinued.

That being said, users are forced to migrate to Windows 10, and Windows Server 2012 respectively.

The discontinuation of Microsoft Server 2008 and 2008 R2 means that those of you still using Hyper-V Server 2008 R2 will also have to upgrade at some point.

While the upgrade isn’t mandatory, you will be exposed to security threats if you do not accept it.

Unlike Microsoft Server 2008, upgrading a Hyper-V Server is a bit more complicated, meaning that an in-place upgrade is impossible.

Thus, and the only way to upgrade is to install a new copy of the operating system.

Note: This installation will remove all your virtual machines from the console, so backing up all of your virtual machines is recommended.

How do I upgrade from Hyper V Server 2008 R2?

For starters, you should move the virtual machines to a new host that is running the version of Hyper-V Server that you want to use. Once all the guest machines have been moved, then you should reinstall the first machine.

However, if you need to upgrade in place then you will need to follow the steps below:

  1. Make sure that you have a backup
  2. Move all the guest virtual machines to known locations
  3. Avoid having configuration files saved in locations like C:\ProgramData
    • This is because any data stored in such locations will get archived
  4. Keep tabs on all the virtual machines, settings and VHD file locations
  5. Make a note of any static MAC addresses set
  6. Make a note of all the iSCSI targets you have configured
  7. Keep tabs on SAN IPs, drive letters or mount points where these are referenced
  8. Make a backup of the virtual switch configuration on the machine
  9. Backup everything again

Since backing up Hyper-V is so important, might as well use a tool that is good at it!


Once everything is backed up and relocated, you install Hyper-V Server by wiping the server and installing a new copy. There is no upgrade path.

Basically, you back up all of your data, and once you’ve installed Hyper-V Server 2012 or later, you just copy back the data you backed up.

While this workaround may be a bit frustrating, it is the only way you can migrate from Hyper-V Server 2008 without data loss.

Do you think Hyper-V Server should implement an in-place upgrade feature? Let us know in the comment section below.

RELATED ARTICLES YOU SHOULD CHECK OUT:

How to upgrade from Windows Server 2008 R2

Typical Windows users are probably already aware that Microsoft is pulling the plug on Windows 7, and that they now have to migrate to Windows 10. However, what some of you don’t know is that Windows Server 2008 is also being discontinued.

This means that server administrators are left with only one choice: Upgrading to Windows Server 2012.

The upgrade process for Windows Server is different from the typical user OS. That is why we’ve decided to create this step-by-step guide that will show you exactly how you can perform the upgrade yourself.

Note: Before proceeding with the upgrade, we recommend that you follow these steps to ensure that no data will be lost and that the installation process goes smoothly:

  • Backup your operating system, apps, and virtual machines
  • Shut down, Quick migrate, or Live migrate any virtual machines currently running on the server

For more information on how you can back up your Windows Server data, check out this in-depth guide.

How do I upgrade from Windows Server 2008 R2?

In order to migrate from Windows Server 2008 R2 to either Windows Server 2012 or 2016, simply follow these steps:

  1. Locate the Windows Server 2012 R2 Setup media
  2. Select setup.exe.server 2012 setup
  3. Click Yes
  4. Select Install now
  5. For internet-connected devices, select Go online to install updates now (recommended)Go online to install updates now (recommended).
  6. Choose the Windows Server 2012 R2 edition you want to install
  7. Select NextWindows Server 2012 R2 edition
  8. Select I accept the license terms
  9. Click Next
  10. Select Upgrade: Install Windows and keep files, settings, and applications to choose to do an in-place upgradeUpgrade: Install Windows and keep files, settings, and applications.
  11. The setup reminds you to make sure your apps are compatible with Windows Server 2012 R2
  12. On this page, click Next

The in-place upgrade will now start, and once it is finished, your server will restart.

By following these steps, you should be able to upgrade your Windows Server 2008 R2 to Windows Server 2012. Keep note that upgrading to Windows Server 2016 or Windows Server 2019 goes in pretty much an identical manner as mentioned above.

The only difference between the setups is that with the 2016 and 2019 upgrades, you will also have to provide the License Key somewhere during the installation process.

As you can see, the upgrade process For Windows Server is fairly simple, with backing up your data being the biggest headache.

Did you find this article to be useful? Let us know in the comment section below.

RELATED ARTICLES YOU SHOULD CHECK OUT:

How to convert a Windows 7 MBR to a Windows 10 GPT Disk

Since Microsoft no longer supports Windows 7, it is only natural that the general public directs its attention to the next suitable OS available, and that is Windows 10.

While those that are part of business environments can always simply opt for the Windows 7 Extended Support for business, this is only a temporary solution, so migrating to Windows 10 is your only viable long-term solution.

With the change in OS, you may also feel the need to make a change in the way your partitions are set. For example, when migrating from Windows 7 to Windows 10, you may also want to change your disks from MBR to GPT.

That is why we’ve created this step-by-step guide that will show you precisely how you can convert your MBR disk to GPT, and be prepared for the OS migration.

How do I convert a Windows 7 MBR to a Windows 10 GPT?

Note: It is advised that you backup all of your data before the migration, or at least after the migration, in case one of the methods listed below fail and cause data loss.

1. Use EaseUS Partition Master

EaseUS Partition Master is one of the biggest names in disk partition tools on the market, and for good reason:

  • You don’t need to delete your volumes in order to convert your disks from MBR to GPT
  • You can create a bootable media to convert MBR to GPT without operating system or during Windows installation

This is how you convert a disk from MBR to GPT without data loss:

  1. Launch EaseUS Partition Master
  2. Right-click the MBR disk that you want to convert
  3. Choose Convert to GPT
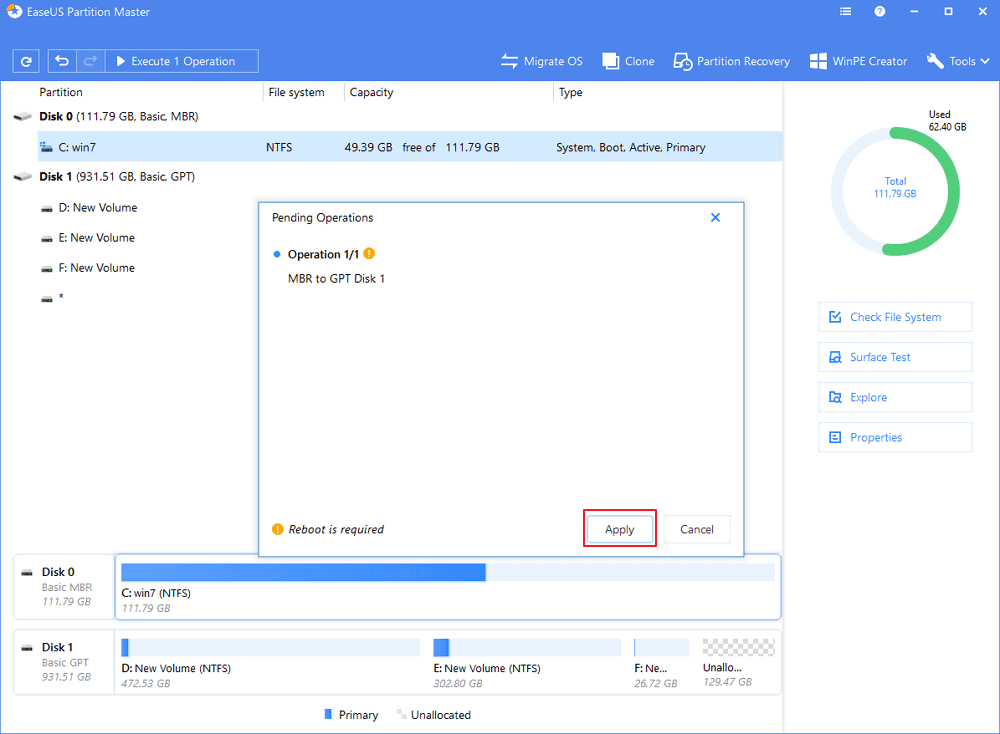
  4. Click the Execute 1 Operation button on the toolbarmbr gpt
  5. Choose Apply to start the conversion
  6. Restart the PC

This method is by far the most efficient, as you don’t need to wipe your disks clean, perform any backups. Additionally, you can even use the bootable media created with this tool to make the conversion while you are upgrading from Windows 7 to Windows 10.

2. Use DiskPart

Back up your disk and then follow the steps below to convert your MBR disk to GPT.

  1. Press Start
  2. Type cmd.
  3. Right-click Command Prompt and choose Run as administrator
  4. When you see a dialog box asking you for permission, click Yes
  5. Enter the following commands one by one to delete all the partitions on your disk and then convert it to GPT:
    • list disk
    • select disk disknumber
    • clean
    • convert gpt

Note: You can use this method even during the Windows 10 install process, as you also have access to the Command Prompt from there.

3. Use Disk Management

Back up your disk and then follow the steps below to convert your MBR disk to GPT.

  1. In Windows 10, right-click on This PC
  2. Choose Manage
  3. Select Disk Management
  4. Right-click each partition on the disk you want to convert and select Delete Volume
    • Do this until you have deleted all volumes
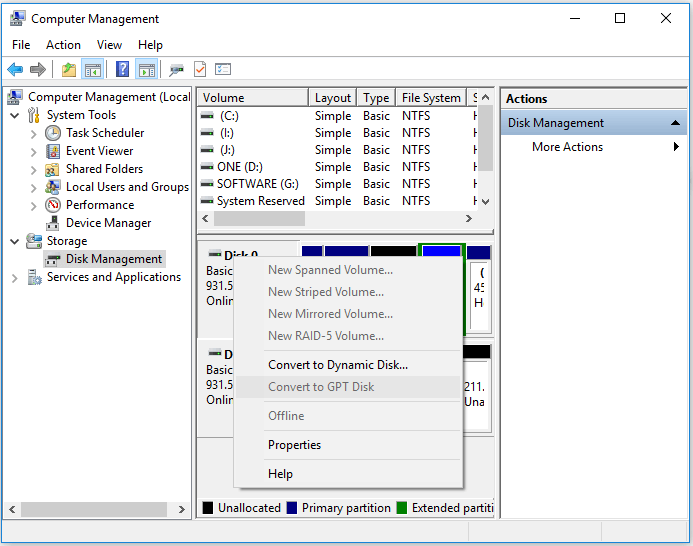
  5. Right-click your hard drive and choose Convert to GPT Disk

mbr gpt disk management

4. Use MBR2GPT.EXE

Microsoft has provided a software solution called MBR2GPT.EXE, but it is only available in the Windows Creator’s Update. It is far more complicated than the solutions listed above, and if you want more info, check out Microsoft’s documentation page on the matter.

By following these methods, you should be able to convert your disk from MBR to GPT, and be ready to migrate from Windows 7 to Windows 10 all at the same time.

Did you find this article useful? Let us know what other things you want to read about in the comment section below.

RELATED ARTICLES YOU SHOULD CHECK OUT:

How to upgrade from Windows 7 to Windows 10 Education

Ever since Microsoft ceased support for Windows 7, many users have already started migrating to Windows 10.

However, there are plenty of ways users can migrate from Windows 7 to Windows 10, some methods being more effective than the others. More so, some upgrade paths stand out from the others in terms of how it is performed.

One good example is that of students and professors that are planning to upgrade to Windows 10 Education.

Normally, the upgrade process would go as with all other methods, but in the case of Windows 10 Education, things are a bit different.

How do I upgrade to Windows 10 Education?

As you can see from the graph provided by Microsoft on their page regarding upgrade paths, an upgrade from Windows 7 to Windows 10 Education is possible.

windows 10 education

Normally, an upgrade would usually involve using the Media Creation Tool provided by Microsoft. However, the Media Creation Tool does not include a qualifying edition, only Home and Pro.

Those that use Windows 10 Education are either students or staff members. Because of that, if you attend a college or university, your institution might provide you with the Education edition of Windows 10.

That being said, you will need to download the Windows 10 Education ISO and use that.

If you are only provided with a license key, you can download the .ISO file from the Microsoft Download Academic Products website.


Do you need an efficient ISO mounting tool? Why not get the best there is?


1. Activate your Windows 10 Education license on the website

  1. Scroll down then enter your Windows 10 Education product key, then click Verify
  2. Input the 25-character license key provided by your University
  3. Select a language for your ISO file
  4. Proceed to download the ISO file

2. Install Windows 10 Education

  1. Mount and launch the image
  2. Follow the on-screen instructions

By following these steps you will now have upgraded from Windows 7 to Windows 10 Education in no time.

You should keep the license key safe in case you ever need to reinstall your OS. All you will need to do is log into your Microsoft account, download the ISO file, mount it, and install it all over again.

Another good idea would be to make a bootable drive using the ISO image.

Do you think getting a free Windows 10 license from your University is a good idea? Share your opinion on the matter in the comment section below.

RELATED ARTICLES YOU SHOULD CHECK OUT:

Upgrade from Windows 7 to Windows 10: Best practices

As you may already know, Microsoft has ceased support for Windows 7. This means that organizations have no other choice but to pay for the Windows 7 Extended Support, or finally migrate to Windows.

Unfortunately, choosing Extended Support is just a temporary solution, and it is also pretty costly. In fact, it becomes even more costly the more you choose to stay with this solution. Additionally, this will only work for another 2 years.

Thus, upgrading to Windows 10 is and will become your only solution at a certain point.

That being said, we’ve compiled a list of best practices you should adopt when migrating your entire company from the  Windows 7 to Windows 10 platform

What are the best practices that I need to follow?

1. Conduct a hardware and software inventory

This is probably the most important part of the migration process. You basically make an inventory of all the computers and hardware your company has at its disposal, as well as all the software that is installed on them.

As you may know, Windows 10 has different system requirements, and as such, some of your equipment may need an upgrade, if not a total replacement. Additionally, some of the software that you use may not work on Windows 10, so you’ll need to either get a version of it that can or replace the software entirely.

2. Create a test group for the migration

Before going through a company-wide transition, it is a good idea to have a select group of users that will act as the test subjects. They will essentially start testing how Windows 10 performs and how they interact with it. 

Based on this experience, you will be able to determine what the wide-scale effect of migration will be.


Looking to migrate to Windows 10 easily? Check out this neat tool!


3. Avoid deploying Windows 10 on groups that mid-project

Because of the reasons mentioned above, deploying Windows 10 to a group that is in the middle of an important project may not be the best idea. This is because all data may be lost if the deployment goes bad.

4. Pick the right version of Windows

There are currently 3 versions of Windows for customers to choose from:

  • The Windows Insider Program (WIP)
    • This version offers users the opportunity to be an early adapter of the latest features that will at some point be used in the mainstream version.
  • The Long-Term Servicing Channel (LTSC)
    • This version is great for users with devices that do not change and are fixed in function, such as point-of-sale, kiosks, bank teller devices, etc.
  • The Semi-Annual Channel (SAC)
    • This is the one whose target audience is business computers are designed for the most common scenarios

5. Make things as simple as possible

A fresh new start with a fresh new OS is the ideal chance for you to change the way things are deployed and managed in your company.

Try to standardize every aspect of these features so that things run more smoothly once the migration is finished.

6. Choose an efficient method to perform the migration

There are currently 4 widely used methods when considering a company-wide migration:

  • PC Refresh: 
    • You choose to replace all the old PC and provide your employees with clean Windows 10 installs
  • In-Place Upgrade:
    • This method is also popular since Microsoft made in-place upgrades and migrations very popular, especially when talking about Windows 10.
  • Re-Imaging: 
    • You basically reset the image to a known-good state that has been tested and vetted properly
  • Virtual Desktop Infrastructure (VDI): 
    • From a standardization point of view, this is by far the most efficient method since you basically remotely control and ensure that there is a centralized infrastructure every PC in the company is modeled after.
    • The only drawback to this method is that it is only viable to organizational users that have identical application needs (pretty much all PCs are the same)

If you’re looking to upgrade to Windows 10 for free, check out this great guide!


7. Accept UEM as a fundamental need

Once the migration is complete, maintenance is the next key step. You will thus need to adopt a modern IT management style that leverages unified endpoint management (UEM).

UEM enhances security through modern configuration management of user policies, and it also handles the deployment of applications and manages OS patch management activities.

This allows better standardization and more fluent control over what is happening.

Conclusions

Now that you will have to upgrade to Windows 10, at least you know exactly what the best practices are so that your transition will go smoothly.

Not only will your company work better with Windows 10, managing it should be a whole lot easier once the upgrade is finished.

Did you find our advice useful? Let us know in the comment section below.

RELATED ARTICLES YOU SHOULD CHECK OUT:

Bring the Windows 7 Start Menu to Windows 10 with This Tool

Windows 10 comes with a pretty awesome Start menu, one that has been absent in Windows 8 and Windows 8.1. But if you still remained true to Windows 7, here’s a tool that will help you bring it back to the newest Windows version.

The Start menu feature in Windows 10 is pretty complete, having a lot of options that both desktop and touch users might find useful. However, each has its own taste and sometimes that doesn’t mean having to like everything new that comes out of Redmond.

Start10 lets you use the Windows 7 Start Menu in Windows 10

start10


Stardock has developed the Start10 tool which bring a Windows 7-style menu to your Windows 10 machine. The 30-day trial version of the software brings you the following:

  • Pin desktop and Modern apps to the Start menu
  • Jump list support
  • Unified search for apps, settings and files
  • Automatically matches the color of your taskbar
  • Skinnable Start button
  • Choose the default behavior of the Start menu power button

If you choose to go premium, this will set you back $5, and you get all the same features, but obviously for more than just a month. Furthermore, Start10 can also display the menu in a Modern or Windows 10 style, if you choose so.

start10  windows 10 start menu personalization

You can set a a custom Start button, apply textures to the menu and taskbar, set icon and tile sizes, transparency, and much more. What’s particularly nice is that you can still make use of Cortana whenever you want. The latest version of the tool also added light theme support.

And if you feel like you want to switch to Windows 10‘s default start menu, you can easily do so by pressing the right Windows key or Ctrl+clicking the Start button. If you want to filter searches in the Start menu, restores the quick links and the “All Programs” UI, this is the right tool for you. If you recently upgraded to Windows 10, Start10 helps you to make the transition smoother.

Are you curious to give it a try? Leave your comment below and let us know.

READ NEXT:

Windows 7 to Windows 10 migration checklist and requirements

As you might have heard, Microsoft will stop supporting Windows 7 as of January 14, 2020. Millions of Windows 7 users are now contemplating upgrading to 10 before or after that date.

To avoid potential upgrade issues, however, you should check and do a number of things before jumping aboard the Windows 10 bandwagon. This Windows 7 to 10 migration checklist includes the essential things to check before upgrading.

The best Windows 7 to Windows 10 migration checklist you need

1. Does your PC match the minimum Windows 10 system requirements?

First, check that the desktop or laptop you intend to upgrade matches all Windows 10’s minimum system requirements. The Windows 10 system requirement page includes the system specifications for that platform.

  1. To check how your own system specs compare, click Windows 7’s Start button.
  2. Then input ‘system information’ in the search box.
  3. Click System Information to open the window shown directly below.System Info window windows 7 to windows 10 migration checklist
  4. Click System Summary on that window for a basic system spec overview.

If you’re looking for the best resources for a Windows 7 to 10 migration, check out this complete article.


2. Do you have enough free hard drive space for an in-place upgrade?

As the system specifications highlight, users need a 32 GB hard drive for Windows 10. Most users will have bigger hard drives, but some might not have 32 GB of free storage space available for in-place upgrades.

If you intend to migrate to Windows 10 with an in-place upgrade, check that you have more than 32 GB of free space left on your hard drive.

To do that, open File Explorer (press the Windows key + E hotkey). Then click Computer on the left of File Explorer, which displays a bar that highlights how much storage the C: drive has.

If you don’t have more than 32 GB storage free, you’ll need to make some space for Windows 10. Uninstalling software is probably the best way to do that. Try uninstalling older software that might not be compatible with the new platform.

3. Do you have sufficient storage devices for a clean install?

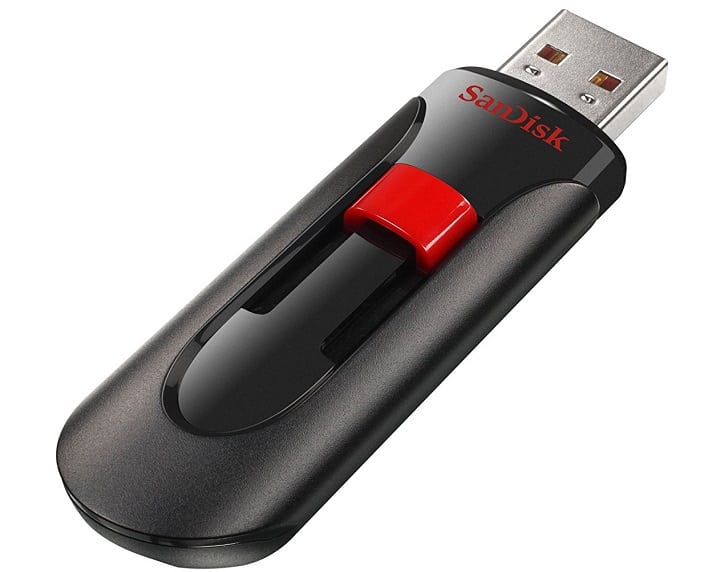
If you’re going to do a clean Windows 10 install, you’ll need two external storage devices (if you also intend to back up data). A USB flash drive with at least four GB will be required for the Windows 10 ISO file. So, check that the flash drive you select is large enough and empty before upgrading.

SanDisk USB drive windows 7 to windows 10 migration checklist

As the clean install method will wipe the hard drive, most users will no doubt prefer to back up at least some of their files and software to external storage (but could also utilize cloud storage for files).

If you need to back up a lot of data, a big USB flash drive or an external hard drive should be sufficient for that. Check that the backup storage has a sufficient amount of space for your requirements.

4. Have you backed up all the software and files you need to keep?

It’s essential to back up data for the clean install method (unless you don’t need to retain any files or software). So, check that you’ve backed up everything that you wish to restore in Windows 10 before proceeding with a clean install. Files are the most essential thing as you can reinstall software.

It’s not so essential to back up anything for an in-place upgrade, which will preserve files and software. However, it might still be a good idea to do so just in case you can’t find something after upgrading.

Microsoft warns that “some applications or settings may not migrate” for an in-place Windows 10 upgrade.


If you want to move Windows 7 backup files to another drive, follow the simple steps from this guide and do it with ease.


5. Have you configured the BIOS or UEFI settings for a clean install?

If you choose to clean install Windows 10, you’ll need to check the PC is configured to boot from from removable media first via its BIOS or UEFI firmware.

To do that from the BIOS, you’ll need to go into the BIOS and select the Boot tab there. Then you can change the boot order to start from USB removable devices.

6. Do you have a Microsoft account?

The Windows 10 OOBE will ask you to sign in with a Microsoft account. Although you can select a Create an account option from there, it’s better to have an MS account to sign in with from the outset.

So, set up an MS account if you don’t already have one before upgrading. If you’re not currently signed in to your MS account, check that you can sign in to it ok before upgrading.

7. Have you checked your system architecture?

When you’re upgrading with a clean install, you’ll need to select the right 32 (x86) or 64-bit (x64) Windows 10 architecture option when setting up the installation media.

The Windows 10 you select to upgrade to needs to match your system architecture. Check what your system type is on the System Information window.

System Type specification windows 7 to windows 10 migration checklist


Looking to switch from Windows 7 to Windows 10? Take a look at this guide to find all the info you need.


Those are the things you’ll need to check to ensure a straightforward and smooth upgrade to Windows 10 without any migration challenges. Those who clean install Windows 10 should check six things on the list (with the possible exception of HDD storage space).

However, users who opt for an in-place upgrade only really need to check system requirements, hard drive storage space, and if they have MS accounts. Thereafter, they can upgrade to Windows 10 or set up a bootable installation disk for a clean install with the Media Creation Tool.

RELATED ARTICLES TO CHECK OUT:

Resources for Windows 7 to Windows 10/11 migration projects

Microsoft will pull the plug on Windows 7 support on January 14, 2020. However, many organizations are still utilizing Windows 7. Kaspersky’s research (from its own user base) earlier in 2019 highlighted that 47 percent of SMB (small and medium size) enterprises are still utilizing Windows 7.

Upgrading a single PC to Windows 10 is one thing, but upgrading hundreds (or even thousands) of desktops from Windows 7 to 10 is quite another. That’s exactly what some larger organizations need to do to fully upgrade their networks to the latest Windows 10 platform.

So, upgrading corporate networks to Windows 10 can be a big project for organizations that need a bit of planning. The resources below will come in handy for Windows 10 migration projects.

What resources do I need for a Windows 7 to 10 migration?

1. Deploy Windows 10 with Laplink PCmover

Laplink’s PCmover software is worth noting for the deployment phase of a Windows 10 migration project. That is Microsoft endorsed software with which you can perform an in-place Windows 10 upgrade and transfer files and apps.

With it, you’re able to move your files, settings, and profiles from a Windows 7 PC to a new Windows 10 PC. You’ll need to invest at least $29.99 in PCmover Professional to utilize the Windows Upgrade Assistant, which isn’t included in the freeware version.

Larger organizations might be more interested in PCmover Enterprise. That’s the version of PCmover more specifically for enterprise users that’s available with volume licensing.

If you’re looking for a safe and secure solution to migrate your data, check out the free version of Laplink’s PCmover down below.

2. Juriba’s Windows 7 to Windows 10 migration project plan template

To set up a clear Windows 10 migration plan, Juriba’s Windows 10 Project Plan might be worth noting. That’s a project plan template for Windows 10 migration that you can download from Juriba’s website.

Fill out the form there to download Juriba’s Windows 10 Project Plan. It’s a plan that includes the following eight stages:

  1. Planning and mobilization
  2. Inventory
  3. Assessment
  4. Design solution
  5. Build solution
  6. Migration management
  7. Scheduling and deployment
  8. Project closedown

That’s a freely available template that will provide a good starting point for your Windows 10 migration project. After downloading the PDF, you can adapt that template to your own enterprise scenario.

3. Assess software readiness and compatibility with Desktop Analytics

The assessment stage of a Windows 10 migration project plan is one of the most essential stages. Microsoft has cited a 99 percent app compatibility figure for enterprise users migrating from Windows 7 to 10.

However, that 1 percent of incompatible Windows 10 apps could still generate some notable issues for a migration project. Thus, it’s important that organizations identify software that might be incompatible with Windows 10 during the assessment stage.

Desktop Analytics windows 7 to windows 10 migration project plan

To assist enterprise users do that, Microsoft provides a Desktop Analytics cloud service. That integrates with Azure’s System Center Configuration Manager and enables users to set up app inventories, assess app compatibility, and identify potential incompatibility issues.

The service also assists with Windows 10 deployment. So, Desktop Analytics is certainly worth noting for organizations with Azure subscriptions.

Those are three handy resources for establishing and implementing a Windows 10 migration project plan. Juriba’s project plan template, Desktop Analytics, and PCmover Enterprise can help ensure a smooth upgrade transition from Windows 7 to 10.

For any other questions or suggestions, feel free to reach for the comments section below.

8GadgetPack Brings Windows 7 Gadgets Back to Windows 10

Desktop gadgets were a huge hit when Microsoft introduced them in Windows Vista, but the company soon decided do discontinue this feature due to security reasons. And now, app called 8GadgetPack offers you to bring gadgets back in Windows 10.
8gadgetspack windows 10
As we said, Windows gadgets made their first appearance in Windows Vista, as set of small desktop tools for assistance of users. The pack featured various useful tools, like clock, CPU meter, calendar, currency converter, etc.

But even if they were popular in Windows Vista, and especially in Windows 10, Microsoft decided to shut them down in 2012, because of the security vulnerabilities. But now, when the risk of security threats is minimal, developer Helmut Buhler created 8GadgetPack, a tool which provides more than 50 gadgets on Windows 8, 8.1 and 10 PCs.

The program is easy to install, with no adware, and when you install it, a few gadgets will immediately appear on your desktop.  The main part of the program is a simple browser, which displays thumbnails and basic info of more than 50 included gadgets.


Best desktop gadgets to download on Windows 10


Bring Windows 7 gadgets back to Windows 10

Just go through the list, and you’ll find all gadgets you loved to use in Windows 7, like CPU meter, calendar, drive and network meters, processes monitor, reminder apps, tiny email app, clocks, puzzles, clock, unit and currency converters, internet radio, weather gadget, and many more. You can use this tiny tool to write notes in your to-do list and add important meetings in your calendar. If you want to check the weather forecast, you can do that as well.

Managing gadgets is also very easy, you can move them on Desktop by simply double-clicking on the gadget, or dragging it. You can set the opacity, and tweak its options. Absolutely everything looks like it did on Windows Vista and Windows 7.

A “Tools” dialog provides options for easy managing of every single gadget. You can adjust the size of every gadget, decide whether you want it to run at Windows startup, organize them in a sidebar, add a new gadget, reset every gadget to its default settings, or uninstall the whole package.

Users who tested this program said that some of the gadgets don’t work for them, but the most important ones are good.

This app is definitely great for all of those who want to bring a little of Windows 7 feel to Windows 10. If you want your Windows 10 to look even more like Windows 7, you can use this tool to completely change the Start Menu by your desire.

8GadgetPack is fully compatible with Windows 10 and does not put any strain on your CPU or RAM. The tool doesn’t impact your computer performance in any way and it’s safe to download.

You can download 8GadgetPack for free.

READ NEXT:

Here Are the Best Steam Games for Windows 7

Windows 7 remains one of Microsoft’s most popular OSs, despite the company’s effort to convince users to upgrade to Windows 10.

The Redmond giant and all app and game developers now focus their creative energy mainly on Windows 10.

If you own a computer running Windows 7, rest assured, there are many apps and games compatible with this OS version.

Speaking of games, the good news is that most Steam games are compatible with Windows 7.

The best Steam to play on Windows 7

Sid Meier’s Civilization VI

Sid Meier’s Civilization VI is a turn-based strategy game where your main task is to build an empire capable of standing the test of time. Establish your civilization, and guide it to the Information Age.

You will wage merciless wars, but also act as a diplomat, and try to establish various connections with history’s greatest leaders.

There are a lot of variables you must take into consideration: build a strong army, and do active research in technology and culture to unlock new potential, while keeping an eye on your opponents.

Sid Meier’s Civilization VI is compatible with Windows 7×64. You can buy the game for $59.99 from Steam.

Counter-Strike: Global Offensive

Counter-Strike doesn’t need any introduction. CS Global Offensive expands upon the original team-based action gameplay and brings new maps, characters, and weapons.

This game version also updates classic CS content and introduces new gameplay modes and matchmaking criteria.

CS is a classic computer game that will always surprise you. Just like wine, it gets better with age. It remains one of the most-played games in the world, and this confirms its value.

You can purchase Counter-Strike: Global Offensive for $13.99.

Rocket League

Rocket League is the place where soccer meets driving. This futuristic sports-action game equips players with strong vehicles that can be crashed into balls and score impressive goals or epic saves.

The game uses an advanced physics system to simulate realistic interactions and relies on mass and momentum to let players control the ball.

Players can use countless Battle-Car customization options with more than 10 billion possible combinations. You are the designer of your car. Also, you can unlock new items and vehicles.

You can buy Rocket League for $19.99.

Warhammer: End Times – Vermintide

Warhammer Vermintide is a co-op first-person shooter and melee combat adventure game. As a player, you’ll assume the role of one of five heroes, trying to survive an apocalyptic invasion from hordes of rat-men.

Each hero has his own play style, abilities, gear, and personality. This game challenges players to make the five heroes work cooperatively, otherwise, they don’t stand a chance against the rat-men.

There are 13 game levels available, taking gamers to fierce battles on the ground, inside buildings, and underground. Stay alert because you never know when the next wave of rat-men will attack.

You can buy Warhammer: End Times – Vermintide for $9.51.

ARK: Survival Evolved

ARK: Survival Evolved is a great survival game for Windows 7. You are stranded naked, freezing, and starving on a mysterious island.

If you want to survive, you must hunt, harvest, craft items, grow crops and build shelters. You can also tame, breed and ride dinosaurs and other primeval creatures living on ARK.

First, you need to capture these creatures by knocking them unconscious. Nurse them back to health and take advantage of their weakness to tame them.

If you’ve tamed and trained them well, they will follow you and help you around, carrying inventory and equipment.

You can buy ARK: Survival Evolved for $27.99. The game is compatible with Windows 7 64-bit version.

Men of War: Assault Squad 2

Men of War: Assault Squad 2 brings new single player style modes that take players from tank combat to sniper stealth missions.

Multiplayer 1v1 – 8v8 maps are available, allowing you to show everybody who the best soldier is. If you really want to put your skills to the test, you can use the game‘s extreme mode that brings huge battles to the table.

Men of War: Assault Squad 2 features 15 single player skirmishes, 8 player multiplayer co-op modes, one multiplayer extreme game mode, and 65 multiplayer maps.

There are 250 vehicles at your command and more than 200 soldiers with unique equipment.

You can buy Men of War: Assault Squad 2 for $24.99.

Resident Evil 6

Resident Evil 6 is a challenging survival horror game that will make your heart beat faster.

The new highly virulent C-virus is lurking in the dark, and you need to move between North America, Europe, and China to kill it. You’ll experience horror on a global scale.

Resident Evil 6 has four distinct, yet interwoven story threads, suitable for solo or co-op play, both offline and online. It is good to know that at key moments, up to four players can join together online to tackle a specific situation.

You can buy Resident Evil 6 for $29.99.

Rust

Rust is all about survival, that’s your main task as a player. You need to be stronger than hunger, thirst and cold. Learn to build a fire, shelter and kill animals for meat.

The other players can turn into your enemies, don’t get too close to them, and don’t hesitate to kill them for meat. Do whatever it takes to stay alive. Also, you can create alliances with other players and form a town.

You can buy Rust for $19.99.

Transport Fever

Transport Fever lets you build your own transport empire. You start in 1850 and build up a thriving transport company, building airports, harbors, and more. The more facilities you build, the more money you’ll earn.

As you fulfill the people’s needs and help cities evolve, your transport company becomes an important link that others depend on.

As you build up your transport empire, you’ll face real ­world transportation challenges that you need to overcome.

You can buy Transport Fever for $25.99.

As you can see, the games listed above are very diverse. They range from regular survival games and horror survival games, to war and tank games.

Microsoft Flight Simulator

We’ll end this list with another simulator game: Microsoft Flight Simulator X: Steam Edition. This game lets you fulfill your dream of becoming a world-class pilot and flying some of the coolest aircraft in the world. There are over 24,000 destinations to choose from and you can basically fly any aircraft type, including jumbo jets and helicopters.

Multiplayer support is also available allowing you to challenge your friends.

Download Microsoft Flight Simulator for Windows 7

We hope this selection helps you choose what game to play next on your Windows 7 computer.

Important note: Microsoft officially ended Windows 7 support. If you’re planning to upgrade to Windows 10, make sure to check out our wide collection of guides on how to make the transition as smooth as possible.

Export Outlook Distribution List to Gmail

Looking for a way to export Outlook distribution list to Gmail? It’s time to discover how to do it since copying and pasting the same email addresses repeatedly until everyone gets your message is unproductive.

Microsoft Outlook has the ability to create a contact group (formerly known as a Distribution List) from your Contacts list, and conveniently store that list in the Contacts folder.

Then, you can use it to send the same email to multiple people – a project team, your coworkers, or simply a group of friends. Or you can share the entire contact group with other users, and they, too, can do the same.

Gmail‘s contact manager cannot import distribution groups from Outlook contacts, but you can set up a different email distribution list from any email client. This way, you make sure everyone stays in the communication loop.

Remember that exporting your Outlook Distribution List to Gmail is a four-step process. Don’t hesitate to read the instructions thoroughly before applying these directions.

How can I export Outlook Distribution List to Gmail?

1. Save Outlook Distribution List as Text file

  1. Open Outlook.open Outlook Distribution List
  2. Browse to Contacts.
  3. Open the Distribution List to be moved to Gmail.
  4. Go to File > Save As.
  5. Save it as a .txt file. Choose an accessible location on your computer to temporarily save the file.

2. Open the Text file in Microsoft Excel

  1. Launch Microsoft Excel.launch Microsoft Excel
  2. Open the saved file.
  3. Now, make sure the Files of Type is set to All Files, or Text Files.
  4. Selecting the .txt file created before starts the Text Import Wizard.
  5. Here, accept all the default to complete the import process.
  6. Make sure the first column has last name, the next column has first name, and the third one has email address.
  7. Insert a row above data.
  8. There, insert these labels: last name, first name, email address.

3. Save the Excel file as CSV file

  1. Click on File > Save As.
  2. Make sure to save as type: CSV (comma delimited).save as CSV
  3. Name your file.
  4. If you get the prompt, click Yes to confirm that you wish to save the Excel file in .csv format and complete the exporting.

4. Import CVS files into Gmail

  1. Open your Gmail account.
  2. Then, browse to Contacts page.
  3. Select import link from the left column in Contacts list.
  4. Select Choose File on the Import contacts popup box.Import contacts popup box
  5. Navigate to your .csv file and click Import.
  6. Once complete, a summary will display. Now, this group can be used just like any contact.

Some people want to be addressed personally and don’t fancy being lumped into a huge group. Don’t worry about that. A personalized email for an entire group solves the problem, so don’t give up on exporting your Outlook Distribution List to Gmail.

If you have any other suggestions or questions, please leave them in the comments section below.

Your server location could not be determined Outlook error

Your server location could not be determined. Contact your administrator – that’s an issue you are no stranger to. When Outlook users try to create a new appointment in Outlook and go to Scheduling Assistant, the Free/Busy information for other people and rooms is nowhere to be found.

They see this server location error message instead. You might have looked up and down for a work-around to this problem, but you have not been able to find an answer.

Let us assist you this time. Below are the simple things that you can start doing to solve the problem.

How can I fix Outlook’s server location error?

1. Change your Outlook time zone

Change Outlook time zone
  1. At first, click the File tab.
  2. Click Options.
  3. On the Calendar tab, under Time zones, type a name for the current time zone in the Label box.
  4. Then, in the Time zone list, click the time zone that you prefer using.

Most Outlook users found the issue comes from the time zone, so they changed it and everything went back to normal.

Keep in mind that when you change the time zone setting, all Calendar views are updated as well so that they display the new time zone, and all Calendar items reflect the new time zone.

Note: Some time zones don’t have the daylight saving time option. When Outlook is set to a time zone that doesn’t observe daylight saving time, such as Arizona, you cannot turn on the daylight saving time adjustment.

2. Check potential cached credentials saved

Cached credentials saved
  1. Go to Start > Control Panel > User Accounts.
  2. Click Credential Manager.
  3. If View by is set to Category, then click User Accounts first, followed by Credential Manager.
  4. Locate the set of credentials that has either Outlook or Microsoft Office in the name.
  5. Up next, select Web Credentials or Windows Credentials to access the credentials you want to further manage.
  6. Click Remove from Vault or Remove.
  7. Check in Credential Manager to see if there are any cached credentials saved. If so, just remove them and try again.

3. Verify Autodiscover functionality

Outlook Autodiscover functionality

The Autodiscover functionality may not appear to be important if everything is working. However, if problems show up and the other troubleshooting steps didn’t work, you may end up wanting to take a closer look here.

When a user’s Exchange information changes, Outlook normally uses the Autodiscover service to automatically reconfigure the user’s profile. Therefore, you could also check DNS to make sure that the Autodiscover service is functioning properly. This should point to the Client Access role server.

Have you completed the above procedures? Remember, if at any time you experience a difficulty with Outlook, don’t hesitate to contact us by using the comments section below.

In the meantime, learn more tips and tricks for fixing some of the most common Outlook errors.

5 best sound scheme resources for Windows 7

For many users, computers are extensions of their personality. What better way to leave your mark on a computer than to personalize it as you wish?

In this article, we’re going to list a series of sound set resources for Windows 7 you can use to customize your machine.

Most users prefer to download game or movie sound sets, and oftentimes they can be extracted by users themselves. Indeed, the best way is to extract the sound sets from games directly.

Most games often have a community of hackers who have access to the tools necessary for that task. Also, sometimes, the sound files are available on disk.

I made Star Wars sounds on my old Windows 7. C-3PO said “Please don’t deactivate me!” when you turned off the computer and Darth Vader “Yes, my master…” when you turned it on.

If you’re looking for a quick solution and you prefer to download the sound file directly, check out the resources listed below.

Best sound schemes for Windows 7

  • WinCustomize

This website has an impressive collection of sound sets for Windows. There are three categories you can choose from: Last Updated, Most Popular, and Recently Featured.

All the sounds available on this website are free. Another advantage is that these sound sets are compatible with Windows 7, Windows 8 and 8.1, Windows Vista and Windows XP.

For more information, check out the WinCustomize website. Unfortunately, you can’t preview sounds.

  • SoundPackager

If you’re tired of the default Windows sound scheme, you can download SoundPackager to instantly change the default sounds with high quality sound sets.

SoundPackager is pre-loaded with a series of sound packages you can activate with just one click. In this manner, you don’t need to download sounds one at a time and then match them to Windows events.

This tool is compatible with both Windows 7 and Vista and you can download it from Stardock.

  • FindSounds

This website offers a series of interesting sounds you can download on your Windows 7 computer. The sounds are organized in several categories: animals, birds, people, TV and movies, etc.

You simply click on the sound you’re interested in, preview it and you can download it if you like it.

The website also allows users to filter the sound results depending on the file formats, the number of channels, resolution and sample rate.

If you’re curios, go to FindSounds’ website and play the sounds.


Looking for the best audio enhancer for Windows 7? Here are our top picks.


  • FreeSound

Freesound is a collaborative database of audio snippets, samples, recordings, and other sounds that everyone can contribute to. Some sound samples are shorter, lasting only for a few seconds, while other are 10 minute long.

You can preview all the sounds, and read the user review for more information. The main advantage of this platform is that the sound data base is constantly updated.

You can visit the FreeSound website for more information.

  • SoundBible

SoundBible.com hosts thousands of free sound effects that you can download on your Windows 7 computer. Sounds are updated three times a week, so you’re definitely find the right sounds to customize your device.

Important note: Microsoft officially ended Windows 7 support. If you’re planning to upgrade to Windows 10, make sure to check out our wide collection of guides on how to make the transition as smooth as possible.
READ NEXT:

MultiBoot Windows 7 with other OSs with WinSetupFromUSB

If you’re looking to multiboot Windows 7, alongside Windows 10, Ubuntu, or even Windows XP, WinSetupFromUSB is one of the best tools that you can use to do it.

Many frustrated users with the performance of other operating systems
might choose to install Windows 7 over the other OSs.

dual boot windows 7 windows 8.1

But you need to know that a nifty simple tool will let you multiboot Windows 7, Windows XP, or Windows 10 from a single USB drive.

This way, you won’t have to create separate bootable USB drives for Windows 7 or other operating systems with the help of the WinSetupFromUSB software.

The best multi-boot tool for any Windows version

WinSetupFromUSB is a Windows program, which prepares multiboot USB flash or fixed disk to install any Windows versions since 2000/XP, boot various Linux and *BSD flavors, as well as many Windows, Linux, DOS based and other utilities. The install Windows from USB project started as a challenge back in 2006 at the msfn.org forum. With the invaluable contribution of several forum members, it was the first method to have regular XP setup run from a USB disk, just like if started from a CD media. WinSetupFromUSB program was made later on to offer graphical interface, and program functionality was slowly extended to allow many other sources in a multiboot USB disk.

The tool fully supports Windows 8.1 as well as UEFI, which, for those who don’t know, is an “evolved” version of BIOS.

This isn’t the single Windows multi-boot tool, but it’s without a doubt one of the best to use, as it is very easy to set up. Follow the link below to download it.

WinSetupFromUSB FAQ: Everything you need to know

  • Does WinSetupFromUSB support customized Windows sources? WinSetupFromUSB generally supports customized Windows sources, but particular sources that have been heavily modified may not install.
  • Can I use multiple sources of the same type? WinSetupFromUSB supports multiple sources of the same type, except for PE1 and Syslinux based sources. You can quickly add multiple sources one after the other without restarting the first program.
  • Does WinSetupFromUSB support Windows Secure Boot? WinSetupFromUSB supports unmodified Windows Secure Boot sources.

What you need to know about Windows 10 dual-boot [update]

For those interested in installing any OS alongside Windows 10, don’t do it because it’ll simply not work.

You will find all the necessary information about that in this article, but the main point is that Microsoft is destroying the dual boot feature in Windows 10.

However, we have found some exciting OSs you can boot with Windows 10. For example, you can boot Endless OS with Windows 10 and Windows 10 with Windows Server.

Before you leave, learn how to run an online Windows 7 simulator and eliminate the need to install the OS.

Let us know in the comment section if you double-booted Windows 10 with any other OS so we can write a dedicated article about it for all our readers.

ASUS 360Hz monitor is your best bet for a perfect gameplay

The frame rate is one of the most important specifications for gaming monitors. That is the frames-per-second (FPS) spec that tells uses how quickly a VDU (Visual Display Unit) refreshes picture frames.

In 2019, 240Hz monitors had the highest frame rates. However, ASUS has now raised the bar for frame rate speeds with the ROG Swift 360 monitor.

ROG Swift 360 is the new standard for Esports


ASUS and its NVIDIA partner unveiled the ROG Swift 360Hz at CES 2020. That is, as its title suggests, a monitor with a 360Hz frame rate. ASUS proudly boasts that the Swift 360 is the world’s fastest monitor.

That VDU also incorporates NVIDIA’s G-Sync Variable Refresh Rate tech to eliminate screen tearing.

Aside from its lightening frame rate, the ROG Swift has a 24.5-inch display. That is a pretty standard display size for a gaming VDU. Of course, ASUS has had to compromise the Swift 360’s resolution, which amounts to a 1,920 x 1,080 FHD display, for the high frame rate.

ASUS has primarily released the ROG Swift 360 for Windows gaming. The Swift 360’s super-fast refresh rate combined with NVIDIA G-Sync will ensure super smooth and responsive gameplay and minimize latency. ASUS is touting the Swift 360 as an Esports monitor for competitive gaming.

360Hz is noticeably smoother than 240Hz

NVIDIA even invited a five-time Counter-Strike: Global Offensive champion to try out the Swift 360. He was initially sceptical that a 360Hz VDU would be noticeably different than one with a 240Hz frame rate. However, he could tell there was a notable difference after playing the game on the Swift 360.

ASUS also showcased the ROG Swift PG32UQX monitor at CES 2020, which is another NVIDIA G-Sync monitor. The PG32UQX is a 32-inch 4K high-dynamic-range gaming monitor with stunning picture quality.

That monitor’s 144Hz frame rate is more modest compared with the Swift 360’s FPS specification. However, a 144Hz frame rate will still be perfectly sufficient for most players.

So, ASUS is raising the bar for gaming monitors with the ROG Swift 360 and PG32UQX . ASUS has not confirmed specific release dates or prices for either monitor. However, ASUS has confirmed that it will release those VDUs later in 2020.

RELATED ARTICLES TO CHECK OUT: 

Switching from Windows 7 to Windows 10/11 [ULTIMATE GUIDE]

This year marks a very important event in Windows 7‘s history: 2020 is the year Microsoft officially ends mainstream support for this OS version. Starting January 14, 2020, Windows 7 computers no longer receive security and quality updates. The Windows 7 end support countdown clock is on and nobody can stop it.

In this guide, we’ll tell you what this means for the average user. We’ll also answer some of the most common questions related to the Windows 7 to Windows 10 transition. Keep on reading to learn everything you need to know about this matter.

Why should I upgrade to Windows 10?

The main reason why you should give up using Windows 7 is security-related.  Starting January 14, 2020, your Windows 7 computer will no longer receive security updates. This means that your device is more vulnerable to threats than ever. Hackers will definitely try to take advantage of each and every security vulnerability they can find in order to get their hands on your data.

As a quick reminder, it was Windows 7 that facilitated the spread of the Wannacry ransomware. Malware and ransomware attacks will only get worse after January 14, 2020. Why expose your computer to cyber attacks when you can upgrade to an OS that’s safer and gets new security updates every month on Patch Tuesday?

Apart from cybersecurity reasons, upgrading to Windows 10 lets you enjoy the latest OS features developed by Microsoft on a much faster platform. Why settle with just enough (Windows 7) when you can take your Windows experience to a whole new level?

For more information about the differences between Windows 7 and Windows 10, check out the guides below:

At the same time, there is a series of Windows 7 features removed in Windows 10. When you turn on your newly upgraded computer for the first time, you’ll notice Desktop Gadgets are gone, libraries are disabled by default, games like Minesweeper and Solitaire are no longer available by default, and so on. For more information, see Top Windows 7 Features Removed in Windows 10.

Before you hit the upgrade button, there is a checklist you should go through in order to make sure the whole update process goes as smoothly as possible.

Windows 7 to Windows 10 upgrade checklist

1. Check the system requirements

There is a minimum set of hardware requirements your computer needs to meet in order to run Windows 10 without any problems. Failure to meet any of these requirements may lead to severe technical issues. We already compiled a useful checklist for you to go through before you hit the update button.

Stay on the safe side and make sure your computer meets these minimum Windows 10 hardware requirements:

  • 1GHz CPU (or faster)
  • 1GB of RAM for the 32-bit version, or 2GB of RAM for the 64-bit version
  • At least 16GB of storage space for the 32-bit version, or 20GB for the 64-bit version
  •  DirectX 9 compatible graphics card and WDDM 1.0 driver.

As a matter of fact, Microsoft recommends Windows 7 users to upgrade their hardware configuration as well. In plain English, this means buying a new Windows 10 computer.

As Microsoft clearly explains on the official upgrade page:

We recommend that you don’t install Windows 10 on an older device, as some Windows 7 devices are not compatible with Windows 10 or could experience reduced feature availability.

If you want to learn what happens if you run Windows 7 or Windows 10 on and old computer, see Windows 7 vs Windows 10 on old PCs: What to expect.

2. Backup your data

Now that you made sure your hardware is compatible with Windows 10, you need to backup your Windows 7 data. In this manner, you should be able to retrieve your files and folders in case anything goes wrong during the upgrade process. Not only that, but when it comes to migrating to a new OS, you may want to transfer all your files to the new platform. In both cases, the solution is to simply backup your data.

For more information, check out a detailed guide on how to backup Windows 7 before upgrading to Windows 10.

We recommend installing a dedicated Windows 7 backup software as this will help you to get the job done faster than Windows 7‘s built-in Back and Restore feature. This is the safest method to upgrade from Windows 7 to Windows without losing data.

If you don’t want to backup all your data but only transfer some files or folder, see How to transfer files from Windows 7 to Windows using an Ethernet cable.

On the other hand, if you’re a gamer and you only want to transfer your Windows 7 games to a different computer, see How to transfer Windows 7 games to Windows 10

How to successfully upgrade to Windows 10

So, up until now, we’ve got the system requirements checked, and data backup checked. It’s time to launch the update process — the simplest way is to hit the update button.

Indeed, Microsoft does allow you to upgrade from one OS version to a new one using the Windows 10 Update Assistant. However, this may often result in data loss. In order to avoid such unpleasant events, we recommend installing Laplink PCMover. This a program that you can use to move all your Windows 7 files, settings, and user profiles to your new PC.

Safety first
laplink pc mover express product box

Migrating from an OS to another is a big risk unless you have the right tool to do it. PCmover Express will move from without any data loss:

  • All your user profiles
  • OS settings
  • Personal data
  • Installed apps and software

Simply download PCMover to both your computer and follow the on-screen instructions displayed by the wizard.

However, this step is different for every user type. Of course, the process is much more complex for Enterprise and Business users than for average Windows 7 Home users but Laplink PCMover can help both users categories.

If you don’t want to use any third-party tools for the upgrade, we compiled the following additional upgrade guides involving different upgrade methods:

How to transfer programs and files from Windows 7 to Windows 10

For a general guide on how to transfer your programs from Windows 7 to Windows 10, see How to transfer installed programs from Windows 7 to Windows 10.

If you want to move your iTunes content from Windows 7 to Windows 10, see How to transfer iTunes from Windows 7 to Windows 10.

If you want to export Outlook contacts to your new OS, see How to export Outlook contacts from Windows 7 to Windows 10.

Speaking of emails, you may also be interested in this guide on How to transfer Live Mail files from Windows 7 to Windows 10.

If you want to keep your bookmark after the upgrade, see How to transfer bookmarks from Windows 7 to Windows 10.

On the other hand, if you just want to move particular Windows 7 files to another drives, here are two useful guides that you can use to get the job done:

Windows 7 to Windows 10 migration tips for network administrators

The Windows 10 upgrade process is more complex for business users as any mistake might trigger money loss. Here are some useful migration guides for network admins:

Despite Microsoft’s best intentions, it seems that 30% of companies won’t upgrade from Windows 7 to Windows 10. Not in the first year, at least.

Bring Windows 7 features back to Windows 10

If nostalgia strikes and you miss certain Windows 7 features after upgrading to Microsoft’s latest OS, here’s what you can do to bring them back:

Troubleshoot Windows 7 to Windows 10 upgrade issues

Sometimes, despite going through the checklist above, technical problems may occur during or shortly after the update process. We hope you never need to use the troubleshooting guides listed below. However, bookmarking this page is a good idea in case the upgrade process doesn’t go as expected.

Windows 7 update errors

Remote desktop

Black screen

Sharing folders

There you go, with the help of this guide, you should be able to safely transition from Windows 7 to Windows 10 without losing any files or folders. If you’ve got other tips and tricks you’d like to share with our readers, hit the comment section below.

New Task Manager UI and Notifications coming to Windows 10

Those that are part of the Windows Insider program are always lucky, or unlucky when it comes to testing out the latest features that Microsoft is bringing to Windows 10.

One good example is this latest update where Microsoft rolled out a new Windows 10 feature update test build, and the Fast Ring Insiders are the ones that get to test it

As the first Fast Ring update to be launched in 2020, the new Windows 10 build 19541, includes a couple of minor new options for Task Manager and Notifications, along with a number of fixes and updates.

What is this Task Manager update all about?

windows 10 task manager process architecture tab

Microsoft added a new option in the Details tab in Task Manager that will show users the architecture of each process, just as we reported back in December. This allows the user to see the architecture of process such as x86, x64 or Arm32. Similar functionality was already present in the Details tab, but it’s limited to 64-bit and 32-bit.

This was announced back in 2019 when,  according to a post on social media, the Windows 10 Task Manager would be enriched with a new tab.

taskmgr will have an ‘Architecture’ column to display the architecture of process, like x86/x64/Arm32

As for the notification updates from Build 19541, Microsoft is adding an icon to let users know when an app is using their location, and it will show up in your notification area.

Additionally, Bing Instant Answers and Timers are now back online, so users that frequently use Cortana can rejoice.

However, keep in mind that Microsoft changed the way they release updates to the Fast Ring. New features that appear here are no longer guaranteed to make it to live.

Microsoft’s next feature update for Windows 10, is scheduled to release somewhere later this spring. Users are eager to know what other new features it will bring.

Do you think that these updates are an improvement for Windows 10? Let us know in the comment section below.

READ NEXT:

Microsoft introduces Bing for Commerce – intelligent search for retail websites

Microsoft is set to announced new tools for retail companies next week at the National Retail Federation in New York. Today, the company has introduced two solutions to help retailers online: Bing for Commerce, and Microsoft PromoteIQ.

Bing for Commerce is a search solution that retailers can use to power their websites, giving shoppers “intelligent search, personalization and product recommendation solution that helps gives retailers the power to meet today’s shopper expectations and grow revenue,” according to the announcement blog post. It’s powered by the tech giant’s search engine and Microsoft AI to tailer the search results.

In addition to Bing for Commerce, the company has also announced Microsoft PromoteIQ. Having initially acquiring the brand back in August 2019, PromoteIQ is a marketing platform that allows retailers to insert relevant ads to their homepages for boosting revenue from various brands, with full integration with Microsoft Advertising. The company is expected to show samples during the retail event next week.

Microsoft has also introduced other new features recently that retail companies can take advantage of. Teams is getting a walkie talkie feature for communication among employees, and the company also recently announced Dynamics 365 Commerce for inventory management, scheduling, and other operations.

What do you think about these new tools for retailers? Feel free to leave your thoughts and comments below.

FIX: Windows 7 Update Center gets stuck checking for updates

Many Windows 7 users who have recently tried to install the latest updates on their computers reported they couldn’t because the Windows Update center wouldn’t work.

The most common cause for this type of issue can easily be eliminated because users have confirmed they had disabled their antivirus program during the update attempt.

This issue is so annoying that users are even considering upgrading to Windows 8.1, hoping that a new Windows will unblock the Windows Update center.

Windows 7 users are complaining that Windows Update gets stuck while checking for updates

I reinstalled windows 7 after a error with windows automatic repair, and now windows update will not work.[…] I have tried the automatic repairs from Microsoft, removing downloaded files in software distribution folder, using CCleaner, and disk cleanup. I am running no antivirus programs because of this to make sure that’s not a problem. I am also considering updating to windows 8.1 because maybe a new windows will help. My only issue with that is I don’t want to loose any files.

On top of that, here are some more common error messages related to this issue:

  • Windows 7 update checking for updates forever – Sometimes, Windows is not even able to find updates, leaving you stuck in an infinite loop of checking for updates.
  • Windows 7 update stuck installing – There’s a chance Windows will actually download updates, but actually get stuck installing them.
  • Windows 8.1 update stuck on checking for updates – It’s also common for Windows 8.1 to get stuck during installing updates.
  • Windows 10 update stuck on checking for updates – The same thing goes for Windows 10.
  • Windows 7 update stuck downloading – There’s a chance Windows 7 will manage to find updates, but get stuck downloading them.

Can I still update Windows 7? Yes, you can! Learn everything about Windows 7 updates from our article!


What to do if Windows 7 Update Center gets stuck while checking for updates

Table of contents:

  1. Use the Microsoft Update Catalog
  2. Go to Microsoft’s Download Center
  3. Run the Windows Update troubleshooter
  4. Run the built-in Update troubleshooter
  5. Delete the Software Distribution folder
  6. Make sure the Update service is running
  7. Run the System File Checker tool (SFC.exe)
  8. Reset the content of the Catroot2 folder
  9. Run the System Update Readiness tool (CheckSur.exe)
  10. Change DNS server settings
  11. Perform System Restore
  12. Use WindowsUpdateLoopFix

Fix: Windows Update got stuck in Windows 7

Solution 1- Use the Microsoft Update Catalog

The Microsoft Update Catalog is a very reliable method, but the catch is that you have to use Internet Explorer, otherwise you can’t access the site.

  1. Go to Control Panel > change the View to Small icons so you can see things easier.
  2. Go to Settings > select Never search for updates.
  3. Save the changes > restart your computer.
  4. Launch Internet Explorer > go to the Update Catalog.
    windows 7 update catalog
  5. Select the latest updates > add them to your update basket.
    windows 7 download update catalog
  6. Click on View Basket > download the content of your basket to your desktop
    update windows 7
  7. Locate the updates on your desktop > double-click them to launch the installer.
  8. Once the updates have been installed, restart your computer.

Epic guide alert! Everything you need to know about keeping your Windows 7 forever!


Solution 2 – Go to Microsoft’s Download Center

  1. Select the latest updates > download them on your computer.
  2. Double-click them > wait for the installation to complete.
  3. Restart your computer.

There you go, you can update your Windows 7 without using the automatic update feature.

For a focused walkthrough that fixes the endless check and stalled installs, open the guide Windows 7 not updating and follow the steps to rebuild services, clear the cache, and apply updates successfully.


Solution 3 – Run the Windows Update troubleshooter

Download the troubleshooter from Microsoft, launch it, and follow the on-screen indications. Once the process is completed, restart your computer.


Solution 4 – Run the built-in Update troubleshooter

Besides Microsoft’s troubleshooting tool from above, Windows 7 also has a built-in troubleshooter. So, you can also run this tool to solve your update problems.

In case you don’t know how to run Windows 7’s troubleshooting tool, follow the instructions below:

  1. Go to Control Panel 
  2. Now, head over to Troubleshooting
  3. Under System and Security, choose Fix Problems with Windows Updates
  4. Follow further on-screen instructions
  5. Wait for the process to finish
  6. Restart your computer

Update Troubleshooter stopped working? Here’s how to fix the problem with our guide!


Solution 5 – Delete the Software Distribution folder

The Software Distribution folder is a specific folder where all data and files of Windows updates are temporarily stored. If there’s something wrong with this folder, you won’t be able to install updates.

So, we’re going to delete this folder, in order to make your Windows Update mechanism work again. Here’s how to do that:

  1. Right-click the Start menu and run the Command Prompt (Admin).
  2. In the command line, type the following commands and press Enter after each:
    • net stop wuauserv
    • net stop bits
    • rename c:windowsSoftwareDistribution SoftwareDistribution.bak
    • net start wuauserv
    • net start bits
  3. Now, try to run Windows Update and check for changes.

Solution 6 – Make sure the Update service is running

As its name says, Windows Update service is essential for installing Windows updates. Now, if you’ve wanted to skip some update in the past, there’s a chance you got this service disabled.

So, we’re going to check if this service is disabled and re-enable it, if needed. Here’s how to do that:

  1. Go to Control Panel
  2. Click on System and Security 
  3. Go to Administrative Tools > Services
  4. Find the Windows Update service
  5. If the service is disabled, right-click it and go to Enable

Solution 7 – Run the System File Checker tool (SFC.exe)

  1. Launch Command Prompt >type sfc /scannow > press Enter.
  2. After the scan is finished > try to install updates again.

Check out our guide and learn to use System File Checker like a real technician!


Solution 8 – Reset the content of the Catroot2 folder

  1. Launch Command Prompt
  2. Type the following commands, hitting Enter after each command:
    net stop cryptsvc
    md %systemroot%system32catroot2.old
    xcopy %systemroot%system32catroot2 %systemroot%system32catroot2.old /s
  3. Delete the content of the catroot2 folder, but keep the folder itself. You should find it here: C:Windowssystem32CatRoot2.
  4. Type the command net start cryptsvc.
  5. Exit the Command Prompt window.

Solution 9 – Run the System Update Readiness tool (CheckSur.exe)

This tool runs a scan for inconsistencies that may prevent servicing operations. After you run the tool, the CheckSur.log file is saved in the following location: .

  1. Download the System Update Readiness tool from Microsoft for the 32-bit Windows 7 version, or for the 64-bit Windows 7 OS.
  2. Install and run the tool.
  3. In the Windows Update Standalone Installer dialog box, click Yes.
    System Update Readiness tool windows 7
  4. Wait for about 15 minutes for the tool to install. When installation is complete, click Close.
    Try to install the latest Windows 7 updates again.

Solution 10 – Change DNS server settings

Some users also suggest that changing the DNS server can also help with faulty updates. That’s mainly because your network operator’s default DNS servers are not working so well.

So, we’re going to change the DNS server settings to widely-used Google DNS.

Here’s how to do that:

  1. Open Network Connections. You can do that by pressing Windows Key + X on your keyboard and choosing Network Connections option.
  2. Locate your network connection, right click it and choose Properties from the menu.
  3. When Properties window opens, select Internet Protocol Version 4 (TCP/IPv4) and click the Properties button.
  4. Now select Use the following DNS server addresses option.
  5. As Preferred DNS server enter 8.8.8.8. As for Alternate DNS server, you need to enter 8.8.4.4. If you want, you can also use 208.67.222.222 as Prefferedand 208.67.220.220 as Alternate DNS server.
  6. After you’re done, click OK to save changes.

Here’s what to do if the DNS server cannot be reached. It’s really simple!


Solution 11 – Perform System Restore

And finally, if none of the previous solutions worked, we’ll perform System Restore. There’s a chance something got disrupted in your system, so (hopefully) System Restore will solve that.

Here’s how to perform System Restore in Windows 7:

  1. Go to Control Panel.
  2. Go to System and Security > System.
  3. Under the Control Panel Home menu, click System protection.
  4. Click System Restore.
  5. Choose the Restore point.
  6. Follow further on-screen instructions.
  7. Once you initiate the process, your computer will restart, and System Restore will get it to the selected previous state.

Solution 12 – Use WindowsUpdateLoopFix

If you want to quickly fix this problem, it’s advised to use the WindowsUpdateLoopFix script. This script was available on the Microsoft Answers forum, but it has since moved to GitHub for ease of management. At the time of writing, the original post on Microsoft Answer’s forum has over 1600 upvotes, so the script should be safe to use and it won’t cause any damage to your PC.

It seems that this issue appears because KB3020369, KB3172605 and Windows Update Agent for Windows 7 (v7.6.7600.256) updates are missing from your PC. By using this script, the updates will be downloaded and installed automatically. To use this script, just follow these steps:

  1. Download the latest version of WindowsUpdateLoopFix.
  2. Close all running applications.
  3. Now double-click on UpdateFix.exe.
  4. Select Express Fix (Recommended) option and wait for the script to finish.

After the script is completed, the issue should be resolved.

We hope these workarounds help you to fix the Windows 7 update issues.

RELATED STORIES YOU NEED TO CHECK OUT:

How to prevent Windows 10 installation on Windows 7/8.1 PC

Microsoft introduced a couple of new policies with Windows 10, like making the system available as a preview, before its actual release, offering it as a free upgrade to all legitimate Windows 7 and Windows 8.1 users, and more. And since the company offers Windows 10 as a free upgrade, it also have chosen to ‘force’ all users who are currently on Windows 7 and Windows 8.1 to upgrade to the new system.

Some users who still find using one of the previous versions of Windows better, don’t agree with this Microsoft’s decision, but there wasn’t much they could do about it. Until now!

How do I prevent my PC from upgrading to Windows 10?

1. Use GWX Control Panel

You probably noticed that various third-part developers are making apps which offer some services and features that Windows 10 itself doesn’t. And this time, we have a revolutionary tool which will prevent Windows 10 from installing on your computer.

The tool is called GWX Control Panel, and it’s developed to stop the installation of Windows 10 on your computer without your permission. As Windows Update automatically installs files need for Windows 10 Upgrade, and changes certain settings to make the installation happen, this tool will prevent your settings from being changed, which will keep Windows 10 out of your computer, as long as you run this tool.

The latest version of the app allows you to run this software in the background, and it will continuously ‘keep an eye’ on any attempts to change your settings without any interruption of your work. Ultimate Outsider, the developer of GWX Control Panel, calls this ability the Monitor Mode.

The only noticeable change this tool will bring to your computer is a small icon in the system try. By clicking on this icon, you can access GWX Control Panel, where you can see various info about the current state of your system, like if ‘Get Windows 10’ app is enabled, or if there are any Windows 10 download folders installed on your computer.

gwx control panel

Besides monitoring all Windows’ attempts to change your settings, this tool also offers some other useful features:

  • The ability to check for updates, so you can always run the latest version of the software.
  • The ability to save all your diagnostics info, such as error messages, or reports of an unexpected behavior, as a .txt file, so you can reach the developer for help.
  • “More comprehensive protection,” which allows you to disable or enable Automatic Updates on your Windows (but it’s not recommended, though)

The developer also joked a little with Microsoft’s way of installing Windows 10 through “Get Windows 10” feature, by saying: “Unlike the Get Windows 10 app, this one includes an Exit option! Just click Enable Monitor Mode to turn the feature on.” You can read the full presentation of the tool on Ultimate Outsider’s Blogspot page.

So if you’re unsatisfied with Microsoft decision to install Windows 10 against your will, and if you want to stick with your current Windows operating system, this tool will be very helpful to you.

You can download GWX Control Panel for free from Ultimate Outsider’s official website.


2. Use Never10 software

Prevent Installation of Windows 10 never10

Another third-party software that will help you prevent Windows 10 upgrade is Never10. The application is incredibly simple to use, and you just have to do the following to stop the update:

  1. Download Never10 software.
  2. Start the application and click Disable Win10 Upgrade If your system has already downloaded Windows 10 files, click on Remove Win10 Files button.
  3. After doing that, restart your PC and you shouldn’t see any notifications asking you to install Windows 10.

3. Download the updates manually

In order to prevent Windows 10 update from installing, it’s important not to download its update. Windows 10 update is labeled as KB3035583, so if you have it on your system, be sure to remove it.

To do that, follow these steps:

  1. Go to Control Panel > Programs and Features > View installed updates.
  2. Now locate KB3035583 update and remove it.

uninstall an update Prevent Installation of Windows 10

After removing the update, you need to change your Windows Update settings. To do that, follow these steps:

  1. Go to Control Panel > System and Security > Turn automatic updating on or off.
  2. Now set Important updates to Check for updates but let me choose whether to download and install them.
  3. In Recommended updates section check the Give me recommended updates the same way I receive important updates.
  4. Save changes.

After doing that, you’ll be able to choose which updates you want to download. Be sure to download all security updates in order to keep your system safe, but don’t download the KB3035583 update since this update will force you to upgrade to Windows 10.

There you go, these are several quick and easy methods that you can use in order to prevent your PC from automatically upgrading to Windows 10.

Xbox One digital pre-orders open for atmospheric flow-style adventure video game Lumini

Pre-orders for Lumini have opened on Microsoft’s family of Xbox One consoles ahead of the game’s January 22nd release date.

Lumini is an atmospheric adventure game designed to create a sense of calm and tranquillity. Players are tasked with guiding a swarm of mysterious creatures through a variety of areas while collecting energy.

Here’s the official game description and trailer:

A long-forgotten species, a hostile planet and a journey of discovery – welcome to the world of Lumini…

Having vanished without trace for thousands of years, an innocent race of creatures known as the Lumini have returned to their home world. Sadly, time has not been kind and the balance of the planet has shifted, turning the once gentle environment into a hostile landscape. Only the Lumini themselves can restore balance and help revive their long-dormant race, before adapting to preserve the future for generations to come.

Explore the Lumini home world in this relaxing flow-style adventure, overcoming obstacles and keeping your swarm safe while collecting the planet’s energy to bring back your fallen comrades. Split and reform your swarm, evolve and discover new abilities to bring the Lumini back to their former glory…

Lumini is currently selling for just $8.99 on Xbox One consoles. Its price is expected to jump up to $9.99 once it launches in under two weeks from now.

Are you curious about Lumini and have you pre-ordered it? Share your thoughts with the community in the comments below and then follow us on Pinterest, YouTube, Facebook, and Twitter for more Xbox gaming content.

Lumini
Lumini
Developer:
2Awesome Studio
Price:
$9.99

Windows 10 Facebook Messenger (Beta) updates with new voice recording feature

The Facebook Messenger (Beta) app designed for Windows 10 devices has updated (via AL) with an introduction of a new feature; voice recording.

After installing the app update, users will be able to record an audio message directly from within the app and attach it to a DM by clicking on the + button next to the text field.

Facebook Messenger (Beta) is used to test new features for stability and useability before rolling them out to the main Facebook Messenger app. The Beta app updated just last month with a rather significant update which changed the app to Electron-based, added several new features, and refreshed the app icon.

Do you use Facebook Messenger on your Windows 10 device or do you prefer to stick with the mobile versions on iOS and Android? Let us know which version you prefer in the comments below and then follow us on Pinterest, YouTube, Twitter, and Facebook for more Windows app news.

Messenger (Beta)
Messenger (Beta)
Developer:
Meta
Price:
Free

How to get a free Windows 10/11 upgrade (Assistive Technology)

With Microsoft pulling the plug on Windows 7, many users are now left with only two options:

The only problem with both choices is that they both involve paying a hefty sum of money. Thus users are looking for methods through which they can get their hands on a free Windows 10 license.

The good news is that that with Windows 10, Microsoft brought a way for people using Windows 7 and assistive technologies to upgrade to Windows 10 for free.

This method still works today, and this article will show you how assistive technologies users can get their free copy of Windows 10.

What are assistive technologies?

For those of you that don’t know, assistive technology is a much larger term which refers to multiple types of aids that help adults and children with disabilities in their daily lives. These include all programs meant to help users with disabilities, including:

  • Screen readers
  • Voice commands and dictation
  • Magnification and contrast
  • Audio descriptions

How can I get a free copy of Windows 10?

All a user needs to do is upgrade to Windows 10 is to simply use their Windows 7 product key that had assistive technologies attached to it.

Note: Before starting off, you should backup all your files and applications or licenses to a removable hard drive or to the cloud. That way, if something goes wrong, you can restore your data without losing it.

  1. Go to the official Microsoft Website and download the Media Creation Tool
  2. Select Upgrade this PC Nowupgrade this pc now
  3. The program will now proceed to download all the Windows 10 installation files.
  4. You will need to choose what to transfer from Windows 7 to Windows 10 and there are 3 choices:
    • Data only:
      • You will transfer only the files, folders, images, etc to the new operating system
    • Data and apps:
      • You will also transfer the apps, not just the data
    • Nothing:
      • This is basically something akin to a clean install
  5. Click Next
  6. Finish the install

You should now be able to now use Windows 10 freely, and benefit from the latest generation of assistive technology that it has to offer.

Do you think this free upgrade is useful for people who need assistive technologies to make their lives easier? Let us know in the comment section below.

RELATED ARTICLES YOU SHOULD CHECK OUT:

Should you transfer Windows 7 from one computer to another?

If you plan on using Windows 7 for a longer period of time, but the hardware you currently have has malfunction or is simply dated, then you are probably wondering whether you can move your Windows installation from one PC to another.

The short answer would be yes, but the truth of the matter is that it is a bit complicated.

How do I move Windows 7 from one computer to another?

1. Move Windows 7 to a different motherboard

The simplest method one can think of when moving a WIndows install from one PC to another would be to simply put the motherboard of the old PC into the new one.

Additionally, you could just transfer the WIndows install from one motherboard to another. In theory, this should pretty much do it, but there are a number of complications linked to this method.

First of all, your Windows 7 install is calibrated to the drivers of your old PC. Because of this, when you move it into another PC (most likely one with a whole different set of specs), you may get error,s or even BSODs when trying to boot.

2. Use Sysprep

This tool is designed for large organizations and PC manufacturers, and it prepares an installation of Windows for duplication, auditing, and customer delivery.

Unfortunately, this isn’t available for the general public, and it can only be used with fresh installs anyway.

Issues with transferring Windows from one PC to another

Besides the hardware issues mentioned above, there is also the matter of activating your Windows install once moved to a new PC. First of all, it all depends on the type of license that you have.

1. If you have a retail license

You can move it to another computer as long as it’s only installed on one computer at a time.

This is because activating it on the second computer will automatically deactivate the license for the first computer. The key will work with both 32 and 64 bit, but only one can be installed at a time.

2. If you have an OEM license

OEM licenses are tied to the first computer they are installed on and can not be transferred to a different computer.

However, one workaround would be to move the motherboard into a computer that has the exact same hardware components. This way you can still use the OEM license without any of the driver issues mentioned above.

Conclusion

Given how many complications there are with transferring an entire Windows install to another computer, you might as well go for a clean install.

However, if personal data is your main concern, you can always simply make a backup of all of your files, and then transfer them to a new computer.

Did you find this article useful? Let us know in the comments section below.

RELATED ARTICLES YOU SHOULD CHECK OUT:

How to move Windows 7 backup files to another drive

Microsoft no longer supports Windows 7, and because of that many users are now flocking to Windows 10.

Of course, the only thing more complicated than the upgrade process itself is transferring their old data from Windows 7 to the new OS.

Fortunately enough, there are tons of methods that you can use to safely migrate your data. Even more so, many of these methods revolve around you using a Windows 7 image backup file.

However, these files tend to be quite larger, so moving them around to other drives can be important. This is specially the case if there isn’t much storage space to go around.

That is precisely why we’ve created this step-by-step guide on how to transfer Windows 7 backup files to different drives, while still keeping them functional.

How do I move Windows 7 backup files to another drive?

Fortunately enough, moving Windows backup files is simply a matter of copying and pasting the files from one directory to another. The only catch is that while this method may be simple, there are a few rules that you should follow if you want the files to be also functional:

You can move your images anywhere you want. However, in order to restore from them, the WindowsImageBackup folder needs to be moved to the root of a drive.

This usually looks something like this:

  • J:\WindowsImageBackup

As you can see, the WindowsImageBackup files are available as soon as you open the external drive, and are not stored in any other folder or subfolder.


Do you find this solution too complicated? Get a program that will make it easier!


One neat treat you should know about is how you can manipulate Windows’ tendency to override backup files. For example, you know that whenever you create a new Windows backup ina directory, any backup already present there will be overridden with the new data.

You can avoid this issue by creating the backup files, then moving them to properly labeled subfolders. You can even include text documents in the subfolders to make it even easier to identify what backup it is exactly.

Whenever you need to restore, simply take the backup files from the subfolder, and place it back into the root of your drive.

Conclusion

As you can see, as long as you follow one simple rule, there isn’t much to moving WIndows 7 backup files between different drives. In fact, you can store different backups at the same time precisely because of this key limitation.

Did you find this article useful? Let us know in the comment section below.

RELATED ARTICLES YOU SHOULD CHECK OUT:

How to move personal folders to another drive in Windows 7

As you probably know, the partition on which you have your OS installed (usually the C drive) should always have enough free space. This is usually due to future updates, and that to make sure Windows has enough space for temporary files.

In fact, you may even come across an error stating that you cannot install a certain program or game, simply because you don’t have enough free space in your system partition.

Thus, moving files between partitions to free up some space is always a good idea.

The problem is that not all files can be moved simply by using Copy and Paste. One good example being the My Documents folder, which is usually the first that grows in size the more you use your PC.

That is why we’ve created this article to show you in a step-by-step manner just how you can transfer such personal files to another partition, and still keep them functional.

How can I transfer personal folders to another drive?

The method involves modifying some of the folder’s file properties, and it is done as follows:

  1. Open the Start menu
  2. Click your user name to open the User folder
  3. Right-click the personal folder you want to redirect
  4. Select Properties
  5. Click the tab Locationmove personal folder
  6. Click Move
  7. Browse to the location where you want to redirect this folder
    • You can select a number of different locations, such as:
      • Another location on this computer
      • A different drive attached to this computer
      • Another computer on the network
  8. Choose the folder where you want to store the files
  9. Click Select Folder
  10. Click OK
  11. Choose Yes when asked to move all the files to the new location

By doing this, you will be able to transfer folders to a different drive, without affecting their functionality as a Copy-Paste operation would.

Notice: While the method mentioned above is extremely effective in transferring personal folders, it won’t work on all of them. Here’s a list of personal folders that this method has proven to be effective on:

  • Contacts
  • Desktop
  • (My) Documents
  • Downloads
  • Favorites
  • Links
  • (My) Music
  • (My) Pictures
  • Saved Games
  • Searches
  • (My) Videos

Any other personal folders moved through this method may lose functionality, and may even cause problems when trying to update.

What other methods do you use to free up the System drive? Let us know in the comment section below.

RELATED ARTICLES YOU SHOULD CHECK OUT:

How to use Windows Easy Transfer to migrate to Windows 10?

Ever since Microsoft pulled the plug on Windows 7, users have been rushing to upgrade to keep their data safe. Of course, those that belong to business groups could always opt to go for the Windows 7 Extended Support for Business.

However, the vast majority will probably go for the upgrade. As such, the biggest concern after the upgrade itself is how will users migrate all of their data from their Windows 7 computers to Windows 10.

Normally’ the first thing that may pop in your hear would be to just copy everything on an external hard drive, and then paste it back on the PC when it is upgraded.

While this indeed a good idea for general files and folders, it doesn’t work with complex data, such as user profiles, installed programs or games, or other similar items.

Fortunately enough, there are plenty of methods you can use to upgrade to Windows 10 and take your data along with you. One good example is by using the Windows Easy Transfer tool, and this article will show exactly how you can use it.

Can I go from Windows 7 to 10 using?

  1. Press Start
  2. Search for Windows Easy Transfer, and open the first result

Windows Easy Transfer

  1. Choose the method you want to use to transfer between the old PC and the Windows 10 PC
    • You can choose from:
      • Easy Transfer Cable
      • Network
      • An external hard disk or USB flash drive
        windoes easy transfer methods

If you’re going for a Windows 10 upgrade, most likely you will be performing an in-place upgrade. Thus, you can choose an external hard disk or USB flash drive since the old and the new computer is actually the same computer. 

  1. Select An external hard disk or USB Flash drive
  2. Select This is my old computer
  3. The next window will present you with a Windows Easy Transfer key. Write it down
transfer key

Prefer a dedicated profile migration utility when you need to keep user settings, app data, and permissions intact; try User Profile Wizard to move a Windows 7 profile to Windows 10 without recreating accounts.

Now that you have copied the profile on the USB stick, it is time to transfer it to the new Windows 10 PC

  1. Insert the external drive in the PC once you upgrade it
  2. Launch migwiz.exe from the external hard drive
  3. Click Next
  4. Select This is my new PC
  5. Click Next
  6. Select My old computer is running Windows 7
  7. Insert the Windows Easy Transfer key 
  8. Finish the setup

By following this method, you should be able to efficiently use Windows Easy Transfer to migrate data from your Windows 7 PC to your Windows 10 PC.

This method has been proven to be quite secure, and it doesn’t require you to use any third-party migration tools.

Did you find this article useful? Let us know in the comment section below.

RELATED ARTICLES YOU SHOULD CHECK OUT:

No Free/Busy Information Could be Retrieved [Fix]

Microsoft Outlook users have been reporting all sorts of problems as of late. One such error is that Outlook Scheduling Assistant’s Free/Busy data could not be retrieved.

This error usually occurs when users try to schedule a meeting or after a mailbox is moved to Microsoft Office 365. If your account is hosted on an Exchange server and the Free/Busy data couldn’t be retrieved by Outlook, the information for other users will be displayed as slash marks.

Keep reading to find out what to do when Scheduling Assistant in Outlook is not showing free/busy!

How can I fix Scheduling Assistant Free/Busy data could not be retrieved?

1. Change the default permissions

Note icon NOTE
The user has to be granted at least Reviewer permission to view calendar item details.
  1. Right-click on the calendar and select Properties.
  2. Go to the Permissions tab, and set the desired permissions/settings.set permission to fix no free/busy information could be retrieved
  3. Once done, click OK to save the changes.

It’s frustrating not having the chance to see the Free/Busy information for the mailbox in Scheduling Assistant. The issue sometimes further extends to no longer viewing the Calendar folder either.

You just receive a Could not be updated error message instead. Long story short, Scheduling Assistant makes cross-forest requests on behalf of the organization relationship instead of on behalf of the actual user who is requesting.

In a hybrid deployment, with the default permissions set to None or Contributor, no Free/Busy information can ever be natively displayed for remote users.

The mailbox owner can though solve this issue by changing the default permissions to Free/Busy time or Free/Busy time, subject, and location.

2. Clear the Auto-Complete caches

  1. Go to the File menu and select Options.
  2. Navigate to the Mail tab, and under Send messages, click the Empty Auto-Complete List button.empty list to fix no free/busy information could be retrieved

Changing permissions on Outlook Calendar solves the Scheduling Assistant Free/Busy data issues for most users.

3. Verify Autodiscover CNAME record

There’s also a high chance to find out that the Autodiscover record is missing or is incorrectly set up. Verify that the Autodiscover CNAME record has been created for your domain.

Outlook Autodiscover

Outlook 2007 and up discovers the Availability Service URL using the AutoDiscovery feature in the Exchange environment.

4. Turn on Public Folders when Scheduling Assistant is not showing conflicts

You’re used to creating meeting requests using the Scheduling Assistant in Outlook, but there’s a problem when the notification Conflicts with another appointment is missing.

Scheduling Assistant Public Folders

This indication of potential conflicting appointments is often related to improperly configured Public Folders.

If turned off, turn them back on. The Scheduling Assistant should start telling users once again that resources are already booked, and invitations cannot be sent without changing the room or the time.

We hope these methods were helpful in solving Outlook Scheduling Assistant’s No free/busy information could be retrieved error.

In case you still face issues, switch to another reliable email client for an error-free experience.

If you have any other questions or suggestions, don’t hesitate to leave them in the comments section below.

Microsoft launches new Bing Pages for businesses and personalities

Microsoft has just launched a beta of a new program that allows individuals to control how they appear on its Bing search engine and other Microsoft services (via Windows Central). Currently in beta, Bing Pages allows users to customize their page with content such as social media feeds that they can easily manage.

Microsoft is also making this a great way for individuals to promote their media profiles at no cost, allowing them to better show up on Bing search. Businesses will also benefit from being able to manage their online personas on Microsoft’s various other services, such as Outlook.

Heading to the Bing Pages sign-up page will allow you to enter various bits of information, including email, social media accounts, and website address. Interestingly, a Twitter account is required as a means of authenticating your account, however all of the other social media boxes can be filled out optionally.

Details on how the whole process works are a little bit are a little short on its website, likely due to that the program is still in beta. We’ve filled out the form for On MSFT, and will let you know more about the process in the future (so follow us on Twitter).

What do you think about the new customizable Bing Pages? Feel free to let us know what you think in the comments area below.

A new Lord of the Rings video game is coming to Microsoft’s Xbox Series X console

Daedalic Entertainment has announced that they’re working on a new video game based on the popular The Lord of the Rings franchise set for release in 2021.

The game will be called The Lord of the Rings: Gollum and, as its name implies, will focus on the character of Gollum and will be set before the events of the main The Lord of the Rings trilogy.

“We have the story that we all know from the book, but everything that happens to him before he appears in the book are the main things we will see in our game. We will tell the story before he first appears in the books,” Daedalic’s Fichtelmann said in an interview with the HR.

Little is known about the upcoming title’s gameplay but it is hinted that decision-making will be involved in some capacity.

The Lord of the Rings: Gollum is confirmed for release on PC and “all relevant console platforms at that time” which will likely include the Xbox Series X consoles, which launches later this year.

While video games set in Middle-Earth are generally hard to come by, fans of the fantasy world may want toc heck out the new digital card game which launched on Xbox One in late-2019.

Are you excited for The Lord of the Rings: Gollum? Let us know why or why not in the comments below and then follow us on Pinterest, Facebook, and Twitter for more Xbox gaming content.

How to transfer Live Mail files from Windows 7 to Windows 10

Windows 7 no longer receives support from Microsoft, and as such, many users are now forced to upgrade to the much more advanced Windows 10.

Those that have business licenses for their Windows OS can also opt to get the Windows 7 Extended Support, although this too is just a temporary solution.

Thus, upgrading does seem like the best choice, if not for the many concerns users are having for their personal data. One good example is how users are wondering how they could transfer their Windows Live Mail messages from their Windows 7 PC to Windows 10.

How do I transfer my Live Mail messages to Windows 10?

One neat feature that will help us in our endeavor is that Windows Live Mail includes functions for exporting and importing mail messages and newsgroup posts.

This is a useful way of backing up to avoid data loss in the event of a computer malfunction. Additionally, it also helps transfer data from one installation of the program to another. 

1. Export the Live Mail messages

In order to successfully export the emails, follow these steps:

  1. Before starting, set Windows Live Mail to Work offline
    • This is mainly to minimize interference
    • All you need to do is disconnect from the network and disable your anti-virus before starting
  2. Create a folder on your desktop
    • This is where you will export the messages
  3. Open the Export wizardexport wizard
  4. Select the temporary folder and select All folders
  5. Check that the number of files in each folder within the temporary folder
    • Make sure it is one more than the number of messages in the corresponding folder in Windows Live Mail
  6. Copy the temporary folder to its final destination on your Windows 10 PC

Not a big fan of Outlook? Check out these great alternatives!


2. Import the messages in Windows 10

The messages will be stored in EML format, and if Windows 10‘s Outlook is the default program to open EML files, then all you will need to do to add them si double-click them.

Once the message is open, you can use the Save button to store it in the Inbox folder or the Move command to save it to the folder of your choice.

Conclusion

By following these steps, you should be able to successfully migrate Live Mail messages from a Windows 7 PC to Windows 10‘s Outlook.

The only noticeable drawback of this method is that once the EML files have been exported, adding them in Outlook can only be done one at a time. Thankfully enough, this isn’t a process that takes long at all, but it can get frustrating if the number or EMLs that need adding is large.

Did you find this article useful? Let us know in the comments section below.

RELATED ARTICLES YOU SHOULD CHECK OUT:

How to transfer bookmarks from Windows 7 to Windows 10

The end of Windows 7 means that pretty much everyone has no other choice but to upgrade to Windows 10. While companies and businesses can still choose to remain with Windows 7 via the Windows 7 Extended Support for Business, this is just a temporary solution.

Thus, with a Windows 10 upgrade left as the only viable option, users are now wondering what will happen now to all of their data. For example, their Internet Explorer bookmarks are probably something they would like to take with them.

Unfortunately, bookmarks are regularly the first thing to get deleted during an upgrade. That is precisely why we’ve created this step-by-step guide on how you can transfer your Internet Explorer bookmarks from Windows 7 to Windows 10.

How do I transfer Windows 7 IE favorites to Windows 10?

1. Export your Internet Explorer bookmarks

  1. Go to your Windows 7 PC
  2. Open Internet Explorer browser
  3. Select View favorites, feeds, and history
    • You can also access Favorites by pressing Alt + C
  4. Select Import and export….export ie favorites
  5. Choose Export to a file
  6. Click Next
  7. On the checklist of options, select Favorites
  8. Click Next
  9. Select the folder that you’d like to export your Favorites from
  10. Click Next
  11. Type in the file path where you want the exported file to be saved
  12. Select Export
  13. Select Finish

By following these steps, your Favorites should now be saved as an HTM file. You will then need to somehow transfer the HTM file to your Windows 10 PC. You can do this via an external drive, or by using a cloud service such as OneDrive.

The next phase will be to import the HTM file into your default Windows 10 browser, which is Microsoft Edge


If you’re upgrading to Windows 10, might as well get a new and better browser as well


2. Import the Favorites file into Microsoft Edge

  1. Open Microsoft Edge
  2. Select Settings and more
  3. Choose Settings
  4. Select Import or export
  5. Choose Import from fileedge import from file
  6. Browser for the location of your exported Internet Explorer Favorites file

By doing this, you should be able to access all of the favorites and Bookmarks you had saved on Internet Explorer in your Windows 7 computer with full functionality.

Did you find this article useful? let us know what other data you want to take with you when you migrate to Windows 10 in the comment section below.

RELATED ARTICLES YOU SHOULD CHECK OUT:

How to transfer installed programs from Windows 7 to Windows 10

The first thing that was on the user’s mind when Microsoft announced that it will cease support for Windows 7 was probably that they should upgrade as soon as possible.

Of course, no one is thinking about going to Windows 8, thus Windows 10 is the go-to answer. While those that belong to business environments could always opt to use the Windows 7 Extended Support for Business, this is just a temporary solution that will only buy you another 2 years at best.

As such, with a Windows 10 upgrade left as the only viable long-term solution, users will just have to comply.

The only problem is that when you migrate from one OS to another, the first thing that may be on your mind is what will happen with all of your data?

While personal files and folders can always be Copy and Pasted to an external hard drive and then move back onto the computer after the upgrade, your installed programs are a whole different story.

Fortunately enough, there are solutions for you to transfer installed programs from Windows 7 to Windows 10, without losing time having to reinstall them again.

How do I transfer programs from Windows 7 to Windows 10?

1. Use a dedicated transfer software

There are plenty of backup tools on the market, and many of them do a pretty good job. However, Laplink PCmover is the only third-party tool specifically designed to help users migrate from Windows 7 to Windows 10.

Down to its essence, it helps migrate pretty much everything from one computer to another, including personal files, folders, installed games or programs, user profiles, and more.

Since most applications are installed ready-to-use on the new PC, you won’t need to find old CDs, previously downloaded programs, serial numbers or license codes.

Another advantage to using this program is the interface, which pretty much guides you every step of the way, so you always know exactly what to do and when.

⇒ Get Laplink PCmover

2. Use the Microsoft Media Creation Tool

This method is a bit more complicated, and it uses tools provided by Microsoft itself. The only advantage that it has over using Laplink PCmover is that it can be used in in-place upgrades, while Laplink requires that you have a secondary external hard drive.

Before using this tool, you must know that you must first buy Windows 10 or have a valid Windows 10 serial number.

Using the Media Creation Tool is fairly simple, as you need to just follow these steps:

  1. Go to the Microsoft Media Creation Tool’s website
  2. Press the Download tool now button
  3. Launch the installer once the download is finished
  4. In the What do you want to do menu, select Upgrade this PC nowupgrade this pc now
  5. Enter your Windows 10 license key
  6. Select Next
  7. Agree with the licensing terms and conditions
  8. Select Keep personal files and apps
  9. Click on Install

While the Microsoft Media Creation Tool may be free of charge, it does not guarantee that all of your files and folders will remain untouched during the upgrade. Thus, if your data is your priority, using Laplink PCmover is your safest bet.

By following the methods mentioned above, you should be able to transfer any programs you have installed on your Windows 7 PC to Windows 10 without having to reinstall anything else.

Did you find this article helpful? Let us know what else you want to read about in the comment section below.

How to export Outlook contacts from Windows 7 to Windows 10

Windows 7 has been discontinued, and because of this, many users are now forced to either upgrade to Windows 10, or risk remaining with a now unsupported OS.

While companies and business owners can always opt for the Windows 7 Extended Support for Business, this, too, is nothing more but a temporary measure.

Of course, moving to a new OS is not without any drawbacks since users may want to take some of their personal files or folders with them during the transition.

For example, many users wonder if moving their Outlook contacts from Windows 7 to Windows 10 is possible. While the short answer is yes, we’ve created this step-by-step guide to show you how it is done.

How do I export contacts from Windows 7 to Windows 10?

The first thing you need to understand is that if you are running Outlook on Windows 7 you are probably using an older version of Outlook. Unfortunately, there is no way to migrate contacts directly from one client to another.

Fortunately enough, one workaround is exporting your entire contact list as a CSV file, and then importing it into the Outlook client of your Windows 10 PC.

The advantage of this method is that regardless of the version of Outlook you are using, CSV files are universally supported, even by the web version. As such, this is how you export Outlook contacts from Windows 7 to Windows 10.

1. Export your Outlook contacts as a CSV file

  1. Open Outlook on your Windows 10 PC
  2. Click File
  3. Select Open & Export
  4. Click Import/Exportexport csv
  5. Select Export to a file
  6. Choose Comma Separated Values (CSV)
  7. Go to the Select folder to export from box
  8. Select the contacts that are under your account
  9. Choose Browse
  10. Name your file
  11. Choose OK
  12. Confirm the location where you will save your contacts, and click Next
  13. Click Finish

Exporting contacts seems complicated? Check out the Outlook Business Contact Manager!


2. Import the CSV file in the new Outlook client

  1. Open Outlook on your Windows 7 PC
  2. Click File
  3. Select Open & Export
  4. Click Import/Export
  5. Select
  6. Choose Import from another program or file
  7. Click Next
  8. Choose Comma Separated Values (CSV)
  9. Browse to where you saved the CSV file
  10. Choose what Outlook should do with duplicate contacts
  11. Map out the columns so the data corresponds
  12. Click Finish

By following these steps, you can export your contacts from one Outlook client to another.

In case you want import Outlook contacts to iPhone, take a look at this quick guide.

Remember that this method is effective even between PCs with the same OS and can even be used as a backup plan for your Outlook contacts.

Did you find this article helpful? Let us know in the comment section below.

How to transfer iTunes from Windows 7 to Windows 10

Since Windows 7 no longer receives any support from Microsoft, it has become vulnerable to cyberattacks. As such, Users are advised to upgrade to the newer Windows 10, as it poses a number of advantages.

Unfortunately, most users would probably want to take some of their data with them, such as programs, files, user profiles, etc.

Those of you that have an extensive music library may even be wondering what will happen to your iTunes library once you migrate to Windows 10.

That is precisely why we’ve created this step-by-step guide, that will show you exactly how to transfer your iTunes files from Windows 7 to a Windows 10 PC.

How do I transfer iTunes from Windows 7 to Windows 10?

Fortunately enough, transferring iTunes files from one PC to another is extremely simple, and it all revolves copying and pasting certain files from one PC to another.

You can also do this in case of an in-place upgrade, but you’ll need an external storage media to keep the iTunes files in during the upgrade.

1. Copy the contents of your Windows 7 PC

  1. Connect your external hard disk
  2. Click Start
  3. Go to Music
  4. Right-click the folder named iTunes then click Copy
  5. Click Start
  6. Go to My Computer
  7. Open your external hard disk
  8. Paste or press Ctrl + V to copy the contents
  9. Eject your external hard disk

2. Paste the iTunes data in the Windows 10 PC

  1. Connect the external hard drive to your Windows 10 computer
  2. Click Start
  3. Open the File Explorer
  4. Go to This PC
  5. Open your external hard disk then copy the iTunes folder
  6. Press Windows + R
  7. Type the following line:
    • %userprofile%
  8. Hit Enter or click OK
  9. Open the Music folder
  10. Click Paste
  11. Launch iTunes

iTunes will automatically populate the files and folders, and adapt them to the Windows 10 OS.

By following these steps, you should be able to successfully transfer all of your iTunes data from a Windows 7 PC to a Windows 10 PC. This includes profiles, songs, playlists, etc.

To learn more about iTunes, we also have a guide on how to download iTunes for Windows 7, so don’t miss it.

Did you find this guide useful? Let us know in the comment section below.

Address Book Download is Missing in Outlook [Fix]

Users who utilize Outlook with Exchange Server can usually download an offline address book. That enables them to access the contact details within it even when not connected to Exchange Server.

However, some Outlook users might not always be able to download that offline address book when errors arise. Error 0X80072f06 is one Outlook Exchange sync issue that stops the OAB downloading.

What can I do if Outlook’s Offline Address Book isn’t downloading?

Before we proceed, here are some quick solutions to try:

  • Restart the computer.
  • Make sure you are running the latest version of Outlook. In case not, download all the pending updates.

If none work, head to the fixes listed next.

1. Manually update the Offline Address Book

  1. In Outlook 2010-16, go to the Send/Receive tab.send recieve
  2. Click on the Download Address Book option.
  3. Now, select the Download changes since last Send/Receive option.
  4. Select Offline Global Address List from the drop-down menu, and press the OK button.

Want to learn more about address books? Check our guide on how to update global address list.

2. Check that Cached Exchange Mode is enabled

  1. Go to the File menu in Outlook.
  2. Click Account Settings twice.
  3. Then, click on Change.
  4. Select the Use Cached Exchange Mode setting.The Cached Exchange Mode option outlook can't download offline address book
  5. Thereafter, restart Outlook.

If the Outlook address book is missing from download, reconfiguring the settings should get things up and running.

3. Check that the BITS service is enabled

  1. Press Windows + R to open Run, type services.msc in the text field, and hit Enter.services
  2. Double-click the Background Intelligent Transfer Service.bits
  3. Select the Automatic option for the Startup type, and click the Start button.automatic
  4. Click the Apply button, and then OK.

4. Rename the Outlook Address Book folder

  1. Press Windows + E to open File Explorer, and navigate the following path where %username% is the current user profile:C:\Users\%username%\AppData\Local\MicrosoftOutlook
  2. Then right-click the Offline Address Book folder and select the Rename option.
  3. Edit the folder title to Offline Address Books.old.
  4. Then click the Update Folder option on Outlook’s Send/Receive tab.update folder

Renaming the Outlook Address Book will refresh the OAB files, which is another potential resolution when you can’t download the address book in Outlook 2016.

5. Set up a new Outlook profile

  1. Open the Control Panel, and select Small icons from the View by menu near the top-right.
  2. Click on Mail.mail
  3. Now, click the Show Profiles button.
  4. Click on Add.
  5. Enter the new profile title in the text box, and click the OK button.create new profile to fix outlook download address book missing
  6. Fill out the other details and click the Finish button.
  7. Then select the Always use this profile option.
  8. Click the Apply and OK buttons.

Those are some potential resolutions that might fix things when the download Outlook address book is missing, and you can get it again.

If the problem persists, switching to another effective email client is also an option.

Anybody who has fixed the same issue with another resolution not listed above is more than welcome to share that fix below.