PC version of Minecraft crosses 30 million sales, Xbox One edition available now on Game Pass

Minecraft is the most popular game of all time, and today it has reached a new milestone. As of today, PC version of the game has officially been purchased more than 30 million times since the game was initially launched back in 2009 (via GamesIndustry.biz).

Last year, the game reached a record high of over 91 million active users, having sold more than 154 million copies since its release. One of the highlights of the game are the continuous updates it continues to receive, with the next major release of the Bedrock edition being the one to complete the Village and Pillage set—adding Bamboo Forests, Campfires, Wandering Traders and many other new blocks, mobs, items and features.

In other recent news, the Bedrock edition of Minecraft for the Xbox One has also joined Game Pass today, so members of the $9.99-per-month service will be able to play the game as part of their subscriptions. Normally, the game runs for $19.99 on the platform, so being able to play it for free on a subscription that includes more than 100 other titles is definitely a good deal.

The great thing too is that the version on the Xbox One also features cross-platform multiplayer of the game between Android, iOS, Windows 10, and Nintendo Switch devices. So if you’ve been interested, now might be a good time to give it a try now that it’s free to play for Game Pass users.

‎Minecraft
‎Minecraft
Developer:
Mojang
Price:
$6.99+


Minecraft
Minecraft
Developer:
Mojang
Price:
$6.99


Minecraft for Windows
Developer:
Microsoft Studios
Price:
Free


Minecraft
Minecraft
Developer:
Microsoft Studios
Price:
Free+

How to create a toolbar on your Windows 10 taskbar

Windows 10’s taskbar is primarily used to launch and switch between applications. You can also add your own toolbars, which let you access the contents of any folder on your PC. If you find yourself frequently opening files within a certain folder, adding a taskbar toolbar can reduce the number of clicks needed to find your content.

Windows 10 taskbar toolbar creation

Toolbars are created by right-clicking the taskbar and hovering over “Toolbars” in the menu which appears. Here, you’ll see three default toolbars which you can add with a single click. Links and Desktop point to their respective folders in your user profile directory, while Address provides a URL input right on your taskbar. Type a URL and press Enter to have it opened in your default browser.

Windows 10 taskbar toolbar creation

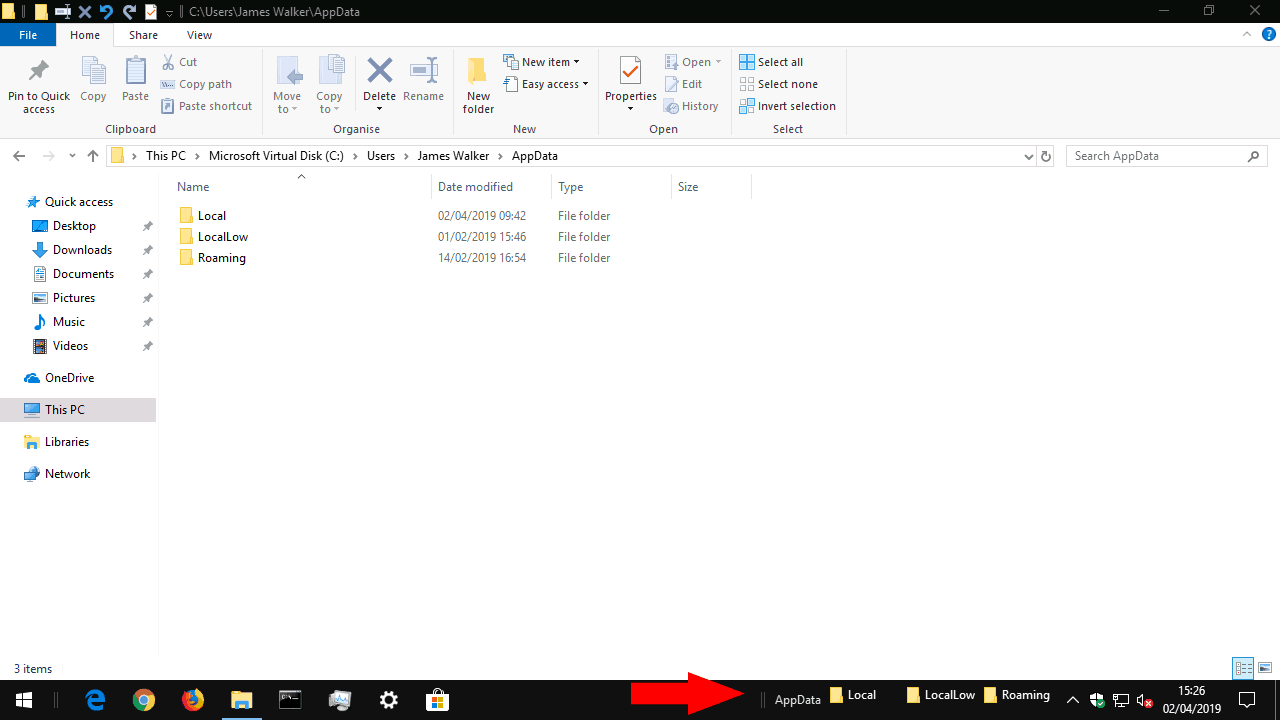
To create your own toolbar, click “New toolbar…” from the toolbars menu. Use the file picker to select a folder on your computer. When you press “OK,” the toolbar will be added to your taskbar. Click the “>>” icon next to its name to view the current contents of the folder it points to.

Whenever you add or remove files or folders inside the directory, the contents of the taskbar toolbar will be updated too. This gives you a convenient way to access files in frequently-used folders, without having to open File Explorer and traverse your directory structure.

Windows 10 taskbar toolbar creation

Once you’ve added the toolbar, you can customise it by choosing to show or hide its icon and label. Right-click the taskbar and uncheck the “Lock the taskbar” option. You can then right-click the toolbar and toggle the “Show text”/”Show title” options. With the taskbar unlocked, you can also rearrange toolbars by dragging them. You can use the grab handles next to a toolbar’s name to expand its width, which will place its contents directly onto the taskbar.

Windows 10 taskbar toolbar creation

Once you’re done customising, remember to relock the taskbar with the “Lock the taskbar” option. This will prevent any unintentional repositioning of the items in the future. When you need to remove a toolbar, right-click it and press “Close toolbar.”

Windows Mixed Reality headset use is growing steadily, now accounts for 10% of Steam VR data

Windows Mixed Reality VR headsets are seeing increase usage on Steam according to the company’s latest hardware and software survey. In March 2019, Windows Mixed Reality VR headsets accounted for 10.57% of VR headsets used on Steam, though remaining far behind the Oculus Rift (47.55%) and the HTC VIVE (39.55%). Still, Windows Mixed Reality headsets didn’t exist two years ago, so crossing a double-digit market share in such a short time frame is quite impressive.

The first Windows Mixed Reality headsets launched in Fall 2017, at a time when Microsoft and its hardware partners wanted to democratize the technology. Microsoft still doesn’t have a lot of content on its own Windows Mixed Reality Platform, but a SteamVR bridge quickly addressed this problem. The Windows 10 19H1 update will also bring support for legacy desktop apps in the Windows Mixed Reality environnement, something that was introduced back in February in the preview build 18329.

It’s still early days for Windows Mixed Reality headsets, and as Microsoft is focused on business users with HoloLens 2, the software giant is leaving its hardware partners do the heavy lifting. A couple of weeks ago, we saw HP announce its new high-end Reverb WMR headset featuring a 2160 x 2160 per eye screen resolution and an expanded 114-degree field of view.

Surface Dial won’t turn on? Fix it with these solutions

The Surface Dial is a new interactive tool built to aid the creators such as artists or designers in their creative pursuits, but many users reported that Surface Dial won’t turn on. This can be an issue, and in today’s article, we’ll show you how to fix this problem once and for all.

What to if Surface Dial won’t turn on?

  1. Reset the Surface Dial
  2. Replace batteries

1. Reset the Surface Dial

If Surface Dial won’t turn on, you can fix the issue simply by resetting the device. You can do that by following these steps:

  1. Open the battery lid and physically remove the AAA batteries.
  2. Wait for a few seconds and re-insert the batteries.
  3. Press and hold the button alongside the battery compartment. Do this until the Bluetooth light flashes. The Bluetooth light is on the other side of the battery compartment.
  4. Now restart your PC.
  5. Follow the standard procedure of pairing the Surface Dial with your PC.
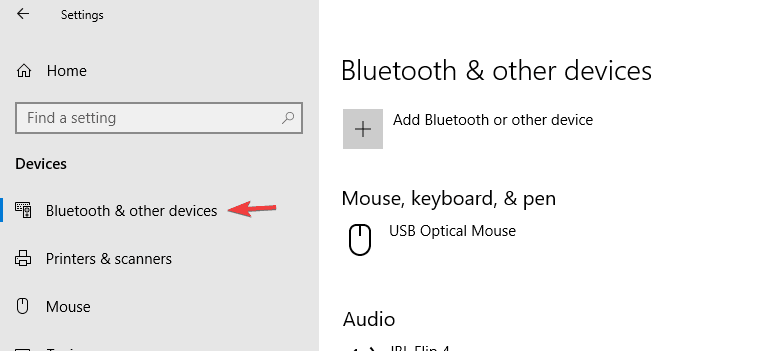
  6. For that, click on Start > Settings > Devices. Under Bluetooth & other devices, toggle the Bluetooth setting to On.
    Surface Dial won't turn on bluetooth and other devices
  7. From the list of nearby Bluetooth devices detected by your PC, select Surface Dial. Follow any on-screen instructions that appear. You are now ready to go.

2. Replace batteries

batteries bluetooth and other devices

Most often, dead batteries are the reason why Surface Dial won’t turn on. Just replacing them should be all that you need to do.

  1. Open the battery lid and make sure the batteries are inserted properly.
  2. Remove the batteries and re-insert them in the right order.
  3. Press the pairing button.
  4. If the LED light does not turn on after 10 secs, you will need a new set of batteries.

This should be all that you can do if your Surface Dial won’t turn on. If the issue persists, it might be of hardware origin. Get in touch with the service center in that case.

READ ALSO:

Open Windows Explorer Folders as Separate Process [How to]

Windows launches File Explorer folders in separate Windows processes by default. In other words, each folder that users will open will have their own separate process. This feature is actually a very practical one.

For example, if Windows freezes randomly due to some folder issues, the rest of the File Explorer processes won’t be affected.

What does launch folder Windows in a separate process mean?

This means that each folder runs as a separate process. This has one benefit, as far as we can tell.

If a folder freezes and you close it from the Task Manager desktop, and taskbar won’t reload like before.

How do I enable a separate process for each folder in Windows Explorer?

Change folder options

  1. Press Windows key + S and type folder options. Select File Explorer Options.
  2. Go to View and enable Launch folder windows in a separate process.
  3. Save changes.

How do I open File Explorer in a new process?

  1. Locate the desired folder.
  2. Right-click it and choose Open in a new window.
  3. It will start as a separate process.

Even if you end the main Windows Explorer process using the taskbar, the Desktop app won’t start. However,  all the open File Explorer windows will be closed.

As you can see, it’s easy to set Windows Explorer to use a separate process for each folder, and it just requires you to make a few small changes.

To optimize your PC even further, read our guide on the best folder settings for Windows 11.

Have you used this feature before? Let us know in the comments below.

Game Install Taking Forever: How to Speed it up

The sheer size of modern games can certainly prolong the installation process. But nonetheless, we can conclude that even Gears of War 4, which is enormous in size and has an abundance of DLCs, will eventually install after a few hours or so.

But what to do when the game install is so long that you’re not even sure if the progress bar is advancing forward? This is especially common when Steam is converting existing game installations.

There are many possible reasons for this, and we made sure to cover them in this article. Irrespective of the cause, you can fix it with the solutions in this guide.

How can I fix my game if it taking forever to install?

1. Quit and try again

A simple but nonetheless viable step when something like this or a running install script occurs, especially if you’re installing digital copies with the Steam client or its peers, is to ensure you have enough storage space. Free up some space, if necessary.

Contemporary games come with many additional patches and updates that can sometimes take up to 10, 20, or more gigabytes.

Basically, for the installation process to finish completely, occasionally, you’ll need to install available updates, too. And that will additionally prolong the installation process.

Therefore, make sure to stop the installation process, clean everything, check all included variables (storage space, permissions, etc.), and start from scratch. Furthermore, if there’s a way, you can start the setup directly and avoid the Steam/Battle.net/Origin client.

2. Run the installer in compatibility mode with administrative permission

  1. Navigate to the folder where the game setup (Setup.exe, most of the time) is located. It’s either on the installation disk or in the PC storage.
  2. Right-click on the Setup.exe file and open Properties.
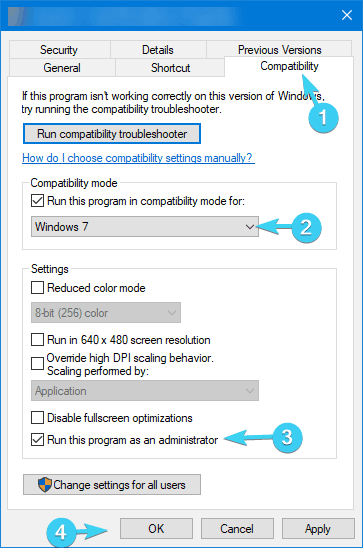
  3. Choose the Compatibility tab.
  4. Check the Run this program in compatibility mode for box.
  5. From the drop-down menu, select Windows 7 or Windows 8.
  6. Now, check the Run this program as an administrator box.
  7. Click OK to confirm changes.
    shadow of war stopped working compatibility tab

While we’re at it, it’s worth mentioning that sometimes the incompatibility with the current system version can stall or even prevent the installer from completing the installation. These errors can manifest in different ways like the libvorbisfile.dll not found.

To avoid this, we advise you to run the game in the compatibility mode to an initially predicted system version.

If your game is older, make sure to run it in compatibility mode for Windows 7. Furthermore, the installer needs administrative permission to make changes to your system.

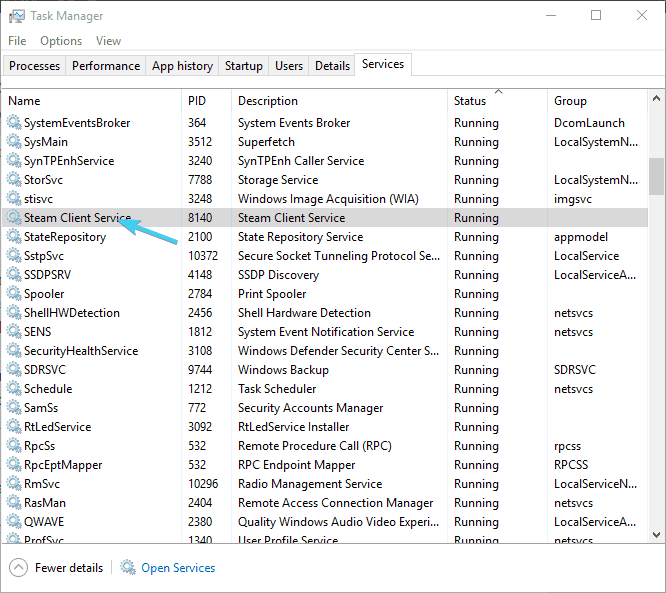
3. Restart Steam and try again

  1. Close the Steam desktop client.
  2. Right-click on the taskbar and open Task Manager.how to use steamflushconfig steam client service restart
  3. Open Details and kill all active Steam-related processes.
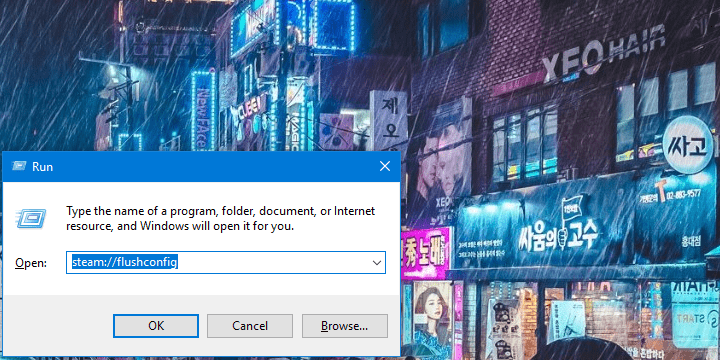
  4. Press Windows key + R to summon the Run utility.
  5. Copy and paste the following command on the command line and press Enter:steam://flushconfig how to use steamflushconfig steam://flushconfig
  6. Wait for some time and restart your PC.

While digital distribution spurs access to a certain game, it also has issues. More than a few users found the Steam client culpable for more than slow installation.

In order to address this, it’s best to restart Steam and move from there. Additionally, you can run the dedicated command in the Run elevated command line. This command will restore Steam to default values, and it’s a good way to avoid reinstallation.

We explained how to run the steam flushconfig command, in our detailed article.

4. Defragment the HDD and check its health

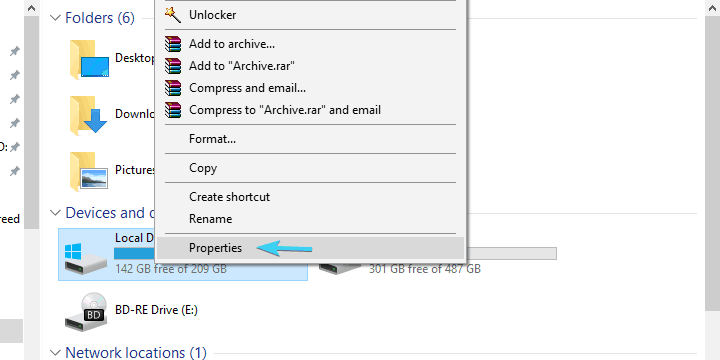
  1. Open This PC or File Explorer.
  2. Right-click on the system partition (most of the time C:) and open Properties.game install taking forever system drive's properties
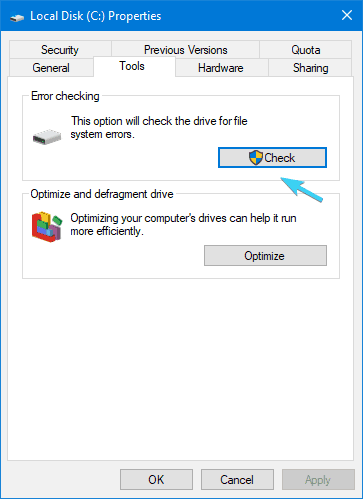
  3. Select the Tools tab.
  4. Under the Error Checking section, click on the Check button.game install taking forever check disk for errors
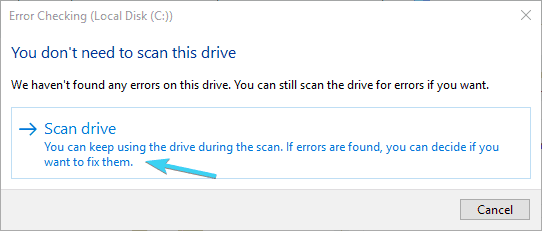
  5. Click Scan drive. This should find and fix all drive errors.game install taking forever scan drive for errors
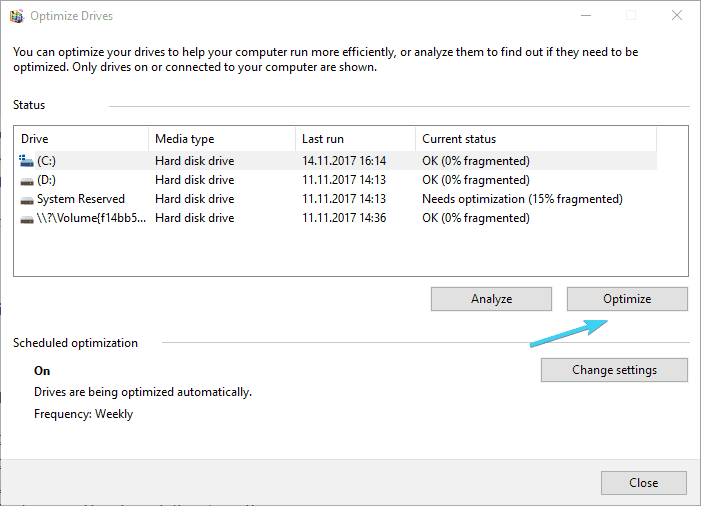
  6. Now, get back to Tools tab and, under the ”Optimize and defragment drive” click Optimize.
  7. Highlight the system partition drive and click Optimize.game install taking forever defragment drive
  8. The defragmentation process will take some time, depending on the HDD size and the fragmentation levels.

The previous steps should have dealt with the lesser evils, but we have finally reached the worst-case scenario: the HDD failure.

The first symptom of HDD health issues or corruption is substantially decreased reading speeds. Thus, file installation or copying can take more time than usual.

Once your HDD reaches this stadium, it’s too late to fix it most of the time. However, maybe the fragmentation levels are too high, or there are some repairable errors. To address these, you can either turn to a third-party tool or use the built-in system tools.

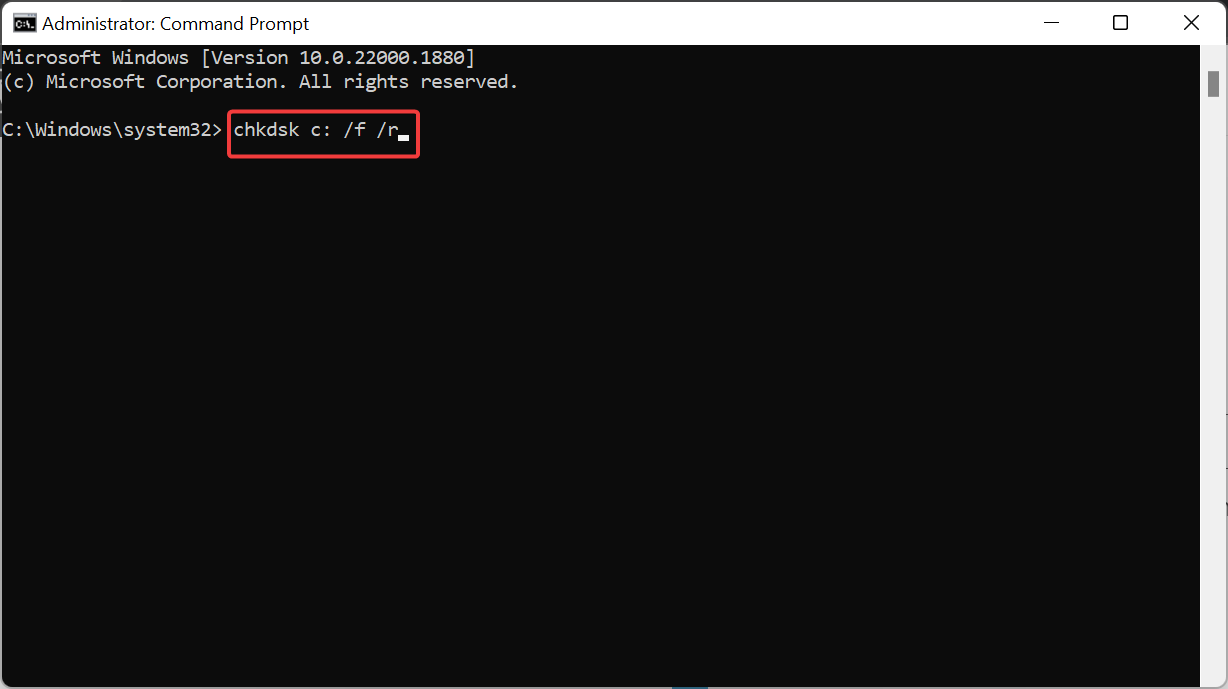
If, after this, you’re still stuck with the same old overlong installation, we advise you to take a more thorough approach. You can do so by running the Check Disk command in order to confirm the integrity of the disk.

  1. In the Windows Search bar, type cmd, and select Run as administrator under Command Prompt.
  2. In the command line, type the following command and press Enter: chkdsk c: /f /rchkdsk
  3. Wait for the tool to analyze the disk and resolve possible errors.

If, even after that, you’re stuck with the same issue, you can go further by using the HDD troubleshooting tools or repair the HDD altogether.

That should do it. If you have additional solutions or questions about the ones we presented above, feel free to tell us in the comments section below.

Office 2016 won’t print [FIX]

Sometimes when you try to use your printer with Office 2016, it may not respond as you expect it to, or Office 2016 won’t print your documents.

In both cases, you need to figure out what the underlying issue is and we’ve got solutions that can help remedy the problem and get you back printing your documents as you normally do.

Here are some solutions to use when Office 2016 won’t print.

Office 2016 won’t print: How to fix this issue

  1. Check if your printer is listed under Unspecified Device state
  2. Test printing in other documents
  3. Uninstall and reinstall your printer
  4. Update printer drivers
  5. Run the printing troubleshooter
  6. Clear spooler files and restart spooler service
  7. Disable Print in background
  8. Print in clean boot mode
  9. Try printing in WordPad or other programs
  10. Try printing with different drivers
  11. Run Detect and Repair
  12. Boot in Safe Mode then test printing

Solution 1: Check if your printer is listed under Unspecified Device state

  1. Select Start
  2. Click Settingssettings win 10
  3. Choose Devices
  4. Click Printers & Scanners on the left pane
  5. Scroll down to Related Settings
  6. Click Devices and Printersdevices settings win 10
  7. Go to Devices list and locate your printer’s name and icon
  8. Check if it is under Unspecified section

Once you confirm whether it is there or not, do these three things:

  1. Ensure your printer is turned on and connected. Check the power switch if it is turned on, and ensure the printer’s power cable is plugged into an electrical outlet. If you’re on a shared printer or network, ensure all computers and routers are turned on as well. Plug in your power surge protector and turn it on.
  2. Plug in the printer’s USB cable properly to your PC.
  3. For wireless printers, turn on the wireless option from your printer then run the printer’s wireless connectivity test from the menu option.

If these are clear, and you still cannot connect the printer to Windows, then your computer may not be connecting to your wireless network.


Solution 2: Test printing in other documents

Usually, when documents are damaged or have damaged graphics and/or fonts, they can cause printing errors. Before you reinstall drivers or any other software, test Word program’s ability to print.

Here’s how to do this:

  1. Open a new blank Word document
  2. Type one sentence ten times
  3. Try and print the document as it is.
  4. If it prints, change the font, or insert clip art, or shape or table.
  5. Test the print function again.

These tests are meant to check whether Word can print in general, but also give you clues about fonts or graphics it cannot print. If you don’t get errors in the test print document, but Office 2016 won’t print your original document, it may be damaged.

If you can’t print a particular document but you can print others in Word, then your document may be damaged, which means it won’t print even from another computer with Office 2016.


Solution 3: Uninstall and reinstall your printer

Follow these steps to remove your printer:

  1. Select Start
  2. Click Settingssettings win 10
  3. Choose Devices
  4. Click Printers & Scanners on the left panedevices settings win 10
  5. Find your printer and click on it
  6. Select Remove device

Reinstall your printer (wireless or local) using the following steps:

  1. Select Start
  2. Click Settings
  3. Choose Devices
  4. Click Printers & Scanners on the left panedevices settings win 10
  5. Select Add a printer or scanner
  6. Choose the printer you want to add then select Add device

Note: you can print a test page to ensure the printer works correctly. If it is installed but doesn’t work, check the device’s manufacturer website for troubleshooting or driver updates.

To connect to a local printer, plug in the printer’s USB cable to an available USB port on your computer, then turn on the printer and check if Office 2016 will print after doing this.


Solution 4: Update printer drivers

Driver software is needed for most printers to work properly. In the event you updated or upgraded to Windows 10, you may have to update your current printer driver so that it matches or is compatible with the new Windows version.

If you had recent power outages, viruses in your computer, or other issues, the drivers may have also been damaged.

Download and install the latest driver using either of these three ways:

  • Using Windows Update. To do this, go to Device Manager, then expand the Printers option to get the list of devices, right click on your device and choose Update Driver. Select Search automatically for updated driver software.
  • Downloading and installing the driver manually by yourself. Do this if Windows doesn’t automatically find a driver update for your printer, or you don’t have an installation disk. You can check the manufacturer’s website then find the latest driver for your printer.
  • Installing the driver software from the printer’s manufacturer. If you have the installation disc, it may contain the software for installing a driver for your printer.

Once you update the driver for your printer, do the following:

  1. Disconnect the printer’s USB cable from the computer
  2. Click Start
  3. Click Settingssettings
  4. Choose Devices
  5. Click Printers & Scanners on the left pane
  6. Choose the printer you want to add then select Remove device
  7. Go to the search field box on the taskbar, type Print Management and select the corresponding search result
  8. Click All Printers
  9. Find your printer, right-click it and select Delete
  10. Restart your computer
  11. Plug your printer’s USB cable back to your computer and try to install the software and driver again.

Once you complete the steps above, run a test print and see if Office 16 will execute it this time. If these steps didn’t work, try the next solution.

Remember, getting the latest driver also helps when Word mail merge envelopes are not printing


Solution 5: Run the printing troubleshooter

If Office 2016 won’t print, or you cannot connect to your printer, run the troubleshooter by doing the following:

  1. Plug in your printer into the power supply
  2. Turn on the printer
  3. Check the USB connection if using a wired printer, or wireless connection for wireless printers
  4. Download and run the printing troubleshooter

Did this fix the Office 16 won’t print problem? If not, try the next solution.


Solution 6: Clear spooler files and restart spooler service

Here’s how to do this:

  1. Click Start
  2. Type Services in the search box
  3. Select Services from the search results
  4. Find Print Spooler and double click on itprint spooler services
  5. Select Stop
  6. Click OK

That clears the spooler files, so now restart the spooler service using the steps below:

  1. Click Start
  2. In the search box, type %WINDIR%system32spoolprinters%WINDIR%system32spoolprinters
  3. Select it from the search results
  4. Delete all files in that folder
  5. Search again for Services
  6. Double click on Print Spoolerservices print spooler properties
  7. Click Start
  8. Go to the Startup Type list
  9. Select Automatic
  10. Click OK

Check if you can print after doing the above. If not, try another solution.


Solution 7: Disable Print in background

Take the steps below to do this:

  1. Open a Word documentOffice 2016 won’t print
  2. Click on File menu
  3. Click Options
  4. Click AdvancedOffice 2016 won’t print
  5. Uncheck the Print in background option to disable it
  6. Try printing again.

Solution 8: Print in clean boot mode

Performing a clean boot for your computer reduces conflicts related to software that can bring up the root causes of the video streaming failure. These conflicts can be caused by applications and services that start up and run in the background whenever you start Windows normally.

Here’s how to perform a clean boot before printing:

In order to successfully perform a clean boot on Windows 10, you have to be logged on as the administrator, then follow these steps:

  1. Go to the search box
  2. Type msconfigwindows skips bios boot options
  3. Select System Configurationmsconfig
  4. Find the Services tab
  5. Select Hide all Microsoft services box.
  6. Click Disable all
  7. Go to Startup tab
  8. Click Open Task Manager
  9. Close Task manager then click Oktask manager startup
  10. Reboot your computer

You will have a clean boot environment after all these steps are carefully followed, after which you can try and check if Office 2016 won’t print problem is gone.


Solution 9: Try printing in WordPad or other programs

The cause of the Office 2016 won’t print problem may be revealed by its scope. Some may only affect Word, others may affect several, or all Windows-based programs.

You can try to print in other programs as described below and see if it helps:

Test with WordPad:

  1. Click Start
  2. Go to All appsOffice 2016 won’t print
  3. Click Windows AccessoriesOffice 2016 won’t print
  4. Click WordPadOffice 2016 won’t print
  5. In the blank document, type This is a testOffice 2016 won’t print
  6. Go to File MenuOffice 2016 won’t print
  7. Click Print then click OK to print the document
  8. Try to add a different font, shape, or clip art to see if the document will be damaged as well

Once you finish this test with WordPad, test the print function in your browser or other Office 2016 programs, then print a test page.

If you cannot print a test page, or can’t print in several Windows programs, then the problem is with the printer driver, Windows OS, hardware or connectivity issues.

Otherwise, if it is with a font, then a damaged font file may be causing the Office 2016 won’t print problem.

However, if you actually get to print in other programs except for Word, try the next solution.


Solution 10: Try printing with different drivers

Word program is printer-intensive, so any issues with printer drivers affects it first before affecting other programs.

If you want to know whether the printer driver is the cause of the Office 2016 won’t print problem, test different drivers. If the printing issue is caused when you print documents with a particular font or graphics, try another printer.

If you don’t have another printer, contact the device’s manufacture to check if there is an updated driver version, or a different driver for your printer model. If the problem occurs when you print documents with text only, try using a text-only printer driver to test printing from Office 16.

If the Office 16 won’t print problem persists, try the next solution.


Solution 11: Run Detect and Repair

If you still experience the Office 2016 won’t print issue, run Detect and Repair to reinstall missing or damaged program files.

Use the steps below to do this:

  1. Exit Office programs
  2. Right click Start
  3. Select Control Panel
  4. Click Programs
  5. Click Programs and Features
  6. Right click on your version of Microsoft Office (Microsoft Office Word)
  7. Click Change
  8. Click Repair or Repair Word (repair Office)
  9. Click Continue
  10. Click Next

Solution 12: Boot in Safe Mode then test printing

Safe mode starts up your computer with limited files and drivers but Windows will still run. To know whether you’re on Safe mode, you’ll see the words at the corners of your screen.

If the Office 2016 won’t print issue persists, check whether it occurs while your computer is in Safe mode.

There are two versions:

  • Safe mode
  • Safe mode with Networking

The two are similar, though the latter includes network drivers and other services necessary to access the web and other computers in the same network.

Follow these steps to start your computer in Safe Mode:

  1. Click on Start button
  2. Select Settings – the Settings box will open up
  3. Click Update & SecurityOffice 2016 won’t print
  4. Select Recovery from the left pane
  5. Go to Advanced startup
  6. Click Restart now
  7. Select Troubleshoot from the Choose an option screen, then click Advanced options
  8. Go to Startup Settings and click Restart
  9. Once your computer restarts, a list of options will come up.
  10. Choose 4 or F4 to start your computer in Safe Mode

A quicker way to get into Safe Mode is to restart your computer then do the following:

  1. From the Choose an option screen, select Troubleshoot>Advanced options>Startup Settings>Restart
  2. Once your computer restarts, a list of options will come up.
  3. Choose 4 or F4 to start your computer in Safe Mode

Once you’re in Safe Mode, test printing your document.

If the Office 2016 won’t print problem isn’t there while in Safe mode, then your default settings and basic drivers are not contributing to the issue.

Once you’re through and the Office 2016 won’t print issue is sorted, exit safe mode so you can get your computer back to normal mode.

How to exit Safe Mode:

  1. Right click Start button
  2. Select Run
  3. Type msconfigOffice 2016 won’t print
  4. A pop up will open
  5. Go to the Boot tab
  6. Deselect or uncheck Safe Boot option box
  7. Restart your computer

Let us know if any of the above solutions helped fix the Office 2016 won’t print problem. Share with us your experience in the comments section below.

RELATED STORIES TO CHECK OUT:

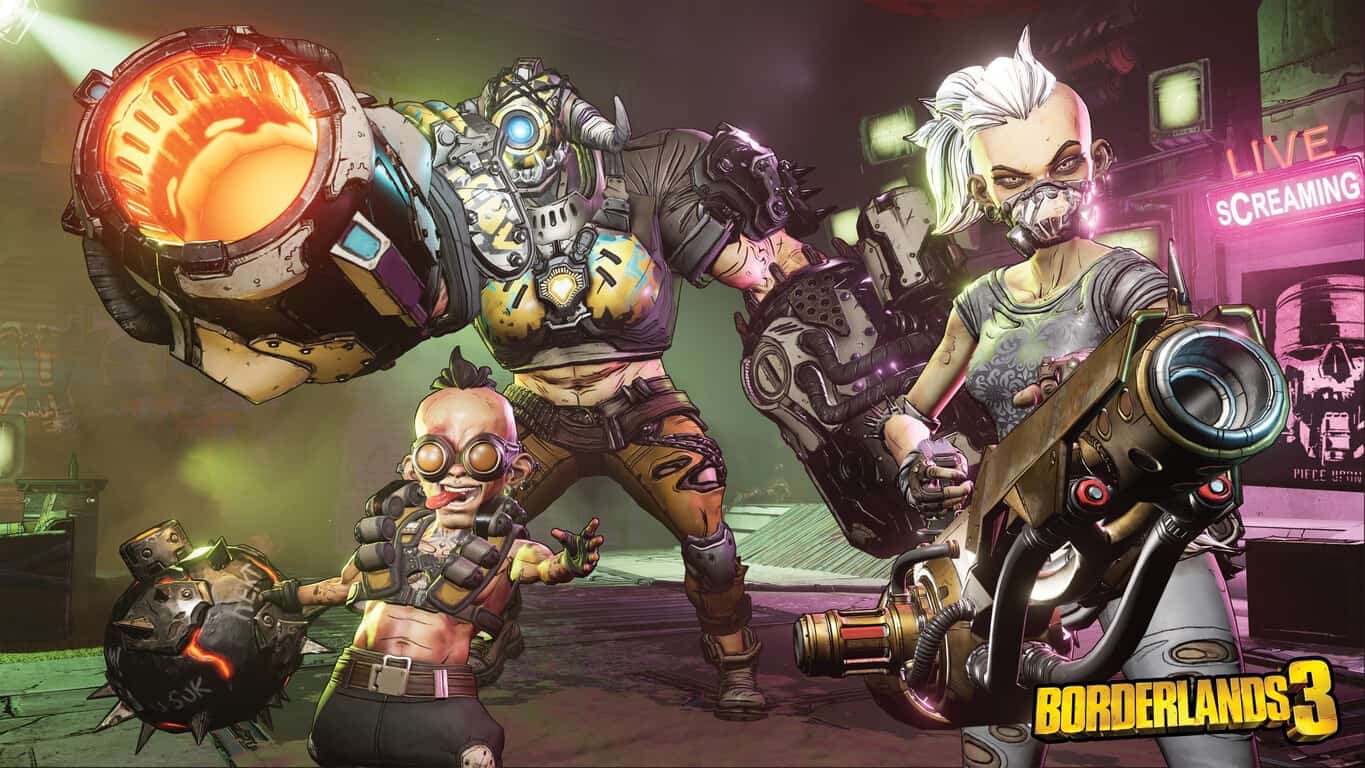
Borderlands 3 is coming on Xbox One and PC on September 13, you can pre-order it now

Following a reveal event at PAX in Boston last week, developer Gearbox Software announced today that Borderlands 3 will be released on Xbox One, Playstation 4 and Windows on September 13. The much-anticipated new entry in the open-world action RPG series will have to compete against heavy hitters like Gears 5 or the rumoured Call of Duty: Modern Warfare 4, though the loot shooter won’t exactly play in the same category.

“Like previous Borderlands games, Borderlands 3 casts you in the role of a Vault Hunter—a treasure-seeking badass with access to powerful abilities that violently complement the game’s seemingly never-ending arsenal of apocaliscious weapons,” explained Gearbox Software in the announcement post. “The Borderlands are under threat; the fanatical Calypso Twins are uniting the bandit clans and attempting to claim the galaxy’s ultimate power, and only you can stop them.”

Borderlands 3 is already available to pre-order on the Xbox Store, and there are three editions to choose from:

  • The Standard Edition of Borderlands 3 ($59.99)
  • The Deluxe Edition ($79.99), which includes five additional bonus packs
  • The Super Deluxe Edition ($99.99), which includes all Deluxe Edition content plus the game’s Season Pass

In addition to the Borderlands 3 news, Gearbox Software is releasing today Borderlands: Game of the Year Edition, a remastered version of the original game released in 2009. The remaster is Xbox One X Enhanced with 4K Ultra HD and HDR support, and it’s a $29.99 purchase on the Xbox Store (owners of the Steam PC version will get the Game of the Year Edition for free). The Xbox One bundle Borderlands: The Handsome Collection, which includes Borderlands 2 and Borderlands: The Pre-Sequel is also getting free Ultra HD Texture Packs for Xbox One X owners today.

Microsoft revamps its Bounty Program with faster reviews and higher rewards

Microsoft is making improvements to its Bounty Program, a project which rewards hackers for spotting vulnerabilities in its Cloud, Windows, and Azure DevOps services. These improvements not only include higher rewards, but also faster payments as well.

For starters, Microsoft will begin paying spotters as soon as the exploit has been successfully reproduced, as opposed to waiting until the fix has been fully implimented. The company has partnered with HackerOne as its bounty payment processing partner, which will deliver bounty payments in many different options depending on the user’s preference, such as PayPal, cryptocurrency, or a traditional bank transfer.

The Microsoft Bounty Program has also awarded more than $2 million since it started in 2018, and the company is taking things further by increasing the maximum rewards. The highest payment for spotting a vulnerability in the Windows Insider program has been increased from $15,000 to $50,000—and a vulnerability spotted in Azure, Office 365, or another online service will reward up to $20,000, up from the $15,000 it was before.

Microsoft is also making changes to its policies, and will now reward the first researcher to discover a vulerability the full bounty, even if it is already known internally by the company. Previously, reports that have already been internally known would have rewarded only 10% of the eligible reward, so it’s clear that it wants to push for more research when it comes to these issues.

Microsoft and OpenClassrooms team up to prepare students for AI jobs

Microsoft is partnering with OpenClassrooms to train Students and prepare them Jobs relating to artificial intelligence. The Redmond giant notes that the partnership will benefit both students by providing them better access to education, as well as employers which will have greater access to highly talented candidates.

According to its blog post, the demand for development of artificial intelligence is higher than the number of candidates available, so much so that as many as 30% of AI and data skills job openings could be left unfilled by 2022. Microsoft, of course, has been a big investor of AI as a late, so such a partnership could definitely serve to be beneficial especially given that the tech giant currently has the most positions open in the AI department of any other tech company.

“As AI is changing the way we work and the nature of jobs, we have a responsibility to ensure graduates are prepared for the workplace of tomorrow,” says Jean-Philippe Courtois, Executive Vice President and President, Global Sales, Marketing and Operations at Microsoft. “We are excited to partner with OpenClassrooms to help equip people with the skills and opportunities they need to thrive in the digital economy.”

Microsoft is confident that those who complete the program from OpenClassrooms will receive a job within six months of graduation—otherwise, a full reembursment will be issued. Additionally, graduates will also receive a masters-level diploma accredited in Europe though OpenClassrooms, which is also working to make U.S.- and U.K.-based accreditation possible further down the road.

How to check which apps are using your internet connection in Windows 10

If you notice your Internet suddenly slowing to a crawl, chances are that an app on your PC is using your bandwidth in the background. Using Task Manager, you can check which apps are communicating over your local network, which might help you figure out where the bandwidth is going to.

Disabling startup apps using Task Manager

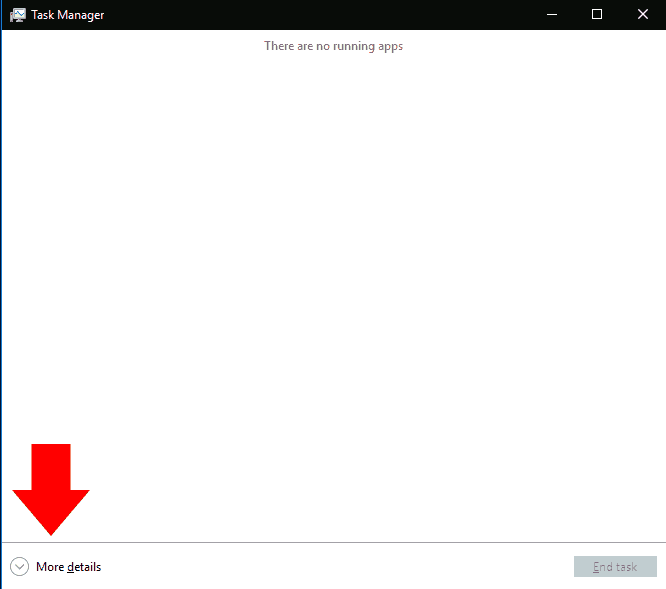
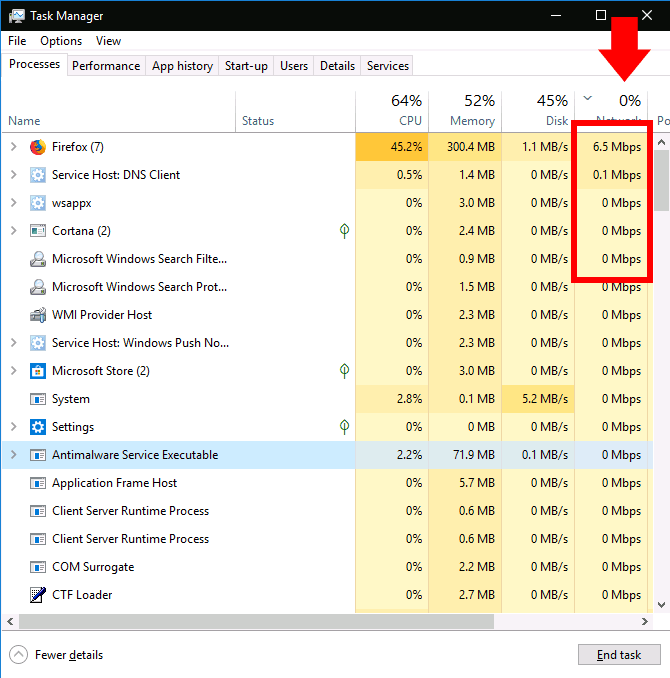
Begin by launching Task Manager using the Ctrl+Shift+Esc keyboard shortcut. If Task Manager opens to its simplified view, click the “More details” button in the bottom-left to expand the window.

You’ll arrive at the Processes tab, which provides information on every app that’s running on your PC – including Windows internal processes. The rightmost column of the table displays the current network usage of each app, in Mbps. Click the column header to sort the running processes by bandwidth usage, highest-to-lowest.

Monitoring network activity in Task Manager

You should remember that this column shows local network activity, not Internet usage. In other words, if you’re backing up files to a network-connected hard drive, that program will be communicating at several hundred Mbps on your network, but won’t be using any Internet bandwidth.

In most cases, an app’s network activity will be purely Internet-based though. If your connection slows down, try and spot an app in Task Manager that’s communicating at around the same rate as your maximum Internet speed. Sometimes, you might find the culprit is a Windows system component, such as “Service Host: Local System,” which is responsible for downloading Windows updates.

Monitoring network activity in Task Manager

If you’d like to see actual data usage details for your apps, switch to the “App history” tab in Task Manager. The Network column here shows you the total network data usage of your apps over the past 30 days.

Windows 10 Data usage settings

Further information can be obtained by opening the Settings app and navigating to Network > Data usage. This screen displays data usage for traditional desktop programs too, whereas Task Manager only includes Microsoft Store applications.

Windows 10 Data usage settings

Finally, you can limit the data usage of Microsoft Store apps from the Data usage Settings page. Under “Background data,” click the “Always” radio button to restrict what apps can do in the background. This will free up more bandwidth for your foreground tasks, but could result in the loss of useful app functionality. Automatic sync processes, live tiles and other background network activity will be prohibited, so you might miss out on incoming notifications and real-time content updates.

Netflix users will be able to watch movies in 4K on Edge

Good news for Netflix fans! Microsoft’s Chromium-based Edge will support 4K Netflix streaming. However, Microsoft plans to offer Netflix in 4K only to those users who are running Windows 10 powered machines.

The news might not be surprising to users as the original version of the browser also offers Netflix in Ultra HD. However, no other Chromium-based browser offers the same capabilities.

Microsoft Edge is expected to arrive with the upcoming Windows 10 version. It will support older Windows versions, including Windows 7 along with macOS and other platforms.

Take a look at this screenshot showing PlayReady support on Edge:

Original Microsoft Edge version failed to impress the users

Microsoft has failed to convince users to switch to the original version of Microsoft Edge browser over the years.

The majority of Windows 10 users were reluctant to use the browser and prefer Mozilla Firefox and Google Chrome over Windows 10’s built-in browser.

It seems like the latest version has been successful in grabbing the attention of Netflix and Windows 10 users alike. The Chromium-based Edge version offers the best features of both (Chrome and Edge) browsers.

Netflix itself recommends using Chromium Edge

netflix ultra HD PC

We already know that 720p streaming quality is currently being supported by Google Chrome and Mozilla Firefox. That is the reason Microsoft Edge is the recommended browser by Netflix itself.

There are some third party extensions that are able to unlock 1080p for unsupported browsers. While these extensions are not reliable as any updates and changes made by Netflix often cause them to stop working.

Alternatively, Windows 10 users can head towards the Microsoft Store to download the official Netflix app. Just in case the download process won’t start, you can use this troubleshooting guide to fix the problem.

The preview version of the upcoming Chromium-based Microsoft Edge browse is going to be released in the next few weeks.

The stable build is expected to be rolled out to the general public later this year.

Right now, the Chromium-based browser does not support Linux. But a new Linux-friendly Edge version is expected to be released very soon. 

RELATED ARTICLES YOU NEED TO CHECK OUT:

KB4490481 gets your Windows 10 PC ready for April Patch Tuesday

Microsoft is back with another Cumulative Update for Windows 10 v1809. The update is currently being rolled out to insiders in the Release Preview ring.

The update boosts the Windows 10 operating system build to 17763.404. Most likely, the role of this patch is to test the Patch Tuesday improvements that are scheduled to be rolled out next week.

Windows 10 v1809’s infamous update history

Windows 10 v1809 has been a devastating update for both Microsoft and Windows 10 users. Most of the users were expecting Microsoft to bring Windows 10 19H1 to the release preview ring. However, the company decided to go instead for a new Windows 10 v1809 update. 

The Redmond giant follows a strict policy of testing upcoming updates in the Release Preview before rolling them out to the general public.

Windows 10 users hoped the company might change this policy this year and test more builds of the next 19H1 update instead.

Well, it seems that the best Patch Tuesday that falls on 9th April won’t bring a new Windows 10 OS version to the table. Expect only regular updates for the OS versions currently supported.

Cumulative update KB4490481 has been released along with a servicing stack update KB4493510. Microsoft has yet to release a changelog for the update.

Users started downloading and installing the update soon after it was released. The Windows 10 Cumulative Update KB4490481 update seems to be a stable one as the went without a glitch. 

However, one of the users reported a little issue with the KB4490481 update download process:

Slight pause at 92% but nothing major. All looks ok.

Download Windows 10 Cumulative Update KB4490481

You can head towards the Settings app to download the Windows 10 Cumulative Update KB4490481. Just check for updates and the update download process should start automatically.

Once again, keep in mind that the update is only available to Windows Insiders enrolled in the Release Review ring. 

RELATED ARTICLES YOU NEED TO CHECK OUT:

Rising Storm 2 Crashes When Joining Game: 4 Easy Fixes

Rising Storm 2: Vietnam often crashes when joining a game, and this is perhaps the most frequent and annoying issue affecting users.

For some, Rising Storm 2 Vietnam is not launching at all. The underlying cause is usually the same, and a quick series of solutions should get things up and running. Keep reading to find out!

What can I do if Rising Storm 2 crashes when joining a game?

Before we head to the slightly complex solutions, try these quick ones:

  • Restart the Steam client or the PC.
  • Open the Task Manager and check if the shadercompiler.exe file is present. If this is the case, the game may be trying to compile shaders. Wait a few minutes for the process to finish, and the game should eventually launch.
  • Install the latest Windows OS updates on your computer. Also, update all the device drivers.
  • Disconnect all USB peripherals.
  • Launch Steam as an administrator.
  • Turn off DxTory.
  • Verify that Easy Anti Cheat has been installed properly.

If none work, head to the fixes listed next.

1. Check the PC specifications

Ensure your PC meets the minimum (preferably recommended) system requirements for Rising Storm 2: Vietnam.

  • CPU: Intel Core i3 @ 2.5GHz or AMD Phenom @ 2.5GHz
  • OS: Windows 7 SP1, Windows 8.1, Windows 10 (64-bit versions only)
  • GPU: NVIDIA GeForce GTX 460 or ATI Radeon HD 5850
  • HDD: 12 GB

Check the PC specifications, and if it doesn’t meet the requirements, you know what’s causing the trouble.

2. Delete the game cache

Often the game cache or other non-critical files may trigger issues when corrupted. And deleting them does the trick!

Delete this game folder where Username is the current user profile: C:\Users\USERNAME\Documents\My Games\Rising Storm 2 Beta\ROGame

Also, delete the Rising Storm 2 directory completely. It should be located in the following path:Documents/ My Games.

3. Verify the integrity of game files

  1. Launch Steam, and go to the game Library.
  2. Right-click on Rising Storm 2, and select Properties.
  3. Go to the Installed Files tab, and click on Verify integrity of game files.verify game file to fix rising storm 2 crashes when joining game
  4. Once done, restart Steam and then launch the game.

Often the problem lies with the game files when Rising Storm 2: Vietnam crashes while joining a server. And for that, Steam offers a built-in repair tool to fix any issues.

4. Install the necessary components

If error 0xc000007b appears on the screen, try downloading, repairing, or reinstalling the following:

That’s it! One of these solutions should help if Rising Storm 2 crashes when joining a game or refuses to launch altogether.

Before you leave, find out how to improve the gaming performance in Windows.

If you’ve encountered other workarounds to fix these annoying game crashes, drop the troubleshooting steps in the comment section below.

Can’t send messages on Windows 10/11 Xbox app or Xbox One

The Xbox app for Windows 10 brings together gamers on both the Xbox One and computers running Windows 10, making it a great tool for cross-platform communication. However, some users are experiencing an issue with the app’s messaging tool, especially this one who took to Reddit:

Unsure of the issue, but for the last month or so the messages tab on the Windows 10 Xbox live app won’t work for me. It says “try again, we had trouble getting your messages”, and when I send a message it says “we couldn’t send this message, try again later”.

Try again. We had trouble getting your conversations

  1. Reset the Xbox app on Windows 10
  2. Reboot your console
  3. Physically power cycle the console

1. Reset the Xbox app on Windows 10

One possible fix to the issue is to open the search bar and look for “Apps & features.” Then, search for the Xbox app, select advanced options and click “Reset.” This should back messages, although you may have to repeat the process every time the error shows up.

2. Reboot your console

Another fix is to restart or power cycle your Xbox One console. Note that the process does not erase any of your games or data.

  1. Press the Xbox button to open the guide.
  2. Select Settings.
  3. Select Restart console.
  4. Select Yes to confirm.

If you’re unable to access the guide or if the console is frozen, press and hold the Xbox button on the console for about 10 seconds until the console turns off. After it does, touch the Xbox button on the console again to restart.

3. Physically power cycle the console

  1. Turn off your console by holding the Xbox button  on the front of the console for approximately 10 seconds. The console will turn off.
  2. Turn your console back on by pressing the Xbox button on the console or the Xbox button  on your controller.
    If you don’t see the green boot-up animation when the console restarts, repeat these steps. Make sure that you hold the power button until the console completely shuts down.

If your console is in Instant-On power mode, the above steps will shut the console completely off. Instant-On mode, or the ability to turn on your console by saying “Xbox on,” won’t be enabled until you restart the console.

Disconnect and reconnect your console’s power cable

  1. Turn off the Xbox One console by pressing the Xbox button on the front of the console for about 10 seconds until it shuts down completely.
  2. Unplug the console’s power cable. Wait 10 seconds.

Be sure to wait 10 seconds. This step resets the power supply.

  1. Plug the console power cable back in.
  2. Press the Xbox button  on your console to turn on the Xbox One.

That should do it. In case you have any additional steps to suggest, make sure to share them with us in the comments section below.

RELATED STORIES YOU SHOULD CHECK OUT:

Why you should block Windows 10 v1903 install this month

Every time Microsoft launches a new upgrade to Windows 10, users have the option to delay it for a few weeks or months.

As a quick reminder, only Windows 10 Pro, Enterprise or Education users can block new updates for months on end.

Unfortunately, Windows 10 Home doesn’t have any update deferral options.

Why should I defer Windows 10 v1903?

The new Windows 10 19H1 will be launched next month — hence the code name Windows 10 April 2019 Update. But before consumers and organizations will be able to download it, you should learn more about it.

In 2018, the update meant for April 2018 was delayed for over 20 days and finally launched in May. Microsoft explained that the delay was due to some finalization problems.

But this is not all for 2018, as the update prepared for October was launched on time indeed, but with some technical issues. This one was immediately stopped, because the manual update was deleting personal user files.

Even though Microsoft tried to stop the update as fast as they could, it still affected millions of users. The issues were of different types, such as ZIP extraction fault, an activation downgrade flaw and a file association problem.

So after all of this, delaying the new update is maybe the best decision, especially for organizations users. Microsoft allows enterprises and education editions to delay Windows 10 update install for months on end.

First update wave is always buggy

As you can see, the first update wave is almost always buggy. The best approach is to simply defer the updates for as long as you can.

In this manner, by the time you hit the update button, Microsoft will have hopefully fixed all the bugs and issues reported by the first users who installed the new OS version.

RELATED STORIES:

Use PC location without the Windows 10/11’s Location Service

While you may always want to let your PC use the Location Service for Windows 10 as a supplementary tool for apps such as Cortana and Weather, enabling the service can somehow invade your privacy, not to mention its large battery consumption.

So, if you still want to get to your destination without a hitch, but without turning on the Location Service for Windows 10, the following steps will guide you accordingly.

Using Location-based apps without switching on Location Service

First off, note that this method works only on Microsoft apps like Maps and Weather, among others. With non-Windows apps, however, you may need to enable the Location Service.

If you are using Windows 10 on your PC, you might have noticed an option called Default location. This tool lets you set a default location, as the name suggests, and all other location-based apps on your PC will recognize it as your current location. That means no other entity will be able to locate since the Location Service remains disabled.

  1. To turn off the Location Service on Windows 10, open Settings on your PC by clicking Win+I buttons at the same time. You may also look for the Settings button in the Win + X menu.
  2. Then press Privacy > Location. You will see a Change button on the right-hand side under Location for this device is on.
    location settings
  3. Select that button and click on the toggle button to turn on the Location Service on your Windows 10 PC.
    location for this device disable
  4. Next, select the Set Default button under Default location option. The Maps app will then appear. You will see the Set default location option on the top-left corner.
  5. Enter an address as your default location. Once a location shows up on the map, click the Change button.
choose your location manually

After that, you shouldn’t be bothered by constant prompts asking for Location services to be enabled in order for the app to function properly. This way, it’ll stick with the address permanently. In case you need to re-enable Location services, just go back to Settings >Privacy > Location and enable it there.

For a detailed walkthrough on setting or adjusting your default location, check out this guide on how to change location in Windows 11.

Do you know of other tricks to use location-based apps without enabling the Location Service on Windows 10? Let us know.

RELATED STORIES YOU NEED TO CHECK OUT:

Media Streaming not Working on Windows 10/11: How to Fix it

Many users prioritize the Windows Media Streaming feature before third-party streaming solutions. That’s an obvious choice if you instead trust built-in Windows features. However, it seems Media Streaming isn’t working for some users in Windows 10.

Supposedly, some of them encountered grayed-out features and could not start it. We prepared a few solutions that should help you substantially to address that. Make sure to check them out below.

What can I do if Media Streaming isn’t working in Windows 10/11?

1. Enable automatic play

  1. Open Windows Media Player.
  2. Click on the Stream drop-down menu near the Menu bar.
  3. From the drop-down menu, choose Automatically allow devices to play my media.Media Streaming not working in Windows 10 allow devices to play my media
  4. Restart Windows Media Player and try again.

First things first, in order to cast or stream any multimedia file via Windows Media Player, you’ll need to enable automatic play. This procedure is simple, and you should be able to make it work quickly.

2. Turn on Search Indexing

  1. In the Search bar, type control and open Control Panel.
    control panel
  2. Choose Uninstall a program under Programs.
    uninstall a
  3. Click Turn Windows Features on or off from the left pane.
  4. Check the box next to a Windows Search Indexing to enable it.
  5. Restart your PC to apply changes.

A few knowledgeable users were reminded that Media Streaming is connected to Windows Search Indexing and, thus, can be affected. If you disabled Windows Search Indexing, we advise you to re-enable it.

This will, hopefully, resolve issues with Media Streaming.

3. Change the Local Group Policy

  1. In the Windows Search Bar, type gpedit.msc, and open Local Group Policy Editor.
  2. Follow this path: Computer Configuration > Administrative Templates > Windows Components > Windows Media Player
  3. Right-click on Prevent Media Sharing and choose Edit.Media Streaming not working in Windows 10 prevent media sharing
  4. Click on Disabled and confirm changes.
  5. Restart your PC and try enabling Media Streaming again.

Local Group Policy is there for configuring and managing various permissions within a system. Now, there are some protective permission settings with the main purpose of preventing unauthorized streaming.

Therefore, you’ll probably want that setting disabled to fix the Media Streaming error. For that, you’ll need Administrative permission on your PC.

4. Check the related services

  1. In the Windows Search bar, type services.msc, and open Services.
  2.  Navigate to UPnP host service, right-click it, and open Properties.Media Streaming not working in Windows 10 reset UPnP Device Host service
  3. Set the Startup type to Automatic, click Stop, and then Start to restart this service. Then click OK.
  4. Now, navigate to the Windows Media Player Network Sharing service and repeat the same procedure.
    Media Streaming not working in Windows 10 reset Windows Media Player Network Sharing Service
  5. Close Services and look for changes.

Like every other Windows component, Media Sharing has more than a few related services that govern everything. Now, by default, once you’ve enabled Media Streaming, they should change status to Active. However, it seems that some of them are, for no apparent reason, permanently disabled.

That occurrence will, consequently, prevent Media Streaming from commencing. Luckily, you can start them manually in a few simple steps.

5. Replace the Media Player cache folder

  1. Copy this path and paste it into the Windows Search bar: %userprofile%appdatalocalmicrosoft
  2. Rename Media Player to Media Player.Old.Media Streaming not working rename Media Player cache folder
  3. Restart your PC and start Windows Media Player.

Windows Media Player stores cache and configuration data in the AppData directory. These files can get corrupted or incomplete and thus provoke a lot of issues with Windows Media Player or, in this distinctive occurrence, Media Streaming through Media Player.

You can delete this folder or its content, but we advise you to rename it and continue your life. The next time you start Windows Media Player, the system will re-create the Media Player folder so you can start from scratch.

That should do it. We certainly do hope you managed to overcome issues with Media Streaming and finally make it work. And once done, learn how to enable DLNA in Windows and stream data across compatible devices on the network.

In the same vein, if you are dealing with Video streaming problems on your PC, check our guide to fix it.

Don’t forget to share your experience with Media Streaming issues with other readers. You can do so in the comments section below.

Fix: The service did not start due to a logon failure

When you are plagued by the service did not start due to a logon failure error, especially when you restart your Windows server, the problem is usually attributed to a password change for the profile being used by the SQL Server Agent.

However, sometimes the password may have remained the same, and you’re sure you didn’t make any changes whatsoever.

In addition to this, you’re tired of changing the login used and returning it back to its original domain login all the time, which you cannot keep doing every time something goes wrong.

The above may happen due to:

No need to worry about this as we have just the right solutions to resolve the issues that bring up the service did not start due to a logon failure error, check out the solutions below.

How to fix the service did not start due to a logon failure error

  1. Configure the service to use the built-in system account
  2. Change the password for the specified user account to match the current password for the same user
  3. Restore user’s right to log on as a service

1. Configure the service to use the built-in system account

If the service did not start due to a login failure, configure it to start up with a built-in system account by doing the following:

  1. Press Windows key + R to open the Run elevated command line.
  2. Type services.msc and press Enter.
  3. Locate the Application Identity service, right-click on it, and open Properties.
  4. Click Log On tab.Application Identity Properties Log On
  5. Click Local System Account
  6. Do not select the Allow service to interact with the desktop check box
  7. Click Apply
  8. Click General tab
  9. Click Start to restart the serviceApplication Identity Properties General
  10. Close the Services tool.

Note: When you try to open the properties of service by using the Services tool in Control Panel, the computer may stop responding, and get the error message that says: The RPC Server is unavailable.

This may occur if the RPC service isn’t started due to login failure with the service, or a dependency service because some have to wait until their dependency services start before they themselves start.

2. Change the password for the specified user account to match the current password for the same user

Here’s how to configure the password for the specified user account to match the current password for that user:

  1. Navigate to Services again by following the steps from the previous solution.
  2. In the search box, type Administrative Tools and click on it
  3. Click Services
  4. Right-click the service you want and select Properties
  5. Click Log On tabApplication Identity Properties Log On
  6. Change the password then click Apply
  7. Click the General tab
  8. Click Start to restart the serviceApplication Identity Properties General
  9. Click OK and close the Services tool

3. Restore user’s right to log on as a service

If the right to log on as a service is revoked for the user account, restore it on a domain controller or a member server (standalone) depending on your situation.

How to restore user’s right on a Domain Controller

Here’s how to do this if the user is in an Active Directory domain:

  1. Right-click Start
  2. Click Control Panelthe service did not start due to a logon failure
  3. Type Administrative tools and select it
  4. Click Active Directory Users and Computers
  5. Right-click the organization unit in which the user right to log on as a service was granted (Domain Controllers organizational unit by default)
  6. Right-click the container you want then click Properties
  7. Go to Group Policy tab
  8. Click Default Domain Controllers Policy
  9. Click Edit to start Group Policy Manager
  10. Expand Computer Configuration
  11. Expand Windows Settings
  12. Expand Security Settings.
  13. Expand Local Policies
  14. Click User Rights Assignment
  15. Right-click Log on as a service from the right pane
  16. Click Add User or Group.
  17. Type the name that you want to add to the policy in the User and Group Names box
  18. Click OK.
  19. Exit Group Policy Manager
  20. Close Group Policy properties,
  21. Exit the Active Directory Users and Computers Microsoft Management Console (MMC) snap-in

How to restore user’s right on a Member Server (stand-alone)

Here’s how to do this if a user is a member of a standalone member server:

  1. Start Local Security Settings MMC snap-in.
  2. Expand Local Policies.
  3. Click the User Rights Assignment.
  4. Right-click Log on as a service from the right pane.
  5. ClickAdd User or Group.
  6. Type the name that you want to add to the policy in the User and Group Names box.
  7. Click OK.
  8. Quit the Local Security Settings MMC snap-in.

Did any of the solutions above help fix the service that did not start due to a logon failure error? Let us know your experience in the comments section below.

No text displayed after upgrading to Windows 10/11 [FIXED]

Windows 10 Creators Update is definitely a milestone in the history of personal computing. Microsoft packed this OS with a series of never-before-seen features and improvements, paving the way for a new era in the industry. But even after months of testing, the Creators Update is not perfect. Many users who upgraded their computers are reporting various technical issues, ranging from install problems to black screen issues. Some of these bugs affect a significant number of users while others rarely occur.

We’ve identified an issue where there is no text displayed in Explorer and Control Panel. Here’s how one user describes the problem:

I have updated my Windows 10 to the latest version. After update I can’t see any text in explorer (no folder and file names), only icons are shown. The same problem is with old Control Panel. On the other hand, the new settings menu is working as well as menu start. I’ve tried restarting, changed english from polish to english and back to polish. I have also created new account, but there is the same problem. How to fix it? It is really annoying.

What to do if the text is missing in Windows 10 Creators Update

  1. Run an SFC scan
  2. Uninstall the Comodo firewall
  3. Reset your PC to factory values

Solution 1 — Run an SFC scan

  1. Go to Start, type cmd,  select Command Prompt, and then Run as Admin.
  2. Type the command sfc/ scannow, hit Enter, and then wait for the scanning process to complete.

Solution 2 — Uninstall the Comodo firewall

Many users affected by this issue confirm that uninstalling their firewall fixes this problem. It appears that there’s currently an incompatibility between Windows 10 Creators Update and Comodo.

Same problem here. Uninstalling comodo fixes the problem!

Solution 3 – Reset your PC to factory values

If uninstalling the Comodo Firewall client doesn’t help, you can always try repairing the installation with the bootable media drive or, even better, roll back to the previous Windows 10 iteration. You can also, find the middle ground, and reset your PC to factory values. If you’re not sure how to do it, follow these steps:

  1. Open Settings.
  2. Choose Update & Security.
  3. Select Recovery from the left pane.
  4. Click Go back to the previous version of Windows 10 or Reset this PC.
  5. Follow further instructions just don’t forget to back up your data beforehand.

Have you encountered any other text-related issues in the Creators Update? Tell us in the comments section below.

RELATED STORIES YOU NEED TO CHECK OUT:

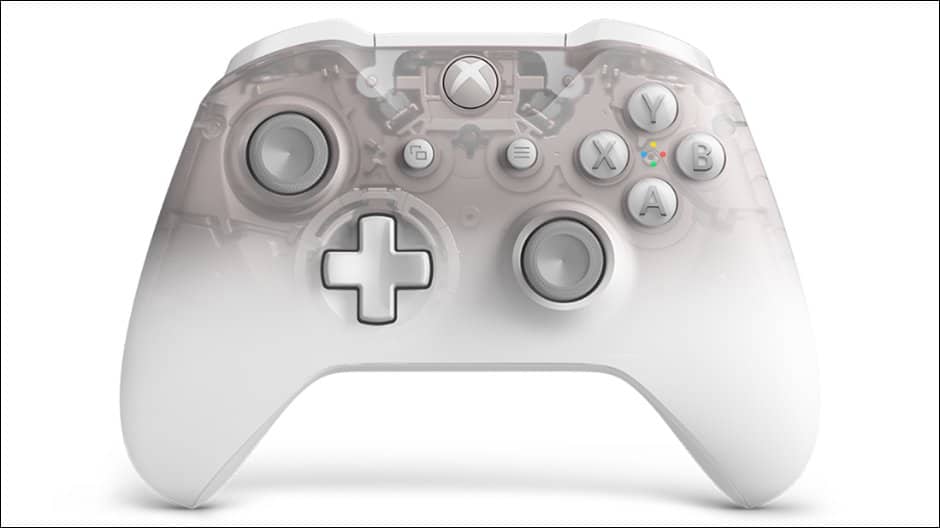
New Phantom White Special Edition Xbox One controller is now available

Microsoft has begun shipping its new Phantom White Special Edition Xbox One controller, so those who have been eyeing it can order it now. This adds a second option to the Phantom Series of controllers, the first option being the Phantom Black Special Edition released last year.

It was officially revealed back in March and features a translucent plastic that gradually fades to a white matte finish. It also features glossy white triggers, thumbtacks, and bumpers, as well as the same textured grips that are available as an option on the Xbox Design Lab controllers. Microsoft also highlights custom button mapping and a 3.5mm stereo headset jack as standard features the controller sports.

Anyone wishing to order it can do so online by going to the Microsoft Store, assuming they can spare the premium $69.99 price that it goes for. And in addition to working on Xbox One systems, it also works wirelessly with Windows 10 thanks to its built-in Bluetooth.

Windows 10 version 1809 gets a new patch with build 17763.404, here’s what’s new

Microsoft has just released a new patch for Windows 10 version 1809, in the form of the build 17763.404 (KB4490481). This is an optional update, though all fixes included in this build will end up in this month’s Patch Tuesday, to be released next week. This is because all Windows 10 updates are now cumulative, and it’s perfectly fine to just install the monthly Patch Tuesday updates that Microsoft releases the second Tuesday of each month.

Here are all the fixes and improvements listed in the release notes:

  • Addresses an issue that occurs on machines that have multiple audio devices. Applications that provide advanced options for internal or external audio output devices may stop working unexpectedly. This issue occurs for users that select an audio output device different from the “Default Audio Device”. Examples of applications that may stop working include Windows Media Player, Realtek HD Audio Manager, and the Sound Blaster Control Panel.
  • Includes a fix for Game Mode that ensures the feature will no longer impact your experiences when using the industry’s top streaming and recording software.
  • Enables activation of insider builds of Windows 10 Enterprise for Virtual Desktops in Microsoft Azure. Microsoft Azure is the only tested and supported platform to host Windows 10 Enterprise for Virtual Desktops, which is a key part of Windows Virtual Desktop.
  • Addresses an issue that may cause the loss of Favorites or the Reading List in Microsoft Edge after updating the operating system.
  • Addresses an issue that causes Internet Explorer to randomly stop working while browsing.
  • Addresses an issue with scrolling ActiveX content in a window in Internet Explorer 11 during a user-triggered scroll operation.
  • Addresses an issue that prevents the operating system from loading new icon files if it encounters a badly formatted icon file.
  • Updates time zone information for São Tomé and Príncipe.
  • Updates time zone information for Kazakhstan.
  • Updates time zone information for Buenos Aires, Argentina.
  • Addresses an issue that prevents the “Turn off app notifications on the lock screen” policy from working. The path is “Computer Configuration\Administrative Templates\System\Logo”.
  • Addresses an issue in which the graphics device interface (GDI) DeleteObject() may cause the calling process to stop working when both of the following conditions are true:
    • The calling process is a WOW64 process that handles memory addresses larger than 2 GB.
    • The DeleteObject() is called with a device context that is compatible with a printer device context.
  • Addresses an issue that prevents applications and callers from connecting to destination endpoints when they use network interfaces that don’t have a default gateway. This issue affects the following:
    • Internet access fails on devices with DSL modems and PPPoE dial-up Internet connections (commonly used with DSL modems).
    • Modern and Microsoft Store apps behave as if there is no Internet access on devices with DSL modems.
      Web browsers and Win32 applications that are connected to the Internet are not affected by this issue.
  • Addresses an issue that causes Windows to reuse an expired Dynamic Host Configuration Protocol (DHCP) lease if the lease expired while the OS was shutdown.
  • Addresses an issue that causes the RemoteApp window to come to the foreground and to always remain active after closing a window.
  • Addresses an issue that prevents the authentication credentials dialog from appearing when an enterprise web server attempts to connect to the Internet.
  • Addresses an issue that may prevent Modern apps icons from appearing in the Taskbar and the Task Switcher during a RemoteApps connection.
  • Addresses an issue that causes certain Microsoft Store applications to fail to launch or stop working, including WeChat on the Universal Windows Platform (UWP).
  • Addresses an issue that fails to register USB cameras correctly for Windows Hello after the out of box experience (OOBE) setup.
  • Adds a new Group Policy setting called “Enable Windows to soft-disconnect a computer from a network”. This determines how Windows will disconnect a computer from a network when it determines that the computer should no longer be connected to the network.
    • If enabled, Windows will soft-disconnect (disconnection is not immediate or abrupt) a computer from a network.
    • If disabled, Windows disconnects a computer from a network immediately.
    • If not configured, the default behavior is soft-disconnect. For more information about soft-disconnect, see Understanding and configuring Windows Connection Manager.
      Path: Computer Configuration\Policies\Administrative Templates\Network\Windows Connection Manager
  • Addresses an issue that prevents a virtual smart card from starting when running in conjunction with Citrix 7.15.2000 Workstation VDA software.
  • Addresses an issue that prevents users from configuring their screens for high-dynamic-range (HDR) video playback.
  • Addresses an issue with the Windows lock screen that prevents users from unlocking a device after multiple smart card users have used the same device. This issue occurs when you attempt to use a workstation that another user has locked.
  • Addresses a memory leak that occurs when a system processes logon sessions.
  • Addresses an issue that causes Always-On VPN exclusion routes to only work for link-local exclusions.
  • Addresses an issue that causes certificate renewal to fail when using CERT_RENEWAL_PROP_ID with the ICertPropertyRenewal interface.
  • Addresses an issue that mutes the sound of single-use applications, typically used in kiosk scenarios, after the system resumes from Sleep.
  • Addresses an issue to meet GB18030 certificate requirements.
  • Addresses an issue that slows server performance or causes the server to stop responding because of numerous Windows firewall rules. To enable this solution, use regedit to modify the following and set it to 1:
    • Type: “DeleteUserAppContainersOnLogoff” (DWORD)
    • Path: HKEY_LOCAL_MACHINE\SYSTEM\CurrentControlSet\Services\SharedAccess\Parameters\FirewallPolicy
  • Addresses an issue that prevents the decryption of data using Windows 10, version 1703 or later versions of Windows. This issue occurs if you encrypted that data using DPAPI-NG or a group-protected PFX file on Windows 10, version 1607, Windows Server 2016, or earlier versions of Windows.
  • Addresses an issue with evaluating the compatibility status of the Windows ecosystem to help ensure application and device compatibility for all updates to Windows.
  • Addresses minor issues with unknown options (unknown OPT) in the Extension Mechanisms for DNS (EDNS) for the Windows DNS Server role.
  • Addresses a timing issue that may result in an access violation when configuring Switch Embedded Teaming (SET).
  • Addresses an issue with the Remove-StoragePool PowerShell cmdlet that fails to clear pool metadata on NVDIMM physical disks.
  • Enables X2APIC support for AMD platforms to support 256 or more logical processors on Windows Server 2019.
  • Addresses an issue that prevents date parsers from converting future and past dates (Gregorian and Japanese) in compound documents (formerly OLE) to a relevant Japanese Era date. For more information, see KB4469068.
  • Addresses an issue that prevents users from enabling gan-nen support for the Japanese Era. For more information, see KB4469068.

That’s a pretty long list of quality fixes, though the patch notes also mention five known issues that should be fixed in an upcoming release. Again, today’s update shouldn’t install automatically on your PC, and you’re free wait for next week’s Patch Tuesday to get all these fixes and more.

How to Fix Power Supply Problem in Windows 10/11 (Step-by-Step)

Having a power supply problem in desktop or laptop PCs can cause serious instability. Whether your PC won’t turn on, randomly shuts down, restarts without warning, or crashes with BSODs, the cause often points to a Windows power supply issue. This guide covers proven fixes to get your power supply PC stable again, including safe, beginner-friendly methods.

Common Causes of Power Supply PC Issues

  • Overheating from poor ventilation
  • Failing or underpowered PSU
  • Loose or damaged cables
  • Faulty AC adapter or battery (laptops)
  • BIOS bugs or outdated drivers
  • Power surge or poor wall power source
  • Malware or misconfigured system settings

How to Fix Power Supply Issues on Desktop or Laptop

1. Clean the PC to Prevent Overheating

performance task manager

Fixes: Sudden shutdowns, restarts, blue screens

  • Turn off your PC and unplug it
  • Use a vacuum or compressed air to clean dust from vents and fans
  • Check if the system feels hot when it shuts down
  • Open Task Manager > Performance tab to check CPU load and temperature trends

If your system overheats often, airflow is likely blocked. Cleaning it regularly prevents unexpected shutdowns during gaming or heavy tasks.


2. Check the Power Supply Using Built-In Tools

Fixes: Shutdowns, failed boots, restarts, power surges

You can check your PSU health without opening your PC.

  • Open the Start menu, search for Event Viewer
  • Go to Windows Logs > System
  • Look for Event ID 41 or 6008 — these often mean the PC lost power unexpectedly
  • Run Command Prompt as Administrator
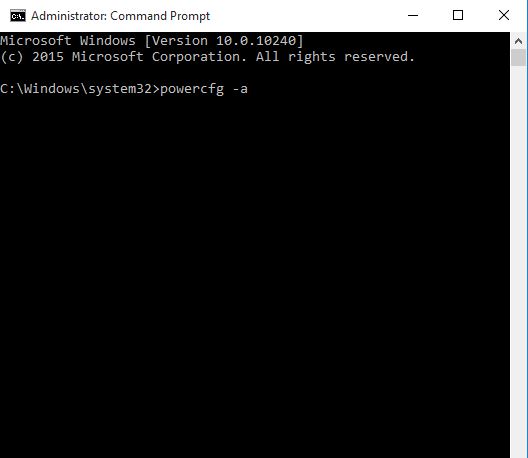
  • Type powercfg /energy and press Enterpowercfg
  • Open the energy report it generates (HTML file) and look for warnings

For a complete walkthrough, use this guide on how to test your computer power supply using software. It shows how to spot PSU issues without tools.

If you’ve upgraded to a powerful GPU, such as a 4090, make sure your PSU matches the required wattage. Check this best PSU for 4090 builds guide to avoid underpowering your setup.


3. Make Sure Power Cables Are Secure

Fixes: Boot failure, power loss, USB errors

Sometimes, power problems happen because a cable is loose or the power button isn’t working right.

  • Check if the wall outlet or power strip is working
  • For desktops, make sure the back PSU switch is turned on
  • Unplug and firmly reconnect the power cable to the back of the PC
  • If you’re on a laptop, remove the battery (if possible) and test with just the charger

If your PC shows no signs of life, review these steps on what to do if your motherboard is not getting power. It’s a helpful next step before replacing parts.


4. Update BIOS and Drivers Safely

Fixes: Blue screens, power-state errors, sleep/resume problems

  • Press Windows + X, select Device Managerselect device manager
  • Expand sections like Display Adapters, Network Adapters, and System Devices
  • Right-click and choose Update driver for key componentsupdate network driver
  • Visit your PC manufacturer’s website and check for BIOS updates

BIOS updates can fix stability and power issues. If you’re unsure how to update it, check your manufacturer’s step-by-step guide. Do not shut down your system during the update.


5. Use Clean Boot or Safe Mode

Fixes: Software-based restarts, crash loops

  • Open the Start menu and type msconfig
  • Under the Services tab, check “Hide Microsoft services,” then click Disable all
  • Go to the Startup tab > click Open Task Manager, and disable all startup items
  • Restart your PC

To isolate issues further, boot into Safe Mode by holding Shift while clicking Restart. This loads Windows with minimal drivers and can help you find apps or settings causing crashes.


6. Check RAM and Storage Health

Fixes: Crashes, no boot, system freezes

  • Open the Start menu, type Windows Memory Diagnostic, and run the test
  • Let your PC restart – it will scan your RAM and show any problems
  • For drive issues, open Command Prompt as admin and type chkdsk /f /r
  • Let the scan complete and follow any on-screen suggestions

You can also run a computer performance test online to spot any weak spots in your system that may be misinterpreted as PSU-related.


7. Scan for Malware and Review Event Logs

Fixes: Forced restarts, strange shutdown behavior

  • Run Windows Security (Windows Defender) or a trusted antivirus tool
  • Do a Full Scan to find hidden malware
  • Open Event Viewer > System logs and check for Event ID 1074 or unexpected shutdowns

Malware or bad update scripts can silently trigger shutdowns or block Windows from restarting correctly.


8. Test the Laptop Charger or Battery

Fixes: Laptop shuts off when unplugged or under load

  • Remove the battery if it’s removable and power the laptop using AC only
  • Then test with just the battery and no charger
  • If the system fails in one of the above tests, replace the faulty part
  • Try a different compatible charger if available

If your battery seems fine but the laptop still shuts down randomly, the charger might not be delivering stable power.


9. Use a Surge Protector or UPS

Fixes: BIOS surge warnings, USB power errors, random reboots

Surge spikes from wall outlets can instantly shut down your system.

  • Plug your PC into a surge protector (or better, a UPS with battery backup)
  • Disconnect all USB devices and reconnect them one at a time
  • If you get USB power surge messages, open Device Manager > USB Controllers, right-click and uninstall the driver, then restart your PC

If you’re unsure about your PSU’s capacity, this guide on how to check your PSU wattage will help confirm if it’s strong enough for your hardware.

Conclusion

Resolving a power supply problem in desktop or laptop systems running Windows 10 or 11 involves checking cables, cooling, and system components. Whether it’s a shutdown, boot failure, or BSOD, these step-by-step fixes address nearly every type of Windows power supply issue.

Start with simple hardware checks like reseating cables and cleaning dust. Then move to software updates and diagnostics. If your PSU is weak or unstable, consider replacing it with a properly rated model using accurate wattage guidelines.

By combining proper airflow, a strong power source, and up-to-date firmware, you can stabilize your power supply PC and eliminate random crashes or failures.


FAQs

What is Event ID 41 in Windows logs?

It signals an unexpected shutdown or reboot, usually due to power loss or instability.

Can the PSU cause blue screen errors?

Yes. A failing PSU can deliver inconsistent voltage that causes system crashes under load.

Is Fast Startup safe to leave on?

It’s safe, but disabling it can fix issues related to shutdown, sleep, or driver loading problems.

What kind of surge protection should I use?

Use a surge protector rated for PC use, or ideally a UPS with voltage regulation.

Microsoft Store to give up on Books category, refunds available

When a company cuts a program, product or service, there tends to be an initial knee-jerk reaction from the company’s most staunch fans and userbase. However, over time the stinging reality of a once supported tool or feature no longer being available fades, and users reevaluate the importance of the removed product in their lifestyle (unless it’s Windows Phone!).

If that doomed product has a monetary value associated with it, that stinging reality could last a bit longer and it seems Microsoft is very aware of that and is preempting complaints with compensation.

A new memo issued by Microsoft concertedly after April 1, 2019, aka April Fools Day, alerts users of the Microsoft Store Book section that the company will be closing its doors on the books category.

Starting April 2, 2019, the books category in Microsoft Store will be closing. Unfortunately, this means that starting July 2019 your ebooks will no longer be available to read, but you’ll get a full refund for all book purchases.

While you can no longer purchase or acquire additional books from the Microsoft Store, you can continue to read your books until July 2019 when refunds will be processed.

In the fine print, Microsoft states that as of April 2, 2019, users will no longer be able to buy, rent or pre-order books and that any pre-order books with delivery dates scheduled for after April 2, 2019, the pre-orders will be canceled and users will not be charged. Now for the important part, refunds.

The refunding process is supposed to be an automated affair that will begin rolling out to customers in early July 2019 and the funds will be debited to the original payment method.

While it appears to be a pretty seamless process, for people who have replaced their cards since purchasing books may need to look int their Microsoft Account for pending debits that can only be used in the Microsoft Store, unfortunately.

The same Microsoft Account fund allocation will be used for books purchased with gift cards. Not only are payment and purchases being removed, but it also appears the entire platform will be gutted and the ability to even read/view books will end in July 2019 as well; that goes for all books, rented, free, or purchased.

For those who used Microsoft’s eBooks for research and academic purposes, annotated books owners will receive a measly $25.00 for their time and effort. Microsoft doesn’t clarify if the above stipulations reach beyond its US walls.

It’s unfortunate that Microsoft is stepping away from the eBook category, especially as it makes another run at education. Hopefully, the company has a plan or a partner waiting in the wings to provide a better solution to its users. Some observers are speculating that appearance of the company’s new Chromium based Edge browser may be the impetus for the shift as Microsoft has touted it providing a superior eBook reading experience.

Visual Studio 2019 launches on Windows and Mac today with an online launch event

Visual Studio 2019, the latest version of Microsoft’s Integrated Development Environment (IDE) is now generally available on Windows and macOS. This major release succeeds to Visual Studio 2017 on Windows, as well as Visual Studio for Mac version 7.8.

For Windows users, Visual Studio 2019 introduces a revamped template selection screen, an improved debugging experience, as well as AI-assisted code completion with Visual Studio IntelliCode. Another important new feature is Visual Studio Live Share, which will allow teammates to collaborate in real-time without needing to clone repos or set up environments

“These capabilities work with both your existing project and new projects – from cross-platform C++ applications, to .NET mobile apps for Android and iOS written using Xamarin, to cloud-native applications using Azure services,” explained John Montgomery, CVP of Program Management, Visual Studio.

For Mac users, Visual Studio 2019 for Mac will be available as an update for Visual Studio for Mac version 7.8, but it’s also available to download on the Visual Studio website. The latest Mac version of the IDE brings a new C# Editor with a native macOS UI, which is currently available in preview and opt-in only. Other new features include the ability to run multiple instances of the IDE, as well as performance, reliability and accessibility improvements.

To celebrate the general availability of Visual Studio 2019 on Windows and Mac, Microsoft is inviting developers to follow its launch event today with no less than 14 different sessions to go in depth on all the new features. Last but not least, Microsoft has teamed up with Pluralsight and LinkedIn Learning to offer free Visual Studio 2019 courses for a limited time.

Microsoft reportedly planning an e-commerce competitor to Shopify

Microsoft is considering joining the e-commerce business to compete with Shopify, which is already used by several big-name companies such as Budweiser and Red Bull.

Microsoft is by no means an e-commerce company, although it does own around 100 of its own stores, plus a new one coming in London this summer. Additionally, the company already provides services to numerous other retailers, including shopping giant Walmart.

In an interview with The Information, Microsoft’s corporate vice president of retail and consumer goods, Shelly Bransten stated that, “it’s something we’re looking at very seriously because our customers are asking us for it,” further noting she has “a lot of respect” for Shopify.

Bransten has plenty of experience in the retailer business of her own, having spent over 15 years at Gap and then later Salesforce. She later joined Microsoft to help them build new products and advise them through related acquisitions, although she declined to comment on the idea of Microsoft acquiring Shopify.

Following the recent news, Shopify’s shares also dropped as much as 2.8% as noted by Seeking Alpha. In addition to potential competition from Microsoft, the e-commerce company is also seeing some from Instagram, which is working on a new checkout feature that will allow users to purchase items without leaving the app.

Microsoft and BMW form “Open Manufacturing Platform,” based on Azure

Microsoft and BMW have partnered to launch the Open Manufacturing Platform (OMP), an initiative that brings the power of Azure computing with AI and machine learning to help reduce costs and increase innovation within the manufacturing sector.

BMW is already a heavy investor in Azure services, holding over 3,000 machines, robots, and other autonomous systems within their own BMW Group IoT Platform. Additionally, BMW has even sought to integrate Cortana into the new BMW 5 Series Sedan as part of their “BMW Connected” platform.

“Microsoft is joining forces with the BMW Group to transform digital production efficiency across the industry,” stated Scott Guthrie, executive vice president of the Microsoft Cloud and AI Group.“Our commitment to building an open community will create new opportunities for collaboration across the entire manufacturing value chain.”

The new partnership is expected to bring in more manufacturers and suppliers, somewhere between four to six as an initial set of partners. The companies also plan to bring at least 15 different use cases, which will be rolled out into select production environments before the end of the year.

Microsoft explains in their blog post that the OMP will allow participating members access to greater opportunities, which will enable them to create and integrate their industrial solutions more quickly and securely. All members will also be able to benefit from sharing software solutions with each other, which will in turn help reduce costs and labor.

Thinking of the iPad Air? Here’s why the Surface Go might be worth considering

Everyone loves a brand new device, and Apple is probably what comes to mind for most looking for a fresh new toy. The latest iPad Air is no exception, and many consumers will undoubtedly purchase one without giving it a second thought. While iPads definitely serve as great entertainment devices and can also be useful for productivity, they also have their weaknesses.

For those still looking for a new tablet, the Surface Go is something that could be worth considering. Released back in August 2018, it offers consumers the power of Windows 10 in a small and portable form factor, for a somewhat affordable price.

Just a quick disclaimer, Microsoft has not asked us to review this device. The opinions expressed are my own, and are not influenced by any third party.

Here’s what you’re paying for

For those who might not have followed the news closely, the new iPad Air starts at $499. The cheapest model comes with a slightly larger 10.5-inch Retina display than the previous generation, along with significantly improved internals with its A12 Bionic 64-bit chip, 3 GB of RAM and 64 GB of storage.

The Surface Go, on the other hand, starts at $399, which is probably the model that most consumers will be looking at if considering one of these. However, I think the fair comparison is with the $499 model, which comes with an Intel Pentium Gold processor, 128 GB of storage, and 8 GB of RAM.

If you compare the two devices pricewise, the Surface Go is the clear winner when looking at storage and RAM. One could argue that the iPad doesn’t need the high specifications of a full Windows 10 tablet because of how optimized iOS is for the device. But the way I see it, the Surface Go is running a more powerful operating system on a more powerful device for the same cost as what Apple is asking for.

How about the actual experience?

We all know that specs aren’t everything, it’s really about the user experience and how you’re going to use your device. In my case, all I want is something that will allow me to work from virtually anywhere and provide me the power I need to get it done, with some occasional Netflix streaming here and there and some light gaming. The Surface Go allows for just that.

As a writer, I am often switching between typing paragraphs and then referring back to my research, so being able to multitask effectively is a must. The iPad Air is definitely plenty capable of getting the job done, don’t get me wrong. But I find that Windows 10 allows for even more effective multitasking by allowing applications to run in resizable windows. Split-screen multitasking, while certainly useful, can be a little limiting, especially if you’re frequently jumping between multiple apps.

I’ve been using the Surface Go for a good few months now, and so far, there’s little I can complain about. It performs just as well as I’d expect from a laptop, yet it offers me the portability of a tablet. And while it does come with S Mode enabled by default, it’s easy to disable and allows me to run many of the applications I’m used to from my desktop.

The Surface Go is good, but not perfect

The only major area of improvement the device really needs is with the battery life. It’s rated at 9 hours with mixed usage (slightly less than the iPad), but to be totally honest, I get maybe three or four hours of continuous screen time. So in other words, if you’re planning on doing some serious work on this thing, you’re probably going to want to plug up before you get things going.

It’s also not the best gaming tablet out there. The Microsoft Store is highly lacking, especially when comparing it to the much larger App Store. While are there definitely are some nice games, you’ll have to be fine with a much smaller catalog.

Despite its flaws, it’s still the better tablet

It’s not just the openness of Windows 10 or the power that comes from its internals, but also the feel of the device. It’s light and premium as I can immediately tell when I hold it, in the same way someone else feels when picking up the iPad Air. But the Surface Go has the added benefit of the hinge used to prop the device, which works very well and can even bring it all the way down to a very slight angle for drawing or handwriting notes.

All in all, if you’re looking something that is powerful enough for productivity and small enough to use just about anywhere, it’s hard for me not to recommend the Surface Go. Hopefully though, the next generation device will sport an improved battery life, which would make it an even more attractive offering for those looking for a new tablet.

Windows Needs Your Current Credentials: How to Stop it

Say that every time you log into Windows, a Windows needs your current credentials message appears in the lower right corner.

This can get tedious rather quickly, and this issue may occur because your credentials couldn’t be verified. However, there are ways to fix this issue, and today we’re going to show you how to do it.

Why does Windows keep asking for my current credentials?

  • Group Policy isn’t properly configured, which leads to this issue.
  • Microsoft hasn’t correctly verified your account.
  • Your Windows installation isn’t activated.

How can I fix Windows needs your current credentials error?

1. Change Group Policy Setting

  1. Go to Run and type gpedit.msc and click OK to open the Local Group Policy Editor.
  2. A window appears where you will need to follow this path: Computer Configuration\Administrative Templates\System\Logon
  3. Once you select Logon, in the right pane double-click the Always wait for the network at computer startup and logon option.
  4. If this option is Enabled, click to Disable it. You can also set it to Not Configured.
  5. Click Apply and then click OK.
  6. Exit the Group Policy Editor and restart the device.

2. Verify your account

  1. Go to the Start Menu.
  2. Right-click on your user profile.
  3. Go to Change account settings.
  4. Go to Your info.
  5. Hit the Verify link and you will be lead to a series of on-screen instructions that you will need to follow to complete the process.
  6. Reboot the device after you’re done with the verification process.

After verifying your account check if Windows needs your current credentials, please lock this computer message on Windows 10 is gone.

3. Active the trial version of Windows

  1. Click Start then click Settings.
  2. Next, go to Update & security and select Activation.
  3. Click the Change product key option.
  4. When prompted, enter the following product key VK7JG_NPHTM_C97JM_9MPGT_3V66T and press Enter. This will only activate the trial version.
  5. Complete the installation until a login screen for the upgraded OS appears with the following message: Edition upgrade completed.
  6. You’re all good to go.

We hope you solved Windows needs your current credentials message using one of our solutions.

If the problem persists, you might want to check our guide on Credential Manager not working for additional solutions.

For more similar problems and their solutions, visit our Solved: Windows Command Line Generates Random Password article.

In the meantime, let us know in the comment section below what solution you came up with.

There was a problem connecting to Adobe online [Fix]

Adobe online services provide essential support for users of the expansive Adobe suite of design and creativity solutions. However, the portal is sometimes unreachable and users receive the There was a problem connecting to Adobe online error message.

How can I fix Adobe connection error?

  1. Turn off system protection software
  2. Disable your firewall
  3. Check if you have are actually connected to the Internet
  4. Add Adobe.com as a trusted site
  5. Set accurate system clock settings
  6. Start your computer in Safe Mode

1. Turn off system protection software

System protection software may prevent various Adobe.com online services from opening. Consider turning it off. Running your PC without protection, however, makes your machine immensely vulnerable to threats so we recommend that you re-enable your antivirus as soon as possible.

We need antivirus software to protect ourselves from online attacks and potential dangers since viruses are always developing.

Whatever you use your computer for, having suitable and trusted antivirus software allows you to navigate and do tasks on it safely. As our everyday lives become more linked with the digital world, there is an increased need to secure our devices from cybercriminals.

2. Disable your firewall

A firewall can sometimes cause There was a problem connecting to Adobe online error. Try to temporarily disable your Windows Firewall.

  1. Click the Start button and choose Settings.settings start menu Adobe online can't connect
  2. Type Firewall in the settings search box and tap on Check firewall status.check firewall status adobe connection error
  3. Next, choose Turn firewall on/off.turn windows firewall on or off unable to reach adobe servers
  4. Then select Turn off Windows Firewall under the two sections (Private and Public).turn off windows firewall There was a problem connecting to Adobe online

At the same time, click the Allow option anytime you get a security alert whenever you attempt to connect to Adobe online sites.
If you’re running a different firewall product, check the instructions on the manufacturer’s website.

3. Check if you have are actually connected to the Internet

Sometimes There was a problem connecting to Adobe online error is caused by your Internet connection.

This is what you need to do:

Go to the address bar of your browser and type another website like Google.com. Is it opening? If it’s not, then you may simply need to repair your current Internet connection to restore connectivity to Adobe online. See how to fix your internet connection in Windows 10.

You can also try launching the Adobe online service using another computer located on the same network. If it also fails, perhaps you need to troubleshoot the network or call upon your system administrator to help.

4. Add Adobe.com as a trusted site

Making Adobe.com a trusted site might also help get rid of the There was a problem connecting to Adobe online error.

Internet Explorer

  1. Open Internet Explorer.
  2. Click the Tools (gear)tab and Scroll down to choose Internet Options.Internet options There was a problem connecting to adobe online
  3. Select the Security tab then click Trusted sites. trusted sites There was a problem connecting to adobe online
  4. Select the Sites tab. 
  5. Type https://adobe.com under Add this website to the zone then Click Add.add trusted site There was a problem connecting to Adobe online
  6. Close and click Apply. Exit the Internet Options window.

Google Chrome

  1. In Chrome, click on the More tab (the three dots at the far right).settings chrome There was a problem connecting to adobe online
  2. Select Settings then scroll down and click the  Advanced hyperlink.advanced settings There was a problem connecting to adobe online
  3. Select Change/Open proxy settings.open proxy settings problem connecting to Adobe online
  4. Now add Adobe’s website to the list of Trusted websites as we showed you in the previous section.

Firefox

  1. In Firefox, click on the 3 lines (upper right corner).
  2. Scroll down and Click Options.options firefox There was a problem connecting to Adobe online
  3. Tap on Privacy & Security.privacy and security can't connect to Adobe online
  4. Scroll to the Permissions tab and click Exceptions.exceptions There was a problem connecting to Adobe online
  5. Type https://adobe.com then press Allow.allowed websites There was a problem connecting to adobe online
  6. Choose Save Changes.

5. Set accurate system clock settings

Time settings don’t directly affect Internet connectivity but may make security certificates to be categorized as expired or invalid. This can lead to There was a problem connecting to Adobe online and other errors.

To fix the problem, make sure that your machine’s date and time settings are correct. Here is how to fix Windows 10 clock if it’s wrong.

6. Start your computer in Safe Mode

Starting your computer in Safe Mode will inhibit lingering errors that could be causing There was a problem connecting to Adobe online error.

  1. Hold down the Power button for around 10 seconds to shut down your PC.
  2. Start your PC again and turn it off while your PC boots to Windows.
  3. Repeat this several times to start your PC in Windows Recovery Environment.
  4. Click Troubleshoot as soon as the Choose an option screen opens.troubleshoot There was a problem connecting to adobe online
  5. Select Advanced options.advanced options There was a problem connecting to adobe online
  6. Click Startup Settings and then Restart.advanced options startup settings There was a problem connecting to adobe online
  7. After your machine restarts, select 4(or F4) to enter Safe Mode.safe mode There was a problem connecting to adobe online

Now you can test if the connection to Adobe online will go through.

There was a problem connecting to Adobe online can be quite annoying, but we hope that you solved it using one of our solutions.

How to fix frequent Outward game issues and resume gameplay

Outward, the newest open-world RPG with a blend of survival elements has been out for a few days. And as we know, no launch is true without hiccups with users reporting various issues with the game.

But we’ve created a list of fixes to common bugs found throughout the game. So let’s get started with our list.

Solutions to fix Outward bugs

  1. Frame drops
  2. Game crashes
  3. Split screen not working
  4. Display bugs
  5. Black screen fix
  6. No audio issues

1. Frame rate drops

Firstly, you’re going to Open your Nvidia Control Panel, and select 3D Settings, then turn off the Dynamic Super Sampling.

When dealing with FPS drops, try lowering the image quality, changing your graphics quality to medium from high. This helps with consistent frames when you might be experiencing drops.

Sometimes, low FPS and lagging gameplay indicate that your graphics driver is not working. A simple driver update can boost gaming speed by fixing performance bottlenecks and applying system tweaks that enable games to run faster and error-free.

We recommend installing a trustworthy third-party driver update manager that will keep your OS up and running with automatic updates and in-depth error fixing.

You can trust that Fortect Driver Updater is capable of making such improvements to assure a proper update with the most recent graphics card drivers compatible with your PC.

2. Game crashes

Don’t we all hate it when this happens? The reasons for a game crashing could stem from not meeting the minimum system requirements, outdated graphic drivers, or even corrupted game files.

To fix Outward from crashing we first suggest that you right-click on your Outward shortcut or exe. file and run the game in Windows Compatibility Mode.

Secondly, if that didn’t work, open your Nvidia Control Panel and select Manage 3D Settings and select Outward from the Program Settings and next you’re going to set the Power Management to Prefer Maximum Power.

nvidia control panel andy os

3. Split screen not working

In order to solve this issue, we suggest that you and your fellow adventurers run the game on Administrator rights.  If nothing else works, simply use the Steam overlay and head on over to your friend list, click the other player and join game.

This works best if neither player is moving at the time they join a game.

4. Fix display bugs

Right-click on the Desktop and click on Display Settings, now you’re going to select Advanced Settings, next click on Adjust Resolution.

Computer screen shifted sideways

Select which one suits your screen, keeping in mind the refresh rate of your screen. Also, you can disable V-sync in your in-game menu.

5. Black screen issues

In order to ensure that this works, firstly you’ll need to try running the game in Windowed Mode or lowering your resolution to 1080p. If this didn’t work, click on Verify or Repair Outward in your Steam client or Epic Launcher.

steam overlay not working windows 10

Or alternatively, simply uninstall and reinstall the game in case you have corrupted files in your Steam directory.

6. No audio

For this fix, you’re going to right-click on the speaker icon on the bottom right corner of your screen or toolbar for hidden icons and click on Sounds.

Now head on over to the Playback section and disable all the sound devices except the internal speaker or the speaker you wish you want to use.

hidden devices playback settings HDMI not showing

Also, keep in mind that changing your audio from surround sound to stereo can do the trick too.

Tips for smooth gaming sessions on PC

  • Always whitelist your game through the Windows Firewall, or any antivirus software that might be preventing the game from going into split screen mode.
  • Keep your graphic drivers up-to-date, and any esential components on your machine.
  • Whenever you have a freshly launched game, it’s best to run the game on recommended settings until future patches are released.
  • Always remember the minimum requirements when running a game, these are specs for Outward:
    • OS: Windows 7 (64 Bit) / 8 (64 Bit) / 10 (64 Bit);
    • Processor: Intel Core i5-750 or equivalent;
    • Memory: 4 GB RAM;
    • Graphics: Nvidia GTS 450 or equivalent;
    • Storage: 15 GB available space.

So these are the main issues reported with Outward RPG. Hopefully, these solutions are an aid whenever you stumble upon any of them. Feel free to share any thoughts on this topic in the dedicated comment area below.

Fix: Generation Zero Leaving Streaming Install Area

There are many great FPS games, and speaking of which, many reported Generation Zero leaving the streaming install area and other various issues.

These types of errors can make the game almost unplayable, so it’s important to fix them as soon as possible.

Luckily for you, in today’s guide, we’re going to show you a couple of great solutions that can help you fix this and various other issues.

Why is my Generation Zero game not loading?

  • An antivirus or firewall blocks the game, so you must make an exclusion.
  • Overclock settings are causing the game to crash.
  • GPU settings are preventing the game from running properly.

How can I fix Generation Zero leaving streaming install area and other issues?

Before we start fixing these issues, there are a few quick solutions that you should try:

  • Make sure that your antivirus doesn’t block the game.
  • Remove overclock settings if you’re using overclocking software.
  • Use Alt + Tab to minimize the game and get back to it quickly.

1. Change GPU settings

  1. Open your Nvidia Control Panel by right-clicking on the desktop and selecting Manage 3D Settings.
  2. Select the game from the Program Settings and set the Power Management to Prefer Maximum Power.
  3. Optional: Go to 3D Settings tab and turn off the Dynamic Super Sampling or DSR.

After making these changes, check if Generation Zero leaving streaming install area error is still there.

2. Allow the game through firewall

  1. Open Windows Defender Firewall and click on Allow an app or feature through Windows Defender Firewall.
  2. Click on Change settings and choose Allow another app.
  3. Locate Generation Zero exe file and make sure you check both Private and Public checkboxes.

After doing that, check if Generation Zero host no longer present error is still there.

3. Verify game integrity

  1. Open Steam and go to Library.
  2. Locate Generation Zero, right-click it and choose Properties.
  3. Go to the Local Files tab and click on Verify integrity of game files.
  4. Wait for the scan to finish.

As you can see, it’s easy to fix Generation Zero, leaving streaming install area and other issues with these steps.

However, if you have additional problems, we have a great guide on how to fix game crashes, so we encourage you to read it.

So far, how are you enjoying the game? Let us know in the comment section below.

What to do if League of Legends Friends List doesn’t work

As one of the most popular MOBA games in the world, League of Legends is basically useless without friends and other players to play it with. But that’s exactly what might happen as occasional problems with Friends Lists in League of Legends are possible.

There are a few factors that can mess up your League of Legends Friends List. Also, there are a few issues with the Friends list that can be quite annoying, including:

  • You or a friend recently changed your Summoner name, but you (or your friend) see the old summoner name.

  • You’re able to send messages to friends, but they don’t receive them (or vice versa).

  • You add a summoner name to your friends list that includes special characters, which can cause your entire friends list to disappear.

Luckily, League of Legends support has provided a workaround that should resolve these issues. The solution is quite simple, all you need to do is to delete the affected friend from your Friends List and then add him/her once again. Your friend needs to do the same thing.

This will reset the Friends List and resolves any possible flaws. Keep in mind that Friends List issues can also be caused by various servers problems. In that case, there’s really nothing you can do but to wait for the development team to address the problem or release a patch.

You can also try and repair the game with the Battle.net client, although that’s a long stretch solution as the bug is on the server-side, not with the local files. With that said, it won’t take too much time. Just open the client, right-click on League of Legends, and repair the game.

Did this advice help you to resolve the problem with Friends List? Do you know about some other workaround? Let us know in the comments below.

RELATED STORIES YOU NEED TO CHECK OUT:

Unable to install Windows 10 Creators Update with Media Creation Tool [Fix]

As we already mentioned in some previous articles, it’s quite comforting to know that there are multiple ways to update your system. Windows 10 is somewhat infamous for its over-the-air update issues, and if there’s no Media Creation Tool, a lot of users will have a hard time updating to the Creators Update.

The latest insights in this useful feature give us a few reports about the Media Creation tool’s failure. Namely, a moderate number of users was restricted from utilizing this tool, which was followed by various errors. So, what do you do when the solution becomes a problem? Luckily, you’ve come to the right place.

We prepared the most common ways to address this issue. So, if you’re prompted with errors like ‘‘There was a problem running this tool” or ”Something went wrong’‘, check the solutions below and we should get the Media Creation tool running in no time.

How to fix Media Creation Tool issues in Windows 10 Creators Update

  1. Enable update-related processes
  2. Disable antivirus/firewall
  3. Change language
  4. Tweak registry
  5. Use another PC

1. Enable update-related processes

First thing first, you should try and run the Media Creation Tool as Administrator. If that wasn’t helpful, there’s a chance some of the needed system update processes are disabled. That will, of course, stall updates or inflict various errors. Luckily, there’s a way to check their status and enable them.

Follow the instructions below to apply this workaround and hopefully resolve the issue at hand:

  1. In the Search Windows bar, type services.msc and open Services.
  2. Confirm that the following services on the list are set to run Automatic:
    • TCP/IP NetBIOS Helper
    • IKE and AuthIP IPsec Keying Modules
    • Server
    • Workstation
    • Automatic Updates OR Windows Update
    • Background Intelligent Transfer Service
  3. Right-click on each of these services and open Properties.
  4. Make sure that they are set to Automatic.

If the problem is persistent and the Media Creation tool still won’t function, check the alternative workarounds below.

2. Disable antivirus/firewall

More often than not, update issues are closely related to 3rd-party antimalware solutions. For the standard Windows update procedure, they block some services and prevent your PC from updating. And, apparently, the same goes for the Media Creation tool, as well. So, before you take some other, more advanced steps, make sure to disable the antivirus before you run the tool.

In addition, some users reported an interference caused by Windows’ native firewall. It’s risky to disable both antivirus and firewall for an extended period, but it won’t harm if you disable it for a couple of minutes.

If you’re unsure how to disable both firewall and Windows Defender, the instructions are just below:

  1. Press Windows + I to open the Settings app.
  2. Open Update & security.update & security windows 10
  3. Under the left pane, select Windows Defender.
  4. On the right side, you’ll see Real-time protection. Turn it off.
  5. Now, right-click the Start menu and, under administrative shortcuts, select Control Panel.
  6. Open System & security.
  7. Click the Windows Firewall.
  8. Disable both Private and Public networks.
  9. Try running the Media Creation tool again.

3. Change language

Some users managed to resolve this issue by changing the language settings. It seems the tool sometimes won’t function on non-English language systems, so your best bet is to switch to the English locale language. You’ll need to match languages, most of the time, in order for the tool to work properly.

Follow the instructions below to change the system language. Later on, you can switch back to any language of choice.

  1. Right-click Start and open Control panel.
  2. Click Region.
  3. Under the Administrative tab, choose Change system locale.
  4. Set language to English, and click OK to confirm.
  5. Now, under the Administrative tab, go to Copy settings
  6. Make sure both “Welcome screen and system accounts” and “New user accounts” checkboxes are checked
  7. Confirm changes and restart your PC.

However, if the language is not the cause behind the faulty Media Creation tool, you’ll need to take an alternative approach.

4. Tweak registry

The registry is dangerous ground for those who aren’t aware of the negative effects it can have on the system. However, it can be used for various tweaks and workarounds, and most of the time will serve you good. When it comes to matters at hand, you can use one registry tweak to resolve the issue with the Media Creation tool.

For the safety of your system, make sure to follow the instructions closely:

  1. In the Windows Search bar, type regedit. Right-click Registry Editor and run as administrator.
  2. Navigate to the following path:
    • HKEY_LOCAL_MACHINESOFTWAREMicrosoftWindowsCurrent VersionWindowsUpdateOSUpgrade
  3. Right-click on the right field and choose New > DWORD.
  4. Name it AllowOSUpgrade.
  5. Set the value for newly created input to 1 and save it.
  6. Restart your PC and look for changes.

If even this procedure wasn’t enough for you to fix your issue, there is still one way you should take into consideration.

5. Use another PC

In the end, if none of the above-mentioned workarounds managed to get the job done, or you lost your nerves trying, there’s an alternative. If you’re unable to run the Media Creation tool on one PC, you can create a bootable media, like USB or DVD on another. The procedure is simple and won’t take you too much time:

Follow the instructions below to create a bootable media on an alternative PC:

  1. Plug a USB stick in one of the ports.
  2. Run the Media Creation tool.
  3. Accept the License Agreement.
  4. Select Create installation media for another PC and click Next.
  5. Select the language, edition, and architecture that resembles the one you already had installed.
  6. Choose USB as media you’ll use.
  7. After the procedure is finished, plug in the bootable USB in troubled PC and double-click Setup.
  8. That way, you should be able to update the system without trouble.

We hope this article helped you resolve the issues at hand. If you have any additional solutions or questions, make sure to post them in the comments section below.

RELATED STORIES YOU NEED TO CHECK OUT:

You can download language packs for Windows via Microsoft Store

Microsoft seems to be experimenting with some new language options for Windows these days.

Microsoft’s latest plans include offering its users access to a few language packs from Microsoft Store. In other words, you would be able to bypass Windows Update and download and install language packs directly from Microsoft Store the same way you download games and apps. This should ease the usage, as Microsoft is focusing on making the Store more valuable to Windows 10 users by making it the hub of all extra features.

You can already find three language packs that include Catalan, Valencian, and Russian in the Microsoft Store.

Redstone 4 will allow users to download language packs

The fact that during the last few days, the company uploaded a series of language packs might mean that Microsoft is planning to soon provide us with the opportunity to download language packs from Microsoft Store with Redstone 4.

The official description of each one of the three available language packs says that if you want to experience Windows in a brand new language, the local Experience Pack will do the job. This includes the latest language resources for Windows features such as Start Menu, File Explorer, and Settings.

The official description of every language pack from Microsoft Store also states that after you install the app, you have to select the Launch button in order to navigate to Windows Settings app and from there you would be able to control all of your language preferences including the Windows display language. This should be really interesting.

For now, you can try downloading the three available language packs that you can find in the Microsoft Store including Catalan, Russian and Valencian. It’s pretty likely that this is just a test for Microsoft to see how things will be going and the company will probably upload more language packs shortly in the Microsoft Store as well.

RELATED STORIES TO CHECK OUT:

GTA 5 Stopped Working: How to Fix it Quickly

Grand Theft Auto 5 is one of the highest-grossing Windows games that has broken industry records.

However, the game doesn’t always run flawlessly and has one error message that states, Grand Theft Auto 5 has stopped working.

That error message pops up for some GTA fanatics when they start the game. Consequently, GTA 5 doesn’t run for them. There are, however, various ways that you can fix this issue.

How can I fix GTA 5 if it stops working?

1. Check GTA 5’s System Requirements

system requirements gta 5

If GTA 5 has stopped working, double-check that your laptop or desktop meets GTA 5’s minimum system requirements, as shown above.

Note that the game requires NVIDIA and AMD video cards, so it isn’t going to run on desktops or laptops with Intel integrated graphics.

You can also check that GTA 5 will run on your PC at the Can You RUN it website. This website matches games’ system requirements with your system specifications to tell you if they will run.

Enter Grand Theft Auto 5 in the website’s search box, and press the Can You Run It button. Then, a new page will open, showing you how your hardware specifications match the game’s system requirements.

canirunit system requirements gta 5

If your PC doesn’t meet GTA‘s minimum system requirements, you can get a refund from Steam, provided you downloaded the game less than two weeks ago.

Your Steam account will list games you can still get refunded. This Steam page provides further details on how to request a refund.

2. Install the Latest Visual C++ Redistributable Pack

The Visual C++ 2008 redistributable pack is also an essential requirement for Grand Theft Auto 5, which should have been installed with the rest of the game. However, Visual C++ might not have been installed correctly; and there’s also a more updated version.

Press the Download button on the Microsoft download website to update Visual C++ if you don’t have the latest version.

3. Run Grand Theft Auto 5 in Compatibility Mode

  1. Open GTA 5’s folder in File Explorer.
  2. Right-click the GTAVLauncher.exe, and select Properties on the context menu.file properties
  3. Click the Compatibility tab to open the options shown directly below.compatibility mode
  4. Select the Run this program in compatibility mode for option and select your preferred OS.
  5. Click the Run this program as administrator checkbox at the bottom of that tab.
  6. Press the Apply and OK buttons on the Compatibility tab.
  7. You can also open the Program Compatibility Troubleshooter from the Compatibility tab, which might come in handy for fixing the GTA 5 stopped working error. Press the Run compatibility troubleshooter button to open the window shown below.
program compatibility troubleshooter

Grand Theft Auto 5 is not an outdated game, but it still predates Windows 10. As such, running the game in compatibility mode as an administrator might resolve the GTA 5 stopped working error.

4. Disable non-Windows Services

  1. Press the Windows key + R, type msconfig, and click OK.system configuration general tab
  2. Select the Services tab shown in the shot directly below.disable non-microsoft services
  3. Click the Hide all Microsoft services check box to remove the MS services from the list.
  4. Now you can select Disable all to switch the third-party services off quickly.
  5. Deselect the Load startup items check box on the General tab.
  6. Click Apply, select OK, and press the Restart button to reboot Windows.
system configuration restart pc

It might be the case that a third-party software service is crashing the game. To ensure that’s not the case, disable the non-Windows services.

5. Update your Graphics Card Driver

  1. Press the Windows key + X and select Device Manager.
  2. Double-click Display adapters to open a list of graphics devices.device manager
  3. Right-click the graphics card listed there, and select the Update driver option.
  4. Select the Search automatically for updated drivers option to install and update the driver automatically.
    update drivers device manager
  5. If no new device driver is detected, there might still be a better driver available on the manufacturer’s website. Open this website page to update NVIDIA graphics card drivers.
  6. Select your graphics card and Windows platform from the drop-down menus.download nvidia drivers
  7. Press the Search button, and click Download to download the listed driver.
  8. Then open the folder that includes your driver, and click its setup wizard or installer.
  9. Restart Windows after installing the driver.

This GTA stopped working error could be due to an outdated graphics card driver. NVIDIA released GeForce Game Ready 350.12 WHQL drivers more specifically for GTA 5.

So it’s worth checking if there is an up-to-date driver for your video card. This is how you can update an NVIDIA graphics card driver manually or automatically.

Regardless of this way, you can perform it effortlessly. It’s possible to find and detect GPU outdated drivers with a fully automated driver application.

With this efficient tool, you will get the full list of outdated drivers on your device and press one click to update them and fix problematic graphics drivers causing gaming issues.

⇒ Get Fortect Driver Updater

6. Verify the Steam Game Cache

  1. First, open and log in to Steam.
  2. Open the game Library section, and then right-click Grand Theft Auto 5.
  3. Select the Properties option on the menu.steam game properties
  4. Select the Local Files tab, which includes a Verify Integrity of Game Files option.verify integrity of game cache
  5. Press the Verify Integrity of Game Files button to verify the cache. Steam will replace corrupted GTA 5 files.

It’s worth verifying the Steam cache for any game that’s not starting. That might detect and repair corrupted game files.

7. Switch off antivirus software

Third-party antivirus software and their firewalls can stop the game from running. The quick way to find out if that’s the case is to switch off third-party antivirus software temporarily.

Right-click the antivirus software’s notification area icon and select its disable or turn off setting if you can find one on the context menu.

Then you can probably select to temporarily switch the software off before launching GTA 5.

8. Reinstall Social Club

Social Club is the online multiplayer setup for GTA 5. Rockstar, the game’s publisher, suggests that players reinstall Social Club to fix GTA 5 startup issues. You can do that by entering appwiz.cpl in Run and clicking OK.

Then select Rockstar Games Social Club, and press the Uninstall button. After that, right-click the Social Club installer and select Run as Administrator to reinstall Social Club.

9. Uninstall Identity Cloaker

Some Grand Theft Auto 5 players have found that the GTA V has stopped working error is due to the Identity Cloaker software.

If you happen to have Identity Cloaker on your hard drive, uninstalling it will probably fix the game. You can uninstall Identity Cloaker via the Programs and Features tab, much the same as Social Club.

Those resolutions will probably fix GTA 5 so that the game runs without a stopped working error. Aside from that, you can also try reinstalling the game.

Similarly, if GTA 5 keeps crashing your PC, check our guide to fix it.

If you have a further fix for the GTA 5 stopped working error, please share the additional tip below.