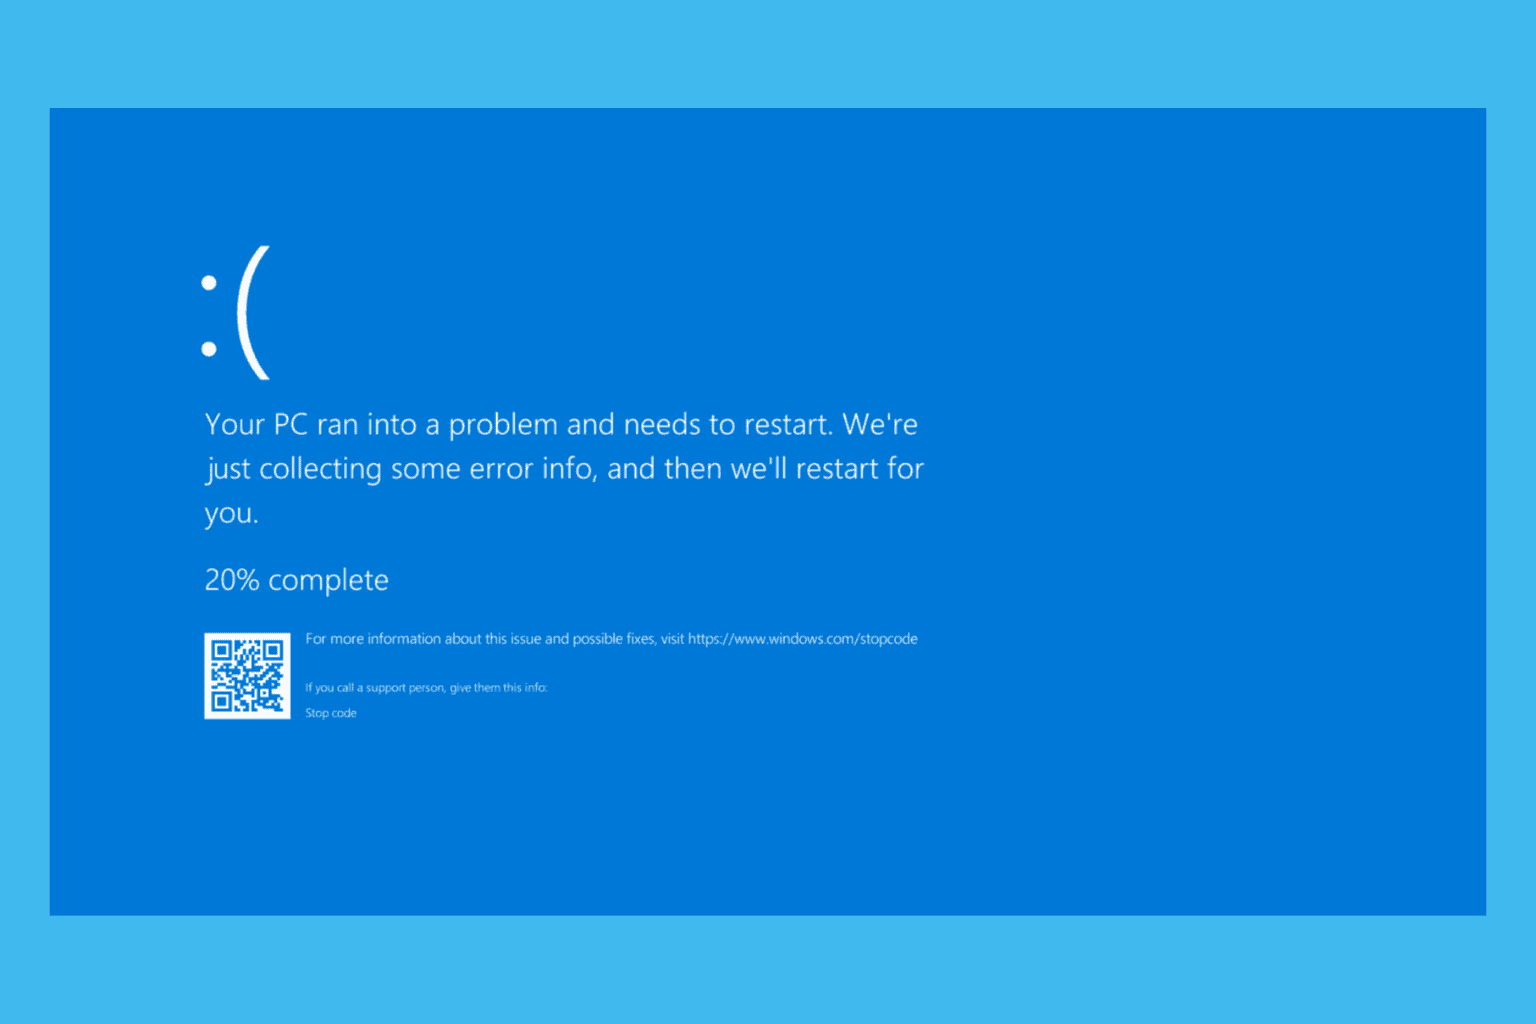
Ryzen 9 5900X vs 7900X: Hardware & Performance Comparison

When it comes to choosing between the Ryzen 9 5900X and the Ryzen 9 7900X, many users find themselves weighing the performance benefits against the costs and practical implications. Let’s dive into the key differences and see which CPU might be the best fit for your needs.

AMD Ryzen 5900X vs 7900X, which one is better?

Hardware differences

Ryzen 5900X is a Zen 3 CPU and it comes with the following specs:

  • 3.7 GHz base speed and 4.8 GHz turbo
  • 12 cores, 24 threads
  • 105W TDP
  • PCIe 4.0 support
  • Supports DDR4 RAM
  • Uses 7 nm technology

Ryzen 7900X is newer, and it’s a Zen 4 model. It comes with the following specs:

  • Base clock 4.7 GHz, Boost clock 5.6 GHz
  • 12 cores, 24 threads
  • 170W TDP
  • PCIe 5.0 support
  • Uses DDR5 RAM
  • Uses 5 nm technology

As for the hardware, while both models have the same number of cores and threads, 7900X offers higher frequency and support for PCIe 5.0 and DDR5 RAM. However, it has a 47% higher TDP.

Benchmark results

According to CPU Benchmark, 7900X outperforms 5900X in almost every regard, which is expected since it’s a newer-generation CPU.

As for CPU Mark tests, 7900X outperformed 5900X by 24.4% which is impressive.

CPU Mark rating Ryzen 7900x and 5900x

We got similar results during the single thread testing and the 7900X won by 18.6%.

cpu benchmark single thread rating ryzen 7900x and 5900x

In other tests, 7900X outperformed 5900X in every single test. The difference was noticeable, especially during multicore tests, and the performance difference ranged from 53.21% to 61.91%.

7900X5900X
Cinebench R23 Multi Core2928915441
Cinebench R23 Single Core20201526
Cinebench R20 CPU (Multi Core)114746104
Cinebench R20 CPU (Single Core)783603
Geekbench 5.1 – 5.4 64 Bit Multi-Core2055311914
Geekbench 5.1 – 5.4 64 Bit Single-Core22901574

Without a doubt, we can say that the Ryzen 9 5900X offers better performance overall.

How much better is the 7900X than the 5900X?

In terms of performance, the 7900X offers up to 60% better results during benchmarks, but that comes with a cost, and the 7900X is more expensive than the 5900X. It also has higher power consumption by 47% so that’s something to keep in mind as well.

If you have 5900X you should stick to it for a while, since the 7900X uses Zen 4 technology and AM5 socket, so you’ll need to upgrade both your motherboard and RAM to DDR5 if you want to switch to it.

On the other hand, if you’re building a new PC, and you want a high-end CPU that is future-proof, then 7900X is the way to go.

If you’re looking for something more affordable, then you might be interested in our Ryzen 5700X vs 5600X guide.

For Intel fans, we also have an Intel N200 vs Core i5 article, so you might want to check it out.

In conclusion, while the Ryzen 9 7900X offers notable improvements, especially in productivity tasks, the Ryzen 9 5900X still holds its ground in gaming and general use. Consider your specific needs and future-proofing requirements before making the upgrade.

You can share your YouTube Music radio with others now

YouTube Music is upping its game by launching a cool feature that further personalizes your music experience: a shareable personal radio feature on your profile or channel page.

According to 9to5Google, this personal radio is a changing mix that gets new daily tunes based on your recent listening habits. If you’re hooked on rock or checking out indie songs, your radio changes to highlight what you’re into. The cool thing? You can send this custom playlist to anyone with a quick link or even save it to your collection like any other playlist you enjoy.

The personal radio is based on YouTube Music profiles, which let users choose between public and private settings. These profiles show off favorite songs, artists, playlists, and other music. Naturally, those favorite songs will make it onto the radio, adding a personal touch to each profile and making it simple to share what you like to listen to with everyone or just your friends.

YouTube is gradually releasing this feature to users. So, if you’re itching to start sharing your radio station, you’ll need to keep tabs on your YouTube Music settings. When it pops up, go to your profile settings, switch ‘Enable public stats’ or ‘Enable public personal radio,’ and click enable.

What do you think? Would you like to add flair to your music profile and let others see what you’re playing?

In other news, QR codes also made their way into the video-sharing platform, and users can now share their favorite content with others using this method. Plus, following X’s steps, the platform is also adding Community Notes to video content, making it easier to gain additional context.

(Photo credits: 9to5Google)

The newly-discovered CVE-2026-6768 plagues Windows 10/11 devices

Windows users are buzzing about a new find: a critical flaw in the system’s driver labeled CVE-2024-6768. This bug impacts updated PCs, causing the infamous Blue Screen of Death (BSOD).

This troubling issue, which was discovered by security company Fortra, is caused by a driver managing the Common Log File System (CLFS.SYS). Due to poor validation, this driver can trigger a denial of service that results in a BSOD.

This problem doesn’t discriminate; it currently impacts all Windows 10 and 11 versions, regardless of your system.

A Denial of Service in CLFS.sys in Microsoft Windows 10, Windows 11, Windows Server 2016, Windows Server 2019, and Windows Server 2022 allows a malicious authenticated low-privilege user to cause a Blue Screen of Death via a forced call to the KeBugCheckEx function.

Worse, a user without privileges could exploit this weakness by creating specific values in a . BLF file, leading to system failures. This could make the system unstable, interrupt operations, and cause data loss.

According to the timeline posted by Fortra, the vulnerability currently has no fix and has been running rampant on Windows 10/11 devices for some time.

  • December 20, 2023 – Reported to Microsoft with a Proof-of-Concept exploit.
  • January 8, 2024 – Microsoft responded that their engineers could not reproduce the vulnerability.
  • January 12, 2024 – Fortra provided a screenshot showing a version of Windows running the January Patch Tuesday updates and a memory dump of the crash.
  • February 21, 2024 – Microsoft replied that they still could not reproduce the issue and they were closing the case.
  • February 28, 2024 – Fortra reproduced the issue again with the February Patch Tuesday updates installed and provided additional evidence, including a video of the crash condition.
  • June 19, 2024 – Fortra followed up to say that we intended to pursue a CVE and publish our research.
  • July 16, 2024 – Fortra shared that it had reserved CVE-2024-6768 and would be publishing soon.
  • August 8, 2024 – Reproduced on latest updates (July 2024 Patch Tuesday) of Windows 11 and Server 2022 to produce screenshots to share with media.
  • August 12, 2024 – CVE publication date.

Fortunately, Patch Tuesday updates are coming out this week, with a possible fix for this serious vulnerability.

How to Fix the FLOPPY_INTERNAL_ERROR Bug Check 0x37

Experiencing the FLOPPY_INTERNAL_ERROR blue screen has the value of 0x00000037. This error typically points to issues with your floppy drive or its connections. If you’re not using an old floppy disk drive, it’s likely that there is a problem with a wrong driver. However, we will deal with all the possible situations.

How do I fix the FLOPPY_INTERNAL_ERROR BSoD?

1. Check and reconnect the floppy drive connections

  1. Shut down your computer completely and unplug the power cable from your computer to ensure it’s completely powered off.
  2. Open your computer case, locate the floppy drive and check both the data cable (ribbon cable) and power cable for secure connections.
  3. Disconnect and then firmly reconnect both cables.
  4. Ensure the other ends of the cables are securely connected to the motherboard and power supply.
  5. Reassemble your computer case, plug in the power cable and turn it on.

Ensuring the floppy drive connections are secure can resolve communication issues that might cause the FLOPPY_INTERNAL_ERROR. This is particularly useful if cables were loose or improperly connected.

2. Update the floppy drive driver

  1. Right-click the Start button and select Device Manager
  2. Expand the Floppy disk drives section.
  3. Right-click on your floppy drive and select Update driver.
  4. Choose Search automatically for drivers and allow Windows to find and install any updates.
  5. If no updates are found, you might need to visit the manufacturer’s website to download the latest driver manually.
  6. Follow the on-screen instructions to complete the installation.

Updating the floppy drive driver ensures that you have the most recent software to manage the hardware, which could fix the FLOPPY_INTERNAL_ERROR. If you’re not actually using a floppy disk drive, check if you installed any other peripheral and reinstall its driver.

3. Check for BIOS settings

  1. Restart your computer and immediately press the key that opens the BIOS setup (commonly Del, F2, or Esc).
  2. Navigate through the BIOS menus to find the settings related to the floppy drive (often under Integrated Peripherals or Advanced).
  3. Ensure that the floppy drive controller is enabled.
  4. Save changes and exit the BIOS setup (usually by pressing F10).

Adjusting BIOS settings can resolve conflicts or incorrect configurations that might cause the FLOPPY_INTERNAL_ERROR.

4. Run Memory Diagnostics

  1. Open the Start menu type Windows Memory Diagnostic in the search bar and press Enter.
  2. Select Restart now and check for problems.
  3. Allow the diagnostic tool to run and check for memory issues.

Although it’s unlikely, this issue might also be caused by a faulty RAM module, and this test will reveal any possible problems. Additionally, you can use third-party diagnostic tools. Running hardware diagnostics helps identify if faulty hardware components are causing the FLOPPY_INTERNAL_ERROR.

By following these steps, you should be able to resolve the FLOPPY_INTERNAL_ERROR and get your system running smoothly again. To prevent such issues in the future, regularly check your hardware connections and keep your drivers and Windows OS updated.

If you’ve had any doubts, floppy drives are still supported in Windows 11, even the 5.25-inch flavor. In fact, we also have a guide on how to use the floppy drive in Windows.

This isn’t the only issue you can encounter, and recently we covered ERROR_FLOPPY_VOLUME, so you might want to check it out.

For any other questions you might have there is the comments section down below.

You’ll Need To Provide Administrator Permission To Copy This File: 3 Fixes

The “You’ll need to provide administrator permission to copy this file” error can be frustrating, especially when trying to move or copy important files. This message usually appears due to file permissions set by the system, which are designed to protect sensitive data. However, there are several ways to fix this issue and successfully copy the file.

Let me show you how!

3 Ways To Fix “You’ll Need To Provide Administrator Permission To Copy This File” Error

Below are some effective methods to resolve this permission error.

1. Take Ownership of the File

This way, you’ll take full control over it. Here’s what to do:

  1. Right-click on the file or folder and select Properties.
select Properties
  1. Go to the Security tab and click on Advanced.
Security tab
  1. Next to the Owner field, click Change.
Tap Change
  1. Type your user account name in the box and click Check Names.
Add user account name
  1. Click OK, then check the box Replace owner on subcontainers and objects.
Replace owner on subcontainers and objects.

Apply the changes and try copying the file again.

2. Disable User Account Control (UAC)

Disabling User Account Control (UAC) can prevent permission prompts, although it’s not recommended for everyday use because it’s more vulnerable to malware and other security threats. Remember to re-enable it once done.

Here’s how to disable it:

  1. Press the Windows Icon + S, type Control Panel, and hit Open.
Type control panel
  1. Tap User Accounts and click User Accounts again.
 User Accounts
  1. Click on Change User Account Control settings.
Change User Account Control settings.
  1. Move the slider down to Never Notify and click OK.
Never Notify

Restart your computer and try copying the file again. Once done, move the slider upwards to “Notify me only when programs try to make changes to my computer.”

3. Enable the Built-in Administrator Account

This gives you full access to the system, allowing you to avoid permission issues. Follow the steps:

  1. Type Command Prompt on the search button beside the Windows Icon and click Run as administrator.
Run as Administrator.
  1. Type the following command to enable the built-in Administrator account:
    net user administrator /active:yes
net user administrator /active:yes
  1. Press Enter to execute it.

The “You’ll need to provide administrator permission to copy this file” error is a common issue, but it’s easy to overcome with the right approach. The above methods should help you successfully copy the files you need. Remember to restore any security settings you adjust to protect your system after completing your task.

Microsoft Lists introduces drag-and-drop for efficient file management

Have you ever struggled with a digital list, trying to sort it just right, but the task felt more like a hassle than a quick job? Microsoft has heard our plea and launched an excellent update to the Microsoft Lists app to simplify our lives.

Now, you can drag and drop items to arrange them. No more clicking around; just an easy, smooth drag will get everything where you want it.

This update is a game changer for anyone who uses Microsoft Lists to stay organized. Whether you’re handling tasks overseeing a project or just trying to keep your grocery list organized, this drag-and-drop feature simplifies the process. And the best thing? Microsoft has created this update with every user in mind, ensuring it’s easy to access and use.

If you use the keyboard more than the mouse, this capability will allow you to move items up or down without dragging or dropping them.

Microsoft will allow users to take a sneak peek at more features coming to the Lists app, such as alerts for new form responses and options to schedule when to collect responses in September.

According to the Microsoft 365 Roadmap, another critical update for Microsoft Lists will be released in November: the capability to add attachments to forms.

You can read more about the new capability here.

Microsoft introduces Face Check that matches a person’s selfie with their photo ID for better security

Security has become one of the most essential topics in the tech industry. Microsoft has made a big move by introducing its Face Check facial recognition technology to strengthen its products. This new tool, created for companies, aims to boost security by matching a person’s selfie with their photo ID. It’s a big step in tackling cybercrime, which often takes advantage of weak ID checks.

Microsoft’s Face Check is now open to all business users, offering a more dependable way to check identities at a time when AI-generated fake content is becoming more common.

In a blog post, the Redmond-based tech giant found that 65% of cybercriminals’ attack paths involve weak login methods. Old tricks like CAPTCHAs or security questions just don’t cut it anymore. That’s why Microsoft came up with Face Check. It steps up the game by matching your selfie to a real photo ID, adding an extra layer of protection.

There’s a growing risk of impersonation and account takeover. Bad actors use insecure credentials in 66% of attack paths. For example, impersonators may use a compromised password to fraudulently log in to a system. With advancements in generative AI, complex impersonation tactics such as deepfakes are growing as well. Many organizations regularly onboard new employees remotely and offer a remote help desk. Without strong identity verification, how can organizations know who is on the other side of these digital interactions? Impersonators can easily bypass common verification methods such as counting bicycles on a CAPTCHA or asking which street you grew up on. As fraud skyrockets for businesses and consumers, and impersonation tactics have become increasingly complex, identity verification has never been more important.

But security isn’t the only focus here. Microsoft also prioritizes user privacy. The system shares match results, not any sensitive personal information. This method ensures companies can check identities more without putting privacy at risk. Face Check is good at spotting and blocking fake attempts, even the tricky deep fakes.

Microsoft has made it available to businesses. It is included in the Microsoft Entra Suite, but you can also get it as a standalone service. Each verification is priced at $0.25. If you want to try it out first, you can sign up for a free trial of the Entra Suite, which gives you eight Face Check verifications every month.

You can find more details about it here.

In other news, companies might want to try the new Microsoft Copilot for Security, which also offers AI-powered ways to deal with cyberattacks.

What do you think about this new security method?

How to Fix Win32 Disk Imager Not Opening

If you’re struggling with Win32 Disk Imager not opening on your Windows system, you’re not alone. This issue is usually due to drives mounting to the system, and especially Google Drive. Don’t worry because we tested the solutions below and they are working.

What do I do if Win32 Disk Imager is not opening?

1. Quit or unmount Google Drive

  1. Locate the Google Drive icon in the taskbar (usually at the bottom-right corner of the screen).
  2. Right-click on the Google Drive icon and select Quit from the context menu.
  3. Try to launch Win32 Disk Imager again.

Unmounting or quitting Google Drive stops it from mounting a virtual drive that interferes with Win32 Disk Imager, allowing the application to launch without issues.

2. Unmount other virtual drives

  1. Click on the File Explorer icon on the taskbar or press Windows + E to open the app.
  2. Navigate to This PC to see all mounted drives.
  3. Identify any virtual drives you don’t need (e.g., ISO files).
  4. Right-click on each virtual drive and select Eject.
  5. Try launching Win32 Disk Imager again.

Unmounting these drives ensures that no conflicts prevent Win32 Disk Imager from starting, which can be a common issue especially with ISO files.

3. Use an older version of Win32 Disk Imager

  1. Go to the Win32 Disk Imager SourceForge page.
  2. Navigate to the files section and look for an older version, such as v0.9.5.
  3. Download and install the older version.
  4. Try launching the application again.

Using an older version can bypass some bugs present in the latest release that might be causing the application to fail to open. If you have an older version than v1.0.0, go straight to the official download page and get the latest one.

4. Check for conflicting applications

  1. Press Ctrl + Shift + Esc to open Task Manager.
  2. Go to the Processes tab.
  3. Look for any applications or services that could be conflicting (e.g., VeraCrypt, pCloud Drive).
  4. Select the conflicting application and click End Task.
  5. Try launching Win32 Disk Imager again.

Ending conflicting tasks can help to ensure that no other application is causing the issue, allowing Win32 Disk Imager to open successfully.

5. Run Win32 Disk Imager with administrative privileges

  1. Right-click on the Win32 Disk Imager shortcut or executable file.
  2. Select Run as administrator from the context menu.
  3. Confirm any UAC prompts that appear.

Running the application with administrative privileges can sometimes resolve issues related to permissions and allow the application to open correctly.

6. Reinstall Win32 Disk Imager

  1. Press Windows + R to open the Run dialog.
  2. Type appwiz.cpl and press Enter to open the Programs and Features window.
  3. Locate Win32 Disk Imager in the list of installed programs.
  4. Right-click on it and select Uninstall.
  5. Download the latest version from the official page.
  6. Install the application again.
  7. Try launching Win32 Disk Imager.

Reinstalling the application ensures that you have a fresh installation free from corrupt files, which can resolve the issue of the application not opening.

7. Disable antivirus or firewall temporarily

  1. Right-click on the antivirus icon in the taskbar.
  2. Select Disable or Pause protection (this varies depending on the antivirus software).
  3. Try launching Win32 Disk Imager again.

Disabling the antivirus or firewall temporarily can help determine if they are blocking the application from launching. Always remember to re-enable protection afterwards.

Following these steps should help you resolve the issue of Win32 Disk Imager not opening. Each solution addresses a different potential cause, ensuring that you can troubleshoot effectively and get the application running.

You may also refer to our guide on what to do when Windows 11 apps are not opening for more solutions and information. If you get the This app can’t run on your PC error, the highlighted guide will provide the needed fixes. If all else fails, it might be time to look into a Win32 Disk Imager alternative.

For any other suggestions or questions, hit the comments section below and let us know.

Transfer Dropbox to Google Drive: 4 Ways to Move Everything

Transferring files from Dropbox to Google Drive can seem daunting, but it doesn’t have to be. Whether you’re switching services or just need to move some files around, I’ve got you covered with several straightforward solutions.

How can I transfer data from Dropbox to Google Drive?

1. Drag and drop using desktop applications

  1. Download and install both Dropbox and Google Drive applications on your PC.
  2. Open Dropbox and Google Drive folders on your computer in separate windows.
  3. Select the files you want to transfer from the Dropbox folder.
  4. Drag the selected files and drop them into the Google Drive folder.
    transfer files dropbox google drive

2. Manually download and upload files

  1. Open your web browser and log in to your Dropbox account.
  2. Navigate to the files or folders you want to transfer.
  3. Select the files or folders and click the Download button to download them to your local computer.
  4. Open Google Drive in your web browser and log in.
  5. Click the New button and select File upload or Folder upload.
    file upload folder upload google drive
  6. Select the files or folders you downloaded from Dropbox and upload them to Google Drive.

3. Use MultCloud

  1. Open your web browser and go to the MultCloud website.
  2. Sign up for a new MultCloud account or log in if you already have an account.
  3. Click on the Add Cloud button and add both your Dropbox and Google Drive accounts to MultCloud.
    add cloud multcloud
  4. Select the Cloud Transfer feature from the MultCloud Dashboard.
  5. Select Dropbox as the source cloud and Google Drive as the destination cloud.
  6. Click on Transfer Now to initiate the transfer process. MultCloud will transfer the files seamlessly in the background.
    multicloud transfer now

4. Use Cloudiway

  1. Register and log in to the Cloudiway portal.
  2. Create connectors for both Dropbox and Google Drive within the platform.
    connectors cloudiway
  3. Discover your Dropbox folders by running a discovery task.
  4. Select the folders to migrate and choose the target location in Google Drive.
  5. Start the migration task and monitor progress.
    migration cloudiway

Can Dropbox sync with Google Drive?

Yes, Dropbox can sync with Google Drive but to do that you need to use third-party services such as MultCloud.

To learn more, we also have a great guide on how to move files from Google Drive to flash drive. If you’re a OneDrive user, don’t miss our OneDrive to Google Drive migration guide.

By following these methods, you can easily transfer your files from Dropbox to Google Drive. To avoid future hassles, regularly back up your important files and consider using cloud management tools to streamline your workflow.

Microsoft and Telstra announce AI partnership to upgrade Australia’s telecommunication industry

The world of tech and telecommunications has a new partnership: Telstra and Microsoft are coming together strategically to change Australia’s AI infrastructure and connectivity scene, seeing Telstra acting as an initial partner for Microsoft’s big plan for expanding AI infrastructure throughout Australia.

This means utilizing Telstra’s latest and high-speed Intercity Fibre Network. Picture this: approximately 1,800 kilometers of fiber spread throughout the country. This is primed to function as Microsoft’s cloud service foundation in Australia, encompassing its AI services.

In the official announcement, Microsoft says Telstra is not just putting down the cables and finishing them. They’re going big by getting 21,000 Copilot for Microsoft 365 licenses for their workers. It is the most significant usage of generative AI service in Australia, and people worldwide are talking about it with communication providers.

Vicki Brady, the CEO of Telstra, says:

As we move into this new era of AI, connectivity has never been more fundamental. There’s so much to be excited about when it comes to AI – including generative AI tools like Copilot – but none of it works without the foundational layer of secure, reliable connectivity.

This joining of forces has the goal of getting Australia ready for AI time. The need for AI to create and handle significant quantities of data requires a quick, dependable, safe connectivity system that can expand. The Intercity Fibre Network of Telstra will supply this crucial connection, expanding Microsoft’s AI infrastructure to deliver the revolutionary advantages of AI throughout businesses, sectors, and the entire country.

It’s not the first time Microsoft has brought its AI tech to the Down Under continent. Earlier this year, the Redmond-based tech giant made some significant advances with the implementation of AI in academic education, thanks to its partnership with Torrens University, where it helped save 20,000 hours and $2.4 million worth of resources.

How to Fix the PAGE_FAULT_WITH_INTERRUPTS_OFF Bug Check 0x49

Encountering the PAGE_FAULT_WITH_INTERRUPTS_OFF blue screen error comes with the value of 0x00000049. This error often points to issues with memory, drivers, or system files. Here are some tried-and-true solutions to help you get your system back on track.

How do I fix PAGE_FAULT_WITH_INTERRUPTS_OFF BSoD?

1. Analyze the Crash Dump with WinDbg

  1. Download the Debugging Tools for Windows from the Microsoft website and install WinDbg.
  2. Launch WinDbg after installation.
  3. Navigate to File > Symbol File Path.
  4. Enter: SRV*C:\Windows\symbol_cache*https://msdl.microsoft.com/download/symbols
  5. Click OK.
  6. Go to File > Open Crash Dump.
  7. Navigate to the location of the dump file (usually C:\Windows\Memory.dmp) and open it.
  8. Type !analyze -v in the command window and press Enter.
  9. Wait for the analysis to complete and review the output to determine the cause of the PAGE_FAULT_WITH_INTERRUPTS_OFF error.

This process helps you identify the root cause of the issue by analyzing the crash dump, giving you detailed insights into what might have caused the page fault with interrupts off.

2. Use Driver Verifier to check drivers

  1. Click the Start button, type cmd and click on Run as administrator.
  2. Type verifier and press Enter to launch the Driver Verifier Manager.
  3. Select Create standard settings and click Next.
  4. Select Automatically select all drivers installed on this computer and click Next.
  5. Click Finish and restart your computer.

Driver Verifier will stress-test your drivers to uncover any that are causing issues, helping you identify if a faulty driver is responsible for the error.

3. Update or roll back drivers

  1. Press Windows + X and select Device Manager.
  2. Look for devices with a yellow exclamation mark.
  3. Right-click on the device and select Update driver.
  4. Choose Search automatically for drivers to update the driver.
  5. If the problem persists, right-click the device and select Properties.
  6. Go to the Driver tab and choose Roll Back Driver if the option is available.

Updating or rolling back drivers can resolve issues caused by corrupted or incompatible drivers that might be causing the PAGE_FAULT_WITH_INTERRUPTS_OFF error. If the automatic process doesn’t work, you may need to visit the manufacturer’s website and download the correct driver.

4. Run the Memory Diagnostic Tool

  1. Press Windows + R, type mdsched.exe, and press Enter.
  2. Choose Restart now and check for problems.
  3. Allow the diagnostic tool to run and restart your computer once done.

Memory issues can cause page faults. Running the Memory Diagnostic Tool will check for RAM issues, helping you identify if faulty memory is the cause of your issue. If it finds problems with one or more memory modules, try reseating them and/or replacing them.

5. Check the disk for errors

  1. Click the Start button, type cmd and select Run as administrator from the results.
  2. Type chkdsk /f /r and press Enter.
  3. Type Y to Schedule a Disk Check on Restart.
  4. Restart your PC and allow Disk Check to complete.

Disk errors can lead to page faults. Running a disk check can identify and repair bad sectors or file system errors that might be causing the PAGE_FAULT_WITH_INTERRUPTS_OFF error.

6. Review and adjust virtual memory

  1. Press Windows + R, type sysdm.cpl, and press Enter.
  2. Go to the Advanced tab and click Settings under Performance.
  3. Navigate to the Advanced tab and click Change under Virtual Memory.
  4. Ensure Automatically manage paging file size for all drives is checked.

Proper virtual memory management can prevent page faults by ensuring there is enough virtual memory available for system processes.

7. Perform a Clean Boot

  1. Press Windows + R, type msconfig, and press Enter.
  2. Go to the Services tab, check Hide all Microsoft services, and click Disable all.
  3. Navigate to the Startup tab and Open Task Manager.
  4. Disable all startup items.
  5. Click OK and restart your computer.

Performing a clean boot helps identify if background applications or services are causing the PAGE_FAULT_WITH_INTERRUPTS_OFF error, by starting Windows with a minimal set of drivers and startup programs.

8. Restore the system to an earlier point

  1. Press Windows + R, type rstrui, and press Enter.
  2. Follow the wizard to choose a restore point before the issue started.
  3. Click Next, confirm your restore point, and click Finish.

Restoring your system to an earlier point can undo recent changes that might have caused the PAGE_FAULT_WITH_INTERRUPTS_OFF error, bringing stability to your system.

By following these steps, you can effectively troubleshoot and resolve the PAGE_FAULT_WITH_INTERRUPTS_OFF error, improving your system’s reliability and performance. To prevent future issues, regularly update your drivers and Windows, and run periodic system checks.

For more information, you may refer to our guide on the causes of BSoD errors. You may also be interested in how to check the Blue Screen log in Windows.

You can address any additional question or suggestion in the comments section below.

Chrome to boost privacy with Fingerprinting Protections, including for Incognito mode

Forget about third-party cookie blocking, Google is preparing strong “Fingerprinting Protection Filters”, including for incognito mode in Chrome to protect user privacy from making a profile by websites to track you.

Google Chrome, despite being owned by an advertising giant, Google has been making efforts to improve user privacy. It’s understandable to have concerns about a browser linked to advertising, but Chrome’s dominant position has pushed it to address privacy issues more proactively.

Google Chrome will be getting Anti-fingerprinting Protections for the first time

One of the major threats to user privacy is Fingerprinting, a covert method websites use to track individuals by creating unique profiles based on device characteristics like screen size, resolution, and browsing habits. Chrome is working to counter these tactics by making it harder for websites to gather such data and implementing measures to block fingerprinting attempts.

Five years back, Google announced it would bring “protections against fingerprinting” to Chrome:

“Because fingerprinting is neither transparent nor under the user’s control, it results in tracking that doesn’t respect user choice. This is why Chrome plans to more aggressively restrict fingerprinting across the web. One way in which we’ll be doing this is reducing the ways in which browsers can be passively fingerprinted, so that we can detect and intervene against active fingerprinting efforts as they happen.” Google said in a blog post.

Five years down the line since the announcement, the company is working on it now as we, WindowsReport spotted from the commit messages and strings in them confirm the toggles to activate fingerprinting protection for normal and incognito will be available in Tracking Protection Settings.

Image Credit: WindowsReport

There were many commit messages related to Fingerprinting Protection Filters [FPF] but we could only find a recent commit that reveals changes Google is bringing to Chrome. Adding an Incognito flag for FPF is one of them.

ImageCredit: WindowsReport

The company is still ironing out bugs related to FPF, while no longer supporting third-party cookie blocking in Chrome was a setback, users will have fingerprinting protections against websites at the profile level including in incognito mode.

Image Credit: WindowsReport

We don’t know when the anti-fingerprinting protections make it into Chrome even in the Canary stage, but we may expect fingerprinting Protections including for Inprivate browsing to be developed and available in Edge also by Microsoft.

Besides this privacy improvement, Google Chrome to get updated warnings for insecure connections. Additionally, Chromebooks are getting Google AI feature for troubleshooting Bluetooth issues.

How to Fix the PC if it’s Slow to Shutdown on Windows 11

Experiencing slow shutdowns on your Windows 11 PC can be incredibly frustrating, especially when you’re in a hurry. This is mostly due to multiple apps and processes running in the background or software that is frozen or stuck. Here’s how to speed up the shutdown process!

How do I speed up the shutdown of my PC?

1. Disable Fast Startup

  1. Click the Start button, type Control Panel, and press Enter.
  2. Click on Power Options.
  3. In the left sidebar, click Choose what the power buttons do.
  4. Click Change settings that are currently unavailable.
  5. Uncheck the box for Turn on fast startup (recommended) and click Save changes.
  6. To apply the changes, restart your PC.

Disabling Fast Startup can often fix shutdown issues by preventing your computer from entering a hibernation state, which can help speed up the shutdown process.

2. End running processes

  1. Press Ctrl + Shift + Esc to open Task Manager.
  2. Click on the Processes tab.
  3. Look for programs consuming a lot of CPU, memory, or disk space.
  4. Right-click each high-resource process and select End Task.
  5. Confirm that you want to end the task if prompted.

Terminating high-resource background processes can free up system resources, helping your computer shut down faster. Of course, you should also close all running software before shutting down the PC.

3. Scan for Registry Issues

  1. Press Windows + R, type regedit and press Enter.
  2. Go to the following key: Computer\HKEY_LOCAL_MACHINE\SYSTEM\CurrentControlSet\Control\Session Manager\Memory Management
  3. Double-click ClearPageFileAtShutdown and set its value to 0.
  4. Now, go to the following key: Computer\HKEY_LOCAL_MACHINE\SYSTEM\CurrentControlSet\Control
  5. Double-click WaitToKillServiceTimeout, and set the value to 2000.
  6. Click OK to save your changes and close the Registry Editor.

Clearing certain registry settings can help Windows shut down services faster, reducing overall shutdown time.

4. Run DISM and SFC

  1. Type cmd into the Start menu search bar, right-click Command Prompt, and select Run as administrator.
  2. Enter the following commands one by one, pressing Enter after each:
    • DISM.exe /Online /Cleanup-image /StartComponentCleanup
    • DISM.exe /Online /Cleanup-Image /Restorehealth
  3. After DISM scan completes, type sfc /scannow and press Enter.
  4. Once the scans are complete, restart your computer.

Using DISM and SFC commands can repair corrupted system files, which might be causing slow shutdowns.

5. Check and Repair Disk Errors

  1. Type cmd into the Start menu search bar, right-click Command Prompt, and select Run as administrator.
  2. Type chkdsk /f and press Enter. When prompted, press Y to schedule the check for the next restart.
  3. Restart your computer to allow the disk check process to run.

Checking the disk for errors can fix file system issues that might be slowing down the shutdown process.

6. Uninstall problematic software

  1. Press Windows + I to open the Settings app.
  2. Click on Apps, then on Installed apps.
  3. Scroll through the list to find the software you suspect is causing the issue.
  4. Click on the software and select Uninstall.
  5. Restart your computer after uninstalling to see if the problem is resolved.

Certain applications can cause shutdown delays; uninstalling these can help speed up the process.

7. Perform a Clean Boot

  1. Press Windows + R, type msconfig, and press Enter.
  2. Click on the Services tab.
  3. Check the box for Hide all Microsoft services.
  4. Click Disable all.
  5. Click on the Startup tab and open Task Manager.
  6. Disable all startup items.
  7. Click OK in the System Configuration window and restart your computer.

Performing a clean boot can help you identify if third-party services or startup programs are causing slow shutdowns.

By following these steps, you should be able to speed up your PC’s shutdown process. To prevent future slowdowns, regularly update your system and avoid installing unnecessary software.

If the Task Host window is preventing the shutdown, click the highlighted link to find the proper solutions to fix it. We also have a helpful guide on how to deal with an app that is preventing the shutdown.

Did our guide help you fix the PC slow shutdown problem? Let us know in the comments below.

Fix: The Requested System Device Cannot be Found in Windows 11

PC crashes happen all the time and during recovery, you may be prompted to boot it from an external device. During such situations, the requested system device cannot be found error may appear.

Your MBR may have been corrupted hence causing this issue. A USB drive is usually used as a bootable drive but Windows is unable to detect it. This could be a malfunctioning hard drive, a faulty USB port or misconfigured BIOS settings. If left unresolved, your PC may get stuck on the boot screen.

How do I fix the requested system device cannot be found error in Windows?

1. Run Startup repair

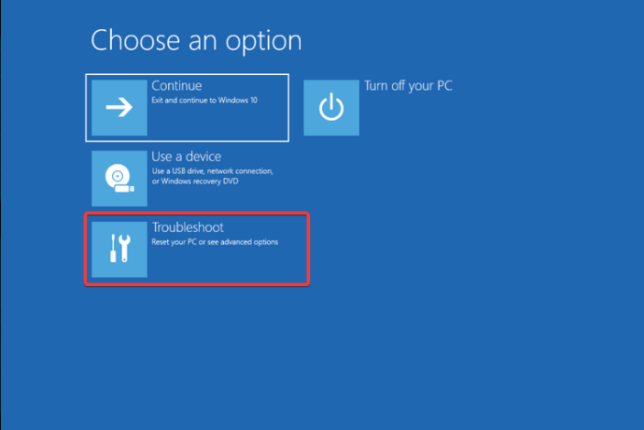
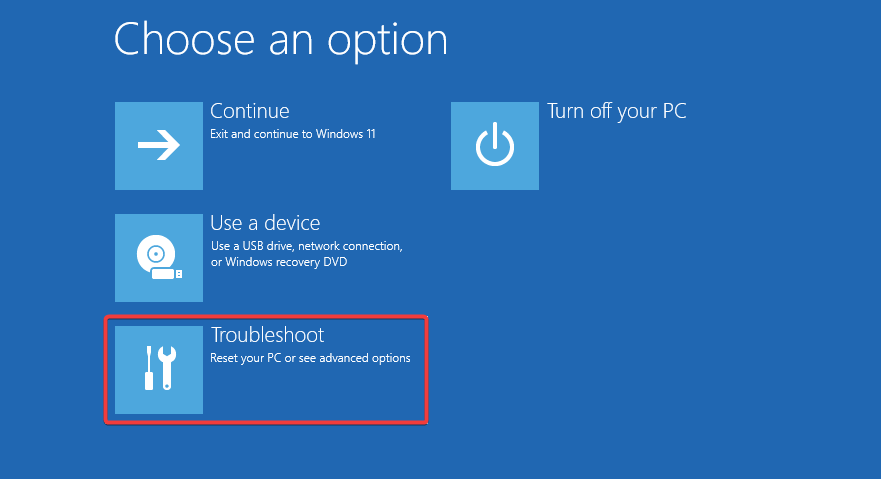
  1. Enter your PC into Safe Mode, navigate to the Advanced option from the blue screen and press the Enter key.
  2. Press the Troubleshoot button.Choose an option - Troubleshoot-secure boot enabled but not active windows 11
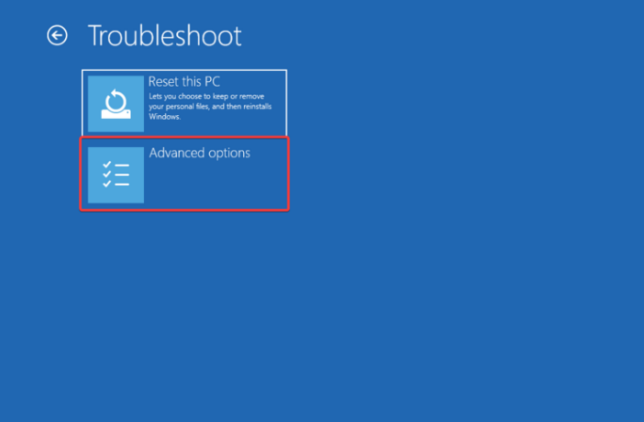
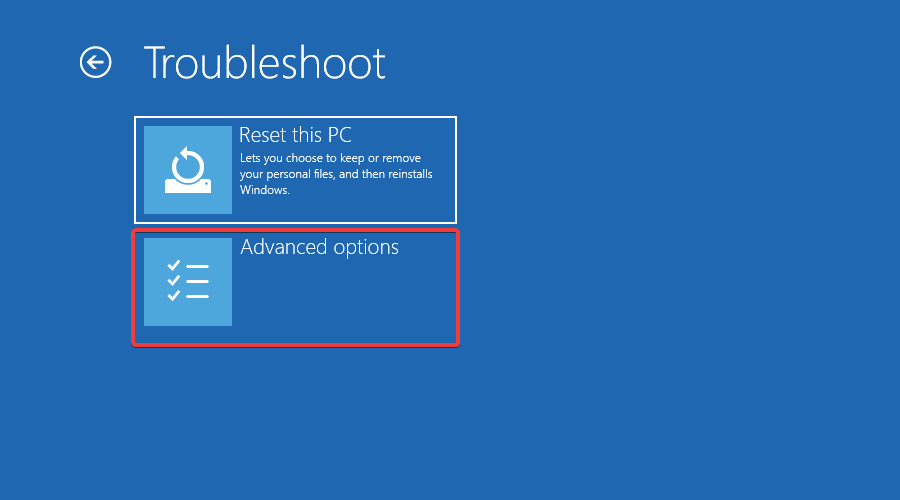
  3. Select Advanced options.Advanced options
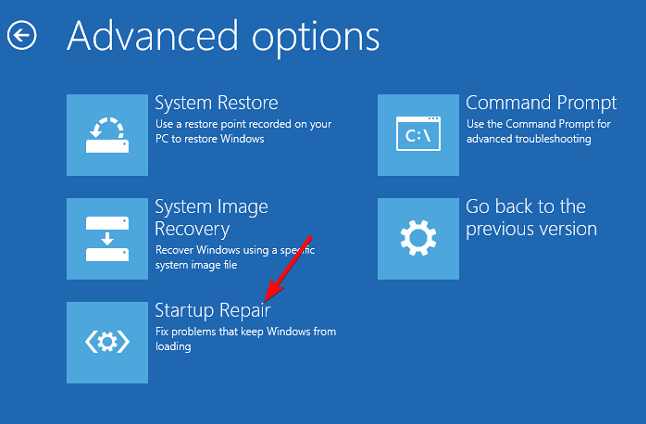
  4. Choose the Startup Repair option.windows 11 startup repair

2. Repair MBR 

  1. Create a bootable Windows 11 USB drive on another PC.
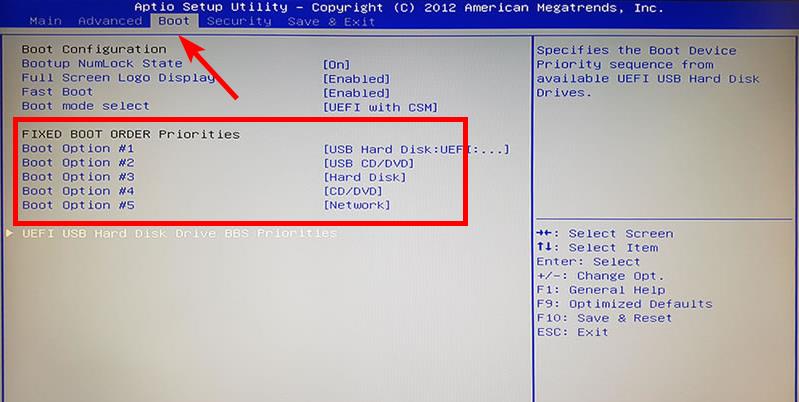
  2. Open the BIOS Settings by pressing the corresponding key shown on the screen. Usually, there can be any of the F10, F2, F12, F1, or DEL keys and it is different for each manufacturer/BIOS.
  3. Now, switch to the Boot tab. Then, under Boot Option Priorities, go to each boot option and press Enter.
  4. Change the boot order to the HDD or SSD you have the system installed on.
  5. Connect the USB drive to your PC and try booting from it.
  6. When the installation window appears, click on Repair your PC.
  7. Next, select Troubleshoot.windows 11 reset pc not working
  8. Click on Advanced options.
  9. Launch Command Prompt on the system.
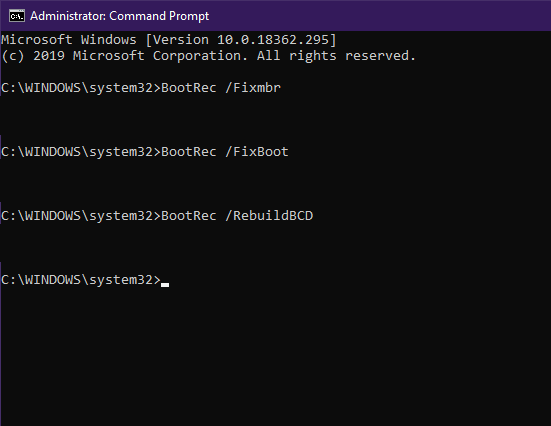
  10. Type the following commands and press Enter after each: bootrec /FixMbr bootrec /FixBoot bootrec /ScanOs bootrec /RebuildBcd
  11. Exit, remove the installation drive, and try starting the system normally.

3. Run the Chkdsk command

  1. Restart your PC and repeatedly press F8 before the Windows logo appears.
  2. Next, select Troubleshoot.windows 11 reset pc not working
  3. Click on Advanced options.
  4. Launch Command Prompt on the system.
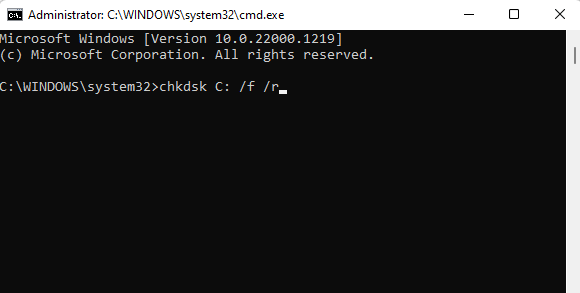
  5. Type in the following command then press Enter: chkdsk:/f run chkdsk command

4. Activate the disk partition

  1. Restart your PC and repeatedly press F8 before the Windows logo appears.
  2. Next, select Troubleshoot.windows 11 reset pc not working
  3. Click on Advanced options.
  4. Launch Command Prompt on the system.
  5. Type start diskpart and hit Enter.
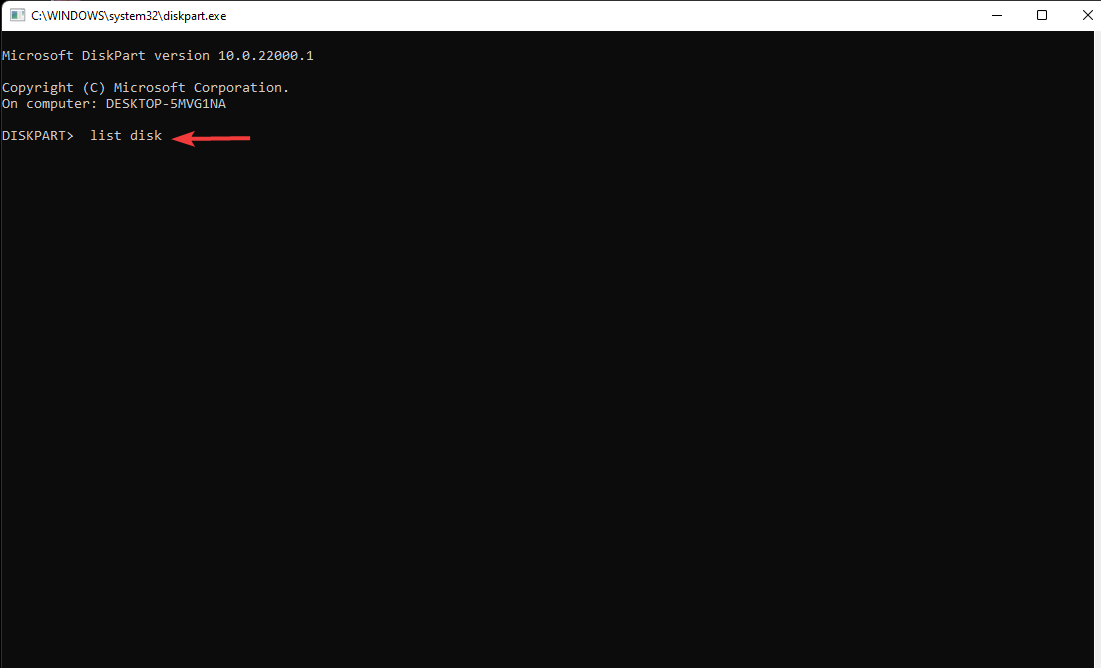
  6. Type list disk and hit Enter to display all the disks on the PC.
  7. To select the disk, type select disk 0 (the number is according to the number of disks you select).
  8. Type list partition and hit Enter.
  9. Select the partition you want to fix, type select partition 2 (Enter the number according to your hard disk), and hit Enter.
  10. Type active and Enter.
  11. Type exit and press Enter to close the Command Prompt.

Your system looks for an active partition to boot from and if it’s the wrong one or unavailable, there will be no boot files to load. An incorrect disk partition can make your hard drive undetectable and make it hard for your system to find the specified drive.

5. Reinstall Windows 11

  1. Create a bootable Windows 11 USB drive on another PC and restart the problematic PC with the bootable USB flash drive which has Windows 11 on it.
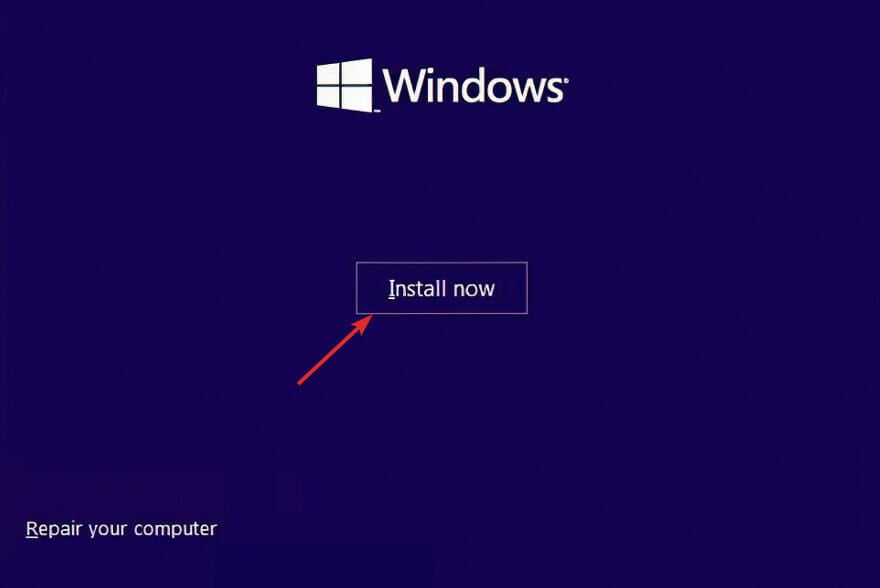
  2. Click on the Install now button then follow the onscreen steps to start the installation process.windows-install-now windows 11 setup without internet
  3. Press the I don’t have a product key button from the bottom side of the window if you don’t have one available.
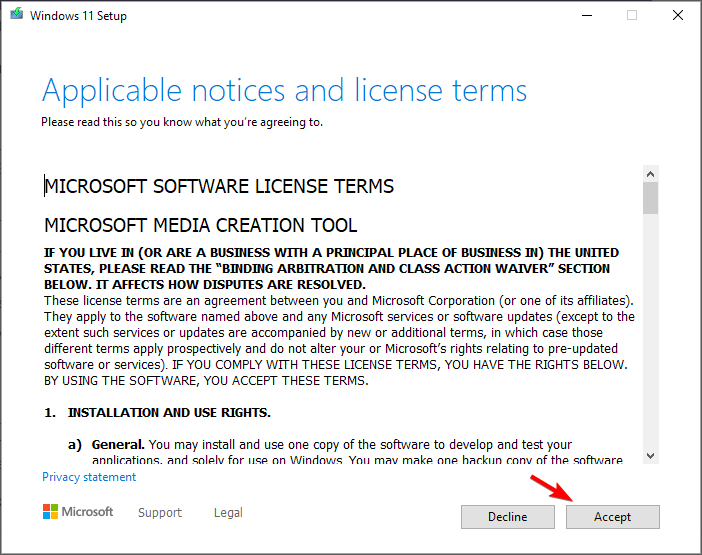
  4. Accept the terms of service and click Next.accept-terms-of-service-w11
  5. Next, choose the Custom installation option when they ask you what type you want to perform.choosing custom windows setup
  6. Select your region, and keyboard layout then once you get the Oops you’ve lost Internet connection screen, press SHIFT + F10 from your keyboard to open a Command Prompt window.
  7. Type the following command and press Enter:OOBE\BYPASSNROoobe windows 11 setup without internet
  8. Your computer will automatically restart and enter the Let’s connect you to a network screen. Here press the I don’t have Internet button. If you have an internet connection, press Next and plug in your Ethernet cable.lets-connect windows 11 setup without internet
  9. Next, click the Continue with limited setup button and proceed with the setup process.
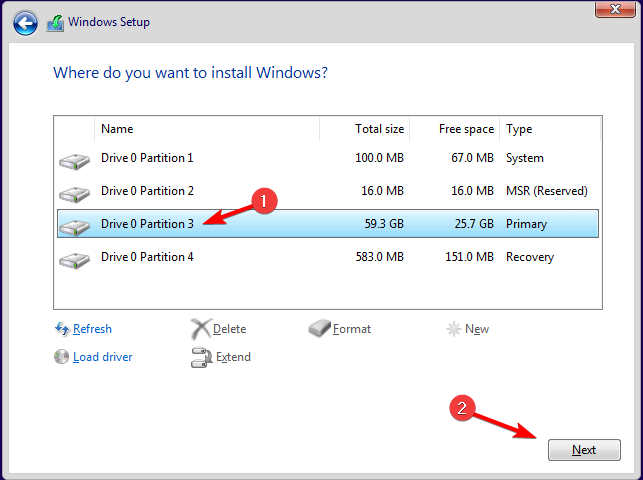
  10. Select the Primary drive and click Next. Double-check to make sure that you’ve selected the correct drive.select-drive
  11. Follow the instructions on the screen to complete the process.

To restore your old files, use the Windows.old folder to restore your files. Remember there’s a time stamp on the validity of these files and they will be deleted automatically after 10 days.

Additional tips and preventative measures

The requested system device cannot be found error in Windows usually occurs because of hardware failures so ensure you perform regular hardware checks to keep it in tip-top shape. Also, avoid using incompatible partition styles and update your BIOS, OS and drivers regularly.

Keep an eye on your PC’s boot behaviour. If your computer always boots to BIOS, check your connections and any other features that may be causing it.

That’s it from us but if you have any other compelling solution you think should be on our list, share it with us in the comments section below.

What is the NTFS File System & Should I Use it?

Your choice of storage device comes with a file system format like the New Technology File System (NTFS) that manages and organizes the data stored inside.

A file system is crucial because it is what dictates how the content stored inside an HDD or SDD will be saved, stored, retrieved and updated. These rules minimize the loss of data and encrypt files from unauthorized persons where need be.

What are the key features of the NTFS file system?

  • File management – Modern storage needs require advanced file system formats that support large file sizes and volumes and NTFS delivers this effortlessly. It can handle up to 256TB. You can also use it on advanced storage configurations like RAID.
  • Data integrity and security – At the cornerstone of data storage is data integrity. If you’re storing large amounts of data, you need to be assured that it is safe and the NTFS makes this possible with its advanced security features. Aside from encryption of files, users can also set permissions on NTFS files to restrict access.
  • File compression – Although NTFS supports storage of large volumes of data, it can easily become unmanageable. With its file and folder compression feature, you can reduce the size of these files through compression and get an additional bonus by saving disk space.
  • Error handling and recovery – Power failures can happen any time and can lead to data corruption. Thanks to NTFS’ journaling feature, it keeps a separate log files, checks for inconsistencies and failures then attempts to repair them.
  • Offloaded Data Transfer – This is another winning feature that makes the transfer of files seamless. It speeds up the file transfer process by offloading the task to your storage device instead of your OS. This saves your system resources and optimizes the file transfer process making it faster and more efficient.

How can I convert a raw disk to NTFS format?

When you have an unformatted drive, it is in its raw format and you need to convert it to a compatible file system format to manage the data stored effectively.

  1. Press the Windows key to open the Start menu.
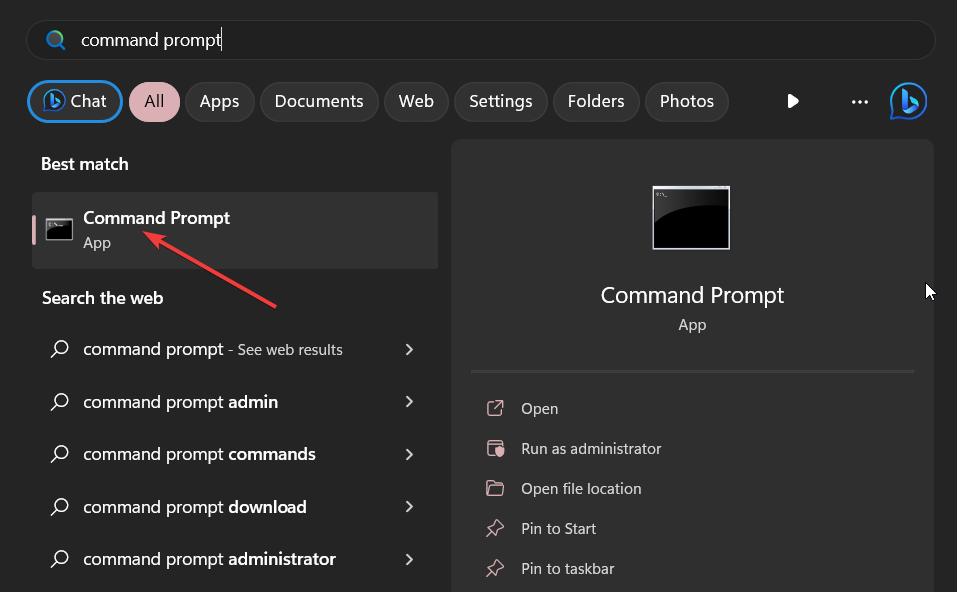
  2. Type command prompt into the search box and run it as an administrator.
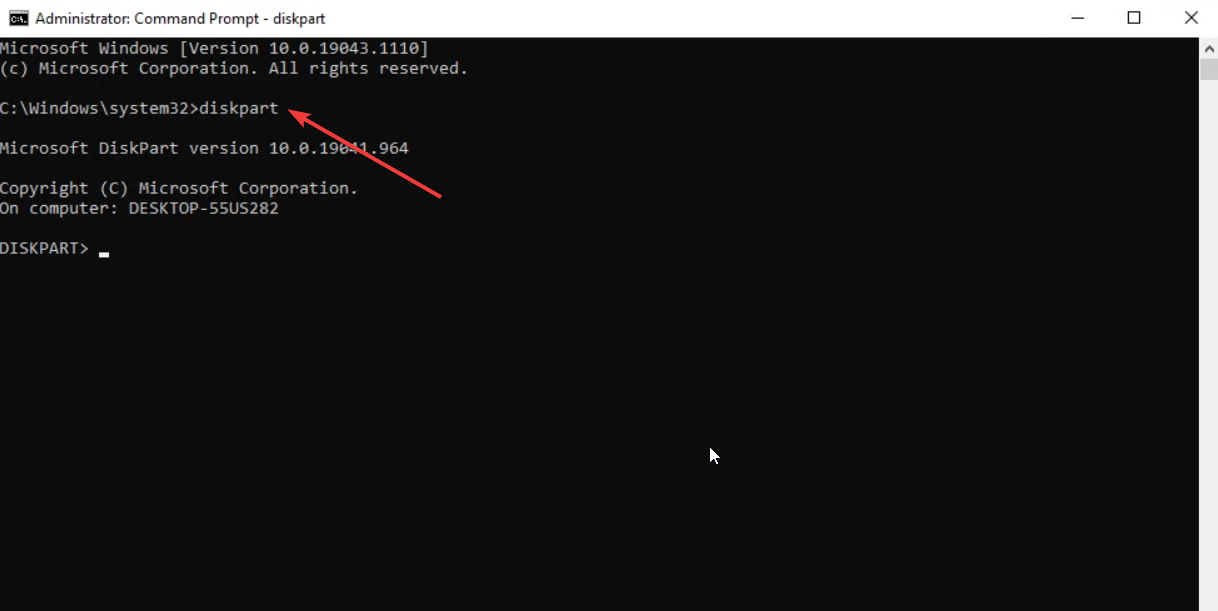
  3. Type the below command and press Enter. Diskpart
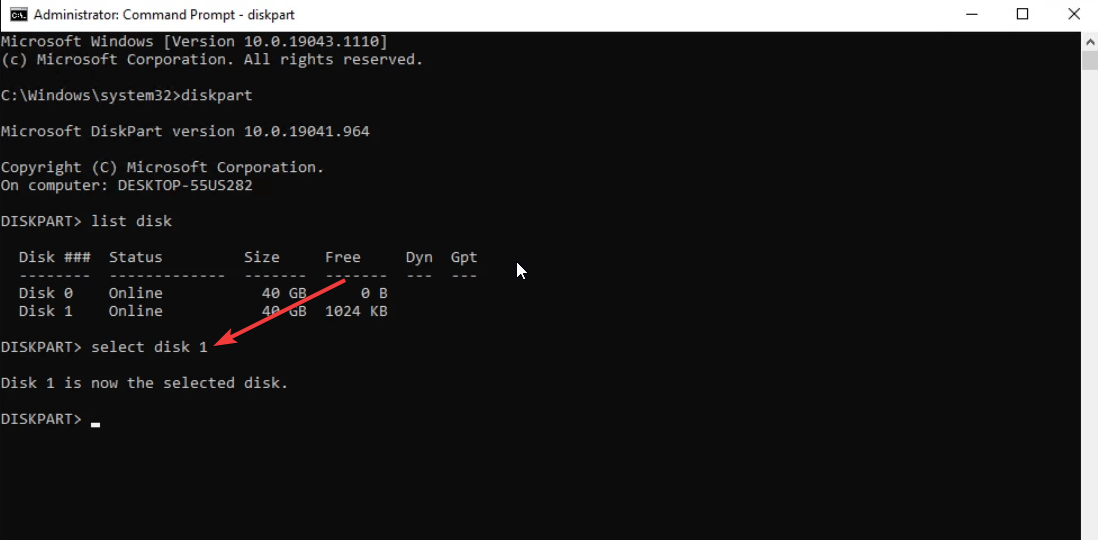
  4. Execute the below command to list all the disks on your computer. list disk
  5. Type the below command to select the partition and press Enter. select disk 1 (Replace the number with the number for the RAW drive)
  6.  Execute the below command to wipe the disk and prepare it to accept a new partition. clean
  7. Type the below command and press Enter. create partition primary
  8. Run the below command to format the drive with the NTFS file system. format fs=ntfs
  9. Type the below command and press Enter to assign a drive letter to the partition. assign

For more ways to convert your raw drive to NTFS, check out our comprehensive guide.

Pros and cons of the NTFS file system

Pros

  • Advanced security features – The disk quotas, page file support, and encrypting file system are just some of the security features you enjoy when you convert to the NTFS file format.
  • Reliability – Since NTFS has a feature that tracks changes, your data is safe because there’s a log file and even in the case of damage, there are built-in tools to repair and recover them.
  • Support for large files – You can store huge amounts of data and even create more space when you use its compression feature for storage efficiency.
  • Storage management – You have full control on your drive. You can set permissions to restrict access and also disk quotas to assign disk space to different users.

Cons

  • Limited Cross-Platform support – While it supports large storage of large volumes, NTFS is not universally compatible as it is primarily designed for Windows. There may be workarounds for other OSes but even if you manage to get support, it will be limited and not work as well as with Windows.
  • Requires extensive system resources – As you enjoy the advanced features of NTFS, they come at a cost of performance overheads. Your device and OS must be able to handle the large volumes so if you have lower-end hardware, you may experience performance bottlenecks especially with high CPU usage and memory.
  • Fragmentation – Any file format can experience fragmentation over time. And while you can defragment your hard drive, it exposes it to early wear and tear and can significantly slow it down.
  • Reliant on hardware – The NTFS system relies heavily on the hardware so your HDD failing can greatly affect its performance and risk at data corruption or loss.

Is NTFS good or bad?

In comparison to other file systems like FAT32 and exFAT, NTFS might be a superior choice but this also depends on your storage needs and your hardware specs.

NTFS is known for its ability to accommodate your large storage needs, has impeccable performance on Windows devices and has a robust security profile that ensures your data is safe. If all these check your boxes then it is the file system for you.

However, if you’re looking for a file system compatible with multiple operating systems, you’re better off with other formats. For a more detailed comparison of NTFS vs FAT32 or NTFS vs ReFS, check out our articles.

You can explore a deeper overview of how NTFS compares to other file systems in this complete guide on the differences between NTFS, FAT32, and exFAT, which highlights compatibility, performance, and storage behavior across platforms.

So far, the NTFS file system seems like a viable option with the good outweighing the bad. If you’re a Windows diehard, we think this will be a great file system format for you. And even though you may run into the NTFS file error or other file system errors, it’s nothing beyond your control.

Have you used the NTFS format before? How was your experience and would you recommend it to other users? Share your thoughts with us in the comment section below.

Lists forms in Microsoft SharePoint will support file attachments; dozens of other enhancements are coming

Lists forms in SharePoint are about to receive a set of updates in the following months that will greatly improve their ability to gather data or other relevant information.

And if we’re being honest, these might be the most significant changes the platform has ever known to date. It’s not an exaggeration. According to the Microsoft 365 Roadmap, which was recently updated, Microsoft Lists within SharePoint will receive no less than four updates.

Two of them will be released in September, while the other two are coming to the platform in November, and they all focus on improving how users interact with lists in SharePoint.

For instance, one of the features coming in September will focus on scheduling and turning on and off responses to forms. This means list form owners and collaborators can schedule specific dates to start and stop accepting responses.

Owners and collaborators can schedule specific dates and times to start and stop accepting responses. The form will be active during the designated period and automatically stop accepting responses once the scheduled end time is reached.

The other capability coming to Microsoft Lists in September is being notified when there are new form responses. Users and owners can be notified of any new response to a form via email. This capability is quite useful when you want to keep track of your forms and know exactly how many responses you have.

Lists forms users can subscribe to be notified of new responses on their forms. By default, this would be toggled off, but a form collaborator can toggle on and receive an email notification for every new response on that form after.

The capabilities coming in November are a bit more complex, and maybe that’s why the Redmond-based tech giant is releasing them just then. The first of them introduces conditional branching in Microsoft Lists forms. With it, users can create dynamic forms that use logic. For example, the form will display relevant questions based on previous answers.

Microsoft Lists forms will enable users to create dynamic forms featuring branching and conditional logic. This update allows users to customize their forms to display relevant questions based on conditions applied to previous responses, empowering them to design smarter forms that adapt to their data collection needs.

Ultimately, one of the most valuable enhancements to Microsoft Lists in SharePoint is the ability to add attachments to forms; if you want to provide additional info and context to those answering your form, you can upload attachments, such as documents or files.

Users will be able to add attachment fields to enhance their list forms. This feature allows users to upload files directly to the form, providing additional context or necessary documentation.

The Redmond-based tech giant has been making significant changes to the SharePoint platform, such as adding the content pane feature, so it’s no wonder the company is updating it even further.

How To Open Numbers File in Excel: 4 Best Ways

Learn how to open a Numbers file in Excel easily thanks to this guide.

Apple Numbers app is the default spreadsheet software for most Apple devices. However, if you’re using Excel but a collaborator or client has shared an Apple Numbers file, it can be tricky.

I’ll show you how to convert a Numbers file to an Excel workbook below, so let’s get started!

How To Open Numbers File in Excel in 4 Ways

Now, let’s look at these methods and their respective steps below:

Export It as an Excel File on Mac

I covered two conversion methods:

Exporting When Offline

  1. From the macOS Dock, launch the Numbers app.
  2. Choose the file you want to convert from the Finder dialog box.
  3. When you’re on the source Numbers workbook, click on the File menu in the Mac toolbar.
  4. Hover the cursor over the Export To menu.
  5. Now, select Excel.
export to excel
  1. On the Export Your Spreadsheet dialog, click the Save button after making any changes if you’d like to.
export excel save
  1. Choose a destination folder in the Finder dialog box to save the Excel file.
  2. Click on the Export button.
save location export
  1. You should find the exported Excel file in the destination.
save as excel
  1. You can now open this Excel file on the MacBook or send the file to a PC via email, shared drive, or Google Drive.

Exporting When Online

  1. When the source file is open in the Numbers app, click on the Share button to the left of the Collaboration command.
  2. Select Export and Send in the context menu that opens.
share button on mac
  1. Go to the Excel tab in the Export Your Spreadsheet dialog and click on Send a Copy.
  2. You can now choose from the available options, like Messages, AirDrop, Mail, and more.
mac send a copy mail

Export It as an Excel File on iPad

If you’ve received or someone is sending you an Apple Numbers spreadsheet file, both of you can follow these steps to convert the file to Excel or send it as a workbook:

  1. Open the Numbers app.
  2. Tap on the workbook you want to open from the Recents menu.
  3. Click on the Share icon in the top menubar.
  4. You should see a context menu with the name of the opened workbook.
  5. Tap the Collaborate drop-down arrow and choose Send Copy.
send copy in share button
  1. Now, tap Export and Send in the context menu.
Export and save
  1. Choose Excel in the Export Your Spreadsheet dialog box.
choose excel
  1. On the Excel Options dialog box, tap the Export button in the top right corner.
excel options export
  1. Tap the Continue button on the Export Details page.
  2. If you’re sending the file to someone else, choose Gmail, Apple Mail, etc., from the file-sharing menu.
  3. Contrarily, if you’re the recipient, you can choose the Save to Files option.
save to files gmail
  1. In the screenshot below, I’ve selected the shared drive on my PC to save the converted file.
save file in shared drive
  1. Now you can use the Excel desktop app to open the Numbers file as an XLSX file.

Using the iCloud Numbers App

If someone wants to share a Numbers file with you, sign up for a free Apple iCloud Drive and ask them to share the file with that account. The Numbers file will now be available as a Shared file in your iCloud Drive. Now, follow these steps:

  1. Log in to iCloud Drive using your Apple ID in which you’ve got the Numbers file.
  2. You should see the file in the Drive Recents section.
numbers file on drive
  1. If it’s not there, click on the Numbers app icon.
  2. It’ll open the Recents section of the Numbers backstage screen.
  3. Now, you should see the shared Numbers file.
  4. Hover the mouse cursor over it to highlight it.
  5. A three-dot menu icon will show up on the right edge. Click on that.
numbers backstage
  1. Select the Download a Copy… option in the context menu that opens.
download a copy
  1. Choose the Excel option in the overlay dialog box.
excel option in choose a download
  1. You’ll see the Creating a file for download… dialog box. It might take a minute for the file conversion.
  2. Click OK on the Export Warnings dialog box.
export warnings ok
  1. Your browser will download the XLSX version of the Numbers file automatically.
downloaded xlsx file

You can now open this file on the Excel desktop or web app.

However, you can avoid this file conversion step by asking the sender to do the following:

  1. When the Numbers file is already open, click on the View Numbers tools menu. It’s the three-dot menu icon.
  2. Click on the Send a Copy… option in the context menu.
send a copy
  1. On the dialog box that follows, choose Excel as the file type.
send via icloud choose excel
  1. When you see the Your spreadsheet is ready dialog box, click on the Email button.
choose email option
  1. Now, the sender will see another dialog box to choose an email client to send the file to you.
  2. You’ll receive a converted Excel workbook.
choose email client

Using a Third-Party File Conversion Tool

Online file conversion tools can instantly transform the Numbers file to an Excel format. However, this method involves uploading your files to a third-party cloud storage. Though many use SSL encryption to safeguard your device’s communication with the file conversion server, consider the risks before choosing this method.

  1. Visit the NUMBERS Converter tool.
  2. Click the Select File button and upload the Numbers file you want to convert.
Select File
  1. Choose XLSX from the Convert To drop-down menu.
convert to
  1. Hit the Convert button.
  2. Click Download to get the converted file on your PC.
download xlsx
  1. Use the Excel desktop app to open the spreadsheet.

Summary

So, now you know how to open a Numbers file in Excel in various ways.

If the converted file isn’t launching, try the troubleshooting steps for the Excel file not opening by double-clicking.

If the article helped or you know a better conversion method, feel free to mention that in your comment. You can also learn how to open .accdb and SQL.BAK files easily, or how to sort data in alphabetical order.

The PC Mod Preview for DOOM Eternal is now available for gamers to join

DOOM Eternal has released a fresh PC Mod Preview, and Xbox Insiders on Windows PC now have the golden ticket for early access to it. If you already own the game (BATTLEMODE – PC) or enjoy it through your active Game Pass subscription, get ready to dive into this modding adventure.

The preview is all about mod support. This means you can look through, play, and maybe even add to a developing set of community mods for DOOM Eternal. The people who have started this effort are excited to know your thoughts. So, your feedback is not just accepted but also desired.

If you want to join in, here’s how: Start the Xbox Insider Hub app on your Windows PC (or get it from the Store if it’s not yet installed). Go to Previews > DOOM Eternal—PC Mod Preview, click Join, and follow the instructions for setup.

Little tip: When you finish registering, it could be good to restart your computer, especially if DOOM Eternal is already installed. This helps guarantee that all updates happen without problems.

If you ever change your mind and want to return to the regular DOOM Eternal version from PC Mod Preview, don’t worry about it. Just leave the PC Mod Preview through Xbox Insider Hub – everything will return to normal. And if DOOM Eternal starts acting up, don’t worry. Report any issues, and the Bethesda team will investigate.

    You can find more details here.

    Tango Gameworks, the studio behind Hi-Fi Rush, was acquired by Krafton

    The Krafton group, known worldwide for its success with PUBG, has acquired Tango Gameworks, an essential studio for creativity and innovation and the mastermind behind the famous Hi-Fi Rush.

    Tango Gameworks was one of the studios Xbox left behind earlier this year due to managing and possible financial restructuring within the company. Following this, Krafton acquired the company, effectively adding Hi-Fi Rush into its portfolio, a popular and widely recognized IP known for its distinct rhythm-oriented action and remarkable audiovisual style.

    Hi-Fi RUSH is not an ordinary game. This rhythm action combat game has won awards for its animation and audio design and has a substantial following from players across the globe. The fact that it obtained ‘Overwhelmingly Positive’ reviews on platforms such as Steam shows its excellence and impact on gaming society.

    In a press release, Krafton says it will help Tango Gameworks transition from Xbox into its repertoire while continuing to work on the legacy of what Hi-Fi Rush has already achieved.

    Kraftone has expressed that it will help the team at Tango Gameworks grow Hi-Fi RUSH IP and look into different projects. This signifies that we might see more thrilling games or even fresh IPs extending limits within the interactive entertainment field.

    As part of this strategic agreement, KRAFTON intends to collaborate with Xbox and ZeniMax to ensure a smooth transition and maintain continuity at Tango Gameworks, allowing the talented team to continue developing the Hi-Fi RUSH IP and explore future projects. KRAFTON intends to support the Tango Gameworks team to continue its commitment to innovation and delivering fresh and exciting experiences for fans. There will be no impact on the existing game catalog of The Evil Within, The Evil Within 2, Ghostwire: Tokyo, and the original Hi-Fi RUSH game.

    It’s also important to mention that this alteration will not impact the current game collection of Tango Gameworks. The ongoing popular games like The Evil Within, The Evil Within 2, and Ghostwire: Tokyo will remain accessible wherever they are, ensuring fans do not lose entry into their adored titles.

    At its heart, Krafton’s buyout of Tango Gameworks and the Hi-Fi RUSH IP is not only a deal. It signifies a daring move towards an upcoming era where creative talent, fresh ideas, and international teamwork combine to construct remarkable gaming adventures.

    How to Add SFC /SCANNOW to Context Menu in Windows 11

    When you face issues in Windows, the SFC (System File Checker) scan comes to your rescue. It replaces all corrupt protected system files with their cached copy stored on the PC. But what if such issues are frequent? You can then add the SFC /SCANNOW command to the context menu!

    To do that, you will need to modify the Registry Editor, a complex process in itself. To simplify things, in the following sections, we will take a more straightforward approach that negates the need for manual editing.

    How can I add the SFC /SCANNOW context menu entry in Windows 11?

    1. Open the Notepad in Windows 11.
    2. Now, paste the following code into the Notepad:Windows Registry Editor Version 5.00

      [HKEY_CLASSES_ROOT\DesktopBackground\Shell\SFC]
      "Icon"="WmiPrvSE.exe"
      "MUIVerb"="SFC /SCANNOW"
      "Position"="Bottom"
      "SubCommands"=""


      [HKEY_CLASSES_ROOT\DesktopBackground\shell\SFC\shell\001menu]
      "HasLUAShield"=""
      "MUIVerb"="Run SFC /SCANNOW"

      [HKEY_CLASSES_ROOT\DesktopBackground\shell\SFC\shell\001menu\command]
      @="PowerShell -windowstyle hidden -command \"Start-Process cmd -ArgumentList '/s,/k, sfc /scannow' -Verb runAs\""


      [HKEY_CLASSES_ROOT\DesktopBackground\shell\SFC\shell\002menu]
      "MUIVerb"="View SFC scan log"
      "Icon"="imageres.dll,-102"

      [HKEY_CLASSES_ROOT\DesktopBackground\shell\SFC\shell\002menu\command]
      @="PowerShell (sls [SR] $env:windir\\Logs\\CBS\\CBS.log -s).Line >\"$env:userprofile\\Desktop\\sfcdetails.txt\""
      notepad file
    3. Now, press Ctrl + S to save the file.
    4. Enter Add SFC Scan.reg as the file name, choose All files from the Save as type dropdown menu, and click on Save.reg file to add sfc /scannow to context menu
    5. Next, double-click on the .reg file you just created, and click Yes in the UAC prompt.

    Now, when you open the right-click context menu, an SFC /SCANNOW entry should be listed at the bottom. Hover the cursor over it, and you will find the options to initiate an SFC scan or view the log file for the ones run earlier.

    sfc scan in context menu
    SFC Scan in the context menu

    If the SFC /SCANNOW entry doesn’t appear right away, select Show more options in the context menu.

    Note icon NOTE
    The script to add SFC /SCANNOW to the context menu has been taken from ElevenForum. It was tested and found to work. But I still recommend you create a restore point beforehand to be able to revert the changes in case the changes don’t turn out as planned.

    How do I remove SFC scan from the context menu?

    1. Press Windows + R to open Run, type regedit in the text field, and hit Enter.registry
    2. Click Yes in the UAC prompt.
    3. Paste the following path in the address bar and hit Enter: HKEY_CLASSES_ROOT\DesktopBackground\Shell\SFCpath for sfc /scannow context menu
    4. Now, right-click on the SFC key in the navigation pane, select Delete, and confirm the change.delete
    5. Once done, reboot the computer, and the SFC /SCANNOW context menu entry will be removed.

    You now know both how to add and remove the SFC /SCANNOW entry from the context menu. Remember, this method works on all iterations of Windows.

    If you ask me, I wouldn’t recommend making these changes. SFC scan doesn’t have to be run frequently, perhaps once or twice a month at the maximum. So, adding it to the context menu doesn’t really save you much time!

    However, if you want to customize things for an improved Windows experience, adding Permanently Delete to the context menu might help!

    What’s your take on it? Share with our readers in the comments section.

    Turn Off Word AutoSave: 6 Efficient Methods

    Learn how to turn off Word AutoSave on the desktop app in various ways, starting with the simplest ones.

    As you know, Microsoft Word saves your work on any document either online or as a backup copy. If the backup is saved on OneDrive or SharePoint Online, it’s usually known as AutoSave. Contrarily, if you’re working on an offline document, it’s known as AutoRecover.

    I’ll show you how to disable it below, so let’s jump right in!

    How To Turn Off Word AutoSave in 6 Ways

    Let’s look at the specific methods and their steps below:

    Using Its Switch

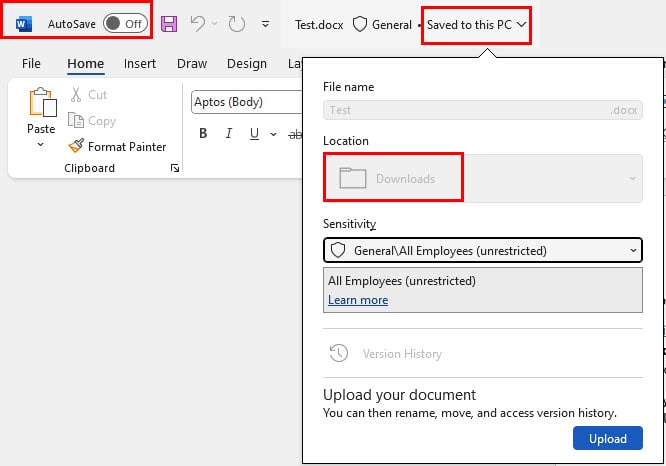
    You’ll find the AutoSave switch in the top left corner of the Word for Microsoft 365 desktop app.

    AutoSave switch ON

    When the setting is in the On position, Word saves a copy of the most recent edit in OneDrive or SharePoint Online.

    To disable the feature, simply click on the switch and toggle it off.

    AutoSave off

    Word will now save future copies in the local storage. Remember that you’ll have to manually save the file or you’ll lose your work.

    Moreover, OneDrive and SharePoint Online will retain the last saved copy. However, it won’t be updated anymore.

    Using Word Options

    This method will disable AutoSave system-wide:

    1. Click on the File tab in the ribbon menu.
    2. A left-side navigation panel will open in the Word backstage view.
    3. Click on the Options button at the bottom.
    4. The Word Options dialog box will open.
    5. There, navigate to the Save category on the left-side list.
    6. You should see the AutoSave files stored in… option below the Save documents section.
    7. Uncheck the box for this setting.
    Word Options disable autosave
    1. Click OK on Word Options to save this modification.

    Via Version History

    Here are the steps to use the Version History setting to turn off Word AutoSave:

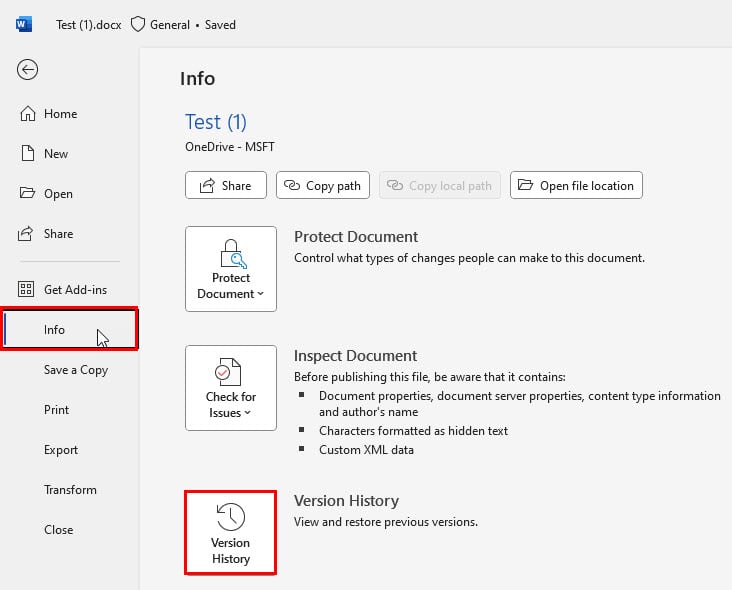
    1. Go to the File tab and select Info from the left-side navigation panel.
    2. You should see the Version History button on the right. Click on that.
    File version history
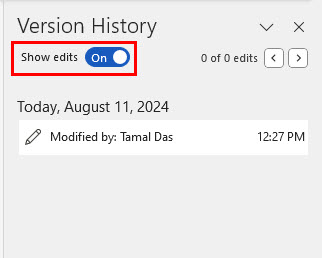
    1. The Version History will open as a sidebar on the right side of the Word app.
    2. You should see that the Show edits switch is in the On position.
    version history sidebar
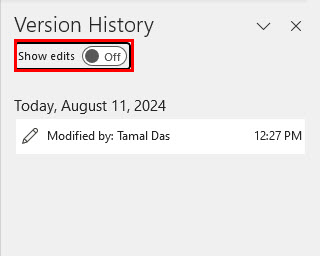
    1. Click on the toggle button to disable Show edits.
    disable show edits
    1. Microsoft Word will open a read-only version of the same document.
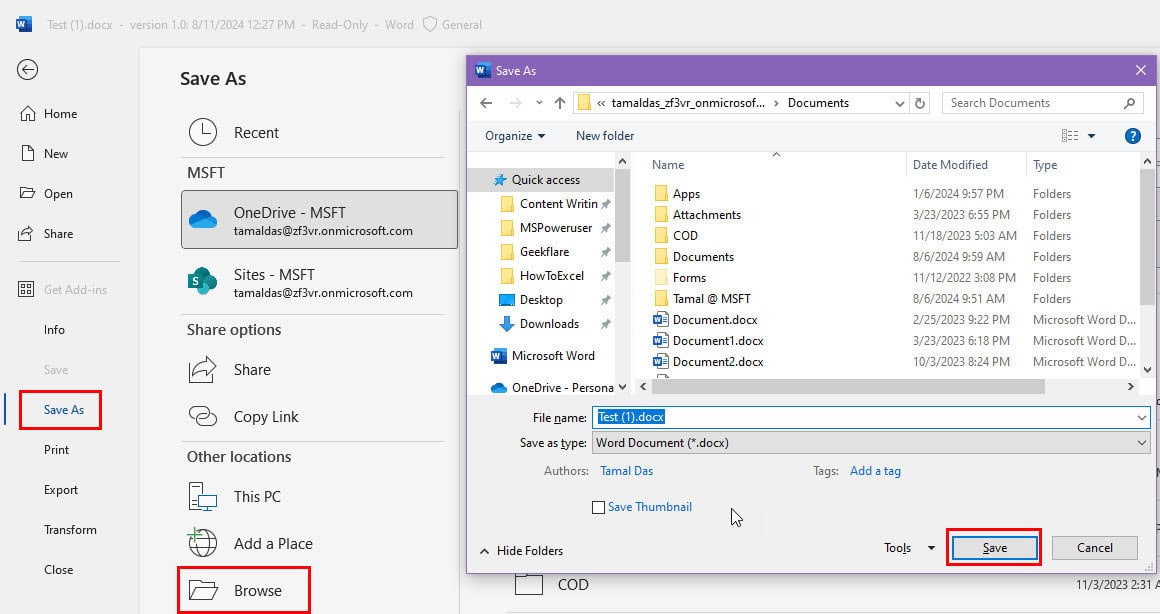
    2. Go to the File tab of this document and click on the Save As option.
    3. Select Browse below the Other locations section to get the Save As dialog box.
    Save as dialog
    1. Save the read-only document to a location on the PC.
    2. Now, Word will allow edit mode for this saved file.
    3. You’ll also see that the AutoSave switch in the top left corner has been disabled.

    Stop Word AutoRecover for All Offline Documents

    Find below the quick steps to disable Word AutoRecover:

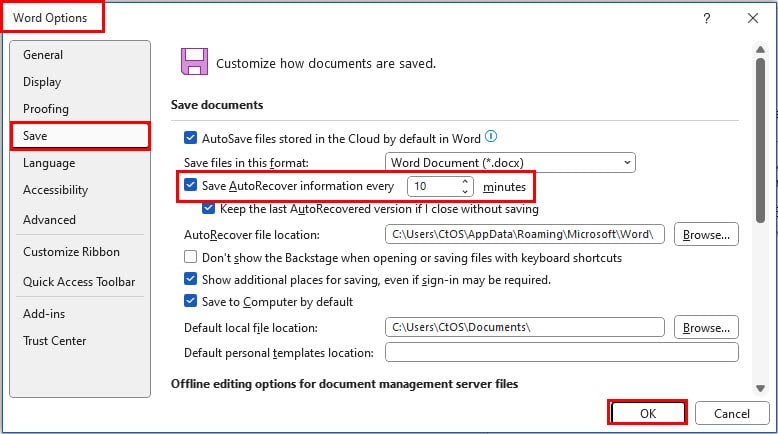
    1. Go to the Save category of Word Options from the File menu or by pressing Alt + F + T keys.
    2. Uncheck the box for Save AutoRecover information every 10 minutes.
    3. Click OK to save this modification.
    Disable global autorecovery

    Remove Word AutoSave and AutoRecover Using Word VBA

    Find below two simple VBA scripts that will help you deactivate different types of backup systems:

    Disable AutoSave

    1. When the source Word document is open, press Alt + F11 to launch the Word VBA Editor tool.
    2. There, select the Project (Test) on the left side panel in the Project section.
    3. Project (Test) will vary with the file name. If your Word document name is HRIS Guidelines by Adite, you’ll see Project (HRIS Guidelines by Adite).
    select project
    1. Now, click the Insert button in the VBA toolbar and select Module from the context menu.
    2. A blank module will open.
    selct module
    1. There, copy and paste the following VBA script:
    Sub DisableAutoSave()
        Dim doc As Document
        Set doc = ActiveDocument
        
        ' Display warning message
        Dim response As VbMsgBoxResult
        response = MsgBox("Warning: AutoSave will be disabled. Your document will only be saved locally on this PC. Do you want to proceed?", vbYesNo + vbExclamation, "Disable AutoSave")
        
        If response = vbYes Then
            ' Disable AutoSave
            doc.AutoSaveOn = False
            
            ' Notify the user
            MsgBox "AutoSave has been disabled. Your document will be saved locally."
        Else
            ' Notify the user that the operation was cancelled
            MsgBox "Operation cancelled. AutoSave remains enabled."
        End If
    End Sub
    1. Click the Save button on the menu bar.
    Save script
    1. A dialog box will show up. Click the No button.
    2. The Save As dialog box will open.
    3. Click on the Save as type drop-down menu and choose the Word Macro-Enabled Document option.
    4. Click the Save button.
    Save As
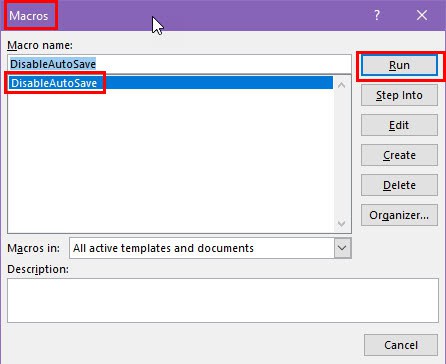
    1. Now, press Alt + F8 to get the Macros dialog.
    2. Select the DisableAutoSave macro and hit Run.
    Select macro
    1. A warning dialog box will show up.
    2. If you select Yes, Word VBA will disable the AutoSave feature with a confirmation.

    Disable AutoRecover

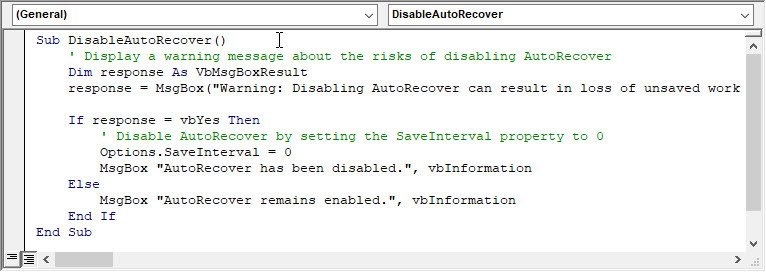
    Follow the steps mentioned earlier to create a new module in the Word VBA Editor tool and use the following script:

    Disable AutoRecovery script
    Sub DisableAutoRecover()
        ' Display a warning message about the risks of disabling AutoRecover
        Dim response As VbMsgBoxResult
        response = MsgBox("Warning: Disabling AutoRecover can result in loss of unsaved work if Word crashes unexpectedly. Are you sure you want to disable AutoRecover?", vbYesNo + vbExclamation, "Disable AutoRecover")
    
        If response = vbYes Then
            ' Disable AutoRecover by setting the SaveInterval property to 0
            Options.SaveInterval = 0
            MsgBox "AutoRecover has been disabled.", vbInformation
        Else
            MsgBox "AutoRecover remains enabled.", vbInformation
        End If
    End Sub

    Once you’ve created the VBA macro, press Allt + F8 to go to the Macros dialog and selectDisableAutoRecover. Now, hit Run to execute the script.

    Macros dialog

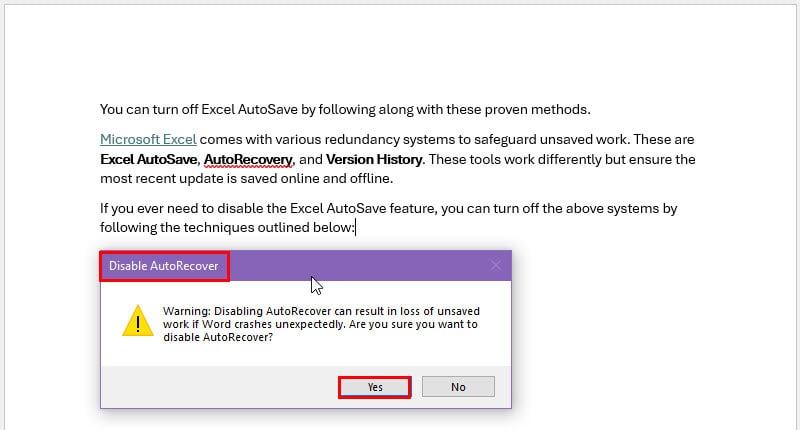
    It’ll show the following warning dialog box:

    warning pop up

    If you allow, the script will run and show a confirmation once done.

    Turn Off AutoSave in Word on Mac

    Follow along with these steps on a Mac to pause AutoSave and AutoRecover:

    1. Open a Word document.
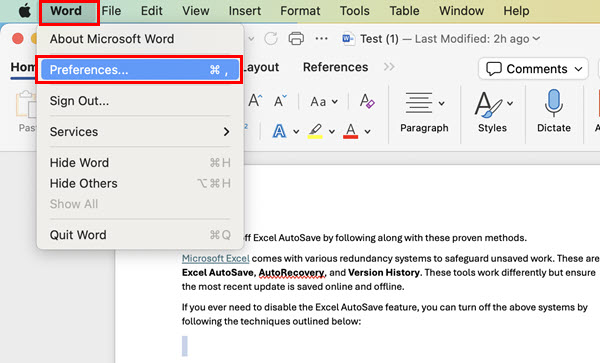
    2. Click on the Word menu near the Apple icon in the top-left corner.
    3. Select Preferences from the context menu.
    word menu mac
    1. You’ll see the Word Preferences dialog box.
    2. Navigate to the Save menu below the Output and Sharing section.
    Word preferences save
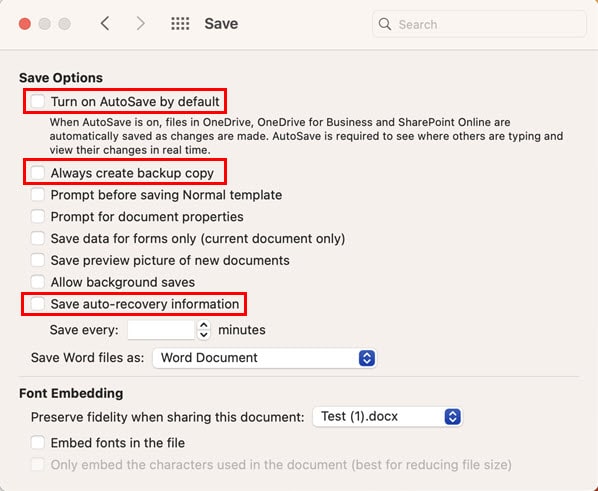
    1. Uncheck the boxes for the following items in the Save menu:
      • Turn on AutoSave by default
      • Always create backup copy
      • Save auto-recovery information
    mac word save dialog

    Summary

    So, now you know how to turn off the Word AutoSave feature. Use the method you find the most intuitive and fitting depending on your situation.

    If the article helped you or you want to suggest any alternatives, feel free to comment below.

    You might also want to read why my Word document won’t save and how to turn off Protected View to manage your files efficiently. Additionally, learn how to turn off AutoSave on Excel.

    Microsoft Compatibility Telemetry’s High Disk Usage: How to Reduce it

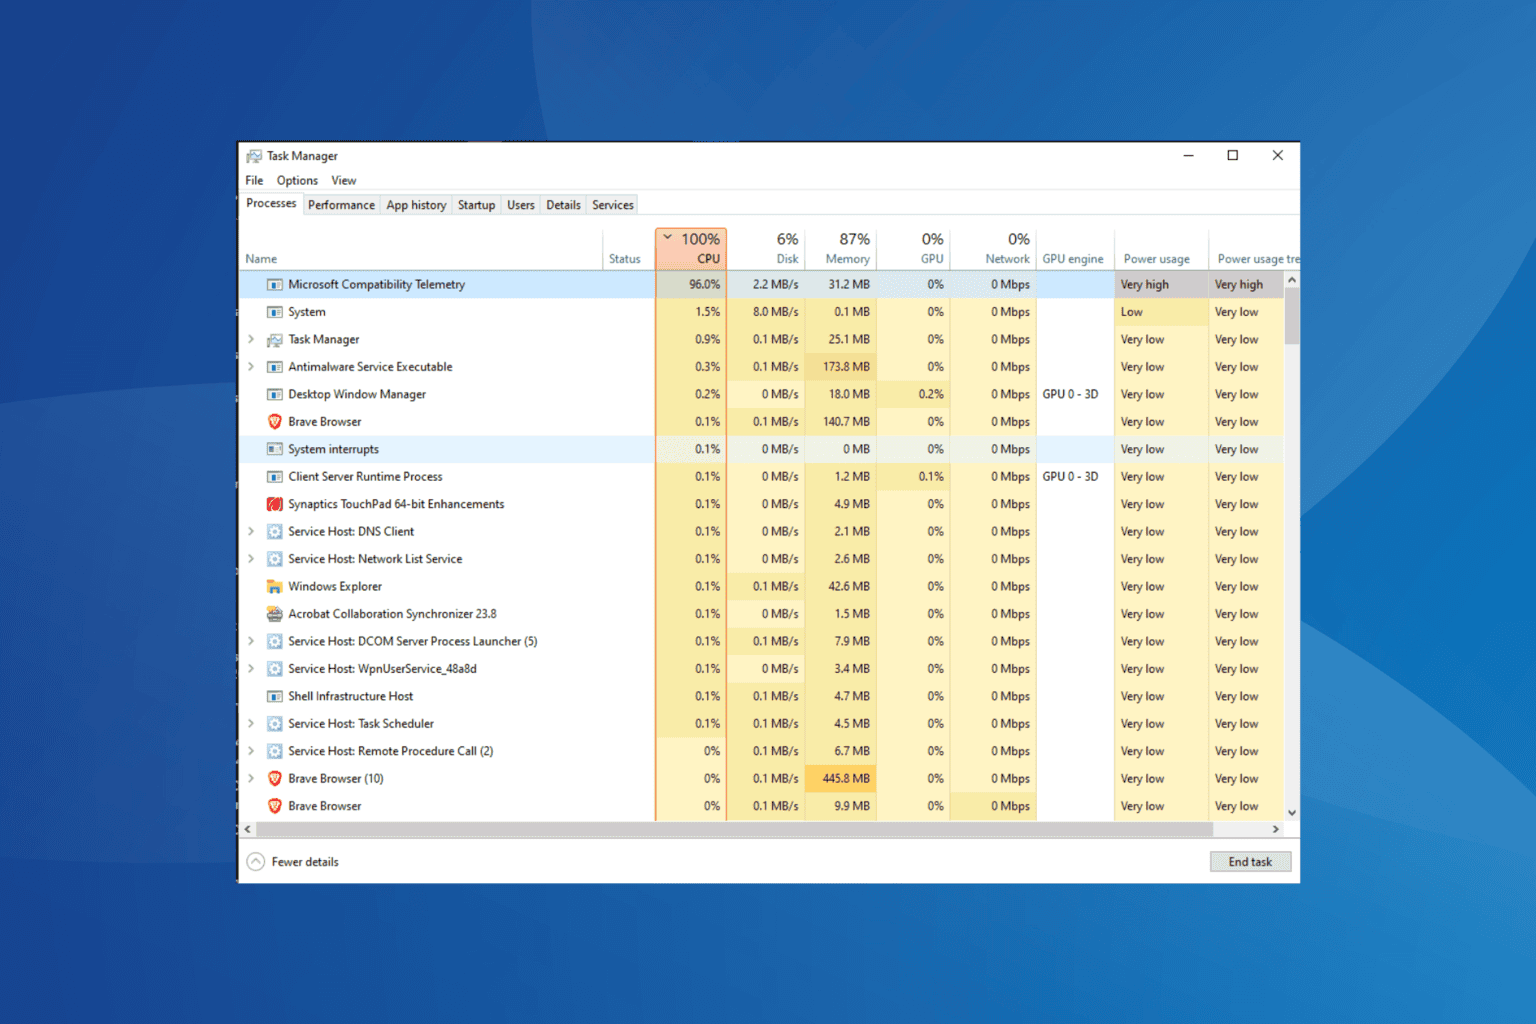
    Microsoft Compatibility Telemetry often turns out to be the most resource-intensive process in Windows, with high disk usage and causing the CPU fans to run at full speed. This is a common problem affecting all iterations of the OS, including Windows 10 and Windows 11!

    For the unversed, Microsoft Compatibility Telemetry is a built-in process in Windows that regularly collects data and shares it with Microsoft to improve the OS experience. It is auto-enabled when you go with the default Windows installation but only becomes a problem when you notice high resource consumption.

    If you want to fix high disk usage by Microsoft Compatibility Telemetry, start by installing all pending Windows updates and scanning the PC for malware. Often, threat actors disguise malware as a critical Windows process, and subsequently, a full system scan helps!

    How do I fix Microsoft Compatibility Telemetry’s high disk usage?

    1. Rename the CompatTelRunner.exe file

    1. Press Windows + E to open File Explorer, and navigate to the following path:C:\Windows\System32
    2. Scroll down, right-click on the CompatTelRunner.exe file, select Rename, and then name it CompatTelRunner.exe.bak.rename CompatTelRunner.exe
    3. If you get a permission error, right-click on the file and choose Properties.
    4. Now, go to the Security tab, and click on Advanced.advanced settings
    5. Click on the Change option.change owner to fix microsoft compatibility telemetry high disk usage
    6. Type your user profile name in the text field, click on Check Names and then OK.check names
    7. Click Apply and OK to save the changes on all existing windows.
    8. Now, again open the Security tab in Properties, and click on Edit.edit permissions
    9. Click on Add.add user accounts
    10. Again, enter your user profile name, click on Check Names, and then on OK.
    11. Select your user account from the list, and tick all the checkboxes under the Allow column, especially Full control.full permissions to fix microsoft compatibility telemetry high disk usage
    12. Click on Apply and OK to save the changes.
    13. You should now be able to rename the file.

    When you rename the CompatTelRunner.exe file responsible for running Microsoft Compatibility Telemetry, the high disk usage issues will never reappear, and the task won’t run automatically. But since the file is present in Windows by default, many experts warn against changes unless you face serious issues!

    However, renaming the file helps when you find Microsoft Compatibility Telemetry disabled but still running.

    Also, some suggest deleting CompatTelRunner.exe, but if you are actually considering that, rename it instead. This way, you can always revert its name in case a conflict arises in the future. If you don’t want to make these changes right away, try our other solutions.

    2. Disable the Microsoft Compatibility Appraiser task

    1. Press Ctrl + Shift + Esc to open the Task Manager and locate the Microsoft Compatibility Telemetry process.
    2. Select the process and click on End task.terminate microsoft compatibility telemetry
    3. Next, press Windows + S to open Search, type Task Scheduler in the text field, and click on the relevant result.
    4. In the navigation pane, expand the Microsoft entry, double-click on Windows, and then choose Application Experience.application experience
    5. Right-click on the Microsoft Compatibility Appraiser task, and choose Disable.disable to fix microsoft compatibility telemetry high disk usage
    6. Once done, reboot the PC and check for improvements.

    After you disable the Microsoft Compatibility Appraiser task, the high disk or CPU usage by Microsoft Compatibility Telemetry will end immediately. But upon subsequent reboots or after installing Windows updates, the task may run again, in which case you can try the solutions listed next!

    2. Set the process to low-priority

    1. Press Ctrl + Shift + Esc to open the Task Manager and go to the Details tab.
    2. Right-click on the Microsoft Compatibility Telemetry process, hover the cursor over Set priority, and choose Low.set priority
    3. Again, right-click on the process, and select Set affinity.
    4. Tick the checkbox for only one CPU from the list, and click on OK to save the changes.1 CPU to fix microsoft compatibility telemetry high disk usage

    If you simply want to lower the high disk usage by Microsoft Compatibility Telemetry, setting its priority to low and affinity to a single CPU will bring down disk usage by 15-30%.

    4. Repair the corrupt system files

    1. Press Windows + S to open Search, type Command Prompt, and click on Run as administrator. command prompt
    2. Click Yes in the UAC prompt.
    3. Paste the following DISM commands individually and hit Enter after each: DISM /Online /Cleanup-Image /CheckHealth DISM /Online /Cleanup-Image /ScanHealth DISM /Online /Cleanup-Image /RestoreHealth
    4. Next, execute this command for the SFC scan: sfc /scannowsfc scan to fix microsoft compatibility telemetry high disk usage
    5. Finally, restart the computer.

    5. Permanently disable Microsoft Compatibility Telemetry via Registry

    1. Press Windows + R to open Run, type regedit in the text field, and hit Enter.registry editor
    2. Click Yes in the UAC prompt.
    3. Paste the following path in the address bar and hit Enter: Computer\HKEY_LOCAL_MACHINE\SOFTWARE\Policies\Microsoft\Windows\DataCollection
    4. Right-click on the empty portion, hover the cursor over New, choose DWORD (32-bit) Value, and name it AllowTelemetry.AllowTelemetry DWORD
    5. Double-click on the newly created DWORD, enter 0 under Value data, and click OK to save the changes.disable telemetry
    6. Finally, restart the computer.

    Of all the permanent ways to disable Windows 11 Telemetry, the Registry Editor remains the most used because, surprisingly, it’s the simplest. Once you are done, 75-100% disk usage by Microsoft Compatibility Telemetry won’t happen anymore.

    Before you leave, discover expert tips to speed up a Windows PC!

    Which fix worked for you? Share with our readers in the comments section.

    Samsung devices will now easily stream apps on Windows 11 PCs

    Samsung has just introduced the new One UI 6.1.1 update, specifically for its latest foldable smartphones, the Galaxy Z Fold6 and Flip6. This change will revolutionize how you use your mobile device with a Windows PC, allowing you to stream apps from your phone to your computer screen.

    In the past, Android smartphone users could link their devices to Windows PCs using Microsoft’s Phone Link app. However, there was a slight problem when Android 14 came out. People had to tap the button many times for streaming apps, which became slightly inconvenient.

    According to the latest reports, the One UI 6.1.1 update removes the repeating step, making the streaming process smoother and more accessible. You still have to unlock your phone for security purposes, but this little tweak makes a big difference.

    The One UI 6.1.1 update also involves changing how app sideloading is managed. The new software blocks this capability on the Galaxy Z Fold6 and Flip6, preventing the installation of apps from sources other than the Google Play Store as its default setting.

    However, if you enjoy installing apps outside this official storehouse, you can quickly turn off this function.

    Only the Galaxy Z Fold6 and Flip6 models can have the One UI 6.1.1 update. Tech circles talk about this update being later given to older Samsung Galaxy phones, but reports say its release could be delayed indefinitely. Also, there are possible delays for the open beta of Samsung’s One UI 7 update, built on Android 15.

    Samsung’s new software update creates a smoother connection between Galaxy Z Fold6 and Flip6 smartphones with Windows PCs. Significant improvements include not having to push “start now” for app streaming and the default block on app sideloading (which can be easily turned off).

    Right now, the update is only available for these two Samsung models. Still, many people are excitedly waiting for it to come to their older models and hoping they will eventually get One UI 7.

    Speaking of seamless connectivity between PCs and Android devices, Microsoft also made it easier to connect in just a few seconds with a new capability released with the latest Insider Build to the Dev Channel.

    How to Open Windows Device Manager [Step-by-Step]

    Want to open Windows Device Manager? It’s the go-to tool for updating drivers, checking hardware issues, or adjusting device settings. Whether you’re trying to open Device Manager quickly, run Device Manager as administrator, or use a handy Device Manager command, Windows gives you several ways to access it.

    Using the Start Button

    This will only take a few clicks:

    1. Right-click the Start button.
    2. Locate Device Manager from the options and tap on it.
    Windows Icon
    1. The Device Manager will open.
    Device manager

    Through Windows Search Button

    Here are the steps to follow:

    1. Type “Device Manager” on the search button beside the Windows Icon.
    2. Tap Open from the search results.
    Search Device Manager

    Using a Command Prompt

    Here’s what to do:

    1. Press the Windows icon + R to open the Run dialog box.
    2. Type devmgmt.msc and press Enter or tap OK.
    Type devmgmt.msc

    Device Manager will open automatically.

    Through the Control Panel

    You can do it via the control panel. Here are the steps:

    1. Type Control Panel in the search bar and click Open.
    Type Control Panel
    1. Tap Hardware and Sound.
    Hardware and Sounds
    1. Click Device Manager beside Devices and Printers.
     Device Manager

    Using Windows Settings

    Follow the below steps:

    1. Press the Windows icon + I to open Settings.
    2. Click on “System” in the Settings window.
    System settings
    1. Scroll down on the left pane, click on About, and tap Device Manager on the right display.
    Access device manager

    These steps will help you to open Windows Device Manager. Whether you prefer using commands, settings, or the Control Panel, accessing it is straightforward and essential for maintaining your PC’s hardware.

    Additionally, you can learn to reinstall a device and recover unknown ones with the same tool. We can also help you if your microphone, camera, or touchpad aren’t showing up.

    Turn Off Excel AutoSave in 6 Simple Ways

    You can turn off Excel AutoSave easily with the right instructions. That’s where this guide comes in!

    Microsoft Excel comes with various redundancy systems to safeguard unsaved work. They include Excel AutoSave, AutoRecover, and Version History. These tools work differently but ensure the most recent update is saved online and offline.

    If you ever need to disable the AutoSave feature, read on!

    Turn Off Excel AutoSave – 6 Methods

    Let’s take a look at the approaches you can choose:

    Using the Dedicated Switch

    Excel for Microsoft 365 comes with an AutoSave switch in the top left corner of the software interface.

    autosave button

    When active, you should see a shield icon to the right of the workbook name along with the OneDrive or SharePoint Online location in the top status bar.

    saved location

    To turn off the AutoSave feature, simply slide the toggle button to the left.

    disabled autosave saved to PC

    If done successfully, the status of the file will change to Saved to the PC.

    Please note that this applies only to the active workbook. It won’t impact any others saved locally on your PC.

    Disable AutoSave for OneDrive & SharePoint Files

    If you wish to globally disable Excel AutoSave on your PC, follow these steps instead:

    1. Press Alt + F + T to launch the Excel Options dialog box.
    2. There, click on the Save category in the left-side navigation panel.
    save category in options
    1. Different workbook-saving policies will show up on the right-side menu.
    2. Uncheck the box for the AutoSave files stored in the Cloud… option.
    3. Click OK to save the changes you’ve made.
    uncheck autosave

    Using Version History

    If you disable the Version History feature, Excel will automatically deactivate the AutoSave feature. Here’s how:

    1. Make sure you’re on the source workbook where AutoSave is active.
    2. Now, press Alt + F + I to open the Excel Info screen.
    3. On the right side, click on the Version History button.
    Excel info version history
    1. You’ll be taken back to the Excel worksheet and the Version History panel will open on the right side.
    2. Click on the Show edits switch to disable the Version History feature.
    disable version history
    1. Now, go to the File tab in the ribbon menu.
    2. Select Save As from the left-side navigation panel.
    3. Click Browse below the Other locations section on the right-side menu.
    4. The Save As dialog box will open.
    5. Choose the location where you want to save the Excel file.
    6. Hit the Save button.
    save as dialog
    1. Now, the saved file will open in edit mode with the disabled AutoSave feature.

    Disable AutoSave for Offline Workbooks

    Microsoft Excel saves an offline workbook at regular intervals for recovery purposes. Here’s how you can disable this feature:

    1. Open the Excel Options dialog box and navigate to the Save category.
    2. Uncheck the box for the Save AutoRecover information every 10 minutes option.
    3. Click OK to save this modification.
    Excel options autorecovery

    Turn Off AutoSave for One Workbook

    If you wish to deactivate automatic backup for one offline Excel workbook, do the following:

    1. Navigate to the Excel Options dialog box.
    2. Click on the Save category on the left.
    3. On the right side, scroll down to the AutoRecover exceptions for: section.
    4. Select the active workbook in the drop-down menu.
    autorecover exceptions
    1. Checkmark the box for Disable AutoRecover for this workbook only option.
    2. Hit the OK button to save the modification.
    disable autorecover for workbook

    Disable AutoSave on Mac

    If you’re using Excel for Mac, you can follow these steps to pause AutoSave and AutoRecover:

    1. Open an Excel workbook on your MacBook.
    2. Click on the Excel menu near the Apple monogram in the top left corner.
    3. Select the Preferences option in the context menu.
    excel preferences mac
    1. The Excel Preferences dialog will open.
    2. There, select the Save menu below the Sharing and Privacy section.
    excel preferences save
    1. You’ll see the Save dialog box.
    2. Uncheck the box for the following options:
      • Turn on AutoSave by default.
      • Enable AutoRecover.
    Save dialog options

    Summary

    These are the six best ways to turn off Excel AutoSave for workbooks stored locally on the PC, OneDrive, and SharePoint.

    Do you know of a better approach? Feel free to share it in the comments!

    If you’ve made custom changes and want to revert back to the original configurations, check out how to reset Excel to default settings. You can also learn how to stop files from closing automatically or how to turn off AutoSave on Word.

    Windows Temp Folder Access Denied: 6 Quick Ways to Fix it

    Normally, accessing the temp folder as administrator is easy but sometimes, you may keep losing access and get folder access denied. You’ve probably come across the temp folder when you needed to quickly do a PC cleanup and optimize performance.

    If you previously had access to your Temp folder but can’t access it anymore, it could be due to corrupt system files or a change in user profile settings. A folder’s access denied error can occur on any folder that is restricted and requires administrator-level permissions.

    How do I give permission to the Temp folder in Windows 11?

    1. Gain complete control

    1. Locate the Temp folder by going to the following path: C:\Users\AppData\Local\Temp
    2. On the Properties window, go to the Security tab. 
    3. Select Everyone and click Edit. Edit
    4. Now select Everyone and under Permissions for Everyone: for Full control, choose Allow and Modify.
    5. On the next window, click OK.Allow
    6. Click Continue on all the following windows.
    7. Now click Apply and OK to confirm the changes. 
    8. Restart your computer.

    2. Enable folder inheritance

    1. Hit the Windows + E keys to open File Explorer.
    2. Locate the Temp folder by going to the following path: C:\Users\AppData\Local\Temp, right-click on it, and select Properties.
    3. Navigate to the Security tab and click on Advanced.
    4. Check the Replace all child object permissions with inheritable permissions from this object box then click Apply and OK.
    5. Restart your PC and check if the problem persists.

    3. Enable built-in administrator account

    1. Press Windows + R to open Run, type cmd, and hit Ctrl + Shift + Enter.
    2. Type the following command and hit Enter:net user administrator /active:yesadmin account
    3. The built-in administrator will be available to sign into
    4. Restart your computer.

    If you’re trying to access folders with restricted permissions, you must be using an administrator account. In case your user profile is corrupt, the built-in administrator account bypasses these errors and may allow you access.

    4. Reset folder permissions

    1. Press the Search button on the Taskbar, type cmd, and select Run as administrator.
    2. Open the Temp folder and take ownership by entering the following text and hit Enter:takeown /R /F *takeown cmd access denied windows 11
    3. Input this command and press Return:icacls * /t /q /c /reseticalcs command cmd
    4. Alternatively, you can reset a folder tree’s permissions to default by including its directory path in the command. Execute this command with a real folder location included within the brackets:icacls [full folder path] /reset /t /c /l

    5. Run DISM and SFC scans

    1. Hit the Start Menu icon, type cmd in the search bar, and click Run as administrator.cmd-run-admin-w11 unexpected kernel mode trap windows 11
    2. Type the following commands and press Enter after each one:DISM.exe /Online /Cleanup-Image /Restorehealth sfc /scannow

    Corrupt system files can restrict access to the folder or even prevent files in the temp folder from deleting.

    6. Use a dedicated tool

    1. Open the IObit Unlocker page, and select Free Download there.
    2. Browse to the folder the IObit Unlocker installer downloaded to within File Explorer.
      Free Download button unlock file windows
    3. Double-click the unlocker-setup.exe file for IObit Unlocker.
    4. Install IObit Uninstaller with its setup wizard.
    5. Open the IObit Uninstaller window with the desktop shortcut for that software.
    6. Click the Add button.
      Add button unlock file windows
    7. Select the locked file you need to unlock and click the OK option in the Browse window.
      Browse for Files window unlock file windows
    8. Press the Unlock button if the file’s status is indeed locked. The box at the bottom of the IObit Unlocker window shows the processes causing the lock.
      Unlock option unlock file windows
    9. Or you can click the small arrow button to select options for unlocking and modifying (renaming, moving, deleting, or copying) the file.
      Unlock operation options unlock file windows

    Alternatives to accessing the Temp folder

    The Temp folder is primarily used to unload the PC from bulk files and optimize performance, If none of these methods work, other alternatives to achieve the same results include:

    • Disk Cleanup – The Disk Cleanup is a built-in Windows utility that helps clear up some hard drive space to speed up your PC’s performance.
    • Storage Sense – Storage Sense is a more advanced version of Disk Cleanup as apart from freeing up junk files, it also uninstalls unused apps and temporary internet files.
    • Third-party tools – If the built-in Windows tools don’t do enough, you can turn to other Disk Cleanup alternatives that do a thorough job of cleaning up your system.

    Still, on the same folder, you may get the Your temp folder is invalid error message so don’t hesitate to check out our guide on how to fix it. In future, when you want to delete files from the Temp folder, ensure you do so safely to prevent any issues.

    Have you managed to regain access to your Temp folder? WHich solution would you recommend to other readers? Let us know in the comment section below.

    Downloaded Files Not Showing up on Desktop: 4 Ways to Fix

    We’ve all been there—downloading a file only to find it mysteriously missing from the Desktop. This can be incredibly frustrating, especially when you need the file immediately. Here are some tried-and-true solutions to help you resolve the issue of downloaded files not showing up on your Desktop.

    Why are my downloaded files not showing up on my Desktop?

    This occurs if your browser isn’t saving them to the Desktop or if desktop icons aren’t visible. Glitches with File Explorer can also cause this problem.

    How do I make downloaded files appear on the Desktop?

    Before trying anything else, try refreshing your desktop by pressing the F5 key.

    1. Check the browser’s download location

    1. Launch the browser where you attempted the download.
    2. In Google Chrome, click the three-dot icon in the top-right corner and choose Settings.
      google chrome settings option
    3. Find the Downloads section. See where your files are being saved. If it is not set to your Desktop, click the Change button and set the location to your Desktop.
      change download folder chrome
    4. Optionally, you can turn on Ask where to save each file before downloading to choose the location each time.

    2. Check desktop icon visibility

    1. Click on any empty space on your Desktop.
    2. Hover over View to see more options.
    3. Make sure that the Show desktop icons option is checked.
      show desktop icons context menu

    3. Restart File Explorer

    1. Press Ctrl + Shift + Esc to open the Task Manager.
    2. Scroll down to find Windows Explorer under the Processes tab.
    3. Right-click on Windows Explorer and select Restart.
      restart file explorer task manager

    Restarting Windows Explorer can resolve issues where the Desktop isn’t refreshing automatically to show new files.

    4. Manually search for the file

    1. Open File Explorer and use the file management system on your operating system.
    2. Type the name of the file in the search bar.
      file explorer search bar
    3. Once found, right-click and select Open file location.
    4. Alternatively, navigate to the Desktop folder and check if your file is there. The location of the folder is the following: C:\Users\Your_username\Desktop

    Manually searching for the file ensures you haven’t missed it, especially if it’s accidentally placed in another folder.

    This isn’t the only download issue, a few users reported that they have two Download folders on their PC, thus causing additional confusion.

    To ensure that your files are downloaded, there are ways to check what’s downloading on Windows, and it’s easier than you think.

    If the problem is still there, double-check if Windows 11 is blocking downloads, since that’s a common issue that many have encountered.

    By following these solutions, you will be able to identify, locate, and ensure your downloaded files consistently show up on your Desktop.

    Edge Dev 129 is now available to users with Browser Essentials and Gamer Mode improvements

    Microsoft Edge released a new update to the Dev Channel, version 129.0.2752.4, and it brings enhancements and repairs to many places that will improve the user experience of the browser.

    Browser Essentials and Gamer Mode have been highlighted among these changes to provide smoother functioning and better performance during use. Browser Essentials has added a new observer feature to monitor extension uninstalls. It may appear minor at first glance, but it marks a significant move towards delivering an interface that feels more natural and user-friendly.

    For people who don’t know about Gamer Mode yet, this unique setting improves browsing when playing games or looking at game-related things like videos and news on websites. In the past, if you turned Gamer Mode off, the browser would crash. Fixing this crash problem is a relief, especially for gamers using Edge as their main way of getting gaming news, watching streams, and participating in communities related to games.

    There are more minor adjustments, such as fixing the visibility problem of browser-specific attributes in the autofill tooltip and ensuring that the ‘X’ icon is transparent in Dark mode. These may appear to be tiny changes, but they add up to a better experience for users who spend long periods of time looking at their screens.

    For mobile users, the update fixes both Android and iOS platforms. Android will correct an incorrect Omnibox action icon and ensure that top site titles are fully displayed when you tap into the ‘Frequently Visited’ section. For iOS users, they can expect issues with opening menus on bing.com to be resolved as well as how the default browser prompt looks like. Also, the center background color of the Tab now correctly shows light or dark mode.

    The update will be available in the Stable Channel around September 19. If you are excited about these fresh features and repairs, visit the Edge Insider website and download the Dev installer.

    You can read Edge Dev 129.0.2752.4’s full changelog here.

    In other news, Edge is growing in popularity. The browser has reached a 14% market share, which is enormous.

    UNEXPECTED_INITIALIZATION_CALL BSOD: 7 Ways to Fix it

    Of the countless BSOD errors, UNEXPECTED_INITIALIZATION_CALL with a value (bug check) of 0x00000033 is truly a rare occurrence. Over the last few years, there have been only a few reported encounters, and most were easily fixable!

    The UNEXPECTED_INITIALIZATION_CALL error often appears due to outdated or buggy drivers, corrupt system files, issues with the RAM or disk, malfunctioning peripherals, and malware infection.

    To start with, install all pending Windows updates, fix overheating issues, and disconnect any new non-critical peripherals from the PC.

    How do I fix the UNEXPECTED_INITIALIZATION_CALL BSOD?

    1. Repair the corrupt system files

    1. Press Windows + S to pen Search, type Command Prompt in the text field, and click on Run as administrator.command prompt
    2. Click Yes in the UAC prompt.
    3. Paste the following DISM commands one at a time and hit Enter after each: DISM /Online /Cleanup-Image /CheckHealth DISM /Online /Cleanup-Image /ScanHealth DISM /Online /Cleanup-Image /RestoreHealth
    4. Now, run this command for the SFC scan: sfc /scannowsfc scan to fix UNEXPECTED_INITIALIZATION_CALL
    5. Finally, reboot the PC for the changes to come into effect and check for improvements.

    The easiest fix for the UNEXPECTED_INITIALIZATION_CALL BSOD is to repair the corrupt system files by running the DISM commands and SFC (System File Checker) scan. The scans replace all problematic protected system files with the cached copy stored on the PC.

    2. Update the installed drivers

    1. Press Windows + X to open the Power User menu, and select Device Manager.
    2. Expand the different entries individually, right-click on each of the devices underneath, and choose Update driver. I am updating the graphics driver.update drivers to fix UNEXPECTED_INITIALIZATION_CALL
    3. Click on Search automatically for drivers and wait for Windows to install the best locally available version.automatic driver search
    4. Similarly, update the other drivers on the PC.

    While letting Windows update the drivers, you will often find that the best version is already installed. However, I recommend you check the manufacturer’s website, look for any updates, and manually install the latest driver.

    An easy option is to use a top-rated driver updater utility, which automatically searches all available sources for the best drivers and installs them.

    3. Check for disk and RAM issues

    3.1. Identifying and fixing disk issues

    1. Press Windows + R to open Run, type cmd, and hit Ctrl + Shift + Enter.command prompt
    2. Click Yes in the UAC prompt.
    3. Paste the following command to run Check Disk and hit Enter: chkdsk /r
    4. If asked to schedule the scan for the next reboot, press Y, hit Enter, and then restart the PC.chkdsk to fix UNEXPECTED_INITIALIZATION_CALL

    After running the Check Disk utility, Windows will tell you whether any problems were found and repaired. Also, you can view the generated Check Disk logs for a more comprehensive overview.

    3.2. Identifying RAM issues

    1. Press Windows + S to open Search, type Windows Memory Diagnostic in the text field, and click on the relevant result.
    2. Save any ongoing work, and then click on Restart now and check for problems.memory diagnostics

    If Windows Memory Diagnostic can’t find any problems triggering UNEXPECTED_INITIALIZATION_CALL, I recommend you go with MemTest86 to run a more comprehensive set of tests on the RAM and identify even the smallest of the problems.

    The tool takes 4-10 hours, so it’s best that you let it run overnight!

    4. Scan the PC for malware

    1. Press Windows + S to open Search, type Windows Security, and click on the relevant result.
    2. Click on Virus & threat protection.windows security
    3. Click on Scan options.
    4. Now, choose Full scan, and then click on Scan now.scan for malware to fix UNEXPECTED_INITIALIZATION_CALL
    5. Wait for the scan to complete.

    If Windows Security can’t detect malware infection, you should always try an effective third-party antivirus solution. These are often more effective at the job!

    5. Uninstall recently added apps

    1. Press Windows + R to open Run, type appwiz.cpl in the text field, and hit Enter.
    2. Select any recently added app(s) from the list, and click on Uninstall.remove app
    3. Follow the on-screen instructions to complete the process.
    4. Restart the computer and check for improvements. If the problem persists, uninstall other recent apps.

    6. Perform a system restore

    1. Press Windows + S to open Search, type Create a restore point, and click on the relevant result.
    2. Click on System Restore.system restore
    3. Select the Choose a different restore point option, and click on Next.restore PC to fix UNEXPECTED_INITIALIZATION_CALL
    4. Pick the oldest restore point from the list, and click on Next.restore points
    5. Verify the details and click on Finish.
    6. Wait for the restore to complete. It usually takes 15-45 minutes.

    7. Perform an in-place upgrade

    Note icon NOTE
    The steps listed below are for Windows 11. If you are currently using the previous iteration, check our dedicated guide on performing a repair upgrade in Windows 10.
    1. Go to Microsoft’s official website, select the OS edition and product language, and then download the Windows 11 ISO.windows 11 iso
    2. Right-click on the ISO file, select Mount, and click Open in the confirmation prompt.
    3. Run the setup.exe file.setup.exe
    4. Click on Next to proceed.
    5. Click Accept to agree to Microsoft’s license terms.
    6. Verify that the setup reads, Keep personal files and apps, and click on Install.in-place upgrade to fix UNEXPECTED_INITIALIZATION_CALL
    7. Wait for the repair upgrade to complete. It will take 1-3 hours.

    An in-place upgrade is similar to reinstalling Windows, but you don’t lose the personal files and apps. In case the previous solutions didn’t work, this should. And if an in-place upgrade fails, you can always reset Windows to factory defaults.

    In most cases of the UNEXPECTED_INITIALIZATION_CALL blue screen error, repairing the corrupt system files and installing the latest drivers fixes things in no time. Only rarely do you have to go with the complex solutions!

    Before you leave, check our latest guide on ERROR_UNEXPECTED_MM_EXTEND_ERR and discover experts tip to make your Windows PC faster than ever.

    For any queries or to share which fix worked for you, drop a comment below!

    Access Your Google Maps Timeline on PC in a Few Quick Steps

    If you access your Google Maps timeline on PC, you can review your past travels or revisit a memorable route. It stores all this information, including places you’ve visited, routes you’ve taken, and even the duration of your journeys. 

    However, the feature is no longer available in the desktop version, but you can access its settings through the activity controls. To access it on your PC, you’ll have to install an Android emulator and then download Google Maps.

    I’ll show the steps, so let’s get started!

    How To Access Your Google Maps Timeline on PC

    Follow these instructions:

    1. Open your browser and search for BlueStacks. Click on the site and tap Download.
    BlueStacks
    1. Once you have downloaded and installed it on your PC, search for Google Maps, then tap Play on App Player.
    Play on App Player
    1. You’ll be directed to the Play Store. Add your email and password to sign in, and then wait for the app to download.
    Log into Play Store
    1. After downloading Google Maps, launch it and tap your profile picture or initials.
    Click your profile picture
    1. Select Your Timeline from the menu.
    1. If you’ve used Google Maps before, your past trips will be available on your timeline. Select the date and month, and they’ll display.
    Timeline

    However, note that using Android apps on a desktop can be challenging, especially if your PC doesn’t support a touchscreen.

    While you can’t directly access your Google Maps timeline on your PC, you can still view your past trips by using an Android emulator like BlueStacks. The above steps will help you install Google Maps and look at your timeline just like on your phone. 

    Additionally, you can learn to measure distance, see toll prices, and rotate your maps.

    Want a ground-level look at places from your trips? Learn how to use Google Maps Street View to explore routes and landmarks in 360° before you go.

    Recent Documents Not Showing in Microsoft Word? Here’s How to Fix it

    Recent documents in Word help you retrieve your documents faster without opening File Explorer but if they are not showing, it can be a big inconvenience to go back and start perusing through folders.

    If you can’t locate any recent document when you open Word, it’s probably a glitch with Microsoft apps, a corrupt cache or a change in file location. You may also have installed a new app or plugin that tampered with your Word settings.

    What can I do if recent documents are not showing in Word?

    1. Log out and log back in

    1. Launch your Microsoft Word app and open a blank document.
    2. Navigate to File and select Account.
    3. Click on Sign Out.
    4. Sign back in and see if the recent documents appear.

    You can also try logging in to your Microsoft Office account with Word for web and see if the issue persists.

    2. Clear Microsoft cache and run Microsoft Word in Safe Mode 

    1. Close all your Office apps.
    2. Press the Windows key + R to open the Run command.
    3. Type the following command and press Enter or click OK: %appdata%\Microsoft\Office\Recent
    4. Delete everything in this folder then restart your Microsoft Word.
    5. Press the Windows key + R to open the Run command.
    6. Type the following command and press Enter or click OK: word /safe

    3. Adjust the number of recent documents

    1. Launch your Microsoft Word app and open a blank document.
    2. Navigate to File and select Options.
    3. Select Options then go to Advanced.
    4. Navigate to the Display section, then adjust the number under Show this number of recent documents.
    5. Next, place a checkmark next to Quickly access this number of recent documents and select a number you’re comfortable with

    4. Switch off MS Word’s Add-ins

    1. To disable add-ins, open MS Word, click the File tab, and select Options to open the software’s settings window.
    2. Click Add-ins on the left of the Word Options window. That will open a list of your active and inactive application add-ins.
    3. Each add-in has a type category, such as COM, Template and Action. Click the Manage drop-down menu and select a type from there.
    4. Press the Go button to open a window displaying all the add-ins that fit within the type selected from the drop-down menu.
    5. Now you can deselect the checkboxes for the active add-ins to disable them.
    6. Press the OK button to close the window.
    1. Launch the OneDrive icon by clicking on the system tray.
    2. Select Settings.
    3. Click on the Account tab, then select Unlink this PC.
    4. Confirm by clicking Unlink account in the dialog box that pops up.unlink-acc onedrive red x

    If you’ve connected your Microsoft account to sync with your OneDrive, it continuously syncs with the local files in your drive. However, if there are any network interruptions, there may be sync issues causing some discrepancies.

    Further, if your documents have set permissions, linking with OneDrive may limit document visibility hence the reason why they may not show up in recent documents.

    6. Repair MS Office

    1. Hit the Windows key, type Control Panel in the search bar, and click Open. control-panel-search fallout new vegas runtime error
    2. Navigate to Uninstall a program under Programs.going uninstall program control panel
    3. Locate MS Office, click on it, and select Change.
    4. Select the Online Repair option and click on the Repair button.

    If the recent documents section fails to reappear after a repair, try resetting your Word to default settings and see if this helps.

    7. Reinstall Microsoft Office

    1. Hit the Windows key, type Control Panel in the search bar, and click Open. control-panel-search fallout new vegas runtime error
    2. Navigate to Uninstall a program under Programs.going uninstall program control panel
    3. Locate MS Office, click on it, and select Uninstall.
    4. Now, restart your PC and install the latest Microsoft Office version available for Windows.

    Unfortunately, this issue is not unique to Microsoft Word. It may occur in any other Microsoft Office app like Excel or PowerPoint so the same solutions apply.

    Speaking of recent files, you may also run into an issue where they’re not showing in the Quick Access toolbar so check out how to get them back. In case you recently deleted files that should be appearing in this section, you can always recover them.

    If this issue happens often, you may also want to check whether your Word documents are not saving and address this issue first. This could be the reason why your signatures are also not showing.

    That’s a wrap from us but we’d love to hear from you if you have any other solutions up your sleeve. Share them with us in the comment section below.

    How to Transfer Files From Laptop to Laptop Using Bluetooth

    Transferring files between laptops can be a hassle, but Bluetooth offers a straightforward and wireless solution. Whether you’re moving essential documents or sharing media files, here’s how you can effortlessly transfer files from one laptop to another using Bluetooth.

    How can I transfer files from laptop to laptop using Bluetooth?

    1. Connect two laptops using Bluetooth

    1. Activate Bluetooth on both laptops. Click on the network on the right side of your Taskbar and click the Bluetooth icon to turn it on.
       bluetooth enable system tray
    2. Open Settings and go to Bluetooth & devices.
    3. Under Bluetooth & other devices, click on Add a device.
    4. In the Add a device window that opens, select Bluetooth or the desired type of device.
    5. Your laptop will search for other Bluetooth devices. When the other laptop appears in the list, select it. A PIN code will appear on both devices. Verify that the codes match and click Connect.
      bluetooth pin code
    6. On the second laptop, a Pair Device screen will pop up. Select Yes to complete the pairing.

    To learn more, we have a great guide on how to turn Bluetooth on or off on Windows 11, so you might want to check it out.

    2. Transfer files from one laptop to another

    1. Ensure both laptops are paired and Bluetooth is enabled.
    2. In the system tray right-click the Bluetooth icon and choose Send a file.
      send a file blueooth
    3. Select the other PC.
      bluetooth file transfer select device
    4. Next, select the file you want to send.
    5. On the receiving laptop, confirm the transfer.
    6. Wait for a file to transfer.

    Remember that you’re not limited to a single device as you can easily pair multiple Bluetooth devices on Windows 11.

    By following these steps, you can ensure a smooth and secure file transfer process between laptops. For future transfers, always make sure your Bluetooth drivers are up to date and both devices are discoverable.

    Keep in mind that issues can occur, and many reported that Bluetooth is not working on Windows 11, but this can be easily fixed.

    Once your transfer is complete, it’s a good idea to verify your device coverage by learning how to check your laptop warranty so you can keep both systems protected in case of hardware issues.

    Microsoft Teams allows users to pin apps in meetings beforehand

    In a time when virtual meetings are frequently held, Microsoft has introduced a new feature that’s altering the game for Teams users.

    Now, Microsoft Teams admins can pin apps onto meetings beforehand. The inventive update comes straight from customer input and aims to improve workers’ prominence and utilization of Teams apps. This is particularly important for those managing this platform in businesses and organizations.

    To make this feature work correctly, the developers of Teams apps need to make a small change in their creations. According to Microsoft, they must switch from “Configurable Tabs” to “Static Tabs” within their extensibility component. This could sound somewhat technical, but it fundamentally means preparing the apps so admins can pin them during meetings effortlessly. On a Microsoft support page, developers will discover all the necessary directions for making this switch.

    We are thrilled to announce that tenant admins can now pin apps to Microsoft Teams meetings organized in their organization. This addresses a long-standing request by our partners and customers to improve org-wide discoverability and distribution for business-critical meeting apps and we are excited to see this now rolled out to General Availability.

    Picture yourself as a sales executive meeting with clients, and you can instantly open up your meeting app connected to the sales CRM. This is the kind of efficiency we are discussing. It’s a vital tool that may significantly increase app adoption in an organization, enhancing collaboration results and efficiency. The Teams Admin Center has a fresh Meeting Extensions section where Teams admins can select which apps to pin. They can make these applications accessible for all in the company or restrict access to specific groups or individuals, as seen in the image above.

    But, there is one thing. This feature doesn’t work for meetings in a channel or meetings made from templates. Also, just two pinned applications will be visible right away at the top of the meeting window. Need more? Just click on the “More” option.

    This is a critical request if you create apps for meetings. You’ll need to adjust your meeting apps to Static Tabs now so they match Microsoft’s new feature and continue to be a preferred tool in Teams.

    What do you think about pinned apps coming to Microsoft Teams?

    In other news, the Redmond-based tech giant recently announced Teams meetings will allow participants to move freely between breakout rooms.

    How to Fix the ATDISK_DRIVER_INTERNAL 0x42 Bug Check

    Dealing with the ATDISK_DRIVER_INTERNAL blue screen error comes with the value of 0x00000042. This bug check is usually associated with problematic drives, memory or drivers. Start by removing all the unnecessary peripherals one by one and restarting your PC to see if any of them is causing this issue.

    How do I fix the ATDISK_DRIVER_INTERNAL BSoD?

    1. Update the drivers and Windows

    1. Press Win + I to open Settings.
    2. Navigate to Update & Security.
    3. Click Check for updates and install any available updates.
    4. To update drivers, press Win + X and select Device Manager.
    5. Expand the relevant device category (e.g., Disk drives) and see if any of them has a yellow exclamation mark next to it.
    6. Right-click on the device and select Update driver.
    7. Choose Search automatically for drivers and follow the prompts.

    Updating drivers and Windows ensures that your system is running the latest software, which can resolve compatibility and performance issues leading to the ATDISK_DRIVER_INTERNAL error.

    2. Run a full scan for viruses and malware

    1. Open the Settings window (Win + I).
    2. Navigate to Update & Security > Windows Security.
    3. Click Virus & threat protection.
    4. Select Scan options.
    5. Choose Full scan and click Scan now.

    Running a full scan helps in detecting and removing any malware or viruses that might be causing the error. Of course, if you have a third-party antivirus installed, use for a full scan instead.

    3. Run Disk Cleanup

    1. Open the Start menu and type Disk Cleanup, then press Enter.
    2. Select the drive you want to clean (usually C:) and click OK.
    3. Check the boxes for the file types you want to delete, such as Temporary files and Recycle Bin.
    4. Click OK and then Delete Files to confirm.

    Running Disk Cleanup removes temporary and unnecessary files, which can help resolve the ATDISK_DRIVER_INTERNAL error by freeing up disk space and improving system performance.

    4. Run SFC and DISM commands

    1. Press Win + S, type cmd and select Run as administrator from the results.
    2. In the Command Prompt, type sfc /scannow and press Enter.
    3. Wait for the scan to complete and restart your PC.
    4. If the error persists, run the following DISM commands one by one:
      • DISM.exe /Online /Cleanup-image /Scanhealth
      • DISM.exe /Online /Cleanup-image /Checkhealth
      • DISM.exe /Online /Cleanup-image /Restorehealth

    Running SFC and DISM commands repairs corrupted system files, which are often the cause of blue screen errors like ATDISK_DRIVER_INTERNAL.

    5. Check for RAM issues

    1. Press Win + R to open the Run window.
    2. Type mdsched.exe and press Enter.
    3. In the Windows Memory Diagnostic window, select Restart now and check for problems.
    4. Follow the on-screen instructions to complete the test.

    Checking for RAM issues can identify and resolve any memory problems that might be causing the ATDISK_DRIVER_INTERNAL error, ensuring your hardware is functioning properly.

    6. Run System Restore

    1. Reboot your PC to enter Safe Mode.
    2. Press Win + R to open the Run window.
    3. Type rstrui.exe and press Enter.
    4. Click Next, then select a restore point from the list.
    5. Click Next and follow the on-screen instructions to complete the restore process.

    Running System Restore reverts your system to a previous state before the ATDISK_DRIVER_INTERNAL error occurred, which can help fix software-related issues.

    7. Check hardware connections and compatibility

    1. Turn off your PC and unplug it.
    2. Open the case and check all internal connections, ensuring they are secure.
    3. Replace any damaged cables.
    4. Refer to the Microsoft Hardware Compatibility List to verify that all installed hardware is compatible with your operating system.

    Checking and securing hardware connections and verifying compatibility can resolve issues related to physical components causing the ATDISK_DRIVER_INTERNAL error.

    By following these steps, you should be able to resolve the ATDISK_DRIVER_INTERNAL error effectively. To prevent future issues, keep your drivers and Windows updated, and regularly scan your system for malware.

    The simplified system tray is finally back in Windows 11, and you can enable it now

    Microsoft has returned the simplified system tray in Windows 11 in the Beta Channel with build 22635.4010 under KB5041869. The simplified system tray focuses on improving user experience. Microsoft introduced this feature before but withdrew it to make some adjustments, and now it’s returning.

    KB5041869 also brings improvements to the Paint app. Users will find better pen support in this application, which allows them to switch between tools more comfortably and choose objects on canvas easily. These tiny changes could significantly affect our everyday relationship with devices.

    If you like a tidy and effective working area, these changes are precisely what you want. The straightforward system tray indicates less time spent shifting through symbols and more concentration on significant tasks. And for those with a creative side, the enhancements in the Paint app may revolutionize how you express your concepts.

    Microsoft is introducing them in phases, employing Control Feature Rollout technology. This method enables Microsoft to receive feedback and confirm everything functions flawlessly before making it accessible to all users. So, you might have to wait for a bit before experiencing them.

    Meanwhile, the Dev Channel also received an important update, with which users will be able to connect their Android devices to PCs in seconds.

    You can read KB5041869’s full changelog here.

    How to Run System Restore From Safe Mode in Windows 7

    Dealing with a problematic Windows 7 system can be frustrating, especially when it refuses to boot normally. Fortunately, running System Restore from Safe Mode can help you revert your system to a previous, stable state. Here’s how you can do it effortlessly.

    How do I run System Restore from Safe Mode in Windows 7?

    1. Run System Restore using the GUI

    1. Make sure the computer is fully powered down.
    2. Turn it back on and immediately start tapping the F8 key on your keyboard at a rate of about once per second until the Windows Advanced Boot Options screen appears.
    3. Use the arrow keys to highlight Safe Mode and press Enter.
    4. Select your account if prompted and if a window opens explaining Safe Mode, close it.
    5. Click the Start button in the bottom left corner and click on All Programs.
    6. Go to Accessories > System Tools > System Restore.
    7. Follow the on-screen instructions to choose a restore point.
    8. Select the Recommended restore if the system was working well at that time.
    9. If not, choose Select a different restore point and pick one from the list.
    10. Click Next and then Finish to start the restore process. Your computer will restart multiple times during the process.

    Running System Restore in Safe Mode using the graphical interface can be particularly useful if your computer struggles to boot normally, as it leverages a basic state of your operating system to access this utility.

    2. Run System Restore from Safe Mode Command Prompt

    1. Start your computer and begin tapping the F8 key on your keyboard until the Microsoft advanced startup menu appears.
    2. Use the arrow keys to highlight Safe Mode with Command Prompt and press Enter.
    3. You’ll see a black Command Prompt window open.
    4. Type RSTRUI.EXE and press Enter: This command launches the System Restore utility.
    5. If asked, enter your username and password. Follow the on-screen instructions to choose and confirm a restore point.

    Using the Command Prompt to run System Restore is beneficial when your operating system can’t load the GUI, offering a straightforward way to access this critical recovery tool.

    3. Run System Restore using a Windows Installation bootable drive

    1. Connect the bootable USB flash drive to your PC. If you don’t have one already, you can use our guide on how to create a bootable USB drive.
    2. Restart your computer. If it doesn’t boot from the disk automatically, you may need to press a key (often F12) to choose the boot device. You may also use our guide on how to change the boot order for more information.
    3. Select your language settings and click Next, then click Repair your computer.
    4. Select the operating system you want to repair and click Next.
    5. Click on System Restore from the list of System Recovery Options.
    6. Review the available restore points. If you think your computer was working correctly at a specific point, select it and click Next.
    7. If you prefer a different restore point, select Choose a different restore point and click Next.
    8. Verify the settings and click Finish to begin the restore process. Your computer will restart once the process is complete.

    Use this method if Safe Mode fails to start or if you don’t have access to Safe Mode. It allows you to perform a system restore without logging into Windows.

    By following these detailed steps, you can effectively use System Restore in Safe Mode on your Windows 7 machine, ensuring your system returns to a stable state without the need to reinstall the operating system. Remember to regularly create restore points to make future recoveries smoother and more reliable.