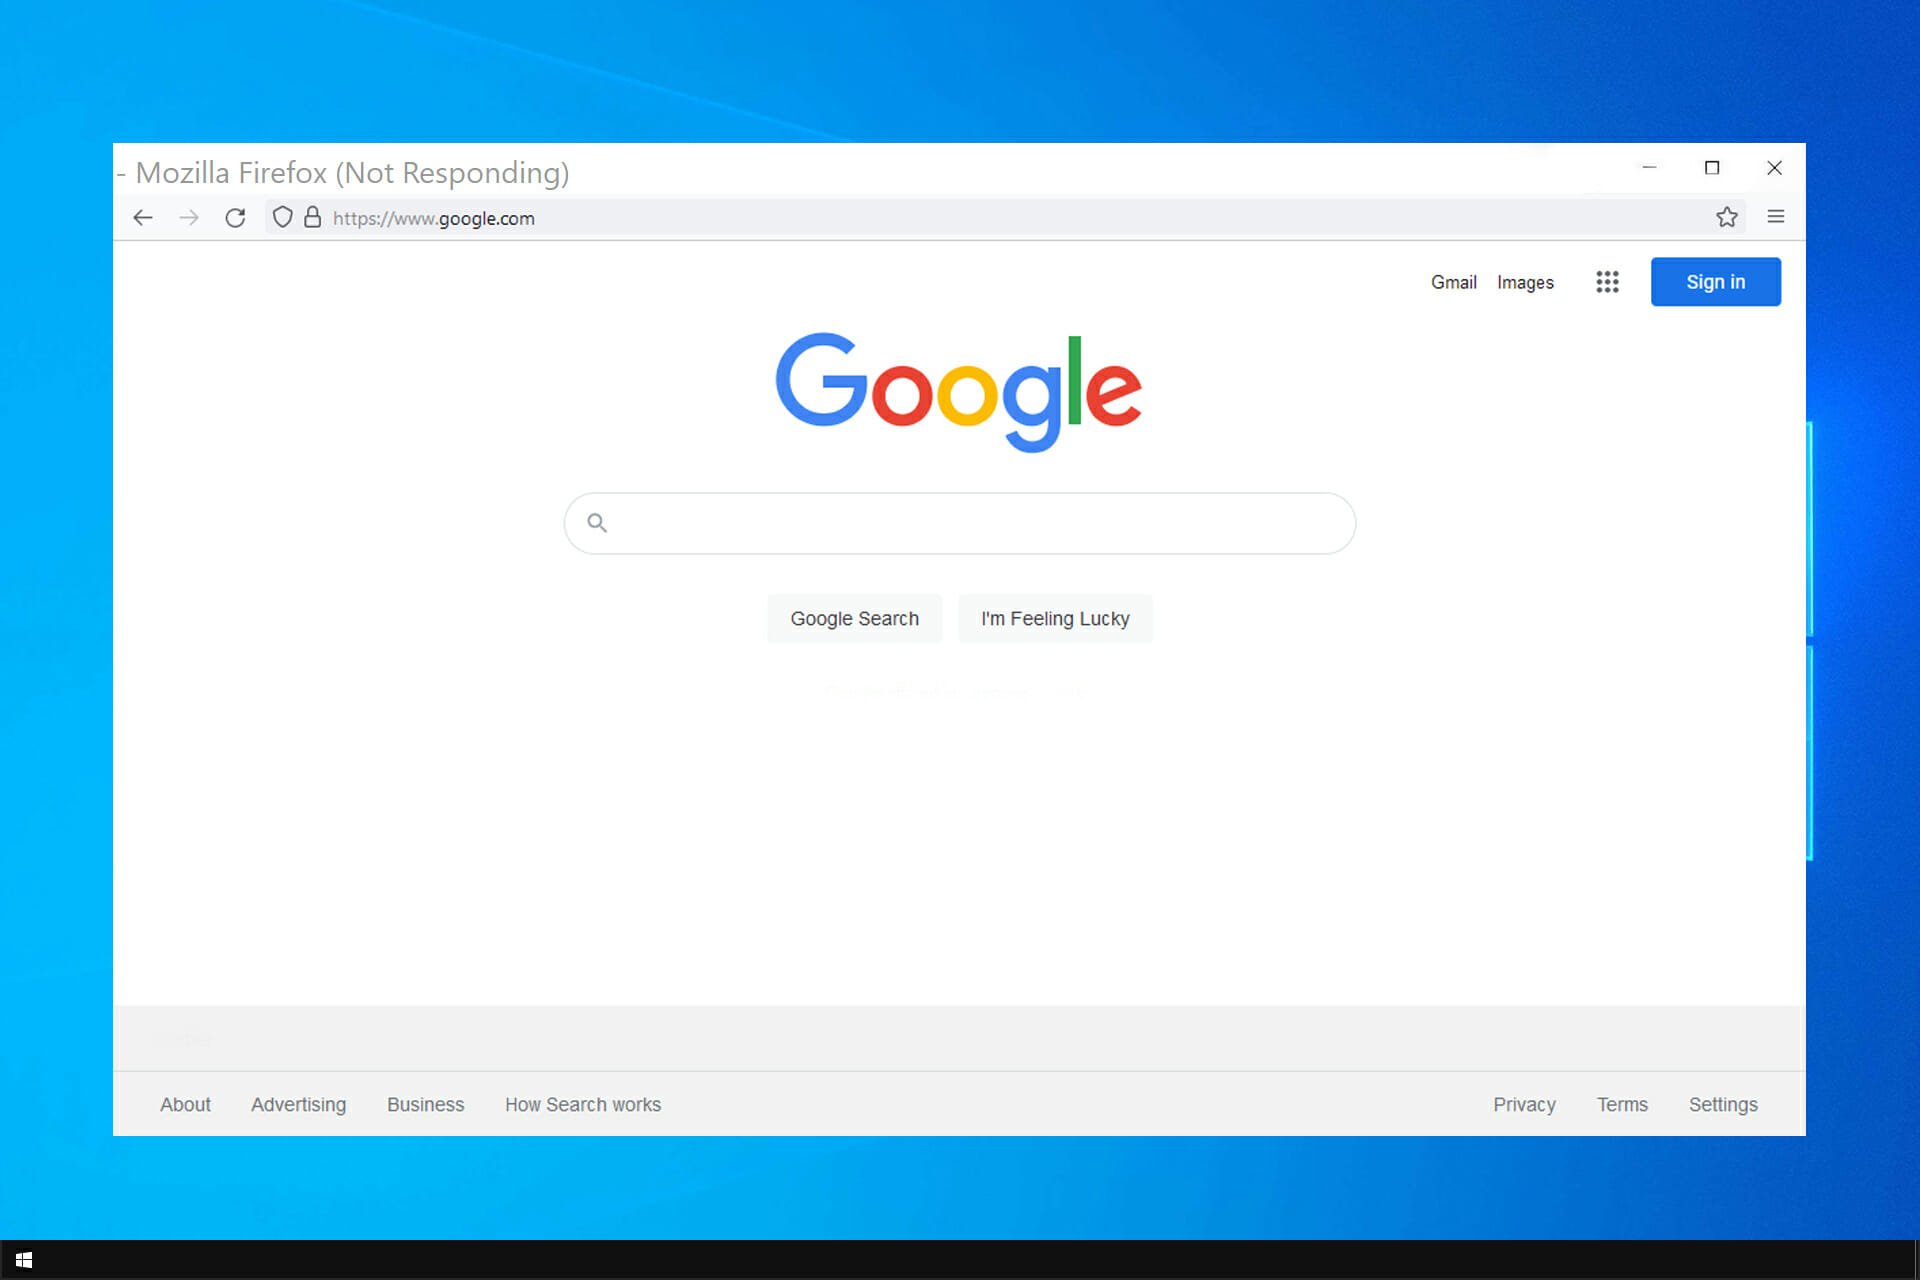
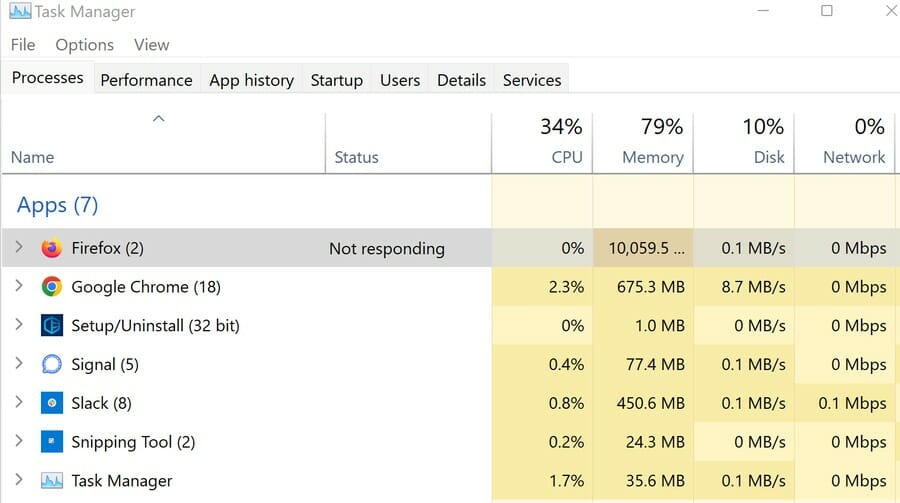
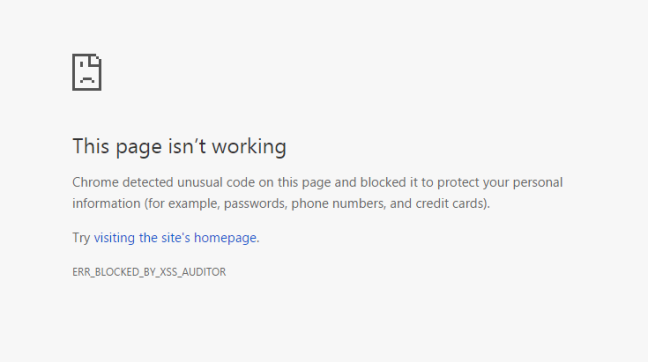
If you are a Twitter user and have a habit of playing videos on the platform, you have probably come across a problem where you can’t play Twitter videos on your Chrome browser.
You may also have come across an issue where you get the Nothing to see hereerror but we have a comprehensive guide on how to fix it.
The issue of videos not playing in Chrome affects both desktop and mobile platforms and is likely to stem from a bug in the browser version you are using.
If you don’t have the time to troubleshoot, you can opt to use another browser or the Twitter desktop application and the videos should play just fine.
Why are my Twitter videos not playing on Chrome?
If you can’t play a Twitter video on your Chrome browser, it could be due to one or more of the following reasons:
Outdated browser – Make sure you have the latest version of Chrome installed on your computer. If you’re using an earlier version of the browser, it may not be able to play some types of video files.
Adblocker interference – Disable any ad blocker you might be using. Some users report that disabling Adblock Plus fixed the issue for them, but it’s not guaranteed to work for everyone.
Cache and cookies – If you have a lot of websites saved in your browser’s cache, they could be preventing the video from playing. You may also come across an issue where Twitter videos are not playing on Wi-Fi. This can be fixed by clearing your cache and cookies.
Sometimes, it could be an isolated issue with your Chrome browser, and switching to another browser might just do the trick.
What can I do if Twitter videos aren’t playing in Chrome?
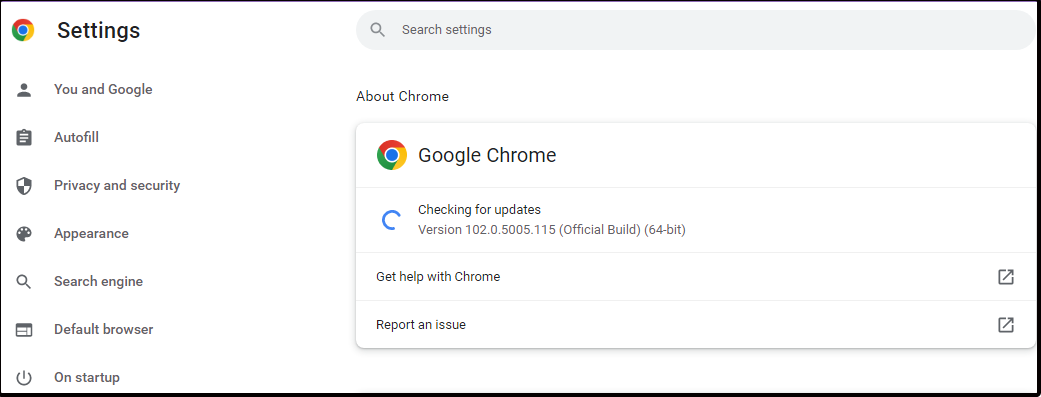
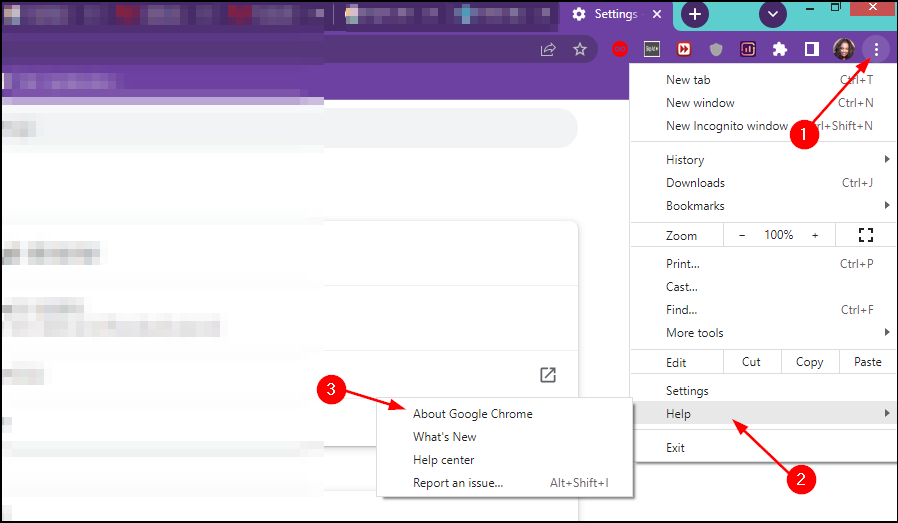
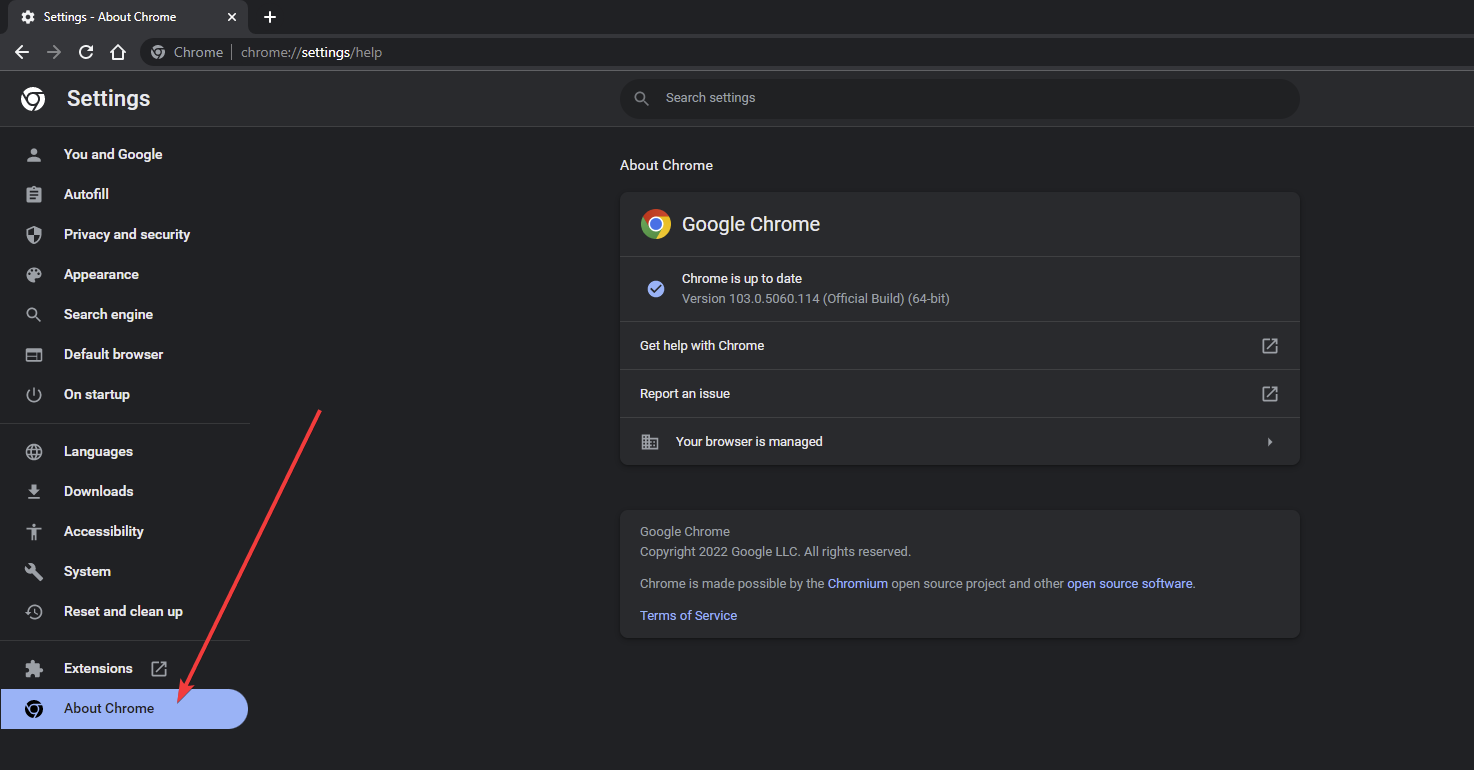
1. Update your browser
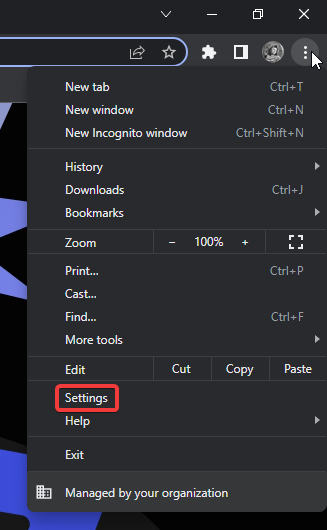
Launch your Chrome browser and click the three vertical ellipses in the top right corner.
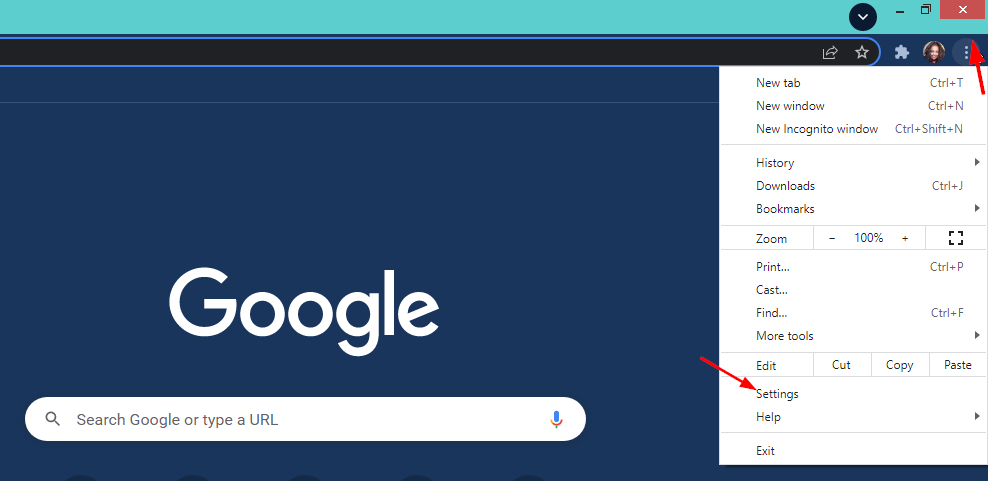
Launch your Chrome browser and click the three vertical ellipses in the top right corner.
Select Settings.
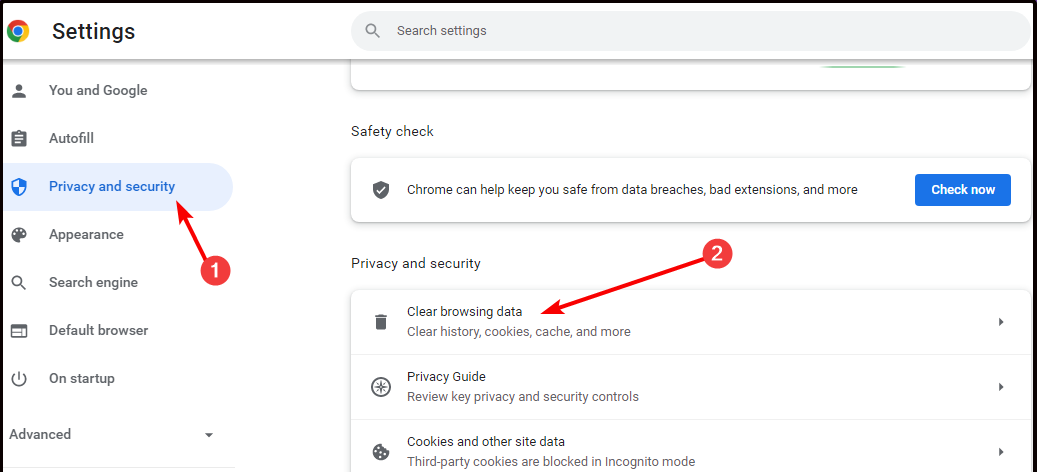
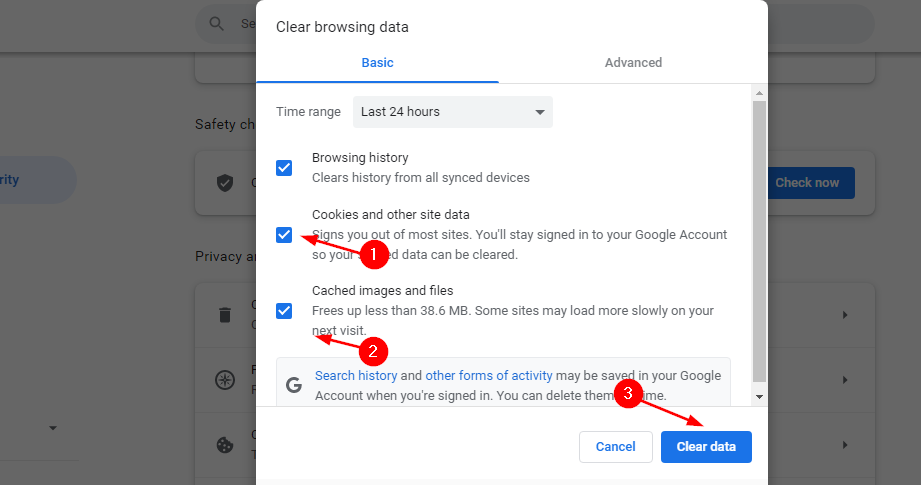
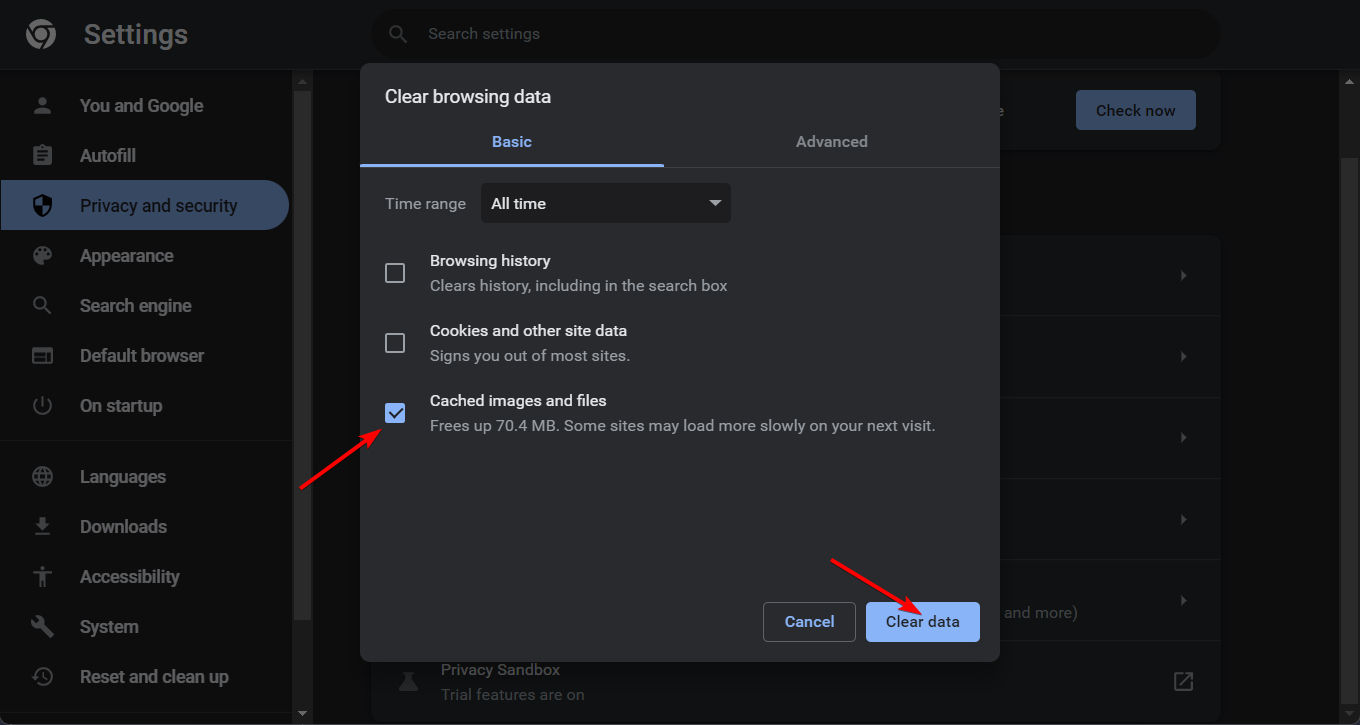
Click on Privacy and security then select Clear browsing data.
Check Cookies and other site data and Cached images and files then hit Clear data.
3. Disable adblocker
Launch your Chrome browser and in a new tab, enter the following address: chrome://extensions/
Locate your adblocker and toggle the Disable button.
Hopefully, with the above troubleshooting steps, you are able to view Twitter videos. If not, we have an exceptional list of browsers to use with Twitter.
Let us know what solution worked for you in the comment section below.
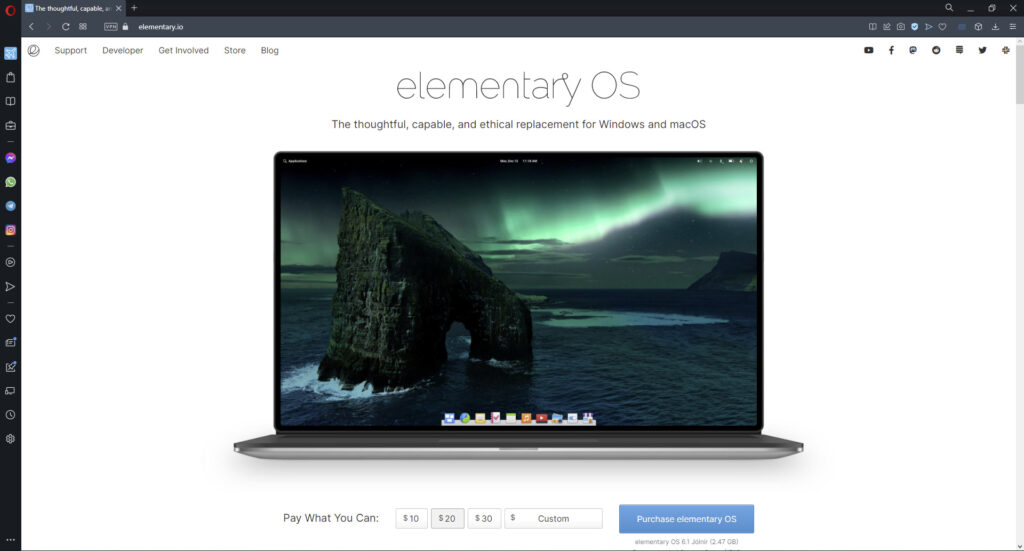
Elementary OS is a Linux distribution that offers a more simple and efficient replacement for macOS or Windows OS. Here are our top ten picks for the best browsers for Elementary OS that are light and fast.
Is Chrome available for Elementary OS?
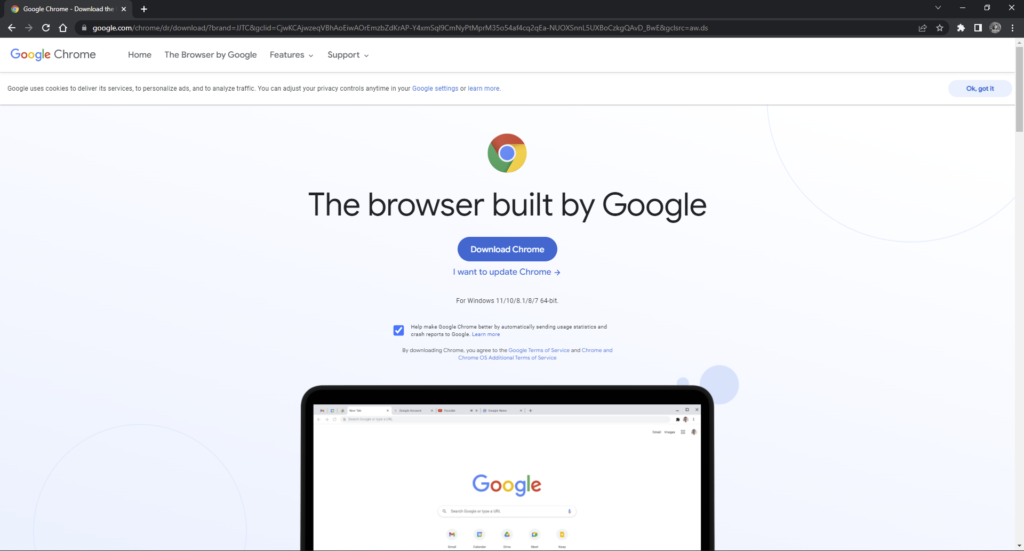
Google Chrome is available for Elementary OS. Users can download Chrome just like they normally would through the Epiphany browser, which is the default browser for Elementary OS. Chrome will then need to be installed via Terminal.
Can I install Firefox on Elementary OS?
Like Chrome, Firefox is not natively installed on Elementary OS, but it is available. Users can install Firefox using their distribution package manager. Because Firefox is an open-source browser, it’s easier to get on Linux than Chrome.
Opera is a great and efficient browser for many reasons, but it makes the top of our list because of its resource usage. Since it does not consume a ton of RAM and CPU, its a resource-friendly browser that pairs great with Elementary.
Opera also has a battery saver mode that can extend the battery life by up to 50% without sacrificing performance. This is perfect for users who take their laptops on the go a lot. The free built-in VPN also protects users on public WiFi networks.
Key features of Opera:
Low resource usage
Battery saver mode
Free built-in VPN
Opera
Use Opera’s battery saver while on the go to extend your laptop’s battery life.
Firefox is another great choice because of its speed and personalization options. This open-source browser claims to be two times faster than Chrome and consumes less memory.
The HTTPS indicator lets users know if the site they are visiting is secure and if it’s recommended to give the site any personal information. Users can adjust their privacy settings to be more or less secure.
It’s no secret that Chrome is the most popular browser which stretches to Linux users. It is a known resource hog; however, it is extremely fast and has some of the best selection of extensions so users can make it their own.
Its speed is owed to its JavaScript rendering which also enhances each tab and makes multitasking more efficient.
Microsoft Edge is a browser that promotes productivity and makes multitasking easy with the vertical tabs feature and the ability to sort tabs in Collections. It also has a grammar and spelling assistant and an immersive reading mode.
Performance-wise it’s on par with Chrome and uses less memory. Edge also supports Internet Explorer legacy apps and sites.
Vivaldi has become a well-known alternative browser because its filled with unique features like the Notes feature and Web Panels which allows users to place tabs in its own panel for better multitasking.
Since it has one of the most customizable interfaces, users can change the layout of the browser to make it as simple or complex as they like. There are tons of features for users to explore in Vivaldi that make browsing fast and efficient without needing to install addons.
Brave is an alternative browser that boasts privacy and speed. By eliminating ads and trackers that weigh down web pages, Brave runs three times faster than big-name browsers and makes users more anonymous while browsing.
Moreover, Brave promises its users that it does not store or sell user data on its servers without permission. While the browser strips ads from third-party companies, it offers its users a reward program with Basic Attention Tokens for opting into Brave ads to replace them.
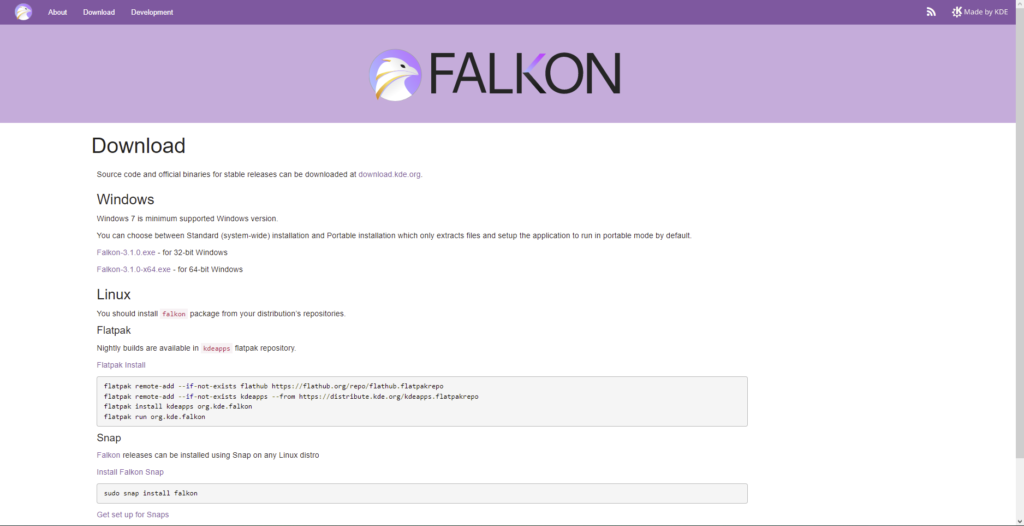
Falkon (formerly QupZilla) is another well-known browser among Linux users because it’s lightweight and has cross-platform compatibility. It has a similar look and feel to Firefox and Chrome making it user-friendly and easy to use.
Falkon offers extension support and a built-in ad blocker, however, it does not have a syncing feature that would allow users to sync browser data across devices. Nevertheless, it is extremely fast and stable making it a great pick for Elementary OS.
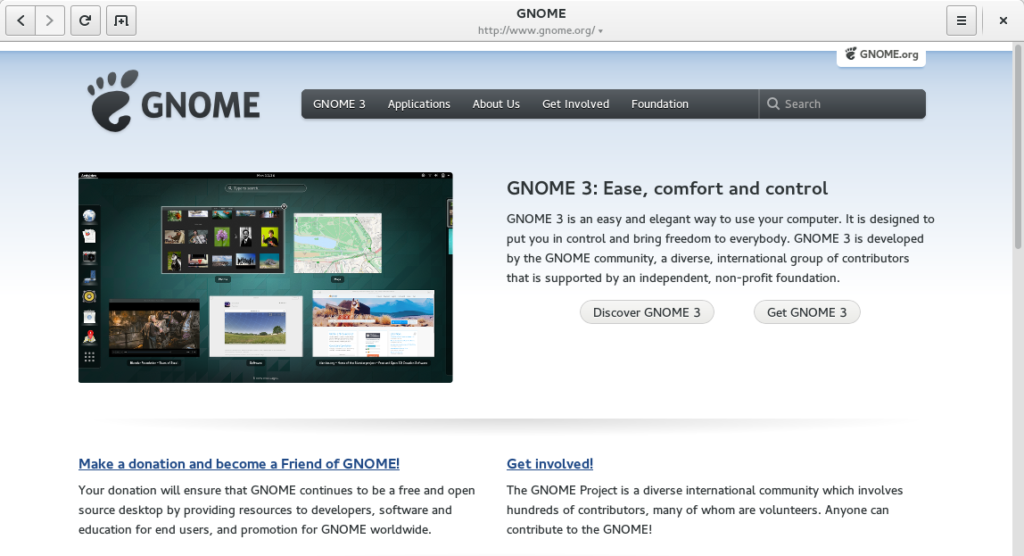
Epiphany (aka GNOME), an open-source browser developed by the GNOME Project, is the default browser for Elementary OS and is popular among Linux users. Its lightweight and reliable but doesn’t have as many features as other browsers.
Epiphany does have an immersive reader mode that reduces web page clutter and offers a quick keyboard shortcut. Recent updates have provided better tab options that allow users to easily navigate tabs.
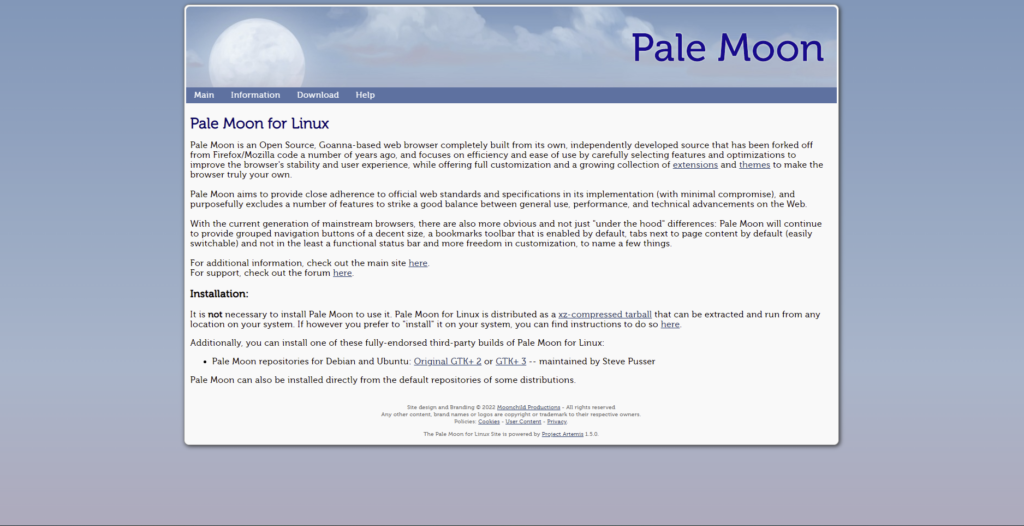
Pale Moon is an open-source browser based on Mozilla Firefox that emphasizes user customization and personalization with a library of extensions and themes.
The browser offers integrated parental control features, and support for HTML5, CSS3, WebGL, and Firefox extensions.
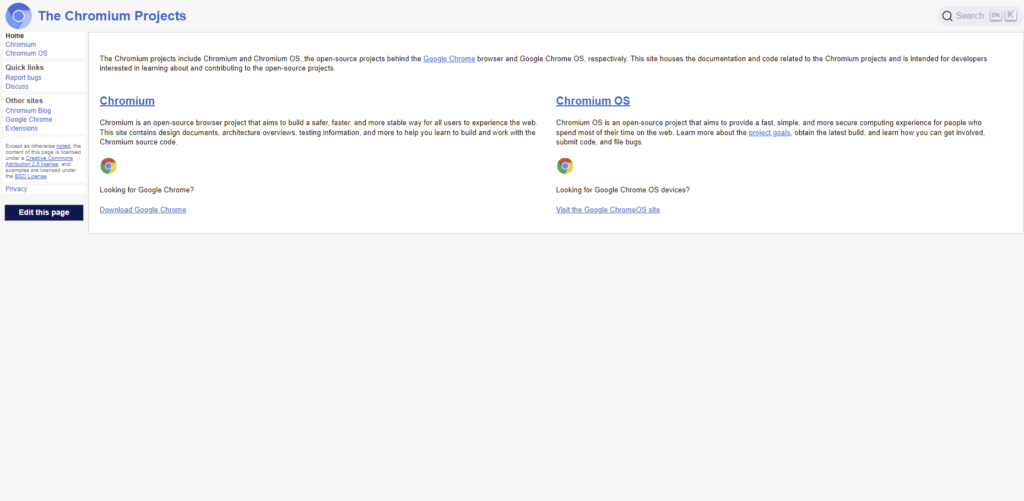
Chromium is Google’s open-source project and is what many of the big browsers, including Chrome, is based on. While it looks and feels a lot like Google Chrome, it lacks a lot of Chrome features and has some of its own unique functions.
Keep in mind that Chromium is mainly meant for developers and is not very user-friendly for the everyday consumer. For websites like Netflix, users will need to manually add support. Think of it as a playground for browser developers.
We hope you enjoy our picks for the best browsers for Elementary OS. If you’re looking for a great Linux emulator for Windows, we have some suggestions for that as well. Let us know in the comments before which browser you prefer to use with Elementary.
Omegle is a popular website that allows you to chat with random Internet strangers. Many users reported that the Omegle camera is not working or that Omegle interests are not working on Chrome.
You can encounter different problems while using this web-based chat service. So, you can expect random error messages, such as server connection errors or microphone and camera disruption.
Sometimes the issue is not related to particular website functionality, but an overall downtime. You can fix most client-side issues by using a browser for Omegle, that is fully compatible with the service.
So in this article, we’ll show you how to fix Omegle issues on Chrome once and for all.
Why Omegle is not working in Chrome?
There can be multiple reasons for Omegle video not working in Chrome, and the server issues are one of the most common causes for it. This can be fixed by waiting out or trying a different browser.
Corrupted cache can also cause this issue, and to fix it, it’s necessary that you clear the cache in your browser, close it and try again.
What browsers work with Omegle?
All modern browsers should work with Omegle without any issues. In case you have any issues with your browser, make sure that it’s up date.
Alternatively, you might want to consider switching to a different web browser.
Quick Tip:
In order to save all the time and effort from fixing other browser’s issues, you should consider Opera One for more accessibility and stability while surfing online.
This new-age browser benefits you with both Twitter and Instagram access, plus integrated messengers in the sidebar to chat with friends more easily.
Opera One
Access your favorite chat platform using this user-friendly and intuitive browser!
What can I do if Omegle doesn’t work on Google Chrome?
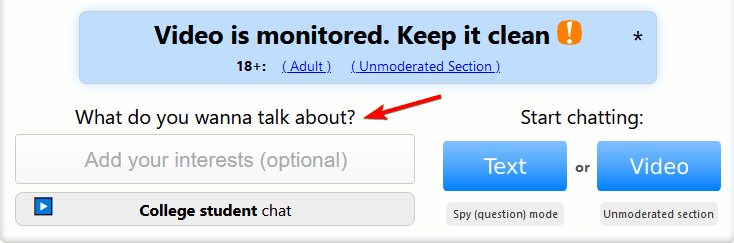
1. Do not enter any interests
Visit Omegle.
Don’t fill any interests.
Now select the video or text chat and check if it works.
Few users reported that this workaround worked for them, so be sure to try it out if Omegle is not loading.
2. Use a VPN
If Omegle is not working on Safari, Firefox, or Chrome, perhaps your ISP is blocking it, or there might be an Internet issue that is causing the problem.
However, you can easily fix this by using a VPN, and we already covered the best VPN for Omegle, so be sure to check out some of these great VPN services.
In some instances, VPN won’t work with Omegle, but we already covered that issue in one of our previous articles.
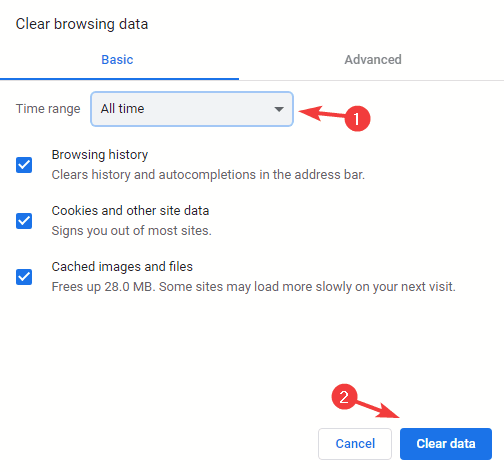
3. Clear your browsing data
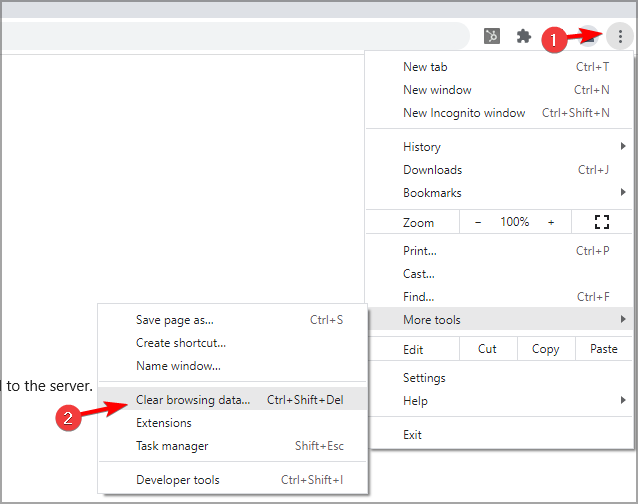
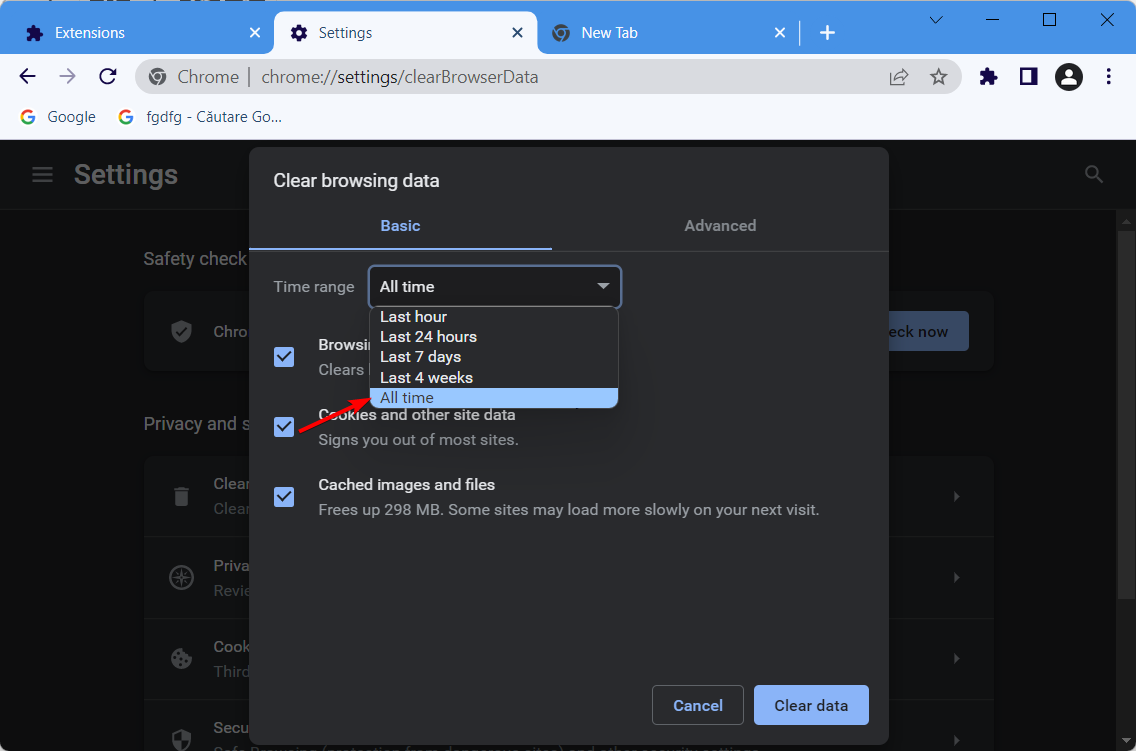
In Chrome click the Menu button and navigate to More tools. Now select Clear browsing data.
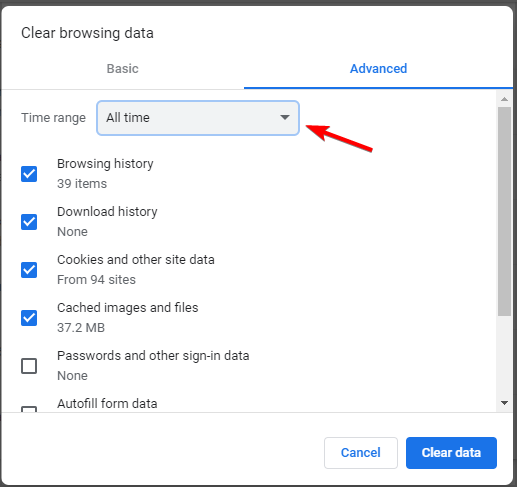
Make sure that you set the Time range to All time.
Click the Clear data button to clear the cache.
If Omegle camera is not working on Chrome, clearing the cache might help with this issue.
Omegle interests not working
If interests aren’t working on Omegle for you, make sure that you’re not using one of banned keywords. Adjust your interests and try again.
It’s also possible that this is a server-side issue, and if that happens, your only option is to contact Omegle and ask them to look into this issue.
Omegle unblocked Chromebook
In case Omegle is blocked on Chromebook, it’s done so by your administrator. There’s no way for you to unblock it on your own.
The only way to do that is to contact the administrator and ask him to whitelist Omegle on your device.
Omegle stranger not loading / camera not loading / video not working
If Omegle is not loading other person, you might be having connection problems. It’s advised to test it on a different network and see if it works.
It’s possible that your network is too slow and it can’t handle the Omegle properly, so switching it might be the best solution.
Not being able to access Omegle can be a problem, but if Omegle mic is not working on Chrome, you can always try accessing it from another browser or use our other solutions.
RuneScape is one of the most popular online RPG games, and what makes this game special is its ability to run in your browser.
With new web technologies and new browsers appearing, the question remains how to play RuneScape in your browser and can you still play it? Today we’ll find that out.
Can you play RuneScape on a mobile browser?
You can’t play RuneScape on a mobile browser, or for that matter any browser since these don’t offer support for Java anymore. The same applies if you try to play OSRS in a browser.
Though, the developers launched a mobile app for RuneScape on both the Google Play Store and Apple App Store. Just download it and play your favorite game.
Does RuneScape still use Java?
Yes, RuneScape still supports Java, but that doesn’t mean that you can’t play the game anymore on your computer. You can simply download RuneScape on your computer from the official website and play RuneScape online.
It was released when several browsers like Chrome and Firefox dropped support for Java, and as a result, users couldn’t play RuneScape in a browser.
How can I play RuneScape in browser?
1. Can you still play RuneScape in browser?
No, RuneScape can’t be played in modern web browsers anymore. The game is made in Java, and over the years, browsers fully dropped support for Java due to security concerns.
As a result, RuneScape, and any other Java-based games can’t run in modern web browsers anymore. If you want to play RuneScape, you need to download and install its desktop client.
However, RuneScape developers are suggesting that the game might still run in Internet Explorer.
Yes, it’s possible to play RuneScape with Xbox One on the Edge browser with GeForce Now. Several users have tried it out, and it works seamlessly for most, but some complained about grainy graphics.
So, you can play RuneScape classic in a browser on Xbox One, though you would be asked to sign in with the Steam account. And, the added keyboard and mouse support for the console will only enhance the gaming experience.
Even though RuneScape isn’t available anymore in modern browsers on PC, there are many other games that work. In order to achieve the best performance in those games, it’s advised to use Opera GX.
This browser has low resource usage, and thanks to the GX Control feature you can easily allocate your resources and ensure that both your browser and other applications are running smoothly.
There’s also Twitch integration that allows you to follow your favorite streamers and check your notifications easily. Thanks to the pop-out video player, you can also watch videos while multitasking.
Additional features include a built-in ad blocker and a free and unlimited VPN that should provide you with an extra layer of protection.
Opera
Feel as if you are playing your favorite browser game on the ultimate gaming rig thanks to the fantastic visuals of Opera GX.
Playing RuneScape in modern web browsers on PC isn’t possible anymore, but you might have some luck playing it in Internet Explorer, so feel free to try that.
For the best experience, we would suggest using a specialized client, so don’t miss our Jagex Launcher review for more information.
Discord’s VoIP service compatibility with game publishing and distribution platforms like Steam means it can broadcast or show what you are playing to other users on your server. However, you can make Discord not show the game that is running.
How can I make Discord not showing what I’m playing?
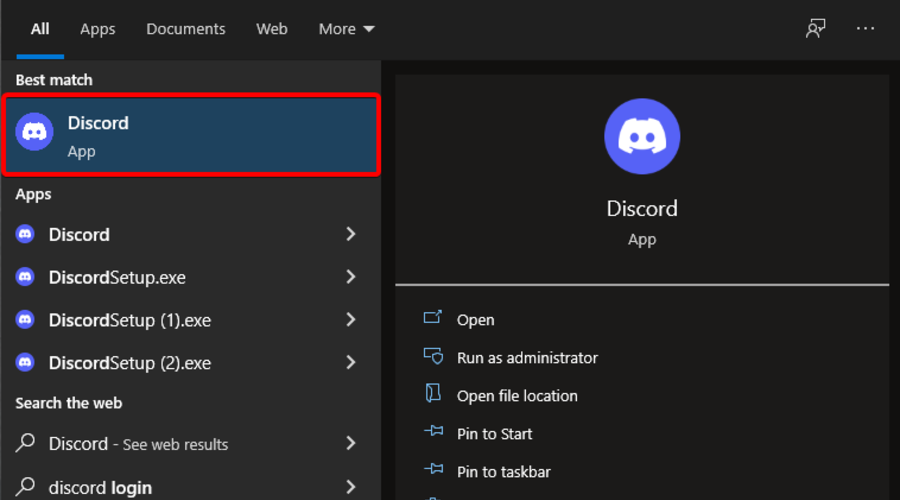
Hit the Windows key, type Discord, then open the app.
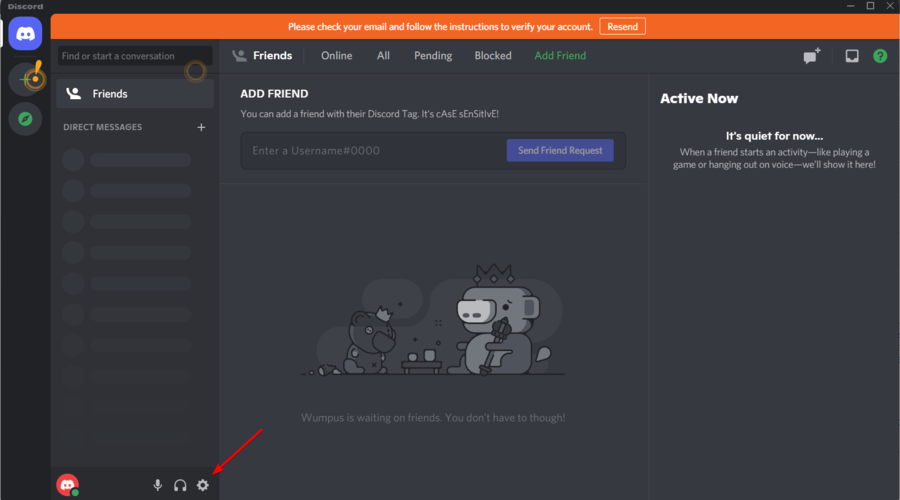
Click on the little Settings icon (Gear button) in the left bottom corner.
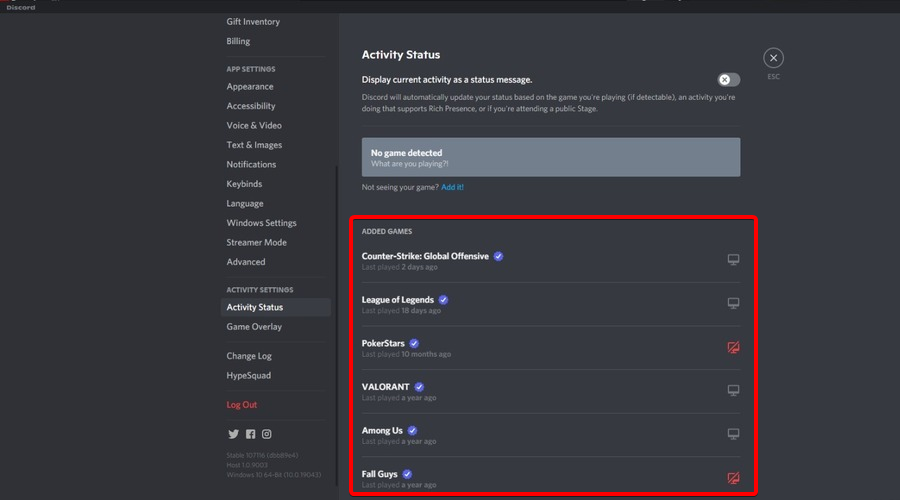
From the left pane, scroll down and open the Activity Status tab.
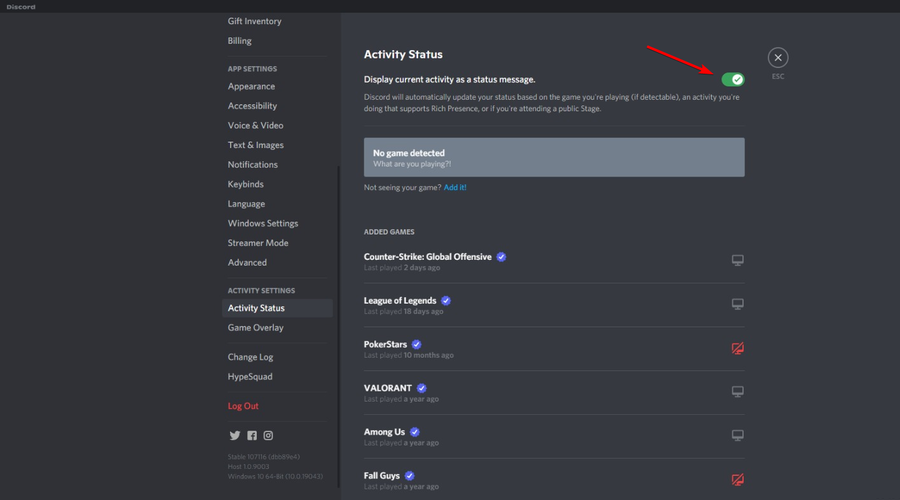
Toggle the switch to turn off Display current activity as a status message option.
Close the User Settings window, and that’s it.
Once disabled, the app will stop sharing your gaming activity with other users. Thus, you’ll manage to make Discord not show the game that you’re playing.
However, if the app continues to put your game title in the status message, try deleting the game from the Activity Status tab. Hover over the game you want to remove and click the red X icon on top of the right corner.
Can I make Discord show what I’m playing again?
In case of change your mind, you can always enable the option again. You should only follow the above steps, then enable back the Display current activity as a status message, from the Activity Status tab.
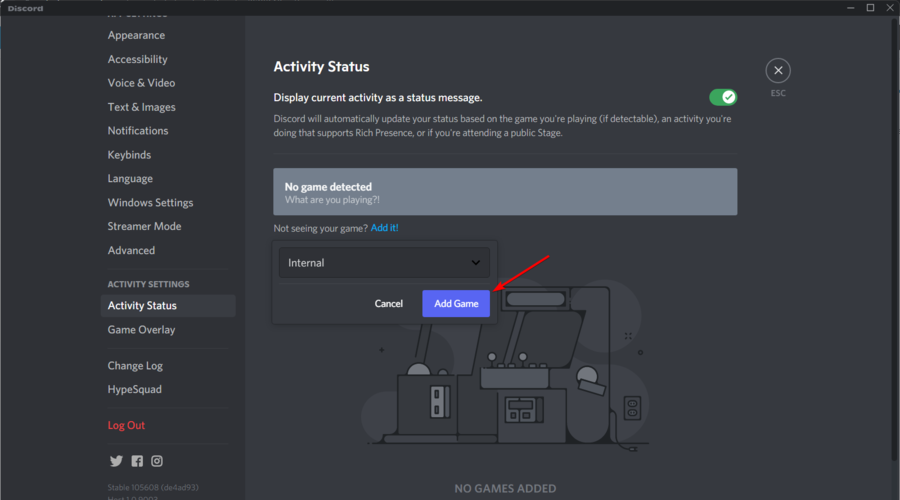
If your game is not showing in the list, just click on the Add it button, under the No game detected section, as in the picture below.
Why would I want to make Discord not show what I’m playing?
As mentioned before, if a game uses Discord’s Rich Presence, your friends can even see where you are in-game.
Because cyberattacks are more frequent, it seems like some users are concerned about their privacy. Thus, they are looking for ways to make Discord not show what they are playing.
As you can see, keeping your gaming activity private on Discord is not a complicated or cumbersome process.
If you follow the steps presented in this guide, nobody will ever know what you choose to play, so you can focus on playing without announcing your choice. Lucky for you, Discord also doesn’t have read receipts so if you’re asked about games you’re playing, you’re safe.
Don’t hesitate to share your experience with us by using the comment section below.
When it was first released back in 2009, Minecraft took the world by storm. After the Better Together update, Minecraft fully supports cross-platform play between PC and Xbox.
The only catch is that you can only play with friends who have the same version. Sadly, Xbox 360 does not support Minecraft cross-play either.
The game developers at Mojang had an incredible idea:
What if we give our users the ability to play across platforms?
In a historical move, they started working on this project, and they finally did it.
They released a very important update to the Minecraft edition, that allows you to play your favorite game from an Xbox One, Windows 10, Nintendo Switch, and even Android/iOS handheld devices.
Which version of Minecraft can cross-play?
If you want to play Minecraft with your friends, but you have different versions of the game, you need to consider some important aspects of cross-play.
In case you have the Minecraft: Bedrock Edition, you can play with Windows, PlayStation, Xbox, Switch, and smartphone players.
For the Java Edition of Minecraft, then you can play with Windows, Mac, and Linux players, but you need to redeem your code on your Mojang account in order to cross-play with other platforms.
Now, if you’ve been wondering if you can play Minecraft using your Windows 10 PC with your Xbox-playing friends, you’ve come to the right place.
The short answer to this question is a resounding YES. But it all depends on the version of the game you have, and also the type of platform. Read on to find out more.
Can Minecraft Java play with Xbox?
No, Minecraft Java can’t be played on Xbox. Minecraft Java can only be played on Windows, Mac, and Linux. Also, Minecraft Java can’t be played cross-platform with Xbox or Playstation.
The Bedrock edition of Minecraft can be played on the Xbox, and it was programmed in C++. Only other instances of Minecraft Java, which can run on either Windows or Mac OS, may connect to one another.
Is Minecraft cross-platform Xbox and PS5?
The Xbox One, Series X/S, Nintendo Switch, PS4, PS5, Mobile, and PC versions of Minecraft are all compatible with one another. Additionally, it supports cross-progression between all devices. This means that you may begin the game in a new location just where you left off in another.
Quick Tip:
There is a worthwhile browser that works just perfectly with your Minecraft gameplay, and that is Opera GX.
You can navigate on this browser built for gaming and enjoy benefits like a game’s release calendar or new game deals in the GX Corner. More, you have a RAM and CPU resource limiter to boost your game.
Opera GX
Play your Minecraft sessions on your PC using a gaming browser for better game performance.
To play cross-platform in Minecraft: Bedrock Edition, all you need to do is add and invite your friends to the world you create. Then you will have created common cross-platform servers for Minecraft on Xbox and PC.
1. Launch Minecraft and log into your Microsoft account from the main menu.
2. Load an existing world, or create a new world and launch it.
3. Open the in-game Pause menu.
4. Click Invite to Game, and select Find Cross-Platform Friends.
5. Find your friends, and choose Add Friend.
6. Under Online Friends, you’ll find those available for multiplayer. Check the box next to their name, and click Send 1 Invite. Once they accept, they will be added to the world you created.
You should take into consideration that not all worlds can be played by users from different platforms in the Bedrock Edition of Minecraft. This is due to the exclusive content that each console has.
There is also the paid solution offered by Minecraft Realms, which hosts multiplayer servers.
Minecraft: Java Edition remains the original version of the game that is available for Mac and Linux users. This edition cannot be played on consoles.
Note, however, that Java users are allowed to play with other Java users using a Windows, iOS or Linux operating system.
Needless to say, doing cross-platform on Java becomes more complicated, but not impossible to play. All you have to do is choose the right alternative for you from the 3 available above.
Minecraft cross-play Xbox One & Switch
Cross-play setup on Xbox One is a breeze since, in comparison to other platforms, there are fewer limits placed on the types of material that may be shared. After installing the game, you won’t need to do anything more since the console has direct interaction with Xbox Live.
Users of Xbox One should make sure they are using the original version of Minecraft. Not the incompatible Minecraft: Xbox One Edition.
Enter the Microsoft Store on Xbox One and select the Search field in order to type Minecraft.
Choose Minecraft from the available titles and download the game. It will be priced at $51 or free for existing Minecraft: Xbox One Edition owners.
Following the completion of the procedures outlined above, your Xbox One will be ready for Minecraft cross-play with other gaming platforms.
Because of the limits of the Nintendo Switch platform, cross-playing games present a few extra challenges that must be solved. Because your game does not have native connectivity with Xbox Live, you will need to login into a Microsoft account.
In addition, since there is not an integrated web browser, you will need to get assistance from a mobile device or a personal computer.
Users using the Nintendo Switch version should take the same precautions as those using the Xbox One version and ensure that Minecraft rather than the incompatible Minecraft: Nintendo Switch Edition is installed.
Access the Nintendo eShop and search for Minecraft in order to download it.
Open the game and select Sign in for free then navigate to the remote connect page on your PC or mobile.
Enter the unique code shown on your screen then sign in to your Microsoft account. Your Xbox Live profile will show on your Switch. Select Let’s Play to complete the process. That’s it!
The video game Minecraft may now be played across several platforms thanks to its integration with Xbox Live.
How to choose the best community-based server?
The first thing you need to think about is the content that a certain server provides for its users. From the most basic survival mode to the most complex well-configured advanced playing system, everything will be accessible.
This suggests that you are able to play in a variety of modes while using the same server. On the other hand, you should never stop playing in survival and creative mode. As this will ensure that every second of gameplay is enjoyable.
You are all aware of how crucial word of mouth is when it comes to finding the appropriate server for your gaming needs, and you have all experienced its importance.
A good server will provide you with a variety of unique areas and stuff that you are free to explore without experiencing any lag or technical difficulties.
By reading Internet reviews, you may get a better idea of how reliable the server you’re using is, which can ultimately enhance the quality of your gaming experience.
Join a server with at least 100 other players if you want to take part in large-scale activities or participate in minigames. If you are looking for an online community that has a smaller member count, like 50 or fewer people, this could be the best option for you.
If you choose to build your own Minecraft server that your friends can join, then a wise idea would be to protect your online privacy with a VPN.
Because most servers are community created, which has helped the game thrive over time, there is a distinct possibility that you may need extra protection for your data.
Discord offers a wide array of features, including screen sharing, but several users reported that Discord screen share has no audio.
This can be an issue, especially if you’re sharing multimedia, but there’s a way to fix this problem, and today we’re going to show you how to do it.
Why does my Discord screen share have no audio/audio quiet?
In case you’re wondering why is Discord screen shares audio quiet, you should know that a bug probably occurred in your app. Fortunately, it is extremely easy to fix it and you’re going to discover how.
If you notice that there is no sound when you screen share on Discord, it might be due to a corrupted cache/temporary files. We also compiled some easy fixes for this. Remember that some of them might also work if Discord audio keeps cutting out.
In addition, do not forget that there might be some issues with your audio drivers. Because these are the most relevant components in using the Discord screen share audio, make sure you always keep them up to date.
Now, let’s discover what you can do, so make sure you read this guide completely.
What can I do if the Discord screen share has no audio/audio quiet?
1. Update Discord
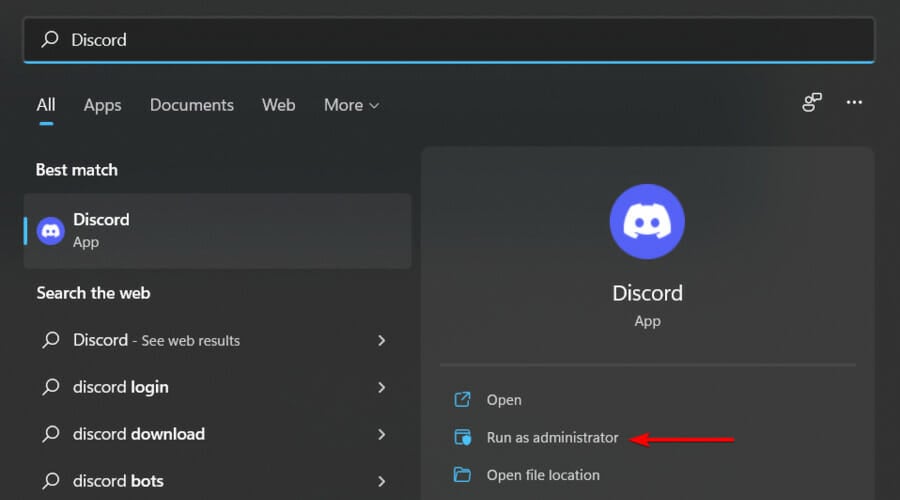
Use the following keyboard shortcut, then type Discord: Windows + S.
Right-click on the first result and select Run as Administrator.
Allow the program to make changes to your computer.
NOTE
Keep in mind that Discord will automatically update itself if the program is run as administrator.
The Discord devs are constantly updating the app, so most of the time when you encounter a problem, it will get fixed in the next update.
If there’s no audio while using Discord screen share, make sure that you update Discord to the latest version.
2. Reset voice settings
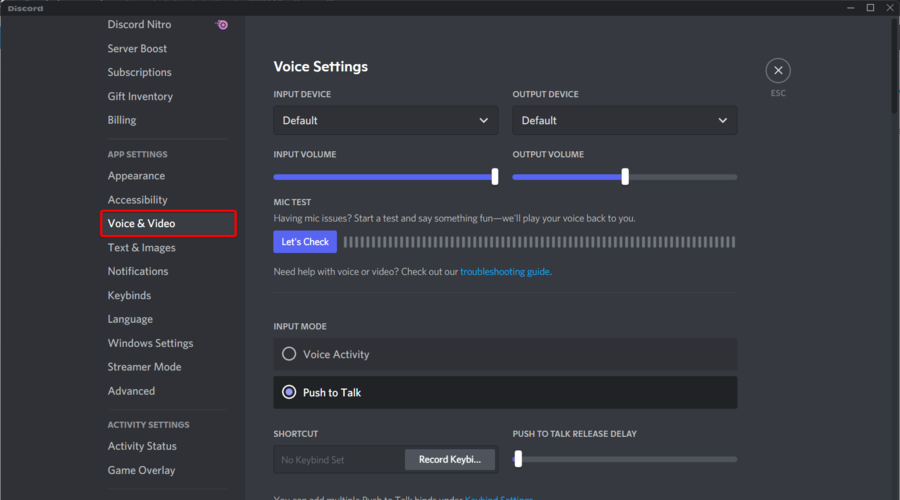
Hit the Windows key, type Discord, then open the first result.
Click on the Settings icon (marked as a gear in the bottom of the window).
Click on Voice & Video.
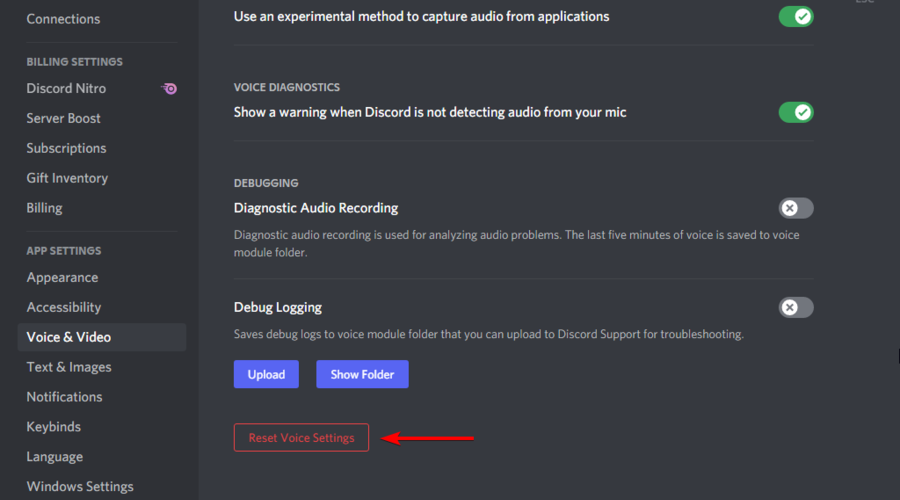
In the right window pane, scroll down, then click on Reset Voice Settings.
Click Okay on the window that pops up.
Few users reported that they fixed Discord screen share no audio issue simply by resetting their voice settings, so be sure to try it.
3. Add shared program to Discord
Double-click on your desktop Discord icon, or hit the Windows key, type Discord and click on the first result.
Navigate to User Settings.
From the left window pane, select the Activity Status tab.
In the right window pane, click on Add it.
Click on the drop-down menu and select the program you want.
Then click Add Game.
Make sure you have Overlay toggled on. So, navigate to Game Overlay.
Now, make sure that the Game Overlay button is set On.
After making these changes, check if Discord screen share still has no audio.
4. Update the audio drivers
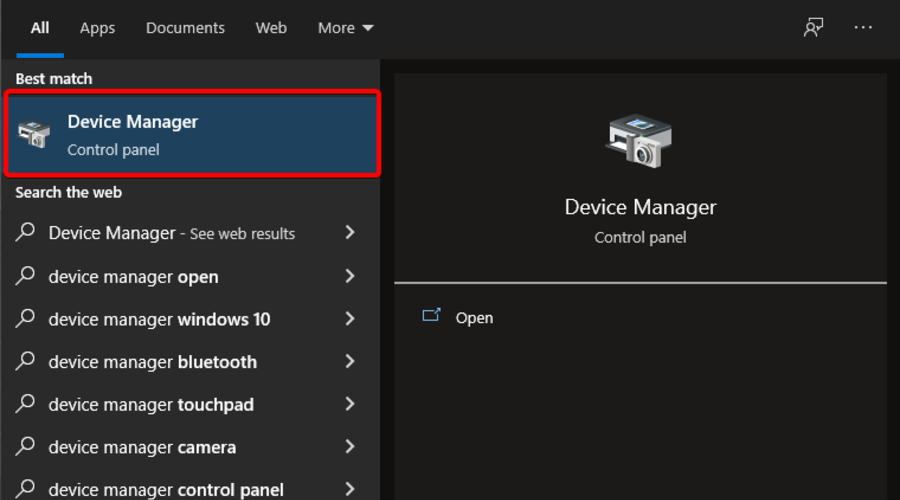
Hit the Windows key, type Device Manager, then open the first result.
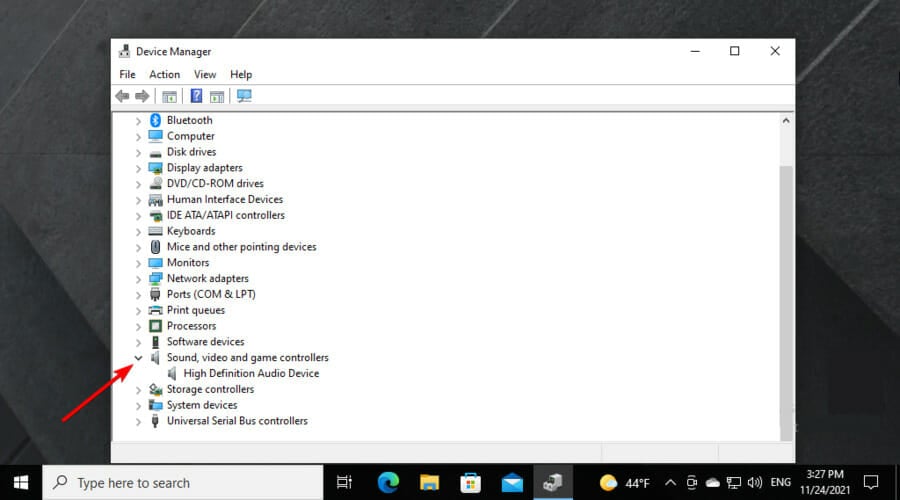
Expand the Sound, video and game controllers section.
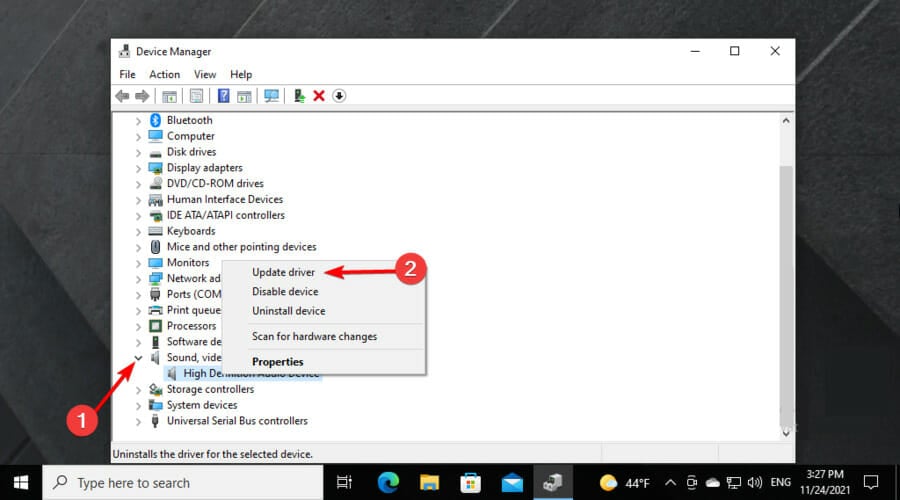
Right-click on the audio driver, then choose to Update driver.
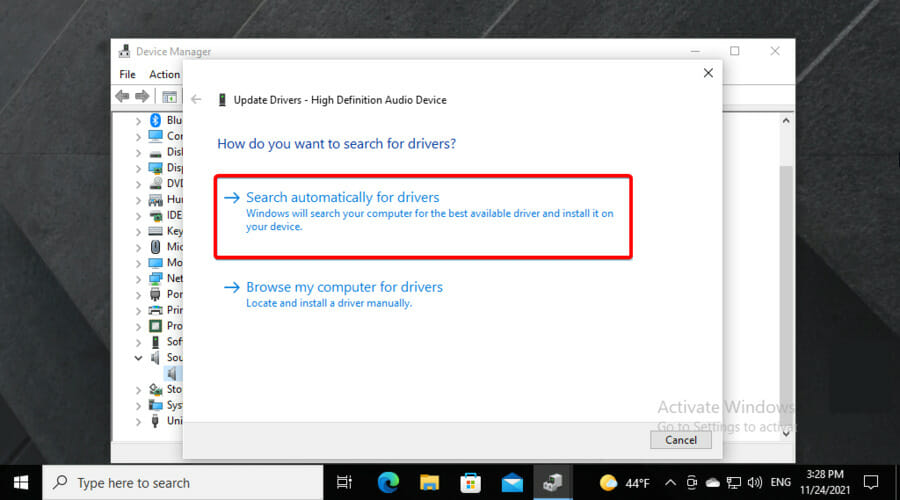
Select Search automatically for drivers.
Then, you’ll be notified if there are any drivers to update.
5. Reinstall Discord
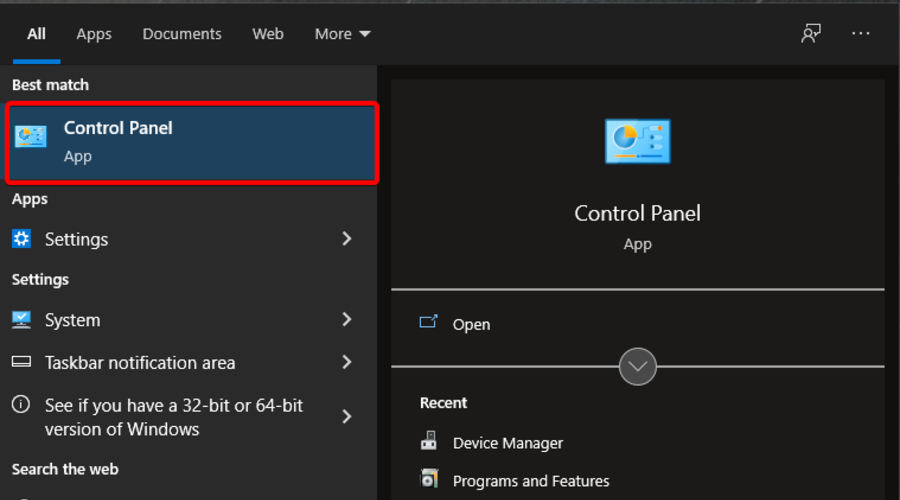
Use the following keyboard shortcut, then type Control Panel: Windows + S.
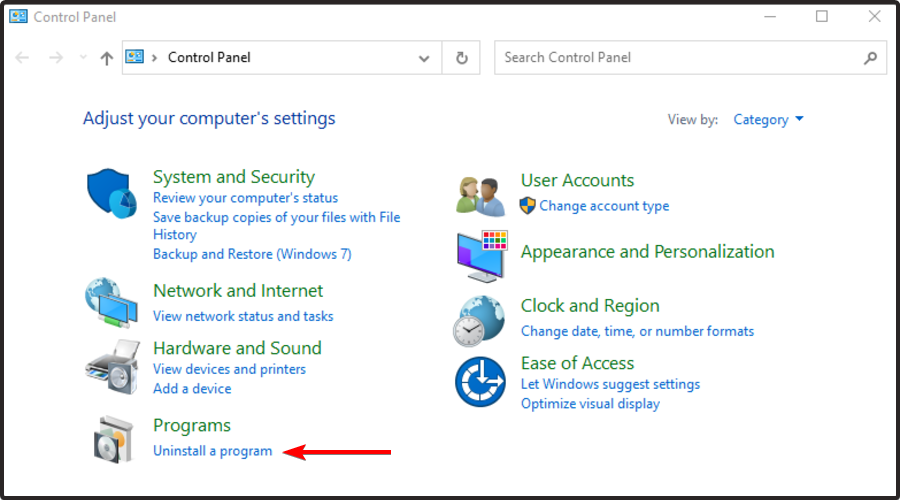
Under View By select Category.
Then select Uninstall a program.
Find Discord, right-click on it, and select Uninstall.
Click on the setup wizard and follow the on-screen instructions.
What else should I know about the Discord screen share?
Not only that the Discord screen share might have no audio/audio quiet, but it can also not work at all. From what users say, sometimes Discord’s screen share displays a blank screen instead of the game.
Some of the most common reasons for this problem are missing permissions, poor connections, or temporary bugs. Fortunately, we compiled a list of useful solutions.
These are some easy solutions to fix your audio problems during screen-sharing on Discord, so you and your friends can get back to watching your favorite streams or movies together.
If you have any feedback or information related to the article, feel free to leave it in the comment section below.
We discuss here the best options for private search engines for Windows 10 and 11.
Standard search engines like Google and Bing track users’ activities and profile their online behavior. The primary reason for this is to create attractive advertisements.
However, there is always the concern of personal information being compromised due to security breaches, state surveillance, and unauthorized data sharing.
Fortunately, private search engines can help keep your confidential information safe.
Simply put, Private Search Engines, also known as PSEs, use proxy and encrypted search requests to hide your personal information from anyone looking to misuse your data.
Below you will find more information about a PSE, how it works, and where to find the best private search engines on the internet.
Regular search engines vs. private search engines
Everyone knows how a regular search engine like Google.com and Bing.com operates. Users type in what they are looking for, and related links and websites appear.
However, most people don’t know that many popular search engines keep each user’s profile.
This profile is typically used for advertising, as it can tailor your ads. Yet, sensitive private information can also be exposed, harming the user.
Private search engines are becoming more popular as they help keep users’ browsing information confidential. For example, PSEs do not allow cookies to track your browsing history, meaning you won’t have a profile.
While there may still be advertisements on PSE, they will not participate in any behavioral tracking. There won’t be filters based on your previous online behavior.
There are two types of private search engines: independent and metasearch. Independent search engines use their own index and crawler.
In other words, they do not utilize the help of search engine titans such as Bing, Yahoo, and Google.
On the other hand, metasearch private engines use proxies and sometimes encrypted servers to access popular search engines like Google.
Metasearch engines will be more powerful as they can access the extensive indexes of standard search engines.
Why do I need a PSE?
Now that you know what PSE is and how it works, you may ask why should I get one? Individuals typically use PSE primarily for privacy reasons.
But, with a PSE, you will also not be targeted with advertisements based on your previous online activity. Furthermore, you won’t have to worry about your information being sold to third-party trackers.
So, simply put, if you value your privacy and are tired of advertisements using your private information, you will want to use a private search engine.
If you are interested in using a PSE but don’t know where to start, the below list of top PSE on the internet will help point you in the right direction.
How can I get a browser with a built-in private search engine?
Few browsers offer such options as privacy and safe browsing. Usually, you would have to take care of these settings by installing third-party extensions.
But Opera One browser comes with several features that help protect your identity while surfing online.
All you need to do is to install the browser for free and tweak a few options in the Privacy & Security section of the browser’s settings, depending on your preferences.
To mention just a few pros in terms of privacy with Opera One:
Built-in ad-blocker to keep annoying ads at bay
Tracker blocker to stop tracking attempts
Free VPN with no traffic limit
Settings control to allow you to choose how Internet sites can access your data
Crypto Mining protection to block crypto mining scripts in case your PC gets hijacked
Opera One
Protect your online presence and keep your identity private with Opera One.
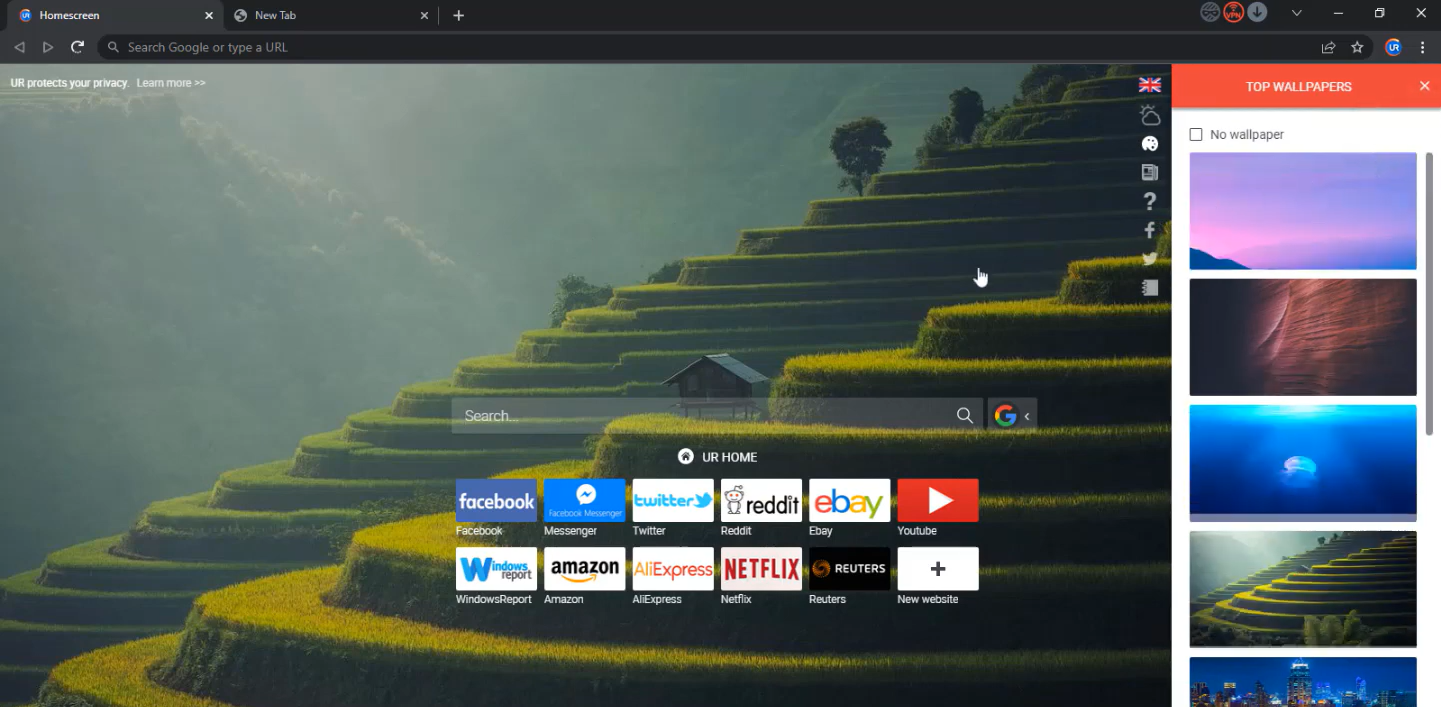
UR Browser is one of the most private and self-proclaimed safest browsers. It has multiple safety options, which you can switch on and off according to preference.
Besides being safe, Ur Browser has quick page loads, fast download speeds, and conveniently placed bookmarks. Overall, it is an excellent choice for those who wish to be as safe as possible while using the internet.
UR Browser also includes these key features:
Anti-tracking
Anti-profiling
Light bandwidth usage
UR Browser
Keep your identity private while browsing the internet with UR Browser, the safest and most private search engine!
With all the cyber-attacks and increased concerns over government Internet surveillance, DuckDuckGo has already surpassed 10 billion searches.
This is what makes DuckDuckGo probably the most popular of all PSE.
Part of its popularity is attributed to the high-security DuckDuckGo promises to users. Searches will produce instant results without any tailored advertisements.
Furthermore, with the filter feature, you can filter searches into categories and regions to easily access the news in a different country or region, for instance.
DuckDuckGo users also can turn off annoying advertisements in their settings.
Users concerned with interface aesthetics will be pleased to know that DuckDuckGo offers customization options. There are six themes to choose from: Retro, Terminal, Contrast, Default, Basic, and Dark.
The colors of backgrounds, search results, typeface, etc., can also all be changed and customized to your liking. This is a great search engine for PC.
The great thing about Lukol is that it will not only keep your information safe by using proxy servers but is built to help prevent users from being tricked by internet fraudsters.
In other words, it has a safeguarding feature that keeps users from entering websites that could potentially flood your computer with spyware and viruses.
Lastly, we recommend it as one of the better options for unblocked search engines.
Oscobo is an independent search engine that allows users to search for specific types of content such as videos, images, news, and more. Furthermore, it does not allow any party to store or track your browsing data.
Users of Oscobo also have the option of adding a Chrome extension which will make using the PSE more convenient.
WolframAlpha is a special search engine considered among the best for Windows 10 and 11. It is designed specifically to provide users with knowledge. Also, it is unique because it uses its own massive supply of expert-level information.
Additionally, WolframAlpha uses algorithms to quickly and automatically answer questions you input in the search query.
Furthermore, while WolframAlpha can be used to surf the Internet for entertainment and work-related information, it is primarily built for teachers and students.
Users will need to pay a monthly fee to go pro and use the collection of features that can significantly aid students in their struggle for academic success.
Pro users can upload data for analysis, get interactive visuals that can be used for presentations, access optimized web apps, and more.
StartPage makes our list of the best search engine for Windows 10 and 11. It is perfect for users looking for something simple, minimalist, and aesthetically pleasing.
The search engine offers only a few settings, filters, and just a bunch of options, which is attractive to some people looking for something easy to navigate.
It may not be as powerful as other private search engines, but it is certainly easy to use.
The Qwant search engine fully prioritizes privacy and takes pleasure in not keeping track of its users’ search queries, and it does not sell their personal information.
The search engine, which has French roots, has a straightforward user interface.
Your results are categorized by the engine into three primary groups, namely social, news, and web. Additionally, it leverages AI to provide its customers access to a music area created specifically to assist music fans in finding new lyrics and songs.
Lastly, it is about the best search engine for your laptop.
While we have mainly avoided these two search engines, it is wise to note that they are the biggest and the leading pioneers of internet search. However, in more recent years, Bing’s popularity has waned, but Google still holds the larger market share.
That said, Google, for years, has built a vast repository of data; this has been aided by the rise of services like YouTube, and the Gsuite, which are among the most used internet services. Hence, you can expect Google to have larger and better data, resulting in a better search engine.
There you have it our round-up of the best search private engine options for Windows 10 and 11.
So, with the help of these private search engines, you can rest assured that their browsing activities are safe from prying eyes.
If your favorite PSE is not on this list, feel free to let us know in the comment section below, and we’ll surely take a look.
Discord is an app that enables players to share the gaming experience with other users. However, it seems like sometimes Discord’s screen share is not working.
If you encounter this problem, you’ll probably see a blank display instead of the game. We understand how irritating it can be, so we prepared some methods that will solve it with ease.
Before discovering the best solutions to make your share screen work, let’s examine some reasons that explain why it can occur.
Why can’t I share my screen on Discord?
Several potential reasons explain why you’re struggling to share your screen on this app. Some of the most common ones include:
Missing permissions – These mean that one of the programs (the game that you are trying to share or Discord) run using admin privileges while the other is not. This alteration often causes the screen share not working issue.
Full-screen mode – Keep in mind that the Discord fullscreen mode might also get you into screen-related troubles.
Poor connections – It is important to ensure that you’ve added the game you want to run to Discord. Otherwise, the app won’t be able to recognize it.
Temporary bugs – Like any other app or program, Discord might encounter temporary issues. Fortunately, it takes only a few seconds to get rid of them.
These are some of the resolutions that can fix Discord’s screen sharing not working with a blank screen.
What can I do if Discord screen share is not working?
1. Check you’ve added the game to Discord
First, check that you’ve added the game you’re trying to share to Discord. To do that, open Discord and the game you want to share.
Click the Settings button in Discord’s window.
Then click on Activity Status, from the left window pane.
Click the Add it option.
Click the Select box to choose a game to share.
Press the Add game button.
In addition, turn on the game overlay toggle.
2. Delete the Discord cache folder
Use the following keyboard shortcut: Windows + R.
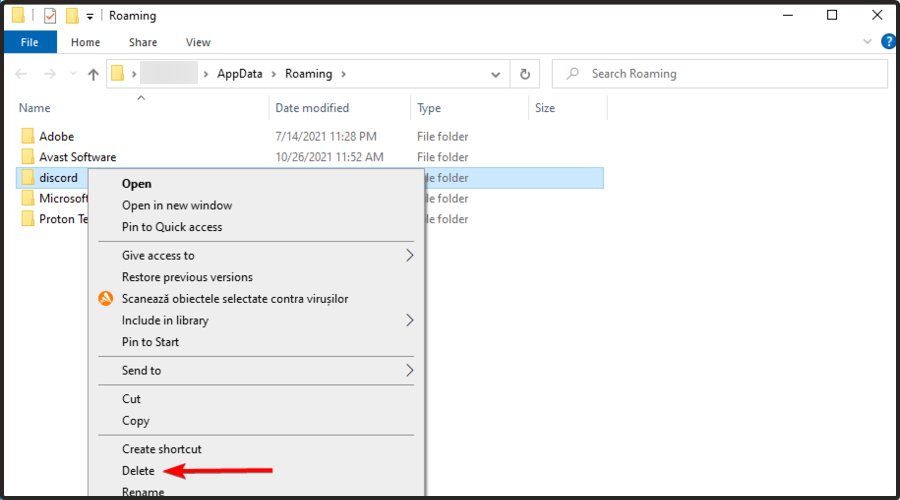
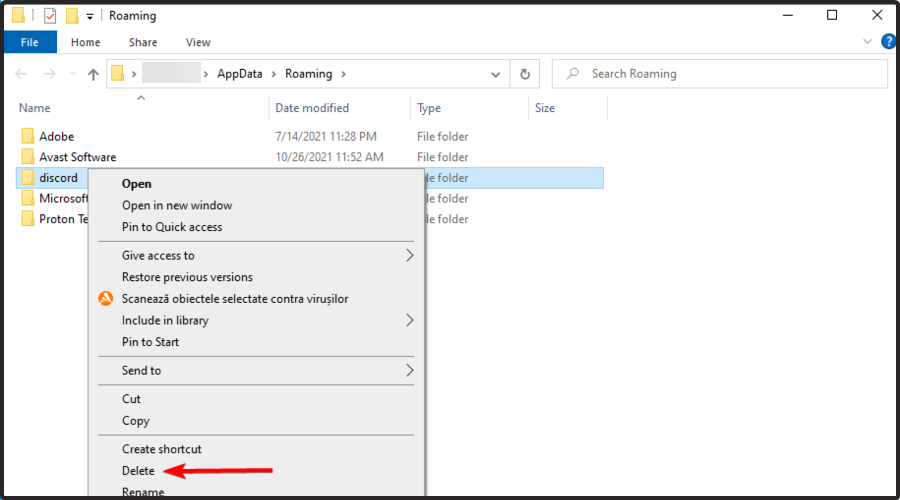
In Run’s Open box, type %appdata%, then click on OK to open the Roaming folder.
Right-click the Discord subfolder and select Delete.
Restart Discord.
Some users have been able to fix our presented issue by clearing the software’s cache folder. Remember that before following the above steps, you have to close the app.
3. Turn off the Use our latest technology option
Hit the following keys: Windows + S, type Discord, then open it.
Click the Settings button at the bottom left of Discord’s window.
Select the Voice & Video tab.
Scroll down, then toggle the Use our latest technology to capture your screen setting off if it’s on.
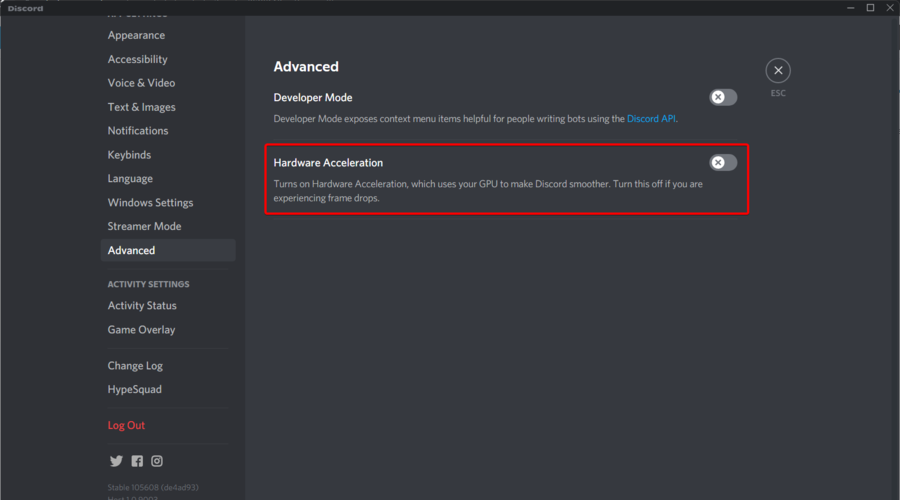
4. Turn Hardware Acceleration off
Hit the Windows key, type Discord, then open it.
Go to Settings, from the left bottom of the page.
Select the Advanced tab, from the left window pane.
Toggle Hardware Acceleration off if it’s currently enabled.
Keep in mind that if you’re utilizing an older laptop with lower specifications, the Hardware Acceleration option might harm your optimal activity. So, turning this off might solve the Discord share screen not working
5. Run Discord and the game as an administrator
Press Windows + S keys.
Input the keyword Discord in the search box, then from the right window pane, choose to Run as administrator.
Thereafter, run the game as administrator by right-clicking its EXE file and selecting a Run as as administrator context menu option.
6. Reinstall Discord
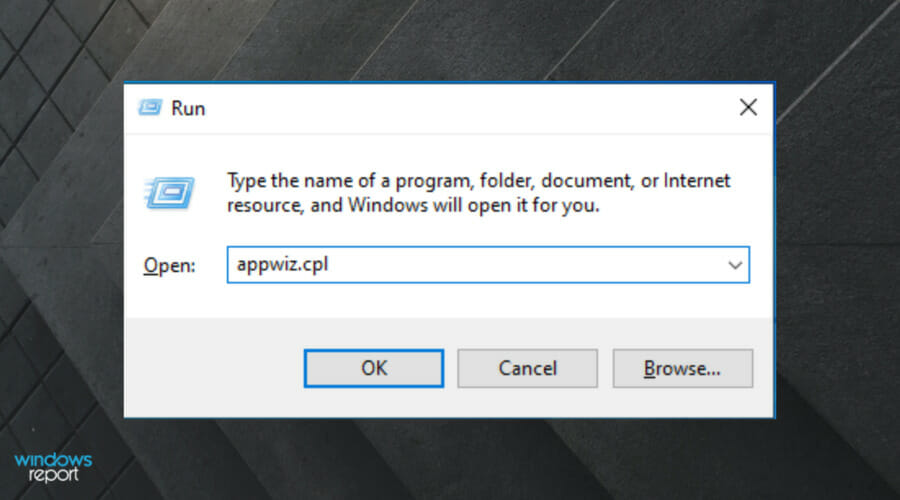
Open the Run text dialog box, by pressing simultaneously on Windows + R keys.
Type appwiz.cpl, then hit the Enter button.
In the Windows uninstaller, select Discord, then click on the Uninstall button.
Now, you’ll have to delete any leftover data. To do it, run the same dialog box.
Type %appdata%, then click on OK.
In the Local folder, right-click on the Discord folder and select Delete.
Thereafter, restart your PC.
To install the latest Discord version, access the official website and click on Download for Windows.
Also, note that Discord doesn’t support fullscreen sharing for programs. Users can only screen share games when they’re not in this mode. So, we suggest switching the game you’re trying to share to a windowed mode.
What else should I know about Discord’s screen problems?
We consider properly letting you know that not being able to share the app’s screen is just one of the potential issues.
Users also reported that Discord screen share has no audio. To fix it with ease, we recommend checking our dedicated tutorial. Also, do not hesitate to use the same solutions if your screen generates quiet audio.
These types of issues can occur when trying to stream Prime Video on Discord, but we have a special guide that shows you how to avoid any issues while doing that.
Those are a few of the more probable fixes for Discord’s screen sharing not working. Aside from that, try closing third-party background processes with Task Manager to ensure there aren’t any conflicting programs.
Getting a Your File Couldn’t Be Accessed It May Have Been Moved, Edited or Deleted Err File Not Found error? We’re here to assist you.
This issue is somewhat similar to Chrome error code 5. The main culprits are problems with PDF extensions and missing or corrupt files. Here’s how to address it:
How to fix your file was not found error on Chrome for good?
1. Remove the Duplicate Tab extension
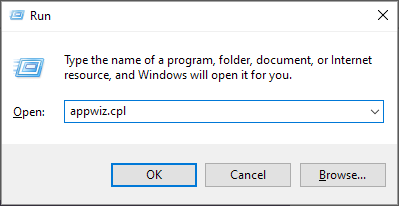
Open the Programs and Features tab by pressing the Windows key + R hotkey.
Entering appwiz.cpl in Run’s text box.
Select the Default Tab, and press the Uninstall button.
Duplicate Tab is not a genuine extension. It is, in fact, a browser hijacker that’s bundled with some freeware software distributed on websites. Browser hijackers are viruses that open new tabs, so it’s important to remove them.
Many Chrome users have discovered that the ERR_FILE_NOT_FOUND error is due to the Duplicate Tab extension.
Thus, removing Duplicate Tab will probably fix Error 6. You might find that the Programs and Features tab’s software list includes Duplicate Tab.
2. Disable the Chrome extensions
Click the Customize Google Chrome button at the top right of the browser‘s window. Select More tools, and choose Extensions to open the tab in the snapshot directly below.
You should certainly delete Default Tab if you find it listed there.
Deselect all the selected checkboxes to disable the other extensions.
Then restart the Chrome browser.
If that resolves the issue, switch all your extensions back on.
Then you can switch one extension off at a time until the Error 6 is fixed to better identify which add-on you need to remove.
If you can’t find Duplicate Tab listed on the Programs and Features tab, the issue could be due to another extension.
After disabling the problematic extensions, the Your file couldn’t be accessed it may have been moved, edited, or deleted. err_file_not_found error will be gone.
3. Reset Google Chrome
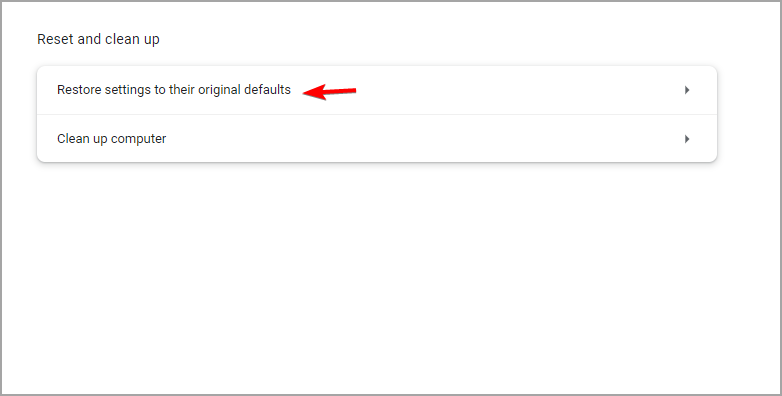
Press the Customize Google Chrome button to open the browser‘s menu. Select Settings.
Select Reset and clean up.
Now click Restore settings to their original defaults.
Confirm that you want to reset the browser.
Resetting Google Chrome to its default settings might also be an effective resolution for Error 6. That will disable Chrome‘s extensions and themes and clear temporary data.
4. Fixing the error when developing extensions
Some developers have also found that the Your file couldn’t be accessed html error occurs when developing Chrome extensions. This is usually because a popup.html file doesn’t match the popup manifest in a manifest.json file.
Make sure that the popup file exactly matches the popup manifest specified within the JSON code. You can fix the issue by editing either the popup file title or specified popup manifest so that they match.
5. Reinstall Google Chrome
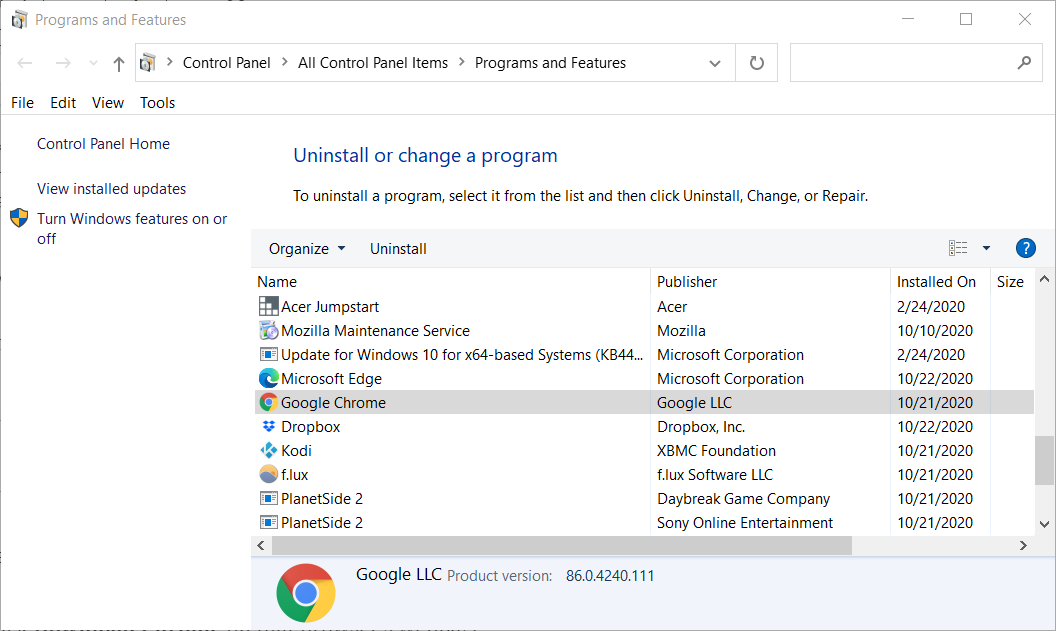
Press Windows key + X and select Apps and features.
Now select Google Chrome on the list.
Click Uninstall.
Now follow the instructions on the screen to remove the software.
After doing that, download and install the latest version of Chrome.
6. Try another browser
If all else fails and you don’t have the time to keep troubleshooting, try another browser. A good alternative that is reliable and in our experience has no file not found type of errors is Opera.
It pretty much has everything you will find in Chrome and a little extra. Both are made using the Chromium engine, however, Opera scores more points when it comes to system requirements, and it is also far more secure since it comes with a built-in VPN, tracker blocker, and more.
Opera One
Get a fast and reliable browser that might end up becoming your new favorite!
This error message appears when trying to visit certain pages, and in most cases, it’s caused by your extensions.
Corrupted files can also be responsive for this issue. The error comes in several variations, and here are the most common ones:
Err_file_not_found Android webview: If this issue appears on your mobile phone, try using a different browser.
Err_file_not_found PDF preview: Missing PDF file can cause this problem. Alternatively, PDF extensions can interfere with this process.
Err_file_not_found Firefox, Chrome: Any browser can be affected by this issue. Check your settings to fix this problem.
Err_file_not_found Adobe: This issue was reported when viewing Adobe’s website. Clear the cache and check again.
Err_file_not_found Outlook: Viewing PDF attachments can cause this problem. Check your extensions to see if that solves the problem.
Err_file_not_found Windows 10: This error affects all versions of Windows, so it’s not uncommon to see it on Windows 10.
Err_file_not_found HTML, CSS, JavaScript: If you get this problem, check if your components are properly linked.
That’s how Chrome users can fix the ERR_FILE_NOT_FOUND issue. In most cases, the issue is related to the extensions or one of your settings.
This isn’t the only error affected by your settings, and many reported Download failed: Network error in Google Chrome, but we tackled that issue in a separate guide.
Did you find a different solution for this problem? Let us know in the comments section below.
High-quality audio makes you able to enjoy listening, learning, or enjoying. Anything greater than 44.1 kHz sample rate or higher than 16-bit audio depth can be considered good audio quality.
Users can listen to high-resolution audio on websites such as YouTube or subscribe to audio-streaming services such as Spotify or Apple Music and listen to songs and podcasts within their browsers.
But there always remains some confusion when choosing the best browser for audio quality. Don’t worry as we’ve got you covered. Keep reading this post to know the seven best browsers for audio quality.
How can I improve the sound quality of my browser?
Internal computer speakers are powerful. But what if you come across a low-level video, and there is only so much good pressing the volume up button will do. Then it’s a matter of sound quality.
If you are streaming music online and something sounds unpleasant, you cannot necessarily go into the track and remix/remaster it. There are certain steps you need to follow to increase the sound quality of your browser.
For example, you can add extensions to improve the sound quality in Google Chrome. Some of the best extensions are Volumix and Equalizer for Google Chrome.
If you want something lightweight but fast, Opera One is the best browser for audio quality. This Chromium-powered web browser is often referred to as a more refined version of Google Chrome.
In terms of bugs, Opera as a web browser does a fantastic job. It is also extremely privacy-conscious, keeping all of your data safe and secure.
Furthermore, Opera will not disappoint you in terms of features. This web browser offers a range of services for modern users, including a VPN service, an ad blocker, a native chat app, and others.
Opera One
Enjoy multimedia audio content at high quality with this fast and light browser!
Firefox is among the best privacy-oriented browsers and is impeccable in terms of audio quality. You don’t need to use any incognito mode to avoid trackers when using this; the browser’s stealth mode is enabled by default.
Firefox offers the best sound quality, with audibly meatier mid and upper bass than the other competitors. Some other features it offers are default ad blocking and tracking, a clean user interface, and Siri shortcuts to clear history with voice commands.
Mozilla’s Firefox is the greatest browser for all of your browsing requirements. However, the lack of tabs might be frustrating, but it is otherwise a good browser app.
Google Chrome is the best browser for audio-quality wireless headphones. As we all know, Chrome’s surfing experience isn’t the most privacy-conscious; nevertheless, it is polished. It also has a variety of add-ons, privacy settings, and a straightforward user interface.
The browser’s cross-platform availability makes it simple to sync data across your devices. It provides a variety of extensions to improve the audio quality of any music, video, or other media you’re listening to.
It also has a website task manager, a visual browser history, and media controls. Chrome is exceptionally quick, especially when loading Google-owned websites like Gmail and YouTube.
Several users complain about Chrome black screen issues. Rest assured that our guide shows you what to do in case that happens.
The Brave web browser is a privacy-first web browser that loads 3x faster without slowing down your computer. It is a Chromium-based web browser that mainly focuses on privacy and automatically blocks ads.
The best thing about Brave is that it allows users to choose any search engine as their default. As a result, this browser will not hamper your surfing experience but rather improve it by enhancing the audio quality of any media you’re listening to.
Keeping aside all these facts, it comes with a built-in ad blocker and a wide address bar, and you’ll also receive rewards for browsing. It is the best browser for audio quality without ads in terms of overall performance.
Vivaldi is a web browser that belongs to the same family as Chrome. However, unlike Google Chrome or Firefox, Vivaldi lacks in terms of functionality and privacy. Yet, because of its numerous options, it is one of the finest browsers for audio-quality wired earphones.
It lets users customize every feature of the web browser, giving it whatever shape they like. Vivaldi also has some pretty nice features that may be beneficial when exploring. It is one of the greatest Apple TV web browser apps.
The next browser on our list is Microsoft’s Edge browser. It’s a replacement for the old Internet Explorer.
Edge has enough features and benefits that make it a real alternative to popular browsers like Chrome and Firefox. It now comes with a personalized gaming homepage with exclusive Xbox features and curated content tailored to enhance users’ gaming experiences.
Many users have complained about Microsoft Edge not closing. If you’re among those, read this post to fix this issue.
The Comodo IceDragon incorporates all of Chrome’s greatest features in terms of browser audio quality. It features Chromium technology, which was designed to provide online users with an internet browser that outperforms competitors in terms of functional performance, stability, and convenience.
Comodo Dragon is a fast, secure, and feature-rich Internet browser based on Firefox. It is fast, easy to use, and light on PC resources. This browser can easily scan web pages for malware right from the browser.
It also has privacy and performance enhancements over Firefox and has full compatibility with Firefox plug-ins.
Best browser for Windows 11: Google Chrome is undoubtedly the best browser available for Windows 11. It might not be the most lightweight browser available, but when it comes to cutting down the response time, it is the best.
It offers various features and leverages a hardware acceleration mechanism for maximizing its performance. Users can open and use multiple tabs easily with the features Chrome offers.
Best browser for audio quality Windows 10: Firefox is impeccable in terms of audio quality. It offers the best, meatier mid and upper bass than other competitors.
Other than that it offers multiple features like default add blocking/tracking easy-to-use user interface, stealth mode, and Siri shortcuts to clear history with voice commands.
Best browser for Android: You can consider the Brave web browser as the best choice for Android users. It is among the fastest and most fully-featured options available.
The browser offers an inbuilt ad blocker and a privacy-first interface that synchronizes data across all your installation. One unique feature is that it offers its own cryptocurrency wallet to pay creators and websites.
Best browser for audio quality Mac: On Mac devices, Apple’s own Safari browser is the best. The Safari browser by Apple is now around for over a decade, and it has gone through certain improvements to be the most generous choice for Apple users.
Browser off as various advantages like built-in functionality to store your bookmarks and browsing history in iCloud. In terms of security, the browser is above all, as it protects users’ data without changing the default settings.
These were the 7 best browsers for audio quality. If you’re having issues with your browser, such as Opera having no sound, then feel free to try any of these browsers.
If the guide was helpful, do let us know in the comments below.
Google Chrome is a browser renowned for its speed and reliability. So, it’s a little surprising that several users have stated on forums that Chrome takes forever to open.
Some users have said that they’re left waiting up to appalling 10 minutes for Google’s flagship browser to open. That’s obviously far too long for the browser to get started.
Learn how to fix the Chrome browser if it takes ages to open in Windows.
These solutions may also help with the following problems:
Chrome takes forever to open
Why does chrome take so long to open?
Google Chrome takes forever to open
Chrome taking forever to load
Chrome takes a long time to open
Why does Google Chrome take so long to open?
In most cases, it was a problematic extension installed that made Chrome slow to open. Also, if you have several extensions installed, it will affect the loading speed of Chrome.
Besides, the Hardware Acceleration feature in Chrome is often found to cause issues, and disabling it worked for many. Certain services too are found to conflict with Chrome and other applications on the computer.
How do I fix slow opening in Chrome?
1. Switch to another browser
If you’re tired of Google Chrome’s mishaps and want to switch to something similar, but more reliable, faster, and lighter, then look no further than Opera One.
Opera One was built using the Chromium engine and was optimized in such a way that it isn’t as resource-intensive as its counterparts.
Opera One’s extension catalog is also quite vast, so enhancing this already rich browser is extremely easy. more, you gain the added benefit of a few security features, such as an ad-blocker, a built-in VPN, and a tracker blocker.
All in all, even if you do go through the trouble of trying to fix Chrome, it doesn’t hurt to use Opera One in the meantime.
Opera One
If you’re tired of browsers that are slow, sluggish, and take up all of your RAM, then go ahead and try Opera One.
Launch Chrome, click on the ellipsis near the top-right, hover the cursor over More tools, and select Extensions.
Now, turn off the toggle under each extension to disable it.
Alternatively, users can get rid of extensions by clicking Remove.
3. Turn off Hardware Acceleration if Chrome takes forever to open in Windows 7,
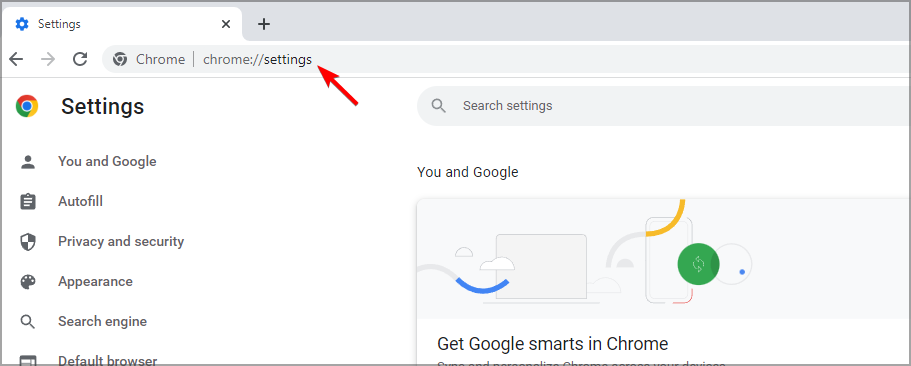
Paste the following path in Chrome’s address bar and hit Enter:chrome://settings/system
Turn off the Use hardware acceleration when available setting, and then click on the Relaunch button that appears.
If Chrome takes forever to load pages, it could be the Hardware Acceleration feature to blame. Though meant to boost the performance, it’s often counterproductive and leads to issues with the browser.
4. Disable the Nahimic service
NOTE
The Nahimic service is related to the audio enhancement software for the audio driver by MSI. If you are not using an MSI laptop or a system with an MSI motherboard, skip this method and head to the next one.
Press Windows + S to launch the Search menu, enter Services in the text field, and click on the relevant search result.
Now, locate the Nahimic service, right-click on it, and select Properties.
Click on the Startup type dropdown menu and select Disable.
Next, click Stop if the service is running, and then on OK to save the changes.
Once done, restart the computer for changes to come into effect and check if the the problem is solved. In case Chrome still takes forever to open, head to the next method.
5. Reset the network adapter if Chrome takes forever to open in Windows 10/11
Press Windows + R to launch the Run command, type wt in the text field, hold the Ctrl + Shift key, and then click OK to launch an elevated Windows Terminal.
Click Yes on the UAC prompt.
Press Ctrl + Shift + 2 to launch Command Prompt.
Paste the following command and hit Enter:ipconfig /flush
Similarly, execute the following command:netsh winsock reset
Restart the computer for the changes to come into effect.
If Chrome takes forever to load first page, it could be a problem with the network settings itself, and resetting them should do the trick here.
6. Reset Google Chrome
Launch Chrome, paste the following path in the address bar and hit Enter:chrome://settings/reset
Click the Restore settings to their original defaults option.
Next, click the Reset settings button.
7. Reinstall Chrome
Press Windows + R to launch the Run command, enter appwiz.cpl, and click OK.
Select Google Chrome and click Uninstall.
Follow the on-screen instructions to complete the process.
The issues causing Chrome to take a long time to open on Mac are pretty much the same as Windows, so the solutions too would be similar. Just try them all out on your Mac, and it should fix things.
In addition to these, you can also update the browser in case a newer version is available, or clear the browsing data for Chrome.
Fix: Chrome takes forever to load print preview
Press Windows + E to open the File Explorer, and navigate the following path where UserName is the account you are having problems with. Also make sure that the hidden files are visible since the AppData folder is hidden by default.C:\Users\UserName\AppData\Local
Next, right-click on the Google folder here, select Rename, and add a different name for it.
You would have to enable syncing in Google Chrome to retrieve the saved data once the process is complete.
How do I give Chrome more RAM?
Press Ctrl + Shift + Esc to launch the Task Manager.
Navigate to the Details tab.
Right-click on the Chrome process, hover the cursor over Set priority, and select High.
Click Change priority in the prompt to confirm the changes.
Those are some of the resolutions that helped a majority of users when Chrome takes forever to open. So try them all out!
Are you curious to know about the WebKit browsers? Go through this article to satisfy your curiosity.
In case you’re not familiar with WebKit, in this article, we will explain what the WebKit engine is and which browsers use it.
What should I know about WebKit browsers?
What is WebKit?
WebKit is a browser engine developed by Apple and used in the Safariweb browser. WebKit started as a fork of KHTML from KDE in 2001, and various major contributors developed it.
The project has been developed for years, and in 2010, WebKit2 was announced, bringing various improvements.
Is WebKit a good engine?
Yes, WebKit offers great performance and a great browsing engine. Overall, it’s 10-15% faster than other browsing engines.
Which browsers use WebKit?
Safari and all iOS browsers
GNOME Web
Dolphin Browser
Konqueror
Split Browser
Otter Browser
Keep in mind that only a few of these WebKit browsers are for Windows, so you might not be able to run them.
Is Google Chrome a WebKit?
Chrome used WebKit until 2013. In that year, Google created a fork of the WebCore component of WebKit and created a Blink engine that it still uses. iOS version uses WebKit.
Is Opera a WebKit browser?
Opera doesn’t use WebKit. Instead, it’s based on the Blink engine, the same as Chrome. And just like all other browsers, the iOS version runs on WebKit.
Apple doesn’t allow developers to use any other browser engine except for WebKit which is developed and maintained by Apple. This can be due to security reasons because Apple prefers to keep its ecosystem closed as much as possible.
Is WebKit going away?
Even though the Blink engine is more popular and more browsers use it, WebKit isn’t going away as long as Safari and iOS devices keep using it, so it’s safe to say that WebKit is here to stay.
WebKit has a long history, and we hope you understand what WebKit is better after reading this article. If you want to try it, you might want to read our guide on downloading and installing Safari on Windows 11.
In case you’re looking for something different, we have a guide on the best browsers for Windows, so don’t miss it.
A USB switch selector, also known more simply as a USB switch, is a small hub device that has multiple USB ports for other gadgets. For example, a USB switch can connect a webcam, a keyboard and mouse, monitor, and printer together.
You can connect the keyboard and mouse to one monitor and then switch control over to another device. You can also connect multiple computers and a USB driver via a switch to share information across the devices.
There are many different reasons why you would want a USB switch. Now the question is what should you look for while shopping for one?
What should I look for in a USB switch?
Something you should consider when shopping for a USB switch is what type of USB ports it supports. The most commonly supported ports are USB 2.0 and USB 3.0. The latter is the superior version as it has a better transfer rate than the previous.
USB 3.0 has a transfer rate of 5Gbps while 2.0 has 480Mbps. You should also consider how many physical ports it has. The more ports available, the more devices you’re able to connect.
And any switches that have non-USB ports are a plus. This includes switches that have a micro USB or HDMI port.
For this guide, many of these switchers go on sale frequently. So be sure to check on days like Black Friday to get discounts.
Starting off the list is the ABLEWE USB 3.0 Switch. This device allows you to connect up to four USB devices to two separate computers. Admittedly, the fact that it can only output to two computers is a detriment.
Still, the ABLEWE USB 3.0 Switch is worthwhile because of how many devices it can share. You can almost any type of USB device to those computers such as printers, mice, keyboards, flash drives, and more.
The fact that it’s USB 3.0 enabled means you can expect lightning-fast connectivity speeds. If you have a device that only supports USB 2.0, you don’t have to worry. The ABLEWE Switch is backward compatible with the older standard.
What’s also cool about the ABLEWE Switch is that you don’t have to upload any drivers to your computer. You just plug it in and it’s set to work from the getgo. Switching between sources is easy as all you have to do is press the top button.
If you’re looking for a really cheap option, then you should look at the Sabrent USB 3. Sharing Switch. At the time of this writing, the Sabrent Switch has a massive discount attached to it; lowering the already low price even further.
Right off the bat, you might see that the Sabrent device isn’t very big. It only has one port for receiving signals and two for directing them to other computers. If you have multiple devices, this might not be the one for you.
That said, it’s still great. Its support for USB 3.0 means fast data transfer speeds and it’s compatible with multiple devices. There’s one button on top that lets you swap between computers.
You won’t have any new drivers to make the device work and it’s really easy to set up. All you have to do is plug your device in and connect the computers. You’re ready to go after that.
If you want a Sabrent switcher that can support more computers, then you should check out their USB 2.0 Sharing Switch. It can support up to four different computers and share data from four different USB devices.
The button used to swap sources is now separate from the main device. That way, the button isn’t taking up room for the extra ports. LEDs can be found on the Sabrent switcher that easily distinguishes which computer currently has the data.
It can be used on Windows computers, as far back as Windows 2000, Linux 2.4 or above, and MacOS 8.6 or above. The USB 2.0 Sharing Switch even comes with USB cables, but it’s unknown how long they are.
According to the official Amazon page, the cables are six feet long. Judging by the concept images in the listing, this seems to be accurate.
The only downside is that it only supports USB 2.0 which transmits data at 480Mbps.
Next up on the list is the UGREEN USB 3.0 Switch Selector. This device supports USB 3.0 for fast data transfer rates (up to 5 Gb/s as mentioned earlier) and has a high bandwidth for this standard.
It can support up to four peripherals from printers, computer mice, keyboards, scanners, USB disks, digital cameras, audio devices, and more. This makes UGREEN’s device ideal for home surveillance systems.
Sometimes older device runs on USB 1.1 or 2.0. The UGREEN Switch Selector is compatible with those old standards. Don’t worry if you have some pretty ancient devices and feel like you need to throw them out.
There’s a single button on top for easy switching between computers plus an LED indicator so you know which computer has the source signal.
UGREEN’s device works for Windows and Mac computers alike, but it doesn’t appear to work on Linux machines so keep that in mind.
Now we have the 2-Port USB DisplayPort Cable KVM Switch from IOGEAR. A KVM, or Keyboard-Video-Mouse, a switch is a special type of USB switcher that lets you control multiple computers from a single workstation.
KVM switchers can be pretty expensive depending on how big they get. The more ports, the bigger it has to be to support everything. Although IOGEAR’s device is one of the smaller ones, it’s still one of the more expensive options on this list.
This particular switcher only supports USB 2.0, making it one of the slower ones, but it makes up for this by supporting a ton of audio/video interfaces. As the product can tell you, the IOGEAR supports DisplayPort.
DisplayPort is the ideal standard for PC gaming as it can support wide bandwidths. This translates to higher resolutions and refreshes rates for hardware-intensive games.
On top of that, the switcher supports HDMI, VGA, and audio channels. It can display resolutions as high as 4L at 30Hz.
Another KVM switch, the AIMOS KVM Switch 2 Ports device is a great choice because it’s compatible with so many machines. You can connect it to a PC, laptop, PS4, Bluray player, and even an Apple TV.
Very few switchers support such a wide array of devices and still transmit at a high speed. The only negative is that the AIMOS doesn’t support the PlayStation 5 nor does it appear to work with Xbox Series consoles.
It’s unknown if this device supports USB 2.0 or 3.0, but it should be mentioned that it has a full bandwidth of 10.2 Gpbs. Part of this can be attributed to USB 3.0, but also the different interfaces the gadget supports.
In addition to USB, it can transmit HDMI at a resolution of up to 4K at 30Hz. The final noteworthy feature is the operating system support. You can connect the AIMOS switcher to a Windows Vista computer and Chrome OS and have it work just fine.
The most expensive switcher on this list has to go to this HDMI KVM Switch 4 Port device from xisiweier. The price tag is arguably worth it for what the device can give you. For starters, it supports USB 3.0 for fast upload speeds.
With that interface, you can connect a keyboard and mouse pair with a monitor for up to four different computers or laptops. And you can change between the different sources via hotkeys.
Hotkeys, if you don’t know, are programmable button combinations that you can press on your keyboard to do something. For example, you can press Num Lock, then CTRL, the number one, and Enter at the same time to switch to another computer.
As for compatible OS’, you can connect to Windows systems as far back as Vista, plus macOS and Linux. It supports some lesser-known systems like Ubuntu and Raspbian. No other switch, KVM or plain USB, can do this.
And the final entry for the best USB switchers has to go to StarTech’s USB 3.0 Peripheral Sharing Switch. When it comes to a pure USB switch, this is one of the best. Be aware it’s not a KVM switch so it doesn’t work with video games, TVs, or the like.
It’s also pretty expensive so we recommend getting this while it’s on sale. Apart from those restrictions, you’ll be happy to know that the device supports USB 3.0 for assured fast speeds.
It also can be controlled remotely; there are no buttons on this model. Instead, it comes with an attachment that has a button that you can press to switch computers.
You can connect four different computers to four different devices. On top of that, it works with Mac, Windows, and Linux computers. While not as robust as the previous entry, it still covers the main systems.
Feel free to comment below if you have any questions on other Windows 11 apps. Also, leave comments about reviews you’d like to see or information on other Windows 11 features.
Indie games are great, aren’t they? The indie scene has been a haven for creativity in the medium for many years now, and indie games have given us some of the most memorable gaming experiences ever.
With its creative blend of a 3D world steeped in noir with two-dimensional shadows, Contrast provides the kind of original gameplay experience that only indie games can provide.
Hailed as one of the best indie games ever, this metroidvania-style adventure brings new quests, new abilities and new boss fights with this Voidheart Edition.
An homage to 8-bit games like Castlevania, Infernax tells the story of a knight who returns to his homeland to find it plagued with black magic.
Little Witch in the Woods
This charming indie title has you playing the role of Ellie, an apprentice witch endeavoring to become a full-fledged witch by doing good in the world.
In this 2D platformer players control Ana, the daughter of the protagonist of the first Spelunky, as she navigates treacherous lunar caverns in search of her missing parents.
Spiritfarer: Farewell Edition
This Farewell Edition of Thunder Lotus Games’ indie adventure title includes all the added content updates, along with everything that made the original title so memorable.
Snoozy Kazoo’s 2021 action-adventure indie game is every bit as quirky as its title suggests. Follow Turnip Boy on his epic quest to pay back his massive debt to Mayor Onion.
Wrap up
And there you have it: 9 of the best indie games available on Xbox Game Pass right now. They don’t call it the best deal in gaming for nothing, and this awesome selection of indie games is part of the reason why. Which one are you the most stoked to try out? Let us know in the comments.
And if you don’t have a subscription to Game Pass yet, you can sign up here. If you would like to learn more about Xbox Game Pass you can visit the Game Pass FAQ page. And don’t forget to check out our other Game Pass recommendations posts to find out what to play on Game Pass for other genres.
Many users encountered hls.js error: networkerror – fatal: true – manifestloaderror while trying to play videos in their browser. Your extensions or antivirus/firewall settings can often cause this problem. Proxy and browser settings can also lead to this issue.
First, check your antivirus and make sure the website you’re trying to access is added to the exclusion list. This applies to Kaspersky antivirus. If you have VPN enabled, disable it.
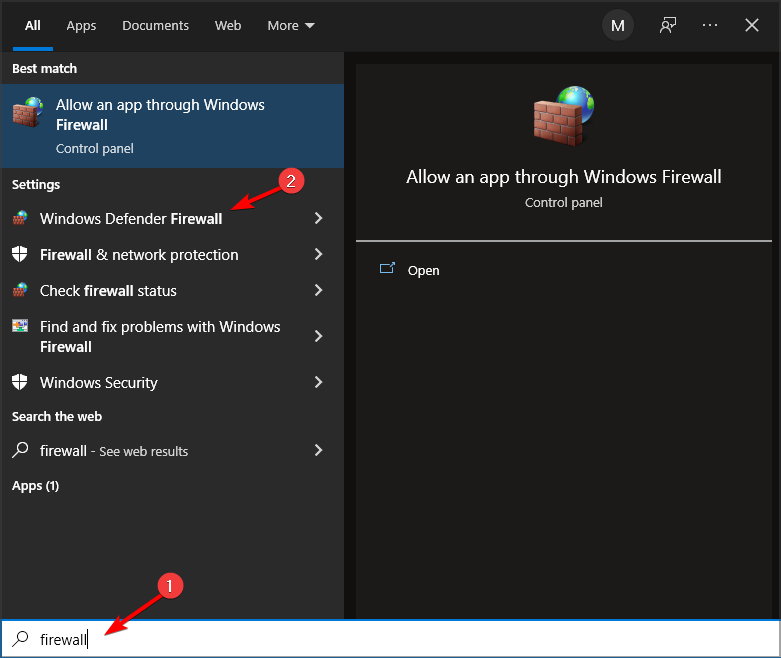
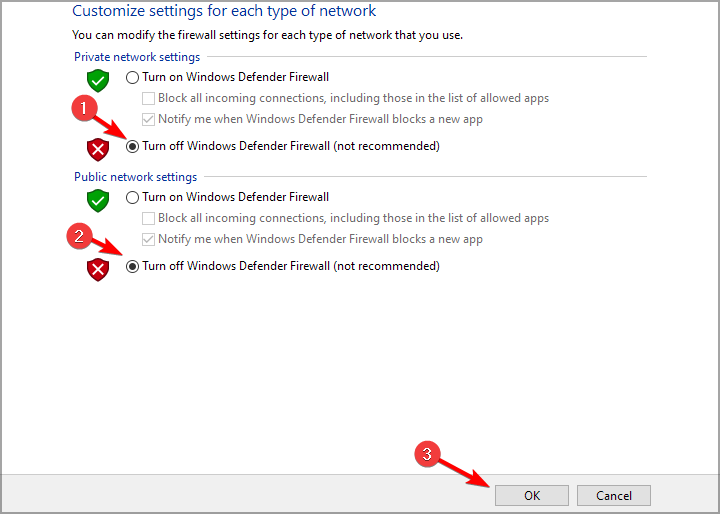
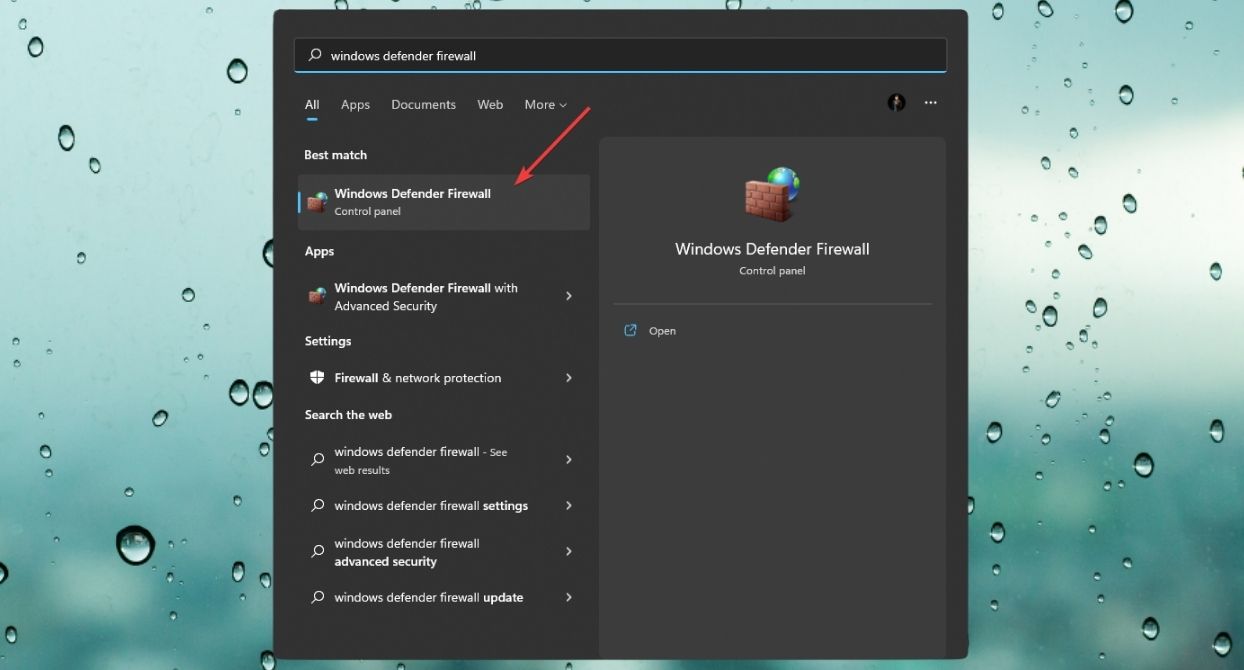
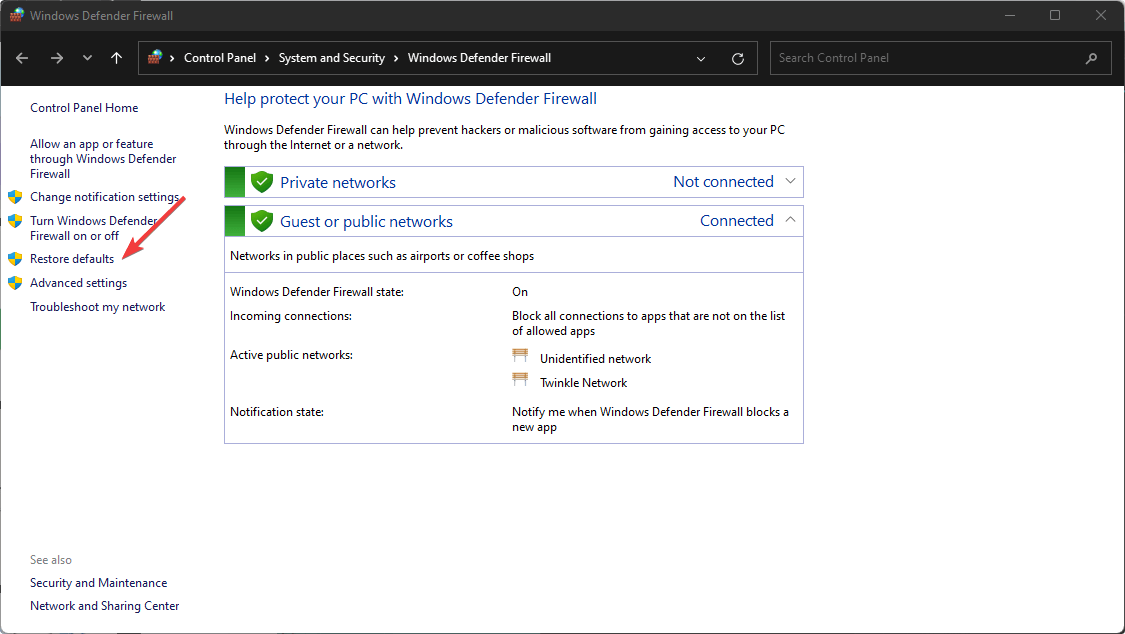
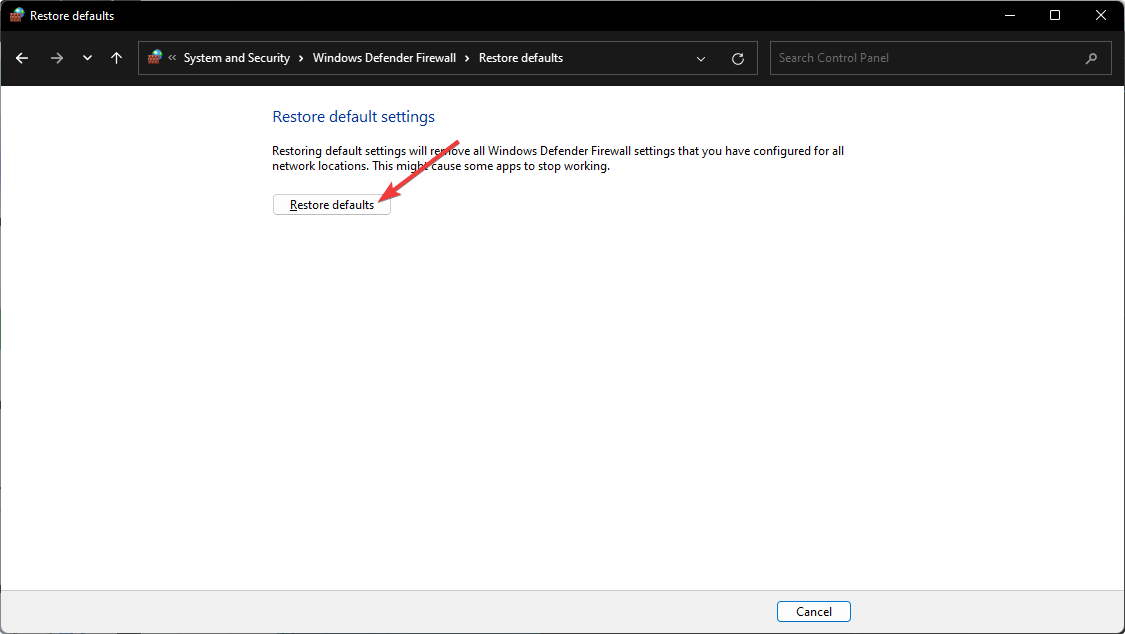
Type in the keyword firewall. Click Windows Defender Firewall.
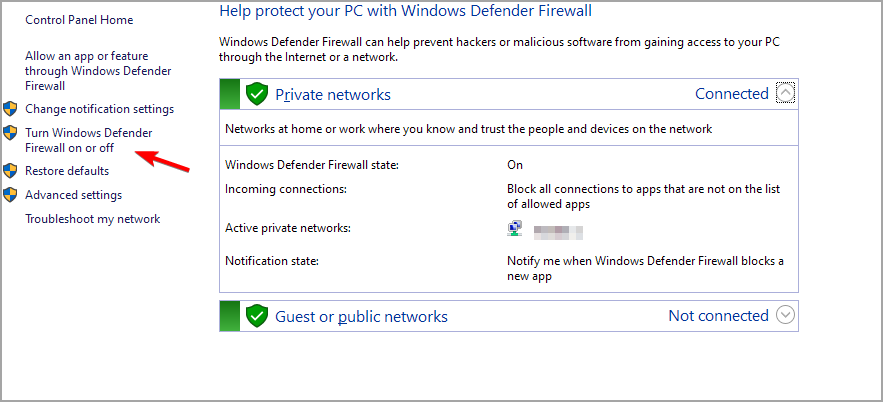
Click Turn Windows Defender Firewall on or off.
Select the Turn off Windows Defender Firewall radio buttons, and click OK to confirm.
NOTE
In case you have installed on your device a third-party antivirus software that has a firewall incorporated, make sure to right-click the system tray icon. Next, you should select to disable the antivirus utility’s context menu to temporarily deactivate it.
2. Disable the Proxy Server
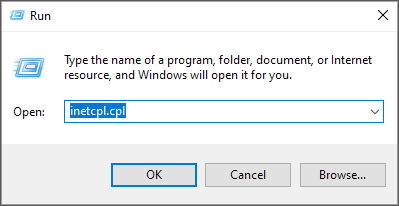
Press Windows key + R. Type in inetcpl.cplinto Run and clickOK.
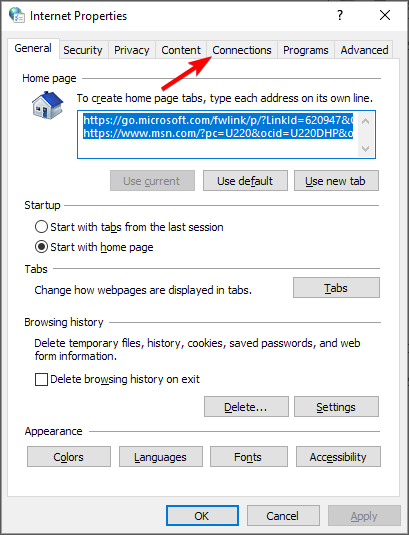
Next, make sure to select the Connections tab.
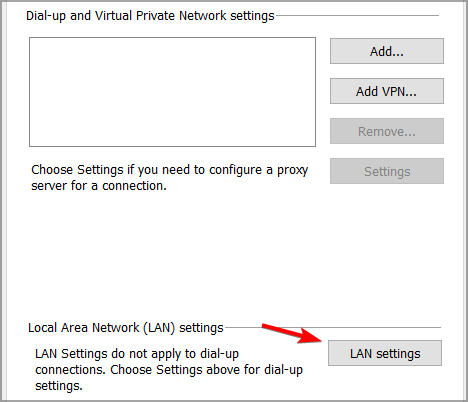
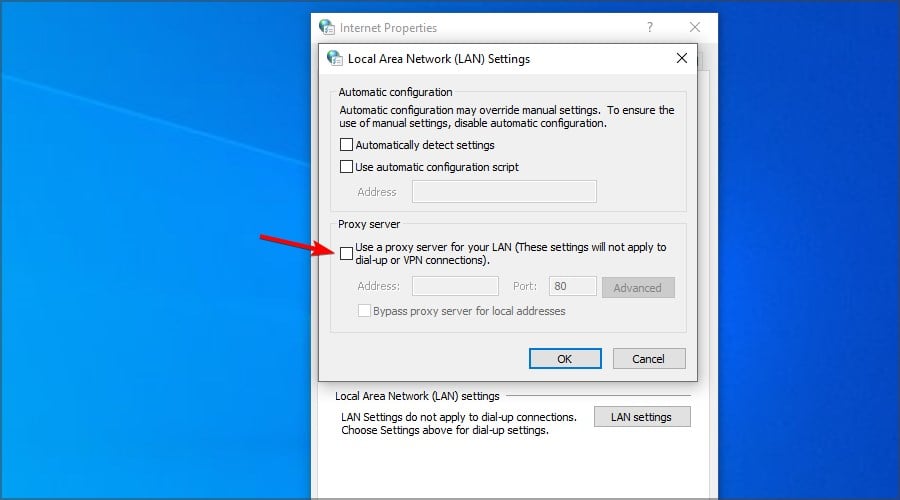
Press the LAN settings button to open the Local Area Network (LAN) Settings window.
Go to the Use a proxy server for your LAN checkbox and deselect it.
Select the Automatically detect settings option.
Click OK to exit the Local Area Network Settings window.
3. Disable your extensions
Open Chrome and click the Menu button. Choose Extensions and then Manage Extensions.
Click the toggle icon next to the extension name. Do this for all extensions.
After doing that, check if the problem is resolved.
Go ahead and enable extensions one by one until you manage to find the source of the problem. Many users reported that JShelter extension caused the problem, so look out for it.
Banking or other financial-related tasks happen to be one of the most important things that we perform online.
That sure highlights the importance of having secure browsers that can detect or thwart phishing or other such attacks that can undermine your online security and privacy.
However, no matter how daunting it might seem, there sure are browsers with enough security features and privacy tools built in to ensure you carry on with your banking tasks with complete peace of mind.
Should I use a separate browser for banking?
Everyone would recommend using a separate browser for banking and online transactions although this is not a 100% safe approach.
However, this way, you will have this browser specifically set up for protection and privacy while you can have a more open approach on your regular browser.
The best way of securing your transactions is to use a 2-way authentification method on any banking app.
If you want a dedicated tool for your transactions, here is a list of the best such browsers that are among the safest out there.
This greatly private browser is the answer for anonymous browsing especially while performing banking activities online.
Avast Browser raises the stakes for privacy given that it includes anti-tracking and fingerprint guarding, or phishing attacks protection to be always secure.
In other words, it’s specifically developed to provide you with maximum security for online financial transactions and security against risky tracking.
You have effective ways of getting mind peace for online banking such as a privacy cleaner that totally remove browser history, online identity masking, or the extensions guard.
Moreover, there is the bank mode that secures your transactions and enhances the security of web browsing for any other searches as well.
It’s with mentioning you have integrated HTTPS encryption to benefit from malicious websites or infected sources that can compromise your device. In this way, you’re also safe against phishing attacks.
The best features found in Avast Browser:
Forbids online tracking and unsafe websites
Anti-fingerprint benefit
In-built AdBlock
Hack check functionality
Secure browsing against ransomware or viruses
Avast Secure Browser
Experience complete online banking security with this leading browser.
Opera One browser has come a long way since its early days, back in 1995. The browser has seen a lot of its code being borrowed from the Google open-source project, Chromium, making it more secure than ever.
One of the best security features of the Opera One browser happens to be the VPN that comes integrated into the browser itself.
The feature provides a layer of security by encrypting your Internet connection, thereby making your browsing session off the bounds of others right away.
Further adding to its security credentials is a host of features such as fraud and malware protection which is integrated into the browser.
It can also detect and block those scripts or add-ons that it considers unsafe for the user, making it quite a secure browser for you to carry on with your banking transactions.
Opera One also maintains a blacklist of phishing and malware sites and will warn you if the website you have requested is part of that list.
It will then be upon you to decide whether to load the site or stay clear of it.
Here are some of the best features found in Opera One:
Private browsing
Tracker blocker
Fraud and malware protection
Crypto mining protection
Frequent updates, usually after every month
The clear interface that’s easy to grasp
Opera One
When it comes to choosing a secure browser for banking, this is the top pick.
UR Browser is one of the rare browsers that focuses extensively on user security and privacy.
The browser comes with its own integrated virus scanner, which will warn you if you face any threat from malicious code.
The browser automatically scans all your downloads, but it will also warn you if you access a malicious or insecure website.
Another way the browser enforces top-notch security is by doubling the RSA key size for SSL Certificates, while also warning you if you attempt to visit a non-HTTPS site.
This way, you can rest assured knowing that your banking information is always safe.
The browser also has various anti-tracking features built in which will prevent even third-party cookies or hidden trackers from collecting information about you.
And if you’re in need of an extra layer of security, there’s also a built-in VPN.
Of course, various customization features and extensions are available, so you won’t miss out on any exciting and advanced features typical of most browsers.
We also have to mention Ninja Mode which refers to private browsing mode. Needless to say, the UR Browser has adequately covered that front as well, or more than what other browsers usually do.
This is achieved by erasing all of your traces when you close Ninja tabs, leaving no trace of whatever you have been up to.
UR Browser might be based on Google’s open-source project, Chromium which comes integrated with trackers.
However, developers behind UR have nullified such trackers to ensure complete privacy and security while you are online.
In fact, with all the advanced security features and a heavy focus on user privacy, UR Browser is one of the best browsers for your banking needs.
Here are its top features:
Doubles the RSA key size for SSL Certificates
Integrated virus scanner
Built-in VPN
Blocks tracking to prevent fingerprinting
UR Browser
With a private browsing mode and a built-in VPN, UR Browser is a secure choice.
The Chrome browser is at the forefront when it comes to user privacy and security.
Regarding privacy, Google Chrome uses Web Authentication API wherein you can use security keys as a verification tool for enhanced security.
The browser is also among the most capable of correctly identifying harmful elements such as ransomware, Trojans, and viruses, and will warn you if any of these attempts infiltrate your system.
Another reason Chrome is considered among the best for conducting banking operations is that it can detect phishing attacks fairly accurately.
Google relies on two blacklists, one each for phishing and malware, that will warn you if the site you are trying to visit is potentially harmful.
Then there are the Trusted Platform Modules that serve as a means of verification of the sites. The browser also scans downloads to ensure nothing untoward gets in that way.
Chrome is also among the most frequently updated as well, with the update getting installed automatically behind the scenes.
What that means is the browser is always ready to deal with all present as well as emerging threats effectively.
In fact, Google encourages hackers to continue finding loopholes in the browser so that they can make it even more secure.
Developed by Mozilla, the Firefox browser is another one that is at the forefront when it comes to offering adequate protection to your online banking transactions.
Its most recent version, the Quantum is already being hyped to be the most secure and privacy-oriented version of Firefox ever.
One reason – among many – why Firefox is considered among the safest is that it restricts scripts on one site from accessing info from another site.
It also uses SSL/TLS to ensure web server communications via the HTTPS protocol are thoroughly secured.
Another inherent positive with Firefox is that it supports HTTPS Everywhere add-on which makes HTTPS mandatory irrespective of whether an HTTPS address is entered or otherwise.
The browser also gets updated quite frequently, which makes it capable of defending against all known and emerging threats.
Bugs discovered as per the bug bounty program that pays the hackers for discovering the loopholes are quickly patched as well.
Plus, the browser also comes with inherent malware and phishing protection features. The browser will also warn you if there is any attempt by any website to install a third-party plugin on the sly.
That is not all, as the browser is also designed to protect against hidden ad trackers that secretly collect information about your browsing habits and pose a security threat as well.
The default Windows browser has come a long way in terms of protection and security since its launch.
For one, it does away with support for legacy tech such as Toolbars, ActiveX controls, VBScript, JScript, VML, and such which significantly reduces its vulnerabilities against hacking attempts.
It also comes with the Windows SmartScreen feature to prevent phishing and malware attacks.
More recently, it has adopted the Chromium project which Microsoft said will make the Edge better compatible with all websites, besides making it more secure as well.
Another way Edge enforces heightened security is by running in a sandbox, which means the browser processes are practically sealed and kept off the bounds of the computer’s file system and other internal elements.
Plus, Edge will also protect you from dangerous extensions that you might end up downloading.
Let’s review some of its key features:
Windows SmartScreen prevents phishing and malware attacks
Most banks used Internet Explorer and still use the IE mode in Edge because they still use some outdated tools like Web Forms and others that integrate with the browser.
Apart from the fact that traditionally, big corporations are reluctant to change, Internet Explorer and now, Edge, offer corporate policy enforcement.
In other words, they can control all of their assets a lot better by using such a browser.
That makes for the list of some of the safest browser for banking to secure your transactions.
If you’re looking for the most secure browser for banking, our top picks are definitely Opera One and UR Browser.
Microsoft Store is set to receive a handful of new policy changes come July 16, this year. Among them is a rule that prohibits the sale of free open-source apps on the platform. “The phrasing of the new policy is broad enough that it covers legitimate applications being sold by the makers of the apps. This led to criticism from several members of the developer community”. (via Windows Central)
Giorgio Sardo, Microsoft’s General Manager of Apps, Partners, and the Microsoft Store indicated that this policy was in place to help them protect their customers from “misleading listings”. While this is important and helps them assert quality control, the move still edges out legitimate companies that put up their open-source apps for sale to earn some income.
We absolutely want to support developers distributing successfully OSS apps. In fact there are already fantastic OSS apps in the Store! The goal of this policy is to protect customers from misleading listings. Thanks for feedback, we will review to make sure the intent is clear
Sardo’s remarks were a response to a tweet by ani betts that indicated, “I suspect this was designed to catch scammers that lazily repackage FOSS software for $$, probably needs an exception for the copyright owners.” Giorgio further indicated that Microsoft will work on the wording of the new policy to establish clarity.
Microsoft’s intention is to have the app store open as it already supports Win32 apps, Android apps, and PWA apps such as the Official Reddit PWA. that we saw make its way to the Windows 11 App store. However, prohibiting the sale of free open-source apps in the Microsoft Store that are listed for free elsewhere changes this narrative completely. Be sure to also check out our expert guide where we unpack some of the biggest changes that have made it to the app store.
Samsung Dex Android tablets and mobiles enable users to utilize them more like desktop (or laptop) PCs.
These devices have a Samsung DeX mode that provides an alternative multitasking UI design, with a taskbar. Users can utilize their DeX devices with keyboards, mice, and full-size VDUs.
So, DeX devices are tablets that can provide a desktop experience for their users. The Galaxy Tab S4, S10, S9, and Tab 7 are some of the tablets and mobiles with DeX modes.
What browsers work on Dex?
Most mobile browsers will open in the Samsung DeX mode. Yet, some mobile browsers are better optimized for that mode than others.
So, all the major browsers that also have a mobile app will do just great, especially the ones we set in the top list below.
What are the best browsers for Samsung DeX devices?
This is a full-fledged Opera One browser for mobile devices that shares many of the features of its desktop counterpart.
The Opera One mobile browser has a comparable Speed Dial page on which you can combine multiple shortcuts. It also incorporates a built-in VPN, ad-blocker, Night mode, and crypto wallet.
Another good thing about this mobile browser is that it includes a Desktop user agent setting.
With that setting, you can configure Opera One to always display the desktop versions of all website pages. So, that saves you from needing to toggle the Desktop site option for every page opened.
With its great features, Opera One is definitely the best browser for Samsung DeX.
Other great features:
Includes a QR scanner
Customizable news feed
Flow enables users to share notes, images, and links between devices
Its Full-screen option enables users to fully display pages on mobile
Opera One
Easily use this browser on Samsung Dex devices and get amazing browsing speeds.
AVG browser gives its best when it comes to compatibility on multiple devices and privacy support.
You can go for this solution for improved protection against online threats like malware, phishing threats, and malicious websites.
That is because you’re fully covered with strong antivirus tools from AVG software and a privacy guard.
Other practical features to use on Samsung Dex devices are VPN support, an automatic adblocker tool, or Flash protection to stop the overuse of PC resources.
It’s worth knowing that you can enjoy various customization options such as themes, wallpapers, or search engine preferences.
Other great features:
HTTPS web encryption
Compatible on Android, Mac, Windows
Privacy Cleaner for history removal
Stealth mode
AVG Secure Browser
Improve your Samsung Dex browsing privacy using this unbeatable browser.
Google Chrome is a browser included with Android devices the world over and the Samsung DeX Chrome desktop mode is pretty nice.
Chrome’s mobile and desktop browser syncing feature and Android integration are good reasons to stick with it for DeX mode.
The mobile version also includes handy voice search, Lite mode, and Dark theme settings. Chrome includes a Desktop site setting.
However, that option only applies to the specific pages you select it for. Some DeX users might prefer to utilize browsers you can configure to display all webpages in desktop mode by default.
In case you need a Samsung desktop browser, Google Chrome is always a safe pick.
Other useful features:
Built-in Google Translate feature
Extensive repository of Chrome extensions
Tap to search feature enables users to select search keyboards on pages
Brave is a fast Chromium mobile browser; the publisher boasts it is three times quicker than Chrome.
That better speed is largely due to its default Shields ad blocker that automatically blocks page ads and trackers. As this is a Chromium browser, its users can also add Chrome extensions to it.
Brave’s permanent Desktop Mode setting for website pages will appeal to most Samsung DeX users.
Its Android sync functionality is another good feature for DeX mobile users who also utilize the Brave desktop version on Windows PCs.
If you need a privacy-oriented browser, then Brave is one of the best browsers for DeX.
Other useful features:
Supports WebTorrent
Includes a Dark Mode
Enables users to support sites with its BAT cryptocurrency
Puffin is a mobile browser with some novel and useful features. It incorporates a full-fledged download manager, incognito mode, dark theme, and data-savings mode to change the image and video quality.
Puffin’s more novel features are its Mouse and GamePad options for page navigation.
Puffin users can select a Request desktop site option for individual pages or as a default browser display setting.
This browser’s virtual mouse trackpad is also a handy addition for navigating desktop websites. Both those features provide a more realistic desktop experience for DeX mode browsing.
Puffin might not be the best browser for Samsung DeX, but it’s definitely worth checking out.
Other great features:
The Puffin Flash Store enables users to play Flash games beyond 2020
The Samsung Internet Browser is one included with Samsung devices. As this is Samsung’s browser, it is one of the best optimized for the DeX mode on Galaxy devices.
It displays all pages with desktop versions by default in DeX and reverts to mobile pages for the tablet mode.
Although Samsung Internet Browser is a bit more basic than some alternatives, it’s still a reliable and fast browser that incorporates some good features.
It includes advanced Video assistant controls, a QR code scanner, a Dark mode, and a High contrast mode.
Other great features:
Syncs with Samsung Cloud
Supports Gear VR headset for VR browsing
Includes an Autoplay video setting
Includes a handy Go to top button for jumping to the top of long pages
The Samsung Internet extension enables syncing with Google Chrome
Samsung DeX can be an excellent way of using your tremendous mobile power and transform it into a desktop computer.
However, we have some tips on how to improve your experience:
➡ Use a good monitor
You’ll need an HDMI-compatible monitor that supports high resolutions because the latest DeX platform can work with HD+ (1600×900), FHD (1920 x 1080), and WQHD (2560 x 1440) resolutions.
Of course, to connect the mobile to the monitor, you will also need a USB-C to HDMI cable or adaptor.
However, if the monitor has a USB-C input, you can use a USB-C to USB-C cable.
➡ Connect a keyboard and a mouse
Obviously, it wouldn’t be a desktop experience without these two accessories. They have to be Bluetooth compatible and you will be able to pair them with your phone from the Settings menu.
You can still use DeX without a keyboard and mouse, by enabling input from your phone, but that will be just like browsing your phone on a bigger screen.
➡ Enable the Samsung Dex Labs
By default, most of the apps in DeX mode will open in a portrait window, just like they would on your phone.
However, if you open the Settings on your desktop and click/tap on Samsung DeX, you will see a toggle switch for Dex Labs.
If you enable it, all the apps will be forced to open in full-screen mode and if you’re lucky, they will be even resizable.
Those are some of the best browsers for more desktop-like browsing in Samsung DeX mode and, as you’ve noticed, we didn’t recommend Firefox for Samsung DeX.
It’s not because it wouldn’t work but Firefox is not such a great choice to use with a desktop mode on an Android device.
The Chrome and Samsung Internet browsers included with Android mobiles are perfectly adequate for DeX browsing.
However, Puffin, Brave, and Opera One are good alternatives that work well with DeX.
Users have reported that Pixiv is not loading images for them, be it the app or the website. If you are one of such users, then you are in the right place.
Follow along to find out the most effective solutions to the Pixiv not loading images issue.
Why is Pixiv not loading images?
The Pixiv not loading images issue can be caused by various issues such as the following:
➡️Server is down – If the server is down you can’t do anything else but wait until the developers solve the problem. You can check the status on the isitdownrightnow page.
➡️Third-party login issues – Check whether your login credentials are correct and if you are actually logged into your account.
➡️Banned account – If you have used the app in ways that were forbidden, your account might have received a ban. If this is the case, you will receive a notice.
➡️Cache – Application, as well as browser cache, can interfere with the functionality of the web page, thus you will have to delete it as we have shown below.
➡️Faulty browser – If the browser you are currently using, doesn’t support Pixiv completely, you will have to switch to another one.
Now that some of the most common reasons you can experience Pixiv not loading images are clear, let us check out the solutions that can help you fix the problem and get back to your world of creativity.
Tip
If you are experiencing Pixiv not loading images on your default browser, then we would recommend you use Opera One and check if the problem exists or not.
Our recommendation is that you make use of the Opera One browser. It has a dedicated extension called Pixiv Image Downloader that can be easily installed so you can enjoy Pixiv better.
How can I fix Pixiv not loading images?
Before moving on to more complex solutions, make sure to do the following:
Check the server status, and if you see that the server is down, simply wait until it is up again.
If you are experiencing a Pixiv not loading images issue on your default browser, let’s say Google Chrome, then we would recommend you use a different browser and check if the problem exists or not.
Often, it is not the fault of the website but the browser that you face different issues. We have a list of some of the best browsers that you can check out and opt for the one that best suits your needs.
Thanks to several unique features and stable performance, Opera One is one of the best browsers on the market.
Here are some notable features of Opera One browsers:
Offers a pop-up video feature.
Comes with Turbo Mode to save data while playing videos and also speed up browsing.
Built-in VPN lets you access restricted content.
Comes with an integrated and powerful ad-blocker to watch content without any disturbance.
Opera One
Install and use the best browser connection through VPN and download Pixiv images.
When you visit the Pixiv website, it will ask you to either log in or create an account. Of course, you can use your email ID, but there are other different options that allow you to create an account on the website.
Notably, you can use Apple, Twitter, Gmail, or Facebook credentials to login into Pixiv. If you use these third-party login methods to log into Pixiv, then you should also check the server status of these platforms.
Again, you can make use of websites such as Downdetector, IsItDownRightNow, etc. to check the status of all these websites.
3. Check if your account is banned
Pixiv has clearly defined its rules and policies that may result in the cancellation or banning of accounts. You can check that out here.
If you have violated any of the rules set out by Pixiv, then your account may get temporarily or permanently banned. So, always keep checking that you are keeping your account clean and free from content that may result in such a situation.
Open Chrome and use the following keyboard shortcut to access the Clear browsing data menu:Shift + Ctrl + Delete and select All time as the time range.
Check the Cached images and files option then click Clear Data to delete the browser cache.
Then, go to Pixiv and see if the images will load.
5. Update the Pixiv app
Open Google Play Store on your smartphone.
Click on your profile icon.
Select Manage apps & device.
Click on See details.
Now check if there is a new update available for Pixiv. If yes, then install it and check if this resolves the issue or not.
6. Clear app cache
Long press on the Pixiv app icon.
Select App info.
Scroll down and select Storage.
Hit the Clear cache button.
Cache files are stored by your OS on your smartphone in order to remember your personalized settings and other tweaks that you have made within the app and load them quickly the next time you access the app.
However, if the cache files get corrupted, then this could result in multiple issues, including Pixiv not loading images problem. Some users have reported seeing a black screen when opening the app. To fix this, you need to simply clear the cache data and reopen the app.
What can I do if Pixiv doesn’t display illustrations or manga?
If you are unable to view illustrations or manga on the Pixiv website, then you can try the below solution and possibly fix the error.
Delete the browser cache
Open Chrome and use the following keyboard shortcut to access the Clear browsing data menu:Shift + Ctrl + Delete and select All time next to the time range.
Mark the Cached images and files option and tap Clear data.
Log out from Chrome then log in again
Open the app then click the three-dot icon and choose Logout.
Reopen the browser and log in again.
Update the browser
Open the browser and click on the three-dot menu followed by Settings.
Click About Chrome from the left side menu then wait to see whether Chrome is up to the most recent version available. An Update button will appear in case it is not up to date.
Let us consider what the best browser for Figma is. But first, here is what you should know.
Figma is a web-based prototype tool and vector graphics editor with extra offline functionality made possible by desktop programs for Windows and macOS.
To get the best of the service, you need to use it alongside the most compatible web browser. So, in this article, we explore our choices for the best browser for Figma.
Figma is primarily a browser-based application. However, this also implies that it may be used with Chrome OS in addition to any complete desktop OS like Windows, macOS, Linux, etc.
Additionally, Figma offers desktop software for Windows and macOS.
You may use the Figma mobile app, compatible with iOS and Android smartphones, for real-time device previewing.
How can I view Figma in my browser?
To view Figma on your browser, you will have to do the following:
Install and enable WebGL
Set your browser zoom to 100%
Update your browser to the latest version
For Mac users, disable gestures for right and left swipe
Opera is a fantastic browser because of its adaptability and interoperability with a wide range of software development tools and graphic editors, like Figma.
Its reliability cannot be understated, and you may use Figma on Opera because of the well-organized sidebar integrations and security features. Opera supports and accurately translates WebGL, HTML5, and JavaScript codes.
Additional features:
Proxy VPN
Great resource management
Plethora of add-ons
Organizer for multi-tabs
Opera
It had many features and is well-known for its speed and efficiency.
Chrome is the most prominent browser name. It is robust and reliable, and with its vast extensions library, there is so much you can accomplish.
For Figma, it is even more popular because of the Figma Chrome extension that will allow anyone select design elements and get the CSS, HTML, and React codes.
Since Safari was exclusively designed for Apple devices, don’t be surprised if it doesn’t work on Androids and Windows OS.
Because Apple focused on usability while creating the Safari browser, it functions well. It is robust enough, and with WebGL enabled, it is an excellent option for Figma.
For Figma, you may not immediately think of Vivaldi, but it is a fast and highly configurable browser. And it will work well for Figma with a few setup adjustments.
We also like its Web Panels, which let you design several web browser windows.
Last but not least, tab stacks are a built-in tab management mechanism. By organizing them into groups based on topics, stacks may be made.
Microsoft Edge is a relatively newer browser, yet it has many features. It has been acknowledged as one of the battery-friendly browsers and works with Windows, iOS, Android, and macOS.
Because it is strong and capable of processing many data kinds, it performs well for Figma on desktop machines, much like a few other browsers on our list.
Edge has undergone a significant update and is now a fantastic browser choice.
This is a robust and well-designed web browser that can handle a variety of functions. Firefox is excellent at preserving your privacy and assisting you in being secure online, so your device will be protected.
It features a clean, polished design and navigates the internet quickly. Additionally, it should not lag unless you have a bad internet connection.
There you go. With any of the browsers we have discussed, you will get the best out of the vector graphics editor.
Remember that while these browsers are all great for Figma, you will also want to consider factors like security and privacy, operating system, speed and memory use, etc., before making a choice.
Finally, please let us know your preferred browser in the comments.
Don’t know what to play on Game Pass? Don’t feel bad: with well over 100 great titles to choose from running the gamut of video game genres and experiences, it can be hard to decide where to get started.
But worry not, because we’ve got you covered with these Game Pass recommendations for those who stick to the shadows. Stealth-action games are the thinking man’s action games. If you like to take out your foes without them even realizing it, then you’ll love these Game Pass stealth-action games coming up. Let’s check them out.
A Plague Tale: Innocence
Asobo Studio’s 2019 narrative-driven action-adventure may at first glance look like The Last of Us in a medieval setting. But in reality it is much more than that. Set in 14th century Aquitaine (a region of France) A Plague Tale: Innocence focuses on young Amicia and her little brother Hugo as they flee both the Black Plague and the French Inquisition.
The stealth gameplay incorporates survival-horror elements. Together with the game’s rather dark aesthetic and themes, it all comes together for a game that is more than the sum of its parts.
The stealth aspect isn’t quite as forced upon the player in this tenth major installment of the Assassin’s Creed franchise. It is, however, an excellent stealth-action game nonetheless. Origins is set in ancient Egypt, interpreted with a high degree of authenticity (the development team consulted Egyptologists extensively) and features a new protagonist: Bayek of Siwa.
The story explores the “origins” of the conflict at the heart of the series – that between the Brotherhood and the Templars. With an open-world setting that is as drop-dead gorgeous as it is exotic, and new roleplaying elements thrown into the mix, Origins is a great way to get into the series for those who are uninitiated.
This first-person stealth-action game from 2012 is still a blast to play today. Coming from none other than Bethesda and Arkane Studios, it should come as no surprise. Play as Corvo Attano, bodyguard/lover of the Princess of Dunwall-turned assassin – and one of the baddest badasses in all of gaming.
Though it doesn’t have the bleeding-edge visual prowess of next-gen games, the presentation is stellar and more than makes up for the game’s age, in both the graphics and audio departments. On this latter topic, the game’s voicework features such talent as Susan Sarandon, Carrie Fisher, Michael Madsen, Lena Headey and Chloe Grace Moretz.
Three games for the price of one! And not just any games, but some of the greatest stealth-action classics ever. The games are identical to their original releases, so unfortunately there is no HD remaster treatment here. There is, however, a collection of great games that are still worth playing today. Here’s what the Hitman Trilogy includes:
Hitman 2: Silent Assassin
Hitman: Contracts
Hitman: Blood Money
See why Agent 47 is one of the most iconic video game characters of all time.
Slipping away…
Now that you clandestine gamers know what to play on Game Pass, why not share your thoughts on our list before you slip away into the shadows once again? Have you played any of these games already? Tell us about it in the comments.
If you don’t already have a Game Pass membership you can sign up here. And if you would like to know more about Xbox Game Pass, you can visit the FAQ page. And don’t forget to check out our other “What to play on Game Pass” articles for more on great Game Pass recommendations.
Incognito mode not working, not showing up, or greyed out in Chrome? You’re not the only one. This usually happens because of corrupt files, faulty settings, or interfering extensions.
Why does incognito mode not work anymore?
Sometimes your organization can block Incognito Mode from running. Your registry settings can also cause this problem.
What can I do if Incognito Mode is not working?
Before we start fixing this issue, ensure that you aren’t using Canary of Beta version of Chrome. If you’re a member of an organization, it’s possible that your administrator has blocked Incognito Mode.
1. Enable incognito mode Chrome registry
Press Windows and search for regedit. Click on the top result to open it.
Next, navigate to the following location: Computer\HKEY_Local_Machine\SOFTWARE\Policies\Google\Chrome
Double click IncognitoModeAvailability from the right side menu. In case there is none, right-click anywhere in the window and select New followed by DWORD (32-bit)value. Set its name to IncognitoModeAvailability.
Double click on the newly created key and type 0 as its value and click OK. 0 will indicate that it is enabled, while 1 means disabled. In case you already had the key created, simply set its value to 0.
Click three dots next to your name and choose Leave family.
Lastly, click on Remove to confirm.
3. Reset Chrome
If incognito mode is not working, open Chrome and click on the three-dot menu followed by Settings.
Next, click on Reset and clean up followed by Restore settings to their original defaults.
Click Reset settings and then try to enter the incognito mode to see if it works.
These are the five most effective methods to use if Incognito is not showing in Chrome. This isn’t the only issue you can encounter and many reported that Chrome Incognito won’t load any pages.
This issue usually occurs because Incognito mode is blocked in Chrome, but if you’re not using Chrome, we have a guide on how to disable Private browsing in Opera that might interest you.
Don’t hesitate to leave a comment in the section below if you need more help.
WebP is a file format that uses lossy compression to reduce the size of images on the web. However, sometimes, you may experience issues with WebP not working on your Safari browser. The main benefit of using WebP over JPEG is that it can reduce file size without affecting image quality too much.
This makes it an excellent option for smaller file sizes like those used in websites and emails. The only downside is that the file format may not work on other browsers and may require the use of photo viewer software.
Safari is one of them. Although you can tweak some settings or download additional programs to view the file format, you may experience some problems.
Does WebP work on Safari?
If you’re using Safari and your site uses WebP images then you may find that they don’t work at all or they only display as blank spaces.
This can be frustrating if you’re trying to use them on a website because they take up less bandwidth and load faster than JPEGs, so they should be used whenever possible.
Why does WebP not work on Safari? WebP works on Safari 14 version so if you are having a problem, it’s probably because Apple hasn’t implemented support for it and you are using an older version.
How can I fix WebP when it doesn’t work in Safari?
1. Upgrade your browser
If you’re using an older version of Safari, WebP files may not be working. You can check for a supported version and then install it.
Navigate to your app store and check whether there is an update available. Alternatively, you can uninstall and then reinstall it.
2. Change file name extension
One of the main problems with the WebP format is that many applications can’t open it. If a WebP file is giving you trouble, you need to change its extension from webp (or .webp) to jpg or png.
As soon as you do this and save the image, your computer will recognize it as a regular image and display it as such instead of showing an error message.
3. Use an alternative browser
Unfortunately, WebP isn’t supported by all browsers yet. Try opening the file in another browser like Opera One. If you’re not sure how it works, the Opera One browser allows you to configure it in its extensions.
To offer you an extension preference follow these steps:
Go to Opera add-ons and install Online Image Convert.
Download any .webp file format of your choice.
Right-click on the image.
Make your conversion, and you are all set up!
If it works there, then you’ll know that the problem is with Safari. Should you have any problems and it doesn’t work there either, then there may be something wrong with your file itself.
All major browsers, including Chrome, Firefox, and Opera One support the WebP format. However, there are some differences between how each browser handles WebP images. You have to check the version that has WebP browser support.
Users prefer WebP because it reduces file sizes significantly while maintaining quality. This makes it ideal for use on responsive websites with many images, such as product pages or galleries with many photos.
Hopefully, one or more of these solutions has helped you bypass the issue of WebP not working on Safari. In case you have another PC running a different OS, it’s easy to open WebP files in Windows 11.
While you are still here, feel free to check out our recommended list of image downloader software that can come in handy when you want to download in bulk.
In the comment section below, let us know of any other solution that may have worked for you.
Yesterday we reported that Xbox Cloud Gaming on Linux operating systems was noticeably underperforming in comparison to Windows. This was first brought to light by a Reddit user who posted about his findings after testing the streaming service on both Manjaro (a Linux distro) and Windows.
There’s an update on the situation from a another Reddit user, u/CohenJordan, who is apparently a member of the Xbox Cloud Gaming team. He goes on to explain that the issue is a purely technical one deriving from the fact that Linux is not technically a supported platform for Xbox Cloud Gaming. u/CohenJordan added that the team wants everyone to have the best game streaming experience possible regardless of OS.
As we reported yesterday, the drop in image quality while utilizing Xbox Cloud Gaming on Linux can be remedied by using Edge Browser’s Clarity Boost feature.
Chromium is an open-source browser project initially developed and used by Google for their Chrome browser. However, the popularity of Chrome meant other developers soon followed suit and developed chromium-based browsers.
Unfortunately, even today, when one speaks of a Chromium-based browser, only Chrome is recommended as the default choice. However, there are plenty of Chromium-based browsers that you can use.
Besides the obvious choice of Google Chrome, Microsoft also introduced its web browser, Edge, based on the Chromium platform. But are there more?
Yes. This article looks at the best Chromium-based browser that offers all the goodies of a stock Chromium browser and an additional set of features.
Which is the fastest Chromium browser?
If speed is the only consideration, we recommend Microsoft’s newly revamped web browser, Edge. It excels on multiple tests, including Basemark, Speedo, and JetStream, and it slightly edges Google Chrome and Opera One in this metric.
Is Opera GX better than Chrome?
Opera GX comes with the core features of Opera One and added features for gamers. As a general-purpose browser, Chrome slightly wins, but since Opera GX is built as a gaming browser, it comes out heads and shoulders above any other browser for gaming.
While it may not be the most obvious thing about this browser, Opera One is a Chromium-based browser available for both Mac and Windows computers.
Compared to other Chromium-based browsers, Opera One offers excellent privacy features. For example, you can use the free VPN to bypass region-blocked websites, block ads, and load web pages faster with an ad blocker.
The latest edition of Opera One also includes in-browser chat apps on the edge of the browser. Furthermore, it also comes with plenty of customization options, including dark and light theme support.
While Opera One has its library of add-ons, you can also install Chrome Store extensions with the help Install Chrome Extensions add-on.
Key features of Opera One browser:
Chromium-based browser with a modern UI
Opera One add-ons and Chrome Store extension support
Built-in ad blocker to load web pages faster and save data
Built-in messenger shortcuts
Opera One
Explore the World Wide Web with one of the most stable and fast browser software in existence today.
Vivaldi is another modern browser based on the open-source Chromium project. However, the browser looks nothing like Chrome and boasts its unique UI.
Vivaldi offers a two-level Tab Stack in the new release to help you group messy tabs together. Web Panel is another unique feature of Vivaldi that allows you to open a website anytime to view it on split-screen.
Like Opera One, Vivaldi also comes with a built-in ad tracker blocker to speed up page loading and offer better privacy. You can also customize the browser with custom keyboard shortcuts.
With built-in Chrome Extension support, you can install any and all the extensions from Chrome Store. Dig further into the themes tab, and you can control everything from themes to the color of your choice.
Microsoft relaunched Edge based on the Chromium platform, and since then, Edge has become an excellent alternative to Google Chrome. With a minimal user interface and unique features, it has the edge over Chrome.
The Collections feature in Edge allows the users to save web pages and group them for better organization. Whether you are an avid shopper or looking for job opportunities, you can organize it all under Collections.
Out-of-the-box compatibility with Chrome extensions makes it easy If you switch from Chrome. Edge comes with a comprehensive set of built-in accessibility tools to increase your productivity on the web.
Right-click on any web page, and you can access the built-in screenshot tool with scroll support, add pages to the collection and even translate selected text.
Google Chrome is the first browser to have been built on the Chromium platform and, as a result, has been the most popular web browser on the Windows platform.
With its minimalist design, excellent extension support, Google account integration, and great sync between all your devices, Google Chrome holds its own against other Chromium-based browsers.
While Chrome is still an excellent browser for day-to-day use, the bad reputation for its memory management and battery optimization issues is something that low-end PC users should consider.
Key features of Google Chrome:
Excellent support for the newest security standards
Brave browser is another Chromium-based project with a focus on user privacy. It claims to be faster than Chrome, offers better privacy than Firefox, and is less power-hungry on handheld devices such as smartphones.
The Brave Shields feature consists of ad and tracker blockers. It helps load web pages faster on slow connections and save data on metered networks.
For optimal privacy, Brave offers Tor support out of the box. It also supports IPFS, Chrome extensions, and can import all your bookmarks from other browsers. Furthermore, you can further enhance online security using a VPN.
Whether you are looking for a Chrome alternative to beat the high resource usage problem or just a change in design, there are plenty of Chromium-based browsers for you.
Please review the list and let us know your favorite Chromium-based browser in the comments below.
Gaming has never been better than it is now today. Technology has moved towards building smaller and more efficient chips that produce less heat and consume less power – giving direct benefits to portable machines such as laptops.
Many people prefer playing online games throughout the world. And as it is Minecraft and Roblox have found their way up to becoming game enthusiasts’ favorites.
If you’re looking to get the best experience while playing Minecraft and Roblox, grabbing a standout laptop for the game could make a huge difference.
Keeping this in mind, we’ve looked closely at specs, reviews, and any other additional features to put together our list of top picks of the best laptop for Minecraft and Roblox.
What kind of laptop do I need for Minecraft and Roblox?
To find the best laptop for Minecraft and Roblox, you’ll need to determine the features that are right for you and your home entertainment setup.
We recommend that you favor laptops with high-grade processors and graphics cards that excel with graphically intensive games and related applications.
Make sure to also consider the form factor, as a light and thin laptop will be better for portability and transport. Also, look for a powerful processor, a gorgeous display, and plenty of RAM and storage space.
Is Chromebook a good option for Minecraft and Roblox?
If you’re wondering if you can play Roblox on your Chromebook, the answer is yes. There’s no native app for Chrome OS, but you can run the Android version on most new Chromebooks.
Minecraft will not run on a Chromebook under default settings. Because of this, Minecraft’s system requirements list that it is compatible only with Windows, Mac, and Linux operating systems.
What are the best laptops for Minecraft and Roblox?
The Dell Inspiron 15 is the best laptop for Roblox and Minecraft, in addition to similar titles. Thanks to a robust feature set that includes the powerful 8th Generation Intel Quad-Core i5-8265U processor.
Moreover, you’ll love the fact that it comes with 16GB of DDR4 RAM in addition to the gorgeous and intuitive 15.6-inch touchscreen display, which turns this into a hybrid laptop/tablet device.
It does not end at that, there are well-appreciated additional features, such as the integrated fingerprint reader, and a massive 1TB HDD for more storage. In short, the battery and RAM are both fantastic.
Gaming is all about power, and that’s what the Acer Predator Helios 300 Gaming Laptop brings to the table. Featuring a cutting-edge i5 processor with a powerful GPU, the latest Minecraft and Roblox will run at 60 FPS on this laptop without any trouble at all.
More so, it comes with Acer CoolBoost technology with twin fans and dual exhaust ports, so you the only things heating up will be your gaming moments and not your hardware.
Key Specifications:
Overclockable NVIDIA GeForce RTX 2060 with 6 GB of dedicated GDDR6 VRAM
15.6-inch Full HD (1920 x 1080) Widescreen LED-backlit IPS display
Gaming laptops don’t all have to be about flashy colors and powerful stats, although the latter does come in handy.
The Lenovo Ideapad L340 Gaming laptop proof of that, as it is a gaming laptop that can also be used for day-to-day activities such as work or school featuring different working modes.
However, it has a powerful CPU and GPU, and the RGB backlight is there to remind you that gaming is still this laptop’s main purpose.
Key Specifications:
9th-generation Intel Core i5 processors
Advanced Dopoundsy audio technology
Game in quick Mode or work in quiet Mode
Includes 8GB DDR4 RAM and 512GB NVMe SSD
15.6-Inch screen delivers a stunning full HD IPS Display with 1920 x 1080 resolution
The Razer Blade 15 laptop has had some rave reviews as it has a stunning display and a quality design-build.
The standout specification of the Razer Blade 15 is its stunning 4K OLED display that few other laptops can match. This makes it an ideal laptop to play Minecraft and Roblox.
The laptop has the game-changing RTX 2080 Super graphics card that has amazing frame rates. With an i7-10875H CPU, this laptop boasts a potential 5.1 GHz clock speed.
In addition, the Razer Blade 15 has a fully mechanical keyboard with customizable RGB lighting effects, which is a good touch.
One great thing about gaming is that it is a portal to another world where you can be whatever you want, and that is achieved masterfully by the MSI GF65 Gaming Laptop.
This is especially thanks to the screen which features incredibly thin bezels, allowing you a level of immersive that few other laptops can deliver.
The specs are impressive as well, especially the i7 processor and the 6GDDR6 GPU that will propel your games at lightning speeds.
Key Specifications:
Memory: 16GB (8G*2) DDR4 2666MHz 2 Sockets; Max Memory 64GB
To help narrow down to the above list of decent laptops for Roblox, we ensured that each of the above Laptop featured specifications advanced enough to easily run Minecraft and Roblox, as well as other modern games.
You have stumbled on this guide because your Firefox browser is not responding. We will proffer the best solutions here.
The Mozilla Firefox browser is known for many of its great features. Users also like the fact that they can extend its use case with add-ons from the extensive extension library.
Additionally, it offers many security features, including tracker blocking and secure private mode browsing.
With the multitude of features it comes packed with, it is a shame when Firefox is freezing, not working, or not responding.
This error may come in different variations, and Firefox not responding may be triggered after clearing history, a mouse click, or an update.
While there are many reasons for this abnormality, whatever the case will be, our solutions should be potent enough to get you on track.
Quick Tip:
When Firefox is unresponsive or locking up, your only option is to try another browser, at least to fix the problem. And, perhaps, you’ll decide to stick to it.
Our recommendation is to settle for another browser that comes with less to zero loading or updating issues. In this particular situation, we suggest using Opera One.
Opera One
Starting with the basic version, you may customize the browser by adding icons, sidebars, workspaces, and bookmarks.
This problem with Firefox freezing and not responding may be triggered by many possible causes, from lack of memory to file corruption or incomplete installation.
That is why we suggest that before going into the solutions we prepared for you, to eliminate some possibilities.
Not enough RAM
This is a common problem for all apps. When you have a lot of tabs open, they consume RAM, and when the system runs out of memory, the software stops responding. You can install a tab management extension to help ease the load.
So, before getting into any other troubleshooting, close some of the tabs you have opened and see if that solves the problem.
We have an article that shows you why Firefox is too much memory and how to fix it. Extensions like DeArrow leave a huge memory footprint but you should get the problem solved in no time.
Previous crashes
If Firefox started to freeze and stopped responding after a few crashes, that can explain a file corruption problem in the app.
Luckily, we also have the perfect guide on what to do if Firefox had a problem and crashed in Windows 10/11, but our solutions below will also address this issue.
The browser slowed down
After a while, the browser can slow down a little, and should you notice that the effect had intensified before it stopped responding, we advise reading our solutions from our article on what to do if Firefox slows down in Windows 10.
Again, many of the fixes work on Windows 10 and 11 with slight differences in the design of the windows.
What can I do if Firefox is not responding on Windows 10 & 11?
1. Restart Firefox
Click on the X button from the window’s top-right corner to close Firefox.
To ensure its processes are closed, right-click the Taskbar and select Task Manager from the list.
Now find Firefox in the list of processes, right-click on it and select End task. If you can’t see the process, that means that Firefox closed with the usual method from the first step.
Now open Firefox again and see if it works as it should.
If Firefox is not responding, something has stopped its processes. And a restart might be the perfect solution for reinitiating everything. This is a valuable fix, especially when Firefox is not responding on startup.
2. Disable hardware acceleration from Firefox
From Firefox’s top-right corner, click on the Menu icon and select Settings.
Go to the General tab from the left and look for the Performance entry.
From there, uncheck the Use recommended performance settings checkbox, then untick the use hardware acceleration when available feature.
Close Firefox and initiate your web browser again.
Hardware acceleration is a feature related to your graphics card. In some situations, depending on certain graphic card setups, Firefox might get into a freeze loop when hardware acceleration is in use.
3. Reinitiate Firefox files
First, go to the Firefox official web page and download a new installer file for your Windows 10 or 11 system.
Make sure that Firefox is closed, just as we described in the first solution of this guide.
Press the Windows key + E to start File Explorer, then go to the folder where Firefox is installed. You can usually find it in the Program Files or the Program Files (x86) folder.
Now, right-click the Mozilla Firefox folder, click on Rename from the menu, and rename it to Fx3805.
Run the installer process by clicking on the downloaded Firefox executable file.
In the end, open Firefox and see if this helped you.
Renaming the Firefox folder is a precautionary method to preserve the data stored there. If the solution works, you will be able to copy them into the new browser installation folder.
4. Create a fresh places database
NOTE
By performing this procedure, your web browsing history and your bookmarks will be deleted.
Click on the Firefox Menu icon and select the Help option.
Choose More troubleshooting information.
From Application Basics click on Open Folder.
Close Firefox.
Now, go to the Firefox folder just opened and, under the profile folder, find and rename the file places.sqlite to places.sqlite.old and places.sqlite-journal to places.sqlite-journal.old.
Start Firefox and see if the problem has been solved.
New places database might fix the Firefox not responding malfunction – interrupted download processes from Firefox can cause corrupted places within the app database.
Click on the browser Menu icon and select the Help option.
Pick More troubleshooting information from the list.
Click on Open Folder from Application Basics.
Close the browser.
From your Profile folder, delete the sessionstore.js file and any associated files like sessionstore-1.js.
Start the browser again to see if the solution fixed the problem.
6. Reset Firefox
From Firefox, click on the Menu icon, then choose Help.
Select More troubleshooting information.
Find and choose the Refresh Firefox option.
Resume the reset process and open the web browser once more in the end.
7. Update your PC
Click on the Start menu and select the Settings app.
On the left pane, click on Windows Update.
Click on the Check for updates button.
If there are any updates, click on the Download and install button.
How do I fix Firefox not responding errors in Windows 11?
Luckily, all the solutions we provided above to solve this problem can be applied to Windows 10 and 11. That is mainly because with slight design differences like the round corners, Firefox is identical on the new and old OS.
Therefore, you will only experience a few design differences when using the solutions that imply the use of File Explorer, but that’s about it.
Of course, you might also take a look at our list of the best browsers for Windows and take your pick. They all work on Windows 10 and 11, so you’ll be fine.
What are some variations of the Firefox not responding issue?
Firefox stuck on new tab: This issue can appear due to problematic extensions, so removing them is advised. After removing them, check if the problem is still there.
Firefox hangs on startup: Corrupted user profile can cause this issue to appear, so be sure to recreate it.
Firefox stuck loading pages: If your cache is corrupted, you won’t be able to load any pages. So, checking if the website works in other browsers is advised.
Firefox stuck in Troubleshoot Mode: Corrupted installation is a common cause for this issue; you might have to reinstall the browser.
These are the most straightforward solutions to repair Firefox. If the web browser is still not responding in Windows, give further info – tell us when you first got the problems, what happened when you tried to fix everything, etc.
Based on these details, we will try to find specific troubleshooting solutions to assist you as soon as possible. You can get in touch with us through the comments below.
Pokemon is a popular video game series by Game Freak. It is one of the oldest games in the series, and it’s been through several changes over time. It has features like the oddball RPG, fierce battles, characters, and legends. The game has millions of players following up from the start, which is amazing for such an old game.
Though the changes over time aren’t as interesting to some, the game is still one of the best in the market.
Pokemon Showdown is a battle simulator for Pokemon that allows you to play with a specific player or random players. We shall take you through how to set up your private server in this article.
How do you do a private battle on Pokemon Showdown?
Doing a private battle on the Pokemon showdown means you want to challenge a particular player. It is a tool for competitive play. You can do this with these steps:
Click the user’s username to prompt their profile or Find a user option in the Main Menu, then type in their username.
After selecting the player of your choice, click Challenge to apply for a battle.
Then choose the format you want to play (Also, you can build teams to challenge in Showdown)
Can you friend in Pokemon Showdown?
Yes, you can friend in the Pokemon showdown. It is a feature that allows you to have a friend list where you can add friends or help friends. You can add friends by using this command: /friend add <insert username>
You can also view your list of friends with the command /friends
How can I create a private server in the Pokemon showdown?
1. Set up your server
Download and install Node.js before attempting to create a private server.
Press the Windows key, search for the command prompt and launch it.
Run the following command to start the Pokeman showdown: node pokemon-showdown 8000
Then visit your server at https://SERVER:8000
You can replace the SERVER with your domain or IP. (e.g https://localhost:8000)
You will be redirected to https://SERVER.psim.us
2. Create an Administrator account
Create a file named config/usergroups.csv and it will contain USER,&
Change the USER to your Pokemon shutdown username.
This is how to set up your own Pokemon Showdown server. However, your computer will be the server computer that others will connect to via port forwarding.
Pokemon Showdown is a simulator that allows you to battle with other players. However, there isn’t much you can do with Showdown without an internet connection.
It is because you need to play with others through an online connection, and there’s no way this can be possible offline. So, to use showdown, you need to be online to add opponents.
Games like Pokémon are fun to play. They have many features that you can enjoy. Also, Pokémon showdown makes it even better because you can set up battles with friends and specific players. Furthermore, there are Pokémon browser games that you can access on your browsers.
We will explore the best browser options for Google Drive (Docs and Sheets). Here is what you should know.
Google Drive is famous for being a well-structured and organized cloud storage option. Within Google Drive, however, there is much more than storage. Two impressive components are Google Docs and Google Sheets.
You can create the most impressive text documents between the two and perform some magic on numbers, records, and general data.
However, since these are web-based applications, manipulating them will require only the best web browsers.
For these reasons, in this article, we will explore some of the best browser options on the market that will improve your workflow with Google Docs and Sheets and enhance your overall text-processing experience.
Google Drive is famous for being a file-syncing and storage service created by Google. Drive was introduced on April 24, 2012, and enables you to sync, share, and save files on the cloud.
Officially it works with Chrome, Firefox, Microsoft Edge, and Safari. Still, interestingly, there are other browsers where it performs excellently even though they are not part of the official listing.
We will take a look at the best of this lot.
Does Google Docs work with all browsers?
At the moment, Google Docs is not supported in every browser. Even though it may work on many browsers, you will get the best out of the web app using it on supported browsers.
Now let’s explore the best browser options for Google Drive.
What are the best browsers for Google Docs & Sheets?
We recommend Opera One as the best browser for accessing, editing, and sharing Google Docs documents because it has fast webpage loading speeds and excellent security and privacy features. Hence Google Docs and Sheets on Opera One work seamlessly.
If you want to access and view your documents on the platform quickly, Opera One will connect you to your Google account within milliseconds. The built-in ad blocker helps to reduce the webpage loading time.
Moreover, Opera One uses very little computer processing power, allowing your machine to direct resources where they are most needed.
If you use Google Docs for work and business purposes, you want to ensure nobody can access your documents. This is where Opera One’s excellent security and privacy options come into action.
You’ll love Opera One’s data sync feature if you access Google Docs on multiple devices. This option syncs all your bookmarks, tabs, passwords, and other data types across all your devices.
The integrated messengers allow you to quickly connect with your colleagues and inform them about significant changes you made on shared documents.
Additional features:
Snapshot tool
Integrated messengers
Workspaces
Opera One
Improve your workflow in Google Docs using Opera One’s multiple productivity features.
UR browser is a very powerful software built with speed and privacy in mind, and it’s one of our top picks for the best browser option for Google Docs and Sheets.
Its fast loading time for web pages is beneficial if you use this browser with Google Docs or any other application that depends on speed to save changes and find documents.
Another detail that makes the UR browser stand out from the crowd is the set of built-in security features.
You won’t need to download add-ons, and the operating speeds won’t be affected by the clutter of extensions running in the background.
UR browser also has potent filters for ads, trackers, and other online threats. It blocks access to any malicious third-party entity that would be able to get access to your private information and files.
You can choose from 3 levels of privacy: low, medium, and high. The last one also activates the built-in VPN (Virtual Private Network) to allow full anonymity online.
All these features ensure that your experience with Google Docs on the UR browser will be flawless, and we encourage you to try it. It is one of the best browser options for Google Drive.
Additional features:
Invisible tracker blocker
Third-party cookie blocker
Virus scanner
UR Browser
Make the most of your Google Docs experience with this lightweight, fast-loading, and fully secure browser.
Google Chrome is the most used browser software option on the market, and for a good reason.
The wide range of customization options allows you to tailor the way it looks and choose from an extensive range of extensions.
This gives you the power to extend Chrome’s capabilities to fit your needs with just a few clicks.
In terms of speed, even though this software is quite an obvious choice for Google Docs, it doesn’t stand a chance against the UR browser.
The possible reason for Chrome’s less-than-speedy performance is that every new tab you open will start a new process on your PC. So, if you use many extensions and open many tabs, Chrome tends to get laggy.
The privacy settings you have access to in Chrome give you some protection from online threats. But Chrome doesn’t have a built-in VPN; today, it’s essential to protect your information.
Not to mention that Chrome removed the ad-block extensions completely for home users. Another detail to take into consideration. It is one of the best browser options for Google Drive.
AVG Browser is a suitable choice if you need excellent efficiency while working on Google Suite like Docs or Sheets.
The main advantage of this full private browser is its lightweight usage while working on multiple projects on Google services.
You can also utilize the anti-tracking utility and enhanced privacy in order to stop malicious websites that use personal information for marketing purposes.
It’s worth knowing that you have easy VPN integration and antivirus defense to stop cyber attacks from stealing official data from your worksheets.
Additional features:
Mandatory HTTPS security
Customizable homepage
Privacy cleaner tool
Anti-hack feature
AVG Secure Browser
Work on different projects on Google Suite apps with great privacy.
Mozilla Firefox is another good software option to use with Google Docs. This classic browser’s wide range of features makes it a good candidate for our top pick.
In addition to a great experience using Google Docs on Firefox, Google Sheets also works seamlessly. Because the browser is not a resource hog, it is easy to work on extensive documents seamlessly.
You can customize how Firefox looks and how it reacts to different online threats.
The built-in privacy settings are not as extensive as the ones found in Chrome or UR browsers, but you can still browse the Internet securely if you add some extensions.
Because Firefox doesn’t have a built-in ad-blocker, you will need to download a third-party add-on to make sure your working process doesn’t get interrupted.
Regarding page loading speed, Firefox’s performance is above Chrome’s (though not by much) but significantly lower than Opera One’s.
Some extensions are available in the store promise to improve loading speed, but this implies installing and giving permissions to third-party applications. That can cause a breach in your online security. It is one of the best browser options for Google Drive.
Nothing is better than using a highly customizable tool with a highly customizable browser. In this sense, Google Drive and the Vivaldi browser go hand in hand.
Although it has many great features, our favorite part is that practically everything can be changed, making it a browser you can call your own.
Because it is based on the Chromium engine, you may expand its functionality by utilizing Chrome’s web store extensions.
You may have numerous users on a single Vivaldi account, which lets you create profiles with specific themes to suit the job you need to do.
Finally, the developers have maintained a clean, user-friendly design despite the abundance of functions that are easily accessible.
In this article, we explored some of the best browser options for Google Drive. Our top pick is Opera One because of the amazing set of privacy features and unchallenged loading speeds.
Please feel free to let us know about your experience with these browsers by using the comment section below.
Google Chrome is one of the most popular web browsers for the Windows platform. But, several users reported that Chrome can’t access the camera or microphone.
When the browser tells you that an error occurred when trying to get access to the camera and/or microphone, the first thing to do is check the settings for that hardware.
Try the solutions below and we hope that you’ll get rid of the error in no time.
Why can’t I access my camera or microphone?
If Chrome can’t access the camera or microphone, it could be due to issues with the browser settings, website settings, or even the system settings.
In case the problem is limited to a particular website, it’s likely that the relevant permissions have not been granted and the website settings need to be modified. While if the issue is encountered across websites, it’s the browser or system settings to blame.
Conflicting programs or corrupt/outdated drivers may also lead to the problem. Several users also reported that the issue started after updating the OS, and the simplest solution for it would be to wait for the next version.
Some of the error message that you might come across are:
Although you granted permission to use the appropriate devices, there was a hardware error at the operating system, browser, or web page level that prevented access to the device.
Check your device camera and microphone hardware
Let’s now head to the solutions when Chrome can’t access the camera or microphone in Windows.
How do I get Chrome to access my camera & mic?
1. Consider using a different browser
If the problem persists even after trying all troubleshooting steps, then your only option left is to simply switch to another browser.
One browser that is just as good, if not better, than Chrome is Opera One. Both tools are based on the Chromium engine, so their extensions are cross-compatible, but Opera One focuses more on speed and a high level of customization.
More so, it is updated frequently, so any potential errors that you may find will not be there for long, especially since you can easily send error logs if they do happen somehow.
Finally, if you love private browsing, you’ll like knowing that Opera One has a built-in VPN and an ad-blocker, unlike most browsers that have these only via extensions, and most of the time those are limited anyway.
Opera One
Excellent web browser that offers many useful tools, including the ability to save and print your web pages.
2. Turn access for camera and microphone for Chrome in Windows
Press Windows + I to launch Settings, and then select Privacy & security from the tabs on the left.
Under App permissions select Camera.
Make sure that Let desktop apps access your camera toggle is enabled, and that Google Chrome is listed under it.
Go back to the previous window, select Microphone, and make sure the same options are enabled for it as well.
Restart your PC and check for any improvements. If Chrome still can’t access the camera or microphone, head to the next method.
3. Enable camera and microphone access in Chrome
Launch Chrome, paste the following path in the address bar and hit Enter:chrome://settings/content
Click on Camera under Permissions.
Now, make sure that the desired camera is selected from the dropdown menu, and then select the option for Sites can ask to use your camera.
Also, verify that no websites are blocked from accessing the camera. If there are any listed here, click on Delete icon.
Navigate to Microphone, and make the same changes there as well.
Relaunch the browser for the changes to come into effect.
If you have blocked access to your camera for any website, you may see that a hardware error has occurred for the webcam.
4. Remove recently installed hardware
Press Windows + I to launch Settings, and select Bluetooth & devices.
Click on Devices on the right.
Look for any of the recently installed hardware like a Mouse or Bluetooth speaker.
If you find any, click on the ellipsis next to it, and select Remove device.
If you noticed that Chrome can’t access the camera or microphone after you installed a new hardware device to your PC, remove the device or uninstall it.
Some hardware devices such as Bluetooth speakers and other wireless devices can create conflict with the web browser and apps, resulting in this error. Make sure you uninstall the hardware device completely and restart the PC.
5. Remove recently installed software
Press Windows + R to launch the Run command, type appwiz.cpl in the text field, and click OK to launch the Programs and Features window.
Select the problematic software and click on Uninstall.
Follow the on-screen instructions to complete the process.
Third-party software might lead to this issue due to the incorrect configuration. To fix the error, it’s best to uninstall them and prevent future conflicts.
6. Update camera and microphone drivers
Press Windows + S to launch the Search menu, enter Device Manager in the text field, and click on the relevant search result.
Expand the Cameras entry.
Now, locate the problematic webcam and select Update driver from the context menu.
Next, select Search automatically for drivers.
Restart the PC after the drivers are installed for the changes to apply.
A better way to update your drivers is to use third-party tools such asOutbyte Driver Updater. By using it, you’ll be able to automatically update all drivers on your PC with just a couple of clicks.
Disclaimer: Some functions of this tool might not be free
7. Update Windows
Press Windows + I to launch Settings, and select the Windows Update tab.
Click on the Check for updates button on the right.
If an update is available, click on Download & install to get it.
If Chrome can’t access the camera or microphone after an update, it’s likely a bug in the current version, and a patch for it should be available in the subsequent releases.
Fix: There was an error trying to activate your camera or microphone
This error message is encountered due to the same reasons as the ones discussed earlier, and the solutions for it too pretty much remain the same.
In addition to these, you can also try disabling the antivirus for a while to verify if that’s preventing your camera or microphone from activating. Also, terminate tasks that are currently using the camera to fix the error.
How do I grant my browser permission to use my webcam?
NOTE
We have listed the steps here for Chrome, but the concept pretty much remains the same for all the browsers.
Paste the following path in Chrome’s address bar and hit Enter:chrome://settings/content
Next, click on the website that you want to specifically grant access to the webcam on the browser.
Click on the dropdown menu next to Camera, and select Allow from the options.
Similarly, grant permission to all the required websites to use the webcam through the browser.
These are our proposed solutions if Chrome can’t access the camera on Windows, and one of the must-have fixed the error for you.
Many reported that only Google works on their Internet and this will make browsing the web impossible. Luckily, there are several ways you can use to fix this issue.
Why is no website opening except Google?
In most cases, this is caused by issues with your DNS, IPv6, or your firewall settings.
What can I do if only Google sites work?
Before we try anything else, try restarting your router or your wireless connection. If possible use a different connection to install the latest network drivers. Remove any recently installed network applications and hotspots.
1. Change the DNS Settings
Press Win + I on the keyboard to open Windows Settings.
Click on Network & Internet.
Go to Ethernet or Wi-Fi, depending on the connection you are using.
Click on Edit next to the DNS server assignment.
Now, type your preferred DNS server addresses. Usually, 8.8.8.8 and 8.8.4.4 (Google DNS) is best for all-purpose.
Click on Save.
If the Internet is connected but only Google works, you can try using a different DNS as shown above. You can also try these alternative addresses
Open DNS address: 208.67. 222.222 and 208.67. 220.220
Cloudflare DNS address: 1.1.1.1
2. Restore the Windows Firewall to default
Open the start menu, type Windows Defender Firewall, and hit Enter to open it.
Click on Restore defaults.
Next, click on Restore defaults on the new window.
Windows Defender Firewall can block the websites you are trying to access, so restoring it to the default settings might fix the issue for some users.
3. Diagnose the connection
Press the Windows key + S and type network connections. Choose View network connections.
Locate your connection, right-click it, and choose Diagnose.
The error is not specific to a particular browser. However, try switching to another one and check if the problem is solved. A stable, secure, and mostly error-free option we recommend is Opera.
It gets frequent updates, is easy to use, and offers full support for data transfer from other Chromium- based browsers, so if you want to make a full transition, you don’t have to worry about losing data.
Recently, a few users complain about WhatsApp web not connecting. This becomes a major problem because using the service on your devices is a huge boost for convenience.
Using the web service means you can communicate with all your WhatsApp contacts from a web browser on your computer. Of course, you would need to activate a few settings with the phone and computer before enjoying the web service.
A few things will trigger this situation, but do not worry because this guide covers causes and the best solutions to resolve the problem.
Quick Tip:
Access WhatsApp web using a browser equipped with specialized support for the messenger, like Opera One. It has a pre-installed WhatsApp integration; you must add your credentials.
Plus, it’s available on all major platforms so that you can access WhatsApp web from almost any device. You get non-intrusive notifications about new messages and can reply instantly without opening a new tab.
Opera One
Stay connected with your peers using this fast browser with quick access to messengers and social media!
If you are on a bel to access WhatsApp on your browser, it is often because of any of the following:
Connection issues– Thi is a first call as your network connection may be weak or unstable, which will mean that certain services will cease to function properly.
Browser issues – A host of browser problems will also trigger the problem. You must investigate to ascertain what specific problem is restricting your WhatsApp connection.
Server issues – There is always the off chance that the WhatsApp server is having an issue, and at such time, you would have to wait it out.
Firewall or antivirus problems – While antimalware is always recommended, you may be using one that is not best suited to your OS, and this means it may block out some applications or services that you need to access.
Since we have covered the possible cause, let us introduce you to some of the most efficient solutions.
What can I do if WhatsApp Web is not connecting?
Before going into any of the solutions that we recommend:
Remember that you may use the desktop application downloaded from the Microsoft Store.
You may consider waiting it out, as it may be a WhatsApp server-side issue, in which case, non of the below fixes will work.
Also, ensure you are connected to a reliable internet source, as this may often trigger the problem.
1. Relogin to fix phone not connected when locked to WhatsApp Web
Press the ellipsis at the top-right and select Log out from the menu.
Again, click Log out in the confirmation prompt.
Once done, follow the instructions in the image below to log back in.
Before trying any fixes below, you need to ensure you have a strong and stable internet connection both on your phone and computer to use WhatsApp Web.
Usually, if the connection is off, a yellow bar will display at the top of the chat list that reads computer not connected, so check if the connection is active.
If it persists, refresh the page, or log out, then log back in to reactivate your web session.
If WhatsApp web is not working on Chrome, update the browser. Also, do this for Firefox, Opera One, Safari, or Microsoft Edge to use the service. Internet Explorer is not supported.
Check whether you’re on a managed Wi-Fi network, like in your office or school/college, as the network may be configured to block or limit WhatsApp Web connections.
2. Update WhatsApp on your phone
Open the Play Store or the App Store (depending on the ecosystem you operate).
Search for WhatsApp.
Click on the Update button (You will see an update button only if you need an update).
Sometimes, when your phone is not connected to WhatsApp Web, check for any notification from WhatsApp reporting that you may not be able to connect over a specific Wi-Fi connection.
If so, you may be on a captive Wi-Fi network. Such hotspots require you to sign in before connecting to the internet.
If you’re on such a connection, you can either disconnect from it and then use your cellular data to connect to the internet or log into the Wi-Fi network and navigate to your home page.
If the issue persists even when you’re signed in, disconnect from the Wi-Fi and forget the connection in the Wi-Fi settings, or check with the network admin to ensure you can connect through the Wi-Fi hotspot.
That’s all you need to know about WhatsApp web and how to fix things when your phone is not connecting to it.
Google Chrome is one of the most popular browsers out there because of its multitasking abilities and performance. However, users have reported receiving the error: Chrome detected unusual code on this page and blocked it. Here are our solutions to fix this issue.
Why am I getting the Chrome detected unusual error?
The error: Chrome detect unusual code on this page and blocked it is an issue associated with XSS protection in Chrome. The error occurs to protect your personal information when filling out forms in Chrome.
Google has this error because there is a chance that there may be some malware in the XSS script, but in blocking the code they also prevent secure code. For more information on how to avoid browser attacks, we have a guide for that.
How can I fix the Chrome detected unusual code error?
1. Use a different browser
Browsers like Microsoft Edge, Firefox, and Opera do not block embed code and thus this error will not occur. We recommend using Opera Browser as if offers some of the best security features, like a free built-in VPN and ad blocker.
Opera also lets users know if the website they are visiting is secure with HTTPS certification that can be found in the address bar. That way, users know that it’s safe to enter personal information on that site.
Opera Browser
Browse securely using Opera’s free VPN and avoid unusual code errors.
In Chrome, click on the three dots in the top right corner and select Settings.
Click About Chrome to reveal any necessary updates.
Update your browser if prompted.
An out-of-date browser can lead to many issues, one of which is the unusual code error. Regularly check for Chrome updates if it’s not set to automatically update.
Click on the Start menu and search for Google Chrome.
Right-click on Google Chrome and click Open file location.
Select Google Chrome and then right-click and select Properties.
Locate Target and add -disable-xss-auditor to the end of the current text.
Click Apply and restart Chrome.
By disabling XSS protection, Chrome will ignore any XSS errors and thus remove the unusual error code from occurring.
We hope one of the above solutions helped solve the error: Chrome detected unusual code on this page and blocked it. Let us know in the comments which solution worked for you or if you have another solution that worked and isn’t mentioned in this article.
Minecraft is one of the most popular games of the last decade, and rightfully so, the game has sold millions of copies and is available on all major platforms.
But did you know that you can play Minecraft in your browser, for free? That’s right, Minecraft Classic is available to play online, and you can access it simply by visiting its website.
However, for the best performance and experience, you’ll need a good browser, so today, we’ll show you the best browsers for playing Minecraft.
If you love playing Minecraft Classic, you should also check out some of the best browser games on the internet.
Can you play Minecraft on a browser?
It may feel a bit strange since talking of a browser Minecraft game specifically since, in the past the game has been more famous on consoles like the Nintendo Switch edition, or on PC.
Well, there is an option to play on the browser. It is called the Minecraft Classic edition. This is just as you remember the original game, with the exception of it working with a browser.
Without a doubt, it is the Opera GX browser. It is famous for being the first major for-gaming browser. We will talk more about it later in the article.
Opera GX is the right browser for the job if you want to play Minecraft in your browser.
The browser has an integrated GX Control feature that allows it to allocate your PC’s resources evenly. Doing so will enable processes to run smoothly alongside even the more heavy-resource games.
The browser also has a built-in messenger and Discord integration, allowing you to contact your friends or communicate while gaming easily.
Twitch integration is also available to follow your favorite streamers anywhere.
Thanks to a built-in ad blocker, you won’t see any ads, and the website loading speed is optimal because tracking scripts are blocked.
We also have to mention that Opera has a built-in VPN for an extra layer of security if needed. The VPN is completely free, and it comes with unlimited bandwidth.
Notable Opera GX features:
Light on resources
Support for Chrome extensions
Built-in adblocker and instant messenger
Resource allocation with GX Control feature
Twitch integration
Built-in VPN with unlimited bandwidth
Opera GX
Try Opera GX today to benefit from all the exclusive gaming features and take your Minecraft experience to the next level.
Another browser that should be able to handle Minecraft is Firefox. The browser is light regarding system resources, so it’s excellent for multimedia and gaming.
Regarding privacy, a built-in Enhanced Tracking Protection feature will block tracking cookies and ads.
As for other features, Firefox offers a customizable user interface, allowing you to remove elements you don’t need easily.
There’s also a password manager you can access with a dedicated extension.
Notable Firefox features:
Privacy-focused
Built-in tracking protection
Available on all major desktop and mobile platforms
Probably one of the most popular browsers on the list is Google Chrome. This application is optimized for multitasking, so it should work efficiently with multiple tabs.
As for security, Chrome comes with a built-in password manager.
Of course, the developers release frequent security updates, so you won’t have to worry about your security online. But it’s also recommended that you use third-party anti-malware software.
We also have to mention that Chrome has a built-in ad blocker that will keep all ads at bay.
Notable Chrome features:
Thousands of available extensions
Search suggestions from Google
Built-in adblocker
Translate feature
Availability on all major platforms, desktop, and mobile alike
Another browser that is great for gaming and Minecraft is Microsoft Edge. This browser was revamped, and now it runs on the Chromium engine and has an improved user interface.
This version of Edge comes with better tracking protection, allowing you to block websites from tracking you.
In addition, thanks to the Microsoft Defender SmartScreen, you’ll be protected from malicious websites and files.
Notable Edge features:
Built on Chromium engine, has support for Chrome extensions
Another browser that can handle gaming is Vivaldi. This browser is privacy-focused, so it won’t track you or sell your data to third parties.
The browser is highly customizable, allowing you to modify the user interface easily.
Vivaldi offers advanced tab management with Tab Stacks, and with the Hibernate feature, you can temporarily disable specific tabs to save your resources.
Notable Vivaldi features:
Quick Commands feature that lets you search the Web and open tabs
There you go; these are the best browsers to play Minecraft. While our list gives you the best alternatives, we hope your final decision comes down to your personal preferences.
Opera will be the overall best gaming browser. Still, in our experience, using more than one browser is never a bad idea, as there are often practical advantages that are not shared across all browsers.
What is your browser of choice? Let us know in the comments below.
Be it Windows 10 or Windows 11, personal data is the most important thing stored on your PC. Taking into consideration the current situation, we are using our PCs or laptops more than ever before, all thanks to COVID-19.
Because of the pandemic, the work-from-home culture has become prevalent in society. People are working from their homes, or students are attending classes online, all on their computers.
Due to such high daily usage, large volumes of data are stored on our PCs. It would be frustrating to lose all of your important data through accidental deletion or data corruption.
To deal with such a scenario and avoid the loss of important files, you need to have reliable data recovery software for your Windows 11 system.
Thankfully, in this guide, we will share with you some of the best data recovery software developed to recover lost data, specifically supported on Windows 11. These data recovery tool has their own set of features, and you can choose any of them, based on your preferences.
How to select the best data recovery software for Windows 11?
Picking the best data recovery software for your Windows 11 machine can depend on various factors. The decision may also not be very easy, as there are tonnes of data recovery tools available on the market that offer features that are better than the others.
You can’t just go to a data recovery software website and download it. There are only a handful of such tools available for free online.
So, the first factor that you need to consider in choosing the best data recovery software for yourself, is to check the pricing of its different packages. You should select the one that offers the required features at a good price.
Another thing to look out for is whether the software is compatible with different storage devices or not. That is, the tool should be capable of recovering data from storage devices with NTFS, exFAT, FAT16, and FAT32 file systems.
If you need it, then you should also check if the software supports the recovery of encrypted media or not. Other things to look out for should also include, recovery from formatted or corrupted drives, supported file types, updates, support, etc.
One of the most essential features that you should look out for in data recovery software is if it offers a preview option.
This option comes in handy as it lets you preview the recovered file before downloading. So, you can make a more informed decision on which files to recover and which ones to leave out.
We’ve already written a guide on the 5+ best data recovery software for Windows 10. For users specifically looking for recovery software for their Windows 11, you can check out the list below.
What is the best data recovery software for Windows 11?
Starting off the list is the Minitool Power Data Recovery software. It is one of the most reliable options if you are looking to recover your lost data.
This software supports Windows 11 and lets you access files from damaged hard drives, SSDs, USB drives, SD cards, and other storage devices.
One of the key features of this tool is that it supports the recovery of up to 70 file types. Additionally, it offers the option of showing a preview of each file before you go ahead and download it.
The user interface is easy-to-understand and offers a simple three-step process to recover your files. Using this software, you can rest assured that it will deeply scan the drive and dig out deleted files with ease.
Here are some of the key features ofMinitool Power Data Recovery software:
Supports recovery of up to 70 file types
Free version allows 1GB of data recovery
Offers preview the file before recovery option
The interface is smooth and simple to use
Minitool Power Data Recovery
Easy-to-use data recovery tool compatible with Windows 11, offers support for 70 file types.
If you are looking for a more user-friendly and effective data recovery software for your Windows 11 PC, then EaseUS Data Recovery Wizard is your option.
This tool also offers a three-step data recovery process. There are two scanning options, i.e. Quick and Advanced. The latter deeply scans your PC sector-by-sector for a complete recovery process.
Fun fact, it is one of the oldest data recovery software, available in the market since 2004. Users in over 160 countries across the globe trust this tool for data recovery.
You can use this tool to recover lost files on any Windows OS running device. One of the key highlights of this tool is that it also gives you a free file repair tool.
This would come in handy when after the data recovery, some files get corrupt due to deleting or formatting. Using this feature, you can recover damaged images, broken MP4 or MOV files, and even repair corrupt documents like Excel, Word, PDF, PPT, etc.
Here are some of the key features of the EaseUS Data Recovery Wizard:
Light in size
Supports recovery of more than 1000 file types
Offers export-import sessions
Ability to filter specific file types
Preview the files before recovery
EaseUS Data Recovery Wizard
Excellent and dependable data recovery software for Windows 11 is small in size.
Developed by Cleverfiles, DiskDrill data recovery software when launched for Windows in 2015, instantly became a hit among Windows users for data recovery.
Cleverfiles has adopted Recovery Vault technology. It runs in the background and saves metadata for all files, protecting them from any accidental deletion.
The vault plays an extended role of a Recycle Bin that does not require additional storage on your PC but offers a one-click recovery option.
It supports multiple files systems such as FAT, NTFS, NTFS5, HFS+, ext2, ext3, and ext4. You can recover any type of file using DiskDrill using either Quick scan or Deep scan.
Moreover, this tool also supports recovery from storage devices like internal HDDs, USB Drives, SD and CF cards, memory cards, digital cameras, SSDs, and flash drives.
Here are some of the highlights of DiskDrill data recovery software:
Free version offers 500MB of data recovery
One-click recovery using Recovery Vault technology
Preview of scanned files before recovery
Simple user interface
Supports recovery of variety of devices
DiskDrill
Simple data recovery tool, with one-click data recovery option using Recovery Vault technology.
From the house of Wondershare, we have the Recoverit data recovery software. This tool offers support to recover over 1000 file formats and a variety of file systems such as NTFS, FAT, HFS+, APFS.
Taking things to the next level, Wondershare has developed Recoverit as a tool that helps you recover data from 2000+ devices.
These include internal HDD, USB flash drive, SSD, external HDD, pen drive, floppy disk, action camera, drone camera, dashcam, camcorder, video player, music player, etc.
The official website boasts that it has a 95% successful recovery rate, which falls in line with its top competitors. You can use this tool to recover your data from over 500 scenarios.
Do note that using Wondershare Recoverit, you can even recover or restore Ultra HD, 4K, and 8K videos as well. It also offers the option to repair damaged files and preview files before recovery.
Here are some of the best features of Wondershare Recoverit:
Supports 1000+ file formats and 2000+ devices
It supports mulitple languages
Can restore 8K video files
Repair multiple files at once
Wondershare Recoverit
Excellent data recovery tool that supports file recovery from over 2000 devices on your Windows 11 PC
The team behind the popular system cleaner, CCleaner, has developed the Recuva data recovery software. Recuva lets you recover files from any scenario, be it an accidental deletion or a system crash.
You can recover popular file formats from a range of supported devices, including, memory cards, external hard drives, USBs, etc.
Recuva’s Deep Scan mode is one of the most powerful scanning modes in data recovery software. It scours your drives to make sure not a trace of a deleted file is left behind from recovery.
Apart from being a data recovery tool, Recuva can also act as a secure file deleted. Often you would like a file to be gone for good from your PC.
In such cases, you can make use of Recuva’s Secure Overwrite feature, and the file will be completely wiped off from the system memory.
Recuva is easy to install and also very easy to maneuver. Although it offers fast scanning, there is no option to preview before recovering any file, which could be a letdown for some.
Here are the key highlights of Recuva:
Offers superior deep scan mode
Recovery from damaged or newly formatted disk
Option for secure deletion
Available as a portable version
Recuva
Recuva is a simple yet powerful tool that can help you recover lost files and also securely delete files you don’t need.
Last but not least, we have AnyRecover in our list of the best data recovery software for Windows 11. Just like any other recovery tool, AnyRecover lets you recover deleted files from your storage.
It supports the recovery of over 1000 file types and supports the Windows 11 operating system. AnyRecover can recover data from a variety of devices, including SSD/HDD, USB, SD cards, digital cameras, pen drives, and so on.
While scanning, if you come across a file that you wish to recover, you can pause the scan and recover that file instantly.
You can use the filter function to sort out deleted or existing files. AnyRecover even allows you to search for a specific file manually.
Here are some key features of AnyRecover:
Recovery of 1000+ file formats supported
Recovered data is stored in a separate folder with date and time attached to the name
Recovery time is less
Offers file filtering
Support the ReFS file system for deep data recovery.
AnyRecover
A decent data recovery tool to recover data from any situation, especially if you have small disk drives.
What points should I keep in mind before selecting a data recovery software for Windows 11?
We make rash decisions when we are in desperate need of a solution to recover our lost important data.
By rushed decisions, we mean not heading over to genuine websites, let alone downloading genuine software. It is highly recommended that you carefully download the recovery software of your choice from their official websites only.
The next thing you should keep in mind before downloading is compatibility with the version of your system’s OS. If you are running Windows 11, then your software should support it.
This will eliminate the hiccups that you may come across during the usage of an incompatible tool.
Make sure there are enough detailed guides available for the software that you will be downloading. Having a step-by-step guide on how to use such tools helps you make informed selections.
Also, check if the software that you are downloading provides technical support or not. It could be via email, live chat, phone call, or another medium. This will come in handy if you have any problems with their software.
Although data recovery software is meant to let you recover lost data from your drives, there is no guarantee that even the most expensive and feature-loaded tool can bring back 100% of your files.
There are certain software limitations, and the recovery of files depends on various factors, including whether the data was overwritten multiple times, the level of damage to your HDD, etc. As a result, keep realistic expectations from such tools in mind.
Waking up to your PC with your data gone can be a nightmare. For that reason, we have a separate section for some of the best recovery solutions which can help in recovering any lost or corrupted file on Windows PCs.