At first glance it may seem like a Borderlands clone, and there is no denying Gearbox Softwares’ hit action-roleplaying-shooter franchise’s inspiration on Roboquest, with its eye-popping cel shaded visuals, raucous tone, loot and shoot mechanics and over the top fast-paced action. The game also seems to be oriented toward the multiplayer experience, something else it shares in common with the Borderlands franchise. It’s cross-platform play between Xbox consoles and PC has been a major focal point for developer RiseUp Studios, makers of VR games Winter Break and The Burning Descent.
At the time of this writing (in late February) the game has not yet come to the Xbox version of Game Pass, though the studio promises it will come sometime later this year following a run in the Xbox Game Preview program. As of this time the game is still considered a work in progress.
Are you facing Call of Duty Cold War not updating on Xbox issue? If so, then you aren’t alone. Several users have reported this problem on official support pages and other platforms.
While for some, updating the console has fixed the issue, and for others, re-installing the game has resolved the Call of Duty Cold War not updating on Xbox problem.
But if all these solutions aren’t working for you and you are looking for ways to fix this problem, then you have landed in the right place.
Because in this guide, we will give you a list of curated solutions that you can apply and possibly fix the Call of Duty Cold War not updating on Xbox problem.
The most common reason for this issue is server issues. As already mentioned, there are several solutions that you can try to fix the problem on your own.
The effect of Call of Duty Cold War not updating on Xbox is different for different users. For some, the update won’t be complete and they are stuck. For others, the update is on loop, or the game, although it completes the update, won’t start.
Whatever the case may be, if you are experiencing any of these problems with the Call of Duty game on your Xbox console, then follow this guide and hopefully fix it.
What are the causes of Call of Duty: Cold War not updating on Xbox?
Call of Duty Cold War was released in 2020. And just like every other Call of Duty game, Cold War quickly became the go-to game for gamers.
It has received multiple updates, and features in the form of new seasons, enhancing the overall gameplay. The best parts about the game are the improved gameplay mechanics and top-notch graphics.
In line with installing the latest update for the game, several users have come across this Call of Duty Cold War not updating on Xbox issue.
Notably, there aren’t any particular reasons that trigger this problem for the users. However, taking a look at various user reports, below are some of the main reasons why you could come across this problem with the game.
Due to presence of a console bug.
Because of Call of Duty Cold War server issue.
Corrupt game cache files.
Console’s software issue.
Problematic installation of the game.
Unstable internet connection.
Outdated console firmware.
Do note that these are some of the reasons that could be behind the Call of Duty Cold War not updating on Xbox problem.
We think that the below-mentioned solutions will be sufficient enough to fix not only the issue at hand but some other Call of Duty Cold War-related problems as well.
How can I fix Call of Duty Cold War not updating on Xbox issue?
1. Restart Xbox
Press once the Xbox button on your console.
Using your Xbox controller, you need to select System on the guide that shows up on your screen.
Then select Settings.
Select Power & startup.
Select Turn off or restart option.
Though restarting your Xbox may not sound that exciting, a simple restart can do wonders. Often, the failure to load important files by the console leads to such issues with games.
In such a case, all you need to do is restart your Xbox, and wait for it to completely boot up. Then try updating the Call of Duty Cold War game and see if this fixes the issue or not.
Besides, some console bugs present in the console’s firmware may also trigger such issues for no apparent reason. A restart is a solution to all of these problems.
2. Check internet connection
A stable internet connection is the most important thing that you need to have to smoothly download and run online games.
An unstable internet connection can often cause several issues, one of which is the Call of Duty Cold War not updating on Xbox.
In such a case, you can take the help of websites such as Fast.com or Speedtest.net to check if you are getting the optimal internet connection as per your data plan or not.
If the internet speed isn’t as per your data plan, then you need to contact your ISP and report the issue.
3. Redownload the update
Head over to My games and Apps.
From the left side select Call of Duty Cold War.
Press the Menu button on your controller and hit Cancel.
After you have canceled the update process for the game, try downloading the update again and see if this helps/ Often due to some bugs, the update process gets stuck and doesn’t complete.
Initiating the redownload process could help you get over the bug and possibly complete the update process of the Call of Duty Cold War game.
4. Clear system cache
Power off your Xbox console by pressing the Xbox logo.
Unplug the power cable from the back of your Xbox.
Now wait for about 30 seconds.
Plug the power cable back into your Xbox and power it on.
Your Xbox console stores game data in the form of cache files, which helps the game operate smoothly and quickly.
This clutter can pile up and, if corrupted, can cause issues such as Call of Duty Cold War not updating on Xbox issues. It is recommended that you perform this power cycle to clear the system cache very often.
5. Reinstall the game
Navigate to the Homescreen.
Press the Xbox button.
Select My Games & Apps.
Highlight Call of Duty Cold War game and press Menu button.
Press Manage Game option from the pop-up menu.
Select Uninstall.
If the problem was not resolved by any of the above-mentioned methods, then you can try uninstalling the game from your Xbox and then re-installing it.
Re-installing a game has several benefits. First, it will properly install all the files that would have been missed due to some bug during the previous installation.
Second, and more importantly, it will install the latest version of the game. So, you don’t need to update it, thus preventing the Call of Duty Cold War not updating issue on Xbox.
Navigate and select Settings under the System menu.
Head to System.
Under the System tab, select Storage.
Here, you will be shown the amount of storage space currently used or left in your Xbox console.
Check if you have sufficient storage space left to download the update or not.
If not then delete any other game, that you don’t play to make some room for the Call of Duty Cold War update to get installed.
7. Clear MAC address
Press the Xbox button on your controller.
Select Settings.
In the Settings menu, select General.
Go to Network Settings.
Select Advanced Settings.
Choose Alternate MAC address.
Select Clear.
Several users on the Microsoft forums have confirmed that for them, clearing the MAC address on their Xbox console has helped fix the Call of Duty Cold War not updating on Xbox issue.
After you clear the MAC address of your console by following the above steps, simply restart your Xbox console. Now, check if you can download the update for the Call of Duty Cold War game.
8. Reset Xbox
Press the Xbox button on your controller.
Select Settings.
Go to System.
Choose Console Info.
Press the Reset this Xbox button.
Select Reset and Keep my Games and Apps.
You can select the Reset and remove everything option, but this removes the entire data stored on your Xbox console. Moreover, there will be no prompt asking you to confirm this selection. So, make sure that you know what you are doing.
What are the optimal settings for the Call of Duty: Cold War game?
Not just for Call of Duty Cold War, but for any game, having the best controller, graphics, audio, and overall gameplay settings can improve your gaming experience.
With optimal settings, you can have a slight edge over your opponent, which can make the difference between you landing on top of the scoreboard.
Even though the exact perfect settings will vary depending on your system and preferences, there are a few general settings that most gamers agree with.
➡ Best graphics settings
Color-blind type: Disabled
Field-of-view: 90
Motion Blur: Disabled
➡ Best controller settings
Horizontal Stick Sensitivity: 5
Vertical Stick Sensitivity: 5
ADS Stick Sensitivity (Low Zoom): 1.2
ADS Stick Sensitivity (High Zoom): 1.0
Left Stick Min Input Threshold: 5
Left Stick Max Input Threshold: 100
Right Stick Min Input Threshold: 4
Right Stick Max Input Threshold: 100
Auto Sprint: Enabled
Sprint Behaviour: Go To
Sprint Cancels Reload: Enabled
Equipment Behaviour: Hold
➡ Best audio settings
Master Volume: 100
Music Volume: 35
Sound Effects Volume: 100
Dialogue Volume: 100
Cinematics Volume: 100
Hit Markers Sound Effect: Enabled
Using the above-mentioned settings, you can experience the best possible gameplay experience with the Call of Duty: Cold War game on your Xbox console.
However, we would like to point out that these overall settings are a choice of personal preference. You may or may not like the settings mentioned above. So, you can always tweak the settings to how you want them.
Let us know in the comments below your thoughts on this topic. Also, do let us know which of the above-mentioned methods helped you fix the Call of Duty not updating on Xbox console error.
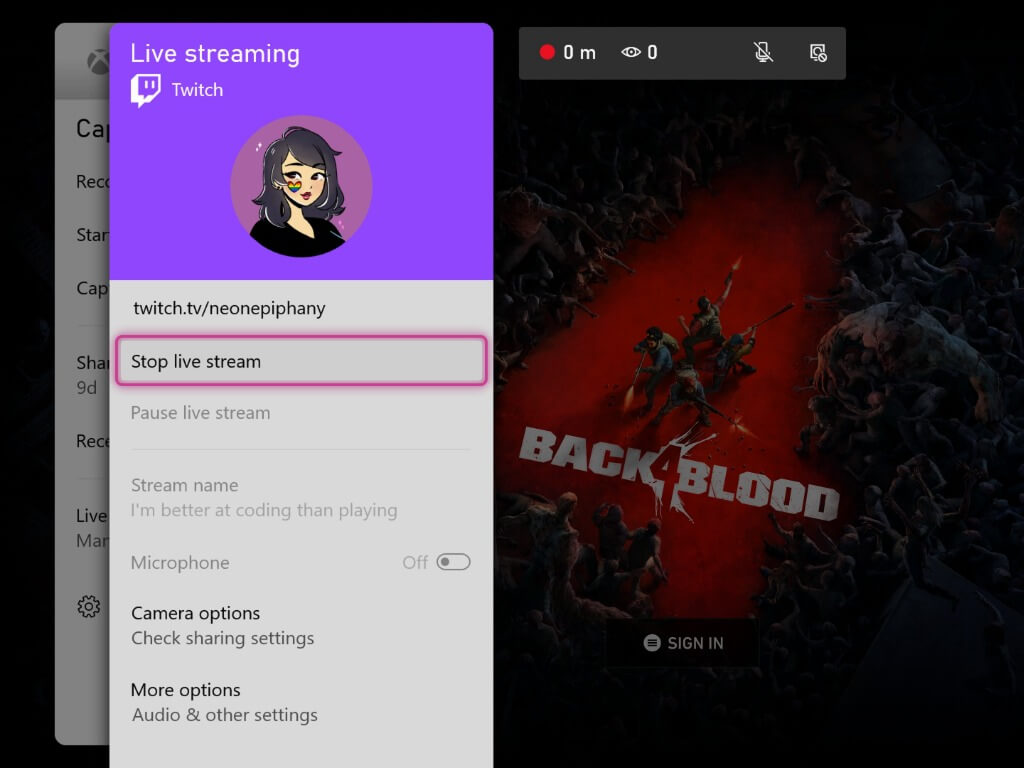
Players will now be able to launch a Twitch stream directly in the Xbox dashboard.
While Xbox streaming is integrated within the Twitch app, but until today’s update Xbox users had been left with no way to directly launch a Twitch stream from the dashboard. The return of this “Console Live Feature” is not exactly unexpected, however, as it was tested back in the Fall of 2021 via the Xbox Insider Program.
Now, Xbox users will be able to launch a Twitch stream without having to do so inside the Twitch app. In fact, Twitch streams can now be launched from the Xbox dashboard without the Twitch app even being installed on the console as long as a player’s Twitch account is linked. The feature can be accessed through the Xbox Guide’s Capture and Share tab.
Sometimes you forget and you need to find the Wi-Fi password on Windows 11. This isn’t as hard as you think, and you can do it in a matter of seconds, by following these steps.
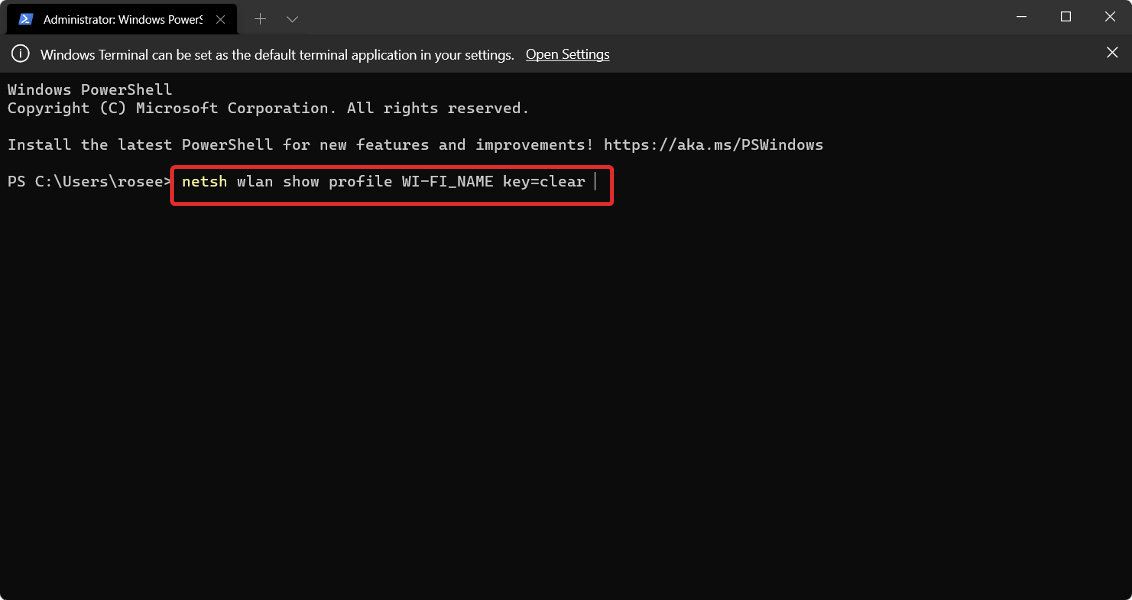
Right-click on the Start icon then tap on the Windows Terminal (Admin) option to open the PowerShell interface.
After it opens, enter or paste in the following commmand and make sure to replace the WI-FI_NAME part with your actual name:netsh wlan show profile WI-FI_NAME key=clear
When you scroll down to the Security settings, you will find the Wi-Fi password next to Key content.
How can I view all saved Wi-Fi passwords in Windows 11?
You can view any saved Wi-Fi password with PowerShell, ex explained in the instructions above. We also have a guide on how to view saved Wi-Fi passwords on Windows 11 that offers more information, so don’t miss it.
FAQs
How can I find my Wi-Fi password on Windows 11?
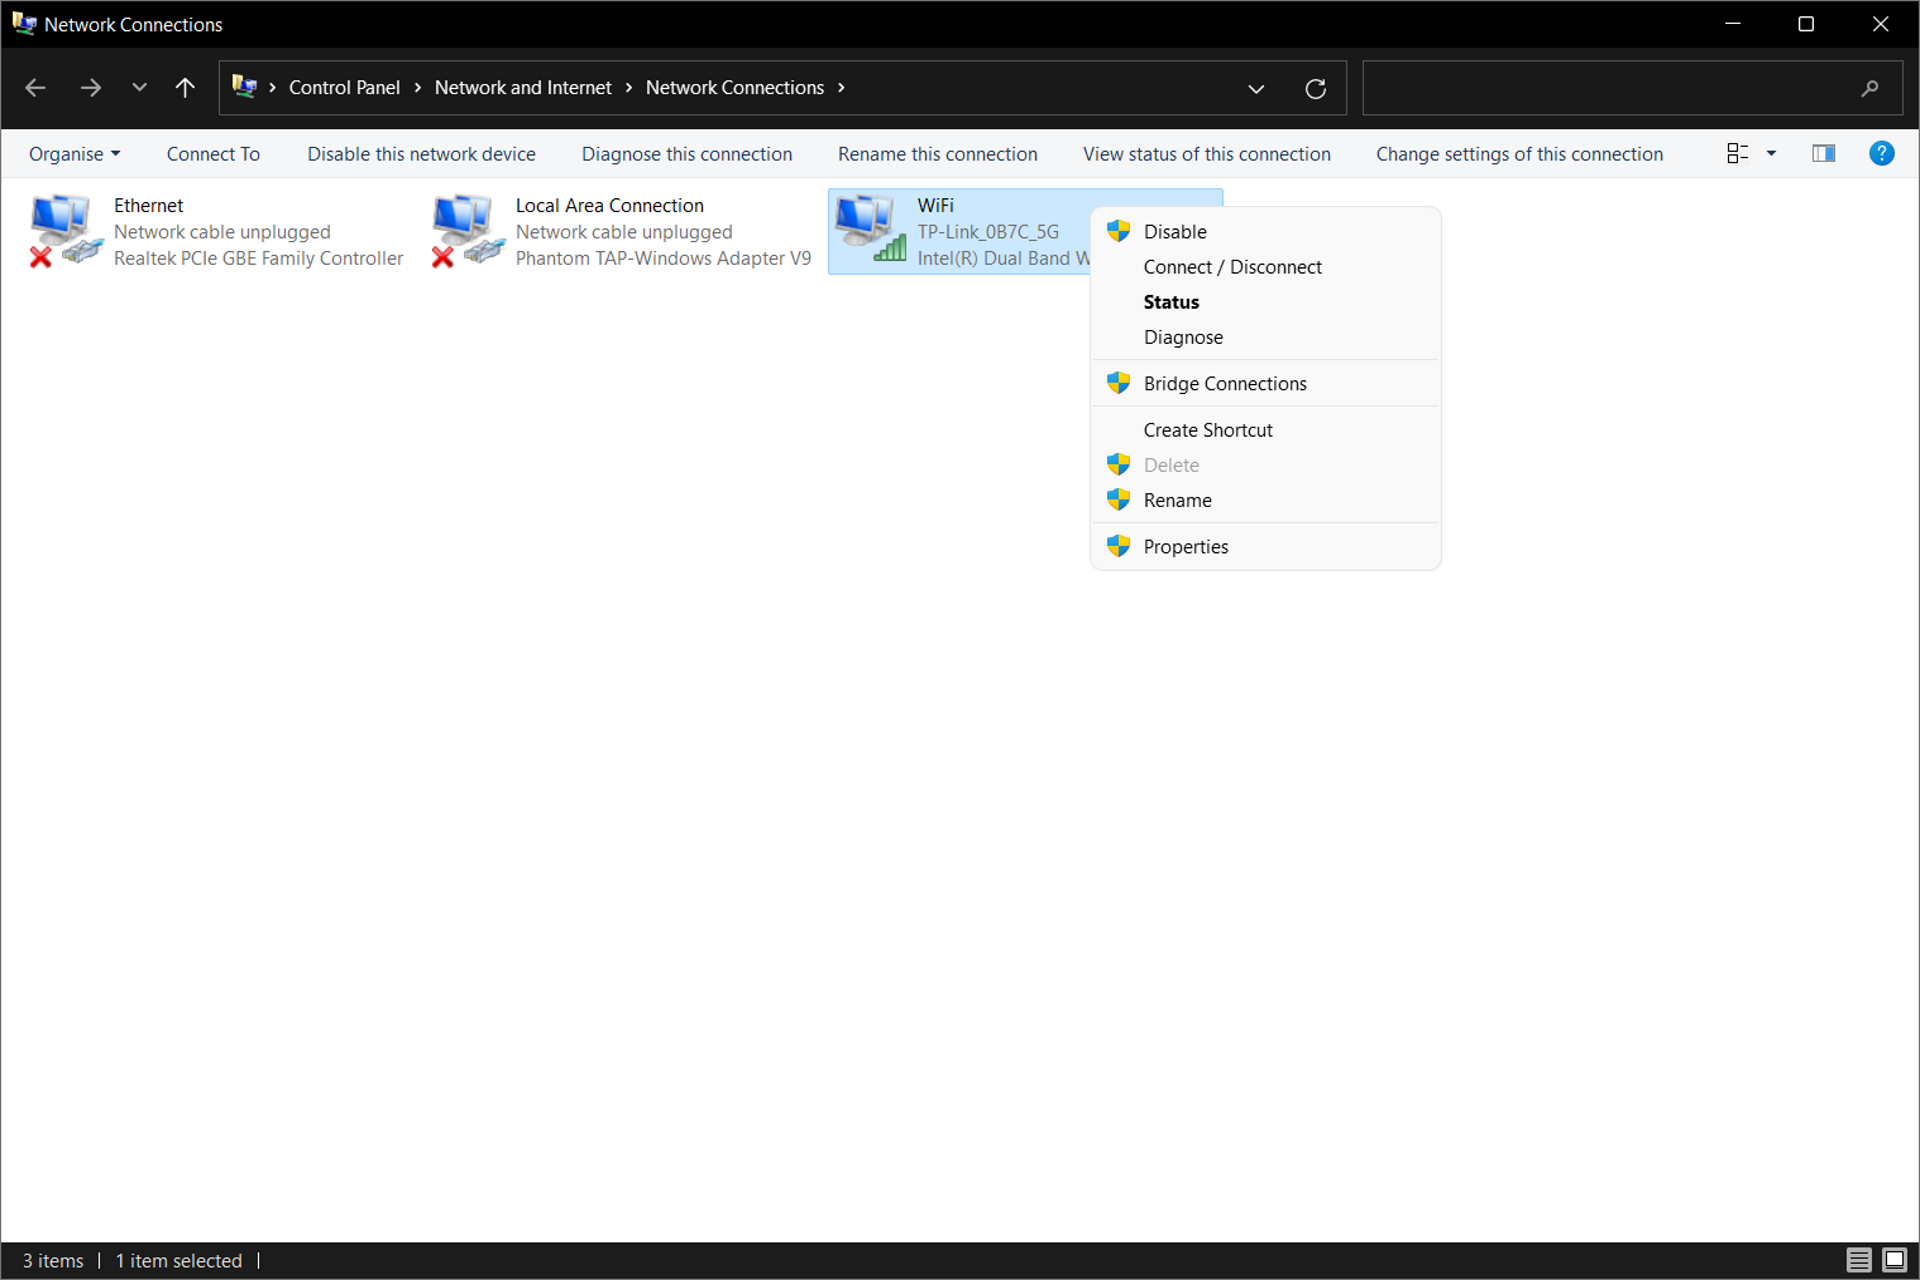
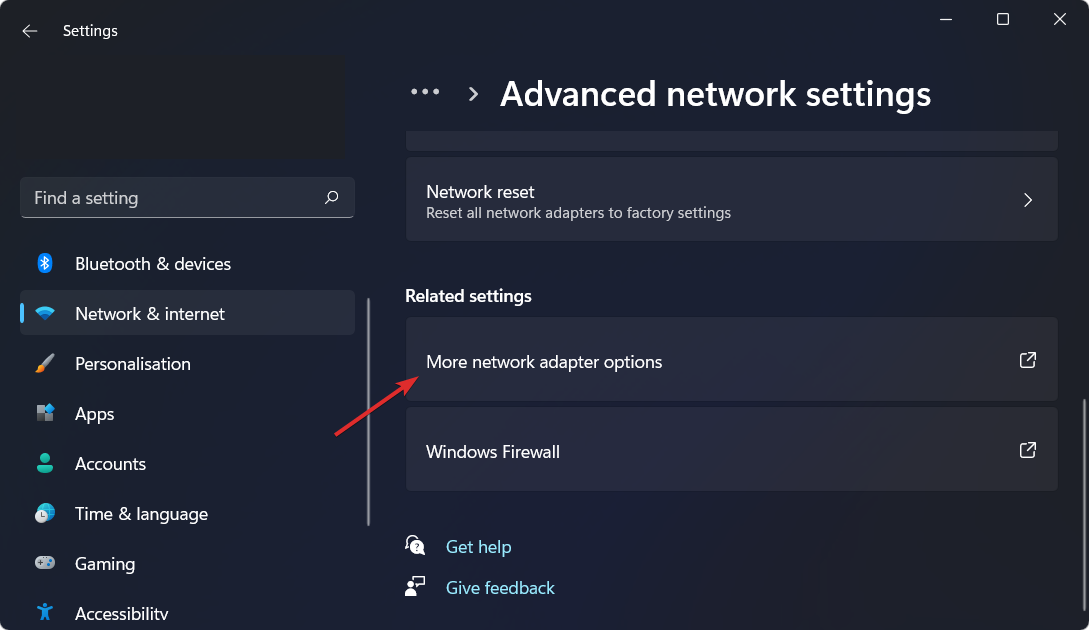
Open Settings > Network & Internet > Advanced network settings > More network adapter options. Right-click your Wi-Fi network, select Status > Wireless Properties > Security tab, and check Show characters to view the saved password.
Can I find the Wi-Fi password using Command Prompt?
Yes. Open Command Prompt as administrator and type netsh wlan show profile name=”WiFiName” key=clear. Replace WiFiName with your actual network name, and check the Key Content line for your password.
Where can I see saved Wi-Fi passwords for all networks?
Use the command netsh wlan show profiles to list all saved networks. Then, run the previous command for each profile to view its stored password.
What should I do if I can’t find the Wi-Fi password?
If the password isn’t stored or visible, log in to your router’s admin page or ask the network administrator. You can also reset the router to default settings if you’ve lost access completely.
We hope this guide proved to be helpful for all of you. Let us know in the comments section below which solution worked for you, as well as whether you have any other solutions in mind.
The Garmin GPS itself has the ability to alter files, maps, routes, and waypoints. However, connecting the device to your computer and using the BaseCamp software is usually considerably more efficient. On rare occasions, you may discover that your computer does not recognize the Garmin GPS.
Don’t sweat it as you are not alone in this and USB cable errors are generally easy to solve. In the worst-case scenario, you will have to acquire a new wire for your device.
Follow along as we have put together a comprehensive list of solutions that you can try in order to fix the error, right after we see what else the company produces. Keep up with us!
What does Garmin produce?
Besides GPS devices, the company manufactures activity trackers and sports watches that are designed for activities such as running, watersports, golfing, cycling, swimming, and other sports that require sensors such as heart rate and GPS.
Some newer variants include Bluetooth audio playback as well as pulse-oximetry capabilities. In addition to measuring the duration and quality of sleep, some Garmin products measure body movement, record heart rate, count steps taken, and the number of stairs climbed by the wearer.
There is also a series largely targeted towards runners, but the watches are more broadly targeted as well, particularly at the top end of the price spectrum.
Among the features are multi-sport tracking capabilities (for example, automatically switching between sports during a triathlon) and a variety of customized profiles for jogging, swimming, cycling, skiing, and paddle sports, as well as other weight-loss and hiking activities.
It has a built-in heart rate sensor as well as GPS functionality. Most contemporary Garmin devices are capable of displaying their current location on a map that is vector-based and either kept in the device’s built-in memory or loaded from external flash memory.
The built-in (or base map) depicts all country borders and significant cities. The company sells a variety of maps, including precise road maps, topographic maps, and maritime maps, all of which can be downloaded.
What can I do if Garmin USB device is not recognized in Windows 11?
1. Unplug and replug the wire
If your computer is unable to recognize the Garmin device, begin by unplugging and powering down your GPS. Restart the device and connect the USB cable to the port on the back.
Last but not least, reconnect the USB wire to your computer. Your Garmin should display a picture of a GPS unit that is connected to a tower. You should be able to see it on your computer as well as on your phone.
2. Try a different port
If the PC is still unable to locate the Garmin after a reboot, there are a few alternative options to consider attempting. First and foremost, connect it directly to the computer rather than using a USB hub or the Garmin’s own cradle, if it is equipped with one.
You could also try connecting it to a different USB port. Theoretically, any port should function, but this is not always the case in practice.
The same may be said about the USB cable as well. Some cables are designed primarily for charging, while others are designed primarily for data transfer, while still others are designed for both.
Garmin suggests that you only use their proprietary cords, but if you have a variety of USB cables on hand, you can typically swap them around until you find one that works.
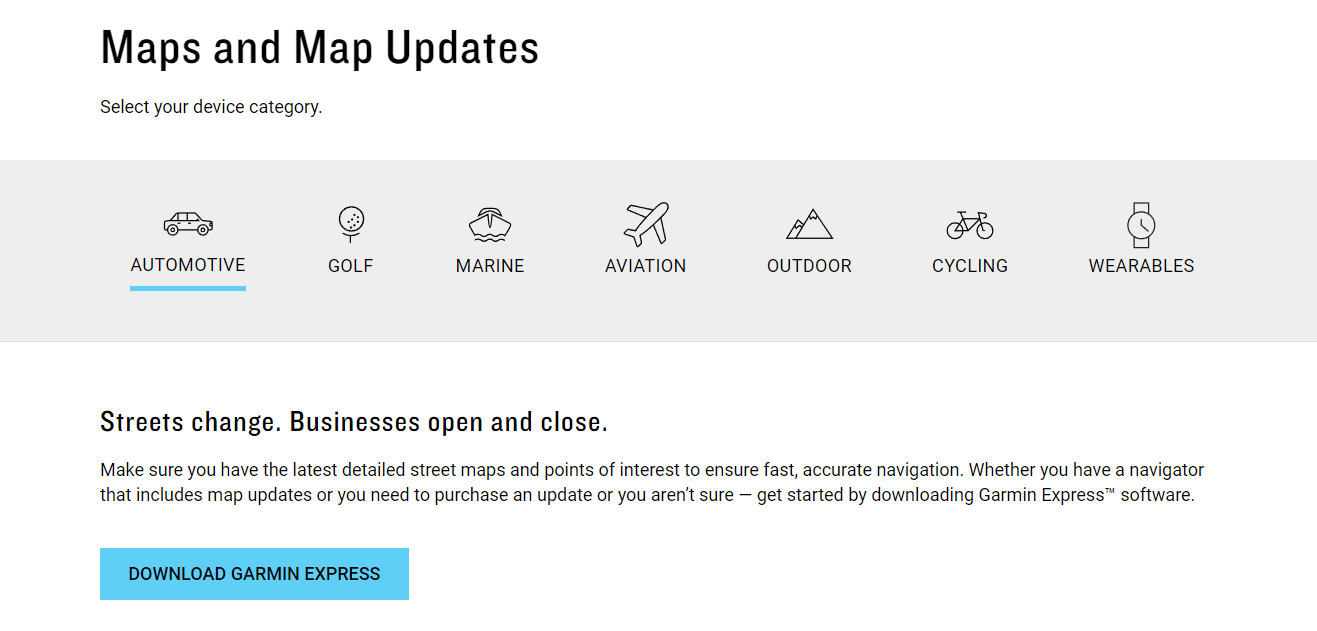
Click on the Download button and follow the on-screen steps to install it on your computer.
We recommend that you check all of your drivers so that they stay up-to-date. There are multiple ways in which you can update them, but one stands out from all and that is performing automatic updates using software such as Outbyte Driver Updater.
How does GPS work?
The Global Positioning System (GPS) is a satellite-based positioning system that is owned by the United States government. The fundamental technique of GPS is to calculate the distance between two receivers while at the same time determining the location of observed satellites.
Note that the predicted positions of the satellites are transmitted to the user together with the GPS signal, which serves as a backup.
The position of the receiver is frequently calculated by comparing several identified positions and, as a result, measuring distances between the receiver and the satellites.
Even more, the speed of the receiver is defined by the difference in location, which can be calculated in relation to time. These satellites are typically located at a height of 20,000 kilometers above the earth’s surface, traveling at a speed of 14,000 kilometers per hour.
The Global Positioning System (GPS) uses the mathematical idea of trilateration to determine the location of an object, and it is comprised of approximately 30 satellites orbiting the earth.
It is exceptionally simple to use because it directs you in the right direction for every turn you make. Otherwise, you’d have to take a long detour in order to get to your destination.
GPS operates in all weather conditions, so you don’t have to be concerned about the weather like you would with other navigation gadgets.
The systems fail for a variety of reasons, and in this case, you should have a backup map and directions on hand.
A battery failure could occur if you are using it on a battery-operated device, necessitating the use of an external power supply, which is not always possible.
Not every organization might be using a single cloud service in its day-to-day operations, and this can sometimes cause security issues. That’s why Microsoft has just announced that Microsoft Defender for Cloud now supports Google Cloud Platform.
With the news, Microsoft hopes that organizations can easily understand and manage their security postures across clouds, and help protect their workloads. More importantly, though, according to Microsoft, it makes Microsoft the only cloud provider that enables you to manage security natively across clouds. Some of the features and examples of benefits of this can be seen below, as explained by Microsoft’s Gilad Elyashar over on the Microsoft Defender for Cloud Blog.
Central, multi-cloud view with a new Secure Score for all clouds combined and the ability to compare your compliance status against critical benchmarks such as Center of Internet Security (CIS) for GCP and AWS.
Microsoft Defender for Cloud will provide more than 80 out-of-the-box recommendations to begin with. These are aligned to industry
standards and security best practices, including a mapping to the CIS benchmark for Google Cloud.
Threat protection capabilities are built into in Microsoft Defender for Cloud for the most critical workloads running in GCP including both containers and servers.
Defender for Cloud is extending its server protection to support Google Compute Engine VMs, another critical workload type across most environments.
For those worried about the onboarding process, Microsoft says that it should be quite easy. Microsoft is using native Google APIs and is allowing security teams to security teams to connect the entire organization or individual projects to Microsoft Defender for Cloud without the need for any agents or additional Google services. You can learn more about this and see a deeper dive during Microsoft’s “What’s next in Security” event on February 24.
There have been numerous reports of customers encountering the error code 2203 when attempting to install any program on their Windows computers.
This error message is typically displayed to the users if they do not have administrative privileges for the directory containing their installation or the temporary folder in their system at the time of the attempt to install the software.
Other possible causes of this error are: insufficient permissions on the installation directory, interference caused by a third-party antivirus or firewall, Microsoft Windows is not up to date, or the installation file has been corrupted.
If you have encountered the 2203 error code, continue reading this post to learn about the various ways that you may employ to resolve this issue while installing any program on your computer. But before, let’s understand the importance of keeping your computer up to date.
Why is it important to update my operating system?
System administrators do not look forward to installing updates on a monthly basis, but they are required and incredibly crucial in the times that we live in.
The majority of the monthly upgrades are security-related. Due to the possibility of being exploited by hackers, security vulnerabilities are the worst type of problem to have. These types of circumstances are frequently encountered in a variety of Windows components, including ActiveX and IIS.
Net Framework and similar frameworks are merely samples. Other Windows updates are designed to fix bugs and issues that have arisen. The stability of your operating system may be compromised even if these programs are not directly responsible for security issues.
And lastly, but certainly not least, Windows updates can bring brand new functionality while also fixing previously identified problems, the best examples of which are IIS and Internet Explorer.
A number of security vulnerabilities, flaws, incompatibilities, and out-of-date software components can be found in the code that makes up the Windows operating system. In a nutshell, we all know that Windows isn’t without flaws.
The most recent Windows security patches are designed to repair vulnerabilities and problems in Windows and associated applications, as well as to periodically bring new capabilities to the operating system. This effectively covers the reasons why you should run a Windows Update on a frequent basis.
Security vulnerabilities in many aspects of the Windows operating system, including the primary platform, are discovered on a regular basis. Even if you do not use the corresponding program, it is a risk not to update it because it is already installed on your machine.
How ca I fix the unexpected 2203 error?
1. Run the installer with administrator access
This is one of the most prevalent situations that has been recorded as causing the 2203 error code. It occurs when the installer does not have adequate rights to copy files from this program into the installation folder or to make use of the temp folder during the installation phase.
If this scenario applies to you, you should be able to resolve the issue by ensuring that you are logged in as an Administrator account and forcing the installer to launch with administrative privileges on your computer.
To open the program’s installer with administrative privileges, simply right-click on it and select Run as Administrator from the menu that appears. Next, when the UAC (User Account Control Prompt) appears, select Yesto provide administrative privileges to the user.
2. Take ownership of the folder
Press the Windows key + R to open up a Run dialog box. Next, type or paste %temp% inside the text box and press Enter to open up the Temp folder.
In the File Explorer, click on the Up arrow to the left of the address bar to move one folder behind which is the Local folder.
Once you are in the Local folder, right-click on the Temp folder, then tap on Properties.
Navigate to the Security tab, then click on the Advanced button at the bottom.
Inside the Advanced Security Settings for Temp window, click on the Change hyperlink next to the Owner.
In the Select User or Group window, type Everyone in the box below Enter the object name to select, then press on the Check Names button followed by OK.
Click on Apply to save the changes made. Now when theWindows Security prompt appears, click on the OK button.
As a result, the Owner name in the Advanced Security Settings for Temp window will be changed, and you will be able to install the package without any more problems.
3. Temporarily disable your antivirus
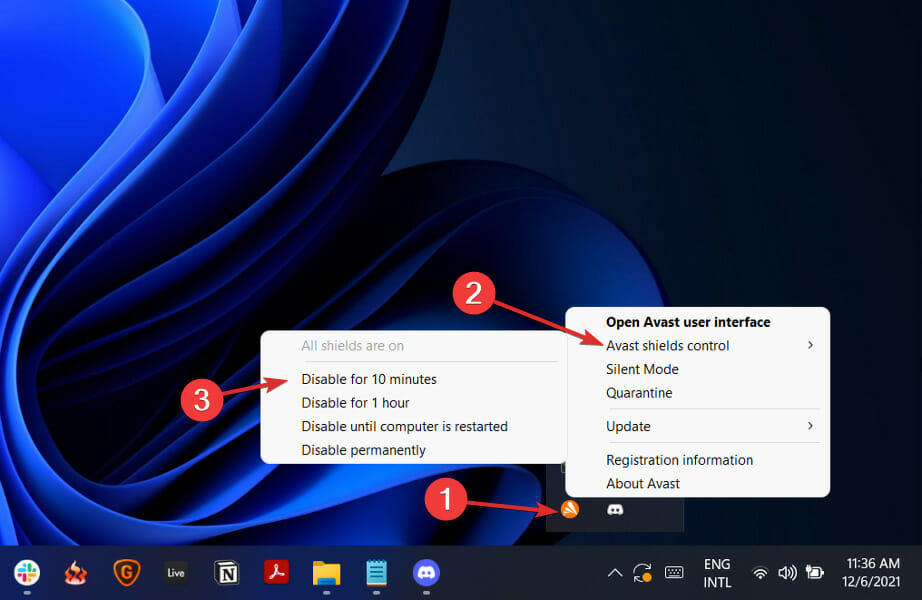
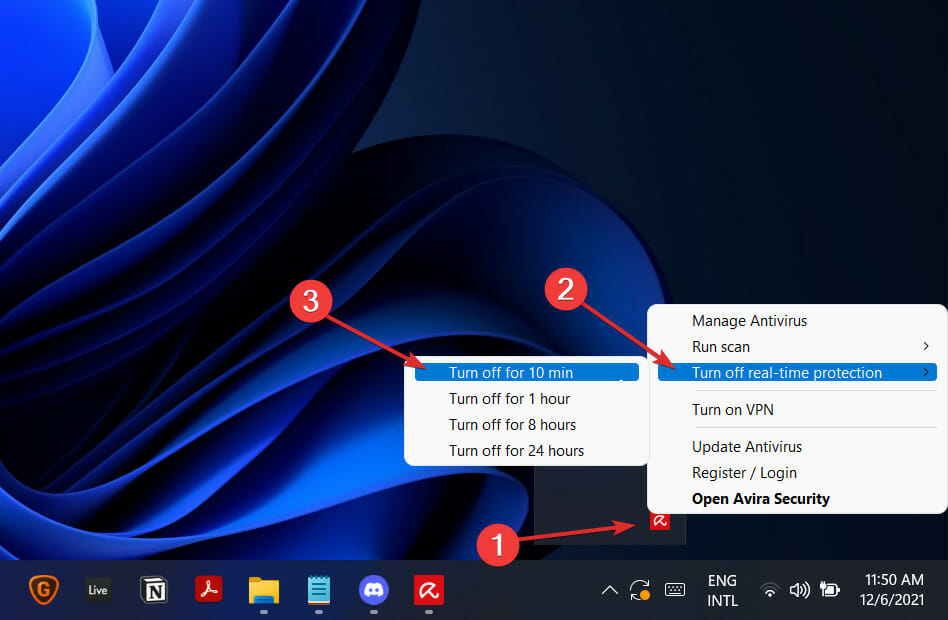
Right-click on your antivirus icon and select Avast shields control, then Disable for 10 minutes from the expand arrow on your taskbar.
If you have other antivirus programs installed, you can temporarily disable the app by following the same or similar methods as before.
You can either re-enable the antivirus or wait 10 minutes after you’ve finished installing the application or the Windows update.
4. Perform a clean boot
Press the Windows key + R to open a new Run box, then type or paste in msconfig, and hit OK.
Then navigate to the Boot tab and check theSafe bootoption under Boot options.
Now go to the tab that says General and make sure that Selective startup radio button is checked but uncheck Load startup items under it.
Select the Service tab and check the box Hide all Microsoft services then clickDisable all to disable all the unnecessary services which might cause issues.
On the Startup tab, click Open Task Manager and disable all the startup items which are enabled.
Following this, you may begin the rebooting procedure. Windows will take care of everything; all you have to do is sit back and wait for the procedure to be completed.
What are the consequences of not updating my operating system?
Damaged software, data loss, and identity theft are all possibilities as a result of failing to install critical security upgrades. Viruses and malware wreak billions of dollars in damage every year throughout the world.
The most common reason is that users fail to install important software or operating system updates, which allows malware to take advantage of flaws that exist in every piece of software ever created. As soon as vulnerabilities are made public, they can potentially be exploited within hours.
You should prepare to install any security updates that become available to defend your machine from malware attacks soon they become available.
Some tools, such as Windows Server Update Services (WSUS) and System Center Configuration Manager, can be used to control and monitor the deployment of Microsoft updates in a corporate context (SCCM).
It is vital to keep your systems up to date with security upgrades in order to keep them safe from harmful attacks. Installing software updates is also vital in the long run, not only for accessing new features but for staying on the safe side in the event that security loopholes are discovered.
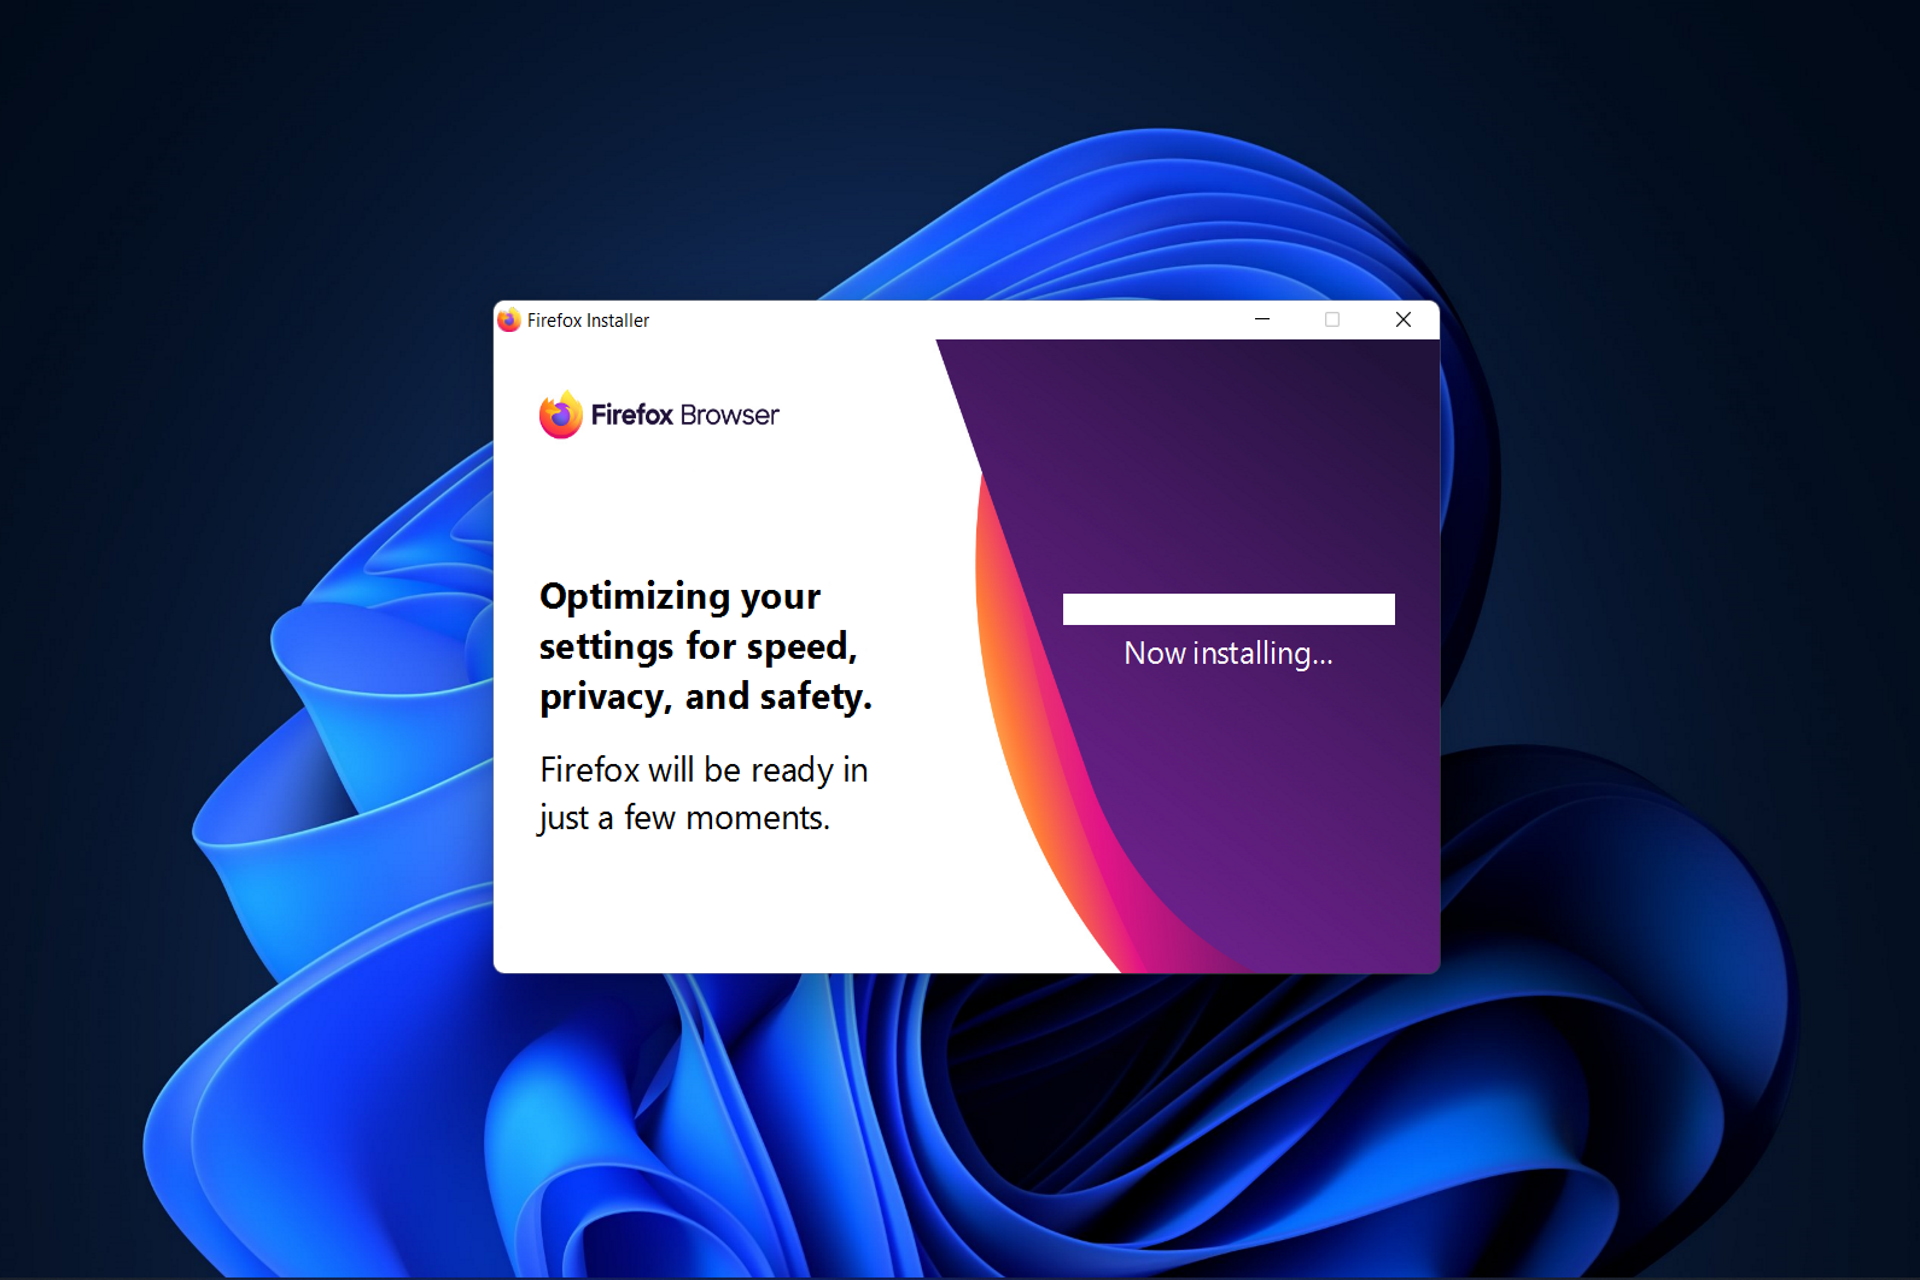
Some users probably encountered the message for some reason we could not install Firefox when installing Mozilla Firefox on their PC. It is one common error that Firefox remains stuck on installing. Do not worry if you are one of them; we have your back.
In this article, we’ll offer you a list of the most common installation problems for Mozilla Firefox as well as solutions to similar error messages.
Why is Firefox not installing?
Users who have experienced installation issues on the browser have attributed it to varying factors. Top on this list includes the following:
Insufficient system requirements – The installation may fail if your computer does not meet the minimum system requirements for Firefox.
Existing Firefox installation – If you already have an older version of Firefox installed on your computer, it may prevent a new version from installing.
Antivirus or firewall software interference – Sometimes, antivirus or firewall software can interfere with installation. This can happen if the software detects the installer as a potential threat.
Corrupted or incomplete installer file – If the Firefox installer file is corrupted or incomplete, it may prevent the installation from completing.
Insufficient disk space – The installation may fail if your computer lacks free disk space to install Firefox.
User account permissions – If you do not have sufficient user account permissions to install software on your computer, Firefox may not install.
What are other Firefox installation errors?
Before trying the troubleshooting steps, let us tell you a few more tips when encountering similar issues:
Hmm, for some reason we could not install Firefox – There are times when the installation procedure does not complete, and users get this message. If that’s your case, note that you can’t run Firefox during installation.
Firefox not installing on Windows 10 – If you’ve tried to install Firefox to no avail, check the setting to Prevent Accessibility Services from accessing your browser from the Privacy & Security panel.
Cannot install/reinstall Firefox keeps saying an old copy is running? – Uninstalling the old copy first isn’t always enough. Also, get rid of any leftovers and stubborn software with the help of the best uninstaller tools.
Firefox won’t install Windows 10 – This issue can sometimes be caused by your antivirus. To fix it, disable your antivirus and check if that helps.
Firefox installs stuck on downloading, housekeeping – Sometimes this issue can appear while trying to install Firefox using the standard installer. According to users, the solution is to download and use the full installer.
Firefox install takes forever – If your Firefox installation is slow, you might be able to fix the problem simply by trying to run it as an administrator. After doing that, check if the issue is still there.
Let’s see what you can do without further ado if you can’t download Firefox on your device. Keep one reading!
Quick Tip:
Encountering this issue constantly can be annoying, so if nothing doesn’t seem to work, you may want to consider switching to Opera One.
This browser is a fast and safe solution and has tons of great features, including a built-in VPN to enhance your privacy and an ad blocker to browse the web without interruptions.
Opera One
If your current browser doesn’t work, don’t hesitate to try a new-age modular browser.
Sometimes you won’t be able to update Firefox at all, and your Firefox install might get stuck with Failed to read the configuration file. Please contact your system administrator message.
If this happens, your mozilla.cfg file might be damaged, and to fix the problem, it’s advised to reinstall Firefox.
In addition to uninstalling the application, you must remove all leftover files from Firefox’s installation directory.
Doing this manually can be a tedious task. Therefore, using an uninstaller software tool such as IObit Uninstaller is always better. For more details, please read our complete guide on how to use IObit.
1.3 Download the full installer
To distribute Firefox faster, Mozilla offers two types of installers, standard and full. The difference between the two is their size.
The standard installer is lighter, so it needs to download the setup files to install Firefox. Unfortunately, this can sometimes cause the Firefox installation to get stuck.
On the other hand, the full installer, also known as Firefox offline installer, won’t download any additional files. Instead, it will install Firefox right away.
This is a simple solution, and many users reported that it works, so be sure to try it out. You can get the full Firefox installer right away.
2. Check your permissions
Press the Windows key + R and enter %localappdata%. Next, press Enter or click OK.
Locate the Temp folder, right-click it, and choose Properties from the menu.
Select the Security tab from the top menu and click Edit.
Click on Add.
In the white box, write the word Users and click OK.
Select Users from the Group or user names list and check Full control in Allow column. Now click Apply and OK to save changes.
In addition to changing the permissions, some users suggest clearing all directories from the Mozilla updates folder. Thus, open a new File Explorer tab by pressingWindows + E.
Navigate to the following location but make sure to replace windowsreport with your username: C:\Users\windowsreport\AppData\Local\Mozilla
Next, navigate to the updates directory and check whether you see any folders. Remove all of them and try to update or install Firefox again. Note that this solution also works when you cannot install Mozilla Firefox on Windows 10.
Finally, if you see any folders in there, remove them and try to update Firefox again.
Check if you can install it without getting the error message for some reason we could not install Firefox.
Click the Menu icon in the top right corner and choose Help, followed by About Firefox.
A new window will now appear, and Firefox will check for updates. If any updates are available, they will be automatically installed.
Theoretically, Firefox is set to install the updates automatically, but sometimes various factors may prevent that. To check for updates manually, do as described above.
4. Run Firefox as an Administrator
Right-click on the Firefox icon.
Select Run as administrator.
If Firefox install gets stuck on your PC, the issue might be related to the missing privileges. Running the setup file as an administrator is required to fix this issue.
If you’re having problems updating Firefox, you just need to repeat these steps for firefox.exe and then try to update it again.
5. Disable Windows Defender
Open Settings first by holding Windows and I and go to the Update & Security section.
Click Open Windows Security.
Go to the Virus & Threat protection section.
Now click Manage settings.
Locate the Real-time protection option and disable it. You can also disable other options if you want.
Even if you don’t use a third-party antivirus, sometimes Firefox install can get stuck on your PC.
Windows Defender can cause this, and in order to fix the problem, you need to disable it, as described above.
After disabling this option, try to install Firefox again. If Firefox installs successfully, be sure to enable Windows Defender once again.
6. Check your security software
6.1 Avast
Open the dashboard of Avast.
Click on Settings, followed by Protection and Core Shields.
Navigate to Web Shield, uncheck the Enable HTTP Scanning box, and click on the OK button to update this feature.
This should stop your Avast antivirus from checking the security certificate of every website you access.
Open ESET antivirus and select Setup followed by Advanced setup.
Click on Web and email followed by SSL/TSL, Enable SSL/TSL protocol filtering, and OK.
Lastly, restart the computer to configure the antivirus filter.
For ESET, you only have to enable the SSL/TSL protocol filtering feature.
6.4 Kaspersky
Open the antivirus dashboard and click on the Settings button from the bottom left.
Scroll down the left menu and click on Network settings.
If using the 2016 version, uncheck the Do not scan encrypted connections box from the Encrypted connections settings section. For an older version, just uncheck the Scan encrypted connections upon request from protection components feature.
Reboot your system to configure your antivirus software.
If Firefox install gets stuck on your Windows PC, the issue might be your security software.
Sometimes certain antivirus features can interfere with your system, so disabling these features is advised. Above is how to do that in many popular antivirus tools.
If disabling this feature doesn’t solve the problem, altogether disable your antivirus. In case the issue persists, remove your antivirus and check if that helps.
If removing the antivirus solves the problem, this might be a perfect opportunity to consider switching to a different antivirus solution.
Getting your products and services known to the general public is no easy task, especially when there are plenty of competitors out there that offer similar services at similar prices.
Your only choice, in that case, is to either offer better services, which translates into more work, offer cheaper prices, therefore lower revenue, or simply make yourself more visible, which seems to be the best solution.
Naturally, this makes email marketing tools like Mailchimp a Godsend, especially for small and medium business owners, but this service can sometimes be unavailable at times as well.
Mailchimp vs Sendinblue
The most important contender for Mailchimp is Sendinblue so we tried to get the most important differences between the two:
➡ Pricing
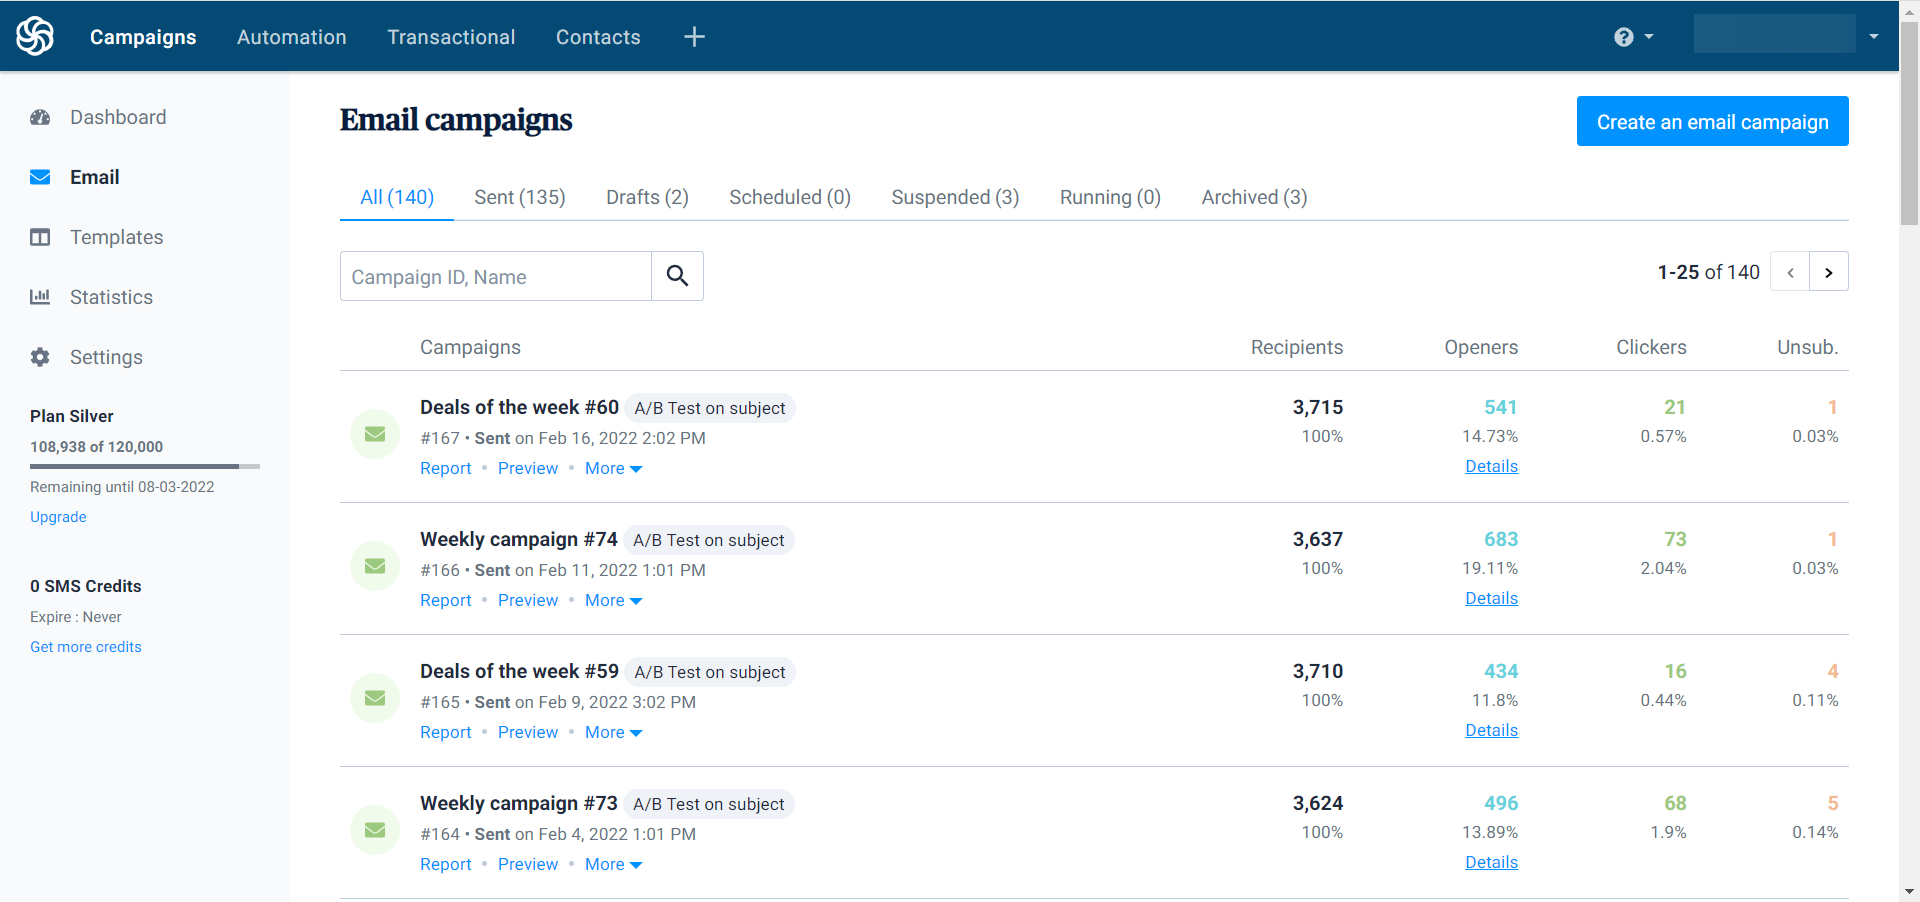
Not only that Mailchimp’s prices are higher but their policy is to charge you by sent e-mails and not by contacts which is a big difference.
The smallest plan of Sendinblue costs half the one from Mailchimp and you get unlimited contacts. We won’t list the prices because they are subject to change, but small research on this chapter won’t hurt.
➡ Contact list management
This is another category that Mailchimp suffers from because it’s impossible to create automations and move the subscribers from one list to another.
Also, you can’t include contacts on different lists in the same campaigns which can be very frustrating but with Sendinblue, all that is pretty easy to do.
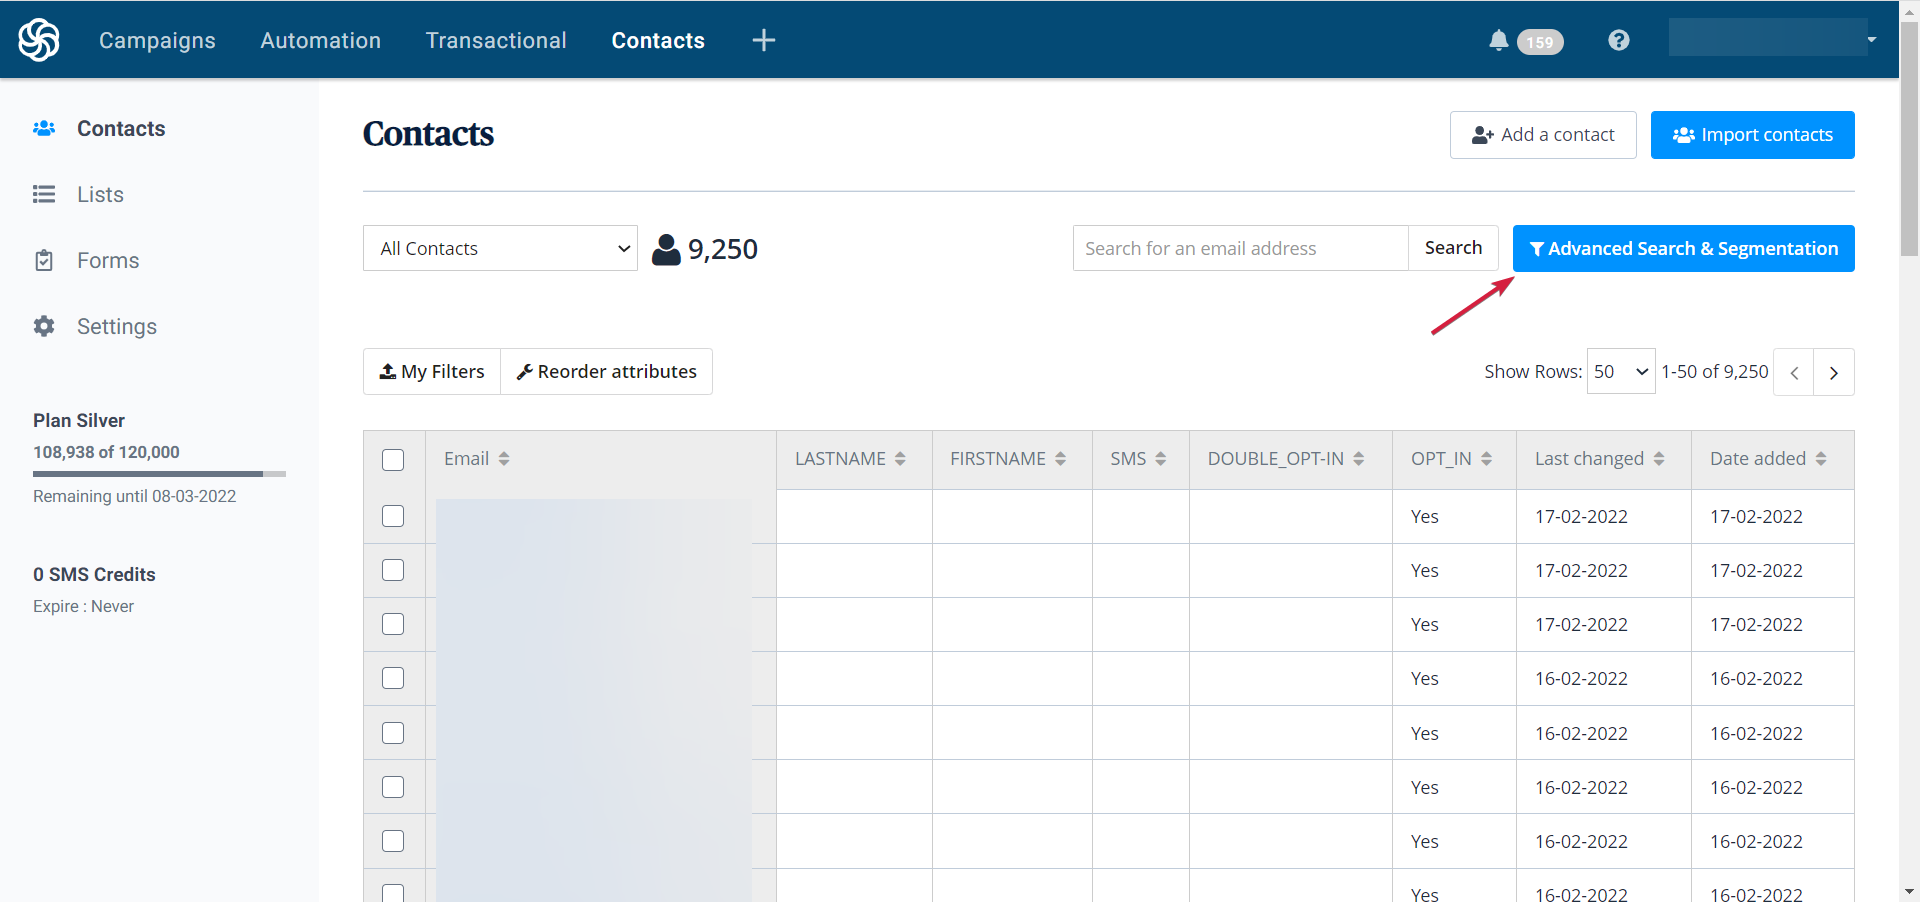
Sendinblue has a very efficient Search & Segmentation tool
With Sendinblue, it’s easy to access your contacts and perform a segmentation based on a lot of criteria, then add the emails on any campaign with your own requirements.
➡ Design and campaign creation
Here, we give a big thumbs up to Mailchimp because it offers a lot of nicely designed templates to choose from.
Also, there are more options to customize your content, a chapter where Sendinblue has a lot of ground to recover.
Maybe you already use Mailchimp and just want to see if there’s something better out there. If you’re with the latter, then we’ve prepared a list of the best Mailchimp alternatives that you can find online.
All of the entries below are proven to do the same as Mailchimp, or more, and they were selected based on features, how easy they seem to control, and their price tag.
Which are the best Mailchimp alternatives available?
This next entry is a multi-purpose tool that starts off as an email client, but with tweaks and integrations can be easily turned into a great e-commerce aid for business owners everywhere.
Features such as sending newsletters or massive amounts of emails in bulk are already something that Mailbird supports, and recurring email delivery, such as those that subscribe to your services are also supported.
When not dabbling in e-commerce, Mailbird makes for an excellent email client as well, allowing you a complete and customized overview of all of your emails from all accounts under a single window.
You will benefit from these best features:
Keep all your accounts and emails in one place
Friendly interface
WhatsApp and Instagram integration
Email automation
Customizable dashboard
Mailbird
Get in touch with your customers faster, easier, and better with this greatly improved email client.
Digital marketing is a fickle area, and only those with the best tools have any chance of making a profit from it. Either that or those that know exactly what tools to use, one great example being Sendinblue.
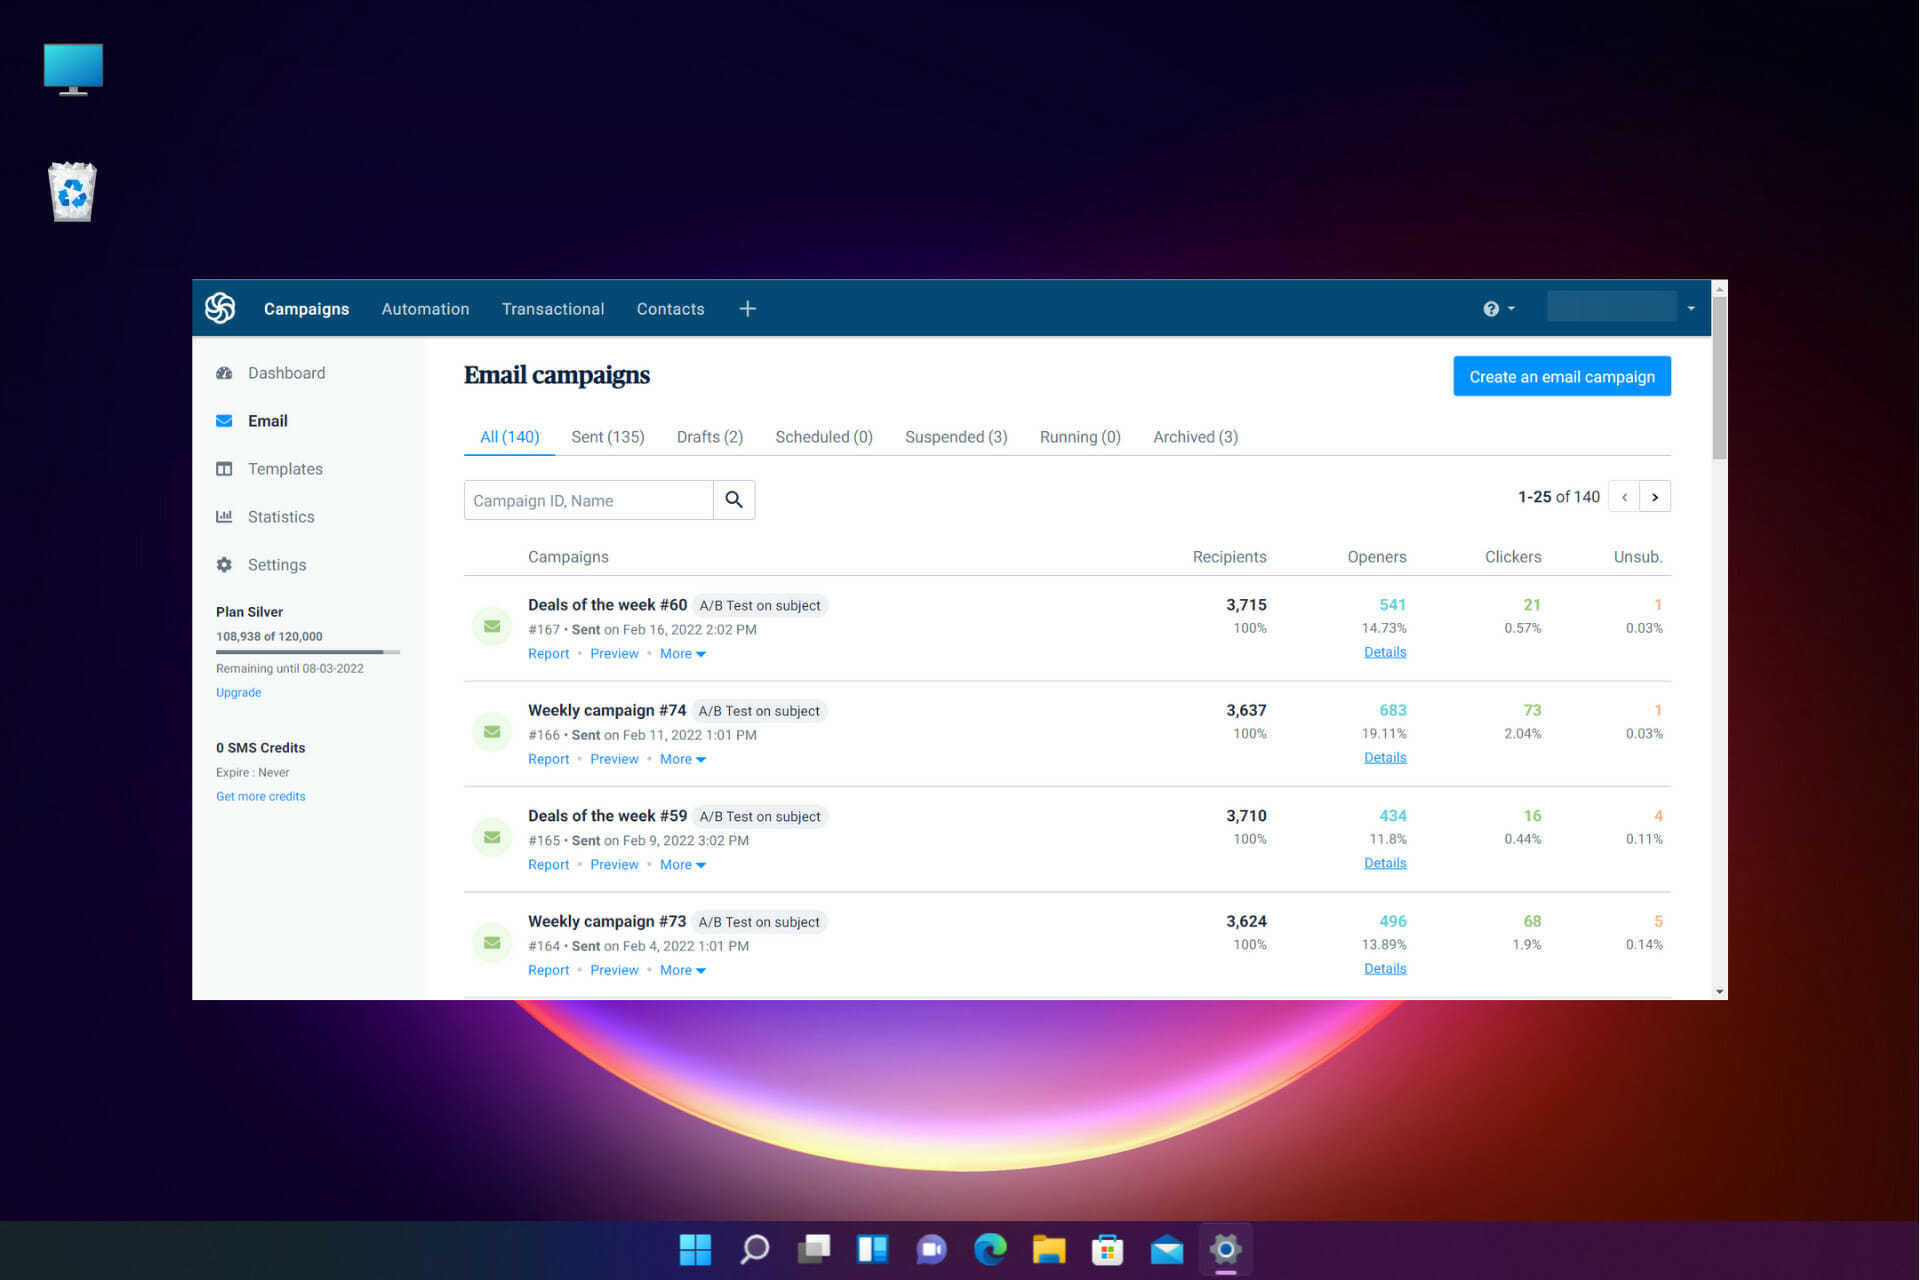
They have incredibly great prices as per the number of contacts, far lower than those of Mailchimp, and they include a plethora of other services that aren’t available on Mailchimp, such as SMS marketing, or Transactional SMS.
It is also heavily automated in many aspects, allowing you to focus on other tasks as well, one great example being the fact that you don’t need to waste time creating customized notification emails, since these are handled.
Besides, their modern toolset allows your emails to always reach their destination thanks to IP pool management, a dedicated IP, and a sending test feature.
Let’s review the most important features of Sendinblue:
SMS marketing and Transactional SMS features
Detailed statistics on click and opening rates
Simple and friendly interface
Step by step campaign creation
Automated email delivery
Sendinblue
Your customers will always be a mere click away from your products, and you won’t even have to perform that click yourself!
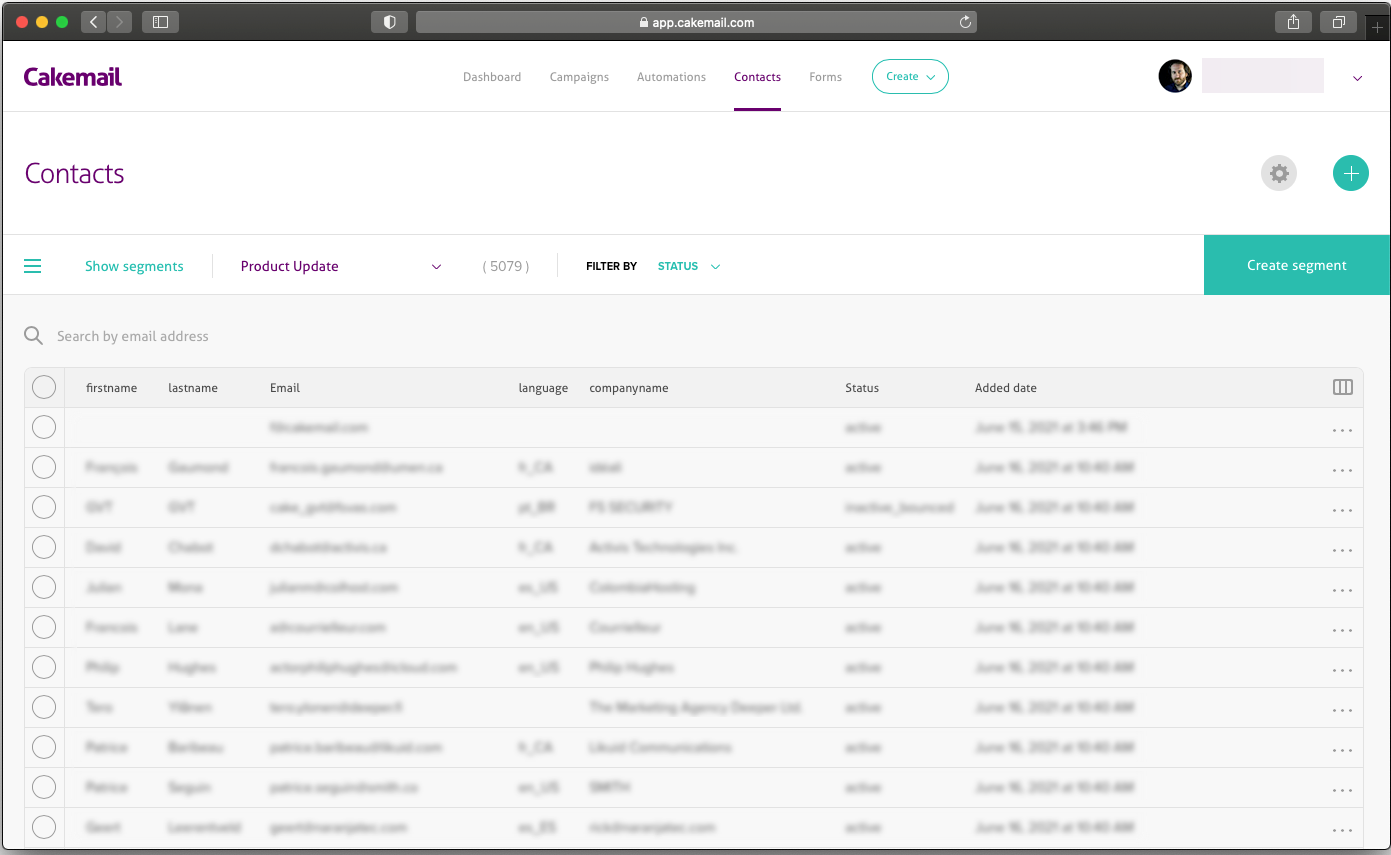
If you want to enhance your email marketing campaigns, Cakemail is certainly a solution that you need to consider seriously.
This tool will make sure that your content looks perfect on every size screen and device and will improve click-through rates by over 10% with beautiful email designs.
Cakemail helps you personalize your content based on data provided by the subscribers, including their recent activity and interests.
You need to make sure that your messages reach their target and this app manages the delivery, ensuring that your campaign will go in the receivers’ inboxes and don’t get blocked by ISPs.
And after they receive your email, you can track their activity like the clicks they made or whether they shared your message with others.
That is excellent information that helps you customize your campaigns further and segment the subscribers and group them based on similar traits, interests, or behaviors.
You will also get reports with automation stats on how many people accessed your campaign, what conditions they met and how many were sent an email.
Cakemail also works in the browser so you will be able to access it from any system, wherever you are in the world with a simple Internet connection.
Let’s review some of Cakemail’s best features:
Subscriber consent management and automated contact list hygene
Advanced subscriber segmentation based on interest, behavior and more
Automation stats
Helps you create sign-in forms
Easy contact list import
Cakemail
Increase your opening and click rate with an excellent tool that features advanced automation tools.
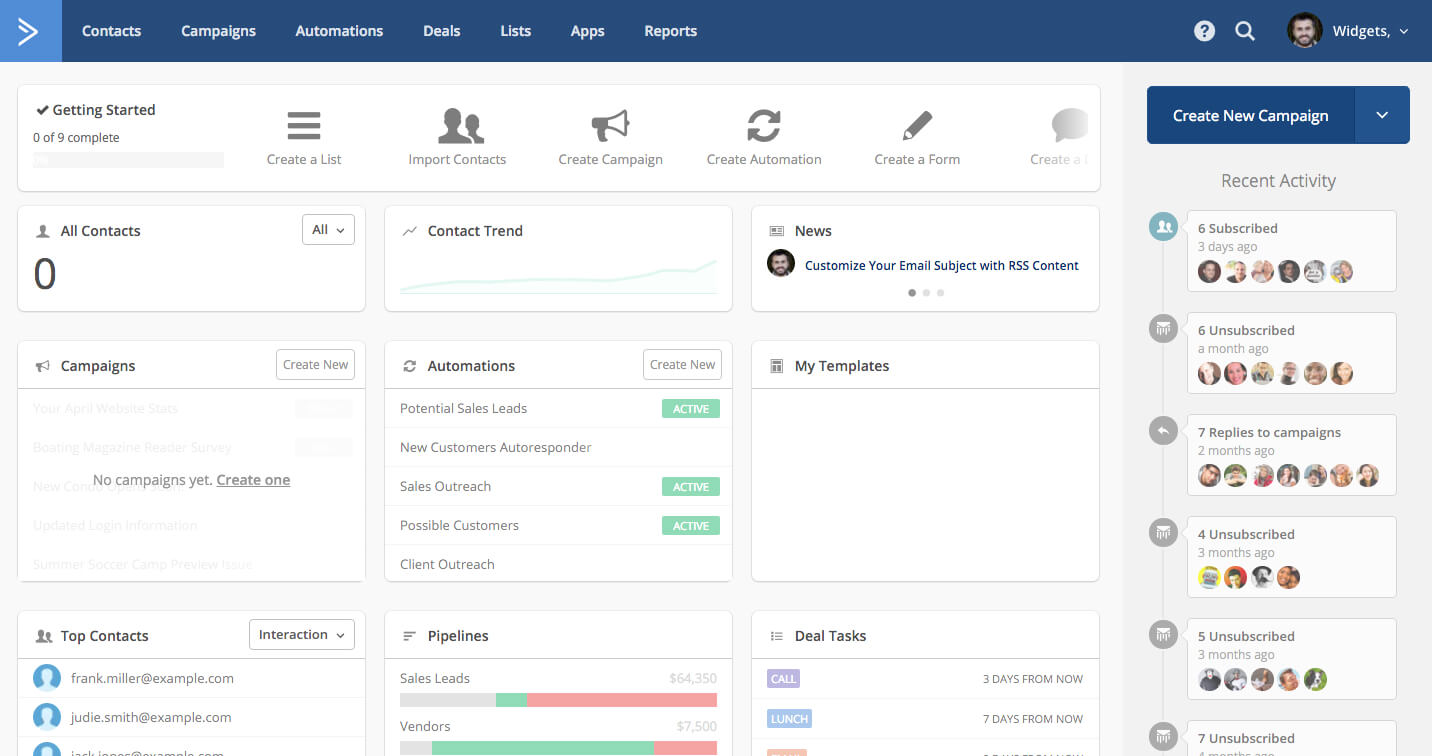
Each email marketing tool seems to focus on certain aspects, and when it comes to ActiveCampaign, it seems that the focus goes towards building solid emails and newsletters that are meant to draw in customers.
This is all thanks to the easy drag-and-drop email builder, a visual automation builder, an intuitive CRM for every branch of your business, and free support and training from one of the ActiveCampaign experts.
Other features this service has as opposed to Mailchimp include lead and contact scoring which lets it evaluate which are the most likely buyers so that it can focus on them.
Another neat feature is ActiveCampaign’s automation split-testing which allows you to test out which automated behaviors work best for your clients, allowing you to hit your mark each and every time.
Let’s go through a few of its best features:
Drag-and-drop email builder
Intuitive CRM features
Free support and training
Lead and contact scoring
Automation split-testing capability
ActiveCampaign
Spread the word about your business with professional, easy-to-build e-mails.
Topping off our list of best Mailchimp alternatives is Omnisend which, as you can probably tell from the name, is meant to advertise your business and services everywhere, and therefore be omnipresent.
Omnisend brings e-commerce marketing automation to an entirely new level, by upgrading all aspects of email marketing, SMS messaging, and task automation, allowing you to focus on sales and not advertisements.
Pre-built automation for cart abandonment, welcome series, transactional emails, and more are some of the things that make Omnisend a self-sufficient service perfectly capable of handling many sales aspects for you.
The best part is that the service is available for testing during a free trial period, and you have complete access to all of its services and not just some demo that doesn’t really give you an idea of what the final product looks like.
Let’s review some of its most important features:
SMS messaging and transactional emails
E-commerce marketing automation advanced features
Task automation
Free trial version for testing
Advance e-mail campaign design builder
Omnisend
Focus on product development and customer service and let Omnisend handle sales and advertisements for you!
Making your products look good and presenting them in a favorable manner is pretty much essential if you ever want to make a sale, and that is the strong point of Benchmark.
Even more, it provides you with everything you need in order to make the most out of your growing client base, from tools that let you customize your product or service pages to automated responses and actions based on customer feedback.
It comes with an email builder, marketing automation features, landing page creation tools, reporting templates, integrations, and more.
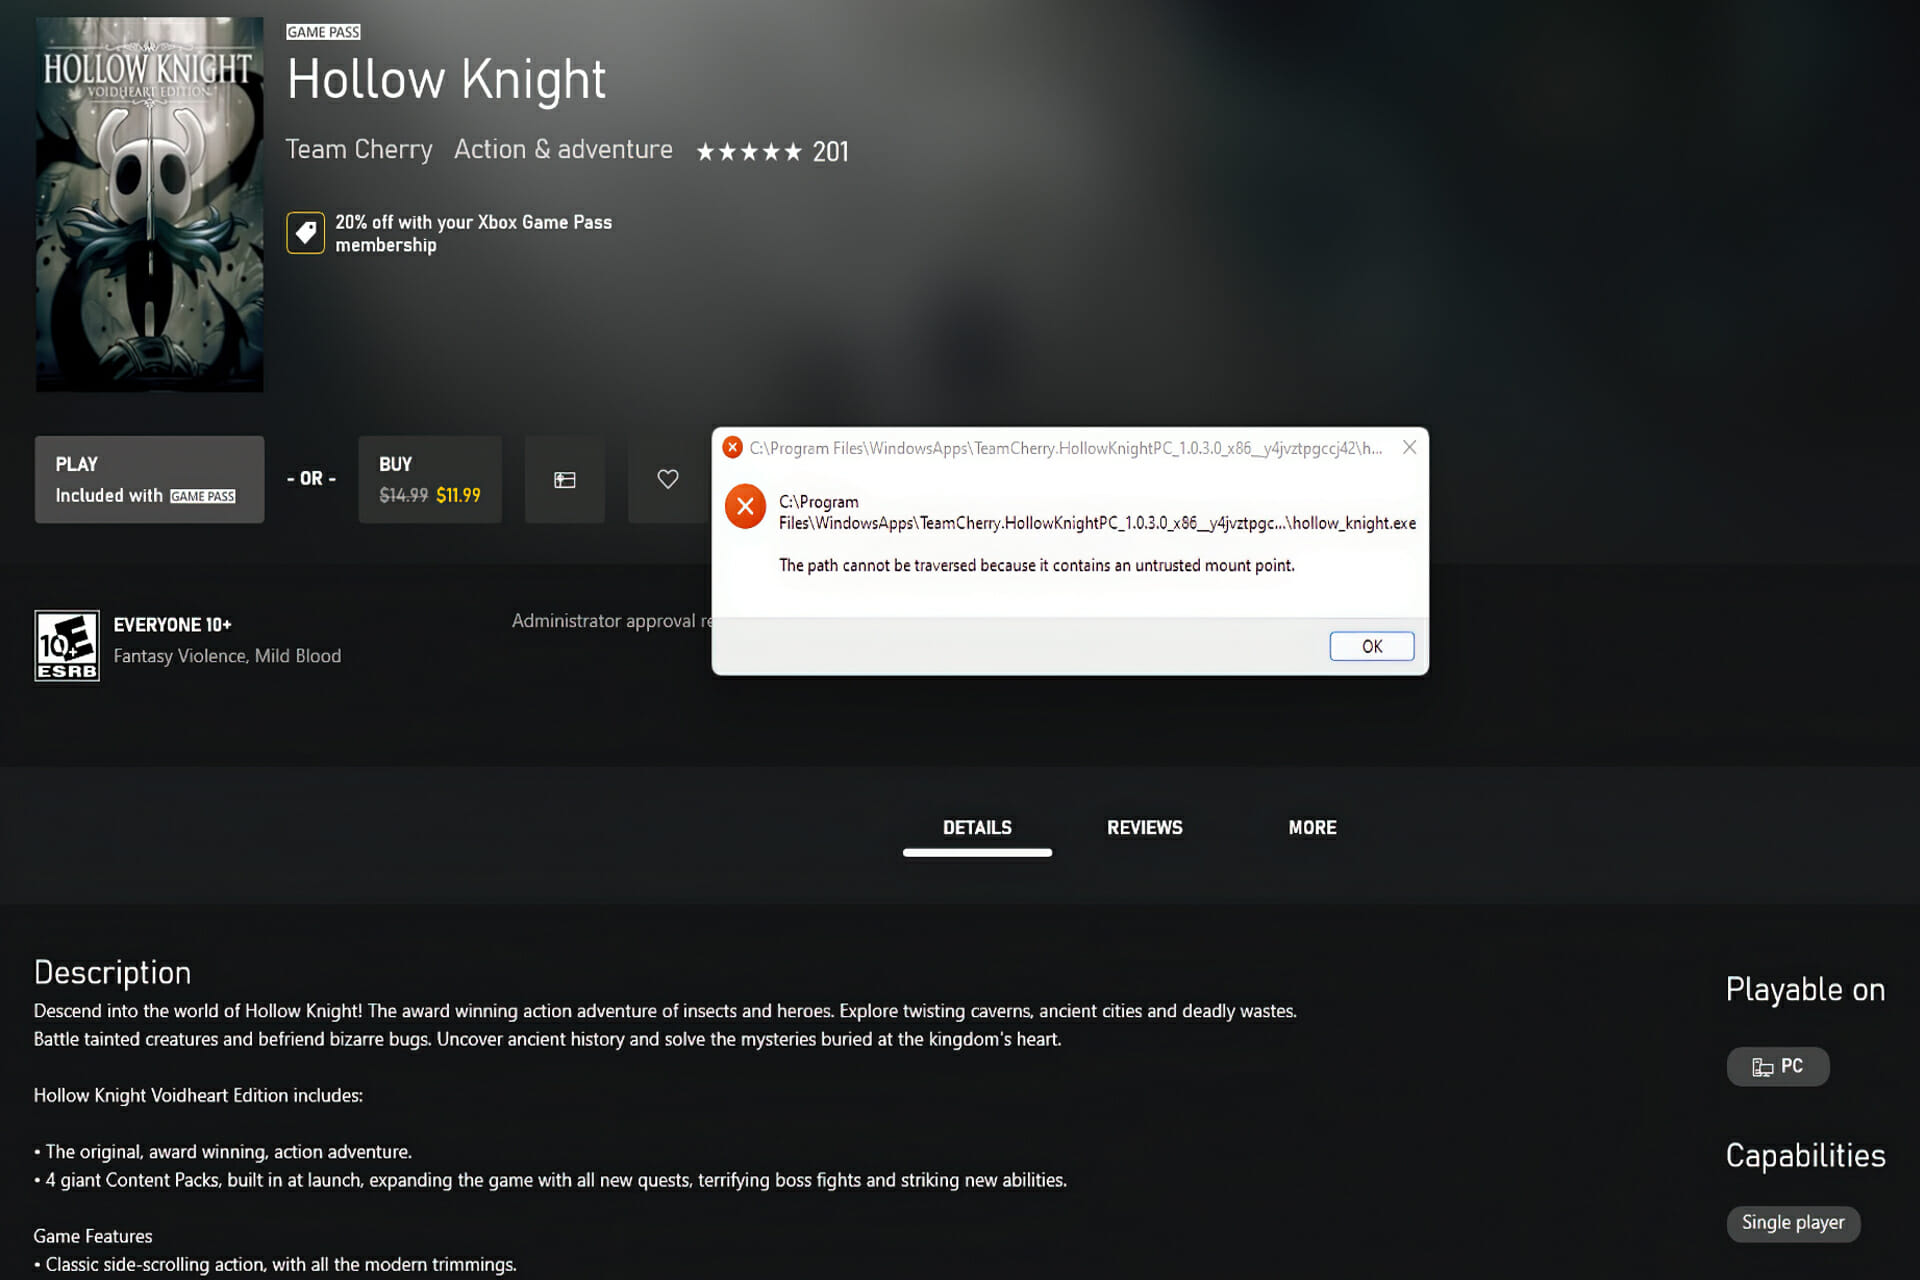
Users have reported getting the path cannot be traversed because it contains an untrusted mount point error message after launching Halo or any other game in Windows 11.
The error seems to be quite ambiguous as the cause of it hasn’t yet been found. However, Microsoft made sure to solve the reported issue in one of its update patches.
We will further see how to keep our Windows up to date right after we understand why it is important to perform OS updates on a steady basis.
Why is it important to keep my OS up to date?
Do you know those annoying pop-up reminders that appear on your computer screen? There is a constant barrage of notifications that your applications and drivers are out of date.
When you’re in the middle of anything important, they always seem to rear their ugly heads and remind you of your shortcomings. You should, therefore, adhere to their recommendations and maintain your computer up to date.
If your computer is running extremely slowly, such as if it is still running Windows XP, it may be time to consider upgrading to a newer operating system. Contrary to popular belief, software upgrades are not intended to cause us to lose our jobs or our homes.
In reality, they’re intended to make our computers safer by discouraging hackers from exploiting weak points in the system. They can correct the code that permits hackers to infiltrate our machines and install harmful software, as well as erase critical files.
All of the projects that you’ve been working on for so long that you don’t have time to update your software are at risk if you choose to ignore the notification. If your operating system is so out of date that you have to patch it on a regular basis, you should consider upgrading it.
By upgrading the operating system on your computer, you ensure that it is compatible with the most recent and most inventive programs, including video games.
If something unfortunate happens to your computer, having an up-to-date operating system will assist the professionals in recovering your files.
For the most part, keeping your systems up to date implies that your data will be safer, which means that your life and job should be a little less terrifying.
What can I do if I get Path cannot be traversed due to untrusted mount point?
1. Keep your Windows up to date
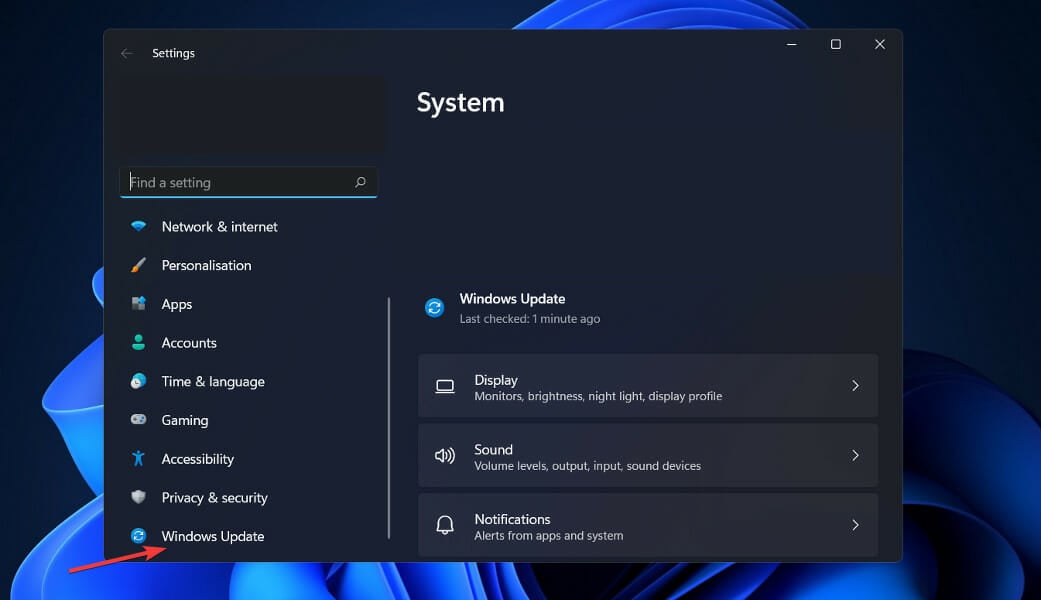
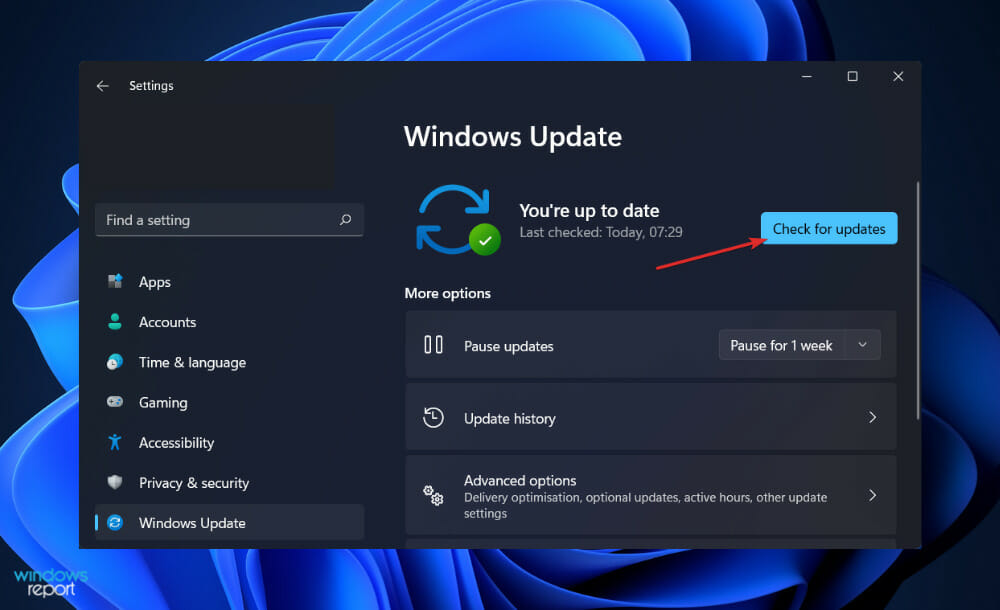
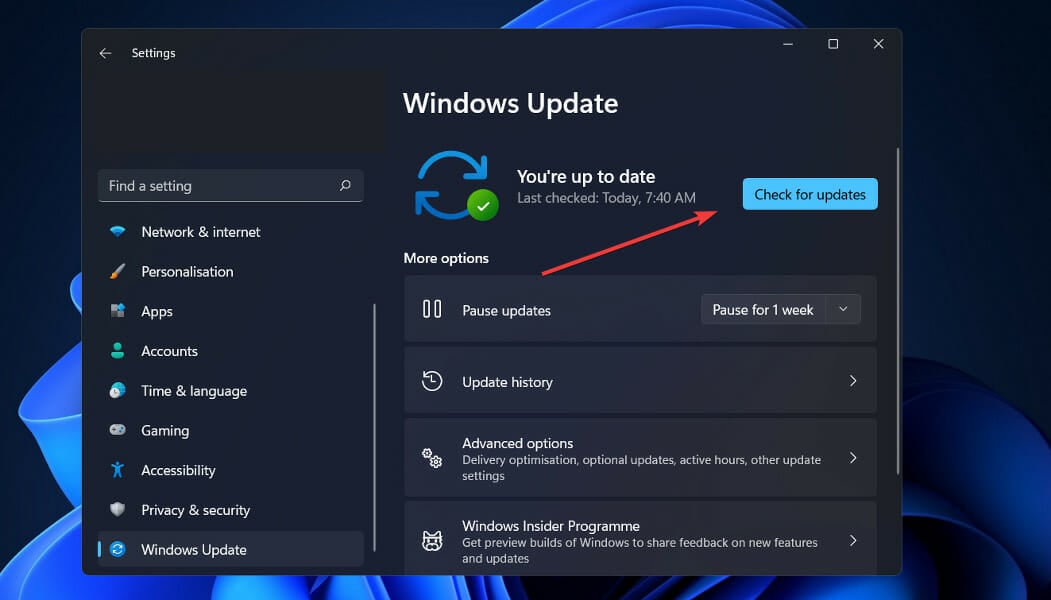
Press the Windows key + I to open the Settings feature and tap on Windows Update from the left menu.
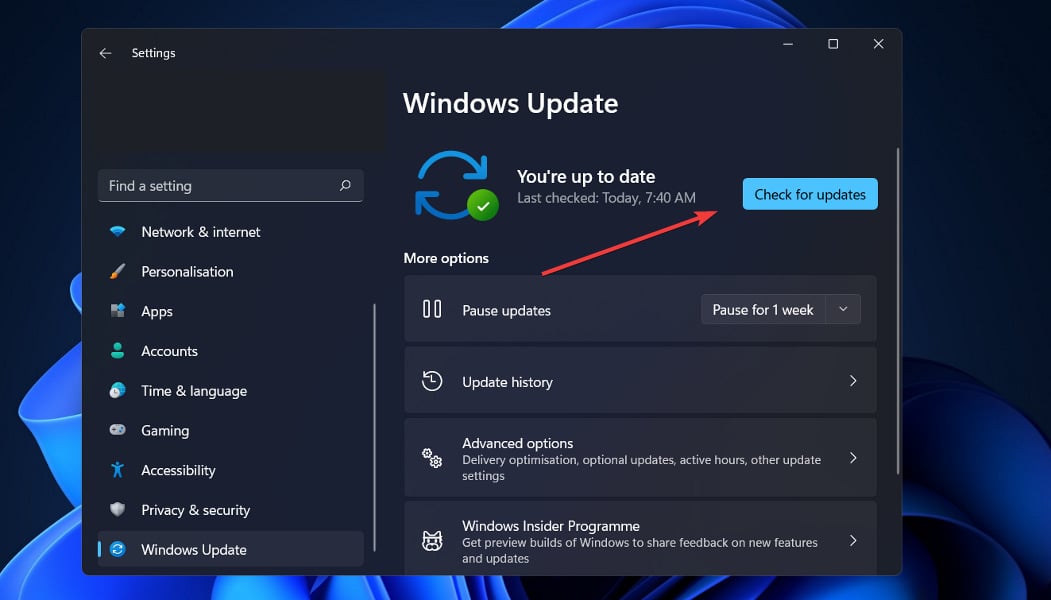
New updates to install will be shown under the Install now button which you have to click on. Otherwise tap on the Check for updates button to look for updates.
A possible reason for the error could be that you are running an older version of Windows, which can be fixed by updating it. People are probably going to make an update to fix the bug.
2. Run an SFC scan
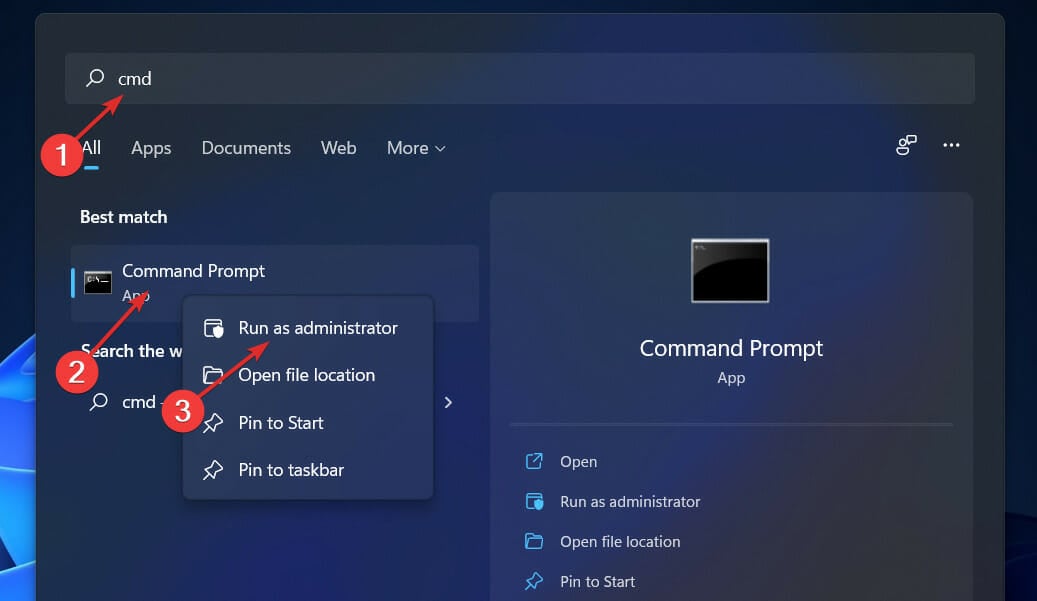
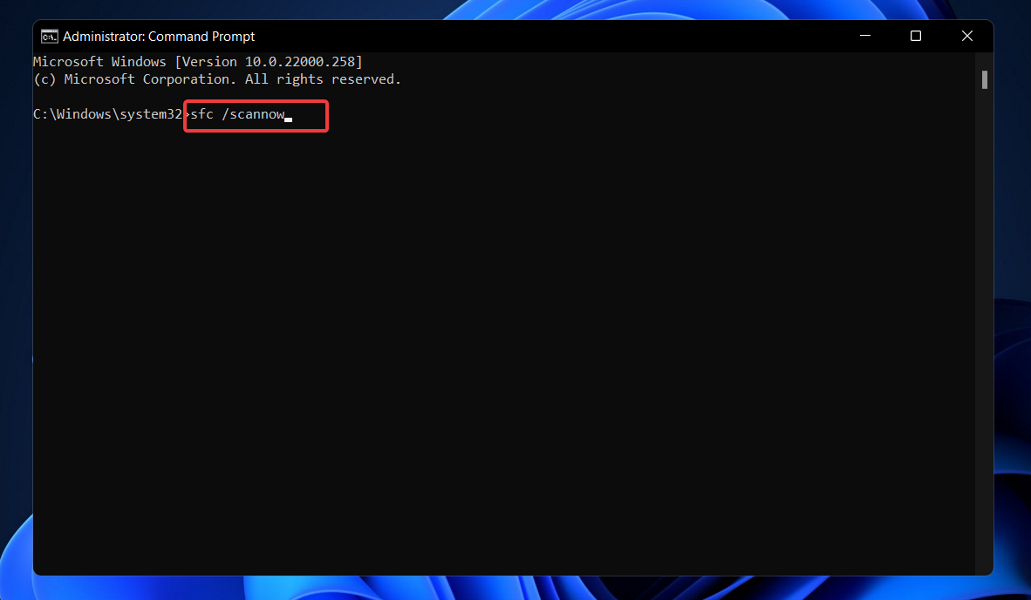
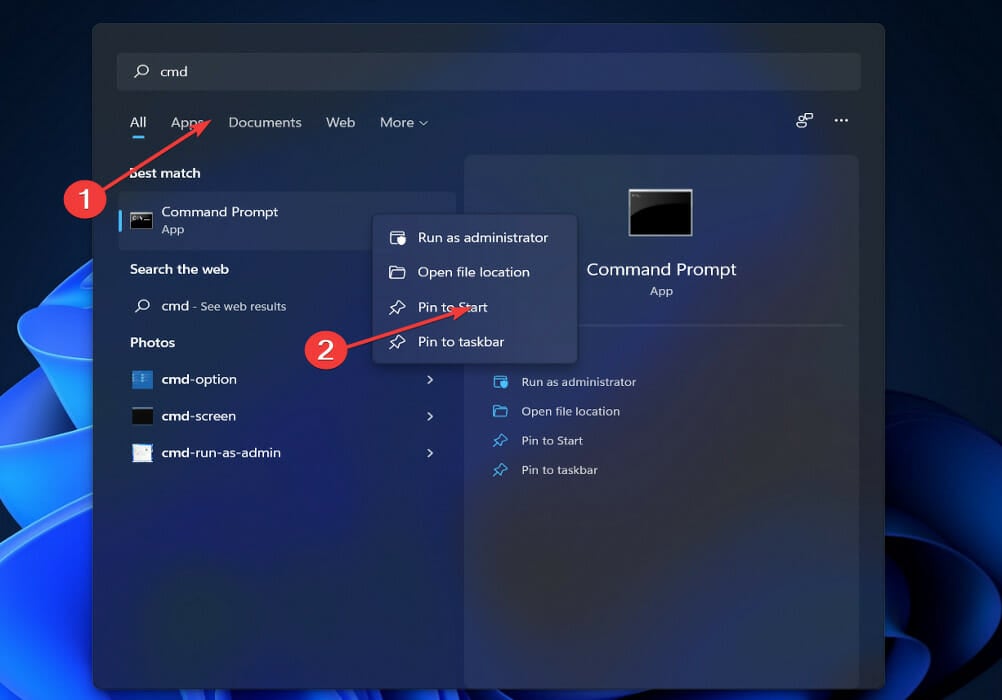
Press the Windows + S key then enter cmd into the search bar. Right-click on the most relevant result to run it as an administrator.
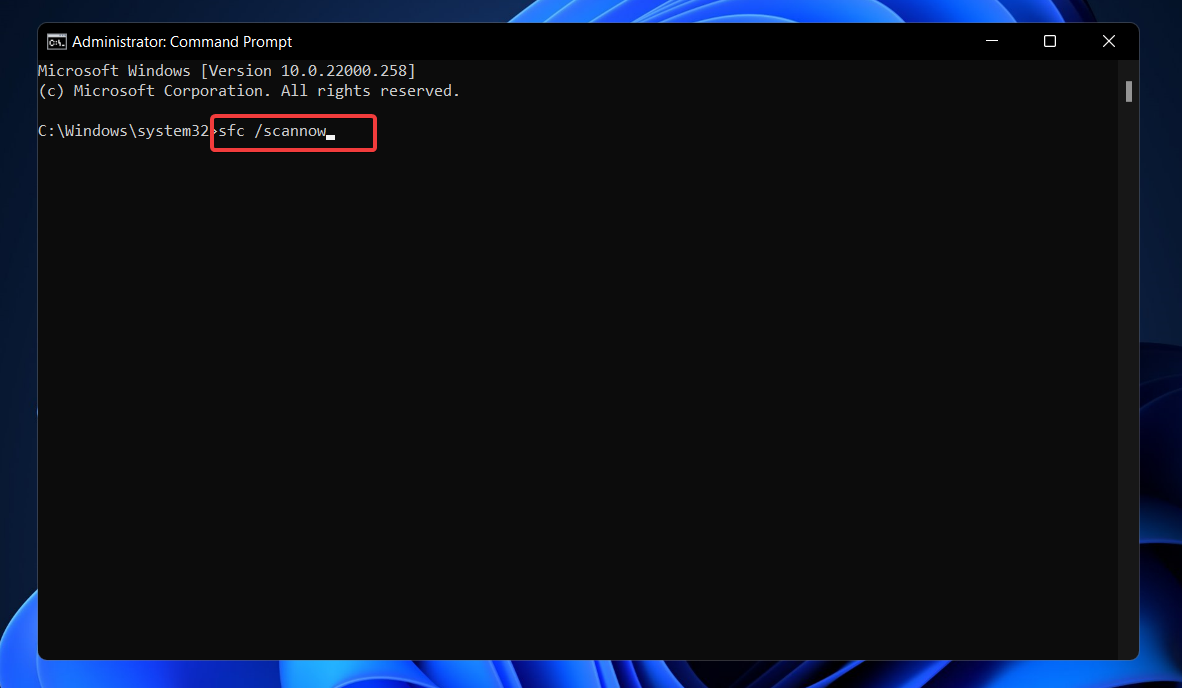
Type or copy-paste in the command and press Enter:sfc /scannow
Prior to continuing, you must restart your computer after you have finished waiting for the process to complete (which could take some time). Alternatively, you can try specialized repair software that will scan your PC for corrupted system files and prompt you to replace them.
3. Uninstall and reinstall the game
Press the Windows + S key to open the Search bar, then type Control panel, and click on the most relevant result.
Once the menu opens up, click on Programs followed by Programs and features.
Now look for the problematic game and right-click on it to choose Uninstall.
To reinstall the game, head to the client that you previously used and download the game.
Is Windows 11 good for gaming?
By releasing it, Microsoft is effectively inviting gamers to update, even going so far as to state that if you’re a gamer, Windows 11 was made for you and the OS is the greatest Windows for gaming that the company has ever created.
And, certainly, there are a number of features that gamers should take into consideration when deciding whether or not to upgrade from Windows 10 to Windows 11, some of which are minor, while others could be game-changers for some. You may look forward to a couple of gaming-related features that have been borrowed from Microsoft’s most recent game consoles, the Xbox Series S/X, in the Xbox One. DirectStorage is the first of these.
By making use of fast NVMe SSDs, DirectStorage is able to significantly shorten load times and improve texture loading while also significantly reducing the CPU strain on those operations.
Despite the fact that DirectStorage is now available on Windows 10 as well, and that it is no longer necessary to utilize Windows 11 in order to benefit from it, the enhanced storage stack in Windows 11 allows DirectStorage to perform to its fullest potential.
There’s also Auto-HDR, which uses machine learning and artificial intelligence to automatically add an HDR setting to any game, regardless of whether or not the game itself supports HDR.
As an added bonus, Windows 11 is tightly integrated with the Xbox app, allowing users to play Xbox Game Pass titles on their PC if they have an Xbox Game Pass Ultimate subscription, as well as access to Xbox Cloud Gaming, where they can access and play their favorite games.
We all know that Windows 11 was officially released to the general public on October 5th, 2021. Before that, only Insiders got to fiddle with the new OS.
And, since then, this latest operating system has received mixed reviews, with people debating in what ways it’s better or even worse than its predecessor.
That being said, the adoption rate for Windows 11 is actually twice that of what Windows 10 had back on its launch day.
And yes, there still are a lot of bugs and glitches to be rooted out from the new OS, as many of you may already be aware of.
Since we’re speaking about loops, we’re about to show you what happens if you decide to interrupt the upgrade from Windows 10 to Windows 11 by performing a hard restart. Spoiler alert, don’t.
Performing a hard restart while upgrading will cause a loop
Needless to say, you should never restart your device while any type of update is being applied, especially a Windows system update.
That can seriously harm your PC’s software and, if nothing else works, you might even have to perform a clean install, which for some people means also losing everything on the device.
And, if you decided to leave Windows 10 behind and discover what the new Redmond experience has to offer, remember that rebooting your machine while it is still in the process is a major no-no.
Why, you ask? Well, because you will get stuck in a continuous restart loop, which can go on for quite some time, if you don’t know how to manage the situation.
As you can see from this user’s experience, this action can have dire consequences, and it’s best if you don’t even think about this possibility really.
It’s also true that the creator of the post mentioned the fact that his upgrade wasn’t quite going as planned, being stuck for eight whole hours.
This can also happen and it’s best you know what to do when it does. If your Windows 11 download is stuck, we have some steps that will help you in this situation.
But under no circumstances should you ever perform a hard reset on your device while it’s still upgrading operating systems and expect no consequences.
What can I do if it happens?
Now, don’t go thinking this will happen one hundred percent every time someone tries to upgrade from Windows 10 to Windows 11.
There are remote cases in which users will have to deal with this nuisance, but it is not as common as you might think.
However, on the off chance it does happen, there really isn’t much to do really instead, of course, reinstalling the operating system.
Make sure you have a USB with the Windows 10 installer on it, boot it from your BIOS, select Repair this PC and leave it to it.
Keep in mind that you might have to completely reinstall the OS, so don’t exclude this scenario. And since we’re talking about restoring, we can help if you need to fix corrupted files in Windows 10 or Windows 11.
So, now, if this happens to you for any reason, you will know what to do, although it would be for the better not to put yourself in such a predicament.
Have you ever gone through a similar experience while upgrading to Windows 11? Let us know in the comments section below.
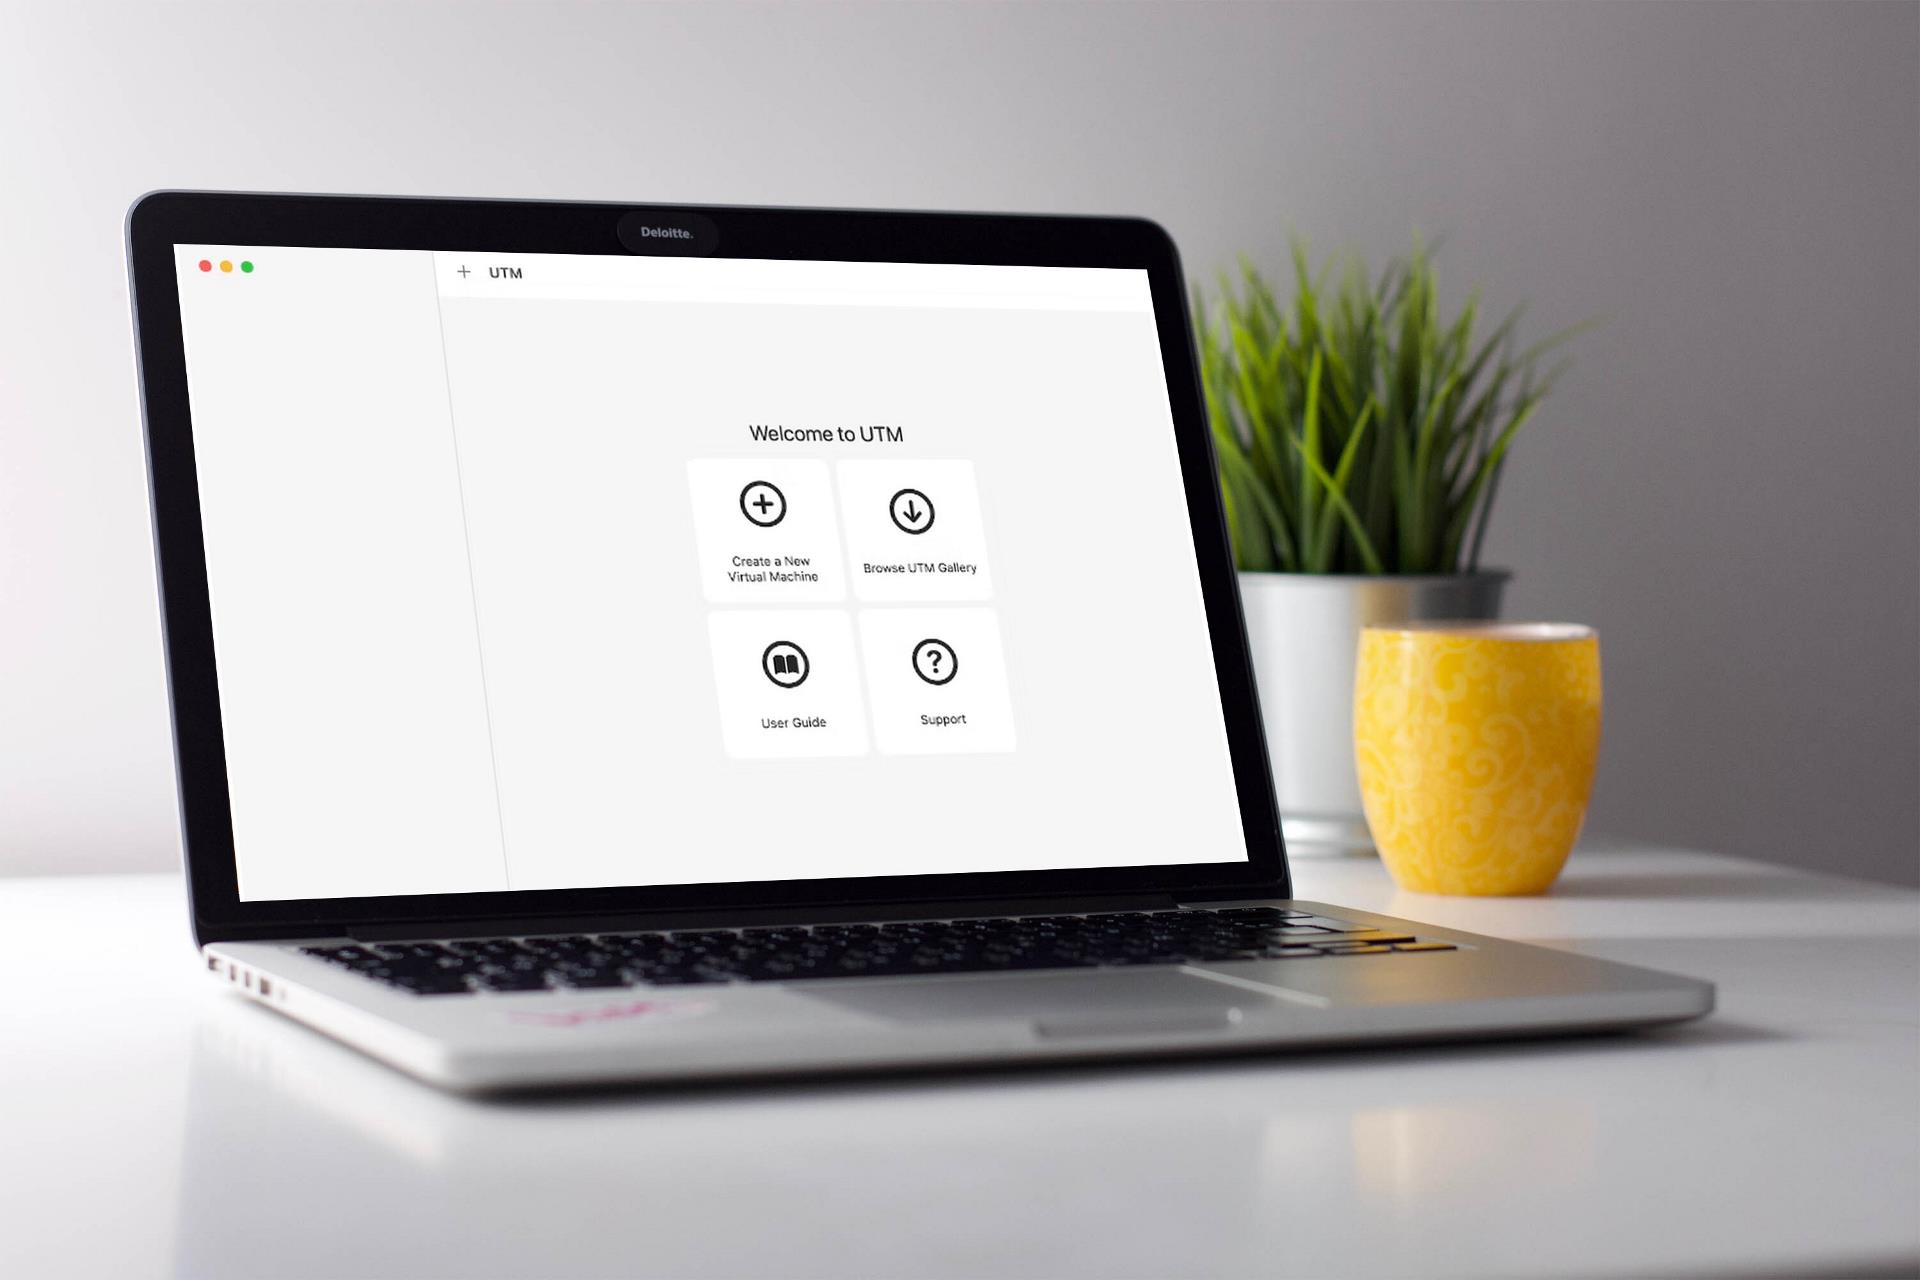
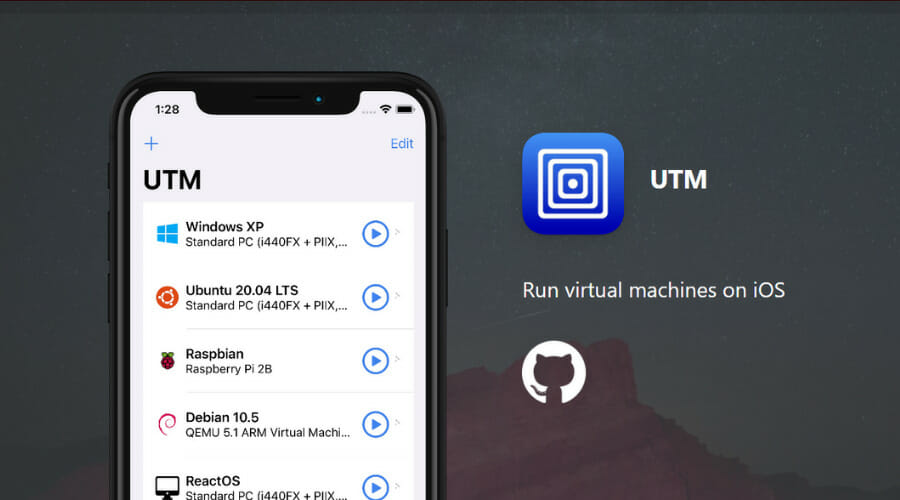
Ever since Windows 11 was revealed to the world, and even before, we’ve been talking about running it on Apple PCs with the help of Virtual Machines (VM). Users have gotten used to installing it using Parallels, on Apple M1 devices, and the OS even received exclusive x64 Windows on ARM emulation.
We’ve seen the OS installed on all sorts of devices, from smartphones to NUCs, so it should come as no surprise. However, the question is how well Windows 11 runs on an Apple M1 device through a UTM VM. Let’s find out, shall we?
Can you install Windows 11 on M1 Mac?
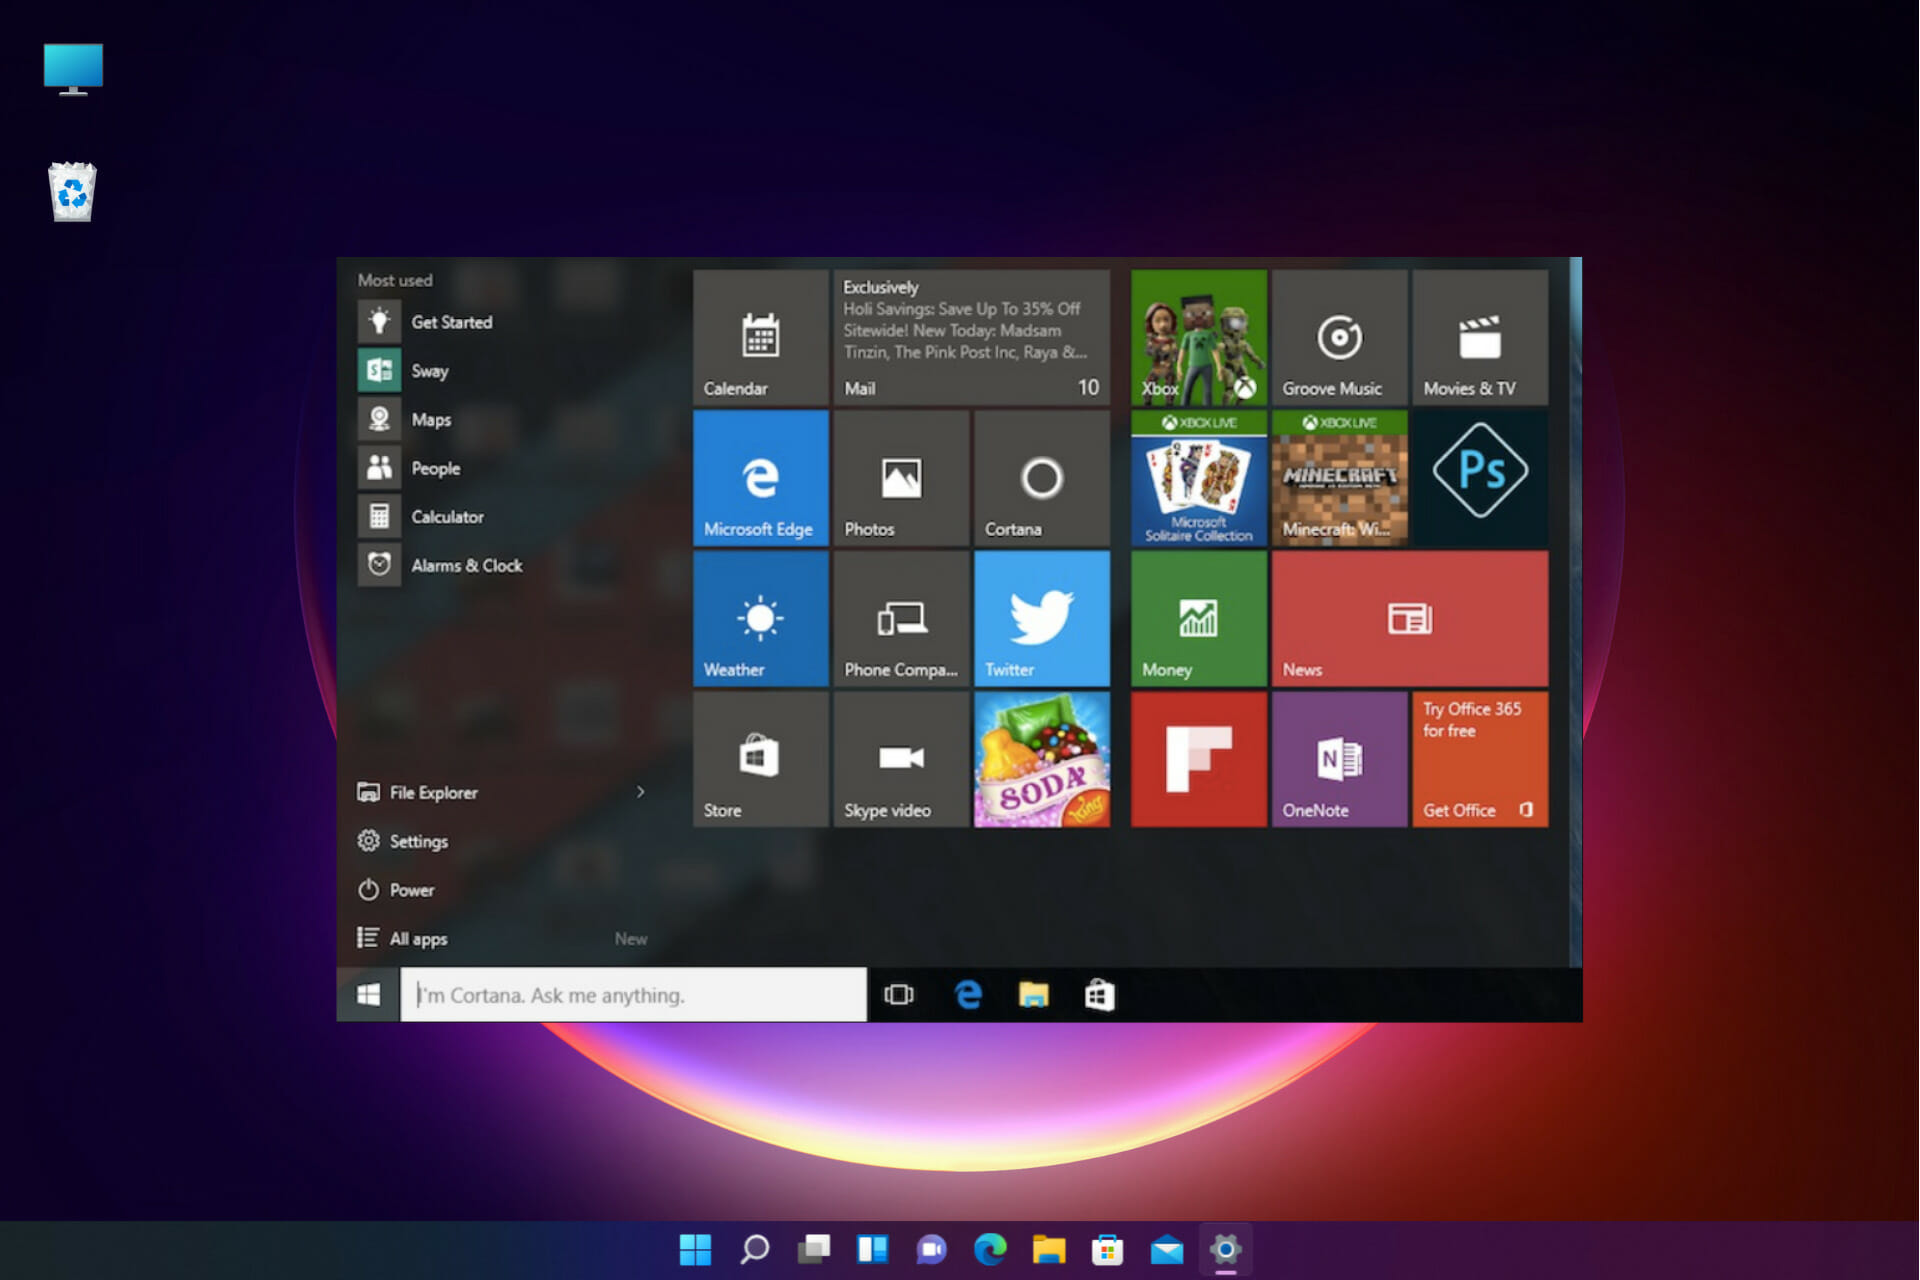
Even though Windows 11 doesn’t run badly at all when you emulate it through Parallels, the answer to the question above will surely please you even more. Yes, you can install Windows 11 on an M1 Mac.
While this may sound like great news in face view, it doesn’t exclude the stringent system requirements that your device should meet to run the OS. This also applies to Mac users. One of the most important features required is TPM.
Microsoft does not officially support the hardware, so some issues may arise when installing Windows 11 on the device. However, if the computer meets the minimum requirements for the operating system, then it should be able to run Windows 11 without any problems.
Also, judging from the first few trials, the attempts were all met with success, and the OS performance was an unexpected bonus.
A recent Reddit post that caught our attention, discussing the same subject, further explains just how efficient Windows 11 seems to be on these Apple M1 chips if you use the right VM for the job.
Everything is snappy and fast, including heavier programs like Microsoft Teams. Sound and video also work perfectly.
How can I run Windows 11 for free on M1 or M2 Mac?
Before you get to installing Windows 11 on your Mac, ensure your device meets the following requirements:
Select Windows as the operating system you wish to virtualize.
Click on Browse and select the Windows 11 ISO image, then hit Next.
You’ll be required to set the amount of RAM and cores for your OS. We recommend selecting anything from 8GB upwards for a smoother performance. The amount will depend on how heavy your activities are. Once set, click on Continue.
Confirm everything is correct from the Summary page, then click Save.
A play button will appear on the next screen, so click on it to boot your device.
Once it boots up, you’ll be taken through the usual Windows setup, so follow the on-screen instructions to complete the setup.
One of the greatest reasons why UTM is the better choice is that it is free. Of course, there exists the paid version for $10 on the Mac Store, but they are basically the same thing. The only difference is that with the free version, you’ll have to keep checking for updates and download them manually.
Another winning feature is that it is open-source, which means developers are at liberty to tweak some of its settings to meet their needs. Needless to say, this is a great option for those who also need to run Windows on their Mac for work or otherwise.
Options like Bootcamp have since become limited to Intel processors making them less available. Apple is slowly or rather quickly moving to ensure that their Macs run exclusively on Apple silicon processors: M1 and M2.
Parallels, however, requires you to get money out of your pocket. Depending on the version you chose to upgrade to, you can easily part with up to $100 for the Pro version.
Yes, in case you haven’t catched it yet, the VM we mentioned in this article, which is UTM, is free. This seems to be a great choice for making good use of the Redmond tech giant’s latest OS on an incompatible device.
Much has been said about Microsoft and its latest operating system in these last months, both good and bad. Users are slowly starting to get accustomed to Windows 11 and many have already upgraded.
Although the new OS still lacks some of the key functionalities that users have appreciated on Windows 10, people are not so against the new operating system anymore.
However, much like in a political campaign, the Redmond tech giant has made some promises to entice people into embracing Windows 11 but still hasn’t delivered.
Now, users are wondering if these small, yet extremely annoying details, will ever change and if going through an OS upgrade is even worth the trouble.
Users still waiting ages for updates to finish installing
We’re talking about Windows Updates and how they still have users sitting around their PCs, wondering if it’s going to be another five minutes, or half an hour before it finishes downloading and installing.
Even though one of the selling points for Windows 11 was much shorter update times, not all users seem to agree with this statement.
For some, in fact, update times haven’t changed a bit and they are getting fed up with idly hanging around their PCs for ages.
Back then, the company announced that new Windows Updates would be 40% smaller, and thus take less time to be applied to your device.
Also mentioned was the fact that older updates would expire, ensuring much shorter scan times. Users, however, strongly disagree with what Microsoft said and are taking to social media and forums to express their frustration.
Microsoft, we need to agree on a definition of 100% complete, because staring at this for 10 minutes isn’t it.
For many of them, it feels like they haven’t moved on from Windows 10 yet, as they are forced to wait around these updates for who knows how long.
Truth be told, looking at a screen that says 100% complete and having to give it an extra 10-15 minutes is not ideal for most of us, especially because time is the most valuable resource we, as humans, have.
Many of us thought we wouldn’t have to deal with endless updates in 2022, especially after moving on to a newer, faster experience.
Users that found a way to speed things up a bit shared their insight with fellow community members and the solution, as you might have expected, is easier than ever.
Get a nvme m.2 SSD. My windows updates are done before I’m even done drinking water lol.
Everyone is hoping that Microsoft will take a bit more time off from imagining Windows 12 and fiddling with the taskbar, to finally fix Windows Updates once and for all.
The Start menu is one of the most important additions in Windows, and the reason why many people love it. But, out of the blue, many users report that their Start menu is not working.
And the only thing we know, for now, is that this issue needs to be resolved as soon as possible. Actually, there are two possible scenarios.
First: you’re facing a minor Start menu issue, which is probably caused by some third-party software, and could be resolved easily.
Second: your system is affected by widely-reported Start menu bugs, unnoticed by Windows 10 and 11 developers, and they still don’t have a proper solution.
So, let’s talk about both scenarios and see if there’s anything you can do, or you’re just forced to sit and wait for Microsoft to deliver the patch through the Windows Update.
What makes the Start menu stop working?
OK, so before worrying about the broken Start menu, we should go and determine the cause of the problem.
There’s a possibility that your system isn’t affected by the critical bug, and something else is preventing your Start menu from working.
There are two known solutions (if the critical bug is not an issue), a registry tweak and a simple PowerShell command.
How can I fix Start menu problems in Windows 10 & 11?
1 Reinstall Start menu using PowerShell
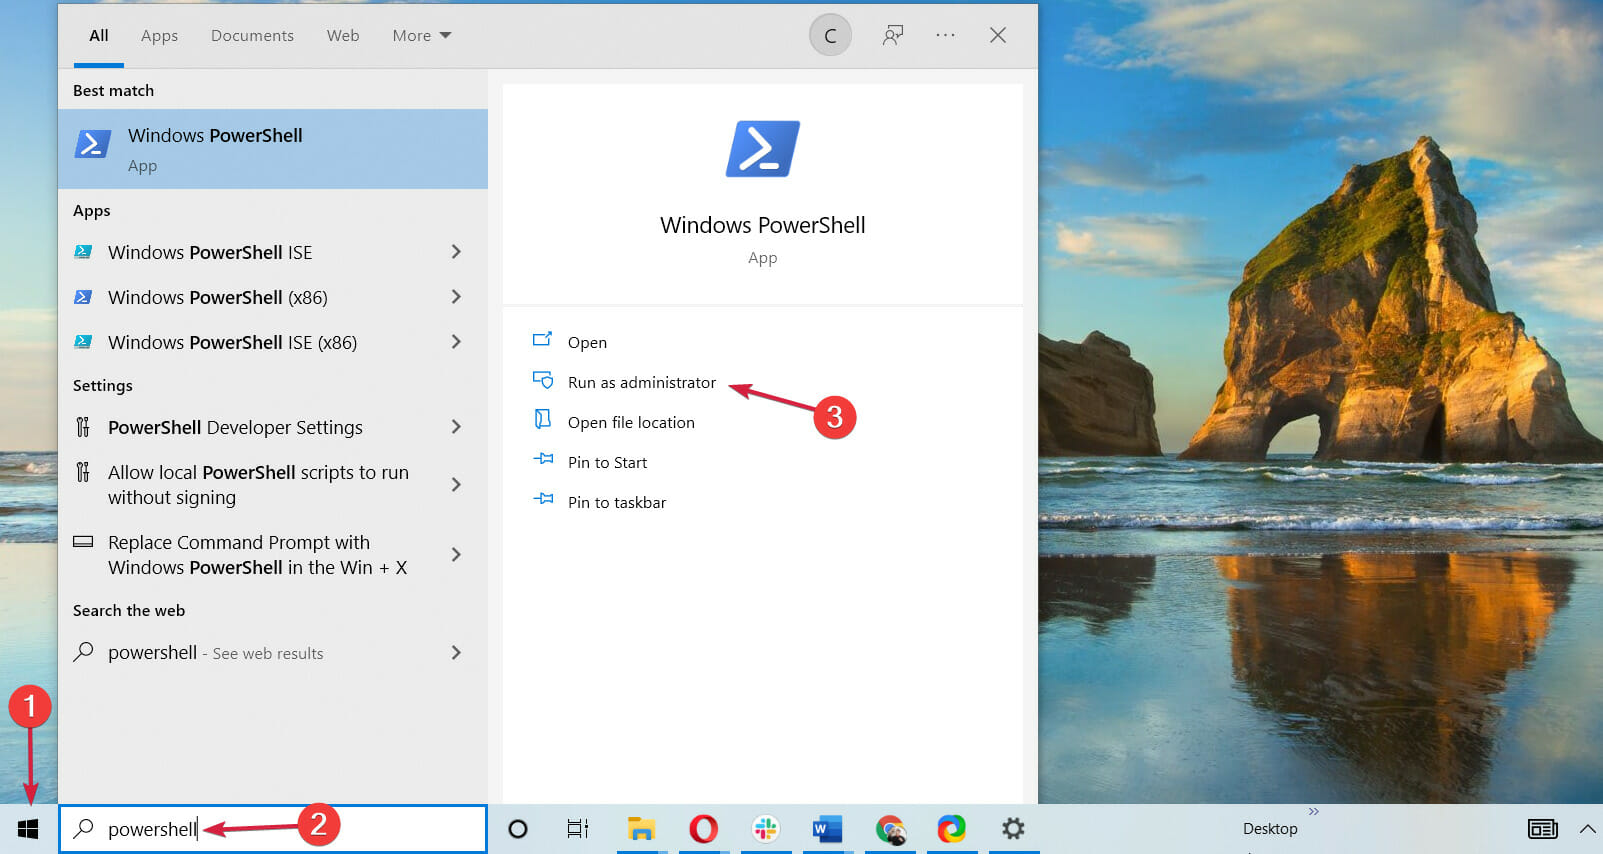
Type powershell in the Search tab and select Run as administrator to open Windows PowerShell with full privileges.
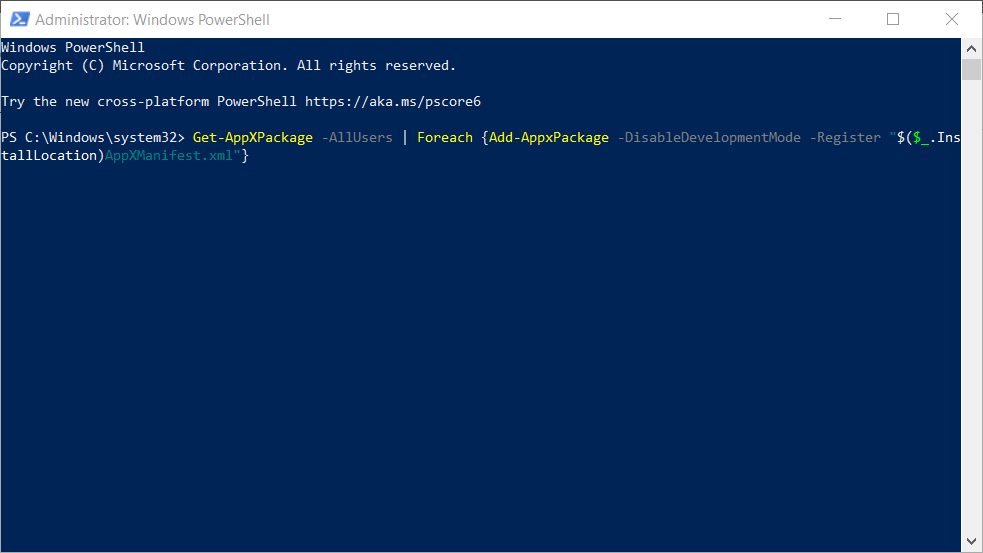
Type the following command and press Enter to run it: Get-AppXPackage -AllUsers | Foreach {Add-AppxPackage -DisableDevelopmentMode -Register "$($_.InstallLocation)AppXManifest.xml"}
Wait for the PowerShell to execute the command (ignore a few red error codes).
2. Add a new subkey in the Registry
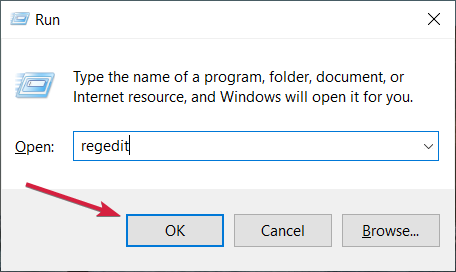
Press the Windows key + R to start Run, type regedit and press Enter or click OK.
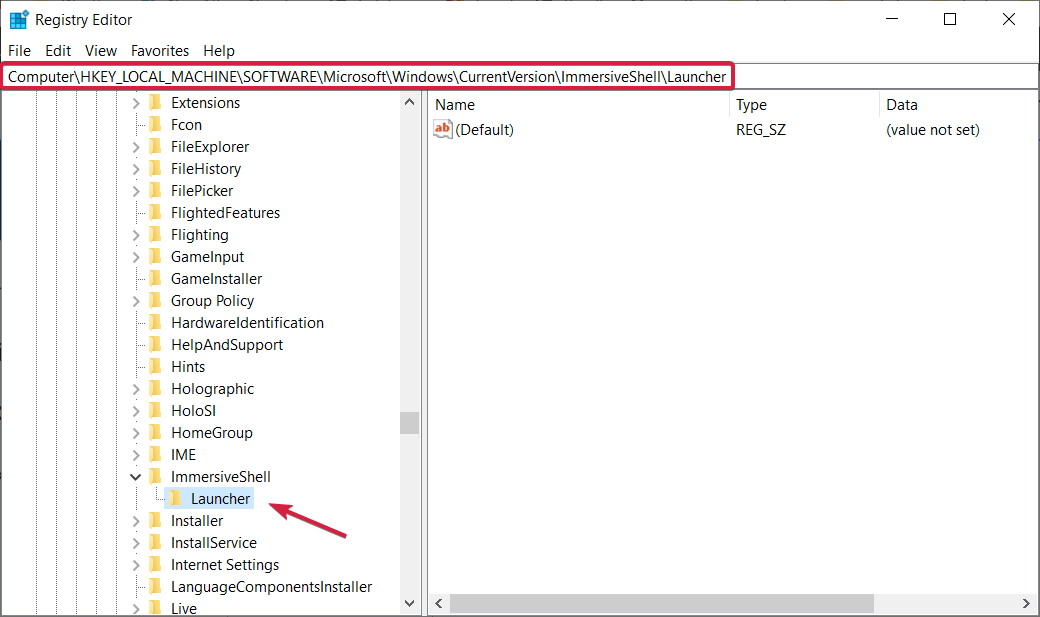
Go to the following path: HKEY_LOCAL_MACHINE\SOFTWARE\Microsoft\Windows\CurrentVersion\ImmersiveShell\Launcher
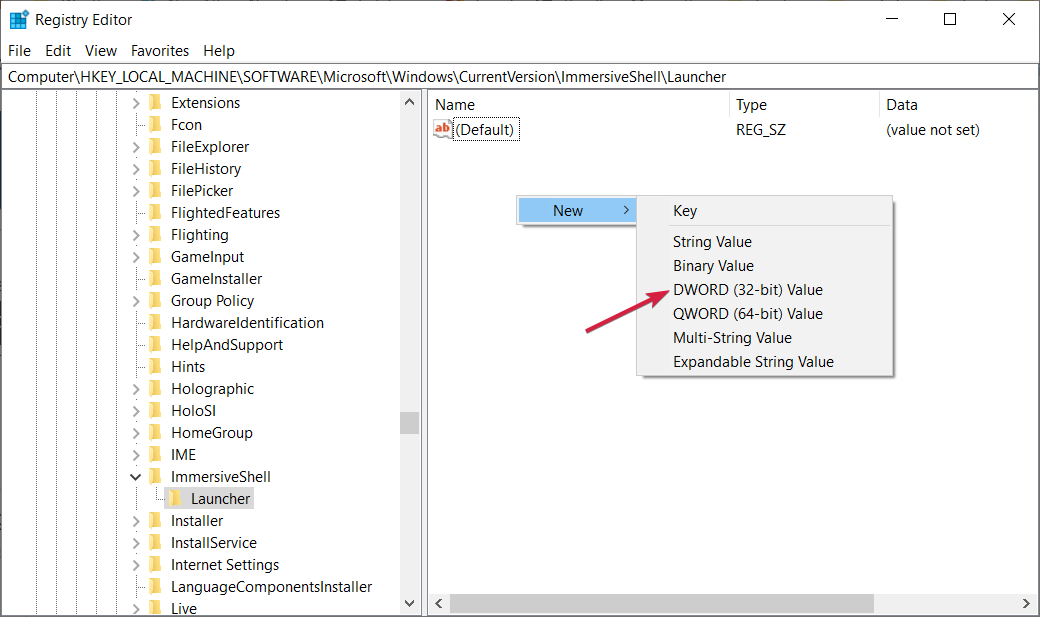
Right click on a free space in the right pane, select New and pick the DWORD (32-bit) Value option, then name the new key UserExperience.
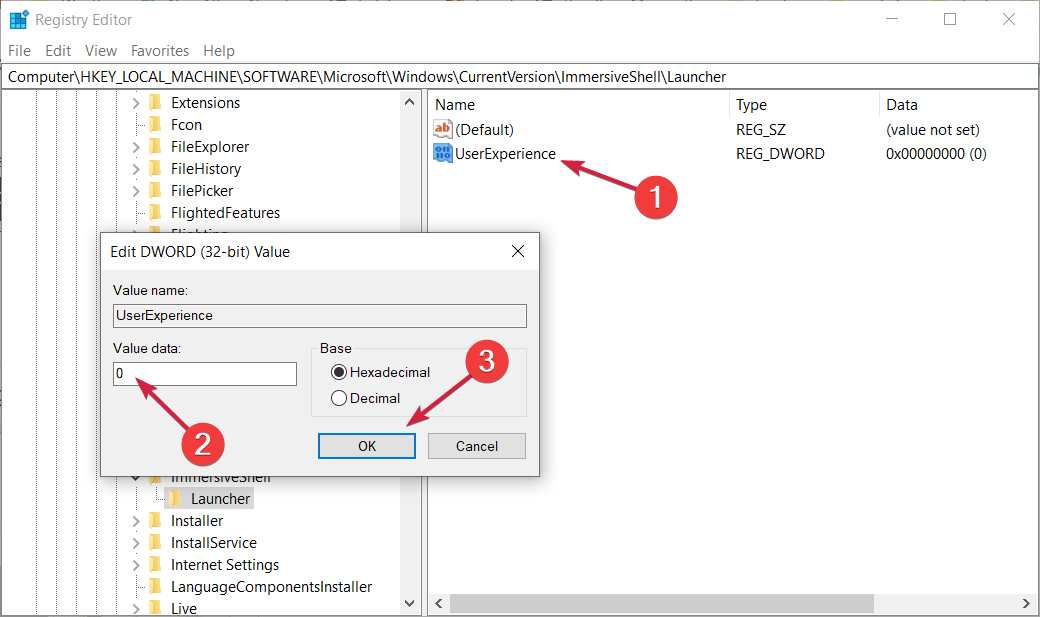
Double-click the newly created subkey and set the value to 0, then hit the OK button.
Close the Registry Editor and then restart your computer.
3. Enter Safe Mode
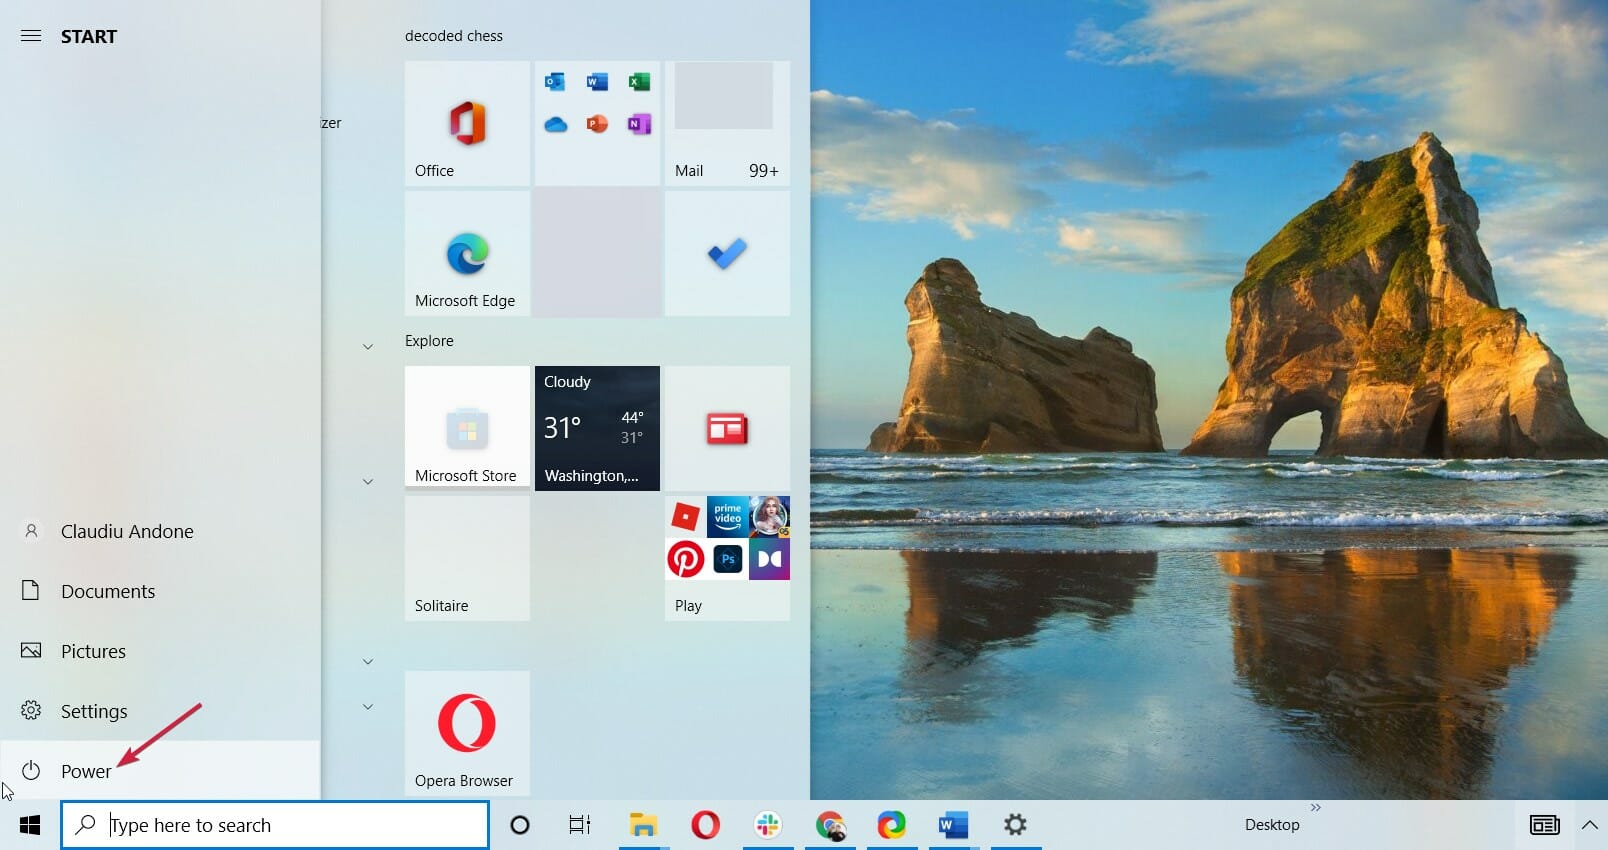
With Windows 10 running, click the Power button in the bottom right corner,hold Shift on your keyboard, and click Restart.
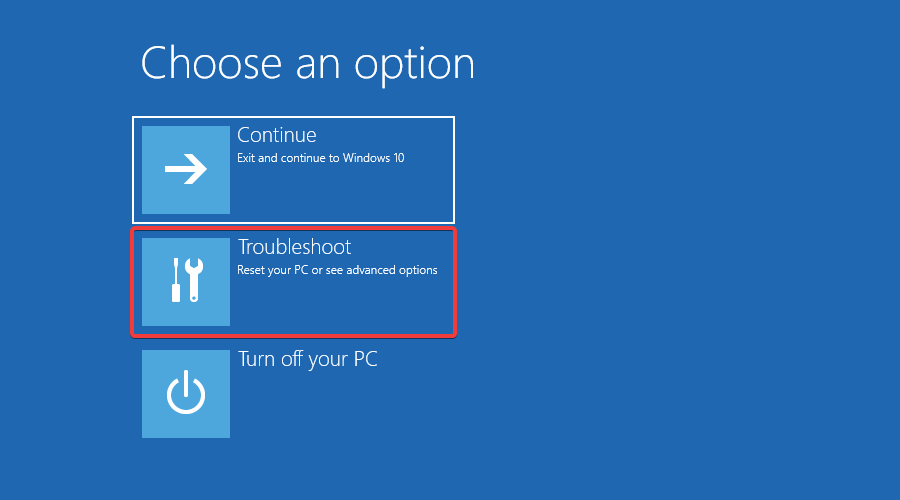
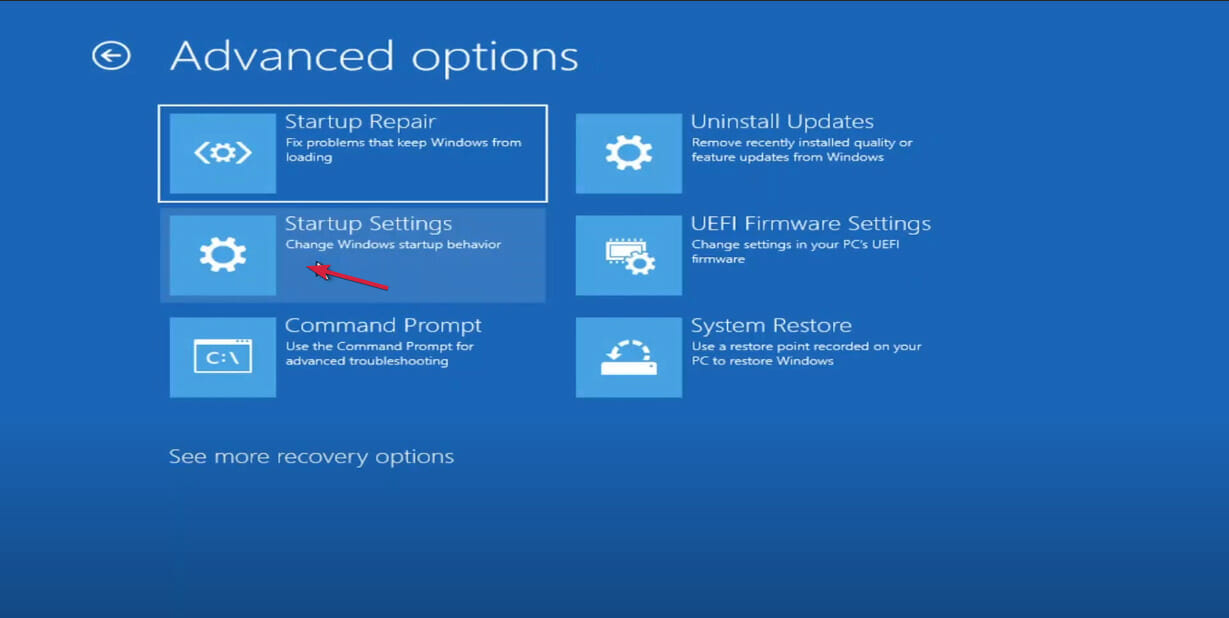
Your computer should now restart to boot options so click on Troubleshoot.
Now select Advanced options and click on Startup Settings.
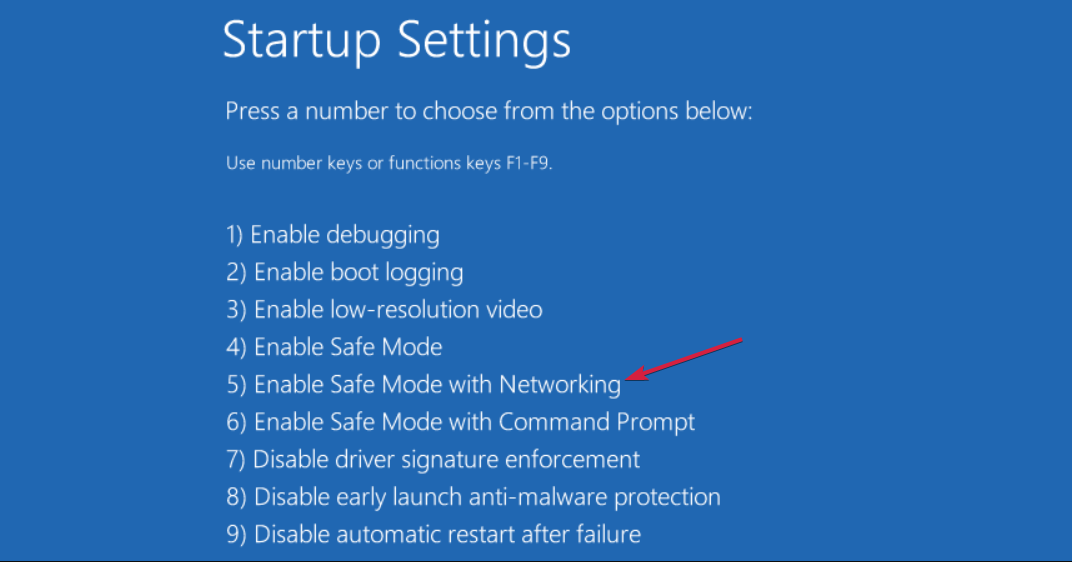
Click the Restart button.
Once your computer restarts again, access Safe Mode with Networking. It should be the F5 key but it might be a different one for your system.
While in Safe Mode, check if the Start menu is working fine. If it does, then a software you installed lately is causing this problem. Try uninstalling it temporarily and restart your PC.
4. Disable your antivirus
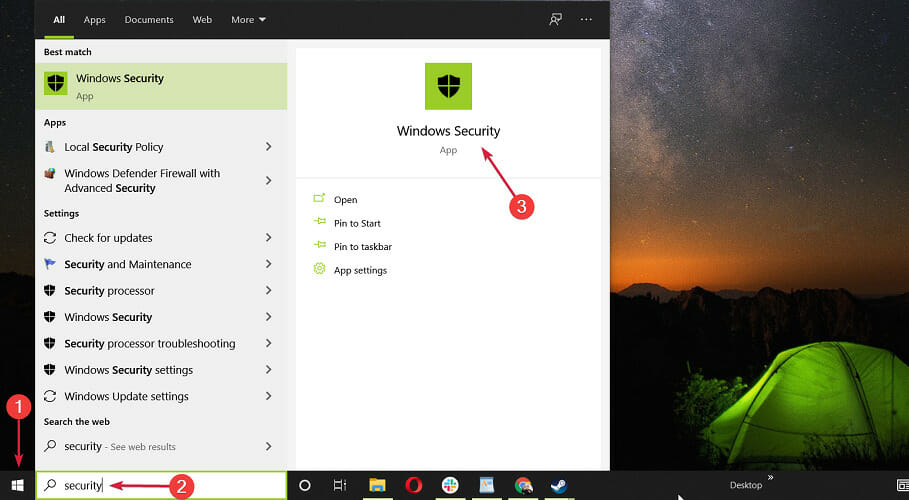
Click the Start button, type security and pick Windows Security from results. You can also open it by clicking the shield icon in the Status bar.
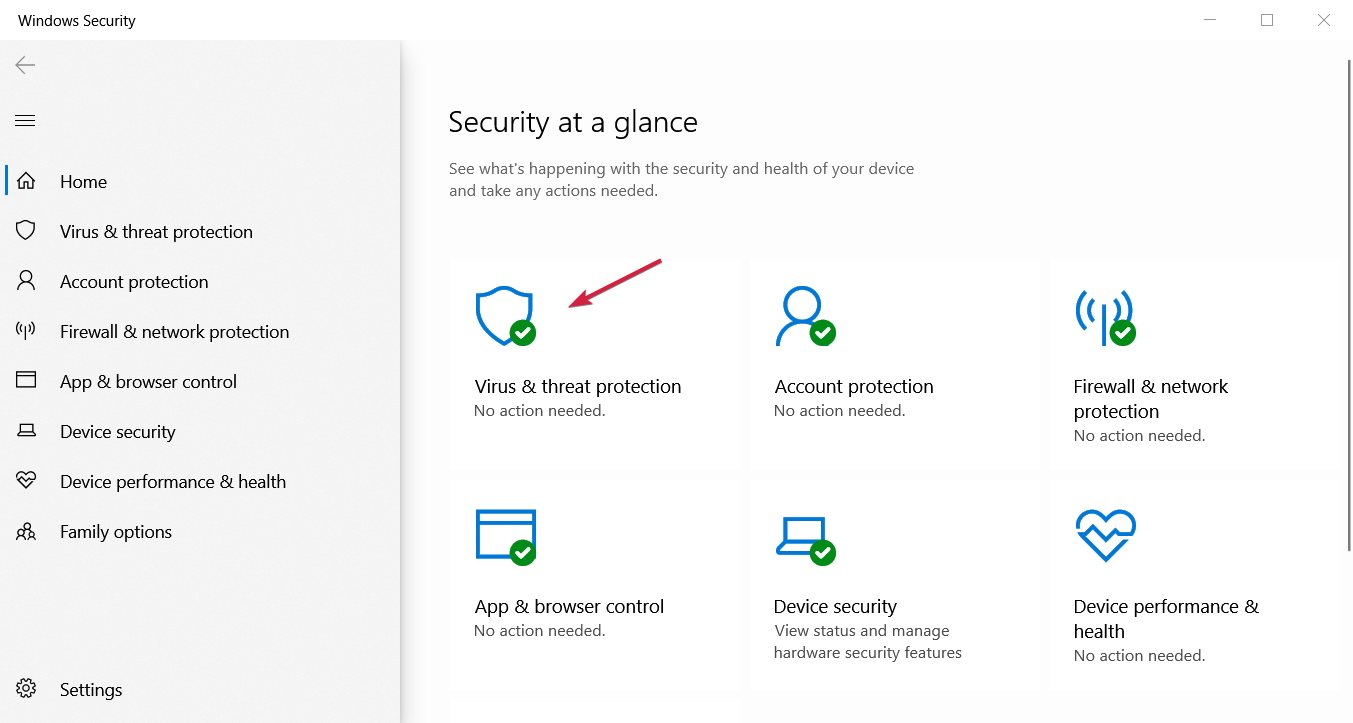
Select Virus & threat protection.
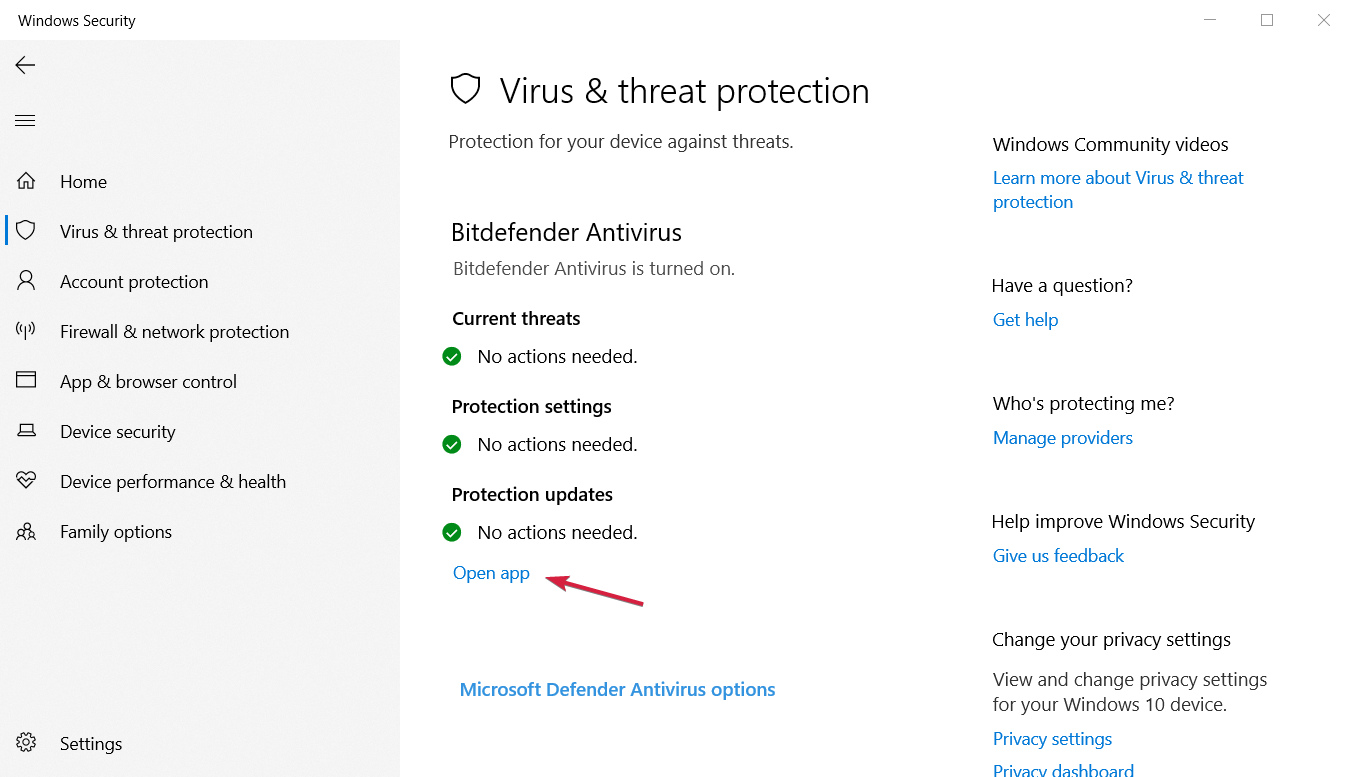
Now, you should be able to disable Windows Defender from this menu but if you have a third-party antivirus installed, click the Open app option.
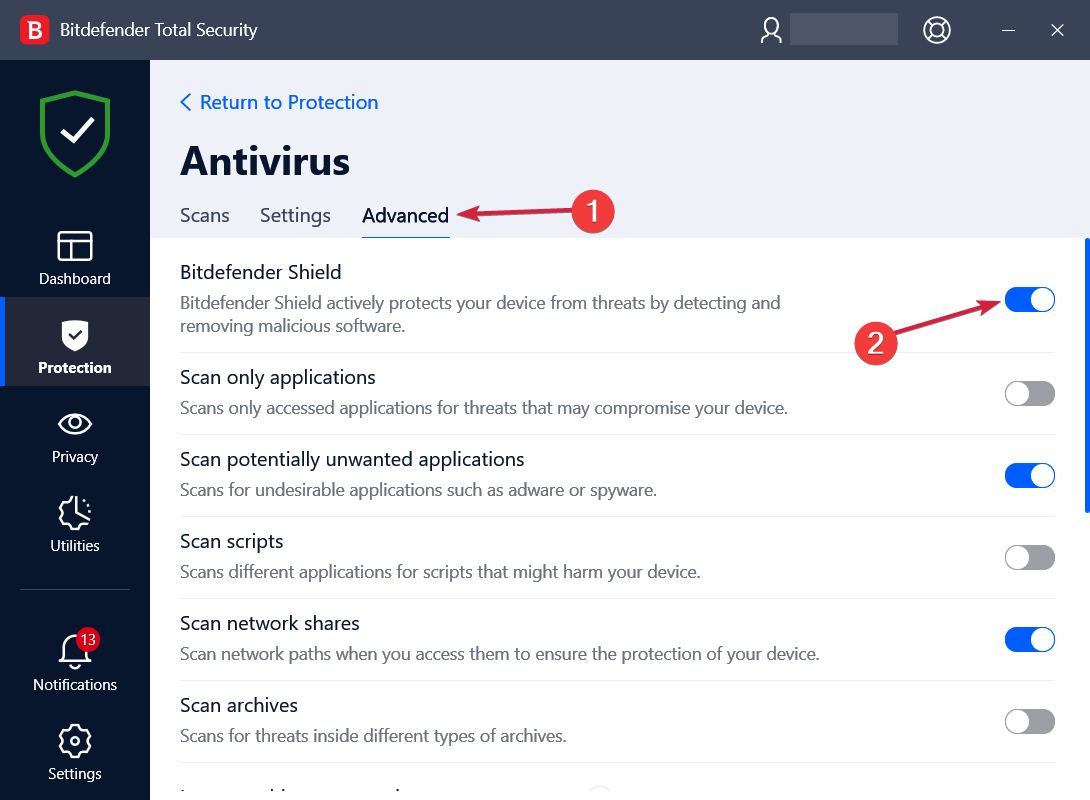
Check its menu and find the disable option that you should find within the Security settings. For instance, in Bitdefender, the Shield is located in the Advanced tab from the Antivirus section.
You probably already know by now that third-party antivirus programs can interfere with some Windows 10 features.
So, to make sure it doesn’t render the Start menu unusable, you should try disabling your antivirus temporarily.
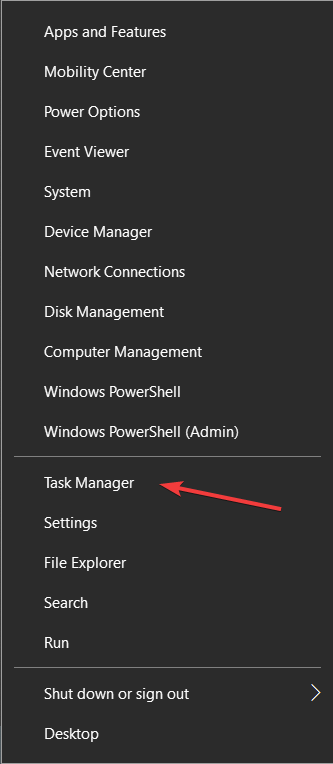
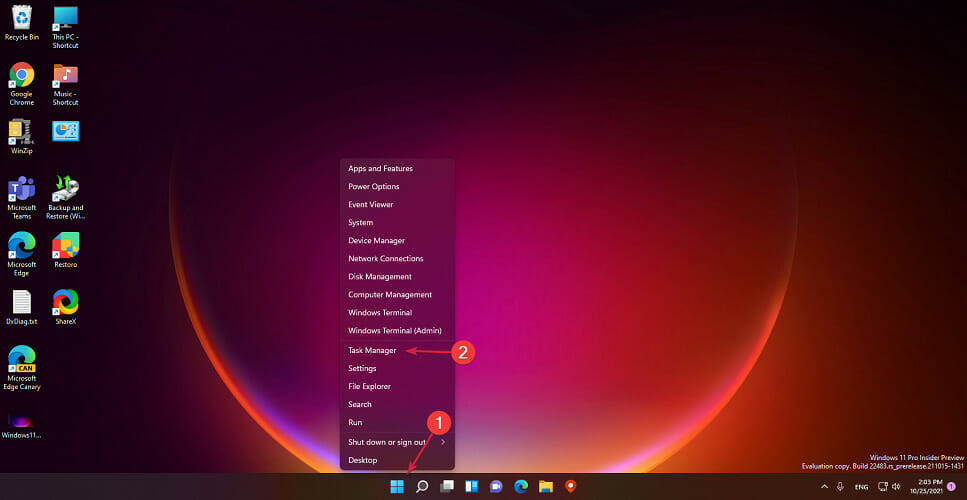
Right-click the Start button and select Task Manager from the list of options. You can also open it by right-clicking the taskbar.
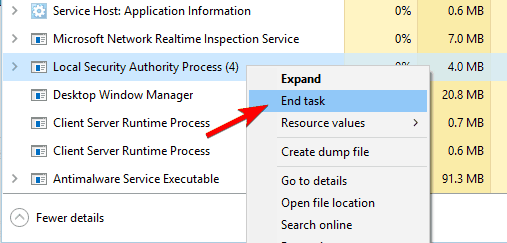
Go to the Processes tab and locate Local Security Authority Process. Right-click it and choose End task.
Close Task Manager and restart your computer, then check if the issue is resolved.
6. Disable Internet Explorer
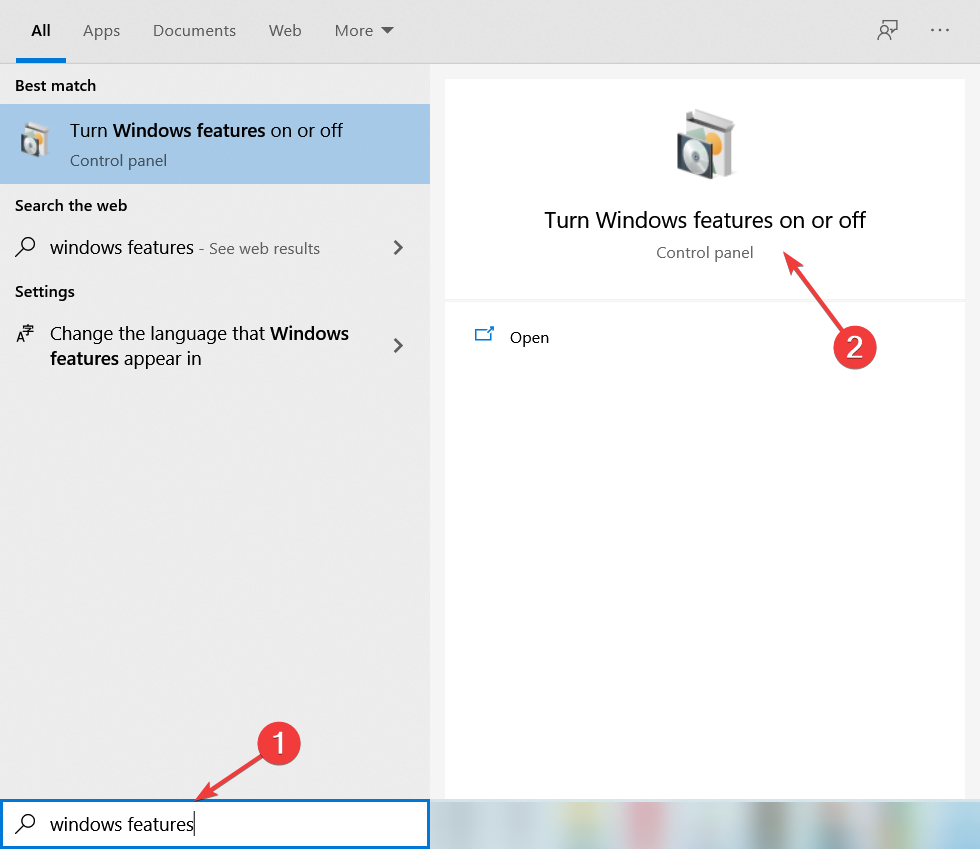
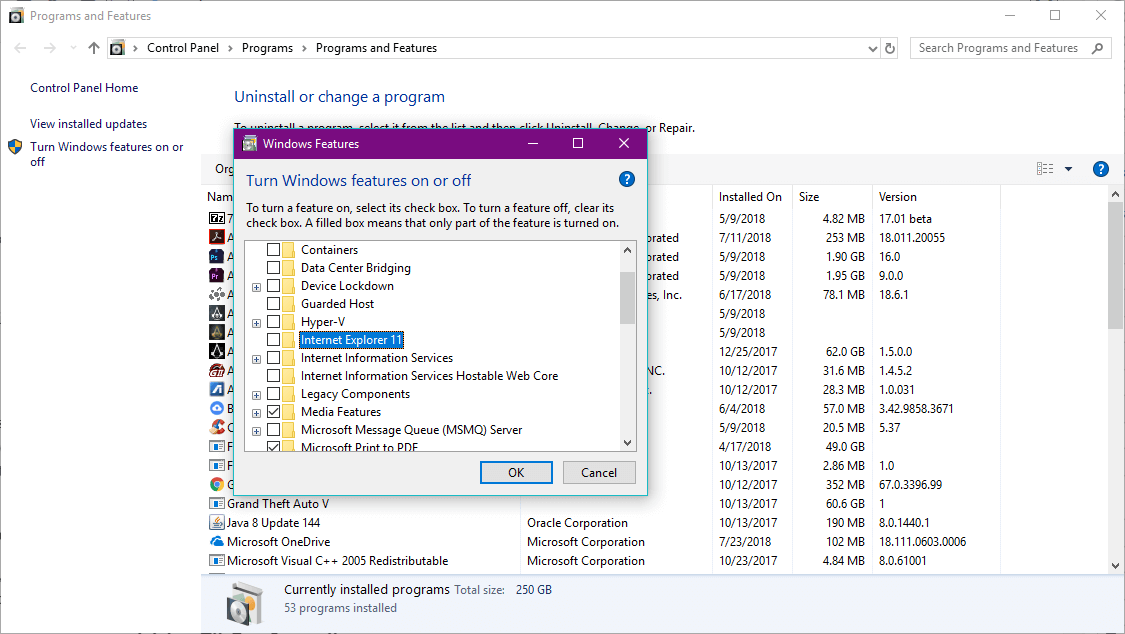
Type windows features in the Windows Search tab and click on Turn Windows features on or off.
Locate Internet Explorer 11 on the list and uncheck it (if you get a warning message just click Yes).
Restart your computer.
You probably don’t use Internet Explorer. This is perfect because Windows 10’s legacy browser may cause the Start menu issues but you can fix that with the solution above.
7. Check for the latest Windows updates
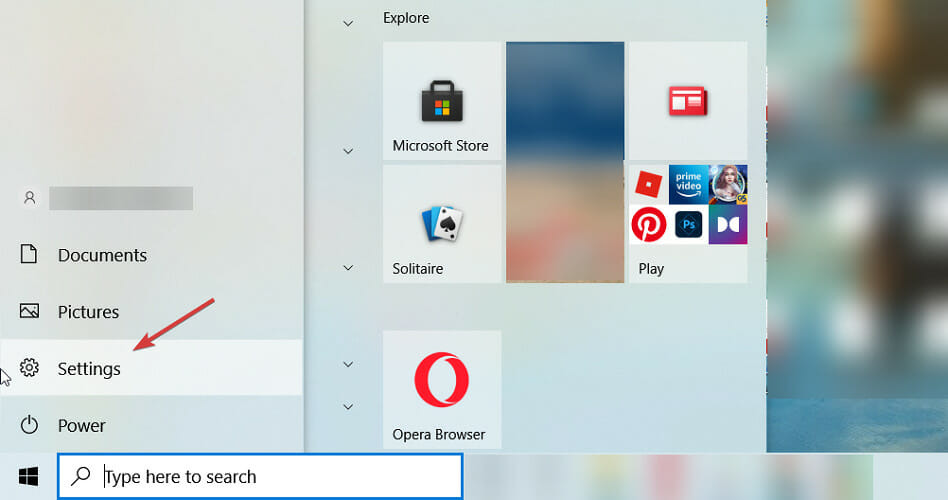
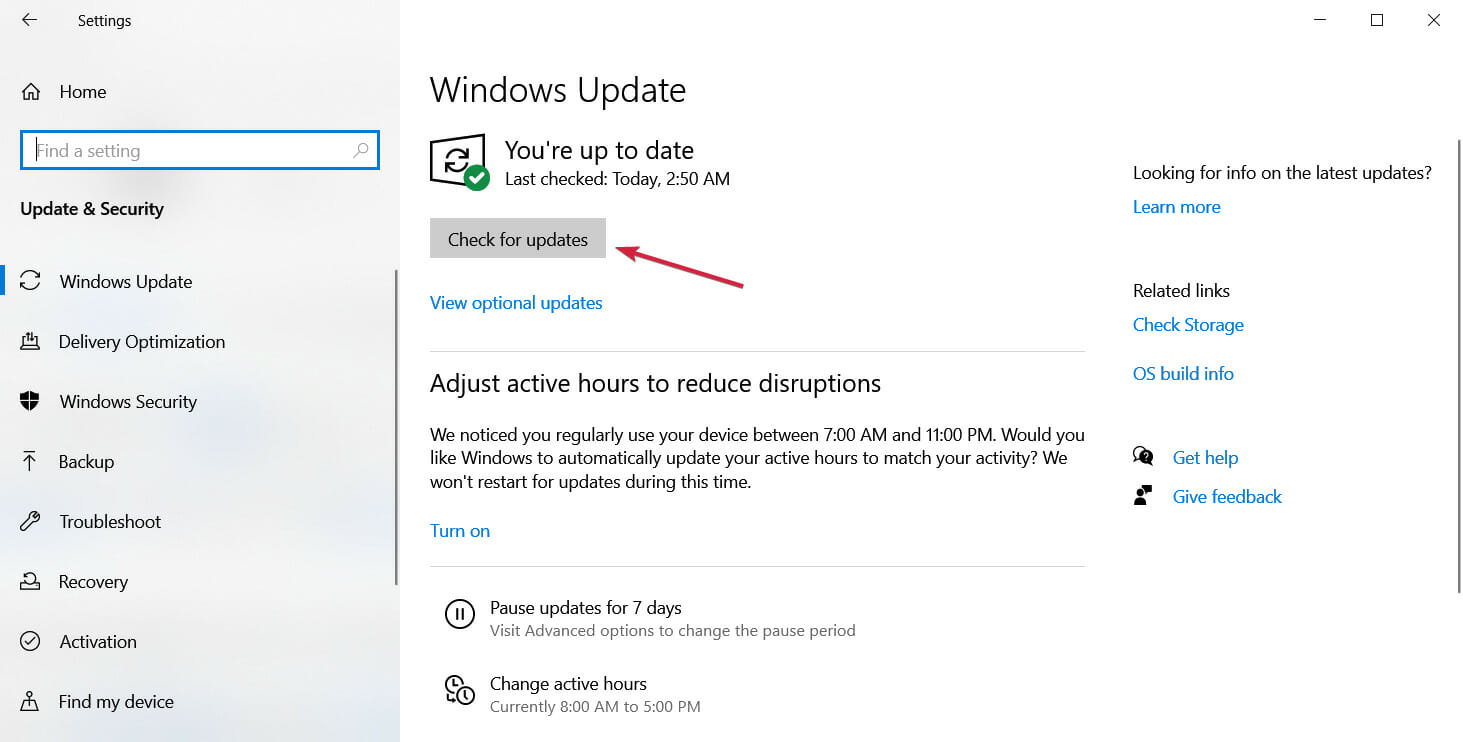
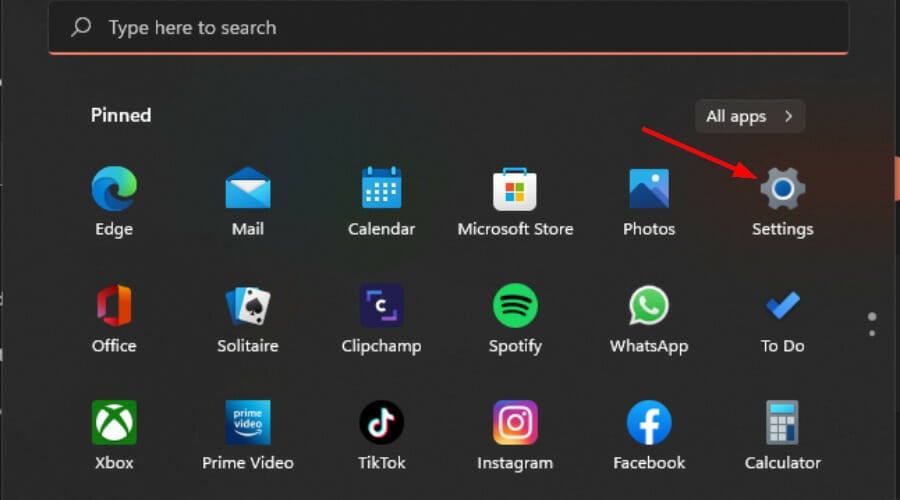
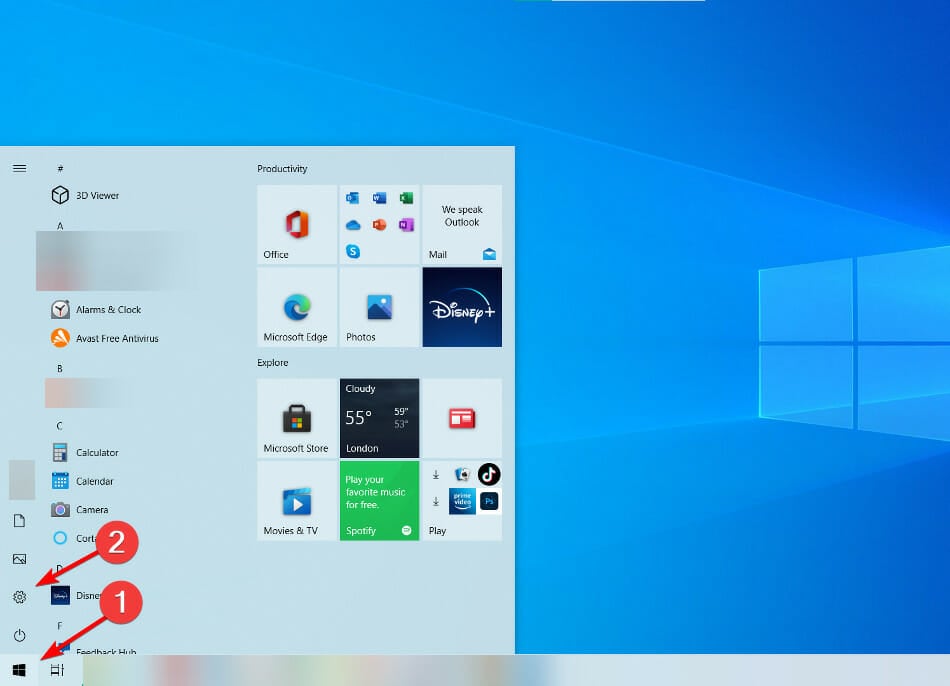
Click on the Start button and select Settings. You can also use the Windows key + I shortcut.
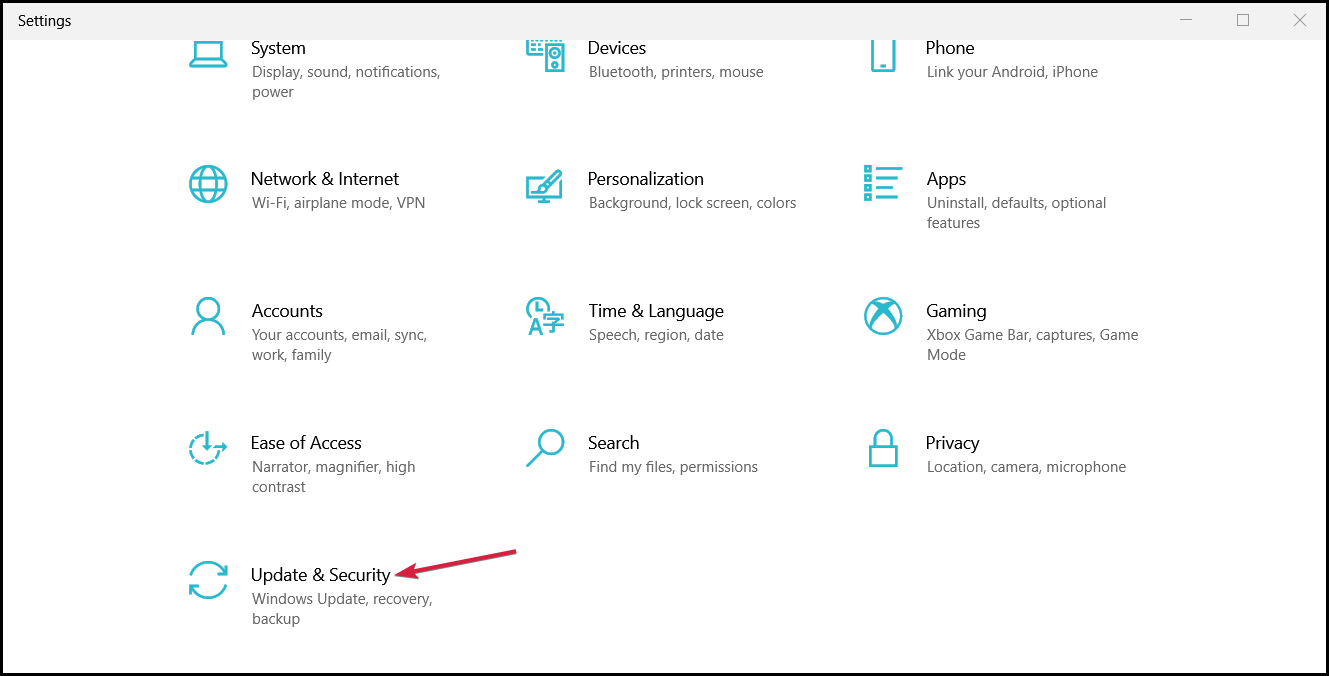
Choose Update & Security.
Now hit the Check for updates button.
If the system finds any new ones, it will download and install them. Make sure you also install the optional updates.
As Windows 10 continuously receives updates, Microsoft delivers various patches for various problems through Windows Update. So, just make sure your system is up to date.
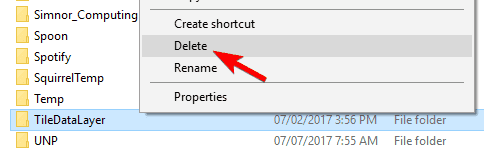
8. Switch to an administrator account and delete the TileDataLayer folder
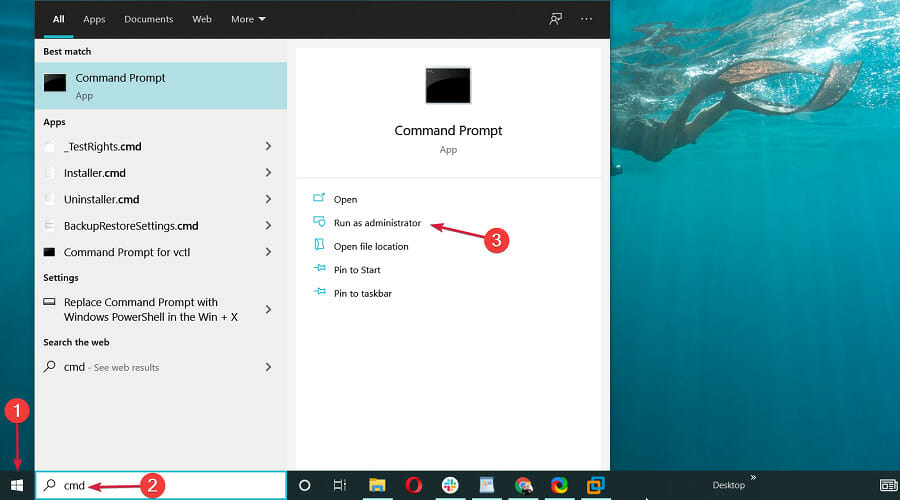
Type cmd in the Search bar and choose Run as administrator from the results.
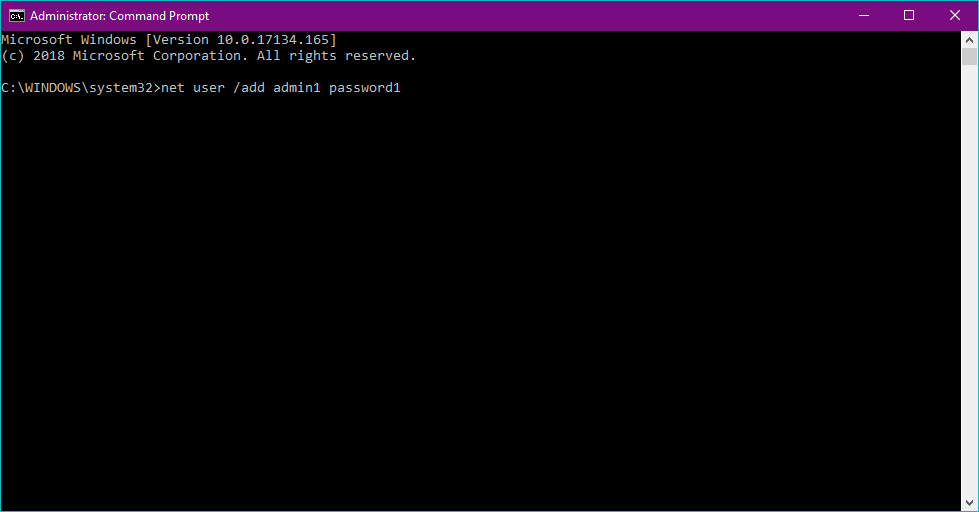
When Command Prompt starts, enter the following command and press Enter to run it:net user /add admin1 password1
This will create a new user account named admin1 with password password1. You can use any other values for username or password.
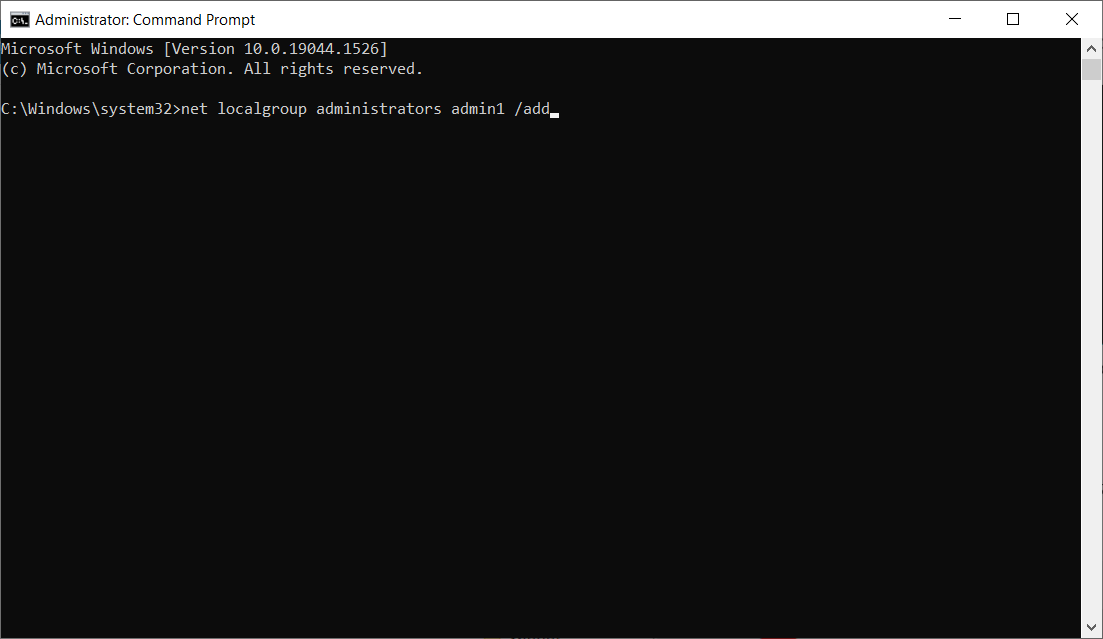
Now you need to turn newly added user, admin1 in our example, to administrator by entering the following command and press Enter: net localgroup administrators admin1 /add
Close Command Prompt, sign out of your current account and go to newly created admin1 account. Use password1 to log in.
Press Windows key + R, type %localappdata% and click OK or press Enter.
Locate the TileDataLayer folder and delete it.
Sign out of the admin1 account and switch back to your regular account.
Some users also reported that switching to another administrator account and deleting the TileDataLayer directory also resolves the problem.
The new OS comes with a lot of new features and improved design but the truth is that it’s not so different from Windows 10.
Although the Start menu is central and it looks different in Windows 11, you will discover that a lot of the solutions above will work perfectly here too.
Task Manager can be started identically in Windows 11
All the shortcuts we used for Windows 10 are identical in the new OS and all the menus correspond.
Dropbox is a popular cloud storage service that’s used by numerous users from all around the world. It’s similar to Google Drive and Microsoft OneDrive, but it offers its own features.
You can access your files from any computer or smartphone, and even share them with your friends.
The service has a lot to offer. It has a great reputation, and it is only getting better as the years go by. One of its best features is the automatic syncing between all devices.
This means that you can access your files from any device because they are automatically saved to the cloud.
The only downside is that Dropbox only offers 2GB of storage for free. You can increase the storage and unlock many more advanced features by subscribing to a monthly payment plan.
It has been a great provider for file-sharing and cloud storage. However, the software sometimes acts up, causing problems with syncing between devices or even causing your computer to crash.
These bugs are usually fixed quickly through updates, but if you have trouble such as not syncing on Windows 11, don’t worry – we’ve got you covered.
Why is my Dropbox not syncing?
There can be multiple reasons why Dropbox may not be syncing. If you’ve updated a file but the changes aren’t appearing on your other devices, it’s possible that your internet connection is down or there are problems with the Dropbox server.
Other possible reasons could be:
There are too many files in any specific folder – To get around this problem, you can use selective sync which allows you to select specific folders and files so that only what you want is downloaded to your hard drive.
Your file/folder is too large – The maximum size of a file that can be synced is 20GB. If you have multiple files taking up a large amount of space, consider moving older versions of files into an archive folder. You can also upgrade your plan with more space if needed.
Your firewall or antivirus is blocking Dropbox – If you suspect that the firewall or antivirus software is incorrectly blocking Dropbox, then the best option is to try adding an exception for Dropbox. In most cases, this should solve the issue. You can also try temporarily disabling the software and see if you can connect to Dropbox.
Your Internet connection is being interrupted – If you still cannot sync, try connecting directly to your modem or router with an ethernet cable. If Dropbox works in this configuration, then a setting on your wireless router might be blocking Dropbox. Try adjusting the settings on your router to allow access to Dropbox.
You are using an outdated version of the application – Using an outdated version can cause conflicts in your Dropbox. Some of your files didn’t sync because your version is out-of-date. Updating to the latest version should solve the problem.
Your file type is not accepted – Dropbox syncs whenever there is a change to a file in your Dropbox folder. If you drop a new file into your Dropbox folder and nothing happens, verify if it’s a type of file that can’t be synced. Beware of how you name your files as special characters may also prevent syncing.
Also, check if the file is being used by another program or has locked permissions. If neither of these is true, then it’s time for some more advanced troubleshooting!
What can I do if my Dropbox is not syncing?
1. Add Dropbox as an exception on Firewall settings
Press the Windows + I keys simultaneously to open Settings.
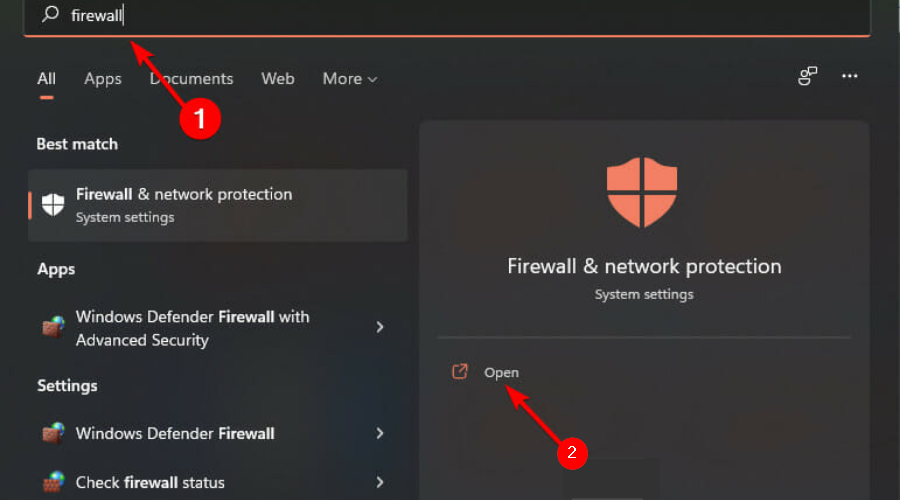
Type Firewall in the search box to find Firewall & network protection then click Open.
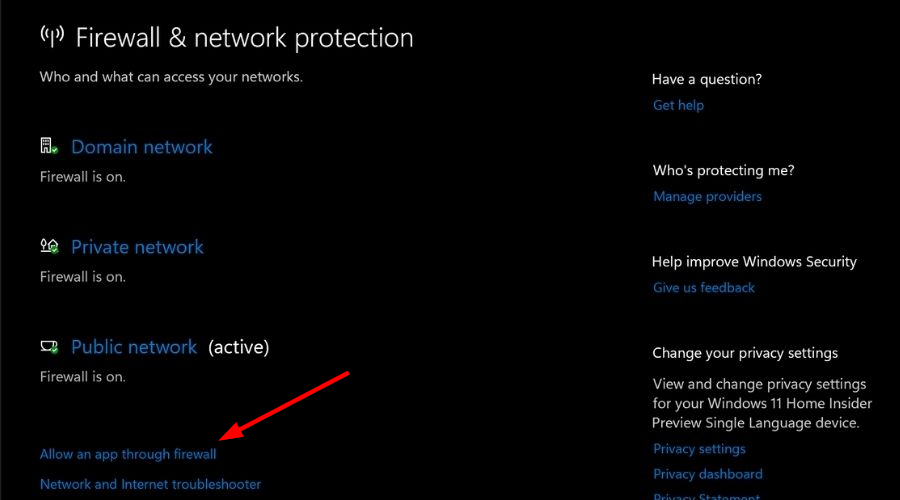
Scroll down and select Allow an app through the firewall.
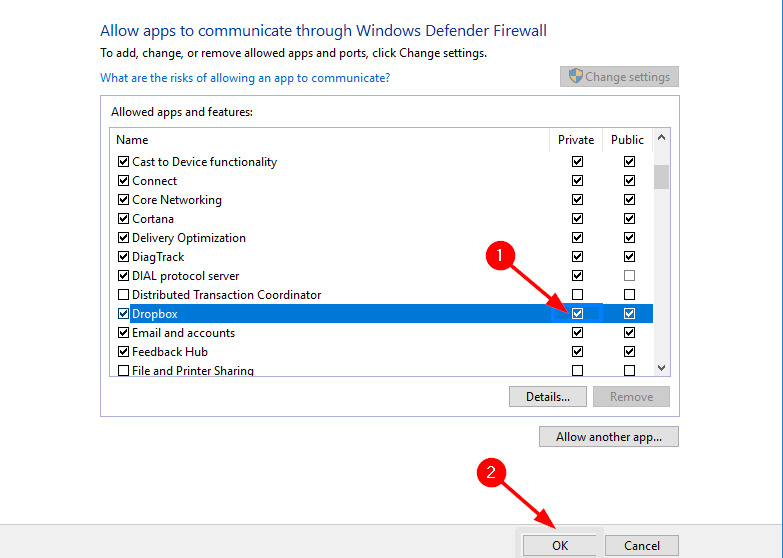
On the dialog box that pops up, check the Dropboxoption, then press OK.
Try syncing again.
2. Do a Hardlink repair
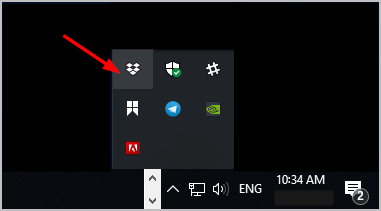
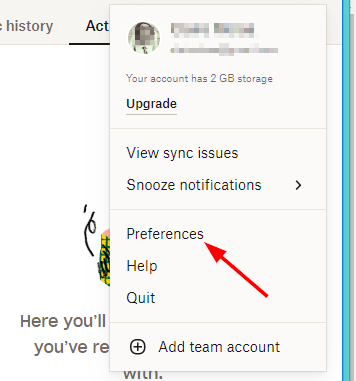
Click on the Dropboxicon present in your system tray.
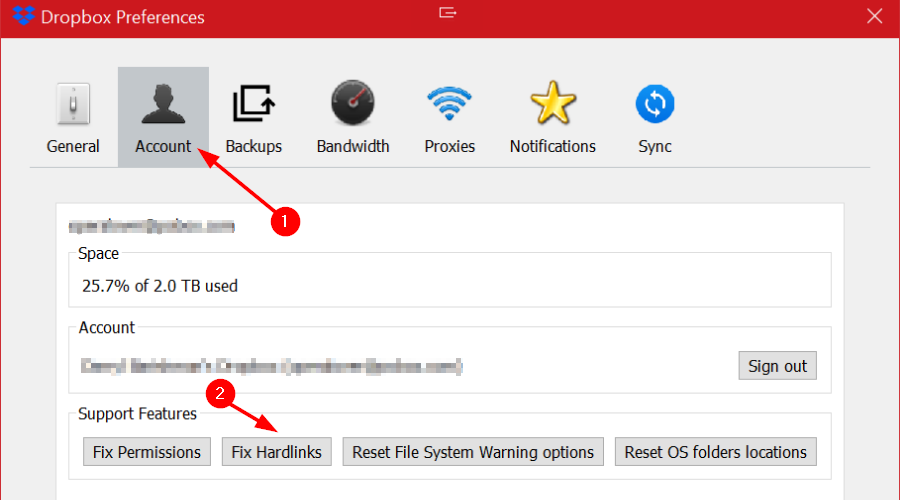
Click on your Profile picture and select your Preferences.
Under the Account section, press the Alt + H keys, then tap the Fix Hardlinks option.
Now try syncing again.
3. Run a series of commands
Shut down all Dropbox processes on your PC.
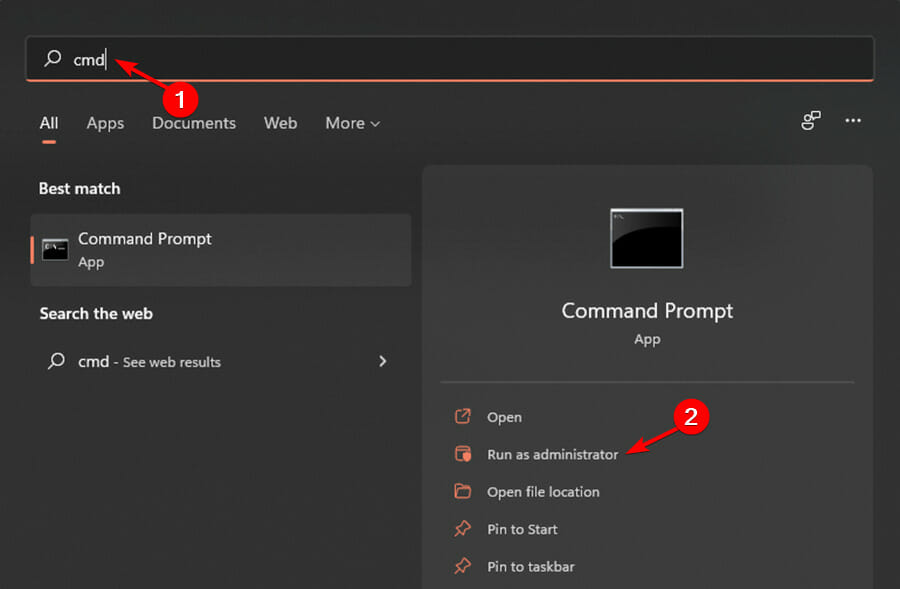
Press the Windows key, type CMD in the search bar, and tap Run as administrator.
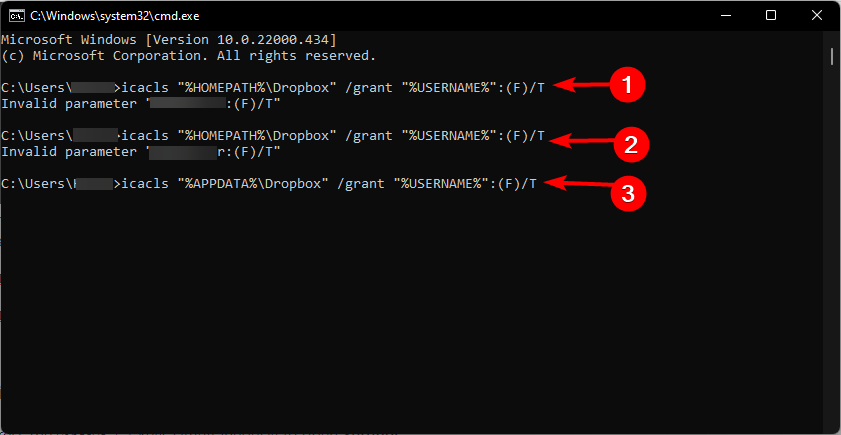
Enter the following command prompts and press Enter after each one: icacls "%HOMEPATH%\Dropbox" /grant "%USERNAME%":(F)/Ticacls "%HOMEPATH%\Dropbox" /grant "%USERNAME%":(F)/Ticacls "%APPDATA%\Dropbox" /grant "%USERNAME%":(F)/T
Open your Dropbox again and try syncing.
4. Troubleshoot network connectivity
Press the Windows + I keys simultaneously to open Settings.
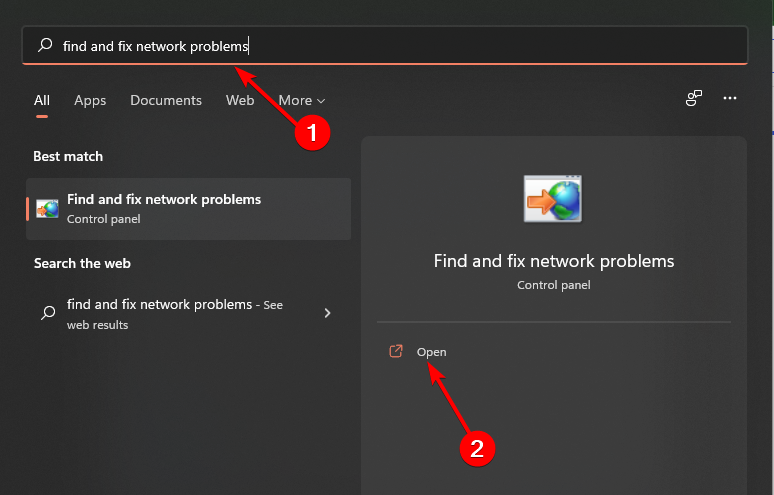
Type Find and fix network problems in the search box then click Open.
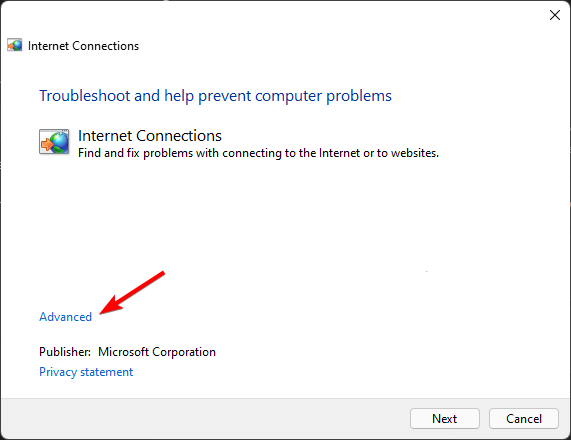
Tap on Advanced in the dialog box.
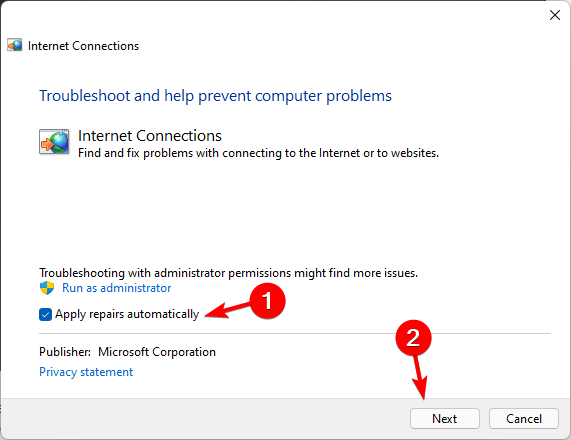
Select the Apply repairsautomatically option, and click Next.
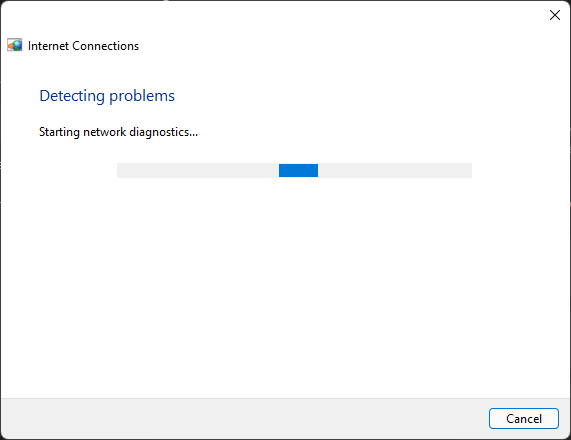
Wait for the problems to be detected and proceed to repair any found.
Try syncing again.
My computer is not supported by Dropbox, what can I do?
If you see the message Your computer is not supported on Dropbox, your current operating system may no longer be supported by Dropbox. This error can occur if your computer does not meet the minimum system requirements.
While this message is shown in the Dropbox desktop app, it’s important to start by checking the platform system requirements for Dropbox to confirm you have a supported operating system.
You can use your web browser to bypass this issue and access the app or check for any pending updates on Windows 11 and then update to access Dropbox again.
To check for Windows Updates:
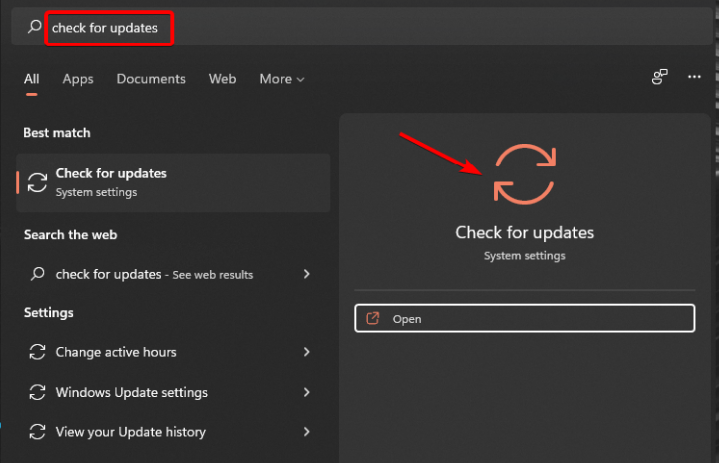
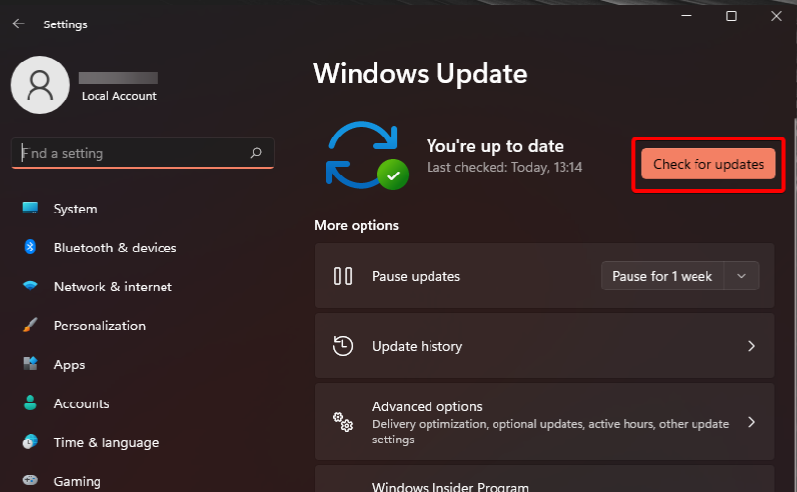
Press the Windows key and type Check for updates and click to open.
Click on Check for updates and install any pending updates.
Aside from Dropbox, there are also other cloud backup alternatives you can explore such as Sync with more storage options that allow you to share sensitive files securely.
U.S. Bank has announced a new deal with Microsoft to help modernize and boost its technology. Under the partnership, Azure has been chosen as the primary cloud provider for U.S. Bank applications.
U.S. Bank believes that this new partnership can help modernize how it works in an increasingly digital world. This includes helping the bank analyze data and “scaling innovative products to customers and partners.” There’s also the goal of helping develop new growth opportunities, as well as improving the security of data, financial assets, and adding to customer privacy. In the words of Microsoft CEO Satya Nadella:
“More than ever, every financial services organization will need to build its own digital capability to meet both evolving customer demands and changing employee expectations. As U.S. Bank’s primary cloud provider, we will apply the power of Azure to help the company adapt and build new, secure experiences for customers and employees in the era ahead.”
For U.S. Bank customers, the partnership opens the gates for more tools that can improve banking experiences. Bigger partners, meanwhile, should get better digital experiences, APIs, and access to real-time data. As for business customers, look out for more ways to generate invoices and to send and receive payments.
Inside U.S. Bank, employees have already begun embracing Microsoft 365 and Microsoft Teams. However, U.S. Bank will still use multiple public cloud providers for redundancy, too.
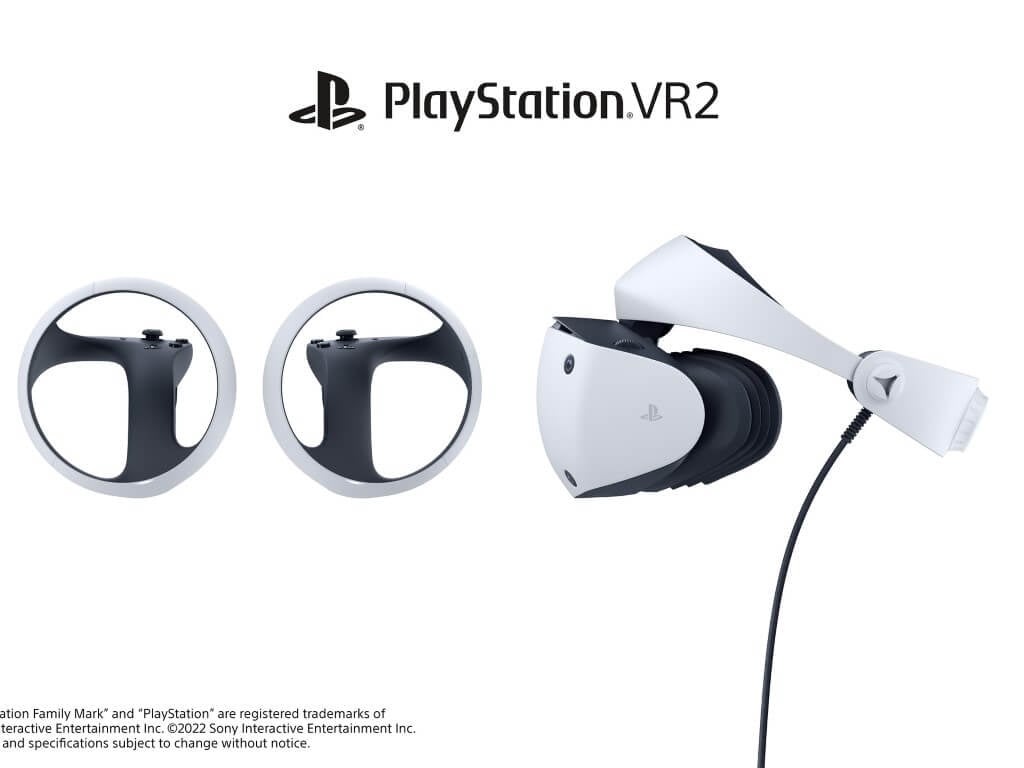
Roughly a month after teasing it, Sony has come out and revealed a first look at the PlayStation VR2 virtual reality system for PlayStation 5 consoles. The new headset matches the “orb” look of the previously detailed controller and fits well with all the design principles of the PlayStation 5, but with some unique tweaks.
As a reminder, this new headset sports two 2000×2040 OLED displays with a 90 or 120Hz refresh rate that can provide a 110-degree field of view. Other features include inside-out tracking, 3D audio, vibration motors, and eye-tracking technology. When it comes to the design, though, Sony was aiming to add emphasis on roundness to the headset, as well as creating a product that can “become an attractive part of your living room decor.”
In doing so, you’ll notice some familiar features from the first-gen headset like an adjustable headband, adjustable scope. New features on PlayStation VR2, though, include lens adjustment dials, a built-in motor for the headset feedback, and a slimmer design with slight weight reduction, plus air vents above the front surface of the scope for increased ventilation. Sony even went with a single-cord design, so it’s easier to get up and running.
No launch date was announced, but the virtual reality and headset space has become hotly contested as of recently, especially with the metaverse coming into play. Microsoft might have drama in its HoloLens team, but Apple’s long-talked-about mixed reality headset is said to have completed production tests and could launch this year.
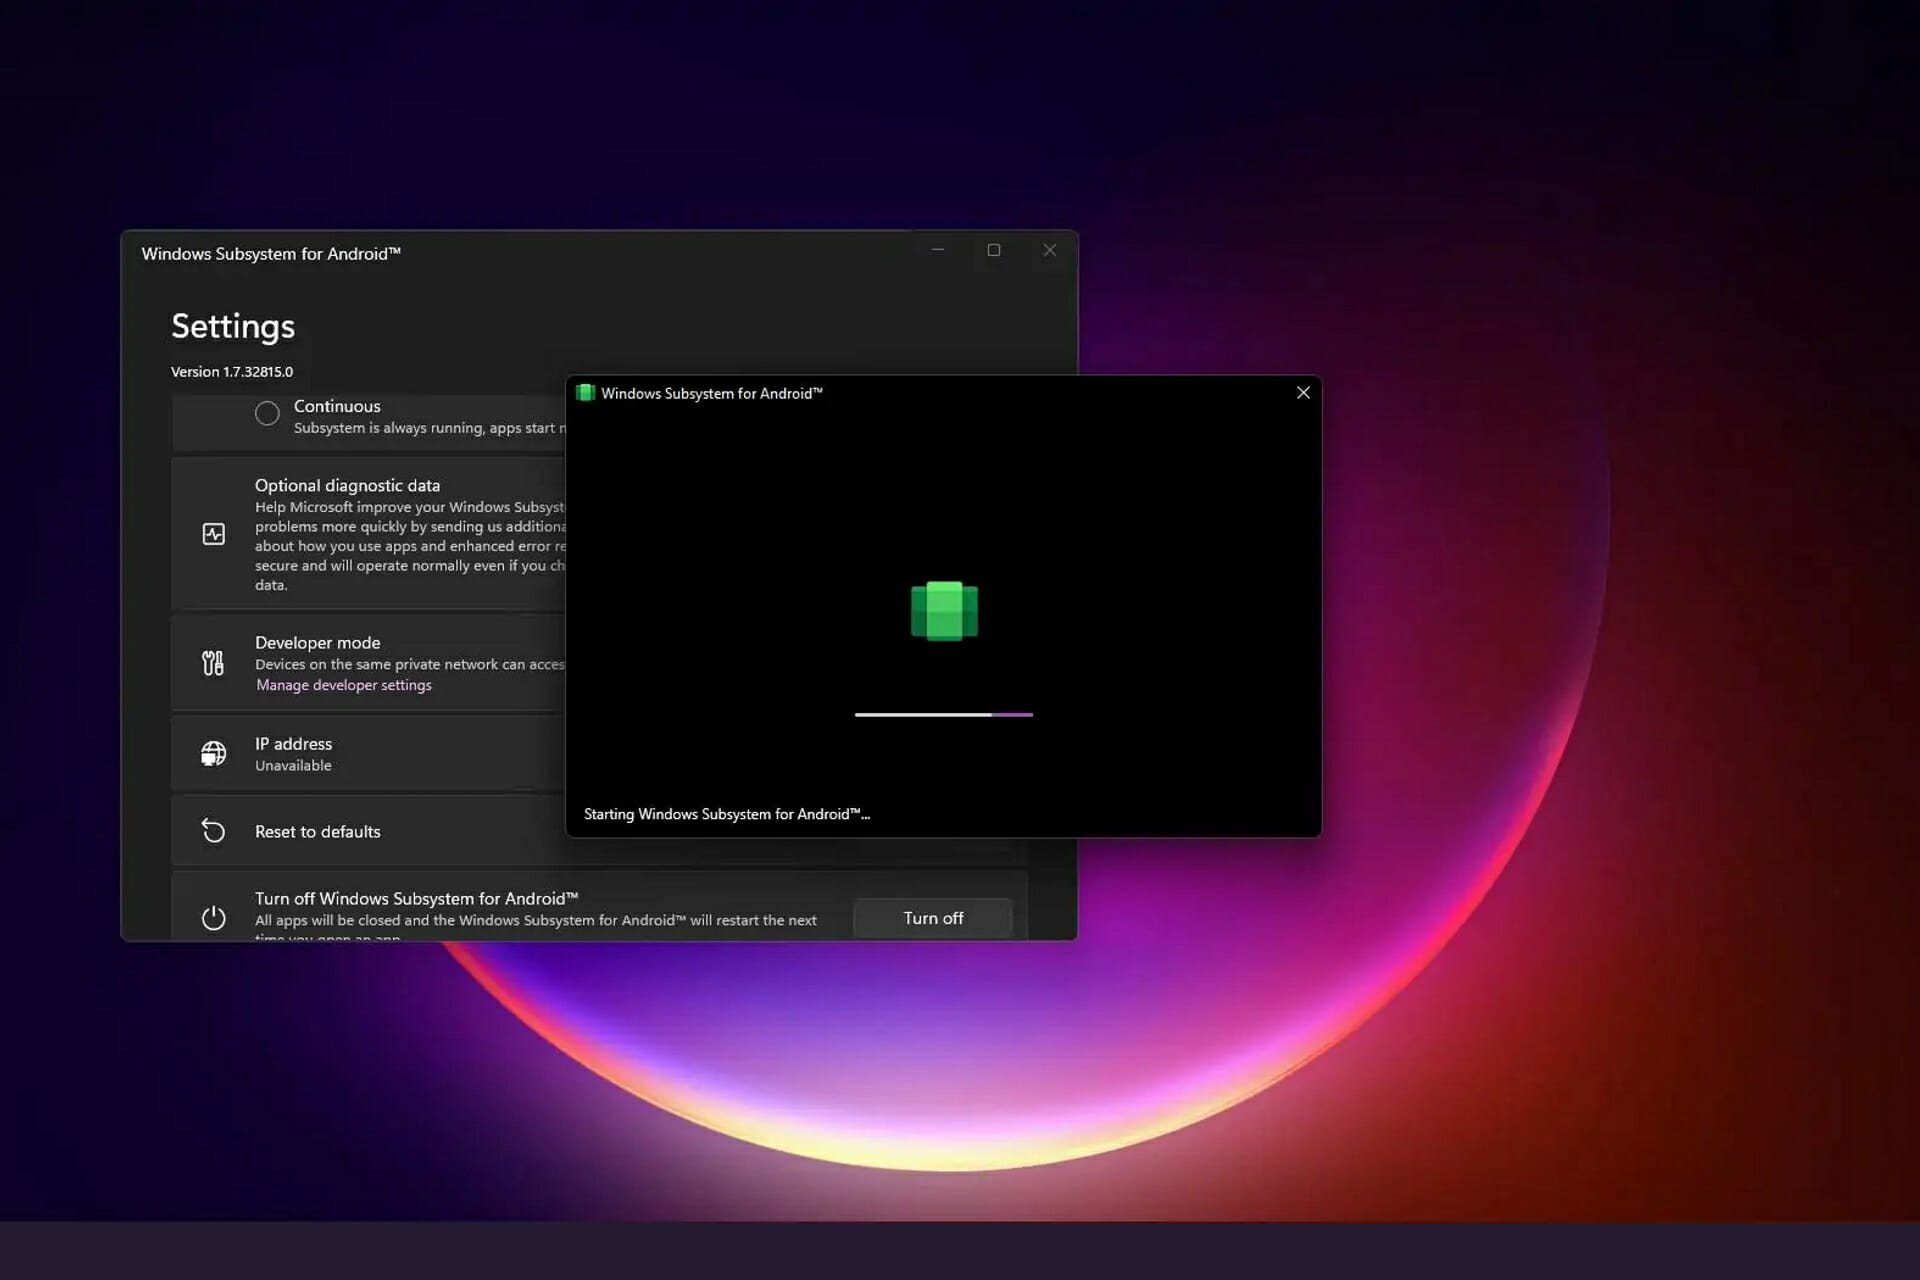
Microsoft has made it possible for users to run Android applications in Windows 11. For the user base, this is really encouraging news, as it means that customers may now download and utilize apps not only on their smartphones but also on the enormous screen of their Windows 11 desktop computer.
When it comes to running Android apps on Windows 11, Microsoft has implemented a sophisticated framework to make this feasible. This is referred to as WSA, which is an abbreviation for Windows Subsystem for Android.
As previously said, the technology that underpins the operation of Android applications is extremely sophisticated, and there is a good probability that you will encounter problems such as apps not working on Windows 11.
Following our identification of the root cause of our current issue, we will provide you with a list of possible solutions to try in order to resolve the problem. Follow along!
What caused WSA not to work?
After doing comprehensive research into this particular issue, it was discovered there are really a number of different scenarios that might ultimately result in this type of behavior on Windows 11.
Here is a list of scenarios that could result in the WSA (Windows Subsystem for Android) feature not working:
➡ Corrupted WSA installation – You may notice that this problem occurs shortly after an antivirus program has been forced to quarantine some files associated with the WSA infrastructure. Taking the opportunity to reinstall the Android subsystem is highly recommended in this situation. ➡ Virtual private network (VPN) software interference – While it may seem implausible, VPN software interference is actually one of the most common causes of this particular issue on Windows 11. Several third-party products have been shown to interfere with the program. ➡ Overprotective antivirus software – As it turns out, VPN software is not the only thing that could potentially interfere with the WSA functioning on Windows 11 if it is installed. There are various third-party antivirus suites that will simply prohibit the Windows Subsystem for Android from functioning. ➡ WSA temporary files that have been corrupted – If you’ve previously utilized the WSA infrastructure and have successfully run some Android apps before you started having this problem, it’s likely that you’re dealing with some leftover temporary files. ➡ Outdated Microsoft Store Framework – In fact, it turns out that this particular issue may be traced back to an outdated Microsoft Store foundation. You should keep in mind that Microsoft has released a vital update for the WSA integration that must be deployed in order for the Subsystem to function.
Following our discussion of possible causes for this type of problem, let’s move on to the real fixes that should be able to help you resolve the Windows Subsystem for Android problem in Microsoft’s latest operating system.
What can I do if WSA isn’t working in Windows 11?
1. Uninstall your VPN
Press the Windows key + R to open a new Run box, then type or paste in appwiz.cpl and hit Enter.
Now locate your VPN app, right click on it, and hit Uninstall.
And if you want to be sure there are no leftovers after removing, you can use CCleaner, which will not only uninstall any useless apps but also clean your device of any junk or residues.
It is unclear why this issue is occurring, and we have not received an official explanation from Microsoft, but the connection is evident because we have located scores of impacted individuals who have reported that the problem was resolved soon after they uninstalled the VPN package.
2. Repair the app
Press the Windows key + I to open the Settings app then go to Apps, followed by Apps & features.
You can search for Windows Subsystem for Android in the search box once you are within the Apps & features window. Then, click on the three dot menu next to it, followed by Advanced options.
Scroll down until you reach the Reset section, and then click on the Repair button to begin the process.
Let the Repair process complete, then proceed with a computer reboot to apply the changes made. Restart the WSA app to see whether its functionality has been restored.
3. Reset the app
NOTE
When you reset the WSA application, all of the information that was previously stored in the program will be lost. As a result, we strongly advise that you create a backup of any important data before commencing the process of resetting your device to factory settings.
Press the Windows key + I to open the Settings app then go to Apps, followed by Apps & features.
Once you are inside the Apps & features window, search for Windows Subsystem Android in the search bar, then click on the three dot menu next to it followed by Advanced options.
Scroll down until you find the Reset section, then click on the Reset button.
4. Update the Microsoft Store Framework
Press the Windows key + R to open a new Run box, then type or paste in msi-windows-store: and hit Enter.
Once you’re inside the Home page, click on Library in the left-bottom corner.
Now click on Get updates in order to update the entire Microsoft Store Framework including WSA.
5. Update Windows
Press the Windows key + I then click on the Windows Update option from the left panel in order to access all the updates.
If you need to download any new updates, click the Install now option and wait for the procedure to complete; otherwise, click the Check for updates button.
You could be experiencing this issue because you’re using an older version of Windows, which could be resolved by updating your operating system to the most recent version. It is almost guaranteed that the bug will be fixed in a future software release.
6. Temporarily disable your antivirus
Click the expand arrow from your taskbar and right-click on your antivirus icon then choose Avast shields control followed by Disable for 10 minutes.
If you have other antivirus programs installed, you can disable the app temporarily following the same steps as above, or similar steps.
If the WSA service is still not working on your computer, the efficient alternative would be an Android emulator like LD Player.
You can emulate helpful Android apps on your computer using this software and enjoy favorite games from your mobile directly on the PC.
Even though the platform is specially designed for running games, you can easily install other practical applications you need to use on your Windows 11 computer.
Android APK sideloading is supported in Windows 11, allowing users to install any Android program that is currently accessible, both within and outside of the Play Store, on their computer.
However, sideloading is not enabled by default on Windows, and the process might indeed be time-consuming if you are unfamiliar with the command line.
Microsoft has developed its own virtual machine container to allow Android apps to run on the desktop as natively as possible, and the installation process is fairly simple if you have access to the Amazon AppStore, which is highly recommended.
Let us know in the comments section below which solution worked best for you as well as how many Android apps you have already installed on your Windows 11 PC. Thanks for reading!
Millions of users take Cox services, and they are now the third-highest service provider in the telecommunications sector, cable TV, etc.
Many Cox users started complaining that they cannot use the Cox Internet service on their devices suddenly and are not sure what can be done.
Why is the Internet not working on Cox?
There are many reports regarding issues related to the Cox internet, Cox cable TV, etc. This issue could possibly be because of the factors mentioned below:
An issue with the Windows system – When there are issues with the Windows system, it tends to throw such problems with the Internet, cable TV service, etc.
A corrupted browser’s cache – If the browsing data in the browser installed on the system gets corrupted due to some obvious reasons, such problems occur on the system.
Subscription of Cox service account – This kind of problem arises when the subscription to a service provider like Cox is invalid or not upgraded
Problem with modem – When the router or modem is defective or damaged for some reason, such issues are bound to happen
Virus or malware attack – When you browse various websites, there might be some unsafe websites; this can cause virus attacks like trojan, etc., on the device, which causes this type of issue. That’s why we recommend using a safety-oriented browser.
This article guides you on resolving the issue where Cox stopped working using the seven best possible fixes.
How do I fix Cox app if it’s not working?
Before we start making changes, here are a few quick tips and tricks to get things working:
Restart the modem or router and check whether the issue is resolved. Also, you may use another router/modem to verify whether the problem lies with the previous one.
Make sure all the Cox bills are paid.
Check if the Cox servers face an outage using Downdetector, a reliable service. In this case, wait a while, and the servers should automatically be up and running.
If these don’t work, head to the solutions listed next.
1. Clear the browser’s cache
Open the web browser on your system like Google Chrome, etc.
Once the Chrome browser is open, press the Alt + F keys together to view the More options list.
Then press the S key on the keyboard once, which opens the Settings page on the browser.
Now on the Settings page, go to the Privacy and security option on the left menu and choose Clear browsing data on the right-hand side.
Under the Basic tab, select All time from the Time range dropdown menu.
Afterward, select the Browsing history, Cookies and other site data, Cached images and files checkboxes.
Finally, click Clear data.
We have shown you how to clear the Chrome cache and cookies, but the process is very similar in all major browsers.
For a faster and safer way to make sure all temporary and junk data is deleted, we recommend using CCleaner, which is specialized in cleaning and optimizing your computer.
Hit the Check for updates button and install any new one.
Restart your system after the updates are installed.
On Windows 11, after you go to Settings, click the Windows Update option from the left and hit the Check for updates button.
If the problem is with the system, we recommend our users try updating the Windows system and then restarting it several times to see if this worked for you.
Many users have claimed to have resolved this issue by following this technique of restarting the system a few times. It is also a best practice to keep the system updated regularly.
3. Scan the system for viruses or malware
Click the Start button, type security, and select Windows Security from the results.
Choose Virus & threat protection.
Select Scan options and check the Full scan box, then hit the Scan now button below.
Above, we have indicated how to perform a full scan using Windows Defender on Windows 10.
If you have a third-party antivirus, open it and select the full scan option from its menu. If you switched to Windows 11, the solution will work the same, so try it out.
Whenever there is a virus attack or malware attack on the system because of browsing unsecured websites, through data transfer from some pen drives, or internet downloads.
So, try connecting the Cox app by scanning the system for viruses using the antivirus software installed on your system and ensuring the system is safe from the virus attack. It should work, then.
Press the Windows + R keys together to open the Run box.
Type ncpa.cpl in its textbox and press the Enter key.
This opens the Network Connections page on the system.
Right-click on the network and choose Properties from the context menu.
In the Properties window, select Internet Protocol Version 4 (TCP/IPv4) and click Properties.
Click Use the following DNS server addresses radio button.
Enter 8 8 8 8 in the Preferred DNS server and 8 8 4 4 in the Alternate DNS server, and then click OK.
Close all the open windows and restart the system.
How do I reset my Cox?
To reset the Cox router, first, ensure that the Ethernet cable connects the Panaromic Gateway and the HomeLife Router, and then unplug the power cable from both.
Now, wait for around 20 mins, and once the HomeLife Router has 3 solid green lights, the reset is complete.
How do you reset Cox after a power outage?
After a power outage where the power supply was completely cut off, the Cox setup box must be reset by pressing the hard reset button, which is present at the rear of the device.
Another way to reset the Cox box is by going to the Cox account and navigating to My services. Then, go to My internet and select the Reset equipment option.
Alternatively, you can switch off the device by unplugging the power cable, waiting for around 30 seconds or more, and then plugging the power cable back into the machine.
This resets the Cox device, but users would lose the data like favorites set, etc., but the speed would increase, which is a plus point for resetting the device.
How long does it take for Cox to reconnect service?
As soon as you reset the Cox device, or sometimes the user’s payment status is renewed for their subscription, Cox would take around two minutes maximum to reconnect the service.
Hope you have managed to resolve this issue on your device. Please let us know in the comments section below!
SYSTEM PTE MISUSE is a BSoD (Blue Screen of Death) problem that causes your computer to crash and forces you to restart it. A problem with certain files (such as file corruption or mismatched drivers) will almost always cause these types of warnings to appear.
Another cause for the SYSTEM PTE MISUSE error code, in some cases, is the mechanism that is implemented by the firmware. It is possible for this situation to arise as a result of the deployment of two separate types of security technologies: PTT and TPM.
You may remedy this issue quickly by disabling them in the BIOS when the computer is rebooted, or by updating your BIOS.
How can I fix the SYSTEM PTE MISUSE error in Windows 11?
1. Disable PTT security in BIOS
Restart your PC and while your system boots, keep pressing the F2 or Del key to enter the BIOS screen.
Use the arrow keys to navigate to the Security tab or a similar-sounding tab inside BIOS. Inside, select an option named PTT or PTT Security and set it to Disabled.
Navigate to the Exit section and choose to Exit Saving Changes. This will proceed with the computer’s boot.
2. Set TPM as hidden
Restart your PC and while your system boots, keep pressing the F2 or Del key to enter the BIOS screen.
Use the arrow keys to navigate to the Security tab or a similar-sounding tab inside BIOS. Inside, select an option named TPM and set it to Hidden or Disabled.
Navigate to the Exit section and choose to Exit Saving Changes. Now your PC will restart and apply the changes made.
3. Update your BIOS
Looking for the motherboard manufacturer’s website, such as Dell’s official page, and finding the Downloads or Support page for the motherboard model that you are interested in will be the first step to take.
The readers out there who have reported getting the SYSTEM PTE MISUSE error and who use HP computers should instead go to the official HP website for more information.
In a similar vein, for our Lenovo users, we recommend that you visit Lenovo’s official page for drivers and updates.
Download the version of the software to which you wish to make an upgrade and save it to your computer. Unless you have a specific requirement for an earlier version, you should generally go for the most recent one that is currently available on the market.
Your download will almost definitely be in the form of an archive, generally a ZIP file, and will take some time to complete. Once it is downloaded, you will have to unzip it, by right-clicking the file and tapping on the Extract all files option.
The flashing tool you choose will be determined by the motherboard you have. There are many different sorts of such tools available. The readme file that comes with the firmware upgrade should be able to assist you in determining which option is the best fit for your particular hardware setup.
Once the package has been unzipped, copy the documents to a USB drive and restart your computer. After that, navigate to the BIOS screen and select the BIOS update option.
Press the Windows + S key to open the Search bar, right-click on the most suitable cmd result and select Run as Administrator.
Press Enter after you type or paste in the following command inside your cmd window: sfc /scannow
Restart your computer when the process is completed. Note that it could take some time, make sure not to stop it midway.
5. Update Windows
Press the Windows key + I to open the Settings app, then click on Windows Update in the left panel.
To see if there are any new updates available, click the Check for updates button, otherwise click on the Install now option and then wait for the download to complete.
It is possible that running an older version of Windows is a contributing factor to the SYSTEM PTE MISUSE issue. Luckily it can be remedied by simply updating the operating system.
6. Update drivers
Press the Windows key + I to open the Settings app, and click on Update & Security from the left panel. Now navigate to Advanced options as we’ve shown below.
After you have found the Additional options area, click on Optional updates to proceed to the next step.
Now click on the Driver Updates option, then select all the boxes listed and lastly click on the Download & install button.
When an issue occurs, you can manually seek updates, even though Windows is frequently in charge of driver updates. However, we strongly advocate using a specialized program such as Fortect Driver Updater to do automatic scans of out-of-date drivers.
Can a BSoD hurt my computer?
The answer is a resounding no. In reality, the entire purpose of a BSoD is to safeguard your computer’s hardware. When Windows detects that something has the potential to inflict serious harm, it immediately suspends all operations, culminating in the famed Blue Screen of Death.
A blue screen of death (BSoD) might be a symptom of a hardware failure. In that instance, it may appear as if the error was the root cause of the problem itself.
Despite that it will not harm your hardware, it might make your day miserable. Everything comes to a grinding halt while you’re busy working or playing. You’ll have to restart your computer, then reload any programs or files that were currently open.
And it’s possible that you’ll have to redo some of the work. When Windows fails, it takes with it everything that is currently in RAM. You will lose everything you have written since your word processor last saved it to disk.
After you encountered the SYSTEM PTE MISUSE issue, we bet you could use some help with future BSoD errors, thus we recommend you to use a professional BSoD repair utility.
If you’re running Windows 11 on unsupported hardware through the Windows Insider program, then be prepared to see a new warning from Microsoft. The company is currently testing a new desktop watermark, which lets you know that your system isn’t up to spec with requirements (via Windows Latest.)
A bit like the classic “Windows isn’t activated” messaging, this new warning plainly alerts Windows Insider beta testers that “system requirements not met.” The message shows up in the bottom right of the screen, right above the current Windows edition, as well as the build number and branch. Here’s what it looks like, courtesy of The Verge.
In its current state, the messaging won’t show up top of other apps or windows, and stays on the desktop. It also doesn’t take away from any Windows 11 features, like customizing your wallpaper or choosing different themes. Previously, Microsoft tested similar messaging at the top of the Windows 11 settings app. That message shows up under the name of your device, with an alert that “system requirements not met.”
It should be made clear that this messaging is only being tested with Dev Channel Windows Insiders at the moment. This means it’s not something that could make it to a future version of Windows 11. Features in the Dev Channel have been known to come and go, so don’t expect this to be final, but do hold your breath a bit.
Microsoft’s minimum requirements to run Windows 11 has been a bit of a source of controversy. You need TPM 2.0, an Intel 8th generation or AMD Ryzen 2000 series or newer processor to officially run the operating system. You can unofficially run it by tweaking the registry, but Microsoft has warned doing so could put your PC at risk since it says it won’t deliver security updates on unsupported systems. Of course, so far that hasn’t been true, and people have installed Windows Update just fine, but Microsoft still reserves the right to withhold updates.
Microsoft has not publicly announced any plans to release another version of Windows. That said, it’s likely that the company will eventually release a follow-up to the current operating system.
What it will be called and what features it will include are still unknown.
However, a good number of users are wondering if the company is planning on releasing another version of windows that can be customized.
Limited functionality
Windows 11 is a great operating system and so far Microsoft has done a good job of releasing regular updates that add new features and improve the experience for users.
Nevertheless, there are still a few features that users could use from the good old days of Windows XP and Windows 7, one of which is being able to move the taskbar to any edge of the screen or even multiple edges.
At present, you can only position the taskbar on the bottom of the screen in Windows 10, but as well as being able to drag it to any corner from there, this is also how you can move it to either side or even above the main part of your display.
Is it Necessary?
If this Reddit thread is anything to go by, then Microsoft should definitely release a version of Windows 11 with a customizable taskbar.
This is because most users believe that the taskbar should be an area where people can add and remove icons and move them around as they see fit.
Not only should the taskbar be customizable, but it should also offer a more user-friendly interface.
There are many reasons why Windows 11 needs to be customizable. For example, users who do not want to see certain applications in their taskbar can hide them by right-clicking on them and selecting “Remove from Taskbar”.
Other users may want to rearrange icons so that they appear in different locations on their screens.
Don’t hold your breath
Now, even with most users wanting Microsoft to upgrade Windows, you should not hold your breath for Microsoft to release a future version of Windows 11 with a taskbar that can be repositioned.
While it doesn’t seem like a huge deal to some people, it is a significant change in the user interface paradigm.
The taskbar has been a staple of Windows and moving it from the bottom to somewhere else would send shockwaves through their user base.
If you really want your taskbar elsewhere, there are many programs available that will allow you to reposition it or move it into the title bar area. A quick search on Google for “taskbar” will find these programs for you.
What’s your take on the newly released version of Windows? Do you think Microsoft should release a new version that allows users to move left, right, or above the screen?
With Microsoft’s acquisition of Skype, it seems that the company is looking to bring the popular video calling service to more users, including those using its new Chromium-based Edge browser.
The new Meet Now tool allows users to start a call with anyone, even if they don’t have a Skype account of their own. To use the feature, click on the share button on Microsoft Edge’s address bar and select Meet now.
Users will be able to start up a Meet Now call directly from within the Microsoft Edge browser. This call can then be shared with others, who can then join in via Skype or even Microsoft Teams.
Once started, the call can be converted into an online meeting that all participants can join whether they have Skype or not.
It’s unclear when this feature will roll out more broadly to users, but it seems likely that we’ll hear more about this in the coming weeks and months ahead of its general availability release.
Meet Now makes it simple for users to start a Skype call with one click in the browser. There are no downloads or signups required, and you can invite others to join the call with a link. The tool will likely be useful for business meetings and other group chats.
Enabling the feature
The Meet Now feature can be enabled by navigating to the Appearance page. Alternatively, you can use the ellipsis menu to open the Meet Now option.
It is worth noting that Skype already offers a web-based experience for users, but this new feature will make things even easier for people with Skype accounts.
For now, there are no details about whether or not this feature will only be available for Skype users or if it will be open for other platforms as well.
The meet now option can be useful for Microsoft Edge users who don’t want to use Skype and prefer to not download or install the Skype application. With this feature, they can initiate calls and even invite participants without installing or logging into any app.
The Meet Now tool will likely be integrated directly with Microsoft Edge, allowing users to quickly initiate a Skype call from their web browser. Windows users are currently required to install Skype before they can make calls over the popular video chat service.
Users concerns
Some people liked the idea of a Meet Now button on the New Tab Page, while others disliked it. Microsoft eventually removed the function and disabled the button when it introduced the new Microsoft Edge.
As such, users showed their concerns about this new feature coming to Microsoft Edge, and many are torn between using Microsoft Teams and Skype.
By clicking on the Meet Now button on the New Tab Page, users will be able to start a new conversation right away or schedule a meeting for later.
Microsoft will also be introducing changes on how users can add other people to their conversation and move a group conversation into Teams or Skype.
This feature is quite similar to Google’s Meet Now tool that was introduced last year in Chrome. However, unlike Google’s Meet Now tool, the Microsoft version is not available for everyone just yet.
The tech giant has been testing this tool for some time now, but it never really made its way into the public version of the browser. According to Microsoft, this feature is available for use in the Canary version of Microsoft Edge.
Are you excited about the meet now tool coming to Microsoft edge? Which features would you like to see added to it? Share your thoughts in the comments section.
The visualizations that shipped with Windows Media Player 9 and earlier versions were developed by a company called SoundSpectrum.
When WMP version 10 shipped, the company had been acquired by Apple. (SoundSpectrum’s music visualization software is now used in iTunes.)
Microsoft’s developers have to agree on whether or not the visualizations are worth the money to license them. Obviously, they thought it was time for something new when WMP 10 shipped.
A new design
The new media player is more minimalistic in design, with a few customizations like changing the skin of the player or adding visualizations.
This is because Microsoft has decided to rework the media player and make it better for users that want to listen to music but not always view the visuals.
The visuals were originally designed for people who owned large screen TVs but now that most people own smaller TV screens or monitor screens, Microsoft has decided to minimize them from the new software.
What is really happening?
Many of the visualizations you see in Windows Media Player are implemented as audio plug-ins, which are also called DSPs (digital signal processors).
Plug-ins are shared pieces of code that applications can use to carry out specialized functions. In the case of WMP, the visualizations use plug-ins to generate various patterns based on the streamed audio.
The plug-in architecture was designed by Microsoft and is used in all versions of WMP and other Microsoft applications, such as Media Center Edition (MCE), but it’s not proprietary.
In fact, several third-party visualization makers have written their own DSPs for WMP. The plug-ins give developers a lot of flexibility in terms of what they can do with their creations.
They can, for example, create a program that requires an additional piece of hardware or a unique graphics card.
However, by distributing their programs as plug-ins, they can ensure that they’ll work with any application that supports them — in this case, any version of WMP (although there may be some minor compatibility issues between different versions).
There’s a 50/50 chance that Microsoft will change things up
The visualizations in Windows Media Player have been around for years and years. They’re part of the software, so there’s no reason why they should be outside of a new version.
Some of them are actually pretty cool, and they can be run on a variety of devices. But the fact is that they’re outdated and haven’t changed with the times.
Even though Microsoft has been updating the visualizations in its music player for decades, it just seems like something that isn’t worth doing anymore.
That’s not to say that Microsoft isn’t trying to make them better. It’s possible that the company could include new visualizations in future versions of Windows Media Player, but we wouldn’t hold our breath.
For now, you’ll have to live with what you’ve got!
What do you think about the latest Windows Media Player? Will you be upgrading given the complaints stated by users? Let us know in the comment section.
In Windows 10 or Windows 11 systems, administrators can reset the system either locally or remotely.
This feature allows users to delete data during the process, but a recent report by Microsoft suggests that wiping actually doesn’t delete any data in Windows 10 or Windows 11 version 21H2.
Keep my files remove apps that were installed after you got the device, as well as apps and drivers you installed from other sources. It keeps your personal files including documents, photos, videos, music, desktop programs, and contacts.
Remove everything removes all apps, drivers, and settings except for information about how your device was originally configured at the factory.
All personal files will be removed from your device. You’ll be given an option to erase everything or encrypt it when you sign back into Windows after resetting your device. This option works even if you can’t sign-
Resetting Windows devices
Resetting a Windows device and deleting the data that is on it can be useful in certain situations.
Resetting a device that runs Windows 10 may be done for various reasons. You may want to hand over a device that you no longer need to someone or sell it to another person.
Resetting a device usually deletes all data from it; however, sometimes this may not be enough and you may want to use additional software tools to wipe disks, for example.
The Windows 10 and 11 version 21H2 operating systems come with a Wipe feature that is designed to remove personal data from the device.
Most users keep personal data on their laptops and PCs, and it is clear that this data should not be handed over to the new owner of the device.
The Wipe feature becomes available once you click on about in settings and scroll down to Reset this PC. The feature is offered when you choose to Keep my files from the reset options.
Selecting it removes most personal data from the device, but as it turns out, not all, as Microsoft has found out recently. The company found an issue in Windows 10 and 11 version 21H2 that caused some personal files to stay behind on the device even after running the wiping option.
The latest version
In the latest versions of Windows 10 and 11, it was discovered that Microsoft’s wipe feature left user data behind on the computer.
The Windows.old folder would contain user data, even when a fresh start was used. However, wiping a Windows 10 system from version 21H1 would clear all user data from the Windows.old folder as expected.
If you use a device running version 21H2, it is suggested that you check the size of your Windows.old folder after performing a wipe operation for your device. If it is not empty, you may have to delete the data manually using Disk Cleanup or another tool of your choice.
Neither Windows 10 nor Windows 11 are supposed to do this, as both are supposed to wipe all data from a device when they get a fresh install.
This means that any company using the wipe feature on Windows 10 or 11 devices running version 21H2 may find out that their data isn’t really gone and could be recovered using standard forensic tools.
Microsoft is aware of the issue and has already fixed it in the OS version that will be released soon.
The 21H2 build of Windows 10 and 11 only. Further investigation is warranted to determine the number of users affected by this wiping issue.
At this time, Windows users who need to wipe a device without retaining the user data are advised to make sure that the Windows.old folder is removed after the operation completes in order to eliminate any chance of data leaking into the wrong hands.
Have you used the wipe functionality on windows 11 and 10? How did you see it? Let us know in the comments section.
There’s no doubt that music is one of the most common pastimes for almost everyone in the world today. Whether you’re working at the office or enjoying free Wi-Fi at your local coffee shop, music moves with you wherever you are.
This is why you need to know the best Windows 7 music player to use while you work away or just want to relax in a music-filled atmosphere.
You have exactly what you need to play your most loved tracks and replay classic or modern albums every single time.
Even if there are alternatives such as streaming platforms to listen to countless songs, using one of these music players guarantees complete independence.
You can collect your favorite music in one single place, without paying a monthly subscription, and play different files anytime you need to.
We made that easy for you to choose, so check out our top picks for the best Windows 7 music player here.
VLC player is one of the best Windows 7 audio players commonly used across the globe, not just for audio but also video formats.
This one comes by default with Windows so if you are satisfied with using this one, you’re good to go. The software is a free and open-source multimedia player that can be used to listen or watch diverse files.
It is freely available, and you’re sure of getting most of the features of a media player including visualization, playback optimization, skin and themes, and support for most major audio formats.
You can also drag and drop your audio files onto the player’s interface, plus you can also stream and convert media files using VLC.
Moreover, you can play files on your PC from multiple sources like virtual files, discs, network locations, webcams, and so on.
You also don’t have to install codec packs because this media player includes them already. Plus, it is a light solution that doesn’t require advanced hardware specifications.
Thus, enjoy your most expressive songs without limitations using this practical music player.
This is one of the most popular picks for the best Windows 7 audio player among music lovers, and this would extend to podcasts and other audio files.
With this music player, you can organize as many as 500,000 audio files as you have in your collection, and even import from other libraries and add tags while you’re at it.
It also comes with an Auto DJ feature you can use to play audios from different artists or genres depending on what you like playing.
Besides your music collection, you can also arrange all your podcasts, radio stations, and audiobooks with MusicBee.
It comes with a 5-band visualizer, plug-ins for added customization, equalizer, and cross-fade functions, plus you can change theme colors to suit your tastes and preferences.
Enjoy 5.1 surround sound if you have external speakers, and if you want to go online and download more information on your tracks, you can do it too with MusicBee’s built-in ID3 tag editor.
This Windows 7 music player supports the most popular audio formats including MP3, WAV, WMA, AAC, and OGG, among many others.
Other salient features are the smart playlists, DSP effects, playback optimization, adding artwork such as the artist or band’s logo, and photos from live gigs, plus it also helps you search for lyrics while each audio file is playing especially music.
This player is available for free and you can sync your audio library to your smartphone, USB drives, or other portable music player devices.
This is another popular Windows 7 audio player with amazing features. Firstly, it is open-source and free to use, but a quick glance may put you off – until you try it.
With such a cool name, one can only expect cool features and that’s what this player delivers.
It comes with a basic interface, easy to use, but you can do so much with it including customizing the look, playing any of the major audio formats such as MP3, and WMA among others, tag editing, managing audio files, playback optimization, ripping and converting audios, plus you can also erase duplicate tracks.
Since its introduction in 2002, Foobar has not changed one bit, so you expect a clean lightweight interface without the common bloating among other audio players, so it is big on performance.
This Windows 7 audio player has similar features to those of MusicBee except for a few differences.
You can listen to your music, podcasts, and audiobooks, plus also use the tag editor feature to organize your audio files.
This audio player has its own mind though, as it can identify tracks, sync, and/or fix tags to your files, plus do the looking up of information for you. It also comes with the Auto DJ feature, plus you can do your own music or audio recording with it.
It also comes with a visualizer and supports most popular audio formats such as MP3, AAC, and FLAC, among many others. You can also rip from audio CDs, convert, and even download podcasts using this player.
It also lets you sync to your other devices and/or portable media players.
When looking for the best Windows 7 music player, you’ll probably come across this one often times as it has most of the features in other popular audio players, though it is built differently.
What makes it different from other music players is its connection to Amazon and MusicBrainz, so it is a big deal when it comes to users who have audio files in cloud storage.
It is a versatile music player that manages your audio library perfectly despite the collection you have.
It also does direct searches and adds audio files to your library automatically once you sign in to your cloud storage service.
With this player, you can stream music seamlessly from Spotify or SoundCloud, plus it supports various popular audio formats – this includes conversion of audio files to such formats.
This is a much older audio player than most of the ones listed above as it was introduced in 1997. It’s one of those you just cannot wish away, but it still works with Windows 7 and other versions. I
t supports major audio formats such as MP3, FLAC, and AAC, among many others, plus you get different skins, plug-ins, and you can sync it to your other devices.
It is available for free, and though it doesn’t do as much as the other music players listed above, it is worth the try.
You can also organize your audio file library with this player, do tagging, plus also build playlists from many videos using the YouTube extension.
It also comes with Internet radio support and smart playlist capabilities.
This being said, cherish your personalized music with no constraints on your PC using one of these classic music players.
Have you found your favorite Windows 7 music player among these? Or do you have one that you feel should be part of the list? Share with us in the comments section below.
Important note: Microsoft officially ended Windows 7 support. If you’re planning to upgrade to Windows 10, make sure to check out our wide collection of guides on how to make the transition as smooth as possible.
As most of you may already know, the Redmond-based tech company recently made an important update to the Window Defender Exclusions permission list.
Now, due to the change implemented by Microsoft, it is no longer possible to view the excluded folders and files without administrator rights.
As you can imagine, this is a significant change as cybercriminals often use this information to deliver malicious payloads inside such excluded directories in order to bypass Defender scans.
But, even so, safety is a relative term and whenever we think that we are safe, there are always going to be insidious third parties ready to breach our security.
Beware of the new Kraken botnet
Even with all the safety measures taken by Microsoft, a new botnet called Kraken, which was recently discovered by ZeroFox, will still infect your PC.
Kraken adds itself as an exclusion instead of trying to look for excluded places to deliver the payload, which is a relatively simple and effective way to bypass Windows Defender scan.
The team stumbled upon this dangerous botnet back in October 2021, when nobody was aware of its existence, or the harm it could do.
Though still under active development, Kraken already features the ability to download and execute secondary payloads, run shell commands, and take screenshots of the victim’s system.
It currently makes use of SmokeLoade in order to spread, quickly gaining hundreds of bots each time a new command and control server is deployed.
The security team that made the discovery also noted that Kraken is mainly a stealer malware, similar to the recently discovered Windows 11 lookalike website.
Kraken’s capabilities now include the ability to steal information related to users’ cryptocurrency wallets, reminiscent of the recent fake KMSPico Windows activator malware.
The botnet’s feature set is simplistic for such software. Although not present in earlier builds, the bot is capable of collecting information about the infected host and sending it back to the command and control (C2) server during registration.
The information collected seems to vary from build to build, though ZeroFox has observed the following being collected:
Hostname
Username
Build ID (TEST_BUILD_ + the timestamp of the first run)
CPU details
GPU details
Operating system and version
If you want to find out more about this malicious botnet and how you can better protect yourself against attacks, make sure you read the full ZeroFox diagnostic.
Though it can be one of the more challenging genres for new gamers to get into, role-playing games can also be some of the most rewarding and memorable. Few would argue that many of the greatest games ever made were roleplaying games: Final Fantasy 7; The Legend of Zelda: Ocarina of Time; The Elder Scrolls V: Skyrim are just of few of the most likely mentions in that conversation.
For you gaming newcomers out there, the role playing genre is a very broad one, and there are numerous subgenres out there. But we’ll not get into all that here. All you need to know for now is that role playing games are typically defined by intricate character growth systems (by which I mean growth in terms of their basic attributes and abilities) more than anything else. To be sure, there is much more to the genre than that, but this trait is the one that ties rpgs together and why something like say, Sea of Stars belongs in the same genre as The Witcher 3.
Many rpgs are decidedly not beginner friendly. In fact the bulk of them aren’t. But fear not, for what follows is a quick list of some of the more accessible role playing experiences that will tide you over for quite some time and get you started down the path to geekhood.
(Windows, PlayStation 3, PlayStation 4, PlayStation Vita, Wii U, Switch, Stadia, Xbox 360, Xbox One)
Child of Light is a side scrolling action rpg with semi-turn-based combat, melodic dialogue, a classic storybook vibe and hand-painted visuals that are truly nothing short of breathtaking. You play as a young heroine named Aurora as she endeavors to restore the enchanted kingdom of Lemuria from the clutches of the Queen of the Night.
The game has been widely praised for its gorgeous presentation and story. It also serves as a nice entry point to the genre with its “role playing lite” mechanics.
(Windows, Linux, macOSX, iOS, Xbox 360, Xbox One, PlayStation 4, PlayStation Vita, Switch)
In this beginner-friendly action roleplaying game players take control of a hero known only as “The Kid.” The game features an isometric view (or what is sometimes called a “three quarters” view) which is semi-top-down in the vein of the Diablo series or the old pre-Bethesda Fallout games. The game’s beautifully rendered world consists of a series of floating landforms that often unfold before the player’s feet, a trick which adds a new level of excitement to the exploration aspect of the game.
As an action rpg Bastion leans more toward the action side of the equation, and is an accessible experience for new gamers. It is also not an overly difficult game to complete, making it even more approachable for those new to gaming. The game also employs what it calls a “dynamic narrator,” which delivers exposition during gameplay and is a nice feature for those who get impatient having to sit through dialogue blocks.
(Xbox 360 and backwards compatible with Xbox One, Windows)
While this may at first glance seem like an odd choice given that the Fable series is known for bucking role playing conventions and forging its own path, this is exactly what makes it a prime candidate for gaming newcomers to get their role playing feet wet. This third installment veers more toward action and adventure mechanics, which makes it the best choice of the three mainline Fable games for new gamers. In fact, I’d recommend trying this first as a primer for the two previous entries of this renowned franchise.
This latest mainline installment (at least at the time of this writing) of the legendary series is a bit of a departure from all that came before, but that isn’t always a bad thing. Thanks to gameplay mechanics that are decidedly more streamlined and action-oriented, Final Fantasy XV is known as one of the best games to get into the series for beginners. And not to worry, the game is a standalone title in terms of narrative and lore, as almost all FF games are. It takes the franchise in a much more accessible direction to be sure, and though it little resembles Final Fantasies of old, it is a great entry point for a new generation of fans.
It looks like Minecraft has finally hit the big time by taking its act on the road. The bestselling videogame of all time kicked off what will be a years-long world tour on February 18th at the Liberty Science Center in Jersey City with Minecraft: The Exhibition.
The Liberty Science Center in Jersey City, NJ. Image courtesy of Wikipedia.
What exactly is Minecraft Exhibition, you may be asking? It is a massive 6,000 sq.ft. multimedia experience featuring an entire gallery of interactive content including life-size models of characters from the game such as the Creeper and the Enderman, as well as game stations that allow those who haven’t yet tried the game to do so. The exhibit also displays time-lapse videos of some of the most amazing builds from expert Minecraft players, in addition to dioramas of Minecraft’s biomes and a crafting table where users can use cards representing in-game building materials to create objects.
In short, the exhibit is the game brought to physical life, and is a great example of experiential learning. It was created through a partnership between Mojang Studios and the Museum of Popular Culture. Minecraft Exhibition will be at LSC through September 5th before moving on to other cities. It is not to be confused with a similar exhibit which was presented by the MoPOP in Seattle a few years back.
So you want to install Ubuntu on Windows 10 or Windows 11? Don’t worry, you’re at the right place. You might be surprised to know, but there’s no single, universal way to install and run Ubuntu on Windows.
In this post, we lay out 3 ways to install and run Unbuntu on Windows 10 or Windows 11, including:
WSL includes things like command line tools, utilities, and other applications. But, keep in mind that you won’t get the default GNOME GUI that comes with other methods of installing Ubuntu in Windows 10.
That is to say, you can only run Ubuntu through the Windows Terminal by using WSL. Also, to run WSL, you’ve to meet certain minimum requirements on Windows 10 or Windows 11; here they are:
64-bit operating system.
Windows 10 build 14393 or later.
If you meet the above minimum requirements, you should be able to run Ubuntu on Windows without any difficulties. Here’s how:
On your Windows machine, go to the Start menu search bar, type in ‘windows features,’ and select the Best match. The Windows Features will be launched.
On it, select the Turn Windows Features on or off feature. From there, scroll down to the Windows Subsystem for Linux, select the checkbox and click on OK.
Windows will begin installing the WSL files, so give it a few minutes. After the installation is finished, reboot your PC or let it reboot by itself if you have the option.
After the reboot, launch the Command prompt. Go to the Start menu search bar, type in ‘cmd,’ and select the Best match. In the Command prompt, type bash and hit Enter.
Now you need to install Ubuntu on Windows, so head to https://aka.ms/wslstore. As soon as you enter the website URL in the address bar, Microsoft Store will be launched on your PC.
There, you’ll see a host of different Linux distributions that you are free to run side-by-side on your Windows operating system. Click on Ubuntu. From there, click on Get to download Ubuntu on Windows.
Next, click Install to install Ubuntu on Windows.
The Ubuntu environment installation will begin on your PC. When the installation gets finished, click on Open to open Ubuntu on Windows.
A new window will get launched and the Ubuntu installation will begin in your WSL. The installation might take a few minutes to complete, depending on your internet speed. So don’t worry if it takes a while.
When Ubuntu installation is complete, you’ll be prompted to set a username. Type in a relevant name and hit Enter. Next, you’ll have to set a password. Do that. Once you’re done with all the credentials, Ubuntu will be all set up.
After everything’s set and done, it’s a good idea to do a quick update for your Ubuntu. Run the following command and hit Enter:
# sudo apt update
Wait till the update gets completed and by the time you’re done, Ubuntu will be successfully running on your PC. Now you can access the Ubuntu command line whenever you want on Windows 10 or Windows 11.
2. Install Ubuntu on Windows from a USB stick
Installing Ubuntu on Windows through the above method works. But, it doesn’t really give you the complete feel of the Ubuntu operating system, which nowadays comes with a GNOME GUI.
The second method on our list is designed to get around just this problem. You can run Ubuntu on Windows from a USB stick without any difficulties.
All you need is the Ubuntu ISO installation media, a USB drive, and software to make your USB stick bootable and write the ISO file onto the stick. There’s a plethora of apps online that can help make your USB bootable.
For this example, we’ve chosen Rufus. You can pick whichever you like.
Let’s first download the Ubuntu ISO file. Head to the official Ubuntu download page, and get the file from there. Currently, the latest LTS version is Ubuntu 20.04.3, so we’ll download that.
After you’ve downloaded the relevant file, you now need to download the Rufus app from the official website. When the download is complete, run the application and then insert your USB stick to make it bootable.
On the main menu of Rufus, click on SELECT, and pick the ISO file you’ve just downloaded. Set the Partition scheme to MBR and Target system to BIOS or UEFI. Under the Format Options section, leave everything as default. Then click on START.
You might get a dialog box asking you to download some additional files. Click on Yes and the files will be downloaded, following which, the ISO copying process will also begin. In the next dialog box, select the Write in ISO Image mode (Recommended), and click on OK.
The copying will get completed in a few seconds and when everything’s done, click on Close.
Now whenever you need to run Ubuntu on Windows, simply plug in the USB before starting up your PC and the computer will boot up from your USB drive. You’ll then get taken to the Ubuntu installation menu and from there, click Try Ubuntu.
That’s it! You’ll now be able to run Ubuntu on Windows 10 or Windows 11 whenever you want.
3. Install Ubuntu on Windows from a Virtual Machine (VM)
A Virtual Machine, or just VM for short, is a virtual environment that helps you run a computer within your computer. Think of it as running an operating system inside a specific VM app.
We’ve already covered how you can install Windows 11 on a Virtual Machine, so it’s no surprise that in the third method, we’ll install Ubuntu on Windows 10 or Windows 11 with a Virtual Machine.
We’ll be making use of Virtual Box here, an open-source Virtual Machine developed by Oracle. To get started, head to the official Virtual Box website and download the app from there; then install the app when you’re done with the download.
Now, we also need an Ubuntu ISO file again. You can download it from official Ubuntu download page as we did in the above step. After the download is complete, launch the VirtualBox and select New from the taskbar above.
In the new dialog box, give a specific name to your new virtual machine (I’ll be setting the name as Ubuntu), set the type as Linux, choose the Version as Ubuntu and click on Next.
Then decide a specific amount of RAM, which you want to assign to your virtual machine, and click on Next.
Finally, select the Create a virtual hard disk now radio box and select Create.
In the next dialog box, select VDI (VirtualBox Disk Image) and click on Next. On the next menu, pick Dynamically allocated and click on Next. Finally, set the size for your virtual hard drive and click on Create
If you look at the left-hand side of your VirtualBox Manager, you’ll see the name of your virtual machine. To get it up and running, simply click on Start and your VM will be launched.
Now we’ve to pick the Ubuntu ISO file that you downloaded earlier. Click on Add, choose the Ubuntu image, and select Open. Then click on Choose > Start.
Ubuntu will be launched on your Virtual Machine. From there, select the language of your choice, and you’ll see two options again: you can either ‘try’ Ubuntu or you can simply install it.
Pick the one you like, follow the on-screen instructions, and you’ll be able to run to Ubuntu on Windows through the VM from now on.
Ubuntu on Windows
And that’s it, folks. These are some of the easiest ways to install and run Ubuntu on Windows. Hopefully, you found the method that worked best for you and can run the Ubuntu OS without any hiccups.
HDMI is often used to move your display from a computer to a second monitor or television and from video game consoles to your television, among other things.
However, to ensure that this functions effectively, it is critical to ensure that the cables are properly configured. Otherwise, you will get error messages and bugs, such as Windows 11 HDMI to TV not working properly.
It is our goal in this article to show you how to quickly and efficiently resolve a variety of typical issues that you may have when utilizing HDMI connections on your Windows PC. This includes a lack of drivers, outdated OS, dusty cables, and others.
What can I do if HDMI port is not working in Windows 11?
1. Clean your HDMI port
Consider performing one of the most basic troubleshooting methods for HDMI issues on Windows 11 before becoming overly concerned: disconnecting and reconnecting the cable.
Before you connect it back in, manually or, better yet, blow out any dust accumulated in the port with bottled air. In addition, visually verify the wire to ensure it is not damaged.
If this is the case, you should replace the wire since it is most likely the source of your difficulties. After you’ve completed this, you should reset the cable on both ends. Note that the solution also works for Windows 11 HDMI audio not working errors.
2. Try another HDMI port
When you try to connect your Windows 11 PC to HDMI, do you notice that there are two or more HDMI ports available? If so, it’s most likely a sign that you’re using a graphics card and that your cable is plugged into the incorrect connector.
Some computers are equipped with integrated graphics, which contain an HDMI connector that is connected to the motherboard by a ribbon cable. If you have a graphics card, make sure the wire is plugged into the HDMI port on the graphics card rather than the port on the motherboard.
Hopefully, this will resolve the situation. Also, if your GPU has many HDMI ports, try a different one on each of your computers.
Press the Windows key + I to open the Settings window then tap on Windows Update followed by Advanced options.
Scroll down and navigate to Additional options section then tap on the Optional updates option.
Now click on the Driver Updates option then select all the updates you are presented with, and lastly, click on the Download & install button.
Although Windows is generally in charge of driver updates, you can always rely on specialized third-party software if you encounter difficulty. After quickly scanning your computer, the software will automatically download up-to-date versions of your drivers, including the ones controlling display settings like the HDMI port.
Press the Windows key + I to open the Settings window, then click on Windows Update from the left menu presented to you.
Now click on Check for updates of Install updates depending on what you get.
5. Reset your screen resolution
Right-click on your Desktop then choose Display settings to open all the settings you have for your screens, including the ones connected through an HDMI cable.
Now scroll down until you meet the Scale & layout section and select the recommended resolution from Display resolution. Here you can also find the Windows 11 HDMI settings once you connect your second monitor.
What do HDMI 1.4, 2.0, and 2.1 mean?
The 1.4 specifications were published more than a decade ago, and all HDMI cables are made to at least that level of quality. It was developed to anticipate 4K and set specific criteria to enable support for it in the future (from 2009) by providing enough bandwidth for 4K video at up to 24 FPS.
The HDMI 2.0 specification was first published in 2013 and amended into 2.0a and 2.0b versions in 2015 and 2016, respectively. As a result of this specification, the maximum bandwidth of HDMI cables was increased from 10.2Gbps to 18Gbps.
Having the capacity to handle 4K video at 60 frames per second with all sorts of high dynamic range helped solidify 4K support even further and established the framework for 8K support as well.
As of 2018, HDMI 2.1 has been released. It is designed to enable 8K and greater images while providing a maximum bandwidth of 48Gbps. The HDMI 2.1 protocol can support 4K and 8K video at frame rates of up to 120 frames per second with plenty of headroom.
If you aren’t planning on purchasing an 8K television anytime soon, the 2.1 standard is mostly essential for high-end gaming. Gaming PCs and the latest game consoles can deliver frame rates greater than 60 frames per second in 4K.
These requirements are crucial for ensuring that media streamers and other devices can transmit and that televisions can receive enough data to perform their functions, but they aren’t very important for the cables themselves.
Which HDMI cable is the fastest?
When it comes to HDMI 1.4 and 2.0, the speed ratings specified by the HDMI Forum and the Licensing Administrator are far more important to consider. They mention speeds in conjunction with their maximum bandwidths but do not specify which cables will be used.
As a result, HDMI wires are classified into one of four speed categories: standard, high speed, premium high speed, and ultra-high speed. Standard HDMI cables are the most commonly used type.
Standard ones are the most basic and slowest of the cables available. A total of 4.95Gbps is available, sufficient to transmit a 1080p signal to your television, but not much more.
Even though Standard HDMI cables are hard to find in stores, they can be found in a bucket somewhere or connected to an old home entertainment system that hasn’t been updated in five years if you look hard enough. These devices are entirely incapable of supporting 4K video.
When it comes to bandwidth, High Speed is more than twice as fast as Standard, with a minimum bandwidth of 10.2Gbps. The vast majority of new HDMI cables you purchase will be High Speed or higher, which means they can transmit a 4K signal in most cases.
The problem is that the available bandwidth will only handle 4K24, which is 4K video at a frame rate of 24 frames per second. That’s OK if you only want to view movies on Ultra HD Blu-ray, but if you’re going to watch streaming TV episodes or play games in 4K at 30 or 60fps, your system won’t be able to keep up.
For further information and potential solutions to your issue, check out our article with a full fix for the HDMI port not working error.
For the longest time now, Skype did not allow for emergency calls. It has even a warning that it’s not capable of doing so, right as you launch the app on your device. But all that is about to change as in an announcement made by Microsoft, it was detailed that Skype users can now make emergency calls from their home PCs in the USA.
This new feature was rolled out upon the release of Skype 8.80 and it is in place to serve as an alternative when you do not have close proximity to your other communication devices. Moreover, the new feature also allows users to share their location whenever they make these emergency calls, but only if you have allowed Skype to share your location with the emergency operators.
Essentially, your location will only be shared during an emergency call for the sole purpose of routing your calls. This is for allowing local emergency operators to trace your location easily for immediate response to your pleas for help. It is worth noting, though, that your location will not be automatically shared when using a device that does not have an API for location sharing. The same also applies when you are in a location where location sharing is not available.
If you want to enable location sharing which will help 911 emergency operators to trace your whereabouts you will need to navigate through Profile picture > Settings > Privacy > 911 emergency location sharing to enable it.
As of now, it is unclear when the feature will be released to other regions. We have to wait and see how well users interact with this new feature on Skype.
Are you experiencing MetaMask not showing tokens issue? If so, then you are in the correct place. Because here, we will show you the steps that will help you resolve this problem.
You will be able to see the tokens in the exchange where you purchased them, but MetaMask’s wallet does not show any tokens.
MetaMask is a browser-based crypto wallet that you can use to store your cryptocurrency. If you are interested and want to know about some other crypto wallet options, then you can check out our guide on the best crypto wallets.
You can go for MetaMask, as it is simple, easy to use, lets you store crypto as well as NFTs, offers SWAP technology for swapping cryptos, and many more other features.
Although the list of features is decent, MetaMask not showing tokens has become sort of a troublesome issue for many users. Do not worry, as this guide is here to help you. Let us check out the solution that can help you fix this problem.
What should I do to safeguard my crypto wallet from online thieves?
There are a variety of crypto wallets available. Some focus on providing a better user interface, or exchange mechanism, whereas others are more inclined towards providing better security.
Interestingly, MetaMask brings the best of both worlds. Not only can you securely store your cryptocurrencies and other deliverables in your wallet, but you also get a good layer of security to protect them from online threats.
However, being an online-based crypto wallet, technically known as Cold Wallet, even MetaMask is prone to online attacks.
But if you follow some preventive measures, which we have listed below, you will be able to protect your crypto wallet from prying eyes.
Here are some of the effective protective measures that we recommend every person having a crypto wallet should follow:
Never share your secret recovery phrase or private keys with anyone. If it is out in the open, it becomes a gateway for online thieves to have full access to your crypto wallet.
Maintain the crypto wallet using an email address other than your primary email address.
Do not open documents, videos, software, or any files sent to you by an unknown person, as they might be infected.
Avoid downloading unofficial blockchain software.
Always keep your MetaMask extension up to date.
If you have a large crypto holding, then consider using a hardware wallet.
These are just some measures, that we believe one should keep in mind before maintaining a crypto wallet. Because in a flash, everything hard-earned, could go into the pockets of the attackers, if and only if you are not taking security measures.
Now let us take a look at the steps that you need to follow to fix the MetaMask not showing tokens issue.
How can I fix the MetaMask not showing tokens problem?
1. Browser extension
Click on the MetaMask extension icon and login with your credentials.
Hit the Assets tab to view all your purchased tokens.
Scroll down and under Don’t see your token? click on import tokens button.
You can also click on Refresh list to refresh the token list. However, even after doing it, if the token’s aren’t showing up then you need to manually add the token address.
Switch over to the Custom Token tab.
Under the Custom Token tab, you need to enter some details about your token such as Token Contract Address, Token Symbol, Token Decimal, and more. The good thing is that you do not need to enter every detail manually. MetaMask will automatically fetch the details via your contract address. If you do not know your contract address, then follow the steps below: a) Head over to Etherscan.io and enter the token name. b) Copy the contract address under Profile Summary.
Paste the contract address into the Token Contract Address field in MetaMask.
MetaMask will take about 3 seconds to retrieve the token symbol and details. If it fails, then you copy these details from Etherscan as well.
Click on Add Custom Token button.
Then click on Import Tokens button to add the tokens to the Assets tab.
2. Mobile app
Open MetaMask app on your Android or iOS mobile and click on the Tokens tab.
Click on the Import Tokens button.
Switch over to the CUSTOM TOKEN tab.
Enter the token contract address you copied from Etherscan.io. or as mentioned above in the appropriate field.
MetaMask will automatically fetch the details. Click on IMPORT.
The newly added tokens will show up under the Tokens tab in the homepage of MetaMask app.
What are the other errors related to MetaMask and how to fix them?
MetaMask not showing tokens isn’t the only problem that users have been facing while using this crypto wallet platform.
Some various other problems or errors have troubled the users from time to time. But some of the most common ones that have been reported are issues related to stuck/pending transactions, the undefined error, or the out-of-gas error.
1. Stuck/pending transactions
Open the MetaMask extension on your browser.
Click on the profile icon.
Select Settings.
Select Advanced.
Scroll down and select Reset Account button.
2. Undefined error
If you are seeing an undefined error, then there are multiple reasons behind it. For instance, this error could show up if your wallet is blacklisted from transacting.
Furthermore, it could be because you have reached the transaction limit or surpassed the transaction timers. Do note that the maximum number of transactions that you can make is limited to 100 tokens.
To fix this problem, you can switch over to a different network by clicking the pill-shaped button next to your profile icon in the MetaMask browser extension.
3. Out of gas error
Once you have consumed all the gas allotted to you for transactions, before they are completed, MetaMask will throw up this error.
During the transaction mining process, a certain amount of gas is used for each operation until the transaction is completed.
So, maintain a gas limit that would let you complete your transactions without any issues.
Cryptocurrencies have seen a boom in the recent past, and there are several rags-to-riches stories available to read.
But there is a high risk involved in trading cryptocurrency, which is why we advise you to first understand the operations of cryptocurrencies and also do proper research on the crypto you are willing to purchase.
Scammers have tried to take advantage of trending things, such as Squid Games coins, to lure investors into investing a huge amount of money, only to cheat them.
Let us know in the comments section below what your thoughts are on this topic and if the method mentioned in this guide helped you fix the problem or not.
The invention of email completely revolutionized the way we communicate as messages can be sent in an instant. And from its creation, many developers have sought to bring their spin to the email by creating clients and apps with unique features.
There are tons of apps and clients out there on the market, but the three that stand out as the best on Windows 11 are the Mail app for the OS, Microsoft Outlook, and Mozilla Thunderbird. These clients have the same thing going for them: an engaging user interface and interesting features beyond just doing email.
When choosing an email client, it’s important to consider what do you need in an app. Nowadays, clients don’t just do email anymore. Many have features that support businesses, while others have access to cloud services. But before going into what’s the best of the three, it’s important to list out some ground rules.
What do I need to look for in an email client?
Security and encryption features are among some of the most important aspects to look out for. Some web-based clients have their developers scan private emails and have control of your data. Most desktop clients have a higher degree of security and the ability to encrypt emails.
Another great feature to have is the ability to combine different email accounts into one client. Instead of running around checking all your accounts, it’s best to have everything centered. And finally, you should look out for app integration, which is how well it works with other applications.
Zoom, for example, is an extremely popular video conferencing app used by businesses everywhere. Email clients that allow Zoom to work with their service get major points in usability. With that said, let’s break down the Mail app, Outlook, and Thunderbird on Windows 11, and decide which one is the best for the operating system.
What is the best email client?
➡ Windows 11 Mail app
The Mail app on Windows 11 got a major overhaul for the new operating system, like a lot of the other native apps. In its newest iteration, Mail gained the ability to pin boxes of your choosing to the Start and the ability to mix different accounts into one single account.
This means you can have your Outlook, Gmail, and Yahoo accounts under one roof, eliminating a chaotic situation. It even took cues from social media as you can now tag people like on Twitter, customize your background, and some keyboard shortcuts.
The Mail app is decent enough, but it isn’t a proper client. It’s great at servicing as a central hub to allocate your email, messages, and calendar, but it lacks a lot of features you’d see on a proper email client. There’s no task manager, notes, web browsing capability, or other tools.
But if you want a simple and easy-to-use email service, then the Window 11 Mail app is just fine as it stands. You shouldn’t expect much out of the Mail app, but for some people, that’s a good thing.
➡ Mail app simplicity
The biggest strength of the Windows 11 Mail app is its user interface. It strips everything down its bare basics with no extra fluff. It has an inbox, an outbox, a Calendar, To-do, a section for individual direct messages, and a section for contacts. It’s all under one single heading. Having essentially no clutter on your screen is a great feeling; sometimes you just want to go to your email without having to fight your way throw a maze of menus.
The focus is all about the content and not stuffing as much menu together. Adding new accounts is easy to do with the ‘New mail’ button to the left. Down in the bottom left corner, you have buttons for the aforementioned Calendar, contacts list, and To-do feature. Smaller features include things like flagging emails or marking them as unread, support folders, and the ability to communicate with other select apps.
Admittedly, there isn’t a whole lot to talk about for the Mail app. What you see is what you get: a simple email app for people who just want to check their inbox. But that’s the beauty of this app. However, if you want something more robust and can do more, then Outlook is the way to go.
Microsoft Outlook
Outlook is a lot more feature-rich. It’s a proper email client made with professionals in mind and is a part of the Microsoft Office suite. It can organize your calendars, contacts, and notes, just to name a few. One of the best aspects of Outlook is how many apps it integrates with.
You can connect to other Microsoft apps like Word or Excel and a ton of third-party software. If you created a series of notes on Evert or Todoist, which are some of the best note-taking apps on Windows 11, you can transfer all that text over to Outlook with a few clicks.
Plus, you don’t need to be connected to the internet to use Outlook. As a client, you can use the app to jot down notes or add something to your schedule if the internet ever goes out. Outlook has a lot going for it.
The two major downsides are that you will have to pay to have all the features on Outlook and the user interface can be pretty confusing. Outlook has a lot going on at once, but the app does have a handy guide that teaches you how to use the software. Plus, there are tons of resources online to answer any question.
Outlook supports complexity
Getting into further detail, Outlook is good at dealing with complexity. Modern-day workflows have you deal with multiple accounts and tons of people it can get overwhelming. A ton of information is being thrown at you, but Outlook is prepared with tools to help you out.
First is a folder system that allows you to access any messages you have and deal with attachments efficiently. You can implement filters, labels, and threads to compartmentalize everything, The folders can be configured to automatically collect incoming items that match the criteria you laid out.
The potential mess of emails on Outlook can also be cleaned up with proper threading, flagging, and grouping, all of which are available. There’s also fast message searching if you want to locate that one specific email.
Outlook also has some great junk mail and phishing filters that automatically move that stuff to their appropriate folder, which is something the Windows 11 Mail app does not have.
Barebone features mean barebone features, and if you rely on the Mail app, you’ll have to trust Windows Defender or some third-party virus app to do the job. Outlook is also a frequent target for viruses so Microsoft has put a lot of effort into protecting its userbase.
On top of that, Outlook has the Social Connector which sends out frequent updates on what people are doing while you work. You can get to know what their status is, their activities, and which social media sites they’re on; all without having to open another window.
Best for power users
If you’re someone who lives and dies by their email account, then Microsoft Outlook is highly recommended. Being able to prioritize which tasks are the most important while keeping in constant contact with others on your work team is a game-changer.
You do have to ask yourself how much of a power user you are. Are you someone who doesn’t care about your email account so long as you get the message or are you someone who likes having all the extra bells and whistles? Or perhaps you’re someone who wants complete control over your email client. If this is you, then you should check out Mozilla Thunderbird.
Mozilla Thunderbird
Thunderbird is an open-source email client that is supported by a large community. It carries some similar features as Outlook like the app integration and the ability to work without an internet connection.
It has a chat feature that enables you to talk with your contacts on a variety of platforms, be it Facebook Chat, Google Talk, IRC, what have you.
If you’re someone with the knowledge and patience to customize your client however you please, then Thunderbird is the best one. What features are available are up to you, so for people who want their software to work right from the get-go, this client may not be for you.
Mozilla updates Thunderbird from time to time, but they’re slow on the upkeep and some may find the user interface old and outdated. Plus, some basic features are not included in Thunderbird: you’ll have to add them yourself.
Create your own email client
The biggest boon to Thunderbird is open it is to customization. Because it’s open-source, you configure the client to suit your needs. It supports many different types of protocols be it POP3 for retrieving email, IMAP which allows you to add your extensions, LDAP for address completion, and OPEN PFP for encryption. Thunderbird can also support files up to 2 GB for free and you don’t even need an account.
As for add-ons, the sky’s the limit. There are tons of extensions and themes available that change the color scheme or the button layout. Powerful security features are supported such as digital signing, encryption, password manager, and spam filters. Chat apps like XMPP and Google Talk can be implemented too with the proper extension.
Honestly, there are so many extensions available for Thunderbird that it’s close to impossible to list all the different kinds out there. For the sake of making it easy, below is a small guide that will show you how to add extensions on Thunderbird.
Adding extensions on Thunderbird
Open the Thunderbird email client.
Click on the three lines in the upper right hand corner.
In the drop-down menu, select Add-ons and Themes.
In the search bar at the top, search for an extension you’re interest in, such as a spam filter.
Select a spam filter that looks good to you or based on the reviews. Click the Add to Thunderbird button.
It will ask for your permission to add it.
If you go back to Add-ons and themes, you will see the new extension added.
So, which is the best?
The best one depends on what you as the user needs and want. The best one out of these three is Microsoft Outlook. It has the best of both worlds by having a simple enough user interface, lots of features that you can purchase, and enough business support for the modern professional.
But Outlook has its weakness. It’s cluttered, can be confusing to use, and is filled with necessary features. On the other hand, you can argue that it has too few features; it depends on how you look at things. If you’re looking for something much more casual for personal usage or you don’t need anything complex, then the Windows 11 Mail app is a better fit.
The Mail app is so easy and friendly that you can do all of your work on it with no problem. Sometimes the extra bells and whistles are just junk cluttering your space.
If you want total control over your email client and customize it however you want, then Thunderbird is the best one. It has the potential to have the best security measures out of the main three and the most customization options; all of them free. However, it will take time to figure all this stuff out.
Admittedly, it’s difficult to recommend Thunderbird, because of how much time and technical knowledge you’ll need to make the most out of it. It’s fine, but do you want to spend extra time and energy putting together your email client when you can just use one right out of the box? Most people don’t and would rather use it from the get-go.
So, the ranking is as follows:
First place: Microsoft Outlook
Runner-up: Windows 11 Mail
Worst: Mozilla Thunderbird
Are there apps for Windows 11 that I should look into?
To keep in line with the theme of this review, you should look into getting yourself a good email client. We’ve established that Outlook is the best one, but perhaps you have a situation where it still isn’t. There are tons of options out there. You should look into Flow Mail, Inky, and Mailbird as alternatives.
While you’re improving your office experience, you may want to look into getting a third-party calendar. Most people won’t think much about their Windows 11 calendar, but some apps bring unique features that make event management so much easier.
Feel free to leave a comment below if you have any questions on other Windows 11 apps. Also, leave comments about what reviews you’d like to see or information on other Windows 11 features.
If you feel like Windows 11’s taskbar is taking much space on your desktop, you can consider hiding it and only appearing when you want to use it.
However, it doesn’t mean that your pinned applications will disappear when you hide the taskbar icons. All the icons will remain but only appear when you place the cursor or touch the bottom side of your PC screen.
At the same time, you shouldn’t pin all your apps on the taskbar as some users have reported slow PC speed and, after unpinning them, normal speed is restored.
We’ll also show you how to use the taskbar for various functions. Read on, and let’s hear your experience at the end of this piece.
What do I need to know about the taskbar on Windows 11?
The taskbar appears, by default, at the bottom of your Windows PC screen, which spans from one edge to another. The Start button is located at the right, followed by a group of app icons and the clock and other system icons on the right side.
Windows 11’s taskbar is almost similar to the one from Windows 10; the main difference is that it’s aligned at the center, and you cannot right-click it to open the Task Manager, Start button, or other pinned apps.
The taskbar has four main parts by default, as shown below:
Taskbar section
Function
Start button
It opens the menu
Main taskbar
Displays icons for all open applications and files and all other apps
Quick launch bar
It has all pinned apps and shortcuts that you use to launch instead of cluttering your desktop with apps and shortcuts.
The system tray
It consists of some of the apps running in the background and the clock.
By default, Windows 11 Task has four task items, namely:
➡ Chat: This is a Microsoft Teams shortcut, a messaging application that is now included on Windows 11
➡ Search: It allows you to find files, apps, folders, etc., on your device AND also lets you find anything else on the Internet; if it’s not working, you can see how to fix the Search box on Windows 11
➡ Widget: This opens up to Windows 11 Widgets which is a panel that you can customize to show anything you want like news, weather, calendar, to-do lists, etc.
➡ Task view: This enables you to use multiple virtual desktops to better focus on several tasks simultaneously.
How do I hide the taskbar icons on Windows 11?
Hide taskbar icons manually
Right-click on any empty space on the taskbar and select or tap Taskbar settings.
Go to Taskbar items. Select the items you want to hide from the taskbar and toggle the button Off.
Scroll down to Taskbar corner icons and Taskbar corner overflow. Select the icons you want to see on the taskbar and turn the button off.
After hiding your items on the taskbar, you might be interested in knowing how easy it is to use it. For that reason, we have prepared tips and easy ways on how you can use and customize the taskbar on Windows 11 below.
How do I hide the entire taskbar automatically?
Right-click on any empty space on the taskbar and select or tap Taskbar settings.
Click on the Taskbar behavior.
Click and check the box against Automatically hide the taskbar.
The taskbar will not be visible on your screen.
To show your taskbar, point your cursor at the bottom of your screen, and it will pop up.
When you move your cursor away, the taskbar will disappear again.
How do I use the taskbar in Windows 11?
1. Pin an app to taskbar
Type the app you want on the search box and then right-click on it. Select Pin to taskbar.
To unpin an app on the taskbar, follow the steps above and select Unpin from the taskbar.
Pinning an app on the desktop helps you quickly access it while on the desktop.
2. Change the taskbar alignment
Right-click on the empty space on the taskbar. Select Taskbar settings.
Click on the Taskbar behaviors.
Scroll and find Taskbar alignment and then select Left.
By default, the taskbar icons are aligned at the center; thanks to Windows 11’s personalization, you can align them left as in Windows 10.
3. Rearrange taskbar icons
Rearranging icons on the Windows 11 taskbar is simple. Click on the icon of your choice and drag it to your preferred position. You can do this to any pinned app on your taskbar.
4. Change the color of your taskbar
Click on the Start button and select Settings.
On the settings window, navigate to Personalization.
Click on Colors and then scroll down to Accent color.
Click to turn on Show accent color on Start and Taskbar. This action changes the color of your taskbar to the overall theme color, and it is available if you select Custom or Dark as the color of your windows. If you select Custom, you will need to select Dark for Choose your default Windows mode.
5. Show badges on the taskbar icons
Right-click on any empty space on the taskbar and select Settings.
Click on Task behaviors and then scroll down to Show badges (unread messages counter) in taskbar apps.
A badge on the taskbar icon is an alert that lets you know something is happening or needs to happen on that particular app.
For instance, a bell badge on the Alarms and Clocks app shows an active alarm that will alert you when you set a time.
This feature is selected as turned on by default, but if you want to turn it off or you just want to check if it’s on, use the above process. There are more tips in our earlier article about how to hide the taskbar on Windows 11.
We hope this article helped you to hide taskbar icons on your PC. We would like to hear from you on this topic or any questions concerning the Windows 11 taskbar. Feel free to tell us your story below, in the comments section.
If Decentraland not working on Chrome issue occurs, what would you do? This article will tell you everything about it, including some key information.
Chrome is the most popular web browser for both desktops and smartphones. Browser-based Virtual World games like Decentraland work great on any chromium-based browser. But, Google Chrome is the most preferable to most users.
Sometimes, Users may not get the expected performance from Chrome with Decentraland. In some cases, the game may not work at all. Fortunately, there are ways to fix this issue.
Why may Decentraland not work with Chrome?
In general, if you use the correct version of Google Chrome on a recommended device, you should not encounter any issue loading Decentraland.org.
However, Many people are reportedly noticing that Chrome is struggling to load this game or the game doesn’t work on this browser at all. The reasons can be the following ones.
Chrome is not up to date
Third-party extensions are causing problem
Incorrect settings
The device has less CPU power
These are the most common reasons. However, there may be more. But, By following the proper steps, you can get rid of this problem easily.
How can I fix Decentraland not working on Chrome?
1. Clear cache and temporary files
Open Google Chrome.
Press CTRL + Shift+ Del on your keyboard.
Set All time for the time range.
Check Cache images and files and then click on Clear data.
2. Update Chrome
Open Google Chrome.
Click on three vertical dots on the top right corner of the browser and click on Settings.
Click on About Chrome.
It will automatically update the browser.
Relaunch Chrome.
If any known bug is behind your problem, updating the browser should fix Decentraland not working on Chrome problem.
3. Disable Adblocker
Visit chrome://extensions/ on Chrome.
Toggle the switch next to any active ad-blocking extensions to disable it.
Restart chrome.
Disabling adblockers works in most cases. Because this type of plugin may cause heavy CPU and RAM usage when you visit any heavy websites like Decentraland.org.
4. Disable heavy extensions
If you still notice that Decentraland is not working on Chrome, you should disable all other heavy extensions. In some cases, you may need to disable all the extensions at once.
The idea is to reduce the CPU, RAM, and power usage as much as possible while playing Decentraland. You can do it by following the same way shown in the previous method.
5. Update the OS
Press Win + I to open the Windows 11 settings.
Click on Windows Update.
Click on Download/Install if necessary. It will automatically download and update Windows.
If you have not updated your OS for a long time or used an ancient version, you may not receive the latest update for Google Chrome. As a result, you will face the problem mentioned above.
So, After updating Windows, try to update Chrome again, as shown in method 1.
6. Enable hardware acceleration
Go to Chrome’s Settings like before.
Click on Advanced to expand it, and then go to System.
Toggle the switch to enable Use hardware acceleration when available.
Restart Chrome.
7. Change GPU preference for Chrome
Open Windows Settings like before.
Click on Display.
Scroll down, find and click on Graphics.
Find Chrome in the list and click on it.
Click on Options.
Check High Performance and click on Save.
Sometimes, Windows may not allow using your dedicated GPU that much. Doing the above things will ensure Chrome can utilize much-needed video memory and graphics cores.
If it was the actual reason, you will no longer encounter Decentraland not working on Chrome.
8. Use an alternative browser
If Chrome doesn’t work at all with Decentraland on your computer, try to use other alternatives. We recommend Microsoft Edge, Brave, Opera, or other popular Chromium-based browsers.
If Chromium is not essential for you, Firefox can be an excellent choice for Decentraland.
9. Upgrade device capacity
Decentraland recommends users to have 8 GB RAM, 2 GB video memory, and a Core i3 2nd Gen+ processor for the ideal experience. However, some other factors may increase the requirements for specific users.
If this game doesn’t find any available resources to utilize from your computer, it may not work properly. So, For the best experience, if there is scope, upgrade specs. Especially make sure to have a dedicated GPU that has more than 2 GB of graphics memory.
Ensuring enough CPU and GPU power will fix the Decentraland not working issue not only on Chrome but also on other supported browsers.
Why Chrome is the most recommended browser for Decentraland?
There are many browsers. But, Among them, Google Chrome is considered the best web browser for Decentraland. There are numerous reasons behind it.
Chromium works best for any modern website. It is compatible with almost anything. But, the main advantage is the Chrome web store, where you can find countless extensions.
Metamask wallet works best for Decentraland. Chrome-web store has this one available. Though Firefox also has this extension. But, For better performance and compatibility, Chrome is ahead of other browsers.
There are some other Chromium based-browsers where you can use Chrome extensions. But, the ecosystem of Google makes Chrome the clear winner.
Also, According to our own experience, Chrome works very well with Decentraland or any other browser-based games.
In general, Chrome works very smoothly without any issue with this Virtual World game. However, If you see Decentraland is not working on Chrome, the troubleshooting methods mentioned above are enough to solve the problem.
You are welcome to share any other working solutions you know in the comment box.