Microsoft Teams Won’t Uninstall? Use These Solutions

Microsoft Teams may be a great communication platform for some, but not for all. Therefore, quite a few users want it gone from their computers.

However, there are major issues with uninstalling Microsoft Teams. Our readers are getting frustrated that after deleting the app and restarting the PC, Teams is back on his system.

As a consequence, even if you uninstall it from Apps, the program refuses to go. This is an annoying issue and today we will show you how to get rid of Microsoft Teams permanently.

How can I uninstall Microsoft Teams?

1. Clear the cache in Teams

  1. Press Ctrl+Alt+Delete and open Task Manager.
  2. Search Microsoft Teams and click on End Task.
  3. Go to File Explorer and paste “%appdata%Microsoftteams” in the location box.file explorer
  4. Open and delete all files from Application Cache, Cache folder, database folder, GPUCache folder, IndexedDB folder, Local Storage folder, and tmp folder.

After you completed all of the above, you can go on and uninstall Microsoft Teams.

2. Use a PowerShell script

  1. Press the Windows Key and type PowerShell.
  2. Right-click on the app and Run as administrator.open powershell
  3. Type this command that allows scripts to run and press Enter: Set-ExecutionPolicy RemoteSigned
  4. Type A and press Enter.powershell command

Copy the following script in PowerShell:

# Removal Machine-Wide Installer - This needs to be done before removing the .exe below!
Get-WmiObject -Class Win32_Product | Where-Object {$_.IdentifyingNumber -eq "{39AF0813-FA7B-4860-ADBE-93B9B214B914}"} | Remove-WmiObject
#Variables
$TeamsUsers = Get-ChildItem -Path "$($ENV:SystemDrive)Users"
$TeamsUsers | ForEach-Object {
Try {
if (Test-Path "$($ENV:SystemDrive)Users$($_.Name)AppDataLocalMicrosoftTeams") {
Start-Process -FilePath "$($ENV:SystemDrive)Users$($_.Name)AppDataLocalMicrosoftTeamsUpdate.exe" -ArgumentList "-uninstall -s"
}
} Catch {
Out-Null
}
}
# Remove AppData folder for $($_.Name).
$TeamsUsers | ForEach-Object {
Try {
if (Test-Path "$($ENV:SystemDrive)Users$($_.Name)AppDataLocalMicrosoftTeams") {
Remove-Item –Path "$($ENV:SystemDrive)Users$($_.Name)AppDataLocalMicrosoftTeams" -Recurse -Force -ErrorAction Ignore
}
} Catch {
Out-Null
}
}

So, there it is. These somewhat easy solutions will fix for you an annoying issue. Use them and Microsoft Teams will be history.

Also, if you want to install it back on your computer, you will find it on the Microsoft website. Check out our article that will guide you step-by-step in this process.

Did these solutions solve the problem for you? Do let us know in the comments section below!

  1. Go to Apps & Features, and type teams in the search bar
  2. Select Microsoft Teams in the list of results
  3. Select Uninstall and confirm your choice
  • Why does Microsoft Teams keep reinstalling?

Microsoft Teams will keep on reinstalling itself if you only remove the Microsoft Teams app, but don’t delete the Teams Machine-Wide Installer. Use a dedicated tool to uninstall software leftovers to fix the problem for good.

  • Is Microsoft Teams a virus?

Microsoft Teams is not a virus, it’s a workplace collaboration software the company has built with employee productivity in mind. Teams is a secure platform offering multiple security layers.

If you want to install the Teams app for all user profiles on a computer, read this guide to learn the detailed steps.

FIX: We couldn’t save your tab settings on Microsoft Teams

A wide number of users have reported the error message saying We couldn’t save your tab settings inside Microsoft Teams.

The error is usually caused by a wrong syntax inside the code of the page, and finding the specific error will require you to check the entire range of coding to find the issue. In order to do so, you will need to use the web-based version of Teams by using the website.

Even though the issue we’re covering in this article might be caused by other errors found inside your code, there a few concepts that apply across the board.

In today’s article, we will explore some of the best troubleshooting methods to deal with this issue. Please follow the steps presented here closely to avoid causing any other problems.


How to fix tab settings errors in Microsoft Teams

1. Modify the value for 3-app.min-*.js inside the debugger


Note: You can find the 3-app.min-*.js  at the path: https://statics.teams.microsoft.com/hashedjs/3-app.min-*.js or by pressing the Ctrl+P on your keyboard and search for the filename.

  1. Open Chrome development tools by pressing the F12 key on your keyboard.
  2. Search for handleSaveSuccess and put a breakpoint on it.
  3. Click the Save button.

2. Check if your website URLs are typed correctly

check URL microsoft teams
In the case your URLs are not the same for both the value validDomains and websiteURL inside your computer code.

Not doing so will make Microsoft Teams show you the error message mentioned above.

The value validDomains needs to contain the exact copy of the websiteURL so no conflict can arise between these two elements.

In today’s article, we explored some of the most common errors found inside the code of Microsoft Teams. In order to fix the error We couldn’t save your tab settings, you will need to access the developer tools, and then debug your entire code.

Please make sure to check for the issues we mentioned in this article first, and then follow your normal debugging method.

We would love to know if this guide helped you identify the problem. Please feel free to let us know if that is the case, by using the comment section below.

[wl_navigator]

How to Blur Backgrounds in Microsoft Teams

Microsoft Teams is a messaging app for Windows, iOS, and Android devices. In 2018, Microsoft added a new blurred background feature to Teams. That’s a great feature for video calls that enables users to blur their backgrounds. Thus, users can essentially join their video meetings without any silly backgrounds.

There are some system requirements for Teams’ blurred background effect. The effect needs hardware with an Advanced Vector Extensions 2 (AVX2) processor. Users with hardware that doesn’t incorporate Advanced Vector Extensions 2 processors cannot utilize the blurred background effect in Teams. Teams users will also need an Office 365 subscription.

How can I blur backgrounds in Microsoft Teams?

  1. First, open the Teams app, which is a pretty essential (and perhaps obvious) step.
  2. Select a scheduled meeting to join in Teams. Note that it’s essential for the meeting to be a scheduled one.
  3. Press the Join button, which will open the video settings shown directly below.microsoft teams how to blur background
  4. Then toggle the middle slider option to activate background blur. That should blur the background in the video before users select to join the meeting.
  5. Press the Join now button.
  6. Users can still blur videos’ backgrounds after joining meetings. To do that, click the … dots button to open a menu as in the snapshot directly below.Blur my background option microsoft teams how to blur background
  7. Click the Blur my background option.
  8. Users can remove the blurred background effect by clicking the … button and selecting the Don’t blur background option.

That’s all users need to do to enable the blurred background effect in Microsoft Teams. Some users might consider blurred backgrounds to be more of a gimmick, but they might sometimes come in handy for video calls.

So, if you want to avoid any embarrassing moments during video conferences, go ahead and blur your background before joining the call.

In case you can’t disable the background blur of the login screen on Windows 11, read this guide to learn the solutions.

Instead of blurring the background, you may also change it with a nice Teams Halloween background.

Note: We recommend PerfectCam that will help you blur your background during your video calls in MS Teams.

⇒ Get now PerfectCam

Discord crashes the Microsoft Teams party and waves at teachers and students

Microsoft Teams, Google Hangouts, and Zoom have become the best ways for teachers to continue education during the Coronavirus crisis, but they can now count on Discord, too. The platform that is usually associated with video gaming communities today released a new blog post, showing how teachers can use Discord as a virtual classroom.

According to the post, Discord, as a company, recently made the decision to change the user limit on the Go Live feature of its platform from 10 to 50 people. This popular feature allows gamers to stream their screen, and “present” their content to their viewers. The decision was apparently designed to help teachers, as the company was “flooded with requests from educators asking: What can I do with Discord?”

In the post, Discord essentially explains that on its own platform, teachers have access to many features found on other services like Microsoft Teams. From chats, video conferencing, and more, the list of what’s possible on Discord includes the following:

  • A dedicated, free to use, invite only class space
  • Text channels to organize things like lessons, homework, or study groups
  • Voice channels for both one-to-one and group discussions, or even office hours
  • A real-time teaching environment where lessons can be shared with up to 50 people at a time
  • Discord is made up of invite only spaces known as servers — think of your server as your classroom.
  • Servers are organized into individual channels where you’ll interact with students or other teachers.
  • There are text channels, where anyone can post messages, upload files, and share images for others to read at any time.
  • And also voice channels, where teachers can conduct classes with Go Live, and students can get together to talk and collaborate

Discord has also created a server template to help teachers get started with using the platform in education. It’s worth noting, though, that there is an age limit, as the minimum age to join Discord is 13. This might be problematic for younger students in grade-school; but for older teenagers, it may very well help as they are likely familiar with the platform anyway.

It’s quite interesting to see the Discord suddenly push its services for use outside of gaming and in education. But, knowing the dangers of Coronavirus, it’s great to see another player join in to help support remote-education. Do you think you’d use Discord for learning? Let us know in the comments below.

Microsoft Teams bad request error? Here is a quick fix!

Microsoft Teams is a popular collaboration software for the organizations to help their team be on the same page. However, at times you may encounter several minor problems like Microsoft Team bad request error while trying to access a file or edit it.

The error can occur due to many reasons including permission issues. Many users have reported a similar error in the Microsoft tech forums.

Teams is up and running in our tenant but when I browse tohttps://teams.microsoft.com/it redirects tohttps://teams.microsoft.com/undefined/_and displays the text “Bad Request”. The client is working fine and the web portal was previously working fine too.

If you are also troubled by this error, here are a couple of troubleshooting tips to help you fix Microsoft Teams bad request error.

How to fix Microsoft Teams bad request error

1. Change Read Only Recommended Settings

  1. The Microsoft Teams bad request error can occur if you have enabled the Read Only Recommended setting for the file.
  2. Open the file in the native app. That is if it is a Word File, open the file in Microsoft Word.
  3. Click on File > Saves As.
  4. Click on Browser.
    save dialog Microsoft Teams bad request error
  5. In the Save window, click on Tools and Select Generation Options.
    general options window Microsoft Teams bad request error
  6. Locate “Read Only Recommended” and uncheck the option.
  7. Click OK and then save the file.
  8. Go back to Microsoft Teams and then try to re-upload the file with the bad request error and check for any improvements.

2. Check the File Compatibility

  1. The Microsoft Teams bad request error can also occur in case the file you are trying to access is not compatible with the current version of Microsoft Office app.
    save as type Microsoft Teams bad request error
  2. For example, if the file you are trying to edit is in .xls format or .doc format then try to change it to .xlsx and .docx format respectively.
  3. Save the file in a new format and reupload the file in Microsoft Teams app.
  4. The users should be able to access the file without any error this time.

3. Change the web browser

UR browser Microsoft Teams bad request error

  1. If you are trying to access the web client of Microsoft Teams, try changing the web browser to fix the error.
  2. At times, the bad cache can create issues with the browser functionality for any specific URL.
  3. If you are using Google Chrome, try accessing Microsoft Teams using Edge or Firefox. If the error is resolved after changing the browser, clear the browser cache to resolve the issue.

Another browser that you should try is UR Browser. This is privacy-focused browser built on Chromium engine.

The browser comes with built-in malware scanner for downloaded files, adblocker, tracking protection, and a built-in VPN, so it will be a perfect choice if you want to secure your privacy while browsing the web.


UR Browser is a great alternative to Chrome. Read our in-depth review to find out why!


Clear Browser Cache for Chrome

  1. Click the Menu icon and select Settings.
  2. Click on Advanced to expand the section.
  3. Scroll down to Security and Privacy section.
    clear browsing data Microsoft Teams bad request error
  4. Click on the “Clear browsing data” option.clear browsing data settings Microsoft Teams bad request error
  5. Select a time range and then check ” Cookies and other site data” and “Cached images and files” option.
  6. Click the Clear Data button.
  7. Relaunch Chrome and check if the error is resolved.

If the issue persists, try to check Microsoft Teams Dekstop client for any pending update and install it.

  1. Click on the Files tab
  2. Click on Get link
  3. Now, click on the SharePoint tab and copy the respective link.
  4. Paste the link you just copied in the file name section on the save screen.
  • Does Microsoft Teams have version control?

Microsoft Teams supports file and document version control but it is not stored directly on the platform.

Here are the steps to follow to access the version control file:

  1. In Microsoft Teams, go to the Files page and select the document you want to open
  2. Click on the option that allows you to open it SharePoint
  3. The SharePoint library should now appear on the screen
  4. Locate the document you’re interested in
  5. Scroll down to version history and check the first version of the document

[wl_navigator]

Microsoft Teams keeps installing or launching on start-up

Microsoft launched its unified communications platform Microsoft Teams back in 2017. Thousands of people prefer to use it on a regular basis for workplace chats, video meetings and more.

However, in some cases, this application opens on your system every time you turn it on. Recently, one Redditor shared a similar experience and asked for help from the community.

My laptop automatically installs and opens the Office Teams app whenever I turn on my computer not matter how many times I uninstall it. Please help me stop this.

Someone came up with an explanation about why the Teams app launches at startup.

If your computer is Azure AD joined then the administrator can make Office get installed, and some Office 365 licenses include Teams which installs to start with Windows, whether you want it or not.

Those who are experiencing similar issues can try one of the following solutions to solve the problem.

Steps to prevent Microsoft Team from installing or launching itself

There is a solution that works in most cases, go to your programs list and locate Teams-machine wide installer. Simply remove the uninstaller and that should prevent Microsoft Team from installing on its own on your PC.

If the issue persists, go to the next solution.

1. Change the settings

We often don’t bother to check the settings of the apps installed on our systems. There is a built-in option that allows users to launch the app on system startup.

Open the settings page of the Teams app and uncheck the “Startup at login” option.

2.Disable unnecessary apps

There are many applications that are running in the background. You need to manually disable any unnecessary apps.

  1. Press Ctrl+Shift+Esc keys to open Task Manager. Task Manager windows 10
  2. Navigate to the Startup tab and look for Office Teams app.
  3. Right-click and select Disable to fix the issue.

3. Check your account type

Many Windows users don’t have any idea that a work account comes with predefined settings.

Therefore, your work account might be responsible for forced installations. Switching to a personal account can be a temporary solution to prevent Microsoft Team from installing itself on start up.

4. Reinstall Office 365 suite

If none of the above solutions works, you can uninstall and reinstall the entire Office 365 Suite.

Comment down below if you have experienced similar issues.

[wl_navigator]

FIX: Windows 10/11 couldn’t be installed

Windows 10 is a great operating system, and it got even better after the latest updates. Unfortunately, installing Windows 10 isn’t always easy and users reported that Windows 10 couldn’t be installed on their PC.

How to fix the “Windows installation has failed” error?

Solution 1 – Run Windows Update troubleshooter

If you’re downloading the latest build of Windows 10 via Windows Update, you might encounter this error. To fix it, run the Windows Update troubleshooter by following these steps:

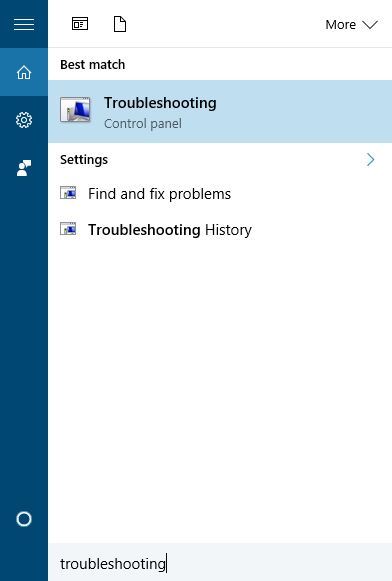
  1. Press Windows Key + S and enter troubleshooting. Select Troubleshooting from the menu.
    windows-10-couldnt-be-installed-troubleshooting-1
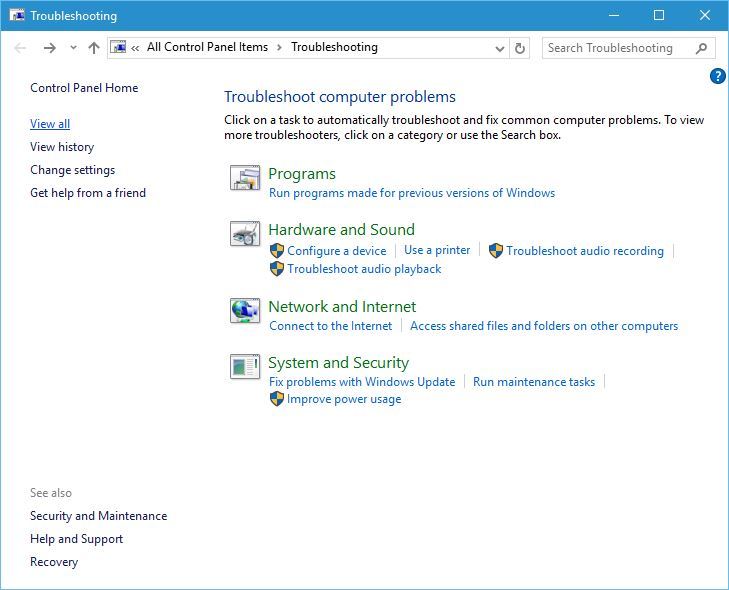
  2. Choose View all from the menu on the left.
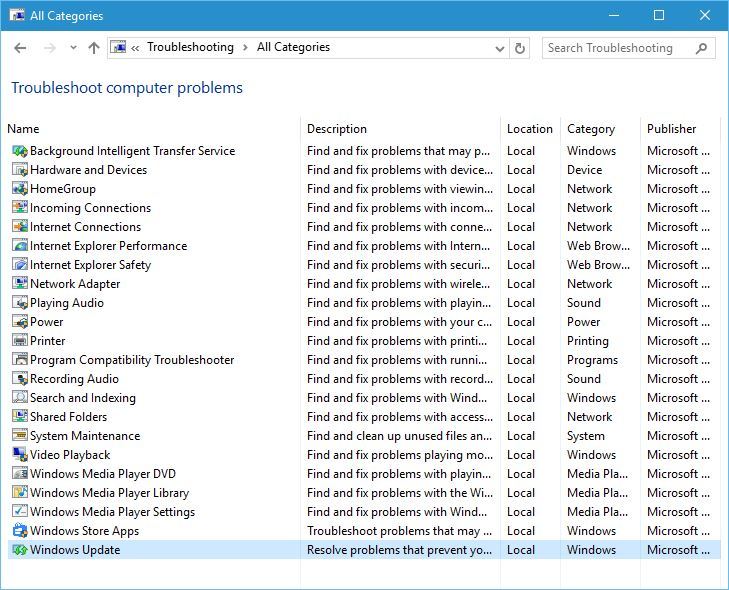
    windows-10-couldnt-be-installed-troubleshooting-2
  3. Select Windows Update.
    windows-10-couldnt-be-installed-troubleshooting-3
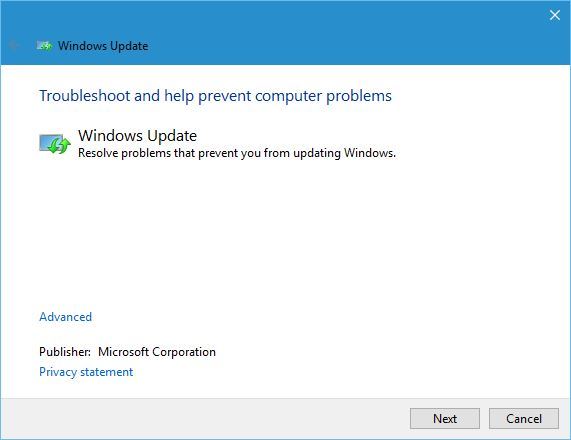
  4. Click Next to start the wizard.
    windows-10-couldnt-be-installed-troubleshooting-4

After the wizard completes the scan and fixes the errors, you should be able to install the new build of Windows 10.

Solution 2 – Install Windows 10 using Media Creation Tool

You might want to try using Media Creation Tool to download the new build. To complete this process you’ll need an empty USB flash drive. Once you download Windows 10 ISO, you can create a bootable installation media using the Windows Media Creation tool. Now you just need to start the installation from the USB flash drive.

Solution 3 – Change registry values

You might be able to fix this problem simply by changing one value in your registry. We have to mention that changing the registry can lead to certain issues if you’re not careful, so it might be a good idea to create a backup of your registry in case anything goes wrong.

To edit the registry follow these steps:

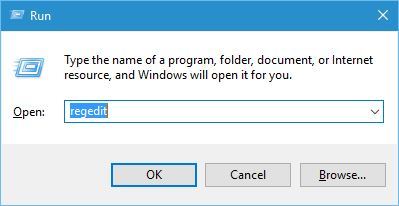
  1. Press Windows Key + R and enter regedit. Press Enter or click OK.
    windows-10-couldnt-be-installed-regedit-1
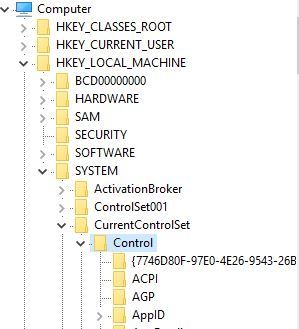
  2. Go to the HKEY_LOCAL_MACHINESYSTEMCurrentControlSetControl key in the left pane.
    windows-10-couldnt-be-installed-regedit-2
  3. In right pane locate PortableOperatingSystem value and double click it to open its properties.
  4. Change Value data from 1 to 0. Some users claim that changing the value from 0 to 1 also fixes the issue, so you might want to try that as well.
  5. Close Registry Editor, restart your PC and check if the problem is resolved.

Solution 4 – Turn off your firewall and antivirus

If you’re getting error code 8024402C while trying to download the latest Windows 10 build, you might want to temporarily disable your antivirus and firewall.

These tools can sometimes interfere with Windows Update. In some cases, you might even have to delete your third-party antivirus and firewall. You can also use a dedicated uninstaller tool to get the job done.

We also have to mention that you’ll have to disable Windows Firewall to fix this problem, and you can do that by following these steps:

  1. Press Windows Key + S and enter firewall. Select Windows Firewall from the list.
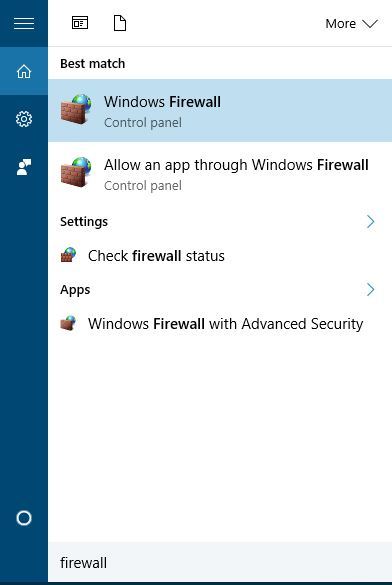
    windows-10-couldnt-be-installed-firewall-1
  2. Choose Turn Windows Firewall on or off from the menu.
    windows-10-couldnt-be-installed-firewall-2
  3. Select Turn off Windows Firewall (not recommended) for both Public and Private network settings.
    windows-10-couldnt-be-installed-firewall-3
  4. Click OK to save changes.

Solution 5 – Restart Windows Update service

You might want to try restarting Windows Update service. To do that, follow these simple steps:

  1. Press Windows Key + X to open the Power User Menu and choose Command Prompt (Admin).
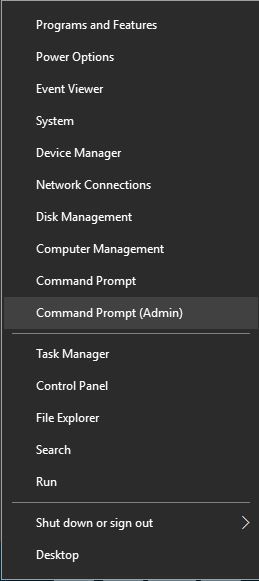
    windows-10-couldnt-be-installed-cmd-1
  2. When Command Prompt opens, enter the following lines:
    • net stop wuauserv
    • net start wuauserv
  3. Once both commands are successfully executed, close Command Prompt and check if the problem is resolved.

Solution 6 – Create a new administrator account and rename the Temp folder

Users claim that you can fix this issue simply by renaming the Temp folder. Before you can do that, you’ll need to create a new administrator account. To do that, follow these steps:

  1. Open the Settings app and go to Accounts.
  2. Go to Family & other users tab and click on Add someone else to this PC.
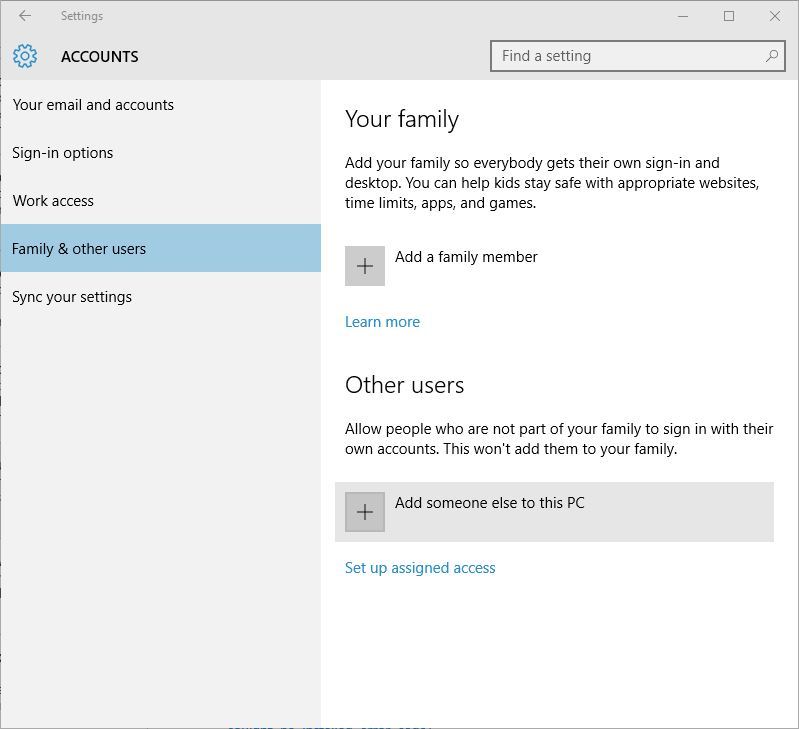
    windows-10-couldnt-be-installed-account-1
  3. Choose I don’t have this person’s sign-in information.
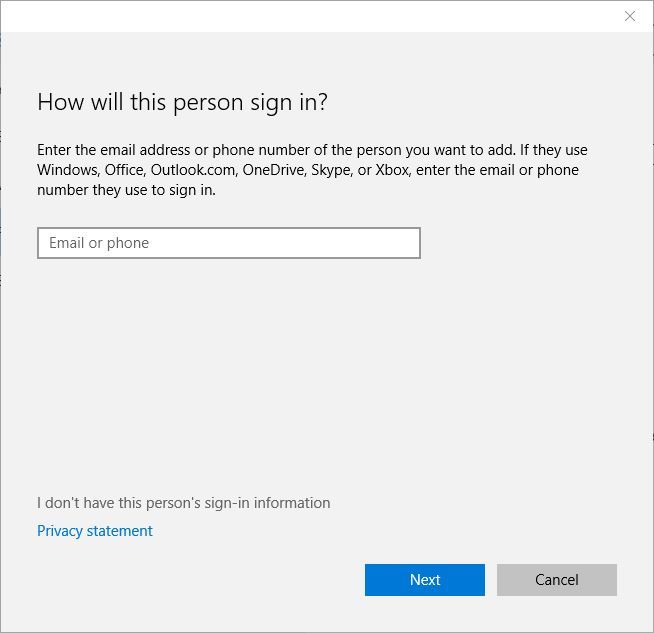
    windows-10-couldnt-be-installed-account-2
  4. Click on Add a user without a Microsoft account.
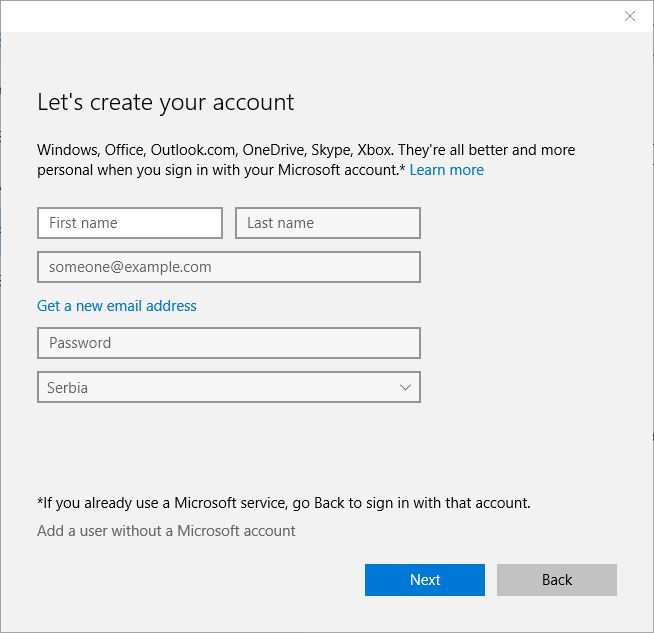
    windows-10-couldnt-be-installed-account-3
  5. Enter the username of your new administrator account and click Next.

After doing this, your new account should be added to Other users section. Keep in mind that all new accounts are created as Standard users which means that they don’t have any administrator privileges.

You can simply fix this problem by doing the following:

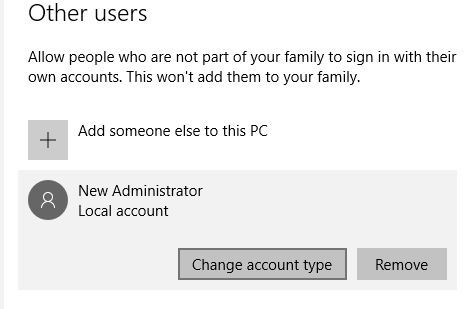
  1. In Other users section you’ll see the new account that you just created. Click on it.
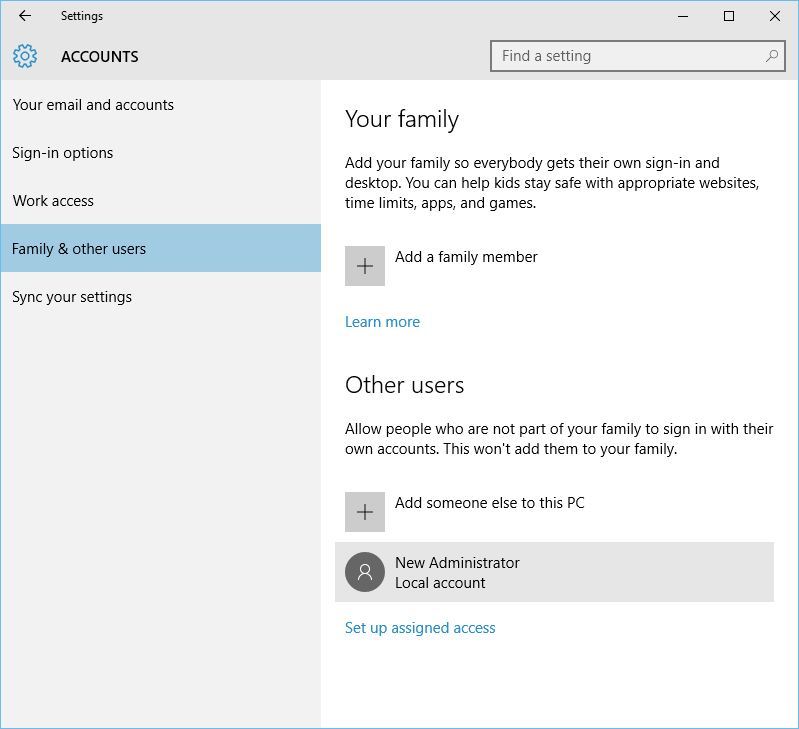
    windows-10-couldnt-be-installed-change-1
  2. Click Change account type button.
    windows-10-couldnt-be-installed-change-2
  3. Change Account type from Standard to Administrator. Click OK to save changes.
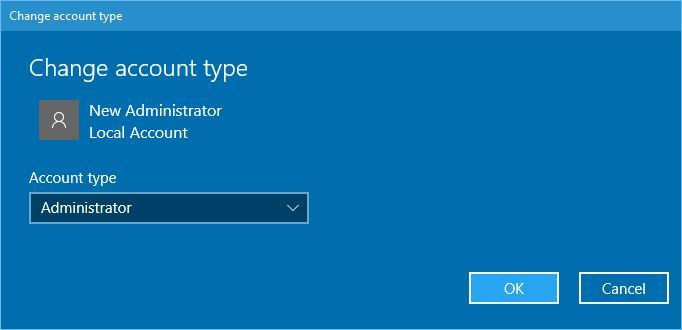
    windows-10-couldnt-be-installed-change-3

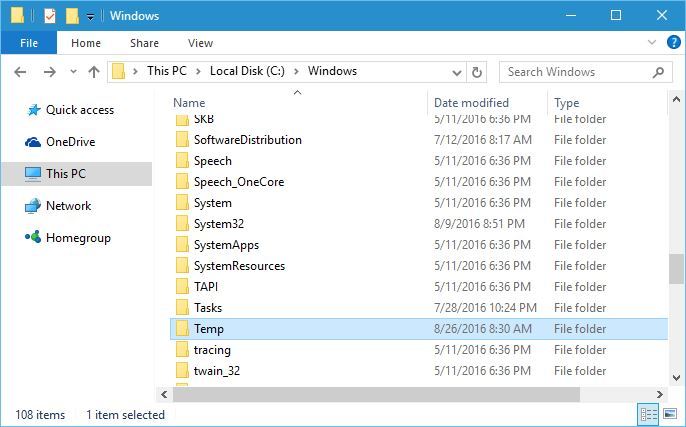
After creating a new account, log out of your main account and switch to the new one. Go to C:Windows folder, locate Temp folder and rename it to Temp2.

windows-10-couldnt-be-installed-temp-1

Log out from your new account and switch back to your main one. Try to download the latest build of Windows 10 again. If everything works, you should delete the new account that you created.

Solution 7 – Check if your registry configuration is correct

If you’re trying to download the latest Windows 10 build, you need to make sure that your registry configuration is correct. To do that, follow these steps:

  1. Open Registry Editor.
  2. Go to the
    HKEY_LOCAL_MACHINESOFTWAREMicrosoftWindowsCurrentVersion
  3. Look for ProgramFilesDir and ProgramFilesDir (x86) entries in the right pane. Bear in mind that you’ll have ProgramFilesDir (x86) entry only if you use 64-bit version of Windows.
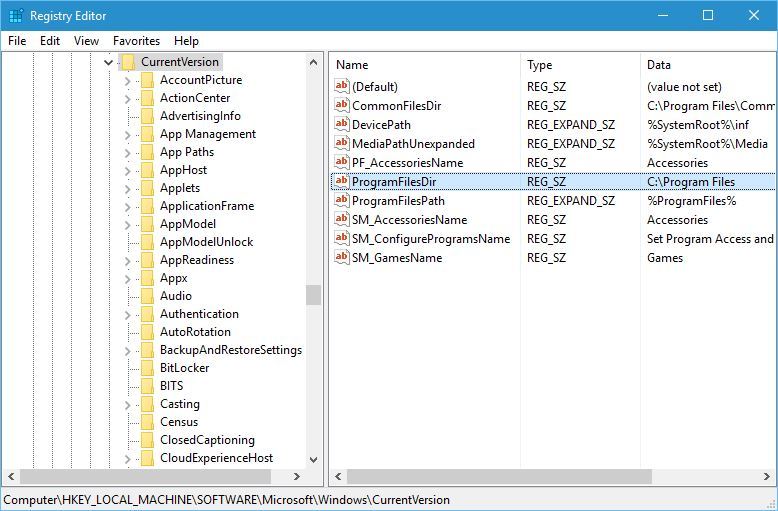
    windows-10-couldnt-be-installed-program-files-1
  4. Double click ProgramFilesDir entry and change the Value data to C:Program Files. If you have ProgramFilesDir (x86) entry, be sure to set its data value to C:Program Files (x86).
  5. After you’re done, close Registry Editor and check if the issue is resolved.

Solution 8 – Uninstall My Rapport Banking software

If you’re trying to install the latest build of Windows 10, you might encounter certain issues due to third-party software. Users reported that My Rapport Banking software can sometimes interfere with Windows 10 installation, therefore if you have this tool installed we suggest that you remove it and check if that fixes the problem.

Fix – Windows 10 couldn’t be installed system reserved partition

Solution 1 – Change the size of System Reserved Partition

If you have problems installing Windows 10, you might need to increase the size of Reserved Partition. To do that, you can use tools such as Partition Magic. Simply download the tool and create a bootable USB flash drive with the tool on it. Connect the USB flash drive and boot your PC from it.

After booting from the USB flash drive, you need to use Partition Magic to expand your System Reserved partition. Before you can do that, you’ll need to shrink one of your partitions by 350MB.

Now just add that space to the System Reserved partition and Windows 10 should install without any problems. We have to mention that this procedure can be somewhat dangerous and cause data loss, so use extra caution and install a tool that prevents data loss.

Solution 2 – Make sure that your C partition is set as active

According to users, you can fix this problem by settings your C partition as active. To do that, follow these steps:

  1. Press Windows Key + X and choose Disk Management.
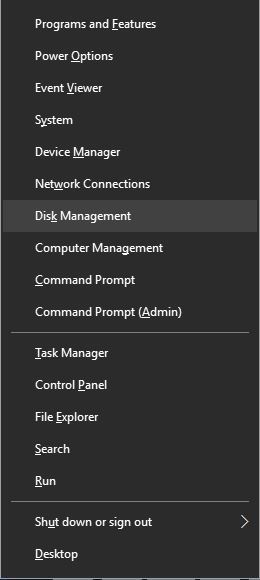
    windows-10-couldnt-be-installed-disk-1
  2. When Disk Management opens, locate your C partition, right click it and choose Mark Partition as Active.
  3. Close Disk Management and try to install Windows 10 again.

Solution 3 – Use Disk Management and Command Prompt

Users reported We couldn’t update the system reserved partition error message while trying to install Windows 10, and if you’re getting this error you can fix it by following these steps:

  1. Start Disk Management.
  2. You should see a Data partition that has a size of 100 MB.
  3. Right click that partition and choose Change Drive Letter and Paths.
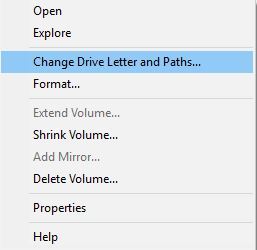
    windows-10-couldnt-be-installed-partition-1
  4. Click the Add button and set Y as the partition letter.
  5. Start Command Prompt as administrator.
  6. When Command Prompt starts, enter the following commands:
    • takeown /f . /r /d y
    • icacls . /grant administrators:F /t
    • attrib -h -s -r bootmgr
  7. Open File Explorer and open Y: drive.
  8. Make sure that hidden files and folders are visible. You can show hidden files and folders by clicking the View tab and checking Hidden items option.
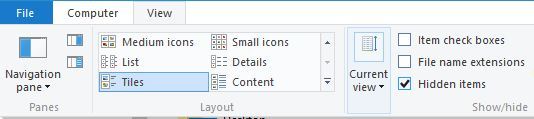
    windows-10-couldnt-be-installed-partition-2
  9. Go to Boot folder and delete all other folders except en-US.
  10. Go back to Command Prompt and run the chkdsk Y: /F /X /sdcleanup /L:5000 command. If you’re getting an error message while trying to run this command, try running chkdsk Y: /F /X /L:5000 command instead.
  11. Now try to install Windows 10 again.
  12. If the installation is successful, go back to the Disk Management and remove the letter of the boot partition.

Fix – Windows 10 couldn’t be installed 80200056, 80072ee2

Solution – Restart BITS

If you’re getting error 80200056, you might want to try restarting BITS service. To do that just start Command Prompt as administrator and enter bitsadmin.exe /reset /allusers. After the command is executed, restart your PC and try to install Windows 10 again.

We covered this error in the past, so if you need more information on how to fix error 80200056, we suggest that you read some of our previous articles.

The same applies to error 80072ee2.

Fix – Windows 10 couldn’t be installed 8007003

Solution 1 – Remove dual boot and merge all partitions

This might not be the best solution because you’ll most likely lose all your important files, therefore we advise you to create a backup and copy all your important files.

Users reported that dual boot with Linux can sometimes cause this error to appear, and in order to fix this problem you need to disable dual boot option and merge all partitions into one. After merging the partitions, you should be able to install Windows 10.

Solution 2 – Check the WIMMount path

Sometimes this error can occur if the WimMount path isn’t properly set in your registry. To fix this problem follow these steps:

  1. Open Registry Editor.
  2. Go to the
    HKEY_LOCAL_MACHINESYSTEMCurrentControlSetServicesWIMMount

    key in the left pane.

  3. In the right pane locate ImagePath entry and check its value. By default it should be set to system32driverswimmount.sys. If it’s set to a different value, be sure to change it to system32driverswimmount.sys.
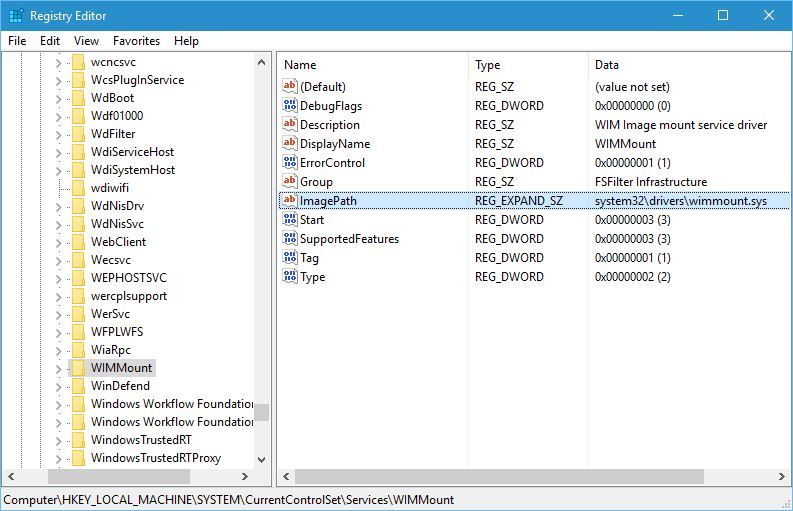
    windows-10-couldnt-be-installed-wimmount-1
  4. Close Registry Editor and check if the problem is resolved.

Fix – Windows 10 couldn’t be installed c1900101-40017

Solution – Be sure that your drivers are up to date

If you’re getting this error while trying to download the latest Windows 10 build, we suggest that you try updating your graphics card drivers. Users reported that this error was fixed after installing the latest AMD drivers, so be sure to try that. The same solution applies to Nvidia owners.

Updating drivers manually is very annoying, so we recommend you to download a driver updater tool to do it automatically.

Not being able to install Windows 10 can be a big problem, but we hope that one of our solutions helped you fix this issue.

How to open WordPerfect in Windows 10

Any file with the extension of .wpd is created in WordPerfect, the word-processing software program by Corel that many users enjoy. They can open these documents by double-clicking them, but this doesn’t do the trick unless WordPerfect is installed on the computer.

If it isn’t, is there any chance to open WordPerfect in Windows 10? Having a copy of Corel WordPerfect installed is not mandatory for opening this type of file. Users can take advantage of another word processing application.

For example, Microsoft Word is capable of opening a wide range of document file formats, including WordPerfect ones. If this topic is of interest to you, don’t hesitate to keep on reading.

Here you’ll find step by step instructions for easily opening WordPerfect in Windows 10.

How can I establish WordPerfect and Windows 10 compatibility?

1. Open WordPerfect file with Microsoft Word

WordPerfect file

  1. Open the Microsoft Word application.
  2. Up next, click the Microsoft button to display all program options.
  3. Click the Open button.
  4. In certain versions, you need to select File first followed by Open.
  5. Click the File Type drop-down menu at the bottom of the dialog box.
  6. Change it to All Files.
  7. Browse to the WordPerfect file.
  8. Select it and click Open.
  9. The file will open up in Microsoft Word after it is automatically converted.
  10. From the File menu, choose Save as.
  11. When the save window opens, make sure the Save As Type drop-down menu reads Word Document (.docx).
  12. If it doesn’t, click to find Word Document (.docx) in the drop-down menu.
  13. Finally, click Save.
  14. If a window appears warning you about changes related to the new file format, click Yes.

If no conversion filter is set, the document may contain all sorts of formatting errors relating to text size, font, or layout. Prevent that from happening by adding an appropriate filter.


2. Rename the extension from .wpd to .doc

rename extension

  1. Place the WordPerfect file on your desktop or some.
  2. Right-click on the file and select Rename.
  3. Change the file extension from .wpd to .doc.
  4. Double-click on the file.
  5. The file should immediately open up in Microsoft Word.
  6. At this point, you can either leave it in .doc file type or convert it to .docx file type.

3. Change your file associations

Corel WordPerfect Office

  1. Put the file on your desktop.
  2. Right-click on the file and select Open with.
  3. Select the option that says Choose default program next.
  4. Highlight Microsoft Word and place a check next to the option on the bottom that says Always use the selected program to open this kind of file.
  5. If you can’t find Word as a choice, click the Browse button to locate Winword.exe.
  6. Up next, click on OK.
  7. The current .wpdfile will immediately open in Word.
  8. For all the upcoming .wpd files, you just need to double-click them and they’ll open up in Word going forward.

Another recommendation for a successful result is to set up your computer to always open .wpd files in Word. It is ideal when you receive a great number of WordPerfect files. In this case, opening and converting the files from Word or changing the filename each time is time-consuming.

In this article, we have tried to cover some of the most convenient ways to open WordPerfect files in Windows 10.

Which one of these procedures sounds more tempting? Let us know by leaving a message in the comments section below.

[wl_navigator]

Microsoft throttles down some “non-essential” Office 365 capabilities to accommodate new growth and demand

As more and more companies are making employees work from home due to the Coronavirus pandemic, online collaboration services like Microsoft’s Office 365 are facing extra stress. In light of the situation, Microsoft recently sent out an email to Office 365 subscribers notifying that it will be making temporary adjustments to select “non-essential capabilities” of the service.

We received an email about these changes on our end, and it has surfaced on Reddit too. According to the email, any changes are not expected to have a significant impact on the end-user experience. The company explains that some changes include how often it checks for presence, the interval in which it is shown that the other party is typing, and video resolution. A full copy of the email message from Microsoft can be seen below.

This move isn’t really too surprising, as demand for Microsoft’s Office 365 services is on the surge. As per a Reuters report, Microsoft experienced 100% growth in usage of in Teams in Italy, alone. Microsoft is also offering a free six month free trial of paid Teams plans.  Such moves will not only ensure that business goes on and that workers can do their jobs from home, but also ensure that service interruptions are minimized.

Microsoft Teams free vs Microsoft Teams paid, what’s the difference?

Updated: 3/16/2023

Like many other teleconferencing services, Microsoft offers both a free and paid version of Microsoft Teams. But, due to the Coronavirus pandemic, the company recently announced it would offer a free six-month free trial of paid Teams plans.

As a result, you might be wondering what is the difference between free and paid plans, to begin with. In this Office 365 guide, we’ll give you a look at that.

As a quick summary, the differences between the free and paid versions of Microsoft Teams comes down to a couple of things. The list includes the maximum number of members, file storage sizes, and extra features for recording meetings as well as phone calls. You’ll also find that there are lots of extra administrative options with paid plans, too.

Now, for the in-depth details. The free version of Microsoft Teams only allows you to have up to 300 members (users) per organization. Paid plans, meanwhile, up that up to a potentially unlimited amount of members, with an enterprise license.

Moving on to file storage, the difference between paid and free is quite substantial. Free Microsoft Teams plans limit storage to 2GB per user, with 10GB shared storage. Paid plans, meanwhile, bump the storage up to 1TB per user.

Feature Teams Free Teams Paid
Maximum members (users) 300 per org Unlimited, with an enterprise license
Storage 1GB per user, and 10GB of shared storage 1TB per user
Scheduled meetings, meeting recordings, phone calls, and audio conferencing Not Available Available
Online and video conferencing meetings for up to 250 people. Online events for up to 10,000 Not Available Available
Unlimited chat messages and search in Teams Available Available
Background blur on video calls Avaialble Available
1:1 calling, group audio and video calls, channel meetings, screen sharing Available Available
Apps and Office 365 Integrations Avaialble Available

When it comes to calling, meetings, and screen sharing, free and paid versions of Teams share a bit. Teams free and paid both let you have guest access, 1:1 and group online and audio-video calls as well as unlimited chats and search.

Naturally, both free and paid Teams plans also let you enjoy real-time collaboration using your favorite Office apps on Office on the web. Features like background blur are common across both free and paid plans, too.

In both tiers, you’re also able to have Channel meetings and enjoy screen sharing. However, the free version of Teams doesn’t have access to scheduled meetings, meeting recordings, or phone calls and audio conferencing. These three features are only available in the paid version of Teams.

Finally, there’s the administrative stuff. Naturally, Teams paid is the only plan which has access to certain administrative tools. The list includes tools for managing users and apps, usage reporting, financially backed uptime, as well as configurable user settings and policies.

Teams paid plans also have phone and web support around the clock and additional compliance and security features. On that front, the list includes: Single sign-on to all Office 365 apps and services, and enforced multi-factor authentication.

If you’re hoping to keep a paid tier of Microsoft Teams once your six-month trial ends, we’ve got a more in-depth guide as to which Office 365 plans include Teams for no added cost. These plans range from $5 per user with an annual commitment or all the way up to $12.50 per user.

In 2023. Microsoft announced the general availability of Teams Premium, a new tier built on Microsoft Teams that is designed to enhance the tool’s meeting experience more personalized, intelligent, and secure. The offering is powered by GPT-3.5, OpenAI’s language model.

You can get the Teams Premium add-on at $10 per month. Be sure to check out our separate guide where we highlight its offerings and more.

Keep it tuned to OnMSFT for news and information and guides about all things related to Microsoft Teams. And, check out our Microsoft Teams news hub for more.

FIX: Sorry, we’re having trouble getting your notebook

OneNoteClass Notebook and Microsoft OneNote helps the entire class to store notes, links, audios, videos, attachments, and more. Unfortunately, certain errors can appear, and in today’s article we’ll show you how to fix them.

How to fix Microsoft Teams We’re having trouble finding your notebook error?

  1. Check if the link is broken
  2. Refresh the user profile
  3. Try accessing OneNote through an app
  4. There could be a temporary outage/server issue
  5. Change the site’s address

1. Check if the link is broken

Based on a discussion thread in the Microsoft forum, in some cases, it appears that the link from OneNote Teams that was broken. In such cases, to get access to the OneNote files:

  • You can access the files directly.
  • Alternatively, you can also open the OneNote application if it’s syncing.

2. Refresh the user profile

If you’re getting this error, perhaps you can fix it simply by refreshing your profile. Sometimes, the simplest solutions work best.


3. Try accessing OneNote through an app

onenote 2016 onenote desktop
Some of the most efficient workarounds that you can use are the following:

  • Access OneNote through a different app or a browser.
  • You can install OneNote from the Microsoft Store as usual or download the desktop edition (OneNote 2016).
  • Alternatively, you can also install the app on any Android or iOS device. Now, you can simply log back into your Microsoft account and attempt to access their notes from this location.

4. There could be a temporary outage/server issue

This error can appear due to a temporary outage. If that’s the case you may wait for some time to see if the server is back up and working.

Alternatively, you can try to access their notebooks via OneNote.com.


5. Change the site’s address

If the Sorry we’re having trouble getting your notebook Teams error still appears, you can fix it by doing the following:

  1. Open the teams’ website in SharePoint designer (download it from Microsoft‘s website).
  2. Once it’s installed and opened, select Open site.
  3. Now add this part of the address in front of the /General_Notes.one and it should open the site.
  4. For instance, paste the address in the format https:/XXXXX/XXXXXXXXXX/XXXXX/ into the Site name box in SP Designer.
  5. Now click on it to open the site. No need to choose a folder or file here.
  6. Click All Files in the folder list.
  7. Open SiteAssets option and the team name folder. This is the place where you should see the OneNote files.

But, if the tab is still intact and it yet cannot open OneNote, here’s what you can do:

  1. Simply remove the Notebook section using the below steps on the Team site.
  2. Click on the Home option and select Edit from the dropdown which is right at the bottom.
    We're having trouble finding your notebook edit
  3. Now, click under the Notebooks section.
  4. Choose the Remove option.
  5. The notebook section is now deleted from the SharePoint quick links navigation.

Alternatively, you can also remove the notebook via the below steps:

  1. Go to the site.
  2. Click on SiteContent.
  3. Select the option Site Assets
  4. Remove the notebook.

Here you are deleting the notebook that was opened when you clicked on the Notebook tab. But, if you want to remove the team tab since it won’t reconnect with the notebook again, here’s what you can do:

  1. Right-click on the OneNote tab and two options show up – Rename and Remove.
    oneote select We're having trouble finding your notebook
  2. Click the Remove option in the dropdown

remove notebook We're having trouble finding your notebook
If as an admin you still cannot remove the tab (no Remove option) and the error still shows up, go to Team settings and check permission.

Alternatively, the tab can also be deleted from the Team browser version.

The final thing to check would be the subscription, since only Office 365 for Education automatically comes with a OneNote Tab. So, if you are not using Office 365, you may create a new team and re-check if the OneNote Tab will be a default option.

Sorry we’re having trouble getting your notebook has been a consistent issue with the OneNote and Microsoft Teams. The error still keeps affecting users randomly every now and then. It mostly turns out to be a server issue.

We hope that we could help you fix the error with one of the above solutions.

  1. Teams is fully integrated with the Office 365 Suite
  2. OneNote does not offer near as many features as Teams
  3. Teams offers video and audio support
  4. Microsoft Teams in a fully-fledged remote work solution
  5. NoteNote is suitable for individual users, while Teams targets business users
  • How do you use Staff Notebook in Teams?

To use Staff Notebook, go to your class team, navigate to the General channel and click on the Staff Notebook tab where you can edit the existing pages or add new ones.

  • Can you duplicate a notebook in OneNote?

To duplicate notebooks in OneNote, navigate to the EDU Notebooks tab, right-click on the notebook you want to duplicate, and click on Save a copy.

[wl_navigator]

Fix: Microsoft Teams Something Went Wrong

Since Microsoft introduced Microsoft Teams as a replacement for Skype Enterprise, this part of Office365 invoked mostly positive reactions. However, this well-designed chat-based workplace application has its share of issues.

One of those is easily recognizable and it’s quite common. Namely, users who tried to log in bumped into an error message informing them that something is wrong. Of course, they were unable to log in.

This initially looks like a minor detour, but it’s, as the matter of fact, a quite complex problem. We have two possible solutions for this issue, so make sure to continue reading.

What to do if Microsoft Teams won’t load

  1. Make sure that you’re using proper e-mail address
  2. Tweak the credentials

1. Make sure that you’re using proper e-mail address

Firstly, we’ll need you to confirm your login credentials. Make sure to use exclusively the e-mail address related to Microsoft Teams.

In addition, try signing in multiple times, since some persistent users resolved the issue that way. Try restarting the app multiple times, as well.

In case you’re still stuck with the issue at hand, make sure to move to additional steps.

2. Tweak the credentials

Thanks to one experienced user, we got the hold of the possible solution for the problem and it concerns the Windows Credentials. Namely, there might be a self-imposed error hidden within the Windows Credentials, the place where Windows stores all passwords and login credentials.

Therefore, in order to resolve this issue, you’ll need to delete the latest Team’s credential input Windows have stored, and try again.

Here’s how to do it:

  1. In the Windows Search bar, type Control, and open Control Panel.
  2. From the Category view, open User Accounts.
  3. Open Credentials Manager.credential manager windows 10
  4. Select Windows Credentials.control panel windows credentials
  5. Under the ”Generic credentials” section, locate msteams_adalsso/adal_context_segments.
  6. Right-click and delete this generic credential. Have in mind that you’ll need the administrative permission to do so.
  7. Restart your PC.

After that, you should be able to log into Teams without any problems whatsoever. In addition, you can try to log into the web version of the app and avoid the desktopapp.

That’s not the solution but it’s an optional workaround that will, at least, enable you to use the Microsoft Teams.

Alternatively, you can switch to a different collaboration software. For more information on the best collaboration tools for Windows 10, you can check out this in-depth guide.

That should do it. In case you have questions or suggestions regarding the issue at hand, make sure to tell us in the comments section below.

[wl_navigator]

Here’s how to fix error 500 on Microsoft Teams

Have you encountered error 500 on the Microsoft Teams application? If so, it could mean one of several things.

Here are some of the common causes of error 500 on Microsoft Teams:

  • Corrupted system files
  • Improper removal of previous installation files
  • Failure to install Office
  • Your Office installation was blocked by either the antivirus program or your computer’s firewall
  • The Office can’t install because your internet connection may be preventing it from doing so
  • Proxy settings are preventing Office installation
  • A previous version of Office existing in your computer is blocking the installation of the newer version (this could be due to an incomplete, partial, change, installation, and/or failed repair or removal of the previous version)

Here are some solutions that show you how to fix error 500 on Microsoft Teams.

How to solve error 500 on Microsoft Teams

  1. Clear credential cache to fix error 500 on Microsoft Teams
  2. Repair the Office application
  3. Remove Office to fix error 500 on Microsoft Teams
  4. Remove Office manually to fix error 500 on Microsoft Teams
  5. Download and install Office again to fix error 500 on Microsoft Teams

1. Clear credential cache to fix error 500 on Microsoft Teams

Here’s how to do this:

  1. Right-click Start.
  2. Select Control Panel.
  3. Click User Accounts.
  4. Open Credential Manager.credential manager windows 10
  5. Clear the credential cache.
  6. Restart Microsoft Team client.
  7. Go to the System Tray.
  8. Right-click on Teams icon.
  9. Log out then restart.

Once you log out, then restart, Microsoft Teams app will request for your credentials.

Enter your Office 365 credentials.


2. Repair the Office application

This helps to fix and/or replace any corrupted system files in your computer that may have caused error 500 on Microsoft Teams.

Take these steps:

  1. Right-click Start.
  2. Select Control Panel.
  3. Click Programs.
  4. Click Programs and Features.
  5. Click on the Office version you want to repair.Repair Microsoft Office
  6. Click Change.
  7. Choose Quick Repair.office 365 repair feature
  8. Click Repair.

Note: In case Quick Repair doesn’t fix it, select Online Repair, then click Repair.

Did this solution help? If not, try the next solution.


3. Remove Office

If error 500 persists after trying to repair Office, try uninstalling Office from your computer using these steps:

  1. Right-click Start.
  2. Select Control Panel.
  3. Click Programs.
  4. Click Programs and Features.
  5. Choose Office Suite.Uninstall-microsoft-office
  6. Click Uninstall.

Sometimes there can be files and data that remain, even after the removal of Office from Control panel. Just to be sure, you can check out the link below and follow the quick steps in the guide.


4. Remove Office manually

If removing Office using solution 2 didn’t work, try manually uninstalling Office to remove it completely using the steps below:

  1. Remove Windows Installer package.
  2. Remove scheduled tasks on Office.
  3. End Click-to-Run tasks on Task Manager.
  4. Delete shortcuts from Start menu.
  5. Delete registry sub keys related to Office.
  6. Delete Office files.

Step 1: Remove Windows Installer package

Do the following:

  1. Go to Office installation folder by going to C:Program Files Microsoft Office.
  2. Right-click the relevant Office installation folder, for example, Office 15 or Office 16.
  3. Click Delete.

Step 2: Remove scheduled tasks on Office

  1. Right-click Start
  2. Type CMD in the search field box
  3. From the search results, go to Command Prompt and right-click on it.
  4. Select Run as administrator.
  5. Type the following commands, then press Enter after each:
    exe /delete /tn “MicrosoftOfficeOffice Automatic Updates”
    exe /delete /tn “MicrosoftOfficeOffice Subscription Maintenance”
    exe /delete /tn “MicrosoftOfficeOffice ClickToRun Service Monitor”

Step 3: End Click-to-Run tasks on Task Manager

  1. Right-click Start
  2. Select Task Manager
  3. Click the Process tab
  4. Check if these processes are running then right-click on each and click End Task
    • .exe
    • Setup*.exe

Step 4: Delete shortcuts from Start menu

  1. Right-click Start.
  2. Type CMD in the search field box.
  3. Right-click Command Prompt in the search results.
  4. Select Run as administrator.
  5. Type
    %ALLUSERSPROFILE%MicrosoftWindowsStartMenuPrograms
  6. Press Enter.
  7. Delete Microsoft Office 16 folder (or the folder for Office on your computer).

Step 5: Delete registry sub keys related to Office

  1. Right-click Start.
  2. Select Run.
  3. Type regedit.
  4. Click Ok or press Enter
  5. The Registry Editor will open. Delete these sub keys:
    HKEY_LOCAL_MACHINESOFTWAREMicrosoftOfficeClickToRun
    HKEY_LOCAL-MACHINESOFTWAREMicrosoftAppVISV
    HKEY_CURRENT_USERSOFTWAREMicrosoftOffice
  6. Once you’re done, delete the Office key

Step 6: Delete the Office files

  1. Right-click Start
  2. Select Run
  3. Type %ProgramFiles%
  4. Click Ok or press Enter
  5. Delete the Microsoft Office 16 folder (or the folder Office in your computer)microsoft office local disk
  6. Open Run dialog box again
  7. Type %ProgramFiles(x86)%
  8. Click Ok or Press Enter
  9. Delete the Microsoft Office folder.

If you could not remove Microsoft Office after following the steps listed above, you may want to check out some of the additional solutions that we listed in this guide.


5. Download and install office again

Here’s how to do this:

  1. Sign in to your Microsoft account
  2. Select Install
  3. Click Run
  4. If you see You’re good to go’, click All done

Did any of these solutions work for you? Let us know in the comments section.

[wl_navigator]

FIX: HP printer error code oxc4eb827f

When you try to start a printing job, the machine may become completely unresponsive to commands sent from any device and finally stops unexpectedly. In many cases, the power light is also blinking on and off and the error code oxc4eb827f hwlmicci2c appears on the screen.

If you’ve never seen this message before, you’re probably at a loss about how to fix it. Fortunately, remedying the situation is not rocket science. These methods can fix the error for you, so let’s check them in detail.

What can I do when getting HP printer error code oxc4eb827f?

1. Power reset your printer

power reset HP Envy 4500

  1. With the printer turned on, remove the ink cartridges.
  2. Disconnect the power cord from the printer and the power outlet.
  3. Power off both the PC and the wireless router.
  4. Complete the process and wait for at least 60 seconds.
  5. After the small pause, plug the printer back in. Ensure you plug it directly to a wall outlet.
  6. You may now install the cartridge.
  7. Power on the router and the computer.

If the carriage is firmly stuck on the right and you have a hard time removing the ink cartridges, try performing a power reset on the printer.


2. Use the printer troubleshooter

use printer troubleshooter

If the previous procedure fails to resolve the oxc4eb827f error, click on the Start button, then type troubleshoot and click Troubleshooting. In the new window, click View, then scroll down to Printer.

You may now click Advanced, then Run as administrator. Click Next, right-click on the icon representing the printer you want to troubleshoot and click Next once more.

Work your way through the Troubleshooter, answering all questions in an effort to resolve the issue for good.


Windows Troubleshooter has stopped working? Count on us to help you solve the issue quickly!


3. Turn off the firewallturn off firewall

There’s another strong possibility that the oxc4eb827f error may be the result of interferences with your firewall. The next step is to check if this has anything to do with the situation you are in.

When confirmed, open your preferences on the firewall and add the executable file for the printer software as an exception. If this makes no difference, disable the firewall temporarily to see if it helps.


Don’t know how to check if Windows Firewall is blocking a program? Follow the steps in this handy guide.


If none of the methods listed above could manage to get rid of this error for you, others reported jiggling the ink cartridge area as the printer is powering on. Checking the correct installation of the HP printer software is also described as a potentially successful solution.

We hope you have cleared this error message. If you haven’t been able to fix it by following the mentioned procedures, then you need to take into consideration potential hardware-related causes.

Contact your nearest HP service center and set up an appointment to have your printer fixed and let us know if you need further assistance by using the comments area below.

READ NEXT:

Windows 10 version 2004 will let you disable Reserved Storage

When it comes to working on a PC, regardless if it is for professional or personal reasons, disk space never seems to be enough, no matter how big our hard drives are.

While it is true that you could always buy an external one, not everyone can afford one. That being said, making use of every bit of what you have is essential.

You could also opt for some good disk management tools to free up space, but those too are most often pay-to-use.

Reserved Storage can now be used again

However, things are about to change for Windows 10 users. Reserved Storage is a relatively new feature that arrived with the May 2019 Update. The mai9n purpose of this feature is to reserve a portion of the disk for future updates and drivers.

While the concept in itself is a good one, it still takes up space that isn’t actually being used until an actual update. However, it seems that Reserved Storage isn’t a system partition and it could be disabled by editing your Windows Registry.

Note: The Registry Editor is a powerful tool that is used to modify, create and delete sensitive Windows files. Incorrectly editing or deleting a protected key can render your system completely unusable.

Things are about to change since Windows 10 version 2004 will make it easier for administrators and common users to manage Reserved Storage. This new Windows version will include DISM options for Reserved Storage.

This will allow you to disable it on your devices, and you can also use the new DISM features to check the status of the occupied storage.

Additionally, by using the Command Prompt, users can type the following line to check the status of the Reserved Storage:

  • DISM.exe /Online /Get-ReservedStorageState

More so, the following commands can be used to enable and disable the use of Reserved Storage:

  • Enable Reserved Storage: DISM.exe /Online /Set-ReservedStorageState /State:Enabled
  • Disable Reserved Storage: DISM.exe /Online /Set-ReservedStorageState /State:Disabled

What do you think about this extra bit of control that Microsoft is giving users? Let us know what you think by leaving a message in the comments section below.

[wl_navigator]

How to Fix Printer Busy or Error With Ease

Are you seeing the dreadful Printer Busy or Error message? Like most printer-related errors, this prevents you from printing anything starting from the moment you’re seeing it.

There can be a variety of reasons triggering this particular error – multiple print jobs, a defective Print Spooler, a virus infection, or even hardware failure.

In this article, you will get the necessary solutions to refresh your printer in the hope of helping it to carry out the printing tasks properly. Just try the following steps one by one.

What can I do if getting Printer Busy or Error?

1. Clear the print queue

clear the print queue
  1. Select Start.
  2. Then, type Command.
  3. Right-click Command Prompt and select Run as administrator.
  4. Type net stop spooler then hit Enter.
  5. Then, type del %systemroot%System32spoolprinters* /Q followed by Enter.
  6. Type net start spooler and press Enter.
  7. Type exit first, then press Enter to fully exit the command window.

If you have a long list of print jobs in Microsoft Windows 10, the tasks are usually set in a queue and completed in a row. Documents waiting in line to be printed are displayed in the print queue.

If this ends up being too large or if a document in the queue is corrupted, you can clear and restart the print queue by using the steps detailed above. Let’s hope that the Printer Busy or Error message goes away.

You may also use one of the best tools to repair corrupted files and set things right again.

2. Remove the Print Spooler

type control printers
  1. Press the Windows key + R keyboard hotkey to open the Run dialog. You could also open the Command Prompt.
  2. Type control printers and press Enter.
  3. The Devices and Printers window should appear next.
  4. Right-click on the printer you currently use and click on Properties.
  5. Up next, set the printer to print directly and not use the spooler.
  6. Confirm by clicking OK and rebooting.

Note: Before completing the procedure, you may receive a print spooler error message. This happens if you have the wrong printer drivers installed on your computer.

Visit the printer manufacturer’s website to download the latest drivers.

3. Uninstall the printer and re-install

  1. Go to Control Panel >Devices and Printers.
  2. Right-click on the printer you wish to remove and select Printer Properties.
  3. Up next, select Remove device.
  4. Click Print server properties at the top of the window.
  5. Then, click on the Drivers tab and highlight the printer driver to uninstall.
  6. Click the Remove button.
  7. Select Remove driver and driver package and click OK.
  8. If the printer is plugged into the computer via USB, you need to unplug the USB cable.
  9. Go to Control Panel > Programs and Features, and look for and uninstall any printer software related to the printer you removed from Devices and Printers.
  10. If a message appears about access being denied or the printer in use, reboot the computer.
  11. Finally, locate driver software to reinstall this printer.

When you are still facing issues and none of the previous solutions are working, try uninstalling the printer and reinstalling it.

If the driver cannot be removed after applying the above steps, restart the computer in a diagnostic startup. Then, remove the driver packages using the printui /s /t2 command.

If these steps do not correct the problem, do a firmware upgrade on the printer and make sure the printer is not out of paper. It’s also worth checking whether it’s malware or not causing the Printer Busy or Error message you’re seeing.

If it is, you may use the best antivirus tools that can initiate a boot scan to remove hidden malware.

These are some of the solutions that you may apply to get the Printer Busy or Error fixed. If you need any extra advice or are still struggling to get past this error, let us know by using the comments area below.

Windows 10 upgrade nag screens are annoying users

The third round of Patch Tuesday updates that rolled out last week came in with a lot of new features for Windows 10. However, Microsoft hasn’t thought of a very clever advertising method for these new features.

Instead, they seem to have opted for the old-fashioned, and extremely annoying, nag screens.

Microsoft is nagging users about their new features

After the latest Windows 10 updates, there appears to be an increase in notifications that urge users to:

Get even more out of Windows

Back before the updates, these prompts would appear only after a clean installation of Windows 10, or when you start of the device for the very first time.

However, Microsoft later started pushing even more notifications onto users’ screens. You may receive the notification that gives you information about additional services such as Your Phone or Office 365 that you can set up.

According to users, the notification started appearing after a recent Windows Update, possibly the March or February Patch Tuesday updates.

Microsoft states the prompts are meant to help

The Windows prompt showcases a number of services that you can acquire after creating a Microsoft Account. As an example, the notification gives brief info on some of the following Microsoft services:

  • Your Phone
  • Windows Hello
  • Office 365 
  • Cross-platform and device experiences with  your Microsoft account
  • OneDrive

Microsoft claims that these notifications are in no way meant to be an annoyance, and they simply want them to be a way for users to discover more things they can do with their OS.

However, if you still consider these notifications to be more of a nuisance, you can always opt to disable them.

What’s your take on these Microsoft notifications? Let us know if you consider them helpful or not by leaving us a message in the comments section below.

[wl_navigator]

See how Xbox Series X will reduce loading times and resume paused games in video

As Sony has yet to share more information about its PlayStation 5, Microsoft continues to own the next-gen consoles narrative by sharing new information about Xbox Series X today. We previously covered all the new hardware details shared by Xbox Wire and Digital Foundry, but the official Xbox YouTube channel has two Xbox Series X video worth looking at.

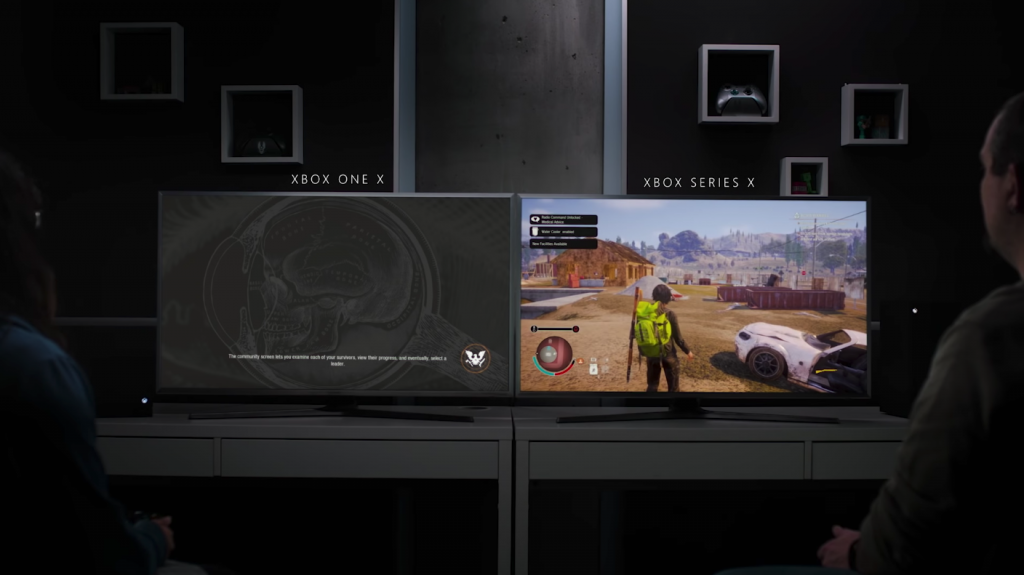
The first video shows how the Xbox Series X will significantly improve loading times thanks to its custom-designed NVMe SSD. The next-gen Xbox console is put next to an Xbox One X which uses a regular 5400rpm hard Drive, and you can see a comparison of loading times on the first-party game State of Decay 2. Xbox Series X can go from the game’s menu to the map in approximately 10 seconds, while the Xbox One X needs roughly 50 seconds to do the same.

It’s worth noting that State of Decay 2 hasn’t been optimized for Xbox Series X yet, but these are definitely impressive results. Loading time should hopefully be slightly faster for games that will be enhanced for the new console, and hopefully even faster for games designed for the ground up for the new hardware.

The second video shows the Quick Resume Technology that will allow Xbox Series X to keep multiple games in a suspended state in memory, and resume them in an instant. As seen in a video, it takes less than 10 seconds for the console to resume multiple games such as Forza Motorsport 7, Hellblade: Senua’s Sacrifice, or Ori and the Blind Forest, and it’s quite amazing to see the console remember when the gamer has paused the action. The feature even works for backwards-compatible Xbox 360 games, in case you were wondering.

This video also shows that Xbox Series X currently uses the same Xbox Guide found on Xbox One consoles today. It’s still not clear if Xbox Series X will use the exact same Windows 10-based OS, but it would definitely make sense to provide a consistent experience across Xbox consoles from different generations.

Put together, Quick Resume and faster loading times seem to be two game-changing experiences. If the slow hard drives in the Xbox One X has been holding the console down, the custom NVMe SSD in the Xbox Series will deliver a 2.4 GB/s bandwidth (4.8 GB/s compressed, with custom hardware decompression block), which is much faster than regular SSDs you can find on the market today.

Working from home? Check out our top tips for video conferencing in Microsoft Teams

Working from home means that you might end up in a video call with your boss or coworkers in some of the most awkward places. Not everyone has a home office or knows the go-tos of how to video chat. You might be sitting in your bedroom, kitchen, hallway, or some other place which isn’t quite professional looking. Microsoft Teams, though, can help you out. There are features in Teams designed to help you enhance your video conferencing, and in this guide, we’ll give you a look at some of them.

Tip 1: Use the background blur feature in Teams

Our first tip is to use the background blur feature in Microsoft Teams. As we’ve covered before, this feature puts you in focus and conceals everything behind you. Please be aware, though, that since it is powered by AI, it only works with objects, and isn’t intended to conceal humans. Anyway, you can enable it before a call by clicking the purple slider next to the video icon. It also can be enabled during a call by hovering your mouse over the bottom middle part of your screen and clicking the “…” icon. You’ll then want to choose the blur my background option.

Tip 2: Check your audio and video outputs

When you’re working from home and you’re on a conference call, you might not want your computer to pick up background noise in your house. That often means plugging in a microphone to your laptop or desktop or using a headset. This makes sure that your voice is more clear and concise when teleconferencing.

Sometimes, though, Microsoft Teams might not properly pick up on your microphone or headset and will use your computer’s input and output by default. You’ll want to check our audio and video outputs before joining any call. You can do this by clicking the settings cog in the “Choose your audio and video settings” page that you see before you enter a meeting or call. This will show you all the detected audio devices on your PC or laptop, You can choose from all the connected speakers, microphones, and cameras. You also can make a test call to help make sure that you won’t run into any troubles during your call.

Tip 3: Know your call controls

During a call in Microsoft Teams, you’ll want to know your controls so that you can change certain settings. These are important and will be especially useful if you suddenly need to disable your video or webcam or change your audio due to something happening in the room you’re in. You can summon these controls by hovering over in the middle part of the screen. We’ll be looking at them from left to right.

First, there’s the timer, this indicates how long the call has been going on. Next to that is the option to turn your webcam on and off. You’ll then find the option to mute your microphone. That’s followed up by a button to share your screen, which we will discuss in the next section. You can then find a more options menu, where you’ll see additional device settings controls, meeting notes, or an option to enter fullscreen.

Other options here also include bringing up the keypad, and options to start recording your call in Teams. Finally, on the far right is a toggle switch for the chat, and showing the participants. This can be useful if you’re having technical issues and need to drop a message in the chat.

Tip 4: Be careful when sharing your screen

One way or another, there might come a time when you’ll need to share your screen with your coworker or boss when on a call. Of course, this isn’t something that every company will require you to do when you work from home, but you still might want to protect your privacy and hide your personal information when sharing your screen. We’ve talked about this topic before, but there are a few tips which can help.

As a recap, to share your screen, you’ll move your mouse to the bottom-middle corner of the screen and choose the chat control options. You’ll then see an icon with a square box and an arrow. Once you click it, you’ll be able to initiate a screen sharing session. For extra privacy, make sure that you choose the option to share a specific program only. This will safeguard your other programs or apps, as everything else over the program will show up as a gray box for the viewer. You also might want to be careful with sharing your audio, as you never know what can happen in the background on your PC during a call. You can change this setting by ticking the include system audio option.

Tip 5: Turn on Live Captions

Our final tip for video conferencing is to turn on Live Captions during your call. This feature might be useful for you if you’re in an environment where you have to mute your computer’s audio, or if you don’t have access to a headset for privacy during a call. Of course, we never recommend going into a call with muted audio, but it is something that some might want to do. Anyway, you can enable it by clicking the settings menu as we described in tip 3, and choosing the Turn on live captions (preview) option. Keep in mind, this isn’t fool-proof as sometimes the captions won’t be correct, but it’s still nice to have anyway if you’re the type of person that likes to read out what’s happening during an audio call.

Check out our Teams coverage for more

These are just some of our top tips for video conferencing in Microsoft Teams. We cover Microsoft Teams extensively here at OnMSFT, so feel free to check out our news hub here for more information. And, if you have any tips or tricks of your own, feel free to let us know in the comments below.

Hands-on with File Explorer beta in Windows 10X build 19578 (emulator)

Earlier this week, Microsoft released an updated version of the Windows 10X Emulator Image, which is available now in the Microsoft Store. This Emulator Image (build 19578) no longer requires installation on an Insider Preview version of Windows 10, requiring only an up-to-date version of Windows 10 Pro and the Microsoft Emulator app. The emulator app has its own list of hardware and software requirements that haven’t changed since the last release. This software is intended for developers who want to begin testing their apps on Windows 10X before an official release.

Because this software is running on an emulator, performance won’t be anywhere near as smooth as if it were running on an actual machine.

Minor changes in Windows 10X Build 19578

Unfortunately for the average Windows Insider, there isn’t much new to see in this build of Windows 10X. Progress is progress, though. Action center now responds to your Windows theme properly, and more of the pre-installed apps have been updated to align with Microsoft’s new design language.

Another significant change in this build of Windows 10X is how the operating system handles windowing Win32-container apps. Win32 apps will open filling one screen and can be dragged to or spanned across the other. This change brings the windowing behavior in alignment with all other apps in Windows 10X.

File Explorer Windows 10x
Left: UWP File Explorer. Right: File Explorer (beta)

File Explorer Beta

File Explorer (Beta) is the most significant new feature present in this build of Windows 10X. This new app can be found listed on the start menu in addition to the UWP file explorer we’ve seen already. At the moment, this new File Explorer is just a OneDrive app for Windows 10X. The app resembles the OneDrive web experience, using the same layout and icons when browsing through files. Unlike the OneDrive website, however, this app relies on the OneDrive sync client to function. The files you see here can be synced to local or online-only status, just like in Windows 10 for desktop.

At this point, the File Explorer (beta) app can’t view local directories and has fewer features than the UWP app that preceded it. Like other mobile operating systems, OneDrive sync will be a prominent feature of file management in Windows 10X.

Windows 10X is beginning to look like the modern mobile operating system Microsoft needs to stay competitive in the ever-changing world of personal computing devices. Windows 10 made up for Windows 8’s failure in the legacy desktop space, and never really focused on providing a good software experience for Mobile devices. It seems Windows 10X will try again what Windows 8 couldn’t achieve in mobile.

Canon Printer Error 5c20: 4 Ways to Fix it

Canon printers are high-quality devices, but many reported Canon printer error 5c20 that prevents them from printing correctly on their PC.

This can be a big problem since you can’t print anything, but luckily, there are a couple of solutions that you can try.

What is error code 5C20 on Canon mx860?

  • This is a hardware error, and hardware glitches can cause it.
  • Issues with the print head and carriage belt can lead to this error.
  • A faulty purge drive system unit can also cause this problem.

How can I fix Canon printer error 5c20?

Before you start any troubleshooting, ensure your Canon printer drivers are up-to-date.

1. Reset your printer

  1. Start by pressing the Power button on the printer and wait for it to turn off completely.
  2. Unplug the printer from its power outlet.
  3. Wait for a minimum of 30 seconds and reconnect the printer to its power source.
  4. Turn on the printer.
  5. Once it is powered on, try to print a test page.

2. Check the printer’s printhead

  1. Unplug the machine from its power outlet and take off the cover panel.
  2. While inside, lift the orange/grey lever to the lift of the ink cartridges.
  3. Remove the ink cartridges and clean the printhead.

3. Make sure the carriage belt is in position

  1. The belt can be found behind the carriage section.
  2. The best is to remove the carriage and check on the belt with a flashlight to confirm whether it has slipped or not.
  3. You might have to adjust the belt to fix the issue manually.

4. Replace purge drive system unit

  1. Open your printer.
  2. Locate the purge drive system unit and replace it.
  3. Contact a professional if you don’t know how to do this properly.

In the above article, we have briefly defined the Canon printer 5c20 error and the symptoms behind the problem.

Unfortunately, this is just one of many errors you can encounter. Many reported that their Canon printer is not turning off or that ink may have run out error.

In some cases, your Canon printer is not detected by Windows, if it’s not configured correctly. Luckily, we have guides for all these types of problems.

We also have a guide on Canon error 5B00, so don’t miss our dedicated guide to see how to fix it.

If none of these methods worked for you, contact the printer support helpdesk or let us know via comments if you need more help from our team.

Fix: Something went Wrong Adding Gmail or Outlook Account

Many Windows 10 users are complaining they cannot add a Gmail or Outlook.com account to Windows 10’s Mail app, with the something went wrong prompt as the stumbling block.

When trying to add one of these email accounts, users encounter various errors, like 0x8007042b, 0x80040154, 0x8000ffff, 0x8007000d, 0x80c8043e, 0x80070435, 0x8007006d, 0x80070425, etc.

If you are also dealing with this issue, the solutions in this guide will help you fix it effortlessly.

What can I do if I can’t add Gmail and Outlook accounts to Windows 10 Mail App?

Before proceeding to the solutions in this section, try the following troubleshooting steps:

  • Connect your Google account to your Windows 10 computer one more time.
  • Enable IMAP on your Google account.
  • Create a new IMAP account.
  • Disable the Credential Manager Service.

If the issue persists, delve into the solutions below:

1. Add your Gmail account manually

  1. Open the Mail app, and click the Settings icon at the bottom left.
  2. Choose Manage Accounts, then select Add account.
  3. Now, select Advanced setup.unable to save outlook gmail to windows 10 mail app 1
  4. Select Internet email.unable to save outlook gmail to windows 10 mail app 2
  5. Now, add the following info:
    • Account name
    • Your name
    • Incoming email server: imap.gmail.com:993
    • Account type: IMAP4
    • User name
    • Email address
    • Password
    • Outgoing (SMTP) email server: smtp.gmail.com:465
    • Leave all checkboxes checkedunable to save outlook gmail to windows 10 mail app 3
  6. Now click Sign-in, and you’re done.

If you still can’t add your Gmail account to Windows Mail, check our detailed guide for other surefire solutions.

2. Add your Outlook account manually

  1. Open the Mail app and select Manage Accounts.
  2. Choose Add account.
  3. Select Exchange (instead of Outlook).
  4. Enter your Outlook login info.
    unable to save outlook gmail to windows 10 mail app 4
  5. Click Sign-in.

That’s about it. Now, you know how to add your Gmail and Outlook accounts to Windows 10 Mail app without getting any errors.

We hope Microsoft will finally fix this issue in one of the upcoming updates, but until then, you have a solution.

However, if you still have problems with your Windows 10 Mail app, you can check out our article about the problems with Windows 10 Mail app for additional solutions.

Also, you can try the best Windows 10 email clients and apps to use from our list.

OneDrive Error Codes 1, 2, 6: What they are and how to Fix

Most error codes on OneDrive are usually sync related. However, there are a few exceptions to this rule, as some could arise as you try to sign in or work on files on your personal or business account.

Three of such OneDrive error codes are errors 1, 2, and 6. In this guide, we will provide you with everything you need to know about these errors and how to fix them.

What are error codes 1, 2, and 6 on OneDrive?

Whenever you get OneDrive error codes 1, 2, or 6, the following are the reasons they came up:

  • Error code 1 – It indicates that an unknown error that has occurred on your computer with OneDrive program.
  • Error code 2 – It means that the OneDrive program has experienced a problem while trying to get your account details. In this case, you need to sign in to your Microsoft account and ensure no authentication issues.
  • Error code 6 – It just means a timeout error has occurred, so you can resolve it simply by restarting your computer or device.

How can I fix OneDrive error codes 1, 2, and 6?

You may get frustrated when you don’t know what to do upfront, and the first thing you do may be either restart your computer or install updates.

If this doesn’t work, then you head online to contact tech support, but before you do this, try the following simple troubleshooting steps:

  • Check the internet connectivity on the computer or device that has the OneDrive problem
  • Check the status of Microsoft Office Online Services
  • Check if you can access other Microsoft services like Outlook or people.live.com. if you’re able to access these services, then the issue may be a temporary one with OneDrive. If you’re not able to access these services, then the issue could be related to your account or a whole different and bigger issue altogether.

If all else is fine and constant, and you still feel you need to talk to someone at support, you can email the OneDrive support team.

If OneDrive error codes 1, 2, and 6 only for a short time, then it is most likely a malfunction or a temporary issue on the server’s side.

In this case, be patient and give it some time, and if you still experience the same problem, you can reach out to the tech support team for further assistance related to your specific issue.

If, however, you wait for it to come around and the issue persists, you can check if it occurs on other browsers or another computer.

If you choose to get in touch with tech support, then make sure you send your server address from Microsoft services along with the error codes and other specific information.

Here’s how to check the server address:

  • Go to the OneDrive webpage and log into your account.
    sign in onedrive error code
  • Click on the OneDrive icon towards the top left corner.
  • You will see other Microsoft Services. Select Outlook.com.
  • Copy the address link from the address box and share it with tech support.

Your account may be under server maintenance, so check the Microsoft Services status page for any known interruptions or outages and share that with the OneDrive tech support team.

Similarly, if you are dealing with the 0x8004e4c3 OneDrive error code, check our detailed guide to fix it.

Was this information of any help to you? Let us know by dropping your comment in the section below.

FIX: Google Chrome doesn’t show YouTube comments

Some users have said on the YouTube forum that YT video comments don’t appear in their Chrome browsers. The loading messages for comments hang below the YouTube videos for those users.

Therefore, Chrome doesn’t display the YouTube comments when the issue arises. Does that sound like a familiar scenario? If so, check out some of the potential fixes below.


This is how you can fix Chrome not showing YouTube comments?

1. Clear Chrome’s Browser data

  1. Click the Customize Google Chrome menu button.
  2. Select More tools to expand a submenu.Clear browsing data option google chrome not showing youtube comments
  3. Click the Clear browsing data option to open the window in the snapshot directly below.Clear browsing data window google chrome not showing youtube comments
  4. Select All time on the drop-down menu.
  5. Select the Browsing history, Cookies and other site data, and Cached images and files check boxes.
  6. Press the Clear data button.

2. Open Chrome in incognito mode

Chrome might display YouTube comments in incognito mode. To switch to that mode, press the Ctrl + Shift + N hotkey. Then a new window will open as shown in the snapshot directly below. If that fixes the issue, you might need to disable some broken extensions within the browser.

Chrome's incognito mode google chrome not showing youtube comments


3. Reset Google Chrome

  1. Open Chrome’s primary menu by clicking the button at the top right of its window.
  2. Click Settings to open the tab shown directly below.Settings tab google chrome not showing youtube comments
  3. Click Advanced, and scroll to the bottom of the tab.
  4. Press the Restore settings to their original defaults button.Restore settings option google chrome not showing youtube comments
  5. Press the Reset settings button.

4. Turn off proxy connections

  1. To turn off a proxy connection via Chrome, enter chrome://settings/ in the browser’s URL bar.
  2. Press the Advanced button to expand the Settings tab.
  3. Scroll down to the Open your computer’s proxy settings option.Open your computer's proxy settings option google chrome not showing youtube comments
  4. Click the Open your computer’s proxy settings option, which will open the Settings window as below.Use a proxy server option google chrome not showing youtube comments
  5. Toggle the Use a proxy server option off option.
  6. Click Save to apply the new setting.

The above resolutions have fixed YouTube video comments for some Chrome users. So, they might also fix the YT comments within your Google Chrome browser. If not, however, you can always open YouTube pages in another browser that will probably display all YT video comments.

If you have any other questions or suggestions regarding Google Chrome-related issues, don’t hesitate to reach for the comments section below.

[wl_navigator]

The Battle.net client is down and gamers aren’t too happy

If you’re an avid fan of Starcraft, Warcraft, Overwatch and more of Blizzard’s beloved titles, then you’ll be extremely disappointed to hear that Blizzard’s very own Battle.net is currently out for the count.

Gamer’s aren’t happy about Battle.net’s downtime

Reports about the issue first started pouring in on Reddit when users observed that they are getting an error message whenever they try logging into it:

I restarted my computer last night and went to play Overwatch this morning and battle.net wouldn’t let me access my games library. I googled my error code BLZBNTBNA00000005, where one of the apparent fixes was to uninstall and reinstall battle.net.

Similar reports have started pouring in from Twitter as well, and as expected, gamers cannot log into their favorite games anymore.

my battle.net stuck on “Blizzard Agent went to sleep. Attempting to wake it up….. More help: BLZBNTBNA00000005” for like a hour now.

For those of you that don’t know, Battle.Net it Activision Blizzard’s proprietary game launcher. You need to have it in order to install, update, patch and launch any of your Blizzard games.

That being said, any inability to launch this program means you will not be able to do anything with any of your Blizzard games.


If you are facing any type of difficulties with your Battle.net client, do check out these useful guides that will find helpful:

  1. Here’s how to fix Battle.net launcher not opening in 6 steps
  2. How to repair Blizzard games: Here’s a quick tip
  3. Is your Blizzard app stuck initializing? Here’s how to fix it

If your Battle.net client is working perfectly, but you have issues with some of Blizzard’s games, check out these articles that will help you solve them:

  1. Overwatch update stuck at 0 b/s: This is how we fixed the issue
  2. FIX: World of Warcraft Won’t Start in Windows 10
  3. Heroes of the Storm Your System Does Not Support Higher Settings [FIX]
  4. Fix: Hearthstone unable to start on PC

No official statement regarding the issue has been made public, and it seems all gamers can do is wait for the problems to sort itself out.

If you’re looking for other articles regarding Blizzard’s Battle.net or any of their game, go ahead and check out these useful articles.

What’s your take on Blizzard’s latest issue? Share your thoughts in the comments section below and we’ll continue the talk.

[wl_navigator]

Fix Sticky Notes not available Windows 10/11 error with ease

Sticky Notes is a quite troublesome Windows 10 feature, and that’s a relatively known fact. Despite Microsoft’s numerous efforts to improve it, it seems that users are still facing the Sticky Notes not available error.

So, here we’ll try to solve one of the most common issues – the Sticky Notes crashing issues. Users are discouraged by the error messages that say Sticky Notes is not available to you which also asks them to go to the Store.

Unlike some other Windows 10 features, Sticky Notes is available to users worldwide, so users’ residing region is definitely not a problem.

In this article, we’re going to explore the possible solutions for the crashing issues, in order to improve the experience of using Sticky Notes at least a bit.

What can I do when getting Sticky Notes not available Windows 10 error?

1. Reset Sticky Notes

  1. Go to the Settings app.
  2. Navigate to System > Apps & features.
  3. Find Sticky Notes, click on it, and choose Advanced settings.go to Apps & features
  4. Now, you just need to click Reset.click Reset to fix Sticky Notes error

The first thing you should try is to reset the app, in order to bring back the default settings, and eliminate potential flaws. You can reset Sticky Notes just like resetting any other app in Windows 10, from the Settings app.

If you’re not sure how to do that, follow the instructions above. After resetting Sticky Notes, run the app once again, and see if any further crashes occur. If you still have the problem, check out some of the solutions listed below.

If you’re having trouble opening the Setting app, take a look at this detailed article to solve the issue.


2. Check for fresh updates

update Sticky Notes


Microsoft updates Sticky Notes quite often. These updates are mainly meant to improve the stability and resolve some of the reported bugs.

So, there’s a chance Microsoft just released a new Sticky Notes update that will address your crashing issues. To update Sticky Notes, go to the Windows Store, and check for app updates.

Or you can go directly to the Sticky Notes’ Store page, and see if any updates are available.


Has Windows deleted all your files in the update process? This guide will surely help you get all your files back.


3. Turn off Insights

  1. Firstly, open Sticky Notes, and click on the three-dot button.
  2. Now, click on the Settings icon in the lower-left corner.
  3. Toggle the Enable Insights option off. turn off Enable Insights

Users report that turning off the Insights feature in the latest versions of Sticky Notes actually resolves the problem. You can disable this feature as well, and then wait for Microsoft to release a new update for Sticky Notes.

Once the new update is released, update Sticky Notes, turn on Insights, and see if the problem is resolved. If you don’t know how to disable Insights in Sticky Notes, use the steps above to complete the procedure.

With these being said, we hope that at least one of these solutions helped you to solve the problem with Sticky Notes not being available in Windows 10.

If you managed to fix this issue, why not check our guide on how to keep Windows 11 Sticky Notes always on top.

In case you are aware of any other working tips, don’t hesitate to share them with us by using the comments area below.

FIX: WoW error 132 fatal exception / access violation

If you’re experiencing the Fatal Exception error on WoW and your game crashes, you can find the explanation and solutions below.

Error 132 (0x85100084) is one of the most dreaded errors among World of Warcraft players. When error 132 appears on the screen, one thing is clear – WoW just crashed, and you need to start looking for a fix quickly.

Error 132 (0x85100084) affects all Windows versions, and it appears it’s prevalent for those users who recently installed the latest updates on their computers or upgraded to Windows 10.

Here’s how one player describes this annoying error message:

I started having Error #132 issues, after the recent big Windows 10 update, whenever trying to launch Wow. It would return with the error, with the Wow window in the background, no graphics, but having sound playing in the background, with the error message window over the Wow window.

The good news is that there are a few quick workarounds available to fix this error message, and we’re actually going to list them in this article.


How do I fix World of Warcraft error #132 (0x85100084)?

There are several quick ways of fixing this common issue with World of Warcraft, and here are just some of them:

  • Close background apps in order to eliminate software conflicts.
  • Reset your UI to solve files and add-on corruption issues.
    • You can find more information on how to reset WoW’s UI in this article.
  • Run the Battle.net repair tool to repair damaged game files.
  • Run ScanDisk > defragment your hard drive to repair any corrupted files.
  • Run a full system scan to remove any viruses or malware.
  • Update your drivers to fix compatibility issues.
  • If you’ve overclocked your computer, set your components to factory default speeds.
  • If your computer locks up and is unresponsive, make sure it’s not overheating.
  • Run the Memory Diagnostic Tool to fix any errors in physical memory.
  • If nothing works, uninstall and reinstall the game.

That should do it. In case you have any additional solutions or workarounds to suggest, feel free to do so in the comments section below. We look forward to hearing from you.

The fixes mentioned above have also proven themselves quite effective in resolving these World of Warcraft-related issues as well:

  • Error #132 wow fatal exception – One common culprit for this issue is a recent OS update that may not be compatible with your game files
  • Error #132 (0x85100084) – This error is can be caused by your own Windows System errors, and are not necessarily linked to your World of Warcraft installation.
  • WoW error 132 access violation – This is a generic error that may be caused by outdated addons, corrupted game files, and more.

Windows 10 won’t turn on? Fix it in a few easy steps

There comes a time when we all have to face reality. There is a chance your Windows 10 won’t start up at all. This is a huge problem indeed, and speaking of problems, users reported all kinds of scenarios.

More precisely, in some cases, the PC won’t be able to boot at all and they simply end up with a black screen. Many Windows 10 users reported this issue after installing a new RAM or a new motherboard.

Moreover, others say that the loading screen in Windows 10 keeps running until it restarts or perhaps it passes the loading screen. However, they only get a black screen with the mouse cursor after it loads.

Users also report that instead of starting Windows normally, they are greeted with a blinking cursor and get a boot failure message on their PC. Another problem that users describe is the inability of Windows to work or load with no apparent trigger.

If you’re currently facing one of these issues too, waste no more time and read the lines below to find out some useful fixes for your Windows 10 unable to start up.

What can I do if Windows 10 won’t turn on?

1. Check your hardware

power supply issues
One or more of your hardware devices might malfunction during a power-up of the Windows 10 computer, thus preventing it to turn on correctly. That’s why we’re recommending to check your hardware by doing the following:

  • You’re most likely wondering: Is my power supply dead? If the PC isn’t powering up at all when you press the Power button, the first thing you need to check is the power supply. If it is fried, your PC won’t respond to anything.
  • Also, check the power outlet in your house. There are times when you might not have power to the socket where you plugged the device.
  • Try removing the power adapter, the battery, and any other peripherals you have plugged in. After you have everything unplugged, hold down the Power button for about 50 seconds, then reconnect everything and try to start it.

If you have power supply issues, check out our dedicated guide and learn how you can deal with them quickly.


2. Start your computer in Safe Mode

  1. While the Windows 10 device boots up you could try continuously pressing the F8 button or the Shift and F8 combination.
  2. If that doesn’t work, open the Start Menu, click the Power button, press and hold the Shift key, and choose Restart from the menu.
    choose Restart from the menu
  3. Then, choose Troubleshoot > Advanced options > Startup settings. Click on Restart button and choose Safe Mode after your PC restarts.
  4. If your Windows 10 device booted into Safe mode, then try to remember any software you recently installed before having this issue. Uninstall the software and try again to boot normally to see if it works.

  5. Undo from Safe mode any recent changes you might have made to Windows 10 system files.
  6. From Safe mode run a system check with your antivirus and see if it finds anything that might make your Windows 10 malfunction.
  7. Try doing a System Restore in your Windows 10 system to get your system to a previous state and possibly fix any issues you might have encountered.

If your Windows doesn’t boot, you might be able to fix the problem simply by entering the Safe Mode. If System Restore fails from working, don’t worry. Check this useful guide and set things right once again.


Safe mode is not working? Don’t panic, this guide will help you get past the booting problems.


3. Perform a clean boot of the system

  1. Press and hold the Windows key + R keyboard shortcut.
  2. Type in the Run window msconfig. Press Enter or click OK to run it.
    type in the Run window msconfig
  3. Left-click on the Services tab now. Check the box next to Hide all Microsoft Services. Left-click on Disable all button.
    click Services tab now
  4. Go to the Startup tab and click on Open Task Manager.
    Task Manager
  5. A list of all startup applications will now appear. Select the first entry on the list, right-click it and choose Disable from the menu. Repeat this step for all entries on the list.
    choose Disable
  6. After you’re done, close Task Manager, go back to System Configuration window and click on Apply and OK to save changes.
    click OK
  7. Reboot the Windows 10 device and see if it boots normally.

If the System Restore did not work for you, try doing a clean boot of the system by following the steps above. If your Windows 10 loads up, then one of the apps you disabled is causing your system to crash.

To find the problematic application, you need to enable apps one by one until you find the cause of the problem. After doing that, you just need to remove the problematic application, and the issue should be resolved.

If you want to know how to add or remove startup apps on Windows 10, check out this simple guide.


Can’t open Task Manager? Don’t worry, we’ve got the right solution for you.


4. Disconnect other devices from your PC

disconnect devices when Windows 10 won't turn on
If your Windows still won’t turn on, that can be due to your USB devices. Several users reported this problem, but after disconnecting all their USB devices from the PC, the computer booted without any problems.

In addition to USB devices, the problem can also be your network adapter, so we advise you to disconnect the Ethernet cable from your PC and check if that solves the issue.


5. Check your hard drive configuration in BIOS

If your Windows doesn’t boot, the problem might be related to your hard drive configuration in BIOS. Few users reported that their SATA Controller mode switched from AHCI to IDE causing this problem to occur.

The solution is relatively simple, and you just have to enter BIOS and set your SATA Controller to AHCI or any other value that you were previously using. After doing that, you just need to save changes and your PC should boot without any problems.

Keep in mind that almost every version of BIOS is different, so in order to see how to access BIOS and how to change SATA Controller, we strongly advise you to check your motherboard manual for detailed instructions.

If your hard drive isn’t showing up in Windows 10, check out this amazing guide to solve the problem.


6. Change your BIOS settings

Several users reported that their Windows won’t start up, and according to them, the issue was their BIOS configuration. Apparently, their BIOS was set not to restart after a power failure.

However, for some unknown reason, their BIOS would interpret any restart as a power failure causing this problem to appear.

To fix the issue, enter BIOS and change the setting that prevents it to start after a power failure. Keep in mind that not every BIOS supports this feature, so be sure to check your motherboard manual to see how to find and disable this feature.

Also, you can write us below in the comments section of the page if you have any other questions regarding this article or tell us if the methods above worked for you or not.

FIX: Windows 10/11 computer keeps freezing issue

Most users have switched to Windows 10, but they aren’t all pleased with it. One of the major problems that they have reported is that their Windows 10 computer keeps freezing.

This is a serious issue since it can completely ruin the users’ experience. If that’s happening to you too, don’t worry. Apply the following solutions to change that immediately.

What can I do when Windows 10 computer keeps freezing?

1. Check your graphics card drivers

  1. Open your Start menu.
  2. In the search field type Device Manager and click the Device Manager shortcut.
  3. You may now check in the category of display adapters to see what version of drivers you have loaded for your graphics card.
  4. Select display adapters drop-down, then right-click the driver and select Properties.
  5. Then, select the Driver tab and this will list the Driver version.check Driver version
  6. Compare this to what is available from the manufacturer’s site and see if an update is required.

Commonly these issues are related to driver incompatibility, so it’s best that you check for the latest drivers on the manufacturer’s website.

2. Disable your graphics card/WiFi card

  1. Go to Device Manager. You can open it by typing Device Manager in the Search bar and choosing it from the list of results.
  2. Now, find the Display adapters section and expand it.
  3. Find your dedicated/integrated graphic card, right-click it and choose Disable from the menu.computer freezes windows 10
Note icon NOTE
You can also do a similar process for disabling the WiFi card if you’re using one.

In certain cases these issues can be caused by an incompatible graphics card or WiFi card, so maybe you should try disabling it.

In the worst-case scenario, you might want to try changing them completely if not being compatible with Windows 10.

However, replacing your graphic card or WiFi card will break your warranty, so you might want to take your computer to an official repair store.

3. Perform a Winsock Catalog reset

  1. Firstly, click on the Start button.
  2. Type cmd in the Start Search text box.
  3. Press Ctrl-Shift-Enter keyboard shortcut to run the command prompt as Administrator. Don’t hesitate to allow the elevation request.
  4. In the Command Prompt, type the following command and hit Enter:
    netsh winsock resetenter netsh winsock reset
  5. Then, reboot the PC and test if it keeps freezing.

A basic Winsock reset can undo configurations made to the Winsock Catalog in Windows. Lots of people have confirmed this to work, so all you need to do is run netsh in Command Prompt, as described above.

Windows 10 freezing issues can be quite frustrating but we hope that some of these solutions were helpful to you.

Have the above procedures failed? Take a leap of faith and increase Virtual Memory or turn off Link State Power Management.

Should you have any problems with the above procedures, remember that we are here to help. In case of know other types of potentially working solutions, feel free to let us know by using the comments area below.

Fix: Print Unable ZC error on Brother printer

An annoying issue frequently prevents users from printing files on their Brother machine. When attempting to initiate the printing process, the error message Print Unable ZC will appear on the display.

This is a clear indication that the printer has a mechanical issue. In most cases, it detects an irregular power supply due to the operating environment. This usually happens when the machine is connected to a special power source such as a generator, a power inverter, or an uninterruptible power supply.

In this guide, we’ll walk you through the steps to get rid of the Print Unable ZC message error once and for all.

What can I do if getting the Print Unable ZC error?

1. Turn the power switch off and back on

turn the power switch Off

  1. Turn the switch off by pressing and holding the On/Off button on the machine panel.
  2. Unplug the power cord from the back of the machine.
  3. Wait 30 seconds or so before plugging the power cord back into the machine.
  4. Finally, press and hold down the power key to power it back on.
  5. If your printer‘s display shows Ready at this point, then it’s your lucky day and the issue is resolved.

If the machine’s display still reads Print Unable ZC after completing the steps, then continue to the next procedures.


2. Put a filter into the power supply

LC filter
Since this issue is related to an irregular power supply, think of a way to get the noise out of it. For newbies, power-supply noise is a combination of unwanted periodic ripple and spikes with random noise from the devices or other external sources.

You could, therefore, use a noise filter on the power supply, just like you use filters to remove noise from a signal. To be more precise, a filter consisting of L2 and C3 is an ideal choice. The output voltage of the power supply is being then filtered by the LC filter.

High-frequency noise coming from both the switching frequency and the switching transition frequency is finally attenuated.


3. Install a voltage stabilizer to the power supply unit

voltage stabilizer
As a final resort when there is an irregular power supply issue causing the Print Unable ZC message error, you could try to install a voltage stabilizer to the power supply unit.

There are various types of voltage stabilizers that successfully keep the voltage of a circuit at a specified level, yet keep in mind that integrated circuit voltage stabilizers are among the most reliable choices.

Let us know in the comments section whether these steps and solutions worked for you. If nothing works, you can contact your printer’s manufacturer to find out more about how to resolve the issue.

READ NEXT:

State of Decay 2: Juggernaut Edition is now available on Xbox One, PC, and Xbox Game Pass

State of Decay 2, Juggernaut Edition, a new version of the zombie survival game is now available on Xbox One, the Windows 10 Microsoft Store, Steam, and Xbox Game Pass. It’s also the first Xbox Game Studios title to launch on the Epic Games Store, showing that Microsoft may be ready to embrace other digital storefronts than the Microsoft Store and Steam for its PC games going forward.

State of Decay 2 was released to mixed reviews back in May 2018, so you should think of this new Juggernaut Edition as a “Definitive Edition” of the game, likely made possible by Microsoft’s acquisition of developer Undead Labs back in 2018.

“Juggernaut Edition provides the highest quality and most expansive State of Decay experience in a single title, replacing the Standard and Ultimate editions, and includes all previous add-on packs (Independence Pack, Daybreak Pack, and State of Decay 2: Heartland). This new edition not only unlocks all previously released DLC, but also adds a tremendous amount of new content like a new open-world map named Providence Ridge, fully remastered graphics and audio, and hundreds of minor improvements for veterans and new survivors alike,” wrote Brandon Wells, Xbox Senior Product Marketing Manager.

State of Decay 2: Juggernaut Edition will keep all your existing saves from the original game, and the Microsoft Store version still supports Xbox Play Anywhere, Xbox Live cloud saves, and crossplay. All versions of the game will also support crossplay through Xbox Live, and that should be very good news for gamers.

March is a pretty exciting month for Xbox Game Studios. Ori and the Will of the Wisps was released just two days ago, and next week will also see the release of Ninja Theory’s team brawler game Bleeding Edge. A final beta for the latter is also available this week-end for Xbox Game Pass subscribers.

Windows Subsystem for Linux (WSL2) will ship with Windows 10 version 2004, kernel to be delivered via Windows Update

There was a time when Microsoft took a much different approach to Linux, but much has changed, and the Windows Subsystem for Linux (WSL) is becoming an essential tool for developers and IT managers. The latest version of WSL, known as WSL2, has been in testing, and Microsoft announced today that it will become generally available and ship with Windows 10 version 2004. We’re getting close to that milestone, with a new build for the 20H1/2004 Slow Ring released today, but a final version is yet to ship.

One big change is coming too to the way WSL2 is delivered. Instead of being baked in to the operating system, WSL2 for the first time will be update-able via Windows Update. However, it’s going to take some time for this new functionality to arrive, so users will still have to manually install WSL2 on Windows 10 version 2004. Here’s more from today’s blog post:

Our end goal is for this change to be seamless, where your Linux kernel is kept up to date without you needing to think about it. By default this will be handled entirely by Windows, just like regular updates on your machine. Inside of the initial release of Windows 10, version 2004, and in the latest Windows Insiders slow ring preview build you will temporarily need to manually install the Linux kernel, and will receive an update in a few months that will add automatic install and servicing capabilities. We made this change now and will have a patch later to ensure that all users in the initial general release of WSL2 will be serviced via this dynamic model, and no one will be left in a middle state using the prior system.

Microsoft seems to keep needing to learn the lesson, as they did with legacy Edge, that building features into the operating system means that they can’t be easily updated in a timely manner, but like the new Edge, WSL2 will soon be able to update independently of the operating system, meaning that innovation can continue separately from the cadence of Windows 10’s update cycles.

Are you using WSL? Is it helping your workflow? Let us know in the comments below.

How to repair Blizzard games: Here’s a quick tip

Blizzard is an important game developer and publisher well-known for its epic games, such as World of Warcraft, Diablo, Starcraft, and more. Blizzard’s games keep millions of gamers busy every day, allowing them to immerse in impressive fantasy worlds.

The company’s gaming platform is very stable and reliable and lives up to the expectations of even the most demanding gamers. Blizzard’s platform operates with a huge list of variables every day, and sometimes various technical issues may occur.

The easiest and simplest solution to repair Blizzard games is to use the platform’s dedicated repair tool. Corrupted and damaged game files can cause a wide variety of problems and errors. Blizzard’s repair tool quickly identifies the faulty files and repairs them in just a few minutes.

How to repair corrupted game files

  1. Launch the Battle.net desktop app
  2. Click the icon of the game you need to repair
  3. Below the title of the game is an option called Scan and Repair > select it
  4. Click Begin Scan > wait for the repair process to complete. This process may take under 3 minutes, or even half an hour, depending on how many files the tools need to repair.

There are also situations when Blizzard’s scan and repair tool stops working, scans games in a loop or the option is completely grayed out.

After the latest patch downloaded my WoW game keeps attempting to scan & repair. It gets to 100% then says updating and proceeds to scan & repair again. I’ve gone directly into the folder and tried to run the WoW file but an error box appears.

If the Scan and Repair tool keeps on scanning games in a loop, follow these troubleshooting steps:

  1. Go to  WTFAccountMYACCOUNT > rename macros-cache.txt to macros-cache.txt.old
  2. Type /script for i=1,120 do DeleteMacro(i) to delete all account side macros.

If this doesn’t help, you can also try reinstalling the game and move from there. Even though the aforementioned tool should replace corrupted files, we can’t say with complete certainty if that will resolve all problems. That’s why, if this fails, we suggest reinstalling the game and moving from there.

You can either use the Battle.net client to remove the game or uninstall it from the Control Panel like any other applications. Once done, reboot your PC, install the game again and hope for the best.

[wl_navigator]

Planning to stay home these days? Xbox Store currently has lots of games on sale

With more and more companies, Microsoft included, inviting employees to work from home to prevent COVID-19 from spreading, the number of people using streaming services or playing games on smartphones, PC, and consoles could be on the rise. Some ISPs around the world have already announced some changes to monthly data caps, and if you’re a gamer now seems quite a good time to check out the latest game deals and get some downloads started.

In case you missed it, Xbox’s Major Nelson recently amended his weekly Deals with Gold post to add new game sales that do not require an Xbox Live Gold subscription. There’s the Triple Threat Villans Sale featuring several Ubisoft games including The Division 2 – Warlords of New York Edition. This new edition of the post-apocalyptic loot shooter includes the game’s brand new DLC that moves the action back to the New York setting of the first game. Other interesting games in this sale include Tom Clancy’s Ghost Recon Breakpoint, Far Cry New Dawn, and Assassin’s Creed Odyssey.

You may also want to check out the Warner Bros Publisher Sale featuring Mortal Kombat 11, Batman: Arkham Collection, or Hitman 2, as well as the massive Back Combat Sale that includes many classics from the Xbox 360 and OG Xbox era: the Dead Space and Mass Effect trilogies, Fallout 3 and Fallout New Vegas, GTA IV, Red Dead Redemption, and Star Wars: Kotor I and II, and much more. There are close to 500 games on sale this week overall, and we invite you to check out the full list on Major Nelson’s blog.

Windows 10 build 19582 upgrades the Your Phone app

Rumors that Microsoft was working on a faster cross-platform file transfer mechanism for the Your Phone app began surfacing toward the end of January this year. So, users have been expecting the application to start supporting copy and paste, drag and drop, or both at some point.

Well, Windows 10 Insider Preview Build 19582.1001 is now live. It includes a Your Phone update that changes the way you transfer files between your Android smartphone and your Windows 10 PC.

Copy and paste capability

If you are a Windows 10 insider in the Fast ring, you can now sample the copy and paste function that Microsoft added to the Your Phone app. What is more, you can transfer images and text using this feature.

We’re excited to introduce exciting new features, which are now available on the latest Samsung Galaxy S20/S20+/S20 Ultra and Samsung Galaxy Z Flip devices in select markets. You can enjoy copying and pasting text and images between your devices.

With your smartphone synced to your Windows 10 PC, you can create a two-way channel that lets you move items in both directions.

Just open the Your Phone app and go to Settings to activate cross-device copy and paste.

The only not-so-great news coming with the update is that, currently, only a few Android smartphone models support that level of cross-platform integration.

You may have noticed that, in the release notes, Microsoft is specific about the type of content you can transfer by copying and pasting. As such, you probably cannot move videos, apps, or other massive files this way for now.

There also is no mention of drag and drop, so maybe a future Windows 10 upgrade will include it.

Build 19582 has two other feature enhancements for Your Phone Companion:

Black screen

The phone screen feature lets you interact with your smartphone’s display via your Windows 10 PC. While you are at it, Your Phone app gives you the option to turn off your phone’s screen as you focus on the content on your desktop monitor.

The black screen is one way to keep prying eyes off your phone’s content.

Rich Communication Service

Your Phone app now boasts RCS support. Therefore, it offers a rich texting experience similar to that of messaging apps like Messenger and WhatsApp. If only the entire telecommunications industry would support the feature today!

Meanwhile, general users and insiders on Windows 10 Build 19H2 have to wait a little longer for the updates to the Your Phone app.

Update KB4551762 patches SMBv3 protocol bug

Cumulative updates KB4551762 for Windows 10 versions 1903 and 1909 are now live. The files contain critical security fixes and a couple of quality enhancements for the operating systems.

But the patch for the bug affecting the Microsoft Server Message Block 3.1.1 (SMBv3) protocol is the star of the latest CU.

The SMB 3 protocol issue (CVE-2020-0796)

The bug came to the fore after Microsoft inadvertently revealed it when it rolled out the March Patch Tuesday updates. Next, the company issued an advisory that included suggestions for circumventing the SMB 3 protocol glitch.

If you have not tried implementing any of the proposed workarounds yet, there is no cause for alarm. Microsoft has announced a patch for the problem.

Updates a Microsoft Server Message Block 3.1.1 protocol issue that provides shared access to files and printers.

CVE-2020-0796 is a remote code execution (RCE) vulnerability

Microsoft said that malicious actors could take advantage of the CVE-2020-0796 vulnerability to launch a server- or client-side attack. Worse still, they would not need to supply the correct user credentials to remotely send a specially-crafted request to an SMBv3 server of interest.

It appears that such a hacker would have to rely on an authenticated user to attack an SMB 3 client.

Thanks to CU KB4551762, the tool is no longer vulnerable to such illicit, RCE coding.

The security update addresses the vulnerability by correcting how the SMBv3 protocol handles these specially crafted requests.

The SMB 3 protocol makes it possible for applications to share files and printers in a computer network. So, when it is a potential target for hackers, patching is not optional.

Keep in mind that Microsoft only said the workaround it proposed might be helpful. In other words, it was a stopgap measure you would not count on in some scenarios.

It is not hard to imagine the kind of damage a hacker would do if they exploited the CVE-2020-0796 vulnerability and accessed sensitive personal data or confidential files in your organization.

Now is the time to patch

The KB4551762 patch installs on your PC automatically if you usually access the latest OS updates via the Windows Update channel.

You may also update manually after downloading the package from the Windows Update Catalog. The third option is automatic syncing with Windows Server Update Services based on your Products and Classifications settings.

Do not forget to backup your files and data before updating to the latest Windows 10 build, though.