How to Fix Corrupt WinRAR Archives With the Best Tools

Looking for the best software to fix corrupt archive files? You’re in the right place.

Check our overviews of the best options available so you can easily get rid of This archive is corrupted errors in Windows.

How to fix corrupt files in Windows?

Find below the best tools to fix corrupt archives in Windows and how to use them:

WinZip – Fully secure file archiver
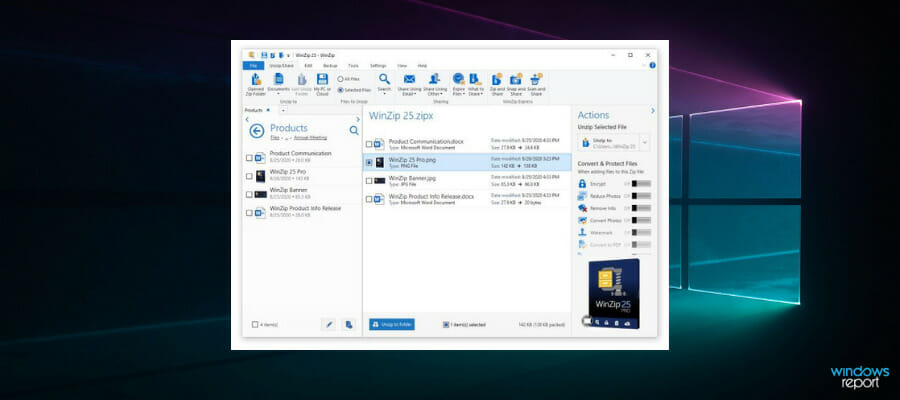
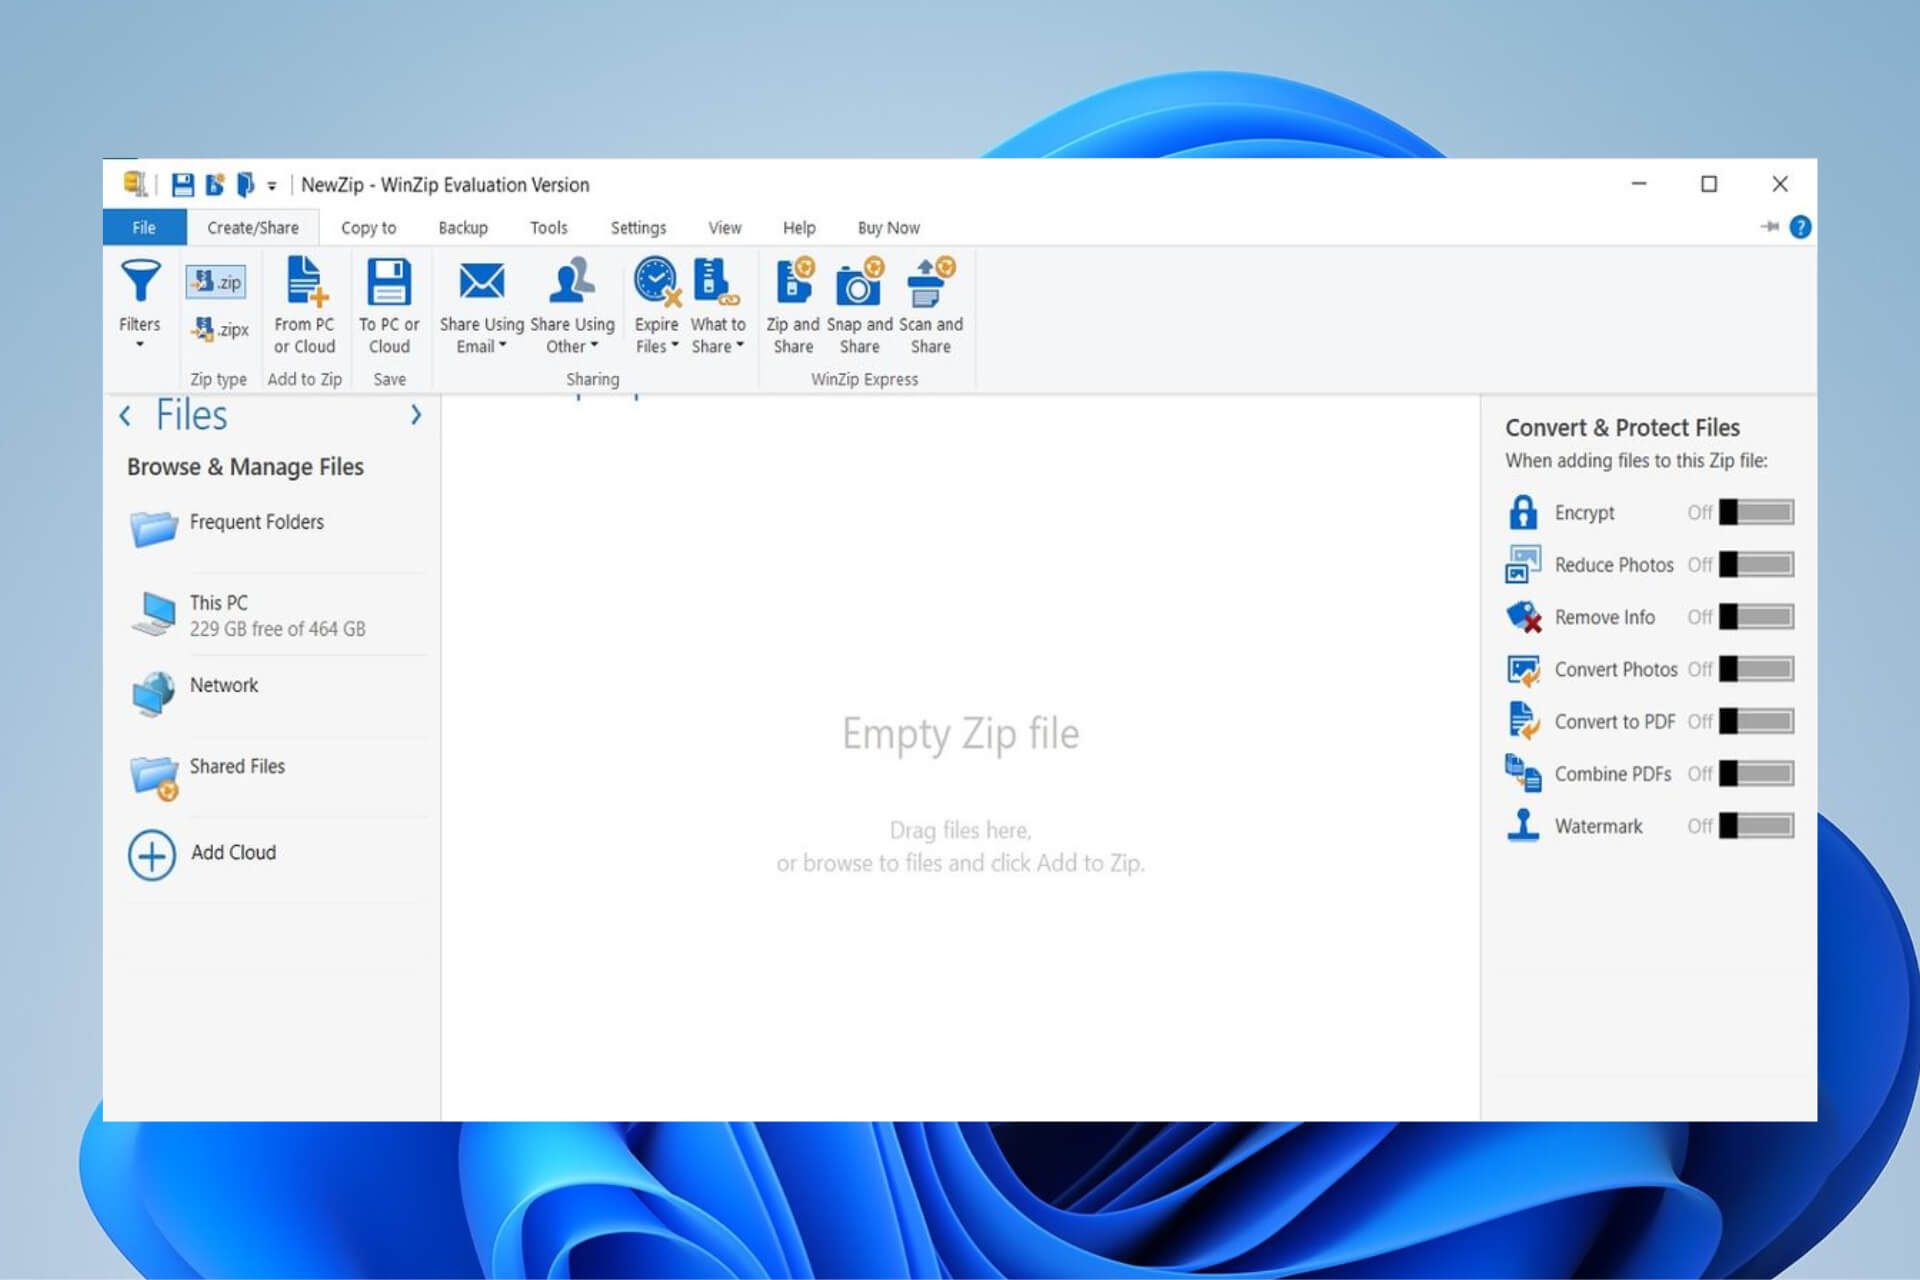
winzip user interface

WinZip is the most popular file compression tool. It supports valuable functions such as sharing, managing, protecting, and backing up your files.

You can use it to fix corrupt archive files be it .zip or .zipx. Here’s how:

  1. Type Command Prompt in the search bar and open as admin.
  2. In the dialog box that opens, type the following command: C:Program FilesWinZipwzzip" -yf zipfile.zip
  3. Press Enter.

For a split or spanned Zip file, use the following command instead: C:Program FilesWinZipwzzip" -yfs zipfile.zip

Note: Change the letter C with the corresponding drive on your device where the WinZip folder is located.

By using this command, WinZip will create a new Zip file with a FIXED suffix in the file name. It will not change the original Zip file. Only the data in the original Zip file is used.

The FIXED Zip file is accessible, but the data may still be corrupt.

WinZip

WinZip

Use this popular tool to compress, share, manage, password-protect, and back up your important large files.
Free trial Visit website

WinRAR – Most efficient file archive and transfer
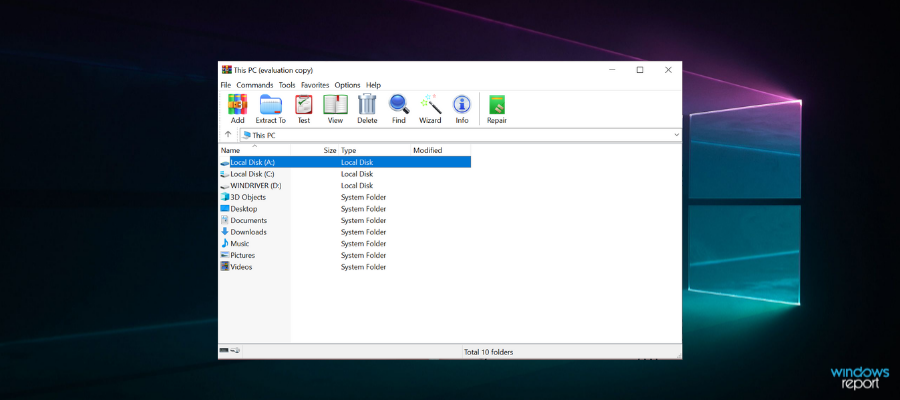
winrar user interface

WinRAR is another popular file extraction tool that you can use to repair corrupt ZIP and RAR formats.

Here’s how to use it to repair a corrupted archive:

  1. Launch WinRAR, click on the address bar and then select the location where the corrupted file is saved.
  2. Click on the corrupted archive file (RAR or ZIP file)
  3. Click on the Repair button in the tool and choose the repair archiver from the drop-down list that appears.
  4. A new dialogue appears, choose the location where you want to save the new archive after repairing the file. Click on OK to save settings.
  5. After the repair process is completed, go to the folder chosen as the location for the new archive and access the repaired file.

Alternatively, you can fix corrupt archive files (most especially small-sized corrupt archive files) by using the shortcut menu. Here’s how to do this:

  1. Launch WinRAR
  2. Select the corrupt archive file and right-click on it
  3. Click on extract files in the shortcut menu that pops up
  4. Move to the Extraction path and options menu and choose a folder to save decompressed archives.
  5. Check the box indicating keep broken files in Miscellaneous
  6. Click OK to start the extraction process. Error messages might appear on the screen; ignore them and extract the archive.
  7. Check the saved folder for all the incorrupt files

⇒ Get WinRAR

PowerArchiver – 256-bit AES encryption

power archiver user interface

PowerArchiver, despite its small size, contains advanced features that make it a good option. It works on various formats, including ZIP, ZIPX, 7Z, RAR, and more.

After the repair process is completed, the new archive file is saved in the same folder as the corrupted file which can then be quickly accessed for further use.

Here’s how to use it:

  1. Open Power Archiver.
  2. Select Repair ZIP from the tools menu.
  3. Enter the name and path of your archive or use the browse option to find it.
  4. Select it and hit Start.
  5. Wait for the process to complete.

⇒ Get PowerArchiver

DiskInternals ZIP Repair – Easiest ZIP file repair

disk internals zip repair dashboard

The Zip Repair tool is a freeware released by DiskInternals and is renowned for its capability of recovering corrupt archive files. It’s lightweight and very straightforward.

The tool can repair multiple archive file formats and save the recovered file on any disk.

Here’s how:

  1. Open the Zip Repair tool.
  2. Hit the Browse button to select the archive you want to fix.
  3. Hit Next and wait for the process to complete.

⇒ Get DiskInternals ZIP Repair

Zip2Fix – Fast processing damage file repair

Zip2Fix is also a recovery tool that uses a different recovery protocol that differs from the traditional methods.

It fixes archive files by extracting the good files and then zipping them back into a new archive. This ensures that you recover the good aspects of the zip file that is corrupted or damaged.

Running it is easy:

  1. Open the software.
  2. Locate the corrupt ZIP file.
  3. Hit next. The tool will automatically begin the recovery process.

⇒ Get Zip2Fix

Object Fix Zip – Fixes files with CRC errors

Object Fix Zip is a popularly utilized recovery tool to repair corrupt or partially damaged archived files.

Moreover, Object Fix Zip uses a four-pronged procedure that starts from the addition of files to be repaired all through the fixing process.

  1. Open Object Fix Zip.
  2. Click the Add button to browse for the corrupt archive.
  3. Once you find it, hit next. The tool will automatically scan and fix it.

⇒ Get Object Fix Zip

So these would be our recommendations.

Data corruption happens a lot typically when dealing with a huge number of files at a time.

Archive files sometimes may be incomplete or rendered corrupt due to a myriad of reasons that lead to the loss of important information contained in the file.

Please keep in mind that although you will be able to access the corrupt archive using one of these tools, it is possible that they still contain a corrupt file, that you should delete or scan using antivirus software.

If you’re looking for efficient ways of combining RAR files, the highlighted guide will help you.

For any questions, don’t hesitate to use the comments section below.

How to Sort Photos by Favorites on Windows 10 & 11

If you’re using Windows 10 or 11, the built-in Microsoft Photos app lets you mark images as favorites — but figuring out how to sort or view them all in one place isn’t always obvious.

In this quick guide, we’ll show you exactly how to organize your photos using the Favorites feature, so you can jump straight to the memories that matter most.

How to sort photos by favorites in Windows

Just follow the steps to view your favorite photos in Windows.

Windows 11

  1. Launch the Photos app by clicking on the Windows key, type Photos in the search bar, and click Open.
  2. All photos on your PC will appear starting from the most recent. Double-click on a photo to open it in full view.
  3. Click on the heart icon at the top to add it to the Favorites folder.
  4. You can repeat this process until you have made a collection of all your favorite photos.
  5. Once your collection of favorites is complete, you can click on that folder to view all of them.
  6. If you’d like to sort them out, click on the three horizontal ellipses at the top and Select all. Alternatively, you can hit CTRL + A to also select all.
  7. Click again on the three ellipses and select Sort. Choose your preferred option to sort either by date or name.

In the unfortunate chance that your Windows Photo Viewer is not working, check out our detailed guide on how to fix it.

You can also explore a reliable option for organizing and viewing your images by checking the full guide on how to download Picasa for PC.

Windows 10

  1. Click on the Start Menu icon and click on Photos. It’s usually among the pinned apps but if not, do a quick search and click on it to open.
  2. Select an image and click on it to open.
  3. Hit the heart icon to favorite or right-click on the image and select Add to favorites.
  4. Repeat this process until you have all your favorite images in the favorites folder.

If you’d like to remove a photo from the favorites album, all you have to do is click again on the heart icon, and the picture will be restored to its original folder.

How do I filter my favorite photos in Windows 10?

  1. Open your Photos app.
  2. Navigate to the Favorites folder.
  3. Click on the Filter icon and choose either Videos or Photos.

FAQs

How do I mark a photo as a favorite in the Photos app?

Open the image and click the heart icon in the toolbar. This adds the picture to your Favorites collection instantly.

How do I view only my favorite photos?

Open the Photos app and select Favorites in the left sidebar. Windows automatically shows only the images you marked as favorites.

Can I sort a folder by favorites in File Explorer?

File Explorer does not support sorting by favorites. The Favorites feature works only inside the Windows Photos app.

Why are some images not showing in Favorites?

The photo may be stored on a disconnected drive or cloud location. Make sure the file is available locally and synced before favoriting it.

Summary

Hopefully, this article has helped organize your albums and made your favorite pictures more accessible.

We also have a great list of the best photo viewers for your Windows device, so be sure to check that out too. And if the image has unwanted elements, Generative Erase can help you get rid of them.

While sorting photos by favorites may work for some people, the more advanced users prefer to use specialized photo culling software that offers more than the basics.

You may want to read more on how to sort photos by face recognition or organize them by date for even better photo management.

For even better photo management, you can sort photos by name using more advanced options in Windows.

Let us know of any other tips you use for photo management using the Photos app in Windows down in the comment section.

Mouse Cursor Keeps Loading: 3 Ways to Fix It

Even though the Mouse loading icon won’t go away issue in Windows 10/11 doesn’t affect how your operating system works, it can become annoying, just like any other mouse issue.

Many things could lead to this problem, including unwanted background processes, outdated drivers, a faulty fingerprint driver, and particular apps such as ASUS Framework.

Here’s how to fix it:

How do I fix my mouse keep loading?

➡️Start by scanning your PC to outrule virus problems. Then go ahead and follow the steps below.

1. Remove Asus Framework

    Users reported that the Asus Framework software was the culprit of the mouse loading icon blinking in the Windows 10 issue. Thus, you can remove it following the steps below.

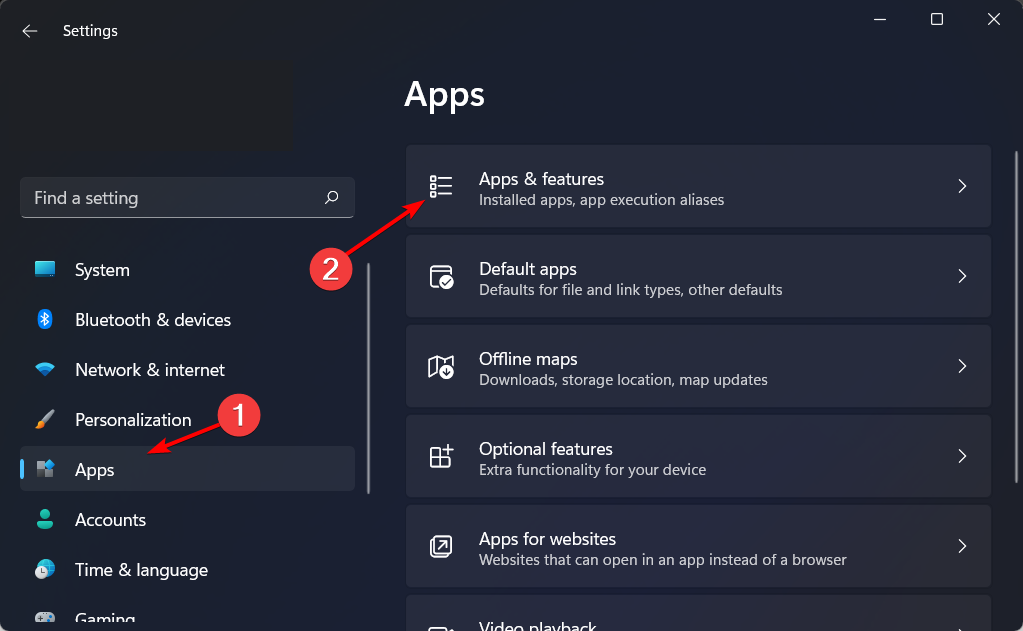
    1. Press Windows + I, then navigate to Apps, followed by Apps and features.
    apps-features where is the chrome menu button
  1. 2. Type Asus Framework inside the search bar, click the three-dot button next to the result, and select Uninstall.

    uninstall-asus mouse loading icon won't go away
  2. 3. Reboot your computer to remove the app from your computer altogether. Alternatively, use an uninstaller software to make sure anything related to Asus Framework gets deleted. The mouse loading icon keeps flashing issue will be fixed.

2. Restart Windows Explorer

  1. Press Ctrl + Shift + Esc to open the Task Manager utility.
  2. Find Windows Explorer, right-click it, and select Restart from the menu. This is another solution to how to stop the mouse from loading icons.windoes-explorer opera not responding

Once you do this, it is necessary to restart it, then reboot your computer to fix the mouse loading icon won’t go away issue.

3. End the Spooler process

  1. If the mouse loading icon is stuck, press Ctrl + Shift + Esc to open the Task Manager utility.
  2. In the Processes tab, search for the process with the name spooler or spool, and select End task.spooler app end task Windows 10 cursor loading circle

Sometimes the mouse loading icon flashing can appear if you’ve clicked Print by mistake without having a printer connected to your PC.

The Spooler is responsible for managing users’ access to printers. The function of the Spooler is completely hidden from view for the vast majority of users. They send a task to be printed to a printer, then travel to the printer to collect the product.

4. Disable the fingerprint device

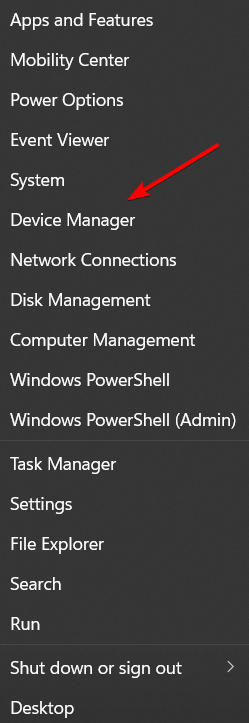
  1. If the cursor has a loading icon that won’t go away, right-click the Start icon, then select Device Manager.device-manager bluetooth won't turn on windows 10
  2. Expand the Human Interface Devices section, right-click the fingerprint device and select Disable device.disable-fingerpint mouse loading icon won't go away

5. Update the mouse driver

  1. Right-click the Start icon, then select Device Manager.device-manager bluetooth won't turn on windows 10
  2. Click the Mice and other pointing devices section, right-click the mouse driver, and select Update driver.mice-update mouse loading icon won't go away

You can also choose to speed-up the process and get an automated tool such as Outbyte Driver Updater. The software will search, find and download the latest drivers for your device specifics.

⇒ Get Outbyte Driver Updater

6. Restart into Safe Mode with Networking

  1. Tap the Windows Start icon and choose Settings.
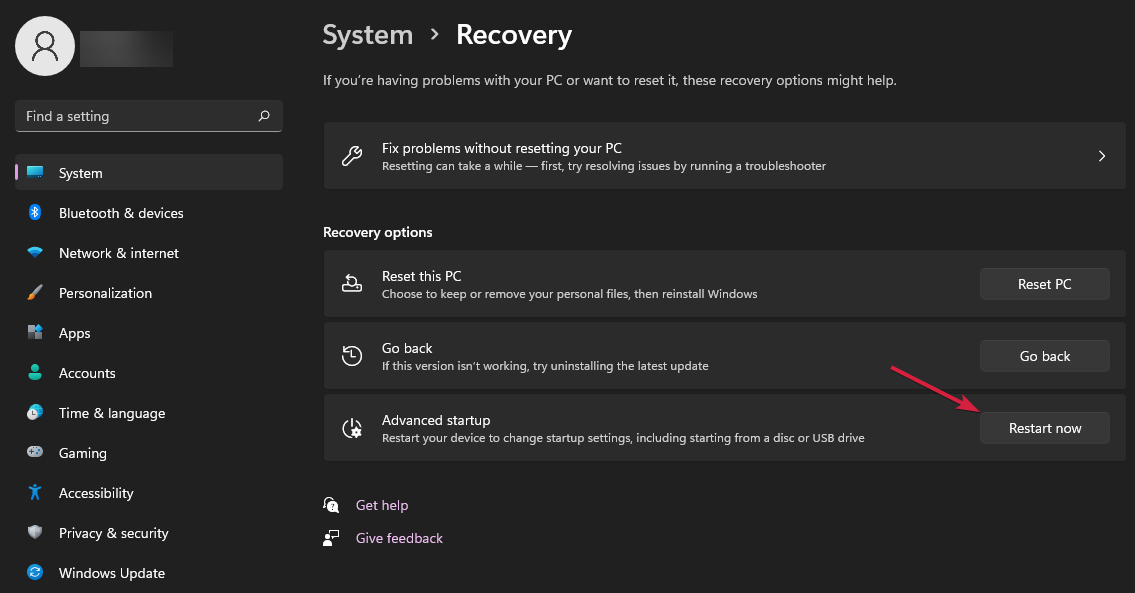
  2. Go to System, then choose Recovery.
  3. Next to the Advanced startup option, click the Restart now button.
  4. Your computer will reboot and then display the Advanced options screen. Here, select Troubleshoot.
  5. Select Advanced options.advanced-opt-troubleshoot mouse loading icon won't go away
  6. Select Startup Settings.startup-sett mouse loading icon won't go away
  7. Click the Restart button.restart-startup-screen mouse loading icon won't go away
  8. Once the PC restarts, press the F5 or 5 key to access Safe Mode with Networking.

When Windows is started in Safe Mode, just a subset of its usual files and drivers are made available for use.

This was how to fix a cursor that keeps loading the blinking circle and refreshing. For more information on mouse issues and potential solutions, check out 6 quick ways to fix a corrupted mouse.

Do let us know in the comments section below whether you have successfully fixed the mouse error.

Critical Word and Excel vulnerabilities persist, endangering thousands of users worldwide

Microsoft Office is used by millions of users worldwide, but have you wondered how safe Office tools are?

Even though Microsoft is doing its best to keep its users safe, and the company has just released KB5035238 which addresses Group Policy Issues, there are still threats that can affect users.

Three security flaws are still wreaking havoc among Office users

As reported by GBHackers, three common vulnerabilities are still affecting Office users. All these vulnerabilities allow hackers to hide the malware and trick users into opening the infected documents.

According to CheckPoint, in 2023 there were more than 13000 samples that had these vulnerabilities. Regarding the affected file types, these exploits affect DOC(X), XLS(X), and RTF files.

Regarding the most common targets, financial and government institutions are top priorities, however, more than half of attacks are targeting other industries.

The most common exploits are CVE-2017-11882, CVE-2017-0199, and CVE-2018-0802, and they have been used to spread various malware.

These exploits allow hackers to run keyloggers and steal your information, such as online credentials. Some of them can even take screenshots without you knowing.

To trick unsuspected users, these documents will usually have poorly formatted text that you can’t edit unless you enable editing. But as soon you do that, you allow malware to spread.

To stay safe, always practice vigilance and keep your system and applications up to date. Also, don’t open links or attachments from unknown senders, and try to keep aware of the latest threats.

Security breaches can happen, and it seems that Azure cloud accounts were hacked in the latest breach, so stay tuned for more updates and security news.

Microsoft Sticky Notes is getting revamped: Anticipation grows for new features

The Sticky Notes app for Windows was introduced in 2002 with Windows XP Tablet Edition and has gone through several updates throughout the years.

The major update for the app came out 4 years ago, but Microsoft is bringing a lot of changes with the latest update.

Microsoft made an announcement from the Microsoft Sticky Notes account on X (formerly known as Twitter):

New year! New updates! Stay tuned for some of our biggest announcements yet!

This announcement piques a lot of users’ interests and leads to people speculating about the new features and changes.

Some users are also expecting the app to be a web-based app, and some requested the company not to make it a web app.

All-in-all with Microsoft being all about AI these days, people also speculated that the Sticky Notes app will be linked with Copilot in some sense.

Some also wanted Microsoft to make it available on macOS, sync the To-do list and Sticky Notes, include image adding & text coloring features, and more.

The list is long but a lot was clarified when another official post went live, informing users that it will not be a web app.

This post brought a sigh of relief to a lot of users, they thanked Microsoft for the update, however, a lot of them posted hilarious & playful comments about the upcoming upgrades to the app.

Another post by Microsoft from the Microsoft Sticky Notes account put the AI upgrade rumors to rest

The Windows enthusiasts started predicting other features coming to the board, like new icons, new interfaces, reorder list items, numbered lists, use markdown, Rich Text formatting, and more.

One user, Ricky Spears, mentioned in the reply to this tweet

Sticky Notes will be announced as the OFFICIAL replacement for Wordpad!

With the announcements, user engagement, and reposts, Sticky Notes is enjoying all the attention it is getting.

However, people are worried that in the pursuit of adding features and improvements to the basic note-taking app, Microsoft might end up compromising its simplicity and functionality.

However, now, with all the attention, Microsoft needs to be extra careful while introducing features in the Sticky Notes app to ensure a seamless and positive user experience.

What are you expecting out of the new upgrade? Share your thoughts in the comments section below.
How to Turn Off Microsoft-verified App in Windows 11

Turning off Microsoft-verified apps on your Windows 11 PC will get rid of messages like The app you are trying to install is not a Microsoft-verified app while downloading outside the Microsoft store.

While this feature is great for security, it can pose limitations if you need to install niche apps from third-party sources. Luckily, there are several ways to do it, all laid out below.

How do I turn off Microsoft-verified apps in Windows 11?

1. By using the Settings app

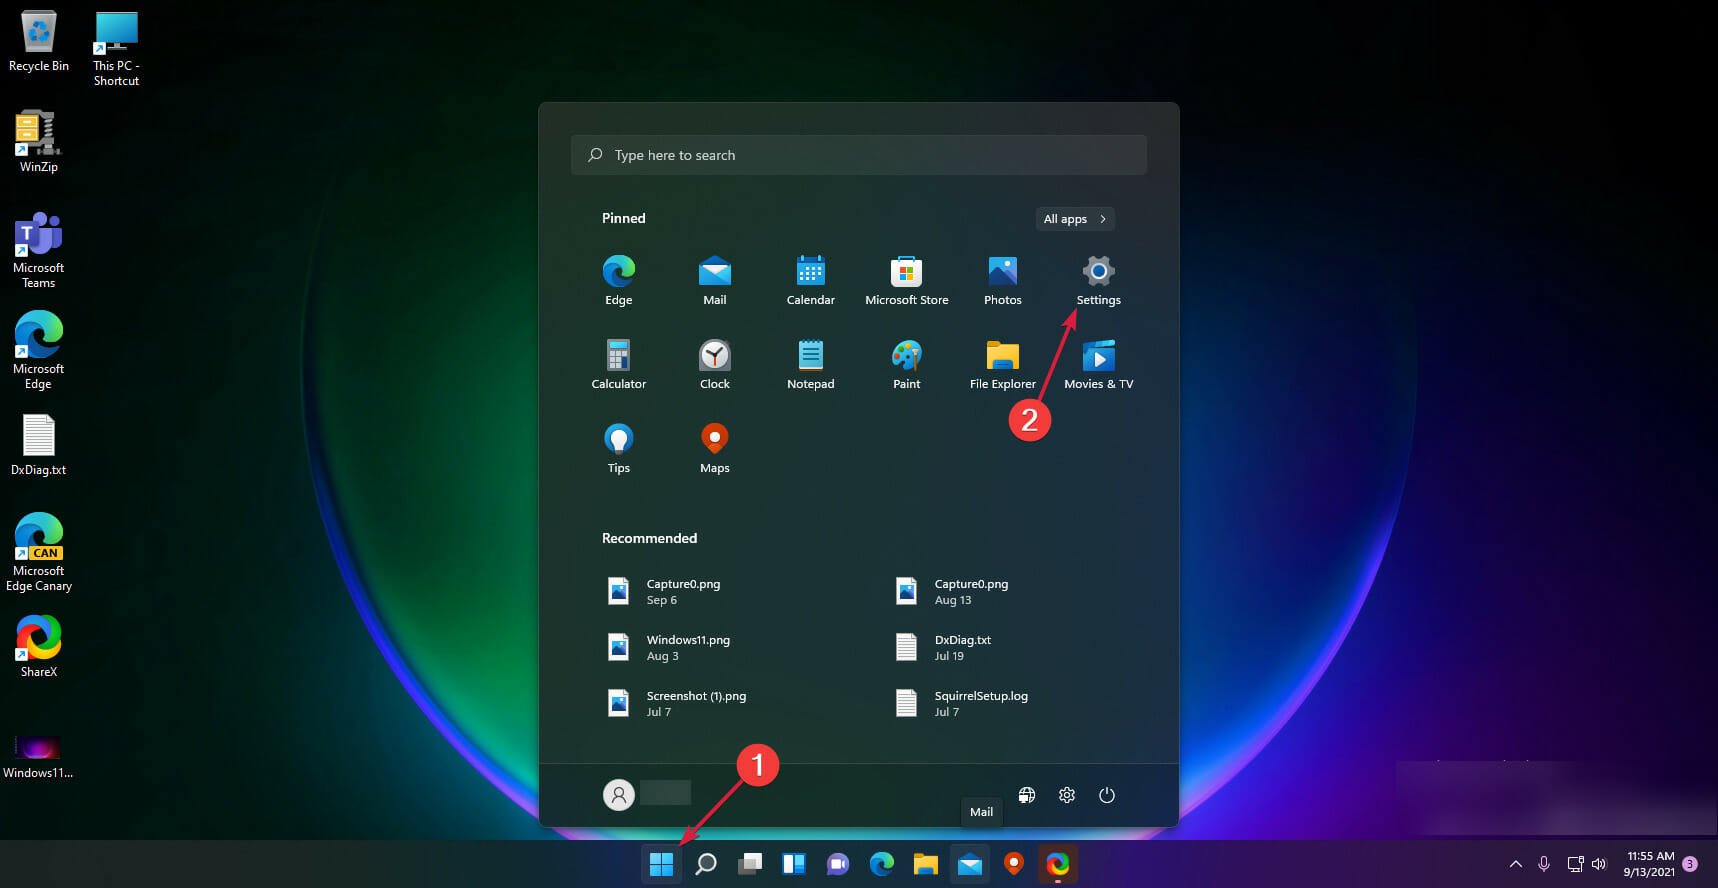
  1. Hit the Windows key and click on Settings.settings windows 11
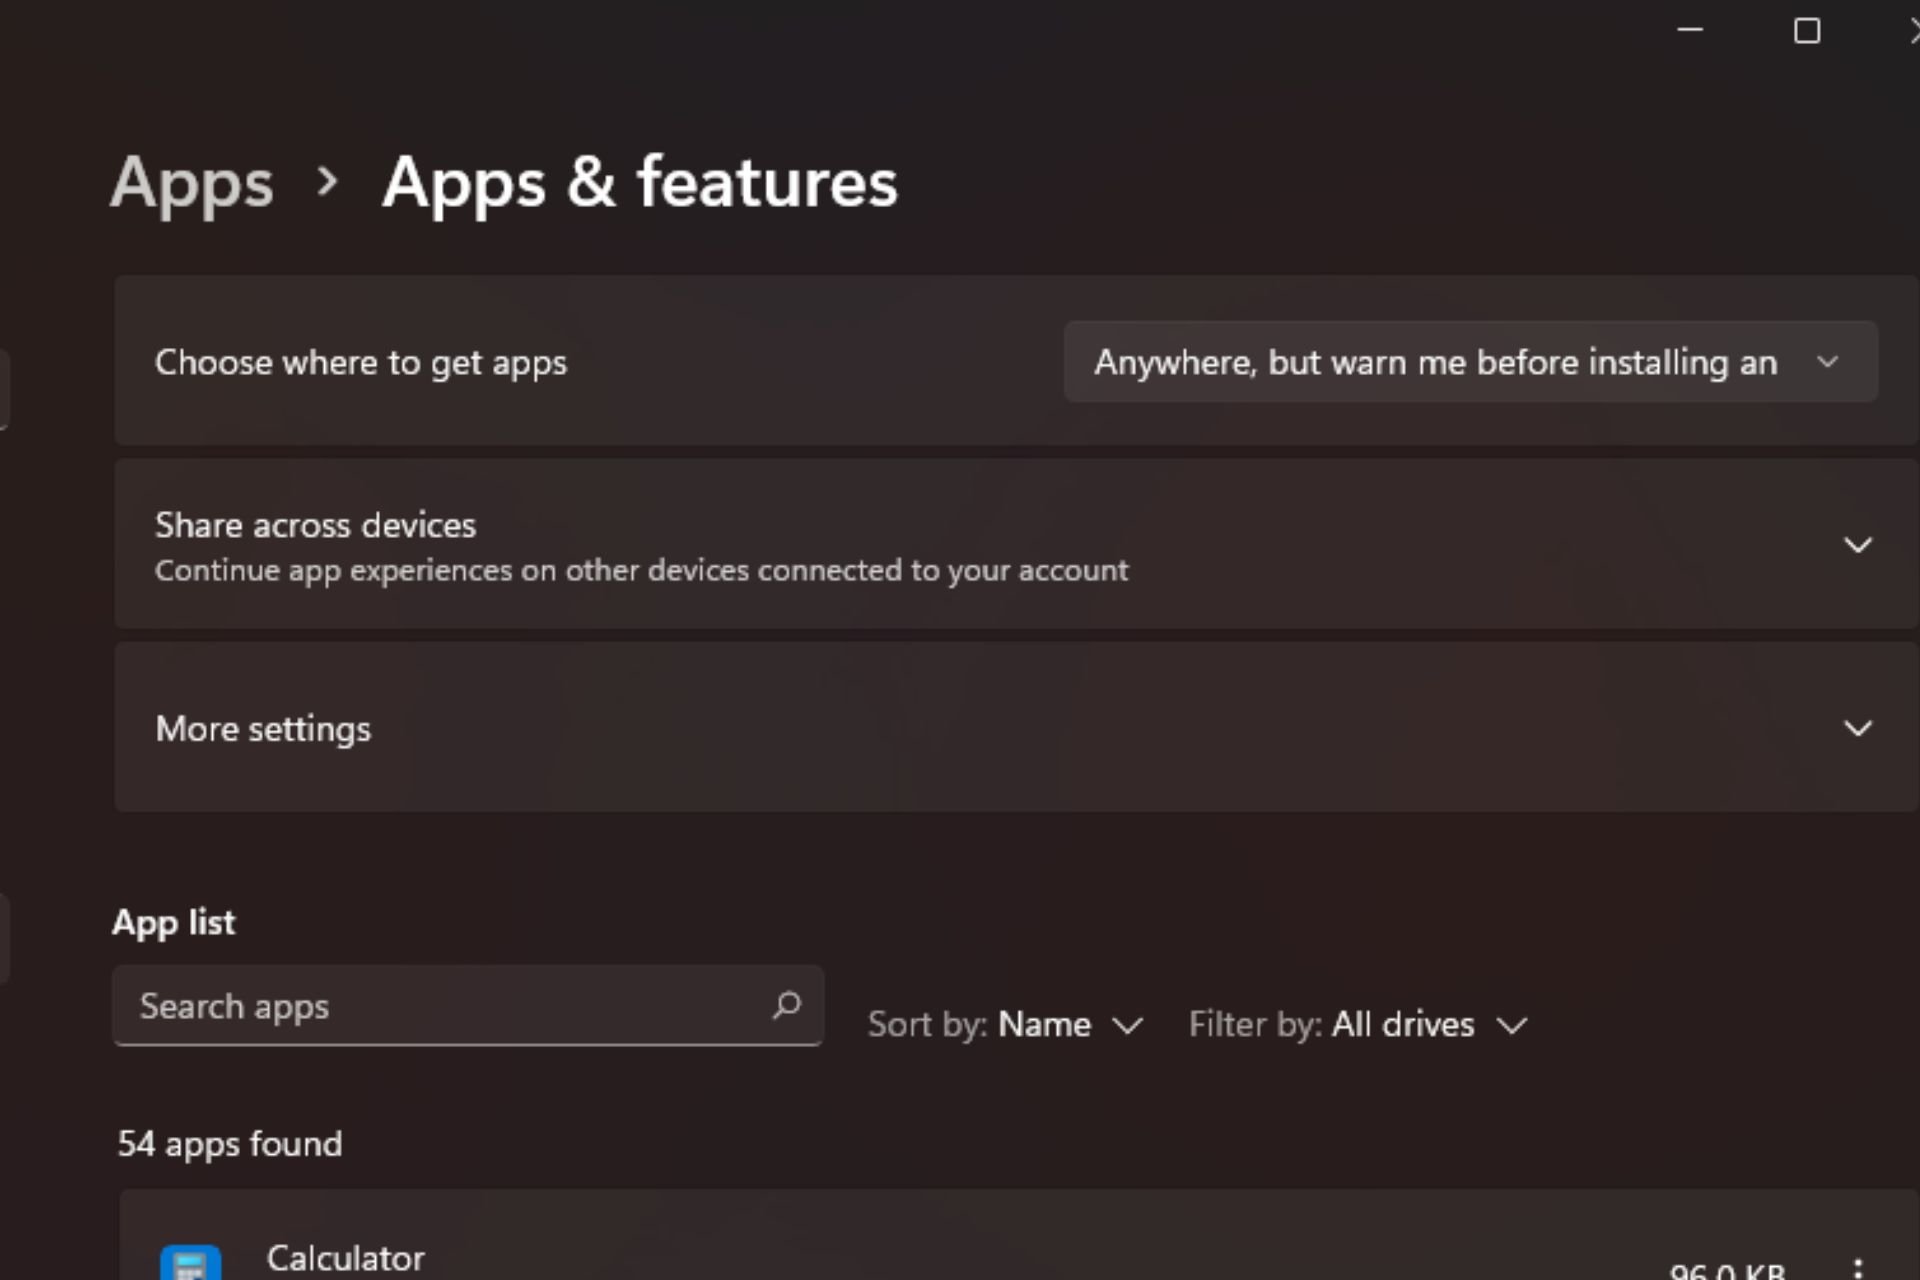
  2. Click on Apps on the left pane, then select Apps & features on the right pane.
  3. Select the drop-down menu under Choose where to get apps, then select Anywhere.

2. By using the Group Policy Editor

2.1 Edit permissions

  1. Hit the Windows + R keys to open the Run command.
  2. Type gpedit.msc in the dialog box and hit Enter to open the Group Policy Editor.GPEDiT.msc -Windows Remediation Service Failed to Start?
  3. Navigate to the following location: Computer Configuration/Administrative Templates/Windows Components/Windows Defender SmartScreen/Explorer
  4. Double-click on Configure App Install Control.
  5. Check the Enabled checkbox then in the drop-down menu, select Turn off app recommendations.
  6. Now click Apply and OK to save the changes.
  7. Restart your PC for the changes to take effect.

2.2 Disable the Microsoft Store

  1. Press the Windows key + R, type gpedit.msc, and click OK.GPEDiT.msc -Windows Remediation Service Failed to Start?
  2. Navigate to the path below in the left pane:Computer Configuration\Administrative Templates\Windows Components\Store
  3. Now, double-click the Turn Off the Store application option in the Store folder.
  4. Tick the radio button for Enabled.
  5. Finally, click the Apply button, followed by OK to save the changes.

Remember that disabling the Microsoft Store may limit your ability to access apps exclusive to the store and miss out on app updates and security patches to already existing apps.

Your Windows system may also become unstable as some native features are integrated with the Microsoft Store hence disabling it may interfere with its functionality.

3. By using the Command Prompt

  1. Hit the Windows + R keys simultaneously to open the Run command.
  2. Type cmd in the dialog box and hit Enter to open the Command Prompt.
  3. In the Command Prompt window, type the following command and hit Enter: reg add HKEY_LOCAL_MACHINE\SOFTWARE\Microsoft\Windows\CurrentVersion\Explorer /v AicEnabled /t REG_SZ /d Anywhere
  4. Restart your PC for the changes to take effect.

4. By using the Registry Editor

  1. Before you start making any changes, ensure you back up your Registry or create a restore point, as some changes can make your PC unstable.
  2. Hit the Windows + R keys to open the Run command.
  3. Type regedit in the dialog box and hit Enter to open the Registry Editor.
  4. Navigate to the following location: HKEY_LOCAL_MACHINE\SOFTWARE\Microsoft\Windows\CurrentVersion\Explorer
  5. Locate AicEnabled, double-click on it, and under Value data, change from StoreOnly to Anywhere.
  6. Navigate to the following location: HKEY_LOCAL_MACHINE\SOFTWARE\Policies\Microsoft\Windows Defender\SmartScreen
  7. Locate ConfigureAppInstallControl double-click on it, and under Value data, change from StoreOnly to Anywhere.
  8. Close the Registry Editor and restart your PC.

Overall, turning off Microsoft-verified apps in Windows 11 gives you more control over your system. You’ll no longer get messages such as the app you’re trying to install is not Microsoft-verified so long as you have administrative privileges.

However, you need to be careful as a lot of third-party sites may be hiding malware in their software. Once it gains entry, your system becomes exposed to all kinds of vulnerabilities.

If you decide to do this, make sure your antivirus is enabled and has real-time protection when you download. This way, if there’s a security risk, it will be able to stop it before it infects your device.

It’s also pretty easy to sideload apps on Windows 11 so you may not even have to turn off Microsoft verified apps.

Would you turn off Microsoft-verified apps in your Windows 11? If you have any reservations, we’d like to hear about them. Leave us a comment down below.

PUA:Win32/Packunwan Virus Removal Guide

PUA:Win32/Packunwan is a particulary tricky to remove malware, but it’s definitely not impossible. Today, we’ll walk you through the whole process of getting rid of this potentially unwanted app in just a few simple steps.

Let’s get right to it.

How do I get rid of PUA:Win32/Packunwan?

1. Using Windows Security

  1. Press Windows + S to open Search, type Windows Security in the text field, and click the relevant result.
  2. Click on Virus & threat protection.threat protection
  3. Expand PUA:Win32/Packunwan, select Remove, and click the Start actions button.remove PUA:Win32/Packunwan
  4. Wait for the process to complete.
  5. Now, click on Scan options.scan options
  6. Select Full scan from the available types, and click the Scan now button.scan now
  7. Check the scan results and verify whether the threat is removed.

The easiest way to remove PUA:Win32/Packunwan potentially unwanted application is through the built-in Windows Security. And, if you are sure about the security aspect of the flagged file/program and believe it is safe, select Allow on device instead.

Running an antivirus scan also helps remove Updt.exe.

If you’re looking for a more in-depth scan of your computer, you can try a third-party antivirus. We like TotalAV because it comes with extra security layers and strong cyber threat removal.

⇒ Get TotalAV

2. Uninstall the problematic program

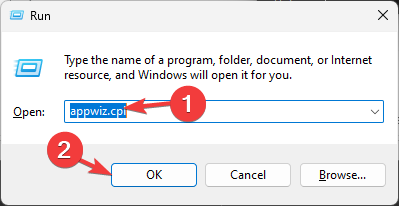
  1. Press Windows + R to open Run, type appwiz.cpl in the text field, and click OK.appwiz.cpl
  2. Select the program being flagged by Windows Security, and click Uninstall.uninstall to remove PUA:Win32/Packunwan
  3. Follow the on-screen instructions to complete the process.

If simply uninstalling the program doesn’t get remove PUA:Win32/Packunwan, consider using an effective software uninstaller tool to get rid of any leftover app files and Registry entries, and the warning shouldn’t appear anymore.

3. Delete the cache in a clean boot environment

3.1 Perform a clean boot

  1. Press Windows + R to open Run, type msconfig in the text field, and hit Enter.msconfig
  2. Go to the Services tab, tick the checkbox for Hide all Microsoft services, and click on Disable all.services
  3. Head to the Startup tab, and click on Open Task Manager.
  4. Identify all programs that read Enabled under the Status column, select each individually, and click on Disable.clean boot to remove PUA:Win32/Packunwan
  5. Once done, head back to the System Configuration window, and click on Apply and OK.
  6. Click Restart in the prompt that appears and wait for the OS to load in the clean boot environment.

2.2 Clear the temporary files/cache

  1. Press Windows + E to open File Explorer, and navigate the following path or paste it into the address bar and hit Enter: C:\ProgramData\Microsoft\Windows Defender\Scans\History\Servicepath
  2. Press Ctrl + A to select all the files and then hit Delete to clear them.delete cache to remove PUA:Win32/Packunwan
  3. Choose the appropriate response in case a confirmation prompt appears.
  4. Similarly, delete all the files in the following locations if they exist, while replacing Username with the current profile, wherever applicable: C:\ProgramData\Microsoft\Windows Defender\Scans\History\CacheManager C:\Users\Username\AppData\Roaming\Microsoft\Windows\Temp C:\Users\Username\AppData\Local\Temp
  5. Finally, reboot the device and the Potentially unwanted app found warning shouldn’t appear anymore.

Windows Defender usually identifies programs bundled with adware or ones without a publisher as PUA:Win32/Packunwan. These include PowerISO, KaOs packs, or cracked software.

Not all of them are viruses, but most of these are unsafe if flagged, and many reported their data being compromised.

Most of the time, it’s easy to get rid of PUA:Win32/Packunwan. But if it just won’t delete, resetting your PC to factory defaults will do the trick!

If you don’t want such a situation to arise, discover the best Windows 11 security settings and enable them to prevent any threats from affecting the PC!

For any queries or to share which application triggered the warning in your case, drop a comment below.

MS Project File Won’t Open? These Methods Will Help

If the MS Project file won’t open, you won’t be able to access it or make any changes to it, and that can negatively impact your productivity, but there are ways to fix this.

Why MS Project won’t open?

In most cases, there’s an issue with your MMP file or with the installation of Microsoft Project.

What can I do if the Project cannot open the file?

You can try opening the file on a different PC, if possible. Alternatively, you can close the MS Project process from Task Manager, start it again, and then open the MMP file from the Project app.

1. Use MS Project online

  1. Go to the online version of Microsoft Project and sign in.
    microsoft project online sign in button
  2. Open the project file that is giving you trouble.
  3. If you manage to open it, save it with a different name.
  4. Try to open it again using the desktop version of Microsoft Project.

2. Perform the online repair

  1. Press Windows key + R and type appwiz.cpl. Click OK.
    Appwiz.cpl run dialog
  2. Select Microsoft Project from the list and click Change in the top menu.
    change button programs and features
  3. Now select Online Repair and follow the instructions on the screen.
  4. Once the process is finished, try to start the application again.

If Microsoft Project cannot open the file, you can try opening it using a different PC or by using the online version. If that doesn’t work, the only option is to repair your installation.

If you choose to reinstall the software, keep in mind that sometimes MS Project is not installing with Office 365, but we have a guide that addresses that.

We’d like to hear more from you on this subject so feel free to comment in the section below.

ExplorerPatcher’s Windows 10 taskbar is no longer working on Windows 11 24H2

Last week, Microsoft released the 26052 build to the Dev and Canary Insider channels, and according to the Redmond-based tech giant this is also the first glimpse of Windows 11 24H2, the next major update of Windows, coming later this year.

While the Insider channels are known for being unstable and breaking existing features, it seems that the build completely broke ExplorerPatcher’s Windows 10 taskbar emulation on Windows 11.

Spotted by Windows enthusiast, @TheBobPony, the taskbar is rendered unfunctional after installing the latest updates, so all those Insiders currently enjoying the Windows 10 legacy taskbar on their Windows 11 Insider version, should be aware of the problem.

The issue is also rendering the other UI elements unfunctional as well. The Windows 10 Start menu that comes with the installation of the ExplorerPatcher’s Windows 10 taskbar, doesn’t work either.

ExplorerPatcher might release an update for this issue, but for now, users will have to avoid installing the 26052 build.

ExplorerPatcher’s Windows 10 taskbar is a suitable solution for those Windows 11 users who prefer the old Windows 10 design on their devices. However, it is understandable that some third-party software won’t automatically work when big Windows updates are released.

The 26052 build was quite big and it carried with it multiple features to Windows 11, debuting the Auto Super Resolution, Sudo, an enhanced Snipping Tool and Notepad, and many more. It also brought the architecture change, effectively being the first glimpse of 24H2, so many of these third-party software are not prepared or updated to work.

However, ExplorerPatcher might soon release an update to fix the annoying issue, so that users can enjoy having the Windows 10 taskbar on Windows 11 again.

For now, as we mentioned, better stay away from the latest build to the Dev and Canary channels, and make sure you follow ExplorerPatcher to get the necessary updates for this emulator.

Background permissions are missing, and people are blaming Windows 11’s latest update

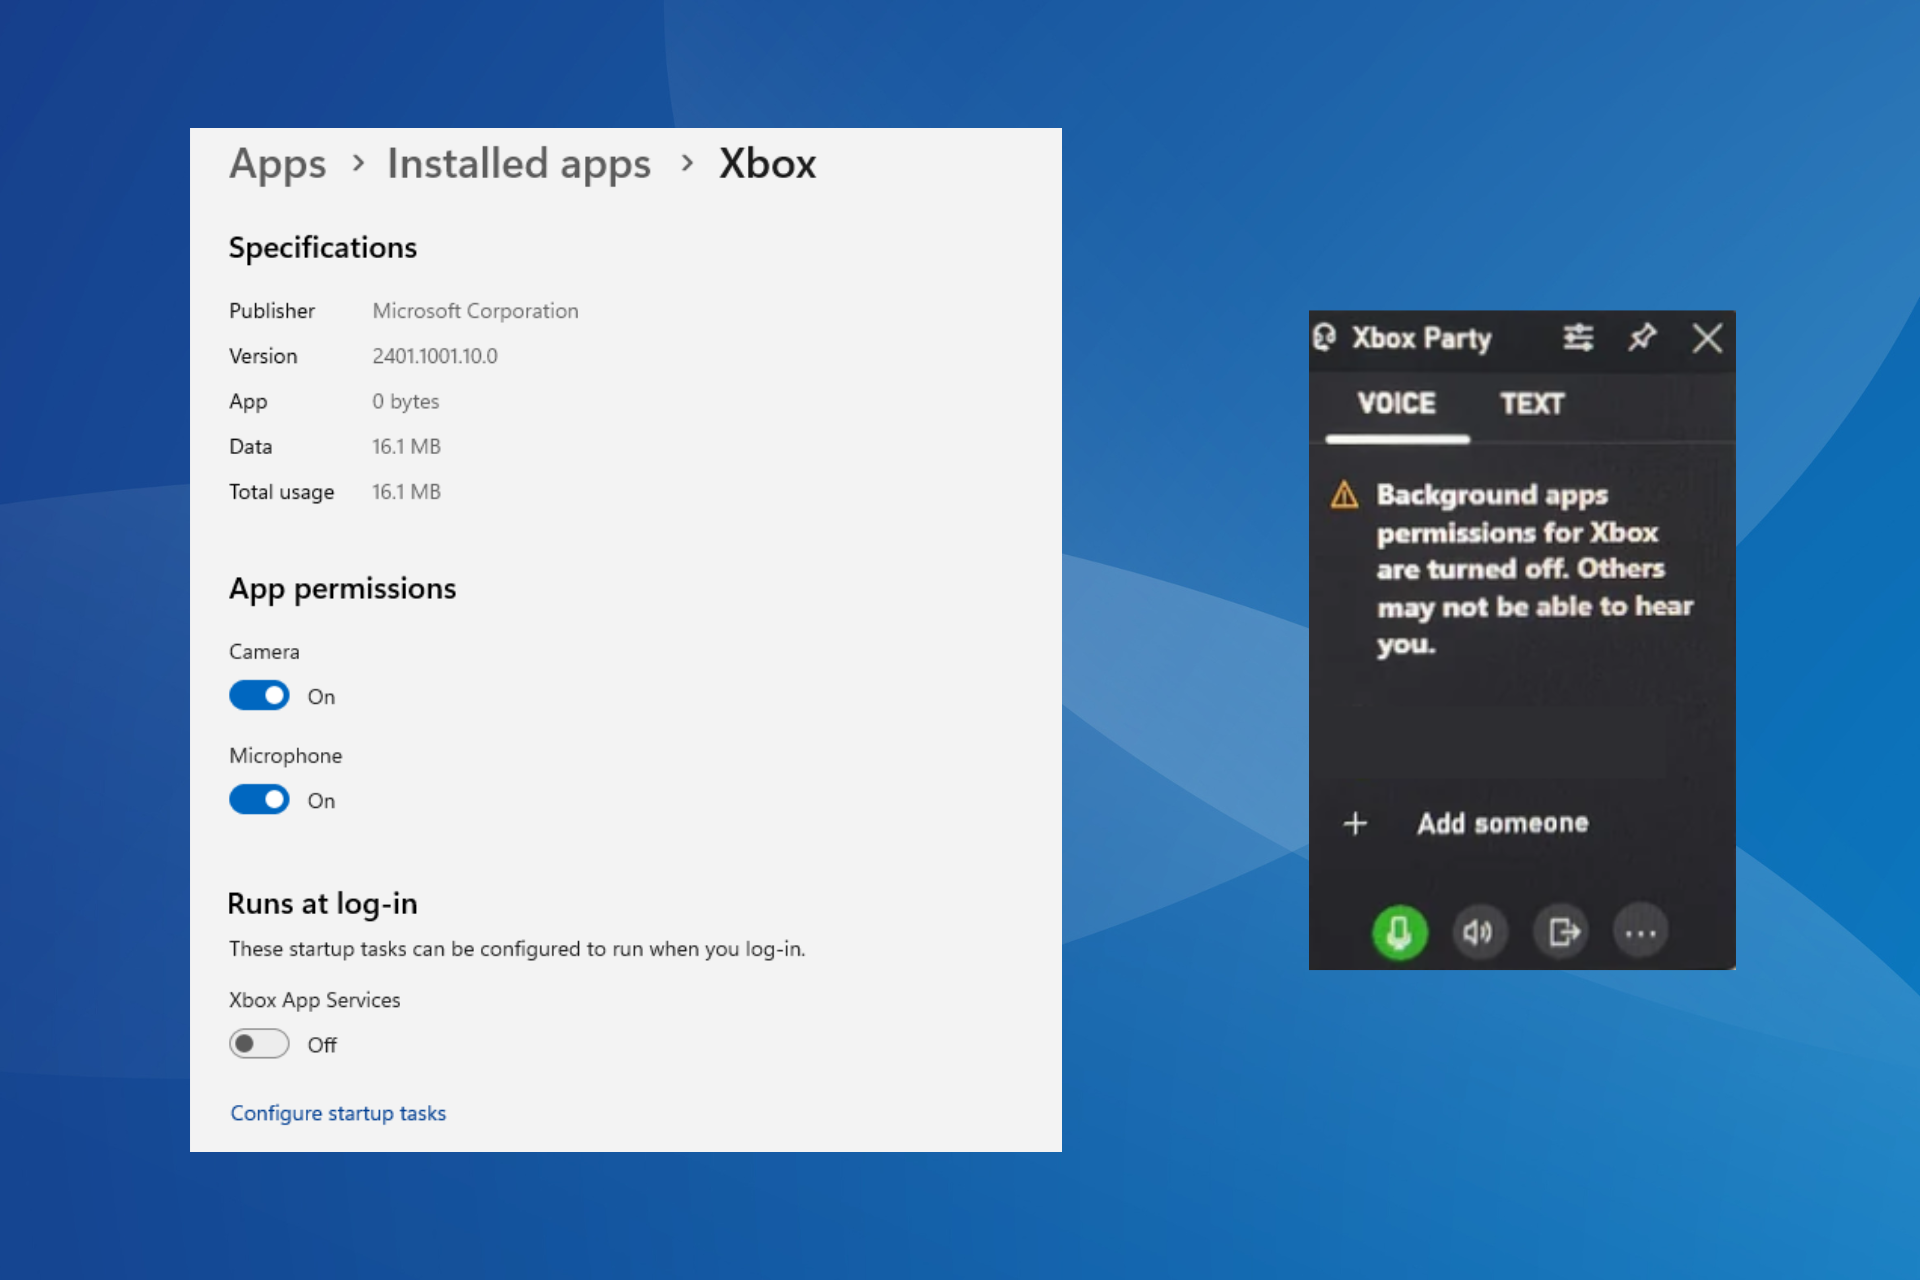
Forums are currently filled with reports of missing background app permissions for the Xbox and Game Bar app in Windows 11. As it turns out, users are blaming the Windows 11 update because the problem started after installing the latest version.

In a post on Reddit, a user reported getting the Background apps permissions for Xbox are turned off. Others may not be able to hear you error message when in a party on the Xbox Game Bar.

Another user posted a similar problem in the Microsoft forum:

Xbox Game Bar wont allow my party chat to run in the background while I am playing games, only while i have the window open. It even says “Background App permissions is disabled in the settings”. But when I go to the settings to enable it, there is no setting anywhere within the app page to enable it at all. My Windows11 is fully updated and I have reset all the apps that correlate to anything having to do with Xbox. Please help me figure out why I cant enable Background App permissions on my PC

It’s the same for everyone. Both the Xbox and Game Bar (in System Components) apps are missing the Background permissions menu under Advanced options!

Available workarounds to get rid of the problem

As of now, there has been no official confirmation of the bug by Microsoft or that it’s an intended change rolled out in the recent update. From what it appears, this is likely a bug!

The following workarounds helped users faced with the problem:

  • Pin chat on top of the active game
  • Repair or reset the Xbox and Game Bar apps: To do that, go to Advanced options for the app > click the Repair and Reset buttons individually.
  • Install an older version of Xbox Game Bar: To do that, paste Get-AppxPackage Microsoft.XboxGamingOverlay | Remove-AppxPackage in an elevated Windows PowerShell > hit Enter > then download the previous version from a third-party website.
  • Turn off Game Mode: To do that, press Windows + I to open Settings > go to Gaming from the left pane> select Game Mode > disable the toggle for Game Mode.
Disabling Game Mode

In case you, too, had been unable to join a party on Xbox Game Bar earlier since the background permissions were missing, these workarounds may help. And if they don’t, wait for an OS or Xbox Game Bar update from Microsoft.

If you know more about the problem, drop a comment below and let us know!

Beware! Using work tech for personal chats can backfire

In the era of remote work, casual conversations with your colleagues about things other than work using company-provided tools like Slack, Microsoft Teams, or email are very common.

Everyone does it for the sake of convenience; however, there are potential risks involved, which are often overlooked.

Before the pandemic, people used to have company emails or cell phones so that employers could communicate with their employees during work hours and sometimes after hours.

However, with technological advancements, instant messaging apps have replaced work emails, as they are easier to access, and with the Work from Home model, it gained more popularity.

This shift increased accessibility, it also blurs the lines between professional and personal boundaries, as employers may contact you outside worktime, and expect you to respond, making the traditional 9-to-5 workday a relic of the past.

Using work technology for personal tasks invites your employer into your personal space. Every message, online purchase, and social media interaction can be potentially monitored, raising concerns about privacy invasion.

While there is no legal right for employers to conduct surveillance on their employees if your organization has extensive policies related to social media usage or the use of work resources, your boss can certainly monitor your activities on work devices or platforms.

The risk of employers finding out about you using work resources for personal reasons isn’t limited to official sanctions. There might be more subtle consequences, like missed career opportunities, strained relationships with co-workers, bullying, etc.

The use of AI technology for monitoring messages has brought new challenges, as organizations have started using algorithms to assess employee morale and reaction to new policies. This could indirectly affect the projects you are working on and your career trajectory.

After reading all these things, you might be a bit nervous and thinking about all your past interactions with your work friends. Well, don’t worry, this doesn’t happen to all of us. However, if you are a whistleblower or are in employment disputes, you might face these consequences.

It all comes down to a question: is using a work-related device or platform for personal communications worth the potential risks?

The straightforward answer is no, it is not. So, instead of using company-provided tools for cribbing about your boss or any other personal work, try using a personal phone, messaging apps, and emails for that.

I know this could be a bit inconvenient every time you open your personal device to chitchat but trust me, it is more liberating and can save you from a lot of unwanted trouble and fear of misinterpretations.

Well, casual conversations on a hectic day can help you get through the day, but having those conversations on your work device could be riskier if you have a snoopy boss.

So, choosing personal channels for non-work-related communication can keep your privacy intact and ensure that a clear boundary between professional and personal life is established.

What do you think? Feel free to share your thoughts in the comments section below.

7 Discord Server Rule Sets Every Mod Should Have Ready

Rules might not be the fun part of running a Discord server, but they’re what keep things from falling apart. Writing them from scratch, though? Total time sink, better use templates.

They’re quick, cover everything from behavior to bots, and help you build a chill, safe space without the stress.

Below are 7 of the best Discord rule sets you can copy, tweak, and drop straight into your server.

What are the best Discord Server rules templates?

General server Discord rules template

general discord rules
  1. Always remain respectful to other people. 
  2. Do not use slurs or defamatory language towards other members. 
  3. Any language that may discriminate against other people based on sex, gender, race, etc, will lead to banning 
  4. Do not threaten anyone on this channel. 
  5. No advertisement on this channel. Offenders will be muted.
  6. Do not start unnecessary drama with other server members. 
  7. Trolling and/or harassing other members is prohibited. 
  8. Do not use abusive language on any member.
  9. Due to this server’s diversity and the mods in place, members can only communicate in English. 
  10. Political or religious discussions are prohibited from this channel
  11. Do not share illegal content.
  12. Be respectful to moderators and other members of our team at times. 
  13. Witch-hunting is not allowed. 

Text chat server Discord rules template

text chat discord rules template
  1. No spamming is allowed. This includes but is not limited to spam messages and unsolicited and unsafe links. 
  2. Do not @mention members unnecessarily. 
  3. Do not use @everyone unless you have express permission from the moderators. 
  4. Moderators reserve the right to delete any written content from the server.
  5. Sending multiple texts here, one well-organized, one is prohibited. 
  6. Avoid typing out walls of text. Break down your texts into paragraphs for easy reading. 
  7. Do not ask to be made a moderator. 

Voice chat rules

voice chat rules template in discord
  1. No loud noises or shrieks during vice chats.
  2. Always use the mute button when not speaking. 
  3. Reduce the amount of distracting background noise when speaking. 
  4. Do not use unnecessary or offending noises when speaking.
  5. Arguing and holding unnecessary debates on the channel is prohibited. 
  6. Moderators reserve the right to disconnect or mute you if your quality is poor. 
  7. While it is okay to use cuss moderately, these words should not be directed to other sever members. 
  8. Do not use voice changers or soundboards. 
  9. Movies and other copyrighted materials are prohibited from this channel. 

Name and profile Discord rules template 

name and profile discord rules template
  1. Offensive nicknames are not allowed.
  2. Offensive profile pictures, such as those showing NSFW content, are not allowed. 
  3. Blank profile images are not allowed. 
  4. Blank nicknames are not allowed. 
  5. Profiles impersonating public figures will be removed. 
  6. Catfishing and/or using a fake identity is prohibited from this channel. 

Bot specific rules 

bot specific rules on discord template
  1. Third-party bots are prohibited from this server.
  2. Use bot commands responsibly. Command spamming is prohibited. 
  3. Don’t change, add, or remove bot commands. 

Personal information rules 

personal information rules template on discord
  1. Do not ask for personal information from channel members. 
  2. Sharing of other people’s personal information within or outside the channel is prohibited.
  3. Do not assume other people’s identities using their personal information. 
  4. Anyone who breaks this rule will be banned from the channel. 

Content server Discord rules template

content server discord rules template
  1. Stealing content or claiming other peoples’ content or art is prohibited. 
  2. Do not distribute unlicensed material
  3. Flashing images or GIFs that could cause epileptic seizures are prohibited from the channel.
  4. Online meeting links are prohibited on this server. 
  5. Do not send any sexually explicit content. This includes pornographic, gory, gross, and disturbing content. 
  6. Content that sexualizes minors will be immediately removed, and the User will be permanently banned from the server. 

How do I make a set of rules in Discord?

  1. Navigate to Server Settings.
     server settings discord
  2. Next, go to Rules Screening and click on Set up Membership Screening.
    setup membership screening discord
  3. Click on Get Started.
    get started with server rules on discord
  4. Now enter the desired rules.
    enter discord server rules

You can also create a dedicated Discord rules channel and copy-paste the templates above in it. To keep your Discord account unblocked from the channel, consider following the rules.

Remember that rules are essential for your Discord channels, but they shouldn’t be long because no one will read them. Besides, if rules screening is not working, check the Safety Setup tab or add a delay.

If you messed up and got kicked off a server, check our easy-to-follow guide on how to get unbanned from Discord.

Are there any more rules that you think would work in Discord channels? Feel free to share them in the comment section.

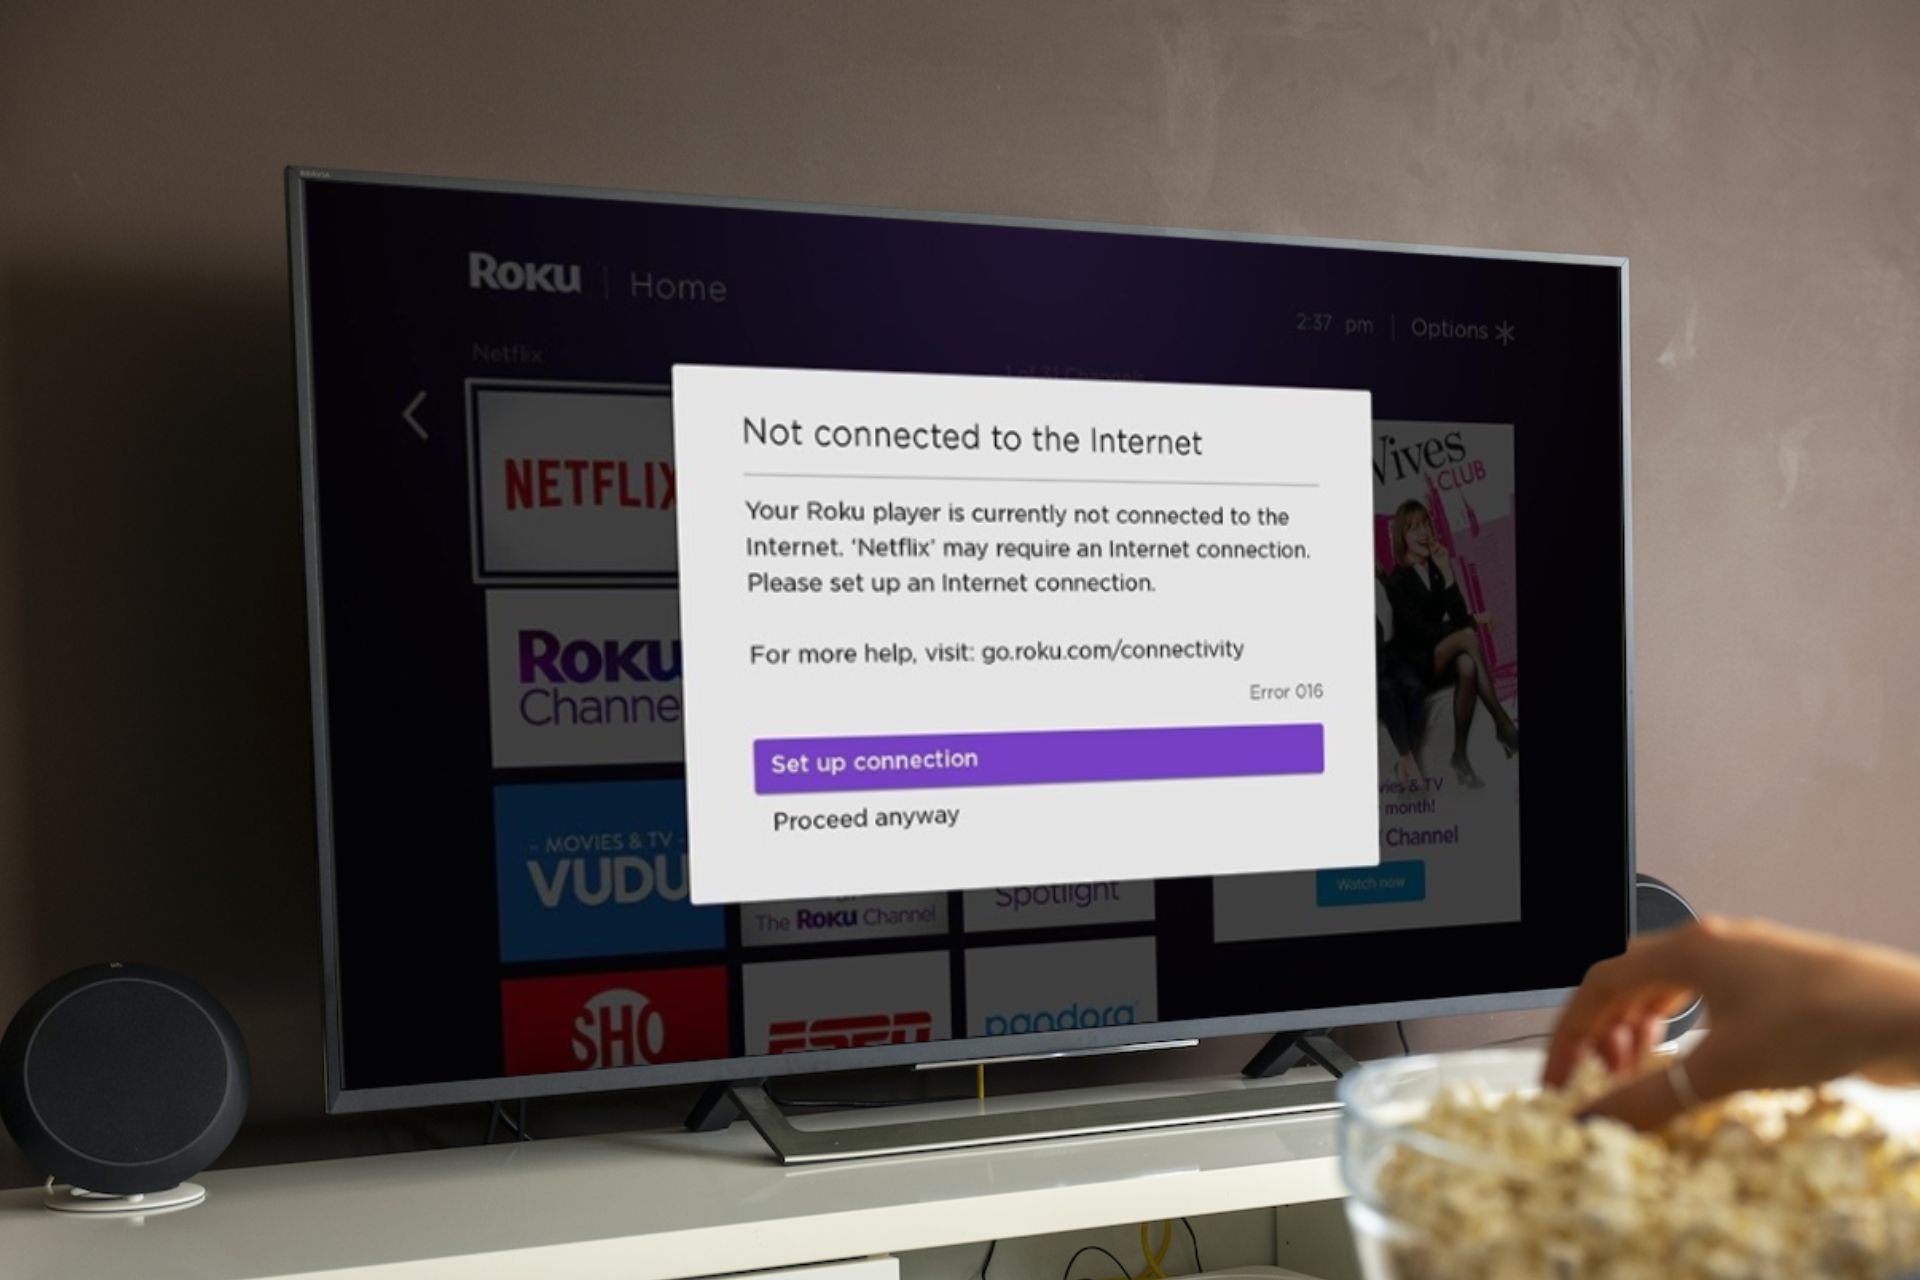
6 Ways to Fix Error 006 on Roku

Setting up a new Roku device or updating its firmware should be a breeze but throwing error code 006, is not a sight to behold.

The error 006 on Roku may appear because of a verification issue. Normally, your internet connection may have dropped during the update or your connection is not strong enough to complete the update.

How do I fix error 006 on Roku?

1. Switch to a faster network band

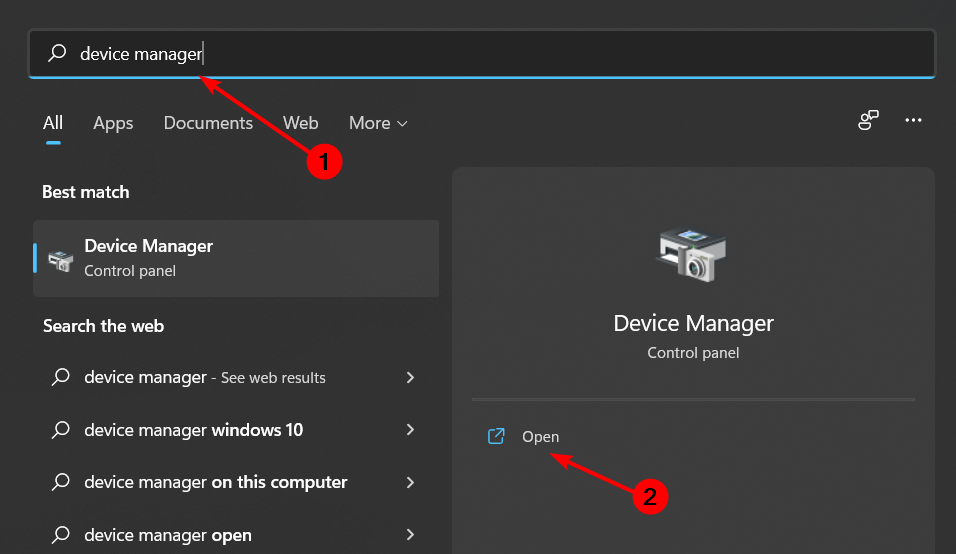
  1. Click on the Start Menu icon, type Device Manager in the search bar, and click Open.
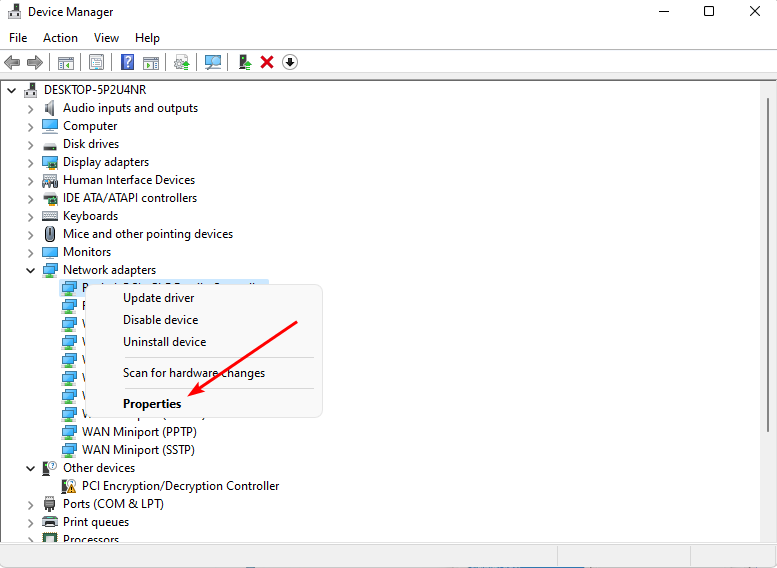
  2. Navigate to Network adapters and double-click to expand.
  3. Right-click on your network adapter and select Properties.
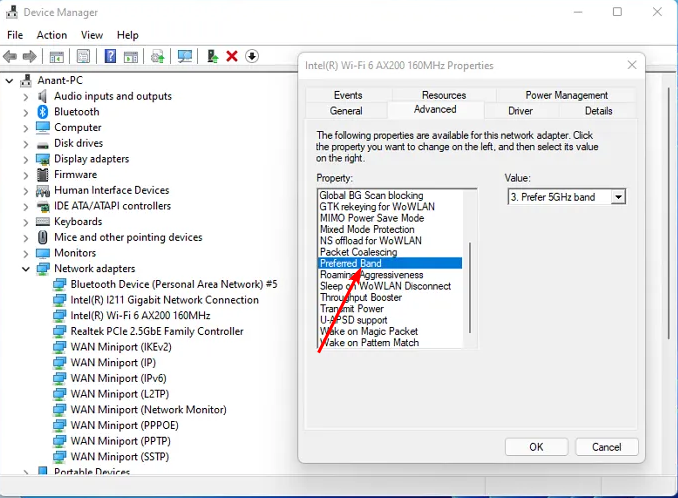
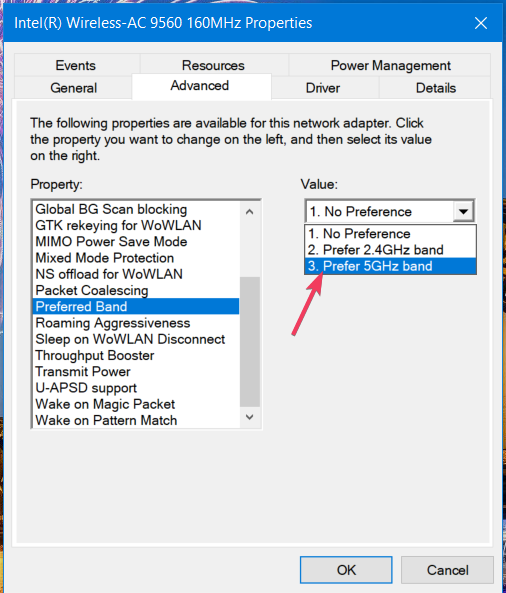
  4. Click on the Advanced tab and locate the Preferred Band.
  5. In the Value drop-down menu, select Prefer 5GHz band then hit Enter.
  6. Restart your PC.
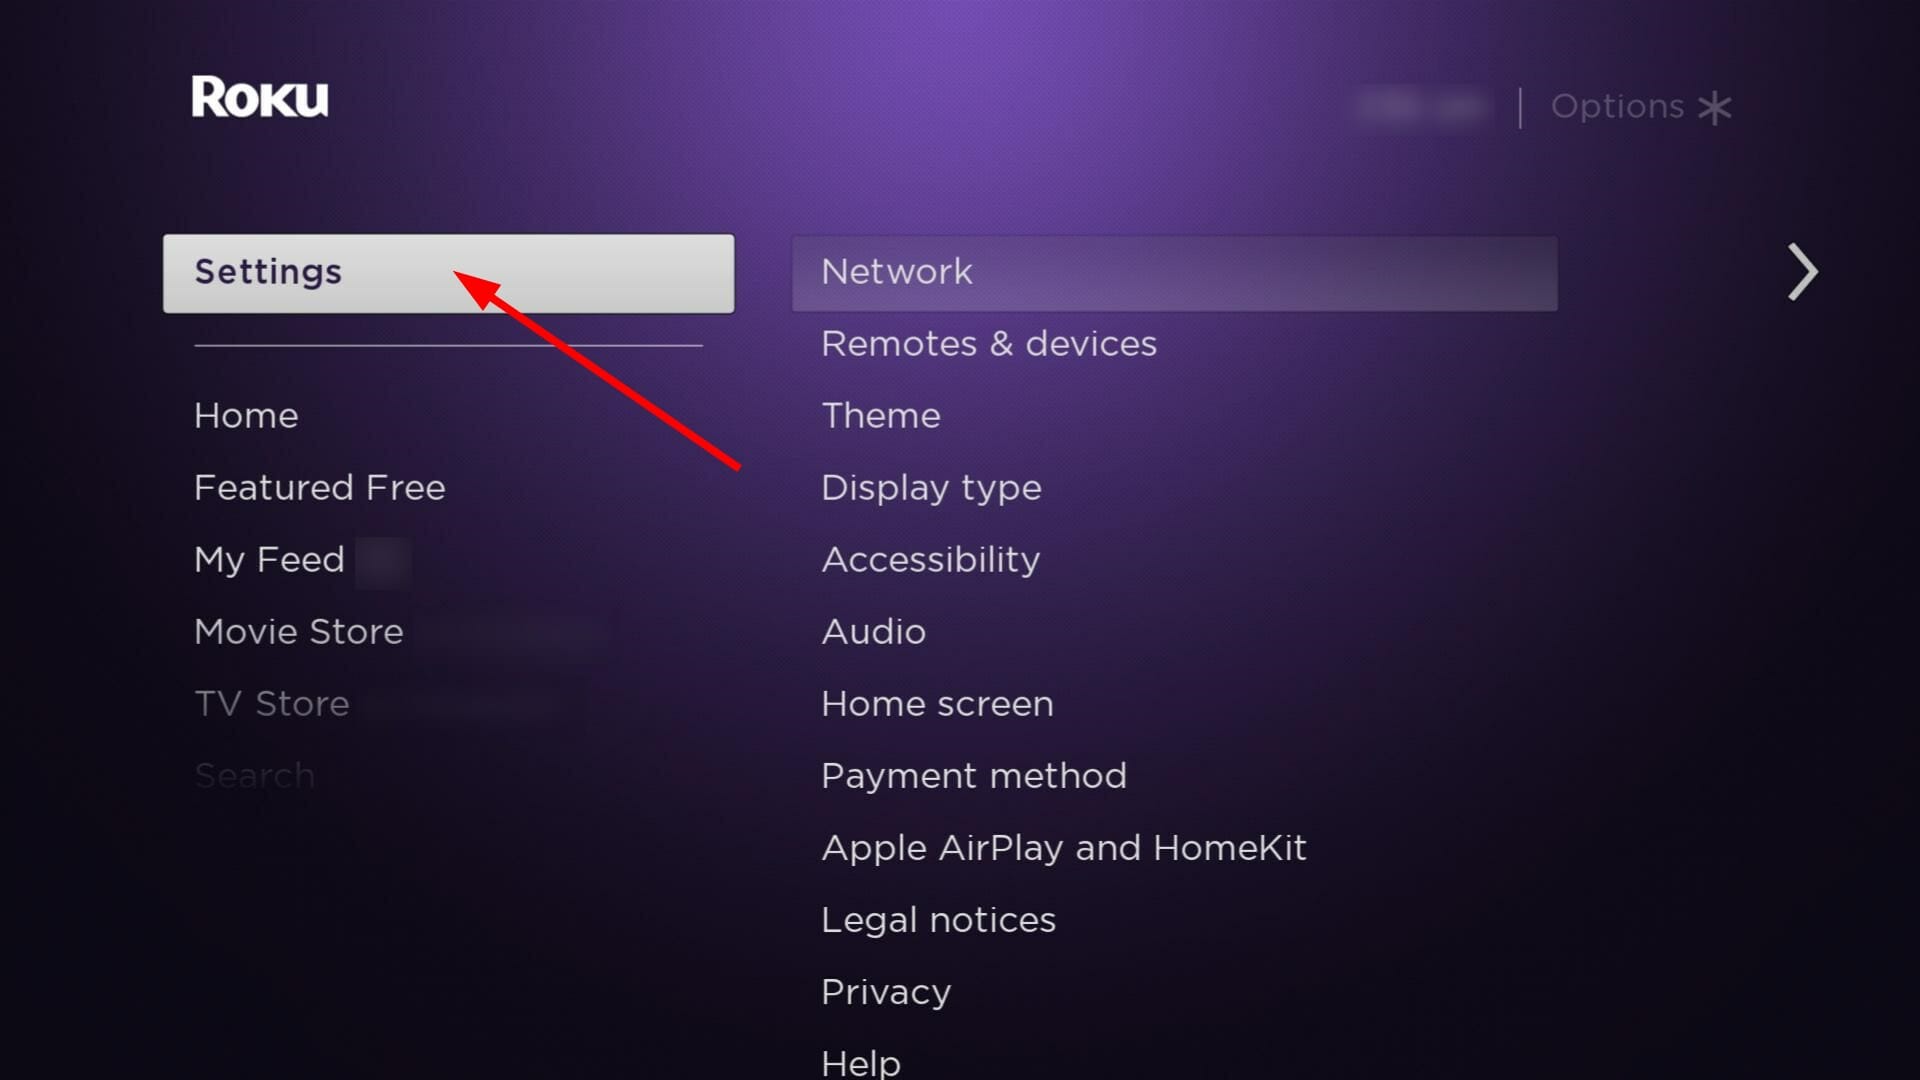
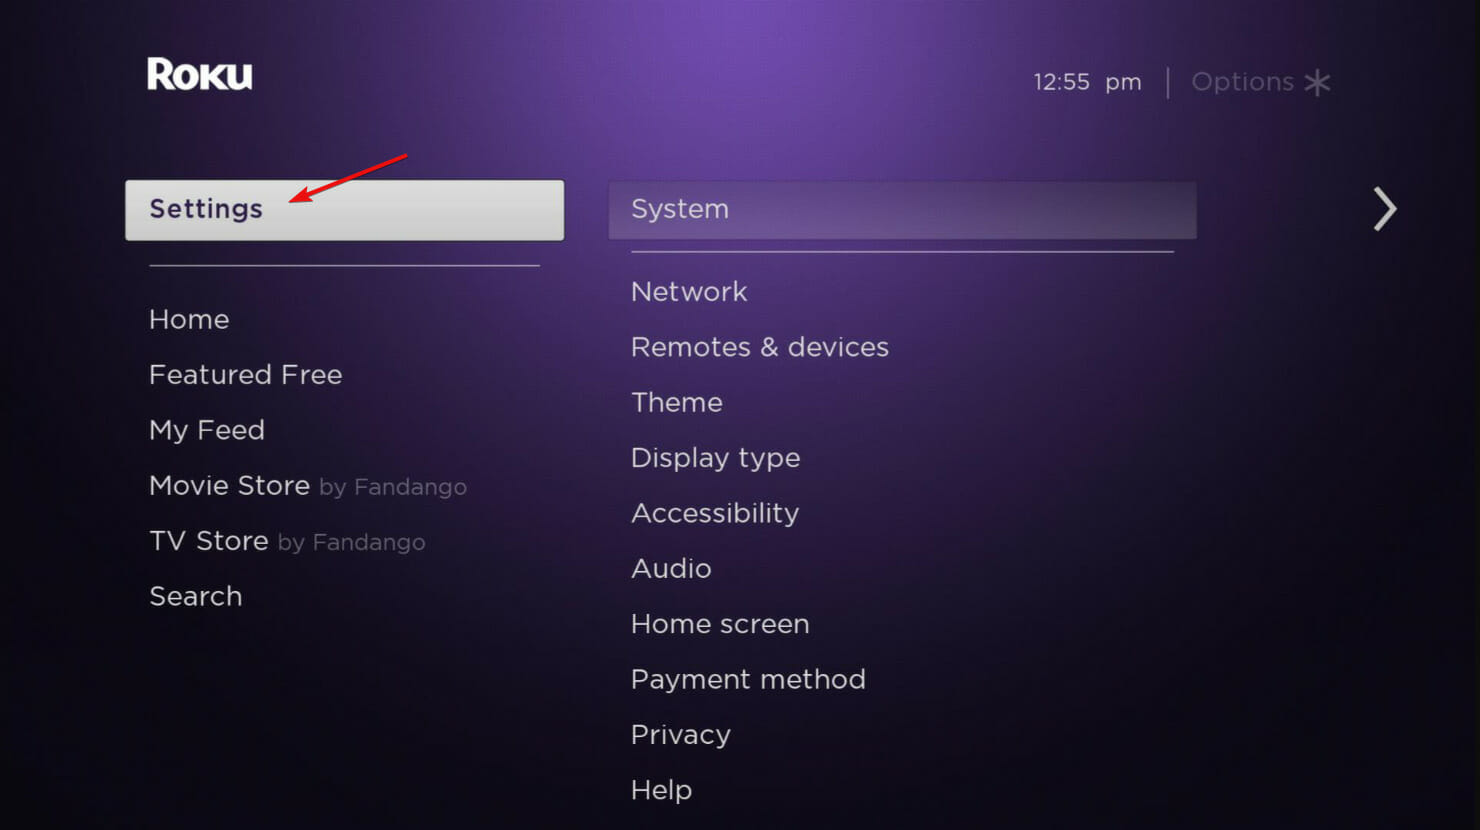
  7. Press the Home button on your Roku remote.
  8. Select Settings.roku connected to Wi-Fi but not working restart
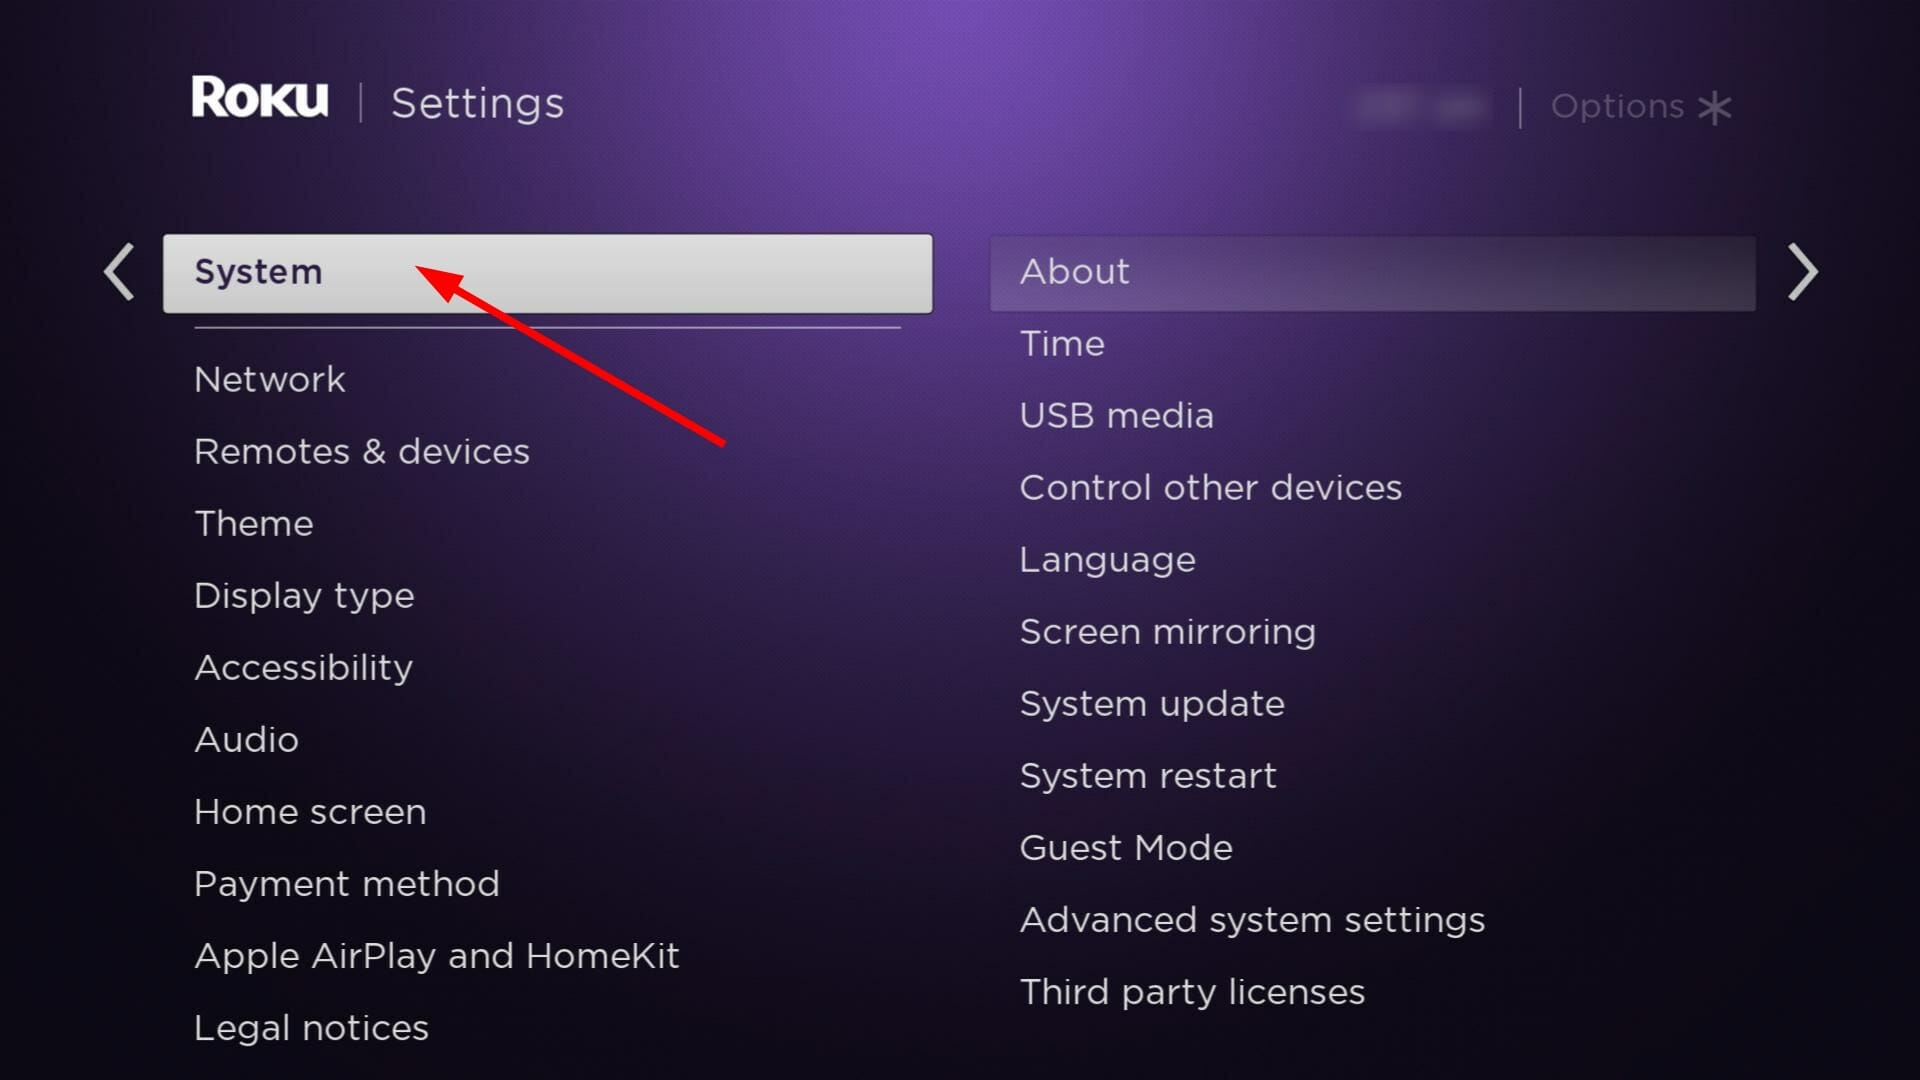
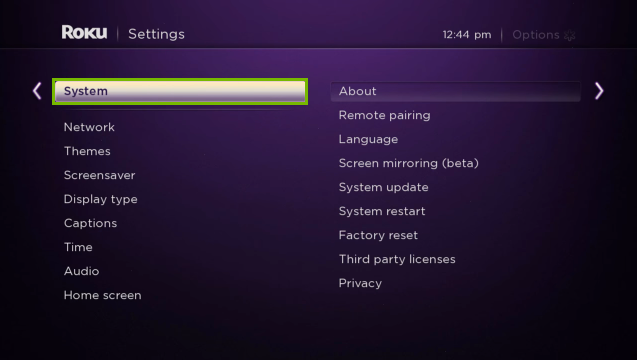
  9. Choose System.roku connected to W-fi but not working system
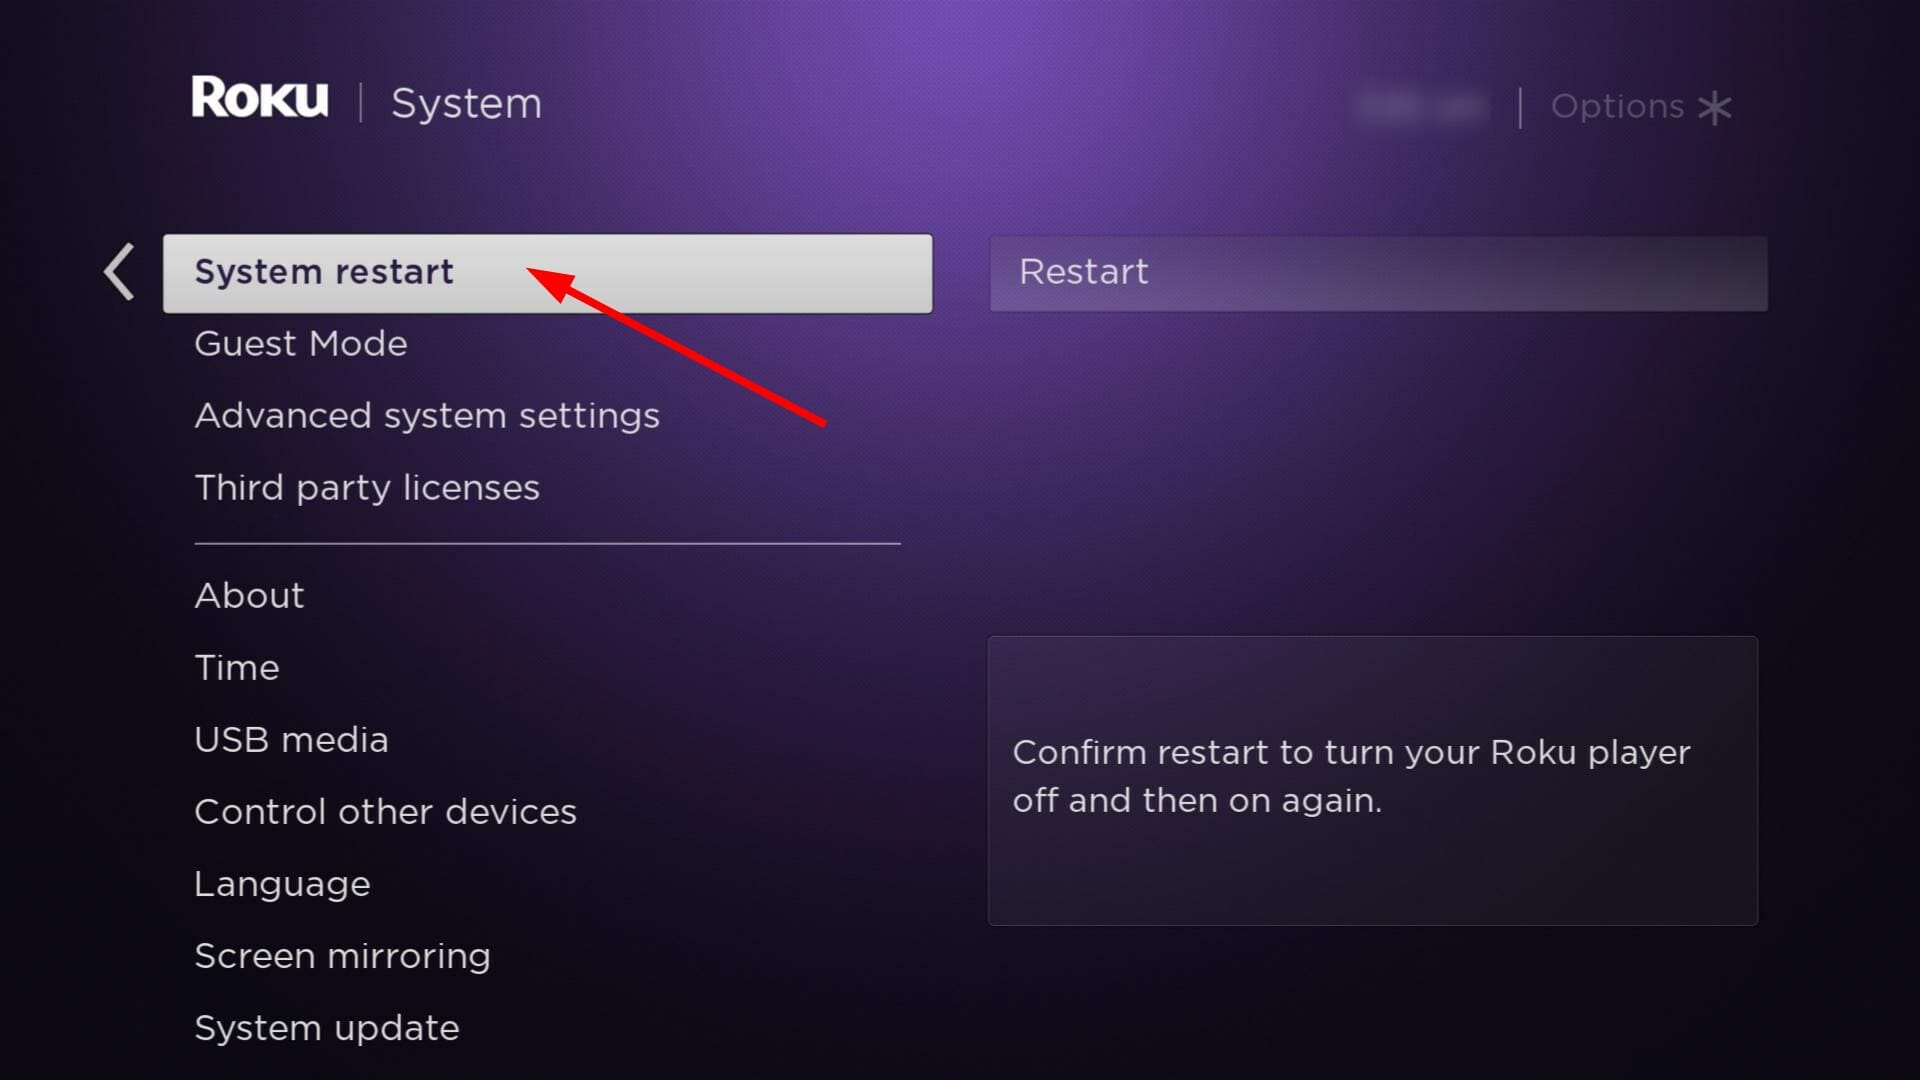
  10. Select System Restart.roku connected to wi-fi but not working system restart
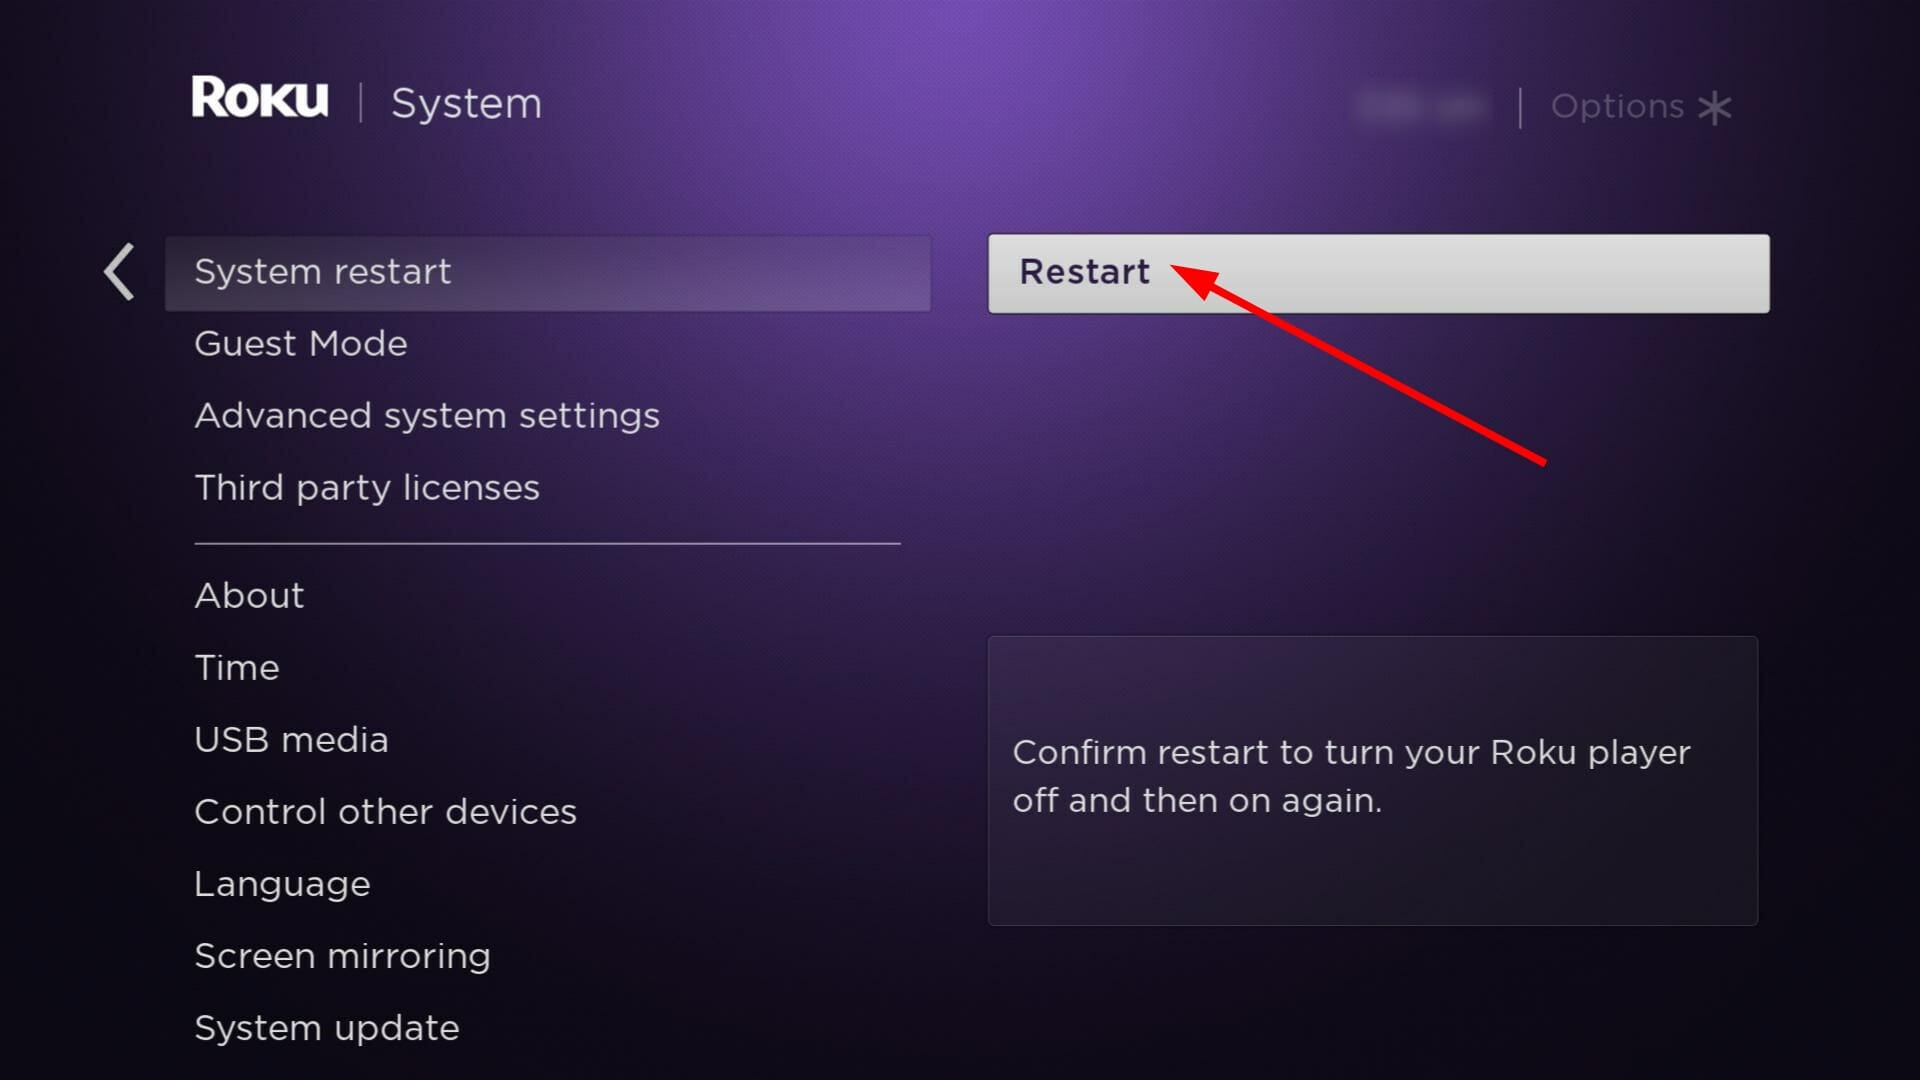
  11. Finally, choose Restart and try again.restart roku

Switching to a faster band when your device does not meet the requirements for a 5GHz band will make things even worse. You can also try switching to another connection like a mobile hotspot to ascertain whether your particular network has issues.

2. Update your Network driver

  1. Hit the Windows key, type Device Manager in the search bar, and click Open.device manager w11
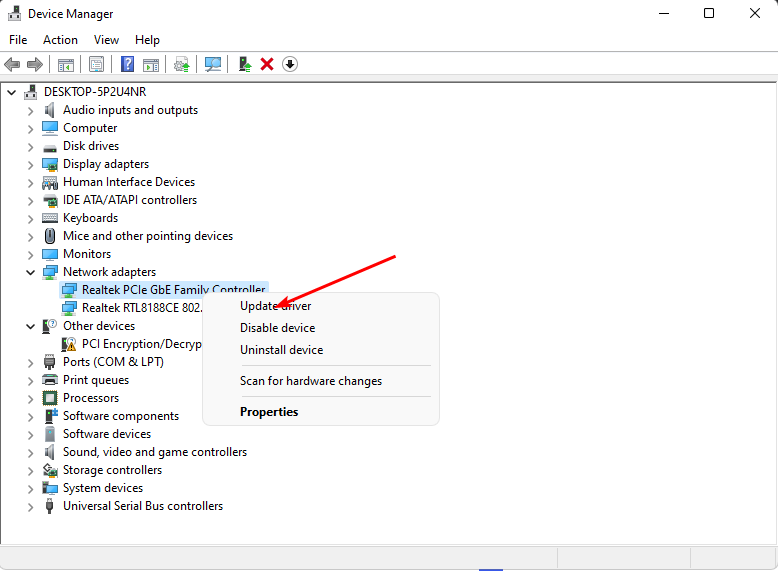
  2. Navigate to your Network adapter, right-click on it, and select Update driver.
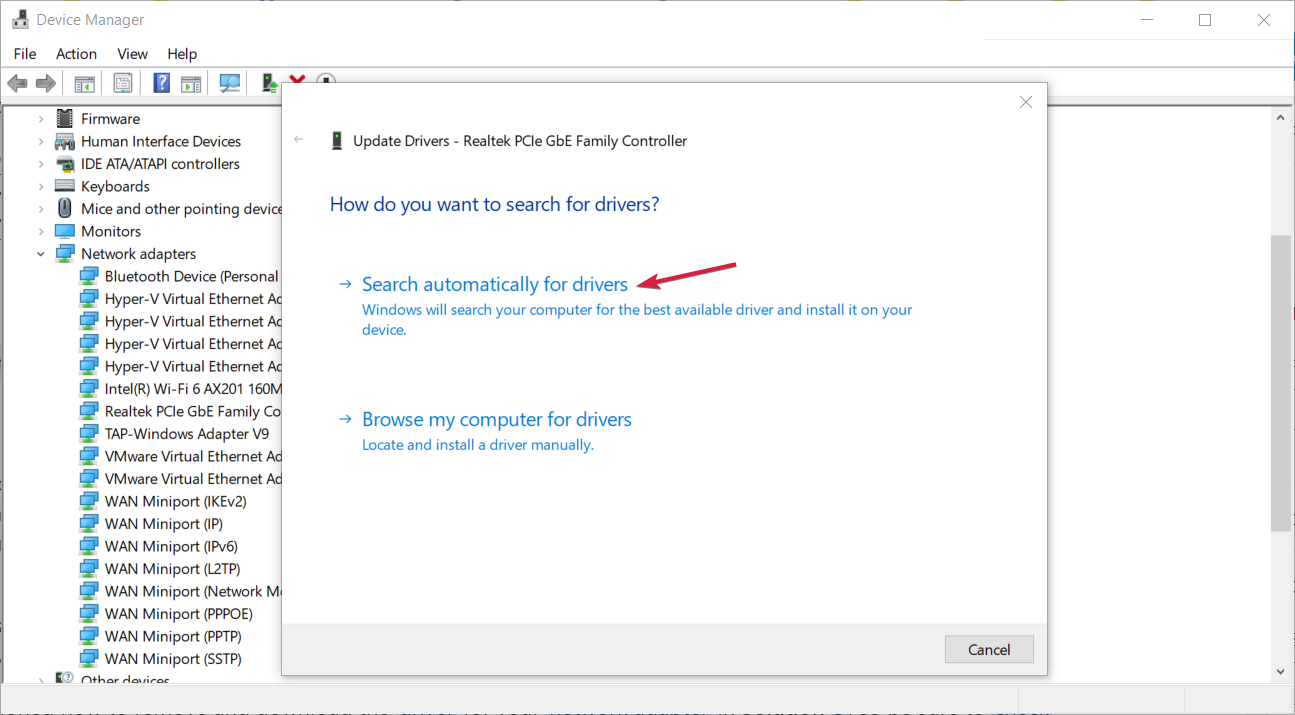
  3. Select Search automatically for updated drivers.

When updating drivers it is always a good idea to employ the help of professional driver updating software. For example, Fortect Driver Updater can scan your computer and update your drivers in just a few minutes. Not only that but it can continually scan and help you keep all your drivers up to date.

⇒ Get Fortect Driver Updater

3. Reset your network

  1. Click on the Start Menu icon and click on Settings.settings windows 11
  2. Navigate to Network & internet.
  3. Select Advanced network settings.going advanced network settings win11
  4. Click on Network reset.Network Reset 1
  5. Next, hit the Reset now button.Network Reset now

In some cases, your network may be misconfigured and eventhough your Roku is connected to Wi-Fi, it is not working. If this is the case, a reset will allow you to re-establish the connection and see if the error 006 persists.

4. Factory reset Roku

  1. Press the Home button on the Roku remote.
  2. Go to Settings.
  3. Select System.
  4. Select Advanced system settings.
  5. Choose Factory reset.
  6. Select Factory reset everything and follow the on-screen instructions.

5. Update Roku manually

  1. Navigate to your browser and go to the Roku update site.
  2. Select your TV brand and enter the TV hardware ID and serial number. You can find this information in Settings > System > About on your TV (depending on your model).
  3. Hit Download Software, locate the executable Roku file from your downloads folder, and insert a USB flash drive.
  4. Copy the executable file to the USB drive and once the transfer is complete, plug the USB flash drive into your TV.
  5. Press the Home button home button on your Roku remote then go to Settings > System > System update > I can’t connect.
  6. Wait for your TV to validate the file on the USB flash drive and it will display a 12-digit code on the TV screen. Enter this code on your PC.
  7. A new 6-digit code appears on your computer screen which you’re to enter on your TV.
  8. A Contents of the update file are invalid message means your TV is already running the latest software version while an Update file could not be opened. Please try again message means the file is corrupted or your USB flash drive is not recognized.
  9. Once you’ve successfully entered the codes, the update will begin and once finished, your TV will restart.

Hopefully, one of these solutions has enabled you to finish your Roku update successfully. However, if the error 006 is persistent, it may be time to contact Roku customer support. Sometimes, nothing is wrong on your side. It may just be the Roku update servers that are experiencing problems.

Should you encounter any other connection-related errors on Roku, like the 004 error code, feel free to check out our expert guides on how to navigate such issues. And if you’re constantly facing issues with slow Wi-Fi, perhaps you need to look into Wi-Fi booster software to improve your speeds.

Roku devices can run into different remote problems, and we’ve also explained what to do if your Roku remote back button not working.

If you managed to fix the error 006 with one of our solutions, we’d like to hear about it. Drop us a comment down below.

These 3 AI trends will define 2026, according to Microsoft

Microsoft announced the Copilot key coming to Windows-oriented devices, and with it, the Redmond-based tech giant says it will usher in a new era for AI and computers. 2024 is expected to be a big year for tech, and especially for Microsoft services and products, due to their continued integration with AI.

For example, while Windows 12 won’t be coming out this year, most likely, Microsoft will release the Windows 11 24H2 major patch update, later this year, and the company will add even more AI features to Windows 11.

We’ve already seen some of them coming to the Insider Program, such as the Auto Super Resolution, which dramatically improves gaming performances on Windows 11 with the help of AI.

However, Microsoft agrees that AI in 2024 will not be solely focused on improving computing power, but instead, the AI trends for this year pinpoint a greater adoption rate from the general public. In other words, AI will become a big part of our tech lives by the end of the year.

Could AI be the next Internet? Possibly so, but the Redmond-based tech giant says AI will also be revolutionary in several other areas.

AI trends in 2024: Top 3 trends that will define the year

According to Microsoft, these 3 trends will define AI in 2024, and they’re focused on making people’s lives better, on every level. We’re talking about integrating AI into the work life, to using AI to discover new medical treatments.

1. Small language models

This trend, which started gaining popularity last year, when Microsoft released dozens of AI models, such as Project Rumi, Orca 13B, phi-1, and many more, is set to continue to grow this year, too, but with another goal behind,

The small language AI models will become widely used in 2024 due to their affordability, accessibility, and small cost to implement and integrate, says Microsoft.

Small language models can make AI more accessible due to their size and affordability. At the same time, we’re discovering new ways to make them as powerful as large language models (LLMs).

Microsoft

The best thing about them is that they can be purposed to complete specific tasks, such as coding, or researching, or communication. Microsoft wants to contribute to this trend by making its existing SLMs, such as Orca and Phi, as powerful as the large language models, and this will lead to people having access to tools to use for a variety of tasks.

2. The rise of the Multimodal AI

AI in 2024 will need to be able to handle multiple task requests that span over a wide category of content. For instance, it’s not enough for the AI to just provide users with text-based solutions.

They need to be able the tasks of creating images, audio, and even video if they want to stand any chance on the market, says Microsoft.

The Multimodal AI will be able to provide a complete experience, similar, says Microsoft, to the human experience, something that most users will be impressed with.

Multimodality has the power to create more human-like experiences that can better take advantage of the range of senses we use as humans, such as sight, speech and hearing.

Microsoft

Having an AI that understands the need to visualize images, and hear sounds will accelerate its adoption, as users will be able to use multimodal AI for a variety of tasks.

Microsoft gives the Copilot example, which is already capable of providing users with text, images, and audio solutions.

3. AI in Science and its use in Medical breakthroughs

Ultimately, Microsoft agrees that the biggest trend for AI in 2024, will be its usage in Science and Medical fields, where it can lead to scientific and medical breakthroughs.

The Redmond-based tech giant exemplifies this with several situations: from AI helping cancer research to creating new tools for sustainable agriculture, new molecules for breakthrough medicines, and new drugs for infectious diseases, as well as helping accelerate the search for less to non-toxic battery materials.

As a matter of fact, Microsoft initiated and founded an AI project in this regard, called DeepSpeed4Science, which aims to use AI to accelerate scientific breakthroughs. Last year, OpenAI also initiated the movement for reaching AGI and ASI, which will effectively change scientific research once these points are reached.

Microsoft says that this is the ultimate goal of AI: to help humanity understand the scientific reality around it.

Artificial intelligence is driving a revolution in scientific discovery that may turn out to be the most exciting, and ultimately the most important application of AI.

Microsoft

2024 will be the year of AI from many perspectives: Qualcomm will reportedly break into the PC CPU market with AI-based units that will mark the beginning of AI Windows PCs.

NPUs are going to become more popular this year, effectively becoming a standard for devices from 2025 onwards, and big tech companies, such as Microsoft, Google, Meta, or OpenAI will focus on letting people with no coding knowledge build their own AI model.

So, for AI skeptics out there: you should get ready because we’re starting to live in the era of AI.

Global Protect Service Not Running: How to Make It Connect

When you get a Global Protect error that says the service is not running or that it couldn’t connect to the service, it’s most likely due to network problems or blocked ports. For some, faulty or out-of-date drivers can also contribute.

We found that simple fixes like restarting the service, reinstalling the software, or resetting the network usually fix the Global Protect service not running, as well as similar errors like Connection Failed.

Scroll down for clear, step-by-step instructions on how to do each fix.

How to fix Global Protect Service Not Running in Windows 11

1. Restart GlobalProtect Service

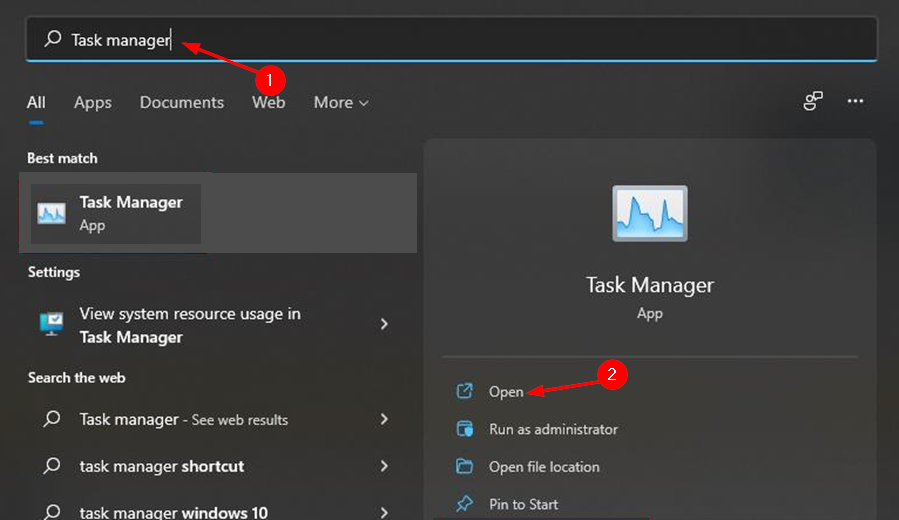
  1. Hit the Windows button, type Task Manager in the search bar, and click Open.
  2. Select the Services tab, locate PanGPS, right-click on it and click Restart.
  3. Try reconnecting.

2. Uninstall and reinstall GlobalProtect

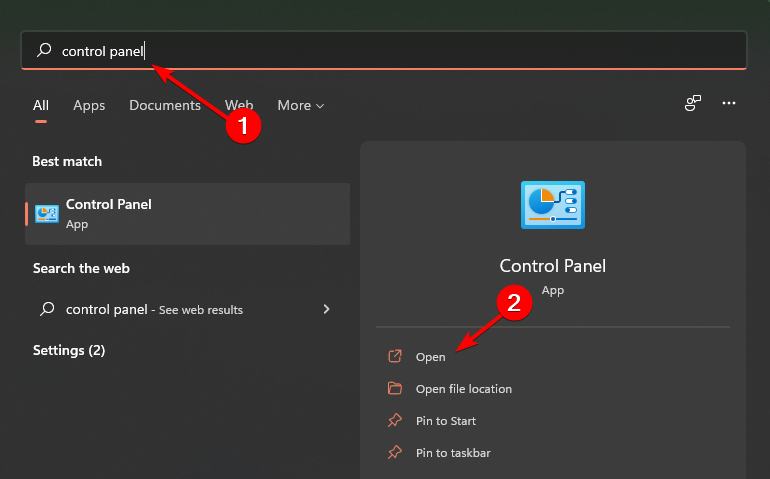
  1. Press the Windows + X keys simultaneously, type Control Panel in the search bar and click Open.
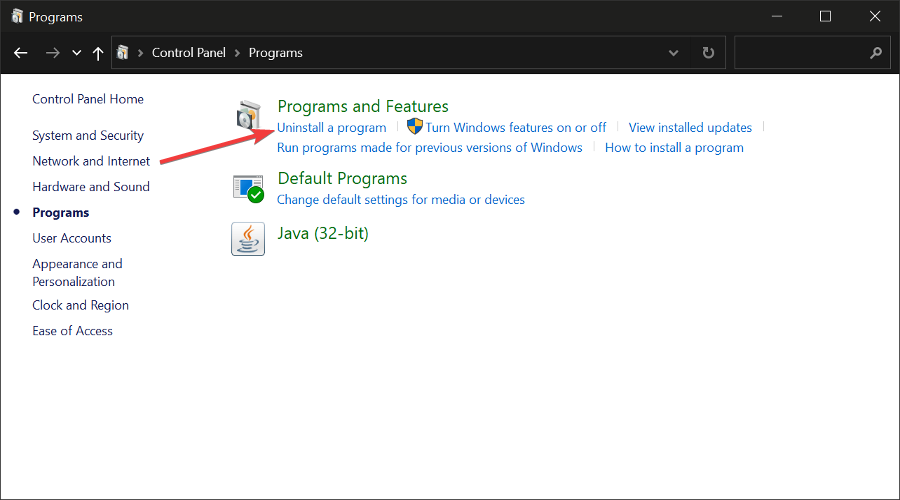
  2. Navigate to Programs and Features and select Uninstall a Program.unable to uninstall program windows 10 11 app won't uninstall
  3. Locate GlobalProtect and click Uninstall.
  4. Navigate to your browser and download GlobalProtect to set up again.

Even seconds of downtime for a VPN can risk the integrity of your organization’s data. A company must safeguard its data in every way.

3. Try another VPN

If all else fails, consider switching to a better VPN. Globalprotect can be a solid choice, but many users report issues with it, especially the free version (never recommended).

A good alternative that’s less buggy and very secure is NordLayer.

It’s offering similar enterprise-grade security and robust encryption. It supports multi-factor authentication, ensuring secure remote access to corporate resources. 

nordlayer ui

With high-speed connections, dedicated IP addresses, and automatic Wi-Fi security, it’s safer and faster alternative to Globalprotect.

NordLayer

Upgrade to NordLayer: Secure, fast, and effortless protection for your business.
Check price Visit website

4. Reset your network

  1. Press the Windows key + I to open Settings.
  2. Navigate to Network and Internet.network settings windows 11
  3. Select Advanced Network Settings.advanced network settings
  4. Select Network Reset.network reset
  5. Click Reset now.reset now button network reset

5. Update network drivers

  1. Type Device Manager in the Start bar and select Open.device manager start bar
  2. Locate Network Adapters and expand the list (click on the “>” arrow).network adapter drivers
  3. Find the Globalprotect Network Adapter in the list, right-click on it, and select Update.update network adapter driver
  4. Wait for the process to complete and restart your PC.

Can’t find the Globalprotect network adapter or are you having a hard time updating it? You can also try using a third-party driver updater like Fortect Driver Updater (free trial).

When it comes to VPN network adapters, Device Manager may not always be able to identify the latest options. Fortect Driver Updater helps if you want automatic updates that install as soon as a new driver is released.

How do I fix GlobalProtect not connecting on Mac

Review security permissions

  1. On your Mac, click the Apple icon and select System Preferences.
  2. Click on Security & Privacy.
  3. Select the General tab and click Allow on System software from Palo Alto Networks was blocked from loading.
  4. Also, hit the lock icon to prevent further changes.

How long does GlobalProtect take to connect? 

Although many factors can affect the time it takes to connect to your GlobalProtect VPN, the general time is up to 15 seconds for the login screen to appear and 30-45 seconds for the actual connection.

You can expect a connection time of less than 10 seconds if the network is fast enough. If you are using a VPN with a slow connection, it may take up to 30 seconds or more.

If you were having connection issues with GlobalProtect, we hope you have tried one or more of our recommended solutions and resolved your problem. 

Summary

This isn’t the only issue you can encounter, and many reported that GlobalProtect not prompting for credentials, but there are ways to fix that issue.

While you are still here, you can also check out our excellent list of VPNs for small businesses that equally do a good job as GlobalProtect.

If GlobalProtect still isn’t working, it might be due to specific issues like it not working on a hotspot, failing to update, or showing a “not authorized to connect” error. Each of these problems has its own fix, so check out the linked guides for detailed solutions.

Let us know what VPN you use if you are a large-scale or small-scale business and some of the reasons why you use it in the comment section below.

Apple’s AI image tool lets you edit with text prompts

The world of AI is constantly evolving at a pace much higher than many had initially predicted. It can be attributed to the growing user interest and the massive opportunities for application. And it’s the image generation capabilities that’s got us hooked.

Now, Apple has come up with a new AI image tool that allows you to edit images simply using text prompts. It can be used to add effects, change colours, modify shapes, add/remove objects, and a lot more!

All about Apple’s new AI image tool, MGIE

Called MLLM-Guided Image Editing or MGIE, the new AI tool is currently only available for download on the open-source developer platform GitHub.

The ability to edit images using text-based prompts is either altogether missing or not well-developed on other AI-based models. For instance, Microsoft Copilot allows making slight changes to images.

But with Apple’s MGIE model, you can do a lot more. For instance, you could add toppings to a pizza. A group of researchers for a research paper prompted the AI model to make a pizza look more healthy, and it generated one with tomatoes and herbs.

Screengrab from the research paper

In another image, it was able to change the content displayed on a laptop’s screen. Similarly, it could perform tasks otherwise intended for Adobe Photoshop or advanced photo editing applications, such as removing people or objects from an image or changing the focus.

Image source: Apple on GitHub

So far, Apple has been away from the AI space, unlike other companies like OpenAI, Google, Microsoft, and Meta. As it turns out, Microsoft has bigs plans for integrating AI.

But with the MGIE model, the California-based tech giant is expected to turn a lot of heads.

There has been no official confirmation yet as to when the MGIE model will be officially rolled out and whether it will be introduced in Apple’s native devices, namely, MacBooks, iPads, and iPhones.

So, it’s a wait-and-watch situation for now. In the meanwhile, others like Microsoft, Google, and Meta can deploy a similar model to retain their existing user base.

What’s your thought on Apple’s new AI image tool? Let us know in the comments section.

How to Use Your Phone as Keyboard for PC [USB, Bluetooth, WiFi]

Need a quick solution to use your phone as a keyboard for your PC? Whether you’re short on space, prefer minimal hardware, or just want an alternative input method, your smartphone can easily serve as a virtual keyboard.

We’ll cover everything you need to know and highlight the top apps for using your Android or iOS device as a keyboard.

How to use your phone as a PC keyboard?

  1. Pick a reliable app to connect your phone to your PC. We used Remote Mouse in this example, but you can find all of our tested top picks below.
  2. On your phone, head to the AppStore or PlayStore and install the app.remote mouse app listing in google play store
  3. Go to the app’s website and install it on your PC.installing remote mouse on pc
  4. Connect your phone and PC to the same WiFi network.
  5. Now you should be able to find your computer listed in the mobile app. Tap on its name to connect.connect mobile keyboard app to desktop pc
  6. Tap on the keyboard icon to switch from mousepad to keyboard. virtual keyboard option in remote mouse app
  7. Now you’ll be able to use your phone’s keyboard on your PC.using mobile keyboard on pc

Now let’s take a look at some of the best apps that allow you to connect your Android or iOS phone to your PC and transform it into a keyboard.

Best software to use the phone as a PC keyboard

Note icon NOTE
Following the guide above, you’ll be able to quickly setup each of the following apps. There might be slight differences, but the main idea is the same.

1. Remote Mouse

remote mouse app dashboard

▷ Operating System: Compatible with Windows and macOS.

▷ Type of Connection: Wi-Fi.

This tool pairs your Android or iOS device to your Windows or macOS computer using WiFi. The process is very simple and takes less than 5 minutes.

All you have to do is install it on the devices you want to link, make sure they’re both connected to the same network, and you’re all set. You can use it both as a virtual mouse and keyboard.

Key features:

  • Provides full keyboard and mouse control
  • Includes media control options for video and music.
  • Gesture support for intuitive navigation.

→ Get Remote Mouse

2. TeamViewer Remote Control

team viewer remote control dashboard on mobile

▷ Operating System: Cross-platform, supports Windows, macOS, Linux, Android, and iOS.

▷ Type of Connection: Internet (does not require the same Wi-Fi network).

TeamViewer can give your phone full remote control options for your PC. It allows it to operate the keyboard, mouse, access files, operate apps, and more.

The setup process is simple: install TeamViewer on both devices and connect them via a unique code. You don’t have to use the same internet connection nor be in the same room with your PC.

Key features:

  • Full remote control, including file access and application management
  • No need for the same Wi-Fi network; can operate over the internet
  • Secure and versatile for various remote control needs

→ Get TeamViewer Remote Control

3 . AirMouse

airmouse mobile dashboard

▷ Operating System: Compatible with Windows and macOS.

▷ Type of Connection: Bluetooth and Wi-Fi.

AirMouse is another straightforward app that lets you use your phone as PC keyboard and mousepad. It has a free version as well as a premium-add free one.

The app uses gesture controls, can be connected through Bluetooth or Wi-Fi, has a Web browser mode, and has PowerPoint mode and integrated media player controls.

Key features:

  • Includes PowerPoint control and media player functions
  • Supports both Bluetooth and Wi-Fi connections
  • Available in both free and premium versions

→ Get AirMouse

4. USB Remote

usb remote dashboard

▷ Operating System: Android (requires rooting).

▷ Type of Connection: USB.

This free app enables your USB keyboard to work universally, even in BIOS and across various devices. For Android, it adds keyboard and mouse functions to the USB port.

To set up, root your Android device, install TWRP recovery, download a custom kernel from GitHub, then connect your device to your computer via USB for control.

Key features:

  • Allows keyboard and mouse functions via USB
  • Works in BIOS and safe mode
  • Requires rooting of Android devices for full functionality

→ Get USB Remote

Wrapping up

Knowing how to connect a phone keyboard to a laptop or PC can be a game-changer in situations where you need quick access to a keyboard without a physical one on hand.

Beyond operating a virtual keyboard, you can also use your phone as a touchpad, use your iPhone or Android as a webcam, or even transform your iPad into a second monitor.

If you have a tablet, you can also use your tablet as a keyboard for PC by using the same apps. Last but not least, most of these apps can help you use a tablet as a mouse for PC, so don’t hesitate to try them.

Third-party software makes this very easy. All you have to do is install them on both devices and you can easily use your phone as a PC keyboard.

Frequently Asked Questions

Can I use my phone as a keyboard for my PC via USB cable?

Yes, apps like USB Remote allow you to use your phone as a keyboard through a USB connection.

How do I connect a mobile keyboard to my laptop?

Download and install a compatible app on both your phone and PC, ensure both devices are on the same network or connect via USB, and follow the app’s instructions to establish the connection.

Does Windows let you connect to your phone without a third-party app?

Windows does not natively support using your phone as a keyboard without third-party apps. You will need an app to enable this functionality.

What should I do if my phone’s keyboard app is not connecting to my PC?

Ensure both devices are on the same network, restart the app on both devices, and check for any updates. If the problem persists, try reinstalling the app or consult the app’s troubleshooting guide.

Can I use my phone as a keyboard for multiple PCs?

Yes, many apps allow you to switch between different PCs by reconnecting through the app. Make sure to follow the specific app’s instructions for managing multiple connections.

I’ve left OneDrive years ago. Will Copilot bring me back?

There are a lot of cloud storage solutions out there, and even though OneDrive is preinstalled with Windows, I must admit that it’s not my first choice. Personally, I consider Google Drive vital for backing up the Android phone data and when it comes to the PC, my external SSD is sacred for document backup.

However, the promise of having Copilot for Microsoft 365 running inside OneDrive sparked a new light on data management.

Why is Copilot marking a new beginning for OneDrive?

To understand why the introduction of Copilot in OneDrive is a turning point in cloud storage usage, we need to look at how we use AI.

Right now, you can ask Copilot, or Chat GPT, or another LLM of your choice, and the AI crawls through the internet in search for the right answer. And yes, you might even upload a Word or PDF document and ask the bot to use it for its answer.

However, the process is not so simple and you need to insist and instruct the bot to use only that particular information if you want it to focus only on what you feed it.

There are also other tools, such as Grammarly, that can analyze your documents, correct them and then create a summarization, but these kind of tools are limited to a certain amount of data.

Data management level PRO

From the many years of creating content, I gathered gigabytes of articles and documents on my drives or on cloud accounts. For instance, when I’m writing this piece on AI, I remember crucial information, citations, but I can’t remember the exact article, when I wrote it and in what circumstances.

Looking for that article with a classic search function in File Manager would be like searching for the proverbial needle in the haystack and I drop this idea from the start.

Now, imagine having all those images in one place and an AI bot capable of looking for that information contextually. All you would need to write or say to Copilot would be: Find all my documents related to AI (artificial intelligence) and summarize all the information chronologically. Eventually, you can ask the bot to bring up the source documents so you can pull out additional information.

The beauty of it is that Copilot can crawl easily only through your documents, without mixing the information with any other documents from the internet.

And you can apply this process for anything, like favorite songs and your huge pile of photos you even forgot you have.

Copilot for Microsoft 365 sets you back $30 but it’s a lot better than Copilot Pro

But here’s the catch: Copilot for Microsoft 365 costs a pretty hefty $30. Is it worth the money? For me, the premise of getting the premium search and summarization makes all the sense in the world and the $30 will pay off handsomely.

For companies running a ton of data and searching for client information in a huge PDF, Word or Excel database that would be an incredible time and work saving. And that’s why Copilot for Microsoft 365 is business-oriented and in fact a lot better than the prosumer Copilot Pro version.

Now, you can understand clearly why Copilot for OneDrive would be an ideal addition even for the average user, not only for businesses.

Some of us would go through the extra steps to get Copilot into OneDrive, but many will drop the idea because you need a work or school account and a Copilot for Microsoft 365 license to get it.

Now, the history taught us that eventually, the business features will one day be available to the average user, but if you can get your admin to implement it inside your business, you won’t need to hold your breath any longer.

Would you use Copilot for Microsoft 365? Share your thoughts in the comments section below.

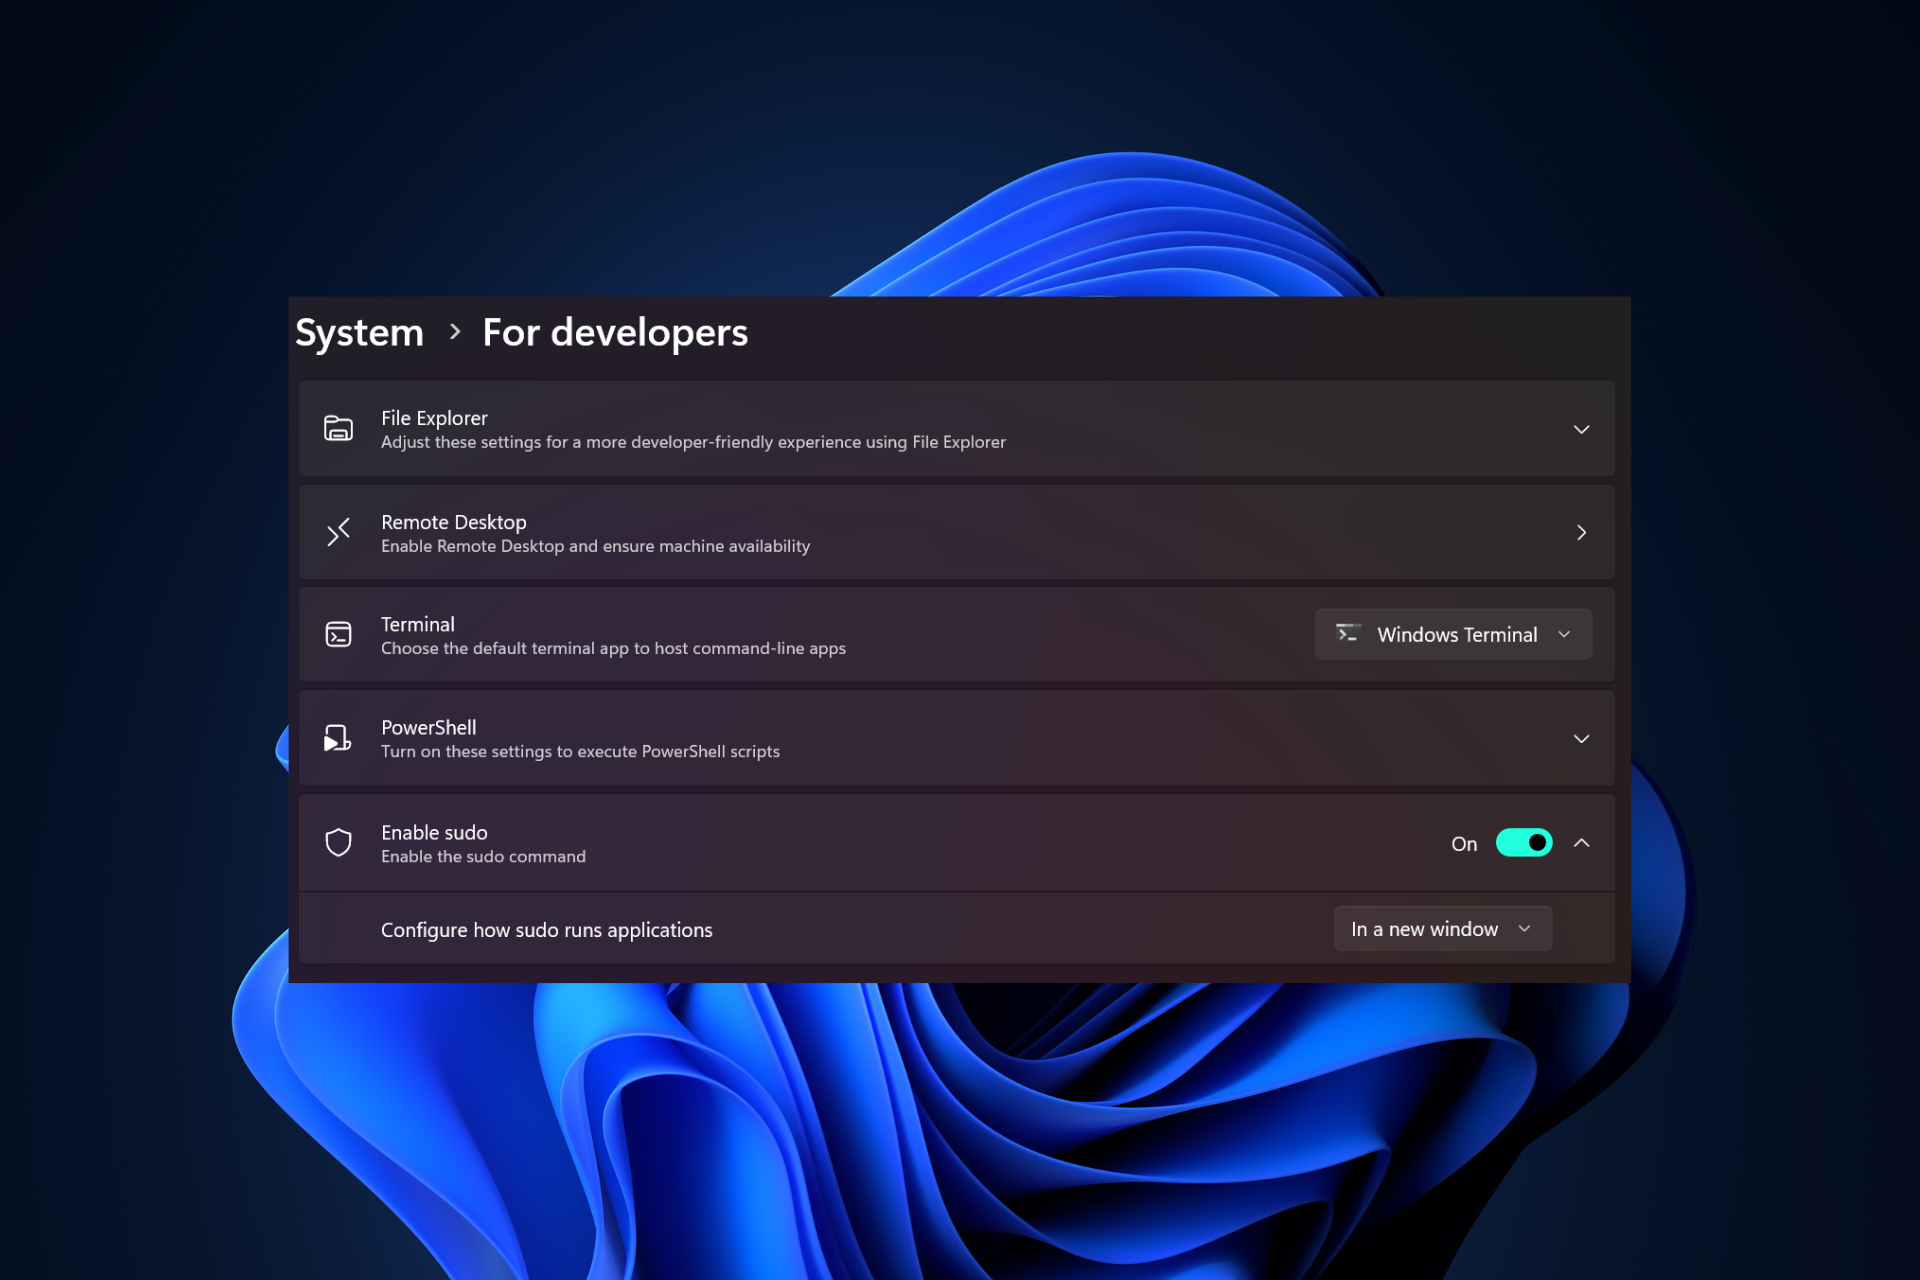
Sudo will not make it to Windows Server 2026, despite being released on Windows 11

Microsoft officially released Sudo to the Dev and Canary channels of the Windows 11 Insider Program, last week, after several Windows enthusiasts spotted the feature earlier. Sudo, which stands for superuser do, is a way to allow standard users to execute high-privileged commands, usually run by administrators.

Sudo has been a central feature of Linux for years now, and many Linux users are familiar with it as they can use it to greatly improve the security and privacy of Linux devices all around. Now, that Sudo is available to test in Windows 11, and you can learn how to do it by following our guide, unfortunately, it won’t be released to Windows Server 2025, anytime soon.

While the Redmond-based tech giant hasn’t explained why it won’t make it available, the company will disable Sudo entirely on those Windows Sever devices where it was mistakenly implemented.

NOTE: The setting for enabling Sudo may incorrectly be showing on Windows Server Insider Preview builds – this feature will not be available on Windows Server and the setting will be disabled in a future Server Insider Preview build.

Microsoft

However, until Microsoft takes the steps to entirely disable Sudo on the existing Windows Server 2025 builds, you can play with the feature as long as you join the Dev or the Canary channel within the Windows Insider Program. Just make sure you have the latest builds installed, and since the two channels share the same build, you can choose the one you prefer.

Sudo should give Windows users the power to control, manage, and customize the security and privacy of their own Windows devices, at will. While Linux had the feature for years, now, Sudo is new territory for Windows users, and it’s recommended to learn how to properly use it to not lock yourself out of privileges.

This guide will offer you the means to enable Sudo in Windows, and if you want to understand it better, it is also a great place to start.

BitLocker is still unsafe on modern devices, key retrieval only slightly difficult

We previously pointed out how it takes less than a minute to break into BitLocker encryption using a Raspberry Pi Pico. Now, as it turns out, modern-day PCs with TPM 2.0, the latest version, running Windows 11, too, are at risk of key sniffing. And it doesn’t take much more effort!

It was pointed out by a security researcher who goes by the name stacksmashing on X (formerly Twitter). This was in response to several users claiming that modern-day laptops are highly secure and bypassing BitLocker encryption is not possible.

The security researcher had previously, in a YouTube video, detailed the process to retrieve the BitLocker recovery key and access the encrypted data.

Since the process employed here utilizes the unsecured communication between the CPU and TPM (Trusted Platform Module) chip, it’s possible to retrieve the BitLocker encryption key as long as the two are distinctly placed.

BitLocker key retrieval on modern laptops

In another post, Stu Kennedy, also a security researcher, explained how soldering directly to the right pads on a Lenovo X1 Carbon Gen 11, released in April 2023, allowed the logic analyzer to get the BitLocker’s VMK (Volume Master Key).

On his GitHub page, Kennedy has listed the steps to retrieve the BitLocker key from several modern-day laptops, along with the hardware required for the job. The list of laptops includes Microsoft Surface Pro 3 and Dell Lattitude E5470 (amongst others), both with TPM 2.0 chips.

As per Kennedy, one of the ways to stay safe from this vulnerability is to enable BitLocker with a security key or PIN. This will act as pre-boot authentication and prevent sniffing devices from retrieving the VKM since it will be released only after the security key is entered.

Also, the problem appears to affect devices featuring a separate, dedicated TPM chip.

Should I be concerned about this?

If you are too concerned, don’t be!

The vulnerability can only be exploited as long as the threat actor has physical access to the device. Accessing over the web won’t do!

You should be more worried about infecting the PC with malware from the web. And for that, practicing good cyber hygiene and an effective antivirus solution are all you need.

Such vulnerabilities have existed in the past and were rectified over the course of time. In this case, too, we might see built-in TPM chips in the CPU or optional pre-boot authentication enforced by manufacturers to eliminate the risks.

What are your thoughts on it? Share with us in the comments section below.
You can finally download games on Xbox 10 times faster

The latest updates to the Xbox Insider channels have apparently greatly increased the downloading speed for video games on the Xbox consoles, as observed by Xbox enthusiast, @IdleSloth84_.

While downloading games, @IdleSloth84 noticed that the speed would go up to 380 MB/second while games were running in the background, and 480 MB/second with no games running. Other Xbox users said they noticed an increase to 800 MB/second, which is 10 times faster than the average of 40 to 80 MB/second.

This is all due to the latest updates coming to the Alpha Skip-Ahead insider channel, where Xbox mentioned one of the new features and experiences coming to Xbox Series X, and S was an improved downloading experience while playing games.

We have made additional network optimizations to improve content downloads while games are running.

Xbox

This improvement comes right at the time when the dialogue on Xbox going entirely digital is being held. By going entirely digital, there would be no point in purchasing video games in a physical form, something not all Xbox users, and gamers, agree with.

It also sparked a whole conversation on whether Xbox will stop working on new consoles, or will get entirely into publishing, something Phil Spencer, head at Xbox, dismissed.

However, it’s still good to see Xbox providing faster internet speeds, given that the Xbox app has been struggling to reach 1 MB/second sometimes. The improvement will no doubt be well received by Xbox users, everywhere, assuming they have the right Internet speed to match the download speed of the app.

But it could add fire to the already ‘going entirely digital’ conversation that’s been happening recently.

The improvement is available within the Xbox Insider Program, and it will take a few days/weeks to be released to the general public, but once it’s there, make sure your Internet provider can match the enormous downloading speed.

Microsoft Stream will introduce an analytics dashboard that offers insights for SharePoint sites’ videos

Microsoft is all about giving organizations and IT managers the tools they need to gain insights on traffic, usage, and statistics that could help them implement better strategies to use Microsoft products and services.

After the Redmond-based tech giant introduced the Microsoft Copilot Dashboard, which is a new platform that is going to be released on Viva Pulse, and Viva Glint to analyze and keep track of the interaction and usage of the Copilot tool by employees, Microsoft will also release a similar dashboard to Microsoft Stream, its video-streaming tool within SharePoint.

According to the latest entry in the Microsoft 365 Roadmap, the dashboard is already available for those SharePoint users who enlisted for the private preview of the feature, but it will be generally available to all SharePoint users in June 2024.

Similar to the Microsoft Copilot Dashboard, this one will have different sections:

  1. A Lifetime Video report containing 3 metrics to analyze SharePoint sites’ videos: Total Views, Unique Viewers, and Average Watch Rate.
  2. A Video Traffic report containing information about views and viewer patterns across the last 7 days, 30 days, and 90 days.
  3. Video usage report that shows views and users by preferred device and geolocation.
  4. The top 20 Videos report will show the most popular 20 videos on the SharePoint site of the week.

This dashboard gives access to aggregated analytics for videos on a SharePoint site. This feature will go live in late January for customers enrolled in the private preview of Stream advanced video analytics. Customers interested in applying to join the private preview may submit an application via the URL associated with this roadmap item. We expect the dashboard to enter general availability in June. The metrics on this dashboard are divided into the following sections: First, the Lifetime Video report contains 3 metrics for videos on the SharePoint site—Total Views, Unique Viewers, and Average Watch Rate. Second, Video Traffic report shows views and viewer patterns across the last 7 days, 30 days, and 90 days. Third, Video Usage shows views by device and geolocation. Fourth, Top 20 Videos shows a list of the most popular videos on the SharePoint site in the last week.

Microsoft

The video analytics dashboard coming to Microsoft Stream should be quite useful to organizations managing their internal sites through SharePoint, as it can offer valuable information that can be used to implement new strategies to engage with employees.

If you’re currently the manager of an organization that uses SharePoint for its internal sites, you can preview this feature, by signing up here.

Hundreds of Azure cloud accounts compromised, senior execs targeted in latest breach

As per emerging reports, hundreds of Microsoft Azure accounts have been compromised in an ongoing breach, and critical data has been stolen. This has reportedly affected dozens of environments, and senior executives across several major corporations have been targeted.

According to cybersecurity firm, Proofpoint, the breach is using the same malicious campaign detected in November 2023, which integrates credential phishing and cloud account takeover (CTO) methods. It helps attackers gain access to OfficeHome and, in turn, the Microsoft 365 apps.

Threat actors are found to have employed proxy services to bypass geographical restrictions as well as mask their true location.

How did the breach happen?

The attackers embedded links into documents, which redirected users to phishing websites. These links usually had View Document as the anchor text, which didn’t raise any suspicion.

The attack was meticulously planned and targeted both mid-level and senior employees, though more accounts belonging to the former were compromised.

As per Proofpoint, roles such as Sales Directors, Account Managers, Finance Managers, Vice President (Operations), Chief Financial Officer & Treasurer, and President & CEO were the common targets.

This allowed the attackers to access information across levels and domains in the organizations.

In such attacks, once the account is compromised, threat actors deploy their own MFA (Multi-factor authentication) for prolonged access, say adding an alternate mobile number or setting up an authenticator app such that the user can’t regain access.

Besides, attackers remove all evidence of suspicious activity to clear their tracks.

These attacks are aimed at data theft and committing financial fraud. While there is no clear evidence, as of now, to identify the threat actors, it’s believed that these attacks originated from Russia and Nigeria, based on the use of local fixed-line ISPs from these regions.

At present, it’s recommended affected users change their passwords right away, if possible, and that organizations strictly enforce a periodic password change policy.

In the long run, organizations can employ security solutions to bolster the security infrastructure in a bid to thwart such attacks.

Microsoft might seal a deal with AMD for the Instinct Series Accelerators

AMD sells their Instinct MI300 Series Accelerators for a lower price to Microsoft. So, it might result in another long time collaboration between the companies. Thus, we can also expect for a new partnership between Xbox and AMD as they are still deciding who will bring the next gen console.

On the other hand, Microsoft could also work with Nvidia. After all, they have the H100 Tensor Core GPU that’s said to be one of the most performant GPUs for the enterprise AI. However, they are far more expensive.

Will AMD beat Nvidia in AI?

It’s hard to know if AMD will beat Nvidia in AI. After all, investing in the CUDA stack from Nvidia is a good idea because a lot of AI software and hardware have optimizations for it. The only downside is that the company keeps the hardware for premium buyers. Thus, they might not drop their price.

On the other hand, AMD is trying to seize a part of the market and bring more customers for the CDNA 3-based Instinct MI300 series. In addition, compared to Nvidia, AMD supplies their buyers faster because they have more resources available.

The final decision could be choosing between quality and quantity. However, Meta, OpenAI and Microsoft will likely invest in both AMD and Nvidia. After all, the companies desire a more diverse market to reduce overall costs and waiting times.

In a nutshell, the strategy AMD adapted might suit the customer’s needs, which is now looking to expand towards AI. Thus, AMD has the potential to size a larger part of the market with the Instinct series accelerators.

Also, Nvidia could lose if the situation becomes a race against time because they don’t have enough supply. Moreover, the partnership with Microsoft could lead to more sales for AMD, especially given the pricing.

What do you think? Is it enough for AMD to sell faster and cheaper to win over the market? Let us know in the comments.

Google and Microsoft AI shared predictions instead of real information

AI is only sometimes suitable, especially when you look for truthful information, but get predictions instead. After all, chatbots get their data from all kinds of sources, and they might not always be reliable. In addition, their power to generate facts could sometimes lead to misinformation. 

If you didn’t know, a few days ago, before the game was over, according to Gemini, the San Francisco 49ers defeated the Kansas City Chiefs during the Super Bowl. However, the truth is that the Kansas City Chiefs won.

How is AI used for predictions?

The AI makes predictions using data from Google searches and other sources, especially Gemini. Thus, we asked the new version of Bard how does it work, and here’s the answer:

As you can see, even Gemini says it can analyze data and use statistical models to estimate possibilities. Thus, for the sake of answering your questions, the AI might generate fictional answers.

Interestingly enough, the AI prediction feature of Gemini already got a fix. So, instead of making predictions, Google’s AI will offer you a list of things it can actually do to assist you.

The good part is that most AI chatbots get regular updates to match the reliable data. Also, their security system and answers are periodically verified to avoid any issues.

If you are working on your thesis and ask a chatbot for book suggestions, you might look everywhere for something that needs to be added. Moreover, you might discover that the book is an article’s name. So, you might want to ask the chatbot for sources.

Ultimately, all you can do is test your sources. Also, could you tell the AI that it’s wrong now and then, since it will start generating new data? Afterward, you can compare it with the previously generated one.

Here’s everything you need if you want to learn more about Gemini.

What are your thoughts? Did you ever run into AI misinformation? If you want, share it with us in the comments.

Windows 11 uses AI to create an Automatic Super Resolution for games

Windows 11 preview build comes with an automatic super resolution feature for us. Moreover, the feature is similar to DLSS or FSR. However, it might not be as potent as they are.

So, if you want a quick performance boost while playing, this feature might lead to it. Also, you can enable Game Mode to boost your performance if you haven’t already.

What is AI Super Resolution?

The AI super resolution is a feature that renders a picture at a lower resolution, then upscales it. This process uses AI, and it might affect the FPS in games. Additionally, most newer games have this option in their settings.

Furthermore, you can adjust the Windows AI super resolution to put an emphasis on performance or quality. Yet, the Windows AI Super Resolution, doesn’t seem to change anything for now. Yet, when it will work you should be able to see a quality difference.

AI super resolution OFF and ON

To turn this feature on, go to Settings, then to the Display tab, and select the Graphics tab. There you will find the option for the Windows automatic super resolution. However, don’t forget that you can only access it if you have the Windows 11 build 26052 or the latest preview build available.

This feature might not work for us right away. There are chances that it needs special hardware that’s capable of using AI, such as an Intel Core Ultra Processor. However, we will discover more about this feature when it is officially released.

Many features are coming to Windows, such as the built-in snapping tool that got a revamp or the mic test utility.

What do you think? Are you going to use this new feature while gaming? Let us know in the comments.

You’ll be able to access the entire Copilot chat history with the new Copilot experience in Teams

Microsoft 365 Chat is being replaced with the new Copilot experience in Microsoft Teams, as announced by the Redmond-based tech giant earlier today. The AI tool was released to the platform in November 2023, as a way for Teams users to communicate with.

Similarly to Bing, and Copilot for Windows, Microsoft 365 Chat provided solutions for tasks requested by users, and virtually it was no different from them.

However, it was quite clear that Microsoft wanted to rename all of its AI tools under a single name, so eventually Bing Chat became Copilot, and now Microsoft 365 Chat becomes Copilot, as well.

Microsoft says users should worry: the functionalities, as we mentioned, will stay the same, however, Teams will now display the Copilot icon on the platform.

The new Copilot experience is an improved version of the Copilot app in Teams that you may have used before (formerly known as Microsoft 365 Chat). It offers the same functionality and content access as the current app, but with additional benefits.

Microsoft

And yes, the new Copilot experience in Teams, also comes with benefits, including:

  • Better prompts, including details specific to you like the people you work with, your meetings, and your files. 
  • Ability to see your Copilot chat history. 
  • Access to a library of prompts via Copilot Lab. microsoft teams copilot

The new benefits include the ability to see the entire Copilot chat history, but it will be interesting to see if Teams users will be able to access the Copilot chat history on Windows devices, for example.

We’re saying this because a while ago, Microsoft said that Windows Copilot would soon become the hub for all Microsoft Copilots out there, including Copilot for Microsoft 365.

We don’t know if this includes Copilot for Teams, as well, but most likely Teams users won’t be able to access the chat history for their Windows Copilot, and vice-versa, as sensitive information can be at risk.

However, it might be interesting to see if Microsoft thinks about it this way.

You can now join work or school Teams meetings with your personal Microsoft account

Microsoft introduced the ability to allow users to join Teams meetings with their own personal Microsoft accounts, according to the latest blog post made by the Redmond-based tech giant.

When using your personal Teams account to join a meeting that originated from a Work or School Teams account, you previously had to join as a guest, often causing your meeting to open in a web browser with limited functionality. Now you can join as your signed-in personal Microsoft account from within the Teams app on Windows 11, providing a better meeting experience for all parties.

Microsoft

You will be able to join a work or school Teams meeting from the Teams platform, by tapping a Teams for work or school meeting link in a chat or community within Teams free. You will then join the meeting with your credentials, as you can see in the image below.teams meeting personal account

For now, the feature is only available in Teams Insider, so if you’re not enlisted in the Teams Insider Program, you can’t use this functionality just yet. However, based on insiders react to it, the feature will most probably be released to the stable version of Teams in the next weeks.

Microsoft has prepared a few intriguing and useful features for Teams that are slated for April, so this feature might also be coming to the general public, by then. We’re talking about shorter meeting URLs, and joining a Teams meeting by scanning a QR code.

These features will effectively make it easier for Teams users to join meetings without any constraints, or back-and-forth between personal and professional Teams accounts.

Despite the quick access, this feature might not be used by all users, as some prefer to have a clear line between professional and personal accounts, and understandably so.

What do you think about these new features? Do you think it is right to connect to professional meetings using your personal Teams account?

Lenovo’s Ctrl/Fn keys are finally in the proper position, thanks to Copilot

Microsoft unveiled the Copilot key a while ago, with the Redmond-based tech giant saying that it will usher in a new era of AI PCs. Manufacturers everywhere said they would release devices with the new Copilot key starting in March-April, and the key will help Windows users access Copilot with a single click.

While Lenovo has yet to add the new Copilot key to its devices, the new ThinkPad X1 Carbon (Gen 12) Windows laptops finally fix an old frustrating arrangement of the Ctrl/Fn keys, and we believe it might be due to integration of the Copilot key in future Lenovo laptops.

The arrangement was quite frustrating for a lot of Lenovo lovers out there, and they were complaining everywhere about it: on Reddit, or the official website.

My brand new laptop from the IT department has this and I’ve been cursing it all week! And then I just found out they gave me the wrong one and I get a new one tomorrow!

Lenovo user

Some even went as far as asking others how to swap the keys.

You can change the Fn key to function as the ctrl key and vice versa in the BIOS settings.

Lenovo user

The Fn key, which stands for function, usually stands on the right side of the left-right arrangement on Windows devices, and it can be activated in Windows 11 to use for accessing special commands.

However, the Lenovo ThinkPad went the other way around: the Fn key was found on the left side, and for users who are used to this key being on the right side, it turned out to be frustrating.

But ThinkPad enthusiasts will love the new device from the Lenovo series: the new ThinkPad X1 Carbon has apparently fixed this problem. The tech giant fixed the arrangement, and the Ctrl/Fn keys are now positioned correctly.

While X1 Carbon doesn’t have the Copilot key yet, future devices might probably sport the new key, and with it, there is a huge chance the Fn/Ctrl arrangement will go on this way, from now on.

But we’ll have to wait and see: while the new transparent laptop Lenovo is working on (which we exclusively reported about) has a fixed Ctrl/Fn arrangement, some of the laptops from the ThinkPad series don’t have it.

So, only time will tell if Lenovo decides to entirely fix the frustrating arrangement. Until then, those who are in love with the Lenovo laptops can choose to purchase the ones that have the correct, and standard Ctrl/Fn key arrangement.

Microsoft Copilot Dashboard: Now you can see how your company feels about Copilot

Copilot has been around for some time, but Microsoft only recently integrated the AI tool within Microsoft 365, Microsoft Teams, Viva, and so on.

Now, today Microsoft announced the release of the Microsoft Copilot Dashboard, a special platform, where companies can now gain useful insights on how employees feel about working with the AI tool.

We are excited to announce the Microsoft Copilot template, now available in both Viva Pulse and Viva Glint! With this research-backed template, leaders and IT admins can gain insight into how Copilot and AI tools impact their workforce. With this research-backed template, leaders and IT admins can gain insight into how Copilot and AI tools impact their workforce.

Microsoft

The Microsoft Copilot Dashboard will be available in Viva Pulse and Viva Glint, and admins can even deploy a survey to employees under the Recurring survey program within these platforms.

Microsoft says companies will be able to find out information and insights on Copilot from employees in terms of:

  • User insights: Copilot will likely be leveraged differently across employee roles. Gathering user feedback helps to refine implementations and ensure enablement efforts are aligned with the real-world needs of your workforce. 
  • Employee empowerment opportunities: Surveys help empower employees by giving them a voice to share their experiences. This empowerment fosters a sense of ownership and responsibility, which can lead to more active engagement with – and adoption of – AI technologies.
  • Copilot impact: Items in this survey help establish the overall impact of Copilot usage. The items show established relationships with Copilot use and general work patterns based on Microsoft research.
  • Success stories: Collecting feedback from employees on their use of Copilot early and often can uncover success stories, best practices, and tips to share across your organization. 
Microsoft

The survey will also be focused on two important areas, according to the Redmond-based tech giant.

  1. Core survey items – asks employees to reflect on the task or work-oriented benefits they experience from using Copilot. Survey results provide insights on how Copilot impacts employee experience and productivity.
  2. Additional survey items – evaluates the relevance of Copilot, organizational processes, and enablement practices to help leaders better understand how their rollout of Copilot is progressing and where additional support may be needed.

Plus, by CY24 Q2, Microsoft will implement the option for companies to capture Copilot sentiment data in the Microsoft Copilot Dashboard. Here’s how the dashboard will look, according to an image shared by Microsoft.Microsoft Copilot dashboard

Copilot has been on the rise recently, and there are more than 75 million Copilot users on Windows alone. Microsoft also announced Copilot for Sales, and the tech company promises it will be a game-changer for the industry.

However, this dashboard will be able to tell companies, and Microsoft, if Copilot is truly of use to employees everywhere.

You can read the full blog post here.

FrameDeck: this functional homemade handheld console was made using laptop parts

Framework Computer, Inc., one of the first US-based companies to propose the electronic right to repair movement has built a prototype of a functional homemade handheld using laptop parts, called FrameDeck, in a node to Steam Deck, and a rival to it, as well.

Touted as The World’s First Open Sourced Framework Powered Handheld, the console is fully functional, and it runs the Windows 10 operating system, so far. However, the console is not yet finished, and there is still work to be done on the design, operability, and buttons.

The company captured the development of the FrameDeck handheld console, and you can watch it below. There are two parts, so take your time.

The handheld was built by Steven B., and all the documentation, including the 3D design, as well as a complete guide with step-by-step instructions are now available to check out on GitHub.

The DIY approach allowed Steven to build FrameDeck using laptop parts, especially the mainboard and battery of a Framework 13 Laptop. If you’re curious about this little beast, here are the components that it is made of, according to the GitHub documentation:

The result is a handheld console that is heavier than its corporate rivals weighing 952g, while Steam Deck is 669g, and ROG Ally is 608g. However, it’s closer to Lenovo Go, when that console has its attached parts (854g), so if you’re already using it, you could basically use FrameDeck.

Why is FrameDeck important and why it could be a game changer?

Well, the company behind this cute handheld, Framework Computer, Inc., is all about sustainability, modularity, durability, and the right to repair. So, this means, that instead of buying a new device, you can just replace the parts that don’t work on your current device. It’s cheaper, kinder to the environment, and far more durable.

Plus, the company is also about improving existing devices by manufacturing and developing them in a way that they can be easily repaired, and replaced.

If the motherboard of a Framework laptop doesn’t work, customers will only have to replace the motherboard, and not the entire laptop, which is essentially cheaper. In addition, the Frameworks laptops are developed in such as way that parts of them can be replaced with newer, more powerful ones.

And the company is all about making it easier for customers to do these things on their own.

With FrameDeck being built with these points in mind, customers can easily improve it by just replacing older parts with newer ones, without the necessity of purchasing a new device. And, since FrameDeck is open-source project, it can be improved by users for users, with specific features in mind, designed to make the console better for all.

It could potentially be a game changer, and lots of people, especially those on a tight budget would be able to enjoy this console, as well.

What do you think? Do you see yourself building your own FrameDeck?

Installing Windows games on Linux is shockingly easy these days

While Windows 11 is slowly but surely becoming the preferred operating system for PC gamers, according to the latest Steam survey, there is also a special category of gamers that prefer none other than the Linux OS to play games on.

While Linux in itself might not be the right choice, as it doesn’t support many PC games, gamers are inventive: they have found a way to install Windows games on Linux, and to the surprise of many, they actually run pretty smoothly.

At least this is what this Reddit user says.

I’m simply awestruck at how much launchers like Lutris simplify the process of installing Windows games on Linux. My work laptop (Running Ubuntu 22.04) is able to run these games more easily than my Windows 10 desktop.

Reddit

The secret: they’re running an emulator that is capable of installing Windows games on Linux, and running them without any issue. The emulator in question is Lutris, which can be downloaded and installed from here. The emulator basically accesses the most important PC gaming platforms, such as Steam, GOG.com, Epic Games, or Humble Bundle, and automatically syncs with them.windows games on linux

It’s especially done for the Linux operating system, so those wanting to play Windows games on Linux, have a means to do it now.

However, as many other users pointed out, the process is not exactly easier, but it’s stable, so far.

I wouldn’t say it’s always “more easily” since adding games that aren’t from Itch, GoG, EGS, and Amazon games (like the ones you can get from Gamejolt) have a multi-step routine where you define their folder and their prefix, but that’s not hard at all after you’ve done it a few times.

Reddit user

“more easily” I doubt its able to run it more easily since its not a one click install unless you use port-proton. But its easy enough to be pretty much seamless.

Reddit user

Others believe Linux is a better operating system than Windows when it comes to gaming performance.

Its gotten to a point where Linux is arguably the better option for gaming the fact that Microsoft first party games work better on my linux partition than Windows alone is enough for me !

Reddit user

This is arguable, though. It’s well known Windows 11 is the best operating system for gaming, as it intelligently uses CPU and GPU resources in a way that doesn’t drain the system. Plus, Microsoft added a bunch of exciting features meant to improve the quality of video game sessions, such as Auto Super Resolution.

But if Linux is your thing, now it’s safe to say you can play Windows games on it.

Microsoft is limiting the OneDrive space to Office 365 A1 users to 100GB per user and 100TB for entire tenants, and it might not be enough

Office 365 A1 license customers will be limited to 100GB of OneDrive space for personal profiles and 100TB of OneDrive space for entire tenants, with the change rolling out effectively over this month, according to Microsoft’s latest blog post.

Effective February 2024, users of Office 365 A1 license (free subscription) will be limited to a maximum of 100GB for OneDrive strage, within the 100TB of pooled storage for the school tenant. IT Admins have the flexibility to set a lower limit for A1 users.

Microsoft

It is quite the downgrade considering, that OneDrive was (and still is, until the change is implemented effectively) providing Microsoft 365 A1 users with a space of 1TB, according to Microsoft, and now the Redmond-based tech giant cut down to 10% of that storage.

Microsoft says the change is necessary to increase the security of the platform.

Some of the benefits we expect to see include helping institutions reduce some of the security risks associated with legacy storage and data sprawl, a top concern for most chief risk officers, while also reducing our shared environmental footprint. 

Microsoft

However, some users are not happy with decision, and many of them complained that Microsoft hasn’t issued a clear warning that their OneDrive space will be reduces.

No notifications have been sent. I asked the support engineer and he was like “Um, not I believe there was no prior warning. I got a lot of tickets regarding this so I believe there was no prior notice”. WTF?! We got close to 1000 users (staff and students). I only got to know this because a user complained about her OneDrive showing a 100GB limit (instead of the usual 1TB). This is rolling out as we speak! I don’t believe this!

Reddit user

However, Microsoft made it clear last summer that these changes were going to be implemented, and we also reported it, back then.

But the new changes might not be suitable for large communities, such as faculties with thousands of students, as one Reddit user notes:

Let’s say you’re an organization that purchases 4,000 A3 for Faculty licenses. Let’s say you have 20,000 students. That would give you a 300TB pooled storage quota that is shared across Exchange Online and SharePoint Online. That means Microsoft is only giving an average of 12.5GB for everything they need to store in their Exchange mailbox and personal OneDrive, plus any usage they would put into Teams/SharePoint sites and shared Exchange mailboxes/resources.

Reddit user

It’s worth mentioning that the limiting will only be affecting the A1 license users, as A3 and A5 still have 1 TB of OneDrive storage. However, many users in the Reddit threads believe this could be the end for Microsoft cloud services, unless the Redmond-based tech giant comes with another solution.

Google One reaches 100 million subscribers, AI Premium is the latest offering

Launched in May 2018, Google One has finally hit the 100 million subscriber target, a massive feat!

In a post on X (formerly Twitter), Google’s CEO, Sundar Pichai, made the announcement while also highlighting the company’s latest offering, Google One Premium AI.

This clearly tells us that Google’s efforts to get users to shell out a few bucks for its services have paid off. In 2021, Google set a limit on free storage offered by Google Photos, which was previously unlimited. It’s now clubbed with the Google account, and you get 15 GB of free space.

So, Google One plans, starting at $2 per month, did seem like a steal deal to many, especially for those far too dependent on Google’s cloud storage.

Besides, these offered access to Google experts, VPN services, additional editing features in Google Photos, and monitored the dark web to identify if your personal information has been leaked.

Recently, Google’s other paid service, YouTube Premium, hit the 100 million subscribers mark.

Google launches the AI Premium plan

To keep up with the massive popularity and tap into the growing user base of AI (Artificial Intelligence), the tech giant has introduced the Google One AI Premium plan.

Google Gemini (Source: Google)

Priced at $19.99, the AI Premium plan includes all the benefits of the Premium plan, along with access to Gemini Advanced and the soon-to-be-released Gemini in Gmail, Docs and more. You get 2 TB of storage with the AI Premium plan.

Google’s generative AI is challenging Microsoft, and if the former manages to keep up the pace, it may emerge as a significant market player in the days to come.

Share your review of Google One and the AI Premium plan, if already subscribed, in the comments section below.
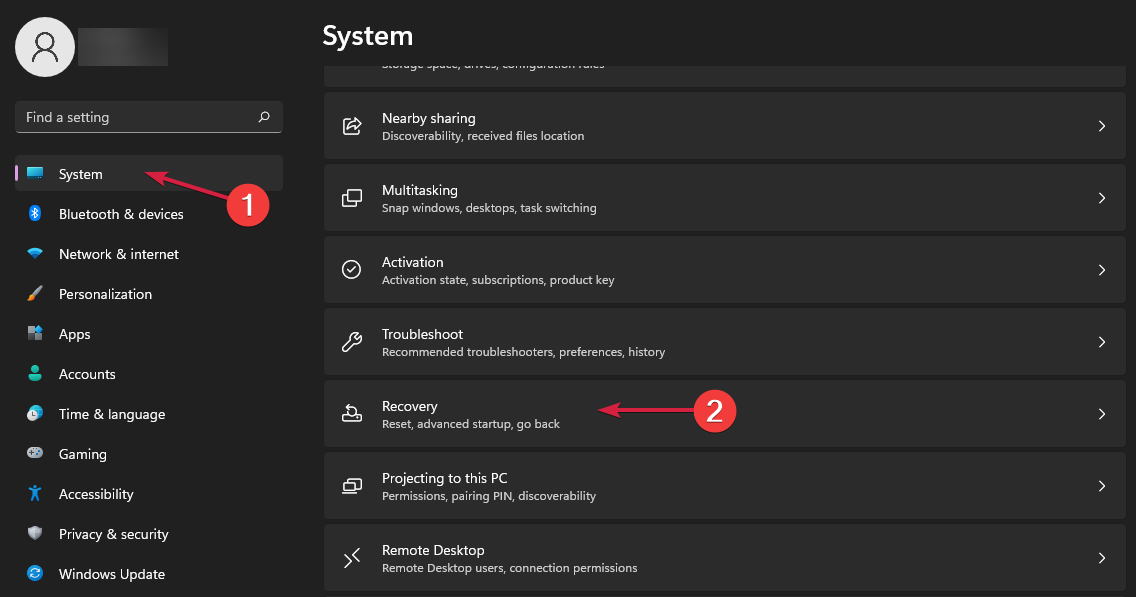
How to Use & Configure Sudo in Windows

With the release of Windows 11 Insider Preview Build 26052, Sudo was introduced to Windows 11, and the user with this version and higher can use it to run commands as an administrator. In this guide, we discuss how to enable, configure and use Sudo in Windows.

How can I use Sudo for Windows?

1. Enable Sudo

  1. Press Windows + I to open the Settings app.
  2. Go to System, then For Developers.
  3. Locate the Enable Sudo, and toggle the switch to turn it on.Enable Sudo - use Sudo for Windows
  4. Click Yes to confirm the action.

2. Configure Sudo for Windows

  1. The default configuration option for Sudo for Windows is In a new window, however, you can configure it accordingly as well.
  2. Press Windows + I to open the Settings app.
  3. Go to System, then For Developers.
  4. Locate Enable sudo, then locate Configure how sudo runs applications, and choose from In a new window (forceNewWindow), Input closed (disableInput) or Inline (normal) from the drop-down menu.configure sudo - How to use Sudo for Windows
  5. Alternatively, you can also open elevated command line, and type the following command after replacing <configuration_option> with forceNewWindow, disableInput, or normal, then hit Enter: sudo config --enable <configuration_option>

In case if you are not sure about the configuration optons, make sure you set it as In a new window.

3. Use Sudo on Windows

  1. Press the Windows key, type cmd and click Run as administrator.CMD elevated
  2. Now use sudo before any of the commands you want to use, let us say you want to check the active network connection, you can use the following command: sudo netstat -ab

In conclusion, to use sudo in Windows, you need to first enable, and configure Sudo on your device, then run commands on the elevated mode.

If you are using sudo, you might want to use dual boot Windows 11 and Ubuntu, read this guide to learn the detailed steps. In case you are already using the dual boot but it is not working for you, try repairing it from Windows or check out other methods.

While this command is now natively available, you can use other commands, and we have a great guide on what is rsync in Windows, so don’t miss it if you want to learn more about command line tools.

If you have any questions or suggestions about how to use Sudo in Windows; feel free to mention them in the comments section below.