NAS or Network Attached Storage has long been a viable solution and an effective alternative for cloud storage in smaller setups. But many found that their NAS is not showing under the Network tab in Windows 11.
The problem is faced across operating systems and manufacturers, be it Synology, RasperryPi, or Iomega, amongst others, and on both office and home setups. Our research found that it was usually a fault at the user’s end.
Why is NAS not visible on the network?
SMB1 is not enabled
Network discovery is turned off
Corrupt DNS or IP cache
A Firewall or third-party app is interfering with the connection
What can I do if my NAS drive is not visible on network in Windows 11?
Before we move to the slightly complex solutions, try these quick ones first:
Restart both the computer and the NAS setup, and make sure the two are connected to the same network.
Check for any available NAS OS updates and install them.
Disable Windows Defender Firewall or any similar security software installed on the PC.
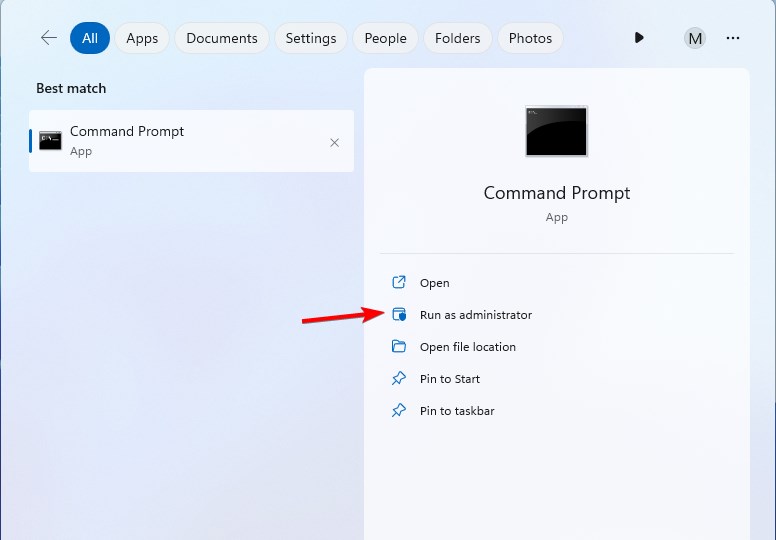
Press Windows + R to open Run, type cmd, and hit Ctrl + Shift + Enter.
Click Yes in the UAC prompt.
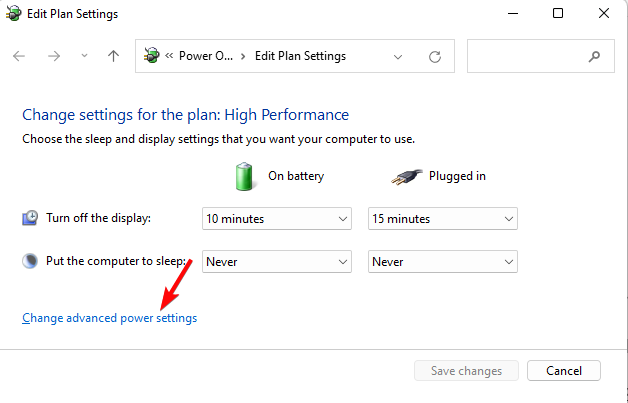
Paste this command and hit Enter to clear the DNS cache: ipconfig /flushdns
Similarly, execute this command: netsh interface IP delete arpcache
Once done, verify whether the network drives reappear in Windows 11.
3. Install and enable SMB 1
Press Windows + S to open Search, type Control Panel in the text field, and click on the relevant result.
Click on Programs.
Click Turn Windows features on or off under Programs and Features.
Expand SMB 1.0/CIFS File Sharing Support, tick the checkboxes for SMB 1.0/CIFS Automatic Removal, SMB 1.0/CIFS Client, and SMB 1.0/CIFS Server, then click OK.
Wait for Windows to find the required files and download them, then restart the computer.
When Windows 11 NAS is not showing in Network, reconfiguring the optional components will help! Besides, it will also fix things when you can’t map a Synology drive.
4. Change the local group policies
Press Windows + R to open Run, type gpedit.msc in the text field, and hit Enter.
Under Computer Configuration, expand Administrative Templates, double-click on Network, and then select Lanman Workstation.
Open the Enable insecure guest logons policy from the right.
Select Enabled and then click Apply and OK to save the changes.
Restart the computer for the changes to apply and check for improvements.
Modifying the policies will also work when NAS is not showing up on Network in Windows 10. Remember, the Local Group Policy Editor is not present on Windows 11 Home Edition by default. But you can always manually install gpedit.msc and make the changes.
5. Edit the Registry
Tip
Before you start modifying the Registry, create a restore point to be able to revert the changes in case they cause any inconsistencies.
Press Windows + S to open Search, type Registry Editor, and click on the relevant result.
Click Yes in the UAC prompt.
Paste the following path in the address bar and hit Enter:HKEY_LOCAL_MACHINE\System\CurrentControlSet\Control\Lsa\MSV1_0
Right-click on the empty portion, hover the cursor over New, select DWORD (32-bit) Value, and name it ConnectedAccountSSO.
Now, double-click the DWORD, enter 2 under Value data, and click OK.
Finally, restart the computer for the changes to apply.
In the absence of the ConnectedAccountSSO DWORD in the Registry, the OS automatically sets the value to 0, which will deny SSO when the concerned network device is Public.
Open the SMB settings and navigate to the Advanced tab.
Go to Others, tick the checkbox for Enable NTMLv1 authentication, and save the changes.
When Synology NAS is not visible on the Network tab in Windows, check the configured settings, especially the NTMLv1 authentication. And do make sure that you have enabled the SMB service.
7. Create a new local user account
Press Windows + R to open Run, type netplwiz in the text field, and click OK.
Click the Add button.
Click Sign in without a Microsoft account.
Now, choose Local account from the bottom.
Enter the user name and password (optional), then complete the account creation.
Select the newly created user profile, and click Properties.
Go to the Group Membership tab, select Administrator, and click OK to save the changes.
Finally, grant permissions to the new account to access files and public folders on NAS, then sign in with it, and the storage should be listed.
Often, when a QNAP NAS is not visible on the Network tab, or even the other ones, creating a new local account will work. Make sure to grant it administrative privileges for an error-free experience.
Remember, when Windows 11 NAS is not showing in Network, quick changes to the network settings or the local policies will definitely fix things. But you may still find the Map network drive option missing, which can be fixed by a Registry edit.
When using a multi-display setup, users want to show tray icons on all monitors in order to keep up with the latest notifications or access certain apps.
This can be quite useful, and in today’s guide, we’re going to show you how to properly enable this feature.
How do I show tray icons on all monitors in Windows 11?
DisplayFusion is a third-party software that brings various customization features for multi-display setups.
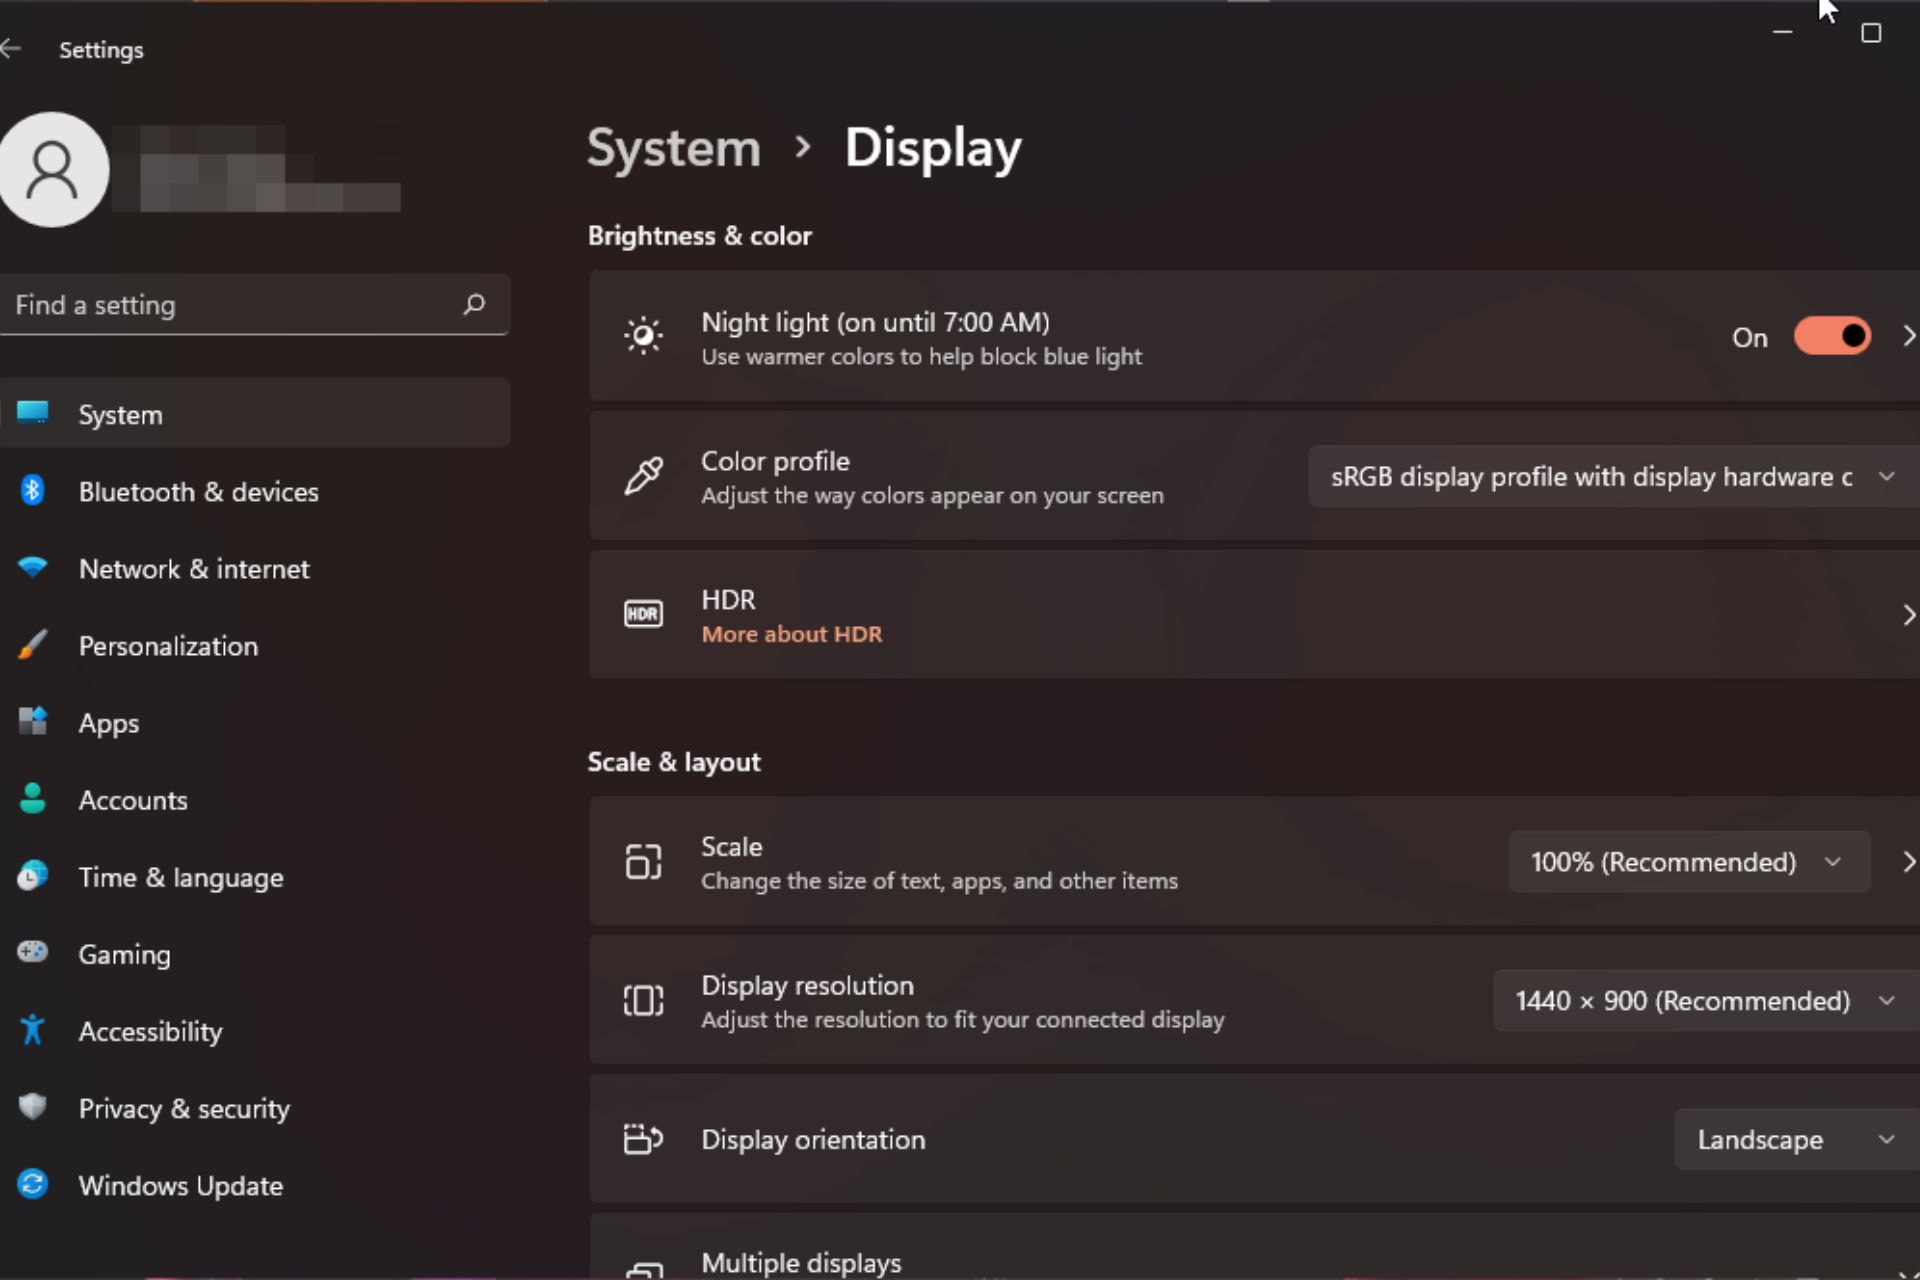
Using the advanced display settings, you can configure the refresh rate of individual monitors or set a dynamic refresh rate.
Display orientation can be changed and you can use your monitor in both portrait or landscape mode. You can also adjust the display scale on high-resolution displays.
Each monitor can have a different resolution, but for best results, it’s advised to use the same resolution on both displays.
You can set up a primary and secondary monitor, but keep in mind that certain features will be available only on the primary monitor.
Even though you can show a hidden icon menu on Windows 11, it won’t show you the tray icons on both screens. Keep in mind that this limitation affects other versions as well, and even though you can show Taskbar on both monitors on Windows 10, it’s not possible to do that with tray icons.
Did you find a different way to achieve this? If so, let us know in the comments section!
If one of your speakers becomes faulty and no longer works, your sound quality will be affected. Replacing it immediately may not be an option, but you can enable your mono audio settings to get a standardized sound output.
However, it’s disabled by default, so here’s how to combine your left and right channels into one on your Windows computer.
Is it better to have mono audio on or off? It depends on the situation. If you have a lot of background noise or your subject is moving around too much, then mono sound may be the best choice for your project.
However, if you want more control of your sound or an immersive experience where every little sound counts, the stereo mode will be a better option.
What are some benefits of Mono audio?
Doesn’t require much concentration to listen to audio.
Sounds more natural and doesn’t require much editing.
Has better clarity.
Is compatible with a wide variety of devices.
How do I turn on or off mono audio in Windows 11?
1. By using the Settings app
Hit the Windows key and click on Settings.
Click on System, then select Sound.
Toggle on or off the Mono audio.
2. By using Accessibility settings
Hit the Windows key and click on Settings.
Click on Accessibility and click on Audio under Hearing.
What are some additional tips for enhancing my PC’s sound quality?
Invest in good PC speakers – It goes without saying that the quality of your speakers affects your sound quality, so consider getting an enhanced bass speaker for an immersive sound experience.
Utilize stereo mode effectively – Stereo mode is a feature that allows your computer to use two speakers instead of just one and can help improve the sound quality significantly.
Use headphones or earbuds – Headphones and earbuds have a higher impedance and will provide better sound quality than most built-in computer speakers.
Find your perfect sound settings – If you have a good set of speakers or even headphones, you can find the best audio settings for your needs.
That’s pretty much it. Mono can be enabled or disabled in just a few seconds, and with this guide, you can turn it on with ease the next time you’re having trouble with audio from a faulty application.
Microsoft Viva Engage is a suite of Microsoft apps intended for work purposes, and it offers employees a way to connect with anyone from their organization, from anywhere and anytime. In other words, Viva is a hub where you have all the tools to do your job. And if you work from, this app can be very useful.
Microsoft Viva is integrated into Microsoft Teams, for an even more seamless experience, but the app has its own features, that are independent of Teams.
For example, according to Microsoft 365’s Roadmap, Viva is getting a new analytics capability that will enable an AI-enhanced summarization. This feature is already on Microsoft Teams, in a different form: the Intelligent Recap.
The new analytics capability in Viva is called Engage Network Analytics, and Microsoft will release a preview for it in September 2023. A full rollout is scheduled to take at the end of 2023, in December.
Just recently, Microsoft also announced that Microsoft Viva will get a brand-new homepage, Viva Home, so this new AI feature is more than welcome.
Engage Network Analytics will bring AI summarization and other features to Microsoft Viva
Microsoft says that this new analytics capability will help users understand certain engagement trends within their organization much better.
Besides the AI summarization, which will help you stay updated with all the activity that happens within your organization, the Engage Network Analytics will also provide you with insights regarding other topics.
For example, Microsoft says that it provides an at-a-glance overview of your organization’s top usage trends including employee sentiment, and cross-community insights.
This will allow users to effectively see the general reactions to topics that are posted and discussed in Viva and then form opinions or polls to discuss them further.
This new analytics capability helps users understand engagement trends across their entire organization. Network analytics provides an at-a-glance overview of your organization’s top usage trends including employee sentiment, cross-community insights and AI-powered summarization to help you stay up-to-date with all the activity that occurs within your company.
Microsoft
It has been long overdue for Microsoft Viva to get more AI features, but it seems Microsoft is finally improving and enhancing the Viva experience, as well.
To redefine the modern workplace, Microsoft and Adobe have teamed up to offer innovative solutions to foster seamless collaboration, improved efficiency, and enhanced productivity for businesses worldwide.
As trusted leaders in business solutions, both Adobe and Microsoft have embarked on a partnership aimed at delivering cutting-edge work experiences. By integrating the capabilities of Adobe Acrobat and Acrobat Sign with Microsoft Cloud solutions, these industry giants are set to change the way teams collaborate and work together.
Adobe’s comprehensive integration with Microsoft ensures that users can leverage the power of Acrobat and Acrobat Sign without leaving their preferred applications. Furthermore, businesses can explore these integrations with a 30-day free trial, without requiring a credit card, making it easier to assess the advantages for their specific needs.
Beyond the immediate efficiency gains, this collaboration aims to unify data, content, and processes to deliver enhanced customer experiences. By combining the insights and advanced capabilities of Adobe and Microsoft Clouds, businesses can offer reliable, secure, and optimized experiences that reach customers across various touchpoints.
Personalization takes center stage as cross-channel customer insights are consolidated into a single profile, streamlining content management, omnichannel campaigns, and customer analytics. This ensures that every interaction with customers becomes more meaningful and tailored to their preferences.
Moreover, the partnership empowers sales and marketing teams with a comprehensive toolkit for successful lead generation and account-based marketing, facilitating customer journey progression from initial engagement to deal closure.
For businesses seeking to scale content creation, the collaboration offers a flexible and extensible platform to create personalized content experiences for B2B and B2C customers across multiple commerce audiences.
Microsoft and the UK’s regulatory body the Competition and Markets Authority (CMA) are once again entangled in a review of a proposed Activision acquisition with a new deadline set for the end of October 2023, for a revised decision, but a resolution could come as soon as next week.
The Verge is reporting that a source familiar with the proceedings, believes a ruling from the CMA is likely coming down the pipe as early as next week which would be roughly 60 days after they undertook another review process but three weeks before Microsoft would have to pay out $4.5 billion to Activision as part of a renegotiated acquisition date.
After being granted an appeal from the UK’s Competition Appeals Tribunal following the CMA’s initial rejection and injunction of the Activision deal, Microsoft has since restructured its bid for ABK to better assuage the initial concerns of European regulators.
While Microsoft is still attempting to require most of Activision Blizzard it has proposed doing so without the direct control of the companies cloud streaming licensing rights. Instead of Microsoft being in sole control of game streaming rights, the company would off-load the responsibility of market pricing and accessibility to Ubisoft for 12 years while also being subject to the same terms and agreements as every other game streaming service available.
With the CMA centering much of its initial rejection of the proposed Activision acquisition on Microsoft’s potential monopolization of cloud streaming, the company’s restructured deal should go a long way in minimizing those specific concerns.
The CMA can issue its preliminary decision as early as next week but a formal yes or no on the $68.2 billion dollar deal still has a deadline of October 18, 2023.
Microsoft is testing folders in the recommended section in the start menu. Adding folders to the Recommended section in the Windows 11 Start menu would be a user interface change to improve the accessibility of recently added applications and suggested files. It was in Windows 11 build 23545.
This could be a useful addition for users who find the Recommended section useful, allowing them to organize their recently added applications and suggested files into folders.
This could be like a similar feature that was added to the Start menu a couple of days ago in Windows 11 build (22621.2359), which is the Start menu showing website suggestions.
It’s not uncommon for Microsoft to release Windows Insider Preview builds with hidden or unannounced features for testing and feedback from enthusiasts and developers.
Please note that these Insider Preview builds are intended for testing purposes and may contain experimental or unstable features that could change or be removed in future updates. Users who participate in the Windows Insider Program should be aware of this and provide feedback to Microsoft to help improve the operating system.
Want to force a BSoD in Windows 11? If you’re troubleshooting a problem with your computer and suspect it may be related to hardware issues, forcing a blue screen error will generate crash dumps with detailed log files so that you can test whether your PC has suffered hardware failure.
You can also address driver errors. Sometimes, a driver update can cause system instability, resulting in a crash or a BSoD. In such situations, forcing a system crash can help you identify the problematic driver software and fix it accordingly.
Navigate to the following location for a USB keyboard and the next for a PS2 keyboard: HKEY_LOCAL_MACHINE\SYSTEM\CurrentControlSet\Services\kbdhid\ParametersHKEY_LOCAL_MACHINE\SYSTEM\CurrentControlSet\services\i8042prt\Parameters
Right-click on Parameters, select New>DWORD (32-bit) Value, and name it as CrashOnCtrlScroll.
Double-click on it, and under Value data, type in 1, then hit Enter.
Ensure you back up your registry before editing, given how uncertain the outcome can be.
5. By creating a shortcut
Right-click on an empty space on your Desktop and select New>Shortcut.
Type taskkill /IM svchost.exe /f in the location entry and hit Next.
Name your shortcut BSoD crash and hit Finish.
Right-click on your newly created shortcut and select Properties.
Click on theAdvanced button.
In the Advanced Properties dialog prompt, check the Run as administratorbox and hit OK.
Finally, click on Apply and OK.
To trigger the error, all you have to do is double-click on the shortcut.
To get rid of the BSoD error you just created, restart your PC.
What hardware causes blue screen failure?
Driver issues – Driver errors are the main causes of a BSoD error. If one driver doesn’t work properly, it can cause a conflict and crash your entire system.
Faulty hardware – Your hard drive might be failing, which means that it can’t keep up with requests from the operating system and applications for new data.
Bad RAM – A bad memory module or one of the memory slots not being able to read the RAM can also cause the dreaded death screen.
How do I run the BSoD troubleshooter in Windows 11?
Well, Microsoft has its own built-in BSoD troubleshooter, but if you find it too basic, there are more advanced BSoD fixers you can use. They are fast and thorough and reduce the chances of the error reappearing.
So there you have it. This is a neat little trick that any geek could easily perform. Maybe the touch of the death button is not the ideal solution to end all problems, but if you think about it, it’s not just a neat trick.
It’s also a great way to test the safety of your software and fix BSoD errors like cldft.sys before they occur.
Whether you want to check for errors or simply pull a prank on your friend, these steps will surely come in handy. However, you may want to consider trying the fake errors for a safer option.
Would you ever consider causing an error on your PC on purpose? Let us know your thoughts on this issue in the comment section below.
CTV refers to any television set that is connected to the internet, whether it be a smart TV or an older TV that has been linked to an external streaming device like Netflix or Apple TV.
Microsoft has stated that users can now advertise their business on popular streaming platforms such as Max, Hulu, and Bloomberg, as well as on websites like MSN, Huffington Post, People, and the Wall Street Journal.
It has been predicted that by 2024, individuals will spend an average of 3.5 hours daily consuming digital video content. This trend is not limited to any platform and includes smart TVs and smartphones. Around 90% of Generation Z individuals in the United States participate in second-screen internet and TV activities, indicating a potential opportunity for advertisers.
Microsoft’s audience intelligence fuels video and CTV ads by leveraging various first-party data points and permissions. This includes search and web activity from Bing and our browser, Microsoft Edge, content interests from Microsoft Start, demographics, and more.
Microsoft Advertising employs advanced machine learning algorithms to create targeted audiences based on various factors such as consumer product and brand preferences, purchase history, content preferences, and geographical location. By leveraging this approach, advertisers can effectively reach their best potential customers.
4 out of 5 consumers read the news online while watching TV, emphasizing the potential for advertisers to target audiences engaged in such multi-screen behaviors. Hence, utilizing video ads seems to be a wise approach, as ad spending is predicted to increase significantly in the upcoming years.
In summary, Microsoft Advertising’s Video and CTV ads offer precise audience targeting and user-friendly integration, enhancing advertisers’ capabilities. However, increasing competition and potential ad saturation pose challenges, necessitating ongoing innovation for success.
Microsoft has announced a new update for its Windows 11 applications, introducing advanced AI capabilities to optimize Optical Character Recognition (OCR) in both the Camera and Snipping Tool apps. This development promises to streamline the user experience by effortlessly extracting and copying text from images or screenshots.
The Camera app, in particular, is set to undergo a remarkable transformation. With this update, users can now scan text directly through the camera lens, significantly benefiting tablet users. Microsoft’s proprietary AI technology, potentially influenced by their collaboration with OpenAI, powers the OCR capabilities of the Windows Camera.
In addition to text scanning, the Camera app will also offer an option to redact sensitive information before sharing edited images. This feature takes into account the growing need for data privacy and ensures that users have complete control over the information they share.
Meanwhile, the Snipping Tool has already rolled out its “Text Actions” feature, leveraging the AI capabilities of Windows 11 to identify text in captured screenshots. This feature enables users to select and copy text directly from images. To take advantage of Text Actions, users need only click the designated button in the toolbar.
Upon clicking the button, Microsoft’s system will automatically highlight selectable text, which users can effortlessly copy using the mouse. To further enhance efficiency, the Snipping Tool also provides convenient shortcuts like Ctrl + A and Ctrl + C for copying text from scanned images.
Excitingly, both the Snipping Tool and the Camera app will soon offer an additional feature—the ability to conceal or redact sensitive details such as email addresses or phone numbers before sharing edited screenshots. This feature ensures that users can confidently share information without compromising privacy.
With these advanced AI capabilities integrated into the Windows 11 applications, Microsoft aims to revolutionize the OCR process and provide users with an efficient and seamless experience. Whether it’s scanning text through the camera or extracting text from screenshots, Windows 11 users can now enjoy enhanced convenience and productivity.
Microsoft announced that the Exchange Web Services (EWS) API for Exchange Online and Office 365 will be retired in approximately three years. EWS is a cross-platform API that allows developers to create apps capable of accessing email messages, meetings, and contacts. These resources can be retrieved from various sources, including Exchange Online, Exchange Online as part of Office 365, and on-premises editions of Exchange.
The Exchange Team stated, “Today, we are announcing that on October 1, 2026, we will start blocking EWS requests from non-Microsoft apps to Exchange Online.” They assured users that while the EWS components will continue to receive security updates and certain non-security updates, there will be no changes to the product’s design or features.
This retirement only applies to Microsoft 365 and Exchange Online, with no impact on Outlook for Windows or Mac, Teams, or other Microsoft products. It’s worth noting that the retirement of EWS also applies to the EWS SDKs for Java and . NET. Microsoft advises developers to switch to the Microsoft Graph API, which will provide access to Exchange Online data.
However, the company acknowledged some feature gaps between EWS and Microsoft Graph, including no access to archive mailboxes, lack of folder-associated information and user configuration, and no Exchange Online management capabilities for third-party apps.
The Exchange Team is actively working on closing these gaps, but developers may need to find alternatives for features that won’t be included in the Graph API. Despite the inconvenience this may cause, Microsoft believes that retiring EWS will ensure more secure, reliable, and performant experiences.
They will publish regular communications to aid affected tenants in identifying EWS usage and encourage the adoption of Microsoft Graph for a wider range of useful and intelligent features.
In conclusion, developers using the EWS API are advised to begin transitioning to the Microsoft Graph API ahead of the retirement deadline. While some feature gaps exist, the tech giant says it is committed to addressing them and providing a seamless experience for users.
Yesterday saw the biggest leak in Xbox history thanks to documents in the FTC v. Microsoft case that were accidentally made public.
The leak included over a hundred documents and files, including internal emails. Among the information made public was the reveal of an all-digital Xbox Series X releasing in 2024. Microsoft’s plans for the next generation of Xbox were also made public, entailing a cloud hybrid console.
Microsoft Gaming CEO Phil Spencer posted on social media to address the leaks.
We've seen the conversation around old emails and documents. It is hard to see our team's work shared in this way because so much has changed and there's so much to be excited about right now, and in the future. We will share the real plans when we are ready.
As Spencer alludes to in the post, much of the info is from a few years back, so many details are likely to have changed.
In other Xbox related news, Starfield has now been played by more than 10 million players worldwide. Bethesda’s epic space RPG has accomplished this feat less than three weeks after its full release. Bethesda Game Studios posted on X (Twitter) thanking all those who have played Starfield so far.
Starfield is the biggest game launch in Bethesda’s history. The game has seen a huge amount of success so far, which is unsurprising given the level of hype and anticipation that surrounded its release.
This week started off with a bit of a bombshell for Microsoft as news of the company’s EVP and chief product officer Panos Panay’s departure leaked via an internal memo drafted up on his behalf.
Despite the face of Microsoft’s Surface hardware efforts leaving the company, computing devices from the company will continue to be a business for the foreseeable future, albeit less about hinges and fabric keyboards and more about integrating dedicated processing units and pushing artificial intelligence to sell products.
The End of an Era
In a short but concise email crafted by Microsoft’s EVP of Experiences and Devices Rajesh Jha, employees were made aware of the seismic changes that are going to occur within the Windows and Devices department starting with Panay’s departure.
Moving forward, we will double down on our strategy. These changes will be effective immediately with Panos’ help in the transition.
Build silicon, systems and devices that span Windows, client and cloud for an AI world. This team will be led by Pavan Davuluri, who will report directly to me. Brett Ostrum, Nino Storniolo, Linda Averett, Ken Pan, Ralf Groene, Aidan Marcuss, Carlos Picoto, Stevie Bathiche, Robin Seiler, Ruben Caballero and Anuj Gosalia will move to report to Pavan with their teams intact. Windows planning and release management will continue to be in this team. Our commitment to Surface and MR remains unchanged.
Build experiences that blend web, services and Windows for an AI world. To this end, Shilpa Ranganathan, Jeff Johnson and Ali Akgun will directly report to Mikhail Parakhin and form a new Windows and Web Experiences Team, moving with their teams intact.
Yusuf Mehdi will take on the responsibility of leading the Windows and Surface businesses with our OEM and Retail partners.
As Microsoft reorients itself following the upcoming departure of its chief Surface hardware champion, Panay will begin decorating his new office across town as part of Amazon’s Alexa and Echo division.
According to Bloomberg, Panay has been tapped to run Amazon’s devices group which consists streaming sticks, Kindle e-readers, Alexa powered computers, tablets, clocks, mirrors as well as the echo brand of speakers and audio products.
Panos’ departure from Microsoft after 19 years feels abrupt, especially given the company’s upcoming Surface hardware event in New York this Thursday, which Panay will no longer be attending.
The sudden news of Panay leaving Microsoft has led to many speculating on the future of the Surface hardware division given it perceived stagnant development and distribution status as of late. Despite a through line being draw by beleaguered Microsoft hardware fans and critics alike that connect declining revenues and profit to a full “going out of business” fire sale of the Surface division, I believe the company still plans to produce its flagship hardware and with significant investment in the future.
Partnerships & Contracts
Yes, over the past few quarters, Microsoft’s Surface division has slipped from its $2b earnings record but remains roughly 4% of the company’s total revenue and accounts for about $7B of the bottom line. Additionally, Windows 11 adoption seems to have stalled out of the gate with fewer people jumping from Windows 11 than did from Windows 8 to Windows 10 measuring similar timelines.
A cursory view on the state of the division Panay was tasked to oversee would understandably look bleak enough to justify a cynical parachute play from the executive as well as warrant speculation of the Surface line being wound down to allow the company to continue to focus on its currently successful pivot to AI, but there are some blatant nuances that should dissuade skeptics from attempting a premature grave dance for the Microsoft Surface business.
Starting with the less obvious, Microsoft recently renegotiated an extension of its partnership with the NFL where the company will continue to provide Surface hardware and support for the league that now includes the Teams communication platform. Yusuf Mehdi, CVP of Modern Life, Search and Devices managed to extend the original 2017 partnership between the two as well as tack on additional services and support, which is something he will be doing more of in his new role.
The original NFL partnership has led Microsoft into further robust contracts with other sporting leagues such as the NBA, PGA Tour, La Liga, and more. While commercial sales of the Surface hardware have succumbed to the global decline in PC shipments, contracts and partnerships with sporting leagues, airlines, hotels, research firms, education, courts, civil engineering contractors, US Congress & Senate committees, the Department of Defense, retail businesses and more, all remain a priority for Microsoft.
Selling an integrated stack solution from software to hardware is not only margin gain for Microsoft but embeds them within that particular business at several levels where they can edge out competitors such as Google, Salesforce, AWS and more. While Microsoft is mostly a software company, the possible exposed vectors to maintaining a thriving business become fewer when they can also pitch Surface Pro and Surface Pro support and maintenance programs to accompany a multi-billion-dollar Azure deal or vice versa, where they pitch Surface Laptops that can server as funnels into Office 365, Azure, PowerBI, OneNote Classroom, etc.
Where to put AI
As a tech journalist, I admit I get giddy over new hardware released from brands but must keep in mind the companies’ objectives as well, and Microsoft’s Surface line remains an endpoint solution disguised as reference devices.
Over the past few years, Panay has wormed his way into the minds of people covering Microsoft’s hardware efforts but its executives such as Medhi who have helped advance devices beyond the stage into meaningful business opportunities to spread the company’s evolving strategic business interest.
The original Surface served as trojan horse for Windows 8 for better or for worse, and over time the company has expanded the portfolio to try and push Windows 10S, Windows on ARM (WoA), Windows 11, and soon Windows 12 infused with AI displayed through its hardware with dedicated Neural processing units built into the silicon.
Microsoft has leaned heavy into AI, generative pre-trained transformers, conversational machine learning, large language models and quantum computing and its looking to infuse these technologies into its various platforms to help customers but more importantly widen its software margins while also securing dependency in the market.
Surface devices like the Surface Pro 9 powered by chips that can translate AI technologies on devices offer a compelling selling point that Microsoft is singularly at the forefront of. Last year Microsoft began pitching Windows Studio Effects which consisted of audio and visual features enhanced with AI to help isolate noise, improve image qualities, apply real-time filters and more.
Windows Studio features represents a baby step into the world of AI enhanced computing Microsoft would like to sell to customers, and to do so, it’s going to need to maintain its Surface lineup as constant threat to chipmakers to help push its AI ambitions forward. Microsoft’s OEM partners have provided similar proprietary solutions as Windows Studio Effects for years, but their disparate efforts have never been enough to coalesce and effort from Intel to dedicate and standardize development around. With the Surface being somewhat of a commercial success and embedded in several business vectors, Microsoft’s flirtation with Qualcomm and its Surface Pro 9 supporting those specific new Windows features may have been enough to get Intel to wrap up its development on similar SoC structures.
Microsoft having its own first party devices to test, pit against, and develop specific features for its various platforms becomes a net benefit in the standardization of Windows features and support from the OEMs who sell devices in the millions each quarter.
Microsoft needs somewhere to display its Windows 12 AI future and Surface devices will remain a home for that effort, even if they don’t sell gangbuster numbers.
What the future looks like
Despite my own personal bias for a “pumped” Panay presentation, his departure marks an opportunity for Microsoft to rewrite the narrative of the Surface line to align with goals from 2023 rather than its previously stated from 2013 as simply being reference design hardware. It’s clear that in 2023, OEMs took notes in 2013 and are now outpacing Microsoft when it comes to reference devices, specs, features, and computing experiences.
From single screen foldables to dual screen convertibles, OEMs are providing more computing options with higher end specs, dedicated feature sets and overall computing experience.
What Microsoft cans start doing is using the Surface device as standard bearer for a polished Windows computing experience expanding on things like haptic keyboards, noise cancellation software, high end webcams, on-device encryption, improved Windows touch support at the OS-level and more while spending less time on new ways to add hinges to device.
Yes, some OEMs offer solid computers already and many customers may argue that having Microsoft in the market is redundant but over the past 10 years the company has put in work to make Surface an aspirational brand and they can capitalize on that by polishing the experience.
Microsoft may not make another Surface Duo bet and the Surface Laptop Studio may be the last experimental design for the lineup, but providing a polished computer like the Surface Pro and Surface Laptop that offers competitive horsepower, a no-fuss, no bloat, full AI-infused computing experience that ties into the various platforms business already subscribe to may just be enough to keep an office of 10,000 or 100,000 seats from going with Lenovo or Dell, and that’s a future the company can control.
In a recent update to Microsoft 365 Roadmap’s Outlook, the company has announced changes to its feedback system, starting in October 2023. The feedback entry point for Outlook for Web will now be relocated from the bottom of the Help pane to the Help tab of the ribbon. This change is aimed at enhancing user accessibility and ease of discovery.
The updated feedback system promises a more streamlined experience for users, with added features such as diagnostics log collection, which will help Microsoft better understand users’ problems and develop solutions more quickly; and the capability to include screenshots and videos in feedback submissions. This not only simplifies the process of describing issues or suggestions but also expedites Microsoft’s ability to take action based on user feedback.
Additionally, users will have the convenience of searching for information related to their feedback. This includes updates on features currently in development, workarounds for common problems, and helpful how-to guides available in the Help section. These adjustments align with Microsoft’s overarching Feedback policy.
This change aligns with Microsoft’s general Feedback policy and is identified by Feature ID 169101. It was added to the roadmap on September 19, 2023. This update will apply to Outlook on the web and will be available for users across worldwide standard multi-tenant cloud instances in the General Availability release phase.
In short
Streamlined experience: The new feedback experience will be easier to access and use, which should encourage more users to provide feedback.
Diagnostics log collection: This will help Microsoft better understand users’ problems and develop solutions more quickly.
Ability to add screenshots and videos: This will allow users to illustrate their issues and feedback in more detail.
Easier to find information about known issues and workarounds: This will help users solve problems independently without having to wait for a response from Microsoft support.
We believe that the new Outlook feedback experience will be a valuable tool for both users and Microsoft. It will help users to get help for and solve any issues that they might encounter, and it will help Microsoft to improve the Outlook experience for everyone.
Microsoft Edge is a versatile web browser that offers a plethora of extensions to enhance your browsing experience. But what about using these extensions in InPrivate mode? InPrivate mode is designed to provide private and secure browsing by not saving your browsing history, cookies, or temporary files. By default, Edge disables extensions in this mode to ensure your privacy. However, if you wish to use specific extensions even in InPrivate mode, you can manually enable them.
In this guide, we’ll explore the capabilities of Edge extensions in InPrivate mode, provide step-by-step instructions on how to enable and use them, and discuss the potential risks involved.
How to enable Edge extensions in InPrivate mode
While Edge restricts extensions in InPrivate mode as a privacy precaution, you can manually enable them if you wish to use specific extensions, even when browsing privately.
Here’s a step-by-step guide on how to do it:
Launch Microsoft Edge on your system.
Click on the Settings and More (three dots) icon at the top-right corner and select the Extensions option from the list.
Under the Extensions pop-up, select the Manage extensions option. This will open the Edge Extension page.
Look for the extension that you want to allow in InPrivate mode. Click the Details option under it.
Check the “Allow in InPrivate” option to enable the intended extension while incognito browsing.
You have now successfully enabled extensions in InPrivate mode on Microsoft Edge. You can use your extensions while enjoying the privacy features of InPrivate mode. Launch the InPrivate mode in Edge and check if the extension you have enabled is working.
Risks of enabling extensions in InPrivate mode
While enabling extensions in InPrivate mode can enhance your browsing experience, it’s essential to be aware of the potential risks:
Privacy Concerns: Enabling extensions in InPrivate mode may compromise your privacy, as some extensions have the capability to collect data or track your online activity. Be cautious about the extensions you enable, and only use those from trusted sources.
Security Risks: Extensions can introduce security vulnerabilities into your browsing session. Malicious or poorly coded extensions may expose your system to risks such as malware or phishing attacks. Ensure you only install extensions from reputable developers and regularly update them.
Reduced Anonymity: InPrivate mode is designed to provide a higher level of anonymity by not saving browsing data. However, enabling extensions may reduce this anonymity, as some extensions could potentially reveal your identity or location.
FAQs
1. Why does Microsoft Edge disable extensions in InPrivate mode by default?
Microsoft Edge disables extensions in InPrivate mode to enhance user privacy. Extensions can potentially collect data or track user activity, which goes against the core purpose of private browsing. By default, Edge restricts extensions to prevent any potential privacy breaches.
2. Are all extensions compatible with InPrivate mode in Microsoft Edge?
Most extensions should work in InPrivate mode once you’ve enabled them as per the instructions in this guide. However, some extensions may have limitations or restrictions, so it’s a good idea to test your specific extensions to ensure they function correctly in private browsing.
3. Can I enable extensions for specific sites while in InPrivate mode?
No, the option to enable extensions in InPrivate mode is a global setting in Microsoft Edge. When you enable extensions, they become available for all websites you visit during private browsing sessions.
4. Can I disallow the extension in InPrivate mode?
Yes, you can easily disallow the extension in InPrivate mode by following the same procedure and unchecking the “Allow in InPrivate” option.
Make InPrivate mode productive
Microsoft Edge provides users with the flexibility to enable extensions in InPrivate mode, allowing for a more customized and productive browsing experience. By following the step-by-step instructions in this guide, you can enable your preferred extensions while maintaining the privacy features of InPrivate mode. This balance between functionality and privacy empowers you to make the most of Edge’s capabilities while keeping your online activities confidential.
We also have a guide on how to always start Edge in Incognito, so don’t miss it for more information. Our latest guide writes about the Edge Incognito shortcut, so feel fee to check it out if you want to learn more.
Explore the world of Edge extensions in InPrivate mode and enjoy a personalized browsing experience tailored to your needs while being mindful of the potential privacy and security risks involved
The original Outlook 97 application, with a refreshingly empty Inbox
When Microsoft Outlook first arrived early in 1997 as part of the new Office 97 suite, it was the first time that Microsoft bundled calendar and email into a single product. Previously, the MS Mail or later Exchange client dealt with the messages, and Schedule+ was used for calendaring, though it would send meeting requests and process the responses using the email client.
Incidentally, an old element of “Microspeak” is “S+”, as in “Shoot me an S+ and I’ll be there”, meaning send me a Schedule+ request for a meeting (or, these days, send me a meeting request in Outlook). Bizarrely, some young ‘Softies who probably hadn’t even learned to talk when Schedule+ gave way to Outlook, seemed to learn that term as part of their induction, though it is a minor bit of corporate lingo. For more commentary on contemporary as well as historical jargon used in Redmond, see Raymond Chen’s Old New Thing
Mail Shortcuts
Since that original PC release of Outlook, there have been numerous other apps & experiences using the name – Mac and mobile versions would eventually appear, Outlook Web Access was a web-based UI for accessing Exchange email, calendar etc, and on the PC, Outlook Express was a rebranding of a freebie mail & news app that didn’t have calendaring. Some vestiges of the Outlook name persist in other places – the Mail & Calendar apps in Windows 11, for example, are actually a single executable but with two functions, and can be launched from the Start menu by entering outlookmail: or outlookcal: directly. Mail and Calendar will be ultimately replaced by the “New Outlook“, which can be launched (after switching to it) with ms-outlook:.
Though The “New Outlook” is ostensibly a thin wrapper for Outlook Web App as presented on Outlook.com and in Outlook on Microsoft 365, it offers some notable benefits, especially when it comes to dealing with multiple accounts. You can easily switch between different mailboxes, and can manage their associated calendars from a single place. The default if you tick multiple calendars is to overlay them into one view – either several sources of calendar data from a single account, like adding national holidays or the birthdays of people in your contacts folder, or when combining multiple accounts across Outlook, M365/Exchange and Gmail. Dusty ol’ Desktop Outlook used to show them side-by-side at first though was able to overlay them if required.
New Outlook and multiple calendars
To separate the calendars out (so making it a little easier to manipulate the appointments), click the split view option in the Home tab, and check out some of the filter options too. You can easily show and hide different types of appointments such as displaying only meetings where you’re the organizer. Nice.
One feature missing completely from New Outlook, though, is a little-used legacy of the original Outlook going back to its very inception.
Outlook Forms
Thinking about how the original PC desktop Outlook works, it’s useful to imagine how it was primarily used. The Exchange Server would hold your mailbox that had inbox, calendar, contacts etc, and Outlook presented all of that data in a single app. Each email, calendar item, contact etc is really a blob of data (eg. body text and attachments) with some associated metadata, like how big the message is or when it was sent. In order to differentiate the data fields and the functions that would apply to each type, the store would associate a message class(IPM.Message, IPM.Appointment, IPM.Contact etc) to every item, and the client app would then know how to interpret what was being given to it. Outlook has a library of forms that can display the data in a different layout and with different actions available to it, even if some of the fields – like Recipient, Sent Date, Size, etc – might be common to many very different types of content. Since Outlook 97, it’s been possible to add custom fields, create your own sub-variants of the standard message classes and using simple built-in tools, make modified or even fully bespoke Outlook forms to render them. But let’s not go down that path, not today.
As well as the actual displaying of items in a form type view, Outlook could also show a tabular view on the folder that contains them – the default way of looking at a folder of email messages, for example, where you might be able to rearrange or add and remove the column headings to show different fields. Using desktop Outlook on PC, resize the view on Inbox horizontally so you see the sortable column headings and you’ll be able choose other fields to drop into the view, or use the View Settings… option to view an old-style dialog that defines the view almost like a query on the folder. So far so good, for email.
Calendar in a different view
Since the Calendar is just a folder full of meetings and appointments (the subtle difference being that a meeting has other attendees, whereas an appointment is just for you), it’s then possible to view a sortable list of those items, and to customize the fields being shown too (eg. add the Organizer name so you can quickly see who created a meeting, and Required Attendees to see who else is going). A bonus tip: in Outlook, if you select the whole list and copy to clipboard (click the top item, press SHIFT+END to select all, followed by CTRL+C), you can paste that view into an Excel spreadsheet, with all the column data visible.
To see this layout, look under the Change View option in the View tab and pick either List (which shows everything) or Active (which filters out stuff that’s in the past, showing only forthcoming appointments and meetings). It’s a great method for showing everything that’s coming up, rather than paging through day by day to look at the schedule. If you are migrating from one account to another, this is an ideal way of making sure you don’t miss some appointment that’s months away, and you may also be able to copy and paste the list items from one calendar to another.
One slight downside of the list view approach is that it is only applied at a single Calendar level – i.e. if you had multiple calendars to check, you’d need to select them one-at-a-time… though at least you could tweak the view as you see fit on one calendar, Save it as a new view, then apply that view to other Calendar folders…
As you might know already, Microsoft updated Windows 11’s Paint with layers, and the feature is getting closer to Photoshop. Adding layers in Paint is now possible, and it can greatly help you work faster and more efficiently on this seemingly forgotten app.
Plus, if you couple it with the recent background removal feature, this effectively turns Paint into a very useful tool to use for content creation, web design, you name it. And it’s free.
But, as lovely as it sounds, it seems that for now, adding multiple layers in Paint greatly increases RAM usage, and it will greatly slow your Windows 11 device. Spotted by Windows enthusiast, @XenoPanther, the more layers you add, the slower your device will be.
Adding a new layer in Microsoft Paint will increase RAM usage by 2-4MB.
As the feature was only released recently, there is a chance this is just a bug, and Microsoft will improve it in the future. So you need to take this into account.
It would be a bit ironic, though. Paint has been getting a lot of love, recently, and it seems, according to the latest reports, that the app will also get an AI tool, called Cocreator, which will allow you to easily sketch and draw, with AI at your side. So, it’s a bummer that this bug exists.
Microsoft Paint can easily crash your PC if you add multiple layers
We’ve tried it and, yes, unfortunately, it slowed our PC to the point it received a blue screen of death. However, you need to know that this only happens if you add tens to hundreds of layers. And, if your device is already buffed up, you shouldn’t run into this issue.
But for regular devices, working on complex projects that require tens of layers, this might be a serious issue.
Plus, when we received the screen of death, we only added empty layers. And it still crashed. Assuming these layers have elements on them, they could make your device even slower.
A second test revealed that adding tens of empty layers in Paint has quite an impact on RAM usage, as you can see below.
And if you end up adding even more elements and using other features, the whole process can be incredibly laggy. Insiders, such as @XenoPanther, revealed just how laggy it can get.
Sure, you won’t end up using thousands of layers on a Paint project, but who knows?
As you might know, on 21 September, Microsoft will hold a special event, and the Redmond-based tech giant will most probably unveil the next Surface products, and other AI features coming to Windows.
But, until then, Intel Innovation is happening on 19-20 September, and the tech giant will focus on Siliconomy. This new concept integrates AI into the economy, to create a better future for the world.
Siliconomy: a better future with the help of AI
We recently covered Siliconomy, which is the future of technology that Intel envisioned. On the first day at Intel Innovation, Gelsinger briefly touched on the subject, mentioning it several times regarding AI.
Intel wants Siliconomy to bring economy and technology together to offer a sustainable approach to the way people live their lives.
AI is part of Siliconomy, together with 4 other technology developments:
Compute – For everything there is a computer, and it defines the way we look at and experience the world.
Connectivity – Everything and everyone is connected.
Infrastructure – Technology is creating a dynamic reliable path for data storage and connected computing.
Sensing – Breakthroughs in low-cost, high-resolution sensors create massive amounts of data from smart devices at the edge.
AI – which in Gelsinger’s words, turns infinite data into actionable insights.
Intel Innovation 2023: The most important announcements
AI-enhanced processors are the future
Intel Innovation 2023 saw the announcement of several AI-enhanced processors including:
Intel Gaudi2 and 3;
4th Gen Intel Xeon;
5th Gen Intel Xeon;
Future-generation Xeon processors: Sierra Forest and Granite Rapids.
Intel also brought up several partners that already used these processors in their businesses. Alibaba, for example, is using the AI-based Xeon technology to innovate their business to the next level, including their own AI model, Tongfei, which reached a 3x acceleration in response time due to them.
What is also worth mentioning is that Intel and Stability.ai are building an AI supercomputer that will most likely rank in the top 15 in the world. The supercomputer will use the intel Gaudi accelerators.
Intel Developer Cloud will be generally available everywhere
Besides Siliconony, Intel now allows general availability to the Intel Developer Cloud, Intel’s cloud-based services. The rule is simple here, the Intel Developer Cloud works on the developers’ rule.
The Intel Developer Cloud services allow developers a faster way to build, test, and deploy AI models on the latest Intel CPUs, GPUs, and AI accelerators. Developers can also use the latest tools to enable advanced AI technologies and performance.
The Intel Developer Cloud has a Premium version, but also a Freemium version with limited features, most probably. Plus, the attendees of the event are lucky: they will receive 1 free week of access to the Intel Developer Cloud.
The services will also provide access to the latest Intel hardware platforms, such as 5th Gen Intel Xeon Scalable processors, starting December 14.
The next era of PC: the AI PC generation
The AI PC is a game-changer moment in the history of technology, according to Gelsinger.
And the AI PC is deemed as a superpower. Intel showcased a situation where the AI PC turned text into a Taylor Swift-like song. It was all done on a regular PC. And Intel envisioned a different AI tool, one that can run locally on your device, without the need to connect it to the Internet.
This was arguably one of the biggest announcements on the first day at the Intel Innovation. And with it, Intel has joined the AI channel properly.
Intel Core Ultra processors (Meteor Lake) will come out on December 14th
Meteor Lake will be the first EUV-enabled process node. Intel 4 will power the CPU cores.
Plus, Intel’s chips will bring AI to Windows Acer Laptops in the future. Acer even showcased its Meteor Lake laptop running Stable Diffusion to make live modifications on the screen.
Here’s the Xeon Roadmap for the year ahead.
As AI consumes a lot of power, Intel is coming with Xeon with E-core, coming in 2024. It will have 2 processors with an astonishing 288 cores.
Rewind AI: a virtual trip into your past
Intel also presented the Rewind AI app, which is an AI tool similar to Windows Copilot, but it’s very time-centered. It will record and document all your activity on your device, and it will display all the things you did at a certain moment in the past.
But don’t worry, Rewind is a personalized AI, that works locally, even without an Internet connection. So you will be safe, as your information won’t risk an online leak. Even so, Rewind AI will work best when it’s connected to the Internet, however, the app should be entirely safe.
Intel Innovation 2023 is all about AI PC
Gelsinger, Intel’s CEO, also showcased a situation where an Intel-powered AI PC transcripted people’s speeches while running locally.
Hybrid AI finds a home at Intel, as the tech company will release Hybrid AI SDK in 2024. Enhancing performance and accessibility, these Hybrid AIs will work locally, meaning they don’t have to be connected to the Internet. They will be based on OpenVIVO, Intel’s AI deployment toolkit.
Deep Render is the video compression solution of the future
Deep Render running on Meteor Lake’s built-in AI engine compresses video 5X better than any other solution on the market.
This could be the video compression solution of the future and it’s entirely AI-based.
Intel displays the world’s first UCIe-enabled processor at the Intel Innovation 2023 event
The processor will power the next-gen chipset designs. Below you can see how it looks, presented by Intel’s CEO, Pat Gelsinger.
These are the most important announcements at the Intel Innovation 2023 Day 1.
Technology is intertwined in every facet of our daily lives. Therefore, it is important to understand the criticality and consequences of technology addiction.
In this comprehensive guide, we will discuss some technology addiction facts and statistics and the harmful effects on people to empower you to foster a balanced relationship with technology.
Mental health issues, like stress, anxiety, depression, attention & concentration issues.
Social isolation & relationship strain.
Decreased productivity, reduced critical thinking, loss of control, and procrastination habits.
Overspending on online purchases or subscriptions.
Statistics and Facts about Technology Addiction
In a survey report published by Ani Petrosyan on Nov 10, 2022, 48% of internet users in the United States considered themselves addicted to one or the other digital devices.
85% of Americans go online daily, 31% are always in cyberspace, 48% check their phones several times a day, and 6% are online once a day.
33.33% of technology users find taking a break from it challenging.
A DataReportal report in 2023 says that from total world population, 5.19 billion people are internet users, i.e., approximately 64.5% of the world’s population. Here are the details.
Quarter
Number of Internet users (in millions)
Increase in %
July 2021
4959
0.1
Oct 2021
4966
1.5
Jan 2022
5041
0.1
Apr 2022
5048
0.1
July 2022
5087
0.8
Oct 2022
5094
0.2
Jan 2023
5132
0.7
Apr 2023
5183
1.0
July 2023
5192
0.2
The number of people worldwide still unconnected to the Internet has dropped to 2.85 billion, with the majority of people living in Africa, Southern & Eastern Asia.
468 million people have internet addiction which is 200 million more than drug users worldwide.
Smartphone impact on technology addiction- Latest statistics
95% of internet users worldwide use mobile phones to go online, accounting for 57% of our online time and 55 percent of web traffic.
If the total world internet users’ time using connected devices & services in 2023 is to be added, it equals 12.5 trillion hours of combined human existence.
The average daily usage of internet worldwide is 6 hours and 40 minutes, which 2.2% less than the daily average of last year.
A report by GWI says that an average person globally spends 2 hours and 26 minutes on social media every month.
Regarding smartphone usage, the top five countries are China with 974.69 million, India with 659 million, the United States with 276.14 million, Brazil with 187.7 million & Russia with 106.44 million. Here are the other details:
A report in December 2022 by NDDC claimed that 25-30% of drivers distracted due to smartphones were in fatal car crashes, and there were 3142 deaths and 32,4652 injured in the United States.
According to a study by Asurion, Americans used to check their mobile devices 96 times a day in 2019; a follow-up study in 2022 revealed the number has increased to 352 times per day, i.e, once every 2 mins and 43 seconds a day if we exclude an average of 8 hours of sleeping time.
Gaming addiction statistics
There are 3.09 billion active video game users in the world. Here are the details with an estimated number of users for 2024 and the percentage of increase year on year:
Year
Number of Gamers
Increase Over Previous Year
Increase Over Previous Year (%)
2015
2.03 billion
–
–
2016
2.17 billion
140 million
↑ 6.9%
2017
2.33 billion
160 million
↑ 7.37%
2018
2.49 billion
160 million
↑ 6.87%
2019
2.64 billion
150 million
↑ 6.02%
2020
2.81 billion
170 million
↑ 6.44%
2021
2.96 billion
150 million
↑ 5.34%
2022
3.09 billion
130 million
↑ 4.39%
2023
3.22 billion
130 million
↑ 4.21%
2024
3.32 billion
100 million
↑ 3.11%
67% of adults and 76% of kids in the United States are video game players.
Social media boosts technology addiction- Latest statistics
According to a DataReportal survey, there are 4.76 billion social media users worldwide, 60% of the total population.
Category
Users (in million)
Year-ON-Year Change
Total Population
67
0.8%
Unique mobile phone users
168
3.2%
Internet users
98
1.9%
Active social media users
137
3.0%
The total percentage of males using the Internet is 67.2%, and 61.6% of females of the entire female population are recorded as internet users.
The average person spends 2 -3 hours a day on social media.
According to DataReportal, January 2023, TikTok is the most addictive social media app globally, with 23.5 hours spent per month, followed closely by YouTube, with 23.1 hours per month. Here are the details for other apps:
Social media app
Time spent in hours/month
TikTok
23.5
YouTube
23.1
Facebook
19.7
WhatsApp Messenger
17.3
Instagram
12.0
Line
11.0
Twitter
5.5
Telegram
4.0
Snapchat
3.2
Facebook Messenger
3.1
However, to be considered addicted to social media, a person has to spend 21.5 hours per week on it.
In the United States, nearly 14 million teens could be suffering from mild social media addiction.
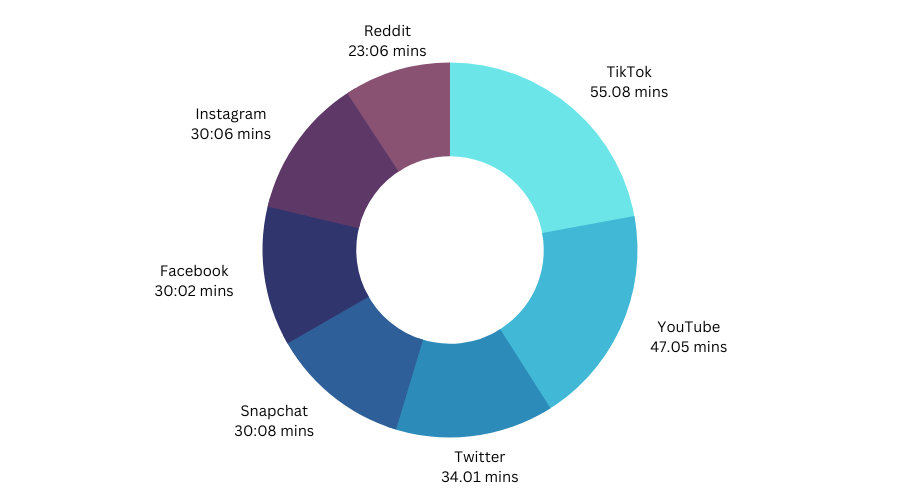
In the United States, an average user spent 55.8 minuteson TikTok in 2022, making it the most-used app in the region. Here are the details for all popularly used apps:
The highest social media usage was recorded in the Philippines at 4 hours and 12 mins, followed by Brazil at 3 hours and 39 mins, Columbia at 3 hours and 34 mins, and Nigeria at 3 hours and 26 mins.
Approximately 40% of the total adult social media users exhibit slight symptoms of depression, and 8.8% show severe signs.
54% of teens says it is challenging to give up social media.
Social media, mobile phones, and video games are critical contributors to internet addiction, but there are more; read this guide to detailed screen time statistics.
Pervasive reach of technology addiction – Prevalence & statistics
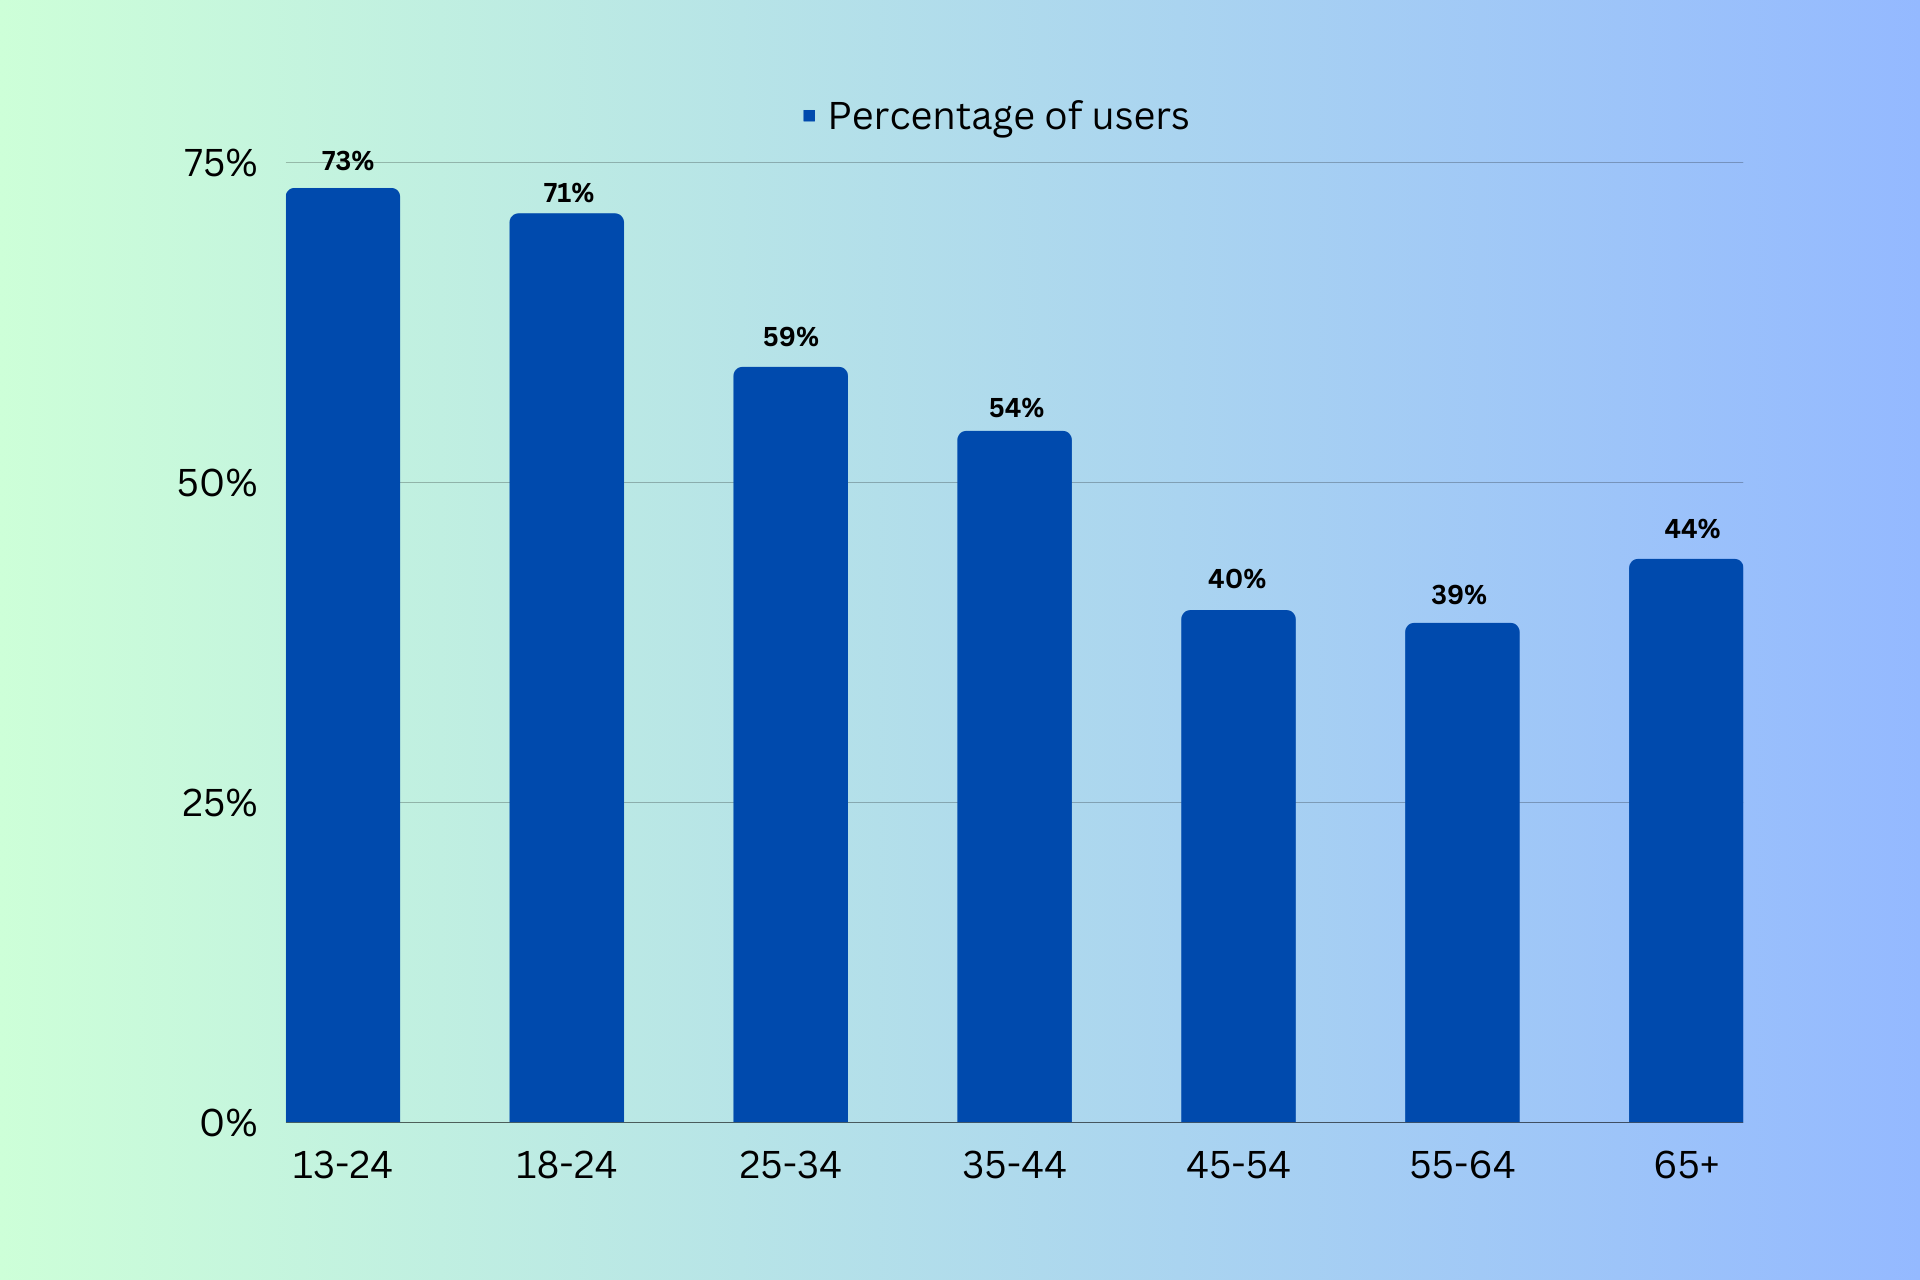
Technology addiction is prevalent in all age groups, with a significant focus on youth, as 73% of users fall within the 13 – 17 age bracket, closely followed by 71% in the 18-24 age group. Here are other details:
Age groups of users with internet addiction
Percentage
13-24
73%
18-24
71%
25-34
59%
35-44
54%
45-54
40%
55-64
39%
65+
44%
A study by Common Sense Media says that American teenagers spend a staggering 9 hours a day streaming video, playing games, and listening to music.
The tweens (8-12 years) spend 6 hours with digital devices in 2021 apart from the schoolwork.
1 out of every 2 teens are addicted to their devices, and 59% of parents feel that their children are addicted.
32% of teens and 36% of parents admit to arguing about the device usage every day.
Increasing purchase of computers & other electronic devices and the rising dependency on them indicate that it’s high time to address the growing concern of addiction and its adverse effects on people.
Mapping Technology Addiction: Global impact statistics
The average screen time by country statistics shows South Africa leading with 9 hours and 38 minutes, and Japan still maintains its position at 3 hours and 45 minutes, whereas the United States at 6 hours and 59 minutes.
This somewhat indicates technology addiction worldwide. Here is the latest data for all countries compared with the last year:
Country
Time spent (HH: MMH.H.(2022)
Time spent (HH: MMH.H.2023)
South Africa
10:46
09:38
Brazil
10:19
09:32
Philippines
10:27
09:14
Argentina
09:38
09:01
Colombia
10:03
09:01
Mexico
08:55
08:07
Malaysia
09:10
08:06
Thailand
09:06
08:06
Russia
07:50
07:57
Indonesia
08:36
07:42
Egypt
08:02
07:41
Portugal
07:56
07:37
U.A.E.
08:36
07:29
Turkey
08:00
07:24
Saudi Arabia
08:05
07:20
Taiwan
08:07
07:14
Israel
07:35
07:08
Romania
07:09
07:03
U.S.A.
07:05
06:59
Singapore
07:29
06:59
Poland
06:39
06:42
Canada
06:45
06:35
Hong Kong
06:46
06:26
India
07:19
06:23
Vietnam
06:38
06:23
New Zealand
06:23
06:12
Sweden
06:22
06:02
Greece
06:06
06:00
Ireland
06:30
05:59
Italy
06:09
05:55
Australia
06:13
05:51
U.K.
0U.K2
05:47
Spain
06.04
05:45
Switzerland
05:44
05:38
Belgium
05:45
05:27
Netherlands
05:11
05:27
France
05:34
05:26
China
05:12
05:25
Austria
05:42
05:22
South Korea
05:29
05:21
Germany
05:22
05:12
Denmark
05:02
04:58
Japan
04:26
03:45
The average time spent has decreased for most countries except China (5:25) and the Netherlands (05:27).
However, if we talk about the highest number of Internet users, China is leading with 1050 million people, followed by India, with 692 million, and the United States, with 311.3 million.
Various social factors play a significant role in technology addiction; some of the common ones are:
Peer influence – If friends and peers are heavily engaged with technology, it can drive people to mimic their behavior, increasing usage and leading to addiction.
FOMO – The fear of missing out on events, updates, & trending topics on social media and the need to stay updated can cause compulsive checking, leading to excessive use of tech.
Validation and self-esteem – The approval garnered from social media engagements and online interactions is addictive, making a person believe that more attention equates to higher self-worth.
Cyberbullying and social pressure – Bad experiences like cyberbullying or social pressure to maintain an image could increase an individual’s screen time and constantly take refuge in technology.
Parental influence and role modeling – Parents’ tech habits & attitudes can impact a kid’s relationship with technology.
These are not the only reasons; there are psychological factors that lead to the addiction; some of them are:
Stress relief and escape route – For some people, technology is a stressbuster, and they use it as a coping mechanism for their problems, which leads to dependency.
Instant gratification – With social media likes or reactions, people get instant gratification, which can be addictive, and people can become habitual & use it frequently to get quick rewards.
Fear of boredom – Being alone with one’s thoughts may sound divine for some, but it could be scary for others. Therefore, they use technology to combat discomfort and loneliness.
Loss of control – Despite the desire to reduce technology usage, people can have anxiety due to losing control over it.
Emotional regulation– People turn to technology to get a sense of relief, comfort, and companionship. They immerse themselves in virtual interactions and online activities to eliminate loneliness.
Signs & Symptoms of Technology Addiction
Spending more time online than intended and neglecting other activities indicates a lack of control or management over tech usage.
Constantly thinking about being online or checking your device, and often feel anxious or restless when unable to do so.
Experiencing irritability, mood swings, and signs of depression & anxiety if unable to spend time online or utilize technology.
Neglecting social face-to-face interactions, failing to fulfill your responsibilities towards work, school, or home, and avoiding social gatherings due to excessive time spent on tech.
Hiding the time spent online or using technology from your friends and family, downplaying the severity of the problem.
Treatment for Technology Addiction in 2023
In Digital detox, individuals can design a plan to reduce technology use and utilize the time to reconnect with friends & family or learn something new.
Adopt healthy lifestyle choices, including a balanced diet, regular exercise, adequate sleep, and engagement in offline social activities.
Join in-person support groups to relate to other people’s challenges and share your experiences, providing mutual encouragement.
Cognitive Behavioral Therapy (CBT), also known as talk therapy, focuses on coping skills to manage triggers & cravings, helping identify and change negative thought patterns related to technology use.
Mindfulness-Based Cognitive Therapy (MBCT) combines mindfulness techniques with cognitive-behavioral strategies, helping individuals become aware of their technology usage and manage the constant urge to use it.
Motivational Enhancement Therapy (MET) uses assessment, feedback, and goal-setting to boost positive changes related to the problematic behaviors associated with tech use.
What percentage of people overuse technology?
Roughly around 6.09% of our global population struggles with internet addiction. It is alarming and can inflict severe damage on physical & mental health, reduce productivity, & strain relationships, diminishing the quality of life.
How does technology affect mental health?
The constant need to check your mobile phone for notifications and updates can overwhelm & burn out an individual.
Also, excessive use could lead to sleep disorders, anxiety, decreased self-esteem, body image issues, and depression.
How does technology affect our critical thinking?
Excessive use of social media and smartphones can reduce your attention span and the ability to concentrate, leading to lower memory retention.
Technology, while providing access to vast amounts of information, often encourages superficial engagement.
This can result in a lack of depth in understanding, impeding the development of deep analytical thinking and discernment abilities.
The technology addiction statistics 2023 presented here underscores the prevalence and urgency of addressing this alarming issue in the fast-evolving digital age.
Implementing strategies for digital detox and embracing a balanced life with offline social connectivity can help you deal with the addiction.
If you often find yourselves reading about stats, we suggest you check out our exciting guide on desktop vs laptop market share.
How can one break free from the digital shackles of technology? Mention your thoughts in the comments section below and help others to detox.
Since Windows has emerged as a preferred gaming platform, it’s all the more important to identify its gaming-oriented features. And one of these is the ability to calibrate an Xbox One controller on Windows 11.
With the built-in manual calibration, you can get rid of drift, random movements, or performance issues and effectively align the X, Y, and Z axes. If the available options don’t work, you can always use a third-party Xbox One controller calibration tool. Let’s find out!
How do I calibrate my Xbox controller on Windows 11?
Before you proceed, make sure to connect the controller to the PC and update the Xbox One controller’s driver. While you are at it, install any available firmware updates as well.
1. Using the Windows built-in calibration utility
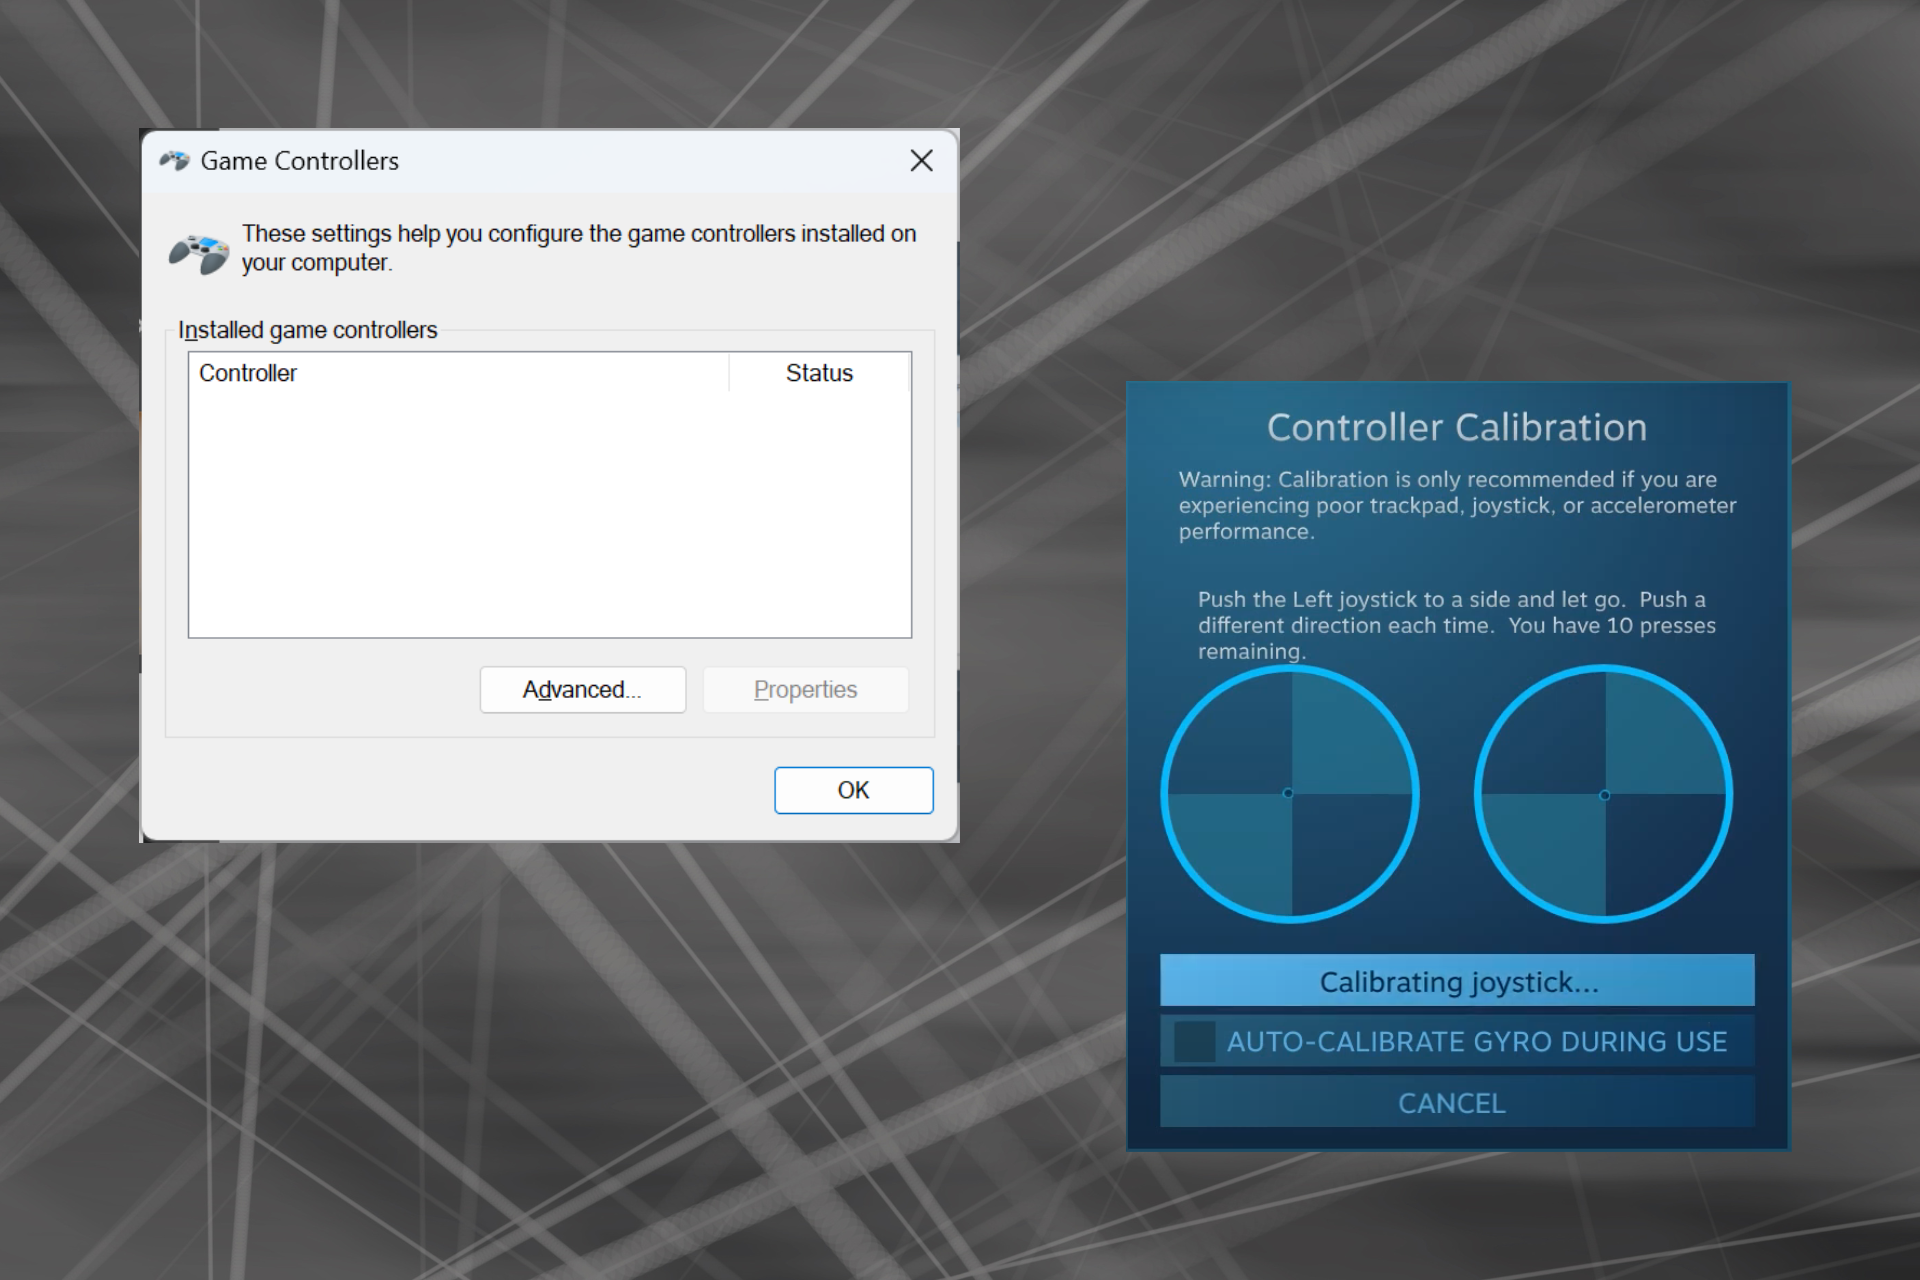
Press Windows + R to open Run, type joy.cpl in the text field, and hit Enter.
Select your Xbox One controller from the list, and click the Properties button.
In the Settings tab, click the Calibrate button.
The Game Device Calibration wizard will appear and will help configure the following aspects:
D-pad calibration to get it centered
Axis calibration (all three, X, Y, and Z) for the right and left triggers and the jumpstick.
Simply follow the on-screen instructions to complete the controller calibration process.
Once done with it, head to the Test tab and verify whether the Xbox One controller is optimally calibrated in Windows 11.
If the calibration settings don’t work out, click the Reset to default button in the Settings menu.
If you don’t have the application, go to Steam’s official website, download the setup, and then run it to install Steam.
Launch the Steam client on the PC, click the View menu, and choose Big Picture Mode from the flyout menu.
Click the Steam Menu near the bottom left corner and select Settings.
Now, head to the Controllers tab, select the Xbox One controller, and click on Calibrate.
Click on Lock Out Joystick Navigation, then the Start Full Autocalibration button, move the analog sticks to the sides ten times as recommended, and complete the calibration process.
Click OK to save the changes, head back to the controller settings, and again click on Calibrate.
This time, configure the left and right stick dead zones until it seems perfect.
Finally, you can tick the checkbox for Xbox Configuration Support to set different sensitivities and other controller parameters for individual games, though it’s an optional measure.
Enabling or disabling the Xbox Configuration Support option depends totally on the game you are playing as sometimes it can cause issues like Controller acting like a mouse.
The third-party calibration tools for game controllers aren’t as effective as the built-in Windows wizard or Steam. But if you still want to use one, Gamepad Tester is the most reliable option.
Remember, you may encounter some inconsistencies with respect to the axis values, or the Xbox controller may not be detected. The website lists some effective measures in the FAQ section that should help.
Troubleshooting issues with controllers on Windows 11
Controller not detected: Check the connections, look for damaged cables, or switch to a wired connection.
While the built-in Game Device Calibration utility comes in handy when eliminating minor misconfiguration, it won’t be as useful for major flaws. And in that case, getting a new Xbox One controller is the best option.
If you are considering purchasing one, check our curated list of the best Xbox controllers.
For any queries about calibrating Xbox One controllers in Windows 11, drop a comment below, and we will get back to you.
Goldflake error in Warzone affects all platforms, and it prevents millions of players from joining any servers or playing online.
This is a big problem since you won’t be able to play the game at all, but luckily, there are a couple of solutions that you can use to fix the problem.
What is the Goldflake Error?
This is a network error code that affects various Call of Duty games.
It’s present on all platforms.
The cause of this error are usually server problems or issues with your Internet connection.
If it is, you’ll have to wait while Activision fixes the server issue.
The issue is likely related to the recent AWS outage and should be fixed shortly.
2. Restart your PC and the game
Close the game client completely, start it again, and check if that helps.
Click the Start button. Next, click the Power button and choose Restart.
Lastly, press the Power button on your modem/router, wait for 30 seconds, and start it again. That should help fix network issues on your end.
3. Change the region in Battle.net
Start the Battle.net client.
Click the globe icon and choose a different region.
Save changes and check if that helps with the Warzone Goldflake error on PC.
Tips for solving Goldflake error on PS5 & PS4
Let the error message loop for 10 times or so. Do not press the exit button during this time and that should help with the connection errors.
Make sure that you have the latest firmware installed.
Change the DNS to 1.1.1.1 and 1.0.0.1 or 8.8.8.8 and 8.8.4.4.
It seems that the Warzone Goldflake error is most likely caused by a temporary outage, but if you’re impatient, feel free to try some of our previously mentioned solutions.
Sometimes in order to ensure that your PC is working properly, you need to check your Windows 11 uptime. This process is incredibly simple and it can be done in just a matter of moments, so today we’ll show you the best ways to do that on your PC.
What should my uptime be?
This depends solely on your PC activities. If you use your PC for lighter tasks, your uptime can be up to a week or even more.
If you use your PC for more intensive tasks or gaming, uptime should be about 3 to 7 days.
How do I check my Windows 11 uptime?
https://youtu.be/2rU6IpMkZ_8
1. Use the Settings app
Open the Settings app. You can do that with the Windows key + I shortcut.
Select Network & Internet in the left pane. In the right pane, select Advanced network settings.
Now select your network connection.
Look for the Duration value to find your system uptime.
2. Use Task Manager
Press Ctrl + Shift + Esc to open Task Manager.
Navigate to the Performance tab.
Locate the Up time value to see how long your system has been running.
3. Use Network Connections
Press the Windows key + S and enter network. Choose View network connections.
Double-click your current network adapter.
In the adapter settings window, locate the Duration value to see how long since your PC started.
4. Use the command line
Command Prompt
Press the Windows key + S and type cmd. Choose Run as administrator.
Run the following command to see Windows 11 uptime: systeminfo | find "System Boot Time"
You should now see your uptime.
PowerShell
Use the Windows key + S shortcut and type powershell. Select Run as administrator.
Next, run the following command: (get-date) - (gcim Win32_OperatingSystem).LastBootUpTime
Your uptime will now appear on the screen.
How do I reset my Windows 11 uptime?
You can reset uptime on Windows 11 by doing the following:
Shutting down your PC completely.
Performing a system reboot.
Why is my uptime not resetting?
If you have Fast Startup enabled, the Windows 11 uptime will not be resetting.
You aren’t shutting down your PC completely due to power settings.
Server providers usually guarantee 99% uptime and availability of their servers, but there are several different levels available and they drastically differ in minutes of downtime.
Uptime
Yearly downtime
99%
87h 40min
99.5%
43h 50min
99.9%
8h 46min
99.95%
4h 23min
99.995%
26min 18sec
99.999%
5min 16sec
99.9999%
31.6sec
Checking Windows 11 uptime is incredibly simple, and the easiest way to do so is from Task Manager, while the fastest is using the command line. You can also check Windows 10 uptime or last reboot time in Windows Server using similar methods.
In addition to uptime, you can easily find process start time using similar methods. What method do you use to check system uptime? Let us know in the comments if we missed it.
A few users found Local Users and Groups missing in Windows 11. And, for some who can access it, the message reads, This snapin may not be used with this edition of Windows 10. To manage user accounts for this computer, use the User Accounts tool in the Control Panel.
Below, we’ll explain how to add local users & groups in Windows Management:
How do I enable local users and Groups in Windows 11?
Before we proceed, make sure to verify which edition of Windows 11 is installed. If it’s Home, you will need to manually enable Local Users and Groups in Windows 11. For the Pro or Enterprise editions, the problem likely lies with the user profile.
1. Download lusrmgr.exe on Windows 11 Home
Open a browser, go to the Group Management page on GitHub, then in the Code tab, scroll download to the bottom, and click on the Download latest version link.
Run the downloaded lusrmgr.exe file.
Click Yes in the UAC prompt.
The Local users and groups console will pop up.
The downloadable version of Local Users and Groups (lusrmgr.exe) differs slightly from the built-in console in terms of usability and interface, but it allows users pretty much the same functionality.
2. Use an alternative tool
If you use lusrmgr.exe to configure user profiles, grant administrative privileges, view the list of users, or fix things when users don’t appear on the login screen, the built-in User Accounts (netplwiz) utility will do the trick.
To open User Accounts, press Windows + R to open Run > type netplwiz in the text field > click OK.
User Accounts (netplwiz)
We don’t recommend using third-party tools for user management in Windows. It’s a critical task, which should be handled by the integrated tools unless you want to expand the functionality or add features.
Press Windows + I to open Settings, and click on Activation on the right in the System tab.
Now, expand Upgrade your edition of Windows, and you will find two options:
Change the product key: Use this when you already have an activation key for the Pro edition. When selected, Windows will prompt you to enter the new product key.
Upgrade in the Microsoft Store app: Use it to purchase the Pro edition. When selected, it will open the Microsoft Store’s page for Windows 10/11 Pro. The purchase can be processed here.
The Local Users and Groups console is not available in the Home Edition, just like the Local Security Policy utility. And if you don’t want to use the downloadable version or an alternative, it’s best to upgrade to Windows 11 Pro.
4. Manage users from Command Prompt
Press Windows key + R, type cmd, and press Enter.
To view all users: Type net user and press Enter.
To create a new user account: Type net user [username] [password] /add and press Enter.
To rename an existing account: Type wmic useraccount where name=”[oldusername]” rename [newusername] and press Enter.
To add a user to a specified local group to grant additional permissions Type net localgroup [groupname] [username] /add and press Enter.
Why are Local Users and Groups missing in Windows 11?
You are running the Home edition of Windows, and Local Users and Groups is available on Pro and upwards editions.
The active user profile doesn’t have administrator privileges.
A recent Windows update broke the functionality.
The system files are corrupt.
How do I access & use local users and Groups in Windows 11?
To access Local Users and Groups, press Windows + R to open Run > type lusrmgr.exe in the text field > click OK.
Using Local Users and Groups is just as simple as opening it. You can create new accounts or groups, delete an existing one, change the password, and much more!
For a clear walkthrough on launching the console via Run, Computer Management, Command Prompt, and PowerShell, see our guide to open Local Users and Groups in Windows 11.
The Local Users and Groups utility is built into Computer Management and can be accessed from the console or independently
While Local Users and Groups would have been a great addition to Windows 11 Home, some features are exclusive to the Pro edition. The Home edition is developed for relative simplicity.
Remember, just getting the lusrmgr.exe utility won’t do! You will have to effectively manage users and groups for an error-free Windows experience.
For any queries or to share your review of the lusrmgr.exe console, drop a comment below.
For most people, the Recycle Bin is just storage for deleted files that can be restored later or get rid of permanently. What you may not realize is that you have the ability to configure it and decide what happens when you delete files from your computer.
Given how easy it is to change these settings, you should be able to adjust them in no time and enjoy a new look, efficiency, and a customized Recycle Bin.
Why should I manage my Recycle Bin settings? If you’re not careful, the Recycle Bin can fill up with files that you don’t need to keep permanently but want to keep just in case. That’s why you need to decide what happens to these files instead of leaving them hanging.
Also, you risk ending up with a slow computer with unnecessary files taking up valuable space on your hard drive. A better solution is to set up rules for what gets stored there and when it gets deleted automatically.
How do I change the Recycle Bin settings on Windows 11?
1. Finding and accessing the Recycle Bin in Windows 11
By default, the Recycle Bin is saved on the Desktop, but if not, you can enable it by:
Hit the Windows key and click on Settings.
Select Personalization and click on Themes.
Click on Desktop icon settings.
In the next dialog box, ensure the Recycle Bin check box is ticked to appear on the Desktop then hit Apply and OK.
Locate the Recycle Bin icon on your Desktop, right-click on it, and select Properties.
Check the Don’t move files to the Recycle Bin. Remove files immediately when deleted option then click Apply and OK.
It’s important that you have a backup of your files because once files are deleted, you can’t retrieve them.
So, how easy was that? You were able to change your Recycle Bin settings without the need for any third-party software or resources. Once again, the Windows GUI comes through for you. Changing your recycle bin settings can have a big impact on your computing experience, so try it today.
Most of these settings can be applied on previous versions as well, and to learn more, check our guide on how to use Recycle Bin on Windows 10.
What are your thoughts? Are these settings good enough, or doing a good job of enhancing the efficiency of this feature? Let us know in the comment section.
The removal of some peer-to-peer (P2P) network services in Microsoft Windows 11, as highlighted in the Insider Preview Build 25951 version, appears to be part of Microsoft’s efforts to prioritize privacy and security in its operating system.
P2P networking, while useful for certain tasks, can pose potential privacy and security risks due to direct communication between devices on the same network.
What is P2P networking?
Peer-to-peer (P2P) networking allows devices on the same network to share files and resources directly without relying on a central server.
When Windows 11 updates itself, it can download parts of the update from other computers on the internet or within your local network. This feature can potentially speed up the update process. However, it may also create certain privacy and security risks. To minimize the exposure to such risks associated with P2P networking in Windows Update, users can disable the “Allow downloads from other PCs” setting.
In older Windows versions, seeing other computers on your network was easy. Windows 11 has made it a bit complicated to do that. Users need to create a workaround by creating a “My Network” folder and adding shortcuts to their computers for network access.
These changes imply that Windows 11 will be more secure and private. However, sharing files and resources with other devices on the network may also be more difficult.
We know that the next generation of Xbox is (very) tentatively slated for a 2028 release. Aside from that, nothing was really known about what the next Xbox would actually be. At least, not until today’s huge Xbox leak—probably the biggest ever in the brand’s 20+ years.
The leaked information pertained to the FTC case against Microsoft’s merger with Activision Blizzard. Part of what has been revealed in the unredacted documentation is that Microsoft’s vision for the next Xbox is to:
“Develop a next generation hybrid game platform capable of leveraging the combined power of the client and cloud to deliver deeper immersion and entirely new classes of game experiences.”
The slide above is from a leaked presentation titled “The Next Generation of Gaming at Microsoft.” The slide also shows some specs and features for the next-gen device, and also mentions sub-$99 consumer or handheld devices.
It strongly suggests a scenario in which cloud and console converge to create gaming experiences. Microsoft refers to this idea as “Cohesive Hybrid Compute” in the documentation.
Given Microsoft’s investment in its Xbox Cloud Gaming service, it would not really be too surprising to see Xbox go this route. In fact, the leaked presentation includes a possible roadmap for the technology involved, seen above. Whether Microsoft ultimately chooses to stay on this trajectory for the next version of Xbox, only time will tell.
As technology advances, video conferencing platforms like Microsoft Teams continue to elevate personal and professional interaction. In an upcoming update that’s certain to push the boundaries of communication, Microsoft plans to launch its ‘AI Library’—a service designed to enhance Teams with Large Language Models (LLMs).
Currently, Microsoft claims this novel feature will “empower” developers, allowing them to “build rich, conversational Teams apps.” The overarching goal is to boost productivity and efficiency for Microsoft Teams users worldwide. As outlined in the official Microsoft 365 roadmap, the AI library is set to roll out in October 2023 across all platforms.
It will provide an extensive suite of code functionalities specifically designed to assist developers in incorporating Large Language Models into their applications.
In addition to simplifying the creation of Bots, Message Extensions, and interactions with Adaptive Cards for conversational exchanges, the Microsoft Teams AI library will help with the migration of existing Bots, Message Extensions, and Adaptive Card functionalities. It is speculated that the process will have seamless integration with Large Language Models into Teams.
Why is AI important?
Its role dramatically enhances the conversational exchange, effectively closing the gap between a face-to-face meeting and digital interaction. These improvements in digital conversational interaction can lead to a significant increase in efficiency and productivity levels.
These upgrades are expected to revolutionize meetings and stimulate a more engaging and interactive remote environment, possibly changing the landscape of remote teamwork and communication. With developers empowered with a suite of tools to integrate AI into Teams, one can routinely foresee the vast range of intelligent apps in the coming years.
So, while our Microsoft Teams calls and meetings might currently be word exchanges and shared files, the future holds the promise of AI-empowered meetings.
There could be a new feature for Microsoft’s Paint app in Windows 10 and 11 with the inclusion of AI-powered image generation through a “Cocreator” feature.
PhantomOcean3, a Windows enthusiast, posted via X that Microsoft plans to integrate an AI image generation feature called “Cocreator” into the Paint app. This feature is reportedly based on OpenAI’s DALL-E AI image generator. DALL-E is known for its ability to generate images from textual descriptions. Microsoft already uses DALL-E for its Bing Image Creator service in Bing Chat.
The latest Paint app update in Dev/Canary (11.2308.18.0) includes strings for a new image generation feature:
Cocreator Describe what you'd like to create Try "a cat walking in a wood" or "A house made out of leaves" Choose a style
There’s anticipation that Microsoft will reveal more about its plans for AI features in Paint and other Windows 11 apps during an upcoming press event in New York City on September 21. This event may provide additional insights into the features and capabilities of Cocreator.
Earlier this week, it was announced that Canary and Dev Channels are getting ‘layers’ and ‘transparency,’ some Photoshop-esque features. Before this there were dark mode, centered canvas, background removal, and more in a span of a month. It makes one believe that Microsoft is trying to improve its core Windows apps more frequently. This is good, as users can expect to see new features and bug fixes more often.
We all have different preferences when it comes to display scaling on Windows 11. Some like big icons, others like small ones. However, we can all agree that having the correct scaling is important.
Poor font scaling or blurry images that have been overscaled can be a real productivity killer when working, so you need to know how to customize it to get even more out of your system’s functionality.
Benefits of custom scaling:
It’s a useful feature for people who have difficulty reading text on the screen.
It helps you see more content on your screen at once.
You can create custom scaling profiles that work only with certain monitors and applications.
Can help improve performance on lower-end hardware.
It gives you more control over how things look on your screen.
How do I change the scaling in Windows 11?
1. By using the Settings app
Hit the Windows key and select Settings.
Select System, then click on Display.
Under Scale & layout, click on the Scale option, click on the drop-down menu, and select a scaling that best meets your needs.
For the custom scaling option, go back to Scale and enter a value between 100 and 500.
Restart your PC.
Note that custom display scaling below 100 won’t work on later versions of Windows, but this shouldn’t be a problem because the default setting is more often than not, the best.
2. By using the Registry Editor
Hit the Windows + R keys to open the Run command.
Type regedit in the dialog box and hit Enter.
Navigate to the following location: HKEY_CURRENT_USER\Control Panel\Desktop
Find the LogPixels key on the right but if unavailable, right-click on an empty space, select New>DWORD (32-bit) Value, and name it as so.
Double-click on it, and under Value data, enter one of the numbers from the table below.
Scaling in percentage
Value data
100% (Recommended)
96
125%
120
150%
144
200%
192
250%
240
300%
288
400%
384
500%
480
Next, locate the Win8DpiScaling entry, and if unavailable, create it as detailed in 4 above.
Double-click on it, check the Hexadecimal box as the Base, enter the same Value data as in 5 above, and then hit OK.
Restart your PC.
Remember editing the Registry manually is discouraged because of its catastrophic results in case anything goes wrong. If you must, ensure, you create a Restore Point so that you can have a safe point of return.
Why are my scaling settings greyed out in Windows 11?
App-based settings – Some applications don’t support changing the scale of the display. You may have to get a third-party scaling tool to counter this restriction.
You’re using older hardware – This usually happens when using an old monitor or laptop with an outdated graphics card. Updating your GPU drivers should resolve the issue.
Outdated OS – If your Windows is not yet updated, your display settings may be unavailable. Try checking for updates and see if this solves the problem.
Non-administrator account – If you don’t have any administrative privileges, these settings will not be available for your local profile. Switch to an administrator account to make changes.
It should go without saying that the ideal display size will depend on your preferences and needs. If one isn’t working out for you and you’re having some scaling issues, try another. There’s no shame in mixing things up a bit.
And if you have any questions or feedback about this guide, please leave a comment below. We’d love to hear from you!
Perhaps the biggest Xbox leak ever just occurred as unredacted documents pertaining to the FTC’s case against Microsoft’s Activision merger have been made public.
One of the more immediately fascinating pieces of info to come out of the leak is that Microsoft is planning a mid-gen console refresh—at least for the Xbox Series X. Unlike the recently released Xbox Series S Carbon Black edition, the all-digital 2TB Series X appears to be a true reimagining of the console.
Image via The Verge.
As you can see in the above image the new Series X, which is know by the codename Brooklin, has a cylindrical design which is a pretty big departure from the current Series X design.
Also, the Brooklin model is planned to ship with Sebile—“all-new, more immersive controller.” Sebille will sport a two-tone design, with modular thumbsticks and gyroscopic controls. And you’ll be able to wake the controller simply by lifting it. Apparently the controller will have a direct cloud connection as well as Bluetooth 5.2 support.
Image via The Verge.
The leak appears to be due to an error on the part of Microsoft. A huge number of documents and files were uploaded to a site hosted by the U.S. District Court for the Northern District of California. The information contained in the docs was most likely not intended to be made public.
The all-digital Xbox Series X is expected to launch in 2024 for $499.
With Memory Compression on Windows 11, your device will run smother even with a limited amount of RAM. In this article, we will show you how to enable or disable Memory Compression on Windows 11.
What is Memory Compression? Memory Compression is a function that compacts the data before writing it to RAM, thus providing more storage on it.
Of course, more data stored in the physical memory translates into a faster running system and better overall performance. This function is enabled by default in Windows 11, but you can disable or reenable it if, somehow, it’s not active.
How do I enable Memory Compression in Windows 11?
Click the Search bar, type powershell, and click on Run as administrator from the results.
Type or paste the following command to see if memory compression is already enabled and press Enter to run it: get-mmagent
If you see the value True to the right of MemoryCompression, that means it’s activated.
If the value is False, type the following command to enable Memory Compression on Windows 11 and press Enter: enable-mmagent -mc
Restart your PC for the changes to take effect.
To check if Memory Compression is working, right-click the Start button and select Task Manager from the menu.
Now, click on Memory from the Performance tab, and on the bottom, you will see the In use (Compressed) memory.
If you hover your mouse over Memory composition above, you will see more detail on the status of Memory Compression on your system.
We recommend using the Get-Mmagent command first because the current status of memory management might be already True.
Please note that you can also use Windows Terminal (Admin) in Windows 11 to perform the same commands.
How do I stop Memory Compression in Windows 11?
Click on the Search field in Windows 11, type powershell, and select Run as administrator to start PowerShell with full privileges.
Type the following command and press Enter to disable Memory Compression on Windows 11: disable-mmagent -mc
Restart your PC for the changes to take effect.
The memory compression feature is great because it optimizes the physical memory utilization so we wouldn’t recommend disabling it.
In fact, you can disable the memory management feature, work on the PC, and turn it back on to see the difference between the states.
If your PC is still running slow, it might be that the PC is not using all the available RAM but the highlighted guide will help you fix that problem.
Why is Memory Compression taking up so much RAM?
Actually, Memory Compression is not taking up RAM. The more compressed memory is processed, the more data can be written on the physical memory.
In other words, a high level of memory compression translates into a better efficiency of memory utilization.
However, high RAM usage means you are running resource-hungry processes and applications which usually also come with high CPU usage. Closing some of them will restore things to normal again.
You’ve decided you want to install Windows 11, but your device doesn’t meet the stringent system requirements, and you don’t want to spend time in front of the computer clicking through pages of dialog boxes.
There’s a better way. You can sit back and relax while the installation is ongoing without prompting you for information. That’s the beauty of creating an unattended installation of Windows 11, and we’ll show you how.
What are the benefits of an unattended installation?
Allows you to automate tasks and complete the process faster than a manual installation.
It can be run on multiple machines using the same installer file.
Useful for large deployments where you want to standardize the configuration of computers on your network.
Ability to customize the installation based on needs and preferences.
No user intervention hence no user password prompts or account sign-in requests.
How do I install Windows 11 unattended?
1. What does an unattended installation require?
1. Hardware requirements check
At least 4 GB of RAM and 64 GB of free disk space on your PC.
A USB flash drive or external hard disk drive that has at least 8 GB of free space and is formatted NTFS or FAT32.
2. Internet connection requirements
You will not need an internet connection for an unattended installation since you’ll be installing Windows offline.
This will prevent the system from forcing you to use a Microsoft account or checking whether your device meets the system requirements.
3. Language settings considerations
If you’re installing Windows 11 in a language other than English, it’s likely that there will be no support for this language.
You’ll have to complete the installation in the available language first and then change your language settings to your preferred choice later.
4. Product Key considerations
Since each copy of Windows 11 has its own unique product key, you will use a generic volume license key for the unattended installation.
This unique product key allows you to install the same product on multiple computers. You can find your Windows edition’s generic volume license keys on the official Microsoft page.
5. 32-bit vs 64-bit version considerations
Since Windows 11 does not come in the 32-bit version, the only option is to go for the 64-bit. However, you can still run 32-bit programs on 64-bit by tweaking some settings.
Once it is downloaded, right-click on it in order to Extract the folder in the current location.
Next, open the extracted folder and click on the subdirectory named Ventoy. Right-click anywhere on the window to create a new text file named ventoy.json. Copy-paste the following text inside it and save the file: { "control": [ { "VTOY_DEFAULT_MENU_MODE": "0" }, { "VTOY_TREE_VIEW_MENU_STYLE": "0" }, { "VTOY_FILT_DOT_UNDERSCORE_FILE": "1" }, { "VTOY_SORT_CASE_SENSITIVE": "0" }, { "VTOY_MAX_SEARCH_LEVEL": "max" }, { "VTOY_DEFAULT_SEARCH_ROOT": "/ISO" }, { "VTOY_MENU_TIMEOUT": "10" }, { "VTOY_DEFAULT_IMAGE": "/ISO/debian_netinstall.iso" }, { "VTOY_FILE_FLT_EFI": "1" }, { "VTOY_DEFAULT_KBD_LAYOUT": "QWERTY_USA" }, { "VTOY_WIN11_BYPASS_CHECK": "1" } ] }
By setting the last argument to 1, the machine will be able to avoid certain registry checks. Such as Windows 11’s Secure Boot with Ventoy.
Select the OS version, and the language, then click on the 64-bit Download button.
Next, head back to the extracted Ventoy folder and double-click on the Ventoy2Disk file. Then insert your USB drive in order to format it.
You will be prompted with a new window in which you will be able to select the USB you inserted and then choose Install.
Now, copy the Windows 11 ISO on the Ventoy drive and reboot your computer in order to enter BIOS. Change the boot sequence so the USB has the boot priority and continue with the installation process.
3. Configuring the Answer File
1. Understanding the Windows Answer file structure
An answer file is a text file that contains answers to questions asked by Windows Setup during a manual installation of Windows.
These questions include where Windows should be installed, which components should be installed on the computer, and whether any specific drivers should be included with those components when installed.
Choose an installation location by clicking Browse then hit Next.
Click Next and accept the Terms and Agreement, then hit Next.
Check the Deployment Tools box, then hit Install.
Click on your Search icon and open Windows System Image.
Select File>System Image.
In Select a Windows Image, choose the ISO file you downloaded in 2 above when creating a bootable USB drive.
Select your Windows version and hit OK.
Next, click Create or open an answer file> New Answer File.
Expand on Components. This will list the various stages for customization, which you can drag to the right side to set the configuration pass. You can check more on how to tweak these settings on Microsoft’s official page.
Finally, once you’ve added all components, click on File>Save answer file and ensure it is saved in XML format in the bootable drive created in 2 above, then eject it.
Switch off your PC and insert the bootable drive, and Windows 11 should install automatically.
Since this is a fairly lengthy affair, we encourage you to opt for a Windows answer file generator to speed up the process and minimize mistakes.
Considering how long Windows 11 takes to download, this is a much-welcome solution that doesn’t require too much time. And with the help of some of the automation tools, the installation period should be reduced significantly.
It is worth giving this method a shot, especially if you have multiple machines you’d like to upgrade to Windows 11 simultaneously.
Have you tried this method of installing Windows 11? On a scale of 1-10, with 1 being easy and 10 extremely hard, how difficult was it for you? Share your thoughts with us in the comment section below.
Windows 11 is a massive upgrade over the previous iterations, but things are not all smooth, as you would expect. A few users found that a folder or more disappeared on Windows 11.
Remember, it’s not an iteration-specific issue, and users reported that folders disappeared in Windows 10 as well. Though on the latest version, generally, the folders were missing from This PC or the desktop.
Why did my folder suddenly disappear?
When the folders are missing, you may have accidentally deleted/removed them or set the File attributes to Hidden. Also, the Windows 11 22H2 version rearranged entries in File Explorer, giving the impression that some folders were deleted.
And there’s always the likelihood that a third-party security program quarantined a folder or changed its location. Besides, corrupt system files may also cause some folders to disappear.
Here are some of the most common missing folders reported by users:
Users folder disappeared in Windows 11
Documents folder disappeared in Windows 11
Desktop folder disappeared in Windows 11
Download folder disappeared in Windows 11
Pictures folder missing in Windows 11
Screenshot folder missing in Windows 11
AppData folder missing in Windows 11
How do I recover a missing folder in Windows 11?
Before we start with the slightly complex changes, perform these quick checks first:
Check the Recycle Bin in case you accidentally deleted the concerned folder and restore it.
Verify whether you are logged in with another account. Sometimes, Windows automatically creates a new account and sets it as the default after an update.
Look for the missing folder in the following path where Username is the active profile: C:\Users\Username\AppData\Local\Temp
Press Windows + E to open the File Explorer, right-click on the empty portion in the navigation pane towards the left, and select the entries to be listed here, be it This PC, Network, or Libaries, amongst others.
To enable folders like Videos, OneDrive, and Music in the Quick Access menu, paste the following path in the address bar, hit Enter, and select your user profile:C:\Users
Now, right-click on the relevant entry and select Pin to Quick access.
2. Show desktop icons
Right-click on the desktop > hover the cursor over View > select Show desktop icons.
When desktop files or folders disappeared in Windows, make sure you have configured them to be visible. Also, the files should be available in the dedicated user folder, but if you don’t find Desktop under Users, check for disk issues.
3. Check the file attributes
Press Windows + E to open File Explorer, click the View menu, hover the cursor over Show, and check the Hiddem items entry.
If the hidden folder now appears and is greyed out, right-click on it, and select Properties.
Untick the checkbox for Hidden file type, and click Apply and OK to save the changes.
4. Repair the corrupt system files
Press Windows + R to open Run, type cmd, and hit Ctrl + Shift + Enter.
Click Yes in the UAC prompt.
Run these three commands individually (paste and hit Enter) for the DISM scan: DISM /Online /Cleanup-Image /CheckHealthDISM /Online /Cleanup-Image /ScanHealthDISM /Online /Cleanup-Image /RestoreHealth
Now, execute this command for the SFC scan: sfc /scannow
Restart the computer for the changes to apply and check for improvements.
Corrupted system files can lead to a range of issues, including the WindowsApps folder missing. In this case, run the DISM commands and SFC scan to get things running. Moreover, you can try dedicated third-party software to repair corrupt or missing files automatically with healthy replacements from a massive database.
5. Rebuild the index
Press Windows + S to open Search, type Indexing Options in the search bar, and click the relevant result.
Click the Advanced button.
Click on Rebuild under Troubleshooting.
Finally, click OK in the confirmation prompt and wait for the process to complete.
When your files or folders disappeared in Windows, it’s likely that the index was corrupted or the concerned item got removed from it. Simply rebuilding the index should do!
Press Windows + I to open Settings, go to Apps from the navigation pane, and click on Installed apps.
Click the ellipsis next to the problematic app, usually a third-party antivirus software, and select Uninstall.
Again, click Uninstall in the confirmation prompt.
Restart the computer and check for any improvements.
If the disappeared folder doesn’t reappear in Windows 11, you may use a reliable uninstaller tool to get rid of any leftover files or registry entries that remain post-removal.
7. Uninstall the latest Windows update
Press Windows + I to open Settings, navigate to Windows Update, and click on Update history on the right.
Scroll down to the bottom and click Uninstall updates.
Locate the recently installed updates, and click the Uninstall option next to it.
Again, click Uninstall in the prompt.
Remember, you may have to uninstall a few updates before identifying the problematic one.
Tip
If none of the solutions listed here helped, the last option is to use an advanced file recovery tool to retrieve the missing folders and files in Windows.
Edge Web Select was one of Edge browser’s more unique features, but it seems that Microsoft has removed it entirely.
Many users aren’t pleased with this change, and in this guide, we will show you a method you can use to get this feature back.
What is Web Select on Edge?
This was a Microsoft Edge feature that allowed users to capture a segment of a web page.
The captured segment would still function, and users could interact with it.
Users could access pictures or copy text directly from the captured segment by doing so.
Why is Web Select not showing in Edge?
Microsoft is constantly improving Edge, and to do that, certain features have to be removed. According to the developers, the feature is deprecated, and it has been removed to improve user experience.
How can I get Edge Web Select back?
Add launch parameters to Microsoft Edge
Close your Edge, then right-click on your Edge browser icon and select Properties.
At the end of the Target option, add the following: --enable-features=msEdgeAreaSelect
Click on Apply, and then restart your Edge. See if Web Select is enabled. You can do so by opening the Setting panel or clicking the Copy+Shift+X shortcut.
If this works, then Web Select might be around for a bit, but don’t get your hopes up. However, given just how valuable this tool is, Microsoft will probably come with a replacement soon.
Restoring/fixing a mixing D drive in Windows 11 is easy. You’re usually dealing with poor cable connection or post-update driver mismatches. These are all quick to address.
Other common reasons why your D drive isn’t showing up include physical damage to the drive or a malware infection.
How do I restore my D drive in Windows 11?
NOTE
First, make sure the drive is properly connected. Also, remove any CD/DVD drives from your PC because it might occupy the the D: letter drive.
1. Scan your drives using Disk Management
Right-click the Windows icon and select Disk Management from the list.
Now, click on Action from the top menu and select Rescan Disks.
Wait for the process to complete and see if the D drive letter reappears.
2. Update the drivers
Right-click the Start button and select Device Manager from the list.
Expand the Disk drives section, right-click on the device driver, and select Update driver from the drop-down menu.
Click on Search automatically for drivers.
If the system identifies any new drivers, it will install them. You might also select the Properties option in step 2, go to the Driver tab, and choose Roll Back Driver. In case the problem appeared after a Windows update, this will restore the correct disk driver.
Additionally, type updates in Windows Search bar, and select Check for Updates. From there, install all the latest Windows 11 updates.
3. Run SFC and DISM scans
Type cmd in Search and select Run as administrator from the results.
Type or paste the following command and press Enter to run it: sfc /scannow
After the scan is complete, run the following command: DISM /Online /Cleanup-Image /RestoreHealth
Restart your PC and see if the D drive has now reappeared.
4. Check your drive for errors
Click the Search box, type cmd, and select Run as administrator to open Command Prompt with full privileges.
Now, type or paste the following command and press Enter to run it: chkdsk d: /f
If the D drive is an SSD, use the following command instead: chkdsk d: /f /r /x
Also, if D is a partition of your C drive, replace D with C in the command lines.
If you get a message saying that the scan can’t be run because the drive is in use, restart your PC and repeat the procedure.
5. Disable USB Selected Suspend (for external drives)
Open Control Panle and go to Power Options.
Select Change Advanced Power Settings.
In the list, expand USB Settings.
Set USB selective suspend settings to Disabled both for Battery and Plugged in.
This will make sure Windows doesn’t automatically disables drives to save power.
If all these methods fail, you may also try restoring your Windows 11 to a previous point in time when your D drive was showing up.
Tips & tricks for avoiding drive disappearance in the future
Keep the system drivers up to date using Automated Updates. You may also use driver updater tools if you want to avoid the manual procedures.
Disk drives may fail at any time, sometimes without a warning so you need to perform regular backups of important data files from your PC. And if you don’t want to do that manually, there are also great backup tools that do that automatically.
Managing hard disk space appropriately is also something you should care about. Keep your folders and files neatly organized and delete unnecessary programs and junk files regularly.
Using disk management tools will also help you assess the drive’s health at any time.
That’s it! We hope that now the missing drive is back, and you can access your personal files stored on it.
The problem may also arise if the drive letter is not available, but our highlighted guide will provide step-by-step instructions to fix that problem as well.
If you have some questions or suggestions, don’t hesitate to leave us a comment in the section below.
As you might know already, Microsoft Teams is not just one of the most popular apps for working environments, but it’s also one of the most targeted apps for phishing, malware, and cyberattacks, altogether.
For example, in 2022, over 80% of Microsoft Teams accounts were the target of cyberattacks. 60% of Microsoft 365 tenants were successfully hacked in 2022, so it’s safe to say Microsoft products are vulnerable and at risk.
However, there are ways to protect yourself from phishing and other malware, when using Microsoft Teams. Watching out for the TeamsPhisher tool is one of them, as this little tool is a Phyton 3 program that fully automates a cyberattack, and has become popular to use amongst hackers and threat actors.
The tool, which has a GihHub page in case you’re wondering how it works, is able to conduct phishing messages and attachments to Microsoft Teams users that allow external communications.
The TeamsPhisher tool bypasses Teams policies to enable phishing attacks
Usually, it’s not possible for any Teams users to send files or attachments outside of their organization. However, TeamsPhisher can apparently bypass this policy by making use of Teams web requests.
Hackers would need a Microsoft Business account (not personal), with a valid Teams and Sharepoint license.
According to the tool’s developers, you can easily get a Microsoft Business account:
This means you will need an AAD tenant and at least one user with a corresponding license. At the time of publication, there are some free trial licenses available in the AAD license center that fulfill the requirements for this tool.
And once you have it, there is a guide on how to effectively hack someone.
On the other side, though, things look far more formal, which creates a feeling of authority, needed for users to actually fall in the phishing trap.
This is how you can recognize a phishing attack done using the TeamsPhisher tool.
And, the tool is also used to send complex and convincing emails to Business users. These emails usually have an attachment that can be clicked. Once you do that, your account is compromised.
So, you should not answer to anyone that isn’t in your organization. Preview their messages first, and then talk to your IT managers or security managers about it.
Then, you should also be mindful about suspecting emails that seem to come from your coworkers. Look out for every odd-looking attachment, that is the first sign something is not right.
The TeamsPhisher has become quite a popular phishing tool when it comes to hacking Teams accounts, and many hackers have tried it and will still try it from now on.
But at least, you’ll know how to recognize these attacks and protect yourself accordingly.



 Tip


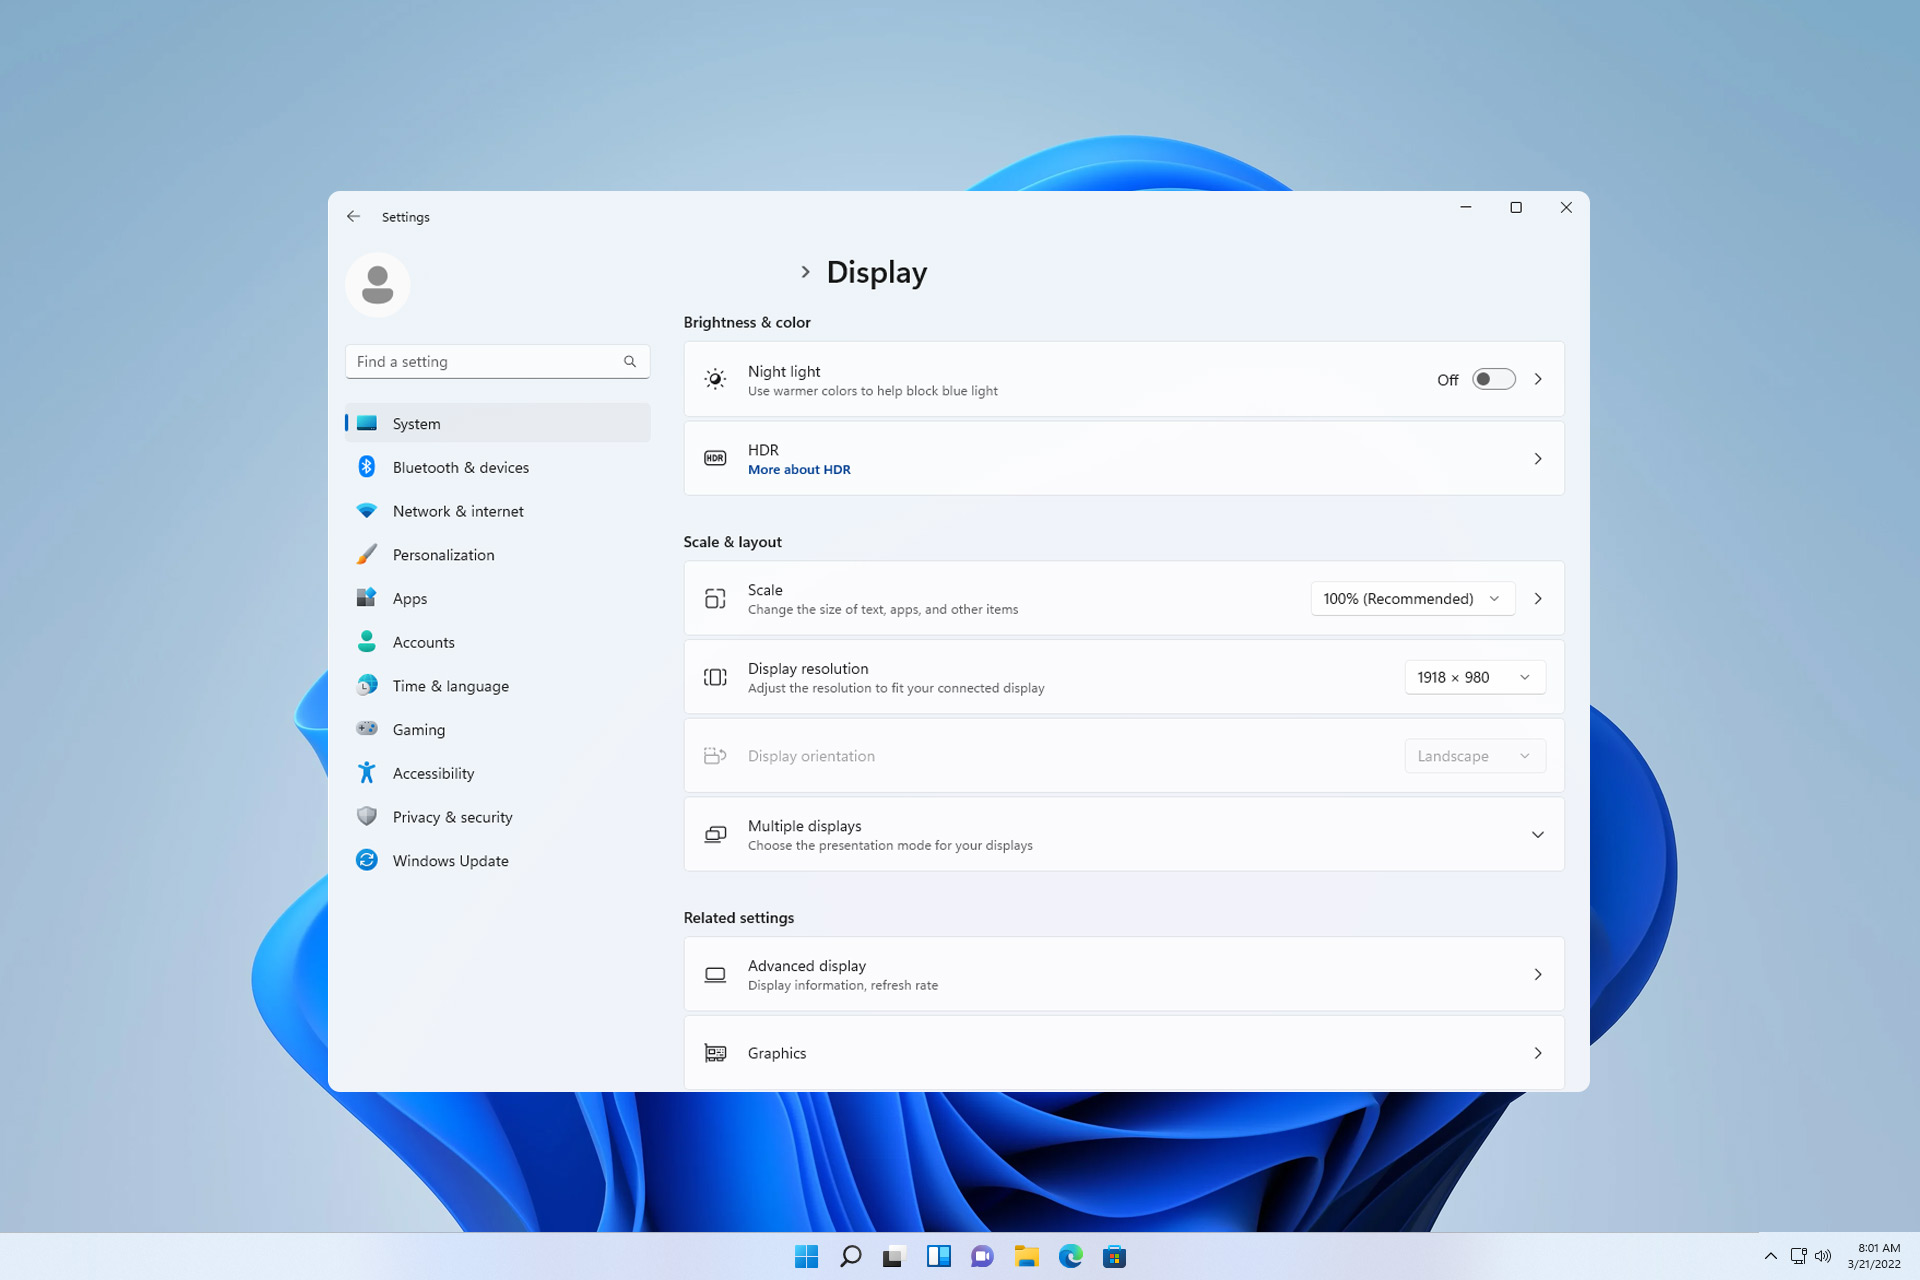





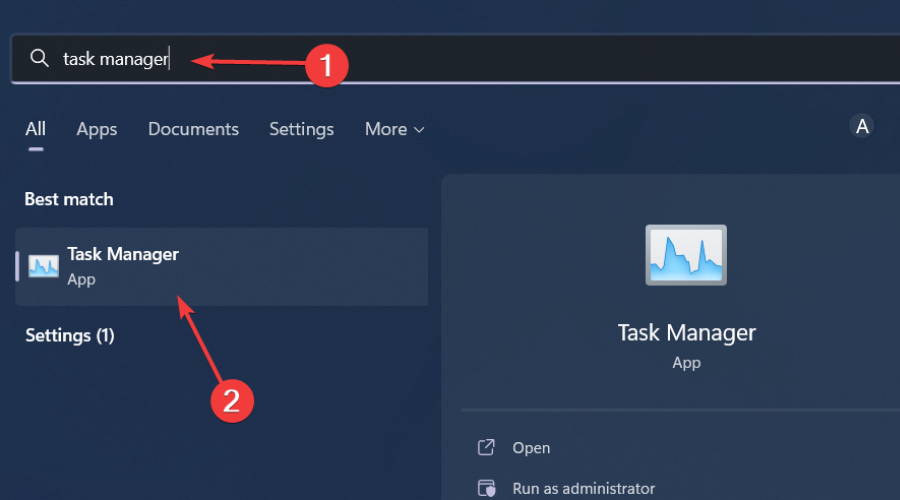









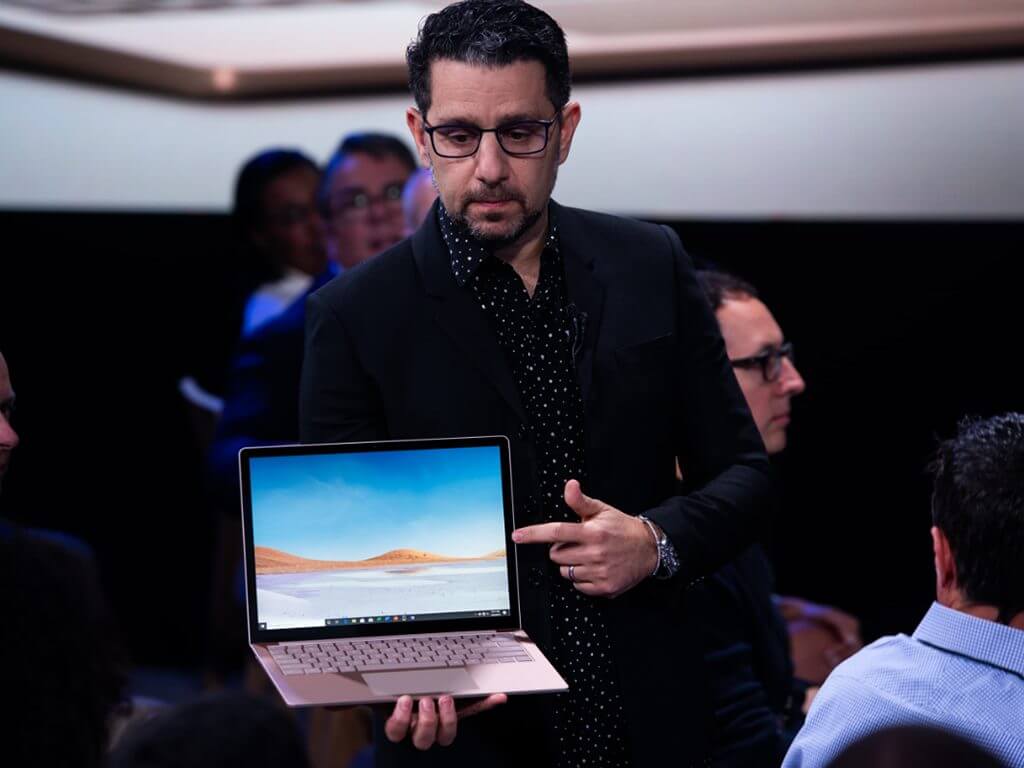



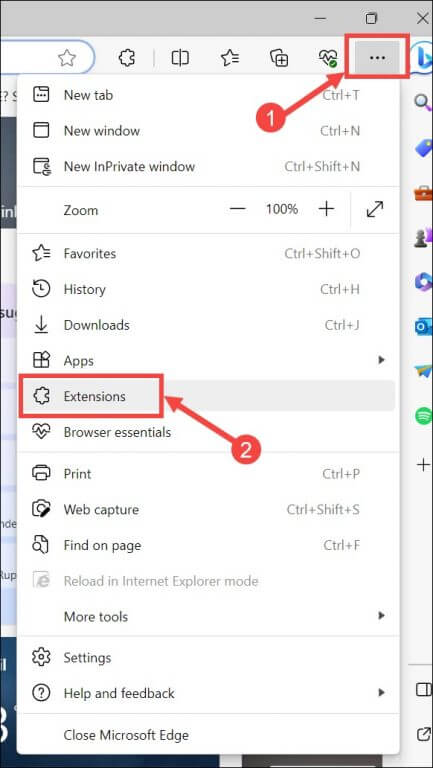


 To separate the calendars out (so making it a little easier to manipulate the appointments), click the split view option in the Home tab, and check out some of the filter options too. You can easily show and hide different types of appointments such as displaying only meetings where you’re the organizer.
 As well as the actual displaying of items in a form type view, Outlook could also show a tabular view on the folder that contains them – the default way of looking at a folder of email messages, for example, where you might be able to rearrange or add and remove the column headings to show different fields. Using desktop Outlook on PC, resize the view on Inbox horizontally so you see the sortable column headings and you’ll be able choose other fields to drop into the view, or use the
 To see this layout, look under the Change View option in the View tab and pick either List (which shows everything) or Active (which filters out stuff that’s in the past, showing only forthcoming appointments and meetings). It’s a great method for showing everything that’s coming up, rather than paging through day by day to look at the schedule. If you are migrating from one account to another, this is an ideal way of making sure you don’t miss some appointment that’s months away, and you may also be able to copy and paste the list items from one calendar to another.