Even if Microsoft focused on AI, the Redmond-based tech giant still does its best when it comes to cybersecurity, and on September 26, the company will release various securities updates.
The Custom App Control for Business policies will be one of them, and it’s also one of the most important security features to be released for organizations.
Custom App Control in Microsoft Tune: what does it do?
For starters, the Custom App Control will regulate applications of your organization’s devices. By this regulation, the apps will have to earn the trust to run, according to Microsoft.
This means that only approved, secured, and trusted apps will be allowed to run on devices. Application control will also stop any of these apps from running any kind of malicious code. We’ve seen this happening before, when Microsoft Teams, for example, was hacked to carry out malicious code.
The Custom App Control is getting next-generation capabilities when it comes to detecting and stop malware, and IT admins will now be able to provide a customizable configuration.
With App Control for Business, IT teams can configure what runs in a business environment through Microsoft Intune or other MDMs in the admin console, including setting up Intune as a managed installer.
Microsoft
And this is not all. Microsoft is also coming up with the Config Refresh feature; in case, your apps get compromised, the Confit Refresh feature will automatically enable settings in the Policy Configuration Service Provider (CSP) on a Windows 11 device to be reset every 90 minutes by default, or every 30 minutes if desired.
This protects against configuration settings being unexpectedly changed through either malicious software or registry edits and ensures that your settings are retained in the way IT configured them.
Microsoft
The Redmond-based tech giant also promises that more enhancements and improvements are coming to Microsoft Intune’s Custom App Control, and Confif Refresh once they are released.
It is about time Microsoft takes steps to improve its cybersecurity. What do you think about these new features? Let us know in the comments section below.
Although Microsoft said yesterday that the features they highlighted in yesterday’s Surface and AI event would become available for Windows 11 22H2 users, they’re already beginning to roll out for Windows 11 22H2 users in the Release Preview Channel. Along with Copilot for Windows, this Release Preview Channel build (22621.2361 (KB5030310) ) also includes the Modernized File Explorer, and “new text authoring experiences to voice access and new natural voices in Narrator, and Windows Backup.”
A more complete list of the new features and changes will be released next Tuesday, the 26th.
You may have to jump through a few hoops to get these new features: first, make sure that “Get the latest updates as soon as they are available” is turned on in Settings > Windows Update, and you’ll get the Windows Configuration Update (KB5030509) when you update to the latest Windows 11 22H2 Release Preview build. If you happen to install the build with the latest updates toggle off, you can still turn it on after the install and “Windows Configuration Update (KB5030509) will be downloaded on your PC where you will be asked to reboot.”
If you leave the toggle off, the new features will be gradually rolled out to your device over time.
So if you want to check out what was announced yesterday, install Release Preview Channel build 22621.2361 and get the latest updates as they are available.
How do I remove a display language from Windows 11?
1. From the Settings
Press Windows + I to open the Settings app, go to Time & language from the navigation pane, and click on Language and region.
Click the ellipsis next to the display language you want to delete, and select Remove from the flyout menu.
Click Yes in the confirmation prompt that appears.
Finally, restart the computer for the changes to apply.
2. With Windows PowerShell
To remove a language pack with PowerShell in Windows 11, press Windows + S to open Search, type PowerShell in the text field, right-click on the relevant search result, and select Run as administrator.
Click Yes in the UAC prompt.
Now, paste the following command and hit Enter to view the installed language packs:Get-WinUserLanguageList
From the language list, identify the LanguageTag for the preferred language you want to remove. For instance, it’s en-US for English (United States).
Now, run this command: $LangList = Get-WinUserLanguageList
Execute the following command while replacing Tag with the LanguageTag you copied earlier: $MarkedLang = $LangList | where LanguageTag -eq "Tag"
Run this command to remove the selected language: $LangList.Remove($MarkedLang)
Finally, execute this command: Set-WinUserLanguageList $LangList -Force
Restart the computer for the changes to come into effect if you removed the default language earlier. And make sure to change the system language to a new one.
Press Windows + R to open Run, type regedit in the text field, and hit Enter.
Click Yes in the prompt that appears.
Paste the following path in the address bar and hit Enter: HKEY_USERS\.DEFAULT\Keyboard Layout\Preload
You will now find all the languages listed here, though not named properly. We will use the keyboard identifiers to find out.
Double-click on an entry in the Registry, and copy the Value data.
Now, press Ctrl + F on Microsoft’s official blog post, paste the value you copied earlier, and identify the corresponding language.
Once you find out, right-click on the key and select Delete to remove the language pack.
Click Yes in the confirmation prompt.
Similarly, remove the key from the following locations as well: HKEY_CURRENT_USER\Keyboard Layout\PreloadHKEY_USERS\.DEFAULT\Control Panel\International\User ProfileHKEY_USERS\.DEFAULT\Control Panel\International\User Profile System Backup
Microsoft is set to release an update for Windows 11 on September 26, 2023. This update includes security enhancements to make Windows 11 more personal and intelligent.
They say that passwords are a common entry point for cyberattacks, and Microsoft emphasizes the importance of passwordless options. Windows 11 will introduce Windows Hello for Business, a more secure login option that eliminates the need for passwords.
Windows Hello for Business is a two-factor authentication solution that eliminates passwords and uses biometric or PIN-based authentication on Windows devices. It combines biometric authentication methods like facial recognition or fingerprint scanning with a Trusted Platform Module (TPM) to provide an extra layer of security and safeguard user credentials.
Passkeys are introduced as a cross-platform, cross-ecosystem way to access websites and applications. After creating a passkey with Windows Hello, users can access various services using their face, fingerprint, or device PIN. This feature aims to enhance security and convenience.
Moreover, The latest Windows 11 update will include new security tools for IT teams. This includes Custom App Control for Business policies with Microsoft Intune to control and secure applications and Config Refresh to protect against unwanted configuration changes.
They also enhance security for Microsoft 365 Personal, Family, and Basic subscribers. This includes credit monitoring and privacy protection in Microsoft Defender for individuals.
Microsoft acknowledges that while employees are eager to use AI in the workplace, leaders have concerns about the associated risks. They aim to provide safe and secure AI solutions for enterprise customers.
The new Outlook for Windows is debuting in preview mode for work and school accounts, offering a glimpse into its features and capabilities. Unlike its availability for personal accounts, it’s still a work in progress for organizational use. It is fully available for personal accounts.
It is currently in a “preview” state, which means it’s not yet fully ready for business and educational use. While the “PRE” tag has been removed, it’s important to note that it’s not considered enterprise-ready yet.
Microsoft has also announced organizations can control its deployment and access:
They can restrict access to the new Outlook for internal testing.
Admins have the option to block the addition of their organization’s Microsoft 365 account to the new Outlook.
The “New Outlook” toggle in the classic Outlook can be disabled for users.
Admins can allow access to the organization but block personal accounts.
Along with all this, it brings faster feature deployment across platforms, offers multi-account support, and offline functionality for basic email triage is on the horizon. Support for various account types is available or in the pipeline, and features like delegation and shared mailboxes are already accessible or under development. The exploration of S/MIME support is also underway.
In summary, the new Outlook for Windows is on its way for work and school accounts, but it’s not fully baked yet.
Teams was one of the video-conferencing and chat communication tools that stood out during the COVID-19 pandemic with all its feature updates.
This gave some annoying users the leeway to abuse this app and ruin your day by spam calls, sending you unwanted messages, or even sharing inappropriate links. Luckily, you don’t have to put up with them when you activate the block button.
What happens when you block someone on Teams? When you block a user on Teams, they will not be able to send you any messages or tag you on any chat groups. They will also no longer receive notifications from you and vice versa.
It’s important to note that blocking is mostly used for personal accounts. If you don’t see the block option, it is because it may not be activated on work/school-managed accounts because your IT department controls these settings.
How do I block someone in Teams?
1. Block via Chat
Launch your Microsoft Teams app.
Select Chat and find the contact you’d like to block.
Click on the three ellipses, and in the pop-out menu, select Block.
2. Block via Contact
Launch your Microsoft Teams app and click on the contact you wish to block.
Click on the three ellipses next to their name and select Block contact.
3. Block via Settings
Launch your Microsoft Teams app, click on the three ellipses next to your profile picture, and select Settings.
Navigate to Privacy and select Block calls with no caller ID under Blocked contacts.
How do I mute someone on Teams?
Launch your Microsoft Teams app.
Select Chat and find the contact you’d like to mute.
Click on the three ellipses, and in the pop-out menu, select Mute.
In some cases, blocking is not an option because communication between the two parties is required. It may just be those annoying out-of-office messages stuck on a profile for a while.
You can choose to mute them and only check their messages when you feel the need to or enable the compact feature to hide previews of messages you don’t want to see.
How do I manage my blocked list in Microsoft Teams?
Launch your Microsoft Teams app, click on the three ellipses next to your profile picture, and select Settings.
Navigate to Privacy and select Edit blocked contacts to view the complete block list.
To unblock contacts, hit the Unblock button.
How do you know if someone blocked you in Teams?
If you can no longer see a person’s profile picture in their chat window, this could be one of the first signs that someone has blocked you.
You’ll also notice that they no longer appear in your contact list, which is another indicator.
If the person is a member of a group chat with other people and they disappear from the group chat, then that’s another sign.
You also won’t be able to send them any messages, invites, or reminders.
With these tips, you can successfully block those guest users who pop up from nowhere. And if blocking seems too extreme, you can choose to block out profanities instead to keep your chatspace respectful.
After all, the goal is to create a safe space where you can be productive and minimize distractions. Do you find the block feature in Teams helpful? Share your thoughts with us in the comment section below.
Microsoft has unleashed a new wave of innovation with Edge, their AI-powered browser, specifically geared towards making online shopping and productivity easier.
“It’s been such an exciting year for Edge and Bing. We’ve worked diligently to bring you rich, AI-powered innovation to help you find, create, and achieve beyond what you ever thought possible,” said the company in a blog post.
The tech giant further asserts that for the past two and a half years it has been continuously improving shopping features in Edge, ensuring users get the best deals while browsing. The browser offers price history, comparison, and built-in coupons, totaling over $4 billion in savings for shoppers in the past year alone.
Shopping
Yesterday, Microsoft announced even more exciting shopping features. They introduced Copilot in Microsoft Shopping, an AI-powered personal shopper. Users can simply ask Copilot to help them find a product, and it will provide intelligent questions to narrow down choices and guide them to the perfect fit.
In the future, users will even be able to share a picture of a desired item, and Copilot will find the right match. This feature will be available on both mobile and desktop for a seamless shopping experience.
Productivity
Microsoft has also expanded the AI-powered productivity features of Edge. Users can now tell Copilot to draft and send emails, saving them time and effort. Additionally, Edge’s Inline Compose feature can help users improve their writing on most websites, suggesting different tones and assisting with longer posts.
Recognizing the importance of productivity on the go, the Redmond-based company is bringing AI-powered innovation to the Edge mobile app. Users will be able to ask Copilot questions about reports, making it easier to digest important information while on their mobile devices.
To support organization and productivity, Edge now offers Tab Auto-grouping. AI technology groups similar tabs based on topics or categories, reducing clutter and streamlining browsing.
Enterprise
In terms of enterprise solutions, Microsoft has made Bing Chat Enterprise available on the Edge mobile app. This feature enables users to shape ideas into formal business wording, ensuring confidentiality and efficient collaboration.
Lastly, Designer in Edge is an integrated graphic design app, making it the first of its kind in a browser. Smart find helps users find specific information within web pages quickly. Furthermore, the browser’s AI leverages features like Website Typo protection, ensuring users are safe from malicious sites that exploit URL typos.
All these innovative features are available at no additional cost to Microsoft 365 customers with specific licenses.
Copilot Lab is a new feature revealed by Microsoft that will teach you how to work and use AI in your organization.
This feature is intended as a hub, where you can share ideas and suggestions with other colleagues, such as learning to write prompts and come up with new recommendations on how to work with an AI tool. Microsoft even released a demo video, which you can watch below.
Copilot Hub is currently available in private preview, but it will most likely be released on November 1, the same date Microsoft 365 Copilot will be available to the general public.
A new Surface Laptop Go 3 has been revealed at the Microsoft Surface Event 2023, unveiling a slick and powerful ultraportable, that comes with a lot of benefits, including 1 month of Xbox Game Pass Ultimate.
This is a bit off, considering this particular laptop is not made for gaming purposes, but more for creative professional, or office situations.
Nonetheless, if you have an Xbox, then this little perk can be quite useful, as the Game Pass Ultimate will allow you to play games on the console, as well as your PC.
In other news, the Surface Laptop Go 3 promises a 15-hour battery life, and you will be able to carry it with you, everywhere you go, as it only weighs around 2.5 lb.
It will be available on October 3, 2023, at a starting price of $799, which is quite reasonable. Check out its full specifications below.
Microsoft unveiled a brand-new Surface laptop at the Microsoft Surface Event, the Surface Studio 2, and it’s safe to say, that the device is a beast.
The Surface Laptop Studio 2 is a 2-in-1 laptop and it can be used as a laptop, tablet, and canvas. Its starting price is $1,999 and it will be rolling out on October 3rd.
This beast is well-suited for casual gamers, creatives, and students. But really, if you’re looking for a powerful laptop, with a lot of capabilities, Surface Studio 2 might just do it for you, entirely.
But enough with the chit-chat. Here are the full specifications for it. You should know that you can customize them when you order your Surface Studio 2, and the price will vary.
Surface Studio 2: full specs
Processor
13th Gen Intel Core™ i7-13700H Processor Built on the Intel Evo™ platform Intel Gen3 Movidius 3700VC VPU AI Accelerator
Touchscreen: 14.4” PixelSense™ Flow Display Resolution: 2400 x 1600 (200 PPI) Refresh rate: up to 120Hz Aspect ratio: 3:2 Contrast ratio: 1500:1 Color profile: sRGB and Vivid Individually color-calibrated display VESA DisplayHDR 400 certified Dolby Vision IQsupport Touch: 10-point multi-touch Corning Gorilla Glass 5 display
Battery life
Intel Iris Xe graphics model: up to 19 hours of typical device usage NVIDIA graphics models (except 2 TB SSD): up to 18 hours of typical device usage2 TB SSD NVIDIA graphics models: up to 16 hours of typical device usage
Full HD front-facing Studio camera1080p Full HD camera with wide field of view Windows Studio Effects with Auto Framing, Eye Contact, and Background Blur Windows Hello 2.0 face authentication camera
Audio
Quad Omnisonic speakers with Dolby Atmos
Mics
Dual Studio Mics with Voice Clarity, enabling super-wideband and natural full-duplex conversations
Connections (Ports)
2 x USB-C with USB4/ Thunderbolt™ 4 (with DisplayPort and Power Delivery)USB-A 3.1 MicroSDXC card reader 3.5 mm headphone jack Surface Connect port
Network and connectivity
Wi-Fi 6E: 802.11ax compatible Bluetooth Wireless 5.3 technology
Pen and accessories compatibility
Designed for Surface Slim Pen 2 and supports tactile signalsIntegrated Surface Slim Pen 2 storage for charging under the keyboard Supports Microsoft Pen Protocol (MPP)
Software
Windows 11 HomePreloaded Microsoft 365 Apps Microsoft 365 Family 30-day trial Xbox Game Pass Ultimate 30-day trial
Activation: Moving (mechanical) keys Layout: English, full row of function keys (F1-F12) Windows key and dedicated buttons for media controls, screen brightness and mute Backlight Precision Haptic touchpad
Battery capacities
Battery Capacity Nominal (WH) 58Battery Capacity Min (WH) 56
Microsoft Surface Event 2023 happened and the Redmond-based tech giant did not disappoint. The company put all the bets on AI, as it has been doing since the beginning of the year, and it has come up with arguably some of the most exciting announcements in a while.
First things first, if you want to watch the Microsoft Surface Event, you should be able to do it now, as the whole event is now available for streaming on Microsoft’s website or on YouTube.
DALL-E 3 is coming to Bing Chat, and you’ll be able to use it to generate stunning images, which will be protected by Microsoft
Microsoft Surface Event 2023: Windows 23H2, Copilot, and even more AI
Windows 11 23H2 out on September 26, 2023
At the Microsoft Surface Event 2023, the Redmond-based tech giant revealed that Windows 11 23H2 will come with over 150 new features. Here’s a summary of the most important ones:
Paint has been enhanced with AI for drawing and digital creation with the addition of background removal and layers as well as a preview of Cocreator that brings the power of generative AI to the Paint app.
Photos has also been enhanced with AI including new features to make editing your photos a breeze. With Background Blur you can make the subject of your photo stand out quickly and easily. The Photos app automatically finds the background in the photo, and with a single click, instantly highlights your subject and blurs out the background. We’ve improved search, with photos stored in OneDrive (home or personal) accounts, you can now quickly find the photo you’re looking for based on the content of the photo. You can also now find photos based on the location where they were taken.
Snipping Tool now offers more ways to capture content on your screen – with this update you can now extract specific text content from an image to paste in another application or, you can easily protect your sensitive information with text redaction by using text actions on the post capture screen. And, with the addition of sound capturing using audio and mic support, it’s easier to create compelling videos and content from your screen.
Clipchamp, now with auto compose, helps you with scenes suggestions, edits and narratives based on your images and footage automatically so you can create and edit videos to share with family, friends, and social media like a pro.
Notepad will start automatically saving your session state allowing you to close Notepad without any interrupting dialogs and then pick up where you left off when you return. Notepad will automatically restore previously open tabs as well as unsaved content and edits across those open tabs.
With the new Outlook for Windows, you can connect and coordinate your various accounts (including Gmail, Yahoo, iCloud, and more) in one app. Intelligent tools help you write clear, concise emails and seamlessly attach important documents and photos from OneDrive. To learn more, visit this link.
Modernized File Explorer, we are introducing a modernized File Explorer home, address bar and search box all designed to help you more easily access important and relevant content, stay up to date with file activity and collaborate without even opening a file. Also coming to File Explorer is a new Gallery feature designed to make it easy to access your photo collection.
New text authoring experiences to voice access and new natural voices in Narrator, continuing our ongoing commitment to making Windows 11 the most accessible version of Windows yet.
Windows Backup makes moving to a new Windows 11 PC easier than ever. With Windows Backup, transitioning most files, apps and settings from one PC to another, is seamless so everything is right where you left it, exactly how you like it.
Copilot will arrive on September 26, 2023.
Apparently, Copilot has a new design, with bright colors, which is different from the existing icon in the Windows Insider Program.
Windows 11 Copilot will support Ink Anywhere, so you’ll be able to handwrite your inputs on the AI tool.
But this is not all. Copilot will make its way to every side of Windows, including Edge. The AI tool will also have context from your phone, meaning Copilot will work across devices. You’ll even be able to send text messages with it.
Plus, the Redmond-based tech giant has just announced Microsoft Shopping Copilot. You’ll be able to easily shop while searching, and Copilot will actually help you with it, with its own suggestions. Microsoft Shopping Copilot will also summarize all the reviews for you, it will compare prices, and overall, it will help you get the best deal possible.
Both will be available on September 26.
Microsoft 365 Copilot coming on November 1
Microsoft 365 Copilot will be generally available on November 1, to enterprise customers.
The AI tool will come with its own chat feature, called Microsoft 365 Chat, which is very similar to Bing Chat, except it’s intended for work projects.
365 Chat will allow you to summarize emails, compose replies, create event plans, and even rewrite entire documents. It will also search the web and within seconds, it will find you everything you’re looking for. The tool includes footnote sources, as well, a very useful feature.
Outlook is getting a ‘sound like me’ feature, that will mimic your writing style
Copilot will also personalize any email to match your unique style and tone of voice, as the AI tool will be integrated in Outlook with a feature called, sound like me.
While the feature might seem eerie at first, it will actually just imitate your style, so, in the end, you’ll be able to task it to write your emails for you.
The feature will be rolling out starting September 26.
Microsoft Surface Event 2023: Surface Laptop Studio 2, Surface Laptop Go 2, Surface Go 3
Surface Go 3 will have AI-powered features, up to 15 hours of battery life, and will start at $799. It also has a 12.4-inch touchscreen and a fingerprint power button. And ironically, it’s coming with a 1 month of Xbox Game Pass Ultimate.
The little beast has some incredible hardware for its size, that will allow customers to take it everywhere, and get the work done. It will be available starting October 3, and you should check its specs to see if it’s worth it.
Surface Laptop Studio 2, touted as “The most powerful Surface we’ve ever built” by Microsoft, has some incredible hardware, and it will be able to function as a laptop, tablet, and a canvas, so it’s more than versatile.
The laptop is mainly aimed at creative professionals, and students, but really, if you like it, you should buy it. It will be available starting October 3, at a $1999 price. So it’s spicy, but we think the specs for it are worth it.
Microsoft Surface Event 2023 also introduced Copilot Lab
Microsoft is coming up with Copilot Lab, which is a hub for people to learn how to efficiently use Copilot models.
And, you can share your ideas with your colleagues there, and learn together how to come up with the best prompts. As you can see below, you’ll have an array of prompts that you can choose from, all designed by fellow AI learners. Copilot Lab will also allow for discussions, and maybe, who knows, it could enable webinars on how to use AI. But it’s still too soon to say it.
Microsoft has even come up with demo video about it, which you can watch below.
Microsoft Designer is coming to Microsoft 365
Microsoft Surface Event 2023 revealed that Designer will now be part of the Microsoft 365 family.
Designer will be available to use in Microsoft Word. The feature will allow you to choose from suggested visual examples to fill your documents with.
Plus, Designer will allow you to upload your own images, as well. And, because it uses AI, Designer will be able to transform your text-ridden documents into highly visual ones within seconds.
For now, only a limited number of users will get to experience Designer in Microsoft 365, but the preview will be expanded, as this new addition is being tested.
Ultimately, it will be released to the general public, most probably at the beginning of 2024.
Microsoft Surface Event 2023 announced DALLE-3 on Bing Chat and Content Credentials
One of the most important announcements of the event was the Content Credentials feature that will be coming to Windows Copilot, Bing Chat, Microsoft 365 Chat, Bing Chat Enterprise.
This will allow you to protect your AI-generated images with an invisible watermark, effectively granting it copyrights.
Content Credentials. As we continue to take a responsible approach to generative AI, we’re adding new Content Credentials which uses cryptographic methods to add an invisible digital watermark to all AI-generated images in Bing – including time and date it was originally created. We will also bring support for Content Credentials to Paint and Microsoft Designer.
Microsoft
Content Credentials were announced as DALLE-3, the latest generative AI from the DALLE series is making its way to Bing Chat, allowing you to generate stunning visuals in seconds.
Long story short: this Microsoft Surface Event was AI-centered. And Microsoft proved to us once again why it is at the forefront of AI.
Needless to say, September 26 can’t come soon enough now. Windows 11 is about to go to the next level.
Forgot your login details again? Windows 11 has built-in tools that securely store your passwords, making it easier to access websites, apps, and networks without constantly typing credentials.
Whether they’re saved in the Credential Manager or your browser, here’s how to view stored passwords in Windows 11 and avoid unnecessary resets.
1. Use the Control Panel
Click on the Windows Search bar, type Control Panel, and click Open.
Select User Accounts.
Click on Windows Credentials.
Next, select MicrosoftAccount and click on it to expand and reveal your password.
Editor’s recommendation: Avoid searching for saved passwords next time
RoboForm cannot recover a password that was never saved, but it can import your existing browser passwords, automatically store new logins, sync them across your devices, and sign you in with one click. This gives you one convenient place to manage your credentials instead of searching through different Windows tools and browser settings.
Take advantage of Windows Hello – Windows Hello allows users to log in with just their face or fingerprint instead of typing their password every time.
Craft unique passwords – This is important because if someone gains access to one account, they could easily access others by trying those same login details on other sites.
So, there you have it, a breakdown of all the many ways you can view your passwords in Windows 11. Finding saved login passwords is a vital yet easily overlooked skill. With some slight alterations, the steps listed here can be applied to other versions of Windows as well.
Left-handed users have a common problem with touch-enabled Windows 11 devices because when you’re writing with a pen, the left swipe gesture causes you to open the widgets instead of writing.
This must be frustrating so, in this article, we will provide the options to disable left swipe on Windows 11.
How does the left swipe function? On Windows 11 touchscreen devices if you swipe left from the edge of the screen, you will open a system UI. Usually, you will get the Notifications or Widgets screen.
How do I turn off swipe from left on Windows 11?
1. Disabling left swipe on Windows 11 with Group Policy Editor (GPEdit)
Press the Win + R keys to open the Run console, type gpedit.msc, and press Enter or click OK to start Group Policy Editor.
Now, go to the following location: Computer Configuration/Administrative Templates/Windows Components/Edge
Double-click the Allow edge swipe from the right pane, check the Disable box, then hit the Apply and OK buttons to acknowledge the change.
Now, check if the Windows disable swipe from left method worked.
Clearly, changing the edge swipe policy is the easiest method to disable the screen edge swipes although some simpler touch screen options would be a lot more helpful for users.
2. Disabling left swipe on Windows 11 with Registry Editor
Press the Win + R key combination, then type regedit in the console and press Enter to start Registry Editor.
Navigate to the following key: HKEY_LOCAL_MACHINE\SOFTWARE\Policies\Microsoft\Windows\EdgeUI
Now, double-click on AllowEdgeSwipe, and set its value to 0 to disable Edge Swipe.
Restart your device and see if you managed to disable side swipe in Windows 11.
To disable the touchscreen gestures, go to Start > Settings > Bluetooth & devices > Touchpad, then click on the Three-finger gestures and Four-finger gestures and select Nothing from the Swipes and Taps drop-down menus.
If you need to disable all gesture modes, you can simply disable tablet mode on the convertible devices.
If Secure Boot is grayed out on Windows 11, you won’t be able to enable it, and your PC will be more vulnerable to malicious code such as boot loaders.
In some cases, certain features might not work properly until you resolve this issue, so let’s see how can we address it.
How can I tell if Secure Boot is enabled on my computer?
Press the Windows key + R and enter msinfo32.
Locate Secure Boot State value.
If it’s set to Enabled, it means that Secure Boot is activated.
How do I fix Windows 11’s Secure Boot if it’s greyed out in BIOS?
1. Set administrator password on BIOS
Restart your PC and keep pressing F2 or Del to access BIOS. The key varies depending on the motherboard manufacturer.
Next, navigate to the Security tab.
Select the Administrator password option.
Set the new BIOS password and repeat it again. Press Enter to save it.
Exit BIOS and save changes.
NOTE
Do not forget your admin password. Without it, you won’t be able to access BIOS anymore.
2. Disable Fastboot in BIOS
Access BIOS to adjust your motherboard firmware settings.
Next, navigate to Advanced Mode and select the Boot in BIOS.
Locate the Fast Boot option and set it to Disabled.
Save changes and restart your PC.
Some users reported that it’s necessary to enable Secure Boot Control in order for this feature to work.
3. Install default keys
Boot into BIOS and navigate to the Secure Boot option.
Choose Install Factory Default Keys or Provision Factory Keys.
Save changes and restart your PC.
A few users suggested that they needed to restore the factory key, update each key, and restore the keys again in order to fix the issue.
Touchpads are designed for seamless operations but are a little too sensitive, especially since laptops have gotten thinner with time. And a common problem many face is that their touchpad clicks but doesn’t move.
For some, the problem appeared out of the blue, while others witnessed the mouse cursor and touchpad slowly lose functionality. And it’s encountered across manufacturers, be it Dell, Toshiba, Microsoft, HP, and Lenovo, amongst others.
Why is my touchpad clicking but not moving the cursor in Windows 11?
The installed touchpad driver is outdated, buggy, corrupt, or incompatible.
A third-party application conflicts with the touchpad.
A recent update to the BIOS broke things.
The touchpad has hardware issues.
How do I fix my touchpad if it only clicks on Windows 11?
Tip
If the touchpad is not working, get an external mouse and use it to execute the solutions listed here.
Before we move to the slightly complex solutions, try these quick ones first:
Each manufacturer usually has a dedicated key to enable/disable the touchpad. For Dell, it’s F5. Press it and check for improvements.
In case the touchpad only works when clicked, check for any spills on the trackpad. Clean the surface with isopropyl alcohol and a soft cloth.
Check for available Windows updates and install them.
Make sure there’s no external pressure on the touchpad from the backside of the laptop.
If none work, head to the fixes listed next.
1. Enable touchpad in BIOS
Shut down the computer, then power it on, and as soon as the display lights up, repeatedly hit the F1, F10, F12, or Del key, depending on the system manufacturer, to boot the BIOS.
Now, check for the touchpad entry in the BIOS. It could also be named trackpad or Internal Pointing Device.
Choose Enabled next to the touchpad, save the changes, then boot out of the BIOS and into Windows.
When the touchpad is clicking but not moving after a restart, it’s likely that the OS updated the BIOS in the background, which changed the settings. So, make sure the touchpad is enabled.
2. Reset the touchpad settings
Press Windows + I to open Settings, go to Bluetooth & devices from the left pane, and click on Touchpad.
Again, click Touchpad to expand and view the related settings, then click the Reset button.
3. Reinstall the touchpad drivers
Press Windows + X to open the Power User menu, and select Device Manager from the list of options.
Expand the Mice and other pointing devices entry, right-click on the touchpad, and select Uninstall device.
Now, tick the checkbox for Attempt to remove the driver for this device if available, and click Uninstall.
Once done, restart the computer, and Windows will automatically install a fresh copy.
If the touchpad works fine for a while and then exhibits erratic behavior, Windows might be automatically updating the drivers. So, disable automatic driver updates.
4. Update the drivers
Press Windows + R to open Run, type devmgmt.msc in the text field, and hit Enter.
Double-click on Mice and other pointing devices, right-click on the touchpad device, and select Update driver.
Click on Search automatically for drivers and wait for Windows to install the best drivers available locally.
If Windows can’t find a better version, head to the laptop manufacturer’s website, locate the latest version, and manually install the driver. Here are direct links to the driver download page for different manufacturers:
Press Windows + S to open the Search menu, type Device Manager in the text field, and click the relevant result.
Expand Mice and other pointing devices, right-click on the trackpad device, and select Properties.
Go to the Driver tab, and click on Roll Back Driver.
Choose a reason for the rollback from the list or enter one, and click Yes to confirm.
6. Uninstall conflicting applications
Press Windows + I to open Settings, go to Apps from the navigation pane, and click on Installed apps.
Locate any apps installed around the same time the problem first appeared, click on the ellipsis next to it, and select Uninstall.
Again, click Uninstall in the confirmation prompt.
If the touchpad still clicks but doesn’t move, chances are that there are still some traces of the app. Here, you could use a reliable uninstaller tool to get rid of any leftover files and registry entries.
Press Windows + S to open Search, type Create a restore point, and click the relevant search result.
Now, click the System Restore button.
Select Choose another restore point and click Next.
Pick another restore point from the list, preferably the oldest, and click Next.
Verify the restore details, and click Finish to start the process.
Tip
When nothing else did the trick, be it the touchpad settings or the device drivers, the last option is to take the laptop to a repair shop. Or if it’s under warranty, contact the system manufacturer.
Even after fixing things when the touchpad clicks but doesn’t move, a few users reported that the two-finger scroll is not working, which can, surprisingly, be resolved by changing the pointer options.
Press the Windows key, type powershell, and click Run as administrator.
Copy & paste the following command to know the status of Enhanced Session Mode of Hyper-V for all users and hit Enter: Get-VMHost | fl -Property EnableEnhancedSessionMode
If the status is false, that means the mode is disabled. To enable it, type the following command and hit Enter: Set-VMhost -EnableEnhancedSessionMode $True
Close the PowerShell window. Press Windows + I to open the Settings app.
Go to System, then Display.
Locate Display resolution settings and click the drop-down next to it; you will get options like 1920*1200, 1920*1080, & 1600*1200. You can choose any of them or select the default screen resolution option to get the best output.
Click Keep changes to confirm your choice.
Why can I not resize the Hyper-V console screen?
Enhanced Session Mode is turned off.
Don’t have Windows Pro edition or higher on the guest operating system.
Integration services are not installed or are outdated.
The host machine doesn’t support the desired display settings, including the resolution and aspect ratio.
A personalized display with optimized visuals promotes productivity, and better user experience, which makes interaction within Hyper-V VMs more effective.
If you have any questions or suggestions about the methods discussed, feel free to mention them in the comments section below.
Sometimes, you will see that your computer says everything is fine, but, at the same time, it just cannot recognize whether there is any internet connection.
If you’re lucky, internet access for some websites will work normally, but this will be short-lived. You need to get to the root cause of the problem and address it f you want a working and stable connection.
Why does my PC say no internet, but secured?
Your Internet Service Provider (ISP) might be having issues with their service.
You may have installed a firewall on your computer which blocks any access to the internet.
Your antivirus software may have detected proxy servers on your computer and flagged the connection.
It’s possible that your network adapter might be malfunctioning.
How do I fix no internet, secured on Windows 11?
Start off with the following preliminary checks:
Ensure that all the cables are connected properly and there are no loose connections in your system.
Check for issues with your ISP by connecting to a different network.
Next, select Network & internet and click on VPN in the right-side menu.
Select the VPN connection you want to disable, click on the drop-down and select Remove.
7. Disable your Proxy
Press the Start Menu icon and select Settings.
Click on Network & Internet on the left pane, then scroll down and click Proxy on the right pane.
Select Edit next to Use a proxy server option in the Manual proxy setup section, toggle off Use a proxy server, and click on Save.
8. Downgrade your network band
Click on the Start Menu icon, type Device Manager in the search bar, and click Open.
Navigate to Network adapters and double-click to expand.
Right-click on your network adapter and select Properties.
Click on the Advanced tab and locate the Preferred Band.
In the Value drop-down menu, select Prefer 2.4GHz band then hit Enter.
Restart your PC.
Giving your PC more bandwidth is usually better to get the best possible performance from your network. But for very old PCs that can’t handle the higher speed, you might want to consider downgrading for optimal performance.
9. Disable IPV6
Click on the Windows Search icon, type View network connections, and click Open.
Locate your network connection, right-click it, and choose Properties from the menu.
Locate Internet Protocol Version 6 (TCP/IPv6) and uncheck it. Click on OK to save changes.
10. Reset TCP
Hit the Windows key, type cmd in the search bar, and click on Run as administrator.
Paste the following commands individually and hit Enter after each: netsh winsock resetnetsh int ip reset
Lastly, close the Command Prompt window and restart your PC.
11. Perform a Network reset
Hit the Windows key and click on Settings.
Navigate to Network & internet.
Select Advanced network settings.
Click on Network reset.
Next, hit the Reset now button.
12. Perform a System Restore
Press the Windows + R keys, type rstui, and hit Enter.
The System Restore window will open. Click on Next.
Select the restore point you wish to revert to and click on Next.
Now click on Finish.
This should be a last resort if all the above steps fail. It will come in handy if you had a corrupt update or your PC has failed to recover from a malware infection.
What can I do if my PC says no internet, secured, but the internet works on Windows 11?
Your connection saying no internet but working may not seem like a problem, but from what a majority of users report, the Wi-Fi network only works on select sites and apps.
You may fail to get critical updates because your system has not registered a working connection. In addition, you’ll also not get the Wi-Fi action is needed message when you connect to strange networks, putting your device at more risk.
If you want to convert a dynamic disk to basic in Windows 11, you should first create a backup because the process will wipe all the data from it.
Why convert dynamic disk to basic in Windows 11? According to Microsoft, dynamic disks have been deprecated from Windows and are not recommended anymore. Plus, Windows Home editions don’t support dynamic disks, so you won’t be able to access these logical drives.
They recommend using basic disk or Storage Spaces if you want to merge more disks together into larger volumes. In this article, we will show you how to convert a dynamic disk to basic on Windows 11
How do I convert a dynamic disk to a basic disk in Windows 11?
Before starting the process, you will need to perform several preparation steps:
Back up all the important data from the dynamic disk. You may use a manual procedure and just copy the data or use a dedicated backup solution for this task.
Type computer management in the Search box and click on Run as administrator from the results.
Now, go to Storage in the left pane and click on Disk Management.
Now, you need to delete all the volumes on the dynamic disk. Right-click on each volume and select Delete to remove the dynamic volumes.
After all the volumes are deleted from the dynamic disk, right-click on the disk and select Convert to Basic Disk. The conversion process will be fast with all the data deleted from the disk drive.
Now, it’s recommended to format the drive and if you want to partition it again, you may do that as well, but you can’t have more than 4 partitions on a basic disk.
That’s the easiest way to convert a dynamic disk to a basic disk and it’s the solution recommended by Microsoft in this case. Deleting the dynamic disk volumes first is the way to go.
2. Convert the disk using Command Prompt
Click the Search bar on Windows 11, type cmd, and select Run as administrator from the displayed results.
Type diskpart and press Enter to start the app.
Type the following command and note down the number of the dynamic disk you want to convert: list disk
Now, type the following command to select the correct disk (replace <disknumber> with the actual number): select disk <disknumber>
Type the following command and press Enter to see the volumes within the disk: detail disk
Enter the command select volume <volumenumber> (replace <volumenumber> with the number of your actual volume), and then type the command delete volume and press Enter to delete it.
Perform step 6 for all the volumes on the dynamic disk to make sure that it doesn’t have any volumes on it.
Now, type the following command and press Enter to select again your dynamic disk: select disk <disknumber>
Finally, type the following command to convert it: convert basic
This solution is basically the same as the first but you’re using DISKPART in Command Prompt instead of Disk Management. You can also use this tool to extend your disk volume.
As you have seen, it’s not that hard to convert a dynamic disk to a basic disk in Windows 11 by using the built-in tools from your OS.
However, you may perform the same procedure by using a third-party disk management tool. They have more features and sometimes they are even more convenient to use.
Why can’t I convert dynamic disk to basic?
There are a few errors that you may encounter during the process so let’s explain them:
The disk is bigger than 2TB – if the Convert to Basic option is grayed out, it might be because Disk Management can’t handle MBR disks of over 2TB so you must convert them to GPT first.
There is not enough space available on the disk(s) to complete this operation – This error appears sometimes if you don’t delete the volumes and data from the dynamic disk before converting it to basic. That is because you need to have at least 1MB of unallocated space to proceed.
The pack name is invalid – This error occurs if the name of the computer has double-byte (DBCS) characters in it. The Chinese ideographs or Japanese kanji have double-byte code values, so if you have them, rename your computer first.
Virtual Disk Service Error: The Disk Is Not Empty error – The error appears if you didn’t delete all the volumes and data from the dynamic disk. However, our guide on how to fix the disk is not empty error will help you in that situation.
Dynamic disk vs basic disk
Dynamic disks can be split into volumes and can have an infinite number of them. The basic disks are structured in partitions and can have a maximum of four partitions (three primary and one extended).
Dynamic disks also have some advanced features like software RAID, fault tolerance, disk spanning, and more so they are used especially by IT specialists in server environments.
By default, when you set up a disk, you are recommended to opt for a basic one, a great option for a personal computer.
That concludes our guide on how to convert a dynamic disk to basic on Windows 11. You should know that these methods also work seamlessly on Windows 10 as well.
It’s the era of Virtual Machines, and Hyper-V is often the preferred option amongst users, given its wide array of customizations and user-friendly setup. But accessing data on USB storage, or passthrough, remains a problem in Hyper-V on Windows 11.
This is all the more important considering how common VMs are, be it for performance, testing software and applications, reducing cost, and isolation from host processes.
Does Hyper-V support USB passthrough?
Hyper-V doesn’t, by default, support USB passthrough since it runs independently from the host. But you can set up passthrough on a Hyper-V VM using the native methods and with a reliable tool.
Here are a few benefits of Hyper-V USB passthrough:
Direct access to the USB storage doesn’t affect the performance, as is the case with emulation.
Better testing of applications and software or sharing data.
Hyper-V USB passthrough is easy to set up.
Most USB devices are compatible with Hyper-V passthrough.
How do I enable Hyper-V USB Passthrough on Windows 11?
1. Set the USB disk as offline
Press Windows + R to open Run, type diskmgmt.msc, and hit Ctrl + Shift + Enter.
Locate the USB storage, right-click on it, and select Offline from the context menu.
Open the Hyper-V Manager, locate the list of VMs, right-click the one that needs to access data on the USB device, and select Settings.
Go to SCSI Controller from the navigation pane, select Hard Drive from the right, and click Add.
Now, select Physical hard disk, choose your USB device from the dropdown menu, and click OK to save the changes.
To set up passthrough with a Hyper-V USB device in Windows 11, you will need to set it offline on the host system. That’s because a disk can’t be accessed from two systems simultaneously.
2. Enable Remote Desktop Protocol
Press Windows + S to open Search, type Control Panel, and click on the relevant search result.
Click System and Security.
Choose Allow remote access under System.
Tick the checkboxes for Allow Remote Assistance connections to this computer and Allow remote connections to this computer, then click Apply and OK to save the changes.
Press Windows + R to open Run, type mstsc.exe in the text field, and hit Enter.
Click on Show options.
Go to the Local Resources tab, and click the More button under Local devices and resources.
Now, expand Drives, and select the USB storage for which you want to set up passthrough on the Hyper-V machine.
Similarly, tick the checkbox for Other supported Plug and Play (PnP) devices, and click OK to save the changes.
Go to the General tab, enter the VM’s details, and click Connect at the bottom.
Remember, you can similarly set up Hyper-V USB passthrough in Windows 10. All you need is to enable the Remote Desktop.
3. Use Enhanced Session Mode
Press Windows + S to open Search, type Hyper-V Manager in the text field, and click the relevant result.
Identify the concerned hostname, right-click on it, and select Hyper-V Settings.
Go to Enhanced Session Mode Policy under Server from the left pane, and tick the checkbox for Allow enhanced session mode.
Now, go to Enhanced Session Mode under User, and tick the checkbox for Use enhanced session mode.
Turn on the VM, and click Show options in the configuration window that appears.
Go to the Local Resources tab, and click on More under Local devices and resources.
Select the USB drive from the list, then click OK to save the changes, and finally click Connect.
Once the Hyper-V Virtual Machine powers on, the USB device will be accessible.
When the built-in options don’t work or seem too much of a hassle, you can always rely on third-party software.
To just transfer data between the two or create a backup, you can use AOMEI Centralized Backupper, an easy-to-use program that allows P2V data transfer.
Or you could choose from a plethora of other options. Just make sure to scan the program files before running the software.
Limitations of Hyper-V USB passthrough
It poses a security risk to all three, the Hyper-V Virtual Machine, the Hyper-V host, and the USB storage.
The host device may witness a reduced performance.
Not all USB devices support Hyper-V passthrough, so compatibility can be an issue.
Often, you need additional drivers to set up USB passthrough.
You now know how to enable USB passthrough in Hyper-V on Windows 11 and the previous iterations. For seamless connectivity, it’s recommended that you add a network adapter in Hyper-V, though the task is usually handled by administrators.
You can set up Hyper-V on Windows Home using a quick script and then enable USB passthrough in several ways. Learn how to install Hyper-V on Windows Home by following this step by step guide how to install Hyper-V on Windows Home.
If you have any queries, drop a comment below, and we will get back to you as soon as possible.
It’s possible to adjust the number of processors in MSConfig, but changing this value will most likely cause stability issues on your PC.
In today’s guide, we’ll answer if this feature improves performance and whether you should enable it on your PC, so without further ado, let’s get started.
What is the difference between logical and physical cores?
A CPU core is an actual physical core available inside of your processor and it’s used to process instructions.
A logical core is a physical core divided using hyperthreading. By doing so, a single core can process multiple threads.
Should I enable all processors in Windows 11’s MSConfig?
What does the number of processors mean?
This feature is used for debugging processor cores.
Windows by default already has access to all of your cores and uses them when necessary.
Changing the number of cores may negatively impact your performance or stability.
Unless you’re debugging processor cores, you should keep this feature disabled.
For a deeper understanding of how CPU cores work and how they impact system performance, check out our full explanation on what CPU cores are and how they function.
Does increasing the number of processors affect performance?
Increasing the number of cores in MSConfig won’t positively affect performance. In fact, it might limit the number of processors you use, or cause problems.
The feature is disabled by default, so even if the number of processors MSConfig says only 1, it doesn’t mean that your PC is only using a single processor core.
Maximum Memory feature in MSConfig
Where to find Maximum memory settings in MSConfig
Press Windows key + R and type msconfig.
Navigate to the Boot tab to see the boot options. Next, click the Advanced options button.
You should find the Maximum memory value on the right side.
What is the Maximum memory setting used for?
This feature allows you to set the maximum memory that your OS can use.
It’s used to simulate low-memory conditions on your PC.
You shouldn’t enable this setting since your PC is already using all your memory.
Should I change the number of processors in msconfig? The short answer is no, because the number of processors value in MSConfig is used only for debugging, and it should remain disabled. Changing it will not improve your performance, and it may cause stability issues.
It’s important to mention that this applet has its share of issues, and many reported that the Apply button is grayed in msconfig which will prevent you from saving changes.
Have you ever used this feature? Share your experience with us in the comments section below.
Microsoft has announced a significant update that introduces extensive AI integration into its core products, quoting Microsoft as the source. The company’s goal is to enhance user experiences by seamlessly integrating AI-powered copilots into widely-used products, including GitHub for efficient coding, Microsoft 365 for workplace productivity, Bing and Edge for web search, and Windows for a holistic computing experience.
The centerpiece of this AI integration is ‘Microsoft Copilot,‘ described as an everyday AI companion. Copilot will leverage web intelligence, work-related data, and real-time PC activities to provide context-aware assistance while prioritizing user privacy and security. It will be available across Windows 11, Microsoft 365, Edge, and Bing, accessible as both an app and through right-click interactions.
The rollout of Microsoft Copilot will commence as part of a free update to Windows 11 starting on September 26. Additionally, updates will be introduced to Bing, Edge, and Microsoft 365 Copilot in the fall. This update includes over 150 new features, with AI-powered enhancements for apps like Paint, Photos, and Clipchamp.
Key highlights from the update include:
Bing’s support for the latest DALL.E 3 model from OpenAI, offers personalized search results and an AI-driven shopping experience.
Microsoft 365 Copilot’s availability for enterprise customers on November 1, 2023, along with the introduction of Microsoft 365 Chat, an AI assistant transforming work interactions.
The Windows 11 update, labeled version 22H2, promises a highly personalized experience with numerous features and AI-powered assistance. Some notable updates include:
Copilot in Windows (in preview), designed to simplify tasks and improve productivity.
AI enhancements in Paint and Photos, allowing for background removal, layers, and image editing.
Improved search capabilities in Photos, based on image content and location.
Enhanced capabilities in Snipping Tool, including text content extraction and audio capture.
Clipchamp’s auto-compose feature for video editing.
Automatic session state saving and restoration in Notepad.
Integration of multiple accounts and intelligent tools in the new Outlook for Windows.
Modernized File Explorer and a new Gallery feature.
New text authoring experiences, voice access, and natural voices in Narrator.
Simplified PC migration with Windows Backup.
In addition to these updates, Bing and Edge will offer new features powered by advanced AI models, such as personalized answers, Copilot in Microsoft Shopping, DALL.E 3 in Bing Image Creator, Content Credentials, and enhancements in Bing Chat Enterprise.
Furthermore, the company is introducing Designer, an AI-powered tool for creating visuals and designs, which will be integrated into Microsoft 365 Copilot. This integration begins with Word and aims to simplify content creation.
Microsoft is also launching a range of new Surface devices, including the powerful Surface Laptop Studio 2, the stylish Surface Laptop Go 3, and the versatile Surface Go 4 for Business, among others. These devices are designed to leverage AI innovations for enhanced user experiences.
Adobe Photoshop is the industry standard for digital design, loved and used by the online community daily. However, when keyboard shortcuts stutter or fail, it can significantly slow down any project or your overall productivity on Windows 11.
Whether you’re a seasoned designer or just dabbling in photo editing, these glitches can be more than just a minor inconvenience in both Photoshop and Photoshop CC.
How do I fix my keyboard shortcuts if they aren’t working in Photoshop?
1. Reset workspace settings
Open Photoshop.
Go to Window in the menu bar > Workspace > Reset [Your Current Workspace].
Restart Photoshop and check if the shortcuts are operational.
2. Disable Sticky Keys
In Windows 11, type Settings in the search bar and click on it.
Locate Accessibility > under Interaction, click on Keyboard.
Turn off Sticky Keys.
Re-launch Photoshop and test the shortcuts.
NOTE
Also, look for any other related settings (like Filter keys) that might interfere with your keyboard shortcuts.
3. Update Photoshop
Open Photoshop.
Click on Help in the menu bar > Updates.
If updates are available, download and install them. Re-open Photoshop afterward.
Relaunch Photoshop while holding down Ctrl + Alt + Shift (Windows) or Cmd + Option + Shift (Mac). A dialog will ask if you want to delete the Photoshop settings file; click Yes.
This resets Photoshop preferences to default. Check if the issue is resolved.
Note: Resetting preferences means custom settings will be lost, so ensure you’ve saved or noted any custom configurations.
5. Check for software conflicts
Close Photoshop and any other running applications. Check Windows 11’s Task Manager to ensure all app instances have been closed.
Reopen Photoshop and test the shortcuts.
If shortcuts are functional, open other applications individually to identify potential conflicts. Once identified, consider updating or replacing the conflicting software.
You can troubleshoot and resolve most keyboard shortcut-related issues in Photoshop by systematically working through the above solutions. Regular software updates and occasional preference checks can preemptively combat such problems, ensuring a frictionless design experience.
If you want to know more about why shortcuts aren’t working in Photoshop, here are some common causes:
Custom Workspace Settings: Occasionally, adjusting or switching between workspace settings can reset keyboard shortcuts.
Outdated Photoshop Version: Running an outdated version may result in specific key shortcuts malfunctioning.
Corrupted Preferences File: Photoshop’s preferences file might get corrupted over time.
Conflicts with Other Software: Other running software can sometimes interfere with Photoshop’s operations. Checking your keyboard driver or resetting to default settings could do the trick here.
When keyboard shortcuts are not working in Windows 11 for different apps, it can heavily slow down your workflows, and Photoshop CC is not the only one with this problem. Users reported the same for Chrome, Microsoft Word, or even Microsoft Excel, but we’ve found fixes.
Creative Cloud is one of the most complete sets of applications out there, and if you’re having issues with key shortcuts or custom shortcuts in any of its other apps, let us know in the comments section below.
GitHub has introduced GitHub Innovation Graph, an initiative to provide open data and insights related to software developers’ global and local impact.
The GitHub Innovation Graph is like a giant library of information about computer programs. It shows us how these programs are created all around the world. This data library started in 2020 and gets new information every few months.
This library includes details like who works on the code, which programming languages they use, and how it affects the economy. And the good news is anyone can look through this window because it’s open and free.
It’s useful for three main groups of people:
Researchers: This resource is useful for researchers studying the impact of software development on society in fields like international development, public policy, and economics.
Policymakers: Policymakers can make more informed decisions based on data related to open-source contributions, innovation, and economic impact.
Developers: Developers can gain insights into how their contributions contribute to global trends and collaborations.
And it can be used in:
Data Exploration: You can explore data trends related to software development, collaboration, and innovation.
Research: Researchers can use this data to conduct studies and research projects in various fields.
Data Visualization: Create visualizations that convey insights from the data compellingly.
Developer Context: Developers can understand how their work fits the larger developer community and global trends.
Here is a simple example of how the GitHub Innovation Graph could be used:
A company is looking for a new software developer. They could use the GitHub Innovation Graph to find experienced developers in the languages and technologies they need.
A researcher is studying the trends in software development. They could use the GitHub Innovation Graph to see which languages and technologies are becoming more popular.
A student is interested in learning to code. They could use the GitHub Innovation Graph to find popular projects to contribute to and learn from other developers.
In simple terms, the GitHub Innovation Graph is like a big library of information about software development worldwide. It’s for researchers, policymakers, and developers to learn, make decisions, and see how their work fits into the software world.
Microsoft’s latest September 21, 2023, event was unlike many of recent past, not only because the brands most recognizable cheerleader and head of Windows and Devices Panos Panay was missing, but because the heavy focus on generative artificial intelligent software over the scant product lineup.
Today’s Surface event spent over half an hour talking about Microsoft’s new AI platform Copilot while rushing through the announcement of two Surface laptops. Typically, head of the Surface division, Panay would emphasize and linger on the upgrades that came to a multitude of devices in the Surface lineup such as Pens, 2-in-1’s, laptops, portable tablet computers and even headphones, but today the Surface Laptop Go 3, and Surface Laptop Studio 2 were the only devices announced on stage.
However, Microsoft will be releasing two more additional devices soon that were saved for enterprise eyes only in the Surface Hub 3 and Surface Go 4.
Surface Laptop Go 3
As previously reported, the Surface Laptop Go 3 base models will indeed come with a 12th Gen Intel Core i5-1235U processor, integrated Intel Iris Xe GPU, 8 or 16GB LPDDR5 RAM and a removable 256GB SSD.
The rest of the Laptop Go 3 remains unchanged from last year’s model that included a 12.4-inch PixelSense Display, 3:2 aspect ratio, 10-point multi-touch screen, 720p HD webcam, OmniSonic speakers with Dolby Audio Premium support and weighing 2.49 lbs.
The new seasonal color options for the Surface Laptop Go 3 include Platinum, Ice Blue, Sage, and Sandstone.
Microsoft’s biggest upgrade to the Laptop Go 3 comes in the company’s claims the laptop reaches 15 hours of performance which is a few hours more than last year’s model.
The Laptop Go 3 also comes in with a higher price tag than its predecessor, starting at $799 for the base model and should start shipping October 3, 2023.
Surface Laptop Studio 2
Microsoft’s powerhouse content creation laptop also got beefed up in both CPU and GPU development, now equipped with a microSD slot and USB-A port as well as 13th Gen Intel Core i7-13700H and Gen 3 Movidius 3700VC VPU AI Accelerator NPU, NVIDIA GeForce RTX 4050, 4060, 200 Ada Generation GPU support, 16, 32, and 64GB LPDDR5 RAM, removable 512, 1TB, and 2TB Gen 4 SSD.
Just like the Surface Laptop Go 3, the chassis of the Surface Laptop Studio remains largely unchanged sans the two new ports and Microsoft is claiming up to 19 hours of battery life with “typical device usage” for Iris Xe GPU led devices and 18 hours for NVIDIA supported ones.
During the event, Microsoft demoed a Blender rendering head-to-head against Apple’s latest M2 power MacBook and the Surface Laptop Studio 2 managed to beat its competitor by a wide margin. However, it remains to be seen how Microsoft’s latest laptop handles similar workloads detached from a power source.
Surface Go 4 for Business
Microsoft did not mention the Surface Go 4 on stage during its event, but as rumored, the device got an upgrade in both name and specs. The new Surface Go for Business comes with Intel’s new N200 processor but otherwise remains unchanged from last year.
Microsoft claims that with the N200 processor onboard customers will experience up to 80% faster performance, which is, in and of itself, a huge upgrade for the mini tablet computer.
The Surface Go 4 still weighs 1.15 pounds without the keyboard attached, comes in Platinum coloring, and should provide up to 12.5 hours of battery during “typical device usage”.
Businesses can outfit their in-the-field IT admins with a Surface Go 4 as early as October 3, 2023, via Microsoft Business Store.
Surface Hub 3
Microsoft also managed to sneak in an upgrade to the Surface Hub, which now brings the conference computer to its third generation.
Specific specs on the Hub 3 are hard to come by but Microsoft’s own marketing materials list 60% CPU and 160% GPU performance increases as well as new AI-enhanced software experience such as Cloud IntelliFrame for better video conferencing, Video Segmentation with unified backgrounds, Copilot infused Whiteboard, and more.
The Surface Hub still comes in 50 and 85-inch models and via the Surface Hub Pack current Surface Hub 2 hardware can be instantly upgraded to Surface Hub 3 devices.
Windows 11 came with stringent requirements, and it would be a bummer to lose your hard drive and data after struggling tooth and nail to acquire that storage. Well, we have good news that can help cushion you from a hard drive failure.
With built-in Windows tools, you can copy all your data from one drive to another. This way, if one drive fails, you can mirror and reconstruct the original data on a replacement drive.
Can Windows 11 do RAID? Thanks to the Windows Storage Spaces feature, you can perform a RAID on your Windows 11. This feature allows you to create multiple virtual disks using hard drives directly attached to your computer with no degradation in performance.
Benefits of a RAID:
Reduce the risk of data loss due to disk failure
Increase performance by spreading the load across multiple disks
Expand your storage capacity by adding additional drives
Acts as an alternative backup solution
How do I configure RAID in Windows 11?
Hardware Requirements for a RAID setup:
All the disks must use the same file system, preferably NTFS.
Ensure you have enough free RAM so your PC doesn’t have to constantly write data back and forth between its hard drive and RAM.
Your CPU should be able to perform the supported RAID levels. If multi-core, even better.
The hard drive disks required will depend on the RAID configuration you choose, but as a general rule of thumb, two should be for RAID 0, which is the minimum array configuration.
Compatible motherboard and chipset. Most modern motherboards support RAID, but older ones may not so check whether your motherboard comes with SATA connectors.
1. By using the Settings app
Hit the Windows key and click on Settings.
Click on System, then select Storage.
Select Advanced storage settings and select Storage Spaces.
Click on Create a new pool and Storage Space.
Select and check the disk you wish to RAID, then hit Create.
Enter a new name for your storage space and a Size & resiliency.
Under resiliency, select one of the options with Simple (no resiliency), Two-way mirror, Three-way mirror, and Parity representing RAID 0, RAID 1, RAID 1, and RAID 5, respectively, then hit Create.
Next, select a name, drive letter, file system as NTFS, and finally, hit Format.
Right-click on the Start Menu icon and select Disk Management.
Locate the drive you wish to RAID, right-click on it, and select New Striped Volume or New Mirrored Volume, depending on the RAID array you wish to create. RAID 0 will be the default, and RAID 1 for the latter.
Click Next.
Add the disk you wish to RAID and hit Next.
Assign a letter to the drive and hit Next.
Select NFTS as the file system and click Next.
Click on Finish and select Yes in the next confirmation prompt.
Hit the Windows key, type Control Panel, and click Open.
Click on System and Security.
Select Storage Spaces.
Click on Create a new pool and storage space.
Select a drive you’d like to add to the RAID array.
Enter a name and select a drive letter for the Storage space, and set the file system as NTFS.
Under Including resiliency, select one of the options with Simple (no resiliency), Two-way mirror, Three-way mirror, and Parity representing RAID 0, RAID 1, RAID 1, and RAID 5, respectively.
Now press Create storage space.
4. By using the Command Prompt
Hit the Windows key, type cmd in the search bar, and click Run as administrator.
Type in the following command: diskpart
Next, enter the following command to list the drives and select one. Remember to replace X with the corresponding drive number: listdiskSelect disk X
Now type in: convert dynamic
Create a RAID by entering the following command: Create Volume RAID Disk 1, 2, 3
With the newly created RAID volume, type in the following commands and press Enter after each one to format. Remember to replace C with your desired drive letter: select volume 2 Format FS=NTFS Label=MyNewVolume Assign Letter=C
You can achieve the same using the PowerShell command. Alternatively, you can consider using RAID software if these steps are too lengthy.
What do the different RAID levels mean?
RAID 0 – Data from multiple drives is combined into one drive, providing higher performance than any single drive in the array. However, if one drive fails, all data is lost since there is no redundancy.
RAID 1 – If one drive fails, data is still available on the other drive(s). However, performance is severely reduced because only half of your total storage capacity is available.
RAID 2 – RAID 2 is a variation of RAID 1, only faster with more storage capacity. The results are still the same, where if one disk fails, both copies are lost.
RAID 3 – This type can tolerate one drive failure at a time without losing data or suffering performance degradation. It uses disk striping with parity, and the parity information is stored in a separate stripe on a different disk.
RAID 4 – RAID 4 is a combined striping and parity scheme, where data is striped across all drives, as with RAID 0. However, there’s an additional set of parity information to recover from drive failures.
RAID 5 – Data is striped across all of the drives in the array. If one drive fails, the data on it isn’t lost because it’s distributed across all other drives. However, since each drive has to store more information than usual, it suffers from capacity bottlenecks.
RAID 6 – This RAID type is the most balanced of all the RAID levels. It provides excellent read/write performance, good capacity, and fault tolerance.
RAID 10 – RAID 10 is a particular type that provides the benefits of RAID 1 and RAID 0. It requires at least two physical drives and offers a two-way mirror combining striping and mirroring benefits.
This is just an overview of the different RAIDs, but for a complete scoop on all RAID levels, check out our detailed article. If you can’t decide which version to use, we suggest reading our guide on RAID 0 vs RAID 1 to learn about the differences between the two.
When you use RAID properly, you will create a virtual drive that can handle the failure of a disk drive or set of disks without interrupting the operation of your system. And the beauty of it all is that it is not only limited to your HDD, as you can also RAID external drives.
Let us know what method you found easy to follow in the comment section below.
Microsoft Defender is taking steps to enhance its security offerings by introducing credit monitoring and privacy protection features. These additions are designed to address the evolving risks of cyberattacks and to help users stay safer online in today’s interconnected world.
Credit Monitoring: Financial Watchdog
Microsoft Defender is expanding its identity theft monitoring capabilities by introducing credit monitoring functionality. This feature monitors users’ credit files and activities to detect signs of malicious behavior. Here are some key points about credit monitoring:
Credit monitoring is a service that keeps track of your financial information to prevent any fraudulent activity. It helps you stay vigilant against identity theft, which could lead to unexpected financial losses and other complications.
For instance, if your credit card information gets stolen and the thief doesn’t use it immediately, you may only realize it months later when you start receiving strange calls or discover that a loan has been taken out in your name. Credit monitoring can alert you as soon as any suspicious activity is detected, such as unexpected changes in your credit score, unauthorized credit checks, or new credit accounts opened in your name.
Credit monitoring helps prevent harm by alerting you to potential fraudulent activity. It can also offer up to $1 million in insurance coverage and help you recover lost funds of up to $100,000. Additionally, it scans the dark web for any sale of your personal information, allowing you to protect your identity proactively.
Credit monitoring is a valuable tool for protecting against identity theft and financial fraud, offering proactive measures to safeguard personal information.
Privacy Protection: Online Data Security
Microsoft Defender’s Privacy Protection feature protects sensitive data when connected to open and public Wi-Fi networks.
Connecting to public Wi-Fi, such as in a coffee shop or airport, can be risky as others might get on your data. To protect your privacy, you need privacy protection that hides your online tracks and safeguards you from hackers on these unsecured networks.
With privacy protection, your IP address and location remain secret from websites and advertisers that want to track you. Furthermore, it scrambles your internet traffic so hackers, your internet provider, or even the government cannot spy on you. Microsoft promises not to track or sell your online activities, ensuring your online business remains private.
These new features enhance Microsoft Defender’s capabilities and reflect the growing importance of online security and privacy in our increasingly interconnected world.
Xbox Free Play Days is back with another exciting lineup of games for Xbox Game Pass Core and Ultimate members to try out this weekend free of additional charge. These games will be available with Free Play Days from Thursday through Sunday, September 24. Without further ado, let’s check out the lineup below.
Enjoy a huge variety of farming operations focusing on agriculture, animal husbandry and forestry in three diverse American and European environments. Now with the exciting addition of seasonal cycles and production chains! Operate more than 400 authentic machines and experience the relaxed farming fun. Join cooperative farming with your friends, or even challenge them in competitive game modes! Benefit from a discount of up to 20% for a limited time and let the good times grow.
State of Decay 2 is an open-world survival-fantasy game set just after the zombie apocalypse. Your small community of survivors seeks to rebuild a corner of civilization, and you get to make all the decisions about how that happens: who to recruit to your team, where to settle your community, how to upgrade your base, how to complete missions, and much more. And make sure to keep an eye out for Curveballs, our brand new in-game events that create exciting changes to missions, your home base, and the wider world.
The best fights are personal in Tekken 7! With over 30 characters, you’ll be sure to find the fighter to suit your style. All the attitude, showmanship, and competitiveness of the arcades are resurrected for this supreme gaming experience. Play Tekken 7 during Free Play Days and be sure to also check out Tekken 8, the upcoming title in the Tekken Franchise!
Learn more about Xbox Free Play Days
The program brings a new round of games for members to try out almost each and every week. It’s a great way to discover something new and maybe even find a new favorite. Visit the Xbox Free Play Days FAQ page to find out more.
Microsoft is introducing new realistic voices designed specifically for conversational scenarios as part of Azure OpenAI GPT. These voices offer improved naturalness and expressiveness for Text-to-Speech (TTS) applications.
Developers can access four new voices:
en-US-AndrewNeural
en-US-BrianNeural
en-US-EmmaNerual
zh-CN-YunjieNeural
Available in public preview in three regions: East US, South East Asia, and West Europe.
The voices in Microsoft’s Text-to-Speech feature have been designed to mimic friendly and helpful individuals while maintaining a natural and unexaggerated tone. Microsoft ensures that these voices become more realistic and human-like than ever before.
Developers have many options, with over 400 neural voices covering 140 languages and locales. Custom Neural Voice (CNV) capability allows businesses to create a unique voice for their brand.
CNV is a text-to-speech feature that enables you to generate a unique and personalized synthetic voice for your applications. Using CNV, you can create a highly natural voice that is customized for your brand or characters by providing human speech samples as training data.
Here are some examples of how the new TTS voices can be used:
A customer service chatbot can use the new TTS voices to provide customers with a more natural and engaging experience.
An educational app can use the new TTS voices to read aloud text to students, helping them to learn new concepts more easily.
A business can use the new TTS voices to create marketing videos or podcasts that are more engaging and informative for customers.
These new voices empower developers to create engaging conversational AI experiences in various applications, from chatbots and voice assistants to gaming and e-learning. Microsoft’s commitment to improving AI voices brings a more realistic touch to AI interactions.
Update: This is the problem when Microsoft allows all the news to filter out through journalists without any official blog posts or live casting – during the event, The Verge announced that the Windows 11 update featuring Copilot etc was a “23H2” update (see below), but instead, as noted in the official Microsoft blog post, which came out after the event was over, it’s not, it’s for 22H2. We still don’t have a release date for 23H2, which is expected soon:
These experiences, including Copilot in Windows and more will start to become available on Sept. 26 as part of our latest update to Windows 11, version 22H2.
Mary Jo Foley is now saying that the 23H2 release will come as a “week D preview release” and that the real 23H2 release won’t come until October:
An update to this: It now seems the 23H2 rollout won't kick off on Sept. 26. That'll still be just a preview release (Week D) and the *real* 23H2 rollout won't start until October #MicrosoftEvent
Microsoft is in the middle of its “Surface” event in New York City, and as expected is spending a lot of time talking about AI. Yusuf Mehdi just announced that the company will be releasing Windows 11 23H2 22H2 on September 26th, and it will include a new slightly rebranded “Copilot.” Microsoft is apparently moving away from the various flavors of Copilot (Windows Copilot, PowerPoint Copilot, etc.) to now use a single Copilot across all its products.
According to the folks at The Verge (Microsoft is releasing a recorded version of the event at 10am PDT, and still at this writing hasn’t issued a press release), Windows 11 23H2 will be cock full of AI:
New Windows 11 update coming on September 26th. Known as 23H2, this update is full of changes like new AI-powered photos tools, updates to Microsoft Paint with layers, passkey support, a new Outlook, and much more. …
We’re watching a video of all the new Windows 11 features. Microsoft seems to be fast-tracking some that were in testing into this release. …
Ink Anywhere is a new feature in this Windows 11 update. You can use your Surface Pen to write anywhere. …
Copilot also works across devices. “Copilot in Windows has context from your phone”. …
You can even use Copilot to write a text to someone. It will pull out data from your calendar and flights to allow you to send a message.
We’ll have more on Windows 11, Copilot, and all the announcements from NYC, stay tuned to OnMSFT.com
Despite the Surface Pro and Surface Laptop rumored to be missing from Microsoft’s September 21, 2023, hardware event, a new report from Business Insider suggests the company is trimming its device lineup to put more focus on products such as those and less on “experimental” ones.
According to Business Insider, Microsoft has scrapped plans to ship a sequel to its education focused Surface Laptop SE, plans for a smaller 11-inch Surface Pro, the ill-fated Surface Duo brand, and its recently “refreshed” All-in-One Surface Studio.
Our friends over at Windows Central all but confirm the Business Insider report with journalist Zac Bowden saying his own sources have also mentioned the above list of products being “placed on the backburner.”
Going forward, the Surface team will focus on its more traditional and arguably best-selling devices such as the Surface Pro, Surface Laptop, Surface Laptop Go, Surface Laptop Studio, Surface Hub, and Surface Go.
Unfortunately, that means category expanding items such as the Surface Headphones or Surface Buds will end with the Surface Headphones 2 and the single iteration of the Buds.
It’s unclear if the new sleeker product focus mandate is forever standing or if Microsoft is simply taking a little break from the more experimental product development the Surface lineup has become synonyms with.
What is becoming clearer however, is that the pivot to consolidate product development did not sit well with former SVP of Devices and Services at Microsoft, Panos Panay.
Amid a year of devastating layoffs and cost cutting measures from Microsoft it seems the Surface team was not immune to the changes and those changes may have been the tipping point for Panay who is making a lateral move to fellow Seattle-based competitor Amazon to head up its hardware and AI division.
While it’s fun to see Microsoft experiment with products and services, the company also has investors who routinely demand the company play to its strengths and in a economy where tech hardware sells are cooling in many product categories, it’s the smart play to follow the “if it ain’t broke, don’t fix” strategy to the Surface line.
According to the company’s official announcement on the Microsoft 365 roadmap, Microsoft has added Dictation Support to its Outlook email service. This new feature, identified by Feature ID 171199, was added to the roadmap on September 20, 2023.
Outlook’s Dictation allows users to compose messages by speaking into a microphone, using speech-to-text technology over a stable internet connection. Moreover, it empowers users to convey their intended tone and nuances precisely, enhancing the quality of their email communications.
This feature looks like a convenient and efficient method for drafting emails, responding to messages, and capturing the desired tone in your communications.
This new Dictation Support feature in Outlook could be useful for individuals who prefer a hands-free email composing method. It can especially benefit users with difficulty typing or those looking to increase their productivity by quickly converting spoken words into written messages. Additionally, this feature could assist in maintaining the intended tone and content of emails, enhancing the overall email communication experience for Outlook users.
The rollout of Dictation Support for Outlook is scheduled to begin in October 2023. This feature will be available in the General Availability phase and can be accessed through the web platform. It will be accessible to Outlook users on the worldwide (Standard Multi-Tenant) cloud instance.
Windows 11 brings a fresh and elegant design to the forefront; the modern interface allows you to personalize & change the finest details, like window borders.
In this guide, we will discuss step-by-step instructions to help you create an environment in the Windows operating system that reflects your style.
Locate the Show accent color on title bars and windows borders option, and toggle on the switch next to it.
To show the accent color on the Start menu and Taskbar, toggle on the switch next to Show accent color on Start and Taskbar.
These steps can also help you change the color of the title bar on an active window; however, to change the color on an inactive window, read this guide.
How do I change the window border color on Windows 11?
Press Windows + I to open Settings; next, go to Personalization and click the Colors option.
Locate Accent Color, and choose Manual from the drop-down.
Select the color you want from the palette present. If you don’t like these colors, you can click Custom colors and select View colors.
Move the mouse pointer to the color region, click the area to pick the color, and choose it.
Click Done and close the Settings app. Now open any window to see the change in color.
How do I change the window border size on Windows 11?
Press Windows +R to open the Run dialog box.
Type regedit and click OK to open Registry Editor.
Navigate to this path: Computer\HKEY_CURRENT_USER\Control Panel\Desktop\WindowMetrics
Locate the Border Width option from the right pane and double-click to open it.
Change the Value data to any value between 0 to -750, then click OK.
Now locate PaddedBorderWidth, double-click it, change the Value data to 0, then click OK.
Close Registry Editor and restart your computer to change the border thickness.
Other Windows 11 Changes to Windows Border
Rounded corners – Windows 11 introduced rounded corners for all windows, including the title bar and borders, giving the OS a cohesive look.
New accent color feature– Customize the color of the border and title bars irrespective of the theme selected; launch Settings>Personalization>Colors, then Accent color and choose a color.
Dark Themes – This can be applied to the entire system; for that, press Windows + I to open Settings>Personalization>Colors, locate Choose your mode, & select Dark on drop-down.
Light Theme – Choose a light theme for the entire system; for that, open Settings>Personalization>Colors, then Choose your mode, and select Light on the drop-down menu.
Colors on Title Bar – Open Settings>Personalization>Colors, then switch the toggle on for the Show accent color on title bars and windows borders option, then select a color from the palette.
For advanced color customization of window borders, Taskbar, and title bar, you can use Winaero Tweaker, a free, easy-to-use tool.
To use it, all you need to do is download the tool, launch it, go to the Appearance option, and customize the settings under it.
How do I remove window borders in Windows 11?
To disable window border color on Windows 11, all you need to do is switch off the toggle next to the Show accent color on title bars and windows borders in the Settings app.
You can also change the taskbar color to match the window border to match it with the borders; read this guide to know the detailed steps.
If you have any questions or suggestions about the subject, don’t hesitate to mention them in the comments section below.
When you right-click an image or a video file, a context menu with a handy list of options appears, but sometimes it has unwanted options like Edit with Clipchamp.
If you want to remove it to declutter the user experience on Windows 11, this guide can help! We will discuss three methods with step-by-step instructions to remove this video editing app option from the right-click context menu.
Is Clipchamp installed with Windows 11?
With Windows 11 22H2 Update, Clipchamp, a video creation tool, comes as a pre-installed app on your computer and can be used to open & edit photos and video clips. You can access it via the Start Menu, just like any other installed app.
How to Remove Edit with Clipchamp from Windows 11 Context Menu?
Before moving to the steps to customize the context menu items and remove Clipchamp from it, make sure you follow these checks:
Log in to your computer using an administrator account.
Create a restore point.
Take a backup of your important data.
1. Using the Registry Editor
Press Windows + R to open the Run dialog box.
Type regedit and click OK to open the Registry Editor.
First, create a backup of the registry files, go to File, then select Export. On the following window, name the .reg file and save it to an accessible location. export” width=”293″ height=”269″>
Now, navigate to this path: Computer\HKEY_LOCAL_MACHINE\SOFTWARE\Microsoft\Windows\CurrentVersion\Shell Extensions
Expand Shell Extensions and locate Blocked. If not found, right-click Shell Extensions, select New, then Key. Name the key Blocked.
Right-click the Blocked key, click New, then choose String Value.
Once you see the value in the right pane, right-click it and select Rename. Name it {8AB635F8-9A67-4698-AB99-784AD929F3B4}
Close Registry Editor and restart your computer.
If you don’t want to restart your PC, you can restart the Windows Explorer process by doing the following:
Press Ctrl + Shift + Esc to open Task Manager.
Go to the Processes tab, right-click Windows Explorer, and select Restart.
In case you want to remove Clipchamp from the context menu for only the current user, go to this path: Computer\HKEY_CURRENT_USER\Software\Microsoft\Windows\CurrentVersion\Shell Extensions and follow the exact instructions mentioned above.
2. Using the Settings app
This method involves removing the Clipchamp app from your computer if you don’t use it.
Press Windows + I to open the Settings app.
Go to Apps, then select Installed apps.
Scroll through the list and find Clipchamp, click the three dots, and select Uninstall.
Follow the onscreen instructions to remove the app.
In case you want to reinstall the app later, you can do so using the Microsoft Store.
If you are not confident in using Registry Editor or don’t want to uninstall the video editor app altogether to remove Edit with Clipchamp on Windows 11, you can use a third-party app like ShellMenuView to get it done.
A zip file will be downloaded, right-click it and select Extract All. On the following window, select Show extracted files when complete, and click Extract.
ShellMenuView will open and display the list of all context menu entries on your PC.
Locate Edit with Clipchamp, right-click it, and select Disable selected items.
However, if you want to disable the new context menu and get the old one from Windows 10 back, read this guide to find the quick steps.
Remove Edit with Paint 3D/Photos/Notepad++/Elementor from Context menu
The shortest way to remove edit with Notepad++ from the context menu is to uninstall the app. However, you might not want to do that with pre-installed like Photos or Paint 3D, so follow these steps:
1. Remove edit with Photos from the context menu
Press Windows+R>type Registry Editor, then click OK.
Navigate to this path: Computer\HKEY_CLASSES_ROOT\AppX43hnxtbyyps62jhe9sqpdzxn1790zetc\Shell\ShellEdit
Right-click the ShellEdit folder, select New>String Value, and name it ProgrammaticAccessOnly
2. Remove edit with Paint 3D from the context menu
Press Windows+R>type Registry Editor, then click OK.
Navigate to this path: Computer\HKEY_LOCAL_MACHINE\SOFTWARE\Classes\SystemFileAssociations\.jpg\Shell\3D Edit
Stuck somewhere? Don’t hesitate to mention your queries about customizing the context menu entry in the comments section below. We will be happy to help!
The Windows installation files, when downloaded from different websites, may contain either the install.wim or install.esd image file in the Sources folder. But if you want, there’s always the option to convert Windows 11 install.wim to install.esd or vice-versa.
It’s a relatively simple process but requires high system resources. Your PC may crash in the absence of available resources (RAM, DISK, or CPU), or the active processes and programs may not run properly. But since it doesn’t take long, you won’t face a lot of problems.
Which is better, ESD or WIM?
The ESD (Electronic Software Download) file format uses a newer conversion algorithm, and the file is relatively smaller in size than the WIM (Windows Image) counterpart. On the other hand, the WIM image file is serviceable, meaning you can update, add, or remove components.
Users prefer ESD files when creating a bootable drive formatted using the FAT32 filing system since the drive size has a 4 GB limit. And the WIM took up more storage space.
In all, it comes down to the user-specific requirements when choosing between the ESD and WIM operating system files.
How to convert ESD to WIM or WIM to ESD?
Tip
We have listed the steps to convert a .wim file to .esd. The reverse is just as simple with a few quick modifications, and we have briefly highlighted those.
1. Via Command Prompt
1.1 Mount the ISO file
Go to Microsoft’s official website, select the OS edition, choose the product language, and then download the Windows 11 ISO.
Right-click on the downloaded ISO file and select Mount.
Wait for the confirmation prompt to appear (takes a few seconds), and then click Open.
Double-click the sources folder.
Locate the install.wim file, then copy and move it to the C: drive (requires administrative privileges). You can choose any other location if desired.
1.2 Convert .wim to .esd with cmd
Press Windows + R to open Run, type cmd, and hit Ctrl + Shift + Enter.
Click Yes in the UAC prompt.
Paste the following command and hit Enter (replace the file path at the end in case you didn’t choose the C: drive earlier): DISM /Get-WimInfo /WimFile:C:\install.wim
The Command Prompt now lists the various Windows editions available for installation, each assigned an Index number.
Identify the one you want to install and execute the following command while replacing X with the Index number: DISM /export-image /SourceImageFile:"C:\install.wim" /SourceIndex:X /DestinationImageFile:"C:\install.esd" /Compress:recovery /CheckIntegrity
The process will take some time, and the PC’s performance might be affected. Once completed, you will find the install.esd file in the same location, i.e., the C: drive.
The DISM command is the easiest method to convert install.wim to install.esd or vice versa in Windows 11. And if you get the DISM Source files could not be found error, check for any duplicate files or reinstate the .wim file in the concerned folder.
2. Using Windows PowerShell
Move the .wim file to the desired location, preferably the C: drive, as highlighted in the first section of the previous method.
Press Windows + S to open Search, type Windows PowerShell in the text field, right-click on the relevant result, and select Run as administrator.
Click Yes in the UAC confirmation prompt.
Use the following command to highlight the various available Windows editions in the .wim file: Get-WindowsImage -ImagePath "C:\install.wim"
Identify which edition you want to use from the list.
Run this command to convert install.esd to install.wim in PowerShell for Index 1 and save the exported file to the E drive: Export-WindowsImage -SourceImagePath C:\install.wim -SourceIndex 1 -DestinationImagePath E:\install.esd -CheckIntegrity
You must have realized how easy it is to convert Windows 11 install.wim to install.esd with the built-in options.
Besides, for converting install.esd to install.wim, the PowerShell command becomes (given you are using the same path and Index: Export-WindowsImage -SourceImagePath C:\install.esd -SourceIndex 10 -DestinationImagePath E:\install.wim -CheckIntegrity
Go to the NTLite’s official website, and download the required setup depending on the Windows architecture.
Run the setup and follow the on-screen instructions to complete the installation process.
Launch the NTLite tool, and when asked for a license, choose Free and click OK. The free version of NTLite works fine for converting install.wim to install.esd.
Click the Add menu near the top-left and choose Image (ISO, WIM, ESD, SWM).
Head to the .wim file’s storage location, select it and click Open.
Select the WIM file, click on Convert, and then choose ESD (High compression, read-only) from the flyout menu.
Tick the checkbox for Replace original image if you don’t require the .wim file anymore, and click OK to confirm.
Wait for the conversion to complete.
It’s that simple! To convert install.esd to install.wim using NTLite, just load the .esd file instead and use the convert option to export to .wim.
And once done, you can replace the install.wim file with install.esd in the USB flash drive before installing Windows.
Requirements for the conversion process
Windows 11 ISO file
A working PC with at least 8 GB of RAM, preferably 16 GB, if you don’t want the performance to be affected.
Administrative permissions (or an administrator account).
A third-party tool (if not using the built-in methods).
Comparison between install.wim and install.esd
Parameter
install.wim
install.esd
Size
Larger (uses LZX compression algorithm)
Smaller (uses LZMS compression algorithm)
File type
Modifiable
Read-only
Support
All iterations
Only for Windows 8 and newer iterations
install.esd vs. install.wim
If you were to choose between install.esd and install.wim, identify whether any changes are to be made to the installation. Say, injecting drivers, configuring Windows deployment options, or adding/removing the security updates. If not, install.esd should be the primary choice.
Now that you have a fair understanding of how to convert Windows 11 install.wim to install.esd and the differences between the two, installing the OS as an administrator won’t be a challenge anymore!
Google’s widely used web browser is known for its speed and efficiency. However, if you’ve ever found your Windows 11 or Chrome shortcuts suddenly unresponsive, you’ll know it can transform smooth browsing into a jarring experience and affect your overall productivity.
No worries; this guide will unravel the usual suspects behind this and offer clear methods to get those key combinations back in working order in Chrome on Windows 11.
Browser Cache: Accumulated cache can sometimes disrupt Chrome’s normal functioning.
Outdated Chrome Version: Not using the most recent version of Chrome browser can cause glitches, including shortcut failures on both guest windows and incognito windows.
Conflict with System Shortcuts:Windows 11 shortcuts might sometimes clash with Chrome’s, causing unresponsiveness.
How do I fix my keyboard shortcuts if they’re not working in Chrome?
1. Disable conflicting extensions
Open Google Chrome.
Click on the three vertical dots in the top right corner > Extensions > Manage Extension.
Look through the list of extensions, disabling them individually to pinpoint the culprit.
Once identified, remove the faulty extension or check its settings for possible conflicts.
2. Clear browser cache
In Google Chrome, click on the three vertical dots.
Scroll down and click on More tools.
Click Clear browsing data.
Check Cached images and files, then click Clear data. Restart Chrome afterward.
3. Update Chrome
Open Google Chrome and click on the three vertical dots in the top right.
Hover over Help and select About Google Chrome.
Chrome will check for updates automatically. If available, allow it to update, then relaunch the browser.
4. Create a new User Profile
Open Google Chrome.
Click on the profile icon (top right corner).
Click on Add another account to create a new profile. Assign it a name and choose an icon.
Switch to the new profile and test the shortcuts to see if they function.
Note: If this resolves the issue, you might want to transfer your bookmarks and settings to the new profile.
5. Check system shortcuts
Navigate to your system settings. For Windows 11, type Settings in the search bar and click on it.
Click on Accessibility > under Interaction, click on Keyboard.
Review the list of system-wide shortcut settings to identify potential conflicts with Chrome.
Modify or disable conflicting shortcuts. Re-test Chrome afterward.
While the last two solutions require more familiarity with Chrome, shortcut options, and Windows 11 system settings, they can effectively resolve deeper-rooted issues. Always ensure you’ve backed up vital data or settings before making significant changes. This way, you can maintain the speed and efficiency that Chrome is renowned for, regardless of the hurdles you might encounter.
Remember that overloaded junk files, suspicious files, and pop-up boxes can also affect standard keyboard shortcuts. Use proper security & privacy solutions to ensure your data is safe and your Chrome shortcuts won’t be affected.
Speaking of keyboard issues, many reported that Ctrl + D shortcut is not working, but we tackled this issue in a separate guide.
If you’re a Microsoft 365 user, know that this issue also affects Microsoft Word on Windows 11 and sometimes even Microsoft Excel, but we’ve found fixes for both.
The Chrome shortcut issue is common enough in the online community, but you can fix both your browser and standard keyboard shortcuts by following the steps above. Tell us what worked for you in the comments section below!
PiP mode can be distracting, especially if you’re trying to focus on an important task, and this is why many users want to disable picture in picture on Windows 11.
You won’t have to deal with any popouts by disabling this feature, so let’s see how we can disable it.
How do I get rid of picture in picture on Windows 11?
1. Disable it in the Edge browser
Click the Menu icon in the top right and choose Settings.
Navigate to Cookies and site permissions in the left pane. In the right pane, scroll all the way down and choose Picture in picture control to open picture-in-picture settings.
Lastly, disable Show Picture in the picture control inside of the video frame.
Keep in mind that this method will hide the popup, but not disable the feature. Instead, it will be hidden in the right-click menu.
If you can’t find this option, you can access it by entering the following in the address bar: edge://settings/content/PictureInPicture
2. Disable it in Firefox browser
Click the Menu icon, and navigate to Settings.
Scroll down to the Browsing section.
Disable the Enable picture-in-picture video controls.
Just like with Edge, this will hide the popup button, but the feature will still be there in the context menu.
This web browser feature lets you keep videos on top of all windows.
You can move the video box, resize it, and control the playback.
Most browsers support it natively, but some require extensions to use it.
Does Windows 11 have a picture in picture mode? you might be wondering. Rest assured, we’ve got an answer for that as well. Windows doesn’t have this feature natively.
Picture in picture is usually available in web browsers. However, a handful of other applications might have this feature as well.
Keyboard shortcut options for enabling/disabling PiP mode
There’s no shortcut to enter or exit PiP mode in Edge. You can use the Picture in Picture Button extension to assign this functionality to Alt + P.
For Firefox, the shortcut is Ctrl + Shift + }.
There are no shortcuts for mobile, and to enable it, you need to go to Apps > Special app access > Picture-in-picture and select the app that you want to use for this feature.
Video player controls inside video frame for enabling/disabling PiP mode
As for control inside the video frame, the play and pause buttons are usually in PiP mode.
Disabling the PiP window is impossible, but you can exit it from the player.
In addition to these features, Firefox allows you to mute videos or manually seek them.
While it’s not possible to disable picture in picture system wide on Windows 11, you can do it individually for each browser. In case you aren’t familiar with this feature, we have a great guide on how to use picture in picture in Edge or how to enable video pop out in Chrome.















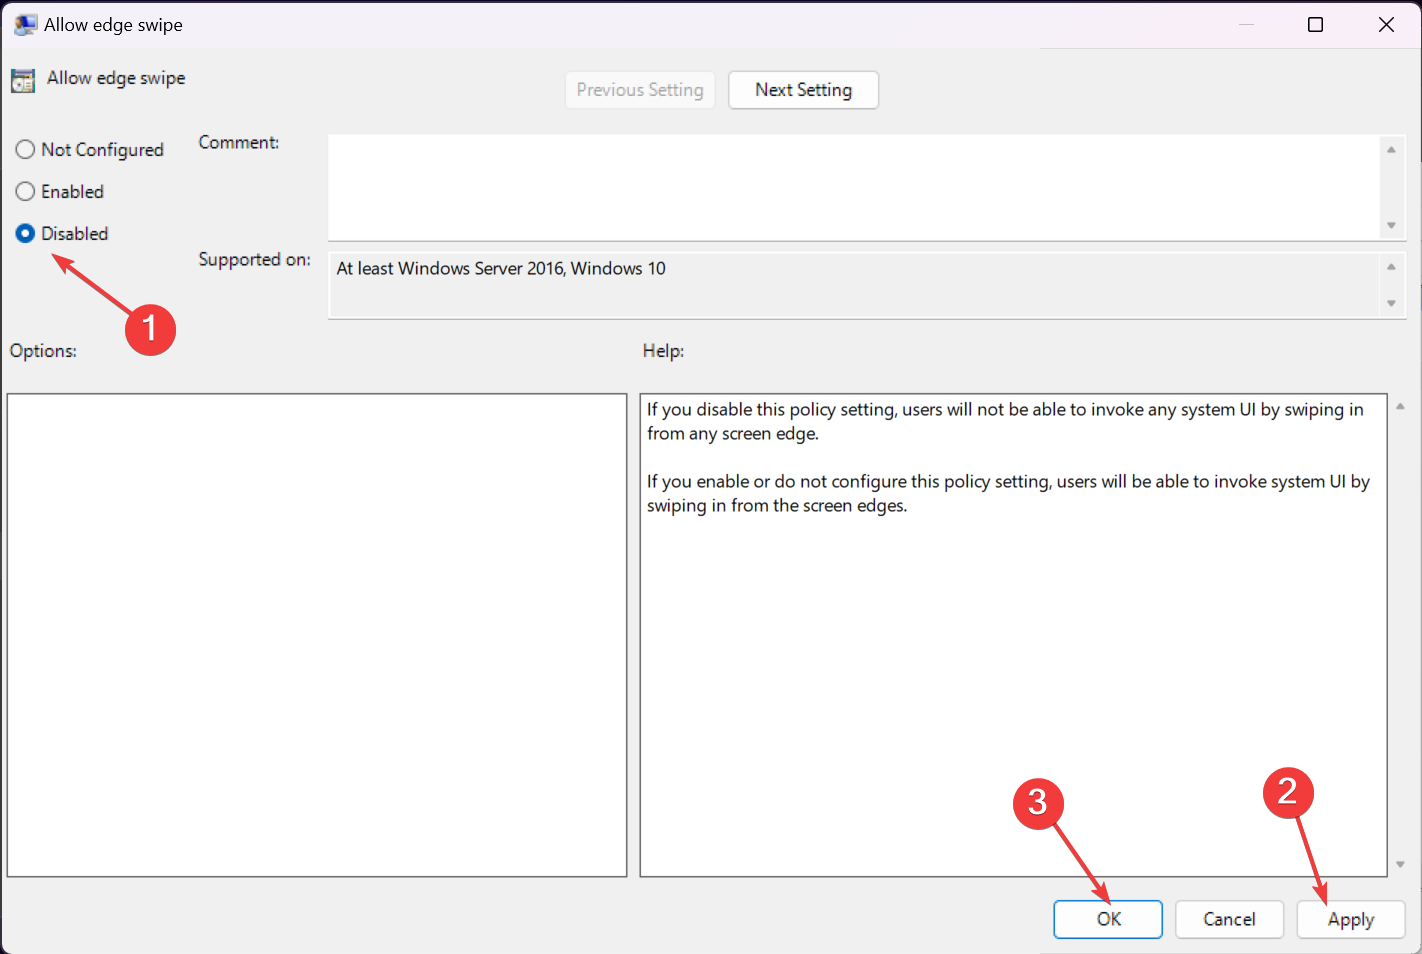


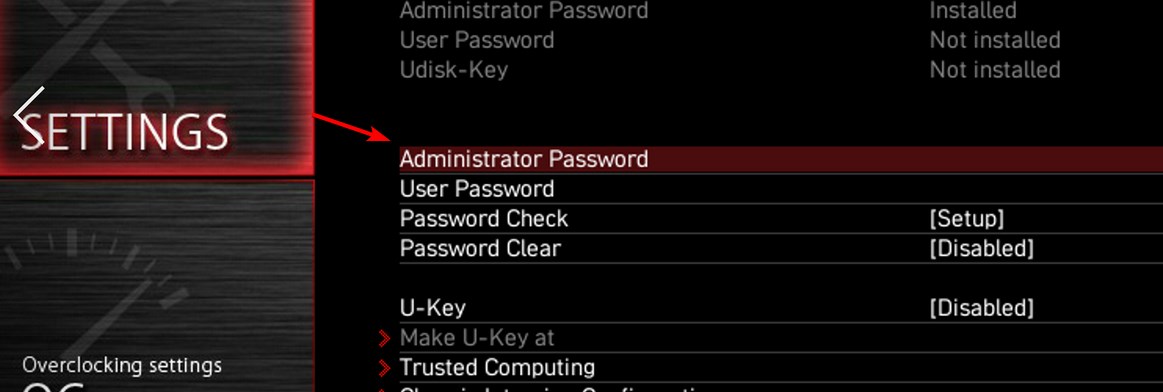
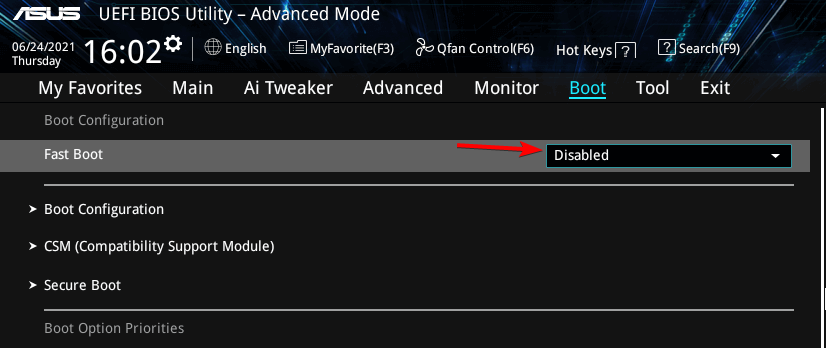
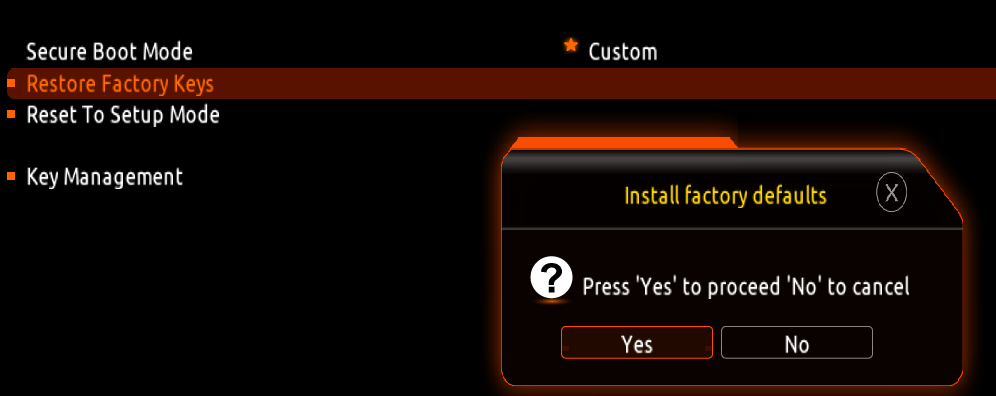
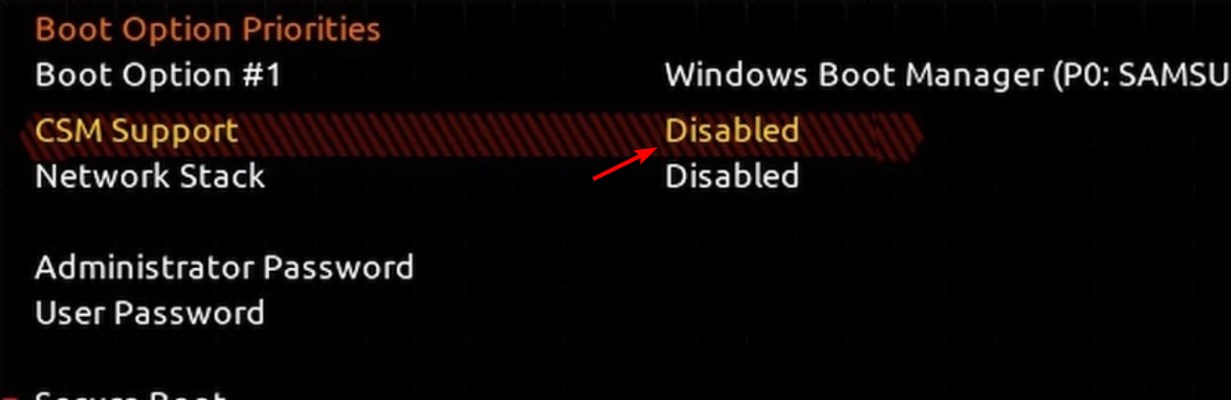
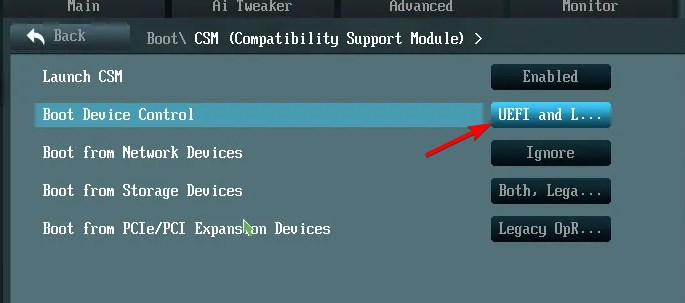
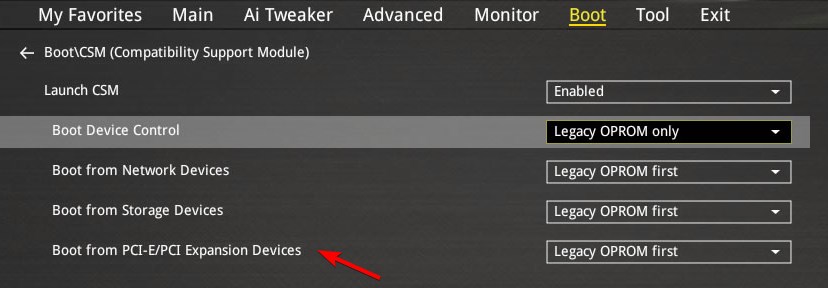


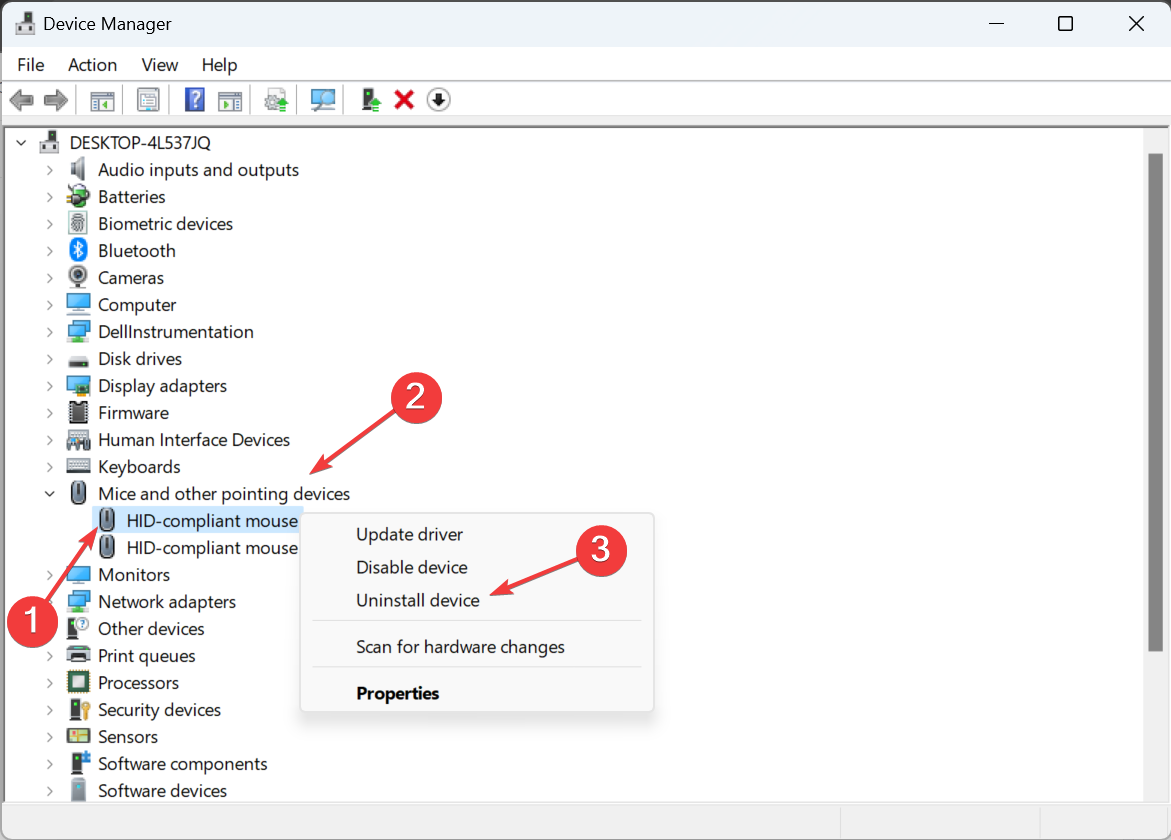
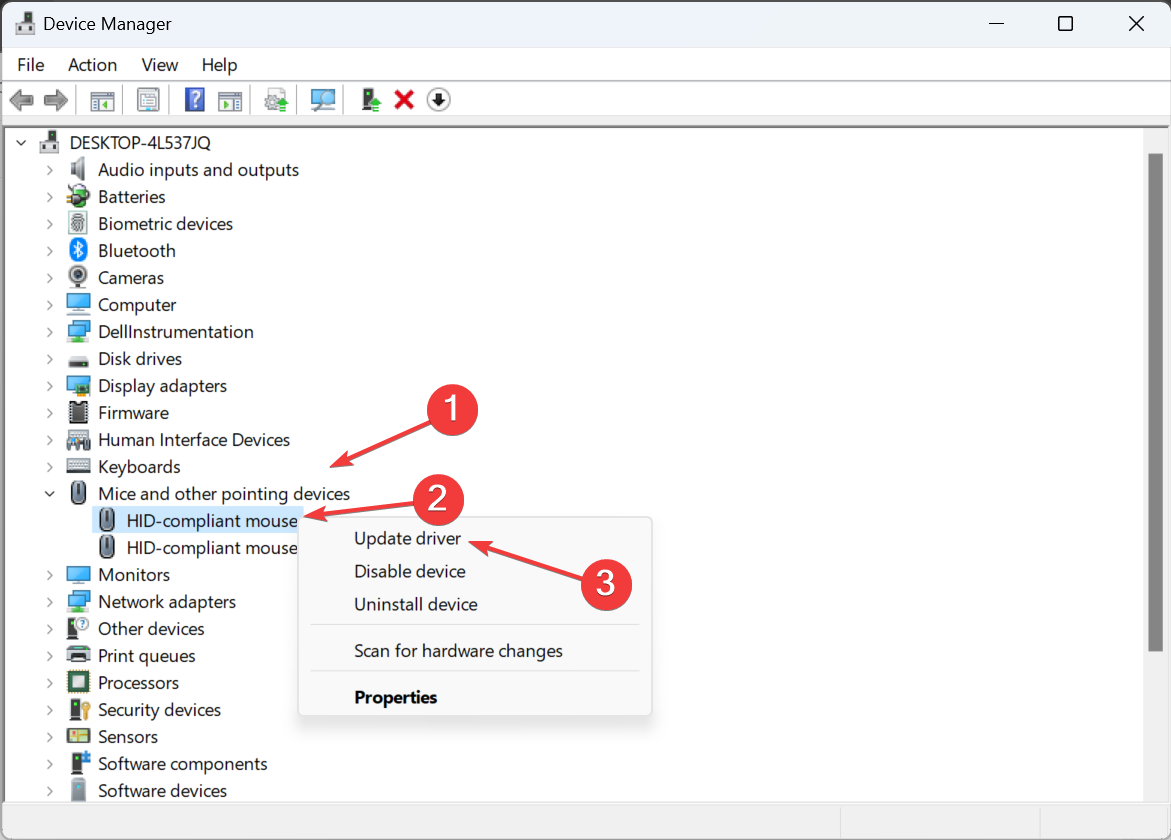
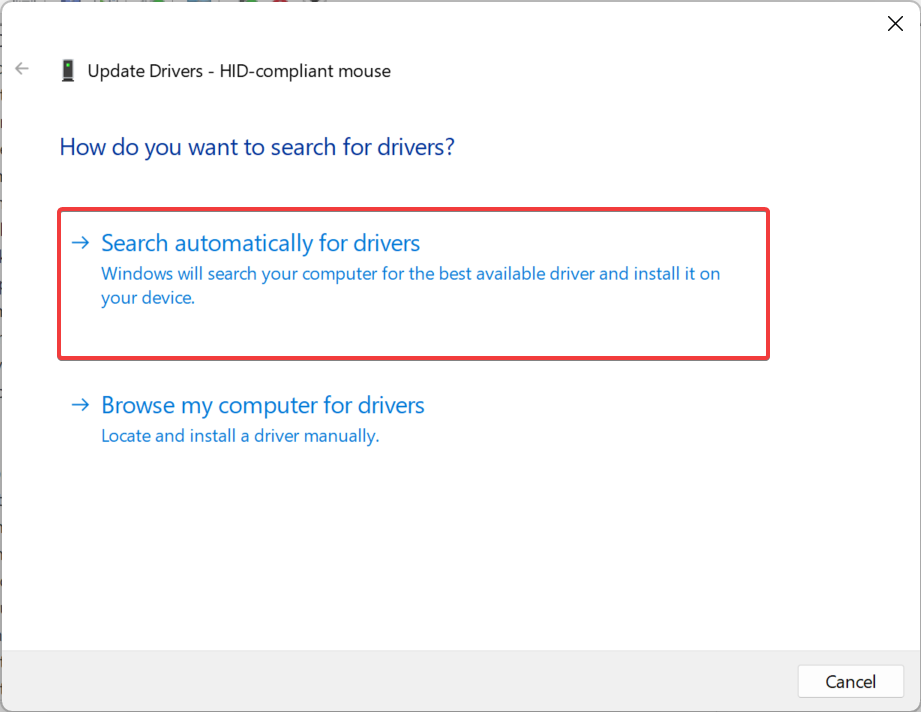







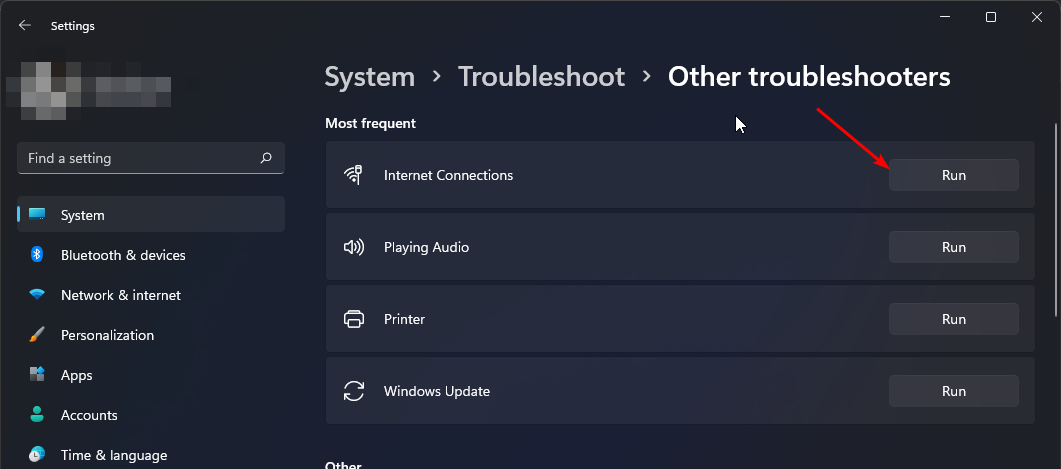




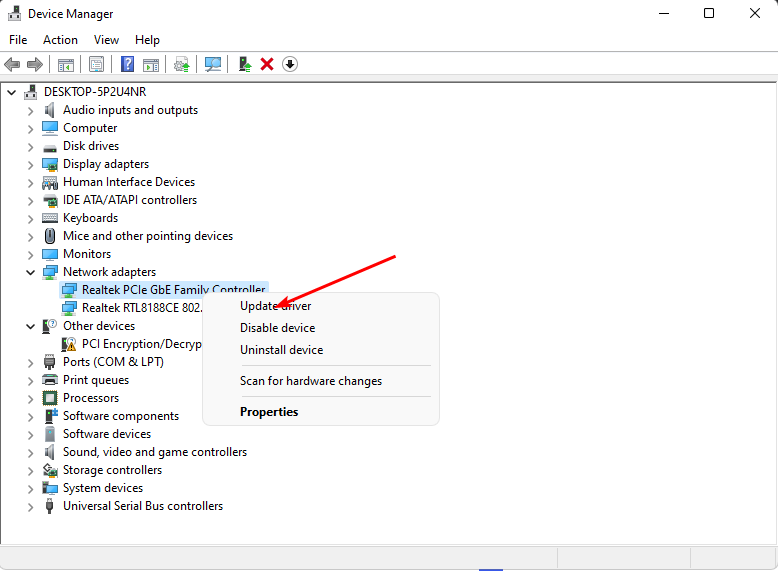
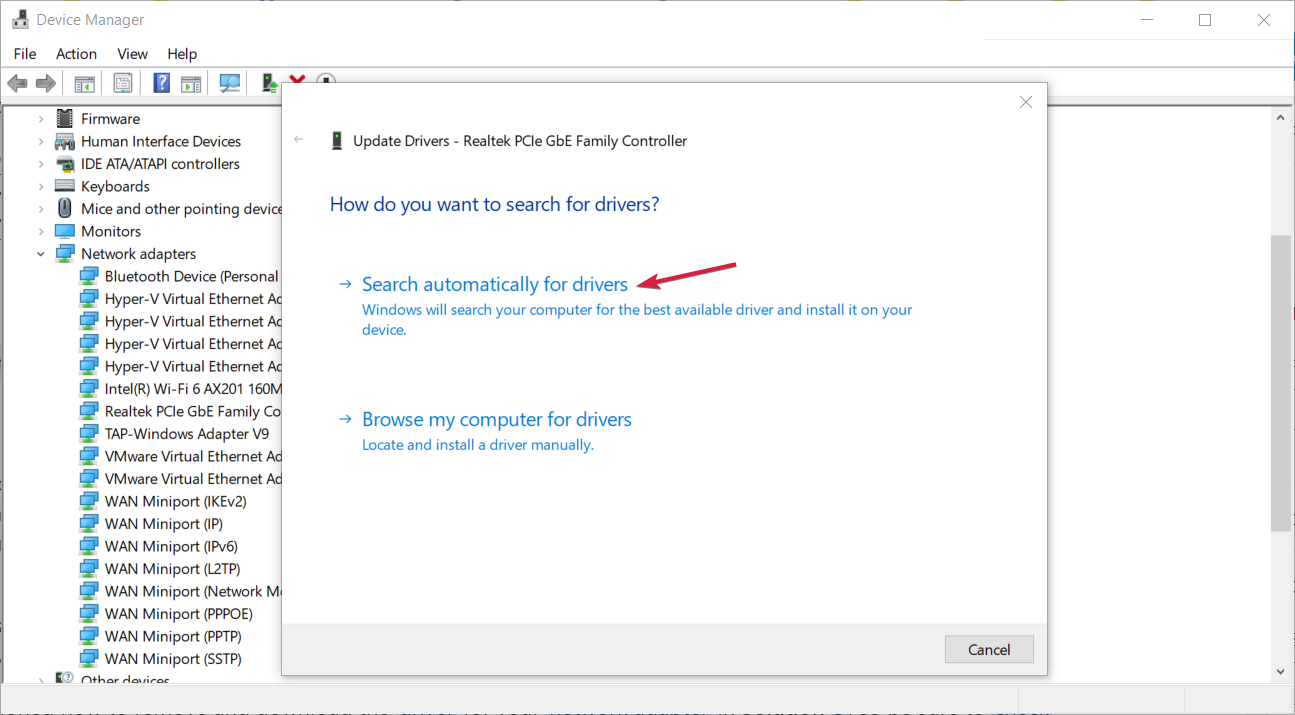
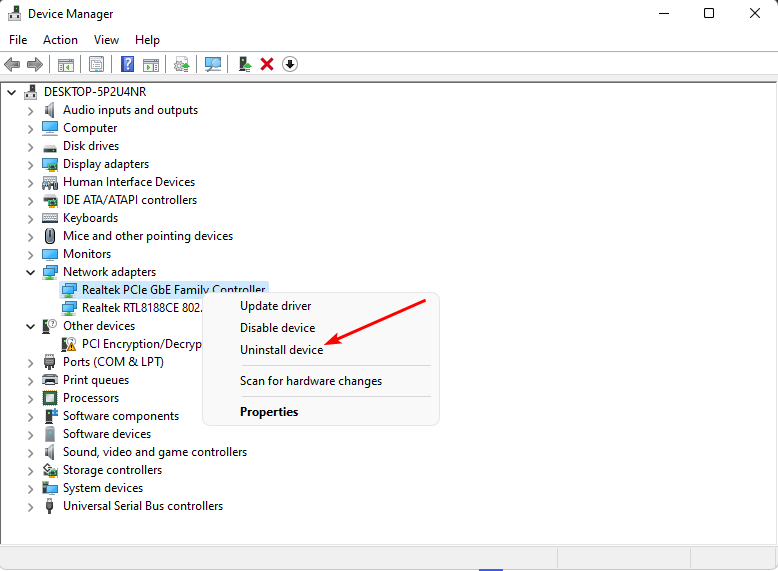








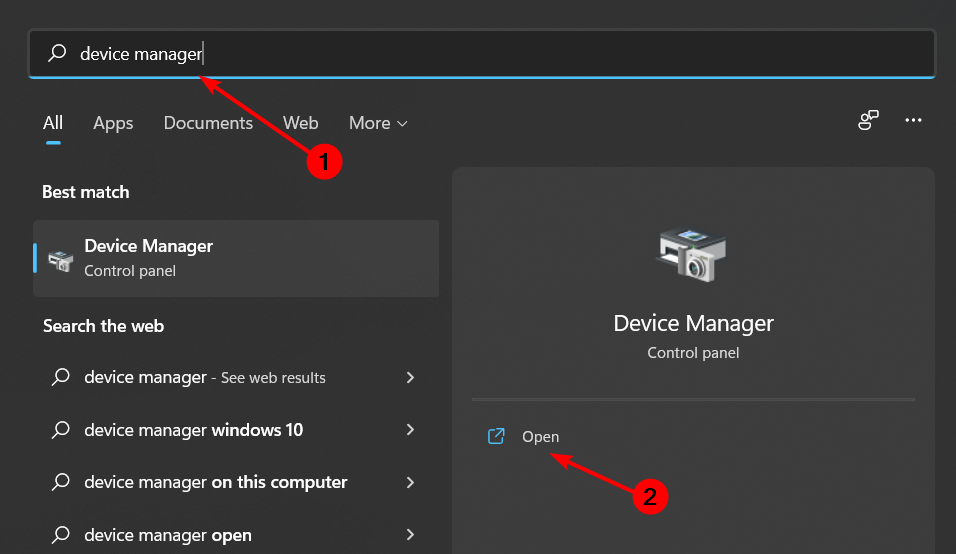
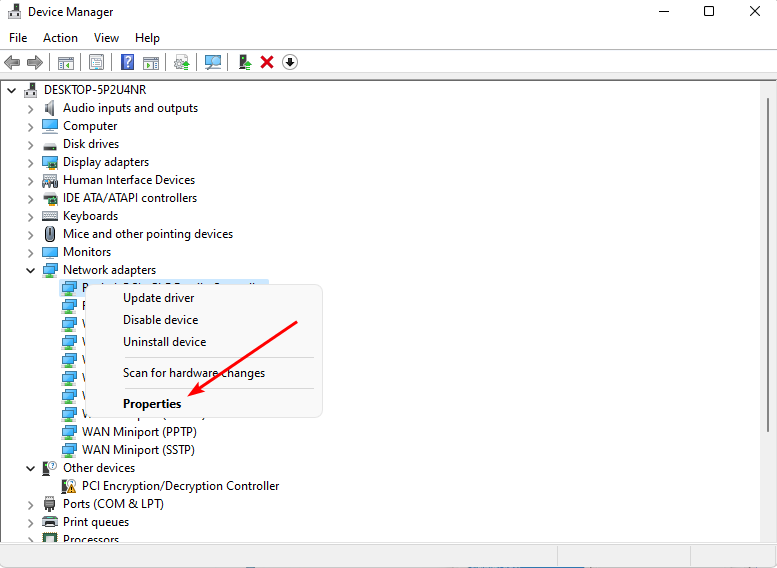
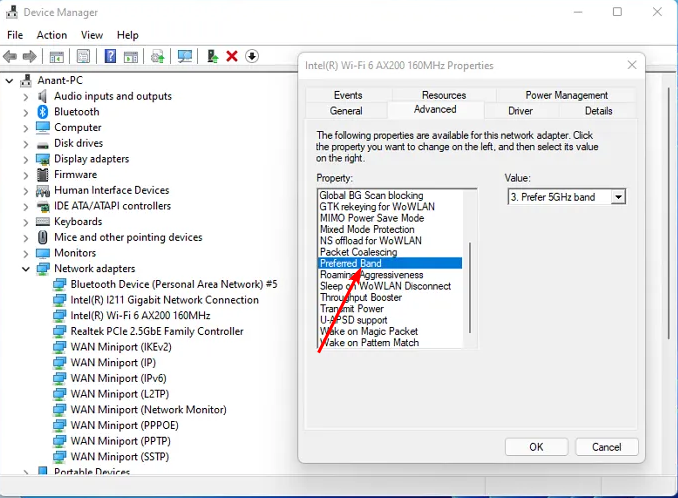
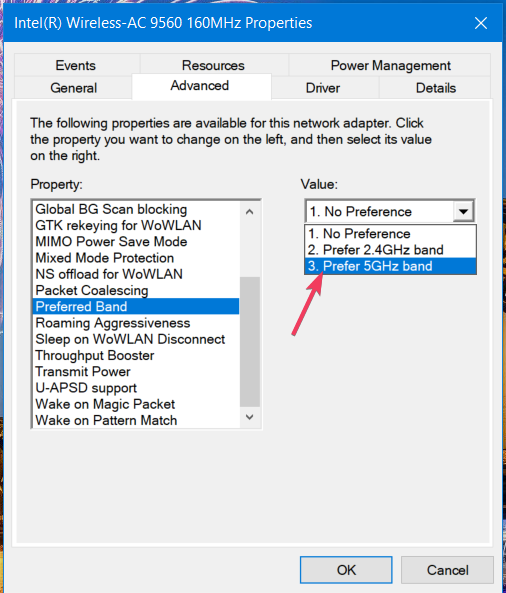

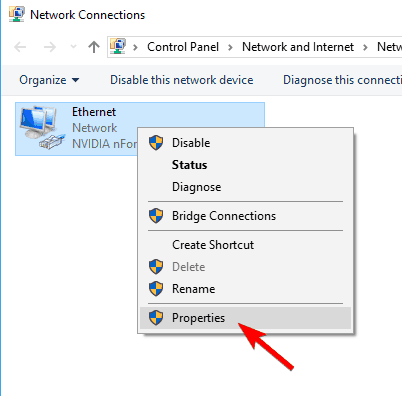
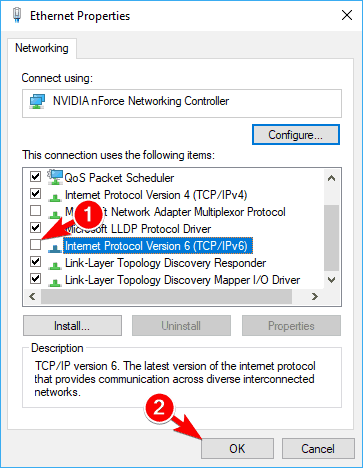










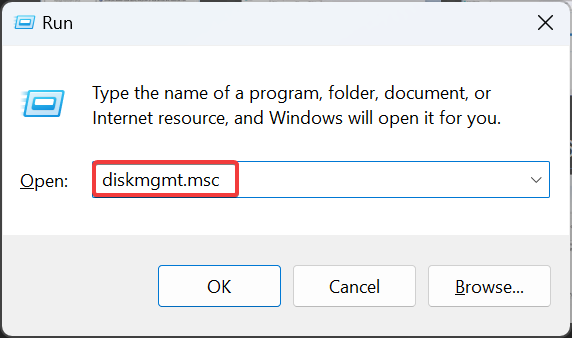
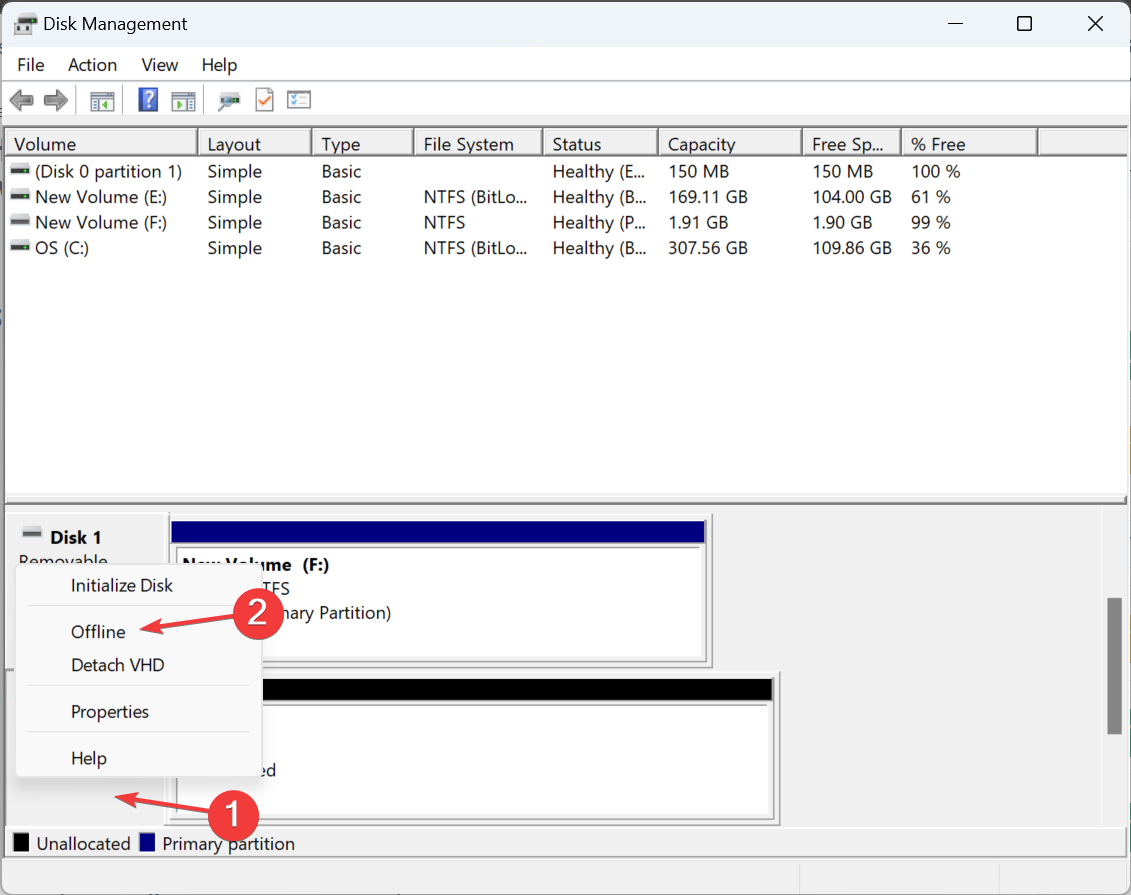
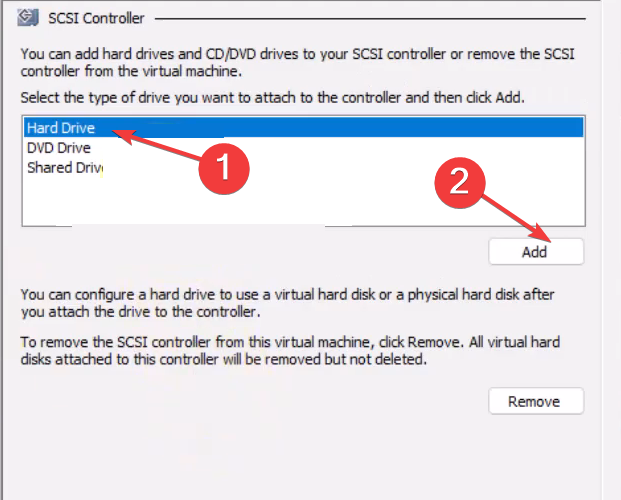
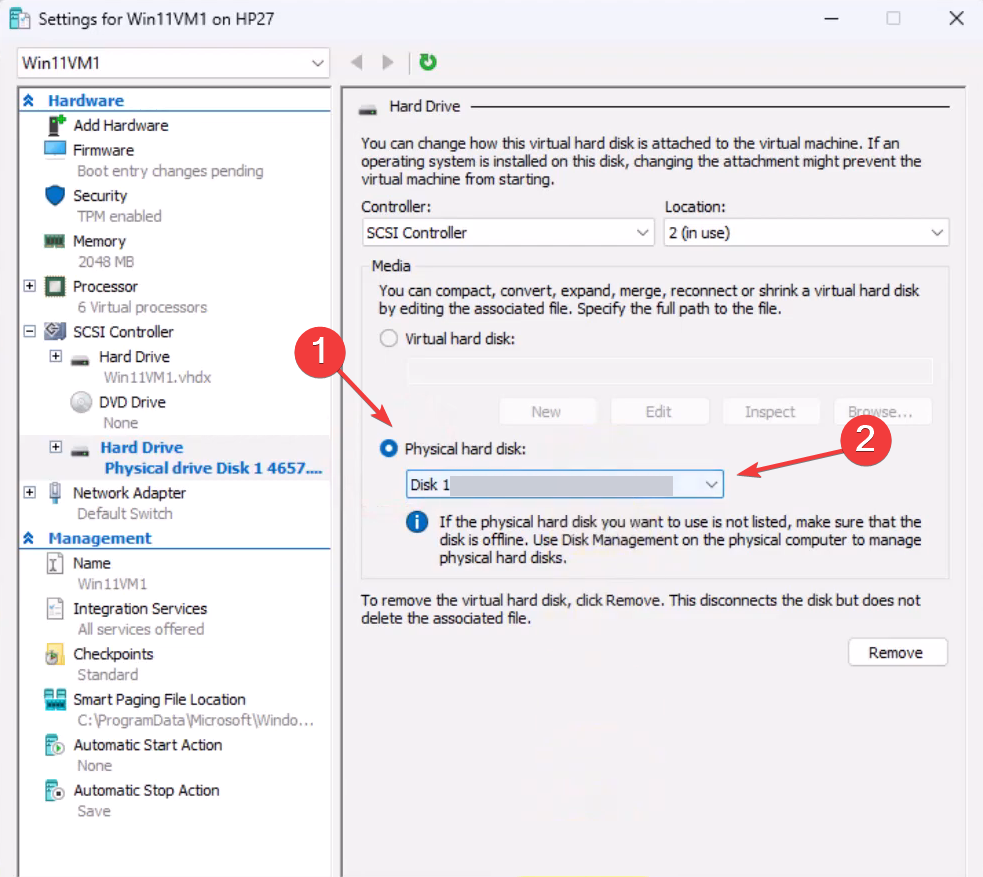
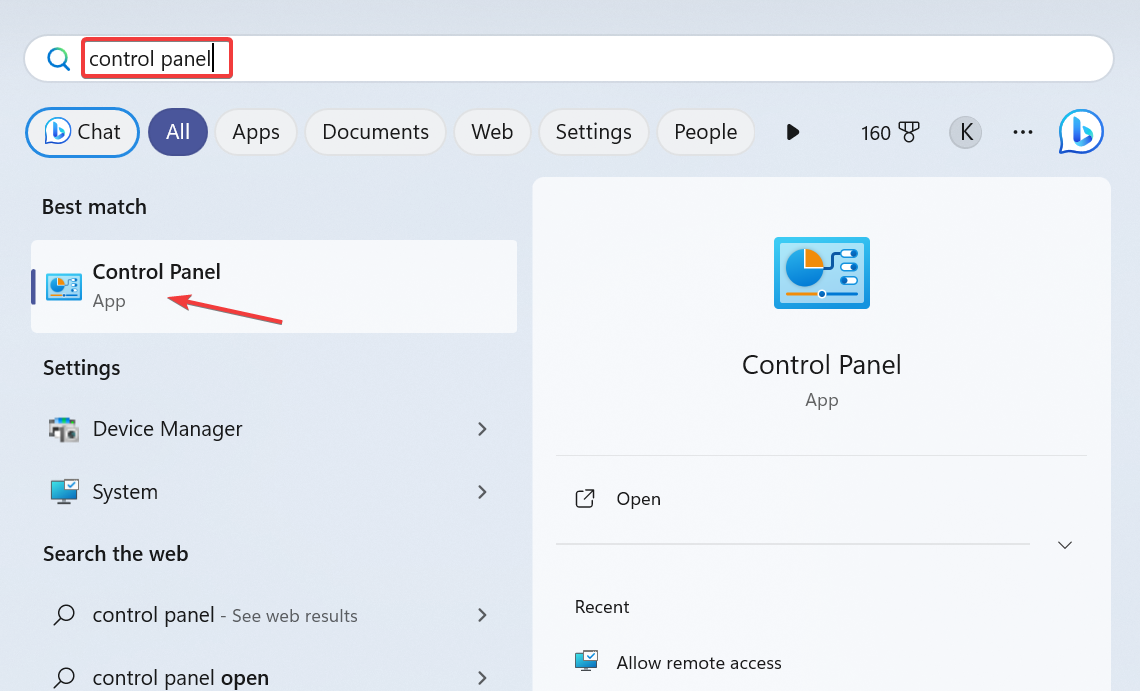
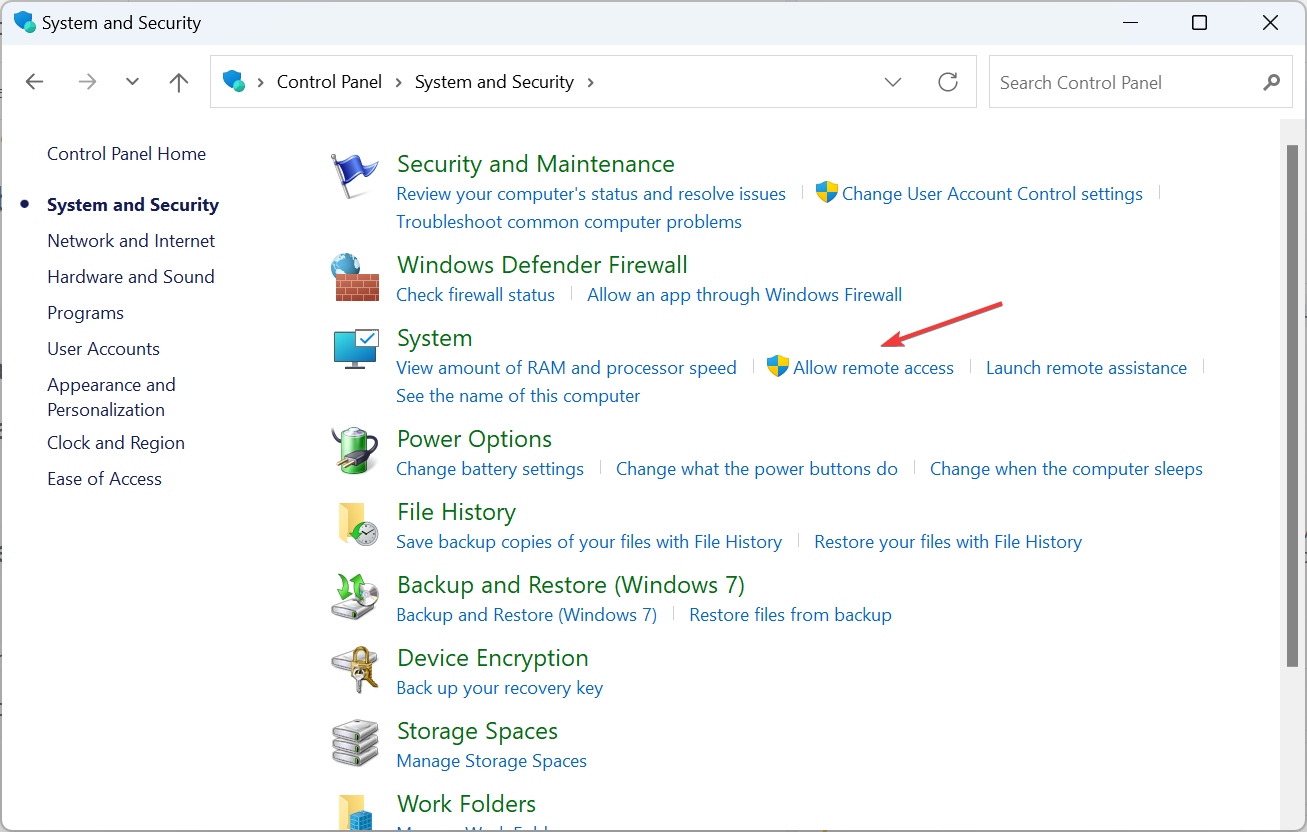
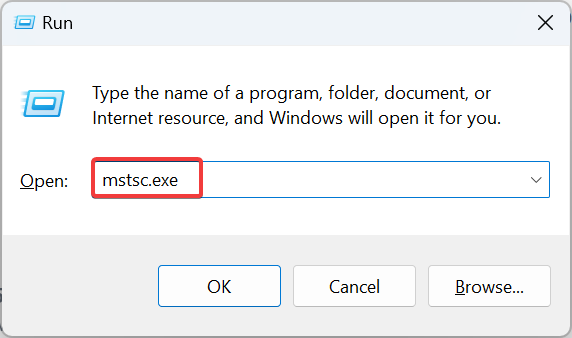
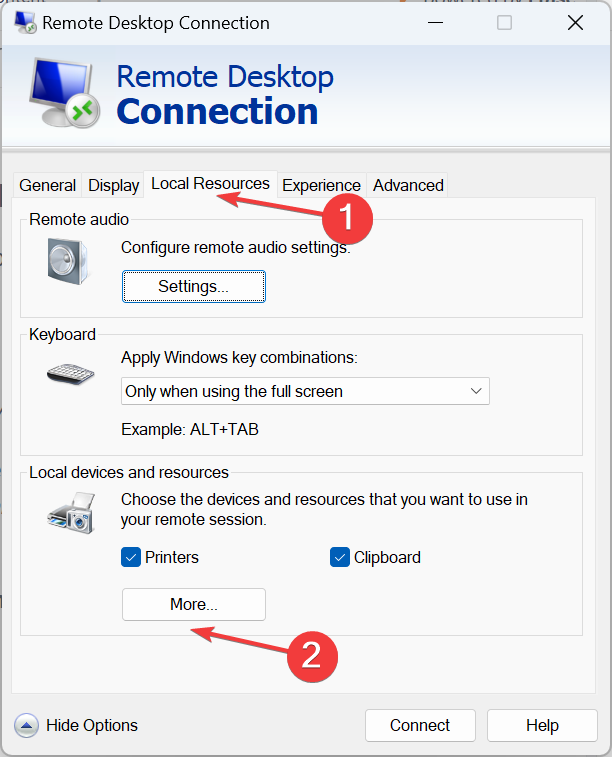
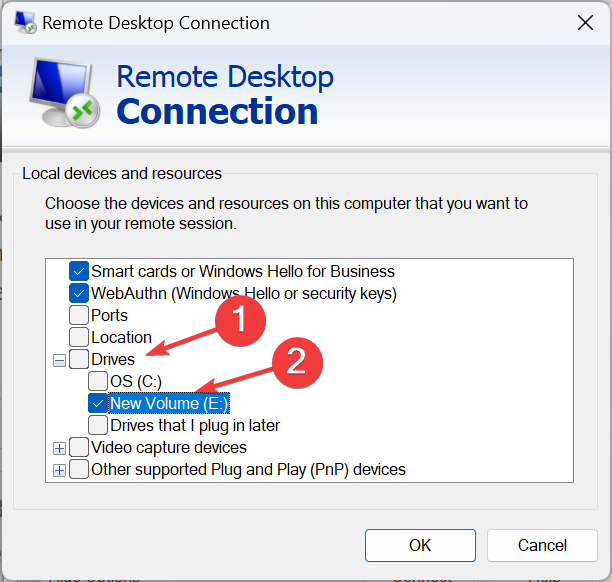
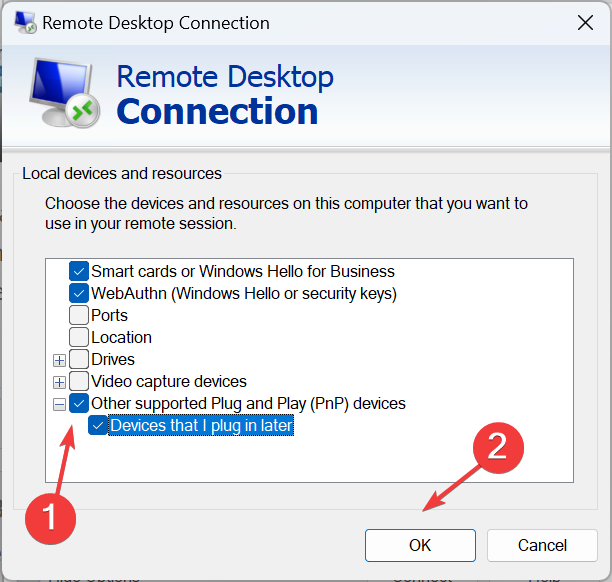
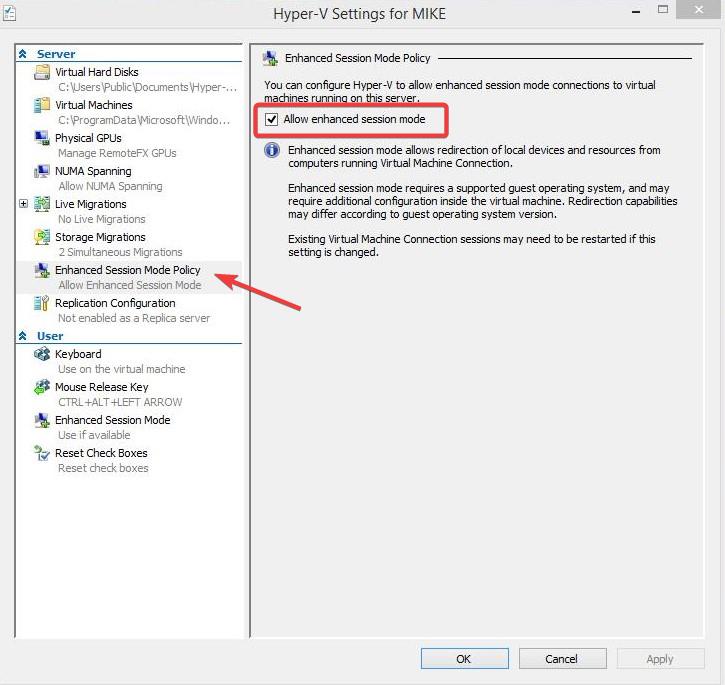
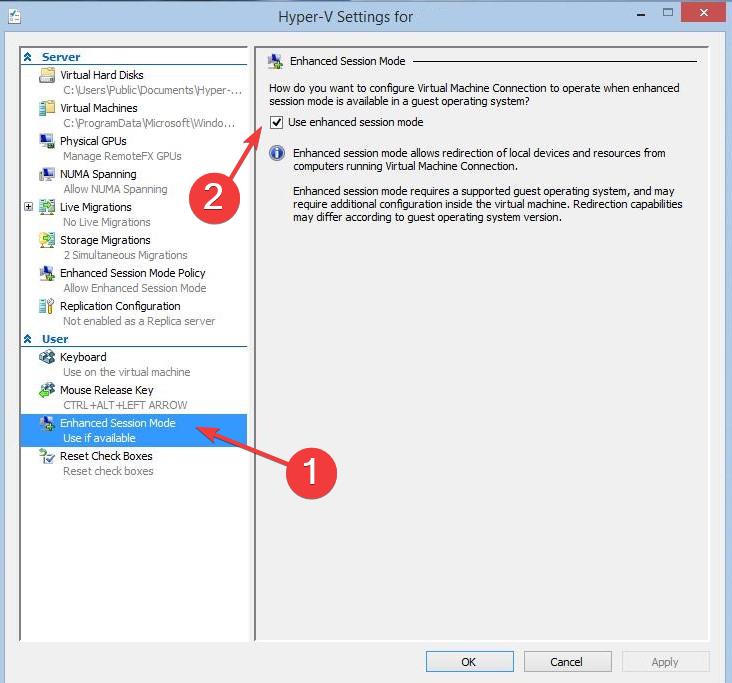
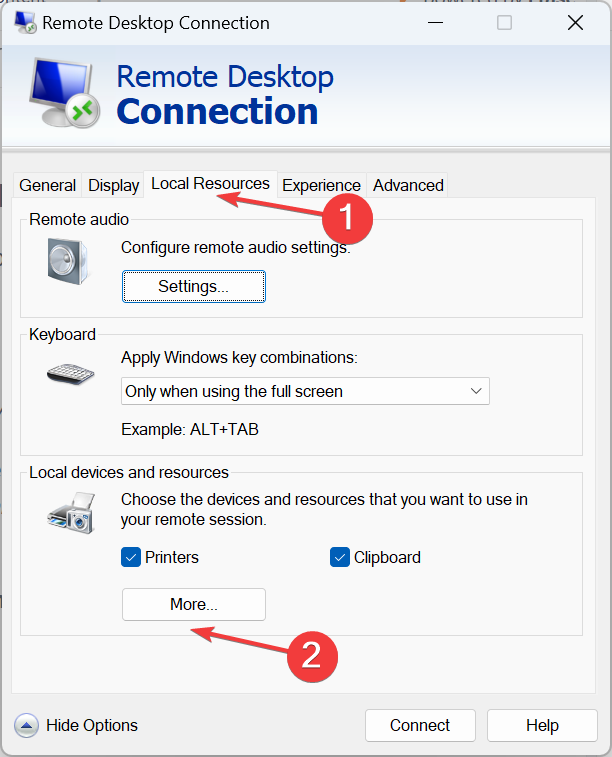
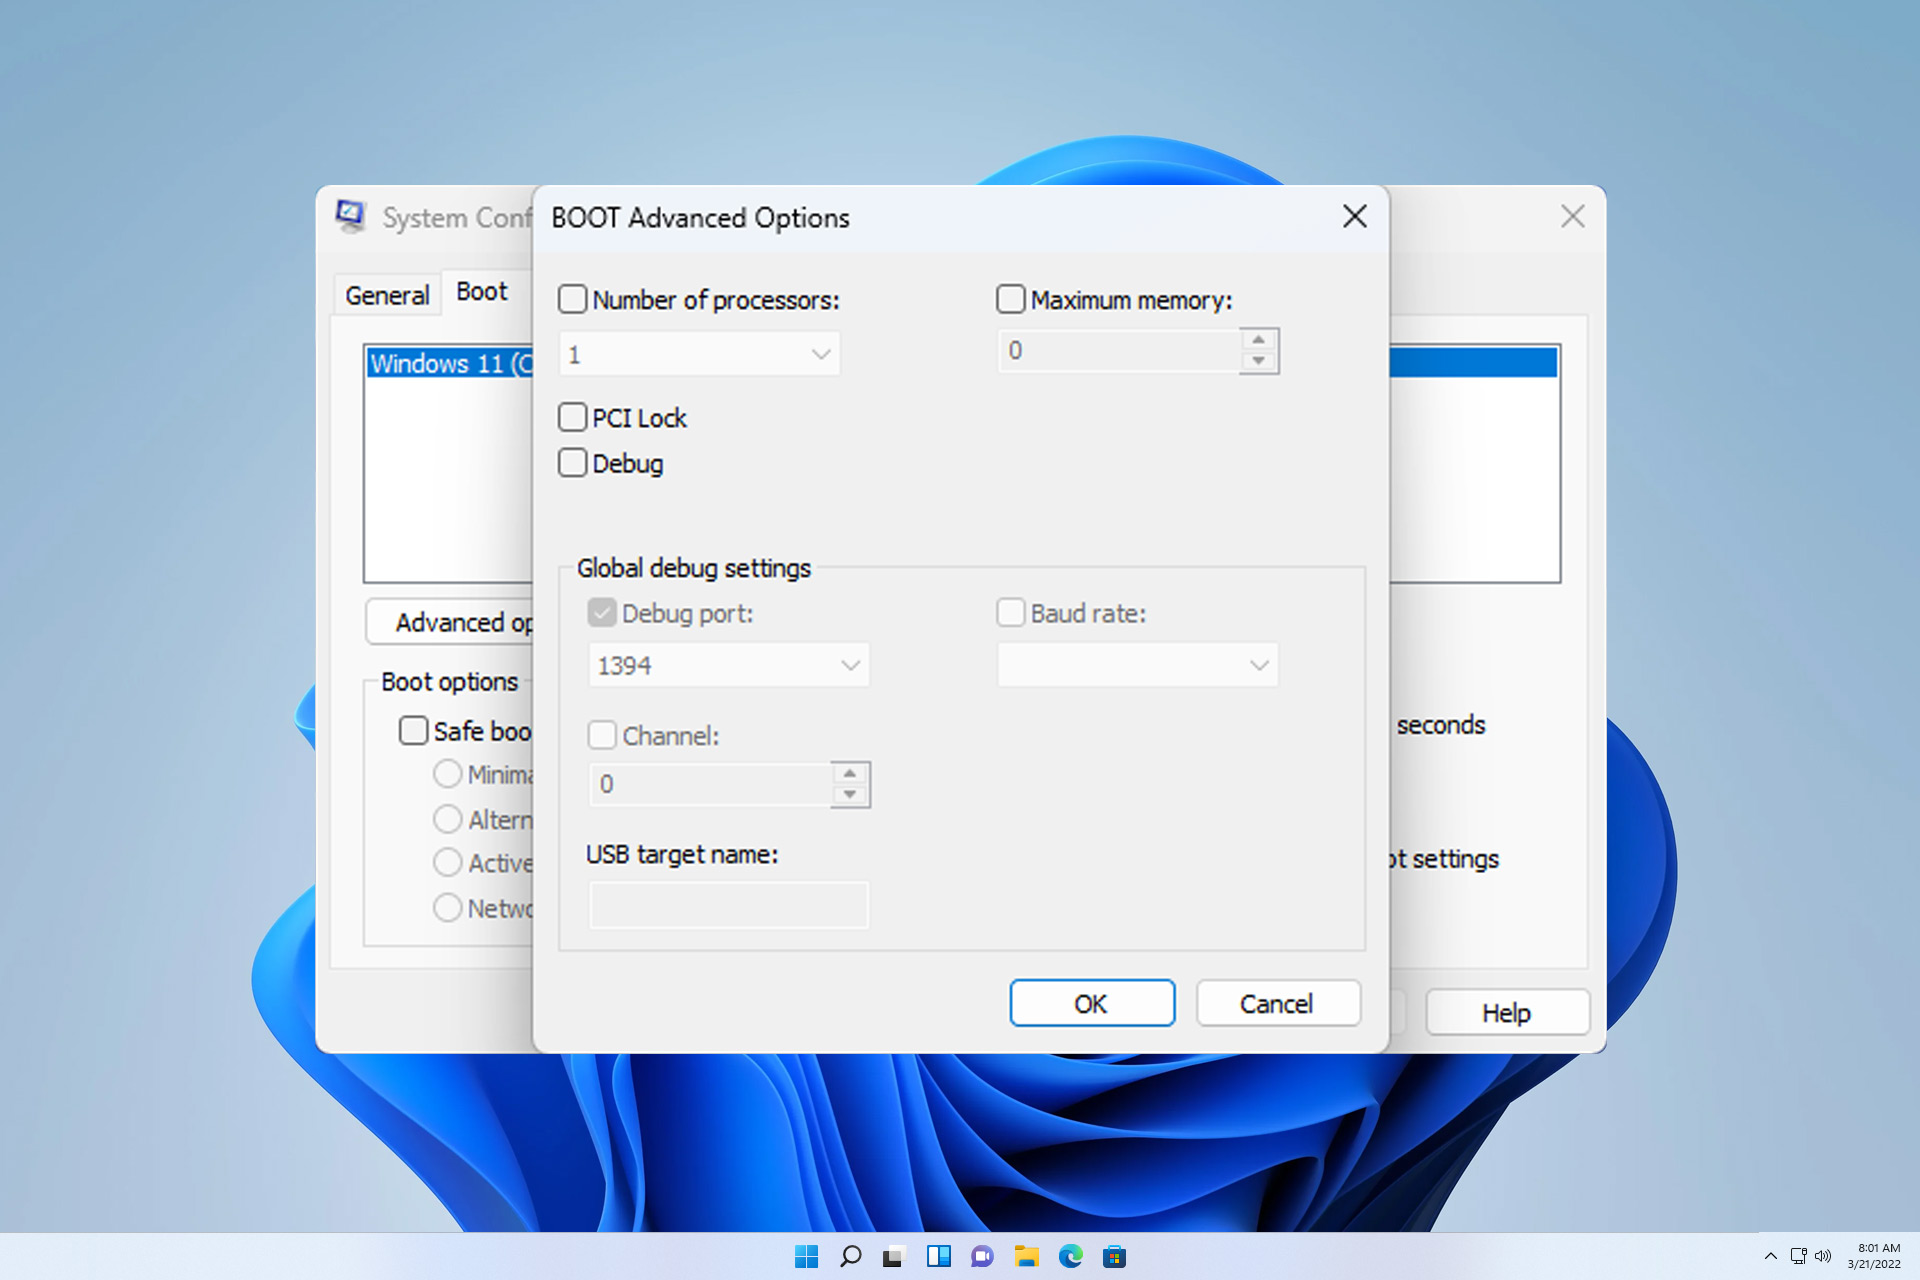


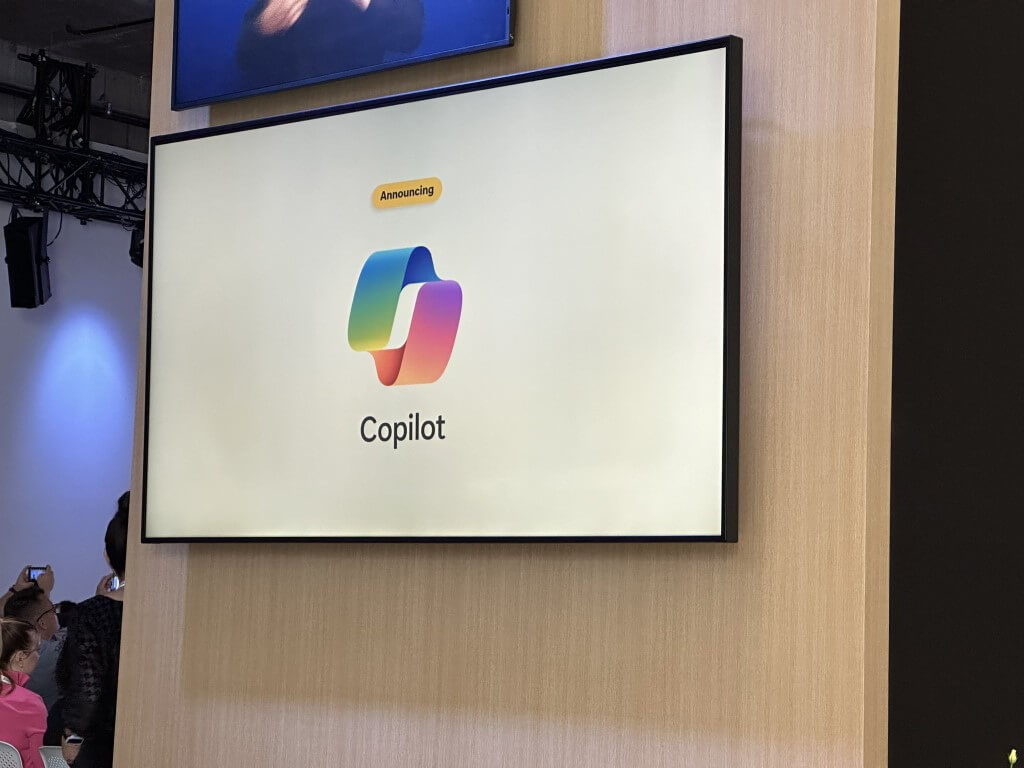


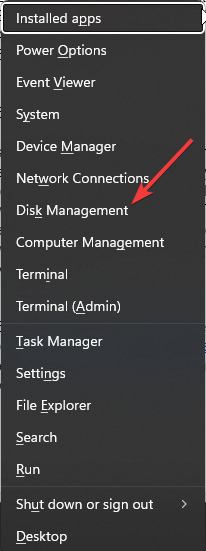


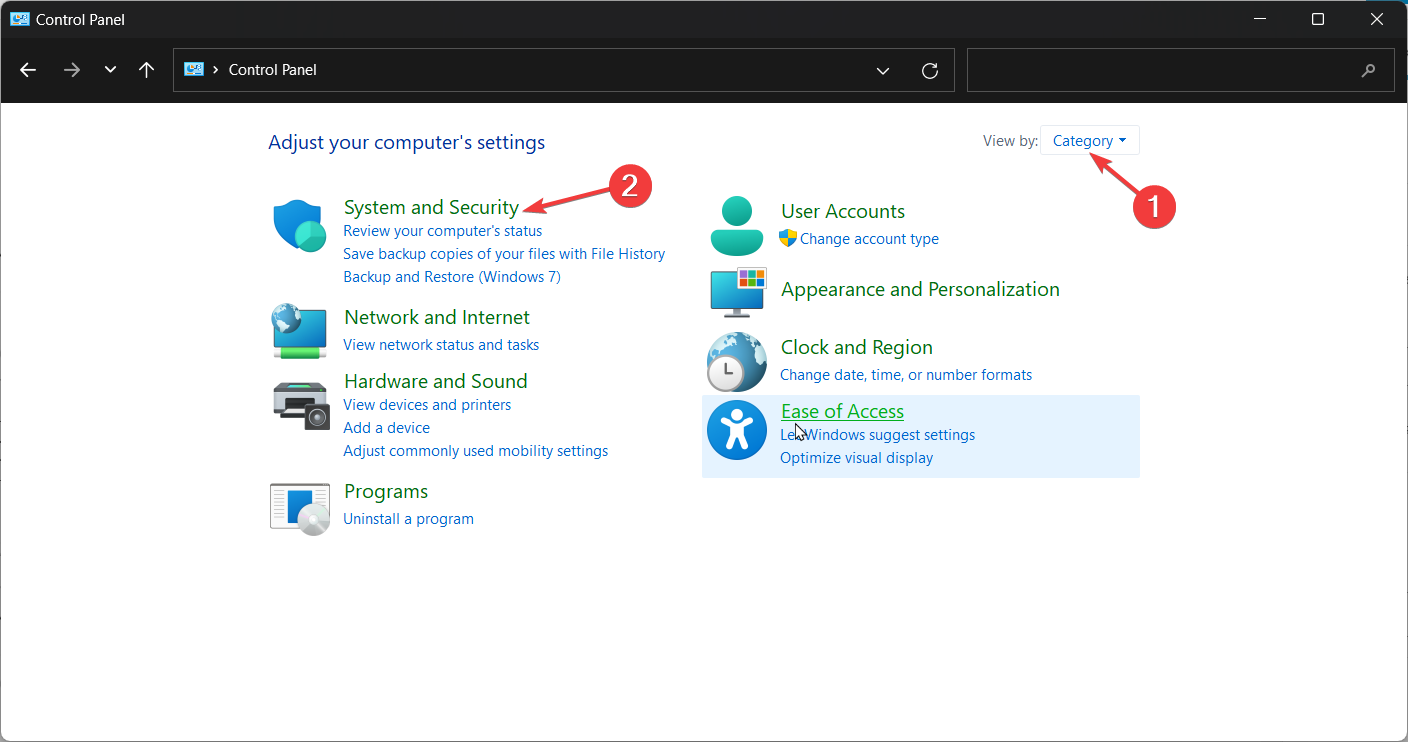




 export” width=”293″ height=”269″>


