Enter your school email address and information on how you plan to use GitHub.
For the next step, you might be asked to upload a photo of your student ID or any other valid document.
You might have to wait for a few hours for your documentation to be verified.
2. Sign up for GitHub Copilot
Make sure that you have a verified student account.
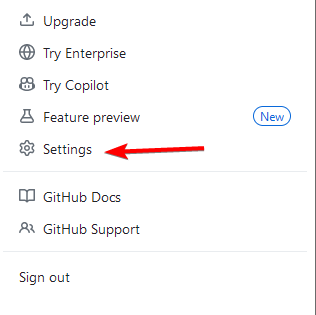
To go Profile Settings page on your GitHub account.
Now select Copilot in the left pane.
Follow the instructions on the screen to sign up with your student account.
After signing up, you just need to install the GitHub extension in Visual Studio Code or your code editor of choice.
How do I get GitHub Copilot free for teachers?
To get GitHub Copilot as a teacher, the process is almost exactly the same as for students. Sign up for the Student Developer Pack as a teacher, verify your teacher account, and that’s it.
How long does the GitHub Copilot Education pack last?
The Student Pack lasts for two years.
It can be renewed at any time if you’re still studying.
Getting the GitHub Copilot Education version is incredibly simple, and you need a valid student or teacher account in order to obtain it.
GitHub Copilot has another variant for organizations and enterprises, GitHub Copilot for Business; to know more, read this guide.
If you’re studying programming, this is one of the best education software you can use. Of course, the tool is available for other purposes, and we have a great guide on how to enable Copilot in Outlook.
Staying productive can be hard, especially when you keep hearing chiming sounds on your Windows 11. You might be working on something important, but you will have to keep stopping to check if the notification refers to something important or not.
The worst-case scenario is when they keep coming at the most inopportune times and you don’t understand where they’re coming from. If this sounds familiar, this post is for you.
Why does Windows 11 keep making constant notification sounds?
Faulty drivers – This can happen if you download drivers from unofficial sites.
Problematic update – If the problem started right after updating your OS, it’s possible the Windows update was full of bugs.
Click on the Start Menu icon, search Windows Security, and click Open.
Select Virus & threat protection.
Next, press Quick scan under Current threats.
If you don’t find any threats, proceed to perform a full scan by clicking on Scan options just below Quick scan.
Click on Full scan, then Scan now to perform a deep scan of your PC.
Wait for the process to finish and restart your system.
3. Run a DISM and SFC scan
Hit the Start Menu icon, type cmd in the search bar, and click Run as administrator.
Type the following commands and press Enter after each one:DISM.exe /Online /Cleanup-Image /Restorehealthsfc /scannow
You can also opt for specialized software if DISM and SFC scans can’t detect all malfunctioning system files that are causing this error.
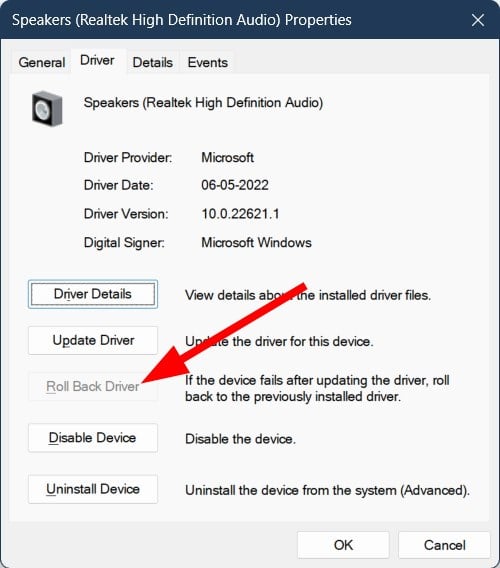
4. Rollback previous audio driver
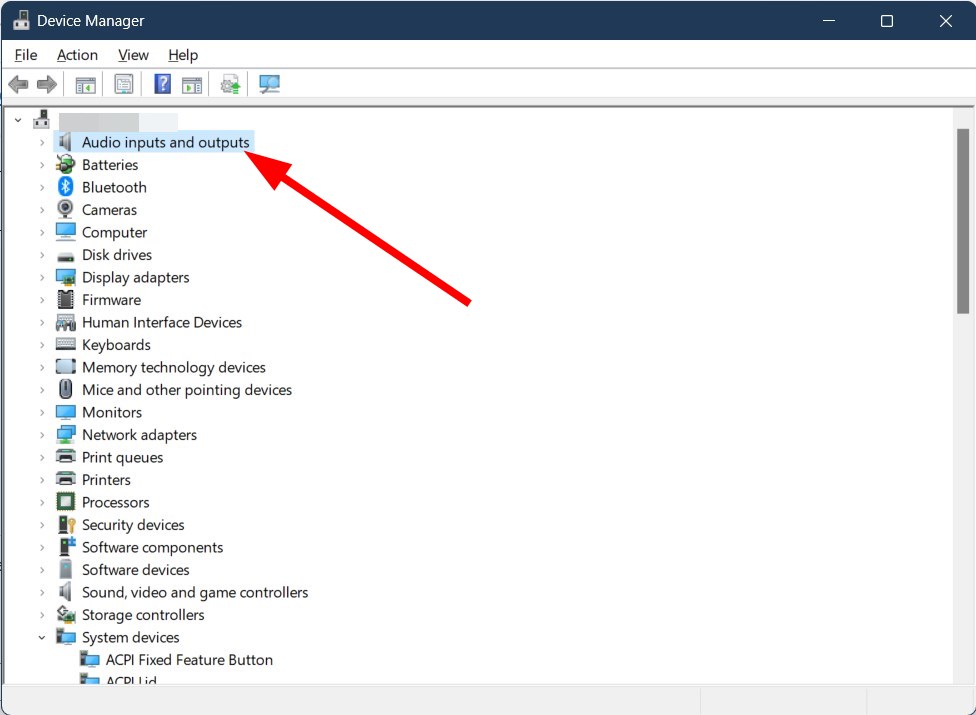
Hit the Windows key, type Device Manager, and click Open.
Expand the Audio inputs and outputs section.
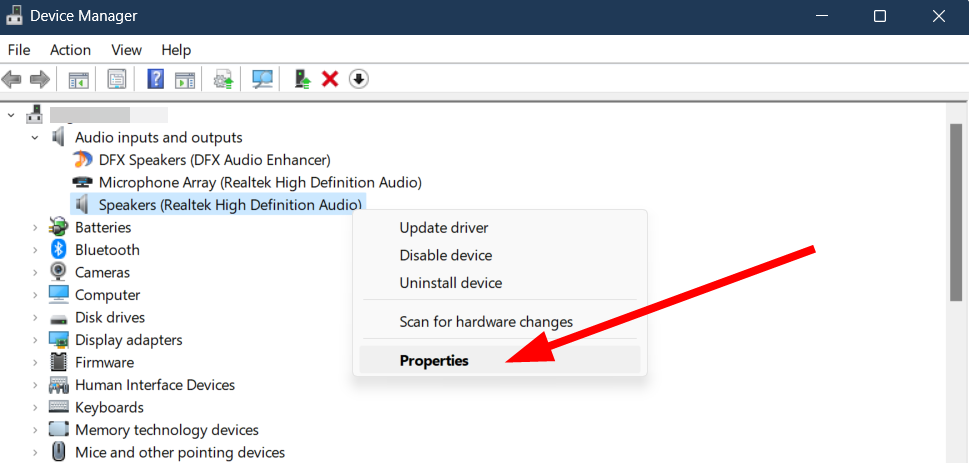
Right-click on your audio driver and select Properties.
Hit the Roll Back Driver button.
5. Uninstall recent Windows update
Hit the Windows key and select Settings.
Click on Windows Update and select Update history on the right pane.
Scroll down, and under Related settings, click on Uninstall updates.
This will take you to the most recent installed updates.
Select the topmost update and click on Uninstall.
Restart your PC and check if the problem persists.
Faulty Windows updates can sometimes cause problems with your audio. For instance, your speakers may produce a high pitched sound because the latest update interfered with your audio drivers.
Hit the Windows key, type Windows Security in the search bar, and click Open.
Click on Firewall & network protection, then select Public network.
Locate Microsoft Defender Firewall and toggle the off button.
7. Perform a clean boot
Hit the Windows key, type msconfig, and open System Configuration.
Switch to the Services tab and select Hide all Microsoft services.
Click on the Disable all button, then hit the Apply button to save the changes.
Go back and click on the Startup tab, select Open Task Manager then click OK.
In the Startup tab of the Task Manager, Disable all the Enabled startup items.
Close Task Manager and restart your PC.
8. Perform a System Restore
Press the Windows + R keys, type rstui, and hit Enter.
The System Restore window will open. Click on Next.
Select the restore point you wish to revert to and click on Next.
Now click on Finish.
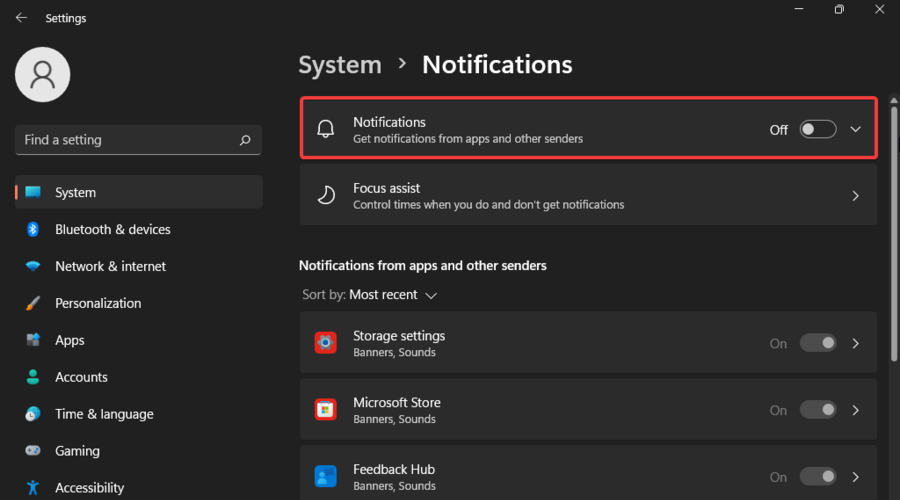
How do I permanently turn off all notification sounds on Windows 11?
Hit the Windows key and click on Settings.
Click on System then select Notifications.
Toggle off the Notifications option.
Whenever you’re ready, you can reverse-engineer these steps to turn them back on.
Disabling all your notifications may give you peace of mind, but you may also miss out on important stuff. It is advisable to turn off notifications for that particular app causing problems and keep the rest.
Better yet, if it’s the notification sound that is annoying, you can easily change your notification sound to one that is more subtle to avoid distractions.
A world of whimsy, wonder, and high-powered weaponry awaits as the unpredictable Tiny Tina takes you along for the ride across her greatest Bunkers & Badasses campaign yet. Forge a highly customizable Fatemaker then embark on a quest to defeat the villainous Dragon Lord. Slay evildoers using a wildly diverse arsenal of guns, spells, and melee weapons, combined with the might of the Multiclass system that lets you harness the power of two unique classes! Get 67% off Tiny Tina’s Wonderlands and Tiny Tina’s Wonderlands: Next Level Edition from September 11, 5:00pm PT to September 26, 3:00am PT.—Xbox Wire.
Create a variety of cats and dogs, add them to your Sims’ homes to forever change their lives, and care for neighborhood pets as a veterinarian with The Sims 4 Plus Cats & Dogs Bundle. The powerful new Create A Pet tool lets you personalize cats and dogs, each with their own unique appearances, distinct behaviors, and – for the first time – expressive outfits! These wonderful, lifelong companions will change your Sims’ lives in new and special ways. Treat animal ailments as a veterinarian and run your own clinic in a beautiful coastal world where there’s so much for your Sims and their pets to discover.—Xbox Wire.
Learn more about Xbox Free Play Days
Xbox Free Play Days is a perk of Game Pass Core (formerly Xbox Live Gold) and Ultimate tiers. Nearly each week there is a new lineup of game for members to try out. It’s a great way to try something new and maybe even find a new favorite. Learn more about the program over on the Xbox Free Play Days FAQ page.
Nintendo just streamed its big September Nintendo Direct, unloading a slew of new game announcements for the remainder of this year and heading into 2024. Below are just a couple highlight from the event.
As mentioned, this is only a taste of the many exciting announcements from the September Nintendo Direct. But what does this mean for Xbox?
Well, most immediately it means some pretty strong competition for the fall and winter, and going on into 2024. That said, Xbox is in a pretty strong position right now with the recent release of Bethesda’s space roleplaying juggernaut Starfield.
And don’t forget that many other big-name releases are on the horizon: Payday 3, Lies of P, Mortal Kombat 1 and of course Forza Motorsport. The excitement from July’s Xbox Games Showcase can’t be discounted here. As the most-watched Xbox showcase ever, 2023’s event exceeded expectations and was jam-packed with exciting games.
Microsoft has released Windows 11 Insider Preview Build 25951 (Canary), incorporating advanced security measures to counteract password-cracking crimes. A noteworthy upgrade will enable administrators to impede New Technology Lan Manager (NTLM) over Server Message Block (SMB), a traditional file-sharing protocol. The large-scale strategy aims to eliminate NTLM usage throughout Windows completely.
NTLM, a legacy protocol no longer deemed secure, can be a significant security vulnerability. Prevention of this via SMB client prohibiting NTLM facilitates secure remote outbound connections. The goal is to protect users’ hashed passwords from being circulated to an external server, the tech giant announced in a blog post.
With this new option, an administrator can intentionally block Windows from offering NTLM via SMB. An attacker who tricks a user or application into sending NTLM challenge responses to a malicious server will no longer receive any NTLM data and cannot brute force, crack, or pass hashes. This adds a new level of protection for enterprises without a requirement to entirely disable NTLM usage in the OS.
Enabling these safety measures doesn’t mean that NTLM usage needs to be entirely disabled. It gives our enterprise customers access to increased protection,
Plans are underway for further protective enhancements in upcoming Windows Insider releases. The company seeks to empower administrators with the ability to control SMB NTLM blocking for specific servers using an “allow list.” This strategy aims to provide defenses not only against password-cracking attacks but also pass-the-hash attacks and NTLM relay attacks.
Previously, tech experts had raised concerns about NTLM’s susceptibility to pass-the-hash and relay attacks. These types of cyber-attacks can happen when a malicious user gets unauthorized access by successfully guessing the hash value, a unique value derived from hashing a user’s password.
The new security feature is decisive evidence of a larger game plan by Microsoft to end NTLM usage throughout Windows. Keep an eye out for further announcements, as there have been indications of more comprehensive changes in line with this strategy in the coming weeks. In a cybersecurity climate that often seems on edge, this intentional focus on safety delivers much-needed reassurance.
In an era when technology continues evolving at mind-boggling speeds, Microsoft is testing a new feature slated to transform how we write content online. With a simple click, the all-new AI writing tool embedded in Microsoft Edge could shift our methods of interacting with text.
The feature, powered by next-generation GPT-4 technology and Bing AI, can copy text on a webpage and reproduce the information in a more tailored, personal tone. Windows Latest reports indicate that users will be able to customize the tone to suit their preference – whether professional, casual, enthusiastic, or informational.
The result? A digital experience uniquely tailored to every user’s personal style or business needs. But it doesn’t stop at tonality. The AI tool is also designed to rearrange the text in various format options. Users can opt for a standard structured paragraph, an appealing blog post layout, or even an email format.
Incorporating this feature directly into the browser means the tool will be easily and rapidly accessible to a wider user base. In the current testing phase, the Redmond-based tech giant has engaged a handful of users in the Canary version of Chromium Edge.
We are keenly waiting for further announcements regarding when this feature will officially be incorporated into Microsoft Edge.
Why is this feature important?
With this update, a wider audience will be empowered to delve into blog writing. For those who may feel timid about publishing faultless copy, the AI-powered tool could be a godsend. Furthermore, it becomes an invaluable asset during research or brainstorming sessions, providing a springboard for new ideas. And say goodbye to penning tedious yet essential emails – let the tool do the heavy lifting.
On the flip side, the AI tool, being web-integrated and fed by text available on the internet, could present a challenge with plagiarism detection, underlining the need for careful monitoring and ethical use.
In conclusion, we are at the forefront of an AI writing revolution, and Microsoft Edge is paving the way with its GPT-4 powered tool. Could a new era of personal communication be on the horizon? Only time will tell.
Microsoft is facing a series of antitrust investigations and complaints from various entities within the European Union, which suggests increasing scrutiny of its regional business practices. The European Union has been investigating Microsoft’s behavior related to its Teams app and other services.
EU Prepares Complaint Over Microsoft’s Teams App
Microsoft’s video-conferencing app, Teams, has caused problems with the European Union. The EU’s antitrust enforcers are upset with Microsoft’s behavior and ready to complain officially. Microsoft tried to solve the issue by offering Teams separately, but the EU wasn’t impressed. According to the Bloomberg report:
Microsoft’s recent proposal to split its Teams from a broader business software package and sell it to customers separately with an annual discount wasn’t enough to satisfy regulators’ concerns, according to people familiar with the matter, who spoke on condition of anonymity.
The European Commission is preparing a statement of objections to send to the company, which could come in the next few months, the people said.
EU investigates Microsoft for Teams Bundling
Microsoft is also facing other complaints filed with EU regulators, including one from a European cloud group that includes Amazon.com Inc.’s AWS as a member, which says that Microsoft is not fair when licensing its cloud infrastructure. Another complaint filed by German cloud platform NextCloud GmbH in 2021 is about Microsoft bundling its OneDrive cloud system with Windows. Microsoft announced that it will unbundle Teams from its Microsoft 365 and Office 365 suites in the European Economic Area (EEA) and Switzerland.
Digital Antitrust Investigation
Additionally, Microsoft is under investigation by the EU’s digital antitrust regulators, who are assessing whether its Bing, Edge, and Advertising services should fall under the scope of the bloc’s Digital Markets Act, which outlines regulations for major tech companies.
Microsoft Teams was down yesterday as it was failing to send and receive messages. Microsoft has acknowledged the issue with Microsoft Teams through their official status handle on Twitter and provided specific information about the problem.
We're investigating an incident affecting Microsoft Teams. Users may encounter delays or failures sending and receiving messages. For more details, please see TM675041 on the Service Health Dashboard in the admin center.
Microsoft 365 has experienced several outages over the past eight months, causing disruptions for its users. These outages have affected various Microsoft 365 services, including Teams, Outlook, OneDrive for Business, and SharePoint.
January: Microsoft experienced an outage, affecting email and Teams access.
February: Another global outage occurred, disrupting email and Teams access.
April (first incident): Users faced issues accessing Microsoft 365 web applications and Teams.
April (second incident): Microsoft investigated a search functionality issue in multiple Microsoft 365 services, including Outlook on the Web, Exchange Online, SharePoint Online, Microsoft Teams, and Outlook desktop clients.
May: The company reported issues with UK users accessing some service offerings under Microsoft 365.
June: Users experienced issues with Outlook Web, Teams, OneDrive for Business, and SharePoint for over eight hours.
Multiple incidents within a short period and spikes in reports suggest Microsoft 365 outages have seemingly significantly impacted users and businesses. Microsoft must address these issues promptly and improve infrastructure resilience to prevent future disruptions. Users and organizations should consider implementing backup and contingency plans.
By default, the title bar color on Windows 11 depends on your selected dark/light theme. However, you can change it to any color you want.
This guide will discuss step-by-step instructions for three methods to change it and personalize your desktop experience, making it visually appealing.
Can I change the title bar color for active and inactive windows?
Yes, you can change the title bar color for an active window using the Settings app and for an inactive window using the Registry Editor. To know the steps, move to the next section.
How do I change the color of my title bar in Windows 11?
1. Using the Settings app
Press Windows + I to open the Settings window.
Go to Personalization, then click Colors.
On the Colors settings page, locate Show accent color on title bars and windows borders and toggle on the switch next to it to activate it.
Select any of the colors from the Windows colors option.
If you want more colors, go to Custom colors, and click the View colors button.
Use the slider to select the custom color and click Done.
This method will only change or show the color of the title bar and window border of a currently active window.
2. Using the Registry Editor
Press Windows + R to open the Run dialog box.
Type regedit and click OK to open the Registry Editor.
First, create a backup; for that, go to File, then click Export and save the .reg file to an accessible location.
Navigate to this path: Computer\HKEY_CURRENT_USER\Software\Microsoft\Windows\DWM
Locate ColorPrevalence, double-click it, ensure the Value data is 1, and click OK to confirm.
Right-click DWN, select New, then click DWORD(32-bit) Value and name it AccentColorInactive.
Now double-click AccentColorInactive, paste the hexadecimal code for a desired color under Value data, and click OK. For example, I want the inactive window’s title bar to be magenta in color, so I will paste FF00FF as the Value data.
Restart your computer to save the changes and enable the colored title bar for inactive windows on your computer.
Select Show extracted fileswhen complete and click Extract. Now double-click the WinaeroTweaker-1.55.0.0-setup.exe to initiate the installation. Follow the onscreen instructions to complete the process.
Launch the Winaero Tweaker app from the desktop, locate Appearance from the left pane, and expand it.
Click Inactive Title Bars Color, and on the right pane, select the box next to Current color.
Choose a color and click OK.
You can also click Define Custom Colors, select the color from the slider, and click Add to Custom Colors.
Next, select the desired color from the Custom colors section, and click OK.
For this method to work, you must always keep the Show accent color on title bars and windows borders settings from the Settings app enabled.
Why is the Windows 11 title bar color not changing?
Theme settings – If you have selected a high-contrast theme, it can bypass the accent settings, so to correct that, go to Settings>Personalization> Themes, & choose a theme that supports accent customization.
Misconfigured accent color settings– Ensure the Show accent color on title bars and windows borders option is enabled.
Third-party software conflict – If you are using some software to personalize your Windows desktop experience, it might interfere with the accent color settings. To fix it, uninstall the app.
Corrupted system files – The system files related to the appearance when corrupted could cause this problem. To fix it, press Windows,>type cmd>click Run as administrator>type sfc /scannow and press Enter.
Users who want clearer text visibility on the desktop can also explore this guide on how to change the desktop font color, which helps improve readability alongside title bar and accent color adjustments.
Remember that you won’t see the window title bar color change in File Explorer, Edge, Command Prompt, Settings, Word, Excel, etc., as they have custom ones that don’t change color based on accent color settings.
Microsoft Viva will have a new home, Viva Home, starting December 2023, according to a new entry in the Microsoft 365 Roadmap.
Viva Home is the home for the Viva suite on the web. Accessible via microsoft365.com app launcher and app explorer, it provides a single landing destination on the web for Viva users with the goal to help with education, discovery and navigation to licensed Viva modules.
You’ll be able to access Viva Home via microsoft365.com app launcher and app explorer, still, and it will provide a unified destination for the Viva Suite on the web.
For now, the rollout is scheduled to take place in December 2023, but Microsoft doesn’t say how long it will last. However, the feature will be generally available everywhere.
Viva Home: The Viva suite on the web
It’s important to note that you’ll be able to use Viva Home to access all the Microsoft Viva suite on the web in one single place, without having to cross from one panel to the other.
While Microsoft doesn’t go into too many details, Viva Home will most probably be designed with simple navigation in mind. The landing page will most probably offer you all you need to know, and then it will guide you to the tools you need to focus on your work.
Since it’s a web-based platform, Viva Home will most probably integrate more web-based features, such as Teams Chats, OneDrive capabilities, and even Copilot, to a degree.
This way, you’ll be able to access it from your device anywhere, and Viva Home will also make it possible for you to be mobile with your work. Since it’s a web-based platform, as long as you have a proper Internet connection, you won’t have to worry about not knowing where you start.
It will all be there, on one single web page.
Are you excited about Viva Home? Do you think it will be better than the current layout or not?
If you are an adventurer, hiker, or person often traveling to remote places, you might want to download the offline maps of a specific region on your Windows 11 in advance.
In this guide, we will discuss step-by-step instructions to download and use them via the Windows 11 Maps app when the network fails you.
There are several benefits of using offline maps:
Saves data, useful for people with limited data plans.
Gives access to maps when you don’t have an active internet connection.
Helps you explore places in areas with no cell service.
Plan your route before starting the journey.
How do I download offline maps in Windows 11?
Press Windows + I to open Settings.
Go to Apps, then click Offline maps.
Locate Maps and click the Download maps button.
Next, select a Continent from the list.
Select a country from the list of countries and click Download.
Also, to get automatic updates for maps, go to Map updates, then select the Update automatically when plugged in and on Wi-Fi option.
To download the maps using a metered connection, on the Offline maps page, locate the Metered connection and toggle on the switch, then follow steps 3 to 5.
Press the Windows key, type maps in the search box, and click Open to open the Windows Maps app.
In the Windows Maps app, locate the search box in the left corner, and type in the name of the city or place on your downloaded map, then click Get Directions.
You can also search for individual locations on the map to get step-by-step directions.
The downloaded maps are usually stored in your system drive, however, you can change the location to ensure there is enough space. To do that, open Settings>Apps>Offline maps>Storage location, and select the drive from the list.
Long gone are the days of downloading video content as streaming apps come by and have been making it easy for users. Xfinity is one of these programs, and while it works well most of the time, an error 500 may appear on your screen, putting your enjoyment on hold.
If you’re lucky, a simple restart of your TV or device will resolve it, but if not, you can try more solutions that don’t require a lot of technical know-how.
What is error code 500 on the Xfinity Stream app? When the Xfinity Stream app is not working or throwing such errors, it is most likely a server error that can occur for several reasons. The most common is that the server is temporarily unavailable or overloaded with requests.
Hit the Start menu icon, type Windows Security in the search bar, and click Open.
Click on Firewall & network protection, then select Public network.
Locate Microsoft Defender Firewall and toggle the off button.
5. Reset your Network
Click on the Start Menu icon and click on Settings.
Navigate to Network & internet.
Select Advanced network settings.
Click on Network reset.
Next, hit the Reset now button.
6. Reinstall the Xfinity app
Open the Google Play Store app on your TV or Roku device.
Click on the three ellipses at the top right corner.
Select My Apps.
Scroll to the Xfinity app and click Uninstall.
Now go back and click Install.
Errors 500 and the TVAPP 00100 error on Xfinity that restrict your streaming are common but can be easily solved following the steps above. Remember, the Xfinity service is parent to other apps, and if it’s having issues, you may also encounter problems like the Adult Swim app not working.
If you’ve been having trouble with your Xfinity account, we hope the above guide has helped you discover and resolve the root of the problem.
For any follow-up questions or if you have something you’d like to add, please don’t hesitate to hit up the comments section below.
A clean boot on Windows 11 is a method in which your Windows boots up with a minimal set of drivers and essential startup programs to help you identify if a background program is interfering with your app.
In this guide, we will discuss step-by-step instructions to restart your Windows 11 computer in a clean boot environment.
Some of the benefits of performing a clean boot on Windows 11 are:
Determine & troubleshoot software conflicts.
Fixes performance issues like slow boot, high CPU usage, and frequent crashes.
Identifies and fixes startup problems
Stops unnecessary programs from running in the background and consuming system resources.
Helps improve security & stability.
How can I do a clean boot on Windows 11?
Press Windows + R to open the Run dialog box.
Type msconfig and click OK to open System Configuration.
On the System Configuration window, go to the Services tab, place a checkmark next to Hide all Microsoft services, and click Disable all. This will ensure only non-Microsoft services are disabled.
Switch to the Startup tab and click the Open Task Manager link.
On the Task Manager window, for each Enabled item, select them and click Disable. Remember all the startup items you have disabled; so that you can turn them back on later.
Close Task Manager.
On the System Configuration window, click Apply, then OK.
Click Restart to reboot your computer in clean boot on Windows 11.
What is the difference between clean boot and Safe Mode?
When comparing Safe mode vs. Clean boot, they are both diagnostic modes used in Windows to troubleshoot issues. They are similar but used for different purposes.
Safe Mode shuts down everything except the things necessary for Windows to start, including the core services, processes, and essential drivers. It is used for hardware, driver, and software-related issues.
On the other hand, Clean Boot on Windows 11 assumes that Windows is not the problem and doesn’t disable anything related to Windows; it disables third-party services and startup programs to help you identify the root cause of app-related errors.
You can enter safe mode using System Configuration, Boot menu, and Command Prompt; however, you can only access a clean boot environment through System Configuration.
How do I disable clean boot in Windows 11?
To return to normal boot and turn off the clean boot, reverse engineer the above steps and restart your computer.
Remember that you should only boot your PC into this mode when you want to troubleshoot performance issues or software conflicts and for a short period.
Also, don’t forget to boot your system back to normal startup to enjoy the full functionality of your Windows computer.
If you discover the problem is not related to third-party software but a Windows issue, you must enter the Recovery mode to troubleshoot further.
Do you know any other method for entering a clean boot environment? Feel free to mention it in the comments section below. We will add it to the guide.
While Phone Link might be a useful feature, many want to disable Phone Link on Windows 11 because they don’t use it or because it tends to send notifications too frequently.
Disabling this feature is simple, and it can be done with just a couple of clicks. In today’s guide, we’re going to show you several different ways to do it.
How do I disable Phone Link on Windows 11?
1. Use the Settings app
Press the Windows key + I to open the Settings app.
Navigate to Bluetooth & devices and click on Phone Link.
In there, set the Phone Link to Off.
Keep in mind that this feature is available in Windows 11 build 23511 (Dev) and newer.
2. Modify the registry
Press the Windows key + R and enter regedit.
Navigate to the following path in the left pane: HKEY_CURRENT_USER\Software\Microsoft\Windows\CurrentVersion\Mobility
In the right pane, double-click PhoneLinkEnabled DWORD.
Set its Value data to 0 and click on OK.
3. Use Group Policy Editor
Press Windows key + R and enter gpedit.msc.
Navigate to the following path: Computer Configuration\Administrative Templates\System\Group Policy
In the right pane, locate the Phone-PC linking on this device and double-click it.
Set it to Disabled and click on Apply and OK to save changes.
How do I stop Phone Link from opening on startup?
1. Change Phone Link settings
Open the Phone Link and click on the Cog icon in the top-right corner.
Next, choose General.
Disable the Start Phone Link when I sign in to Windows.
2. Use the Settings app
Open Settings app.
Go to Apps and select Startup.
Locate the Phone Link and set it to Off.
3. Use Task Manager
Press Ctrl + Shift + Esc keyboard shortcut to open Task Manager.
Go to the Startup tab.
Right-click the Phone Link and choose Disable from the context menu.
How do I uninstall Phone Link on Windows 11?
Use PowerShell
Press Windows key + S, type powershell in the search box and select Run as administrator.
Run the following command: Get-AppxPackage Microsoft.YourPhone -AllUsers | Remove-AppxPackage
Wait for the process to uninstall the Phone Link.
If you don’t use Phone Link for iPhone or Android, the best way to disable it is right from the app settings. More advanced users can use Group Policy or Registry Editor. Keep in mind that disabling the app won’t unlink the phone from Windows 11.
Whether you need it or not depends on whether you often transfer files between your phone and PC, like accessing your phone’s texts and other apps through your computer and share screens between these devices.
You can explore an alternative that handles calls, messages, mirroring, and transfers through your PC by checking how to use Dell Mobile Connect for a different way to link your phone with Windows.
Is it safe to remove Phone Link?
Yes, uninstalling Phone Link from your PC is completely safe.
Even though it’s a Microsoft app bundled within the OS or added through an update, it’s non-essential. Removing it won’t affect any process on your PC, nor will it impact performance.
So you have the perfect picture but want to shave off the edges or bring it more to focus. Well, Windows 11 gives you endless options to crop an image to precision with its built-in tools.
The process is pretty straightforward and shouldn’t take too much of your time, as you shall see below.
How do I crop an image in Windows 11?
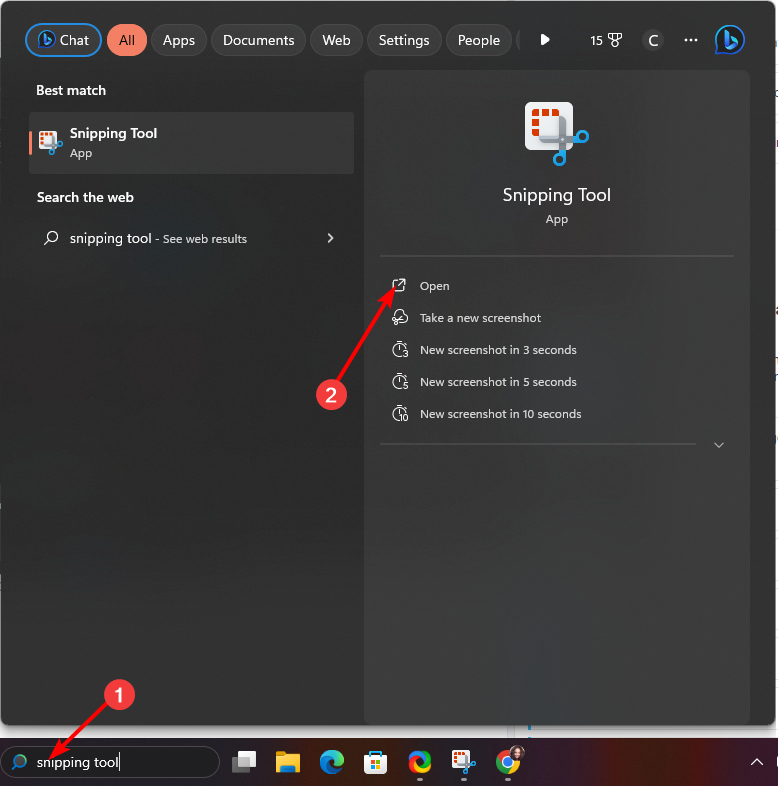
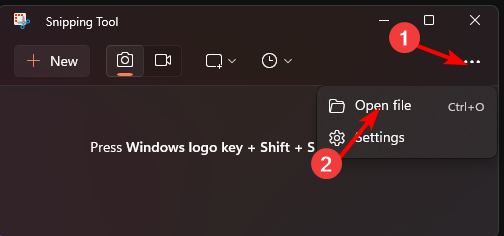
1. By using the Snipping Tool
Click on the Search bar, type Snipping Tool, and click Open.
Next, click on the three ellipses at the top right corner and select Open file.
Select a folder containing the image you wish to crop.
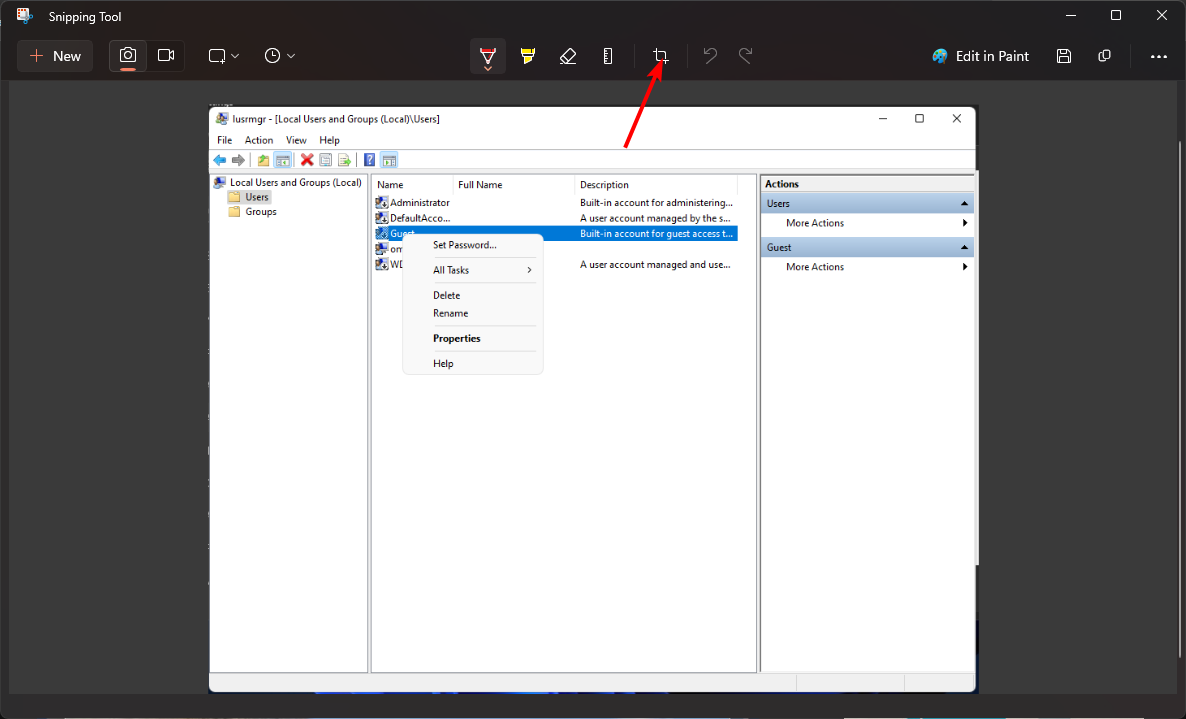
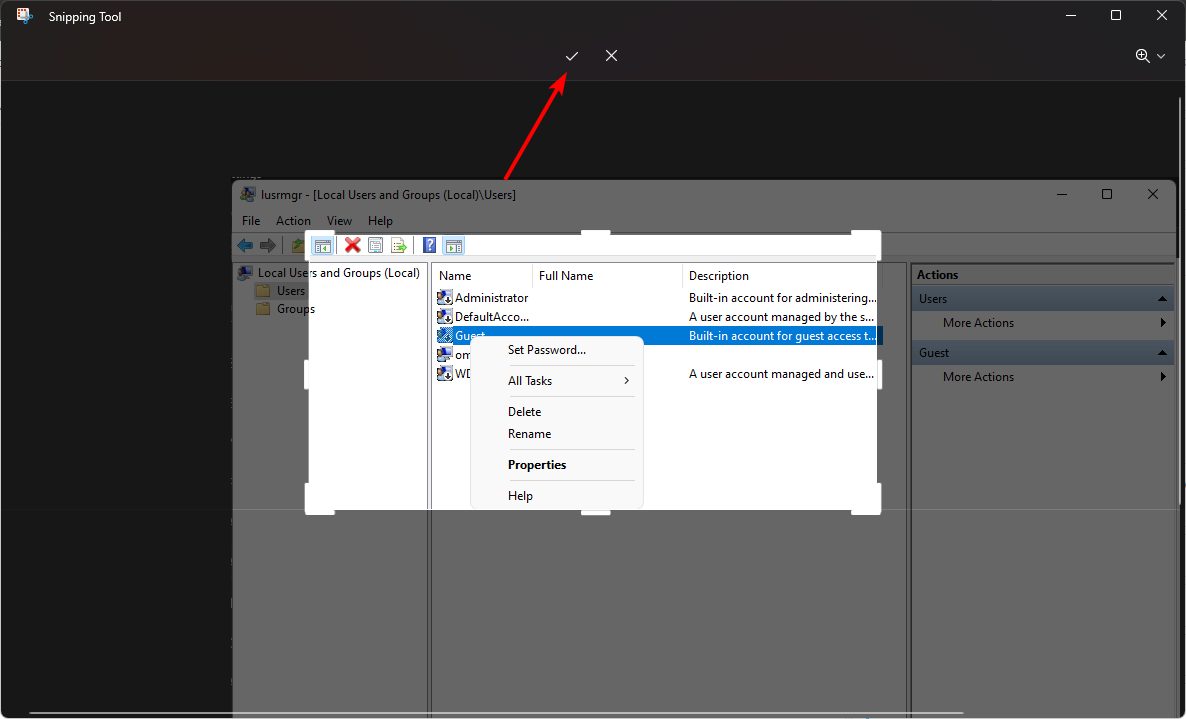
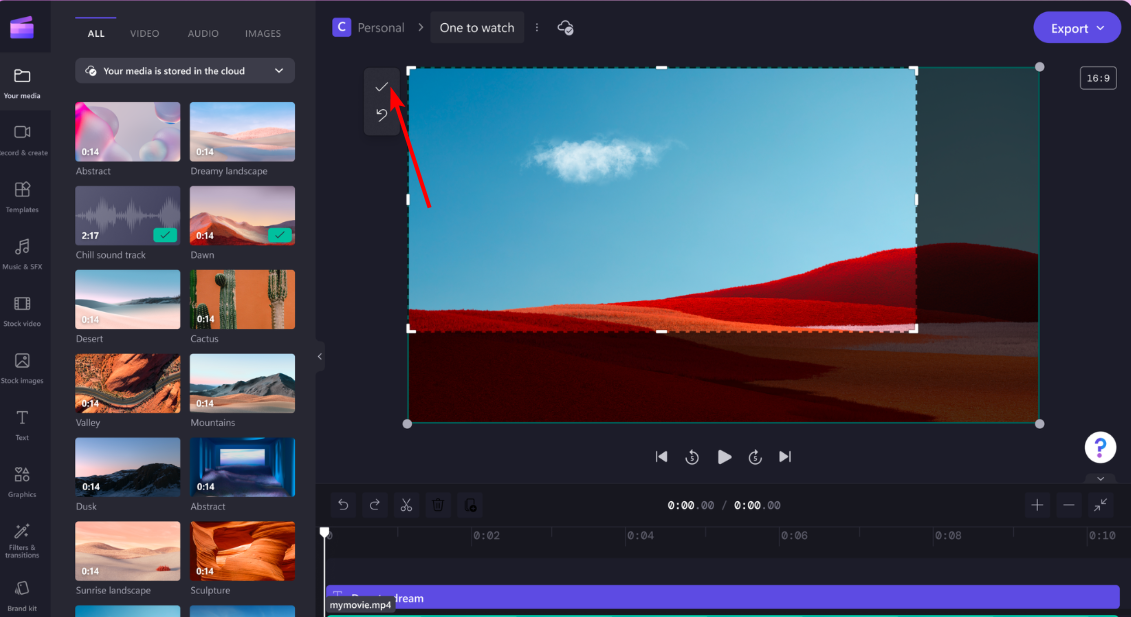
Click on the crop icon, then drag the box to your preferred crop size.
Hit the tick icon when done.
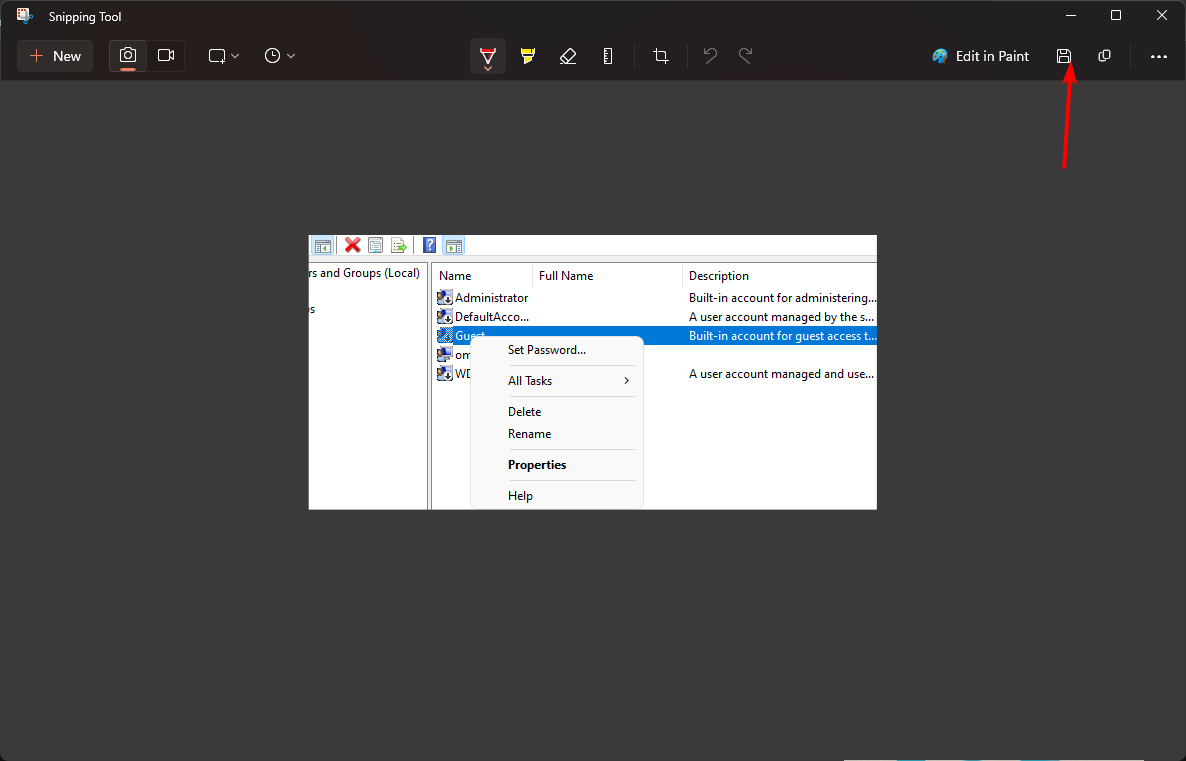
Hit the Save as icon to keep an original of the file.
If these steps seem too lengthy, you’ll be happy to know that the Windows + Shift + S keys shortcut combination will achieve the same results. You just have to open your image first.
2. By using the Photos app
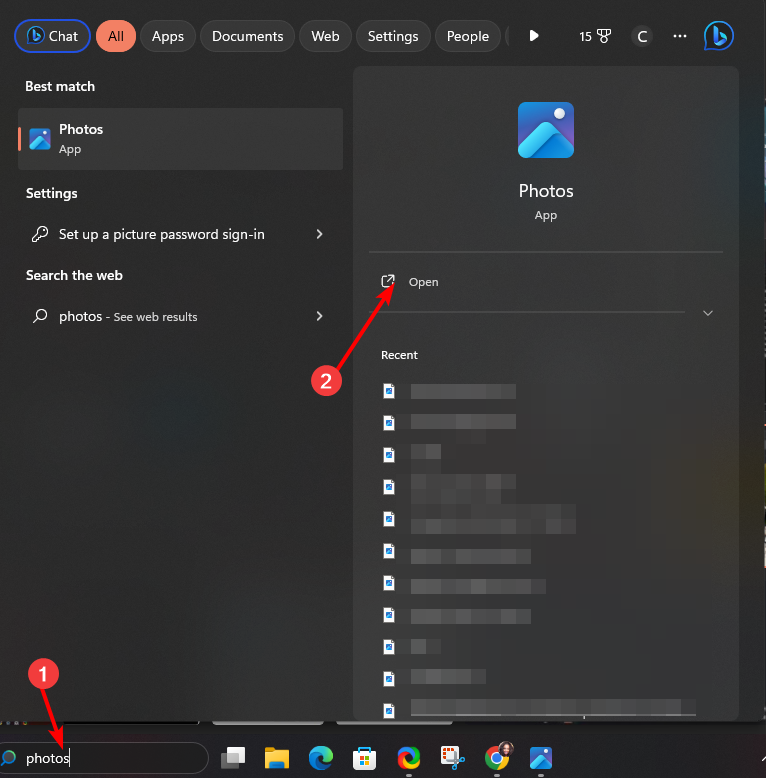
Click on the Search bar, type Photos, and click Open.
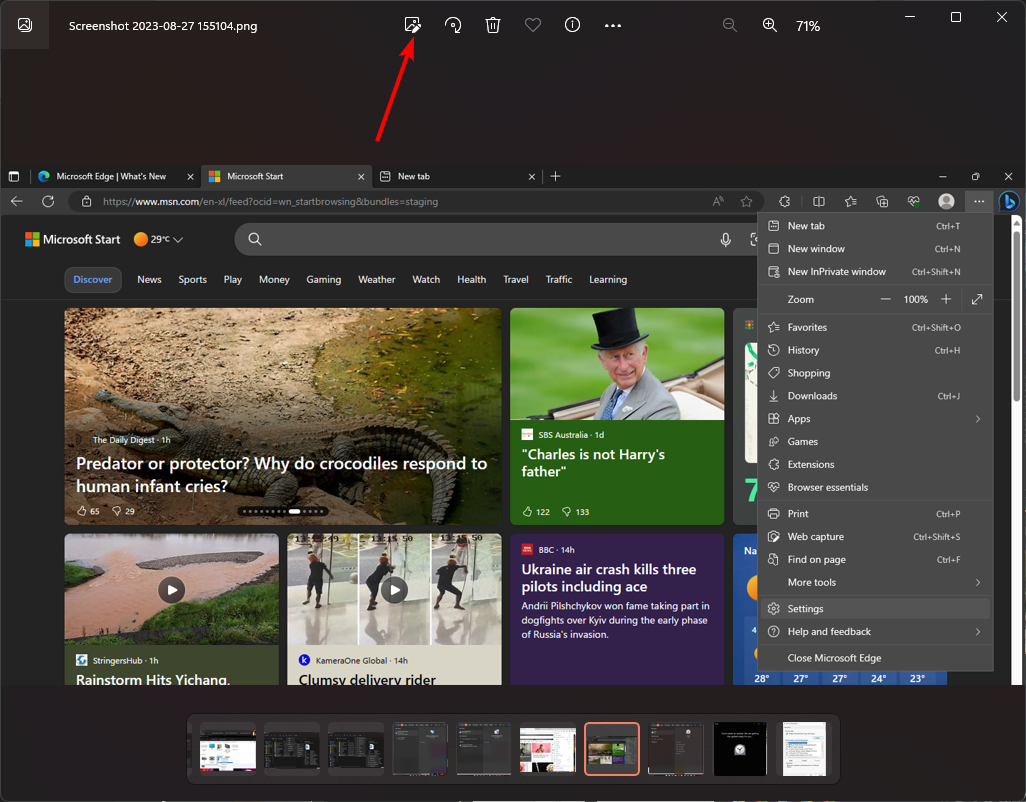
Double-click on the image you wish to crop and click on the Edit image icon.
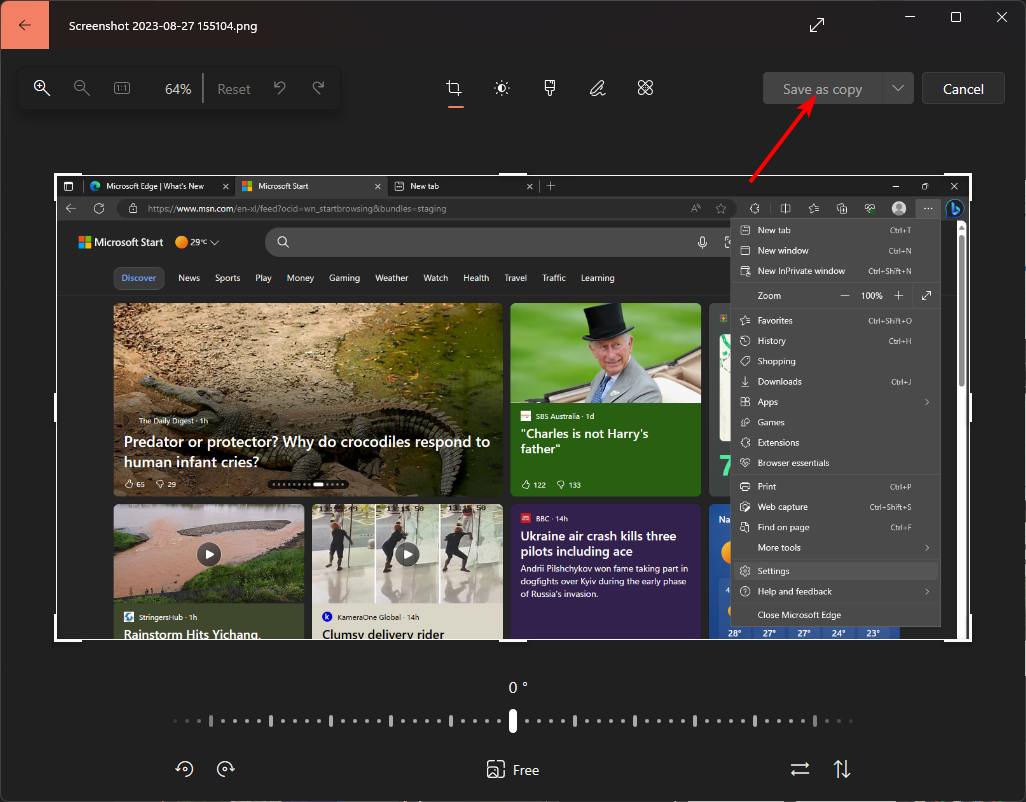
Click on the crop icon, drag the box to desired crop size then hit Save as copy.
3. By using the Paint app
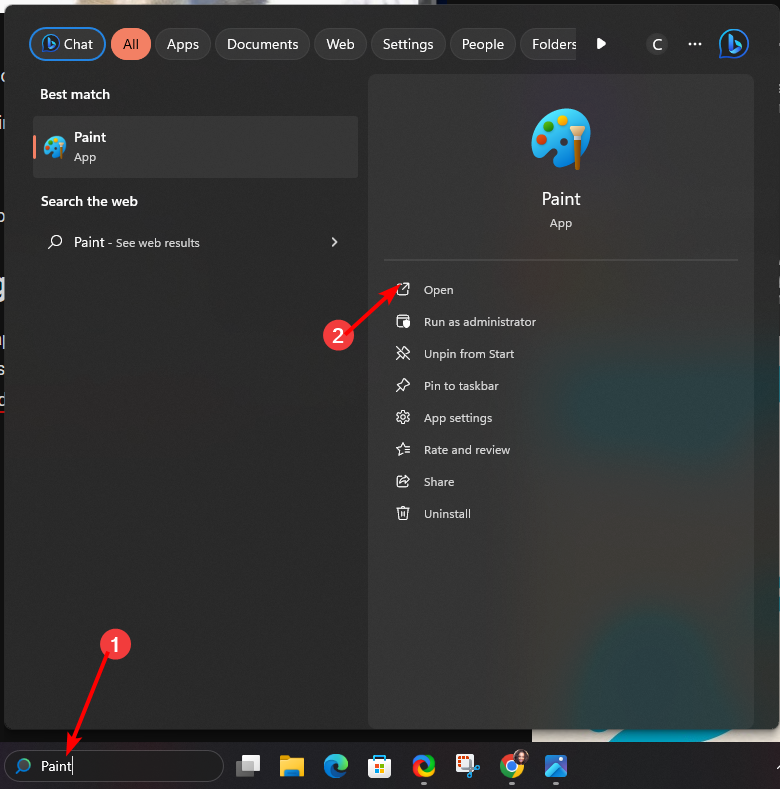
Click on the Search bar, type Paint, and click Open.
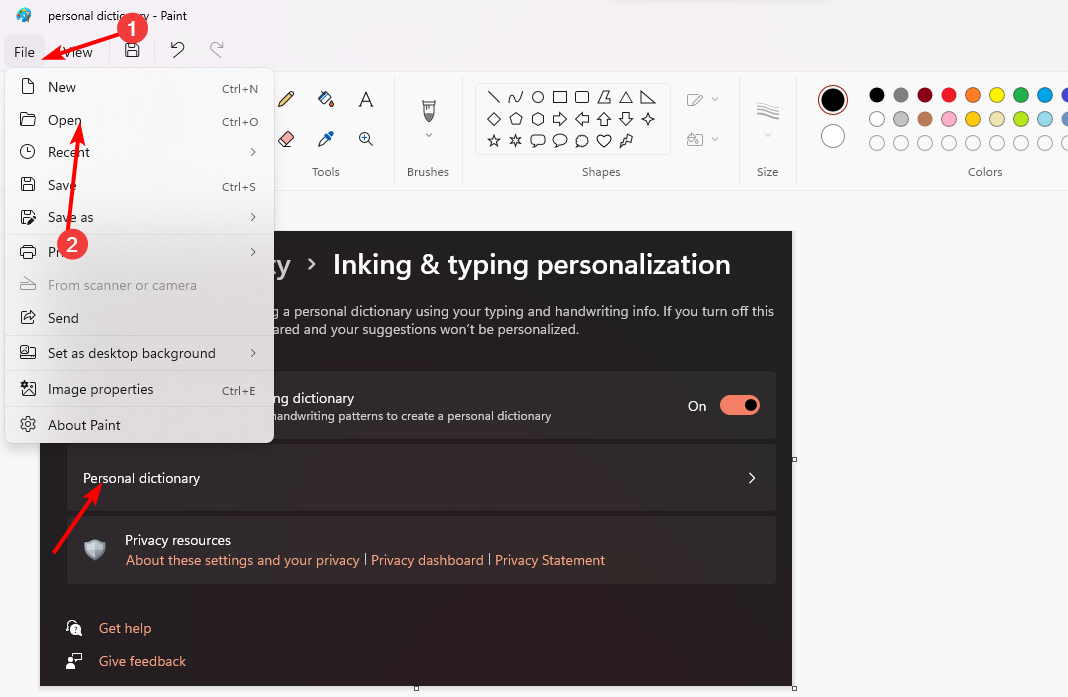
Navigate to File>Open, then select the image you wish to crop.
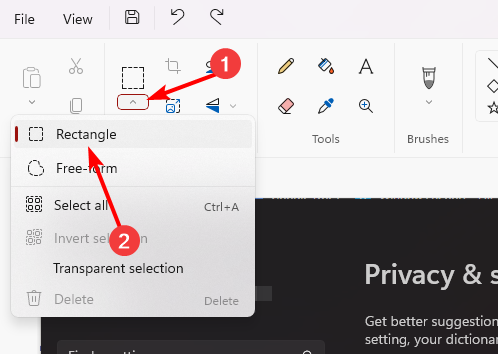
Go to the image tab, click on the rectangular icon, and in the drop-down menu select Rectangle.
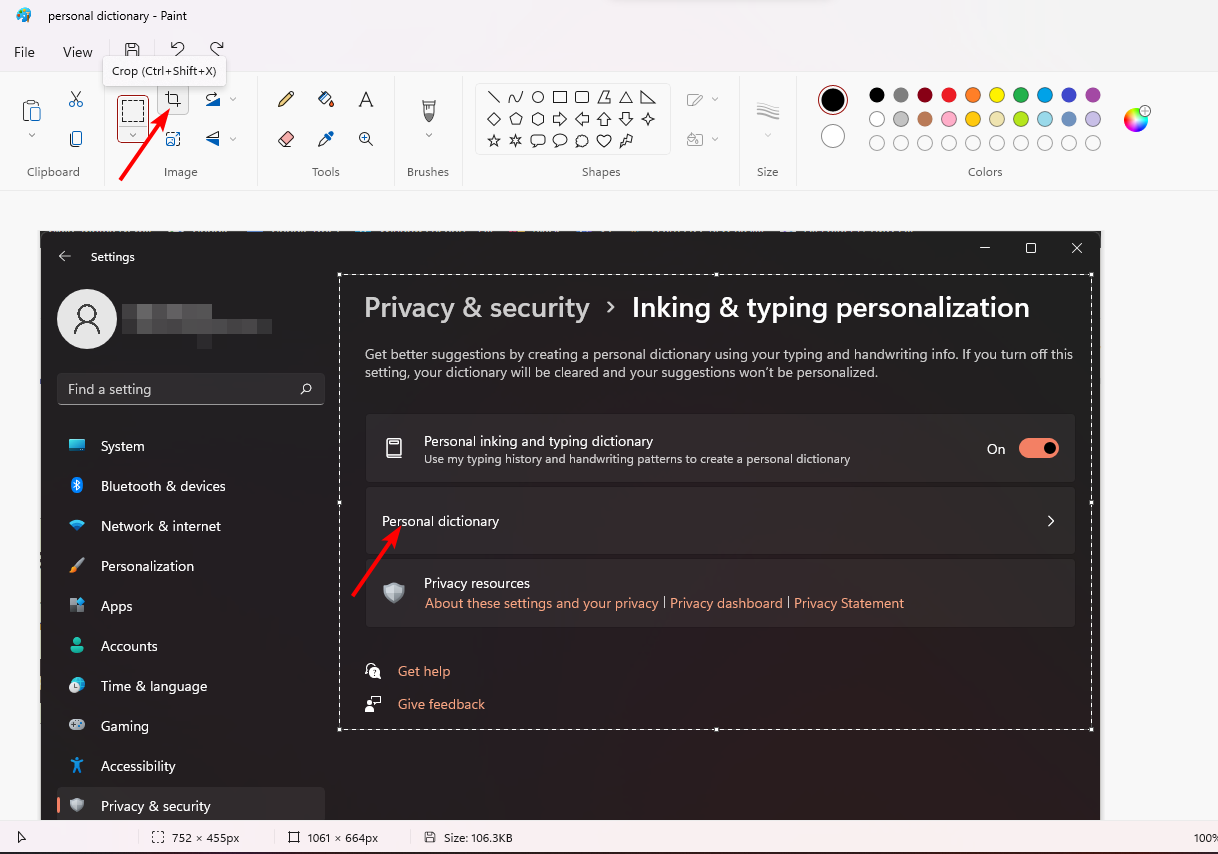
Crop your image to your desired size, then hit the crop icon or click CTRL + Shift + X.
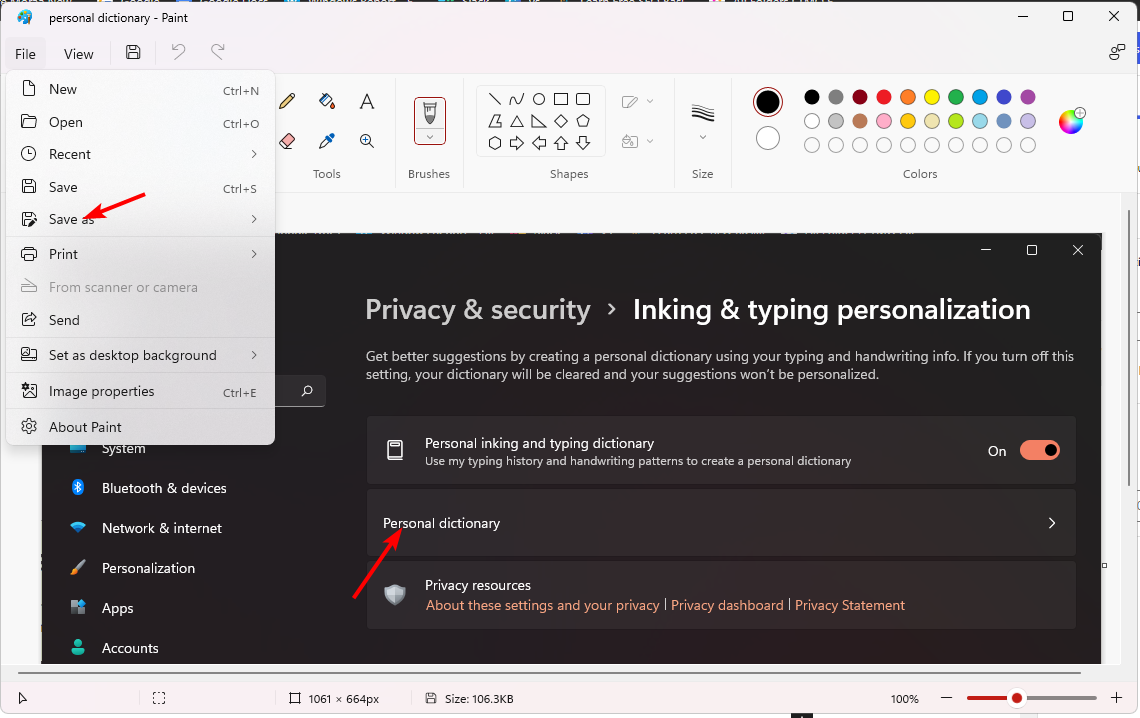
Click on File, select Save as, and give your cropped image a name.
4. By using the Paint 3D app
Hit the Windows + E keys to open File Explorer.
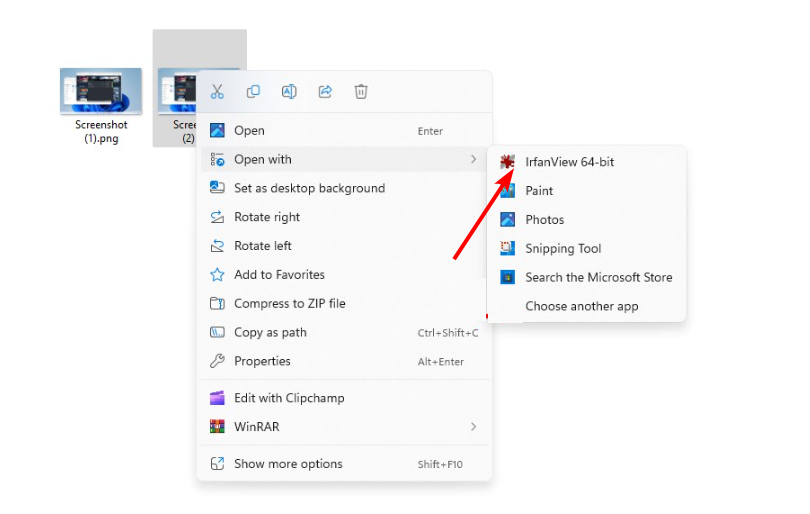
Locate the image you wish to crop, right-click on it, and select Open with>Paint 3D.
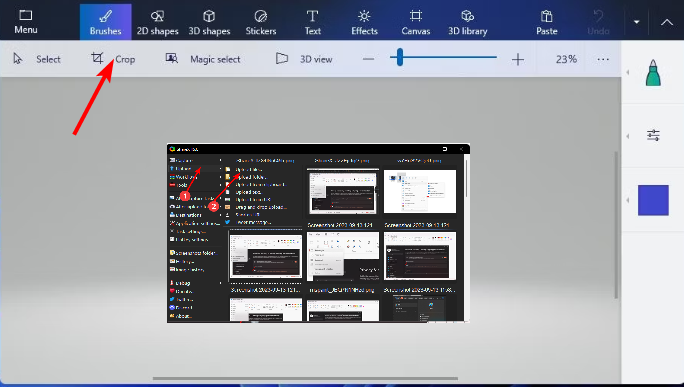
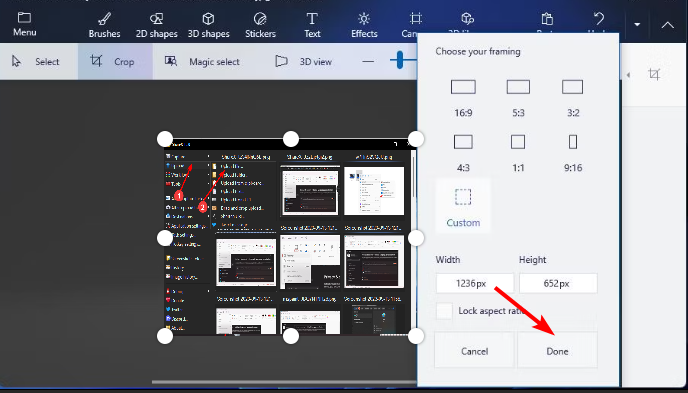
Click the crop icon and adjust the area to get your desired size.
Hit Done when finished.
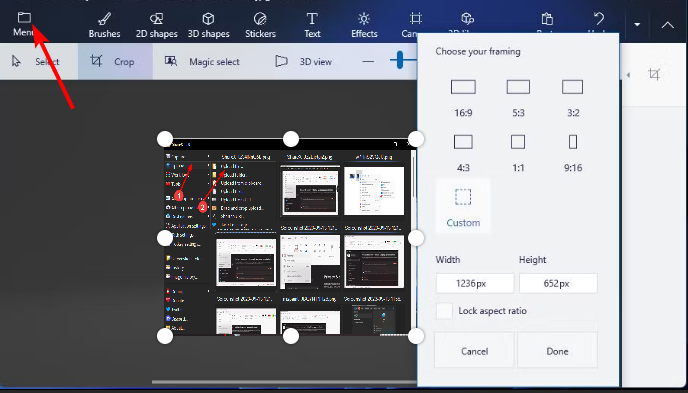
Click on Menu, select Save as, and give your cropped image a new name.
Paint 3D is similar to the Paint app only with advanced features.
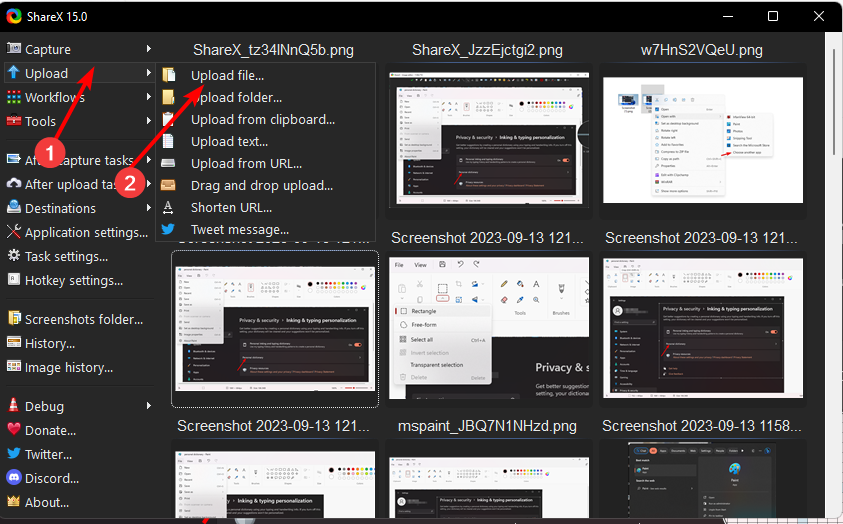
Click on the Upload>Upload file and select the image you wish to crop.
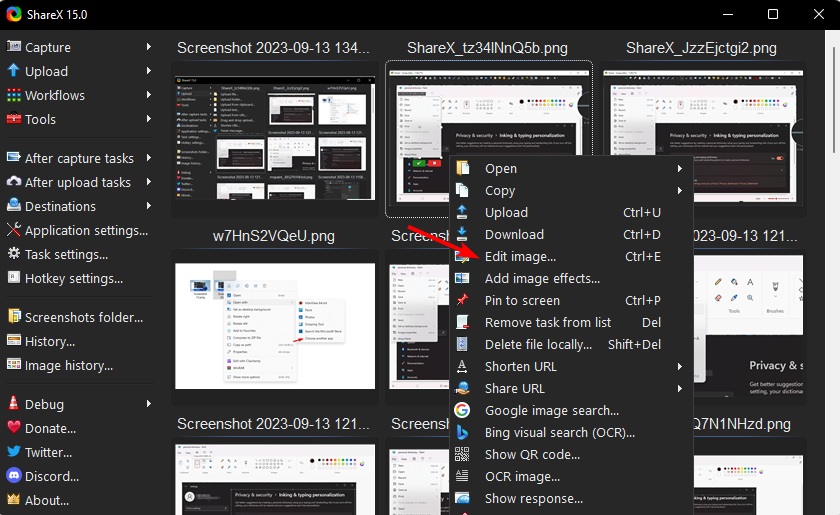
Right-click on the image and select Edit image.
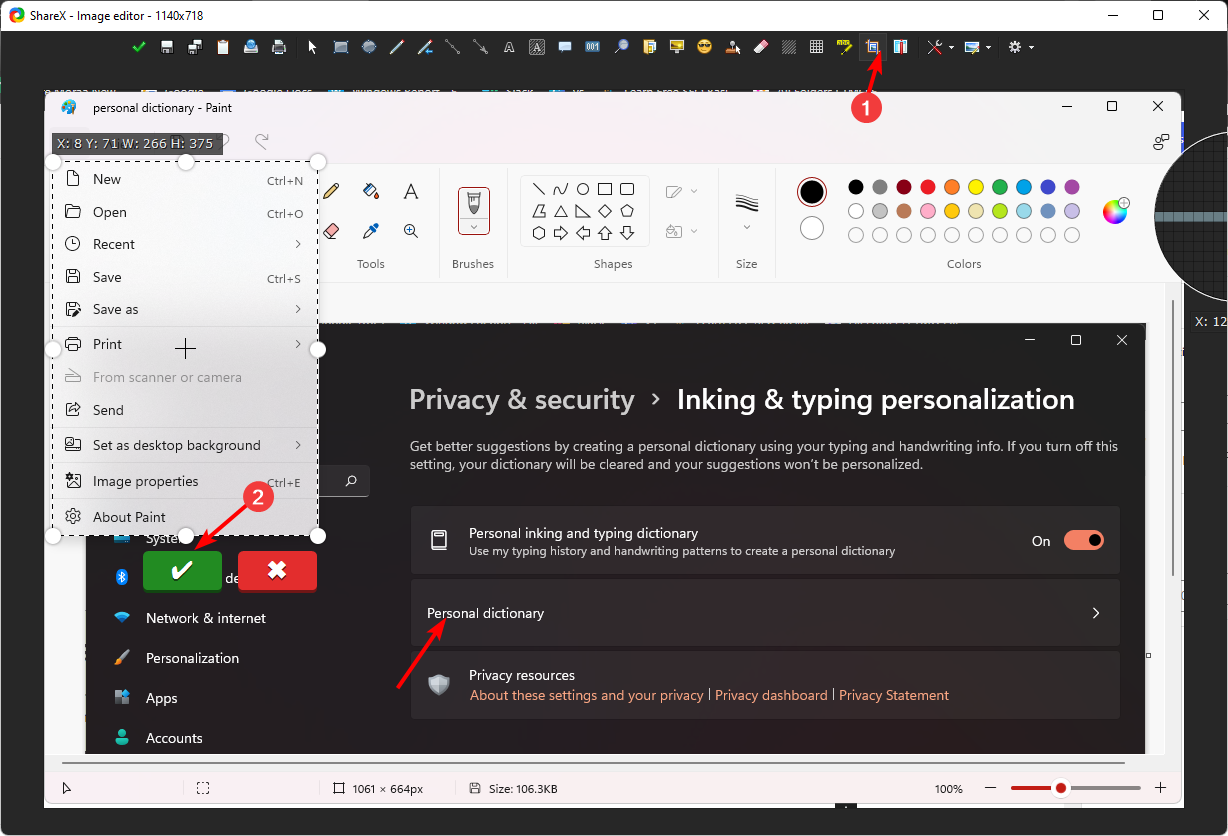
Click on the crop icon and adjust the rectangle to your desired crop size, then hit the green tick.
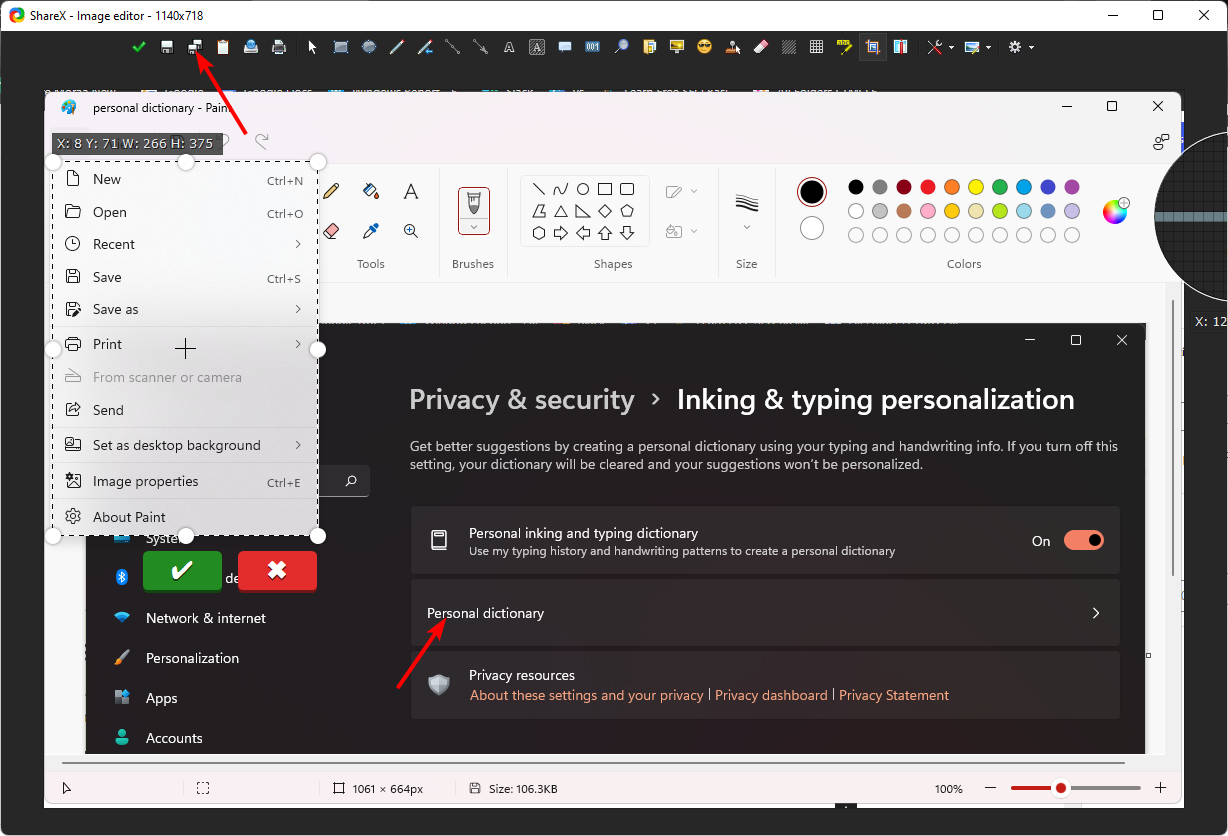
Hit the Save as icon and rename your image.
Aside from the built-in tools availed by Windows 11, you can also get other third-party image editors that are lightweight and have advanced features you may need. For instance, when cropping images with GIMP, you can use various methods to achieve the same results.
If you’re more into advanced editors, you can explore the Fotor editor, which comes with AI features and other tools. Further, where cropping may fail to get rid of unwanted elements, you can use Generative Erase.
And that’s all there is to it. Whether your image needs to be cropped before you upload it, or are you just looking for a way to make changes in-house without needing expensive software, Windows gives you access to easy-to-use image editing programs.
Hopefully, you’ve put to use one of the above methods and can crop your images with ease. Let us know your preferred program to crop your images in the comments below.
The File Explorer is one of the most effective file managers with an easy-to-use interface. But it often becomes a source of problems. A few users found Windows 11 File Explorer taking focus when they were working on another app.
The File Explorer window opened without any trigger, even when the computer had no active applications. Users reported the issue when running video files, playing games, or working on Excel. And for some, File Explorer would open at a fixed time every day.
What does it mean for a window to take focus?
When the window opens on top of all active programs, and any cursor actions are directed to it, it’s said to have taken focus. You can force trigger a window to take focus, but the configured settings play a significant role here.
How do I stop Explorer from taking focus on Windows 11?
Before trying the complex solutions, give these simpler ones a try:
Terminate Windows Explorer or explorer.exe from the Task Manager.
Press Windows + S to open Search, type Command Prompt, right-click the relevant search result, and select Run as administrator.
Click Yes in the UAC prompt.
Paste the following commands individually and hit Enter after each: DISM /Online /Cleanup-Image /CheckHealthDISM /Online /Cleanup-Image /ScanHealthDISM /Online /Cleanup-Image /RestoreHealth
Now, execute this command to run the SFC scan: sfc /scannow
Once done, restart the computer and check for improvements.
You should know there are other methods of repairing corrupt system files. For instance, you can try automatic repair tools.
2. Reinstall the problematic drivers
Press Windows + X to open the Power User menu, and select Device Manager from the list of options.
Expand Human Interface Devices , right-click on the touchscreen device, and select Uninstall device.
Click Uninstall in the confirmation prompt, and then restart the computer.
If the problem remains unresolved, reinstall the graphics and touchpad drivers.
3. Update all the drivers
Press Windows + R to open Run, type devmgmt.msc in the text field, and hit Enter.
Expand the Display adapters entry, right-click on the active graphics adapter, and select Update driver.
Click Search automatically for drivers and let Windows search the PC and install the best available version.
Restart the computer and verify whether the problem is fixed.
Often, outdated drivers are responsible for malfunctions in Windows, and updating the graphics card driver should work when the Windows 11 File Explorer is taking focus.
If a newer version is not available locally, head to the manufacturer’s website, locate the latest version and manually install the driver. And while you are at it, update the touchpad and touchscreen device drivers.
4. Delete any scheduled tasks
Tip
This solution only applies to cases where File Explorer takes focus and launches at specific times every day.
Press Windows + S to open Search, type Task Scheduler in the text field, and click the relevant search result.
Select Task Scheduler Library from the navigation pane, and identify any tasks configured for the same time when File Explorer steals focus.
If you find one, right-click on the task and select Delete from the context menu.
Click Yes in the confirmation prompt.
A task could be responsible when File Explorer comes to the foreground and takes focus in Windows 11. A user reported that clearing CCleanerCrashReporting from Task Scheduler did the trick!
Press Windows + I to open Settings, go to Apps from the left pane, and click on Installed apps.
Click the ellipsis next to an app installed around the same time the problem first appeared, and select Uninstall.
Follow the on-screen instructions to complete the process.
You may have to uninstall a few apps before finding the problematic app.
6. Disable the touchscreen functionality (2-in-1 laptops)
Press Windows + S to open Search, type Device Manager, and click the relevant search result.
Double-click the Human Interface Devices entry, right-click on HID-compliant touch screen, and select Disable device.
Click Yes in the confirmation prompt.
Restart the computer, and if Windows 11 File Explorer is still stealing focus, re-enable the touchscreen.
7. Perform an in-place upgrade
Open Microsoft’s official website, choose the edition and follow the on-screen instructions to download the Windows 11 ISO.
Double-click the downloaded ISO file to view its contents.
Run the setup.exe file.
Click Yes in the UAC prompt that appears.
Click Next to proceed with the in-place upgrade.
Check the Microsoft’s license terms, and click Accept.
Make sure the setup reads, Keep personal files and apps, and then click Install.
Wait for the process to complete.
Issues like Windows 11 File Explorer randomly opening, stealing focus, or the Explorer’s search not working can be fixed with an in-place upgrade. It’s similar to reinstalling the OS, but the stored data remains unaffected.
Other common File Explorer issues & how to fix them
Tip
If you are facing any of these issues, click on the hyperlink and view the verified solutions for each in the dedicated guide.
Remember, when Windows 11 Explorer is taking focus from the active window, it’s often a problem at your end or the OS to blame. And now that you have things up and running, check some quick File Explorer customizations to personalize and streamline the experience.
For any queries or to share which fix worked for you, drop a comment below.
If Windows is not asking to replace files when copying new content, that may turn into a big problem that you won’t even notice until too late.
Why isn’t Windows 11 prompting duplicate files? Usually, that happens because the Folder options in File Explorer were modified.
However, according to a Microsoft Support Specialist, you should also know that the duplicate file dialogue only appears when you copy something from one partition to another. For example, from C: to D:.
If you are pasting from an external source or from the same drive to the same folder and the file has an identical name, the system will add a copy of the destination file with an additional identifier like (Copy) to the new file to differentiate it.
What can I do if the Replace or Skip dialogue box no longer appears?
1. Restore the Folder options to default
Press Win + E on your keyboard to start File Explorer.
Click on the three horizontal dots from the top bar and select Options.
Now, click on View and hit the Restore Defaults button.
Click Apply and OK to save the changes.
This is the quickest solution for the Windows 11 no file overwrite prompt issue. If some modifications have been made to File Explorer, this method should restore everything to normal.
Press the Windows + E keys to start File Explorer.
Click on the three horizontal dots from the top bar and select Options.
Select the View tab and uncheck the Hide folder merge conflicts.
Click Apply and OK to save the changes and try the copy action again to see if the Replace dialogue appears.
This should reenable the file dialog box when attempting to overwrite a folder with the same name as the destination directory.
3. Reset File Explorer
Press the Windows + E key combination to start File Explorer.
Click on the Menu button and select Options.
Now, hit the Restore Defaults button in the General tab. That will restore all the File Explorer settings.
Click on Apply and OK to preserve the changes, then restart File Explorer and try to copy the files again to see if the Replace and Skip dialogue appears.
The Replace and Skip dialogue should also appear when you extract some files from an archive to the same destination folder from which the files originated.
By default, when you use the Extract all option in Windows 11, the app creates a new folder but if you have changed the settings and set it to paste the file in the same folder, you will have to see the replace or skip options.
How do I restore a file or folder to the earlier version?
In case you have overwritten a file or a folder by mistake or due to this file conflict, here’s how you can undo the action.
Right-click the file or folder that you have overwritten and select Properties.
Go to the Previous Versions tab, click on the version you want to restore, and hit the Restore button.
Click on Apply and OK to confirm the changes.
This concludes our guide, hoping that our solutions helped you get over the file dialog bug and you still have the original files intact.
File or folder properties are used to access the vital details or reconfigure the settings, including permissions. But a few users found no Details tab in the properties on File Explorer in Windows 11.
Tabs may go missing occasionally due to a problem with the OS. Some even found the Security tab absent in File Explorer, and it’s just General and Previous Versions available in most cases.
Why is there no Details tab in Windows 11?
Corrupted operating system files
Issues with the user account
Missing file permissions
Recent changes to the PC triggering conflicts
How can I add the Details tab back to Proprieties on Windows 11?
Before we head to the slightly complex solutions, try these simpler ones first:
Check whether it’s a file or folder you are viewing. By default, Windows only shows the Details tab for files.
Press Windows + R to open Run, type regedit in the text field, and hit Enter.
Click Yes in the UAC prompt.
Now, paste the following path in the address bar and hit Enter:HKEY_CLASSES_ROOT\*\shellex\PropertySheetHandlers
Check whether the {883373C3-BF89-11D1-BE35-080036B11A03} subkey exists in the left pane. If not, right-click on PropertySheetHandlers, hover the cursor over New, select Key, and give it the same name as the string.
Alternatively, if you have stored a backup of the reg file before deleting the key, restore it, and the Details tab should reappear in the Windows 11 file properties.
2. Repair the corrupt system files
Press Windows + S to open Search, type Command Prompt, right-click on the relevant search result, and select Run as administrator.
Click Yes in the prompt that appears.
Paste the following three DISM commands individually and hit Enter after each: DISM /Online /Cleanup-Image /CheckHealthDISM /Online /Cleanup-Image /ScanHealthDISM /Online /Cleanup-Image /RestoreHealth
Next, run the SFC scan by executing this command: sfc /scannow
Wait for the scan to complete, and then restart the computer.
Often, file properties disappear due to corrupted system files, and that’s where the SFC scan and DISM commands come to our rescue. These will replace any corrupt files with their locally stored cached copy. Moreover, you can use dedicated software to perform this task for you.
3. Restore the system
Press Windows + S to open Search, type Create a restore point, and click the relevant search result.
Click the System Restore button.
Select Choose a different restore point and click Next.
Now, pick another restore point (preferably the oldest) from the list, and click Next.
Verify the restore details and click Finish.
Wait for the restore to complete.
4. Perform an in-place upgrade
Go to Microsoft’s official website, select the ISO edition and product language, and then download the Windows 11 ISO.
After it’s downloaded, double-click the file and click Open to confirm.
Run the setup.exe file.
Click Yes in the popup window.
Click Next to proceed.
Read through the Microsoft’s license terms, and then click Next.
Finally, verify that the setup reads, Keep personal files and apps, and click Finish.
When there’s no Details tab or you can’t edit file properties in Windows 11, a quick solution to eliminate any inconsistencies or conflicts is an in-place upgrade. The process may take a few hours, but it is as good as reinstalling the OS, and the stored files and apps remain unaffected.
Press Windows + R to open Run, type netplwiz in the text field, and click OK.
Click the Add button.
Click on Sign in without a Microsoft account.
Choose Local account from the bottom to proceed.
Enter the username, password, and a hint, then complete the account creation.
Select the new account, and click on Properties.
Go to the Group Membership tab, select Administrator, and click OK to save the changes.
Sign in with the new user account, and you should find the Details tab in file properties on Windows 11. To transfer data between the accounts, you can use an external drive, a USB stick, or an effective cloud storage service.
Alternatives to viewing file details in Windows 11
For files downloaded from the web, check details on the hosting server.
While no Details tab in Windows 11 properties is serious, another issue that affects users is the missing Compatibility tab, which prevents them from running older apps.
And some found the Location tab missing, but it’s easily fixable with a quick Registry edit.
If you know of other solutions or workarounds, drop them in the comments section.
Keeping your PC safe from unauthorized access is crucial if you want to protect your files and personal data, and this is why many want to create a USB security key on Windows 11.
This is the most secure authentication method, and in today’s guide, we will show you how to set it up on your PC properly.
The benefits of using a USB security key on Windows 11
The physical security key offers the most secure two-factor authentication.
They are immune to phishing attacks since they don’t use Internet connection.
Security keys can protect both your Windows account and most online accounts.
Many security keys are compatible with Windows Hello.
How do I create my USB security key from scratch on Windows 11?
Use the Settings app
Press the Windows key + I to open the Settings app.
Navigate to Accounts in the left pane. In the right pane, choose Sign in options.
Expand the Security key section and click on Manage.
Insert your security key and touch it to activate it.
Click the Change button and then enter your old PIN and new PIN twice.
Save changes to complete the Windows security key setup.
Backup options for your USB security keys
Due to the nature of USB security keys and physical authentication, it’s not possible to backup USB security keys.
Instead, it’s always better to have multiple security keys since key recovery isn’t an option.
Additional tips for enhancing your level of security with a USB drive on Windows 11
Always have a backup key ready. A good practice is to have two or three keys available.
If possible, protect your USB key with a PIN. A strong PIN will add an additional layer of protection.
Use security keys from reputable brands to avoid any security and compatibility issues.
Store backup keys in a remote but easy-to-access location
The USB security key offers advanced security features since it’s a physical device, and this is why many users prefer using USB software to lock their PCs.
To protect your PC further, we have a guide on the Windows 11 security settings that you should enable. One of these settings includes file encryption, and to learn more, check our guide on how to encrypt a USB flash drive in order to protect it.
If you get tired of receiving the message to insert your security key, you can disable the USB security key and explore other authentication options.
In a world where software updates come faster than the morning coffee, it’s refreshing when they introduce meaningful changes. One such case is the recent update to PowerToys, presented via a pull request on GitHub (Fluent UX PowerToys Run #28538).
According to the pull request on GitHub, PowerToys is getting an update. The major attractiveness of this update is the transition of Run from the Modern WPF platform to WpfUI.
The developers behind the project had a specific cause for this shift: paving the way for the UX update, aligning seamlessly with the Windows 11 Design Language. So, what does this mean for users? A sleek interface, intuitive design, and a general feeling of smoothness are some of the prominent improvements.
Another hefty change that comes packed in this update is an enhancement that Windows enthusiasts have been eagerly waiting for – the acrylic backdrop. This neat feature becomes apparent when the search box is empty.
Rather than just a void, users now find themselves before an interactive overview of all activated plugins and trigger commands. This gives them a bird’s-eye view of their commands, making navigation more effortless.
Further delving into the cosmetics, the update blesses us with a substitution of all old plugin icons. Replacing them are the fresh symbols from Segoe Fluent Icons. Now users can enjoy a more aesthetically pleasing, coherent appearance in their icon lineup.
Lastly, the default size is now trimmed down, a slight modification that increased the utility of the software. The window of Run isn’t as intrusive as before, with its minimized presence. But don’t be fooled. Sometimes, less is more, and in this case, that ‘more’ is the result. Yes, this reduced size can surprisingly provide a larger stream of results. Efficient and subtle.
In conclusion, this upcoming update may appear less creative at first glance, but it brings with it efficiency, aesthetic appeal, and higher functionality all under one umbrella. PowerToys is thus taking a step in the right direction, adding quality-of-life changes for the users and making their interactions with the software more enjoyable and effective.
Microsoft has released a new pair of Windows 11 Insider updates today, for the Canary Channel (25921) and the Dev Channel (23545). For the Canary Channel, there are a couple of new features for Server Message Blocks (SMB), and the new Canary Channel build now supports blocking NTLM for remote outbound connections. This changes legacy behavior, and an administrator can now “intentionally block Windows from offering NTLM via SMB.”
Admins can now also control which SMB2 and SMB3 dialects the SMB server will negotiate.
In addition, the network flyout on the lock screen will now better match the network flyout from quick settings. You can check out all the details over at the Windows Insider blog post.
Microsoft plans to expand Bing Chat’s character limit in both its consumer and Enterprise versions. Doubling the character limit from 4,000 to 8,000 characters could offer users more conversation flexibility.
Mikhail Parakhin, the Vice President of Search at Microsoft, tweeted about the limits, and some of the technical challenges involved in making such a change.
It is the same in both Consumer Bing Chat and BCE. We will expand it, but not quickly: all the algorithms are quadratic in context size, so, increasing to 8K would be 4x more expensive.
Expanding the character limit could benefit users who require longer and more detailed messages in their chats, especially in enterprise settings where communication is often more extensive and complex.
This update might be well-received by Bing Chat users who have found the previous character limit restrictive for their conversations. It will be interesting to see how this change affects the overall user experience and the adoption of Bing Chat in various contexts.
With the latest Windows 11 Beta channel build, Windows enthusiasts are witnessing a change. It appears Microsoft has begun pushing the New Outlook onto Windows Insiders.
Windows enthusiast and Twitter user PhantomOcean3 discovered that the Beta channel build 22631.2338 (KB5030305) automatically installed the new Outlook after a system reboot.
Looks like the new Outlook for Windows app might be automatically installed for you after updating to 22631.2338. I didn't go and download it myself, yet here it is. pic.twitter.com/MUdoSA3sKu
PhantomOcean3 conducted an impromptu Twitter poll to gather feedback and confirm updates from other users. As of the last count, it became evident that a fraction of the voters, approximately 28.8%, also received the new Outlook client following system updates.
If you've updated to 22631.2338, were the new Outlook for Windows app and/or Dev Home automatically installed after an additional reboot?
Brandon LeBlanc, Senior Program Manager of the Windows Insider Program, confirmed PhantomOcean3’s discovery. According to LeBlanc, the auto-installation of the new Outlook was, indeed, an expected move on Microsoft’s end.
However, the implementation is currently expected to occur on some systems only, indicating that Microsoft might be test-driving the feature. The move is possibly in preparation for an automatic installation breakthrough with the Windows 11 23H2 feature update. Still, its distribution might take on the more digestible rate of a gradual rollout.
Tracing the roots of the New Outlook back to May 2022, the project was an initiative by Microsoft to trial a new, redesigned, and revamped version of Outlook. The end goal of the initiative was to unify the Outlook application across all platforms, consequently leading to the project often being referred to as “One Outlook.”
Upon successfully passing the trial stages, Microsoft ventured into debuting the preview to the Current channel users. As of now, the feedback from users who have started using the new Outlook client is highly anticipated.
But for now, Microsoft’s Windows Insiders are poised to continue their explorations and to bring such interesting changes to light.
Microsoft has released two new Windows 11 Beta channel builds. One of these iterations, Build 22631.2338, typically known for bringing in fresh features, has, in fact, pulled the plug on a significant one – Teams Chat is now officially labeled Microsoft Teams – Free.
Microsoft Teams – Free will now appear as a default icon pinned to the taskbar, operating much like any other app. It can be unpinned at user discretion, akin to other taskbar apps, the tech giant announced in a blog post.
Beginning to roll out with this build, Chat is now Microsoft Teams – Free. Microsoft Teams – Free is pinned by default to the taskbar and can be unpinned like other apps on the taskbar.
Updates on Windows 11 Builds
The Windows 11 Build 22631.2338 promises several new developments. It holds the most buzz due to the virtual exit of Teams. Instead of Teams integration within the system, Microsoft now presents a free version of Teams.
Named “Microsoft Teams – Free”, the app offers features identical to Teams’ consumer and personal versions in previous Windows, including the ability to pin and unpin it from the taskbar. Bug fixes and an overall system enhancement accompanied the rollout.
The second build, Windows 11 Beta Channel 22621.2338, is primarily focusing on bug fixes. We’ve provided an in-depth explanation of both builds in a separate post. Please refer to it for further insights.
We are particularly interested in requiring “safety brakes” for highly capable AI models in critical infrastructure. This seems sensible to mitigate the risks of these systems being used for malicious purposes. We look forward to following the legislative process’s progress and seeing how the government can work to ensure that AI is used for good.
Many Microsoft-watchers – especially fans of OneNote – may reflect on the company’s application strategy over the last few years, as the initial push to Windows 8 “Modern” – not “Metro” – apps evolved into the Universal Windows Platform that could run on phones, PCs and other devices. Clearly, with the cancelling of Windows Mobile, things didn’t work out quite the way they were envisaged and UWP is all but dead. Microsoft itself dabbled with UWP in some areas (for a while offering slimmed down Office apps) but is now leading developers away from that specific model.
Which OneNote is the one for me?
At one stage, the venerable OneNote was dropped from the Office suite in favor of the Modern/Store/UWP app (into which all future developments would be put), confusingly also named “OneNote” but known during its life as some combo of “OneNote for Windows Store”, “OneNote Modern app” etc. Calling different things by the same name can cause confusion, but apart from Office, Skype, Teams, Xbox and a few others, Microsoft fortunately doesn’t have too much of this problem.
The mobile app was eventually renamed “OneNote for Windows 10” yet is not the first controversy around the naming scheme for OneNote – during the original app’s development (as “Scribbler“, to be released as part of Office 2003), some of the engineering team so disliked the branding that marketing gave it, they referred to it disparagingly as “Onay-No-Tay“.
In a later change of plan, it was revealed that the original OneNote would in fact be revived and all efforts would be going into that. The UWP app will finally go away in 2025, at the same time as Windows 10 goes out of support.
Anyway, now that life is both breathed back into the old Win64 version of OneNote and it is the stated way forward, one positive is that, unlike in the UWP version, there is an addin framework so the base app can be extended. Not that addins are particularly numerous or even easy to find – there’s no “Addins” menu option in the OneNote app, and the AppSource product catalog only lists a handful. App developers can build and install their own addins as EXE files to be distributed and installed like any other program.
Introducing OneTastic
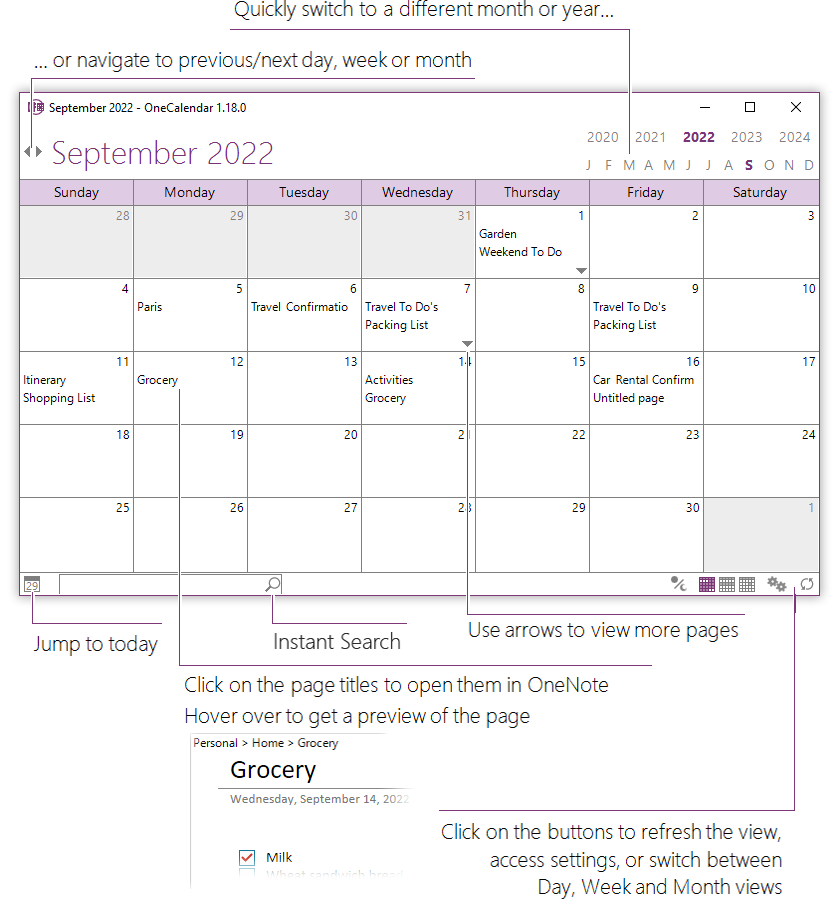
OneTastic and its predecessor OneCalendar have been available for over a decade now, published as a side gig by Omer Atay from the OneNote product group. OneCalendar is especially useful as it shows you a list of which OneNote pages you have edited based on when you did so; if you routinely keep meeting notes in lots of different parts of one or multiple notebooks, it’s a lifesaver. Click on any of the short links on a given day, and it will jump to that particular page, in whichever section or notebook or hover the mouse to get a preview of that page, so it makes jumping back to the notes you took at last week’s meeting so easy.
[Image courtesy of OneTastic.com]
OneCalendar started life as a separate app to OneNote, and it can be installed and run separately if you don’t want any of the other stuff OneTastic brings. It is included as a menu option within OneTastic, and the wider suite includes a variety of other tools including a macro language which can automate OneNote. “Macroland” is a rich library of downloadable off-the-shelf macros to carry out functions that don’t exist in OneNote, like inserting a table of contents or doing more advanced table handling, sorting and the likes. There are some limits on downloading and usage of Macros in the free version, with commercial licensing available.
Everyone who considers themselves a heavy user of OneNote should check out OneTastic, especially for the OneCalendar function. Some of the macros will save you a lot of time if using OneNote in a collaborative setting, too, and given that it’s written by someone who’s been a long-time part of the OneNote engineering team, it’s the perfect way to fill in some of the gaps in functionality which presumably exist to try to keep OneNote simple and not overburdened with options.
While the default theme in Windows works fine for most, some prefer a solid color, especially a black background, for enhanced visibility. And this is where the Windows 11 high contrast themes come into the picture.
Windows offers a set of built-in dark themes, but you can always get more if the available options don’t fulfill the intended purpose. Besides, you can further customize the dark mode, change the background color, and choose other theme options.
Benefits of high contrast themes:
Optimal color combination for people who have trouble viewing.
Lesser eye strain.
A sleek and unique look.
Changes the color of links and buttons, enhancing visibility.
How do I get more contrast themes in Windows 11?
1. Choose an already available contrast theme
Press Windows + I to open Settings, go to Accessibility from the navigation pane, and select Contrast themes.
Choose one of the high contrast themes from the dropdown menu. You can also check the appearance under previews.
Click on Apply for the changes to come into effect.
Similarly, you can enable other contrast themes in no time.
2. Get Windows 11 contrast themes from the Microsoft Store
Press Windows + S to open the Search menu, type Microsoft Store in the text field, and click the relevant result.
Type Windows Themes in the search field at the top, and hit Enter.
You will now find a range of themes compatible with the PC.
Select any and click the Get button to download it.
After the theme is downloaded, press Windows + I to open Settings, select Personalization from the left pane, and click on Themes.
Finally, choose the one you got from the Microsoft Store, and it should apply immediately.
Microsoft Store offers a wide range of dark themes for Windows 11. Though, for most of these, the changes are limited to the desktop, and you won’t get the high-contrast colors in the built-in apps.
WindowsReport is not affiliated with any of the websites listed here. We recommend scanning files downloaded from these websites with an effective antivirus solution to keep the device safe.
There are several online platforms that allow creators to submit themes and, at the same time, let users download high contrast themes for Windows 11. The options here are limitless, and you should surely find one that meets the requirements.
Press Windows + I to open Settings, select the Accessibility tab, and then click on Contrast themes.
Choose a theme from the menu, and click Edit.
You can now change the background color, text color, hyperlink color, and the color assigned to buttons, amongst others. Simply click on the color box next to individual entries and select one that works best.
Click Save as to create a new theme.
Enter a theme name in the text field, and click Save and apply.
The new theme will be applied, and its details will be stored on the PC, while the contrast theme you edited initially remains unaltered. Besides, you can create custom themes for Google Chrome.
How do I turn high contrast mode on or off in Windows 11?
Use the keyboard shortcut: Press Left Alt + Left Shift + Print Screen > click Yes in the dialog box. The dedicated shortcut will also turn off high contrast mode when it’s enabled.
From Settings: Press Windows + I to open Settings > go to Accessibility > select Contrast themes > choose one from the dropdown menu > click Apply.
From Control Panel: Press Windows + R to open Run, paste shell:::{ED834ED6-4B5A-4bfe-8F11-A626DCB6A921} > hit Enter > select one of the High Contrast Themes listed here.
Windows allows you to choose from the built-in contrast themes, download one, or edit the available lot. Using the last option, you can find the best high contrast settings for Windows 11. Also, you may consider enabling high contrast on the browser for a better experience.
If all this sounds too complex to deal with, you can invert colors in Windows 11 and get a somewhat similar outcome.
Do share your favorite Windows 11 high contrast theme in the comments section below.
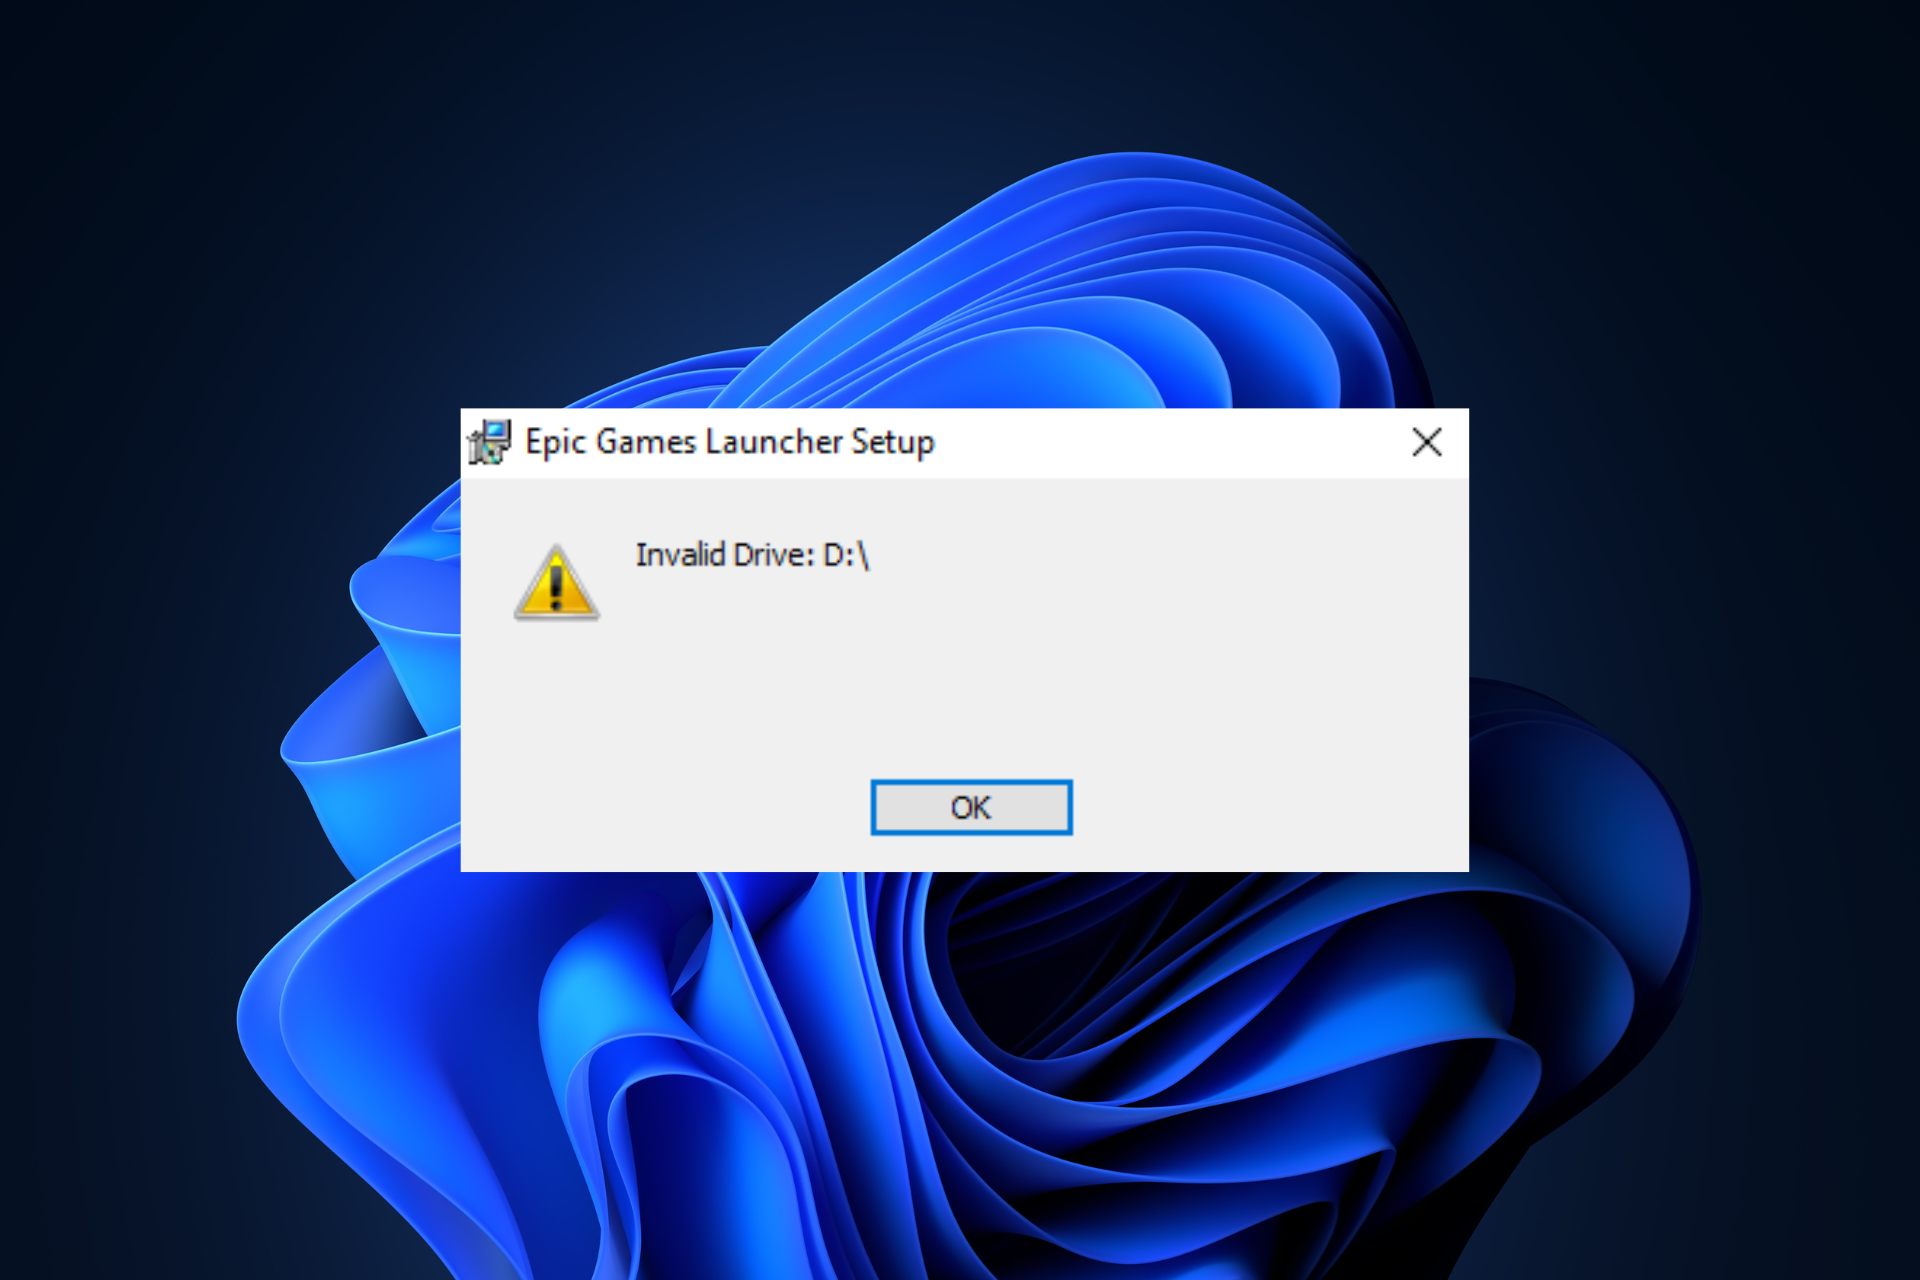
Many users have reported encountering the Invalid Drive error message when using the Epic Games installer to install a game from the store. If you are one of them, this guide can help!
We will discuss expert-recommended solutions to address the issue and get you back to gaming in no time.
Why am I getting the invalid drive error?
The installer is trying to access a drive letter that doesn’t exist or is currently unavailable.
Issues with Registry, like corrupted drive mappings.
Insufficient administrative permissions.
Third-party security software interfering with the installation process.
How can I fix the Invalid Drive error when installing the Epic Games Launcher?
Before we go to the advanced fixes, here are a few quick things you could try:
Restart your computer and uninstall unwanted apps.
Install all Windows updates if available.
Right-click the Epic Games Launcher or Installer, select Run as administrator, then try to perform the action.
Turn off the third-party security software temporarily if applicable.
1. Recover space on the drive
Press Windows + R to open the Run dialog box.
Type cleanmgr and click OK to open Disk Cleanup.
On the Disk Cleanup: Drive Selection window, select Windows (C:) or the system drive and click OK.
Click Clean up system files.
On the Disk Cleanup: Drive Selection window, select the system drive again and click OK.
Select all the items under Files to delete and click OK.
Select Delete Files from the following window.
Removing temporary files from your computer improves the system performance and can prevent issues like Something went wrong on Epic Games. If your disk is still low on space, try moving large files to an external HDD or cloud storage.
On the Programs Uninstall and Install troubleshooter window, select Advanced.
Now click Apply repairs automatically and click Next.
Choose Installing, as we are facing issues while installing.
Select the program from the list and click Next.
Follow the onscreen instructions, and the tool will try to fix the problem.
3. Change the drive letter & reinstall the game launcher
First, we will change the driver letter; for that, follow these steps:
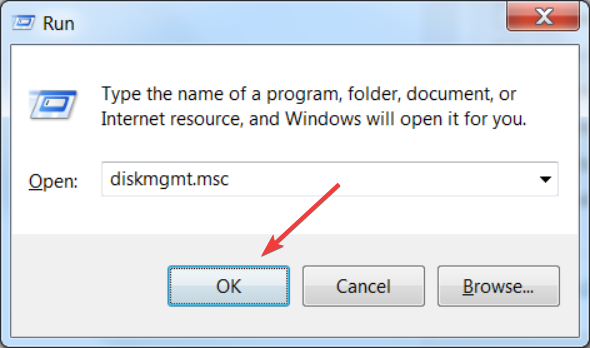
Press Windows + R to open the Run dialog box.
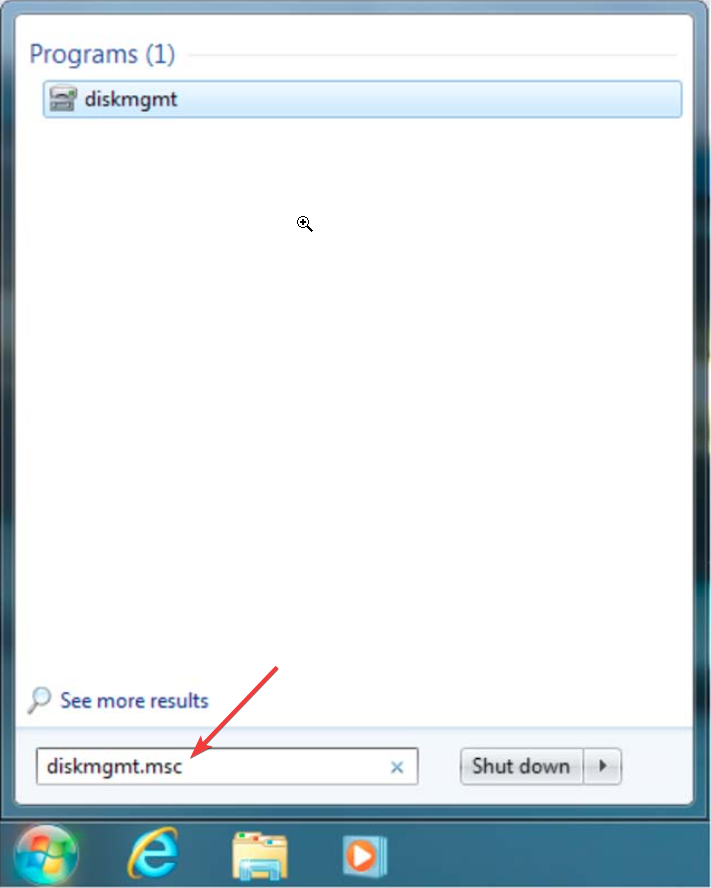
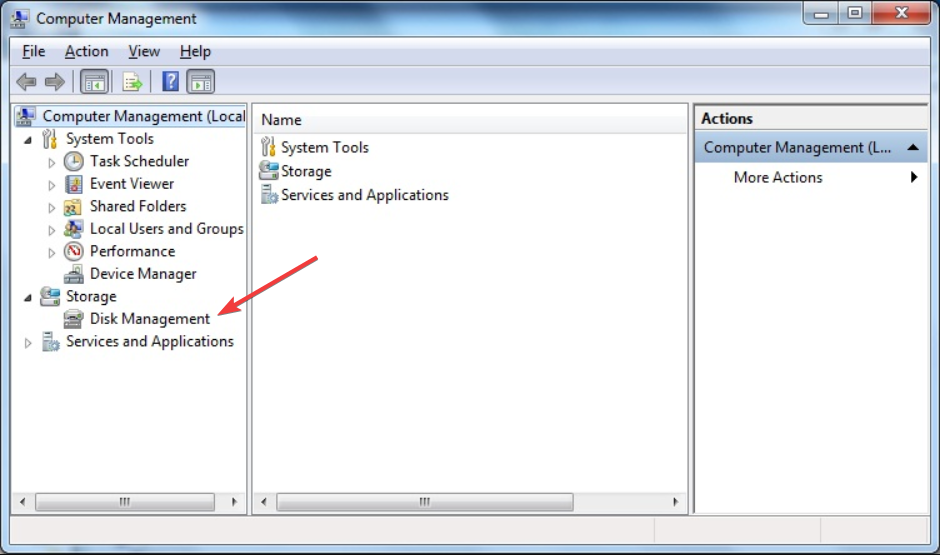
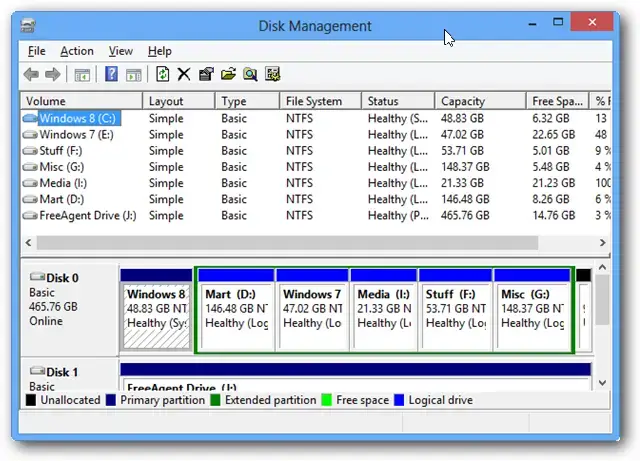
Type diskmgmt.msc and click OK to open the Disk Management window.
Right-click the drive you don’t use much to change the letter and click Change drive letter and paths.
On the Change Drive Letter and Paths window, select Change.
Next, on the following page, from the drop-down list, select the drive letter that appeared on the error. For example, it was Invalid Drive D:\, so I will change the letter to D.
Click OK. You will get a warning prompt; click Yes to proceed.
Click OK to confirm the changes.
Now follow these steps to install the game launcher:
Next, uninstall Epic Games Launcher, and for that, follow these steps:
Press Windows + R to open the Run dialog box.
Type appwiz.cpl and click OK to open the Programs and Features window.
Locate Epic Games Launcher and click Uninstall.
Follow the onscreen instructions to complete the process.
Next, press Windows + E to open File Explorer.
Go to C:\Program Files (x86)\Epic Games and delete the game folder.
Next, use the steps mentioned above to change the drive letter to the previous one so that everything on your computer works fine. Launch the game launcher installer, choose a desired location, and click Install.
On the Advanced Options page, click Startup Repair.
Your computer will restart, and the tool will diagnose & try to repair the issues. Once your computer is up but the Invalid Drive error persists, we suggest you try a specialized repair app.
5. Use the Command Prompt to substitute the drive
Press the Windows key, type cmd, and click Run as administrator.
In the Command Prompt window, type the following command to trick your Windows into thinking that your C drive is the D drive and press Enter: subst C:D:\
You need to replace the drive letter as per your computer. For me, here, C is the one I want to use to install Epic Games Launcher, and I am getting Epic Games installer Invalid drive D.
Once the command is executed, try performing the same action you did when you got the error to see if the issue persists.
6. Delete the registry entry
Press Windows +E to open Windows Explorer. Go to a drive where you want to install Epic Games Launcher, click New, select Folder, and name it Epic Games.
Right-click it, select Copy as path, and paste it at an accessible location after removing the quotes.
Press Windows + R to open the Run dialog box.
Type regedit and click OK to open Registry Editor.
Go to this path: Computer\HKEY_LOCAL_MACHINE\SOFTWARE\WOW6432Node\Microsoft\Windows\CurrentVersion\Uninstall
Double-click Uninstall to expand, and go through the entries to find the folder for Epic Launcher.
On the right pane, locate InstallLocation, double-click it, change the Value data to the path you copied, and click OK.
Restart your computer to save the changes.
If you have changed the hard drive and started getting this error, you might have to reinstall Windows to fix the issue.
In case none of these solutions worked for you, we suggest you contact Epic Games customer support for further help.
Can I install Epic Games on an external hard drive?
Yes, you can install Epic Games on an external hard drive, and it could be a great alternative if you don’t have space on the internal drive or want to access the game library on multiple devices.
To get it on an external drive, uninstall it from your local hard drive. Once uninstalled, run the installer. Once you are on a page to choose the installation location, select the external drive, click Install, and follow the onscreen instructions to complete the process.
Remember that while performing tasks related to installation or uninstallation, you should always log in using an admin account & run the installer file as administrator to avoid related errors.
Autocorrect is a really useful feature that can save a lot of time in your daily life. While it is not perfect, most of the time, you can rely on it to fix your typos and mistakes in writing.
However, sometimes it doesn’t work as it should. You’ll find that it doesn’t recognize some words making it difficult to work efficiently. Other times, you just want to disable it and go back to the old ways.
But are there any benefits to using autocorrect?
Saves you time by correcting your typos.
Helps you learn new words by showing you the correct spelling.
It helps you avoid embarrassing mistakes in emails and other documents.
You’ll be able to type faster and make fewer mistakes.
How do I turn spell check on or off on Windows 11?
1. By using the Settings app
Hit the Windows key and click on Settings.
Select Time & language, then click on Typing.
Toggle on or off the Autocorrect misspelled words option.
If you’d like to get notified of the misspelled words without changing them, keep the Highlight misspelled words option on.
2. By using the Group Policy Editor
Hit the Windows + R keys to open the Run command.
Type gpedit.msc in the dialog box and hit Enter.
Navigate to the following location: User Configuration/Administrative Templates/Control Panel/Regional and Language Options
Double-click on Turn off autocorrect misspelled words.
Check the Enabled box then hit Apply and OK to save the changes.
Go back to step 3, double-click on Turn off highlight misspelled word, and repeat step 5.
To turn it off, follow the above steps and select the Disabled option.
Navigate to the following location: HKEY_CURRENT_USER\Software\Microsoft
Right-click on Microsoft, select New Key, and then name it Control Panel.
Next, right-click on the newly created Control Panel, select New Key, and name it International.
Right-click on International, select New DWORD (32-bit) Value, and name it as TurnOffAutocorrectMisspelledWord.
Create another New DWORD (32-bit) Value and name it as TurnOffHighlightMisspelledWords.
Double-click on each and enter the Value data as 0 for each entry then hit OK.
To disable, enter the Value data as 1 for each.
As a precaution, remember that manually editing the registry can render your PC inoperable. To cushion your device from unexpected failure, backup your registry or create a restore point.
How do I remove certain words from autocorrect?
Hit the Windows key and click on Settings.
Click on Privacy & security, then select Inking & typing personalization.
Select Personal dictionary.
Hit Clear your personal dictionary.
This is a handy feature that can help you delete any words you greenlighted but want to remove.
With these tips, you now have better control of your spelling. After all, autocorrect can be an interesting feature at times, but it can also cause more trouble than it’s worth.
It is important to note that the autocorrect feature is only available for Windows and not other apps. So if you run into an issue where Microsoft Word is not spell-checking after you’ve enabled the autocorrect feature in Windows, the two are unrelated.
File permissions prevent unauthorized access and modification of your files, and this is why many users want to assign read and write folder permissions but not delete privileges.
Setting up these permissions is simpler than you think, and this guide will show you a couple of methods you can use to prevent your files from being deleted.
Can you delete files with read/write permissions?
Read/write permissions usually allow you to modify and delete files and folders. However, you can always adjust the advanced settings and revoke delete permission if needed.
How do I set up read/write permissions for files and folders?
1. Use file Properties
Right-click the desired file or folder and choose Properties.
Navigate to the Security tab and click on Edit. From here, you’ll be able to modify basic permissions.
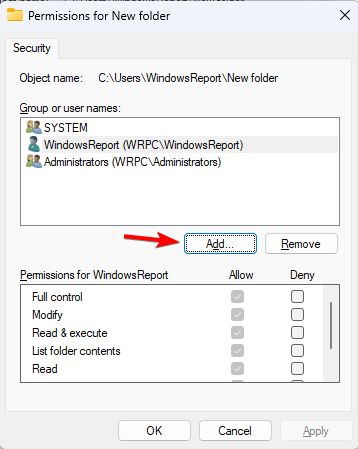
If the desired account isn’t on the click, click on Add.
Next, type the account name, click Check names, and then OK.
Select the desired account. Next, check the directory permissions you want to assign to it in the Allow column and lastly click Apply and OK to save changes.
2. Use advanced security settings
Right-click the desired file and choose Properties.
Navigate to the Security tab and click on Advanced to open the advanced security permissions window.
If your account isn’t on the list, click on Add.
Click on Select a principal.
Enter the desired username, click on Check names, and then click OK.
Select the individual permissions and click on OK.
Click Apply and OK to save changes.
3. Use command line
Press the Windows key + X and select Terminal (Admin).
Run the following command: icacls "C:\Users\WindowsReport\New folder" /grant "Test:(R,W)"
After that, the Test user will have read and write privileges over the New folder.
How do I remove delete permissions for files and folders?
1. Use advanced security settings
Locate the desired file or folder, right-click it, and choose Properties. Next, go to the Security tab and click Advanced.
Double-click the desired account. Click on Show advanced permissions.
Lastly, uncheck Delete and Delete subfolders and files and click on OK.
After that, you’ll only have Windows permissions to create files but not delete.
2. Use the Terminal
Press the Windows key + X and select Terminal (Admin).
Run the following command to remove delete permission: icacls "C:\Users\WindowsReport\New folder" /remove "Test:D"
To remove delete permissions from a folder and subfolders, use: icacls "C:\Users\WindowsReport\New folder" /remove "Test:(DC)"
Tips for maintaining permissions settings
Plan carefully which privileges you want to assign to users or groups, and assign only the necessary file permissions to users.
Try to utilize built-in groups in Windows since they already have predefined permissions.
Use deny permissions rarely since improper configuration can lead to issues.
If you’re managing multiple users or computers, document all permissions and access rules.
It’s easy to manage read and write folder permissions, and for less experienced users we suggest using file or folder properties, while more advanced ones can use the command line to quickly change their settings.
Permissions are extremely useful since users need to provide administrator permission to delete certain folders on their PCs. You can also use this feature to limit folder access, and if you do so, restricted users will get access denied to folder messages when trying to open certain directories.
Keep in mind that permissions are quite sensitive, and you can cause issues if you’re not careful, but luckily, you can always reset all permissions to default on your PC.
How do you configure your folder permissions? Share your favorite methods with us in the comments below.
The Windows 7 Disk Management tool is extremely helpful because it allows you to partition the drives, change the drive letter, or format them. In this article, we will show you how to access Disk Management in Windows 7 and use it.
If you’re wondering where is Disk Management in Windows 7, its executable file is diskmgmt.msc and you can find it in the System32 folder on your PC: C:\Windows\System32\diskmgmt.msc.
How do I get to Disk Management in Windows 7?
1. Using the search field
Click the Start button.
Type diskmgmt.msc in the search box and click the file in the results.
This is probably the easiest and quickest way of starting Disk Management whether you’re running Windows 7, 10 or 11.
2. Using the Run console
Press the Windows key + R to start the Run console.
Type diskmgmt.msc and press Enter or click OK.
3. Using Control Panel
Click the Start button and open Control Panel.
Now, go to Administrative Tools and access Computer Management.
Next, double-click on Disk Management.
4. Using Command Prompt
Click the Start button and type cmd in the search box.
Then, right-click on cmd in the results and select Run as administrator.
Now, type the Windows 7 Disk Management command and press Enter to start the app: diskmgmt.msc
Exploring the User Interface of Windows 7 Disk Management
In the upper part, you have the command tabs, and right below, you will see the list of your volumes with their drive letter, type, file system, status, capacity, free space on each one in data volume, and percentage.
You will also notice that your partitions will also feature the operating systems, whether you have one or more on the same PC.
Right below, you will have the color-coded list of drives and the partitions on each one. On the bottom, the Disk Management interface shows you the color map.
The disk partitions can be modified, extended, or merged, as long as they have the same file system. You can’t merge an NTFS partition with a FAT partition unless you delete or convert one of them first.
All the functions of the tool are available at a right click away. Select the drive you want to modify, right-click on it, and you will see all the available options.
For instance, to delete a volume, right-click on that volume, and select Delete from the drop-down menu.
If you have unallocated space on your disk, you may either create a simple volume or extend an adjacent partition to its left with the amount of space of the unallocated one.
Right-click on the volume to its left and select Extend Volume. The app will detect and add the unallocated volume to its right.
With Disk Management, you can only extend the partition to the left of the unallocated disk space, whereas more advanced tools will allow you more options.
What are the differences between Basic and Dynamic Disk?
Some of our readers ranked us if they should go for a Basic Disk or a Dynamic Disk. By default, when setting up a disk, the settings lead you to a basic one and if you have a simple PC for personal use, it’s the simplest way to go.
The main difference between basic and dynamic disks is that basic disks are structured in partitions, and dynamic disks can be split into volumes. Basic drives can have a maximum of four partitions (three primary and one extended).
Dynamic disks can have an infinite number of volumes. You will also benefit from advanced features like disk spanning, software RAID, fault tolerance, and more so they are used by more advanced users in complex hardware environments.
Why is Disk Management not working?
Problems with the Storage Service – If the Storage Service is not enabled or poorly configured, Disk Management will fail to start or crush.
Hardware issues – Disk Management will likely fail if one or more drives on your PC are malfunctioning or have bad sectors. This is a sign you should check the drives using the chkdsk tool in Command Prompt (change the drive letter according to your needs): chkdsk C: /f
Corrupted system files – As Disk Management is part of the Windows 7 system, it’s likely to be affected by corrupted system files or a corrupted Registry.
These are the main problems why this app is not working but luckily, our guide on how to fix Disk Management issues will help you straighten things out.
We hope that our guide provided useful information on how to access the Disk Management utility in Windows 7 and how to use it.
Security remains a vital aspect, given the rise in online and offline threats. To combat the problem, Microsoft introduced Device Encryption, but a few users found that the setting was missing in Windows 11.
The Device Encryption feature encrypts your data and renders it unreadable to unauthorized users or hackers if the device is stolen or hacked. To retrieve it, you will use the provided recovery key. Remember, Device Encryption is available on the Windows 11 Home edition.
Why is Device Encryption missing from Windows 11?
TPM or Secure Boot is not enabled.
The PC doesn’t support UEFI (Unified Extensible Firmware Interface).
Your device is missing vital updates.
The user account doesn’t have administrative privileges.
Your PC doesn’t support Modern Standby.
What can I do if device encryption is missing on Windows 11?
Before we start with the slightly complex solutions, try these quick ones first:
Check for any pending Windows updates and install them.
Make sure you are signed in with a Microsoft account and not a local user profile.
If none work, head to the fixes listed next.
1. Check if your device is compatible (and the reason for incompatibility)
Press Windows + R to open Run, type msinfo, and hit Ctrl + Shift + Enter.
Scroll down on the right side and check what it reads next to Device Encryption Support.
The various messages here mean:
Meets prerequisites: Your PC supports device encryption.
Elevation required to view: You are not running System Information with administrative privileges. Make sure to launch the app as an administrator.
Any other codes: Critical settings are disabled, or the PC doesn’t meet the system requirements.
2. Enable Secure Boot
Turn off the computer, then power it on, and as soon as the display lights up, repeatedly press the F1, F2, F10, or Del keys, depending on the system manufacturer, to launch the BIOS.
Now, navigate to the Boot tab or the related section.
If you get an error code, clear any inconsistencies or reconfigure the BIOS settings. Usually, changing the other suboptions should fix the problem.
3. Enable TPM
Boot the PC into Recovery Mode and launch the BIOS. Or you could do it by pressing the dedicated key after turning on the PC.
Now go to the Advanced tab, locate the TPM entry, and select Enabled from the dropdown menu next to it.
A vital requirement for Device Encryption is TPM support. Besides, it’s not just the chip that should be present. You will also need to enable TPM from the BIOS.
4. Switch to an administrator account
Sign in with an administrator account on the PC.
Press Windows + R to open Run, type netplwiz in the text field, and hit Enter.
Select the user account that doesn’t show Device Encryption and click on Properties.
Go to the Group Membership tab, select Administrator, and click OK to save the changes.
Sign in with the problematic account and check whether Device Encryption is now available in Windows 11.
Press Windows + S to open the Search menu, type Local Group Policy Editor, and click the relevant search result.
Expand Administrative Templates under Computer Configuration from the left pane, and then double-click on Windows Components.
Select BitLocker Drive Encryption, then choose Operating System Drives under it, and double-click on Configure TPM platform validation profile for native UEFI firmware configurations on the right.
Select Enabled, then untick the checkbox for PCR 2: Extended or pluggable executable code.
Finally, click Apply and OK to save the changes, and restart the computer.
Reconfiguring the dedicated local policies may help when the Windows 11 Device Encryption is not showing. But users running the Home edition of the OS will need to manually install the Local Group Policy Editor (gpedit.msc).
Alternatives to device encryption on Windows 11
Device Encryption and BitLocker have long been a source of errors, in addition to incompatibility issues. When faced with either of the two, you may download an effective third-party encryption solution. Here are a few:
VeraCrypt
EasyLock
Dell Data Protection
These are just as good and employ advanced encryption algorithms to protect your data. Besides, you get access to a wide array of security features.
After you have fixed things and Device Encryption is not missing anymore, enable it from Privacy & Security in Windows 11. Also, you can easily adjust the Device Encryption settings or get a copy of the recovery key.
It’s no secret that online piracy is a massive issue on the web. From games to TV shows, users are resorting to piracy to save a few coins at the expense of producers.
At face value, this may seem like the only issue, but aside from getting content for free, you’re also putting your device at risk. How dire is this situation? We compiled this report to show you the current status of online piracy.
How common is online piracy? Piracy is a word that gets thrown around a lot these days, but what does it really mean? It is defined as the unauthorized copying or use of another person’s work without permission.
According to a report by Go-Globe, there are at least 357 million visits to piracy websites every day. This loosely translates to a quarter of a million per minute, and streaming sites are the most visited.
What are the global online piracy statistics?
1. Number of downloads Worldwide
The number of illegal downloads worldwide is estimated to be 42% from film alone. Downloads have certainly gone down over the last decade, but that has not reduced piracy. People are opting to stream more as data has become more available with free Wi-Fi areas.
The steady increase in visits to illegal streaming sites can also be attributed to the growth in internet users, especially during the Covid-19 pandemic.
As of April 2023, a report by Statista shows that 65% of the world’s population are internet users, so you can see how this translates to the staggering number of downloads.
2. Countries with the highest rates of piracy
When it comes to piracy rates, a number of factors come into play. These include the digital population in the said country, how stringent the laws are, and GDP.
The world’s most pirated countries are the ones that have the fastest internet connections. The rate of piracy is directly proportional to the speed at which content can be accessed online.
Countries at the bottom of the list tend to have slower internet speeds and have less access to legal alternatives for watching movies and TV shows.
Country
Piracy percentage rate
USA
91%
Russia
91%
Zimbabwe
91%
China
90%
Iraq
90%
Moldovia
90%
Libya
90%
Belarus
88%
Armenia
87%
From the above list, we can deduce that both first-world and third-world countries access illegal sources, and the laws play a major role in accessibility.
It’s no wonder the antivirus statistics show a rising trend implying that a huge chunk of the digital population has secured their devices because they are treading on dangerous grounds.
3. Global revenues lost to online piracy
The piracy business is a lucrative one. In fact, as of 2022, the industry is said to hit a new high of $52 billion. As much as legitimate sites are growing, pirated sites are working hard to bridge the gap, which could cause the profits to plummet for their legal counterparts.
In addition to these direct revenue losses, indirect effects on employment and tax revenue further impact the economies. Consumers’ unwillingness to purchase after seeing pirated versions online will create decreased public perceptions of intellectual property rights.
4. Most downloaded content types
Movies and TV shows are the most downloaded content types. Users prefer to watch these shows from their favorite illegal sites for a few reasons:
Subscription platforms cost a lot of money.
You may have to subscribe to more than one platform to access a variety of shows.
TV shows take a while to release seasons, so a subscription may be wasted.
Although TV and film collectively account for the largest portion, we cannot ignore the publishing sector. While the music and movie industry continued unabated for years, the publishing sector remained relatively safe from digital theft.
It was much harder to pirate something that required an additional piece of hardware or software. However, the growing popularity of e-books has made it a lucrative industry. Publishers are losing up to $200 million annually to e-book piracy.
Before the Internet took over, artists were successful at selling CDs and vinyl records. The Internet then came and changed the music industry. The demand for music has grown exponentially with the rise of digital music and streaming services.
But it hasn’t been all good news for artists. It’s easier than ever to execute digital video piracy. While many people are willing to pay for legal streaming services like Spotify or Apple Music, others prefer free options like YouTube and SoundCloud.
And even on free sites, any attempt to earn revenue by the inclusion of ads is thwarted by users’ continued usage of adblockers and other tools.
This makes it more difficult than ever for artists to profit from their work. Users are unwilling to pay for streaming subscriptions as these releases tend to be expensive compared with digital downloads.
The effects of piracy on the film industry are devastating. Not only does it affect profits, but it also affects future productions as well as jobs for many people involved in making films.
A research by Statista indicates that the film industry is on a downward spiral, with losses registered every passing year.
In addition to the direct costs of piracy, there are also indirect costs associated with increased security measures. Companies will suffer from lost opportunities for consumer sales of legitimate goods and services related to a particular film or TV show.
The worst thing about the film industry is that while their music counterparts can earn extra income from live shows and performances, once a user has viewed a movie, the chances of them watching it again are really slim.
And since actors rarely do live performances of the same film, they are the most affected by this piracy business.
What are some of the streaming platforms used for piracy content?
Platform name
Website
Seriesonline
https://seriesonline.gg/
DopeBox
https://dopebox.to/
HDToday
https://hdtoday.tv/
Onionplay
https://onionplay.se/
Goojara
https://www.goojara.to/
The illegal streaming services provide access to thousands of titles for free or at a low cost, making them an attractive alternative to paying for subscriptions to Netflix, Hulu, or Amazon Prime Video.
Usually, they’re similar to the real thing but with a few alterations. For instance, an illegal site mimicking Netflix will have the same name, and the icon will deviate from the original by a color hue.
Other noteworthy characteristics to look out for include:
They can be difficult to find as they often use multiple URLs to hide their true location, and may change them frequently.
The address will also be different and end in something like .cc or .to.
No geo-restrictions, and usually contain a warning that you’re entering an unsecured site.
They offer movies and TV shows in poor quality.
What has the online piracy evolution been like over the last decade?
Online piracy has been around for a long time, but it’s only in the last decade that it has become an increasingly popular way to consume media.
From Napster to Limewire, Torrents to Popcorn Time, and even Netflix and Hulu, the way we consume media has changed significantly. Consumers want easy access to entertainment at a reasonable price, and pirate sites usually deliver this better than legal services.
The biggest change over the last ten years is that people are using more devices to consume content. Just look at how many computers are in the world, and you’ll get an idea of how many people use laptops and smartphones to access pirated content.
This, in addition to their TVs and gaming consoles, explains why piracy is not going anywhere anytime soon. Torrent sites like The Pirate Bay still host millions of illegal downloads every day, but these downloads are becoming less popular as streaming becomes easier.
Even as ISPs around the world try to block these torrents, there will be fewer people using them in the future, but it’s nothing a good VPN can’t solve.
What does the future hold for online piracy?
The online piracy statistics will continue to grow. As the internet becomes more important in our daily lives, so does online piracy.
The future of online piracy is likely to be influenced by a number of factors, including the growth of mobile devices, the development of new technology, and the continuing evolution of copyright law.
As technology advances, so too will tools that allow users to circumvent copyright protection measures and take advantage of free music and movie downloads from illegal websites.
While some illegal sites may shut down or be forced to relocate their operations because of legal actions taken against them by rights holders or regulatory agencies, this may not stop all piracy activity.
The only way to combat the issue is by educating people about the dangers of online piracy. We need to change people’s mindsets about pirating content. It is not a victimless crime because at least 59% of the population knows they’re accessing illegal content.
What are the malware and virus risks from visiting pirate sites?
Your system risks virus and malware attacks from downloading content from these sites if the cyber attack numbers are anything to go by.
You could inadvertently be installing a malicious program onto your machine.
Your identity may be stolen if you visit a pirate site that asks for personal details.
Loss of access to legal content if banned or caught pirating.
Piracy is illegal, and if caught, you could face criminal charges for sharing copyrighted content.
To protect yourself against malware/virus attacks, below are some security measures to observe:
While most of these countries have copyright infringement policies in place, and the consequences of piracy seem severe, the reality is that few cases ever lead to actual prosecution.
This is because most people who infringe on copyrights may claim to do so unintentionally. In most cases, the owner has already made significant financial losses and does not have sufficient resources to pursue litigation. The cases can also drag on for years which is just not worth pursuing in the long run.
We hope that by sharing these piracy statistics and facts, we are able to reinforce the message that piracy is a growing and evolving problem. And while it’s a complex matter, we can also appreciate the efforts made to combat it.
Change starts with you, and as a user, the first step is to adjust consumer behaviors. First, stop using unlicensed software and sites and accessing illegal content.
Do you access illegal content, and if so, why are legal sites not an option? Is there anything that can be done to make you switch over to legal sources and software? We’d love to hear your thoughts, so drop us a comment down below.
Microsoft has just posted an announcement on news of their ongoing partnership with Oracle. Details will be unveiled on Thursday, September 14, 2023, at 1 p.m. PT.
Satya Nadella, Chairman and CEO of Microsoft, and Larry Ellison, Chairman of the Board and Chief Technology Officer of Oracle, will make the announcement.
We will be posting all the details as soon as they are out.
Previous partnerships by these tech giants were speculated in May this year, where they are considering a collaboration to tackle the growing demand for high-capacity servers in the field of artificial intelligence.
The launch of the hotly anticipated Forza Motorsport reboot is less than a month away, and more information is coming out about the game. Earlier this week we got our first look at hand-on previews from various outlets, all of them raving in unison about their experience with the game.
Performance: Prioritize 60FPS on-track performance at 4K
Performance RT: Enable ray tracing at 60FPS with variable resolution
Visuals: on-track full 4K with ray tracing, 30FPS
As for the Series S version, Forza Motorsport will feature two performance modes, and neither will include on-track ray tracing. Rather, that feature will be limited to off-track visuals as in the Car Theater bits of the game. No doubt many will find this disappointing.
The Series S Performance Mode will feature 1080p resolution at 60FPS, while the Quality Mode allows 1440p at 30FPS.
Forza Motorsport will release on October 10 for Windows and Xbox Series X|S as a day one Xbox Game Pass release.
OneNote for Windows 10 was introduced as a successor to the traditional x86 client but faced challenges among enterprise users who relied on the full-featured version.
Users will no longer be able to translate pages or selections of text within the application after this date. However, there are alternative options available for those who wish to continue translating content in their notebooks.
If users want to download OneNote for free, they can get it from the Microsoft Apps Store. The free version provides the same translation experience as OneNote for Windows 10. It allows the user to use their existing notebooks. However, if the user wishes to use OneNote, they must purchase or subscribe to a Microsoft 365 plan that includes it. The user’s existing notebooks and translation feature won’t be affected.
If you encounter difficulties transferring your notebooks from OneNote for Windows 10 to OneNote for Windows or Microsoft 365 OneNote, it may be because your notebooks are stored in OneDrive or a different location on your device.