5 Ways to Fix Server Execution Failed Error On Chrome

Encountering the Server execution failed error on Google Chrome is quite annoying. Besides some incompatible Windows 10/11 updates that might cause it, the usual suspects are malicious software, PuPs, or something similar.

Here’s how a user described his problem on Microsoft Support Forum:

Chrome, Firefox and starcraft2 will not operate since updating to windows 10. Recieved server execution failed for Chrome also unable to uninstall Chrome to reload.

If you are one of the unlucky users who is currently facing this issue, don’t worry. This article has the solutions you will need.

Why am I getting server execution failed?

It is really hard to tell you what is causing the server execution failed error on your PC without close analysis. However, after doing some research, we have found the followings:

  • Incompatible version of the Chrome browser
  • Malware problem
  • Corrupted registry
  • Browser misconfiguration
  • Outdated version of Windows 10 or 11

You may find other reasons as well. But, the main roots of this problem are the things mentioned above.

Fortunately, you can easily get rid of this problem. We have prepared some methods that can quickly solve server execution failed error on Chrome.

The following fixes also deal with these issues as well:

  • Chrome server execution failed
  • Server execution failed
  • Chrome chrome.exe server execution failed
  • Server execution failed chrome.exe
  • Server execution failed

Quick Tip:

If this error is unsolvable, switching to another browser could be a viable solution. Opera One has everything Chrome has, but it’s better optimized and has many useful functionalities built in.

Opera One Browser is repellent to threats, thanks to its superior set of features, covering both security and privacy. Opera One comes with built-in Ad Blocker, VPN and AI, you can rest assured that your browsing experience will be faster and more anonymous.

Opera One

Avoid server execution failed errors and enjoy lightning-fast and secure browsing.
Free Download Visit website

How do I get rid of Server execution failed?

1. Scan for malware

We recommend you open your antivirus security utility and run a full PC scan to see whether there are any viruses or suspicious applications in your system.

You can use the built-in Windows Defender to do so, but we highly recommend trying a third-party antivirus with higher detection rates.

While the built-in security utility does provide the tools necessary to keep your PC protected at a basic level, dedicated applications are typically able to detect a larger number of threats and block them faster before they get a chance to cause serious problems.

When you pick your antivirus, make sure to look for an up-to-date utility that integrates multi-layered protection. This security method implements more than one type of shield, making sure your PC is protected on all fronts, leaving no weak points.

Another thing to consider is how many resources the AV requires. Thankfully, modern antiviruses are light and able to run in the background even if you have a lower-end PC.

2. Clean your registry

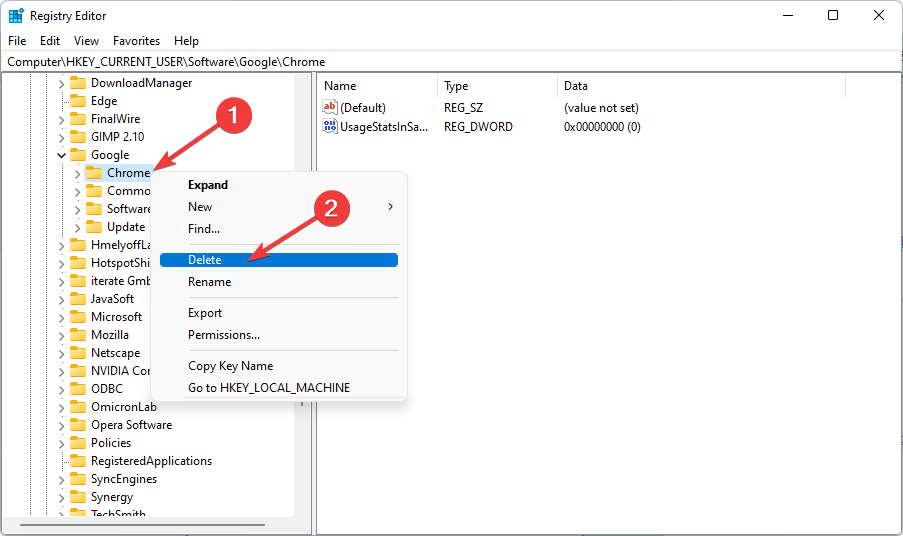
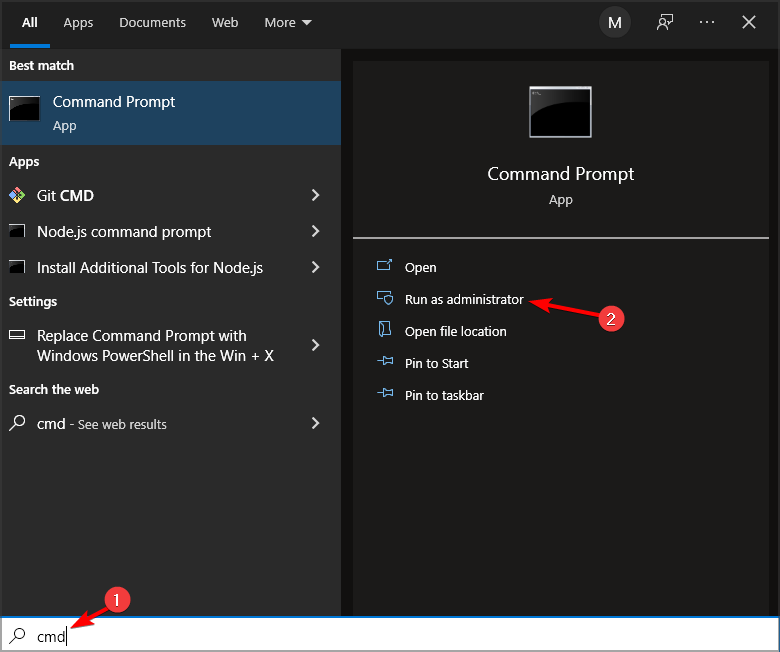
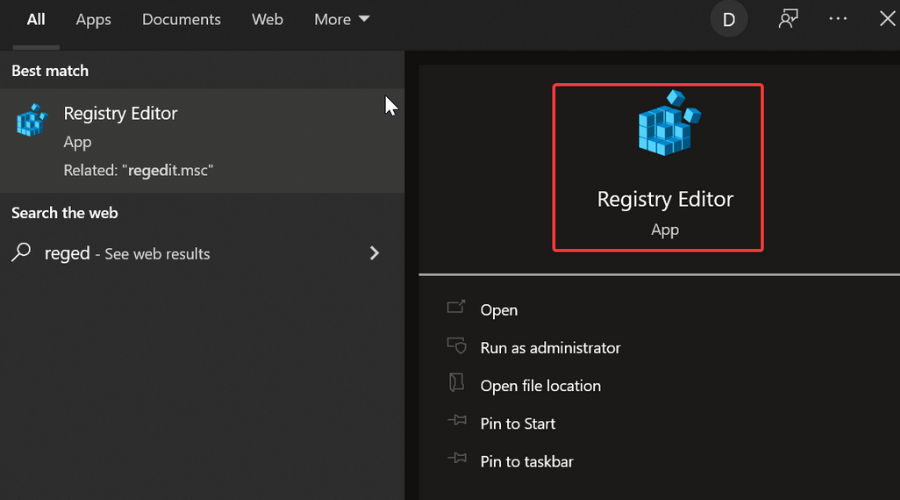
  1. Type regedit in the taskbar and open the Registry Editor.
  2. Expand the HKEY_LOCAL_MACHINE list.
  3. Scroll down to Software and select Google.
  4. Right-click on the Chrome folder and select Delete.deleting chrome registry key

Make sure you do not delete any other key. When the process is complete, try to run Google Chrome again.

If you want to make sure you clean your registry properly and don’t mistakenly delete anything that is to be kept, we recommend you use a dedicated PC cleaner utility.

We recommend CCleaner because it has a dedicated Registry menu that scans your registry and is able to detect every entry that can be removed. It can clean your whole registry or specific folders within it.

  1. Download and install CCleaner.
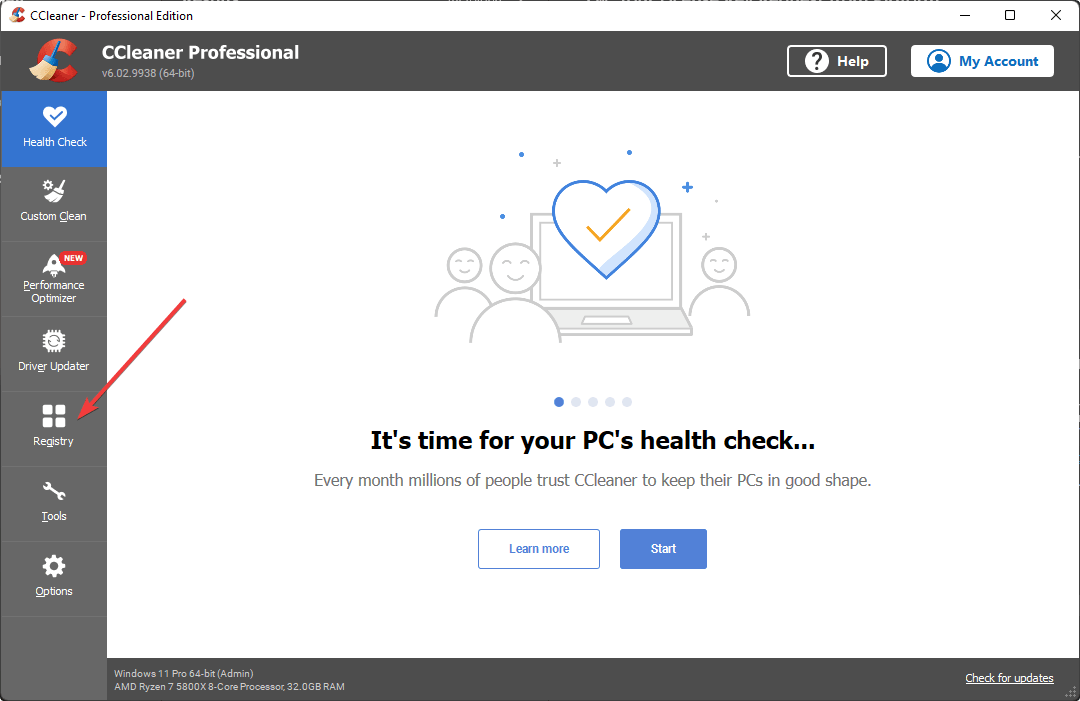
  2. After installation, launch CCleaner and then click on the Registry option and select Scan for issues.going registry ccleaner
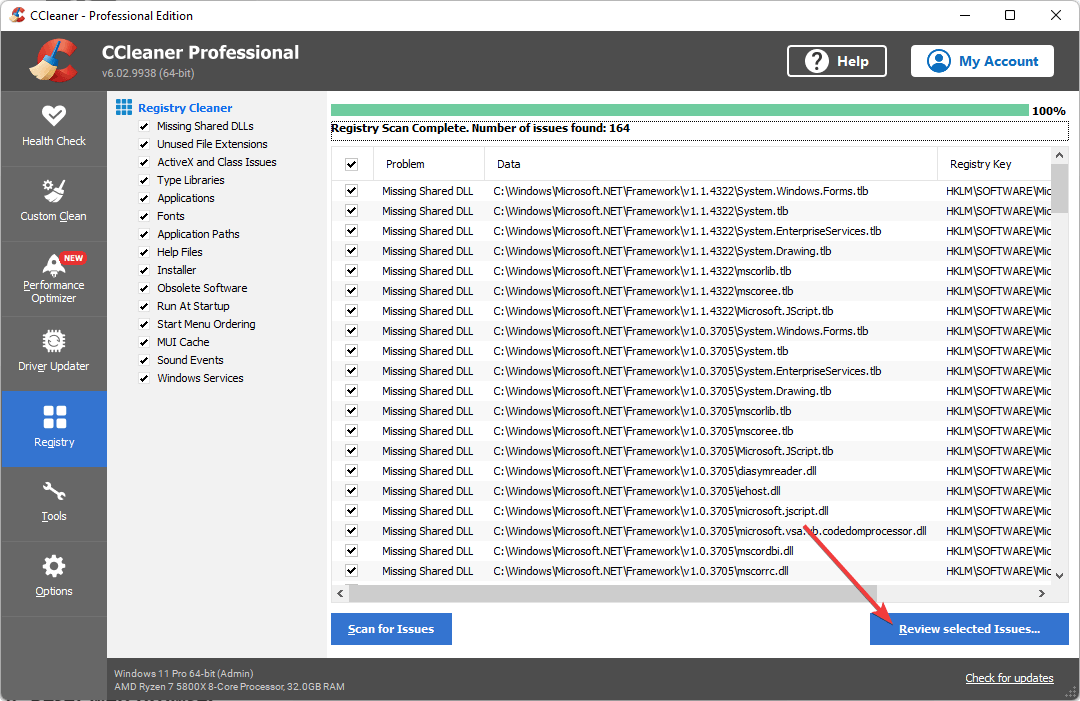
  3. After CCleaner has finished scanning, click on Review selected issues. Follow the prompts to enable CCleaner to delete all the leftovers found and fix the Windows registry.review selected issues ccleaner registry

After you finish cleaning, check to see if you are still met with the server execution failed chrome.exe error.

3. Reset web browser

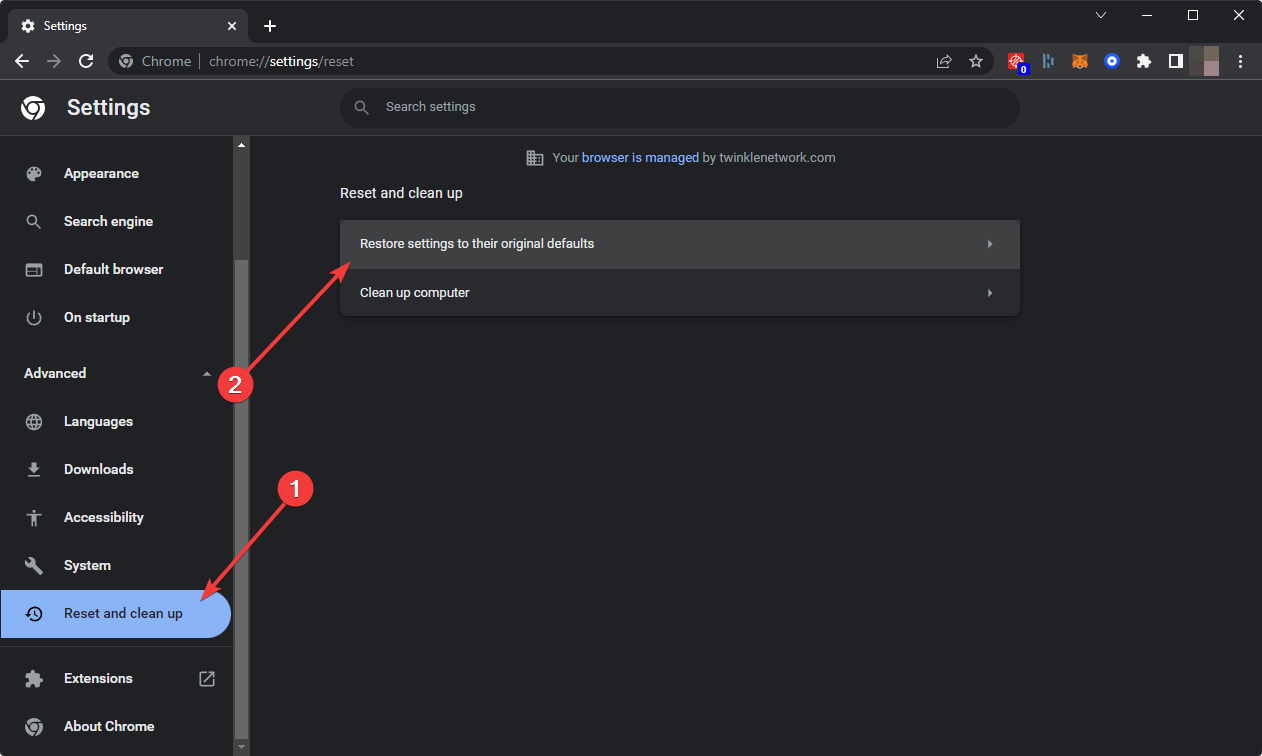
  1. Open Chrome and type the following address in the address bar, and hit enter: chrome://settings
  2. Expand Advanced, click on Reset, clean up, and then Restore settings to their original defaults.restore chrome settings to default
  3. Click on Reset Settings.

This method is ideal if you can open the browser. If you face the server execution failed error before properly opening Chrome; you can ignore it.

4. Update web browser

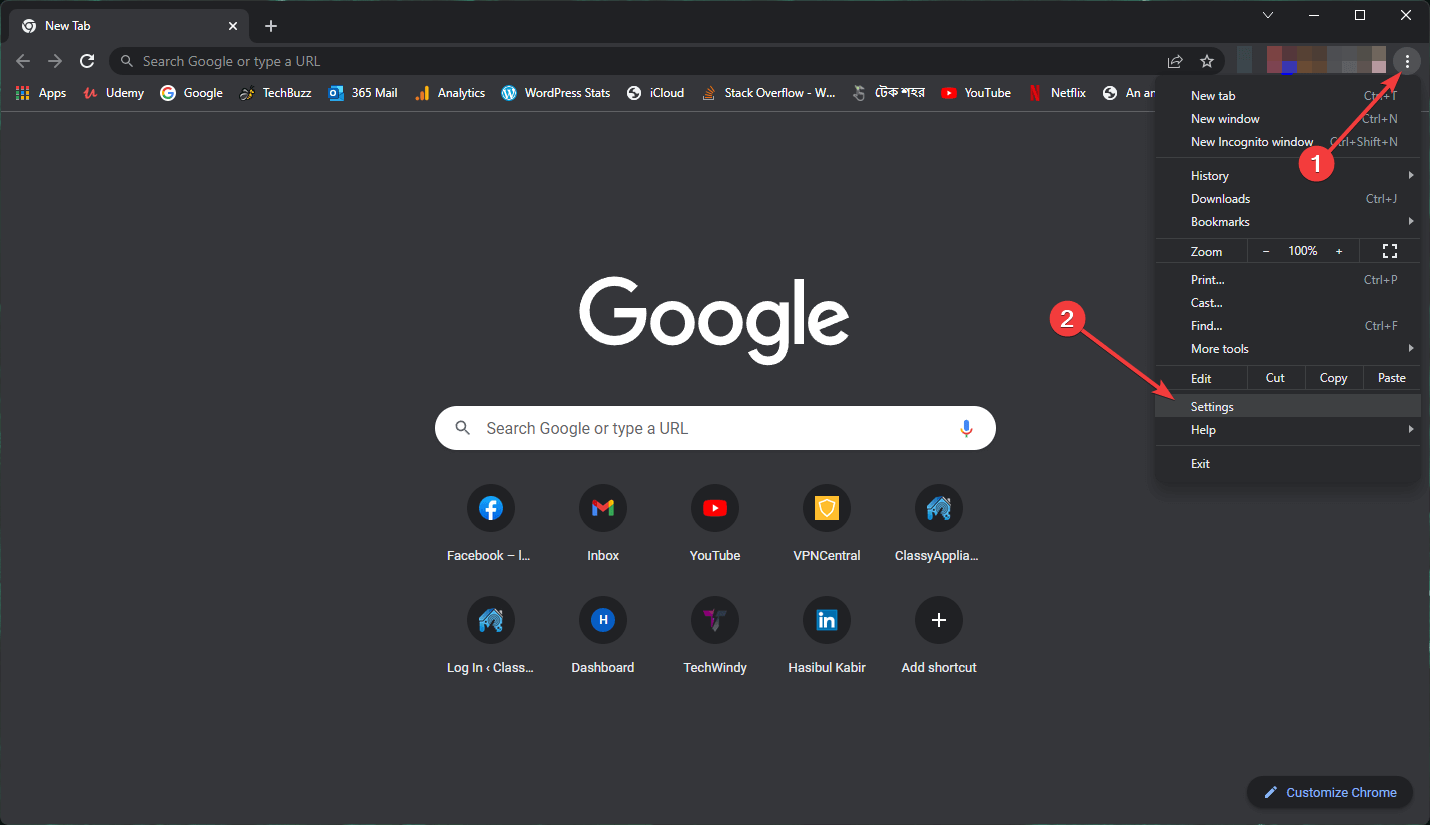
  1. On Chrome, click on three vertical dots on the top right corner and Settings.going settings chrome
  2. Go to About Chrome.
  3. Chrome will check for the update and install any available one automatically.
  4. Relaunch Chrome.

5. Run Windows Updates

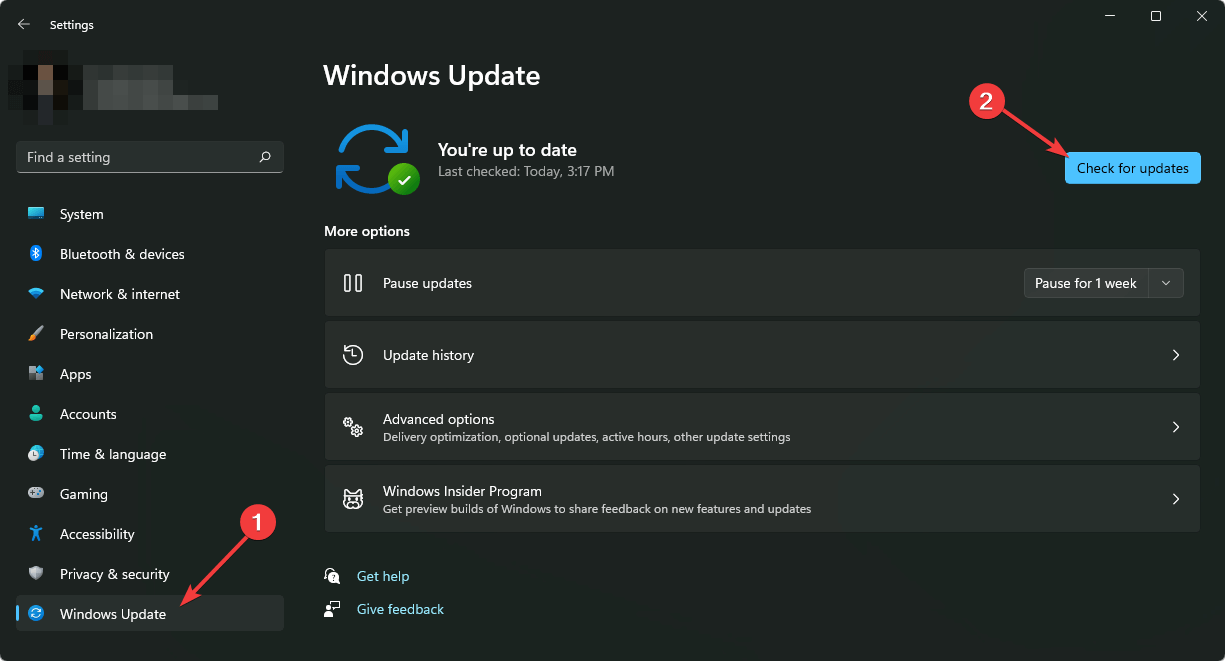
  1. Press Win + I on the keyboard to open Windows Settings.
  2. Go to Windows Update and then click on Check for updates.updating windows 11
  3. It will automatically install any available updates.
  4. Restart your PC if necessary.

The daily browser and computer usage can lead to common issues like this Server execution failed error on Chrome.

As we’re sure you know by now, it is not very difficult to overcome it, and it can happen to any user. It does not make Chrome any less of a good browser.

Speaking of server errors, we also have a guide on A padding to disable MSIE and Chrome friendly error page error, so don’t miss it.

Please let us know more about your experience with this error. Which method did you decide to try? Also, for any tips or questions, make sure to comment below.
3 Quick Ways to Fix a Bad Network Request on Discord

Discord is a popular online chat room that is used by gamers to communicate with each other. If you have ever used Discord, then you know how important it is to have a good connection. This is because if the network request is not working correctly, then it can cause all sorts of issues.

You are likely to get a message that indicates there was an error in sending data from your computer to the server. The server may have rejected this request for any number of reasons, such as network problems or firewall issues. 

Once this happens, your communication is instantly dropped. You may be unable to connect to your friends or receive any messages or notifications at all.

Usually, users are accustomed to experiencing high CPU usage in Discord especially if they have old PCs or running too many programs simultaneously.

Why is Discord saying bad network request? 

When Discord is saying a bad network request, you need to check if the problem is only with your PC or if it is also affecting other users. If it’s not working on others’ PCs, too, then your system must have some problem.

Some common reasons include:

  • Network error – The most common cause of this is that your internet connection isn’t stable, hasn’t been configured correctly or has been interrupted and needs time to recover. Discord has some network requirements, so ensure you have a strong internet connection.
  • Server problems – Sometimes, the issue is with Discord; their server is not connecting. You can verify from their status page to check if they are having downtime. Usually, Discord will give a timeline when things are likely to revert o normalcy.
  • Firewall settings – If you’ve recently installed a new antivirus program or updated an existing one, it might have flagged Discord as malware and blocked it from communicating with the server. 

Now that you know the common causes, it becomes easier to troubleshoot using the solutions below.

How do I fix a bad network request on Discord? 

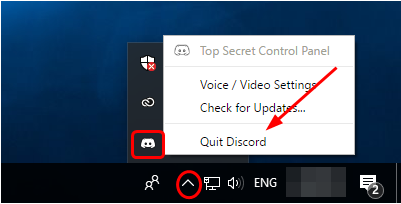
1. Restart the Discord application

This might seem obvious, but it’s worth trying first. Sometimes, a simple restart is all that’s needed to fix your problem. This will force a new connection to the Discord servers and re-download any files that you’re missing.

If the issue persists after restarting Discord, go ahead and restart your PC. This will reset all of your programs and services to the default settings. It will also clear out any temporary files or corrupted settings that might be causing problems with your connection.

2. Check internet settings

Discord was designed to work with a good internet connection. So, if you’re having trouble with the application, you have to check whether you have enough bandwidth or if there are too many users on the same network.

If so, you need to limit the number of users or change from wireless to wired connection and see whether the error persists.

3. Check your firewall settings

Make sure your antivirus isn’t killing the connection. Some antivirus software has been known to block certain types of traffic from reaching the Internet (like Discord). 

If this is happening to you, try disabling your firewall or whitelisting Discord from being blocked by your antivirus software and see if it makes a difference.

Why is Discord so slow right now?

If you’re getting this error message frequently, you may want to check your internet connection and make sure no other programs are running in the background that could interfere with your computer’s functioning.

Other causes for the slow connection include:

  • Outdated app version – The first thing to check is that you’re using the latest version. Outdated versions can cause problems with performance and stability. Updates often contain bug fixes that can help reduce lag and increase performance across all areas of your device.
  • Old OS – If you have an older version of macOS or Windows installed on your computer, it could be slowing down the Discord app.

If you want to elevate your Discord experience, you may find useful Discord extensions that will enhance its functionality. And if you recently came across the Temporary Network Error in Discord, download the app via Epic Games.

Let us know which solution worked for you down below.

Encountered an Unknown Error Retrieving Your Data. [Fix]

It’s happened to all of us before. You log in to your computer, click on an icon, and a little box pops up saying that some error has occurred.

The error may come up while playing a game, accessing a website, or trying to read an important email. However, the result will always be the same.

When you run into an error retrieving your data, it feels like your information is lost forever. You may be unsure of what to do next especially if you are unfamiliar with the site. 

Users who have reported this issue seem to be from USCIS when they attempt to check the status of their immigration. Granted, the United States Citizenship and Immigration Services is a busy website and it is expected that sometimes things can go wrong.

This is why we recommend using browsers for government websites that not only are secure but are also fast and reliable.

Why am I getting encountered an unknown error retrieving your data? 

Most people who get this message think that their accounts have been compromised but below are some possible reasons:

  • Your information is unavailable – Sometimes, nothing is wrong with your package, it just means that not all your information is available in the system.
  • Poor internet connection – One of the most common reasons is that your internet connection is weakened, which could be an issue with your internet connection or with the servers. 
  • Firewall settings – Another cause might be if you have a firewall running on your computer. The firewall keeps you safe by monitoring and stopping unauthorized access to your computer, but it can also interfere with how our website works. 

Now that you understand the reasons why you may have encountered an unknown error retrieving your data, below are some possible solutions.

Quick Tip:

Unknown error retrieving your data can also be caused by overlapping cached data or saved cookies. Switching to a browser that optimizes data usage might solve your problem.

Having a built-in ad blocker, Opera One operates with less information by not loading the ads and pop-ups. It also provides an unlimited VPN and a tracker blocker for your privacy, along with a native AI.

Opera One

Browse more and load less to avoid issues with this smart browser.
Free Download Visit website

How do I fix encountered an unknown error retrieving your data? 

1. Restart your browser/PC

Try restarting your browser. This will force your computer to re-establish its connection to the internet and close any windows that may have prevented the website from functioning earlier.

If this does not work, try restarting your computer entirely. Try accessing the website again and see if anything has changed.

2. Clear cache and cookies

When you come across an error message that says encountered an unknown error retrieving your data in your internet browser, all you need to do is clear your cookies. 

Cookies are small text files that websites use to save information regarding your online preferences and history of where you have been on the website. While they are useful, sometimes they can easily get corrupted.

3. Temporarily disable your firewall

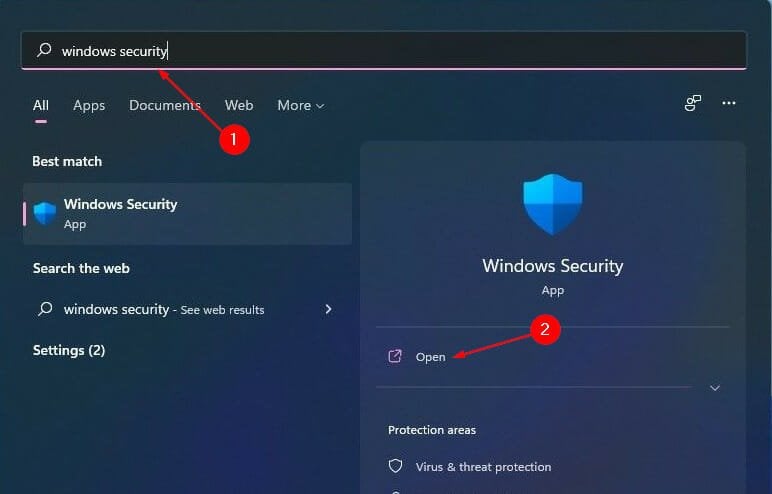
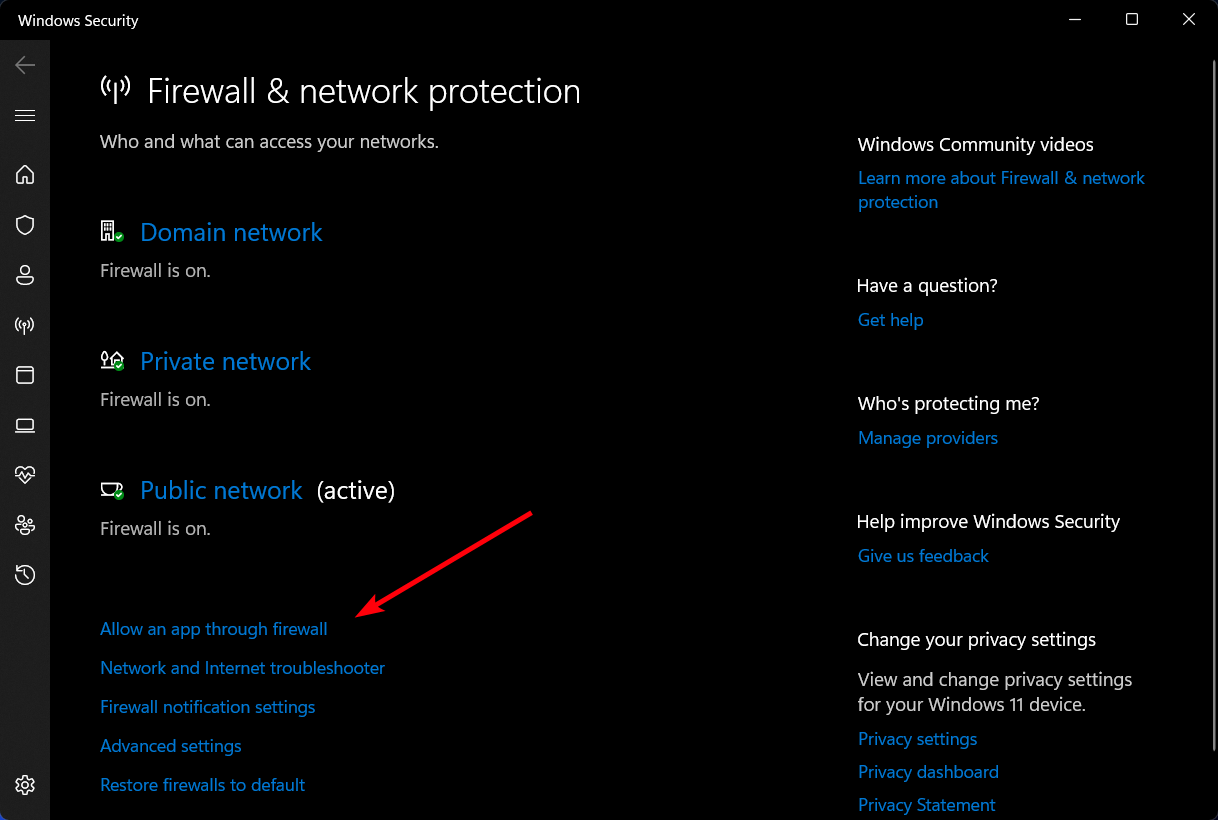
  1. Hit the Windows button, type Windows Security in the search bar, and click Open.
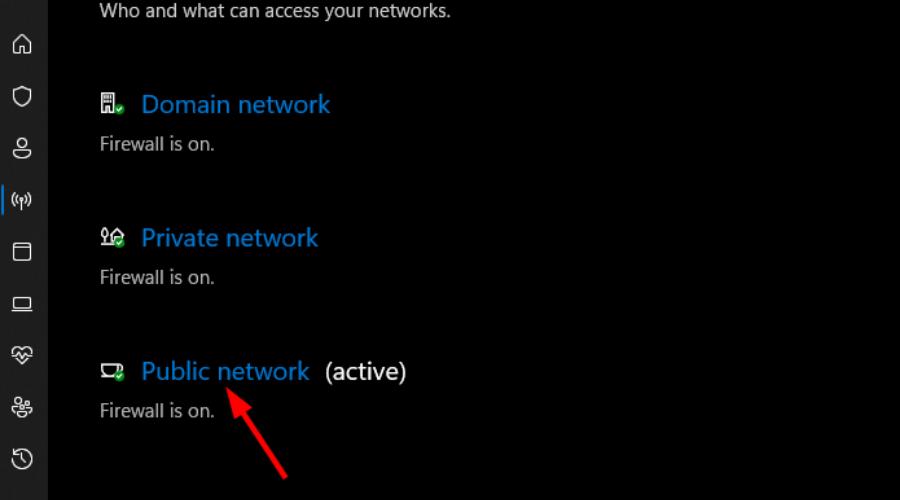
  2. Click on Firewall & network protection then select Public network.
  3. Locate Microsoft Defender Firewall and toggle the off button.

In some instances, these solutions may not work at all and all you have to do is wait it out. Sometimes, it takes a bit of time for the website to consolidate your data and make it available to you.

If you feel that you have waited for a significant amount of time, you can try reaching out to USCIS. You can do so by submitting a case and selecting the type of feedback you’d like.

Hopefully, you now have a better understanding moving forward of what to do if you ever encounter this error.

You may also find the need to use VPNs on most of these sites so we suggest taking a look at some of our recommendations. We also have a new guide on Error updating the NVD data message, so feel free to visit it.

Feel free to share any other tips that have worked for you in the past down below.

What to play on Game Pass for kids (and kids at heart)

Don’t know what to play on Game Pass? With so many games to choose from (literally hundreds) across just about every genre out there, it can be hard to know where to start. Thankfully, we’ve got you covered with these Game Pass recommendations for kids (and kids at heart). These are some of the best games on Game Pass that are not only suitable for kids, but games that they will love. Let’s dive into them.

Ben 10: Power Trip

Fans of the animated television series will get a blast out of Ben 10: Power Trip from Outright Games. The visual style and humor from the Cartoon Network show is intact here, and the game offers plenty of combat, puzzles and exploration—all playable cooperatively with a friend via local split screen. And there are 12 alien forms the player can transform into.

Costume Quest 2

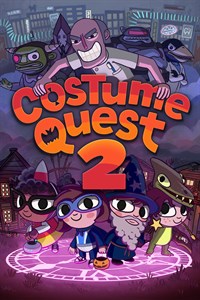
In this action-roleplaying game from the video game mavens at Double Fine Productions (responsible for such classics as Psychonauts and Broken Age), players take control of Wren and Reynold. These twins are on a quest to stop the evil Dr. Orel white from destroying Halloween forever, and to do it they will need to collect candy and special ability-bestowing costumes along the way in this sequel to the 2010 original Costume quest.

My Friend Peppa Pig

If you don’t know, this game is based on the long-running British animated TV show Peppa Pig. In the game, you get to create your own character and create your own story…with the help of your new friend Peppa Pig, of course. And all your other favorite characters from the show will be there too to make every playtime a new experience. Splash muddy puddles, help Daddy Pig find his glasses, follow the animal tracks in the forest, and more in this exciting adventure.

Unravel two

In this platforming adventure you play as a pair of Yarnys. What is a Yarnys, you ask? A Yarny is a small creature made of yarn. This follow-up to the original Unravel throws a whole new dynamic into the mix by putting you in control of two Yarnys on a simple but poignant quest to chase their spark. Unravel two was the winner of “Family Game of the Year” at the 2019 D.I.C.E. Awards.

Wrap up

So what do you think of our selections for best kids’ games on Xbox Game Pass? We hope this post helps you discover a new favorite. If you don’t already subscribe to Game Pass, you can sign up here. Learn more over on the Xbox Game Pass FAQ page. And don’t forget to check out our other “What to play on Game Pass” posts for other Game Pass recommendations.

Featured image courtesy of gamespot.com. 


3 Fixes for Unreputable Browser Add-ons Detected in Avast

Avast is great antivirus software, so it’s no wonder that many prefer it. However, the application has its share of issues as well.

Many users reported Unreputable browser add-ons detected errors in Avast, and today we will show you how to fix this problem.

Why am I getting Unreputable browser add-ons detected message?

As the message suggests, the reason for this error is that Avast has detected one or more problematic add-ons.

So, if you installed an add-on for your browser from an unreliable source, the antivirus identified something wrong with it.

What is the Avast browser extension?

Its complete name is Avast Online Security & Privacy and it’s a free browser add-on or extension that protects your browser.

The software can detect malicious and phishing websites; it also prevents potential intruders from accessing your data and checks your other add-ons.

If you installed this extension, there is even more reason to believe that it’s the source of this message.

Quick Tip:

In some instances, your web browser can be the cause of this problem, so you might want to replace it. Opera One is a great alternative that will automatically block ads and tracking cookies.

The browser is similar to Chrome, and since they share the same engine, Chrome extensions will work with Opera. The browser is also lightweight, and it can handle all types of multimedia with ease.

Regarding security, there’s a built-in VPN with unlimited bandwidth that should give you an extra layer of protection. Plus, this browser is smart since it comes with it’s own AI, be sure to give Opera One a try.

Opera One

Getting the Unreputable browser add-ons detected an error in Avast? Then, it’s time to start using Opera One!
Free Download Visit website

How can I fix the Unreputable browser add-ons detected error?

1. Check the Avast log file

  1. Check the following locations on your drive: C:\ProgramData\AVAST Software\Avast\report or C:\Program Files\AVAST Software\Avast\x64\DATAlog
  2. Open the log file and try to find the problematic add-on.

Many of our readers reported that they couldn’t find anything useful in the log file. If that’s the case, move on to the next solution.

2. Disable problematic add-ons/extensions

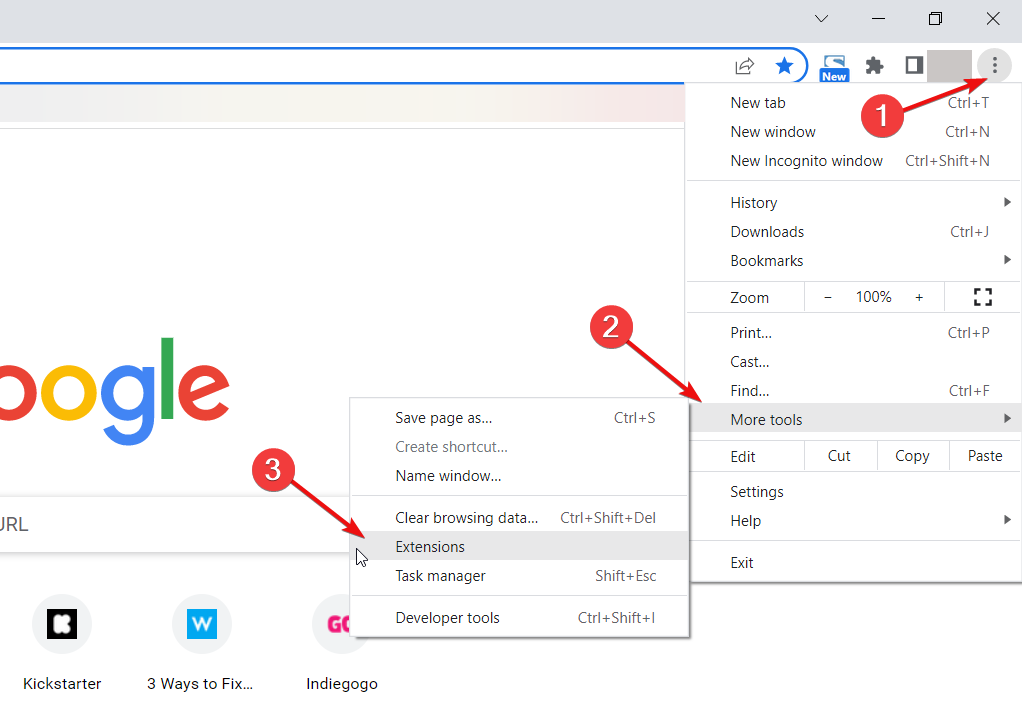
  1. Open your browser and check the Extensions menu. For instance, in Chrome, click the three vertical dots from the top-right corner, select More tools and then choose Extensions.
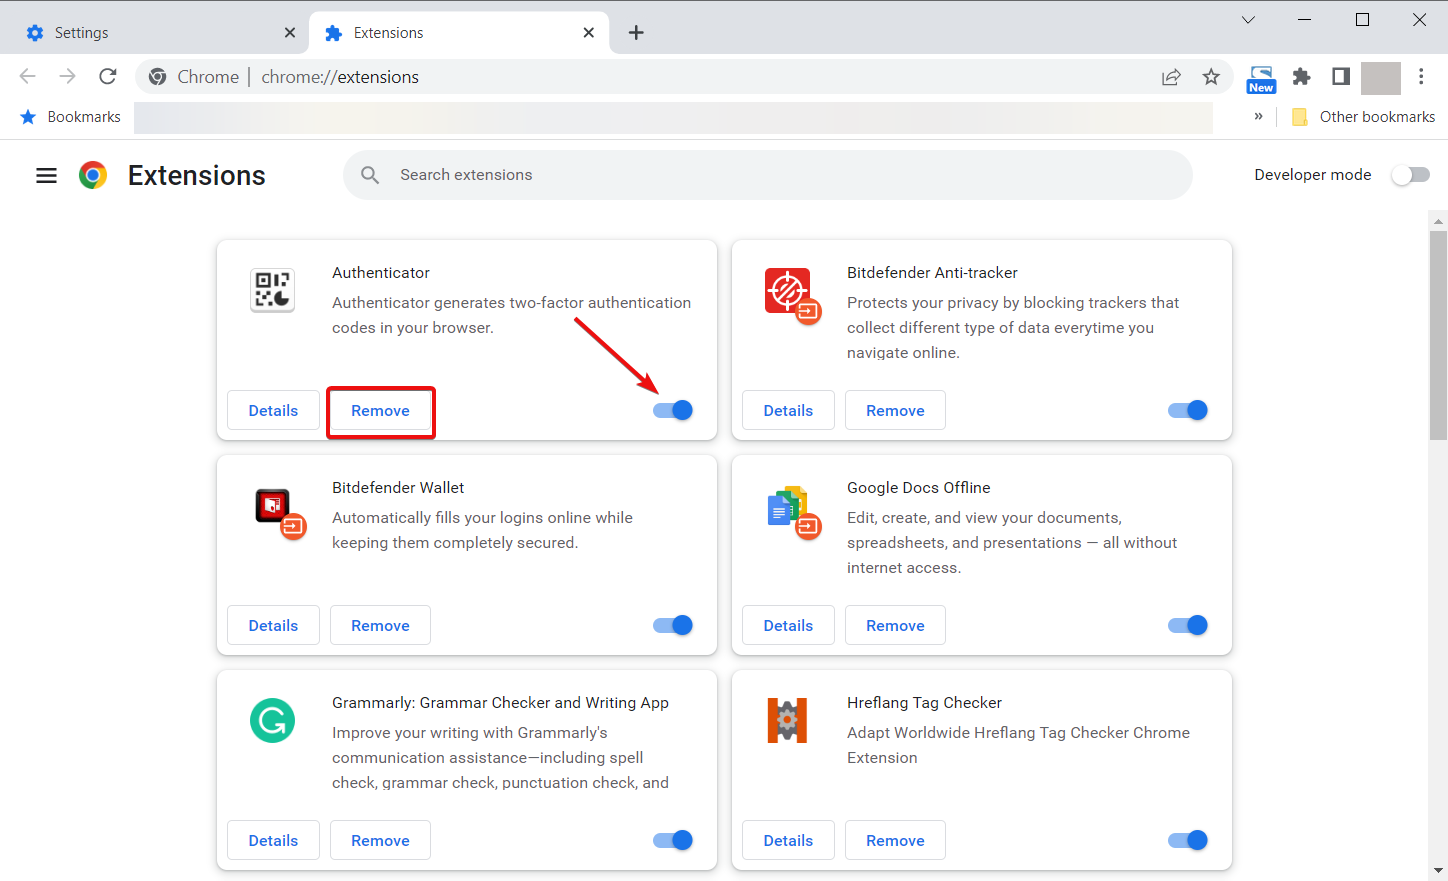
  2. Locate the problematic extensions and remove or disable them.
  3. We have shown you how to do that in Chrome, but the process is very similar in all the other browsers you may use.
  4. After doing that, check if the problem is still there.

Usually, the Avast unreputable browser add-ons detected happens on Chrome and Firefox extensions.

If the issue is still there, you might want to remove the extensions and check if that solves the problem.

3. Disable the Browser Cleanup feature

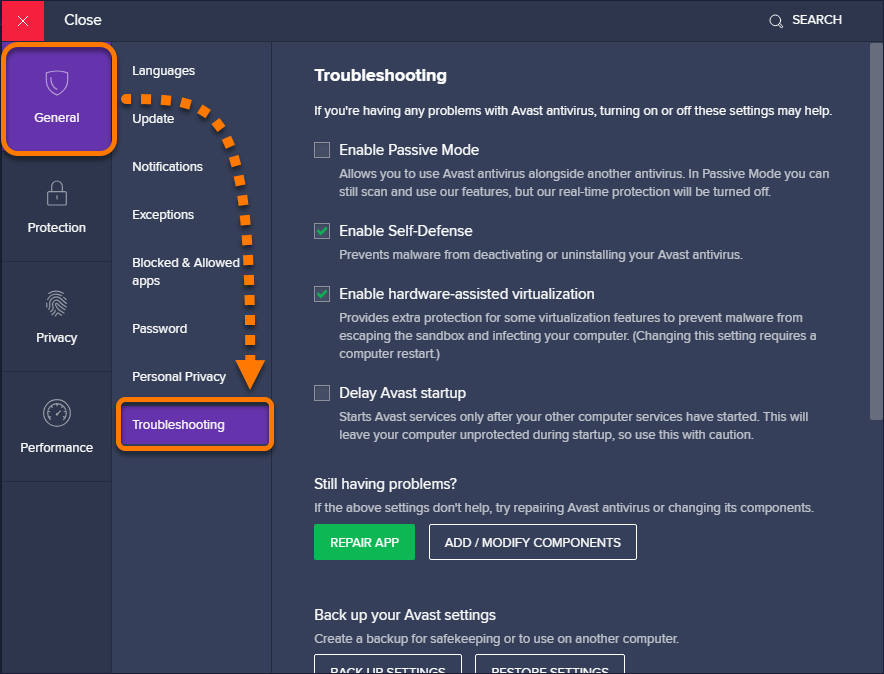
  1. Open Avast.
  2. Navigate to Settings, select General and click on Troubleshooting.
  3. Disable the Browser Cleanup feature.

Bear in mind that this solution will disable browser scanning altogether, but it won’t fix the core problem. Use this solution only if you’re certain that you don’t have any problematic add-ons installed.

Is Avast Secure Browser a virus?

The Avast Secure Browser is certainly not a virus, it is a browser developed by Avast to create a secure environment for banking and online transactions.

It’s a lot safer and faster than other browsers and comes with advanced protection against phishing, fingerprinting, and more.

In fact, if you want to learn more, take a look at our comparison between Avast Secure Browser and Opera.

Unreputable browser add-ons detected the message is mostly a false positive, and fixing it is simple as disabling the Browser Cleanup feature.

Alternatively, you can try removing your extensions or switching to a different browser.

If you have any other questions or suggestions, use our comments section below and we will get back to you.

3 Simple Ways to Fix PS4 System Software Update Error

The PlayStation 4 (PS4) is one of the world’s foremost game consoles. However, it still has a few error codes, such as SU-30746-0.

The PS4 system software update error SU-30746-0 (or system update loop) arises for some players when they turn on their PlayStation 4 consoles.

Instead of starting up, the PS4 displays this error message:

An error has occurred. SU-30746-0

Read on to find out how to resolve this issue once and for all.

What does the system software update error on PS4 mean?

Don’t panic; you don’t have to throw your console in the trash and purchase a new one. All errors have fixes that will restore console functionality.

Know that the System software update has failed (SU-30746-0 PS4 error code) can appear when your PS4 console has been unable to install the latest firmware update.

How do I fix the system software update error on PS4?

1. Update your system software

Use Safe Mode

  1. Power off your PS4 if it’s on.
  2. Next, press and hold the power button until you’ve heard a couple of beeps.
  3. Release the power button after the second beep.
  4. Connect your DualShock 4 control pad to the PS4 with a USB cable.
  5. Press the PS button on the DualShock 4.
    The Safe Mode menu ps4 update error [system software]
  6. Select Update System Software on the Safe Mode menu.
  7. Select the Update using Internet option.

Reinstalling the system software on the PS4 safely can help you fix the Cannot start the PS4 (CE-34335-8); read this guide to learn more.

Use a USB drive

Setting the USB drive up
  1. Format a USB stick to FAT32.
  2. Open the PS4 System Software Update 7.51 page.
    The PS4 System Software Update page ps4 update error [system software]
  3. Click the Download PS4 update file link.
  4. Make sure that the title for the PlayStation 4 update file is PS4UPDATE.PUP.
  5. Plug in your USB stick into the PC.
  6. Open the File Explorer window, and select the USB drive on the left of Explorer.
  7. Click the New Folder button, and set PS4 as the folder title.
  8. Create another new folder named UPDATE inside the PS4 folder.
Transfer the update package
  1. Open the download folder that includes the PS4 update file.
  2. Select the PS4 update file, and click the Move to button.
    Move to button ps4 update error [system software]
  3. Select the Choose location option.
  4. Then select to move the update file to the UPDATE folder on your USB stick.
  5. Next, eject the USB stick from the PC. Insert the USB drive into your PlayStation 4.
    The PlayStation 4 ps4 update error [system software]
  6. Start the console in Safe Mode by holding its power button until it beeps twice.
  7. Then connect the DualShock 4 controller to the console with its USB cable, and press its PS pairing button.
  8. Select the Update System Software > Update from USB Storage Device options on the Safe Mode menu.
  9. Select the OK option.
  10. Select Next to continue, and follow the on-screen instructions to complete this process.

2. Restore the PS4 to its default settings

  1. Start the PS4 in Safe Mode exactly as outlined for the first resolution.
  2. Select the Restore Default Settings option on the Safe Mode menu instead.
    Default Settings option ps4 update error [system software]
  3. Select the Yes option and press X to confirm.
  4. Restart the PlayStation 4.

You will need to sign back into the PlayStation Network after restoring the console to the default configuration.

3. Use the Initialize PS4 option

  1. Back up your saved PlayStation game data to a USB device or cloud storage.
  2. Save the system software for PlayStation 4 to a USB drive as outlined for resolution two.
  3. Insert the USB drive that includes the system software for the PS4 into the console.
  4. Start the PlayStation 4 in Safe Mode as outlined for the fixes above.
  5. Select the Initialize PS4 (Reinstall System Software) option on the Safe Mode menu.
    Initialize (Reinstall) option ps4 update error [system software]
  6. Then select OK to confirm.

How do I force update my PS4?

To force update your PlayStation 4 console, please refer to solution 1 in this guide and use Safe Mode.

That is the only way a forced update can be applied to your Sony gaming console, just in case you didn’t already know.

There you go. Now, you will be much better prepared for the next time your PS4 system software update results in an error and it’s frozen.

Throughout time, users have reported dealing with the following error codes:

  • System software update ps4 error SU-42118-6
  • PS4 system software update error SU-30746-0
  • PS4 system software update error SU-42481-9
  • PS4 system software update error SU-42477-4
  • PS4 system software update error CE-36329-3
  • PS4 system software update error CE-43461-8

We also covered SU-41350-3 error in one of our newer guides, so don’t miss it for more solutions.

Those are some of the best fixes for error SU-30746-0. If you still need other fixes, you can discuss the issue further with live chat on the PlayStation 4’s support website.

Fix: There is a Problem Connecting Securely to This Website

Some Internet Explorer and Edge users have encountered an error message that states: There is a problem connecting securely to this website. The security certificate presented by this website is not secure.

This invalid certificate issue can occur in any browser, albeit the error messages aren’t always the same. In this case, the error blocks you from opening the web page.

This can be very frustrating, but we have provided the best solutions in this article.

You may want to consult our other article if you have any issues with Edge not working on your PC.

Why am I getting a security certificate warning?

The issue occurs with several other programs as well, as shown below:

  • There is a problem connecting securely to this website (no option to continue) – This issue usually occurs if your clock isn’t set correctly.
  • There is a problem connecting securely to this website (Chrome, IE11, Edge) – The cause is usually your antivirus. Disable your antivirus or switch to a different browser to fix the issue.
  • There is a problem connecting securely to this website (Facebook, YouTube, Outlook, PayPal, Netflix, Wikipedia) – Sometimes, you might not be able to access a specific website due to this error. Add the website to the Trusted Websites section to fix that and check if that solves your problem.
  • The security certificate presented by this website was issued for a different website’s address – This problem arises when the domain name in the SSL certificate doesn’t correspond to the address in the browser’s address bar.
  • An application is preventing Microsoft Edge from safely connecting to this site Fortinet – This is another iteration of the same problem, but this time, peculiar to Fortinet.
  • The host name in the website security certificate differs – This may happen if the certificate you choose has an issue, but you have set up an IIS Site Binding to utilize HTTPS.

Below, we detail each of the solutions mentioned above, so you might want to go directly to the one that applies to your situation.

How can I fix There is problem connecting securely to this website?

1. Try an alternative browser

There is a problem connecting securely to this website message can sometimes be related to your browser, and if you want to fix it, it’s advised that you temporarily switch to a different browser.

If you experience this issue only on Library Genesis, you can follow our Libgen not working troubleshooting guide for step-by-step fixes.

If the issue doesn’t pop up, you should permanently switch to the other browser for the time being. On this note, we recommend trying Opera One as your default browser.

Downloading Opera One takes only a couple of minutes, and settings it up is extremely easy. Besides, you can switch from your default browser to Opera One in only a few steps.

Namely, after downloading it, you can find a Synchronization option in the Settings area that allows you to import bookmarks, pages, and other data from your default browser.

Furthermore, you can customize the browser by adding icons, sidebars, workspaces, and bookmarks for easy access and a better-organized workflow. Unique features also include workspaces, tab islands and a built-in AI.

We should mention that Opera One comes with an integrated VPN to keep your online activity private. Since IP restrictions might cause the mentioned error, the VPN will hide your location, preventing the error message from appearing.

Opera One

Try this highly customizable browser today and enjoy an error-free browsing experience.
Free Download Visit website

2. Check your antivirus

In some cases, the mentioned error appears due to your antivirus. Certain security settings can interfere with your system and cause this issue to appear, but you can fix that by disabling certain antivirus features.

We only advise that you do this temporarily until the problem is fixed. Or, better yet, use an antivirus that does not interfere with other programs.

3. Check your date and time

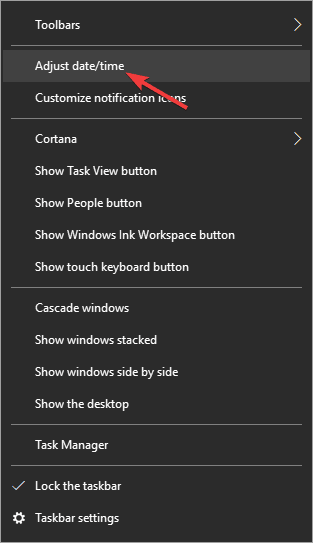
  1. Right-click the clock icon on your Taskbar, and select Adjust date/time from the menu.
    There is a problem connecting securely to this website no option to continue
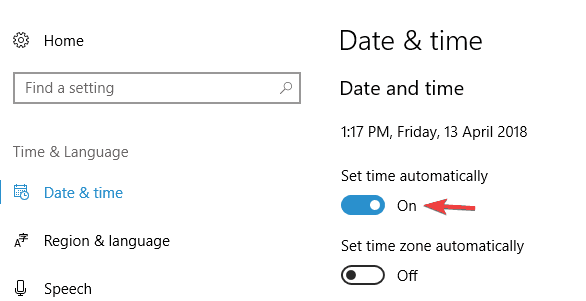
  2. Disable the Set time automatically option. After a couple of moments, turn this option back on again.
    There is a problem connecting securely to this website IE11
  3. Check if you can now access the web resource.

This will resynchronize your time and date. Once your date and time are set, the issue should be resolved.

If the clock on Windows does not work correctly, your motherboard battery may be drained, so you’ll need to replace it.

This process is relatively simple, and you just need to disconnect your PC from the power outlet, open the computer case, and carefully remove the battery from your motherboard.

Once you remove the battery, replace it with a new one, and the problem should be resolved.

4. Add the website to Trusted Websites

  1. Press Windows Key + S and enter internet options. Select Internet Options from the list of results.
    there is a problem connecting securely to this website
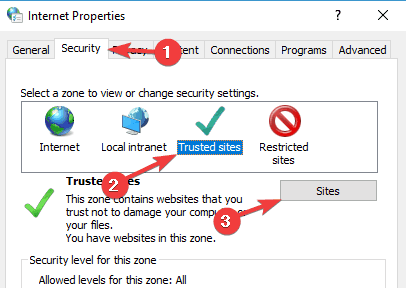
  2. Navigate to Security, choose the Trusted sites category, then click the Sites button.
    There is a problem connecting securely to this website Edge
  3. Enter the URL in the Add this website to the zone section and click the Add button.
    there is a problem connecting securely to this website
  4. Once you add the website to the trusted list, save changes.
  5. After you add the desired website to the Trusted Website zone, verify that the error message there is a problem connecting securely to this website is cleared.

Be sure to add only websites that you truly trust and not some random websites that you’re visiting for the first time.

5. Clear the SSL Cache

  1. Press Windows Key + S and enter internet options. Select Internet Options from the list of results.
    there is a problem connecting securely to this website
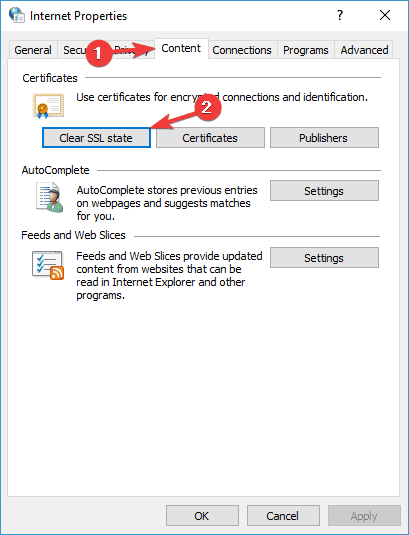
  2. Now select the Content tab and click the Clear SLL slate button on that tab.
    There is a problem connecting securely to this website Outlook
  3. Verify that the error message there is a problem connecting securely to this website is cleared.

Clearing the SSL cache should erase corrupted certificate data and allow you to access the desired website.

6. Remove OpenDNS

  1. Open the Control Panel.
  2. Click on View network status and tasks.
    there is a problem connecting securely to this website
  3. Select Change adapter settings from the left pane.
    there is a problem connecting securely to this website
  4. Right-click on your adapter and select Properties.
    there is a problem connecting securely to this website
  5. Click on Internet Protocol Version 4 (TCP/IPv4) and select the Properties button.
  6. Delete the listed DNS server address numbers and select the Obtain DNS server address automatically option.
  7. Press the OK button to confirm the new settings.

Since you’ve effectively erased the OpenDNS server addresses, previously blocked sites might open.

This fix is applied mainly when browsing on corporate networks. OpenDNS is a service that enhances the Domain Name System on many corporate networks and blocks more legitimate websites.

How do I fix HTTPS not secure in Chrome?

You must first get an SSL certificate to remove the not secure warning from your website.

Several providers offer these certificates, including Namecheap, Bluehost, GoDaddy, etc. When someone uses a search engine, an SSL certificate you purchase and install will vouch for the security of your website.

You may buy certificates, like an OV (Organization Validated) SSL certificate, that show your visitors that the website and other material are trustworthy.

Note icon NOTE
For the complete collection of articles on Windows errors, see our Windows Troubleshooting Hub. You can also find helpful material on browser issues on the dedicated Browser Troubleshooting page.

We hope one of these solutions restores the connection to the desired website in Internet Explorer and Edge browsers.

If you have further suggestions for solutions, contact us using the comments section below.

Grounded video game gets new secret feature on Xbox and PC

Obsidian has announced that their game “Grounded” will be getting a major new addition: shared worlds.

What are shared worlds? To quote the developer forum, “Shared Worlds are stored in the cloud and you can share them with any of your friends so they can host that world while you are not online.”

  • Users can own up to three shared worlds at a time.
  • Users can have 50 worlds shared with them at a time.
  • Any standard world can be converted to a shared world through the save/load menu.
  • Also, shared worlds can be copied to play as a standard world.
  • Only one person can host a shared world at a time.

Shared worlds are useful in that players can use them to share game saves with friends. And if you happen to own both a Steam copy and Xbox or Windows copy, you can use shared worlds to play the same game save across platforms. And there are other use cases for shared worlds as well.

Note that the shared worlds feature is currently in beta testing right now, and there are still bugs to be fixed before it gets a full public release. Grounded is available on Xbox Game Pass in Game Preview form, and will see a full release on September 27.


What is Smooth Scrolling & How to Enable It [Edge, Chrome]

As the name implies, smooth scrolling is a recently introduced enhancing feature designed to improve scrolling on the best web browsers. This feature has been adopted by Mozilla Firefox, Google Chrome, Internet Explorer, Edge, and Opera One, among others.

This feature allows you to navigate a page smoothly, regardless of size. While it is now a basic feature on most browsers, many still find it difficult to use/enable.

This guide will show you how to enable the smooth scrolling feature on Windows 10 & 11 for some of the major browsers.

Why is my computer not scrolling smoothly?

As the name implies, the smooth scrolling feature on major Windows 10 and 11 browsers makes scrolling smoother. This feature makes it smoother and more coordinated, unlike the usual scrolling that feels choppy and stops abruptly.

With it enabled, it is easier to navigate pages of different sizes. Also, smooth scrolling on browsers like Chrome and Firefox eliminates stuttering scrolling. So, enabling the feature has many advantages.

How do I make my Windows scroll smoother?

1. Enable Smooth Scrolling on Opera One

  1. Open Opera One.
  2. Press the Extensions button.
  3. In the Extension screen, select Get more extensions.
  4. Type in SmoothScroll in the Search for add-ons search bar.
  5. Select the SmoothScroll extension, and click on the Add to Opera button.

Now that you’ve installed the extension, enjoy a better way of navigating your websites.

Speaking of customization, Opera One’s extensions can transform the browser entirely, allowing you to specialize it in whatever direction you want: streaming, gaming, writing in WordPress, etc.

It is an excellent browser to use if you want something modern and efficient.

2. Enable Smooth Scrolling on Microsoft Edge

  1. Open the Run dialog box by pressing the Windows key + R.
  2. In the dialog box, type systempropertiesadvanced and press Enter.system advanced what is smooth scrolling how do I enable smooth scrolling in windows 10
  3. In the list of options, click on the Advanced tab.
  4. Under Performance, click on the Settings… button.
    settings button smooth scrolling windows 10
  5. Locate and check the Smooth-scroll list boxes.
  6. Select Apply followed by the OK button.
    apply
  7. Click OK again in the confirmation prompt to finish the process.

This is the simple way to enable smooth scrolling on Edge for Windows 10 and 11.

3. Enable Smooth Scrolling on Mozilla Firefox

  1. Launch Firefox.
  2. Type about:preference in the address bar and hit Enter.
    preferences
  3. Scroll down to the Browsing section and check the box for Use smooth scrolling.
    use  smooth scrolling windows 10

After enabling the feature, you can try and reconfigure the browser’s settings to optimize the smooth scrolling function further.

To do this, go through the step-by-step guidelines below:

  1. Type about:config in the Firefox address bar, and press Enter.
    config
  2. Click the Accept the Risk and Continue button when prompted.
    accept
  3. Search for general.smoothScroll.currentVelocityWeighting in the search box.
  4. Double-click on the entry from the results list, and set its value to 0.
    weighting smooth scrolling windows 10
  5. Search for general.smoothScroll.mouseWheel.durationMaxMS and set it to 250.
    general
  6. Search for genral.smoothScroll.stopDecelerationWeighting and set it to true.
    genral
  7. Lastly, search for mousewheel.min_line_scroll_amount and set it to 28.
    mouse wheel smooth scrolling windows 10

And you are all set!

4. Enable Smooth Scrolling on Google Chrome

  1. Open your Chrome browser and input about:flags or chrome://flags in the address bar, and press Enter.
    about flag
  2. Type Smooth Scrolling in the search box.
    search
  3. Click the dropdown before Smooth Scrolling and select Enabled.
    enable smooth scrolling windows 10
  4. Now, click the Relaunch button to restart your browser.
    relaunch

Once this is done, you can enjoy an optimized, Smooth scrolling experience on your PC.

Should I enable smooth scrolling?

The advantages of the smooth scrolling feature on the major Windows 10 & 11 browsers are numerous. It also helps to eliminate some scrolling-related issues on your browser.

However, it is not without downsides. With the feature enabled, scrolling feels a bit slower but smoother. But on the balance of things, the pros outweigh the cons.

The smooth scrolling feature on Windows PCs improves user experience considerably. We have shown how to enable the feature on four of the most popular browsers available. So, you have all you need to use it.

Are you facing issues like the scroll wheel not working on Chrome? Then, check our guide on the topic to get it fixed effortlessly. Besides, many are not pleased with its functionality in the latest iteration and modify settings to have the scrollbar always show up in Windows 11.

Feel free to let us know if you encounter any problems while trying to enable the smooth scrolling feature in the comments below.

How to use the Rendering tool on Edge to force dark mode on any website

Windows 11 has an option to use either dark or light mode on any application. Microsoft has a similar tool available for called the Rendering tool on Edge. The Rendering tool can “emulate dark or light schemes in the rendered page” allowing you to see what a website would look like

So, if you want an option to enable dark or light mode without using an Edge extension like Dark Reader, you can use the Rendering tool on Edge instead.

It is important to note that the Rendering tool on Edge is a web development tool meant to be used by web developers to see what a webpage looks like in different display options or for people with vision deficiencies, such as color blindness.

Developer tools in any browser are for testing only, so it is not possible to save any changes you make in this tool. You can only make changes and save the changes in your code only.

Enable Developer tools

Similar to the Rendering tab on Chrome, you can use the Rendering tool on Edge to see what a website looks like displayed in different color options.

Chris Heilmann, Principal Program Manager for Browser Tools at Microsoft, offered some helpful advice on how to force dark mode for websites where dark mode isn’t an available option.

In order to enable and use this feature, you need to open Edge DevTools. You have 4 ways you can open DevTools:

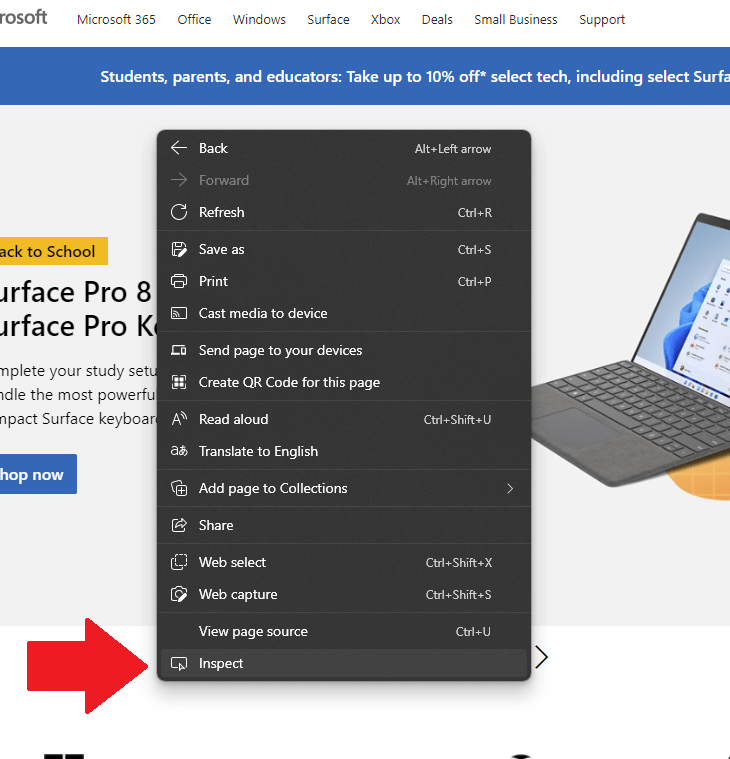
1. Right-click on any website using your mouse and left-click Inspect. This option actually takes you to the “Elements” tab under Developer tools (DevTools), but you can always click the “Rendering” tab from there.

rendering tool on edge

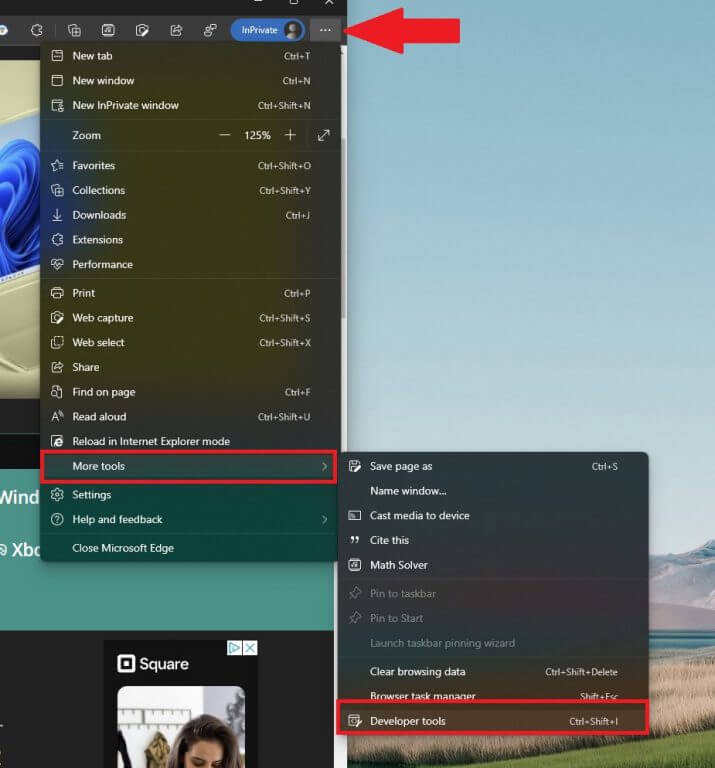
2. Go to the three-dot Edge Settings in upper right of an open Edge window. Click More tools > Developer tools.

3. Use the Ctrl + Shift + I keyboard shortcut.
4. Press F12 on your keyboard. You can always turn this keyboard shortcut off later in Edge settings.

Access Rendering tool on Edge

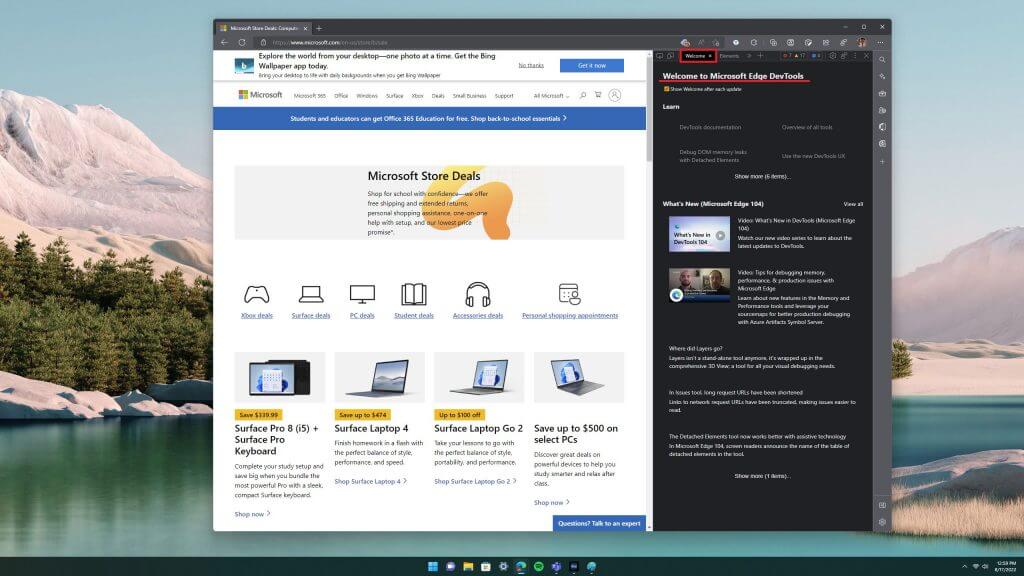
Now that DevTools is open in Edge, you should be greeted by the “Welcome” tab.

rendering tool on edge

The next step is to open the Rendering tab. Here’s what you need to do.

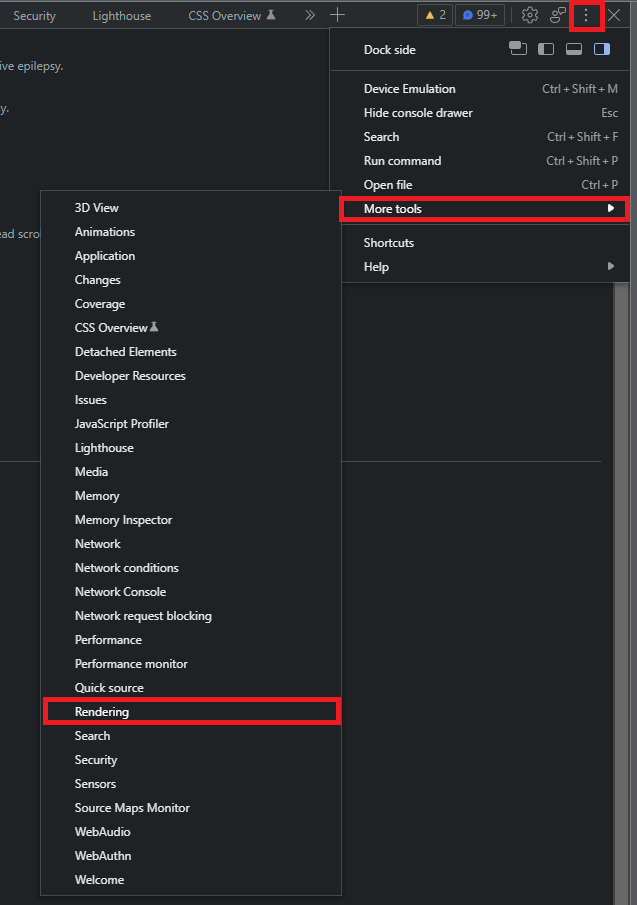
1. Click the DevTools three-dot menu in the upper right.
2. Click More tools > Rendering.

rendering tool on edge
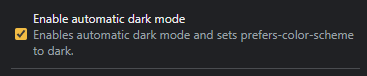
3. Scroll until you find Enable automatic dark mode. Click the checkbox to enable automatic dark mode which sets the prefers-color-scheme to dark.

rendering tool on edge

The change to automatic dark mode is instantaneous, so no need to refresh the webpage for the changes to take effect.

Nickname passwords and filter history by date come with the latest Microsoft Edge Dev build

Microsoft recently released a new Edge Dev build, upping it to 106.0.1349.1. The build features the usual round of improvements, but also comes with three new features.

First up is a new capability that will allow users to filter history by date allowing you to easily trace back your steps. What’s more, users will also be able to nickname passwords for easy identification. And finally, there are also new policies from upstream and corresponding downstream changes. You can also check below for the reliability improvements and more.

Improved reliability:

  • Disabled pinning options in the menu for a specific website, if the website is already pinned to the taskbar
  • Improved smart history searches (e.g.: “videos from last week”)
  • Improved camera feature for websites on Android

 Changed behavior:  

  • Fixed an issue where certain address bar instant answers were unnecessarily truncated
  • Fixed Narrator announcements in Settings
  • Fixed various crashes
  • Updated a Policy, so when signed into Microsoft Edge with a work or school account (AAD), feedback is associated with account and organization
  • Fixed an issue where feedback cannot be sent from within the side pane
  • Fixed an error when attempting to generate a QR code on Android
  • Fixed a crash when changing profiles on iOS

This isn’t the only Edge news this week, Microsoft Edge Canary on Windows 11 and Windows 10 recently got a consistent dark mode for both Edge and window frame context menus. Microsoft Edge 105 also shipped to the Beta Channel.

Flock Browser: Everything You Need to Know

The browser industry is a very competitive one. Aside from the well-known browsers for all devices, like Opera One, Chrome, and Firefox, there are still many excellent browsers.

In the heat of the competition, some browsers could not be continued. Among the many excellent browsers that were discontinued is the Flock browser.

This browser was well-known for its unique features and overall performance. Despite its unavailability, some users still want to know how it works.

This guide will take a closer look into how the Flock browser works, what makes it unique, and every other vital information about it.

What is the Flock Browser app used for?

what is flock browser

Flock browser was first released in 2005, bringing many Web 2.0 features to the user interface.

The early versions were based on the Gecko rendering engine. But in 2011, the browser switched to the WebKit engine.

The browser was popular because it had a social media integration. With this, you could easily keep track of social networks or your webmail at any time.

Additional features included native sharing of content, the ability to preview online videos, a built-in RSS reader, a built-in blog editor and reader, and synchronization with web-based email.

The browser was available on all desktop platforms but was discontinued in 2011.

Who founded Flock?

The Flock browser was co-founded by Bart Decrem and Geoffry Arone in 2005. The browser was built on the Mozilla Firefox architecture focusing on social media and network integration.

Also, the founders hoped that Flock would improve the user experience. Hence, it packed many unique features.

Quick Tip:

Although the Flock browser was great due to its social media integration, other browsers, such as Opera One, can provide the same functionality.

Opera One has Instagram integration, allowing you to browse your feed and send messages while browsing other websites. It also features integrated messaging apps and a native AI.

Opera One

Get instant social media integration but with the added security layers of a VPN, thanks to Opera One’s clever build.
Free Download Visit website

How do you log into Flock?

Immediately you download and install the Flock browser as a new user, it opens a page to log in and activate your favorite social media accounts.

If you have been using Flock for some time, you only need to close and reopen the browser, it will display the page. From here, you can log in and manage your social media accounts.

Is Flock Safe to use?

When it was active, the Flock Browser was very safe to use. It packed some excellent security features that protect users online.

However, with the ever-evolving internet and hackers finding new ways to attack, the same cannot be said about the browser since it was discontinued. This is because it is no more receiving security updates.

So you will be better off trying an alternative browser.

Is Flock Expensive?

The Flock browser is a free browser that costs absolutely nothing. Although it is no more available via official sources, you can still get the Flock browser apk and installer from third-party sites for Mac and Windows 10 PC.

How do you delete a Flock chat?

To delete your social media chats on the Flock Browser, you only need to follow the steps you use for the app’s web version. Flock does not have any special for the apps.

Instead, it only makes it easier to access and manage them.

The flock Browser was excellent in its time. But now, you might need to consider other frequently updated browsers with similar features for security reasons.

Do you need an in-depth review of the Opera GX browser? Then check our detailed guide for all the vital information you need.

If you have any questions or addition on Flock, feel free to let us know in the comments below.

How to Schedule Themes in Vivaldi Browser [Bonus Tip]

There is no doubt about it, Vivaldi is one of the best customizable browsers. Vivaldi themes offer many flexible customization options, along with many powerful features, and the browser has become even more versatile with the latest updates.

You can use the theme scheduling feature to make your browser change your favorite themes according to your needs.

Theme scheduling is exactly what it sounds like. It allows you to choose a few themes for your browser, which will automatically change when you’ve set them.

Joining our myriad of features and functionality, theme scheduling gives you the power to set your favorite theme to your preferred time as no other browser has ever done. After enabling a theme in the Settings, you can set its scheduling.

You can switch a theme whenever you want to match your current mood or time of the day.

So, for example, while you’re at work, you can set a bright theme or choose a dark theme when browsing the internet at home, with lights off.

Quick Tip:

Vivaldi browser has a lot of users who deem it better than Chrome or Firefox due to its great UI design and low resource usage.

However, what if we told you there’s a browser with a variety of customization options that’s also safer and tends to your privacy more than any other browser?

We’re talking about Opera One, of course. But this isn’t your regular, standard version of Opera One browser.

We are suggesting the gaming edition called Opera GX. While even the classic Opera One has personalization options, Opera GX takes things to the next level.

Yes, you can change your colors, wallpaper, and themes. Yes, you can even add multiple wallpapers at the same time. But you can also adjust things like transition animation and sound effects!

Opera

Ultimate control of your PC resources and the look and feel of your browser with Opera GX

How do I set up theme scheduling in the Vivaldi browser?

  1. Open the browser, and go to Settings (a small gear icon in the lower-left part of the window).
    settings vivaldi theme scheduling
  2. Go to the Themes tab.
    option
  3. Scroll down to the THEME SCHEDULE section.
  4. Tick the radio for the Manual Schedule.
  5. Click the Add button.
    manual
  6. Select two or more themes to schedule and move the timer as necessary.
    select multiple vivaldi theme scheduling

There you go. Once you schedule your themes, the browser will automatically switch from one to another when the time comes.

You can choose between themes like Light, Subtle, Redmond, Dark, Human, Olive, and more. So basically, there’s a theme for everyone’s taste.

Where are Vivaldi themes stored?

The background images on Vivaldi are stored in the application. The steps to get to them depends on your operating system.

If you download any theme, it will be stored in Chrome storage in the browser folder. However, if you are wondering how to move them, there is no official way to do it. But you can use developer tools to do it.

What do you think about Vivaldi’s features and versatility? Have you ever used this browser as your main daily engine for surfing the internet?

Tell us in the comments below.

FIX: Steam error joining multiplayer session (5 solutions)

Steam users report the Error joining multiplayer session message when trying to play certain games, such as Sid Meier’s Civilization V (Civ 5), Sid Meier’s Civilization VI (Civ 6), and Grand Theft Auto V (GTA 5).

Here’s an example:

Error joining multiplayer session?!?

How do I fix this?!?! Thanks!

posted by pineapple bun on Steam Community forum

If you’re one of these unfortunate gamers, here’s what you need to do to get rid of this error message.

Quick Tip:

Errors while joining a game can also be created by online browsing. We recommend using a browser that can limit the network usage so you encounter no such issues in your multiplayer experience.

In Opera GX not only you can limit network consumption of the browser, but you can also limit CPU and RAM usage. These features and more others serve only one purpose, to create an enticing gaming experience

Opera GX

Leave joining errors in the past with a new engaging gaming browser.

How can I fix the multiplayer session error in Steam?

1. Repair .NET Framework

  1. Download the Microsoft .NET Framework repair tool, from the Microsoft Store.
  2. Select the NetFXRepairTool.exe and download it
  3. Open the downloaded file and follow the instructions on the screen (you need admin rights)
  4. Once this is done, restart your computer
  5. Launch Steam, your game, and try to join a multiplayer session

Some Steam games require .NET Framework to work properly. If you don’t have this software package installed, it could be the reason why you can’t join online sessions with other gamers on Steam.

However, the Microsoft .NET Framework repair tool should solve any problems related to this dependency, including missing libraries, failure to launch, or an outdated version.

2. Remove the Steam and game cache

  1. Using your file explorer, visit the following address:
    • C:UsersYOURUSERAppDataLocal
  2. Replace YOURUSER with your PC username
  3. Select and delete the Steam folder
  4. Also, select and delete your game folder in this location

Clearing Steam and game cache is a good way to fix multiplayer issues. If you know the other players, get in touch with them and ask them to do the same on their devices.

3. Use a premium VPN solution

If you want to use a VPN to not only avoid Steam multiplayer issues but also improve your ping by connecting to VPN servers closer to the host, consider investing in a premium VPN service.

The best VPNs for Windows 10 are services that have a large number of servers across the whole world.

This means that they are able to cover any type of connection and let you connect to your game with no issues, regardless of where you are.

Some VPNs have specific gaming features that help you connect to the best possible service for the game you are playing.

You can manually connect as well if there is a server you prefer, but the VPNs are able to detect the best configuration for you.

Just make sure to get a VPN with a strong privacy policy and additional secure network features such as a killswitch.

4. Disable your free VPN service

If you’re using a free VPN while playing on Steam, it could be the reason why you’re experiencing an error when trying to join multiplayer sessions: your IP address changed.

VPN servers might occasionally go down at random or become unreliable, causing you to get kicked out of your game or experience data loss.

It is difficult to tell how well a VPN paid service performs when it comes to gaming until you join up and try it for yourself, most of the providers offer money-back guarantee options or trials.

So, because it’s a free VPN service, you may experience data tracking from whoever controls the VPN and has the ability to see what you’re doing.

You can resolve this problem by turning off your free VPN before firing up Steam, and for good. It doesn’t seem healthy for your activity and private data to use a free VPN service nonetheless.

5. Deny folder permission

  1. Go to Documents > My Games folder
  2. Select any folders that resemble: packageddumps, moduserdat, logs, dumpgs
  3. Right-click each folder and select Properties
  4. Go to the Security tab and select your group of usernames
  5. Click the Edit button
  6. Select the first group or username and check the Deny box
  7. Repeat the previous step for other user groups
  8. Save changes
  9. Restart your Steam games

The instructions above prevent Steam from creating game cache files in those folders, in order to fix the error when you’re trying to join multiplayer sessions.

To recap, if you’re encountering a Steam error message when trying to join your online friends in a multiplayer session, make sure to repair .NET Framework, remove the Steam and game cache, as well as manage permissions for cache folders.

You should also disable any free VPN you’re using. Instead, we recommend opting for a premium VPN service like Private Internet Access.

Our Steam area is dedicated to more awesome guides about this gaming platform, and you can also join our VPN Hub to find out how a VPN can make your digital life better!

Verify Integrity of Game Files not Working: 3 Fixes to Use

You have received the Verify integrity of game files not working message. Let us walk you through all you should know. Steam is a popular online platform where users can play, create, and discuss games. Sometimes you may encounter errors when playing certain Steam games, such as random crashing.

This guide will show you how simple it is to follow a series of steps and solve the situation quickly. When this error occurs, some users see purple checkerboards; often, the weapon or the world models are missing, and sometimes they experience crashes when the game is loading.

If you are no stranger to this issue, don’t hesitate to apply the solutions we will suggest in this article.

Why won’t Steam verify the integrity of game files?

There could be several reasons why Steam needs to verify the integrity of game files. Here are some possible explanations:

  • Outdated game files – If Steam detects that the game files are not up-to-date, it will not verify the integrity of the files. 
  • Game files in wrong directory – If the game files are not located in the correct directory, Steam may be unable to find them and, therefore, cannot verify their integrity. 
  • Technical issues – Sometimes, Steam may experience technical problems that prevent it from verifying the integrity of game files. 
  • PC requirements – If your computer does not meet the minimum requirements for the game, Steam may encounter this problem. 
  • Corrupted game files – In some cases, the game files may be so corrupted that Steam cannot repair them.

Quick Tip:

Opera GX is a web browser outside the Steam desktop app. However, since Steam’s built-in browser works in the Steam overlay, Opera GX is easier to access and use its perks while playing.

In-game purchases and market functions, game invites through integrated Discord will perform better outside of the Steam client using Opera GX, as it will not get overloaded with cached files.

Opera GX

Avoid cache overload in the Steam client; use Opera GX for other actions you need to perform.

What can I do if verifying the integrity of game files is not working?

1. Clear download cache

  1. Open Steam and select Run as administrator.
    verify integrity of game files not working
  2. Next, click Steam at the top of the window to expand the menu.
    verify integrity of game files not working
  3. Select Settings.
  4. Click Downloads on the left of the Settings window.
  5. Then, press the Clear Download Cache button.
    verify integrity of game files not working
  6. A confirmation window will open, so don’t hesitate to click OK.
  7. Select OK on the Settings window as well.
  8. Restart Steam to keep the changes.

This is an easy way to restore functionality when you receive the Steam verify the integrity of game files not working message.

Regardless of the integrity of game files, you can let Steam check into the problem. The cause of this type of issue is usually a bad cache, so follow the steps described above.

2. Reinstall the affected game

  1. Press Windows + E to open your Windows Explorer, navigate to the common folder using the path below, and rename the game folder.
    C:\Program Files (x86)\Steam\steamapps\common
  2. Open the Steam application.
  3. Visit the Library section.Check the Steam library
  4. Verify your game list and choose the one that has issues.
  5. Right-click on the game, click on Manage, then Uninstall.
  6. Return to step 1 and revert the folder name to its original name.
  7. Finally, find the game on Steam and click on Install.

This solution allows you to set the Steam mechanism to search into your steam-apps folder for any game that displays different errors. Its purpose is to check if there are any missing or corrupted files.

Whenever Steam finds any missing file, the application will automatically download that specific file and complete the game.

It has also been known as an effective solution in issues like the FiveM could not contact entitlement service error; read this guide to learn more.

3. Use flushconfig

  1. Open your browser and enter this line in the address bar: 
    steam://flushconfig/
  2. Then, in the new pop-up dialogue, click on Open Steam.
  3. You will get another pop-up warning from Steam saying that the action will delete the download cache, and you will need to log in again, so click OK.
  4. This will also restart Steam; you must enter your password.

Clearing the download cache will hopefully resolve the problem of verifying the file integrity of your games.

How to verify the integrity of game files without Steam?

You cannot verify the integrity of Steam game files without using Steam. Steam is the distribution platform for the game, and the only reliable way to verify the integrity of the game files is through the Steam client.

When you use Steam to verify the integrity of a game’s files, it compares the files on your computer to those on the Steam servers. If files are missing or corrupted, Steam will automatically download the missing or corrupted files and replace them with the correct ones. This ensures that you have a complete and functioning version of the game.

And that is as much as we will cover. So follow these simple steps and learn how easy and fast you can let Steam analyze the game that gives you errors and fix those issues.

Also, remember that Steam confronts them with an online source to verify the game files. That means you should have a steady and consistent Internet connection.

You might also be interested in reading our guide on how to fix the Steam Verifying Login Information error.

This isn’t the only issue, many reported that Files failed to validate and will be reacquired in Steam, but we have a guide that tackles this issue.

After giving our tips a test, please comment in our section and tell us how it went.

5 Best Bookmark Manager Extensions for Your Browser

More often than naught, we uncover a website or a specific page of a website that we like all by mistake, and then we leave it after we are finished with it.

After some time, we can’t backtrack our steps to get to that website or page again.

Thus begins the arduous journey of looking through your history or bookmarks if you’re conscientious. However, if you’re the type with many bookmarks, you’re in for a search.

That is why bookmark managers exist; the best are available for multiple browsers. Because they are many, we’ve decided to compile a list of the ones we think are the best.

If you have errors using these tools, check out our guide on resolving issues of Chrome not loading extensions.

Is there a better bookmark manager for Chrome?

Chrome has a decent free bookmark manager; however, you may be tempted to improve on this. On the Web Store, you will find many options that are unique to what the native one offers.

In some ways, many of these are better than Chrome’s built-in Bookmark Manager, and we shall share the very best of them with you, including great open-source bookmark manager options and options for other browsers like Edge.

Which is the best bookmark manager?

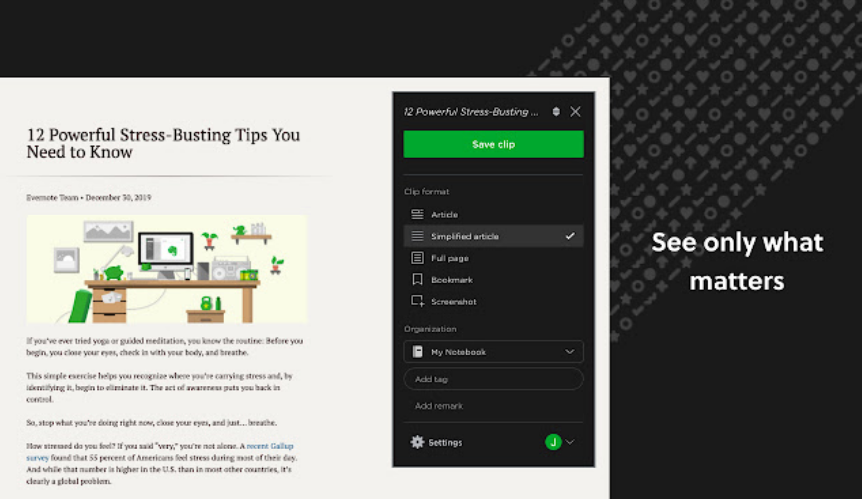
Evernote Web Clipper – Cross-platform use

Evernote Web Clipper is the program you need if you’re looking for a bookmark manager that can be used in almost any imaginable form.

With it, you can save bookmarks through a Web browser extension, mobile apps, email, and desktop applications, access and manage bookmarks through a web-based interface, and more.

This tool is available as a browser extension, mobile app, desktop application, and more. In addition, it is compatible with multiple platforms and devices.

The bookmarks are saved on the cloud or the account, and if you get the premium version, you can benefit from a few extra tools.

Other important features:

  • Document scanner
  • Templates
  • Calendar

⇒ Get Evernote Web Clipper

Diigo – Cloud storage capacity

Bookmark Manager Extensions

If you are interested in just plain old efficiency, then Diigo is the bookmark manager that you need.

One of its key features is that it can collect articles and text snaps from the web and PDFs, which can be useful.

This app allows you to save and tag your online resources for easy access anytime, anywhere. In addition, all of your bookmarks are stored on the cloud, and you can add labels to bookmarks.

Other important features:

  • Highlight and sticky notes
  • Anywhere access
  • Group-based content curation

⇒ Get Diigo

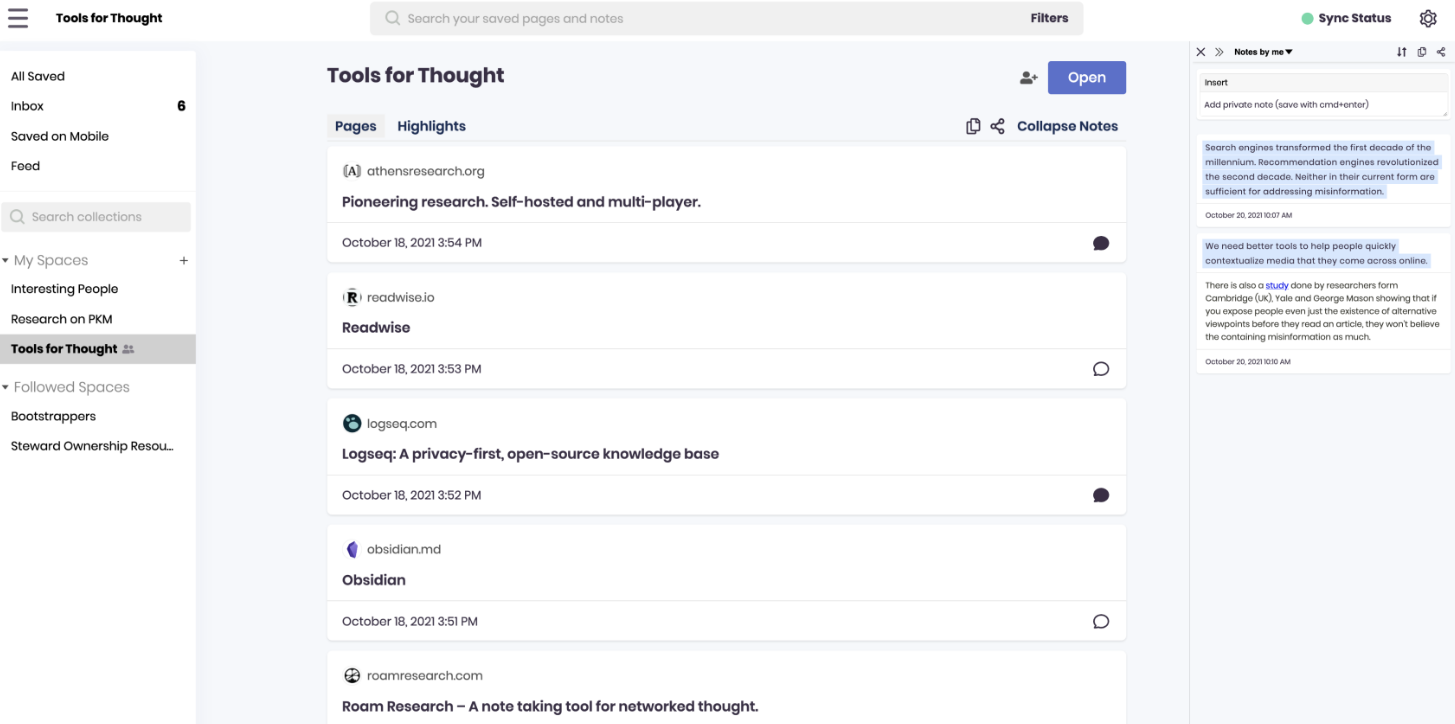
Worldbrain’s Memex – Great for Firefox

Bookmark Manager Extensions

If you’re looking to revisit a long-lost website that you may have visited long ago, then Memex is an excellent extension and the best Firefox bookmark manager out there.

It brings new tools to your browser by enhancing the way you bookmark a page and search for entries in your browser history, and it improves the search speed for anything you are searching for.

The sidebar feature enhances how you add and manage bookmarks in your browser. Another perk is that it’s available for Google Chrome and Firefox.

Other important features:

  • Declutter
  • Workflow integration
  • One-click save

⇒ Get Worldbrain’s Memex

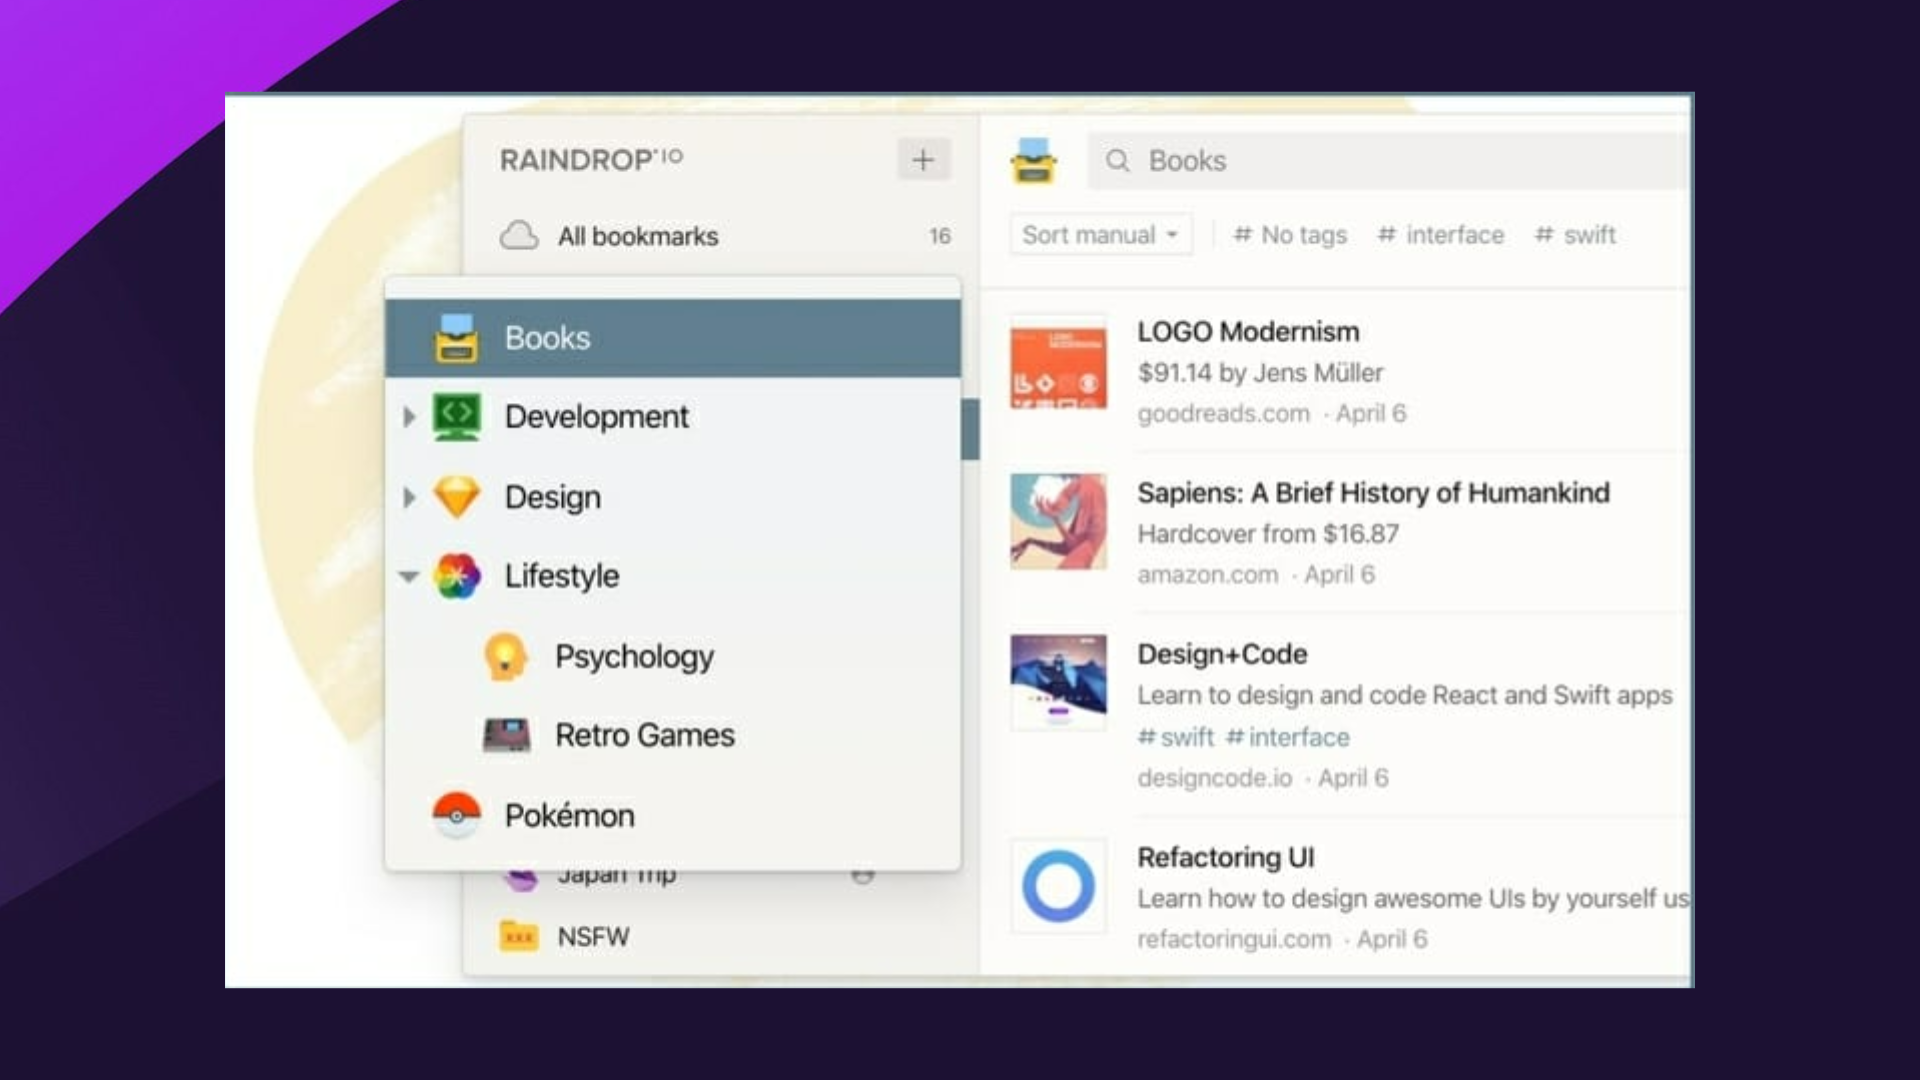
Raindrop.io – Great organization and labeling features

Bookmark Manager Extensions

If you’re the type with many bookmarks, finding something in them will still feel like finding a needle in a haystack.

That’s why a bookmark manager extension like Raindrop.io can be handy. It enhances your sidebar with tools that let you better organize and label your bookmarks with icons and tags.

Raindrop.io can be considered, in our opinion, the best Chrome bookmark extension, and you should try it.

This tool will make finding one entry among 500 others feel like a piece of cake. It is also available for Firefox, Opera One, and Microsoft Edge and is highly customizable.

Other important features:

  • Organize with ease
  • Instant preview
  • Multiple views

⇒ Get Raindrop.io

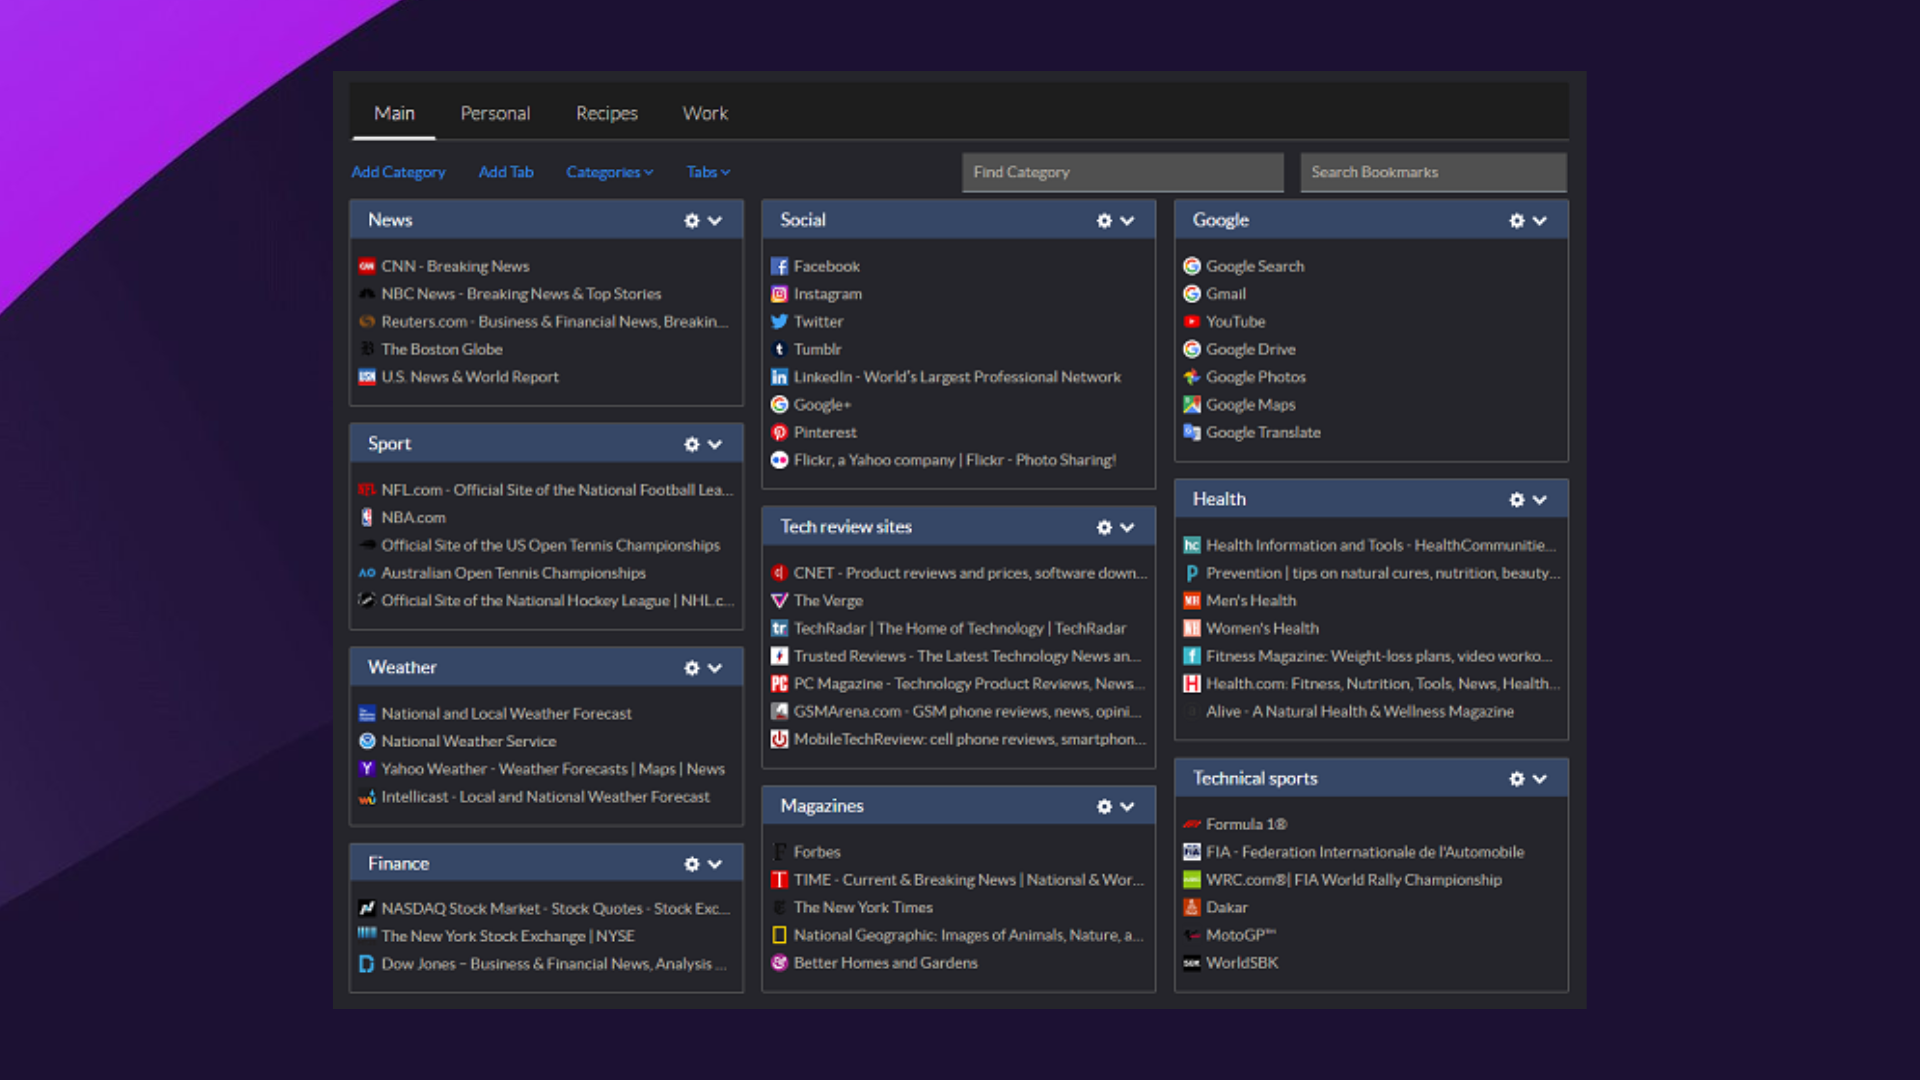
Bookmark Ninja – Great support for PC and mobile browsers

Bookmark Ninja is a more peculiar entry in our list since it is a web app and not a browser extension, but it does offer support for all browsers you may have on your PC or mobile device.

You can also consider it a perfect alternative to a Chrome bookmark manager extension.

This web app is easy to use and offers support for handling and organizing many bookmarks with advanced tag management and an overall dashboard view.

Additionally, the UI is extremely clean, so using it isn’t confusing if you already have many bookmarks to organize.

With the help of this tool, you can share your bookmarks between all your devices, and it also features a Dark Mode to help you save energy.

You can use it for free; afterward, you need to pay a fee for a subscription.

Other important features:

  • Simple UI
  • Mobile functionality
  • Dedicated Ninja email

⇒ Get Bookmark Ninja

What is the best way to organize links?

We have discussed bookmark managers, which are the best way to organize your links. However, here are some other options you may want to try.

  • Pocket on Android/iOS – It helps you conveniently save anything from the internet in one place.
  • Emailthis – The tool will email all your links to you, giving you a choice to manage them using an email client.
  • Google Keep – A cross-platform note-taker on the web and also available as a standalone app.
  • Evernote – Offers a web clipper that makes you copy and save entire web pages.

In addition to that, we tested and managed bookmarks with AVG Secure Browser. Hence, we advise you to organize your web bookmarks and keep track of all your web pages efficiently.

We as humans love having keepsakes of everything we do and all the things we like, even when it comes to digital items.

That’s why the bookmark feature was probably implemented in browsers so that we can quickly revisit our pages of interest.

However, these bookmarks can pile up over time, so having a way of efficiently searching through them seems like something inevitable.

From our recommendations, choose the best bookmark manager that suits your needs. We’d like to hear more from you on this subject, so give us your opinion in the comments section below.

Play Tetris Right in Your Browser!

Let us tell you all about your Tetris browser and extension options.

One of the most popular games of all time is probably Tetris. This game is available on every platform, so you can also play it on your PC.

Speaking of Tetris, in today’s article, we’ll show you how to play the Tetris game in your browser, so let’s get started.

How can I play Tetris on my computer?

  1. Visit the Tetris page on Windows Store.
  2. Click on the Get button.
    tetris browser
  3. Wait for the download to complete, then launch the app and play.

Note that there are a few paid options, but with this app, you can play Tetris for free on your PC.

We will now show you how to play Tetris on a browser online.

Quick Tip:

Playing games online is simple, but do you have the proper browser for the job? For gaming, it would be best to use a gaming-oriented browser such as Opera GX.

Opera GX offers a GX Control feature that allows you to allocate your resources to your browser and ensure that other processes on your PC can run smoothly.

Opera GX

Play Tetris in an ultra-modern web browser created for gamers.

Which Tetris website is best?

1. Tetris.com

  1. Visit the Tetris website.
  2. You should see a Play Tetris button in the top right corner. Click it.
    play tetris tetris browser
  3. Wait for the game to load.
  4. After the game is loaded, click on Play to start the game.
    tetris play button tetris browser

2. Htmltetris.com

  1. Visit the Htmltetris website.
  2. Your Tetris game will start as soon as the page loads, so be ready.
    htmltetris tetris browser
  3. You will use the arrow keys to direct the different dropping objects.

3. Freetetris.org

  1. Visit the Freetetris website to play Tetris unblocked in browser.
  2. The game will start loading automatically.
  3. Once the game loads, press the Play game button to start the game.
    freetetris play game tetris browser

Does Tetris have an end?

The player only finishes as many lines as they can before suffering an unavoidable loss; the game will not end with your triumph. 

Since 1996, Tetris has established internal standards and requirements that publishers must follow to get a Tetris license.

You can now play away using any of the three recommended websites. Of course, these are not the only places to play the game online, but they are our favorite go-to’s.

You may also try out Tetris browser multiplayer on websites like Tetr. Note that using any of the best gaming browsers will enhance your Tetris experience.

As you can see, playing Tetris in your browser is incredibly simple. If you found this article helpful, let us know by leaving a comment below.

3 Best Firefox Dynamic Themes you Simply Need to Try Out

Let us explore Firefox dynamic themes and share all we know with you.

Mozilla Firefox is and will always be a grand adversary to Google Chrome. Its privacy-oriented focus, simplicity, and fantastic personalization features have slowly become a viable choice for the daily driver web browser.

As the cherry on top of the Mozilla Firefox revival, we offer you three excellent themes to improve the experience.

The dynamic theme is, by definition, a theme that vibrates with various colors and patterns instead of sticking with a single solid color or motif.

It’s a great way to enrich your browsing experience without losing focus on what’s important. The only issue is that these are still relatively scarce for Firefox.

Nonetheless, we found our way around the Add-on Store and brought out the three themes (they’re Add-ons) which should serve you justice. So make sure to check them out below.

Quick Tip:

Firefox is not the only browser familiar with dynamic themes. Opera GX does an excellent job on customizability that exceeds the basics and goes for esthetic like no other browser.

With an award-winning design, it gives the user complete control over looks. With plenty of colorful and dark themes already preinstalled, it comes with a great setting that forces web pages to go into dark mode for better night browsing.

Opera GX

Avoid eye strain with this great fully customizable browser.

How do I make Firefox more aesthetic?

The best way to make Firefox more appealing to the eye is by using add-ons. There are a lot of them. While we discuss some of the best Firefox dynamic themes in this article, you must note that many other fantastic classes of themes exist.

Browse through the add-ons store to have a feel of the many options you may try out.

Are Firefox themes safe?

Generally speaking, Firefox themes are safe. However, some of them may be engineered to serve malicious purposes. Therefore, we recommend installing only themes you trust in your browser.

What are the best Firefox dynamic themes to use?

Native Dark – Customizable options

This belongs to the group of Firefox dark themes and mimics the color of your Windows system theme. It works great with the latest Firefox release and is a unique little piece of software.

This theme is, of course, dynamic. It’ll change color on Address and Title bars and Tabs, too. So basically, most of your workspace in Firefox will resemble the accent color of a Windows theme.

It sits so well with the Windows background that one might assume that Firefox is the native Windows 10 browser and not Edge. But, of course, these are only aesthetic changes.

But as far as we tested Native Dark, the accent colors are relatively fine, and our only issue is with the vividly light accent color. The font is barely seen if your theme of choice is relatively bright.

Feature-wise, there are multiple tweaks you can take advantage of. For example, you can set a static mode with only one color or change the nuance between the Address bar and the rest of the interface.

Important features:

  • Customizable settings
  • Easy installation
  • Multiple modes

⇒ Get Native Dark

Dolan’s Dynamic Theme – Focuses on website color

This nifty theme for Mozilla Firefox takes the step up and changes the coloring of the browser following the site color.

It primarily focuses on website icons. If you open YouTube, the theme will switch to reddish color. For Twitter, it’ll turn blue, resembling the tweety bird icon. Facebook – dark blue. You catch the drift. Every site has a different color for the Title bar and tabs.

Sometimes it’ll have difficulty determining which color to use, so it’ll stick with the default theme pattern. However, it’ll work most of the time without any issues.

We liked the transition between the tabs; this is our go-to theme. It fits great if you’re multitasking to break the monotonous single-colored user interface.

Keep in mind that this theme is still developing, so it’s far from perfect. This means it’s sometimes slow to load or misses the saturation and hue of the website’s icon. But, of course, this shouldn’t be the dealbreaker.

Important features:

  • Easily customizable
  • Blending colors
  • Great hue selector

⇒ Get Dolan’s Dynamic Theme

Zenfox – Open-source Firefox theme

The browser must be adequately themed for work or play as we spend an increasing amount of our lives on computers, and this extension does a superb job of that.

The gorgeous Solarized Theme, converted to Firefox utilizing its most recent APIs, is used by ZenFox. The overflow, download, and hamburger menus of a browser are examples of menus that follow the theme of the rest of your browser.

The Solarized Dark & Light Themes may be switched using four distinct techniques.

These include Time (change themes automatically at times of your choosing), Manual (toolbar button to alter themes upon pressing), System (automatically changes the themes around the OS light/dark theme), and Weather.

You may also select the accent color applied to the colors of the tab loading, tab line, and icon attention.

Zen Fox doesn’t ask for pointless permissions; all the code is available as open source on GitHub.

Important features:

  • For modes
  • Easy permission requirements
  • Solarized theme

⇒ Get Zenfox

How do I change the color scheme in Firefox?

  1. Click the menu icon and select the Settings option.
    firefox dynamic themes
  2. Scroll down to colors and click on the Manage Colors button.
    firefox dynamic themes
  3. Select colors for Text, Unvisited Links, Backgrounds, and Visited Links, according to your preferences, then click OK.

This wraps up our article on the best Firefox dynamic themes. We’ll make sure to inform you about the future additions to this theme niche.

We hope more talented developers will give it a go, as it improves the overall end-user experience by a wide margin.

For the time being, check out the presented ones, and post your impressions in the comments section below.

Can’t Sign Into League of Legends? Reasons and 3 Quick Fixes

League of Legend, most commonly known by its acronym, LoL, is a free-to-play MOBA game that is as contagious as it’s competitive.

There are not many reported issues, but the login problems are quite frequent. Especially since there are a lot of phishing websites creeping on the inattentive players.

Users reported that League of Legends won’t accept their password after several tries.

Why is my Riot client not launching?

There can be many potential reasons for the Riot client for LoL not to start but among the top ones, we need to list the graphics card driver.

Try to update its software too before going into any other troubleshooting steps. Also, check if Windows Firewall is blocking the app for some reason.

Coming back to our problem, if you can’t seem to login into your LoL account, check the steps below and resolve the problem with ease.

How do I fix the Riot client not logging in?

1. Check region settings and the server status

  1. Open the League of Legends client.
  2. Under the Region/Language section, choose your native region server.LoL client region select league of legends won't accept my password
  3. If you are still unable to sign in, check the League of Legends server status.
  4. If the server is up and running, try signing in again. In case the server is down, wait for some time and give it another go.

This should fix the problem if you can’t sign into League of Legends but if this doesn’t work, check the next solutions below.

2. Change your password

  1. In the League of Legends client, click on the Forgot your password hyperlink.LoL client forgot password league of legends won't accept my password
  2. This will take you to the Recovery webpage where you should insert your username and region.
  3. The automatized service will send you the reset link to the email address you registered.
  4. Open your email client and follow the link.
  5. Change your password.
  6. Open the League of Legends client again and try signing in with the newly-created password.

3. Run Hextech Repair Tool

  1. Download Hextech Repair Tool, here.
  2. Select your Region and check the Add Firewall exception and Force Repatch boxes.Hextech Repair Tool LoL league of legends won't accept my password
  3. Click Start and wait for the troubleshooter to resolve the problem.
  4. Restart your PC and try logging in again.
  5. Alternatively, you can send your LoL logs to the support team.

How do I know if I got banned from League of Legends?

When the publisher suspects any foul play or there has been any unaccepted activity on your account, you may get banned for a certain period of time.

If you try entering a match, the timer will still be ticking as the pop-up would show. So, you literally can’t join any games within the shown timeframe.

Of course, there are also permanent bans and if this happens you won’t be able to access your account at all.

Can the LoL account be unbanned?

If there’s a permanent ban, you can’t sign in to League of Legends and there is little you can do but for a temporary ban, you can contact Riot support for the login issues.

Basically, you need to access your LoL account and click on the Submit a Ticket button. Then, select the Discuss a personal suspension or restriction option from the drop-down menu.

The only thing left to do is explain and demonstrate your alleged innocence in a compelling way.

These steps, hopefully, addressed the League of Legends not logging in problem and you are ready to storm the Summoner’s Rift. Share the results with us in the comments section below.

4 Best Zombie Browser Games To Play [Free & Paid]

As you might know, there are all sorts of great games available in web browsers, but today we’re going to focus on a specific genre of games.

Zombie games have gained massive popularity over the years, and today we’re going to show you the best zombie games that you can play in your web browser.

Quick Tip:

Playing zombie games online is incredibly simple, but for best performance, it’s advised that you use a gaming browser such as Opera GX.

The browser has a built-in ad blocker, so you’ll be sure not to see any ads while playing online games. In addition, by blocking ad scripts, your web pages will load faster than before.

Twitch integration is available as well, so you can keep track of your favorite streamers with ease. In addition, you can view videos in a pop-out window which is perfect for multitasking.

Opera GX

Defend yourself in the zombie apocalypse faster and better by using the world’s first web browser dedicated specifically to gamers.

What are the best zombie browser games?

1. Mini zombie games on gaming websites

  1. Open the desired gaming website.
  2. Search for Zombies or go to the Zombie section on the website.
  3. Select the desired game and wait for it to load.zombie games
  4. Once the game is loaded, click on Play.

2. Die2Nite – The most popular

  1. Go to the Die2Nite website.
  2. Click on Try it button.zombie game button
  3. Now enter your username and password or choose the Facebook/Google sign-up option.zombie games online
  4. After doing that, log in and start your game.

3. Urban Dead – The most simple

  1. Navigate to Urban Dead’s website.
  2. Click on Create a Character.create character
  3. Enter the character name, password, select your class, and start the game.
    Urban Dead character creation zombie browser games

4. The Last Stand: Union City – The most apocalyptic

  1. Visit the Last Stand: Union City website.
  2. Click the Play Now button.last stand union city
  3. Press Start Game.union city

Whether you decide to go for The Last Stand: Union City or any other online zombie browser games, we’re sure you will find what you need right here.

The best free zombie browser games are small, interactive titles that will give you the adrenaline boost you need, but don’t expect them to look like Days Gone graphics-wise.

There are a lot of FPS zombie browser games to choose from if you got bored of Call of Duty, or your rig won’t support large games.

You can choose between hundreds of 2D zombie browser games, among which is also Apocalypse Z Survival.

And, if you don’t want to play by yourself, we’re sure that there are plenty of zombie browser games in multiplayer that you and your friends will like.

Playing zombie browser games is simple, and you’ll be able to do it by using the methods that we showed you in this article. What is your favorite zombie game? Let us know in the comments section below.

How to Play NES Games Online with Friends [Free]

The Nintendo Entertainment System, otherwise the NES, was one of the big N’s first home game consoles. It was the biggest game console of the 1980s for which Nintendo introduced game series that continue to go strong today, such as Mario, Zelda, and Metroid.

The big N even re-released the game console in 2016 with NES Classic Edition. However, you don’t need NES Classic Edition to play its retro games. You don’t even need to install an NES emulator on Windows.

You can play a multitude of classic NES games in your web browser at retro game emulator websites! This is where you can play NES games online.

Playing NES games online free is something we all want to do, especially if you grew up in the ’80s and ’90s, so buckle up and find out where you can play the best SNES games online.

Can I play Nintendo games online?

You should know that, before the Switch Online service launched, the Nintendo company offered free online multiplayer for games like Splatoon 2 and Mario Kart 8 Deluxe.

However, now, you have to have a subscription to use the online features of first-party Nintendo games and most third-party games.

Keep in mind that Nintendo Switch Online members can download and play the online mode of the game at no extra cost.

Stick with us to the end and discover all viable options for NES emulators unblocked online, as well as NES games online for multiplayer.

And, if you aren’t using a PC or a laptop and prefer mobile devices such as phones or tablets, you can also search for NES emulators that are online for mobile.

Quick Tip:

Replaying games from the 80s or 90s makes us want to go through that memory lane once again. That’s why we use a gaming browser like Opera GX.

Opera GX comes with one purpose, to make the gaming experience more enticing. With GX Corner, you can play games right in from the browser and it facilitates finding old titles with ease. It also provides limiters for CPU and RAM usage plus a hot tab killer for the browser.

Opera GX

Experience an amazing gaming session with Opera GX features.

Where can I play old NES games online?

Nintendo Emulator – Contains all the classics

Nintendo Emulator play nes games online

Nintendo Emulator is a website dedicated to NES and SNES games. So, this website has a big collection of NES games you can browse through on its A-Z index.

This site’s emulator includes options for keyboard customization and a full-screen mode. With its Setup Gamepad option, you you can play NES games with a gamepad.

⇒ Access Nintendo Emulator

8BBit – Has some of the best Nintendo oldies

8BBit website play nes games online

88BBit is an emulator site exclusively for NES games. Here you can play the vast majority of games released for NES. Players can select to play its games with Javascript or Flash Emulator. 88BBit NET provides cheat codes for some of its games.

This website has a novel multiplayer feature for its NES games, which isn’t something many alternative sites include. Registered users on this site can also leave comments under games and gain access to more exclusive parts of the website.

⇒ Access 8BBit

MyEmulator.Online – Contains a fair selection of oldies

The MyEmulator.Online website includes NES, SNES, Nintendo DS, N64, Game Boy Advance, Neo Geo, and Genesis games on it. It has a very decent catalog of NES games amounting to 139 titles in total.

The good thing about MyEmulator.Online is the additional configuration options its emulator includes. Players can adjust shader, aspect ratio, sound, and image settings for games. In addition, this site’s emulator includes a Save Manager you can save multiple games too.

⇒ Access MyEmulator.Online

RetroGames – The most popular one

RetroGames website play nes games online

RetroGames has a massive collection of online NES games. This website’s A-Z index of NES games amounts to 57 pages, which is very big considering there are more than 30 titles on each page.

This site includes different national release versions for its game titles, which inflates the size of its collection.

Aside from its massive A-Z index of NES titles, RetroGames is also based on a good emulator to boot. RetroGames’ emulator includes Shader, Color Palette, Sound Quality, Turbo Enable, 4 Players Support, and Region settings.

Furthermore, the emulator provides a heat option players can click to open cheat lists for games.

Here’s another NES game emulator that many of you will like to try, just to bring back the sentiment of nostalgia and enjoy some of your favorite childhood games.

⇒ Access RetroGames

PlayEmulator – User favorite

PlayEmulator is one of the best websites for online retro games generally. It includes emulators for 26 alternative consoles/platforms. Its NES game index amounts to 15 pages, most of which include 39 titles each.

So, this website is packed to the rafters with online NES games and those for other consoles.

⇒ Access PlayEmulator

Legendary videogames Online – Stacked with vintage titles

Legendary videogames ONLINE website play nes games online

Legendary videogames ONLINE is a website museum of retro games. This website includes online game emulators for various retro consoles.

It includes a pretty long list of NES titles for you to play in your browser with an emulator that’s seemingly exactly the same as the one at MyEmulator.Online.

This site also provides more extensive additional details for its retro games from Wikipedia. In addition, Legendary videogames include a collection of offline emulators for players to download.

⇒ Legendary videogames Online

That being said, if you were on the lookout for NES emulators for online multiplayer, you have everything you need right here.

There are so many entertaining games to play through an NES online emulator, so it’s only natural you want to explore all options.

NES online emulators that are unblocked aren’t that easy but also not that hard to find. This article, however, will filter the best options for you.

These are some of the great websites to play NES games online on. There, you can play a plethora of 8-bit NES games from a golden era of console gaming.

Firefox 77 Offers Better Browser Performance to More Users

Firefox 77 brought a whole bunch of functional features and fixes. Chances are you want to find out more about it as well.

Notably, this version pushes WebRender to more users of Firefox for Windows 10. Mozilla is developing the feature to improve browser stability and performance.

What is Firefox’s current version?

We’re glad you asked that and, as always, we have the exact answer for you. Below you will find the current version of Mozilla’s Firefox browser:

Release EditionPlatformVersionRelease Date
Firefox Standard ReleaseDesktop103.0.22022-08-09
Firefox Extended Support ReleaseDesktop102.1.02022-07-26
Firefox iOSMobile103.12022-08-09
Firefox AndroidMobile103.02022-07-26

How do I download an older version of Firefox?

Before you think about that, know that the latest Firefox version includes security updates so downgrading to an older version leaves you more vulnerable to attacks and most likely doesn’t fix the problem.

That being said, if you still want to downgrade, you can visit Mozilla’s directory of older Firefox versions.

Downgrading and using older versions can make the browser insecure and more vulnerable to attacks and scams.

That being said, if you are looking for a Firefox 77 download link, all the information you need is right below.

Quick Tip:

The Opera One browser meets user expectations by maintaining peak accuracy while still supporting earlier versions for Windows XP PCs, for example. This makes it flexible and easy to install and navigate.

It has a different architecture than Firefox, but it is versatile and resourceful. There is no doubt that Opera One is a feature-rich browser. It even comes with a built-in AI.

Opera One

Depending on your PC’s specs, you’ll need a stable and performant browser for personal or business use.
Free Download Visit website

Here’s what you need to know about Firefox 77

With WebRender, Firefox should offer superior frame rates. In turn, the feature lets applications run smoothly on the browser.

The tech is a work in progress, however, and to date, it’s still not available to all Firefox users.

According to the release notes for Firefox 77, the feature is on by default on Windows 10 laptops with certain models of Nvidia Graphics hardware.

WebRender continues its roll out to more Firefox for Windows users, now available by default on Windows 10 laptops running on Nvidia GPUs with medium (<= 3440×1440) and large screens (> 3440×1440).

Other interesting features

Starting today, Firefox users in the UK will be receiving Pocket’s recommendations for stories and articles. This service is already available in regions and countries like the U.S, Canada, and Germany.

Also, Firefox now offers you a better way to access and manage web certificates. Simply go to the newly created about:certificate page to do that.

Fixes

This stable version of Firefox sports a couple of accessibility updates. While it’s a shame that some visually impaired users couldn’t access the Firefox Options application list via screen readers, the bug is no more.

The update also fixes a problem where certain live regions didn’t register text changes for JAWS screen reader users.

Additionally, for accessibility tools users, date and time entries won’t be missing labels any more.

What are the different versions of Firefox?

You should know that there are five different versions of Mozilla Firefox, as you are about to see below.

First, we will start with the standard version of Firefox, the one that most people use, and you can also see referred to as Firefox Quantum.

The second version is Firefox Nightly, which is for active users who volunteer to test and report bugs. This version is for accessing all the cutting-edge features in development, long before they hit mainstream.

There is also Firefox Beta, the version that allows you to test all of the new about-to-be-released features for the browser.

The fourth one is Firefox Developer Edition, which is pretty much aimed at developers, as you probably noticed from the name.

And, finally, there is Firefox ESR (Extended Support Release), a version that is for organizations that control their client’s desktops, such as businesses, schools, governments, and so on.

You should know that this version doesn’t have the latest features but still gets important security patches.

If you are in need of a Mozilla Firefox 77 offline installer, in order to restore the Firefox browser’s old version, you now know where to get one.

On the official support page for Mozilla’s browser, the one we provided above, you will also find the Firefox 77 32-bit version, as well as Firefox 77 for Mac.

What are your thoughts about Firefox 77? Feel free to let us know in the comments section below.

Play Elder Scrolls Online, Outriders, and Just Die Already for free on Xbox this weekend

Xbox console owners with an active Xbox Live Gold subscription will this weekend be able to play The Elder Scrolls Online, Outriders, and Just Die Already for free until the end of Sunday.

It is worth mentioning that both The Elder Scrolls Online and Outriders are currently in the Xbox Game Pass library which means that those with an active Xbox Game Pass subscription are able to play these two for free already right now and well after this weekend is over.

Basically, if you have an Xbox Game Pass subscription, it’s recommended that you take advantage of Just Die Already’s Free Play Day promotion this weekend instead of Outriders and Elder Scrolls Online.

Here’s the official description for each title:

Outriders

OUTRIDERS is a 1-3 player co-op RPG shooter set in an original, dark and desperate sci-fi universe. As mankind bleeds out in the trenches of Enoch, you’ll create your own Outrider and embark on a journey across the hostile planet.

With rich storytelling spanning a diverse world, you’ll leave behind the slums and shanty towns of the First City and traverse forests, mountains and desert in the pursuit of a mysterious signal. Combining intense gunplay with violent powers and an arsenal of increasingly twisted weaponry and gear-sets, OUTRIDERS offers countless hours of gameplay from one of the finest shooter developers in the industry – People Can Fly.

The Elder Scrolls Online

Includes The Elder Scrolls Online base game and the Morrowind Chapter. Join over 18 million players in the award-winning online multiplayer RPG and experience an ever-expanding story in a persistent Elder Scrolls world.

  • ESO COMES TO Xbox Series X|S – Experience the award-winning RPG like never before with game-changing features/enhancements such as 60-fps performance mode, advanced lighting and shadows, improved reflections, shorter loading times and more!
  • BEGIN YOUR ADVENTURE – Discover Tamriel’s Second Era and enjoy all the epic quests, memorable characters, and dangerous enemies you expect in an Elder Scrolls game.
  • PLAY YOUR WAY – Battle, craft, steal, siege, or explore. Combine different types of weapons, armor, and abilities to create your own style of play.
  • TELL YOUR OWN STORY – Experience any story in any part of the world, in whichever order you choose – alone or with friends.
  • INCLUDES THE MORROWIND CHAPTER – Journey to the iconic island of Vvardenfell and stop a meteor from crashing into Vivec City

Just Die Already

Just Die Already is an old people mayhem sandbox game created by the designers of Goat Simulator. You are an old retired person in a near future where people aren’t having any children. There isn’t anyone to pay for pensions due to those ungrateful millennials who prefer playing video games instead of doing actual work. With no one to cover your living costs, you – just like all other old people in this world – have no other choice but to survive on your own.

How will you survive in a world that wants you to Just Die Already? To make things worse, you’ve just been kicked out of your retirement home, and your only option now is to perform dangerous challenges and explore the world for retirement tickets to qualify for free retirement care. So with society wishing you dead, isn’t it finally time to live a little?

In other Xbox news, an absolutely massive Dragon Ball Super event is now live in Fortnite and a new South Park video game is on the way.

Need more Xbox news? Give us a follow on Twitter and Facebook.

OUTRIDERS
OUTRIDERS
Developer:
Square Enix Ltd
Price:
$19.99


The Elder Scrolls® Online


Just Die Already
Just Die Already
Developer:
Curve Digital
Price:
$14.99

Google Maps Download for Windows 10 and 11

Google Maps is an Android app you can view online that lists the routes and provides accurate directions. It’s gained massive popularity recently, with many wanting to download Google Maps on Windows 10.

The process is not as simple as on Android or iOS devices since the app is unavailable for Windows OS. But one of the best parts of the OS is the ability to install a range of otherwise incompatible apps through emulators.

So, let’s find out how you can download the Google Maps 64-bit full version for free on Windows 10.

Can you download Google Maps on Windows 10?

Yes, you can download Google Maps on Windows 10 desktop. The app’s standalone version is not available on the Windows OS.

Here, you have to either download it through other means or use a reliable and effective substitute for it. Microsoft itself offers Windows Maps, a similar option for users who want to quickly install and get a maps app up and running.

How can I download Google Maps on Windows 10?

1. Download Google Maps within LDPlayer

  1. Open the LDPlayer website in a browser, and download the latest version of it.LDplayer to google maps download for windows 10
  2. Open the LDPlayer setup wizard to install the emulator and follow the on-screen instructions to complete the process.
  3. Once done, launch the emulator, and click on System Apps.system apps for google maps download for windows 10
  4. Click on Play Store in LDPlayer.play store
  5. Sign in with your Google Account. If you don’t have one, set up an account and then sign into it.Sign in
  6. Search for Google Maps, and click on the Install button next to the relevant search result.install to google maps download for windows 10
  7. Once installed, you can open and access the app from the LDPlayer emulator’s home screen.maps
  8. Now, you can utilize Google Maps within the emulator’s window.use

That’s it! This is how you can download Google Maps for Windows 11 and the previous iterations of the OS. Also, if you are wondering how to update Google Maps on PC, check for a newer version on the emulator itself.

2. Add Maps App Discovery to Windows 10

Maps App Discovery is a Windows 10 app that utilizes the Google Maps API. It is also based on the Google Material Design language. So, Maps App Discovery is the closest thing to a native Google Maps app for Windows.

Map App Discovery Download Google Maps for Windows 10

You can download Maps App Discovery from its MS Store page. Click the Get button there to add it to Windows 10. Then you can open the app from the Start menu.

3. What’s the Windows alternative?

The alternative to Google Maps is Windows Maps. That’s Microsoft’s alternative to Google Maps which has its own UWP app. Windows Maps has many features comparable to G Maps, such as its Streetside and 3D Cities views.

Windows Maps Download Google Maps for Windows 10

Click the Get in Store app button on the Windows Maps app page to download it. Once done, you can launch the app and look for the desired locations in it.

You can also download offline apps on Windows Maps to save data or use them with limited access to data.

How do I set Google Maps as my default in Windows 10?

Unfortunately, there’s no way you can set Google Maps as the default app in Windows 10 or other iterations. Still, you can always add Google Maps or any other website to the Taskbar in Windows for easy access.

Or, you could download Google Earth Pro and set it as the default application for launching map files on the computer. These are the only two options available to users right now. We will update the article accordingly if and when more methods are available.

Speaking of downloading, we have a guide guide on how to download Google Earth for Windows 10, so don’t miss it.

We also have a great guide on how to download the Google Maps app for Windows 7, so don’t miss it.

So, that’s how you can download and utilize Google Maps in Windows 7, Windows 10, and other iterations of the OS.

Fix: Windows 11 Second Monitor Flickering or Blurry

Users understand how multiple displays make your life easier. One benefit of using multiple displays is that it improves the viewing experience and increases your work efficiency.  This is why it can be frustrating when one faces issues with Windows 11‘s second monitor flickering or being blurry.

The good news is that there are ways that you can deal with this frustration. We will be providing you with different fixes that you can apply to your Windows 11 PC. 

Your first step might be to double-check the second display connection. If this doesn’t work, you can restart your computer and retry connecting the second monitor. If the problem persists, read on to find different fixes that you can try. 

What could go wrong when using two monitors?

Aside from the flickering issue that has been noted with the second monitor in Windows 11, other errors relating to the second monitor have been observed by our users.

Fortunately, we have addressed all of them today, with a list of solutions provided in the section below. But first, let’s take a look at the problems that are associated with it:

  • Windows 11 second monitor blurry – Like its counterpart, blurrness can occur due to driver issues to which we provided a solution below.
  • Windows 11 second monitor not detected – When an external device, including monitors, aren’t being detected, it can be solved by either performing a detecting scan or by changing the port that you had plugged the monitor in.
  • Windows 11 second monitor not working – This broad mention reported by our users will be fixed by updating the drivers and/or operating system.
  • Windows 11 second monitor taskbar icons missing – When you set your native monitor as primary, the second one will not be occupied by taskbar icons, nor desktop ones.
  • Windows 11 second monitor lag – Lag can occur due to CPU overload, viruses or incompatibility. To adress this, you need to also google your computer’s performance and see if it’s sustainable for a second monitor.
  • Windows 11 second monitor issues – This is another general complaint that we have heard from the crowd and that will certainly not pass by without any attention from us.

Before we dive into the list of solutions, let’s have a look at why you should utilize multiple monitors, who they are intended for, and what advantages they provide. Follow along!

Why use multiple monitors?

display windows 11 second monitor flickering

Multiple monitors are used for one simple reason: additional screen space. More space allows you to run multiple programs at once without switching between windows or making endless mouse clicks.

If you need to engage with an application, you can effortlessly move your mouse between the displays, or simply leave them open for reference–tremendous assistance when writing an essay or an article. You might even watch a movie or a TV show while working on the main screen from time to time.

Assume you’re the company’s social media manager. You can monitor what’s going on on Twitter with Tweetdeck open on one display.

Meanwhile, on your primary screen, you can be working on a report with a web browser open to your company’s analytics dashboard on one side and Microsoft Word open on the other.

If you’re a writer, you may use half of one monitor for a text editor, the other half for notes, and the secondary monitor for research.

Having all of these programs open at the same time demands that your PC has sufficient processing capacity, but most mid-range PCs with a Core i5 CPU or higher should suffice.

However, if you want to run a video editing tool like Photoshop alongside some other apps, you’ll need a lot of RAM to avoid the system stalling.

Multiple displays aren’t the only option. For example, you could buy a massive 4K panel and then utilize Windows Snap to divide your screen into quarters, thus generating four smaller 1080p places.

However, as compared to using numerous monitors with greater window widths, this can be a little uncomfortable.

What can I do if Windows 11’s second monitor is flickering?

1. Find the missing display 

  1. Click on Windows and type settings.go to settings: Windows 11 second monitor not detected
  2. Select System.Select system
  3. Choose Display under System.Choose display
  4. Scroll down to Multiple displays.Scroll down to multiple display
  5. Click Detect under the Detect Other Displays section.Detect Other Displays
  6. It will recognize the second monitor in your setup.

2. Update the display driver

    If your monitor is flickering, then updating your display drivers is very likely to solve the problem. Most display-related issues are caused by faulty or outdated drivers.

  1. 1. Press Windows + R together to open the Run dialog.

  2. 2. Type devmgmt.msc and hit Enter.

    devmgmt.msc:Windows 11 second monitor not detected
  3. 3. Navigate to the Display adapters section and click on it.

    Display Adapter
  4. 4. Right-click on the display driver and click on Update driver.

    Update Driver: Windows 11 second monitor not detected
  5. 5. Chose the Search automatically for drivers option.

    Search automatically for drivers
  6. 6. Allow Windows to install the appropriate driver for your computer.

  7. 7. Check if the issue persists.

Updating your drivers will solve 99.99% of your computer issues. We cannot stress enough how important it is to bring your drivers up-to-date. To make the task easier, for now, you should try using software that performs automatic updates to your drivers such as Outbyte Driver Updater.

3. Rollback the display driver

  1. Click Windows and type Device Manager.Device Manager
  2. Click on the Display adapters section to expand it.Display adapter
  3. Double-click on the display driver to modify it.Modify display driver
  4. Head to the Drivers tab.Drivers: Windows 11 second monitor not working
  5. Click on the Rollback driver option.Rollback Driver
  6. Your computer will restart automatically.

Is there an HDMI splitter for dual monitors? 

An HDMI splitter splits a device’s HDMI video output, such as a Roku for instance, into two distinct audio and video streams. After that, you can send each video feed to a different display.

Unfortunately, the majority of splitters are terrible. Due to a built-in anti-piracy feature called High-Bandwidth Digital Content Protection, many don’t work (HDCP).

HDCP is an anti-piracy feature that can be found in streaming devices, televisions, and cables. It safeguards content by enforcing a verification step between the video player and the display.

This anti-piracy feature encrypts the signal when it creates a confirmed connection to prevent unauthorized recording of the content. This approach also makes it impossible for content owners to see their own work.

The video won’t play if it’s HDCP-protected yet one aspect of your setup isn’t HDCP-compliant (sometimes with an error message). As a result, many users with older equipment will be unable to view legally purchased content.

If the equipment isn’t HDCP-compliant, HDCP-compliant video will fall back to a lower resolution (typically 720p) if it isn’t HDCP-compliant. Devices other than a splitter rarely cause fallback mode, which is why splitters are such a good solution to this problem.

By accident, some low-cost splitters completely avoid HDCP. They shouldn’t be able to play protected video at all because cheap splitter makers didn’t bother paying for an HDCP license.

Because they activate Fallback mode, however, the content is lowered to a lesser resolution and continues to play normally. At least most of the time.

You can also check out some of the extra fixes we have for Windows 11 not detecting the second monitor.

We also have helpful solutions for you if your custom resolution is not working in Windows 11. 

Alternatively, if the split screen is not working in Windows 11 and you need it urgently, take a look at the article linked in order to learn how to solve the issue.

Feel free to leave us a message in the comments on how these solutions have worked for you. You can also share opinions on a different method that you think might work.

Fix: You do not Have Permission to Play With Other Users

Xbox is one of the most popular gaming consoles, and it’s been around for a while. However, playing Xbox games in the comfort of your home is very interesting but can’t be compared to having one or two other players to play.

Nonetheless, some players complain about encountering issues while trying to play with other users. This error is known as the “you do not have permission to play with other users.”

Furthermore, several reasons can be responsible for this error ranging from privacy issues, network connection issues, banned account issues, etc.

Nonetheless, we’ll discuss the cause and some easy ways to fix the multiplayer issues on your Xbox.

Why does my Xbox say I don’t have permission to play multiplayer?

  • Multiplayer is blocked in Settings: The other player’s privacy settings may be intercepted, resulting in the “you don’t have permission to play multiplayer” error. However, this error may erupt in your or the recipient’s settings. Therefore, your friend needs to toggle settings.
  • Network connection issues: Though the multiplayer problem seems complicated to get by, it can be a network connection issue that poor or unstable internet connections may cause. When your network is wrong, it can make some game features inaccessible.
  • Account set up as a Minor issue: Another reason you may encounter the “this Microsoft account does not have permission to play multiplayer” problem is the account settings. Some features like multiplayer won’t be available if your console is a minor account because of the age restrictions.

How do I fix you do not have permission to play with other users’ errors?

1. Toggle your game settings to allow multiplayer games

  1. Using the Parent’s Microsoft account, log in to https://account.xbox.com/settings to prompt Settings.
  2. Select the child’s account profile and click on the Xbox Series X|S, Xbox One, and Windows 10 devices Online Safety option.
  3. Tap on Allow for the “You can create and join clubs” and “You can join multiplayer games” options.

Doing this only affects your console and doesn’t affect your friend’s settings. Hence, ask your friends to follow the steps above to allow multiplayer features for their console.

2. Check your network connection

Using a wired router that requires a cable connection to your computer can affect your network and make it slow. Hence, we recommend that you switch to a wireless network connection. It will help you connect to the internet faster and more smoothly. Furthermore, performing a power cycle of your router can fix some issues.

3. Banned/suspended account

If your live performance is banned or suspended for something, it can prevent you from accessing some features like multiplayer. However, the Microsoft service agreement violation can result in your account being stopped by the Xbox Live Policy & Enforcement Team.

Nonetheless, users can check their account status to know if they are suspended and understand why.

4. Perform a Power cycle on the console

  1. Press down the Xbox button in the controller’s center to prompt the Power center tab.
  2. Select Restart console and click on Restart.Restart xbox one

Another simple solution that can help you fix some Xbox issues is restarting the console.

However, players can refer to our article about the Xbox One multiplayer won’t work to know more about it. Also, we recommend you check Xbox Live service status to know if there’s a maintenance or a problem.

You can leave your comments and suggestions below in the comments section. We’d like to hear from you.

How to Disable Snap Layouts on Windows 11

The new Windows 11 operating system that Microsoft announced towards the end of the year has made big waves in the IT world and especially among Windows users.

Although you need to meet certain requirements to enjoy the new OS, it already brings many functional and aesthetic changes designed to make your work more efficient and your life easier.

If you download the Windows 11 Insider Preview Build 22000.51 update on your Windows 10 PC, you can already notice one of the features that stands out as soon as you start the new interface -Snap layouts.

While most users are usually happy with the change, well, some of them are not only indifferent to the new feature, but perhaps even it gets in their way.

As a result, there is already interest among users to disable Snap layouts because it is a feature they will probably never use, even if the American giant wanted to help them get organized more easily.

This is by no means a problem, because Microsoft is certainly making something available to every tech-savvy user through the new operating system.

How can I turn off the Snap layouts feature on Windows 11?

    If you do not enjoy using the Snap layouts feature, you can easily remove it using the system’s built-in settings. All you need to do is navigate to the Multitasking menu and manually turn the feature off.

  1. 1. Click on the Start button to open the Settings app.

    settings start windows 11
  2. 2. Select the System category.

  3. 3. Click on the Multitasking tab.

    w11 multitasking settings
  4. 4. Uncheck the box next to the Show snap layouts when I hover over a window’s maximize button option.

    disable snap layouts in windows 11 settings
  5. 5. Close the Settings app.

  6. 6. The Snap layouts feature is now disabled on your device.

By following the above steps, you will no longer see the Snap layouts feature on your new Windows 11 operating system.

But if you change your mind and want to enable the Snap layouts feature again, you can follow the full steps in our detailed guide to make sure you don’t do anything wrong.

If you have second thoughts and want to give this useful feature a chance, it’s also good to know that older monitors with a resolution lower than 1920 pixels don’t allow you to take full advantage of it.

But once you activate it and start creating layouts to your liking, you can save and access them later in Snap Groups in the taskbar.

With this move featuring the new operating system, Microsoft will offer users significant enhancements in terms of security, design, and performance.

If you want to make sure you get a holistic view of Windows 11 compared to Windows 10, take a closer look at our comprehensive guide and stay informed.

For more suggestions or other questions about the new operating system that Microsoft is rolling out soon, visit the comments section below.

Quickest Way To Bookmark All Tabs In Firefox

It’s not uncommon to have a whole mess of tabs open on Firefox whenever you’re researching something or stumbled upon a really interesting topic. And in midst of this information binge, you find that you don’t want to lose the information that you found.

So you wonder if there is a way to save all of these tabs at once so you can get back to them at a later date. On Firefox, there is certainly a way to do to this by bookmarking all these tabs.

Can you save all the tabs at once?

Yes, you do this by bookmarking all of the tabs and placing the links into their respective folder. In fact, this is something that a lot of browsers can do and is done in a similar fashion.

This guide will show how you can save all of your tabs on Firefox at the same time. We’ll also show you how you can restore them all at once.

How do I bookmark all tabs at once?

1. Bookmarking all tabs and then restoring them

  1. Right-click one of the tab and a context menu will appear.
  2. Choose Select all tabs.
  3. Once highlighted, right-click the tabs again and select Bookmark tabs.
  4. Name the folder and choose a location in the Location drop-down menu. This guide will stay on Bookmarks Toolbar.
  5. Click Save to finish.
  6. If you want to only bookmark specific tabs, hold the Ctrl key on your keyboard and then click on the tabs you don’t want. Then repeat the earlier steps to save the bookmarks.
  7. To restore the tabs, click the folder you created. On this guide, it’s on the Bookmarks bar.
  8. Click Open All in Tabs to restore the session.

Feel free to leave a comment below if you have any questions on other apps or if you have some that you recommend. Also, feel free to leave comments about guides you’d like to see or information on other web browsers.

5 of the Best Escape Room Games to Play Online

Online escape room games can be as much fun as real ones, despite the fact that one is missing the team spirit and adrenaline sharing.

You have a lot of virtual escape rooms, which offer as many challenging ways to feel like you’re breaking free – from a confined room, from a prison, from the office, from all sorts of rooms, from a castle, and so on.

The rooms usually consist of a locked door, different objects to manipulate as well as hidden clues or secret compartments. The player must solve several rooms until he reaches the end.

Most of the games are played just using the mouse. And, of course, your brain.

Can you play an escape room online free?

Of course, you can play escape room games online free but for that, we recommend a browser that is both reliable and distraction-free.

Opera GX was designed especially for gaming and aside from its cool integrations like Twitch, it blocks all unwanted ads and trackers.

But most of all, with Opera GX, you can prioritize the resources of your PC on your game so it will run very smoothly.

So here’s a list of some of the best online games that you can find online. All these titles are escape room games online without Flash because, as you know, it’s not supported anymore.

Opera GX

Play free online escape room games right from the browser with Opera GX.

What are the best online escape room games?

The Submachine Series – Popular choice

This is a series of 13 underground labyrinths, an abandoned lighthouse, a padded white cell, and more, that you have to escape from.

You can start playing any of the games since they are independent of one another. The background music keeps you on your toes.

⇒ Play The Submachine Series

Crimson Room – Guaranteed fun

Crimson Room was among the first escape room online games to be launched and, thus, it is also a classic.

It displays the typical room that you have to escape from, using various clues that you find around you.

You may consider it a black noir online escape room game but you will definitely have fun with it.

⇒ Play Crimson Room

Hogwarts Digital Escape Room – Basic knowledge of the Harry Potter books

A Harry Potter-themed escape room created by a Pennsylvanian librarian, hosted by Google Docs.

The game requires basic knowledge of the Harry Potter books, and it can be played solo, as a group, or competing against friends.

⇒ Play Hogwarts Digital Escape Room

Minecraft Escape Room – Involves problem-solving and videos

Similarly to the previous game, this one was also created by a librarian. The graphic reminds vaguely of the Minecraft games, hence the name.

The game involves problem-solving and videos. It is quite easy to follow and it’s one of the best adventure escape games online.

⇒ Play Minecraft Escape Room

100 Doors – Escape from School – Classic game

Another classic escape room, where you go through the same doors over and over again, until you find the missing pieces that open the closed ones.

The game can become fast-paced with all the going back and forth trying to figure out which door led where.

It’s one of the best escape games online free and unblocked you can play anywhere on your browser.

⇒ Play 100 Doors – Escape from School

Can you play Escape Room on Zoom?

You will be surprised but yes, you can actually play virtual escape room games on Zoom. It’s a new type of online escape room multiplayer game.

All you need to do is to visit The Escape Game website. There, you can choose a location from the U.S., and then you and up to 7 other friends can play virtually in one of the 7 available escape rooms.

On the screen, you will actually see each other’s cams but also the room, the indications, and everything you need to solve the puzzle.

There are several other websites that offer virtual escape rooms but you should know that none of them are free for obvious reasons.

We hope that this guide has helped you choose the perfect escape room games online unblocked for you, but if you have any interesting suggestions, don’t hesitate to leave us a comment.

You might also be interested in our list of top 15 VR games you can find on Steam because they can be also extremely entertaining.

Do you know any other escape room games worthy to be on our list? Feel free to tell us about them in the comments section below.
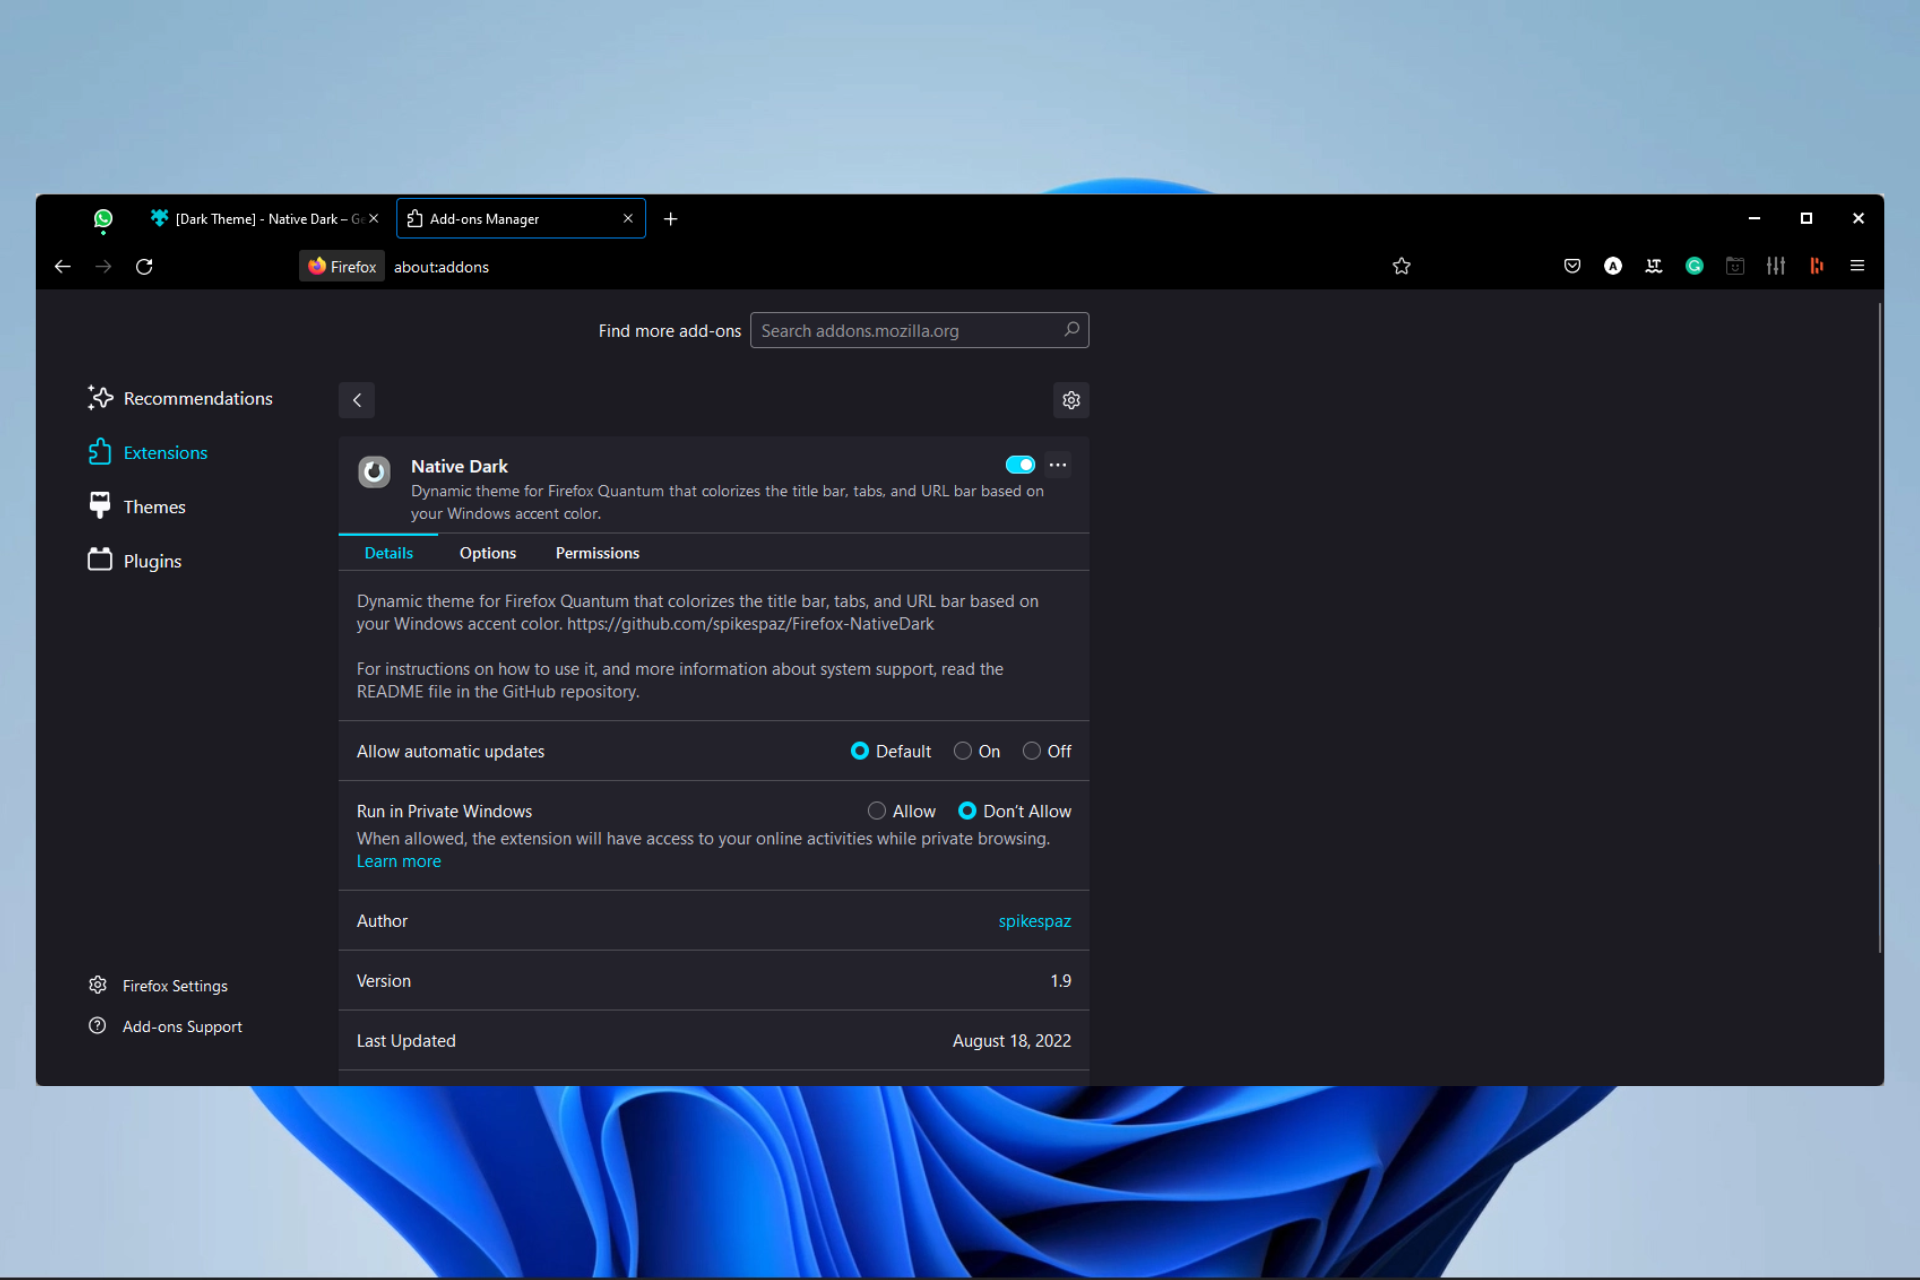
Download & Install Sidekick Browser for Windows 10 & 11

There are a lot of developers out on the internet working on the next great web browser. You have more generalist browsers like Chrome and Edge that most people use for browsing the internet.

But some people want browsers with more specific uses; specialized tools. Opera GX, for example, is great for gamers with its many video game tools and features. Brave is great for those who value privacy.

And now we have the likes of Sidekick, which has been specifically designed for enhancing productivity.

What is the Sidekick browser used for?

To be honest, the best way to think of Sidekick is to consider the work version of Opera GX. It’s a highly specialized web browser with a sidebar filled with easy access to productivity and messaging apps.

On the left-hand side, you will see the likes of Slack, Skype, and even WhatsApp. Sidekick also offers an Opera-like feature in Sessions which lets you save the tabs in groups.

That way you won’t lose your spot if you decide to open a new window. It even has a built-in search feature to browse through your tabs.

It should come as no surprise that Sidekick is built on the Chromium browser engine, just like Opera One. This guide will show you how to download Sidekick on Windows 11 and Windows 10.

Quick Tip:

If you prefer a robust and organized web app for organized workspaces, the sophisticated version of the Sidekick browser is Opera One. The difference is that Opera One has a built-in proxy VPN and ad-blocker.

You can establish user accounts and leverage Messenger, WhatsApp, Instagram feed, Telegram, and VK chat integrations, as well as a Video-Pop out for meetings and calls. You can also stay more organized with workspaces, tab islands and built-in AI

Opera One

Always up-to-date, stable, and organized workflow with built-in chats and Video Pop-out.
Free Download Visit website

How do I download the Sidekick browser?

How to download Sidekick on Windows 11

  1. Start by going to the Sidekick browser website.
  2. Click the Download button in the middle.
  3. Click the middle button on this new page.
  4. Save the application and go to the downloaded file’s location.
  5. Double click the file and it will immediately install. You don’t have to go through an installation wizard asking you where you want to save the app.
  6. Once Sidekick finishes installing, it will open up and ask you to register by adding your email. Or you can click Skip registration below the email input.
  7. If you do decide to register, you will be asked if you want to import bookmarks and browsing history. Click Import to migrate bookmarks over or hit Skip.
  8. Next, you can choose to import login data.
  9. Now you can select which web apps you use. These will appear on the left side bar. You can also import extensions from a previously selected browser.
  10. Now you can make Sidekick your default browser or do it later.

How to download Sidekick on Windows 10?

  1. On Windows 10, go to the Sidekick website.
  2. Click the Download now button.
  3. Click the Download button for your respective operating system.
  4. Go to the downloaded file’s location and double-click it to install it.
  5. Like Windows 11, Sidekick will install automatically.
  6. When Sidekick opens, create an account by signing in with your email.
  7. Import bookmarks and history, if you’d like.
  8. Then import login data or skip it.
  9. Choose the web app you want.
  10. You then have the opportunity to make Sidekick your default browser.

How do I use the Sidekick browser?

You pretty much use Sidekick as any old browser, but what’s unique about it is those sidebar easy-access apps. You click on any one of those messaging apps and you’re taken to a sign-in page.

Enter your credentials for that messaging app and you’re in. You use it like you would the desktop app. Sidekick also has an ad blocker to stop annoying advertisements on web pages.

Plus the browser has a CPU monitor and tab suspender so you can keep an eye on how much of the processor Sidekick uses. If one tab is using too much, you can suspend it.

Feel free to leave a comment below if you have any questions on other apps or if you have some that you recommend. Also, feel free to leave comments about guides you’d like to see or information on other web browsers.

Here are The Best Ways to Set Up Conan Exiles Private Server

Conan Exiles is one of the best role-playing games that challenges players to stay alive in a harsh environment where only the strongest live.

At the same time, the game has also tested player patience since its launch. Many gamers have reported server connection issues, but the good news is that Funcom recently fixed most of these bugs.

Conan Exiles has a limited number of public servers, but fans can create their own to spend time with just the people they want to play with. If you’re interested in creating your own Conan Exiles server, follow the steps listed in this guide.

Can you make private servers on Conan Exiles?

As mentioned earlier, Conan Exiles’ public servers are limited. Hence, it will be difficult for all gamers to play in multiplayer mode.

Thankfully, gamers can create their private servers and play with a specific number of people. With this, you can enjoy the game with other players online.

How do I run the dedicated Conan Exiles server?

To run a dedicated private Conan Exiles server, you need to set it up from the settings. After the setup, you need to configure the server before you can run it.

All these will be detailed in the next section of this guide.

How do I set up my own dedicated Conan Exiles server?

1. Set up Conan Exiles private server with SteamCMD

1.1. Create the server

1. Download SteamCMD.

2. Extract the content of the .zip file.

3. Open a terminal window on the folder you chose.

4. Create a different folder to install the server into, for example, C:Exiles.

5. To create the server, run these commands: login anonymous
force_install_dir C:YOURFOLDERNAMEHERE
app_update 443030
quit

1.2. Running the server

  1. Make sure you do not have a Steam client running.
  2. If you do, you’ll see some errors regarding Steam DLLs that you can ignore.
  3. From C:Exiles, run the ConanSandboxServer.exe file.
  4. By default, it will listen on UDP ports 27015 and 7777.
  5. Add an exception in your firewall to get the server to appear in the Steam server browser.
  6. Use the following command line parameters: ConanSandboxServer.exe -log -MaxPlayers=16
    -log
    MaxPlayers=70
    ServerName=ConanExilesServer
    MULTIHOME=aaa.bbb.ccc.ddd (select network interface by ip)
    QueryPort=27015 (steam queryport)
  7. Specify the following settings in the Engine.ini file located at this address: ConanSandboxSavedConfigWindowsServerEngine.ini [/script/onlinesubsystemutils.ipnetdriver]
    NetServerMaxTickRate=30
    [OnlineSubsystemSteam]
    ServerName=YOUR_SERVER_NAME_HERE
    ServerPassword=YOUR_DESIRED_PASSWORD_HERE
  8. You can also add other server settings in the Game.ini file (ConanSandboxSavedConfigWindowsServerGame.ini): [/script/engine.gamesession]
    MaxPlayers=70

If you don’t want to use this manual method, you can download the latest version of the Conan Exiles dedicated server app.

2. Set up your Conan Exiles server with Host Havoc

havoc conan exiles server private set up

You can easily set up your Conan Exiles game server using Host Havoc with a custom control panel where you can change maps and install further modifications to your server in seconds.

We suggest you try this high-performance server with excellent 24/7 technical support that helps you fix any issue easily. You can follow their tutorial about creating your server to do great installing.

Here are some of its main features:

  • Instant Server Setup
  • Complete Control of Your Server
  • Easy Configuration
  • 24/7 Customer Support
  • Full FTP Access
  • Daily Backups Available
  • Switch Games Any Time
  • Free DDoS Protection

With a powerful control suite, unique features, and installers, this server hosting is quite simple for novice and advanced users.

Host Havoc

Host Havoc

High-performance hosting services with DDoS protected networks and 24/7 support.
Check priceVisit website

How much does a private server cost Conan Exiles?

The cost of owning a private server for Conan Exiles on PC depends on the host. Also, it depends on the number of players you want to allow on the server.

So, there is no general price to look forward to. However, you can choose a budget-friendly host like Host Havoc.

When you set up your Conan Exiles private server, it removes the limitation of playing the single-player mode alone. With this, you can compete with your friends on the highest level in multiplayer mode.

While we are still at it, if you need the list of the best game server control panels to download for free, you can check our guide on the topic for some excellent options to use.

Feel free to let us know in the comments below if you encounter any problem setting up your server.

Microsoft shutters “Olympia Corp,” which was used to test beta versions of Windows in enterprise

As Microsoft continues to figure out its development and release cycles for Windows 11 and the inevitable OS that follows, it seems the company is putting Windows 10 and its related projects further in the rearview as it shuts down Olympia Corp.

According to a report from journalist Mary Jo Foley over at ZDNet, Microsoft is shutting down the Olympia program in a month’s time and thus signaling the end of Windows 10 testing for Enterprise users.

In 2017, when Microsoft originally launched the Olympia project which later evolved into the Olympia Corp, it intended to host a separate enterprise-oriented Insider program to test the release of business-related features and patches for Window 10.

As Windows 10 development and support wind down to its end-of-life (EOL) deadline in 2025, it now seems the Olympia program, designed to test the release of Windows 10 enterprise features is no longer needed.

Windows Insider MVP Chris Gahlsdor shared an email issued from Microsoft about Olympia Corp being shuttered via Twitter.

Hi Olympia participant,

We are sending this email to notify you that we will formally be shutting down the Olympia program in a month. We will be unassigning Olympia licenses and deleting the Olympia feedback path.

Action Required: Take a backup of any data if you are using the provided Olympia licenses in the next 30 days, by September 12, 2022.

Thank you for your participation and feedback ? Let us know if you have any questions!

Thanks,
Olympia Team

As of now, Microsoft isn’t not sharing any details officially as to why the Olympia project is no more, but it seems reasonable to wager that as Microsoft further streamlines the development and release cycles of its operating systems by moving to a 3-year cadence and prioritizing enterprise and consumers separately, related Insider programs such as Olympia and others, will either evolve or die off.

Can you Share a VPN Account? Is it Safe?

A VPN is, without a doubt, one of the most valuable tools you can have under your belt if you’re constantly online.

Even if you’re an occasional web surfer it wouldn’t be such a bad idea to invest in a good VPN.

These times we live in, many want to get their hands on your private data for various reasons. Monitoring your every step, targeting you with ads, stealing your data, and even locking your files behind a ransom wall.

VPNs aren’t universal when it comes to protecting your devices against cyberattacks, but they’re a vital addition. Essentially, they route your data through private tunnels and encrypt it.

Therefore, even if someone were to intercept your Internet traffic, it would all be for nothing.

However, what happens if you have more than one device you’d like to use a VPN on? Do you have to purchase multiple licenses or can you use several devices on the same account?

We discuss below whether it’s safe to share a VPN account and if providers allow it.

Can VPN be used on multiple devices?

Generally speaking, the answer is yes. Every VPN provider allows you to share your account between multiple devices so that you won’t need to purchase additional subscription plans.

However, the maximum number of devices you can use on the same VPN account greatly depends on the provider. Some of them are more generous than others.

So, it’s a matter of who you choose to go with in the long run. As long as you keep the number of devices under the maximum number accepted by your service, things should be good.

Even if you accidentally exceed that number, you’ll most likely be asked to remove one of the previous devices to make room for the new one.

Quick Tip:

In order to share your VPN connection with family or other people in your social network, you should rely on flexible software.

PIA (Private Internet Access) is that one when it comes to VPN sharing because it supports 10 connections at once for any major platforms like Windows, macOS, Apple, or Android.

Private Internet Access

Share your VPN connection with your peers using this exhaustive privacy software.
Check price Visit website

Can I share my VPN with my family and friends?

Many VPN providers are OK with this, especially ones who offer router VPN solutions.

Therefore, you don’t even need to use a VPN on each device. It’s enough to install the VPN on the router (or routers, depending on your setup) that your family members have access to.

More so, some VPN services even provide you with safety instructions on how to use VPN on multiple devices on the same account so that your account won’t be compromised.

Can I share my VPN with another household?

If your household accommodates more than just one member, you might want to protect your loved ones with a VPN. But what if you need to share it with a different household?

This can be possible as well depending on your VPN subscription. The majority of providers offer multiple or even unlimited connections using one account.

You may benefit from 5 simultaneous connections or more within one subscription. So multiple people can benefit from a shared VPN account.

In any case, you should be aware of the VPN terms of use before sharing it with numerous households to avoid account restrictions.

Can you share a VPN with someone else?

You probably considered purchasing a VPN subscription plan and splitting the bill with others, who are not necessarily strangers, but they’re not family members, either.

While that’s a great way to cut costs, since you can split the bill with a bunch of people, it’s worth mentioning that this practice is kind of frowned upon.

Actually, scratch that. VPN providers have nothing against sharing plans with your peers, otherwise, they wouldn’t allow multiple devices on the same account (and so many of them, too).

However, what they do have something against is denying responsibility. So you should know that the person who makes the purchase must claim 100% responsibility for everything that happens on the account.

Thus, if you purchase a plan, split it with your friends, and one of your peers decides to go ahead and engage in unlawful behavior, you’d be responsible.

Is it safe to use someone else’s VPN account?

Yes, in certain conditions.

If you’re using a zero-logging VPN that doesn’t access your data, you should be fine (regarding authorities and whatnot).

However, most VPN providers passively monitor some of the traffic and can terminate your account if they detect something fishy on your account, even if it’s not you who did it.

Don’t believe us? Try reading the Privacy Policy and Terms of Use documentation for once. You’ll find it all there.

How many devices can I use with one VPN account?

As we’ve briefly mentioned above, that greatly depends on the generosity of the provider.

Below you can find some of the best VPNs for multiple devices, including the number of maximum devices you can use on the same account.

Product NameMaximum devices per accountCompany Name
Private Internet Access10Kape Technologies
CyberGhost VPN7Kape Technologies
BullGuard VPN6BullGuard
NordVPN6Tefincom & Co., S.A.
Surfshark VPNUnlimitedSurfshark LTD
VyprVPN5Golden Frog GmbH
IPVanish10StackPath, LLC
ExpressVPN5Express VPN International Ltd.
ProtonVPN5Proton Technologies AG
Hide.Me VPN10eVenture Ltd.
Private VPN6Privat Kommunikation Sverige AB
Pure VPN10GZ Systems Limited

How to share a VPN connection?

  1. Sign up for a VPN that allows multiple connections. ❗To protect your data, don’t use your primary email address or a password you have on other accounts.
  2.  Then, once your account is up, you can share your VPN credentials.
  3. Optional: Use a password manager that allows sharing.
    This way, your password is safely stored in a vault protected by encryption. Sharing via social media or text may not be as secure.

You can check your VPN admin panel to keep track of which devices are connected.

But what if you don’t have a VPN that supports multiple connections? Can you still share your VPN with your family and friends? Well, yes, but you have to be on the same network.

You can secure a whole household with a VPN if you install it directly on the router.

You can share a VPN account, but be cautious about it

So, can you share a VPN account safely? We believe so, yes, but you should be extra cautious about it, especially if you don’t plan on sharing it exclusively with your family members.

While some VPN providers will even encourage you to share your VPN account, most of them advise against it and hold you solely responsible for whatever happens on your account.

We strongly advise you to choose a VPN service and give its privacy policy and terms of service documentation a thorough read before attempting to share your account.

You might even end up with your account suspended if you’re not careful enough.

Finally, you have our best VPNs that can protect your online privacy. Plus, visit our VPN Hub to discover more guides and tools to help you protect your online identity.

CPU OPT vs CPU FAN: When & Why to Use Each of Them?

When building a PC, one of the most important parts is the central processing unit, better known as the CPU. This is the piece of hardware that controls all of the different parts of a computer by sending out instructions.

The full capability of a computer is directly tied to how good your CPU is. So if you ever wonder why whenever Intel or whoever releases a new CPU it’s such a big deal, it’s because companies like that have set the standard. Intel creates some of the best CPUs on the market today.

A CPU is made up of several different components such as a control unit and an arithmetic logic unit. Certain CPU models come with a fan attached to them to keep them from overheating.

You place the CPU unit directly onto the motherboard. But as you look down, you may see some writing on the motherboard header that reads CPU OPT and CPU FAN.

CPU FAN is self-explanatory; this is where you hook up the fan to, but what about CPU OPT? What does that mean and is it at all like the CPU FAN attachment?

Are CPU FAN and CPU OPT the same?

No, but they are similar in function. CPU FAN is the header where the main cooling fan will go, some may call this the heatsink. Without a cooling fan attached to the CPU, your computer will not boot.

It’s crucial that your computer stays at an optimal temperature because overheating can cause damage to the machine. In fact, if someone managed to turn your computer on without a cooling fan, it will shut down automatically if it detects high temperatures.

Check CPU temp in Windows 11
Source: Joseph Greve/Unsplash

CPU OPT stands for CPU Optional. As the name suggests, it’s an optional header for a second heatsink. This could be a second fan or a liquid cooling system.

Either way, it’s not necessary to connect something there. Your computer will still boot up as normal and won’t shut down if it detects something wrong with the optional heatsink.

What are the differences between CPU OPT vs CPU FAN?

There are a few differences between the two. As stated earlier, it is mandatory to have a fan connected to the CPU FAN header. On CPU OPT, it’s totally optional to have something there and your computer will turn on as normal.

Source: tookapic/Pixabay

The second difference also mentioned earlier, is how your computer reacts. Your computer will not boot if there isn’t a fan connected to the CPU FAN. It also shut down if the machine detects high temperatures.

And the final difference relates to what kind of devices can be connected. Yes, you can connect a liquid cooling system to CPU FAN, but it’s recommended that you don’t.

It’s better that you connect a fan to CPU FAN to serve as the primary heatsink. A cooling fan doesn’t have as much power and certain motherboards may have a limit on how much amps a header can take.

Source: axonite/Pixabay

Some motherboard fan headers have a limit of 1 amp. A typically cooling fan consumes around 0.20 amps of power whereas most liquid coolers take around 2 amps. If you connect something that exceeds the motherboard’s limit, you can damage the motherboard.

There are exceptions, so it’s best to double-check with the manufacturer or any documents you have for the motherboard and check its amp limit.

When should I use CPU OPT and when should I use CPU FAN?

When it comes to the CPU FAN, it’s not a matter of whether you should or shouldn’t connect a cooling fan there. You must connect something to the CPU FAN header in order for your computer to boot.

CPU OPT can be used if you want that extra cooling system, but most of the time, it’s really necessary. A single cooling fan is enough to get the job done on most computers.

Source: Dave Morgan/Pexels

But if you plan on overclocking your computer or pushing its hardware, then it’s recommended that you do get an additional fan.

How many fans do you need for one header?

You just need one. You can connect multiple fans to one header using a fan splitter cable, but you have to be careful to not connect too many.

Too many fans on one header can exceed the amp limit on a motherboard which can damage it. We recommend checking what the amp limit is on your motherboard.

CPU OPT vs CPU fan vs AIO pump

AIO stands for All In One and it refers to a liquid cooling system that’s easy to install. All you have to do is plug it into a header and it’ll work, but the question is which one?

Source: Nathan B. Caldeira/Pexels

It’s best to connect an AIO pump to the CPU OPT header and connect a fan to the CPU FAN. That way if it fails, you still have a fan working for you. Plus as stated earlier, connecting an AIO pump may exceed the amp limit on CPU FAN.

Feel free to leave a comment below if you have any questions on other pieces of hardware or if you have some that you recommend. Also, feel free to leave comments about guides you’d like to see or information on other computer parts.

2 Easy Methods to Enable Reserved Storage in Windows 10

Users can’t update Windows 10 when their hard drives lack sufficient storage space for the updates. As such, Windows 10 version 1903 will include new reserved storage when the 19H1 update rolls out.

That is storage that is automatically reserved to ensure there’s enough space for Windows updates. And you can later disable or enable Reserved Storage at your own volition.

Microsoft announced reserved storage within its Windows 10 Insider Preview Build 18312 blog post. The new 18312 preview build is the first to showcase reserved storage. However, Windows Insiders need to modify the registry to enable reserved storage.

The new feature is currently available for those users running build versions from18298 to the latest one This is how users can activate reserved storage in those Windows 10 preview build versions.

How to enable Reserved Storage in Windows 10?

1. Use the DISM command in Command Prompt

    Reserved Storage can be easily enabled through the usage of the built-in Command Prompt. The DISM command can toggle Reserved Storage on and off in just one line.

  1. 1. Press the Windows + X hotkey to open the WinX menu.

  2. 2. Select Command Prompt (Admin) from the list. Users need to be logged in with an admin account to enable reserved storage.

    cmd admin
  3. 3. Input the following command: dism /Online /Set-ReservedStorageState /State:Enabled

  4. 4. Press Enter to run the command.

  5. 5. Reserved Storage is now enabled on your device.

2. Use the Registry Editor

  1. Run cmd as an admin. Those users who aren’t logged in to administrator accounts can activate the built-in Windows 10 admin account by pressing the Windows key + X hotkey and selecting Command Prompt (Admin).
  2. Then input ‘net user administrator /active:yes’ in the Command Prompt and press Enter.
  3. Restart Windows 10, and select to log in with the new admin account.
  4. Launch Run with its Windows key + R keyboard shortcut.
  5. Enter ‘regedit’ in the Run accessory, and click the OK button.
  6. Then go to this registry path within the Registry Editor: HKEY_LOCAL_MACHINE\SOFTWARE\Microsoft\Windows\CurrentVersion\ReserveManager. Users can copy and paste that registry path into the Registry Editor’s address bar with the Ctrl + C and Ctrl + V hotkeys.
  7. Click the ReserveManager key on the left of the window.
  8. Then double-click the ShippedWithReserves DWORD.
  9. Enter ‘1’ in the Value data text box.
  10. Press the OK button to close the Edit DWORD window.
  11. Restart Windows after editing the registry.
  12. Thereafter, users can see what the reserved storage amounts within the Settings app. Click Cortana’s Type here to search button, and then enter the keyword ‘storage’ in the search box.
  13. Select Storage to open the Settings app.
  14. Then click Show more categories, System & reserves and Reserved storage within the Settings app to open the reserved storage details shown in the snapshot directly below. That’s one way to enable Reserved Storage.
enable Reserved Storage

— RELATED: How to solve memory leaks in Windows 10

Uninstall Options Features to Reduce Reserved Storage

In the snapshot above, reserved storage amounts to about seven GB. The amount of reserved storage partly depends on the number of optional features Windows 10. Thus, removing optional features might reduce the reserved storage value. Users can uninstall optional features as follows.

  1. Open the Cortana search box.
  2. Enter ‘optional features’ in the search box.
  3. Then select Manage optional features to open the window shown directly below.
    enable Reserved Storage
  4. Select a listed feature, and click the Uninstall button.

So reserved storage might come in handy for users with small hard drives. The 19H1 update will introduce reserved storage to most users when it rolls out during spring 2019. This read should help you disable, allocate space, or enable Reserved Storage.

RELATED STORIES TO CHECK OUT: 

Service.msc – How to Open & Use The Windows Service Manager

Services.msc is a built-in tool in Windows that allows you to access and modify various services running on your computer. Some services are native to the OS, while others are installed by third-party applications.

Today, we’ll show you a few different ways to open it and give you some tips on the best ways to use it and what for.

How can I open services.msc (Windows Service Manager)?

1. How to open services.msc from the Run window

  1. Press Windows + R to open Run.
  2. Enter services.msc and press Enter or click OK.
    run services windows
  3. The Services window will now appear.

This is the fastest method that you can use to access services.msc, and it’s one of the methods that we most commonly use.

2. How to open services.msc from Command Prompt

    You can easily open Windows Services Manager through a command input in Command Prompt.

    All you need to do is input the command line and press Enter.

  1. 1. Press Windows + S and type Command Prompt in the text field, then click on the relevant search result.

    command prompt
  2. 3. Type services.msc in the box.

    services cmd line
  3. 4. Press Enter to execute the command.

  4. 5. The Windows Services Manager is now opened.

3. How to open the Windows Services Manager using Powershell

  1. Press Windows + X and select Windows PowerShell or Windows PowerShell (Admin).
    powershell windows
  2. Enter services.msc and press Enter.
    powershell services windows

As you can see, both methods are almost the same, and it doesn’t make a difference if you’re using Command Prompt or PowerShell.

You can also run both of these applications without administrative privileges, and you’ll be able to open the Services window without any problems.

Use our detailed guide if you’re having trouble accessing Command Prompt as an admin. Our quick workarounds are exactly what you’re looking for.

  1. Press Windows + S to open the Search window, and type services in the search field.
  2. Now select the Services from the search results.
    search results for services

This is one of many different ways to access services.msc, and since it’s quick and easy, we encourage you to try it out.

5. How to open services.msc from the Start menu

  1. Press Windows to open the Start menu.
  2. Now scroll down to the Windows Administrative Tools section and expand it.
    administrative tools windows
  3. Select Services.
    services start windows

This is another easy-to-use method that you can use to open services.msc, but in our opinion, it’s not the fastest one.

6. How to open services.msc through the Control Panel

  1. Press Windows + S, then enter control, and select Control Panel from the list of results.
    control panel open
  2. Go to the Administrative tools section.
    control panel administrative tools windows
  3. Now select Services from the list of results.
    control panel services

7. Use Computer Management to open Services

  1. Open Computer Management. You can do that by using the search option or any other method.
    computer management search results windows
  2. Now expand Services and Applications from the navigation pane, and select Services under it.services.msc

This method can be useful if you’re using the Computer Management window frequently. If that’s not the case, then our previous methods might prove better.

8. Create a Desktop shortcut for Windows Services Manager

  1. Right-click your desktop and expand the New menu. Now select Shortcut.
    create new shortcut windows service manager
  2. Enter services.msc in the input field and click Next.
    open services.msc shortcut
  3. Now enter the name that you want to use for the shortcut and click on Finish.
    finish shortcut services

There are several different ways to access services.msc on your PC, and we encourage you to try them all. But once you are aware, choose one that seems the most convenient and quick.

How can I run services.msc as admin?

  1. Press Windows + E to open File Explorer, paste the following path in the address bar, and hit Enter:C:\WINDOWS\System32path
  2. Right-click on the services.msc file, and select Run as administrator.services.msc

What is Services MSC used for?

Here are a few key features of Services.msc:

  • Lists all services in one place: With the built-in tool, you can view all the services in one place, that, too, in alphabetical or reverse-alphabetical order.
  • Allows starting or stopping a service: Several need to be run while other services are to be disabled for specific operations to complete, and the tool provides an easy way to do that.
  • Lets users change the startup type: Configuring the startup type comes in handy, as it allows you to choose whether a service starts running automatically at boot or has to be manually triggered.
  • Provides insights on dependencies: Services are often interlinked with each other in the sense that stopping one will stop the others that depend on it. And you can easily verify this through the built-in Services.msc.

What is services.msc file location?

Like any other tool and application, Services, too, has the relevant launcher files stored in the C: drive. Both the services.exe and services.msc files can be found in the System32 folder found in the following location:C:\WINDOWS\System32

System32 Folder

Besides the other methods listed here, you can always navigate the path and easily open Services.msc.

Speaking of the Services window, many users reported that services.msc is not opening in Windows, but that, too, is easily fixable.

Did you know you can use services.msc to connect to another computer? That’s right, and we have an entire guide dedicated to it.

What is your preferred method of accessing the Services window? Do not hesitate to share it with us in the comments below.