Microsoft releases Edge Insider Dev Channel build 76.0.167.1, fixes launch bug, adds translator, dark mode

Microsoft’s usual early Friday Dev Channel update to the new Chromium based Edge hit a bit of a snag this morning when some testers found that the browser wouldn’t launch. That build, 76.0.167.0, was quickly pulled, and the Edge team has rereleased the latest Dev Channel build with that issue now fixed.

In addition, this week’s Edge Dev build has a number of interesting new features, here’s the list:

  • The built-in translator has now rolled out to everyone. We’d appreciate it if you’d let us know how it works on your sites in your language. Just use the send feedback smiley button.
  • Dark mode, which many of you have enabled manually via a configuration flag, is now on by default for everyone. To see Microsoft Edge in dark mode, you will need to change your Windows or macOS system settings.
  • Keyword search for the address bar is now enabled. When you begin to type the “keyword” for a search engine into the address bar, you will be reminded that you can press tab to search using that engine. You can also type the entire keyword and press space to enter keyword search mode. If you continue typing and press enter, you will navigate directly to search results for that search engine. You may also see search suggestions from that engine as you type. Keyword search is available for all search engines you install or which are automatically detected for you as you browse. To manage search engines, open Settings, then Privacy and services, then Address bar, then Manage search engines. Here you can add or delete search engines AND customize the keyword used for them.

Some other improvements:

  • Added a “Close Microsoft Edge” option in the “Settings and more” menu
  • Improved dark theme support in Browser Task Manager
  • You can now tab to address bar icons which indicate blocked site permissions
  • Apps now appear in the same order on the apps menu and the apps page
  • Updated the keyboard focus rectangle so that it’s more clearly visible

Along with the new features, the team has been hard at work fixing bugs, here’s what’s fixed in this release:

    • Fixed an issue that was causing high CPU usage while the browser was idle.
    • Fixed an issue where extensions couldn’t alter video playback speed.
    • On the download page, individual download cards no longer change height as you tab through them.
    • Removed the “Unknown” option from the language dropdown menu in the translator
    • Fixed an issue where encrypted video only appears as a black screen.
    • Fixed an issue where clicking on menu items sometimes doesn’t do anything.
    • Fixed a crash when enabling sync.
    • Fixed a crash during the first run experience.
  • Fixed an issue where the Settings page crashes due to a corrupted user profile.
  • Fixed a crash when opening Settings while in a guest browsing session

As a reminder, you can download and install either the Edge Insider Dev Channel (weekly updates) or Canary Channel (daily updates), or even run them both at the same time.

Xbox app gets new messaging UI and more on iOS and Android

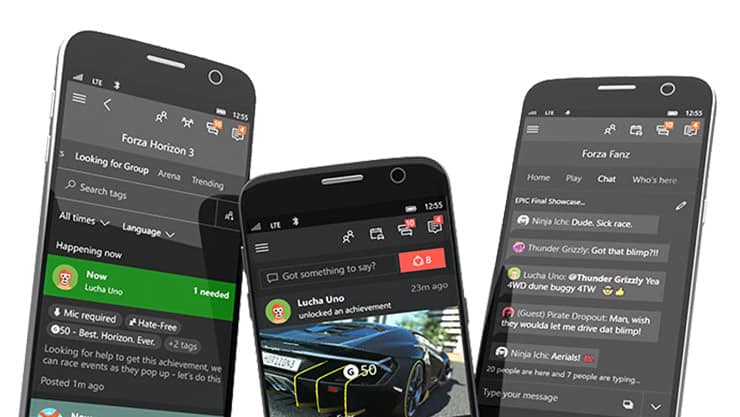
Following the release of the Xbox One 1905 update last week, Microsoft is updating its Xbox apps for iOS and Android today. The updates keep up with the latest Xbox Live Messaging improvements now available on Xbox One on Windows 10. First of all, the new mobile apps now have the same “Message Requests” feature that puts Xbox Live messages from strangers in a separate section.

The messaging experience has also been updated with a new UI, improved group messaging functionality and faster performance. However, the Contacts section still doesn’t display if your online friends are on Xbox, PC or mobile, something that is now visible on Xbox One and the new Xbox Game Bar on Windows 10.

Here are the full release notes for iOS and Android:

This update kicks off a series of improvements that we’re making to messaging in the Xbox Mobile App!

In this update we’ve added:
-New messaging UI that’s faster and more performant
-Improved group messaging functionality
-Improved spam control in your inbox with the addition of ‘Message Requests’

We’ve also made numerous bug fixes and stability improvements based on your feedback. Please continue to send us feedback as we roll out these new changes over the coming months!

The Xbox mobile apps could soon play a bigger role as Microsoft prepares to launch public trials for its Project xCloud game streaming service. Microsoft never brought Xbox One game streaming to mobile devices (something that the Windows 10 Xbox app does support), but we expect Project xCloud to either leverage the existing Xbox mobile apps, or have its own dedicated apps on iOS and Android. We’ll hopefully learn more about Microsoft’s plans during the company’s E3 press briefing on June 9.

‎Xbox
‎Xbox
Price:
Free


Xbox
Xbox
Price:
Free

Microsoft remains silent on Huawei ban, but removes them from cloud products page

As the US-based tech companies square off against Huawei, in large part to a tariff war between the United States and China, Microsoft has decided to figuratively remove its hat from the ring by pulling Huawei products from one of its Cloud Server Catalogs.

According to Bloomberg news, “Microsoft Corp. has removed Huawei Technologies Co. from one of its websites offering cloud gear, a week after the U.S. government blacklisted the Chinese company.”

This has been one of the most significant moves Microsoft has made in the wake of the new US regulated restrictions levied against Huawei, and could potentially trip up its momentum in the cloud with Huawei being one of Microsoft’s partners in its Azure Stack product program.

Interestingly enough, Microsoft has remained mum on whether or not it has officially pulled Huawei’s ability to license its Windows operating system for laptops and smart devices.

Even as the US eases its initial restrictive stance against Huawei’s business operations, major industry players remain strident in their positions on Huawei with companies such as Intel, Qualcomm, and Google informing employees that they will not supply the China-based manufacturer “until further notice.”

Windows was unable to install your Broadcom USH [PRO TIPS]

Broadcom USH which stands for Unified Security Hub is relevant for those devices that come with an integrated fingerprint reader. That also makes it extremely important for you to have the latest version of the Broadcom USH installed on your device to ensure optimum security and reliability.

So if your device is showing errors with the Broadcom USH or if Windows is unable to install your Broadcom USH, here is what you need to do to set things right. What also needs to be kept in mind is that Broadcom USH is applicable for all devices irrespective of those featuring a fingerprint reader. That makes it important for all Windows devices to ensure they have no issues with Broadcom USH.

How to fix Windows was unable to install your Broadcom USH error? The simplest method is to use the Device Manager and choose the option to update the driver automatically. If that doesn’t work, you need to find the model of your device and download the required driver from the manufacturer’s website.

How can I fix Windows was unable to install your Broadcom USH error?

  1. Download and install via Device Manager
  2. Download and install the Broadcom USH driver manually

1. Download and install via Device Manager

You can also download and install the Broadcom USH software via Device Manager as well. Here are the steps:

  1. Launch Device Manager. For that, simply type Device Manager in the Cortana search box and select from the search results shown.
  2. Locate and expand Other devices in Device Manager.
    device manager Windows was unable to install your Broadcom USH
  3. You will usually see a yellow exclamation mark next to Broadcom USH to signal something is wrong with it.
  4. Right-click on Broadcom USH and select Update Driver.
  5. You will get to see an Update Driver window showing two options: Search automatically for updated driver software and Browse my computer for driver software.
    search automatically driver software can't install Broadcom USH
  6. Selecting the former will be more hassle-free as Windows will do the searching and installation bit on its own. Follow on-screen instructions that might be applicable.

2. Download and install the Broadcom USH driver manually

If you’re unable to install Broadcom USH, perhaps you just need proper drivers. You can obtain them by doing the following:

  1. Visit the manufacturer’s website.
  2. Go to the driver section that and download the suitable driver for your device.
  3. After you have downloaded the particular driver, double click on the file to start the installation process. Follow on-screen instructions to complete it.

If this seems a bit complicated, you can also use a third-party tool to automatically update all your drivers with just a couple of clicks.

With this proficient driver tool, you will get smart technology to manage any driver automatically, without taking the risks to damage your system.

Plus, using Outbyte Driver Updater helps any user to install or update drivers from all manufacturers. With a rich online database, this software supplies millions of driver files.

⇒ Get Outbyte Driver Updater

That’s it. This should be all to do to deal with any issues with Broadcom USH on your device, including the one where Windows is unable to install the driver on your device. Also, here are some more resources for you to browse through.

Recently discovered Microsoft patent hints at a new Surface Type Cover design

A newly uncovered patent (see above image) filed by Microsoft offers a glimpse at a potential future iteration of the Type Cover detachable keyboards that are used with the company’s line of Surface devices.

Discovered by WU, this new patent shows a new type of Type Cover that would feature built-in magnets designed to stick the keyboard to the back of a Surface device when flipped around, something that’s occasionally done when using the Windows 10 Tablet Mode.

Surface owners who frequently use Tablet Mode will be well-aware that the Type Cover can also be completely removed from the Windows 10 device for a less-cluttered tablet experience but if the idea presented this new patent works well, it may encourage more people to keep their Type Covers attached at all times.

Is this a feature that you would like to see come to future iterations of the Type Cover? Would you pay to upgrade to one that has it? Share your thoughts with the community in the comments below and then follow us on Twitter for more Surface news.

Xbox One Dashboard tabs are moving locations for some gamers

Some Xbox One owners over on Reddit have begun to notice that the order of the Dashboard tabs on their consoles have started to change.

Reddit user, sakattack360, was the first to make a post about his console’s new menu order which now displays Home, Game Pass, Mixer, and then Community followed by Store. He had assumed that this change was due to being an Xbox Insider but other users soon commented that their Dashboards had also changed and they weren’t part of the Xbox Insider program.

This change hasn’t rolled out to everyone though (As of the time of this writing, my own Xbox One still uses the original Home, Mixer, Community, Game Pass, Store order) so the odds are that this is simply Microsoft doing some sort of testing to see which menu order gets the most engagement from users.

Do you have a preferred order for the tabs on your Xbox One Dashboard? Let the community know where you’d want each tab in the comments below and then follow us on Pinterest for more Xbox gaming content.

Wrong File Size Calculation in Windows: How to Fix it

Some users have been slightly baffled by properties windows showing them the wrong file and folder size calculation. File Explorer shows some users that some subfolders have larger sizes.

Thus, Windows must be miscalculating the sizes of the primary folders when properties show that some subfolders are larger than the main folders they’re in. While users had reported USB drives showing incorrect file size, this is new. Keep reading to find out all about the problem!

What can I do if Windows 10 files are showing the wrong size?

1. Reduce file title lengths that eclipse 255 characters

  1. First, click Download Now on this Softpedia page to save the TLPD ZIP file.
  2. Open TLPD ZIP in File Explorer, right-click, and select the Extract all button.
  3. Click Browse to choose a path to extract TLPD too.
  4. Select the Extract option.extract compressed zipped folders
  5. Then click TLPD.exe or TLPD_x64 in the extracted TLPD folder to open the window shown directly below.check a specific drive or path
  6. Select the No option to check all directories and drives. However, some users might prefer to select Yes to scan the directory path that includes the folder with the wrong size.
  7. Enter 255 in the text box, and click the OK button.threshold 255
  8. Press Windows + R to open Run, type the following path, and hit Enter:%temp%
  9. Click TLPD-log to open the text document in Notepad, as shown directly below.tldp log
  10. Now users can see the paths that include folder and file titles that eclipse 255. Look for paths that include folders with miscalculated sizes.
  11. Then users can open the listed paths in File Explorer, right-click the file or folder titles, and select Rename to edit them. Enter a new folder or file titles much shorter than 255 characters.

Users have stated that they’ve fixed File Explorer folder size miscalculations by editing files and folder titles that eclipse 255 characters. Those users significantly reduced those file or folder titles to be much shorter than 255 characters.

Users can scan for folder and file titles that eclipse 255 with the TLPD software. TLPD will generate a text document that lists all file and folder titles that eclipse a specified number of characters. This is how users can scan for files and folders that eclipse a 255-character threshold with TLPD.

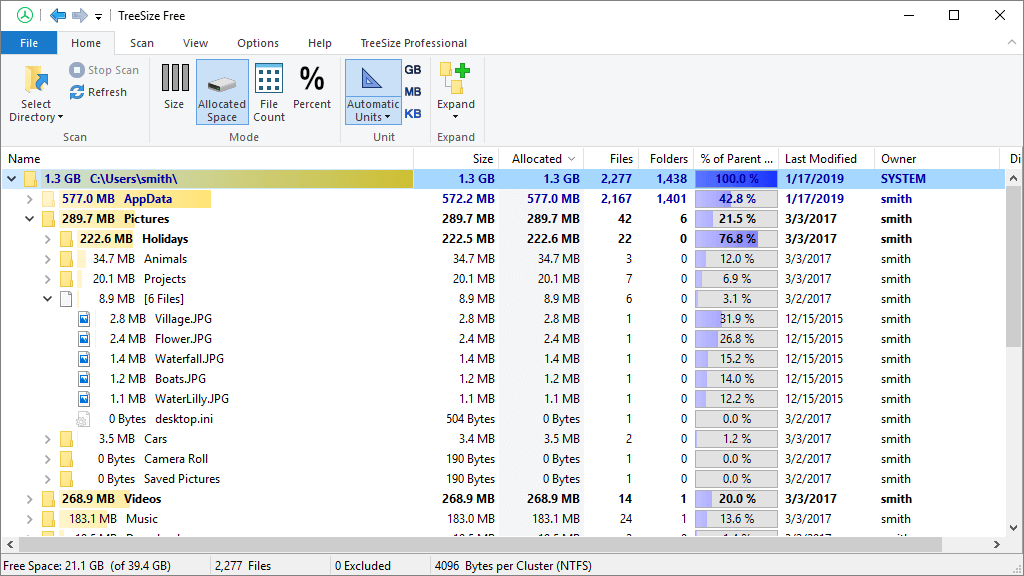
2. Check folder sizes with TreeSize

  1. To add TreeSize to Windows 10, click the Download button on the software’s webpage.
  2. Open TreeSize’s setup wizard to install the software.
  3. Once done, launch TreeSize.TreeSize application
  4. Click the Select Directory button to open a more specific path in TreeSize.
  5. Then press the Allocated Space button to get a more detailed overview.

There are various disk space manager software for Windows 10 users to check folder sizes. Users who need more accurate folder size details can add TreeSize to Windows 10. That gives users a more detailed file and directory size overview than Explorer.

So, editing folders or file titles that eclipse 255 characters might fix File Explorer folder size discrepancies. Alternatively, add TreeSize to Windows 10 to check folder sizes and fix things when Windows 11 shows an incorrect file size.

Before you leave, check some reliable File Managers for Windows, in case the built-in File Explorer is the underlying cause.

For any queries or to share what worked for you, drop a comment below.

Don’t install Windows 10 May Update if you want to avoid audio issues

Windows 10 May Update is now available to the general public. Although Microsoft tried their best to make this new update an unmatched experience in terms of optimum OS performance and minimal errors, users already reported quite a large number of problems.

For example, many reports refer to various audio issues. Many users reported that after the update they faced awful problems such as audio fading and loss of sound.

One user highlighted that after the update, the bass disappeared and the sound quality was not the same as it was before the update.

Just updated to 1903, and have lost all sound,I know it’s old soundcard, but it was working perfectly on build 1809/1803/1709/1703/1607.

The OP uses a Creative SB sound card. Well, this is not a new issues and Insiders also complained about the same problem a few days ago.

The OP further added that when he opened the sound panel, the following alert popped to the screen: Windows detected that the improvements of the following device (my audio board) are causing problems and were disabled. Do you want to re-enable them?

Indeed, the OP said that his sound card was old but it was compatible with all the previous builds, including 1809 /1803 /1709 /1607. So, this fact should not create any problems.

Microsoft agents suggested this problem is actually due to outdated drivers.

The best solution to avoid this annoyance is to go to Creative Labs ’support site and then check if there are any updated driver versions available for download.

If this is the case, select the driver that is compatible with your sound card and the problem should be solved.

If you’re facing similar problems, try this solution and let us know if its yielded positive results or no.

RELATED POSTS:

New Chrome and Firefox extensions from Microsoft bring hardware isolation technology to more browsers

Microsoft has created a new browser extension for Google Chrome and Mozilla Firefox users who care about security. The new Windows Defender Application Guard extensions for the two browsers provide the same hardware-based isolation technology found on Microsoft Edge on Windows 10, and they will automatically redirect users to an isolated Microsoft Edge session when they’re visiting untrusted websites.

Once the extension is installed, users will be able to open an Application Guard session anytime by just clicking the extension icon in the browser. “In the isolated Microsoft Edge session, the user can freely navigate to any site that has not been explicitly defined as enterprise-trusted by their organization without any risk to the rest of system. With our upcoming dynamic switching capability, if the user tries to go to an enterprise site while in an isolated Microsoft Edge session, the user is taken back to the default browser,” the company explained.

The new extensions for Chrome and Firefox require the configuration of Windows Defender Application Guard on Windows 10 PCs, plus the definition of network isolation settings by IT admins, as well as the installation of a new Windows Defender Application Guard companion app from the Microsoft Store. This app is the component that will allow Chrome and Firefox users to browse untrusted sites in the isolated Microsoft Edge environment.

Last year, Microosft previously released a Windows Defender Application for Google Chrome, but this one only provides a real-time indicator of harmful sites and website status to the browser. It can be used by all Windows 10 users, unlike these new Windows Defender Application Guard extensions which are designed first and foremost for the enterprise world. “We know that many of our customers depend on multi-browser environments to allow enterprise apps to meet various compatibility requirements and enable productivity,” the company explained today.

Full Fix: Nokia Lumia Hotspot Not Working [Lumia 520, 920]

Many cellphones support wireless hotspot feature that allows you to connect to them with other devices in order to access the Internet.

This is an amazing feature, especially if there’s no available Wi-Fi, but some users reported that hotspot isn’t working on their Lumia phone, and today we’re going to show you how to fix that problem.

Lumia hotspot not working, how to fix it?

Fix: Lumia hotspot not working

  1. Keep your screen turned on
  2. Restart the hotspot
  3. Turn off Battery Saver feature
  4. Perform a hard reset
  5. Restart your phone
  6. Delete all Wi-Fi connections from your phone
  7. Turn off Random hardware address feature
  8. Turn off automatic connection for available networks
  9. Create a new APN and turn on your default APN
  10. Delete the APN
  11. Turn on FIPS compliance for this network
  12. Create a new Access Point on your phone
  13. Use Google’s DNS
  14. Disable AirDrop
  15. Check if mobile data is enabled
  16. Update the data profile

1. Keep your screen turned on

This is just a workaround, but few users reported that it works for them, so you might want to try it out.

According to them, wireless hotspot turns itself off as soon as your screen turns off due to inactivity, and one way to keep your hotspot working is to tap your screen from time to time.

This will prevent the screen from turning off and it will keep the hotspot working.

Although this isn’t a convenient solution, it’s still a working workaround, so you might want to try it.

2. Restart the hotspot

If the hotspot stops working for some reason, you can simply fix it by turning it back on. As we mentioned in our previous solution, this occurs when your phone screen turns off.

To fix this problem, simply disable the hotspot and turn it back on again. This is also a temporary workaround, but it works according to users.

3. Turn off Battery Saver feature

Your phone automatically updates Live Tiles, emails and your calendar, but those features can drain your battery rather fast. This is why Lumia comes with Battery Saver feature that allows you to turn off these features in order to save battery.

In fact, Battery Saver will turn itself on automatically when your phone is low on battery in order preserve preserve energy.

As you can see, Battery Saver is quite a useful feature, but according to users, it can sometimes interfere with your wireless hotspot.

To fix problems with Lumia and wireless hotspot, you need to disable Battery Saver by following these steps:

  1. Swipe down to open notifications screen and select All Settings.
  2. From the list of options select Battery saver.
  3. Locate Battery Saver switch and tap it to turn off Battery Saver.

After disabling Battery Saver feature your battery might drain a bit faster than before, but any issues with wireless hotspot should be completely resolved.

4. Perform a hard reset

Few users reported that they managed to fix this problem simply by performing a hard reset on their Lumia. Hard reset will delete all files from your device, so if you plan to do it be sure to back up all important files.

To reset your phone, do the following:

  1. Press and hold the Power button on your phone to turn it off.
  2. After your phone turns off, press and hold the Power button for a moment to turn it on.
  3. As soon as your phone starts vibrating, release the Power button and press and hold the Volume Down key.
  4. If you did everything correctly you’ll see an exclamation mark on the screen. When the exclamation mark appears, release the Volume Down key.
  5. Now you need to press Volume Up, Volume Down, Power, Volume Down to perform the reset.

You can also reset your phone without any key combinations by following these steps:

  1. Go to the Settings section and select About.
  2. Tap the Reset your phone option and follow the instructions on the screen to complete the reset.

As we already mentioned, hard reset will delete all files from your device and restore your phone to factory state, so keep that in mind.

Although factory reset can be used to fix some problems on your Lumia, it’s recommended to use hard reset as the last option.

5. Restart your phone

According to some users, you might be able to fix the problem with your hotspot simply by restarting your phone. To do that, simply hold the Power button pressed until you see Slide down to power off message.

Now slide down and your phone will turn off. After that, simply hold the Power button to turn on your phone again.

Another way to restart your device is to hold down the Volume down and Power buttons pressed for 10 to 15 seconds.

When you feel your phone vibrating, release the buttons and the phone will restart itself automatically.

Keep in mind that some phones don’t support this method, so be sure to check your phone’s instruction manual to see if it supports it.

After your phone restarts, the issue should be completely resolved and wireless hotspot will start working without any problems.

6. Delete all Wi-Fi connections from your phone

According to some users, you might be able to fix this problem simply by removing saved Wi-Fi networks.

For some reason saved Wi-Fi networks can interfere with your wireless hotspot and cause problems on your Lumia, and in order to fix this problem you need to delete all Wi-Fi connections from your device.

To do that, follow these steps:

  1. Go to Settings section.
  2. Tap on Wi-Fi and select the connection that you want to remove.
  3. Tap the Delete icon to delete the connection.
  4. Repeat the steps until you remove all saved Wi-Fi connections.

This might not be a convenient solution, but it works according to users. This solution can be problematic especially if you have a lot of remembered Wi-Fi connections on your device.

We also have to warn you that by performing this solution you’ll have to enter passwords for all Wi-Fi connections when you try to access them again which can be an inconvenience.

7. Turn off Random hardware address feature

Random hardware address feature is designed to give your device a new MAC address on certain networks. This can be useful if you use your device on public and unprotected network.

By using this feature, your device can become harder to track, which adds another layer of protection and privacy.

Although this feature will give you a random MAC address whenever you access a specific network, this feature can also cause certain problems with the hotspot feature on your Lumia.

If hotspot isn’t working on your Lumia, you might want to try disabling Random hardware address feature. To do that, follow these steps:

  1. Go to All apps section and select Settings.
  2. Navigate to Network & wireless > Wi-Fi.
  3. Select Manage.
  4. Turn off Use random hardware addresses option.

After turning this feature off your MAC address won’t be random every time you connect to a different network, which can be a privacy concern for some users, but wireless hotspot should start working again without any problems.

8. Turn off automatic connection for available networks

As we already mentioned in Solution 6, this problem can be caused by memorized Wi-Fi connections, and one way to fix this problem is to remove those connections from your phone.

This isn’t the most practical solution since you’ll have to enter a password for each connection when you want to connect to it.

Apparently, you can fix this issue simply by turning off automatic connection feature for available networks.

After doing that, you won’t automatically connect to any available Wi-Fi network, but at least you won’t have to enter network passwords or delete any of your saved wireless connections.

According to users, after you disable automatic connection your wireless hotspot will work even if your display turns off.

9. Create a new APN and turn on your default APN

According to users, this issue can occur due to problems with your APN, and in order to fix the problem with wireless hotspot you need to create a new APN. To do that, follow these steps:

  1. Swipe down to open the notification center and choose All settings.
  2. Go to Network & wireless > Cellular & SIM > SIM settings.
  3. Select Add Internet APN.
  4. Add any name for the APN and choose Save.
  5. Locate the newly created APN and tap Apply to turn it on.
  6. After the new APN is enabled, restart your phone.
  7. When your phone restarts, enable the default APN and try to use network sharing. If the issue still persists, restart your phone again and try to create a wireless hotspot.

10. Delete the APN

If you have problems with wireless hotspot on your Lumia, you might be able to fix the problem by removing the APN. Users reported that they had two APNs, one in Access Point section and one in the Cellular section.

After removing the APN in Cellular section and restarting the device, the issue with with wireless hotspot was resolved, so be sure to try that.

11. Turn on FIPS compliance for this network

FIPS is a government standard of encryption, and it’s used by government computers in order to protect sensitive data.

Windows 10 allows you to use FIPS standard on your personal computer, but turning on this security encryption might affect your network experience by blocking certain components.

However, few users reported that enabling FIPS allows them to connect to their Lumia wireless hotspot, and you can enable FIPS by following these steps:

  1. Open Network and Sharing Center on your computer and choose Change adapter settings on the left.
  2. Locate your phone’s wireless connection, right click it and choose Status.
  3. Now click the Wireless Properties button.
  4. Go to Security tab and click Advanced settings button.
  5. Check Enable Federal Information Processing Standards (FIPS) compliance for this network.
  6. Save changes and check if the problem is resolved.

12. Create a new Access Point on your phone

According to users, they managed to fix this problem simply by creating a new Access Point on their phone. Before you do that, you need to forget or delete the phone’s wireless network from your Windows 10 PC or tablet.

After doing that, create a new Access Point by following these steps:

  1. Go to Settings section and navigate to Access Point.
  2. Tap Add and enter www as the APN name. Enter other APN information provided to you by your mobile provider.
  3. Save changes and restart your phone.
  4. Turn on Wi-Fi on your PC or tablet.
  5. Turn on Internet sharing on your Lumia and try to connect to its wireless network.

Some users are recommending to use 202.139.83.152 as the proxy address and 8070 as the port, so you might want to try that as well.

13. Use Google’s DNS

According to users, they managed to fix the problem with Lumia hotspot simply by using Google’s DNS instead of their provider’s DNS.

It might be that your ISP has some issues with DNS, and if that’s the case, you might want to use Google’s DNS instead.

Keep in mind that you need to change the DNS on the device that are you using to connect to your wireless hotspot.

To change your DNS on Windows 10, do the following:

  1. Press Windows Key + X to open Win + X menu and choose Network Connections.
    lumia-hotspot-not-working-network-1
  2. When Network Connections window opens, right click your phone’s wireless connection and choose Properties from the menu.
    lumia-hotspot-not-working-network-2
  3. Select Internet Protocol Version 4 (TCP/IPv4) and click Properties.
    lumia-hotspot-not-working-network-3
  4. Select Use the following DNS server addresses and enter 8.8.8.8 as Preferred DNS server and 8.8.4.4 as Alternate DNS server. If you want, you can use OpenDNS by entering 208.67.222.222 and 208.67.220.220 as Preffered and Alternate DNS respectively.
    lumia-hotspot-not-working-network-4
  5. After you’re done, click OK to save changes.

Keep in mind that you need to use Google’s DNS for all devices, such as tablets and smartphones, that have problems accessing your wireless hotspot.

14. Disable AirDrop

Few users reported that Lumia hotspot works perfectly with their PC, but they are unable to access the hotspot on their Macbook.

To fix this issue you need to disable AirDrop on your Macbook, and you can do that simply by opening the terminal and entering defaults write com.apple.NetworkBrowser DisableAirDrop -bool YES.

After doing that, restart your Macbook and you’ll be able to access your Lumia hotspot without any issues.

15. Check if mobile data is enabled

In order to use your Lumia as a wireless hotspot, you need to have mobile data enabled. To check if your mobile data is enabled, do the following:

  1. Go to Settings.
  2. Select Cellular + SIM.
  3. Now look for Data connection option and make sure that it’s turned on.

After enabling Data connection, check if your wireless hotspot works.

16. Update the data profile

According to some users, you can fix the problem with wireless hotspot simply by updating your data profile. To do that, follow these steps:

  1. Go to Settings.
  2. Select Network profile.
  3. Now choose Update profile and wait for the update process to complete.
  4. After the update is completed, tap Done to finish.

After your profile is updated, check if the problem is resolved.

Fix: Lumia 520 hotspot not working

  1. Enable CHAP authentication type
  2. Try replacing your SIM card

1. Enable CHAP authentication type

According to users, you can fix the problem with hotspot on Lumia 520 simply by creating a new APN and setting CHAP as the authentication type.

While creating a new APN be sure to use your cellular network settings. After doing that, you should be able to access the new wireless hotspot without any problems.

2. Try replacing your SIM card

According to users, this problem can occur due to your mobile provider, and in order to fix it, you’ll need to get a SIM card from a different mobile provider. After getting a new SIM card, enable Internet sharing on your phone.

Now turn off the phone and remove your SIM card. Replace it with a SIM card from a different mobile provider. After you do that, Internet sharing should start working without any problems.

Turn off your phone, and insert your original SIM card. After that, the issue with hotspot should be permanently resolved.

Fix: Lumia 920 hotspot not working

  1. Turn off Wi-Fi on your phone
  2. Delete APN settings and enter them again
  3. Turn off automatic screen lock
  4. Try changing your SIM card

1. Turn off Wi-Fi on your phone

Users reported that hotspot on Lumia 920 doesn’t work if you have your Wi-Fi turned on, therefore be sure that your Wi-Fi is disabled before using your phone as wireless hotspot.

To disable Wi-Fi, do the following:

  1. Open the notification center and choose Settings.
  2. Select Wi-Fi.
  3. Now select WiFi networking and turn off your Wi-Fi.

After you turn off Wi-Fi on your phone, you should be able to use it as a wireless hotspot without any problems.

Some users are also suggesting to restart your phone before you turn on Internet sharing on it, so be sure to try that as well.

2. Delete APN settings and enter them again

According to some users, the problem with hotspot on Lumia 920 can occur due to your APN settings.

To fix this issue you need to delete the APN settings and enter them again. After you do that, the problem should be completely resolved.

Some users are also recommending to remove MMS configuration from APN settings, so if you made any changes to MMS configuration, be sure to remove them and check if that solves the problem.

3. Turn off automatic screen lock

It seems that wireless hotspot on Lumia 920 stops working as soon as your screen locks.

To avoid this problem, many users are disabling automatic screen lock, and you can do the same by following these steps:

  1. Tap the On/Off button on your phone.
  2. Slide upwards on your display.

In addition, you can change the time period after your display turns off. To do that, follow these steps:

  1. Go to Settings > Lock Screen.
  2. Locate Screen times out after field and select the desired period.
  3. Save changes.

According to users, as long as your screen is turned on the wireless hotspot should be working, therefore be sure to try this workaround.

4. Try changing your SIM card

Users reported that they were unable to use hotspot feature on their Lumia 920 with their SIM card, and if that’s the case you might want to try replacing your SIM card.

You can also check with your mobile provider if you can keep your old phone number while using a new SIM card.

After switching to a new SIM card, users reported that the issue was resolved, so you might want to try this solution.

Many people tend to use their Lumia smartphones as wireless hotspots, especially if they don’t have Wi-Fi access, but problems with hotspots can occur.

If Lumia hotspot isn’t working for you, be sure to try some of our solutions.

Modern Warfare Remastered Crashing on PC: 7 Ways to Stop It

Call of Duty is a popular franchise, with its first game released back in 2003. A first-person shooter game, it has come a long way and enjoys a massive following. However, many users reported that Modern Warfare Remastered is crashing on the PC.

This could happen on any supported iteration of the OS, and in the worst case, some even had Modern Warfare Remastered not launching at all. If you are a franchise fan, keep reading, and by the time we reach the end, the game should run without a single issue.

Why does Modern Warfare remastered keep crashing?

Here are a few reasons Modern Warfare keeps crashing:

  • PC doesn’t meet the minimum requirements: The most common reason why Modern Warfare Remastered crashes on startup is that the PC doesn’t meet the minimum requirement for the game.
  • Corrupt or outdated drivers: Such issues might appear when the drivers are outdated or corrupt, primarily the graphics driver.
  • Overheating: If Windows overheats, the system performance is affected, programs start to crash, including the game, and the PC may randomly shut down and turn on when the temperature reaches the optimal level.
  • Misconfigured game settings: Though not precisely misconfigured, given these are added for enhanced gameplay, specific settings are the reason behind the Call of Duty: Modern Warfare Remastered crash on the loading screen.

What can I do if Modern Warfare Remastered is crashing on my PC?

Before we start making major changes, here are a few quick things you can try:

  • Restart the computer to free up the system resources. If you are running low on RAM or the CPU usage is high, this should help.
  • Remove Riot Shield and Overkill in the game since this has helped many users when they face the Modern Warfare Safe Mode crash.
  • Make sure your PC is not overheating. If you are running the game on a laptop, use a cooling pad.

If none work, move to the solutions listed next.

1. Run Modern Warfare Remastered as administrator

Note icon NOTE
If you have downloaded the game via Steam, start from step 1. For those who used a disc for installation or got it directly, start from step 2.
  1. Open Steam, go to Library, right-click on the game, hover the cursor over Manage, and select Browse local files.browse
  2. In the game folder, locate the launcher, right-click on it, and choose Properties.properties
  3. Head to the Compatibility tab, tick the checkbox for Run this program as an administrator, and then click OK to save the changes.Run as administrator to fix modern warfare remastered crashing pc

A quick fix that worked for many when Modern Warfare Remastered was crashing on the PC was to run it with administrative privileges.

2. Disable overlay

Note icon NOTE
We have listed the steps to disable Discord overlay since this usually triggered the crash. If you have other apps with overlay turned on, disable it for them.
  1. Open Discord, and click on the Settings icon.settings
  2. Go to the Game Overlay tab under Activity Settings, and make sure the toggle for Enable in-game overlay is turned off.disable in-game overlay to fix modern warfare remastered crashing pc
  3. Once done, relaunch the game and check if it now runs without crashing.

3. Update the graphics driver

  1. Press Windows + R to open Run, type devmgmt.msc in the text field, and hit Enter.device manager
  2. Expand the Display adapters entry, right-click on the graphics adapter, and select Update driver.update driver to fix modern warfare remastered crashing pc
  3. Choose Search automatically for drivers and wait for the OS to install the best one.search automatically for drivers

An outdated graphics driver is just as likely to be the reason Modern Warfare Remastered keeps crashing on your PC. So, update the graphics driver, and if Windows cannot find one, you can manually install the latest driver.

Here are quick links to driver update pages for the major OEMs.

On the other hand, you have another effective option to automatically update drivers safely and much faster than performing it manually.

Updating your device drivers can help prevent other issues while playing Call of Duty, such as DirectX error; read this guide to learn more.

4. Modify in-game settings

We went through several forums and identified that a handful of in-game settings were responsible for Modern Warfare Remastered crashing on the PC. Disabling these worked out well for users, and the game no longer crashed or threw errors.

So, here’s a list of settings you can disable in Modern Warfare Remastered:

  • Sun Cache
  • Shader Preload
  • NVIDIA Reflex Low Latency
  • Spot Shadow Caching

5. Disable Razer services

  1. Press Windows + R to open Run, type msconfig, and click OK.msconfig
  2. Navigate to the Services tab, and tick the checkbox for Hide all Microsoft services.hide all microsoft services
  3. Locate all the Razer services here, uncheck them, click Apply, and then OK to save the changes.disable Razer services to fix modern warfare remastered crashing pc

A few users resolved Modern Warfare Remastered crashing on the PC by disabling the Razer services. Remember, turning off some might affect the Razer devices, so identify and leave those while disabling the rest.

6. Verify the integrity of game files

Note icon NOTE
Go with this solution only if you have downloaded Modern Warfare Remastered from Steam.
  1. Open Steam, right-click on the game, and select Properties.properties
  2. Head to the Local Files tab, and click on Verify integrity of game files.verify integrity of game files to fix modern warfare remastered crashing pc
  3. Wait for the process to complete, and then relaunch the game.

7. Uninstall conflicting applications

  1. Press Windows + R to open Run, type appwiz.cpl, and hit Enter.appwiz.cpl
  2. Select the programs installed around the same time the crash first occurred, and click Uninstall.uninstall app to fix modern warfare remastered crashing pc
  3. Now, follow the on-screen instructions to complete the process.

If nothing else helped and Modern Warfare Remastered keeps crashing on your PC, the last option is to uninstall the conflicting app. Remember, identifying it would be a challenge, but if there’s one and you manage to remove the app, the crashes would be gone for good.

Also, while we are on the subject, find out the best ways to improve gaming performance in Windows or what to do when faced with the mw3 error code 14515.

For any queries or to share a solution we might have missed, comment below.

Microsoft to purchase wind energy from Dutch based company Eneco

Microsoft has signed an agreement with Netherlands-based wind farm development company Eneco to purchase ninety megawatts of energy from its massive 731.5 MW offshore wind project, the Borssele III/IV. As part of the agreement, Microsoft will receive renewable energy from Eneco for 15 years starting in 2022, which will be used to power the company’s datacenters that reside in the country. Brian Janous, general manager of Energy and Sustainability at Microsoft, explains:

“Our purchasing of renewable energy helps improve the sustainability of our operations and local grids. This agreement is our 14th renewable energy power purchase agreement and brings our total clean energy portfolio to more than 1.5 GW. The electricity generated will help support the continued long-term growth of Microsoft cloud services delivered from the Netherlands, which is one of 54 Azure regions announced and part of one of the largest and most innovative cloud infrastructures in the world.”

This is Microsoft’s second significant wind energy purchase in the Netherlands, having previously signed an agreement with Vattenfall to purchase 100 percent of the energy generated by a repowered farm that was conveniently located near its datacenters. The company has also made numerous other investments in both wind and solar energy throughout the world, bringing its entire portfolio to 1.5 GW according to Janous.

It’s definitely clear that Microsoft doesn’t want its customers to have to worry about the sustainability of its services. Renewable energy choices are definitely important decisions for any company, something we should all consider for the near future.

Review: Rock Jaw T5 Ultra Connect wireless earphones – Bluetooth 5.0 and USB-C for £75 ($95)

Rock Jaw Audio is a UK-based manufacturer of audio products which aim to precisely strike the fine line between quality and affordability. The company’s new T5 Ultra Connect is its first set of wireless earphones, which it describes as a “fresh and new” product which “holds no punches.” Having tested several Rock Jaw products in the past, I took a look to find out whether the T5 might be an ideal set of earphones for on-the-go computing – such as with a Microsoft Surface.

Screenshot of adding a Bluetooth device in Windows 10

Throughout my time with the T5, I’ve been using them with my Surface for one simple reason: its top-mounted 3.5mm jack makes for a frustrating time when using wired earphones. The dangling cable is all too easy to snag or swipe over the screen, so I find Bluetooth earphones highly preferable when working with the device.

Getting set up with the T5 in Windows 10 is a simple procedure – pairing through the Settings app took just a few seconds, with the T5 providing voice feedback as the connection completed. Rock Jaw has equipped the T5 with Bluetooth 5.0 for maximum performance, but you don’t need to worry if your device has an older version. Bluetooth 5.0 is fully backwards compatible with older specs, so the T5 works identically irrespective of the Bluetooth version in use.

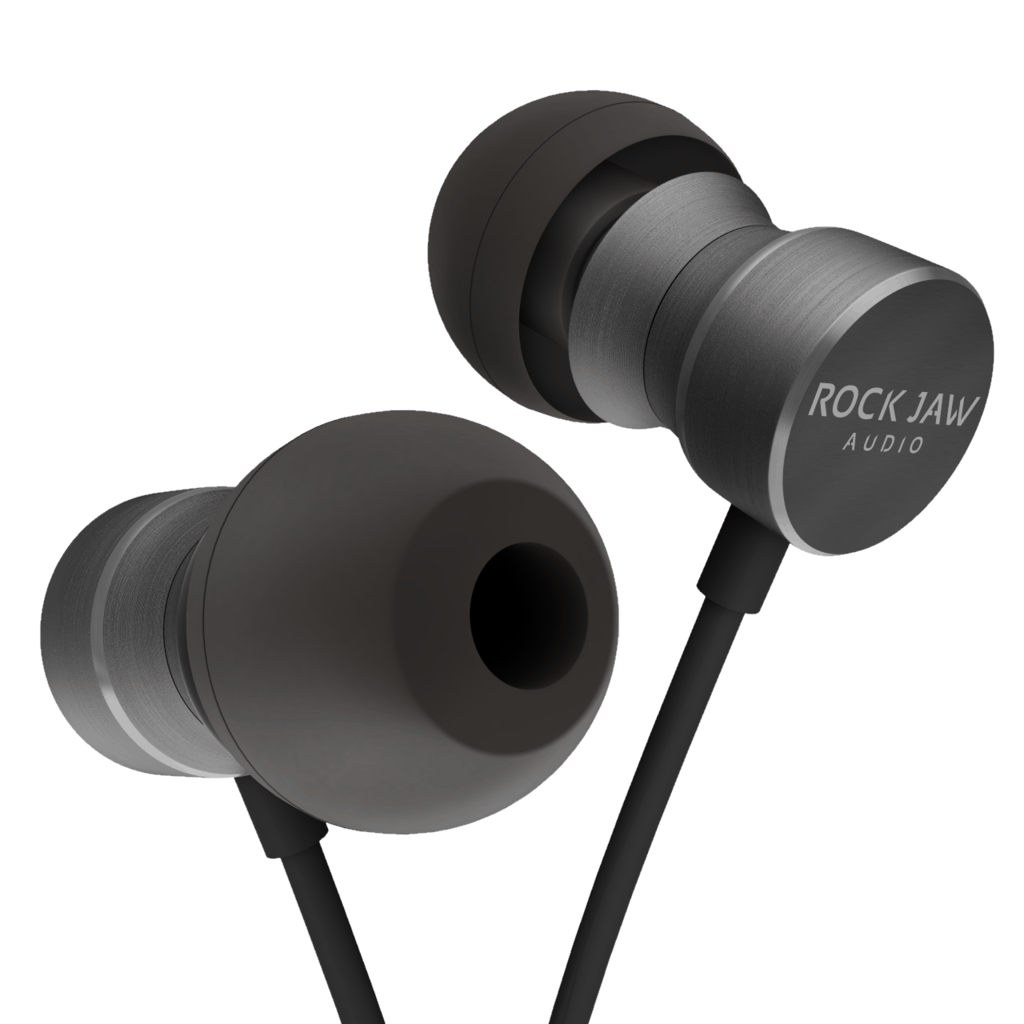
Rock Jaw Audio T5 Ultra Connect Bluetooth earphones

Design-wise, the T5 is a clear evolution of previous Rock Jaw designs. The cylindrical earphones are made from brushed aluminium which makes for a very refined look. They’re pleasingly cool to the touch and have that hard-to-describe “premium feel” about them. Strong magnets ensure they stay together when not in use.

Rock Jaw has added two control modules – the one on the right side of the cable contains the three-button control system, while the module on the left cable houses the battery. The buttons are simple enough to use, with volume, play/pause, track controls and call handling all supported. However, they aren’t particularly tactile and can be difficult to press, usually presenting a spongy feel.

Rock Jaw Audio T5 Ultra Connect Bluetooth earphones

How about the sound though? I was pleased to find that the switch to wireless hasn’t significantly impeded Rock Jaw’s usual performance. There is a persistent background hiss, but once music is playing you’re unlikely to notice it. It may be more of an annoyance if you tend to listen to podcasts or other spoken content.

Audio is clear and punchy. There’s adequate bass, good treble and a decent midrange response. All this is uniquely customisable – Rock Jaw has retained its signature tuning filters, which allow you to tailor the T5’s output to the genre of music you’re listening to.

Out of the box, you’ll the find the standard gold-coloured filters fitted. These attempt to strike an acceptable balance between treble and bass for everyday listening. Switching to the silver ones amplifies the bass output, while the black filters emphasise treble.

Rock Jaw Audio T5 Ultra Connect Bluetooth earphones

The difference is real and immediately noticeable, although my existing views of their usefulness are unchanged. I expect most people will end up sticking with a single set of tuning filters and for me, it’s going to be the silver, bass-centric ones. I found the standard gold filters lacked an adequate low-end for my typical mix of classical, pop and country listening, whereas the increased bass from the silvers increased my enjoyment of all three genres. Naturally, your own experience may vary.

Rock Jaw recently published an impassioned blog post asserting its tuning filters are “more than gimmicks.” Quoting the company, “a little treble can mean much more detail to one person, but sound too harsh to another. Which is exactly why we provide three options in the box. When a customer purchases a pair of earphones […] from Rock Jaw Audio, they get flexibility and choice.”

This approach to customer preferences is admirable and a large factor in Rock Jaw’s success. Even so, I can’t help but feel that developing a single, more balanced sound signature would be more likely to please all audiences.

Rock Jaw Audio T5 Ultra Connect Bluetooth earphones

While the filters do materially alter the audio output, the process of changing them (remove tip, unscrew filter from earphone, insert new filter, reapply tip) makes them difficult to switch out on-the-go and ultimately offers little more value than adjusting equaliser settings would. Nonetheless, Rock Jaw’s tuning filters do have many fans too, and the T5 will continue to please people who enjoy this unique customisation system.

Alongside the tuning filters, Rock Jaw also provides a choice of two kinds of earphone tip, with three different sizes provided for each. It’s expected most people will wear the Comply memory foam tips, which mould themselves to the shape of your ear for a secure and noise-isolating fit. If you’re not a fan of foam tips, you can opt instead for the silicone alternatives in the box. A soft mesh carrying case is also included.

Rock Jaw claims an 11-hour battery life, with recharging achieved via a USB-C connection. The earphones also have IPX5 sweat and water-resistance, so you can safely use them while exercising in wet weather. The technical specs claim an impedance of 24 ohms at 1KHz, with a frequency response of 15-25,000Hz. Bluetooth range is rated at 12m.

Rock Jaw Audio T5 Ultra Connect Bluetooth earphones

Rock Jaw has priced the T5 Ultra Connect at £75, which means they aren’t particularly cheap earphones. However, they are well-built, with the earphones themselves the standout component. Sound quality is good, but not exceptional, while the tuning filters will be seen by some as a defining feature and by others as little more than a gimmick – sorry, Rock Jaw.

With all things considered, the T5 is a competent contender for wireless earphones in this price bracket, and perhaps the best option available. Nonetheless, it occupies a tricky position in the market, too expensive to attract casual listeners but with a sound quality that’s not necessarily going to satisfy demanding audiophiles.

The tuning filters really are the key feature here, along with the Bluetooth 5.0 connection, IPX5 resistance and USB-C charging port. Still, if you’re looking for earphones with these qualities, the T5 may be an attractive proposition. You can find out more and order from the Rock Jaw website.

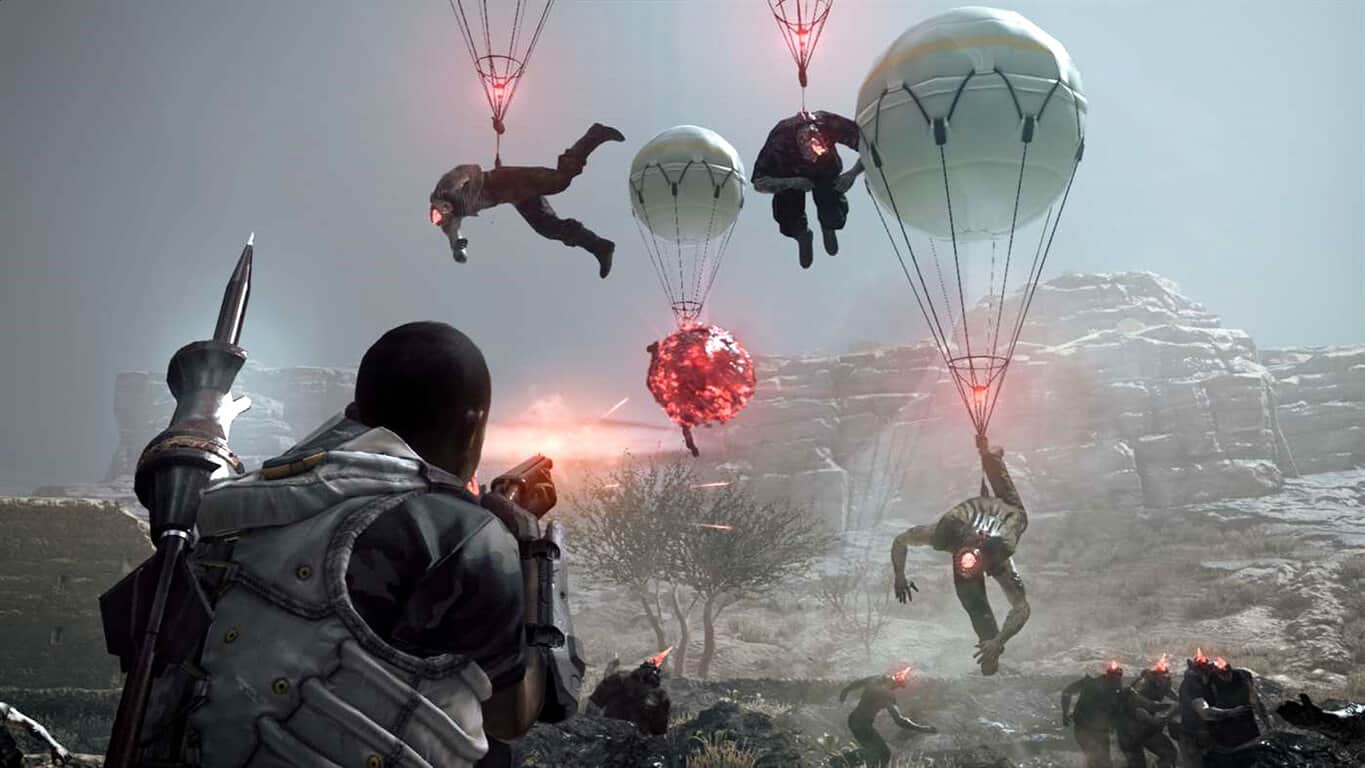
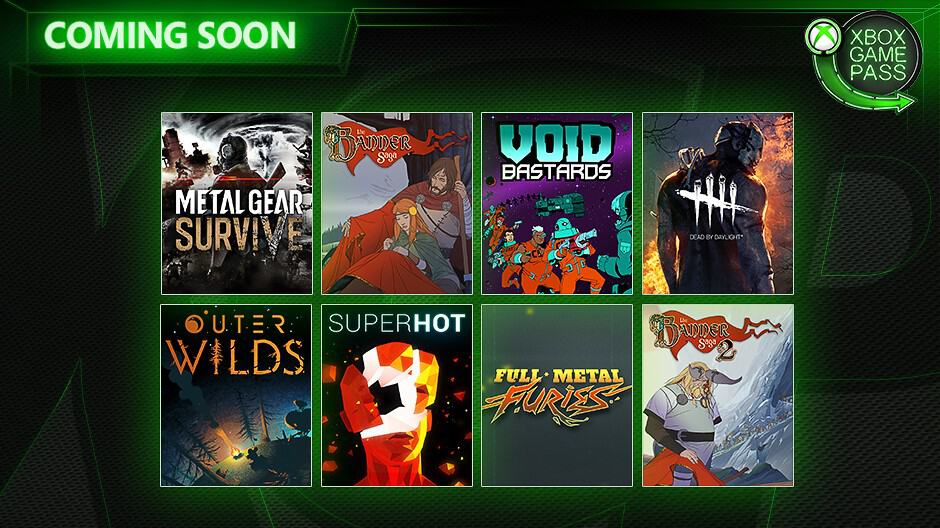
Xbox One’s The Banner Saga and Metal Gear Survive are now playable with Xbox Game Pass

The Banner Saga and Metal Gear Survive are both now playable for Xbox Game Pass subscribers. Both titles were announced to be coming to the subscription service this morning and will be followed by six other video games over the coming weeks.

Here’s the official game description and trailer for The Banner Saga:

Live through an epic role-playing Viking saga where your strategic choices directly affect your personal journey. Make allies as you travel with your caravan across this stunning yet harsh landscape. Carefully choose those who will help fight a new threat that jeopardizes an entire civilization. Every decision you make in travel, conversation and combat has a meaningful effect on the outcome as your story unfolds. Not everyone will survive, but they will be remembered.

Here’s the official game description and trailer for Metal Gear Survive:

METAL GEAR SURVIVE builds upon METAL GEAR SOLID V’S enduring stealth action gameplay while introducing the new elements of exploration and survival to create a bold new experience. METAL GEAR SURVIVE is a spin off from the main METAL GEAR SOLID V story that takes place in a strange alternative universe. Create your own character and learn to survive. Scavenge resources, craft weapons, build a base camp and explore the unknown while developing the survival skills necessary in this hostile environment. In CO-OP mode, assemble a team of four players to infiltrate and defend areas from hordes of creatures. Place fortifications and defensive weapons strategically to give you an advantage against ever intensifying enemies. Team work and resourcefulness are key in these fast paced co-op missions.

Xbox Game Pass is a Microsoft-run subscription service that’s kind of like the video game equivalent of Netflix. For a recurring monthly fee, members are given full access to around 100 Xbox video games with new titles being added every month and others removed.

Do you use Xbox Game Pass? Are you happy with these two games coming to the service? Let us know why or why not in the comments below and then follow us on Pinterest for more Xbox gaming content.

The Banner Saga
The Banner Saga
Developer:
Versus Evil
Price:
$24.99


METAL GEAR SURVIVE
METAL GEAR SURVIVE

FIFA 19 players can’t use Xbox controller to control characters [FIX]

FIFA 19 is Electronic Arts’ football simulation video game. This is the most popular football simulator game with millions of active players.

Many users reported experiencing various issues regarding the Xbox One controller activity on Windows 10.

Apparently, when starting a game, users can’t control the characters on the field. Sometimes users experience issues in the menu as well.

This issue could be caused by outdated drivers, connection type and other system issues.

In order to fix this issue, we managed to come up with a few solutions that you should try.

Steps to fix FIFA 19 Xbox One controller issues

  1. Connect the controller using a cable
  2. Reinstall the driver
  3. Change button configuration
  4. Always have Steam closed
  5. Install a controller emulator

1. Connect the controller using a cable

Although the Xbox One controller has a wireless feature, sometimes it could be problematic.

Connect your controller directly to your device using a cable.

Wireless connections can interfere with other wireless devices, causing the controller to perform improperly.

2. Reinstall the driver

Abnormal controller activity could be caused by damaged or corrupted device drivers.

Uninstall the Xbox One controller driver and restart your computer. It will automatically detect your controller and reinstall the needed driver.

In order to uninstall the controller driver, follow these steps:

  • Press the Windows logo key + R on your keyboard > type devmgmt.msc in the Run box and hit Enter to open the Device Manager
  • Expand the Microsoft Xbox One Controller section > right click Microsoft Xbox One Controller > select UninstallXbox One Controller uninstall task manager
  • Check the box next to Delete the driver software for this device in the confirmation window > click OK
  • Unplug the Xbox controller from your PC and reboot your computer
  • Plug the controller back in, let the system automatically install the driver

3. Change button configuration

Some users reported that changing their button configuration fixed the issue.

Access the FIFA 19 in-game settings, find the controller settings and swap buttons (e.g. swap LB with RB) and see if it makes any difference.

Try changing the Player Movement from the analog stick to the d-pad as well.

4. Always have Steam closed

Apparently having Steam opened in the background sometimes interferes with FIFA 19’s activity. This could cause the controller to work improperly.

Make sure to properly close the Steam client. Check the Task Manager and end any active Steam processes.end steam processes

After closing Steam, open FIFA 19 and see if it fixed the controller issue.

5. Install a controller emulator

Installing an Xbox controller emulator provides extra support for your controller.

You have the option to adjust the button configuration and even select the game that you want to run.

Get the Xbox 360 Controller Emulator and use it for your Xbox One controller.

In conclusion, if none of the above solutions work for you, then you should try to check if your controller is not damaged.

We do not recommend that you try fixing it by yourself. Always go to an authorized service as the controller is a really complex and fragile piece of hardware.

If you found other working solutions, please share them in comment section below.

READ ALSO:

Windows Sandbox error 0x80070002 after update [QUICK FIX]

Many Reddit users encountered error 0x80070002 on Windows Sandbox following the Windows 10 v1903 update.

One user reported the following situation:

Windows Sandbox giving 0x80070002 error :s. Any ideas how to fix this?

Another one offer few further details regarding the issue:

I finally found the Windows Sandbox, it was translated to my default language PT-BR “Área Restrita do Windows” but when I try to launch I get the error 0x80070002

The problem might occur only on non-English Windows operating systems.

It is worth mentioning that Windows Sandbox is only available on Windows 10 Professional, Enterprise and Education, and not on Windows 10 Home.

How to fix Windows Sandbox error 0x80070002

Another user offered a few quick solutions to the problem.

1. Use Windows Event Viewer

First, if you encounter the same issue, check the Windows Event Viewer. This tool will show you a log of system messages, such as errors. It will help you to troubleshoot this problem.

2. Update your drivers

Then, you need to make sure to install all the updates, reboot, and have the latest Intel drivers installed.

If you don’t want to manually install the latest drivers, you can automatically update your computer’s drivers with the help of these driver updater solutions.

3. Change your time zone settings

There may also be a simpler solution for error 0x80070002 on Windows Sandbox and this involves changing your time zone settings.

change date and time pc

To do this, open “Date and Time from Control Panel” and click on “Change date and time” and configure your time zone if necessary.

Also, go to the Internet time tab, navigate to Change Settings and check “Synchronize with an Internet time server” and choose a Time Server from the list. Then restart your computer.

Synchronize Internet time server

Have you encountered other problems with Windows Sandbox? Let us know in the comment section below.

Users can’t apply selected color to taskbar in Windows 10 v1903

Microsoft  recently rolled out Windows 10 version 1903 (aka May 2019 Update) to the general public. This feature update brings some exciting new features for you.

Some of these include a new light theme, an improved Windows sandbox feature, and more. The company even decoupled Windows Search and Cortana.

Microsoft announced a new Windows Health Dashboard that came along with this release. This dashboard informs users about the update rollout status as well as known issues.

Microsoft is completely depended upon Windows Insiders to extensively test their new OS versions. Unfortunately, the company didn’t fix all the reported issues.

Taskbar color won’t change in Windows 10 May 2019 Update

Some users even stated that the company knew some of these bugs existed and it deliberately ignored them.

Speaking of bugs, many Windows 10 users who recently upgraded their systems to Windows 10 version 1903 reported that they can’t apply their selected color to the taskbar.

Cannot apply selected color to the taskbar, is it a bug? 

As you can see in the screenshot below, users can’t check all the available options in the Settings page.

taskbar color bugs windows 10 v1903

It seems like Microsoft may have to spend this summer fixing the long list of bugs reported by users.

Apart from these bugs, we can’t deny the fact that this release fixed some major issues as well. For example, this Reddit user stated that Windows 10 May 2019 updated fixed the following issues:

This update fixed some major bugs for my PC. 1.Previously versions of win in task manager always showed me wrong mhz memory speed (1333mhz) now its right 2. Small but huge for me, no more flickering taskbar when deleting files from recycle bin(on light theme) 3. Alot gliches fixed like no slider for volume , missing or flickering icons 4. And performance is waay better now Im happy. 

If you still want to install the Windows 10 May 2019 Update on your system, head to the Windows Update section and check for updates.

RELATED ARTICLES YOU NEED TO CHECK OUT:

This PC can’t be upgraded to Windows 10 v1903 [POTENTIAL FIX]

Windows 10 May 2019 Update brings a weird bug that blocks the installation of the new OS. As a matter of fact, Microsoft already acknowledged the issue.

The company stated that Windows 10 users who attempt to install Windows 10 version 1903 may encounter the error This PC can’t be upgraded to Windows 10.

The tech giant says that this error arises if an external SD card or USB device is connected to your PC during the installation of Windows 10 v1903. Microsoft explains that drives are not properly reassigned during the upgrade process.

The Redmond giant suggested that users should unplug all external SD cards and USB devices from their system. Finally, you need to reboot their systems before starting the upgrade process.

However, one Reddit user created a post to report that unplugging USB devices didn’t solve the issue.

I unplugged all my USB devices on my gaming desktop and still failed, then realized my Corsair AIO water cooler is also using USB and the update still fails. For anyone with an AIO water cooler that uses USB, if you’re able to unplug that, you’ll have to do so as well in order to update or just wait for an official patch, or go Insider.

It is pretty annoying that Windows users have to unplug their AIO devices. There are some unofficial reports that suggest installing the latest Insider patches can fix the issue.

Microsoft confirmed that this issue no longer exists in Windows 10 Insider Preview Build 18877 or later. However, the company promised to release a hotfix for the general public in the upcoming release. 

RELATED ARTICLES YOU NEED TO CHECK OUT:

Windows 10 May 2019 Update doesn’t recognize SB X-Fi sound cards

Many Windows 10 users reported experiencing issues with their Sound Blaster X-Fi sound cards.

Creative Technology’s SB sound cards drivers often fail to recognize the speakers.

This issue seems to occur after users installed the Windows 10 May 2019 Update.

Here’s how one user describes this issue:

Hi, like above. I updated my Windows 10 from 1803 to 1903 and my XFI stopped working. I formated my PC and still the same problem. I install the drivers (daniel_k 4.0 ) without any problems, but it doesnt detect my yy… (speaker X-fi), just SPDIF
Is there any working solution ?

Another user confirms he encountered the same problem:

Just moved from W10Pro 1809 to 1903 (18362.116) and unfortunately my X-Fi Platinum Fatal1ty Champion stopped working. Reinstalling SBXF_PCDRV_L11_2_30_0011.exe from 21 January 2016 does not make any difference. Some ports like SPDIF In/Out pop up in Device manager but no Speaker endpoint. Is there going to be any newer driver release for W10-1903 or is this the end of the road?

It seems that Sound Blaster X-Fi sound card users have no reason to worry though. They just need to have a little patience until a hotfix is rolled out to their computers.

Creative is already aware of this issue and are working on developing a new driver that provides support for Sound Blaster X-Fi sound cards on Windows 10v 1903.

 Creative_Ryan
There will be a driver released very soon. Received an update from the team and it looks like within this week. THanks for the patience! There’s a LOT of work to do under the hood for these cards (that are 10 years old).

Have you encountered similar issues after installing the latest Windows 10 OS version on your machine? Let us know in the comments below.

If you’re looking for ways to troubleshoot this problem, here are a few suggestions:

Set associations for a program is blank/greyed out [SOLVED]

Windows, by default, sets some programs as default apps to open files with specific file types. The user can, however, change the default program by changing the file association for a program from the File Explorer. However, sometimes, the set association for a program may not preserve the changes or show the section blank or greyed out.

Is the File Association option blank or greyed out for default programs? For starters, reset default apps in Windows 10 and re-assign them again.

This is the best way to resolve the problem. On the other hand, if the issue persists, restore default Windows File Extensions or use Registry Editor to fix it.

Check the detailed instructions below.

How do I fix Set associations for a program is blank/greyed out?

  1. Reset Default Apps in Windows 10
  2. Restore Default Windows File Extensions
  3. Alternate Registry Editor Fix

1. Reset Default Apps in Windows 10

If the issue persists after performing a deep scan with your security programs, try to reset the default apps in Windows 10. Here is how to do it:

  1. Click on Start and select Settings.
  2. Click on Apps.
  3. From the left pane, click on Default Apps.
    Reset Default Apps Windows 10 Set associations for a program is blank
  4. Under Default Apps, scroll down and click on the Reset button.

Now try to open the file and check if the “Always use this program to open file type” option for Open with is functioning or not.


2. Restore Default Windows File Extensions

If you are using Windows7 or if the resetting the Default Apps settings in Windows 10 did not resolve the error, you can restore the default Windows file extension through the registry editor. Here is how to do it.

  1. Press “Windows Key +  R” to open Run.
  2. Type regedit and hit enter to open the registry editor.
  3. Now, navigate to the following location in the Registry Editor.
    • Computer\HKEY_CURRENT_USER\Software\Microsoft\Windows\CurrentVersion \Explorer\FileExts
  4. Under FileExts, look for the file extension that is giving you the trouble. I have used .bmp for this demonstration.
    Registry Editor Export Userchoice Set associations for a program is grayed out
  5. Expand the .bmp Key/folder and look for UserChoice folder.
  6. Right-click on the UserChoice folder and select Export. Enter a name for the key and save it.  (This step is optional and created for backup purpose).
    Registry Editor Delete UserChoice Set associations for a program is blank
  7. Again right-click on the UserChoice folder and select Delete.
  8. Close the registry editor and reboot the system. After the restart, check if you are able to set file association for the program.

Want to enable Reserved Storage on Windows 10? Here’s how to do it properly!


3. Alternate Registry Editor Fix

If the problem is occurring after you have set a specific file type to open with a specific program(like .ini file type with regedit tool) and now unable to restore the settings to default, follow these steps.

Note: For this article, I will be using the regedit tool for demonstration. Make sure you apply these steps to the problematic program appropriate in your case.

  1. Press Windows Key + R to open Run.
  2. Type regedit and press OK.
  3. In the Registry Editor, navigate to the following location:
    • HKEY_CLASSES_ROOT\Applications
  4. Expand the Applications Key and click on Regedit.exe.
    Regedit NoOpenWith Set associations for a program is blank
  5. In the right-pane, you should see the NoOpenWith value. Right-click on it and Rename it as NoOpenWith2.
    Regedit NoOpenWith 2 Set associations for a program is grayed out
  6. Close the registry editor and check for any improvements.

If you found our solutions helpful, let us know in the comments section below.

RELATED STORIES YOU MAY LIKE:

Outlook Meeting Location Suggestions are Not Working [Fix]

Outlook allows users to add other users to the Calendar. However, recently, users have reported an issue where the Outlook meeting location suggestions are not working.

When you add new users to an existing meeting and try to send updates only to added or deleted attendees, the Outlook Meeting location is missing. There are a few tricks to Outlook and get things running!

What can I do if Outlook meeting location suggestions are not working?

1. Repair Outlook Client

  1. Close the Outlook client and other Office applications if running.
  2. Press Windows + R to open Run, type appwiz.cpl, and hit Enter.
  3. Select your Microsoft Office client and click on the Change button on top.
    repair office 2016
  4. Select the Quick Repair option and click on the Repair button. 
    Microsoft Office Repair Option
  5. If that doesn’t work, select Online Repair the next time.
  6. Follow the on-screen instructions in case asked to apply any fixes.
  7. Once done, reboot the PC and check whether the error is fixed.

Microsoft offers an inbuilt troubleshooter to fix Microsoft Office suite-related issues. Since Outlook also comes as part of Microsoft Office, run the repair tool to fix things when Outlook 2016 meeting location suggestions are not working or missing.

2. Repair Outlook Data File

2.1 Locate the data files

  1. In the Outlook client, click on File, and select Account Settings. 
  2. Select Account Settings from the option.
  3. Go the Data Files tab and note down the Outlook data file location. It should look something like:C:\Users\username\Documents\Outlook Files
    Outlook Data Files Location

2.2 Run the Inbox Repair tool

  1. Exit Outlook and other Office applications if running.
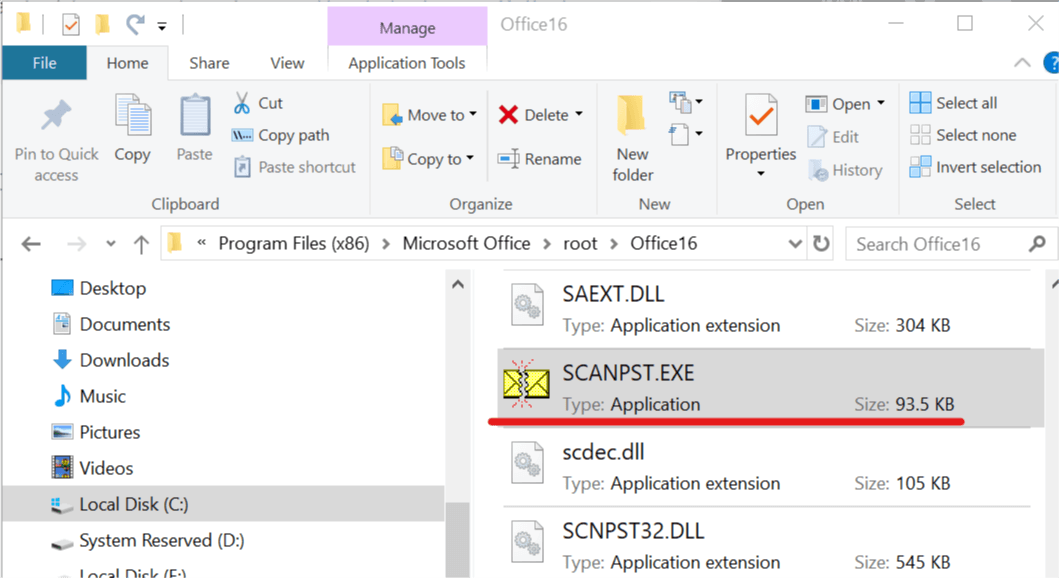
  2. Press Windows + E to open File Explorer and navigate to the following location:C:\Program Files (x86)\Microsoft Office\Root
  3. Now, click on the version of the Microsoft Office folder installed on your system. In this case, it is Office 16.
    SCANPST - exe file
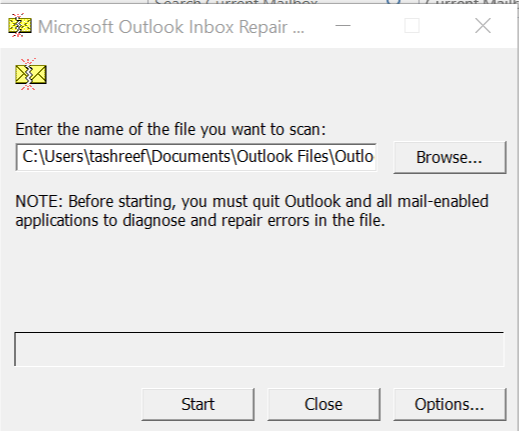
  4. Locate SCANPST.exe file and run it. It will open the Microsoft Office Inbox Repair tool
  5. Click on the Browse button and navigate to the Outlook Data Files location. Select the file and click Open.
    Outlook Inbox Repair Tool
  6. Click the Repair button to begin the process and check for any improvements after it is over.

The Inbox Repair tool can help you with repairing the Outlook data file in case the issue occurs due to missing data or corruption. The tool checks the Outlook data files on your computer to see if they are in good condition. 

By now, you should have fixed things when Outlook 2019 meeting location suggestions are not working.

Before you leave, do check some quick tips to speed up Outlook when it’s running slow.

Tell us which fix worked for you in the comments section below.

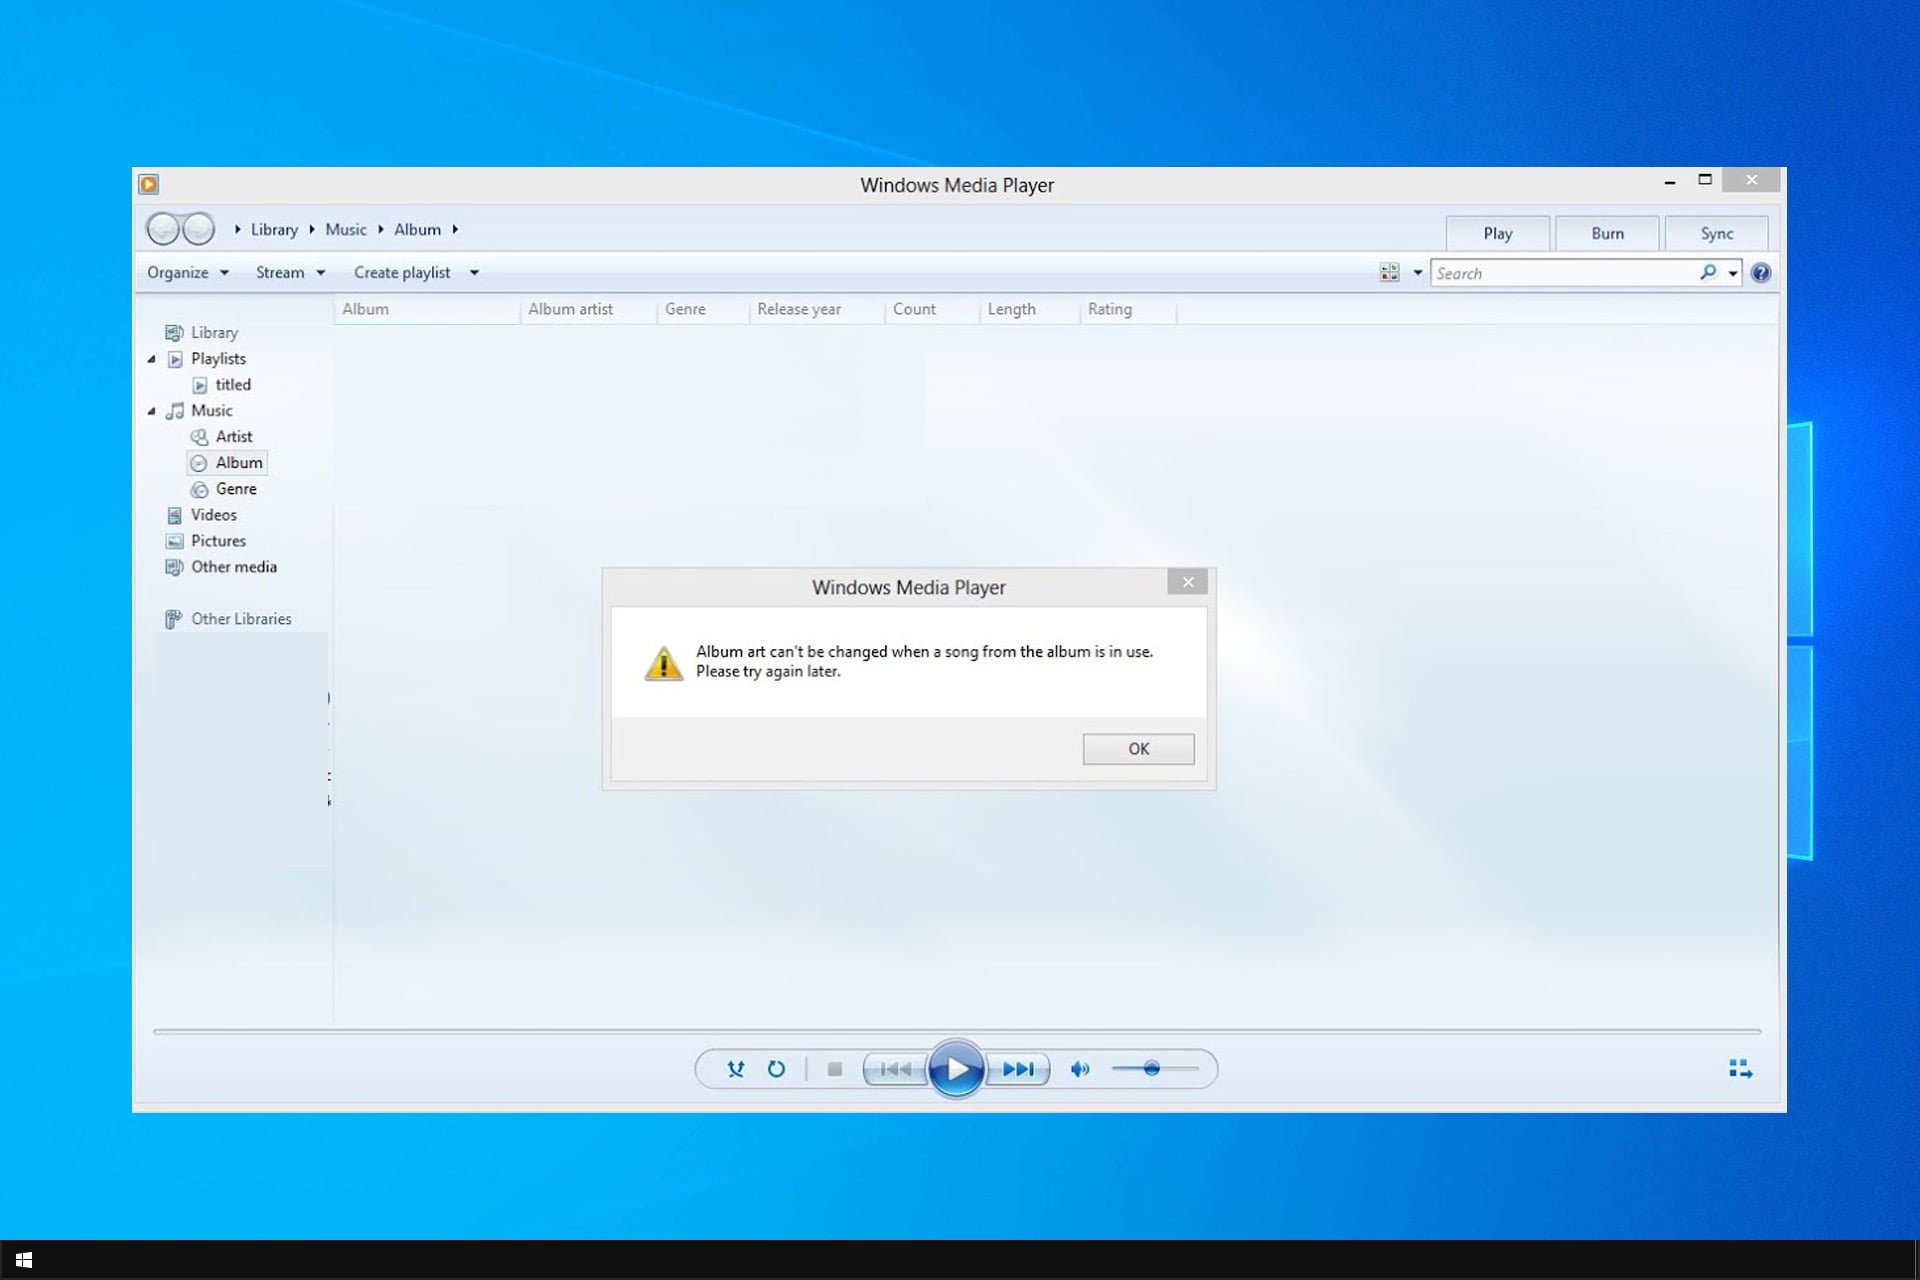
Album Art Cannot be Changed When a Song is in Use [Fix]

Windows Media Player allows you to add album art to your favorite tracks, but you might get Album art cannot be changed when a song is in use message sometimes.

There are other issues with album art, and we already wrote about Windows Media Player not finding album info. Today, we’re going to focus exclusively on album art issues.

Why won’t my album art change in Windows Media Player?

  • Permission errors can sometimes prevent you from changing the album art.
  • The MP3 tags might not be properly configured, thus resulting in an error message.
  • A corrupted Media Player Database can sometimes cause this issue.

How do I fix Album art cannot be changed when a song is in use error?

1. Change file permissions

  1. Close the Windows Media Player if it is open.
  2. Open File Explorer and navigate to the location where the album folder is stored.
  3. Select all the files in the album and right-click on the tracks.
  4. Select Properties from the option.
    Album art - Read only attribute
  5. The Attribute must be set to Read-only. Uncheck the Read-only box and click Apply and OK to save the changes.
  6. Launch Windows Media Player and check if you can add album art without the error.

2. Use the tag editor software

  1. Download MP3TAG and install it on your computer.
  2. Launch MP3Tag, click on File and select Add Directory.
    MP3Tag File Add directory
  3. Navigate to the directory where your album folder is stored. Select the folder and click on Select Folder.
  4.  Now right-click on all the track that is affected by the said error and select Remove Tag.
    MP3Tag Remove Tag
  5. Click Yes when asked to confirm the removal of the tags.

Once the tags have been removed, reopen the track in the Windows Media Player. Try to add the album art and check for any improvements.

3. Clear Windows Media Player database

  1. Quit Windows Media Player if running.
  2. Press Windows key  + R.
  3. Type the following and press Enter: %LOCALAPPDATA%\Microsoft\Media Player 
  4. Select all the files in the Media Player folder and delete them.
    Windows Media Folder
  5. Relaunch Windows Media Player and check if you are able to add the album art without any error.
  6. If that does not work, navigate to %LOCALAPPDATA%\Microsoft
  7. Delete the Media Player folder.

These are just a couple of solutions you can use to fix Album art cannot be changed when a song is in use message.

If you want to learn more about album art, we have a great guide on adding album art to MP3 files, so don’t hesitate to check it out.

How did you fix this problem? Share your solution with us in the comments section below.

Windows 10 v1903 bugs: Display brightness won’t change

Microsoft finally released the much-awaited Windows 10 May 2019 Update today. The update stayed in the Release Preview ring for about a month so that no major bugs made their way to the final release version.

However, it seems that the strategy didn’t work out as planned and Microsoft started acknowledging the first Windows 10 v1903 bugs.

As a matter of fact, this release is affected by 12 known bugs. In this article, we are quickly going to discuss about a driver compatibility issue that may cause display brightness settings not to respond to adjustments.

Display brightness adjustment issues

Microsoft acknowledged a known issue that is affecting Windows 10 1903 (May 2019 Update). Microsoft says that some Intel display drivers may trigger driver compatibility issues on your PCs.

Your actual display brightness may not change even if you modify brightness settings. The tech giant warns that this issue may arise shortly after the installation of the latest OS version.

Microsoft says that it blocked Windows 10 version 1903 on problematic devices. The company is working to fix this issue as soon as possible.

How to fix display brightness issues in  Windows 10 v1903

Microsoft suggested a quick workaround to resolve the issue. You simply need to reboot your system several times for the brightness changes to take effect.

As mentioned earlier, Microsoft is working on fixing the bug. This indicates that a permanent fix is expected to be available in the upcoming updates. The Redmond giant warned its users that they should not try a manual update.

We recommend that you do not attempt to manually update using the Update now button or the Media Creation Tool until this issue has been resolved.
Comment down below if you have you encountered display brightness issues as well.

RELATED ARTICLES YOU NEED TO CHECK OUT:

Download Windows 10 v1903 ISO files for a smooth upgrade process

Microsoft officially rolled out Windows 10 May 2019 Update (Windows 10 v1903). The update was previously available to Slow and Release Preview ring Insiders.

Microsoft wanted to get rid of all the potential issues that may hit Windows 10 before its public release.

We all know Windows 10 October 2018 Update’s story. This time Microsoft didn’t want to repeat the update bug history and therefore delayed the public release.

The tech giant also took an important step forward and users now have the possibility to delay or defer updates for up to 35 days.

Download Windows 10 v1903 ISO files

Microsoft has already rolled out Windows 10 version 1903. The update should autocratically install on your system starting next week.

As a quick reminder, Microsoft gradually rolls out the update. It usually takes one week for major feature updates to be available to all users.

Alternatively, you can also use the ISO files for Windows 10 May 2019 Update to manually download and install the update.

Microsoft recommends Home and Pro to grab Windows 10 v1903 through any of the following links:

However, the above-mentioned links are expected to expire soon. Alternatively, you can use Windows 10 installation media tool available on the official download site.

It is worth mentioning that Windows 10 May 2019 Update brings a series of known issues. Microsoft is currently working on fixing these problems and new patches should soon be available.

Don’t forget to backup your system before installing the update.

RELATED ARTICLES YOU NEED TO CHECK OUT:

Microsoft starts rolling out Windows 10 May 2019 Update today

Microsoft just announced the Windows 10 May 2019 OS is now available for download.

Windows 10 version 1903 brings a plethora of new features and improvements. For more information about the full changelog, you can check out Microsoft’s official webpage.

Windows 10 v1903 is not available for all users just yet

Microsoft decided to implement the update gradually, in an attempt to detect and hopefully fix all the potential system issues before making it available to all PC users.

Based on positive data and the feedback we’ve seen from this longer preview phase; I’m pleased today to share that we are beginning to make the Windows 10 May Update available. We will be taking a measured and throttled approach, allowing us to study device health data as we increase availability via Windows Update.

In other words, Windows v1903 will not be available for everyone at the same time.

For the time being, automatic download is not an option. If you want to download and

In order to manually download the Windows update, you would need to opt to Check for updates from the Windows Update section, in the Windows Settings.

Microsoft is very cautious with this specific update release. It will only make the Download and Install button available if it detects that your PC’s specs are compatible with the official system requirements.

Microsoft’s website also contains a section dedicated to reported issues and update status information. There you can find information if these specific bugs are under investigation or have been fixed.

If you already installed the Windows 10 May 2019 Update on your device, do tell us more about your experience in the comments section below.

If, on the other hand, you want to block the update, you may want to check out the following guides:

Xbox Insider Hub doesn’t work [FIXED by EXPERTS]

If you’re trying to open up the Xbox Insider Hub on your Windows 10 PC, and get an error message, you are not the only one to experience this issue. The most common error relating to Xbox Insider is Please try again. There was an issue with your network.

Getting this error message every time you want to log into the Xbox Insider Hub can be very stressful. You can’t get access to your beta testing games, so it is impossible for you to give a proper review. In this article, we will explore some of the best methods to deal with this issue.

How to fix Xbox Insider Hub problems on Windows 10? Problems with Xbox Insider Hub can occur if the date and time aren’t correct on your PC, so be sure to check them first. In addition, make sure that your antivirus or firewall isn’t interfering with the Xbox app. If that doesn’t work, try resetting Xbox Insider Hub.

What to do if Xbox Insider Hub doesn’t work on my PC?

  1. Check date and time settings in Windows
  2. Check third-party antivirus software
  3. Check if the Windows firewall is blocking your Xbox Insider Hub connection
  4. Clear and reset Microsoft Store cache
  5. Reset Xbox Insider Hub

1. Check date and time settings in Windows

If the clock and date of your PC are not set to the right timezone, then the capability of your system to connect to Xbox Insider Hub will be affected.  The most efficient way to do that is to set your time and date settings to Set time automatically. Here’s how to do it :

  1. Right-click on your Windows clock found in the right side of your screen.
  2. Choose the Adjust date/time option.adjust date Xbox Insider app doesn't work
  3. In the new window that opens, make sure you have the Set time automatically, and the Set time zone automatically options toggled on.

2. Check third-party antivirus software

Some versions of antivirus software can set custom privileges for other apps and block others from running. In this case, it is possible that the firewall of your antivirus might be blocking the Xbox Insider App from accessing the Internet.

Make sure to check the firewall settings in your respective antivirus software, and allow all connections for the Xbox Insider Hub.

In some instances, you might have to disable or even uninstall your antivirus. If it comes to that, you might want to consider switching to a different antivirus.

There are multiple antivirus programs that don’t block other services unless it’s advised to. You can surely find a more efficient antivirus that suits your needs entirely.

Hence, protect your system accordingly and at the same time, use the most efficient antivirus software for gaming.

3. Check if the Windows firewall is blocking your Xbox Insider Hub connection

  1. Press Windows Key + X keys on your keyboard, and select Windows PowerShell (Admin).windows powershell Xbox Insider app not working
  2. Copy this command to your clipboard: netsh advfirewall firewall show rule 4jxr4b3r3du76ina39a98x8k2
  3. Inside the PowerShell window, right-click on the top bar, then select Edit > Paste.paste powershell Xbox Insider app doesn't work
  4. If the command looks like the image below, you can press Enter.netsh powershell Xbox Insider app doesn't work
  5. This will start the process of verifying if any custom rules are set for your Windows 10 firewall.
  6. If the result of the scan is ‘ No rules match the specified criteria.’ , then it means you have no rules blocking your Xbox Insider Hub connection.no rules match the criteria Xbox Insider app doesn't work

4. Clear and reset Microsoft Store cache

Sometimes Xbox Insider Hub doesn’t work due to the corrupted cache. To fix that, follow these steps:

  1. Press Windows Key + R keys on your keyboard.wsreset.exe Xbox Insider app doesn't work
  2. Type in WSReset.exe, then press Enter.
  3. A Command Prompt window will open until the process is complete.
  4. After the process is finished, try connecting to your Xbox Insider Hub again.

5. Reset Xbox Insider Hub

  1. Click on Start button > choose Settings.
  2. Click on the Apps button in the Settings window.apps settings app
  3. Search for the Xbox Insider in the list, right-click on it, and select Advanced options.
  4. This will open up a new window.
  5. Scroll down to the bottom of the screen > click Reset.
  6. Restart your computer.
  7. Check if the problem persists.
  8. If it does, you can uninstall and reinstall the app, then try connecting to Xbox Insider again.

In this article, we explored some of the best methods to deal with the issue of not being able to connect to your Xbox Insider Hub from Windows 10. Please make sure to follow the steps presented in this article closely for the best results.

Please feel free to tell us if this guide solved your connection issue, by using the comment section below.

Privacy Eraser Pro deletes your browser activity protecting your privacy

Deleting your browsing history can sometimes come in really handy especially if you share a computer with others. You definitely wouldn’t want them to find out your more private searches. This is where software that is able to delete your browsing history comes in hand, and one of the best tools that can do this is Privacy Eraser created by Cybertron Software.

Privacy Eraser’s key features

Privacy Eraser is a handy solution that protects your privacy by deleting your browsing history and more computer activity. This piece of software supports all main web browsers, and with a single click, it offers you the chance to erase all of your digital footprints including browsing history, web browser cache, cookies, saved passwords, search history, temporary files, recycles bin and more.

This tool supports Windows systems, and it’s packed with lots of great features such as the following:

  • Privacy Eraser provides enhanced computer security for Windows.
  • It supports over 250 free pre-configured plugins that will clean the traces left by lots of apps, and you will also get the chance to extend the cleaning features by making your own app plugins.
  • Privacy Eraser is a great tool that permanently erases specific files and folders from your computer without any chance of recovery.
  • It also wipes additional and hidden data from all of your drives, and all the free clusters will be eliminated.
  • The program removes invalid registry entries for apps that no longer exist, and it fixes corrupted registry entries as well.
  • It can optimize your overall PC performance, and it will also speed up Windows startup.
  • You will be able to use this piece of software each and every time that you close your browser after every session spent at the PC.
  • You can also set this tool to monitor Windows in the background and autodetect what to clean.

Privacy Eraser is effortless to use, and it provides enhanced security on any computer running Windows. Using this tool, you will be able to recover hard drive space by deleting unnecessary or redundant data.

You can head over to Privacy Eraser’s official website and get the software for free to boost your PC’s performance and stability and to make your system run leaner, faster and more efficient than ever. You can also check out more great features and benefits that you will be able to enjoy if you do decide to use this great program.

Your system’s overall performance can be boosted with other useful software, CyberGhost that is perfect for those users who desire high speed and reliable privacy for their machine. This is a robust solution mainly thanks to its zero logs policy and a vast set of useful features.

Hotspot Shield is yet another app that you can choose for secure web browsing, and it’s important to note that this software’s target is to provide users anonymous presence online via an excellent VPN service that will mask the IP. Both these apps along with Privacy Eraser reviewed above come with extended sets of features which catapult them into the top high-quality privacy-related software.

Or you might as well try with a browser that doesn’t require third-party software to clear the browsing data or a third-party VPN to keep you anonymous online? UR Browser is everything one would ask for from a web browser and then some.

UR Browser comes with an advanced anti-tracking and anti-profiling mode similar to those Incognito modes falsely advertised in so many browsers. The Ninja Mode makes you a ghost when online and no website would be able to track you. You can configure 3 privacy modes separately for every website and have 12 search engines at just 1 click to choose from.

Check out UR Browser today and see for yourself how effective it is against intrusive websites and prying eyes.

Editor's recommendation
ur browser
  • Fast page loading
  • VPN-level privacy
  • Enhanced security
  • Built-in virus scanner

RELATED STORIES TO CHECK OUT:

Learning to code? With Windows 10 May 2019 Update, Microsoft has made installing Python much easier

When you’re just learning to code, sometimes just getting started is the hardest part. Most tutorials you’ll find online assume you know how to do the basic stuff, and move right in to managing your server farms or whatever. This is true across a lot of technical learning, but especially so for learning Python, an easy to use and easy to read coding language that is still powerful enough to do real coding, but it doesn’t come built-in to Windows. Up until now, getting Python installed on Windows is just the kind of frustrating experience that can slow down or stop aspiring programmers, but that hasn’t gone unnoticed at Microsoft, and the Python team has made some changes to make it much easier to install Python on the Windows 10 May 2019 update, and get to coding without tearing your hair out.

The first thing the Python team did was to help the open source community develop a Microsoft Store installation of Python. With the Store app, rather than hunting around for instructions on how to get the programming language working on Windows, you just install the app and you’re up and running. A Windows Dev blog post explains:

It’s been widely known for many years that Windows is the only mainstream operating system that does not include a Python interpreter out of the box. For many users who are never going to need it, this helps reduce the size and improve the security of the operating system. But for those of us who do need it, Python’s absence has been keenly felt.

Once you discover that you need to get Python, you are quickly faced with many choices. Will you download an installer from python.org? Or perhaps a distribution such as Anaconda? The Visual Studio installer is also an option. And which version? How will you access it after it’s been installed? You quickly find more answers than you need, and depending on your situation, any of them might be correct.

We spent time figuring out why someone would hit the error above and what help they need. If you’re already a Python expert with complex needs, you probably know how to install and use it. It’s much more likely that someone will hit this problem the first time they are trying to use Python. Many of the teachers we spoke to confirmed this hypothesis – students encounter this far more often than experienced developers.

So we made things easier.

But that still wasn’t easy enough, and users expecting Python to just be there may still not know to go to the Store, so Microsoft took it one step further. Now, if you type in “python” or “python3” in the Windows 10 May 2019 Update search box, you’ll be taken directly to the Microsoft Store app if Python isn’t yet installed (once Python is installed, typing “python” opens a command prompt running Python:

Python command line

As someone who’s spent hours trying to get past a seemingly easy hurdle, so easy in fact that no one bothers to write it up as a blog post or a how-to, this kind of shortcut, making it easier to get started is a welcome addition indeed, and hopefully students and others learning to code won’t feel quite so intimidated when doing a simple task like installing Python is actually indeed simple.

Are you trying to learn to code? What are your pain points?

New online Windows Health Dashboard works with Windows 10 May 2019 Update and older versions, too

Microsoft has already flipped the switch and has begun rolling out the Windows 10 May 2019 Update to the general public. While it definitely has its share of useful new features, it also has its fair share of known issues that need to be sorted out, which can be seen in the new Windows Health Dashboard.

Microsoft is currently investigating three of these issues, including one that involves a compatibility issue that prevents the display brightness from responding to user adjustments. Some users are also experiencing audio loss when using Dolby Atmos headphones or home theater. Additionally, another issue causes some known folders—such as Documents, Pictures, or Downloads—to be incorrectly redirected to a newly created folder of the same name. Here’s the issues that are being “investigated”:

  • Display brightness may not respond to adjustments
    Microsoft and Intel have identified a driver compatibility issue on devices configured with certain Intel display drivers.
  • Audio not working with Dolby Atmos headphones and home theater 
    Users may experience audio loss with Dolby Atmos headphones or Dolby Atmos home theater.
  • Duplicate folders and documents showing in user profile directory
    If known folders (e.g. Desktop, Documents, or Pictures folders) are redirected, an empty folder with that same name may be created.

Microsoft has also listed nine other issues marked as “mitigated,” including issues with Bluetooth, Wi-Fi, Intel Audio, the Camera app, among others. Here’s the list.

  • Error attempting to update with external USB device or memory card attached 
    PCs with an external USB device or SD memory card attached may get error: “This PC can’t be upgraded to Windows 10.”
  • Unable to discover or connect to Bluetooth devices
    Microsoft has identified compatibility issues with some versions of Realtek and Qualcomm Bluetooth radio drivers.
  • Night light settings do not apply in some cases
    Microsoft has identified some scenarios where night light settings may stop working.
  • Intel Audio displays an intcdaud.sys notification
    Microsoft and Intel have identified an issue with a range of Intel Display Audio device drivers that may result in battery drain.
  • Cannot launch Camera app 
    Microsoft and Intel have identified an issue affecting Intel RealSense SR300 or Intel RealSense S200 camera apps.
  • Intermittent loss of Wi-Fi connectivity
    Some older devices may experience loss of Wi-Fi connectivity due to an outdated Qualcomm driver.
  • AMD RAID driver incompatibility 
    Installation process may stop when trying to install Windows 10, version 1903 update on computers that run certain versions of AMD RAID drivers.
  • D3D applications and games may fail to enter full-screen mode on rotated displays
    Some Direct3D (D3D) applications and games may fail to enter full-screen mode on rotated displays.
  • Older versions of BattlEye anti-cheat software incompatible
    Microsoft and BattlEye have identified a compatibility issue with some games that use older versions of BattlEye anti-cheat software.

Microsoft has placed safeguards that prevent certain PCs with incompatibility issues from downloading the update until the issue is resolved. The company is currently studying device health and implementing fixes for a small subset of users that have the May 2019 Update, which is being gradually rolled out to the public. This way, it can minimize potentially major issues should they arise.

Microsoft has mentioned on his release blog post that it is committed to increasing transparency by releasing the new Windows Health Dashboard, which allows users to keep track of known issues much more effectively than keeping tabs on KB numbers. It works not just for the May 2019 update, but also the older versions of Windows as well, including all Windows 10 versions from 1507 on, Windows 7 and 8.1, and Windows Server versions beginning with Windows Server 2008 SP2.

Windows Server version 1903 also reaches general availability

The Windows team has been on a relative tear lately with the release of several updates to users systems that include the official May 2019 Update as well as several rounds of supportive cumulative rollouts.

Adding to its docket of Windows-related releases for the month of May is Windows Server version 1903.

According to the Microsoft Server blog, the sneak peek window for select IT managers and developers is over and the updated version 1903 will be given to all. New features for 1903 include Windows Server Containers that support Azure Kubernetes Service (AKS) and GPU Acceleration.

The Windows Admin Center Storage experience is also getting some needed attention that now addresses Windows Server 2008 migrations with updated Azure File Sync integration.

Server Core received two new additions in Task Scheduler and Hyper-V manager tools to help improve application compatibility with the Feature on Demand (FOD) augmented server sessions of Server Core.

To see the full list of features and details coming with Windows Server 1903’s rollout, visit here.

Microsoft plans to simplify Windows 10 Xbox app, starts by removing group messaging

Following the release of the Xbox One 1905 Update last week, Microsoft has started notifying users of the Windows 10 Xbox app that the Xbox Live Messaging experience will soon be revamped. According to the message shared by Windows Central, the Xbox app will get the same Message Request feature that Microsoft is bringing to Xbox One consoles and the new Xbox Game Bar on Windows 10, as well as support for GIFs.

Image credit: Windows Central

However, Microsoft is also warning users that the Windows 10 Xbox app will also lose its group messaging functionality, adding that “a desktop solution for group messaging is coming soon” (Group messaging is already supported in the new Xbox Game Bar). These changes to the Xbox app are apparently coming tomorrow, May 23, and you can read the full message below:

We will be upgrading our messaging services to introduce improved chat features (secondary inbox for non-friends, GIFs, and more). Sadly, your old group messages will be lost during the upgrade, so copy any old chats that you want to keep on Xbox.com.

After the transition, we will be removing group messaging from this app to focus on console settings and simplify our apps. But rest assured a desktop solution for group messaging is coming soon so be sure to update Windows to get the newst Xbox apps and experiences when they become available.

In the meantime, please use the Xbox app on iOS/Android for the upgraded group messages experience. The upgraded group messages will be available on your Xbox console on 23 May.

Thanks for understanding. We continue to look to you and your feedback to help us build the best Xbox apps so please let us know how we’re doing as we transition!

The part where Microsoft says that it will “focus on console settings and simplify our apps” is quite interesting. The new Xbox Game Bar, which has dedicated widgets for Xbox Live Messages and the Looking for Groups social feature, is already much faster than the Xbox UWP app, which has become quite bloated over the years. Perhaps it’s time for Microsoft to trim it a bit and refocus it on some of its killer features, such as Xbox game streaming to Windows 10 PCs.

Microsoft is expected to kick off public trials for its Project xCloud game streaming service later this year, and we’re wondering if the Xbox app could also be used to handle xCloud streaming on Windows 10 PCs. It would make sense if the Xbox app could finally be used to play actual Xbox games, even though those are streamed from the cloud. Otherwise, Microsoft could well launch a separate xCloud UWP app that would do the heavy lifting, similar to what the company did with its Windows Mixed Reality Portal for VR headsets.

This is all speculation for now, but with the Xbox Game Bar becoming really good for everything related to Xbox Live social features, maybe it’s time for the Windows 10 Xbox app to get a bigger gaming role. “I know we’ve talked quite a bit over time about what we want to deliver for the player on PC, but at E3 this year, and throughout 2019, you’ll begin to see where we’ve been investing to deliver across Store, services, in Windows and in great games. It’s just the beginning,” said Xbox head Phil Spencer back in February in an interview with PC Gamer. We’re hoping to hear more during Microsoft’s E3 press briefing on June 9.

Metal Gear Survive, The Banner Saga and six other games are joining Xbox Game Pass

The Xbox team is doing it once again, there is a second wave of new Xbox Game Pass games this month. Overall, eight new games will join the catalog between May 23 and June 6, starting with Metal Gear Survive and The Banner Saga tomorrow.

Three other games will join Xbox Game Pass next week, with Void Bastard coming on May 29 and Dead by Daylight and Outer Wilds following on May 30. The later will actually be available on Game Pass the same day as its launches worldwide on Xbox One, Windows and PlayStation 4.

Lastly, The Banner Saga 2, Superhot (a previous Games with Gold title) and Full Metal Furies will be added to Game Pass on June 6. It’s worth noting that the latter also supports Xbox Play Anywhere and cross-platform multiplayer between Xbox One and Windows 10.

Microsoft’s Xbox Game Pass service will likely be a big topic at Microsoft’s E3 press conference on June 9, and we’re looking forward to seeing what Xbox head Phil Spencer will announce during the event. If you have yet to try the game subscription service, we remind you that you can currently get three months of Game Pass for just $1 (instead of $29.97) for a limited time.

Sticky Notes keeps resizing on Windows 10/11 [TECHNICIAN FIX]

Even though Sticky notes is a greatly useful application, but some users reported that Sticky Notes keeps resizing. The most common trigger for this issue is using multiple monitors for the same PC. Because of an error found in the code of the Sticky Notes app, it has issues reformatting the image to a monitor that has lower DPI capabilities.

While we wait for an official fix from Microsoft, in this article we will explore the best methods to try and solve this issue. Read on to find out more.

What to do if Sticky Notes keeps resizing? First of, update Windows 10 to the latest version, since it’s highly possible that Microsoft has addressed this issue in of the recent updates. If that doesn’t help, try resetting Sticky Notes app or try using Microsoft Store Apps troubleshooter.

How to fix Sticky Notes resizing issue on Windows 10?

  1. Update your Windows 10
  2. Reset the Sticky Notes application
  3. Troubleshoot the Microsoft Store apps

1. Update your Windows 10

If Sticky Notes keep resizing, be sure to check for latest updates from Microsoft.

  1. Click on Start Button > choose Settings.settings app Sticky Notes keeps resizing
  2. In the Settings app, select Update and Security.update & security Sticky Notes keeps resizing
  3. In the Windows Update tab, click on Check for updates, and install if anything is found.check for updates Sticky Notes keeps resizing

2. Reset the Sticky Notes application

Note: Please make sure to save all the information from your Sticky notes app before trying out this step, as this may result in the loss of the data found on the notes.

If Sticky Notes keep resizing on your PC, perhaps reinstalling the app can solve the problem.

  1. Open the Settings app.
  2. Now click on Apps.apps settings app Sticky Notes resizes
  3. Find Sticky Notes in the list, select it, then choose Advanced options.advanced options Sticky Notes keeps resizing
  4. In the Advanced options window, choose the Reset option.
  5. Try to see if the Sticky Notes issue has been solved.

3. Troubleshoot the Microsoft Store apps

If Sticky Notes keep resizing, perhaps you can solve the problem by running the built-in Microsoft Store Apps troubleshooter.

  1. Click on Start button > select Settings button > Update & Security > Troubleshoot > Windows Store Apps.windows store apps troubleshooter sticky apps Sticky Notes keeps resizing
  2. After you’ve clicked on Run the troubleshooter, a window will open that will scan for any issues with your Windows Store Apps.
  3. When the process of scanning for issues is complete, you can try to see if the Sticky Notes error persists.

In this article we explored some of the best ways to deal with the Sticky Notes apps error that keeps resizing the notes after a monitor disconnect. Please make sure to follow the steps presented in this article in the order that they were written, to avoid any issues.

Please let us know if this article helped you solve your issue, by using the comment section below.

READ ALSO:

Xbox One’s Star Wars Battlefront II update increases Trooper levels from 70 to… 1,000!

The Star Wars Battlefront II video game is receiving a rather significant update on Xbox One consoles right now that has the potential to both please players and cause some controversy.

The biggest change with this update is the increase of level caps. While the player level is still stuck at the same limit it had at launch, all player/character classes can now level up to Level 1,000. This is pretty substantial as previously Troopers would be maxed out at 70, Heroes at 40, ships at 40, Reinforcements at 30, and vehicles at 30.

While players will continue to unlock Star Cards and earn Credits for reaching each level before the previous limits, no rewards will be granted for levelling up to one of the newly available levels. This level increase is very much being done to give players bragging rights and to continue working towards something.

The latter had become almost impossible for many long-time players who had been playing since launch and had already maxed out all of their classes.

In addition to the level increase, today’s update also completely revamps the popular Heroes Versus Villains mode, changing it from the previous targeting system to a new free-for-all model. Once the update is installed, players will no longer be tasked with attacking one specific target on the opponent’s team and will be granted team points for every kill they make.

Other changes include the addition of Kamino to the new Capital Supremacy game mode, the introduction of a dialogue wheel that works like the current emote wheel, appearance bundles being made purchasable with Crystals only, new victory poses for Iden and Rey, an increase to the number of Heroes using voice lines at once, and a variety of character adjustments.

Star Wars Battlefront II has been receiving a lot of updates these past few months and there’s been hints that something major could be announced regarding future updates next month. With the EA earnings call now out of the way and EA Play just two weeks away, it makes perfect sense that any Battlefront II announcements would be coming in June.

Whether that’s the addition of the rumored Padme and Ahsoka Heroes or content to tie into The Mandalorian and The Rise of Skywalker remains to be seen.

Do you play Star Wars Battlefront II on your Xbox One? Let us know what you think of these changes in the comments below and then follow us on Pinterest for more Xbox gaming content.

The app was not found in the store. ?

How to fix FIFA 19 server issues and join Weekend League

FIFA 19 is a football simulation video game developed and published by Electronic Arts.

Millions of gamers play this game on a daily basis, making FIFA the biggest football simulation game. FIFA Ultimate Team is a game mode that has a huge player base.

Usually, FIFA has its weekly audience peak during FUT Champions, from Friday to Sunday.

FUT Champs (Weekend League) gives FIFA Ultimate Team enthusiasts the possibility to play 30 games over the course of three days, offering substantial weekly rewards. This means that many gamers play at the same time, sometimes congesting the servers.

Many FIFA fans reported experiencing connectivity issues during FUT Champs implying server disconnects and heavy lag. And yes, this problem occurs almost every weekend.

Although sometimes the connectivity issues could be caused by EA servers, sometimes they are caused by the users’ setup.

In order to help you improve your connection to the FIFA Ultimate Team servers, we came up with a series of solutions that you can use on your PC.

How to prevent FIFA 19 server disconnections

  1. Use a wired connection
  2. Check your internet connection
  3. Perform a hard reset
  4. Change your DNS

1. Use a wired connection

Making sure that you use a wired connection is the first thing that you should consider.

Many users reported noticing big differences between using a wired connection and a wireless connection.

Wi-Fi connections tend to be slower and less constant. This inconsistency causes you to experience speed-up lag and server disconnects.

2. Check your internet connection

Test your internet speed and ping if you experience connectivity issues.

Try browsing different websites too see if they respond quickly.

You can also test your internet speed from the Xbox settings if you’re playing the game on your console.

In order to perform an internet speed test, follow these steps:

  • Press the Home button on your controller
  • Select the Settings icon > go to All settings
  • Choose Network > Network settings
  • Select Test network connection and wait for the process to commence test network connection xbox one
  • If you experience latency higher than 100ms, the issues could be caused by your internet connection.

— RELATED: How to fix FIFA 19 bugs on your Windows PC

3. Perform a hard reset

Apparently, connectivity issues during the Weekend League could occur due to incorrect server connection settings.

Sometimes EA connects you to servers located too far away from your location. This could cause lag and server disconnects to occur.

After performing a PC/router/console hard reset, you should get connected to a server that is closer to your location. This offers a better gaming experience.

In order to perform a hard reset to your console, follow these steps:

  • Turn your console off
  • Unplug your console from the power socket
  • Plug it back in after at least 2 minutes
  • Open your console and see if it made any difference.

4. Change your DNS

Try to connect to a different DNS than your default one.

High latency could, as well be, a sign of a problematic DNS.

Try connecting to the Google Public DNS to see if you get better connection. Manually input the following addresses:

Change DNS IP addresses (IPv4) to:

  • 8.8.8.8
  • 8.8.4.4change DNS settings

Change DNS IPv6 addresses to:

  • 2001:4860:4860::8888
  • 2001:4860:4860::8844

Test the connection speed afterwards to see if your internet speed and latency improved.

If it didn’t improve or made the connection worse, search online for different free DNS addresses and see which fits your connection best.

Also, make sure to find the DNS addresses closer to your location.

Eventually if nothing works, there could be an issue with the EA servers. Make sure to check if other users have been experiencing issues with the EA servers lately.

We hope that at least one of our solutions helped you fix this issue. If you liked this article, leave a comment in the comment section below.

READ ALSO:

Windows Media Player cannot download media information for CD [FIX]

Windows Media Player allows you to burn the media files to your CD. However, at times the player may display Cannot download media information for this CD error while ripping the CD. The tracks, artist, and the album will be identified as “Unknown” in your library. For best results, connect to the Internet or manually add media information for the CD.

Why Windows Media Player won’t download media information when ripping CD with audio files? Start by reinstalling Windows Media Player through Windows Features. This should reset the settings and, hopefully, resolve the issue at hand. If you’re still stuck with the error, run Windows Media Player Configuration tool or enable Error Correction option.

Read about the aforementioned solutions below.

Fix Windows media player cannot download media information for this CD

  1. Uninstall and Reinstall Windows Media Player
  2. Run Windows Media Player Configuration Tool
  3. Enable Error Correction
  4. Check the Privacy Option

1. Uninstall and Reinstall Windows Media Player

If the troubleshooter did not resolve the error, try to uninstall and reinstall the Windows Media Player. Here is how to uninstall and reinstall the app.

  1. Press “Windows Key + R” to open Run.
  2. Type control and click OK to open Control Panel.
  3. Go to Programs > Programs and Features.
  4. From the left-pane click on “Turn Windows on or off”.
    Turn Windows features on or off
  5. In the Windows Features window, expand Media Features.
  6. Uncheck “Windows Media Player” option.
    Disable Windows Media Player
  7. If a warning pop-up appears, click on Yes.
  8. Click OK to save the changes and reboot the computer.
  9. After the restart, go to  Control Panel > Uninstall Programs > Turn Windows Feature on/off.
  10. Check “Windows Media Player” option and click OK.
  11. Reboot the system, and that should resolve the error.

2. Run Windows MediaPlayer Configuration Tool

Windows media Player Library

Microsoft offers a configuration troubleshooter tool that can find and fix any configuration related issues with the Windows Media Player. Here is how to use them:

  1. Download the three fixes listed below
    Windows Media Player Configuration tool
    Windows Media Player Library 
    and Windows Media Player DVD
  2. Run the troubleshooters one by one and follow the on-screen instructions. Apply the fixes suggested by the troubleshooter and reboot the system. Check for any improvements.

3. Enable Error Correction

If the error is occurring due to a corrupted file or some error in the CD, you can enable the error correction which will allow the Windows Media Player to skip the faulted files. Here is how to do it:

  1. Launch Windows Media Player.
  2. Click on Organize and select Options.
    Windows Media Player - Organize - Options
  3. Go to the Devices tab.
  4. Select your DVD device and click on the Advanced button.
  5. Check “Use error correction” option. Click OK to save the changes.

Now try ripping the CD and check if the Windows Media Player media information error is resolved.


4. Check the Privacy Option

Windows Media Player allows you to disable the access to the internet to retrieve media info for the music files. You may face this error if the option is disabled in the Privacy tab.

  1. In the Windows Media Player, click on Organize and select Options.
  2. Open the Privacy tab.
    Update music files by retrieving media info from the internet
  3. Make sure “Update music files by retrieving media info from the internet” option is checked.
  4. Click Apply and OK to save the changes.

RELATED STORIES YOU MAY LIKE: