Sky Go Unable to Load Configuration? Fix It Now

Unable to load configuration on Sky Go is one of the most vexing issues that might occur when trying to watch a show.

Sky Group provides this streaming app for Sky TV subscribers for free. With the help of Sky Go, users can now watch live Sky TV on their Windows computers.

While Sky Go is one of the best streaming apps available, it has flaws, such as when it fails to launch or play content.

The most recurring of these errors is error code 200: Sky Go Unable to Load Configuration. We’ll walk you through a few simple solutions to fix the error in this article, but first, let’s talk about why this happens.

Why does the error code 200 Unable to load configuration happen?

When you read the prompt, you can see a description that says, Unable to load configuration.

You should ensure your device has an active network connection and try again. This is a clear sign that Sky Go is not functioning correctly. Several reasons can cause this error, such as:

  • Sky Go is not connected to a stable network connection
  • Some corrupt files exist in the %LocalAppData% folder
  • Your hardware is problematic
  • You have set your device’s date and time incorrectly

What can I do if Sky Go is unable to load configuration?

1. Restart router/gateway

  1. Unplug your modem/router from power. You can do it from the mains or the power cable at the back of it).
  2. Let it be unplugged for half a minute.
  3. Plug it back to power and turn it on.
  4. Wait for it to reinitialize and gain its stability back. This can take between 30 seconds to 5 minutes.

One of the main reasons for Sky Go’s unable to load configuration error is an unstable network connection.

Rebooting the gateway/modem/router/hub can fix this, give you a more stable connection, and avoid issues like Sky on Demand not working.

2. Reset network

  1. Click on the Start menu, type Settings, and open it.Open Settings
  2. From the left-side panel, choose Network & Internet. Afterwards, click on Advanced network settings.Go to Advanced Network Settings
  3. Then, click on Network Reset.Click on Network Reset
  4. Finally, click on Reset Now. Click on Reset Now

Restarting your network can also give you a more stable internet connection and help you fix Sky Go unable to load configuration error.

3. Turn off the Firewall

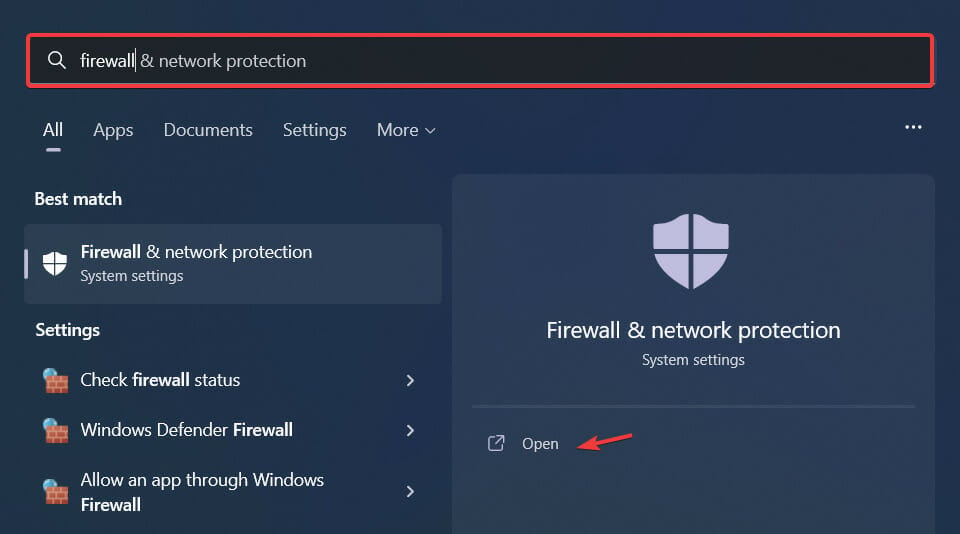
  1. Press Windows + S to open the search utility, type firewall in the search box, then open the Windows Defender Firewall.Open Windows Defender Firewall
  2. Click on Turn Windows Defender Firewall on or off.Click on Turn Windows Defender Firewall on or off
  3. Now, choose the Turn off Windows Defender Firewall option and click on the OK button.Click on Turn Off Windows Defender Firewal

Firewalls don’t always mix so well with streaming service apps. A firewall can block the internet connection from Sky Go and lead to the Sky Go unable to load configuration error.

If you use other firewalls on your Windows 11, refer to its manual to disable it. Turn off or uninstall third-party antivirus services that contain firewalls.

Mostly, you can right-click the antivirus tray icon and disable it from there.

4. Check the Date and Time

  1. Right-click on the Clock in the bottom right corner of the Windows Taskbar and select the Adjust Date and Time option.Adjusting Date and time
  2. Activate Set the time automatically, Adjust for daylight saving time automatically, and Set the time zone automatically. Change Date and Timezone to Automatic

Most online applications fail to work appropriately when the date and time of the device are not properly set.

In addition to the steps above, ensure that you have set the short and long date format of your Windows 11 to dd/MM/YY.

5. Close screen recording apps

  1. Right-click on the Start menu and select Task Manager.
  2. Under the Processes tab, find any screenshot/screen-recording application from the list. Click on End Task to close it.Task Manager

Screen capturing services can stop Sky Go from working expectedly. So, ensure to close them by following the steps above.

6. Clean boot your Windows

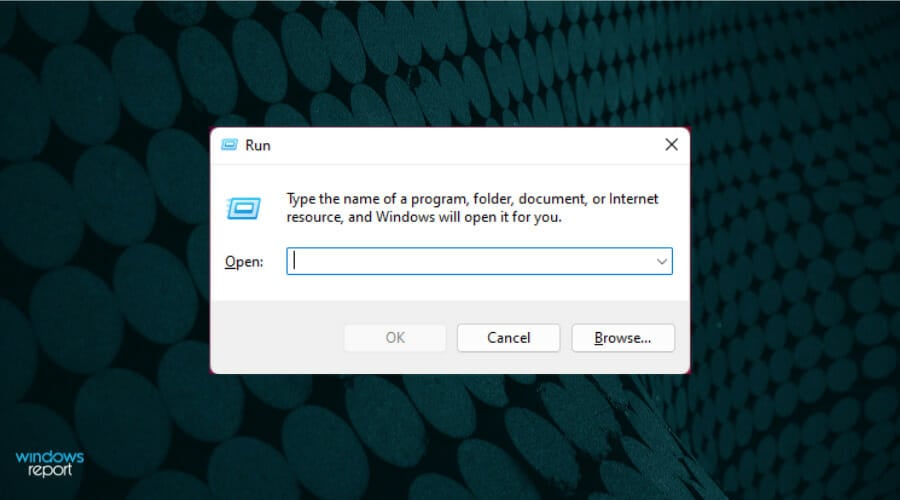
  1. Press Windows + R keys to open the Run window.
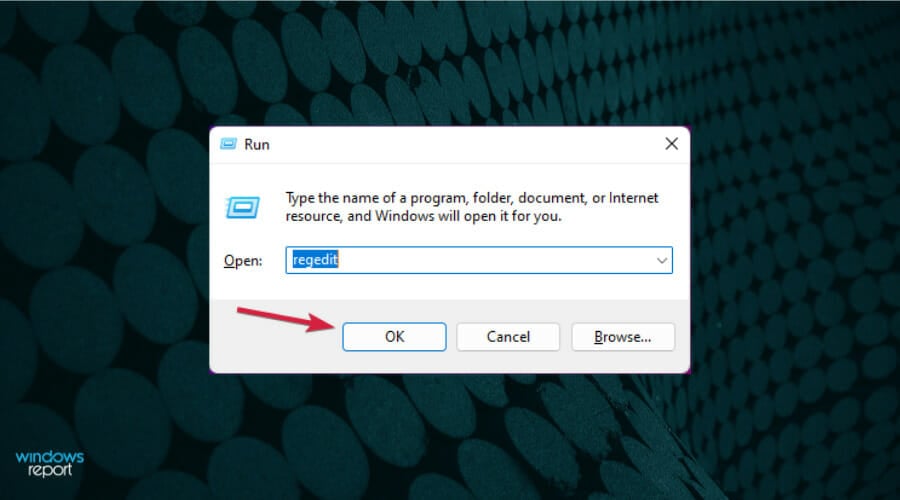
  2. After that, type msconfig and hit Enter to open the System Configuration.
  1. Under the General tab, select Selective Startup, Load System Services, and Use Original Boot Configuration then, deselect the Load Startup Items checkbox. Now click on OK. Change System Config Options
  1. Under the Services tab, select Hide All Microsoft Services and Disable All options. Finally, click on OK.Change System Config Options
  1. Reboot your computer.

Some third-party applications, such as CiscoVideoGuard, are not compatible with Sky Go.

Clean-booting your windows helps you eliminate them from being opened at startup and therefore, you will not run into Sky Go unable to load configuration.

7. Uninstall CiscoVideoGuard and Sky Go 

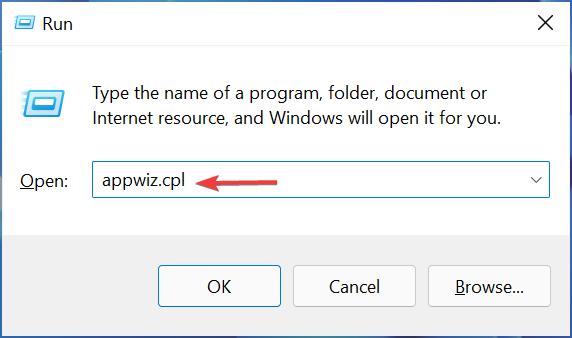
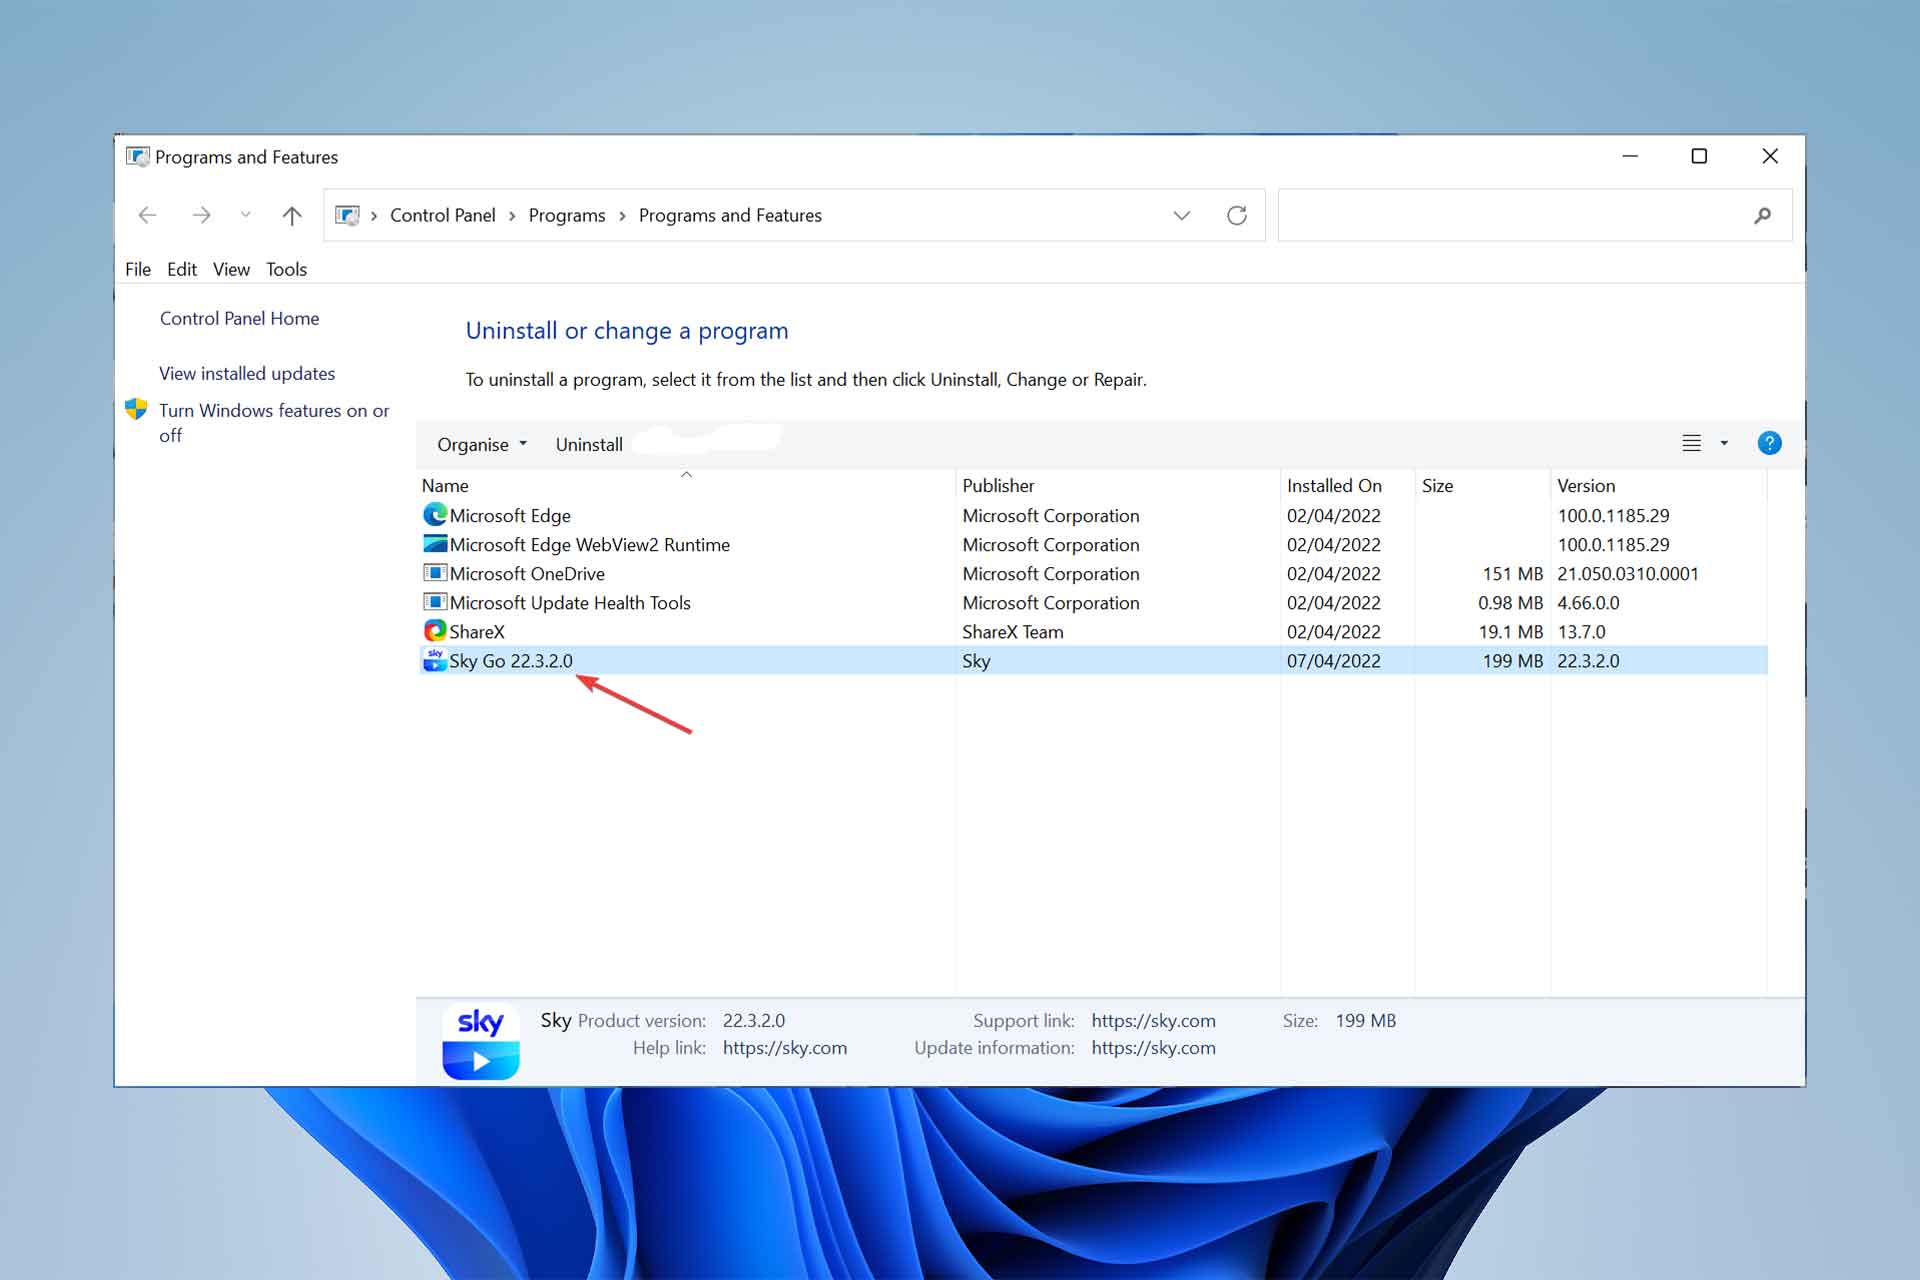
  1. Press Windows + R to open the Run dialog box then type appwiz.cpl in the box and hit Enter.Type appwiz.cpl in Run dialog box
  1. Select CiscoVideoGuard from the list right-click on it and select Uninstall.
  2. Then, select Sky Go and click on Uninstall.
  3. Go to the Start menu and click on File Explorer.File explorer
  4. Go to following patchs and delete the VideoGuardPlayer folders:
    C:/User/<username>/AppData/Local/Cisco
    C:/User/<username>/AppData/LocalLow/Cisco
  5. After that, delete the Sky Go and Sky folders from this path:
    C:/User/<username>/AppData/Roaming.App Data
  6. Reboot your system.
  7. Finally, go to the Sky Go download page and click on Download Now for Windows.
  8. Then, Reinstall Sky Go by following the steps from the installer.

Uninstalling CiscoVideoGuard and Sky Go and deleting the remaining files help you reinstall Sky Go from a clean slate.

Sky Go’s unable-to-load configuration error will surely be gone after this process.

8. Contact the Sky Go support team

If the error persists after trying all the steps above, it is best to contact the Sky customer support team.

They are professionals who will figure out the exact problem you are facing and help you fix it.

Be sure to let them know the troubleshooting steps you have done so that they better understand what exactly the problem is.

What are the benefits and drawbacks of Sky Go?

You can use Sky Go on up to 2 devices. If you pay extra for a monthly fee, you can go up to 4 devices. To play content on computers, you need a deprecated browser plugin called Microsoft Silverlight 3.0.

Not all programs are available on Sky Go. Because of viewing rights, specific programs are blacked out from the schedule.

If you’re looking for the best browsers to stream Sky Go on PC, take a look at this article. Or if you have the box connected to the TV, find out how to fix the red light on Sky Q.

To access the complete list of live TV channels that Sky Go supports, subscribe to the corresponding Sky TV packages.

Sky Go unable to load configuration error is a common error, but it is not the only error you might run into.

You might encounter login problems, hit the maximum number of downloads, or weird errors, such as Sky Go error 202. Sky boxes are also prone to issues, and we already wrote about the Sky Mini box not working or the Sky Glass remote being unresponsive in one of our previous guides.

Also, whether the app is connected or not, stuttering and buffering are signs of a problem with a LAN connection or an unstable connection.

Last but not least, ensure you haven’t left a VPN running if you’re seeing geo-blocked restrictions.

If you run into Sky Go unable to load configuration in Windows 10, read this article. We also have a guide to help you if Sky Glass won’t turn on, so be sure to check it out.

If you can’t watch your favorite channels on your Sky Glass due to stuck at software update in-progress issue, read this guide.

If you have any questions or suggestions about the subject, please mention them in the comments section below.

Your Web Browser Isn’t Compatible With SketchUp [QUICK FIX]

If you see the message Your web browser is not compatible with SketchUp error, rest assured, you are not the only one experiencing this.

The error message appears whenever you try opening SketchUp inside a browser that doesn’t support OpenGL ES 2.0.

Here is what one user had to say about this issue on the SketchUp community forums:

Last Saturday I was using SketchUp Free with no problems. Yesterday I started getting browser not compatible errors. I am using Internet Explorer 11 with Windows 10 Pro. I have cleared history and cache but continue to have the problem. Is anyone else having this issue and is there a fix for it?

This error seems to appear on different browsers and system configurations.

Seeing this error message repeatedly can become extremely frustrating. For this reason, in today’s article, we will explore the best fixes for this issue. Read on to find out more.

How to fix SketchUp browser errors

1. Download and use another browser that supports OpenGL ES 2.0

Because SketchUp requires depends on WebAssembly, not all browsers will be able to run this application.

One browser that doesn’t have issues with this tool, however, is Opera One, although you must know that versions older than version 42 don’t support it either.

However, this is only worth knowing if you plan on downloading an older version on purpose.

The link provided below will give you the latest version of Opera One. It also brings you unique built-in features, such as VPN, Ad Blocker, AI and a modular design for the integration of other AI’s.

Create interactive music videos, games, data visualization, art, 3D design environments, 3D modeling of space, 3D modeling of objects, and more with WebGL within this amazingly lightweight, fast, and customizable browser now.

Opera One

An excellent web browser that offers many useful tools, including the ability to save and print your web pages.
Free Download Visit website

2. Use cookie cleaner software to delete all cache and cookies

Another way to fix the SketchUp issue on your browser implies removing the cache and all the cookies stored on your browser memory.

You can find multiple third-party tools that are capable of removing your browser data and potentially resolving this error message.

We recommend CCleaner to be the most compatible handy tool that can search your computer for cookies and erase them all at once, saving you from having to do it separately for each browser.

Furthermore, you may enable an automatic browser cleaning feature to clean browser files automatically when Smart Cleaning detects that one of your web browsers is closed, this popup opens to clean cookies.

This notice appears after CCleaner has cleaned a web browser and shows the amount of space you have saved on your PC. This becomes useful whenever you don’t have the time or energy to manually delete cookies and cache stored by SketchUp on your PC and browser.

Hence, in order to delete browser information such as cookies and improve system performance, you need to use the best cookie cleaner tools for Windows PCs.

In today’s fix article, we explored some of the most common methods to deal with your web browser that is not compatible with the SketchUp error message.

We hope that the methods presented in this list helped you get back to using SketchUp without encountering any errors.

To learn more about browsers, visit our dedicated Browsers Hub. Content creators might also like the articles on our Graphic & Design page as well.

Please feel free to let us know if this guide helped you solve your issue. You can do so by simply using the comment section found below.

Time Synchronization Failed on Windows 11: 9 Ways to Fix it

If your PC isn’t set with the correct date and time, then you will face multiple system-related problems.

Notably, several tasks on your PC will be hampered if the time is not synced or if the time isn’t set correctly.

For instance, if you have downloaded or saved a file on your PC, due to an incorrect time, the file information will have adulterated information. Since it is the system clock that your PC uses to add timestamps to your files, keeping the correct time and date is important.

Software or updates also rely on internet-based authorized time, and if there is an incorrect time set on your PC, then your PC may reject those updates or install the software.

Usually, Windows 11 uses the NTP, i.e., Network Time Protocol, to connect your PC with the internet server to synchronize the clock. However, if it fails to do so, then you will experience the time synchronization failed on Windows 11 issue.

If you are also facing a time synchronization issue on Windows 11, and are looking for solutions, then you are in the right place.

Because in this guide, we will give you a list of some effective solutions, that have helped users fix the problem at hand. Let us check each solution out.

How to manually sync time on a Windows 11 PC?

1. From the Settings menu

  1. Press the Win + I buttons to open Settings.
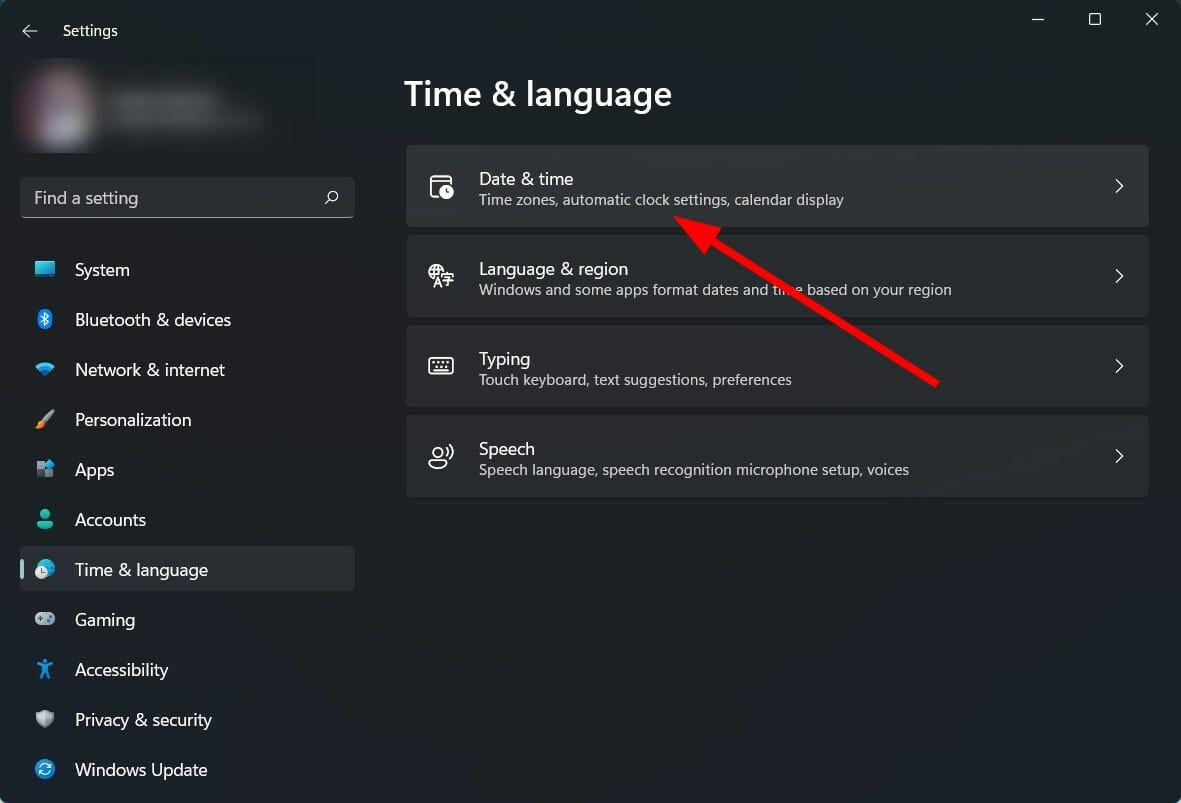
  2. Click on Time & language.Time and language
  3. Select Date & time.date and time
  4. Scroll down and under Additional settings, hit the Sync now button.
  5. The tick will appear confirming that your PC has updated and synced the time.

2. From Control Panel

  1. Open the Start menu.
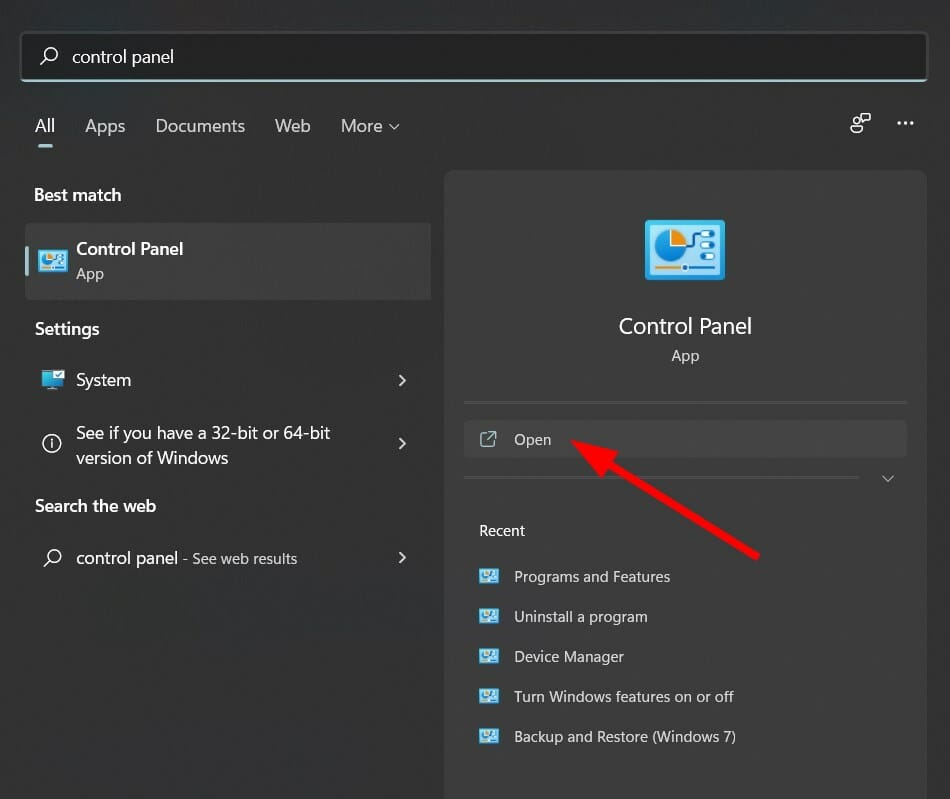
  2. Search for Control Panel and open it.control panel
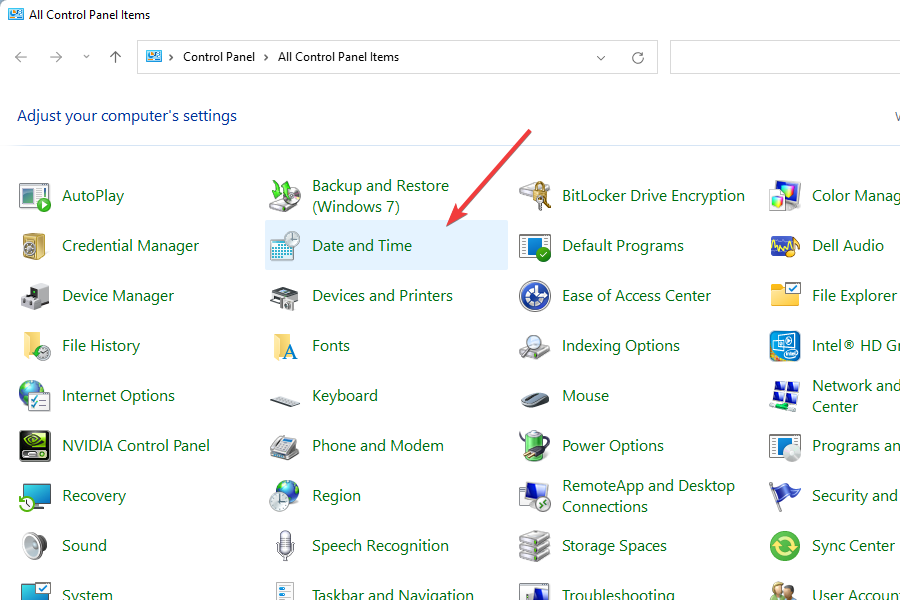
  3. Click on Date and Time.open date and time to from control panel
  4. Switch to Internet Time.Internet Time tab
  5. Click on Change settings.
  6. Hit the Update now button next to Server.
  7. Click OK.

How can I fix the time synchronization failure on Windows 11?

1. Check time settings

  1. Press the Win + I buttons to open Settings.
  2. Click on Time & language.Time and language
  3. Select Date & time.date and time
  4. Turn on the toggle for the Set time automatically and Set time zone automatically.

To start with, you can check if the date and time settings in the Settings menu are set to update automatically or not.

2. Check if the Windows Time service is active

  1. Press the Win + R keys to open the Run dialogue.
  2. Execute the below command. services.msc
  3. On the right side, locate the Windows Time service and double click on it.Windows Time service not installed
  4. Under Startup type, select Automatic.
  5. Also, click the Start button.
  6. Click Apply and OK to save changes.

Your Windows 11 PC relies on the Windows Time service to update the date and time on your PC.

If for any reason, this service fails to operate or function correctly, then you will experience issues such as time synchronization failure on Windows 11 error.

3. Use command prompt to force time sync

  1. Click on Start.
  2. Search for Command Prompt and run it as administrator.Command prompt
  3. Execute the below commands one by one. net stop w32time w32tm /unregister w32tm /register net start w32time w32tm /resync
  4. Restart your PC.

When you execute the above commands, your Windows 11 PC will force the system to sync the time of the PC with the server.

There are chances that some third-party apps might have conflicted with the time sync. So, we would advise you to run the commands and see if that helps.

4. Run System File Checker

  1. Click on Start.
  2. Search for Command Prompt and run it as administrator.Command prompt
  3. Type the below command and press Enter. sfc /scannowRun SFC scan to fix windows 11 error recovery
  4. Restart your PC.

If there is a presence of corrupt system files, then your PC won’t function appropriately and will also give rise to certain issues, such as time synchronization failed on Windows 11.

The System File Checker is an in-built tool that not only detects corrupt files but also fixes them. All this is done by simply executing a command.

Alternatively, you can also make use of reliable third-party software to help you resolve several system-related issues triggered by corrupt system files.

5. Use a different server

  1. Open the Start menu.
  2. Search for Control Panel and open it.control panel
  3. Click on Date and Time.open date and time to from control panel
  4. Switch to Internet Time.Internet Time tab
  5. Click on Change settings.
  6. Select time.nist.gov as the Server and click the Update now button.

Several users have reported that they managed to fix the time synchronization failed on Windows 11 by changing the time server. You can also give it a try and hopefully fix the issue.

6. Tweak the SpecialPollInterval registry key

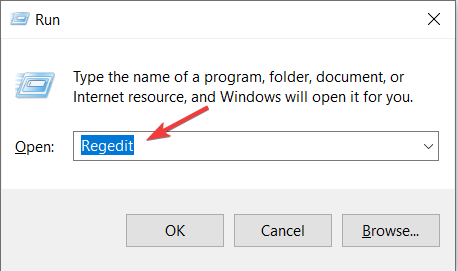
  1. Press Win + R keys to open the Run command.
  2. Type the below command and hit Enter. regedit
  3. Head over to the below address. HKEY_LOCAL_MACHINE\SYSTEM\CurrentControlSet\Services\W32Time\TimeProviders\NtpClient
  4. On the right side, double-click on the SpecialPollInterval key.
  5. Change the value to 86400 and hit OK to save the changes.
  6. Restart your PC for the changes to take effect.

You can use the above steps to fix the time synchronization failed on Windows 11. The above tweak in the registry settings helps change the update interval on Windows.

However, we would advise you to only tweak the registry settings if you are sure of what you are doing. You can also go ahead with the above steps, but before that, take a backup of the registry files.

7. Add new time servers

  1. Press Win + R keys to open the Run command.
  2. Type the below command and hit Enter. regedit
  3. Head over to the below address. HKEY_LOCAL_MACHINE\SOFTWARE\Microsoft\Windows\CurrentVersion\DateTime\Servers
  4. On the right side, right-click on the space and select New > String Value.
  5. In the Value name, enter the number for the server, i.e., 3.
  6. In the Value data field, enter time.google.com.
  7. Hit OK to save changes.
  8. Open the Start menu.
  9. Search for Control Panel and open it.control panel
  10. Click on Date and Time.open date and time to from control panel
  11. Switch to Internet Time.Internet Time tab
  12. Click on Change settings.
  13. Click on the Server drop-down menu and select time.google.com.
  14. Hit the Update now button next to Server.
  15. Click OK.

Do note that the above is just an example of how you can add a new time server to your PC and update it to fix the time synchronization failed on the Windows 11 error.

You can add as many servers as you want. If you are confused about which servers you can add, you can refer to the list of servers below:

  • time-a.nist.gov
  • time-b.nist.gov
  • 128.105.37.11
  • europe.pool.ntp.org
  • clock.isc.org
  • north-america.pool.ntp.org
  • time.windows.com
  • time.nist.gov

8. Change registry values

  1. Press the Win + R keys to open the Run command.
  2. Type the below command and hit Enter. regedit
  3. Head over to the below address. HKEY_LOCAL_MACHINESYSTEMCurrentControlSetServicesW32TimeConfig
  4. On the right side, locate MaxNegPhaseCorrection and double-click on it.
  5. Set the Value data to fffff.
  6. Click OK to save changes.
  7. Double click on MaxPosPhaseCorrection and set Value data to ffffff.
  8. Click OK to save changes and exit.

9. Disable Firewall

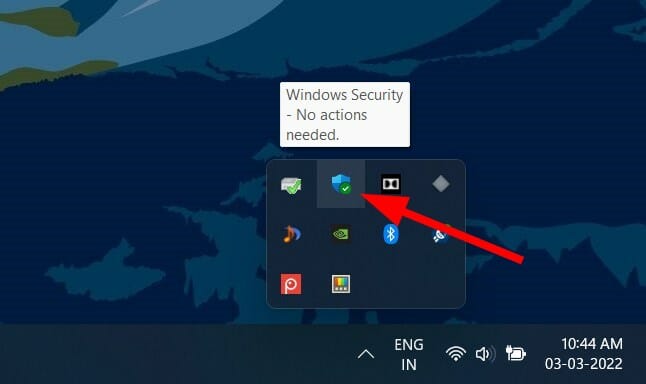
  1. Click on the upward arrow button on the bottom-right taskbar.
  2. Select Windows Security.
  3. Select Firewall & network protection from the left pane.
  4. Disable the Firewall for the Domain network, Private network, and Public network, one by one.

If you use a third-party antivirus software then you also need to disable the firewall. Antivirus software with a firewall enabled is one of the most common reasons why a connection to the time sync server gets interrupted.

Aggressive anti-malware could also cause multiple issues, including the one at hand. You can try disabling the antivirus or antimalware software and check if this fixes the time synchronization failed on the Windows 11 issue.

The above-mentioned solutions should be sufficient enough to help you resolve the issue. However, if nothing helps you solve the problem, you can start afresh by either resetting your Windows 11 PC or reinstalling Windows 11 on your PC.

Let us know in the comments section below which one of the above methods helped you fix the problem. Feel free to share with us any other solutions that did the job for you.

5 Best Browsers for Huawei Tablets [Windows, Android, Harmony]

It’s been a while and we’re sure you’ve heard about the infamous ban (or as we like to call it, the modern Great Schism) that prohibited Google to do business with Huawei back in 2020.

No more App Store, no more YouTube, no more Android-based OS, and most importantly for us, no more Google Chrome.

Instead, you have the Huawei Browser to rely on, which is a secure and speedy browser, optimized for Huawei tablets and phones. Disappointed? Don’t be! Just like you, we don’t take no for an answer (except when no means no, obviously).

How do I install a different browser on my Huawei tablet?

The newest Huawei tablets run a proprietary OS called Harmony that provides its own alternatives to the PlayStore. We’re talking about the Huawei AppGallery and Petal Search that allow you to sideload apps.

Besides these two, you can also:

  • download an independent APK directly from your tablet’s browser and store it in the Downloads folder
  • use a USB cable to connect your Huawei tablet with your Windows PC and transfer the APK file from one desktop to the other
Note icon NOTE
The above information concerns Huawei tablets running on Harmony OS. However, there are still plenty of models that run on Windows (both tablets and laptops) and you will have no restriction concerning the choice of browser apps on these devices.

So, without further ado, let’s check out these best browsers for Huawei tablets running on Windows 10.

What is the best browser for Huawei tablets?

Opera One – Suitable for mobile browsing

Opera One went from a niche browser to a widely cherished web surfing solution in the past years and we salute its initiative to increase its audience.

Essentially, the browser becomes more flexible, more performant, and much more customizable without compromising on privacy and security, which is quintessential for their approach.

One particularly nifty feature it boasts is the ability to automatically recognize when Windows 10 is set to Tablet Mode.

Here are its key functionalities in a nutshell:

  • Cross-platform compatibility, allowing it to work seamlessly across Windows, Mac as well as on mobile platforms
  • Integrated VPN and ads blocker for enhanced privacy
  • Excellent streaming and video broadcasting support (Opera One is one of the few browsers that allow you to enjoy clips without buffering or lags)
  • Convenient integrations to accelerate and simplify your workflows

Opera One

Pair your tablet and enjoy this smooth and secure browsing as never before.

UR browser – Extra privacy layers

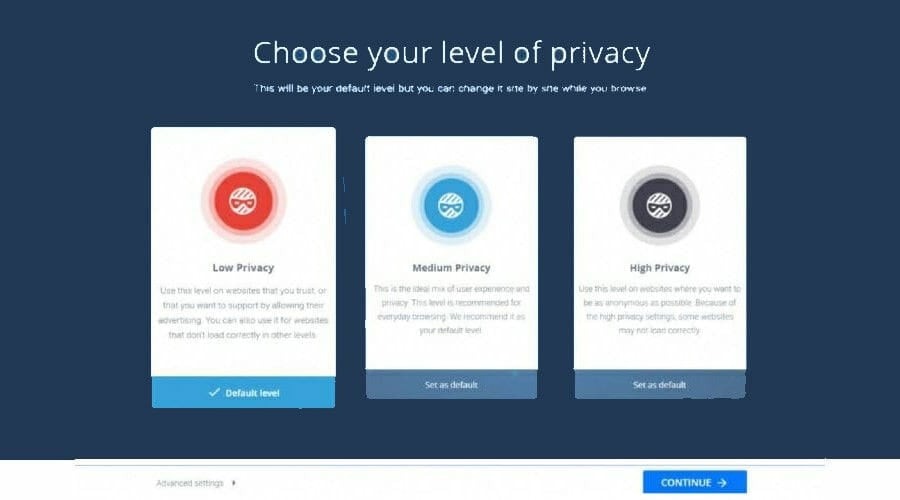
Similar to Opera, the UR browser is also a privacy aficionado. As you can see from the screenshot above, the attention assigned to this particular aspect is as high as it can be.

Thus, you can choose with granular precision the level of privacy that best suits your needs.

It’s safe to say that this browser leaves nothing at all chance and it will undoubtedly impress you with its useful features. So let’s take a closer look, shall we?

Here are its key functionalities in a nutshell:

  • Customizable appearance (centralized information, adjustable background, and widgets)
  • Integrated Download manager to identify your files quickly
  • Up to 4 times more speed when downloading files from the web (advanced parallel downloading technology)
  • Filters and content controls to only receive trustworthy news

⇒ Get UR browser

Brave – No cookies and tracking

We know that versatility is highly appreciated, that’s why Brave ranks so highly on our list.

Catering to users running on Windows, Mac, and Linux (for desktop) as well as iOS or Android on mobile platforms, Brave is one cross-platform browser you will not regret installing.

Private, secure, and flawlessly equipped to meet modern users’ needs, brave is an excellent choice for browsing on Samsung devices as well Huawei tablets.

Here are its key functionalities in a nutshell:

  • Unique rewards system to support your favorite websites
  • Full compatibility with Chrome extensions, but faster
  • Flawless syncing process (+ possibility to import bookmarks)
  • Enhanced privacy and security (including VPN and firewall)

⇒ Get Brave

Chrome – Quick navigation

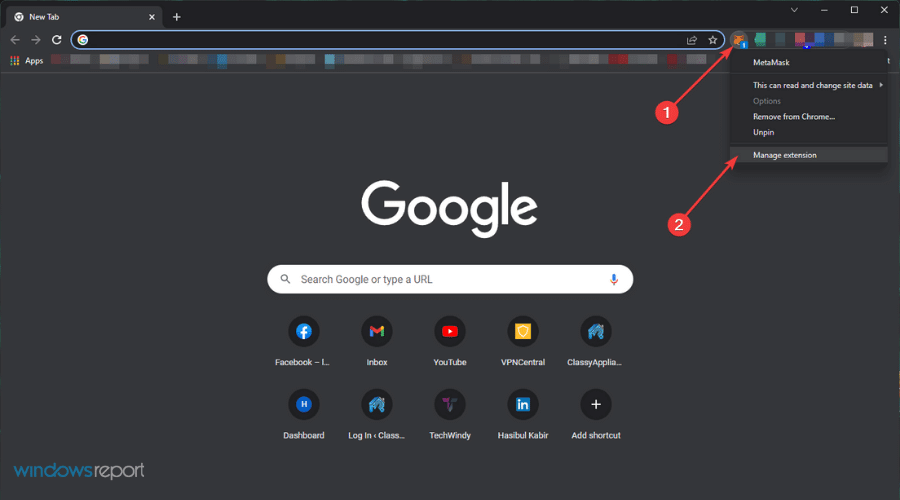
going manage extension metamask chrome

We mentioned earlier that Brave has full compatibility with Chrome extensions.

And it is relevant because the browser built by Google still dominates the industry and has the most comprehensive library of extensions and plugins on the market.

A true pioneer, Chrome has made a name for itself and earned users’ trust with revolutionary features and an equally impressive integration suite.

Here are its key functionalities in a nutshell:

  • Seamless integration with other Google apps to boost your productivity
  • Excellent tools for enterprises, developers, and explorers worldwide
  • Easy privacy setup and cookies controls
  • Excellent Dark Mode for enhanced comfort

⇒ Get Chrome

Firefox – Productivity tools

Last, but certainly not least, Firefox provides an attractive alternative for Huawei tablet users. This veteran has proven their strength, agility, and versatility time and again.

For those of you who would prefer a more lightweight browser there is also a Lite version for Firefox, so feel free to give it a go.

Here are its key functionalities in a nutshell:

  • Blocks third-party tracking cookies/social trackers by default
  • In-browser screenshot tool and bookmarks manager to optimize your flows
  • Picture-in-Picture rendering
  • Dark Mode available + adjustable tab layout

⇒ Get Firefox

Even though the Huawei Browser is a convenient built-in tool that allows you to browse the Internet fast and safely, you might still want to do it on your own terms. And there’s nothing wrong with that.

Whatever is the OS you currently run, it’s still possible to use a third-party browser for Huawei tablets and surf the web with all the freedom, mobility, and customization you could think of.

We hope you managed to find exactly what you were looking for. If not, don’t be shy to drop us a line in the comments section below, and we’ll take it from there.

How to install Maxthon browser on Windows 10

The browser market is dominated by popular browsers, but they aren’t the only ones available. Many lesser-known browsers offer some unique features to users, so they are worth considering.

One of them is Maxthon, and the browser was popular in the past, but over the years it has lost its popularity. However, due to its humble requirements, it’s a great web browser for old PCs.

Therefore, in today’s guide, we’re going to show you how to download and install the Maxthon browser on Windows 10.

What are Maxthon browser features?

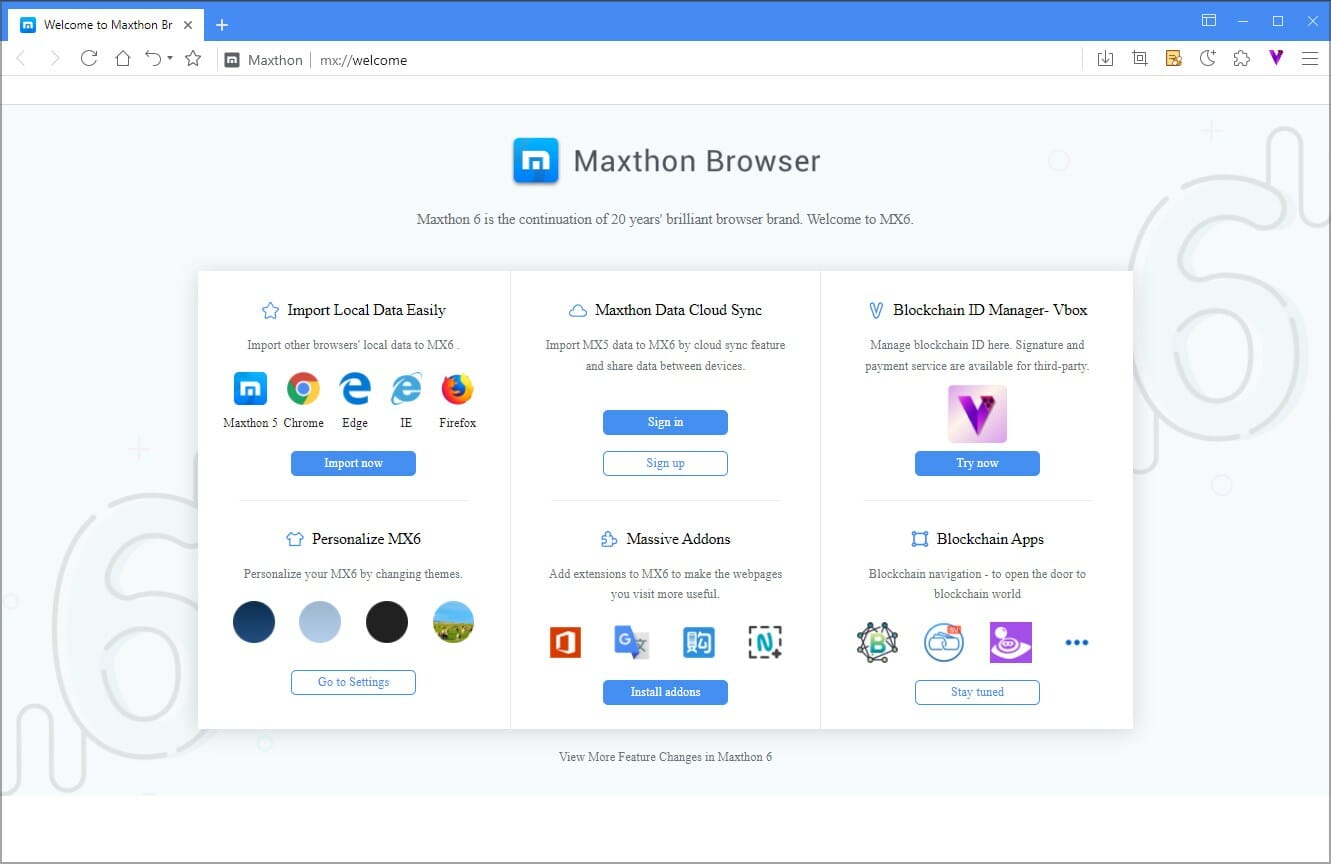
The browser is based on Chromium so it’s compatible with almost all Chrome’s extensions. Unlike other browsers, this one comes with a built-in blockchain identity manager.

There’s also support for NBdomain protocol allowing you to protect your privacy. The software is available on multiple platforms, and thanks to the synchronization feature all your data will be synced across multiple devices.

Now that we know what this browser can do, let’s see how we can install it on our PC.

How can I install the Maxthon browser on Windows 10?

1. Use the official installer

  1. Navigate to the Maxthon download page.
  2. Select PC Download (64-bit) and wait while the setup file is being downloaded.
  3. Once the download is finished, run the setup file.
  4. Choose the installation directory and click on Install.
  5. Now wait for the installation to finish.
  6. After the setup is finished, click on Sign in with guest account.

That’s it, after doing that the browser should start automatically and you’re ready to browse the web.

Quick tip

While Maxthon is a great browser, it’s not without flaws, and this is why you might be better off by using different software, such as the Opera One example.

Opera One is based on Chromium, so it’s similar to Chrome and it works with Chrome extensions. However, it offers a couple of unique features such as tracking protection, VPN, Ad blocker and AI.

⇒ Get Opera One

2. Use the portable version

  1. Go to the Maxthon download page.
  2. Select Portable version (64-bit).
  3. Wait for the download to finish.
  4. Once the zip archive is downloaded, open it.
  5. Extract the MaxthonPortable directory to the desired location.
  6. Navigate to extracted MaxthonPortable directory.
  7. Locate and run the Maxthon.exe file.

This method is great if you don’t want to install the software on your PC or if want to run the browser from a flash drive.

Is the Maxthon browser safe?

While the browser is safe from malware, it has certain privacy concern issues. It seems that in 2016 the browser was collecting sensitive user data and sending them to the remote server.

According to Maxthon, this is a part of the User Experience Improvement Program and it’s completely optional, but it seems that the data was still collected even after opting out of the program.

Among the collected data were users’ ad-block status, visited websites, search queries, list of installed applications along with their current versions.

According to the Maxthon CEO, this was due to a software bug, and it issue has been supposedly fixed.

Installing the Maxthon browser on Windows 10 is simple, and you can do that in a matter of seconds by following the instructions from this guide.

If you decide to continue using this software, we suggest reading our guide on how to activate the dark mode in the Maxthon browser for late-night browsing sessions.

Have you ever used the Maxthon browser and what did you think of it? Let us know in the comments section below.
How to disable Windows Firewall in Windows 10 or Windows 11

The Windows Firewall is your first line of defense against malicious threats from incoming internet traffic. It works by blocking out any data packets susceptible to malicious intent.

It was introduced with Windows XP back in 2001 as “Internet Connection Firewall” and has come a long way since then. Being an important component of Windows security, the question arises why should you disable it then?

There will be instances when some critical applications might force you to disable Windows firewall, at least temporarily. For instance, some antivirus programs might not work with Windows Firewall and vice-versa, thereby pushing you to disable the firewall in Windows 10 or 11.

In this article, we’ll go through the steps you need to follow to disable Windows firewall in Windows 11. Let’s get started.

How to disable Windows firewall in Windows 11

While you can always turn it back in no time, you should think carefully and deliberately before you decide to disable your Windows firewall—an added layer of security is a plus for your PC.

So do it only if you know your way around or when it’s an absolute necessity. With that said, here’s how you can turn off your firewall right away:

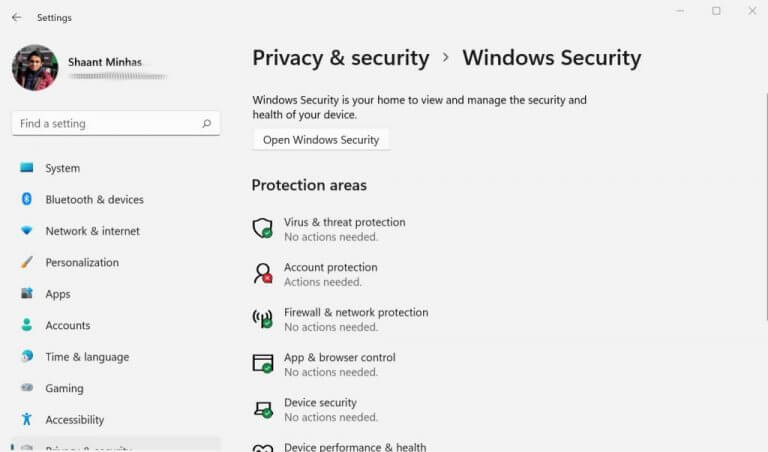
  1. Go to the Start menu search bar, type in ‘settings,’ and select the best match. Alternatively, press the Windows key + I shortcut.
  2. Head to Privacy & security and click on Windows Security.
  3. Click on Open Windows Security.
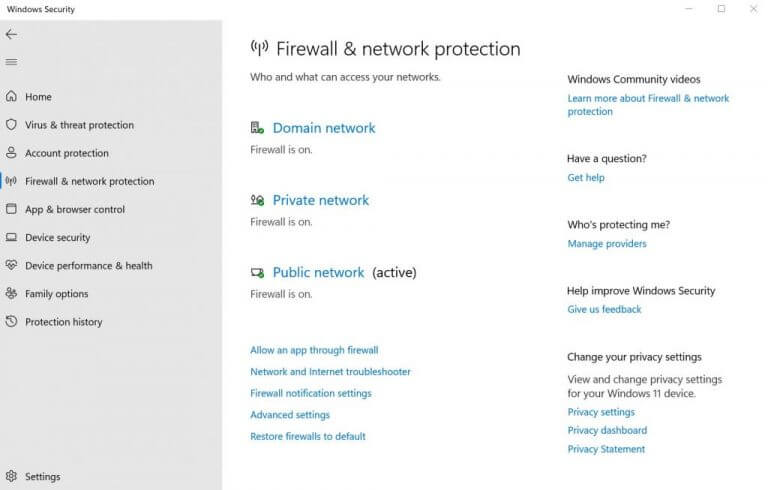
  4. Now click on Firewall & network protection > Public network.
  5. Select Public network.
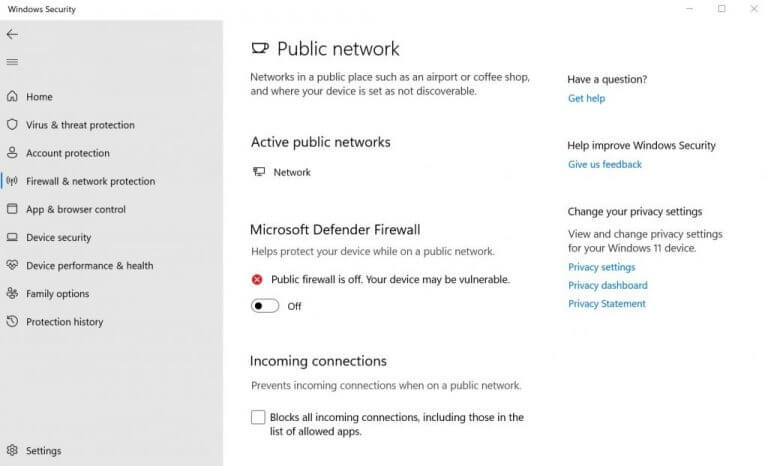
  6. Toggle off the button for Microsoft Defender Firewall.

windows security menu

firewall and network protection

disable windows firewall

As soon as you do this, your Windows Firewall will be disabled, and you should see the following message under Firewall settings: Public firewall is off. Your device may be vulnerable.

Disabling the firewall for specific apps

You can also tweak the above process a little and turn off the firewall for specific apps. Simply follow the above method until the fourth step and get to the Firewall & network protection menu. From there, follow the steps below:

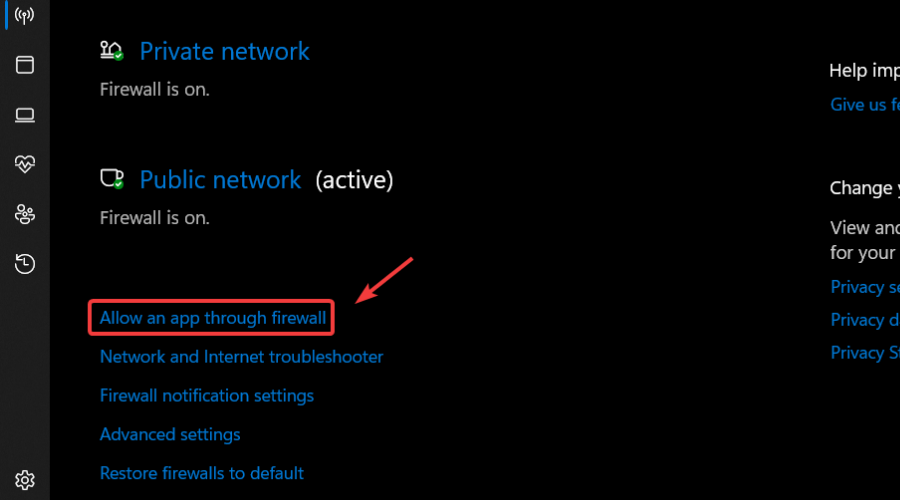
  1. Click on Allow an app through firewall option.
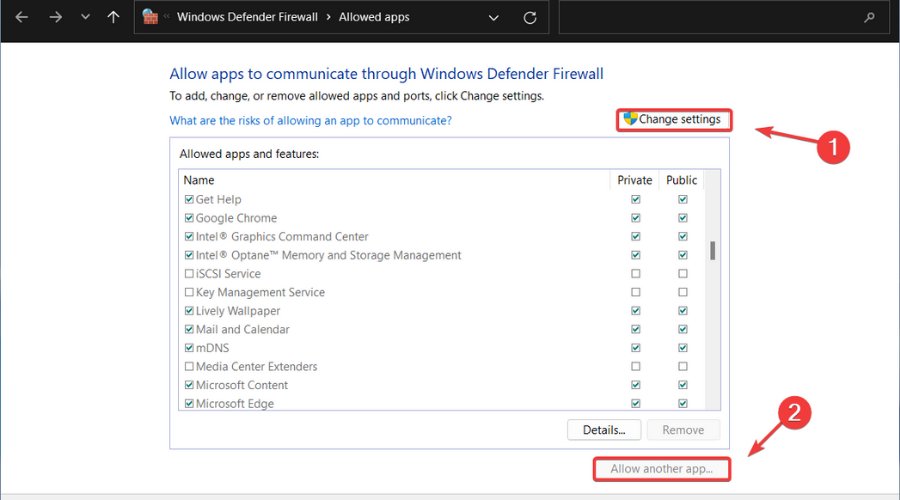
  2. In the new windows, click on Change settings located right in the corner.
  3. Click on the checkbox in front of the app you want to bypass the firewall and select OK.

This way, the app can now work around the firewall and will now become functional.

Disable Windows firewall in Windows 10 and Windows 11

Hopefully, you can now disable Windows firewall without any hassles by now. To reiterate again, the firewall is an integral component of Windows Security; it therefore should only be turned off when you can’t find any other alternatives to your specific problems.

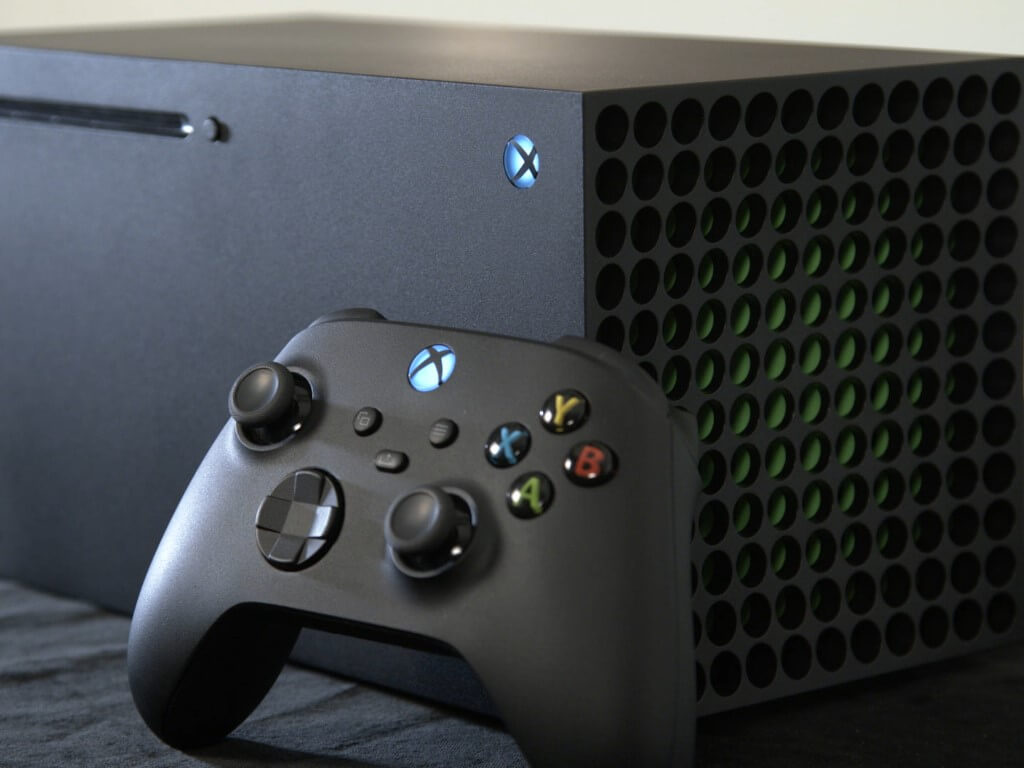
Microsoft may be working on a smaller and more efficient chip for the Xbox Series X

While it is highly unlikely that we will be seeing a “slim edition” of the Xbox Series X any time soon, it is being reported that Microsoft may be developing a smaller, more power-efficient chip for its ninth generation powerhouse console.

It should be noted that Microsoft is constantly developing revisions of such components, and information on this supposed chip revision for the Series X remains scant at this point. The source of the speculation comes from a new video from gaming journalist and insider Brad Sams, who is also Vice President and General Manager of Stardock Software. In the video Sams states (in around the 25 minute mark) that he is “very confident” that the Series X will see a revised chip in the not-too-distant future.

Such hardware revisions are commonplace, and indeed par for the course for most consoles. A smaller, more efficient chip would reduce production costs for Microsoft, as well as help in Microsoft’s Cloud Gaming data centers, so it really seems like a foregone conclusion that Microsoft would eventually do such a revision.


OnMSFT’s second gaming give away: Win a Lenovo Legion 5i Gaming Tower w/NVIDIA GeForce GTX 1660

We just finished our review of the Lenovo Legion 5i Gaming Tower and walked away decently whelmed.  There was something left on the cutting room floor that could have made it top tier rig, but for $999.99 it offers a solid base for inexpensive upgrades in the future. As for a free rig, given away by us, it’s definitely worth the money and a great grab for those hard-to-find NVIDIA GPUs these days.

We’ve teamed up with Lenovo to give away the Best Buy configuration of the Legion 5i Tower, equipped with Desktop – Intel Core i5-11400 – 8GB Memory – NVIDIA GeForce GTX 1660 Super – 256GB SSD + 1TB HDD – Raven Black – limited to US and Canada residents only.

Winner

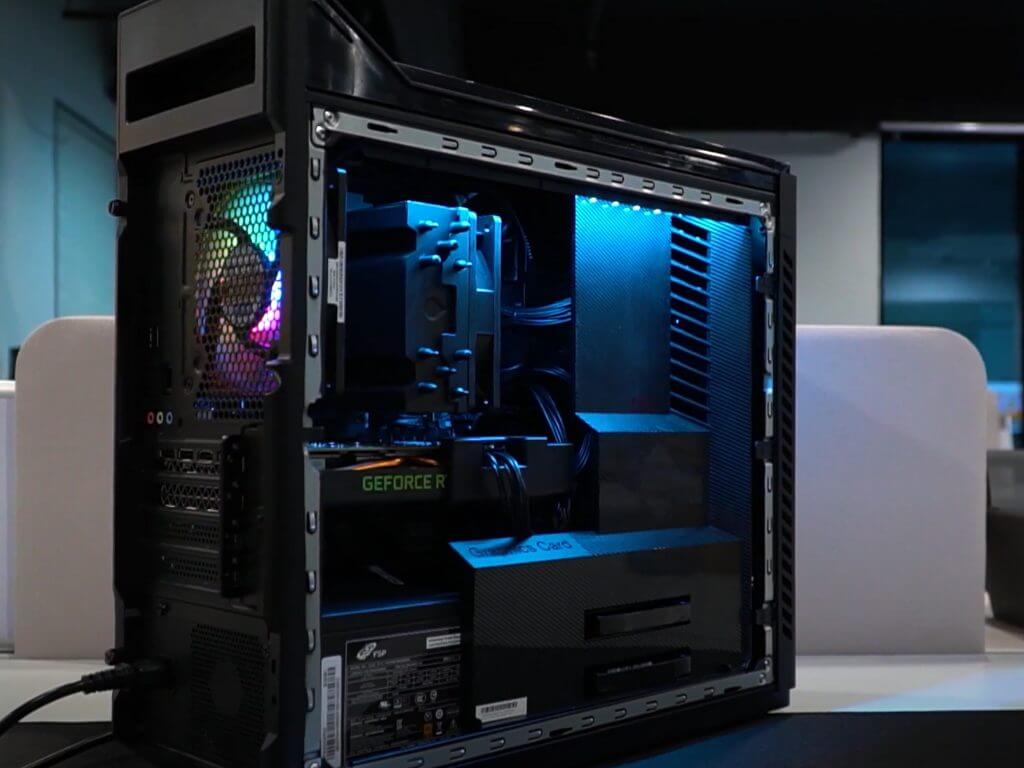
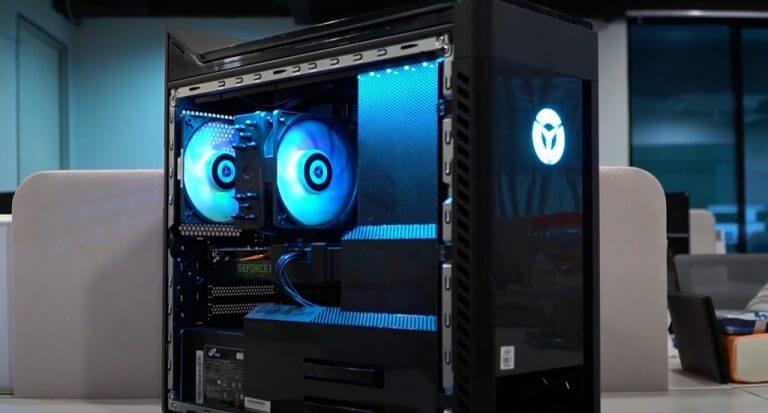
Lenovo Legion 5i Gaming Tower - side

Legion Tower 5i Gen 6 (Intel)
Processor Up to 11th Generation Intel® Core™ i7-11700F Processor (2.50 GHz, up to 4.90 GHz with Turbo Boost, 8 Cores, 16 Threads, 16 MB Cache)
Operating System Windows 11 Home

Windows 10 Home

Graphics NVIDIA® GeForce® RTX™ 3060 12GB

NVIDIA® GeForce® RTX™ 3070 LHR 8GB

NVIDIA® GeForce® GTX 1660 Super 6GB

Storage 1 TB 7200 RPM HDD

Up to 1 TB PCIe SSD

Optional: Dual Hard drive configuration available

Weight Less than 14kg / 30.9lbs
Display Legion Vantage

McAfee LiveSafe™ (trial)

Office 365 (trial)

XBOX Game Pass

Storage Removable solid-state drive (SSD)6 options: 256 GB, 512 GB, 1TB, 2TB
Preloaded Software Windows Hello face authentication camera (front-facing)
1080p resolution front facing camera.
Dual far-field Studio Mics
Quad Omnisonic™ speakers with Dolby Atmos®
Memory 16GB or 32GB LPDDR4x RAM
Dimensions 205mm x 395.4mm x 420mm / 8.07″ x 15.57″ x 16.54″
Wireless 802.11AX (2 x 2)

Bluetooth® 5.1

Battery 650W: ES Gold

400W: ES Gold

Color Raven Black
Ports/Slots Front:

2 x USB-A 3.2 Gen 1

2 x headphone/mic combo

Rear:

USB-C 3.2 Gen 2

2 x USB-A 3.2 Gen 1

2 x USB-A 2.0

RJ45

3 x audio jack

USB port transfer speeds are approximate and depend on many factors, such as processing capability of host/peripheral devices, file attributes, system configuration and operating environments; actual speeds will vary and may be less than expected.

What’s in the box Legion 5i Gen 6 Tower

USB Keyboard

USB Mouse

Quick Start Guide


Rafflecopter will be used to track entries, and a winner will be randomly selected on April 22, 2022. Giveaway is limited to residents of US and Canada only!

To enter, please comment in the Rafflecopter widget which will direct you to the giveaway comment section. Tell us about your current gaming setup and what games you’re playing or looking forward to soon!

Contestants can enter a maximum of one comment that equals one entry. Rules are outlined in the Rafflecopter widget.

Don’t already follow @OnMSFT on Twitter? Increase your chance of winning by following our news feed at @OnMSFT.

  • Comment on the giveaway post 1x entry
  • Follow @OnMSFT on Twitter 1x entries
  • Subscribing to OnPodcast via YouTube, Spotify, Apple Podcast, Google Podcast, etc 3x entry

The winner will be selected at random shortly after the contest has closed. We’ll publish details of the winner once we’ve made contact – so be on the lookout to find out if you’ve won! We will be contacting you via Twitter or the email you use to comment, make sure you’re paying attention on April 22nd!

a Rafflecopter giveaway

Opera vs. Dolphin: Which is the best browser for mobile?

Dolphin Browser is one of the oldest alternative browsers for Android and iOS devices and has been praised for its speed and performance.

Dolphin has all the great features of popular browsers like Chrome and Safari including tab management and sync support. However, the alternative browser also has some unique features that set it apart from others.

Opera has also been around for many years and is one of the most popular alternative browsers. It has both a desktop version and a mobile app for Android and iOS.

Can’t decide between the two browsers for your device? Keep reading for a head-to-head comparison of Opera and Dolphin to help you decide which is best for your mobile device.

Is Dolphin Browser available on PC?

Dolphin Browser is only available for Android and iOS devices. There is no desktop version for Dolphin, however, with an Android emulator for Windows 11, users can use the browser on their PC.

With the Dolphin Connect Chrome Extension, users can install this add-on to their default PC browser to send web pages and sync bookmarks to their Dolphin Browser on mobile.

Opera vs. Dolphin Browser: Which is the best?

➡ Interface

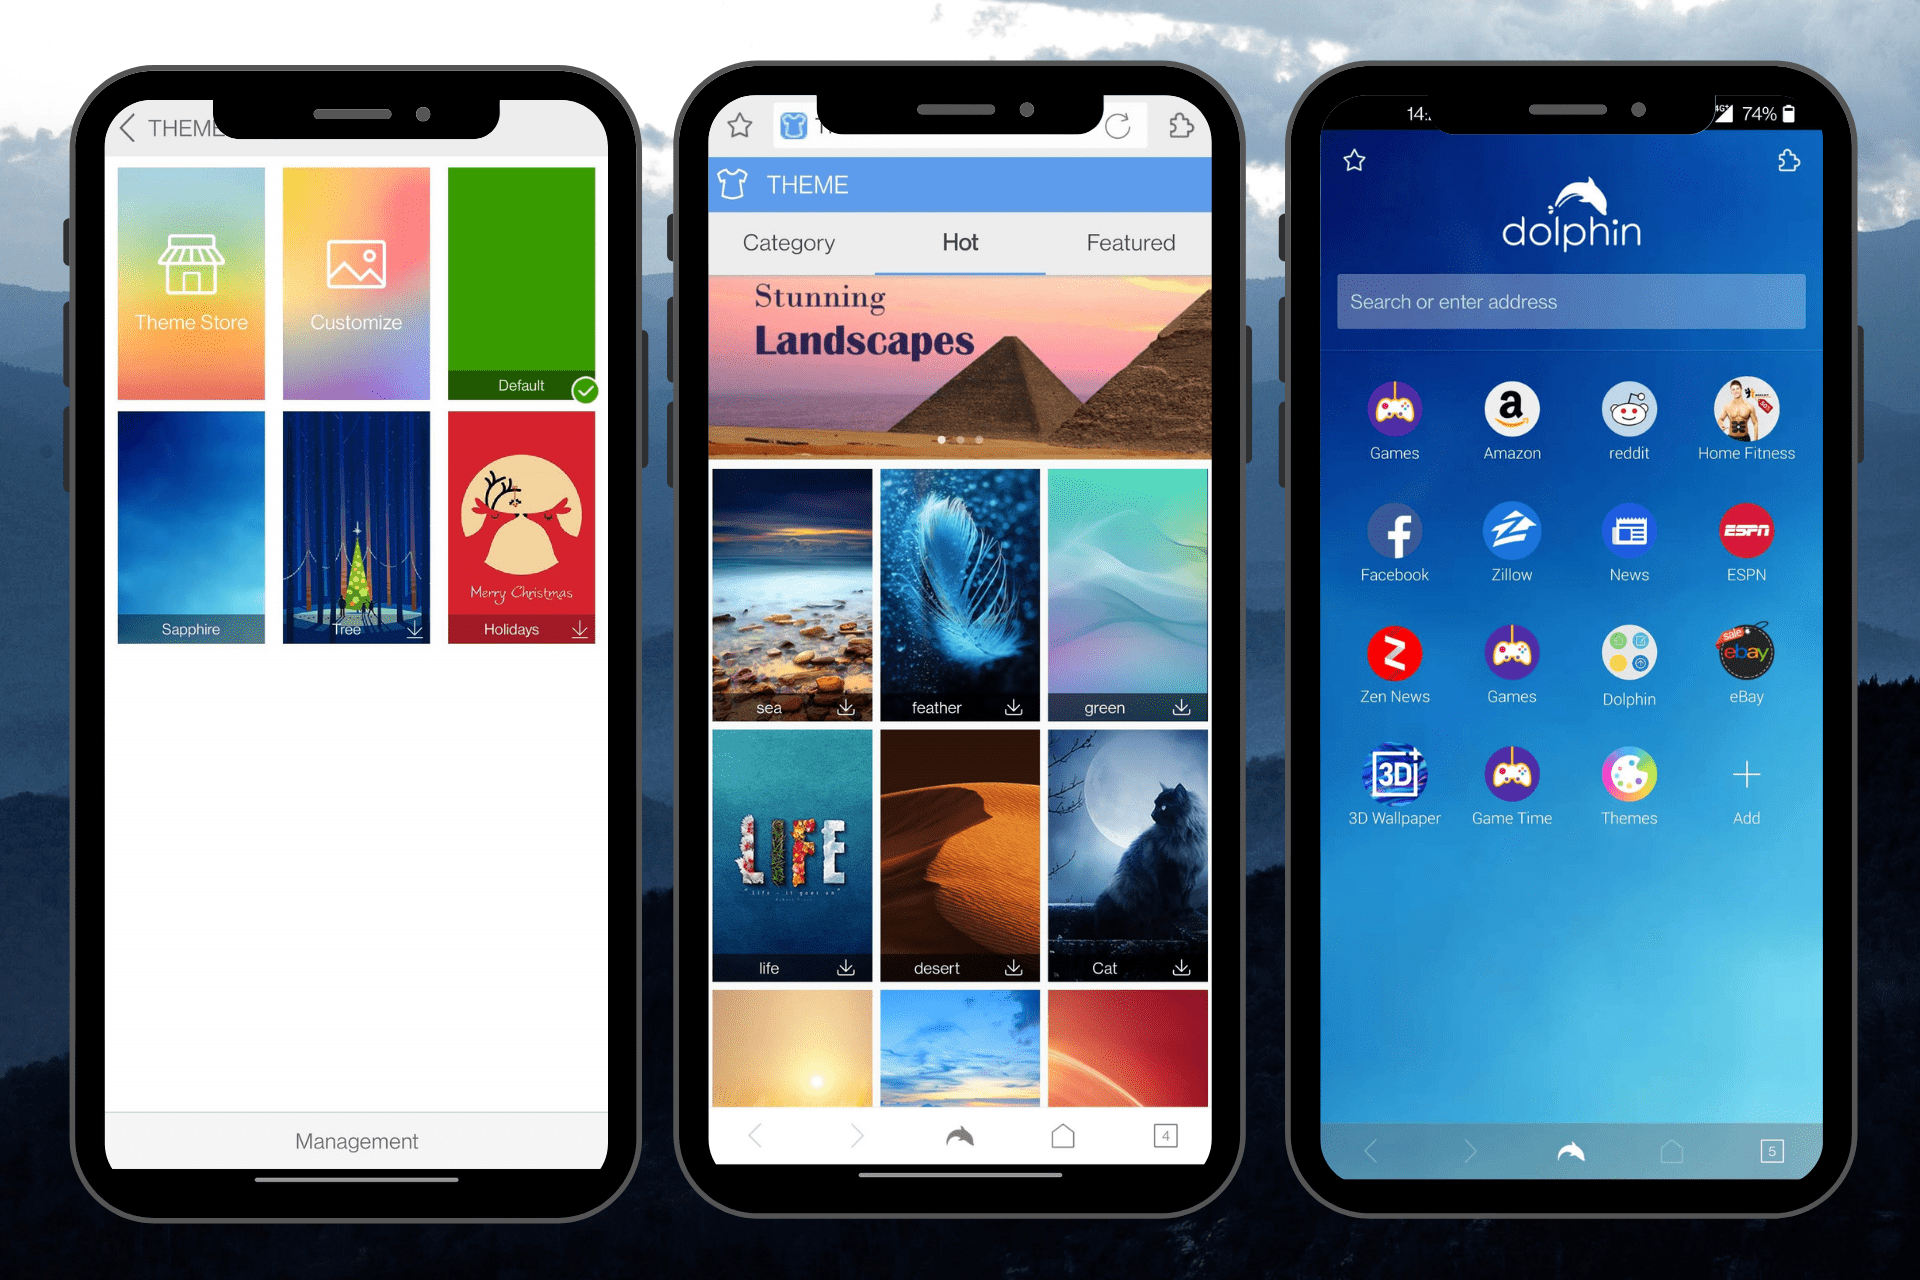
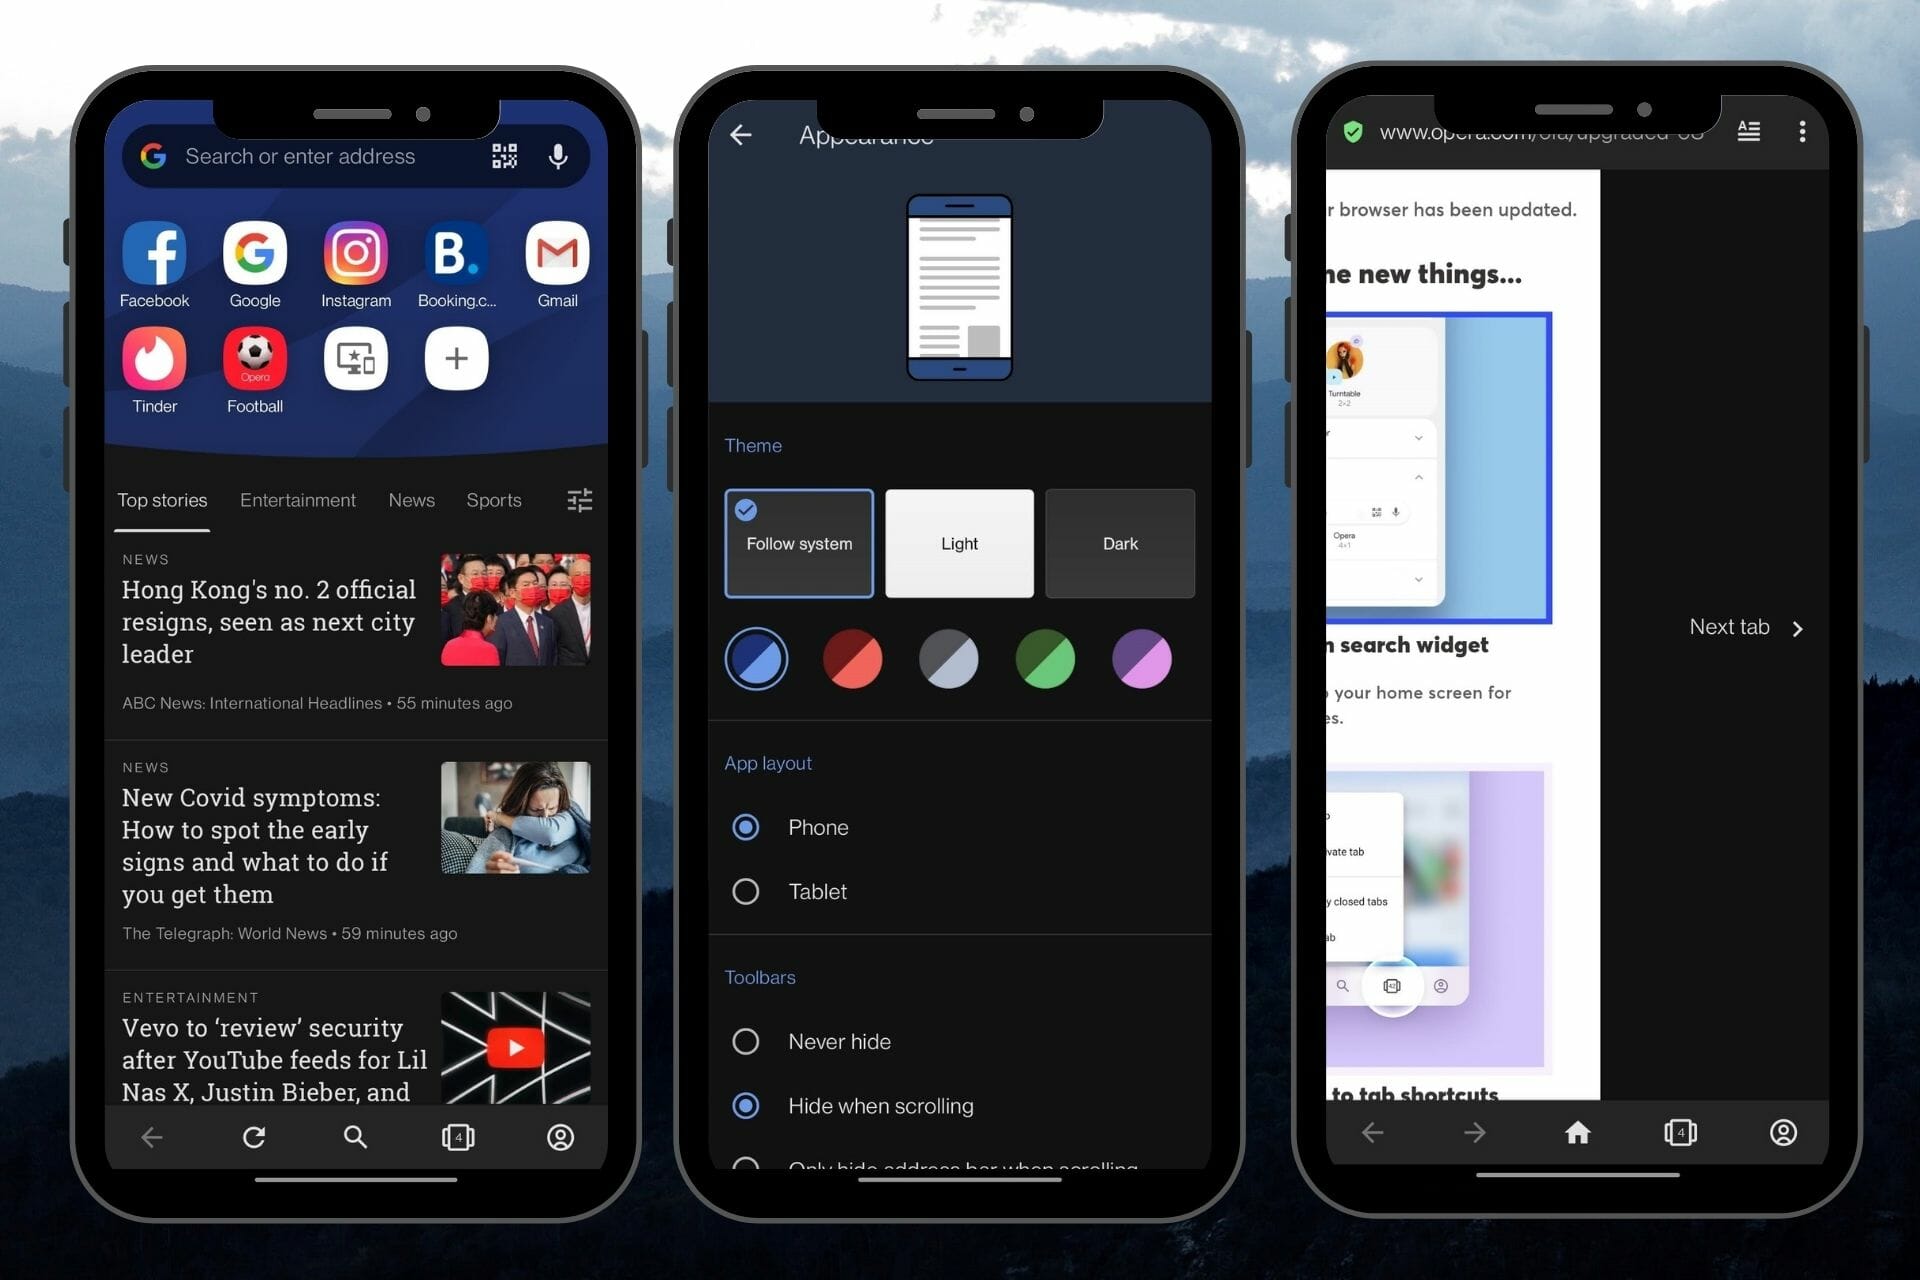
Dolphin allows quite a bit of customization with the option for users to upload their images to use as a theme. There is a theme store where users can easily download a theme from the Dolphin library. Users can also customize the home screen to any web page they like.

However, there is no dark mode for Dolphin, users will need to download a separate add-on to have a dark mode feature.

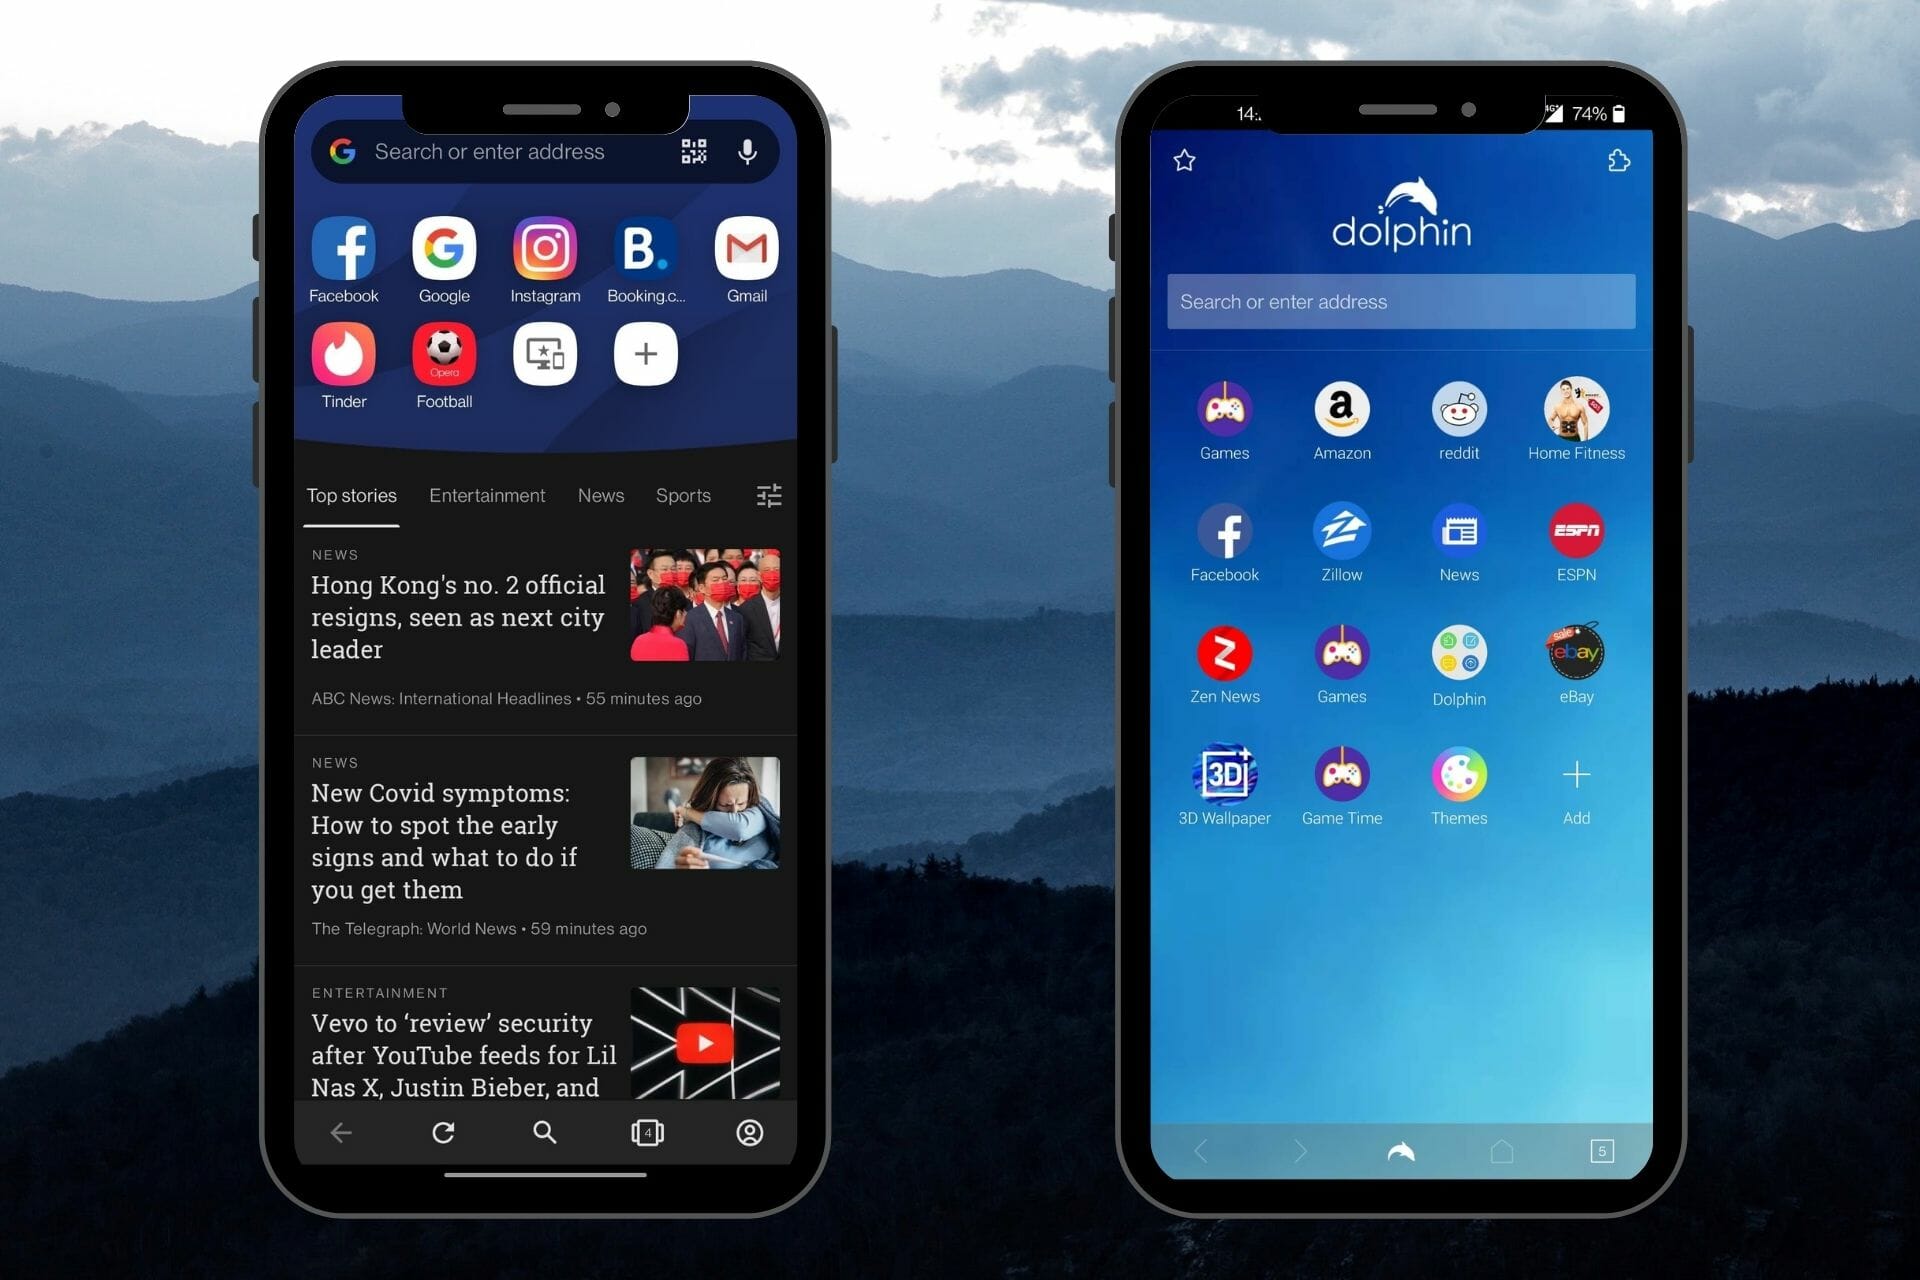
Dolphin Browser has a simple interface that offers easy access to its settings and features from the bottom toolbar.

Dolphin Browser interface.

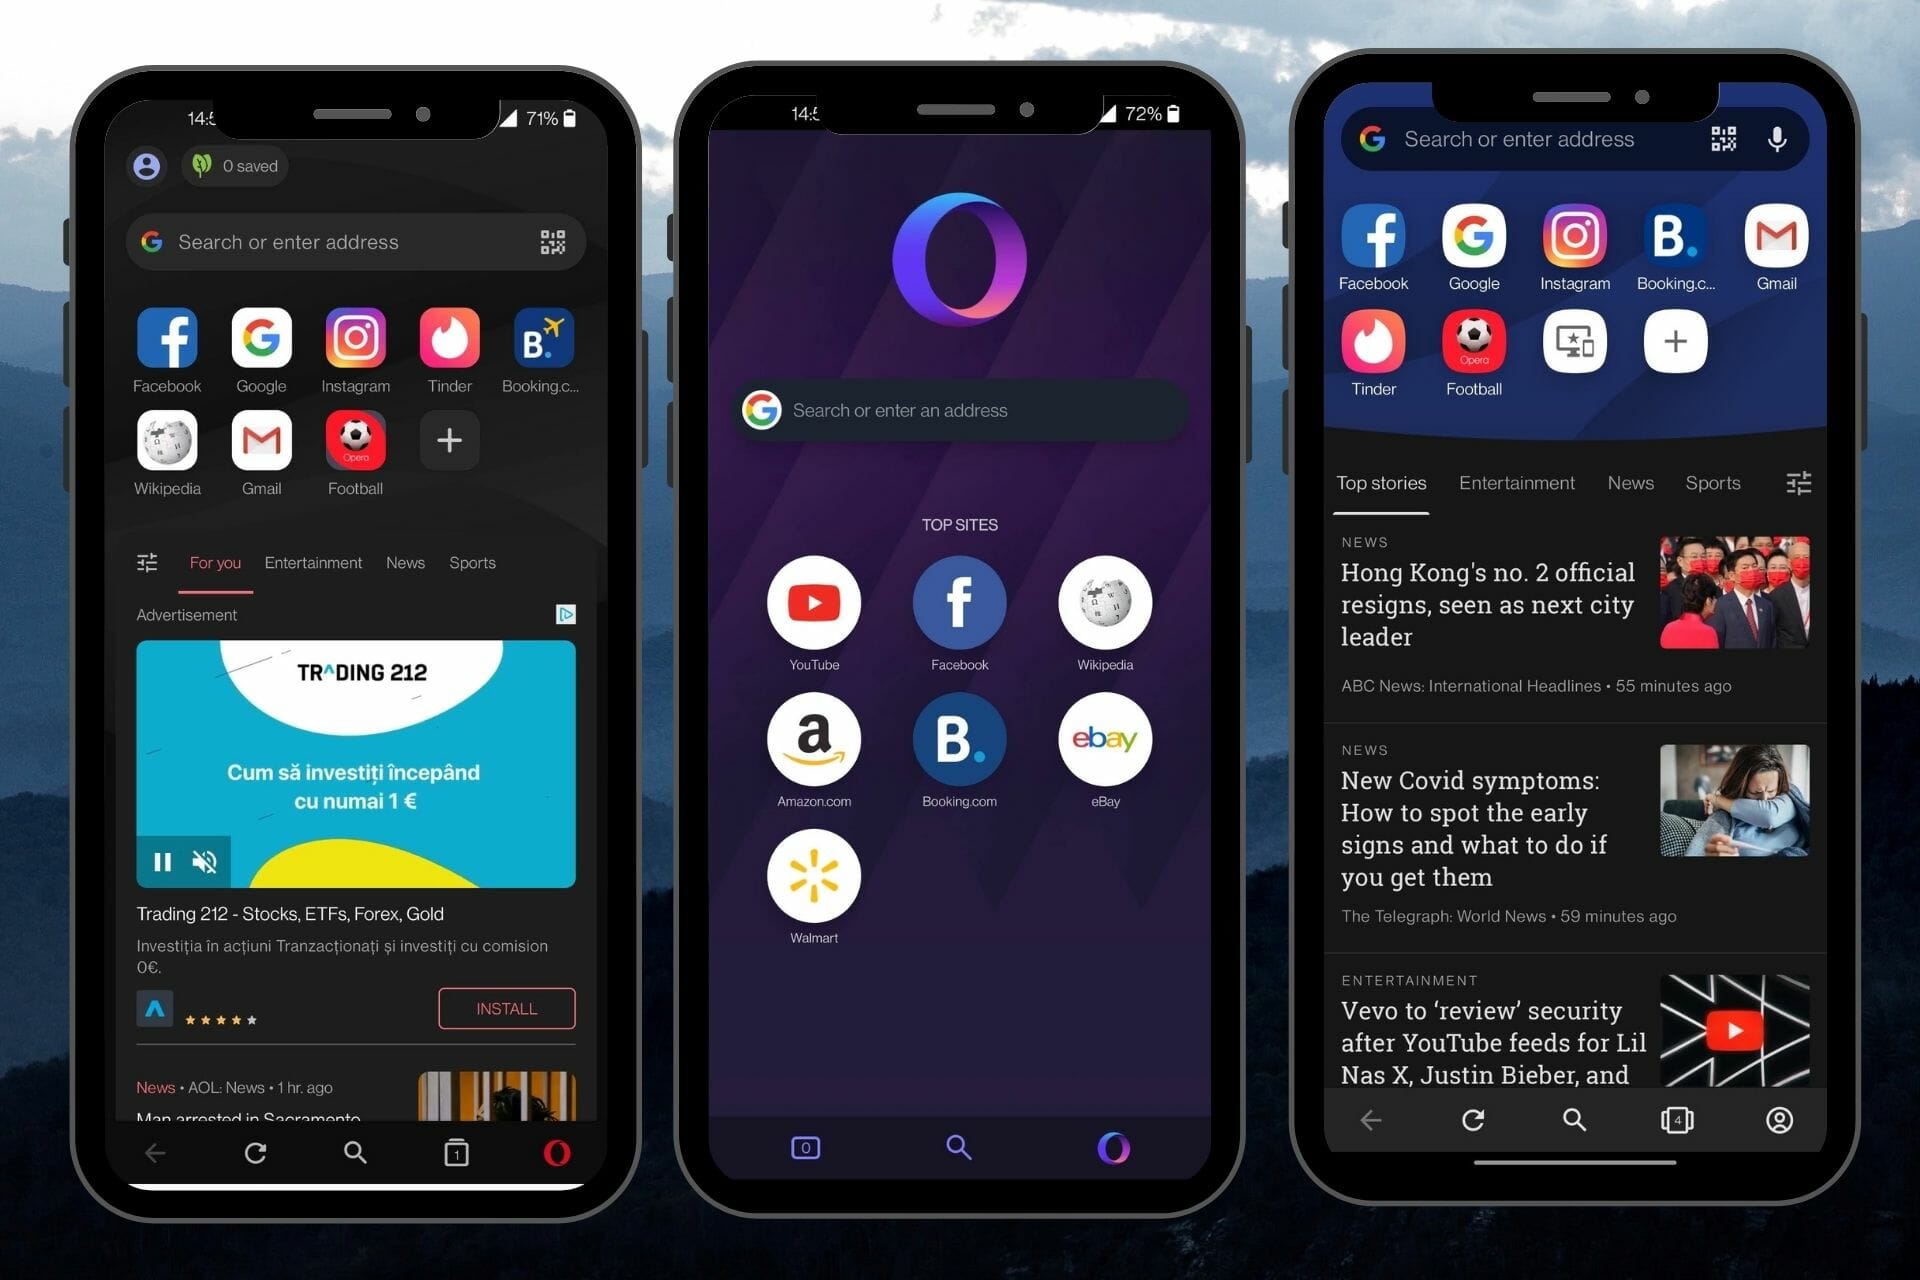
Opera browser on mobile has two menu bars, one on the top and one on the bottom. While this offers a lot of convenient options, it can clutter up the screen for smaller devices. Luckily, these toolbars can be customized to disappear when scrolling or to be always there.

There are a ton of options and features when it comes to customizing the Opera browser. It offers light and dark modes or users can have it sync with their device’s settings. Users can also change the color of the details and accents.

The tab management on Opera is also easy-to-use and convenient. The browser offers a carousel layout of tabs and displays the full page so users can easily find a specific tab. Users can also simply swipe left or right on the bottom toolbar to navigate between tabs.

Opera browser interface.

➡ Unique features

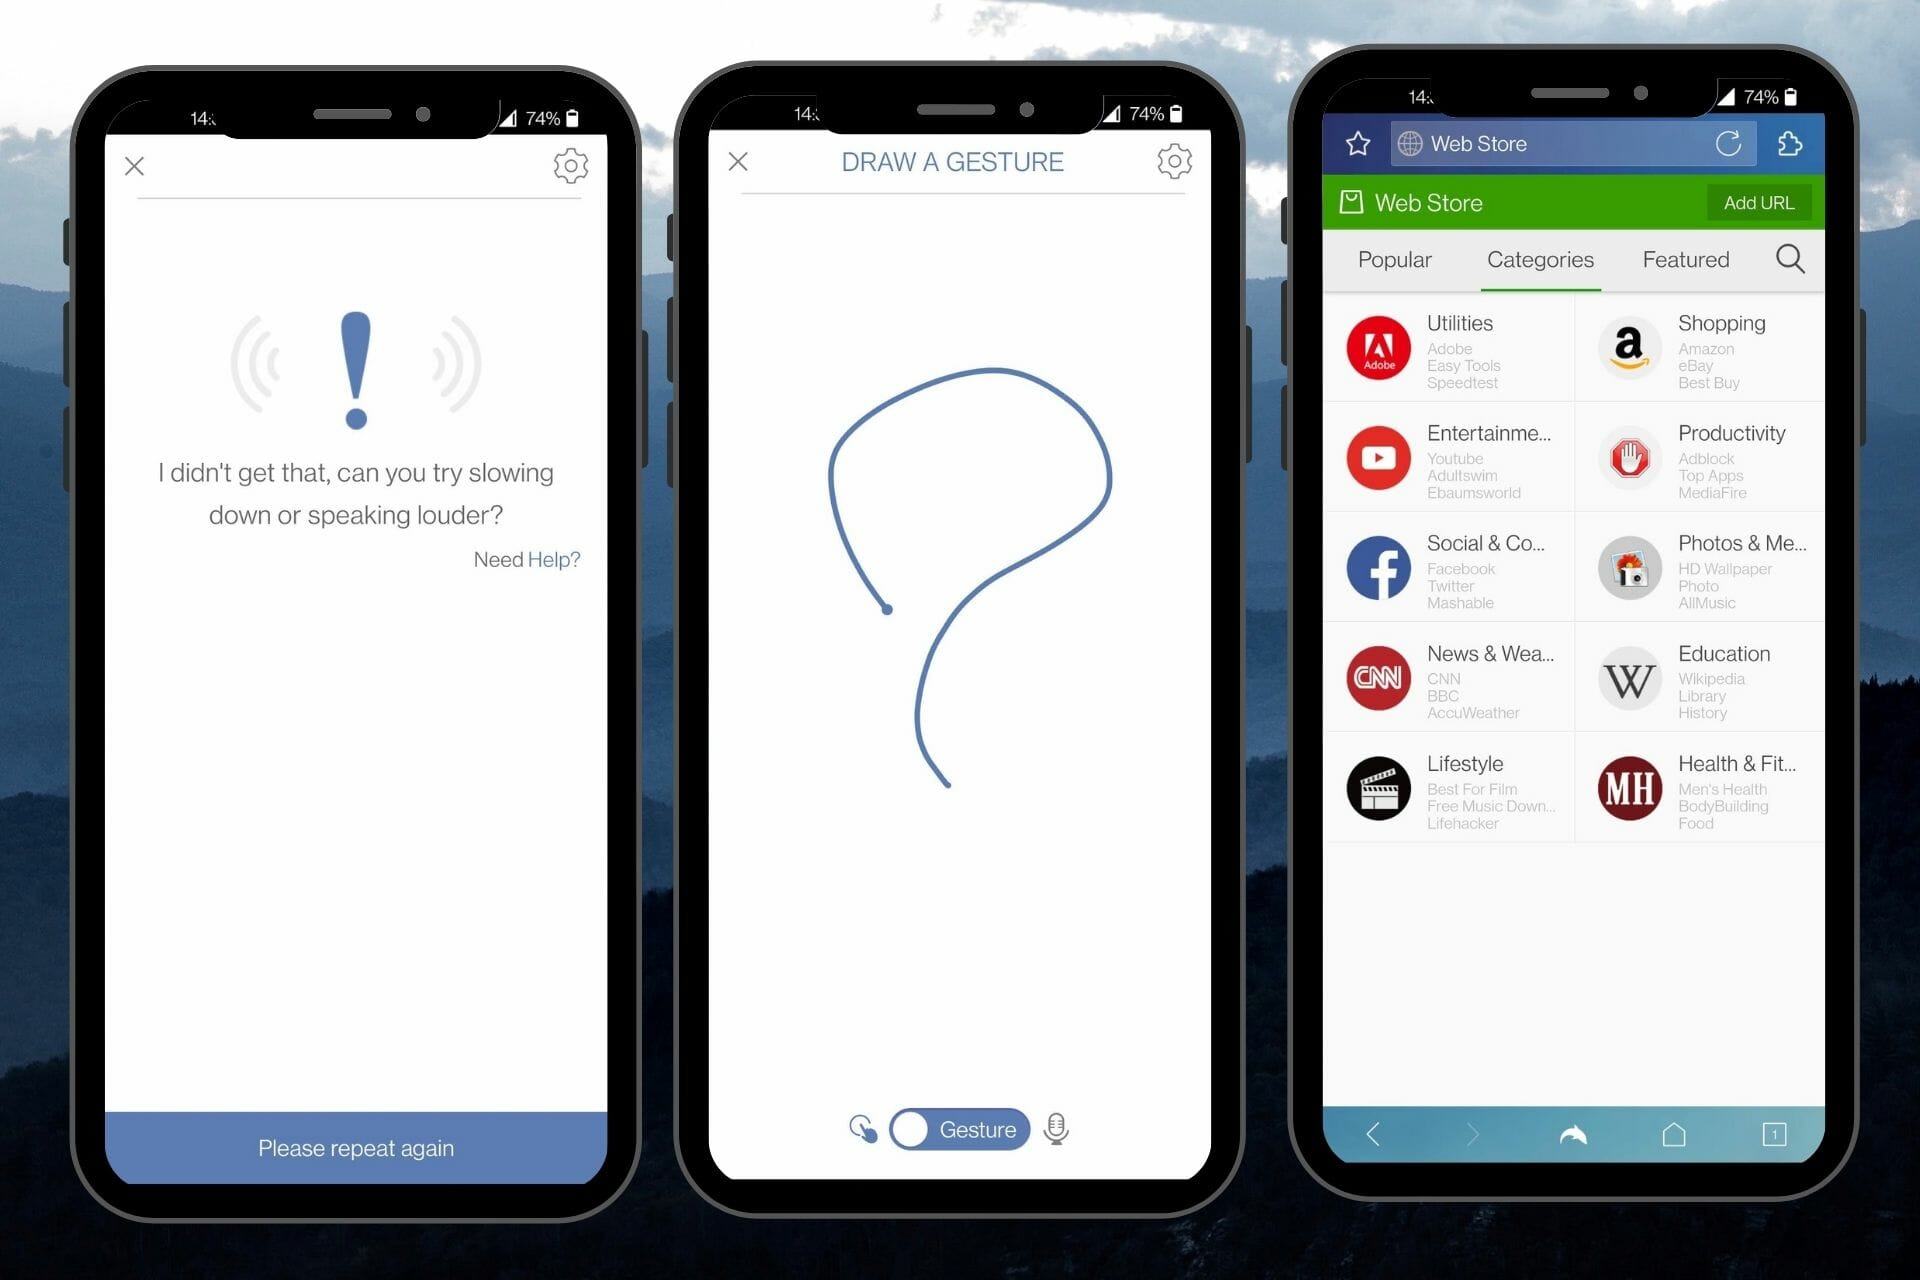
With Dolphin Sonar, users can search using voice commands for a hands-free browsing experience. This feature also allows users to share content and navigate the web using voice commands. Users can enable this feature by holding down the Dolphin button until the microphone pops up.

Gesture browsing is a unique feature where users can navigate the browser using swipe gestures. These gestures can be customized to any design. Instead of typing in a URL or searching through history or bookmarks, users can draw a set design to navigate the web.

Dolphin has add-on support if users want more features for their mobile browser. Most browsers only offer add-ons and extensions on their desktop versions.

Dolphin Browser unique features.

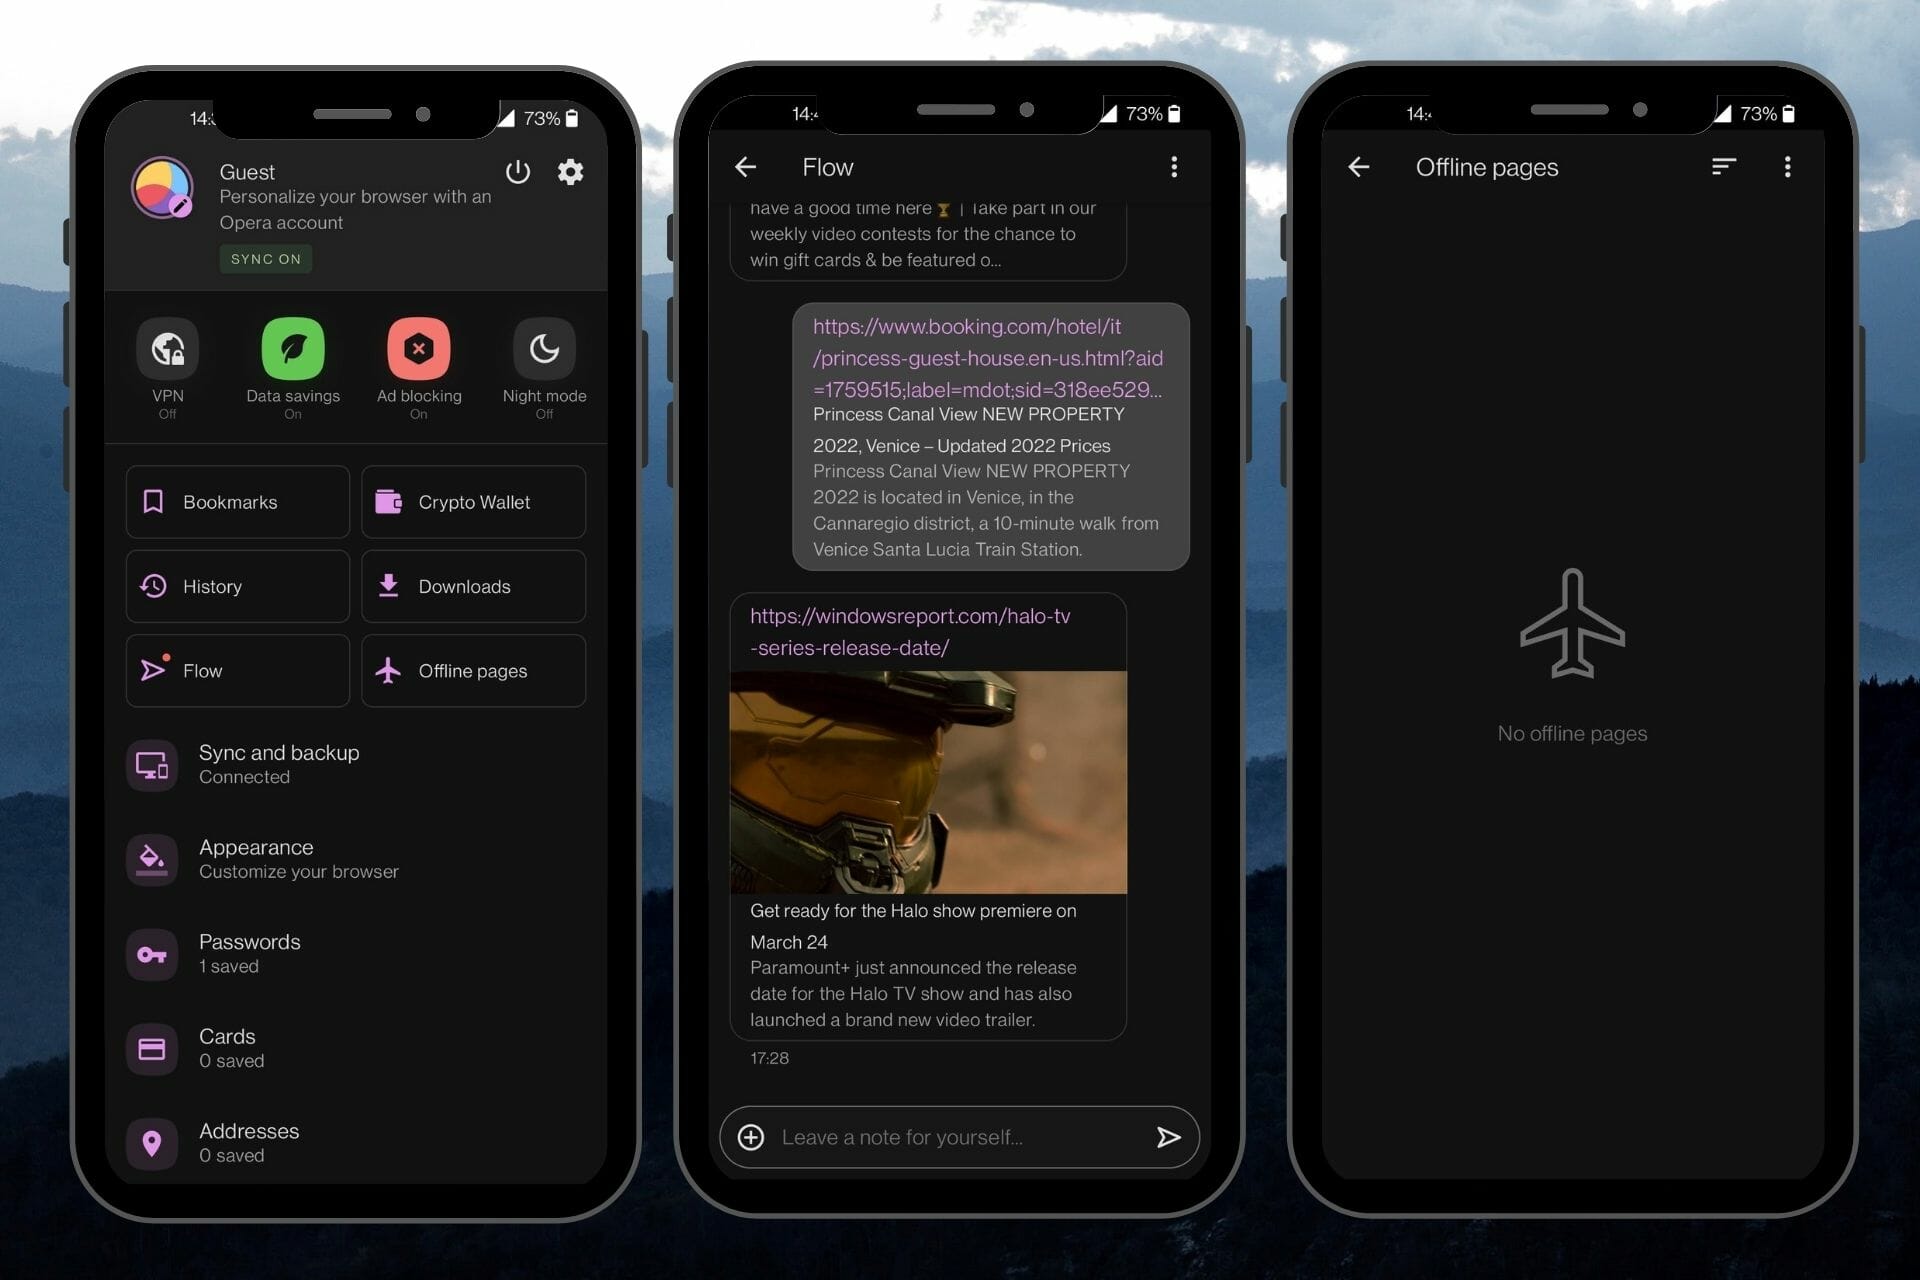
Opera is the first browser to incorporate a native crypto wallet. This feature allows users to explore Web 3.0 and make transactions with cryptocurrency. The Crypto Wallet is available on the mobile version of Opera so users can manage their tokens and cryptocurrencies while on the go.

With the offline pages feature, users can save open pages to the offline pages folder to have access to when not connected to the internet. This feature is perfect for traveling, simply save content in the offline folder and access it from anywhere regardless of network connection.

The Flow feature in Opera allows users to send and receive files, media, links, etc. between the mobile browser and the desktop browser.

Opera unique features.

➡ Accessibility

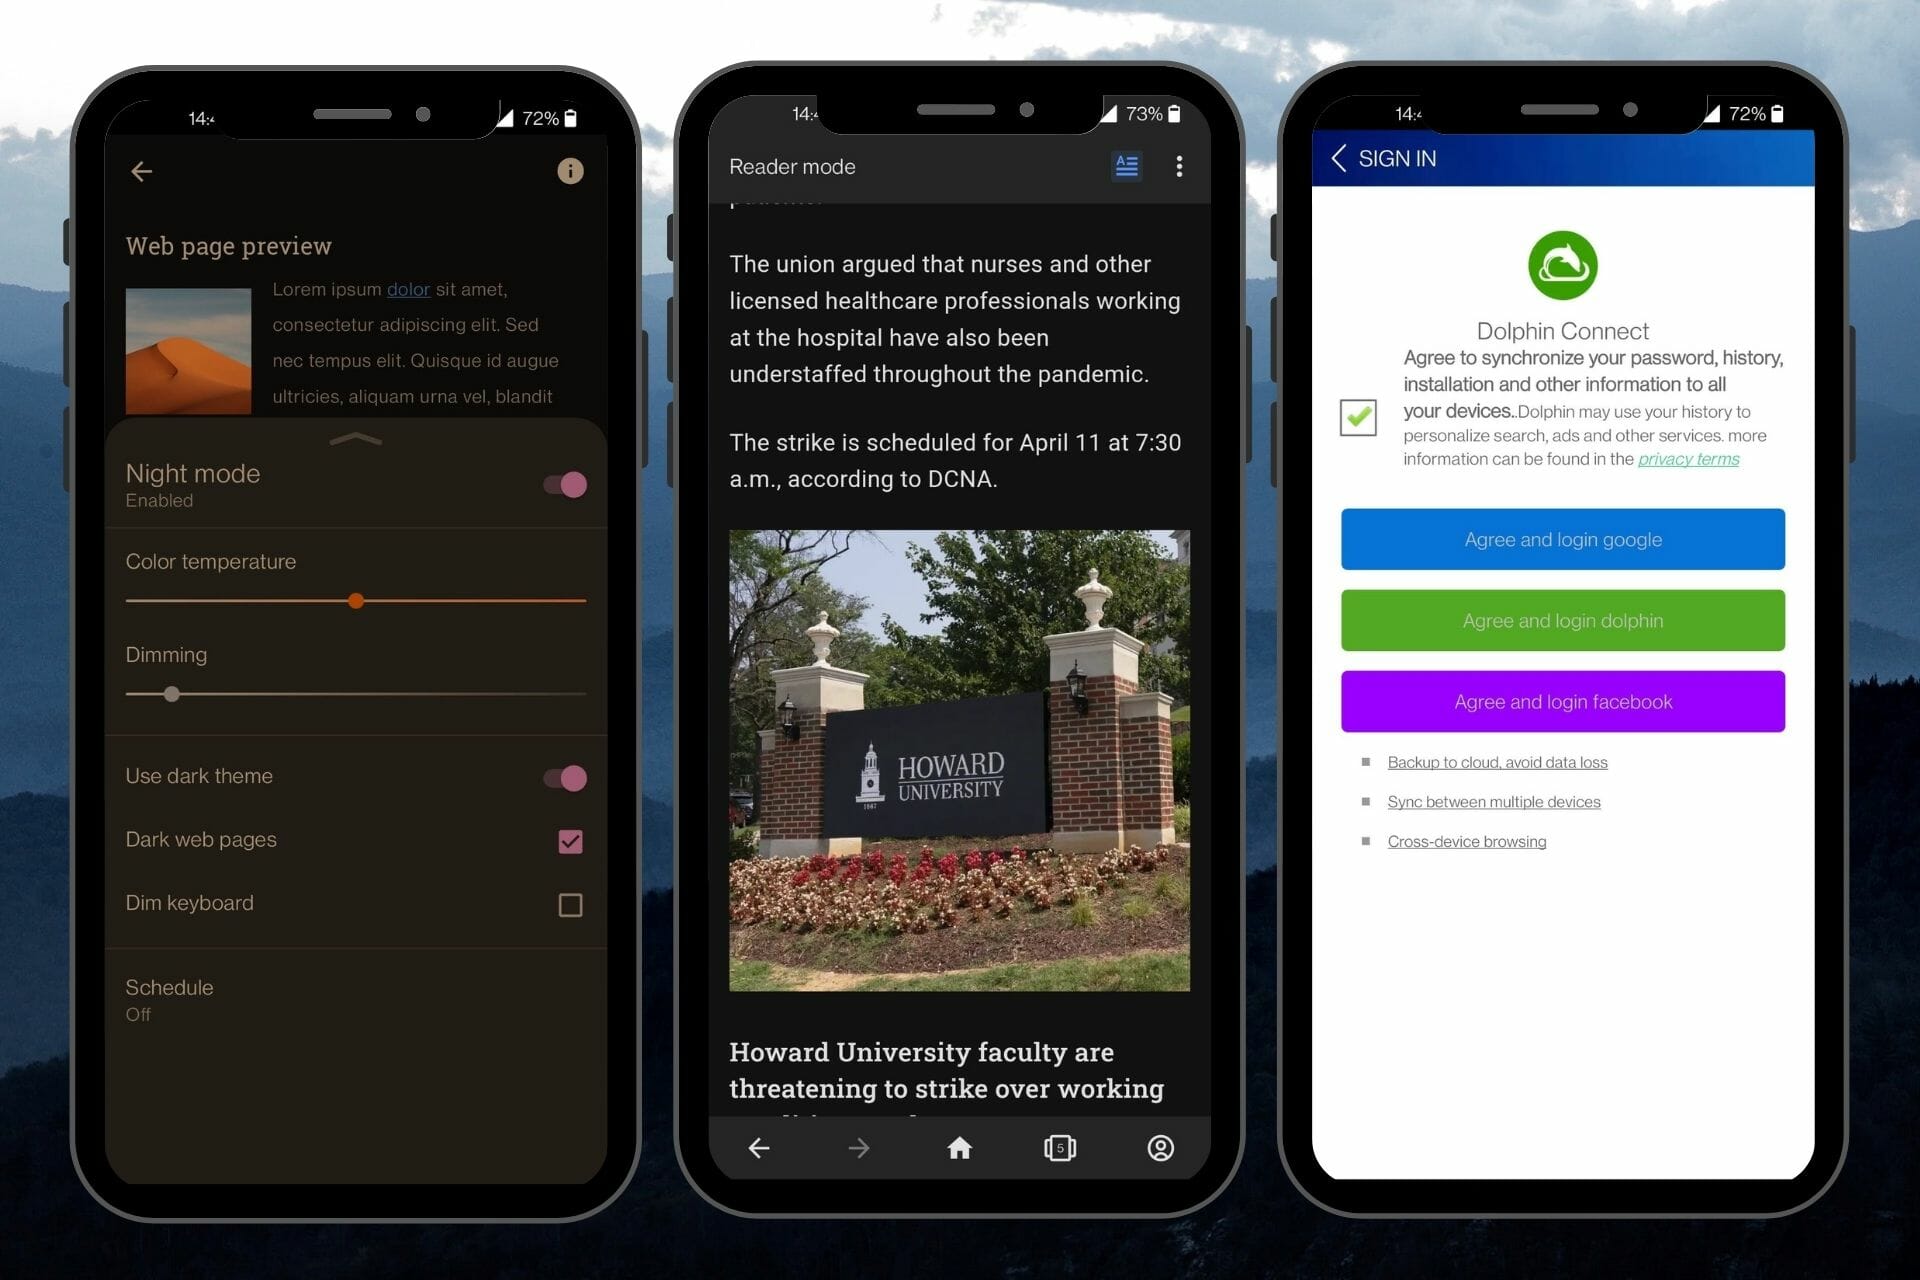
Opera has a reading mode that automatically activates on web pages with articles or reading material. This feature removes clutter from the page for a smoother reading experience.

Night mode on Opera dims the screen and removes blue light to protect sensitive eyes when browsing at night or in the dark.

Opera and Dolphin accessibility features.

Dolphin Connect allows users to sign in with their Google or Facebook accounts or create a Dolphin account. With this feature, users can sync their history, bookmarks, and browser data across devices.

Users can also customize auto-sync to only work when connected to a Wi-Fi network, so Dolphin doesn’t consume data in the background.

With the Chrome extension, users can sync their bookmarks, tabs, and more from their desktop browser to Dolphin on their mobile device.

➡ Speed and performance

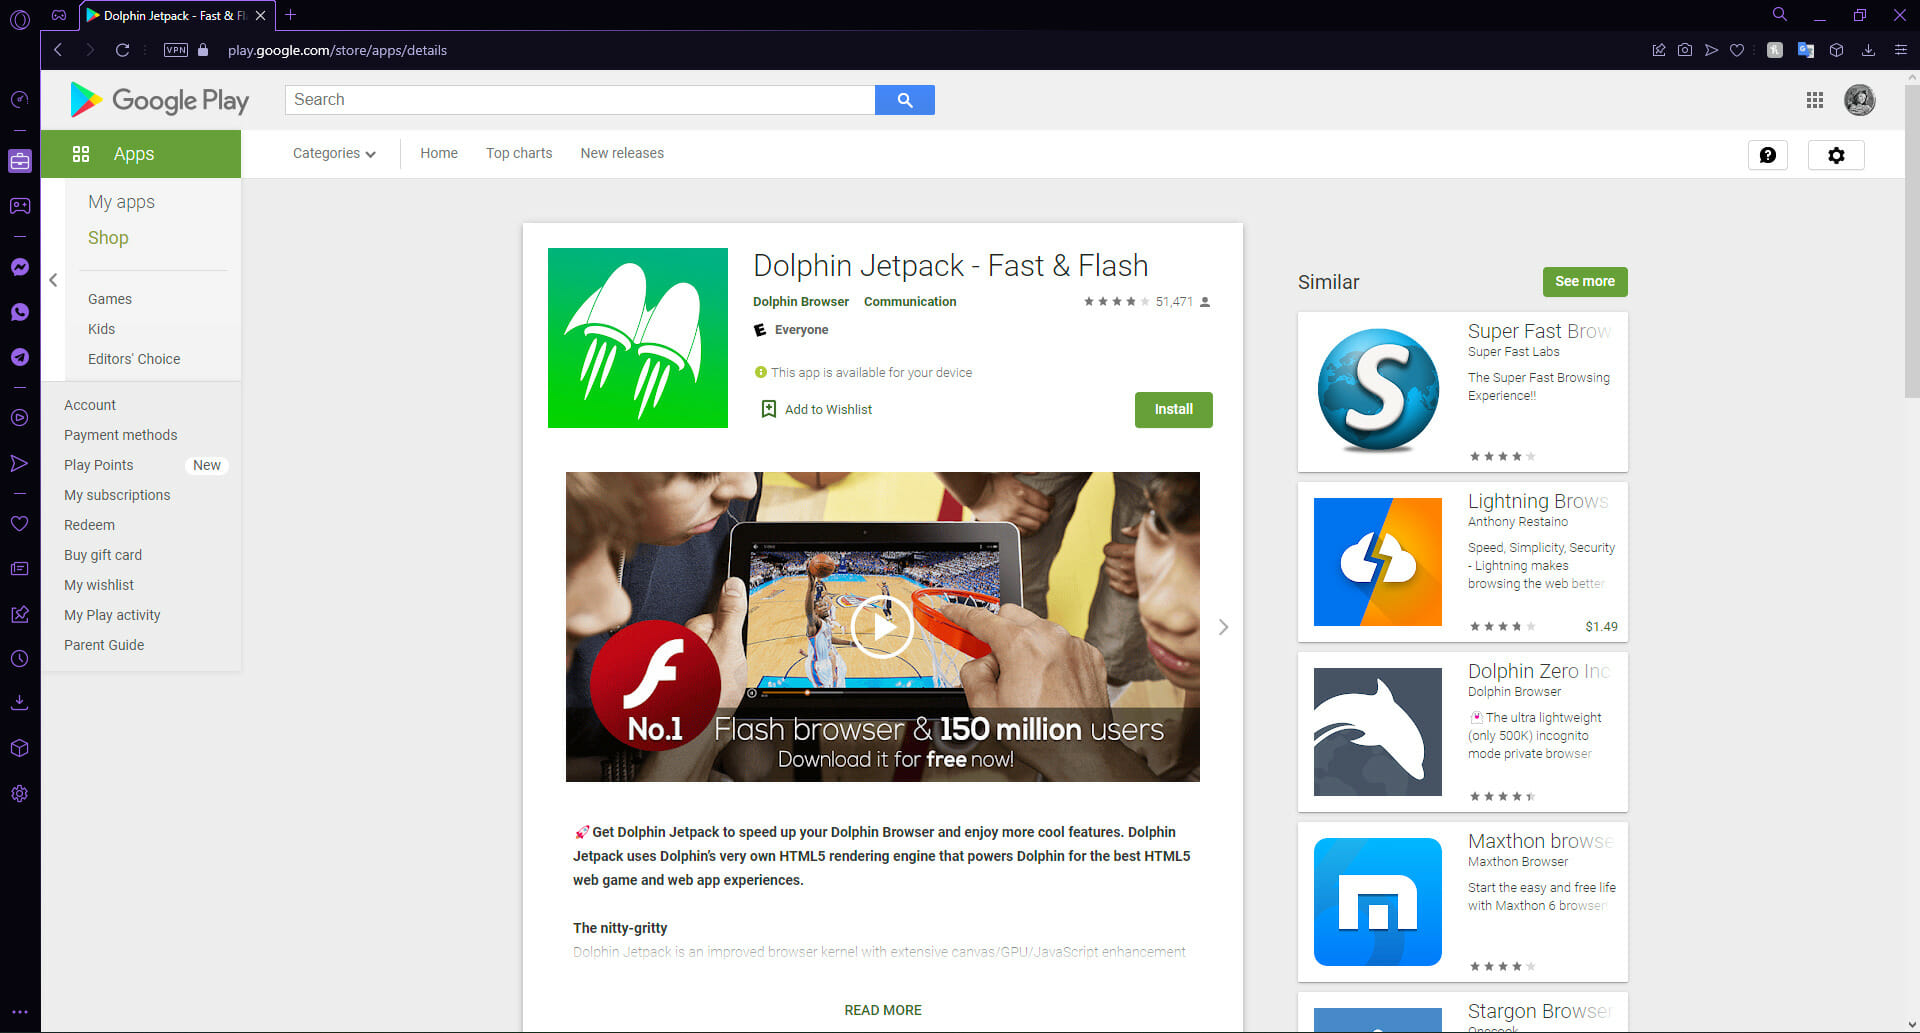
Dolphin Browser is extremely fast, especially with Jetpack mode. This feature speeds up web pages and loading times for fast web surfing. The only downside is that this feature is not already built into the browser when installed. Dolphin Jetpack is an add-on that needs to be installed from the Dolphin store.

Dolphin JetPack feature.

However, Dolphin is repeatedly praised for its speed, claiming to be 2x faster than Chrome. It has an extremely quick page loading speed because it’s not weighed down by a ton of functions and features.

Opera browser has a data savings feature that reduces the amount of data needed to load pages, thus using fewer device resources and speeding up page loading time.

➡ Security

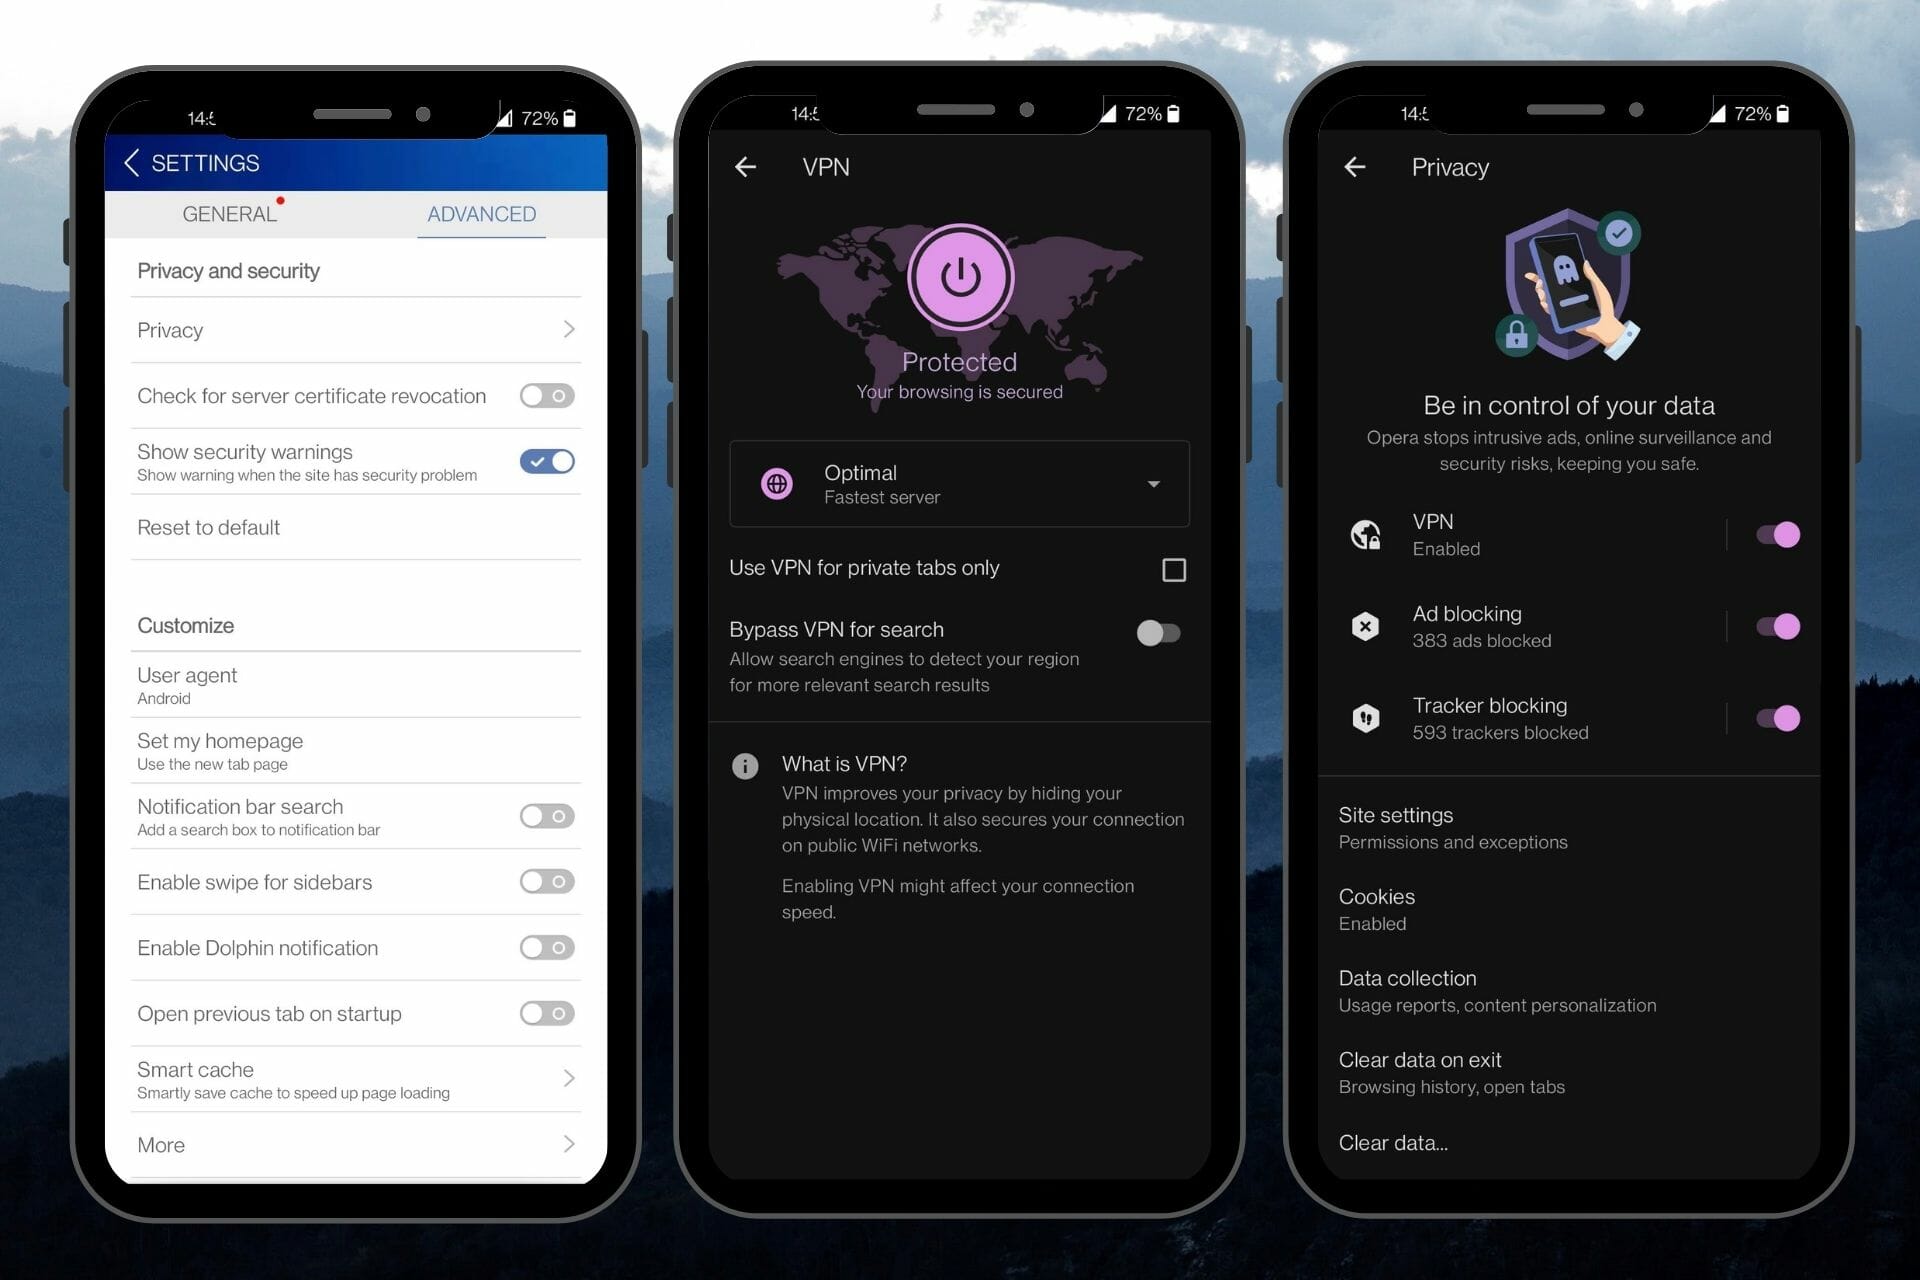
Dolphin doesn’t have a designated incognito mode like other browsers, but users can browse privately by adjusting the settings. Users can toggle switches to customize whether or not they want Dolphin to remember their passwords, data, and history.

Dolphin will let users know when a site has a security breach or is potentially insecure with the security warning feature. This feature can be enabled or disabled in settings.

Security features of Opera and Dolphin.

Opera browser has a built-in VPN and ad-blocker for a secure browsing experience. The VPN is free to use and doesn’t require users to register. The ad-blocker not only speeds up browsing but also prevents malicious ads that can harm your device.

Opera offers private browsing which doesn’t save browsing history or searches for untraceable web surfing.

What’s the difference between Opera, Opera Touch, and Opera Mini?

Opera is the standard browser that offers users a ton of features for a fully customizable mobile browsing experience. This browser offers the same capabilities as the desktop version but is made to be compatible with mobile devices.

This browser will ensure quick access to some of your preferred streaming platforms, easy access to instant messaging apps, and other social media and Spotify connection. All this is rounded up with an amazing built-in VPN that keeps you safe online, and an amazing background music feature that can help you focus at work.

Opera Mini is just like Opera but with fewer features and higher compression. This browser is designed for devices with less storage space and data. It is also a lot faster than the standard Opera.

Opera Touch caters to convenient, one-handed browsing. It has efficient features but without clutter and extra functions. It’s perfect for quick and easy browsing when on the go.

All Opera browsers are great and it depends on your needs when choosing which browser to use. For a more in-depth look between the browsers, check out our comparison of Opera and Opera Mini.

Opera vs. Opera Touch vs. Opera Mini.

While Dolphin offers a ton of features, most of them need to be installed separately from the Dolphin store. Because the browser is not weighed down by a bunch of extra features, it has a better performance. This also allows users to pick and choose which features they want.

Opera is a popular alternative browser because of its extensive built-in features and performance. Its customization options allow users to personalize the browser to fit their needs.

Let us know in the comments below which browser you prefer to use on your mobile device.

⇒ Get Opera

⇒ Get Dolphin Browser

Steam error on Windows 10/11: Preparing to launch [Fix]

Steam is arguably the best gaming client for Windows PC, but it occasionally throws errors that prevent you from playing your favorite games. For instance, when you’re trying to open a game, Steam might display the Preparing to launch message.

Normally, it doesn’t take long before it disappears and your game is fired up (unless you’re waiting for an update).

However, some users report that the issue sequence takes forever, even after running all the required game updates, so it basically turns into an error message.

You’ve probably already tried all sorts of hacks to fix this problem, without any luck, but don’t worry! We’re here to help you with some of the most efficient options you can find.

How do I launch a Steam game without launching it?

Many users are wondering how they can launch a Steam game without launching it. Well, if you’re in the same boat, keep in mind that you can’t launch a Steam game without Steam running.

However, you don’t need Steam to be open in the foreground, if you simply launch the .exe (or use a shortcut on your desktop) Steam will not launch its window, but will instead run in the background.

What can I do if I get the Steam error: Preparing to launch?

1. Update graphics card, DirectX, and audio drivers

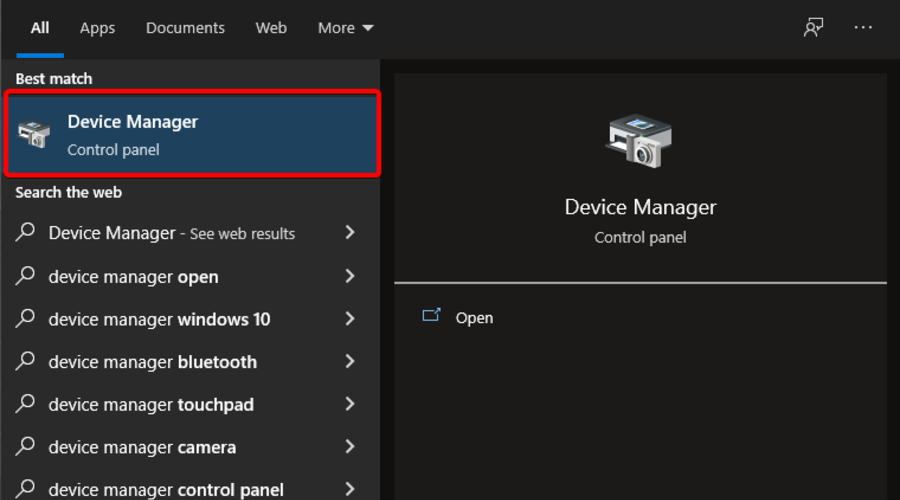
  1. Hit the Windows key, type Device Manager, and open it.
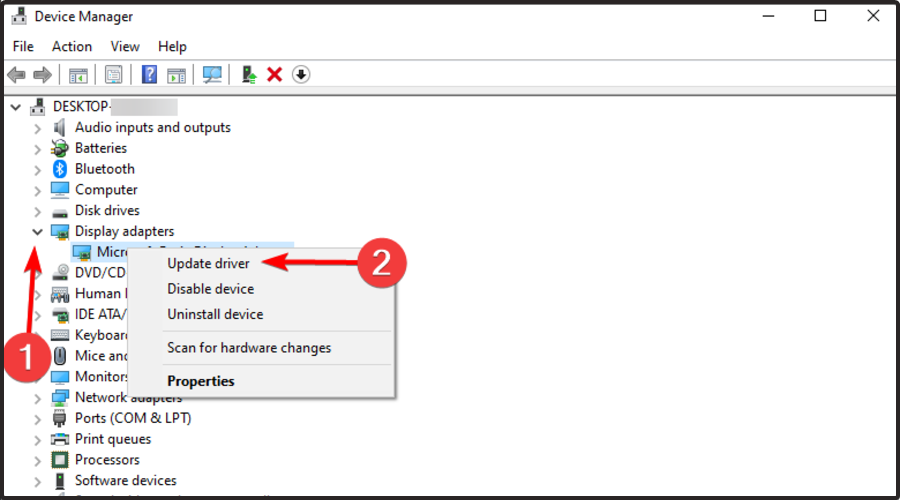
  2. Expand the Display adapters section, right-click on the needed component, then choose to Update driver.
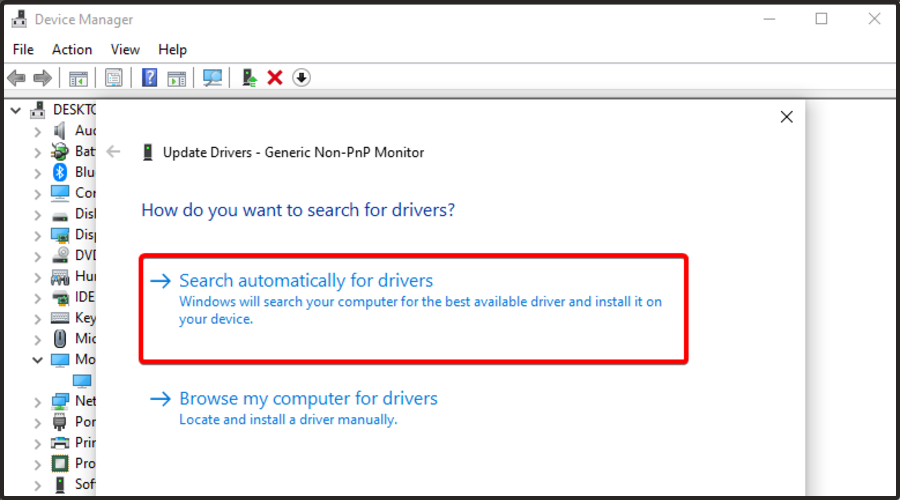
  3. Select to Search automatically for drivers.
  4. Now, your OS will scan and recommend the most reliable solutions.
  5. Repeat the same process with all of your graphics drivers.

Get started by updating your graphics card drivers, audio drivers, and DirectX to the latest version.

Your Steam games might not work if those drivers are outdated, missing, or corrupted in some way, resulting in the Preparing to launch loop.

As you can see, you can manually update drivers in just a few simple steps.

A quicker way is to use a reliable driver updating tool such as Outbyte Driver Updater. It’s lightweight and has an intuitive interface. Outbyte Driver Updater performs a full system scan automatically on startup, finding any outdated, damaged, or missing drivers.

All you have to do is select the drivers you’re interested in updating and let Outbyte Driver Updater take care of the rest.

Reboot your PC afterward to finalize driver modifications. Then, try to launch your Steam games again.

⇒ Get Outbyte Driver Updater

2. Verify the integrity of game files

  1. In your Windows search bar, type Steam, then open the desktop client.
  2. Now, in the main menu, go to the LIBRARY section.
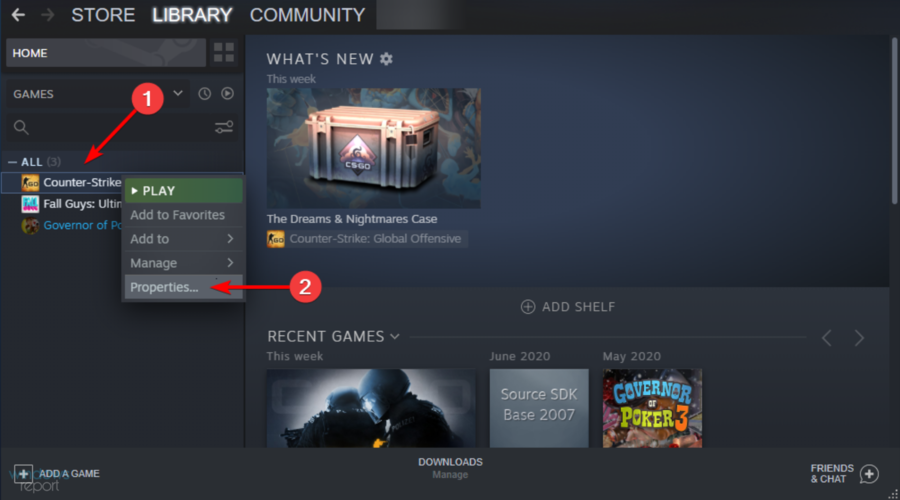
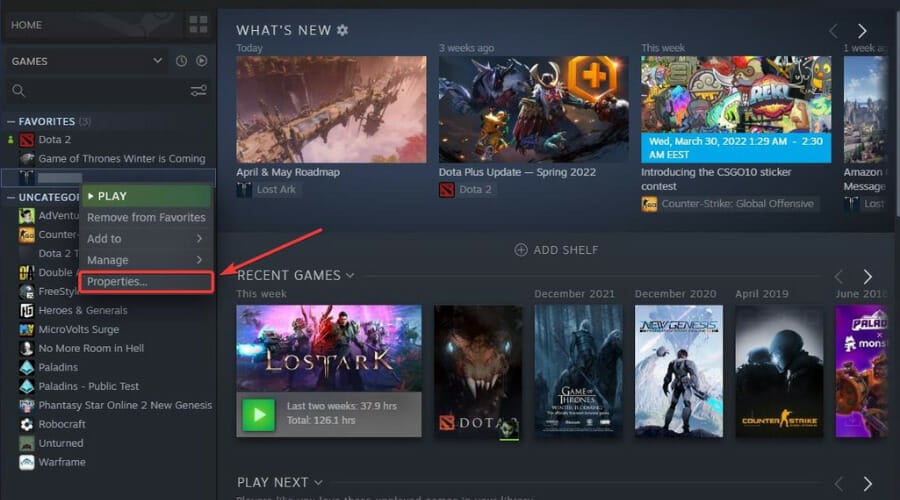
  3. Right-click your game and select Properties.
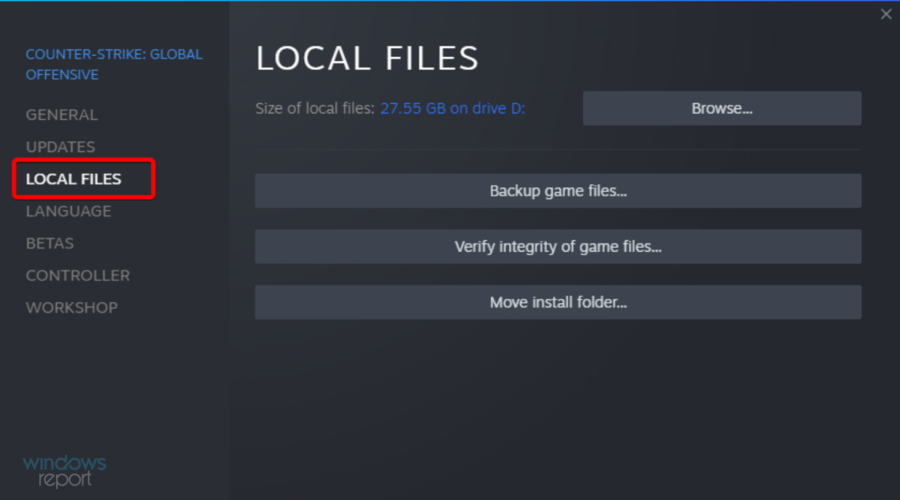
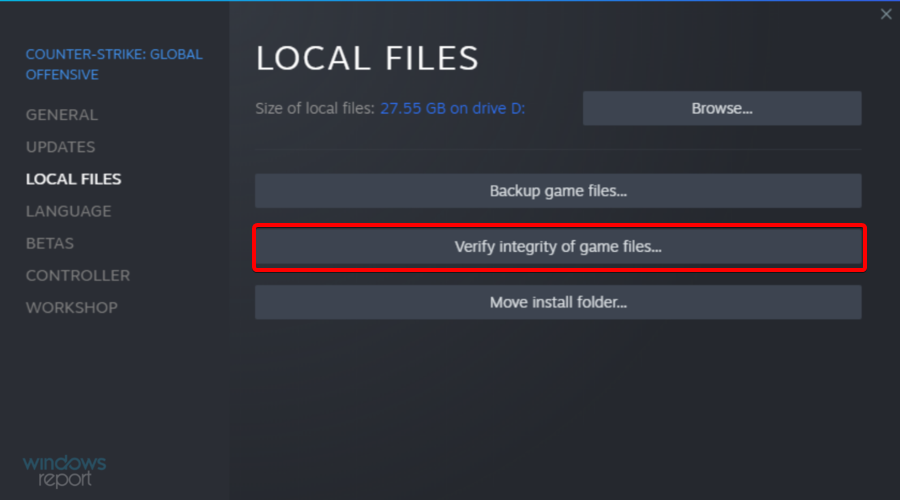
  4. Select Local Files.
  5. Now, choose to Verify the integrity of game files.
  6. Wait until the process is over.
  7. Try to launch the game now.

If the Preparing to launch error is caused by a corrupt game cache, follow the steps above to fix this in just a few clicks.

3. Update Steam and your OS

3.1 Steam

  1. Hit the Windows key, type Steam, then open the first result.
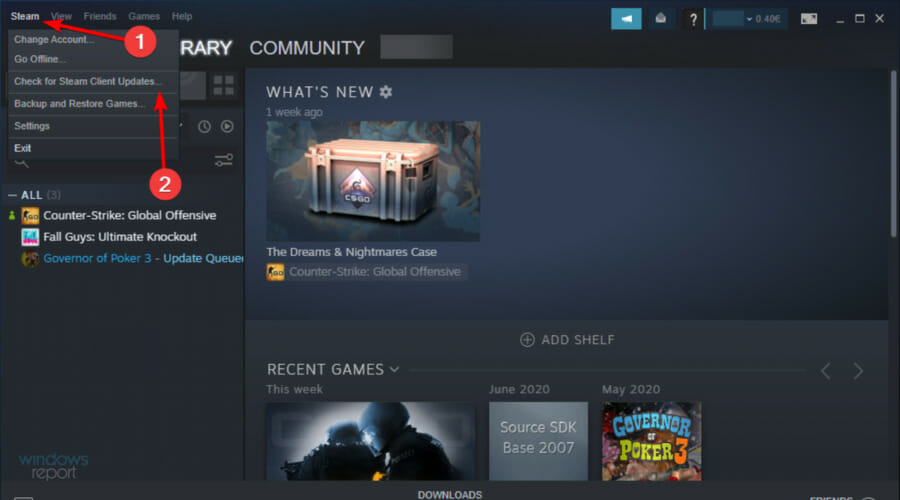
  2. From the top-left corner of the window, click on Steam, then choose to Check for Steam Client Updates.
  3. If Steam failed to apply updates and reverts your changes, check out our easy guide and find the best solutions for you.

3.2 Windows 10

  1. Use the following keyboard shortcut to open Windows Settings: Windows + I.
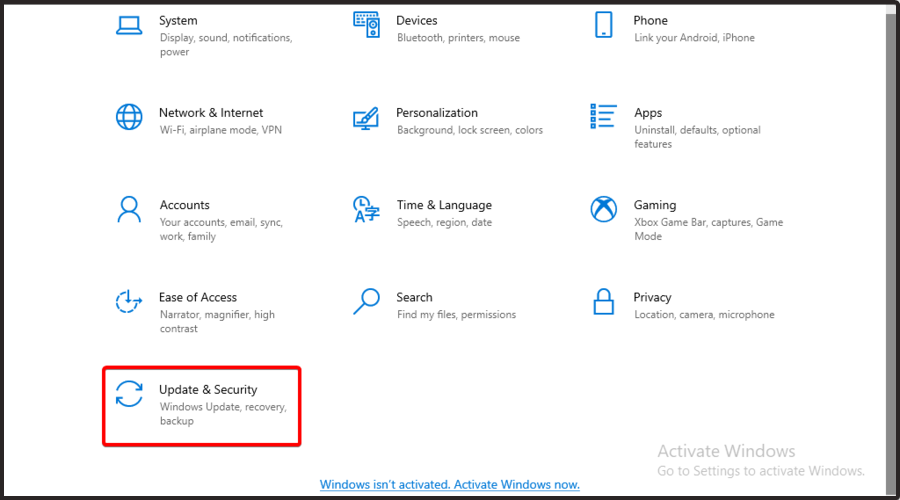
  2. Go to Update & Security.
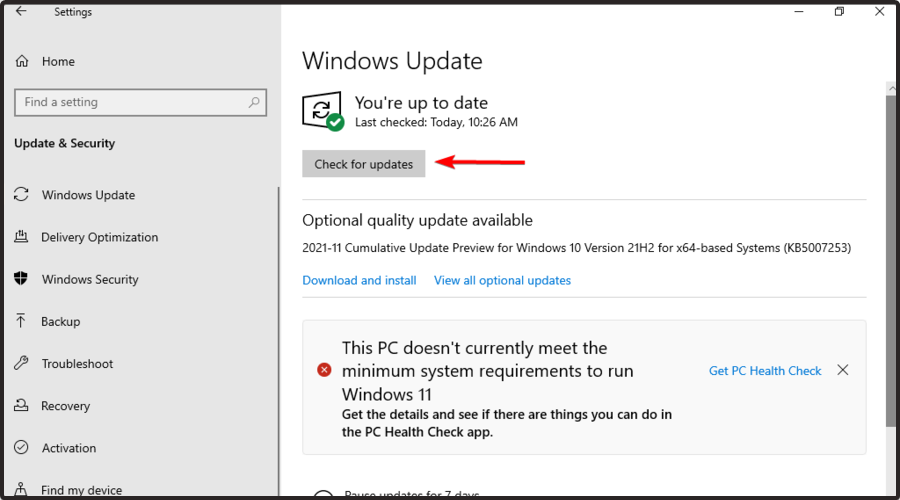
  3. Stay on the Windows Update page, then from the right side of the window, choose to Check for updates.
  4. Press on the Download button if any updates are ready to use.

Make sure you’re running the latest updates for Steam and Windows 10, in order to take advantage of the newest features, improvements, and bug fixes.

If your Steam games depend on .NET Framework, we suggest downloading Microsoft .NET Framework Repair Tool and using it to fix it.

4. Reinstall Steam

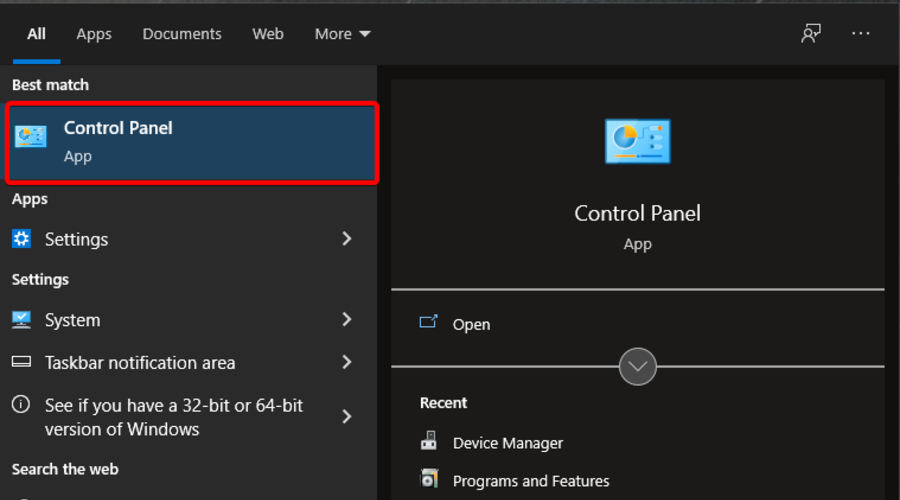
  1. In the Windows search bar, type Control Panel, then open it.
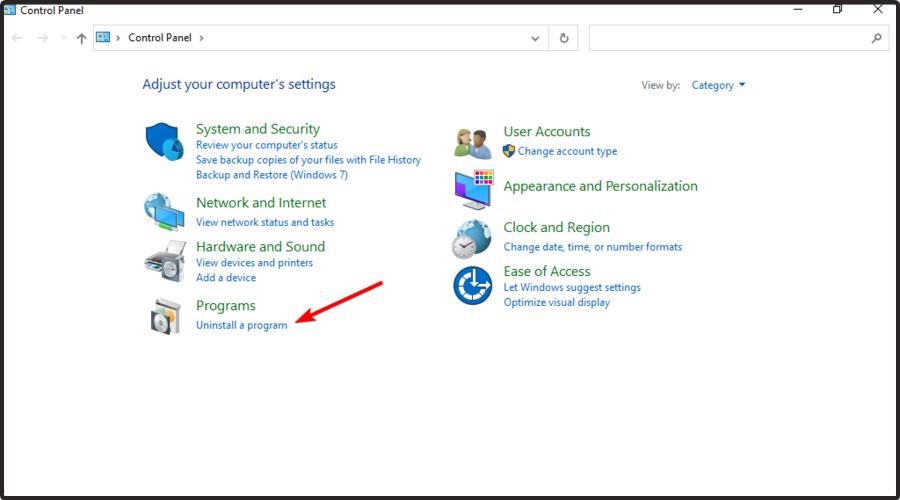
  2. Click on Uninstall a program.
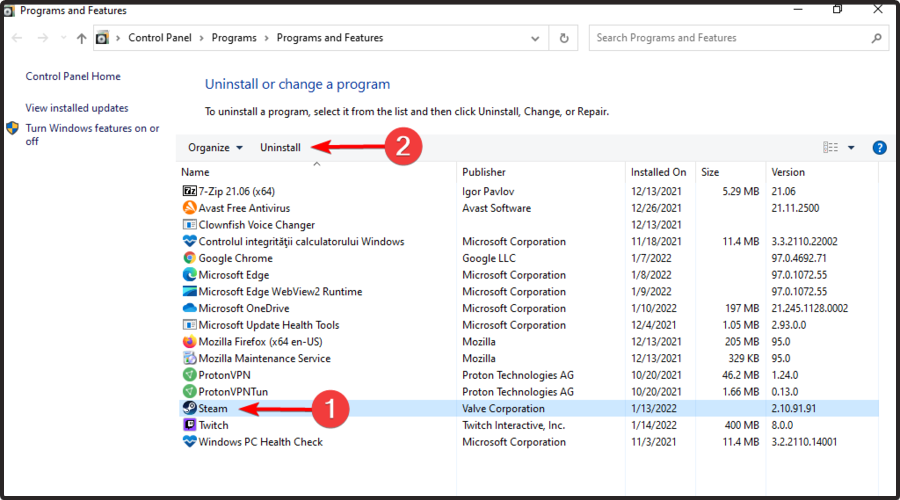
  3. Here, search for Steam, click on it, then choose to Uninstall it.
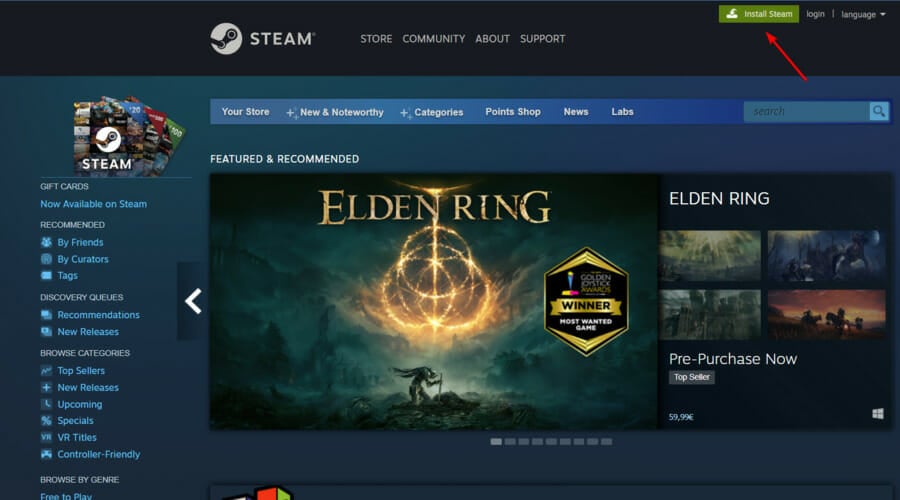
  4. Now, navigate to the Steam download page.
  5. From the top-right corner of the window, click on Install Steam.
  6. Follow the on-screen instructions to proceed the installation.

This should solve any problems with the Steam package if it’s at fault. You can quickly download Steam from our website.

5. Change your DNS servers

  1. Use the following keyboard shortcut: Windows + R.
  2. In the opened Run dialog box, type ncpa.cpl, then press on the Enter key.
  3. Right-click your Internet connection and select Properties (you need admin rights).
  4. Click on Internet Protocol Version 4 (TCP/IPv4), then go to Properties.
  5. Select Use the following DNS server addresses.
  6. Set Preferred DNS server to 8.8.8.8 and the Alternate DNS server to 8.8.4.4.
  7. Click OK
  8. Go back to Steam and try to launch your game

Certain ISPs block Steam traffic and even poison your DNS servers to prevent you from playing on Steam.

Some popular examples include Dutch Telecom, Bluewin, and Micronet Broadband.

But you can modify your DNS servers as a workaround. You will be able to play Steam games even if you get the Preparing to launch error but nothing happens.

In the instructions above, we used the free, public, and secure DNS servers provided by Google Public DNS. You can also try Cloudflare or OpenDNS.

6. Disable your free VPN service

Steam has trouble working properly with some VPN tools. It usually happens with free VPNs, because they use public IP addresses.

So, if you are currently connected to a secure tunnel created by a VPN, make sure to turn it off.

It could be the reason why Steam prepares to launch your game but never does.

7. Use a premium VPN service

Using a VPN has tons of benefits, as long as the service is of exceptional quality. We previously established that a free VPN can hamper your Steam gaming experience, but a premium VPN is different.

In this matter, we can’t think of a more trustworthy VPN solution than Private Internet Access.

You can use it to secure your network connection while playing on Steam and bypass throttling if your ISP blocks Steam traffic.

Moreover, this VPN supports split tunneling. If you’re having any sort of network issues on Steam due to VPN, you can set up split tunneling mode to reroute all network traffic through VPN, except for Steam.

As a result, you will be able to navigate the web and download torrents securely, access more content, and unblock Netflix US anywhere else in the world, while playing games on Steam outside of the VPN tunnel.

What other Steam launch errors can I encounter?

Of course, the Steam error: Preparing to launch is not the only one you can face on your Windows OS. Because it is always important to be aware of potential troubles, we’ve prepared a list of the most common Steam launch errors:

  • Steam games can’t run on Windows 10/11 – In this case, it seems like several games won’t launch on the gaming platform. This can be due to a number of reasons, but mostly it’s related to outdated drivers.
  • Steam won’t launch at all – It is worth mentioning that the solutions presented in the related fixing guide apply to a variety of Steam error messages. In order to discover them all, make sure you navigate to the indicated link.

To summarize, you can fix the Steam Preparing to launch loop on Windows 10 by updating your graphics card, audio drivers, DirectX, Steam, and operating system.

If that doesn’t work, make sure to verify the integrity of the game files, reinstall Steam, change your DNS servers, disable your free VPN, and use a premium VPN solution that won’t sabotage you.

Windows 11 Won’t Eject External Hard Drive? How to Force it

Some users are reporting that they are not able to safely eject their external hard drive on Windows 11. This can be a major problem for users using the external hard drive for backup purposes.

If your Windows 11 won’t eject your external hard drive (or any other external media for that matter), it can be very frustrating. Your computer might freeze, crash, or even restart when you try to eject an external hard drive. Fortunately, there are several ways to fix this problem.

Removing a hard drive with Windows is fairly easy, but you need to do so safely to avoid data being corrupted or damaged.

If you are unable to safely eject the external hard drive or the option isn’t available, there may be some causes. For instance, the drive may still be in use (try closing all applications), or there could be outdated drivers.

This article highlights some of the most important causes of this issue and provides quick fixes that may resolve the issue.

Why Windows 11 won’t eject the external hard drive?

If your external hard drive is not safely ejected, you might get an error message such as Failed to safely eject volume, Devices have been found or Eject button on an external drive is missing.

Windows 11 could issue the warning for two main reasons:

  • The drive contains files that are currently in use. If the background processes or applications are using the files stored on the external drive, it can cause the issue.
  • USB drivers on your system are outdated or malfunctioning.

What can I do if Windows 11 won’t eject the external hard drive?

1. Restart your PC

Restarting your computer is the first thing to consider when you’re experiencing this issue. Shutting down your computer closes down all applications and third-party processes.

Including the ones that are accessing files on the external hard. You can eject the external drive when the system boots up again.

2. Update USB drivers

  1. Go to the Windows Search bar and type Device Manager. Hit Enter.
  2. Expand the Universal Serial Bus Controller option.
  3. If you see an entry with a yellow exclamation mark, right-click it and select Update Driver.

Outdated or incorrect USB drivers can also affect your ability to eject the drive from your computer. To fix this issue, simply update your USB drivers and then try ejecting the drive again.

You can also update drivers through the Outbyte Driver Updater. It is a powerful, easy to use driver update software tool that allows you to find and download the latest official drivers for your computer.

It can even help you install them automatically. With an intelligent user interface, Outbyte Driver Updater is easy for both novice and advanced users to navigate.

⇒ Get Outbyte Driver Updater

3. Use Command Prompt

  1. Press Windows + R to open the Run dialog window.
  2. In the Run window, type CMD and hit Enter. This will open up the elevated Command Prompt. window.
  3. Once in Command Prompt, copy and paste the following and hit Enter: RunDll32.exe shell32.dll,Control_RunDLL hotplug.dll
  4. Select the drive you want to eject and click Stop.

You can easily access the Safely Remove Hardware utility through Command Prompt. This should open the disk utility and allow you to safely eject your external hard drive.

4. Run Windows Hardware and Device Troubleshooter

  1. Go to the Run dialog window, type CMD, and hit Enter.
  2. In the Command Prompt window that opens, copy and paste the following and hit Enter: msdt.exe -id DeviceDiagnostic
  3. Click Next to run the troubleshooter.

The Windows Hardware and Devices Troubleshooter diagnose common problems with your computer. If you are experiencing any issues removing an external hard drive, the Troubleshooter can help fix the problem.

5. Close running tasks in Task Manager

  1. Go to the Windows Search bar, type Task Manager, and hit Enter.
  2. In Task Manager, select the Processes tab and you should be able to see a list of running processes.
  3. Right-click any program that appears to be taking up too many resources and select End Task.

If you ever find problems ejecting the external drive, the best way to fix it is to close any programs that are open in the Task Manager.

Is it safe to remove a drive without ejecting it?

Firstly, it’s worth mentioning that most of the time you can unplug your devices without safely ejecting them. It’s only when we start to make this a habit that problems might arise.

If you unplug your USB device while data is being written, it may become corrupted. Moreover, it can slow down a lot of operations on your computer, or even move files around that you may have been working on for hours.

The above two methods should suffice to fix your problem of external hard drives not ejecting on Windows 11.

You can also consider installing the latest Surface updates to fix outdated drivers.

If you have any questions, let us know by leaving a comment below and we will try to help you out.

5+ Best Windows 11 Hands-Free Audio

Using hands-free audio gives users to perform tasks without interfering with others. There are a lot of changes in audio devices with the advancement of technology, i.e., the introduction of new Bluetooth versions or voice assistants.

Most hands-free audio devices enable you to communicate with no hands or limited use of hands. The majority of them have speakers and microphones that help in the communication process.

In this article, you will look at the best Windows 11 hands-free audio that you can use.

Why are hand-free audio devices the best?

They are good in situations where the user requires less mobility. For example, if there is a phone call, the user doesn’t have to move to receive the call. He stays and goes on with the call.

They help avoid simple accidents due to trying to multitask or attend to several activities. The hands-free device allows the multi-tasker to move around and complete other tasks while talking on the phone.

This can be useful when doing housework or performing office duties. It also allows the user to take notes or type on the computer while talking on the phone.

One of the primary motivations for developing the hands-free device was to free up the hands of drivers while they talked on the phone. However, whether or not this truly makes driving safer is hotly debated.

Supporters argue that it allows the driver to keep both hands on the steering wheel. As a result, the driver can drive more cautiously and with greater vehicle control.

Opposers of the hands-free device argue that, while it frees the driver’s hands, talking on the phone is still a distraction because the driver cannot focus fully on the task of driving. Opponents also claim that the device may give drivers a false sense of security.

They argue that the device may give drivers a false sense of security and may only free up their hands to perform non-driving tasks such as adjusting the radio, changing climate controls, drinking, and eating.

What are the best Windows 11 hands-free audio devices?

Panasonic RZ-S300W

  • Water-resistant
  • Long battery life
  • Small and lightweight
  • Compatible with Alexa
  • Supports Bluetooth connectivity
  • It may require an adapter to use

Panasonic has been around for a while and is known for producing quality products. They are wireless, and they use different technologies to achieve the results. It follows one of the best Japanese engineering practices to achieve its performance.

Also, Panasonic RZ-S300W comes in a pair suitable for calls, videos, and sounds. Their cases are water-resistant and can resist smudges due to the smooth edges.

During the first use, you have to install the Panasonic app that helps you connect, displays battery life, volume, and sound settings. It has an antenna that provides a powerful connection preventing volume drop and unbalanced sounds.

Bowers & Wilkins PX7

  • Adaptive noise canceling
  • 30 hours of possibility
  • It has carbon fiber composite arms
  • Has playback buttons to control the play configuration
  • It may require an adapter to use

It uses driver technology and Qualcomms to build successive wireless headphones. It uses aptX HD Bluetooth to transmit clear audio during wireless transmission.

They have an adaptive Codex that takes care of the environment around the user. Easier to cancel noise using the low, medium, and high buttons. They are comfortable to wear, inspired by their fabric finish and less weight.

The Px7 will follow your every move. Lift an ear cup to hear what’s happening around you, and the music will stop automatically. When you replace it, the music resumes.

Race cars served as inspiration. The Px7’s carbon fiber composite arms mimic the strength and agility of the world’s fastest vehicles, channeling pure sound to you while standing up to everyday wear and tear. So pack them in your overnight or work bag and prepare to be immersed in sound.

Shure Aonic Free

  • Studio-quality sound
  • Clear call
  • Fingertip Control
  • Noise cancellation feature
  • Supports Bluetooth 5 technology
  • Not water-proof

It is one of the best headphones right now. It has an excellent quality sound, and they are well designed for users to enjoy. Its design inspiration is through the historical development of products they built for musicians and performers.

These headphones come with a 2-year warranty, a free charger, and a USB-C charging cable for all purchases.

They are well designed, with sleek design, pill-shaped for those with small ears, making them comfortable to use and wear. It comes with the ShurePlus app that plays roles in button customization, environment mode changing, and prompts customization.

Bose QuietComfort 45

  • Noise-canceling
  • Quiet and aware modes
  • Up to 24 hours of battery life
  • It comes with Bose app
  • Studio-quality sound
  • It may require an adapter to use

It has one of the best noise-canceling features that use tiny mics to measure outside noise and cancel it with incoming opposite signals.

Its acoustic architecture ensures that the volume and bass balance produce high-quality audio.

Even more, its material is synthetic leather and nylon, making it durable, comfortable, and luxurious. It makes it easier to wear them throughout the day without any struggles.

Sony WH-1000XM4 Wireless

  • Up to 30-hour battery life
  • Touch sensor controls 
  • Dual noise sensor technology
  • Uses GPS technology
  • Has sensor controls
  • It may require an adapter to charge

It is an amazing headphone model that is good for phone and video calls and controlling Alexa. It’s the best if you need some focus due to its noise-canceling feature powered by algorithms and chips.

Are comfortable to use due to its rich features that improve the user experience. They have slight textures, not the previous smooth surfaces, making them more user-friendly. It uses pick-up technology to make voices clearer during calls.

However, it is intended for use in the United States. Because outlet and voltage standards vary from country to country, it may require an adapter or converter for use in your destination. Please double-check compatibility before making a purchase.

Philips PH805

  • 30 hours of playtime
  • Comfort fit
  • Hi-Res audio
  • Supports Bluetooth 5.0
  • It comes with a USB 3.0 cable
  • It may require or adapter to charge

This device’s design and price are low in the current market, and its performance is good. Hi-Res audio headphones allow you to feel the full impact of every note, no matter what you love.

When connected to a high-resolution source via the included 2.5 mm to 3.5 mm cable, you’ll get the full benefit of lossless audio recorded at a higher sample rate than cds’ for brilliantly lifelike performance.

The earbuds material is leather and very soft to make the user comfortable, increasing the luxury and making wearers stay long with the headphones.

It has Neodynium sound drivers to produce strong bass and sound. Its single charge takes 2 hours which guarantees 30 hours of playback.

AKG Y400

  • Multi-point connectivity
  • Play and pause automation
  • Quick 5-minute recharge
  • Can access Bixby and Siri voice assistants
  • Supports Bluetooth 5 version
  • It may require a converter or adapter to recharge

It is one of the latest Samsung earphones that comes with many benefits. They are small in size with small circular earcups. They are portable and well-cushioned due to the rotation of earcups and the position of the extension point.

When you remove your headphones, they will automatically pause and resume playing when you replace them over your ears.

Enjoy up to 33 hours of music that inspires you throughout the day. With a quick 5 minute recharge, you can listen to music for an extra hour.

It has a USB-C charging port, and it’s comfortable to use due to its little weight. It has a detection feature that stops playback when you remove them from your ears.

What should I consider when buying hands-free audio devices?

When buying hands-free audio devices for your Windows 11 PC, you have to look at several things – the device’s price, compatibility, and reviews. Make sure you understand the features by reading the descriptions.

Most Windows 11 PC users have to embrace hands-free audio devices to enjoy maximum concentration and match with the latest technologies and advancements.

You can check out the best earbuds and headphones if you love listening to music.

Which device worked better for you? Please drop us a comment below.

How to Reset Logitech G Pro Wireless: 4 Ways to do it

If you encounter issues with your wireless mouse, you might have to reset it. Speaking of which, in today’s guide we’re going to show you how to reset Logitech G Pro Wireless mouse, so let’s get started.

How can I reset the Logitech G Pro Wireless mouse?

1. Disconnect it from the PC or use the Reset button

  1. Disconnect the USB dongle.
  2. Wait for a few moments and connect it to a different port.
  3. If your device has a Reset button, press and hold it for 5 seconds. Sometimes you need to use a pin in order to reach it.

For connection problems that may appear similar to a reset issue, check this step-by-step guide on how to connect a Logitech mouse to a laptop before trying advanced fixes.

2. Uninstall the Logitech G Hub

  1. Search Logitech G Hub using Windows Search. Select Uninstall.
  2. Follow the prompts to complete the uninstallation.
  3. Redownload Logitech G Hub.
  4. Follow the screen prompts and reinstall the software.

3. Update or reinstall the driver

  1. Launch Device Manager using the Quick Link. To do this, right-click the Windows Logo at the bottom of your screen.
  2. Select Mice and other pointing devices—Right-click on the mouse name. Select Update driver. Choose Search automatically for drivers in the pop-up.

A mouse update can sometimes cause a reset because the update process may require the mouse to restart or reboot. Some users reported that using the Uninstall device option instead worked for them since it forced the PC to install a new driver.

To do this automatically without going through any of the stress above, use Outbyte Driver Updater. This lightweight tool will help to update your mouse driver to the latest version. It can also instantly update all other PC drivers to avoid future driver errors.

⇒ Get Outbyte Driver Updater

4. Troubleshoot the mouse

  1. Press Windows key + R. Type control, and select OK.
    how to reset logitech g pro wireless
  2. In the Control Panel, select View devices and printers.
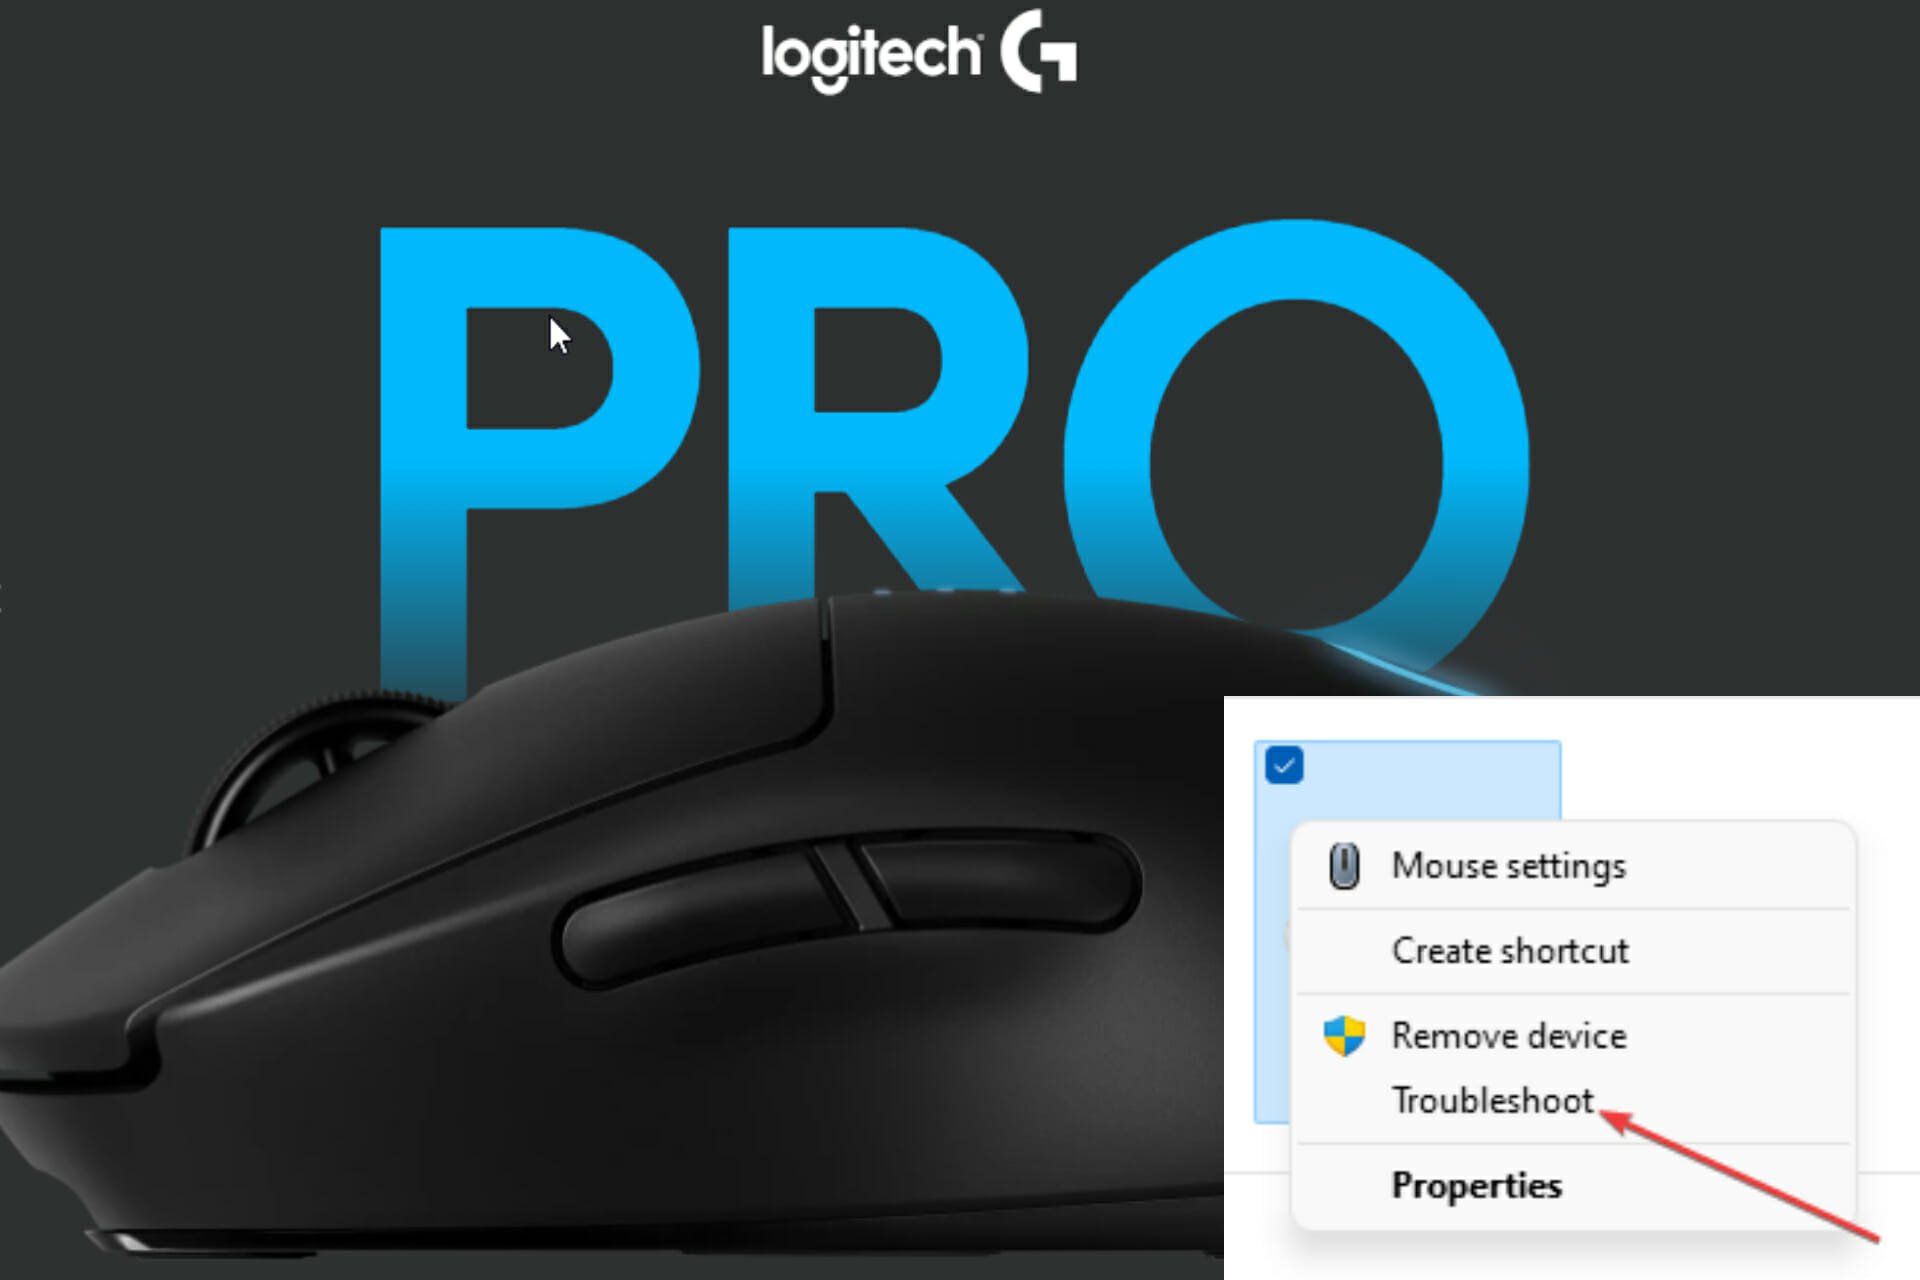
  3. Right-click on the Logitech G Pro Mouse. Select Troubleshoot. If any issue is found, select the option to apply the recommended fix.

In some cases, the troubleshooting process will force the device to reset.

These solutions are universal, and they should help you reset the Logitech G Pro X Superlight or any other model with ease.

After resetting or troubleshooting, you might also want to check our full guide on how to use a Logitech mouse to get the most out of its features and settings.

If you are wondering how to reset Logitech G Pro wireless, these are the only options you may have. For devices with the reset button, using this feature will be the best option.

It’s not unusual that you have to reset your Logitech mouse especially if the Logitech G Pro Wireless not working or if the G Pro Wireless is not showing in the Logitech gaming software.

Speaking of issues, many reported a problem with Logitech G Pro wireless double click, but we covered that one in a separate guide.

Let’s find out in the comments section if this guide helped you fix the problem. Also, don’t hesitate to share any other method you think might solve this problem.

GoPro Driver Isuses on Windows 11: How to Connect The Camera

Sometimes, GoPro drivers on Windows 11 can cause issues, such as your camera being unrecognized by the PC.

This can be a problem, and you won’t be able to transfer any of your photos. Luckily, there are a few simple solutions that you can use to fix this problem.

Is GoPro compatible with Windows?

Yes, GoPro is compatible with Windows, but it can encounter various issues. To avoid them, make sure you have the latest drivers, software, and firmware installed. Also, using a high-quality certified cable can help.

Why is my GoPro not connecting to my computer?

  • The camera isn’t properly configured for file transfer.
  • Outdated drivers can sometimes cause this and other issues.
  • You don’t have the necessary GoPro software installed.

How do I get Windows to recognize my GoPro?

Before we start fixing this issue, try removing the SD card from your GoPro and connecting it to your PC. Many reported that with this method, you can avoid all connection and driver problems.

1. Change the camera mode to MTP

  1. Disconnect the camera from the PC.
  2. Swipe down on the GoPro screen, swipe left, and choose Connections.
     
  3. Select USB Connection.
  4. Set it to MTP.
  5. After that, connect the camera to your PC, which should be recognized.

A few users suggest installing GoPro Quik, so you can also try that.

2. Update your drivers

  1. Right-click on the Start icon from your Taskbar, then go to Device Manager.device-man windows 11 not recognizing gopro hero 8
  2. Next, locate your GoPro device, right-click it, and choose Update driver.
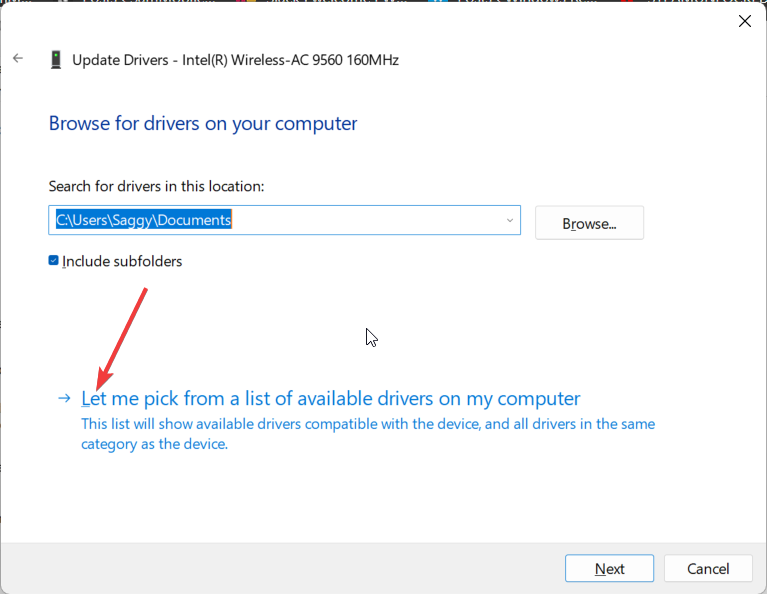
  3. Select Browse my computer for driver software and then choose Let me pick from a list of available drivers on my computer.
  4. Select an MTP device on a list and install its driver.

3. Install GoPro Player

  1. Visit the GoPro Player download page.
  2. Click on Get it from Microsoft.
     
  3. Next, click on Install and then on Get.
  4. Wait while the application is downloaded.

How do I update my GoPro firmware?

  1. Turn off the GoPro and remove the SD card. Connect the card to your PC and format it.
  2. Go to the GoPro page, locate your model, and download its latest firmware.
  3. Next, locate the Update.zip file you downloaded and move the Update folder to the SD card.
  4. Insert the SD card into the GoPro and turn it on. It will automatically beep and turn itself on a few times.
  5. The update was successful if you see a green checkmark on the screen.

Alternatively, you can pair your GoPro with the GoPro app on your phone, automatically allowing you to update your firmware.

Note icon NOTE
Ensure that your battery is fully charged before attempting a firmware update.

GoPro drivers on Windows 11 can cause various problems, but hopefully, you managed to fix them. Check out what to do if Windows won’t recognize GoPro camera if you have additional problems.

Alternatively, in case your GoPro video won’t play, we have a special guide that addresses that.

Leave us a comment in the section below and tell us what you think about our post and whether you have any more solutions. Thanks for reading!

How to fix Dying Light 2 Double Time bug

Dying Light 2 is undoubtedly one of the most impressive masterpieces that can be played on the Steam gaming platform.

It places the gamers into an action and adventure scenario, where humanity is threatened by a virus and you have to use your agility and combat skills to survive.

Even if this game comes up with tons of amazing features and stories, it seems like there are also some troubles you have to consider.

In this matter, keep in mind that some users reported facing the Dying Light 2 Double Time bug. It seems like they get the Double Time quest even after completing it several times.

According to most of them, this will occur even after closing the game entirely and starting it up again.

If you’re here, you’ve surely encountered this issue as well, so let us explain more about this subject.

What can I do if I encounter the Dying Light 2 Double Time bug?

Unfortunately, developers haven’t come up with solutions yet. So, you have nothing to do since the bug has no fix even after starting the game again or restarting the system.

But be careful of what we’re about to say. A lucky user reported that the only way he managed to fix the bug is by just progressing through the game as usual, and automatically the quest disappears from the list.

It is not confirmed if this fix works for all, but it has helped some players go through the game without issues.

In this matter, until developers release specific and dedicated solutions, this is the only way you’ll probably get rid of the Dying Light 2 Double Time bug.

Keep in mind that some unlucky users also reported that Dying Light 2 is not launching on Steam and if it’s happening to be in the same boat, make sure you check a useful guide to fix it.

In order to always enjoy a smooth and complete gaming experience, we strongly recommend using a dedicated booster.

Tip icon Tip
The Game Fire for Smart PC Utilities is one of the best on the market. It will help you optimize your PC performance to eliminate in-game lags and boost FPS.

Nothing Game Fire does is anything you couldn’t do manually, but the advantage of this system is you only need to choose what processes to stop once. Then, you can stop and start them all at once, saving a lot of effort.

If you’re aware of some additional fixes, do not hesitate to share them with us by leaving a comment in the section below.

How To Download And Play Dying Light 2 Stay Human

Surely you’ve heard about Dying Light by now, and about its critically acclaimed sequel, Dying Light 2 Stay Human.

If you like the suspenseful, always on the lookout, never being safe life of a zombie hunter, then this is a game you should definitely try.

In short, Dying Light 2 Stay Human is actually an action role-playing survival horror video game, with its action being based on a zombie apocalyptic-themed open world.

What happens in the sequel is set 22 years after the first Dying Light game and it stars a new protagonist named Aiden Caldwell.

If you’re already intrigued and would like to try it out for yourself, we’ll show you where to find and purchase this awesome triple-A title.

Where can I get Dying Light 2 Stay Human?

As you probably know, Dying Light 2 is available for playing on platforms such as Nintendo Switch, PC, Xbox One/Series X|S, and PlayStation 4 and 5.

If you want to help Aiden make his way to the city of Villedor after being notified that there is an informant that knows the whereabouts of Dr. Waltz, this is your big chance.

Developers confirmed that there are over 3000 parkour animations added to the game in order to give a more fluid-free running experience.

Tools such as a grappling hook and a paraglider also aid traversal in the city, giving you a feeling that many found hard to describe in words.

Of course, a lot more information about the game and everything it stands for can be found on the official Dying Light 2 Stay Human website.

Don’t worry, we have download links for Dying Light 2 on all available platforms so you can teleport to the purchase page in just a matter of seconds, eliminating the need to search for it.

⇒ Get Dying Light 2 Stay Human for Steam

⇒ Get Dying Light 2 Stay Human for PS4/PS5

⇒ Get Dying Light 2 Stay Human for Xbox One/Series X|S

Once you purchased your new favorite game, all you have to do is go through the setup process, which is pretty self-explanatory and easy to understand.

After installing Dying Light 2 Stay Human, all you have to do is stay alive for as much as possible and try lending a hand to other survivors that are in need.

Also, keep in mind that the game came with some nasty bugs and errors, but nothing we can’t help you fix if you encounter them in-game.

If you are playing on Steam, learn about what to do if you get the Unable to initialize Steam API error, or how to fix the game not launching at all on Steam.

PlayStation players have complained about having to deal with the dreaded CE-34878-0 error, but we can help you with that as well, so don’t worry.

On the off chance you want to enjoy some good old-fashioned Co-Op and end the zombie apocalypse with your friends, learn about cross-gen and crossplay for Dying Light 2.

Have you gotten your hands on Techland’s latest title? Share your experience with us in the comments section below.
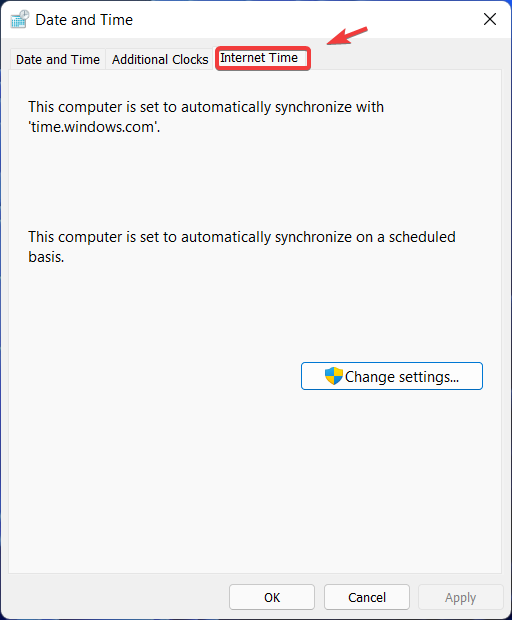
Dying Light 2 Not Letting You Join Your Friends? Fix It With This Helpful Guide

Why take on a giant horde of zombies on your own, when you can get a few friends to join the fray, thus greatly increasing your odds of victory.

Even though it makes perfect sense, some players are having trouble locating their friends in order to team up against the common enemy.

Just so you know, we’re not talking about your friends being lost in the city of Villedor. We’re actually talking about not being able to join them for some online Co-Op.

First of all, it’s important to understand how cross-gen and crossplay work in Dying Light 2, and that you can’t join your friend’s game in Dying Light 2 if you haven’t completed the prologue.

You will, therefore, need to best the prologue by completing the quest Markers of Plague in Dying Light 2 Stay Human in order for this feature to become available.

However, there are players that claim prologue completion wasn’t enough to be able to join other players. Luckily, if you run into the same issue, we can show you how to sort it all out.

How can I fix not being able to join friends in Dying Light 2?

1. Restart your internet router or switch to a wired connection

If you feel that the internet could be the main cause of this abnormal behavior, make sure to restart your router and give it a few minutes to connect again.

If that didn’t do the trick, we strongly recommend switching to a wired connection on your console or PC or if that’s not possible, try getting as close to your internet router as possible.

Running an internet speed test will shed more light on the matter, confirming or dismissing the internet as the main culprit for this issue.

2. Verify game file integrity

  1. In Steam, right-click Dying Light 2 and select Properties.dying light steam properties
  2. Select the Local Files tab and click on the Verify integrity of game files.game file integrity

3. Restart your PC

  1. Push the Start button, click on Power, and then on Restart.restart pc

4. Update Dying Light 2 to the latest version

An extremely important detail to keep in mind here is that both you, and the friends you are interested in playing with, need to have the latest version of Dying Light 2 installed.

Otherwise, you will constantly run into this problem and you won’t be able to enjoy some good old fashion Co-Op zombie hunting.

  1. On Steam, right-click Dying Light 2 and select Properties.steam game properties
  2. Select the Updates tab and activate one of the two Auto-update options.update steam games

5. Allow Dying Light 2 through the Firewall

  1. Press the Windows key, search for Firewall and select Open.open firewall
  2. Click on Allow an app through Firewall.allow app through firewall
  3. If Dying Light 2 isn’t in the list, click Change Settings, then Allow another app.Allow another app
  4. Click the Browse button, locate your game and press the Add button.browse firewall games

5. Reinstall Dying Light 2

As a final solution, provided none of the above-mentioned steps helped you solve the issue, you will sadly have to reinstall Dying Light 2 Stay Human.

This can either be done from your Steam interface, the Epic Games Store or directly from the Control Panel.

Once the title has been successfully uninstalled, you can start installing it again and, hopefully, get rid of the pesky bug that made you have to go through this in the first place.

These workarounds actually solved the problem for many players in the same situation. Also, if you bought Dying Light 2 through Steam, check how you can fix the Unable to initialize Steam API error.

Since we’re talking about errors and bugs, find out how to fix the CE-34878-0 error for PlayStation consoles, or what to do if you can’t earn any skill points in Dying Light 2.

Also, if you were thinking about trying Horizon Forbidden West, we’ve compared it to Dying Light 2 in order to help you make a choice.

Not Getting Any Skill Points In Dying Light 2? Here’s What You Can Do

We all know how frustrating it can get when we’re just trying to enjoy our game and all of the sudden we get game-breaking errors or glitches that make it impossible to advance.

Those are the times when a solution is the most needed, but unfortunately, many bugs that plague today’s games don’t have a fix guide yet.

Why? Well, because nobody knows what causes these problems and the workarounds tried so far haven’t seemed to do the trick.

That being said, many of the issues we encounter during gameplay have easy solutions that can restore game functionality.

Lots of Dying Light 2 players reported dealing with the Unable to initialize Steam API, as well as the CE-34878-0 errors.

And because we helped you out with the above-mentioned problems, we saw only fit to do our best and help you solve not getting skill points as well.

If you find yourself in a similar situation, the solutions are limited, but here’s what you can do to try and fix this nuisance.

What can I do to fix not getting skill points in Dying Light 2?

1. Update Dying Light 2 to the latest version

  1. On Steam, right-click Dying Light 2 and select Properties.steam game properties
  2. Select the Updates tab and activate one of the two Auto-update options.update steam games

2. Update your graphics drivers

  1. Press the Windows key, search for Device Manager and select Open.run device manager
  2. Expand Display Adapters, right-click on your GPU, and select Update driver.update gpu
  3. Click on Search for updates automatically.search for driver automatically

Remember that big-time gaming can be done without crashes, lags, or freezes by keeping all drivers up to date and error-free. 

Manual checks are hard to perform, that’s why we recommend using an automated assistant that will scan for fresh driver versions daily.

In case you’re a beginner, you don’t have to worry! Outbyte Driver Updater is smart, simple, engaging and its user interface was built to make your life easier.

⇒ Get Outbyte Driver Updater

As much as we hate saying this, this problem is completely random and you cannot avoid it by playing in a specific way, unfortunately.

The best you can do is just continue the game and keep earning experience points, and the problem should fix itself after leveling up a few times.

Another option you should explore is also getting the missing skill points. The game shouldn’t block you from developing Aiden’s skills.

As soon as we find new and better solutions for this bug, and maybe even an explanation as to why it keeps happening, you will surely be the first to know.

If you are on a budget and have to divide between playing Dying Light 2 Stay Human and Horizon Forbidden West, we’ve compared the games to help you make the choice.

Have you encountered this issue while playing Dying Light 2 Stay Human? Share your experience with us in the comments section below.
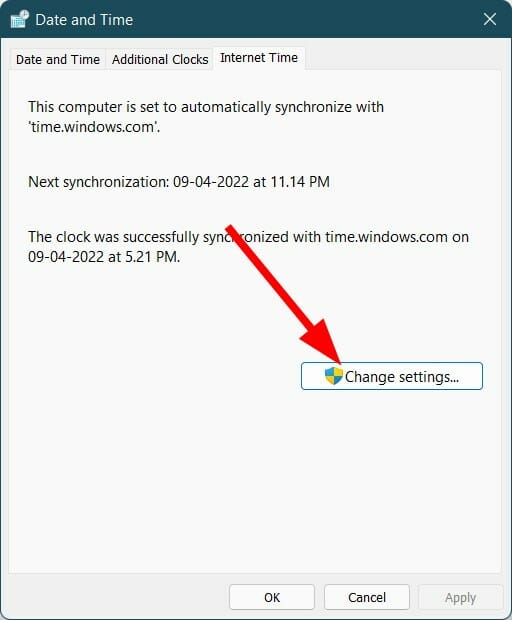
Fix: Can’t Install Torch on PC [Torch Alternative Browsers]

Torch browser was an alternative browser that many users favored for streaming music and videos. This Chromium-based browser had a lot of features for YouTube and other multimedia platforms.

It had one of the best download managers that enhanced streaming and could handle torrents. With the media grabber feature, users could download video and audio easily without needing extensions or added software.

However, as of August 2021, you can no longer download Torch. When users try to download Torch, they are redirected to install a Chrome extension called Torch Search.

Does the Torch browser no longer exist?

While Torch still offers the option to download the browser on its website, when you hit the Download button, you are redirected to Torch Search, a Chrome extension configuring Chrome’s Default Search settings to its own search tool.

This will allow you to search the web straight from your Chrome address bar, but it will replace Google.

You can still find older versions of the Torch browser for download, but we don’t recommend doing so. It will not be updated, and soon, it will become more of a hazard to the security of your machine than a good browser.

Since the browser no longer exists, we will explore the alternatives for the Torch browser.

Quick Tip:

Install an up-to-date browser that supports buffer-free media streaming. We recommend Opera GX because it’s built to carry out demanding tasks like streaming and gaming.

It lets you adjust each tab’s bandwidth allocation and RAM and CPU usage. Combine these features with the built-in adblock to get seamless, uninterrupted video streaming.

Opera GX

Transform your streaming experience with dedicated features focused on performance!

What are the best alternatives to Torch?

Since the Torch browser was very light and handled torrents very well, we recommend checking our list of the best lightweight browsers for PC.

You might also be interested in consulting our selection of the best browsers you can download now.

How do I disable/uninstall the Torch Search extension?

We don’t discourage you from trying the Torch Search extension for Chrome, but you need to know that it will replace the search option in Chrome.

If you have installed it by mistake or you want to disable or uninstall it, here’s how to do it:

  1. In Chrome, click on the Extensions icon from the top-right corner and select Manage extensions from the drop-down menu.
  2. Now, look for Torch Search and click on the buttons to disable the extension or uninstall it.

You should know that when you install Torch Search, Chrome will disable it automatically, so you will activate it from the menu above if you want to use it.

If you’re looking for Chrome enhancements, we also have a list of the best extensions to speed up Chrome.

Let us know in the comments what you think about Torch not being available anymore, and describe your experience with the browser.

Can’t install Tor Browser? Here’s how to fix that

If you need a good privacy-oriented web browser, then Tor Browser might be the best choice for you. Unfortunately, many users reported that they can’t install Tor Browser on their PC.

This can be a problem, and multiple causes will prevent you from downloading and using Tor Browser on your PC.

Luckily, there are ways to fix that, and this guide will show you how to circumvent this issue, so be sure to keep on reading.

Why is Tor Browser not working on Windows 10?

There are multiple reasons, but if Tor isn’t working, you most likely don’t have the necessary privileges to run it. In some instances, your antivirus or firewall can block the application, so check your antivirus settings.

If you’re running a VPN, it’s advised that you disable it because it can interfere with Tor and cause additional problems with it.

What do I do if I can’t install Tor Browser?

1. Move the setup file to a different directory

  1. Locate the Tor setup file.
  2. Now right-click it and choose Cut.
  3. Move to a different directory, such as Desktop.
  4. Right-click the space and choose Paste.
  5. Now try to run the setup file again.

2. Use a different browser

Tor isn’t the only web browser that is private, and there are other ones such as Opera One for example. This browser comes with built-in tracking protection, so you can rest assured that other websites aren’t following you.

Free and unlimited VPN is also available, allowing you to securely browse the web. It’s worth mentioning that the browser has a built-in ad blocker, so you won’t have to deal with ads ever again.

To top it off, the browser also has many productivity features, such as the ability to organize your tabs into workspaces, so it’s worth checking out.

Opera One

A fast, secure, and reliable browser that provides users with private and ad-free browsing.

3. Install the browser to a different location

  1. Run the Tor setup file.
  2. Select the desired language.
  3. Change the installation directory to something else and click on Install.
  4. Follow the instructions on the screen.

4. Make sure the date and time are correct

  1. Right-click the clock in the bottom right corner and choose to Adjust date/time.
  2. Disable Set time automatically.
  3. Wait for a few moments and enable this feature again.
  4. Your date and time should be now updated.
  5. Run the setup again.

5. Make sure that your antivirus isn’t interfering with the setup

  1. Press Windows key + S and type defender. Select Windows Security.
  2. Select Virus and threat protection. Now select Manage settings.
  3. Navigate to Add or remove exclusions.
  4. Click on Add an exclusion and then select File.
  5. Select the Tor setup file.
  6. After doing that, try to run the setup again.
  7. If the problem is still there, you might have to disable your antivirus entirely.

According to the Tor developers, this issue usually appears when using the following security software:

  • Webroot SecureAnywhere
  • Kaspersky Internet Security 2012
  • Sophos Antivirus for Mac
  • Microsoft Security Essentials
  • Avast Antivirus

6. Disable your VPN

  1. Press Windows key + S and enter VPN. Select VPN settings from the menu.
  2. If any VPN is connected, click on Disconnect.
  3. Alternatively, you can also click Remove to remove a VPN.
  4. If you have any VPN software running, make sure to disable it.

7. Run the setup as an administrator

  1. Locate the Tor setup file.
  2. Right-click and choose Run as administrator.
  3. Follow the instructions on the screen and try to complete the process.

Why won’t Tor connect?

This is most likely caused by your antivirus, so make sure you check its settings and whitelist Tor. Do the same thing in your firewall.

Making sure that your date and time are correct is a great way to prevent any connection issues that you might have with Tor Browser.

If you can’t install Tor Browser, the issue is most likely related to your settings, but hopefully, you managed to fix this problem using our solutions.

In case you need additional security, here are the best VPNs that work with the Tor Browser, so you can enhance your online privacy even further.

Did you find a different solution to this problem? If so, feel free to share it with us in the comments section below.

5 Best Browsers For Elearning [Top Picks]

Students are utilizing technology for learning now more than ever. Almost every institution operates online to some degree.

Online learning has become the preferred method of continuing education for many students. eLearning provides access to institutions from all over the world.

Every student requires a fast and secure browser for all their online education needs. Keep reading for a look at our picks for the best browsers for eLearning.

What are the advantages of eLearning?

Online learning is one of the best ways to further education. Because of its online format; presentations and lectures can be recorded. This allows students to rewatch or re-wind until they understand the topic.

In addition, online learning encourages active and independent methods of learning. This teaches valuable lessons in research and organization.

Students can engage in education from anywhere in the world. They can also easily reach their instructors and peers through discussions or chats.

What are the best browsers for eLearning?

Opera One

Opera is the best browser for eLearning.

Opera One is one of the best browsers for eLearning because of its speed and multitasking capabilities.

What makes Opera One truly great for learning are few unique features. First off, Opera One’s ability to create workspaces helps any online learner keep focus. Next, Opera One gives you the power to arrange your open tabs in Tab Islands, in order to be better organized. An lastly but not least, Opera One provides a build in free and up to date AI to help you boost your learning.

Opera One also has a built-in VPN with unlimited data and an ad-blocker that can be enabled to get rid of distracting pop-ups. The snapshot tool allows users to easily take screenshots which can be especially useful for saving notes or presentations.

With Opera One’s Turbo Mode, users with a slower internet connection can increase their browsing speed. Opera One also has a battery saver mode that extends browsing time by 35% when not plugged into a charger. This is especially helpful for students that take their laptops on the go.

Key features of Opera:

  • Smooth multitasking features with Tab Islands
  • Create workspaces to stay focused
  • Ad-blocker that removes clutter
  • Build in AI to help boost your learning
  • Free build in VPN for more secure browsing
  • Battery-saver mode improves browsing time by 35%

Opera One

Take online learning to the next level by using workspaces, tab islands and AI in Opera.
Free Download Visit website

Google Chrome

Google Chrome good for eLearning.

Google Chrome is appealing to students because of its integration with Google apps like Gmail and Google Drive. Chrome allows users to access these services even while offline. This feature is perfect for students that are on the go.

Its simple and clean design is appealing to those who prefer a clutter-free browser. It also has a wide range of add-ons for those who prefer a more customizable browser.

Chrome is also very secure with automatic updates and protection against any malware.

Key features of Google Chrome:

  • Google app integration
  • Sleek design
  • Wide selection of extensions
  • Malware security

⇒ Get Google Chrome

Microsoft Edge

Microsoft Edge perfect browser for eLearning.

Microsoft Edge is another great browser suitable for eLearning. This browser has tracking protection and security that screens websites and downloads for suspicious activity.

With reading mode, web pages are cleaner, and clutter is removed for the best reading experience. Microsoft Edge’s reading mode is a feature that removes distractions and caters to those with reading disabilities, such as dyslexia.

Microsoft Edge has a user-friendly interface that is customizable. There is also a Kids Mode that can be added to Microsoft Edge that provides safe and secure browsing for children. This is incredibly handy for children who are learning online.

Key features of Microsoft Edge:

  • Tracking protection and malware security
  • Reading mode reduce page clutter
  • Customizable user interface
  • Kids Mode designed just for children

⇒ Get Microsoft Edge

Internet Explorer

Internet Explorer (IE) has received a lot of criticism over the years. However, while IE might not be the best for high-speed gaming, it is perfect for online learning.

It’s safe and compatible with many older sites. This browser is perfect for older computers or ones that have low RAM space.

IE is great for students that need access to websites that are only compatible with Internet Explorer. IE supports frameworks and tools like Active X that are specific to many eLearning applications.

Unfortunately, IE will no longer be supported on desktops starting June 2022. However, there are still ways to get access to Internet Explorer in Windows 11.

Key features of Internet Explorer:

  • Compatible with older websites
  • Perfect for older computers or PCs with lower RAM
  • Supports frameworks designed for eLearning
  • Simple and easy-to-use interface

⇒ Get Internet Explorer

Mozilla Firefox

Mozilla Firefox great for eLearning

Mozilla Firefox is a browser filled with features that are helpful for eLearning. One of these is its efficient password manager that remembers log-in information across all devices.

Firefox is also known for its add-on selection to improve online learning functionality. This browser has embedded memory. If Firefox suddenly stops responding or closes for any reason, the websites will be restored.

Despite all of Firefox’s features, the user interface is simple and clean. It’s also customizable according to user preference.

Key features of Mozilla Firefox:

  • Password manager
  • Extensive add-ons
  • Embedded memory
  • User-friendly interface

⇒ Get Mozilla Firefox

Whether you use Blackboard, Udemy, Canvas, or others, these browsers will improve your online learning experience. With online education becoming more and more popular, having a browser that meets demand is vital.

If you’re an instructor looking to create online courses, then check out this article for our top picks for course-making software.

With online learning a rapidly growing form of education, it’s important to have a browser that can cater to students’ needs.

Windows news recap: Voice Clarity for Surface Laptop Studio, Update Catalog gets more secure, and more

Welcome back to our Windows news recap, where we go over the top stories of the past week in the world of Microsoft’s flagship operating system.

The Surface Laptop Studio is getting a Voice Clarity feature later in April

Later this month, the Surface Laptop Studio is getting a new feature called Voice Clarity. Using the studio microphones built-in to the device, it will remove echoes and background noise from Teams calls, helping you be heard more clearly.

The Surface Laptop Studio is getting a Voice Clarity feature later in April - OnMSFT.com - April 5, 2022

Microsoft Update Catalog gets secure with HTTPS connection

It might seem a little odd that it wasn’t already using HTTPS, but the Microsoft Update Catalog now provides updates, drivers, and other files using a secure HTTPS connection, as opposed to HTTP.

Photo of Windows Update settings in Windows 10

Microsoft promotes Windows 11, more security improvements, endpoint manager

At its Future of Hybrid Work event, Microsoft spent a lot of time on promoting Windows 11, with a keen focus on security improvements and new features. A range of Windows 11 security improvements were promoted, including Microsoft Pluton security processor, enabling HVCI by default on a broader set of devices, Smart App Control, Credential Guard on by default for Windows 11 Enterprise, Personal Data Encryption, and Config Lock.

That’s it for this week. We will be back next week with more Windows news.

TranslucentTB Not Working on Windows 11: How to Fix it

Windows 11 comes with multiple new features and also brings some improvements to the already existing Windows 10 features.

While the overall look and design of the Windows 11 OS has changed and it gives you a bit of a macOS-ish vibe, there are several customization options that are true to its Windows lineage.

The Transparent Taskbar is one of the features that lets you make the bottom taskbar transparent and show the background clearly.

If you are into desktop customization or have a knack for customizing your desktop in your own way, then selecting a taskbar color or turning it completely transparent plays a huge role in the way you decorate your desktop.

However, for several Windows 11 users, this feature isn’t working properly, and they are facing Windows 11 taskbar not transparent issue.

The toggle inside the Personalization section of Windows Settings, even after turning on, doesn’t seem to have any effect on the desktop elements.

If you are also facing the Windows 11 taskbar not transparent issue and are looking for solutions to fix it, then you are in the right place.

Because in this guide, we will give you some solutions that will help you possibly fix this problem. Let us check it out.

How can I enable the transparent taskbar option in Windows 11?

  1. Press the Win + I buttons to open Windows Settings.
  2. From the left-pane select Personalization.Personalization in Settings app
  3. Click on Colors on the right-pane.Colors
  4. Toggle on the Transparency effects.

While Windows 11 brings a slew of new features, it also removes some features that could have been important for many users.

Notably, even after toggling on the transparency effects in the Windows Settings menu, only a limited level of transparency is added.

Besides that, you can only change the color of the taskbar, and nothing more. Microsoft has removed certain taskbar customization features, such as adjusting the size of the taskbar, opening the task manager, and more.

Some features that are available for you to tweak in the taskbar include the option to add or disable widgets, choosing icons to appear, moving the icons left or right, etc.

If the Transparency effects option is not available to you or if the transparency effect is not applied to the taskbar on your Windows 11 PC, then follow the solutions mentioned below.

How can I fix Windows 11 taskbar not transparent issue?

1. Reboot your PC

  1. Open the Start menu.
  2. Click on Power.
  3. Select Restart.shut down PC

The first thing that you should do if you come across any system malfunction is to simply restart your PC.

Restarting your PC gives the system a clean slate to work upon and it loads all the important system files that might have been missed during the previous session, thus triggering the Windows 11 taskbar not transparent issue.

2. Disable battery saver

  1. Press the Win + I buttons to open Settings.
  2. Click on Power & battery.Power and battery
  3. Expand the Battery saver section.
  4. Hit the Turn on now button next to the Battery Saver option.Turn on battery saver

Once you have disabled the battery saver option under Power & battery settings, head over to Personalization and toggle on the transparency effect, and see if this fixes the Windows 11 taskbar not transparent issue.

3. Enable high-performance mode

  1. Press the Win + R keys to open the Run dialogue.
  2. Type the below command and press Enter. powercfg.cplpower settings
  3. Click on the circle next to the High-Performance power profile.high performance radio button
  4. Exit the windows page.

The above steps will enable high-performance mode on your PC. Do note that although everything will work top-notch, the battery of your laptop will drain faster.

After enabling the high-performance mode, you need to enable the transparency effect again, and check if this fixes the issue or not.

4. Tweak the registry editor

  1. Press Win + R to open the Run dialogue.
  2. Execute the below command.: regedit
  3. Head to the below path.:Computer\HKEY_LOCAL_MACHINE\SOFTWARE\Microsoft\Windows\Dwm
  4. On the right-side, right-click and select New > DWORD (32-bit) Value.
  5. Name this created DWORD as ForceEffectMode.
  6. Double-click on ForceEffectMode.
  7. Under Value, enter 2.
  8. Press OK and exit the registry editor.
  9. Restart your PC.

Some users have found this solution to be effective, and after following the above steps, the Windows 11 not transparent issue seems to be resolved.

However, we would advise you to be extremely careful before you go ahead and tweak the registry editor. Because if you do something wrong, your PC performance will be compromised.

How can I get the best transparency effect in Windows 11?

If the above methods helped you fix the Windows 11 not transparent issue, but you are not satisfied with the amount of transparency it applies, then you can follow the below two methods to enhance the level of the effect.

– Apply OLED Taskbar Transparency

  1. Press the Win + R keys to open the Run dialogue.
  2. Type the below command and hit OK. regedit
  3. Navigate to the following:HKEY_LOCAL_MACHINE\SOFTWARE\Microsoft\Windows\CurrentVersion\Explorer\Advanced
  4. On the right-side pane, right-click and select New >DWORD (32-bit) Value.
  5. Rename the newly created value to: UseOLEDTaskbarTransparency by right-clicking on it and choosing Rename.
  6. Right-click again, select Modify.Use OLED Taskbar transparency - Modify value to 1
  7. Change the value from 0 to 1.
  8. Click OK to save the settings.
  9. Restart your PC.

Once you restart your PC, you will see that the level of taskbar transparency has increased. The Windows 11 registry editor gives you such options to tweak the level of customization on your Windows 11 PC.

We have a dedicated guide on how to customize your Windows 11 using Registry Editor. This guide can be helpful for you to achieve the level of customization you are looking for.

– Download TranslucentTB

  1. Download TranslucentTB from the Microsoft Store.
  2. Open the app.
  3. Click Continue in the pop up that appear.
  4. Your taskbar will be automatically set to transparent.

Using the TranslucentTB app from the Microsoft Store, you can achieve the highest level of transparency for your taskbar. It simply makes the entire taskbar completely transparent.

That’s not all. You can use the TranslucentTB application to make the taskbar opaque, or apply a blur effect. There are other settings that you can tweak within the app, such as the maximized window, Start Menu open, Cortana open, and Timeline open.

The above solutions are effective and have helped users fix the Windows 11 taskbar not transparent issue, as well as helped them achieve a satisfactory level of transparency effect.

Let us know which one of the above mentioned method helped you fix the problem. You can also let us know if there are some other methods that did the job for you, down in the comments section.

How to Install Windows 11 Without BitLocker

BitLocker is a drive-encryption feature introduced in the Windows Vista iteration and has been a part of the ecosystem ever since. Though many like it, some users want to install Windows 11 without BitLocker.

The BitLocker feature is only available on the Pro and Enterprise editions of Windows 11 and not the Home edition. But, some 2-in-1 laptops and certain tablets support Device Encryption in Windows 11, a feature similar to BitLocker.

But, if you don’t want to have the feature on your system, here’s how you can install Windows 11 without BitLocker.

How can I install Windows 11 without BitLocker?

As discussed earlier, BitLocker is bundled with the Pro and Enterprise editions of Windows 11. So, there’s no way you can install these editions without it.

However, a simple workaround would be to install Windows 11 Home, which doesn’t offer the BitLocker feature. To do that, select Windows 11 Home when you are asked to select the operating system while clean installing Windows 11.

Install Windows 11 Home edition

But there’s a downside to it, too. The Home edition also lacks several other features that you would be missing out on. Though, you can download and enable Local Group Policy Editor (gpedit) on Windows 11 Home edition as well.

If you want to install the Pro or Enterprise edition of the latest iteration but don’t want the feature, we recommend disabling BitLocker in Windows 11. The process is fairly easy; this way, you can use the other features bundled with the edition.

What are the benefits of BitLocker in Windows 11?

In the present times, data theft and misuse have become common, and users have been looking for ways to prevent it. You can use a reliable third-party antivirus in Windows 11 that automatically scans for malware or viruses and eliminates them, such as TotalAV.

BitLocker, on the other hand, helps encrypt the data on the drive, thus making it unreadable to anyone with unauthorized access to your drive. Once encrypted, the data on the system is protected from any intrusion or breach.

Also, if your laptop or the hard drive from the desktop is stolen, its data could not be read or used without the BitLocker recovery key.

Besides, one of the best parts about the feature is that it doesn’t hog the system resources. So, even if your PC has low specifications, having BitLocker running in the background shouldn’t affect the performance.

Though if you are not a big fan of BitLocker, there are various other data encryption software for Windows 11 that you can try, or check our detailed comparison on Device Encryption vs BitLocker to make an informed choice.

You now know the benefits of BitLocker and how to install Windows 11 without it. And you can even disable BitLocker if it comes preinstalled on your system.

Also, do not hesitate to find out what to do if Windows 11 asks for the BitLocker recovery key when booting the OS.

Tell us your reason for installing Windows 11 without BitLocker and if you went ahead with the idea in the comments section below.
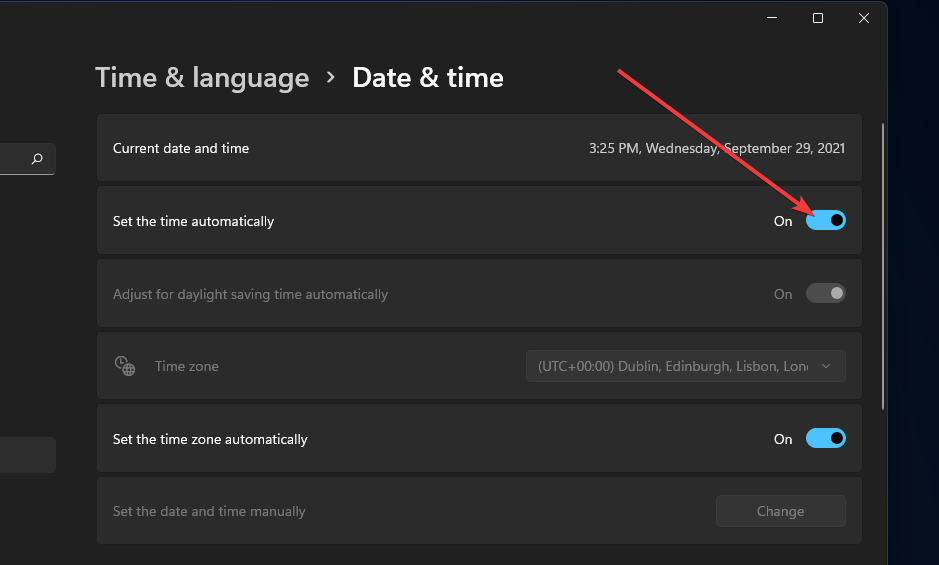
Get Double Parkour XP In Dying Light 2 With This Glitch [Guide]

Remember when we told you about the annoying bug that didn’t allow players to receive any skill points in Dying Light 2?

Well, now we’re back to tell you about a glitch you can exploit in order to receive double parkour XP while playing your new favorite game.

The game actually rewards players with both combat and parkour XP for simply playing through it, which is both fun and productive.

Helpful as that could be, with various ways to gain parkour XP quickly, this method called “the glitch” is the best one yet.

Gamers that discovered the parkour XP glitch say it allows anyone to level up their free-running skills in the game quickly and safely, and it’s possibly not even a glitch.

It’s no secret that unlocking skills such as sprinting or sliding in Dying Light 2 can take a long time. Thus, using this recent method can save you a lot of time, and it’s also fun, but a bit boring.

Without any further ado, let’s get right into it and find out how you too can become a parkour master of Dying Light 2 faster than you can say zombie.

How can I get double parkour XP in Dying Light 2?

Before we start, know that there are some prerequisites for achieving this goal, so keep that in mind prior to making any plans.

However, you don’t need end content gear or skills to succeed, just one skill that will be the cornerstone of the entire process.

We’re talking about the Far Jump skill, which costs 120 stamina to use, and it will take you soaring from one rooftop to another while in Villedor.

Keep in mind that this Dying Light 2 XP glitch can be used in a specific location to quickly farm XP by repeating simple parkour moves multiple times, especially at night.

When you have the above-mentioned skill, you are going to have to travel to the Horseshoe district for the next part of the plan.

Head to a certain rooftop on the west side of Horseshoe next to the border with Old Villedor and use Far Jump to go between rooftops multiple times, which will earn XP at an accelerated rate.

Basically, the idea is that there are two rooftops with multiple trees and some metal scaffolding covered in yellow plastic between them.

All you have to do is use Far Jump to leap from one rooftop to the other, action that will earn you an astounding amount of XP.

But wait, there’s more. There’s actually a way to multiply these gains even more if you’re not scared of the dark and all creatures that come with it.

If you keep doing this at night when the rewards are higher, you will be done with your grind even faster. However, nighttime is a lot more dangerous than mid-day, so keep that in mind.

You can even start a chase if you see a Howler and you’re brave enough. Performing these long jumps during a chase will earn you even more XP.

That being said, we recommend you get some good gear and some serious regen if you are going to attempt that.

Also, if you are playing Dying Light 2 Stay Human via Steam, we can help you with issues such as the Unable to initialize Steam API error, or the game not launching on Steam.

PlayStation players can also use some help when it comes to errors, especially if they have to deal with CE-34878-0, and we’re here to assist with that as well.

Have you started your double XP parkour grind yet? Share your experience with us in the comments section below.
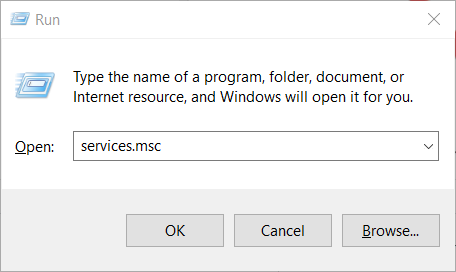
Weird West Is Not Working On Your PC? Fix The Problem Fast With This Guide

Haven’t heard about Weird West yet? We’re about to remedy that, by telling you that Weird West is a top-down action role-playing game with elements of the immersive sim genre, with randomized elements through each playthrough.

Long story short, the game itself is based on the Weird West genre it borrows its title from, in which the player takes the role of heroes in the American frontier who encounter supernatural elements.

You will discover a dark fantasy reimagining of the Wild West, where the lawmen and gunslingers actually share the frontier with fantastical creatures of all sorts.

Each journey you dare to undertake is unique and tailored to the actions taken. Engage in a series of high-stakes adventures where everything counts and the world reacts to the choices you make.

If you already purchased Weird West but can’t seem to get it to work on your PC, we can lend a helping hand and provide some workarounds that will restore game functionality.

What can I do if Weird West won’t work on my PC?

Before we get into the troubleshooting process itself, the first step should always be checking the system requirements for this game.

Trying to run it on an incompatible machine could actually result in the title not launching at all, so be sure to keep that in mind.

Minimum system requirements

  • CPU: Intel Core i5-2380 or equivalent / AMD FX-6100 (6 * 3300) or equivalent
  • RAM: 6 GB RAM
  • GPU: GeForce GTX 650 Ti (1024 MB) / Radeon HD 7770 (1024 MB) or equivalent
  • OS: Windows 10, 64-bit
  • STO: 16 GB available space

Recommended system requirements

  • CPU: Intel Core i7-6950X (10 * 3000) or equivalent / AMD Ryzen 7 2700 (8 * 3200) or equivalent
  • RAM: 12 GB RAM
  • GPU: GeForce GTX 1050 (2048 VRAM) / Radeon RX 460 (4096 MB) or equivalent
  • OS: Windows 10, 64-bit
  • STO: 16 GB available space

However, if your device totally supports Weird West but your title still won’t even start, here’s what you can do in order to fix the problem and restore game functionality.

1. Launch the game as Administrator

  1. Locate the folder where Weird West is installed.WW install folder
  2. Right-click on the Weird West executable and click on Properties.propreties
  3. Select the Compatibility tab and check the Run this program as administrator box.run werid west as admin

2. Update your graphics driver

  1. Press the Windows key, search for Device Manager and click on Open.run device manager
  2. Expand Display Adapters, right-click on your GPU and select Update driver.update gpu
  3. Select Search automatically for drivers.search for driver automatically

Gaming can be enjoyed without any crashes, lags, or freezes by keeping all drivers up to date and error-free easily. 

Sometimes, manual checks are hard to perform, that’s why we recommend using an automated assistant that will scan for fresh driver versions daily.

In case you’re a beginner, you don’t have to worry! Outbyte Driver Updater is smart, simple, engaging and its user interface was built to make your life easier.

⇒ Get Outbyte Driver Updater

3. Verify game file integrity

  1. In Steam, right-click Dying Light 2 and select Properties.dying light steam properties
  2. Select the Local Files tab and click on the Verify integrity of game files.game file integrity

4. Disable Xbox Game Bar overlay

  1. Click on the Start menu and then on the Settings button.settings
  2. Select the gaming category. gaming
  3. Turn off the Xbox Game bar.xbox game bar

5. Allow Weird West through the Windows Firewall

  1. Press the Windows key, search for Firewall and select Open.open firewall
  2. Click on Allow an app through Firewall.allow app through firewall
  3. If Weird West isn’t in the list, click Change Settings, then Allow another app.Allow another app
  4. Click the Browse button, locate your game and press the Add button.browse firewall games

6. Update Windows to the latest version

  1. Press Windows + I to access Settings.
  2. Select the Windows updates tab and click Install all.install Windows updates
  3. If no updates are queued for installation, press the Check for updates button.check for updates

7. Install Visual C++ Redistributable

  1. Visit the official Microsoft download page.c++ download page
  2. Click on the version of Visual C++ Redistributable you want to install.C++ version
  3. Go through the setup.

8. Reinstall Weird West

If nothing else works, please uninstall Weird West from your PC and try reinstalling it to solve this annoying problem once and for all.

You can uninstall the game directly from its installation folder, or from the Control Panel. Hopefully, this step won’t be at all necessary.

Have you managed to solve your problem using this guide? Let us know in the comments section below.
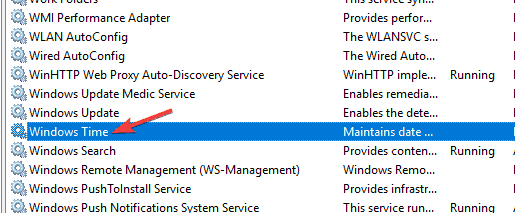
How To Download Tiny Tina’s Wonderlands

We’re just going to go on a limb here and presume that everyone has pretty much heard about the Borderlands game series at least once in their lifetime.

The first-person shooter franchise captivated the imagination of a massive audience, and developers thought that it was time for a new twist to the old tale.

Thus, Tiny Tina’s Wonderlands was created by Gearbox Software and 2k Games, to sort of refresh the highly popular title series.

Much like its predecessors, the game is a first-person shooter with elements of an action role-playing game.

This recent title can be played solo or with up to three other players in online or local split-screen multiplayer, which means the whole family can enjoy the action-packed adventures.

No doubt you would like to get it for your own by now, and we’re about to show you where you can score Tiny Tina’s Wonderlands for all available platforms.

https://www.youtube.com/watch?v=3gJgj2ngCyA

Where can I download Tiny Tina’s Wonderlands from?

If you’re ready to step into the world of a fantasy-themed tabletop role-playing game, then you already know the basics, or you are more than eager to test yourself.

This title features an overworld, which is used by the playable characters to traverse the various locations in the game, with random combat encounters and quests that can only be completed in the overworld.

In fact, Tiny Tina’s Wonderlands builds upon the standards set by the Borderlands franchise that it originated from while also differing in several key aspects.

And, if you are wondering about the characters themselves, rather than playing as a specific vault hunter, with their own personality and voice lines, know that players instead opt for a custom-made character using the game’s character creator system.

Provided you were going to ask if the game is also available on Microsoft’s Store, the answer is not yet. You can only find an informational guide app that acts as a tutorial for new players.

Currently, Tiny Tina’s Wonderlands is only available for Xbox One/Series X|S, PlayStation 4 and 5, and Windows PC.

⇒ Get Tiny Tina’s Wonderlands from Amazon

⇒ Get Tiny Tina’s Wonderlands from Green Man Gaming

Players that already bought the game, stay that it’s still recognizably Borderlands, but the sense of place and improvisation elevates Tiny Tina’s Wonderlands beyond expectations.

Furthermore, the game’s character-building options, humor, art style, and usage of Dungeons & Dragons tropes and mechanics made it all the more desirable.

Also, Tiny Tina Wonderlands multiplayer extends to all three types; online coop, split-screen, and even crossplay.

We’re also here for you if you run into problems with your brand new game, such as Tiny Tina’s Wonderlands not loading on PC.

Have you tried the game already? Share your experience with us in the comments section below.

Best Windows 11 Business Laptops: 5 Picks for 2026

Many different laptops are on the market today, but not all are good for business use. If you’re looking for a computer that will help you be productive while going, you need to check out the best Windows 11 laptops.

They come with perfect features for business users, such as long battery life, fast processors, and plenty of storage. They run the Windows 11 operating system, which is ideal for business users.

Whether you’re buying a group of laptops for your staff or just getting yourself a productivity system, one of the finest business laptops will combine efficiency and ease of use.

As with previous versions, Windows 11 is available in several different editions, catering to home users, business users, and enthusiasts. Each edition of Windows has a different set of features.

Here are the actual requirements for running Windows 11 and a more in-depth explanation to gain a better perspective:

  • 1 GHz or a faster processor with 2 or more cores
  • 4 GB Minimum RAM requirement
  • Display resolution of at least 9 inches in diagonal, high-definition (720p), and 8 bits per color channel
  • Requires a WDDM 2.0 driver and is compatible with DirectX 12 for graphic cards
  • 64 GB storage capacity
  • TPM 2.0 version capability
  • UEFI security measure

What do I consider before buying a Windows 11 business laptop?

  • Portability – If you’re always on the go, you’ll want a laptop that’s light and easy to carry around. Some business laptops have built-in batteries that offer all-day use, while others require an AC adapter to stay powered up.
  • Processor – The processor is the most critical component of any laptop. It determines how quickly the device can complete tasks and affects overall performance. Select one with a powerful processor that can handle multitasking and complex applications when choosing a business laptop.
  • Display – A high-quality display is essential for any business laptop. Choosing a model with a large enough screen to comfortably work on and that offers good viewing angles is critical. 
  • Memory – To ensure smooth performance, you’ll want to choose a laptop with plenty of memory. Most business laptops come with at least 4GB of RAM, but 8GB or 16GB is better if you do a lot of multitasking.
  • Storage – Storage is another essential consideration, especially if you plan to store many files on your laptop. Many business laptops come with SSDs (solid-state drives), which offer faster speeds and better reliability than traditional hard drives.

Now that we’ve covered the basics, let’s look at some of the market’s best Windows 11 business laptops.

What are the best Windows 11 business laptops?

Dell XPS 13 9310

  • 13.3-inch display
  • 8th Generation Intel Core i5 processor
  • Built-in webcam and microphone
  • SD card reader
  • 6 months Dell Migrate
  • It may require an adapter to recharge

The Dell XPS 13 9310 Windows laptop line has long been recognized as one of the finest, thanks to its compact size, lightweight, and lengthy battery life. 

XPS 13 9310 was unveiled in 2020 with an 11th-generation Intel CPU, a smaller screen, and updated Wi-Fi and Bluetooth.

It has the ultimate high-performance laptop for graphic-intensive applications, featuring the most up-to-date processors and displays and components that provide quicker time to productivity.

OMEN 15T-EK100

  • 8th gen Intel Core i7 processor
  • 16GB of RAM
  • 2-way privacy screen protector film
  • GTX 1060 graphics card
  • Up to 7 hours of battery life
  • It may require an adapter to recharge

The OMEN 15T-EK100 is perfect for businesses who want a robust and reliable laptop. This machine is packed with features that will make your workday more accessible, including a large screen, fast performance, and long battery life. 

It comes in a sleek and professional design that will look great in any office. So if you’re looking for a powerful and durable laptop, the OMEN 15T-EK100 is an excellent choice.

Its backlit keyboard and stylish design make it stand out from the crowd. If you’re looking for a powerful and versatile laptop, the OMEN 15T-EK100 is worth considering.

ASUS ZenBook UX330UA

  • 13.3-inch screen
  • 8th gen Intel Core i5 processor
  • 8GB of RAM
  • 256GB of storage
  • Thunderbolt 4
  • It may require an adapter to recharge

The ASUS ZenBook UX330UA is a powerful and stylish laptop perfect for students or busy professionals. It also has a backlit keyboard, fingerprint sensor, and USB Type-C port.

Plus, it comes with a free one-year subscription to Office 365. The ZenBook UX330UA comes with Windows 10 pre-installed, so you can start using it immediately.

So if you’re in the market for a new laptop that is affordable, reliable, and can handle any task, you may consider ASUS ZenBook UX330UA. 

Lenovo Yoga 9i 2-in-1

  • 8th Gen Intel Core i7 processor
  • 16GB of RAM
  • 13.3-inch Infinity Edge display
  • Fingerprint reader
  • Active Stylus Pen
  • It might require an adapter to charge

The 2021 Lenovo Yoga 9i is a powerful and versatile laptop perfect for work and entertainment. And with its 13.3-inch Infinity Edge display, you’ll enjoy stunning visuals and immersive entertainment. 

Plus, the Yoga 9i features a built-in fingerprint reader for added security. With its high-end hardware and versatile design, the Yoga 9i is perfect for students, professionals, and anyone who needs a powerful portable device.

The Yoga 9i also features a 360-degree hinge, so you can use it in laptop mode, tablet mode, stand mode, or tent mode. And with its Windows 10 operating system, the Yoga 9i provides a versatile and user-friendly experience.

Microsoft Surface Laptop

  • 13.5-inch PixelSense display
  • 7th Generation Intel Core i5 or i7 processors
  • Up to 1TB of storage
  • Surface Pen included
  • It may require an adapter to charge

Microsoft has just announced a new addition to its Surface lineup – the Surface Laptop. This device is designed for students and comes in four different colors: Burgundy, Cobalt Blue, Platinum, and Graphite Gold. 

One of the main selling points of the Surface Laptop is its battery life. Microsoft claims that the laptop can last for up to 14 hours on a single charge. This is impressive, especially compared to the average battery life of most laptops.

Another feature that sets the Surface Laptop apart from other laptops is its design. The laptop has a sleek and stylish design, which will appeal to many users.

Should I buy a Windows 11 pre-installed laptop?

There is no definitive answer to this question. However, there are a few factors you may want to consider when making your decision.

Aside from the potential for improved specs, which is something to think about whenever you’re purchasing a new PC, the only benefit of waiting is that the new device will come equipped with Windows 11 pre-installed.

First of all, Windows 10 laptops are generally more affordable than Windows 11 laptops. This is partly because Microsoft has been offering Windows 10 as a free upgrade for devices running Windows 7 or 8.1.

Windows 10 also offers several features not available in Windows 11, such as the Cortana virtual assistant and the Microsoft Edge browser. 

However, Windows 11 does include some features not found in Windows 10, such as the ability to run multiple apps in separate windows on the same screen.

Which laptop features attracted you most? Feel free to leave us a message in the comments section.

Dying Light 2: Unable To Initialize Steam API Error [Fixed]

So you’re trying to play Dying Light 2 Stay Human from Steam and you simply can’t because of the Unable to initialize Steam API error?

Don’t worry, it happens to a lot of people, for a lot of games. And although this can get pretty frustrating in a really small amount of time, we got the solution for you.

Since we’re talking about Dying Light 2 errors, other players have also mentioned dealing with error code CE-34878-0, which is also easily fixable and we can show you how.

In fact glitches, bugs and errors are so common nowadays that having a solution handy when it happens is crucial for uninterrupted, quality gaming.

Because of that, we are about to present to you three easy steps that can fix your Unable to initialize Steam API error and allow you to keep on doing what you do best.

How can I fix Dying Light 2 Unable to initialize Steam API error?

1. Allow Dying Light 2 through your Firewall

  1. Press the Windows key, search for Firewall and select Open.open firewall
  2. Click on Allow an app through Firewall.allow app through firewall
  3. If Dying Light 2 isn’t in the list, click Change Settings, then Allow another app.Allow another app
  4. Click the Browse button, locate your game and press the Add button.browse firewall games

2. Opt out of all Steam Beta programs

  1. Click on Steam and select Settings.Steam settings
  2. Select Account and press the Change button under Beta participation.Steam account
  3. Click on None – opt out of all beta programs and press the OK button.opt out of beta

3. Run Steam as Administrator.

  1. Locate your Steam installation folder.steam folder
  2. Right-click on the Steam executable and select Properties.steam properties
  3. Click on the Compatibility tab and tick the box next to Run this program as an administrator.run as admin - steam
  4. Press the Apply button and close the window.apply

That is what you can do in order to resolve this error once and for all. The solution is pretty easy and will only take up a few minutes of your time.

Also, many people are now weighing their options when it comes to buying games, so in case you were trying to decide between Dying Light 2 and Horizon Forbidden West, we compared both games.

⇒ Get Dying Light 2 Stay human from Amazon

⇒ Get Dying Light 2 Stay Human from Kinguin

⇒ Get Dying Light 2 Stay Human from G2A

Did you find this guide useful? Share your experience with us in the comments section below.
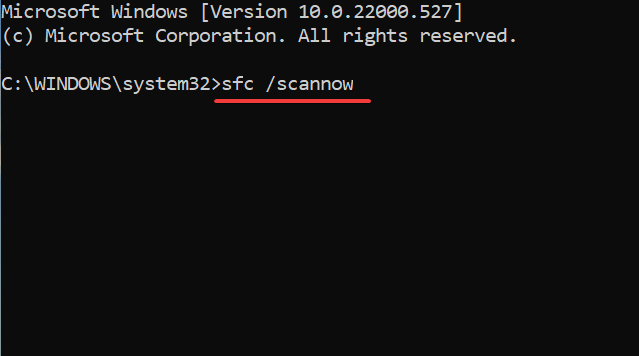
How To Fix The Dying Light 2 CE-34878-0 Error For PlayStation

Dying Light has gained massive popularity not only among fans of the game’s prequel but also among gamers that enjoy a good old open-world zombie survival game.

There’s no denying that this is a gaming masterpiece. However, this title, as many others before it, came with quite an impressive number of bugs and errors.

And since you came here for a specific problem, know that error CE-34878-0 is a PlayStation error code, that affects both PS4 and PS5 consoles.

Furthermore, the code isn’t at all specific to Dying Light 2 and can be best described as a general error code, known among PlayStation users.

In other words, it means that your console has crashed, but there isn’t necessarily a specific cause to pinpoint it.

Most of the time, the error seems to coincide with the maintenance of the PlayStation network and it will resolve itself with no additional action required.

That being said, if you aren’t the type to wait around and want to take immediate action, we can show you how to fix this annoying error.

What can I do to fix error CE-34878-0 on my PlayStation?

We don’t want you to deal with these dreaded game-breaking bugs and errors and we’re here to lend a helping hand.

Follow these steps and get back to free-running around a zombie-infested cityscape in no time, as we will show you how to deal with error CE-34878-0.

Sony’s support page says it’s a PlayStation 4 error, but PlayStation 5 owners can also go through this experience.

1. Power cycle your console

  1. Hold down the PS button on your Dual Shock controller until the Quick Menu pops up.
  2. Select Power Options and then Turn Off PlayStation.Turn off PS

2. Update the PlayStation’s software

2.1 For PS4

  1. Make sure that the connection between your PS4 and the Internet is stable.
  2. Now, navigate to PS4 Settings.
  3. Click on System Software Update.
  4. Press the X button.
  5. You’ll get a message that informs you if the latest version of your system console has already been installed.
  6. Otherwise, the message will let you know that you should upgrade your system. To install it, click on Upgrade now.

2.2 For PS5

  1. Open Settings.
  2. Go to System.
  3. In the System Software section, click on System Software Updates and Settings.
  4. Choose the type of update you want to perform.
  5. Click on the Update button, then wait until your console is updated and restarted.

3. Rebuild the database

3.1 For PS4

  1. Completely power off your console.
  2. Press and hold the power button.
  3. Release the button after you hear the second beep.
  4. For PS4, you’ll need to connect your controller via USB, then choose to Rebuild Database.

3.2 For PS5

  1. For PS5, you’ll now boot into Safe Mode. Plug your controller in with the cable, then go down and select Clear Cache and Rebuild Database.
  2. After that, click on Rebuild Database, then on OK.

4. Remove PlayStation camera and disable Face Recognition

  1. Remove the camera.
  2. From the PlayStation 4 home screen, select Settings.
  3. Select Users.ps users
  4. Select Login Settings.login settings
  5. Uncheck Enable Face Recognition.face recognition

5. Reinstall the original Hard Disk Drive

If by any chance, you installed a different Hard Drive than the one that your console came with from the factory, we advise you to remove it, reinstall the original HDD and reboot your PlayStation.

This step has solved the issue for many PlayStation gamers that went through situations involving error code CE-34878-0.

Keep in mind that installing foreign hardware could actually be the root cause for you experiencing these errors in the first place.

Remember that there are other games that Dying Light is in fierce competition with, among which Horizon Forbidden West. We compared the two games for you in order to assist you in making a choice.

Was this article helpful to you? Let us know in the dedicated comments section below.
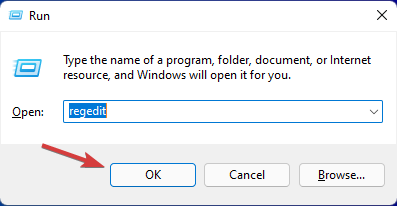
Can’t install LockDown Browser? Here’s what to do

If you’ve taken any online courses, then you’re probably familiar with LockDown Browser. This browser is often used to administer online exams that protect the integrity of the test.

Most instructors that teach online courses prefer to use LockDown Browser because it discourages digital cheating and forces students to apply themselves more throughout a course.

However, some users have reported the LockDown Browser is not installing. Follow these easy solutions for a quick fix. 

Why can’t I open LockDown Browser?

Your security software, such as a third-party antivirus might be interfering with the browser’s functionality. Thus it is recommended that you temporarily disable it.

There is another possibility that your current default browser is blocking the download of LockDown Browser for some reason, such as a corrupted browser cache or cookies.

What does LockDown Browser do?

LockDown Browser has features that prevent digital cheating during online tests. It’s compatible with Learning Management Systems (LMS) such as Blackboard, Canvas, and Moodle.

Can't install LockDown Browser by Respondus.

It also blocks other applications on the device so students can’t switch to another browser or application while taking their exam.

LockDown Browser goes to extra lengths to also protect the exam by blocking print functions, copy and paste, and screenshots.

What can I do if I can’t install LockDown Browser?

1. Install from another browser

There could be an issue with your default browser blocking the download of LockDown Browser. We recommend using Opera One browser. This browser can perform heavy downloads quickly and without consuming a lot of PC resources.

Opera One also offers a lot of security and privacy protection features and will alert users of phishing or malware attacks. Users can browse and download files securely with Opera One’s free built-in VPN.

Many users that reported having issues downloading LockDown Browser were using Internet Explorer. Instead of rearranging the download preferences in Internet Explorer, consider using Opera One instead.

Opera One

Use Opera One browser for seamless and secure downloading.

2. Temporarily disable security software

  1. Open the Start menu.
  2. Search Windows Security and hit enter. Search Windows Security
  3. One the left panel select Virus & threat protection. Open Virus & threat protection
  4. Under Virus & threat protection settings click Manage settings. Click on manage settings
  5. Turn off Real-time protection. Turn off real-time protection to install LockDown Browser
  6. Install LockDown Browser.

Turning off Real-time protection should allow users to install LockDown Browser without any issues. Turn this security feature back on once LockDown Browser is installed. However, if you forget, Real-time protection will automatically turn back on after a short time.

3. Login as an administrator

  1. Click on Start menu and search Control Panel then hit enter.
  2. Under User Accounts select Change account type. Click on change account type to become an administrator if you can't install LockDown Browser.
  3. If it doesn’t list you as an administrator then click on your user profile. Click on your profile
  4. Select Change the account type. Select change the account type
  5. Click on Administrator then Change Account Type. Switch to administrator to install LockDown Browser.
  6. Restart PC if prompted.
  7. Install LockDown Browser.

Many eLearning courses and institutions require students to use LockDown Browser to take exams. If you can’t install LockDown Browser, we hope one of the solutions above fixed any issues with downloading the browser.

LockDown Browser gives instructors peace of mind when administering exams with the knowledge that the integrity of the online test is protected. Students can get more out of a course by applying themselves more to exams taken through LockDown Browser.

If you’re an instructor teaching an online course, check out our picks for the best online course-making software.

Let us know in the comments down below the solution that worked for you, or leave a comment if you found a solution that worked and is not listed above.

Xbox Spring Sale includes up to 80% discounts on select Xbox and PC games

The annual Xbox Spring Sale is now underway. As part of the sale, you can save up to 80% on select Xbox and PC digital games, and enjoy additional separate discounts on PCs, as well as Xbox items in the Microsoft Store.

Right now, some of the deals include discounts on Forza Horizon 5, The Elder Scrolls Online, and Sims 4. There are over 600 titles that are discounted, so you can check the full list here. Halo Infinite (20% off), Microsoft Flight Simulator (20% off,) Grid Legends (33% off,) and NBA 2K 22 (67% off) are just some examples. Over on the Microsoft Store, meanwhile, you can save up to $500 on select Windows PCs, 30$ on HyperX accessories, $200 on the Surface Pro X, $400 on the Razer Blade 14, and 30% on SteelSeries gaming accessories. Check it out in the video below.

If you’re interested in any of these sales, it’s best to act fast. The deals will only last through April 21. If you end up buying something, let us know in the comments below!

5 best browsers for BombCrypto that are fast and secure

Cryptocurrency experts are always looking for new ways to earn and trade cryptocurrencies. Fortunately, it got a lot more fun with the rise of Play-To-Earn (P2E) crypto games. Players can farm and collect cryptocurrency tokens that can be traded or sold for real money.

There are many P2E crypto games on the market, but BombCrypto recently topped the charts for the highest earned funds on the Binance Smart Chain (BSC) Network.

Experts recommend that you avoid using your day-to-day browser while dabbling in cryptocurrency. Most browsers hang onto the data from all your favorite websites, such as Facebook, Amazon, Netflix, etc.

When trading cryptocurrency, it’s wise to be as secure as possible. It’s important to use a browser with user data privacy protection. This article will reveal the best browsers for BombCrypto and cryptocurrency.

What is BombCrypto?

BombCrypto is an in-browser P2E game where the player farms and fights monsters to earn BCOIN that can be traded for real money.

The popular P2E game is developed by Senspark, an independent Vietnamese development company. Senspark was first created in 2011 and mainly focuses on developing indie games for Android and iOS.

Play as a pixelated NFT hero that searches for BCOIN. BombCrypto has three gaming modes: Story mode, Treasure Hunt, and Battle. Currently, only Treasure Hunt and Adventure mode are available to play.

Is BombCrypto free?

The minimum cost to join BombCrypto is 10 BCOIN which must be purchased using real money. From there you can purchase a hero and start earning. Players can purchase more NFT heroes using the BCOIN that they collect in-game.

BombCrypto uses Metamask to store digital assets and for blockchain transactions. Metamask is an addon that turns a browser into an Ethereum browser. Use Metamask to get access to Binance Smart Chain (BSC) Network. BombCrypto is only playable through BSC Network.

What are the best browsers for BombCrypto?

Opera GX

BombCrypto for Opera GX

Even though Metamask is not compatible with Opera GX, it still makes the top of our list. In order to play BombCrypto, you have to have the Metamask extension. Unfortunately, Metamask is only supported on Chrome, Firefox, Microsoft Edge, and Brave browsers.

Luckily, there is a loophole around this. Opera designed software that allows users to download and install Google Chrome addons to any Opera browser. Simply get the Install Chrome Extensions from the addon store in Opera. Now Metamask can be installed from the Chrome Web Store and is compatible with Opera GX.

Opera GX is the world’s first browser designed specifically for gamers. It’s also considered one of the most secure with a built-in VPN. Thus, is the most ideal browser to play BombCrypto. One of the best features of Opera GX is the ability to control resource usage with built-in limiters for RAM and CPU.

Opera GX has quickly become a new favorite among users. With performance and speed to rival big-name competitors, this browser is perfect for P2E games and cryptocurrency trading.

Key features of Opera GX:

  • Gamer-oriented browser
  • Sleek design and customizable user interface
  • Built-in VPN
  • Control resource usage

Opera GX

Use the browser built for gamers to play BombCrypto and start earning. Remain secure in your cryptocurrency transactions with the built-in VPN.

Mozilla Firefox

Firefox is one of the best browsers for BombCrypto.

Firefox is a popular browser for gaming because it uses the least amount of RAM compared to other Chromium-based browsers. Gamers also prefer Firefox because of its light system memory consumption.

In general, Firefox is a great open-source browser with a user-friendly interface and a plethora of extensions. It also has excellent user data privacy and security protection features, a vital feature when dealing with cryptocurrency.

In addition to a customizable user interface, Firefox has a wide range of extensions specially created for gaming. Firefox also has a great selection of extensions for protecting privacy.

Key features of Mozilla Firefox:

  • Low RAM consumption
  • Open-source Chromium browser
  • Wide range of extensions
  • Data security protection features

⇒ Get Mozilla Firefox

Google Chrome

Chrome is one the best browsers for BombCrypto.

Chrome is another great choice for playing BombCrypto because of its multitasking functions. BombCrypto is a time-consuming game that doesn’t require a lot of hands-on experience. With Chrome, you can leave the game running in one tab and continue with your cryptocurrency business in another.

Google Chrome is also has a built-in ad-blocker and a scanner for viruses and malware. Chrome has a feature that will let the user know whether the site they are browsing is secure or not.

However, because Chrome is the most used browser, it’s likely many users already utilize Chrome for their everyday business. The safest way to trade and sell cryptocurrency is to avoid using a browser that you also use for your day-to-day life.

Key features of Google Chrome:

  • Efficient multitasking features
  • Built-in ad-blocker
  • Alerts user of browser security
  • Fast browsing speed

⇒ Get Google Chrome

Brave

Brave browser for BombCrypto

Brave is becoming increasingly popular among gamers because it prioritizes privacy and user choice.

With a built-in ad-blocker and features that protect against trackers, users can play BombCrypto securely. Brave provides the user with the choice to see Brave Private Ads and gives Basic Attention Tokens (BAT) to users for viewing their ads. BATs can be exchanged for gift cards or even crypto.

The browser is Chromium-based so it has a familiar user interface. For gamers that are not a fan of light mode, Brave has a dark mode that can be enabled.

This alternative browser is one of the best for BombCrypto and cryptocurrency. Its browsing speed and data protection are top-notch and perfect for any gamer.

Key features of Brave:

  • Protects against trackers
  • Earn rewards with the Brave Private Ads option
  • Dark mode feature
  • Prioritizes speed and privacy

⇒ Get Brave

Microsoft Edge

Microsoft Edge has endured a lot of changes throughout the years. Now based on the Chromium engine, Microsoft Edge supports extensions and in-browser games.

With SmartScreen, users will be alerted about malicious websites and phishing. Microsoft Edge also has an efficiency mode that can be enabled which extends battery life. This feature also increases speed and saves CPU usage by putting unused tabs to sleep after 5 minutes of inactivity.

Microsoft Edge uses tracking prevention to keep user data protected. This feature can be toggled between basic, balanced, and strict. Users can play BombCrypto without worrying about their personal data being tracked.

However, while Microsoft Edge is one of the most secure browsers, it sacrifices functionality to do so. The stricter the security, the less likely certain websites operate as intended.

Key features of Microsoft Edge:

  • Chromium-based engine supports extensions
  • SmartScreen alerts users of any malicious activity
  • Efficienct mode to extend battery life and reduce CPU usage
  • Customizable tracking prevention

⇒ Get Microsoft Edge

Is BombCrypto worth it?

Just like with every cryptocurrency token, BCOIN is highly volatile. Any new token released on the market is high risk. However, the game has topped P2E charts and has received an overwhelmingly positive response.

BombCrypto is a luck-based game and is beginner-friendly, thus its growth and popularity have been steadily increasing. Ultimately, it’s up to the user’s personal preference and risk level if the investment is worth it.

When trading or selling crypto, security is the utmost concern. While gaming, speed, and CPU usage are a major priority. The browsers on this list combine the needs of both gamers and cryptocurrency traders.

Finding the best browser for BombCrypto can be a difficult choice, we hope this list made the decision easy for you. Let us know in the comments what browsers you prefer for P2E games and cryptocurrency.

Vivaldi is also not happy with Microsoft over the default browser choices in Windows 11

Microsoft quietly made changes to the way you can swap out default browsers in Windows 11, but not everyone is happy. The folks who make Firefox recently told Microsoft that “more can be done,” and now, Vivaldi has some things to say too, mentioning that Microsoft should make it easy for all users to use other browsers (via Neowin.)

The statement aimed towards Microsoft’s efforts comes in an article published in The Register. There, Jon Von Tetzchner, who is the Vivaldi boss, mentioned that Microsoft only made it easy to switch default browsers in one click to avoid lawsuits. In a stronger message, he also mentioned that Microsoft needs to stop abusing its powers. He said:

Microsoft should make it as easy for all users to use other browsers, as it is to use Edge, and stop abusing their power to push Edge onto users [. . .] They continue to try to make it harder to switch to and use other browsers. We look forward to the EU following up on this malpractice

In another statement, Tetzchner gets into how only technical users realize they need an optional update to swap out default browsers with one click. In his own words.

This should apply to all users, not just the ones who are technically competent enough to realize that they need to install an optional update, and know how to actually do so. It should be installed for all users.

Microsoft is always listening to feedback, and the original changes it made to switch browsers in one click are appreciated. However, certain file types might still be associated with Edge even after swapping out to another browser, which Mozilla had issues with. It’ll be interesting to see how Microsoft reacts, and if any changes will be coming in the future.

PSA: The Windows 10 November 2019 Update & Windows 10 October 2020 Update are hitting end of service on May 10

If you’re still running the Windows 10 November 2019 Update (1909) or the Windows 10 October 2020 Update (20H2), Microsoft has a warning for you. These versions of the operating system are hitting end of servicing life soon, and it’s time for upgrade to the newest version of Windows 10 (via Neowin.)

Word of the end of service has been present on the the respected Windows Lifecycle product pages for a while, but Microsoft recently updated the Windows message center with an announcement, too. There, Microsoft warns that Come May 10, the Home and Pro versions of Windows 10 20H2 and all versions of Windows 10 version 1909 will no longer get security updates. After the date, there won’t be security patches, which means the devices might be vulnerable to viruses, and other issues.

Anyone on these versions of Windows 10 Home, or on non-managed business devices that are several months at end of servicing, will be automatically updated to the latest version of Windows 10 via Windows Update. You’ll always be able to choose a time to restart, and complete the update.

If you need assistance, Microsoft has some guides that can help out. Do note that the most current version of Windows 10 is Windows 10, version 21H2, otherwise known as the Windows 10 November 2021 Update. Microsoft is shifting to once a year featured updates for Windows 10 and Windows 11, so be sure to update now to ensure you won’t be left behind.

Don’t expect a native ability to move the Taskbar in Windows 11 anytime soon

Despite it being a modern operating system that can help boost your productivity, Windows 11 has been full of some missing features when compared to Windows 10. Microsoft has steadily approved to add things like Folders in the Start Menu, or the date and time on multiple monitors, but one of those still not added is the key ability to move the Taskbar to the top or the sides of the screen.

Well, as spotted by Neowin, this was a topic of discussion in a recent Microsoft AMA session on YouTube. And, it is looking as though the company seemingly confirmed this highly requested feature won’t be coming natively to Windows 11 in the foreseeable feature.

Seen here at around the 10-minute mark, when asked about the Taskbar, Tali Roth, who is the Head of Product for Windows Core Experiences at Microsoft, seems to defend Microsoft’s decision to not allow users to move the Taskbar in Windows 11. She brings the challenges of it disrupting the workflows of users, as well as how developer’s apps have to manually adjust to it.

When it comes to something like actually being able to move the taskbar to different locations on the screen, there’s a number of challenges with that. When you think about having the taskbar on the right or the left, all of a sudden the reflow and the work that all of the apps have to do to be able to understand the environment is just huge.

This is more than likely true, as Paul Thurrott points out that another AMA member mentioned out that Microsoft had to completely re-write the code for the Taskbar in Windows 11. In doing so, the ability to move the Taskbar around was lost. Hence, the feedback.

Speaking of Feedback, Roth went on to talk about the data around the need for features in Windows 11. Apparently, based on what Microsoft is seeing around the Taskbar being moved, it’s still a really small subset of users that want it, and there’s bigger things of focus right now. This is despite Feedback Hub, mainly driven by Windows enthusiasts, having tons of requests for the ability to move to Taskbar. She said:

And when you look at the data, while we know there is a set of people that love it that way and, like, really appreciate it, we also recognize that that a set of users is really small compared to the set of other folks that are asking for other features. So at the moment we are continuing to focus on things that I hear more pain around.

The final thing of discussion around the Taskbar comes around if and when Microsoft will ever add the feature back to Windows. There seems to be indication that Microsoft is listening, but doesn’t really want to actually take action on it anytime soon. Per Roth:

It is one of those things that we are still continuing to look at, and we will keep looking to feedback, but at the moment we do not have a plan or a set date for when we would, or if we should, actually build the side taskbar.

So, there you have it folks. It’s looking as though if you really want to move the Taskbar around in Windows 11, you’ll have to keep using third-party programs like Start11, which allow you to move it with no issues. It also adds the other lost ability in Windows 11, to ungroup Taskbar icons.