How to recover deleted/archived emails in Gmail

Are you wondering how to recover deleted or archived Gmail messages? There is no need to worry, this post is for you.

Archived Gmail is neither saved in the Starred folder nor seen in the Inbox folder in your Gmail account. However, you can access the archived messages in the All Mail folder.

Sometimes, Windows users delete archived emails accidentally or intentionally, but they may need to unarchive them. However, emails from the Trash folder may not be recovered if they are deleted manually or automatically after the 30-day waiting period.

If you have yet deleted the archived Gmail from the Trash folder on your Gmail account, this issue is solvable, but if otherwise, you may have to contact the Gmail server administrator to help you recover your emails.

How can I recover archived Gmail messages deleted by accident?

1. Undelete from Trash

  1. Login to your Gmail.recover deleted archived gmail
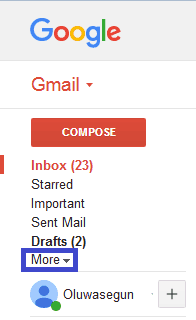
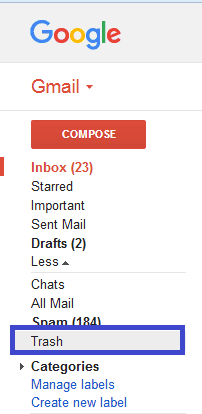
  2. On the left side of the page, click More. From here, go to Trash.recover deleted archived gmail
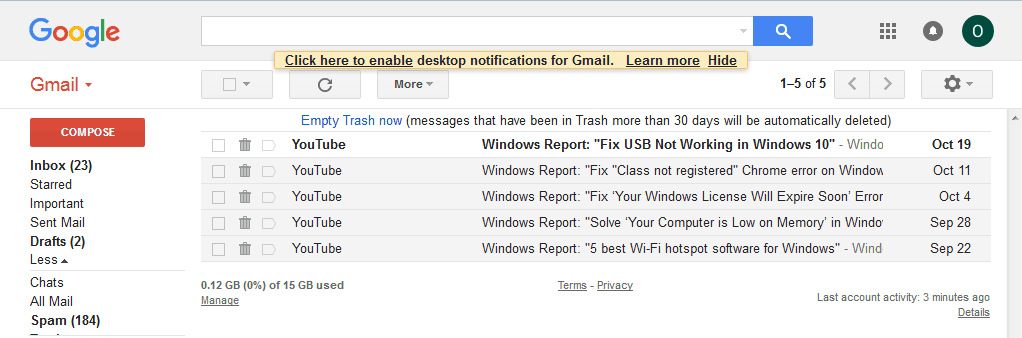
  3. In the Trash folder, check the box next to any messages you want to recover.recover deleted archived gmail
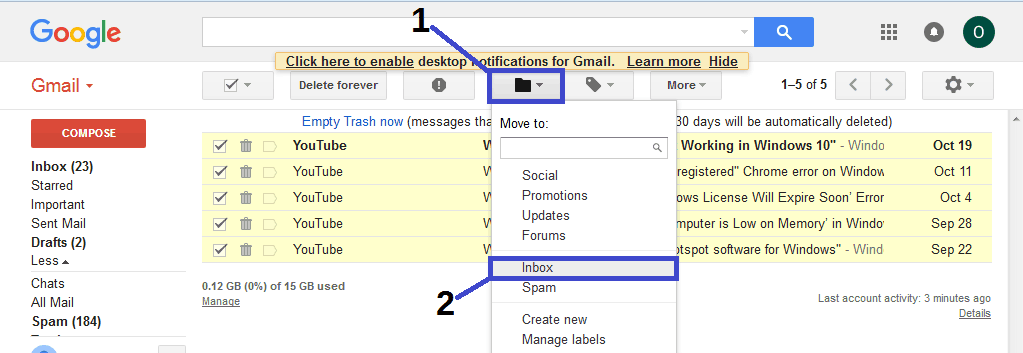
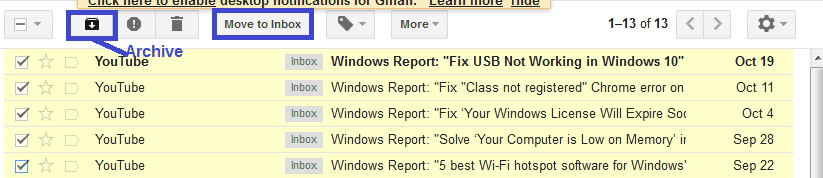
  4. Now, click on the Move icon, and then select Inbox.recover deleted archived gmail
  5. Select where you want to move the messages.recover deleted archived gmail

This method requires identifying the specific message you deleted from the archive; you should check the box next to the messages.

Alternatively, you can search for the deleted message in the search bar and move it back to the Inbox or Archived folder.

2. Use an alternative email client

Perhaps it’s time you changed the email client altogether since many great alternatives can replace Gmail.
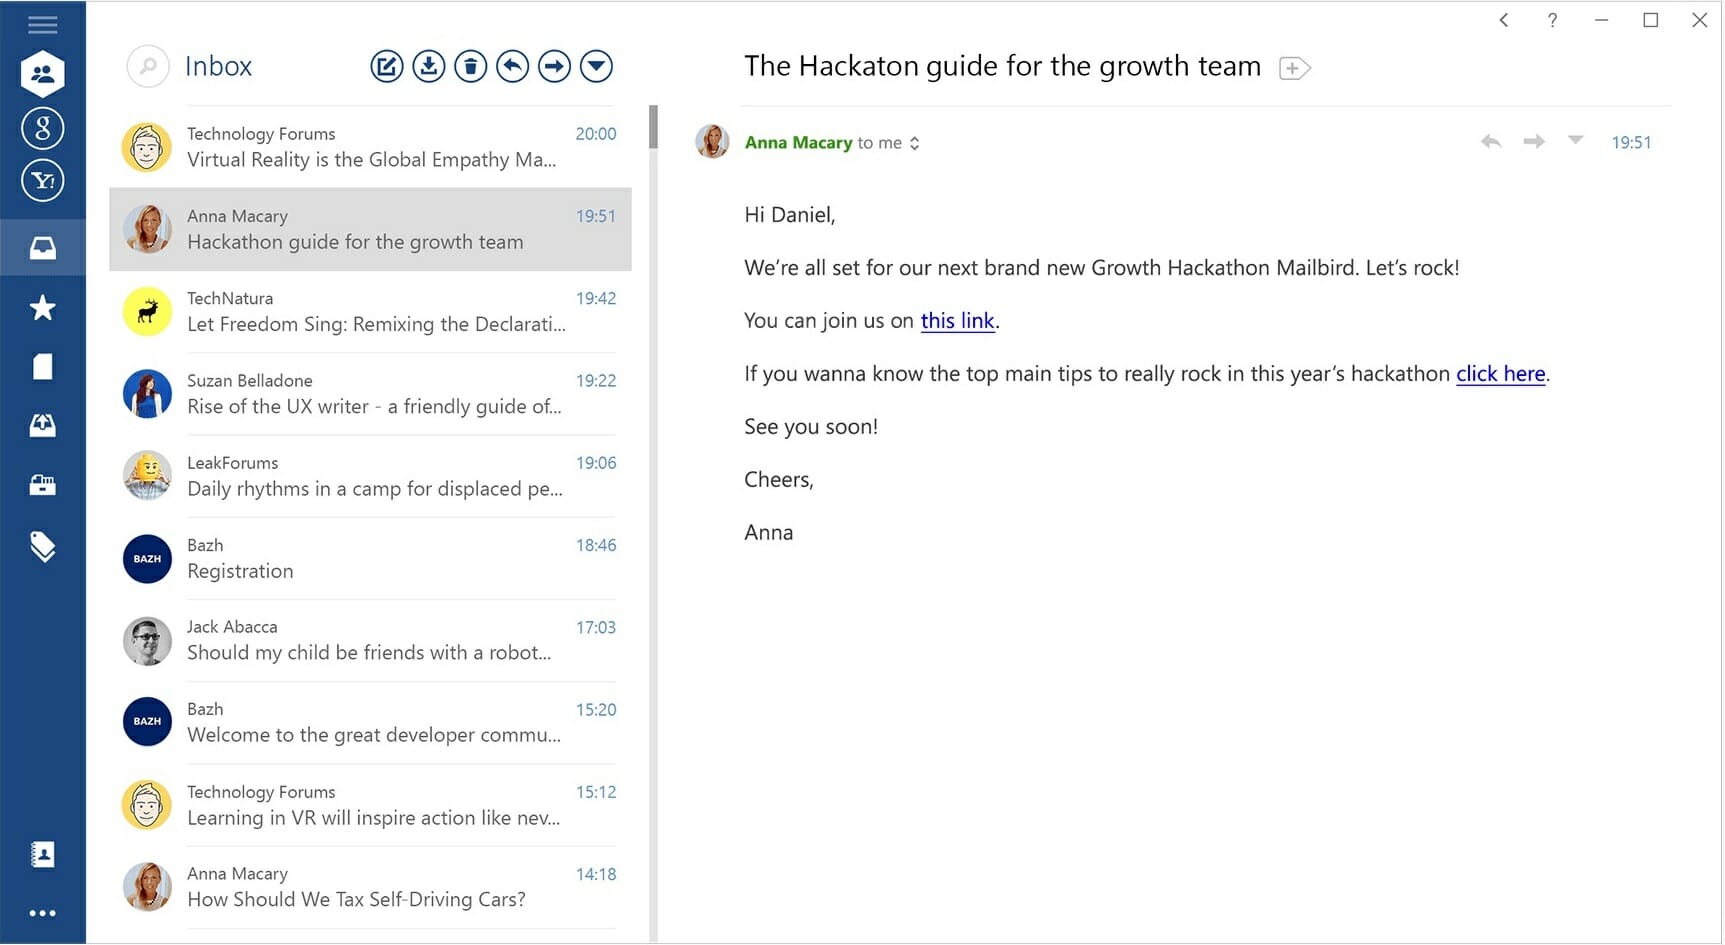
And our top suggestion in this particular case would be Mailbird.

Currently, Mailbird is one of the most popular email clients and also one of the best email apps for Windows 10.

The tool comes in extremely handy, syncing all your emails and contacts from multiple accounts in one unified Inbox. Plus, it brings a lot of easy-to-set customizable features and options to serve the mentioned purpose.

Users praise Mailbird for its minimalist user interface, its low impact on the system, plus the ease of use of a lot of convenient shortcuts.

Mailbird

Use Mailbird to benefit from a seamless, lightweight emailing experience that brings all your email accounts to one place.

3. Use Microsoft Outlook

  1. Launch Microsoft Outlook and login to the email account.
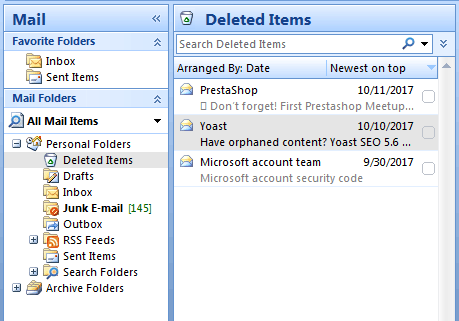
  2. Click on the “Mail Folder” tab and then “Deleted Items”.recover deleted archived gmail
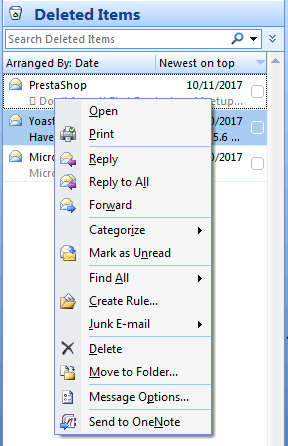
  3. Now, right-click on the deleted archived message and select “Move to folder” option.recover deleted archived gmail
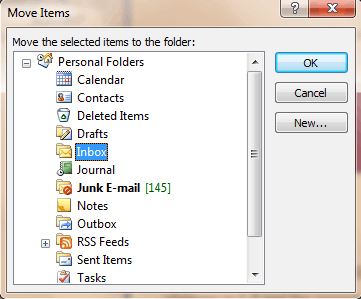
  4. Then, click on “Inbox to move the deleted message to the “Inbox” and wait for the process to be completed.recover deleted archived gmail

Some companies/organizations use Microsoft Exchange server for their corporate email address.

In addition, it is also possible to create a custom domain email with Gmail by using G-Suite available at a reasonable price per user every month.

4. Contact Gmail Support Team
recover deleted archived gmail

Another option for retrieving the deleted archived message is to contact the Gmail Support Team. Sometimes, the Trash folder may have been cleared accidentally or automatically; however, you can request the Gmail Support Team to help you recover deleted messages in your Gmail account.

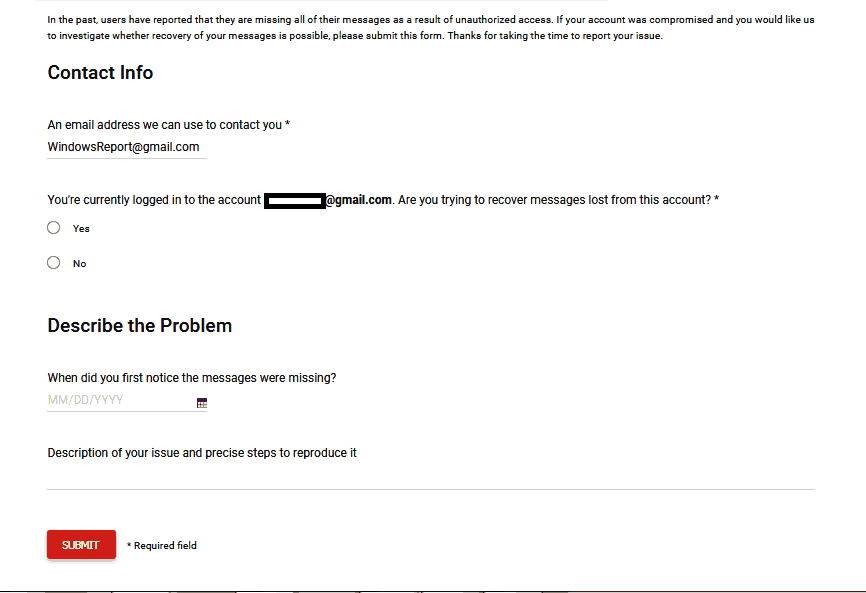
If you intend to reach out to Gmail Support Team, go to Gmail’s missing emails page.

Fill out the form and enter essential details such as your email address where the deleted archived emails have been deleted, whether you are currently logged in, and a short description of the problem (nature of the deleted email).

After completing the form, click on the Submit button; the Gmail Support Team will recover the deleted email for you.

In conclusion, you can use these methods to recover deleted archived Gmail messages on your Windows PC. As for Skype, check out how to recover deleted Skype messages.

We would like to hear from you, especially based on the addressed issue; you can comment below if you have any questions.


Office 365 users targeted in SurveyMonkey phishing attack

As phishing attacks continue to increase, it’s such a bad time for a Windows 10 user not to have an effective antimalware solution installed on their PC.

Worse still, spear phishing is the name of the game these days, in which case, the recipient of the malicious email or link is always a well-researched individual. It’s partly why such attacks are very difficult to stop.

Threat actors have targeted Office 365 users in these types of cybercrime multiple times before, and they continue to do so to date. Unsurprisingly, some of the latest victims/targets are employees participating in a fake SurveyMonkey survey.

SurveyMonkey phishing attack

The folks at Abnormal Security recently uncovered attempts to steal O365 user credentials on the pretext of conducting surveys among employees.

In the campaign, the victim receives an email from a genuine SurveyMonkey site. But the message contains a hidden link, which upon clicking, redirects the victim to a Microsoft form submission page.

The user has to submit their O365 email and password to proceed. This way, the malicious actors steal the unsuspecting user’s Microsoft account security credentials.

The email is sent from a real SurveyMonkey domain (surveymonkeyuser.com), but with a different reply-to domain. That reply-to domain was registered only 1 month ago. The email simulates an automated notification with a link to open the “survey”. This link is an actual SurveyMonkey link that redirects to the main phishing page.

It appears that these spear phishing attacks have a high probability of success due to various factors, including the use of a trusted domain. Likewise, concealing the redirect link makes it a little difficult for the target to suspect anything.

Abnormal Security points out that up to 50,000 mailboxes may have received the SurveyMonkey phishing link.

What’s your take on the state of cybersecurity against the backdrop of rising cases of Office 365-related phishing attacks? Feel free to let us know via the comments section below.

[wl_navigator]

Microsoft to boost its Dynamics 365 capabilities with new acquisition of Orions Systems

Microsoft announced this week the acquisition of Orions Systems, a company delivering smart vision system that it plans to use to improve its Dynamics 365 offerings (via ZDNet). Muhammad Alam, CVP of Microsoft Dynamics 365 explained how the smart vision systems expert could improve Microsoft’s solutions for companies looking to optimize their retail operations through computer vision.

“The acquisition will bring additional technologies that will allow solutions like Dynamics 365 Connected Store and the Microsoft Power Platform to offer retailers and other organizations a way to build and train their own AI models to customize and optimize how they can learn from their physical space. This extra set of tools will deliver on scenarios beyond what is offered out-of-the-box today and can adapt to the truly unique dimensions and needs of their physical spaces,” explained the exec.

Microsoft announced its Dynamics 365 Connected Store last year as a new way to improve the retail experience by analyzing data from video cameras and IoT sensors. The ongoing covid-19 pandemic hit the retail industry pretty hard, and Microsoft actually announced the closure of all of its retail stores worldwide last month. Still, the company remains committed to helping the retail industry reinvent itself with smart vision. You can learn more about upcoming Dynamics 365 features on this previous blog post.

[Solved] Windows 10 Fall Creators Update won’t install

Windows released the Fall Creators Update back in October 2017. And while millions of users were getting it, the rollout was not as smooth for everyone. In fact, there were some users who reported they were unable to install the freshest Windows 10 version.

If you’re dealing with Windows update problems as well, we’ve got your back. Here are some workarounds that we’re sure will help you obtain a Windows 10 update as soon as possible.

How to solve Windows 10 Creators Update installation issues

1. Make sure you have enough disk space

The very first thing you should do when installing just about any major update for Windows 10 is to check if your current configuration supports it. If you have a newer computer, there’s no need to bother at all, because a Windows update really doesn’t require a beast.

But if your computer is older than 5 years, you might as well take a look at the minimum system requirements:

  • Processor: 1GHz or faster processor or SoC
  • RAM: 1GB for 32-bit or 2GB for 64-bit
  • Hard disk space: 16GB for 32-bit OS or 20GB for 64-bit OS
  • Graphics card: DirectX9 or later with WDDM 1.0 driver
  • Display: 800×600

So, if your computer doesn’t meet the minimums here, first of all, make sure to get your PC ready for the installation of the update with a full clean-up, maintenance, and optimization process.

Use a dedicated cleaner and optimizer program to remove temporary files or unwanted system files so as to free your disk space and make it ready for installation.

These tools will help you find web browsing traces, hidden data junk, superfluous Registry entries, and system vulnerabilities that might interfere with other processes.

Furthermore, they will also remove unwanted software installations, plus they will scan all of your system components to make sure your drivers are up-to-date.

Their improved Defrag option merges free space on your device and retrims used space to make sure your drive is used to its full capacity.

2. Make sure you don’t pause updates

In a previous article, we explained how to block the Fall Creators Update on certain versions of Windows 10. And it involves deferring major upgrades.

So, if you have this option enabled, you won’t be able to receive any updates. In case you don’t know how to disable it, follow these instructions:

  1. Go to Settings > Update & securitydefer windows updates
  2. Now, go to Advanced options
  3. Make sure to set the option for deferring updates to default (Select date option).

3. Disable metered connection

The same goes for a metered connection. Users can set their Internet connection to metered in order to block certain updates from installing on their computers.

So, if you want to install the update, after all, you have to make sure your Internet isn’t set to metered. This applies to both WiFi and wired Ethernet connections. Here’s how to disable the metered connection in Windows 10:

  1. Go to Settings > Network & Internet
  2. Now, go to Properties
  3. Toggle Set as metered connection on off.

4. Disable Antivirus and Firewall

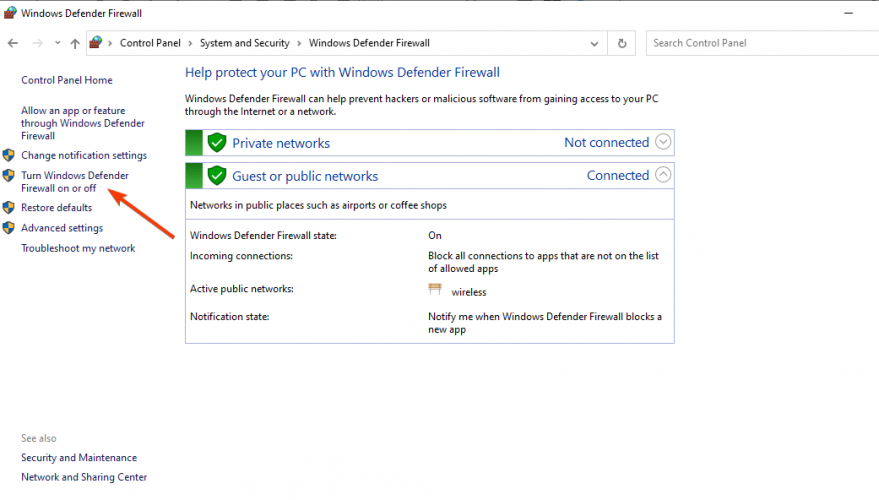
  1. Navigate to Control Panel.
  2. Click System and Security.
  3. Go to Windows Defender Firewall, then to Check Firewall Status.
  4. Select Turn Windows Firewall on or off from the left side.how to turn off windows firewall
  5. Turn off Windows Firewall for both Private and Public networks and click OK.
  6. Try updating again.

It’s known that third-party antivirus programs don’t go along very well with Windows 10 updates, especially major ones. So, if you’re still unable to download a particular update, disable your antivirus firewall or the antivirus entirely, only temporarily, and try again.

If the antivirus was indeed the culprit, you should be able to install the update without any problems.

Keep in mind that you should disable these security measures temporarily. It’s unwise to leave your computer completely unprotected for a longer period of time.

So, either re-enable your antivirus once the update gets installed, or switch to Windows Defender, which also received some changes in the Fall Creators Update.

5.  Restart Windows Update services

  1. Right-click Start Menu and run Command Prompt (Admin).
  2. In the command line type the following commands and press Enter after each:
    • net stop bits
    • net stop wuauserv 
  3. Now, close the Command Prompt and navigate to C:Windows/SoftwareDistribution.
  4. Backup this folder and delete everything inside.
  5. Restart the PC and try updating again.

6. Run the SFC scan

  1. Go to Search, type cmd, right-click Command Prompt, and select Run as administrator
  2. Enter the following command, and press Enter: sfc/scannowrun sfc command to fix windows update
  3. Wait for the process to finish

The SFC scan is a built-in tool that’s designed for dealing with various problems within the Windows OS. Even though it’s not specifically meant for resolving update issues, it certainly can help.

7. Install the update manually

And finally, if you’re still unable to install the upgrade even after performing all the previous solutions, perhaps your best bet is to take matters into your own hands and just update your system manually.

As we know, there are two legitimate ways to install a Windows update on your computer. So, if the automatic Windows Update process has failed, your only chance is to turn to the Media Creation Tool.

We already have the article about installing Windows 10 Fall Creators Update, so you can check it out for precise instructions. Even though the updates are different, the procedure is identical.

That’s it for now. We hope at least one of these solutions helped you finally obtain the Fall Creators Update. If you have any comments, questions, or know about a solution we didn’t list here, please let us know in the comments down below.

How to fix DoorDash login error

DoorDash is one of the most food delivering service across the US and Canada. With more than 340,000 stores they work with, there are plenty of options you can choose from.

The ordering process is pretty simple and straightforward. You log in to your account, enter your address and follow the steps in selecting what you want to have delivered home and from where.

If you have encountered an error when trying to log in on your DoorDash account, know that you are not the only one.

We investigated the issue and in this article, we are presenting a few confirmed solutions for you to try. Hopefully, this will fix the login error.

What to do if you can’t log in to DoorDash?

1. Check your internet connection

fix log in error doordash

For everything to work, you need a good internet connection when entering in your DoorDash account.

Turn on and off your Wifi to force reconnection. If you are not using Wifi, make sure the mobile data is working.


2. Clear data and cache

how to fix can't log in doordash

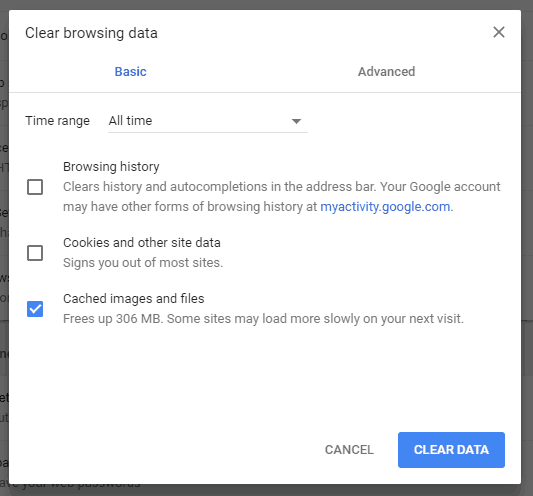
If you still get a checkout error, clear your browser’s cookies and your browser’s cache.

Clear your browser cookies and then close and reopen it. Go to DoorDash.com and try placing the order again.


3. Check DoorDash social media accounts

fix doordash unable to log in

Looks like DoorDash is very responsive on their social media accounts, especially Twitter. Make sure to check there for any reported issues on their part.

Hopefully, one of these solutions will help you fix the login error you have encountered. However, if you’ve used another method, feel free to share it with us in the comment section below.

[wl_navigator]

Fix email certificate errors [Expired, Invalid, Not Secure]

You may have tried at least once to log in to your email and encountered an email certificate error, but didn’t know how to work around it.

Certificate errors happen whenever there’s an issue with a certificate or a web server’s use of the certificate itself, thus Internet Explorer, Edge, Chrome, and other browsers display red flags through warnings about certificate errors.

The most common reason is that the certificate is valid for a certain period of time, so if your computer’s date and/or time is set to a different date or time, then you are likely to get the email certificate error warning.

However, if you still get the email certificate error even after adjusting the date and time, then it is possible that either the certificate of the website itself has expired and needs to be renewed, or, the website is not to be trusted.

You could have encountered the email certificate error on a site you visit regularly without errors, so in this case, the website itself may not be configured correctly.

Another cause could be that the website’s certificate has expired and the owner or operator needs to renew it so that you continue using it, as this cannot be corrected in your browser.

When you get an email certificate error, it is advisable that you do not put important login identities or passwords on such pages.

How can I fix email certificate errors?

1. Adjust time/date to appropriate values

  1. Right-click Clock on the taskbar.
  2. Click Adjust time/date.Adjust time and date
  3. Click Change date and time.
  4. Set the correct date and time.
  5. Click OK.

Check to ensure your time and date on the computer are set to the appropriate or correct values. If you set ahead of or behind the actual time/date, the certificate can read as invalid.

Use the above steps in order to check the time/date settings and adjust them easily.

2. Try out a more powerful email client

Think of a really important email that you’re ready to send. This email may be related to your family or work projects and it contains sensitive data that you’d never want to get in the wrong hands.

The same goes for not being able to complete the action due to countless email certificate errors. The best mail clients can keep you away from all of these, so maybe it’s time to think of a better choice too.

Mailbird isn’t simply designed to cover the basics you’ve come to expect from similar email clients. Trusted by users worldwide, it lets you manage multiple accounts.

Keep in mind that it not only packs various smart productivity tools, but messages are neatly organized so that you can enjoy an uncluttered interface.

Mailbird

Mailbird is intuitive, integrates with countless apps/services, and will keep you away from email certificate errors.
Check price Visit website

3. Retype the address

If it’s a site you visit regularly and you hardly get any email certificate error, then the site itself may not be configured correctly.

You should better try and retype the address then see if the problem persists.

4. Configure the use of mail over SSL settings

If you’re trying to connect to your email using a default mail server name, what happens is there’s a mismatch between the domain name, and that of the shared SSL certificate on the server, which results in an email certificate error.

In order to remove the email certificate error you receive, configure your email client with an SSL setting, because by default, when sending or receiving emails, they’re not encrypted so if they’re vulnerable and easy to intercept by cybercriminals.

Some users opt to use email over SSL owing to restrictions by their Internet service provider that prevents them from sending any email messages.

In order to use your email over an SSL, update the settings for both incoming and outgoing servers, plus ensure your email client has port 465 configured as the SMTP port.

Have any of the above solutions helped resolve the email certificate error for you? Let us know by leaving your comment in the section below.

Besides addressing email certificate expired issues, do note that the previously mentioned solutions are confirmed to work when facing the following errors as well:

  • Unable to fetch the certificate from the server – There are times when the name on the security certificate is invalid or doesn’t match the name of the site. Retyping the address may help.
  • Mail server certificate is invalid – One of the most common causes of this issue is the clock on your computer being wrong. Therefore, don’t hesitate to adjust the time/date settings.
  • Certificate not secure email – When facing this error, you’re once again entitled to suspect incorrect date and time settings. Even more, make sure to validate your device email settings with the email server settings.
  • Email server certificate not trusted – This specific error message is related to certificate installations that weren’t properly completed on the server hosting the site. Refer to the above tips for solving this issue in no time.

Game developers are now using Project xCloud to access Xbox Development Kits remotely

The Xbox and Project xCloud teams have learned to adapt on during the global COVID-19 pandemic. Working from home presents its own unique set of challenges for everyone, but especially for game developers. One pain point is that many game developers are unable to access their Xbox Development Kits.

Without this access, game developers, artists, and designers might not be able to churn out new game content for gamers. Most of the traditional Xbox remote access tools are not ideal to be used in a work from home scenario.

As noted in a post on their Game Stack Blog, Microsoft is working to make Xbox Development Kits more easily accessible.

Project xCloud
via Microsoft

“We’ve set out to solve these remote access challenges by re-allocating our Project xCloud resources; going beyond mobile and creating a PC app experience for developers that runs a low-latency 60fps gaming experience that allows for continued game development. By giving developers access to our PC Content Test App (PC CTA) they can remotely connect to their Xbox Development Kits from their PC, allowing them to test, play and iterate as if they were in the office. It also prevents them from having to download daily builds to local hardware in the home, which can often take hours.”

So far, the following game developers have used the PC CTA to improve their remote working environment, including Eidos-Montréal, Infinity Ward, Ninja Theory, Playground Games, Rare, Turn 10 Studios, and Undead Labs​.

Once the PC CTA is installed, game developers can use the Direct Connect functionality to access their Xbox Development Kit remotely. With the PC CTA, all the developer tools needed to develop your game are accessible, including game performance simulations, network testing, and game system resource monitoring are accessible.

How to Fix Error Code 30068 When Installing Office

Installing Microsoft Office is a straightforward process allowing users to access various productivity tools and features.

However, like any software installation, it is not immune to encountering errors. One such error that may arise during the installation process is error code 30068.

There are several ways in which the error codes can appear, including 30068-29 (2), 30068-4 (3), 30068-4 (1715), 30068-39 (3), and so on.

In this guide, we will provide step-by-step instructions for troubleshooting methods to tackle Error Code 30068 effectively.

What causes the error code 30068 while installing Office?

There could be various reasons for the error to appear; some of the common ones are mentioned here:

  • Corrupt system files – Damaged system files on your computer can interfere with the Office installation process and lead to Error Code 30068. Try running an SFC scan to fix it.
  • App interference – Certain applications or programs installed on your computer may conflict with the Office installation, resulting in the error.
  • Incomplete previous installation – If a previous installation of Office was not completed successfully or was interrupted, it can leave behind remnants or conflicting settings that can trigger the error.
  • Network connectivity issues – Network connectivity problems, such as intermittent or slow internet, can disrupt the installation process, leading to errors. Try basic troubleshooting to fix it.
  • Insufficient disk space – Office requires a certain amount of disk space to be available for installation; if it is lacking, error code 30068 may occur.

So, these are the causes of the error code; let us check out the solutions to fix it.

How can I fix the error code 30068?

Before proceeding with any steps for fixing the error, go through the following preliminary checks:

Once you have checked these, move to the troubleshooting steps.

1. Verify if the Microsoft Office Click-to-Run service is disabled

  1. Press Windows + R to open the Run dialog box.Services RUn command error code 30068 when installing office
  2. Type services.msc and click OK to open the Services app.
  3. Locate and right-click the Microsoft Office Click-to-Run service, then choose Properties.Microsoft Click-to-run
  4. Locate the Startup type and select Automatic from the drop-down.Select Automatic
  5. Click Apply, then OK to save the changes.
  6. Now restart your computer and try to install Office again.

2. Uninstall the previous Office app & its folders

Note icon NOTE
If you can’t find the old version of the Microsoft Office app installed on the computer, move to the following method to remove the app.
  1. Press the Windows key, type control panel, and click Open.Control Panel start menu error code 30068 when installing office
  2. Select View by as Category and click Uninstall a program.CP Uninstall
  3. From the list of installed programs, select Microsoft Office and click Uninstall.Uninstall Office
  4. Click uninstall again to complete the process.Uninstall Microsoft Office 1
  5. Press Windows + E to open File Explorer.
  6. Navigate to this path: C:\Program Files (x86)Office click Delete button
  7. Select the Microsoft Office folder and click the Delete button.
  8. Now go to this path: C:\Program FilesOffice click Delete button
  9. Select the Microsoft Office folder and click the Delete button.

Once Microsoft Office is uninstalled completely, try to install it to check if the issue persists.

3. Use the Microsoft Support & Recovery Assistant

  1. Download the Microsoft Support & Recovery Assistant.
  2. Once the SetupProd_OffScrub.exe file is downloaded, double-click it and click Install on the wizard.Install Recovery Assistant error code 30068 when installing office Follow the prompts to install the tool.
  3. Choose the version of Office you want to uninstall and click Next.Uninstall Office
  4. Follow the onscreen instructions to complete the process, then restart your computer.
  5. Once the PC is up, the tool will re-open to complete the final step of the process.
  6. Go to the Microsoft Office setup file and double-click to restart the installation. Follow the prompts to reinstall it.

4. Run SFC & DISM scans

  1. Press the Windows key, type cmd, and click Run as administrator.CMD elevated error code 30068 when installing office
  2. Type the following command to repair system files and hit Enter: sfc/scannowSFCSCANNOW CMD
  3. Wait for the complete to execute, then copy & paste the following command to restore Windows OS files and press Enter: Dism /Online /Cleanup-Image /RestoreHealthRestore health
  4. Once it is executed, reboot your computer to let the changes take effect.

This method ensures that all the corrupted files on your device are replaced with a healthy version of the file, ensuring no system file interferes with the installation process. Try to install Windows again.

So, these are the methods to fix the error code 30068 while installing Microsoft Office.

If you are facing other issues like Microsoft Office not working on Windows 11, we recommend you check out this informative guide to find the solutions.

Please feel free to give us any information, tips, and your experience with the subject in the comments section below.

Kindle Paperwhite Application Error: Easy Ways to Fix it

Kindle Paperwhite is a popular e-reader that allows you to download and read e-books from Amazon. That said, several Kindle users have reported the application error when using the reader.

As per the reports on Amazon’s official forum, the application error is temporary and can randomly occur when the device is in use. Performing a power cycle has fixed the error for many.

In this article, we have listed a couple of troubleshooting tips to help you resolve the application error in Kindle Paperwhite.

Why does my Kindle keep saying application error?

Below are some of the reasons you’re getting the Kindle Paperwhite application error:

  • Outdated Kindle software: If the Kindle software is outdated, you will likely encounter issues like this. Hence, it is good practice always to update your Kindle software.
  • Issues with Kindle Paperwhite: At times, this problem might be due to minor issues with your Kindle device. Performing a power cycle should help you rectify this most times.

How can I fix the application error on Kindle?

1. Perform a power cycle

  1. Press and hold the power button.
    press and hold kindle application error
  2. Wait for a power dialog box to appear, or the screen goes blank.
  3. Continue holding the button for another 40 seconds, then release.
  4. Leave the device idle for a few minutes.
  5. Press the power button to turn on the device.
  6. Check if the application error is resolved.

Performing a quick restart seems to have fixed the error for many. However, if the issue persists, leave the device idle for more than a few minutes.

For some users, turning off the device and leaving it idle overnight has helped fix the issue. Try to leave it idle for a couple of hours in a shutdown state before proceeding with the next set of steps.

2. Update the Kindle software

2.1. Download the software

  1. From the home screen, tap on Settings.
  2. Tap on three dots and select Device Info.
  3. Note down the Kindle software version.
  4. Now head over to the Kindle Software Update page using your computer.
    update page
  5. Download the latest version of the software available for your Kindle device.

2.2. Update Kindle Paperwhite manually

  1. Connect your Kindle device to your computer.
  2. Move the downloaded software package to the Kindle drive.
  3. Eject the device once the transfer is complete.
  4. On your Kindle device, tap on Menu.
  5. Select Settings.
  6. Tap on Menu and select Update Your Kindle.
    update your kindle
  7. Tap OK to initialize the updating process.

Kindle will locate and install the software update package from the internal drive. The update may take some time, so wait till the upgrade is complete.

Once installed, the tablet will reboot automatically. Register your Kindle Paperwhite with Amazon, and the device should start repopulating your purchases.

Kindle Paperwhite downloads and installs updates automatically when connected to the internet. However, if it fails, you can install the updates manually.

3. Reset to factory default

  1. Tap on Settings.
  2. Choose Menu.
  3. Select Reset Device.
  4. Tap Yes to confirm the reset action.
    yes kindle application error

Kindle will reset to factory default in a few minutes. Do not use or turn off/on the device during the reset process. The device will reboot automatically as the process completes.

Once restored, you may have to re-register Kindle Paperwhite on Amazon and restore your backups.

Note that factory resetting any device will erase all the data in the internal memory of the device. Make sure to create a backup of your data before proceeding with the factory reset.

How can I fix Kindle Paperwhite error while registering?

  1. Ask the owner to log in to their Amazon account.
  2. Go to Manage Your Content and Device.
  3. Click on Devices.
  4. Click the Action button.
  5. Select Deregister to remove the Kindle device linked to the account.

If you are receiving an error while registering a Kindle device, make sure it is deregistered by the previous owner. All the Kindle devices are linked to the original owner’s Amazon account and, to prevent theft, are blocked when accessed using an unknown account.

The Kindle Paper application error can occur due to a temporary glitch. You can fix the error with a quick restart, as described in the article above. Follow other steps if performing a power cycle does not help.

Similarly, if Kindle is not downloading books, check our quick guide for sure ways to fix it.

Feel free to let us know the solution that helped you fix this issue in the comments below.

How to use and customise the Office 365 Admin Centre homescreen

The Office 365 Admin Centre is the nerve centre of the administration experience for organisations using the platform. The default Home page gives you an at-a-glance view of your tenant’s installation, so it’s important to configure it to give you the most utility.

The homescreen uses a card-based interface. Each primary page within the admin centre has its own card, which lets you quickly drill down into the data you need. To add or remove cards, click the “Add card” button next to the searchbox at the top.

Select the cards which matter to you by dragging from the flyout pane onto your homescreen. You can rearrange cards at any time by dragging their header bar and moving them around the screen. To remove any card, click the ellipsis icon in the right of its header and click “Remove”.

Most cards contain some key information and a handful of important action buttons. Some display data within the card itself. One example is the “Active users” card, which displays a condensed version of the Active Users graph.

Effective use of the homescreen can accelerate common management tasks. For instance, the User Management card gives you one-click controls to add, edit and delete users – click the button and then search for the user to modify.

Your layout will save automatically and persist wherever you access the admin centre. One final control to mention is the searchbox at the top, which lets you quickly jump to other pages within the Admin Centre.

How to view and report Office 365 service advisories using the admin centre

Experiencing problems using Office 365? Heading to your admin centre will enable you to check all the latest service advisories which may explain the issue.

You can access the admin centre at admin.microsoft.com. You might need to re-enter your Office 365 credentials as an extra security protection. You’ll land on the dashboard, which can be configured to include a “Service health” tile.

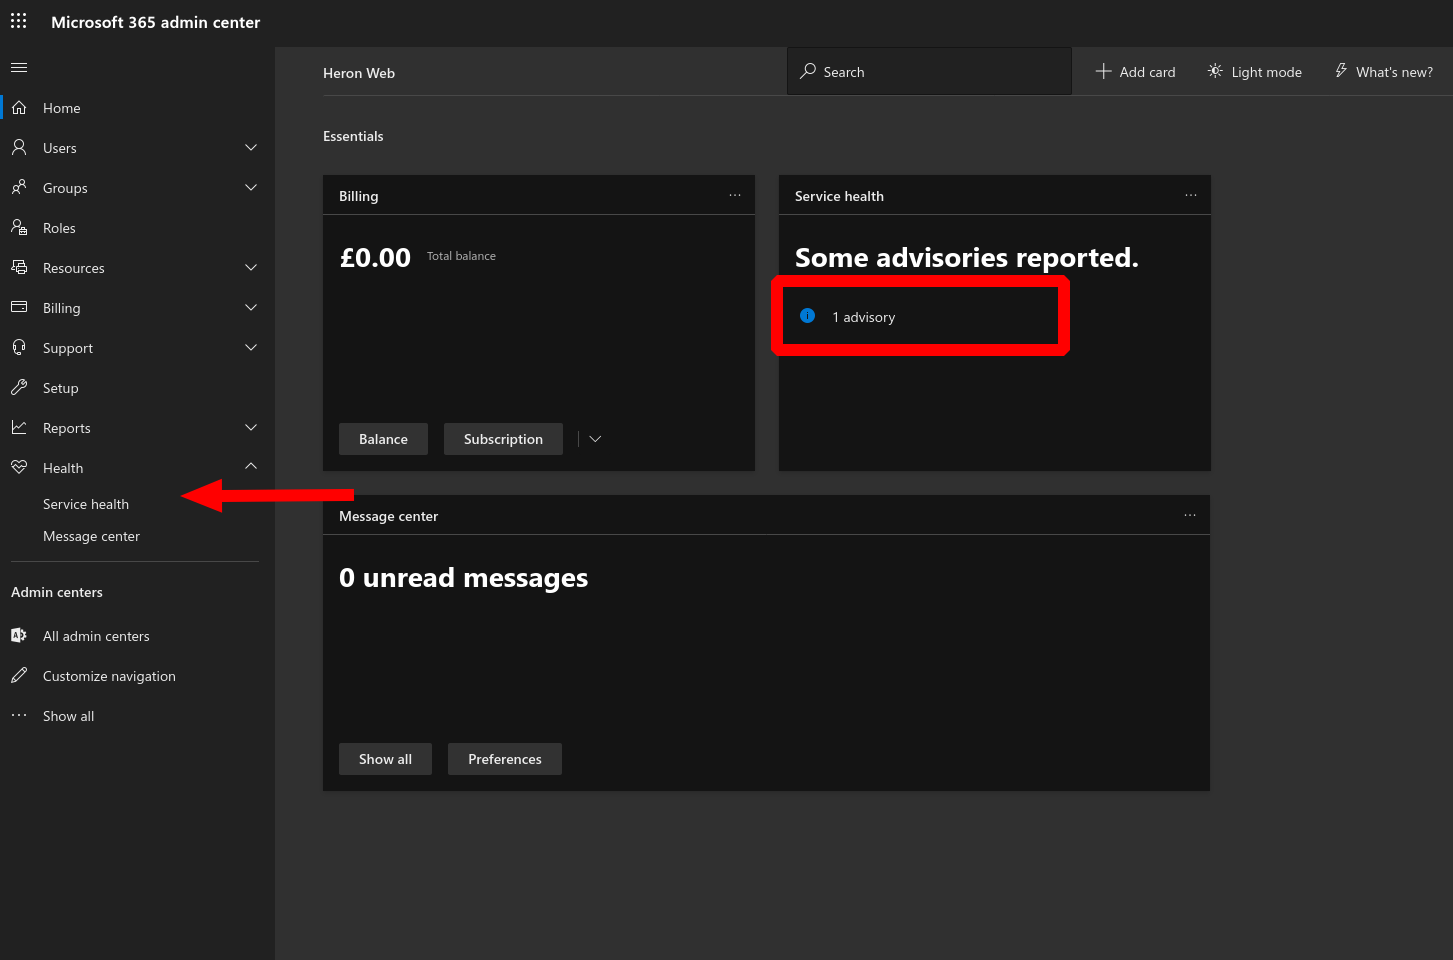
The tile will give you an at-a-glance view of any active advisories and incidents. Click the categories to jump straight to the relevant details. If you don’t see the tile, expand the “Health” category in the left menu and click the “Service health” page. (If you don’t even see the Health section, you’ll need to add it using the “Customize navigation” button at the bottom of the menu.)

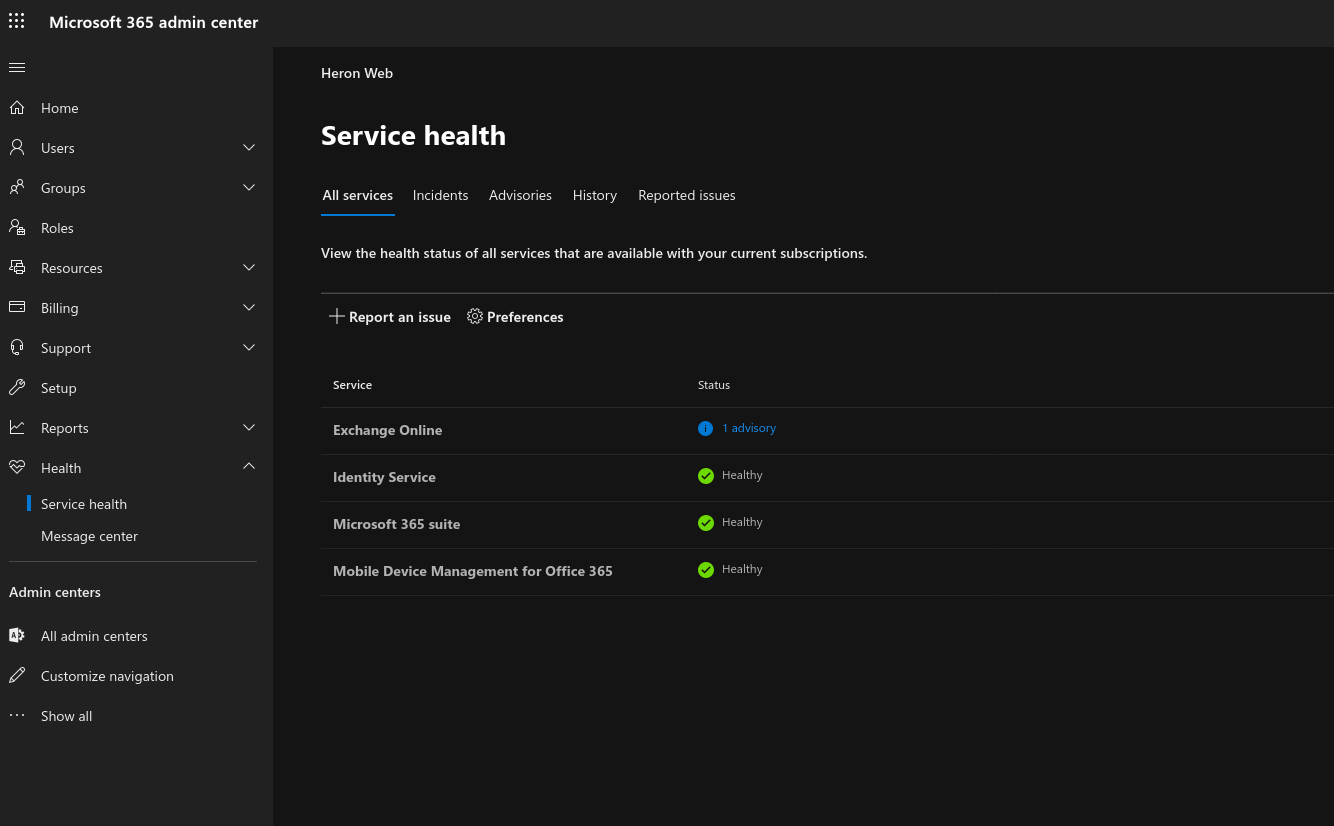
The Service Health page displays all the active advisories and incidents affecting Office 365 infrastructure. Click a service with an advisory or an incident to view the details. You can also use the tabs at the top (Incidents, Advisories and History) to see a list of all active issues. Click any one to expand its details.

To report a new issue, use the “Report an issue” button on the page. Fill out the form to describe the problem you’re facing. This should only be used when you’re confident the issue is caused by a temporary problem with Office 365 – if the product is working normally but you’re not sure how to use it, submit a support ticket instead.

Finally, you can subscribe yourself to get service alerts via email. Click the Preferences button to enable this option. Future advisories and incident reports will be sent straight to your inbox, keeping you informed of any potential problems before you run into them.

FIFA 14 Game for Windows 8, 10 Released in Windows Store [Review]

Note: Very important moment here for the evolution of the Windows Store, Electronic Arts has finally decided to break the ice and has released a notorious game for Windows 8, 8.1 and even RT users – FIFA. Read below for more on this and check out the video!
fifa 14 app windows 8
Since Rockstar has decided to release the popular Grand Theft Auto San Andreas game for Windows 8 and RT users, this is the second biggest launch.

The official Windows 8 app for the FIFA 14 game is now available for download completely for free in the Windows Store.

However, what needs to be said beforehand is that while it is mention that it will work for x86 and x64 devices, it doesn’t come with keyboard support, which is a real pity.

But it does come with mouse support, but it’s rather weird to play like that, I fear. However, since there is a FIFA 14 desktop game for PC players, it makes sense for the Windows Store version to be available only for touch devices.

The good part is that Windows RT users haven’t been forgotten.


windows 8 fifa 14

I tried out the game on my Windows 8.1 laptop, but will soon give it a try on my Windows 8 tablet, as well, to see how it performs. The good part in the fact that this is a game only for touch devices is that there are a lot of features and special touch controls that make the game experience quite awesome.

There are two gaming modes – touch and classic. The classic mode comes with a on-screen joystick and is easier to master than the touch mode which is made for professional player or those who are just really well acquainted with the game.

windows 8.1 app fifa 14

Welcome to the most authentic football game on Windows 8. Feel the excitement of every pass, shot, and tackle with new touch controls. Plus, live every moment of real-world football mastery with EA SPORTS™ Football Club Match Day. Featuring 34 leagues, over 600 licensed teams, and more than 16,000 players. From the English Premier League to La Liga and beyond. Plus, for the first time on mobile, listen to commentaries in English, French, German, Italian and Spanish! Earn and trade, or buy and sell FIFA players to create your own fantasy team. Compete in tournaments to earn coins, then spend them on new players and items to improve your team. Play for free or purchase packs. The choices are endless!

fifa 14 windows 8 game

The big advantage in touch mode is that it leaves a lot of screen space, but it might take a while until you will learn all the commands. That’s why there’s always a small tutorial before you start a game that teaches you different aspects of the game.

You can turn it off anytime, but make sure you’ve learned all the controls and commands when you do so. You can go in the Settings section of the game and from there adjust how you want to play the game.


Best football game in the Windows Store

While the game is free to download, naturally, it comes with inside-application purchases, so to get extra content or features, you will have to pay. The game is Xbox Live enabled and allows you to enter your Xbox account side by side with the Fifa 14 game.

There are some nice Xbox Achievements inside the game that you will definitely want to have on your checklist. Also, Origin has partnered with Electronic Arts and you can login with your account to connect with others.

fifa 14 windows 8 xbox live

Also on the Home section of the game, you are able to play games in the Ultimate Team mode, also known as FUT, where you get to experience the finest football (or soccer) played by the best players in the world.

The Games of the Week feature is also really cool as it allows you to play on your Windows 8, 8.1 or RT tablet games that are taking place in the real world!

There’s a penalty shootout mode if you feel like you want to master your skills in such important moments. The Manager and Kick Off modes are available for purchase inside the game.

fifa game windows 8.1

Another cool feature which has made FIFA 14 so enjoyable is the fact that there’s a Square Update function on the Settings tab, which means that by using it, you can get the latest players to your team, as per the most recent transfers.

To see how the game looks like, you can have a look at the below video. I later on discovered that you can use your mouse for playing, but it’s not as fun as your keyboard, touchscreen or a controller. Follow the link from below and start playing some nice football!

⇒ Download FIFA 14

Pro Evolution Soccer 2018: Most frequent issues

Pro Evolution Soccer 2018 was released last week and fans of the franchise are excited to finally try the next installment of their favorite sports simulation. But with many people recently reporting various issues in PES 2018.

Luckily, we’ve made a list of the most common issues in PES 2018 based on its earliest reviews. So, if you still haven’t bought the game, keep reading this article to find out what to eventually expect from the game.

We’ll also try to solve as many problems as possible, in hope that you won’t need anything else besides this article to solve your PES 2018 issues.


Reported problems in Pro Evolution Soccer 2018

1. Crash at launch

One of the first reported problems is a crash on launch, an issue many people are facing in the form of the PES stopped working, windows looking for a solution error. Here’s what one player said:

I just downloaded the game and when I launch it, I get a white screen and an error message. Does anyone else have the same issue? Any idea for a workaround?

There are a couple of things you can try to resolve the crashing problem. Since this issue may be caused by various factors, here are some of the most common solutions:

  • Update your graphics card driver
  • Update DirectX
  • Switch Windows sound to Stereo. Go to Search, type sound, and select Sound. Now, select your Playback device, go to Configure, and choose Stereo. Save the settings, and finish configuring your audio device. Restart your computer.

2. No in-game audio

Another player reported that there’s no in-game audio when a computer is connected to a TV through HDMI. Here’s what he says:

I have an integrated intel graphics card and an nvidia GTX 960M dedicated card. When plugging the laptop to TV through HDMI, intel display audio transmits the audio to the TV. This works well with PES 2017 and many other games, but with PES 2018, audio plays on the laptop speakers (realtek audio) and not on the TV.
Is Konami planning any fix, because it seems that the video game developer needs to handle this as it is working fine with some games and not others?

However, the same player who reported the issues in the first place also found a solution:

Lolo, the workaround I found is to play PES in windowed mode and to use borderless gaming tool (open source, free tool) to make the window take full screen)


3. Unable to play PES 2018 online

Some players also report they’re unable to play online as the game won’t connect to the servers:

hi guys , when I find someone to play with him online in myclub, it is disconnected and get me lose the match without we play ,, how to fix that ? anyone have same problem ? need help please

Unfortunately, we have no confirmed solution for this issue. But, you can check out our article about games being unable to connect to the internet for potential solutions.


4. VRAM crashing issue

One of the most common issues are game crashes due to a problem with the VRAM in a graphics cards.

hi well im very sure that my pc can run pes 2018 without any prob but i get the vram prob i put all the graph settings low but still got a very lagy gameplay the fps don’t even reach 29 what r ur thoughts guys ?!”

Unfortunately, nobody has the right solution yet. We’ll update this article as soon as we get more information or if someone finds a proper solution.


5. Screen flickering

And finally, another graphics-related problem is screen flickering. Here’s what one player who recently encountered the issue said:

I play in NVIDIA Surround (triple screen) and everything works like a charm. Only problem is that in the menus the player characters are flickering and semi-transparent. This happens (most of the time) when you choose your team and opponent team (then you see one player of each team) and also when you select your own generated player in the Be a pro mode…
Any ideas?
I also had stuttering (micro stutters?) problems although I can achieve high framerates with my TITAN X (Pascal) but could mostly get rid of it by disabling motion blur.


If you have any other solutions for any of these problems, please let us know in the comments below.

[wl_navigator]

FIFA 15 Ultimate Team for Windows 10/11 [Review]

Note: FIFA 15 Ultimate Team has been released for quite a few days on the Windows Store, but only now have we decided to give it a review and see whether it’s worth your time or not. Find the review below.
fifa 15 ultimate team fame windows 8
First of all, what you need to know is that we’re reviewing the official FIFA 15: Ultimate Team app from the Windows Store, which can be downloaded and installed on Windows 8, 8.1 and Windows 10 devices in the future when it will become broadly available.

This version of the game has been made with mobile devices in mind, but it can also be easily played with your keyboard and mouse, and as you’ll see in the videos below, this is exactly how I’m playing it.

What needs to be said beforehand is that the version for PlayStation or Xbox gaming consoles is far more advanced, so if you like the FUT concept that much and you also own one of these, I’d say to go for that.

But if you have a Windows tablet or you just want to have it downloaded on your Windows 8 or 10 laptop or desktop device, then this is the version you need to try out.


Inside the FIFA 15: Ultimate Team menu

The video from above walks you through the menu of the FIFA 15: Ultimate Team game for Windows 8, 10 devices and what you can accomplish inside.

If you know they FUT idea, then you know that Ultimate Team is all about buying and selling new players in order to build the most competitive squad that you will need to advance in divisions.

For winning games you get coins, and you use these to buy players, club consumables, managers and more.

fut windows 10

As you can see, there is a bunch of various rewards that you will get, so when you run short of coins, just go ahead and check what other quests you can finish.

There are 4 categories – recommended, learn, play and manage. You’ll find various challenges available in each of these.

fut 15 windows

When you will find new players through the Transfer Market, what you need to pay attention to most of all is chemistry. As you probably know by now, it is positively influenced if you pick players either from the same country, league or even the same club.

And you also need to assign them on their positions, or else they won’t play as good as they could. Or, you could use a ‘position’ card on them to help them learn new things.
fut 15 error servers

Unfortunately, just as the Android counterpart, there are still many problems with their servers, and what’s most annoying is that these mainly occur either when you’re bidding for a new player or after a game in simulation mode has ended.

A real let-down from EA, especially that this problem has been around for weeks now.

auction error fifa ultimate teamfifa 15 ultimate team windows

When a game is ended, you will get awarded coins for various tasks, such as goals, shots on target, tackles, corners, pass accuracy , and others.

You can also switch to match facts for more details and to player facts to see what scores they got. Scoring a lot of goals is a good strategy to making sure you never run out of coins.

fifa 15 ultimate team windows game

When purchasing a pack, you need to assign the new items in your club. If you don’t like that much what you have obtained, you can either quickly sell them all, which is not a good ideasince you will only be getting some coins; or, you can make a quick action and transfer them. You can also put them on the transfer list.


Playing the game

[wr_responsive_video_embed url=’https://www.youtube.com/watch?v=d4zTDpP-aJA&feature=youtu.be’]

The graphics are just like on other mobile devices, so if you’ve played the game on Android, iOS or Windows Phone, this is just about the same.

However, there are glitches, don’t you worry. Just have a look at the screenshot from below. Yes, what in God’s name was my player doing in the net? I guess that doesn’t qualify as offside…
fut windows 8 glitch

The camera are also pretty basic and I honestly was hoping for a broader selection, especially one that would allow me to see the game just as the player does. fifa 15 ultimate team windows 10 fifa 15 ultimate team windows 10 game

The simulation mode is a quick way to progress through divisions in order to get to the top. That is, of course, if you don’t want to play on the lower divisions. But it’s pretty fun there, as well. fifa 15 ultimate team windows 10 game soccer fifa 15 ultimate team windows 8.1Here’s how your squad looks like. The chemistry, as I’ve already explained, is linked to the country, league , and club similarity between the players.

Sometimes it can be a real pain in the ass to get great chemistry, but in the end, you’ll manage to reach 100.

fifa 15 ultimate team windows 8.1 review

And if you’re short of cash, there’s always the FIFA points, which can cost quite a lot. 12,000 FIFA points will cost you around $100…

fifa 15 ultimate team windows 8.1 gameWhat I disliked about the game is that there’s no love for keyboard users. I still didn’t figure out how to dribble, and I think I pressed all the keys on the keyboard.

The same thing goes for lobbing the goalie. On touchscreens, everything’s much more intuitive, and you have dedicated controls for every action.

However, when compared to the Xbox and PS versions, FIFA 15 Ultimate Team for Windows lacks a bunch of things, from the graphics department to the AI which is on many occasions favored.

Many times, the opponent players would just fault me and steal the ball in an obvious violation, but they’d get clean. When you are slightly touching them, it’s immediately foul.

Shooting at the net is also not that easy. On touchscreen devices, you can apply a finesse shot (and even there are problems) but here you just have the shoot button which, as always, is on the D button.

So, as a wrap-up, this game is worth getting if you own a Windows touchscreen, and if you’re on keyboard and mouse, you can still play it, but you’ll be frustrated with its drawbacks.


[wl_navigator]

PiPO W4 Review: an Ultra-Cheap Windows 8.1 Tablet for Less than $100

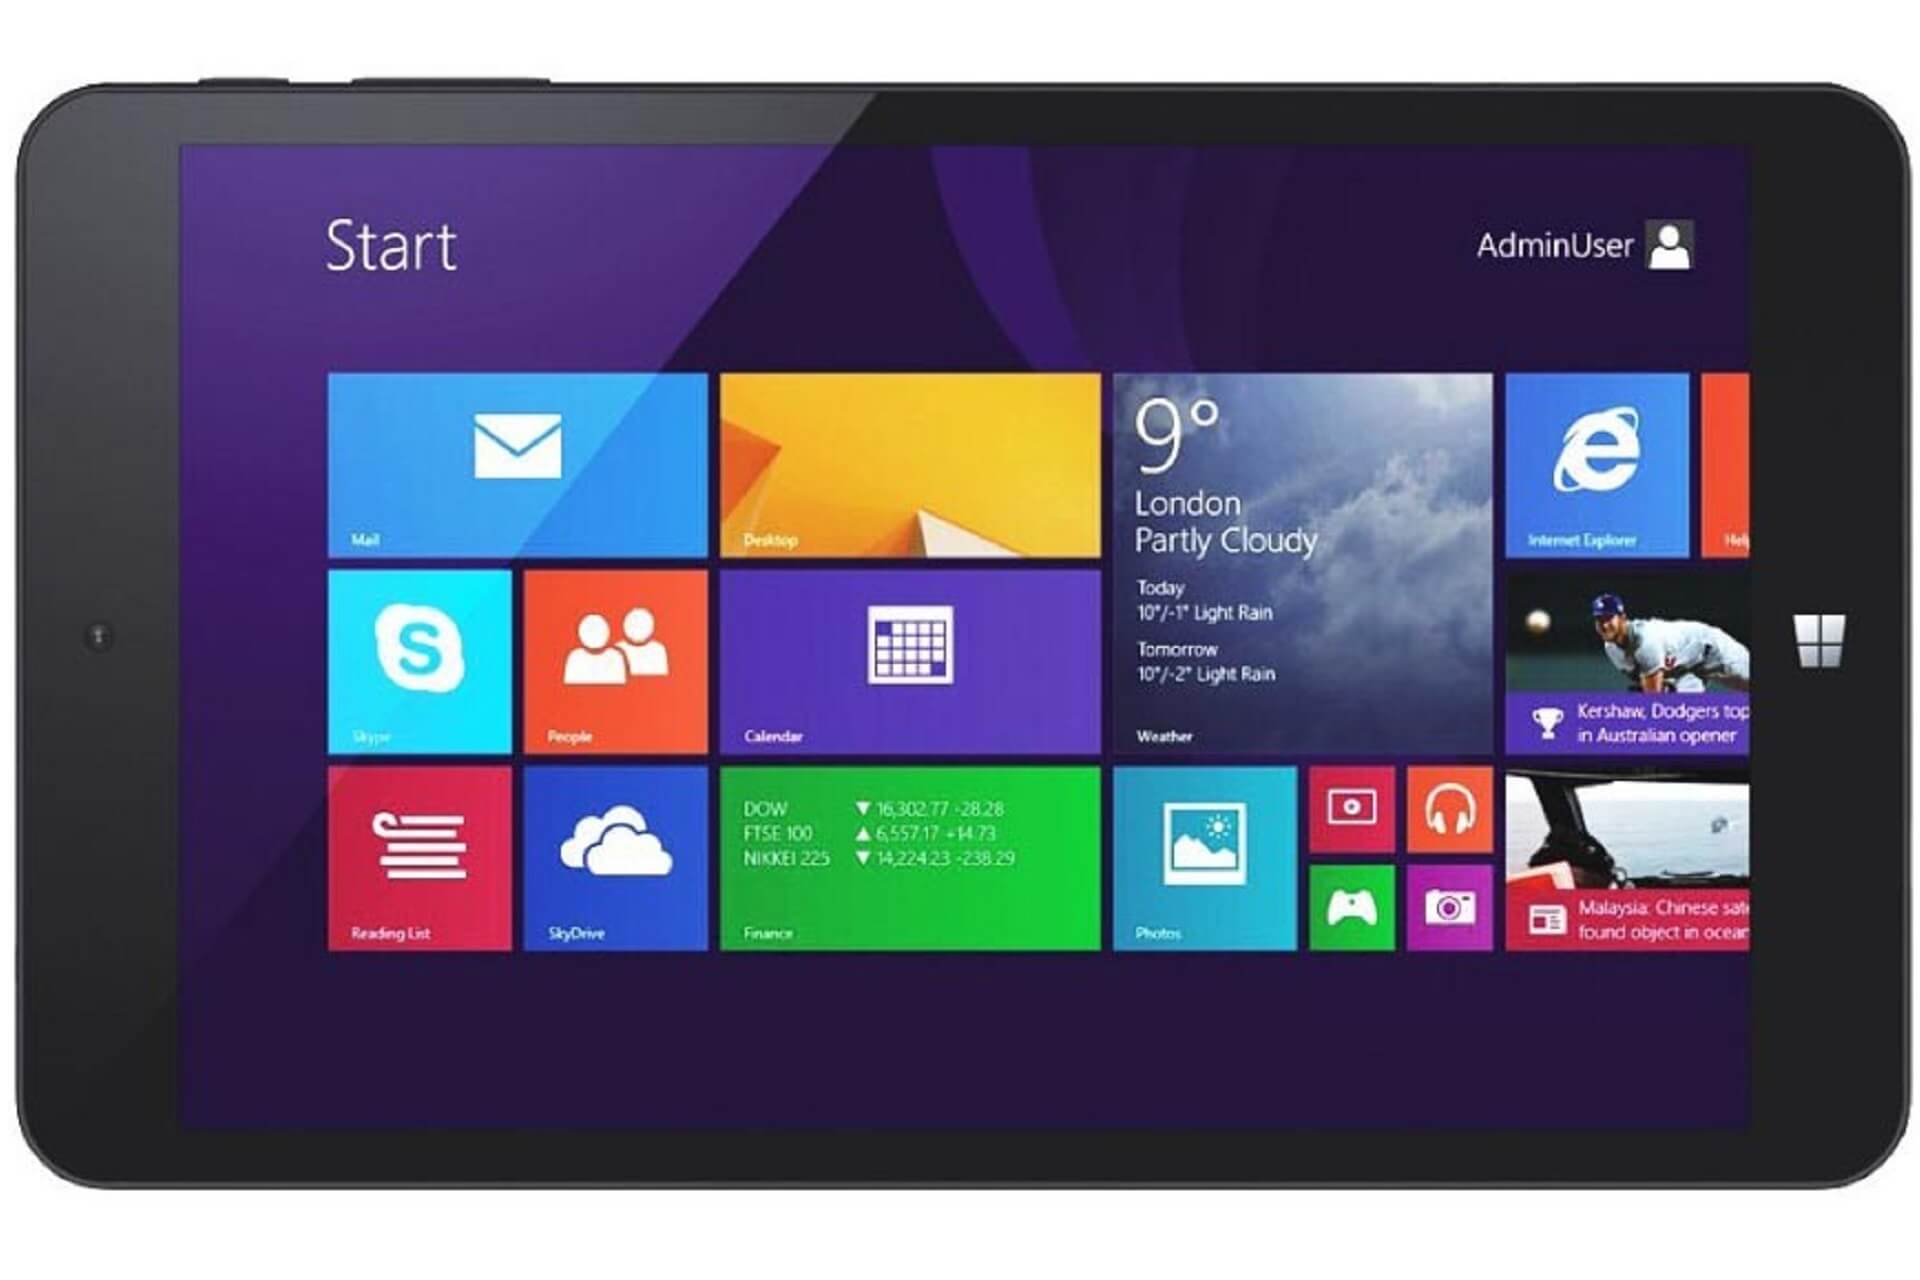
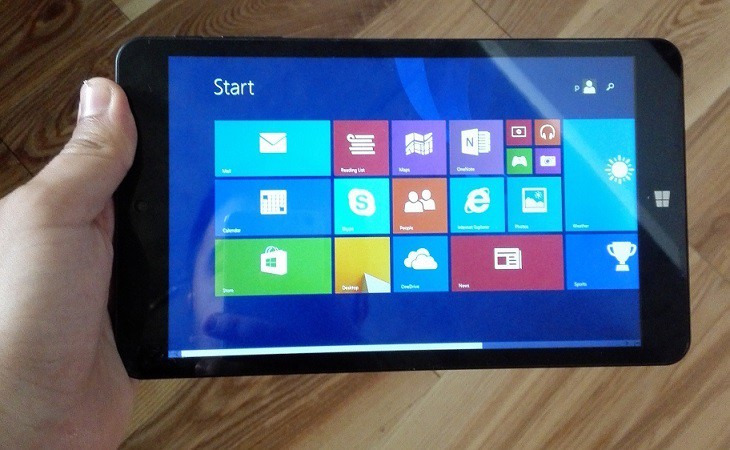
There are plenty of Windows-based tablets out there, for all the different type of buyers. If you’re a budget buyer looking to get a cheap Windows 8.1 tablet so that you could mix the desktop with the touch experience, then PiPo W4 could be a potential acquisition for you.
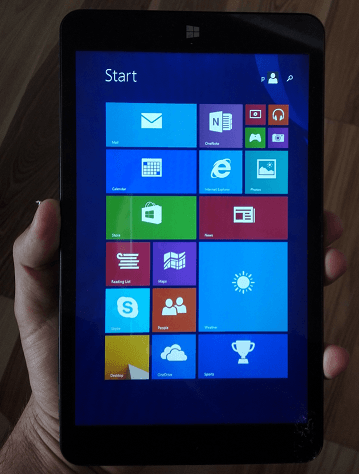
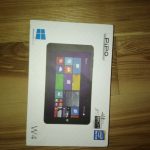
pipo w4 reviewPiPO W4 is one of the cheapest tablets with Windows 8.1 you can buy at the moment, so if you don’t want to spend more than $100 on such a product, then you could try with this 8-inch slate.

I’ve been using the tablet for the past week, and I pleased when it comes to certain features of the product, and a little bit letdown with others. But, hey, we’re talking about an ultra-cheap Windows tablet here, so your expectations really shouldn’t be high.


PiPO W4 Specs

Before I lay out my own impressions of the device, it’s important that we have a look at all its most important specs and features, so that we know what this device can and what it can not do.

  • Windows 8.1 with Bing pipo w4
  • Intel Z3735G Quad core  1.33Ghz
  • 1GB RAM, 16GB internal memory (expandable with a TF card memory)
  • 8-inch display, screen resolution 1280×800 pixels
  • Front 0.3 MP and Back 2.0 MP cameras
  • HDMI, Bluetooth
  • Wi-Fi 802.11 b/g/n, 1 Earphone Jack, 1 Micro USB Port, 1 TF Card Slot, 1 HDMI Port
  • 4500mAh battery, Power Device Adapter Input 100/240V Output 5V-2A
  • Supported Formats: video – MPEG4,H264,H263,VC1,etc; audio – MP3,MIDI,WAV,AAC,PCM,AMR,WMA; e-Book – UMD,TXT,PDF,HTML,RTF,FB2

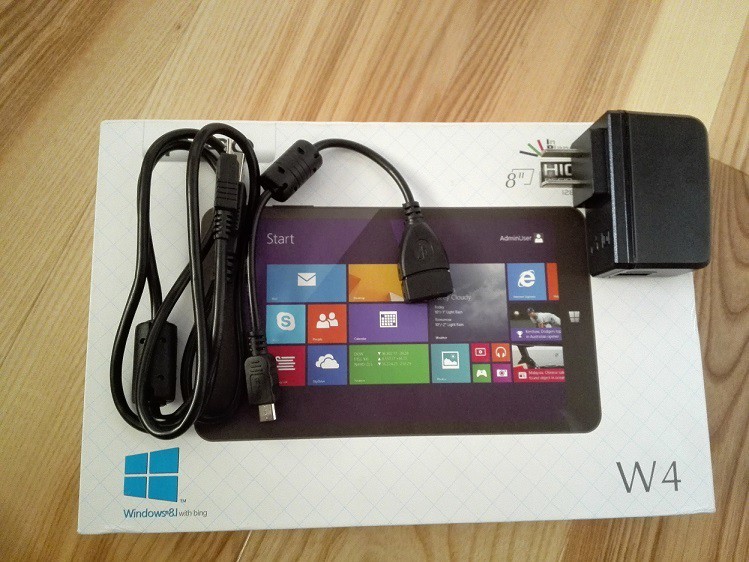
In the package that I received after ordering the tablet from GearBest, I also got one USB cable, one charger, one OTG Cable and a user manual.

If you are going to order your product from Europe or other parts of the world, you should know that the charger won’t work and you’ll need an adapter for it.

However, I’m charging it using it the OTG cable and I have no problems whatsoever with the charging speed.


My experience with the PiPO W4

Let me tell you from the beginning that we’re dealing with a ultra-budget tablet here, so you need to know what that means. The biggest and the only problem, in my opinion, is the storage.

The tablet does come with 16 GB of internal storage, but you really, really need to get a microSD card if you want to use your tablet for more than just web browsing.

And, speaking of web browsing, the tablet manages to handle that pretty well, and I’ve actually been able to load several websites much faster on the tablet than on my laptop.

With 4500mAh paired with a low-resolution display, the tablet can last for several hours on one charge. I didn’t measure the exact time, but I can say that I wasn’t disappointed.

So, this here is a trade-off: you sacrifice the resolution but you get an increase in battery life.

pipo w4 cheap windows tablet
And now, back to storage, it needs to be pointed out that the tablet also comes with a one-year subscription to Microsoft Office, which is great. However, since you can’t install Microsoft Office on an external card, you are obliged to install it on your main storage.

And if you do that, you are left with almost zero storage, if you also take into account the mandatory Windows Updates. Therefore, to make use of the storage as much as you can, you need to either disable Windows updates or to choose not to install Microsoft Office, which is quite a pity.

So, storage is the biggest problem of the device, and you need to seek for a few ingenious solutions to fix that. But, all in all, the tablet offers good performance with good battery life. It comes with an all-plastic build but there’s no creaking nor flimsy construction.

It feels quite robust in your hand and if you put it to hard work, such as playing a game or browsing multiple tabs, it will heat, of course, but to a normal level. I mean, it won’t be that noticeable.

Watching movies on the tablet is quite pleasant, as well, but I must admit that I’ve had some problems with streaming the content from HBO GO.

After all, it comes with just 1GB of RAM. I suspect the WiFi connection to be the culprit here, as well, but I didn’t encounter that problem when watching YouTube videos.

After witnessing all its ups and downs, I’m now using the PiPO W4 as a very good tool to watch movies that I copy from my laptop, play some games from the Windows Store , and for heavy browsing.

Therefore, if you’re looking to get a tablet so you can read whatever you like on the web or also as an eBook reader, then this could be a good choice, if we take into account its great price.

There are two small speaker grills on the back which provide a modest sound experience. These aren’t the loudest and most clear sounding speakers, but I’m not disappointed in their quality when watching movies or playing games.

And you can always connect some external speakers to it if you want.

Albeit not confirmed, but it’s almost sure that we won’t be able to upgrade Windows 8.1 with Bing to Windows 10, and it’s quite hard to make the Technical Preview version to work, as well.

But if Microsoft changes its mind and allows for this, then it would be so awesome to be able to run iOS and Android apps, as well, on this device.

If you’re perhaps looking for another Windows tablet, do check-out what GearBest can offer you.

Disclaimer: this product has been offered as a free review unit by GearBest but all the thoughts expressed here belong to me.

[wl_navigator]

Please stay online while Office downloads

Under normal circumstances, after you’ve purchased Office 365, the installation process takes 5 to 10 minutes, the sign-in process before and after the installation included.

On some occasions, though, the installation gets stuck and the process prompts certain messages. The most common ones include freezing when the installation is almost complete or stating Please stay online while Office downloads.


Why is the Office 365 installation stuck?

Of course, it is mandatory to stay online if you’re using the web installer. It is the easiest method, after all. Only that this sometimes gets stuck.

Fortunately, your PC is still usable when this happens as the process doesn’t block the entire OS.

It is advisable to reboot your device at this stage and see if Office isn’t already installed. The frozen message might have been only deceiving.

If otherwise, the solution that works in most cases of this type is to uninstall Office 365 folder altogether and resume the process but using the offline installer.

How to use the Office 365 offline installer?

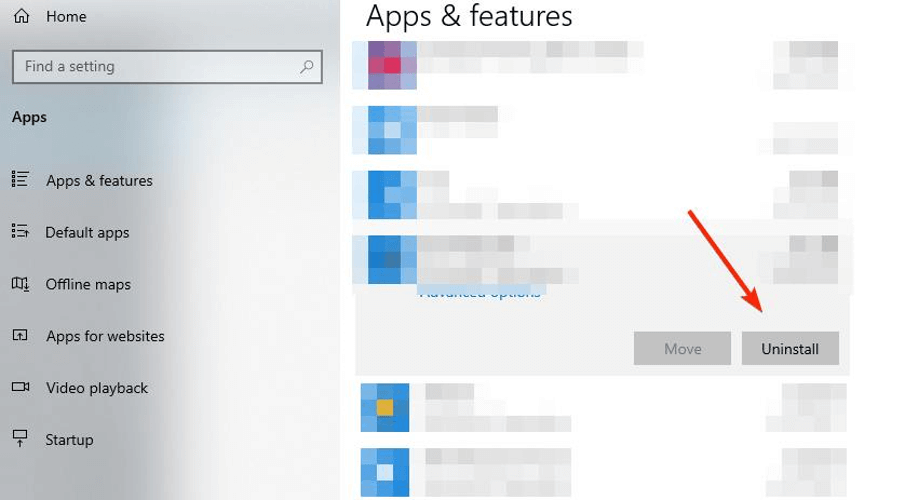
  1. First, uninstall whatever Office 365 files you have on your device. Open Settings, go to Apps, find the Office package, and right-click on it. Then click on Uninstall.uninstall office app
  2. Next, go to the Office website. Sign in with your Microsoft account associated with the Office purchase, if you haven’t already done that.
  3. Click on the Install Office button on the home page.
  4. In the Download and install window, select Other options.
  5. Check the box Download an offline installer and select the language you want to install Office in. Select Download.
  6. Save the installation file on your device then open the virtual drive in its location.
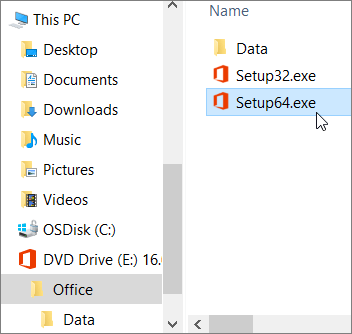
  7. Choose the version you want to install (32bit or 64bit, depending on your system).how to install office manually
  8. The process should run smoothly from now on, and you just need to activate Office after the installation is complete.

And that’s about it. Offline installation usually fixes whatever an online installation couldn’t. The online process can get stuck even when the Internet connection is good, but it’s never a bad idea to check this aspect before starting.

We hope that this guide was useful; if so, please give us your feedback in the comments section below.


[wl_navigator]

Microsoft doesn’t want Xbox One to Xbox Series X video game upgrades to be paid DLC

According to a report by VGC, Microsoft is hold a fairly firm stance when it comes to how they want current and next gen Xbox video games handled going forward.

While there will be numerous titles that will be getting both an Xbox One and Xbox Series X release, the company is apparently restricting developers, or at least strongly discouraging them, from charging gamers for an upgrade to the Series X version as a separate fee or some kind of downloadable content (DLC) purchase.

Game developers will still be able to release separate Xbox One and Xbox Series X versions of their titles and ask players to buy each one and they’ll also be allowed to sell both versions as part of a bundle. Microsoft is, of course, encouraging everyone to take advantage of their Smart Delivery system though which will give gamers the Xbox Series X version of a game for free if they own the Xbox One version and vice versa.

As it stands right now, numerous third-party video games have been confirmed to be using Smart Delivery for their Xbox Series X release in addition to all of Microsoft’s first-party titles but some games, such as NBA 2K21, will need consumers to buy both outright.

It is important to emphasise that almost all Xbox One video games will work on the Xbox Series X console and many will even load faster and play better on it. The Xbox Series X versions will boast superior graphics however, so gamers wanting the best-looking version of their games will have to upgrade one way or another.

Interestingly, this report also confirms that those Xbox games using Smart Delivery will register as the same title on Xbox Live and share the same save data and Xbox Achievements. Video games that don’t support Smart Delivery and release two console versions will actually show up as separate games, similarly to how there are Xbox 360 and Xbox One versions of some titles.

Is a free upgrade important to you or will you be buying two versions of some games? Share your thoughts with the community in the comments below and then follow us on Pinterest and Twitter for more gaming content and check out all of the latest Xbox Series X news here.

Fix: Error code 0x80070032 in Win 10 [Backup, Mail, Login]

Many users have switched to Windows 10, however, the operating system isn’t perfect.

There might be errors from time to time, and many have reported error code 0x80070032 popping out when trying to use Windows Mail on Windows 10, so let’s see what can we do about it.

Error code 0x80070032 is related to Windows Mail and the Microsoft Store, and it occurs when users can’t sync their email folders on their PC with Microsoft’s servers. When trying to sync their emails users would see this message:

Something went wrong…
We can’t synch right now. But you may find more information about this error code at www.windowsphone.com

Error code: 0x80070032

How to fix error 0x80070032 in Windows 10 after update or startup?

1. Download the latest Windows 10 updates

Error 0x80070032 has affected millions of users worldwide, and Microsoft did its best to fix the issue through updates.

The best solution is to download the latest patches available using the Windows Update feature.

2. Try switching from local to Microsoft account

If the previous solution didn’t work for you, you might want to try switching from local to Microsoft account.

First, we need to switch from Microsoft to a local account:

  1. Open Settings and go to Accounts.
  2. Go to Your Account and click on Sign in with a local account instead.
  3. Type your current Microsoft account password.error code
  4. Add user name, password, and password hint for a new account.
  5. Now click Sign out a finish.

Now you need to switch back to Microsoft account:

  1. Go to Settings > Accounts > Your account.
  2. Click Sign in with a Microsoft account instead.
  3. You’ll be asked to enter the password for your local account.
  4. Enter your Microsoft account username and password and click Next.
  5. Click Switch to switch back to Microsoft account.

That’s it, performing the mentioned update should solve the problem, but you can try the second solution, as well. However, if you consider that it causes too many troubles for you, we suggest you simply switch to another email client.

Install Mailbird

With Windows Mail being your first choice, it’s safe to assume that you might not be a fan of third-party apps.

The beauty of Mailbird resides in its simplicity and dare we say, its resemblance to the native webmail in terms of ease of use.

The main difference resides in its stronger and more complex capacities since Mailbird is one of the most high-rated email clients at the moment.

This email client features an uncluttered and very intuitive interface that will allow you to easily manage your emails, attachments, and contacts in one unified Inbox.

Designed to complement the Windows structure to the point where it seamlessly blends with the OS’s architecture, Mailbird will cover all your emailing needs and never obstruct your update process.

Something went wrong code 0x80070032 is something you can simply forget about the very moment you decide to install this email client.

By adding integrations to the table (and Mailbird surely does allow you to connect all your favorite email, calendar, task, and messaging apps into one), you will enjoy a plethora of functionalities to cover all your communication needs.

Firstly, you can have simple emails and contacts management from a unified Inbox or customization options like numerous free color themes or Windows-adapted layouts.

More so, benefit from a practical snooze feature to separate and prioritize your emails every time you get busy. Plus, you have custom Sounds notifications for incoming and outgoing emails.

It’s worth mentioning that Mailbird offers seamless app integrations (Facebook, Twitter, Whatsapp, Dropbox, and more). Also, using intuitive keyboard shortcuts for archiving, composing, replying, or forwarding.

If you have any questions or suggestions, just reach for the comments section below.

Microphone Test: 5 best online tools

Perhaps you don’t use your device’s microphone on a daily basis. And perhaps you already heard stories about your conversations being listened to by most apps, since you accept permissions for them to access your location, mic, and webcam. Still, there are times when the microphone is necessary: online meetings, Skype calls, network games, personal or business sessions via all kinds of dedicated apps, online workshops, online classes, and so on. And there’s nothing more frustrating than going online for such an occasion and finding out that your mic is not working. So you’d better test it beforehand to make sure that it works and that the sound is good. You can do a quick test for your microphone either using the default testing option in Windows 10 or using an online app. None of the tests involve downloading third-party apps, they are free to use and some of them also offer additional features.

Test microphone online with these tools

Online Mic Test

Online Mic Test is a plain testing app in which you just have to click the Play button, record something, and then listen to the recording.

What you also need to do, though, is to allow the app to use your microphone. Namely, when you push the Play button, a small window will pop up in the upper-left corner of your browser, requesting permission. Choose Allow.

If you block permission, you won’t be able to take the test. If you block permission by mistake, just reload the page and try again.

With this app, you can do similar tests for your keyboard, mouse or webcam, by going to the Tools menu.

⇒ Try Online Mic Test

MicTests

With MicTests.com, the recording process is similar. You press the Test mic button, allow the site to use your microphone, then record something.

Besides just testing the mic, the app also shows a lot of technical information such as its name, number of audio channels, latency, sample size, and sample rate.

You can save all these details by submitting a review of your mic using the form to the right of the page. You will get a unique sharable URL.

If the app detects a problem with the mic, it will display troubleshooting options.

⇒ Try MicTest


Your built-in mic isn’t working? Try these easy troubleshooting steps

Online Voice Recorder

Unlike the previous apps, this tool comes with some useful features.

  1. After allowing it to use the mic, press the red button to start recording.
  2. You can pause anytime, then resume recording if you like. The tool will not cut the piece in two.
  3. When you’re done, just press the Stop button.
  4. Save your recording by pressing the same name button to the left. The piece will be automatically downloaded on your device.
  5. The app will show the entire recording on the screen. From here, if you want to listen to it on the spot, press Play.
  6. Additional features allow you to crop the recording and cut the silence, or keep just what you need, by moving the sidebars.
  7. By pressing Save again, you will download the edited piece.

⇒ Try Online Voice Recorder

SpeakPipe

SpeakPipe is another free online voice recorder, just perfect to test your microphone. The tool works not only on Windows but also on Android or iOS devices.

The testing steps are the same: you start recording, you allow the app permissions and then you listen.

Additionally, you can save the recording in the SpeakPipe cloud server,  and get a link to it, so you can send it via email or use on the web. For this feature, you will also have to sign up/sign in to the app.

⇒ Try SpeakPipe

Vidyard

Online video platform for business Vidyard offers a free mic testing tool that anyone can use. You don’t have to create an account to use it.

With this tool, you can record something and save the file to listen for it in your browser.

The platform has a similar webcam testing tool.

⇒ Try the Mic tool on Vidyard


On a general note, mic testing is the same whether you are using your device’s built-in microphone or a USB microphone. Troubleshooting might be different, though, in case something isn’t working as it should.

We hope you found these recommendations helpful. If you have any suggestions related to this topic, use the comments sections below.


[wl_navigator]

FIX: Can’t send attachments in Windows Mail app

Are you having email attachment problems in the Windows 10 mail app? First of all, you need to double-check that the attachments you are trying to send have not passed the maximum sending capacity limit.

There are a few bugs with the Windows 10 mail app but the important thing is that you can fix them very quickly.

Usually, when sending multiple attachments in one email, the first attachment will be sent correctly but the other ones will go to your draft folder or you will just receive a message telling you that the mail did not go through.

By following the guidelines below, you will be able to fix this problem in just a few minutes of your time and properly send attachments in your Windows 10 mail app.

Windows 10 can’t attach files to emails? Here’s how to fix it:

Windows 10 mail app not showing attachments

  1. Run the Mail app troubleshooter
  2. Update your Mail app
  3. Disable your antivirus
  4. Use a different mail app
  5. Turn off your firewall
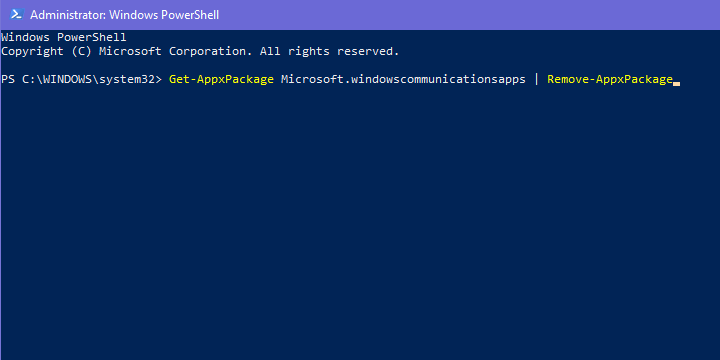
  6. Reinstall the Windows Mail app
  7. Check network permissions
  8. Reset Mail app settings

1. Run the Mail app troubleshooter

We will need to run the Windows 10 mail app troubleshooter and let it fix any errors you might have with your mail account or just with the mail app.

After you installed the troubleshooting app, open it, and wait for it to finish the scanning and repair process on your Windows 10 system.

2. Update your Mail app

Check to see if the latest Mail app updates are installed on your Windows 10 PC. Running outdated Mail app versions may prevent you from using all the app’s features and even block outgoing emails.

3. Disable your antivirus

Check and see if your antivirus is allowing the Windows 10 mail app to run properly.

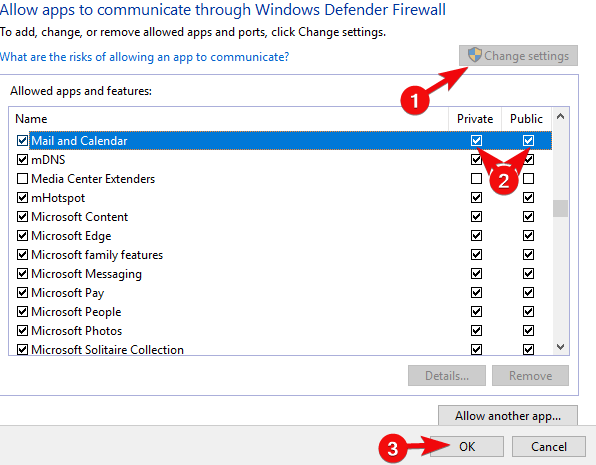
The best way to do this is to disable the antivirus and try sending the attachments. If it works, then you have to set the permissions in your antivirus to allow the mail app to work correctly.

4. Use a different mail app

Since simplicity is usually the key to solving all issues, we suggest you switch for a different email app that can perform this task easily.

You might not be a fan of third-party apps, but we dare say that our recommendation below is quite similar to the Windows native emailing solution in terms of ease of use, the only difference residing in its stronger and more complex capacities.

We suggest you using MailBird, this email client features an uncluttered and very intuitive interface that will allow you to easily manage your emails, attachments, and contacts in one unified Inbox.

Speaking about that, the incredible Attachment Search feature allows you to quickly and effortlessly track down even year-old attachments.

By adding integrations to the table (and Mailbird surely does allow you to connect all your favorite email, calendar, task, and messaging apps into one), you will enjoy a plethora of functionalities to cover all your communication needs.

Let’s quickly look at its key features:

  • Easy emails and contacts management  from a unified Inbox
  • Customization options (numerous free color themes, different Windows-adapted layouts and more)
  • Seamless app integrations (Facebook, Twitter, Whatsapp, Dropbox, Google Calendar, Asana and more)
  • Snooze feature to separate and prioritize your emails
  • Custom Sounds notifications for incoming and outgoing emails
  • Intuitive keyboard shortcuts for archiving, composing, replying, and forwarding
  • Multi-language 24/7 free support

⇒ Get Mailbird

5. Turn off your firewall

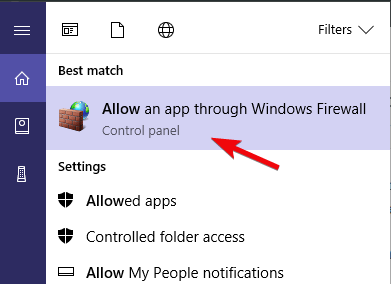
Double-check if the Windows 10 mail app is blocked by your Windows Firewall. If it is, it might prevent you from sending mail attachments.

Try turning off the Windows 10 Firewall and send the attachments again. If you can, then you will have to set the necessary permissions to allow your mail app to work correctly.

6. Reinstall the Windows Mail app

If you still have this issue after trying the three options above, then we are going to reinstall the app by following the steps posted below.

  1. Log in to the Windows 10 mail app as you normally do.
  2. Press and hold the buttons Windows and C in order to open the Charms bar.
  3. Left-click on the Settings icon situated in the upper right corner of the charms bar.
  4. Left-click on the Accounts icon.
  5. Left-click on your account.
  6. Left-click on Remove all accounts on the lower side of the window.
  7. After performing the steps above, you can go ahead and add again your account to your mail app in Windows 10.

7. Check network permissions

If you are using your email at work and you have a VPN network, then maybe you should talk to the network administrators as they can set permissions that might prevent you from sending email attachments.

8. Reset Mail app settings

If you don’t want to reinstall the Mail app, resetting its settings may help you fix the email attachment problem. Here are the steps to follow:

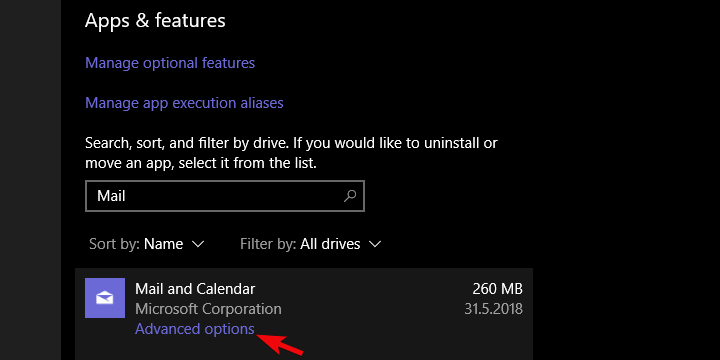
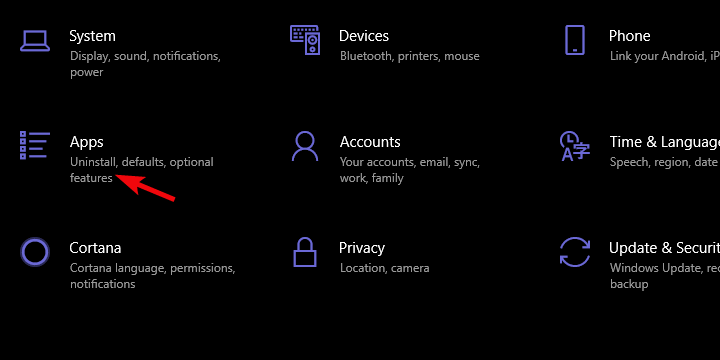
  1. Open the Settings app > go to Apps > Apps & features > Mail and Calendar
  2. Expand the Mail and Calendar app >select Advanced options.windows 10 mail app stuck in outbox
  3. Click on the Reset button.windows 10 mail app stuck in outbox
  4. Sign in and try to send a new email attachment file to check if the problem persists.

There you have a few options you can try in order to fix your Windows 10 Mail app issues.

For any new ideas on the subject and additional troubleshooting solutions, feel free to reach for the comments below.

An object could not be found Outlook error [FIX]

Are you getting a The attempted operation failed, an object could not be found error when sending emails in Outlook?

Or maybe you’re getting the error when replying or forwarding emails using the app?

If that’s the case, here are some potential ways you can fix the issue for Outlook. Note that these fixes might also work not only with the latest version but also with earlier ones.

Fix: The attempted operation failed. An object could not be found

  1. Check that Outlook is not configured to run in Compatibility Mode
  2. Set up a new Outlook Profile
  3. Use third-party Outlook Recovery Tool
  4. Repair Outlook via Programs and Features tab
  5. Repair the Outlook account
  6. Switch off the anti-virus software

1. Check that Outlook is not configured to run in Compatibility Mode

  1. Open the folder that includes Outlook with File (or Windows) Explorer.
  2. Then, right-click the Outlook.exe and select Properties from its context menu to open the Properties window.
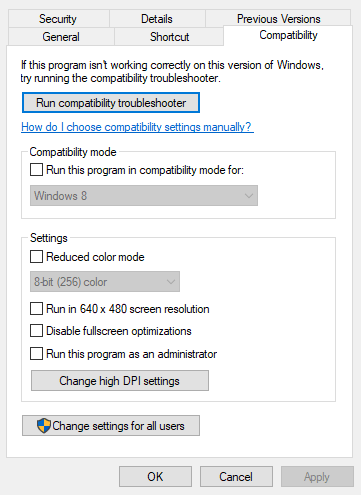
  3. Now click the Compatibility tab, which includes the Run this program in compatibility mode for checkbox.compatibility tab program properties
  4. If the Run this program in compatibility mode for checkbox is selected, deselect that option.
  5. Press the Apply button and click OK to close the window.

2. Set up a new Outlook Profile

  1. First, type Control Panel in the search box and open it.
  2. Click the Mail icon to open the Mail applet.
  3. Next, press the Show Profiles button on the Mail Setup window
  4. Now press the Add button on the General tab to open a New Profile window.
  5. Enter a new name for the profile and click OK.
  6. Click the Add Account link to open the Add Account wizard window. Now you can fill out the required files in that wizard to set up the account.
  7. Send the email to the new account profile.

3. Use third-party Outlook Recovery Tool

There are also numerous third-party programs that you can repair Outlook with. Not all of them are freeware, but most have a trial package you can add to Windows for a few weeks and potentially fix the error.

On this note, we recommend Stellar Phoenix Outlook PST Recovery Tool.

The tool is just the perfect thing to restore your Outlook mailbox data – including deleted and missing emails – lost due to PST file corruption, which might be the cause of the mentioned error.

The installation is pretty easy and using the tool, similarly simple. What’s more, the recovery process is done in just 3 simple steps.

Basically, after installing, you only indicate the PST file that needs scanning and the Stellar Pheonix will do the job, recovering all mailbox items (emails, attachments, contacts, calendar items, journals, notes, etc.). The new PST file it creates is readily importable in Outlook.

⇒ Get Stellar Phoenix Outlook PST Recovery Tool

4. Repair Outlook via Programs and Features tab

  1. You can repair Outlook’s configuration via the Programs and Features Control Panel tab. First, press the Win key + R keyboard shortcut and input ‘appwiz.cpl’ to open the tab in the shot below.uninstall a program
  2. Next, you should right-click Microsoft Office or Outlook and select Change from the context menu.
  3. Select the Quick Repair radio button on the window that opens, and click Repair. Alternatively, you can select the Online Repair option, which is more thorough.
repair office installation

5. Repair the Outlook account

  1. Open Outlook and click its File tab.
  2. Select Info and click Account Settings from which you can open the settings for the specific account that needs fixing.
  3. Click the Email tab on the Account Settings window, choose an account to fix, and press the Repair button.
  4. A Repair Account window will open from which you can repair the selected account by pressing Next.
  5. When the email account is repaired, restart the software and send an email with that account.

6. Switch off the anti-virus software

Anti-virus software integrates with Outlook to scan emails which can generate errors when you send them. As such, you should also switch off third-party anti-virus software.

You can close anti-virus utilities in Windows by right-clicking the taskbar and selecting Task Manager.

Here, you can select the anti-virus software under Background processes. Press the End task button to close the program.

task manager

Alternatively, you can disable the anti-virus software from its system tray context menu if it includes the required options. Then, open Outlook and send an email to check if that fixed the error.

Any of those fixes could feasibly resolve The operation failed… which is an error that’s blocking your emails. There’s a good chance that at least one of those fixes will do the trick!

Dead by Daylight connection issues: How to fix?

Dead by Daylight is a survival game but with a spin. You can play as either a killer or a survivor and fulfill your one true objective, which is to keep survivors from, you know, surviving, or escaping the killer.

It’s a blast and we bet you’ll have hours of fun if you’re a fan of the genre. Each killer is inspired by popular horror movie stars such as Michael Myers, the Demogorgon, Freddy Krueger, or the Executioner from Silent Hill.

Dead by Daylight connection issues

It’s the same old same. Every online game has its fair share of connection issues, ranging from moderate ping to downright disconnections, which can obviously ruin your fun.

Take packet loss for instance. Regardless of where you may encounter it, is annoying on all levels. It can quickly take a pleasant gaming experience with your peers and turning to an absolute nightmare.

And we’re not talking about the nightmare-inducing heart-pumping chases of Dead by Daylight while playing survivor. We’re talking about de-syncs, jitters, high ping, that kind of thing.

Other Dead by Daylight connection issues include:

  • Dead by Daylight can’t connect to online services
  • No network connection in Dead by Daylight
  • Dead by Daylight disconnected from host

Just to make sure we’re on the same page: packet loss and high ping aren’t actually the same thing. To clarify even further, packet loss can cause high ping, but not all high ping situations are caused by packet loss. Hope we didn’t throw you off too much.

How to detect packet loss in Dead by Daylight?

First thing’s first, you’ll need to ask yourself: is Dead by Daylight down? But instead of asking yourself this question, you could head to the downdetector website and check Dead by Daylight’s status.

Once you’ve ruled out that the server is indeed up and all systems operational, you’ll need to troubleshoot the connection manually. As a side note, things weren’t so bad when DBD used P2P servers. Dedicated servers can’t seem to handle network congestion too well.

Anyway, while you’re connected to a Dead by Daylight server, use a packet sniffer or CMD’s netstat to identify the IP address of the DBD server.

Once you’ve got it, use pathping x.x.x.x (replace x.x.x.x with the server’s address) to run a packet loss test.CMD pathping
Check each node and identify the location of the leaks. The node with the highest packet loss percentage is the culprit, just to be clear.

How to fix packet loss in Dead by Daylight?

1. Use a VPN

  1. Download Private Internet AccessPIA Dead by Daylight
  2. Install it on your computer
  3. Launch it
  4. Log into your PIA account
  5. Choose a fast server
  6. Launch Dead by Daylight
  7. Check if the problem still persists

Usually, using a VPN with Dead by Daylight should take care of your situation as easy as pie. You just install the VPN, connect to a random fast server and your traffic should be re-routed to avoid packet loss.

However, note that if you’re the one leaking packets, or if the game server is experiencing problems, using a VPN will actually do more harm than good.

Private Internet Access

Private Internet Access

Dead by Daylight connection issues are bugging you? Try PIA to fix them.
$2.85/mo. Buy it now

For this reason, you need to make sure that your ISP is the one causing the problem. If you know for a fact that it throttles your bandwidth or experience packet loss frequently at certain hours (peak hours), you can safely use a VPN.

2. Perform a bit of manual troubleshooting

  • Check if the Dead by Daylight server is up and running without an issue
  • Try using a wired connection instead of a wireless one (Wi-Fi packet loss occurs frequently)
  • Connect your PC straight to your modem or home line (bypass your router)
  • Try restarting your router and/or modem
  • Check and fix/replace any faulty component on your side of the connection (PC, drivers, cables, router)
  • Update your router to its latest firmware
  • Call your ISP and ask them if they can look into the issue
  • Contact Dead by Daylight’s support team and inform them if they seem to be leaking packets
  • Try to avoid peak hours

It’s worth mentioning that while these steps might sound ridiculous, there are a lot of factors that weigh in on packet loss occurrence. Note that even upgrading your CAT 5 Ethernet cables to CAT 6 ones can improve packet loss dramatically.

Dead by Daylight connection issues can be fixed

All things considered, if you’re experiencing packet loss, high ping, or any other connection issues on Dead by Daylight, you might consider waiting it out.

If that’s out of the question, there are several ways that you can improve your connection without breaking a sweat. As we’ve stated above, merely restarting your router, or changing your Ethernet cables can have a huge impact.

However, you should first make sure that the game server isn’t facing any difficulties and it’s, in fact, up and running before trying anything else.

Last, but not least, know that using a VPN can fix both packet loss and high ping, but only if the issue is on your ISP’s side.

How to watch MSNBC online [Safe Streaming]

MSNBC is a US-based cable TV channel that mostly shows political news. If you live in the United States, you don’t need help with watching MSNBC online since you can sign up for an account for free by referencing your cable provider and start watching MSNBC live streaming. However, if you live in any other part of the world, you can’t watch MSNBC online since it’s restricted to US residents only. It only shows a free daily preview of 10 minutes. Unfortunately, this also applies to US citizens who are living or traveling abroad. We’ve done the hard work and looked for the best ways to help you watch MSNBC online outside of the United States, no matter where you are. Here are the 4 best solutions and tools.

How can I watch MSNBC live streaming from anywhere?

Use a VPN

PIA is the best VPN for streaming

  1. Download Private Internet Access (PIA).
  2. Install PIA on your computer.
  3. In the PIA main window, press VPN Server.
  4. Search for United States and choose the first shown city (lowest latency).
  5. Click the power button to connect to the US VPN server.
  6. If you have an account with one of these TV providers, sign in to watch MSNBC live.
  7. Otherwise, you can sign up for Hulu + Live TV, SlingTV, AT&T TV or YouTubeTV.

Made by Kape Technologies, Private Internet Access can unlock live streaming services so that you can watch MSNBC and live TV from any part of the world. You just have to connect to a US VPN server.

PIA has an impressive network of VPN servers as well as tons of security features. It can defend your router from hackers as well as protect your DNS queries using exclusive DNS servers.

You can even disable VPN encryption if you need a speed boost, although this shouldn’t be necessary. And, if you ever stumble upon technical difficulties with this tool, you can turn to 24/7 live chat support.

More about PIA:

  • +3,300 VPN servers in 48 countries
  • 10 simultaneous connections
  • No logs
  • 30-day money-back guarantee (no free trial)
Private Internet Access

Private Internet Access

Watch MSNBC from any part of the world using this fast and secure VPN for streaming.
$2.85/mo. Buy it now

Use Mobdro

use Mobdro

  1. Download and install Mobdro on your Android*.
  2. Launch the app and tap the search button.
  3. Type MSNBC and look for this TV channel.
  4. Select MSNBC from the list of results.
  5. Start watching MSNBC live.

*To install Mobdro on Windows PC, download BlueStacks.

Mobdro is a better choice for users who are looking for a totally free solution to watch MSNBC. There are no hidden costs when using this tool, and you don’t need to spoof your IP address to connect to US.

The downside is that Mobdro isn’t built for security, so it shouldn’t be used by privacy-concerned users. For instance, it’s not available in the Play Store, so Google can’t vouch for the Mobdro APK when it comes to malware.

On top of that, you have to jump through some hoops to set up Mobdro on any device that doesn’t support Android. And you can’t get rid of the in-app ads unless you’re willing to share your device’s resources with a third party.

Use IPTV software

use ProgDVB

  1. Download ProgDVB and set it up on your computer.
  2. Fire up ProgDVB and select the FreeWorldTV tab.
  3. Search for MSNBC and double-click its entry.
  4. Start watching MSNBC live.

ProgDVB is one of the best IPTV software tools, which can be installed on Windows, Android, and iOS. You can use it to watch TV and radio channels from all over the world, without having to conceal your true location.

However, unlike a VPN, ProgDVB doesn’t support safe streaming, so you can only use it to watch TV.

Use an Internet circumvention tool

use Psiphon

  1. Download Psiphon and install it on your PC.
  2. Launch the app and go to Settings > Psiphon Server Region.
  3. Select United States and click Apply Changes.
  4. If you have an account with any of these TV providers, log in and watch MSNBC live.
  5. If you don’t, you can sign up for Hulu + Live TV, SlingTV, AT&T TV or YouTubeTV.

Psiphon is a proxy tool that can hide your geographical position and connect you to US to lift geo-restrictions. It’s totally free to use and can be installed on Windows, Android, and iOS. It’s a great solution to watch MSNBC live (with or without cable).

But Psiphon and other Internet circumvention tools don’t act exactly like a VPN, in the sense that they don’t use encryption to secure your Internet connection. As such, if you’re looking for a safe streaming method to watch MSNBC, you should stick to the VPN.


Can’t connect to proxy on Windows 10? Our quick guide shows you how to fix it.


Taking everything into account, these 4 solutions can help you watch MSNBC live streaming online, no matter where you are.

If you have trouble deciding what’s the right fit for you, choose a VPN like PIA if you’re looking for a safe streaming method.

Otherwise, if online privacy and security are not your top priority, go with Mobdro since you don’t have to pay for anything.

[wl_navigator]

Fix Windows 10 Mail app stuck in outbox in 7 quick steps

Even though the ways we communicate are changing, emails are still a massive part of our everyday lives.

Microsoft included the UWP Mail and Calendar app in Windows 10 to meet those needs, but the app is far from perfect, and even intrusive.

Some of the issues are minor, while others render it completely unusable. The one we singled out today prevents sending emails. All sent messages are stuck in the outbox.

Since this is the main purpose of the given app, we decided to tackle the issue in detail. If you’re unable to send emails with Windows 10 Mail app, the steps below should help you overcome the error.

How can I fix Windows 10 Mail app stuck in outbox?

  1. Sign out and sign in again
  2. Try out a different email client
  3. Run the dedicated troubleshooter
  4. Reset Mail app settings
  5. Re-register Mail app with PowerShell
  6. Allow Mail and Calendar app through Windows Firewall
  7. Update Windows
  8. Tweak Privacy settings

1. Sign out and sign in again

  1. Open the Mail app.
  2. Click on the cog-like settings button at the bottom.windows 10 mail app stuck in outbox
  3. Choose Manage accounts.windows 10 mail app stuck in outbox
  4. Select the troubled account.
  5. In the next dialog box, click Delete account from this device.windows 10 mail app stuck in outbox
  6. Restart your PC.
  7. Navigate to the same destination and, within the Manage accounts section, add a new account.windows 10 mail app stuck in outbox
  8. Enter your credentials and try sending emails stored in the outbox again.

First things first. Before we move to more complex solutions, we suggest trying to sign out and sign in with the affected account.

Sometimes, the bug-ridden nature of the Mail app for Windows 10 comes to light. And the best way to resolve these minor stalls is to simply sign out of the affected account.

After that, restart your PC and sign in again. That should help and the outbox messages should finally get sent. Also, deleting the account and re-establishing it might help.

As a side note, don’t forget to check the Internet connection and confirm that everything works as intended. If your messages are still stuck in the outbox, continue with the steps below.

2. Try out a different email client

Luckily enough, there’s no rule saying that you need to stick with applications Microsoft forced upon you.

Quite the opposite, there are so many third-party alternatives and one of them will most likely end up checking most of the boxes you need, if not even all of them.

If you’re not sure what third-party e-mail client to use, factors that need to be considered are ease of use, if it integrates with apps like WhatsApp, and Response Management features.

When it comes to functionality, we recommend getting a lightweight email client, because these will most likely work smoothly even if you use them to manage multiple accounts. 

3. Run the dedicated troubleshooter

  1. Press Windows key + I to open Settings.
  2. Choose Update & Security.windows 10 mail app stuck in outbox
  3. Select Troubleshoot from the left pane.
  4. Scroll down until you reach Microsoft Store apps.
  5. Expand the Microsoft Store apps troubleshooter and click Run the troubleshooter.

Windows 10 is, for all intents and purposes, packed with various features. Some of them are rather useful and perform admirably.

Others, like the aforementioned Mail app, is just a pale shadow of Windows Live Mail. And a lot of its lackluster nature it owes to its UWP nature.

Luckily, amongst those numerous features, there are more than a few dedicated troubleshooting tools. And, in this case, the one intended for Microsoft apps should help you fix the outbox bug.

Use the above steps to run this troubleshooter.

4. Reset Mail app settings

  1. Open the Settings app.
  2. Choose Apps.windows 10 mail app stuck in outbox
  3. Under the Apps & features, search for the Mail and Calendar app.
  4. Expand the Mail and Calendar app and open Advanced options.windows 10 mail app stuck in outbox
  5. Scroll down and click on the Reset button.windows 10 mail app stuck in outbox
  6. Open the Mail app and sign in with your credentials.

As with any other app, the Mail and Calendar app stores cache in order to speed up the loading process. Besides that, it keeps locally all your emails so you can access them offline.

This might, over time, even slow down the performance and cause some inexplicable behavior.

The inability to send emails is a good example. In comparison to standard Windows 32 apps, you can reset the Mail and Calendar app within the System settings interface.

Have in mind that you’ll need to re-establish your account as this action restore it to factory values.

5. Re-register Mail app with PowerShell

  1. Right-click Start and open PowerShell (Admin).
  2. In the command-line, copy-paste the following command and press Enter: Get-AppxPackage Microsoft.windowscommunicationsapps | Remove-AppxPackagewindows 10 mail app stuck in outbox
  3. Wait until the procedure ends and restart your PC.
  4. Run the Mail app and access your account.
  5. Open Outbox and try resending the messages.

The reinstallation of the Mail app is not an option. At least not in a standard way. It’s a built-in part of Windows 10 and thus can’t be removed.

You can, on the other hand, re-register the Mail app and, hopefully, it’ll finally allow you to get the messages out of the outbox. In order to do so, you’ll need to use the PowerShell elevated command-line as admin.

Follow the above steps to reinstall the Mail and Calendar app with PowerShell.

6. Allow Mail and Calendar app through Windows Firewall

  1. In the search bar, type Allow and open Allow an app through Windows Firewall.windows 10 mail app stuck in outbox
  2. Click on the Change settings button. You’ll need the administrative permission to access settings.
  3. Scroll down and confirm that Mail and Calendar can freely communicate through Firewall. Make sure both Public and Private networks are enabled.windows 10 mail app stuck in outbox
  4. Confirm changes if needed, and try sending emails again.

It’s well within our expectations for a Windows 10 native app to freely communicate through Windows Firewall. And more times than not that’s just the case.

However, we advise you to navigate to the list of allowed programs and confirm that the Mail app indeed has unobstructed traffic to public networks.

Additionally, if you have a third-party antimalware suite that includes an active firewall, make sure to allow Mail the safe passage, too.

7. Update Windows

  1. Open Settings.
  2. Open Update & Security.windows 10 mail app stuck in outbox
  3. Under Windows Update, click Check for updates.

Windows Updates on Windows 10 cover everything. Besides the common security patches and various fixes, they cover all built-in applications.

For that reason, if something’s wrong with the current Mail iteration, the update might fix it. Chances are that you already keep your system up to date, but checking for updates manually won’t cost you a thing.

In addition, try navigating to Microsoft Store and updating the app from there. Follow these instructions to check for updates in Microsoft Store.

8. Tweak Privacy settings

  1. Open Settings.
  2. Click Privacy.windows 10 mail app stuck in outbox
  3. Select Email from the left pane.
  4. Under the Allow access to email on this device, click Change and confirm that the option is enabled.windows 10 mail app stuck in outbox
  5. Same for the Allow apps to access your email.
  6. Under that section, make sure that the Mail and Calendar app is toggled on.windows 10 mail app stuck in outbox

Finally, the last thing we need to mention is Privacy settings permission. In order to allow the system and respective third-party apps to access your sensitive data, you need to grant them permission.

For emails, for example, these are granted by default. However, it’s worth checking those out and confirming everything is as it’s supposed to be.

If these are, for some reason, revoked you won’t be able to use the Mail app fully. Follow the above instructions to inspect the email-related Privacy option.

With that, we can call it a wrap. Hopefully, one of those steps works out for you, so you can send emails again. Also, don’t forget to comment on this matter in the comments section below.

Before leaving, do note that the above guide contains instructions to fix the following errors too:

  • Windows 10 Mail not sending emails – The Windows 10 mail working poorly and not sending emails comes as no surprise. In case you’re keen to try out alternatives to the rather subpar Mail app, check out the best Windows 10 email clients.
  • Windows 10 mail app won’t send – If facing this issue, our mission is to walk you through professional fixes. You’ll find them all listed above.

Visit our Windows 10 Mail section with no hesitation for other tips and full solutions to your issues.

For similar comprehensive guides, feel free to bookmark this Windows 10 Apps Hub.

PowerToys for Windows 10 gets memory leak fix and more with latest update

It’s been almost a week since Microsoft released PowerToys version 0.19, but today the company is following up with the version 0.19.1 is out. The focus of this release is to deliver a few critical fixes to improve the overall stability of the app.

The incremental patch specifically aims to address existing issues affecting the FancyZones and PowerToys Run tools, and it brings some usability improvements to ensure easier navigation through the search suggestions.
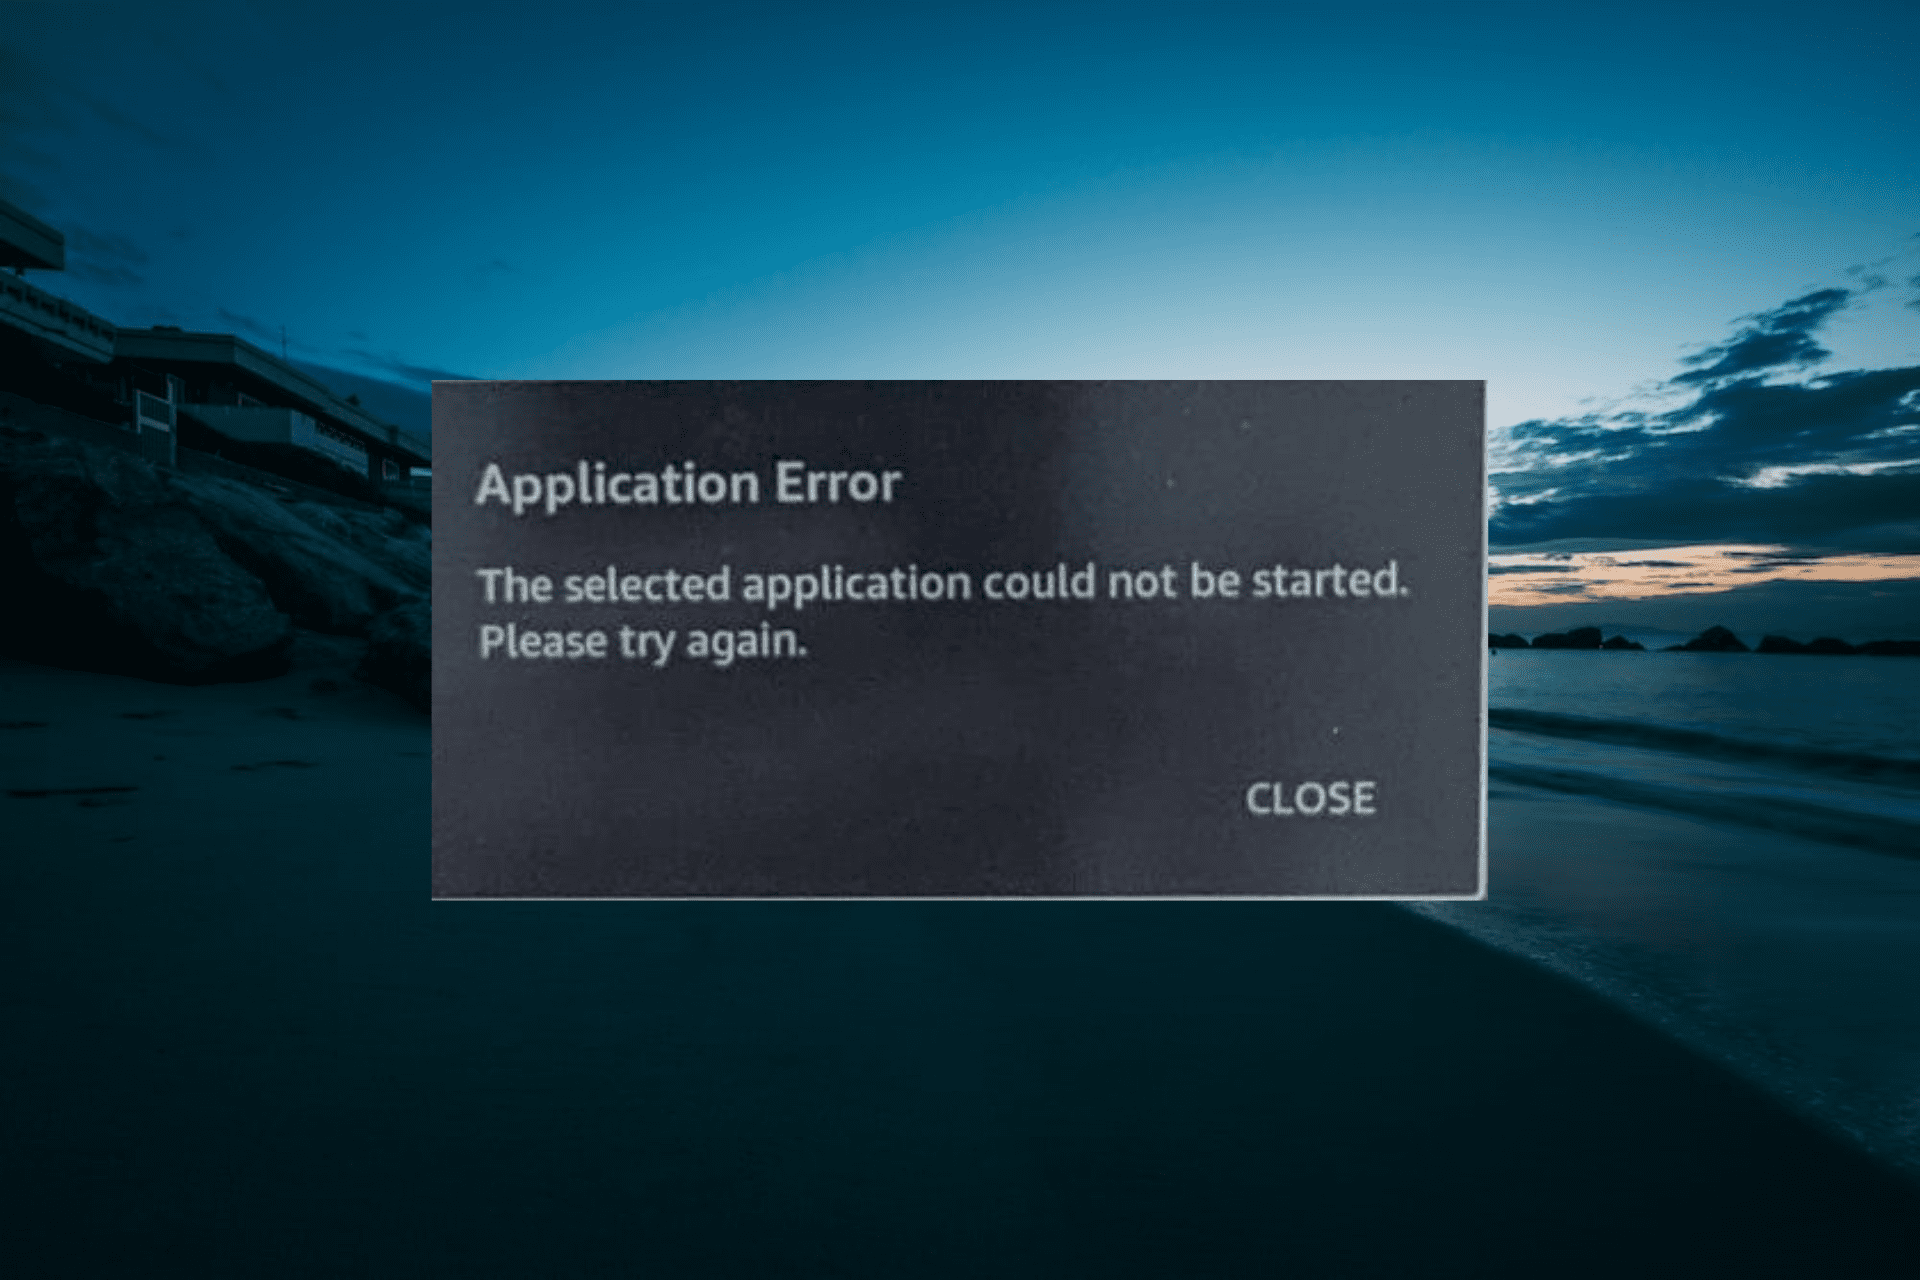
Here’s the full list of improvements and fixes in PowerToys version 0.19.1:

  • #4578 – WinKey for PT Run throws a lot of false positives
  • #4646 – FancyZones: When “Hold Shfit key” is deactivated, Shift key should deactive FancyZones
  • #4625 – [Run] Search text not updating on up/down navigation
  • #4432 – Mitigated the race condition in os detection
  • #2047 – Memory leak in PT Run
  • #4647 – Fix remapped shortcuts not getting activated in succession

Besides the aforementioned issues, Microsoft has also acknowledged another bug that is currently preventing users from opening PowerToys Settings when it’s minimized in the taskbar. The company has promised to address this issue in the full PowerToys v0.20.0 release.

If you are interested, you can download the latest version from the GitHub releases page, and feel free to check out our previous post about PowerToys v0.19 to learn more about the latest version.

Watch CBC in USA: Ultimate streaming guide

CBC is a popular broadcasting company from Canada that serves as the country’s public radio and TV broadcaster. CBC, which is short for Canadian Broadcasting Corporation, is also known as Radio-Canada and is owned by the Government of Canada.

Currently, you can only watch CBC if you’re on Canadian territory. Thus, you might not be able to watch CBC even if you’re a Canadian expat living in the USA.

Which is perfectly understandable, but what if, as a Canadian living in a foreign country, you’re missing out on important broadcasts?

What is geoblocking?

Fortunately, this situation isn’t exactly unheard of and can be easily bypassed. As in this case (CBC), when a certain service or website is not available outside of a certain region or is only available in specific countries, we call it geoblocking.

There are several reasons why certain services can get blacklisted in certain regions, and politics usually play a huge role in this kind of decision. Censorship is another factor that heavily influences the outcome of these situations.

How can I watch CBC online outside Canada?

1. Use a VPN

  1. Download Private Internet Access
  2. Install it on your computer
  3. Launch it and log into your account
  4. Choose an appropriate server (*)

(*) – if you want to watch CBC, which is only available in Canada, you should choose a Canadian server. For the best results, make sure you select a fast (low ping) server.

Private Internet Access is a great VPN service offered by Kape Technologies. You can think of it as the multi-tool of VPNs, as it can help you tackle various challenges.

Private Internet Access

Private Internet Access

Want to watch CBC online outside Canada? Try PIA.
$2.85/mo. Buy it now

For instance, you can use it to bypass geo-restrictions, anonymize your online identity, and secure your connection. Additionally, PIA can help you curb packet loss and improve ping, which is ideal when it comes to multimedia streaming.

Private Internet Access has more than 200 servers (246 at the moment) in 4 locations on Canadian territory. You can connect to any servers in Ontario, Toronto, Vancouver, and Montreal.

Thus, even if one of the servers and/or locations doesn’t work, you can just disconnect and pick another server.

2. Use a Smart DNS service

If using a VPN doesn’t sound ideal to you, there’s another approach to watching CBC in the USA. You can use a Smart DNS service, which in some cases proves to be better than using a VPN.

First of all, there’s absolutely no encryption. As a result, you won’t lose speed over the service while streaming your favorite CBC content.

However, that’s good news and also bad news, since the lack of encryption opens up your connection like a book to potential attackers. Your IP won’t be masked and none of the traffic will be encrypted.

Therefore, anyone who would decide to spy on your online activity (hackers, your ISP), won’t be bothered by any encryption obstacle.

Smart DNS services simply replace your ISP-assigned DNS with one of their own. The newly-assigned DNS is stripped of all metadata that would reveal your real geo-location to any server you interact with.

More so, a Smart DNS also routes your traffic through its own dedicated server, which is located in the country you chose.

3. Use a proxy server

Proxy servers are similar in nature to VPNs. Using such a service will hide your IP address in order to bypass geographical restrictions. However, when it comes to encryption, proxies are not exactly ideal, since this feature may not be as strong, or be available at all.

Additionally, given that many proxy servers are public-access-based, you’ll be sharing the same servers with potentially hundreds of other users. In order to curb congestion issues, many proxy server administrators throttle the bandwidth, so that everyone could get a piece.

Furthermore, proxy traffic is usually extremely easy to detect. As a result, many services block your attempts to even access them if they detect you’re connecting through a proxy.

You can watch CBC outside of Canada effortlessly

To wrap it up, even if you’re not currently on Canadian territory, you can easily enjoy CBC. Whether you choose to connect to this service through a VPN, a Smart DNS, or proxy, is a matter of choice, but you should be aware that some of them are better than others.

For instance, proxy servers are usually free but might not work at all or throttle your bandwidth, whereas VPNs such as PIA are paid services, but offer you great speed and unmatched protection.

How to remove duplicate contacts from Windows Live Mail

Now we’re going to talk about one common and really annoying problem for users of Microsoft’s Windows Live Mail: duplicate contacts.

There are a couple of reasons for duplicating your contacts, as well as a couple of solutions for this problem, so let’s take a look at this detailed guide.

The only solution that we managed to confirm is to remove them (manually or not). This is not a hard task but could be very boring and time-taking.

This happens especially if you have many duplicated contacts that you want to get rid of, so don’t say that you haven’t been warned.

How to clean up duplicate contacts in Windows Live Mail?

1. Delete duplicate contacts manually

  1. Sign in to your account.
  2. On the menu bar click Manage and then go to Clean up contacts.
  3. Check duplicate contacts you want to remove and click on Clean up.

But if you don’t have that many duplicate contacts in your People list, then this solution might be good for you. Use the above steps in order to delete duplicate contacts manually.

2. Clean up your duplicated contacts directly from Windows Live Mail

  1. Log in to your Windows Live Mail.
  2. Go to Contacts on the left bottom side of the window.
  3. Go to Clean up contacts and do the same thing as above.

Many Windows Live Mail users are not satisfied with this method because it is very time-taking and requires a lot of work.

Because of that, they constantly demanded from Microsoft to include features of deleting duplicate contacts in the further versions of Windows Mail.

QUICK NOTE: Since the writing of this guide, Microsoft discontinued Windows Live Mail. In order to use a reliable email service, then probably the best solution is to ditch Windows Live Mail completely.

If you don’t know what email software to install on your computer, we can give you a helping hand with an intuitive email client for Windows PCs.

Mailbird is a complete email program that can be used to manage all emails and contacts from multiple accounts in one place.

Just get started with your account and Mailbird will set up folders for received emails, archiving, drafts, and more, along with any custom folders that you’d love to use.

If you have a more effective solution, please share it with us in the comments and we will update this article with it immediately. Even more, our readers will be thankful to you.

How to watch German TV in the US [Streaming Guide]

You can watch German TV in the US and any other part of the world on any device as long as you have the right tools for the job. It doesn’t matter if you’re a German citizen living or traveling in the US, or a US citizen who wants to learn a foreign language by watching German TV. We’re showing you the complete steps to help you watch German TV online in four ways: with a VPN, Mobdro, IPTV software, and an Internet circumvention tool.

How can I watch German TV in the US?

Use a VPN

PIA is the best VPN for streaming

  1. Download Private Internet Access (PIA).
  2. Set up PIA on your device.
  3. Click PIA’s systray button and press VPN Server.
  4. Look up Germany and select the first displayed city (lowest latency).
  5. Press the power button to connect to the German VPN server.

Once connected to an IP address from Germany using PIA, you can use your web browser to watch live TV streaming, such as ZDF, which is only available for German users. Plus, if you have a Netflix account, you can log in to unlock German exclusive movies and TV series.

Developed by Kape Technologies, PIA is the best VPN for streaming. You can use it to watch TV online in the USA and any other part of the world by connecting to one of its high-speed servers to bypass geoblocks.

PIA has private DNS servers, OpenVPN and WireGuard protocols, together with SOCKS5 and Shadowsocks. It’s compatible with all major devices, supports 10 simultaneous connections, and comes with 24/7 live chat support.

More about PIA:

  • +3,300 VPN servers in 48 countries, even Germany
  • Unlock Netflix DE and other Netflix libraries
  • No identifying logs
  • 30-day money-back guarantee (no free trial)
Private Internet Access

Private Internet Access

Watch German TV in the US and other countries using the high-speed VPN servers of PIA.
$2.85/mo. Buy it now

Use Mobdro

use Mobdro

  1. On your Android*, allow apps to download from unknown sources.
  2. Download and install Mobdro.
  3. In the Mobdro main screen, tap the search button.
  4. Enter the name of a German TV channel.
  5. Select its entry from the list and watch TV.

*Although Mobdro is only available for Android, you can download BlueStacks and use the Android emulator to set up Mobdro on Windows PC.

Mobdro is the best way to watch German TV online for free. It’s completely free to download, install, and use. And you can find many German TV channels without having to change your geographical position.

However, you might occasionally run into buffering issues. When that happens, use a VPN like PIA to connect to a German VPN server before using Mobdro. It could speed up your Internet connection.

Use IPTV software

use ProgDVB

  1. Download ProgDVB and install it on your PC.
  2. Launch the tool and switch to the FreeWorldTV tab.
  3. Search for a German TV channel and double-click it.
  4. Start watching live streaming.

There are a few great IPTV software solutions, and ProgDVB is one of the best. You can use it to watch TV in German and other languages without having to resort to a web browser.

On the other hand, ProgDVB can’t be used to unblock Netflix DE and other streaming services since it’s limited to IPTV.

Use an Internet circumvention tool

use Psiphon

  1. Download Psiphon and set it on your computer.
  2. Launch Psiphon and go to Settings > Psiphon Server Region.
  3. Select Germany and click Apply Changes.

Psiphon is one of the best proxy tools available. It’s completely free to use and can be installed on Windows, Android, and iOS. You can use it to unblock websites and watch German TV in the US or any other part of the world.

However, unlike a VPN, Psiphon can’t encrypt your network traffic. So it’s not an ideal choice for privacy-concerned users who want to not only watch German TV in the US but also secure their browsing sessions.


Trouble with proxy connections on Windows 10? This article shows how to quickly fix it.


In conclusion, you can use any of these 4 solutions to watch German TV in the US or any other part of the world.

If you can’t make a decision about which solution is the best, we suggest using a VPN like PIA. It can not only circumvent geoblocks and give you unrestricted access to German television but also secure your browsing sessions, protect you from hacker attacks, and help you find cheaper flights.

[wl_navigator]

How to reverse a string in JavaScript [Step-by-step]

A palindrome is a word or list of characters that read the same when reversed. A good example of this is the word ‘RADAR’.

The easiest way to check for a palindrome in JavaScript is to create a copy of the original string, reverse it, and then compare it. If you want to build an algorithm that does this effectively, you’ll need to learn how to reverse a string in JavaScript. In this guide, you’ll learn how.

How do I reverse a string with JavaScript?

1. Convert it into an array and reverse it

  1. Split your string into an array of substrings using the split() method from the String object class. The split method requires a string as its argument. In this case, you’ll use an empty string. So the method should look like this:
    split("")
  2. Reverse the order of the array using the reverse() method.
  3. Convert the array back into a string using the join() method. Much like the split method, the join method requires a string as an argument. Once again, you’ll use an empty string:
    join("")

The best way to implement the above steps is through a function. Here’s a quick source code example that you can copy, test, and modify:

<!DOCTYPE html>
<html>
<body>
<H2> The Great Reverso! </H2>
<p>Current String: "Reverse this String!"</p>
<button onclick="myFunction()">Reverse</button>
<p id="demo"></p>
<script>
function myFunction() {
var str = "Reverse This String!";
var res = str.split(""); //Split the string into an array of characters
res.reverse(); //Reverse the order of the array of characters
str = res.join("");
document.getElementById("demo").innerHTML = str; //Attach the string to the HTML demo
}
</script>
</body>
</html>

In the above example, we create a function that reverses a hard-coded string and then sets a document element to it.  The function is then called from a button labeled ‘Reverse’.

There are numerous ways you can shorten and modify this code. For instance, instead of assigning the joined string to the str variable, you can reassign it to to the res variable and then point the  demo HTML document element to it i.e.

res = res.join("");
document.getElementById("demo").innerHTML = res;

Alternatively, you can condense all three steps into a single line:

var res = str.split("").reverse().join("");

Either way, the results should be the same:

reverse-javascript-string-example


Want to learn JavaScript even faster? Learn why you should download JavaScript Code by reading this article!


2. Reverse the string in JavaScript using a for loop

  1. Create a new empty string variable that will house the reversed string.
    var reverseString = "";
  2. Construct a for loop with the following characteristics:
    • Initializer: initialize a counter whose value is the length of the string to be reversed subtracted by 1.
    • Condition: make sure that the counter is greater than or equal to 0.
    • Iteration: the counter should decrement with every successful loop.
    • The body of the for loop should add a character from the original string to what will become the reversed string while using the for loop counter to set the character position.
      for (var i = fwdStri.length - 1; i >= 0; i--) { 
             reverseString = newString + fwdStr[i]; 
      }

Once again, you should apply the above operation in a function within scripting tags. Whether you want to include the JavaScript as an external file or embedded code is up to you. Here’s how the above solution looks in action:

<!DOCTYPE html>
<html>
<body>
<H2> The Great Reverso! </H2>
<p>Current String: "Reverse this String!"</p>
<button onclick="myFunction()">Reverse</button>
<p id="demo"></p>
<script>
function myFunction() {
var fwdString = "Reverse this String!";
var reverseString = "";

for (var i = fwdString.length - 1; i >= 0; i--) {

reverseString += fwdString[i]; //Alternative to newString + fwdString[i]

}

document.getElementById("demo").innerHTML = reverseString;

}
</script>
</body>
</html>

The above code works by looping through your original string in reverse and clones it character by character. If you’re not interested in explicitly casting your string into an array, then you may find this solution more suited to your goals.


3. Reverse the string in JavaScript using recursion

  1. Create a new function with a string as its parameter e.g.
    function reverseString(str) {
  2. Within the body of the function, create an if statement that checks if the string passed to the function is empty. If true, it should return an empty string e.g.
    if (str === "")
    return "";
  3. Add an else statement.
  4. In the body of the else statement, return a recursive call to the current method with a substring of the method’s string parameter, starting from the second character i.e str.substr(1). Append the first letter of the new substring e.g.
    else
    
    return reverseString(str.substr(1)) + str.charAt(0);

You should call this method from another function that’s responsible for displaying the results. The complete code should look something like this:

<!DOCTYPE html>
<html>
<body>
<H2> The Great Reverso! </H2>
<p>Current String: "Reverse this String!"</p>
<button onclick="myFunction()">Reverse</button>
<p id="demo"></p>
<script>


function myFunction() {

var str = this.reverseString("Reverse this String!");
document.getElementById("demo").innerHTML = str;

}

function reverseString(str) {
if (str === "")
return "";

else

return reverseString(str.substr(1)) + str.charAt(0);


}
</script>
</body>
</html>

Recursion works a lot like a for loop, but you’re tricking JavaScript‘s logic to work for you. Instead of appending characters to the end of the string, it attaches it to the front with each loop. Nevertheless, the results are much the same.

The above examples can be tested by using Windows Notepad and a web browser. However, we suggest using a cross-platform code editor or an integrated development environment to save yourself some time.

How to reverse a string in a Javascript is a common interview question. Therefore, understanding it may be imperative to your success as a software developer.

Nonetheless, let us know which method worked best for you in the comments below. As always, thank you for reading.

[wl_navigator]

Gmail won’t download attachments [QUICK SOLUTIONS]

A few Gmail users have found that they can’t download files attached to their emails on Windows 10. The documents stop downloading after selecting to save them to HDD.

So if that’s a familiar scenario, this is how you can fix Gmail attachments that aren’t downloading.

What can I do if Gmail attachments won’t download?

  1. Check that Gmail supports your browser
  2. Use Mailbird email client
  3. Update the browser
  4. Uncheck the Do not save encrypted pages to disk setting
  5. Switch off the Gmail Labs setting
  6. Switch off antivirus software
  7. Clear browser cache

1. Check that Gmail supports your browser

First, check you’re opening Gmail emails in one of its supported browsers. Gmail works in Chrome, Firefox, Safari, Internet Explorer and Edge, which are its supported browsers.

As such, Vivaldi, Maxthon, and Opera are not among Gmail‘s supported browsers. Also note that Gmail requires JavaScript and cookies switched on in browsers.


If you want the latest and greatest browser available right now, check out our best picks.


2. Use Mailbird email client

Switching to an email client has some considerable advantages.

First of all, Gmail and others are quite heavy web apps, which means that the browser will consume more memory and CPU to display the content. Since we use email all the time, most likely there’s always one or two tabs permanently open for emails.

Using an email client offloads that effort from the browser, making it snappier. It also means better offline support. Using Mailbird, the winner of most popular Mail alternative 2020 as your primary email client is even better.

Why? Because you can connect your Gmail account and have all your attachments readily available on your computer. You can also connect other providers for increased productivity.

Going one step further means you can connect your other favorite calendar apps or messaging apps (Whatsapp, Facebook, WeChat, etc.) and have them all in one central place. No more tab switching with the websites you visit.

Other powerful features:

  • Snooze messages to focus only on the important emails
  • Connect with LinkedIn to quickly see details about a sender
  • Search through your attachments to find anything faster

Easily and safely connect Gmail to Mailbird using IMAP port 993 for SSL and SMTP port 587 for TLS.

⇒ Get Mailbird

3. Update the browser

Perhaps you are unable to download attachments from Gmail in Chrome. Make sure that your browser is the most updated version.

You can update Google Chrome by pressing the Customize Google Chrome button and selecting Help > About Google Chrome.

The browser will then automatically update if it’s not the latest version. You can also ensure that any browser is the most updated version by downloading its installer from its website and then reinstalling the software.


4. Uncheck the Do not save encrypted pages to disk setting

  • Press the Cortana taskbar button and entering the keyword internet options in the search box.
  • Select to open the Internet Options window shown directly below.
  • Then click the Advanced tab in the snapshot directly below.
  • Now uncheck the Do not save encrypted pages to disk option if that’s selected.

Some Gmail users have fixed Gmail email attachments that aren’t downloading by deselecting the Do not save encrypted pages to disk set.


5. Switch off the Gmail Labs setting

  • Press the Settings button in Gmail and select Settings from its menu to open the General tab below.
  • Click the Labs tab to open the Gmail Labs options in the snapshot directly below.
  • Now you can disable those options by selecting the Disable radio button for each one.
  • Press the Save Changes button to confirm the new settings.

Gmail includes a variety of experimental settings in Gmail Labs. However, they are only experimental settings that might not always work. If you have lots of Gmail Labs settings selected, switching off those options off might fix Gmail attachments.

The quick way to switch those options off is to add ‘labs=0’ to the end of Gmail‘s URL.


Your Gmail settings are out of date? Don’t worry, we’ve got you covered.


6. Switch off antivirus software

  • Right-click the taskbar and select Task Manager on the context menu.
  • Select the Start-up tab shown in the snapshot below.
  • Now select the anti-virus utility and press its Disable button.
  • Then you can restart Windows.
  • Thereafter, open Gmail email and download an attachment.

Antivirus software can hamper both email client software and webmail. To ensure that isn’t the case, switch off third-party antivirus software.

You can usually do that by right-clicking anti-virus utilities’ system tray icons and selecting a disable or exit option from their context menus.


Can’t open Task Manager? Don’t worry, we’ve got the right solution for you.


7. Clear browser cache

  • Press the Customize Google Chrome button at the top right of the browser to open its menu.
  • Select Settings to open the tab below.
  • Click Advanced to expand the Settings tab.
  • Select the Clear browsing data option to open the window in the shot directly below.
  • Select the Cached images and files checkbox, and then press the Clear Data button.
  • Restart Chrome after clearing the cache.

Clearing browser caches can often be an effective resolution for a variety of web issues and frees up hard drive space. How you clear the cache varies from browser to browser.

If you have any other suggestions or questions, leave them in the comments section below and we’ll surely take a look.


[wl_navigator]

Outlook won’t connect to server & Gmail [Solved]

Outlook is the defacto email service used by most businesses and individuals, and just like other programs, this too can have issues in performance, among other technical issues.

One of the common and known issues is Outlook not responding or won’t connect, which usually happens for one of the reasons below:

  • Latest updates have not been installed
  • Outlook is being used by another process
  • Outlook is loading external content in an email
  • An installed add-in is interfering with the program
  • Mailboxes are too large
  • AppData folder is redirected to a network location
  • Office programs need repairing
  • Data files are corrupted or damaged
  • Security software is outdated or in conflict with Outlook
  • Your user profile is corrupted

Other causes have to do with software and hardware like insufficient computer specifications, insufficient write performance for Outlook files, search indexing issues, incomplete file (PST/OST) closure, and many RSS feeds, among others.

Similar issues that can be solved the same way:

  • Outlook not connecting to exchange server – since the error is not related to the type of server, the solutions will fix this issue as well.
  • Outlook won’t connect over VPN – it might be possible that SMTP is blocked by the VPN. See how to fix Outlook if it won’t connect via VPN.
  • Outlook won’t connect to Office 365 account – if the credentials are all right, apply the solutions from this article.

Whatever the case, if you find Outlook not responding or won’t connect, try the solutions below to resolve it.

How do I fix Outlook not responding or not connecting?

  1. General fixes
  2. Fix PST file
  3. Disable AppData directory redirection
  4. Cancel Outlook integration with Microsoft Office Communicator
  5. Disable antivirus software add-ins installed in Outlook
  6. Create a separate send/receive group for your RSS feeds
  7. Create a new Outlook profile
  8. Close any open dialog box
  9. Repair Office programs

1. General fixes

  • Ensure your computer meets system requirements for the Office suite you’re using – minimum system requirements don’t give optimal performance
  • Check that you’re running the latest Outlook build
  • Check that your PST/OST files are not large as size may cause performance issues like the app pausing during typical operations in Outlook like reading, moving, or deleting emails.
    • A size of up to 2GB will give a good user experience.
    • More than 4GB is where pauses start, and as it increases to 10GB or larger, you’ll get Outlook not responding or won’t connect.
  • Check that your computer has a first-gen SSD or slow rotational HDD s these will cause Outlook not responding or won’t connect issue due to performance in the operations
  • Check that you don’t have too many items in one folder as these will affect performance. move several items to separate folders in one store or an archive store, and use Arrange By: Date
  • If you connect to Exchange in Online mode, it affects Outlook’s performance and overall user experience
  • If you have nonessential add-ins installed, remove them from Outlook.
    • To view the installed add-ins, click Trust Center>Tools>Add-ins.
    • Outlook can also use Microsoft Exchange Server client extensions that may cause performance issues.
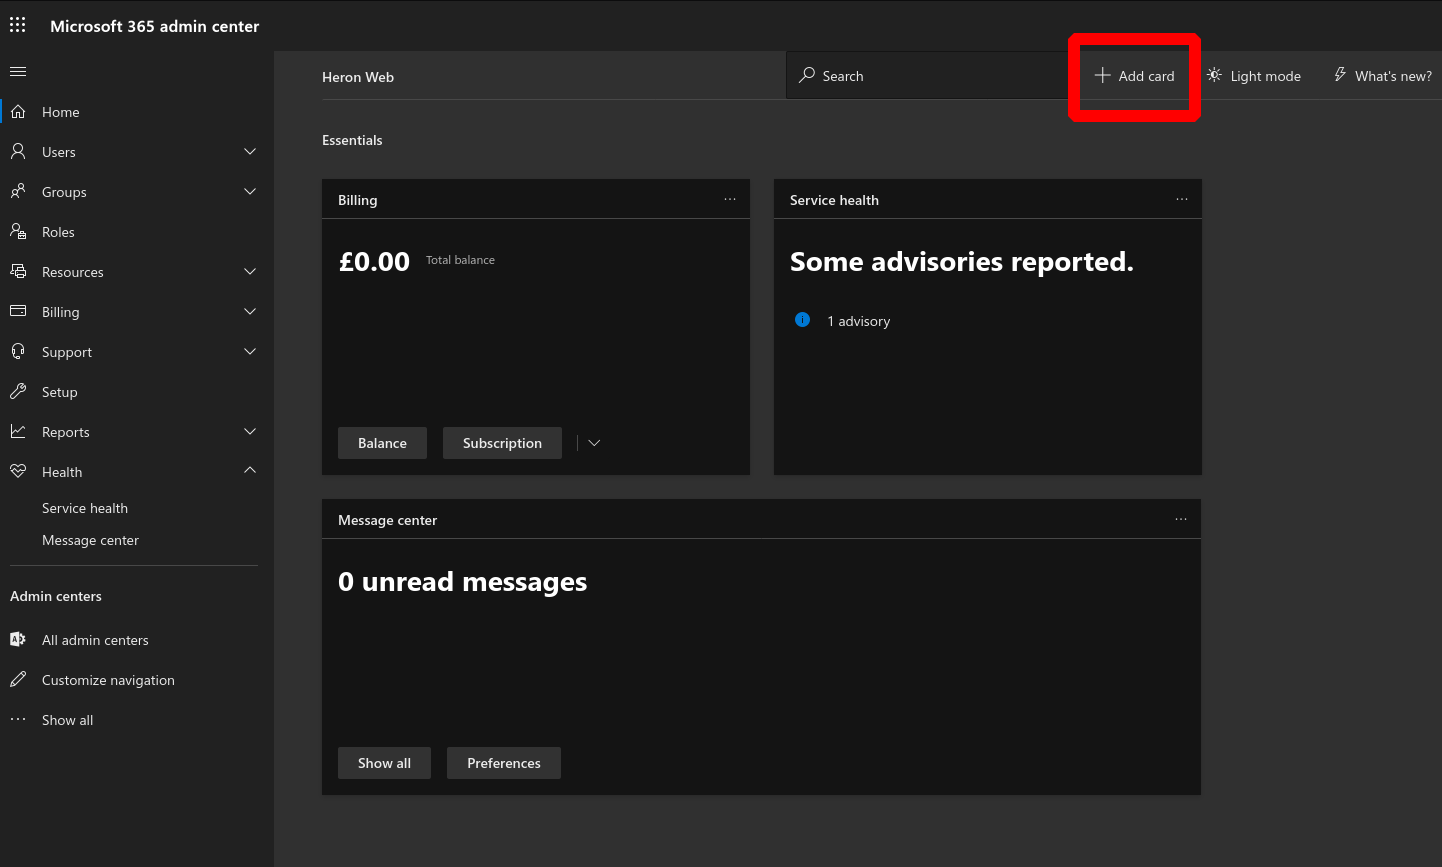
      • To see these extensions, click
        Exchange Client Extensions > Managelist > Add-ins > click Go.
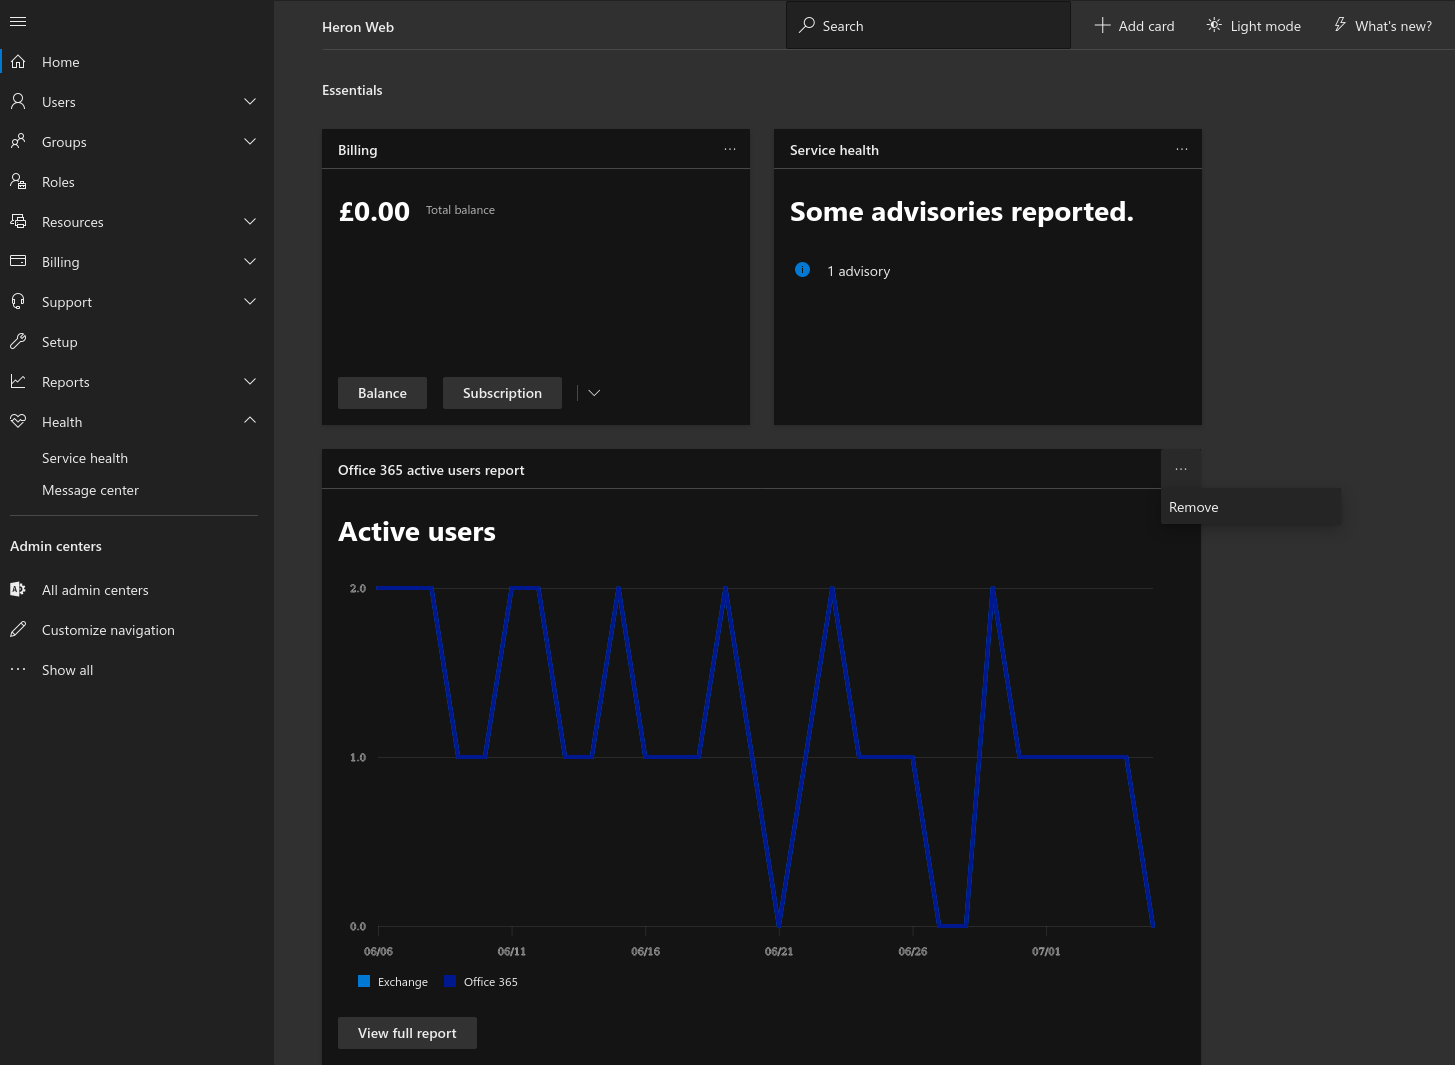
      • The Add-In Manager dialog box will display these extensions.
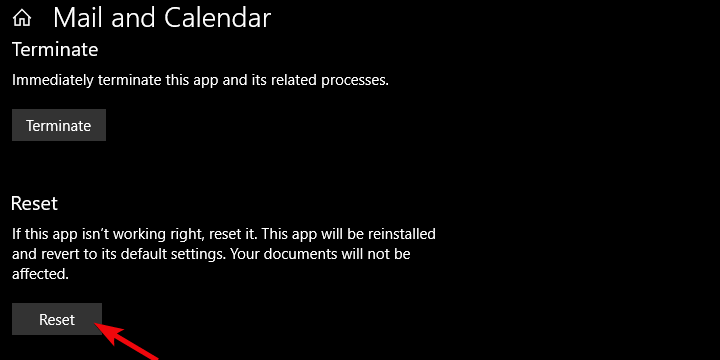
  • Run Outlook in Safe Mode to determine if the performance problem is caused by add-ins.
    • In Safe Mode, Outlook’s COM add-ins and Exchange Server client extensions are disabled.
    • If the problem goes away in safe mode, then probably one of the add-ins is causing the performance issue.
    • Disable any items that you do not use regularly, then restart Outlook, or, disable the remaining add-ins one by one.
    • If that does not fix Outlook not responding and won’t connect issue, then it may not be caused by an add-in.

2. Fix .PST file

Use Stellar Repair for Outlook to perform a repair operation on the .pst file.

Since the .PST file is crucial for how Outlook performs, keeping it in a good shape is critical. Microsoft Outlook already performs some cleanup operations in the background.

A combination of factors, however, can prevent the cleanup to perform and the file to get corrupted.

IT technicians usually repair damaged pst files in order to fix a number of issues with Outlook such as low response time from the app, Outlook search not working, and connection issues.
This tool has low system requirements and is compatible with all Windows versions. It supports MS Outlook 2019, 2016, and earlier.
3. Disable AppData directory redirection

  • Exit Outlook.
  • Right-click Start and select Run, then type regedit.exe and then press OK.
  • In Registry Editor, locate and then click the following subkey:
    HKEY_CURRENT_USERSoftwareMicrosoftWindowsCurrentVersionExplorerUser Shell Folders
  • Locate and then double-click AppDataappdata windows 10
  • In the Value data box, type %USERPROFILE%AppDataRoaming and then click
  • Exit Registry Editor.

If your AppData folder is redirected to a network location, this can affect Outlook’s performance, as some data like email signatures and dictionaries are stored in that folder, which it must wait for reading and write operations in the directory to finish.

4. Cancel Outlook integration with Microsoft Office Communicator

  • In Outlook, click Options under Tools
  • Click Other tab, and uncheck the Display online status next to a person name checkbox under Person Names
  • Click OK.
  • Restart Outlook.

5. Disable antivirus software add-ins installed in Outlook

If your antivirus includes Outlook integration, performance issues may arise. You can disable the integration or antivirus software add-ins installed in Outlook.

You may have to contact the antivirus manufacturer on how to configure the antivirus software to exclude any integration or scanning in Outlook.

6. Create a separate send/receive group for your RSS feeds

Outlook won’t respond or won’t connect if you’re synchronizing many RSS feeds into Outlook.

By default, the RSS feeds are automatically synchronized at set intervals. If you have too many feeds, Outlook may become unresponsive.

A separate send/receive group for your RSS feeds will allow you to sync them on-demand compared to set intervals.

7. Create a new Outlook profile

  • Close Outlook.
  • Open Control Panel
  • Choose User Accounts
  • Click Mail
  • Click Show Profiles.
  • In TE103999994, open the Apps menu, choose Control Panel > Mail > Show Profiles.
  • Choose Add, and in the Profile Name box,
  • Type a profile name, and click OK.
  • Enter an email address and a password for the primary email account you use in Outlook and then follow the steps to create the profile.
  • Go to Show Profiles dialog
  • Choose Prompt for a profile to be used.
  • Start Outlook and choose your new profile.

Your Outlook messaging profile may be misconfigured, so creating a new profile may fix Outlook not responding or won’t connect.

If this fixes Outlook not responding or won’t connect problem, return to Show Profiles dialog and delete your old profile.

8. Close any open dialog box

There are times Outlook won’t respond until you close an open dialog box. Check for these and see which ones may be stopping Outlook from responding.

If there isn’t any, check that Outlook isn’t working on a large or long process as this causes performance issues.

9. . Repair Office programs

This resolves issues with Outlook not responding or won’t connect.

  • Quit any running Office programs
  • Open Control Panel
  • Choose Programs and Features.
  • In the list of installed programs, right-click Microsoft Office (your version) and then choose Repair
repair microsoft office

Did any of these solutions help fix Outlook not responding or won’t connect? Let us know by leaving a comment below.

Op-Ed: Now that Microsoft Stores are shut down, will it be harder to service Surface devices?

Microsoft Stores had always been a great way to experience the company’s latest products. You could have walked right into a physical store, played with a Surface or Xbox, and then purchased one right on the spot. And, if you later suffered from device failures or other technical problems, you would have had the support of the Microsoft Answer Desk to help you out.

That experience, though, is now changing. As someone who once frequented the Flagship 5th Ave Microsoft Store in New York City, I now have one lingering thought. With Microsoft Stores shutting down, service options for Surface devices will be limited — so will it impact sales or make Surface devices a risky buy?

No more friendly Microsoft Store helpers

Going back to the start, one of the benefits of physical Microsoft Stores was the in-store service. If your Surface or Microsoft Product went bad, you could have scheduled an appointment online, go into the store, and meet someone face to face to resolve your problem.

Even if you didn’t have an issue, but curious about Surface, you could have still chatted with someone in the store, and have them find you the right PC for you. Microsoft Store employees were truly respectable, knew how to help, and had the patience and people skills to walk you through your issues or curiosity.

It’s something I experienced many times. My Surface Pro 4 suffered from Flickergate, and an employee in the Microsoft Store walked me through the process of replacing it (for free) with a Surface Pro 2017 model. When I wasn’t happy with the Surface Pro X, I walked into the Microsoft Store, spoke with an associate about why I didn’t like it and he helped/suggested me to exchange it for a Surface Laptop 3, which is now my daily driver. Finally, after returning home from a vacation in Los Angeles, my Surface Headphones stopped working. I walked right into the store and got a free replacement with almost no questions asked.

In all three of these situations, the physical Microsoft Store was there to help me. I didn’t have to mail in a device, wait weeks to get it back, or deal with people on a phone call or chat. I got the service I needed, right away, and came out as a happy customer. Not to mention, there were also cool demos of Microsoft products in the store, like HoloLens, and Surface Hub 2 to keep me engaged with Microsoft experiences.

While it is true that some Flagship Microsoft Store locations in London, NYC, Sydney, and Redmond campus will retain this customer experience, this still isn’t something that everyone will be able to experience. From what we know, these will only be at flagship stores, and Microsoft will instead train Microsoft Store employees from other store locations to do remote service.

That’s a problem, as Surface devices are sold worldwide, and across the USA.  With only two stores in the US, folks will have to deal with all-online support, which just isn’t the same. In fact, some people have said it is “god awful,” having to “go through hoops to get hardware replaced” with “hours of hours of documentation, multiple reimages, etc.”

Nothing beats face-to-face interactions, and with stores closing, getting Surface devices fixed might end up being a pain. If your Surface breaks, you’ll lose access to it while you ship it, and you’ll have to deal with shipping services. You’ll also have to explain your problem in words by typing it out on a keyboard or speaking over the phone, which isn’t something that isn’t as easy as just showing someone your problem. It’s a legitimate worry, especially for folks who aren’t as technology savvy.

With Surface troubles, things can only get more troubling

Microsoft, Surface, Windows, Xbox, Microsoft Store

I won’t lie, Surface products are not perfect. Surface Pro 4 suffered from Flickergate and the Surface Book from issues of its own. Consumer Reports at one time dropped their recommendation to buy Surface products, too, though they later restored it.

That in mind, this makes me worry. It is true that Microsoft has since fixed these issues (and even made it easier to repair devices) but if newer Surface products do have more reliability issues going forward, would it even be worth buying for some people?

If you purchase a Surface, it’s supposed to be a long term investment. And, without a proper place to go to get support, getting a device fixed would be a huge pain (as I said above.)

I may be overreacting, but people are used to Apple Care, where you can go to a store to get your product fixed. Without Microsoft having its own version of this, it would become a frustrating experience for most people, and make them never want to buy a Surface again.

The community is concerned, and I am too

I am just one Microsoft fan, writing an op-ed, but I am not alone. On the Surface subreddit, many other Microsofties share my concerns. There are over 211 comments in a thread about the store closures, and most of them are not good. If this doesn’t show why closing Microsoft Stores is a problem, then I am not sure what will.

“Will be picking up the Duo, but I’m not really sold on owning another tablet/laptop having experienced just how bad their customer support is outside of the stores,” said one user. “That’ll probably be the end of me with surface then. I only made the switch from Mac to PC due to the Apple Store-quality service you received in Microsoft Stores. Not gonna risk having to deal with online service,” said another.

Another user also makes are fair point. Surface devices are not really meant to be “repairable.” In most cases, Microsoft would just swap your unit out for another one. You used to be able to do this at a physical Microsoft Store right away, but now, you’ll have to wait.

On the business side, Microsoft obviously knows what it is doing by closing its retail stores, but for consumers, it could end up being a huge loss.

Fix: Word isn’t your default program for viewing and editing

Some MS Word users have posted on Microsoft’s forum about a dialog box that says, Word isn’t Your Default Program for viewing and editing Docs.

The dialog box window keeps opening for some users when they try to open document files with Word. That issue can still arise even when users have configured the selected file type for Word.

Microsoft Word isn’t your default program for viewing and editing documents

Disable Word’s default program dialog box

  1. Select the File tab in Word.
  2. Click Options to open a Word Options window.
    Word Options window microsoft word isn't your default program for viewing and editing documents
  3. Select General on the left of the Word Options window.
  4. Scroll down the window until you get to Startup options.
  5. Deselect the Tell me if Microsoft Word isn’t the default program for viewing and editing documents option.
  6. Click the OK button.

Repair Word’s Office Installation

  1. Open the Run dialog by pressing its Windows key + R keyboard shortcut.
  2. Type appwiz.cpl in the Run box and click OK to open the uninstaller Control Panel window.
    The Programs and Features window microsoft word isn't your default program for viewing and editing documents
  3. Select your MS Office suite listed there.
  4. Click the Modify button to open repair options.
    Online Repair option microsoft word isn't your default program for viewing and editing documents
  5. Select the Quick Repair or Online Repair radio button.
  6. Press the Repair button.
  7. Restart Windows after repairing Office.

Check the default apps by file type settings

  1. Check that all the file types for Word are configured to be the default ones. To do so, click Windows 10’s Type here to search taskbar button.
  2. Next, enter the keyword default in the search box.
  3. Click default apps to open the window in the shot directly below.
    The Apps & features tab microsoft word isn't your default program for viewing and editing documents
  4. Click Set defaults by app to open a list of software.
    Set defaults by app list microsoft word isn't your default program for viewing and editing documents
  5. Select the Word software, and click the Manage button for it.
  6. Then you’ll see a list of file types Word can open. Select Word for all file types its not the default app for.
  7. Select Word again for file types its already the default for just to refresh.
  8. Thereafter, restart your laptop or desktop.

Uninstall old Office suites

  1. Open the Run dialogue box.
  2. Then you can open the uninstaller by entering appwiz.cpl in Run and clicking OK.Run accessory microsoft word isn't your default program for viewing and editing documents
  3. Next, look for an old Office installation listed in the Programs and Features.
  4. Select an old Office installation (not your current one), and click its Uninstall button.
  5. Click Yes on uninstall confirmation prompts.
  6. Restart Windows after uninstalling your old Office software.

Select Notepad and then Word as the default file type

  1. Right-click the file the dialog box opens for to select Open with.
  2. Select Choose another app > More apps > Notepad.
  3. Select the Always use this app checkbox.
    The app selection window microsoft word isn't your default program for viewing and editing documents
  4. Click the OK button.
  5. Then right-click the same file again to select Open with > Choose another app > Word.
  6. Select the Always use this app option again, and click the OK button.

Those are some of the most probable resolutions for fixing the Word isn’t your default program dialog box.

If you still need further resolutions, you can get in touch with Microsoft support agent via the Contact Office Support page.

[wl_navigator] 

Public preview of Microsoft Defender ATP web content filtering is now free for enterprise users

Microsoft Defender ATP Web Content Filtering, a new feature allowing security administrators to regulate access to websites based on specified content categories, will now be free to use for enterprise customers during the public preview that kicked off earlier this year. In a recent blog post, Microsoft explained that they decided to make the feature free during the public preview as a result of customer feedback.

“We have heard your feedback and are excited to share that going forward, web content filtering will be offered as part of Microsoft Defender ATP without any additional partner licensing. Now you get the benefits of web content filtering without the need for additional agents, hardware, and costs,” explained the Microsoft Defender ATP Team.

Until this announcement, enterprise customers needed an active 60-day trial subscription with a partner license in order to use Web Content Filtering with Microsoft Defender ATP. The feature will continue to be in public preview for the time being and will allow system admins to set access policies based on device groups, monitor and block certain online tools, and certain websites. Notably, the tool supports all browsers including Microsoft Edge through SmartScreen, Firefox, and Chrome through Network Protection.

enable Microsoft Defender ATP web content filtering tool

Enterprise customers who have preview features turned on can check out web content filtering in Microsoft Defender ATP today. If you haven’t yet opted in, follow the process mentioned in Microsoft’s support article to turn on preview features in the Microsoft Defender Security Center. You can also read the official documentation to learn more about the new security feature.

MTG Arena Installer Not Working: 3 Fixes if It Won’t Install

MTG Arena is one of the popular collectible card games for Windows, Mac, and mobile platforms. Several thousand users play the game daily, but many trying to get it for the first time reported that the MTG Arena installer is not working.

The problem has been encountered on different operating systems, though it’s most prominent on Windows, with some even receiving the MTG Arena Invalid drive error. So, let’s see how you can work things out in this case!

Why won’t MTG Arena install?

Here are a few reasons MTG Arena is not installing:

  • Network issues: Often, it’s a slow Internet or loss of connectivity, so the MTGA installer is not working.
  • Installed apps conflicting with the installer: Several antiviruses and firewalls, including the built-in Windows Defender Firewall, can conflict with the process, and as a result, you can’t install MTG Arena.
  • Missing permissions: For some programs to work or install, they need administrative privileges. And for that, you will need to run the app as an administrator.
  • Running an outdated version of the OS: Some users even found out that their version of the OS was outdated and became the reason the MTG installer was not opening.

What can I do if the MTG Arena installer is not working?

Before we start with the major changes, here are a few quick things you can try:

  • Check the dedicated MTG Arena Status Page to determine whether the servers are operational. If they are not, wait a few hours and run the installer again.
  • Run the installer with administrative privileges. All you have to do is right-click on the installer, choose Run as administrator, and then click Yes in the prompt.
  • When running the installer, proceed with the default settings and verify whether the process goes through.
  • Install any available Windows updates.
  • Make sure you don’t have a slow Internet connection.
  • If you have a reliable VPN on the PC, connect to a server based in the United States and then run the installer.
  • Disable any third-party security software installed on the PC, and check whether the MTG Arena installer is still not working. In case it does, we recommend you switch to a more effective and OS-friendly antivirus.
  • For those who previously had MTG Arena, use an uninstaller software to clear any leftover files or Registry entries, and then retry the installation.

If none work, move to the solutions listed next.

1. Disable the firewall

  1. Press Windows + S to open Search, type Windows Defender Firewall in the text field, and click on the relevant search result.windows defender firewall
  2. Click on Turn Windows Defender Firewall on or off from the navigation pane.turn windows defender firewall
  3. Select the Turn off Windows Defender Firewall (not recommended) option under both Private network settings and Public network settings, and then click on OK.disable firewall to fix mtg arena installer not working
  4. Now, run the MTG Arena installer, and check whether the process goes through.

In some cases, the built-in Windows Firewall led to the MTG Arena installer not working. For those using a third-party firewall software, make sure to disable it as well. And remember to re-enable the firewall once done with the installation.

2. Use the MSI installer

  1. Open a browser, and download the Windows Installer Package for MTG Arena.
  2. Once done, double-click on the downloaded file to launch the setup and follow the on-screen instructions to complete the process.MTG arena

The MSI installer did the trick for some who were unable to install MTG Arena with the regular setup. So, do try it once when the other methods fail.

3. Get MTG Arena on Epic Games

Tip icon Tip
Use this solution only when all else fails because you will have to run MTG Arena through Epic Games and, therefore, can’t remove the latter.
  1. Go to the official website, and download the Epic Games Launcher.epic launcher
  2. Run the setup and follow the on-screen instructions to complete the installation.
  3. Complete the sign-up process. It shouldn’t take more than a few minutes to complete the initial setup.
  4. Now, search for Magic: The Gathering Arena in the Epic Games Launcher, and click the Get button to purchase the game. Fret not, it’s free!download to fix mtg arena installer not working
  5. Click on Place order to proceed.place order
  6. Finally, click on Install Now in the notification prompt that appears, and once done with it, you can play MTG Arena.install now to fix mtg arena installer not working

One of these solutions should have helped when the MTG installer is not working. However, many users don’t prefer playing the game over Epic Games Launcher, so we recommend you raise a support ticket at MTG Arena’s Submit A Request page.

Before you leave, check some quick tricks to optimize the PC for gaming and get the best performance.

For any queries or to share more solutions with us, comment below.

Search Protocol Host Process Failed: How to Restart it

Some users have reported to the Microsoft forums that they’re getting Search protocol host process failed very often.

This can be a problem, and it can even cause File Explorer search to stop working, so it’s important to fix it as soon as you can, and this guide will show you how to do that.

What is the search protocol host process?

  • This process is a core Windows process used by Windows Search Indexer.
  • Windows uses it to perform searches and render search results.

What can I do if Search Protocol Host process has failed?

1. Check if Windows Search service is enabled

  1. Go to Search and type administrative tools.
  2. Open Administrative Tools, and go to Services.
  3. Find Windows Search service and check if it’s enabled.searchprotocolhost.exe application error Windows 10
  4. If the service is not enabled, right click on it and choose Start.

Restarting this service can also help resolve issues with the searchapp.exe process if it’s consuming excessive system resources.

2. Check indexing settings

  1. Go to Search, type control panel, and open Control Panel.
  2. Go to Indexing options.
  3. Click on Advanced tab.Microsoft windows search protocol host Windows 10
  4. Click on Rebuild tab, under Troubleshooting section.

Now check if your search works again after rebuilding the index. If you still can’t search your files normally, try some of the following system solutions.

3. Perform a clean boot

  1. Press Windows key + R and type msconfig.
  2. On the Services tab of the System Configuration dialog box, tap or click to select the Hide all Microsoft services check box, and then tap or click Disable all.
  3. On the Startup tab of the System Configuration dialog box, tap or click Open Task Manager.
  4. On the Startup tab in Task Manager, for each startup item, select the item and then click Disable.
  5. Close Task Manager.
  6. On the Startup tab of the System Configuration dialog box, tap or click OK, and then restart the computer.

4. Use System File Checker Tool to repair damaged files

  1. Go to Search, type cmd in the Search box, and then right-click on Command Prompt.
  2. Click on Run as administrator. (If you are prompted for an administrator password or for a confirmation, type the password, or click Allow).
  3. At the Command Prompt, type the following command, and then press Enter: sfc /scannowSearch protocol host process failed Windows 10
  4. Wait for the scan to complete.

After doing that, check if the problem is gone.

5. Perform Disk Cleanup

  1. Go to Search, type disk cleanup, and choose Disk Cleanup from the list of results.
  2. Select your Windows 10 hard drive, by default it should be C. Click OK.Microsoft Windows search protocol host popup Windows 10
  3. Disk Cleanup will scan your computer. When the scan is completed, make sure that the Temporary files option is checked on the Files to delete list.
  4. Click OK to clean your disk.

To learn more, we have a great guide on how to use Disk Cleanup, so be sure to check it out.

6. Run DISM

  1. Go to Search, type cmd, and open Command Prompt as Administrator.
  2. Enter the following command on the command line:
    DISM.exe /Online /Cleanup-image /RestorehealthMicrosoft windows search protocol host asking for credential
  3. In case the DISM can’t obtain files online, try using your installation USB or DVD. Insert media and type following command:
    DISM.exe /Online /Cleanup-Image /RestoreHealth /Source:C:Repair/Source/Windows /LimitAccess
    Make sure to replace the following with the path to your installation media C:Repair/Source/Windows

Performing one of these four solutions should solve your problem with the Windows Search service.

But, if you’re still getting the Search Protocol Host processes failed message, try reading out Quick Search not working guide for more solutions.

What method did you use to fix this error? Use the comments section below, and let us know.