Windows 11 Insiders in the 23H2 Release Preview Channel begin to get Copilot updates with build 22631

Today, Microsoft released an update to current Windows 11 users on version 22H2 (non-Insiders) that brings the newly sorta rebranded Copilot for Windows (as opposed to Windows Copilot), along with new features for Paint, Snipping Tool, Photos, and more. Insiders in the Windows 11 22H2 Release Preview Channel began to get these updates late last week, and today, Windows 11 Insiders in the 23H2 Release Preview are beginning to get them too, with build 22631.

That is, Windows 11 23H2 Release Preview Insider commercial customers are being offered these updates. Consumer users will have to wait for a bit longer, unless they’re “seekers” (more below).

Along with the updates offered in this “Moments” package, commercial Insiders in the Windows Insider Program for Business will see some other changes, too:

  • Chat is now Microsoft Teams (free)
  • Access is available for Phone Link for Microsoft Teams (free)
  • A new People experience can help you find “relevant people easily on Teams and makes it possible to access and connect with contacts synced by users.”
  • A new Play Together widget in Windows Game Bar

Windows Insiders for Business users can get the update via WUfB, WSUS, and/or via the Azure Marketplace. ISOs are now also available (for anyone) for build 22631.

For those not in the Windows Insider for Business program, you’ll have to either wait until the update is made available to all Release Preview Insiders, or, as long as your machine meets the Windows 11 hardware requirements, can go to Settings > Windows Update, and choose to install build 22631.

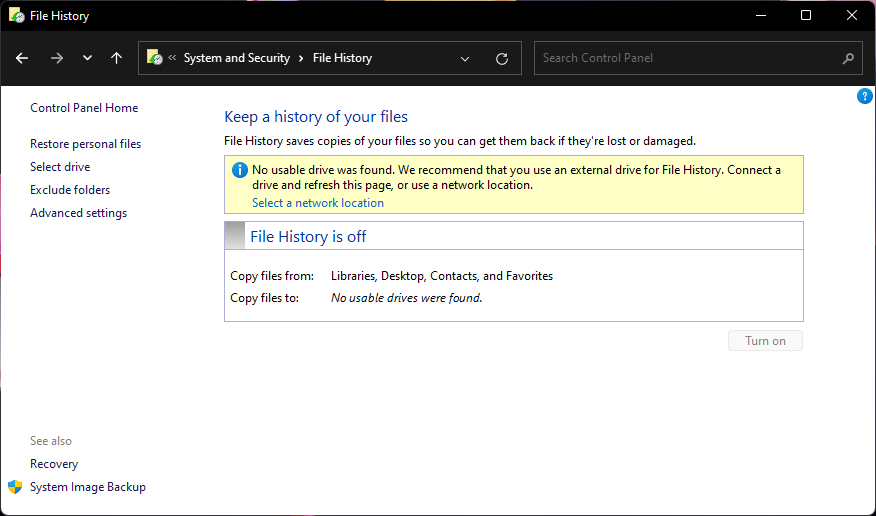
File History vs Backup: Which One’s Better on Windows 11?

We can all agree that having a backup solution is a great save for anyone who stores anything important on their PC. Windows 11 comes with two backup utilities: File History and Windows Backup.

Both offer a great way to keep your files safe in case of an emergency, but the two tools have different features and work slightly differently. If you’re yet to explore either, we give you a complete rundown so that you can make the right decision.

What is the difference between File History and Backup on Windows 11? 

File History

Windows 11 File History is a feature in the Control Panel that allows you to restore your files from a previous point in time. This can be useful if you accidentally delete or corrupt a file or your computer crashes.

Features

  • Automatic backup – Creates an automatic backup of your files on a regular basis. It saves copies of your personal files, pictures, music, and documents to a location you choose.
  • File recovery – Users can recover deleted documents from the recycle bin without additional software or third-party utilities.
  • File restore – Users can access previous versions of files and folders, including the ability to restore them if needed from the last 30 days. This is because it keeps multiple copies of your files.
  • Multiple storage locations – If you have multiple hard disks connected to your computer and want to protect them all with File History, this is possible, too.
Pros
It's a free, built-in backup system that automatically saves versions of your files and folders
If your computer becomes unusable, File History can restore your files from a previous point in time when the computer was working properly
There's no need to manually back up every hour or every day, as the backup process happens automatically
Protects your backup files from corruption, malware, and system crashes
The backups are always available locally, so you can always access them if your network connection fails
Cons
An external HDD or USB flash drive must be connected to your PC at all times
Backup options are limited and cannot be customized per the user's requirements since it only backs up files in Libraries and Desktop folders
It doesn't work with older versions of Windows and does not support some file formats
You can't set up a schedule for when you want to run backups
Has a time limit for file recovery, so you may be out of options after the 30-day lapse
Resetting your File History deletes all previous file versions

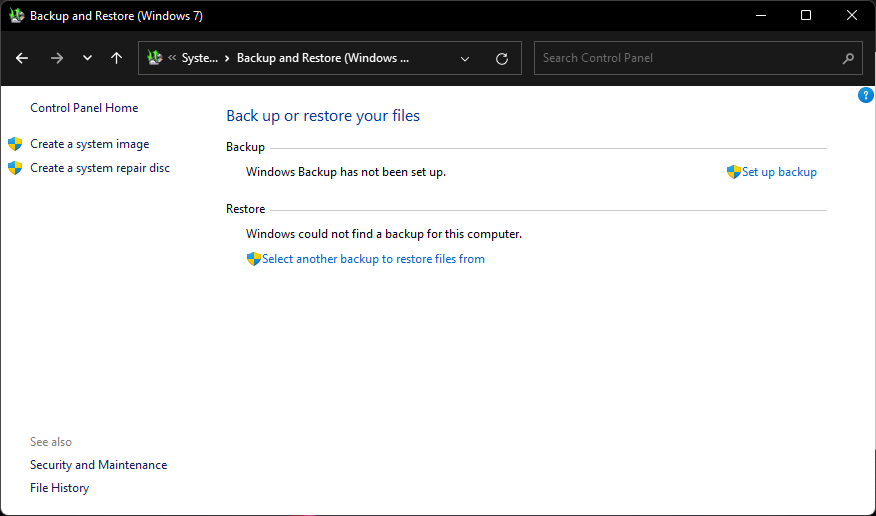
Backup and Restore

Windows Backup is a more complete solution that also protects your operating system, installed applications, and other settings. You can use a local drive or external device to back up these items, but it also allows cloud backup with a little tweaking.

Features

  • System Image Backup – This feature allows users to create an image of their PC and restore it later if something goes wrong with it.
  • Backup – The backup feature allows you to backup your files from your computer, external hard drive or even from a network location.
  • Restore – The restore functionality allows you to recover deleted or lost files from your computer or an external location.
  • Recovery – This feature allows you to perform troubleshooting operations on Windows components.
Pros
It doesn’t require any technical knowledge or expertise to use
You can make a complete backup of your system
It can help you to recover from any kind of data loss problem
ou can customize your backups according to your needs and requirements
Does not require any additional software or hardware for backing up your data
You can restore your system to a previous state if something goes wrong with your computer
Cons
Does not offer any encryption or compression support; hence takes up a lot of storage space
It takes a long time to complete the process of backing up data
The Backup and Restore feature is available only in Windows 7 and later operating systems
Restoration is not a guarantee of a virus-free system

Differences between File History and Backup and Restore

FeatureFile HistoryBackup and Restore
System Image backupNoYes
Cloud backupNo supportSupported
RecoveryRestores previous file versionsRestores previous system restore point
Type of backupIndividual files and folders Incremental backupsSystem-wide Incremental backups
Storage limit30 daysUnlimited
File typesLimitedBacks up all data

Should I use File History or Windows Backup?

When it comes to backup, you should first ensure your data is properly protected. File history is a great way to protect yourself from accidental changes or deletions, but unlike Windows Backup, which backs up all kinds of data, it only backs up select folders.

The Backup and Restore feature is primarily intended for recovering from a complete system failure, such as a hard drive failure or malware infection. Although it’s an all-in-one backup tool, it’s mostly used when you need to back up your entire system.

Therefore, if you’re looking for a backup solution with advanced features, use Windows Backup. If you only want to back up user data, File History backup is the most viable option.

If it were up to us, we’d definitely go for both. File History isn’t as robust as Windows Backup but is still fairly comprehensive. You can use both services separately if you want more control over how often and where backups are stored.

And whichever backup option you choose, you can always tailor the backup settings to meet your needs to ensure you’re getting the most out of these features.

To take your backup knowledge to another level, check our guide to see how to restore individual files from Windows Backup.

Is there a scenario in which File History is your first choice, or vice versa? Let us know your thoughts in the comments below.

How to Turn Off/On Media Streaming in Windows 11 [5 Ways]

In this guide, you’ll learn how to enable and disable the DLNA Media Streaming feature in Windows 11. We’ve broken the process into easy steps and provided options to help you get what you want.

How to turn on Media Streaming on Windows 11

1. Using Control Panel

  1. Press Windows + S to open the Search menu, type Control Panel in the search bar, and click the relevant result.
  2. Click on Network & Internet.network and Internet
  3. Click Network and Sharing Center.
  4. Now, select Media streaming options from the navigation pane.media streaming options to enable dlna windows 11
  5. Click on the Turn on media streaming button.media streaimg options
  6. After turning on media streaming in Windows 11, change the name of the DLNA media server in the text field if required. 
  7. Click on Choose default settings, and you can configure these for both the local and public network.change settings
  8. Once done, click OK to save the changes. 
Note icon NOTE
To stream content from your Windows PC, move the file to the current library folder. For instance, if it’s a picture, move it to the Pictures library, videos to the Videos library, and music files to the Music library. Once done, the files will be visible to connected devices.

Remember, you will also need a DLNA-compatible media player on another device, be it VLC, Roku Media Player, Xbox One Media Player, or PS4 Media Player.

2. Via Registry Editor

Tip icon Tip
If you are using Windows 11 Home, first install gpedit.msc on the PC since the console is not included in the Home edition.
  1. Press Windows + R to open Run, type regedit in the text field, and hit Enter.regedit to enable dlna windows 11
  2. Click Yes in the UAC prompt.
  3. Navigate the following path or paste it in the address bar and hit Enter: HKEY_LOCAL_MACHINE\SOFTWARE\Policies\Microsoft\WindowsMediaPlayerpath
  4. Locate the PreventMediaSharing DWORD, right-click on it, and select Modify. If you can’t find the path and/or key, create it.
  5. Enter 0 under Value data and click OK to save the changes.PreventMediaSharing

You can always turn on Media Streaming in Windows 11 via the Registry.

The same changes can be made through the Local Group Policy Editor.

3. With a third-party app

If the built-in DLNA functionality doesn’t meet your requirements, go with a reliable third-party solution.

Problems usually arise when a codec is not supported, and you can eliminate this through a player that employs real-time transcoding.

You can try Playon, Ampache, Plex Media Server, or Jellyfin, amongst others. All these are easy to use, and their official website lists the steps to get things running.

How to turn off Media Streaming on Windows 11

1. Using Control Panel

  1. Open the Control Panel.
  2. Click on Network and Internet. control panel network and internet
  3. Select Network and Sharing Center.control panel network sharing center
  4. Pick Media streaming options from the left pane.media streaming options
  5. Click the Block all button.block all media streaming windows 11

2. Via Local Group Policy Editor

  1. Open Gpedit.msc.
  2. Select Administrative Templates under Computer Configuration.
  3. Choose Windows Components.
  4. Double-click on Windows Media Player.
  5. Open the Prevent Media Sharing policy on the right.
  6. Choose Enabled.
  7. Click Apply and OK to save the changes.disable DLNA Windows 11

What are the benefits of using DLNA?

DLNA allows media streaming across devices on the network, given the streaming device is compatible with the standard. Once set up on a smart TV or another system, you can view the list of devices and select the desired input.

Besides, DLNA allows media sharing. You can transfer music, pictures, and video files from the dedicated folder in a user account to another user on the same PC, a different computer, and a DLNA-compatible device.

Troubleshooting common issues with DLNA on Windows 11

Here are a few things to try when Media Streaming is not working in Windows:

  • File formats are not being recognized by the server: Make sure the file is in a supported format. If not, convert it or use a streaming service compatible with the file type.
  • A pop-up window appears when trying to stream files: Make sure the personal folder you are streaming files from is added to the relevant library. You could add folders to libraries via File Explorer or the Windows Media Player. 
  • Default settings do not allow for file sharing: Re-enable DLNA media streaming or enable Network Discovery in Advanced sharing settings.
  • Can’t turn on Windows Media Streaming: Check network settings, enable in Control Panel, ensure services are running, update Windows, restart PC, check firewall settings, and run the troubleshooter.

Summary

You now have a fair understanding of DLNA, how to enable it, and the streaming capabilities in Windows 11.

And if you are still running the previous iteration, learn how to set up a DLNA server on Windows 10. The steps are nearly identical.

If you have any questions, don’t hesitate to ask us in the comments.

Everything (besides Copilot) included in the Windows 11 Moments 2 Update

Microsoft’s September 21, 2023, event focused heavily on Copilot features coming to Windows 11 this week, but even the hour-long showcase couldn’t detail all the company’s operating system-based generative AI developments destined for PCs soon, so here is comprehensive list to explore.

While it’s easier to identify each version of Copilot by its associated platform experience, Microsoft mentioned last Thursday, the company is consolidating the title of its disparate platform specific generative artificially intelligent experiences under a single Copilot branding.

The Copilot experience for Windows is centered around helping users not only have quick access to resources for collaboration, research and creativity, but also as means for navigating and troubleshooting OS-specific questions, request, or issues.

After the update brings Windows Copilot to the desktop, users can navigate via the new icon or by using the WIN + C key combination to surface the side pane experience.

Paint

However, Microsoft hasn’t relegated its AI efforts just to a single pane on the desktop, users can also experience AI enhancements in many of the in-box Windows apps such as Paint.

The old school image editor has been updated with its own mini-Copilot where users can interact with a text prompt to search for styles and journey through creative suggestions similar to Bing Image creator.

Windows 11 Update 2023 AI Paint

Paint will also get the coveted Adobe Photoshop Layers experience, which should allow for more precise editing within the platform versus the Undo and Redo dance most users have mastered.

While Paint represents Microsoft’s AI revitalization of a classic OS editing tool, the company is also bringing its AI to its new editing toy Clipchamp.

Users can now use new settings such as Auto Compose to save time by letting the system sift through the editing process based on a brief QA about a project. Once the QA about a project is completed by a user, Clipchamp will use generative AI to produce several recommended scenes, edits, and narratives based on the uploaded content.

Snipping Tool

Microsoft’ Snipping Tool has slowly been gaining more features over the past two years and its evolution continues with the addition of audio capture via audio and mic support recently implemented.

Snipping Tool also gains the ability to extract and redact text from a still or video capture image through a new beefed up Microsoft’s Lens technologies.

Photos

Microsoft Photos is constantly getting updates, but many have landed deftly with the broader Windows community due to several evolving image curation behaviors from phone to desktop, but for those who still navigate images via a laptop, the Search in Photos is getting a boost.

Once an image is found, AI can help users adjust backgrounds with an enhanced resolution tool to apply blurred effects to images, after the fact.

Windows Backup

Microsoft is reducing the time it takes to set up new PCs with its new Windows Backup feature that acts like Samsung’s Smart Switch between phones.

Instead of having to go through the rigmarole of manually searching for and redownloading apps, resetting manual settings and preferences and uploading previous logins and credentials, users will now have those items transferred over via the cloud and applied to their new device shortly after the out-box intro setup is complete.

Voice access

Microsoft is beefing up its Voice Access platform in Windows with support for voices during log-in and preferred PC voice settings and complex dictation of standard and non-standard words.

Users can also make use of new spelling, auto corrections and recognition experiences through Voice Access when the Windows 11 Moments 2 update lands this week, according to Microsoft.

Narrator Natural Languages

Windows users who make use of Narrator can now do so with support for even more languages such as Spanish, Portuguese, French, German, Mandarin, Japanese, Korean, and UK and India versions of English.

To try grab a Natural Language package that better suits the region, accents, or colloquialisms to help navigate Window, users can simply use the Win + Ctrl + Enter keyboard commands.

Passkeys

Microsoft is following Apple a bit with its new Passkey feature for Windows 11 that will piggyback Windows Hello integration to offer secure sign-in management for password-based logins and confirmations.

A passkey creates a unique, unguessable credential and allows you to sign in using your face, fingerprint, or device PIN. Passkeys on Windows 11 will work on multiple browsers including Edge, Chrome, Firefox, and others.

Presence Sensing

Some Windows OEMs have been building proprietary versions of Presence Sensing for some time now, and it seems Microsoft is ready to finally support it as a standard operating-level feature.

Combined with new Adaptive Dimming, Wake on Approach, and Lock on Leave, Presence Sensing is intended to help secure PCs when users are away as well as conserve battery.

Presence Sensing can also be added to external monitors if support is built into them. For now, Presence Sensing is an opt-in feature that will allow users to customize how their system reacts when they are way or idle long enough in front of their screens Windows 11 Moments 2 hits.

Admins can also assign Passkey functionality as a replacement for traditional password security, as a policy set through Microsoft Entra ID to access company resources.

Config Refresh

Moving to the nittier and grittier details of Windows 11’s Moments 2 Update involves resetting the settings in the PolicyCSP for Windows 11 devices every 30 or 90 minutes to help IT Admins access saved files for troubleshooting situations.

Admins can also pause the Config Refresh for select times, but the feature will eventually startup again unless monitored by Admins.

Intune

Intune with App Control for Business now replaces Windows Defender Application Control for Admins but still allows the same level of application control as before Admins via the Settings in the Admin console.

WDAP is not a system level update and thus comes to only current Microsoft Intune customers with Intune managed Installer whenever it does make it to the mainstream rollout of Windows Moments 2 Update.

Windows 365 Boot

Windows 365 Boot will be coming out of preview and hitting general availability for commercial Windows 365 subscribers enabling to port Windows 11 login experiences from one device to another via Cloud PC technologies.

The Windows 365 Boot is free to use current, and Microsoft 365 subscribers.

Mobile Application Management (MAM)

Microsoft is now making it easier for Admins to assign access to company information from personal devices through MAM.


Through Microsoft Edge on unmanaged devices, Admins can assign access to company content as well as putting in conditions like timed, location based and the number of access attempts from employees when dealing with company data on personal devices.

File Explorer & Start Menu

Microsoft will be beefing up its File Explorer and Start Menu experiences with AI-powered recommendation and settings at the onset usage of the respective applications in large and bright thumbnails.

Microsoft Store & Instant Games

Users will now be able to jump from previewing games in the Microsoft Store to directly playing them without having to wait for full downloads to occur.

Not every game will be part of this new platform feature, but Microsoft has already been working with several publishers to make the experience worthwhile. Developers can speak with Microsoft about joining the Instant Games platform in the future to help build out the experience.

Admins also can assign where downloaded content from the Microsoft Store goes such as specific drivers and locations for game installations.

The Store will be getting several rounds of fresh paint over the next few weeks that will bring performance improvements, richer search engine results on the Apps webpage, and new ways to discover gaming content on Windows devices.

Miscellaneous features

Other updates that aren’t category specific will also be coming in the Windows 11 Moments 2 Update such as the new Outlook for Windows, which is the PWA version that’s intended to replace the Mail App from Windows 10, a new Settings Home tab that surface several key settings in place, Auto Color management which should help improve gradients and color accuracy, Volume mixer bringing per-app based customizations, Dynamic Lighting, and new Dev tools such as Dev Home, WinGet configuration and the Windows Subsystem for Linux which should help a lot of Linux users stomach Windows development environments.

How to Get Windows 11 Moments 2 (version 22H2)

Consumers with eligible devices running Windows 11, version 22H2 who are interested in experiencing these new enhancements now, including Copilot in Windows, can choose to do so by going to Settings > Windows Update and turning on and get the latest updates as soon as they’re available.

New Microsoft Teams update offers enhanced meeting notification control, via Microsoft 365 Roadmap

To enhance user experience, Microsoft Teams is set to integrate Chat notifications with Meeting RSVP status, announced via the Microsoft 365 roadmap. Microsoft Teams users will gain more control over how they receive notifications during meetings based on their RSVP status.

Here’s how it works:

  • Declining a meeting invitation will result in no further notifications or the inclusion of related chats in your chat list. 
  • Conversely, accepting a meeting invitation means you will receive notifications for all new messages about that meeting.

The feature, identified by Feature ID 161739, was added to the roadmap on September 25, 2023, and is set to roll out in December 2023.

This change will apply to Microsoft Teams users across various Android, Mac, Desktop, and iOS platforms. The feature will be available to users in different cloud instances, including GCC, Worldwide (Standard Multi-Tenant), GCC High, and DoD.

Possible benefits of the new feature could be:

  • Reduced distractions: If you decline a meeting, you will no longer be bothered by notifications from the meeting chat, hence less distraction.
  • Improved focus: If you are focused on a task and do not want to be interrupted by chat notifications, you can decline the meeting.
  • Increased productivity: By reducing distractions and improving focus, this feature can help you to be more productive.

The rollout phase for this update is General Availability, making it accessible to a wide range of Microsoft Teams users starting in December 2023.

How to Access the User Folder on an Old Hard Drive [Windows 11 Guide]

Due to permissions, it’s not always possible to access certain folders, and in today’s guide, we’ll show you how to access the user folder on an old hard drive on Windows 11.

This process is simple, but it can take a while, sometimes even hours, depending on the size of your drive, so be extra patient and closely follow the instructions from this guide.

Why cannot I access user folder on old hard drive?

  • The ownership of the user folder belongs to a different PC, so you can’t modify it.
  • In addition to ownership, you don’t have any permissions over that folder.

How do I open user files on an old hard drive?

1. Take ownership of the folder and change permissions

  1. Locate the old Users directory, right-click it, and choose Properties.
  2. Navigate to the Security tab and click on Advanced.
    Security tab, and click Advanced - Error Code 2502 & 2503 on Windows 11
  3. Locate the Owner section and click on Change.
  4. Enter the name of your user account, click on Check names, and then click OK.
  5. Check Replace owner on subcontainers and objects.
  6. After that, click Apply and OK. Wait for the process to finish.

Now we need to change the permissions:

  1. Click the Advanced button again.
  2. Next, click on the Add button.
     
  3. Choose Select a principal.
  4. Enter your name, click Check names, and then OK.
  5. Set Applies to This folder, subfolders and files and check Full control.
  6. Save changes.
  7. Lastly, check Replace all child permission entries with inheritable permission entries from this object and click Apply and OK.
  8. Wait for the process to finish, it can take a few hours depending on the size of the folder.

2. Use the command line

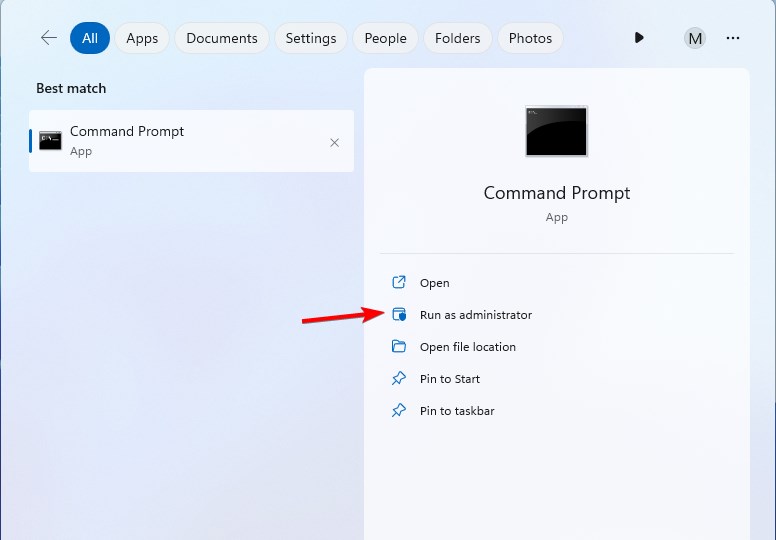
  1. Press the Windows key + S and type cmd. Select Run as administrator.
     
  2. Run the following commands:
    takeown /F "D:\Users" /R /D Y

    icacls "D:\Users" /grant "WindowsReport:F" /T
  3. Wait for the process to finish. Keep in mind that both processes can take few minutes or hours to complete.

Where are user files stored in Windows 11?

On all versions of Windows, the users folder is located in the root directory in the same drive where your system is installed. On your PC, that is usually the C drive.

Accessing the user folder on an old hard drive requires certain privileges, and to obtain those, you need to take ownership in Windows 11 and get full permissions over the users folder.

Speaking of user folders, we also have a guide on how to change user folder name on Windows 11, which might come in handy to you.

What method do you use to access the Users folder? Share your tips with us in the comments section!

Thanks to GenAI, Microsoft stock rating upgraded from ‘sell’ (bad buy) to ‘neutral’ (okay to buy)

Guggenheim, a global investment and advisory firm, has upgraded its rating on Microsoft Corp from “sell” (not a good buy) to “neutral” (okay to buy). This decision was influenced by the belief that Microsoft will benefit from generative artificial intelligence (GenAI) in the future.

Guggenheim had maintained a “sell” rating on Microsoft’s stock since January, partly due to concerns about the performance of Microsoft’s Windows product and challenges in the Azure cloud-computing business.

Microsoft stock

Even though they’ve changed their rating, Microsoft’s stock didn’t do very well on the announcement day, and it had been going down for a while. However, Microsoft’s stock increased by about 32% over the year.

Approximately 90% of analysts tracked by Bloomberg have “buy” ratings on the stock, with the remaining analysts issuing “hold” ratings. This is a positive sign for the stock, as it suggests that analysts are starting to see the potential of this new technology to drive growth for Microsoft.

Overall, we think that Microsoft is a well-positioned company with a strong track record of innovation. The company is also investing heavily in new technologies, such as AI, recently announced Copilot, which could drive significant growth in the future, but only time will tell.


Microsoft Edge turns saved passwords into secret code, but there’s a fix

In a surprising turn of events, Microsoft’s recent bug or update has quietly changed saved passwords in Edge on Windows 11, iOS, and other devices to GUID-like serial key strings. The unexpected change has left the users confused and frustrated, making saved passwords useless for copying and pasting into other apps or websites.

“Hey, did anyone else get it? Edge has changed all my saved passwords to something like a serial key. Is there a way to fix it?” one user posted on Reddit.

For those unfamiliar, Microsoft Edge securely stores and encrypts saved passwords on their servers, syncing them across devices in real time. These passwords are also cached locally within Edge, with only Microsoft having access to read the data in the folder or on the server.

Users can conveniently view these passwords by visiting the passwords page in the profile settings, clicking the eye icon in the list, and passing a security challenge, such as entering a password, PIN, or using facial recognition.

However, this once-simple process has become more complicated. But here’s a fix:

On PC:

  1. Open Microsoft Edge.
  2. Go to Settings.
  3. Select Profiles.
  4. Toggle on “Passwords” under Sync.
  5. Trigger a resync to retrieve original passwords.

On iOS or Android:

  1. Reinstall Microsoft Edge and open the app.
  2. Click the three-dot menu.
  3. Go to Settings.
  4. Select your profile.
  5. Open the sync page.
  6. Toggle on “Passwords” under Sync.
  7. Trigger a resync to restore your passwords.

By following these instructions, you should be able to revert the broken Edge password update and regain access to your original passwords.

Microsoft adding a new screenshot tool to Edge with advanced editing features

A new screenshot tool is being added to Microsoft Edge called Microsoft Edge Screenshots. This feature appears to offer some significant improvements in terms of capturing and editing screenshots directly within the browser.

Introducing the screenshot tool could be a replacement or consolation for removing the “web select” feature in Microsoft Edge, which was discontinued because of low usage and high support cost. Web select allowed users to select and retain the formatting of web content for easy pasting into documents or OneNote notebooks.

The new screenshot tool in Microsoft Edge offers a zoomed-in view of the area around your cursor, helping users make precise selections when capturing screenshots.

Edge Screenshot

However, this screenshot tool should not be mistaken for another similar feature that allows users to save screenshots of visited web pages directly to their browsing history.

The editing capabilities seem to have been upgraded with the ability to draw shapes like circles and squares, add arrows, freehand drawings, and apply text. Additionally, including a mosaic effect for redacting or censoring content is useful.

The screenshot tool overlays directly on the webpage, eliminating the need to open a new window and contributing to a more seamless user experience.

While the new screenshot tool is a welcome addition, it’s worth noting that removing the web select feature disappointed many users who found it useful. Nonetheless, the screenshot tool offers more comprehensive features for capturing and editing content within the browser.

via XDA Developers

Google launches AI training courses: Free & paid options for all skill levels

Google has recently launched a set of training resources that focus on generative AI. The aim is to prepare professionals with the required knowledge and skills in this emerging field. To achieve this, the tech giant has introduced two comprehensive learning paths on its Google Cloud Skills Boost platform.

The first learning path, aptly titled “Introduction to Generative AI,” is designed for individuals in non-technical roles such as sales, marketing, HR, and operations. With a series of introductory courses, this path provides a solid foundation for understanding generative AI and its implications for business.

Participants can expect to explore responsible AI principles and gain insights into how generative AI can contribute to various aspects of an organization’s operations.

As a bonus, the introductory path is free and can be completed within a mere 45 minutes. However, for those who seek a more in-depth understanding, there are additional courses available.

By completing the “Generative AI Fundamentals” skill badge, which includes the introductory course along with two others on “Introduction to Large Language Models” and “Introduction to Responsible AI,” participants can earn a comprehensive understanding of Google Cloud’s generative AI technology.

Moving on to the second learning path, “Generative AI for Developers,” Google aims to cater to software developers and engineers interested in harnessing the full potential of generative AI. To embark on this path, participants must first complete the prerequisite courses on “Introduction to Responsible AI” and “Generative AI Fundamentals.” It is worth noting that this advanced path does come with a price, as Google Cloud credits are required to access the more technical labs on services such as Generative AI Studio and Vertex AI.

For those who want to immerse themselves in generative AI education, a Google Cloud Innovators Plus subscription offers a full year of on-demand training, granting access to all AI content through the Google Cloud Skills Boost program.

In addition to theoretical knowledge, Google provides a range of labs that allow learners to gain practical knowledge by directly working on the platform.

These labs cover topics such as getting started with Generative AI Studio, prompt design with Vertex AI, and integrating search in applications using Gen AI App Builder, among others. Each lab requires a certain amount of Google Cloud credits, varying from one to five credits.

Furthermore, Google Cloud has joined forces with DeepLearning.AI, led by renowned AI expert Andrew Ng, to develop an additional course titled “Understanding and Applying Text Embeddings with Vertex AI.”

The collaboration aims to delve into topics such as classification, outlier detection, text clustering, and semantic search. This course is offered for free and provides valuable insights into the practical applications of generative AI.

Looks like Google is paving the way for professionals to thrive in the ever-evolving field of generative AI. Let us know your thoughts on this.

Microsoft’s Bing Chat to introduce “No Search” feature as a plugin

Mikhail Parakhin, the former head of Microsoft’s Advertising and Web Services, disclosed an intriguing development related to Bing Chat. A limited number of privileged users were granted access to an exclusive feature called “No Search.”

The feature allows users to disable Bing Chat from doing a web search, presenting certain advantages for specific tasks and interactions. By disconnecting from the web search functionality, users could experience a more focused and personalized interaction with the chatbot. The feature was received with great enthusiasm by the select few who were fortunate enough to test it.

However, despite this initial announcement, there has been a dearth of updates regarding the expansion of the “No Search” feature to a wider audience of Bing Chat users.

When this question was posed to Mikhail Parakhin, who has since assumed the role of head of Windows and Web Devices, he revealed on X (formerly Twitter) that the feature is transforming. It will be reimagined as a plugin, offering an improved user experience, and awaiting a general plugin rollout.

While the exact details of this plugin integration remain undisclosed, the implications are promising for Bing Chat users worldwide. Transitioning “No Search” into a plugin suggests a more accessible and seamless adoption of the feature in the future.

As of now, the precise timeline for the general rollout of the plugin remains uncertain. Until then, enthusiasts eagerly await more information regarding the expanded availability and potential applications of the “No Search” feature within Bing Chat’s ecosystem.

How to Open & Use the Emoji Panel on Windows 10

Whether you are engaging in a fun conversation or conveying thoughts in a professional one, you can use emojis on Windows 10 to add a dash of creativity & emotion to your messages.

In this guide, we will discuss the way to open the emoji panel and use it on apps and communication platforms.

How do I open & use the Emoji panel on Windows 10?

  1. Go to any app that allows you to enter text; it may be Word, Excel, Notepad, web browser, communication platform, or even WordPress.
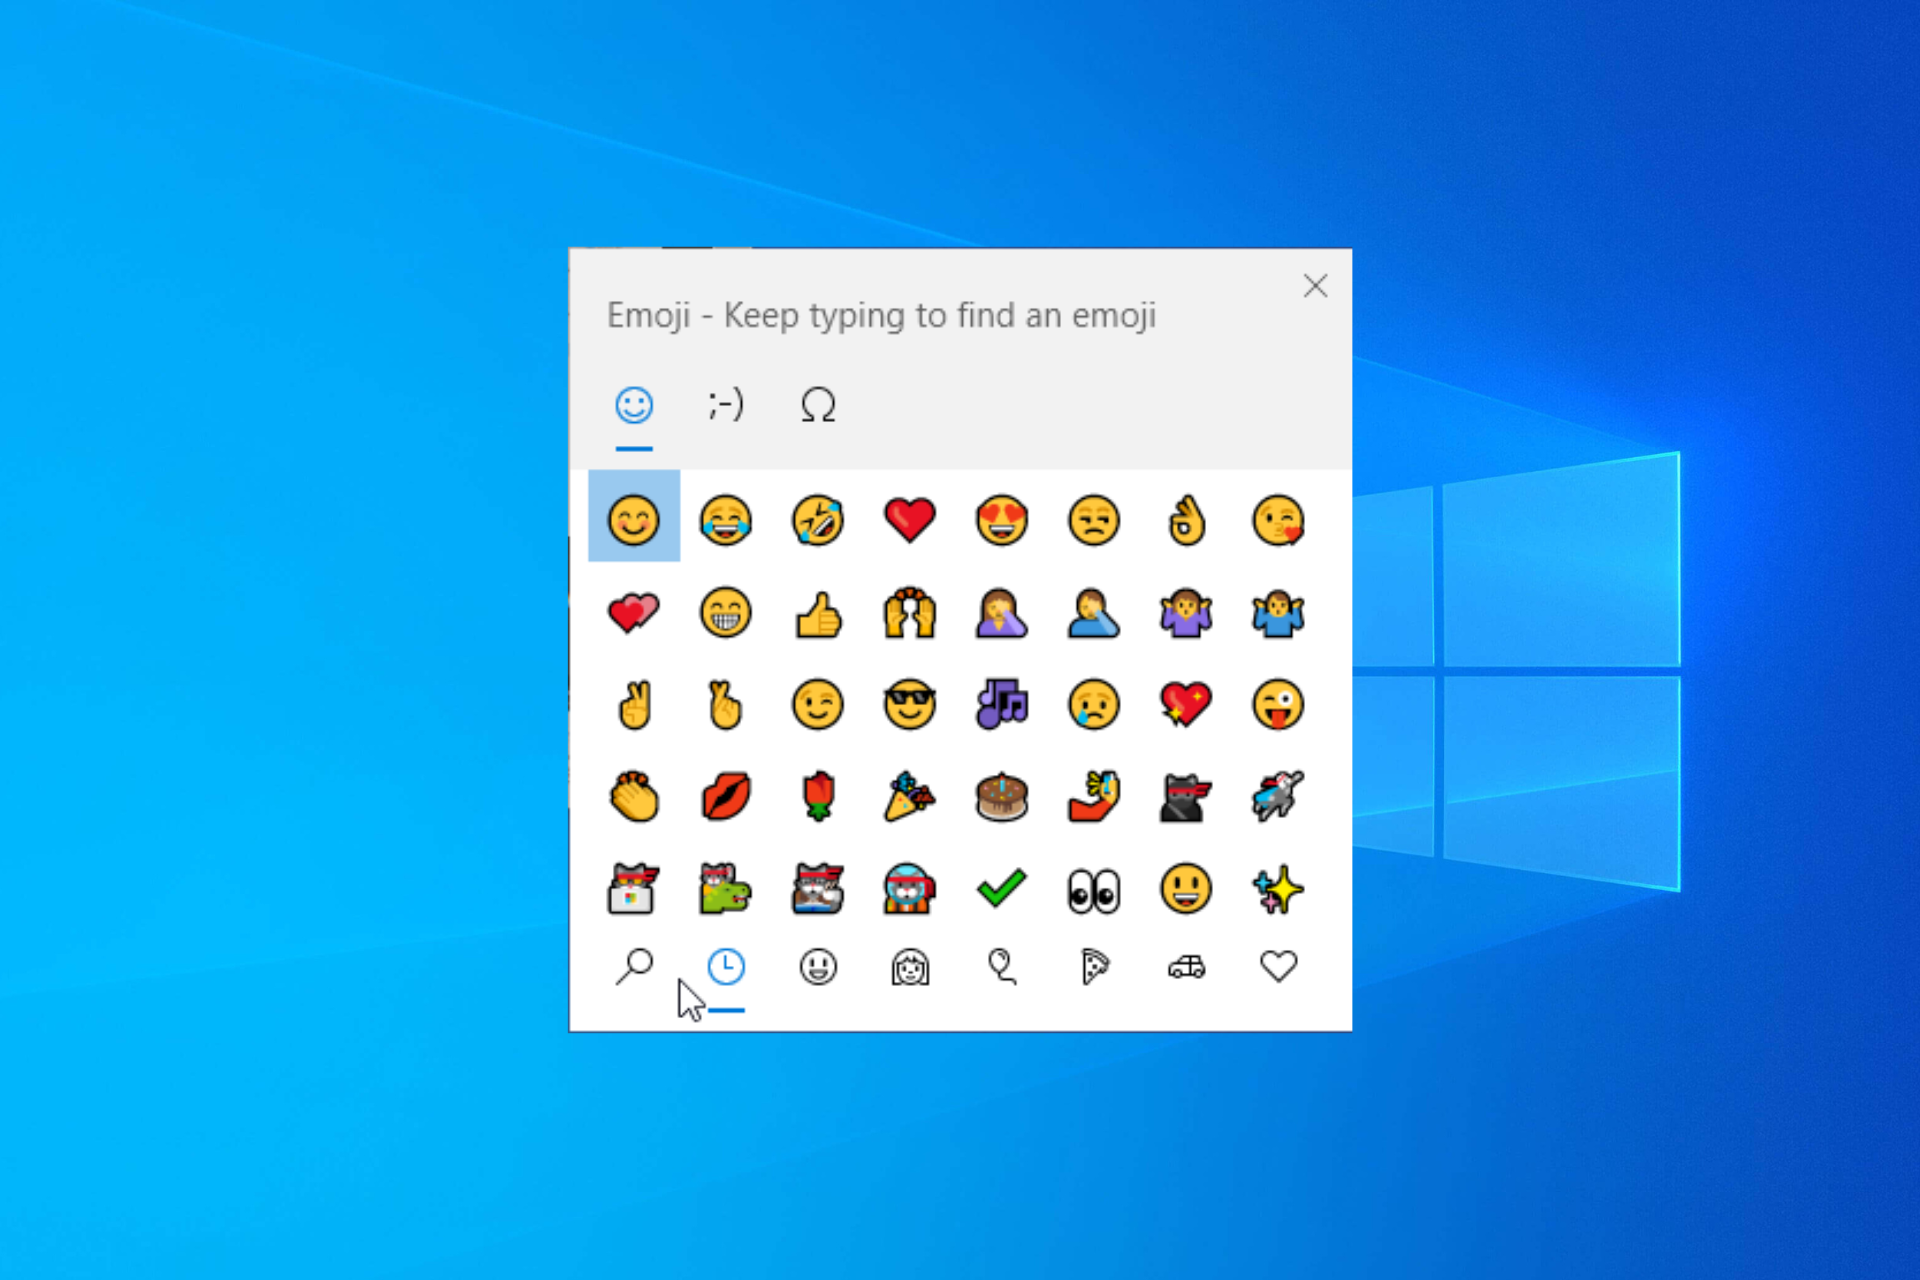
  2. Click the area where you want to enter the emoji, then press Windows + . or Windows + ; to bring up the emoji keyboard.Emoji panel Windows 10
  3. You will have various tabs to choose from; select any from the top. You can then choose from the categories like Recently used, Smiley faces and animals, People, Celebrations and objects, Food and plants, Transportation and places.
  4. Once selected, pick any emoji under the category to use on the app or platform.
  5. You can also add Kaomoji and Symbols to your chat; switch tabs to find the options.

To bring up an emoji keyboard on a touchscreen keyboard, you need to click the emoji icon on the keyboard.

Using emojis on apps and platforms is common, but wouldn’t it be cool to add an emoji to your Outlook emails? Read this guide to know more.

What are the popular keyboard shortcuts available for emoji panel?

Keyboard shortcutTask performed
EscClose
Enter Choose an emoji
Arrow keysNavigate through the emoji options
Tab or Shift + TabSwitch categories

How can I enable or disable the Emoji panel on Windows 10?

  1. Press Windows + R to open the Run window, type regedit, and click OK to open Registry Editor.
  2. Navigate to this path: Computer\HKEY_LOCAL_MACHINE\SOFTWARE\Microsoft\Input\Settings\proc_1
  3. Press Ctrl + F to open the Find dialog box, type EnableExpressiveInputShellHotkey, and press Enter. In case you can’t find the entry, navigate to the above path, right-click proc_1, select New>DWORD (32-bit Value), and name it EnableExpressiveInputShellHotkey.New - DWORD
  4. Once it is located, double-click it, and set the Value data to 0, & click OK to disable it. If you want to enable the emoji keyboard, change the Value data to 1 and click OK.Value data 0 or 1 = emoji WIndows 10 disable/enable

Remember to always restart your PC to save the changes to Registry Editor.

Why is my emoji keyboard not showing up on Windows 10?

  • Disabled from the Registry Editor app, use the above method to enable it.
  • Windows updates are pending.
  • Misconfigured keyboard settings.
  • Incorrect regional settings.

Now that you know the reasons for the emoji keyboard not working issue, to know the quick steps to resolve it, read this guide.

Adding an emoji to a conversation can spice up things and add a little flair to your messages, as expressing your thoughts in plain English can be boring or lack that vibrant touch.

What are your favorite emojis? Feel free to mention them and tell us how they light up your messages in the comments section below!

Find My Device on Windows 11: How to Enable & Use

The mere thought of losing your device to a stranger can make you worry. If that’s happened to you before, the good news is that Microsoft offers a device tracking service at no cost.

It, however, doesn’t work automatically, so here is a guide to show you how a click of a button can keep you in the know of where your device is at every time.

How does Find My Device work?

Find My Device is a built-in Windows tool that lets you track your device and help you find it if it’s lost. It can also help you get back into your computer and remotely wipe your data from the device. With the help of GPS tracking, it can determine your device’s location.

It checks in with Microsoft and starts looking for any devices connected to your Microsoft account. Once you select the lost device, it then downloads the latest data from Microsoft’s servers.

This includes a map view that shows the location of your device, along with other information such as the device name, device ID, and the battery level. Here, you can choose to lock it to prevent unauthorized access.

How do I enable Find My Device on Windows 11?

  1. Hit the Windows key and click on Settings.settings windows 11
  2. Select Privacy & security on the left pane, then click on Find my device.
  3. Toggle on the Find my device option.

How do I turn off Find My Device in Windows 11?

Simply reverse-engineer the above steps and toggle off the Find My Device option.

How do I use Find My Device to track or lock a lost Windows device?

Before you can use Find My Device, you’ll need to make sure your device meets the following requirements:

  • Your PC must have a working Internet connection through Wi-Fi or a cellular network. 
  • Ensure you’re signed into an administrator account. You’ll need this to manage your devices.
  • You must be signed in with the same Microsoft account you used to set up your device and ensure it’s not a work/school account.
  • Use a supported web browser.

Once you’ve met these requirements, proceed with the following:

  1. Hit the Windows key and click on Settings.settings windows 11
  2. Select Privacy & security>App permissions>Location.
  3. Toggle on Location services and Let apps access your location options.
  4. Navigate to your browser and sign in to your Microsoft account.
  5. Click on the Find my device option.
  6. Select the device you want to track, and then hit Find. A map showing an approximate device location will appear.
  7. From here, you can Lock it and leave an additional message with instructions on what someone should do if they find your lost device.

Supported Devices & Operating Systems 

  • Windows 10 and Windows 11
  • Works on any Windows device

And there you have it. Quick and easy instructions for locating your lost laptop. If you’re a forgetful individual who never wants to worry about someone finding your device, Find My Device is an incredibly useful security setting that you should definitely turn on.

That being said, sometimes, the Find My Device feature is not working, or users find it too basic and prefer more advanced tracker tools to find lost devices. Whatever your choice, the end goal is to secure your privacy and hopefully recover your device.

Have you used the Find My Device feature before? How accurate was it, and would you recommend it to other users? Let us know in the comment section below.

Reddit launches Contributor Program, allowing users to earn real money

Reddit users everywhere, brace yourselves because the social media giant has just announced its Reddit Contributor Program, which will allow you to earn real money by using the platform in your free time.

Fake internet points are finally worth something! Now redditors can earn real money for their contributions to the Reddit community, based on the karma and gold they’ve been given.

Reddit

Essentially, to earn real money with the Reddit Contributor Program, you’ll need to earn karma and gold, while enlisted in the program. Once you get enough of both resources (karma and gold), you’ll be able to exchange them for real money.

Reddit even tells you how much karma you need to earn to be able to exchange it for real money.

Contributor TierKarma (Over 12 mo period)Payout Rate (Dollars per Gold)Minimum Gold for payout
Non-contributor0-99 KarmaNo payout; balance rolls overn/a
Contributor100-4999 Karma$0.90 per 1 Gold10
Top contributor5000+ Karma$1.00 per 1 Gold10

Reddit Contributor Program: How it works

  • You’ll need to apply to the program, to see if you’re eligible. For instance, I’m not eligible for it. reddit contributor program
  • If you’re selected as part of the program, you then must earn enough karma and gold to pay cash.
  • Other Redditors will be able to give gold to posts, comments, or other contributions they think are really worth something; so, if you’re already a Reddit passionate, you might easily earn gold.
  • Top contributors make top dollar. The more karma and gold contributors earn, the more money they can receive.

However, the Reddit Contributor Program is quite selective. For now, there are a few rules on who can join the program.

  • To stay in the Reddit Contributor Program, you’ll have to earn gold and karma each month.
  • Provide verification information.
  • Account age must be 30+ days old.
  • Be over 18 and live in the U.S.
  • Only Safe for Work contributions qualify; so no NSFW posts.

And don’t worry, even though, for now, the Reddit Contributor Program is only available to US Reddit users, more regions will be included in it, soon, according to Reddit.

You can even check the program’s full FAQ for more information about it. but it seems rather an exciting program. If you’re a long Reddit user who has a lot of karma, already, and spend time daily on the platform, you should join it.

And let us know in the comments section below, your experience with it.

Windows Copilot might not be available in Europe, after all

Windows Copilot availability is not global, even though Microsoft places all the bets on this AI tool. Despite being one of the most anticipated Windows releases in a while, this Windows 23H2 feature, which is coming on the 26th of September, will not be available in Russia, Belarus, China, and, surprise, the European Community, which is another name for EU.

It’s not entirely clear why Windows Copilot availability doesn’t extend to the European countries, however, the EU recently labeled Microsoft as a gatekeeper under its Digital Markets Act.

Copilot in Windows is available in all global markets, except European Community, Russia, Belarus, and China (PRC).

Microsoft

The Redmond-based tech giant will be forced to make changes to Windows if some of its features are to see the light of day in Europe.

For now, however, Copilot won’t make it to Europe. It’s not clear when this AI tool will be released to the region, and neither Microsoft nor the European Union has issued any statements on it, yet.

Windows Copilot availability in Europe: will it hurt Microsoft or not?

Well, as anticipated as Microsoft makes it to be, Copilot won’t be entirely missed by the European Windows users. In fact, according to the latest statistics, only 19,21% of European Windows users are in fact using Windows 11. The rest of them are using Windows 10, or older versions of Windows.

One thing is clear, though: Windows 11 has not been fully adopted by the European Windows community, and in fact, it has a long way to go until it wins people’s hearts, there.

As Copilot is a product exclusively for Windows 11, it’s safe to say that the absence of it in the European Market won’t mean such great damage to Microsoft.windows copilot availability

However, for those of you who are located in Europe, and have been waiting for Copilot to come out, this is bad news, unfortunately.

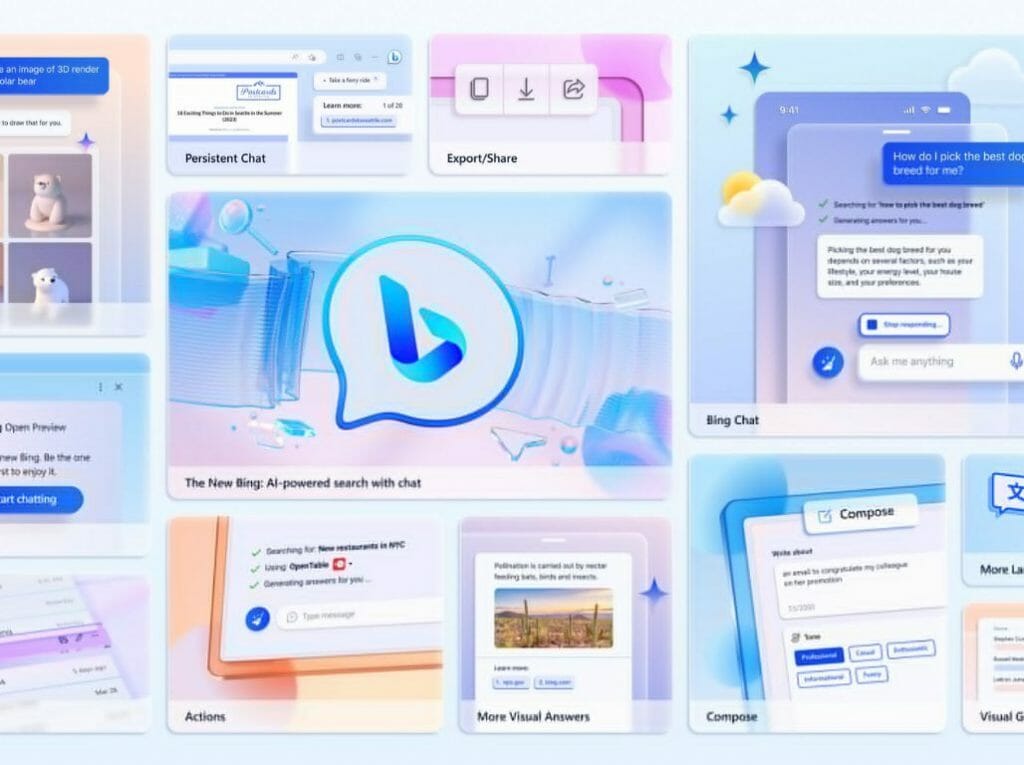
But there are solutions: basically, Windows Copilot is just Bing Chat but you can find it directly on Windows 11, instead of using Edge. However, you can use Bing Chat on Chrome too, and you can have the Copilot experience, although a bit limited.

Either way, we should wait and see. Maybe it won’t take long for Microsoft to come to an agreement with the EU.

Are you from Europe? Were you excited about Copilot?

How to Use GitHub Copilot in Visual Studio

If you are looking for a way to speed up your coding process in a Visual Studio environment, GitHub Copilot, an artificial intelligent pair programmer, can help!

In this guide, we will explain the step-by-step instructions to install the extension and how to utilize the tool’s artificial intelligence in the Integrated Development Environment.

Is GitHub Copilot free in Visual Studio?

If you are a student, teacher, or maintainer of a popular open-source code project, then you can install GitHub Copilot for free. However, if you don’t fall into these categories, you can get a one-time 30-day free trial of the tool.

How do I use GitHub Copilot with Visual Studio?

Before proceeding with any steps to get GitHub Copilot and use it on Visual Studio, go through the following preliminary checks:

  • Updated version of Visual Studio 2022 or 2019.
  • A working GitHub account.
  • Sign up for a GitHub Copilot technical preview subscription.
  • A stable internet connection

1. Download the GitHub Copilot extension

  1. Press the Windows key, type visual studio and click Open.Visual Studio open - Use GitHub Copilot in Visual Studio
  2. Go to the Extensions tab and select Manage Extensions.Extensions - Manage Extensions
  3. Locate the search bar from the top right corner, type github copilot, select the appropriate result from the left pane, and click Download.Download and Use GitHub Copilot in Visual Studio
  4. Once downloaded, close Visual Studio, and you will be prompted to install the GitHub Copilot extension; click Modify.VSIXInstaller_Modify
  5. Follow the on-screen instructions to complete the process and relaunch the Visual Studio 2022 app.

After installing the extension, it helps to know how to clone a repository in GitHub so you can bring projects into Visual Studio and start coding with Copilot suggestions.

As you bring projects into Visual Studio, you may also want to learn how to delete a GitHub branch to keep your repositories clean and organized.

2. Add the GitHub account to your Visual Studio

During the installation process, you might be prompted to sign in to a Microsoft account linked with your GitHub if you haven’t already. If not, follow these steps to add your GitHub account to Visual Studio: 

  1. On the Visual Studio app, click the Profile icon, select Add another account, then choose GitHub account.Add the GitHub account
  2. You will be redirected to the GitHub sign-in page on your browser; enter the credentials and 2FA code if needed to sign in. Once done, close the browser window and return to the app.

3. Setting up GitHub Copilot for use

  1. On the Visual Studio 2022, click File, then New> Project.Add new project  - Use GitHub Copilot in Visual Studio
  2. On the Create a new project page, select any of the options available and click Next.Select the app
  3. Name the project and click Next.name the project
  4. Click Create.Click Create - Use GitHub Copilot in Visual Studio
  5. You will get the GitHub Copilot icon on the bottom left corner of the Visual Studio 2022 app. Click it to get options like Enable Globally, Enable for CSharp, and more. Click on any of them to activate and customize it as per your preferences.Enable options for  GitHub Copilot in Visual Studio
  6. Now start typing the code, and you will get suggestions or corrections in grey color. You can click them or press the Tab button to accept. You can also ask questions or ask the tool to write code for a certain thing. For example, to get the rainbow colors type this command and press Enter: //Generate an array of all the colors from the rainbowUsing GitHub
  7. The tool will use artificial intelligence and produce a suggestion in grey color; if you want it to include it, press the Tab button on your keyboard.

To improve collaboration further, you can also learn how to merge branches in GitHub so your Copilot-generated code integrates smoothly with ongoing development.

To keep Copilot-generated code clean and consistent, learn how to format code in Visual Studio with shortcuts and Code Cleanup.

Exploring Features of GitHub Copilot in Visual Studio

  • Natural language support for programming languages – GitHub Copilot’s artificial intelligence understands & processes natural language to provide code suggestions, making it easier to translate ideas into actual code efficiently.
  • Autocomplete-style suggestions – Offers suggestions for entire functions, methods, and even code snippets, reducing manual coding, thereby saving time and increasing productivity.
  • Personalized suggestions based on context – Provides suggestions on the context of a function, variable name, and even keyboard shortcut, helping you complete the code faster.
  • Ability to analyze billions of lines of code at once – GitHub Copilot has been trained on vast amounts of codebases, therefore, it can analyze code to provide relevant suggestions.
  • Accessible from the left-hand side panel – You can click the GitHub Copilot’s icon and select Open Copilot to get it on the left side, ensuring an integrated and seamless experience on Visual Studio.
  • Neural network – The tool uses a neural network, a variant of the Generative Pre-trained Transformer (GPT) architecture, to generate intelligent and accurate code completion suggestions.
  • Add comments or structured blocks of code – It suggests relevant code and also helps add comments and structured blocks faster, which improves code readability and manageability.
  • Boilerplate code generation – When you start a new function, method, or class, GitHub Copilot can generate the initial boilerplate code, which saves you time and helps you focus on writing the core logic of a program.

The seamless integration of GitHub Copilot within Visual Studio can help you perform repetitive tasks faster and more efficiently. You can add the GitHub Copilot for Business using the same steps. To know more, read this guide.

Using the tool not only accelerates the development of the code but also nurtures learning by offering educational insights. You can also add its extension to Visual Studio Code, Azure Data Studio, JetBrains suite of IDEs, Vim, and Neovim.

Another AI-powered virtual assistant by Microsoft is Microsoft 365 Copilot; you can add it to Outlook, Word, Excel, and other 365 apps on your Windows, Mac, or mobile OS to get suggestions for various repetitive tasks. You can also check out this GitHub Copilot vs Microsoft Copilot comparison if you’re unsure which tool to use.

If you need something different, you can always try using Blackbox AI as an alternative to Copilot.

Download GitHub Copilot, use it, and tell us your experience and what you think about the tool in the comments section below.

Microsoft Edge now has a Translate button on its PDF reader toolbar

Microsoft Edge can do a lot of things: from its Bing Chat AI to the built-in Photo app, and the PDF reader, the browser is quite versatile, and fast. Unfortunately, much to Microsoft’s dismay, Edge is still not the popular choice, when it comes to Internet browsers.

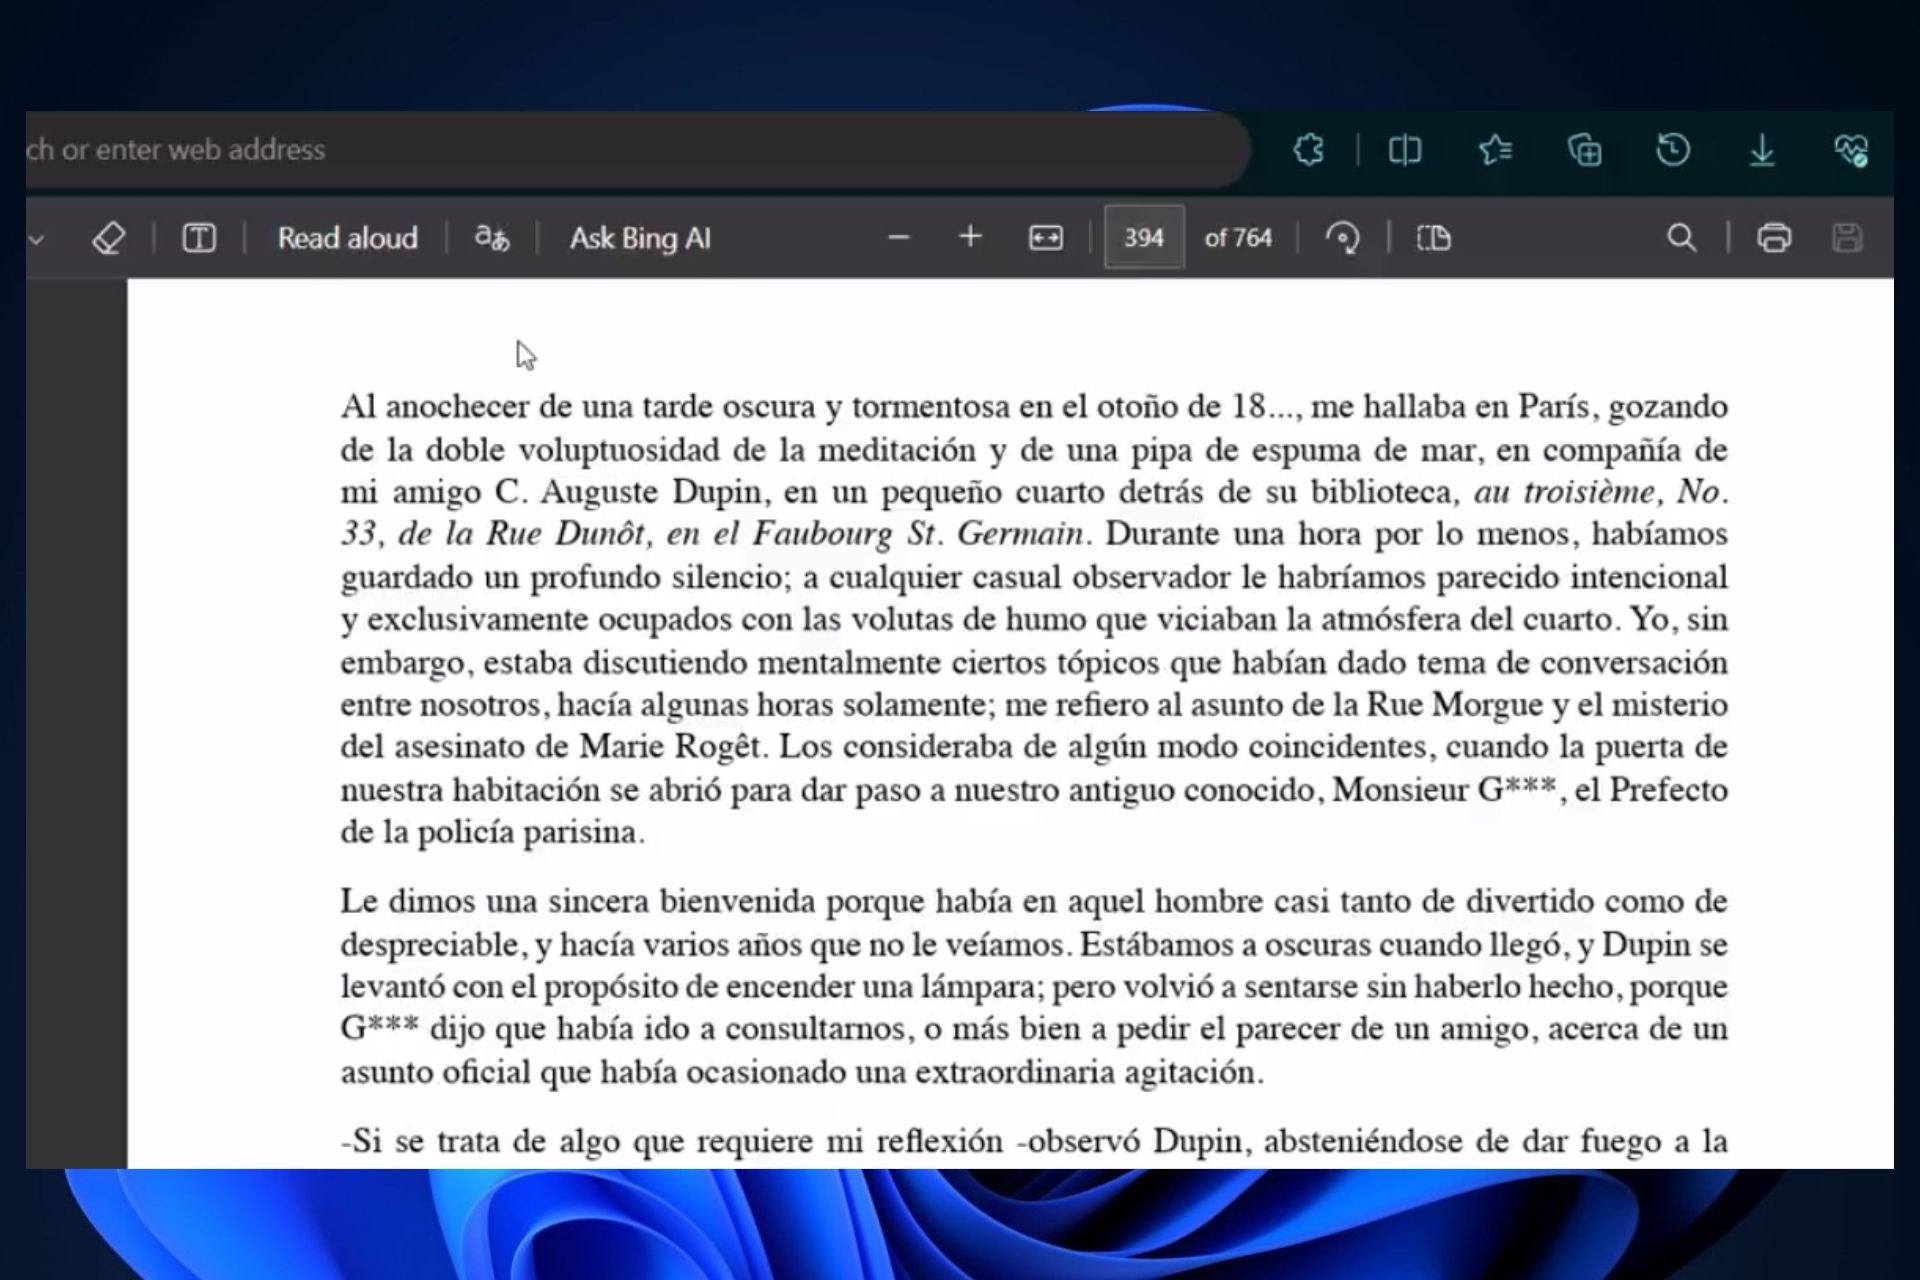
However, despite this, Microsoft keeps on improving it with really useful features. Take, for example, the new Translate button that the Redmond-based tech giant added to its PDF reader toolbar. Spotted by Windows enthusiast, @Leopeva64, this new button might be used to translate entire documents at once.

If this turns out to be true, then it will be quite a useful feature, as you won’t have to select the text to translate it, as you currently have to do in Edge’s PDF reader.microsoft edge translate button

For now, the feature is only on Edge Canary, meaning the users enlisted in the Edge Insider program will be able to see it and test it. However, you should know that the feature is still experimental and it hasn’t reached its final stage yet.

If you do so, let us know your experience in the comments section below.

Teams introduces Branded Meetings, companies can brand their meetings

Microsoft Teams will introduce Branded Meetings starting on November 2023, according to the latest entry in the Microsoft 365 Roadmap.

It is a Premium-only feature that will allow companies and commercial users to brand their Teams meetings with their logo and images. Zoom, for example, already allows its customers to brand their meeting experience, so it was about time Microsoft Teams introduced this feature as well.

You will be able to use your company’s logo to brand your live meeting, while you can customize the Launcher screen with brand images.

The feature is particularly useful especially if we take into consideration the popularity of Microsoft Teams across organizations. Every situation should be the perfect moment for branding, and this new feature will allow it.

The rollout is scheduled to start in November 2023, as we mentioned earlier, and it should be done by the end of this year.

How to Remove Duplicate Drive Letters on Windows 11

While Windows 11 remains a major upgrade over the previous iteration, some of the issues seem not to have been polished by Microsoft. A common problem is duplicate drive letters in Windows 11, i.e., the same drive is listed twice, and you need to remove the excess entries.

For instance, it will be listed under This PC and then again as a removable drive in the navigation pane. While this doesn’t translate to increased storage space consumption, this will certainly clutter Windows Explorer. 

Why is my drive showing up twice in Windows 11?

Windows, by default, shows external drives twice in the navigation pane. That’s how it is developed. But conflicting drive letters or corrupt system files can also trigger the problem for some. 

When faced with the issue, we will start by deleting the underlying Registry files and then looking for other issues to remove duplicate drives in File Explorer.

How do I delete duplicate drives in Windows 11?

1. Modify the Registry Editor

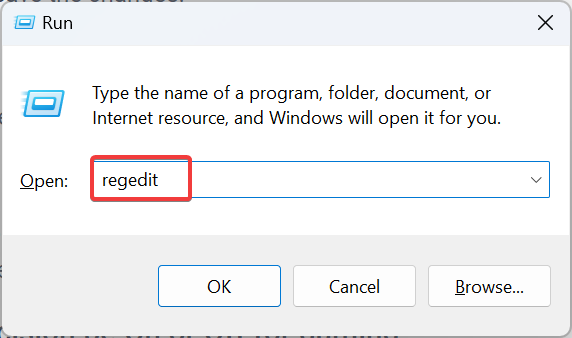
  1. Press Windows + R to open Run, type regedit in the text field, and click OK.regedit
  2. Click Yes in the UAC prompt.
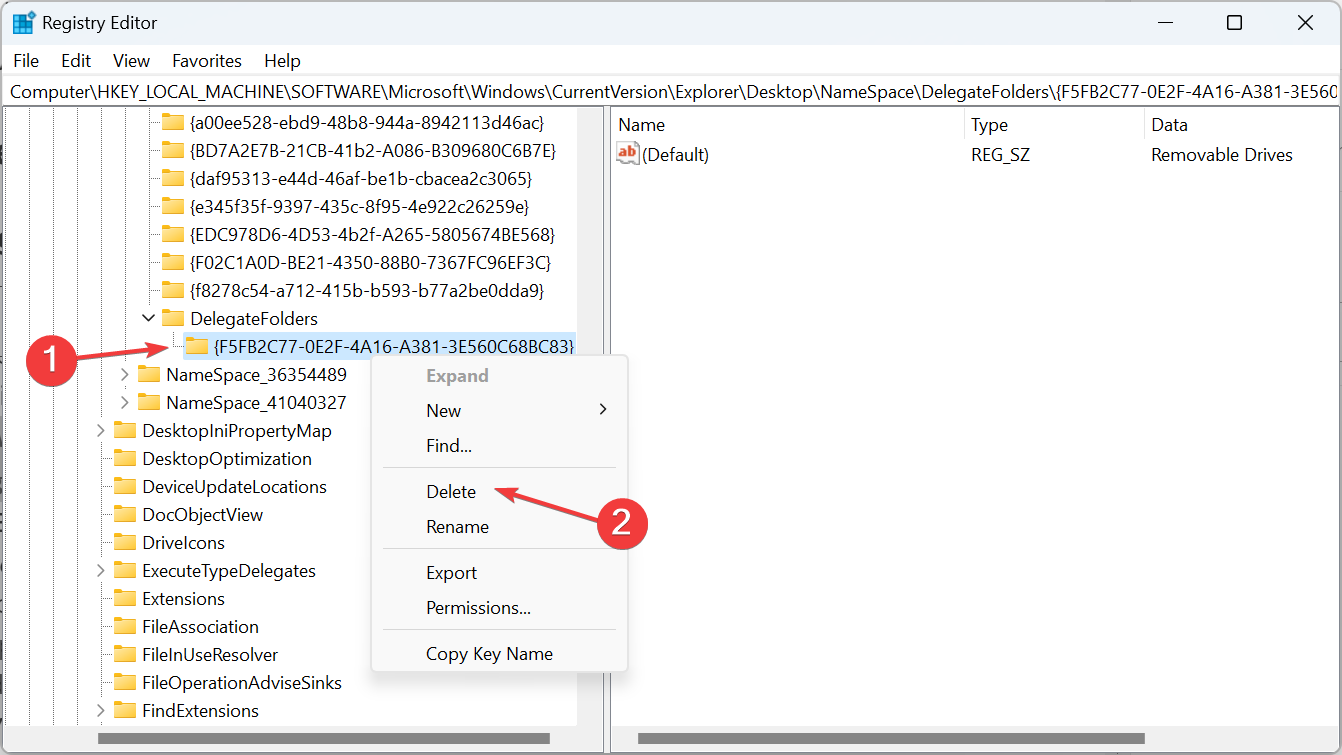
  3. Paste the following path in the address bar and hit Enter: HKEY_LOCAL_MACHINE\SOFTWARE\Microsoft\Windows\CurrentVersion\Explorer\Desktop\NameSpace\DelegateFolders
  4. Locate the {F5FB2C77-0E2F-4A16-A381-3E560C68BC83} key in the navigation pane, right-click on it, and select Delete.key
  5. Click Yes in the confirmation box.
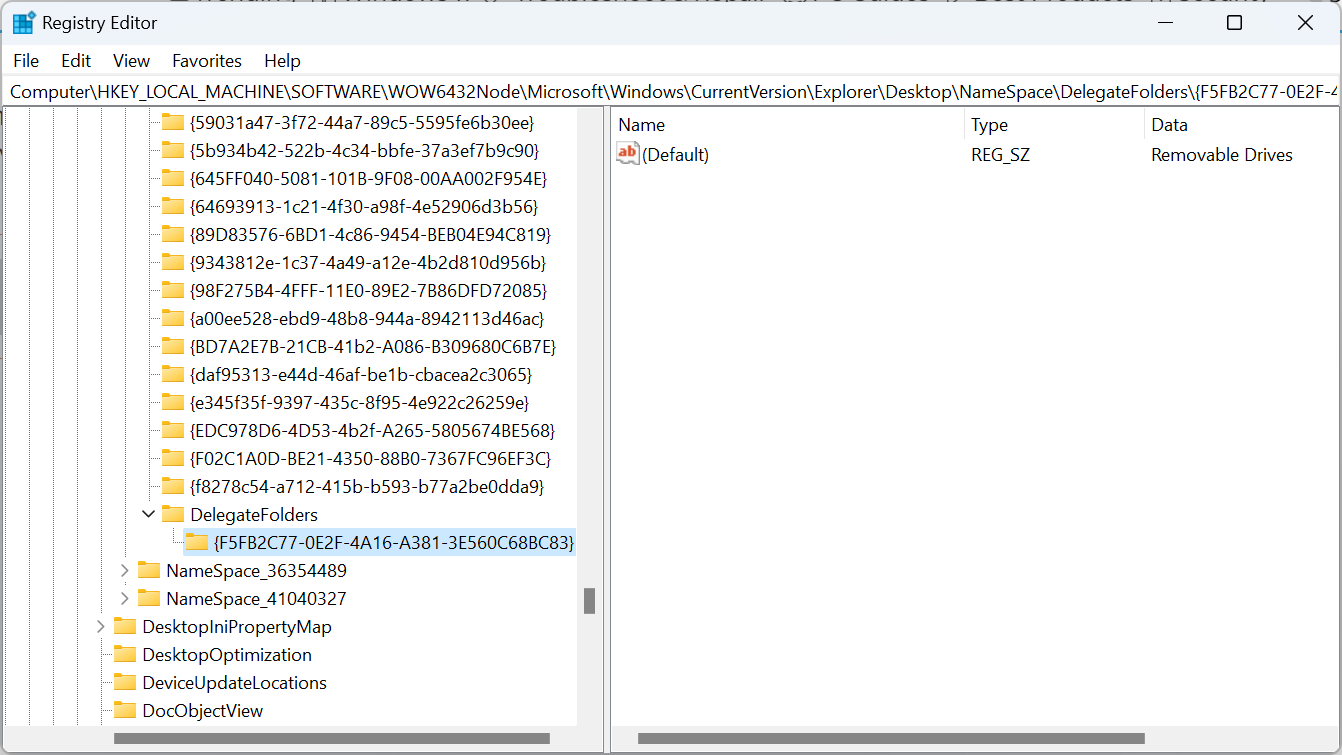
  6. Restart the computer and check whether File Explorer now shows only one entry for the external drive. If not, and you are running a 64-bit architecture, go to the following path: Computer\HKEY_LOCAL_MACHINE\SOFTWARE\WOW6432Node\Microsoft\Windows\CurrentVersion\Explorer\Desktop\NameSpace\DelegateFoldersregistry key
  7. Finally, delete the {F5FB2C77-0E2F-4A16-A381-3E560C68BC83} key here as well and restart the computer to remove duplicate drives in File Explorer.

Deleting the REG files is one of the best solutions when you find duplicate drive icons in Windows 11. But remember, the Registry Editor is a complex tool. Do not make any other changes, and it’s better that you create a restore point beforehand.

2. Change the drive letter

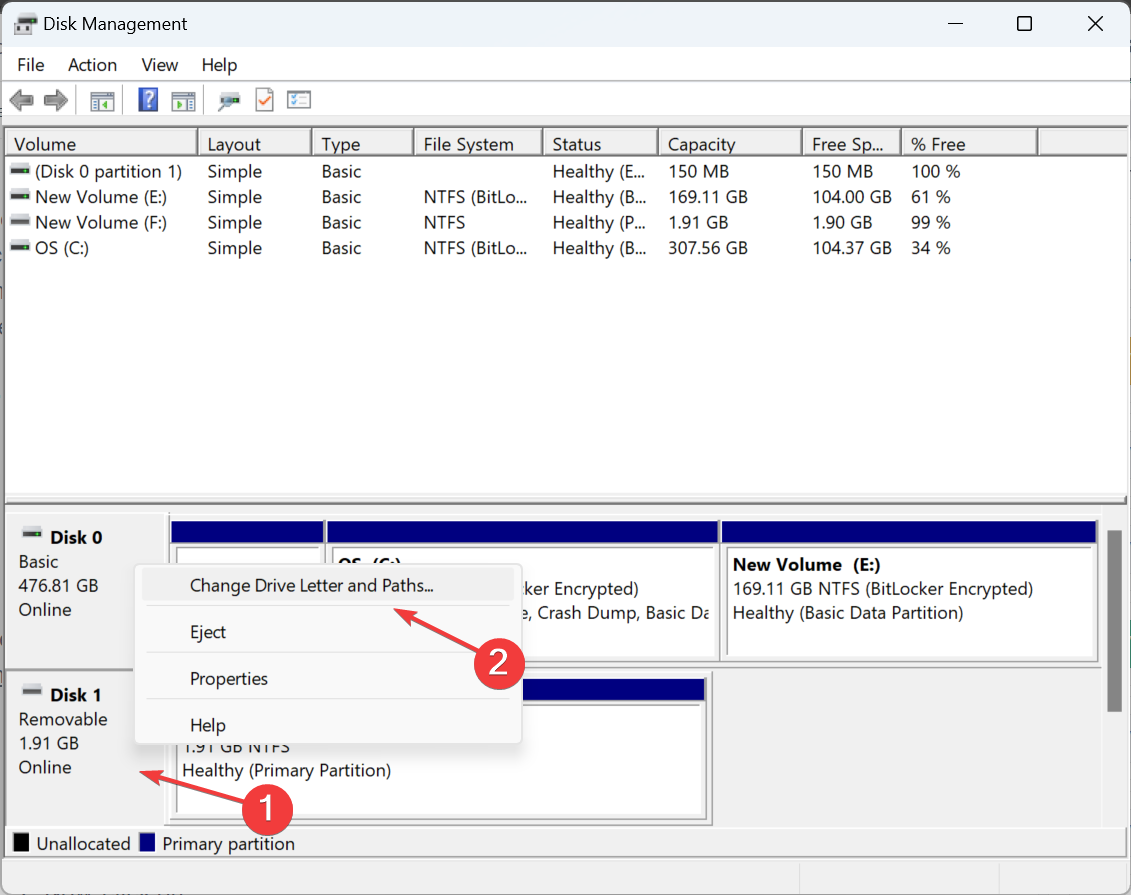
  1. Press Windows + S to open the Search menu, type Disk Management in the text field, and click on Create and format hard disk partitions.
  2. Now, right-click the affected drive and select Change Drive Letter and Paths.change drive letter to remove duplicate drives in windows 11
  3. Click the Change button.
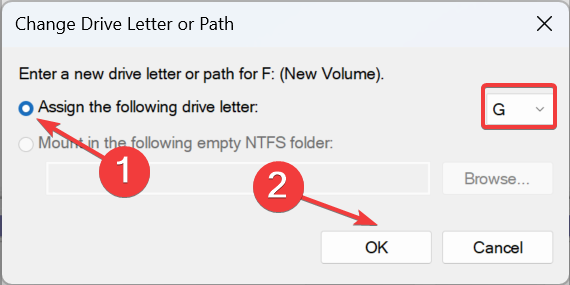
  4. Select the Assign the following drive letter option, choose one from the dropdown menu, and click OK to save the changes.assign drive letter
  5. Click Yes in the confirmation dialog box. 

3. Restore File Explorer defaults

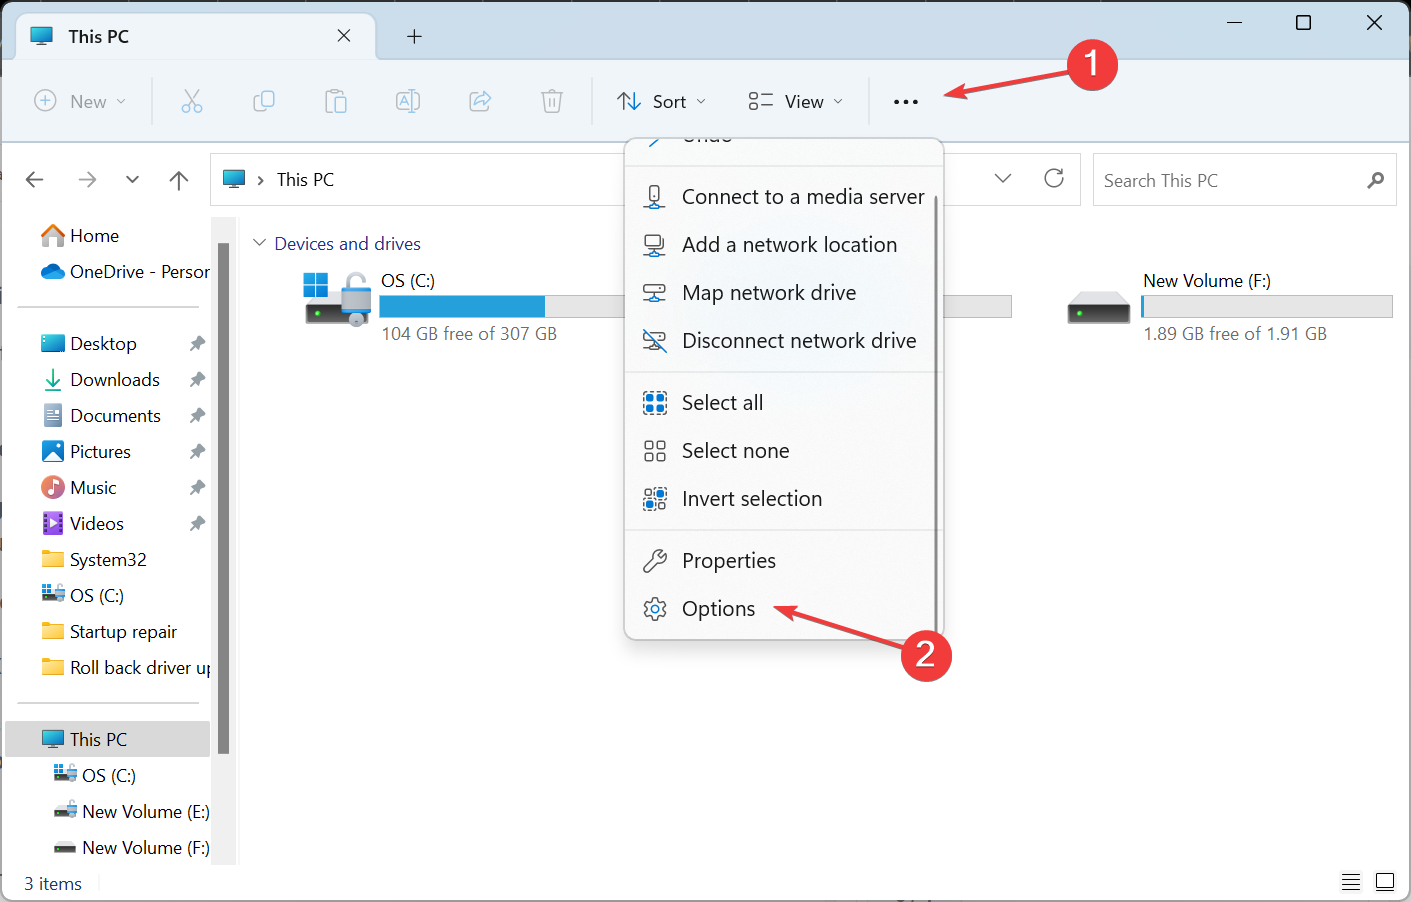
  1. Press Windows + E to open File Explorer, click the ellipsis near the top right, and select Options from the flyout menu.file explorer
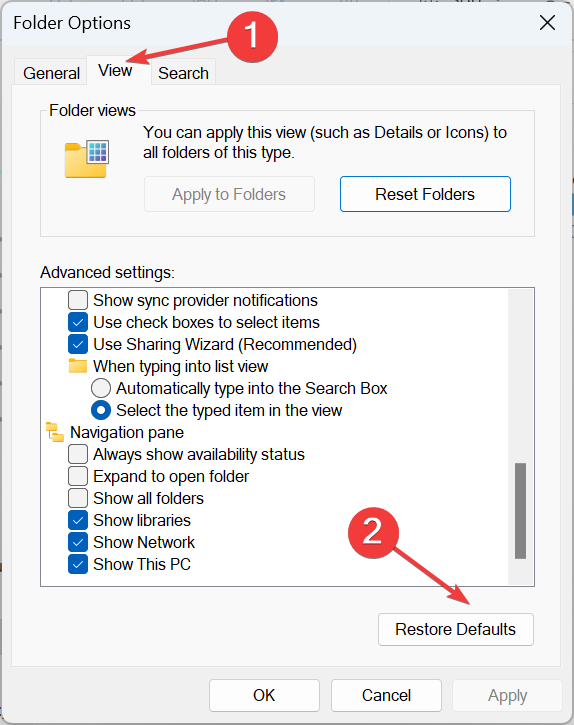
  2. Go to the View tab, and click the Restore Defaults button.restore defaults to to remove duplicate drives in windows 11
  3. Once done, the USB flash drive shouldn’t appear as a separate entry in File Explorer.

4. Customize the File Explorer’s navigation pane

  1. Press Windows + E to open the File Explorer.
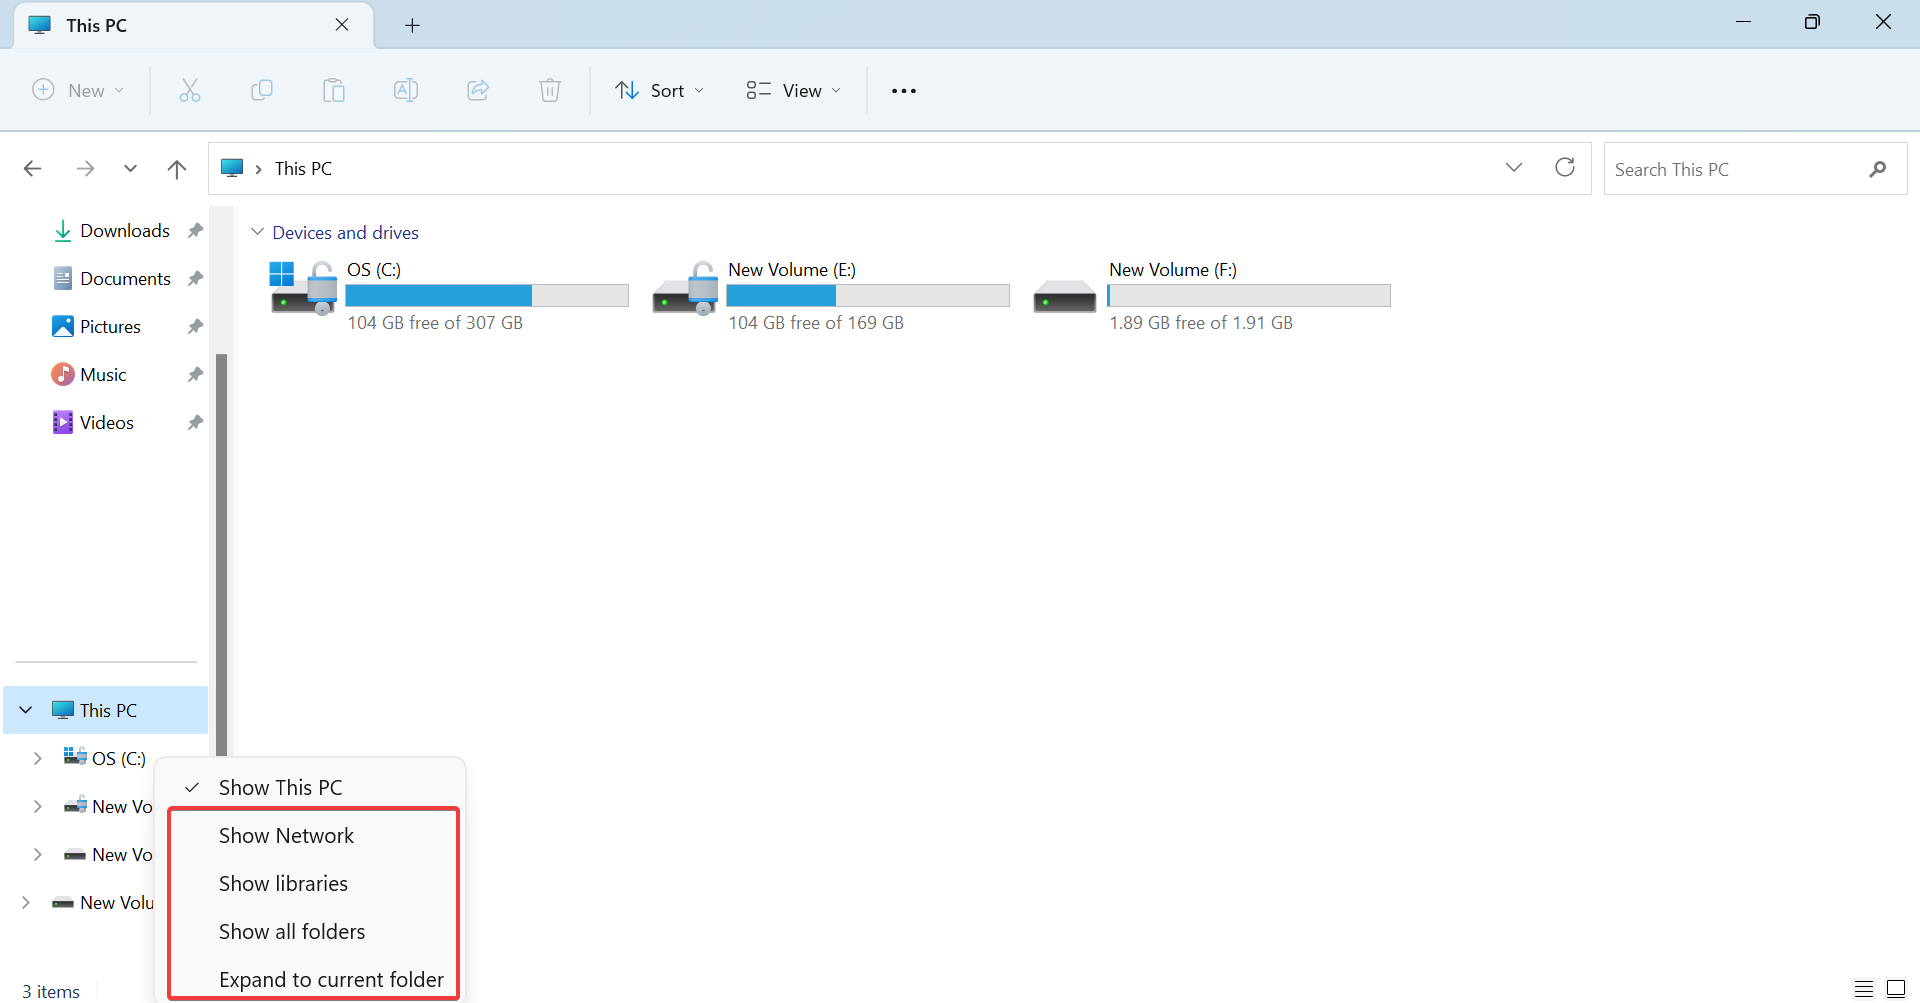
  2. Right-click in the navigation pane on the left, and uncheck all the entries except Show this PC. This includes Show Network, Show libraries, Show all folders, and Expand to current folder.change settings

Remember, this is a workaround to unclutter the left pane to some extent and make File Explorer run faster. It won’t have a direct bearing on duplicate drives unless you uncheck Show This PC, but then the internal drives won’t appear in the navigation pane.

You now know why your external drive shows up twice in Windows 11 and how to remove duplicate drives in no time! And while we were focused on drives until now, duplicate files, too, pose a major problem, and these end up consuming more storage space.

An understanding of data deduplication in Windows 11 will help you clear unnecessary files and clutter from the PC.

Besides, remember that it’s just as easy to delete duplicate files in Windows 10. There are both built-in features to find unwanted files and the option to use a third-party file finder tool.

For any queries or to share what worked for you, drop a comment below.

How to Enable or Disable TRIM on Windows 11

Using an SSD drive leaves you in constant fear of losing your data and being unable to recover it.  However, Windows allows you to achieve optimal performance by executing a TRIM command that writes only the necessary data without managing old data blocks.

For this to work, you need to ensure that your SSD supports TRIM and that it is enabled in your operating system.

How do I check if TRIM is enabled?

The TRIM feature is usually enabled by default in modern SSDs. But to make sure this checks out, you can run a command with administrative privileges.

Simply open an elevated Command Prompt, run the fsutil behavior query DisableDeleteNotify command, and your SSDs will be listed. 0 means it’s enabled and 1 disabled.

How do I turn on TRIM in Windows 11?

By using the Command Prompt

  1. Hit the Windows key, type cmd, and click Run as administrator.
  2. Type the following command and hit Enter: fsutil behavior set DisableDeleteNotify 0
  3. Restart your PC for the changes to take effect.

How do I disable TRIM in Windows 11?

While enabling TRIM can expand the lifetime of your SSD, sometimes older hardware tends to experience slow boot times because of this feature.

In such cases, it is best to disable TRIM. Reverse-engineer the above steps and replace the value data with 1. 

How do I improve my SSD performance in Windows 11?

  • Run Disk Cleanup frequently – If your SSD is slow, this tool can help you remove unnecessary files from your PC and free up space for excellent performance.
  • Check your disk for errors – It’s essential to check your hard drive for errors using a utility like CHKDSK to scan for bad sectors on your drive and fix them if necessary.
  • Disable hibernation – Hibernate is a power-saving feature, but it’s incompatible with most SSDs. Since it can slow them down considerably, it’s best to turn off hibernation.
  • Optimization software  – With the right SSD optimization tools, you can ensure your disk drive is always at peak performance.

Solid State Drives are extremely fast but not immune to the same issues as hard drives. Unfortunately, they have a finite number of reads and writes before they wear out. In fact, they can get much worse performance degradation over time if they aren’t maintained properly.

You can squeeze more life out of them by optimizing them using the above tips. As a rule of thumb, enabling TRIM is always a good idea, as it is an essential feature to ensure your SSD operates at its optimal speed and life expectancy.

After all, you want your SSD to last as long as possible before you’re forced to upgrade. Hopefully, these pointers helped to get TRIM working on your drive. And if you’re wondering how frequently you should perform TRIM, we have the answer.

If you have any additional questions, please feel free to ask in the comment section.

How to Remove Viruses Using Microsoft Safety Scanner

If Windows Defender isn’t working, or if you’re having trouble with your antivirus software, you can remove a virus with Microsoft Safety Scanner.

This tool is incredibly simple to use, and if you’re not familiar with it, today we’ll show you how to properly use it.

Can Microsoft Safety Scanner remove a virus?

Microsoft Safety Scanner is an on-demand virus scanner software and it can remove all types of malware.

While the software doesn’t offer real-time protection, it’s available for download from Microsoft’s website for free, and it’s a decent alternative to your regular antivirus.

How can I use Microsoft Safety Scanner to remove a virus?

How can I download Microsoft Safety Scanner?

  1. Visit the Microsoft Safety Scanner download page.
  2. Download the version that matches your architecture.
  3. Wait for the download process to finish.

To learn more about this software, we have a special Microsoft Safety Scanner review guide that has more useful information.

How can I use Microsoft Safety Scanner?

  1. Run the Microsoft Safety Scanner file that you downloaded.
  2. Accept the terms of service and click Next.
     
  3. Click Next again to proceed.
  4. After that, select the type of scan you want to perform and click Next.
  5. Wait for the scan to finish.

Use Microsoft Safety Scanner from the command line

  1. Press the Windows key + S and type cmd. Choose Run as administrator.
  2. Navigate to the location where Microsoft Safety Scanner is downloaded with the cd command. In our example, we used the following command: cd Downloads
     
  3. Run the following command to scan your PC: msert

To fully utilize the command line, you can use one of the following parameters:

msert /fPerform a full scan.
msert /qScan the PC for malware in the background without a visual interface
msert /f /qPerform a full scan without a visual interface
msert /f:yIt will scan your PC and automatically remove infected files.
msert /nScan in detect-only mode without removing any files
msert /hDetect high-level and severe threats

You can combine these parameters any way you want to achieve the desired results.

Microsoft Safety Scanner vs Defender

  • Windows Defender offers real-time protection against malware and it comes enabled by default.
  • It’s automatically updated via Windows Update.
  • Microsoft Safety Scanner doesn’t offer real-time protection and it can’t replace your antivirus software.
  • It’s not regularly updated and to get the latest updates you need to manually download the software again.
  • Microsoft Safety Scanner is portable and it can run on any PC, even from a flash drive.

While you can use Microsoft Safety Scanner to remove a virus from your PC, we advise you to rely on reliable antivirus software for Windows 11 for protection. If you’re on a budget, check how good Windows Defender is and stick to it.

Have you ever used this tool and what was your experience with it like? Let us know in the comments section.

How to Turn On or Off Enhance Pointer Precision on Windows 11

Pointer precision is vital in cases where you need higher accuracy and better cursor positioning. It’s enabled by default in Windows 11, but you may need to reconfigure Enhanced Pointer Precision for better performance.

For instance, you may not want Windows to readjust the pointer speed automatically but cover a fixed distance when making similar mouse movements.

What is Enhance Pointer Precision?

Enhanced pointer precision adjusts the distance moved by the cursor based on how quickly the mouse is moved. So, the faster the mouse movement, the more the distance covered. For those wondering what Windows Enhance Pointer Precision does, it changes the mouse sensitivity.

How do I turn on or off Enhance Pointer Precision in Windows 11?

1. Via Settings

  1. Press Windows + I to open the Settings apps, go to Bluetooth & devices from the left pane, and click on Mouse.mouse for enhance pointer precision windows 11
  2. Click on Additional mouse settings under Related settings.
  3. Go to the Pointer Options tab, tick (to enable) or untick (to disable) the checkbox for Enhance pointer precision, and click Apply and OK to save the changes.enable or disable

Wondering how to turn off Enhance Pointer Precision in Windows 11? The quickest way is via the additional mouse options/settings.

2. From Control Panel

  1. Press Windows + S to open the Search menu, type Control Panel in the search bar, and click the relevant result.
  2. Click on Hardware and Sound.hardware and sound
  3. Click Mouse under Devices and Printers.
  4. Under Motion in the Pointer Options tab, enable or disable the Enhance Pointer Precision feature, and then save the changes.enhance pointer precision in Windows 11

3. Using Registry

  1. Press Windows + R to open Run, type regedit in the text field, and hit Enter.regedit
  2. Click Yes in the UAC prompt.
  3. Go to the following path from the navigation pane or paste it into the address bar and hit Enter: HKEY_CURRENT_USER\Control Panel\Mousepath
  4. Now, double-click the MouseSpeed string on the right, enter 1 under Value data, then click OK to save the changes and enable Enhance Pointer Precision.mousespeed   
  5. Similarly, change the Value data for MouseThreshold1 to 6.mousethreshold1
  6. Also, for the MouseThreshold2 string, change the Value data to 10.
  7. To disable Enhance Pointer Precision in Windows 11, use the following values for the respective strings:
    • MouseSpeed: 0
    • MouseThreshold1: 0 
    • MouseThreshold2: 0

While you can enable or disable mouse acceleration or precision using the Registry, it should be used as a last resort or when Windows automatically reverts the mouse pointer settings. And it’s recommended that you create a restore point beforehand to prevent issues from arising.

Should Enhanced pointer precision be On or Off for gaming?

Based on feedback from avid gamers across genres, it can be said that disabling the feature, to a great extent, improves the gaming experience. Besides, it’s one of the key changes when we discuss the best mouse settings for gaming.

When you enable Enhance Pointer Precision in Windows 11, the OS will adjust the DPI (Dots per Inch) covered by the mouse cursor, and the movement won’t be uniform. 

As a result, the cursor will move farther in some cases and a smaller distance if the mouse is moved slowly. Subsequently, it would affect mouse consistency while gaming. That’s why many recommend you turn off Enhance Pointer Precision in Windows 11 when gaming.

Now that you understand the concept of the Enhance Pointer Precision feature and the changes it introduces, gaming should be relatively smoother, and you will have precise movements.

Besides, if you are bored with the current view, there’s always the option to personalize the Windows 11 cursor, say, change its theme, style, color, and whatnot!

For any queries or to share your experience with the Enhance Pointer Precision feature, drop a comment below.

4 Ways to Check the SSD Health on Windows 11

SSDs are quickly replacing HDDs thanks to their quick read, write, and access speeds, but even though they are more reliable, you still need to check SSD health in Windows 11.

Can I check SSD health? Of course, you can, and you should because SSDs have limited read/write cycles. The most popular SSD right now is an SLC NAND flash SSD, which can cope with around 50,000 to 100,000 write cycles.

Nevertheless, in this article, you will learn how to check the health of an SSD on Windows 11 and extend its life cycle.

How do I check the SSD health on Windows 11?

1. Using WMIC

  1. Press the Win + R key combination to start the Run console.
  2. Type wmic and press Enter or click OK.
  3. Now, type or paste the following command to check the SSD health status: diskdrive get status
  4. If you get the Status: OK message, your SSD drive is healthy. If you get the Status: Pred Fail message, then start backing up the data from the SSD because it has serious issues and is about to fail.

If your SSD is dead, we have a comprehensive guide on how to recover your SSD and get it to work.

2. Check the SSD drive health using Settings

  1. Click the Start button and select Settings.
  2. From the System tab, go to Storage.
  3. Now, scroll down on the right pane, select Advanced storage settings, and choose Disks & volumes from the menu.
  4. Click the Properties button on your SSD.
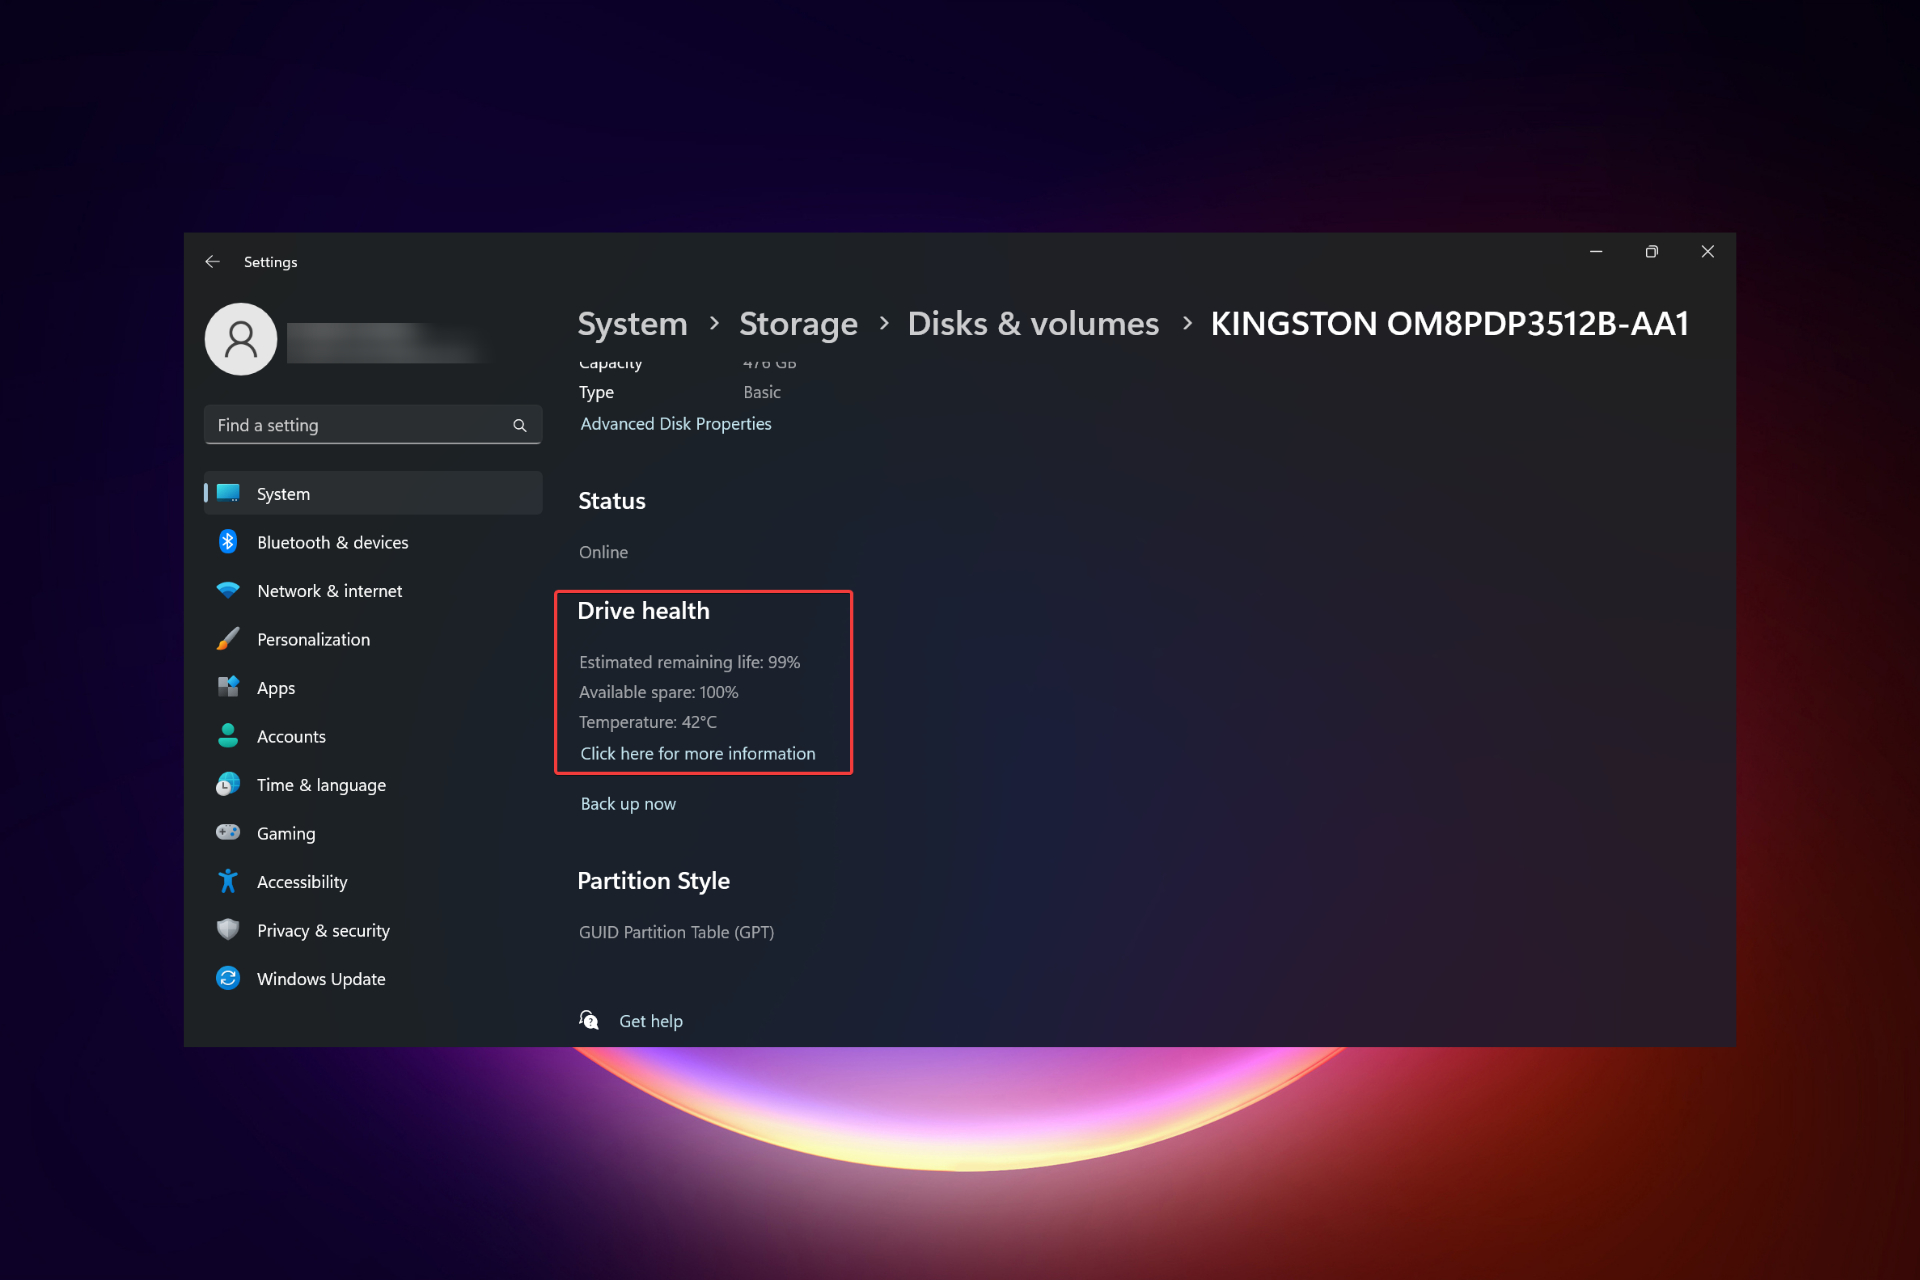
  5. If you scroll down, you will see the Drive health information with additional data on the estimated remaining life and temperature.
  6. In our example, the drive is healthy, but you might get a message saying Warning: reliability is degraded and/or a low estimated remaining life. This should indicate that you should start backing up the data from it and replacing it as soon as possible.

You have noticed that the information also includes the drive’s temperature but that is available only for drives that have a dedicated controller. So, if you don’t find that information, it’s not a problem.

However, if you do receive unusually high-temperature information (over 70-80 degrees), you should check if your PC is adequately cooled or test the drive in a different environment to monitor its behavior.

3. Check the SSD for errors

  1. Press the Win + E key combination to start File Explorer.
  2. Go to This PC, then right-click the SSD and select Properties.
  3. Now, go to the Tools tab and hit the Check button to check the SSD for errors.
  4. In the next pop-up window, you will see if the drive needs to be scanned for errors, but you will also have the option to scan it anyway, so you might as well do that.

4. Use dedicated health check software

As you can see, there are a few manual methods to check the SSD health in Windows 11, but they don’t provide much information.

You also have the option to use health check third-party apps or SSD-dedicated software like Samsung Magician that will provide more data and are easier to use.

Also, keep in mind that you can always easily recognize an SSD that is about to fail:

  • You start getting system failures and BSoD errors frequently.
  • The PC starts to crash inexplicably.
  • You can only read the data, and errors occur when you want to write on it.
  • Bad block errors are beginning to appear.
  • The writing process is starting to slow down.

How do I optimize my SSD for best performance?

You probably know an SSD can’t be defragmented like the old HDD. The analog process for SSDs is called trimming and is included in the drive’s optimization process.

By default, the system detects if your drive is an SSD and turns on the regular optimization, but you may also do that manually. Here’s how you do that:

  1. Click the Search bar on Windows 11, type optimization, and select Defragment and Optimize Drives from the results.
  2. Select your SSD from the list and click the Optimize button.
  3. You will notice that in our example, the Scheduled optimization is turned On. If that is Off on your computer, click on Change settings to its right to turn it On and set up its frequency.
  4. You may also choose the drives on which to perform the optimization.

The trimming removes the deleted pages and blocks, prolonging the SSD’s life and improving its performance. It also deletes unused data blocks, helping the drive controller delete invalid data pages and leading to better drive management.

What can I do to extend the SSD life?

  • Now that you know how to check the drive temperature, ensure your PC doesn’t overheat. SSDs don’t work well in extreme temperatures.
  • Avoid filling up the SSD to 100%. Monitor the storage capacity and delete old or unused programs or files if necessary.
  • Update the SSD’s firmware as often as possible to maintain its top performance.
  • You should enable the AHCI option in Windows. This will optimize the data communication between the drive and the motherboard.
  • Avoid physical damage to your PC. Although SSDs are more sturdy than HDDs, drops or sudden shocks can cause serious problems to all your components. This may affect its ability to sell as a second-hand SSD.

That’s it! We hope that our guide on how to check the SSD health on Windows 11 has offered you all the necessary information. If you have any other concerns on best practices for your SSD, we have an enlightening article on how often you should TRIM your SSD.

You might also be interested in checking our article on the best SSD management software to help you keep the drive in optimal condition.

Windows 11 Controller is Acting Like a Mouse? How to Stop it

If your controller acts like a mouse on your Windows 11 when you load a game, disrupting your gaming experience, this guide can help!

We will discuss some expert-tested solutions with step-by-step instructions right after explaining the probable causes of the same.

Why is my controller acting like a mouse?

  • Misconfigured controller settings on Steam.
  • Enabled as a mouse in Control Panel settings.
  • Software conflicts.
  • Outdated drivers.

How do I stop my controller from acting like a mouse on Windows 11?

Before moving the detailed troubleshooting steps, try these fixes to eliminate the problem:

  • Restart your computer and check for pending Windows updates.
  • Let the game load first, then plug in or connect your controller to avoid the mouse input issue.
  • Add the non-Steam game to the Steam Library.
  • Check if the game controller is properly calibrated.

1. Disable the Xbox configuration support option

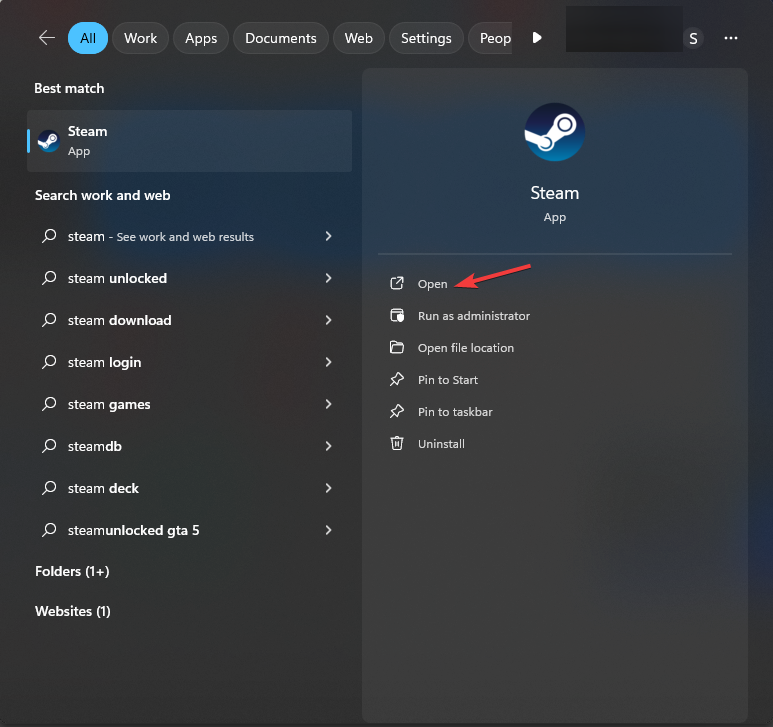
  1. Press the Windows key, type steam, and click Open.Open Steam - Sream settings  -  Windows 11 Controller is Acting Like a Mouse
  2. On the top left corner, click Steam and select Settings.Sream settings  -  Windows 11 Controller is Acting Like a Mouse
  3. Next, navigate to Controller on the Settings window.
  4. Go to General Controller Settings.Controller settings window
  5. Remove the checkmark next to the Xbox Configuration Support option and click the Back icon.Xbox Configuration Support
  6. Click OK to save the changes, then reboot your PC and check if the controller controls the mouse cursor.

This method works if you are using the controller to play non-Steam games. However, don’t forget to reverse-engineer these steps to enable the feature before playing a game from Steam Library.

2. Deactivate the Enable the Steam Overlay while in-game option

  1. Press the Windows key, type steam, and click Open.Open Steam - Windows 11 Controller is Acting Like a Mouse
  2. On the top left corner, click the Steam app Menu and select Settings.Sream settings - Windows 11 Controller is Acting Like a Mouse
  3. Locate In-Game from the left pane on the Settings window. Enable the Steam Overlay while in-game.
  4. Toggle off the switch next to the Enable the Steam Overlay while in-game option.
  5. Restart the Steam app to let the changes take effect.

However, if you want to disable it for a single game, follow these steps:

  1. Launch the Steam client, click Library, and locate the game from the home screen.
  2. Right-click it and select Properties.
  3. On the Properties window, go to the General tab and turn off the toggle switch next to the Enable the Steam Overlay while in-game option.steamwebhelper_steam overlay disable - Windows 11 Controller is Acting Like a Mouse
  4. Restart Steam to save the changes.

3. Disable it as a mouse from the Control Panel

  1. Press the Windows key, type control panel, and click Open.Control Panel start menu -Windows 11 Controller is Acting Like a Mouse
  2. Select Category as View by and click Hardware and Sound.Hardware and Sound
  3. Under the Devices and Printers option, click Mouse.Devices and Printers - Mouse
  4. On the Mouse Properties window, select the mouse related to the controller. Generally, it appears by the name AlphaMouse; select it and click Properties.Select mouse and click Properties
  5.  On the following window, go to the Driver tab and click the Disable device button.Disable device
  6. Click OK on both windows to save changes & deactivate the mouse emulation.

You can also use the same steps to disable the controller as a keyboard if it is acting like one. All you need to do is click the Keyboard link under the Devices and Printers option, choose the keyboard, and Disable it.

4. Choose the Disable Steam Input option

  1. Press the Windows key, type steam, and click Open.Open Steam - Windows 11 Controller is Acting Like a Mouse
  2. Go to Library, locate, and right-click the game to select Properties.Select game properties
  3. On the Properties window, click the Controller tab.
  4. Select the Disable Steam Input option from the drop-down to turn off mouse emulation.Disable steam as input

Turning the Steam input on or off can also help you fix other controller issues, like the controller not working on your PC.

5. Modify the Desktop Configuration settings

  1. Launch the Steam client, then from the top left corner, click Steam and select Settings.Sream settings - Windows 11 Controller is Acting Like a Mouse
  2. Next, navigate to Controller on the Steam Settings window.
  3. Click the Desktop Configuration button.Click the Desktop Configuration button.
  4. If you see the same image as below, then the Joystick Mouse is enabled; change it to None and close Steam. Now check if the controller moves the mouse pointer.Joystick Mouse is enabled

Always keep your Steam application updated and establish the controller connection properly, especially when using a wired one.

In case you are facing other Xbox controller issues, you can try using controller software for Windows; read this guide to know more about it.

If you have any questions or suggestions on the subject, feel free to mention them in the comments section below.

Fix: Failed to Transfer Logged Messages to Event Log

The Failed to transfer logged messages to the event log with status 50 Chkdsk error is closely linked to a critical issue with the PC. And more often than not, users are unable to boot the PC. Whenever they turn it on, the OS crashes, sometimes with a blue screen, and triggers Automatic Repair.

The problem has been prevalent across iterations, be it Windows 11, Windows 10, Windows 7, or Windows Vista, with no single solution working for all. It’s all about identifying and eliminating the underlying cause in your case!

Why am I getting Failed to transfer logged messages to the event log error on Windows 11?

  • The hard drive is configured for Read-only mode
  • Corrupted system files
  • Problems with the OS installation
  • A recent Windows update broke things
  • Bad sectors or physical damage to the hard drive

How do I fix Failed to transfer logged messages to the event log with status 50 error?

Tip icon Tip
Since the error is closely linked to the hard drive, we recommend transferring any data on it to another PC or disk drive in order to avoid data loss. Or you could use an effective data backup solution.

Before we head to the slightly complex solutions, try these quick ones first:

  • Disconnect all non-critical peripherals, especially any added recently, and then boot Windows.
  • Check for any physical damage to the external drive.
  • Clear the event log and run the CheckDisk command again.
  • Reset the BIOS. Since the interface is different for each, we recommend you check the manufacturer’s official website for exact steps.
  • If it’s an external disk, connect it to another PC and verify whether the data is accessible. In case not, you might have a dead disk.

If none work, move to the fixes listed next.

Note icon NOTE
If you can’t sign into the user account, boot the OS into Safe Mode or the Advanced options presented on the Automatic Repair screen. We will be using the latter since most users are unable to access the system components.

1. Repair the bad sectors

  1. Click Advanced options on the Automatic Repair screen.
  2. Click on Troubleshoot.troubleshoot to fix failed to transfer logged messages to the event log with status 50
  3. Again, choose Advanced options.
  4. Select Command Prompt from the entries listed here. 
  5. Type or paste the following Chkdsk command and hit Enter: CHKDSK /R /F /Xcheck disk
  6. Run the command a few times, if required, until the error message disappears.

When disk errors arise due to bad sectors, your primary approach should be to run the Chkdsk utility. It will eliminate these or prevent data storage on one. And subsequently, the Failed to transfer logged messages to the event log with status 50 error will go away!

2. Disable write protection

  1. Launch Command Prompt from Windows RE.
  2. Paste the following command and hit Enter to launch the Diskpart utility: diskpart
  3. Run this command to view the available disks and check the number assigned to each: list disklist disk
  4. Execute the following command while replacing X with the number assigned to the system drive: select disk Xclear attributes
  5. Finally, run this command to clear the Read-only disk attribute: attributes disk clear readonly

3. Repair the corrupt files

  1. Open an elevated Command Prompt from the Windows Recovery Environment.command prompt
  2. Paste the following DISM commands individually and hit Enter after each: DISM /Online /Cleanup-Image /CheckHealth DISM /Online /Cleanup-Image /ScanHealth DISM /Online /Cleanup-Image /RestoreHealth
  3. Once done, execute this command for the SFC scan: sfc /scannowsfc scan to fix failed to transfer logged messages to the event log with status 50
  4. Finally, restart the PC and check if you can get past the blue screen errors and boot Windows normally. 

Furthermore, if you’re unsure about repairing your system files manually and also want to prevent other errors from occurring, we suggest you use specialized repair software that can easily replace malfunctioning files with healthy versions.

4. Uninstall recent Windows updates

  1. Boot into Windows RE and select Uninstall Updates under Advanced Options.uninstall updates to fix failed to transfer logged messages to the event log with status 50
  2. Depending on the last update type, choose Uninstall latest quality update or Uninstall latest feature update.update type
  3. Now, confirm the uninstall and follow the on-screen instructions to complete the process.confirm

For those wondering how to fix Failed to transfer logged messages to the event log with status 6 or status 50, uninstalling Windows updates will do the trick if a recent version introduced any inconsistencies. To verify, check if the problem is widespread and others, too, are facing it. 

5. Run Windows Memory Diagnostics

  1. Open up the Command Prompt, either in Windows RE or the regular OS interface.
  2. Now, paste the following command and hit Enter: MdSched.exeMdSched.exe to fix failed to transfer logged messages to the event log with status 50
  3. Click on Restart now and check for problems (recommended), and wait for the process to complete.windows memory diagnostics

In case the issue persists, we recommend you use a hardware diagnostics tool for comprehensive testing and fixing of problems.

6. Reset the PC

  1. Click Advanced options on the Automatic repair screen.
  2. Click on Troubleshoot.
  3. Now, click on Reset this PC.reset this pc
  4. Select whether to keep the files (first option) or remove everything (second option).keep or remove files
  5. Click on Local reinstall when asked how you would want the OS installation to proceed.
  6. Wait for the process to complete.resetting

When faced with Failed to transfer logged messages to the event log with status 50, and the hardware and software troubleshooting doesn’t work, you should reset Windows to get things up and running! 

7. Reinstall Windows 11 

If the reset, too, failed with an error, the last option is to reinstall Windows 11. Remember to get the Windows 11 ISO or installation media from Microsoft’s official website.

Simply create a bootable USB installation disk, change the boot disk order in the BIOS, select the USB device as the primary option, and then boot the PC through it and follow the on-screen instructions to clean install Windows 11.

When you get the Failed to transfer logged messages to the event log with status 50 error, start by fixing the bad sectors and corrupted files with a Disk Check or the System File Checker scan. As a last resort, reinstall Windows 11. One of these is bound to work!

Once done, find out the best Windows event log practices to prevent such errors from reappearing.

To share any queries or the solution that worked for you, drop a comment below.

How to Unlock a Microsoft Find My Device Locked Computer

Find My Device feature is useful, especially if you want to protect your laptop from theft, but how can you unlock your device after using the Microsoft Find My Device feature?

This can be a problem since you’ll be stuck on the lock screen, however, there are a couple of solutions that you can try.

How does Find My Device work on Windows 11?

This feature allows you to remotely track your device if it’s stolen. In addition to tracking, you can remotely lock your PC to protect your data.

When you lock your PC, the tracking features will be enabled, all users will be signed out and local users won’t be able to log in. Only authorized users and administrators with appropriate permissions will be able to access the locked device.

How do I unlock a device that was locked by Find My Device?

1. Make sure your PC is connected to the Internet and use the password

  1. Ensure that you have a stable Internet connection.
  2. Use Windows Hello to unlock it, if you have it enabled.
  3. If not, click on Sign-in options.
  4. Select the password option and enter your password. Alternatively, you can use your PIN.

2. Change your Microsoft password

  1. On a working PC, go to the Microsoft account page.
  2. Click on Change password.
     
  3. Enter your current password as well as the new password.
  4. Use the same account information to sign in to the locked computer.

Keep in mind that this method works only if you use the same Microsoft account on both devices.

3. Use password removal software

  1. Download a reliable password recovery tool.
  2. Create a bootable media.
  3. Boot your locked PC from the bootable media and follow the instructions on the screen to remove the password.

To complete this step, you might have to convert your Microsoft account to a local account.

4. Reset Windows 11

  1. Optional: Create a bootable Windows 11 drive. You can also create a bootable Windows 11 drive on Android.
  2. If you have bootable media ready, connect it to your PC.
  3. Restart your PC several times to access the Recovery Mode.
  4. Navigate to Troubleshoot and choose Reset this PC.
  5. Choose Keep my files.
    Keep my files
  6. If you have a USB drive ready, choose Local reinstall. If not, select Cloud download.
  7. Follow the instructions on the screen to complete the process.

For more information on how to do this, we suggest reading our guide on how to factory reset Windows 11 without logging in.

Additional security measures for unlocked devices

1. Enabling Device Encryption

  1. Open the Settings app. Navigate to Privacy & security and select Device encryption.
  2. Turn on Device encryption.
  3. Do not turn off your PC and wait for the process to finish.

2. BitLocker Drive Encryption or Device Encryption

Both methods offer the same type of encryption so they are just as safe. However, there are a few differences:

  • Drive Encryption is enabled by default on compatible devices that have TPM and a Microsoft Account to store your keys online.
  • Unlike BitLocker, this feature is available on all versions of Windows, including Windows Home edition.
  • It encrypts your entire drive and you can’t choose which drive you want to encrypt.
  • BitLocker offers advanced configuration, the ability to choose individual drives to encrypt, and it allows you to store recovery keys in different locations, including locally.
  • BitLocker can also work without TPM.

While both methods offer the same protection, Drive Encryption is better for less experienced users while BitLocker is a better option for users that want more configuration.

3. MEID/serial number for fully-managed devices

This offers the highest level of protection since your device is managed entirely by your administrator, but this feature is available only to corporate users.

As you can see, it’s not always easy to unlock a PC when it’s locked with Microsoft Find My Device. In most cases, you need to use an administrator account.

While this is a great feature that can help you retrieve your laptop, you should be careful not to lock yourself out. Speaking of which, we have a great guide on how to lock Windows 11, so don’t miss it for more information.

Did you manage to unlock your PC after locking it with this feature? Let us what method worked for you.

YouTube introduces 5 cutting-edge creator tools, including an AI video generator and app

YouTube recently announced a series of innovative AI tools aimed at revolutionizing content creation on its platform.

Among the five features showcased, one named “Dream Screen” caught the attention of users and creators alike. The feature enables users to incorporate AI-generated images or videos as backgrounds for their YouTube Shorts.

In a demo, YouTube displayed how Dream Screen works. Users can type in a prompt specifying their desired video or image as the background within the Short-creating UI. For instance, a user typed in “Panda drinking coffee,” and the platform instantaneously generated a plethora of captivating videos portraying this scene.

These generated videos can then be effortlessly combined and overlaid with other clips, giving creators the freedom to imagine and craft unique content.

The platform will also introduce the “AI insights” feature next year. Drawing insights from what the audience is already watching, the AI suggestions provided by this feature allow creators to gain valuable inspiration and improve the effectiveness of their videos.

The innovative tool acts as an in-depth guide, empowering creators to understand their audience’s preferences better and tailor their content accordingly.

Another feature, “Assistive Search in Creator Music,” available next year, utilizes AI to reduce the time wasted on scrolling through countless music options to find the perfect soundtrack for a video. By leveraging the power of AI, creators can swiftly discover the ideal background score that complements their visuals, ensuring a seamless and engaging viewing experience.

Not stopping there, YouTube aims to bridge language barriers and expand the reach of creators with an automatic dubbing tool. With this tool, viewers can toggle between the original language and AI-generated dubbing in their native language, making content more accessible and interactive for global audiences.

The platform also unveiled “YouTube Create,” a user-friendly editing app designed specifically for mobile devices. This intuitive application allows creators to effortlessly edit their YouTube content using creative options, including text, stickers, sound, captions, and voiceover capabilities. With the app, creators can now edit their videos seamlessly on the go, allowing for quick and efficient content creation.

Windows 11 expands language support for ‘Ink Anywhere’ feature

Microsoft is progressing with the Ink Anywhere feature in Windows 11 and is expanding language support for it. Ink Anywhere is a Windows 11 feature that converts handwriting to typed text in any text field.

Chinese Simplified, German, Spanish, French, Italian, Japanese, Korean, Portuguese, and other dialects of English will soon be supported in addition to the existing en-US support. Expanding language support is always a positive step, making technology more accessible worldwide to a broader range of users.

According to the tweet, Windows 11 Dev build 23550 appears to include partial support for additional languages for Voice access, such as Spanish, French, and Japanese. However, the fact that the user interface translations appear incomplete suggests that this feature might still be in the testing or development phase.

Additionally, there are further indications of additional languages that haven’t been officially listed, as observed on GitHub.

Either way, we are particularly interested in the potential of Ink Anywhere to be used with Copilot. This would allow users to interact with Copilot in a more natural way, using handwriting to input their instructions and requests.

via MSPowerUser

How to Show The Folder Size on Windows 11?

Windows 11 doesn’t show folder size in File Explorer by default, however, you can make certain changes in the Explorer settings to make them visible.

In this guide, we will discuss some of the easiest ways to show the size of folders so that you can manage disk space efficiently on your PC.

How do I view a folder’s size on Windows 11?

1. Using the Properties window of a folder

  1. Press Windows + E to open Windows File Explorer.
  2. Go to the folder of which you want to check the size, right-click it, and select Properties from the context menu.Properties on context menu
  3. On the folder properties window, go to the General tab and locate the Size section to know the space taken by the folder.Size  - Show The Folder Size on Windows 11?

2. Enable the Item check boxes or Details option

  1. Press Windows + E to open Windows File Explorer.
  2. From the top menu bar, click the drop-down next to View.
  3. Next, click Show and select Item check boxes.Show and select Item check boxes -Show The Folder Size on Windows 11
  4. Now, to check the size of the folder, select the folder and the size will be displayed on the bottom left side of the window.

3. Enable the Display file size information in folder tips option

  1. Press Windows + E to open Windows File Explorer.
  2. Click the three-dots icon and select Options.Options window  Show The Folder Size on Windows 11
  3. On the Folder Options window, go to the View tab, select the Display file size information in folder tips option, and click Apply, then OK.isplay file size information in folder tips, and click Apply, then OK.

4. Using the Command Prompt

  1. Press the Windows key, type cmd, and click Run as administrator.CMD elevated -Show The Folder Size on Windows 11
  2. To determine the size of a directory, replace folder-path with the path of the folder, type the following command, and press Enter: cd folder-path
  3. Copy & paste the following command to get the details of the folder and hit Enter: dir/scmd_ folder size
  4. If the folder has subfolders, all will be scanned, and you will get the size of the entire folder in bytes.

5. Using the Windows PowerShell

  1. Press the Windows key, type powershell, and click Run as administrator.Powershell Show The Folder Size on Windows 11Show The Folder Size on Windows 11
  2. Copy & paste the following command after replacing the C:\YourFolderPath with the folder path and hit Enter: Get-ChildItem -Path "C:\YourFolderPath" -Recurse | Measure-Object -Property Length -Sumpowershell_
  3. PowerShell will display the size of the entire folder.

6. Using the Windows Settings app

  1. Press Windows + I to open the Settings app.
  2. Go to System, then click Storage.System storage
  3. Click the Show more categories hyperlink.
  4. Now locate and click Other; every folder on the system drive will be listed there, and you can check the details, including the folder size.click  Other -  Show The Folder Size on Windows 11

This method only works for the system drive, so if you want to check a folder size located in some other drive, use the other methods listed.

How do I see the total size of multiple folders?

To see the total size of multiple folders, select them, right-click, and select the Properties option from the context menu. On the Properties window, you can see the combined size of the selected folders.

Alternatively, you can also select the Details option under View, and it will display all the details under the Date, Type, Tags, and Size columns for every single folder.

How do I change folder display in Windows 11’s File Explorer?

  1. Press Windows + E to open File Explorer, select a folder, click View>choose any layout option: Extra large icons, Large icons, Medium icons, Small icons, List, Details, Tiles, & Content.
  2. You can also click Sort by or Group by to sort the files & folders on the basis of name, Size or Date modified, Date created, etc.
  3. To know the file extensions, you can click View>Show>File name extensions.

Tips for Managing Your Disk Space and Folders in Windows 11

  • Use Disk Cleanup or Storage Sense to clean up the Windows Update folder whenever you update or upgrade Windows.
  • Change the default location for saving new files and folders.
  • Remove unwanted apps and their folders.
  • Delete content from Recycle Bin every week.
  • Find & move large files or folders to another drive, cloud storage, or external source.
  • Remove unnecessary images, files, folders, and videos
  • Compress large files and folders into RAR or ZIP to reduce space.
  • To avoid wrong folder/file size calculation, ensure the file title is limited to 255 characters.

Knowing a file or folder is essential for managing disk space on your computer efficiently, which, in turn, is useful for the smooth functioning of your PC.

If you can’t see the size of the folder even after using the above methods, chances are your Windows is outdated, or the File Explorer is corrupt; read this guide to know the detailed solutions to fix it.

Before you go, don’t miss our guide on how to sort files by size in Windows 11, since it might come in handy to you.

Do you know any other method to check the folder size? Don’t hesitate to mention it in the comments section below. We will add it to the list.

Fix: No Internet in Windows 11 Safe Mode With Networking 

Encountering no internet connectivity on your Windows 11 computer while in Safe mode with networking can be frustrating, especially when you are diagnosing & troubleshooting system issues.

In this guide, we will talk about the potential causes of the problem and list the effective solutions to ensure you get internet access when in safe mode.

Why is there no internet in Safe Mode with networking?

  • The network adapter is not compatible or properly loaded.
  • Third-party firewall, security software, or antivirus may interfere with network connectivity in safe mode.
  • Network services are not running.
  • Malware infection.

What can I do if the internet is not working on Windows 11’s Safe Mode with networking?

Before engaging in advanced troubleshooting steps, you should consider performing the following checks:

  • Make sure you sign in using an account with admin privileges.
  • Restart your computer and ensure there are no pending Windows updates.
  • Disable third-party security software temporarily.
  • Check the ethernet cables, and other connections to ensure they are securely plugged in.
  • Verify the internet works fine without any issues in normal mode.

1. Use Advanced startup to enter safe mode

  1. Press Windows + I to open the Settings app.
  2. Go to System, then click Recovery.System - Recovery Windows 11 - No Internet in Windows 11 Safe Mode With Networking
  3. Next, locate Advanced startup, and click Restart.Recovery Advanced Startup
  4. Your computer will restart, and you will get Choose an option screen, select Troubleshoot.Choose an option - Troubleshoot
  5. Next, choose Advanced options from the Troubleshoot page.Advanced options
  6. On the Advanced options screen, click Startup Settings.Startup Settings - No Internet in Windows 11 Safe Mode With Networking
  7. Your computer will restart and show you a list of Startup Settings options, and press the number or the function key mentioned for Enable Safe Mode with Networking.Enable safe mode with networking

If you can’t get your internet connection to work in safe mode, then use the System Configuration window to restart your computer in normal mode and follow the steps mentioned below.

2. Verify if the Internet Protocol Version 4 (TCP/IPv4) option is selected

  1. Press Windows + R to open the Run window.NCPA run command 1 - No Internet in Windows 11 Safe Mode With Networking
  2. Type ncpa.cpl and click OK to open the Network Connections.
  3. Right-click the ethernet connection and choose Properties.Network Properties
  4. Under The connection uses the following items heading, scroll, and check if the Internet Protocol Version 4 (TCP/IPv4) option is selected.Internet Protocol Version 4 (TCP/IPv4)
  5. If not, then select it and click OK.

3. Run the Network troubleshooter

  1. Press Windows + I to open the Settings app.
  2. Go to System, then select Troubleshoot.System troubleshoot  -  No Internet in Windows 11 Safe Mode With Networking
  3. Click Other troubleshooters.Other Troubleshooters
  4. Locate the Network Adapter option and click Run to launch the troubleshooter. Follow the on-screen prompts to complete the process.Network Adapter Run

The network troubleshooter can be pretty helpful in fixing connection issues, especially after a Windows update.

4. Start the WLAN Auto Config Service

  1. Press Windows + R to open the Run dialog box.Services RUn command - No Internet in Windows 11 Safe Mode With Networking
  2. Type services.msc and click OK to open Services.
  3. Locate and right-click WLAN Auto Config and select Start.WLAN Auto Config and select Start -  No Internet in Windows 11 Safe Mode With Networking
  4. If the Start option is grayed out, click Restart.Restart WLAN
  5. Wait for the service to start again, then close the Services window.

5. Re-enable the network adapter

  1. Press Windows + R to open the Run window.Device Manager Run command -No Internet in Windows 11 Safe Mode With Networking
  2. Type devmgmt.msc and click OK to open the Device Manager window.
  3. Locate the Network adapter and click to expand it. Right-click the network driver, and select Enable device. You will get the Enable device option only if the network adapter is disabled.Enable device
  4. If you see the Disable device option, click it, then select Yes on the following prompt to confirm the change.Disable device
  5. Now, right-click the driver and select Enable device to re-enable.

6. Update/Reinstall your network driver

  1. Press Windows + R to open the Run window.Device Manager Run command -No Internet in Windows 11 Safe Mode With Networking
  2. Type devmgmt.msc and click OK to open the Device Manager window.
  3. Locate the Network adapter and click to expand it. Right-click the network driver, and select Update driver.Update Network driver -
  4. Click Search automatically for drivers and follow the on-screen instructions.
  5. If no update is found, right-click the driver again and select Uninstall driver.Uninstall Network driver'
  6. Next, go to Action, then select Scan for hardware changes to reinstall the driver.Action scan for hardware changes

Keeping the network drivers up to date can help you prevent other network connectivity issues like Windows can’t find a Wi-Fi network.

7. Reset TCP/IP stack

  1. Press the Windows key, type cmd, and click Run as administrator.CMD elevated -  No Internet in Windows 11 Safe Mode With Networking
  2. Copy & paste the following command to reset your network connection and hit Enter: netsh int ip resetcmd_netsh int ip reset
  3. Once executed, restart your computer.

To successfully use the internet in safe mode, ensure you have a stable internet connection in normal mode via ethernet cable.

Once the task is done, don’t forget to revert to normal mode to enjoy the full functionality of the operating system.

In case you are facing another internet connection issue on your Windows computer, read this guide to find quick solutions.

If you have any questions or suggestions about the methods mentioned, feel free to mention them in the comments section below.

Bing Chat won’t save the conversation if the information is private

If you’ll ever have conversations with Bing Chat where the information that you shared with the AI tool is sensitive, or private, Bing Chat won’t save it, apparently. As spotted by Windows enthusiast, @Leopeva64, Bing Chat will release a prompt telling users that it will not save the conversation previously had with it.

Let’s not save this conversation. The answer to your question may contain info that’s not public. To protect your privacy, we’re not saving it. Chat history so far has been saved.

Bing Chat prompt

The tool will give you the option to agree, by allowing you to click on a Got it button.

So what does it mean? Well, private information is information protected by law, which can become a criminal act if it is shared. This is everything from your personal information, such as ID credentials, to passwords, and card information.

It makes sense that Bing wouldn’t save such data, as it can be quite risky if your device were to be hacked. But it’s a bit surprising: it can recognize your personal data.

Not saving it, yes, that the right thing to do, however recognizing it, means that Microsoft could potentially have an insight into information that should remain private.

What do you make of this? Let us know in the comments section below.

Fix: System has a Driver Locked to Manufacturer Specifications

The graphics driver is one of the most important on the PC, directly affecting the performance and gaming experience. But when updating the driver through the setup, many got the Your system has a driver that is locked to manufacturer specifications error.

The problem arises because the manufacturer limits updates unless one is specifically pushed from their end. This ensures stability but can be a problem for many. So, let’s find out how you can fix things in no time! 

How do I fix Your system has a driver that is locked to manufacturer specification on Windows 11?

Before we move to the slightly complex solutions, try these quick ones first:

  • Make sure your PC and OS meet the system requirements for the driver.
  • Boot the PC into Safe Mode, and then update the driver.
  • Verify that you have downloaded the correct display driver, or get another copy from Intel’s official website.
  • Use generic graphics drivers.
  • Check if a driver update is available on the PC manufacturer’s webpage and install it instead of one from the Intel website. It also works against the DRIVER RETURNED HOLDING CANCEL LOCK error.

If none work, head to the fixes listed next.

1. Uninstall the current driver

  1. Disconnect the Internet connection. In case it’s Ethernet, remove the cable, and for Wi-Fi, disable the network adapter.
  2. Press Windows + R to open Run, type devmgmt.msc in the text field, and hit Enter.device manager
  3. Expand the Display adapters entry, right-click on the affected graphics adapter, and select Uninstall device.uninstall device to fix your system has a driver that is locked to manufacturer specifications
  4. Tick the checkbox for Attempt to remove the driver for this device, and click Uninstall.uninstall driver
  5. You will notice the screen flash and the resolution reducing a bit. Now, run the driver setup you downloaded earlier and proceed with the installation.

In case the driver installer still shows the Your system has a driver that is locked to manufacturer specifications error in Windows 11, execute the same steps, but this time, restart the computer before the final driver installation.

2. Switch to Microsoft Basic Display Adapter 

  1. Press Windows + X to open the Power User menu, and select Device Manager from the list of options.
  2. Double-click the Display adapters entry, right-click the affected adapter, and select Update driver.update driver
  3. Click on Browse my computer for drivers.browse computer
  4. Then, click Let me pick from a list of available drivers on my computer.
  5. Select Microsoft Basic Display Adapter from the list, click Next, and wait for the installation to complete.microsoft basic display adapter to fix your system has a driver that is locked to manufacturer specifications
  6. Finally, run the downloaded setup to install the latest 11th Generation or another driver version.

3. Use a third-party tool

If manually removing the driver before running the setup seems tricky, you can rely on third-party software.

The tool may be flagged as PUP (Potentially Unwanted Program) or malware, but it’s safe to use as long as you get it from a reliable source.

4. Run the setup with administrative privileges

  1. Locate the setup, right-click on it, and select Properties.
  2. Go to the Compatibility tab, tick the checkbox for Run this program as an administrator, and click OK to save the changes.run as administrator
  3. Finally, run the setup and check if the installation goes through.

5. Get the latest drivers through Windows Update

  1. Press Windows + I to open Settings, go to Windows Update from the navigation pane, and click on Advanced options.advanced options
  2. Click on Optional updates.
  3. Expand Driver updates, tick the checkbox for the Intel Graphics Driver, and click Download & install.update to fix your system has a driver that is locked to manufacturer specifications

If nothing worked, try looking for the latest Intel driver version in the Windows update. Microsoft allows hardware vendors to release updates through the official channel, and this way, you don’t run into any error messages and eliminate conflicts.

After fixing the Your system has a driver that is locked to manufacturer specifications error, a few reported the This driver has been blocked from loading message, but it can be easily fixed by disabling driver signature enforcement. 

Remember, it’s recommended that you run the latest drivers, and any errors encountered alongside can be fixed in no time! 

For any queries or to share what worked for you, drop a comment below.

Change Notepad Font, Style, and Size on Windows 11

Many users want to change the font in Notepad on Windows 11 because the default font is too small for them, or hard to read.

Changing the font is pretty simple and fast, and in this guide, we’ll show you how to customize Notepad and change your font as you wish.

What font does Windows 11 Notepad use by default?

As for the default font options, the Notepad uses Consolas font, and the default font size is set at 11 pixels.

How do I change Notepad font size and style in Windows 11?

Use the Edit menu in Notepad

  1. Click the Search button and type notepad. Select Notepad from the list of results.
  2. In Notepad, click the Edit menu and choose Font.
  3. You should now see settings in the left pane and their values on the right.
  4. Next, change the Font family and Font size as you wish.
  5. Save changes.

Can I change the Notepad font color in Windows 11?

While it’s possible to change Notepad font size and style, it’s not possible to change font color. This is a simple text editor, and it doesn’t support this feature.

Since it’s not possible to change font color in Notepad, you’ll have to use a different editor that supports this functionality, such as WordPad or Notepad++.

As you can see, it’s pretty easy to change the font in Notepad on Windows 11, and it can be done from the menu bar. Of course, you can further customize it and even add a dark Notepad to Windows with the dark theme.

To learn more about customization, check our guides on how to change the default font on Windows. While you’re at it, why not check these great fonts for Windows 11 for additional customization?

Do you customize Notepad font or do you prefer the default one? Let us know in the comments section.

How To Turn Off Internet Access for an App in Windows 11: 3 Ways

If your PC is running slow or you need to prioritize bandwidth for your game, blocking internet access for specific apps can be your savior.

Today, we’ll walk you through a few different ways to achieve this. Just follow the steps below.

How do I restrict Internet access to apps in Windows 11?

1. Via the Windows Defender Firewall

  1. Press Windows + S to open the Search menu, type Control Panel in the text field, and click the relevant search result.
  2. Click on System and Security.system and security
  3. Click on Windows Defender Firewall.
  4. Select Advanced settings from the left pane.advanced settings  to block internet access for specific apps in windows 11
  5. Choose Outbound Rules, and then click on New Rule on the right-hand side.outbound rule to  to block internet access for specific apps in windows 11
  6. Select Program and click Next.program
  7. Click on Browse, then locate the app you want to block Internet access for, select the launcher, click Open, and then Next to proceed. The app should be in the ProgramFiles or ProgramFile(x86) folder.
  8. Select Block the connection radio button and click Next.block the connection
  9. Tick the checkboxes for all three network profiles and click Next.network profiles
  10. Enter a name and description (optional) for the rule, and then click Finish.finish

If it’s a browser you have blocked the Internet access for, the ERR_NETWORD_ACCESS_DENIED error will show up.

2. Using the Command Prompt

  1. Press Windows + R to open Run, type cmd, and hit Ctrl + Shift + Enter.cmd
  2. Click Yes in the UAC prompt.
  3. Paste the following command to set up an inbound rule while replacing Path with the app’s storage location, and hit Enter:netsh advfirewall firewall add rule name="FF Block In" protocol=TCP dir=in action=block program="Path"
  4. For instance, if we were to block the Brave browser, the command would be: netsh advfirewall firewall add rule name="FF Block In" protocol=TCP dir=in action=block program="C:\Program Files\BraveSoftware\Brave-Browser\Application\brave.exe"block internet access for specific apps in windows 11 with command prompt
  5. Similarly, execute the following two commands and replace Path with the actual program path as found in the File Explorer: netsh advfirewall firewall add rule name="FF Block TCP" protocol=TCP dir=out action=block program="Path" netsh advfirewall firewall add rule name="FF Block UDP" protocol=UDP dir=out action=block program="Path"

You can easily turn off the Internet for a specific app in Windows 11 or an executable file using the command line. Remember, the rules you created will appear in Windows Defender Firewall with Advanced Security.

3. With a third-party app

If you want to block all apps except one from accessing the Internet and find the manual methods rather tedious, a third-party tool would come to aid.

To simply block Internet access for an individual app, we recommend using a reliable third-party tool. These will also help if you want to block several apps at once, view network statistics, and perform advanced actions.

How do I unblock Internet access for specific apps?

Delete the rule: Open Windows Defender Firewall > select Advanced settings from the left panel, go to Outbound Rules > right-click the relevant rule > select Delete > click Yes in the confirmation prompt.

Remember, if you ever face connectivity issues with a specific app, check if Windows Firewall is blocking the program, then delete the rule or reconfigure the settings.

Benefits of blocking Internet access for specific apps

  • Prevents necessary downloads and enhances security
  • Increased Internet speed
  • Other apps get the required share of bandwidth
  • Save network resources on limited Internet plans

Once you know how to block internet access for specific apps in Windows 11, allocating network resources shouldn’t be much of a hassle! And you can now enjoy seamless connectivity with a high Internet speed.

Besides, if other users are running network-hogging apps, you can always restrict user access to programs.

For any queries or to share your favorite method, drop a comment below.

What is The Difference Between CHKDSK, SFC, And DISM on Windows 11?

When fixing PC issues, it’s important to know the difference between CHKDSK, SFC, and DISM on Windows 11 if you want to effectively fix the problem at hand.

To better understand how each tool works and when to apply it, in today’s guide we’re going to take an in-depth look at each tool and see how it works.

What is the difference between SFC, CHKDSK, and DISM?

When should I use each tool?

CHKDSK

CHKDSK on Windows 11 is a file repair tool, and it’s used to scan your entire drive for errors, bad sectors, and corrupt files. Bad sectors can cause file loss and additional issues, so CHKDSK tries to repair the files or recover them.

The tool can be used in the following situations:

  • If your PC is freezing or experiencing slowdowns.
  • It can fix some disk or file system errors.
  • To scan check drive health and determine if the drive is failing.
  • It will also check the integrity of disk partition or storage drives.

SFC

SFC /scannow command on Windows 11 is used to fix system errors that can occur due to corruption of the operating system. The scan will scan your installation and restore any corrupted or missing system files:

You can use this scan in the following circumstances:

  • If your system is crashing, freezing, or being unstable due to a corrupted file system.
  • When certain Windows components aren’t working properly.
  • It can also help with some application or driver issues as well as integrity violations.

DISM

DISM on Windows 11 will scan your Windows system image for any damage or corruption and repair it. For complete instructions, see our detailed DISM commands guide for Windows 11.

It’s usually used to fix these problems:

  • Frequent freezes, crashes, and system errors.
  • If SFC is unable to fix the problem or if it’s not working at all.
  • Corrupt Windows installation.

How do I execute each tool?

1. Use the command line to run CHKDSK

  1. Press the Windows key + X and choose Windows Terminal (Admin). You can also use Command Prompt or PowerShell.
  2. When it opens, run the following command, but replace the drive letter if needed: chkdsk c: /f
  3. Wait for the CHKDSK scan to finish.

2. Use drive properties to run CHKDSK

  1. Open File Explorer and navigate to This PC.
  2. Locate the drive that you want to scan, right-click it and choose Properties.
     
  3. Navigate to Tools and click on Check in the Error checking section.
  4. Wait for the scan to finish.

If you want to learn about everything this tool can do, our guide on how to use chkdsk on Windows 11 will provide you with in-depth information.

3. Use the command line to run SFC

  1. Start Terminal as administrator.
  2. Run the following command: sfc /scannow
  3. Wait for the scan to finish.

4. Use the command line to run DISM

  1. Start the command line tool as administrator.
  2. Run the following command to determine if the image is corrupted: Dism /Online /Cleanup-Image /CheckHealth
    CheckHealth-1
  3. Run an additional scan to check if the image is healthy: Dism /Online /Cleanup-Image /ScanHealth
  4. If any of the previous two scans reports any problems, run: Dism /Online /Cleanup-Image /RestoreHealth
  5. Wait for the DISM command to finish. It can take about 10-20 minutes.

What issues can be solved with each tool?

CHKDSK

  • File system, directory/disk structure, file attribute, and drive errors.
  • Issues with bad sectors or lost clusters.
  • Problems caused after improper shutdown.

SFC

  • Corrupted operating system files and system stability issues, including Blue Screen errors.
  • Application errors as well as driver errors or conflicts.
  • Issues with Windows features and registry problems.
  • Performance issues.

DISM

  • Stability issues, system crashes, and error messages.
  • Problems with various Windows components.

All these tools have their own purpose, and each of them can be used to fix a different type of problem. While CHKDSK can be used as a maintenance tool, SFC should be used for fixing problems, while DISM should be your last option if SFC fails or if it doesn’t work.

And in certain situations where CHKDSK is not working with Vanguard, you can explore third-party file repair tools.

To learn more about these tools, we have dedicated guides on how to use the SFC scannow command and how to use DSM to repair Windows, so don’t miss them.

Did we miss any important information? If so, don’t hesitate to let us know in the comments section.

4 Ways to Fix LiveKernelEvent 144 Error on Windows 11

If the LiveKernelEvent 144 error parameter 3003 or 1001 on Windows 11 interrupts your gaming session, this guide can help!

We will discuss some expert-recommended solutions to get rid of the issue and restore the smooth functioning of your computer.

What is LiveKernelEvent 144 Error?

LiveKernelEvent 144 is a BSoD error often related to hardware, like a graphics card or motherboard chipset drivers.

You must check the error description to understand it better if you encounter this error. Some of the common reasons for the occurrence are:

  • Incompatible, faulty, or outdated graphics driver.
  • Corrupted system files.
  • Third-party interference
  • Incompatible hardware or faulty components like malfunctioning power supply unit (PSU)

How do I fix the LiveKernelEvent 144 error on Windows 11?

Before engaging in advanced troubleshooting steps to fix the LiveKernelEvent hardware error, you should consider performing the following checks:

  • Restart your computer in a clean boot to check what is causing the issue.
  • Run a deep scan using antivirus software.
  • Check if the graphics card & other components are clean and seated properly, and also check the PSU. Loose connections are also the reason behind LiveKernelEvent Code 1a1.
  • Ensure Windows updates are not pending, and uninstall the Overclocking software (if applicable).
  • Check if the graphics driver has the recommended settings for the game you are playing, and reinstall the NVIDIA or AMD control panel.

1. Update/Reinstall your graphics driver

  1. Press Windows + R to open the Run dialog box.Device Manager Run command - Fix LiveKernelEvent 144
  2. Type devmgmt.msc and click OK to open the Device Manager.
  3. Go to the Display adapters, click it to expand, right-click the graphics driver, and click Update driver.Graphics Driver update
  4. Select Search automatically for drivers.Update driver 2
  5. If the update is available, follow the on-screen instructions. If not, then right-click the graphics driver and select Uninstall device.Uninstall graphics driver
  6. Go to Action, then select Scan for hardware changes to reinstall the driver.Action scan for hardware changes

Follow the same steps for the Chipset drivers to update or reinstall them to eliminate the issue. Keeping the important drivers updated can also help you prevent issues like Kernel Power Error 41.

Using specialized tools to update your drivers will help you streamline the process and ensure the health of your system.

Fortect Driver Updater can scan and download the right drivers for all your components. Plus it allows you to create scheduled scans to make sure your drivers will never be outdated again.

⇒ Get Fortect Driver Updater

2. Rollback your graphics driver to the stable version

  1. Press Windows + R to open the Run window. Type devmgmt.msc and click OK to open the Device Manager.Device Manager Run command - Fix LiveKernelEvent 144
  2. Go to the Display adapters, click it to expand, right-click the graphics driver, and click Properties.Properties - Fix LiveKernelEvent 144 Error on Windows 11
  3. On the properties window, go to the Driver tab, and click the Roll Back Driver button.Rollback driver and click OK
  4. Select a reason and click Yes on the next window, then click OK to confirm the changes.Select a reason and click Yes

Rolling back the video card driver can resolve many incompatibility issues like LiveKernelEvent codes 1a8 & 1b8, giving you a stable environment to play your favorite game.

3. Run SFC & DISM scans

  1. Press the Windows key, type cmd, and click Run as administrator.CMD elevated - Fix LiveKernelEvent 144 Error on Windows 11
  2. Type the following command to repair the corrupted system files using cached copies and hit Enter: sfc /scannowSFCSCANNOW CMD
  3. To check and fix the component store corruption using Windows Update and restore the image to a good known state, copy & paste the following command and press Enter: Dism /Online /Cleanup-Image /RestoreHealthRestore health
  4. Wait for the command to be executed, then reboot your computer.

Running these scans can also help you fix similar issues like LiveKernelEvent 141. To know more about this error, read this guide.

4. Run the Windows Memory Diagnostic tool

  1. Press the Windows key, type memory diagnostic, and click Run as administrator.Memory diagnostic tool -
  2. On the Windows Memory Diagnostic window, select Restart now and check for problems.Windows Memory Diagnostic window, select Restart now and check for problems.
  3. Your computer will restart, and the tool will scan the RAM for potential issues. As the test is complete, your computer will reboot, log in to see the results.memory-diag-tool -scanning RAM

If the results come back fine, then your RAM is working fine. However, if it indicates issues, then remove the RAM modules, clean the dust & debris, reseat it, and run the scan again. If you see the errors again, you might have to replace the RAM.

If nothing worked for you, and you have faced the issue for the first time, restore your computer to the previous version.

However, if you often get issues like these while playing games, you might have an inadequate GPU. To be sure, run a benchmark tool to determine if you need to invest in an upgrade.

Did we miss a method that worked for you? Don’t hesitate to mention it in the comments section below. We will happily add it to the list.