A Problem Occurred in Extended Storage on PS4 [Expert Fix]

PS4 is one of the finest consoles in recent times. But it is not free from errors like the PlayStation network sign-in error.

Now, it is the PS4 extended storage problem that is troubling users. This error occurs when your USB drive isn’t compatible with the system.

However, you can’t just assume that it’s incompatible, especially if you’ve previously used it before the issue with the PS4 error CE-30022-7 extended storage started.

The PS4 can not repair extended storage if it’s corrupt or incompatible with the software. Sometimes, the external drive is fine, but your console causes the issue.

Here is a detailed guide on how to get rid of PS4 extended storage not working and beeping, no matter the cause.

Why is my extended storage not working on PS4?

There are various reasons your extended storage might not be working on PS4. It could be due to issues with the storage or some console glitches. Below are some of the common causes:

  • Incompatible storage
  • Outdated console
  • Faulty drive
  • Minor console issues

How can I repair the PS4 extended storage not working?

1. Force restart the console

  1. Press the Power button and hold it down for around 7 seconds.
  2. The console will beep twice and shut down.
  3. Leave the system off for a while and then power it back on.
  4. Connect the storage device. If it’s still working, we can assume the drive doesn’t meet the PlayStation 4 requirements.

If PS4 is showing errors like cannot find the following application when using extended storage, restarting your console might help fix the issue

2. Check the storage drive’s compatibility

The PS4 extended storage will not work if the disk has insufficient space.

Even though the PlayStation 4 supports various external storage devices, they must meet certain specifications to be compatible.

To use your external storage device on your PlayStation 4, ensure that it meets the following requirements. You are bound to get a PS4 extended storage error if it doesn’t.

Drive PropertyRequirement for PS4
PS4 system software4.50 or newer
Type of USB interfaceUSB 3.0 or newer
Storage capacity250 GB to 8TB
EncryptionNo encryption on storage
Number of partitions1
Drive formatexFAT

You must get a compatible device if your external storage drive doesn’t meet the above requirements.

The factors outlined above are hardware requirements, so you can’t configure anything to fix it. Your only bet is to replace it.

You can start your search on our article about the best external storage drives for Xbox.

If your drive meets the PlayStation4 requirements but still gets the PS4 extended storage errors, proceed to the next solution.

3. Manually update your PS4

  1. Power on the system and go to Settings.
  2. Select the System Software Update option.
  3. If your system has the latest software version, you will see The latest version of the system software is already installed message.
  4. Otherwise, click the Next or Update button to start downloading the update if it finds an available update.
  5. On completion of the update downloading, you will receive a notification.
  6. Click on the Notifications link denoted by i.
  7. Navigate to Downloads on the left-hand panel, and you’ll see your downloaded system software on the right.
  8. Select the file by tapping X on your controller.
  9. Follow the on-screen instructions to complete the system update.

Updating the system software has fixed PS4 extended storage error for many gamers.

We hope it is the case for you as well, but if it isn’t, the following method should do it.

4. Test the storage drive on a computer

  1. Connect the USB drive.
  2. Open the File Explorer and go to This PC.
  3. Your connected storage device should show up under the Devices and drives section.
  4. Double-click on it to open it.
  5. Copy a file onto your device.
  6. Disconnect the device.
  7. Re-connect it and check if the moved file is corrupted/damaged.

If you still haven’t fixed the issue, your PS4 external storage is probably broken. But we can’t tell for sure without testing it on a different system.

To do this, disconnect the external drive from your console and follow the steps above to test it on your computer.

If your PS4 extended storage is corrupted, it is safe to assume that the storage device has more serious issues.

In a case where the PS4 extended storage is broken and not repairing despite several attempts, a message keeps appearing. The only way to resolve the issue is to replace the storage device with a new one.

5. Initialize the external storage drive

  1. Press and hold the PlayStation button on your controller.
  2. Connect the external USB device to your console.
  3. Click on Notifications and select the connected device from the list.
  4. Select the Format as Extended Storage button at the bottom of the page and hit Next.
  5. Click on Format (click Yes to authorize the formatting and wait for it to finish).
  6. Click on the OK button to finish the process.

In rare cases where the external drive is healthy as per the previous solution, and the PS4 error CE-30022-7 extended storage still comes up, you may need to initialize (format) the device. After initializing the drive, your PS4 will set it as the default location for saving data.

There you have it: a comprehensive guide on fixing a problem in extended storage on PS4. Carry out the above troubleshooting solutions listed in this guide, and things should return to normal. You can also contact PlayStation support to get help.

We hope one or more of the methods presented above will get you back to gaming in no time. If the problem persists, we have a guide on how to format PS4 hard drive on Windows 11, so be sure to check it out.

Let us know the solution that worked for you in the comments below.

Windows Defender Browser Protection: Everything You Need to Know

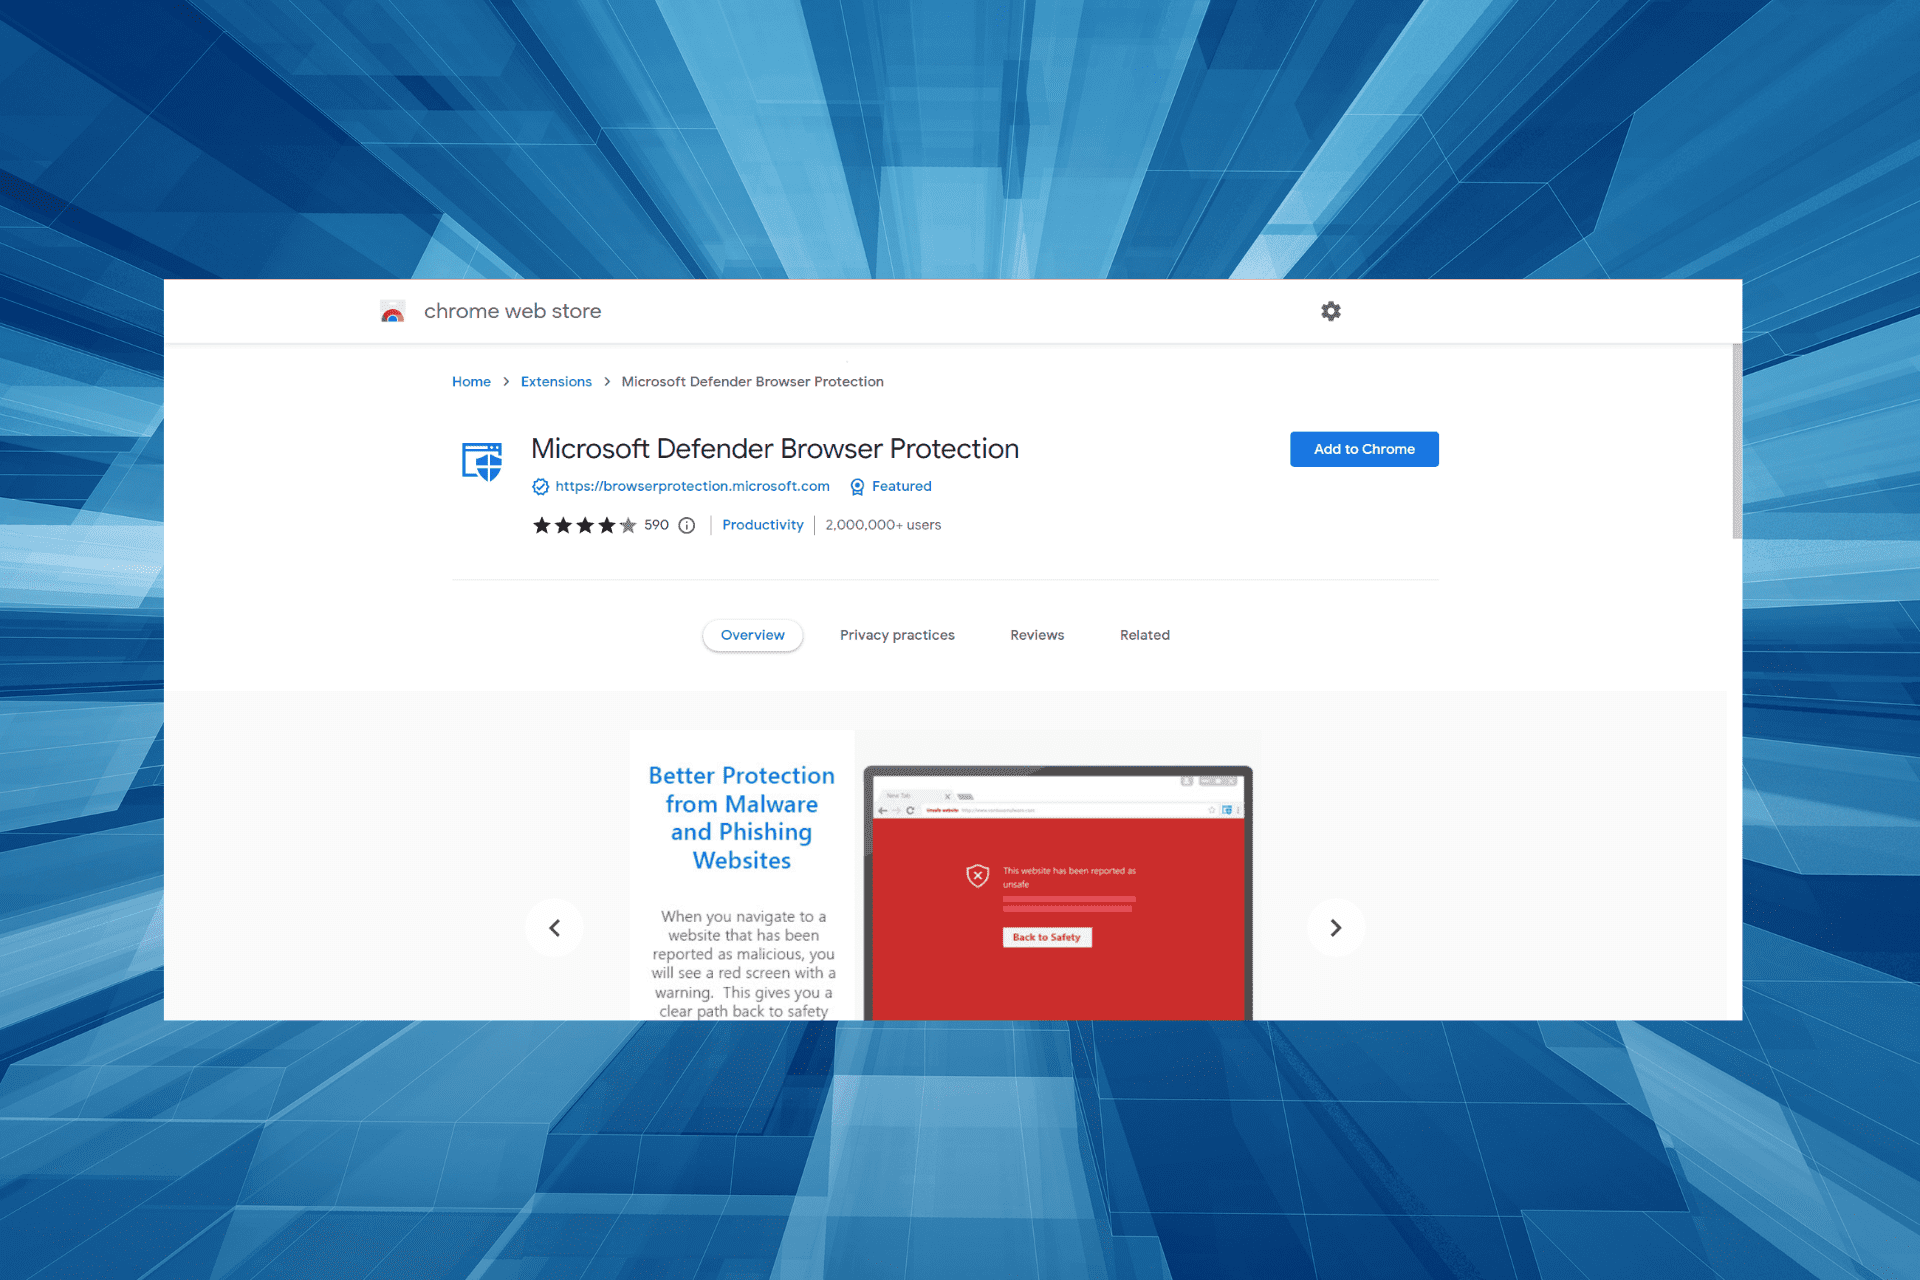
Windows Defender is the default antivirus software on Windows, but Microsoft has also released the Windows Defender Browser Protection extension for Chrome.

The scope of the extension is to provide better phishing and malware protection from various websites using real-time data from Microsoft.

In today’s article, you will find out all about the antivirus extension and the steps to install in the most popular browsers to protect your PC.

Is Windows Defender Browser Protection legitimate?

Yes, the Windows Defender Browser Protection is legitimate and one of the best extensions in the category. It protects you against a wide range of online threats, including phishing attempts and malicious software.

The extension is available for all major browsers. Users prefer Windows Defender Browser Protection over third-party antiviruses since Microsoft developed it. Though, a Microsoft Defender Browser Protection whitelist feature would have come in handy.

If you are concerned about installing it, the extension is legitimate and perfectly safe, but make sure you download the right one.

How can I use Windows Defender Browser Protection?

1. Opera One

  1. Visit the Windows Defender Browser Protection’s Chrome Web Store page on Opera One, and then click the Add to Opera button.add to opera to get windows defender browser protection
  2. Now, click on Add extension in the confirmation prompt.add extension

This browser is based on Chromium, so the extensions from the Chrome Web Store can be installed on Opera One as well.

After doing that, Windows Defender Browser Protection will be installed. It’s worth mentioning that Opera One has a couple of unique features when it comes to security.

First off, there’s a built-in ad blocker that will block tracking scripts and ads and make your browsing experience faster.

For additional protection, there’s a built-in VPN with unlimited bandwidth. Also built-in you’ll find an Ad blocker and an AI

It also comes with various other great ideas and features. Find out more about the browser by clicking the Read more button below.

Opera One

Opera One is a modern browser, focused on privacy and security, which makes it ideal as your default option.
Free Download Visit website

2. Chrome

  1. Visit Windows Defender Browser Protection on the Chrome web store, and then click on the Add to Chrome button.Add to Chrome to get windows defender browser protection
  2. Click on Add extension in the prompt that pops up.add extension

After the Windows Defender Chrome extension installs, it’s ready to be used and will protect you while browsing online.

3. Firefox

  1. Open the Application Guard Extension on the browser, and then click on the Add to Firefox button.add to firefox
  2. Click the Add button to confirm.add to get windows defender browser protection

After doing that, the Microsoft Defender Browser Protection add-on will be installed on Firefox, and your system will be also protected.

4. Microsoft Edge

  1. Press Windows + S to open the Search menu, enter Windows Security in the text field, and then click on the relevant search result.windows security to get windows defender browser protection
  2. Now, click on App & browser control.App & browser control
  3. Click on Reputation-based protection settings.Reputation-based protection settings
  4. Next, make sure that the SmartScreen for Microsoft Edge option is enabled.Smart screen for microsoft edge

The Microsoft Defender Browser Protection is already available in Microsoft Edge by default, and it works as long as the Smart Scan feature for your browser is enabled. So, simple simply enable the feature and you are good to go.

5. Install a third-party antivirus for better protection

Windows Defender Browser Protection is a nice extension that will protect you online, but that will only stop a limited number of threats.

If you want to safeguard your system properly, you will need a full-fledged, third-party antivirus installed on your system.

The tool recommended below is installed by over 110 million users worldwide, so now you can get a measure of how trusted this software is.

Its multi-layered protection system will not only secure your PC but also all your other devices, including the webcam and the router.

⇒ Get TotalAV

How do I get rid of fake Windows Defender security warning?

Several users reported encountering a Windows Defender Browser Protection red screen when browsing the web. In some cases, the warning listed a support helpline number to call for further resolution. Do not call on the number! It’s most likely an ad disguised as a fake warning.

If you see such messages on a particular website, either stop visiting it or use a reliable ad blocker tool. Also, it’s recommended that you run a malware scan on your PC just to make sure no malicious software on it is triggering the error.

Besides, disable any suspicious extensions on the browser, and if none of these methods work, resetting the browser would do the trick.

Windows Defender Browser Protection offers solid protection to your browser, and we hope you’ll consider using it after reading this article.

However, you need to consider that a browser extension is not as powerful as a dedicated antivirus. So, find out the best-unlimited license antivirus for your computer.

If you have any recommendations or suggestions, or you just want to express your thoughts about this extension, leave us a comment in the dedicated section below.

Avast Secure Browser vs Chrome: In-depth comparison

Google Chrome is currently the world’s most popular web browser, but there are many other browsers that are quite similar to Chrome, with some unique features. So let’s see which of the two, Avast Secure Browser vs Chrome, outperforms the others.

Chrome is somewhat minimalistic in terms of features, but browsers such as Avast Secure Browser are trying to change that.

In today’s guide, we’re going to take a closer look at Avast Secure Browser and see how it compares to Google Chrome and tell you which is the better browser for your needs.

Avast Secure Browser vs Chrome, which one is better for you?

A short history lesson

Avast Secure Browser: A more secure version of Chrome

Avast Secure Browser was first released as Avast Safezone Browser in 2016, and it was a part of the paid version of Avast Antivirus.

The browser was rebranded in 2018 as Avast Secure Browser, and it’s now available separately, for free. Regarding availability, this browser is available on Windows, macOS, iOS, and Android.

Chrome: Browsing veteran from Google

Google Chrome was first released in 2008, and since its release, it became a dominant browser on the market.

Currently, Chrome has 66% of the market share, and it’s a dominant web browser on desktop and mobile alike.

Regarding availability, Chrome is available on Windows, macOS, Linux, Android, and iOS.

Quick Tip:

A decent browser simplifies your daily web use, that’s why it is essential that the browser is user-friendly and includes the necessary pre-installed features to ensure a smoother experience.


Opera One is a Chromium-based browser that includes several amazing features out of the box, like an advanced ad-blocker, VPN integration, native AI and built-in WhatsApp and Twitter apps.

Opera One

Get the best out of your online experience with Opera One browser!
Free Download Visit website

User interface

Avast Secure Browser: A clone of Chrome

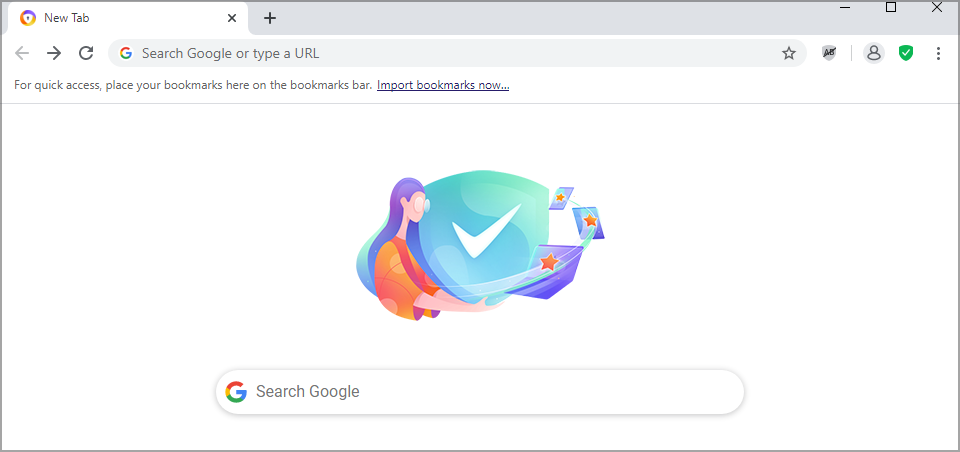
When you first start Avast Secure Browser, the first thing you’ll notice is how much it looks like Chrome, which is no surprise since both are using the Chromium engine.

The home page has the search bar along with the website shortcuts. If needed, you can easily add any website shortcut to the home tab.

Some basic customization options are available, allowing you to switch to the dark mode right from the home tab.

The browser also comes with a couple of icons in the toolbar that let you block ads or activate other browser features.

Overall, the interface is simple and clean and not much different than Chrome.

Google Chrome: As minimalistic as it can be

Google Chrome is known for its simple but highly effective user interface. The main tab comes with a search bar and a list of website shortcuts. Of course, you can add new shortcuts or rearrange your shortcuts any way you want.

The interface can be customized, and you can show the most visited websites instead of shortcuts, or you can hide the whole section if you choose to do so.

Chrome also supports various backgrounds, and you can even add your own from your PC. Regarding the color themes, that are several themes available, but you can also choose a custom-colored theme.

Features

Avast Secure Browser: Chromium-based, optimized for security

Although Avast Secure Browser is similar to Chrome when it comes to features, the browser also focuses heavily on user security and privacy.

The first feature that you’ll notice when you start the browser is its built-in adblocker. By blocking ads, the pages you visit will load faster, plus you’ll be able to browse the web without any distractions.

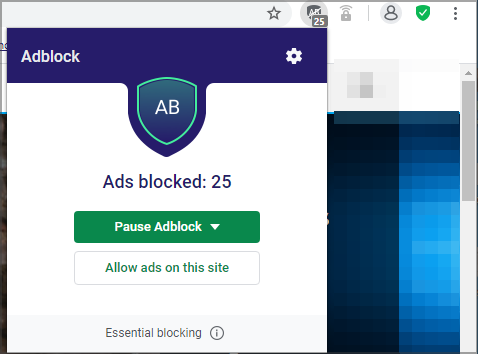
You can enable the adblocker from the toolbar with just a couple of clicks. Once you enable it, you can see how many ads were blocked on a specific page with ease.

If needed, you can pause the Adblock on a specific website or on all websites, and for better control over the ads, you can access the advanced settings with a single click.

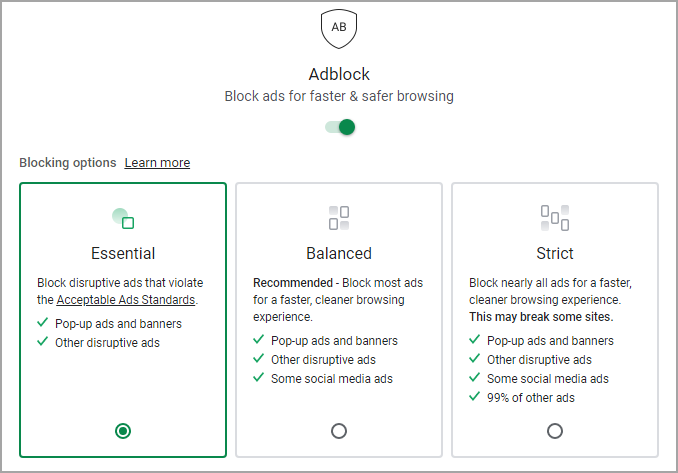
The Adblock feature is based on uBlock, and we have to admit that is highly effective. There are three presets available: Essential, Balanced, and Strict, and you can use any of them.

Each will block different types of ads, and although the Strict preset offers the best protection, it might cause certain websites not to load properly, so keep that in mind while using it.

If needed, you can also add websites to the exclusion list if you want to see ads on that one page, or if the page has trouble rendering after using the Adblock feature.

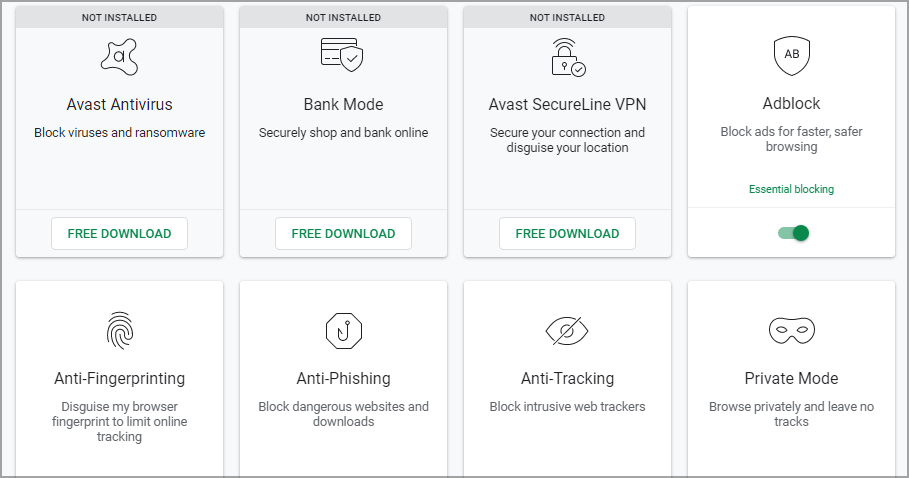
The browser also has anti-fingerprinting, anti-phishing, and anti-tracking features, so you can rest assured that websites aren’t tracking you or trying to steal your login credentials.

We also have to mention that the browser has an extension guard that will block any harmful extensions that you try to install.

Lastly, there’s a webcam protection feature that will make sure that websites don’t have access to your webcam.

Avast Secure Browser also has a Hack Check tool that can scan your email and check if any online accounts that you’ve signed up to with that email have been hacked.

All of these features are available from the Security & Privacy Center and you can access them at any time with just a single click on your toolbar.

Some features such as antivirus, Bank Mode, and VPN are also available, but to use them, you need to download the additional software from Avast.

Overall, Avast Secure Browser offers some great features, and we’re pleasantly surprised by how effective its Adblocker is. As for other security features, they make a great addition, and they will surely improve your online security.

Google Chrome: A web browsing giant

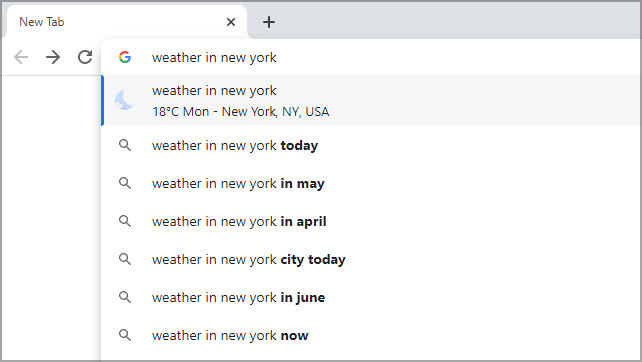
Google Chrome comes with a versatile address bar that is powered by Google and it can provide you with certain information at a glance.

For example, you can check the weather in your city, do simple calculations, or currency conversions right from your address bar. This is a small feature, but it might come in handy to some.

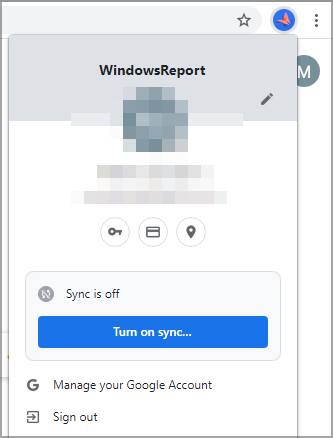
Chrome puts a great focus on synchronization, and once you sign up with your Google account, you can have your bookmarks, passwords, and browsing history available on all other devices.

Tab grouping is one more feature that is extremely useful if you’re multitasking since it allows you to group tabs and minimize them to organize open tabs better.

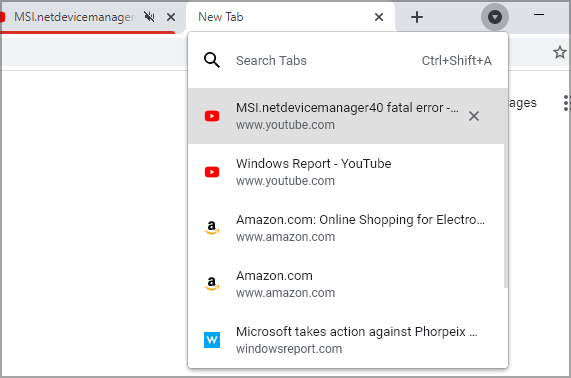
To make tab navigating easier, Chrome has the Search Tabs feature, so you can easily find any open tab, simply by entering its title in the search field.

Chrome offers multimedia features as well, and you can easily control the multimedia playback from the toolbar. Of course, integration with Chromecast and Stadia is also there.

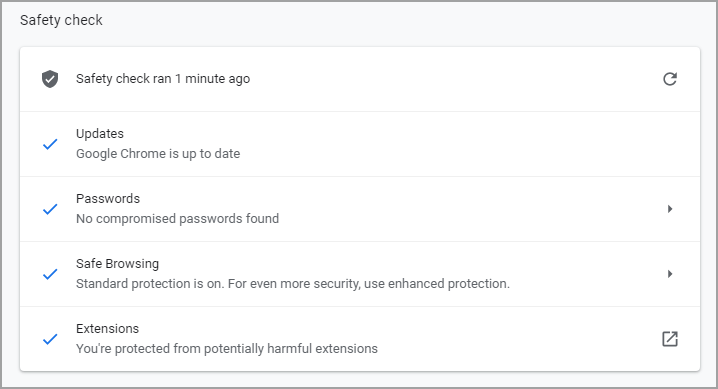
Regarding security, this browser offers great security to its users, and you can always perform a quick Safety check and make sure that your browser isn’t compromised.

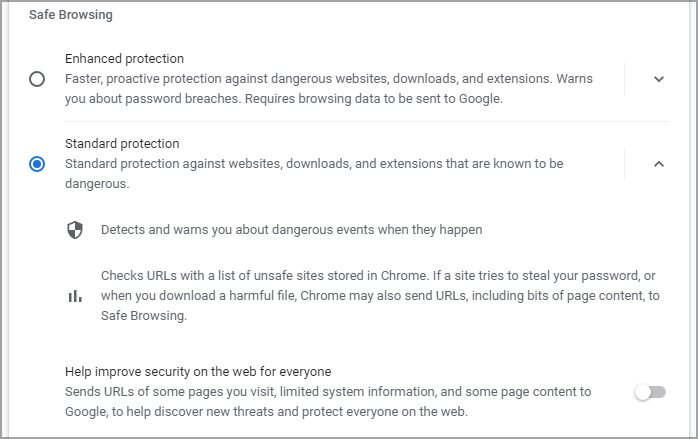
Chrome also has a Safe Browsing feature that will protect you against dangerous websites and downloads.

You can customize this feature, but keep in mind that some settings require you to send your browsing data to Google for analysis.

The browser also has a built-in ad blocker, but it’s not enabled by default, and it blocks only intrusive or misleading ads. However, the feature is located deep into settings, so it will take you a couple of clicks to access it.

Chrome and Avast Secure Browser share many features since they are both based on Chromium, but Avast offers better protection features and ad blocker that is faster and easier to access.

Security comparison

Google Chrome is already a secure web browser, but Avast Secure Browser manages to enhance your security with a couple of unique features.

The built-in Adblock is a great addition since it allows you to modify your settings, and with strict blocking mode enabled, you’ll block even the toughest ads.

On the other hand, Chrome’s ad-blocking feature is primitive and buried in the settings, so it’s rather likely that users won’t ever find it or use it.

Avast Secure Browser has all the security and privacy features right in the toolbar, and with just a single click you can enable all these features in a matter of moments.

Both browsers are secure since they share the same engine, but if we had to pick, we’d go for Avast Secure Browser since it has better privacy options and a reliable ad blocker right at your fingertips.

Performance

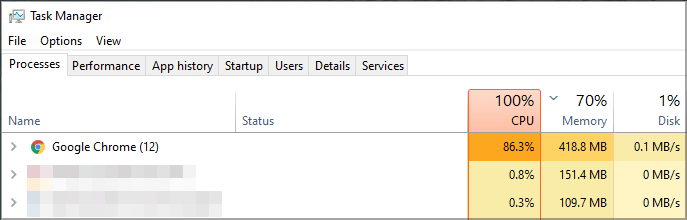
During our testing, we had no issues with Avast Secure Browser. We tested the browser with five open tabs and full HD video buffering in the background and got around 75% CPU and 424MB RAM usage on a low-end PC.

While being idle on a home page we got about 1.5% CPU usage and around 160MB RAM usage.

We repeated the same test in Chrome, with five tabs and full HD video buffering in the background and we got up to 85% CPU usage and 414MB RAM usage.

While being idle on the home page, Chrome used almost no CPU and up to 100MB of RAM.

Since both browsers are running on the same engine, we weren’t surprised to see that both are using roughly the same amount of resources.

Keep in mind that in some instances Avast can use a bit more memory compared to Chrome, but that’s nothing to worry about.

We experienced no slowdowns or any other issues with both browsers, so in terms of performance, we can say that they are almost the same, with Chrome having just a bit less memory usage at times.

Conclusion

Google Chrome is a great browser overall, with great security, but it’s not oriented toward user privacy as Avast Secure Browser. Almost all features from Chrome are available in Avast Secure Browser, so it’s just as safe.

Google Chrome: A web browsing standard

Pros
Made by Google
Offers the latest features
Secure
Low memory usage
Tab searching
Cons
Ad blocking feature could be better

Chrome’s minimalistic interface and unique features make it one of the best browsers on the market, and it’s perfectly safe to use.

Unfortunately, the browser doesn’t have too many privacy features, and if you’re extremely worried about your online privacy, Chrome might not be the best choice for you.

⇒ Get Chrome

Avast Secure Browser: Chrome with extra security features

Pros
Secure
Privacy protection features
Great adblocker
Works great with other Avast products
Based on Chromium
Cons
Uses bit more memory than Chrome

On the other hand, Avast Browser also has a couple of unique features of its own, and a great ad blocker combined with privacy features that are available at your fingertips makes this a great browser.

Almost all features from Google Chrome can be found in Avast Secure Browser, with an exception of Tab Searching and a few others.

⇒ Get Avast Secure Browser

What is the safest browser to use?

While there is no dearth of browsers, none offer all the security features required from one. After reading the comparative study of Google Chrome vs Avast Secure Browser, you must have realized that both options are good but lack certain aspects.

If we look at the available options, Opera, undoubtedly, is the safest browser right now. It comes with a built-in tracker blocker that prevents websites from keeping a record of your online activity.

Meanwhile, the ad blocker feature keeps intrusive ads that cover a large part of the screen at bay. Besides, Opera comes with a built-in VPN to reroute your connection, a feature missing in some of the most popular options.

If you were to choose between Avast Secure Browser vs Chrome, both browsers are more or less safe. But if you want a reliable browser that has all the latest features, Chrome is the better option.

On the other hand, if you want a browser that is free from ads and that offers great security and privacy protection, be sure to give Avast Secure Browser a try.

What is your take on Avast Browser vs Chrome? Let us know in the comments section below.

5 Best Sniper Games to Play Online for Free [No Download]

There are numerous gaming platforms that include various categories of web games. Sniper games are among the more popular browser-based games.

Most platforms include a wide range of sniper games online for free. These sniper games work on PC as well as other compatible devices. And in most cases, the sniper games online require no download. You can directly play sniper games online from the browser.

If you fancy a bit of sniping action, check out some of these browser game websites.

Quick Tip:

You can play web-based games with lots of alternative browsers. However, Opera GX is one of the first browsers specifically designed for gaming.

Opera GX includes numerous gaming features, such as its GX Game Corner which keeps users updated with the latest game releases. GX also incorporates system optimization tools, such as its RAM Limiter and Hot Tabs Killer.

Opera GX

If you love gaming, you will surely fall for all the gaming-related features this amazing browser offers.

What are the best online sniper games?

Agame.com – One of the favorites

Agame.com sniper games online

Agame.com is a website that currently includes 104 sniper games for you to play. Among them, it includes some multiplayer sniper games you can play against other players.

Players can also register Agame.com member accounts. With membership, you can watch walkthrough videos for games, leave comments, and bookmark your favorite sniper games on the site.

⇒ Check out Agame

Y8 – The most extensive collection of sniper games

Y8 website sniper games online

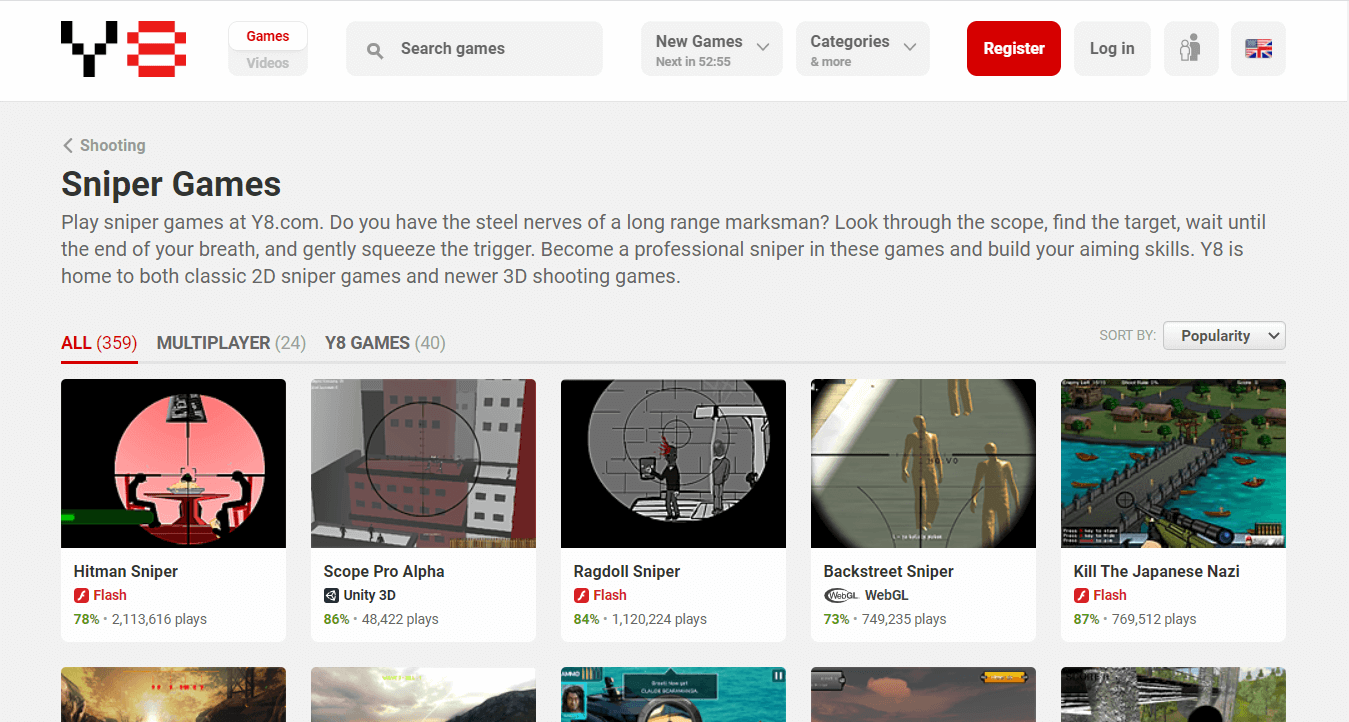
Y8.com has a vast collection of sniper games online, free and unblocked, amounting to 359 in total. So, you’ve certainly got plenty of sniper games to choose from on this website.

A lot of those are Flash games, but there are also lots of Unity 3D, HTML 5, and WebGL games on Y8.

The Sift Heads games are among the most highly rated and widely played sniper games on this website.

Sniper Clash 3D and Freefall Tournament are two of the most popular multiplayer sniper games on Y8, which the site’s stats highlight have had more than 35 million plays combined.

⇒ Check out Y8

Silvergames.com – Best for full-screen gaming

Silvergames.com sniper games online

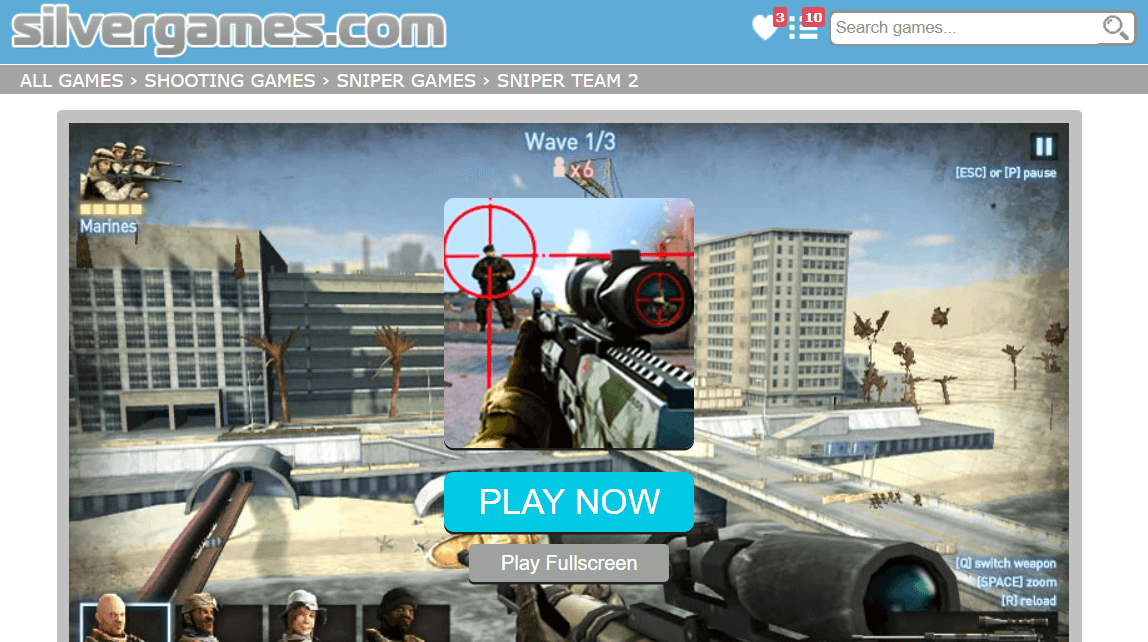
Silvergames.com doesn’t have an especially big collection of sniper games compared with Y8. However, there’s still a reasonable selection of sniper games you can get stuck into here.

This website includes video walkthroughs you can watch without any registration required.

You can also play some of its sniper games at 100% full screen. Sniper Team, Sniper Team 2, and Krunker are among the most highly rated sniper games at Silvergames.com.

⇒ Check out Silvergames

Crazy Games – The best sniper games collection

Crazy Games sniper games online

Crazy Games is another website that doesn’t have a massive number of sniper games, but you’ve got still got 62 to choose from here.

Furthermore, the Crazy Games collection is a compilation of some of the best sniper games online. The website says this:

We collected 62 of the best free online sniper games… They include new sniper games such as Winter Clash 3D and top sniper games such as Rooftop Snipers, Ghost Sniper, and Sniper Attack 3D.

⇒ Check out Crazy Games

Gameflare.com – Offers some thrilling titles

Gameflare.com sniper games online

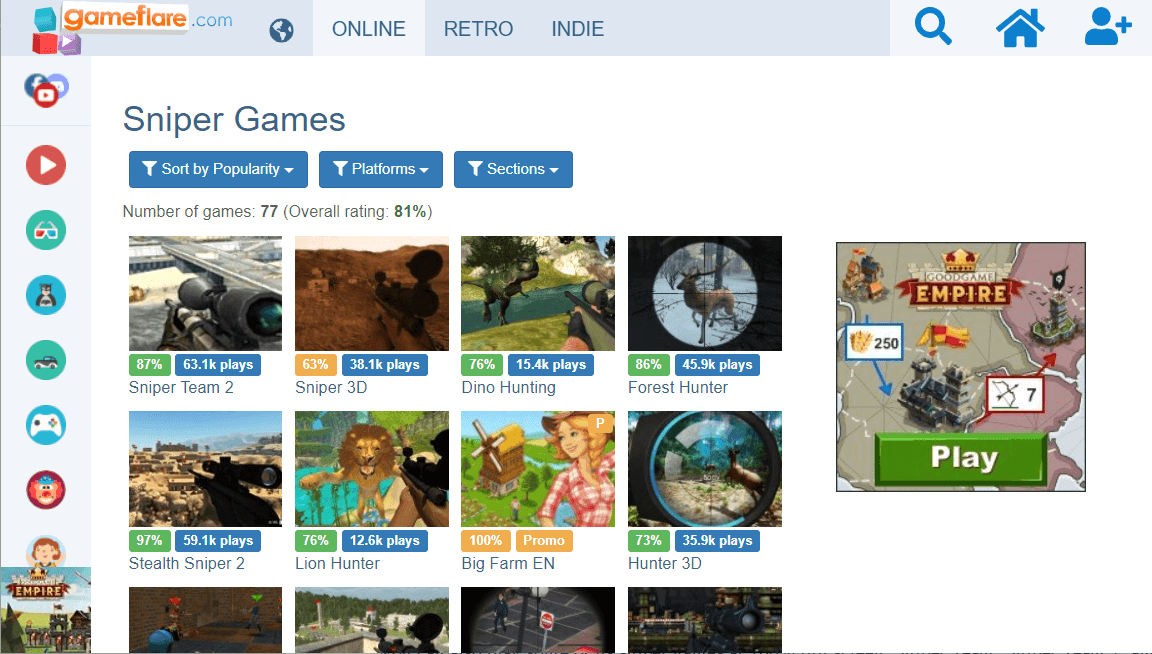
At Gameflare.com, you can currently play 77 online sniper games. Game-loading times on this site are a little longer primarily because an ad is displayed for about 15 seconds before each game starts up.

However, this website still includes a decent crop of sniping games to play. Stealth Sniper 2, Sniper Team 2, War of Soldiers, Stick Squad, and Sniper Clash 3D are among the most highly rated sniper games on this website. Registered players can also leave comments on Gameflare’s game pages.

⇒ Check out Gameflare

This concludes our list of the best sniper games online unblocked. We have listed the platforms for sniper games in order of the thrill they offer and how well they engage the players, so make sure you follow the same sequence when trying them.

If you have a slow Internet speed, try the best sniper game offline like Sniper Ghost, or search the web for more. Besides, there are several sniper games online in the stickman category that you can try today.

Tell us your favorite pick for shooting games in the comments section below.

Best Browser to Play Darkorbit [Boost the Gaming Experience]

Most Darkorbit players complain about lag when playing the game online using their browser.

When it comes to browser, it’s critical that you choose the best one since it directly affects the game’s performance and, in turn, the gaming experience.

We’ve analyzed all this, and in this article, we will present a list of the best browsers you can use in order to play Darkorbit, so make sure to keep on reading.

What is DarkOrbit?

DarkOrbit, now called Dark Orbit Reloaded, is a massively multiplayer online (MMO) game where players control spaceships in outer space and fight other players and computer characters to survive.

Also, players can join one of the many clans in the game and flourish with the support of their mates.

Developed by Bigpoint Games, DarkOrbit Reloaded has been hugely successful, with over 300 million registered users. DarkOrbit Reloaded offers engaging gameplay, thrilling combats, and exciting rewards to keep players glued.

How to play Darkorbit on a browser?

Opera GX – Browser dedicated to gaming

When it comes to Opera GX, this is the best gaming browser that has been specifically optimized and created in order to get the most out of gaming.

The unique features incorporated solves all of the issues most gamers have to deal with when playing games online, such as lags, popups, long waiting time, and many more.

Opera GX allows full control over RAM consumption, CPU, and network usage so that you can adjust it properly in order to have the best gaming experience.

With the Network limiter feature, you can also set limits when it comes to uploads and downloads so that it won’t take more than needed from your overall bandwidth dedicated to gaming.

Moreover, with the Twitch integration, you will be able to keep in touch constantly, see who is online, and you can select to receive notifications when someone goes live.

Other great features:

  • Twitch and Discord integration
  • GX Control for resource management
  • Ability to instantly close resource-intensive tabs
  • Free and unlimited VPN
  • Support for Chrome extensions

Opera GX

Darkorbit has never felt so good as it does when playing it using Opera GX, the most reliable and customized gaming browser.

Chrome – Boasts of the best performance

Chrome works perfectly for playing online games, including Darkorbit, thanks to the available features it comes with.

The browser is light and easy to use while keeping a strong focus on online privacy and security.

Also, the incorporated tools for browsing, such as password manager, dark mode, and tab management options, allow for smart and fast browsing.

With Chrome, you will benefit from the best of all in terms of a fantastic browsing experience and a flawless gaming experience.

⇒ Get Chrome

Firefox – Fast and seamless

Firefox has been constantly updated, and thanks to all the efforts, it has become one of the most appreciated browsers for playing Darkorbit online.

The Firefox Quantum update made some fantastic improvements in terms of speed and RAM usage.

For gaming, this is a fantastic change as it will allow you to have more RAM memory for playing online games.

Moreover, Firefox is one of the browsers that can process AR and VR content more efficiently when compared to other browsers.

⇒ Get Firefox

Edge – Microsoft’s recommended browser

Edge is an excellent browser that has grown and has been modified constantly over the years in order to get at this point.

The speed and the responsiveness of the browser are simply fantastic, which is also one of the reasons why Edge is great for playing Darkorbit online.

Edge also comes with features that allow for more control and productivity without compromising privacy and online security.

Moreover, the AdBlocker will ensure that you can control and block all annoying popups, which in return, will not interfere with your gaming experience.

⇒ Get Edge

Vivaldi – A lightweight browsers but just as fast

Vivaldi is a powerful browser, with a strong focus on privacy and performance, which is what recommends it for online gaming also.

You can customize Vivaldi from keyboard shortcuts to themes and extensions in order to create it how it works best for you.

Moreover, Vivaldi will not store any kind of data while you are browsing over the internet or playing games online.

This is a feature that not many browsers are offering and is another great selling point for giving Vivaldi a try.

⇒ Get Vivaldi

Can you play DarkOrbit on Android?

Yes, users can play DarkOrbit for Android and iOS devices. All you have to do is download the Puffin Web Browser from the Google Play Store.

Once the browser is installed, set it up, head to DarkOrbit’s official website, and you can start playing the game. The gameplay and experience wouldn’t be as seamless as on the computer, but you can now play the game anywhere.

That’s all for today! You now know the best browser to play Dark Orbit and how to play the game on an android device.

Also, find out the best games you can play online without downloading.

Please share with us in the comments section below which one you have tried or if you have additional suggestions.

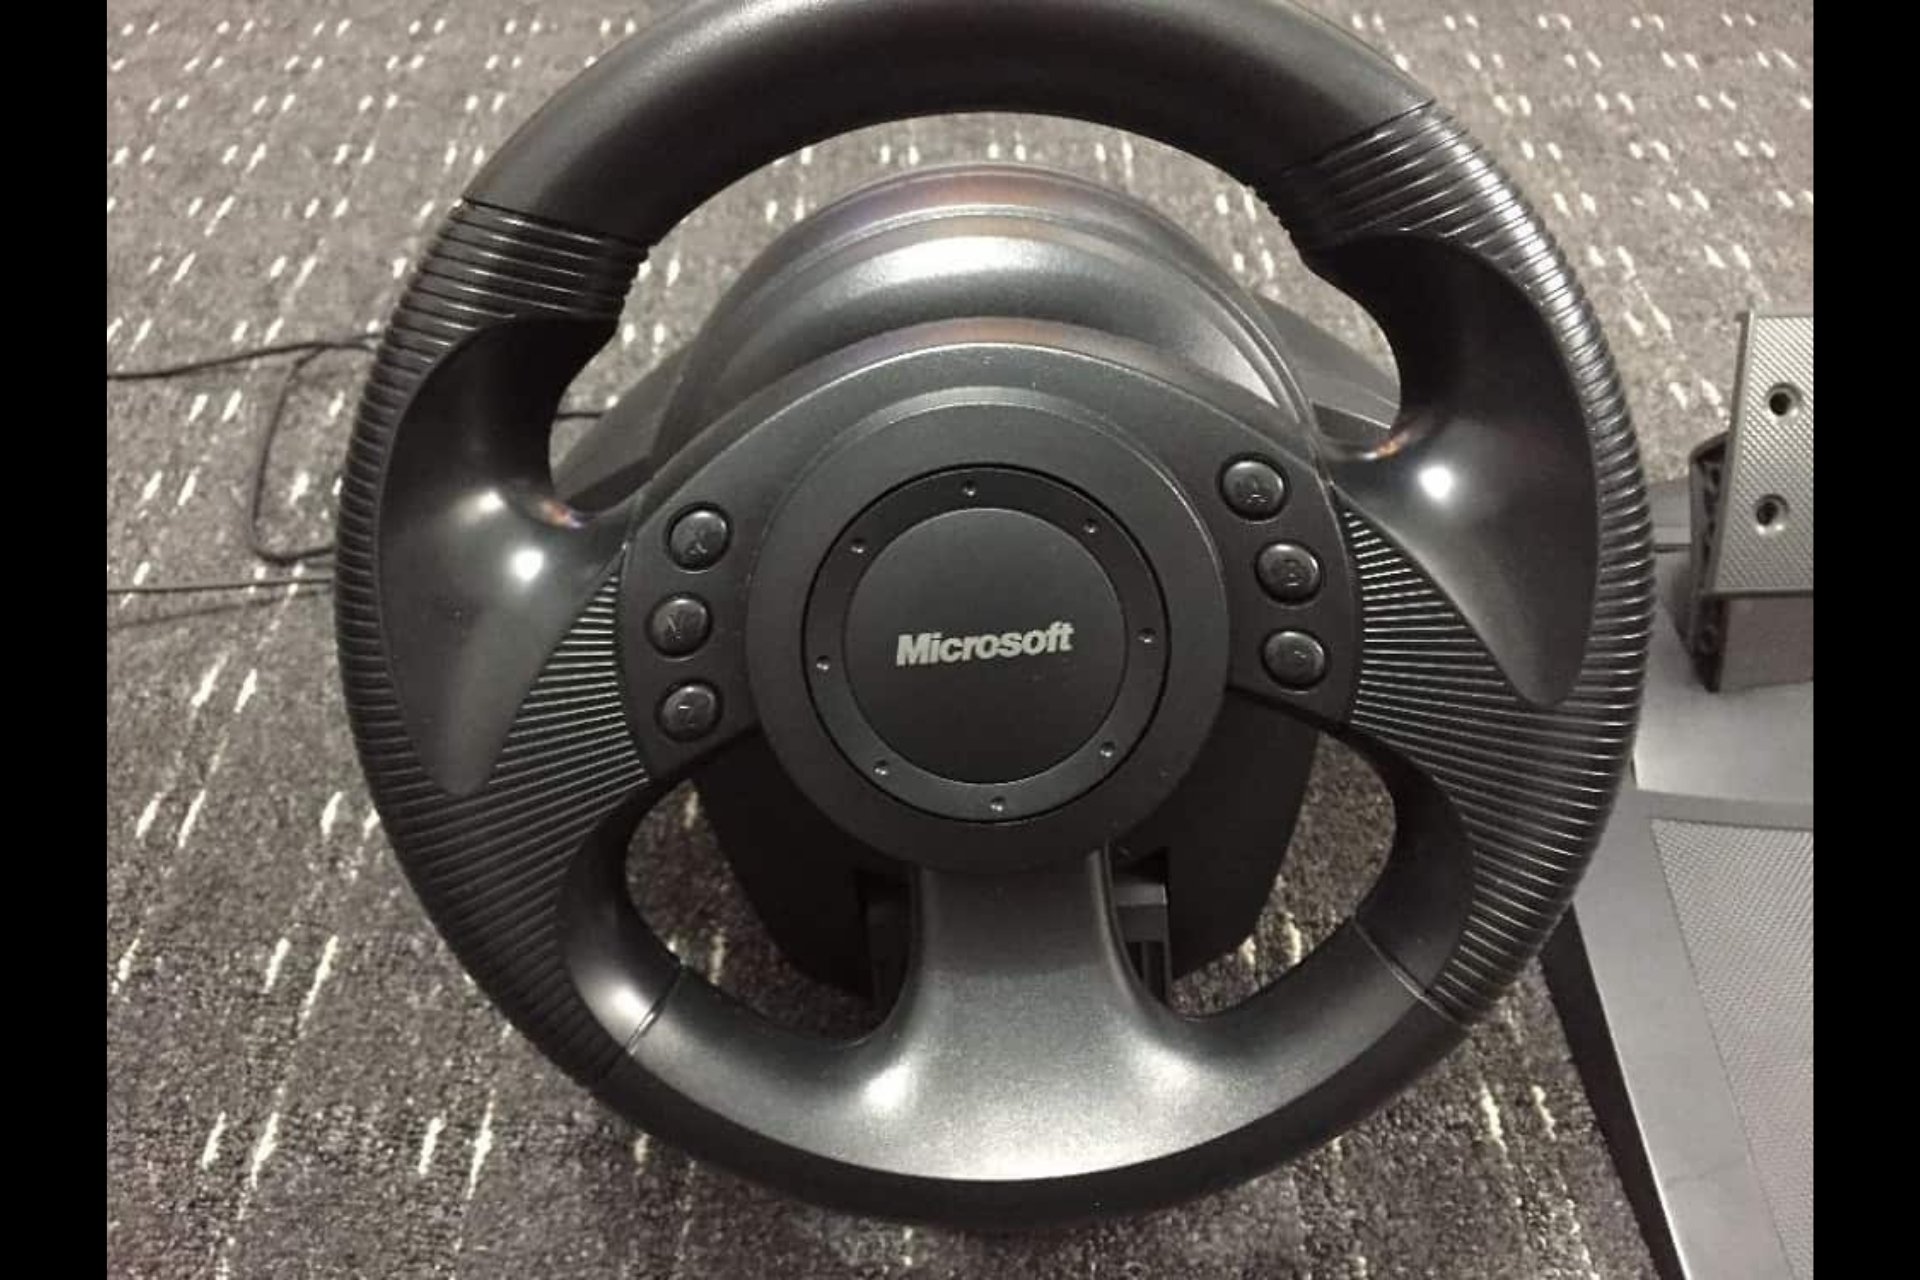
Microsoft Sidewinder Precision Racing Wheel Drivers for Windows 10

Even though it’s primarily known for software development, Microsoft made more than one piece of hardware.

Now, one of the most popular gaming wheels in the ’90s was produced by Microsoft as the part of Sidewinder project and it was compatible with Windows 98.

Yes, you read it right. However, there are still users that are willing to take this ancient wheel for a ride, but on Windows 10.

For that purpose, we offer one solution that should, hopefully, enable you to run this wheel on Windows 10. There are no guarantees but it’s worth a try.

As for the Microsoft SideWinder wheel compatible games, after you make it work, with Windows 10, you can virtually play any racing game.

Is Microsoft SideWinder compatible with Windows 10?

First things first. Even though this sturdy Microsoft-produced piece of hardware is still a valid choice, that only goes for hardware.

Sadly, the Microsoft Precision Racing Wheel was made ages ago and it comes with drivers that, at the best, support Windows XP.

Now, we run into some users with have had an easy time using almost 2-decades-old hardware to play racing games on Windows 10.

On the other hand, this still doesn’t mean that you’ll be able to run every given game that’s out there.

An important thing to note is that there are no available drivers for post-XP Windows iterations. So, the Microsoft SideWinder Precision Racing Wheel driver download is not possible.

; microsoft sidewinder precision racing wheel force feedback

Most of them are malware. The only way to run Microsoft Precision Racing Wheel on your Windows 10 PC is to run the installer (and later the application) in the compatibility mode for Windows XP. Some users managed to make it work that way.

How can I use Microsoft Precision Racing Wheel in Windows 10

1. Use compatibility mode

  1. Right-click on the desktop and create a New folder.
  2. Insert the supporting CD you’ve got with the wheel.
  3. Copy all files from the supporting CD to the New folder.
  4. Open the folder, right-click on the Setup and open Properties.
  5. Select the Compatibility tab.
  6. Check the Run this program in compatibility mode for: box and select Windows XP (Service Pack 2) from the drop-down menu.
  7. Check the Run this program as an administrator box.
  8. Click OK.download microsoft precision racing wheel software
  9. Run the installer and restart your PC.

That should do it. In addition, don’t worry if you’re unable to configure the wheel from the system settings.

Most users report states that most of the essential tweaks are within the in-game settings menu.

Technically, you can even use Microsoft SideWinder Precision Racing Wheel with Forza Horizon 4.

Online, you will even find Microsoft SideWinder steering wheel mods but we don’t recommend using them.

2. Use third-party software

As mentioned before, most of the so-called drivers you’ll find on the Internet are either malware or some other dangerous file, so don’t rely on manual search.

Instead, use a trusted third-party driver updater. These apps are secure and they make updating drivers for all of your hardware easy and comprehensive.

Is Microsoft SideWinder compatible with Xbox One?

No, unfortunately, the Microsoft SideWinder Precision Racing Wheel is not compatible with Xbox One.

As we’ve mentioned above, it’s an old racing wheel that was designed back in the Windows XP era.

Does the Microsoft SideWinder work with Xbox 360?

Again, the answer is no. Microsoft SideWinder Precision Racing Wheel. The old wheel was designed for PC, not for video consoles.

We hope this was a helpful read and you were able to use your favorite legacy wheel to enjoy the racing games just like before.

You might also want to take a look at our guide on how to install unsigned drivers because the information may help you.

Don’t forget to tell us if this helped you or to offer an alternative solution. You can do so in the comments section below.

How to Use the Firefox Picture in Picture Mode like a Professional

In this article, we shall explore the Firefox picture-in-picture feature; here is all you need to know.

From the early 90s, browser tech has thrived. From being capable of only the barest tasks, now they are robust systems capable of rendering some of the most complex data types.

The increased capacity of browsers has also seen a boom in their use cases, and the picture-in-picture Firefox feature is one example.

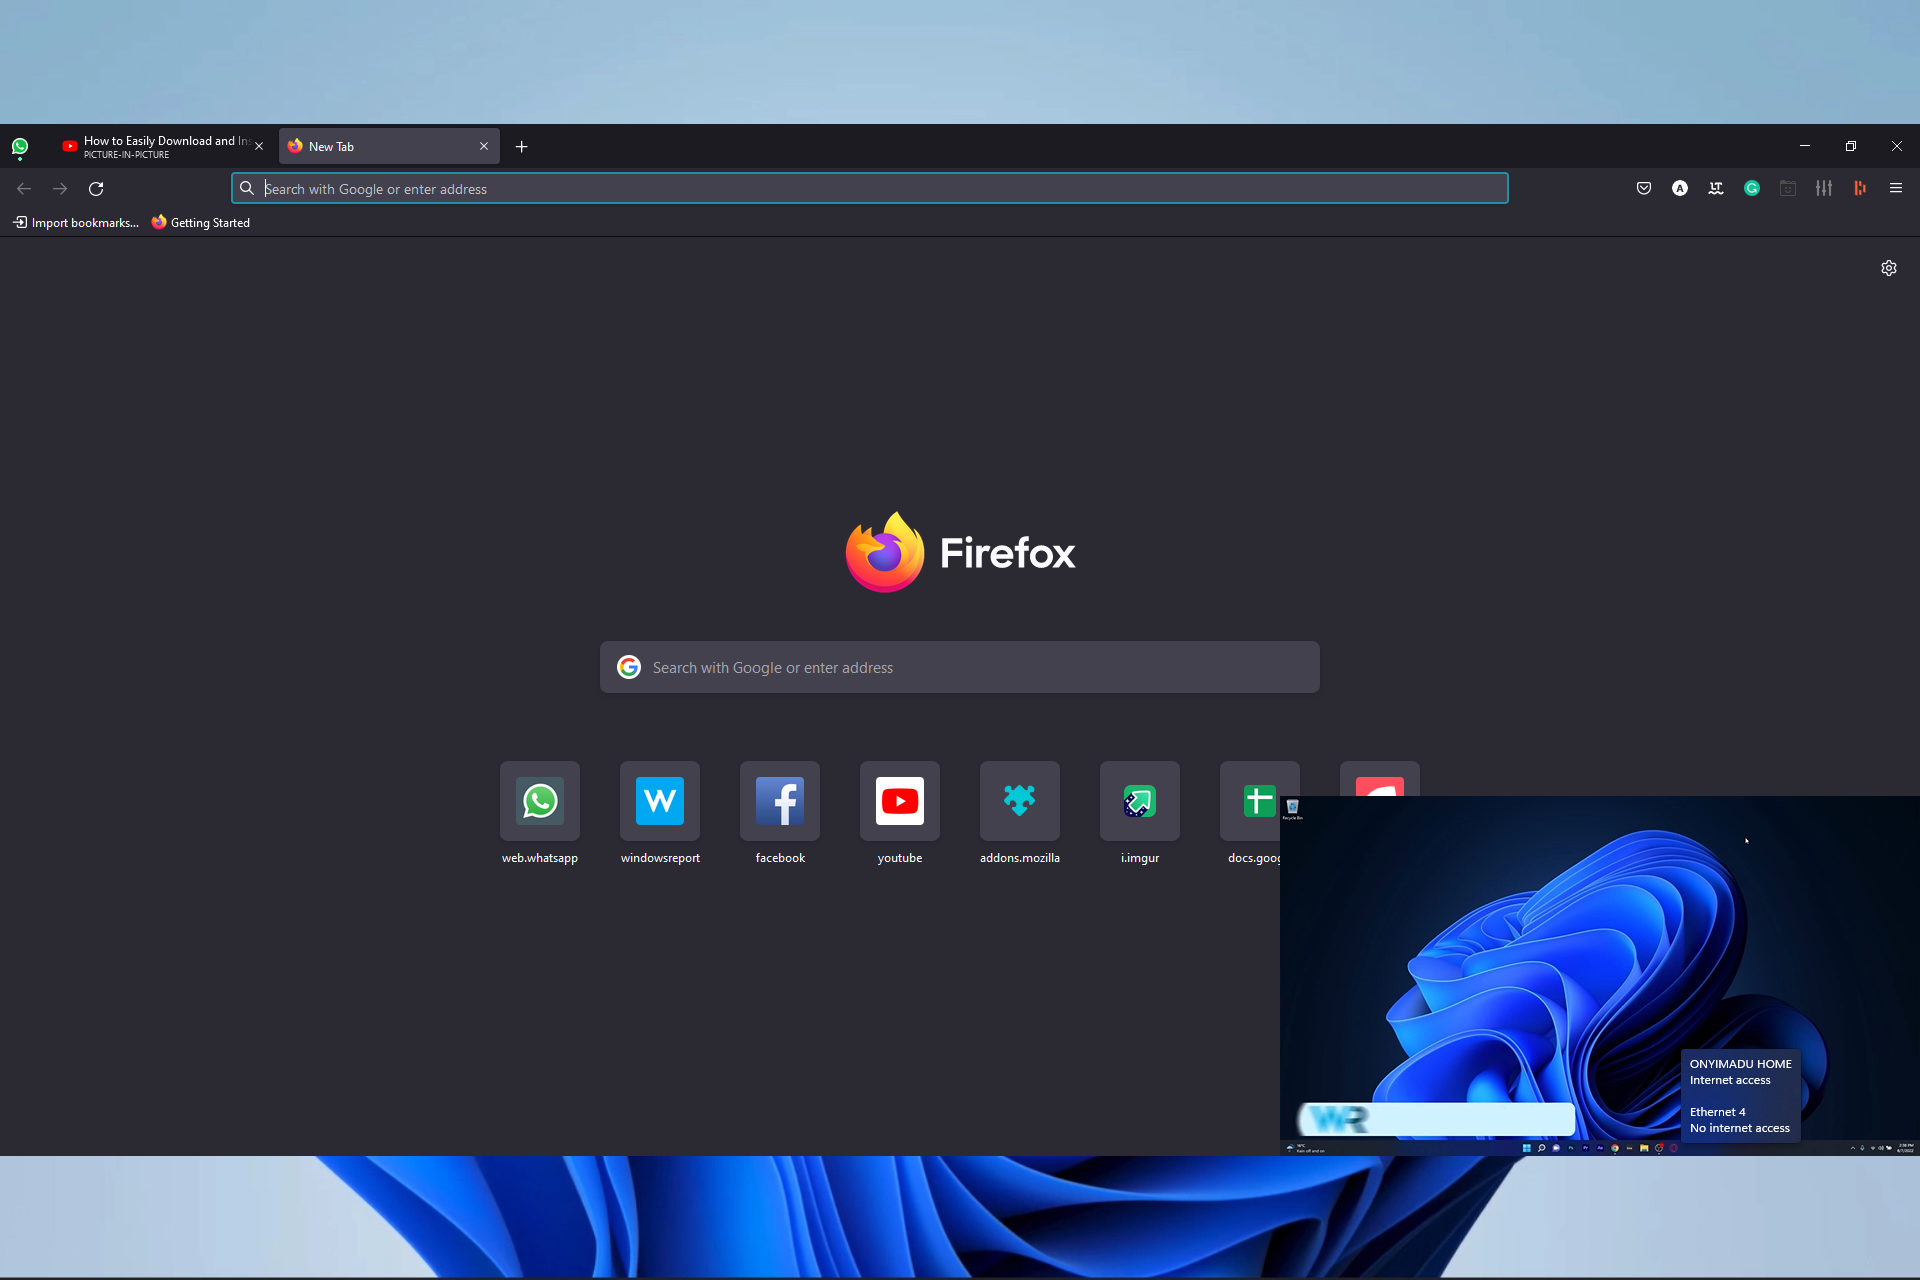
This feature would allow videos to be played in a small overlay on the screen, and users could navigate between tabs and sites without interfering with the playing video using the detached video player.

You can already use picture in picture in other Chromium-based browsers. So far, the feedback regarding the feature has been mostly positive, and Mozilla users are excited to know they will get to try it as well.

Does Firefox have PiP?

Yes, Firefox has now implemented picture-in-picture. So, just like its Chromium-based counterparts, you can dock a video within your main browser frame.

This is great because you do not have to stop watching your videos while scrolling up and down the page.

You will find the Firefox picture-in-picture feature invaluable on YouTube and even on your Android devices.

And before we get to it, note that if the Firefox picture-in-picture is not showing or working, you may need to update your browser to the latest version.

With that said, let’s get into it.

Quick Tip:

Firefox is an amazing browser, yet there is a better alternative that supports this feature. Opera One is a Chromium-based browser that thrives in speed and design.

Opera One comes with some unique features that require no additional downloads. Among those you’ll find the video pop-up player that let’s you detach a video from it’s tab. Also it comes with a native AI.

Opera One

A simple but reliable Chromium-Based browser for all your needs.
Free Download Visit website

How do I enable Picture-in-Picture mode in Firefox?

1. Using the config settings

  1. Launch the Firefox browser.
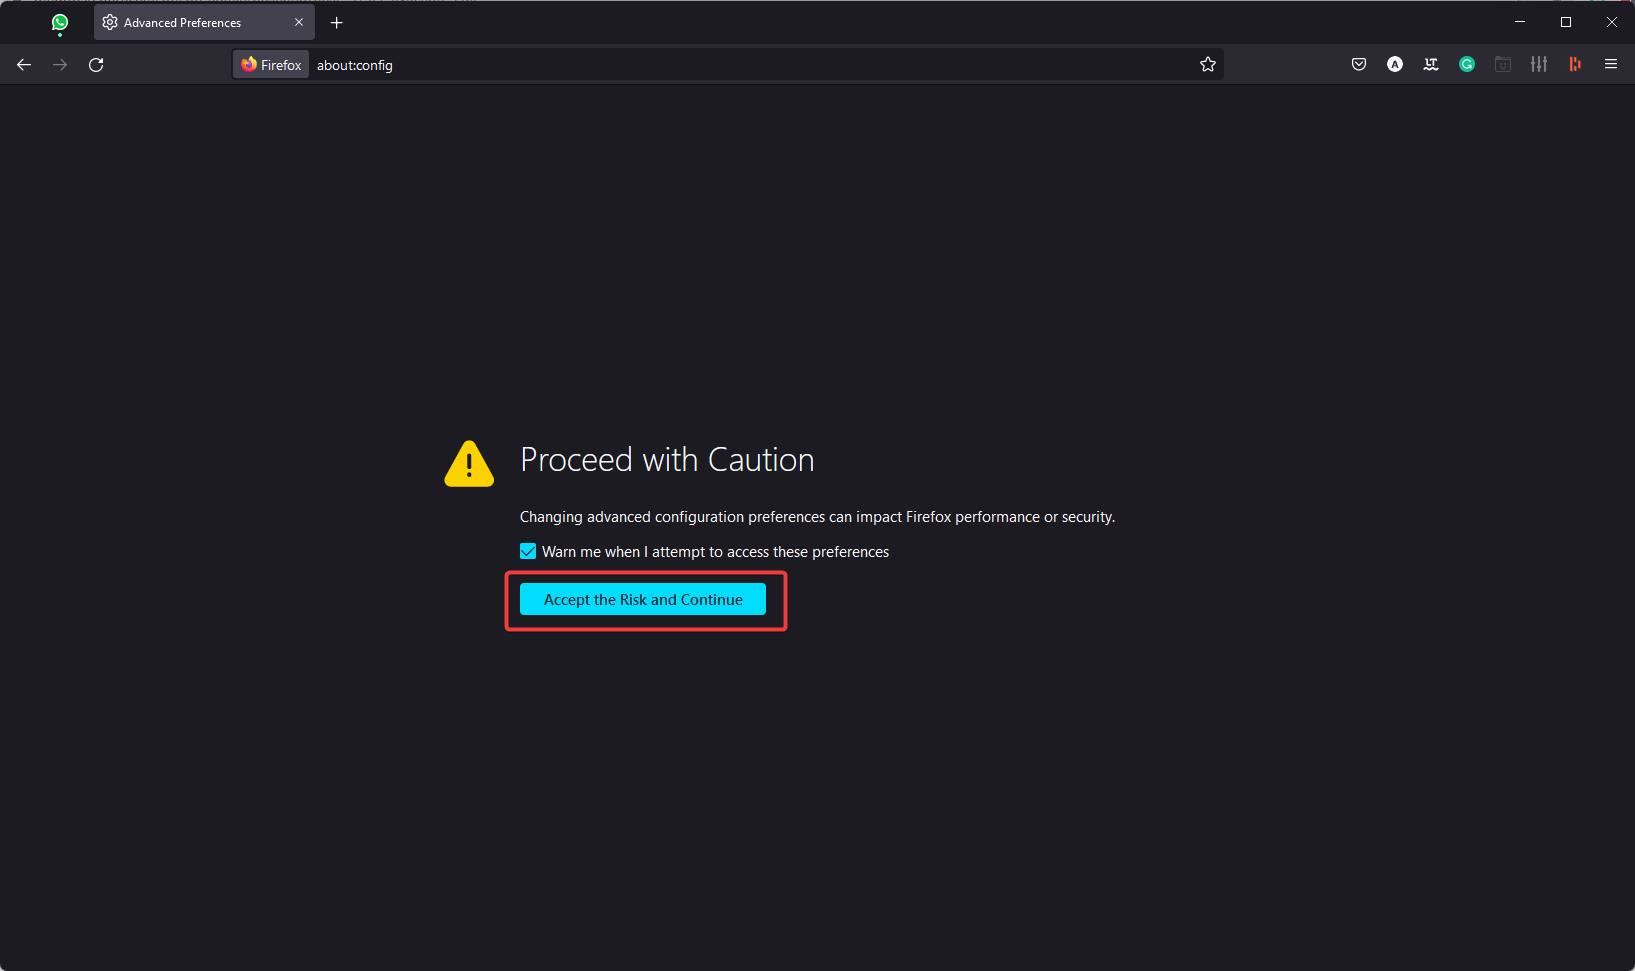
  2. Type the code below in your Address bar and click Enter.
    about:config
  3. Click on I accept the risk to open the configuration page.
    firefox picture in picture
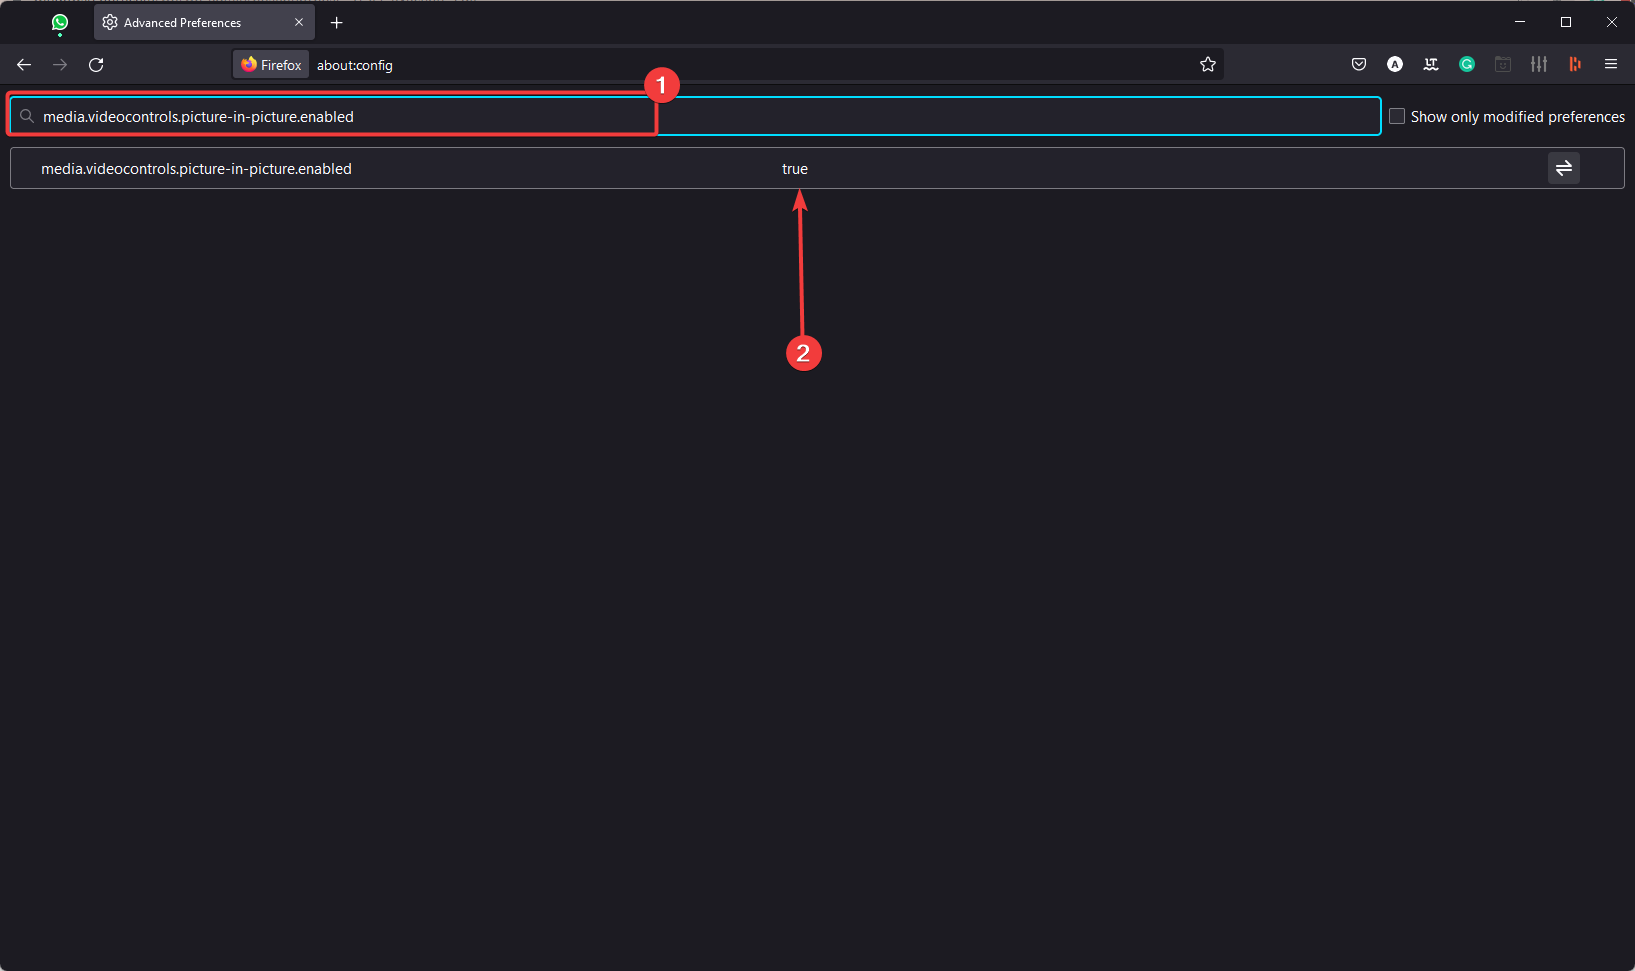
  4. In the text field just below the Address bar, type in the code below, and make sure the value is set to True:
    media.videocontrols.picture-in-picture.enabled
    firefox picture in picture

Please remember that the Firefox preference media.videocontrols.picture-in-picture.enabled determines whether Picture-in-Picture mode is activated, so it needs to be activated. Turning this value to false will disable the Firefox picture-in-picture feature.

2. From the browser settings

  1. Launch the Firefox browser.
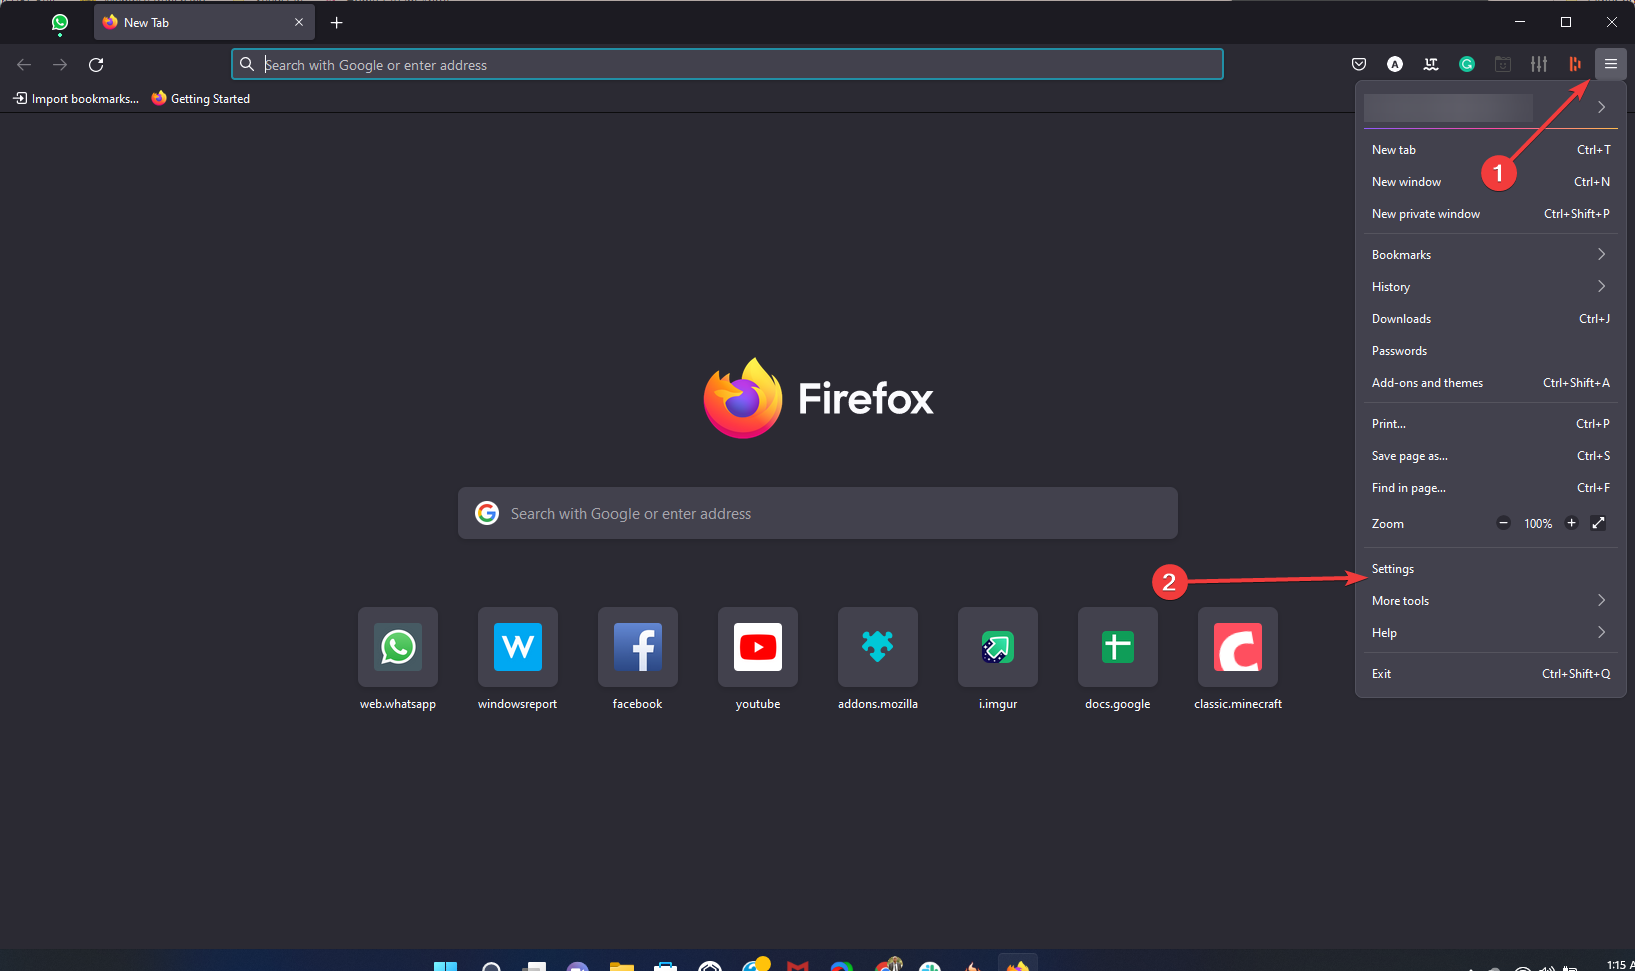
  2. Click on the hamburger menu icon and select Settings.
    firefox picture in picture
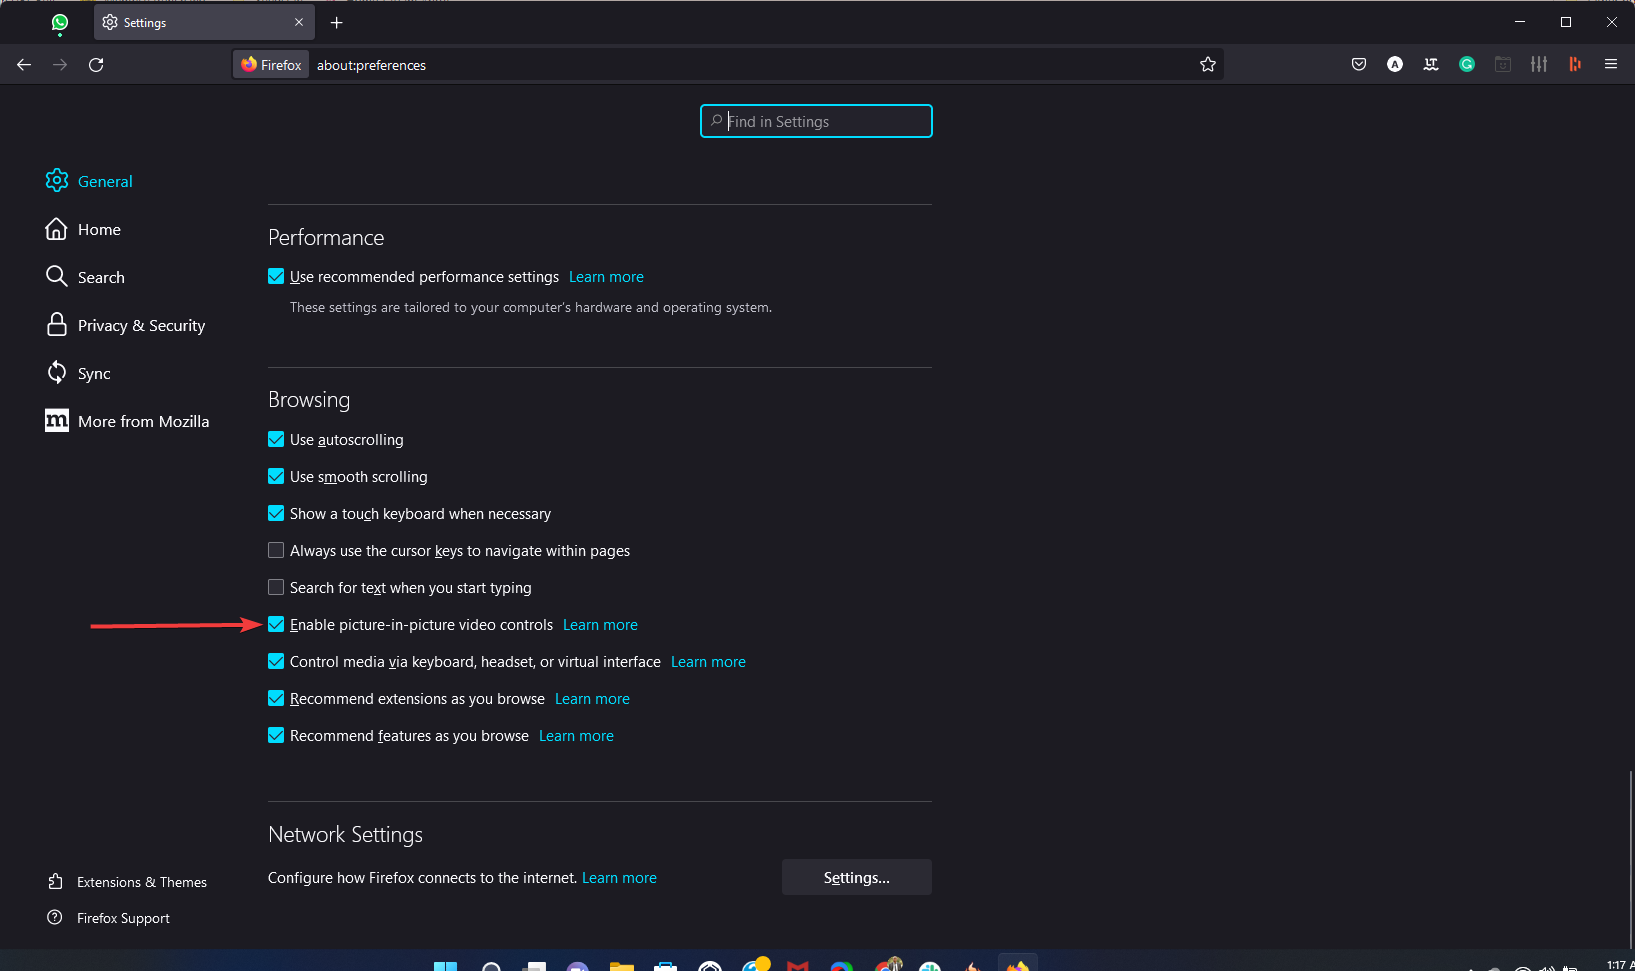
  3. Scroll down to the Browsing section on the right pane and tick the Enable picture-in-picture video controls checkbox.
  4. Restart the browser.

Note that you can adjust the Firefox picture-to-picture size by dragging the edge of the docked video.

3. Using hotkeys

  1. Launch your browser.
  2. Navigate to a site with the video.
  3. Start playing it, then on your keyboard, press Crtl + Shift + ].

This hotkey serves as an automatic Firefox picture-in-picture button. It should immediately dock the video to the bottom right corner while you continue scrolling up or down the page or if you open other applications.

Note that if you want the Firefox picture-in-picture to always be on top, you can drag it after using the hotkey.

4. Using the picture-in-picture icon

  1. Launch your browser.
  2. Navigate to a site with the video.
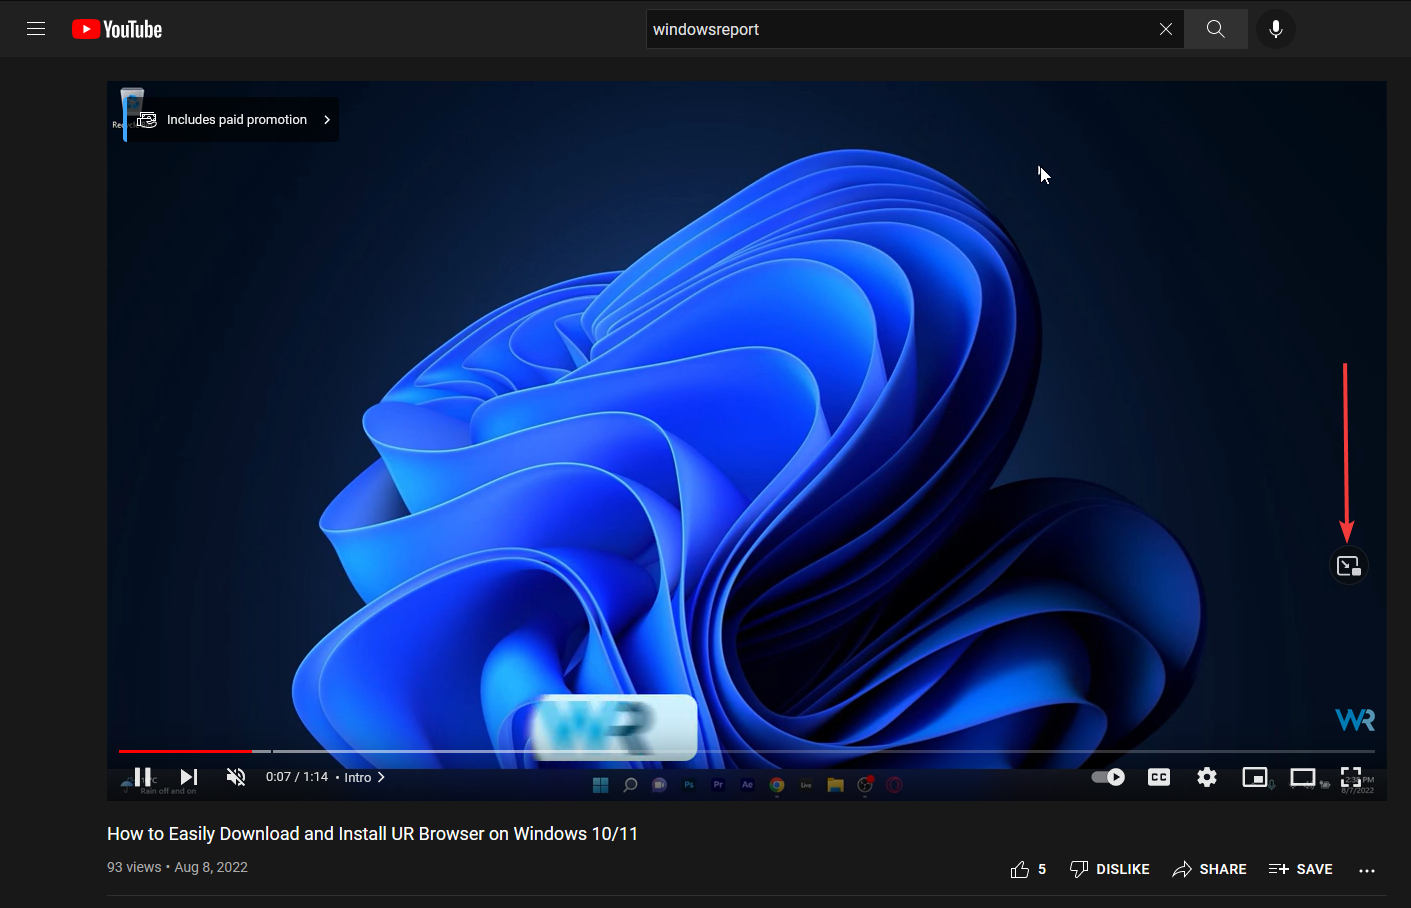
  3. Hover on the video you want to play and click the picture-in-picture icon.

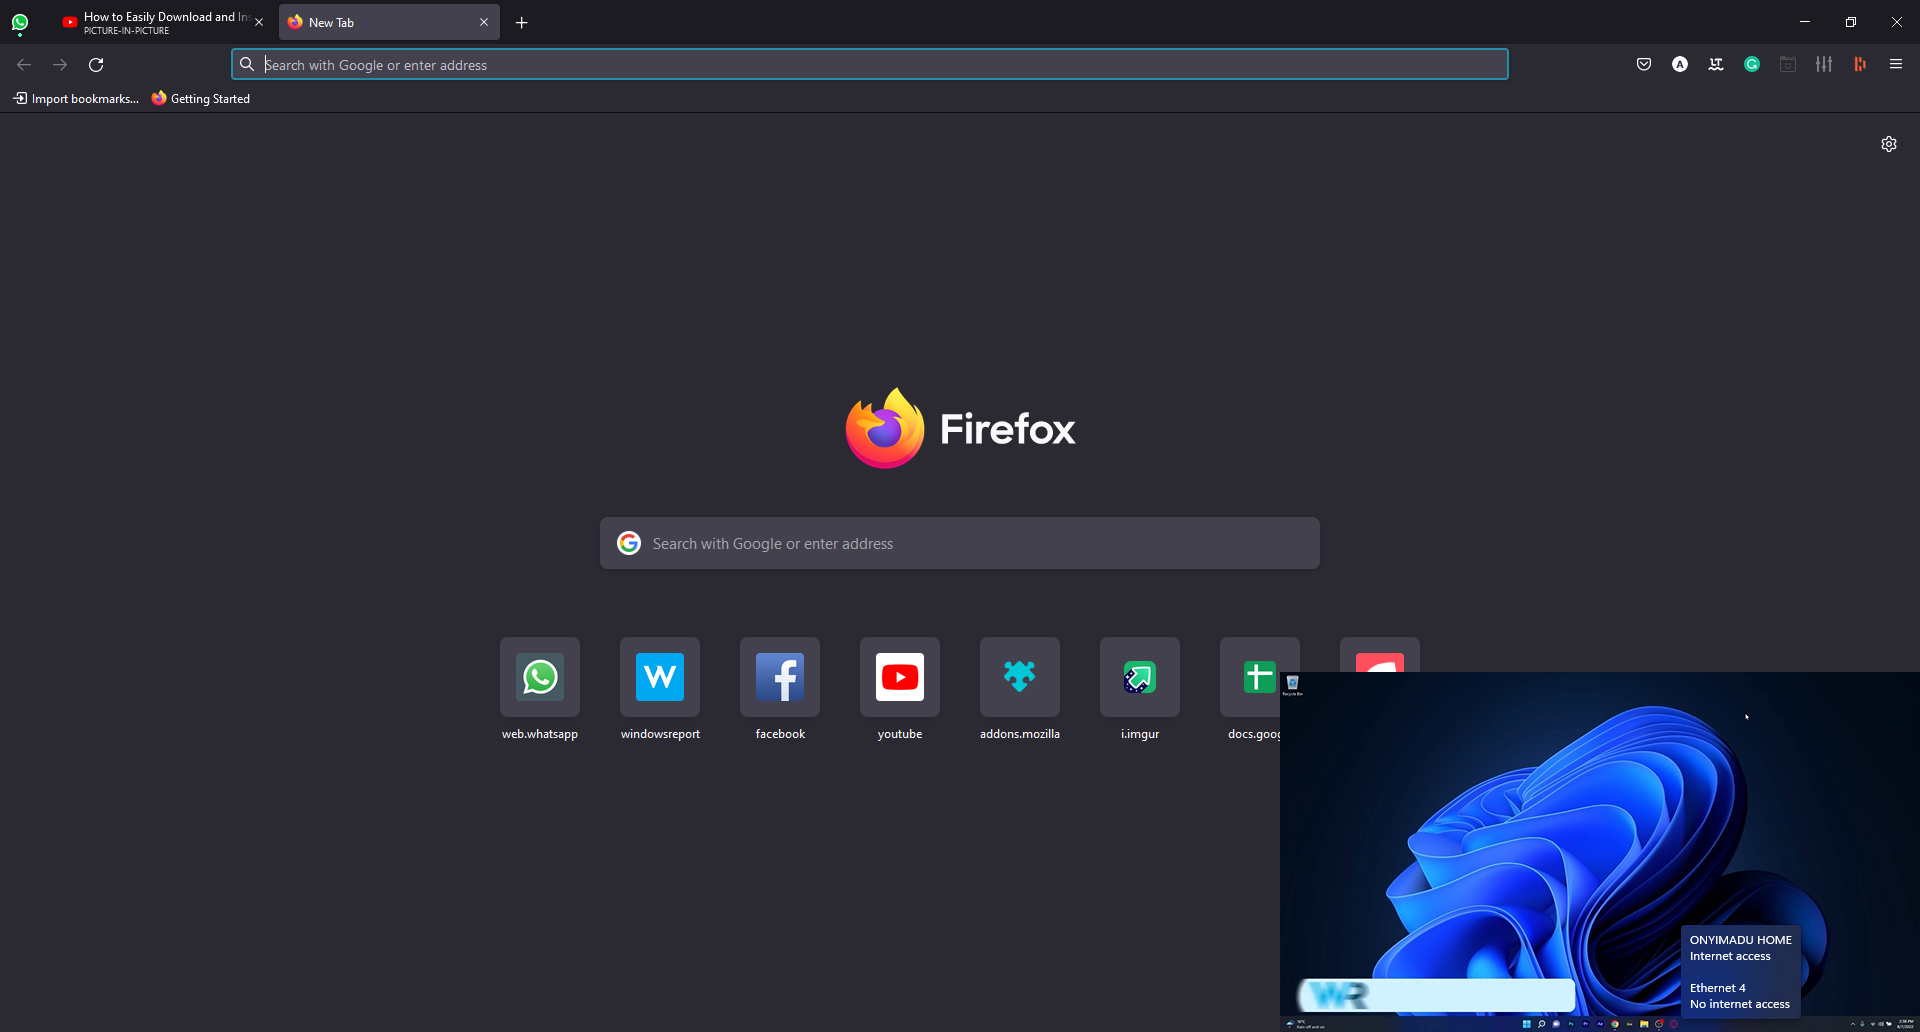
Once you click the icon, the video will open in the Picture-in-Picture interface and display a placeholder on the original site.

The Picture-in-Picture overlay is quite flexible already. You can move it around independently of the tab that hosts the video, and you can resize it as you please, but closing the tab that is the source of the video will also close the Picture-in-Picture window.

It would help if you remembered that the picture-in-picture mode is still in its early stages of development.

As such, the window displays just the pause and play button, and you lack all of the other controls you may expect, such as changing the video’s volume or the quality.

What are your opinions about Firefox introducing picture-in-picture mode? Let us know in the comments section below.

Google adds Xbox Cloud Gaming integration to search results

Google began testing a new front page for its main website with a small selection of users earlier this month. While the biggest change is the addition of widgets, a small addition that seems to have flown under everyone’s radar was the implementation of support for cloud gaming services such as Microsoft’s Xbox Cloud Gaming and Google’s own Stadia.

Bryant Chappel was one of the first to spot this new feature which adds a “Play” button to the search results for games that are playable via the cloud. Upon clicking this new button, the user is taken immediately to the game in the appropriate cloud gaming service and can begin playing almost immediately.

You can see the feature in action in the tweets below.

It’s worth noting that this Xbox Cloud Gaming functionality isn’t live for everyone yet but it is definitely something to keep an eye out for in the near future, especially if you frequently play via the cloud.

In general, this is a pretty great move as this will allow people to simply search for a game in their web browser’s address bar instead of having to go to the Xbox Cloud Gaming website. Sure, it’s just the removal of a single step, but added convenience is added convenience.

These new buttons prominently displayed in Google search results will also expose a large number of people to cloud gaming who likely wouldn’t have heard about the technology otherwise.

Xbox Cloud Gaming is a relatively new initiative by Microsoft that allows people to play video games without having to download and install them or own expensive hardware by streaming the game content in real-time via Microsoft’s servers.

After more Xbox news? Give us a follow on Twitter.

4 Ways to Batch Rename Files in Windows 10/11

Windows 10, and all versions of Windows in particular, feature a very easy way to batch rename files or folders, and in this guide we’re going to show you how to do it.

How to rename multiple files at once with different names on PC?

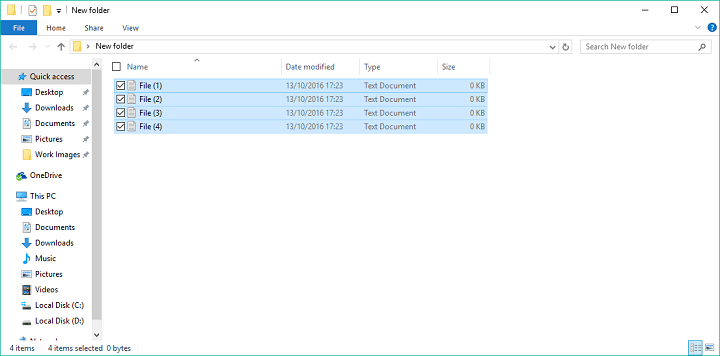
1. Rename files in Windows Explorer

  1. Locate the files you want to rename
  2. Select all the files you want to rename, right-click it, and select Rename
  3. Now just name your file, and that’s it, the rest of files will have the same name, plus numbers to put them in order
bulk rename files windows 10 1

As we said, the easiest way to batch rename files in Windows is to use the traditional way. You just need to select the files you want to rename, click on the first one’s name, set a new name, and all files will have the same name, plus ordering numbers.

This is the simplest way, but it doesn’t allow you to do anything else, as it automatically assigns numbers to the rest of files.

But if that’s okay with you, look no further. There you go, that’s the easiest way to rename multiple files in Windows 10.

However, if you want some more options, like the ability to add underscores, add numbers without brackets, change file extensions and more, try some of the methods listed below.

For users who only need to change a single item instead of a whole batch, you can follow this step by step guide on how to rename a file in Windows.


2. Rename files using the Command Prompt

  1. Locate the folder with files you want to rename
  2. Hold Shift on your keyboard, right-click anywhere in that folder, and choose Open command prompt here
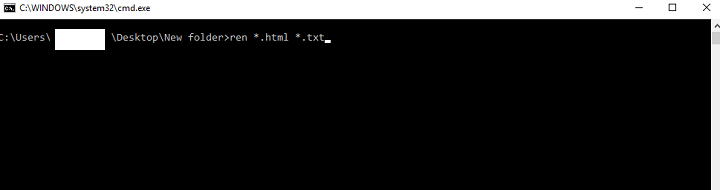
  3. When to Command Prompt window pops up, add the ren command, along with current file type, and the file type you want to convert it to.
    • Here’s how it should look:
      bulk rename files windows 10 2
  4. Press Enter

Command Prompt offers more flexibility than the regular way, but it still isn’t the most advanced option.

This tool is the most useful if you want to change multiple file extensions at once. So, in case you want to quickly convert, for example, text files to HTML files, just use the Command Prompt.

There you go, after performing this command in the Command Prompt, all your select files are going to be converted from one format to another.

If you can’t run Command Prompt as administrator to test this solution, check out our article about this topic.

We can also help you personalize Command Prompt to your liking.


3. Rename files using Powershell

    The most powerful Windows 10’s built-in tool to batch rename multiple files is PowerShell. This tool allows you to rename all the files in a folder of your choosing at once, according to your commands.

  1. 1. Press the Windows Key and type powershell in the search box.

  2. 2. Select the first result to open the Powershell tool.

  3. 3. Input the command cd along with the location of the folder containing files you want to rename.

  4. 4. Press Enter to run the command.

  5. 5. Now you can add various commands to customize renaming of your files.

  6. 6. For example, we’re going to type a command which replaces blak spaces with underscores (_): Dir | Rename-Item –NewName { $_.name –replace “ “,”_” }

    bulk rename files windows 10 command
  7. 7. Press Enter to run the command.

  8. 8. Your files have all been renamed in the manner you wanted.

This feature offers the most options, but using this method can be time-consuming, and complicated for beginners, which is why we assume that most users will skip this solution.

There you go, PowerShell is the most powerful tool for renaming multiple files in Windows 10.

You can experiment with various options and commands, in case you have some free time, and want to learn more about this tool.

For example, you can remove default apps on Windows 10 using Powershell.


4. Rename files with a third-party program

We’ve shown you the three best built-in ways to batch rename multiple files in Windows 10. However, if you still want some advanced options, but don’t want to mess with command lines, there’s always a third-party solution.

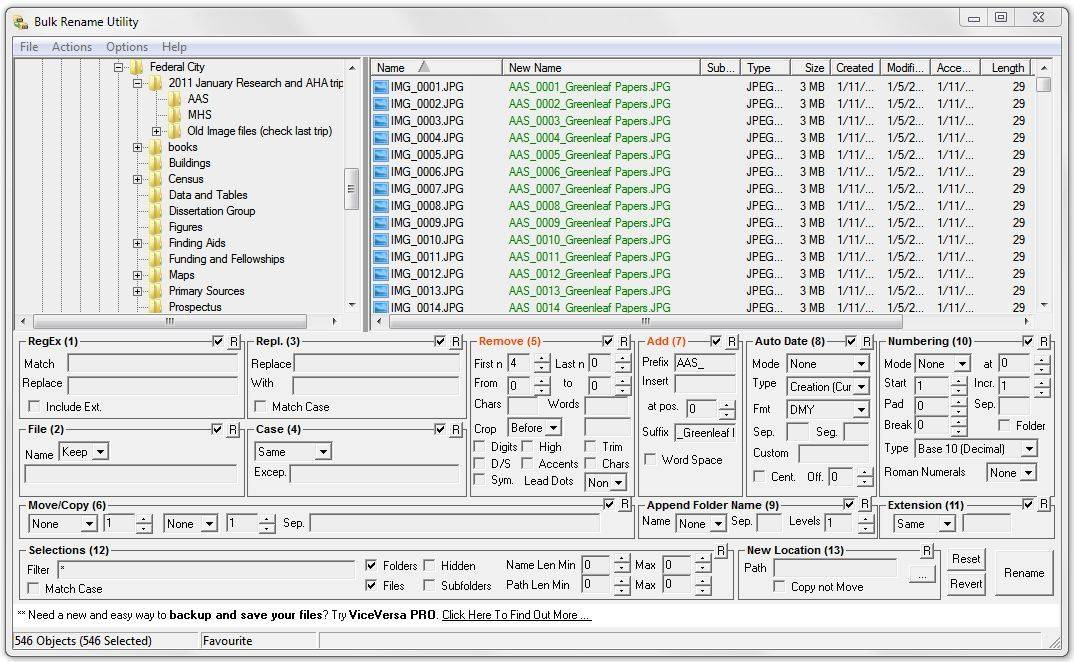
There are numerous programs for bulk renaming files in Windows, but our favorite is the program called Bulk Rename Utility.

Bulk Rename Utility is a simple, easy-to-use tool that allows you to choose between various options for renaming your files. The program is available for free, and you can download it from this link.

bulk rename utility windows

When you open Bulk Rename Utility, just locate the files you want to rename, and select them. Now you can choose a high variety of options for renaming. Some of the options are the ability to replace characters, remove characters, add dates, numbers, and even relocate your files.

If you’re not satisfied with how Bulk Rename Utility works, you can check for some alternatives online, we’re sure there are more good tools to batch rename files in Windows 10.

For those looking to manage system folders or perform advanced tasks like renaming the Software Distribution folder, check out this helpful guide on how to rename the Software Distribution folder in Windows.

FAQs

What tools can I use to batch rename files in Windows?

You can use built-in tools like File Explorer or third-party software like Bulk Rename Utility or Advanced Renamer to easily batch rename files.

Can I use special characters when batch renaming?

Yes, you can use certain special characters like underscores and hyphens. However, avoid using characters that are not allowed in file names, such as slashes or colons.

Is there a way to add a prefix or suffix to all files?

Yes, when renaming, simply type the desired prefix or suffix before or after the base name. Windows will apply it to all selected files.

Can I batch rename files using Command Prompt?

Yes, open Command Prompt, navigate to the folder, and use the ren command to batch rename files with specific patterns or formats.

For more interesting tutorials, you can check out our How-To section.

That should be all for our article about renaming multiple files in Windows. Tell us what in the comments, what do you think about these methods, and what is your favorite.


How to easily install graphics card drivers on Windows 10

Drivers are the most important software components which allow our PCs and apps to run in optimal conditions. Considering this, it is essential to perform a proper installation for them.

There are a few easy ways you should consider when it comes to installing your graphics card drivers on Windows 10.

In this article, you will find a selection precisely of the best-proven solutions regarding this subject. Just take a closer look below.

How can I install the graphics drivers on Windows 10?

1. Install graphics card drivers using third-party apps

Installing your graphics card drivers manually is a time-consuming task. We strongly recommend you to use third-party software, so your work will be simplified much more.

With this option, you’ll not have to bother yourself again with any driver-related action. This tool will help you automatically install, update, and fix your software components.

⇒ Get Fortect Driver Updater

2. Download and install Windows 10 drivers from the manufacturer’s website

AMD drivers

  1. Go to the AMD driver support website.
  2. You can instantly download the free recommendation.
  3. You can either type your exact product name or search for it in the Graphics drivers list.
  4. Download the one needed.
  5. Follow the on-screen instructions to complete the setup.
  6. Restart your PC.

nVidia drivers

  1. Access the Nvidia driver support website.
  2. Identify the appropriate driver for your nVidia product, then click on the Search green button.
  3. After the search is done, select Download.
  4. Follow the on-screen instructions to complete the setup.
  5. Restart your computer.

Intel drivers

  1. Go to the Intel driver download center.
  2. Choose Graphics.
  3. Search for the graphics driver that you need and click on its name.
  4. Choose an option from the available downloads.
  5. Don’t forget to check the detailed description listed on the right side

3. Install drivers for your graphics card using Device Manager

    The easiest way to install drivers for your graphics card is to use the built-in Device Manager. This tool helps you download and install the latest drivers for your GPU.

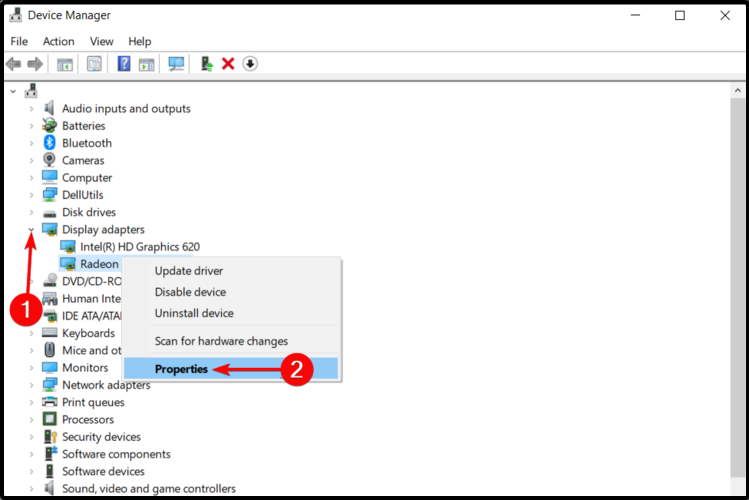
  1. 1. Open Device Manager.

    device manager windows 10
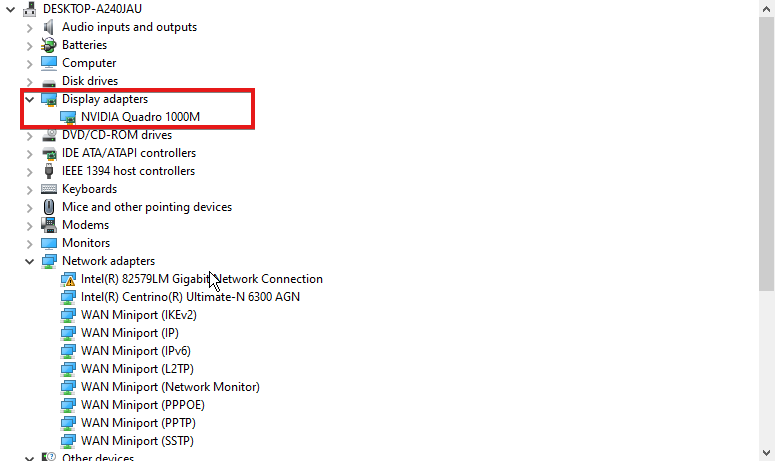
  2. 2. Expand the Display adapters tab and right-click on your graphics card driver.

    display adapters windows 10
  3. 3. Select Properties from the list of options.

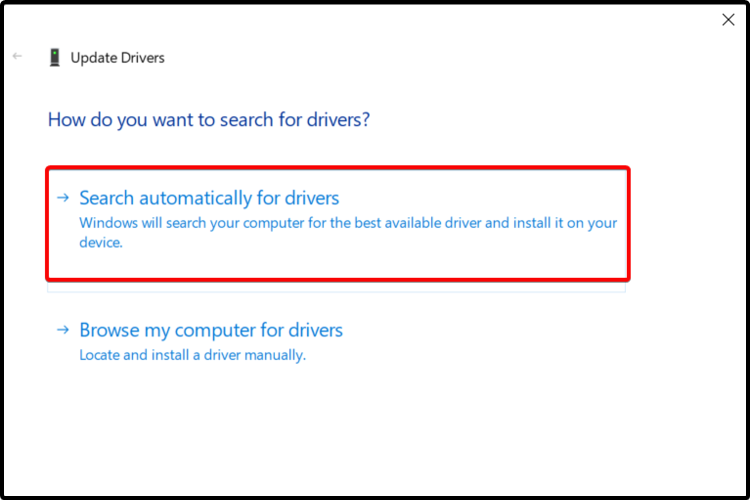
  4. 4. Click on the Driver tab, then select Update Driver.

    windows 10 update driver
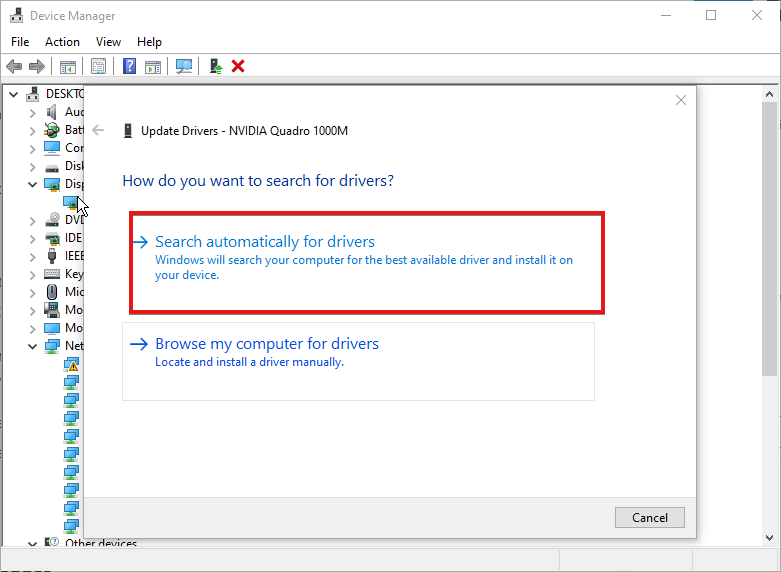
  5. 5. Click on Search automatically for updated driver software.

    update drivers windows 10 automatically
  6. 6. Device Manager will now install the latest drivers on your PC. This process can take a few minutes.

Note icon NOTE
If your graphics card is not recognized in Device Manager, then feel free to check our full fix guide.

The presented methods will definitely help you install the graphics card drivers. Also, to keep your software components safe, you can always check how to update drivers in Windows 10.

For any other questions or suggestions, don’t hesitate to leave a comment in the section below. We’re eager to hear your opinion.

How to Enable System Sound on Windows 10

A Windows 10 system sound app might be very useful when you are near the PC but don’t see the monitor.

In this case, you will need a specific sound to tell you when the PC starts, or if you got any new pop-ups regarding some updates for example.

You have the option to enable or disable these system sounds on Windows 10. Many users found out that the sounds are quite helpful when they are not at the computer or when playing games.

This audio feature will notify them about any changes that the operating system is doing without having to close a movie or quit a game.

Is this what you have in mind as well? In such a case, we have prepared a guide for you.

How can I activate sound on Windows 10?

1. Update your sound card driver

  1. First of all,  press the Windows button plus the R button on the keyboard (Windows +R).
  2. Type devmgmt.msc to launch Device Manager.
  3. In the Sound, video, and game controllers, click (left click) on the driver you have there.
  4. Click on Properties.
  5. Click on the tab that says Update.
  6. From here you will need to check if you are able to make an update on the card, if you can do it by following the instructions on the screen see afterward if the system sounds on Windows 10 work.
  7. Reboot the PC.

Whatever the reason might be, Windows 10 comes with several options to update a device driver manually. The first thing that you should in this case do is to update your sound card driver.

For immediate results, you can install the third-party application called Outbyte Driver Updater and update your sound card driver with one click.

Outbyte Driver Updater updating drivers

Besides that, upon installation, this lightweight tool will scan your PC for more out-of-date device drivers that can cause you a lot of trouble.

Outbyte Driver Updater

With a quick push of a button, Outbyte Driver Updater will make your PC use the latest sound card driver.
Check price Visit website

2. Enable sound in Windows 10

    You can easily enable system sound by configuring the Sound settings on your device. From there, you can toggle sound on and off in just a click.

  1. 1. Right-click on a free space on your desktop. A menu will open.

  2. 2. Click on the Personalize option.

    Windows personalize options
  3. 3. In the Personalization window, click on Sounds. This option is situated in the lower side of the window.

  4. 4. In the Sound dialog, navigate to Play Windows Startup.

    play windows startup sound
  5. 5. Check this box to enable sound on your device.

  6. 6. Click on Apply on the lower side of the window.

  7. 7. Reboot the PC and check if the sound works.

You can also access the Sound menu much quicker in this manner: go to Start > type control panel > hit Enter to launch the Control Panel > go to Hardware & Sound > select Change system sounds.

change system sounds windows 10

This is all, you can see a few easy steps above that will help you with the system sounds on Windows 10.

After completing the procedure, do not hesitate to bookmark our Tech Tutorials Hub.

Also, since you seem to be interested in this topic, check out the best software to boost bass sound.

If you have any ideas on how to enable audio in Windows 10, just share your thoughts in the comments below.

How to rotate an object and the view in Paint 3D

In the past, in order to rotate a 3D object, you had to invest in specialized 3D software.

Today you can achieve the same results by simply using the built-in options found inside Paint 3D.

If you want to know how to rotate the view of your 3D project inside Paint 3D, you don’t have to look any further.

Read on to find out how to rotate an object in Paint 3D on your Windows 10 PC.


How to rotate an object in Paint 3D?

    You can easily rotate an object in Paint 3D using the app’s built-in tools. Paint 3D allows you to rotate an object to any direction you want, as well as further modify it afterwards.

  1. 1. Search for Paint 3D on your computer and launch it.

    paint 3d app - Paint 3D how to rotate view
  2. 2. Click the New button to create a new 3D project, or browse for a previously created 3D project.

  3. 3. Select the 3D shapes option from the top menu bar.

    rotate view paint 3d application
  4. 4. Choose a desired shape from the menu found on the right side of your screen. You need to click on it to make the selection.

    how to rotate in paint 3d choose shape
  5. 5. Drag and drop the shape onto your Paint 3D canvas.

  6. 6. You will see multiple semi-circle icons surrounding your shape. Each one rotates the shape to another direction.

    rotate 3D shape - How to rotate view Paint 3D
  7. 7. Click the buttons to rotate your shape as you like.

What is the Mixed Reality tool?

Besides all the cool and yet simple-to-understand features that Paint 3D has to offer, none of them is as interesting as the Mixed Reality view.

This mode allows you to observe, rotate and re-arrange your 3D models inside a 3D space.

Mixed Reality uses the 3D Viewer app found inside your Windows 10.

This app will allow you to observe your 3D project from any angle you choose. Beyond this, you can also apply changes and draw inside the same environment.

Moreover, Mixed Reality makes it easier than ever to create detailed 3D structures with just a few clicks of the mouse.

How to rotate the view in Paint 3D

  1. Open up Paint 3D by searching for it in Cortana.
  2. Select the New button. You can create a new 3D project, or open a previous project of yours.
  3. Add the 3D elements you want to have in your project or edit the previously created ones to your desire.
  4. To see your 3D project from any perspective, press the Mixed Reality button found in the middle of the upper part of your screen.
  5. This will open the 3D Viewer app.
  6. You can now modify, color, add, and delete elements from your 3D project while observing it from any perspective.

Want to move text and objects inside Paint 3D? Here’s how to do it


Note: When working with 3D objects inside Paint (3D text included), you will be able to modify the location and edit the size of the 3D elements at any point.


In today’s how-to article we explored how to be able to change the view and direction of your 3D project inside Paint 3D.

We hope that you found this article helpful. Please let us know by using the comment section below.

READ ALSO:

Full Fix: Deceit game issues on Windows 10, 8.1, 7

Deceit is a multiplayer first-person shooter that will put your instincts to the test. As a player, you wake up in an asylum to the sound of an unfamiliar voice, surrounded by five others.

You realize that a third of your group has been infected with a virus. The only question is: who will escape?

Deceit is a challenging and exciting game, but players report it’s also affected by various technical issues.

Fortunately, the game developers have published a helpful post explaining how to fix the most frequent Deceit bugs that gamers may encounter.

Why is my deceit black screen?

It’s not a secret that some users reported experiencing this issue after returning to the game due to changes from their old settings file.

So, don’t panic; this is a more common thing than you know. There’s no reason to be alarmed because we are about to show you how to fix it in the article below.

Deceit is a unique multiplayer game. However, it has its share of issues. Speaking of issues, here are some common problems that users reported:

  • Deceit game freezes, low fps – According to users, the game can sometimes freeze or encounter fps issues. To fix that, be sure to remove any problematic applications that might interfere with the game.
  • Deceit won’t launch, start, not working, has stopped working – Many users reported that the game won’tuld start on their PCs. This can be an issue, but you can fix it by disabling your antivirus software.
  • Deceit failed to load profile – This is another standard error, and missing components or corrupted game files can cause it. Again, verify the integrity of game files and install DirectX and Visual C++ components, and the issue should be resolved.
  • Deceit game keeps crashing – Crashes can occur due to specific third-party applications. To fix that, be sure to remove those applications altogether.
  • Deceit voice chats not working – This issue can occur due to your audio configuration or drivers. If your microphone is configured correctly, update your audio drivers and check if that solves the problem.

How do I make my Deceit run better?

You could try dropping the resolution while ensuring Vsync is off and playing in true fullscreen.

That being said, you also have to check the system requirements for the game and make sure that the rig you are playing on is strong enough to handle the graphics.

Recommended system requirements:

  • Requires a 64-bit processor and operating system
  • OS: Windows 10 (64-bit)
  • Processor: Intel Core i5 / AMD Ryzen 5 or higher
  • Memory: 16 GB RAM
  • Graphics: NVIDIA GeForce GTX 970 / AMD Radeon R9 290X or higher
  • DirectX: Version 11
  • Network: Broadband Internet connection
  • Storage: 20 GB available space

How do I fix frequent Deceit bugs?

1. Install the latest drivers

Sometimes issues with Deceit and other games can occur if your drivers are out of date. For example, Graphics card drivers usually cause problems, so be sure to sort them out first.

You can download the necessary drivers by visiting your graphics card manufacturer’s website and searching for your model.

However, sometimes other drivers can cause this issue to appear, and to fix it, it’s advised to update all other outdated drivers.

This can be a tedious process if you’re doing it manually, so it’s better to use an automated driver updating solution that will update all your drivers automatically with a single click.

These programs are fully automated, with little input needed from the user himself, and the libraries that back them up ensure that your drivers will always be the latest ones available.

2. Check your antivirus

According to users, your antivirus software is the most common cause of Deceit issues. To fix the problem, it’s required that you add the game to the exclusions list in your antivirus and allow it to go through your firewall.

If that doesn’t work, you can try disabling certain antivirus features or disable your antivirus altogether. If that doesn’t work, your final option is to remove your antivirus.

Remember that your system will be protected with Windows Defender if you remove your antivirus, so there’s no need to worry.

If removing the antivirus solves the problem, you should consider switching to a different antivirus solution.

Finding a better antivirus to protect your system from malware may sound challenging to decide, but you can easily pick one from the best antivirus software for Windows 10.

3. Remove problematic applications

Automaton has already acknowledged the annoying crashes affecting the game and is looking for a permanent fix. Unfortunately, there are also cases where third-party programs are leading to crashes. Such external applications are known to cause issues, including currently NVIDIA ShadowPlay and NVIDIA GameStream.

To fix this problem, removing the problematic applications from your PC is advised. To do this accordingly and without app leftovers, you can now use the best uninstaller software on the market.

If you’re unfamiliar, uninstaller software will remove the selected application and all associated files and registry entries.

Using the uninstaller software will ensure that the application is completely removed from your PC. Once you remove the problematic applications, check if the issue is still there.

Tip icon Tip
Game Fire is a game booster that will get rid of freezes, lags, low FPS and other issues while playing. Download it now (free) for a better gaming experience.

4. Restart Steam

Sometimes this problem can occur due to minor glitches with Steam. However, you need to restart Steam to fix this problem.

Once Steam restarts, try to rerun the game and check if that solves the problem.

5. Install the latest updates

  1. Press Windows Key + I to open the Settings app.
  2. When the Settings app opens, go to the Windows Updates section.windows updates
  3. Click the Check for updates button.windows 11 check for updates
  4. Windows will now check for updates. If any updates are available, they will be downloaded in the background and installed as soon as you restart your PC.

If you’re having issues with the Deceit game, you might be able to solve those problems simply by installing the latest Windows updates.

According to users, sometimes specific bugs on Windows 10 can appear, and to fix them, the best method is to install the missing Windows updates.

Once the latest updates are installed, check if the problem is still there.

6. Make sure that you download the latest patches

Although Deceit has various issues, developers are working hard to fix them. There were several patches released addressing frame rate and stability issues.

To fix this and many other problems, keep the game updated.

7. Download the Universal C Runtime update

If you’re running Deceit on a Windows 7 or 8 computer, make sure you’ve installed the Universal C Runtime update.

You can download the update from Microsoft’s Support page.

8. Edit game.cfg file

According to users, the game is forcing them to use 1920×1080 resolution regardless of their current display resolution. This can be a big problem for some users, and to fix it, you need to change a few lines in-game.cfg file.

This is relatively simple, and you can do it following these steps:

  • Go to this directory:
    • C:UsersYour_usernameSaved Gamesdeceit 
  • Locate the game.cfg file and open it with Notepad.
  • Now locate r_Height and r_Width values and change them to your current resolution accordingly.

After that, save changes, and the game will be forced to start using the resolution you specified.

9. Verify integrity of game files

  1. Open Steam
  2. Go to your Library  and locate Deceit
  3. Right-click it and choose Properties from the menu.steam properties
  4. Go to the Local Files tab and click Verify Integrity of Game Files button.verify game file integrity
  5. The verification process will now start.
  6. This can take about 15 minutes, so don’t interrupt it.
  7. Once the process is finished, try to start the game again.

If you have any issues with the game, that might be because game files are corrupted.

10. Make sure that you have the necessary components installed

Sometimes Deceit won’t run properly on your PC unless you have the essential elements installed.

This is usually Visual C++ Redistributables and DirectX. You can generally find the required components in the game’s installation directory.

Search for vcredist and DirectX directories and run all setup files from these directories.

Alternatively, Microsoft’s website can download the necessary components for free.

11. Use a dedicated graphics card

According to users, they encounter various issues in Deceit, which seem to be related to your graphics card. Many users have integrated and dedicated graphics, which can sometimes lead to multiple problems.

To fix the problem, you need to open your graphics card control panel and set your dedicated graphics card as your default. Alternatively, you can go to BIOS and turn off your integrated graphics. Unfortunately, doing so will force your system only to use dedicated graphics.

You will often run into situations such as:

  • Deceit timer expired
  • Deceit unable to authenticate with Steam
  • Deceit keeps crashing
  • Deceit stuck at the loading screen

That being said, there’s no need to be alarmed, as I showed you the best steps to take when handling such a problem.

You can also look for more information about these problems on the Deceit forums, or the Deceit Discord, where fellow gamers post about these topics.

Deceit is a unique game, but it suffers from various issues. However, we hope this guide was helpful to you when your Deceit has stopped working.

How to find the Windows Update Log in Windows 10

In previous versions of Windows, whenever you performed a system update, the update log would be stored on your PC in the form of a text document that you could open easily.

However, all of these changed when Windows 10 came along. Instead of a typical text file, the Windows Update service now writes a number of Event Tracing for Windows logs.

So actually, there is no Windows update log location. Opening these logs isn’t as simple as it once used to be. However, there are workarounds for this.

How can I find the Windows Update Log in Windows 10?

We’ve compiled this step-by-step guide to show you how you can access the Windows Update logs using 2 different methods.

1. Use PowerShell

  1. Right-click the Start button and select PowerShell (Admin) from the list.
  2. Type in the following command and press Enter to run it: Get-WindowsUpdateLog
    powershell

Once the command finishes running, it will create the classic WindowsUpdate.log file in your Desktop folder.

This folder can be then easily opened with Notepad, and you can troubleshoot any issues you may have with Windows Update.

If PowerShell has stopped working, check out our article and fix the issue in no time.


2. Use Event Viewer

    The update logs on your device can be easily accessed using the built-in Event Viewer. You can select the events you are interested in and read the logs for each one of them.

  1. 1. Press Windows + X to open the WinX menu.

  2. 2. Select Event Viewer from the list.

    Winx menu for Event Viewer
  3. 3. Go to the following path: Applications and Service Logs\Microsoft\Windows\WindowsUpdateClient\Operational

  4. 4. Select the events whose logs you want to see from the middle column.

    event viewer windows 10
  5. 5. Read the log details listed for every event you are interested in.

  6. 6. Close Event Viewer when you finish.

If you want more options, check our comprehensive article to find the best event log viewers that you can use on Windows 10.

By following these two methods you will be able to once again read the Windows Update Log as you used to in previous versions of Windows.

For advanced PowerShell commands to view and export update history, see our detailed tutorial here: Windows Update History with PowerShell.

Please remember that updating your Windows is important, and if you encounter any issues when trying to update, the Windows Update Log can come in handy.

You can also review past release details directly from the Windows 10 update history page.

Do you think that the Windows Update Log was better off being the way it was before Windows 10? Let us know in the comment section below.

Also, leave there any other questions or suggestions that you may have and we’ll be sure to check them out.

Fix: Internet Explorer Tabs Freeze or Open Slowly

Internet Explorer is counting its last days, but it still has many users. And these users are indeed facing some issues with Microsoft’s outgoing browser, even if it’s more stable than ever.

If your Internet Explorer constantly crashes, freezes, or hangs in Windows 10, 8.1, 7, or maybe it won’t even start, you’ve come to the right place.

One of the main concerns of IE users is that their tabs take a lot of time to open or freeze. If you only encounter performance problems within the browser, you should look at your settings.

This issue can be caused by a cluttered browser cache and outdated or malicious browser add-ons. 

We found the most common causes that make your Internet Explorer tabs load slowly or freeze and comprised an easy-to-follow guide on what you can do.

Why does my Internet Explorer keep freezing up?

Buggy toolbars or other browser add-ons commonly cause crashes. You can check if add-ons are the problem by running Internet Explorer without add-ons. To do so, open the Start menu and launch the All Programs > Accessories > System Tools > Internet Explorer (No Add-Ons) shortcut.Feb 6, 2013

  1. Clear IE Cache
  2. Check Your System
  3. Check if the specific add-on is causing problems
  4. Change Internet Settings in Registry Editor
  5. Additional Solutions

How do I stop Internet Explorer from freezing?

Crashes, freezes, or slow responses are usually caused by buggy toolbars, browser add-ons/extensions, corrupted caches, cookies, or slow Internet.

You can check if add-ons are the problem by running Internet Explorer without add-ons, but also delete cache and cookies to be safe.

Quick Tip:

You may also try out a different browser and see how it works with your everyday activities. When Internet Explorer crashes, switch to Opera One and import all of your passwords, bookmarks, and extensions.

Opera One’s built-in ad blocker and VPN will block trackers and prevent cookies and cache overflow in the browser. Moreover, this browser also brings a built-in AI.

Opera One

Avoid sluggishness in your browser with built-in tools designed for day-by-day easy use.
Free Download Visit website

1. Clear IE Cache

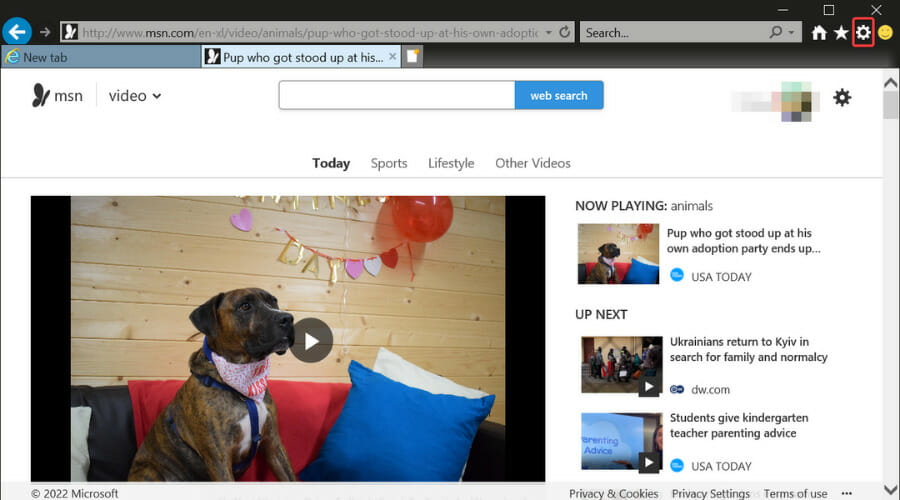
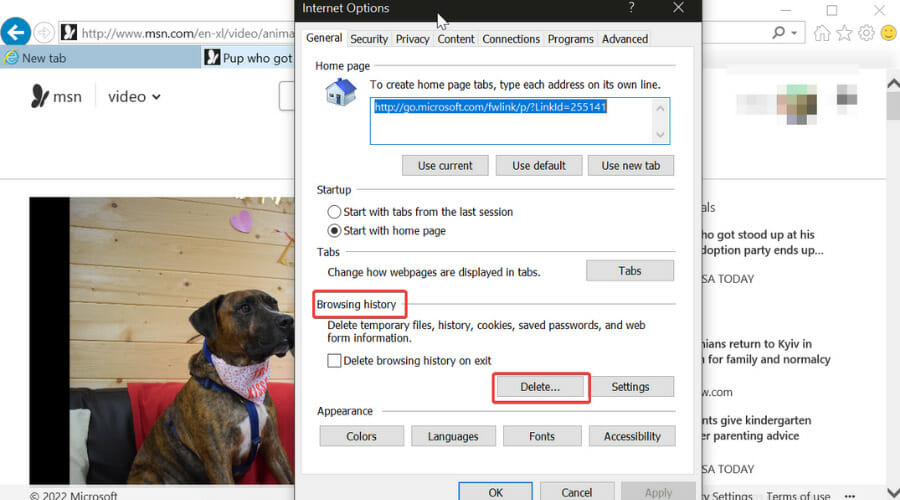
  1. Click the Settings icon.Internet Explorer Tabs Freeze or
  2. Select Internet Options.
  3. Under the Browsing history section, click on the Delete button.Internet Explorer Tabs Freeze or
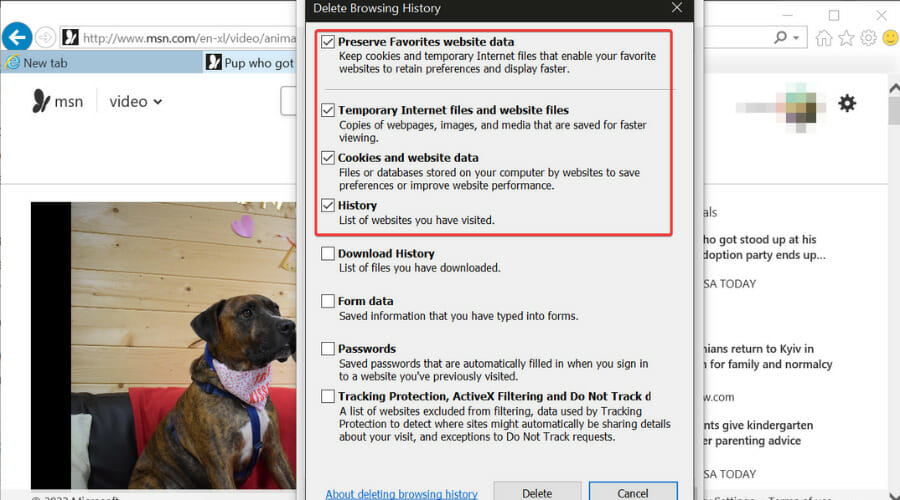
  4. Select what you want to delete and click on the Delete button.Internet Explorer Tabs Freeze or

The browser automatically selects temporary files, cookies, and history as these are the files that take up space and slow down your browser. If you want to keep any of this data or delete something else, tick the corresponding box.

You can also clean Internet Explorer with the help of a third-party cleaning tool. For more information on keeping your system clean, this post will take you through some of the best registry cleaners for Windows 10.

Our top recommendation is CCleaner, a cleanup tool that will erase browsing data and free up disk memory within a few clicks.

The software will enhance your PC’s performance with reliable features like custom cleaning for Internet cache or cookie files.

In addition, you can delete temporary files or duplicates from your system, analyze your disk health, and clean outdated files or broken settings on your PC.

2. Check Your System

Next, you can run sfc/scannow command in the Command Prompt to check your system for errors.

Also, you may scan your system with efficient antivirus software.

And finally, go to Internet Explorer, click Tools, Internet Options, Security, and Reset all Zones to Default level.

If these system tweaks didn’t help you, try some other solutions listed below.

3. Check if a specific add-on is causing problems

Maybe some of your add-ons are giving you a problem.

So, run Internet Explorer without add-ons and see if things improve.

To disable all add-ons in Internet explorer, do the following:

  • open Internet Explorer
  • type about:NoAdd-one in the search bar.
    This command will open Internet Explorer without add-ons, toolbars, or plug-ins.

If it works fine, one of your add-ons is causing problems.

Use the Manage add-ons tool to disable each one after the other to find which add-on is causing the problem. Then, when you notice which add-is the problem, delete it.

You can also disable add-ons if you go to Internet Options, Advanced tab, and click on Reset tab and Restart IE.

This option will reset Internet Explorer, delete all temporary files, disable all add-ons, plug-ins, and toolbars, and set all the settings to default.

This is maybe the quickest way to fix the problem with add-ons; after you perform it, you’ll have to install everything again.

But if the problem is not with your add-ons, try some of the solutions listed below.

4. Change Internet Settings in Registry Editor

If none of the solutions listed above worked, you may try to make a few changes in the Registry.

But make sure to create a backup of your system, because playing with Registry Editor could be dangerous sometimes. Find out more in the post 5 best backup software for Windows 10.

Here’s what you need to do to edit your Registry:

  1. Run Regedit and navigate to the following key:
    • HKEY_CURRENT_USERSoftwareMicrosoftWindowsCurrentVersionInternet Settings
  2. Right-click on the right page and select New
  3. Create a New DWORD value called MaxConnectionsPerServer
  4. Double-click MaxConnectionsPerServer and give the value as 10
  5. Create another new DWORD with the name MaxConnectionsPer1_0Server
  6. Double-click it and give the value as 10
  7. Save and Exit from the registry
  8. Restart Windows

You should also check if the following registry subkey is enabled:

HKEY_LOCAL_MACHINESoftwareMicrosoftWindowsCurrentVersionInternet SettingsUseCoInstall

Suppose it isn’t, no problem. But if it is present and its DWORD value is set at 1, change this value to 0, Click OK, and Exit.

5. Additional Solutions

You can always try Microsoft’s in-house troubleshooting tool, Microsoft Fix It. Just download it, choose the cause of your problem, which is crashing Internet Explorer, in this case, and it will try to fix it.

Microsoft Fix It usually fixes common problems with Internet Explorer, like freezing, running slow, security issues, etc. And it could also be effective this time.

You can also use Software Rendering instead of GPU Rendering and see if the problem still exists. To enable this setting, do the following:

  • go to Internet Options
  • select Advanced Tab
  • check Use Software Rendering instead of GPU Rendering under the Accelerated graphics section.

You can always try a different browser, such as Opera One, if everything else fails. It is light and easy to use, plus it gets constant updates that keep it stable and secure.

Every user can switch to the Opera One browser without effort, importing all information from the old browser in seconds.

There will be many cases where Internet Explorer freezes when opening, which also has to do with the fact that it is an outdated, obsolete browser.

Many users have complained over time that Internet Explorer keeps freezing and have since switched to other, more modern browsers.

You even have situations where the Internet Explorer tab freezes, but that’s all normal when dealing with Microsoft’s defunct browser, unfortunately.

The browser is highly customizable, with many integrated apps and functionalities, a built-in VPN, an integrated adblocker, personalized pinboards and bookmarks, and more.

Windows 11 Device Encryption: How to Enable & Use it

If you want to protect your sensitive data, it’s important to use drive encryption on Windows 11.

Here, we will explain how to encrypt your hard drive on Windows 11 and use BitLocker on Microsoft’s operating system.

How to manage the encryption of my hard drive on Windows 11?

1. Enable hard drive encryption

    You can encrypt your disk on your Windows 11 device using the built-in BitLocker tool from Control Panel. This tool allows users to encrypt their data so that it is only accessible to those who either insert a designated USB drive upon booting, or input the required password.

  1. 1. Click the Search icon on your Taskbar.

  2. 2. Type BitLocker in the search box that opened and click on the app from the results.

    windows 11 start bitlocker
  3. 3. Select Turn on BitLocker.

    windows 11 turn on bitlocker
  4. 4. You will be prompted to select a method to unlock your drive at startup. We recommend using the password method but you can also use a USB key that you need to provide.

    enter password bitlocker
  5. 5. Enter the password and re-enter it, then click Next.

    bitlocker password windows 11
  6. 6. After that, you will be asked to save the key in another way too. You can save it in your Microsoft account, on a file, on a USB stick or just print it.

    save key bitlocker windows 11
  7. 7. The next step is to choose whether you want to encrypt the whole drive or just the used part.

    bitlocker encrypt drive windows 11
  8. 8. Make your selection, then click Next.

  9. 9. Now you need to choose the encryption mode you want to use. As you’re using Windows 11, you can go with the first option, for fixed drives, but you can also select the second one if you plan on moving your drive.

    bitlocker encryption mode windows 11
  10. 10. At last, check the Run BitLocker system check box and then click Continue.

    bitlocker windows 11
  11. 11. You will now be prompted to Restart.

    bitlocker restart windows 11
  12. 12. After the reboot, you will be prompted to enter the password to unlock your drive.

    unlock password bitlocker

2. Encrypt your drive if your PC is not TPM 2.0 compatible

If after you click on the BitLocker drive encryption from Device encryption you see the message that Device encryption is not available for this device, that means your PC is not TPM 2.0 ready.

Don’t worry, we can take care of that with a few easy steps to perform.

  1. Press the Windows key + R to start Run, type gpedit.msc and press Enter or click OK.
  2. In the Group Policy Editor, go to the following path: Local Computer Policy\Computer Configuration\Administrative Templates\Windows Components\BitLocker Drive Encryption\Operating System Drives
  3. Now double click the Require additional authentication at startup key to open it.
  4. Check the Enabled option from the top, then check the Allow BitLocker without compatible TPM (requires a password or a startup key on a USB flash drive) box, then click OK.
  5. Now, repeat the steps from the first solution to enable BitLocker encryption.

3. Disable drive encryption

If you have changed your mind and down want to use drive encryption on your Windows 11 PC, you can do that by following these steps:

  1. Click the Search icon from the Taskbar, type bitlocker and select the app from results.
  2. Now click on Turn off BitLocker.
  3. Confirm your choice clicking again on Turn off BitLocker.
  4. Wait until BitLocker finishes to decrypt your drive before restarting or shutting down your PC.

What is drive encryption, and why do we need it?

Hard-drive encryption is the process of encrypting the data stored on a hard drive using mathematical functions.

This way, essential data will not be seen by anyone who doesn’t have access to the key or password you set up. This is an essential layer of security against ransomware and other online attacks.

Here’s how it works: when a file is written to the drive, it is encrypted automatically with the help of specialized software.

In the same way, when you access a file on the drive, the same tool decrypts it, but only if you can provide the password you set up when you encrypted the drive. Windows 11 comes with Device Encryption and BitLocker Encryption.

There’s a catch! You can’t use BitLocker if your PC has no TPM 2.0 chip installed. However, we have a workaround for that, too, so read on.

FAQ

Why should I enable Device Encryption on Windows 11?

Enabling Device Encryption helps secure your personal data by making it unreadable to anyone who doesn’t have the proper credentials, providing protection if your device is lost or stolen.

How can I check if my device supports Device Encryption?

You can check by going to Settings > Privacy & Security > Device Encryption. If available, it will show as “On.” If not, it may be due to hardware limitations, like the lack of a TPM chip.

Can I disable Device Encryption?

Yes, you can turn off Device Encryption, but it’s not recommended as it reduces the protection for your personal data, making it more vulnerable to unauthorized access.

How do I recover my device if I forget my password or PIN?

If you forget your password or PIN, you can recover it using your Microsoft account credentials or the backup recovery key you created when enabling Device Encryption.

Encrypting the drive is essential for all sensitive data from your PC and will enforce an additional layer of protection against attacks and even prying eyes.

However, this can be a two-way street because if you don’t take all precautions in managing your unlocking keys or your password, you will be unable to access your data yourself. But many, when setting up the feature, found that Device Encryption is missing in Windows 11.

You might also be interested in our guide on how to protect a folder in Windows 11 and only secure certain files. You can check out more with our in-depth comparison of Device Encryption and BitLocker Encryption.

For additional information on securing individual files and folders, you can check out our detailed guide on encrypting files and folders in Windows 10.

We hope our guide helped you enable drive encryption on Windows 11 and that your data is safe now.

If you have any questions or suggestions, write them down in a comment in the dedicated section below, and we will get back to you as soon as possible.

Chrome blocks websites from detecting Incognito mode access

Google released Chrome75 just a few days ago. The search giant is now working to bring some fantastic new features in the upcoming release.

You may be surprised that users can bypass paywalls in the upcoming release. In other words, the new Chrome will fool websites into thinking you’re not using incognito mode. This feature may not go well for websites that highly rely on paywalls and subscriptions.

Currently, users cannot view the articles published on these sites. So, if you try to open articles in Chrome’s Incognito Mode, you can’t view any reports. Instead, users are usually asked to sign in to their accounts to access the full articles.

You’re using a browser set to private or incognito mode. To continue reading articles in this mode, please log in to your Globe account.

What happens if I go Incognito on Google Chrome?

First, you’re not going to get that part you want in your favorite spy movie if you do this, so we’re clear on that.

In truth, while using Incognito, none of your browsing history, cookies and site data, or information entered in forms are saved on your device.

Thus, your activity doesn’t show up in your Chrome browser history, so people who also use your device won’t see your activity.

Quick Tip:

Speaking of browsers, you may also want to learn more about Opera. This privacy-focused web browsing solution blocks third-party trackers natively and ads for a swift browsing experience.

With Opera in Private window, you will double the safety. History, cache, and cookies will be immediately wiped after you’ve closed all private windows following your online session.

Opera

VPN, ad-blocker, and the Private window that gives you that curtain feels when browsing.

How do I enable Incognito mode in Chrome?

  1. Open Google Chrome.
  2. Click on the three dots in the top right corner.chrome options
  3. Select New incognito window.incognito window

How do publishers detect Incognito Mode?

Let’s understand the science behind it. First, websites cannot read or write cookies in Incognito Mode. Therefore, the publisher can not determine if the user has purchased the subscription or utilized the free quota. Hence, a user can get access to an unlimited number of articles.

On the other hand, the websites detect Incognito Mode with the help of a short JavaScript code. When users visit a site in Incognito Mode, the script detects the disabled Chrome browser API and blocks them.

However, Google changed the implementations of the FileSystem API in Chrome 76. The new deployments make it impossible for websites to detect any access in Incognito mode.

Chrome to remove Flash plug-in soon

Following Adobe’s decision to end support for Flash, Google also announced its plans to remove the Flash plug-in from Chrome by the end of next year.

Chrome says HTML5 offers faster browsing as compared to Adobe Flash player. Furthermore, it would help if you visited chrome://settings/content/flash to enable Flash in Chrome 76.

Chrome 76 will also feature a new button in Omnibox, allowing users to download progressive web apps. But, most importantly, there is a piece of good news for dark mode fans. Chrome 76 brings support for dark mode too.

Is Incognito private?

You should know that Incognito or private mode will keep your local browsing confidential, but it won’t stop your ISP, school, or employer from seeing where you’ve been online.

Furthermore, your ISP has access to all your browsing activity, no matter what you do. You can, however, use a Virtual Private Network (VPN) service.

You should keep that in mind when thinking about Incognito, as it won’t make you invisible while online.

Opening an Incognito tab is easy, but keep in mind that there are still rules in place, which we recommend you follow.

You can even make an Incognito mode shortcut if you want this process to become much more accessible.

A rIn the comments section below, report any issues you might have encountered while using the Incognito mode on your browser.

It is pretty much possible that publishers find a way to deal with this new feature. Google is currently testing Chrome 76 and the company plans to release a stable version by the end of July.

Speaking of browsers, you may also want to learn more about UR Browser. This privacy-focused web browsing solution blocks third-party trackers and ads for a fast and secure browsing experience.

Google Chrome Won’t Open? Here’s Why & How to Fix

Google Chrome is the most used browser on the Internet, but people are also having problems with it occasionally. One of the most frequent issues is that Google Chrome won’t open in Windows.

And this problem is definitely the annoying one, especially when you need to search for something on the Internet. Here, Google Chrome won’t open when I click on the icon or try to launch it through any other means.

So, here’s all you need to know about the issue and the most effective solutions for it.

Why Google Chrome won’t open?

When Google Chrome won’t open on my laptop, the first thing to do is to identify the underlying cause. It could be anything, from running an outdated version of the browser to issues with the DLL files or conflicting applications installed on the PC.

Sometimes, it’s a minor bug, and the shortcut you are using might have stopped working. In which case, creating a new shortcut should do the trick.

Besides, problems with the Registry can also trigger conflicts, and Google Chrome won’t open as a result. But no matter which of these is causing the problem, the solutions listed in the next section should get things up and running in no time.

Quick tip:

Even though Chrome’s popularity is unquestionable, Opera One is built as a lightweight browser to enhance opening speed and give the user a more immersive feeling while surfing the web.

Opera One browser offers a smooth experience by providing the user with integrated apps such as Ad-blocker, tracker blocker, VPN as well as a free built-in AI.

Opera One

Opera One is incredibly stable, offering a simple but wholly experience, making itself a worthy alternative to Chrome.
Free Download Visit website

How can I fix Google Chrome if it won’t open?

1. Configure compatibility settings

  1. Right-click on the Chrome shortcut, and then select Properties.properties to fix google chrome won't open
  2. Navigate to the Compatibility tab.compatibility
  3. Now, tick the checkbox for Run this program in compatibility for and then select Windows 8 from the dropdown menu underneath.compatibility mode to fix google chrome won't open
  4. Once done, click on OK to save the changes.ok

When Google Chrome won’t open on my laptop, running it in compatibility mode fixed the issue.

2. Pin a new Chrome icon to Start

  1. Press the Windows key, locate the Google Chrome icon, right-click on it, and select Unpin from Start.Unpin from Start
  2. Now, press Windows + E to open File Explorer and navigate the following path:C:\Program Files\Google\Chrome\Application
  3. Right-click on the chrome.exe file, and then select Pin to start.Pin to start to fix google chrome won't open

Once done, you should now be able to open Google Chrome from the start menu, and it won’t throw errors anymore.

3. Update Chrome

  1. Open Chrome, paste the following path in the address bar, and hit Enter:chrome://settings/help
  2. The browser will now look for available updates and install them.Update chrome

After you have updated Google Chrome, relaunch the browser and check if it runs properly now.

4. Register DLL files again

  1. Press Windows + S to open the Search menu, enter Terminal in the text field, right-click on the relevant search result, and select Run as administrator.Terminal
  2. Click Yes in the UAC prompt that appears.yes
  3. Press Ctrl + Shift + 2 to open Command Prompt.
  4. Now, paste the following command and hit Enter:FOR /R C: %G IN (*.dll) DO “%systemroot%\system32\regsvr32.exe” /s “%G”command to fix google chrome won't open
  5. Ignore any error messages you come across while running the scan, and restart the computer after the scan is complete.

5. Uninstall/reinstall Chrome

  1. Press the Windows + I keys to open Settings and then click on Apps.
  2. In the Apps & features tab on the left, select Google Chrome, and click Uninstall.
  3. Choose the appropriate response in case a confirmation prompt pops up.
  4. Once done, restart the computer for the changes to come into effect.
  5. Now, go to Google’s official website and download the latest version of the browser.download

In case you want accuracy, we strongly recommend uninstalling Chrome using a third-party uninstaller, like IObit Uninstaller. These tools will uninstall Chrome with all its folders and residual files.

One of these methods must have helped fix things if Chrome won’t open on your computer.

Also, find out how to reduce Chrome’s CPU usage in Windows. In fact, it’s an excellent substitute for potentially tricky-to-handle registry fixes. Moreover, you can install Chrome offline if you’re having problems with your internet connection.

If you have some additional comments, suggestions, or maybe other solutions, please feel free to leave your comment in the comments section below.

Fix: Folder Upload is Not Supported by Your Browser

Many users save files and folders on cloud storage instead of their hard drives. OneDrive, Google Drive, and DropBox are three of the biggest cloud storage providers that give users gigabytes of extra storage space. Users upload their files and folders to their storage space with browsers and cloud storage apps.

However, not all browsers support folder upload. Google Chrome was the first to support folder uploads, and in 2014 that remained the only browser users could upload folders.

It took somewhat longer for Mozilla to update Firefox with folder upload support. Thus, older versions of Firefox don’t support folder uploads.

Why is folder upload not supported in the browser?

The Folder Upload is not supported by your browser error message pops up when users try uploading folders to Google Drive with some old Firefox versions and browsers that don’t support folder uploads, such as Internet Explorer 11.

Keep that in mind the next tie you see this error code, just so that you will know what causes it and how to prevent it.

How do I upload a folder to my browser?

Usually, the quickest way to do this is by using the classic drag & drop technique, where you click on the desired folder and drag it to your browser window.

If that doesn’t work for you, you can use all kinds of third-party apps that will allow you to do just that, with upload features.

Quick Tip:

Opera One is well-known for its trustworthy advanced options, which you may use to toggle and add files and folders to the My Flow integration right in the sidebar. Sync all your devices and manage them easily.

Moreover, when you send a link, an image, a video, a note, or a file, it is immediately available for download or viewing on your linked devices. If not enough, it also comes with a built-in AI.

Opera One

An excellent web browser through which you can easily download and upload files and folders.
Free Download Visit website

How can I fix folder upload if it’s not supported by the browser?

1. Update the Browser

  1. Firefox users can update Fox by clicking that browser’s Open menu button.firefox options
  2. Click Help and select the About Firefox option.about firefox
  3. Firefox will then automatically download the latest update.
  4. Press the Restart to update Firefox button.
  5. Alternatively, users can update any browser by uninstalling and installing the latest version.
    • To do that, open Run by pressing the Windows key + R hotkey.
  6. Input’ appwiz.cpl’ in Run’s text box and click OK to open the Programs and Features uninstaller.firefox
  7. Select the browser to remove, and click the Uninstall option.
  8. Click Yes on any confirmation dialog boxes that pop up.
  9. Restart Windows after removing the browser.
  10. Then download the latest browser version from its website.
  11. Reinstall the browser with its setup wizard.

Firefox (and even Chrome) users who still see Folder Upload is not supported by your browser error messages need to update their browsers to the latest versions that support folder uploads.

2. Upload Folders With Cloud Storage Apps

OneDrive folder browser does not support folder upload

Alternatively, users can upload folders with cloud storage apps instead of browsers. For example, Google Drive, DropBox, and OneDrive have apps that sync users’ hard drive storage with cloud storage.

Those apps usually set up a cloud storage folder that users can drag files and folders in File Explorer to upload. Then, users can download the syncing apps from their cloud storage websites.

How can I upload a folder without ZIP?

As we said at the beginning of the article, you can use all kinds of third-party applications that can do the job for you.

Alternatively, you need to upload each file individually, enumerate the files in the local directory, and then loop over each and upload.

So, users who need to upload folders to cloud storage can undoubtedly do so by updating Chrome and Firefox browsers. However, users might need to update those browsers if a folder upload error arises.

There will be, however, situations where you cannot upload documents to websites using Chrome, but now you know what to do.

For SharePoint, we can’t upload folders or empty files is also a standard error message, but rest assured we are to help you whenever.

Users utilizing Internet Explorer, and perhaps some other browsers, should switch to Chrome, Firefox, or Edge to upload their folders to cloud storage.

Here are the Best Ways to Use Steam Screenshot Manager

Steam is one of the most used gaming platforms in the world. The service offers a wide range of game genres, and it has become the go-to option for people wanting to download new games or even try the trial versions before the game is officially released.

If you’ve ever played online games, you know how important it is for you to be able to take a screenshot of the action happening on the screen.

This can be useful in various cases, but it is mainly used to keep a visual record of game bugs, gather useful information, etc.

In today’s article, we’ll explore how to use the Steam Screenshot feature, so make sure you read it thoroughly.

How to save Steam screenshots?

To take a screenshot in Steam, you can press the F12 key or Fn + F12 on your keyboard, depending on whether the Function key is locked or unlocked. This will take a screenshot, a thumbnail of it will be displayed near the bottom-right, and the screenshots will be saved.

This handy tool comes as a new addition to the Steam gaming platform, and it allows you to take screenshots, manage, and share them without needing to exit the program.

After you’ve created your screenshots, they can be sorted into specific folders for each game, and you can choose between saving them on your hard drive or sharing them with the Steam community.

You also have the option to keep your screenshots private if you choose to do so.

Where is the Steam screenshot folder on Windows 10?

The screenshots are stored in the Steam folder in Program Files (x86). But since Steam creates a folder with your Account ID, the path is different for all users. Here’s the path for the Steam screenshot folder:C:\Program Files (x86)\Steam\userdata\AccountID\760\remote

Once you navigate the path, there will be several folders in Remote, each with screenshots for a particular game denoted by the game number.

There’s also a simpler way to find the screenshots for any game on your computer listed in the next section.

How can I use the Steam Screenshot Manager?

1. Find screenshots

  1. Launch the Steam app, click on the View menu near the top-left corner, and then select Screenshots.View steam screenshot folder
  2. Click on the Show dropdown menu, and then select the game on which you have captured screenshots.select
  3. Now, click the Show On Disk button.Show on Disk to view steam screenshot folder
  4. The folder with the screenshots for the selected game will now launch.view

This method is more straightforward than manually navigating through the Steam folder in File Explorer looking for screenshots.

2. Change the visibility of screenshots while uploading

  1. Click on the View menu, and then select Screenshots.screenshots
  2. Select the desired game from the Show dropdown menu.select
  3. Click on the Select All button or manually select the ones you want to upload while holding the Shift key.Select all steam screenshot folder
  4. Click on Upload.upload steam screenshot folder
  5. Now, select Private, Friends only, or Public from the Visibility dropdown menu, and then click on the Upload button.change visibility

That’s how you can change the visibility of the screenshots. Setting the visibility to Public will share the screenshots on the web.

How to change the Steam screenshot folder?

  1. Press Windows + E to launch the File Explorer, and navigate to the following path where AccountID is the one for your Steam account:C:\Program Files (x86)\Steam\userdata\AccountID\760
  2. Select the remote folder, and hit the Del key.Delete steam screenshot folder
  3. After you’ve deleted the folder, hit the Windows + S key, type Command Prompt, and then choose to Run as administrator.Command Prompt
  4. Click Yes in the UAC prompt that appears.yes
  5. Type in this command, making sure to change the path of your Steam screenshot folder to fit your needs, then hit Enter:mklink /D "C:\Program Files (x86)\Steam\userdata\AccountID\760\remote" "path_to_custom_screenshot_folder"

In this article, we explored some of the best ways to get access, create, and also manage all the screenshots you took while playing your favorite Steam game. Also, you now know how to change the location of the Steam screenshot folder in Windows 10.

Besides, find out how to optimize the PC for gaming and get the best performance.

Feel free to let us know if the information in this article was helpful to you by using the comment section below.

Is Google Forcing You to Change Your Password? Find out Why

Google is the most popular online platform, with billions of users around the world.

Many of our readers reported that Gmail forces them to a password change. Others received the message Change your password to secure your account.

Why does Google keep forcing me to change my password?

If Google Chrome detects any suspicious activity in your Google Account, it may ask you to change your password. Several users have reported similar password issues with the browser.

According to Google, this is a security measure and recommends that users change the account password immediately to protect the account as well as remove the message.

In this article, we take a look at a couple of possible solutions to help you resolve Chrome asked to change password error.

Quick Tip:

Before trying in-depth solutions for Chrome, you may consider switching to Opera. It’s an optimized and fully customizable browser.

It comes with bookmarks imported from other browsers, tabs syncing, or Opera Flow for quick file sharing between devices. Plus, take advantage of newest technologies with the native AI.

Opera One

Go for a highly secure browser with protection against tracking and free VPN.
Free Download Visit website

How do I stop Google from forcing me to change my password?

1. Change your password

1.1 On a Windows PC

  1. Open your Google Account.
  2. Enter the account credentials to log in.
  3. From the left pane, click on the Security tab.
  4. Scroll down to sign in to the Google section.
  5. Click on the Password option.
  6. Enter your current password for verification.
  7. In the Change Password screen, enter your new password.
  8. Enter the password again, and make sure it is secure enough.
  9. Click on Change Password to change the password.
  10. After that, you will receive the Your password has been changed message.
  11. Relaunch the browser and log in with your newly created password if asked to log in again.

The steps from above on how to change Chrome password mean that you will also need to make changes to other devices where you are logged in with a Google account, such as your email client.

1.2 On an Android device

  1. On your Android phone, tap on Settings.
  2. Go to Google, and tap on Google Account.
  3. Under your Google Account, tap on Manage your Google Account.
  4. Tap on the Security tab.
  5. Under Sign into Google, tap on Password.
  6. Enter your current password and tap on Next.
  7. Enter your new password, then enter the password again to confirm it.
  8. Tap on Change Password to change the password.

2. Use a password manager

The password-saving functionality included in the web browser is very basic. Some implementations are not even secure enough.

Step up your security game and use a good password manager that can store your passwords from everywhere with encryption included.

Your privacy is an essential factor if you’re using the internet for shopping and other activities that require sensitive data like personal data, credit card information, and so on.

It is ideal to improve the security of your credentials using efficient password managers to protect all your online passwords and accounts more properly.

3. Clear the browser cache

3.1 On a Windows PC

  1. On your computer, open Chrome.
  2. Click on the Chrome menu (three dots).
  3. Go to More Tools and select Clear browsing data.
  4. Click the drop-down menu for Time Range and select the appropriate option. To delete everything, select All Time.
  5. Next, check the boxes for Cookies and other site data and Cached images and files.
  6. Click on the Clear data button.

3.2 For an Android device 

  1. Open Chrome on your Android phone
  2. Tap on the Menu (three dots) and select Settings.
  3. Scroll down and tap on the Privacy option under the Advanced section.
  4. Tap on Clear browsing data.
  5. Next, change the Time Range.
  6. Check the Browsing history and Cookies and site data boxes.
  7. Tap on Clear data.
  8. Close and relaunch Google Chrome and check for any improvements.

After clearing the cache data, you will be logged out of all the websites you are logged in to, and you might need to sign in again.

4. Reset the browser settings

  1. On your computer, open Chrome.
  2. Click the Chrome menu (three dots) and select Settings.
  3. Click on Advanced to expand the section.
  4. Under Reset and clean up click on Reset Settings.
  5. Click on Reset Settings again to confirm the action.

Resetting the browser settings will restore any changes made by third-party apps that might be causing the Chrome change password issue.

You are rightfully intrigued asking: Why is Chrome telling me to change the password?

Google Chrome only asks users to change the password if it suspects any abnormal behavior with their Google Account.

The latest updates in Chrome suggest that it will now be alerting you to change some other passwords saved in the Google account if it detects the username as being part of a breach.

So, if Chrome is telling you to change your password, you should pay close attention.

Make sure you change your Google Account password before attempting any other steps to secure your account.

You might also be interested in our guide on what to do if you can’t sign into your Gmail account.

Were you ever persistently asked by Google to change your password? Tell us how you solved this issue in the comments section below.

Add Twitch Chat on your Browser Source in 3 Steps [OBS & Xsplit]

Twitch is one of the world’s leading live streaming platforms where all game enthusiasts can chat. That’s why many users are more interested in discovering how to add Twitch chat to their browser source.

With Twitch chat, you can easily interact with members of the community and the streamers as well.

Thanks to the Twitch chat, everything you need to know regarding gaming events, activities, and many more is one click away.

The Twitch URL is received as a result of using a subscription alert system, such as TwitchAlerts.

What is a browser source?

A Browser Source is a plugin or software that lets you display and edit a web page from the Internet or stored locally.

Using it will let you different elements like chat, streaming sources, Javascript, and more, just like the Twitch chat overlay.

Is OBS or Streamlabs better for streaming?

That is a matter of choice because Streamlabs and OBS Studio deliver excellent performance.

Regarding resource consumption, OBS Studio is a bit better, but if you have a powerful PC, you should go for Streamlabs.

We have gathered in this article exactly how you can add the Twitch chat on your browser source, so keep reading.

How can I add the Twitch chat to my browser source?

1. Use a specialized browser

The Twitch chat is a valuable feature that allows you to keep in touch with the community members and other streamers.

Using a specialized browser that already comes with a Twitch integration is the easiest way to ensure a flawless experience.

Opera GX is such a browser for gaming enthusiasts, and the excellent news is that it also comes with the Twitch chat integrated.

Opera is grand if you want a safe navigation experience. In addition, its built-in AdBlocker is designed to be privacy-focused, so you won’t have to worry about any Twitch-related problems.

Its top performances are no longer a surprise. That’s why thousands of worldwide users choose to use Opera GX.

Thanks to its complex tools, this browser allows you to customize your experience according to your needs and preferences.

In addition, you have to keep in mind that Opera GX consumes a low amount of resources. Thus, your PC’s performance won’t be affected while using it.

Check out some of the most impressive features of Opera GX:

  • Free VPN
  • Built-in AdBlocker
  • Easy customizable
  • Twitch and Discord integration

Opera GX

Have a go with this gaming-oriented browser and enjoy streaming platforms like Twitch right in the browser.
Check price Visit website

2. Set up the browser source

2.1 For OBS

  1. Download the CLR Browser Plugin.
  2. After the download, locate the Plugins folder for OBS.
  3. Right-click on the folder, then select Extract all the files from the folder.
  4. Launch OBS, and look at the Source section at the bottom of the window.
  5. To add a source, click on the + button, then click on Browser.
  6. Check the Create new option, then click on OK.
  7. Enter the provided URL, then click again on OK to save the changes.

So this is how to add the Twitch chat browser source in OBS. Although it may look complicated, if you follow the steps above, you will be all right.

2.2 For XSplit

  1. Press on the Windows key, type XSplit, then open it.
  2. From the bottom left corner of the page, click on Add Source, then select Webpage.
  3. Enter the provided URL, then click on OK.
  4. You will now see the URL under the Scene section. Right-click on it and customize it as needed.

3. Use the URL

  1. Go to your channel on your streaming platform of choice.
  2. Expand the chat.
  3. From the bottom right corner of the window, click on Settings (marked as a gear), then navigate to Popout chat.
  4. Copy the URL from the address bar from the window that pops out.
  5. Press on the Windows key, type OBS, then open it.
  6. From the upper menu, go to View, select Docks, then click on Custom Browser Docks….
  7. In the first empty box under Dock Name, give your chat a name, then in the corresponding box under URL, paste the twitch chat URL from the popout chat window you copied in step 3.
  8. Click on Apply.

What uses more CPU, OBS, or Streamlabs?

Streamlabs are more demanding when it comes to CPU usage. That’s because it has more features and offers a higher level of customization.

Also, the built-in themes with multiple overlays take a toll on resource consumption, so if you have a slightly older PC, OBS is a better choice.

Adding the Twitch chat to your browser source does not have to be complicated at all. In fact, by following the steps indicated in this article, you will have this done in minutes.

But if the Twitch chat is not showing in OBS, change the chat settings in your Twitch profile to Popout Chat.

You might also be interested in the best Twitch alert sounds for your streams to ensure you instantly get notified.

Please let us know in the comments section below if you have additional recommendations or suggestions.

Some Apps Won’t Respond to Scaling Changes [Fix]

There are different screen sizes and resolutions, meaning my display sizes may differ from yours. However, Windows has an inbuilt feature called scale.

It allows you to configure font size, app display, resolution, and other visual contents. Nonetheless, there are some difficulties you can encounter with this feature in some apps.

So, it is essential to understand what to do if some apps won’t respond to scaling changes. Likewise, we’ll discuss how to fix the scaling issues in Windows 10/11.

Why is custom scaling not recommended?

Custom scaling seems a good option for people with vision difficulties and those who want to ease the eyes from strains.

However, custom scaling in some apps or software can cause issues like the inability to read the font or deformities. It is because some displays are built not to support the scaling feature. So, forcing the custom scaling on it can merge text clipping and fonts.

Why are some apps not responding to scaling changes?

  1. Unsupported scaling feature: Some apps don’t support custom scaling features by default. It means the developers didn’t authorize users to adjust its display quality. Therefore, it won’t adjust to the system settings. Also, the app may not respond to scaling changes if the display font & resolution are not set to scale up to the change.
  2. Outdated display drivers/Windows: Windows uses drivers to operate and control display graphics hardware. However, if this driver becomes old and obsolete, it can cause difficulties with some applications. Furthermore, outdated Windows can affect your computer. It can prevent it from functioning with some apps and cause Windows 11 scaling issues.
  3. Outdated app: The problem is not only from the device if some apps won’t respond to scaling changes. However, some apps misbehave when they are not up-to-date and can prevent them from responding to the scaling changes you set.

How do I fix apps that won’t respond to scaling changes?

1. Close and relaunch the application

An application can malfunction if something is wrong or when there is a problem while it is launching. However, some apps won’t respond to scaling changes until you close and reopen them.

So, close and relaunch the app to see if the “apps won’t respond to scaling changes” issues persist.

2. Update graphics drivers

  1. Press the Windows + R keys simultaneously to prompt the Run dialogue box.
  2. Type the following into the search space: devmgmt.msc, then click the OK button.
  3. From the search results, click on Display adapters.
  4. Select the driver from the drop-down and right-click on it.
  5. Click the Update Driver Software option, then select Search automatically for updated driver software.

Windows will automatically download and install driver updates if there are any available. Alternatively, you can use Outbyte Driver Updater to automatically download all the latest drivers rather than downloading them individually.

⇒ Get Outbyte Driver Updater

3. Update the apps not responding to scaling changes

  1. Launch Microsoft Store.
  2. Click on the Menu button in the upper right-hand corner of the screen and select Downloads and Updates.
  3. Go to the app you want to update and click Get updates.

If there’s any update available for the app, Windows will search automatically and install it.

How do I force display scaling?

  1. Press the Windows key + I to launch the Settings app and click on System.
  2. Select the Display option.
  3. Go to the Scale and Layout tab.
  4. Click the drop-down button to expand the features you want to adjust.

Restart your computer to save the changes you’ve made.

Does display scaling lower resolution?

Scaling and screen resolution are different features. When you scale your display, it affects the size of what’s on your screen. The resolution deals with the image quality. Hence, display scaling doesn’t affect the number of pixels of a resolution.

Conclusively, apps like Chrome require fixes for scaling issues. Hence, we recommend that users check through our article on ways to fix any Chrome scaling and zooming issues.

Also, you can read through our article on the performance comparison between GPU scaling vs Display scaling.

Get Zoom for Microsoft Edge With This New Extension

Zoom for Microsoft Edge is a new browser extension for Windows 10 and 11’s default web browser created by the maker of Turn Off the Lights. In Edge, users can zoom in various ways, but advanced zooming controls are still missing.

While the default zooming options (Ctrl+ for zooming in, Ctrl – for zooming out, or holding down the Ctrl-key and using the mouse wheel) all work, they’re limited. There isn’t an option for changing zoom steps, setting a different default zoom, or applying a custom zoom level for specific sites.

Does Zoom work on Microsoft Edge?

Yes. Like any other web browser, the zoom function works perfectly on Microsoft Edge. You can press CTRL on the keyboard and use the mouse scroller to zoom in and out. Also, there are keyboard shortcuts for this which are already mentioned above.

But, If you want to use the zoom function with a more customized experience, it is impossible without any third-party option.

How do I turn off Zoom in Microsoft Edge?

  1. Install this extension called Zoom Block on Microsoft Edge.installing zoom block extension Edge
  2. Toggle the extension icon to on or off zoom on Edge.using zoom block extension edge

This trick will not work if other zoom addons are active on your browser. So, if you want to lock the zoom, ensure you have not activated such extensions.

Zoom for Microsoft Edge

The new Zoom for Microsoft Edge extension changed all this by adding some advanced controls to the Windows 10 and 11 browsers and was released on the official store.

The Edge extension collection includes many titles. After adopting the Chromium engine, Edge also supports extensions from Chrome Web Store. So, you can use any popular extension on this browser without any problem. However, Zoom for Microsoft Edge is natively available on the Edge addons store.

The Zoom extension we are talking about adds a new icon to Edge, and you’ll find it once you click the menu icon. Right-click on the icon, and you’ll be able to move next to the address bar to make it more accessible.

⇒ Get Zoom for Edge

Zoom for Microsoft Edge features:

  • Click the icon and use the slider to change the zoom level (1-400).
  • Click the icon and use the mouse to change the zooming level.
  • Enable the zoom together from the preference page to zoom in/out on all open pages simultaneously.
  • Save the zoom value for all websites.
  • Switch between the zooming engine of the default browser and use CSS zoom.
  • Display the zooming percentage on the icon.
  • Set a default zoom ratio for every site and set custom zooming steps.

Zoom for Microsoft Edge is quite a helpful extension for the browser, especially for users interested in more advanced zoom options and customizations.

Browsers with similar extensions

We may have an alternative for you if you need a browser with a bit more control over how you zoom in on UI elements.

It looks and feels just as modern as Edge, and it is also Chromium-based and called Opera One.

While the browser doesn’t have too many zoom features, it has access to an immense library of extensions, just like Edge’s Zoom.

However, that’s where the list of similarities ends since the Opera One extensions have been proven to be much more stable.

More so, both are free, but Opera One has a few nifty extra tools in its arsenal, so you might as well go for the better alternative.

Opera One

A lightweight Internet browser that is responsive, sleek, and has access to a wide variety of extensions, including some that help with page zooming.

How do I set custom zoom in Edge?

The Zoom for Edge extension enables the ability to customize the zooming experience on Microsoft Edge. You do not need to worry about much. Every opened tab will have a different level of zoom if you set it differently.

If necessary, you also can reset zoom for all tabs altogether. For this, you can simply right-click on the proper icon and choose to Apply the reset zoom value to all tabs.

This extension also has other usefulness. You will explore it while using it.


Hopefully, you understand the Zoom for Microsoft Edge extension and its benefits and alternative options. Let us know in the comment box if you have any opinions regarding this topic.

How to Turn a Folder Into a ZIP File [Windows 10, Mac]

Assume that you have received a ZIP file containing hundreds of folders over an email sent by your friend. You already have your photos organized in folders and ready to be displayed.

It’s clearly easier for you to work this way, not to mention that the ZIP takes up less space. Therefore, don’t hesitate to also learn to turn a folder into a ZIP file.

Rest assured that you can work with zipped files in the same way that you currently do with uncompressed folders.

For similar solutions and further guidance, feel free to bookmark this Tech Tutorials Hub.

How can I turn a folder into a ZIP file on Windows 10 and Mac?

The below procedures cover the steps you need to follow in order to convert a folder to a ZIP file, so don’t hesitate to take a closer look.

    How to turn a folder into a zip file Windows 10

    You can easily zip a folder using the WinZip application. It is a file archive and compressor that allows you to convert any type of files into zip format, as well as extract zip files.

  1. 1. Install a professional compression software

    Download WinZip and install it on your computer.

    winzip install
  2. 2. Navigate to the file location of the folders you want to zip

    After you installed WinZip, go and find the folders you want to zip in order to start the process.

  3. 3. Select the folders you want to convert

    Select the folders and right-click on them.

  4. 4. In the WinZip sub-menu, choose Add to [filename].zip(x) or Add to Zip file

    The second one gives you the chance to specify your own Zip file name, encryption, compression type, conversion options, as well as the destination folder.

  5. 5. Wait for the conversion to be complete

    It will only take you a few seconds.

As you can see above, all it takes is to follow a few simple steps in order to easily create a ZIP file from your folders with WinZip.

Other useful options are convenient access to Background Tools, banking-grade encryption, and seamless integration with Microsoft Teams, so you’ll find your current choice useful in the future too.

Winzip for Windows

Looking for a way to turn a folder into a ZIP file? Try out WinZip and you’ll easily achieve your goal!
Free trial Get it now

How can I turn a folder into a ZIP file in Mac?

  1. Download WinZip for Mac and install it.
  2. Open a folder window and locate the folder you want to zip.
  3. Then, just right-click the folder.
  4. You can now choose Add to filename.zip or another Add option that suits you better from the WinZip submenu.

Once again, in order to turn a folder into a ZIP file in Mac, we recommend giving a try to WinZip. Given its ease of usage, comprehensive interface, and unquestionable speed, it won’t disappoint you.

Useful options such as convenient zipping, even when it comes to large files, and direct sharing to Dropbox, Google Drive, and iCloud Drive are available as well.

Winzip for Mac

If you want to easily turn a folder into a ZIP file on Mac, look no further. WinZip is our top recommendation!
Free trial Get it now

In order to easily organize your data, take a look at our File Management Software section.

Have you successfully completed the above procedure and managed to turn a folder into a ZIP file? Let us know in the comments below.

How to Change Taskbar Color on Windows 11 [3 Ways]

The taskbar is an integral part of Windows 11. Its taskbar looks a little different from its predecessors because its icons are centered.

However, Windows 11’s taskbar color customization settings aren’t that much different from those in 10.

You can customize the taskbar’s colors via Settings much the same you used to set a custom color for the taskbar and the Start Menu in Windows 10.

Windows 11 retains the dark and light themes introduced in the previous OS. Selecting either the Dark or Light option will switch the taskbar’s color from black to white.

Yet, many users will prefer different colors for the taskbar. Fortunately, Windows 11 includes a good range of accent colors to choose from. You can select custom accent colors as well.

How can I activate Windows 11?

Note icon NOTE
The only snag for customizing taskbar colors is that you’ll need to activate Windows 11 to do so. Windows 11’s color settings are grayed out when it’s not activated.
  1. First, click Windows 11’s Search (magnifying glass) button on the taskbar.
  2. Type the keyword activation settings in the search text box.
    Activation settings change taskbar color in windows 11
  3. Then click Activation settings to open the Settings window.
  4. Click Upgrade your edition of Windows to expand that category. 
  5. Press the Change product key option’s Change button.
  6. Then type a valid key in the Enter a product key window.
  7. Click the Next button after you’ve entered the product key.

If you don’t happen to have a product key for Windows 11, forget about the above method! However, you can still activate that platform with a KMS client key instead. To do that, follow the steps below:

  1. First, bring up the search tool in Windows 11 by clicking the magnifying glass taskbar icon.
  2. Next, input Command Prompt in Windows 11’s search box.
  3. Click the Run as administrator option for the Command Prompt search result.
  4. Type this command in the Command Prompt and hit Enter: slmgr /ipk kmsclientkey
    slmgr /ipk command change taskbar color in windows 11
  5. Next, input this command and press Enter: slmgr /skms yourserver
    slmgr /skms command change taskbar color in windows 11
  6. Finally, type in this command and press Return: slmgr /ato

You’ll need to replace kmsclientkey in the command specified for step four with your Windows 11 edition’s KMS client key code. These are KMS client keys for the Windows 11 Home, Enterprise, Pro, and Education editions:

  • Home Edition: TX9XD-98N7V-6WMQ6-BX7FG-H8Q99
  • Education: NW6C2-QMPVW-D7KKK-3GKT6-VCFB2
  • Professional: W269N-WFGWX-YVC9B-4J6C9-T83GX
  • Enterprise: NPPR9-FWDCX-D2C8J-H872K-2YT43

You’ll also need to replace your server in the slmgr /skms command with a kms host address. These are some of the online kms host addresses you can include in that command:

  • kms.shuax.com
  • kensol263.imwork.net:1688
  • k.zpale.com
  • m.zpale.com
  • mvg.zpale.com
  • kms.digiboy.ir
  • 54.223.212.31
  • kms.cnlic.com
  • kms.chinancce.com
  • kms.ddns.net
  • franklv.ddns.net

Also, note that not all those host addresses will necessarily work. If you receive an error message for activating Windows 11 with this method, try entering a different online kms host address.

How can I change the taskbar’s color in Windows 11?

1. Switch between dark and light taskbar color themes

  1. Press the Start button on the taskbar to open the menu that you can see below:
    The Start menu change taskbar color in windows 11
  2. Click Settings on that menu.
  3. Select the Personalization on the left of Settings.
  4. Then select Colors.
  5. Click the Choose your mode drop-down menu.
  6. Then you can select alternative Light and Dark options that change the taskbar’s color accordingly.
  7. If you select the Custom option, you can select the alternative color modes for Windows and apps.

2. Select custom accent colors

    Windows 11’s built-in Personalization settings allow you to fully customize the color of your taskbar. You can select a custom accent color or create one from scratch.

  1. 1. Press the Windows + I keys on your keyboard to open the Settings menu.

  2. 2. Choose Personalization from the list of options.

    windows 11 taskbar color change personalization
  3. 3. Navigate to Colors.

    change taskbar color windows 11 options
  4. 4. Go to the Choose your mode drop-down menu.

    taskbar colors change windows 11 change your mode
  5. 5. To select custom accent colors for the Windows 11 taskbar, you’ll need to select the Dark option.

  6. 6. Toggle the Show accent color on Start and taskbar option On. That option will be grayed out with the Light option selected.

  7. 7. Now click Accent color to choose a color. Your taskbar will then change to your selected color.

    windows 11 change taskbar color custom accent
  8. 8. To customize your selected color, click the View colors button to bring up the tool that you can see below.

    change color taskbar windows 11 customize accent
  9. 9. You can change your selected color by dragging the circle to different positions on the palette.

  10. 10. You can also drag the Value bar left and right to further adjust your taskbar’s color.

  11. 11. Click the More button to bring up RGB and HSV color details. There you can enter color codes within the text box.

  12. 12. Press the Done button to close the color utility when you are finished.

  13. 13. As a bonus, you can also apply a snazzy transparency effect to your taskbar by clicking the Transparency effects toggle button within the color settings On.

To find more details on this topic, don’t hesitate to check out this article on how to make the taskbar transparent in Windows 11.

You can also try a dedicated free taskbar customizer to adjust colors, transparency, and layout in far more detail than the default Windows 11 settings allow.

3. Use different themes

  1. Selecting different Windows 11 themes will also change the taskbar’s color. To do so, open the Personalization tab in Settings as outlined in method one.
  2. Click Themes.
  3. Then click through the six alternative default themes that come with Windows 11 to choose one.
    Default themes change taskbar color in windows 11
  4. Alternatively, click Browse themes to get one from the Microsoft Store.
  5. Choose a theme in the Microsoft Store window that opens, and click the Free button to download it.
Note icon NOTE
If you select a light theme, you won’t be able to further configure its taskbar color.

Are there any other useful color settings in Windows 11?

The Accessibility tab in Settings includes some general contrast theme options that will also change the taskbar’s color. Those color options are supposed to make apps and text clearer. Follow the steps below to tinker with those options:

  1. To open Settings, hold the Windows key and press I at the same time.
  2. Next, click Accessibility on the left of Settings.
  3. Then click the Contrast themes drop-down menu.
  4. Choose a contrast theme on the drop-down menu.
  5. Click Apply to see what your selected contrast theme is like.

Overall, it’s pretty straightforward to change the taskbar’s color in Windows 11. With the OS’s personalization settings, you can adjust your taskbar’s color to whatever takes your fancy.

You can also change the title bar color and window border to customize your desktop experience further; read this guide to learn the steps.

Users exploring color and visibility options in Windows 11 can also improve text clarity by adjusting icon label colors. You can check this guide on how to change the desktop font color to enhance readability alongside your taskbar and theme adjustments.

Changing your taskbar’s color is a great way to customize Windows 11. You can really liven up your PC’s desktop by selecting a more vibrant accent color for the taskbar and the Start menu as well.

Even more, you can change the taskbar size in Windows 11 by editing the registry or adjusting the scaling settings. If the result doesn’t match your expectations, there are a few simple tricks to apply in order to make Windows 11 look like Windows 10 again.

Tell us in the comments if you managed to change the taskbar’s color and if our solutions helped you do that.

How to Enable & Use Nvidia Reflex to Improve Latency in Games

In this article, we’ll discuss how to use the Nvidia Reflex to fix the latency issues with your computer. Latency is an issue many users complain about. However, latency means the system takes longer than expected to reflect the inputs from its components like mice and keyboards.

Hence, getting software that’ll help fix the system latency issues is essential as it’ll improve your computer’s productivity.

The Nvidia Reflex is a technology with many subsidiaries that help it detect and analyze inputs from components of your computer.

Likewise, it improves the speed at which your system reflects this input. Hence, the software reduces system latency or lagging by reducing the time it takes to reflect the input from components on your desktop or monitor.

Is the Nvidia Reflex good for gaming?

Having a system that can power responses quickly and smoothly is one of the advantages you can enjoy as a gamer. However, the Nvidia Reflex is the best option for reducing system latency in video games.

It helps professional gamers to be more competitive and swift in their gaming activities. Also, it allows you to enjoy your game without being sluggish.

Furthermore, the Nvidia Reflex doesn’t negatively impact your game or computer, which is why we recommend it.

Likewise, users need to know more about using the Nvidia Reflex analyzer and the Nvidia Reflex in games like Valorant. However, it is supported by many games.

Should I activate the Nvidia Reflex?

We recommend activating it on your system and in your games. It is a free feature that doesn’t affect your system’s performance and will drastically reduce latency.

How do I run the Nvidia Reflex?

  1. Launch any browser on your PC.
  2. Go to the Nvidia Reflex official website to download the Nvidia application on your device.
  3. On the website, choose the compatible version of the application for your system and click on the download button.
  4. After the download is complete, double-click on the .exe file to install it. (Follow the prompts on your computer screen to complete the installation)
  5. Use the X button at the top of the screen to close all the games on your computer.
  6. Then right-click on your computer screen to prompt the Nvidia Reflex control panel.
  7. Select the Manage 3D settings from the panel and go to Low Latency Mode.
  8. Set the Low Latency Mode to ON or Ultra. (Depending on your computer’s strength, the Ultra mode might be too tasking for some computers. So, we recommend that you leave it on the ON option).
  9. Click the Apply button to effect the changes on your computer.

Doing this will help you implement the software into your computer by reducing latency and improving productivity.

Does enabling the Nvidia Reflex affect FPS?

The Nvidia Reflex doesn’t significantly impact the FPS though your frame rates can differ in several settings and games. However, it is not enough reason not to consider enabling it. Hence, using the app should reduce latency but can barely affect your FPS.

Does my GPU have the Nvidia Reflex?

The Nvidia Reflex doesn’t support every GPU. Specifically, you need to run the GeForce GPU before using technologies like the analyzer.

Which GPU can use NVIDIA Reflex?

The Nvidia Reflex is a technology with requirements for the systems that can use it. The unavailability of the app for every GPU is one of its downsides. Likewise, the Nvidia GPU doesn’t support an AMD GPU. Rather, you need the GeForce GPU to use it.

However, it requires a GTX 900 series GPU and above to run it. It means it doesn’t support any series below the GTX 900 series. Hence, you’ll need the GTX 900 series, the GTX 1000 series, the RTX 2000, or the 3000 series before you can use the Nvidia latency technology.

Furthermore, downloading the best Nvidia drivers for Windows will help it perform better. So, we recommend you read through our article about the best Nvidia drivers for Windows 11.

Conclusively, users complain about the Nvidia Control Panel not opening. Hence, you can click on the link above for easy fixes for the issue.

Play Eiyuden Chronicle: Rising and two other games for free this weekend with Xbox Free Play Days

Xbox Free Play Days is back with another trio of exciting games for subscribers of Xbox Live Gold and Game Pass Ultimate. These games will be playable from Thursday through Sunday. Let’s have a look at another great Xbox Free Play Days August 2022 lineup.

Eiyuden Chronicle: Rising

(33% off: $10.04)

Eiyuden Chronicle: Rising combines a thrilling adventure through ancient ruins with the tale of one town’s rise from the ashes.

Saints Row The Third Remastered

(75% off: $9.99)

Saints Row®: The Third™ – Remastered gives you control of the Saints at the height of their power, and you live the life to show for it. This is your City. These are your rules.

Space Crew: Legendary Edition

($24.99)

This is Space Crew: Legendary Edition. The legendarily challenging single-player strategic survival simulation game!

And best of all, these games will be available for purchase at a great discount throughout the Play Days event. Learn more about Xbox Free Play Days over on the FAQ page.


Microsoft publishes new findings on digital transformations in industry

Every organization wants to be resilient, agile, and sustainable in today’s manufacturing world. And there are so many manufacturers investing in innovative solutions to make their operations and products smarter by switching to advanced technologies including AI, digital twins, and the internet of things (IoT).

Back of 2019, Microsoft published its first report which provided a broad view of IoT across a variety of industries- from manufacturing and energy to healthcare. And Microsoft did the latest 2022 report on the IoT signals. IoT signals are a series of impactful content curated by Microsoft, basically to inform the community about the latest developments and digital transformations, and technology trends in the IoT industry.

Microsoft conducted more in-depth reviews with participants to gain a deeper understanding of the digital transformation strategies, and execution plans. Microsoft publishes some new findings on digital transformations in Industry, have a look at them.

Microsoft discovers six new digital transformations in Industry

The new IoT survey reveals insights from real-world manufacturers that have started their digital transformation journey. During the research, Microsoft discovered six key new findings on digital transformations.

  • Most manufacturers are advancing their efforts to build smart factories
  • Operational improvement is a still top goal for manufacturers
  • Organizations are shifting investments to industrial-automation-based process control
  • Manufacturers face new challenges with scaling smart factory initiatives
  • IT-OT convergence is happening in the manufacturing industry
  • Manufacturers plan to increase investments in smart connected IoT products
Microsoft publishes new findings on digital transformations in industry
Image Courtesy- Cloudblogs-Microsoft


Digital transformation continues to be top of mind for these manufacturers as they work to increase agility, drive growth, and improve customer engagement. All the six key findings share a common theme- manufacturers across the globe are advancing their digital transformation efforts and organizations are switching to innovative solutions to build a more sustainable and resilient future.

For more latest and exclusive tech news follow us on Google News.

Windows 11 Mobile Hotspot: How to Set Up & Manage

Of course, sharing mobile internet between an Android smartphone and a Windows 11 PC can be useful, especially when Wi-Fi is not available.

Thus, knowing how to share mobile internet with a Windows device can come in real handy when other options are just present.

Just like an iPhone can be tethered to a Mac when there’s no Wi-Fi, Android devices also let users do the same with their smartphone’s internet connection with any Windows laptop via USB and Bluetooth.

Connecting a phone and a PC via a cable is not an option for many of us, while internet connectivity via Bluetooth can be slow.

Therefore, creating a Wi-Fi hotspot with your smartphone is the only option that’s both fast and uncomplicated.

Are hotspots safe to use on Windows 11?

To answer this question we need to take into consideration a few important things:

  • The creator of the hotspot
  • Source-network security level
  • The hotspot’s name and password choice

Because this information is essential in case you’re worried about your system’s security level while accessing a hotspot, let’s dive deeper into each of these elements and discuss the details.

➡ The creator of the hotspot

If you have created the hotspot by yourself, then you shouldn’t be worried about other people accessing the network without your knowledge. This, of course, involves using a password and network name that only you or the people you trust are aware of.

In case somebody else created the hotspot and you have been given access to the password and network name, ensure that you trust that person enough to avoid any network attacks.

➡ Source-network security level

This element is one of the most important of the three presented above, as it involves the security level applied already to the network from which you will share the internet connection through the hotspot.

If you are at home, and a trustworthy ISP provides your internet connection, then you don’t need to worry about security levels, as most companies that provide internet are secure enough.

In case you’re using a public network, like one from a coffee shop or train station, it is recommended that you use powerful antivirus software that also offers network protection.

➡ The hotspot’s name and password

Windows 11 enables you to choose both a network name and a password is that this allows you to improve the security level from the start.

Anybody who doesn’t have the right network credentials will not be able to access the hotspot.

That being said, not all passwords are the same, nor they should be. Whenever you choose a password for your network, no matter if it’s a hotspot or not, it is recommended that you create one that contains both numbers and letters.

Also, make sure that you can remember that password, or simply write it somewhere safe to ensure you can always access the hotspot without any issues.

How can I create a mobile hotspot on Windows 11?

    You can easily create and configure a mobile hotspot on your PC device through the Network & internet settings. In just a few clicks you can choose a name and password for your hotspot, then you can connect to it using another device.

  1. 1. Click the Windows icon from the taskbar.

    windows taskbar icon
  2. 2. Choose the Settings button from the menu.

    windows settings
  3. 3. Select Network & internet from the sidebar.

    network and internet settings windows 11
  4. 4. Click the Mobile hotspot option.

    network and internet mobile hotspot windows 11
  5. 5. Choose which connection you want to use for the hotspot from the drop-down menu (if you have multiple connections).

    network and internet connection type
  6. 6. Click the Share over toggle to choose how you want to share your connection.

    share your connection mobile hotspot windows 11
  7. 7. Select the Edit button from the Properties section.

    mobile hotspot in windows 11 settings
  8. 8. Set a name and a password for your Hotspot.

    mobile hotspot windows 11 set name
  9. 9. Click the Save button.

    save network name mobile hotspot
  10. 10. Lastly, turn on the Mobile Hotspot toggle, and connect your other device to the newly-created network.

    create mobile hotspot windows 11 toggle

As you can see, the process that needs to be followed to create a hotspot in Windows 11 is far easier than in any other previous version of Windows. You can also set up a hotspot via CMD.

The user-friendly interface guides you through the entire process and offers all the information you need to achieve this task, but having a handy step-by-step guide can ensure no issues are encountered.

How can I connect my Windows 11 laptop to a mobile Hotspot?

The process we mentioned above is simple and only requires a few clicks. Even better, it works on older versions of Windows as well, including 10/8.1/8/7 and so on.

The critical condition here is that the Android device has cellular data. If so, it can be tethered to virtually any Windows computer with a Wi-Fi adapter.

Naturally, once the mobile hotspot is set up on the phone, the connection can be used by virtually any other device, including a Windows PC, a Mac, an iPhone, or a second Android device.

The quickest and easiest way to share an Android smartphone’s cellular data connection with a Windows 11 device is to switch on the Hotspot option from the phone’s Quick Settings panel.

To do this, swipe down from the phone’s home screen. Now tap on the button that says Hotspot, and the cellular data connection of that phone will be available for use on any compatible device.

connect laptop to mobile hotspot windows 11

Before you attempt all this, remember that it will only work once the hotspot has been set up and configured with an SSID and a password.

So let’s see exactly what you have to do to set this whole thing up on your mobile device.

  1. Access your phone’s Settings menu.
  2. Select the Mobile Network option.hotspot guide 1
  3. Select Personal Hotspot from the list.hotspot guide 2
  4. Modify and configure various security options, including the hotspot’s name, security type, and the password that will be required to use the connection, then activate the hotspot.

So we figured out how to set it up on the mobile device. To use this hotspot on a Windows 11 computer, you simply have to find the connection and access it.

To do that, click on the Wi-Fi icon in the System Tray and select the mobile hotspot as your internet option, then fill in the password and hit Connect, to establish the connection.

Also, when not in use, we advise you to switch off the mobile hotspot for security reasons and to save the phone’s battery life.

What if I can’t connect via hotspot?

If the Wi-Fi hotspot isn’t working, a USB cable can share the internet between the Android phone and the Windows 11 device.

To do this, connect the PC and the phone using a compatible USB-C or micro USB cable. Then go to Settings access Hotspot & Tethering on the phone and switch on USB Tethering.

As with any wired Ethernet connection, there’s no need for passwords, and the internet can be accessed through the PC the moment the USB tethering option is enabled on the phone.

That’s pretty much all there is to this process. Neat, right?

Before you leave, find out what to do when the cellular option is missing in Windows 11, a common problem arising from driver issues.

In case you encounter any problems with mobile networks our We can’t set up mobile hotspot article should be able to help you.

We also have a guide on what to do if the laptop is not connecting to a mobile hotspot, so don’t miss it. Did you know that you can connect to a Bluetooth hotspot on Windows 11? That’s right, and we have a guide that can help you with that.

We also have a guide that explains whether it is possible to hide hotspot SSID on Windows 11, so don’t miss it for more useful information.

What to play on Game Pass: games that offer something a bit different

Don’t know what to play on Game Pass? Don’t feel bad – with literally hundreds of games to choose from across the service spanning just about every genre out there, it can be tough to know where to start.

Thankfully, we have you covered with these Game Pass recommendations for those gamers who dig something a bit different from time to time. What follows are some great unique offerings that aren’t quite like other games out there. These games break up the status quo of popular shooters, racing and sports games, and open world adventures, and offer a gaming experience that is distinctly its own. So read on and brace yourself: because these games hit just a little different.

Hardspace: Shipbreaker (PC Game Pass)

This first-person action-adventure game has players exploring and dismantling abandoned spacecraft while scavenging valuable materials. It is definitely a breath of fresh air relative to all the space-based shooters out there. The game was developed by Blackbird Interactive, the same studio that is currently developing Minecraft Legends. Note that Hardspace: Shipbreaker is available for PC Game Pass and Game Pass Ultimate only (Xbox Game Pass excluded).

House Flipper

Watch the video on YouTube

In House Flipper, the player fixes up properties in the hopes of selling them for a profit. Just as the game’s title implies. Clean, paint, lay down new tiles or carpeting, even tear down entire rooms and start over again to turn your vision of a dream home into a reality. The gameplay loop can be very satisfying, as so many game reviewers have noted.


Moonglow Bay

Watch the video on YouTube

Moonglow Bay is not your typical, run-of-the-mill fishing/role-playing video game, no matter what anyone tries to tell you. The gameplay loop involves fishing, cooking, and making upgrades to your boat. And there are plenty of side quests to mix things up. But more than that, the game is about fostering relationships with the people of the small fishing village and restoring its splintered community.


Overcooked! 2

Watch the video on YouTube

Overcooked! 2 dishes out a veritable buffet of fun for kids and adults alike. Culinary chaos reigns supreme in this cooking simulator, and with online multiplayer support for up to four players, there is no such thing as too many cooks in the kitchen. And with the fate of the Onion Kingdom in the balance, the steaks have never been higher.


PowerWash Simulator

A recent day one Game Pass release, PowerWash Simulator is a “first-person cleaner” from Square Enix’s independent game division, Square Enix Collective. In the game players take control of a small power washing business in the town of Muckingham, taking on a variety of cleaning jobs. These aren’t mundane tasks, however, as you’ll be cleaning everything from run of the mill homes to a Mars space rover. And you’ll gain access to new tools and equipment upgrades along the way.

Slime Rancher

Watch the trailer on YouTube

In this first-person open-world adventure you play as a “slime rancher” named Beatrix LeBeau, whose job consists of building a ranch and collecting, raising, feeding and breeding slimes. Toward this end you’ll venture through disparate areas collecting resources such as slime food with your VacPack. What is a Vacpack, you are probably asking? It’s a vacuum backpack, and you’ll be using it a lot to suck up slimes and items.


Surgeon Simulator 2: Access All Areas

Watch the trailer on YouTube

Surgeon Simulator 2 has players conducting a series of increasingly complex operations – hopefully with successful outcomes for the hapless patients. In addition to the campaign mode there is also a party mode, and up to four players can get in on the fun in either. Players can even create their own surgery scenarios.


Turbo Golf Racing (Game Preview)

This fast, arcade-sports title just hit Game Pass as one of the most recent additions at the time of this writing. In Turbo Golf Racing you will boost, jump and flip your supercharged car as you chip, putt and smash giant golf balls to the finish line. And you can do all this with up to 8 friends online. Note that the game is still in Preview status and is a work in progress.

Weird West

Watch the trailer on YouTube

Weird West is a top-down action-RPG that takes on – as you might be able to guess – a weird western aesthetic. From Devolver Digital and developer WolfEye Studios, the game is somewhat reminiscent of the earlier, pre-Bethesda Fallout games. It follows the stories of five bounty hunters and raises the stakes with the inclusion of permadeath, meaning that the player’s choices in the game have very real consequences in the game.


Wrap up

So now that you’ve seen our list of Game Pass games that offer something a little different, tell us what you think. Are there any other unique Game Pass titles that we missed? Is there a personal favorite of yours featured here? Let us know about your experiences with these games.

If you don’t already have a Game Pass subscription, you can sign up here and get your first month for only $1. Learn more about Game Pass by visiting the FAQ page. And don’t forget to check out our other “What to play on Game Pass” posts for more Game Pass recommendations.

How to Download & Install Nvidia Reflex on Your PC

Technology is advancing by the day with new things coming up. These advancements help humans in their day-to-day activities. However, there are countless difficulties you can encounter on your computer due to latency. Hence, we’ll discuss how to go about the Nvidia Reflex download.

Nvidia Reflex is one of the best technologies that help you manage your computer’s speed and productivity. Its essence is to help users reduce input slowing or lagging.

The lagging may be between the computer and any other components that are connected to it. Furthermore, knowing how to stop or reduce the latency between your input and the computer’s response will aid in smooth gaming performance.

However, this latency can be in two ways: system latency and network latency. Nvidia helps to reduce the lagging components causing the system latency.

Is the Nvidia Reflex free?

The Nvidia Reflex is a free application that helps users reduce the latency in their Pc and improve their productivity. However, you don’t need to pay any amount before you use the application.

Likewise, free doesn’t reduce its credibility or reliability as it is the best app for fixing system or network latency. Also, it doesn’t affect your computer negatively and allows you to download updates for free for the app.

Is the Nvidia Reflex good for gaming?

One of the difficulties thy gamers encounter is the lagging system. It affects your gaming activities in such a way that your inputs will take time to effect, and the system response will also be slow.

Hence, the Nvidia Reflex is our best recommendation for fixing any computer latency issues affecting your gaming activities. It’ll help you reduce the system latency affecting your game.

How do you get the Nvidia Reflex?

  1. Launch any browser on your computer.
  2. Go to the official website for the Nvidia Reflex to download the application on your computer.
  3. On the website, choose the compatible application version for your computer and click on the download button.
  4. After the download is complete, double-click on the .exe file to install it. (Follow the computer prompts on your screen to complete the installation process)
  5. Use the red X button to close all the games on your computer, then right-click on your computer screen to prompt the Nvidia Reflex control panel.
  6. Select the Manage 3D settings from the panel and go to Low Latency Mode.
  7. Configure the Low Latency Mode to ON or Ultra. (Depending on your computer’s strength, the Ultra mode might be too tasking for some computers. So, we recommend that you leave it on the ON option).
  8. Click the Apply button to effect the changes on your computer.

We recommend that users consider the Nvidia Reflex latency analyzer download. However, users can also enable the Nvidia Reflex in selected games.

  1. Launch the game on your computer and go to Settings.
  2. Select the Video settings and select Nvidia Reflex Low Latency from the options.
  3. Configure the settings to ON or ON+boost.
  4. Restart the game.

You can repeat this process for every game on your computer. It’ll help you enjoy low latency.

Which GPU can use NVIDIA Reflex?

The only downside about the Nvidia GPU is that it doesn’t support an AMD GPU. However, the Nvidia Reflex requires a GPU on the GTX 900 series and above. Meaning it doesn’t work with any series below the 900 series.

Hence, you’ll need the GTX 900 series, the GTX 1000 series, the RTX 2000, or the 3000 series before you can use the Nvidia latency technology.

Furthermore, knowing the appropriate GPU for your computer will help with the Nvidia Reflex driver download.

Can Nvidia Reflex improve latency?

The Nvidia Reflex reduces the latency in your system and helps improve its performance. The app uses Reflex SDK to improve latency and lagging speed in your games.

Nonetheless, some users complain that the Nvidia app isn’t functioning correctly on Windows 11. Hence, users can learn how to fix Nvidia crashing issues on Windows 11. 

Also, we recommend that you do proper research about the best Nvidia drivers for Windows 11 before downloading any on your computer.

Leave your questions and suggestions in the comments section below, we’d like to hear from you.

How to Download & Use Synapse X For Roblox [Quick Guide]

Fanatics of Roblox will marvel at Synapse X, which allows you to browse through different servers and play any game you want. Synapse X for Roblox is a third-party application.

Although Roblox is a great platform, you may encounter issues such as Roblox not updating, and such issues can quickly dampen your mood. This is why users find Synapse X a necessary tool when playing.

Since Roblox does not tolerate cheating or exploiting, users risk their accounts being banned by using this program. However, Synapse X developers have made significant efforts to ensure it is undetectable to minimize the risk.

What does Synapse X do in Roblox?

Synapse X is an executable program that enables users to add Roblox exploits to their online games so they may cheat on them.

The main objective of the tool is to enable users to write scripts for Roblox games. Every time you launch a game, these scripts are triggered, giving you access to many features that allow game designers to alter their works.

While the injections may improve your performance, you must also consider the possible adverse effects of introducing the exploits.

Can you get Synapse X free?

Is Synapse X paid? Yes. It is a third-party program that can be downloaded and installed for free, but neither Google Play nor the App Store currently has it listed. However, PayPal or cryptocurrency coins cost $20 and $15, respectively, to use as payment.

How do you use Synapse X on Roblox? 

  1. First, join a Roblox game as you usually would.
  2. Disable your antivirus.
  3. Open a browser tab and navigate to the Synapse X download page, then click on the download button.
    synapse x roblox
  4. Now open the downloaded folder and double click on the Synapse X.exe. Once you have it open, it will automatically update.
  5. Now go back to the folder and click on scripts, then create a new text document and paste your Synapse X Roblox scripts inside of it.
    synapse x roblox
  6. When you return to the game, right-click on your script that should appear on the left pane of Synapse and select Execute.

Synapse X is a tool that helps you get the most out of Roblox. It is a powerful tool that will help you get more from the game.

You will have to inject Synapse X into a game to reap all benefits and use the program effectively.

To ensure you are using it correctly, you must follow the rules above.

Is Synapse X safe now?

This software raises certain security issues since it might expose security flaws in your browser or computer.

Synapse X may be flagged as a virus by your antivirus software since it is a Roblox cheating tool that may be used to get an unfair edge over other players, but you can make an exemption because it is safe to use.

You need to be cautious while granting Synapse X rights. You should also read the privacy statement of the business that made it, explaining how and what they do with your information.

We hope that this guide has been useful in helping you uncover what SYnapse X for Roblox is all about and how to get the most out of it.

If Discord is your preferred platform and you happen to experience any problems such as Synapse X Discord not working, we have a dedicated article with comprehensive solutions.

We have also covered some of the best browsers to play Roblox on your Windows PC; you’ll be spoilt for choice.

Let us know what tricks you are using with Synapse X on Roblox in the comments section below.

Microsoft introduces Experience insights for Microsoft 365

Microsoft just launched Experience insights for Microsoft 365. “We’ve developed Experience insights to give our customers’ designated IT admins an at-a-glance view of core user experience metrics like product usage, in-product feedback, Net Promoter Score™ (NPS) values, and data on help content viewed across an organization.”

With Experience Insights, users will now be able to better understand key user experience signals from select Microsoft 365 apps and services thus allowing administrators to evaluate situations and decide whether they should intervene. The platform also provides users with adequate information regarding a particular app or service where you will be able to gather more details regarding usage, feedback provided, and NPS surveys. You also get to see the most viewed self-service articles by members of your organizations, which helps you determine whether they require more training in a certain sphere.

Using Experience insights, users can gather more information regarding the usage of a particular feature on selected apps and services like Microsoft Teams as highlighted below:

This way you will be able to decipher what is really important to your staff thus helping you make further enhancements that will improve their user experience.

The Experience insights platform will not collect any user-level data, this kind of information is strictly limited to Global admin, Global reader, and Reports reader roles. “Experience insights are aggregated at the tenant level only; no user-level data is available,” Microsoft explained.

Experience Insights is currently in preview limiting its availability to customers with over 20,000 seats in Targeted Release. Though Global admins, Global readers, and Reports readers will also be able to access it via Microsoft’s 365 admin portal. Microsoft has further indicated that they intend to make this experience available to smaller organizations in the near future.


Twitch Password Reset Not Working? Here’s What to do

Twitch brought millions of viewers and thousands of streamers together, making the latter pop stars of modern society.

However, although the platform usually works without significant issues, some Twitch users were unable to reset the password after a lot of tries.

The procedure is as simple as it usually is with all account-based services, but it seemingly won’t work for some.

Firstly, make sure you navigate to the Password Reset Request page here and try from there. If that doesn’t help, follow the steps in this guide.

Why is Twitch unable to reset my password?

  • Cache and cookies are blocking the process – If you don’t clean them periodically, they might harm specific apps or activities. Thus, you’re going to discover how to do it with ease.
  • Bugs in the factory settings – Your browser might sometimes run into unexpected and temporary settings-related troubles. We’re going to show you how to refresh your browser, and after that, you might be able to reset your pass.
  • Server-related issue – In this case, you’ll probably need to wait until they are resolved. In addition, you can always raise a ticket to the dedicated Twitch team.

Quick Tip:

Opera GX browser is built on the Chromium engine and it can offer you chatting or streaming apps, with Twitch and Discord integration.

If you choose this browser, you’ll never miss a live stream. With Twitch right in your sidebar, you can easily see the channels you follow, who’s online, and choose to receive notifications every time it’s needed.

Opera GX

Get custom skins, GX Corner, FAB navigation, Flow, Twitch support all in a secure private browser.

What can I do if Twitch is unable to reset my password?

1. Clear browser cache and cookies

1.1 Google Chrome

  1. Hit the Windows key, type Chrome, then click on the first result.
  2. Use the following keyboard shortcut to open the Clear browsing data menu: Shift + Ctrl + Delete.
  3. Select All time as the time range.
  4. Checkmark the Cookies and other site data and Cached images and files sections.
  5. Click on the Clear Data button.

1.2 Mozilla Firefox

  1. Press the Windows key, type Firefox, and open the first result.
  2. Click on the three horizontal lines button from the top right corner.
  3. Navigate to History.
  4. Click on Clear Recent History.
  5. Click on the Time range dropdown menu and select Everything.
  6. Checkmark the History and Data sections then hit the OK button.

1.3 Microsoft Edge

  1. Press the Windows key, type Edge, then click on the first result.
  2. In the upper-right corner of the window, click on the three horizontal dots to open Edge Menu.
  3. Navigate to Settings.
  4. From the left window pane, select Privacy, search and services.
  5. Scroll down to the Clear browsing data section, then click on Choose what to clear.
  6. Drop down the Time Range menu, then select All time.
  7. Tick Cookies and other site data and Cached images and files, then click on Clear now.

As mentioned before, Twitch might be unable to reset your password due to the cache blocking the process. So, it would help if you tried disabling them with the above steps. If nothing seems to work, make sure you keep on reading.

2. Reset your browser

2.1 Google Chrome

  1. Press the Windows key, type Chrome, then click on the first result.
  2. Click on the 3-dots menu, from the upper-right corner of the window.
  3. Open Settings.
  4. In the Search bar, type Reset, scroll down until you reach the Restore settings to their original defaults option, then click on it.
  5. Click on the said option and then click Reset settings.

2.2 Mozilla Firefox

  1. Hit the Windows key, type Firefox, then open the first result.
  2. In the top-right corner of the window, click on the 3-line menu.
  3. Click on Help.
  4. Now, select More Troubleshooting information.
  5. Click on the Refresh Firefox… button.
  6. Confirm the process by selecting Refresh Firefox.

2.3 Microsoft Edge

  1. Press the Windows key, type Edge, then open it.
  2. Select the 3-dots menu from the right-upper corner of the page.
  3. Navigate to Settings.
  4. From the left window pane, select Reset Settings, then click on Restore settings to their default values.

If Twitch can still not reset your password, we have one more solution you can try.

3. Send the ticket to Twitch support

  1. To send the report ticket, launch your browser.
  2. Navigate to the Twitch support page.
  3. Fill in the form and wait for the answer.

If Twitch is still unable to reset your password, we are most likely looking at a server-related issue or temporary bug with the app.

In case you’re in a hurry, the only way to proceed is to send a report ticket to the dedicated team and ask for the email link that will allow you to reset your Twitch pass.

How do I change my Twitch password?

  1. Launch your browser.
  2. Visit the password reset page and input your email, then click on the Continue button.
    twitch unable password reset
  3. Follow the instructions sent to your email to reset your password.

That should be enough to allow you to reset your Twitch password. However, if you are still unable to reset your account password on Twitch, we suggest waiting for some time and trying again on the dedicated link.

Note that if a regular Twitch password reset is not working on your mobile devices, the above method should also come in handy.

And if Twitch is not sending a password reset code, ensure you have the correct email, and try again after a few minutes.

Lastly, a Twitch password reset may work even if you have no email, but you must contact support.

We hope you have found this article very helpful. We are curious to know what worked for you, so please leave your comments in the section below.
Sony launches “PlayStation games for PC” webpage. Does it Compare to PC Game Pass?
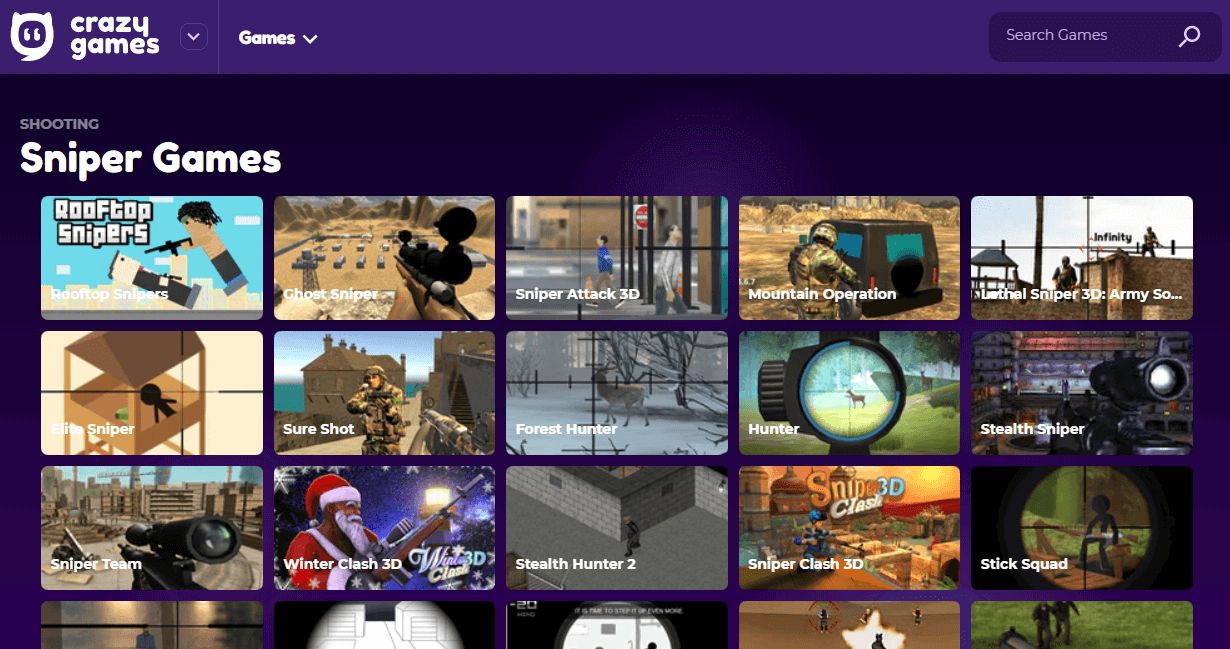
There is a new addition to the official PlayStation website. Sony has launched the “PlayStation games for PC” page over on playstation.com, and it features—can you guess?—PlayStation games on PC.
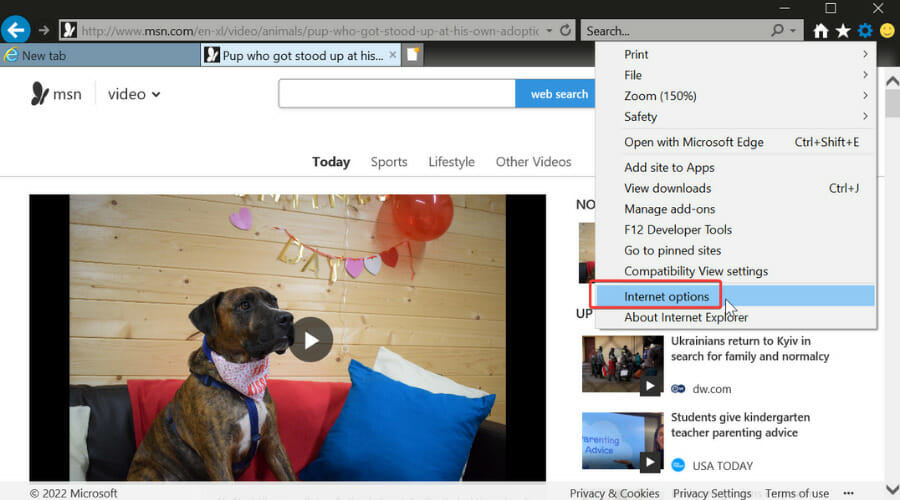
Among the games featured on the page are PlayStation-to-PC blockbusters God of War and Horizon Zero Dawn, and there is a Coming Soon section which currently lists UNCHARTED™: Legacy of Thieves Collection as coming to PC in 2022. Also listed here are two Spider-Man games: Marvel’s Spider-Man: Miles Morales coming to PC this Fall, and Marvel’s Spider-Man Remastered hitting PC on August 12.

Sony is getting serious about bringing more PlayStation games to the PC | PCWorld

These games are purchasable on Steam and the Epic Games Store, which are linked on the PlayStation PC Games page.

Sony expects considerable growth in the PC gaming market. In fact, it expects to earn a cool $300 million on PC games this year alone. And it has stated that it expects almost half of PlayStation game launches to be on PC and mobile by 2025.

Could Sony’s increased focus on the PC gaming market beget a rival to Microsoft’s PC Game Pass? At this point it’s hard to say, but with PC Game Pass’ 25-million-subscriber head start, Sony will have a lot of work to do in the future if that is its aim.

Featured image courtesy of game-news24.com.