Earlier today, Twitter user Knoebel spotted Xbox Cloud Gaming pages for Elden Ring, GTA V, and Soul Hackers 2.
While these games didn’t appear to be playable via Microsoft’s cloud gaming platform at the time, their listings, which have since been taken offline, are notable as these titles aren’t currently available to play as part of the Xbox Game Pass subscription service. Currently only Xbox Game Pass games are playable via Xbox Cloud Gaming.
Seems like #Xbox is ramping up their plans to bring Games that are not a part of #XboxGamePass to Xcloud.
The addition of player-owned, non-Game Pass, games to Xbox Cloud Gaming isn’t news, as plans for this kind of support was confirmed by Microsoft a couple of months back, but the sighting of these listings does seem to suggest that this evolution of Xbox Cloud Gaming is set to finally happen sometime in the near future.
Either that or GTA V, Soul Hackers 2, and Elden Ring are coming to Xbox Game Pass soon.
Also today, another Twitter user, Jadson, was shown an ad for Game Pass Ultimate featuring Elden Ring. However, it’s unclear if this ad is just for Xbox Cloud Gaming support being added to Elden Ring for those that already own the game or if Elden Ring will also be added to the Xbox Game Pass library.
The latest update for the Halo Infinite video game is now available on Xbox consoles and Windows PCs. This latest update, named the August Drop Pod, makes visor cosmetics available for all Armor Cores, expands support for Mark VII helmet attachments with more Mark VII helmets, and adds Challenge progress to the Pause menu.
In addition to the above changes, a variety of fixes and adjustments were also made. Here’s the official list of changes made with the Halo Infinite August Drop Pod Update:
RESOLVED ISSUES
The following changes were made in the August 9, 2022 Drop Pod.
MULTIPLAYER
The volume of a nearby player’s shield recharging has been lowered, especially when the recharging player is out of the line of sight.
Choppers will no longer continue boosting after being disabled by a Dynamo Grenade’s EMP effect.
The M41 SPNKR’s damage radius has been improved and now more consistently damages enemies.
A fully charged shot from the Plasma Pistol will now correctly deplete all Shields, including active Overshields.
Mark Assists and medals related to the Mark system will now appear correctly when the Superintendent AI is equipped.
Players can no longer mark enemies who are obscured behind waist high cover.
Headshots more consistently register on enemies without shields when using precision weapons such as the Mk50 Sidekick or the Stalker Rifle.
In Custom Games, King of the Hill now goes to Overtime when both teams have the same score as time runs out.
In Free-For-All King of the Hill matches, the mini scoreboard near the bottom of the screen no longer shows unused meters and the full scoreboard shows the following stats:
Points
Score
Kills
Deaths
In Custom Games, Attrition rounds now consistently end when a team is fully eliminated.
While spectating a player in Observer Mode on PC, player weapons will no longer shake when the camera moves up or down.
Resolved an issue where dropped Equipment could not be picked up near the lower light bridge on Catalyst.
Observers will no longer be counted as a member of the enemy team in Attrition Custom Games.
The outline of the Danger Zone’s final circle will no longer appear early in Last Spartan Standing Custom Games.
Dropped weapons will no longer accumulate during Tactical Slayer matches.
MENUS
The fourth Challenge slot will now always be enabled when a Premium Battle Pass is equipped.
Visor colors will now appear correctly when using the following helmet and attachment combinations:
Cambion helmet with the UA/Februus attachment
AKIS II-GRD helmet with the TAS/Lantifrid attachment
Land Grab and Last Spartan Standing now have unique Game Mode icons in various menus.
In the Ranked Arena playlist menu, changing the Ranked Queue type now correctly updates the Estimated Wait tooltip.
Error messages now consistently appear in matchmaking playlist menus.
BALANCE CHANGES
GRAPPLESHOT
To maintain multiplayer balance, players will no longer be able to exit a vehicle to cancel an enemy’s Grapplejack.
LIGHT AND MEDIUM VEHICLES
Non-tank vehicles, such as the Ghost or Warthog, are now more resistant to small arms fire. All of these changes apply to Multiplayer and a few apply to Campaign as well. See the Developer Notes for a full breakdown of the changes in each mode.
WARTHOG
The Warthog can now be knocked around more easily by players using weapons such as the M41 SPNKR or the Repulsor Equipment.
KNOWN ISSUES
With this update, the team has added one new issue to our Known Issues list. Visit the Known Issues & Workarounds section for more information.
In Last Spartan Standing Custom Games, bots do not level up after gaining enough score to improve their loadout.
The Xbox app or Microsoft Store app version of Halo Infinite may download extra data upon launching the game.
Sorry, this video is not available in this region due to license errors is an error message that many Internet users receive when they try to watch specific clips, movies, or TV shows on the web.
Any video-sharing service, including Netflix, Prime Video, and YouTube, can display this error message or its variations. There’s nothing wrong with your computer or Internet connection. It’s just an error caused by geo-restrictions and copyright laws.
If you want to get rid of Sorry, this video is not available in this region due to license errors to watch any clip in your area, you can use a VPN. Stumbling upon a video unavailable in your country notification is not uncommon either, but this solution is also available in this case.
It also hides your IP address and geo-location, making it seem like you’re connecting from another part of the world. The best part is that you can decide your new IP by connecting to a VPN server from another country.
How do I bypass geographical licensing restrictions?
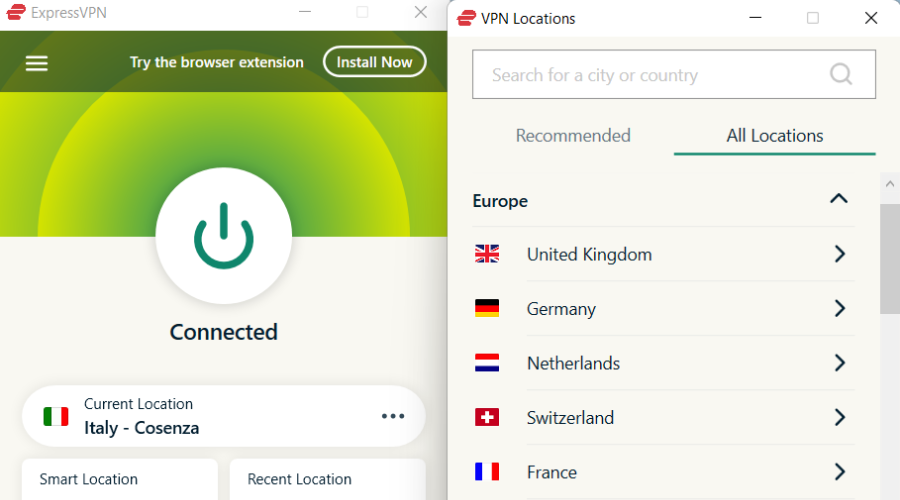
We suggested using ExpressVPN in our example above because, out of all the VPNs we tested and reviewed, this is the best one for unblocking videos from any country by eliminating licensing restrictions.
This VPN can circumvent geoblocks, bypass firewalls, and load videos from any region, thanks to supporting thousands of servers in 160 cities and 94 countries.
What’s more, ExpressVPN has exclusive DNS servers to protect your DNS requests. It supports OpenVPN, dynamic IP addresses, port forwarding, a kill switch, and a split-tunneling feature.
ExpressVPN
Get this fast and secure VPN service to easily unblock videos and eliminate licensing restrictions.
In conclusion, if you want to watch videos from any country and get rid of the Sorry, this video is not available in this region due to license error messages. Use a reliable VPN like ExpressVPN.
Besides, a VPN can protect your network traffic from hackers, especially when connecting to public, unprotected Wi-Fi hotspots. You can also watch Netflix libraries from all over the world, reduce your ping while gaming, and find cheaper flights online.
According to specialized publications, the licensing restrictions mean that any website with copyrighted products can’t be copied or displayed on the Internet without the publisher’s permission.
In addition, users complain about being unable to access Paramount Plus due to licensing restrictions with Paramount Plus fatal errors 5408, 5402, and so on.
Not only that, it’s possible to encounter licensing restrictions on multiple web platforms or services as follows:
CBS, Amazon Prime, and Crunchyroll licensing limitations
Due to licensing restrictions, this song cannot be skipped
Due to licensing restrictions, this video cannot be played over wifi
Sorry, this video is not found or is no longer available due to date or rights restrictions
Due to licensing restrictions, we cannot serve players from your country. If you’re using a VPN, please deactivate it and try again.
All being said, you can also join our VPN Troubleshooting Hub if you’re experiencing any VPN-related errors.
Otherwise, return to our Unblocking section to find out what kind of videos you can unblock.
Factorio is a construction and management simulation game where you must build factories and infrastructure, harvest resources, and research technologies, automate production, and fight various enemies.
It’s available on Windows, macOS, and Linux (Steam and GOG). Unfortunately, many users report Factorio multiplayer lag when trying to enjoy the game with their friends in co-op mode.
If you’re looking for a fast and easy way to take care of this issue, you can reduce your ping with a VPN. So if you have Factorio multiplayer lag, it’s best to consider a market-leading VPN.
A VPN service is not only useful for spoofing your IP address and encrypting your Internet traffic. You can also use a VPN to improve packet loss and optimize your network connection for gaming.
But this requires a powerful VPN app with high-speed servers and top-notch security features.
Why is Factorio Multiplayer so laggy?
The main causes of experiencing lag on Factorio are high background activity and network congestion.
More exactly, if you run other processes in the background or use the same ISP as your friends, you’ll get a laggy performance.
Additionally, other players reported different lag issues on Factorio Multiplayer as it follows:
Factoriolan LAN lag
Factorio Multiplayer input lag
Factorio space exploration multiplayer lag
Factorio Multiplayer lag spikes
Factorio lag when shooting
Factorio Multiplayer latency
Furthermore, you can employ effective VPN software that is capable to reduce high lag on your gameplay.
What are the best VPNs to fix Factorio multiplayer lag?
NordVPN offers a fast and easy solution to reduce Factorio server lag so that you can go back to enjoying the game with your friends.
Made by Tefincom & Co., this VPN service can fix Xbox packet loss. Plus, it has something the others don’t: obfuscation mode.
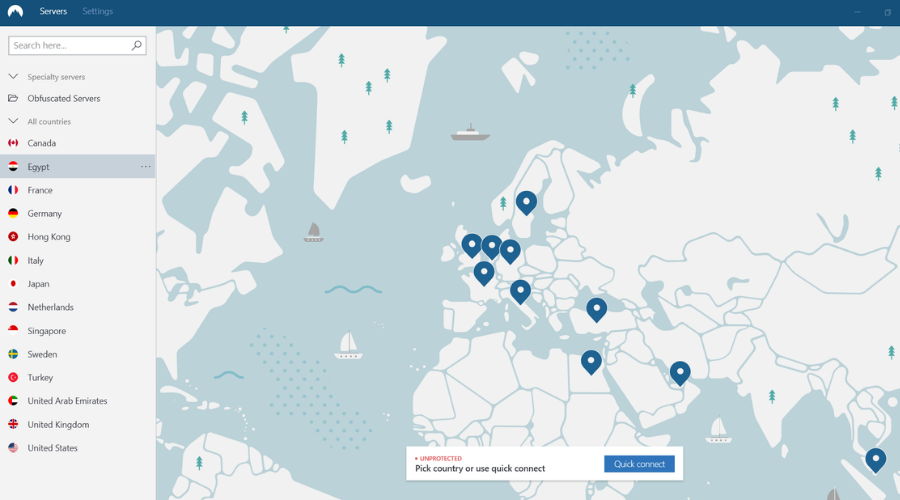
If your VPN connection is refused by the remote host, you can get around this problem by connecting to NordVPN’s obfuscated servers to make it look like a regular HTTPS connection.
It’s the preferred solution to turning off your VPN and having to deal with Factorio multiplayer lag.
So, if you need to play Factorio multiplayer with a VPN that doesn’t get blocked, you can trust NordVPN.
It has many servers worldwide, uses the OpenVPN protocol to redirect your network traffic, and optimizes your connection for gaming.
More about NordVPN:
+5,400 VPN servers (59 locations)
Can be installed on Windows, macOS, Linux
Strict no-logs privacy policy
An ideal Factorio VPN for fixing lag and high ping
30-day money-back guarantee (no free trial)
NordVPN
Play Factorio with no interruptions by connecting to the best server for your configuration.
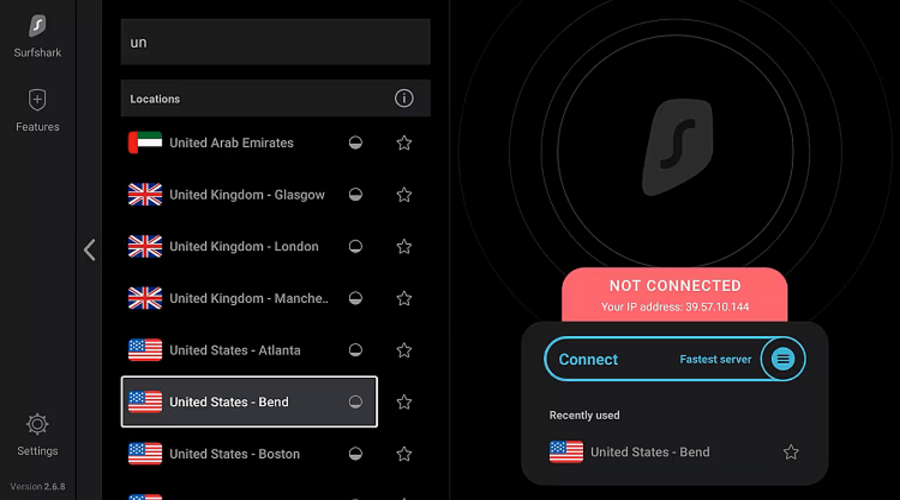
Surfshark is another good option for users that want to reduce lag and ping issues. It is also compatible with all major platforms, so it is suitable for various types of games.
This VPN service has over 3,000 servers worldwide which means that it allows you to connect to the best server configuration for your game.
Latency issues can significantly decrease if you connect to a location that’s closer to the servers you play on.
Plus, this VPN lets you hide your IP address so if you have an internet service provider that checks your traffic and places limitations on it, when your IP is hidden, this is not possible.
None of your online activity will be visible. Surfshark has a strict no-logs policy so no information about your identity or traffic will be stored nor by them, or by any third parties.
On top of that, this VPN has a split-tunneling feature that you can easily access from the UI. It is called Bypasser and it lets you prioritize traffic towards the app of your choice.
This can increase speed rates even more and allow you to connect your game through VPN servers and get traffic through your actual IP at the same time.
Other key features of Surfshark include:
OpenVPN
Anti-tracking
Adblocker
Anti-malware
Powerful AES-256-GCM encryption
Surfshark VPN is a subscription-based service. You can try it for free in the 7-day trial and see if it caters to your needs.
Surfshark VPN
Connect to an optimal VPN server and enjoy seamless gaming regardless of where you are located.
An alternative solution for dealing with Factorio multiplayer lag is by using CyberGhost VPN (by Kape Technologies).
It’s a secure virtual private network solution that can fix network congestion for gaming.
CyberGhost VPN gives you the possibility to connect to numerous VPN servers worldwide. You can use its split tunneling mode to set up whitelists or blacklists, protect your device from DDoS attacks, and defend your router from hackers.
Moreover, you can use CyberGhost VPN to minimize Wi-Fi packet loss, which is a huge help to handle Factorio lag spikes through a wireless network connection. Besides, it’s the only free VPN on this list.
More about CyberGhost VPN:
+6,400 VPN servers (89 locations)
Compatible with Windows, macOS, Linux
Zero logs
Handles Factorio multiplayer lag without any issues
45-day money-back guarantee (1-day free trial)
CyberGhost VPN
Use this Factorio VPN tool to quickly reduce high ping, lag spikes, and latency problems.
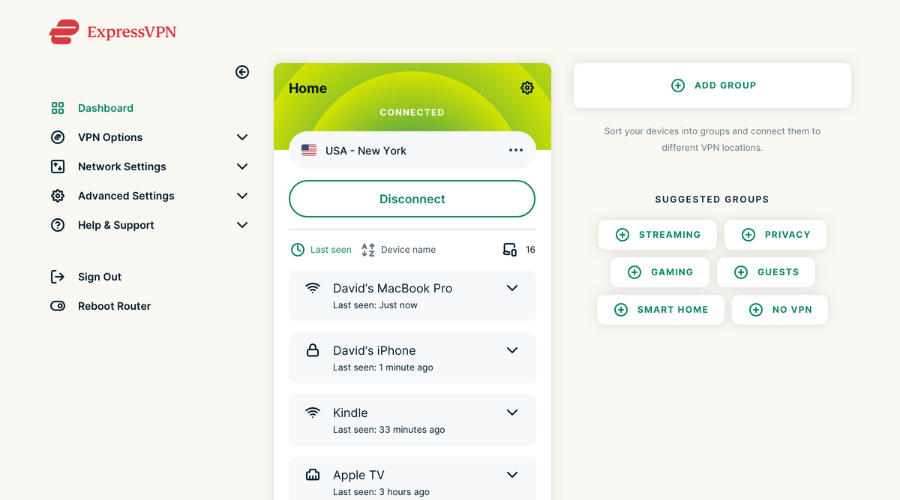
Another great option to eliminate lag and ping and fully enjoy Factorio is ExpressVPN.
It has 160 servers in 94 countries and it ensures that you are always connected with the best possible configuration. The software automatically scans and connects you to the fastest server location for your network.
Safety is one of the biggest concerns for Internet users of all kinds. ExpressVPN ensures that your browsing is secure at all times.
It uses advanced AES-256 encryption which is recommended by most security experts.
Moreover, it doesn’t keep any logs of your browsing activity, users of ExpressVPN are guaranteed complete anonymity.
You can simply display the Factorio check ping by pressing the F5 button and see the level of your ping in the game.
According to different other players, you should have a 150 ping score for the same continent as the game server.
To summarize, if you can no longer enjoy the Factorio multiplayer due to lag spikes, high ping, and latency problems, use a fast VPN to resolve all these issues without any stress.
A VPN can help you fix packet loss and speed up your Internet connection for gaming.
eM Client is one of the most popular email clients and the first choice for many. Despite the great features that eM Client offers its users, some reported that eM Client is not sending emails.
The problem has been present for long but has been reported extensively in the last few months. So, if you recently started having issues sending emails on eM Client, many others are in the same boat. So, let’s find out how they managed to get things up and running.
Why is eM Client not sending emails?
Here are a few reasons you are unable to send emails through eM Client:
A buggy update: The eM Client SMTP error could appear after updating either the OS or the email client itself if there’s a bug in the current version.
Misconfigured settings: Sometimes, the ISP or the email service provider can change the critical settings, which, unless appropriately modified on eM Client, would trigger errors.
Services are down: In some cases, there’s also the likelihood that the services are down, though it doesn’t last more than a few hours.
Conflicting third-party software: For many users, it was the antivirus or firewall blocking the program, and adding an exception fixed things.
What can I do if eM Client is not sending emails?
Before we start with the major changes, here are a few quick things you can try:
Restart the computer.
Make sure you can access the email provider’s website. If that’s down, you now know why eM Client is not sending emails.
Use a different network, say switch to a wired network if you are currently on Wi-Fi. Or you could try the mobile data pack by enabling the hotspot.
Try eM Client on another device.
Disable any installed VPN software. A user reported that Norton Secure VPN was responsible when eM Client was not sending emails.
Check with your email service provider or the ISP about any network or security settings changes.
If none work, move to the solutions listed next.
1. Use a different email client
If eM Client still isn’t receiving emails, you might want to try using a different email client. There are some other just as reliable email clients with built-in productivity features that may not cause as many issues as eM Client.
Most worthwhile email clients on the market allow you to log in to an unlimited number of email accounts and easily access them from one main window.
A good replacement for this eM Client is Mailbird, which includes similar contact management features. These features will allow you to sync all contacts from all your email accounts in one decentralized platform.
You will be happy to find that Mailbird includes email templates, signatures, translation, and spellchecker features, as well as integrations with popular productivity apps and social media.
Mailbird
Try this email app as an alternative to eM Client, it’s a good choice to get back on track.
The values listed here work best with Gmail. In case you are using a different email service provider, check the values for them.
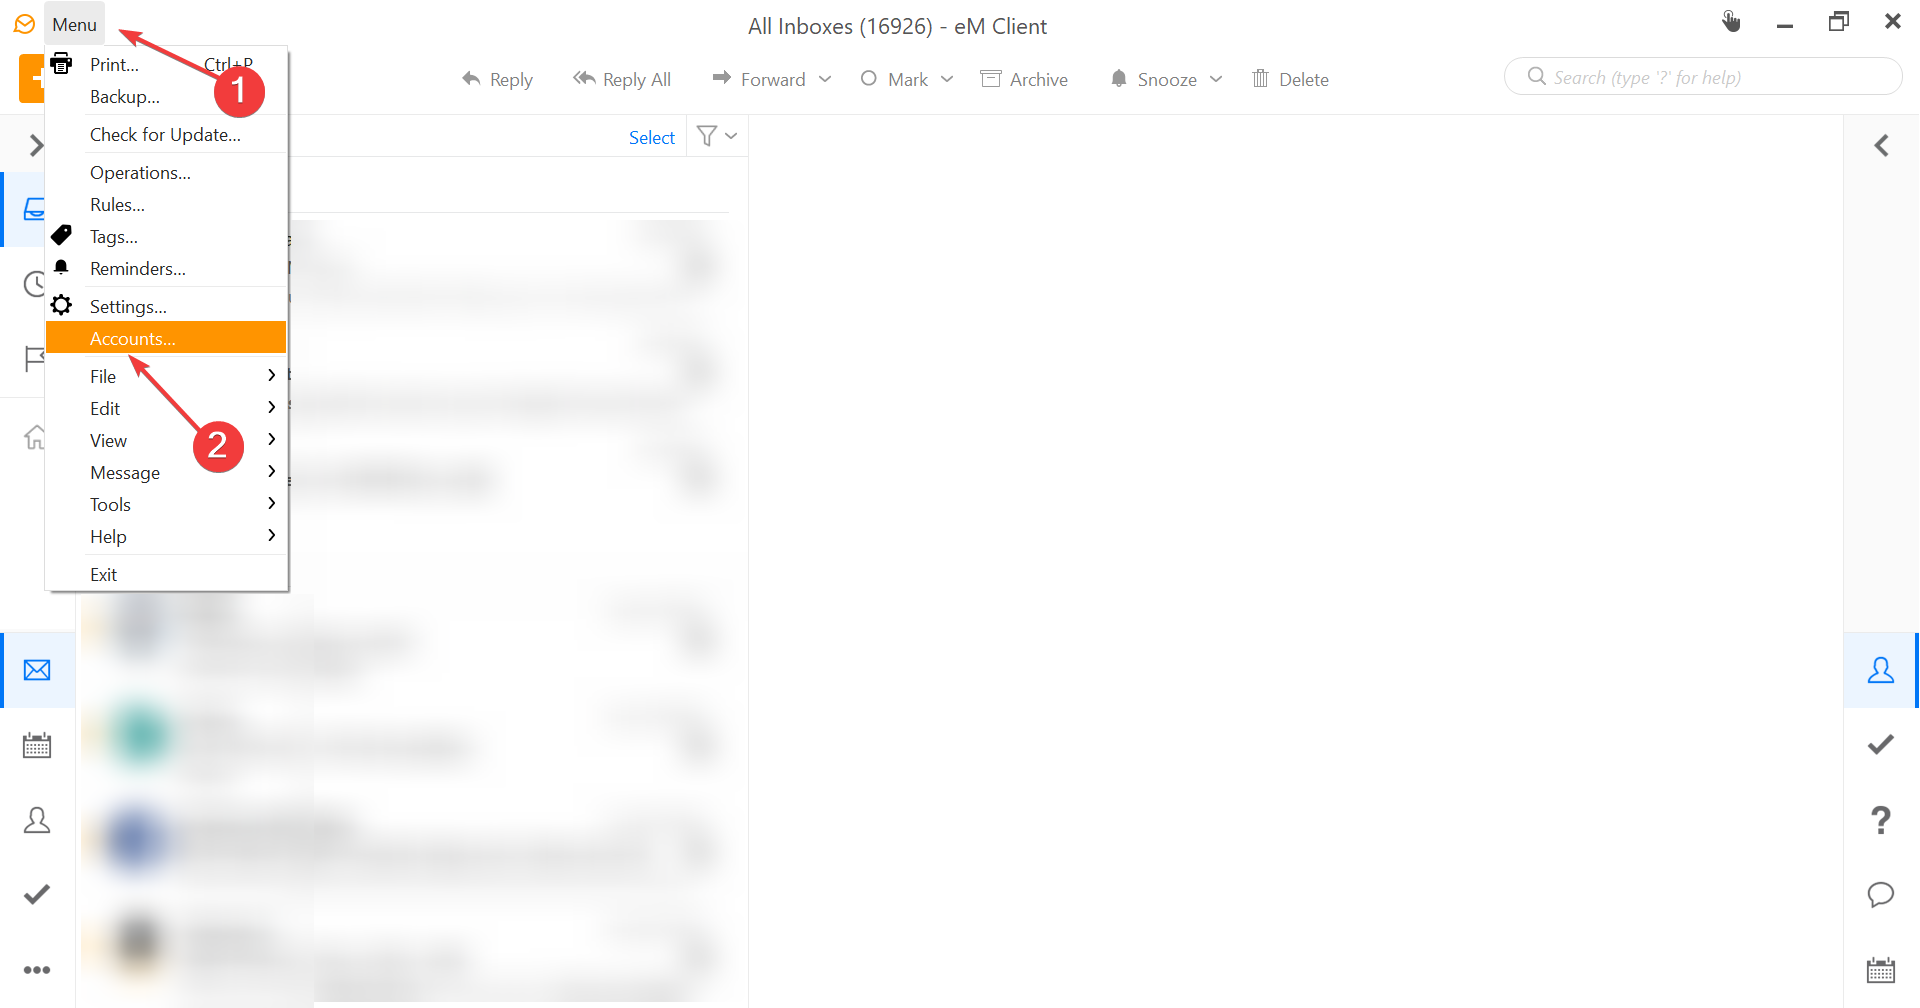
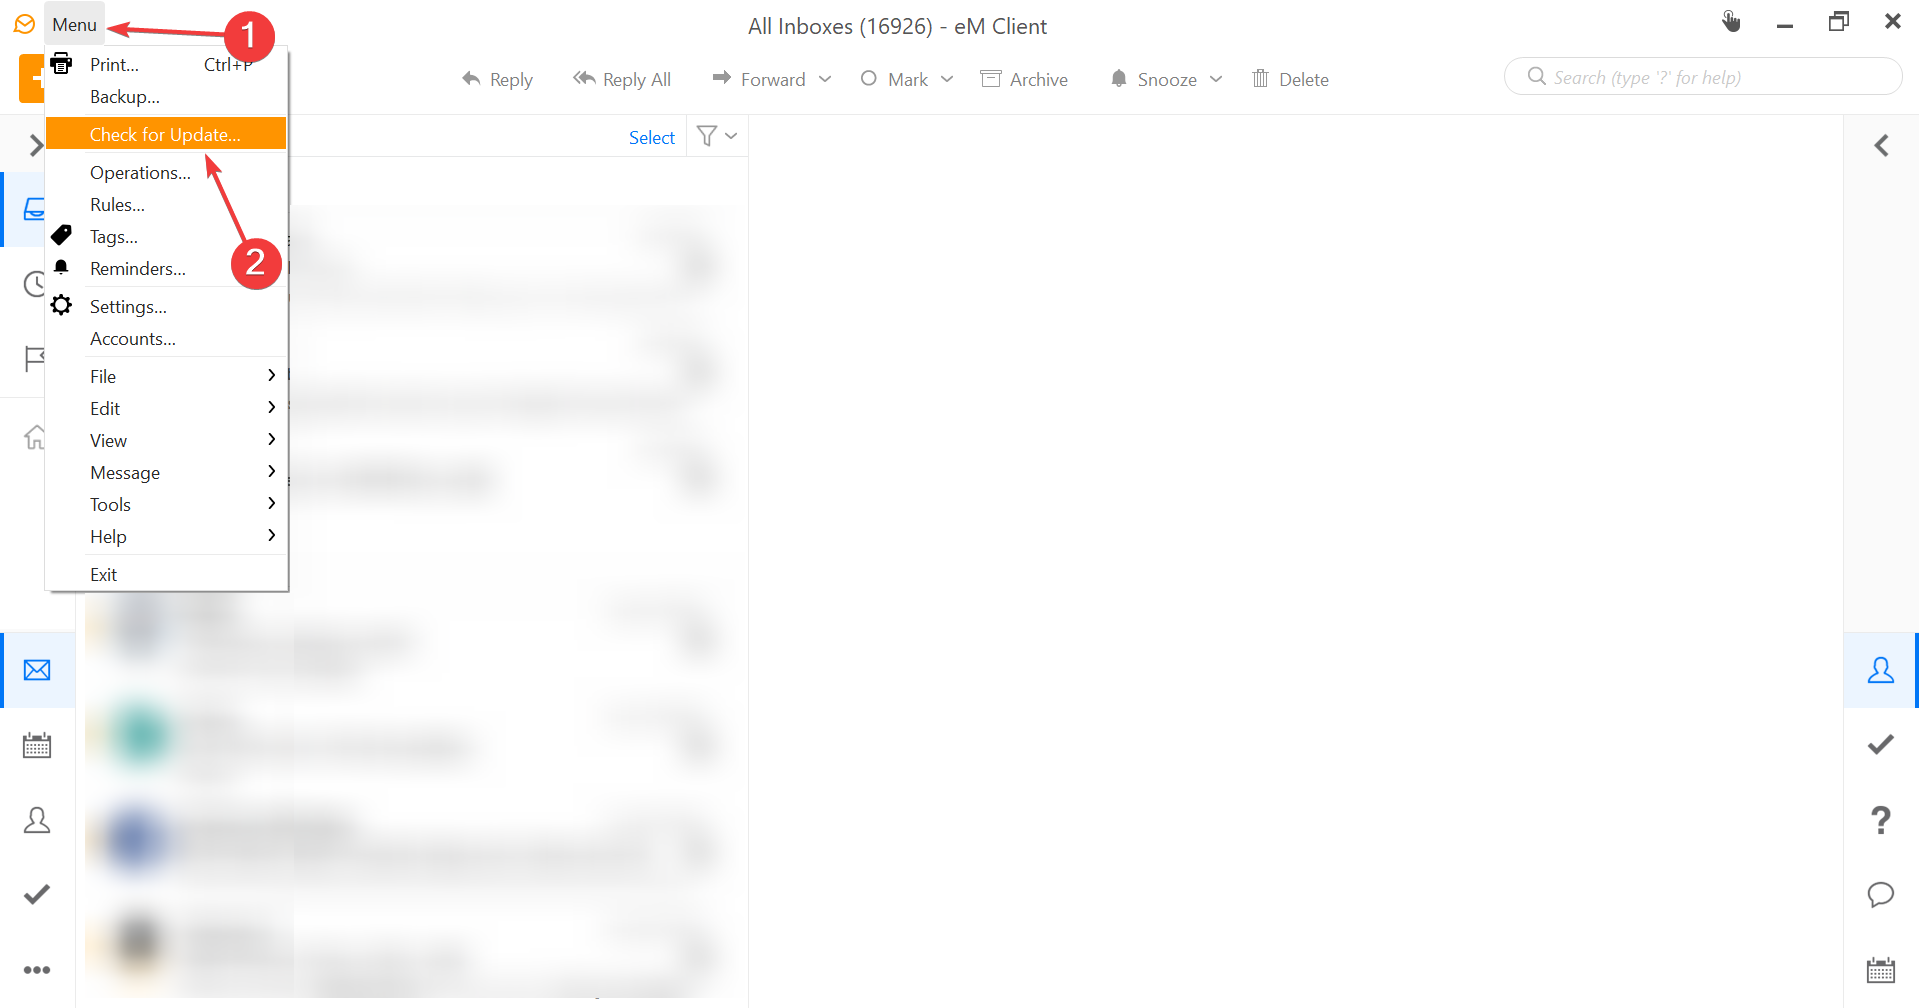
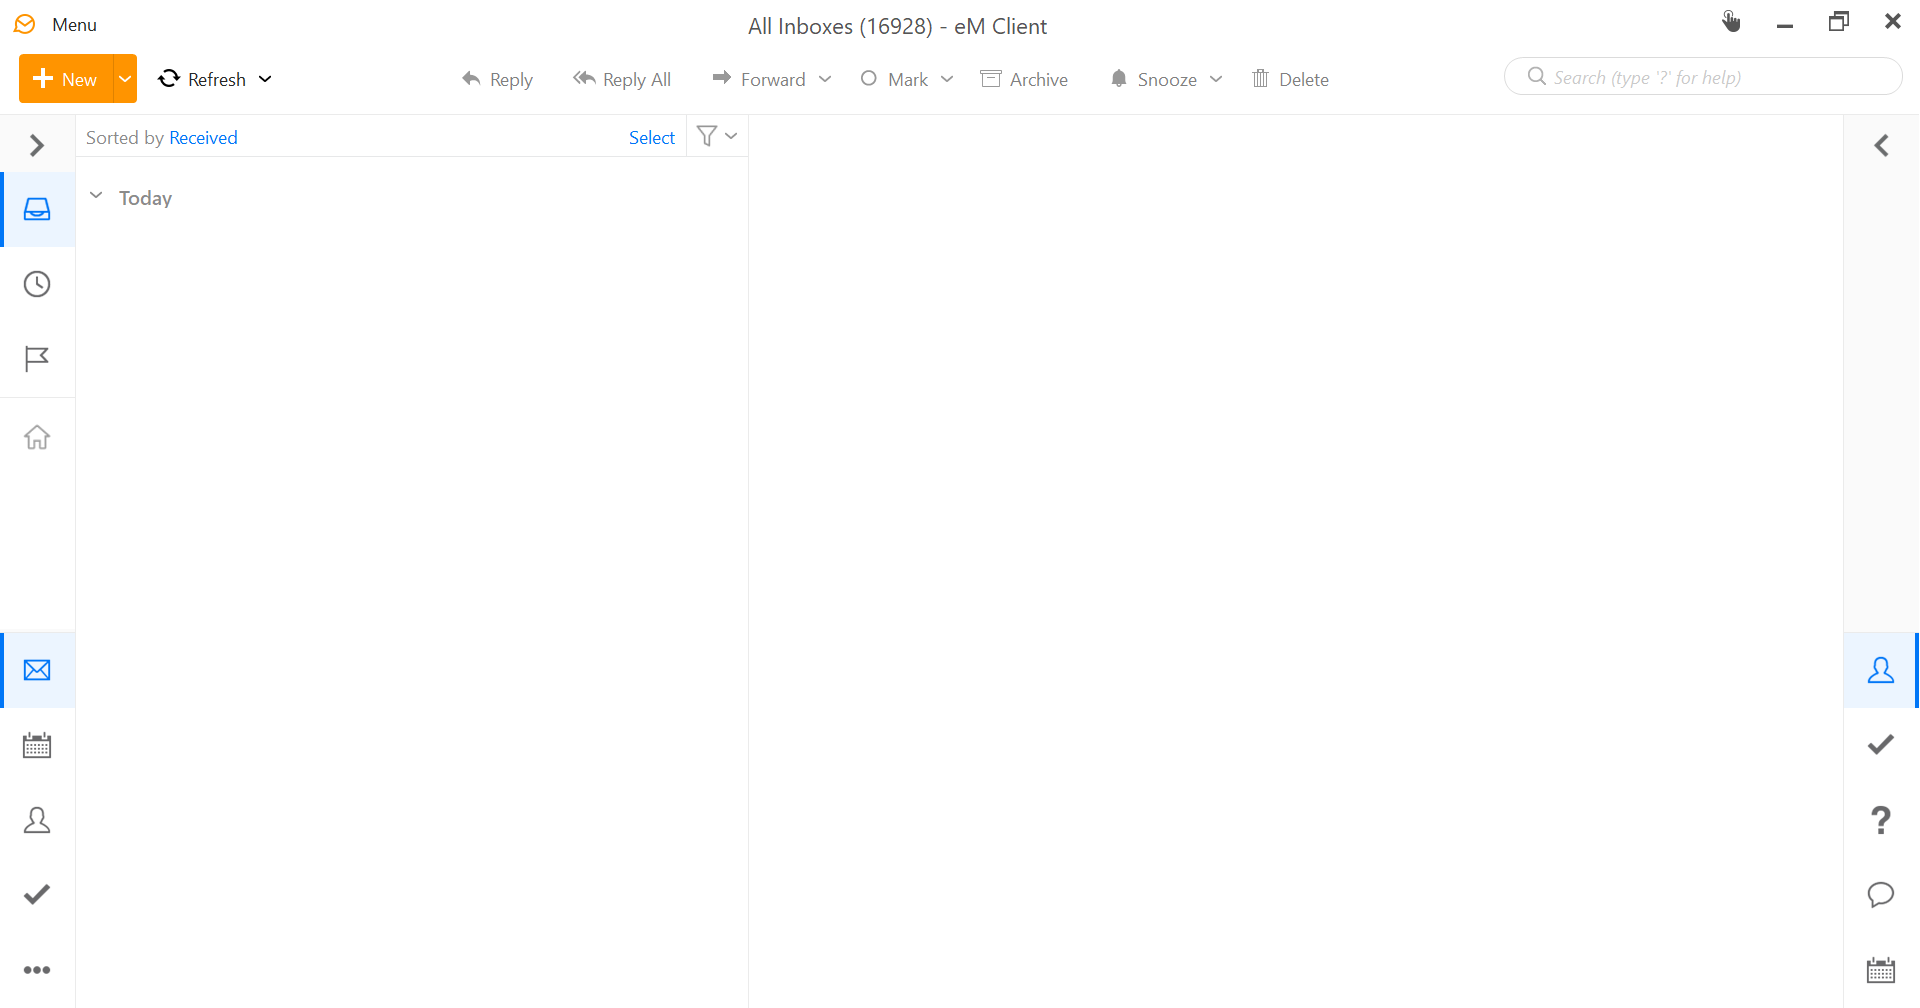
Launch eM Client, click on the Menu option near the top left, and select Accounts from the list.
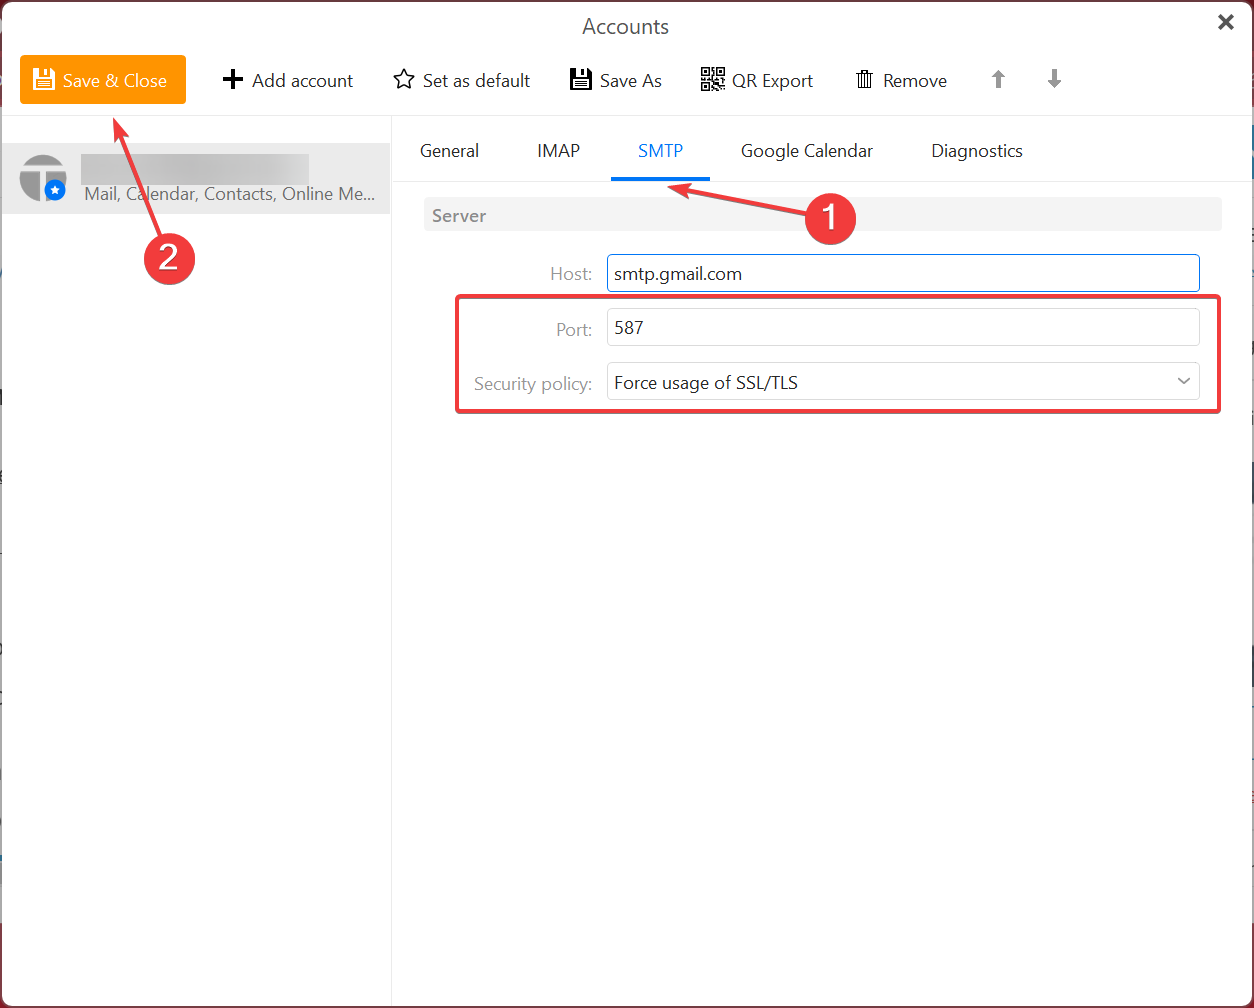
Head to the SMTP tab and use the following values, and click on Save and Close:
Port: 587
Security policy: Force usage of SSL/TLS
According to users, eM Client might not be sending emails if your email configuration isn’t correct. So, check that and make the necessary corrections. This will also help in case the eM Client Cannot send message (Email recipient not accepted by the server) error.
3. Update eM Client
Launch eM Client, select the Menu option, and click on Check for updates.
If any updates are available, wait for them to install, and then relaunch eM Client.
Oftentimes, when eM Client is not sending emails, it’s a problem with the software itself, and the developers soon release a patch for it, which can be installed in the subsequent updates.
4. Use the Registry workaround
Tip
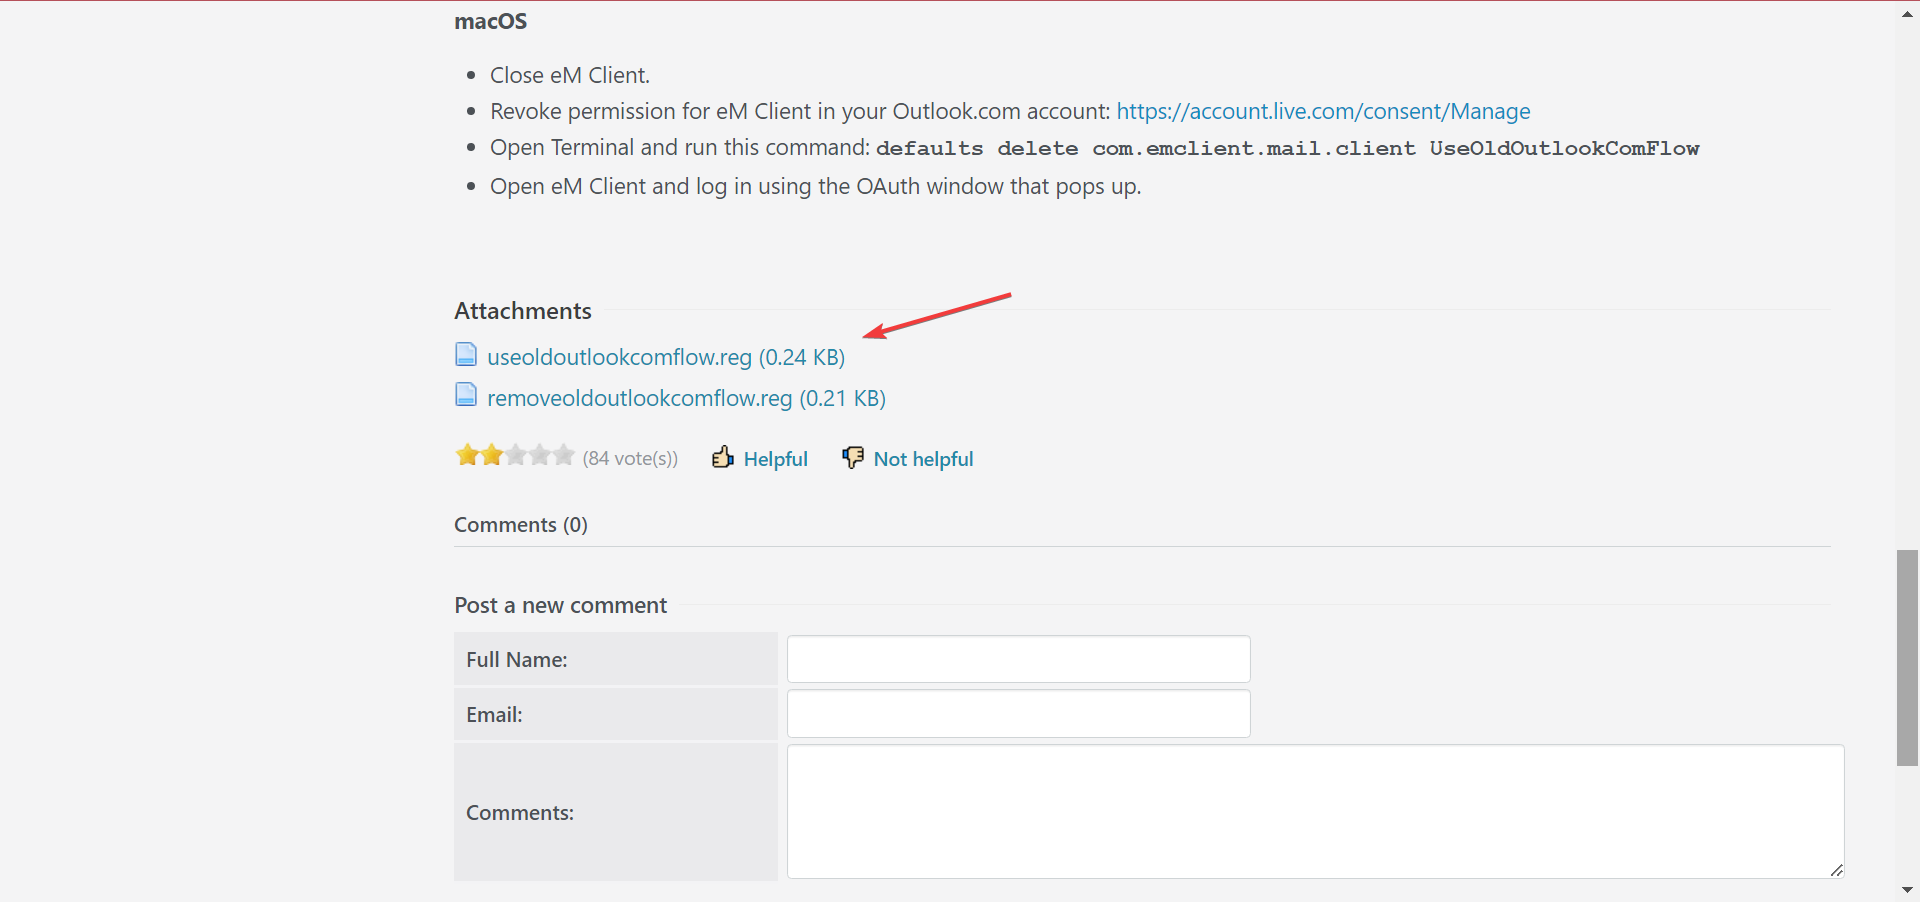
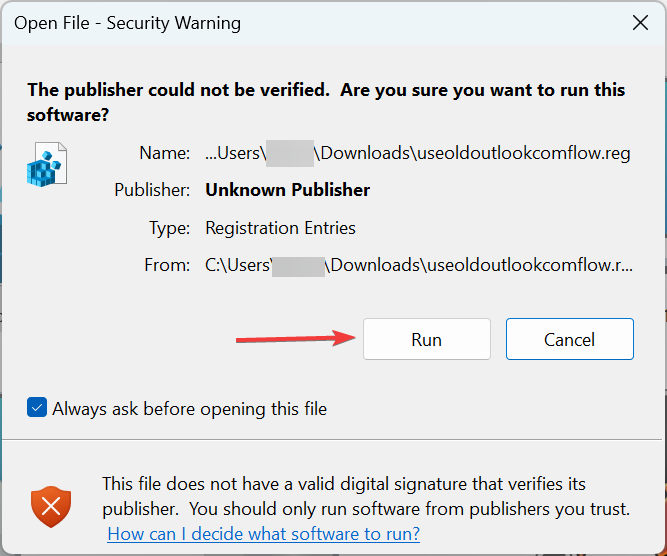
EM Client shared this workaround after the recent changes by Microsoft, which affected all its email services, for instance, Outlook and Hotmail. The registry entry will configure your account with a previous version of the OAuth login method.
The steps listed here are for Windows Defender Firewall. If you use a third-party firewall, check the official website for the exact process.
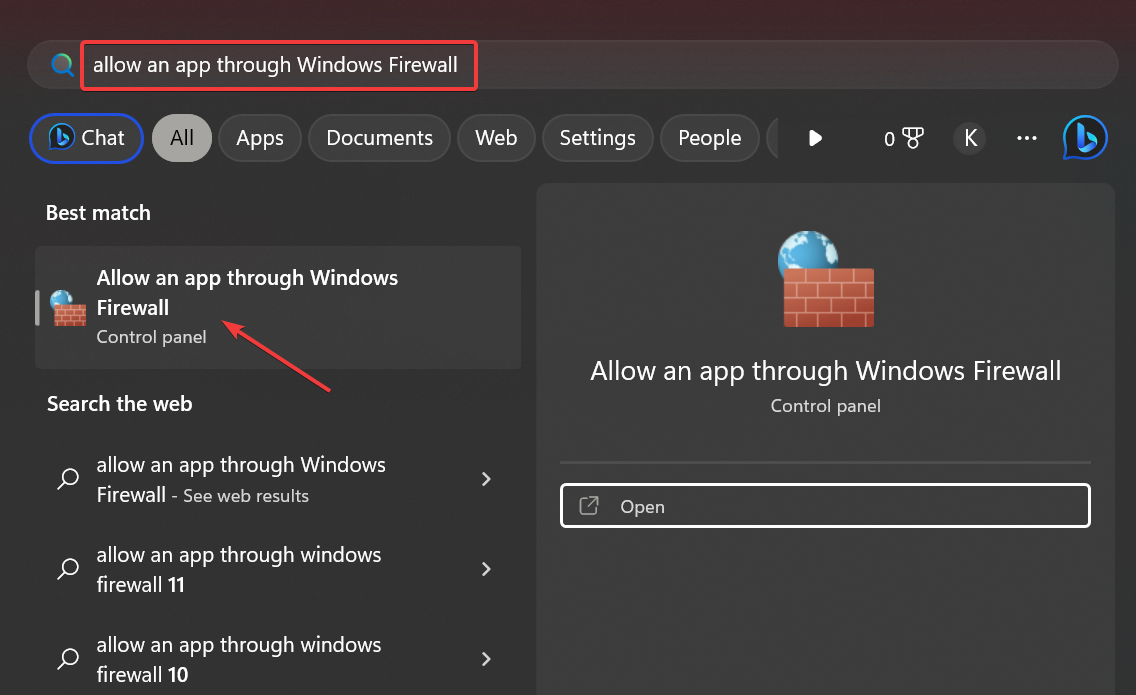
Press Windows + S to open Search, type Allow an app through Windows Firewall, and click the relevant search result.
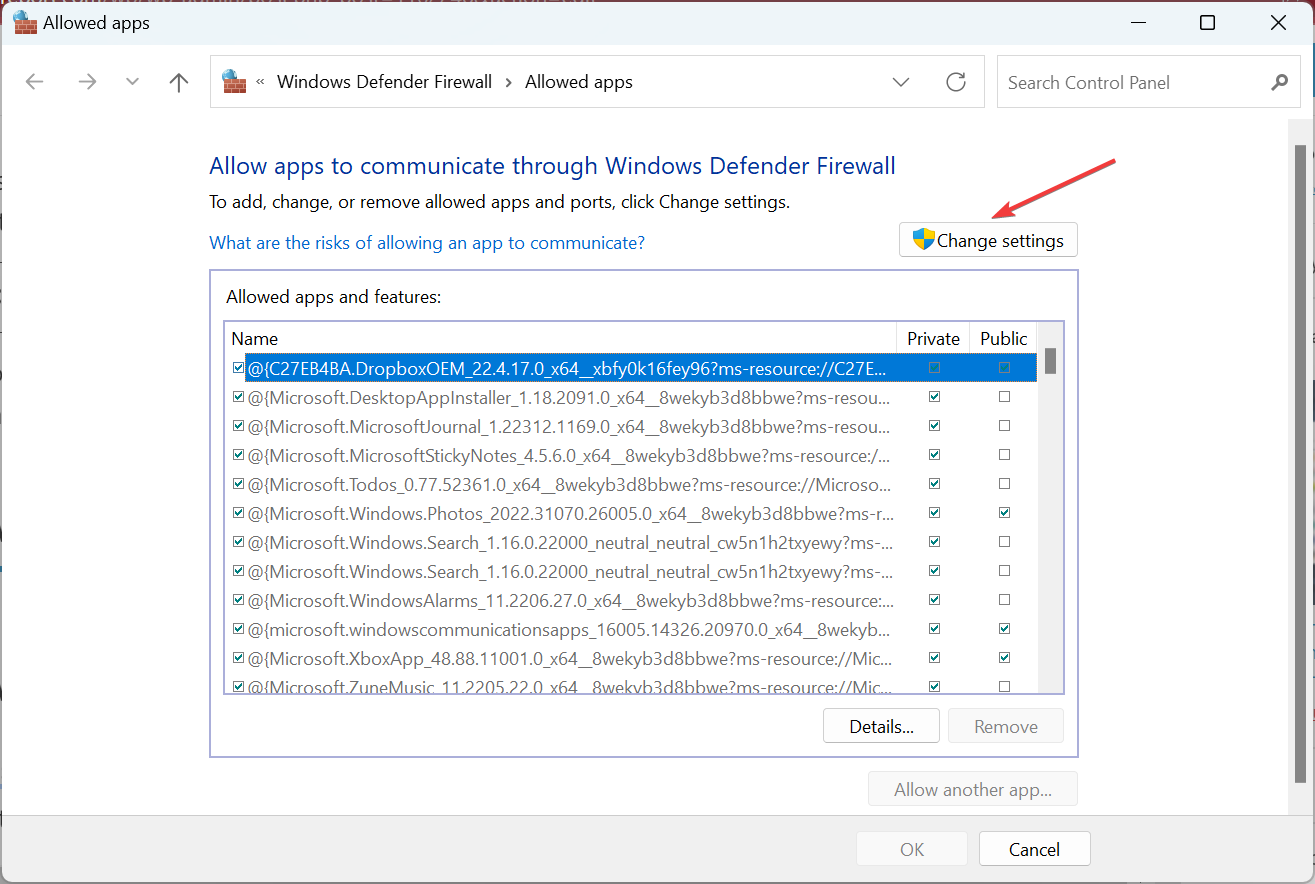
Click on Change settings.
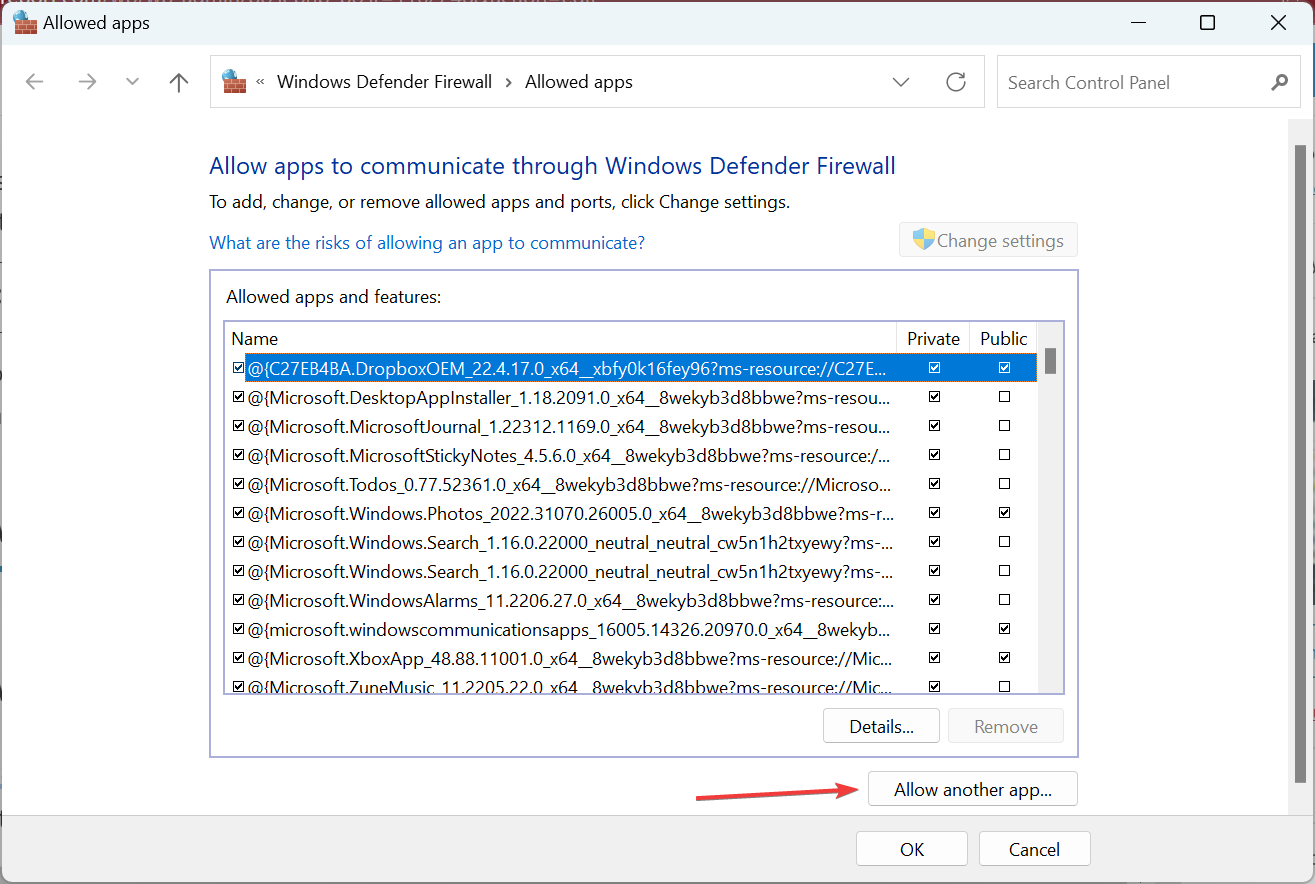
Click on Allow another app at the bottom.
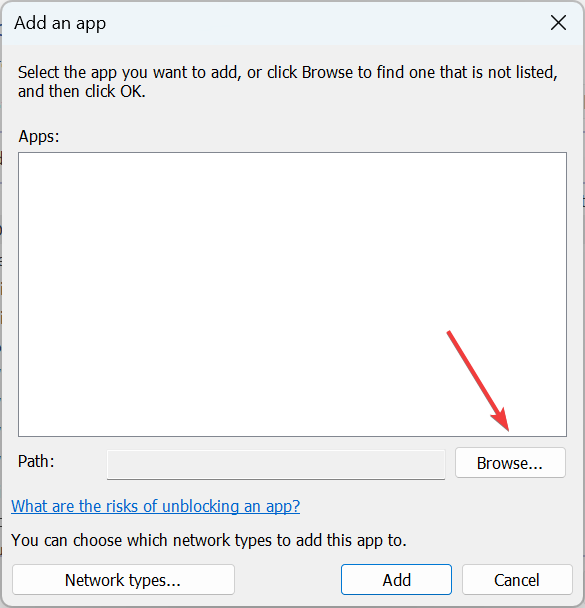
Now, click the Browse button.
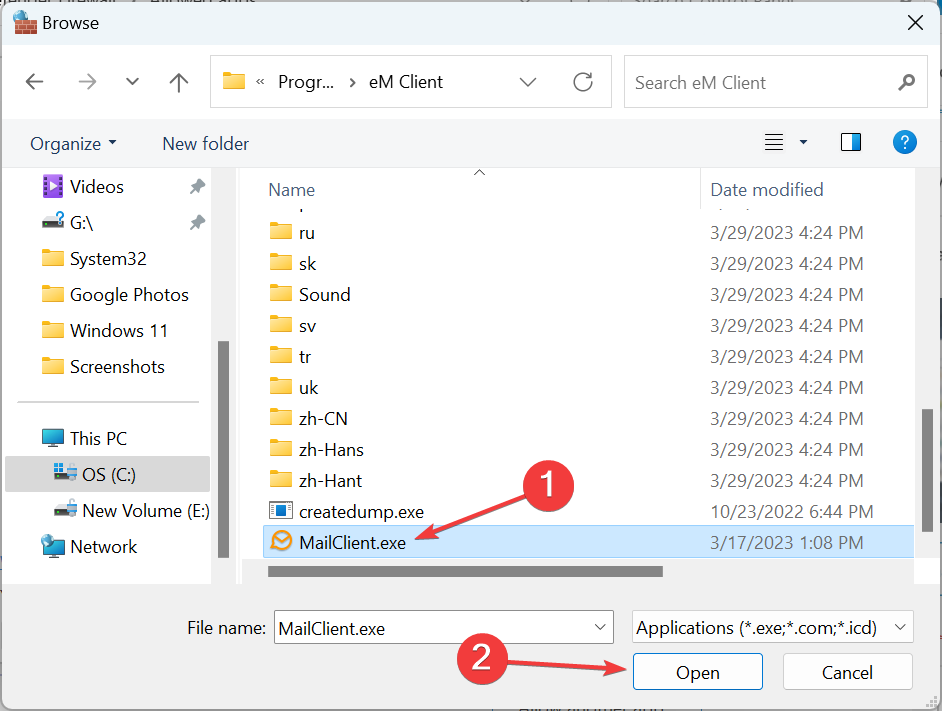
Navigate to eM Client’s install location, select the launcher, and click Open.
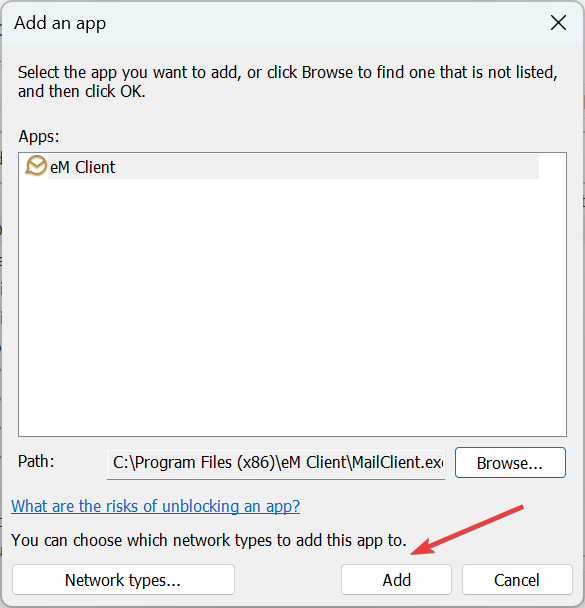
Click on Add.
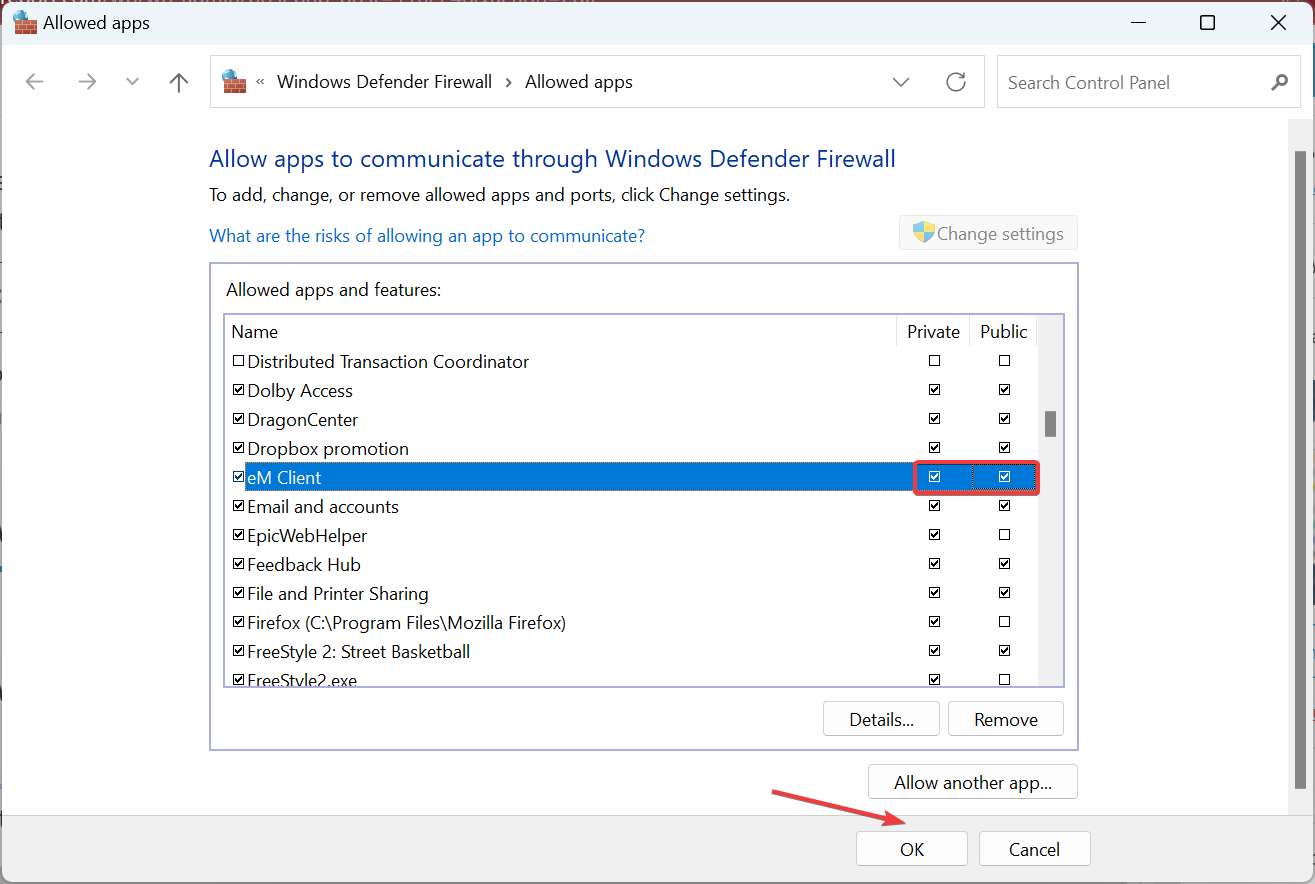
Finally, make sure both the Private and Public checkboxes are ticked for eM Client, and click OK to save the changes.
A few users found out that it was the firewall that led to eM Client not sending emails, and either disabling it or adding an exception for the client worked. We recommend the latter since the firewall is critical from the security point of view, and disabling it puts the PC at risk.
6. Reinstall eM Client
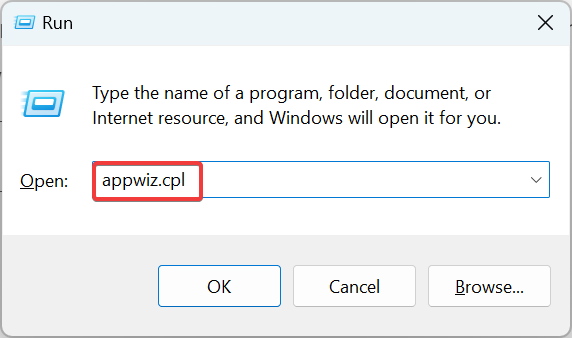
Press Windows + R to open Run, type appwiz.cpl in the text field, and hit Enter.
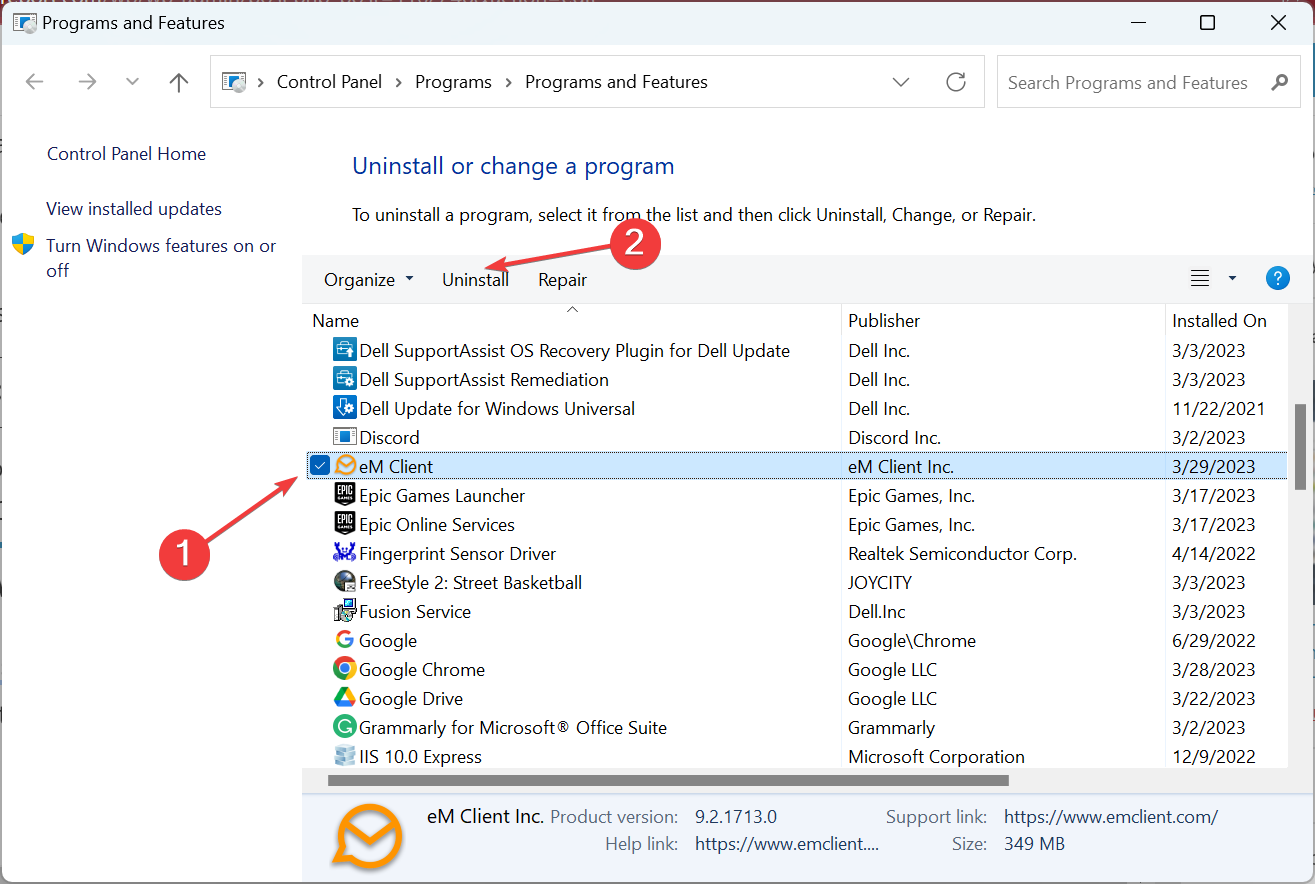
Select eM Client from the list, and click Uninstall.
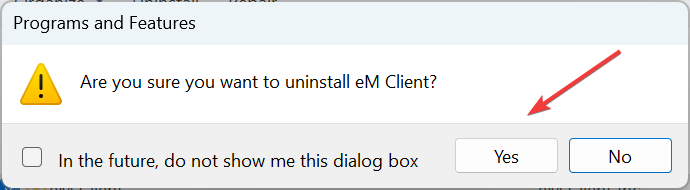
Click Yes in the confirmation prompt.
Once the uninstall is complete, restart the computer for the changes to come into effect.
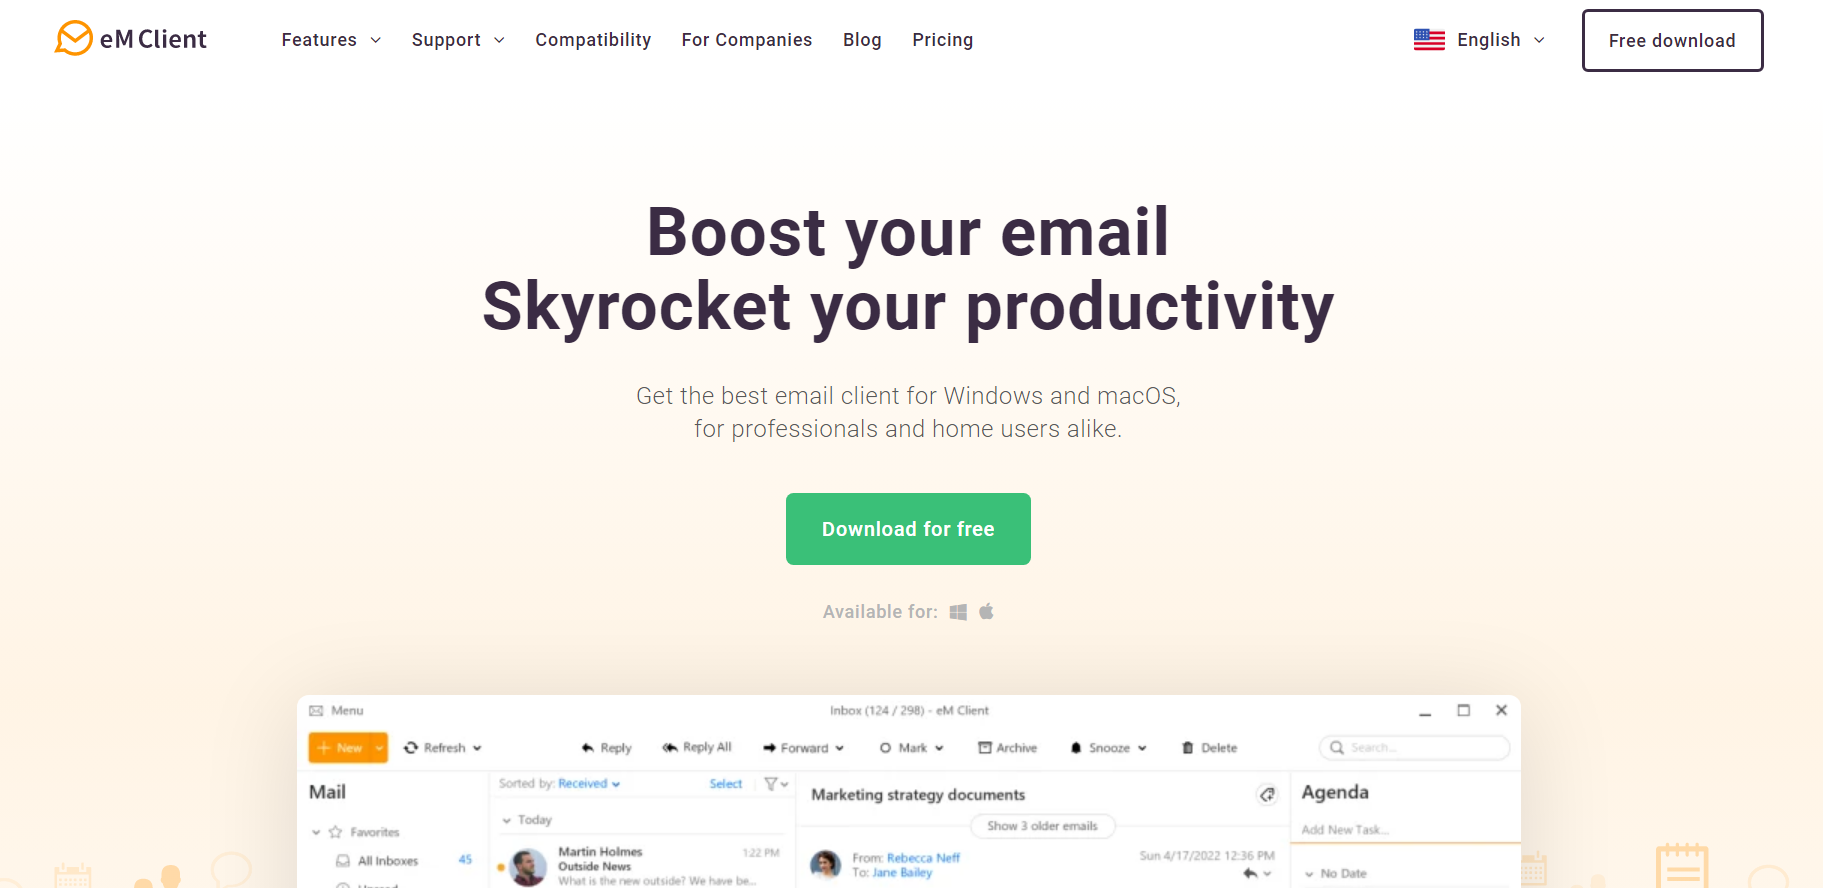
Now, go to the official website, and download eM Client again.
Run the setup, follow the on-screen instructions to complete the installation, and then set up your account.
If nothing previously worked, reinstalling eM Client should work when it’s not sending emails. Though if it’s a bug in the latest version or an issue with the network or service provider, reinstalling the client won’t help, but we have already covered the fixes for these earlier.
There are all sorts of browsers on the market, and while Chrome and Firefox dominate the western market, QQ Browser has gained massive popularity in China.
So, what is the QQ Browser, how does it work, and what features does it have? So, today we’re going to try to answer all these questions.
Is QQ spyware?
It is known that Tencent has been caught spying on users’ web browsing history with QQ Messenger.
Yes, you heard correctly, QQ Messenger, a popular Chinese instant messaging app by Tencent, was caught scraping web browser history with their desktop client.
So, you can say it is spyware if you want to put it like that. However, facts speak for themselves, and many have stopped using the QQ browser immediately.
What is QQ Browser, and should I use it?
1. What is QQ Browser?
QQ Browser was first released in November 2000 by Tencent and was called Tencent Explorer. What makes this browser unique is the fact that it uses two engines, WebKit and Trident.
QQ Browser is available on all major platforms, including macOS, iOS, Android, Windows, and Linux.
The browser is available for download from the official website, but you might have minor difficulties navigating it since it is in Chinese.
According to users, both Windows and Android versions of QQ Browser seem to transmit your data to the QQ without encryption or by using weak encryption.
The Android version sends the user’s IMEI, IMSI, nearby Wi-Fi access points, visited URLs, Android ID, and search queries.
The Windows version sends the list of visited websites, hard drive serial number, MAC address, and machine hostname to QQ servers.
In addition, the software updating process has vulnerabilities on Android and Windows versions that can be exploited easily.
QQ Browser has privacy issues, and if you want a good alternative, we recommend Opera One.
The browser is available on all desktop and mobile platforms and allows you to sync your data across platforms easily.
As for privacy, tracking protection will block tracking scripts and cookies and make your web pages load faster. Opera One also has a free VPN with unlimited bandwidth for an extra layer of privacy
In addition, there’s a built-in ad blocker, so you won’t have to deal with ads anymore.
Opera One comes with a built-in AI and a modular AI-ready design for other AI technologies intergration. The browser is based on Chromium, and it should work with Chrome extensions without problems.
Overall, Opera One is a great browser that protects your privacy, so consider it.
Opera One
If you’re sick of data leaks and want to go to the opposite end of the spectrum, then Opera One is your most secure option.
To answer this, we’re going to say that the popular QQ web browser has significant security flaws that could leak personal user data.
This can include web and search history and other personal data you might want to hold on to. Again, it’s your decision, but we’d recommend you choose another browser.
There are different browser versions, so you can get a QQ Browser for PC if you are a Windows user.
People that rely on mobile devices can find QQ Browser for Android, and other versions of QQ Browser mobile, so keep that in mind.
QQ Browser offers decent features, but you might want to consider using a different web browser due to various privacy concerns.
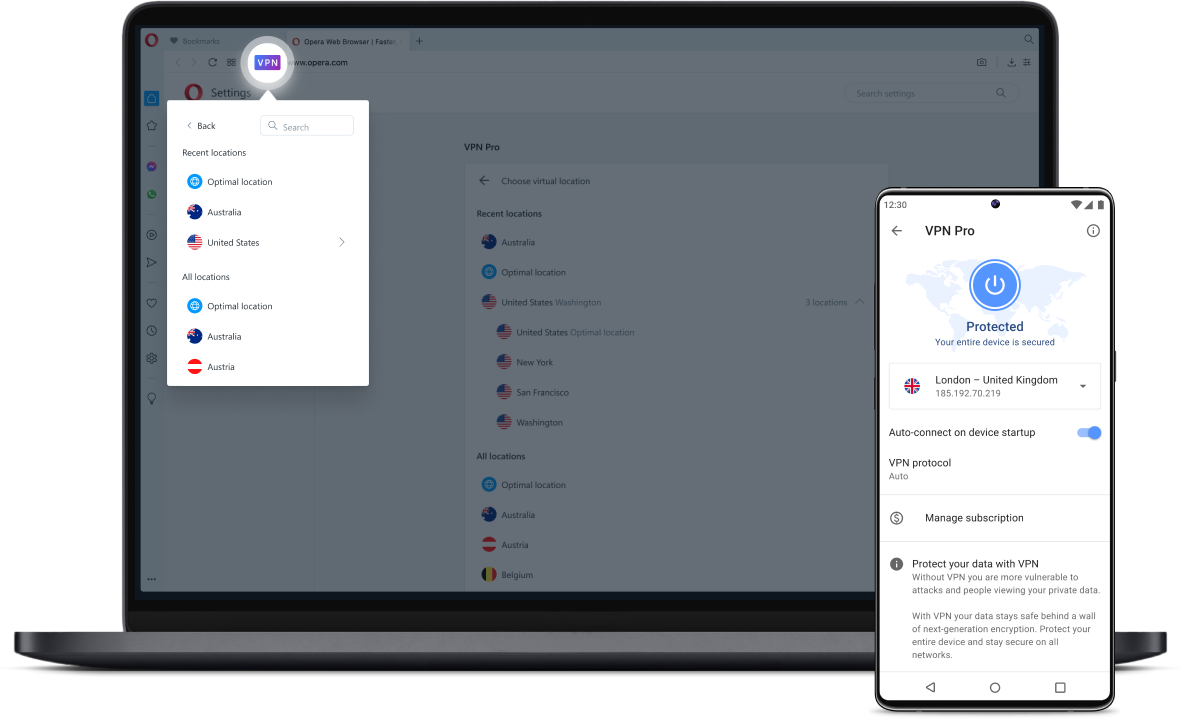
Opera VPN Pro adds some handy features to the already-amazing built-in VPN that this browser includes by default.
This VPN service, coupled with all the fantastic features that Opera and Opera GX offer, will improve your online experience considerably, whether you’re a regular user or an avid gaming fan.
The creators of this powerful VPN version for Opera that works on any device had this to say about it:
Recently, we were spotting the increasing interest in trusted entire-device protection based on our users’ requests. That’s why launching a trusted VPN Pro solution was a logical further step for Opera.
Stefan Stjernelund – Product Manager at Opera
In today’s guide, we will dive deep into analyzing this new Opera VPN release, find out what makes it tick and if it’s worth your time.
Read on to find out!
What is Opera VPN Pro?
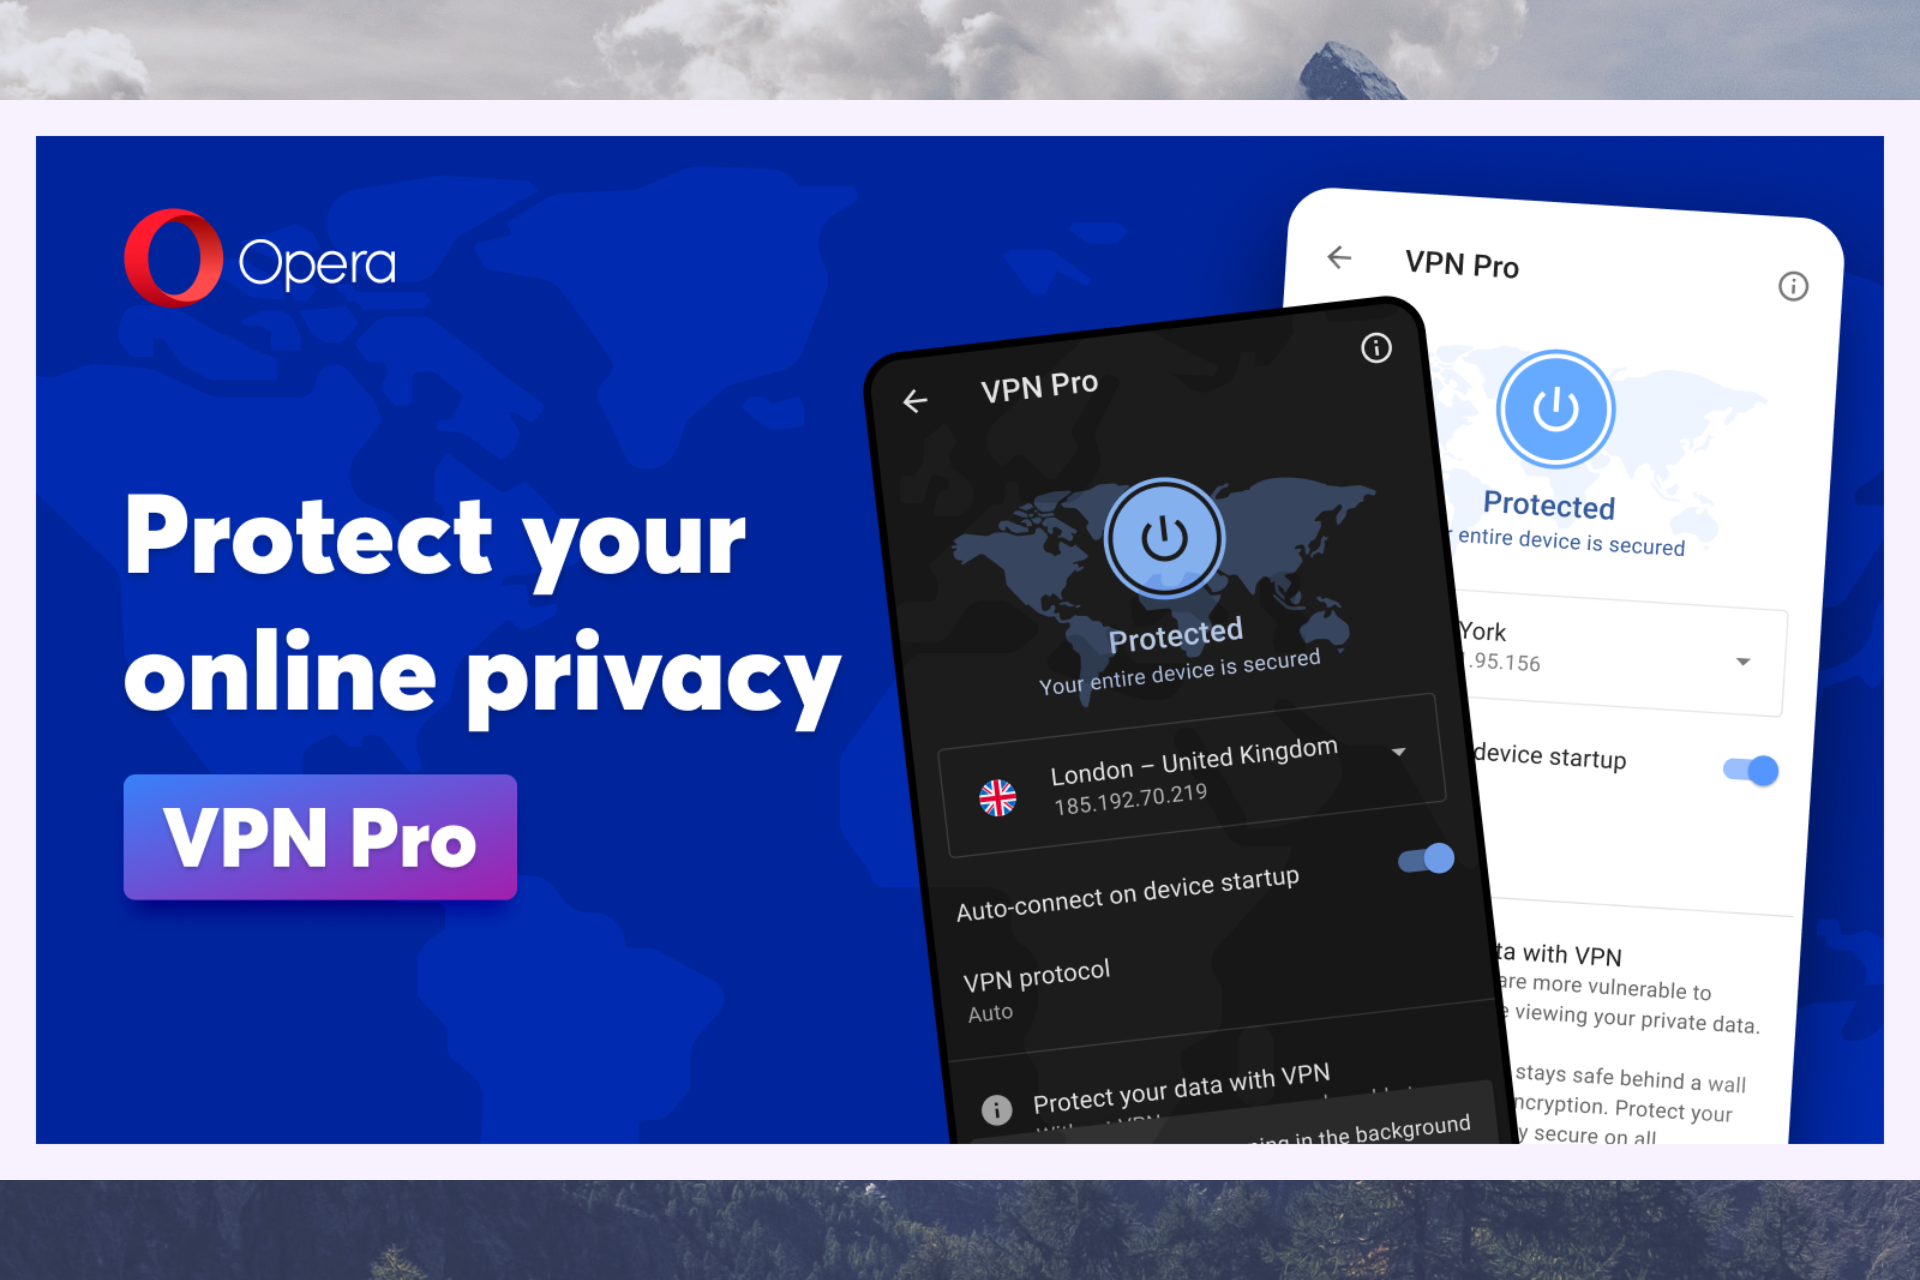
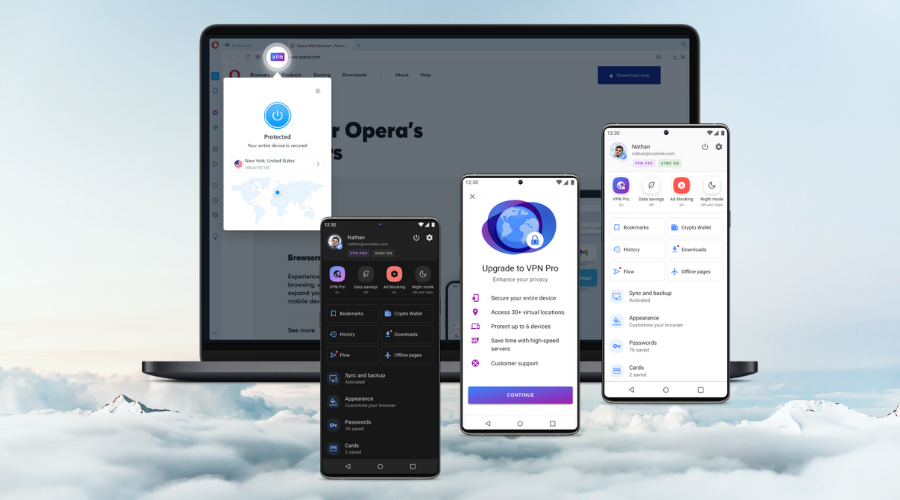
Opera VPN Pro is a new version of the Opera VPN we’ve all grown to love, but with a twist: More privacy and online security!
Opera VPN Pro
Different from the free built-in VPN with more security and enhanced privacy.
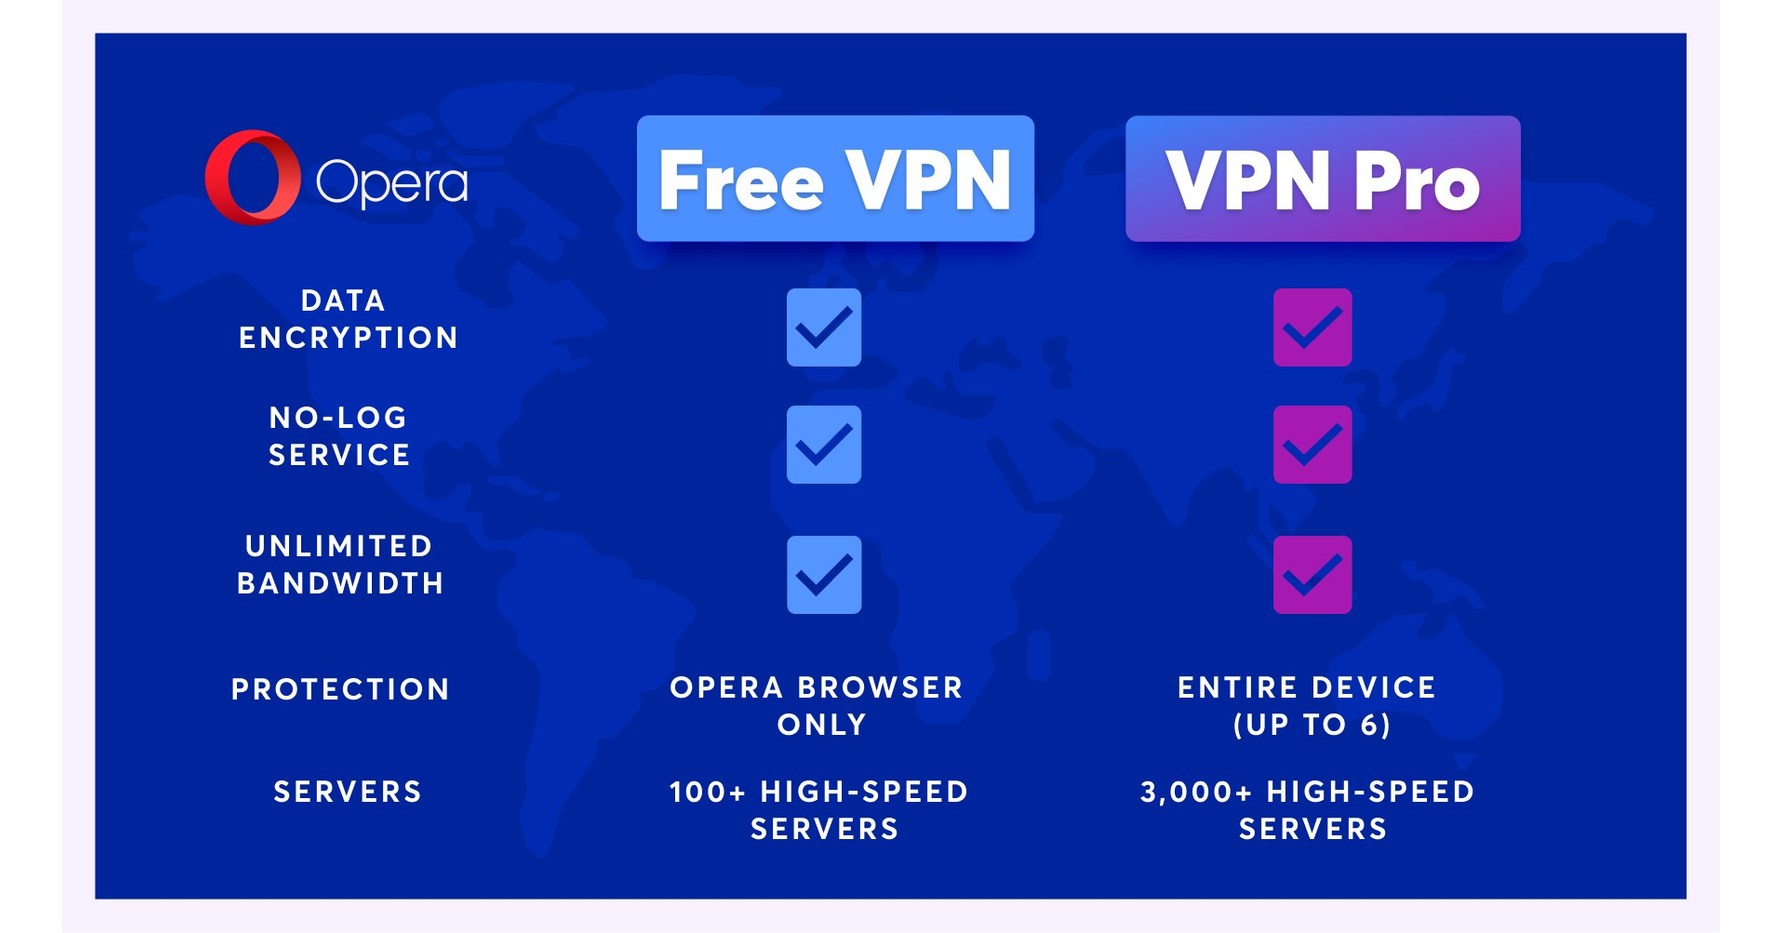
Opera VPN Pro offers a better-quality service than the free option, ensuring you access over 3000 private network servers and more than 30 virtual locations across the globe.
Accessing all these servers will ensure that your Opera VPN Pro will ensure that it happens no matter what content you want to watch online.
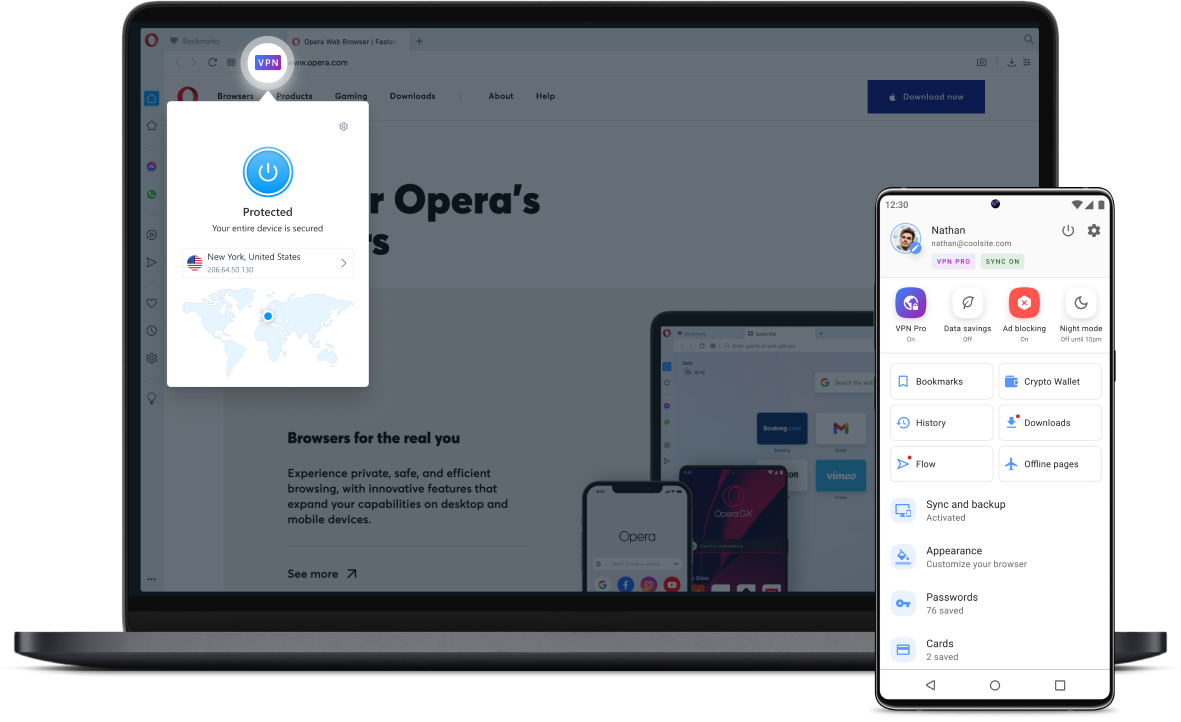
The new premium VPN offer from Opera offers a service that will cover your entire device, not only the browser activity, making it far more capable and secure than before.
As a bonus, you can also run the service in data-saving mode, ensuring that your mobile phone internet plan is not too affected.
Is Opera VPN Pro free?
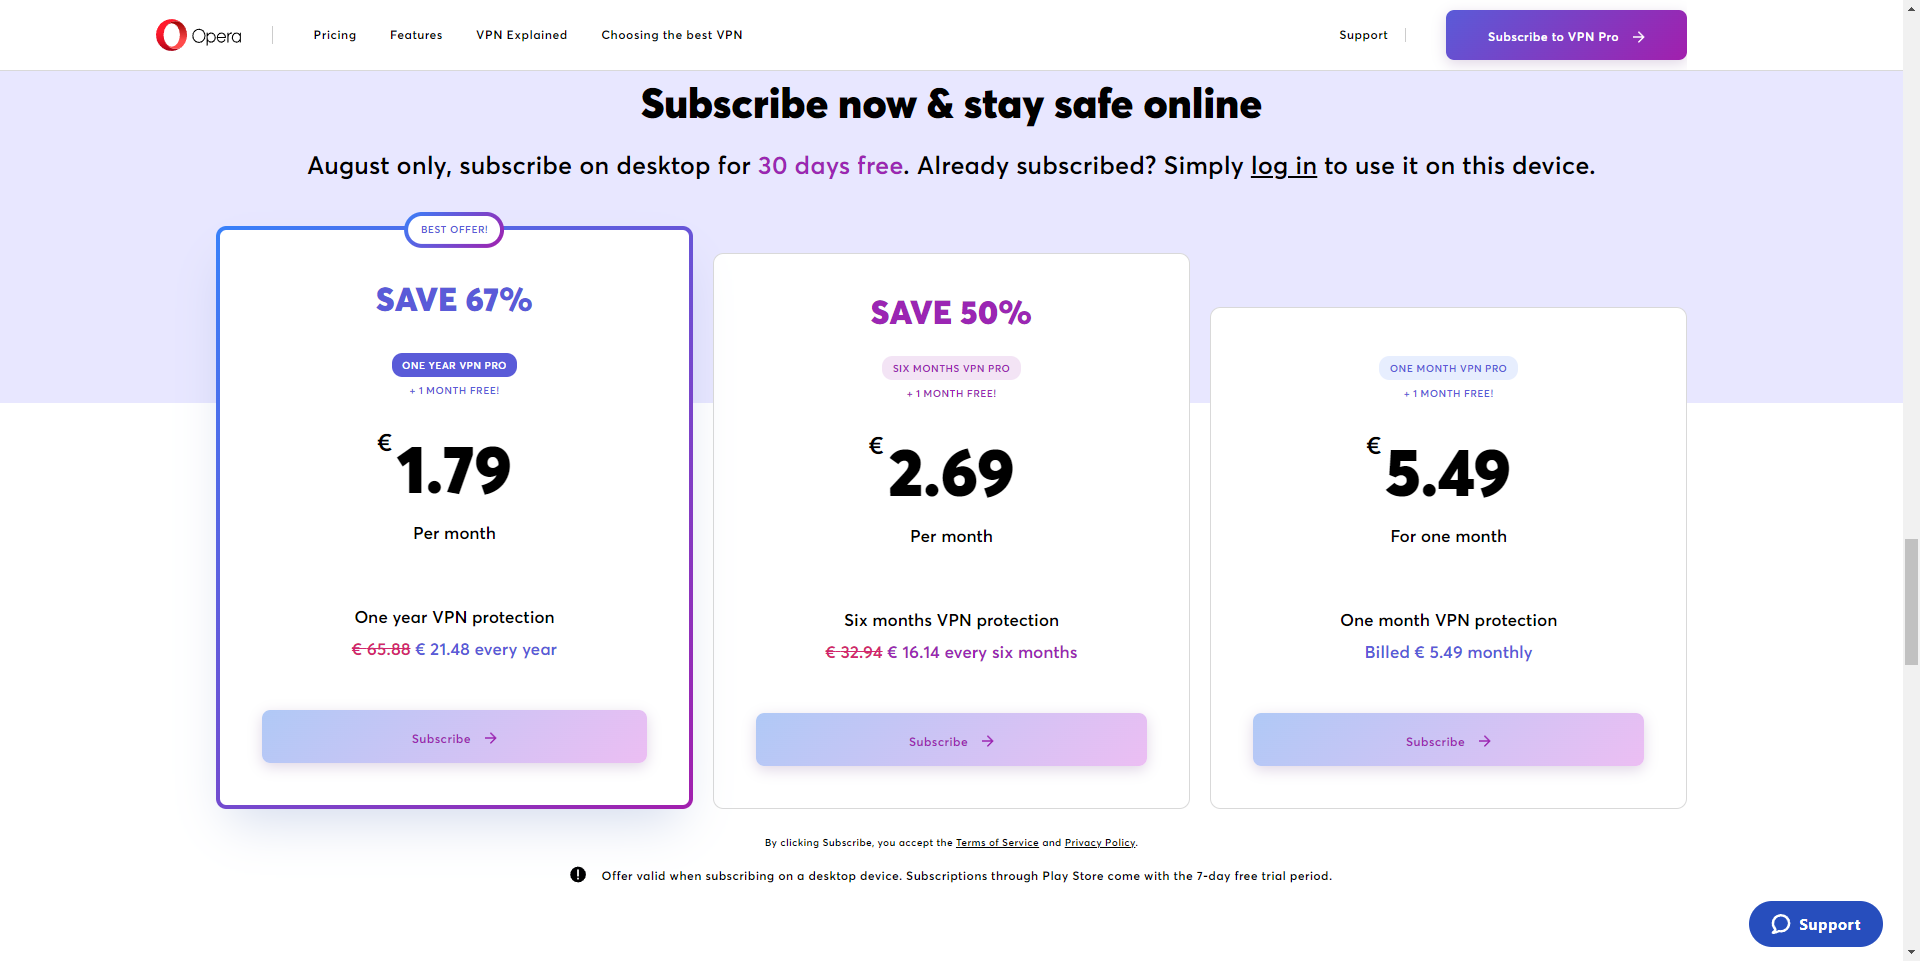
No, Opera VPN Prois not a free service, but you can try it out freely for 30 days if you subscribe. Depending on the exact duration of your subscription, the prices will vary.
What are the features of Opera VPN Pro?
➡ Unique features
– Enhanced security on multiple devices
Whether you’re using an Android device or PC, your online traffic will be secured by the powerful Opera VPN Pro.
The same principle applies no matter what application you’re using; the VPN service will ensure that it’s private.
– Privacy boost as there is a no-log policy
As in the case of the regular version, the service shield used by Opera VPN Pro has a no-log policy, meaning that absolutely no activity (both local and online) will not be logged into the Opera servers.
This not only ensures that your personal information will remain private, but no third party will be able to collect or share your data.
– Amazing browsing speeds
The 3000+ VPN servers provided by theOpera VPN Prowill allow you to stream high-quality content online, no matter where you are in the world, what content you want access to, and what kind of security level it has.
Additionally, the large number of servers improves privacy and security features and allows fast browsing speeds with unlimited bandwidth.
➡ Other features
– Protects up to 6 devices at once
With Opera VPN Pro, you can have up to 6 different devices connected to the same subscription, allowing you to ensure your protection and privacy online and your family’s.
– Live VPN support
Access to 24/7 chat support can be handy, especially if you encounter any issues during setup. The experts behind the help chat will help you resolve any problems quickly.
Opera VPN Pro – Pros & Cons
Pros
More than 3000 private network servers
30 virtual locations situated across the globe
Privacy protection for the entire device, not just the browser
Built-in data-saving mode
Cons
Not free
Final Score: 5/5
How does Opera VPN Pro compare with other VPN options?
Now that we covered all the aspects of the powerful Opera VPN Pro, let’s have a look at how it compares with other VPN options on the market:
Opera VPN Pro
ExpressVPN
CyberGhost
Private Internet Access
3000+ servers
3000+ servers
7,700 servers
35.000+
30 virtual locations
160 locations
91+ countries
78+ countries
Device-wide protection
Device-wide protection
Device-wide protection
Device-wide protection
Up to 6 devices/subscription
5 simultaneous connections
7 simultaneous connections
10 simultaneous connections
Live VPN chat support 24/7
Live VPN chat support 24/7
Live VPN chat support 24/7
Live VPN chat support 24/7
As you can see from the table presented above, Opera VPN Pro is in line with all the biggest VPN providers on the market and is the only one that comes packed with a handy and versatile browser: the Opera browser.
Combining these two elements will ensure you will never have to worry about your online privacy again.
Opera VPN Pro price
When it comes to the price you need to pay to get all the benefits of Opera VPN Pro, the price will depend on the subscription choice and the device you’re using.
You can try out Opera VPN Pro for 30 days free by subscribing to the service for a limited time. However, as you can see from the image above, the price of a yearly subscription paid per month is impressive, especially considering what the subscription brings to the table.
Yes. Opera VPN Pro is a service offered by the Opera Limited software company, located in Norway and founded in 1995.
Why do I need Opera VPN Pro?
Opera VPN Pro was created for people who want to take their VPN security and privacy levels to the next threshold, as this service now covers the entirety of all network transfers performed on that device.
This ensures that any third parties cannot affect your privacy, no matter what kind of attack they use.
What do you think about the new Opera VPN Pro? Will you try it out? Please inform us of your decision and reasoning using the comment below.
Waterfox is one of the best alternative browsers to Firefox that you can use today. It’s a browser that’s very fast and light on resources, and it doesn’t track your activity.
Sometimes, however, Waterfox won’t open or work properly, and this can be frustrating if it happens to you.
In most cases, you can restart your PC and solve the issue but sometimes, your PC won’t open any browser. If you encounter such an issue, refer to our expert guide on how to resolve it.
Why is Waterfox not working?
If you are trying to access Waterfox but it is not launching, it could be due to one or more of the reasons listed below:
Corrupt extensions – If the problem with Waterfox not opening has started after installing an extension, you need to examine your extensions closely and check whether they are causing the problem. This is because some extensions don’t play nicely with Waterfox and may cause it to crash or not load properly.
Viruses or malware – If you have not updated your anti-virus software to its latest version in a while, your system may have been compromised. Update your antivirus and scan your system.
Incompatible OS – Waterfox may not be compatible with your operating system or other programs running on your computer. You can check on the official Waterfox website whether your device meets the requirements to run the program.
Insufficient RAM – You may not have enough memory (RAM) available on your computer to run multiple programs at once; RAM usage depends on how many tabs are open in each browser window, so if you’re using too many tabs at once it can cause problems when switching between them.
Should any of the above be causing Waterfox not to load pages, try one of the below solutions to resolve the problem?
Quick Tip:
If you want the quickest approach, switch to the Opera One browser, which is more versatile. You may always return to Waterfox if you picked it as a temporary solution.
Besides, you’ll be impressed at how extensions function in Opera One. Moreover, there are built-in Ad blocker, VPN and AI. It even comes with modular AI-ready design which let’s you integrate other AI’s
Opera One
Its functions are balanced, and its options and customization are quite fun and enjoyable.
Click on the gear icon in the top-right corner of your screen and select Help from the dropdown menu.
Select About Waterfox.
If your browser is up-to-date, you will get the following dialog box.
2. Scan for viruses
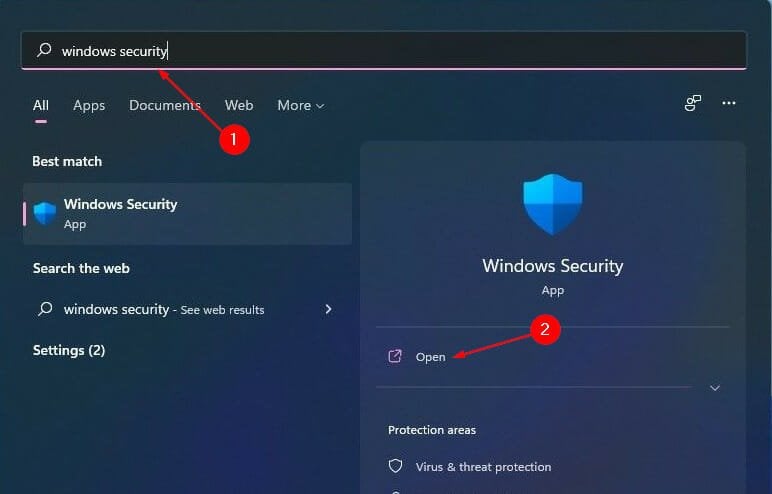
Press the Windows key, search Windows Security and click Open.
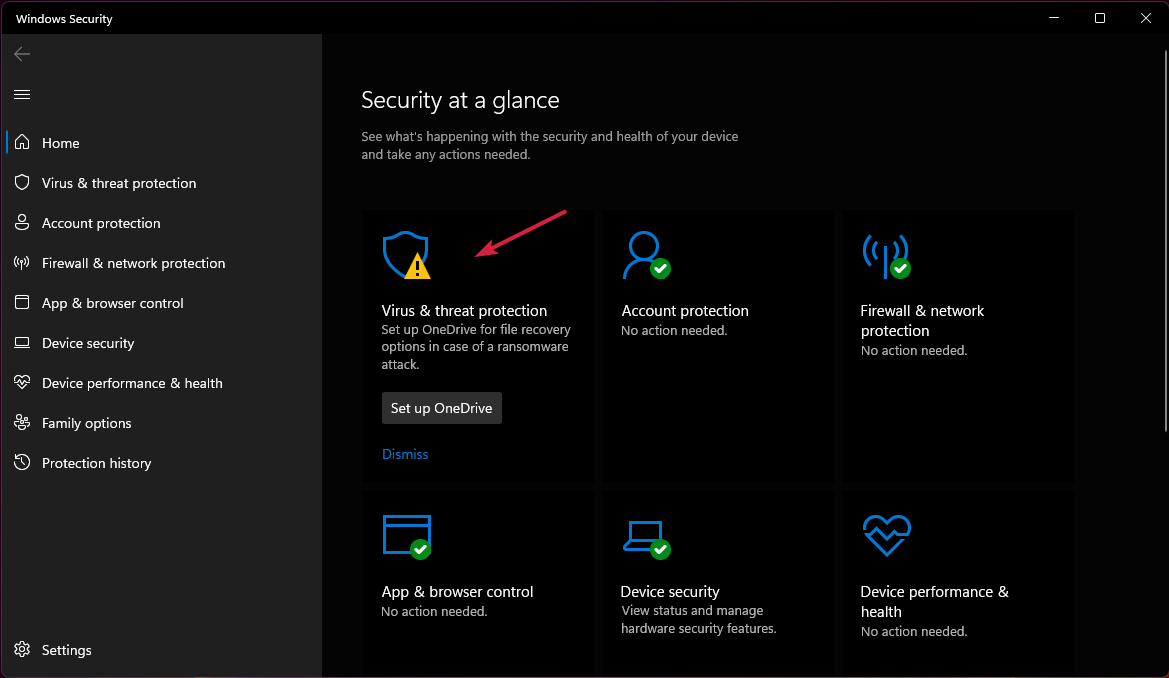
Select Virus & threat protection.
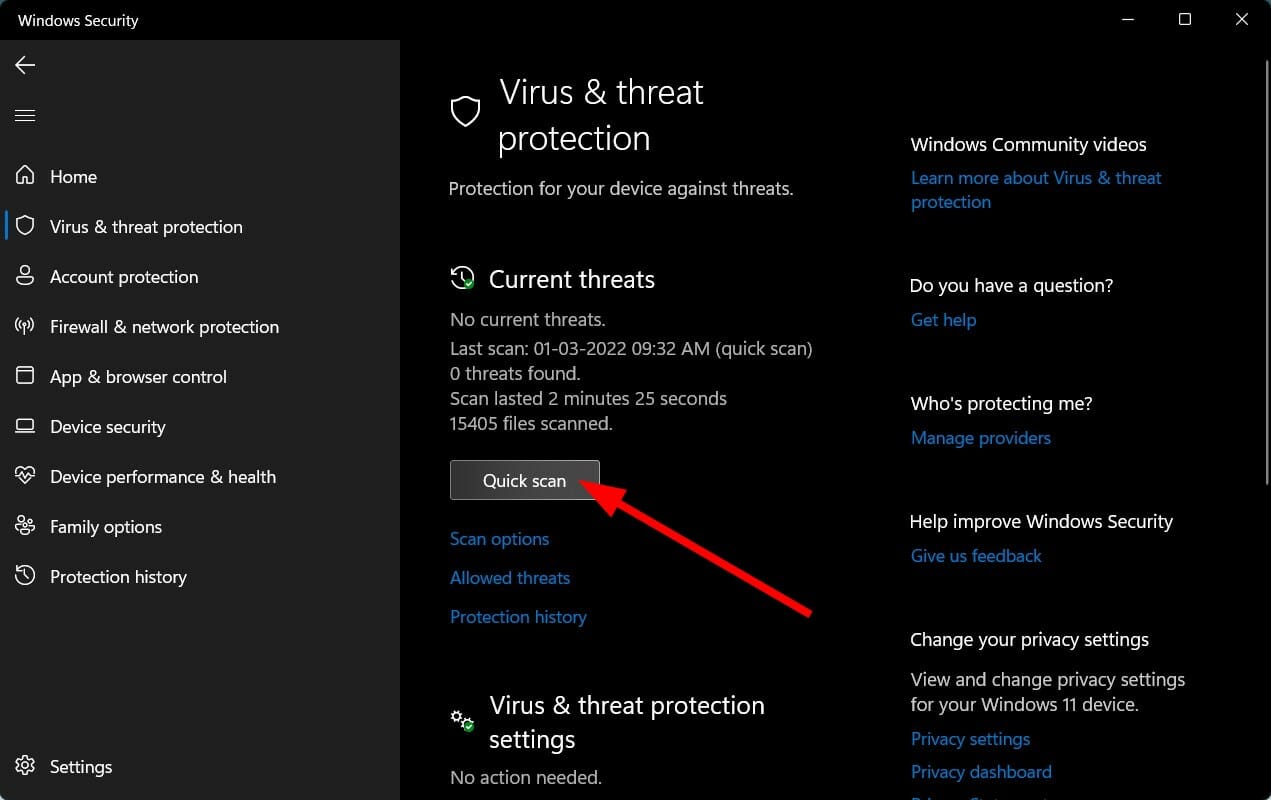
Next, press Quick scan under Current threats.
Wait for the process to finish and restart your system.
3. Free hard disk space
There are many ways you can free up space in your device. You can choose to uninstall unnecessary apps and programs from your system or use a third-party uninstaller.
A disk cleanup can also do the job or you can use Storage Sense. Storage Sense is great at automatically detecting temporary files and suggesting to you to remove them to create space.
The first thing you’ll notice about Waterfox is that it looks just like Firefox so it is expected that the security level will also be similar.
Security is a major concern for most users so it makes sense why this question would suffice. As with any browser, you’ll want to keep your personal data safe.
While Waterfox does a good job at not tracking your activity across websites or spying on you, it is still lagging behind in terms of security.
The biggest concern about Waterfox is that it doesn’t receive as frequent updates as Firefox. Security patches are important because they can fix vulnerabilities in your software before hackers can exploit them.
Browsers are constantly being targeted by hackers and other malicious actors who want access to your data. This can be extremely dangerous if you’re using an outdated browser that hasn’t been updated in months or years.
Still, the browser does a great job if your internet activities are not as heavy and you are using another antivirus program for browsing.
However, if security is a priority for you, and you’re looking for a browser with enhanced privacy protection features, Waterfox may not be worth checking out. You may benefit from browsers with the best virus protection features.
Do not hesitate to let us know which solution worked for you in the comments section.
This is a security feature; as such, it’s not something that most users will ever use on their PC. By enabling it, you may reduce the security of your device, so this is why this option is hidden.
Should Developer Mode be on or off?
As previously mentioned, this option is hidden for a reason. You should only enable it if you’re developing or debugging a Windows Store application.
If you still have some questions or even suggestions for us, do not hesitate to let us know by using the comments section below, and we’ll get back to you as soon as possible.
MSN Explorer can sometimes freeze or become unresponsive while you are using it. This can be frustrating if you are trying to use the application for an important task or conversation.
If MSN Explorer stops responding while you are chatting with friends or logging in, then you may have encountered some issues with your computer. This could be due to a software conflict or hardware problem that has caused Windows to stop responding completely.
The first thing you should do when trying to prevent freezing is to free up space on your hard drive. If there isn’t enough room for all of the programs running on your computer at once, then one of them may stop working properly or shut down completely.
Why does MSN keep freezing?
There are a number of reasons why MSN keeps freezing. Some of the common causes include:
Outdated program – The most common reason why MSN will freeze is because of an old version of the program installed on your computer. If this is the case, then updating the software should solve your problem.
Too many active programs – Another reason why MSN may freeze is if there are too many programs open at once on your computer. This will overload it and cause it to crash. Closing some programs down may help prevent this from happening again in the future.
Insufficient memory – Your computer might be running low on memory or resources. If your computer has just a few megabytes of free memory (RAM) or is too old, it may not have enough memory or processing power for the task at hand.
Virus infection – It is possible that you may have been infected with a virus or spyware. This can happen if you are not careful when downloading files from the Internet. You should not download anything from an unknown source because there could be a virus in the file that will infect your computer.
Other reasons include an outdated OS which you can easily update to the latest version.
Quick Tip:
The Opera One browser is an excellent alternative to MSN Explorer because it includes mail, a player for audio and video in the sidebar, and a password manager.
When MSN Explorer fails to respond, switch to Opera One, with all of your bookmarks and stored passwords. Opera One comes with the new tab islands and a native AI.
Opera One
Sidebar integrations for email, chats, and a Player for media files at your fingertips.
Make sure that your computer isn’t running any other programs when you try to open MSN Explorer. Too many programs running in the background will affect the performance and speed of your computer.
If another program is running at the same time as MSN Explorer and uses up too much memory or CPU power, it could cause problems with the browser hence the need to close them.
2. Update MSN
Simply uninstall and reinstall the program. This usually fixes any problems that might arise from an update or just starting up the computer.
You can uninstall it from the Control Panel and then go back to the official MSN website to download it again.
Press the Windows key, search Windows Security and click Open.
Select Virus & threat protection.
Next, press Quick scan under Current threats.
Wait for the process to finish and restart your system.
Are Internet Explorer and MSN the same thing?
The answer is no. Internet Explorer is a web browser that comes with Windows, but MSN is an online service that allows you to chat with friends, play games, and check email. You can use MSN without having to install Internet Explorer.
Because of this difference in functionality, Internet Explorer and MSN can be used at the same time. For example, you can use Internet Explorer to surf the web while also using MSN Messenger to chat with friends.
It is worth noting that Internet Explorer has since been discontinued and replaced by Microsoft Edge but you can still continue using Internet Explorer if you wish to.
If you’ve tried logging into Twitch and you couldn’t see the content of any channel you’re following even though you managed to sign in, you came to the right place.
This error is pretty common among users of Twitch, and once it had been reported enough, the developers at Twitch Interactive intervened and solved the issue.
Their reports suggest that a server-side issue caused the error. However, even though this issue was fixed, it is recommended that you follow this guide if the error pops up again because of its random nature.
Why does it say error while following on Twitch?
Before discovering the best solutions to solve this annoying issue, let’s take a look at some causes that can lead to it.
Wrong privileges – To load the following channels without problem, you must sign in with administrator privileges.
Temporary and random glitches – In this case, uninstalling and reinstalling Twitch proved to fix our presented error.
Browser-related issues – Twitch might generate the loading followed channels error due to some problems related to your browser. To ensure you’ll never get this error again, use our recommended alternative solution.
For any of the reasons mentioned, you may get a message that reads – error while following please try again. We will share a few troubleshooting steps that helped other users in the past.
Does Twitch have a follow limit?
Yes, Twitch has a follow limit. In the earlier days, it was 100, then the devs did an upgrade and made it 2000. Sadly, from following user feedback, this seems not to suffice as you will quickly max out on 2000 followers after a while using Twitch.
Let’s keep our fingers crossed and see if that will change soon.
Quick Tip:
The simplest and quickest option you have is to switch up browsers. Among the most stable browsers out there is Opera GX. Twitch is most likely to perform at its best capacity on this browser.
Opera GX offers a Twitch Speed Dial that you can quickly access from the startup page. You will permanently know when the channels you follow go live if you set up notifications from Twitch.
Opera GX
Easily follow Twitch channels, and manage them in the dedicated browser for gamers.
How can I fix the Twitch error while loading followed channels?
1. Run Twitch as an administrator
Right-click the Twitch shortcut on your PC’s desktop.
Click on Run as administrator.
Confirm by selecting Yes.
If you’re getting an error while viewing followed channels, you might want to try running the application as an administrator.
Are things any better? If not, move on to the next solution.
2. Use Twitch Studio
Use hotkeys Windows + I to open Windows Settings.
Navigate to Apps.
On the right side of the window, scroll down until you find Twitch.
Click on it, select Uninstall, then confirm by clicking Uninstall again.
Wait a bit until the process is done.
Visit the Twitch Studio download page and click on Download Now.
Click on the downloaded Twitch Studio installer and wait for the Wizard to complete the installation.
In some instances, an error while loading followed channels can appear if your installation is corrupted. To fix that, do as described above.
You can remove Twitch completely from your PC using dedicated uninstaller software. Unlike a regular uninstallation, these tools will detect and remove all leftover files related to the app you want to delete.
All it takes is a free download of this utility, and you’ll ensure that all files and registry entries related to Twitch are wholly removed from your PC.
Removing unnecessary files will enable you to perform a clean reinstallation, and it will also save memory space and increase your device’s overall performance.
Therefore, you’ll prevent future issues from appearing once you reinstall the application.
What other Twitch loading errors should I be aware of?
Twitch failed to load module – This one seems to be pretty popular among worldwide users. Fortunately, we’ve compiled a series of solutions that will fix it in a few minutes.
Twitch chat is not loading – When you stream, it is essential to interact with others; this issue might stop you from going through a complete experience. So, if you’re in the same boat, check our dedicated guide.
The app won’t load in-browser – Some users also reported that Twitch wouldn’t load on Chrome or Firefox.
This article explored some of the best troubleshooting options to try when Twitch won’t load the following channels.
Note that this is not unique to desktop users; in fact, Twitch error while loading followed channels have also been reported by iPhone users. In this case, an app update or reinstallation may be your best bet.
Please let us know in the comments section below if this guide helped solve your issue.
Even though Redmond officials continuously state that Windows 11 is all about quality, no operating system can be perfect and problems sometimes appear when you expect them the least.
Microsoft has just issued a notification for both Windows 10 and 11 users about a new known issue in the OS.
XPS files won’t open on Windows 10 and Windows 11
Judging from what we read on the Windows Health Dashboard documentation page, Windows currently struggles with opening specific XPS documents (Microsoft’s alternative to Adobe PDF, which has nothing to do with the Dell XPS lineup).
After installing KB5014666 or later updates, XPS Viewer might be unable to open XML Paper Specification (XPS) documents in some non-English languages, including some Japanese and Chinese character encodings.
Note that the above-mentioned issue affects both XML Paper Specification (XPS) and Open XML Paper Specification (OXPS) files.
When encountering this issue, you may receive an error like This page cannot be displayed within XPS Viewer or it might stop responding and have high CPU usage with continually increasing memory usage.
The Redmond tech giant also said that, when the error is encountered, if XPS Viewer is not closed it might reach up to 2.5GB of memory usage before closing unexpectedly.
Besides the inability to open XPS and OXPS documents in non-English languages, XPS Viewer stops responding and starts hogging CPU and RAM resources until it crashes upon reaching 2.5GB of RAM usage.
Microsoft officials stated that the problem originates from KB5014666 and KB5014666 (Windows 10 19044.1806 and Windows 11 22000.778), which were released on June 26 and 28.
The tech colossus is now busy investigating the bug and promises to release a fix in the upcoming releases. Unfortunately, there are no temporary workarounds.
Please keep in mind that the problem will not even bother the vast majority of regular Windows 10 consumers in any way, shape, or form.
GIMP is a multi-platform open-source image editing/manipulation tool that offers an advanced set of editing tools found in more expensive software like Photoshop.
The text editing tool allows you to add text to your project. Apart from the type of text, you can also choose the alignment of the text.
In this article, we walk you through the steps required to center text in GIMP.
How to center text in GIMP
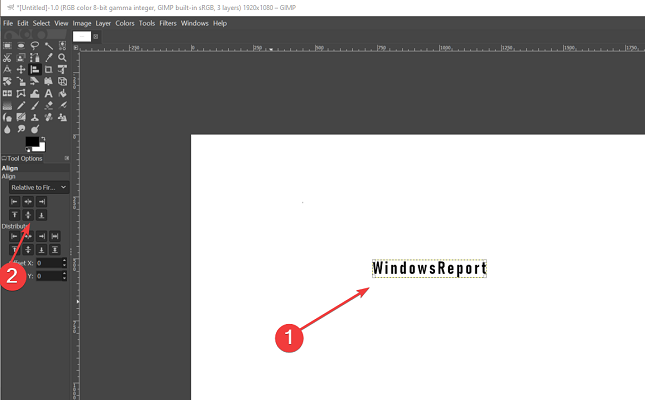
You can easily center text in GIMP using the built-in Align tool. The Align tool is useful to align the image layers with various image objects. GIMP offers a decent set of tools to align texts as per your preference.
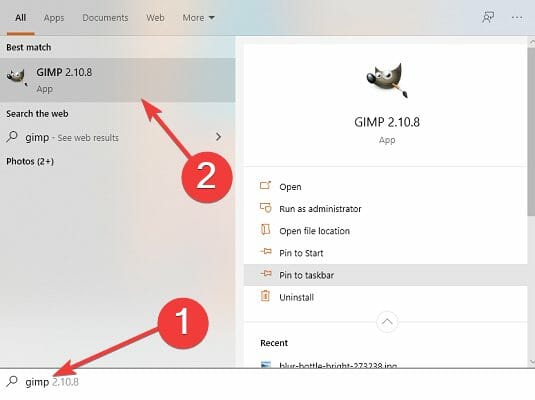
1. Launch GIMP.
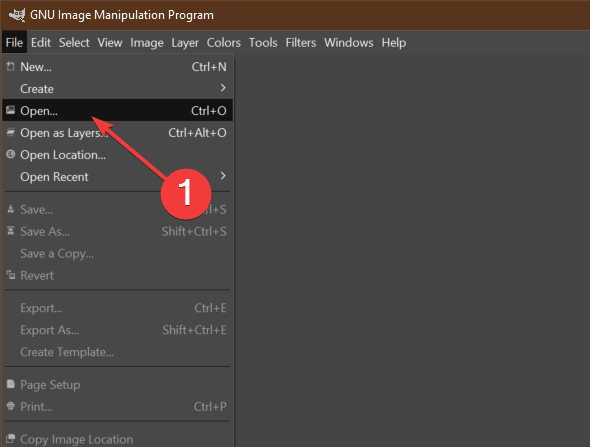
2. Open a project a file where you want to add the text.
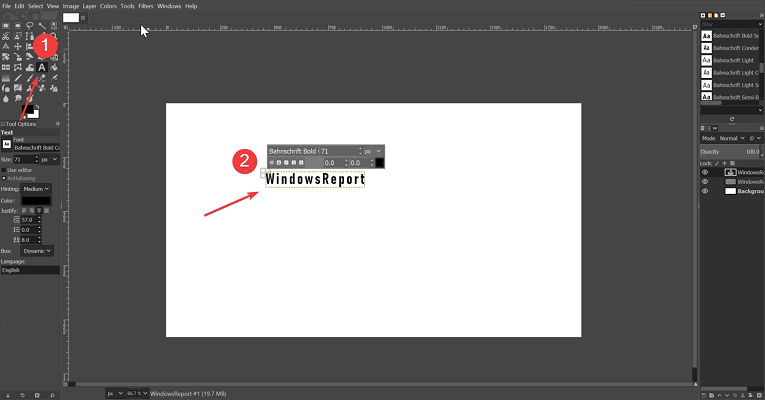
3. Select the text tool. You can access it by clicking on the A icon.
4. Click anywhere on the image and type the text.
5. Once done, highlight all the text (Ctrl + A ).
6. Click on Tools (toolbar).
7. Select theTransform Tool.
8. Select Align from the context menu.
9. From the left pane, chooseAlign middle of the target.
Note:You can also change the alignment to left or right using the same steps. Simply change the alignment in step 9.
By following the steps in the article, you can center text in GIMP. Follow the steps to learn how to use the alignment feature in GIMP. Do let us know if you have any GIMP related queries in the comments.
Throughout August Microsoft is adding organizations that support indigenous communities to the Microsoft Rewards Program on console, meaning users in the U.S. and Canada can donate earned Microsoft Rewards points to those organizations. Here are the three orgs listed below.
In celebration of indigenous artistry, Xbox will be featuring a slew of Xbox logos designed by artists of indigenous heritage, with more following during the month. You can check back in the see more of them on the Xbox Wire page linked above at the beginning of the post.
Check out these Xbox games curated by indigenous communities
Tell Me Why
Raji: An Ancient Epic
Never Alone
Button City
Check out indigenous streamers on the Xbox Twitch channel
Throughout the week Xbox Plays will be featuring indigenous streamers on the Xbox Twitch channel. Scheduling is listed below. Be sure to check them out.
Tuesday, August 9 at 9:30 a.m. (PDT) – Chief Sweet
Wednesday, August 10 at 9:30 a.m. (PDT) – BloodieKnux
Thursday, August 11 at 9:30 a.m. (PDT) – Gunade
Thursday, August 11 at 3:30 p.m. (PDT) – Cuzb0T
Friday, August 12 at 9:30 a.m. (PDT) – Hiosik
New gamerpics, profile themes and avatar items inspired by indigenous communities
Also, there will be a slew of new items that you can check out here. These will be available throughout the month and will include gamerpics, profile themes, and avatar items.
If you’re planning to switch to Opera GX, you’re probably wondering how to transfer data from Opera to Opera GX. This guide will show you how to do it properly.
How do I transfer data from Opera to Opera GX?
1. Choose the import option
Launch Opera GX and navigate to the below path: opera://settings/importdata
Next, on the right, scroll down and under Synchronisation, click on Import bookmarks and settings.
In the Import bookmarks and settings pop up, select Opera 15+ from the dropdown.
Check all the boxes Browsing history, Favourites/Bookmarks, Saved passwords, and Cookies. Click on Import.
This will automatically import all the Opera One settings to Opera GX effortlessly.
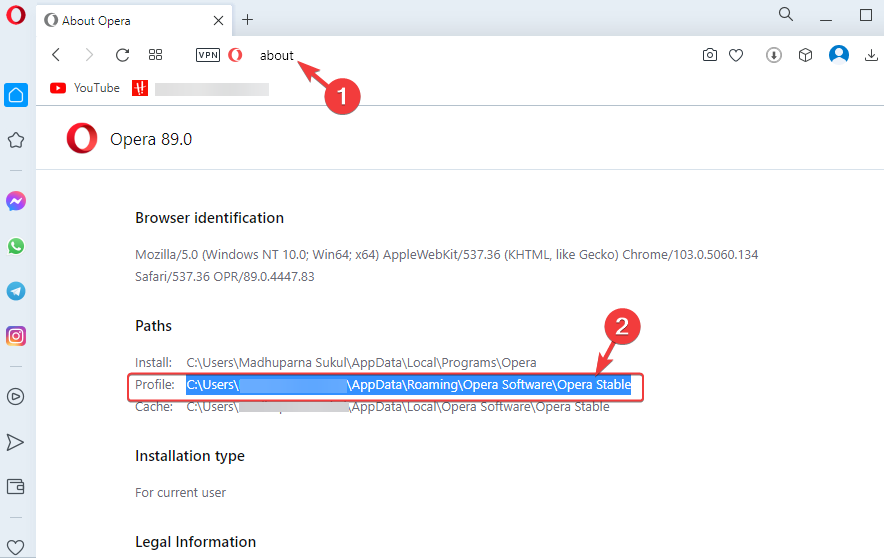
Now, scroll down and go to Paths. Here, copy the profile path next to it.
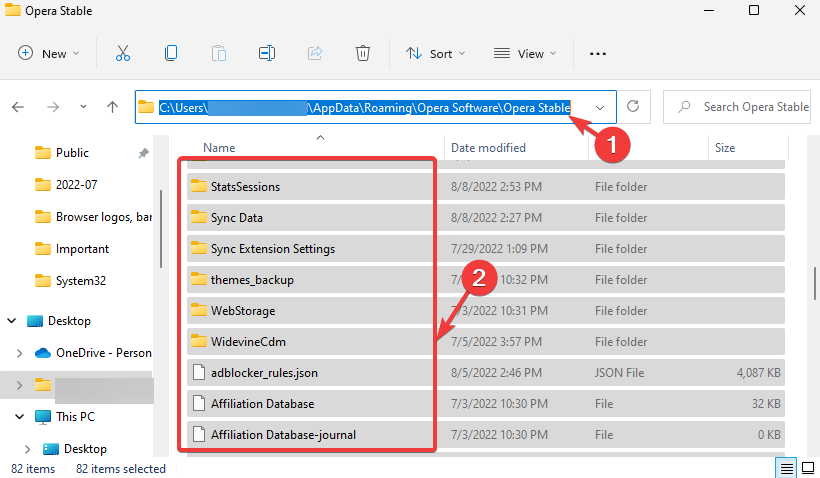
Next, press the Win + E keys simultaneously to launch File Explorer.
Paste the profile path copied in step 2 in the address bar and hit Enter.
Next, copy everything under the Opera Stable folder and keep the File Explorer open.
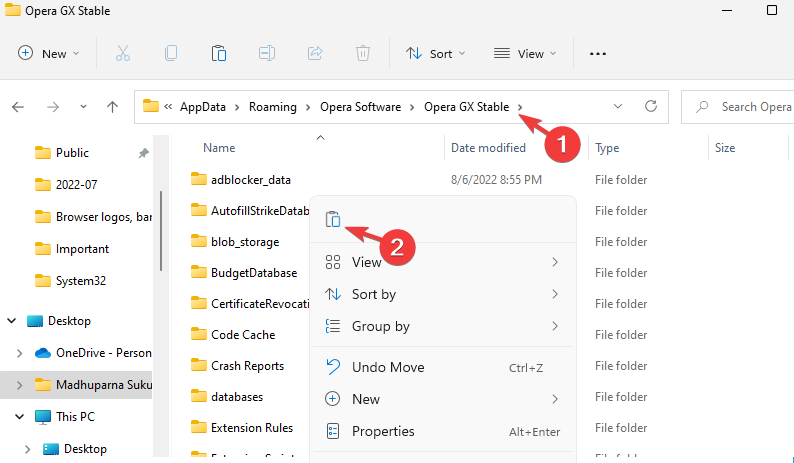
Now, open Opera GX and repeat steps 1 and 2 to copy its profile path.
Next, in the File Explorer window, paste the copied profile path and hit Enter.
Paste all data you copied in step 5 in Opera GX‘s profile folder.
Once done, relaunch Opera GX to find all the data from your Opera One browser. If you have any issues following these steps, we have a guide on how to find Opera’s browsing history location that can help you.
If you don’t want to copy files, you can just rename the directories:
Make sure that Opera and Opera GX are closed.
Press the Windows key + R and enter the following: %appdata%\Opera Software
Locate the Opera GX Stable folder and delete it, or rename it to something else.
Next, rename the Opera Stable folder to Opera GX Stable.
NOTE
This process won’t transfer your extensions or saved passwords, so you’ll need to export them manually.
All methods listed above will import your browsing history to Opera GX.
Whether you choose Opera One or Opera GX, as a user you are in a win-win situation as most of the useful features like the built-in VPN, ad-blocker, or crypto wallet are common in both browsers.
We’re pretty sure that at least some of you remember us talking about Parallels Desktop, which is one of the most popular virtualization tools available now.
The last time we mentioned this software it was to announce that you could actually use Windows 11 ARM on M1 devices, with Parallels.
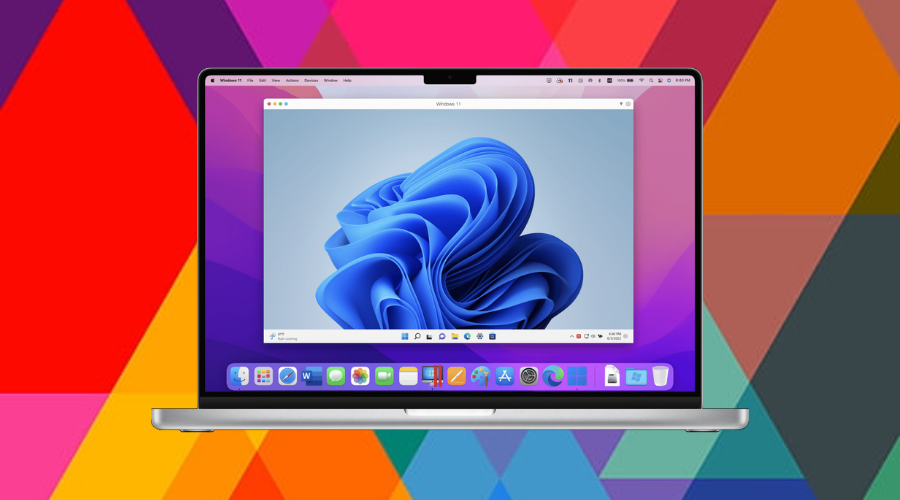
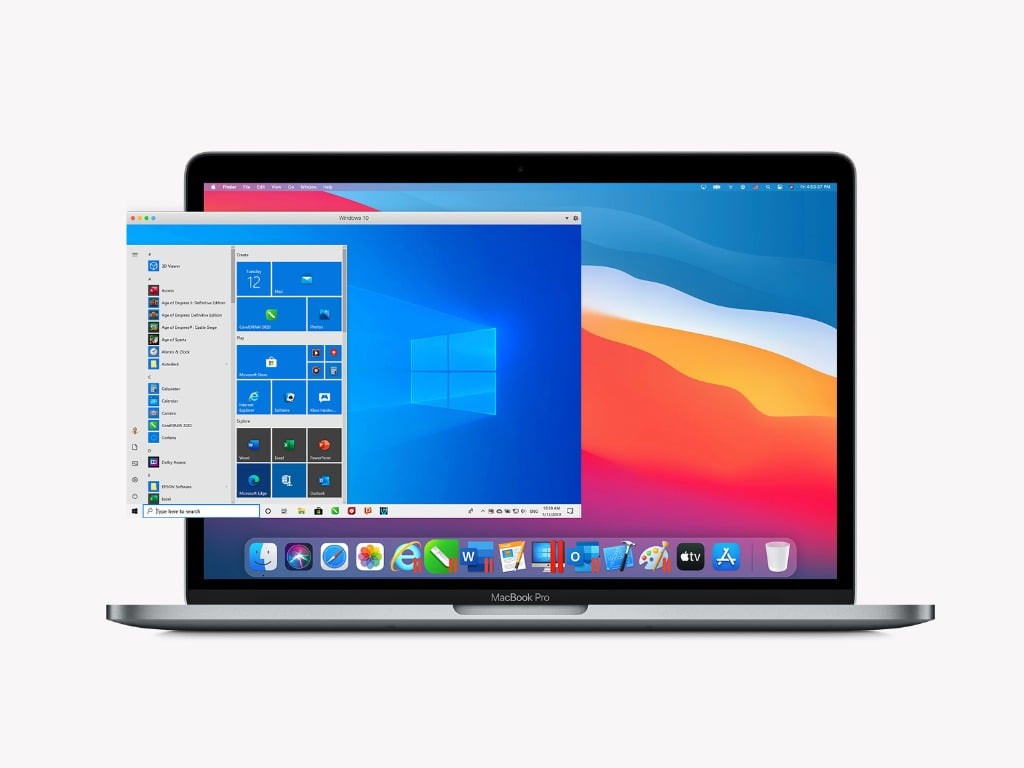
Now, it’s time to take a step forward and discuss the new version of Parallels Desktop and say that the company has released the latest generation of Parallels Desktop, popular virtualization software for macOS that allows users to run Windows or another operating system inside macOS.
Mac users get a lot of Windows 11 improvements
You should know that Version 18 of Parallels Desktop is now available with several notable improvements and new features, such as easier Windows 11 installation and gaming enhancements.
You are probably more than curious about what these improvements are, so let’s get straight to the point and answer this question.
Many of you then wondered how the Windows 11 gaming experience was with Parallels 17, to which we provided a trustworthy answer at the time.
However, now, gaming is going to be so much better on Windows 11 through the Parallels Desktop virtualization tool, as you are about to see.
Here are the improvements that the company announced, designed to enhance the Windows 11 experience on your macOS device:
Single-click Windows 11 installation. Parallels Desktop 18 provides the ability to download, install, and configure Windows 11 with just one click. Besides, the app can download a free set of ready-for-use Linux distros.
Better gaming using Windows inside Mac. Users can pair a compatible Xbox or DualShock controller to their Macs, fire up Parallels Desktop 18 and start playing. Performance improvements also result in higher FPS and smoother Windows UI.
Better performance on M1 Ultra. Parallels Desktop 18 comes with optimizations and performance improvements on Apple Silicon devices, especially on M1 Ultra, delivering up to 96% faster speeds in Windows 11 compared to the previous release.
Improved USB 3.0 support provides access to streaming devices, such as Elgato HD60, Startech USB 3.0 Video Capture, and others.
Improved x86 apps in Windows 11. x86 applications running in Windows 11 on ARM now benefit from improved compatibility and performance improvements, especially when saving and reading files from the Mac disk.
Yes, you are getting the whole package, which is yet another reason to be even more excited at the prospect of having another OS at your fingertips.
Some of the other improvements in Parallels Desktop 18 include Apple’s ProMotion display support, networking improvements (custom network conditions, network isolation, network boot on Linux), and optimizations for the upcoming macOS Ventura.
Please keep in mind that some features are only available in Parallels Desktop 18 Pro or Business Edition, and you can learn more about Parallels Desktop 18 in a press release on the official Corel website.
Share with us, in the dedicated comments section below, if you have enjoyed, or not, the Parallels 18 Windows 11 experience.
Your opinion is valuable to us and we’d like to know just how much better, or worse, your entire experience got after trying this new version of the software.
Parallels Desktop 18 for Mac, the latest version of the popular virtualization software for macOS is available today with several new features under the hood. First up is the enhanced support for the macOS Venture. The gameplay experience has also been enhanced where users will be able to connect controllers to their Macs. Moreover, users will also be able to run Windows applications easily on Parallels Desktop 18 as it has simplified the process and enhanced workflows. It also features enhanced support for ProMotion displays.
Parallels Desktop 18 comes in three different variations, so let’s dive in and see what’s in store for you.
First up is the Standard Edition
which comes with enhanced compatibility of Intel (x86) when you want to run Windows on ARM when saving and reading files from the Mac Disk. The standard edition comes optimized for the macOS Ventura release, this way it is able to support new features and enhance functionality. What’s more, is that it also includes full support for Apple’s ProMotion display with automatic refresh rate changes and increased Apple M1 Ultra performance which allows the users to make use of the available resources effectively, ultimately allowing them to run Windows 11 up to 96% faster. As for the gamers, they will now be able to share Xbox or DualShock Bluetooth game controllers with Windows and Linux automatically. And finally, Parallels Desktop 18 comes with enhanced USB 3.0 support for live data streaming devices such as Startech USB 3.0 Video Capture. That said, once macOS Ventura reaches general availability, users will be able to access the Windows app via Stage Manager.
The second variation is the Pro Edition,
which features a network conditioner on Apple M1 Macs that is in place to assist users to adjust various network conditions such as packet loss and delay for the virtual machine on both Windows and Linux. With this edition, you will be able to isolate the VM network from Mac on Apple M1 Mac computers for better security and start a Minikube cluster with Parallels Desktop as a virtualization provider. You will also be able to analyze the performance of an application using the enhanced Parallels plugin for Visual Studio in a separate VM.
And finally, the Business Edition
comes with all the features presented in the Standard and Pro Edition. On top of that, it also features SSO/SAML authentication where employees will be able to sign in and activate Parallels Desktop with a corporate account. Admins will also be able to deploy, provision, and transfer a Windows 11 VM across the staff’s Mac computers, thus making the provisioning of licenses easier. Last up, is the ability to manage Parallels Customer Experience Program participation from a convenient point, Parallels My Account.
Parallels Desktop 18 for Mac is available
today at $99.99 for a perpetual license, you can also opt for a perpetual license for $129.99. As for the Pro Edition and Standard Edition they are available as a perpetual license for $129.99 and $149.99 per year respectively. Owners of a previous Standard edition can upgrade for just $69.99 while the Pro Edition upgrade can be made at $69.99 per year. If you made the upgrade to Parallels Desktop 17 you can also check out their Tech Guarantee to see if you qualify for a free upgrade. If you’ve never tried Parallels Desktop before, Parallels also offers 14-day trials for Mac users.
Windows 11 has seen a much larger crowd embracing it since it first came out, even though people were reluctant to make the switch at first.
Even though your average user still prefers to use Windows 10 on a daily basis, Microsoft has made huge efforts to transform Windows 11 into the stable experience that it is today.
When the latest operating system was first announced last summer, there was a lot of frustration among users due to the strict system requirements for running it.
Back then, only modern processors from AMD and Intel were supported because they were said to have enhanced security support compared to previous generation CPUs.
We are, of course talking about Intel 7th Gen Kaby Lake and AMD Zen (Ryzen 1000) or older processors, just so there is no confusion.
However, even though the Windows 11 operating system is a lot more reliable now, that doesn’t mean that it is 100% problem free, as you are about to see in a moment.
Microsoft acknowledges VAES CPU issues through KB5017259
All that being said, the Redmond tech giant has found that there are issues with the supported CPUs which come with Vectorized AES (VAES) instruction.
Microsoft stated that such Windows 11 and Windows Server devices are susceptible to data damage as the Advanced Encryption Standard (AES) instruction is meant to accelerate data encryption and any bugs in this are bound to adversely impact device data.
Windows devices that support the newest Vector Advanced Encryption Standard (AES) (VAES) instruction set might be susceptible to data damage.
The affected Windows devices mentioned in the Microsoft statement actually use one of the following on new hardware:
AES XEX-based tweaked-codebook mode with ciphertext stealing (AES-XTS)
AES with Galois/Counter Mode (GCM) (AES-GCM)
Under symptoms, Microsoft stated that AES-based operations might be two times slower after installing the Windows update for the May 24, 2022 preview release or the June 14, 2022 security release.
Apparently, this is happening because the tech giant added new code paths to the Windows 11 (original release) and Windows Server 2022 versions of SymCrypt to take advantage of VAES (vectorized AES) instructions.
Some of you might already know that SymCrypt is the core cryptographic library in Windows. These instructions act on Advanced Vector Extensions (AVX) registers for hardware with the newest supported processors.
There is some good news here, which is that Microsoft has resolved the issue via previous Windows Updates KB5014746 and KB5014019.
Affected users are therefore expected to have a performance impact on BitLocker, TLS, and also disk throughput upon installing the workaround updates.
Microsoft has not yet provided an official list of CPUs that are affected, but from what we can tell, Intel CPUs starting from the 10th Gen Ice Lake 10nm mobile chips are affected.
These were actually the first CPUs that introduced the VAES instructions for the first time with their new Sunny Cove design.
How can I fix this problem?
Install the June 23, 2022 preview release for your OS:
Some of you might remember that this isn’t even the first time that users have faced performance issues with supported Windows 11 processors.
Last year, it was revealed that Virtualization-based Security (VBS) was causing a crippling impact in games even on supported chips.
We’ll see what the future holds for us but just remember that Windows 11 is still a young OS and many things can still go wrong with it.
Have you also experienced problems such as the ones described in this article since installing Windows 11? Share your experience with us in the comments section below.
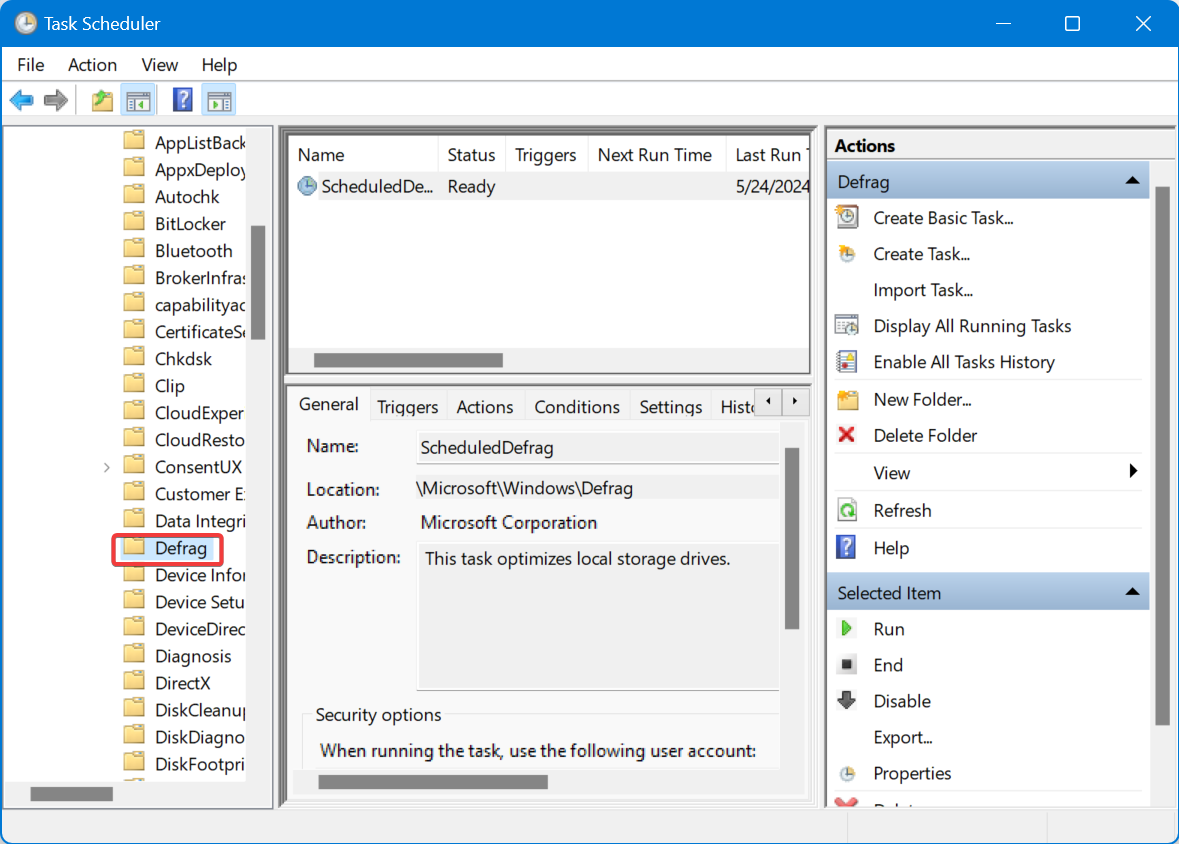
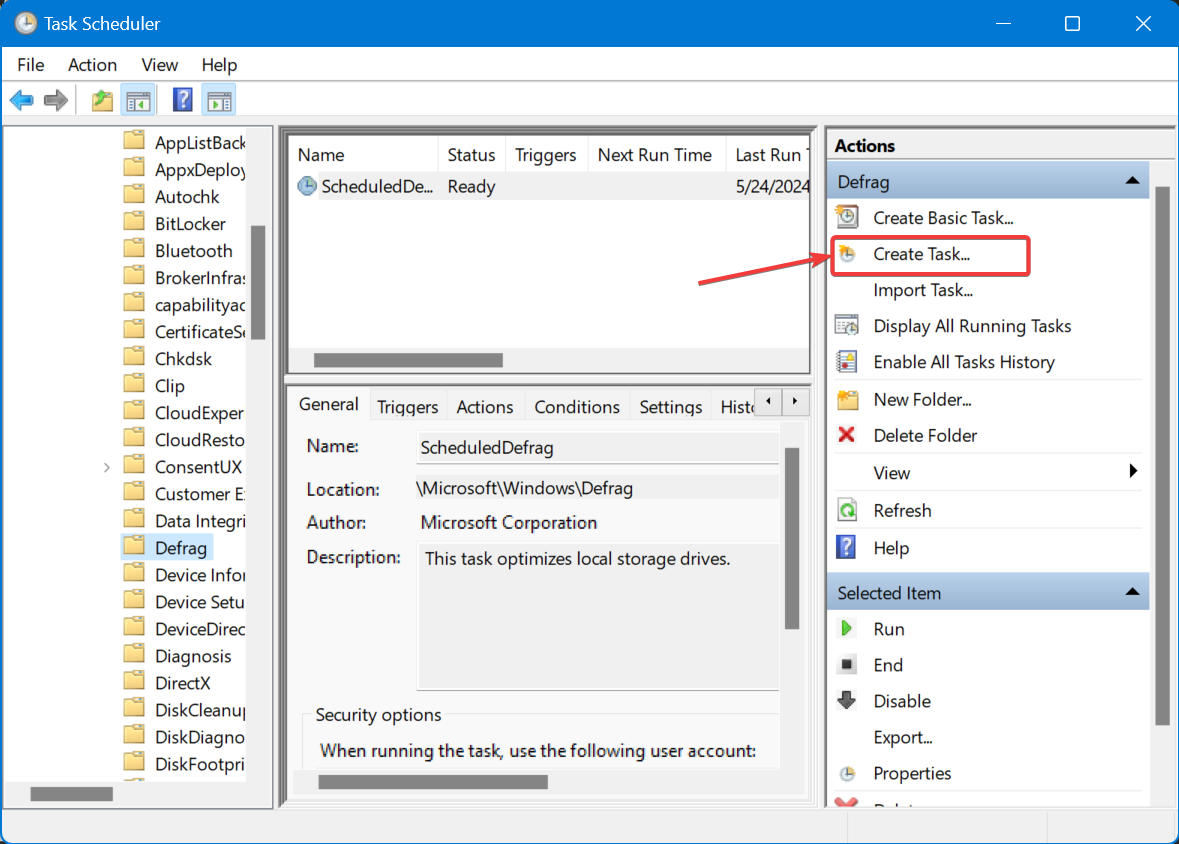
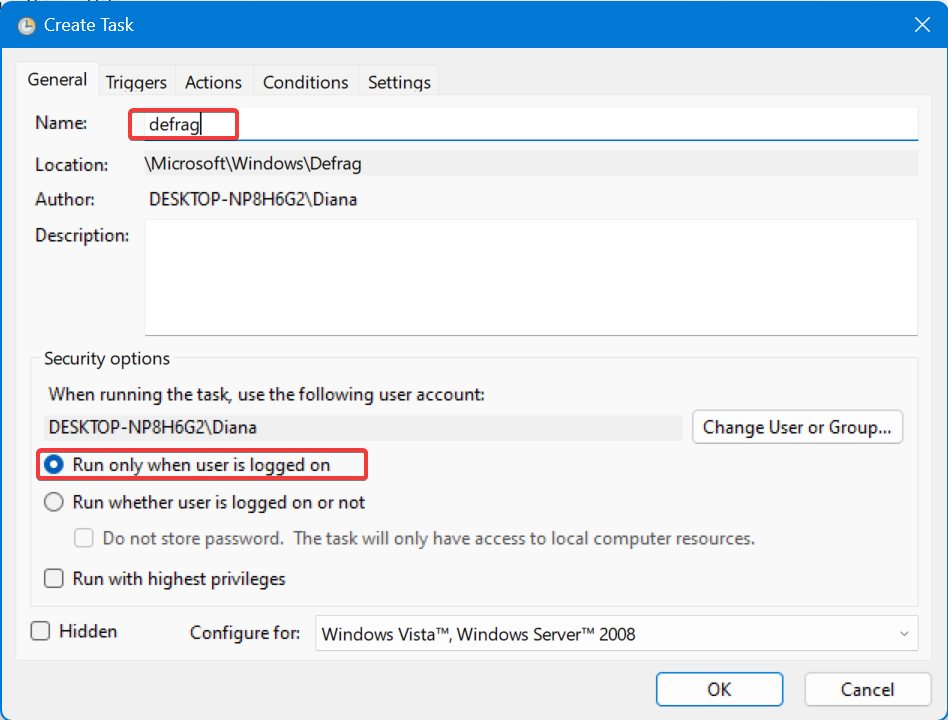
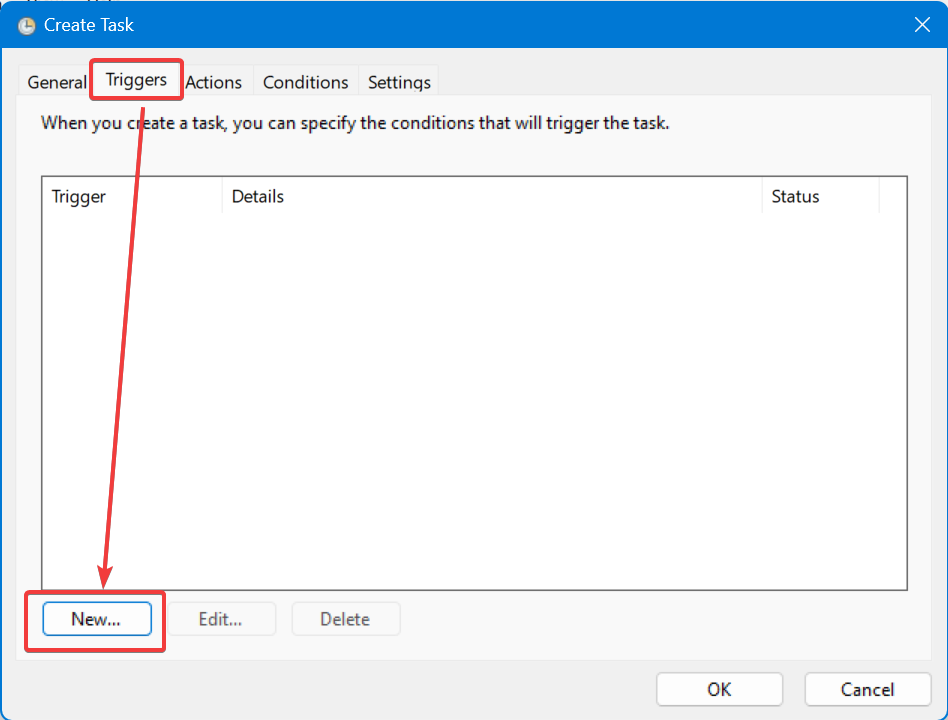
However, if you want more control over how the process is handled and get extra perks like detailed reports, SSD optimization, and disk cleanup, consider getting a third-party defragmenter software.
How do I check my defrag schedule?
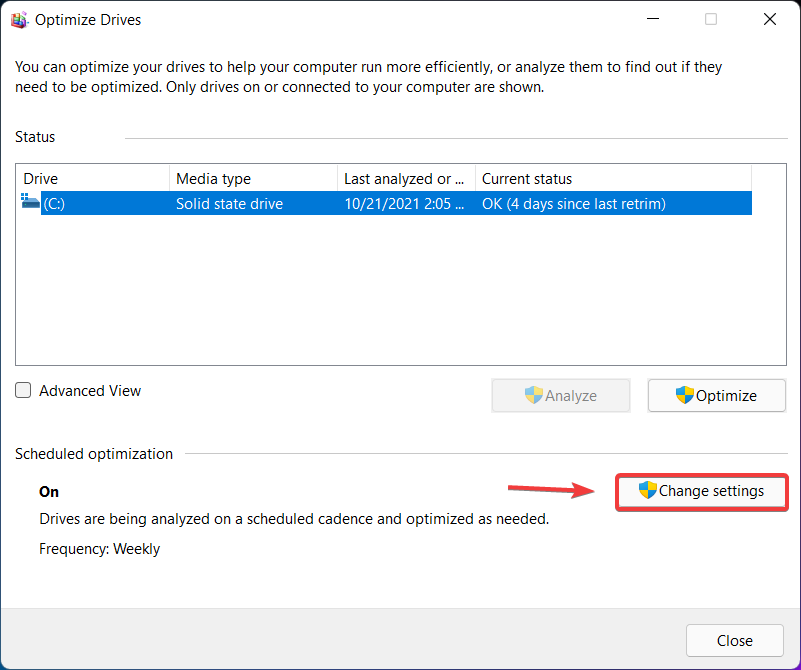
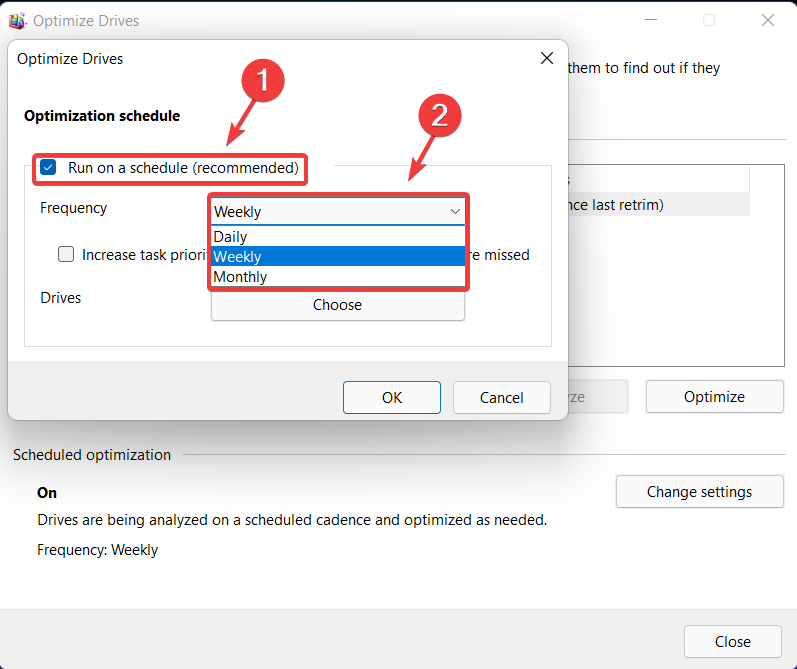
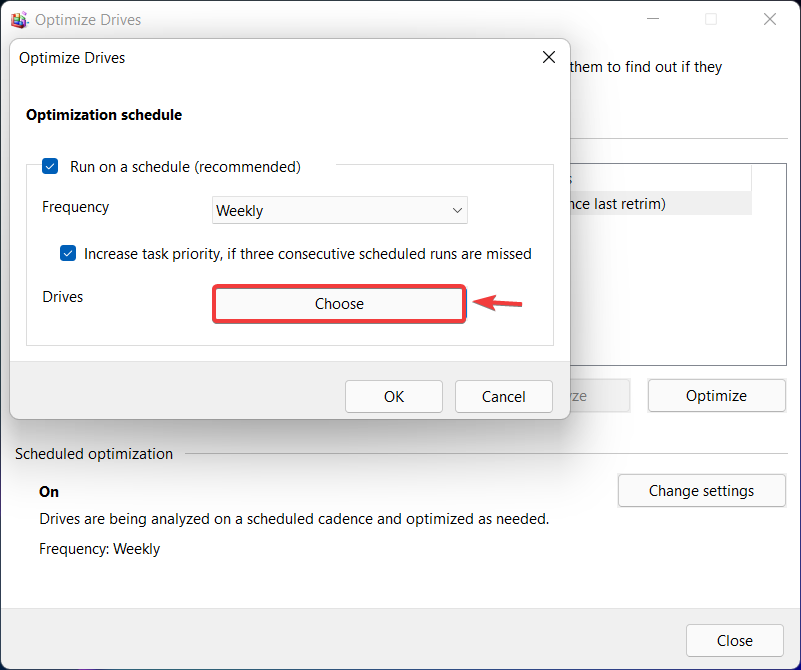
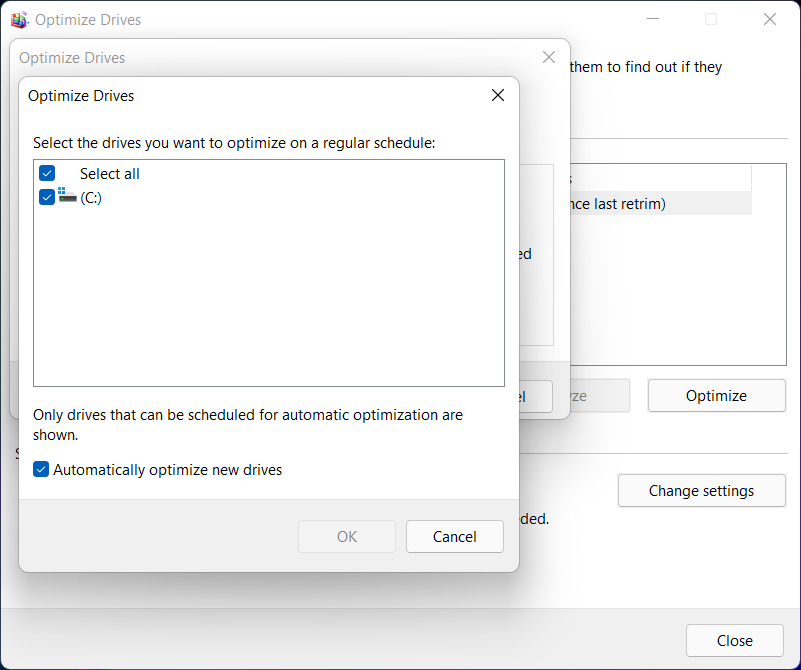
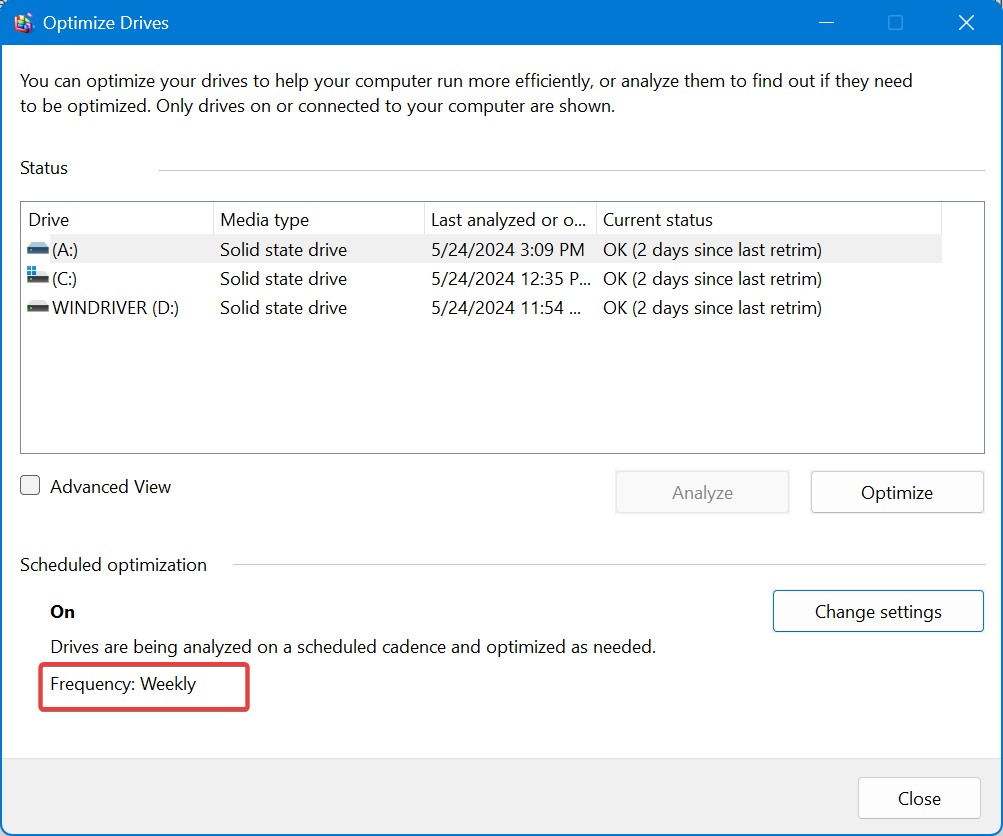
To check your defrag schedule on Windows 11, open the Defragment and Optimize Drivers software and take a look at the Scheduled Optimization section at the bottom. If scheduling is on, you’ll be able to see the frequency it’s set to weekly, daily, or monthly.
What is Disk Defragmentation?
Disk defragmentation organizes fragmented data on a computer’s hard disk or solid-state drive, enhancing performance.
Over time, files become scattered across the disk, slowing read and write speeds. Defragmentation rearranges data to group related pieces together, reducing access times.
Wrapping up
That’s it! Now know exactly how to schedule disk defragmentation on Windows 11. After going through this process you don’t have to worry about this aspect of your computer’s performance.
Was this article helpful to you? Let us know in the comments section below.
Konqueror is a free open-source browser and file manager developed by KDE. Unfortunately, Konqueror is only readily available for Linux devices. However, we have some solutions to work around this. Here’s how to download Konqueror browser for free for Windows 7.
Does Konqueror work on Windows 7?
While developed for Linux and optimized on KDE desktop environments, users can get Konqueror on Windows 7. Konqueror uses KHTML to render its browser and is compatible with HTML, JavaScript, CSS, and others.
What’s the latest version of Konqueror?
The latest version of Konqueror is version 22.04.3. However, users can download an earlier version for Windows 7 if they wish. If you don’t want to go through the hassle of downloading and installing Konqueror for Windows 7, consider using Opera.
Users can install the latest version of Opera and enjoy its unique features like the built-in VPN and integrated messaging system. Check out our guide on how to download and install Opera for Windows 7.
Opera Browser
Explore all Opera’s unique features and functions on Windows 7.
How do I download and install Konqueror on Windows 7?
1. Via third-party source
The easiest and quickest way to get Konqueror for Windows 7 is to download it from a trusted third-party website. Users can ensure a website is credible by doing some light research to ensure there are no reports of scams or viruses from that site.
Most of these sources will offer either a 32 or 64-bit installation depending on your PC. However, remember that Microsoft discontinued security updates for Windows 7 in 2020, so proceed with caution when downloading anything to your Windows 7.
A Linux emulator allows users to launch a Linus OS on a Windows OS via a virtual machine. Basically, an emulator projects Linux over Windows and allows users to use Linux applications and features.
Users can use a Linux emulator to install some of the most well-known distros like Linux Mint, Ubuntu, Fedora, and more.
3. Dual Boot Linux
Users can install Linux on their Windows 7 in a dual-boot configuration. That way, when users start up their Windows 7 PC they can start it as a Linux and use Konqueror that way.
Users can choose a Linux distro they want to dual boot on their Windows and install the OS without needing to get rid of their Windows 7 OS. Each time you turn on your PC, you will be given the choice to start it either as Linux or Windows 7.
However, if you are only interested in running Konqueror and do not use other Linux apps, then It’s better to use an emulator via a virtual machine or download the app from a third-party source.
KDE has maintained Konqueror since its release in 1996, however, after KDE 4 the file manager has since become Dolphin. KDE still releases updates for the browser portion of Konqueror, but not for the file manager, which is maintained by Dolphin.
Hopefully, you were able to download and install the Konqueror browser free for Windows 7. Let us know in the comments if you run into any issues or if you use Konqueror as your default browser.
Microsoft Store has to face an old bug that limited review counts, and had a tough time counting past 2000. In the past, the old technical limit issue prevented the Microsoft store from showing more than 2000 plus reviews per product. But now, Microsoft Stores’ Principal Architect Rudy Huyn has officially confirmed that the limitations are finally gone.
An old technical limitation prevented the #MicrosoftStore from displaying more than 2,000 reviews per product in the past, this is something we had to fix and we are now very glad to announce that this limitation is finally gone! pic.twitter.com/tjJT5lCl9w
With fixing that bug now the Microsoft store shows an accurate number of reviews for particular games and apps. As noted by Neowin.net, the Microsoft Store recently received more enhanced editions discoverability, and improved price tags. Also, the Microsoft store changed some policies about its paid and open source apps.
For more latest and exclusive tech news follow us on Google News.
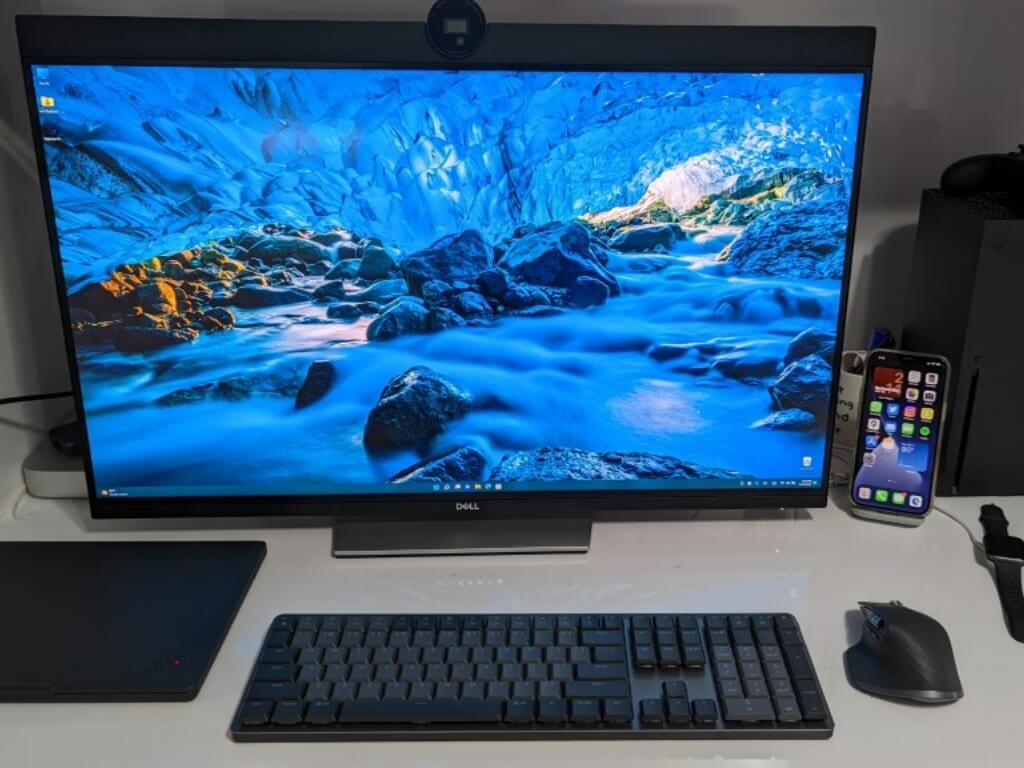
If you’re going back to school or live in a dorm in school, and even schooling from home, then a monitor is essential. You can increase your screen real estate and fit more things on the screen. In some cases, monitors even have webcams and built-in speakers, too, unlocking your best video conferencing experiences.
In our latest entry to our back-to-school series, we’ll be looking at the best premium Dell monitors you can use for school. Note that our guide focuses on Dell products specifically. Based on listings from our reviews catalog, you’ll find that our back-to-school guides are also similar. These guides feature products we’ve spent quality time with and products that we’ve put through our tests.
At the top of our list is the Dell Ultrasharp 32 4K Video Conferencing Monitor. This monitor is priced a bit high but has everything you need to be a single solution with your PC for your Teams, Zoom, Slack, or Skype calls. for school The display is bright and vibrant, it has an amazing built-in webcam and speakers, daisy chain support, a USB hub, and even can work with HDMI devices. Our full review has more on why we enjoyed this monitor.
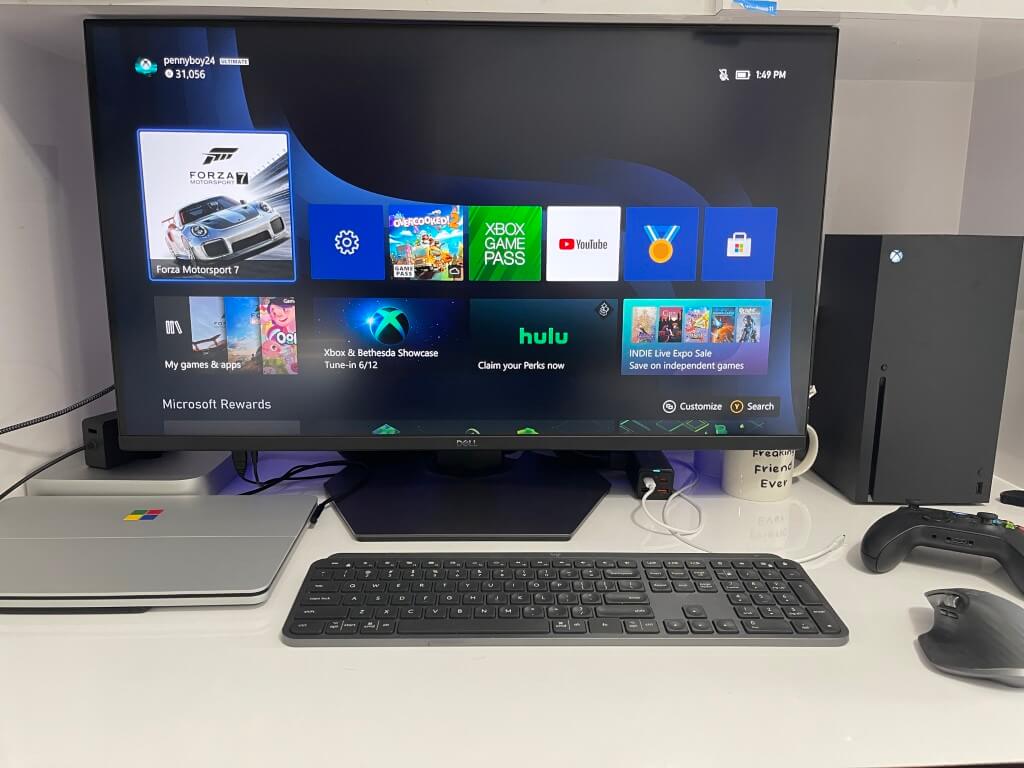
Second on our list is the Dell-32-4K-UHD-Gaming-Monitor. This is an all-rounder monitor that’s perfect for a dorm. It’s great for gaming at 4K resolution, has a fast 144Hz refresh rate, and has a really great design. Check out our full review for more on why we loved this display so much.
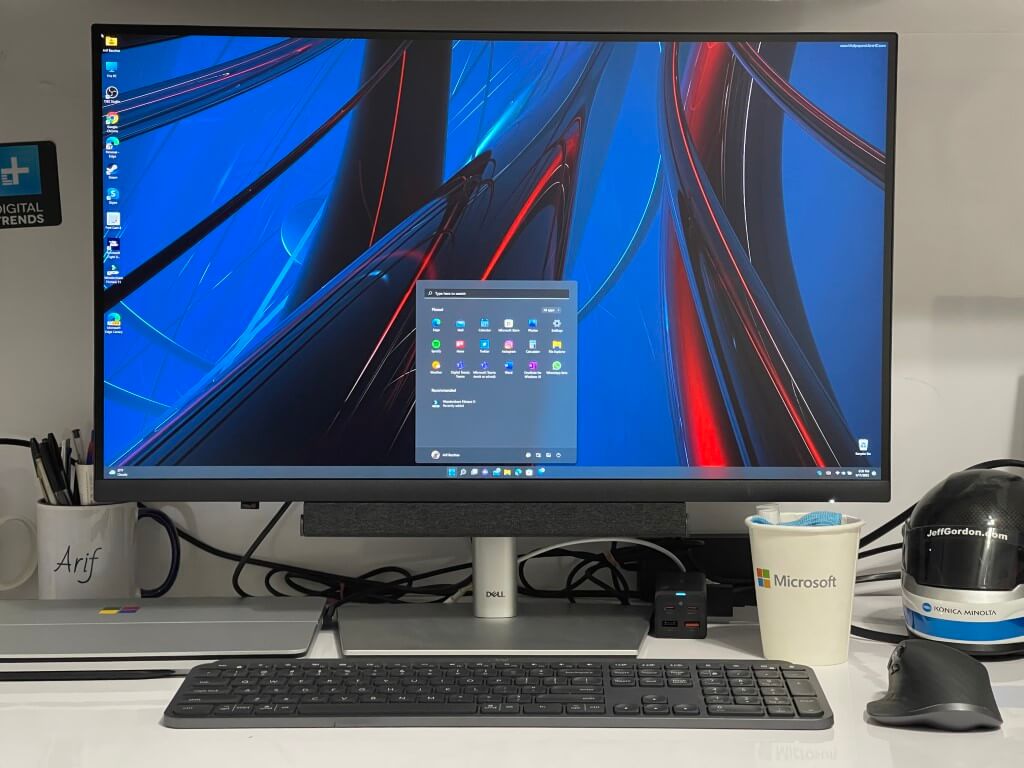
At number three on our list is the Dell 27 4K USB-C Hub Monitor P2723QE. This is a monitor that’s all about the conveniences of USB-C connectivity, HDMI, and its 4K resolution. There’s even an optional speaker bar that can help boost your experience. We have this on our list, as this is one of the more affordable premium monitors we’ve come across, priced at $730. We reviewed it back in March.
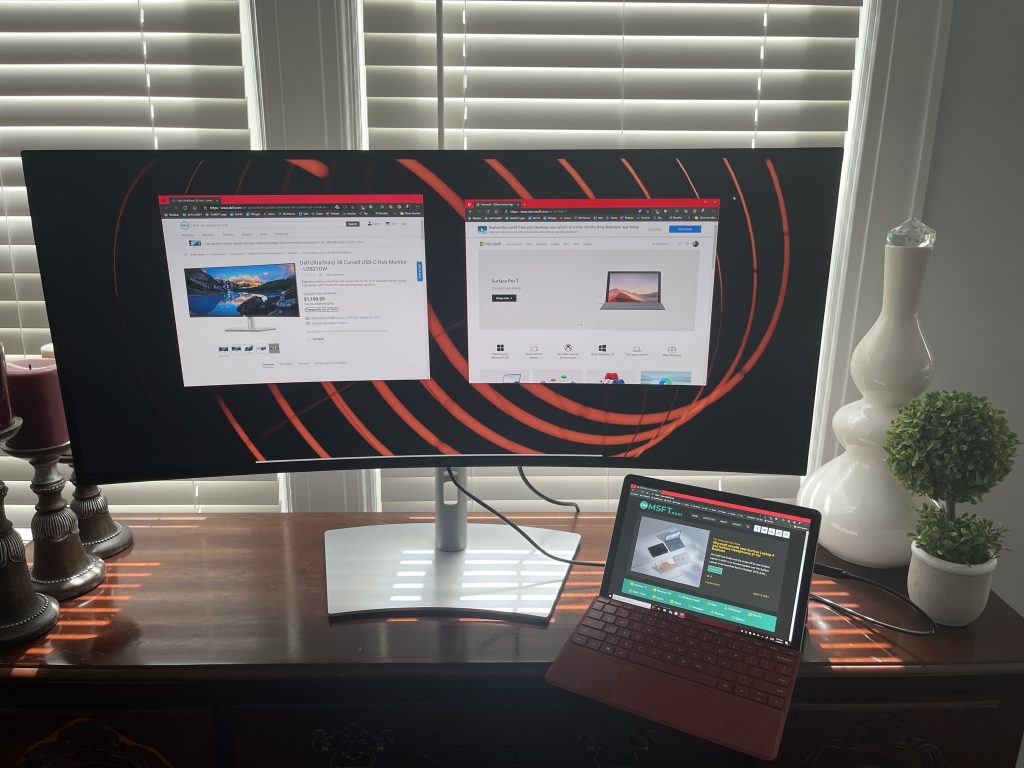
Rolling down our list, we now land at the Dell UltraSharp 38 Curved USB-C Hub Monitor. This monitor is an older one in Dell’s lineup, but it’s for those who must get one of the best curved monitors on the market for productivity. The natural comfortable curve, high resolution, and great design with integrated speakers make this a great pick for us. We reviewed it last year in April of 2021, so check out full review for more.
The last pick on our list is another curved monitor. This time it’s the Dell 34 Curved USB-C Monitor (S3423DWC). This curved monitor sports ultra-wide WQHD (3440 x 1440) resolution, USB-C connectivity, built-in speakers, and a USB port under the chin. There’s even AMD Adaptive-Sync technology on board. We really found this curved monitor as one of the best in 2022. Our full review has more.
Dell has all kinds of monitors
We’ve focused our guide on monitors that we’ve already reviewed. However, the best place to buy and select new monitors is Dell.com. You can filter monitors by screen size, resolution, pricing, features, response time, and more. If there’s a monitor you want, then Dell has you covered!
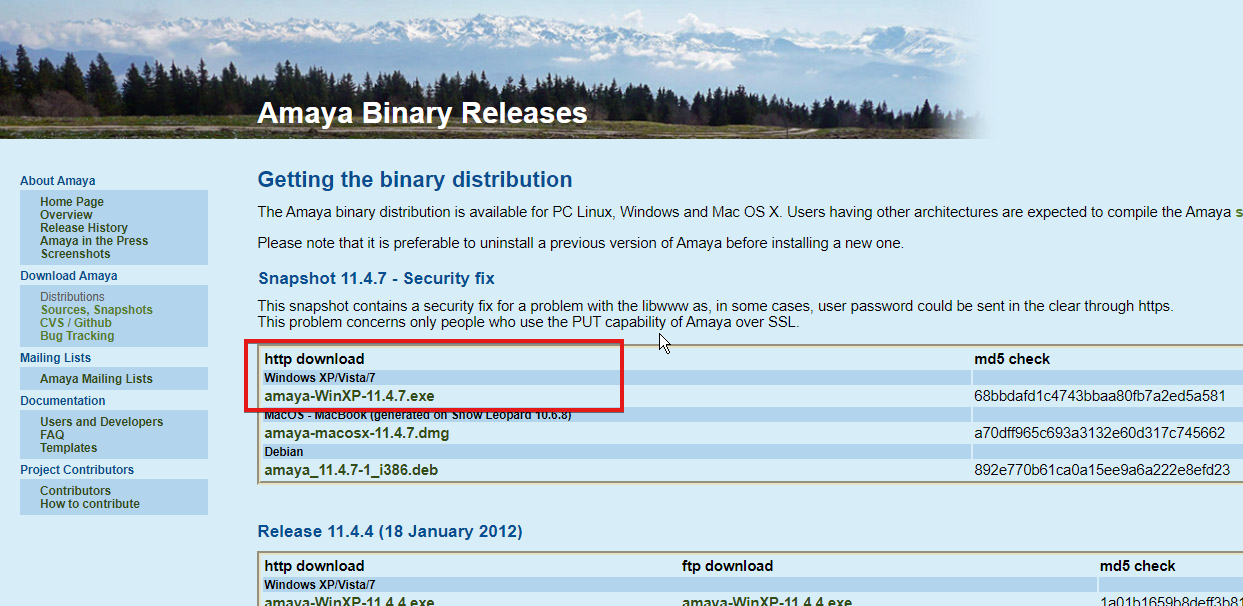
Browsers are of several types; what makes the difference between them is their features. Amaya browser is one of the best among the new age browsers in the market. Likewise, it comes with integrated web tools that help users access the latest technologies for browsers.
It has many features making it a commendable browser and unarguably one of the best. However, lots of users complain about not being able to download the Amaya browser.
Also, the browser has a fast speed for loading websites which is one of the essential features of a web browser. It allows users to browse quickly without delays and smoothly.
Another feature of the Amaya browser is the XML support try allows it to run XML browsers without any difficulties. It is a free and open-source web browser that mainly works as a web authoring tool.
The web authoring feature infuses the ability to create and edit documents directly from the internet without exporting them to any third-party app.
Furthermore, the browser is one of the safest browsers that allows users to use its HTML web editor and browse safely across the internet. Also, it is one of the best browsers for developers because of its W3C tools for creating websites.
Hence, this article will discuss downloading the Amaya browser on Windows 10/11. Amaya is commendable because it is a cross-platform browser that works across different operating systems.
What is the latest version of Amaya?
The Amaya browser project started in the year 1996, and it has gone through several updates since then. The latest update for the browser was Amaya 11.4.7, released in 2013.
This browser version comes with advanced features like XML support. Also, it comes with an integrated web editor tool that allows you to create HTML and XHTML web pages.
Furthermore, the latest update features CSS support, likewise MathML, SVG, RDF & Xpointer. Also, there were advancements in the web browser, including the page zooming feature that allows you to upscale browsing pages. Unlike previous versions of the Amaya browser, Amaya 11.4.7 has a reliable password manager and access keys system.
Is the Amaya browser free?
The Amaya browser is a freely available open-source web editor. It features two platforms: the web editor that allows users to create and edit web pages and a browser that allows you to surf the internet.
However, the browser doesn’t require any payment before users can use it. Likewise, being free doesn’t make the browser less reliable and doesn’t give it any limitations. Hence, the software is accessible across every operating system for free.
Quick Tip:
Amaya is an excellent browser with its own set of capabilities, but have you tried Opera One? Opera one is one of the most all-encompassing browsers, with continuous updates to its functionality and user experience.
If you’re interested in the Amaya browser, you should also check out Opera One free. The appealing user interface, sidebar integrations, and native AI are just a few of the handy tools we surely value.
Opera One
Neatly organized, valuable setups for a safer and faster browsing experience.
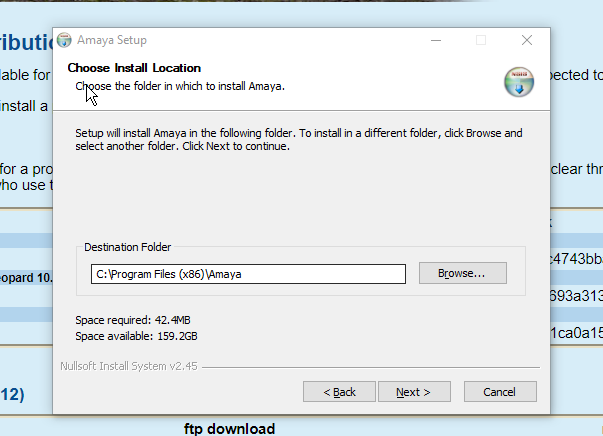
Double-click on the download file to install the browser.
Follow the on-screen prompts till the process is complete.
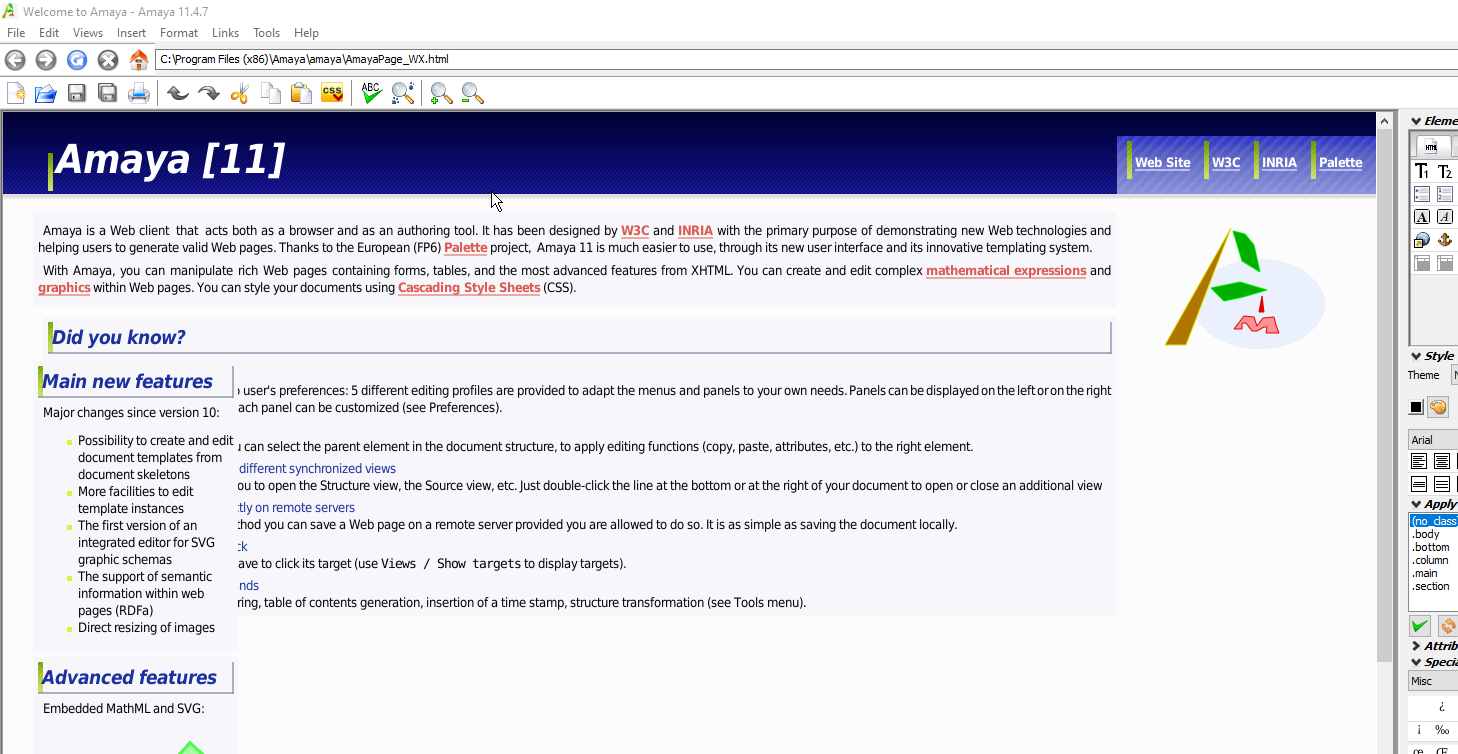
Launch the Amaya browser on your computer and enjoy.
On the official Amaya browser website, check for the latest version for your device before downloading and installing any. It will help you enjoy the new features that contributed to the latest browser update.
Though it’s been a while since Amaya’s last update, the browser still features some features that are not available in most browsers today.
Conclusively, we recommend that users have a vast knowledge of what tools are best for HTML5 editors. Hence, you can read our article about the best HTML5 editors for Windows 10/11.
Leave your questions and suggestions below in the comments section. We’d like to hear from you.
Windows 11 offers some new great features that are also easily customizable. So, setting them according to your needs will create a more pleasant and original digital environment.
Among others, touchpad and touchscreen functionalities are extremely popular and require specific attention.
Because we want to always keep you up to date, today’s article will explore how to personalize Touchpad Gestures in Windows 11. But before anything else, let’s look at the supported ones and why to use each one.
How can I easily set Windows 11 Touchpad Gestures?
1. Customize Zoom & Scroll Gestures
Navigate again to the Touchpad page, from the Windows 11 Settings Menu.
Expand the Scroll & Zoom section.
Now you can manage Scroll & Zoom Touchpad Gestures.
2. Set Three-Finger Gestures
2.1 Swipes
Go to the Touchpad page, from the Settings menu.
Expand the Three-finger gestures option.
Windows 11 comes with existing templates to start with for using three-finger swipe gestures.
NOTE
Windows 11 comes with existing templates to start with for using three-finger swipe gestures. To find out more about them, make sure you keep on reading.
2.2 Taps
Navigate again to the Touchpad page, located in the Windows 11 Settings menu.
Expand the Three-finger gestures option.
Look at the Taps section, then click on Open search.
Now, you can customize your Taps options.
2.3 Three-Finger Gestures options in Windows 11
As mentioned before, Windows 11 three-finger swipe gestures offer specific templates, so take a look at the list below and discover how great they are:
Switch apps and show desktop – This option is set by default and allows you to switch among apps using the three-finger sideways swipe gesture. When you swipe up, you’ll have the Mutlitasking view and if you choose swipe down Desktop will show.
Switch desktops and show desktop – In case you choose this one, you’ll be able to switch among desktop instead of apps using the three-finger sideways swipe gesture, while other two swipe gestures will have the same function as they did in the previous preset.
Change audio and volume – Last, but not least, this preset is more adequate for music or podcasts passionates. If you enable this one in Windows 11, you’ll be able to turn up or down your volume using the three-finger up/down swipe gesture respectively. In addtion, its side ways will allow you to jump to previous/next song currently present in your queue.
Similar to the three-finger swipe gestures, taps ones come with multiple options, as you can see below:
2.4 How can I customize the Three-Finger Gestures option?
The great part is that you can map your own peripherals specs (like keyboard shortcuts or mouse actions) for both Swipe and Taps Three-Finger Gestures. This would help if you feel like presets provided by Windows 11 are not that useful for your needs.
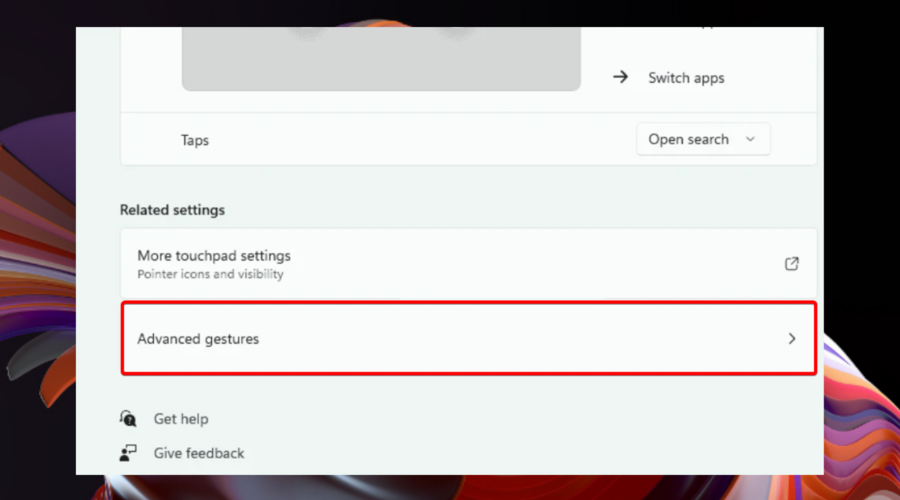
Fortunately, it is extremely simple to do that. And you only have to navigate to the already known Touchpad page, then access the Advanced gestures options.
Personalize tap gestures on Windows 11 touchpad
You can personalize the tap gestures settings on your touchpad by going into Control Panel. The tap gestures are enabled by default as soon as you connect the touchpad. Afterwards, you can easily configure touchpad sensitivity and tapping settings.
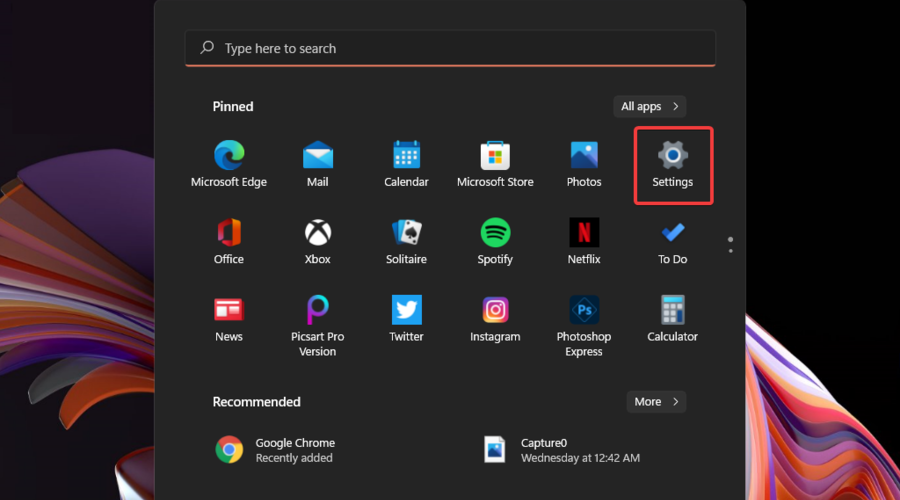
1. Hit the Windows key, then open the Settings menu.
2. Click on Bluetooth & devices, then navigate to Touchpad.
3. To reveal the needed gestures, click on Taps.
4. There, checkmark the options you want. Note that you can choose multiple preferences.
5. You can also select the level of Touchpad Sensitivity.
So, as you can see, there are multiple ways to set Touchpad Gestures in Windows 11. You can also use them when you connect your Apple Pro Vision headset to your PC since the eyes don’t work as a cursor with PCs.
If you customize them according to your day-to-day needs, ensure you’ll get a more pleasant and accessible workplace.
What Touchpad Gestures are supported in Windows 11?
Tap Gestures
Tap and swipe represent two common gestures for devices like laptops or tablets.
The Tap gestures detect one or more fingers pressing the touchpad briefly. Maybe it sounds complex, but keep in mind that they do nothing but allow you to select certain items during your day-to-day work.
When a supported precision touchpad is installed, these are always enabled on a Windows PC.
Zoom & Scroll Gestures
Considering the Scroll gesture, it does exactly what it says. Thus, you can use it to scroll conveniently without reaching out to the window’s scroll bar you need to search in.
Similarly, the Zoom Gesture allows you to zoom in or out of a certain box. You usually do this by pinching or expanding with two fingers on your touchpad.
Three-Finger Gestures
These are the most customizable parts of the Touchpad gestures. Windows 11 allows you to be more specific and configure three-finger swipes and taps to do as you please.
While you might have already heard about Opera, Google Chrome, and Mozilla Firefox, there are several other browsers that provide the same features or more available on the market.
In fact, there are several browsers that offer more security and features and are overall lightweight in size compared to the mainstream web browsers.
QQ Browser is a not-so-well-known web browser that is developed by Tencent, the team behind the uber-popular Players Unknown Battleground (PUBG) game.
It is a well-known name in its home country of China but is not even considered as an alternative in the west, where the likes of Operas and Chromes have taken over.
If you do not care about your privacy and data and want to know if you can install a QQ Browser on your Windows XP PC, then you can keep reading this guide.
Can I use QQ Browser on Windows XP?
Yes. On the official website of the QQ Browser, it is written that you can download the latest version of the browser for Windows XP.
This means you do not need to worry about downloading an archived or old version of the QQ Browser on your Windows XP PC.
In fact, the minimum requirement to run the QQ Browser is that you need to have a Windows XP installed PC.
Some notable features of the QQ Browser include it is a Chromium-based browser, available for multiple platforms, integration with chat platforms from the sidebar, and it uses two browser engines, such as WebKit and Trident.
What is the best browser for Windows XP?
The Opera browser is, overall, the best browser for your Windows XP PC, because of the features it offers. The last supported version of the Opera browser for Windows XP is Opera 36.
The installer is in Chinese. So, you may need to use the Google Translate app to translate the menu options.
The middle blue button is the Install button, which installs the browser with default settings. Whereas the button on the bottom-right is Custom Installation.
By clicking on the Custom Installation button, you can select the directory to install the browser.
Select if you wish to create a desktop icon or not.
Choose to add it to the quick launch bar.
Set it to be the default browser and choose to either opt-in or out for the user experience improvement plan.
Follow the on-screen prompts and install the browser on your PC.
Is the QQ Browser compatible with Windows 10 & 11?
According to multiple user reports and research reports consider QQ Browser is not so safe for the masses to use.
It has been reported that both the Windows and Android versions of the QQ Browser have been caught transmitting the user data to the host server without encryption.
Worse is that the Android version of the QQ Browser has been found to be leaking the user’s IMEI, IMSI, nearby Wi-Fi access points, visited URLs, Android ID, and even search queries.
Speaking of the Windows version, it has been found to be sending a list of visited websites, hard drive serial number, MAC address, and machine hostname to QQ servers.
If you are still interested then, you would be glad to know that the QQ Browser does support Windows 10 and Windows 11 OS.
Do we recommend using the QQ Browser?
To answer this in simple terms, we would say do not use the QQ Browser. The browser has been notoriously found to be leaking your crucial information to the host server.
So, in this case, one should stay a mile away from browsers that leak personal information. Moreover, there is nothing exceptional about the QQ Browser that you should choose over other commercially viable options.
QQ Browser is good enough only for people who are in China or do not care about their personal data. For more information, you can check out our guide on dedicated guide about the QQ Browser.
We hope that this guide gave you complete information about the QQ Browser and how you can download it on your Windows XP PC. Let us know in the comments below if you use this browser or want to try out the browser sometime.
The video in question is an unboxing video about a minute and a half long, and was posted on July 12 on the Nicholas Lugo channel. The video shows a white Xbox Elite Controller with black grips. Back in March it was reported that a similar Xbox controller had been spotted at an unnamed retailer.
While many are anticipating the debut of the Series 3 Xbox Elite Controller, the video in question clearly states in the title that this black and white controller is a Series 2 one.
It is interesting to note that Microsoft will be present at Gamescom on August 24. That is the same event in which Microsoft first announced its white Elite controller four years ago. Even more interesting is that that controller was also leaked before it was announced.
K-Meleon is a lightweight and open-source web browser exclusive to the Windows operating system. It’s built on the Mozilla Gecko browser engine, the same one used in Firefox.
It is a totally barebones browser that doesn’t a lot have in terms of features. K-Meleon feels like something out of the early 2000s. It has the basic features of a bookmarks page, browser history, and Settings, but that’s it.
K-Meleon is meant to be totally customizable. You download the browser and you can add whatever you want to it. Although you may run into some issues with certain websites telling you to use something more mainstream.
Why is my browser not working?
There is a multitude of reasons why K-Meleon doesn’t work on certain websites. The browser is usually fine, but some pages may flag K-Meleon and tell you to use something like Chrome or Firefox.
The majority of pages nowadays prefer more contemporary browsers because they support JavaScript. Without that support, the browser won’t work. K-Meleon is kind of a novelty and better suited for old computers.
These solutions were found on the K-Meleon forum. It’s a little difficult to navigate the forum because it uses an old style. We thought it’d be best to present those solutions in a more straightforward manner.
Quick Tip:
Try opening the web from another browser. It’s the quickest way to get back online, and we recommend Opera One for the task because it’s modern, frequently updated and includes tons of features.
Opera One is a Chromium based browser that is very light, with a modern and highly customizable UI where you can easily find and enable the ad block, the free VPN, and native AI.
Opera One
Upgrade to a more reliable browser for a better overall experience!
In the address bar at the top, type in about:config
Hit the Enter key.
A new page will appear. Click the button that appears.
Right-click anywhere on K-Meleon and a context menu will appear.
Hover over New and then select String.
Now you need to name the string. Enter general.useragent.overrride and click OK.
Now you have to enter a string value. Type the following in and hit OK: Mozilla/5.0 (Windows NT 6.1; rv:68.0) Gecko/20100101 Firefox/68.0.
2. Disable global useragent
The previous solution was to add a global useragent to K-Meleon, but some Pro users have had issues with certain useragent preferences. You can switch it off yourself, however, so start by going back to: about:config
In the search bar at the top, enter kmeleon.privacy.useragent.Count. This will narrow down the preference that you’re looking for.
Right-click the entry and select Modify in the context menu.
Enter 0 into the string value and hit OK.
3. Enable JavaScript
On K-Meleon, hit the F2 key to bring up the Preferences menu.
Click JavaScript on the left-hand menu.
Ensure that the box next to Enable JavaScript is checked off. If it’s off, click it to turn it on.
K-Meleon vs Pale Moon
Another browser built on the Firefox engine is Pale Moon. This particular browser is a lot like K-Meleon, an open-source piece of software that’s just as customizable. But after briefly using it, Pale Moon was an overall better experience.
First off, Pale Moon doesn’t have the same access issues as K-Meleon has. The browser itself feels like Firefox from the early Windows 10 days. It has a similar blocky design to it with the same tabs.
Using it felt like getting back on a bicycle. We also discovered more websites that worked with Pale Moon. Going to YouTube let us watch videos instead of being greeted with a blank page.
It also opens up to a help-up quick start page with lots of icons to notable websites like Twitter, YouTube, Twitch, and eBay. An overall better experience than K-Meleon.
Feel free to leave a comment below if you have any questions on other apps or if you have some that you recommend. Also, feel free to leave comments about guides you’d like to see or information on other web browsers.
Many users may well have heard of JavaScript. However, most users probably aren’t so familiar with the WebAssembly (otherwise known as Wasm) browser standard for web development.
WebAssembly is not exactly a programming language for the web. It is, in fact, a compilation target for scripting languages like C++. Web developers utilize Wasm for creating embedded apps on sites and executing web browser operations.
Some users may see error messages that say your browser doesn’t support WebAssembly when they try to open certain webpages. Such messages can also appear within browsers’ developer consoles.
If you see a message like that, it means the page you’re trying to access incorporates WebAssembly content. Yet, your browser can’t open the page because it seemingly doesn’t support Wasm.
Do all browsers support WebAssembly?
Five major browsers support WebAssembly. Google Chrome, Firefox, Opera One, Edge, and Safari are the big five browsers that support Wasm.
WebAssembly isn’t supported in all versions of those browsers. Older versions of those web browsers don’t support Wasm. This caniuse.com page shows what browser versions support WebAssembly.
So, don’t be surprised if you see a WebAssembly unsupported error in any browser that doesn’t support Wasm. However, some users still need to fix that error in browsers that supposedly support that standard.
To make sure you have a seamless experience, we recommend using Opera One. That’s because the browser is very light and responsive. It supports multitasking and doesn’t freeze or impact your PC with multiple tabs open.
Opera One
Use this browser for built-in WebAssembly support and modern features for productivity and privacy!
WebAssembly vs. JavaScript performance comparisons have consistently highlighted that WebAssembly is faster. Such tests have shown that Wasm can be up to 16.11 times faster in certain browsers.
WebAssembly is generally faster across all web browsers because of its low-level binary format. That smaller-sized format ensures browsers can fetch Wasm code faster whenever required.
How do I fix the browser does not support WebAssembly error?
1. Make sure WebAssembly is enabled
Google Chrome and Edge
Open Chrome’s Experimental feature tab by typing chrome://flags/ in the URL bar and hitting Enter.
Input WebAssembly in the Search flags text box.
Select Enabled on the Experimental WebAssembly’s drop-down menu.
Enable all other WebAssembly flag settings listed in the search results.
Click the Relaunch option at the bottom right of the Experimental features tab.
Firefox
Type javascript.options.wasm in Firefox’s URL bar and hit Enter.
Input javascript.options.wasm in the Search preference name box.
Click the Toggle button for javascript.options.wasm to set that preference to true.
NOTE
You can enable WebAssembly much the same in Microsoft Edge. However, you’ll need to input edge://flags/ in Edge’s address bar to open its Experiments tab.
2. Update your browser (by reinstalling it)
Open the Power User menu, and click Run.
Input this Run command: appwiz.cpl
Select Run’s OK option.
Click the browser you need to reinstall in Programs and Features.
Select the browser’s Uninstall option.
Click Yes if prompted to confirm.
Navigate to your browser’s website, and click the download option for its latest version.
3. Disable the Enhance your security on web setting (Edge Fix)
Input edge://settings/profiles in Edge’s URL bar and hit Enter.
Type security in the search box.
Turn off the Enhance your security on the web feature by clicking the Are you satisfied with enhanced security mode toggle switch.
Try applying those potential fixes when WebAssembly doesn’t work in a supported browser. For most users, it will probably be the case that WebAssembly isn’t enabled within the browser software.
Let us know which solution worked for you in the comments area below.
Skyrim is a popular action role-playing video game developed by Bethesda Game Studios.
However, sometimes when running the game you may encounter the Microsoft Visual C++ runtime error forcing the user to force close the game and exit.
What is the reason for the runtime error?
The Skyrim Microsoft Visual C++ run time error usually occurs if the Microsoft Visual C++ installation is corrupted or incompatible.
If you are also troubled by this error, here are a couple of troubleshooting tips to help you resolve the Skyrim Microsoft Visual C++ runtime error in Windows.
How can I fix Microsoft Visual C++ run time Skyrim error?
1. Repair/Reinstall Visual C++
1.1 Repair Visual C++
Open File Explorer and navigate to the following location: C:\Program Files (x86)\Steam\SteamApps\Common\Skyrim
In the Skyrim folder, locate the VCRedit file.
Double-click on the credeist_x86.exe file.
In the next window, you will get two options, to Repair or Reinstall Visual C++.
First, select the Repair option.
The troubleshooter will run and fix any corrupted Visual C++ file in the system.
Close the troubleshooter and try running the game again and check for any improvements.
1.2 Reinstall Visual C++
Open File Explorer and navigate to the Skyrim installation folder: C:\Program Files (x86)\Steam\SteamApps\Common\Skyrim
Double-click on the vcredit_x86.exe file to run it.
This time select the Uninstall option and click Yes if prompted to confirm the action.
Once installed, launch Skyrim and check if the run time error is resolved
Reinstalling Microsoft Visual C++ seems to have resolved the error for many Skyrim players.
However, make sure you download the correct edition of Visual C++ 32/64 bit according to your system configuration before proceeding with the installation.
2. Delete multiple game saves
Press the Windows + E keys to start File Explorer.
Navigate to the following location: C:\Users\username\Documents\My Games\Skyrim\Saves
Copy all the files saved in the Saves folder.
Create a new folder anywhere on your desktop.
Name the new folder as old game saves.
Paste the copied game files to the new folder.
Now go back to the Skyrim/Saves folder again.
Delete all the saves except the most recent one and the autosaves.
Close File Explorer and check if the error is resolved.
Several users have reported that deleting old game saves has helped them get rid of the error.
Deleting the old saves can fix the problem if the amount of saves that you have is creating conflict with the game files.
The runtime error Skyrim crash problem will hopefully be fixed this way so you must definitely try it.
3. Uninstall the problematic software
3.1 Clean boot your PC
Press Windows key + R to open Run.
Type msconfig and click OK to open the System Configuration window.
In the System Configuration window, open the Services tab.
Check the Hide all Microsoft services option at the bottom. This will hide all the essential Microsoft services.
Next, click the DisableAll button to disable all the non-essential services.
Keep the System Configuration tab open.
Right-click on the taskbar and select Task Manager.
Open the Startup tab and disable all the apps that have enabled it in the startup list.
In the System Configuration window, click Apply and OK to save the changes.
Reboot the computer.
3.2 Finding and uninstall the problematic software
Once booted into the Clean Boot mode, launch Steam and try running Skyrim.
If the game works without any error, it means a third-party software installed on your computer is creating conflict with the game.
To do that, click the Start button and select Settings.
Next, select Apps.
Now, uninstall the most recently installed program to check if that resolves the error.
If the error occurs even in the Clean Boot mode, the issue is with the game or critical service that is required to run the game.
In this case, try reinstalling Skyrim to see if that helps resolves the error.
This might be an unusual way to fix Skyrim runtime error but third-party software can interfere with the game and uninstalling it will solve the problem.
How can I fix Skyrim runtime error R6025?
Our readers also reported the Microsoft Visual C++ runtime library error R6025 that occurs when running software that relies on Visual C++ libraries.
And Skyrim is one of the programs that can trigger this issue. You can fix it by scanning the system files and installing the Visual C++ libraries.
Tinder is currently one of the most popular messaging/dating apps. The application is available on mobile, but did you know you can use it in your web browser?
That’s right, Tinder is available in your web browser, and today we will show you how to use it properly.
If you already use the Tinder browser, you may have encountered the white screen or the Tinder browser not working errors. Solutions in our guide on fixing Tinder error 5000 may come in handy.
Can you use Tinder on the browser?
Yes, you can use Tinder on your browser. But, of course, it offers an experience slightly different from using the apps, especially the mobile application, but some users prefer this experience.
While creating an account on Tinder or any other app, you may be required to confirm a code sent to your mobile number by SMS, or you might get a registration error.
Click Allow when asked to enable Tinder to access your location.
Select Allow once again to confirm.
If additional dialogs appear asking for your location, select Allow.
After that, you should be able to access your feed, send messages, and do everything else you can on the mobile app.
How do I install Tinder on my PC?
There is no Tinder desktop app. By navigating to the app download and clicking on the download button, you will be redirected to the Tinder web app.
Using Tinder in your browser is incredibly simple; you just need to sign up/sign in, and you’re good to go. Are you going to try using Tinder in your browser? Let us know in the comments below.
The Resolving host error in Google Chrome disrupts your browsing experience. Chrome is one of the best web browsers in the world, and it has this status for good reasons.
The browser is fast, has a great in-built download manager, and a massive library of useful extensions. However, it’s not free from issues.
Sometimes, when you open a web page, it delays for a while and returns the annoying Resolving Host error in the status bar.
This issue comes up when the pre-fetching operation in Google Chrome goes wrong due to several factors. This issue also affects Safari, Firefox, Edge, and other major web browsers.
Why does my browser keep saying resolving the host?
Resolving host means your browser is translating web addresses you enter in your browser’s address bar into the IP addresses of the sites you want to visit.
If your internet is poor or misconfigured, the browser wouldn’t be able to locate the correct IP address and returns the resolving host error.
Why is resolving host taking so long?
Resolving the host will take longer if the DNS Server configured by the internet service provider is having difficulty finding a mapping address for the URL you want to visit.
Another reason it might take long is the poor internet connection or wrong settings.
Quick Tip:
It’s possible that your browser is actually at fault, so we suggest trying to open the same page from a browser that’s known to be reliable and error-free, such as Opera One.
Beside being very light and having all the standard features, this browser also has already built-in an Ad blocker, VPN and AI.
Opera One
Avoid errors by browsing the web with this reliable alternative!
In Command Prompt, type the following commands and press Enter: ipconfig /release ipconfig /flushdns ipconfig /renew
Exit Command Prompt.
You will see the message Successfully flushed the DNS Resolve Cache if done correctly.
2. Clear your browser’s DNS cache
Launch Chrome.
Type chrome://net-internals/#dns in the URL bar.
Click on the Clear host cache button.
Clearing the host cache on Chrome is a quick way to solve the resolving host issue. Ensure to restart your browser when the process is complete to sync the changes.
3. Disable IPv6 to fix the resolving host error
Right-click on the network icon on your taskbar and select Open Network & Internet Settings.
Click on Change adapter options.
Right-click on your active connection and hit Properties.
Find Internet Protocol Version 6 (TCP/IPv6) and unmark the checkbox beside it.
Click on the OK button.
4. Disable DNS prediction
Start Google Chrome.
Click the menu button and select Settings.
Click Privacy and security on the left pane.
Choose Cookies and other site data.
Toggle the switch for Preload pages for faster browsing and searching backward to disable it.
The preload pages feature helps to speed up browsing speed considerably. However, it might be the cause of the resolving host issue.
5. Edit hosts profile
Press the Windowskey +Qcombination.
Type Notepad.
Right-click on Notepad from the results and choose Run as administrator.
Select File and click on Open.
Click on the File type dropdown and select All files (*.*).
Go to Hosts and hit Open.
Clear all the text following the # sign.
Click on the File menu and select Save.
Close Notepad.
Restart your PC.
6. Disable VPN service
From VPN extensions
Open Chrome and click the menu button.
Select the More tools option.
Select Extensions.
Toggle the switch for the VPN extension backward to disable it.
Disabling VPN programs
Launch the VPN application.
Right-click on the VPN icon in your taskbar.
Click on the option to disconnect the VPN service.
Type msconfig in the Run dialog box and hit Enter.
Navigate to the Boot tab.
Mark the Safe boot checkbox.
Click on the OK button.
Restart your computer.
Press the Windows key +R to open the Run prompt.
Type inetcpl.cpl in the Run dialog box and press Enter.
Navigate to the Connections tab.
Click on the LAN settings button.
Unmark the Use a proxy server for your LAN option and hit OK.
Return to Step 3 and unmark the Safe boot option.
Click on the OK button.
Restart your computer.
What does it mean to resolve an IP address?
Domain resolution helps to convert domains to an IP address. Since an IP address is a numerical address used to identify a site on a network, it makes sense to use the Domain Name instead to facilitate the memory.
So, this Domain is resolved to an IP address when you need to visit a site.
How do I know if my IP address is resolving?
To resolve your IP address is resolved on a local computer, you can add entries to the local host files on your computer. With this, you can be sure that your IP address will be resolved.
If all seven solutions above don’t fix the resolving host error, do well to contact your internet service provider. Inform that above the challenge and the troubleshooting steps you’ve taken so far.
At this point, your ISP can fix the problem from their end or recommend further troubleshooting steps.
You must have encountered the Twitch error when your browser won’t support video playback. In this article, we recommend the best fixes.
When you have this problem, the browser may display the error message this video is either unavailable or not supported in this browser (error #4000). At such times, you can not play the video or continue streaming.
Some users have also encountered the error 1000 on Twitch; some of these fixes may also come in handy.
Why is a video not playing in Twitch?
Several reasons explain why this error can appear, and we’ve compiled a list of the most common ones to get a better perspective of this error:
Certain settings are enabled – In this case, you should know that to run any video playback on the web browser app, enabling the media autoplay and software rendering settings is mandatory. You’ll discover how to do it later in this article.
Browser-related problems – If you’re using a browser that doesn’t have a Twitch integration, it might frequently get into troubles that won’t allow you to have a complete streaming experience. Thus, we strongly recommend using a dedicated browser. Make sure you read this article entirely and find what the best option you can try is.
What browsers does Twitch support?
For Twitch users, many browser options are compatible. The list includes:
Opera GX
Firefox
Chrome
Edge
Brave
But it is not limited to these; they are just a sample of what you may try.
How can I fix browser doesn’t support video playback on Twitch?
1. Enable media autoplay
1.1 Google Chrome
Press on the Windows key, type Chrome, then click on the first result.
Look at the upper-right corner of the window, then click on the 3-dots icon.
Navigate to Settings.
From the left window pane, click on Privacy and Security, then from the right side of the page, select Site Settings.
Now, scroll down the menu, click on sounds, and select Sites can play sounds.
1.2 Mozilla Firefox
Hit the Windows key, type Firefox, then open the first result.
In the address bar, type the path below and press Enter. about:config
Click on Accept the Risk and Continue.
Search for the value below and ensure it’s set on True. media.autoplay.enabled
Check if the problem is resolved.
Even if our presented problem seems to appear only on the Firefox browser, we considered properly to also deliver solutions for Chrome, in case it is ever happening to it.
2. Enable software rendering
Use the following keyboard shortcut to open the search box: Windows + S.
Type Internet options in and click on the first shown result.
Go to the Advanced tab option.
Locate the Use software rendering instead of GPU rendering option and enable it.
Click on Apply, then on OK to save the changes.
Restart your computer and check if the error persists.
If the browser won’t support video playback on Twitch, enable software rendering, and retry it.
3. Update the browser
3.1 Update Chrome
Launch the Chrome browser.
Click the menu icon, then select Help and About Chrome.
Wait for the browser to install updates, then restart when prompted.
3.2 Update Firefox
Launch the browser.
Click on the Menu icon, then select Help.
Click on About Firefox.
Wait for the browser to install updates, then restart when prompted.
It is possible you are running on an old version of the browser, and an update may be all you need when the browser won’t support video playback on Twitch. It is also an excellent general fix when Twitch won’t load on any browser.
What other Twitch video errors should I be aware of?
Twitch error deleting video – Some streamers recently ran into the problem as they could not delete past broadcasts for some reason. If it ever happens to you, check our dedicated fixing guide.
Twitch error 1000 – In this case, your video download would be canceled for several reasons. Fortunately, we’ve also prepared a list of solutions that will solve it in a matter of time.
Twitch not loading when logged in – In most cases, you need to delete your cache as they may have logged old data that prevents you from logging in.
So, here you are at the end of today’s guide with the best three solutions to try if your browser doesn’t support video playback on Twitch. Before you start these fixes, we recommend you access Twitch from another browser. If it works, your easiest fix may be a browser change.
In extreme cases, you may try a browser reset, but note that you may lose some data in the process.
Because your opinion is important, do not hesitate to share it in the section below; thus, for any questions or suggestions, make sure you leave a comment.
The Marvel’s Midnight Suns video game was originally set for an October 2022 release but it’s now been officially delayed for release at an unspecified time sometime before March 2023.
Curiously, while the current gen Xbox Series X, PS5, and Windows PC versions of Midnight Suns are due out within the above window, the last gen Xbox One and PS4 versions are now listed as TBA which suggests that they could have their releases delayed even further or, what’s more likely, they’ll simply be delayed outright as by mid-2023 even more players would have upgraded to Microsoft’s Xbox Series X and Sony’s PlayStation 5 console families.
Marvel’s Midnight Suns is a dark take on the Marvel Comics characters which draws inspiration from the comic line of the same name. The Midnight Suns video game is currently set to feature a rather diverse mix of characters ranging from Wolverine, Captain Marvel, Magik, and Spider-Man to Blade, Robbie Reye’s Ghost Rider, Scarlet Witch, and Iron Man.
This article will give insight into Facebook and its use on a browser.
For nearly two decades, Facebook has taken the world by storm as it revolutionized social media. Messaging, video and audio calls, and status updates are a few features the social media pioneer is famous for.
The service has apps that work on Android, iOS as well as desktop devices. But if you still love interacting with a browser, let’s get you well on your way.
Does Facebook have a browser?
Facebook is not a browser on its own, but you will often click on links on Facebook that will be opened up in a browser. This browser is usually not the default browser you are used to, especially on mobile devices.
It is more or less a watered-down version of a browser, permitting you to read web content and access some other media in the barest form of a browser.
You will not be able to access this browser by clicking a mobile app icon as you will typically do to open a browser.
Quick tip:
Try Opera One, a light resource browser, that helps you handle any multimedia content you encounter on Facebook without any slowdowns. The browser also has a built-in messenger that works with Facebook and WhatsApp, and there’s even Instagram integration available.
It’s worth mentioning that Opera One has tracking protection, VPN, ad-blocker and AI all built-in, so it will load pages faster.
Opera One
Upload pictures, share stories and chat with friends with Opera One!
Facebook works great in your browser since it was initially designed as a web application, and almost all of its features are available in the web browser.
Input your log-in credentials and click the Log in button.
In most cases, even if you navigate to facebook.com rather than m.facebook.com on a Facebook mobile browser, you will be automatically redirected to the mobile version.
As the internet has grown, so has the number of services we need to use and register. The problem is that we need to create and safeguard new passwords constantly. At a particular stage, this becomes humanly impossible, and the only option is to use a password manager.
Using a password manager is a great way to protect all your online accounts, and one of the most popular password managers is Dashlane.
Using Dashlane in your web browser is incredibly simple, and in today’s article, we’ll show you how to do that properly using Dashlane extensions.
Dashlane works with the Edge, Chrome, Firefox, Opera One, and Safari browsers and is accessible on the Windows, iOS, Mac, and Android operating systems.
The web app is accessible in most browsers as a light add-on. You may store and automatically fill out forms and logins while you explore the internet by using the Dashlane add-on.
Additionally, you can visit the online app to obtain additional information, including the Password Health, and copy, view, and create passwords.
After the extension is installed, click Create an account; if you do not have one, or for old users, enter your email address and click Next.
Once you have followed the steps of creating an account or login in, you should be able to use the service to store and manage all your passwords on the browser.
While Dashlane is a great way to protect your online accounts, Opera One as a browser offers some great security features as well.
First, Opera One has tracking protection, blocking all tracking cookies and scripts automatically and thus speeding up webpage loading time.
Opera One also has crypto mining protection and a built-in ad blocker, so you won’t have to deal with ads anymore.
For an extra layer of protection, there’s a free VPN with unlimited bandwidth available. Opera One also has advanced tab management so that you can organize tabs into workspaces and tab islands.
An lastly but not least, Opera One comes with a built-in AI and a modular AI-ready design for integration of current and future AI technologies.
The browser is available on all desktop and mobile platforms, so if you want a secure and reliable browser, try Opera One out.
Opera One
Get seamless access to web services with the help of this high-speed and customizable web browser
After the extension is installed, click Create an account; if you do not have one, or for old users, enter your email address and click Next.
Once you have followed the steps of creating an account or login in, you should be able to use the service to store and manage all your passwords on the browser.
When a confirmation dialog appears, click on Continue to Installation.
Click on Add.
On the privacy window, click Agree.
After the extension is installed, click Create an account; if you do not have one, or for old users, enter your email address and click Next.
Once you have followed the steps of creating an account or login in, you should be able to use the service to store and manage all your passwords on the browser.
After the extension is installed, click Create an account; if you do not have one, or for old users, enter your email address and click Next.
Once you have followed the steps of creating an account or login in, you should be able to use the service to store and manage all your passwords on the browser.
Which is better Dashlane or LastPass?
The two password managers are both excellent cybersecurity tools. A premium version from Dashlane has additional features and is more fully featured, but it is also somewhat more costly.
The free edition of LastPass is more liberal, and while the subscription version is less expensive, it offers fewer features.
So, you can choose, but in the end, you will get good value for your money regardless of the tool you choose.
Please note that the process for getting the Dashlane browser extension for Safari is similar to all the browsers described in this article.
It is a great tool that gives you the flexibility of management across different browsers. Since it is safe and reliable, you can rest assured that it will secure your passwords.
Dashlane is a great password manager, and installing it is usually a breeze. However, the service has a few issues, and we recently wrote about Unexpected error occurred please try again in Dashlane, so don’t miss it.
What is your password manager of choice? Let us know in the comments below.
ARK: Survival Evolved is a great action-adventure survival game, but many users reported Unable to query server info for invite message in ARK.
This error message will prevent you from joining a specific server, causing you to lose all your progress. Fortunately, there’s a way to fix this issue.
What does it mean when ARK says unable to query server info for invite?
If you are joining your ARK server straight from the Steam server list, it is likely the cause of the message ARK unable to query server info for invite.
If you are encountering this issue, you are not authorized to join the server. Rather than doing so from outside the game, you should join from inside it.
Why can’t I join any servers in ARK?
This happens when either the ARK game client or the ARK: Survival Evolved game server is out of date. This might be because of a recent update to the game itself, or it could be because of a recent update to one of the modifications on your server.
Note that the following solutions will also address these similar issues reported by our users when it comes to ARK:
ARK network failure message
ARK unable to query server info for invite non dedicated
ARK unable to query server info for invite after update
Without further ado, let’s jump into the list of methods in which you can address the ARK unable to query server info for invite issue. Follow along!
How do I fix the ARK network failure message?
1. Verify your game files
Start Steam and go to Library, then select Home.
Find ARK: Survival Evolved in your game library and right-click on it, then select Properties.
Go to Local Files and click Verify Integrity of Game Files.
Wait for Steam to verify your files, then wait for it to download the necessary ones.
This is a simple solution that might fix the ARK network failure message: Unable to query server info for invite after an update, so be sure to try it.
2. Change Steam launch options
Start Steam, then go to Library, select Home, and find your game.
Right-click on it, and select Properties.
Select Set Launch Options.
Find the IP address of your server.
Type connect <IP_of_the_server> in the box, then press Ok.
This is a simple workaround for ARK Unable to query server info for invite non dedicated so be sure to try it out.
Create new TCP / UDP Ports with 7777 and 7778, then another TCP / UDP Port with 27015.
Click Apply and make sure you restart both your router and the computer you’re going to use as a server.
This solution only works for those who are hosting an ARK: Survival Evolved server on their PC. In order for your server to work outside the local area, you need to port forward your router.
5. Try another professional ARK Server Hosting
If the mentioned solutions didn’t work for you, we suggest you ease your work by using ARK Server Hosting developed by Host Havoc.
Unfortunately, errors can occur even in the most popular games, such as ARK. What you need to have is prompt support that helps you fix the issues easily and fast.
We suggest you try ARK Server Hosting, a high-performance server that upholds high network availability that can keep you away from server connection errors.
Very easy to use for both novice and advanced users, this professional server hosting comes with a powerful control suite and unique features, and installers. Also, it provides good file management, 2-step authentication, and free DDOS protection.
These easy solutions should solve your connection problems with ARK servers, so you can get back into action and continue building an awesome base with your friends.
If you know anything worth noting about the subject, do not hesitate to share it with us in the comment section below.