PuTTY and Audacity Win32 apps now available in the Microsoft Store in Windows 11

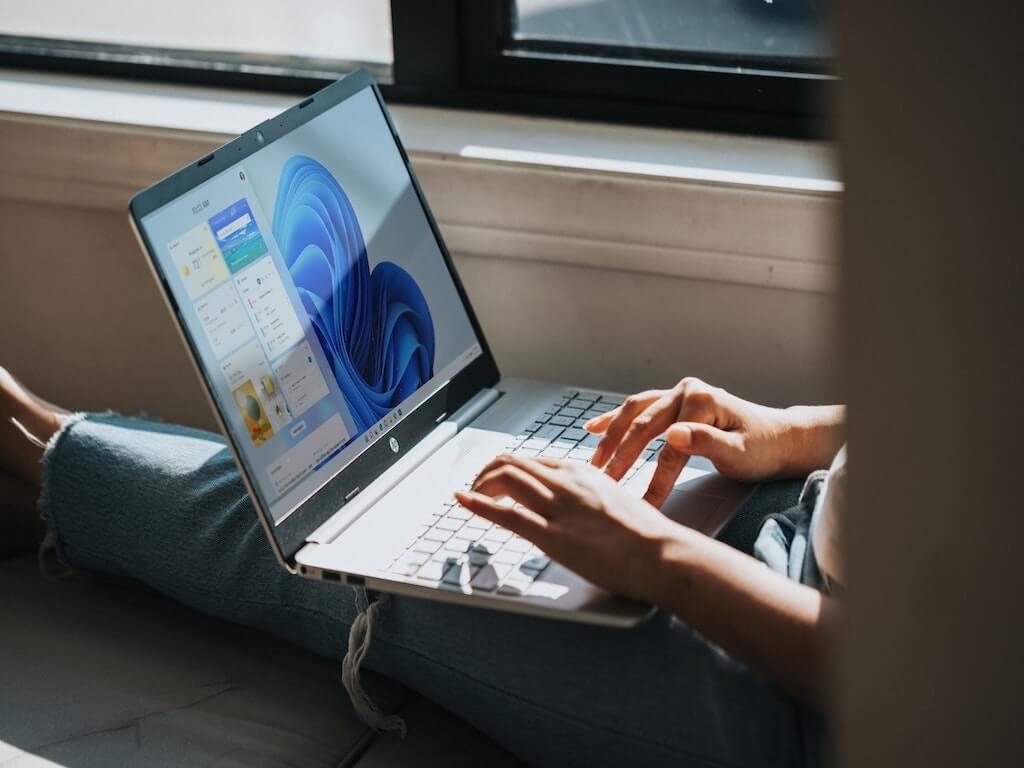
Two new Win32 apps have landed in the Microsoft Store. Spotted by @kid_jenius on Twitter, PuTTY and Audacity are now available as downloads on Microsoft’s storefront on Windows 11.

For those unfamiliar, PuTTY is a popular communications tool. It is often used for running interactive command-line sessions on other computers using the SSH protocol. The app also lets you communicate over a serial port, or speak various legacy Internet protocols. As for Audacity, it doesn’t need an explanation, as it is a multi-track editor and recording tool, used in podcasting and other audio production.

Before these official apps landed in the store, there were plenty of “fakes” or third-party apps that use the same logo as the real apps. Audacity has likely added a checkmark to the logo on their Microsoft Store app for this reason. Now that Win32 versions of PuTTY and Audacity are in the store, they join other heavy hitters, like OBS Studio, Firefox, Opera, and VLC media player.

Google not Deleting Search History? 3 Easy Ways to Fix It

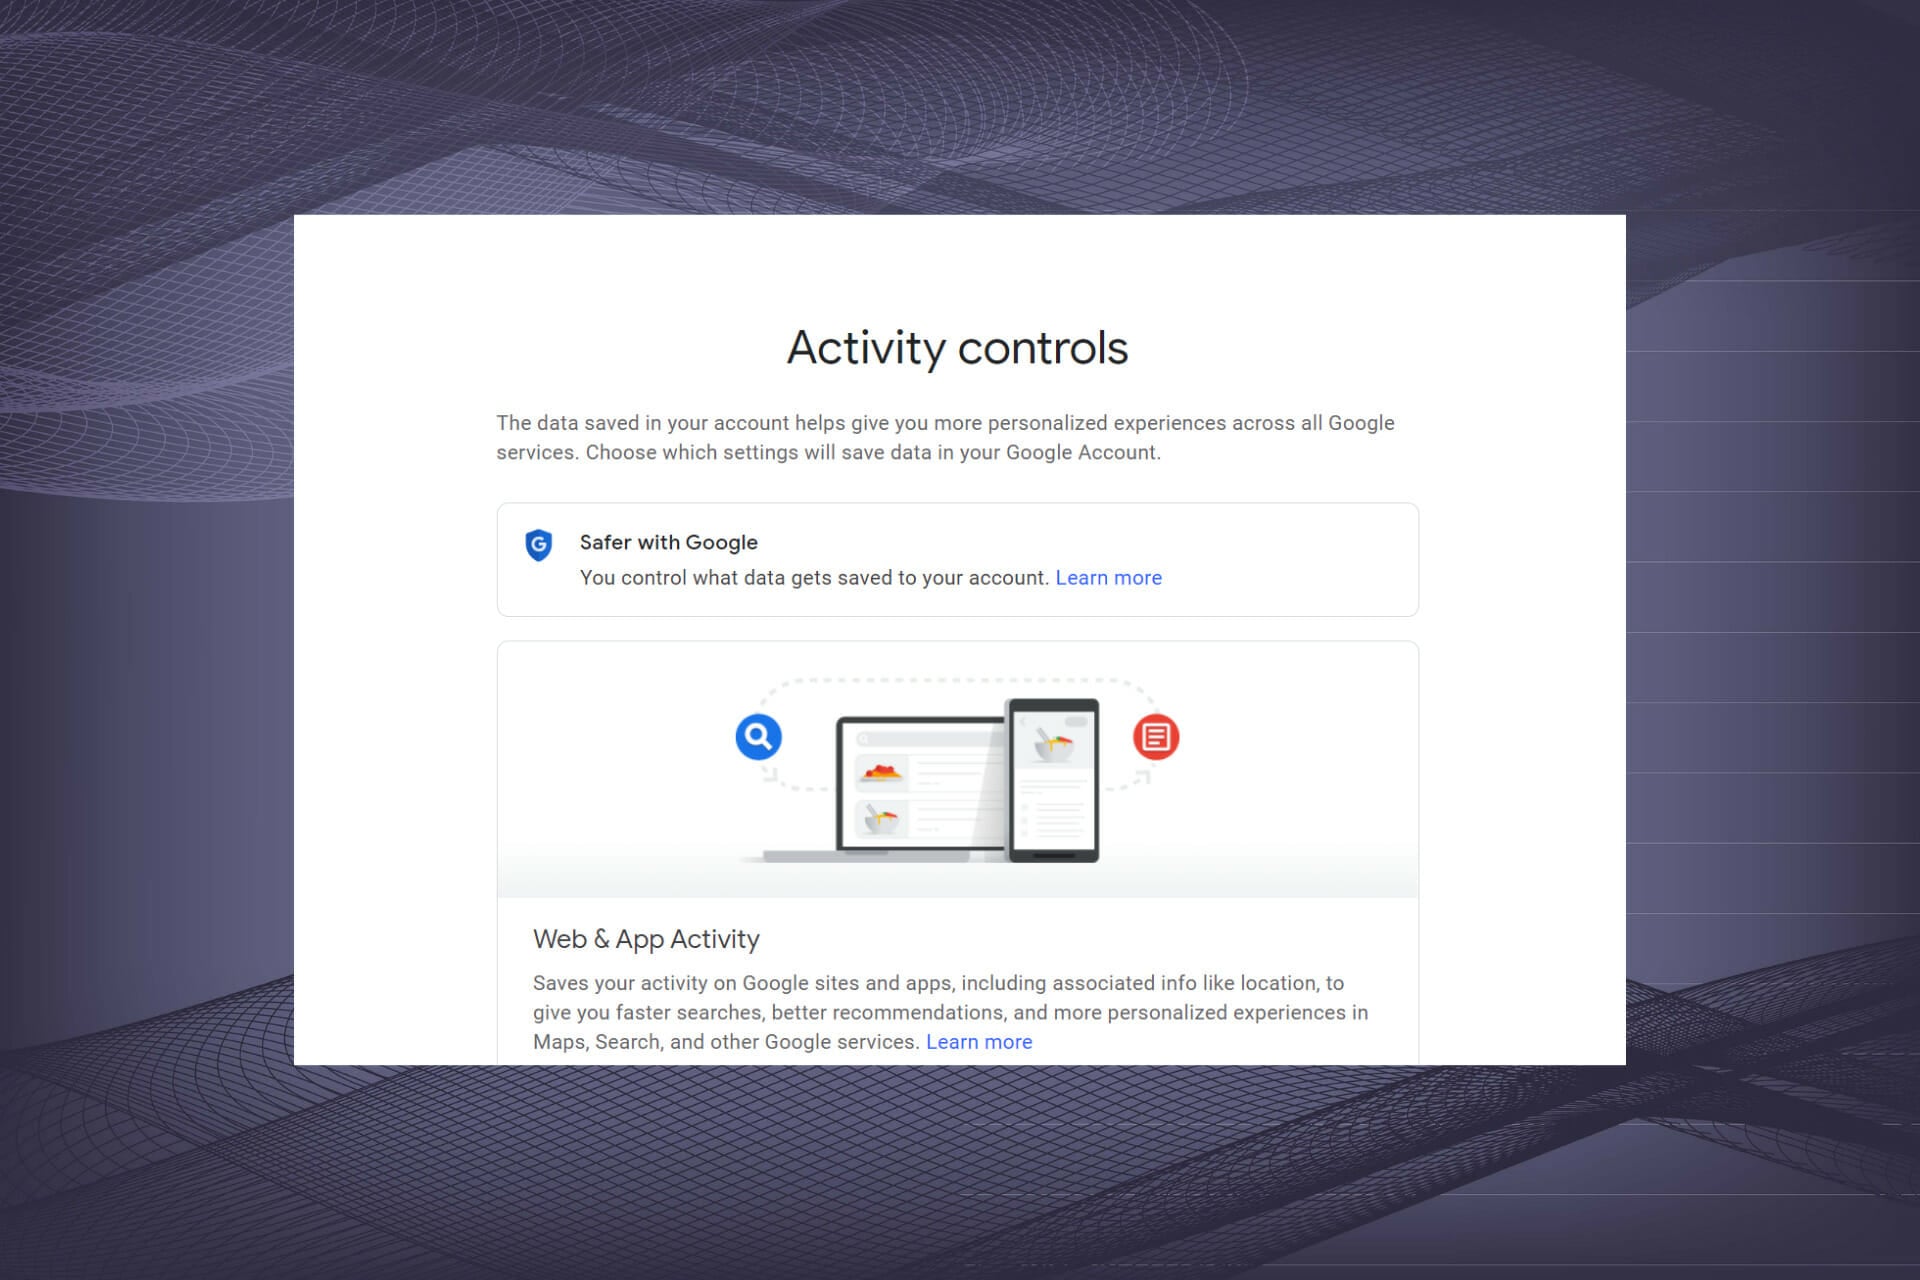
Many of us are under the impression that deleting the search history on the browser ensures privacy and security. What we don’t realize is that Google, too, keeps track of our activity, and when trying to delete its search history, many users run into an error.

Google utilizes the search history to show personalized ads to users. While viewing personalized ads doesn’t seem that big an issue, knowing that your searches are being recorded and can be accessed later is a grave concern for many.

If you, too, don’t want your searches to be recorded, here is how you can delete the Google search history.

How can I delete the Google search history?

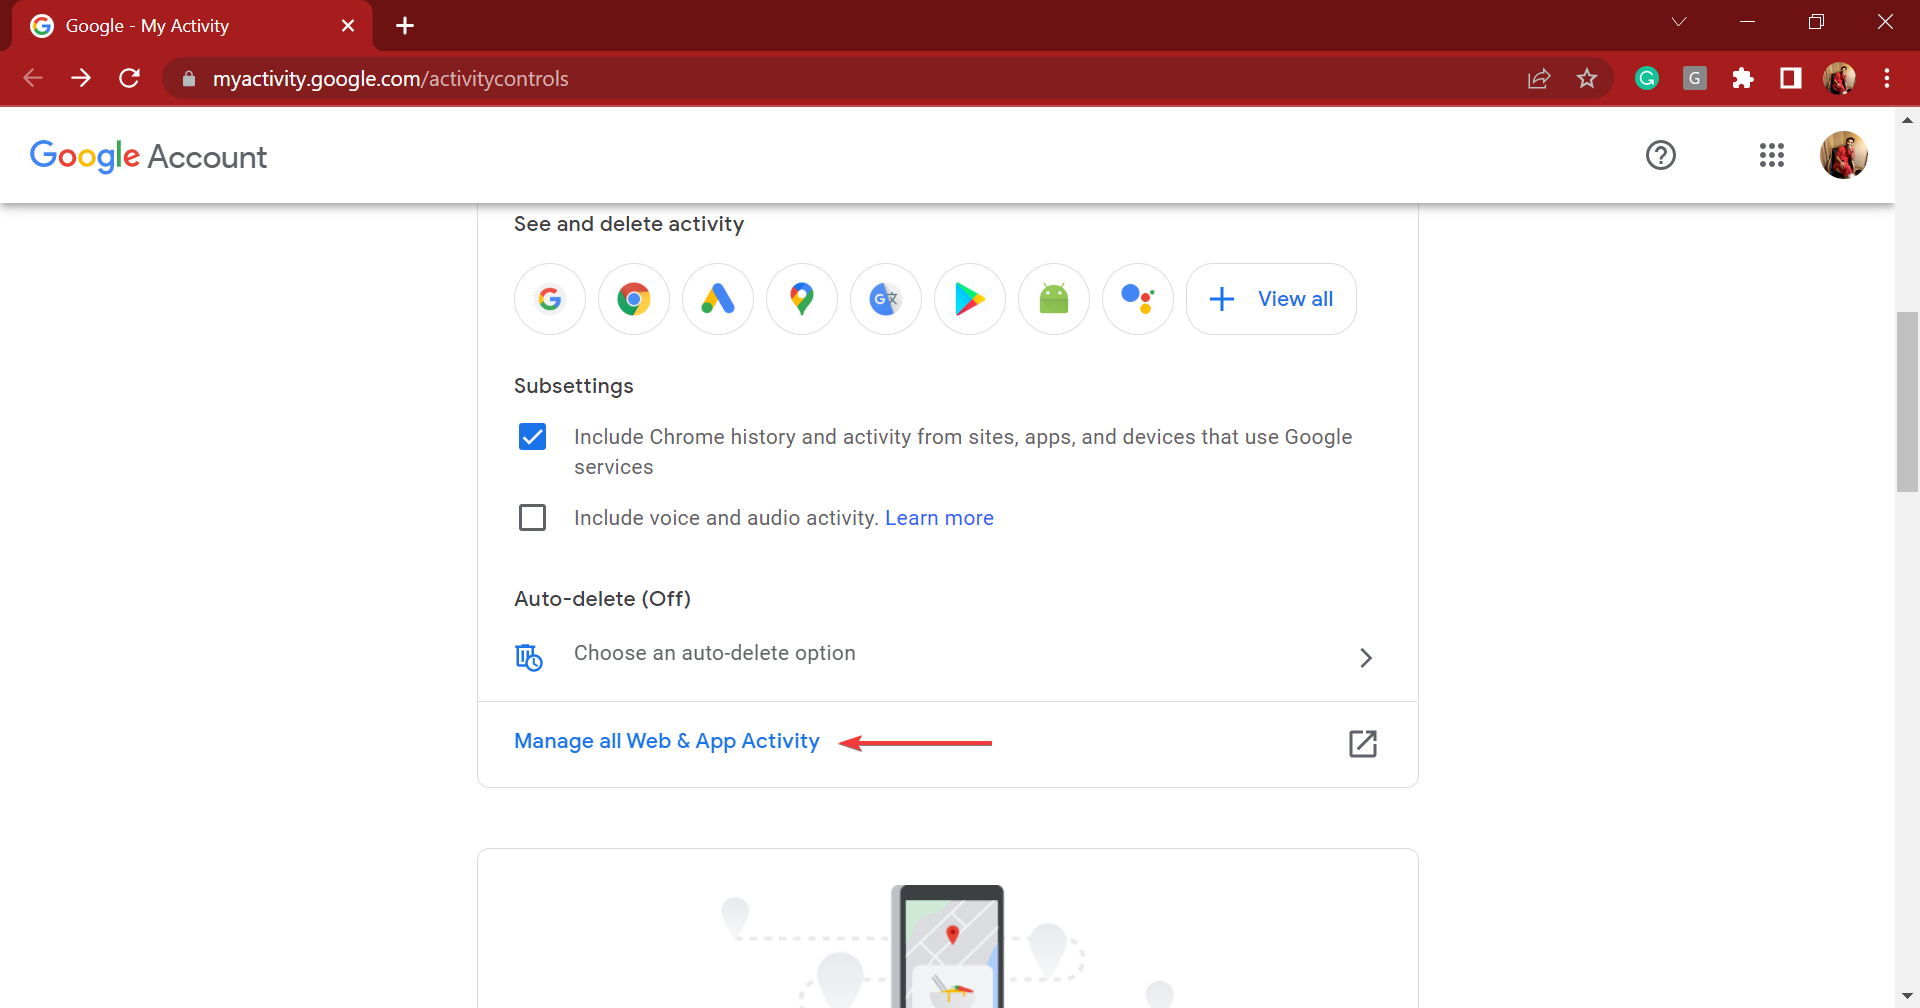
  1. Launch any reliable and safe browser, go to the Activity controls section in your Google account, and click on Manage all Web and App Activity.Manage all web and App activity to fix google not deleting search history
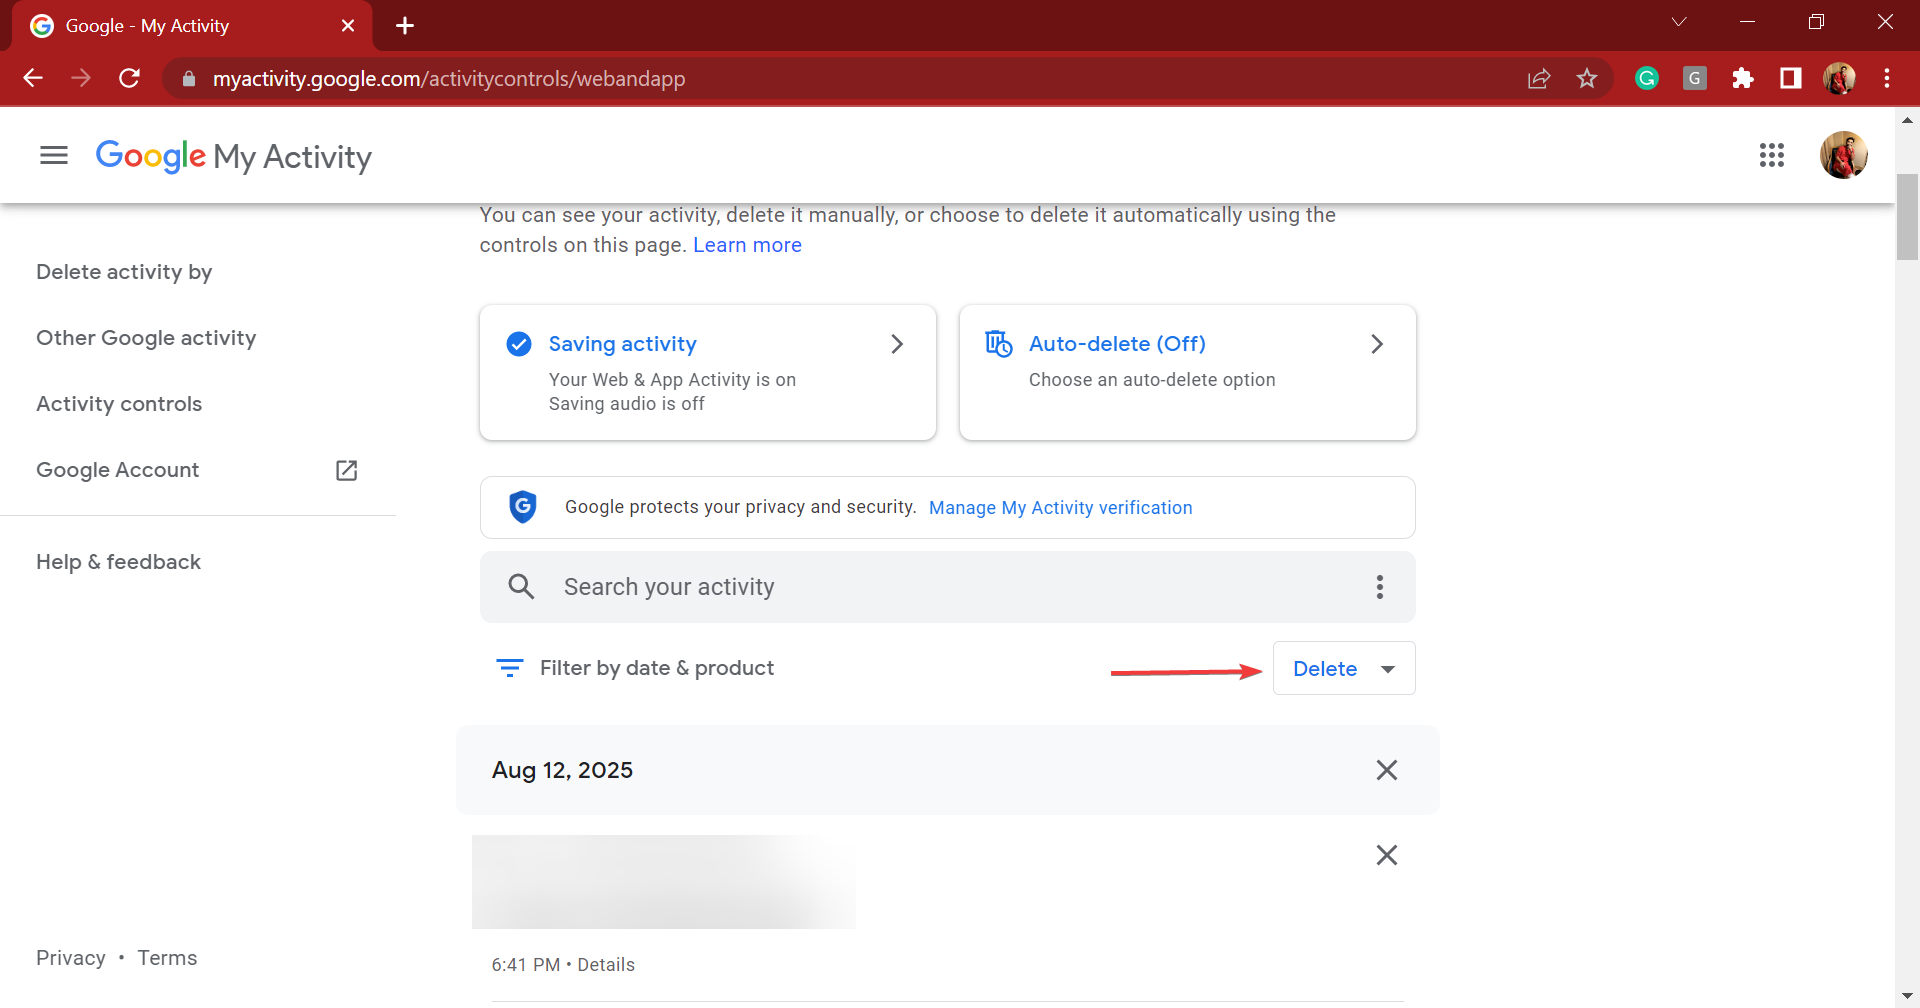
  2. Now, click on the Delete button under Search your activity.Delete
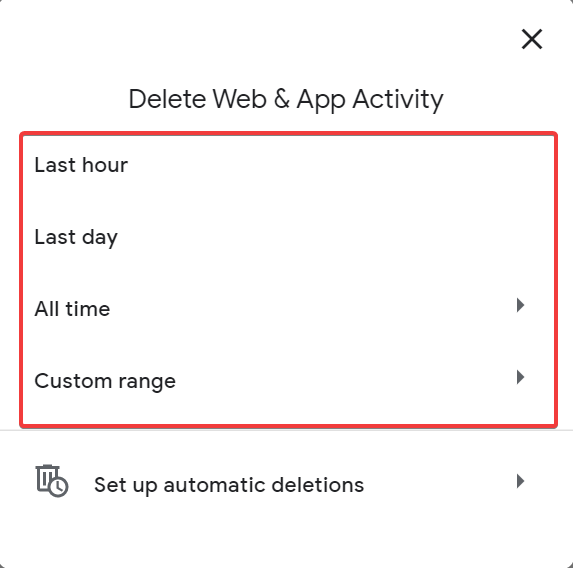
  3. Finally, select the time range for which you want to delete the Google search history on the computer.time range
  4. The data that falls under the selected time range will be deleted automatically.

This will delete the search history for all Google products, such as Chrome, Gmail, Maps, News, and Translate. If you want to delete a specific one or a few, add them to the filter and proceed with the deletion. And if you find Samsung One UI Home in Google Activity, it’s not something to be concerned about!

Remember, deleting the search history does not necessarily mean it will be removed from Google’s servers immediately. However, it will not be used for showing personalized ads anymore.

What do I do if Google is not deleting the search history?

1. Try again in some time

If you regularly clear the Google search history and face the problem for the first time, it could be a temporary issue with the server. Or you could be having trouble with the Internet connection. Try restarting the computer and the modem/router.

No matter the underlying cause, it’s always better to wait for some time in these cases and then try again. If Google is still not deleting the search history, head to the following method.

2. Re-login to your Google account

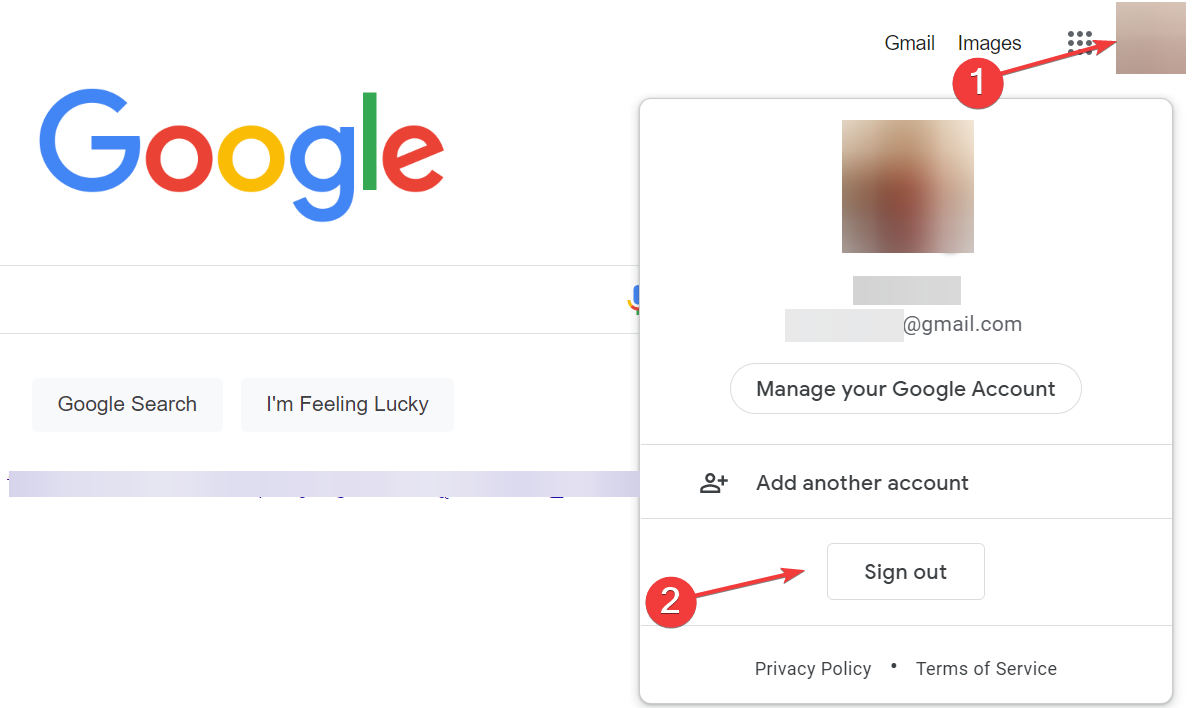
  1. Go to Google, click on your profile picture (or the alphabet in case you haven’t added a picture), and select Sign out from the menu.Sign out to fix google not deleting search history
  2. Next, click on the Sign in button near the top-right corner.Sign in
  3. Now, enter your Google account details to log in.

In some cases, logging out and then signing in back to the Google account helped fix the problem. This is generally due to a trivial bug that crept in, which a re-login would easily eliminate.

Once done, the Google not deleting search history problem should be fixed.

3. Use a dedicated VPN

If both methods have not worked, you should use a dedicated and reliable VPN. This is because the problem most likely lies with the connection settings, and using an effective VPN would eliminate that.

Apart from that, VPNs offer many other advantages, the most important being their ability to mask the user’s identity. Also, these can help you bypass geo-blocking by connecting to a server in another country.

If you require industry-standard VPN security to resolve this browser safety matter, it’s advised to pick reliable and fast software like Private Internet Access.

This VPN tool delivers super-fast servers spread to thousands of regions with advanced tools like split tunneling or censorship blocking for unlimited content in restricted countries.

⇒ Get Private Internet Access

How do I set the Google search history to delete automatically?

  1. Go to the Activity controls section in your Google account, and click on Choose an auto-delete option under Web & App Activity.Choose an auto-delete option
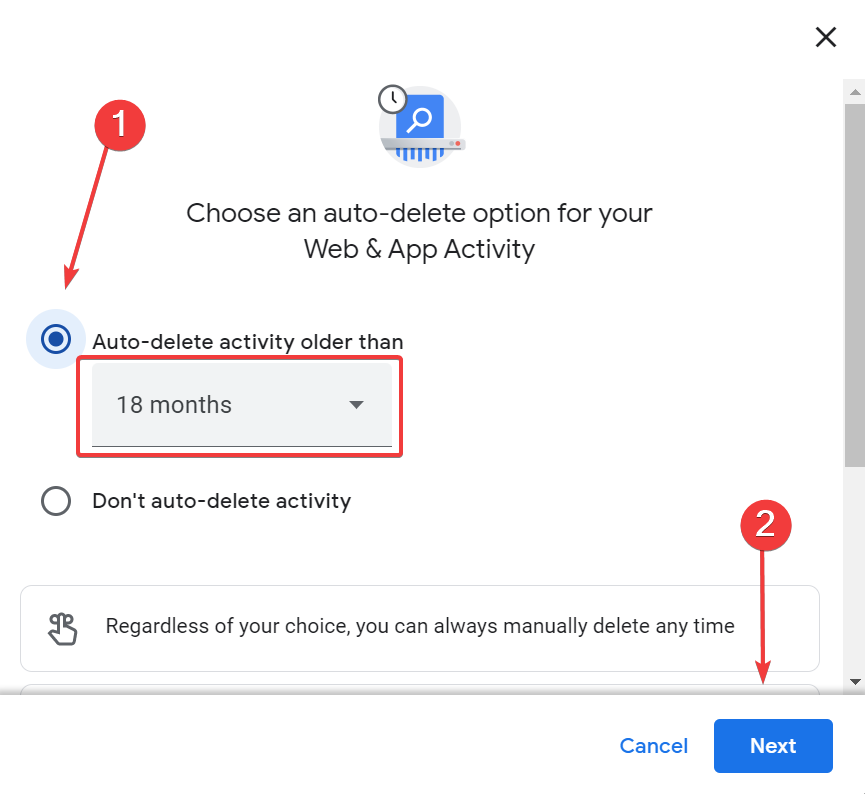
  2. Select the Auto-delete activity older than option, choose the desired duration from the dropdown menu, and then click on Next at the bottom.Next to fix google not deleting search history
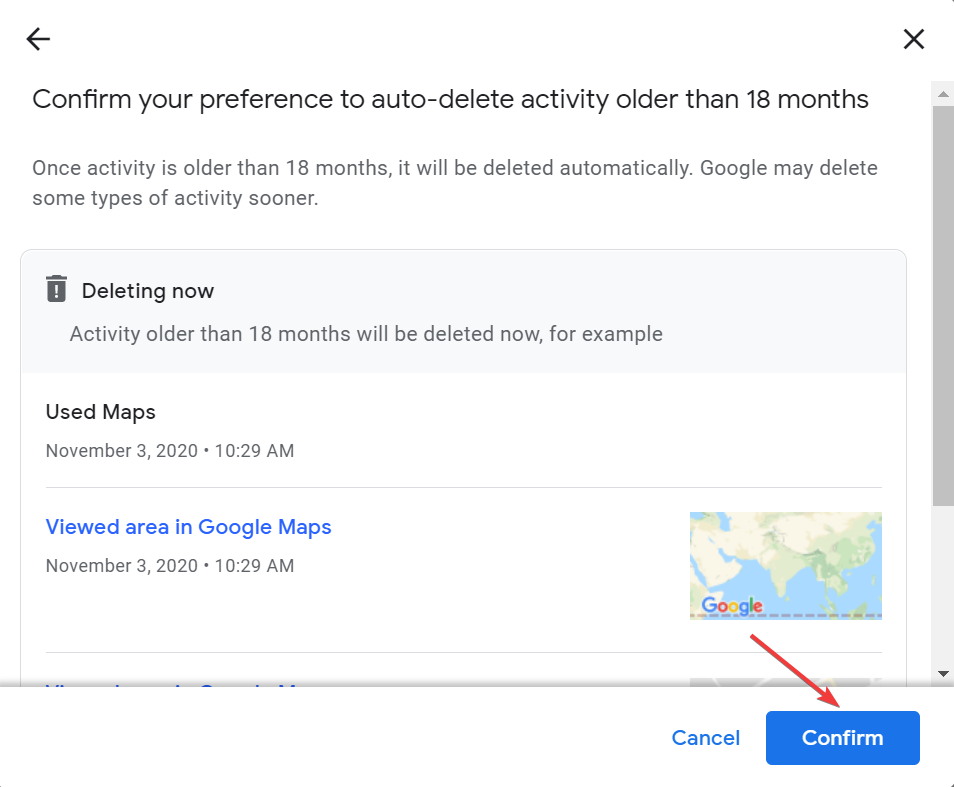
  3. Now, click on Confirm to save the changes. Also, the saved activities older than the selected duration will be deleted right now.Confirm

From now on, Google will automatically delete the search history, and you won’t have to worry about it. However, you can still manually delete it anytime you want.

The methods listed here, though illustrated for a Windows PC, work on every device and can fix Google not deleting search history on Android or iPhone as well. To delete Bing’s search history, refer to our expert article.

Also, find out what to do if you find unknown searches in Google search history since it could indicate an account breach.

Tell us which fix worked and your thoughts on Google search history in the comments section below.

Play Session: Skate Sim and 2 other games free this weekend with Xbox Free Play Days

Three more games will be playable for Xbox Game Pass and Xbox Live Gold subscribers free of charge this weekend with Xbox Free Play Days.

Perhaps the most notable entry for this week’s Free Play Days lineup is Session: Skate Sim (Game Preview). With tweaked visuals and an overhauled physics system, this is the most realistic iteration of the game yet. It features a unique control scheme in which the dual thumbsticks represent the in-game characters feet, and is inspired by 1990’s golden age street skating culture.

Another game that is largely centered around its in-game physics is Moving Out. The game also has a rather unique premise: players take the helm of a startup moving company named “Smooth Moves.” You’ll take on a variety of increasingly challenging moving jobs throughout the town of Packmore in this quirky game that features up to four player co-op multiplayer.

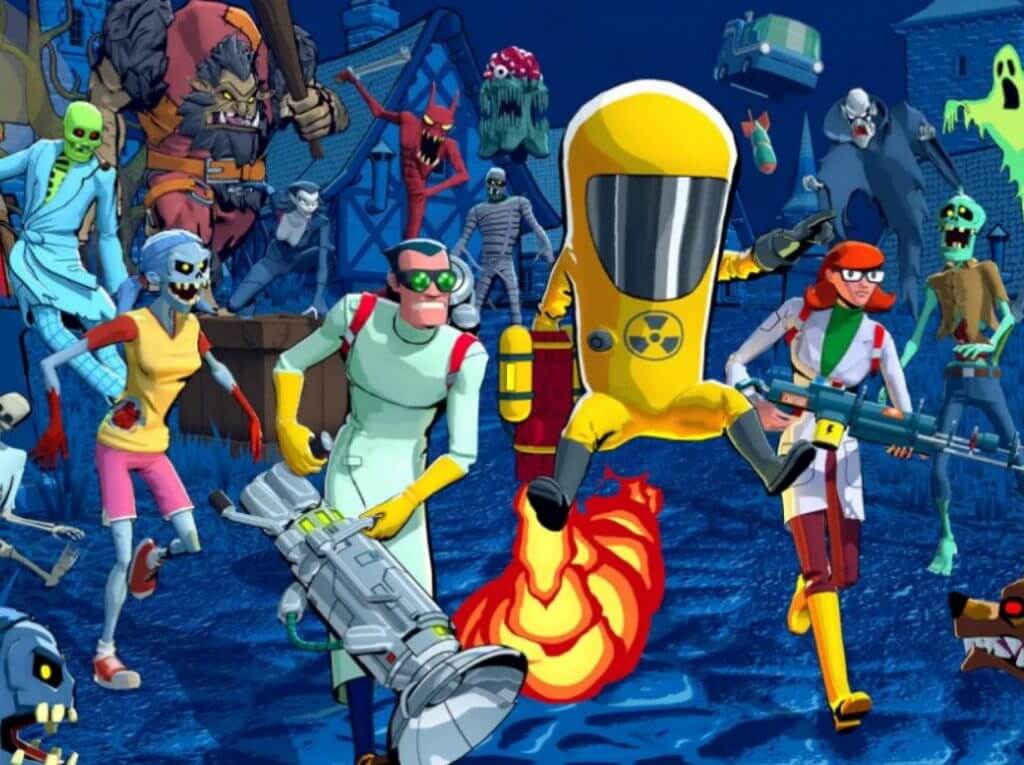
Lastly for this week’s Free Play Days games we have Embr, in which players take on the role of a firefighter for hire. Players can play alone or with up to three friends in multiplayer co-op, throughout 25 hazard-filled levels in three districts. As you fight fires and save lives (and perhaps “collect” a few loose valuables in the process) you will rack up ratings based on your performance, hopefully leading to jobs from wealthier clientele. And there is an array of tools, vehicles and outfits to obtain that will help you get the job done in all-new ways.

Xbox Free Play Days is another perk of having a subscription to Xbox Game Pass or Xbox Live Gold. A new lineup of free-to-play games is introduced each week. It is a great way to try something new and maybe even find your new favorite. You can learn more about Xbox Free Play Days here.


Microsoft Edge version 101 now in Stable channel with PWA, profile improvements

Microsoft Edge version 101 is now rolling out to the stable channel. The release is still a fairly minor one, but it adds two new features relating to Progressive Web Apps, as well as browser profiles. Here’s a look at what you need to know.

First up, there are some improvements to the Progressive Web Apps launch experience. You’ll now be able to launch these from the favorites bar via an Apps icon. In addition, there are changes to the ability to set the default profile. Microsoft says that a new EdgeDefaultProfileEnabled policy will let you set a default profile to use when opening the browser instead of the last profile that was used. Other new features are below.

  • Client Certificate Switcher: This feature will offer a way for users to clear the remembered certificate and resurface the certificate picker when visiting a site that requires HTTP certificate authentication. This can be done without manually quitting Microsoft Edge.
  • Manage the “Allow extensions from other stores” setting. Now you can use the ControlDefaultStateOfAllowExtensionFromOtherStoresSettingEnabled policy to set the default state of the “Allow extensions from other stores” setting.
  • Improvements to the Enterprise Site List Manager. Now you can configure shared cookies between Microsoft Edge and Internet Explorer on your enterprise site list. You can access the Enterprise Site List Manager at edge://compat/SiteListManager.

As usual, the release brings some depreciated and new policies. We invite you to check out Microsoft’s changelog for more on these. We also remind you that updating Edge to version 101 will patch some security issues. There are two CVEs related to Edge that Microsoft has listed. Check it out here.

Microsoft Edge should auto-update to the latest version, but if it does not, you can trigger it manually. Just head to the browser’s menu, choose Help and Feedback then About Microsoft Edge and wait for the update to download and then restart.

Pi Browser Not Opening: Why It Happens & Fix

Is Pi Browser not opening and showing errors like Invalid Code. Go back to the Pi Network App and tap the “Open Pi Browser” button again? Follow the guidelines below to fix it quickly

What can I do if Pi Browser is not working?

1. Sign in and open with Chrome

  1. Open the Pi Network mobile app.
  2. Tap on the three lines in the top left corner then select Pi Browser. open Pi Browser.
  3. Tap Sign in to Pi Browser. Tap sign in to Pi Browser.
  4. In the Open with pop-up, select Chrome.

For this solution, you need to have the Pi Network app and Chrome installed on your device. Users reported that when they sign in to Pi Browser through Google Chrome, the issue is solved and they can open Pi Browser without getting stuck on the welcome screen.

2. Check for updates

  1. Open the Google Play Store or Apple Store for iOS.
  2. Tap on your profile and select Manage apps & device. in your profile select manage apps and device.
  3. Under Updates available, tap See details to check if there is an update for Pi Browser. Under Updates select see details.
  4. Update Pi Browser if available.

Usually, when an application on your device is bugging out or has issues, it may be an indication that it needs to be updated. Check your app store regularly to keep your apps up to date and prevent issues.

3. Set Google Chrome as the default browser

  1. Open Settings on your mobile device.
  2. Scroll down and open Apps. In Settings click on Apps.
  3. Select Default apps.
  4. Tap on Browser app and change it to Chrome. Set Chrome as the default browser app.

For some reason, when Chrome is set as the default browser, Pi Browser will open and operate seamlessly. Try setting Google Chrome as the default and check if that solves the issue.

4. Force stop Pi Browser

  1. Open Settings on your mobile device.
  2. Scroll down and open Apps.
  3. Tap App management and search for Pi Browser. Search for Pi Browser.
  4. Select Force stop. Tap Force stop.
  5. Tap Force stop again. Select force stop again.

If you were receiving an error message in Pi Browser or it stopped responding, force-stopping the app may do the trick.

5. Clear cache and data

  1. Open Settings on your mobile device.
  2. Scroll down and open Apps.
  3. Tap App management. Open App management.
  4. Search for Pi Browser and select it.
  5. Tap Storage usage. Open storage usage.
  6. Select Clear data then Clear cache. Tap Clear data and then clear cache.

This will reset the app and remove any potential bugs or malware that could be causing Pi Browser to not work. Try opening the browser again after clearing the data and cache.

6. Try a different browser

Use a different browser

One of the biggest appeals of Pi Browser is that it offers access to dApps and has an integrated crypto wallet. For a great browser with all these features and more, try Opera Browser.

This browser is the world’s first Web3 browser and has a native non-custodial crypto wallet.

Opera Browser is available for download on your PC and has a mobile app to pair with it. With Sync, users can synchronize the Opera on their desktop to the one on their mobile device for seamless Web3 browsing.

Opera

Opera

Get the best of the web with Opera’s fast & secure browsing!
Free Download

Let us know in the comments which solution worked for you. If there is a solution that worked that is not listed above, also let us know.

8 Solutions to Solve Huion Pen Pressure Not Working

The Huion tablet, paired with the best painting software for Huion, can take your drawing skills to a new level. Creatives have increasingly grown accustomed to this top-notch tab, as it allows them to recreate their vision and imagination perfectly.

However, users are starting to complain that the Huion pen pressure is not working. The reasons range from broken or faulty drivers to activating wrong settings and some unknown causes.

Irrespective of the cause, this encompassing guide contains fixes that will get your Huion pen pressure working again in Photoshop, Windows, and Mac. Read on to find out more!

Why is pen pressure not working on Huion H420/H640P/GT 191?

This issue can occur if your tablet isn’t configured correctly, so you’ll have to open its configuration software and make a few changes to fix it.

Users reported issues in Photoshop, but the problem doesn’t appear in other software, so you might consider using it instead.

Outdated drivers are the common cause of various problems, and users reported pen pressure issues on the Kamvas Pro 16 and Kamvas 13 models. It’s also the reason XP Pen is detected as a keyboard.

Luckily, this can be easily fixed, and our guide will help.

What can I do if Huion pen pressure is not working in Photoshop?

1. Enable Windows Ink

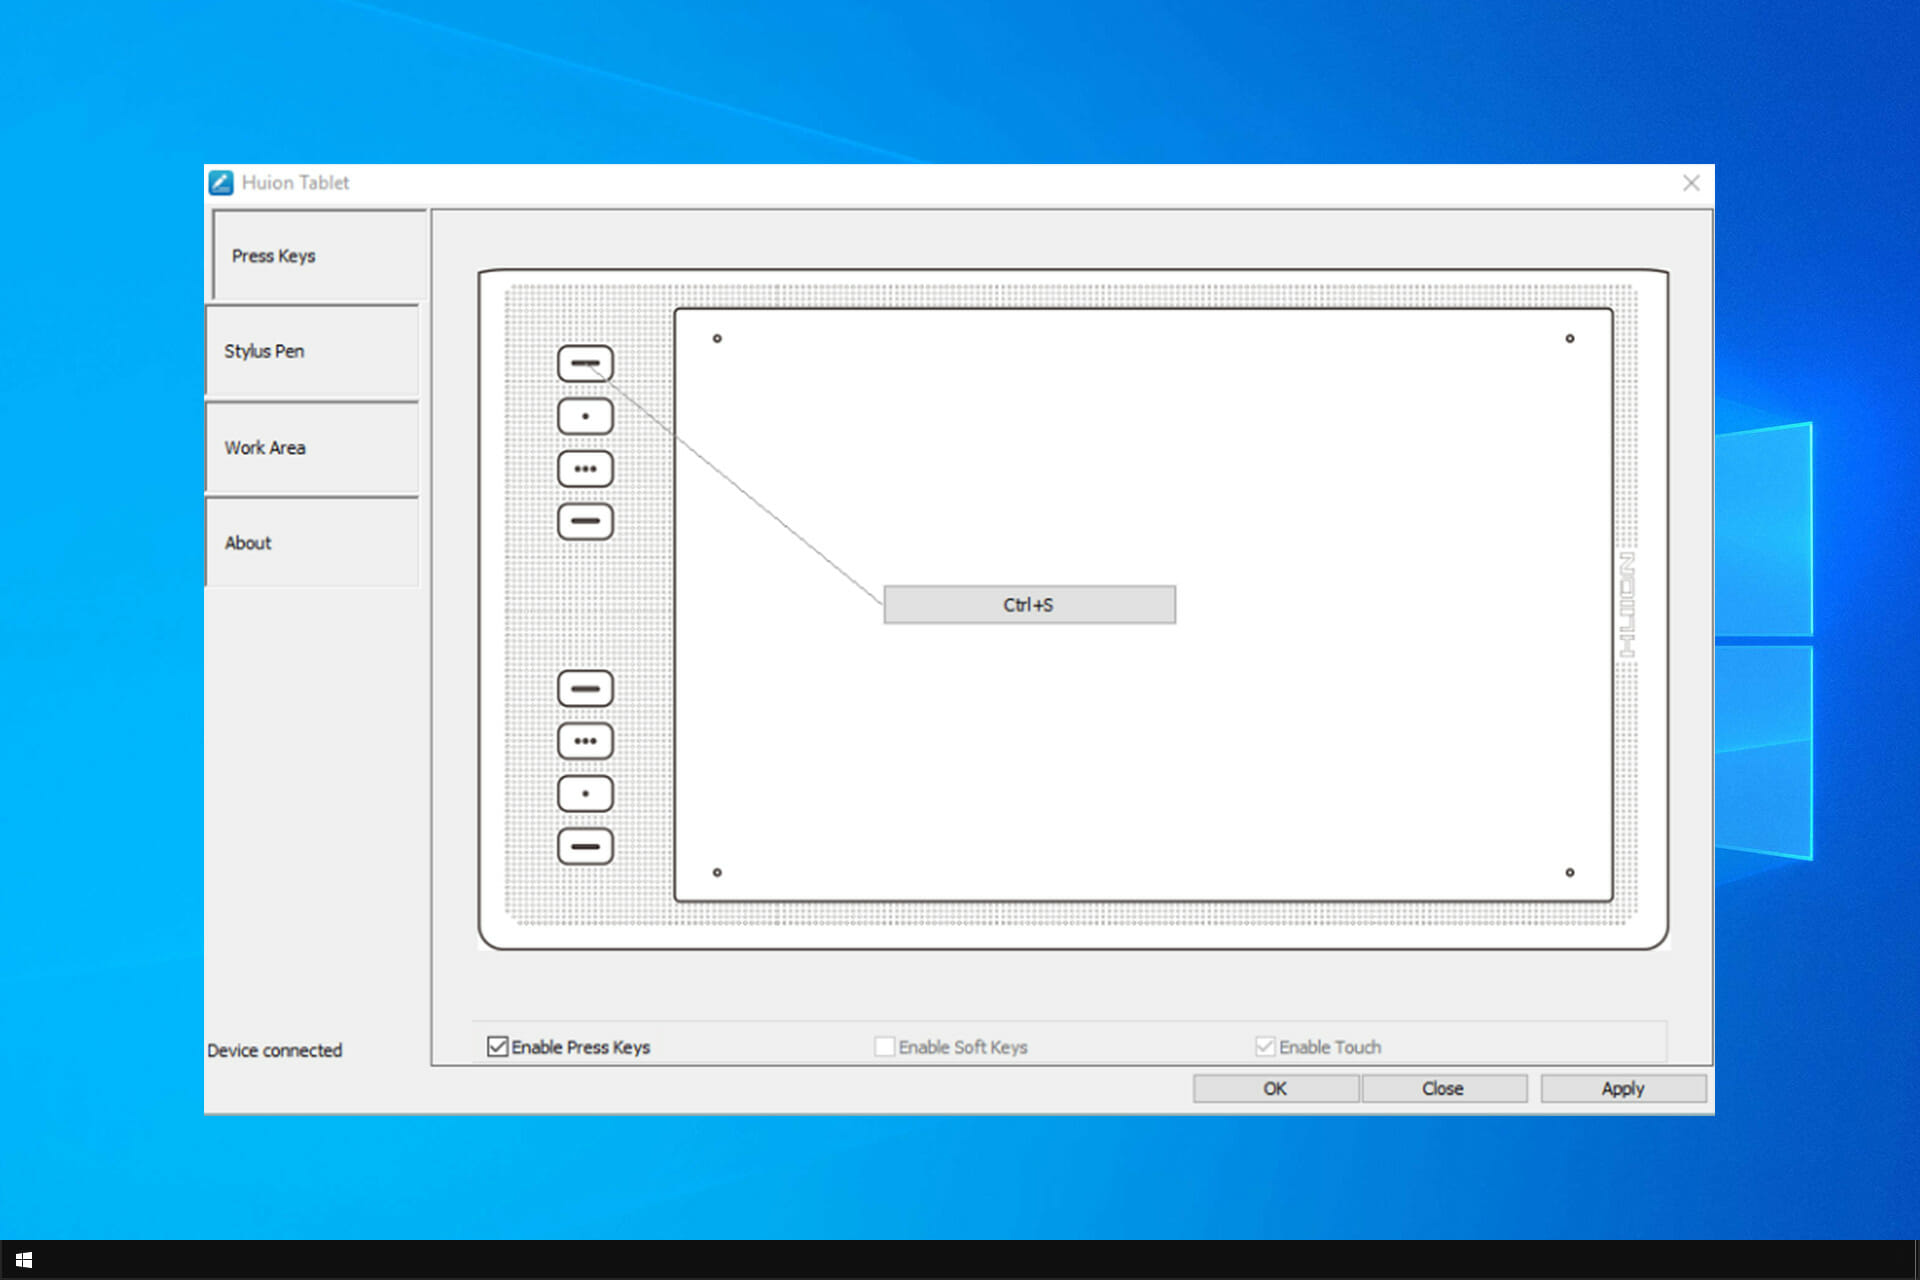
  1. Launch the Huion tablet interface on your PC and click the Stylus Pen tab on the left pane.
  2. Check the Enable Windows Ink checkbox.
  3. Finally, click Apply followed by the OK button, to save the changes.

In previous Photoshop, like the 2018 versions and below, disabling the Windows Ink feature helps to solve brush lags and other issues. The only tradeoff is the unavailability of some drawing tools.

However, in the latest versions from 2020 and above, you need to enable the Windows Ink feature to have any chance of using the Huion tablet pen pressure.

Lastly, if you created a PSUserConfig.txt in the past to force Photoshop to use WinTab instead of Windows, you need to delete that text file to solve the Huion pen pressure not working problem. Remember, these are universal solutions that also work when XP-PEN pressure is not working in Photoshop.

2. Use another compatible software

If you still can’t get Huion pen pressure to work after trying the fix above, you should try another creative software in Clip Studio Paint for a change.

Clip Studio Paint is a stunning software specifically designed for drawing and painting. It boasts a natural brush feel well beyond anything you have ever experienced on other graphics software.

The powerful brush engine allows you to recreate your vision stroke after stroke as you imagined. What’s more, it has a free trial period that will enable you to glimpse what you will be getting before deciding.

However, to use it with a Huion tablet, you must upgrade to the Pro version. But with the ability to detect even up to 8192 pen pressure levels, you are sure that you will never experience the Huion pen pressure not working again.

How can I fix the pen pressure not working on Windows PC?

1. Update driver

Update manually

  1. Go to the Huion website and enter your tablet model in the search box.huion driver download
  2. Select Windows as the OS and Driver as the Category.
  3. Click the Submit button and wait for the page to load.download driver
  4. Scroll down on the new page and click the download option before the available update.
  5. Now, go to the Downloads folder and extract the contents of the downloaded zip file.driver extract
  6. Open the folder you just extracted and double-click the Application file to open it.application huion pen pressure not working
  7. From here, follow the simple on-screen instructions to complete the update.

It is important that you download the exact driver update for your Huion tablet model and your computer. Else, the driver will not work.

Restart your computer after the update to effect the changes. You can also check this guide for other ways to manually update your Huion tablet driver.

Update automatically

Instead of taking the risk of installing the wrong drivers and spending lots of time doing so, you can download and install the Huion drivers automatically with a specialized driver updating tool.

Whether it is repairing broken drivers, downloading missing ones, or updating drivers, these tools do it all with aplomb. What’s more, they don’t just recommend any driver for you.

Instead, they give you a list of original and compatible drivers from trusted manufacturers worldwide.

2. Disable Sleep mode

  1. Press the Windows key + I to open the Settings app.system pen pressure not working
  2. Select the System option.
  3. Click on the Power and sleep option on the left pane.power and sleep
  4. Select the Additional power settings option under the Related settings section.change plan settings
  5. Click the Change plan settings option at the front of your preferred power plan.
  6. Click on the dropdown button in front of the Put the computer to sleep option and select Never.never sleep huion pen pressure not working
  7. Finally, click the Save changes button to effect the changes.

3. Uninstall and reinstall drivers

  1. Press the Windows key and type control panel. Select Control Panel.
  2. Click the Programs option followed by Programs and Features.program and features
  3. Select any Huion tablet-associated file and right-click on it.uninstall driver
  4. Select the Uninstall option. Do this for all other Huion tablet files.

The Huion pen pressure not working problem might be due to a faulty driver. The only solution here is to uninstall the driver and reinstall it.

After you completely remove the driver, you can reinstall it with the disk that came with your tablet or follow the steps in Solution 1 above to reinstall it manually.

How can I fix pen pressure not working on Mac?

1. Restart the computer

Sometimes, the simple fix is the best one. If Huion pen pressure is not working on Mac, you should restart your PC and relaunch the tablet interface.

This fix can be especially useful if your tablet driver has problems, stopping it from working well. If this does not work, you can proceed to the next fix.

2. Unplug and plug the tablet

Establishing the right connection between Mac and your Huion tablet is important to the pen pressure working properly. Sometimes, it might be that the USB port you connected the tablet to is faulty.

Hence, you should try disconnecting it from the present USB port and connecting it to another port. This has proven to solve the problem many times.

3. Give everyone read/write access to the tablet driver directory

  1. Locate the tablet driver folder.
  2. Right-click it and select Get info.
  3. Go to Sharing & permissions and click the lock icon.
  4. Enter your password if needed.
  5. Set Privlege to Read & write and save changes.

The Huion pen pressure not working can be frustrating as you might not know the cause. Thankfully, it is not the most difficult problem to solve, as shown by our numerous fixes.

What are other issues that can occur with Huion tablets?

Pen pressure issues will make your tablet almost unusable, and users also reported the following issues:

  • Huion pen pressure too sensitive: This can be caused by a bad driver or your configuration settings.
  • Huion pen pressure not working: If your pen isn’t working, the tablet will be almost useless. If that happens, we suggest you check your device for hardware damage.
  • Huion tablet not working on Windows 10: In a worst-case scenario, your tablet might not work at all. If this happens, check if everything is connected correctly and update all your drivers.

It is important to note that some of the fixes for Windows, such as driver updates, can work on Mac and vice versa.

Also, this type of issue affects other brands besides Huion tablets, and we have covered one of them in our Wacom error: no device detected article.

Wintab32.dll error can often cause issues with your tablet, but we have a guide that addresses it, so don’t miss it.

We hope this guide helps you get back to your creative best soon. In the comment section below, discuss the fixes that helped you solve the problem.

HP Recovery Manager not working on Windows 10/11 [Fixed]

HP Recovery Manager is preinstalled on computers purchased from an HP authorized reseller. It is a program designed to help you recover your computer system in the event of a failure or disaster. 

If your PC has a hard drive failure, you can perform a system recovery using the recovery media instead of an external hard drive/flash drive or DVD disc.

At times, the HP Recovery Manager may fail to start due to some technical problems. It could be outdated software or it’s simply corrupted.

In such cases, you can either download the latest software update or uninstall and reinstall the program and see if the problem persists.

What can I do if my HP Recovery Manager is not working?

Download HP firmware updates

  1. Navigate to your browser and go to the HP official site to download HP updates.
  2. Click Start Download in the dialog box that pops up.

Is HP Recovery Manager a reliable recovery tool?

HP Recovery Manager is part of the software that comes with your computer when you purchase it. It allows you to reinstall and recover the system in case of errors or problems with the operating system.

There are many recovery tools available in the market. The HP recovery tool is one of them. Whereas it is useful in restoring your PC’s software and programs, there are times when it may fail and stop working.

If you are thinking of using HP Recovery Manager to recover your files, you might want to consider using some of the best third-party recovery software designed for that.

We hope this short guide was everything you were looking for when you were faced with this problem. Remember to back up all your files before attempting any recovery as you may lose important files in the process.

If you tried out another solution that worked for you, we’d love to hear it. Share with us in the comment section below.

2 Simple Ways to View Google Docs Anonymously

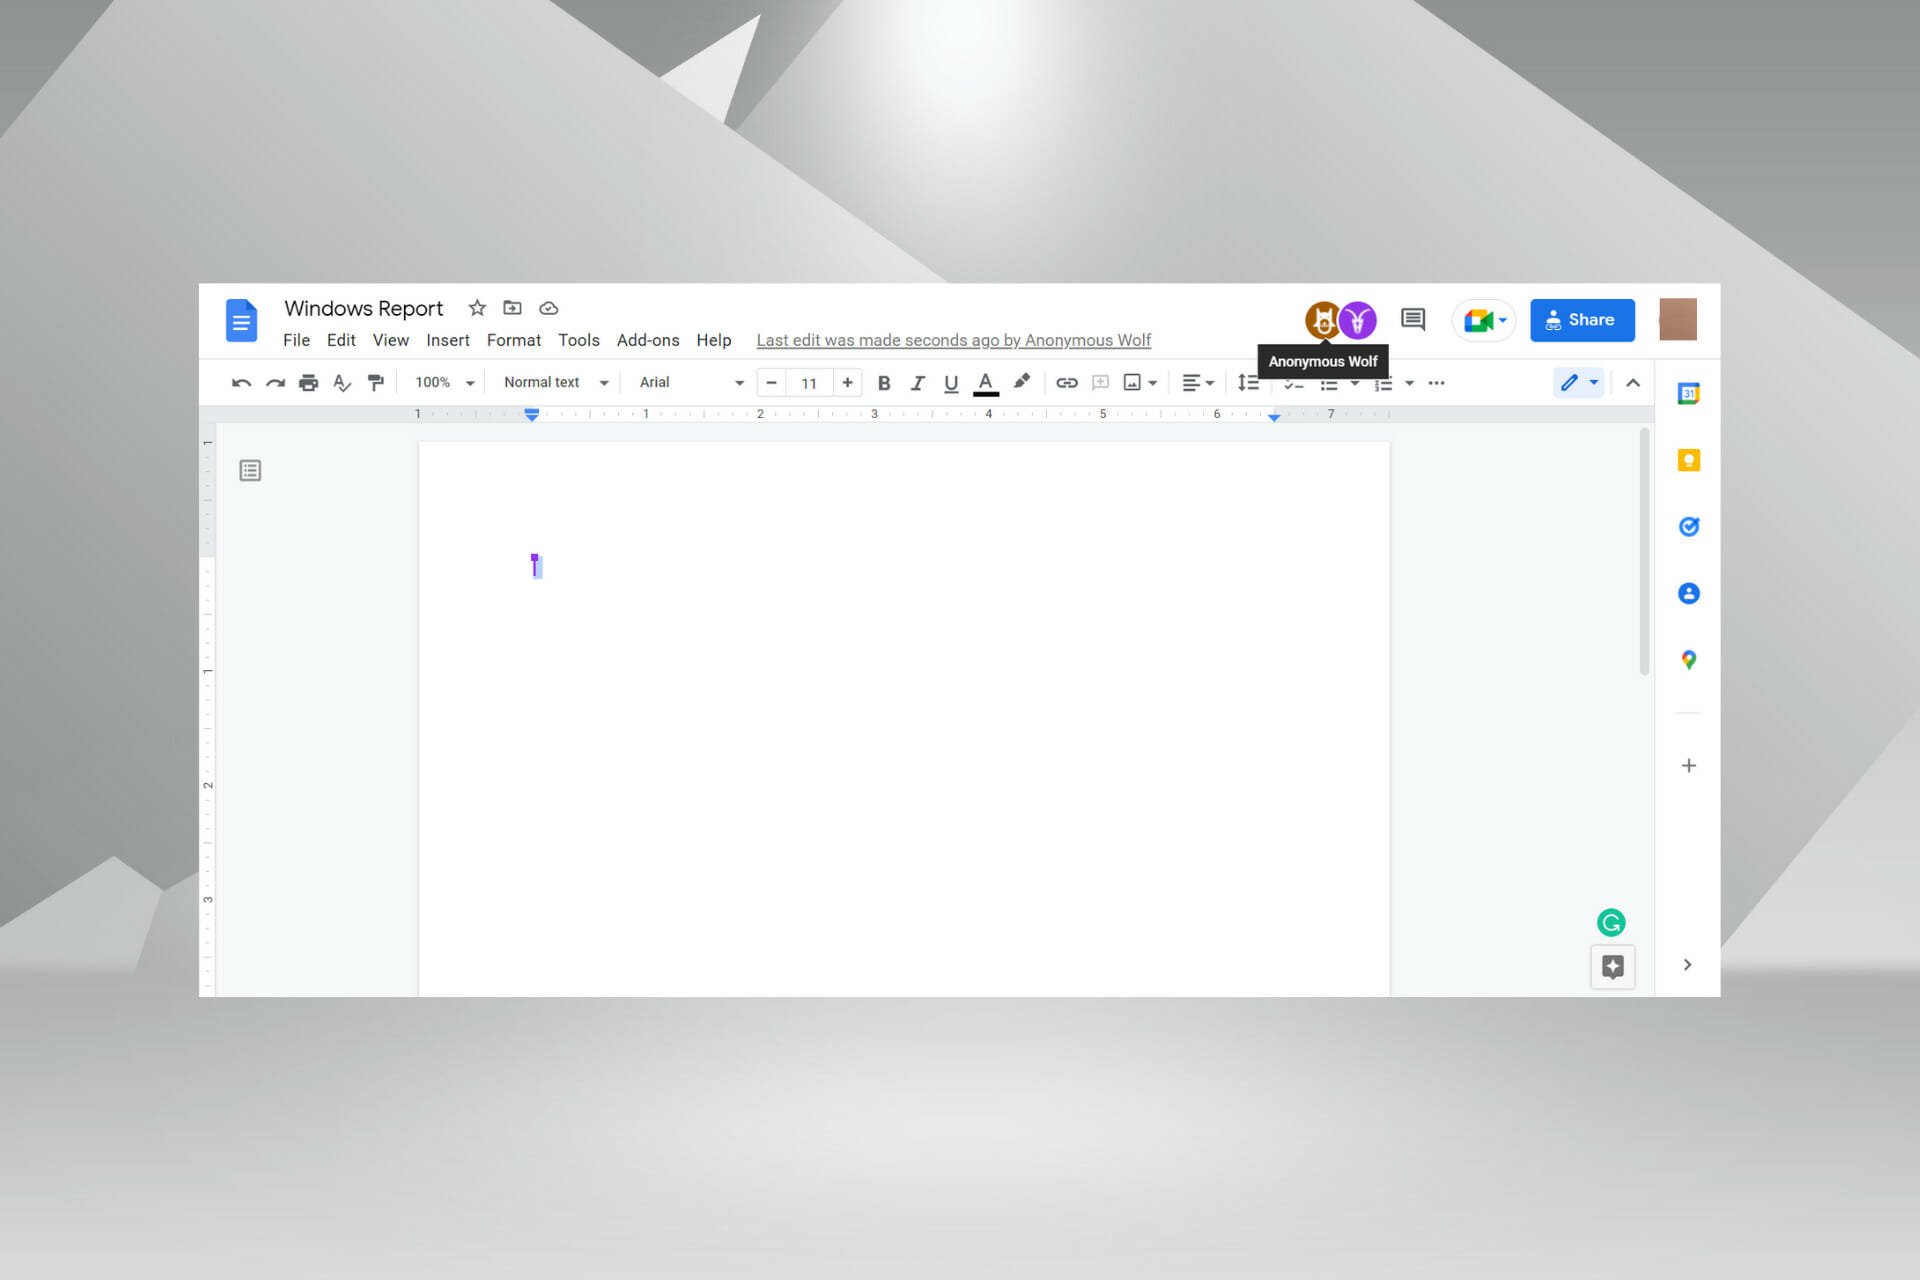
Google lists the profiles of all the users currently viewing a document in the top-right corner. You may have encountered users with random names if you work regularly on shared Google Docs. This happens when others anonymously view Google Docs on a browser.

In this case, instead of showing their Google account name, Docs refers to these users as Anonymous animals. For instance, the user views the document anonymously if you see someone named Anonymous Wolf, Anonymous Iguana, or Anonymous Ibex.

Once you know there’s an option, curiosity arises about how to view Google Docs anonymously. To find out, read the next section.

How do I view Google Docs anonymously?

1. Sign out of the Google Account

  1. Sign out of your Google account.
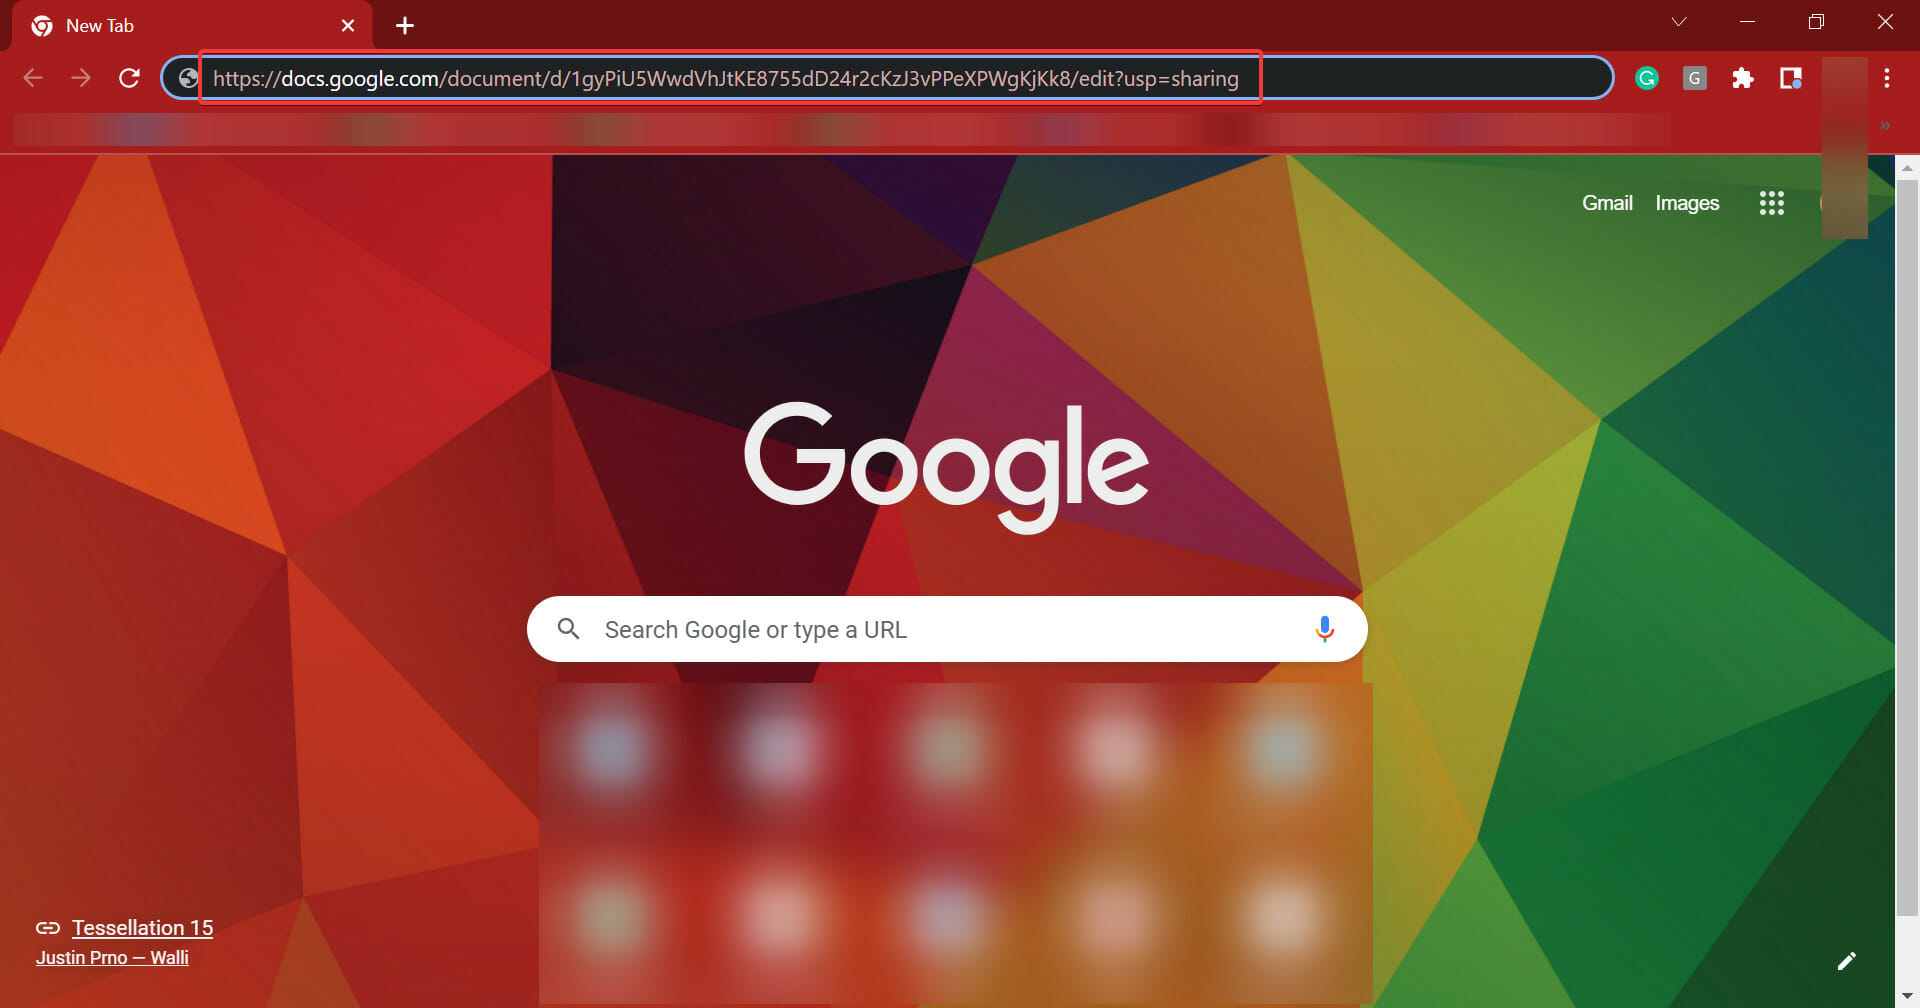
  2. Now, paste the Google Docs link you want to view anonymously in the address bar and hit Enter.how to view a google doc anonymously

Your real account name would not appear to other users while viewing the document now.

However, all else remains the same. Whether you can edit or leave comments depends on the permissions provided by the user who created the document and won’t be affected by going anonymous.

This method is suitable for those who occasionally view a Google Doc anonymously and don’t mind signing out of their account for a while.

2. Use Incognito mode

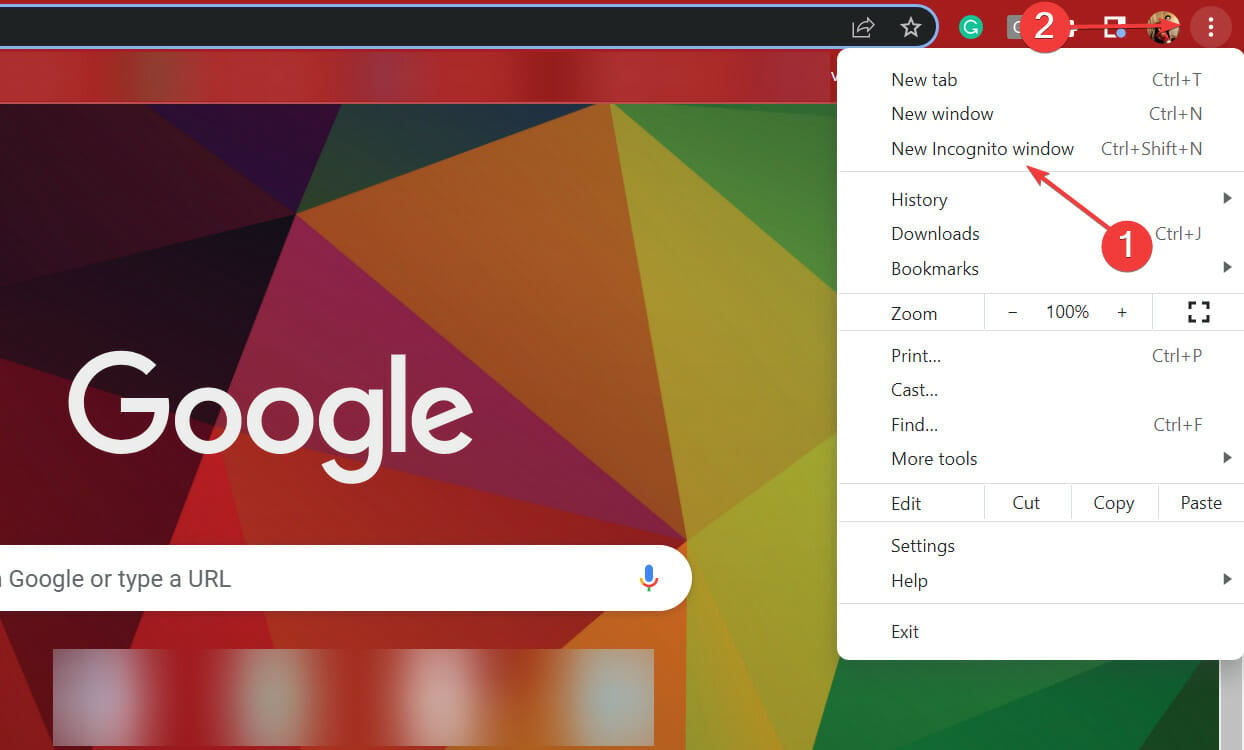
  1. If you are using Chrome, click on the ellipsis near the top-right corner and select the New Incognito window from the flyout menu. Alternatively, you can press Ctrl + Shift + Esc to launch the Incognito mode.Incognito mode
  2. Once done, paste the link for the Google Docs in the address bar and hit Enter.

You would appear anonymous since the incognito mode is isolated and doesn’t rely on stored cookies. This may also help if the Google Docs site refuses to connect when logged in.

You can also use similar modes in other browsers to view Google Docs anonymously, for instance, Private mode in Firefox or InPrivate browsing in Edge.

This method works better for users who prefer viewing Google Docs anonymously since they don’t have to regularly sign in and sign out of their account, thus saving some time.

Why don’t I appear anonymous in Google Docs?

Remember, you will appear anonymous only when accessing the Google Docs through a link and not if the document has been individually shared with you. So, the sharing settings should be configured such that anyone with the link can view/edit the document.

In case someone has individually provided permission to view/edit the Google Docs, your Google account name would appear even if you use Incognito or Private mode.

Also, you will be asked to sign in to your Google account to access the document, so the first method listed earlier won’t work either.

Why do I need to view Google Docs anonymously?

Everyone has reasons for it, but it’s generally to mask the identity. If you are viewing a document shared by a bunch of people and don’t want others to find out when you are viewing it, go anonymous.

For instance, class notes that teachers share with students or, in some cases, official documents.

Whether to go anonymous or normally view a document depends solely on your requirements and the situation.

Speaking of choices, you can also enable or disable Strikethrough on a document on Google Docs. You can also hide comments in Google Docs for a distraction-free reading experience.

Also, find out how to create awesome and fancy borders in Google Docs since there are no direct methods, and you must resort to workarounds. And if you want, you can even learn how to hide comments in Google Docs.

Aside from all the col stuff you can do on Google Docs, compare it with Microsoft Word and see which one you prefer.

If you have any queries, drop a comment in the section below.

FIX: VirtualBoxVM.exe application error on Windows 10/11

VirtualBox has been a user’s favorite virtualization software since its release in 2007.
It lets you run multiple operating systems on the same computer, being compatible with all major platforms including Windows, Mac OS, Oracle Solaris, and Linux.

It’s a good solution to test out operating systems and new software and it is a good option in terms of backing up your data as well.

VirtualBox is all in all a great virtual machine software, but unfortunately, many users reported VirtualBoxVM.exe errors while using it.

This problem will prevent you completely from running a virtual machine on your PC, but there are ways to fix it.

Here’s how one user described the problem on the Spiceworks forum:

In intervals last from less than a minute to over an hour, VirtualBox throws this error and the VM freezes.

VirtualBox.exe – Application Error

The instruction at 0x00007FFA94CC6733 referenced memory at 0X0000000000000018. The memory could not be read[…].

How do I fix VirtualBox.exe application error?

1. Uninstall and reinstall VirtualBox

  1. Go to your Start menu and open Control Panel.
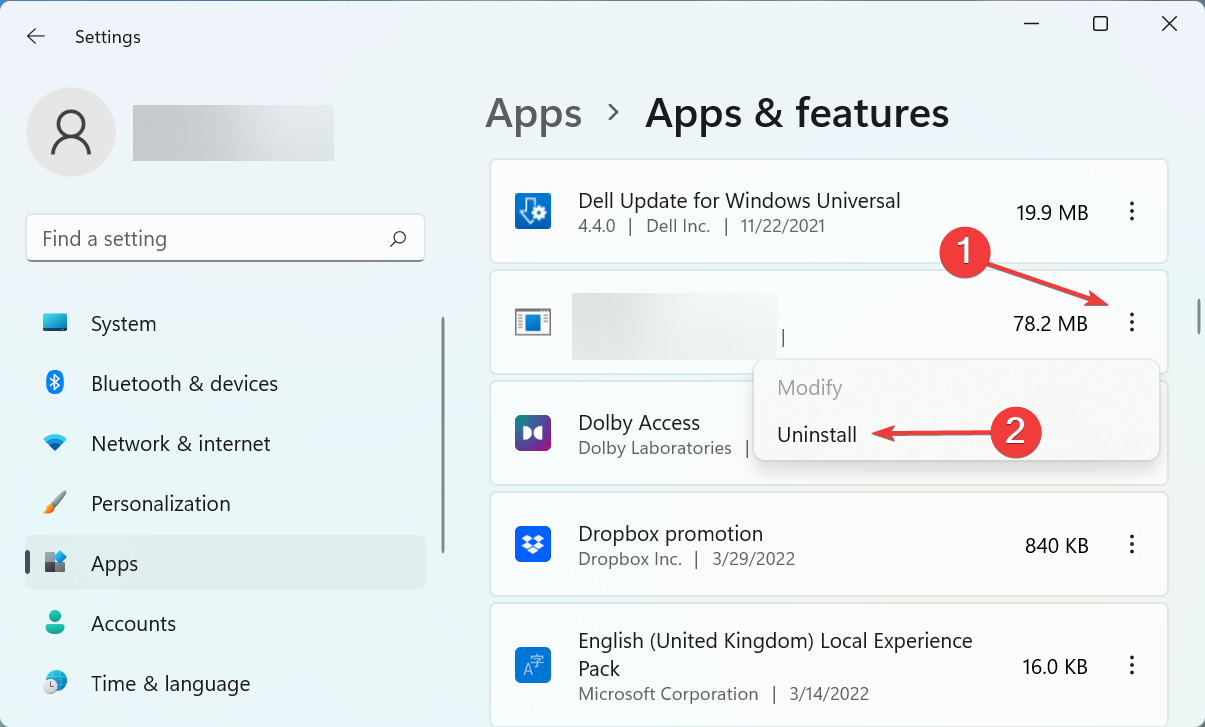
  2. Click on Uninstall a program.
    uninstall a program VirtualBoxVM.exe error
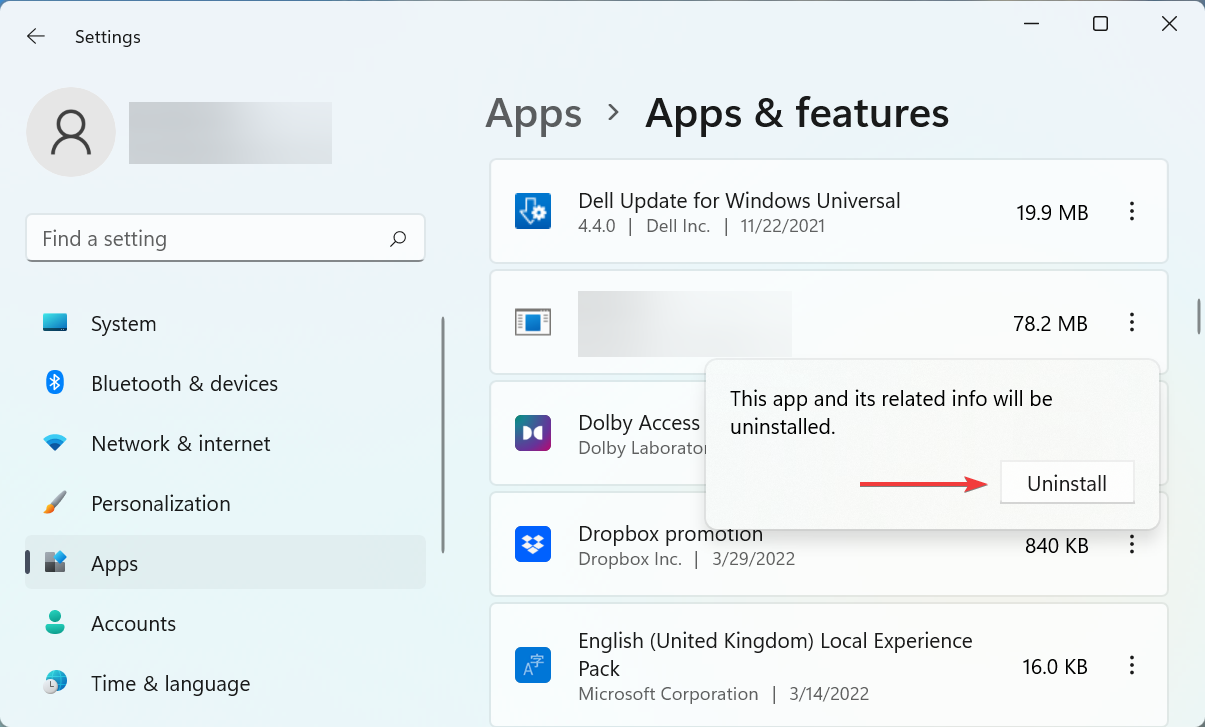
  3. Select VirtualBox and uninstall it.
  4. Proceed to download VirtualBox from its official website.
  5. Open the file and reinstall the program.

Many software products leave some files behind after a regular uninstall and sometimes, those leftovers can prevent you from reinstalling the app.

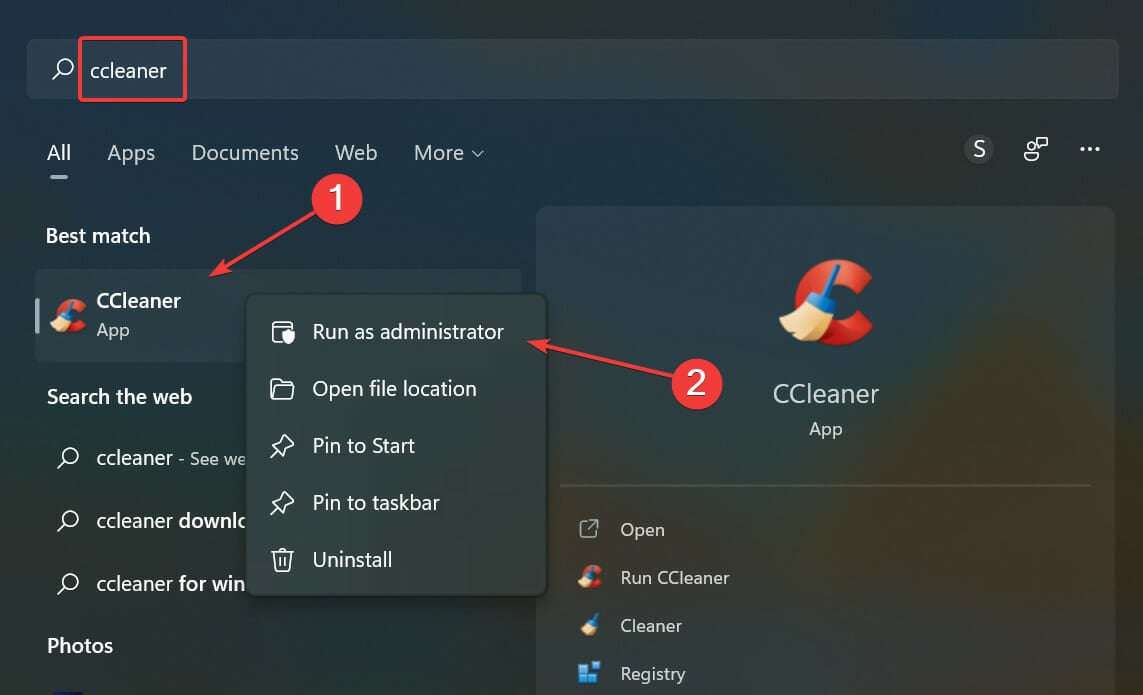
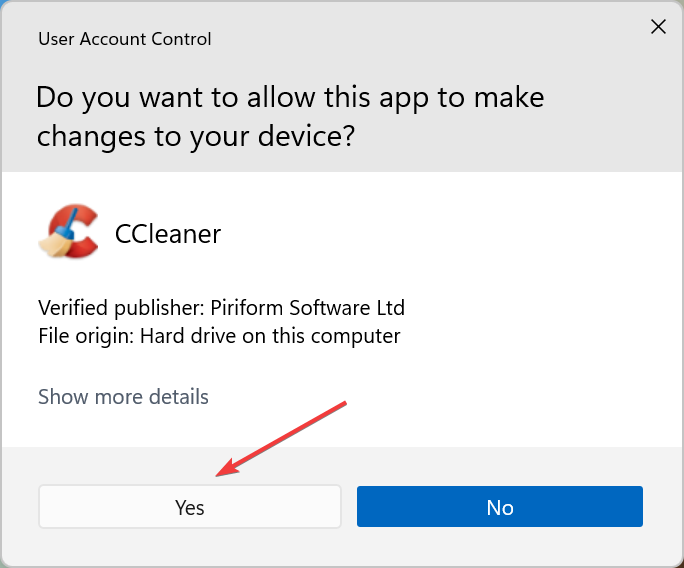
If you want to make sure that you remove all the contents of VirtualBox, you need to use specialized software like CCleaner.

By using this type of software you’ll be able to uninstall and then verify and clean your registry and scan for any leftover files and remove them as well.

After you completely remove VirtualBox, you can download the installer wizard and follow along with its prompt. The process should go smoothly after all leftover files are gone.

2. Update the graphics card driver

  1. Check your graphics card drivers.
  2. If the drivers are outdated, visit the graphics card’s manufacturer’s website and download the latest drivers for your model.
  3. Once the latest drivers are installed, check if the problem is still there.
  4. If updating your graphics card didn’t offer any acceptable results, try disabling 3D acceleration for your graphics card.

You can also use the Windows Device Manager panel to automatically check for driver updates.

  1. Type device in the taskbar and open Device Manager.
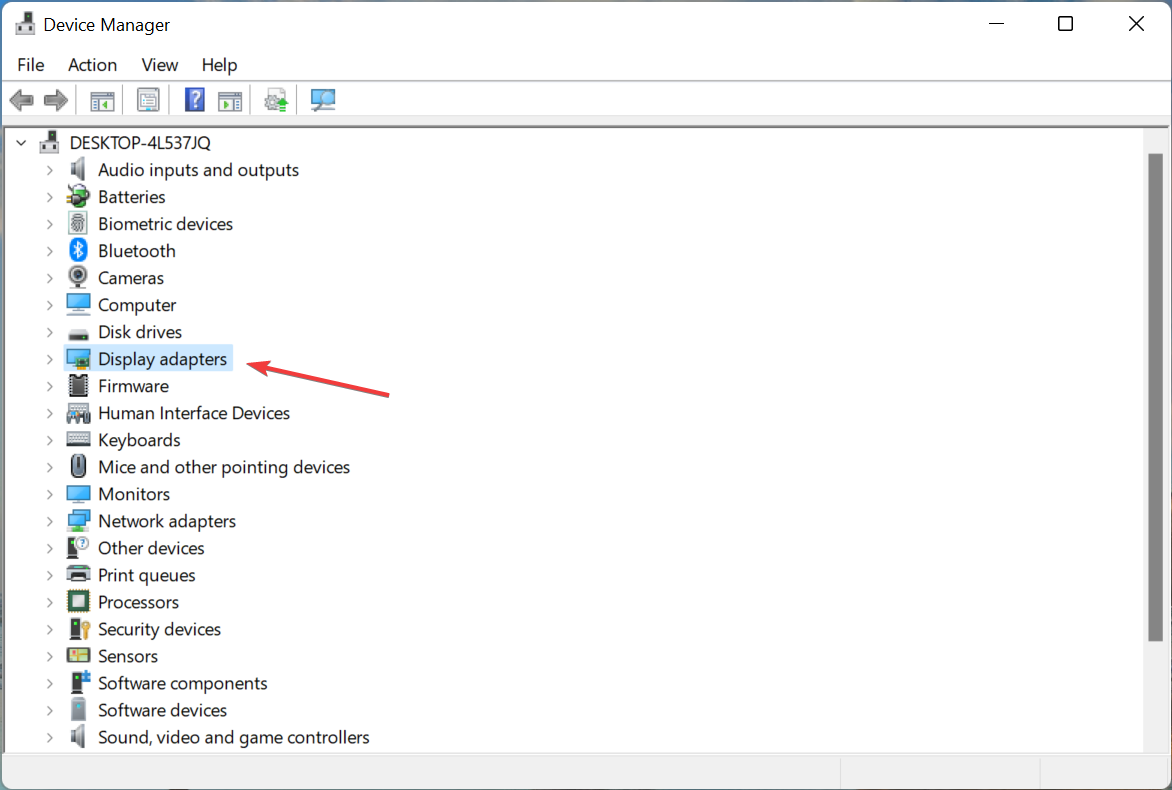
  2. Locate the Display Adapters category and expand it.
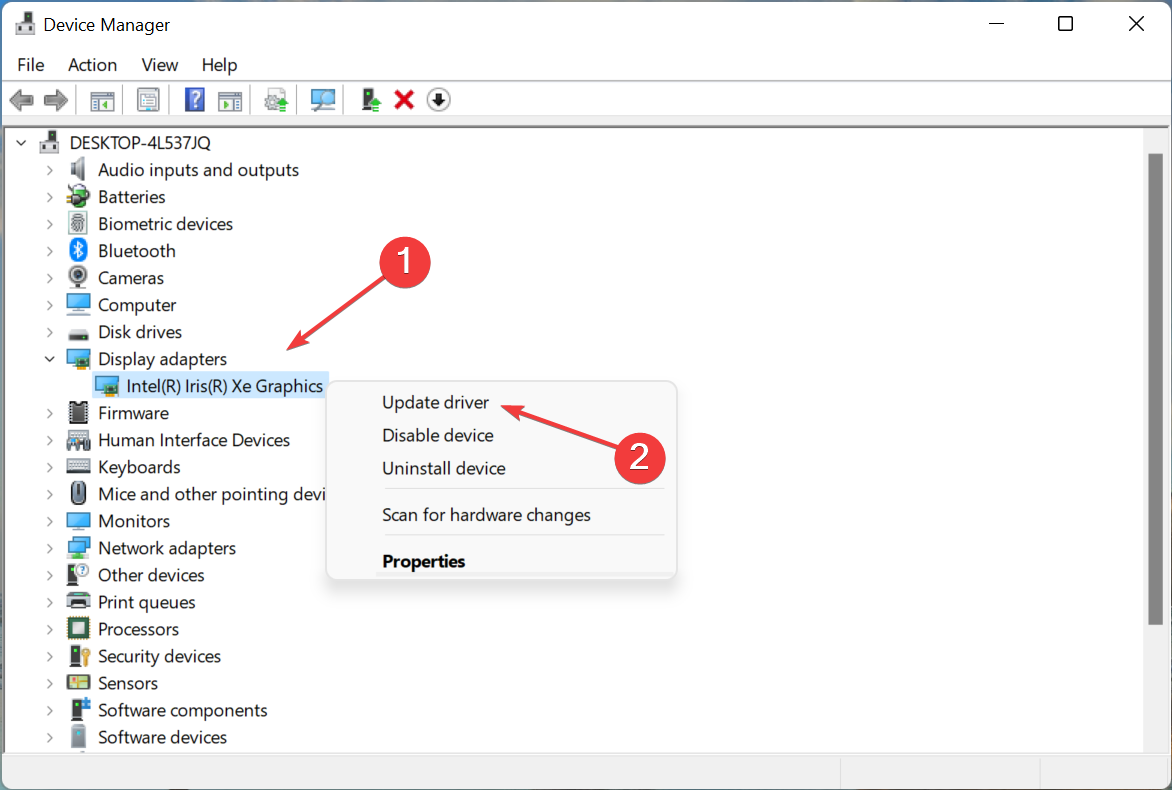
  3. Right-click on your graphics card driver and select Update.
  4. If Windows identifies any new drivers, it will automatically install them. Wait for the process to complete.

We must mention that Windows sometimes fails to identify new driver updates even if they’ve been made available. For that, we recommend you try the first method.

Keep in mind that it is very important to make sure you install the correct driver version, otherwise you risk generating more problems.

Faulty drivers can lead to frequent app crashes, BSoDs, malfunctioning of the corresponding hardware, and other annoying issues.

To make sure you avoid these, you can use a dedicated utility such as Outbyte Driver Updater. The tool is safe and uses its own Windows driver database to detect the newest driver versions for your hardware.

It’s easy to use, lightweight, and can keep all drivers in your system in check on a regular basis, so you will not experience such problems in the future.

⇒ Get Outbyte Driver Updater

3. Perform a malware scan

You can always try to scan your PC for malware using Windows Defender. It comes with your OS for free and it offers basic protection.

However, if you want to make sure that you detect and eliminate all possible malware from your system and stay protected at all times, you will need a professional-grade security solution.

We recommend you look into the best Windows 10/11 antiviruses to use today. Up-to-date antiviruses use advanced detection technology in order to find and block present-day threats.

Most antiviruses have a similar user experience, so on the app of your choice, run a full PC scan and remove/quarantine any threat found.

After you are positive that your PC is free of malware, try to use VirtualBox again. The error should no longer appear and the app should work as new.

4. Stop VM from the Task Manager

  1. Press Ctrl + Shift + Esc to open Task Manager.
  2. In the Process tab select the VirtualBoxVM.exe and right click on it.
  3. Select End Process Tree.
    task manager VirtualBoxVM.exe error
  4. Exit Task Manager and start VirtualBox.

There you go, 4 quick and simple solutions that can help you fix VirtualBoxVM.exe error on your PC. Feel free to try all of our solutions, and let us know which solution worked for you.

VirtualBox errors can be a headache, but if you follow any of these solutions, you should be able to start reusing the software as if nothing happened.

These have been our recommendations on what you can do to overcome these issues. If you want to learn more about VirtualBox and similar software, bookmark our Virtualization Hub.

If you need more assistance with PC-related issues, our Tech Troubleshooting Hub is full of possible solutions to your PC problems.

For any questions or suggestions regarding how you can fix this issue, please feel free to use the comment section below.

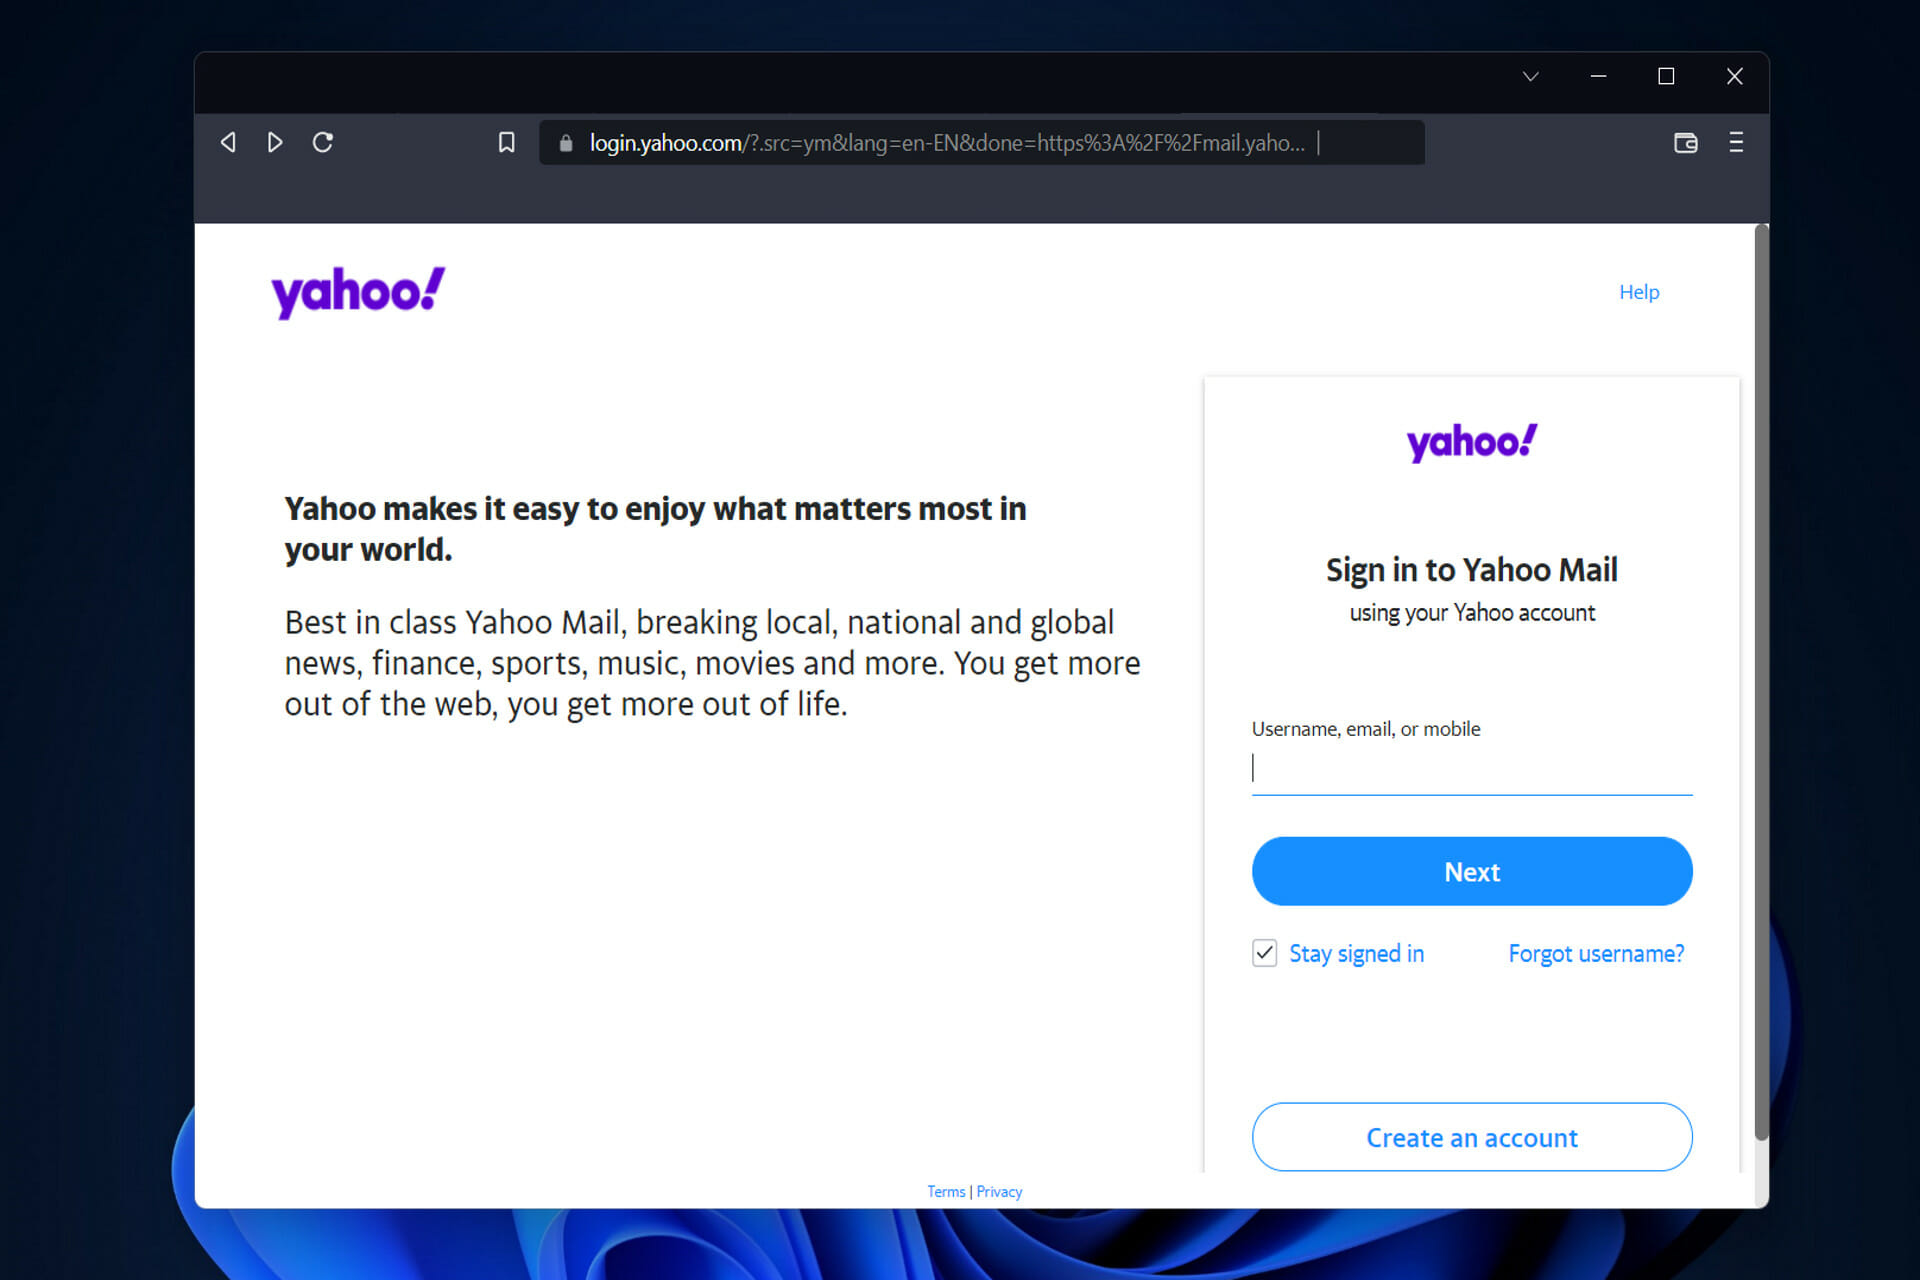
Got the temporary error: 19 on Yahoo Mail? Check our 3 fixes

Because Yahoo Mail is a dependable and effective email service, when users experience issues such as the temporary error: 19, it is adamant to fix them right away.

A technical glitch prevents Yahoo from allowing its users to send emails or messages to the recipients they have specified. There are a variety of factors that could be causing your Yahoo Mail to stop working.

Most of the time, temporary errors in Yahoo last between a few seconds and several minutes. In some cases, it can take up to thirty minutes before the errors are detected and corrected automatically. And the temporary error: 19 is no exception to this rule.

When this error appears in your mail account, you may also receive a message stating that your account has been temporarily locked. Log out of all your devices and browsers, then follow the solutions we have prepared for you below. But first, let’s see what the advantages of using Yahoo are.

What are the advantages of Yahoo?

In addition to offering products and services ranging from maps and movies to photos and technology, Yahoo is more than just another online email provider.

It is a full-fledged online company with distinct advantages over other online businesses. For example, Yahoo Small Business can assist you in setting up an online store that can generate revenue for you.

While the Yahoo Store does not offer any free services, there are a plethora of other useful free services just a click away.

With the Standard mail service, you can send and receive emails, manage contacts, and keep track of your appointments. Every email sent or received is encrypted, and users have 1TB of space to store emails and other files.

yahoo news temporary error: 19
Yahoo News (Source: Yahoo)

It can be difficult to get Web applications to work correctly across all browsers. Yahoo, in contrast to some other Web companies, solves this problem by providing free access to its massive Yahoo User Interface Library.

When you need to know the distance between Mars and Earth, or if you want to know how to make a good quiche recipe, type your question into the Yahoo Search box to find the answer.

Yahoo indexes the Web and makes information from Web pages available to searchers in the same way that Google does.

You will receive additional benefits when you create a Yahoo account, such as the ability to view the results of your previous searches and Bing, which is one of the most popular search engines in the United States.

How can I fix the temporary error: 19?

1. Use supported browsers

Not all browsers are created equal, and some are extremely fast but lack security, while others are slower but overburdened with features, and still, others take an eternity to load a simple page at the speed of light.

Opera One is the best Yahoo Mail browser to use on your Windows 11 computer, and it is also the most secure. It operates at breakneck speed and consumes minimal resources while providing a plethora of features.

However, there are also other browsers that support Yahoo that you can opt for instead. Check out the article linked to make your decision and fix the temporary error: 19 issues on Yahoo Mail / AOL.

2. Enable your browser to accept cookies

  1. Open your browser and navigate to the Settings page. Here, we will be using Opera One as it is one of the best options on the market, and we will click on the menu button from the top-right corner and then go to full browser options.menu-settings temporary error: 19
  2. Expand the Advanced section and go to Privacy & security in order to find the cookies settings.adv-privacy temporary error: 19
  3. Click on Cookies and other sites data then select the radio button next to Allow all cookies.allow-all temporary error: 19

3. Clear your browser’s cache and cookies

  1. Navigate to the Settings section from your browser as we have shown in the first solution.menu-settings temporary error: 19
  2. Then expand the Advanced button in order to choose Privacy & security.adv-privacy vtemporary error: 19
  3. Choose the Clear browsing data option from the right menu and then select Cookies and other site data and Cached images and files to delete them.clear temporary error: 19

Cookies are small text files that websites you visit store on your computer’s hard drive. They make your online experience more convenient by saving information about your browsing habits.

Sites can use cookies to keep you logged in, remember your site preferences, and serve you content that is relevant to your location.

Cache is a feature of your Internet browser that allows you to speed up the loading of web pages. However, when websites are updated and developed, it can sometimes cause issues because the files saved may conflict with the actual code that is being used to build the page itself.

We recommend that you check out our post on the 5 best backup software for Yahoo Mail to make sure you don’t lose any important data.

Was this guide useful to you? Don’t hesitate to tell us what you think in the comments section below. Thanks for reading!

Microsoft introduces Mica material and rounded tabs for Edge Canary

If you decided to forsake any other browser options out there, such as Chrome, Opera, Brave, or Firefox, then you surely decided to stick with Microsoft’s very own Edge.

Now, that isn’t a bad thing at all, considering how much work the Redmond tech company puts into perfecting its flagship browser experience.

Thus, if you know your Edge, you surely noticed that, recently, Microsoft added a new setting for managing experimental appearance settings in Edge Canary.

This toggle, however, did not work initially, but now you can use it to test what looks like the biggest Edge redesign since its launch in early 2020.

Ready to find out more about this? Let’s get right into it and discover what future plans Microsoft has for Chrome and Firefox’s biggest competitor.

Edge takes another step into the future with new looks

This will surely not come as a surprise, but Microsoft is actually on track to insert a lot more Windows 11-like design bits in the Edge browser.

Edge Canary already has tabs with rounded corners and the Mica material effect, which means that there’s not much left to do.

Now, Edge’s tabs are a lot more similar to Firefox, and the Mica effect adds dynamic translucency to primary parts of the UI.

However, you should keep in mind that both these changes are experimental, which means Microsoft might remove them at some point.

That being said, that doesn’t necessarily imply that these design features will be gone. They could very well also be here to stay, permanently.

How can I test the updated Edge UI?

Before we show you how to do this, make sure you remember that this only works on Windows 11 machines, not on Windows 10.

  1. Update Microsoft Edge Canary to the latest version.
  2. Access edge://flags.
  3. Enable Show experimental appearance settings.
  4. Restart Edge.
  5. Access edge://settings/appearance and turn on Show Windows 11 visual effects.
  6. Enable Use rounded corners for browser tabs.
  7. Restart Edge.

That’s pretty much all you have to do, so make sure you have a go at it and see if the new looks of the browser won’t make you fall in love with it even harder.

Also, remember that Edge will allegedly get an integrated, Cloudflare-powered VPN service soon, so there’s more to look forward to.

Have you tried the updated Edge UI yet? Share your experience with us in the comments section below.

Microsoft details Purview classifiers that can help prevent abuse, harassment, other illegal activities on Teams

It has been known for some time that Microsoft was working on more ways to allow IT admins to monitor Teams chats and channels, and as spotted by Neowin, we now know the specific work that’s being done under the hood to do so. Indeed, the Microsoft 365 Roadmap recently added several new classifiers relating to Microsoft Purview, the solution that scans and detects security and other risks in a company’s Microsoft 365 services against pre-set compliance standards.

To be specific, there’s a total of eight new classifiers for Purview that Microsoft is working on. The list covers sexual harassment, corporate sabotage, gifts and entertainment, money laundering, stock manipulation, workplace collusion, leavers, and authorized disclosures. A lot of those classifiers are self-explanatory, but we’ve included a sample explanation below.

The sexual harassment classifier detects explicit instances of sexual harassment as may be outlined in your organization’s policies and code of conduct, such as sexual advances, sexual comments and sexual favors. Microsoft Purview Communication Compliance helps organizations detect explicit code of conduct and regulatory compliance violations, such as harassing or threatening language, sharing of adult content, and inappropriate sharing of sensitive information.

When configured if Purview’s A.I. scans or spots anything that relates to any of these themes, the messages or content are sent for moderation. Do note, that the feature is Built with privacy by design. This means that usernames are pseudonymized by default, role-based access controls are built-in, investigators are explicitly opted in by an admin, and audit logs are in place to help ensure user-level privacy.

These classifiers are set to hit preview in June. General Availability should then come in September of 2022.

State of Decay 2 error code 1006: 5 easy ways to fix it

State of Decay 2 has been popular amongst the gaming community and is available on various platforms. But several users who played it on their Windows computer reported encountering the State of Decay 2 error code 1006.

Released in 2018, the game has been largely successful but the computer version of it is known to run into errors from time to time. The error code 1006 is one of the many you may come across.

This error is encountered if you have outdated drivers installed, set the date and time incorrectly, or the firewall is interrupting the connection. However, all these are easily fixable given you follow the right approach.

Without further ado, let’s get straight to the most effective solutions for State of Decay error code 1006.

How can I fix the State of Decay error code 1006?

1. Some basic checks

Misconfigured connection is one of the most common reasons behind the error. So, first, unplug the modem/router from the power source, wait for a minute or two, and then plug it back. Also, restart the computer in the meantime.

Besides, make sure that you are not using a VPN since it could prevent the computer from establishing a proper connection with the game server. If both these don’t help eliminate the State of Decay error code 1006, head to the next method.

2. Add an exception for State of Decay 2 in the firewall

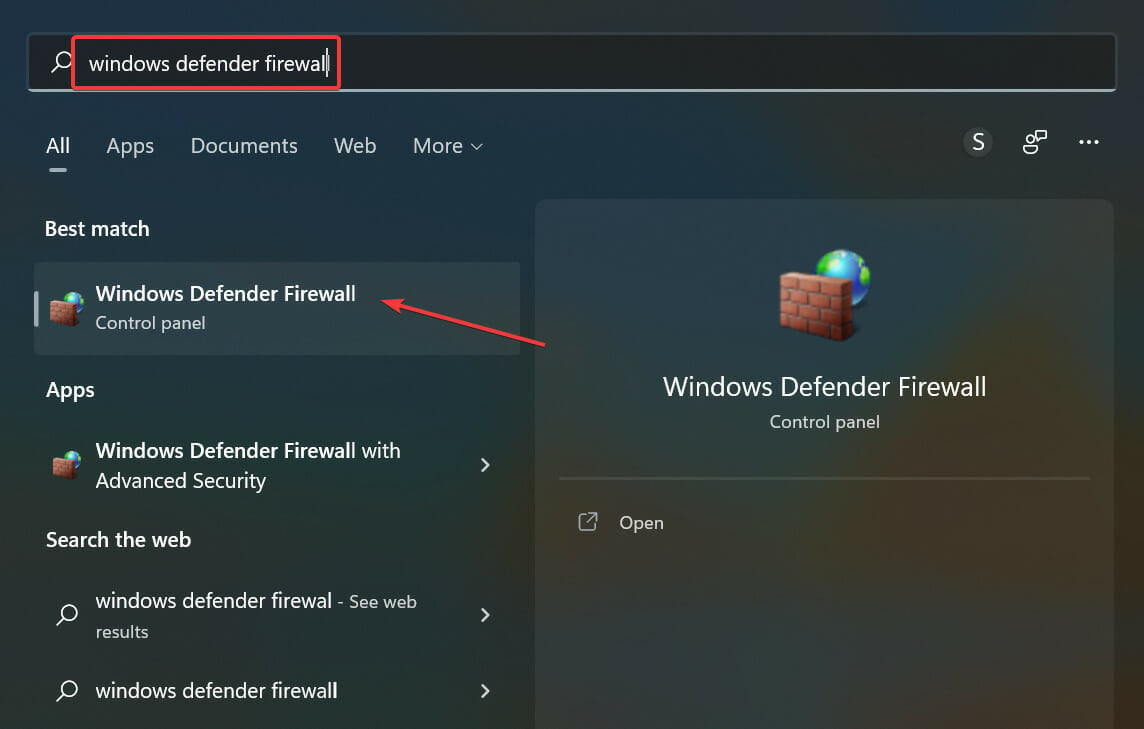
  1. Press Windows + S to launch the Search menu, enter Windows Defender Firewall in the text field, and click on the relevant search result that appears.Windows defender firewall
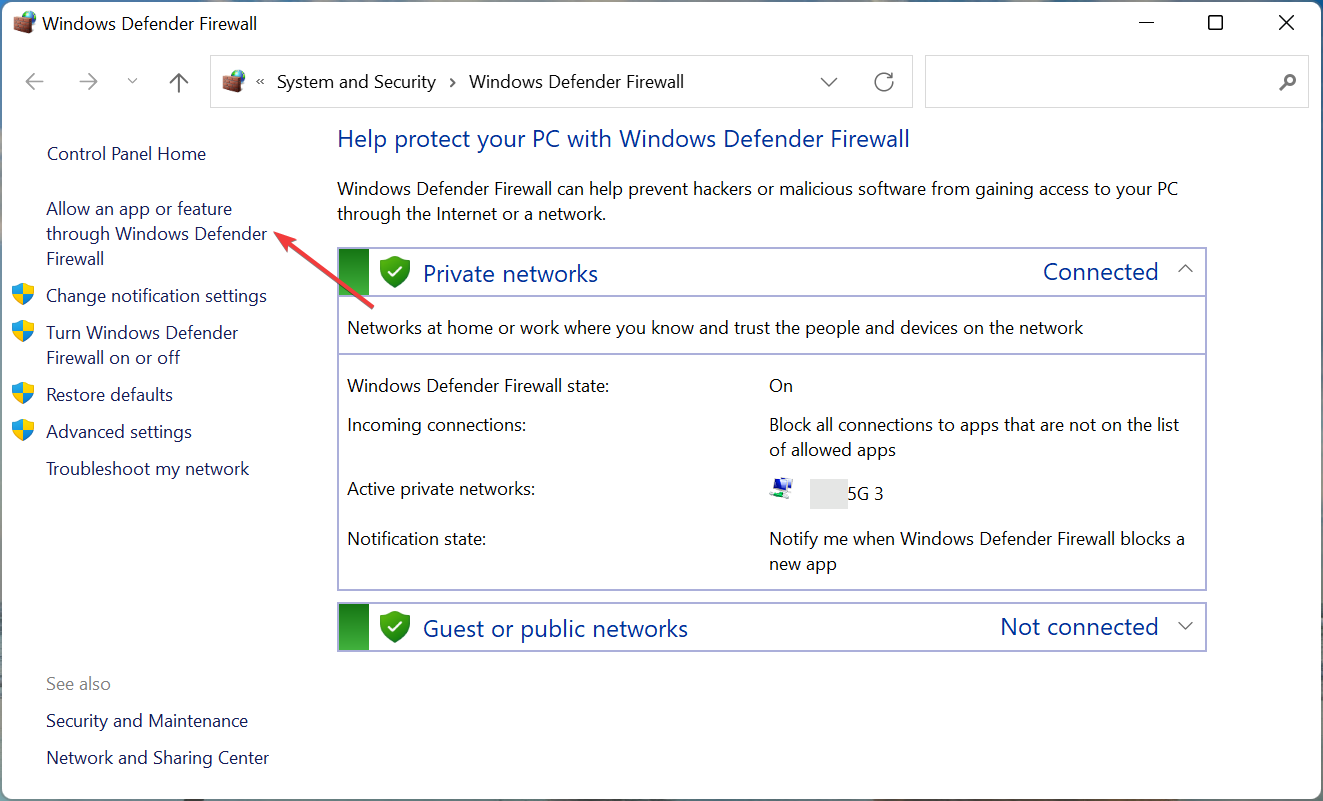
  2. Next, click on Allow an app or feature through Windows Defender Firewall from the list of options on the left.Add app or feature
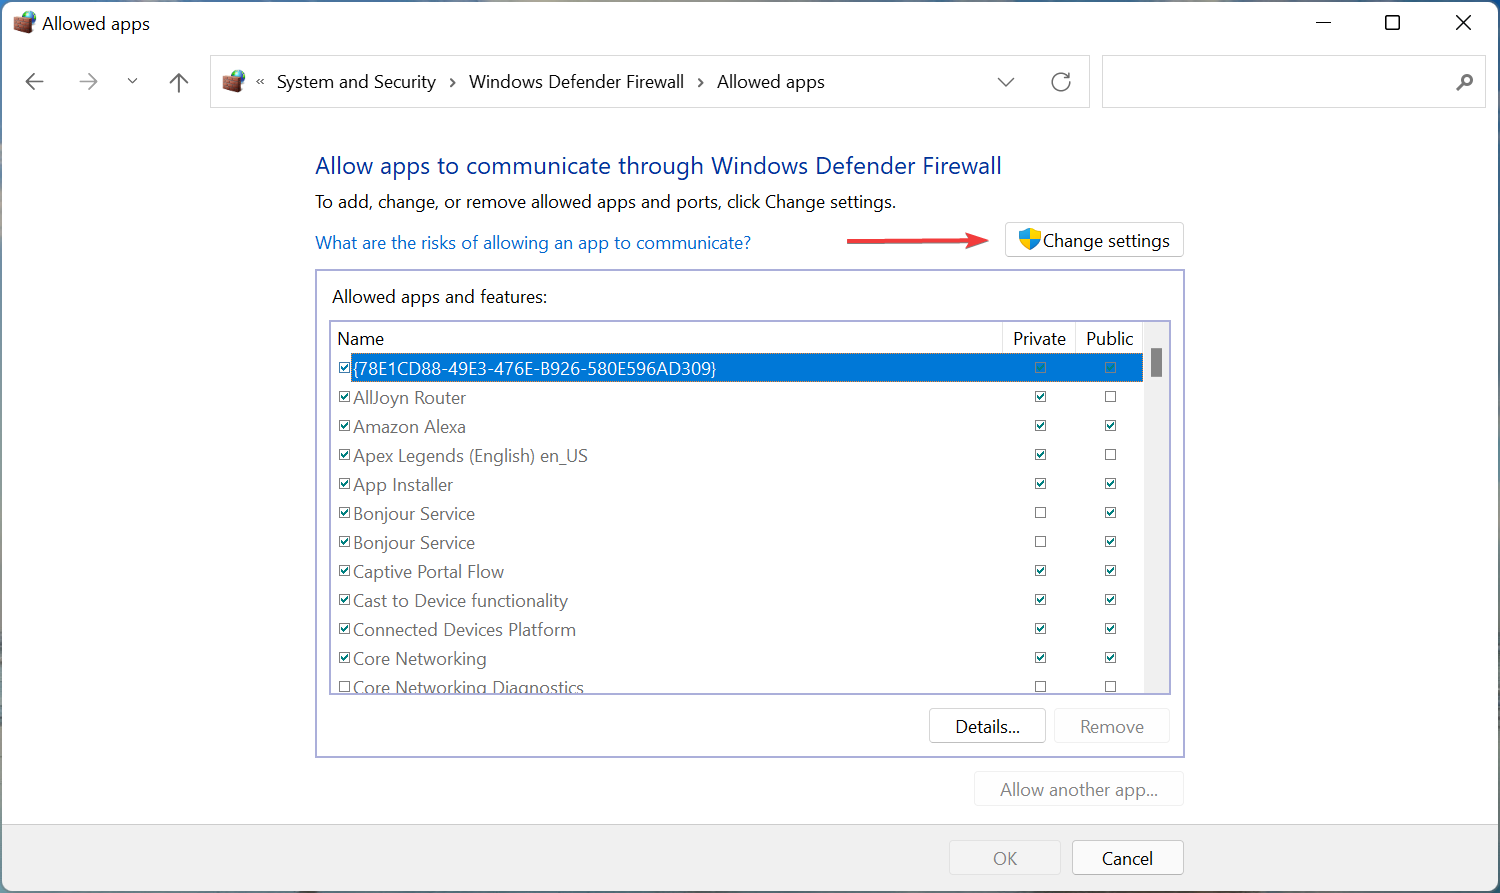
  3. Click on the Change settings button.Change settings to fix state of decay 2 error code 1006
  4. Now, verify that the checkboxes for both Public and Private are ticked for State of Decay 2 and click on OK at the bottom. If the game is not listed here, follow the steps listed below.tick checkbox
  5. Click on Allow another app at the bottom.Allow another app
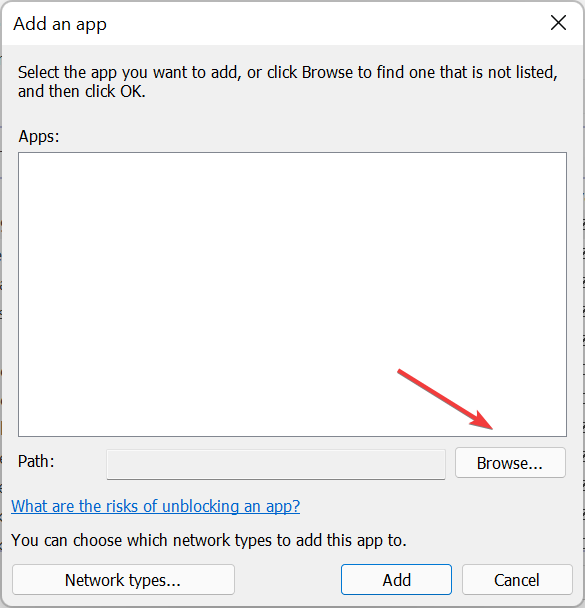
  6. Click on Browse to locate and select the game.Browse
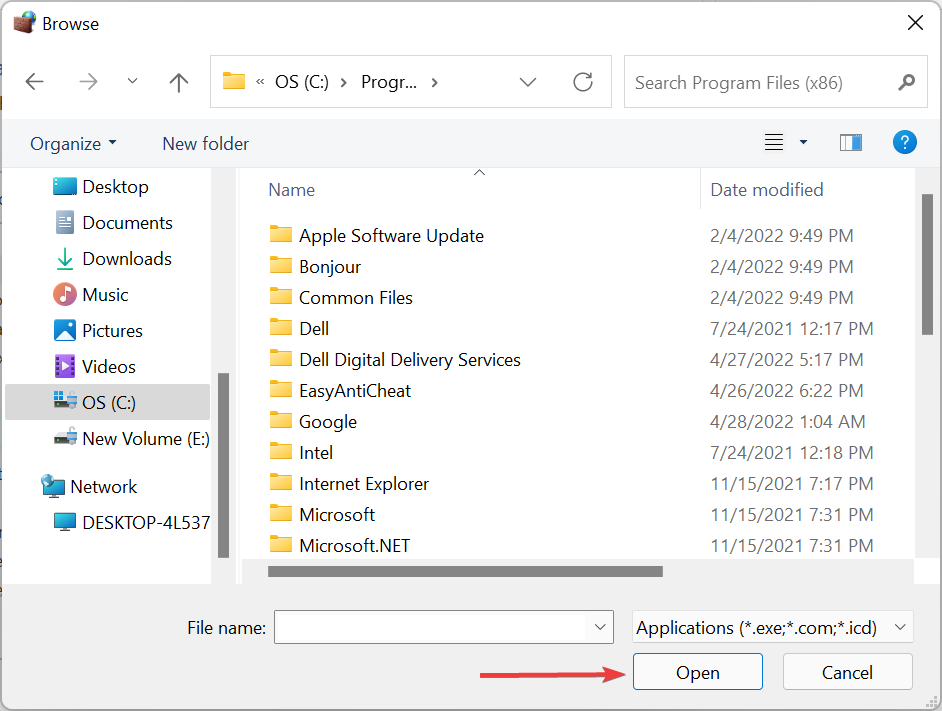
  7. Navigate to the folder where the launcher (.exe) for State of Decay 2 is stored, select it, and then click on Open at the bottom.locate
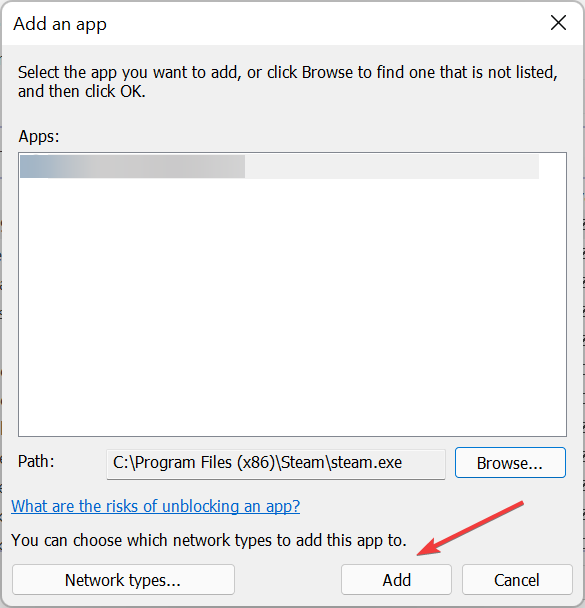
  8. Finally, click on Add.Add to fix Navigate to the folder where the launcher (.exe) for State of Decay 2 is stored, select it, and then click on Open at the bottom.

If the Windows Defender Firewall is interrupting the connection, you can add an expectation for the game. Once done making the changes, restart the computer and check if the State of Decay error code 1006 is eliminated.

3. Update the drivers

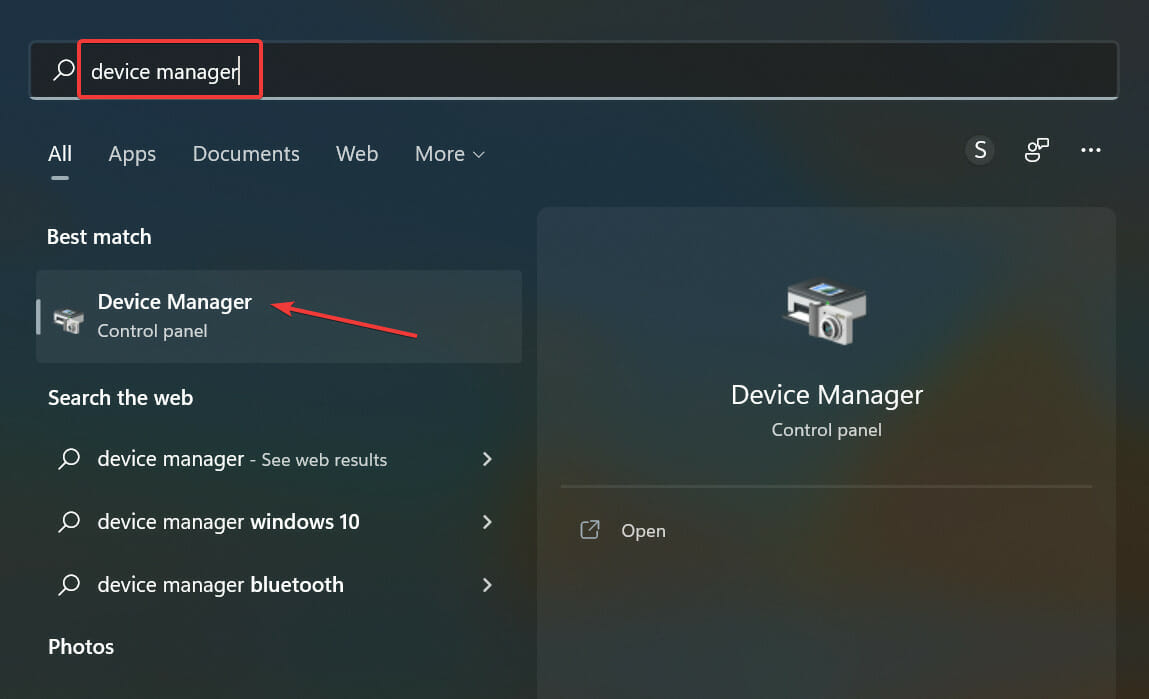
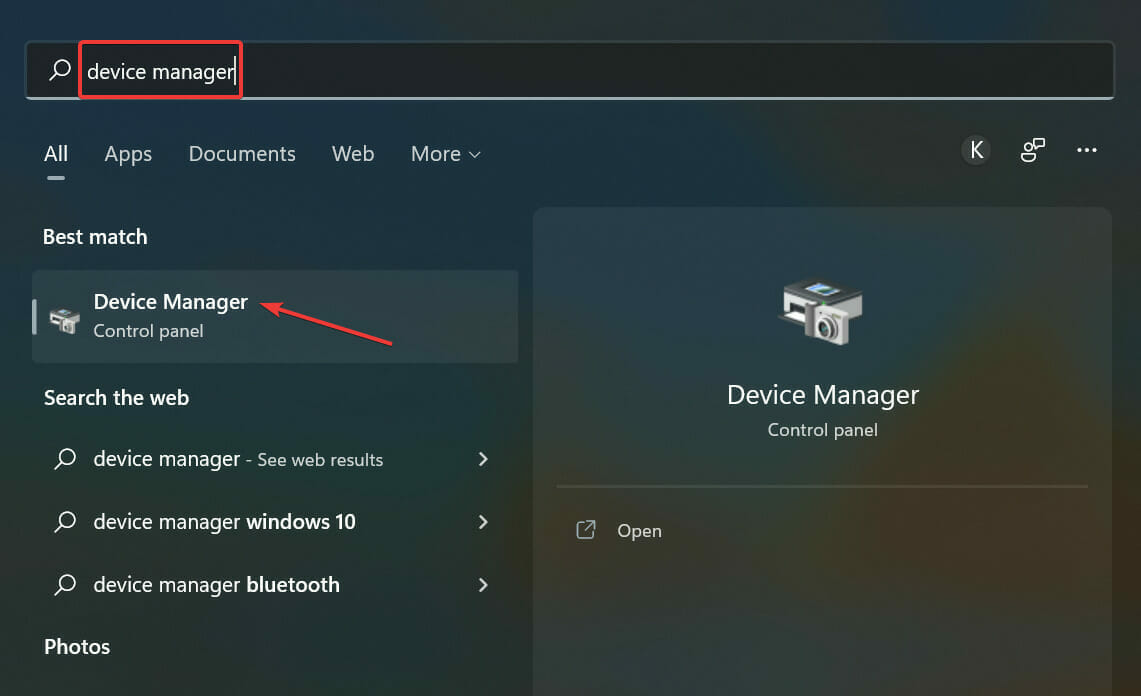
  1. Press Windows + S to launch the Search menu, enter Device Manager in the text field at the top, and click on the relevant search result.Device Manager to fix state of decay 2 error code 1006
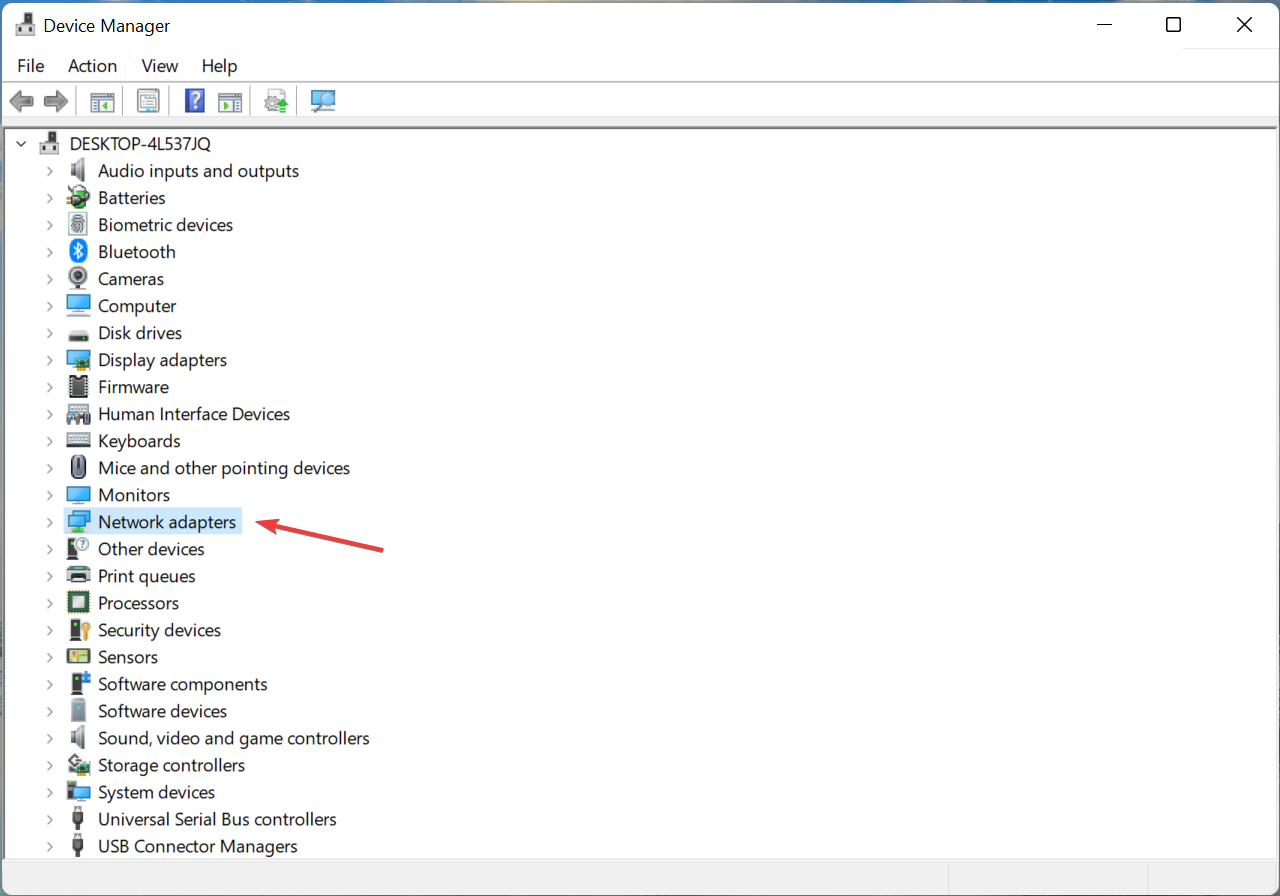
  2. Double-click on the Network adapters entry to expand and view the devices under it.Network adapters
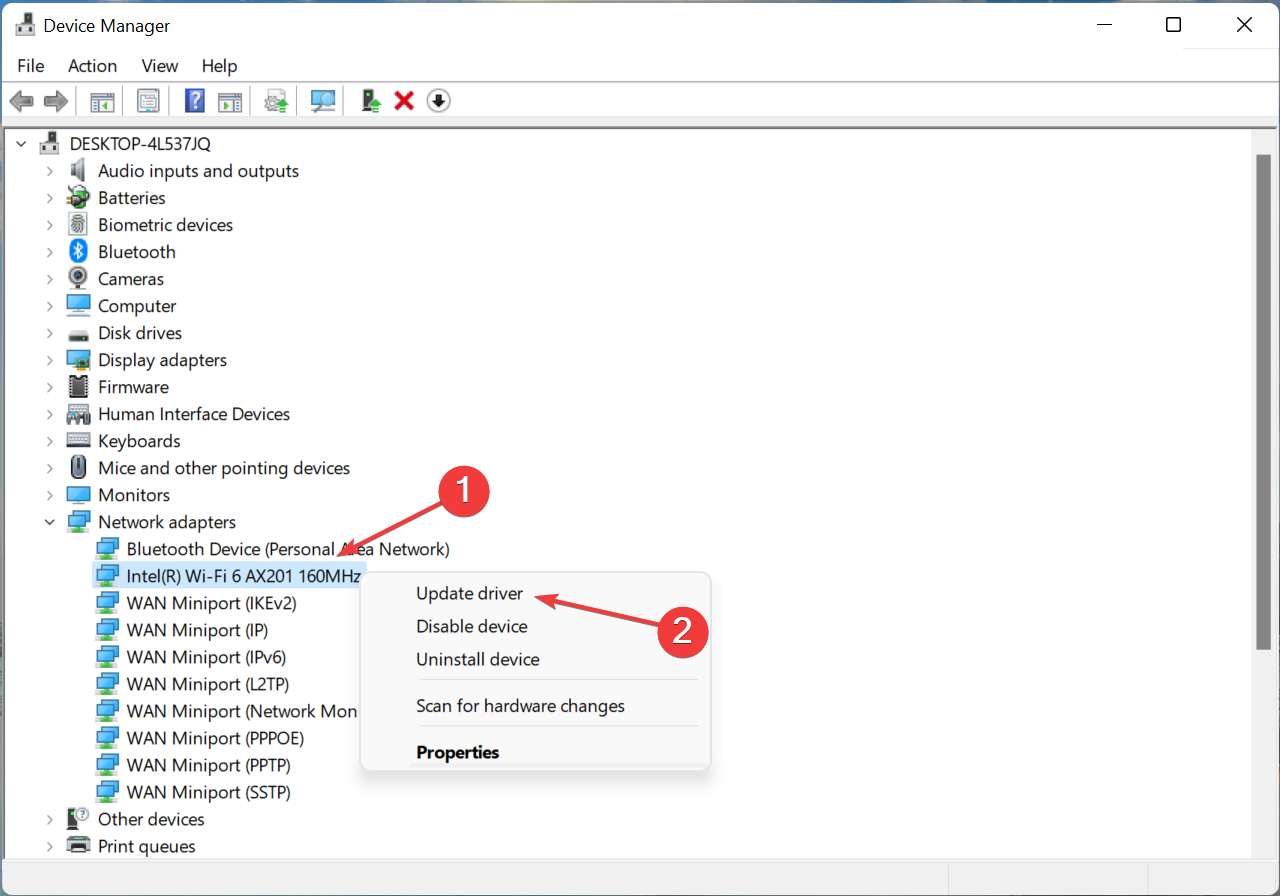
  3. Right-click on the adapter that you are using to access the Internet, and select Update driver from the context menu.Update driver to fix state of decay 2 error code 1006
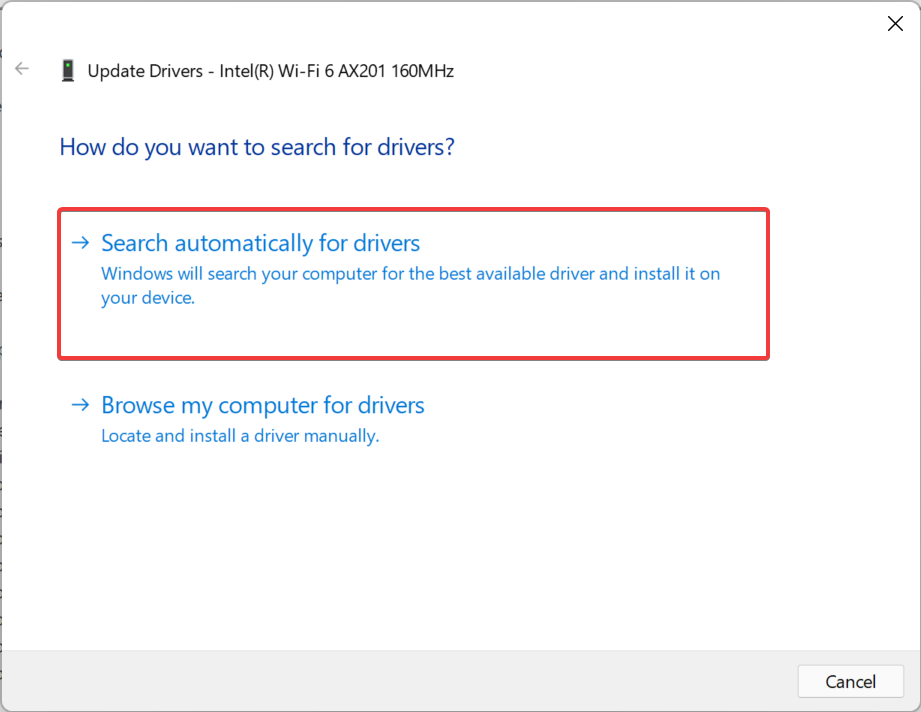
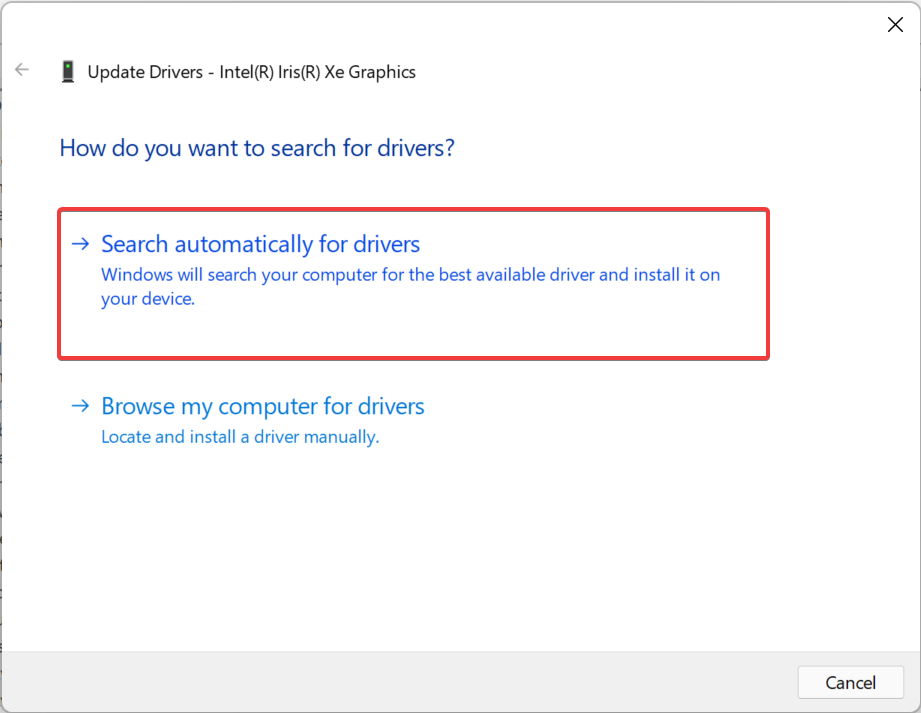
  4. Next, select Search automatically for drivers from the options in the Update Drivers window.Search automatically for drivers
  5. The OS will scan for the best available driver on the system and install it.

An outdated driver is just as likely to cause the State of Decay 2 error code 1006 on your computer. The only thing that you can do here is to update all the drivers installed on the computer after you are done with the network adapter driver.

In case the update didn’t go through via the Device Manager, try the other methods to manually install the latest driver version in Windows, since this one will only look through the drivers already downloaded to the computer.

However, if you want to update your network drivers automatically in a few minutes, you can use a specialized driver updater like Outbyte Driver Updater.

This software can entirely scan your computer and identify out-of-date drivers in your system, and therefore update particular device drivers or all your drivers at once.

⇒ Get Outbyte Driver Updater

4. Verify the date and time set on the computer

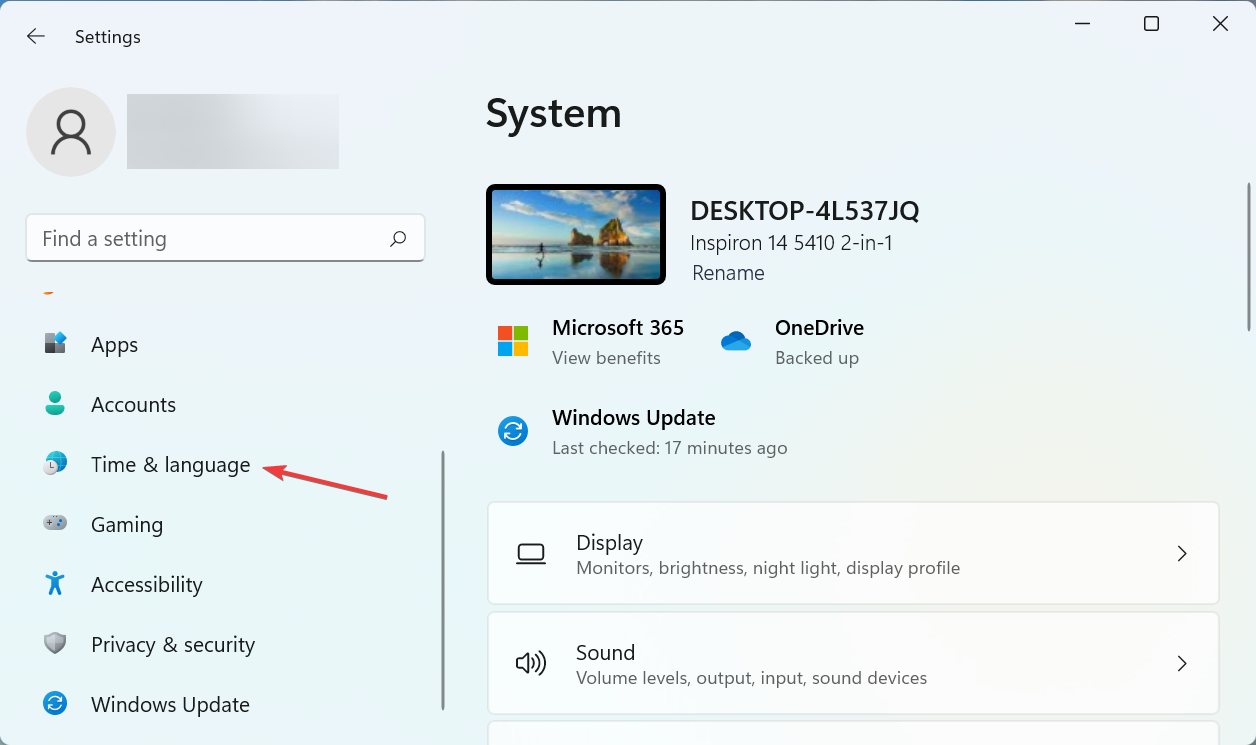
  1. Press Windows + I to launch the Settings app, and select Time & language from the tabs listed in the navigation pane on the left.Time and language to fix state of decay 2 error code 1006
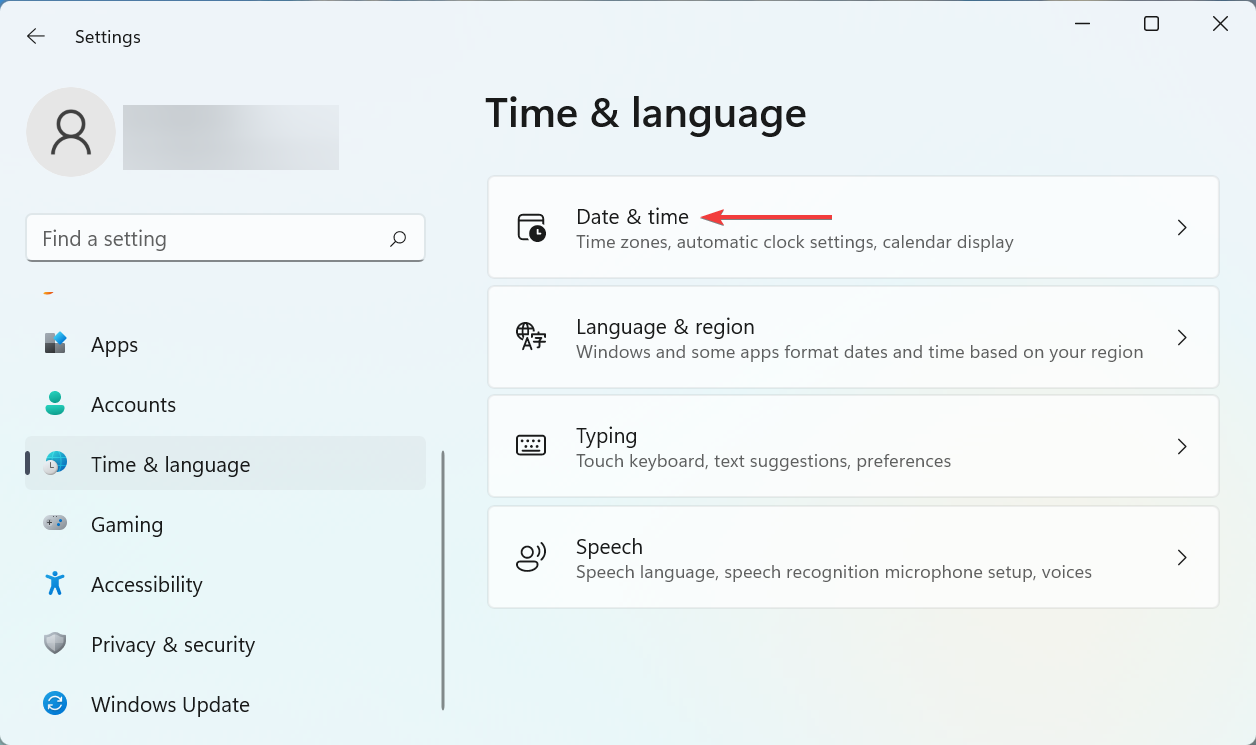
  2. Next, click on Date & time on the right.Date & time
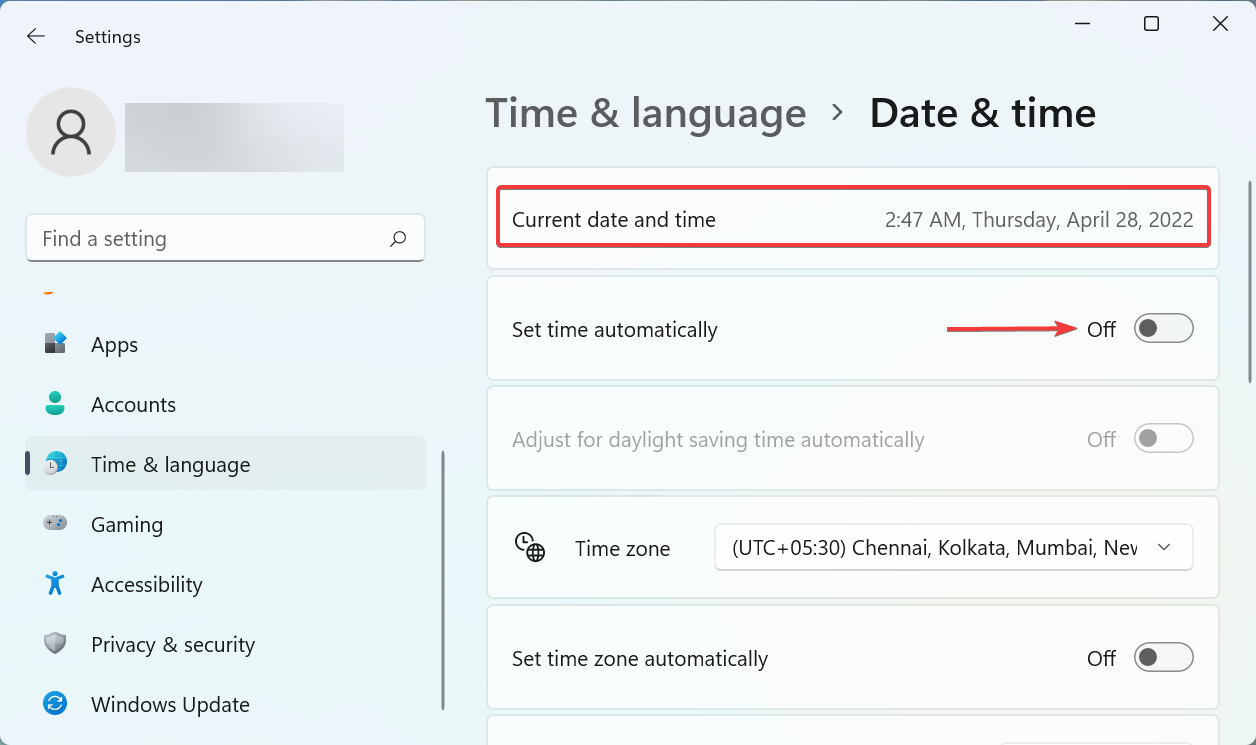
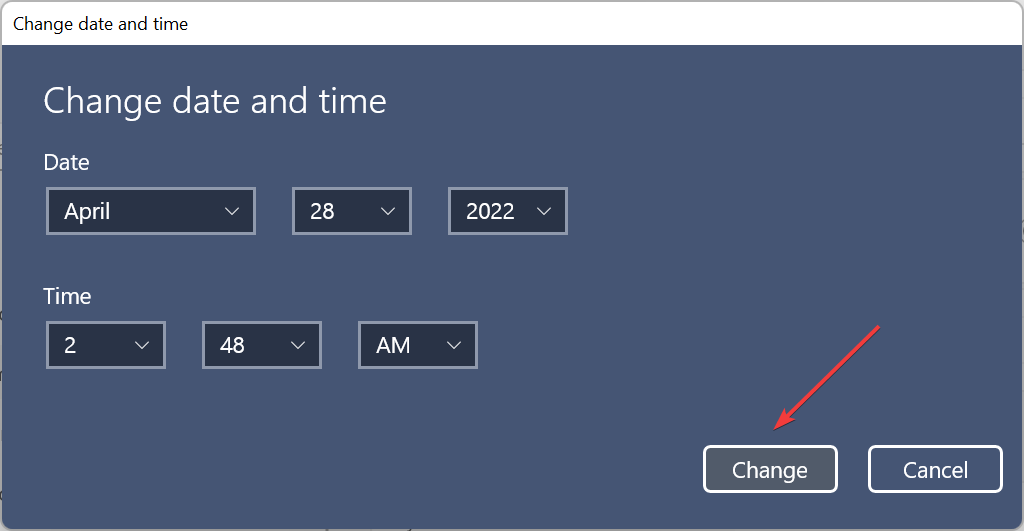
  3. If the Current date and time are incorrect, disable the toggle for Set time automatically.Set time automatically
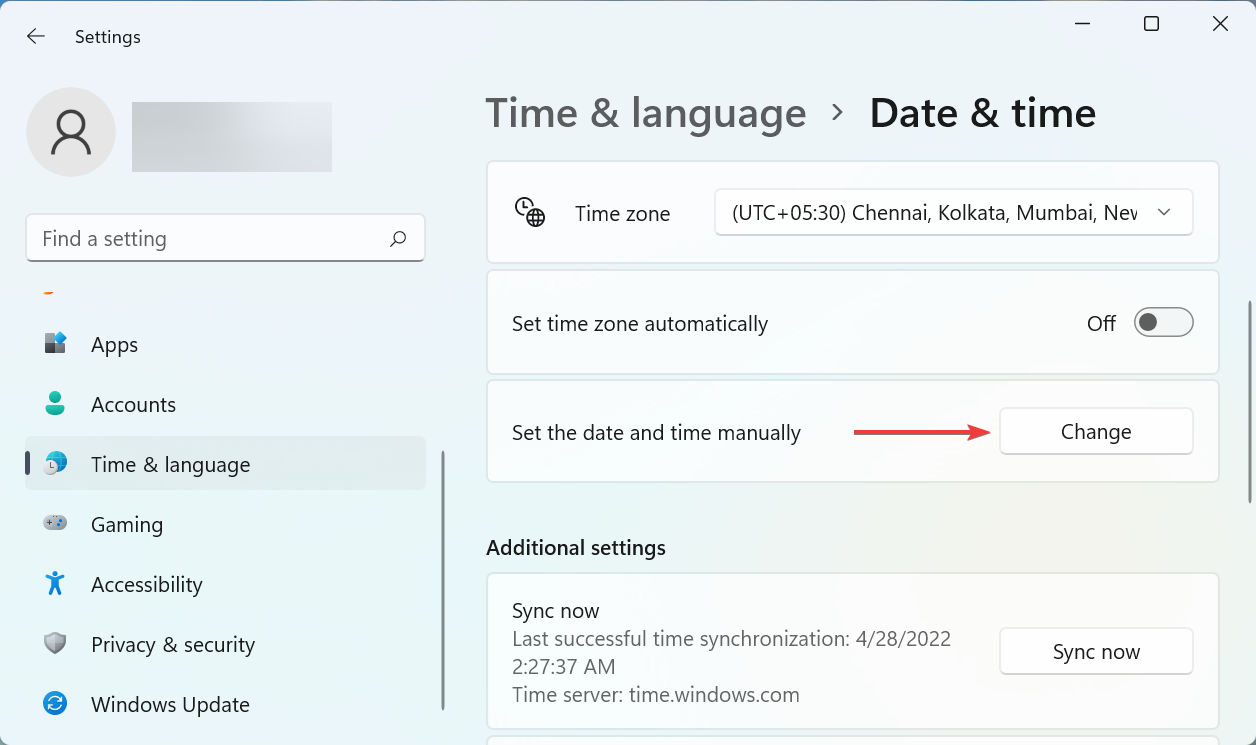
  4. Click on the Change button next to Set date and time manually.Change to fix state of decay 2 error code 1006
  5. Now, set the correct time and date here, and click on Change.Change

If the date and time set on your computer are incorrect, you are likely to encounter the State of Decay 2 error code 1006, and a bunch of other issues. So, make sure to correct it, and check if the problem is fixed.

5. Activate the Teredo adapter

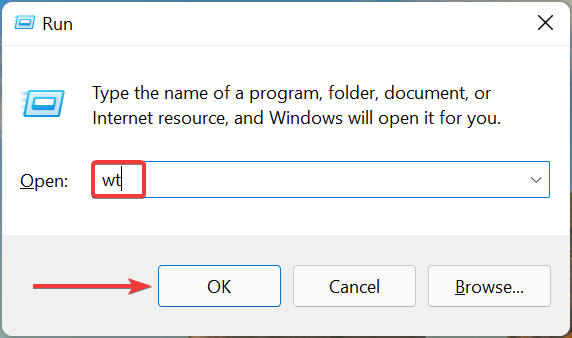
  1. Press Windows + R to launch the Run command, type wt in the text field, press and hold the Ctrl + Shift key, and then either click OK or hit Enter to launch Windows Terminal.Terminal
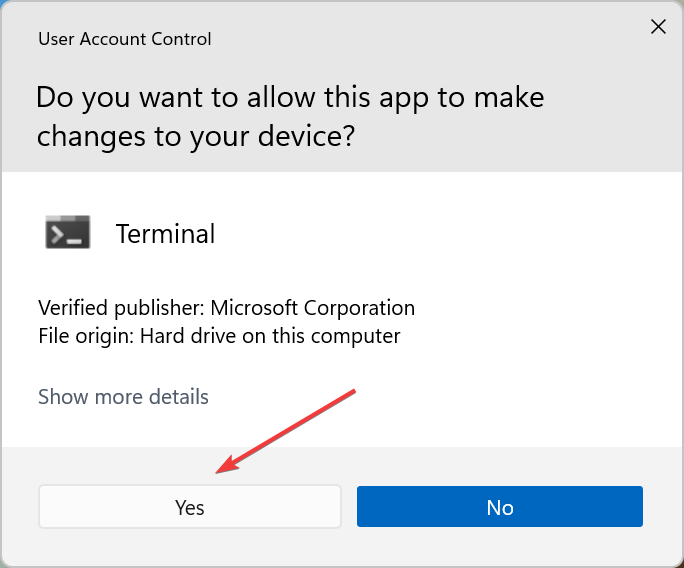
  2. Click Yes in the UAC (User Account Control) prompt that pops up.Yes
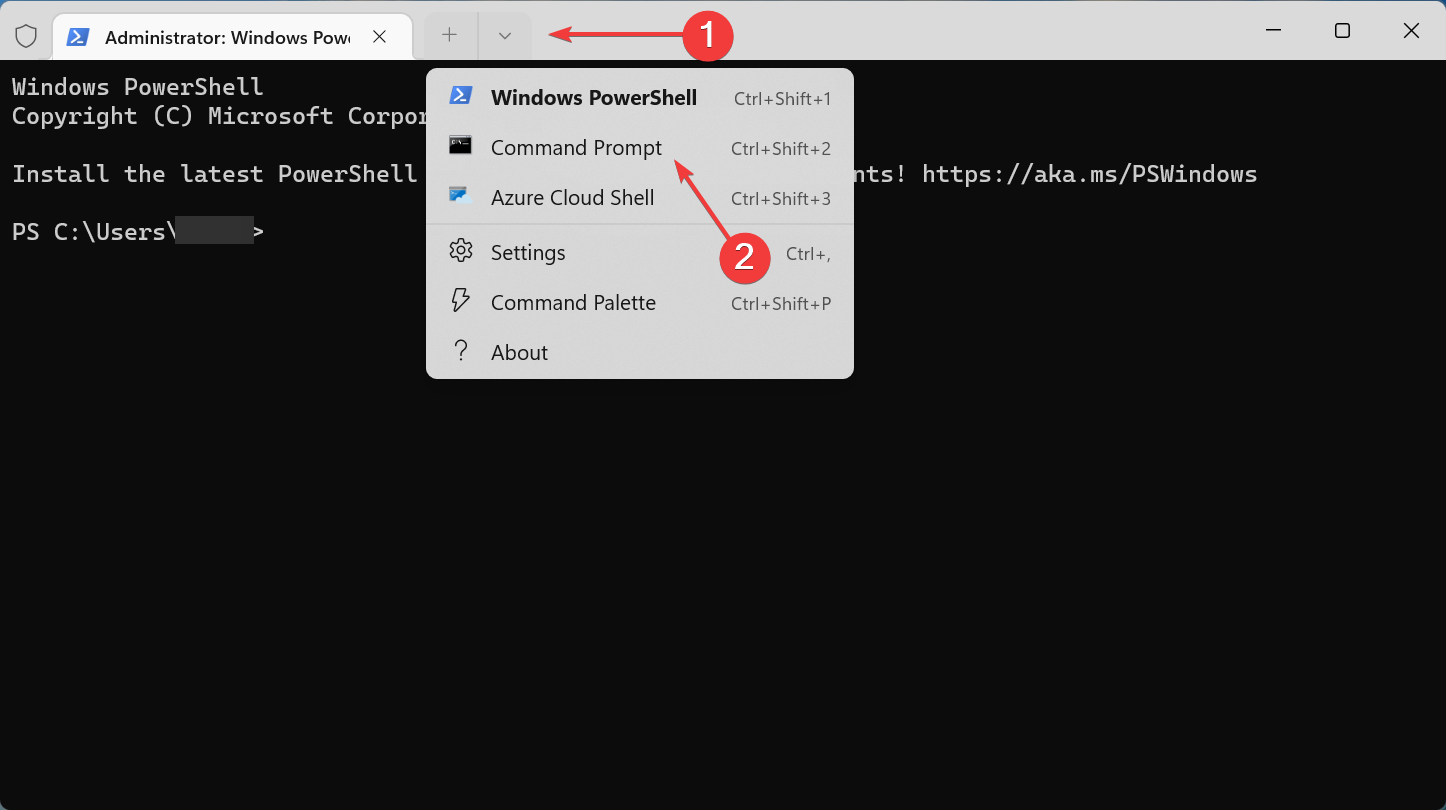
  3. Next, click on the downward-facing arrow at the top, and select Command Prompt. Alternatively, you can hit Ctrl + Shift + 2 to launch Command Prompt in a new tab.Command prompt
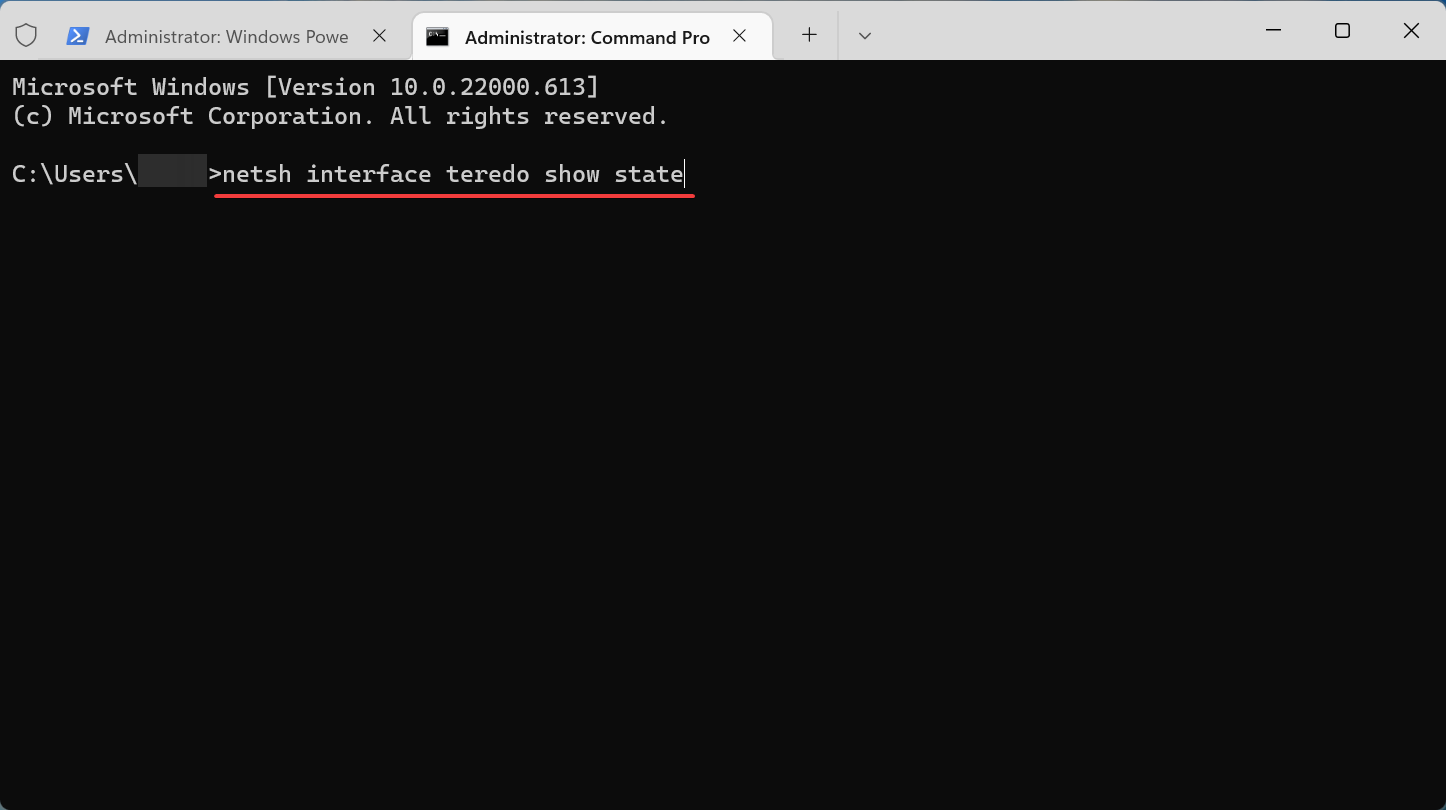
  4. Paste the following command and hit Enter:netsh interface teredo show stateCommand to fix state of decay 2 error code 1006
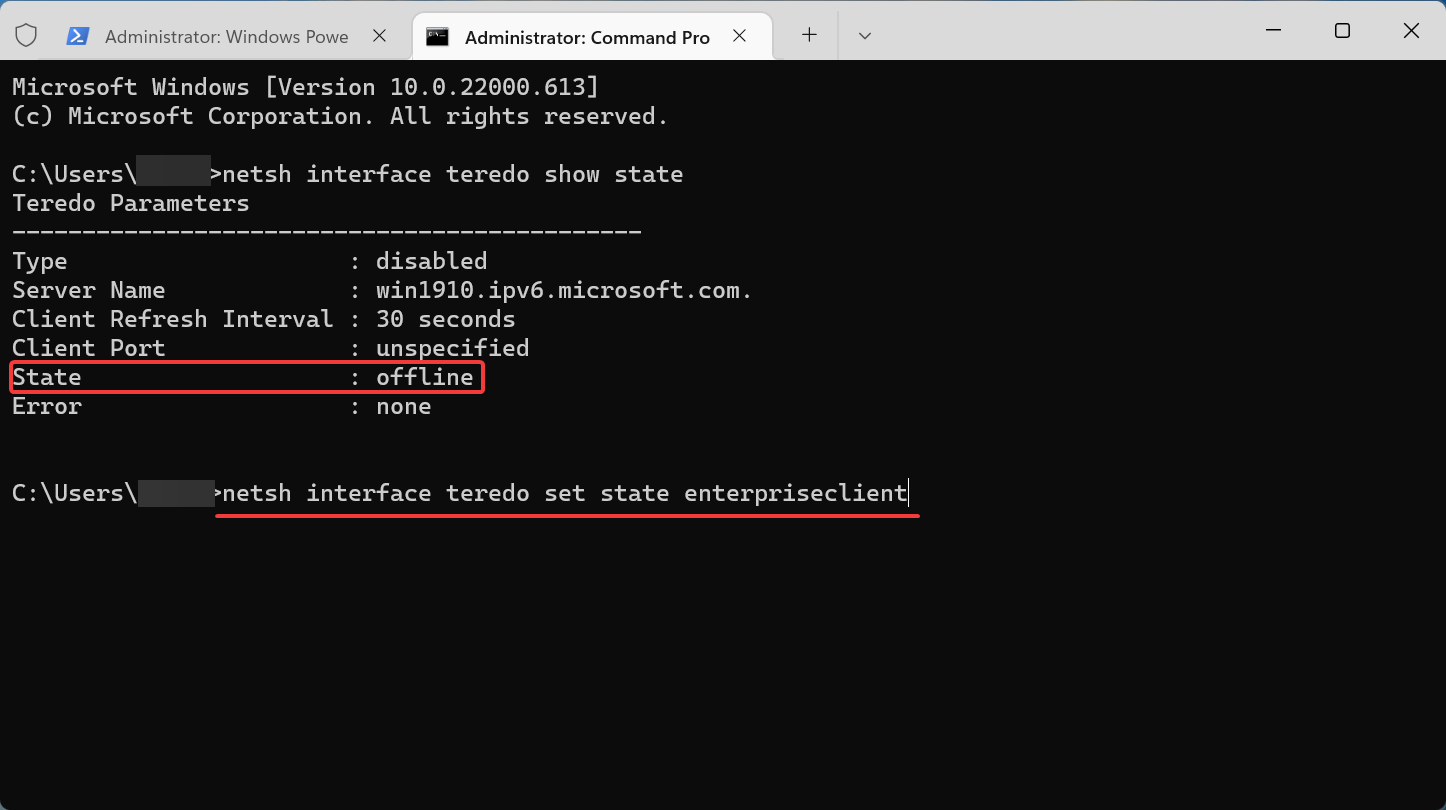
  5. If you find the State listed as Offline, execute the following command:netsh interface teredo set state enterpriseclientExecute command to fix state of decay 2 error code 1006

If the Teredo adapter is not functioning, you may come across the State of Decay 2 error code 1006. And, enabling it should eliminate the problem.

That’s it! By the time you reach this part of the article, the error should be long gone and you would be able to play State of Decay 2 with your friends.

Also, find out how to fix bugs in State of Decay 2 using a bunch of quick and effective methods.

Tell us which fix worked and your review of the game, in the comments section below.

Microsoft outlines world’s ‘first hybrid war’ between Russian and Ukraine

Microsoft was among the first “cyber” actors attempting to alert Ukraine to the digital threats Russia was imploring shortly before the country enacted its land invasion of the sovereign nation.

With firsthand experience and knowledge about cyberattacks preceding a physical confrontation, Microsoft released the conclusion of a report “detailing the relentless and destructive Russian cyberattacks we’ve observed in a hybrid war against Ukraine.”

Yesterday, the company posted to its Microsoft on the Issues blog, a report it commissioned that lays out the details of Russia’s seemingly sanctioned nation-state (the GRU) cyber-attacks launched in concert with kinetic military actions as well as how Microsoft sought to help protect Ukranian people and organizations during the onslaught.

See the source image

Below are some details on a handful of what Microsoft believes to be upwards of 237 attacks, that also happen to align with widely reported “kinetic military operations,” listed in its detailed report.

As today’s report details, Russia’s use of cyberattacks appears to be strongly correlated and sometimes directly timed with its kinetic military operations targeting services and institutions crucial for civilians. For example, a Russian actor launched cyberattacks against a major broadcasting company on March 1st, the same day the Russian military announced its intention to destroy Ukrainian “disinformation” targets and directed a missile strike against a TV tower in Kyiv. On March 13th, during the third week of the invasion, a separate Russian actor stole data from a nuclear safety organization weeks after Russian military units began capturing nuclear power plants sparking concerns about radiation exposure and catastrophic accidents. While Russian forces besieged the city of Mariupol, Ukrainians began receiving an email from a Russian actor masquerading as a Mariupol resident, falsely accusing Ukraine’s government of “abandoning” Ukrainian citizens.

Not only does Microsoft cover more specific instances of coordinated cyberattacks, but it charts the percentage of destructive attacks concerning government, military, economic and civilian organizations or critical infrastructures as well as detailed timeline of the types of techniques used.

When Russian troops first started to move toward the border with Ukraine, we saw efforts to gain initial access to targets that could provide intelligence on Ukraine’s military and foreign partnerships. By mid-2021, Russian actors were targeting supply chain vendors in Ukraine and abroad to secure further access not only to systems in Ukraine but also NATO member states. In early 2022, when diplomatic efforts failed to de-escalate mounting tensions around Russia’s military build-up along Ukraine’s borders, Russian actors launched destructive wiper malware attacks against Ukrainian organizations with increasing intensity. Since the Russian invasion of Ukraine began, Russian cyberattacks have been deployed to support the military’s strategic and tactical objectives. It’s likely the attacks we’ve observed are only a fraction of activity targeting Ukraine.

Microsoft’s Special Report: Ukraine an Overview of Russia’s Cyberattack Activity in Ukraine is an engaging piece of immediate historical reference as per the company’s president Brad Smith puts it, marks the first publicly highlighted hybrid war.

See the source image

Microsoft’s report also examines the most overt and subtle forms of cyber warfare where Smith implores the world’s nations to be on the lookout for “disinformation” campaigns which are particularly threatening to democracy around the globe.

Not all is lost by the end of the 21-page report Microsoft offers a set of recommendations that include:

  • Minimizing credential theft and account abuse
  • Secure internet-facing systems and remote access solutions
  • Leverage anit-malware, endpoint detection, and Identity protection solutions.
  • Enable investigations and recovery
  • Defend against destructive attacks
  • Review and implement “best practices” for defense in depth.

Microsoft vows to continue to work with Ukraine to spot, catalogue and address future Russian backed cyber aggression but also encourages liberal arts and computer majors to switch class focus for a bit to better identify the political, socio-economic, historical and engineering aspects to future hybrid war strategies.

Bad Module Info has Stopped Working: How to Fix it

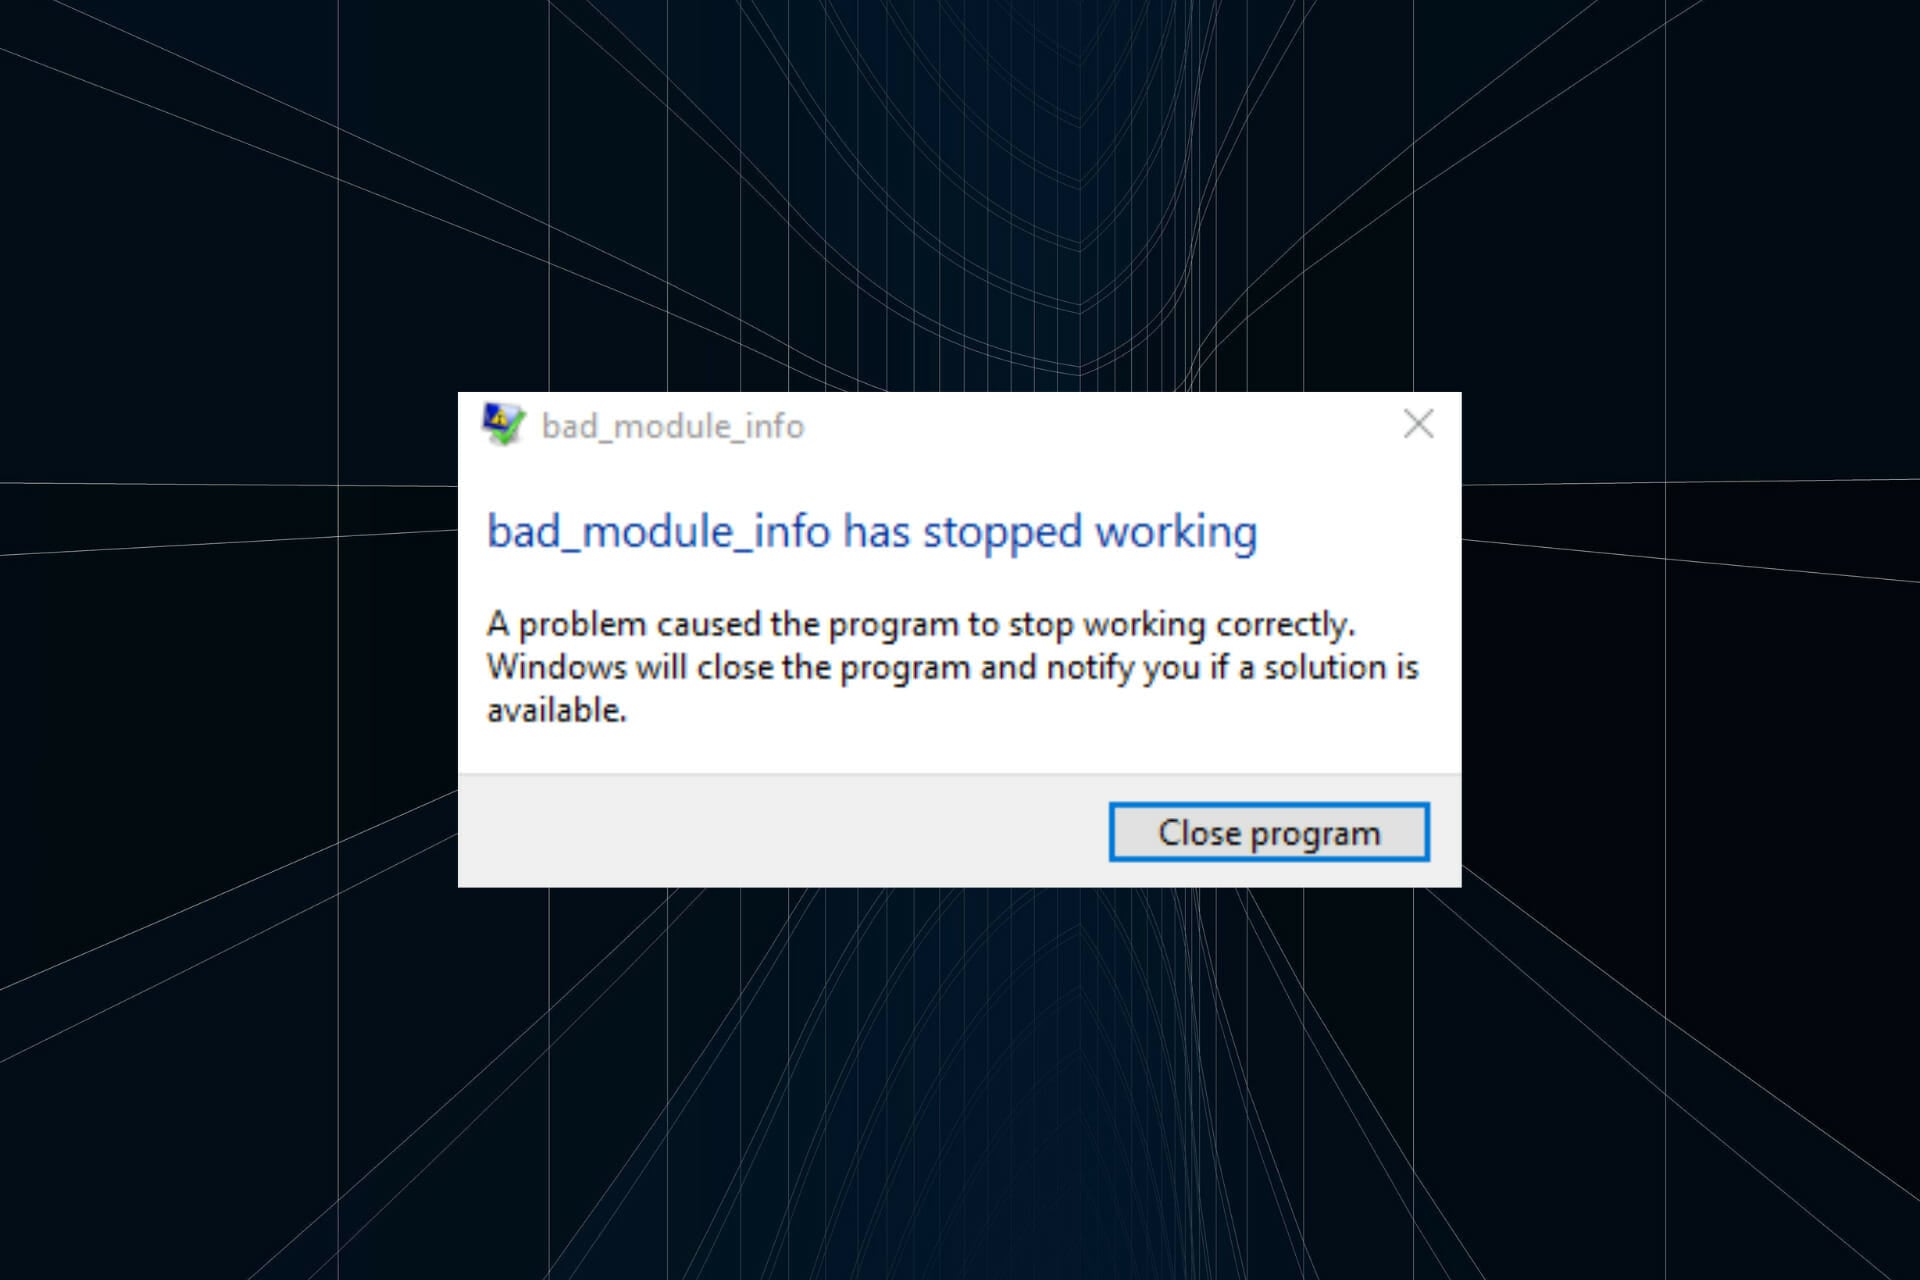
Playing games is only fun when there is the least disruption and no lags or stutters. But some users have reported encountering the bad_module_info has stopped working when running games. Generally, you would come across it in Fortnite, Counter-Strike, and Minecraft.

Besides, it’s generally encountered when the system resources are running low, there’s a problem with the installed drivers, or an application is conflicting with the game.

Now that you understand the underlying causes let’s walk you through the fixes for the bad_module_info has stopped working error.

How do I fix bad_module_info has stopped working?

1. Reboot the computer

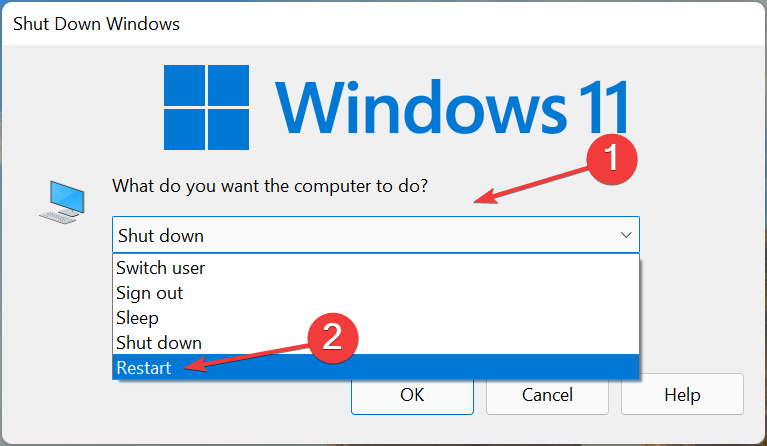
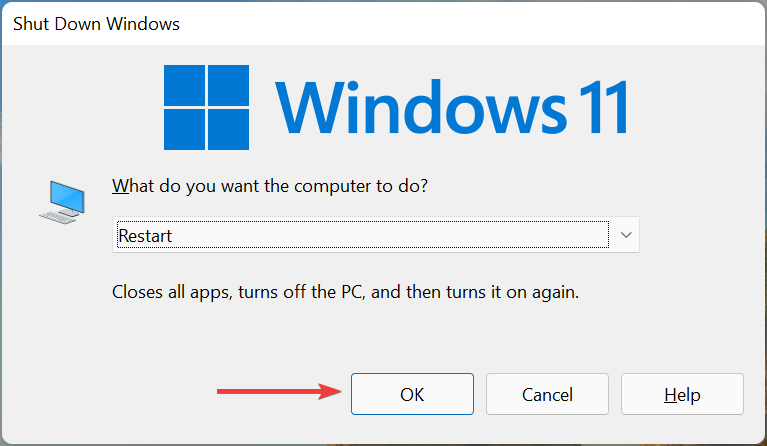
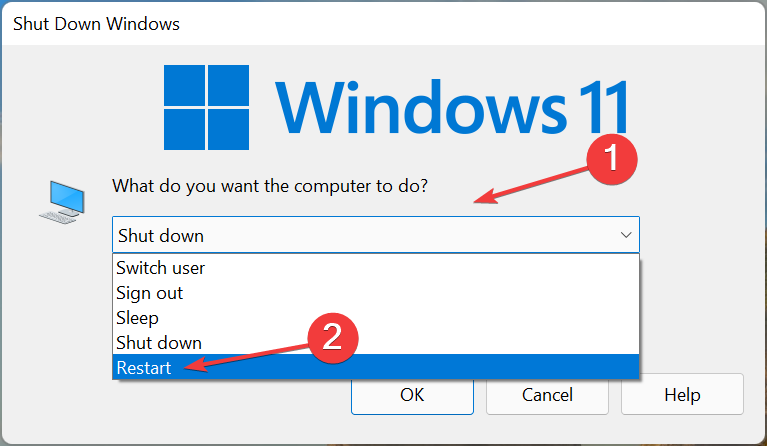
  1. When you encounter the error, navigate to the desktop, press Alt + F4 to launch the Shut Down Windows box and select Restart from the dropdown menu.Restart to fix bad_module_info has stopped working
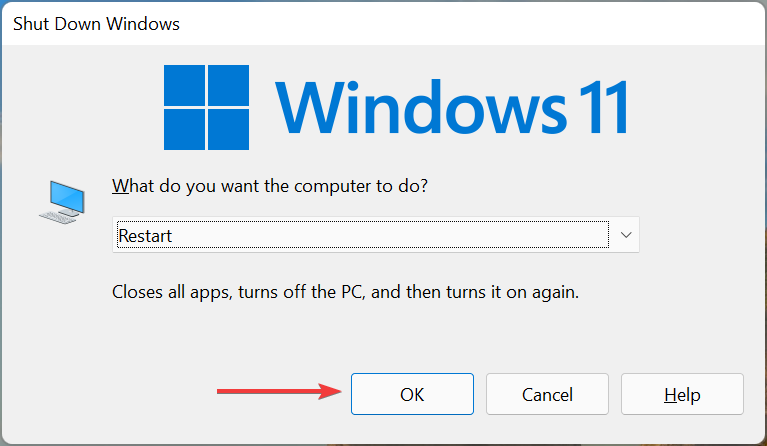
  2. Next, click OK at the bottom to restart the computer.OK

In most cases, low system resources led to the bad_module_info has stopped working error in Valorant. When you restart the computer, all the background processes are terminated, thus releasing a good amount of load from the CPU.

2. Disable fullscreen optimization

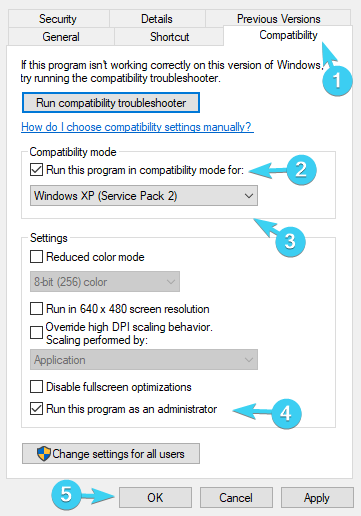
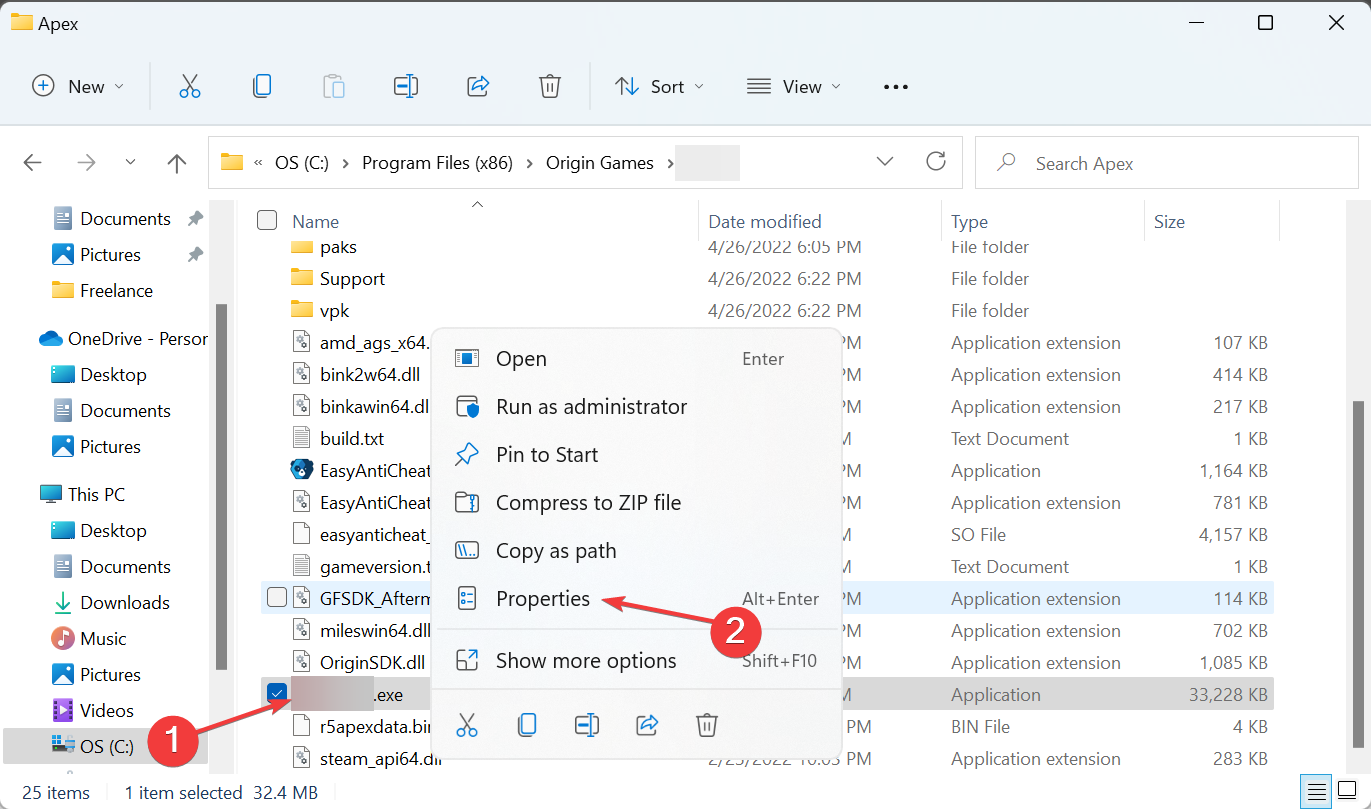
  1. Go to the folder where the launcher (.exe file) for the problematic game is stored, right-click on it, and select Properties from the context menu.Properties
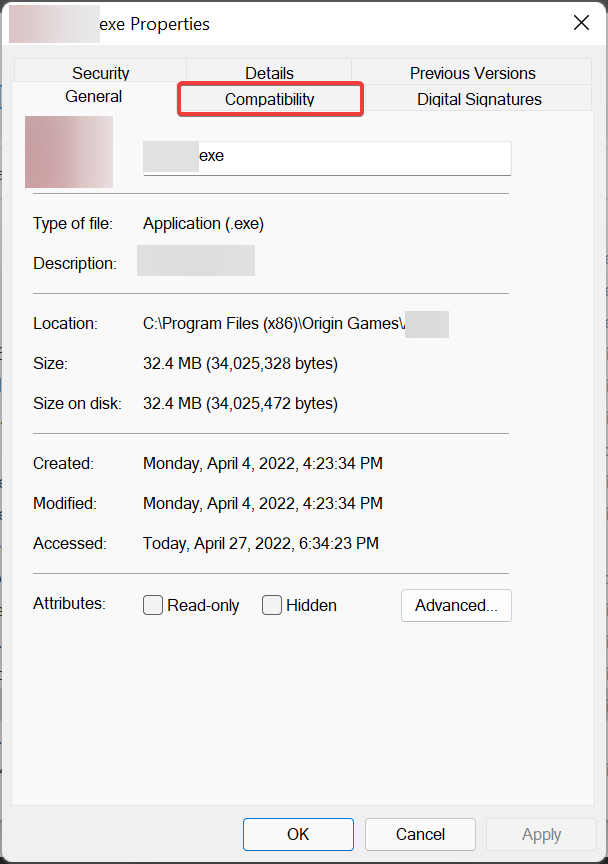
  2. Next, navigate to the Compatibility tab.Compatibility
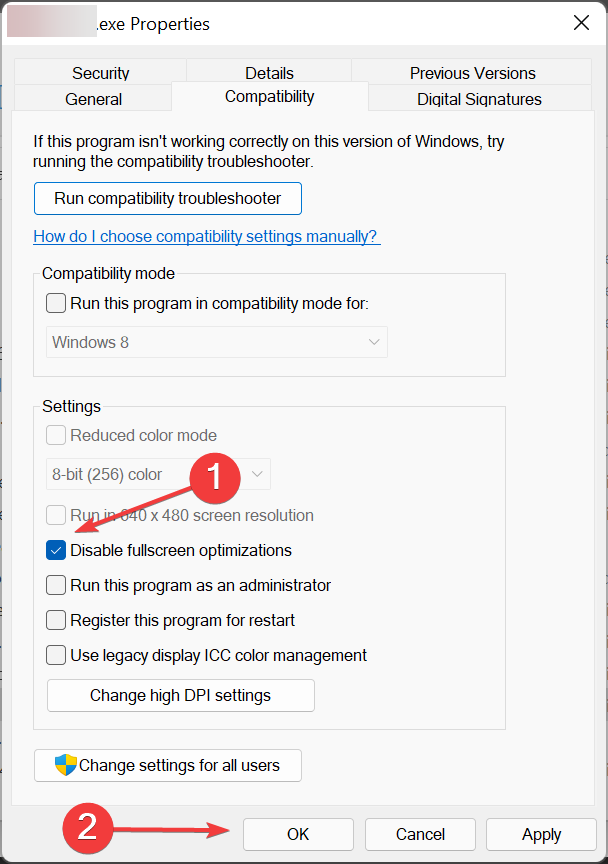
  3. Tick the checkbox for Disable fullscreen optimization, and click on OK at the bottom to save the changes.Disable to fix bad_module_info has stopped working

The fullscreen optimization feature is enabled by default for games and video players and helps enhance the gaming experience by optimizing the system’s performance.

However, it also leads to the bad_module_info has stopped working error with Adobe and other similar applications, so disable the feature. If the error is not fixed, re-enable fullscreen optimization and move to the next fix.

3. Update the graphics driver

  1. Press Windows + S to launch the Search menu, enter Device Manager in the text field at the top, and click on the relevant search result.Device manager to fix bad_module_info has stopped working
  2. Next, double-click on the Display adapters entry to expand and view the devices under it.Display adapters
  3. Right-click on the graphics adapter, and select Update driver from the context menu.Update driver to fix bad_module_info has stopped working
  4. Now, select Search automatically for drivers from the two options in the Update Drivers window.Search automatically for drivers
  5. Wait for the system to find and install the best available driver.

Also, make sure to check if there are updates available for the other drivers as well and install them. Once done, check if the bad_module_info has stopped working error with Genshin Impact and other games is fixed.

If the update didn’t go through successfully using the Device Manager, you could try other ways to manually install the latest driver in Windows.

A reliable alternative is to use automated software such as Fortect Driver Updater. Using its comprehensive database, it will identify and install the latest drivers in just a few minutes.

⇒ Get Fortect Driver Updater

4. Disable SysMain service

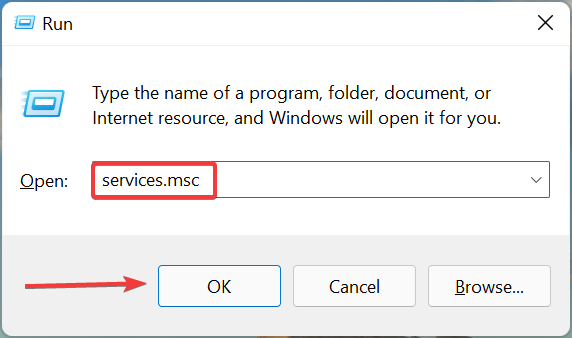
  1. Press Windows + R to launch the Run command, type services.msc in the text field, and then either click OK or hit Enter to launch the Services app.services
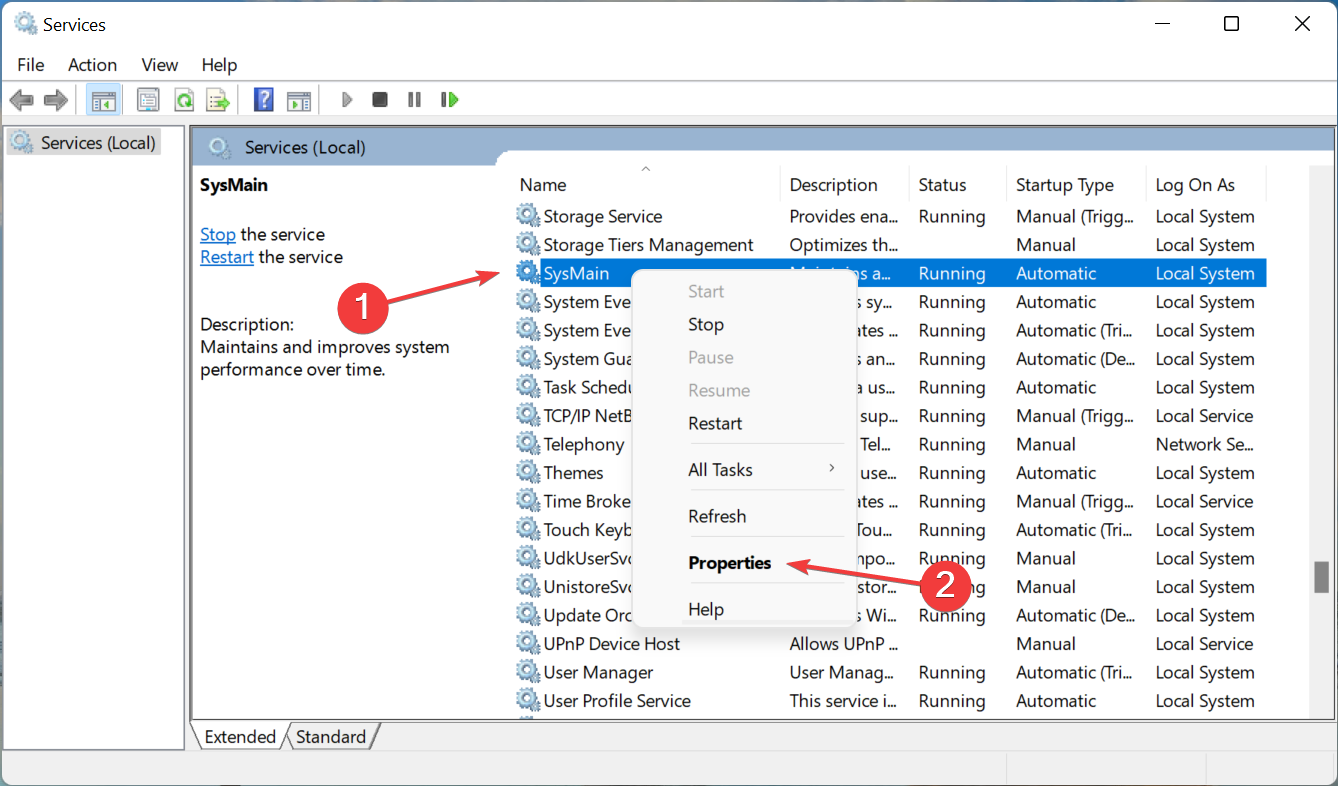
  2. Locate the SysMain service, right-click on it, and then select Properties from the context menu.SysMain properties
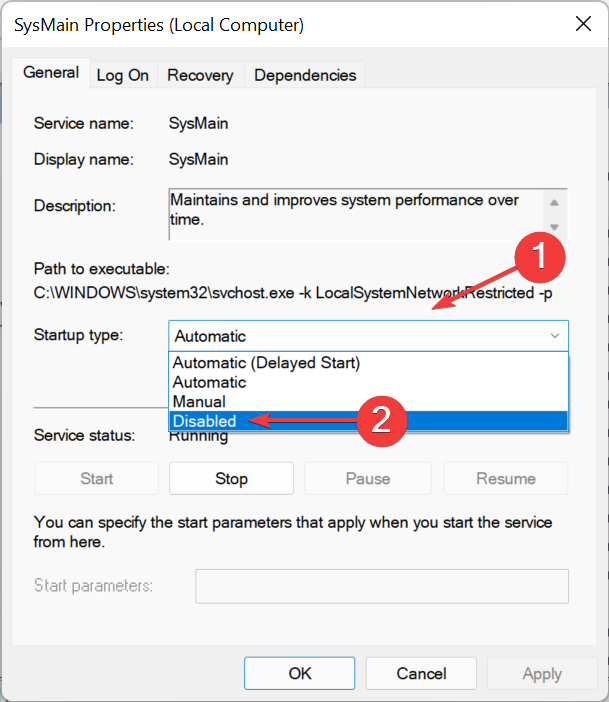
  3. Now, click on the Startup type dropdown menu, and select Disabled from the list of options.disable to fix bad_module_info has stopped working
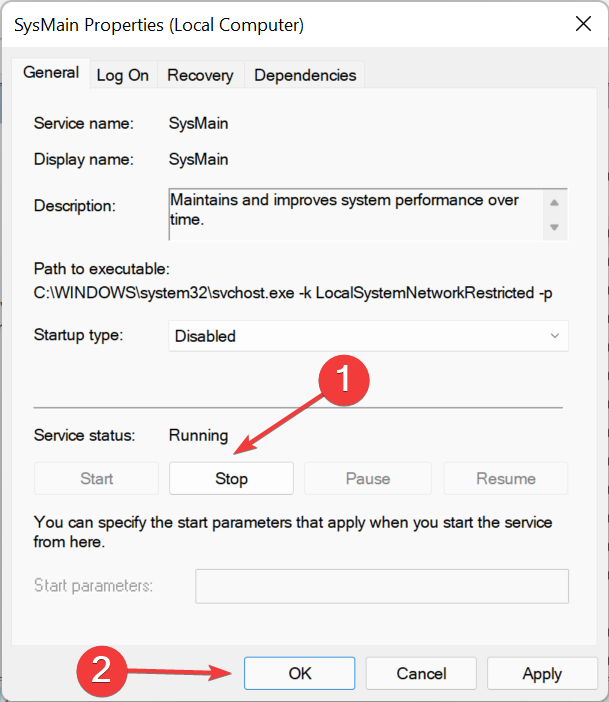
  4. If the service is currently running, click on the Stop button under Service status, and then click on OK to save the changes.Stop

SysMain is one of the most advanced services but consumes a lot of resources while running in the background, which could lead to the bad_module_info has stopped working error.

The service basically identifies a pattern of how you use the computer, which apps you open, and at what particular time of day. Subsequently, it will load these programs to reduce the boot time and optimize the system’s performance.

Even if it doesn’t help eliminate the bad_module_info has stopped working error, you may consider keeping the SysMain service disabled to free up system resources in case the computer is unresponsive or lagging most of the time.

5. Remove conflicting applications

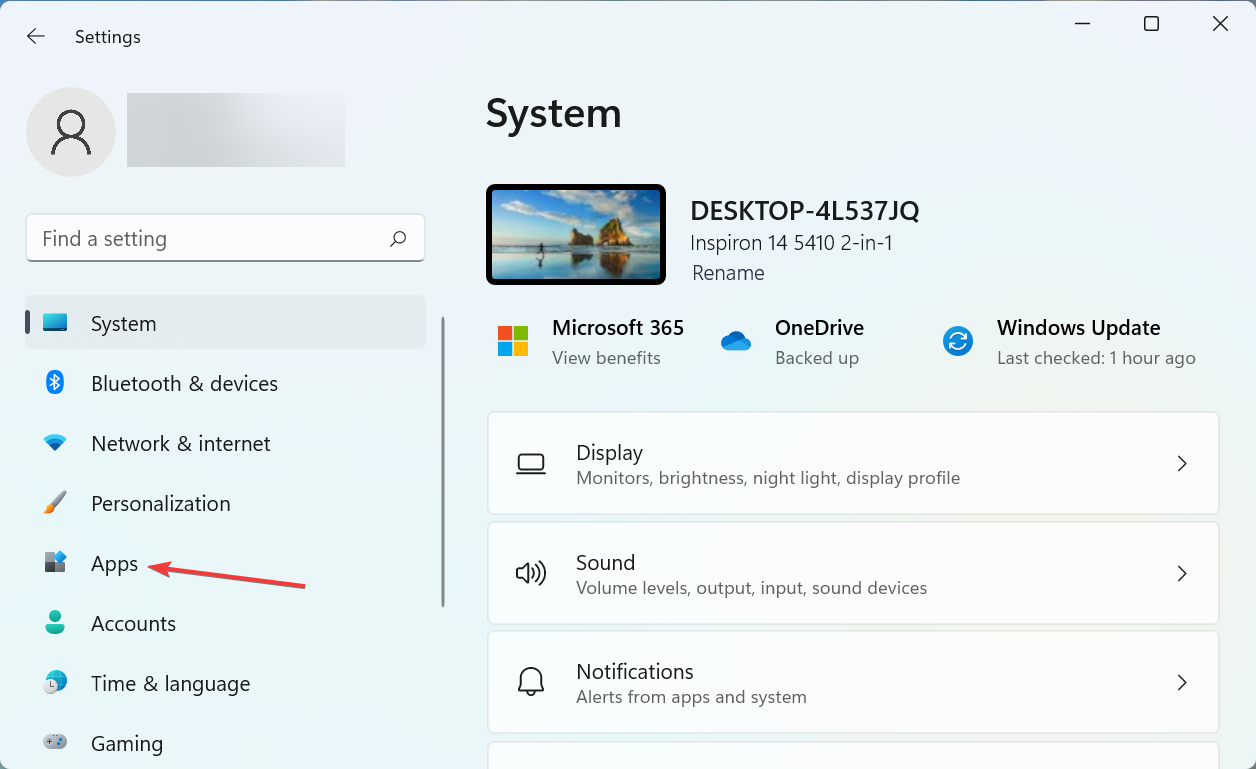
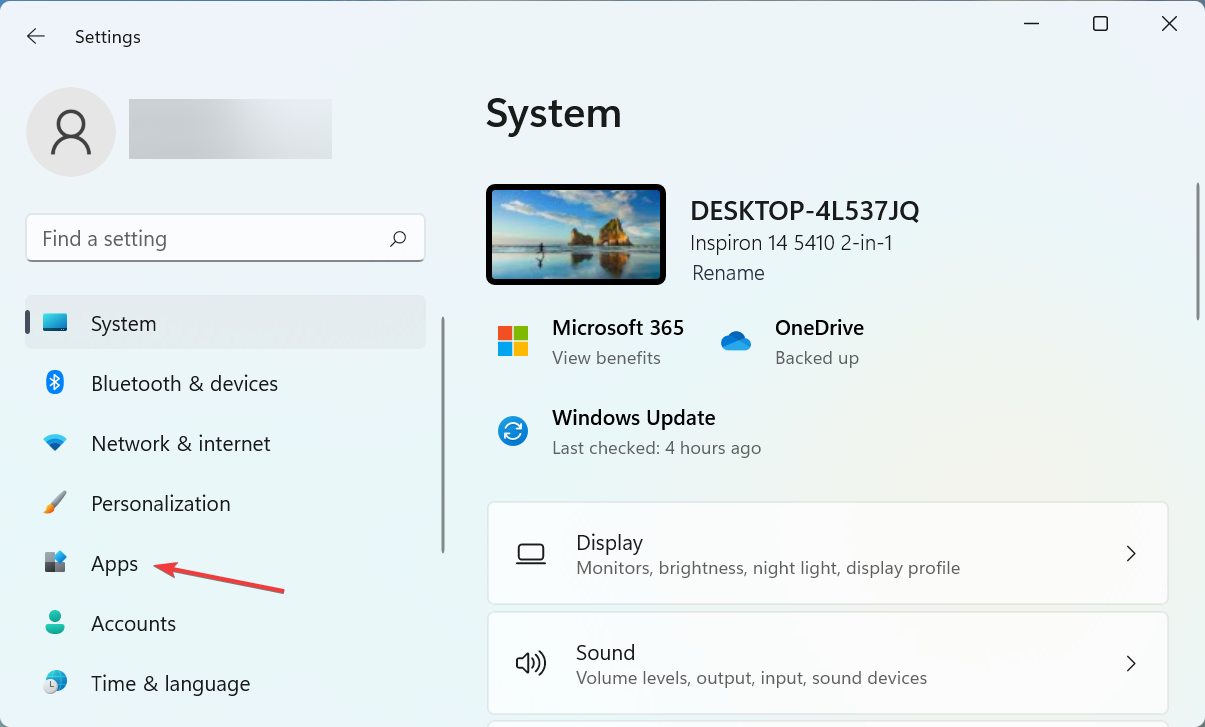
  1. Press Windows + I to launch Settings, and select Apps from the list of tabs in the navigation pane on the left.Apps
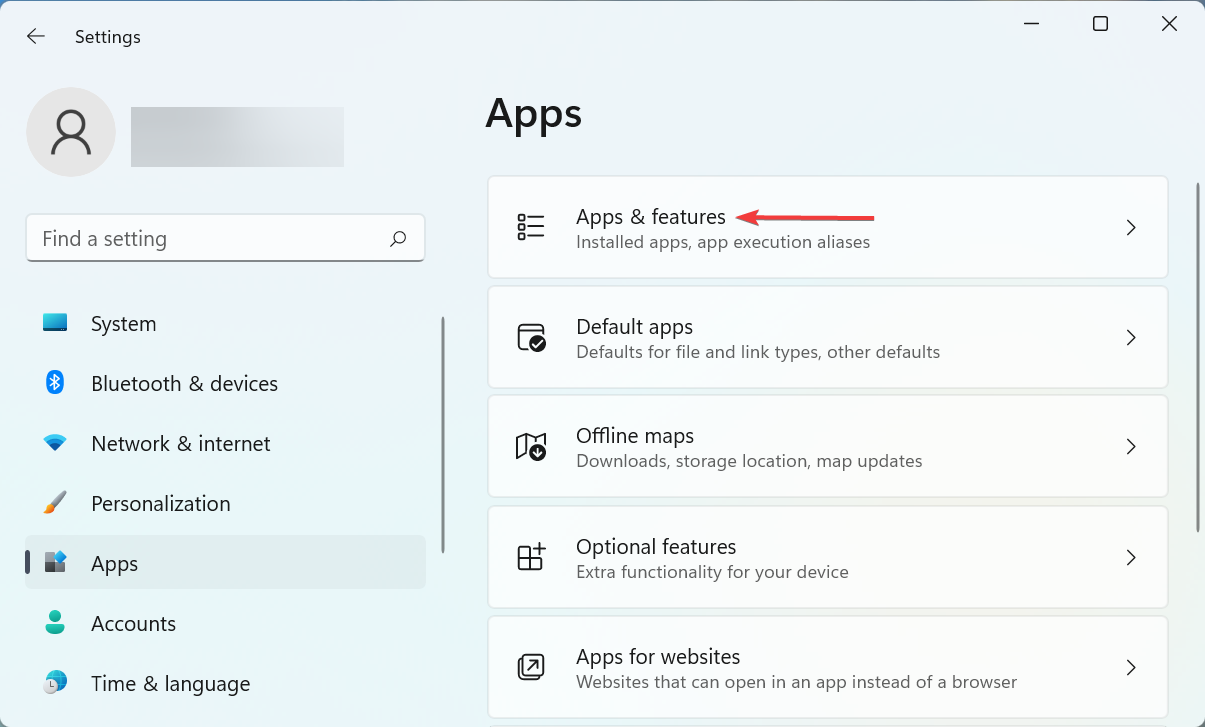
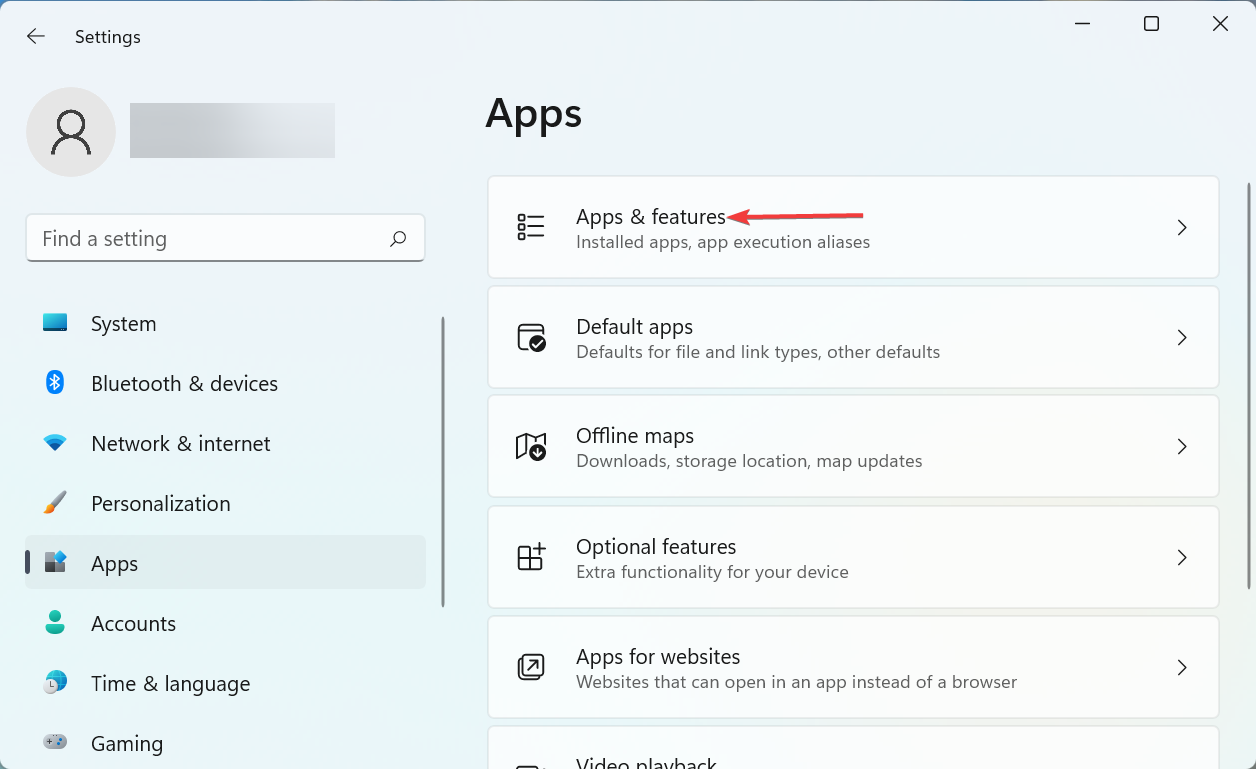
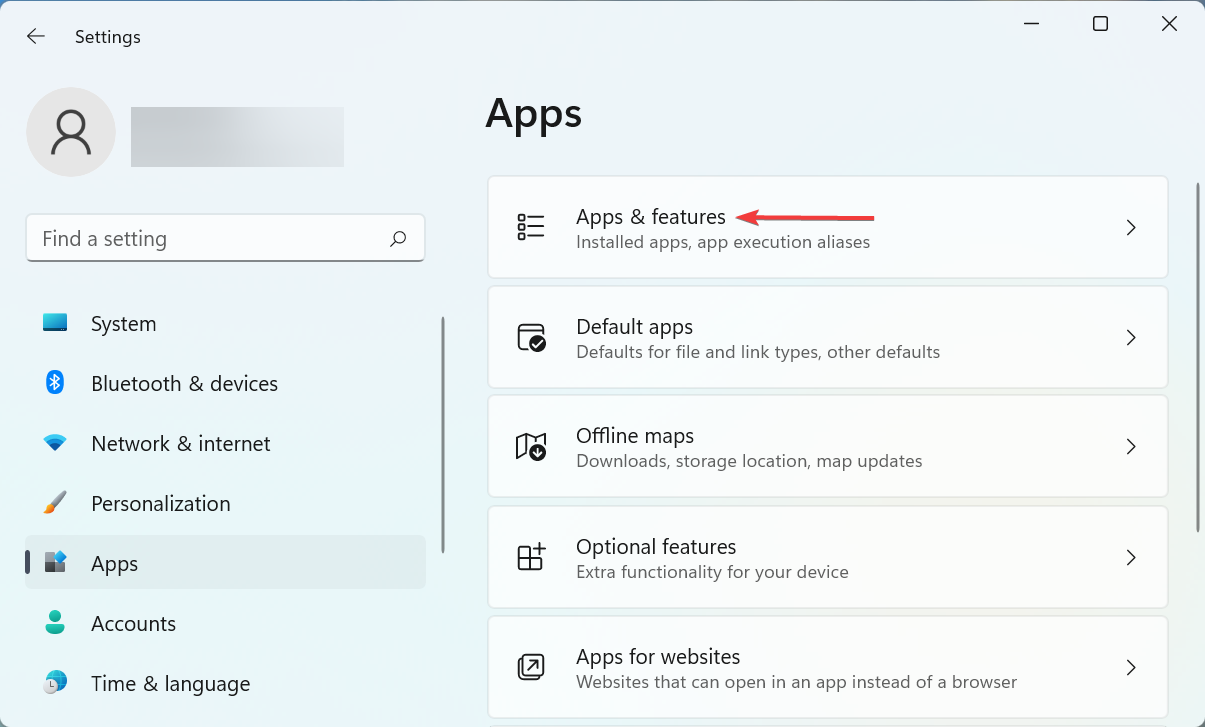
  2. Click on Apps & features on the right.Apps & features to fix bad_module_info has stopped working
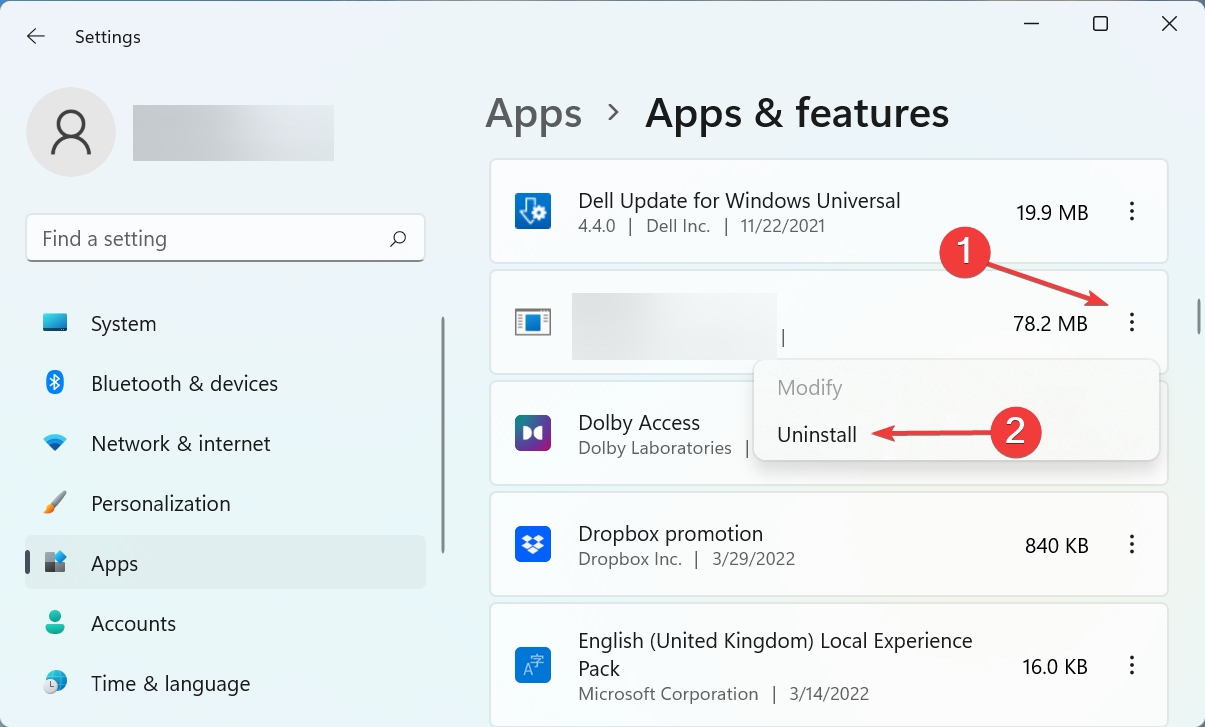
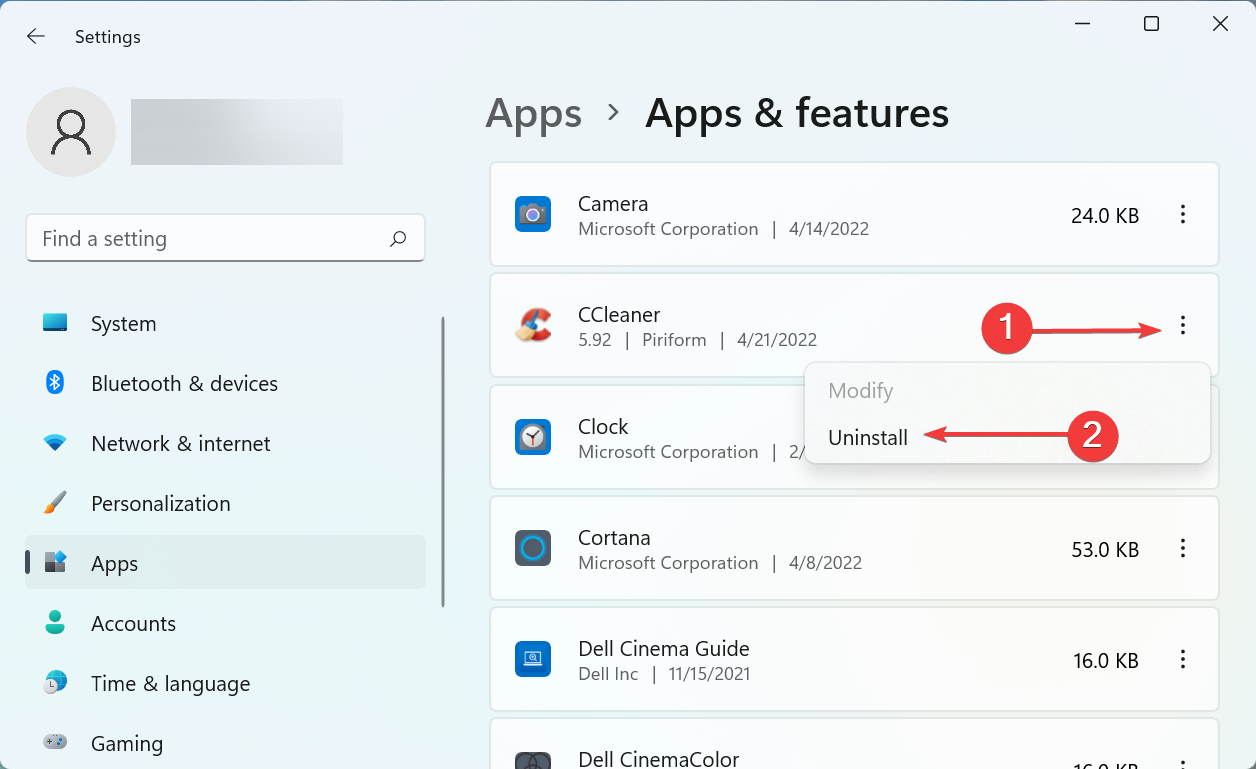
  3. Locate the conflicting app, click on the ellipsis next to it, and then select Uninstall.Uninstall to fix bad_module_info has stopped working
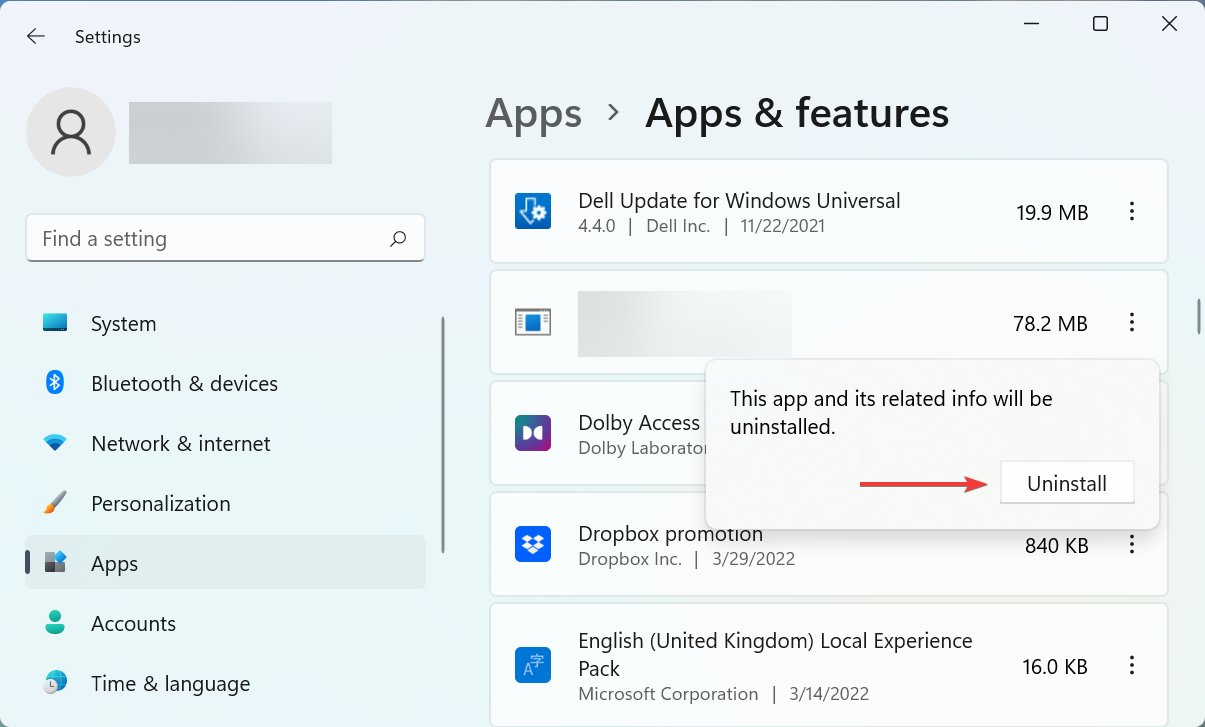
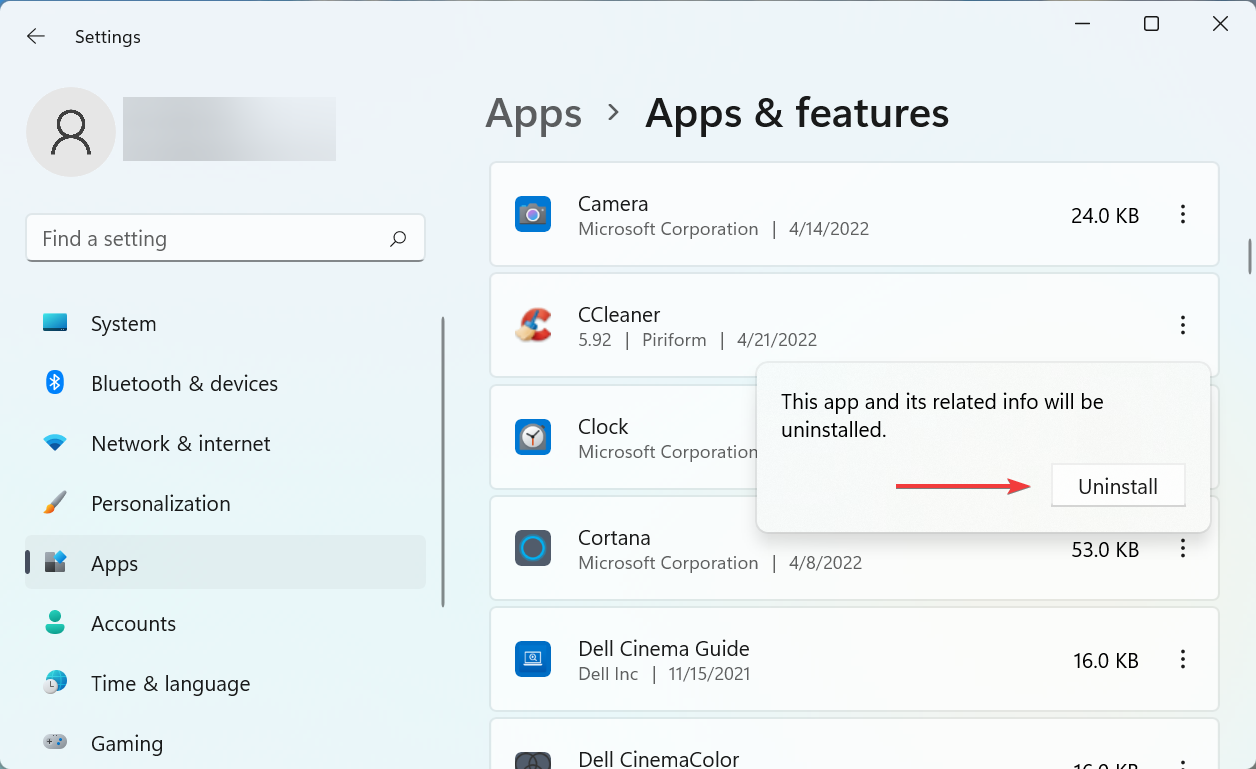
  4. Again, click on Uninstall in the prompt that pops up.Confirm

Several applications are known to conflict with games, and in most cases, it was a third-party antivirus. Malwarebytes was the most common of these. So, if you have any third-party antivirus installed, remove it. And do not forget to check the most reliable antiviruses for Windows.

6. Use a dedicated game booster software

If none of the methods listed here have worked, you may want to consider going for an effective game booster software. These are designed to optimize the computer’s performance by strategically allocating the system resources and enhancing the gaming experience.

Game booster software may come in handy for computers with low-end specifications. It will improve the FPS, decrease ping, and some even offer the option to overclock the CPU.

These are all ways to eliminate the bad_module_info has stopped working error. Once you’ve done so, you can play your favorite games the way they were meant to be.

Also, find out how to optimize the PC for the best gaming experience.

Tell us which fix worked, and if you know any that have not been listed here, drop them in the comments section below.

Microsoft testing rounded corners, more subtle Windows 11 design effects in Edge Canary

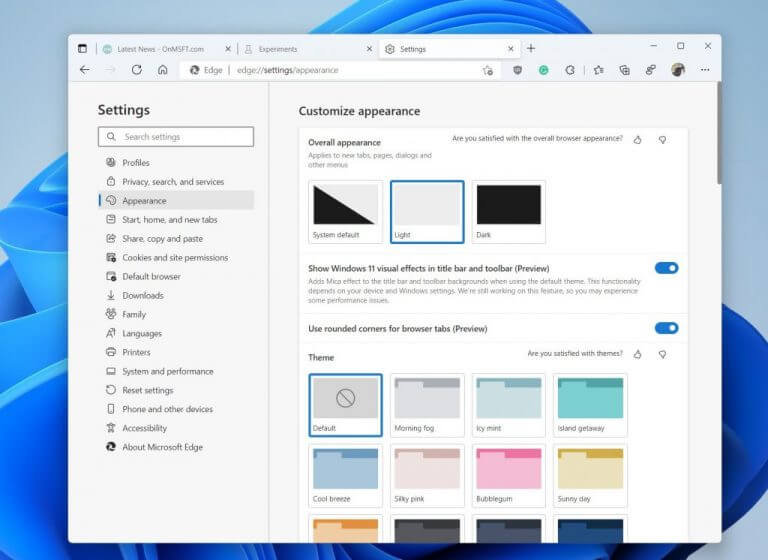
Microsoft has been known for some design inconsistencies, where not all of its products or apps look the same on Windows. Yet Windows 11 was a huge step forward in cleaning things up, but one more thing is in the works, too. Shared by FireCube on Twitter (via Windows Central), Microsoft is testing rounded corners, and more subtle Windows 11 design effects in Edge Canary.

These new design options come in Edge Canary version 102.0.1241.0 and is exclusive to Windows 11, but take a bit of digging to get to. You’ll first have to go to edge://flags and search for the Show experimental appearance settings option and turn it Enabled, then quit and reopen the browser.

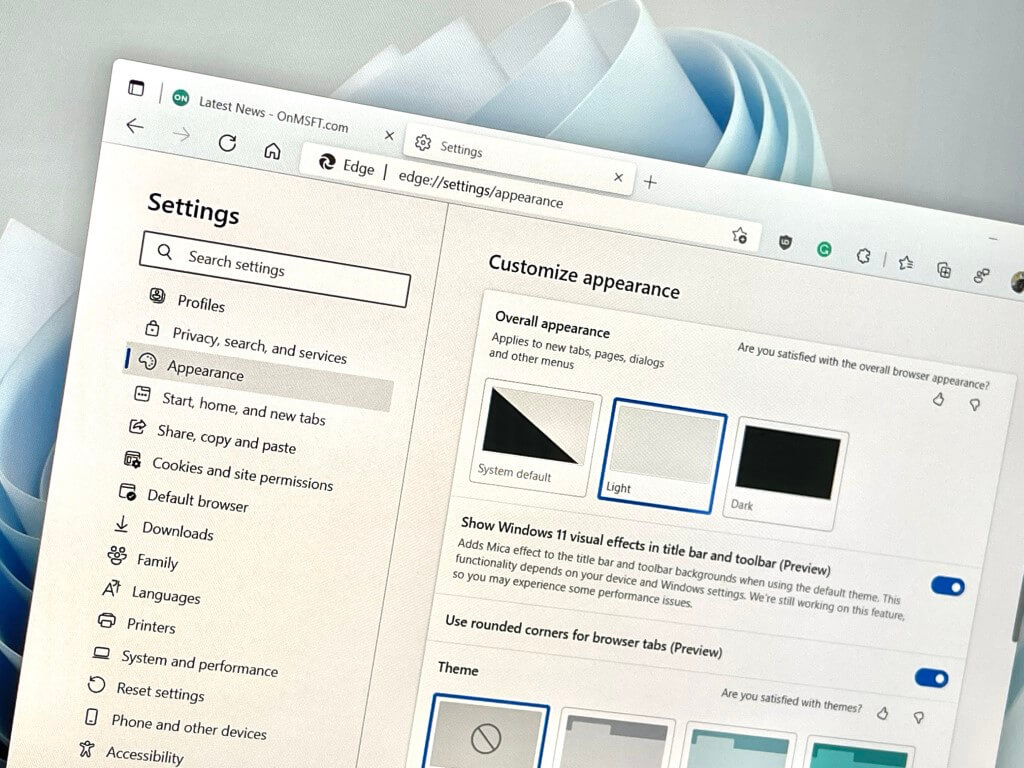
Once that’s enabled, you can go back to Edge’s appearance settings menu, and look for the new Show Windows 11 visual effects in the title bar switch. Turn it on. You’ll also see a Use rounded corners for browser tabs (Preview) option, too. And it can be toggled to the on position as well. Once done, restart the browser, and Edge should look like the screenshot below.

Overall, this is a really nice look, very reminiscent of the now-defunct legacy version of Microsoft Edge. It definitely helps the web browser look more consistent with the operating system that it is running on, mainly thanks to the semi-transparent mica effects that already make Windows 11 look so beautiful. Even the rounded tabs are nice, as it has more of a “floating” look, similar to what Mozilla has accomplished in the latest version of Firefox.

We hope that Microsoft rolls this design change out to the regular stable version of Microsoft Edge soon. However, features in Edge Canary are known to come and go, so just because we’re seeing this today, it doesn’t mean that it’s final. Do check it out, though, and let us know what you think in the comments below!

Xbox Game Pass subscribers to get early access to Disney Dreamlight Valley

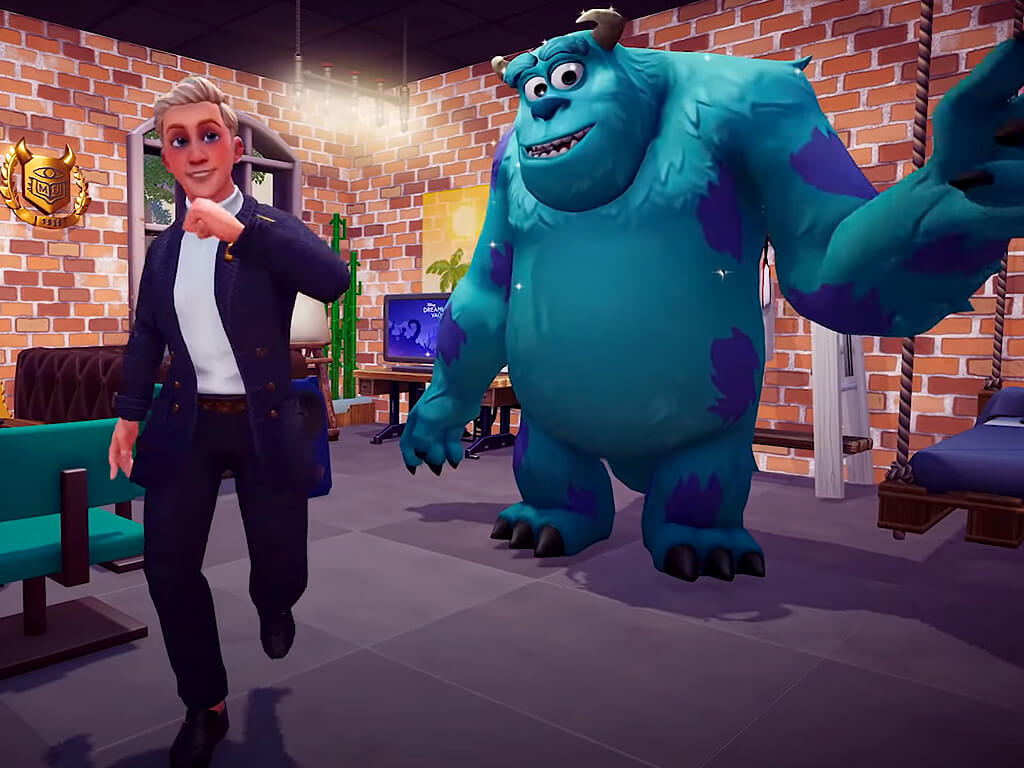
Gameloft today announced an upcoming video game called Disney Dreamlight Valley that’s currently expected to release on Windows PC, Xbox One, Xbox Series X (and S,) and Sony and Nintendo’s rival consoles in 2023.

Disney Dreamlight Valley seems to be a bit like The Sims and Animal Crossing and allows the player to customize their own player avatar and complete tasks within a village populated by Disney and Pixar properties.

A short teaser video was released that shows a variety of customization options and activities that players can explore. Rather amusingly, Disney Dreamlight Valley seems aimed at adult fans of Disney properties rather than young players. As in, it has a strong free-to-play mobile game for soccer mums to play vibe going for it. This isn’t necessarily a strange decision though as there are definitely a lot of adult Disney fans out there, this writer included.

While Disney Dreamlight Valley isn’t due for release until 2023, subscribers of Microsoft’s Xbox Game Pass subscription service will be given free early access to a kind of open beta which is expected to debut sometime this year. Interested gamers on other platforms will have to purchase a Founders Pack to partake in this early testing period.

Need more gaming news in your life? Follow us on Facebook, Twitter, and Pinterest.

How to turn off the touch screen on HP? 7 easy ways

HP laptops and Chromebooks with touch screen displays offer advanced user experience for improved workflow and better work mobility.

The touch screen functionality often comes as a default feature on touch screen enabled HP laptops and most users never bother to learn how to turn off the touch screen on HP.

While a touch screen has a lot of benefits for fluid workflow, there are situations where you might need to temporarily turn off the touch screen on your gadgets.

To learn how to turn off the touch screen on HP, we will provide different ways in this article. But before that, let’s understand the reasons you might need to turn off the touch screen.

Why turn off the touch screen on the HP device?

Various scenarios could prompt you to disable the touch screen functionality on your PC. However, most users turn it off due to its heavy power consumption on their devices.

Also, some users have reported about the Ghost touch. This is an erratic malfunctioning of the screen to react automatically without a user’s interference and prevent you from using it.

Another reason might be to prevent unexpected disturbances during troubleshooting and other mechanical issues. Although, some users simply disable it because they don’t use it because they are more comfortable with a mouse and keyboard.

Whatever the reason may be, simply follow the instructions in the methods provided below for a quick solution.

How can I turn off the touch screen on an HP laptop?

1. Disable the Human Interface devices

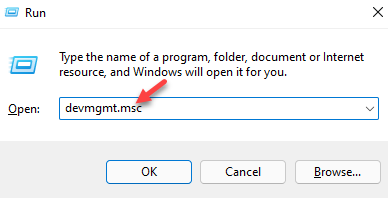
  1. Press Windows + R to launch the Run box, input devmgmt.msc and click OK. write devmgmt.msc in the run command and press enter
  2. Locate Human Interface Devices and expand them. 
  3. Right-click on HID-Compliant Touch Screen and choose Disable device.
  4. Restart PC to take effect.

It isn’t uncommon to have more than one touch screen driver, so you should disable them all.

By disabling the touch screen via device manager, it should override its functionalities. However, you may have to enable the device before your screen touch can be reactivated on the PC.

2. Use the Windows PowerShell

  1. Right-click the Start button and choose Windows PowerShell (Admin).Windows PowerShell (Admin) - How to check .net version Windows server
  2. Input the following command and press the Enter key: Get-PnpDevice | Where-Object {$_.FriendlyName -like ‘*touch screen*’} | Disable-PnpDevice -Confirm:$false
  3. After a successful process, the touch screen should be disabled.
  4. Restart your PC.
  5. To re-enable the touch screen, input the following command: Get-PnpDevice | Where-Object {$_.FriendlyName -like ‘*touch screen*’} | Enable-PnpDevice -Confirm:$false

Most Dell laptop users reported success with this method. Hence, it is one of the most effective solutions on how to turn off the touch screen on Dell.

Sometimes, the PowerShell might display errors on the commands you run on HP laptops, but that doesn’t mean it isn’t successful.

So, there’s no reason to panic if it pops up an error code, just restart your PC. If it fails to work, you can retry the steps again or proceed to the next method.

3. Adjust settings in the Control Panel

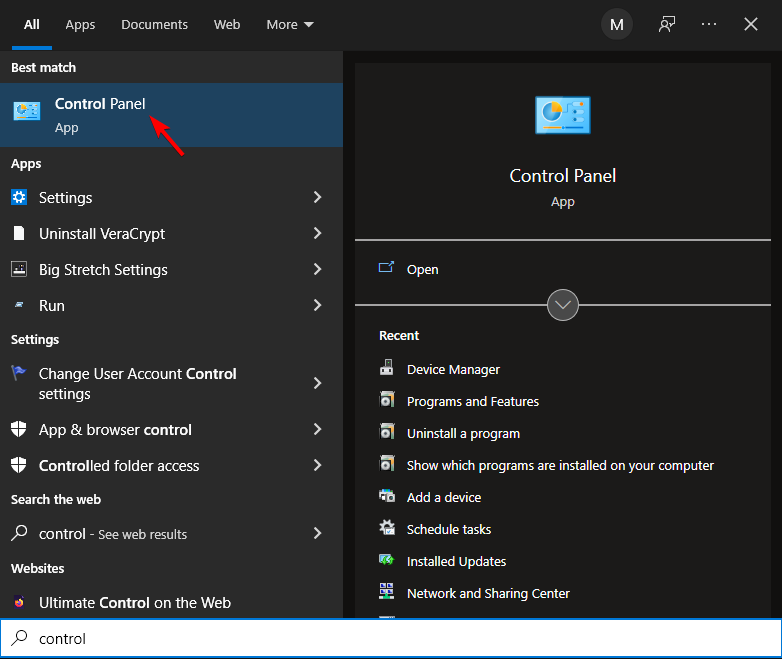
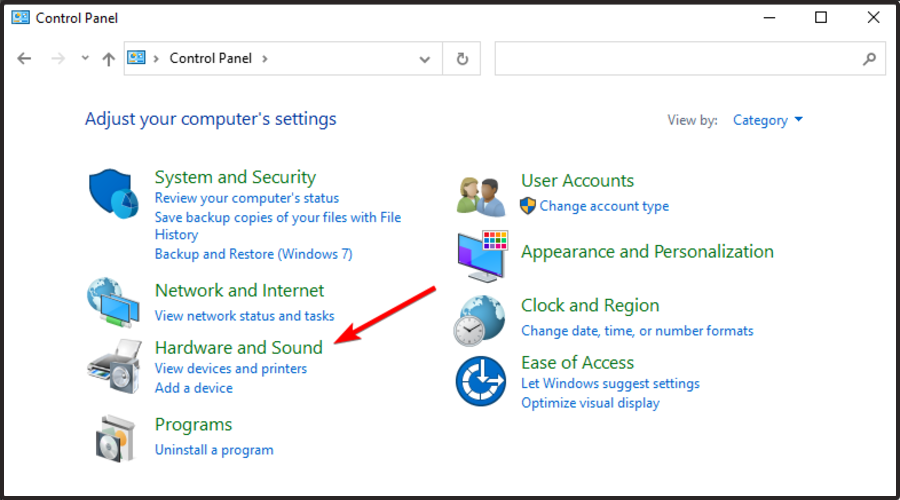
  1. Press the Windows key and search for Control Panel.
  2. Choose Hardware & Sound.
  3. Select HP Touch screen Configuration.
  4. Click the Global tab, and tick both Touch screen and Touch Screen Sound.
  5. Press Enter and restart your PC to take effect.

This is a much easier and faster way to get your HP touch screen turned off. You may not need to restart the PC in some cases. This is more suited as a solution for users who have upgraded to Windows 11.

4. Change settings in Registry Editor

  1. Press Windows key + R to launch the Run dialogue box,
  2. Input regedit and press Enter or click OK.Type regedit in Run search bar and hit Enter
  3. In the registry editor, navigate to the following or paste this location manually in the navigation box above: Computer\HKEY_CURRENT_USER\Software\Microsoft\Wisp\Touch
  4. Right-click the space on the right pane, then click New and choose DWORD (32-bit) Value.
  5. Change the value name to TouchGate.
  6. Double-click TouchGate, change value data to 0, and Base to Hexadecimal.In Edit DWORD (32-bit) Value change value data to 2
  7. Restart PC to take effects.

This should turn off the touch screen on HP if done properly. However, It is important to backup your registry before attempting this particular method. 

The registry editor houses some important configuration files for the proper functioning of your PC. To prevent issues as a result of mistakes during this process, you can safely restore from backup.

5. Change Bios settings

  1. Power on your PC and keep pressing the F2 or F10 keys during the booting process.
  2. Navigate with the keyboard arrow keys to choose Advanced Bios.
  3. Select system properties or device options.
  4. Locate the touchscreen device, and press Enter key on the highlighted Enable/Disable option.
  5. Press the Esc key, click on the Exit menu and select Save Changes and Exit.

Unless everything else has failed, changing settings through the Bios is not recommended.

6. Disable the touch screen on ChromeOS

  1. Launch Chrome and search for the following: chrome://flags
  2. Input Debugging Keyboard Shortcuts in the search flag menu.
  3. Click to enable it.
  4. Restart Chrome book to take effect.
  5. Then press the following keys simultaneously to disable the touch screen: Search key + Shift key + T

This offers a much more straightforward solution on how to turn off the touch screen on Chromebook once the settings have been updated in Chrome OS settings.

7. Disable touch screen through Registry Script

  1. Download the .reg file, unzip it and open it.
  2. Navigate to the disable/enable_touch_screen and highlight them. 
  3. Right-click and select Merge.
  4. Click Yes and Restart PC to take effect.

This Registry Script offers the best solution on how to turn off the touch screen on Lenovo but it applies to HP devices too.

These are all the solutions available if you want to learn how to turn off the touch screen on HP.

In addition, there are differences in the efficiency of each method depending on your device. Some are suitable options for Windows 11 users, Windows 10, and even Chromebooks.

However, if your device isn’t HP, you can check out our article on how to disable the touch screen on Windows 10.

We also recommend you to check our article, Windows 11’s touch screen not working fixes on how to enable your touchscreen back when needed.

We’d love to hear back from you in the comments section below on your questions and suggestions about this article.

7 best sound modules for greeting cards to surprise your friends

In recent years, personalized greeting cards have become a popular way to convey affection to people we feel for. 

A greeting card is made of a piece of card that typically has some illustrations or photos on it and is used to express sentiment.

What better way to put a sound module for greeting cards inside so that it is even more personalized?

In this article, we will explore seven of the best sound modules you can use for your greeting cards.

How do audio greeting cards work?

Audio greeting cards are not made up of complicated technology. The circuit board contains a Chipcorder which is glued to a paper mounting.

A tab made of plastic refrains the electrical contacts from being in touch with each other and closing the circuit.

The paper mounting which is attached to the end of the plastic tab is drawn back every time the card is opened.

It slips out of the two contacts, which makes the circuit complete. This sends the Chipcorder a signal to start playing the recording.

Not all audio greeting cards allow you to record your own personalized message. The reason is that it costs more to include this technology.

What are the best sound modules for greeting cards?

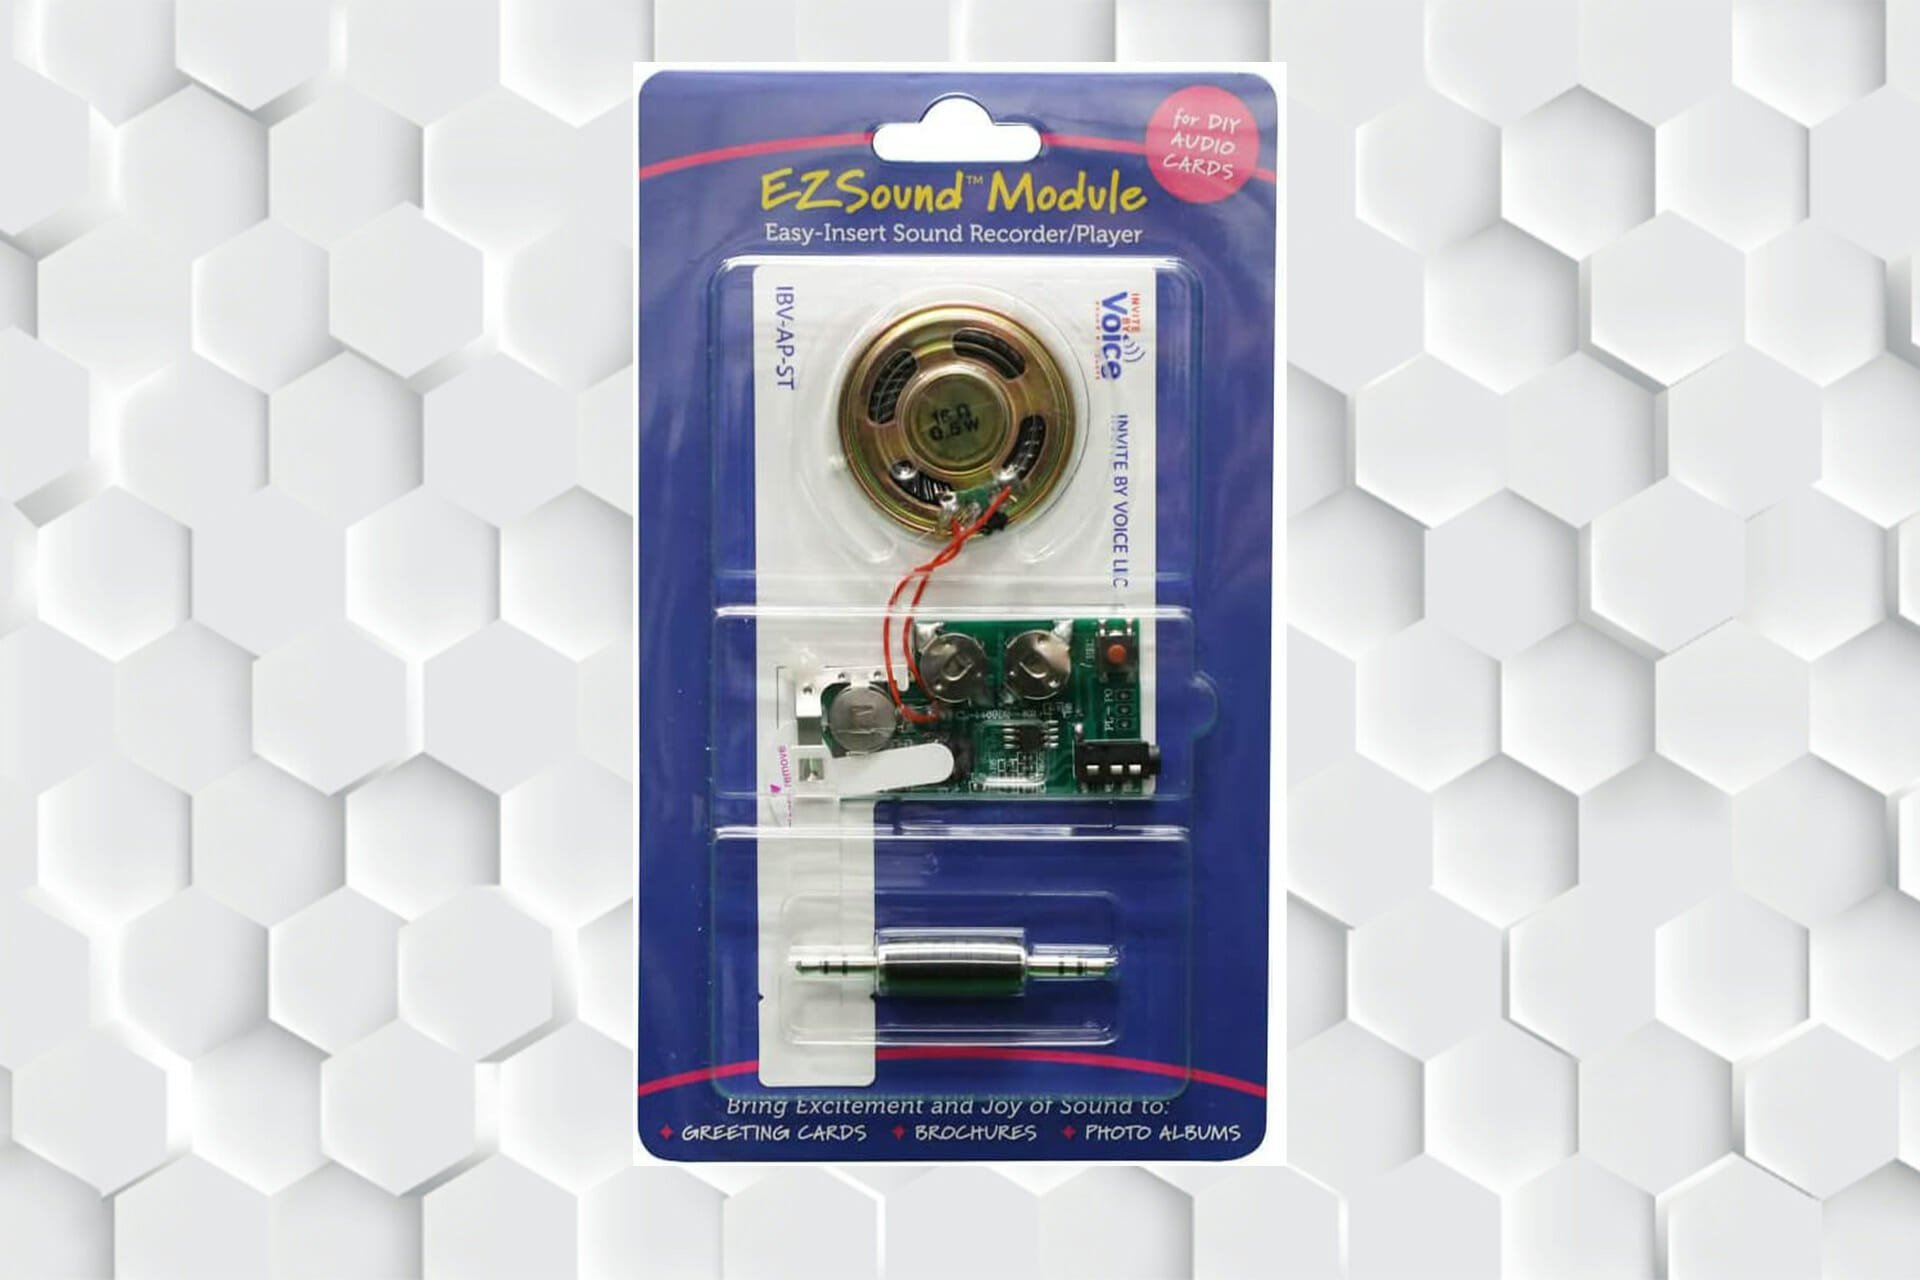
EZSound module for DIY audio cards

  • Capable of recording audio from video and sound files, etc.
  • Compatible with Mac, Windows, iOS, Android, MP3 Player, Tablets, etc.
  • Capable of recording up to 120 seconds
  • Lacks a push-to-play button
  • Needs to be plugged in to be able to record.

EZSound sound module is a module that comes with a double-sided audio adapter to record your voice messages. It needs 3 LR44 batteries and has a 2.5-millimeter headphone jack. It has a 5-inch screen size and weighs 0.7 Ounces.

This sound module for greeting cards lets you record audio from video and sound files, voice recordings, messages on your phone, etc.

Moreover, you do not need to install any software and it is compatible with any device (Mac, Windows, iOS, Android, MP3 Player, Tablets, etc.).

EzSound enables you to record up to 120 seconds and you can re-record your message as many times as you want.

MultiPlay light activated recordable sound chip

  • Light sensor
  • Store and play multiple audio files
  • Capable of recording up to 120 seconds
  • Cannot play the recorded sound based on a 12v relay switch

The MultiPlay sound module is a light-sensor activated audio module. It plays the next recording every time it is exposed to light.

It needs 1 Lithium-Polymer battery. Furthermore, it has a screen size of 10 inches. You can store and play multiple audio files on MultiPlay and also re-record your message as many times as you want.

Additionally, this sound module for greeting cards has a 2 MB internal capacity which means you can record up to 120 seconds total.

Unfortunately, the MultiPlay sound module cannot play the recorded sound based on a 12v relay switch.

WayinTop sound module

  • Carious trigger modes
  • Built-in 8 MB memory
  • Comes with a micro-USB port 
  • Cannot record multiple files
  • Needs to be connected to a computer to be able to record

WayinTop sound module is a fit-for-all sound module. It is the ideal choice for DIY small gifts for different holidays. It weighs 85 grams and has a mono microphone operation mode.

WayinTop sound module enables you to develop a module that suits your own project best. You can choose various trigger modes by connecting different soldering pads.

However, you cannot record multiple files in this sound module for greeting cards. Also, it needs to be connected to a computer to be able to record.

Icstation–IS recordable sound module

  • Push-to-play button
  • Compact body and is self-adhesive
  • Windows recognizes it easily when you connect it via USB
  • Deleting the files will open the way for re-recording new sound

Icstation-IS sound module for greeting cards is very easy to use. This sound module is a button-activated type.

Furthermore, it needs 2 Lithium-ion batteries and the button batteries are rechargeable via the micro USB.

Icstation-IS has a compact body and is self-adhesive which gives you a lot more flexibility when you want to hide it.

This sound module comes with a micro port and more importantly, Windows recognizes it easily. ICstation-IS has 8 MB of storage.

You can remove old sound files and re-record new ones if the memory is full.

Fosa 4-minutes voice greeting card

  • Record messages up to 4 minutes
  • 3-button battery
  • Loud and clear speaker
  • Buttons must be manually triggered every time to play

Fosa comes with three battery-powered buttons and the ability to record four minutes of audio. This allows you to playback your recordings many times before running out of power.

Another benefit was that it allowed for the use of an 8 0.25W green speaker that produced loud and clear sound.

Importantly, you can control the voice movement with button induction. The wire is 10cm long, allowing you to install them wherever you like.

The button on the Fosa sound module needs to be manually triggered every time to play.

5Zerone DIY greeting card chip

  • Record your message for up to 120 seconds
  • Enables you to loop your playback
  • Re-record as many times as you need 
  • No instructions and manuals

Zerone sound module is suitable for DIY homemade greeting cards, gift boxes, invitations, handmade products, etc. It comes with 3 built-in replaceable button batteries for power supply.

With this product, you can re-record for as many times as you need and it enables you to loop your playback.

Moreover, the Zerone sound module for greeting cards lets you record your message for up to 120 seconds.

On the downside, we should point out that if you do not cut the red chord when you are finished with your message, you risk accidentally removing it and having no method of recovering it.

ASHATA recordable voice module

  • Record up to 60 seconds
  • Loop mode
  • The sound has a bit of static noise

ASHATA sound module has a screen size of 2 inches. It is powered by a single CR2 battery and weighs 20 grams, so it will not add significantly to the weight of gifts that must be lightweight.

Furthermore, ASHATA allows you to record up to 60 seconds, which is plenty to express your love and affection for the recipient of the gift.

The installation of this sound module is made easier by the 10cm button line length. Also, the board is 31x21mm in size, so it won’t take up too much space for you to enjoy listening to a recorded audio file.

How do you make a recordable card?

  1. Record your message after pressing the button on the sound module.
  2. Move the Pull tab to test if your message has been recorded the way you like.
  3. Insert the module into the holder.
  4. Peel the adhesive off the back of the holder.
  5. Open your greeting card and align the notches of the module with the folding line of the card.
  6. Stick it down and press on it until it completely sticks to the card.

Now, every time someone opens the card, your voice message should be played for them. Of course, there are other ways to make a recordable card with a sound module for greeting cards, but this was the easiest way around.

Using a sound module for greeting cards to show your loved ones affection is a great idea. After reading this article, you must be able to choose the best sound module for your needs.

Be sure to follow the instructions for each sound module to get the best experience. Also, keep in mind to hide the sound module from plain sight by using a gift card or something beautiful.

Check out this article, if you are looking for the best greeting card maker software.

In the comments section below, tell us which of the greeting card sound modules you’d want to buy and why.

Instagram Bulk Downloader for Photos: 7 Best to Use in 2026

Instagram is a social media giant owned by Facebook. It is one of the most popular forms of social media with over 1 billion users worldwide.

Users were once limited to posting only on the Instagram app for Android and iOS, however, users can now create Instagram posts straight from their PC. This feature makes it easier for users who edit their photos and videos on their computers.

This is also beneficial for social media marketers who use social media automation tools to grow their businesses. Being able to bulk download photos and videos from Instagram is essential for marketers. keep reading for our suggestions for the best tools to batch download Instagram photos.

Can I manually batch-download Instagram photos?

  1. Go to the Instagram profile you want to save images from.
  2. Right-click anywhere on the page and select Save as. Save webpage to PC.
  3. Save to your downloads then open the file. Open the saved webpage file.
  4. To save a specific image right-click on the link and select Open image in the new tab.
  5. Right-click the image and select Save as to save it to your PC as a JPG. Right-click and select Save image as.

That is the manual way to save bulk images from an Instagram profile to your PC. Luckily, this guide will give suggestions for the best tools to make this process faster and easier.

If you’re looking to download bulk stock photos, we have suggestions for the best image downloader software for Windows.

What are the best tools to batch-download Instagram photos?

ByClick Downloader – Best hassle-free downloader

ByClick Downloader.

ByClick Downloader is a graphical user interface (GUI) tool that allows users to download all posts from an Instagram user. It also works on YouTube, Twitter, and Facebook. This downloader also allows users to download media from private accounts.

ByClick Downloader can handle most media files such as MP3 and MP4. It also downloads in the highest quality possible. The One Click feature automatically detects media on a page and bulk downloads it, saving users the hassle of copy and pasting URLs.

Key features of ByClick Downloader:

  • Simple user interface
  • Compatible with Youtube, Twitter, and Facebook
  • Download from private accounts
  • Handles most media files

ByClick Downloader

Download all media from Instagram in no time with this easy-to-use tool.

4K Stogram – Best user interface

4K Stogram to batch download Instagram photos.

This Instagram downloader allows users to download not only photos, but also stories, reels, and hashtags. 4K Stogram has a simple user interface making downloading Instagram media quick and easy. Users can download all Instagram posts or select specific ones for a more curated download.

4K Stogram also allows users to download photos from private accounts. Users can back up their own Instagram accounts using 4K Stogram.

Key features of 4K Stogram:

  • Download photos, stories, reels, and hashtags
  • Simple user-interface
  • Backup Instagram profile
  • Pick and choose downloads

4K Stogram

Download Instagram photos, stories, reels, and hashtags easily with the 4K Stogram app.

WFDownloader – Perfect for all types of media

WFDownloader for bulk downloads.

WFDownloader is a free bulk image downloader for PC. It’s compatible with Windows, Mac OS, and Linux. It has a simple interface but also offers a lot of features like proxy support. WFDownloader will also export links and will work if users added links to their Instagram photos.

This bulk image downloader also works for Twitter, Youtube, Pinterest, and more. It can handle all types of media including videos and audio files.

Key features of WFDownloader:

  • Cross-platform compatibility
  • Download up to 20 files at once
  • Proxy support
  • Can bulk download videos and audio files

⇒ Get WFDownloader

IG Downloader – Best extension for downloading IG photos in bulk

IG Downloader.

This Instagram photo downloader is a free extension for browsers compatible with Chrome extensions. IG Downloader allows users to download Instagram photos and videos in bulk. The extension is open-source and no sign-in is required so it does not collect user data.

To download all photos on a profile, simply click the download icon next to the home button. However, users cannot download photos from private accounts.

Key features of IG Downloader:

  • An extension only, no downloading necessary
  • Open-source
  • No sign-in required

⇒ Get IG Downloader

Toolzu – Quickest tool to batch-download images

Toozu Instagram image downloader.

This website allows users to input links to Instagram profiles to download all the photos from the profile. No registration is required to use the program, however, to download all the photos of a profile at once, users need to sign up.

Toozu only downloads high-resolution images and allows users to pick and choose which photos they want to download from a profile.

Key features of Toolzu:

  • Pick and choose downloads
  • High-resolution images
  • No installation required

⇒ Get Toolzu

ImgDownloader – Compatible with any website

ImgDownloader.

ImgDownloader is an online Instagram image downloader tool that is free to use. It does require users to create an account to use the designated bulk Instagram downloader.

There is no need to download an application, users can download Instagram photos with Imgdownloader straight from their browser. However, users have to copy and paste individual links from Instagram into the bulk downloader.

Key features of ImgDownloader:

  • No installation required
  • Easy user interface
  • Compatible with any media website

⇒ Get ImgDownloader

InstaLoader – Perfect for Python users

InstaLoader for photo bulk downloads.

InstaLoader is another open-source Instagram downloader. What sets this downloader from others is that it allows users to download all Instagram photos from multiple profiles rather than just one.

This streamlines the image-saving process if you are someone who needs to download a large amount of Instagram photos. However, users need to be familiar with Python and code to use this program.

Key features of InstaLoader:

  • Download from private accounts
  • Bulk download from multiple profiles
  • Open-source

⇒ Get InstaLoader

How do I manually download Instagram videos?

  1. Open the video or reel you wish to save in your browser. Open Instagram reel.
  2. Right-click and select Inspect element (or View page source). Right-click and select inspect element.
  3. Press Ctrl + F and type .mp4. Press Ctrl + F and search for mp4.
  4. Copy the link that ends in .mp4 next to src= and paste it into a new tab.
  5. Right-click the video to save it to PC.

This is the way to save videos from Instagram without using any of the tools listed above. To make your life easier, we recommend using a program from the list above to streamline this process. Most of the tools suggested also apply to Instagram videos, reels, and stories.

We hope this list helped you pick out a tool to batch download Instagram photos easily and quickly. There is no easy way to download photos and videos from Instagram without using one of the tools.

If you’re someone who has a lot of content to post on Instagram but you struggle to come up with a good bio, we have a guide on the best ideas for Instagram bios to make it easier.

Let us know in the comments below which tool you use for batch downloading Instagram photos or videos.

Global Protect VPN for Windows 11: How to Download & Install

Today we’ll walk you through all the steps for downloading, installing, and setting up GlobalProtect 64-bit on your Windows PC.

The VPN stands out for its reliable security, seamless integration with enterprise networks, and user-friendly interface that makes it easy to stay connected, even on complex systems.

How do I download GlobalProtect for Windows 11?

  1. Go to Microsoft Store or use the link provided by your company.
  2. Search GlobalProtect and hit enter.
  3. Select Get to begin the downloading process. Click get GlobalProtect VPN.
  4. After downloading, click Open. After downloading, click open.
  5. Select NETWORK & INTERNET VPN Settings. Click on network and internet connection settings.
  6. Next to VPN connections select Add VPN. Click on Add VPN to add GlobalProtect.
  7. Fill in the information as provided by your organization and click Save.

Check with your organization before installing GlobalProtect to ensure they have a gateway subscription. If so, your organization or institution should be able to provide the necessary information to complete the setup.

What are the features of GlobalProtect VPN for Windows 11?

GlobalProtect VPN for Windows connects users to a server on the Palo Alto Network firewall for the best enterprise security. The application will automatically connect users to the nearest gateway for optimal performance.

GlobalProtect VPN uses the Palo Alto Network firewall.

Since the GlobalProtect app will automatically connect users when it detects an unsafe network, users don’t need to remember to toggle the VPN on or off. This allows users to work efficiently and securely when on the go.

For an added layer of security, GlobalProtect VPN connects via SSL, which provides and maintains secure internet connections and protects sensitive data. This way, users can use their PCs in public places, knowing that their data and information are safe.

In addition to being available for PCs, GlobalProtect is also compatible with mobile devices so that users can browse safely from their smartphones or tablets.

Get GlobalProtect VPN on Google Play.

GlobalProtect is a great and secure VPN for large companies to keep their employee’s connections safe when browsing on public networks, and you can easily download it on Windows 11.

The software does have some minor issues, and we already wrote about GlobalProtect not prompting for credentials in one of our previous guides.

Many also reported that Global Protect VPN is not connecting, but that can be easily resolved. If you use this VPN, you may also encounter issues like GlobalProtect not working on a hotspot, problems with GlobalProtect not updating, or errors such as not being authorized to connect.

Looking for the best VPN software for small businesses? We have suggestions for that as well.

Let us know if your organization uses GlobalProtect VPN in the comments below.

7 ways to make CCleaner update again & get the latest version

CCleaner is a great utility that can be used to remove unwanted files from the computer, along with updating the installed drivers and optimizing the Registry. But, several users have reported that the CCleaner update is not working.

For CCleaner to work effectively, it should be up-to-date. Updates for it are released regularly to keep up with changes and make sure that your PC is optimized accordingly. And, if CCleaner is not updated for a while, it may affect the system’s performance.

So, now that you have a basic understanding of the problem and the risks it poses, read the following sections to find out why the CCleaner update is not working and the most effective fixes for it.

Why is CCleaner not updating to the latest version?

When CCleaner is not updating to the latest version, it could have to do with a large number of reasons. You may have possibly disabled automatic updates for CCleaner. Or, a third-party antivirus installed on your computer may be blocking the update.

Even not running CCleaner with administrative privileges (as an administrator) can lead to issues with the update process. Also, there might be a bug in the current version of Windows that could be preventing CCleaner, and maybe other applications, from updating.

Apart from these issues, there certainly could be others as well behind the CCleaner update not working, but the chances are low.

Yet, we have covered all possible solutions in the next section, and once done with these, you should be able to update CCleaner on your computer.

What can I do if the CCleaner update is not working?

1. Reboot the computer

  1. Navigate to the desktop, press Alt + F4 to launch the Shut Down Windows box, and select Restart from the dropdown menu.Restart to fix ccleaner update not working
  2. Now, click on OK at the bottom to restart the computer.Ok

One of the simplest methods that fix a plethora of errors, including CCleaner update not working, is restarting the PC. It will eliminate any background process or trivial bug that might be conflicting with the update process.

2. Manually install the latest version of CCleaner

Note icon NOTE
This is a two-step method, first, uninstall the current version, and then download and install the latest version. But, since it will consume time, you can go with this one after trying the other methods listed here.
  1. Press Windows + I to launch Settings, and select Apps from the tabs listed in the navigation pane on the left.Apps to fix ccleaner update not working
  2. Next, click on Apps & features on the right.Apps & features
  3. Locate the CCleaner app, click on the ellipsis next to it, and select Uninstall from the flyout menu.Uninstall to fix ccleaner update not working
  4. Now, click Uninstall in the confirmation prompt that pops up.Confirm Uninstall
  5. After removing the version that was currently installed, you can safely download the latest version of CCleaner.
  6. Follow the on-screen instructions to complete the installation process.

This method will probably take some time, but is the most effective when it comes to eliminating the CCleaner update not working problem, and has worked for most of the users.

3. Check if Automatic Updates are enabled in CCleaner

  1. Launch CCleaner and click on Options in the navigation pane on the left.Options to fix ccleaner update not working
  2. Next, select Updates from the right.Updates
  3. Now, verify that the checkboxes for Keep CCleaner updated automatically and Send notifications when there is a new version of CCleaner are ticked. If not, make sure to do that.Enable settings
  4. Now, restart CCleaner for the changes to come into effect.

Whenever there’s an update available for CCleaner, you receive a prompt to approve the installation of the latest version. But, if the necessary settings are not in place, you may never realize that a newer version is available until you check for it manually.

4. Uninstall third-party antivirus

  1. Press Windows + I to launch Settings, and select the Apps tab from the left.Apps
  2. Click on Apps & features on the right.Apps & features to fix ccleaner update not working
  3. Locate the conflicting third-party antivirus, click on the ellipsis next to it, and select Uninstall.Uninstall to fix ccleaner update not working
  4. Again, click Uninstall in the prompt that appears.Click

Third-party antiviruses are often found to conflict with the process and prevent CCleaner from updating. But, before you go ahead and uninstall it, disable it first, and if the update goes through, uninstall the antivirus since it could cause other similar issues in the future.

After uninstalling the one installed previously, check our curated list of the most reliable and effective antiviruses.

5. Run CCleaner as administrator

  1. Press Windows + S to launch the Search menu, enter CCleaner in the text field at the top, right-click on the relevant search result, and select Run as administrator from the context menu.Run as administrator to fix ccleaner update not working
  2. Click Yes in the UAC (User Account Control) prompt that pops up.Click Yes
  3. Now, click on Check for updates near the bottom-right corner and if an update is available, make sure to install it.Check for updates to fix ccleaner update not working

Oftentimes, it’s the lack of administrative privileges that leads to the CCleaner update not working problem. In this case, just running the app as an administrator should do the trick.

6. Update Windows

  1. Press Windows + I to launch the Settings app, and select Windows Update from the tabs listed in the navigation pane on the left.Windows Update
  2. Next, click on Check for updates on the right.Check for updates to fix ccleaner update not working
  3. If an update is listed after the scan, click on the Download & install button.Download & install

7. Perform a System Restore

  1. Press Windows + S to launch the Search menu, enter Create a restore point in the text field, and click on the relevant search result that appears.Create a restore point
  2. Now, click on the System Restore button.System restore to fix ccleaner update not working
  3. You can either proceed with the recommended restore point or manually choose one. We recommend you to select the Choose a different restore point option and then click on Next.Choose a different restore point
  4. Now, select the desired restore point from the list, and click Next at the bottom.select restore point
  5. Finally, verify the details of the restore, and click on Finish to start the process.Verify details to fix ccleaner update not working

If none of the methods listed earlier have worked, it’s likely a problem specific to your computer and one that is not encountered generally. If you had been able to update CCleaner until now, performing a system restore should solve the problem.

Just remember to choose a restore point that was created before you first started encountering issues with CCleaner, and once the restore process is complete, the CCleaner update not working issue would be resolved.

These are all the ways you can eliminate issues that cause the CCleaner update not working problem. Also, find out how to clean your computer with CCleaner to clear storage space and boost the performance of the computer.

Besides, if you notice that CCleaner keeps disappearing, update the OS or disable Smart Cleaning, amongst other methods in the linked guide.

Tell us which fix worked and your review of CCleaner, in the comments section below.

FIX: iTunes.exe bad image error in Windows 10/11

Bad image errors can occur for various Windows software. Some iTunes users have stated on forums that a bad image error message pops up when they launch iTunes. The error message states:

iTunes.exe – Bad Image <file path> is either not designed to run on Windows or it contains an error.

Try installing the program again using the original installation media or contact your system administrator or the software vendor for support.

Quick tip

Do you want to make sure that you never lose the desired images or that you will have access to them without any unexpected errors? Then Zoolz is exactly what you need!

This service offers a complete solution for backup. You can easily organize, search through, share, and preview all of your files.

Just select the folder to backup and the tool will periodically check for the files changed and will upload it to the cloud storage.

Zoolz

Now you can be fully secure with Zoolz back-up and access your data anywhere and anytime!
Check price Visit website

In the following lines you will discover how to fix the iTunes.exe bad image error.

How can I fix the iTunes.exe bad image error in Windows 10?

1. Run the System file checker

  1. Press the Win key + X hotkey.
  2. Click Command Prompt (Admin).
  3. Input DISM.exe /Online /Cleanup-image /Restorehealth
  4. Press Enter to run the Deployment Image Servicing tool.
  5. Enter sfc /scannow and press Return.
  6. Restart Windows if the SFC scan states that Windows Resource Protection repaired corrupt system files.

2. Reinstall iTunes

The error message suggests also that you can Try installing the program again using the original installation media or contact your system administrator or the software vendor for support.

So if the issue occurs for iTunes, reinstalling the software might be a potential fix.

You can uninstall the software more thoroughly with a third-party PC optimization utility such as CCleaner which can erase leftover registry entries.

The tool has its own Uninstall feature where you can easily select iTunes from a list and remove it in just a few clicks. Wait for the standard uninstall to complete.

Afterward run the registry cleaner to remove registry entries and other data remains from the applications safely and irrevocably.

You only have to select the iTunes software to remove and the uninstaller will scan for and list leftover registry entries. Then you have to close the tool and you can now reinstall the iTunes software.

⇒ Get CCleaner

3. Reinstall QuickTime

QuickTime is also fairly essential software for iTunes to run. As such, also consider reinstalling QuickTime with a third-party uninstaller as outlined above.

Download the latest version of QuickTime . Open the QuickTime installer to add the software to Windows.

4. Repair iTunes with a repair install

No sound with Netflix
  1. Press the Win key + R hotkey.
  2. Enter appwiz.cpl in Run and click OK to open.
  3. Select iTunes on the software list.
  4. Then select the Repair option for iTunes.
  5. Alternatively, you can also press the Change button and then select a Repair option.
  6. Thereafter, restart your desktop or laptop.

5. Uninstall recent Windows updates

Fonts missing after Windows update
  1. Open the Run accessory with the Win key + R hotkey.
  2. Enter appwiz.cpl in Run to open.
  3. Click View installed updates to open the list of updates.
  4. Select an update to remove, and press the Uninstall button.
  5. Then you can restart Windows.
  6. Download and open the Show or hide updates tool.
  7. Click Next and select the Hide updates option to open an available updates list.
  8. Select the update you uninstalled to ensure Windows doesn’t reinstall it.

6. Repair Windows to a restore point

  1. Enter rstrui in Run, and press the OK button.
  2. Press the Next button on the System Restore window.
  3. Click the Show more restore points.
  4. Now select a restore point to roll Windows back to.
  5. Pick a date that predates the iTunes exe bad image error.
  6. Press the Scan for affected programs button.
  7. Click the Next and Finish buttons to confirm your selected restore point.

You can also utilize the System Restore tool to roll Windows back to a time when the iTunes image error message wasn’t popping up.

System Restore will roll back all minor Windows updates after a selected restore point. So this resolution might also fix the bad image error for you.

One or more of these resolutions might kick-start iTunes and resolve the bad image error. Added to that, running the Automatic Repair tool from a Windows installation disc might also fix the issue.

Check out our dedicated Windows 10 Fix page for helpful and complete troubleshooting guides.

For further information on the best cloud services, be sure to bookmark our Web Cloud Hub.

Are there other ways you use to resolve the bad image error in Windows 10? Share with us in the comments section below.

FIX: ”hl2.exe has stopped working” error in Windows 10

Playing legacy games on Windows 10 proved to be a problem for some avid fans of classic first-person shooters developed by Valve. Namely, older titles are unified within the one Source engine and, even though the error we’re addressing today points towards Half-Life 2, it can occur with other similar shooters. The sudden crash followed by the ”hl2.exe has stopped working” message seems to bother a substantial player base.

There are different aspects and causes that lead to this exact error, so we provided resources that should get you out of the slump. In case you’re experiencing this error in Windows 10, the solutions below will come in handy.

How to address the ”hl2.exe has stopped working” error in Windows 10

  1. Run the game as an administrator and in a compatibility mode
  2. Update Graphics drivers
  3. Disable a third-party antivirus
  4. Check the DirectX version
  5. Disable the Steam service
  6. Reinstall the game

1. Run the game as an administrator and in a compatibility mode

As we already stated, even though the ”hl2.exe” points towards Half-Life 2, all other Valve-produced games with slight Source engine variations can be affected by this error.

The first thought goes to incompatibility with Windows 10. Some of those games, like Counter-Strike 1.6 or Half-Life 2 are quite old. That’s the main cause for this error in the first place.

The primary solution could be to force the game to run in compatibility mode. Also, in order to avoid system limitations imposed by Windows 10, you should run it as an administrator. Here’s how to do so in a few simple steps:

  1. Navigate to the game’s installation folder. Mostly found in C:ProgramsSteam.
  2. Locate the exe file, right-click on it and open Properties.
  3. Select the Compatibility tab.
  4. Check the ”Run this program in compatibility mode for” box and select another iteration of Windows from the drop-down list. The one that’s noted in the game’s system requirements is the preferred one.
  5. Furthermore, check the ”Run this program as an administrator” box.hl2-exe-has-stopped-working
  6. Confirm changes and try starting the game.

If the crashes with the distinctive error are persistent, check the other solutions.

2. Update Graphics drivers

When it comes to Graphics card drivers and Windows 10, there’s no simple solution when the problem emerges. Windows 10 tends to install generic drivers through Windows Update. Those drivers might suffice for certain games, but that’s far from a concept you can rely on. Furthermore, even if you get the latest drivers manually from the official site, taking into consideration the game’s release date, it still might not work.

So, the only way to resolve this is to block the drivers-updating feature in Windows Update and experiment with various older and newer drivers versions until you find the one that fits.

If you’re not sure how to do it in Windows 10, follow the steps we provided below:

  1. In the Windows Search bar, type System settings and open ”View advanced system settings” from the list of results.
  2. Select the Hardware tab.
  3. Open Device Installation settings.hl2-exe-has-stopped-working
  4. Toggle ”No (your device might not work as expected)”.hl2-exe-has-stopped-working
  5. Now, navigate to one of these sites (depending on what’s your GPU manufacturer) and download drivers:
  6. Now, right-click on Start and open Device Manager.
  7. Expand Display adapters.
  8. Right-click on your GPU and uninstall it.hl2-exe-has-stopped-working
  9. Use a dedicated removal tool to clear all the remaining driver inputs.
  10. Install the proper drivers you’ve downloaded from the OEM’s site.
  11. Restart your PC and start the game.

In the same manner, you can download and install older drivers and not the latest ones. As we already said, experimenting might get things sorted out. It can be time-consuming but also quite rewarding if you match the driver version with the game.

On the other hand, you can use a third-party tool. Using an automatic driver updater will certainly save you from the hassle of searching for drivers manually, and it will always keep your system up to date with the latest drivers.

After several tests, our team concluded that Outbyte Driver Updater is one of the best solutions. It has a large driver database and the ability to detect the exact version you need for your specific hardware.

3. Disable a third-party antivirus

Some third-party antivirus solutions weren’t even concepts when Half-Life 2 or Counter-Strike 1.6 hit the market. So, some of them might detect these gold legacy titles as something malicious and prevent them from running. The main suspect, if it’s to be believed to reports, is AVG antivirus solution. Nonetheless, many others can and will occasionally block Valve games, either on startup or after some time.

Therefore, we advise you to at least temporarily disable a third-party antivirus and start the game again. If you’re still unable to run it and the launcher crashes followed by the ”hl2.exe has stopped working” error prompt, consider uninstalling as a viable option.

Finally, if you can’t make your current antivirus and the game work together, we advise you to try Bitdefender. It’s a top-notch security solution, with a remarkable virus base and various protective features. Here’s our review, so make sure to take a look.

4. Check the DirectX version

Older games require older DirectX versions to run. If you’re running Windows 10, all the chances imply that you’re using either DirectX 11 or 12. That, of course, isn’t suiting the game older than 10 or even 15 years. Because of that, make sure to install older DirectX versions, mostly DirectX 9 that was the most-present solution for ages.

Nonetheless, even if you have DirectX 11 or 12, you can still install and use older versions. You can find the DirectX 9 on this link. Once you install it, start the game and look for changes. Hopefully, it won’t crash anymore.

5. Disable the Steam service and other background programs

The Steam client for Windows is a usual way to launch the game, especially the ones produced by Valve which founded Steam. However, this nifty launcher/application reportedly had issues with legacy titles, mainly referring to likes of Half-Life 2, Team Fortress, or Counter-Strike. Therefore, disabling the process before starting the game or running the game without the Steam client are possible solutions for the issue at hand. All of those are affected by the ”hl2.exe has stopped working” error.

Furthermore, there are a lot of other background programs that can affect the game in the same manner. So, by limiting the background activity, you can resolve the issue.

It’s worth a shot, so make sure to follow the instructions below to overcome possible issues inflicted by the client itself or other programs:

  1. Right-click on the taskbar and open Task Manager.
  2. Click on the Startup tab.
  3. Disable all startup programs in the list and restart your PC.hl2-exe-has-stopped-working
  4. Start the game from the installation folder and look for improvements.

6. Reinstall the game

In the end, if the problem proves more resilient than we initially expected, you can reinstall the game or use the game client (Steam) to validate the integrity of the game files.

However, instead of a classical reinstallation, we advise you to clean all of the remaining files before you install the game again. You can do that with the help of a PC cleaning utility.

⇒ Get CCleaner

But, before we move to reinstallation, try running the tool within Steam in order to validate the integrity of the game files. They can get corrupted or incomplete over time due to virus infection (or antivirus false detections) and misuse. Here’s how to repair the game integrity with the Steam client:

  1. Open the Steam desktop client.
  2. Open Library.
  3. Right-click on the affected game and open Properties.
  4. Open Local Files.
  5. Click on the ”Verify integrity of game files…” button.hl2-exe-has-stopped-working

Finally, if even this doesn’t help, follow these steps to perform a clean reinstallation:

  1. Open Steam.
  2. Under Library, right-click on the affected game and Uninstall it.hl2-exe-has-stopped-working
  3. Navigate to the installation folder and delete all the remaining files.
  4. Use a professional removal tool to clear the associated registry entries.
  5. Get back to Steam and install the game from the Library.

With that, we can conclude this article. We hope that these workarounds helped you resolve the  ”hl2.exe has stopped working” and run legacy SourceEngine-related games without crashes again. Don’t forget to share your experience with the error or ask subject-related questions in the comments section below.

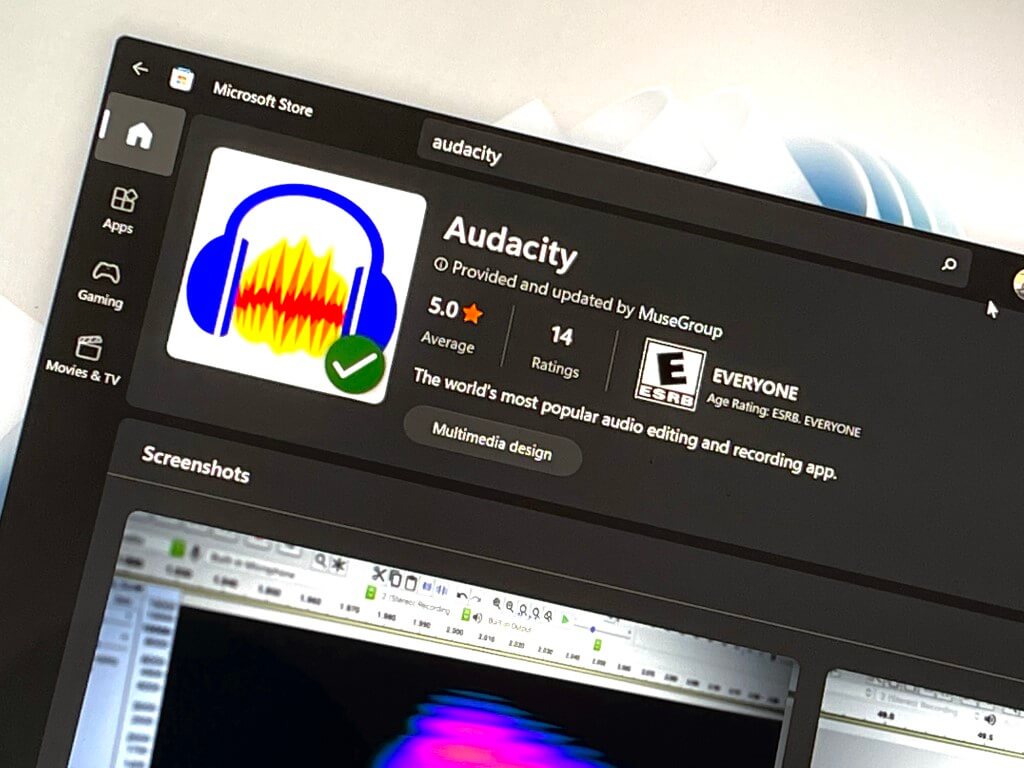
Genshin Impact: Failed to Check for Updates Error – 10 Fixes to Apply

If you are a fan of online games like Genshin Impact, you may often come across the Failed to check for updates error. This occurs mainly when you try to launch the game and the automatic update fails.

Genshin Impact is one of the most popular waifu games, but like any other online PC game, this also comes with its own set of issues.

Failing to check for updates error is quite common while trying to launch Genshin Impact, and hence, this post will help you fix the issue and continue to play the game without hassle.

Why does the Failed to check for updates error occurs in Geshin Impact?

You may encounter this error due to outdated or faulty network drivers, network issues, server outages, busy game servers, too many open applications interfering with the game, modified system configurations, and more.

While you can play it smoothly on Windows 10, a stable version of Genshin Impact for Windows 11 is yet to be released. Check the official website for more details.

Having said that, the game is compatible with Android, iOS, Microsoft Windows, macOS, Nintendo Switch, PlayStation 4, and PlayStation 5.

However, all trouble can start due to system incompatibilities so below we listed the minimum and recommended requirements.

Minimum system requirements:

You must save at least 30 GB of space for the game and then make sure of the below system requirements:

  • CPU: Intel Core i5 or higher
  • RAM: 8 GB RAM or higher
  • GPU: From NVIDIA GeForce GT 1030 graphics card
  • DX: Version 11
  • Supported OS versions: Windows 7 SP1 (64-bit), Windows 8.1 (64-bit), or Windows 10 (64-bit)

Recommended system requirements:

While you must remember to reserve a minimum of 30 GB of space for the game, below are some of the recommended requirements for the game to be installed on your system:

  • CPU: Intel Core i7 or equivalent
  • RAM:16 GB RAM
  • GPU: NVIDIA GeForce GTX 1060 6 GB and higher
  • DX: Version 11
  • OS: Windows 7 SP1 (64-bit), Windows 8.1 (64-bit), or Windows 10 (64-bit).

What can I do if Genshin Impact failed to check for updates?

1. Run Genshin Impact directly

  1. Close the already open Genshin Impact game and then press the Win + E shortcut key to launch File Explorer.
  2. Navigate to the below path in the File Explorer window: C:\Program Files\Genshin Impact OR C:\Program Files\Epic Games\GenshinImpactNavigate to games launcher folder for genshin impact
  3. Replace Epic Games with the name of your games launcher.
  4. Now, look for the launcher.exe file and double-click on the file to run the game. Double click on launcher.exe file in Ginshen Impact folder
  5. Alternatively, you can right-click on the launcher.exe file and select Run as administrator, to run the game in administrator mode. Right-click on Launcher.exe in the game folder and select Run as administrator

Many users reported that running the game in administrator mode helped them fix the failed to check update issue.

2. Change your DNS servers

  1. Press the Win + R keys simultaneously to open the Run console.
  2. In the search bar, type ncpa.cpl and hit Enter. Type ncpa.cpl in Run Console and press Enter
  3. It will open the Network Connections window. Right-click on the active network adapter and select Properties. right click on acctive network adapter and select Properties
  4. In the network properties dialogue box, under the Networking tab, go to This connection uses the following items field.
  5. Here, select Internet Protocol Version 4(TCP/IPv4) and click on the Properties button below. Select Internet Protocol Version 4 and click on Properties
  6. Under the General tab, select Use the following DNS server addresses.
  7. Enter the below DNS server addresses in the respective fields: Preferred DNS server: 8.8.8.8 Alternate DNS server: 8.8.4.4Enter DNS server addresses in Properties
  8. Press OK to save the changes and exit.

Now, try launching the Genshin Impact game and see if the Failed to check for updates error is fixed. This also helps with Genshin Impact’s Error Code 4201.

3. Flush the DNS cache

  1. Go to Start, right-click and select Run. Right click on Start and select Run
  2. In the Run console search field, type cmd and press Ctrl + Shift + Enter simultaneously to launch the elevated Command Prompt. open elevated command prompt by pressing Ctrl + Shift + Enter together
  3. Run the below command in the Command Prompt (admin) and hit Enter: ipconfig /flushdnsRun command in elevated command prompt t flush DNS
  4. Alternatively, you can also run the below command in the mentioned format and hit Enter: C:\Usernames\Yourname>ipconfig \flushdns
Note icon NOTE
Replace Yourname in the path with your specific username and also remember to add a space after ipconfig.

Once you see the success message, try updating the game and check if the error still persists.

4. Reset the network settings manually

  1. Press the shortcut key combination Win + R to open Run console.
  2. In the search box, type cmd and press the keys – Ctrl + Shift + Enter simultaneously. This will open the Command prompt in admin mode. Type cmd in Run console, press Ctrl + Shift + Enter
  3. Now, execute the below commands one after another and hit Enter after each one: ipconfig /release ipconfig /flushdns Copyipconfig /renew netsh int ip reset netsh winsock resetreset network by running commands in cmd admin

Once done, close the Command Prompt, restart your PC and now check if the Failed to check updates error for Genshin Impact is gone and it’s updating now.

5. Check for updates in the game launcher

  1. Open the game launcher and click on Settings (the gear icon) on the upper right. Click on the gear icon in Genshin Impact game
  2. In the Settings window, click on Version Information on the left. Genshin Impact Settings - Version Information
  3. Now, on the right side, under the Game Version, you should see an option to check for updates. In this case, it’s Game Update.
  4. If there’s an update available, the Game Update button will be active. Click on it to check if it installs the update.
  5. But, if no updates are available, it will be greyed out. Press Confirm to exit. Check if he game update button in ginshen impact game settings is active or greyed out
  6. If the update is successful, you should be able to play the game now.
  7. However, if you still encounter the error, press the Win + E shortcut keys together to launch File Explorer.
  8. Navigate to C:\Program Files\Genshin Impact OR C:\Program Files\Epic Games\GenshinImpactNavigate to games launcher folder for genshin impact
  9. Replace Epic Games with the name of your games launcher.
  10. Here, locate launcher.exe, right-click and select Run as administrator to run the game as an administrator. Right-click on Launcher.exe in the game folder and select Run as administrator

This should help you install the update for Genshin Impact and you can now launch and play the game normally.

6. Install the Microsoft Visual C++ 2019 redistributable

  1. Visit Microsoft’s official page for the Microsoft Visual C++ 2019 redistributable.
  2. Go to Visual Studio 2015, 2017, 2019, and 2022 and download the version based on your system architecture (32-bit or 64-bit).Visit Microsoft's official page to download Microsoft Visual C++ 2019 redistributable
  3. Once downloaded, run the setup file and follow the on-screen instructions to complete the installation.

This will install the missing DLL files. You can now try updating the Ginshen Impact game and check if you still encounter the failed to check for updates error.

7. Update Genshin Impact from file location

  1. Right-click on Start and select File Explorer. right click on Start and select File Explorer
  2. In the File Explorer window, navigate to the below path and hit Enter: C:\Program Files\Genshin Impact OR C:\Program Files\Epic Games\GenshinImpactNavigate to games launcher folder for genshin impact
  3. Replace Epic Games with the name of your games launcher.
  4. In the folder, look for the updateProgram folder and open it. Open updateprogram folder in the Genshin impact game folder
  5. Now, look for Update.exe, right-click on it and select Run as administrator to run it with admin rights. right click on update.exe file and select Run as administrator

Try updating the game and the failed to check for updates error should be fixed.

8. Create a shortcut for the game

  1. Navigate to Start, right-click and select File Explorer. right click on tart and click on File Explorer
  2. Go to the Genshin Impact folder path in the File Explorer: C:\Program Files\Genshin Impact OR C:\Program Files\Epic Games\GenshinImpactGo to Genshin Impact game path in the File Explorer
  3. Replace Epic Games with the name of your games launcher.
  4. In the File Explorer window, look for launcher.exe file. Right-click on it and select Create shortcut.right click on launcher.exe and select Create shortcut
  5. You will now see a Shortcut prompt that informs you that the shortcut can be created on the desktop. Press Yes to confirm. Click yes in the shortcut prompt to confirm

Once the shortcut is created, you can launch the game through it and it will check for updates automatically.

9. Use a VPN

During peak hours, when the traffic is high, the game servers are busy and the network is usually unstable.

Most internet service providers throttle your connection speed when you connect to a gaming-related website or app.

In such a case, you can install a VPN to help improve the network connection and fix the check for updates failed error. This is because the VPNs tend to have reduced downtimes, larger bandwidths, and a strong connection.

A VPN, such as ExpressVPN, encrypts your traffic, making it difficult for your ISP to determine where you’re connecting and, as a result, less likely to throttle your connection speeds.

ExpressVPN’s extensive network allows you to access a wide range of geo-restricted content, gaming, and other content.

To avoid server fatigue, you may also use Smart DNS to configure a proxy connection for your gaming devices, allowing you to instantly change your virtual location and play Genshin Impact safely without interruptions.

10. Reinstall the Genshin Impact game

  1. Press the Win + R keys together to launch the Run console.
  2. Type appwiz.cpl in the search bar and hit Enter to open the Programs and Features window in Control Panel. type appwiz.cpl in run command and press Enter
  3. In the Control Panel window, navigate to the right side. Go to the list of programs, look for Genshin Impact or the game’s launcher, right-click on it and select Uninstall. Under Uninstall or change a program, right click on game launcher and select Uninstall

Once it’s completely uninstalled, restart your PC and re-install the game from its official download page. The updates should go through usually and you should not see the error.

What are some other tried and tested solutions?

  1. The error could also pop up due to the game server issue, hence, check their Genshin Impact Twitter handle for server updates.
  2. You should also try uninstalling any recently installed app that may be causing the issue. According to some gamers, uninstalling Riot Vanguard, Adlock, or Origin helped them fix the error.
  3. Go to Start and right-click on Task Manager. Here, close all instances of Genshin Impact and relaunch the game. This resolves the issue in most cases.

While you can restart your network by unplugging the power cords from your router or modem and then plugging it back after 2 minutes, you can also follow the other advanced methods above to fix the issue.

You can also update your router’s firmware to rule out any possibility of an outdated version. This will ensure that your router has all the latest features and runs smoothly.

We have mentioned the best possible solutions above based on some of the common causes. This should help you fix the issue easily.

Let us know in the comments section below if you come across any other solutions.

2 Ways to Fix bad Owner or Permissions on SSH Config

SSH is commonly used by network administrators to control systems, and issues such as Bad owner or permissions on SSH config occur seldom.

Fixing this problem is rather straightforward, but it is one of those processes rife with blunders and misinformation from multiple sources.

But what if someone who did not know how to fix this problem encountered it? Here are some fixes that might help you.

What is SSH used for?

SSH connections have been used to secure a variety of communications and administrative or management duties between a local workstation and a remote host.

Among other things, SSH is used to control routers, server hardware, virtualization platforms, operating systems (OSes), and file transfer programs.

A related problem is the Unable to establish host authenticity but this guide will help you fix it quickly. You can learn more about secure remote access by checking this guide on what OpenSSH is and how it works on Windows.

Now, let’s see how we can fix bad owner or permissions on SSH config with the solutions below.

How can I fix bad owner or permissions on SSH config?

1. Change permission

  1. Open Windows Explorer and locate your .ssh folder. It is usually located in C:\Users\
  2. Right-click the .ssh folder and click Properties.
    ssh file properties
  3. Find and click the Security tab and then click Advanced.
    security tab and then advanced
  4. Click Disable Inheritance.
     disable inheritance
  5. A warning popup will appear. Click Remove all inherited permissions from this object.
    Remove all inherited permissions from this object
  6. Click OK to close the Advanced Security Settings for .ssh window.
  7. You will notice that all users will be removed. On the same window, click the Add button.
     add owner
  8. Next, click Select a principal to bring up the Select Users or Groups window.
     select a principal
  9. Click Advanced.
    advance setting for principal
  10. Click the Find Now button. A list of user results should appear.
    find now
  11. Select your user account.
  12. Then click OK.

2. Using commands

  1. First, type in
    chown $USER ~/.ssh/config
  2. After that, type in
    chmod 644 ~/.ssh/config

What is the difference between telnet and SSH?

Telecommunications and Networks are abbreviated as Telnet, and it is a networking protocol best known for the UNIX platform.

Telnet is credited as being the first Internet, having been created as a method of remote control for managing mainframe computers from remote terminals when the Internet originally opened in 1969.

While there is no official fix for bad owner or permissions on the SSH config problem, many users have reported that removing inherited permissions has worked for them.

Additionally, there are numerous lines of commands that might fix the issue and are available on the web and in the forums.

The fix for a bad owner or permissions on the SSH config problem can vary in steps depending on the process type.

If you are experiencing ssh_exchange_identification connection closed by host issues, read this article.

Let us know whether you were able to fix the bad owner or permissions on the SSH config in the comments section below.

Implausible Industries launches its first original game dubbed Research and Destroy

Today, Implausible Industries took to a blog post to announce the official launch of its first-ever original game, Research and Destroy. It is a turn-based action that supports both single and multiplayer. The game will provide players with the thrill of having direct control over the character in the game similar to that of a person playing an action game.

According to the blog post on Xbox Wire, the player will assume the role of three “brilliant” scientists and get to develop strange new weapons and gadgets that will be used to fight off and destroy supernatural hordes that have crushed humanity. While playing, gamers are supposed to cause havoc using science in the utopia created by the hordes post the elimination of mankind.

Gamers will be required to complete the first few missions first, this will then allow them to either play the game “via couch co-op or online with any other player on the Xbox ecosystem, including on the cloud.” The game can either be played in single-player mode or in co-op. Players also have the provision to pop in and out of a friend’s open game at any point.

At $19.99, you will get to experience this and more. The game is already available for Xbox One, Xbox Series X|S, Windows 10/11 PC, and with Xbox Game Pass and from the cloud with Xbox Cloud Gaming. As gamers continue to pursue this quest, they will be able to customize their gameplay experience by researching and developing “radical upgrades for each strange weapon and fascinating gadget.”


3 Quick Methods to Install a Browser on Firestick

The Amazon Fire TV Stick is a gadget that connects to your TV’s HDMI connector and lets you surf the web if you know how to install the browser on a FireStick.

Additionally, it allows you to watch your favorite TV episodes and movies, subscribe to subscription services, listen to music, see photos, and play games.

Amazon’s new device can be confusing to work with but with a few steps, you will be able to install a web browser on this amazing device.

Does FireStick support browsers?

Browsers are supported in some fashion by Fire Stick devices, and the most well-known browser is Amazon Silk, which is completely supported.

You can visit websites on Amazon’s Fire TV Sticks via web browser apps, just like you would on a computer or smart smartphone.

How can I install a browser on FireStick?

1. Via the internet

  1. First, choose Find and then Search on your Fire TV Stick home screen.find and download buttons in fire stick
  2. Type in the name of the browser.
  3. After that, click the browser icon or tile on the following window.
  4. Now, click Get or Download on this window and wait for the browser to download and install.get or download the app
  5. Then, click Open to access the installed browser.open the downloaded app

2. Via the Amazon website

  1. Open the Amazon website’s Fire TV Apps directory in your preferred browser.
  2. Following that, select the web browser app that you want to install on your Fire TV Stick.
  3. Choose your Fire TV Stick’s name from the dropdown menu on the right side of the screen.
  4. Finally, select Deliver. The web browser app should automatically install on your Fire TV Stick.

3. Install Google Chrome

  1. Select Settings from the home screen menu.
  2. Go to My Fire TV (on new Fire OS versions, this option is called Device & Software).my fire tv setting
  3. After that, select Developer options.developer options
  4. Enable Apps from Unknown Sources.enabling apps from unknown sources
  5. Then, select Search on the FireStick home screen.
  6. Type Downloader.downloader app
  7. You may see similar apps, so make sure to select Downloader, the orange app in the Apps & Games category.
  8. Once located, select and hit Download or Get.download the downloader app
  9. Now your FireStick is ready to sideload the Google Chrome APK through the Downloader app. Go ahead and click Open.open the downloader app
  10. The application will ask permission for storage access. Select Allow, then OK to lock configurations.give permission to the downloader app
  11. On the home page of the Downloader app, type the following in the URL bar: https://chrome.en.uptodown.com/android.
  12. Hit Go and the system will navigate to the page where you can download the Google Chrome APK.
  13. Once downloaded and installed, select Done and the system will take you back to Downloader.
  14. Access Your Apps & Channels on your FireStick / Fire TV and launch Google Chrome. You may have to select See All, as Chrome may not show up among the side-scrolling options.

What browsers to install on FireStick?

Amazon Silk is a straightforward FireStick browser with straightforward controls. This browser was developed with Fire TV devices in mind.

Another good alternative is Mozilla Firefox which can be downloaded for FireStick devices and used to access the world wide web.

You can check out this article if you’re looking for the best browsers for your FireStick.

For a highly compatible browser with your FireStick device, you should use Opera One. This browser comes with thousands of integrated applications and strong security against online dangers.

⇒ Get Opera One

While installing the Silk browser is simple, installing Chrome on these devices would necessitate a number of additional procedures.

Amazon Silk and Firefox, which are both popular FireStick browsers, are both fantastic alternatives to Google Chrome.

Many people have been perplexed as to how to install a browser on FireStick, but by following the steps above, anyone should be able to install a browser with ease.

If you want to reset factor Amazon FireStick, this article could help.

Let us know in the comments if you were successful in installing a browser on your FireStick, and if so, which one.

Microsoft Build 2023: When Is It And Where Can You Watch It?

Yea, it’s that time of the year again. Wait, just so that we avoid any type of confusion, we’re not actually talking about Easter or Christmas.

It’s the time of the year when all the major software and hardware companies announce their upcoming projects and endeavors.

We also covered last year’s Build conference, However, in 2022, Microsoft decided to reveal the dates of its upcoming Build conference first.

Thus, we’re happy to announce that the Microsoft Build 2022 event will go live starting on May 24th, all the way up to May 26th.

Microsoft opened up free registration for everyone interested

As most of you are already familiar with, the Microsoft Build 2022 showcase will be a three-day developer conference.

During these three days, the software giant will unveil its latest developer tools, technologies, and updates for various software products.

In 2020 and 2021, due to the pandemic, Microsoft had to shift from in-person to virtual events. Build 2022 will be exactly the same, as Microsoft apparently is not ready to host a large in-person conference.

It’s only natural for all of us to want to go online, check out this conference, and learn more about the latest dev tools and innovations from the software giant.

Doing so is very easy, as you can quickly register on the official Build website. Yes, registration is now open for everyone and is absolutely free.

The Redmond tech company says Build 2022 will help developers innovate without compromise, develop creatively, and build the next generation of apps for more than one billion devices.

This main event will actually feature 13 speakers from Microsoft, among which Satya Nadella, Kevin Scott, Amanda Silver, Scott Guthrie, Kathleen Mitford, and others.

Of course, all present attendees will get a chance to learn during live sessions and book time with Microsoft experts.

Now, you might be wondering what differentiates Build 2022 from previous developer conferences held by Microsoft is new regional spotlights.

Microsoft strongly aims to provide keynote analysis, trending news, and topics for specific regions, such as France, Germany, Japan, Latin America, and the UK.

You can watch the event live on the official site, but also on YouTube, as it was in previous years as well.

Apple will also host its WWDC 2022 soon enough, on June 6-10. This year’s Worldwide Developer Conference will be an online-only event, the same as Microsoft’s.

Did you already get your front-row virtual invitation to this magnificent tech event? Share your thoughts with us in the comments section below.
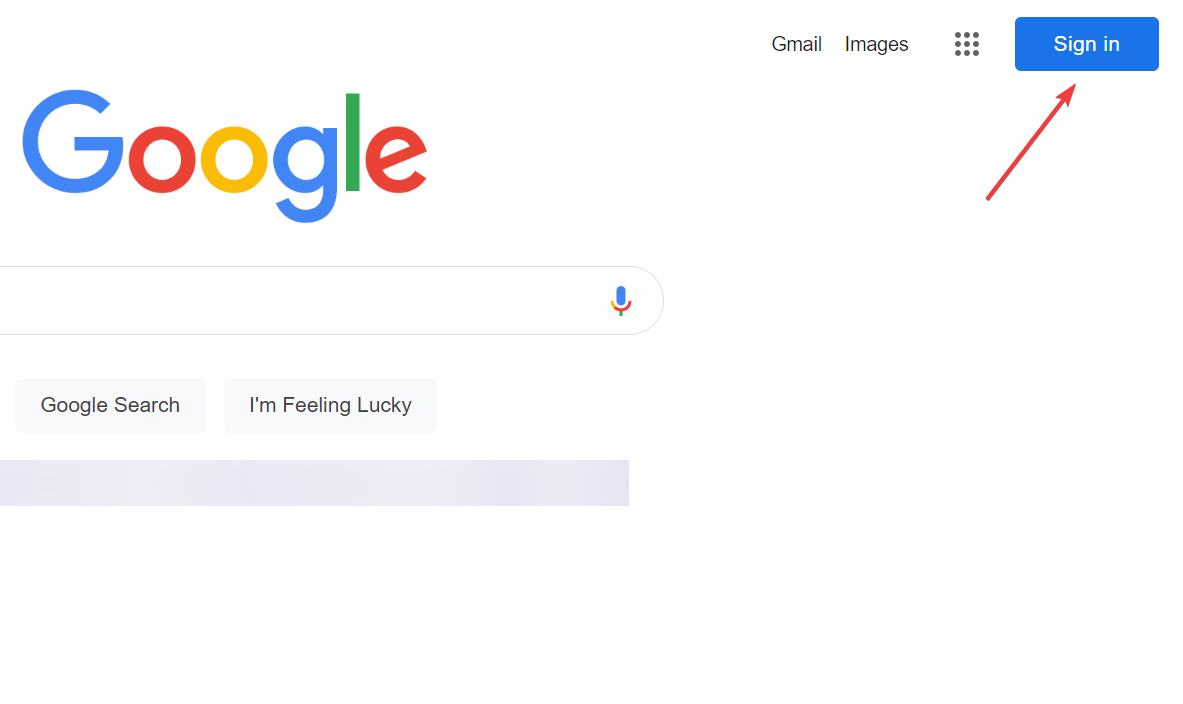
Accessing Edge tabs from other devices is easier with Dev Build 102.0.1235.1

Were you expecting another weekly Edge update from the Redmond tech giant? If the answer is yes, then this is exactly up your alley.

Last week, we discussed how build 102.0.1227.0 brought a new management policy to control if the Network Service Sandbox is Enabled. 

However, now, Microsoft has released another weekly Edge update for the Dev channel. Version 102.0.1235.1 is now available for all users with an improved Tab Actions menu and a traditional list of bug fixes.

What to expect from Edge Dev build 102.0.1235.1

The 102.0.1235.1 version for Microsoft Edge doesn’t come with an impressive array of new features, but it does bring important changes to the table.

By far, the only visible change is a slightly improved Tab Actions menu that now lets you access tabs from other devices.

Now, the Tab Actions menu offers the ability to enable or disable vertical tabs, tab search, recently closed pages, add tabs to a new collection, and now tabs from other devices.

If you use Edge Stable, you can access tabs from other devices in the History flyout. We know you want to see the entire changelog for the brand new build, so we’re going to provide that for you as well.

Added features: 

  • Added a link to Tabs From Other Devices in the Tab Actions menu. 
  • Enabled support for a management policy from Chromium to control if the javascript engine behavior to Set Timeout Without 1 Ms Clamp is Enabled, which controls if calls to setTimeout() with a 0ms timeout are changed to have a 1ms timeout.  Note that updates to documentation and administrative templates may not have occurred yet. 

Improved reliability: 

  • Fixed an issue where all tabs crash with an error code:  FACILITY_VISUALCPP/ERROR_PROC_NOT_FOUND. 
  • Fixed a crash on mobile when sending feedback. 
  • Fixed an issue where WebView2 apps crash when setting User Data Folder Access options (Issue 2363). 
  • Fixed a crash on Xbox when using Tab Search. 

Changed behavior: 

  • Improved how many types of tabs can be put to sleep. 
  • Reduced the number of tabs that are discarded due to memory pressure in certain situations.   
  • Fixed an issue where Tab Search doesn’t work. 
  • Fixed an issue where printing and print preview sometimes doesn’t work. 
  • Fixed an issue where certain search engines can’t be removed from Settings. 
  • Fixed an issue where certain languages aren’t available in Spell Check. 
  • Fixed an issue where IE mode sometimes can’t be enabled or configured. 
  • Fixed an issue in Application Guard windows where downloads are sometimes blocked when they shouldn’t. 
  • Fixed an issue where work/school results don’t appear in the search engine when searching from the address bar. 
  • Mobile: 
    • Fixed an issue where Top Sites can’t be edited because the edit button is too hard to hit. 
    • Fixed an issue where Read Aloud sometimes doesn’t highlight words that it should, or says words that it shouldn’t. 
    • Fixed an issue where the Read Aloud controls sometimes don’t appear in the notification shade. 

Known issues: 

  • Users of certain ad blocking extensions may experience playback errors on YouTube.  As a workaround, temporarily disabling the extension should allow playback to proceed.  See this help article for more details. 
  • Some users are still running into an issue where all tabs and extensions immediately crash with a STATUS_INVALID_IMAGE_HASH error.  The most common cause of this error is outdated security or antivirus software from vendors like Symantec, and in those cases, updating that software will fix it. 
  • Users of the Kaspersky Internet Suite who have the associated extension installed may sometimes see webpages like Gmail fail to load.  This failure is due to the main Kaspersky software being out of date, and is thus fixed by making sure the latest version is installed. 
  • Some users are seeing “wobbling” behavior when scrolling using trackpad gestures or touchscreens, where scrolling in one dimension also causes the page to subtly scroll back and forth in the other.  Note that this only affects certain websites and seems to be worse on certain devices.  This is most likely related to our ongoing work to bring scrolling back to parity with Edge Legacy’s behavior, so if this behavior is undesirable, you can temporarily turn it off by disabling the edge://flags/#edge-experimental-scrolling flag. 

Be sure to download the correct version of the update, depending on the channel you are currently using Microsoft’s Edge browser on.

Have you updated your Edge browser lately? Share your experience with us in the comments section below.
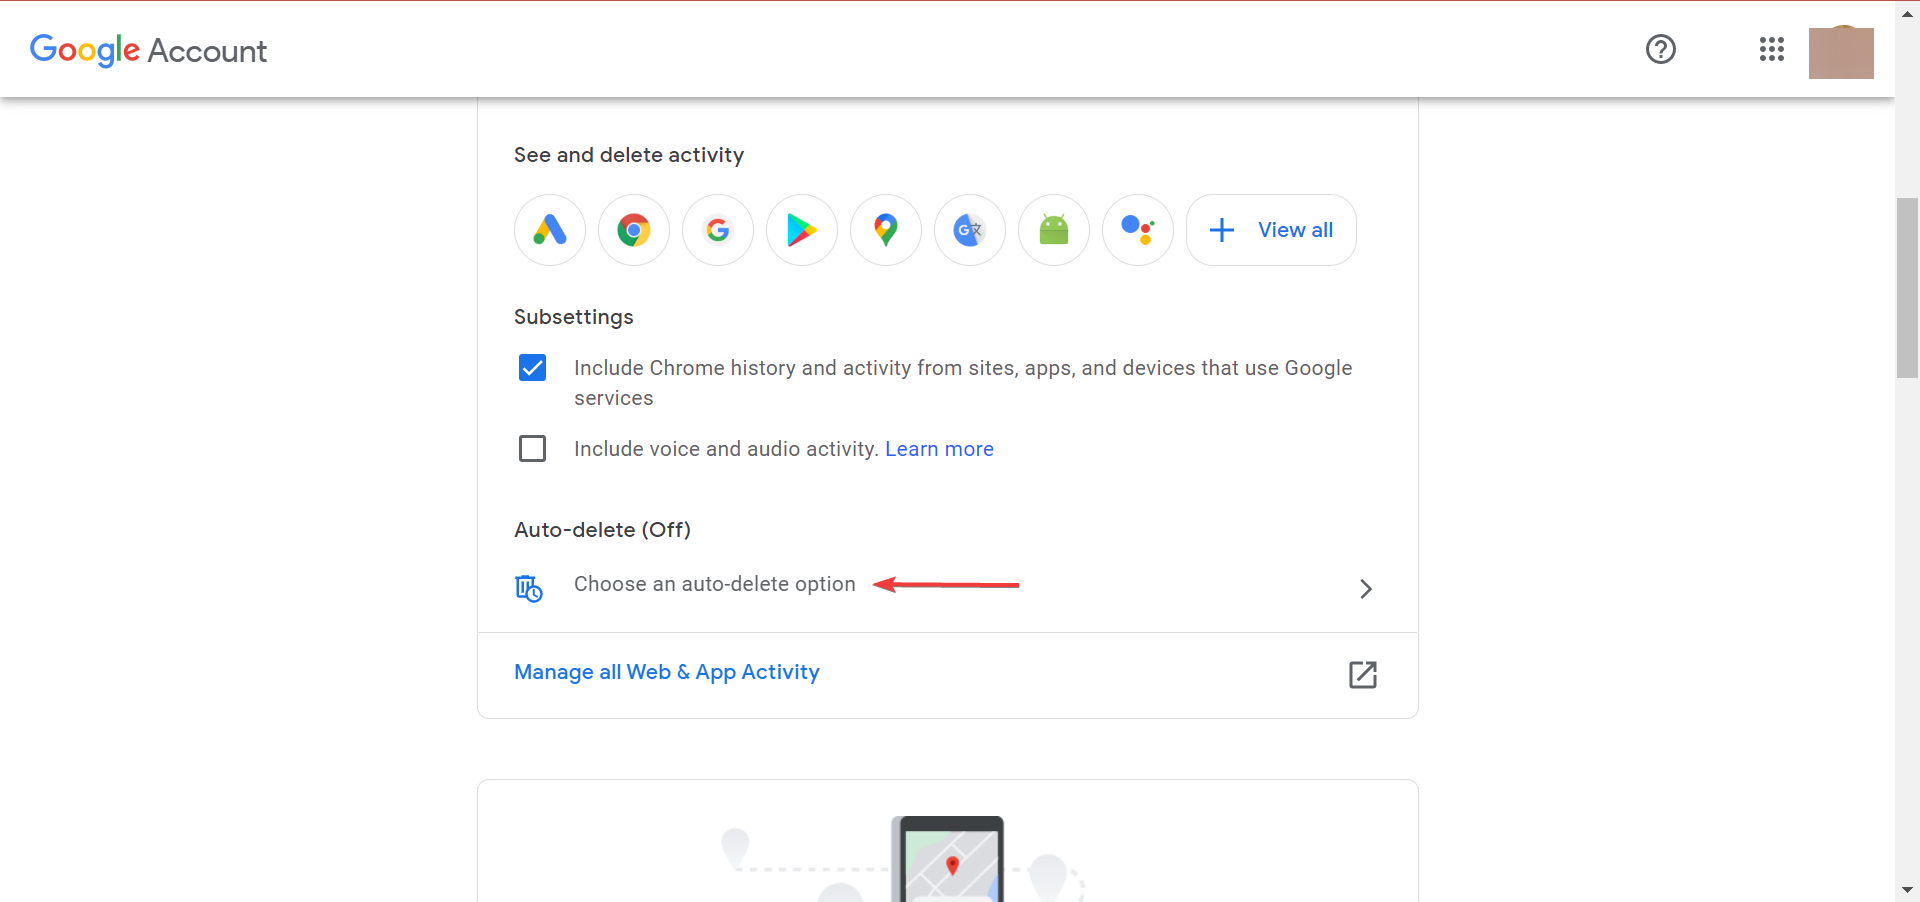
What is Windows Recovery Environment & how you can boot into it

Updated: 3/29/2023

The Windows Recovery Environment, also called WinRE, is an important tool in the Windows operating system that can help you fix a host of problems in your Windows computers.

In this article, we’ll dig a little deeper into the exact processes of Windows Recovery Environment (WinRE). Let’s get started.

What Is the Windows Recovery Environment (WinRE)?

The WinRE is a handy Windows tool that helps you fix your Windows environment.

“The Windows Recovery Environment (WinRE) is a companion operating system installed alongside Windows 10, typically in a separate partition, that can help with troubleshooting, recovery, or booting from external media, such as a USB stick.

WinRE is also used during the Windows update process to apply updates in specific paths or phases. (This process is sometimes referred to as SafeOS.),” says Aaron Lower from Microsoft.

So, now that we know its function, let’s look at how we can access it.

You can learn more about the underlying environment that WinRE relies on by reading this clear explanation of what Windows PE is, which helps you understand how recovery tools run on your system.

Accessing the Windows Recovery Environment (WinRE)

A peculiar specialty of WinRE is that if you’re facing any problems, the tool will get launched automatically.

However, even if you’re currently not facing any issues with your PC’s working, you can still access the WinRE without any hassles. But, before you get going, make sure that it’s enabled in the first place.

Here’s how you can do that:

  1. Go to the Start menu search bar, type in ‘cmd,’ and launch the cmd as an administrator.
  2. In the cmd, type in the following command and hit Enter:
    reagentc /info
  3. Check the Windows RE Status. It should be set to enabled. In the case it’s disabled, run the following command below:
    reagentc /enable
command prompt

So now that you’ve verified the Win RE status to be enabled, you can get going by launching the WinRE manually.

Here’s how you can launch the WinRE:

  • Turn off your PC and the next time you power it on, press the F11 key while you boot into it. However, depending on your PC manufacturer, you might’ve to use press different keys, such as F9 or F12.

Alternatively, you can also boot into WinRE using Windows Settings. Go to the Start menu search bar, type in ‘settings,’ and select the best match. Alternatively, press the Windows key + I.

In the Settings menu, click on System > Recovery. Now, from under the Advanced start-up section, click on Restart Now. This will push your computer into a restart and take you straight to WinRE.

windows recovery

Things to do with Windows Recovery Environment

But, what are the exact tools that Windows Recovery Environment has to offer us? Let’s take a look at all the tools we’ve at our disposal.

1. Reset your PC

If your PC has been bogged down for a while now, you can rely on the factory reset through WinRE. Although you can reset your PC through Windows Settings as well, WinRE comes in handy when you’re unable to access your PC.

resetting the windows pc

2. Startup Settings

So you want to change how your PC behaves at the startup? The Startup Settings feature is what you should put your stakes in. For instance, after you’re in the Startup Settings through WinRE, you can then enter into Safe mode, which helps you launch your Windows with minimal programs.

additional settings

3. Do a System Restore

Through the WinRE feature, you can use the restore a Restore Point.

A System Restore creates a Restore point, an image of your PC based on past settings, where everything works smoothly. You can then resort to these settings when something goes off with your PC.

All about Windows Recovery Environment

And that brings our brief introduction to Windows Recovery Environment to a close. As a complementary solution to WinRE, you should have a nice Windows backup set up beforehand. After all, precautions are better than cure and data loss is a huge annoyance for almost all computer workers.

Switching accounts in Microsoft 365 web apps is now possible without signing out

Remember that Microsoft announced its community that it was currently working on a capability that would allow users to switch between different accounts with ease when using Microsoft 365 web apps?

You probably didn’t know how long it was going to be until it was actually going to happen, so we’re here with an update.

Indeed, the Redmond-based tech giant stated that this feature has started to roll out and will become available to everyone within the next couple of months.

You don’t have to sign out in order to switch accounts

Before this new way was perfected, users had to first sign out of a Microsoft 365 web app and then sign in to a different one.

Not to mention that the multi-factor authentication when signing in each time further hindered overall productivity and workflow as well.

We won’t have to worry about that anymore, as seamless account switching has finally started to roll out.

All you really need to do is simply click on the account switcher on the top-right corner of your Microsoft 365 web app and then choose between other accounts that have previously signed into the service.

The switch should be seamless, and you wouldn’t have to sign out from your current account and then sign in again to the other one.

However, you can only be active on one account per app. Thus, you can’t have two active apps with different Microsoft accounts running in the same browser instance.

Seamless account switching for Microsoft 365 web apps has started rolling out to Worldwide environments of Office, Word, Excel, PowerPoint for the web, Outlook on the web, OneDrive for the web, SharePoint, and Microsoft 365 admin center.

The tech giant is also working to expand this to more services but the rollout for the current scope is expected to be complete by June.

You should keep in mind that the featre is not available for Microsoft 365 operated via 21Vianet, Microsoft 365 Government, and Germany cloud environments.

There are no admin controls to turn off the feature but Microsoft has assured IT admins that data integrity and privacy will be maintained.

Microsoft announces GitHub Desktop 3, now with updated pull requests

Microsoft has announced the release the GitHub Desktop 3. From the onset, GitHub was specifically designed to help simplify developers’ workflow. But now, with the GitHub Desktop 3 comes more enhancements, such as squashing, reordering, or amending commits that are geared toward improving git operations.

A key enhancement is the ability to review the status of your pull requests, which in return helps developers confirm whether the code is indeed ready for production. The blog post further provides an illustration of how to use it:

Just click on the badge with the pull request number, and start diving into the checks, jobs, and steps to better understand and fix whatever problem you might run into. You still can’t find out why your checks failed? Don’t worry! You can just re-run your checks to give them another chance to succeed. Users also now have the ability to re-run failed or individual GitHub Action checks.

The GitHub Desktop 3.0 also provides support for high-signal notifications. Essentially, this will help the user sieve through the numerous notifications that keep on popping up, it will instead only alert the user about important notifications that occur in the repository the user is on.

Developers will also be able to get ahead of failed pull request checks, in that GitHub Desktop 3 will notify them when they fail to file commits. It redirects users to a new dialog with a detailed account of what transpired. In return, this makes it easier for the developer to identify where the problem is and rectify it.

It is Microsoft’s hope that the new enhancements that come with the GitHub Desktop 3 will help promote effectiveness, and efficiency and cut down on distractions.


Paging File Error in Warzone: 6 Solutions That can Help you

This article explores the Paging file error on Warzone, identifying causes and recommending solutions.

The Call of Duty: Warzone is one of the trendy games that has taken users’ gaming experience to another level. However, things are not all rosy, as users face problems with it.

One of the earliest problems was the Warzone stuck on the loading screen, which proved frustrating. Now, the Warzone paging file error deprives users of the pleasure of doing what they love.

Thankfully, we have gathered seven effective and proven fixes for this problem. The fixes are not far-fetched, and you should find them practicable.

What causes paging file error?

The causes of the paging file error on Warzone are numerous. Below are some of the common ones:

  • Outdated Windows – When the OS is outdated, many applications and processes may stop functioning properly. For some users, this results in the Warzone paging file error
  • Outdated or broken drivers – A few users had also reported that they experienced the error when drivers, especially the graphics driver, became outdated.
  • Insufficient virtual memory allocation -All applications need to use some system resources. Low virtual memory will trigger this error.
  • Running counter programs – Conflicting programs on a device often result in errors and bugs and may trigger the Pagging file error.

We will now show you the best steps to restore the game to normal functioning after experiencing this error.

How do I fix the paging file error in Warzone?

Before starting with these solutions, check your RAM and ensure it sits properly. A loosely-fitted RAM causes all sorts of problems on PCs. For example, it has proved to be one of the major causes of the paging file error on Warzone.

1. Update Windows

  1. Press Windows + I to open the Settings app.
  2. Select the Update & Security option.
    update and security
  3. Click the Check for Updates button.install updates paging file error
  4. Click the Install now button to download and install all available updates.

2. Update graphics card drivers

2.1 Update manually

  1. Press the Windows key + X and select the Device Manager option.
  2. Click on the Display adapters option to expand it.
  3. Right-click on any of the drivers there and select the Update drivers option.
    update driver
  4. Select the Search automatically for drivers option.
    search update automatically paging file error warzone
  5. From here, follow the simple on-screen instructions to install any driver update shown.

2.2 Update automatically

Instead of going through the steps above, you can automate the process with a top-notch driver updater in Outbyte Driver Updater.

Outbyte Driver Updater is renowned software that automatically scans, recommends, and installs drivers. Whether outdated, missing, or broken drivers, this incredible software leaves no stone unturned.

It has a whooping database of 18 million original drivers from trusted manufacturers worldwide. This assures you that it indeed has everything you need in-store already.

What’s more, you can schedule driver scans on Outbyte Driver Updater. This lets you focus on other things and let it take care of your drivers’ functionality. It is everything you need, never to be bothered by driver problems on your PC again.

⇒ Get Outbyte Driver Updater

3. Set virtual memory to Automatic

  1. Press the Start button and type control panel.
  2. Select the Control Panel app option.
  3. Click System and Security, and click the System option.system and services
  4. Click the Advanced system settings option on the left pane.advanced system settings paging file error warzone
  5. Switch to the Advanced tab in the System properties window.
  6. Click the Settings button under the performance tab.
  7. Switch to the Advanced tab in the Virtual Memory window.
  8. Go to the Virtual Memory section and click the Change button.
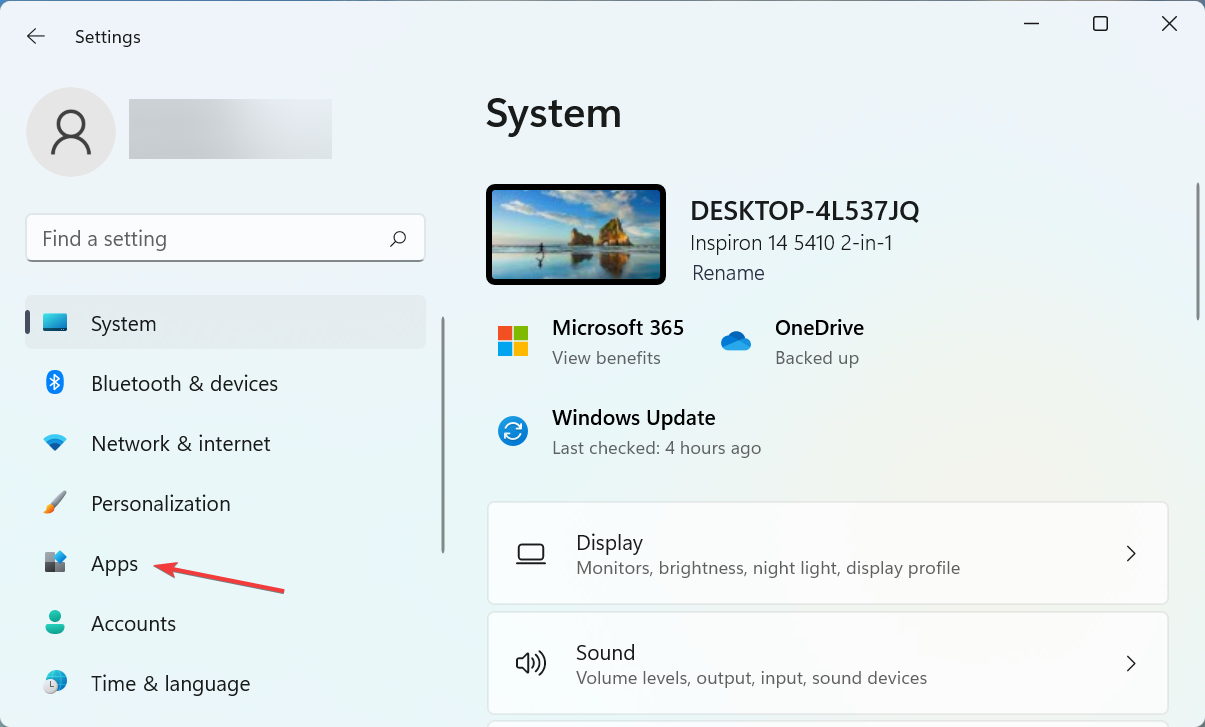
  9. Now, check the Automatically manage paging file size for all drives checkbox and click the Ok button to save the changes.

4. Increase Video memory scale value

  1. Press Windows + E to open File Explorer and click the Documents folder on the left pane.
  2. Select Call Of Duty Warzone.
  3. Now, select the Players option.
  4. Double-click on adv_options.ini file.
  5. Select Notepad as the app to open it.
  6. Finally, increase the value of VideoMemoryScale.

Allocating more video memory to the Call of Duty Warzone game is an excellent solution to the paging file error. This is because the increased VRAM allocation helps eliminate many graphical problems that could lead to it.

However, it is essential that you only allocate as much VRAM as your graphics card can take. To ensure you get it right, increase the value slowly and test your game to see if it runs with stability.

5. Close running programs

  1. Press the Windows key + X and select the Task Manager option.
  2. Right-click all the apps in the Apps section and choose the End task option.
    end task
  3. Relaunch Warzone.

6. Repair game files

  1. Launch the Battle.net app.
  2. Choose the Call of Duty Modern Warfare.
  3. Click the Settings Cog and choose Scan and Repair option.
    paging file error warzone

There you have it: the seven practicable fixes for Warzone paging file error. As frustrating as this error could be, it is not difficult to solve, as we have shown.

If you face other issues like Warzone lag spikes, you can check out our detailed guide on fixing it quickly.

In the comments section below, let us know the fix that helped you get back to your gaming best.

Microsoft employee shows up on Windows Insider podcast using unsupported Windows 11 hardware

By now, we are all conversant with set system requirements that a user is required to have under the hood to run the Windows 11 OS. These restrictions have led some users to use workarounds to get the OS on their unsupported devices. As it now appears, even Microsoft employees have now joined the bandwagon too.

As spotted by Aathif Mahir on Twitter, Claton Hendricks, a Program Manager at Microsoft, had a Core i7-7660U processor running under the hood while discussing the new Task Manager which is set to reach Windows Insider soon. The device is not part of Microsoft’s list of supported devices. (via Digital Trends)

Windows 11 unsupported device

It has been established that it is possible to run Windows 11 on an unsupported device. According to Microsoft, though, the downside to this is that the user will not receive any security updates which potentially exposes them to a lot of risks. Of course, this hasn’t been proven to be true. Unsupported Windows 11 systems are still getting monthly security updates today, but Microsoft could reserve the right to pull these updates at any time.

Xbox Cloud Gaming has now been streamed by over 10 million people, says Microsoft

Over 10 million people have streamed games via Xbox Cloud Gaming, according to Microsoft CEO Satya Nadella. The announcement was made as part of the company’s third quarter earnings report for fiscal year 2022. Microsoft Communications Lead Frank Shaw confirmed the milestone in a tweet on April 26.

Xbox Cloud Gaming is only available through Xbox Game Pass Ultimate. Game Pass currently has over 25 million subscribers across all three variants of the service, a number which is steadily growing year by year and is up from 18 million subscribers from the same time the year previous. With Xbox Cloud Gaming reaching the 10 million streamers mark, along with recent news that Xbox had a record-setting month in March, it seems that the Xbox brand as a whole is on quite a roll as of late.

Xbox Cloud Gaming is available on several platforms in addition to Xbox consoles: PC, Android, and even iOS, and features an ever-expanding library of compatible games.