FIX: Audio renderer errors on YouTube when loading videos

Many Windows 10 users reported encountering an issue with Youtube making videos unable to load.

Error message Audio Renderer error, Please restart your computer leaves users frustrated, not allowing access to videos.

This frequent error seems to be caused by various reasons, some of which:

  • A lack of synchronization between the Windows Sound driver frequencies and the ASIO driver frequencies
  • Some bug in the audio driver, making the audio render unavailable

In order to fix this issue, we came up with a series of fixes that are worth trying out.

How do I fix Youtube audio render errors?

1. Run the troubleshooter

  1. Press the Windows logo key + R on your keyboard > type ms-settings:troubleshoot in the Run box and hit Enter.ms-settings:troubleshoot Youtube Audio renderer error Please restart your computer
  2. Find the Get up and running section > click Playing Audio > select Run the troubleshooter.audio troubleshooter Youtube Audio renderer error Please restart your computer
  3. Select the device you’re encountering the error with.
  4. Wait for the troubleshooter to analyze the problem and recommend a fix.
  5. Click Yes > select Apply fix.
  6. Restart the computer after the process finished and check to see if the issue was fixed.

2. Try out a different browser

If you try all of the troubleshooting steps listed above and below and notice that things still don’t work, then maybe replacing your browser is your only solution.

Since everything began with you trying to watch YouTube, we recommend a browser that is designed for watching YouTube and streaming content, and that browser is called Opera.

This lightweight browser is based oof of the Chromium engine, and it has all the tools that make it the perfect choice for watching YouTube.

For example, the adblocker will help with those pesky YouTube ads from in-between videos, and the built-in VPN will let you access region-locked content as well.

The browser is light and highly customizable. It has a light/dark switch that may be useful and improve your watching experience even more.

Opera

Audio renders for YouTube are different thanks to the unique codes used for reading.

3. Disable and enable back your audio adapters

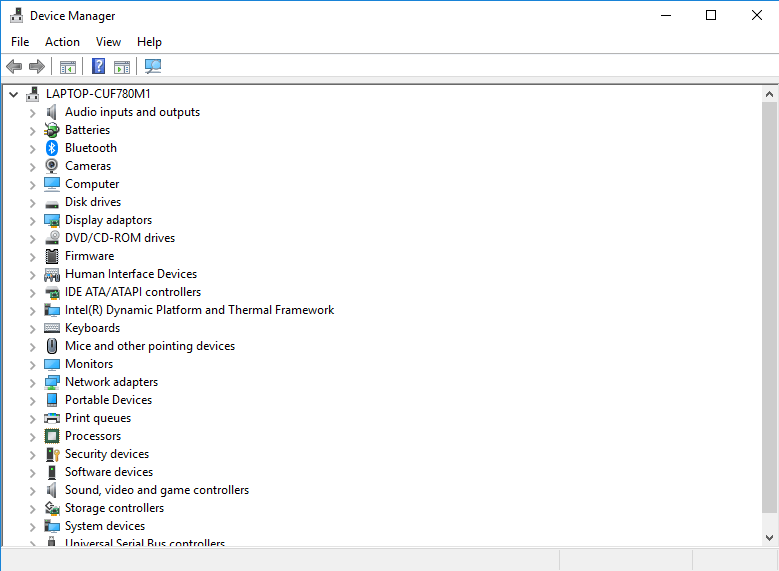
  1. Press the Windows logo key + R on your keyboard > type devmgmt.msc in the Run box and hit Enter.devmgmt.msc Youtube Audio renderer error Please restart your computer
  2. Click the arrow next to Sound, video and game controllers to expand the menu.
  3. Right-click on each audio adapter > click Disable device.
  4. Right-click on each audio adapter again > click Enable device.
Realtek High Definition Audio Youtube Audio renderer error Please restart your computer

4. Rollback your audio driver

  1. Press the Windows logo key + R on your keyboard > type devmgmt.msc in the Run box and hit Enter.
  2. Click the arrow next to Sound, video and game controllers to expand the menu.
  3. Right-click your audio adapter > select Proprieties.audrio driver Youtube Audio renderer error Please restart your computer
  4. Select the Driver tab > click Roll Back Driver, if unavailable, select Uninstall Driver – Windows will automatically install the driver back after restarting your PC.Uninstall driver Youtube Audio renderer error Please restart your computer
  5. Restart your PC and see if this had any effect on the error.

5. Synchronize the Windows Sound driver and the ASIO drivers’ frequencies

  1. Press the Windows logo key + R on your keyboard > type mmsys.cpl in the Run box and hit Enter.mmsys.cpl Youtube Audio renderer error Please restart your computer
  2. Select the problematic device > click Properties.
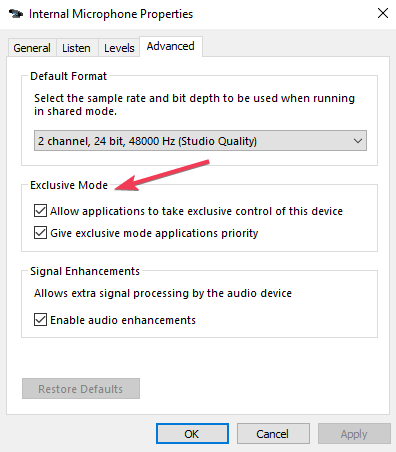
  3. Go to the Advanced tab > change the Default format to the desired quality that you want to use > click Apply.deafault sound format Youtube Audio renderer error Please restart your computer
  4. Open your Audio Card driver settings > find the option where you can change the frequency and make sure to set it to the same one you chose for the Windows Sound driver.set default sound format Youtube Audio renderer error Please restart your computer
  5. Restart your computer and see if this fixed the error

Alternatively, even though it’s not always the case, but the browser might be the problem. That’s why we would suggest switching to a browser that doesn’t have any issues whatsoever with media streaming, especially YouTube. We are talking about UR Browser.

We hope that our solutions to fix Youtube‘s video render issue were of help for you. Leave us a comment in the comment section below if this article helped you fix the error message.

Here’s how to quickly fix 0x97 error on Epson printers

Do you have an Epson printer? Are you getting the error code 0x97 on your printer?

You must be wondering why this error occurs during the printing process. Continue reading below, we have more to talk about this problem.

Epson printers are widely used all over the world; however, many users, especially long term Epson printer users, reported that Epson error code 0x97 comes up during the printing process.

This error appears on the indicator with a notice to turn the printer off and on again.

After this error occurs, the printer will stop printing, hence preventing any printing activity from taking place.

Error 0x97  is due to issues involving the printer’s internal hardware. Fixing this printer problem requires hands-on technical workarounds which we have compiled in this article.

How can I fix Epson printer error 0x97?

  1. Use Microsoft’s Printer Troubleshooter
  2. Unplug and Plug-in
  3. Clean the printer using wet tissue
  4. Update your drivers
  5. Contact Hardware Specialist

Solution 1 – Use Microsoft’s Printer Troubleshooter

First of all, consider using Microsoft’s printer troubleshooting tool to fix the error problem. While running the troubleshooter, you may be required to unplug or couple the printer.

However, ensure you follow the instructions after running the troubleshooter. Download and use the Microsoft Printer troubleshooter by using these steps below:

  1. Go to the link here.
  2. Download and install the troubleshooter on your Windows PC.
  3. Follow the prompts to fix the printer error.

Another alternative to this method is to use the user manual included in the printer’s package box. Locate the error problem and possible solutions as indicated in the user manual.

Solution 2 – Unplug and Plug-in

cable disconnect epson printer

When error 0x97 occurs on an Epson printer, the indicator requires that the printer be turned off and then on again.

This process requires unplugging from power supply and plug-in to power supply. Here’s how to carry out unplug and plug-in:

  1. Unplug all USB and cables attached to the printer.
  2. Open the printer casing and remove any jammed papers.
  3. Remove the printer cartridges and keep in a safe place.
  4. Hence, since the printer is disconnected, press the power button on your PC. This will release any remaining current left in your printer.
  5. Reconnect all the power cable and USBs attached to the printer.
  6. Turn on your printer afterwards.

Solution 3 – Clean the printer using wet tissue

In addition, error code 0x97 could occur because the printer has accumulated dust which surmounts to making the printer dirty.

Other factors include: waste ink around head sprayer, paper particles within the roller, and presence of unwanted elements within the printer.

We highly recommend that you clean your printer by using a wet tissue (preferably moist). Here’s how to clean up your printer:

  1. Turn off your Epson printer
  2. Open the printer casing carefully.
  3. Now, take a tissue and use warm water to wet it.
  4. Hence, clean up the internal components of the printer most especially the mechanic pad and other sensitive areas.
  5. Remove the tissue afterwards and wait for 15 minutes.
  6. Then, assemble the printer and turn it on using the power button.

Solution 4 – Update your drivers

If you’re having this problem with Epson printer, the issue might be related to your drivers.

To fix the problem, it’s advised that you update your drivers to the latest version and check if that helps.

This is a fairly simple procedure, and you can do it by visiting the printer’s manufacturer’s website and downloading the latest drivers for your model.

Once you download the latest drivers, install them, and check if the problem is still there.

If downloading drivers manually seems a bit tedious to you, you might be able to fix the problem by using third-party tools such as Fortect Driver Updater.

⇒ Get Fortect Driver Updater

This tool will allow you to automatically update your drivers with just a few clicks, so it’s the simplest and fastest method of updating your drivers.

Solution 5 – Contact Hardware Specialist

Another option is to pack the printer inside a box and give it to a hardware specialist for repairs.

Some users who gave their Epson printer to hardware specialists complained about the expensive charges incurred when fixing their printer.

However, if the printer comes with a warrant, then you may possibly contact customer care on how to get a full replacement.

Consequently, if you try out any of the fixes we listed above and you are still getting this error, we highly recommend that you switch to a new printer.

We hope you solved the problem using the fixes we listed. Feel free to comment below.

How to Fix Steam Incomplete Installation Errors

Steam is the most popular game distribution platform in the world. Millions of players worldwide use it to play their favorite games with friends, and some even turned it into a full-time job.

But just like that’s the case with every bigger major platform, issues with Steam are unfortunately common, as well.

Today, we’re going to talk about one of the most annoying issues that bother some Steam users.

Namely, some players might encounter an Incomplete installation issue when trying to launch a game, even if the game is fully installed.

As various factors can cause this problem, the error message usually comes with various error codes, each associated with a specific cause of the problem.

In this article, we’re going to explore the most common error codes and try to solve them. Keep reading.

How can I fix Installation incomplete errors on Steam?

1. Error code #2 – Inappropriate installation

Reportedly, Steam conflicts with some types of FAT32 hard drives.

Although the company tried to deal with these issues with a couple of updates, it seems the problem still persists for some users.

According to the community, moving Steam‘s main folder to the default location (C: Drive) corrects the problem.

In case you don’t know how to move the Steam folder to another location, here’s exactly what you need to do:

  1. Exit the Steam client application.
    Browse to the Steam installation folder for the Steam installation you would like to move (D:Steam, for example).
  2. Delete all of the files and folders except the SteamApps & Userdata folders and Steam.exe
  3. Cut and paste the whole Steam folder to the default location (C:Program FilesSteam by default)
  4. Launch Steam and log into your account.

Once you’ve done this, you’ll also need to change the default installation path for the games you’ll install in the future. To do that, follow these instructions:

  1. Open Steam
  2. Navigate to your Steam client ‘Settings’ menu.
  3. Select ‘Steam Library Folders’ from the ‘Downloads’ tab.Steam Library Folders
  4. From here, you can view your default installation path, as well as creating a new path by selecting ‘Add Library Folder’.
  5. Once you have created the new path, all future installations can be placed there.Add library folder in Steam
  6. Now, just right-click the newly created path, to make sure it’s set to default.

This is how you should deal with error code #2; so far, we don’t know about any other solution, but this one proved to be appropriate, it should solve your problem.

2. Error code #3 and #- Internet connection problems and network timeout

These error codes occur if your Steam client cannot connect to the internet. In this case, there are a few things that you can do to make things right.

For detailed solutions for the networking problem with Steam, you should check this article.

Additionally, if you have problems connecting to the internet, not just with Steam, check out our article about the internet issues in Windows 10.

And as your last resort, you can switch to the Offline mode until you find the proper workaround.

3. Error code #10 – Steam servers are busy

This error appears if you are unable to reach the platform’s servers because they’re busy or overloaded.

And since Steam is a massive service, issues like this can happen every now and then.

In case Steam servers are busy, there’s actually nothing you can do about it at the moment.

The only solution is to wait some time and try again later when the servers return to work.

4. Error code #35 – Required ports are not opened

Steam requires certain ports to be opened on your router in order to connect to the servers. These are usual ports, and most users don’t need to set up anything.

However, if you’ve recently messed with your ports, this error may occur.

To make Steam functioning again, just make sure the required ports are opened. The ports are:

To log into Steam and download content:

  • HTTP (TCP port 80) and HTTPS (443)
  • UDP 27015 through 27030
  • TCP 27015 through 27030

Steam Client:

  • UDP 27000 to 27015 inclusive (Game client traffic)
  • UDP 27015 to 27030 inclusive (Typically Matchmaking and HLTV)
  • UDP 27031 and 27036 (incoming, for In-Home Streaming)
  • TCP 27036 and 27037 (incoming, for In-Home Streaming)
  • UDP 4380

Dedicated or “Listen” Servers:

  • TCP 27015 (SRCDS Rcon port)

Steamworks P2P Networking and Steam Voice Chat:

UDP 3478 (Outbound)
UDP 4379 (Outbound)
UDP 4380 (Outbound)

5. Error code #53 and #55 – Conflicts with antivirus

And finally, some antivirus programs are known for causing issues with certain Steam games or the client in general.

To make sure this indeed is the case, disable your antivirus software for some time and try to run Steam games then. If the error is gone, your antivirus causes conflicts.

To resolve this, you need to whitelist the entire Steam folder, along with the client in your Antivirus.

Some users also reported that they had to uninstall the antivirus completely, so you might consider switching to Windows Defender, as well.

Additionally, the same error code shows up a Steam service failed to load. To enable Steam service, do the following:

  1. Exit Steam.
  2. Go to Search
  3. Type the following command: C:Program Files (x86)SteambinSteamservice.exe /Install (If you have installed Steam to another path, replace C:Program Files (x86)Steam with the correct path.)
  4. Launch Steam and see if the issue is still present.

That’s about it; as you can see, we’ve tried to cover the most common Steam error codes and provide proper solutions.

As this is a massive issue, all these error codes might get you confused, so we advise you once again to pay attention to details to solve the problem as soon as possible.

This issue is associated with a Steam disk write error, and we covered that issue in-depth in a separate guide.

What are your experiences with this issue? Do you know about some solutions we didn’t list in this article? Let us know in the comments.

Easy steps to fix MS Office error 1713 in Windows 10

Error 1713 arises for some users when they try to install MS Office suites, such as Office 365 or Office 2016.

The error message states: MSI_package_name cannot install one of its required products. Contact your technical support group.

Users can’t install Microsoft Office when that error arises.

How can I fix error 1713 in Windows 10?

1. Thoroughly Uninstall Previous Office Software

  1. Error 1713 often arises due to an existing or remnants of a previous Office installation that needs removing. So, try uninstalling an existing MS Office suite with Advanced Uninstaller PRO, or another third-party uninstaller.
  2. Add Advanced Uninstaller PRO to Windows with its installer.
  3. Open the Advanced Uninstaller PRO window.
  4. Click General Tools and Uninstall Programs to open the window shown directly below.Uninstall Programs window how to fix error 1713 windows 10
  5. Select the MS Office suite, and click the Uninstall button.
  6. Click the Use the leftover scanner option, which will enable users to delete all leftover files and registry entries for MS Office.The Use the leftover scanner option how to fix error 1713 windows 10
  7. Click the Yes button to confirm.
  8. Thereafter, select all the leftover files and registry entires listed within the Advanced uninstall clean-up window.
  9. Press the Done button.

Users who have already uninstalled an MS Office suite can try reinstalling it and then uninstalling it with third-party software.

Alternatively, delete all remaining MS Office folders from File Explorer by right-clicking them and selecting Delete.

Users can also scan the registry with CCleaner to delete leftover Office registry items.

2. Turn Off the Windows 10 Firewall

  1. The Windows Defender Firewall could be blocking an MS Office suite installation when error 1713 arises. To turn off Windows Defender Firewall, click the Type here to search button.
  2. Enter the keyword firewall in the search box, and click Windows Defender Firewall.The Windows Defender Firewall applet how to fix error 1713 windows 10
  3. Click Turn Windows Defender Firewall on or off to open firewall settings.Turn off Windows Defender Firewall settings how to fix error 1713 windows 10
  4. Click the Turn off Windows Defender Firewall radio buttons, and select the OK option.

3. Run a Registry Scan

  1. Error 1713 can also be due to corrupted or leftover registry keys from previous Office versions. To clean and fix the registry, Download CCleaner.
  2. Add CCleaner to Windows with its downloaded installer.
  3. Open the CCleaner window, and click the Registry tab.CCleaner's Registry tab how to fix error 1713 windows 10
  4. Select all the registry checkboxes, and press the Scan for Issues button.
  5. Click the Fix selected issues button.
  6. Then click Fix All Selected Issues to confirm.

4. Turn Off Third-Party Antivirus Firewalls

In addition, users might need to turn off third-party antivirus software firewalls. How exactly users can do that varies between antivirus packages.

However, users can expect to find some kind of disable or turn off setting on antivirus utilities’ system tray context menus. So, right-click the system tray icon for an antivirus utility to select an option that will temporarily disable it.

Avast shield controls how to fix error 1713 windows 10

5. Remove Software From the System Startup

  1. Some third-party programs can potentially generate MS Office installation conflicts. To remove third-party software from the system startup, open Run with its Windows key + R hotkey.
  2. Enter msconfig in Run and click OK to open the System Configuration window.The General tab how to fix error 1713 windows 10
  3. Click the Selective startup radio button.
  4. Deselect the Load startup items check box.
  5. Select the Use original boot configuration and Load system services check boxes.
  6. Press the Apply button.
  7. Click OK to exit the System Configuration.
  8. Select the Restart option to reboot Windows.
  9. Thereafter, try installing the MS Office software.
  10. Users can restore the startup software by selecting the Load startup items option on the System Configuration window.

6. Run a System File Scan

  1. Software install errors, such as error 1713, can arise due to system file corruptions. To run a system file scan, press the Windows key + X keyboard shortcut.
  2. Click Command Prompt (Admin) to open an elevated Prompt.
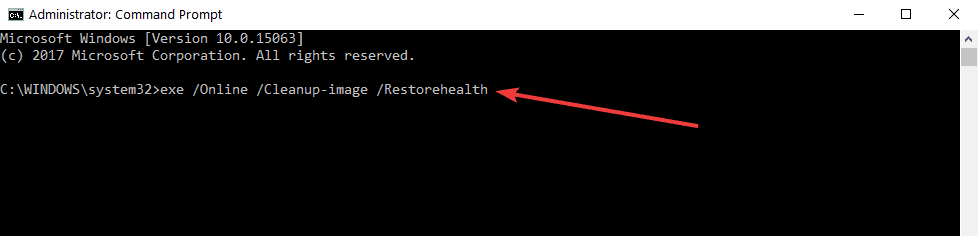
  3. Enter DISM.exe /Online /Cleanup-image /Restorehealth in the Prompt’s window, and press the Return button.
  4. Input sfc /scannow and press the Enter key.The SFC command how to fix error 1713 windows 10
  5. Restart Windows if the scan repairs system files.

Need more details on how to run SFC scannow in Windows 10? Check out this guide.

10+ ways to fix error code 0x80240031c in Windows 10

Updating Windows 10 isn’t always simple, and there might be some problems from time to time. Some users are getting error 0x80240031c while updating Windows 10, so let’s see how to fix this error.

How can I fix error 0x80240031c in Windows 10?

Table of contents:

  1. Log in with a local account
  2. Delete Windows.old folder
  3. Disable or temporarily uninstall your antivirus software
  4. Update using the wired connection
  5. Disable your graphics card drivers
  6. Perform Automatic Repair
  7. Run the Update Troubleshooter
  8. Run the SFC scan
  9. Run DISM
  10. Restart Windows Update components
  11. Restart the BITS service

1. Log in with a local account

If you’re updating to newer build of Windows 10, and you’re using your Microsoft account to access Windows 10, you might want to switch to local account in order to fix error 0x80240031c.

There are two ways to do this: you can create a new local account and switch to it, or you can change your current account to a local one. To create a new local account, follow these instructions:

  1. Open the Settings app.
  2. Navigate to Accounts > Other users.
    windows-10-settings
  3. Under Other users section, click Add someone else to this PC.
  4. Choose I don’t have this person’s sign-in information, and then click on Add a user without a Microsoft account.
  5. Enter the username and password for this user.
  6. Now you need to log out of your account and switch to a new local account that you’ve just created.
  7. After switching to a new account, try to update Windows 10.

After you’re done, you can delete the local account. If you wish to change your account from Microsoft account to a local account, do the following:

  1. Open Settings app and go to Accounts > Your account.
  2. Next, click on Sign in with a local account instead.
  3. Enter the password for your account and click Next.
  4. Now, enter username and password that you wish to use. After you’re done, click Next.
  5. Next, click Sign out and finish.
  6. Log in back again to your account, and try to update Windows 10 again.

2. Delete Windows.old folder

If you have upgraded from Windows 8 or Windows 7, you might have Windows.old folder on your main hard drive. This folder contains everything from your old operating system, and you can use that folder to switch back to the previous version of Windows. However, if you’ve performed a clean install or you have been using Windows 10 for more than a month, this folder is probably not on your hard drive.

Sometimes this folder can be the cause of error 0x80240031c on Windows 10, so make sure that you delete it. After deleting Windows.old folder, you won’t be able to return the previous version of Windows, so keep that in mind.

3. Disable or temporarily uninstall your antivirus software

Sometimes error 0x80240031c is caused by your antivirus software, so before you try to upgrade, make sure that your antivirus software is disabled. If the issue persists even if your antivirus software is disabled, uninstall your antivirus and try to upgrade Windows 10 again.

Users have reported that AVG antivirus is causing this issue, but if you use different antivirus software, make sure that you disable it, or uninstall it if you’re getting error 0x80240031c.

4. Update using the wired connection

It has been reported that this error appears when you try to update Windows 10 using a wireless or mobile network such as Verizon 4G LTE, AT&T 4G LTE, etc. If you’re using wireless or mobile network, connect your device to a wired network and try to perform the upgrade again.

5. Disable your graphics card drivers

Graphic card drivers can cause issues when performing Windows update, and it’s advised that you disable your graphic card driver when you’re upgrading your Windows. To do so, just visit Device Manager, find your graphic card, right click it and choose Disable.

After you’ve disabled your graphic card driver, try to perform the upgrade again.

6. Perform Automatic Repair

If the issue persists, you could perform Automatic Repair in order to fix this problem. To perform Automatic Repair, you’ll have to use Advanced Startup.

To access Advanced Startup, you need to do the following:

  1. While in Windows 10, hold the Shift key on your keyboard and click the Power button. From the list of options choose Restart.
  2. Your computer will restart and take you to the Advanced Startup menu.
  3. Now you need to choose Troubleshoot > Advanced Options > Automatic Repair.

If Automatic Repair doesn’t fix this issue, you might want to refresh your PC. To do that, you need to repeat Step 1 from this solution and choose Troubleshoot > Refresh your PC.

7. Run the Update Troubleshooter

The next thing we’re going to try is running Windows 10’s built-in troubleshooter. This troubleshooting tool can resolve various issues, including our update problem.

Here’s how to run the Update troubleshooter in Windows 10:

  1. Go to Settings.
  2. Head over to Updates & Security > Troubleshoot. 
  3. Select Windows Update, and go to Run the Troubleshooter. 
  4. Follow further on-screen instructions and let the process finish.
  5. Restart your computer.

8. Run a SFC scan

Since we got involved with the troubleshooting tool, you may as well try the SFC scan. This is a command-line tool that basically scans your system for potential issues, and resolves them automatically (if possible).

Here’s how to run the SFC scan in Windows 10:

  1. Right-click on the Start Menu button, and open Command Prompt (Admin).
  2. Enter the following line and press Enter: sfc/scannow
  3. Wait until the process is done (it may take a while).
  4. If the solution is found, it will automatically be applied.
  5. Now, close the Command Prompt and restart your computer.

9. Run DISM

And finally, the last troubleshooting tool we’re going to try is Deployment Image Servicing and Management (DISM). As its name says, this tool deploys the system image all over again, and can hopefully ‘wipe away’ the problem.

Here’s how to run DISM in Windows 10:

  1. Open the Command Prompt as shown above.
  2. Enter the following command and press Enter:
      • DISM.exe/Online /Cleanup-image /Restorehealth
  3. Wait for the process to finish.
  4. Restart your computer.
  5. In case the DISM can’t obtain files online, try using your installation USB or DVD. Insert media and type following command:
      • DISM.exe/Online /Cleanup-Image /RestoreHealth /Source:C:RepairSourceWindows /LimitAccess
  6. Make sure to replace C:RepairSourceWindows path of your DVD or USB.
  7. Follow further on-screen instructions.

10. Restart Windows Update components

If none of the previous solutions resolved the problem, let’s try with resetting Windows Update components. Here’s how to do that:

  1. Start Command Prompt as administrator.
  2. When Command Prompt starts, run the following commands:
  • net stop wuauserv
  • net stop cryptSvc
  • net stop bits
  • net stop msiserver
  • ren C:WindowsSoftwareDistribution SoftwareDistribution.old
  • ren C:WindowsSystem32catroot2 Catroot2.old
  • net start wuauserv
  • net start cryptSvc
  • net start bits
  • net start msiserver

11. Restart the BITS service

The final thing we’re going to try is restarting the BITS service, which is responsible for acquiring updates. Here’s how to reset the BITS service:

  1. Go to Search, type services.msc, and open Services.
  2. Find Background Intelligent Transfer Service. Right-click and open Restart.
  3. Wait for the process to restart.
  4. Now, on the General tab, find Startup type and choose Automatic.
  5. If the BITS is not running, right-click and choose Start.
  6. Confirm selection and close window.

We have to mention to use refresh option as the last solution and only if you’re unable to fix error 0x80240031c in any other way.

Bear in mind that refreshing your PC will delete your downloaded software and files, although your personal documents and Universal apps will be saved, so use it as a last resort.

[wl_navigator]

How to fix GWXUX.exe application error in Windows 10

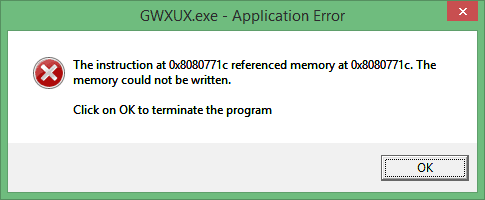
Updating to Windows 10 isn’t always smooth as expected. Users have reported that file GWXUX.exe gives them an annoying Application Error alert while trying to update to Windows 10.

1050e196-1312-477d-8993-9239c19786ea

So, let’s see what we can do to resolve this issue.

What is gwxux.exe?

First off, let’s explain what GWXUX.exe does. This application is in charge of updating your Windows 7, Windows 8 or Windows 8.1 to Windows 10.

If you’re using an older version of Windows, you’ve probably noticed the little icon in your Taskbar that asks you to update to Windows 10.

That is GWXUX.exe, it scans your computer in order to see if your system is compatible with Windows 10, and it informs you when the update is ready to be downloaded.

However, after clicking the icon and trying to update to Windows 10 many users have received an Application Error. If you’re having this problem, don’t worry, there is a way that you can fix this.

How can I fix gwxux.exe application errors?

As far as we know, this error is caused by corrupted system files. The best solution is to reinstall Windows or to perform a repair installation.

However, for some users, this isn’t the best solution, especially if you don’t want to deal with backing up of your files and reinstalling your software all over again.

But don’t worry, you can repair corrupted system files without installing a fresh copy of Windows.

1. Perform an SFC scan

SFC stands for System File Checker, and it will scan your system for corrupted files and it will repair them. To perform an SFC scan, you need to do the following:

  1. If you’re on Windows 8 or Windows 8.1, go to the bottom right of your screen and open Search. Then type Command Prompt in the search box and find the Command Prompt application from the list. Right-click it, and select Run as administrator. You might have to enter your administrator password to proceed or allow the application to run.
  2. On Windows 7 it’s almost the same. Open the Start menu, in the search box type Command Prompt, right-click the application and select Run as administrator from the context menu. Again, you might need to enter your administrator password or to allow the Command Prompt to run.
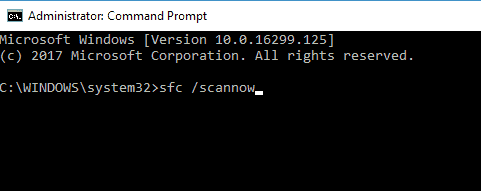
  3. The next step is the same for both Windows 8 and 7. Command Prompt will open up and you’ll need to type sfc /scannow in it. Just press Enter and SFC scan will perform, replacing any corrupted files it finds.Error 0x80070020 Windows 7
  4. Before starting SFC scan please close all other applications, and do close Command Prompt until verification is 100% complete.
  5. After the scan is complete, you’ll be notified if SFC has managed to find and repair the corrupt files. If the corrupted files have been repaired the GWXUX.exe Application Error should be fixed.

2. Run DISM

  1. Open Command Prompt as an administrator
  2. Enter the following commands one by one and hit Enter:
    • DISM.exe /Online /Cleanup-image /Scanhealth
    • DISM.exe /Online /Cleanup-image /RestorehealthDISM Restore Health
  3. Reboot your computer and check if the error persists.

3. Reinstall your Windows

If the issue cannot be fixed with SFC scan, and you’re still getting GWXUX.exe Application Error you might need to reinstall your current version of Windows.

Keep in mind that other files can experience these kinds of issues, and to learn more, we suggest reading out nvwmi64.exe errors guide.

That should do it, feel free to try any of the solutions detailed above and let us know what worked for you in the comments section below.

[wl_navigator]

Microsoft improved every aspect of its upcoming controller except the battery, for greater “flexibility”

Despite Microsoft improving the ergonomics of its Xbox Series X controller to reduce the amount of latency while gaming as well as including USB-C and adding a new share button, the company is adamant about dragging old AA-battery tech into this next generation experience.

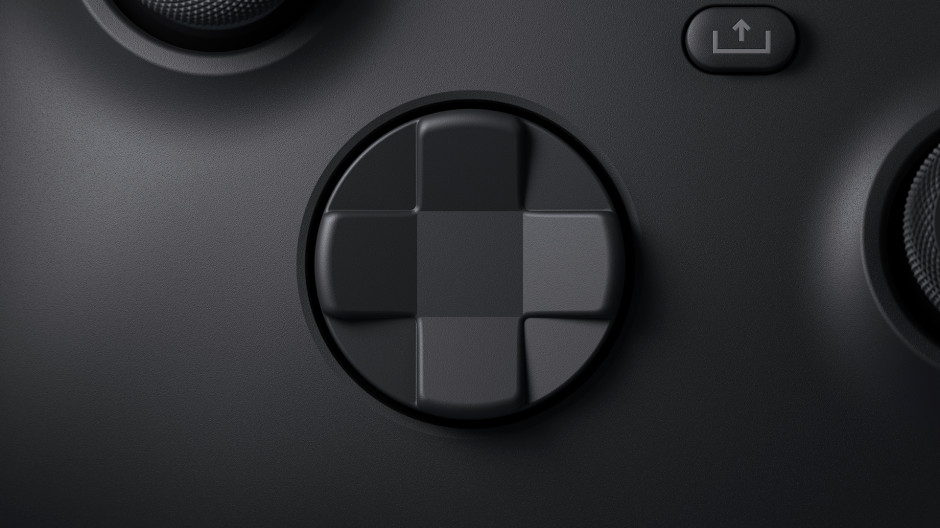
Earlier this month, senior designer Ryan Whitaker within the Xbox division unveiled some specifics about its Xbox Series X controller that included a refined ergonomic design, Dynamic Latency Technology, USB-C port, tactile dot pattern, deeper dish D-pad design, PS4-inspired Share button, and included Bluetooth connectivity out of the box.

However, it was Whitaker’s tidbit about the inclusion of AA-battery tech powering the Xbox Series X controller experience this time around that had the internet ablaze.

Fortunately, Microsoft is a company run mostly by telemetry and data, and the company justifies its choice as one that offers gamers greater flexibility.

Microsoft spoke to a group of reporters at its Redmond, WA campus this month and explained that “What it comes down to is when actually talking to gamers, it’s kind of polarising and there is a strong camp that really wants AAs. So just giving flexibility is the way to please both [sets of] people… You can use a rechargeable battery pack and it works just like it does on the Elite, [but] it is a separate thing.”

While built-in rechargeable batteries seem future-forward, Microsoft is working with a sound argument that AA battery tech incorporates a level of flexibility that circumvents the degradation of recharge cycles while addressing in-game solutions that offer a handy answer to low-battery issues in the midst of heated gaming.

With much of the general design of the Xbox Series X leveraging aspects of its predecessors, there is a chance that older controllers will still interface with the new console and staunch rechargeable battery fans can continue to use their controller of choice.

How to scan your Windows 10 PC with Windows Defender offline

Windows Defender is among many features that received various improvements with the Anniversary Update a few years ago. The most useful feature that Windows Defender got with the update is the ability to scan offline, before the system boots.

This could be really useful and effective because it will keep your system safer than while Windows 10 is actually running. That way, various malware, and other malicious software won’t even have a chance to get to your files, which is really good.

Before we show you how to run Windows Defender at startup, we have to tell you that once you initiate the process, your computer will restart automatically.

So, before running the scan, make sure you closed all your work, and that your computer is ready for restarting.

Now, let’s see how to perform an offline scan with Windows Defender in Windows 10 version 1607.

How can I run an offline scan with Windows Defender?

  1. Open the Settings app
  2. Go to Update & security > Windows Defender
  3. Under Windows Defender Offline, click on Scan Offline
    windows defender offline
  4. Your computer will restart after 60 seconds

Once your computer starts again, the scan will automatically begin. Windows Defender Offline scan looks almost the same as in the regular mode, so you won’t have any problems working with it.

If any malicious software is found, you would need to remove it, that’s basically the only thing you need to do while running the offline scan. Once the process is done, your computer will start automatically.

windows defender offline scan

As you can see, initiating and performing this process is extremely easy, and it could actually be more beneficial to your computer than performing a regular scan.

If you need extra useful options for offline antivirus protection, there are efficient methods to secure your PC even if you lost your internet connection.

You can also read a full breakdown of what each Windows Defender security setting does in Windows Defender settings explained, including how offline scan protection works to block malware before Windows loads.

To do so, you should rely on a powerful offline antivirus that can offer complete scanning services and other perks you can definitely benefit from.

So, how do you like the offline mode for Windows Defender?

Does it actually make any difference in eliminating malicious software? Tell us your opinion in the comments section below.

How to set up a Windows 10 Kodi Remote Control [Full Guide]

The Media Center fell by the wayside in Windows 10. That was perhaps one of the more debatable things for Microsoft to remove from the OS.

However, there are a few Media Center replacements compatible with Windows 10. One is Kodi Jarvis, which is a multiplatform software package you can play videos, films, music and photo slideshows with.

How can I set up a Kodi Remote Control in Windows 10?

You can set up a Windows 10 Kodi remote control with an Android tablet or phone.

If you don’t already have Kodi, you can save its installer to Windows from this website page.

Click Installer beside Windows to save its setup wizard. Then run through the Kodi setup wizard to open the software as in the snapshot below.

Kore

Setting up an Android Remote for Kodi

Now you can set up a new Kodi remote to navigate the software with something comparable to a TV controller. However, you’ll need to have an updated Android tablet or phone to add the Kore app to.

First, add the XBMC Foundation Kore app to your Android device from this page. Then open Kodi and configure the software as follows.

  • Click System on the Kodi home page, Services, and then Remote control to open the options shown directly below.

Kore2

  • Select both Allow remote control by programs on other systems and Allow remote control by programs on this system if it’s not already selected by default.
  • Next, select Web server from the left menu as below.

Kore3

  • There you should also select the Allow remote control via HTTP option.

Configuring the Kore App

Now open the Kore remote app on your Android device. Kore might automatically detect the Windows 10 Kodi installation.

However, if Kore doesn’t detect it, you’ll need to enter media center name, port, username, and IP address details in the app’s Manuel configuration page.

  • You can find the required details in Kodi by clicking System > Services > Web server.
  • The Web server options include your port number and username details. Enter those details into the required fields on Kore’s Manuel configuration page.
  • You can also enter Kodi as the media center name on Kore’s Manuel configuration page.
  • To find your IP address, click System Info under System on the Kodi home page. Then click Network to open the details below.

kore7

  • Your IP address is included there. So enter that IP address into the Address field on Kore’s Manuel configuration page.
  • Only fill out a password if you’ve set one up for Kodi. If not, you can leave that blank.
  • Now press the Test button on Kore’s Manuel configuration page. An All done page should open informing you that the media center is configured.

If Kore Still Doesn’t Work

If Kore still isn’t working after you’ve followed the above guidelines exactly, that might be down to your firewall settings. The firewall might block Kodi. So configure firewall settings in Windows 10 as follows.

  • Enter firewall into the Cortana search box and select Allow an app through Windows Firewall to open the window in the snapshot below.

allow apps kodi


  • Press the Change settings button on that window.
  • Then scroll to the Kodi app. Select all the Kodi check boxes as above, and then press the OK button.
  • Enter the required details into the Kore’s Manuel configuration page again to set up the remote control.

Kore65

Now you can navigate Kodi with the Android remote shown directly above. Click the arrow keys and middle button on the remote to navigate the Kodi menus and options.

Kore is the official remote for Kodi, but you can also set up an Android remote for the software with the Yaste app. Both apps are great remote controls for the media center.

Have a go at the steps above and let us know what you think in the comments section below.

[wl_navigator]

How to fix Xbox Live if it doesn’t work on child accounts

To prevent fraud and protect children from the online threat Xbox allows the parents to create a Child account with restrictions. However, the parents can share their Xbox Live Gold account with their child account from the parental controls.

However, some Xbox users have reported Xbox Live won’t work on child account issues while trying to use their Xbox Live account with the Child account as reported in the Microsoft Community Forums.

Adding XBox Live to a Child Account
Hello,
I’m a bit of a newbie to XBox.  We recently got an XBox One for my kids and I’m having difficulty adding XBox Live to their accounts.  I went into settings and have it set to ask a parent, but when I try to purchase on their child account it says “You need a Parent to Buy this”  “we can’t send a request”.  Isn’t it supposed to send a request for me to approve the purchase.

Follow the troubleshooting steps in this article to fix Xbox Live won’t work on child account problem.


How do I fix Xbox Live when it doesn’t work on child accounts?

1.  Change Privacy and Online Safety Setting for Child Account

  1. First login to Microsoft Family settings and check if you are signed in as the adult.
  2. To change your child’s account setting, do the following.
  3. First, sign in to the Xbox Settings page with your adult account. Verify the ownership if asked to confirm.
  4. Now choose the Gamertag for your child’s account to which you want to add Xbox Live account.
  5. Click on Xbox One/Windows 10 Online Safety tab. Or click the Privacy tab.
    Xbox Live won't work on child account
  6. Now check the privacy settings and make necessary changes to the child account.
  7. Click Save to save the changes.
  8. Now sign in to your child account in Xbox and then sign out to apply the changes.

Cross-play Minecraft on Windows 10 and Xbox [SIMPLE GUIDE]


2. Change Privacy on Child Account

Xbox Live won't work on child account

  1. If the issue persists, you can try changing the privacy setting on the child account a little enough so that you can buy Xbox Live on their account.
  2. After making the purchase you may change the privacy back to child-appropriate settings.
  3. Although this is not an ideal fix, you can use it as a workaround to till Xbox resolves the issue.


The Xbox Live won’t work on Child account is not a new issue and there seems to be no definite fix for this problem where the parents can link their child’s Xbox Profile with a Microsoft Live account with ease.

However, we have listed some of the recommended fixes to get around this issue. Do let us know if any of the solutions helped you resolve the issue.

[wl_navigator]

Color Picker Software for Windows: 18 Best Apps in 2026

If you’re a designer you probably used color picker software at least once. Many design applications have a built-in color picker tool, but sometimes you might need a tool that has some extra features.

If you’re a designer and you’re looking for color picker software, today we’re going to show you some of the best color picker apps for Windows 10.

What is the best color picker software for Windows 10?

1. ColorPic

The interface of ColorPic

If you’re looking for a simple color picker software, ColorPic might be perfect for you. The application is simple to use and to select a color you just have to click your mouse.

ColorPic can show you colors in both hex and decimal format, and you can easily adjust hue and saturation values along with RGB channels.

In addition, the application will also show you the percentage of Cyan, Magenta, Yellow, and Black.

The application has a magnification area at the bottom that you can use to precisely pick a color from your screen.

It’s worth mentioning that you can zoom in and out of the magnification area in order to pick the desired color easily.

In addition, you can also use the arrow keys to move your mouse and to perform precise selections.

The application has a color mixer and you can choose between Hex, Rainbow, Hue, and Sliders mixer. This feature is rather useful if you want to select a specific color or perform a slight adjustment to an already selected color.

The application supports web-safe colors and it can easily snap to the nearest web-safe color if needed. You can also choose between point samples, 3×3, or 5×5 color sampling.

Lastly, you can create color palettes using ColorPic and save the selected colors for later use.

The application allows you to copy selected colors right to the clipboard, so you can easily use them with other design tools.

ColorPic is a simple color picker tool so it will be perfect for first-time users. The application is completely free, so you can use it without any limitations.

⇒ Get ColorPic

2. Just Color Picker

Just Color Picker is another simple color picker software for Windows. The application has a rather simple interface, and you can see the selected color along with the magnifier section at all times.

The application supports 10 different color formats and you can easily choose between HTML, RGB, HEX, CMYK, etc.

All selected colors will be added to your palette, and you can easily export them and save them for later use. You can also open, edit and save Adobe Photoshop .aco color switches and GIMP .gpl palette files.

In addition, you can also add comments to your selected colors thus providing additional details about them. The application has support for RGB, HSV, or HSL adjustments so you can easily adjust the selected color.

The application allows you to see the different shades of the selected color, and there’s even a gradient view available so you can choose between a wide range of colors. In addition, there’s support for both RGB and RYB color wheels.

If needed, there’s a text preview feature so you can see how your color compares against different backgrounds. As for available colors, you can copy them easily simply by clicking them.

Just Color Picker is a simple application that offers a humble user interface that might turn away some users.

The application relies on Alt + X shortcut for color selection, so you won’t be able to select any color, even from the application, without using the shortcut.

This seems a bit confusing at first, but you’ll get used to it after a while.

Overall, Just Color Picker doesn’t have any major flaws, so feel free to try it out. The application is completely free, and thanks to the portable version it will work on any PC without an installation.

⇒ Get Just Color Picker

3. Instant Color Picker

Unlike previous entries on our list, Instant Color Picker comes with a modern user interface, so it looks visually appealing. The application allows you to pick any color from the screen simply by clicking it.

There’s a magnifier tool that you can zoom in up to 8x and you can easily see the color code in it even before you select a color. As for color sampling, you can use single-pixel, 3×3, or 5×5 sampling.

Your palette can have up to 20 colors, and you can click on each saved color and see more information about it. Available information includes color codes and variations of the color.

If needed, you can also change the lighting or saturation of the selected color. The application is quite simple to use, and you can even pick a color by pressing a keyboard shortcut.

After doing that, its color code will be added to the clipboard so you can easily paste it to any other application.

We have to mention that Instant Color Picker supports RGB, HSL, HSV, CMYK, HTML, Hex, ActionScript, Delphi, VC++, and VB color formats.

Of course, you can easily get a color code in any of these formats and paste it into a different application.

It’s worth mentioning that you can save your color palette in image format, but you can also save it in a .aco format that is compatible with Photoshop.

The application has a Quick Color Palette feature thus allowing you to easily choose colors from a color spectrum. In addition, there are Named Colors so you can search the list of colors with ease. There’s also a test layout feature that allows you to see how different color combinations will look.

Overall, Instant Color Picker is a great tool. The application has a modern design and it offers a wide range of features.

It’s also worth mentioning that the application is completely free so you can use it without limitations.

⇒ Get Instant Color Picker

4. CP1

CP1 is another simple color picker software that we wanted to show you. The application has a simple and modern user interface, so it’s perfect for basic users.

There is support for RGB and HTML hexadecimal format and you can easily copy any color code simply by selecting it.

Color picking process is rather simple, and after you start it, the application will turn into a large magnifier that allows you to select the desired color precisely.

The application offers both Wide and Narrow Palette modes so you can see the different shades of the selected color. Of course, there’s a History Palette as well that saves all your selected colors.

It’s worth mentioning that the application allows you to export and save your color palette as .txt or .json file. Unfortunately, .aco Photoshop file isn’t available.

We have to mention that CP1 doesn’t allow any color adjustments and you can’t adjust brightness, color or saturation which is a flaw in our opinion.

Overall, CP1 is a decent tool, but it lacks some advanced features that other entries on our list have. On the other hand, CP1 has a modern user interface and it’s quite simple to use, so it’s perfect for basic users.

The application is completely free, and with the portable version available you can use it without installation.

⇒ Get CP1

5. ColorPix

If you’re looking for a simple color-picking software, ColorPix might be perfect for you. This application is rather simple and it comes with color picker and magnifier.

The magnifier allows you to zoom up to 1600% so you can select the desired color with ease.

The application is simple to use, and in order to select a color, you just have to hover your cursor over the desired color and press any key on your keyboard.

This will cause the color to become locked. After the color is locked, you can see its RGB, HEX, HSB, and CMYK code available.

If you need to use the color in any other tool, you can simply click to copy it to the clipboard.

Thanks to this feature, you can easily select any color on the screen and use its color code in any application.

Even though ColorPix is rather simple to use, it doesn’t offer any advanced features.

The application doesn’t support color palettes, so you won’t be able to save your colors. In addition, you can’t edit your selected color by changing its hue, saturation, or brightness.

Overall, ColorPix is a decent tool, but it offers only the most basic options when it comes to color picking. The application is completely free and portable, so it will be perfect for basic users.

If you want a more advanced color picker, you might want to consider a different tool.

⇒ Get ColorPix

6. Pixie

Pixie is another simplistic color picker software. The application is rather simple and it doesn’t offer any advanced features. Pixie has a rather humble user interface that relies heavily on shortcuts for color picking.

The main window will show you HEX, RGB, CMYK, and HSV color codes of the currently selected color.

However, you can’t select colors and add them to palettes. Instead, you can use the shortcut key to copy the color’s hex value.

Thanks to this feature, you can easily use the selected color in any other application.

The application has a magnifier, but in order to use it you need to press a keyboard shortcut.

We also have to mention that the magnifier doesn’t update automatically, so you’ll have to press the keyboard shortcut to update the preview. This seems like a major flaw and it makes the magnifier harder to use.

The application doesn’t allow you to change color or saturation of the selected color, but you can open color mixer with a keyboard shortcut and perform some minor adjustments.

Pixie is an incredibly small and portable application, so it will work on any PC without issues. We have to mention that this tool offers rather limited functionality, so it might be suitable only for the most basic users.

One of the biggest flaws is the lack of color palette and history, so you can’t save your selected colors.

If you don’t mind the lack of this feature, you might want to try Pixie, especially since it’s completely free and portable.

⇒ Get Pixie

7. GetColor

If you’re looking for a free and simple color picker, GetColor might be perfect for you. The application has a simple user interface that allows you to pick any color from your screen.

Color picking is rather simple and you just have to drag and drop the eyedropper tool to select a specific color. After doing that, you’ll see the selected color in RGB Hex, RGB Decimal, and RGB HTML format.

After you select a color, you can easily copy its code to the clipboard and then use it in a different application.

The application allows you to preview the selected color, but unfortunately, there isn’t a magnifier tool which makes color picking a bit more complicated.

Speaking of missing features, there’s no ability to customize your colors, and you can’t change their hue or saturation.

In addition, you can’t create a color palette and save your colors which is a major flaw in our opinion.

GetColor is a simple color picker application, but it offers the most basic features, so it might not be suitable for advanced users.

On the other hand, if you’re a basic user that needs a simple color picker, this application might be just what you need. The application is completely free, so you can use it without any restrictions.

⇒ Get GetColor

8. Color Cop

Color Cop is another simple and free color-picking software. The application has a humble interface that allows you to select colors simply by dragging and dropping the eyedropper tool.

As for sampling, the application supports 1px, 3x3px, and 5x5px sampling. There’s also a built-in magnifier tool that can help you select any color that you want with precision.

Magnifier supports up to 16x zoom, which should be more than enough for most users. The tool has an auto copy feature that will automatically copy the selected color code to the clipboard so you can use it in other applications.

Regarding color codes, the application supports HTML hex, Delphi hex, and six additional formats.

The application supports web-safe colors, and you can also reverse the selected color, generate a random color or convert the current color to grayscale.

The application also has a colorful history feature that can memorize up to seven different colors. In addition, there’s also a complementary color palette that has 42 different colors to offer.

It’s also worth mentioning that the application has a color mixer, so you can easily adjust the selected color.

Color Cop is a solid tool, but we have to admit that there’s no ability to save your palette, which is our only complaint.

The application has a simple design that some users might not like, but despite its design, this is still a solid color picker software.

This is a freeware application, and since it’s completely portable you can run it on any PC without an installation.

⇒ GetColor Cop

9. PixelPicker

If you’re looking for freeware color picker software, you might want to try PixelPicker. The application is rather simple to use, but we have to mention that it works a bit differently than other applications on your list.

To pick a color, first, you need to drag and drop to the part of the screen that you want to use for color picking.

After doing that, that section will be added to the magnifier and you’ll be able to zoom in and out with your mouse.

Now you just have to drag and drop over your magnifier to select the desired color. After doing that, you’ll see the selected color along with its code below the magnifier.

Now you just need to click the selected color and you can paste its code to any third-party application.

Regarding color formats, the application supports 10 different formats including RGB, ARGB, HTML, CMYK, HSL, HEX, etc.

We have to mention that PixelPicker doesn’t allow you to save your colors so there’s no support for palettes or color history.

The application is rather simple to use, and you’ll get used to it after a few tries.

PixelPicker offers a simple user interface, so it’s perfect for first-time users. The application is completely free, so feel free to try it out.

⇒ Get PixelPicker

10. Hex Color Finder

Another freeware color picker software that we need to mention is Hex Color Finder.

The application offers a simple user interface that lets you pick colors using the drag-and-drop method. After you pick a color you can easily adjust the amount of red, green, or blue.

There’s also a gradient available, so you can choose from a wide array of colors.

Color palette feature is available allowing you to store about 30 different colors for later use. The application allows you to create presets so you can switch between different palettes with a single click.

As for color customization, you can invert the selected color, and change its lighting or contrast.

Hex Color Finder is a simple color picker software, but it offers all the necessary features. Using this tool you can easily copy the color code of any color and use it in other applications.

Unfortunately, you can’t export color palettes, so you won’t be able to use them in tools such as Photoshop.

Overall, this is a simple application and since it’s completely freeware we strongly advise you to try it out.

⇒ Get Hex Color Finder

11. ACA Color Picker

Unlike previous entries on our list, ACA Color Picker isn’t a freeware application. The tool is simple to use and in order to select a color from your screen you just need to move the mouse to the desired location and press the shortcut key.

We have to mention that the application will automatically copy the color code to the clipboard so you can use it with different applications.

Regarding the supported formats, the application offers Standard, Bytes, Percentage, and Decimal as output formats.

There’s also a magnifier feature that can zoom up to 36x. The application has a color palette so you can easily see all selected colors.

Thanks to the color export feature you can save your palettes in .aco format and use them in Photoshop. You can also save the color list and use it later.

If needed, you can rename the colors in order to distinguish them better. There’s also a color mixer so you can easily edit the selected color.

If you want to save space on your screen, you can always minimize the application to the system bar and it will keep working in the background.

ACA Color Picker is a decent tool and it offers almost all the features an average user needs. However, the application isn’t free, so in order to use it you need to purchase a license.

Many other tools on our list offer the same features while being completely free, so if you want to save money you might want to consider a different tool.

⇒ Get ACA Color Picker

12. Moo0 Color Picker

There are many free and simple color pickers, and one of them is Moo0 Color Picker. The application has a minimalistic interface and it’s rather simple to use.

To take a screenshot, you just have to move your cursor over the desired color and press the keyboard shortcut to pick your color.

The application will show you the hex code of your color and you can easily copy it to the clipboard with a single click. You’ll be pleased to hear that you can adjust your color by changing its hue, saturation, and lighting.

The application also allows you to preview your text against different backgrounds so you can easily find the best color combination.

Despite the simplistic user interface, the application doesn’t have a lot to offer.

There’s no support for color pallets, so you won’t be able to save your colors. In addition, the magnifier feature is also missing making precise color picking harder than it should be.

Moo0 Color Picker is a basic color picker, and even though it doesn’t offer any advanced features, it’s simple to use so it’s perfect for basic users.

The application is completely free, so you can use it without any limitations.

We have to mention that application will try to install some additional applications from this developer, so be sure to disable their installation during the setup process.

⇒ Get Moo0 Color Picker

13. Pixeur

Another free color picker tool for Windows that we want to show you is Pixeur. This is a simple application that allows you to pick colors simply by using the drag and drop method.

If you’re picking colors for a website, you’ll be pleased to hear that this application supports web colors as well.

Pixeur offers color mixer so you can easily adjust your colors by changing RGB or CYMK components. In addition, you can also change color hue, saturation, and balance.

After you select a color, its hex value will become available so you can easily copy it and use it in other applications.

All your picked colors will be available in the color history panel, and you can easily export the selected colors and save them for later use.

Speaking of saved colors, you can copy them in Hex, reversed Hex, RGB, or Long Value format.

Pixeur has a simple user interface which might be its only flaw.

The application has all the necessary features so it’s perfect for first-time users. If you don’t mind the application’s humble user interface, feel free to try Pixeur.

⇒ Get Pixeur

14. ZZoom

If you’re looking for a minimalistic color picker that doesn’t have any advanced features, you might want to consider Zoom. This is a lightweight application that allows you to pick any color from your screen.

The application has a magnifier field that you can use to pick the precise color. Magnifier supports up 15x zoom and you can zoom in and out with your mouse wheel.

It’s worth mentioning the magnifier has a grid for extra precision.

Color picking is rather simple and it relies on shortcuts. Simply move your cursor over the desired color and press the C key on your keyboard to copy the color code.

We have to mention that you’re limited only to Hex format, but you can see the RGB value of the color before you pick it.

ZZoom is a simple tool so it doesn’t offer any advanced features. There are no color adjustments or color palettes, so you can’t save your selected colors.

On a positive note, the <span id=”urn:local-text-annotation-yqydx7xtupot5ufm4b4qfiychk62vqig” class=”textannotation disambiguated wl-thing” itemid=”https://data.windowsreport.com/windowsreport/entity/application_software”>application is completely free and portable so it will work on any PC without an installation.

⇒ Get ZZoom

15. Color Archiver

Another free color picker on our list is Color Archiver. With its simple user interface, this application is perfect for first-time users. To pick a color, you need to drag and drop to the desired part of the screen.

After that, you just need to click the magnifier and select the desired color. This method might be a bit confusing at first, but you’ll get used to it after a few tries.

The application allows you to see color codes in RGB, Web, Long, CMYK, and Hex formats. In addition, you can easily copy the color code and use it in different applications.

You can also adjust your colors and change HSL, HSV, RGB, or CMYK values. If needed, there’s also a standard color mixer available for color adjustment.

Color Archiver is a decent tool, but its humble design might turn away some users.

The application has a unique way of picking colors that might take you a few tries to get used to it. Overall, this tool is completely free and portable, so feel free to try it out.

⇒ Get Color Archiver

16. Pickard

If you’re looking for a portable and free color picker, Pickard might be the perfect choice for you.

The application allows you to pick colors from the color spectrum, but at the same time, you can adjust the hue, saturation, and luminosity of your color.

In addition, you can also change the amount of red, blue, and green <span id="urn:local-text-annotation-hlkor4xp2wh2lzkz0wbp2e5r4beptyol" class="textannotation disambiguated wl-thing" itemid="https://data.windowsreport.com/windowsreport/entity/color”>color right from the color spectrum.

Pickard is a simple application and it works great as a color picker, but it lacks the color palette feature. With this feature missing, you’re unable to see previously selected colors and save colors for later use.

Despite this minor flaw, Pickard is a solid tool and since it’s completely free and portable there’s no reason not to try it.

⇒ Get Pickard

17. Pipette

Another solid color picker software for Windows is Pipette. Using this application you can easily pick any color from your screen.

The application is rather straightforward so your color code is copied to the clipboard automatically.

Another useful feature is color list that allows you to save all your selected colors.

⇒ Get Pipette

18. ColorBug

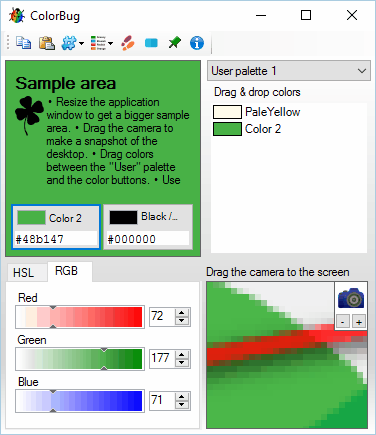
If you’re looking for color picker software that has a wide array of features, you might want to consider ColorBug.

To pick a color you need to select the desired part of the screen and then use the magnifier area to pick the color manually.

After you pick a color, you can easily adjust HSL and RGB values using built-in sliders.

The application also has a useful text area that allows you to see how your color looks compared to different backgrounds.

Of course, a color palette feature is available, and you can name your colors in order to differentiate them easily. It’s important to mention that you can export your color palettes and use them with other design tools.

Regarding colors, you can see the color code in 13 different formats and you can easily copy and use it in any other application.

ColorBug also offers some extra features including a color step tool. With this tool, you can see different shades of colors and pick any color for your project. In addition, the application offers a gradient tool so you can create gradients with ease.

If you’re a web designer, you’ll be pleased to hear that you can export the gradient to CSS code and use it for your projects.

ColorBug is a great color-picking software that allows you to have multiple color palettes and switch between them with ease.

The application also offers some extra features such as a gradient generator and color step tool.

ColorBug is completely free, and with the portable version available you should be able to run it on any PC without an installation.

⇒ Get ColorBug

Conclusion

Color picker software is a must-have if you’re a designer, and there are many great color-picking applications available.

Most applications on our list are completely free and portable, so don’t hesitate to try them out.

New Microsoft PowerToys update brings the fun with 4 new utilities

Microsoft PowerToys brought some fun to Tuesday with the release of v0.16.0 that includes some bug fixes and stability updates, along with 4 new utilities including the always popular Image Resizer extension. To get everyone up to speed, PowerToys used to be a utility that would allow anyone to customize previous versions of Windows, and since its release in September 2019 for Windows 10, Microsoft has seen a lot of enthusiasm from the community with many developers wanting to contribute to PowerToys.

With today’s 0.16 release, Microsoft has made improvements to its utilities, documentation, and tools making it easier for the community to dive in. The major updates with this release include:

  • FancyZone improvements:
    • Multi-Monitor improvement: Zone flipping switching now works between monitors!
    • Simplified UX: Removed layout hot-swap and flashing due to multi-monitor lacking
  • New Utilities!
    • Markdown Preview pane extension
    • SVG preview pane extension
    • Image Resizer Window Shell extension
    • Window Walker, an alt-tab alternative
  • Updated and closed over 100 issues!
  • Testing improvements
    • 54 UX Functional tests
    • 161 new Unit tests

Hopefully, with the next release, Microsoft will enable a new auto-update feature for PowerToys and indicated that they already have a plan for it. For anyone interested in giving PowerToys a try, just visit their GitHub page to install and run it via GitHub.

Microsoft resumes Edge Chromium updates, Edge 81 coming in “early April”

Microsoft has confirmed that development on Edge Chromium is continuing and that despite its announced delay of updates back on March 20th, Edge 81 will be released into the stable channel in early April.  This revised schedule matches Google’s recent announcement that Google Chrome 81 will be released the week of April 7th and that releases will get back to a more regular 6-week schedule.

With today’s update, Microsoft also confirmed that they will continue to deliver security and stability updates to Edge 80 and the preview channels will be on their regular schedule.  One important change to the schedule includes the cancellation of the version 82 release with Microsoft jumping ahead to Microsoft Edge 83 for their next release in mid-May.

For anyone who wants the latest updates, you can check out Microsoft Edge’s twitter feed.

TLS 1.0 and 1.1 security for Microsoft browsers changes coming, but delayed

It’s been almost a year and a half since Microsoft first announced that they will disable Transport Layer Security (TLS) 1.0 and 1.1  during the first half of 2020 by default for Microsoft’s browsers. However, with the impact of Covid-19 still in effect for many of us, Microsoft has announced that they will be postponing the planned change to later this year to minimize any potential disruption to their users.

For Microsoft Edge (Chromium), TLS 1.0 and 1.1 are designed to be disabled by default with Microsoft Edge version 84, which is currently planned for July 2020.

For Internet Explorer 11 and Edge legacy edition, the designed disable date is September 8, 2020.

It is important to note that for many people the impact of this change will be minimal and by moving to TLS 1.2 Microsoft is doing us all a favor and improving the cryptographic protocol used to transport data over the network. Today, TLS 1.2 is already supported by most modern browsers. More importantly, this change ensures that a user’s browser experience remains seamless.  Services such as PayPal, Stripe, UPS, and others have indicated that they already support version 1.2 and will soon begin refusing older TLS 1.0 connections.

Users can also “re-enable” the previous versions of TLS in Microsoft’s browsers, but Microsoft strongly recommends that organizations move off of the previous versions as quickly as possible.


Microsoft introduces new Azure Edge Zones for 5G edge computing, now in private preview

With Microsoft’s recent acquisition of Affirmed Networks, it seems that they have 5G on their minds.  Today, Microsoft confirmed that they are enabling 5G Edge computing capabilities with their new Azure Edge Zones.  The first Azure Edge Zones will be launched in partnership with AT&T in Los Angeles in the spring.

Azure Edge Zones are designed to support emerging technologies such as Edge, IoT, and 5G with many of the devices and applications requiring little to no latency.  For example, some of these scenarios could include online gaming where responsiveness is critical, or smart infrastructure allowing a city to connect and analyze millions of endpoints in almost real-time.  The idea of Azure Edge Zones is to connect the devices and applications on the edge and enable them to use highly scalable compute, storage and network with little to no network hops.

Corporate Vice President of Product Management for Azure Networking, Yousef Khalidi said, “some Edge Zones will live within the network; others with carriers and operators; and some in customers own sites to improve scenarios like automation, supply chain, retail, robotics, gaming and more. What makes Edge Zones unique compared to how Microsoft currently enables edge computing is that hey will be delivered as a Microsoft-managed service”

While the service is in private preview for telco and carrier partners, it is clear that Microsoft is taking an aggressive approach to 5G and offering an alternative to Amazon’s recently announced partnership with Verizon by quickly moving ahead to couple 5G alongside their cloud services.  Microsoft indicated that they are looking to deliver Azure Edge Zones in ten cities over the next 12-months including New York and Miami.  It’s important to note that Edge Zones initial launch with AT&T won’t be exclusive and Microsoft has already identified several other partners who are part of the private preview including NTT Communications, Rogers, SK Telecom, Telstra, Vodafone, and Etisalat.

The private previews will also include Azure Private Edge Zones that combine 5G alongside Azure Stack technology allowing companies to set up and run their Edge Zones on-premises.


Microsoft’s InXile Entertainment studio delays its Wasteland 3 game to August 28, 2020

Microsoft’s InXile Entertainment has delayed its release of Wasteland 3 due to the coronavirus. This news comes on the heels of the newest recommendations by medical professionals to continue to practice social distancing until April 30, 2020. Wasteland 3 was set to be released on Xbox One, Windows 10 PC, and Xbox Game Pass on May 19, 2020.

On Twitter, Brian Fargo, Studio Head at InXile Entertainment, released an official statement detailing that Wasteland 3 will instead be released on August 28, 2020.

Certainly, it will be a letdown for many players to wait a few more months for Wasteland 3 to be released. However, it will be worth the wait as Fargo and his team work diligently to bring the best Wasteland 3 experience upon the game’s new release date on August 28, 2020.

Wasteland 3 is a squad-based RPG game set in post-apocalyptic Colorado. Wasteland 3 will feature tactical, turn-based combat with a story line following the events of Wasteland 2. Look for Wasteland 3 coming on August 28, 2020, where it will be available on Xbox One and Windows 10. Wasteland 3 will be available free for Xbox Game Pass subscribers at launch.

Are you angry about Wasteland 3 release date being pushed back? Let us know in the comments.

Google Chrome crashes on Windows 10/11? We got fixes for it

Microsoft released quite a few Windows 10 post-RTM build for insiders over the years, but they are still far from bug-free.

Reportedly, a lot of users of Google Chrome who are testing the latest build said that the browser just crashes, for no particular reason.

Why is Chrome crashing all the time?

According to various reports, the 64-bit version of Google Chrome doesn’t work in particular Windows 10 build versions. On the other hand, the 32-bit version works just fine.

You can try it yourself, just run the 64-bit version of Google Chrome, and you’ll probably get a crash report and a bunch of error messages.

So, why does this happen? Google Chrome uses a special technology called sandbox, which isolates the browser’s processes in order to reduce the vulnerability of the browser and reduce the chance for malicious software to get to your computer.

Cutting through the noise, it looks like the sandbox is breaking in the Win10 10525 previews for 64-bit Chrome, said Justin Schuh, a Google software engineer, in one of his messages on the Chromium bug tracker.

We will be listing several solutions for this issue in the article below. Know that these solutions will also work if you are experiencing the following problems:

  • Chrome crashing Windows 10
  • Chrome keeps crashing Windows 10
  • Google Chrome keeps crashing Windows 10
  • Google Chrome crashing Windows 10
  • How to fix Chrome crashing on Windows 10

How can I fix Google Chrome crashes on Windows 10?

1. Disable sandbox

  1. Right-click on your Desktop shortcut of the Chrome browser and go to Properties
  2. Go to Shortcut tab and click on the Target: field
  3. Type space at the end of the path in Target: filed and enter the following: –no-sandbox
  4. Click OK, and use that shortcut to launch Google Chrome

This should restore the functionality of Google Chrome in Windows 10, but it takes some risks with it.

Namely, when you disable the sandbox feature of your Chrome browser, it will become more vulnerable, and potentially malicious content will find an easier way to enter your computer through the Google Chrome browser.

But, if you don’t want to mess with your security in the Chrome browser, you can switch to the 32-bit version, or maybe try another browser, until Microsoft comes up with the solution.

And, since this issue is now widely reported, I’m sure that Microsoft’s developers will start working on the solution, along with the fixes for other bugs.

If you have any other Windows 10-related issues you can check for the solution in our Windows 10 Fix section.

2. Try out a different browser

If Google Chrome continues to have stability issues, then one solution would be to simply switch to a different browser until you manage to fix it.

One particular browser that is extremely stable is Opera One. It shares many features with chrome, such as the Chromium engine, and therefore the equally-large library of extensions.

Additionally, it is extremely fast and lightweight, while still managing to provide some much-needed tools, such as a tracker-blocker, an ad-blocker, a full-fledged VPN and even an AI.

Opera One

An excellent web browser that offers many useful tools, including the ability to save and print your web pages.
Free Download Visit website

3. Additional solutions

  1. Check if you have an Internet connection available
  2. Clear your browser cache
  3. Uninstall extensions that you don’t use anymore
  4. Free up memory by closing other applications in use
  5. Restart your browser
  6. Run a full system antivirus scan
  7. Clean boot your computer
  8. Reinstall Chrome is the crashes persist.

There you go, these are just a couple of solutions that can help you if Google Chrome is crashing on your PC.

FIX: Server temporarily unavailable in Skype for Business

Skype for Business offers additional features over the standard Skype plan which is free. However, if you are coming back from a long vacation, you encounter “Server temporarily unavailable” or “a network or server issue is temporarily limiting features “errors in Skype for Business.

Several Skyper for Business users reported to have encountered this error in the Microsoft community.

I cannot login to Skype for Business from my desktop application.  I get this error: Server is temporarily unavailable.  Though, I can login from my mobile devices and from my desktop using the OWA version.  But, not the application. 

If you are also troubled by this error, here are a couple of troubleshooting tips fix the server is temporarily unavailable Skype for Business error.

What can I do to fix Server is temporarily unavailable Skype error?

1. Clear corrupted cache

Server is temporarily unavailable Skype error
  1. The cache can become corrupted if the application is not used for a long time. Try clearing the bad cache and check for any improvements.
  2. Close Skype for Business app from the taskbar.
  3. Press Windows Key + R to open Run.
  4. In the Run dialogue box, type %localappdata% and click OK.
  5. It will open the Windows File Explorer and navigate to the cache folder.
  6. Inside the folder, navigate to the following location:
    C:UsersusernameAppDataLocalMicrosoftOffice16.0
  7. Open the Skype for Business folder and delete sip_profilename folder.
  8. Open the Tracing and delete all the files inside the folder. Only delete the files inside, and not the folder itself.
  9. Close the File Explorer and launch Skype for Business.
  10. Try signing in and check if the Server temporarily unavailable error is fixed.

2. Manually configure Skype for Business

Server is temporarily unavailable Skype error
  1. If the issue persists, try configuring Skype for Business manually. This should help you fix any configuration issues.
  2. Launch Skype for Business.
  3. Click on Options (gear icon) and select Personal.
  4. Go to Advanced > Manua Configuration.
  5. Enter the following details for the Internal and External server:
    Internal Server: sipdir.online.lync.com:443
    External Server: sipdir.online.lync.com:443
  6. After configuring Skype for Business, repeat steps 2 again to clear the cache and check for any improvements.

Check service status

  1. If the issue persists, try accessing the Skype for Busines from your smartphone.
  2. Open the web browser on your computer and try accessing Skype for Business web app.
  3. If the apps are not working, the issue is probably with the Skype service.
  4. You can check the Skype status to get updates about the service.

3. Update and reinstall Skype

Server is temporarily unavailable Skype error
  1. You can try to update Skype to the latest version to fix any bugs in the software.
  2. Open Skype for Business and check if any update is available.
  3. Download and install any pending updates.

Reinstall Skype

Server is temporarily unavailable Skype error
  1. If the issue persists, uninstall Skype for Business and reinstall it from the official website.
  2. Press Windows Key + R to open Run.
  3. Type control and click OK.
  4. Go to Programs > Programs and Features.
  5. Select Skype for business and click on Uninstall.
  6. Once uninstalled, go to Skype for Busines download page.
  7. Download the app and install.
  8. Launch Skype for Business and check if the error Server temporarily unavailable is resolved.
Why can’t I log into Skype for Business?

There are a number of technical reasons why this might happen. Wait a few minutes and try to sign in again. If that doesn’t work, contact your workplace technical support and provide a link to this page: Troubleshooting Skype for Business Online sign-in errors for administrators.

By following the steps in this article you can fix server issues with your Skype for Business app in Windows.

Skype keeps asking for password? Here’s how to fix that

Skype is an excellent tool to keep in touch with family and friends, but some users reported that Skype keeps asking them for a password.

Here’s how one user described this problem on Microsoft Answers forum:

I’m using skype for quite a long time. It was working fine but after the latest update of skype, it keeps on asking for password again and again even though I have entered correct password because it is working on web version of skype. I have tried every possible solution even tried re-installation of skype but the problem is still there. I even tried changing my windows defender settings but nothing different happened.

Fortunately, Microsoft has taken cognizance of the issue and has already bundled the solution in the latest version of the communicating platform.

What do I do if Skype keeps asking for password?

1. Update Skype

Update Skype if Skype keeps asking for password


  1. Launch the Microsoft Store.
  2. Click on the three horizontal dots at the top right corner and select Downloads and updates.
  3. In the Downloads and updates page, see if there is an update available for Skype.
  4. If yes, download the update.
  5. If not, you already have the latest version installed on your system.

2. Update Windows

  1. Go to Start > Settings > Update & Security.
  2. You will get to see the last time your PC checked for updates.
  3. If it’s a long gap, click on the Check for updates button to check if there is one available.
    Update Windows if Skype keeps asking for password
  4. Download and install any update that is available.

3. Uninstall and re-install Skype:

  1. To uninstall Skype, go to Start > Settings > Apps.
  2. In the Apps & features page, look for the Skype application.
  3. Select and same and click on the Uninstall.
    Uninstall and reinstall Skype if Skype keeps asking for password
  4. Follow on-screen instructions that may pop up.
  5. To re-install the latest version of Skype, click here.
    Download Skype afresh if Skype keeps asking for password
  6. Select the operating system you have on your PC and download the Skype app.
  7. Follow on-screen instructions.

This is all you need to do to if Skype keeps asking for a password.

Meanwhile, here are some related texts for you to browse.

[wl_navigator]

Microsoft Edge to support InPrivate search in Bing

If you are an Edge user, you will soon be able to browse the web and search with Bing without leaving a single footprint.  That is one of a host of family-centric features that Microsoft promised to add to the new Chromium-based browser.

InPrivate search in Bing

InPrivate is Edge’s equivalent of incognito. The feature is ideal for families that share desktops. It ensures the complete deletion of your browsing history, cookies, and site data once you are done browsing.

Other browsers also support incognito browsing. But Microsoft said that Edge has the feature incorporated into Bing, enhancing search privacy.

In addition, Microsoft Edge is the only desktop browser that offers built-in InPrivate search with Bing. So, when I’m browsing in InPrivate mode, my searches aren’t tied to me or my account.

Only insiders can explore InPrivate search in Bing in the meantime. But Microsoft said that the feature is coming to the Stable channel soon.

The Redmond tech giant already suspended updates to Edge due to the effect of the coronavirus pandemic on its operations.

Other new Edge features include:

Third-party tracker blocking

The web is getting smarter day by day. You visit a website, and the ads you see are for items you are considering buying or have bought in the past.

It sometimes gets creepy, and you start wondering who is really monitoring your online activity. Microsoft Edge will soon offer the option to block third-party trackers, especially from website you have not directly visited.

Password protection

Microsoft announced the availability of Password Monitor in Edge. The feature secures your credentials against threats that lurk behind the dark web.

The dark web is usually difficult for ordinary users to access. So if somebody has stolen and is selling your password there, you just cannot tell. Fortunately, the advanced password security feature will be doing the legwork on your behalf.

Edge will be penetrating darknet markets and notifying you if it finds a password and username that matches your browser’s saved credentials. You may then change those details to secure any affected accounts.

Other new features include smart copy and Immersive Reader for Edge users with reading disabilities. There is also smart copy, a time-saver, and vertical tabs that enable you to work more efficiently.

All these unique additions indicate that Microsoft is not done developing Edge into a browser that outshines Chrome and Firefox in key areas. The browser’s ability to block cryptominers is an important differentiator too.

Enable this new Bing setting to donate your Microsoft Rewards earnings to charities for free

Microsoft announced a new feature today for its Microsoft Rewards program that allows users to automatically donate value they earn by searching on Bing to the charity of their choice.

The feature is now live in some regions such as the United States and can be activated from within the Microsoft Rewards settings page.

“With everything that’s happening these days, one thing that I am trying to keep in mind and model for my kids is how small things can make a big difference,” Microsoft’s Liat Ben-Zur wrote in a blog post. “Whether that’s self-care or looking out for others. Today, we are introducing Give with Bing and the Give Mode feature in Bing, a new way to help you to support the causes you care about. It’s a simple thing but it has the potential for real impact. If you choose to search in Bing you can earn reward points for those searches as part of the Microsoft Rewards program. By turning on the new Give Mode feature within your rewards settings, you can donate your reward points to the cause of your choice. There is no cost to you, just search with Bing.”

One of the organisations supported is the CDC Foundation which is involved in tackling the COVID-19 pandemic. Microsoft will also match all donations made until the end of June, making this a rather remarkable way to support a good cause completely for free.

Are you going to activate Bing’s new Give Mode? Let us know in the comments below and then follow us on Pinterest and Twitter for more Microsoft tech news.

Fix Windows 10/11 error 0xA0000400 in a few easy steps

As surprising as this may sound, there are Windows users who still haven’t managed to install Windows 10 on their computers.

Update errors are still plaguing many users, who are forced to roll back to their previous Windows OS in order to use their machines.

Error 0xA0000400 is one of the most frequent errors users encounter, and it occurs only when they hit the upgrade button.

Error 0xA0000400 stops users from installing the Windows 10 OS version, as we may all see:

I’m running Windows 10 Education (Build 10240), and when I attempt to manually update to the Anniversary Edition (Build 14393), I get an error code 0xA0000400. The update does not even attempt to install, as soon as I click “update now” it fails immediately with this message.

It is worth mentioning that the majority of users who reported this issue are running the Windows 10 Education edition, but there are also exceptions to the rule.

One way or another, Windows users have proven once again they are resourceful people and came across a few workarounds. Let’s see what you can do in order to get rid of this error.

How can I fix Windows 10 update error 0xA0000400?

1. Run the troubleshooter

  1. Type troubleshooting in the search bar and select Troubleshooting.
  2. Select View all.
  3. Click on Windows Update > follow the on-screen instructions to run the troubleshooter.

2. Close all active apps

[…] what seems to have worked for me is closing everything I could including Skype, Onedrive, Ventrillo, Blizzard Games Launcher, Curse Updater, Visual Studio 2015, Firefox and Edge.  I have no idea which of these were stopping it, but it is my opinion that it was Skype.  I basically closed as much stuff as I could and it started working.

The users who tried this workaround confirm that Skype is the culprit. Try to do the same as well.

3. Turn off the Internet connection when the update download is finished

  1. Go to Windows Update > Check for Updates.
  2. Select Learn More > a link will open on your default browser.
  3. Click on Get the Anniversary Update now. The folder name is Windows10Upgrade28084.
  4. Open it and make sure it downloads all the files.
  5. Turn off your Internet/WIFI/LAN IMMEDIATELY when the download reaches 100%.

Since you already have the error, file is already on your computer so it’s going to just verify like a hash check to make sure the Windows 10 update files are intact. Now it should install upgrades but get stuck at the usual 2%, make it stay there for about 30 seconds and re-enable your Internet/WIFI/LAN and the upgrade should finally pass 2%. You can then live in peace.

Have these solutions worked for you? Let us know by using the comments section below.

[wl_navigator]

Miss FMV video games? A new one is now out on Microsoft’s Xbox One consoles

Full motion video (FMV) video games used to be all the rage back in the day due to their ability to offer gamers a proper interactive movie experience. As video game graphics improved though, interest in FMV titles waned and the genre was almost completely abandoned.

Wales Interactive has been one of the very few games publishers that has refused to give up on FMV titles and has released a new one today on Xbox One consoles called The Complex.

The Complex is a Sci-Fi FMV and boasts the writing talent of Lynn Renee Maxcy (The Handmaid’s Tale) and stars Michelle Mylett (Letterkenny, Bad Blood) and Kate Dickie (Game of Thrones, The Witch).

Here’s the game description and trailer:

The Complex is an interactive sci-fi thriller movie from Wales Interactive. After a major bio-weapon attack on London, two scientists find themselves in a locked-down laboratory with time, and air, running out. With choose-your-own-narrative style gameplay, your actions and your relationship with other characters will lead you to one of eight suspenseful endings.

Having treated the victims of a chemical attack in the totalitarian state of Kindar, Dr Amy Tenant is a leader in the advancement of Nanocell Technology. Now, in London, news breaks of a blood-vomiting civilian whose identity is far from coincidental. Reunited with an old friend, Amy is trapped in an impenetrable HQ of laboratories—a womb of scientific advancement with a perilous secret.

For every decision you make, every interaction, your character’s personality is being tracked. At the end of each playthrough, you are rewarded with a Personality Score and a breakdown to see how you played the game. Discover the five basic dimensions of a personality; openness, conscientiousness, extraversion, agreeableness and neuroticism. Which of those will your character play?

The Complex can be bought by itself or as part of a bundle containing Late Shift, Wales Interactive’s previous FMV title, and within a larger Ultimate FMV Bundle containing even more games in the genre to play on Xbox One.

Are you a fan of FMV video games or will this be your first one? Share your thoughts with the community in the comments below and then follow us on Pinterest and Twitter for more Xbox gaming news.

The Complex
The Complex
Developer:
Wales Interactive
Price:
$12.99


The Interactive Movie Bundle


The Ultimate FMV Bundle
Developer:
Wales Interactive
Price:
$49.99

Skype Voicemail not working? We got fixes for that

Skype provides a very useful networking tool for individuals and businesses, but sometimes your Skype voicemail just isn’t working. Several reasons can account for Skype voicemail not working, and today we’ll show you how to fix them.

How to fix Skype Voicemail problems on your PC? Firstly, go to Skype settings and make sure that Call forwarding is enabled.

If it is, disable Call forwarding temporarily or adjust your privacy settings and allow everyone to call your Skype number.

What do I do if Skype Voicemail isn’t working?

  1. Check if call forwarding is enabled
  2. Disable Call Forwarding temporarily
  3. Change privacy settings
  4. Ensure to Set up Skype Voicemail correctly

1. Check if call forwarding is enabled

  1. Sign in properly to your Skype account.
  2. Go to Manage features and select Call forwarding and voicemail.
    call forwarding enable skype voicemail not working
  3. Make sure call forwarding is Enabled.
  4. Go to the Skype profile picture at the top to click on Sign out.
  5. Now, sign in again. This should help to resolve the issues with voice messaging issue and enable voicemail.

2. Disable Call Forwarding temporarily

  1. Sign out of Skype account.
  2. Close the Skype application.
  3. Launch the Skype URL at https://www.skype.com/en/
    skype log in call forwarding enable
  4. Login into Skype account via My Account on the Skype website.
  5. Locate Manage Features and select Call forwarding and voicemail.
  6. Check the Call forwarding option to disable it.
  7. Wait patiently for 3 to 5 minutes before re-enabling the call forwarding option.
  8. Log out of the Skype website.
  9. Re-open the Skype application and log in to Skype account.

This should take care of the problem and Skype voicemail should start working properly again.


3. Change privacy settings

  1. From Skype settings go to Tools and then Options.
  2. Select Privacy and then Allow calls to my Skype Number(s) and click on Anyone.
  3. Click on the Save option.

Now check if the problem is resolved.


4. Ensure to Set up Skype Voicemail correctly

  1. Go to the Skype client page.
  2. Log in to Skype and select Options.
  3. Locate the Tools menu.
  4. Under menu ensure that Receive unanswered calls as voice message is activated or checked.

There you go, these are just a couple of solutions that can help you if your Skype Voicemail isn’t working. Be sure to try all of our solutions and let us know in the comments section if you found them helpful.

[wl_navigator]

FULL FIX: Xbox error code 80072ef3

Many people play their favorite games on their Xbox online, but sometimes certain errors with Xbox can occur and prevent you from enjoying your favorite game.

Users reported Xbox error code 80072ef3 and today we’re going to show you how to fix this error.

Error 80072ef3 usually occurs when you try to sign in to Xbox Live on your Xbox console. This error will prevent you from playing games online, and that can be a major problem for most gamers.

This issue is usually caused by a network connection problem or corrupted data on your console’s hard drive, but fortunately, there are few ways to fix this problem.

How can I fix Xbox error 80072ef3?

1. Restart your console

Usually, you can fix most problems with your Xbox simply by restarting your console. To do that, you need to follow these steps:

  1. On your Xbox controller press and hold the Xbox Guide button for 3 seconds.
  2. A menu will now appear. Select the Turn Off console option and press the A button.
  3. Your console will now turn off. Wait for a few seconds and press and hold the Xbox Guide button on your controller to turn the console back on.

After your console turns on, check if the problem is resolved.

2. Delete the corrupted content

Sometimes this error can occur due to corrupted save game files, and one way to fix this problem is to delete the corrupted file. To do that, follow these steps:

  1. Press the Guide button on your controller.
  2. Go to Settings and choose System Settings.
  3. Now go to Storage.
  4. Select a storage location and press the A button.
  5. Select Games and Apps and press the A button again.
  6. Scroll down and check for corrupted game save files. Corrupted files will have a yellow exclamation point so they’ll be easy to find.
  7. If you manage to find a corrupted file, select it and press the A button.
  8. Select Delete and press the A button again.
  9. You’ll get This will permanently delete the selected content from your console. Are you sure you want to delete the message. Select Yes.
  10. Repeat this process for all corrupted save game files.

Corrupted save game files can cause this and many other problems on your Xbox console, but you should be able to fix them simply by finding these files and removing them from your device.

3. Clear your cache

Corrupted save game files can cause error 80072ef3 to appear, but this error can also be caused by corrupted system cache.

To fix the problem with corrupted cache, you’ll have to remove it from your console. This is a simple procedure and you can perform it by following these steps:

  1. Press the Guide button on your controller.
  2. Go to Settings and open System Settings.
  3. In System Settings select Storage.
  4. Select any available storage device and press the Y button.
  5. Select Clear System Cache from the menu.
  6. Choose Yes to confirm that you want to clear the system cache.

If you have multiple storage devices available, you don’t have to clear the cache for all of them. Simply select any of the available devices and clear its cache and the cache will be clear for all storage devices.

After the cache is cleared, check if the problem is resolved.

4. Make sure that you don’t have any unpaid subscriptions

Many Xbox gamers use all sorts of services that require subscriptions, but sometimes this error can occur if you have any unpaid subscriptions.

If that’s the case, you have to pay the required subscription before you can fix this problem. To do that, follow these steps:

  1. Go to Services & subscriptions section of your Microsoft account.
  2. Locate any past-due subscriptions. These subscriptions will be in red so you’ll be able to easily recognize them.
  3. Select the Pay now option and follow the instructions to pay the subscription.

After all subscriptions are paid, this error should be fixed.

5. Delete and re-download the profile

In some cases, there might be a problem with your profile that is causing error 80072ef3, and in order to fix it, you need to delete and re-download the profile stored on your console. This is quite simple and in order to do it you need to follow these steps:

  1. Press the Guide button on your controller.
  2. Go to Settings and choose System.
  3. Select Storage > All Devices.
  4. Navigate to Gamer Profiles and select the gamertag that you want to delete.
  5. Select Delete.
  6. Now select Delete Profile Only. By choosing this option your profile will be deleted, but save games and achievements will remain.

After deleting your profile, you’ll have to redownload it by following these steps:

  1. Press the Guide button on your controller.
  2. Select Download Profile option. If you don’t see this option, it means that you’re probably signed in to your profile, so you’ll need to sign out first.
  3. Log in using the Microsoft account that is associated with your gamertag.
  4. Select the storage device for your profile and the download process should start.
  5. After the process is completed, sign in to your profile and check if the problem is resolved.

Facing slow download speeds on Xbox One? Check out this guide and have it fixed in no time.

6. Restart your network connection

You can sometimes fix error 80072ef3 on your Xbox simply by restarting your network connection. To do that, simply turn off your router and wait for a few seconds. After that, turn the router back on and check if the problem is resolved.

7. Check if you have verified second email address

If you forget your account password, you might need to use a second email address to recover it.

If you don’t have your second email address verified or any other alternate way of recovering your profile, we suggest that you add it and verify it in order to fix this problem.

Few users reported that they fixed this issue by adding a third email address to their profile, so you might want to consider doing that as well.

8. Check if Xbox Live is available

Error 80072ef3 can occur if Xbox Live is having issues. If that’s the case, be sure to check with others if Xbox Live is working for them. It’s unlikely that Xbox Live is down, but if that’s the case, you’ll have to wait until Microsoft fixes the issue.

9. Perform a factory reset

Before you start this procedure, we strongly suggest to back up all files from your console. This process will delete all files from your Xbox, therefore be sure to back up all important files such as your downloaded games.

To perform a factory reset, do the following:

  1. Press the Guide button on your controller and select Settings > All Settings.
  2. Select System and go to Console info & updates.
  3. Select Reset console option.
  4. You should see Reset and remove everything and Reset and keep my games & apps option. You can choose the second option and check if that solves the problem for you. If that doesn’t work, repeat the process and choose Reset and remove everything option.
  5. After resetting your system, check if the problem is resolved.

Once again, we have to mention that resetting your Xbox will delete all files, therefore be sure to back them up.


Xbox error code 80072ef3 can be a nuisance, but you should be able to fix it after restarting your Xbox.

If that doesn’t work, feel free to try any other solution from this article and let us know what worked for you in the comments section below.

[wl_navigator]

Xbox error E74: Get the full fix here

Sooner or later you’re going to experience some error on your Xbox. While some errors are harmless, other errors, such as Xbox error E74, can prevent your console from starting.

Since this is a serious error, today we’re going to show you a few potential solutions that might help you.

How can I fix Xbox error E74?

This error is often caused by a hardware problem, most commonly HANA/ANA chip warping away from the motherboard. This issue usually occurs due to excessive heat that causes the chip to warp away.

This is a hardware issue, and if your Xbox is under warranty, we strongly suggest that you send it to the Microsoft repair center or ask for a replacement.

The warranty period for error E74 is one year since the purchase date, so if your console is still covered by warranty, we suggest that you send it to the repair shop.

Even if your warranty is expired, you can still have your console repaired for a fee. The following solutions are potentially dangerous, and they can damage your Xbox permanently, therefore use them at your own risk.

Most of the following solutions will break your warranty, so keep that in mind as well.

1. Use pennies and electrical tape

To perform this solution you’ll need electrical tape, pennies, thermal paste, and a bit of super glue. The first thing that you need to do is to open your Xbox and remove all the components, including heat sinks, motherboard, and pads from the RAM chips on the bottom side.

Now you need to make 4 sets of 2 pennies and wrap each set in electrical tape. It’s crucial that you cover penny sets completely in electrical tape in order to avoid causing damage to your console.

Now you need to apply a thin layer of thermal paste to the RAM chips where the old pads were. Put the penny sets instead of pads and use just a bit of super glue to glue them.

Be sure to scrape old thermal paste from the processors and heat sinks. Apply the thermal paste to the chips under the heat sinks.

Put the heat sinks back on along with X-clamps. Put your Xbox back together and screw the black screws on the bottom of the case tightly.

Make another stack of pennies, protect it with electrical tape and be sure that it can fit under the white heat duct while pushing it up a bit.

Now insert the duct and DVD drive back. Make another stack of pennies covered in electrical tape and position it so it can apply pressure when you put the top of the case back on.

Now put the case back on and screw in the screws carefully. Pennies will apply pressure to the HANA/ANA chip and make your console run. Thanks to the pressure from the pennies, the chip will attach itself again due to heat.

2. Apply the pressure to the heat sink

According to some users, in order to fix this problem, you just need to apply pressure to the heat sink. Open the console, locate flat silver heat sink and remove it. Apply some thermal paste to the chip below the heat sink and return the heatsink to its original position.

Apply pressure to the heat sink and put the cover back on. If there’s enough pressure on your heatsink, the error E74 should be resolved.

3. Clean the heat sink

Few users reported that in order to fix error E74 you just need to remove the heat sink from the processor and clean the old thermal paste from it. After that, you need to apply a thin layer of new thermal paste and put the heat sink back on.

After doing that, the issue should be resolved. Some users are also suggesting to reset your Xbox by starting it without a heat sink until you see two red lights on the power button.

After that, leave your Xbox to cool down, put your heat sink back on again and check if the problem is resolved. Keep in mind that starting your Xbox without a heatsink can cause permanent damage, therefore use extra caution.

4. Block your fans

According to users, you can sometimes fix the E74 error on your Xbox by blocking your fans. This is a potentially dangerous solution so use it at your own risk. Simply unplug your Xbox and put it in a horizontal position.

On the back, locate the fans and block them with any non-metal object. After blocking the fans, start your console.

Wait until you see two red lights around the power button. After that, turn off your console and remove objects that are blocking your fans. Wait until your Xbox cools off and start your console again and the problem should be resolved.

5. Apply pressure to the HANA/ANA chip

Users reported that the HANA/ANA chip is the cause of this problem and in order to fix it be sure to apply pressure to the chip. To do that, take a couple of pennies, super glue them and cover them in electrical tape.

Place the pennies on the HANA/ANA chip and then put the fan cover back on. If the cover doesn’t fit as well as before, don’t worry, this is what is needed to apply the pressure to the chip.

Now insert your DVD drive and add place about 7 CDs or DVDs on it to apply more pressure to the chip. Put the case back on carefully and make sure that the pennies or CDs don’t move.

If they move, you’ll have to repeat the same process again. After doing that, turn on your console and check if the problem is resolved.

6. Clean the thermal paste and replace the X-clamps

Error E74 sometimes appears due to your X-clamps. These components are flexible and sometimes they can bend and cause this issue to appear.

To fix this problem you need to open your console and remove the heat sinks. After doing that, carefully remove the X-clamps. These components are hard to remove, therefore use extra caution and be sure not to damage your motherboard.

After removing the X-clamps, remove the old thermal paste. Apply the new thermal paste and add new X-clamps. You can also use your old X-clamps, but it’s highly recommended to replace them.

After that, return the heat sink and all other components and check if the problem is resolved.

7. Unplug the AV cable

According to users, you should be able to fix this problem simply by unplugging your AV cable. Unplug the AV cable and turn on your console.

A red ring will appear around the power button. Quickly connect the AV cable and press the controller to reassign the button if needed. Turn off and turn on your console and the issue should be resolved.


Xbox error E74 is a serious error, and if you have it, it means that there’s a hardware problem with your console. If your device is still under warranty, we highly recommend that you send it to the repair center or ask for a replacement.

Most of these solutions are advanced, and if you’re not careful you can cause irreversible damage to your console, so use them cautiously.

[wl_navigator]

5+ easy ways to fix Xbox purchase error 807b01f7

Xbox Live allows you to purchase all sorts of content such as games and DLCs, but sometimes certain errors can occur while making online payments.

Users reported error 807b01f7, and according to them, this error occurs whenever they try to make a purchase on Xbox Live. This can be a big problem, but there are a few solutions that you can try.

How can I fix Xbox error 807b01f7?

1. Check the status of Xbox Live services

Xbox Live relies on certain services in order to work properly, and if one of those services is down, you might experience error 807b01f7 while making an online purchase.

You can check the status of Xbox Live services simply by visiting the Xbox website, but if any of the services are down, you can only wait until Microsoft fixes the issue.

2. Test your Internet connection

According to users, you might be able to fix this issue simply by testing your network connection. This is a simple procedure, and you can perform it on Xbox One by following these steps:

  1. Open Settings on your Xbox One.
  2. Select Network.
  3. Network Settings screen will now open. In the Troubleshooting section select Test network connection.
  4. After the scan is completed, select Test multiplayer connection.

To test your connection on Xbox 360, do the following:

  1. Press the Guide button on your controller.
  2. Select Settings > System Settings and go to Network Settings.
  3. Select your wireless network or choose the Wired Network option.
  4. Now select Test Xbox Live Connection.

If there’s any problem with your network connection, you have to resolve it before you can make purchases on Xbox Live.

3. Remove your Xbox profile and download it again

This error can sometimes appear if your Xbox profile is corrupted, and one of the best ways to fix it is to remove your profile and download it again. To do that on Xbox One, you need to follow these steps:

  1. On the Home screen, scroll left to open the Guide.
  2. Select Settings > All Settings.
  3. Under Account section select Remove accounts.
  4. Select the account that you want to remove.
  5. Select Remove to confirm.
  6. After you’re done, select Close.

Now you need to add your account again by following these steps:

  1. Scroll left on the Home screen to open the Guide.
  2. Move all the way down on the Sign in tab and choose Add & manage.
  3. Select Add new.
  4. Enter your Microsoft account login information.
  5. Read the Microsoft Service Agreement and Privacy Statement and choose I Accept option.
  6. Follow the instructions on the screen to configure Sign-In & Security preferences.

To delete your profile on Xbox 360, follow these steps:

  1. Go to Settings and select System.
  2. Select Storage.
  3. If you have an external storage device connected to your Xbox, such as a USB flash drive or a portable hard drive, select All Devices. If you don’t have any external devices, select Hard Drive option.
  4. Select Profiles and choose the profile that you want to delete.
  5. Select Delete option.
  6. Now choose Delete Profile Only. This option will delete your profile but it will keep your saved games and achievements intact.

After deleting the profile, you need to add it again by following these steps:

  1. Press the Guide button on the controller.
  2. Select Download Profile option. If this option isn’t available, you need to check if you are signed in to any Xbox profile. If you are, press X to sign out and then select Download Profile option.
  3. Select the Download Profile button on the Download Profile screen.
  4. Enter your login information.
  5. Now select the storage location and wait until your profile is downloaded.

After removing and downloading your profile again, the issue should be resolved.

4. Clear the system cache

Xbox error 807b01f7 can appear due to a corrupted cache, and if you want to fix this error you need to clear your cache. This is a simple process and in order to do it on Xbox One you need to follow these steps:

  1. Press and hold the power button on your console until it turns off.
  2. Unplug the power cable from your console.
  3. Now press the power button few times to completely drain the battery.
  4. Connect the power cable to the console.
  5. Wait until the light on power brick changes from white to orange.
  6. Press the power button on your console to turn it on again.

To clear the cache on Xbox 360, you need to do the following:

  1. Press the Guide button on your controller.
  2. Go to Settings > System Settings.
  3. Select Storage or Memory.
  4. Highlight any storage device and press Y on your controller.
  5. Select Clear System Cache option.
  6. When the confirmation dialog appears, select Yes.
  7. Restart your console.

After clearing the cache, check if the problem is resolved. Some users are suggesting clearing your cache after you delete your Xbox profile, so you might want to try that. To see how to delete and download your Xbox profile, be sure to check our previous solution.

5. Keep trying to make a purchase

According to users, you might be able to circumvent this error by trying to make the purchase again. Users reported that they were able to make their purchase after trying a few times. If that doesn’t work, you might want to wait for an hour or two and try again.

6. Start a game and log in to your Xbox Live account

Some users claim that they fixed this error simply by starting their game and logging in to Xbox Live from the game itself. This is a simple solution, therefore be sure to try it.

Not being able to purchase content on Xbox Live can be a big problem, but as you can see, there are several solutions that you can use to fix Xbox error 807b01f7. Which one worked for you? Let us know in the comments section below.

[wl_navigator]

How to fix Xbox billing errors [COMPLETE GUIDE]

You can purchase all sorts of content online with your Xbox such as movies, games and DLCs. Unfortunately, certain errors can appear while buying multimedia content online, and you might get Xbox billing error on your console.

Billing errors can prevent you from buying content online, but there are few ways to fix these types of errors.

How can I fix Xbox billing errors?

1. Change your billing information

If you get a billing error on your Xbox, you might want to try changing your billing information. You can easily do that using your web browser or directly from your Xbox One or Xbox 360. To change the billing information in your web browser, follow these steps:

  1. Sign in to your Microsoft account in any web browser.
  2. Go to Payment & billing and select Billing info.
  3. Now select Edit profile and make the necessary changes to your billing address.

To change your billing information on Xbox One, do the following:

  1. Scroll left from the Home screen to open the Guide.
  2. Choose Settings > All Settings.
  3. In Account section select Payment & billing.
  4. Now choose Change billing address.
  5. Enter your billing information. Keep in mind that you can skip the billing information that you don’t want to update by pressing B on the controller and choosing Next.
  6. Now select Save info to save changes.

You can also change your billing information on Xbox 360 by following these steps:

  1. Make sure that you’re signed in to your console.
  2. Go to Settings and select Account.
  3. Choose Manage Payment Options.
  4. Select the payment option that you want to update.
  5. Update the billing information.
  6. Select OK to save changes.

After making the necessary changes to your billing information try to make the purchase again.

2. Check the status of Xbox Live services

Xbox Live relies on certain services in order to run properly and if one of those services isn’t running, you might encounter all sorts of billing errors. To check the status of Xbox Live services, simply visit the Xbox website.

If the Purchase and Content Usage service is up and running you should be able to make purchases online. If this service is down, you’ll have to wait until Microsoft fixes the issue.

3. Make sure that you don’t have any balance due

Billing errors such as 80153021 can appear if you have a balance due on your account. If that’s the case, you won’t be able to make any purchases until you settle the balance due. To do that, follow these steps:

  1. Sign in to your Microsoft account on any web browser.
  2. Navigate to the Services & subscriptions page.
  3. Select Pay now option and follow the instructions on the screen to pay the balance due.

After settling the balance due check if the error is resolved.

4. Check if your country or region matches your PayPal country or region

If you recently moved to a different location or country, you might experience billing errors on your console until you change your region settings. Changing your region on Xbox One is simple, and you can do it by following these steps:

  1. Sign in to your Xbox One.
  2. On the Home screen scroll left to open the Guide.
  3. Select Settings > All Settings.
  4. Select System.
  5. Now choose Language & location.
  6. Select a new location from the list and then choose Restart now.

To change your region on Xbox 360, do the following:

  1. Sign in to your console.
  2. Go to Settings and choose System.
  3. Select Console Settings.
  4. Choose Language and Locale > Locale.
  5. Select the desired locale.

As you can see, changing your region or locale is simple, but there are certain limitations that you should know about. Firstly, you can change your region only once every three months, so keep that in mind.

Also, you won’t be able to change your region if your account is currently suspended or if you have a balance due on your Xbox Live subscription.

You should also know that money from your Microsoft account won’t be moved if you choose to change your region, therefore be sure to spend it. Lastly, certain services might not be available in some regions, so keep that in mind.

5. Contact your bank or financial institution

Sometimes you can get billing errors due to problems with your credit card. It can happen that your card is not activated or that it’s not authorized for online purchases or automatic billing.

If that’s the case, you should contact your financial institution and ask them if they can fix the problem.

6. Try to perform the purchase at a different time

You might get billing errors if you made several purchase requests that were declined. In addition, your card might be flagged as a suspicious payment option and that can lead to these types of problems.

Using an incorrect region can also cause billing errors to appear, and if that’s the case, wait for 24 to 48 hours and try to make your purchase again.

7. Use Xbox gift card

If you’re having billing errors, you might want to consider using an Xbox gift card. Simply purchase it and add it to your account. Keep in mind that not all purchases work with Xbox gift cards, so be sure to check if your desired purchase can work with a gift card.

8. Add a new payment option

If you have problems with billing information errors, you might want to consider using PayPal to purchase content online. To add a new payment option on your Xbox One, do the following:

  1. Sign in to your console with a Microsoft account.
  2. On the Home screen scroll left to open the Guide.
  3. Select Settings > All Settings.
  4. Select Account > Payment & billing.
  5. Select Add credit card or Add PayPal and follow instructions on the screen.
  6. Follow the instructions on the screen and enter the necessary information.

To add a new payment option on Xbox 360, do the following:

  1. Make sure that you’re signed in to your Microsoft account.
  2. Go to Settings > Account.
  3. Choose Manage Payment Options.
  4. Select one of the following options: Add Credit Card or Add PayPal and follow the instructions on the screen.

9. Check if the credit card information is valid

Billing error can occur if your credit card information isn’t correct or if your credit card is expired. To update a payment option on Xbox One, do the following:

  1. Sign in to your console with a Microsoft account.
  2. Scroll left on the Home screen to open the Guide.
  3. Select Settings > All Settings.
  4. Select Account > Payment & billing.
  5. Scroll down to the payment option that you want to update and select Edit.
  6. Update payment option details and select Save info once you’re done.

To do this on Xbox 360, follow these steps:

  1. Sign in to your Microsoft account on your console.
  2. Go to Settings > Account Management.
  3. On the Account Management page, select Manage Payment Options.
  4. Navigate to Your Memberships and select the membership you want to update.
  5. Select Change Payment Options.
  6. Optional: You might have to select Modify Membership to select the membership plan.
  7. After that, enter the new payment option and select OK.

You can also change a payment option on your Microsoft account in any web browser if these methods don’t work for you. To do that, follow these steps:

  1. Sign in to your Microsoft account with any web browser.
  2. Go to Payment & billing and select Payment options.
  3. Choose a payment method and select Edit info.
  4. Now change the desired information and click Next.

10. Check if the prepaid card is activated

Users reported billing error 801613FB while using a prepaid card, and to fix this error you need to check if the prepaid card is activated.

According to users, activation of the prepaid card can last up to 24 hours. If the problem still persists after 24 hours, we suggest that you contact the retailer and check if your card is activated.

11. Check your internet connection

Sometimes billing errors can occur due to problems with your Internet connection, but you should be able to fix them simply by testing your Internet connection. To do that on Xbox One, follow these steps:

  1. Open Settings and select Network.
  2. In the Troubleshooting section select Test network connection option.
  3. After the scan is completed, select the Test multiplayer connection option.

To test your connection on Xbox 360, do the following:

  1. Press the Guide button and go to Settings.
  2. Select System Settings > Network Settings.
  3. Select Wired Network or the name of your wireless network.
  4. Select Test Xbox Live Connection.

Need some help in archiving files on Xbox One? Check out this guide on 8 Zip


12. Delete and download your profile again

You might be able to fix some billing errors simply by removing and downloading your Xbox profile. This is a simple procedure and to do it on Xbox One you need to follow these steps:

  1. Scroll left on the Home screen to open the Guide.
  2. Choose Settings > All Settings.
  3. Select Account > Remove accounts.
  4. Now choose the account that you want to remove.
  5. Select Remove to confirm.
  6. After you’re done, choose Close.

To add an account on Xbox One, do the following:

  1. Scroll left on the Home screen to open the Guide.
  2. On the Sign in tab move all the way down and select Add & manage.
  3. Enter your Microsoft account login information and select Enter.
  4. Read Microsoft Service Agreement and Privacy Statement and select I Accept.
  5. Follow the instructions on the screen to configure your Sign-in & Security preferences.

To remove your Xbox account on Xbox 360, follow these steps:

  1. Go to Settings > System.
  2. Select Storage > Add Devices.
  3. Choose Gamer Profiles.
  4. Select the Xbox Live profile that you want to delete.
  5. Choose Delete > Delete Profile Only. This option will delete your profile but it will keep your saved games and achievements.

To download your Xbox Live profile on Xbox 360, do the following:

  1. Press the Guide button.
  2. Select Download Profile option.
  3. Enter your Microsoft account login information.
  4. Select the storage device for your profile.

After deleting and redownloading your profile check if the billing error still appears.

13. Clear your cache

You can fix some billing errors simply by cleaning your cache. To do that on Xbox 360, follow these steps:

  1. Press the Guide button on the controller.
  2. Go to Settings > System Settings.
  3. Select Storage or Memory.
  4. Select any storage device and press Y on the controller.
  5. Choose Clear System Cache.
  6. When the confirmation message appears, select Yes.
  7. Restart your console.

On Xbox One this procedure is a bit different, but you can do it by following these steps:

  1. Press the Power button on your console and hold it until the console turns off.
  2. Unplug the power cable from the console.
  3. Press the Power button on the console few times to drain the battery completely.
  4. Connect the power cable to the console again.
  5. Wait until the light on power brick changes from white to orange.
  6. Press the Power button again to turn on your console.

After clearing the cache, check if the billing error is resolved.

Billing errors can prevent you from purchasing online content, but you should be able to fix these errors simply by using one of our solutions. Let us know what worked for you in the comments section below.

[wl_navigator]

How to fix Avipbb.sys errors on Windows 10/11

Errors like the avipbb.sys can be very frustrating for a beginner to fix. Even some professionals might encounter issues while fixing this error.

Having this avipbb.sys error connotes that something is wrong with your computer and needs urgent attention.

If the avipbb.sys error is not fixed on-time it might lead to another serious issue that might disrupt your computer from functioning properly.

Nevertheless, here are some easy steps that you can follow to get the avipbb.sys error out of your way.

How can I fix Avipbb.sys error on Windows 10?

  1. Restart your computer
  2. Make a deep virus scan
  3. Fix corrupt registry
  4. Try to reinstall newly installed and uninstalled programs
  5. Update your computer drivers to the latest
  6. Run System File Checker
  7. Use System Restore
  8. Install Windows updates
  9. Scan the hard disk for errors

1. Restart your computer

Though this solution seems just too easy, the fact is many computer issues have been solved just by restarting your PC. If this works fine for you, there’s no need to try any other complex solutions.

2. Make a deep virus scan

  1. Get into Safe Mode with Networking.
  2. Erase Temporary Files.
  3. Use Windows key + R shortcut to open the Run window.
  4. Type cleanmgr and hit OK.
    cleanmgr Avipbb.sys Error
  5. Wait for the process to finish.
    disk cleanup scan Avipbb.sys Error
  6. Select Temporary Files and the ones you want to erase, then hit OK to delete them permanently.
    disk cleanup temporary files Avipbb.sys Error
  7. Perform an antivirus scan. If your current antivirus didn’t detect the malware, try a different antivirus such as ESET HOME Security Essential for example.
  8. After scanning, remove the malware, and restart the computer.

Note that some malware like spyware, Trojan horses, and viruses can encroach into your system even when you have an antivirus.

Malware can even try modifying the avipbb.sys and other files. Therefore, you should pick the best antivirus protection for your computer and prevent that from happening.

ESET HOME Security Essential is able to detect even the sneakiest threats with its multi-layered protection features that ensure there are no weak points in your system.

⇒ Get ESET HOME Security Essential

3. Fix corrupt registry

  1. Open the Registry Editor by pressing on to Windows key + R key on the keyboard as seen in the picture.
    Avipbb.sys Error windows key + r
  2.  Type regedit in the box and hit the OK button.
    regedit Avipbb.sys Error
  3. Right-click on the Computer and hit on Export in the displayed box.
    registry editor export Avipbb.sys Error
  4. Create a file name and the location for a backup file and click on save

If the registry entries connected to the avipbb.sys are corrupt, then you will get avipbb.sys error. Registry errors are mostly caused by malware attacks, improper installation, and uninstallation.

Consistent registry maintenance is needed to keep your computer fast and error-free.

If you want to edit your registry by yourself, you would need to follow the steps written above But make sure you create a total backup of the registry before repairing it.

Note that manually editing your registry is at your own risk, so you might consider a professional’s help.

4. Try to reinstall newly installed and uninstalled programs

  1. Shut down the program that uses the avipbb.sys file.
  2. Open Program and Features by right-clicking on the Start Button.
    programs and features Avipbb.sys Error
  3. Select the program that is using the avipbb.sys file in the list.
  4. Click the Uninstall option at the top to remove it.
  5. An uninstall window will show up. Follow the instruction to uninstall the program.

If a certain application isn’t installed properly that can lead to avipbb.sys error.  If you are experiencing any issues, try consulting a professional.

5. Update your computer drivers to the latest

The avipbb.sys error can also be caused by outdated or faulty drivers. To fix the issue, make sure that your computer drivers are up-to-date.

There are several methods you can use to fix this problem, but the fastest and simplest way to update your drivers is to use a third-party tool.

Fortect Driver Updater scans your drivers and automatically downloads and installs the newest versions available. It is also able to repair issues related to damaged or missing drivers.

⇒ Get Fortect Driver Updater

6. Run System File Checker

  1. In the start search box type cmd.
  2. A small window will appear, right-click on Command Prompt and choose Run as administrator.
    command prompt administrator Avipbb.sys Error
  3. Now in the Command Prompt window type sfc/scannow and press the Enter key.
    sfc /scannow command prompt Avipbb.sys Error
  4. The System File Checker will perform a scan and replace any corrupted files.

The System File Checker, also called the sfc/scannow is an essential Windows service that can be used to scan system files and repair them.

The sfc/scannow is able to replace these system files with new ones when they are damaged or altered. Therefore, running a System File Checker is recommended for avipbb.sys error.

7. Use System Restore

  1. In search box type system restore and select Create a restore point.
  2. Click the System Restore button.
    system restore button Avipbb.sys Error
  3. Click Next.
    system restore main window Avipbb.sys Error
  4. As soon as the Wizard window appears, select a restore point.
restore points Avipbb.sys Error

Note: Click on Scan for affected programs, only if you are not sure which programs are affected. Then click on Next, follow the instruction and wait until the restore is completed.

The main purpose of this is to roll back your system files and programs to the previous state when it was working perfectly.

When troubleshooting avipbb.sys error, this might be very helpful because it will roll back system files, installed programs, registry entries, and many other files.

8. Install Windows updates

  1. Open the Settings app.
  2. Go to Update & Security section and click Check for updates button.
    check for updates Avipbb.sys Error
  3. Wait while Windows downloads the latest updates.

Did you know that Microsoft often releases updates and security patches for their software? Sometimes installing windows updates can be a good solution to avipbb.sys error.

9. Scan the hard disk for errors

  1. Press down the Windows key + E button at the same time.
    windows key +e shortcut Avipbb.sys Error
  2. Right-click the Local Disk C and select Properties.
    hard drive properties Avipbb.sys Error
  3. Click on Tools and hit on the Check button.
    check hard drive Avipbb.sys Error
  4. Click On Scan drive to continue the process.
    scan drive Avipbb.sys Error
  5. If an error is found, perhaps you might have to replace your hard drive.

Hardware failures and software problems can lead to avipbb.sys blue screen error. This is why it is important to often check the hardware.

Disconnect newly added hardware devices such as printers, RAM sticks etc. If the avipbb.sys error is resolved, then it’s certain that disconnected hardware was the problem.

If these errors still remain, check the hard disk for errors.

If our solutions helped you fix avipbb.sys error, let us know in the comments section below.

Jraid.sys: What it is, frequent errors and how to fix them

System files are used in Microsoft Windows and DOS operating systems mainly to store hardware drivers, various system settings, and related Windows functions.

Despite .sys files being super important to the smooth running of a computer, they are one of the most misunderstood categories of files. Some Windows users even go to the extent of labeling them malware. Now, one such .sys file is the jraid.sys file.

What is jraid.sys?

JRAID runs on the Microsoft signed jraid.sys file and can be seen from the processes tab in Windows Task Manager.

Where is jraid.sys located?

The file resides in the folder C:WindowsSystem32drivers. This is the same location where you find countless other driver software for your various devices.

Is jraid.sys a virus?

Jraid.sys doesn’t seem to be malware. However, some of the creators of malicious software label their dangerous programs after genuine apps. To see whether yours is legit, perform an antivirus scan using a reliable tool.

Function of jraid.sys

Drivers allow your PC to communicate with connected devices and hardware and being a driver file, jraid.sys acts as a bridge between Windows and controller chips (specifically those supporting RAID).

This function enables you to use your PC hardware without hitches.

To work properly, your version of jraid.sys must be compatible with the Windows edition in your machine, be it a 32-bit or 64-bit system.

What are the most common jraid.sys issues?

Jraid.sys may from time to time cause your computer to malfunction. If this happens, your PC issues various error messages including:

  • STOP 0x0000000A: IRQL_NOT_LESS_EQUAL – jraid.sys
    • This indicates driver problems perhaps due to issues with the file.
  • STOP 0x0000001E: KMODE_EXCEPTION_NOT_HANDLED – jraid.sys
    • This blue screen bug means that the file driver/function could be facing challenges.
  • Your PC got problems and needs to restart. We are just collecting information and then restart it for you. If you need to know more, search online for jraid.sys error:
    • The error implies that yourPC could have crashed as a result of a bad JRAID
  • STOP 0×00000050: PAGE_FAULT_IN_NONPAGED_AREA – jraid.sys
    • Again this points to a fault in your systems jraid driver file configuration.
  • A problem was detected and Windows shut down to prevent further damage to the computer.
    • The problem is likely caused by the Jraid.sys file: You are confronted with this issue if any of the related system files are destroyed or deleted.

What causes jraid.sys errors?

Jraid.sys problems are due to a variety of reasons.

  • Memory issues
  • Corrupted system files
  • Malware infection.
  • The file failing to load properly during computer startup.
  • Difficulties while executing specific functions.
  • Conflicts with newly added third party software.
  • Incorrect Windows registry.
  • Spoiled hardware such as a hard disk.

How can I fix jraid.sys errors?

There are a number of walkabouts for the aforementioned jraid.sys complications.

1. Scan your System for Malware

Disinfecting your PC of any malware may remove the relevant error. There are a few top-level security antiviruses that come with a trial option that you can use for this purpose. If stuck, visit the manufacturer’s website with instructions.

We suggest you take a look at what TotalAV has to offer. It is one of the most well-received security software on the market because it provides full security while being light on your system.

Not only does it protect against all threats, old and new, but it also includes safe online payment features, a powerful firewall, webcam protection, parental controls, and more.

⇒ Get TotalAV

2. Restore Your Computer

  1. On the search box (in the taskbar), type control panel
  2. Then select control panel from the results.Jrais.sys - Blue Screen.
  3. Go to the Control Panel’s search box and type recovery.Jraid.sys
  4. Click on Recovery.
  5. Now choose Open System Restore.jraid.sys
  6. The Restore system files and setting dialog box comes up. Click Next.Bsod 1d jraid.sys
  7. Choose the relevant restore point (the one that worked before sys started issuing warnings.
  8. You can also choose Show more restore points checkbox to view more restore points.
  9. Select Scan for affected programs.
  10. A listing of items to be deleted once you remove the chosen restore point is displayed.
  11. Select Close then Next and finally Finish If you’re fine with the deletions.

This action will retrieve the last settings that worked according to the restore points you may have created manually. Automatic restore points are also created when you install new apps or drivers and also show up in the list of available restore points.

3. Uninstall any newly program

  1. Tap on the Start  button.
  2. Select Settings  then Apps.
  3. Select the program you desire to discard, and then choose Uninstall.jraid sys bsod

You may also opt to uninstall an app you’ve installed if you suspect it of triggering Jraid.sys-related hitches.

4. Repair Corrupt Files Using sfc /scannow

  1. Go to the search box (on the taskbar) and enter Command Prompt.
  2. Right-click the Command Prompt (Desktop app) option (from your search results).
  3. Select Run as administrator.jraid.sys bsod
  4. Enter DISM.exe /Online /Cleanup-image /Restorehealth (there is a space before each /).
    • Be patient as this command can take up to 30 minutes to complete (See the screenshot after step 5).
  5. Now enter sfc /scannow (maintain the space between sfc and /).BSOD jraid.sys+4396

The SFC (System File Checker) is a powerful Windows 10 utility that inspects your system for file corruption. Initialize it and see if the annoying error will halt.

5. Run ChkDsk

  1. Press Windows key + X
  2. From the results, click on Command Prompt (Admin).jraid
  3. Click Yes if the UAC window prompts you for permission to start the feature.
  4. On the next command prompt,type chkdsk D: /f /r /x (note the spacing) then press Enter.
  5. Insert your drive letter in place of D. JRAID. SYS ERROR
  6. This prompts you to schedule the tool to scan the hard disk during the next start up.
  7. Type Y then press Enter.

Running CheckDisk command can also help rule out corruption in the hard disk and assist your recovery from the jraid.sys troubles.

6. Install the latest Windows Updates

  1. Tap the Start.
  2. Select Settings.
  3. Click Update & Security.jraid.sys
  4. Choose Windows Update.
  5. Press Check for updates.jraid.sys

Sometimes the jraid.sys error will cease bothering you once you download and install the latest Windows 10 updates. You then wait for the updates to install before restarting your PC.

7. Check your memory for errors

If the jraid.sys blue screen errors started appearing after installing a new RAM module, then you need to investigate the added memory chip. It could be incompatible or wrongly set up.

Just open your computer casing and detach the concerned RAM. Restart your PC and see how it will behave. Needless to say, you will be required to change the memory if this solves your predicament.

By following these steps, you should be able to get rid of any error messages related to jraid.sys.

If you know of any other solution that we may have missed out on, leave us a message in the comments section below.

FIX: Windows installation encountered an unexpected error

In comparison to previous Windows iterations, installing Windows 10 is rather simple. Especially since almost everything, including drivers, is managed by the system itself.

Also, software distribution is much simple nowadays with the Media Creation Tool. However, this, on a paper simple procedure, posed quite a burden for various users.

The Windows installation encountered an unexpected error prompt and the consequent installation failures are not uncommon.

In order to address this, we prepared a list of possible solutions. If you’re stuck with this error after multiple tries, make sure to check the steps we provided below.

How do I  fix the Windows installation error?

  1. Check the system requirements
  2. Check RAM and HDD
  3. Switch USB port and the USB drive
  4. Remake the installation media with the Media Creation Tool

1. Check the system requirements

Let’s start with compatibility. Windows 10 isn’t exactly too distinct from Windows 7 when it comes to system requirements. However, there are some disparities, and you should take them into account if you’re installing Windows 10.

Extra RAM here and a tad more storage space there can make a great difference.

Here are the system requirements you’ll need to meet in order to install Windows 10:

  • CPU: 1 gigahertz (GHz) or faster processor or SoC
  • RAM: 1 gigabyte (GB) for 32-bit or 2 GB for 64-bit
  • HDD space: 16 GB for 32-bit OS 20 GB for 64-bit OS
  • GPU: DirectX 9 or later with WDDM 1.0 driver
  • Display: 800×600windows installation encountered an unexpected error

If you met the system requirements, make sure that your installation media is well-created.

2. Check RAM and HDD

  1. Download the USB version of MemTest86, here.
  2. Plug in the USB. Have in mind that this procedure will erase all its data.
  3. Extract (unzip) the file and run “imageUSB tool“.windows installation encountered an unexpected error
  4. Select the USB drive and create a bootable drive.
  5. Restart your PC and boot from a USB drive.

Amongst the various hardware issues which can cause installation errors, RAM and HDD sit at the top.  We suggest investigating RAM health with the third-party tool called MemTest86.

This tool is highly regarded as the best for the job. The thing with it is that you’ll need to mount it on the bootable media in order to work.

HDD-wise, you can use the built-in utility or resort to third-party tools to check for bad sectors and health issues.

  1. In the Windows Search bar, type cmd, right-click on Command Prompt and run it as an administrator.
  2. In the command line, type the following command and press Enter:
    • chkdsk c: /rwindows installation encountered an unexpected error
  3. Wait until the procedure ends.

Another thing you can try if the error is persistent after you click Install is formatting the drive via the Command Prompt. This is what you need to do:

  1. When the bootable USB drive boots, click Repair your computer.
  2. Choose Troubleshoot.
  3. Click Command Prompt.
  4. In the command line, type the following commands and press Enter after each:
    • diskpart
    • list volume
  5. Now, you should see what’s the number beside your system partition. Remember it. Will use “3” as an example. Act with caution and make sure you’re not selecting the data partition. If everything is merged in one partition
  6. Enter the following commands and press Enter:
    • select volume 3windows installation encountered an unexpected error
    • clean
  7. After that, close the Command Prompt and try installing Windows 10 again.

3. Switch USB port and the USB drive

Another thing that seemingly slips under the radar is the installation media itself. Even though the majority of USB thumb drives with 6 or more gigs of space will suffice, some might not.

For that reason, if possible, switching to an alternative USB flash stick might get you going. As a side note, we recommend sticking with the 2.0 USB drives if you’ve never installed Windows 10 and enabling USB legacy in the BIOS settings.

On the other hand, even if the bootable USB drive works fine, the problem might be within the USB port you’re using. Some users managed to address the issue at hand by simply restarting the PC and switching between the USB ports.

Finally, you can, if the circumstances allow, try using an ISO file to create a bootable DVD.

4. Remake the installation media with the Media Creation Tool

  1. Download the Media Creation Tool from here.
  2. Plug in the USB flash drive with at least 6 GB.
  3. Run Media Creation Tool and accept the License Terms.windows installation encountered an unexpected error
  4. Choose Create installation media (USB flash drive, DVD, or ISO file) for another PC.windows installation encountered an unexpected error
  5. Choose the fitting language, architecture, and edition and click Next.windows installation encountered an unexpected error
  6. Select USB flash drive and then click Next.windows installation encountered an unexpected error
  7. Media Creation Tool will download the setup and copy the installation files onto the USB flash drive.
  8. Restart your PC and boot with the newly-created installation media.

In the end, if none of the previous steps resolved the issue at hand, we encourage you to remake the bootable drive. The best and the most favorable way is to use the Media Creation Tool.

With that said, the whole procedure is rather simplified and it won’t last too much. Of course, this depends on your bandwidth speed. Due to unwelcome circumstances, you can use any other PC to create a bootable installation media for Windows 10.

After that, you should be able to install Windows 10 without any issues whatsoever. If the error is persistent, we recommend contacting your computer OEM.

And on that note, we can wrap it up. In case you have some additional questions or suggestions, feel free to share them with us. You can do so comfortably in the comments section below.

FIX: The current active partition is compressed

When switching to Windows 10 from previous Windows iterations, users have two options. Either they can install Windows 10 clean on the formatted drive or, in the more likely scenario, upgrade over older iteration and retain all applications and data.

However, the latter convenient option seems to be impossible for some users, as they run into the prompt message informing them that The current active partition is compressed.

After that, the upgrade process can’t be continued and they are forced to stick with Windows 7/8.1.

This is a severe problem, especially since Windows 10 is becoming (mostly due to security traits) a system you would want to use these days.

Luckily, there’s a solution to every issue, and we made sure to acquire and post some of them on the list below. Therefore, if you’re unable to upgrade to Windows 10 due to the partition error, you’re at the right spot.

How do I fix the The current active partition is compressed error?

  1. Disable drive compression
  2. Check HDD for errors
  3. Expand the reserved partition
  4. Use Media Creation tool to upgrade to Windows 10
  5. Clean install Windows on an alternative HDD/SSD

1. Disable drive compression

  1. Open My Computer.
  2. Right-click on the system partition (usually it’s C:) and open Properties.
  3. Under the General tab, uncheck the Compress this drive to save disk space box and confirm changes.windows 10 error the current active partition is compressed
  4. Restart the upgrading process and look for changes.

First things first. In order to preserve the system partition’s storage space, some drives might be automatically compressed. It depends on the configuration setup, as some prebuilt configurations tend to compress data on the system drive, as they’re rarely upgraded, storage-wise.

This is mostly the case with the workstations, but there are exceptions in the non-enterprise pre-built configurations as well.

For various reasons, Windows 10 can’t be upgraded on the compressed system partition within one drive. The most prominent one concerns data allocation, as Windows 7/8.1 is preserved in a folder later on in order to preserve the data.

You can address this by simply unchecking the drive compression and trying to upgrade again.

2. Check HDD for errors

  1. In the Windows Search bar, type cmd, right-click on Command Prompt and run it as an administrator.windows 10 error the current active partition is compressed
  2. In the command line, type the following command and press Enter:
  3. chkdsk c: /rwindows 10 error the current active partition is compressed
  4. Don’t forget to replace c: with an alternative letter assigned to your system partition.
    • Albeit, the C is commonly used.
  5. Wait for the procedure to scan for errors and close Command Prompt.
  6. Restart your PC and retry upgrading.

Another thing worth checking concerns the overall health of the HDD at hand. Of all the hardware pieces, HDD is the most prone to malfunction. Symptoms are easily distinguishable: system booting and loading take longer than usual and, eventually, you’re unable to boot.

It might be too late to do something when the boot errors occur, so you should check your data storage drive on regular basis.

In order to check for HDD corruption and faulty sectors, you can use third-party tools or built-in system resources. Either way, those can help you address minor errors and give you an insight into HDD’s overall health.

And it’s good to know if it’s in good shape or close to its demise, so you can backup your data timely.

3. Expand the reserved partition

The reserved partition is the small part (around 500MB) allocated from your system partition. It stores essential data during the installation procedure and it should be active, on both Windows 7 or Windows 8.1 if you want to upgrade to Windows 10.

Now, there are 3 things that should occupy your attention regarding the Reserved system partition:

  • It needs to have at least 500 MB
  • It needs to be set to Active partition mode
  • You can’t use compressed Reserved system partition

With that in mind, we need to check if all the conditions are met before moving to alternative upgrade procedures. In order to do so, follow the steps we provided below:

  1. In the Windows Search bar, type Disk and open Create and format hard disk partitions from the results.windows 10 error the current active partition is compressed
  2. Right-click on the System Reserved partition and open Properties.
  3. Under the General tab, uncheck the Compress this drive to save disk space box and save changes.windows 10 error the current active partition is compressed
  4. Also, make sure that the partition meets all of the aforementioned conditions.
  5. Restart your PC and give upgrading another go.

You can also opt for an easier solution and use third-party software with multiple capabilities that allow you to manage partitions with ease and more.

4. Use Media Creation tool to upgrade to Windows 10

  1. Download Media Creation Tool 
  2. Plug in the USB flash drive with, at least, 8 GB of storage space
  3. Run Media Creation Tool and accept the License Termswindows 10 error the current active partition is compressed
  4. Select ”Create installation media (USB flash drive, DVD, or ISO file) for another PC”.windows 10 error the current active partition is compressed
  5. Choose the preferred language, architecture, and edition and click Next.windows 10 error the current active partition is compressed
  6. Media Creation Tool will download the setup and copy the installation files onto the USB flash drive.windows 10 error the current active partition is compressed
  7. Now, you should tend to back up your data. Finally, restart your PC.
  8. In the initial boot screen press F10, F11, or F12 to access the Boot menu. It differs depending on your motherboard.
  9. Select your preferences and choose to Upgrade rather than Custom installation and the installation process should commence.

Now, back in the days, when the free upgrade was offered through the Windows Update, users were able to obtain Windows 10 through the system interface.

However, since that’s a goner, there are few ways to obtain and perform an upgrade to Windows 10 legally. You can download Media Creation Tool and upgrade to Windows 10 from the Windows 7/8.1 interface.

Or you can create the installation media (USB or DVD) and upgrade to Windows 10 with it.

Now, even though the former is much easier, it’s not particularly better. Especially, if we take into consideration the error at hand. So, we’ll show you below how to create an installation media and upgrade to Windows 10 that way. Make sure to backup your data just in case something goes astray.

5. Clean install Windows on an alternative HDD/SSD

Finally, if none of the previous steps addressed the issue and you’re still stuck on the The current active partition is compressed screen, we recommend the clean reinstallation.

It’s for the better for various reasons. In theory, the Windows 10 platform should integrate all files and applications from the former system iteration. However, and based on our experience, this doesn’t work that well in practice.

For that reason, and if you’re positive that you indeed have enough storage space, properly configured reserved system partition, and non-active partition compression, we recommend clean reinstallation.

Just make sure to backup your data and Windows 7/8.1 license key. Afterward, you can install all applications from scratch. You can find detailed instructions in this article.

That’s a wrap-up. Just in case you have any questions regarding the aforementioned steps or an alternative solution for the upgrade error at hand, make sure to tell us in the comments section below.

FIX: This unsafe download was blocked by SmartScreen

Microsoft SmartScreen is a security mechanism that can protect you from malware and phishing attacks. In addition, this filter can protect you from potentially dangerous files.

Unfortunately, users reported the This unsafe download was blocked by SmartScreen message while downloading certain files, and today we’re going to show you how to fix it on Windows 10.

How do I bypass the Microsoft SmartScreen filter on Windows 10? The simplest way is the ‘Download unsafe file’ option. This only applies if you’re absolutely certain that the file is safe and the message is the result of an error.

A more complicated solution that will surely work is to disable the SmartScreen.

If you want to know how to do that, keep on reading.

Quick Tip:

If you need a browser that will keep you safe from pretty much anything, then look no further than Opera One.

So, you get a free VPN that has no traffic quota, an ad-blocker that will prevent adware from spamming you, and a tracker-blocker so anything you do remains unrecorded.

With so many layers of protection, having to deal with unsafe downloads will be a thing of the past as soon as possible.

Opera One

Not just a web browser, but also a VPN, an ad-blocker, and a tracker-blocker, all rolled up into one amazing tool.

What do I do when SmartScreen blocks unsafe downloads?

  1. Click the Download unsafe file option
  2. Disable SmartScreen

1. Click the Download unsafe file option

  1. Open Microsoft Edge.
  2. Click the Hub icon in the top right corner and then click the Download icon on the right. Alternatively, you can use Ctrl + J keyboard shortcut to quickly open the Downloads panel.
  3. Locate the problematic download, right-click it, and choose Download unsafe file from the menu. The problematic file should have its name in red, so it will be easy to spot.

Sometimes, the This unsafe download was blocked by SmartScreen message that can appear while downloading certain files.

If you’re certain that your file isn’t malicious and that it comes from a safe source, you can easily fix the problem by locating the file in the download list, right-clicking it, and choosing Download unsafe file.

If you’re using Internet Explorer, you can download unsafe files by following similar steps:

  1. Open Internet Explorer.
  2. Click the Gear icon in the top right corner and choose View downloads from the menu. Alternatively, you can use the Ctrl + J shortcut to open the Downloads window.
  3. Once the Downloads window opens, locate the problematic file, right-click it, and choose Download unsafe file from the menu.

2. Disable SmartScreen

  1. Press Windows Key + S, type Internet Options and click the first result.
  2. When the Internet Properties window opens, go to the Security tab and click Custom level.
  3. Locate the Miscellaneous section. Now, locate the Use SmartScreen Filter option and set it to Disable. Click OK to save changes.
  4. Optional: You can disable SmartScreen by going to the Advanced tab and unchecking the Enable SmartScreen Filter option. After doing that, click Apply and OK to save changes.

You can also turn off SmartScreen Filter right from Internet Explorer. To do that, follow these steps:

  1. Start Internet Explorer.
  2. Click the Gear icon in the top right corner and choose Safety. Then, click Turn on SmartScreen Filter.
  3. Choose the Turn off SmartScreen Filter option and click OK to save changes.

If you’re frequently getting the This unsafe download was blocked by SmartScreen message, you might want to consider disabling SmartScreen entirely.

If you’re using Microsoft Edge, you can disable SmartScreen by following these steps:

  1. Click the More icon in the top right corner and choose Settings from the menu.
  2. Scroll all the way down and click on the View advanced settings button.
  3. Scroll all the way down and disable the Help protect me from malicious sites and downloads with SmartScreen Filter option.

You can also disable SmartScreen by using the Windows Defender Security Center. Keep in mind this method might not work on your PC if you have Windows Defender disabled or if you’re using a third-party antivirus.

To disable SmartScreen using this method, do the following:

  1. Open Windows Defender Security Center.
  2. Click on App & browser control tab in the left pane.
  3. In the right pane, locate the SmartScreen for Microsoft Edge section and choose Off from the menu.

If you’re an advanced user, you can disable SmartScreen for Edge by modifying your registry.

Remember, modifying the registry can lead to certain issues if you’re not careful and therefore it’s highly recommended you create a registry backup just in case.

To disable SmartScreen using the Registry Editor, follow these steps:

  1. Press Windows Key + R and enter regedit. Click OK or press Enter.
  2. When the Registry Editor opens, navigate to the following key in the left panel:
HKEY_CURRENT_USERSOFTWAREClassesLocal SettingsSoftwareMicrosoftWindowsCurrentVersionAppContainerStoragemicrosoft.microsoftedge_8wekyb3d8bbweMicrosoftEdgePhishingFilter
  1. In the right pane, double-click EnabledV9 and change its Value data to 0 to turn off SmartScreen. Now click OK to save changes.
  2. Close Registry Editor.

After disabling SmartScreen for Internet Explorer or Edge you should be able to download your files without any issues. Keep in mind that these methods will completely disable SmartScreen protection, meaning that it won’t scan downloaded files or websites you visit.

While this can be a security concern for some users, with third-party antivirus software installed, you should have no issues.

If you want, you can also disable SmartScreen system-wide. To do that, follow these steps:

  1. Press Windows Key + S, type Control Panel and click the first result. disable smartscreen filter windows 10
  2. When the Control Panel opens, select Security and Maintenance.
  3. Click on Change Windows SmartScreen settings.
  4. Click on Don’t do anything (turn off Windows SmartScreen) and click OK to save changes.

You can also disable SmartScreen system-wide by using Registry Editor. To do that, follow these steps:

  1. Open Registry Editor.
  2. Navigate to HKEY_LOCAL_MACHINESOFTWAREMicrosoftWindowsCurrentVersionExplorer in the left panel.
  3. In the right panel, locate SmartScreenEnabled and double-click it. If this value isn’t available, right-click the right panel and choose New > String Value. Set the name of the string value to SmartScreenEnabled.
  4. Change the Value data to Off and click OK to save changes.

If you don’t want to modify your registry, you can also disable SmartScreen by changing your Group Policy. To do that, follow these steps:

  1. Press Windows Key + R and enter gpedit.msc. Click OK or press Enter.
  2. In the left pane, navigate to Computer configuration > Administrative Templates > Windows Components > File Explorer. In the right pane, locate and double-click Configure Windows SmartScreen.

  3. Select the Disabled or Not Configured option and click on Apply and OK to save changes. In addition, choose the Turn off SmartScreen from the Options panel if available.

By using one of these methods, you’ll completely disable SmartScreen on your Windows 10 PC, which will allow you to download and run any file you want.

Disclaimer: Some settings, file paths, or options can differ depending on your Windows 10 version and patch. Be sure to check similar named features/options.

If you’re aware of another way to solve the problem, please share it in the comments section below. If you have any other questions, post them there, as well.

When you visit a website, SmartScreen compared the code on the respective page with its database to detect threats. If there is any string of code matching its threat database, the tool blocks your access to the respective website.

  • Should I disable Windows SmartScreen?

SmartScreen is a very useful security feature that protects your computer against malware and phishing attacks and it is not recommended to disable it. The security risks you run by turning SmartScreen off are far greater than the benefits.

  • How do I disable SmartScreen?

Here are the steps to follow to disable SmartScreen:

  1. Navigate to Settings > Update & Security
  2. Go to Windows Security > App & browser control
  3. Locate the option SmartScreen for Edge
  4. Check the off checkbox to disable SmartScreen.

T.asm file and web.vortex: Here’s why browsers download them

Oftentimes, when users connect to Microsoft Answers, a file called t.asm begins to automatically download. Since no details are available about this file, many users panic when they see it on their desktop fearing they just downloaded a virus.

The t.asm file is usually downloaded on devices running iOS as well as on Windows 7 and Windows 10 computers. The file primarily gets downloaded when users connect to Microsoft’s Answers website and when they try to create a new Microsoft account.

What is the t.asm file that downloads every time I log into this site?
The .asm extension suggests an assembly language file. That leaves me a little uneasy.
So, what is this file and why does it download every time I sign into a Microsoft community?

What is a t.asm file? What is web.vortex?

The download of the t.asm file is actually triggered by an incompatibility issue between Microsoft’s website and the browsers installed on certain computers.

Technically, Microsoft Answers doesn’t support Safari and this explains why the file is downloaded to iOS. However, we still don’t know why Windows 7 and Windows 10 browsers download it as well. All in all, the file itself is not harmful and can simply be deleted.

Some users complain that the file prevents them from accessing Microsoft’s forums:

It’s only on iOS devices where access to the site is blocked, for me at least.  On a Mac, the downloads just go harmlessly into a folder.  But on an iPhone or iPad, they stay on the screen and cannot be removed.

If the t.asm file prevents you from accessing Microsoft Answers, you can use this workaround: Don’t log into the site. As long as you don’t try to log in, you should be able to connect to the website.

According to user reports, the t.asm file is also accompanied by the web.vortex extension in the History/Cache listings. It appears that the web.vortex.microsoft.com is what serves the website and the t.asm is part of the sign in routine.

If you’ve got additional information about the t.asm file, use the comment section below to tell us more about it.


UR: A browser that won’t download anything on its own

There is a swarm of malicious files out there and, even though t.asm and web.vortex aren’t malicious, it’s discouraging to see your browser downloading files on its own.

It’s a risk not many are welcoming. That’s why UR Browser is perfect: it prevents files from automatically downloading, even when they come from trusted sources.

download UR-Browser

In case some website wants to download files, you’ll be immediately prompted. You can block it or even permanently prevent the said website from repeating that action.

In case you, accidentally, download something you’re unsure about, the built-in antivirus will scan it and tell you whether it’s safe or not to keep that file.

UR Browser is free browser made by a small but dedicated team of enthusiasts focused on privacy. It’s built on the Chromium project, so it might look like Chrome but it’ll certainly exceed your expectations. Check it out now.

Editor's recommendation
ur browser
  • Fast page loading
  • VPN-level privacy
  • Enhanced security
  • Built-in virus scanner

  1. Download an assembler such as MASM32
  2. Install the assembler. Click OK on any error windows that may appear on the screen.
  3. Write the Assembly
  4. Go to the folder where you saved the file and compile it into an executable file.

[wl_navigator]

Skype Delayed Messages: 4 Ways to Deal With Pending Messages

Skype is the pioneer of messaging and video conferencing software. It remains the most used and, with its many integrated services, is undoubtedly one of the best applications in the market. But many users reported that Skype had delayed messages.

For some, Skype is sending messages late, while others found that Skype messages are stuck on sending and don’t go through at all. No matter the case, the problem can be easily fixed, and we will help you.

Why are my Skype messages delayed?

Here are a few reasons Skype is taking forever to send messages:

  • Problem with network connectivity: A slow Internet or random loss of connectivity can often lead to delayed messages, so check this aspect first.
  • Bug in the installed version of Skype: The problem was mass reported on particular versions of Skype and in the same period, which points to a bug in the update.
  • Corrupt app data or missing files: Sometimes, problems with the initial installation or a corrupt app cache can trigger issues in Skype, and resetting the app should do the trick.

What can I do about delayed Skype messages?

Before we head to the slightly complex solutions, try the quick ones first:

  • Turn off the modem/router by unplugging the power cable for at least two minutes and then power it on. While doing so, restart the computer as well.
  • Log out of all devices except the primary one where you want to continue using Skype.
  • As a quick workaround, type /refresh all in the chat box and hit Enter to view any pending ones if Skype is not sending messages to one contact.
  • In case you see delayed messages in a group chat on Skype, try creating a new group. This has worked for some users.

If none work, move to the fixes listed next.

1. Update Skype

1.1 Downloaded from Microsoft Store

  1. Press Windows + S to open the Search menu, type Microsoft Store, and click on the relevant result.microsoft store
  2. Click on Library near the bottom left.library
  3. Now, click on Get updates.get updates to fix skype delayed messages
  4. If a newer version of Skype is available, wait for it to install.skype

1.2 Downloaded from the website

  1. Launch Skype, and press and hold the Alt key for the various menus to appear.
  2. Click on the Help menu, and select Check for Updates.update to fix skype delayed messages
  3. Wait for the pending updates to install, and then restart Skype.

2. Reset Skype

Note icon NOTE
The steps listed here work when you download Skype from Microsoft Store. In case you got Skype from the official website, locate the folder for it under AppData and rename it to Skype.old.
  1. Press Windows + I to open Settings, select Apps from the navigation pane, and click on Installed apps.installed apps
  2. Locate Skype, click on the ellipsis next to it, and choose Advanced options.advanced options
  3. Click on the Reset button.reset to fix skype delayed messages
  4. Again, click Reset in the confirmation prompt.confirm
  5. Once done, launch Skype, and log into your account.

Resetting any app fixes a range of issues, which also works in the case of delayed messages on Skype. After completing the reset, check whether the problem is resolved. If not, you are left with limited options.

3. Install the classic version of Skype

If the previous solutions didn’t work, you could download the classic version of Skype. Most users who reported problems with the regular version found Skype Classic working seamlessly without any delayed messages.

Just ensure you don’t already have Skype installed when running the setup. If that’s the case, uninstall the application and then launch the setup for Skype Classic. Though if you have previously installed Skype from the Microsoft Store, both versions should run together.

4. Use the web version of Skype

Certainly not the first choice for many, but when all else fails, you can always use the web version of Skype. Simply head to the website, log in, and you should be ready.

This negates the idea of using Skype as an application, which is far more seamless but could be used as a temporary measure.

These are all our solutions when Skype has delayed messages; we hope one of these did the trick for you. In case you delete messages and would like to recover them later, we have an interesting article on how to recover deleted Skype messages.

Besides, if you are looking for alternatives, check our curated list of the most secure video conferencing software.

For any queries or to share solutions that worked for you, use the comments section below.

Skype can’t access your sound card? We have the best fixes

Sound cards serve as the ultimate controllers of all audio functions on computer systems.

Hence, every program (system or installed) that hosts an audio (or video) function requires a seamless connection to the sound card, to enable it to function properly. One of such programs is Skype.

Skype is an instant messaging app, which is prominent for its video calling functionality.

This calling function significantly relies on the computer’s in-built sound system, for recording sounds (outgoing calls) and receiving sounds (incoming calls). In this regard, the sound card is a very important component.

However, at times, Skype users often encounter the Skype can’t access your sound card error. In this case, the app is unable to use the computer’s microphone.

What causes Skype error: Can’t access your sound card?

There could be a myriad of reasons for the Skype can’t access your sound card error. The most notorious of these, however, are system updates and Windows upgrades.

These often result in some form of system modifications, which remove Skype’s permission to access the sound card and use the microphone.

Another notable cause of this error is an old and outdated sound card driver. The idea is that, a freshly updated Windows system that operates on outdated drivers is liable to encounter various forms of errors.

As such, outdated sound card drivers running on newly updated computers will most likely result in access error for Skype and other audio-related programs.

Aside the aforementioned causes, a whole lot things could cause the Skype audio error.

However, you don’t have to worry much, as we have compiled comprehensive solutions, to help you resolve this issue. Follow with rapt attention!

How to I fix Skype can’t access your sound card error?

1. Upgrade Windows sound card drivers

  1. Click Start and type settings in the searchbox.
  2. Select Settings and click Update and Security.
  3. Navigate to the Windows Update tab
  4. Locate and select Check for Updates to search for available updates.check for updates button slack microphone
  5. Download and Install all available updates (if any).
  6. Open Skype and check if the error is resolved

If the Windows update could not fix the error, try updating the drivers. To update your sound card drivers, follow the steps outlined below.

  1. Close the Skype window.
  2. Click on the Start
  3. Type device manager in the searchbox.
  4. Locate Device Manager in the pop up options and right-click on it. (For convenience, you can easily press the Windows Key + R to open the Run dialog box. Type in devmgmt.msc in the box and select OK).skype error cant access your sound card
  5. On the Device Manager window, locate Sound, video and game controllers, and expand it to open up more options. This will reveal options High Definition Audio and Intel(R) Display Audio.skype error cant access your sound card
  6. Update both drivers by right-clicking on each driver and selecting the Update driver
  7. On the displayed window after an update, click Search automatically for updated driver software. Windows will automatically find the new driver and this should resolve the error.
  8. Reopen Skype and check if this process effectively resolves the Skype can’t access your sound card error.

Updating drivers manually can be a bit tedious, especially since you need to know the model of each component you’re trying to update.

However, you can use a third-party tool to update all your drivers automatically with just a couple of clicks.

⇒ Get Fortect Driver Updater

If unsuccessful i.e. the method was ineffective against the sound card error, try the next method.

2. Allow programs to access your computer sound system

For Windows 8 and older versions:

  1. Close your Skype app.
  2. Click on the Start button and navigate to Control Panel.
  3. Change the window’s view to Category and select Hardware and Sound.hardware and sound control panel
  4. On the displayed options, select Sound.
  5. Navigate to the Recording tab, located at the top left corner of your screen. This will reveal to you the type of microphone you are using.
  6. Click on the displayed Microphone and select Properties, which is below the microphone icon, by the right hand side.microphone properties
  7. On the displayed window, navigate to the base of your screen and locate Device usage drop-down menu.
  8. On the drop-down options, select Use this device (enable).enable microphone
  9. Scroll up and navigate to the right hand side to locate the Advanced Click on the tab.
  10. Locate Exclusive mode.
  11. Under this mode, locate the Allow applications to take exclusive control of this device checkbox and uncheck the box
  12. On the same window, locate the Give exclusive mode applications priority checkbox and uncheck the box.exclusive mode microphone settings
  13. Click Apply to save changes.
  14. Repeat the process for Speaker device and close the window.
  15. Reopen Skype and check if the Skype can’t access your sound card error still persists.

For Windows 10:

  1. Close Skype.
  2. Click on the Start
  3. Type Settings and click on Settings on the pop up options.
  4. Locate Privacy and click on it.
  5. Locate App permissions by the left hand section of your screen and click on it.
  6. Locate Microphone and click on it.
  7. Check if the Allow access to the microphone on this device pop up option is On. If not, change it to On.let apps use my microphone
  8. Locate Allow apps to access your microphone and set it to On.
  9. Locate Skype under installed apps, set the slider to On, under Skype.
  10. Relaunch Skype and check if the error is still there.

By default, Windows computers allow programs to access the microphone.

However, due to some changes, tweaks, scans, repairs or updates, this default setting might be disrupted. Hence, a program like Skype may be denied access to the system’s microphone.

3. Use Windows Media Creation tool

  1. Navigate to Microsoft site to download the Windows Media Creation tool.
  2. After successful download, double-click on the tool’s executable file tagged .exe. This with open the file’s setup.
  3. Click on Accept
  4. Select Update this PC now and click Next. This action will download some files.
  5. Scan your computer to check for updates.
  6. On the displayed windows after the update, select Accept, to agree to terms & conditions.
  7. After agreeing to the terms, a Ready to install window will pop up, with the options Install Windows and Keep personal files and apps.Reset Windows 10 - Keep personal files and apps
  8. Proceed with the installation.
  9. Relaunch the Skype program and check if the problem still persists.

In case the Skype error still persists, proceed and try the next method.

4. Clean install Skype

  1. Click the Start button
  2. Type Settings in the box and click on it in the displayed options.
  3. Select Apps > Apps & Features.
  4. Locate Skype on the displayed window and click on it.skype error cant access your sound card
  5. Click the Uninstall
  6. Finish uninstallation by clicking the pop up Uninstall

After successful uninstallation, the next step is to clear every associated file from the system. To do this:

  1. Press Windows Key + R.
  2. Input %appdata% in the Run dialog box and press OK
  3. Right-click on Skype and select Delete

The next step involves clearing Skype’s registry entries. To do this:

  1. Press Windows Key + R.
  2. In the dialog box, type regedit.
  3. Click Ctrl + F (Find) and input Skype in the provided box.
  4. Select Find next.
  5. Delete any found registry entry (key).
  6. Repeat the process to delete the next registry key.

Note: Some keys might require special permissions to successfully clear them. In this case, you can get the necessary permission under your user account settings.

Lastly, after removing every file associated with the uninstalled Skype, you can then proceed to download the app and reinstall it. This should effectively eliminate the Skype can’t access your sound card error.

This is like the last resort to resolving the Skype can’t access sound card error. It entails removing every file and program related to Skype from your computer and then downloading and reinstalling a new, bug-free, app.

Note: You can backup your Skype chats on your computer by moving it to another file location on your system.
To do this, search for %appdata%/Skype in the Run dialog box to locate the My Skype Received Files. Press Ctrl + C on the folder and paste it under a new folder on your system.

Conclusion

Skype, a prominent instant messaging/calling app, is one of the common programs that use sound card on computer systems.

However, for various reasons, Skype might not be able to connect to a computer’s sound card — hence, the emergence of Skype can’t access your sound card error message.

To solve this problem, one of the above solutions will definitely work for you.