Microsoft to host “Cascadia Rail Summit” to promote a Portland-Seattle-Vancouver, B.C. high speed train

Microsoft is hosting a summit with various business, transportation, and government leaders to build a high-speed railway connecting Portland, Seattle, and Vancouver B.C. with a high-speed train system. The rail line would allow individuals to travel from Seattle to Vancouver B.C. in less than an hour (via GeekWire).

Microsoft has already put in almost $574k into research on determining the feasibility of such a rail system connecting these areas, including consumer demand and market viability. However the high-speed line is estimated to cost between $24 billion and $42 billion, according to officials at the Washington State Department of Transportation, and could be capable of generating between $160 million and $250 million per year. The WSDT also estimates $355 billion in economic growth in the region should the rail line be built.

“This Summit will build on those studies, create momentum for the project, and begin the important planning, financing and governance work to bring it to reality,” according to the Cascade Rail Summit website. It will take place November 6 to 8 at Microsoft’s Redmond headquarters and will include speakers such as the company’s government affairs director Irene Plenefisch, former Washington Governor Christine Gregoire, Washington Department of Transportation Secretary Roger Miller, and others.

What do you think about a new high-speed train system connecting Portland, Seattle, and Vancouver B.C.? Share your thoughts in the comments area below.

How to listen to webpages and articles aloud in Edge Insider

Microsoft’s Edge Insider includes a selection of features which make it easier to consume content on the web. You can have articles read aloud to you, which improves accessibility and helps you to multitask effectively.

Reading aloud in Edge Insider

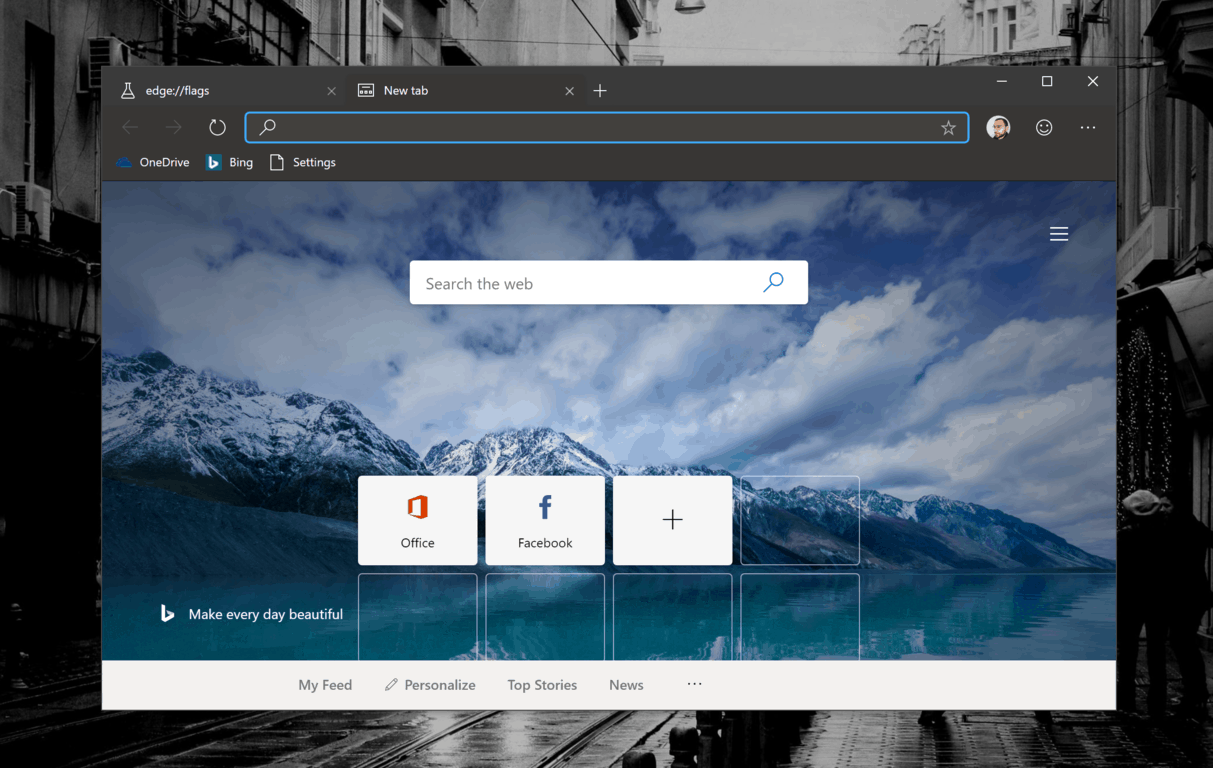
First, you’ll need to find a webpage to read. The site must be compatible with Edge’s Reading View. Most content-heavy webpages in an article format will work. Look for the book icon in the address bar and click it when it appears.

Reading aloud in Edge Insider

Reading View will launch. Click or tap the background to display the Reading View toolbar at the top of the screen. Press “Read aloud” to start listening to the content.

You can control playback using the buttons in the toolbar. You can play and pause reading and skip between paragraphs.

Reading aloud in Edge Insider

The “Voice options” button lets you customise the sound. Use the slider to adjust the speech speed. The “Choose a voice” menu lets you pick from the text-to-speech voices installed on your device.

Once activated, reading continues until the end of the article. It will keep playing even if you switch tab or app, so you can listen to articles in the background while you complete your work.

Star Wars Battlefront II video game update adds new maps, skins, and features

The latest free update for the Star Wars Battlefront II video game has begun to roll out to Xbox One consoles and it contains a lot more than players had been expecting.

In addition to the previously announced new map for Ewok Hunt and new A New Hope appearances for Luke Skywalker and Han Solo (see above image), this update is also adding the planet Felucia to the popular Heroes Versus Villains mode, the options to choose a faction and defend in the new Co-Op mode, a new appearance and icon for the Republic Jet Trooper, and new items and abilities for the Troopers and Ewoks in Ewok Hunt.

A large number of minor adjustments are also being made to weapons, gameplay, and heroes. They’re too numerous to mention here but you can read about them all in detail on this page.

Star Wars Battlefront II continues to add new content for all owners of the game to play on a monthly basis. Recent updates have added Felucia and Clone Commandos, new emotes and poses, and the fan-favorite Droideka destroyer droids while near-future updates will add a new planet, reinforcements, and appearances based on the new film, Star Wars Episode IX: The Rise of Skywalker.

Do you play Star Wars Battlefront II on your Xbox One console? Let us know what new content you like the most in the comments below and then follow us on Twitter, Pinterest, and Facebook for more Xbox gaming news.


Hitman 2’s Whittleton Creek Pack is now live on Microsoft’s Xbox One console

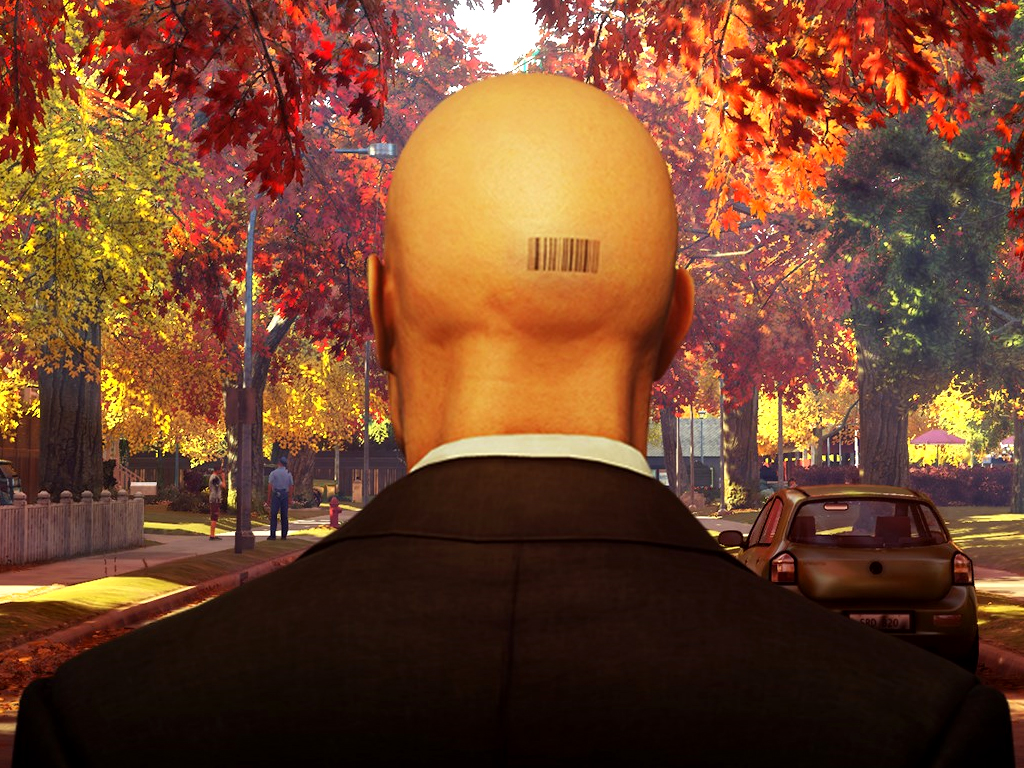
The Hitman 2 Whittleton Creek Pack is now live on Xbox One consoles. This new content pack works as a standalone video game and doesn’t require the purchase of the full Hitman 2 title but it can also work in conjunction with those who own the main game as well.

Whether playing on its own or as part of the full Hitman 2 game, the Whittleton Creek Pack will unlock the sandbox locations and the contract modes for Whittleton Creek (USA) and Hawke’s Bay (New Zealand), the Himmelstein (Austria) Sniper Assassin Map, and all future content for Whittleton Creek and Hawke’s Bay.

Here’s the full game description:

Welcome to the picture-perfect community of Whittleton Creek, USA – the quintessential American suburb. Get started with HITMAN 2 and enter the world of assassinations in style with the Whittleton Creek Pack.

Included in the Whittleton Creek Pack:

  • Whittleton Creek (USA) sandbox location
  • Hawke’s Bay (New Zealand) sandbox location
  • Contracts Mode for Whittleton Creek & Hawke’s Bay
  • Himmelstein (Austria) Sniper Assassin Map
  • All permanent and future content for Whittleton Creek and Hawke’s Bay

If you enjoy this pack and want more HITMAN 2 in your life, you can upgrade to the full HITMAN 2 experience at a reduced cost via the Upgrade Pack.

Are you a fan of the Hitman video games or will this be your first taste of the franchise? Let us know in the comments below and then follow us on Pinterest, Twitter, and Facebook for more Xbox gaming content.


How to convert Outlook mail to Thunderbird or Yahoo

Not everyone is a big fan of Microsoft Outlook, as it lacks some of the visual perks of other mail clients.

While it is indeed the go-to client for work environments, it isn’t all that popular when it comes to personal use.

As such, it should come as no surprise that users are wondering how they can convert their Outlook mail into some other format, such as Thunderbird or Yahoo.

This article will guide you in a step-by-step manner on how to successfully accomplish this task.

How do I connect my Outlook mail to Thunderbird?

1. Export your Outlook to Thunderbird on a single PC

  1. Press Windows
  2. Go to Default Programs
  3. Set Outlook as your default mail program
  4. Open Thunderbird
  5. Click on Tools
  6. Select Import/Export Menu
  7. Select the radio button and then click Next
  8. Choose Outlook from the list
  9. Select Next
  10. Click Finish
  11. Press Windows
  12. Go to Default Programs
  13. Set Thunderbird as your default mail program

convert outlook thunderbird import export


Tired of the same old Outlook? Why not try one of the alternatives from our top picks?


2. Manually convert the OST and PST files to MBOX

  1. Find the locally stored Outlook files
  2. Use a third-party tool to convert the OST and PST file to MBOX
    • Note that the Internet is filled with such programs, and some of them are actually free too
    • Copy the MBOX files
  3. Find Mozilla Thunderbird‘s Local Folders directory
    1. To do this Launch Mozilla Thunderbird
    2. Right-click Local Folders
    3. Click Settings
    4. You can now see the local folder for your account
  4. Paste the MBOX files in the local folder
  5. Restart Mozilla Thunderbird

You will now be able to see the mailbox in the Local Folders list

How do I connect my Outlook mail to Yahoo?

The first thing you need to do is enable POP or IMAP on Yahoo

  1. Login to your Yahoo Mail account via a web browser
  2. Go to Account Security Settings 
  3. Turn on the Allow apps that use the less secure sign-in setting

YAHOO Allow apps that use less secure sign in

If Yahoo has 2-step verification enabled, you will need to create a third-party password to register Outlook

  1. Visit the Yahoo Account Security page
  2. Select Account Security
  3. Select Manage app passwords
  4. Choose Outlook Desktop in the Select your app field
  5. Select Generate
  6. Copy the password
  7. Select Done

Having multiple accounts on Outlook seems too complicated? Why not try another email client.


Now that you enabled POP and IMAP on Yahoo, you can proceed to the next steps:

  1. Open Outlook
  2. Select File
  3. Click Info
  4. Select Add Account
  5. Log in using your Yahoo email credentials
  6. Select Connect
  7. Click on Done

Outlook Add Account

How to Import an Outlook PST to Yahoo

After you’ve connected your Yahoo and Outlook account, you are now ready to migrate your PST content from one to the other.

Unfortunately, the next steps usually involve the use of a third-party migration utility.

This is because migrating emails between Outlook and Yahoo is impossible otherwise.

The Internet is filled with such migration utilities, and plenty of them are free as well.

RELATED ARTICLES YOU SHOULD CHECK OUT:

How to download Outlook Assistant

If you frequently use the Microsoft Office 365 Suite, then you are more or less familiar with the process of migration.

In simple terms, it is the process of migrating multiple customers’ emails, calendars, and contacts from user mailboxes to Office 365.

Outlook Assistant is a neat tool that works in conjunction with Migration Sync to finalize the migration.

How do I download and install the Outlook Assistant?

First of all, you must know that you will need to register an account at the Outlook Assistant’s official website.

The user receives an email with their unique Password Reception URL.

This is to ensure that the Password Reception Page and the Outlook Assistant can correctly identify the user.

Note: Do not share a download of the Outlook Assistant between different users.

When you click the link in the email, it will open the Password Reception Page.

This will provide any necessary information and credentials to the Migration Application.

At the end of the Password Reception process, the Outlook Assistant download begins automatically.

Please remember that you need to have the outlook assistant installed at least 72 hours prior to beginning migration.

However, some users have complained that they are having issues downloading and installing the Outlook Assistant.

Can anyone advice me why Avast keeps blocking a download of the Skykick Outlook Assistant (SKOA) from Comcast Business? I need it in order to migrate my e-mail from old version of Outlook into Office 365. Even when I turn off my Avast VPN and Firewall, it keeps moving the file that I need to download into Virus Chest.

What can I do if I cannot download the Outlook Assistant?

Check out your antivirus settings

The case mentioned in particular seems to be like a simple case of an antivirus detecting a false positive.

In the case of Avast, all you need to do to report a false positive is to go to the designated website and upload the file.

Avast Report a suspected false positive

Additionally, if you can download the app, but cannot install it due to a virus threat detection, whitelist the file.

The process of whitelisting a file varies from one antivirus client to another.

For a more in-depth guide, please contact the antivirus software’s official website for more information.

By following any of these tips, you should be able to successfully install the Outlook Assistant tool, thus allowing you a smoother migration process with Office 365.

Know of any other reasons why downloading and installing the Outlook Assistant doesn’t work?

If you do, please share your solutions with us in the comments section below.

RELATED ARTICLES YOU SHOULD CHECK OUT:

How to disable end of support notifications in Windows 7 Pro

Windows 7 is one of the most cherished platforms in Microsoft’s Windows series. Although Windows 10 has now overtaken 7’s user share, Win 7 retains a substantial user base. Microsoft will discontinue support for Windows 7 from January 14, 2020, which might be enough to convince more users to upgrade to Win 10. Now the big M has extended its upgrade notifications to Windows 7 Pro users just to remind them that Win 7 is approaching its end of support date.

Microsoft recently updated a Making the transition to Windows 10 blog post to confirm that its extending upgrade notifications. That updated post states, We are now extending the notifications discussed below to Windows 7 Pro devices to ensure our customers are aware of the end of support for Windows 7 and can take action to remain productive and secure. To extend the upgrade notifications, the big M is rolling out a KB4524752 update to Win 7 Pro.

The KB4524752 update will automatically roll out to Win 7 Pro users much the same as others. With the update installed, a notification window pops up for users. That window states, After 10 years, support for Windows 7 is nearing the end. It also includes the end of support date and a button users can click on for further details.

However, users can disable that notification. To do that, users can select a Do not notify me again option at the bottom left of the notification’s window. Alternatively, users can edit the following registry key DWORDS to disable the upgrade notification:

Registry key path: HKEY_LOCAL_MACHINE\Software\Policies\Microsoft\Windows\Gwx
DWORD: DisableGwx

Registry key path: HKEY_LOCAL_MACHINE\Software\Policies\Microsoft\Windows\WindowsUpdate
DWORD: DisableOSUpgrade

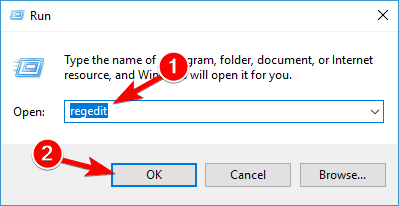
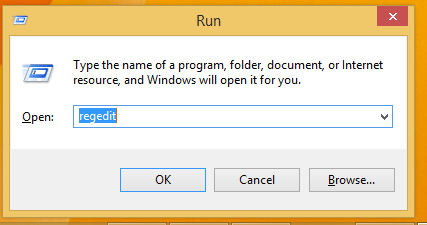
To edit those DWORD values, press the Windows key + R hotkey. Enter ‘regedit’ in Run, and press the OK button. Double-click the DisaleGwx and DisableOSUpgrade DWORDs at the key paths specified above to open their Edit DWORD windows. Then change their value data values to 1 from that window.

Thereafter, that upgrade notification will not pop up again on Windows 7. However, it’s still worth considering upgrading to Windows 10 whether Win 7 is supported or not. Windows 10 includes many of the best things from Win 7, a better Start menu, numerous UWP apps, the Cortana virtual assistant, and more besides.

RELATED ARTICLES TO CHECK OUT:

How to Download Outlook Calendars & Signatures

Microsoft Outlook is the most used email client around, at least as far as companies are concerned.

More so, when you have a work email, you are pretty much glued to it while at and away from work.

As such, you’d want to know how you can have calendars, signatures, and sound sets, and have them everywhere you go.

This step-by-step guide will show you how you can easily download calendars, signatures, and sound sets from Microsoft Outlook.

How do I download calendars and signatures from Outlook?

1. How to download calendars from Microsoft Outlook

  1. Open Outlook
  2. Open the Calendar
  3. Select the Calendar you want to export
  4. Click File
  5. Select Save Calendar
  6. Give the calendar a name
    • You’ll be presented with a summary showing the calendar name, date range, and detail level next to More Options
  7. Click More Options
  8. Click Date Range and choose how much of the calendar you want to include in the file
    • You could also choose Specify dates to manually input the range
  9. Click Detail and choose the amount of detail you want to show
  10. Click OK, and then click Save
Outlook Save Calendar

To learn more, we have a guide on how to add a public folder calendar to Outlook, so be sure not to miss it.

After exporting your calendar, you might also find it helpful to learn how to share your Outlook calendar with colleagues for better collaboration.

2. How to download signatures from Microsoft Outlook

  1. Open File Explorer
  2. Input %userprofile%AppDataRoamingMicrosoftSignatures in the address box
  3. In the Signatures folder, you will see that the signature corresponds to three files:
    • An HTML document
    • A Rich Text Document
    • A Text Document
  4. Select the 3 documents and Copy or Cut them
  5. Paste the documents in whatever location you desire
Download Outlook Signatures

How do I change the sound sets from Microsoft Outlook?

  1. Press Windows + R
  2. Type in control.exe
  3. In the search box of the Control panel window, type in Sounds
  4. The Sounds dialog box will now open
  5. Go to the Sounds tab
  6. Click New Mail Notification
  7. Click Browse
  8. Select a different audio file
  9. Restart Outlook
Change Outlook Sound Sets

By following these steps, you can download the calendar, signatures, and change the sound sets from Microsoft Outlook easily.

If you want your tasks to appear in Outlook, we have a great guide on how to show tasks in Outlook Calendar.

Do you know any other feature you’d like to download or extract from Outlook? Tell us more in the comments section below.

How to fix KB4517389 BSOD errors

Microsoft rolled out KB4517389 at the beginning of October as part of the Patch Tuesday release.

Right after the release, many users started complaining about various issues. You can read more about the initial bug reports below:

Unfortunately, the saga of technical glitches doesn’t end here. Recent reports suggest that KB4517389 is now causing BSOD errrors.

On my laptop machine (but not on my desktop) I started getting BSOD failures in cldflt.sys after installing KB4517389. […]Uninstalling KB4517389 fixes the problem. Presumably, disabling cldflt.sys would do so, too, but I haven’t tried that yet.

So, if you’re also experiencing BSOD issues on your Windows 10 computer, rest assured you’re not the only one. There is nothing wrong with your machine. It’s Microsoft’s fault again.

Troubleshoot KB4517389 BSOD issues

If uninstalling the update is not on your list of options, maybe there is something you can do to fix the problem.

We’ve written extensively on BSOD errors, so do check out the troubleshooting guides listed below:

If you’re getting a different BSOD error code, you can check out our BSOD troubleshooting hub. Just use CTRL + F to find the article tackling the error you’re experiencing right now.

Posted in Fix

Microsoft Teams missing from new Office 365 deployments

Microsoft Teams is a unified communications platform developed by Microsoft.

It combines persistent workplace chat, video meetings, file storage, and application integration.

Teams is part of the Office 365 subscription office productivity suite and features extensions that can integrate with non-Microsoft products.

While it may have been part of Office 365 since the beginning, some users have been reporting that it is missing from the latest deployments of Office 365.

[…] We’ve seen a handful of instances where Office 365 is installed find, but for some reason Teams is missing. They also do not have the Microsoft Corporation folder in their Start Menu (Where Teams shortcut should be)
No idea why this would happening since it’s obviously the same Installer/XML file being used. I’m guessing that means it’s client side….but what that is, who knows ?

Is Microsoft Teams missing from Office 365?

At first, some were speculating whether this was a sign that Microsoft Teams is meeting its end of life. Apparently it was just a case of improper installation of the Office 365 client.

According to Microsoft support, Teams won’t show up until the user has logged off and back on again (or restarted the device). This is a common mistake most users make when installing a new piece of software.

As you may know, most installations usually involve a complete system restart in order to be fully complete. Besides, Microsoft Teams is downloadable as a standalone client for free as well, as long as you create an account.

More so, even if the app itself would not be installed for some reason, remember that you can always simply log into the web app.

Have you also encountered issues with Microsoft Teams? Let us know in the comments section below.

RELATED ARTICLES YOU SHOULD CHECK OUT:

Windows 10 1903, 1909 CPU requirements updated

Microsoft officially detailed the new CPU requirements for the hardware that will be released pre-installed with the new Windows 10 version 1903, respectively 1909.

As we already know it, the 1909 upcoming Windows 10 update will be quite similar with the current 1903 build. Thus, the minimum CPU requirements are, in most parts, identical for both Windows versions.

Windows 10 system requirements for new PCs

Mainly, the Microsoft hardware clarifications adds support for Intel, AMD and Qualcomm. Of course, these are the CPU requirements on new hardware that will be launched along with the Windows 10 version 1903 and 1909.

Therefore, if you’re already using a Windows 10 powered computer, you will still be able to receive and install the November updates without any problems. You only have to grant enough storage space for the actual patch. You can also download the Windows 10 v1903 ISO for a smooth install.

For running a relatively old build on a newer machine the problem will consist in the support offered by the manufacturer. Shortly put, if the BIOS was updated, you might not be able to run older versions of Windows anymore.

As for the new specification list, the Microsoft press release now includes the 5G Snapdragon 8cX. It was previously excluded on the May 2019 Update.

Additionally, the new document lists support up to Snapdragon 850 and Intel’s 10th generation Core processors. The Xeon E-22, Atom, Pentium and Celeron CPUs are also mentioned. See the image below for further details on that matter.windows 10 cpu requirements

Microsoft is expected to push out the Windows 10 v1909 during the following two or three weeks. And for the devices that ships with either 1903 or 1909 builds, the CPU minimum requirements are now crystal-clear.

On the new updates, for clean installs you will need to provide at least 32GB of storage space. This space is required for apps that will be added during the installation process. It will be also used for keeping data safe on your device.

Anyway, as we know, starting with the May 2019 Update Microsoft added the Reserved Storage feature. This feature is automatically reserving space for updates, temporary files, system cache or apps.

Microsoft Edge stable release link goes live, official launch soon?

Back in 2018, Microsoft had announced it will be switching to the open-source Chromium framework for its Edge browser.

While the Beta version of the same was released back in October 2018, looks like Microsoft is finally ready to announce the browser officially.

It seems that the Microsoft Edge stable download link is already showing up in google search results:

Can I download the stable version of Microsoft Edge now?

Edge stable release

Yes, a new page for Edge browser stable version is now live on the official Microsoft website. You can download and install the browser on your Windows computer.

However, do note that the browser will replace the classic Edge on your Windows computer. Once installed, you won’t be able to uninstall the Chromium-based browser for now.


How to change Internet Options in Microsoft Edge


When’s the official launch expected?

While Google and Firefox are gearing up to launch the newer version of their respective web browsers today, it is possible that Microsoft will also join the party with its new shining browser.

Download Microsoft Edge Stable release

The Beta version of Edge browser has received a positive response from the early testers. Although the stable version of Edge was leaked online earlier, this is the first time the software giant is expected to make it official.

After the installation, we did not notice any changes to the logo or icon. However, being a stable release the browser will ditch the beta/dev tag inside the about section.

That said, there is no official confirmation from Microsoft about the release date yet nor Microsoft has linked to the stable channel on the Microsoft Edge insider page. We will update the post as it happens.

RELATED STORIES YOU MAY LIKE:

Windows 10 Xbox Game Bar gets FPS Counter And Achievement Tracking

If you haven’t checked Microsoft’s Xbox Game Bar on Windows 10 recently, the overlay has been recently updated with two new useful features that are part of the October 2019 Game Bar update. First of all, the Performance widget has gained a frame rate counter, which displays your game’s current framerate as well as the frame rate history over the past 60 seconds.

“For the performance junkies, we’re also giving you more control over which system resources are tracked and displayed on-screen, and added graphical options so you can customize the look and feel of the overlay (including transparency!),” the Xbox team explained today.

The second new feature added to the Xbox Game Bar is an Achievement overlay for PC games that support them. The Xbox One already had a similar feature, so it’s nice to see it coming to Windows 10 PCs through the Game Bar.

“We have a ton of things in store for you over the coming months,” the Xbox team teased today, and we’re looking forward to seeing what other new features are in the pipeline. To make sure you have the latest version of the Xbox Game Bar, you can just check for updates in the Microsoft Store.

Secured-Core PCs are Microsoft’s answer to firmware attacks

Microsoft announced a new initiative called Secure-Core PCs that aims to address the threats targeted at the firmware and operating systems level.

As part of this new initiative, the tech giant is collaborating with PC manufacturing partners like Intel, AMD, and Qualcomm.

Secured-core PCs have to meet certain requirements

These secured devices meet a specific set of requirements to better protect the firmware layer and offer more security to the Windows operating system.

As such, they’re primarily intended for industries that work with highly-sensitive data, as Microsoft explains:

These devices are designed specifically for industries like financial services, government and healthcare, and for workers that handle highly-sensitive IP, customer or personal data, including PII as these are higher value targets for nation-state attackers.

As you already know, the hacking group Strontium targeted many systems last year, and again this year, by delivering malware through firmware attacks.

Why? Because through firmware you can get directly to the hardware, thus gaining higher privilege than the hypervisor and operating system kernel.


Keep your PC safe against hackers with these amazing software tools!


What is a Secured-core PC?

That’s the reason why Microsoft is betting big on Secured-core PCs:

Secured-core PCs combine identity, virtualization, operating system, hardware and firmware protection to add another layer of security underneath the operating system. Unlike software-only security solutions, Secured-core PCs are designed to prevent these kinds of attacks rather than simply detecting them.

With Secured-core PCs customers can boot securely, prevent and protect against firmware attacks, prevent unauthorised access, and credentials protection.

They can also be remotely monitored by SecOps and IT admins to make sure that the system health and the hardware are not susceptible to any immediate threats.

Along with Secure Boot, UEFI, and new hardware capabilities, Windows 10 will have a new Secured-core PC  requirement called System Guard Secure Launch.

If you’re interested in better securing your data, you’ll be happy to know that manufacturers like Dell, Dynabook, HP, Lenovo, Panasonic and Surface, offer verified Secured-core PC.

For more info about Secure-core PCs and the full list of verified devices, check out Microsoft’s official page.

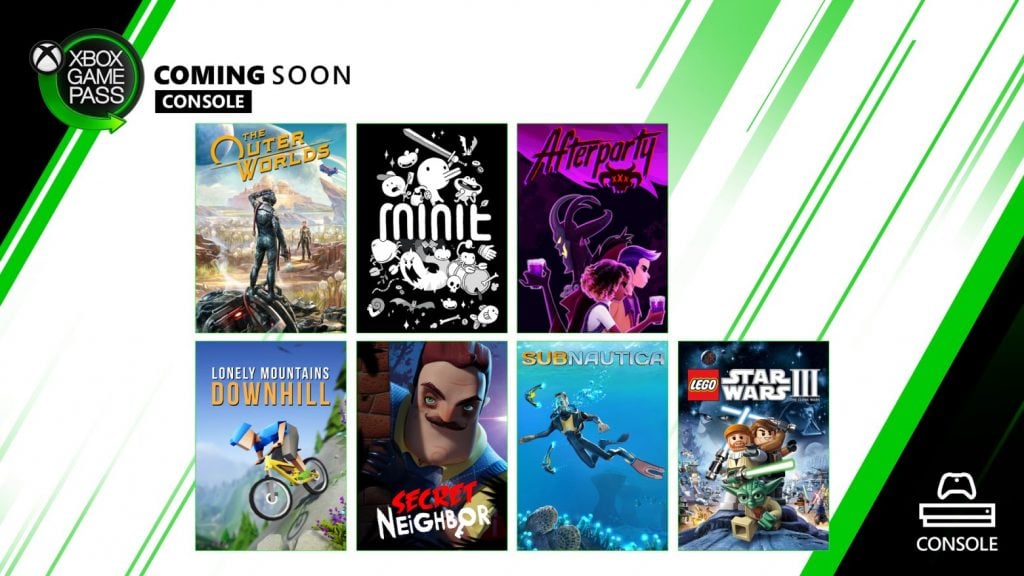
The Outer Worlds, Subnautica, and more are coming soon to Xbox Game Pass for Console

Microsoft has just announced the second wave of games coming to Xbox Game Pass for Console in October. Two brand new games will join the catalog tomorrow, October 23, with the biking game Lonely Mountains: Downhill (also coming to Xbox Game Pass for PC), and the multiplayer horror game Secret Neighbor.

The indie adventure game Minit, which has already been announced for Xbox Game for PC, will also join Xbox Game Pass for Console on Thursday, October 24. A day later, The Outer Worlds, the new single-player sci-fi RPG from Obsidian Entertainment will officially launch on Xbox Game Pass for PC and console. The game is already available for pre-download on both platforms, and early reviews have been very positive so far. A launch trailer has also been published last week, and you can watch it below.

Two more games will join Xbox Game Pass before the end of the month, Afterparty on October 29, followed by the Xbox 360 game Lego Star Wars III on October 31. Lastly, the underwater open world adventure game Subnautica is the first new Xbox Game Pass title announced for next month, coming on November 7.

In case you missed it, The Escapists, Thief of Thieves: Season One, and GRIP are the three games leaving Xbox Game Pass for console at the end of the month. We hope these will be replaced by even more cool in November.

Surface Neo and Duo to feature a “good camera,” but no 5G support at launch, says Panos Panay

At an event in Berlin, Microsoft Surface chief Panos Panay spoke a bit more about Surface Duo and Surface Neo and revealed some extra details about the upcoming foldable devices. As noted by WinFuture (via Windows Central), the Surface chief said that both Neo and Duo will feature a “good camera,” but no support for 5G support at launch.

Although 5G networks are yet to become mainstream and popular here in the United States, WinFuture reports that Microsoft is apparently “preparing” to equip the Surface Do and Neo for the technology. However, the report also mentioned that Panay believes this could take some time, due to the “ambitious roadmap for the introduction of 5G-enabled devices.” Panay stopped short of officially commenting on specifics of the matter, and instead mentioned that the devices would support LTE-advanced, hinting that 5G support could likely come in the future.

As for the cameras, which have been a much talked about topic, Panay simply said both devices would feature “a good camera.” in the first generation. It’s not exactly clear what “a good camera” means, however, or if that refers to a rear-facing camera or a front-facing camera.

Firefox 70 is out with social media trackers blocked by default

Mozilla has just released its version 70 of its popular privacy-centric Firefox web browser on Windows as well as macOS, Linux, Android, and iOS. This update focuses on improving the users privacy thanks to the addition of social media tracking blocked by default, a new Privacy Protections report, and new features for Lockwise.

With the addition of social media tracking prevention now being enabled by default with this update, Mozilla has also enabled users to quickly and easily obtain a report about all of the trackers that have been blocked. The company brought tracking prevention to its browser back in June, so these new features will could definitely serve to be useful for privacy-centric individuals.

Additionally, Mozilla’s free password manager Lockwise is also receiving enhancements on its own. Users will now be able to quickly generate new strong passwords to secure their online accounts directly in the Firefox web browser, as well as on the Lockwise app for Android and iOS. The Lockwise dashboard within the Firefox browser has also been improved, allowing passwords to be created, searched for, sorted, updated, and deleted at any time.

Mozilla has been pushing for improving user privacy for some time now, and it’s definitely helping users become more self-aware and allowing them to further control their data, which is constantly being shared to third-parties.

What do you think of these new enhancements? Any additions you’d like to see to help protect your privacy online? Let us know what you think down below.

Former Outlook and Cortana boss Javier Soltero is the new head of Google’s G Suite

It’s been almost a year since Javier Soltero, the former head of Outlook and Cortana at Microsoft left the company, but Axios reported yesterday that the former Microsoft exec has been hired by Google to lead G Suite. For those unfamiliar, G Suite is Google’s alternative to Microsoft’s Office 365, combining Gmail, Google Docs, Google Drive and more in a single package.

As the founder of the Acompli email app, which Microsoft purchased to rebrand it to Outlook Mobile, Soltero is definitely a great hire for Google. The Axios report mentions that Soltero will report directly to Google Cloud CEO Thomas Kurian.

Google’s G Suite may be lagging behind Office 365 in the business world, but Microsoft definitely shouldn’t underestimate the competition. Google has built a collection of solid web and mobile apps over the years, with G Suite plans starting at $6 per month per user for the Basic plan. The more expensive Business and Enterprise plan also provide unlimited cloud storage (or 1TB per user if fewer than 5 users), which can be interesting for SMBs.

Even though Soltero left Microsoft a year ago, he isn’t the only high-profile Microsoftee to join another GAFA. Gabe Aul, former head of the Windows Insider program left Microsoft to join Facebook back in June. Last year, we also saw Xbox veteran Albert Penello join Amazon to “grow Alexa/Echo presence in gaming.” A recent report from CNBC actually pointed out that Amazon had hired at least 30 executives from Microsoft between 2015 and 2017, mostly due to the fact that both companies are very close to each other in the Seattle metropolitan area.

FIX: Windows 10 doesn’t recognize CD Drive

Windows 10 might have a few issues with hardware, and speaking of hardware issues, users have reported that Windows 10 doesn’t recognize CD drives on their computers. This might be a big problem if you rely on optical media for file storage, so let’s try to fix this problem.

What to do if CD drive isn’t recognized on Windows 10?

Many users reported that Windows 10 doesn’t recognize CD drives. This can be an annoying problem, and speaking of issues, users reported the following problems related to CD drive:

  • DVD/CD-ROM drives not in Device Manager Windows 10 – Sometimes your CD drive is missing from Device Manager. This can happen if your drivers are out of date.
  • Windows 10 CD drive not showing, working, detected, visible, found, recognized – Many users reported various problems with their CD drive, and if your CD drive isn’t showing or if it’s not detected, be sure to try some of our solutions.
  • Windows 10 CD drive missing – If you’re having this problem, the issue might be related to your drivers. To fix it, be sure to update your chipset drivers to the latest version.
  • Windows 10 CD drive not reading discs – If you’re having this problem, try connecting your CD drive to a different port on your PC. If the issue still persists, you might want to replace your CD drive.
  • Windows 10 CD drive Access Denied – If you’re getting Access Denied message, it’s possible that you don’t have the necessary privileges to access your CD drive. To fix the issue, you might have to modify your system policy.
  • Windows 10 CD drive won’t play CD – If you’re unable to play CDs on your Windows 10 PC, the issue might be caused by your registry. However, you can fix the problem by making few changes in your registry.
  • Windows 10 my CD drive disappeared – This is another problem that can occur with your DVD drive. If this happens, you won’t be able to read any CDs on your PC.
  • Windows 10 can’t find CD drive – This is another relatively common problem with CD drive. If you’re having this issue, be sure to try some of our solutions.

Fix – Windows 10 doesn’t recognize CD drive

1. Use Hardware and Devices troubleshooter

  1. Press Windows Key + S and type control panel. Choose Control Panel from the list.
    Windows 10 can't find CD drive
  2. When Control Panel opens, select Troubleshooting.
    DVD/CD-ROM drives not in Device Manager Windows 10
  3. When Troubleshooting section opens, navigate to Hardware and Sound section and click Configure a device.
    Windows 10 CD drive not detected
  4. Follow the instructions.

2. Reinstall the driver

In order to reinstall your CD drive driver, you just need to navigate to Device Manager and uninstall the driver that you currently have installed. To do that, follow these steps:

  1. Press Windows Key + X and choose Device Manager from the list.
    Windows 10 CD drive Access Denied
  2. Go to DVD / CD-ROM drives section, find your CD drive driver, right click it, and choose Uninstall device.
    Windows 10 CD drive won't play CD
  3. When the confirmation message appears, click Uninstall.
    Windows 10 my CD drive disappeared
  4. Restart your computer and check if the issue has been resolved.

If the previous solution didn’t work, we strongly suggest doing it automatically through third-party software that will protect your computer from permanent damage during manual driver installation (incorrect version of drivers).

3. Remove the corrupted registry keys

If Windows 10 doesn’t recognize the CD drive, this can be due to corrupted registry values, and if that’s the case, the best solution is to delete those registry keys. Before we start, make sure that you are using an administrator account on this computer. We have to mention that changing registry values can sometimes lead to system instability if you’re not careful, so proceed with caution.

  1. Press Windows Key + R and type regedit. Click OK or press Enter to start Registry Editor.
    Windows 10 CD drive not reading discs
  2. When Registry Editor starts, navigate to the following key in the left pane:
    • HKEY_LOCAL_MACHINESYSTEMCurrentControlSetControlClass{4D36E965-E325-11CE-BFC1-08002BE10318}
      Windows 10 CD drive Access Denied
  3. In the right pane locate UpperFilters entry. Right click it and choose Delete.
  4. Now locate LowerFilters in the right pane and delete it.
  5. After you’ve deleted LowerFilters and UpperFilters entries, close Registry Editor and restart your computer.

If you can’t find LowerFilters or UpperFilters, don’t worry, just skip to the next step of the solution.

4. Create a new registry subkey

If Windows 10 still doesn’t recognize the CD drive, you might want to create new subkeys for each CD drive that you have. To do that, just follow these steps:

  1. Start Registry Editor by pressing Windows Key + R and typing regedit in the Run dialog.
  2. When Registry Editor starts, navigate to the following key:
    • HKEY_LOCAL_MACHINESYSTEMCurrentControlSetServicesatapi
  3. Right click atapi and choose New > Key.
    Windows 10 CD drive won't play CD
  4. Enter Controller0 as the name of the new key.
  5. Right click Controller0 key and choose New > DWORD(32-bit) Value.
    Windows 10 my CD drive disappeared
  6. Enter EnumDevice1 as the name of new DWORD.
  7. Double click the EnumDevice1 to open its properties.
  8. When properties window opens, in the Value data box enter 1 and click OK to save changes.
  9. Exit Registry Editor and restart your computer.

If you have two CD / DVD drives on your computer, you might have to repeat this solution for every CD drive that you have. The steps for the next CD drive are exactly the same, except that you need to set the name of the new key to Controller1 in Step 4.

5. Use Command Prompt to add values to the registry

If you don’t want to add values to the registry manually, you can use Command Prompt. Using Command Prompt is a quicker and for some users a simpler solution. To change registry using Command Prompt, follow these steps:

  1. Start Command Prompt as administrator. To do that press Windows Key + X and choose Command Prompt (Admin) from the list.
    Windows 10 CD drive missing
  2. When Command Prompt starts, paste the following line and press Enter to run it:
    • reg.exe add “HKLMSystemCurrentControlSetServicesatapiController0” /f /v EnumDevice1 /t REG_DWORD /d 0x00000001
      Windows 10 CD drive not reading discs
  3. Close Command Prompt and restart your computer.

6. Run .reg to add changes to the registry

If you don’t want to use Command Prompt, and you don’t want to change the registry manually, you can use this .reg file to change the registry for you. Just open the archive, extract the .reg file, double click it, and it will make changes to the registry automatically.

Fix – Windows 10 doesn’t recognize CD ROM

1. Uninstall additional ATA / ATAPI controllers

Sometimes Windows 10 doesn’t recognize CD ROM due to additional ATA / ATAPI controllers that are installed in Device Manager. We’re not sure why this happens, but the only solution is to uninstall these additional controllers from Device Manager. To do that, follow these steps:

  1. Open Device Manager.
  2. Go to IDE ATA / ATAPI controllers section and expand it.
    Windows 10 CD drive not showing
  3. You might see several ATA Channel controllers available.
  4. Uninstall all ATA Channel Controllers by right clicking them and choosing Uninstall from the list.
  5. After you’ve uninstalled all ATA Channel Controllers, close Device Manager and restart your computer.

2. Delete all DVD / CD ROM and IDE ATA / ATAPI drivers

  1. Open Device Manager.
  2. Go to View and choose Show hidden devices.
    Windows 10 can't find CD drive
  3. Now go to DVD / CD-ROM drives section and uninstall all devices.
  4. Now go to IDE ATA / ATAPI controllers section and uninstall all devices.
  5. Click Scan for hardware changes button and wait for Windows 10 to install the missing drivers.
    DVD/CD-ROM drives not in Device Manager Windows 10
  6. After Windows 10 has installed all the drivers, restart your computer.

3. Unplug your hard drive and replace it with your CD / DVD drive

If Windows 10 doesn’t recognize CD ROM, you might want to try connecting your CD ROM to a different port. Open your computer, unplug your CD ROM and hard drive and connect them to different ports. If your computer is under warranty, we strongly advise that you take it to a repair shop in order not to break your warranty. In addition, if you don’t know how to do this properly, maybe it’s better that you ask a professional to do it for you.

4. Install new chipset drivers

Your CD ROM might not be recognized on Windows 10 due to the generic SATA Controller this is installed on your computer, so you’re advised to download the latest chipset driver from your motherboard or chipset manufacturer. After you’ve downloaded the drivers, install them, restart your computer and check if Windows 10 recognizes your CD ROM. If the problem persists, you might have to manually install the drivers. To do that, follow these steps:

  1. Open Device Manager and navigate to the IDE ATAATAPI Controllers.
  2. Find your currently installed driver, it should be called Standard SATA AHCI Controller, and right click it. Choose Update driver.
    Windows 10 CD drive missing
  3. Click on Browse my computer for driver software and locate the folder where your chipset drivers are stored.
    Windows 10 CD drive not reading discs
  4. Check the Include subfolders option and click Next.
    DVD/CD-ROM drives not in Device Manager Windows 10
  5. If everything goes well, your drivers should be updated and you just need to restart your computer to complete the process.

5. Update your SATA Controller driver

To do this step, you might have to do some research and find out what type of SATA Controller do you have. In our case, it was an AMD controller, but it might be a different one on your computer. To update your SATA controller driver, do the following:

  1. Open Device Manager and locate SATA controller driver. Right click it and choose Update Driver Software.
  2. Choose Let me pick from a list of device drivers on my computer.
    Windows 10 CD drive not working
  3. Uncheck Show compatible hardware. Locate your SATA controller manufacturer in the left pane, in our case it was AMD but it might be different on your computer, and select it. Choose the model in the right pane and click Next.
    Windows 10 CD drive missing
  4. After the driver has been installed, restart your computer.

Windows 10 sometimes has problems with certain drivers or devices, and this is the main reason why Windows 10 might not recognize your CD drive, but as you can see, you can easily fix this issue by following our solutions.

Xbox One’s Plants vs. Zombies: Battle for Neighborville video game is now live

Plants vs. Zombies: Battle for Neighborville, is now live on Xbox One in a regular version and a Deluxe Edition for $39.99 and $49.99 respectively. Those with EA Access receive a $5 discount on either version.

Battle for Neighborville is the latest video game in the 3D shooter spin-off series based on the original hit Plants vs. Zombies smartphone game. Like its predecessors, Plants vs. Zombies: Battle for Neighborville lets players play as a variety of classes and fight through several large play areas in real-time action matches.

Players can play by themselves or team up or play against a friend locally. The game also supports online play with matches with up to 24 players being supported.

The Deluxe Edition comes with the base game plus the Legendary Chickpea Costume for Peashooter, the Legendary Judge Z Costume for 80s Action Hero, a digital comic, and five emoji.

Here’s the official game description:

Welcome to Neighborville, where all is well. Except that a crazy new coniferous conflict between brain-less and botanicals is brewing! What are you gonna do – call the crops? Soil your plants? Prepare to kick some grass in a plant-on-zombie conflict that will take you to the outer edges of Neighborville and back again.

  • Customize Every Character for Battle: Join the newest bloom in the age-old battle between plants and zombies with 20 fully customizable classes at launch, including a Team Play class for each faction. Bring the unique abilities of each character class to six PvP modes, including the new Battle Arena, and experience the unbeleafable thrills of combat.
  • Venture to the Outer Edges of Neighborville: The tension across the terra has expanded with three free-roam regions and one PvE mode that extend beyond the town of Neighborville. Squad up with up to three friends in the Giddy Park social region and take back Weirding Woods, Mount Steep, and Neighborville Town Centre. It’s grow time!
  • Play with Your Favorite People, in Every Mode: Join forces with other players to experience split-screen couch co-op in every mode. Connect with up to three players and battle through flourishing free-roam regions or jump into the fray with up to 24 players in online multiplayer across a gigantic suburban skirmish.

Are you a fan of the modern Plants vs. Zombies video games and will you pick up Battle for Neighborville on Xbox One? Share your thoughts with us in the comments below and then follow us on Pinterest, Facebook, and Twitter for more Xbox gaming news.


10 Best Outlook Features You Need to Try Right Now

Microsoft Outlook is probably the world’s most well-known personal information management tool.

It started as a mere email client and has evolved into an integral part of the Microsoft Office Suite. While still an email client – one of the best there is, for that matter – it has a host of new features to offer.

Here are the top 10 best features that Outlook brings to the table.

How do I get the most out of Outlook?

1. Outlook for collaboration

What is neat about Outlook is that it has tools that accurately reflect your typical workday. For example, it lets you keep track of your clients‘ needs and actions so you know exactly what your next moves are.

You can then use Outlook‘s tools dedicated to group work to make a plan of action.

Getting everybody together on a project is key, and it is much easier when everyone is in the same Office 365 group.

Of course, scheduling meetings is an integral part of working as a group, and Outlook makes that aspect a whole lot easier. Unfortunately, not everyone is always available, so Outlook helps by letting you time the meetings just right.

Once you’ve finally gathered and discussed the latest topics on your agenda, Outlook provides you with the tools to take efficient notes.

Looking to improve the level of collaboration within the company? Take a look at these software tools.

2. Increased folder sharing

In a work environment, sending and receiving information is essential. Because of this, Outlook is fully prepared to meet even the highest expectations regarding file and folder sharing.

This allows you as a group to keep sharing data without worrying about deleting older files and folders to free up space.

3. Outlook inbox payments

When you’re all busy at work, it is easy to forget about common day-to-day tasks, such as paying your bills.

With Outlook, however, you can pay bills via Microsoft Pay without worrying about tax penalties.

4. Dark Mode

Many programs have decided to include Dark Mode, and Outlook is not far behind. When it was first announced, users were pretty excited about the news.

Their excitement was also fueled by the knowledge that Outlook would now receive full support for Black Office Theme.

Additionally, Dark Mode is far easier on the eyes, especially when reading documents at night or in dark rooms. More so, because the screen is no longer so bright, it helps reduce battery consumption on mobile devices.

Because of this, those of you who usually read their emails off of their phone are probably the most avid users of Outlook‘s Dark Mode.

5. Modern UI

Looking fresh is almost as important as being useful, and Outlook boasts a sleek UI for the modern user. More so, the design is constantly updated, and new features are consistently added to the toolset.

This includes, among others, new interactive ways for you to get notified regarding an upcoming event. Outlook includes Fluent Design-inspired effects that will make using it extremely enjoyable.

However, this modern design isn’t just for show, as it helps Outlook perform a lot faster too.

6. Ink usage

As mentioned above, writing emails doesn’t have to be standard and boring.

Outlook provides all the tools you need to send emails that are either stylish or fun, depending on your mood.

7. Encrypt your emails

When you send or receive an email, you expect that your privacy is respected. With Outlook, you don’t have to worry about security issues, thanks to its advanced end-to-end encryption.

This feature will ensure the highest level of security, allowing you and your company’s secrets to remain a secret.

Is privacy your #1 concern? Take a look at these great encryption tools that we’ve picked for you!

8. It uses AI

As mentioned before, Outlook is continuously evolving, and it seems that the next trend in almost every domain is AI.

Outlook and other apps belonging to the Microsoft Office suite will also receive AI-powered features that will make working with it easier.

More importantly, it will be able to communicate more easily with other AIs, improving the exchange of information between apps.

9. Focused Inbox

Prioritizing emails is key, especially when you send and receive plenty of them daily.

Because of this, Outlook features something called a Focused Inbox, where emails are arranged based on a user-attributed priority. More so, other tools such as @-mentions and cloud attachments make Outlook an email client of the future.

You can organize your Outlook emails with some more tips if you want a clutter-free inbox and prioritized tasks.

10. Fixable and versatile

With its neat tools and great design, we must remember that Microsoft Outlook is a computer application. Like any computer application, it can be prone to faulty registries, bad installs, and corrupted data.

Fortunately, Outlook is extremely popular, and as such, there are plenty of tools that will make fixing it a breeze.

Due to its popularity and extensive range of features, Outlook is ranked third in the email market share. To know more about it, read our post. And Outlook for Windows and Outlook for Web will soon get a new button option. Users will be able to initiate email synchronization with Outlook’s Sync option, so it’s just a matter of having more patience.

Still not convinced of Outlook’s effectiveness? Why not try an alternative email client instead?

How to Download Outlook Contacts and the Distribution List

Microsoft Outlook is a solid choice for an email client, mainly when used as the go-to email client in a work environment.

If you use it in a work environment, your contact list will probably be extensive and filled with essential details.

Because of this, you may sometimes need to download your entire contact list and have it in a more manageable format for you to use.

Your contacts are stored in the Outlook Distribution List (DL) or the Global Address Book (GAB). This step-by-step guide will show you how to download your Microsoft Outlook contacts in one way or another.

How do I export my Outlook contacts?

  1. Open Outlook.
  2. Click File.
  3. Select Open & Export.
  4. Click Import/Export.
  5. Select Export to a file.
  6. Choose Comma Separated Values (CSV).
  7. Go to the Select folder to export from box.
  8. Select the contacts that are under your account.
  9. Choose Browse.
  10. Name your file.
  11. Choose OK.
  12. Confirm the location where you will save your contacts, and click Next.
  13. Click Finish.
Outlook Import Export

How do I download my Outlook Distribution List?

1. From the Outlook desktop client

  1. Open Outlook.
  2. Start a new email.
  3. Click the To button.
  4. Select the distribution list you need to save in CSV.
  5. Click the + sign to expand the members.
  6. Select all the members of the distribution list.
  7. Copy them.
  8. Close the email.
  9. Go to Home.
  10. Select New items.
  11. Choose More items.
  12. Click on the Contact group.
  13. Go to Add members.
  14. Select From Address book.
  15. Paste the names and emails in the Members field.
  16. Go to File.
  17. Select Save As.
  18. Save the contact group as a TXT file.
  19. Open the txt file you just created and remove the first row from it.
  20. Save the TXT file as CSV file.
    • You will have to select All files and add .csv manually at the end of its title.
Outlook Contact Groups

Your file should now be saved as a CSV file, and you will now need to open it in Microsoft Excel to format it better.

  1. Open Microsoft Excel.
  2. Go to Data.
  3. Select From Text.
  4. Choose Delimited.
  5. Select Tab or Comma.
    • You will get to see a preview of how it will look, and this will let you choose appropriately.
  6. Click Finish.

2. From the Outlook web client

  1. Go to the People page.
  2. Select Manage.
  3. Click Export contacts.
  4. Choose to export all contacts from a specific folder.
  5. Click Export.
  6. Click Save or Save as (the bottom of the page) to download your Contacts.csv file.

How to download the Outlook Global Address Book?

  1. Open Outlook.
  2. Go to File.
  3. Select Info.
  4. Go to Account Settings.
  5. Select Download Address Book.
    • An Offline Address Book dialog box will pop up.
  6. Click the Choose address book box.
  7. Select the address book you will download.
  8. Click the OK button.
Download Address Book

We also have a great guide on how to update the global address list in Outlook, so be sure not to miss it.

How do I import your Outlook contacts to my iPhone?

1. If you are running iOS 10 or 11

  1. Navigate to Setting.
  2. Tap Contacts.
  3. Select Accounts.
  4. Check Add Account.
  5. Select and log into Outlook.

2. If you are running iOS 8, 9, 10, 11, 12 and 13

  1. Navigate to Setting.
  2. Select Mail.
  3. Select Contacts.
  4. Choose Calendar.
  5. Tap on Add Account.
  6. Select and log into Outlook.
  7. Turn on the Contacts.
  8. Tap Save.

If you’re on iOS devices, you can also sync iCloud contacts with Outlook and avoid the hassle.

Following the steps above, you can quickly download and manage your contacts list. You may print the Outlook contacts to avoid losing them or share the contact group with other users.

Before you leave, find out how to import vCards or VCF files in Outlook.

If you know any other way of downloading your Microsoft Outlook contact list, share it with us in the comments section below.

Convert PST to OST And Import it Into Outlook [How to]

If you want synched copies of your emails and the ability to make changes offline, you have to convert PST to OST.

PST files are mail archives on your drive that don’t sync with your email client. In contrast, OST files are synchronize copies of your mailbox. They allow you to make offline changes that sync once you’re connected.

How to convert PST to OST

Note icon NOTE
The steps below only apply if you use Outlook Classic. The new version of Outlook stores email files in the cloud and no longer has the import/export option.

How to Import a PST file into Outlook

  1. Open Microsoft Outlook and click on File.
     file outlook
  2. Go to Open & Export. In the right pane, click on Import/Export.
  3. Select Import from another program or file and click Next.
  4. Choose Outlook Data File (.pst) and click Next.
  5. Click on Browse and locate your PST file on the drive.
  6. Select how you want to handle duplicates.
  7. Lastly, select if you want to add this data to the current folder or to your mailbox.

To complete this step, you need to know the location of the PST file on Windows and add it.

How do I open a PST file in Outlook?

To open a PST file in Outlook, you just need to convert it to OST and import it into Outlook. Follow the steps above to achieve just that.

Can I use an old PST files with Office 365?

Yes, PST files from older Outlook versions are fully compatible with Office 365, and they can be easily converted to OST files.

Why is Outlook creating OST instead of PST?

Outlook creates a PST file only if you’re using a POP3 protocol. If you’re using IMAP protocol, you’ll have to use OST format since IMAP doesn’t work with PST files.

That said, you can open OST files without Outlook. Online alternatives like Group Docs app and dedicated software allow you to view and manage OST file contents without needing Outlook installed.

We also have a great guide on how to create PST file in Outlook, so don’t miss it. If you need to check the contents of the PST file, we have a guide on how to open PST files, do be sure to check it out.

While the PST and OST files are the most used, you can also import mbox file to Outlook by following the steps from this guide.

Do you have any questions as to how you can convert a PST file to an OST file? Leave us your questions and opinions in the comments section below.

How to download WebEx for Microsoft Outlook

Cisco WebEx, is a company that provides on-demand collaboration, online meeting, web conferencing and videoconferencing applications.

In other words, Webex is an ideal tool to add to the corporate environment for boosting overall productivity.

More so, WebEx can also be integrated in other useful company tools, such as Microsoft Outlook.

While Microsoft Outlook may not be as popular as other email clients when it comes to personal use, WebEx isn’t designed for that either, making it the ideal candidate for integration.

However, adding Webex to Outlook is a bit more tricky than it sounds, as it goes far beyond simply installing an Add-in.

As such, this article we compiled was made to show you how you can add WebEx to your Microsoft Outlook client ina step-by-step manner.

How can I download Webex to Outlook?

1. Make sure WebEx Productivity Tools are installed

  1. Go to your company’s WebEx website
    • Your administrator should know the URL
  2. Go to the Meeting Center tab
  3. Select Support
  4. Choose Downloads
  5. Choose the Productivity Tools
  6. Go to the My WebEx tab
  7. Click on Productivity Tools Setup
  8. Select On your Desktop
  9. Click on Install Productivity Tools

Install WebEx Productivity Tools

2. Check if Outlook Integration is granted to WebEx

  1. Open the WebEx Settings dialog
    1. If WebEx is not yet running:
      1. Press Start
      2. Go to All Programs
      3. Select WebEx
      4. Go to Productivity Tools
      5. Go to WebEx Settings
    2. If WebEx is already running:
      1. Click on the Edit WebEx Settings link at the bottom or press F11
  2. Click on the Tools tab
  3. See that Microsoft Outlook is available for Email and Scheduling
  4. Press OK
  5. Restart Outlook and verify that WebEx features appear both in the Toolbar or in the Ribbon

3. Enable the WebEx Productivity Tools Add-in

You only need to follow these steps if the WebEx features still don’t appear in the Toolbar or in the Ribbon after following the steps mentioned above.

  1. Open Outlook
  2. Go to the File tab
  3. Click Options
  4. Click Add-Ins
  5. Go to the Manage field
  6. Type in COM Add-ins
  7. Select the WebEx Productivity Tools
  8. Click Go
  9. Restart Outl0ok

webex Outlook Add-ins

By following the steps listed above, you should now be able to fully integrate all of the features of the WebEx Productivity Tools within your Microsoft Outlook client.

Please remember that you also need to have the WebEx Productivity Tools for PC installed.

More so, keep in mind that you need to keep them installed in order for the Outlook Add-ins to continue functioning.

RELATED ARTICLES YOU SHOULD CHECK OUT:

Outlook Web App can’t download attachments

If you are an avid user of Microsoft Outlook, then you probably familiar with both the downloadable client, as well as the Web App (OWA).

Both of these choices offer pretty much the same functionality, although some prefer the web app so they won’t fill in their PC’s hard drive.

However, some users have been reporting that they are having issues downloading mail attachments when using the web version, especially on Google Chrome.

More so, users seem to be having problems with downloading XML files while using the Web App.

[…]our external partners has sent us attachments which are MHT extensions and XML files with XLS extensions. In both cases, we cannot view or save these attachments.

How do I fix Outlook attachments blocked by Google Chrome?

First of all, you must know that such problems can be caused both by the browser you are running the OWA on and by Outlook’s own functionality.

1. Disable Chrome’s safe browsing features

  1. Open Google Chrome
  2. Type in chrome://settings/ in the search bar
  3. Click Sync and Google services
  4. Locate Safe Browsing (Protects you and your device from dangerous sites)
  5. Toggle it off

attachments & emails not downloading in outlook safe browsing


Want to access your emails in a safer and more secure manner? Why not try this neat browser


2. Enable attachment preview

  1. Open the Outlook Web App
  2. Click on Gear Icon
  3. Select Options
  4. Click on Active view settings
  5. Select Always show previews (for example, photos and videos)
  6. Save the changes

This works especially well with photo and video attachments.

3. Whitelist the sender

  1. Open the Outlook Web App
  2. Click on Gear Icon
  3. Select Options
  4. Click on Filters and reporting
  5. Select Show attachments, pictures, and links for senders with good reputations
  6. Save the changes

This method works extremely well when you receive emails from the sender with known good reputations.

4. Check out what type of files are being sent via the OWA

As a standard, Outlook Web App blocks attachments that have a wide variety of extensions.

To bypass this, here are two workarounds you could try:

  • Compress the attachment
    • This will inadvertently change the extension as well
  • Rename the attachment before sending, and add the extension after downloading it

Keep note that these two workarounds work for both the Outlook Web App as well as the client.


Tired of how limited Microsoft Outlook seems? Why not try an alternative from our list?


Only certain files, such as XML files, aren’t downloading

If the attachment download error only happens to a certain type of file, such as XML, your only solution is to change the Outlook Web App mailbox policy.

To do this, you need to perform some PowerShell work in order to do this, which looks like this:

  1. Press Start
  2. Type in CMD and run the Command Prompt with administrator rights
  3. Type in the following command:
    • Get-OwaMailboxPolicy | Set-OwaMailboxPolicy -BlockedFileTypes @{Remove = “.xml”}
    • Get-OwaMailboxPolicy | Set-OwaMailboxPolicy -AllowedFileTypes @{Add = “.xml”}
    • Get-OwaMailboxPolicy | Set-OwaMailboxPolicy -BlockedMimeTypes @{Remove = “text/xml”, “application/xml”}
    • Get-OwaMailboxPolicy | Set-OwaMailboxPolicy –AllowedMimeTypes @{Add = “text/xml”, “application/xml”}

In this example, we made sure XML files are marked as included in the list of permitted extensions.

Keep note that this last solution applies only to the Outlook Web App and not the client.

Do you also encounter issues downloading attachments form the Outlook Web App?

If you know of any solution we may have missed out on, let us know in the comments section below.

RELATED ARTICLES YOU SHOULD CHECK OUT:

Microsoft Secured-core enabled PCs include HP, Dell, Lenovo and Surface Pro X

Aside from manufacturing custom silicon for its Surface Pro X and Surface Laptop AMD driven devices, the company is also pushing forward its custom Secured-core PC architecture this year as well.

Microsoft is stepping out beyond software solutions to partner with many of its PC OEMs to provide a triple layer of hardware, firmware, and software to protect devices typically used with government, financial services and healthcare sectors.

The essence of Secured-core PC lies in hardware-based security components. Trusted platform chips enable virtualization-based security that creates a secure hardware isolated kernel that prevents access to other critical parts of the hardware or software, all working together.

The entire process also makes use of Windows Defender System Guard through a series of System Integrity checks during boot up.

According to Microsoft,

This process and data are hardware-isolated away from Windows to help ensure that the measurement data is not subject to the type of tampering that could happen if the platform was compromised. From here, the measurements are used to determine the integrity of the device’s firmware, hardware configuration state, and Windows boot-related components.

This ensures protection from unsigned malware, one of the primary vectors for major attacks. Once Windows has started and is running securely and a user signs in with Windows Hello,

Credential Guard ensures that identity and domain credentials are isolated and protected in a virtualization-based secure kernel thereby blocking credential theft attack techniques and tools used in many targeted attacks.

Even malware running in the operating system with administrative privileges will not be able to extract authentication tokens.

To have a look at the hardware and partnering companies, Microsoft has a list of devices for sale with Secure-core here, which include Dell, HP, Dynabook, Lenovo and even Microsoft’s upcoming Surface Pro X.

Microsoft acquires cloud file migration service Mover in bid to help customers move content to the cloud

Microsoft today announced that it has acquired Mover, a cloud file migration service. The company hopes that this will further boost its customer’s abilities to move content to the cloud, and Microsoft 365.

According to Microsoft, as part of this new acquisition, and working with Mover, customers will be able to enjoy “fast and reliable migrations to the cloud, with best practices and security and more connectors to more source systems.” Mover already supports migration from many other cloud services and holds “deep expertise and migration technology.” Microsoft believes this will help advance its initiatives to successfully move companies to the Microsoft Cloud and Microsoft 365 in the most efficient matter.

More information is promised during Ignite 2019. Customers can get started with Mover and learn more here.

EU unhappy with Microsoft’s GDPR compliance, company says “contractual changes” coming

Microsoft’s contracts with European institutions don’t respect EU’s latest rules on data protections such as GDPR, the European Data Protection Supervisor said today (via Reuters). EDPS opened this new investigation in April and worked with the Dutch ministry of Justice, which ran a similar inquiry back in June.

“Though the investigation is still ongoing, preliminary results reveal serious concerns over compliance of the relevant contractual terms with data protection rules and the role of Microsoft as a processor for EU institutions using its products and services,” the EDPS said in a statement.

GDPR data protection rules, which aim to to give consumers in the EU more over their personal data, went into effect back in May 2018. Microsoft emphazised their support for user privacy ahead of GDPR’s implementation date, but the company can apparently do better and is willing to do so. Some changes are coming according to a statement from a Microsoft spokesperson.

“We are committed to helping our customers comply with GDPR, Regulation 2018/1725 and other applicable laws,” a Microsoft spokesman said. “We are in discussions with our customers in the EU institutions and will soon announce contractual changes that will address concerns such as those raised by the EDPS.”

How to manage, cancel, or modify your Office 365 Subscription

Before the days of online subscriptions, managing your software was easy. You purchased it once, and you’re good for life, or at least until you decided to upgrade. Now, with Office 365, you can either purchase a yearly or monthly subscription, depending on your needs. But, do you know where you can go to manage it all if you decide you no longer want a subscription?

In this guide, we’ll give you a quick look at how you can take care of all things related to your Office 365 subscription.

Managing Office 365 with a Microsoft Account

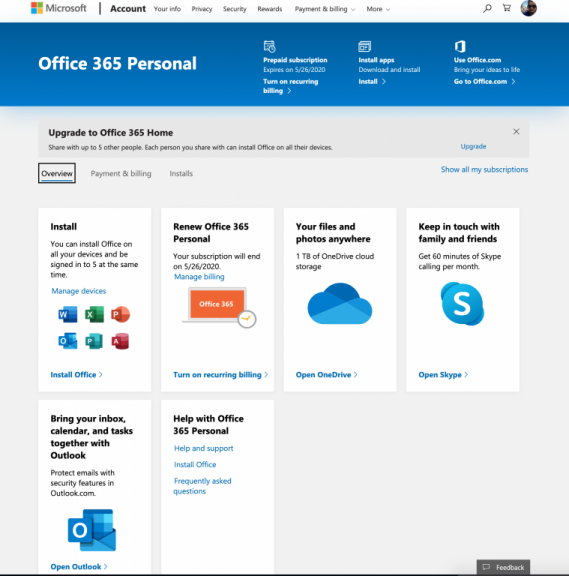
If you’re using Office 365 with your Microsoft Account, of purchased Office 365 through Microsoft or a code through a retailer, you’ll need to manage your Office account from the Microsoft Account page. Simply log in and visit the page here. You’ll then want to choose Services & Subscriptions from the list running along the top of the page.

Next, you’ll need to search through the list and find your Office 365 Subscription associated with your account. Once you find it, there are a few things you can do from here, as we describe below.

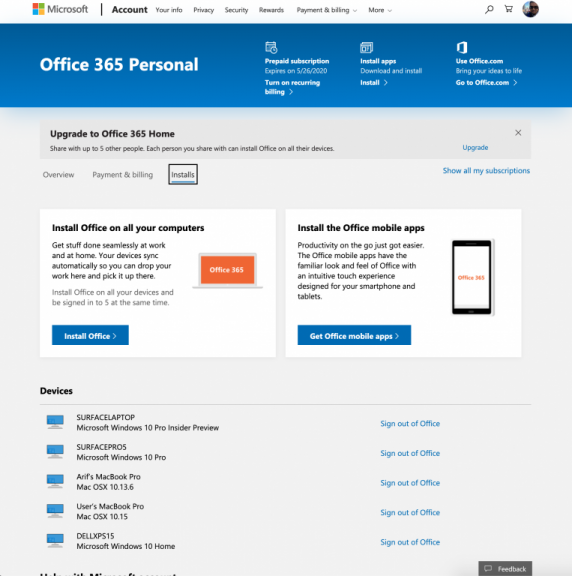
  1. Click on the Overview tab to get a quick look at some common tasks you can accomplish. These include Installing Office, reviewing your subscription, opening OneDrive, or Outlook. You’ll also see the help section here, where you can go to contact support.
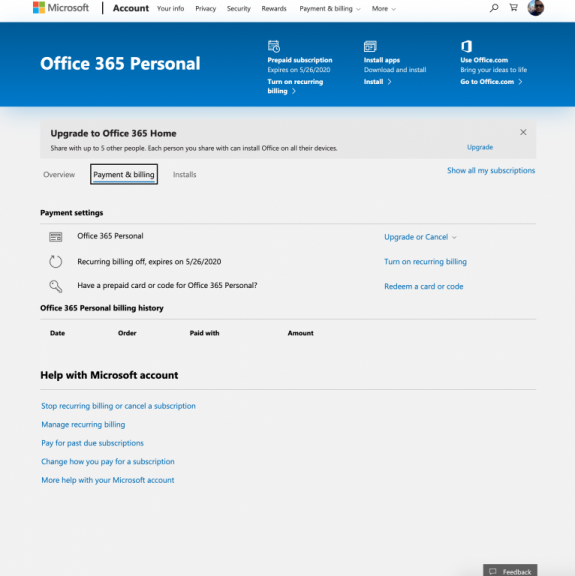
  2. Click the Payment and billing tab to see your subscription option. From this page, you can upgrade or cancel your Office 365 subscription, turn on recurring billing, or redeem an Office 365 card or code.
  3. Click the Installs tab to manage your Office 365 installs. From here you can download the installer for new PCs, or remove and sign out of Office on PCS you no longer are using.

If you’re still unsure of how to navigate your way around this page or manage your Office 365 subscription, Microsoft is still here to help. You can find links to help articles in the Help with Microsoft Account section at the bottom of the overview page. Some common topics covered there include how to stop recurring billing, pay for subscriptions, and more.

Managing Office 365 with a work or school account

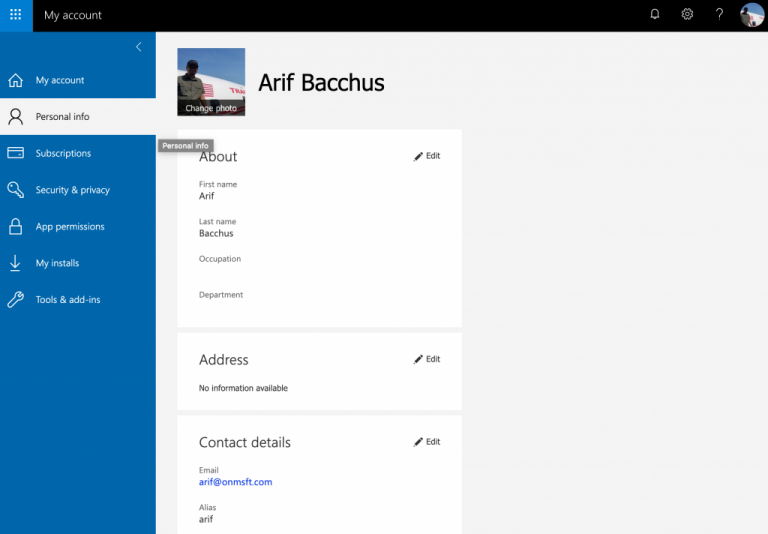
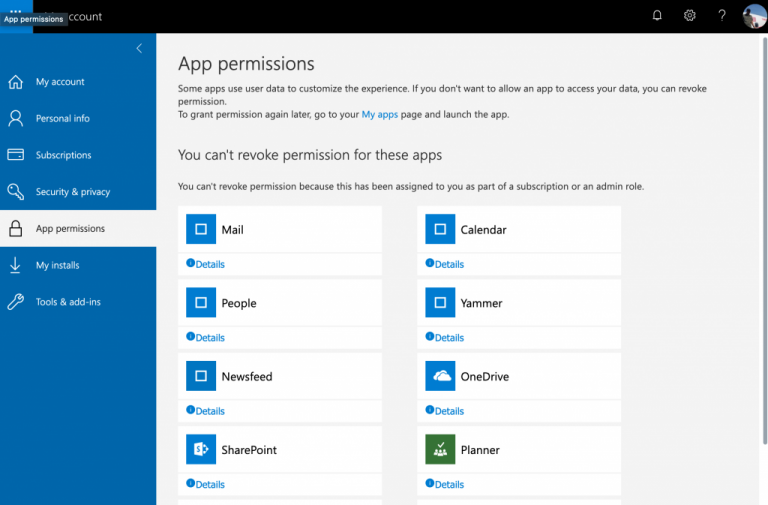
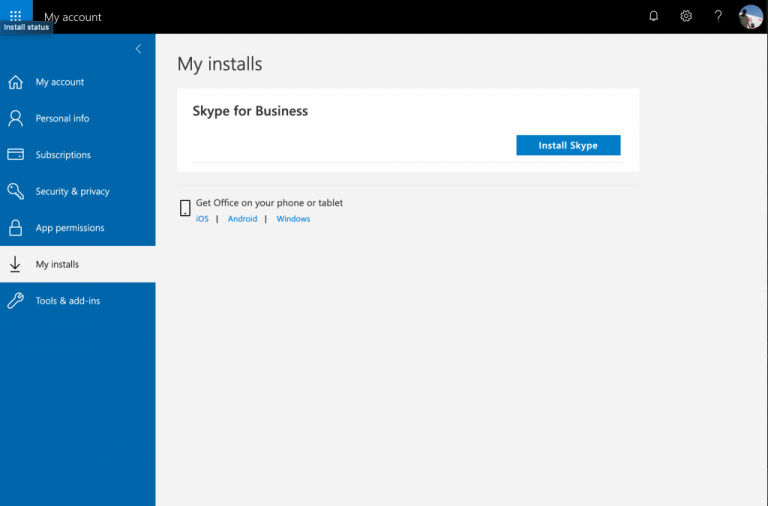
Not everyone wants to pay for Office 365, and if you’re using Office 365 for free with a school or work account, managing the subscription is a bit different. You’ll need to go to the My Account page for your organization. Once you’re there, there are some common tasks that you can accomplish.

  1. If your subscription allows it, click on Manage Installs to install office 365, or deactivate and remove devices from your list.
  2. Click Personal info to edit your personal information tied to your Office 365 account.
  3. Click Subscriptions to see any apps or services that your Office 365 plans include.
  4. Click Security & Privacy to change passwords or contact preferences.
  5. Click App permissions to manage the permissions of your Office 365 apps.
  6. Click My Installs to manage your Office 365 apps.

Final tidbits

In the event that you’re confused, and don’t remember your email address associated with your Office account, or if its a work, school, or personal account, don’t worry, You can always open up any of your installed Office applications to see your username and check the account tied to Office 365.

On Windows, you can do this by heading into a new Office file, and click the File menu. You can then click to the bottom where it says Account. From there, you’ll see your email under User Information. You’ll also be able to click Manage Account on the right side of the screen, which will redirect you back to the main Microsoft Account page, or the My Account page, depending on which type of account is in use.

But, if all else fails, you can also feel free to check out Microsoft’s support page for more information.

Microsoft, SAP partner in new 3 year cloud deal

Microsoft is deepening its ties with German software giant SAP, three years after the latter started to use Azure in a five year expanded partnership. In a new preferred cloud partnership, Microsoft and SAP have agreed today to make it easier for customers to transition to SAP products and services on Microsoft Azure .

“As part of this simplified customer journey, Microsoft will re-sell components of SAP Cloud Platform alongside Azure. This unique offering is aimed at more easily migrating SAP ERP and SAP S/4HANA customers from on-premises to public cloud,” Microsoft explained in a press release.

Earlier this year, SAP announced “Project Embrace,” a collaboration program with Microsoft Azure, Amazon Web Service and Google Cloud to move SAP S/4HANA to the cloud. this new cloud partnership with Microsoft doesn’t mean that the German company will stop working with other cloud vendors, as it still needs to provide choice for its customers.

“This partnership is all about reducing complexity and minimizing costs for customers as they move to SAP S/4HANA in the cloud,” said Jennifer Morgan, co-chief executive officer of SAP. “Bringing together the power of SAP and Microsoft provides customers with the assurance of working with two industry leaders so they can confidently and efficiently transition into intelligent enterprises,” the exec added.

How to prevent Windows 10 from rebooting after update

As we all know, Windows 10 isinstalling updates automatically. Of course, that’s not a bad thing, but what is quite annoying is the automatic reboot sequence that is applied after each update. Unfortunately, in Windows there is no in-built feature to use in order to disable the automatic reboot function, so you will have to do it manually.
automatic rebootThe automat reboot after updates might be the cause from which you can end up in losing your personal info, data and saves. If you are not around to postpone the restart, the Windows system will reboot your laptop, tablet or desktop automatically, just like an emergency restart. Anyway, you should now that you can now easily prevent automatic reboots on by following the steps from below.

Do note that we have explained two methods for you, so use the one that you prefer the most, or the operation that works for you and for your handset.

How to block Windows from rebooting after update?

1. Use Group Policy and disable automatic reboot

  1. On your Windows 10device, from start page, open the “run” box.
  2. In order to do so, press the “Windows” key from your keyboard along with the “R” button”.
  3. On the mentioned box type “gpedit.msc” and click “ok”.
  4. From the Local Group Policy Editor Window go to path “Configuration – Administrative Template – Windows Component – Windows Update”.
    local group policy editor win 8
  5. From right panel of Local Group Editor right click on the section dubbed as “No auto-restart with logged on users for scheduled automatic updates installations” and click “Enable”.
  6. Save and restart your computer.

— RELATED: Fix: Computer keeps rebooting and freezing


2. Use the Registry Editor

  1. Once more press Win+R keys in order to initiate the “run” box.
  2. This time, type regedit and click on OK.
    win+run
  3. Then from Registry Editor go to HKEY_LOCAL_MACHINESOFTWAREPoliciesMicrosoftWindows.
  4. From left panel right click on Windows select “new” and pick “key” in order to create a new key.
  5. Name the new key WindowsUpdate.disable automatic reboot
  6. Now, right click on the recently created WindowsUpdate select “new” and pick “key”.
  7. The new key should be dubbed as AU (you will name it, just like before).
  8. Now, go to the right panel and there right click on any empty space; select “new” followed by “DWORD Value”.
  9. Now, under “default” you should have listed the NoAutoRebootWithLoggedOnUsers key.
  10. Right click on the REG_DWORD type and on the “value data” section enter “1”.
  11. Click “ok”, save your changes and then reboot your Windows 8 or Windows 8.1 device.

3. Block update reboots on Windows 10

If you’re running Windows 10 on your computer and you want to block it from restarting after installing the latest updates, you can check out this guide for additional solutions.


4. Use RebootBlocker

There is also a dedicated tool called RebootBlocker that you can use to block Windows update reboots. Honestly speaking, the tool doesn’t block reboots completely, but it uses Microsoft’s Active Hours to track computer use patterns and then set a proper time to update.

That’s all, you have now disabled automatic reboot after update in Windows 10, 8 and Windows 8.1, so good job. Stay close for further tips, tricks and essential Windows tutorials.

RELATED STORIES TO CHECK OUT:


Overwolf overlay not launching? Here’s a quick fix

Overwolf is a software platform developed for the game developers to create extensions for videos game. The end users can use the Overwolf’s app store to download the extensions fort game.

However, several users have reported Overwolf overlay not launching issue on their computer.

Overwolf client is safe to download and use. However, the issues affecting Overwolf’s launch can be due to cache problems or corrupt registry entries. Similar issues are reported by the Reddit users as well.

Hi, this is a fresh install of Overwolf installed yesterday (7/23/2016), after rebooting my PC this morning I have noticed Overwolf was not open (as I disable it on startup) and now it does not launch at all.

Follow the steps in this article to fix Overwolf not opening issues in Windows computers.


How to resolve Overwolf overlay launch issues?

1. Update Overwolf client

Overwolf client will update automatically whenever a new update is available. However, in case the automatic download did not work, you may miss out on critical bug fixes.

  1. To update the Overwolf client manually, do the following.
  2. Head to the Settings menu.
  3. Click the Support tab.
    Overwolf overlay not launching
  4. Click on Check for updates options.
  5. Select Relaunch.
  6. Overwolf will download and install all the pending updates.
  7. Once the update is installed, check if the Overwolf overlay not launching issue is fixed.

2. Delete registry entries

If the issue persists, you can try to delete two registry entries that are stopping the Overwolf service from running. Here is how to do it.

  1. Before making any changes to your registry, create a restore point. This will allow you to restore the PC in case something goes wrong.
  2. Once the restore point is created, follow these steps.

Delete registry entries

  1. Press Windows Key + R to open Run.
  2. Type regedit and click OK to open the Registry editor.
    Overwolf overlay not launching
  3. In the Registry Editor, navigate to the following subkey:
    • HKEY_LOCAL_MACHINESOFTWAREMicrosoftWindows NTCurrentVersionImage File Execution Options
  4. Delete the following folders.
    • overwolf.exe
    • overwolflauncher.exe
  5. To delete, right-click on the folder and select Delete.
  6. Close the registry editor.
  7. Relaunch Overwolf and check if the launch issue is resolved.

3. Disable third-party software

Overwolf overlay not launching

Third-party software like the graphics enhancing software can create conflict with Overwolf. Try disabling any third-party software that is running alongside and check again.

  1. If you have game-enhancing software like SweetFx installed, close or disable them temporarily.
  2. Try to revert overclocks on your graphics card if you have any.
  3. Also disable third-party programs like Asus AI Suite, Razer’s Data tracking, EVGA Precision or MSI software.
  4. Check if any other related app is running in the background, by clicking on the Taskbar and close them.

4. Reinstall .NET Framework 4.5

  1. Press Windows Key + R to open Run.
  2. Type appwiz.cpl and click OK to open Control Panel.
  3. From the left pane, click on Turn Windows features on or off.
  4. Locate “.NET Framework 4.54.64.7” and uncheck it.
  5. Click OK. Wait for the uninstallation process to complete.
    Overnot launcher not opening
  6. Now close the window and restart your computer.
  7. After the restart, again open the Control Panel > Turn Windows features on or off.
  8. This time, check the “.NET FRamework 4.54.64.7” and click OK.
  9. This will install the software.

By following the steps in this article, you can fix the Overwolf overlay not launching issue. Do let us know which method worked for you in the comments.


[wl_navigator]

FIX: There aren’t any sections here message in OneNote

Many users reported There aren’t any sections here, click here to add a section message in OneNote.

This message usually appears if your notes are gone, but don’t worry, you can still get them back, and today we’ll show you how to do it.

How to fix There aren’t any sections here, click here to add a section OneNote error?

1. Try using the web version

If you’re having this issue, perhaps you can use the web version as a workaround. Simply go to the Office website, log in with your account and check if OneNote is working.

You can use any browser for this, but if you want a secure and stable browser that enables you to browse seamlessly at high-speed rates, we recommend you use Opera.

It’s simple and highly customizable, plus it is very secure. Along with constant updates to keep up with any type of online threat, Opera also has a built-in VPN and adblocker.

The VPN ensures online privacy and the adblock eliminates the interruptions and even the infection risks imposed by intrusive ads.

⇒ Get Opera

2. Make sure that OneNote notebook is exported properly

According to users, There aren’t any sections here, click here to add a section message appears when you export your notebook to OneDrive improperly.

To fix this problem, do the following:

  1. Close the notebook.
  2. Move the notebook file back to their original location. By default, it should be Documents\OneNote Notebooks.
  3. Open the downloaded notebook in OneNote.
  4. Now use File > Share option to move your Notebook to OneDrive.

Note: This solution is applicable only if you moved your .one file to OneDrive on your own.

3. Try to re-sync the notebook

Sometimes a temporary glitch can cause There aren’t any sections here, click here to add a section OneNote message.

To fix it, do the following:

  1. Close the notebook and sing out of your account in OneNote.
  2. Sign back in again with the same account.
  3. Choose File > Open > Open from OneDrive.

Once you select your notebook, it should be re-synced and it will start working again.

There aren’t any sections here, click here to add a section error can be problematic, but we hope that you found our solutions helpful. If you did, let us know in the comments section below.

Getting Xbox app error 0x80070002? Here’s a quick fix

Many users reported error 0x80070002 while trying to login to Xbox app on Windows 10.

This error message will prevent you from logging it, but there’s a way to fix it, and today we’ll show you how to do it.

How to fix error 0x80070002 in Xbox app?

1. Try removing the Xbox app

One way to fix error 0x80070002 is to reinstall the Xbox app by following these steps:

  1. Press Windows Key + S and enter powershell. Choose Run as administrator from the menu.
    run powershell as administrator Xbox error 0x80070002
  2. Once the PowerShell opens, run the following command:
    • Get-AppxPackage *xboxapp*| Remove-AppxPackage
  3. If the command is successful, the Xbox app should be gone from your PC.
  4. Now, go to the Microsoft Store app and download the Xbox app again.
  5. Check if the issue is resolved.

Streaming lags in Xbox app? There’s a way to make it fast again!


2. Make sure that Xbox services are running properly

If certain Xbox services aren’t running on your PC, you might get error 0x80070002. To enable the services, do the following:

  1. Press Windows Key + R and enter services.msc. Press Enter or click OK.
    services.msc run window Xbox app error 0x80070002
  2. Locate Xbox services in the Services window. There should be 4 services available.
  3. Pay attention to their Startup Type. If the Startup Type for a certain service is set to Disabled, double-click that service and change the Startup Type to Automatic or Manual.
    xbox services Xbox app error 0x80070002
  4. Optional: You can set the Startup Type for all four Xbox services to Automatic or Manual if you want.
  5. Save changes and check if the problem is still there.

3. Make sure that Windows is up to date

If error 0x80070002 keeps appearing in the Xbox app, try updating Windows 10 to the latest version. To do that, follow these steps:

  1. Press Windows Key + I to open the Settings app.
  2. Go to the Update & Security section.
  3. Now click Check for updates button.
    check for updates Xbox app error 0x80070002
  4. Once the updates are installed, check if the issue is still there.

There you go, these are solutions for the error 0x80070002 on Xbox app. If you found our solutions helpful, feel free to leave a comment below.

READ ALSO:

Recycle Bin Icon Not Refreshing or Changing: 4 Ways to Fix

Many reported that the Recycle Bin icon is not refreshing, which can be a problem for some users because they can’t know if the Recycle Bin is empty.

While this isn’t a major issue, many users find this bug irritating, and in today’s guide, we’re going to show you a couple of solutions that can help you fix it.

Why won’t my Recycle Bin icon refresh?

  • Issues with the registry can sometimes cause this problem.
  • Your thumbnail cache is corrupted, and it needs to be recreated.
  • Recycle Bin icons aren’t correctly configured.
  • Temporary Recycle Bin glitches.

What can I do if the Recycle Bin icon is not refreshing?

1. Edit the registry

  1. Launch Run by pressing the Windows key + R hotkey.
  2. Input regedit and click OK in Run to open the Registry Editor.
  3. Next, open this registry key path: HKEY_CURRENT_USER\Software\Microsoft\Windows\CurrentVersion\Explorer\CLSID\{645FF040-5081-101B-9F08-00AA002F954E}\DefaultIconDefaultIcon key windows 10 custom recycle bin icon not refreshing
  4. Select the DefaultIcon key.
  5. Next, double-click the (Default) string on the right of the Registry Editor to open the window below.
    Edit String window windows 10 custom recycle bin icon not refreshing
  6. Enter ,0 after the icon file path, as shown in the snapshot below. For example: %USERPROFILE%\Downloads\Seanau-Email-Trash.ico,0An Edited string windows 10 custom recycle bin icon not refreshing
  7. Then repeat the above steps for the empty and full strings in the DefaultIcons key. Then, the empty and full strings should also include ,0 at the end of their value data paths, much the same as the (Default) string as in the image directly below.Edited DefaultIcon strings windows 10 custom recycle bin icon not refreshing

A few users suggested that deleting (Default), empty, and full strings worked for them. To do that, follow these steps:

  1. Navigate to the DefaultIcon key.
  2. Select all three strings, right-click them, and choose Delete.
  3. Click OK to confirm.
  4. Restart your PC.
Note icon NOTE
Modifying the registry and deleting values can lead to other issues. It’s recommended to create a backup if you decide to do so.

2. Rebuild the thumbnail cache

  1. Open File Explorer by pressing the Windows key + E hotkey.
  2. Then open this folder path in File Explorer: C:\Users\%username%\AppData\Local\Microsoft\Windows\Explorer
  3. Select all the .db files in the folder.The Explorer folder windows 10 custom recycle bin icon not refreshing
  4. Click the Delete button.
  5. Restart Windows after deleting the .db files in the Explorer folder.

3. Select empty and full Recycle Bin icons

  1. Right-click the Windows 10 desktop and select Personalize.
  2. Click Themes on the left of the window, and scroll down to the Desktop icon settings option.The Themes tab windows 10 custom recycle bin icon not refreshing
  3. Click Desktop icon settings to open the window shown directly below.Desktop Icon Settings window windows 10 custom recycle bin icon not refreshing
  4. Select Recycle Bin (full), and press the Change Icon button.
  5. Select the empty Recycle Bin icon in the Change Icon window, and click the OK button.Change Icon window windows 10 custom recycle bin icon not refreshing
  6. Select Recycle Bin (empty), click Change Icon, and choose the full Recycle Bin icon. Click the OK button to exit the window.
  7. Click the Apply button.
  8. Then try deleting something to the Recycle Bin to see if the icon changes to empty, or empty the bin to see if it refreshes to the full icon. If it does, return to the Desktop Icons tab and change Recycle Bin full and empty so they show their correct icons.

4. Reset the Recycle Bin

  1. Press the Windows key + S and type cmd. Choose Run as administrator.
  2.  Run the following command: rd /s /q C:\$Recycle.bin
    The rd command windows 10 custom recycle bin icon not refreshing
  3. Check if the problem is resolved.

How do I make my Recycle Bin reappear?

  1. Open Settings and go to Personalization. Select Themes.
  2. Select Desktop icon settings.
  3. Make sure Recycle Bin is enabled and save changes.

To learn more, we suggest reading a guide on how to restore Recycle Bin.

If the Recycle Bin icon is not refreshing, it’s usually a minor registry glitch that can be easily fixed. For more information, you can check our corrupted Recycle Bin guide to see how to fix it.

To learn more about this feature, we suggest reading our guide on how to change Recycle Bin settings or our guide on how to hide Recycle Bin.

If you know any other working methods, let us know about them in the comments section below.

How to download images in Microsoft Outlook

Microsoft Outlook is the de facto email client of the Microsoft Office Suite.

Because of this, it is used as the default email client in all major enterprise environments, regardless of the fact that it isn’t all that popular for personal use.

One of the reasons Microsoft Outlook isn’t all that popular is because it has many features that make it feel too tight and secured.

For example, one popular issue with Microsoft Outlook is that it comes with a feature that prevents images to download automatically in your emails.

There are advantages to this though, as this can help prevent certain issues:

  • It can help you avoid viewing potentially offensive material
  • It helps keep malicious code from damaging your PC
  • You get to decide if an image is worth viewing (this is especially useful in a low-bandwidth network)

How can I download the pictures in an email in Outlook?

1. Unblock picture downloads for a single message

This option is useful when you trust a particular contact or website, but cannot spare the bandwidth to waste on all of their email images.

When you open the message to read it, you will see an error message above it stating that the images are hidden for security reasons.

All you need to do is click that message and select Download Pictures.

Outlook cannot download images


Looking for an alternative email client? Check out our top picks!


2. Unblock all picture downloads from a certain email address or domain

This option is especially useful when dealing with websites and contacts that you fully trust.

When you open the message to read it, you will see an error message above it stating that the images are hidden for security reasons.

  1. Right-click the message
  2. Select Add Sender to Safe Senders List
  3. Click Add the Domain @domain to Safe Senders List

3. Unblock picture downloads for all messages

This option is useful when you know and trust all websites and contacts that send you emails.

The drawback to this option is that while it is the most time-saving option of the three, you expose yourself to images from spam emails.

  1. Open Microsoft Outlook
  2. Go to File
  3. Go to Options
  4. Select Trust Center
  5. Under Microsoft Outlook Trust Center, click Trust Center Settings
  6. Deselect the Don’t download pictures automatically in HTML e-mail messages or RSS items checkbox

Don't download pictures automatically in HTML e-mail messages or RSS items

By following these steps, you should now be able to download and see all images and background attached to the Outlook emails of your choosing.

Got any more questions about Microsoft Outlook‘s functionality? Let us know in the comments section below.

RELATED ARTICLES YOU SHOULD CHECK OUT: