Job listing hints at next Xbox console generation tech

While there is wild speculation that Microsoft is set to move away from console hardware and take up stake in a more cloud-backed software solution that could span platforms and physical game boxes, a peak at a new job listing undercuts those theories just a bit.

According to job posting on the company’s internal job boards, Microsoft is looking for someone to handle memory management of what seemingly will be the next piece of hardware to come from the software giant.

We are seeking a qualified candidate for a Senior Engineer to lead the DRAM solutions for the Xbox console hardware development team. DRAM solutions include DDR3, GDDR5, GDDR6 and future DRAM technologies. The successful candidate will be the primary technical focal point for existing and leading-edge memory technologies on currently shipping and future Xbox design projects. The focus will be integrating the right memory solutions into the console based on a variety of constraints such as power, cost, reliability, signal integrity and performance requirements. Integration includes defining the system requirements for each memory technology, creating specifications, working within an internal team, partner teams and external vendors to identify specific components that meet the requirements and then completing a characterization, qualification and validation of the chosen technology.

With GDDR6 on the market, it seems like a no brainer that Microsoft is looking to hire someone to lead the charge in building a working understanding of how to implement it with partners such as NVIDIA and AMD next go around for the Xbox memory and GPU upgrades.

So fans of the Xbox console or business can at look forward to at least one more piece of hardware in the near future.

“Switch out of S Mode” page appears in Microsoft Store for Redstone 4 devices with Windows 10 S installed

Citing the initial success of the streamlined and secure Windows 10 S, Microsoft recently said they would rebrand of the OS to “Windows 10 in S mode.” The company explained new PCs would ship with the locked down OS and also an option to switch to regular Windows 10 Home or Pro for free. Well, noted by Richard Hay on Twitter, Windows Insiders with Windows 10 S devices are now getting the first look at the “Switch out of S mode” option in the Microsoft Store.

The page shows up in the latest Windows Insider build, which just so happens to be the RTM for the Redstone 4 featured update. It also explains the benefits of switching out of S mode, which is mainly getting the flexibility of installing more apps that are not verified by Microsoft. Importantly, the page also points out that the switch is one-way, and you won’t be able to go back to S mode once updated to Pro or Home unless using a restore from a recovery drive.

This is not anything new, and it is exactly as it is right now, since one can already switch out of Windows 10 S from Windows 10 Pro. The only thing new here it the naming which is now “S-mode” instead of Windows 10 S. Anyway, it’s still nice to see that Microsoft isn’t forcing Windows 10 in S Mode into users, though there still might be some security concerns with the OS for the company to deal with.

YouthSpark Summer Camps coming to Microsoft Stores this summer

Starting next month, students in the US, Canada and Porto Rico will be able to participate to free YouthSpark Summer Camps to learn coding, movie making and other digital skills. Camps will be available at Microsoft Store locations and will welcome students ages 8 and up, though the sessions will also be opened to siblings, parents and teachers.

“These summer camps provide real-world opportunities for students looking to translate their passions and 21st century skills into something tangible for their communities and futures,” Microsoft explained on its Education blog today. Activities will include learning code with Minecraft, programming an expressive robot and making movies with 3D and Mixed Reality.

Summer camps will be available from May through June, and you can register online or at your local Microsoft Store. The company notes that it’s also offering five new Summer Camp curriculums this year, including a first philanthropy camp to help students develop solutions for local issues they care about.

Test your gaming knowledge with Microsoft’s new Trivia with Fangs Skype bot

If you’re a pro at the popular quiz game HQ Trivia on iOS or Android, you might also want to try out Microsoft’s new Trivia with Fangs Skype bot. The fun quiz bot is the result of a partnership with pro-gamer Jesse Fangs, and tasks you with answering gaming related questions— with the ultimate chance of winning an Xbox One S as a prize.

To get started with the Trivia with Fangs Skype bot all you need to do is click here to add it to your contacts on Skype on desktop, iOS, or Android. You can then type a “Hello” message to get one of three trivia challenges started— 80’s the foundation, ’90s the revolution, and 2000s and beyond: the final level.

Each of the challenges consists of a series short 5-second video questions from Jesse Fangs. There is no time limit, and after watching, you can type out your answer to keep proceeding through the round.  If you complete a full section of trivia challenge questions, you will be entered to win an Xbox One S and will be notified via Skype if you’re the winner.

You can also use the Trivia with Fangs bot to learn more about Jesse Fangs. She can also be found on Twitch, Instagram, and Twitter. Do you think you have what it takes to be a Trivia with Fangs champion? Let us know your thoughts below.

Get Madden NFL 18 free with any Xbox One purchase

The NFL Draft season is coming up here the United States, and there are still some ways you can enjoy ahead of the big moment, especially if you’re also looking to buy an Xbox. Indeed, Microsoft is now offering a digital copy of Madden NFL 18 free with any Xbox One purchase, ensuring that you football fans can get your fix in during the offseason.

The offer is valid starting today, but Microsoft does not make it clear how long it will last. Anyway, it is still something to look forward to, especially since Madden 18 is the most comprehensive Madden game to date. Features of the game include an all-new Longshot story mode and photorealistic graphics.

Madden NFL 18 is also Xbox One X enhanced, running in full 4K UHD and at 60fps, making it a nice option for football fans looking to pick up the words most powerful console. You can check out all models of the Xbox One here at the Microsoft Store.

Convert OneNote 2016 to OneNote for Windows 10 [How to]

Microsoft will only support OneNote 2016 until October 2025, and many are wondering how to convert OneNote 2016 to OneNote for Windows 10.

The two versions aren’t fully compatible, so it’s important to find a way to continue using your old notes on a new version of OneNote.

So if you want to keep all your notes intact, we suggest reading and finding the best ways to keep them.

Is OneNote 2016 compatible with OneNote for Windows 10?

The two versions have several differences that you should know about. OneNote for Windows 10 only supports notebooks stored on OneDrive, SharePoint or OneDrive for Business.

You can’t use it to open local notebooks. However, that doesn’t mean that the versions aren’t compatible.

What you can do instead is another thing as OneNote for Windows 10 will be able to move local notebooks to OneDrive on your behalf.

How can I convert OneNote 2016 to OneNote for Windows 10?

Upload local notebooks to the cloud

  1. Open OneNote for Windows 10.
  2. Click on your notebooks and choose More Notebooks.
     
  3. Select your local notebooks.
  4. Click on Open.
  5. After that, click on Select cloud account and choose the desired account.
  6. Lastly, click on Upload.

After you’re done, your local OneNote notebooks will be uploaded to your OneDrive account, and the transition process will be complete.

In case you missed any files, we have a great guide on recovering deleted files in OneNote, so be sure to check it out.

Do you know a different method to perform OneNote 2016 sync to OneDrive? If so, let us know in the comments below.

Fix: On-Screen Keyboard Not Working in Windows 10/11

We have seen technology move towards mobile computing in the last few years.

Windows tablets have become more common, and the market is filled with these kinds of devices from top manufacturers and low-end ones.

Today, we will go through some methods of bringing up the Windows 10 On-Screen Keyboard in situations where it doesn’t come up automatically as it should.

What to do if the on-screen keyboard isn’t working on Windows 10?

The on-screen keyboard can be rather useful, but many users reported certain issues. Speaking of issues, these are some of the most common problems that users reported:

  • On screen keyboard not typing – If the on-screen keyboard won’t type, you might be able to fix the problem by running the keyboard troubleshooter.
  • Keyboard and onscreen keyboard not working (Windows 10) – Several users reported that both their physical and on-screen keyboard aren’t working. If this happens, you might want to consider buying a new keyboard.
  • Could not start on-screen keyboard (Windows 10) – If On-screen keyboard won’t start on your PC, the problem might be its service. To use the on-screen keyboard, make sure that the necessary services are running.
  • Windows 10 on-screen keyboard not working login – Sometimes your on-screen keyboard won’t even work on the login screen. If this happens, the issue might be caused by a corrupted Windows installation.
  • Surface Pro onscreen keyboard not working – Several users reported issues with the on-screen keyboard on their Surface Pro. However, you should be able to fix the problem by using one of our solutions.
  • On-screen keyboard not working after update – According to users, problems with on-screen keyboard started appearing after a certain update. If that’s the case, you need to find and remove the problematic update and check if that solves the issue.
  • On-screen keyboard not appearing (Windows 10) – This is one of the most common problems that you can encounter on Windows 10. If you’re having this problem, create a new user account and check if that solves the issue.
  • Windows 10 on-screen keyboard not working in tablet mode – Tablet Mode is a useful feature, but some users reported that the on-screen keyboard isn’t working while using their PC in Tablet Mode. This is an annoying problem, but you should be able to fix it by using one of our solutions.

1. Change your settings

The first place to look for is the Settings panel. Click on the Start menu and select Settings, or do a search for it and open it from there. Then head over to Devices and select Typing from the left side menu.

In the resulting window, ensure that Automatically show the touch keyboard in windowed apps when no keyboard is attached to your device is Enabled.

Fix On-Screen Keyboard not working in Windows 10

Some Windows 10 users have reported that even though this option was already activated, disabling it and then re-enabling solved the problem.

Make sure you also do a reboot of the system before dismissing this solution as a possible fix.

2. Check if the on-screen keyboard is enabled

The On-Screen Keyboard in Windows 10 can also be brought up from the Settings menu. Access it from the Start menu and select the Ease of Access category.

Select Keyboard from the left side menu and enable it by switching on Turn on the On-Screen Keyboard option.

Fix On-Screen Keyboard not working in Windows 10

3. Add the on-screen keyboard to the Taskbar

One of the best solutions for quickly accessing the On-Screen Keyboard in Windows 10 is adding a dedicated button in the Taskbar.

This can be achieved by right-clicking on the taskbar and enabling Show touch keyboard button.

Fix On-Screen Keyboard not working in Windows 10

This will add a button next to the clock in the taskbar, which can be used for fast access to the On-Screen Keyboard.

4. Start on-screen keyboard from the application list

The On-Screen Keyboard in Windows 10 can also be accessed from the All apps list. Scroll down to the Windows Ease of Access folder, expand it and select On-Screen Keyboard.

Fix On-Screen Keyboard not working in Windows 10

5. Create a new user account

If the on-screen keyboard isn’t working on your PC, the problem might be your user profile. Sometimes, a user profile can become corrupted, and that can cause this and many other errors to appear.

Profile corruption can occur for various reasons, and since there’s no way to repair your profile, the best solution would be to create a new one.

This is relatively simple, and if you need to create a new profile, you can do that by following these steps:

  1. Open the Settings app. You can do that quickly by pressing Windows Key + I shortcut.
  2. When Settings app opens, navigate to the Accounts section.
    Windows 10 on screen keyboard not working login
  3. In the left pane, select Family & other people. In the right pane, choose Add someone else to this PC.
    Surface Pro onscreen keyboard not working
  4. Choose I don’t have this person’s sign-in information.
    On screen keyboard not working after update
  5. Now select Add a user without a Microsoft account.
    On screen keyboard not appearing Windows 10
  6. Enter the desired user name and click on Next.
    Windows 10 on screen keyboard not working in tablet mode

After creating a new user profile, switch to it and check if the problem still persists. If not, it means that the issue was caused by profile corruption.

As we already mentioned, there’s no way to repair the corrupted profile, so your only solution is to move your personal files to a new profile and start using it as your main one.

6. Check if the necessary services are running

Many users reported that on-screen keyboard isn’t working on their PC. If you’re having this problem, the reason might be your services.

In order for the on-screen keyboard to work, you need to have certain services enabled.

To enable these services, just follow these steps:

  1. Press Windows Key + R and enter services.msc. Now press Enter or click OK.
    Surface Pro onscreen keyboard not working
  2. Now locate Touch Keyboard and Handwriting Panel service and double click it to open its properties.
    On screen keyboard not working after update
  3. Set Startup type to Automatic or Automatic (Delayed Start). If the service isn’t running, click the Start button to enable it. Now click on Apply and OK to save changes.
    On screen keyboard not typing

For more ways to enable this service, visit our guide on how to enable Touch Keyboard and Handwriting Panel service.

After doing that, check if the problem is resolved. If the issue still persists, the cause might be dependent services.

Touch Keyboard and Handwriting Panel service depends on various services, and if those services aren’t running, you won’t be able to use the on-screen keyboard.

However, you can enable dependent services by doing the following:

  1. Open the Services window and double click Touch Keyboard and Handwriting Panel service.
  2. Now go Dependencies tab. Now check This service depends on the following system components field. Write down the available services and make sure that they are running and that their Startup type is set to Automatic.
    Keyboard and onscreen keyboard not working Windows 10

After doing that, your on-screen keyboard should start working again without any problems. Many users reported that this solution worked for them, so feel free to try it out.

7. Remove the problematic updates

If on-screen keyboard isn’t working, the problem might be a certain Windows update.

Windows 10 tends to download updates automatically without your knowledge, and sometimes, a new update can cause certain issues to appear.

If you started having this problem recently, it’s rather likely that a Windows update caused the issue.

However, you can fix the problem simply by removing the update. To do that, you need to follow these steps:

  1. Open the Settings app and go to Update & Security section.
    Could not start on screen keyboard Windows 10
  2. Now click on View installed update history.
    Keyboard and onscreen keyboard not working Windows 10
  3. Check the list of recent updates and write down few of the latest updates. Now click on Uninstall updates.
    Could not start on screen keyboard Windows 10
  4. A list of installed updates will now appear. Double-click on an update in order to remove it.
    Windows 10 on screen keyboard not working login

Once you remove the update, check if the problem reappears. If not, the update caused the problem with your on-screen keyboard.

As we already mentioned, Windows 10 tends to install updates automatically, and it will install the problematic update again on your PC.

To prevent this update from being installed, be sure to check our guide on how to block automatic Windows updates.

8. Modify your registry

Another way to fix on-screen keyboard is to modify your registry. To do that, you need to start Registry Editor and make the following changes:

  1. Press Windows Key + R and enter regedit. Now press Enter or click OK.
    On screen keyboard not typing
  2. When Registry Editor opens, go to HKEY_LOCAL_MACHINESOFTWAREMicrosoftWindowsCurrentVersionExplorerScaling in the left pane. In the right pane, double-click on MonitorSize.
  3. Set the Value data to 22.5 and click on OK to save changes.

After making the changes, check if the problem with the on-screen keyboard is resolved. Remember that this solution works only with computers with touchscreen functionality.

If you can’t find the key from Step 2, then this solution doesn’t apply to you.

9. Try using a third-party software

If the on-screen keyboard isn’t working on your PC, you might consider using a third-party virtual keyboard software as a replacement.

In the past, we covered the best virtual keyboard software, and If your on-screen keyboard isn’t working, we encourage you to try one of these applications as a workaround.

You can switch to virtual keyboard software easily if you experience troubles with your physical or virtual keyboard. Also, in case you want to protect confidential data from keylogger threats.

More so, it is likely to choose from multiple layouts or styles that will customize your keyboard precisely how you need it.

I hope these solutions fix your problems with the Windows 10 on-screen keyboard or at least give you other options for accessing it quickly.

If you’re facing additional problems, please let us know in the comment section below.

Surface updates pending? Here’s how to fix it in Windows 10/11

Your Surface updates are usually performed automatically via the Windows Update function on your device.

There are two types of updates that keep the Surface at its best in terms of performance: hardware or firmware updates, and Windows software updates, both of which are automatically installed once they are made available.

If you find your Surface updates pending, there are a few quick workarounds you can use to get it back up and running, and updates installed, including some mentioned below.

FIX: Surface updates pending in Windows 10

  1. General troubleshooting
  2. Run Windows Update troubleshooter
  3. Check your date and time settings
  4. Reinstall battery driver
  5. Restart your Surface
  6. Install updates manually
  7. Check updates from Microsoft Store
  8. Solutions from other Surface users

1. General troubleshooting

Before you do anything to try and resolve the Surface updates pending issue, try some of these general or preliminary fixes and tips:

  • Check that your Surface is plugged into a power outlet prior to installing the pending updates. While the device is updating, make sure not to turn off or unplug it, and ensure it is charged at least up to 40 percent before beginning the update installs.
  • Attach any docking station or typing cover before turning on your Surface to enable these devices get the latest updates as well.
  • Ensure you have a stable internet connection to download updates. For mobile broadband connections, this is set to metered, automatically, and usually updates may not download over such connections so you’re better off using WiFi to get all updates.
  • If you have an unlimited data plan, change the Set as metered connection setting, to turn it off.

Note: if the pending updates read ‘requires a restart to finish installing’, go to Start>Power>Restart. Don’t shut down the Surface, and repeat this for all updates that require a restart. Your Surface will show a notification if a firmware update is available.

2. Run Windows Update troubleshooter

This tool detects and fixes most incorrect settings on your computer, automatically. To do this:

  • Click Start and type Troubleshooting in the search box
  • Click Troubleshooting
  • Click View all in the left pane
  • Select Windows Updatetroubleshoot windows update
  • Click Next to run Windows Update Troubleshooter, then follow the instructions on the screen

Check your date and time settings

Incorrect date and time settings may lead to errors as Windows Updates tries to scan for any Surface pending updates, or those that may not install correctly. To change to the correct date and time settings, go to Start>Settings>Time & Language, and key in the correct settings.

3. Reinstall battery driver

If you try to charge the Surface up to 40 percent and it won’t charge above that level, then remove and reinstall the battery driver. To do this:

  • Plug your Surface to a power outlet
  • In the search box on your device, type Device Manager and select it from the results
  • Tap on the arrow next to Batteries category
  • Under Driver tab, double click Microsoft ACPI-Compliant Control Method Battery
  • Select Uninstall
  • Click OK
  • Go to Start>Power>Restart. This will reinstall the battery driver.

If the battery charges above 40 percent after reinstalling the battery driver, try installing the Surface updates pending on your device. If it still won’t charge above that level, you may need to service the Surface.

4. Restart your Surface

Before doing this, you need to note that while Surface updates are pending, you could damage your device by interrupting them using a reboot. If the update has stalled, and your device doesn’t automatically reboot, wait for about twenty or so minutes before rebooting it yourself.

Among the errors that can be fixed with a restart include update error 80248007, installation freezes beyond 20 minutes, update gets stuck on ‘Getting devices ready’ or ‘Please wait while we install a system update’ screen for over 20 minutes, update history shows ‘pending restart’ and/or ‘pending failed’ statuses.

Here’s how to restart your Surface based on these update errors:

  • If you get update error 80248007, restart your Surface by going to Start>Power>Restart (Update and restart) then install the updates again
  • Force a shut down. For Surface Studio/Laptop/latest Surface Pro/Surface Book 2, press and hold the power button till the screen goes off for 10 seconds and release the power button. Press and release it again to turn it back on – the Microsoft logo should be displayed. Do the same for Surface Book, Surface Pro/2/3/4. You can also use the two-button shutdown by pressing and holding down the power button for 30 seconds, then release it, and press and hold the volume-up and power button simultaneously for 15 seconds or so, and release both, wait 10 seconds and turn it back on using the power button.

5. Install updates manually

To do this, download the update file to your Surface. If you cannot connect your device to the Internet, use a different computer with internet to get the .msi file on a USB flash drive, then transfer the file to your Surface. Press and hold the file and select Install, then click OK when it is done.

Note: update files are for hardware and firmware only, you won’t be able to install Windows updates using the manual way. Similarly, you cannot download and install Surface updates manually on both Surface Pro and Pro 2 devices, otherwise, your device may need service.

6. Check updates from Microsoft Store

If your Surface updates are pending, check Microsoft Store for updates by doing the following:

  • Click Start
  • Select Microsoft Store
  • Select More next to the search box (three dots)
  • Click Downloads & Updates
  • Select Get Updates

7. Solutions from other Surface users:

  • Empty the folders in: C:\Windows\SoftwareDistribution as it may have downloaded the files with the thought that it really needs them, but in actual sense it doesn’t discard those files now that it doesn’t need them.
  • Firmware updates are dropped into C:\Windows\Firmware (and driverstore). Firmware updates are just “drivers” to Windows, so they can “install” correctly and still show as pending on a reboot, because there’s more to a firmware update than just staging the .bin files.
  • Check if your device battery level is lower than 25 percent as this will trigger the firmware to skip the update to avoid bricking the device – whether it is plugged in or not.
  • There’s actually a registry key that contains values that say why a firmware update succeeded or failed, and what version is actually installed – it’s not necessarily human-readable, but it can be deconstructed as necessary.
  • Select each pending update one by one, cancelling the download for each and start it again

Have any solutions here helped fix the Surface updates pending problem? Let us know in the comments section below.

RELATED STORIES TO CHECK OUT:

Microsoft news recap: Windows Defender becomes an extension for Google Chrome, Office 365 Multi-Geo to give choice on data storage location, and more

Microsoft news recap is a weekly feature highlighting the top Microsoft news stories of the past week. Sit back, grab some coffee, and enjoy the read!

Windows Defender extension for Google’s Chrome browser released

Unexpectedly, Microsoft has brought its Windows Defender technology from Windows 10 right into the dominant browser, Google Chrome. A new Windows Defender extension for Chrome aims to combat malicious websites and warn users in real-time of any threats.

Microsoft Edge Beta on iOS updated to support Windows Timeline

Ahead of the release of Windows Timeline for Windows 10, Microsoft is preparing its Microsoft Edge extension on iOS. A new beta update has added support for Windows Timeline.

Office 365 introduces Multi-Geo to control where your data is stored

Microsoft has announced that organisations with more than 5,000 users on Office 365 will now have the ability to choose where their data is stored, as part of a new Multi-Geo control option. This feature is currently only available for Exchange Online and OneDrive, giving the ability to set where mail, attachments, and files are stored.

Microsoft, others sign Cybersecurity Tech Accord, vow not to help govts conduct cyber warfare

Microsoft have announced that they have signed the Cybersecurity Tech Accord, with part of the aim being to not aid governments in conducting cyber warfare. It is one of many large-scale companies that have signed, including Nokia, Cisco, Facebook, and more.

That’s it for this week. We’ll be back next week with more Microsoft news!

Xbox Preview Alpha users receive build 1805.180418-1920

The Xbox team have released a new build to Xbox Preview Program members on the Alpha ring. This latest update comes in at build number 1805.180418-1920. The changelog notes that there are a few fixes in this build, but also refers back to the new features mentioned previously, but doesn’t state which new features are being made available specifically in this build.

Here are the fixes in this build:

Home – Avatars

  • Fixed an issue in which Avatars were not properly displayed within the profile pages.

Home – Cortana

  • Fixed an issue in which Cortana was unable to make selection of account names.

Mixer

  • Fixed an issue for a user when broadcasting and opening the guide would cause the camera momentarily to vanish from the active broadcast.

My Games and Apps

  • Fixed an issue in with users would lose navigation controls/focus in the manage game section for a game or app.

 Notifications

  • Fixed the social icon within the notifications toasts that was appearing as a blank square while in Light theme contrast.

Settings – Accessory App

  • We have resolved  an issue in which some users were not able to navigate correctly, assign controller configurations and set Vibration settings in the Xbox Accessory app.

And, as expected, there are also some known issues with this build:

Audio

  • Some users may experience intermittent loss of Audio with certain configurations of AV receivers with ATMOS or with changing audio configurations during console use.

Pi-hole

  • Pi-hole users may encounter issues signing in, creating, or recovering accounts upon downloading the 1804 update. This is due to a new configuration file which is downloaded from a URL Pi-hole blocks by default.
  • Workaround: Add clientconfig.passport.net to the Pi-hole allowed IP address list.

Profile Color

  • Sometimes users may encounter an incorrect Profile color when powering on the console.

When connecting to Xbox Live, the console will prompt to install the latest build before being able to make use of the console.

Fix: 0xc1900200 error in Windows 10

Free upgrade period is coming to an end, and if you want to upgrade to Windows 10 this is your last chance because free upgrade ends on July 29. Unfortunately, Windows 10 upgrade can sometimes encounter problems and one of the most common problems is error 0xc1900200.

How to fix 0xc1900200 error on Windows 10?

Table of contents:

  1. Use a third-party repairing tool
  2. Disconnect all USB devices
  3. Reset the Windows 10 Update components
  4. Check if your PC matches the requirements
  5. Run SFC scan
  6. Whitelist the Windows Update servers
  7. Run DISM
  8. Change the size of the reserved partition
  9. Update your BIOS

Solution 1 – Use a third-party repairing tool

A simpler way to repair corrupted files and get rid of system errors is to use a dedicated repair tool that can do all the work for you. The software will automatically scan your PC for problematic files and act accordingly.

Solution 2 – Disconnect all USB devices

Sometimes you might get a 0xc1900200 error during Windows 10 upgrade if you have your external hard drive connected. External hard drives are extremely useful for file backup, but if you have your external driver connected during the Windows 10 upgrade process you might encounter certain errors, therefore it’s highly recommended that you disconnect it.

Users also reported the same error with a USB Bluetooth receiver for the wireless mouse. According to them, the issue was completely fixed after disconnecting the receiver from the PC. Bear in mind that almost any USB device can cause this error to appear, so be sure to disconnect all the unnecessary USB devices such as your printer, controller, etc. before starting Windows 10 upgrade process.

Solution 3 – Reset the Windows 10 Update components

Another thing you can do if you can’t install the upgrade is resetting the Windows 10 Update components. If you’re not sure which components exactly, just follow these instructions:

  1. Right-click the Start Menu, and open Command Prompt (Admin)
  2. Type the following commands and press Enter after each command:
    • net stop wuauserv
    • net stop cryptSvc
    • net stop bits
    • net stop msiserver

Now, you should rename the SoftwareDistribution and Catroot2 folder. Here’s how to do that:

  1. Open the Command Prompt and enter the following commands:
    • Ren C:WindowssoftwareDistribution SoftwareDistribution.old
    • Ren C:WindowsSystem32catroot2 Catroot2.old
  2. Now, restart the BITS, Cryptographic, MSI Installer, and Windows Update Services by typing the following commands in Command prompt:
    • net stop wuauserv
    • net stop cryptSvc
    • net stop bits
    • net stop msiserver
  3. Type Exit in the Command Prompt to close it

Solution 4 – Check if your PC matches the requirements

Windows 10 isn’t a demanding operating system, but in order to upgrade you need to make sure that your PC matches its requirements. If your computer matches the hardware requirements, it quite possible that a certain application, driver, or firmware is preventing the Windows 10 upgrade, so be sure to update your drivers and check if everything is up to date. In addition, make sure that you have the latest Windows updates installed.

Updating drivers is crucial for your system’s stability and safety, and to quickly update all your drivers, we suggest you try this professional driver update software that does it all automatically.

⇒ Get Fortect Driver Updater

Solution 5 – Run SFC scan

Now, let’s turn to the troubleshooting tools. If there’s something inside your system that needs tweaking, and therefore prevents you from upgrading it, the SFC scan could be a perfect solution. Here’s how to run the SFC scan:

  1. Open Command Prompt as Administrator.
  2. Type in the following command, and press Enter: sfc/scannowBattery percentage missing Windows 10
  3. Wait for the process to finish (it can be lengthy).
  4. Restart your computer

Solution 6 – Whitelist the Windows Update servers

Maybe you’re unable to receive the upgrade because your computer is set to block Microsoft’s update servers. Here’s how to unblock them:

  1. Go to Control Panel and open Internet Options.
  2. Select the Security tab that you have in the upper menu of the Internet options window.
  3. Select the Trusted Sites option from the Security window, and click Sites.
  4. Uncheck the Require server verification (https:) for all sites in this zone feature.
  5. You will now have a box there that says Add this website to the zone. Type in the following addresses: https://update.microsoft.com and https://windowsupdate.microsoft.com
  6. Click on the Add button after you typed in the addresses above.
  7. Click on the OK button to save your settings.

Solution 7 – Run DISM

And the last troubleshooting tool w’re going to try is DISM. DISM is basically same as the SFC scan, but is more powerful, so if the SFC scan didn’t get the job done, chances are, DISM will.

Here’s how to run DISM in Windows 7/8:

  1. Open the Command Prompt  as an administrator.
  2. In the command line, copy-paste these lines one by one and press Enter after each:
    • DISM /online /Cleanup-Image / ScanHealth
    • DISM /Online /Cleanup-Image /RestoreHealth
  3. Wait until the procedure ends (it might take up to 10 minutes).
  4. Restart your PC.

Solution 8 – Change the size of the reserved partition

Sometimes you won’t be able to upgrade to Windows 10 due to the size of the reserved partition. To fix this issue you have to expand its size, and the simplest way to do that is to use a third-party tool such as MiniTool Partition Wizard Free. Once you install the application increase the size of your reserved partition from 300MB to 1GB for example. If necessary, you might have to reduce the size of other partitions on your hard drive. Bear in mind that this procedure can be potentially dangerous, because you might accidentally delete a certain partition if you’re not careful, therefore extra caution is advised.

Solution 9 – Update your BIOS

Few users reported that they are unable to upgrade to Windows 10 due to their BIOS. According to them, their CPU clock was incorrect, and that was the cause for the 0xc1900200 error. After updating the BIOS, the issue was fixed and Windows 10 upgrade was installed without any problems. We have to mention that this issue can occur even if you have the latest version of BIOS installed, so you might have to install it again just to fix this error. Bear in mind that BIOS upgrade is somewhat an advanced procedure, therefore if you don’t know how to perform it properly, we strongly suggest that you check your motherboard manual for detailed instructions. BIOS upgrade can cause permanent damage if the upgrade process goes wrong, therefore be extra cautious if you decide to upgrade BIOS.

Error 0xc1900200 can prevent you from upgrading to Windows 10, and if you’re having this error be sure to try some of our solutions.

Excel Online won’t calculate/ won’t open [Best Solutions]

The huge grid of rows and columns that make up the Excel program, plus other elements increases the size of the worksheets to work with compared to earlier versions that had slow-calculating worksheets.

Large worksheets in the program also calculate slower than smaller ones, but the big grid introduced with Excel 2007 puts performance as a priority, because slow calculation and data analysis tasks make it hard for the user to focus on what they’re doing and this can lead to more errors.

When you find Excel Online not calculating or not opening, some of the causes include these tasks and the size of the files being used. Multithreaded calculation is another cause for the calculation time lag, but the most important factor is how your worksheet is designed and built.

Once you identify and measure then improve the calculation issues in the worksheets, you can fix the calculation problems you’re experiencing with Excel Online.

Below are a few calculation considerations for Excel Online that can help resolve the calculation and file opening problem.

FIX: Excel Online not calculating/not opening files

  1. Open the workbook in the latest version of Excel
  2. Examine your formulas
  3. Calculate across workbooks
  4. Limit usage of volatile functions
  5. Check usage of array formulas
  6. Check for Defined names in your workbooks
  7. Check links and hyperlinks

1. Open the workbook in the latest version of Excel

When you open a workbook the first time, in a new version, it may take long to open if it has many calculations because the program recalculates it and verifies all its values. If you find the file opening slowly, or not opening at all, try the next solution.

2. Examine your formulas

Check your workbook and examine the formulas used, because some take up a lot of memory like the array formulas including Lookup, Offsets, Index, Match, and Indirect, which are okay to use, but the referenced ranges can cause Excel not to perform well, thus not open files or not calculate.

With the new grid, referencing a whole column means referencing more than a million columns, which will cause Excel Online performance issues, unlike the old version or grid where you could reference just one column.

For earlier versions, reconstructing your formulas to reference only the cells you need for your formulas will work. Check also the defined names so that there are no other formulas referencing whole rows and columns.

Some functions too have been deprecated from Excel Online and Excel desktop application so check if you’re using such functions because they affect calculation or file opening.

3. Calculate across workbooks

microsoft excel won't work

It is recommended that you limit the formulas doing calculations across all your workbooks if you’re trying to open the file over the network and/or Excel Online is trying to calculate huge data.

In this case, have the formula in one workbook, then create a link from one workbook to the next instead of calculating across networks.

4. Limit usage of volatile functions

There’s no need to have many cells with the TODAY and NOW function, as long as your date and time settings in your spreadsheet are current, you can use one of these functions at a time, then reference it via a defined link name.

5. Check usage of array formulas

These must be used in the correct way but you need not add more cells than you must have to your array. When a cell has a formula that needs calculation, then all cells in that formula will be calculated.

6. Check for Defined names in your workbooks

Defined names reference cells and formulas all over your workbook so as to add a name to your formulas, one that is friendly for use. Check for defined names linking to other workbooks or temporary internet files, as these links slow down or make Excel Online not calculate and/or not open your files.

The Name Manager tool comes in handy to help you find or view defined names that are invisible in the Excel Online interface, and those you don’t really need.

7. Check links and hyperlinks

Excel Online can bring live data from other spreadsheets, so you need to know the file and any external files it links to. There’s no limit on how many workbooks can be linked, but you can encounter issues around this, so test your file without the links to see if the Excel Online not calculating or not opening files issue is in this specific file, or in one of the files that are linked.

Did any of these solutions help? Share your experience in the comments section below.

RELATED STORIES TO CHECK OUT:

Use Mach2 software to activate hidden Windows features

Windows includes numerous hidden features that are not enabled by default. They are not enabled as they are not are entirely ready for utilization in Windows. However, Mr. Rivera has recently released the open-source program Mach2 that enables Windows users to discover pre-release features that are not enabled.

Mach2 is not an official Microsoft program. Nevertheless, you can still download it from this Github page. You will also need to compile the software with Visual Studio 2017 Express to install its executable. This Github page provides full installation guidelines for Mach2.

Another thing to note is that Mach2 scans PDB files, for which you will need Windows 10 SDK to download. You can download Windows 10 SDK from this page. Windows SKD installs SymChk.exe, which downloads symbol files for executables under C:Windows.

Enable Windows Feature Control

Mach2 taps into Windows Feature Control to activate new features. Feature Control gates off experimental or incomplete features in production code. As Mach2 manages the Feature Core component of Feature Control, it can display which features are deactivated or activated.

Note that Mach2 is a command-line utility. As such, it does not have a UI window from which you can select options. The utility scans for PDB files when you enter ‘mach 2 scan in the Command Prompt. The program then generates a list of feature IDs within a text file. Mach2 users can enter ‘mach2 enable ‘ in the Prompt’s window to activate a feature.

A word of warning, however, comes from the Mach2 developer. Mr. Rivera states:

Turning on unfinished features can completely trash your Windows installation… You do not want to use this on machines you don’t feel comfortable wiping at a moment’s notice.

Mach2 does not come with any warranty. So Mach2 is probably a program that most users should leave untouched. The freeware Winaero is much better software for tweaking and customizing Windows. However, Mach2 might still be worth noting for users registered on the Windows Insider Program.

RELATED STORIES TO CHECK OUT:

Would you like to install this device software? How to disable the prompt

Microsoft is pretty strict when it comes to drivers distribution and installation. If there’s a device and its manufacturer doesn’t provide the proper drivers inspected by the Microsoft, you’ll have a hard time making it work. You’ll repeatedly get prompted by the “Would you like to install this device software?” dialog box. Furthermore, even if you willingly accept the untrusted source, there are a lot of issues which might emerge later on.

For the sake of avoiding this, it’s recommended to disable the driver signing. If you’re not sure how to do it, we posted the detailed instructions below.

How to disable the “Would you like to install this device software?” prompt in Windows 10

There are various ways to overcome this security protocol which makes sure that your driver is indeed safe to use. If the driver comes from the “untrusted” source (doesn’t have WHQL signature), you’ll have a hard time installing it on any Windows iteration, especially Windows 10.

However, there’s a way to disable the driver signature and avoid the prompt. Bear in mind that this will permanently disable the driver signature and, on a long run, this makes your PC susceptible to third-party malware in the driver disguise. You can re-enable it later, of course.

Disabling the driver signature enforced protocol in Windows 10

Follow the instructions below to disable the driver signature security enforcement in Windows 10:

    1. Press and hold Shift and restart your PC.Would you like to install this device software
    2. Click Troubleshoot.
    3. Choose Advanced options.
    4. Select UEFI Firmware settings.
    5. The PC should boot into the BIOS (UEFI).
    6. In there, disable Secure boot, confirm changes and exit.
    7. When the system starts, type CMD in the Windows Search bar, right-click on the Command Prompt and run it as an administrator.Would you like to install this device software
    8. In the command line, copy-paste the following command and press Enter:
      • bcdedit.exe /set nointegritychecks onWould you like to install this device software
    9. Close Command Prompt and restart your PC.
    10. Try installing the non-signed driver afterward and the prompt shouldn’t appear again.

Additionally, if you want to re-enable the driver signature enforcement, just repeat the action and, instead of the aforementioned command, enter bcdedit.exe /deletevalue nointegritychecks or bcdedit.exe /nointegritychecks off. Albeit, Windows 10 won’t be able to load the non-signed driver later if you decide to re-enable it.

We guess that’s the choice you’ll have to make. If you’re dependent on the device, driver signature need’s to be disabled in order for everything to work in a seamless manner.

That’s should do it. In case you have questions or suggestions regarding the driver signature and “Would you like to install this device software?” prompt, make sure to post them in the comments section below.

RELATED STORIES YOU SHOULD CHECK OUT:

Word Online Not Working: How to Get it Back

Word Online is a program that allows you to edit and format your document in a web browser. However, many reported that Word Online is not working properly.

This can be an issue since you won’t be able to use Word or edit documents online. In case you’re not familiar with this feature, we have a guide on how to use Word in browser, so be sure to check it out.

Today we’re going to show you how to fix this issue, so let’s get started, shall we?

Why is online Word not working?

  • Issues with your browser or device can cause this problem.
  • Problems with the browser cache can sometimes cause this issue.
  • Browser settings can prevent Word from working online.
  • Popup settings can sometimes cause this issue.

What can I do if Word Online not working?

1. General troubleshooting

  1. To fix Word Online not working or not responding, check first whether you can access it on a different browser, like inPrivate browsing.
  2. Also check if you experience the same when accessing the program on a different device.
  3. Restart your device, sign in again and then restart Word Online and see if it helps.

2. Download the document and edit in Word

  1. Try to download the document and edit in Word desktop application (locally).
  2. Once the document is downloaded, open it in Word/Office installed on your PC.
  3. Alternatively, use WordPad.

This is a simple wokaround if Office Online is not working.

3. Refresh your browser cache

  1. Right click Start and select Run.
    word online not working
  2. Type inetcpl.cpl.
  3. Press Enter or click OK.
  4. Click Advanced under Internet Properties.
    word online not working
  5. Restore Advanced settings.
    word online not working
  6. Reset until a new prompt opens up
  7. Check Delete personal settings box
  8. Click Reset and click OK

If Wword online not workingord online won’t work, refreshing the cache is the best way to fix it.

4. Reset browser settings

For Chrome

  1. Open Google Chrome
  2. Click Settings
    word online not working
  3. Scroll down and click Advanced
    word online not working
  4. Go to Reset box
    word online not working
  5. Click Reset and confirm by clicking Reset again
    word online not working

Resetting Chrome settings changes the default search engine back to Google, but also changes your homepage and tabs, as well as the new tab page, pinned tabs, content settings, cookies and site data, extensions and themes – back to the default settings.

The only settings that will be reset are for the logged-in Chrome profile, and these changes will apply across all computers or devices you’re signed into with your current and active profile.

After doing that, check if Word Online still won’t work.

For Internet Explorer

  1. Start Internet Explorer
  2. Go to Tools menu
    word online not working
  3. Click Internet options
    word online not working
  4. After that, click Advanced tab in the Internet Options window
    word online not working
  5. Click Resetword online not working
  6. A confirm reset dialog box will display
    word online not working
  7. Select Delete personal settings box if you want to clear browser history, search providers, home pages, tracking protection, accelerators, and ActiveX Filtering data as well.
    word online not working
  8. Click Close once default apps have been applied, then exit and restart Internet Explorer

5. Set browser pop-up blocker

  1. Open browser settings.
  2. Locate popup settings.
  3. Make sure that popups are allowed for Office.

6. Run browser in safe mode

  1. Type CMD in the search box
  2. Click Command Prompt
    word online not working
  3. Type C:\Program Files\Internet Explorer\iexplore.exe –extoff
  4. Press Enter
  5. Go to the website you are accessing Word Online from and check if the issue persists

You don’t need to run the command again to enable the browser extensions; open a new Internet Explorer to run a normal window.

In case you haven’t Word Online still won’t work, we have a great guide on download Word for free, so don’t hesitate to check it out.

Has any of these solutions helped fix Word Online not working/not responding on your PC? Share with us in the comments section below.

Download the Windows Defender Chrome extension, it’s 99% efficient

Tech giant, Microsoft, is bringing its antivirus protection to Chrome, as a browser extension meant to add an additional layer of protection for Chrome users as they browse online. The Windows Defender Browser Protection extension for Google Chrome not only alerts users about known malicious links, but also directs them back to safety, and is powered by the trusted intelligence found in its Microsoft Edge browser.

According to the firm, the extension, which is available for free, protects its users with a 99 percent rate of efficiency and effectiveness against phishing, and malicious websites, through its real time protection features.

Google Chrome is already a safe browser with similar protective features for its users, which also sends alerts in the event that a user stumbles upon or goes to a malicious website, or may have clicked on a link laden with malware that can seep into their computers.

However, Microsoft insists that its service is a much better option compared to what Chrome offers users. The company went ahead to share a comparison from a report by security firm NSS Labs, which found that Microsoft Edge browser blocked up to 99 percent of phishing attacks, compared to Google Chrome’s 87 percent, and Mozilla Firefox’s 70 percent.

Windows Defender Browser Protection extension for Google Chrome

It seems there’s a current trend by tech and software firms upping the ante on users’ safety and privacy. Just last month, Firefox launched a new extension dubbed Facebook Container, with an aim to make it hard for Facebook to track users’ activity outside of its network.

Similarly, Czech-based antivirus giant, Avast, released a new version of its web browser dubbed Avast Secure Browser, meant to protect users’ data, while enhancing security and privacy.

Windows Defender’s Chrome extension is said to run in tandem with Google’s built-in security features, which may just be the strongest combination when it comes to a much safer browsing experience for users.

What do you think about the new Windows Defender Chrome extension? Share your thoughts in the comments section below.

RELATED STORIES TO CHECK OUT:

Microsoft reveals all the features coming with Xbox One May update, including 120Hz support

Microsoft released the second preview of Xbox One version 1805 to Xbox Alpha Insiders this week, and today followed up to announce all the features coming with the “May Update.” Many of the features for this next version of the Xbox OS build on what will be coming soon with the upcoming Xbox Spring Update (version 1804.) Big features include 120Hz support, the ability to organize pinned apps into groups, and more.

120Hz support

Expanding on the 1440p resolution support which Microsoft introduced in Xbox Version 1804, is support for 120Hz refresh rate. The option will be available in May for gamers who have their Xbox connected to displays which support 1080p and 1440p output resolutions. This is especially a nice option for high-end monitors and display which support the high refresh rate.

120 Hz

Grouping Games and Apps

A much-requested feature also coming in May is the ability to group pinned games and apps together. Microsoft is fittingly calling this feature “Groups,” mentioning that you can make collections of anything that is listed within My Games and Apps and have them sync across your consoles. You’ll also be able to assign custom names to groups, organize and order groups, and add groups to your home page so you can see them at a quick glance.

Groups will not be enabled for everyone in the Alpha ring and will be rolling out on a gradual basis. Microsoft says they are doing this in order to gauge interest and collect feedback on the feature first.

Grouping Games and Apps

Trimming Clips Directly in the Guide

Microsoft had previously made it easier to share and upload captures from Xbox to Twitter, and in May, this process is getting even faster. The company says gamers will soon be able to trim recent games captures directly from the guide, eliminating the need to switch to Upload Studio.

Trimming clips

Other features

120 Hz support, grouping apps and games, and trimming captures from the Guide may be the biggest features coming in May, but there are also some minor changes too. For one, Microsoft says they will be improving on Family Settings and adding a “Details” page for Parents to configure their controls on Xbox consoles. Another big change is an improved Xbox Accessories app, which should be easier to navigate and look through. Finally, there are “Intuitive Button commands”, which will allow you to use the View button on Home to edit the order of blocks and re-order items within Groups.

Xbox Accessories App

These are some nice features, and it’s good to see that Microsoft is working on the feedback from gamers and looking to introduce more experiences to the console OS. As usual, you can expect most of these features to roll out over time, and you might even see additional experimental features not introduced in today’s announcement. Do you like these new features? Feel free to let us know your thoughts in the comments below.

[Updated] Xbox is reportedly testing several ways to let gamers gain experience with new “Career” system

Microsoft pioneered the achievement system with the Xbox 360 back in 2005, a great gamification feature that can now be found on pretty much all gaming platforms. It’s quite fascinating to see dedicated Achievements hunters getting closer to a 2 million Gamerscore, but Microsoft is now looking for new ways to keep Xbox gamers engaged.

A couple of months ago, we learned that Microsoft was working on a new “Career” system for Xbox gamers, complete with visible player levels, prestige ranks, quests to complete and exclusive rewards. According to a new report from Windows Central, this Xbox Career system is still in active development. There could be several ways for gamers to earn EXP, and the following solutions are reportedly in testing:

  • Total playtime across all games, to be updated at specific milestones.
  • EXP level milestones.
  • The number of games you have played.
  • Simply playing a set number of games per day.
  • Competing on Xbox Live, although it’s not clear in what context, whether as part of Tournaments or general multiplayer games.
  • Creating content on Xbox Live, perhaps by sharing game clips and so on or streaming.
  • Earning regular Gamerscore achievements.

To keep players engaged every day, the Xbox team is reportedly working on “daily quests” to allow gamers to win extra EXP every day. The most interesting aspect of this career system could be the cosmetic items to unlock for your Xbox Avatar. “Microsoft might be tying the Career system to lootcrate-like rewards for the new Avatar system, which will bring vibrant and updated customizable character models for players on Xbox Live,” the report says.

Last but not least, the Redmond giant is also reportedly considering some tie-ins between this new Career system and Microsoft Rewards. This is an interesting idea considering that Microsoft Rewards will replace the Xbox Live Rewards Program in all markets in June. We may learn more about this Xbox Career System during E3 2018 in June, so best to keep tuned for more.

Update: Xbox’s head of platform engineering Mike Ybarra tweeted today that this career system isn’t in active development. “As fun as it all sounds, there isn’t a career system in active development. Good to see all the feedback on this, however,” he said.

Google’s Project Zero outs Microsoft for security flaw in Windows 10 S

Google’s Project Zero team has rightfully pointed out several security issues with Microsoft’s products in the past, and they’ve now just disclosed yet another vulnerability. This time, after waiting out the 90-day deadline for a fix to be published (and not getting action from Microsoft) the team has publically documented a “medium” security vulnerability in the Windows 10 S operating system (via Neowin.)

Windows 10 S made its debut on Microsoft’s Surface Laptop last year, and this special version of Windows 10 that can only run Windows Store apps has since been used by some PC manufacturers for low-cost education-focused machines. Considering that Windows 10 S is marketed by Microsoft as “streamlined for security,” this latest disclosure definitely raises some questions about how secure the operating system really is.

Google’s notes on the vulnerability can be seen here, and it primarily involves a method of bypassing the Windows Lockdown Policy by using a bug in the .NET Framework. The vulnerability, though, only impacts systems with Device Guard enabled, and it can’t be exploited remotely, which makes it less severe. According to Google:

This issue was not fixed in April patch Tuesday therefore it’s going over deadline. This issue only affects systems with Device Guard enabled (such as Windows 10S) and only serves as a way of getting persistent code execution on such a machine. It’s not an issue which can be exploited remotely, nor is it a privilege escalation. An attacker would have to already have code running on the machine to install the registry entries necessary to exploit this issue, although this could be through an RCE such as a vulnerability in Edge. There’s at least two know DG bypasses in the .NET framework that are not fixed, and are still usable even on Windows 10S so this issue isn’t as serious as it might have been if all known avenues for bypass were fixed.

Google originally disclosed this vulnerability to Microsoft in February but Microsoft was not able to patch it in time, even after requesting a 14-day extension period and providing additional context for the deadline miss. Microsoft also requested an additional grace extension, saying the Redstone 4 release would have the fix, but Google once again turned it down, saying there is no firm date for the Redstone 4 release, and it is not considered a “broadly available patch.”

Microsoft is actually planning on re-branding Windows 10 S to “Windows 10 in S Mode” later this year. The company has said that S mode will be available for all versions of Windows 10, and it will appear on new PCs following the Redstone 4 update. Citing security and consistent performance, Microsoft previously noted that its customers have received Windows 10 S positively, so it will be interesting to see how Windows 10 in S mode takes off.

Phantom Trigger launches on Xbox One & Windows 10 with Xbox Play Anywhere

The video game, Phantom Trigger, is now available to play on Windows 10 PCs and tablets and Xbox One consoles. Being an Xbox Play Anywhere title, buying it on one platform will automatically unlock it for free on the other and gameplay progress with sync between versions.

Phantom Trigger is an action adventure title that revolves around an everyday man who is thrust into a battle against the supernatural. The game features a branching storyline and four alternate endings to experience and a combat system that evolves as the game progresses. Here’s the full game description.

Stan is losing control. The phantom realm brings arcane hexes into a pulsing neon reality, where demons fight in packs and use every trick they have to break your defense. Throw spells and traps mid-combo, ride the edge of control and chaos in this fresh take on action combat. You are your own worst enemy in Phantom Trigger.

Story: You play as Stan, a white-collar middle-class worker living an ordinary life that gets disrupted by a mysterious event. Discover a brand new world and connect the dots along a branching story through neon-demonic worlds. Phantom Trigger has 4 alternate endings.

Gameplay: Merging elements from slasher, RPG, and rogue-like genres, Phantom Trigger takes a rich combo system and builds on it, with trapping and freezing enemies, herding groups, burning bosses and dashing from one combo to the next.

Do you prefer to play your Xbox Play Anywhere video games on your Windows 10 device or on your Xbox One? Let us know in the comments below and make sure to follow us on Pinterest for more video game content.

Phantom Trigger
Phantom Trigger
Developer:
tinyBuild
Price:
$14.99

Twitter progressive web app gains Windows 10 Live Tile support

The new Twitter progressive web app (PWA) has updated with a significant change, most notably the addition of support for Windows 10 Live Tiles.

This new functionality allows users to pin Twitter profiles to their Windows 10 Start Menu for easy access and the tile itself can be resized to one of three different sizes (S, M, and L). Once pinned, the Live Tile will update automatically to display information and media associated with the related account.

Being a PWA, the app itself doesn’t need to update in the traditional sense. Instead, the changes should already have been made as soon as the developers published the changes.

This new progressive web app version of the Twitter app is currently only available to Windows Insiders running Redstone 4 and 5 as it’s still being tested and developed. Users running a regular public version of Windows 10 (which is most people) will still have the original UWP Windows 10 Twitter app which will be replaced by this PWA version whenever it’s ready for public use.

Have you tried the PWA Twitter app yet? Let us know if you like it in the comments below and make sure to follow us on Twitter for more Windows 10 news.

Microsoft only trails behind Apple as ‘Most Valuable US Company’

In my opinion, the stock market is a lot like tarot reading, where a shuffling of vague data points results in even vaguer but loosely related predictions, but for whatever reason, the current industry climate has been the perfect nesting bed for Microsoft’s stock and what investors are predicting is its future value.

Earlier this week, Microsoft’s market value shot pass two of its staunchest rivals in Amazon (AWS) and Google (everything else), putting it in the runner-up position as the Most Valuable US company, just behind Apple’s juggernaut evaluation.

The news comes just two months after it had been reported that Microsoft and Amazon were jostling for that coveted second position among the most valuable companies in the US.

According to the numbers, Microsoft’s market value has been placed at $728 billion, surpassing Amazon’s $709 billion, inching out $722 billion and still a distant second to Apple’s $890 billion.

Part of Microsoft’s recent surge comes at stock deflations that have befallen tech companies whose dealings in data collection cross their business models in rather ambiguous ways which are leading to mounting public backlash.

Over the last month, companies such as Facebook, Google, and Amazon have been facing mounting legal battles in courtrooms around the world which are wreaking havoc on their stock prices as each company has either suffered stagnation or decline in the market due to the scrutinization of their business practices.

Fortunately, for Microsoft, the company has spent the latter part of three decades earning goodwill and trust regarding the collection and storage of sensitive data via its operating system Windows, its productivity software in Office, and using both those commodities to grow its presence in the cloud.

As Microsoft continues to seemingly shed its more consumer-facing endeavors and adheres to a further retrenchment into an enterprise-focused business the company should undoubtedly be rewarded with a steadily increasing market value as its competitors dance amongst the double edge sword of consumer adoption and individual privacy that’s as unpredictable as forecast during a tornado season.

How to show the Microsoft Edge Favorites toolbar

Most browsers include a favorites (or bookmarks) toolbar that you can select to include at the top of their windows. A bookmarks bar includes bookmarked sites and usually sits just below the URL bar for more direct page access. Edge also includes a Favorites bar, but it’s not selected by default. This is how you can show the Favorites bar in MS Edge.

How to enable the Favorites bar in Microsoft Edge?

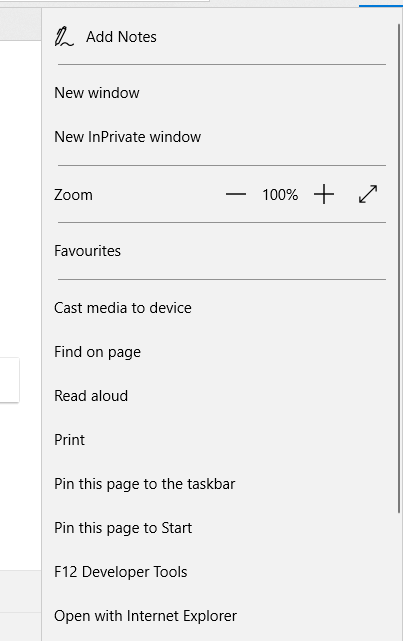
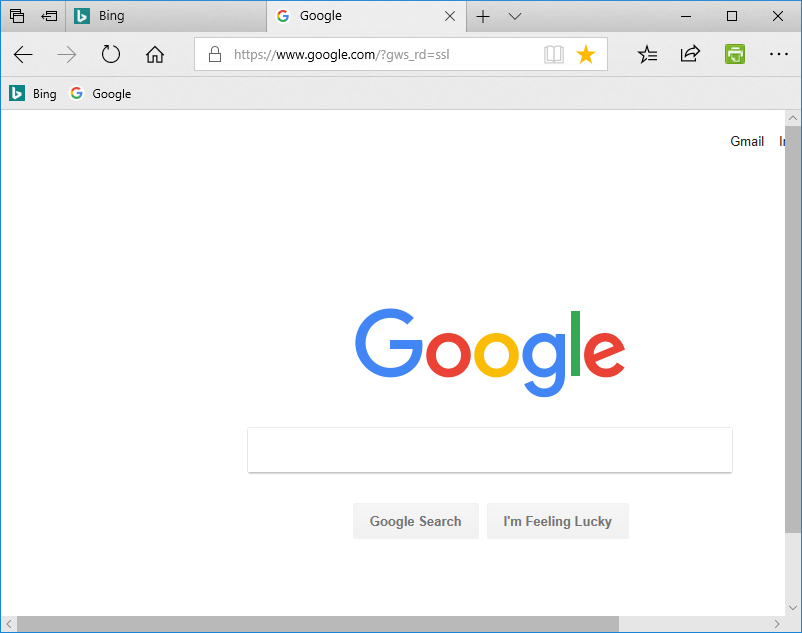
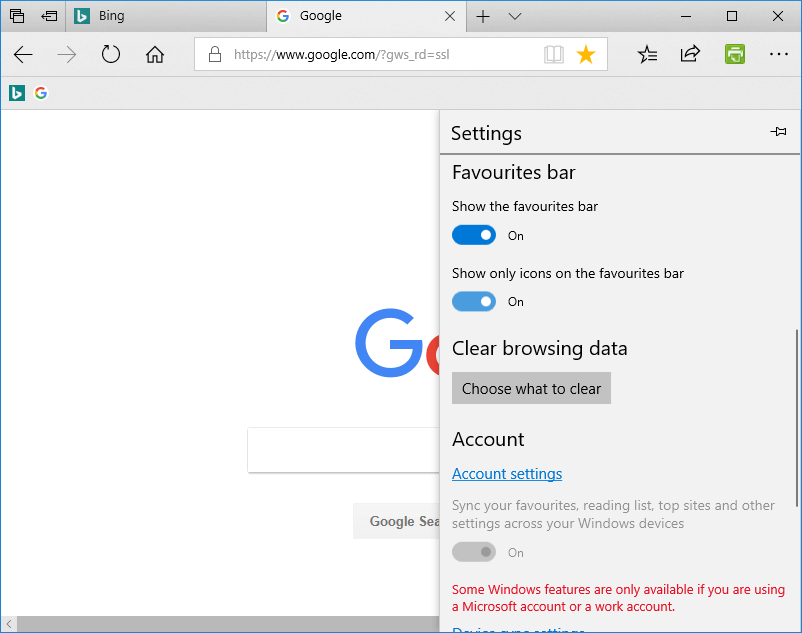
  • First, click the Settings and more button to open the menu shown directly below.

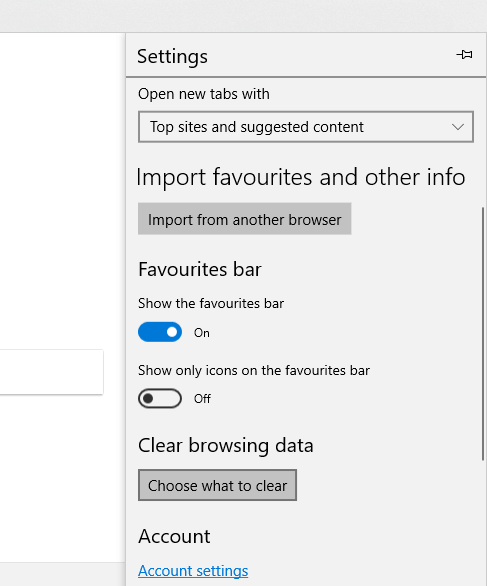
  • Click Settings to open the options in the snapshot below.

  • Then toggle the Show the favorites bar option on.
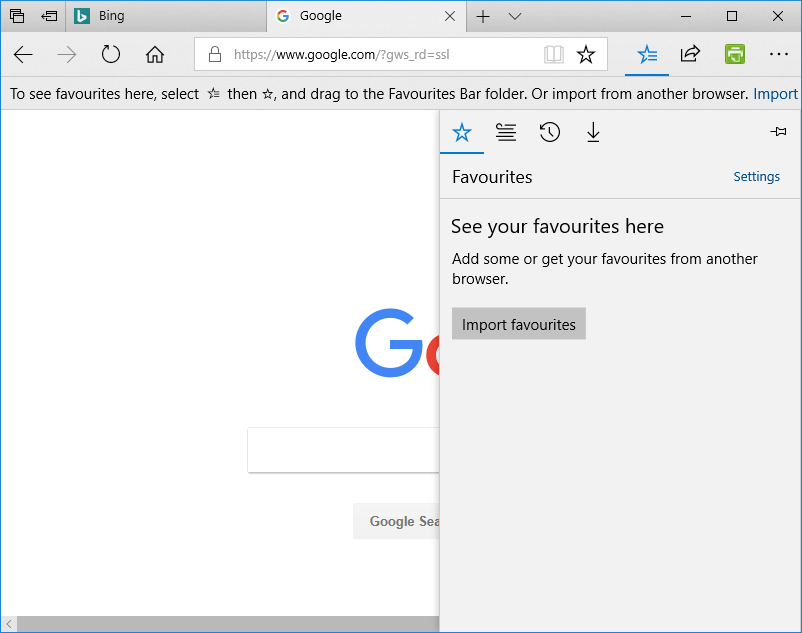
  • The Favorites bar will not include any webpage shortcuts if there’s nothing in the Favorites Bar folder. If there are no page shortcuts on the bar, press the Hub button to open the Hub as below.

  • Click the Favorites button to open a list of bookmarked sites.

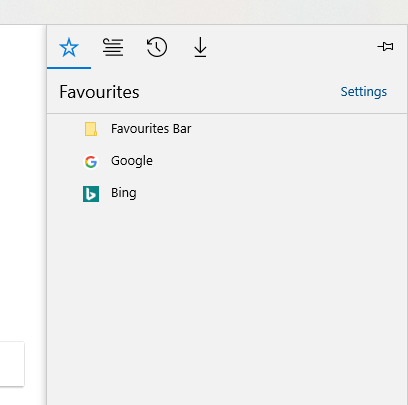
  • Now drag the listed page bookmarks into the Favorites Bar folder by holding the left mouse button and moving them. The bookmarks will then appear on the bar as in the shot below.

Remove Text From the Favorites Toolbar

Bookmarked pages on the Favorites bar include the website titles. You can remove the text from the bookmarks to free up some space on the bar. This is how you can remove the text on the bar so that it includes just page icons.

  • Click the Settings and more button.
  • Select Settings on the menu to open further options.
  • Then select the Show only icons on the favorites bar option to remove the text from the bar as shown below.

  • Note that you can also select a Show icons only option by right-clicking a page shortcut on the Favorites bar and selecting Show icons only.

Add Folders to the Favorites bar

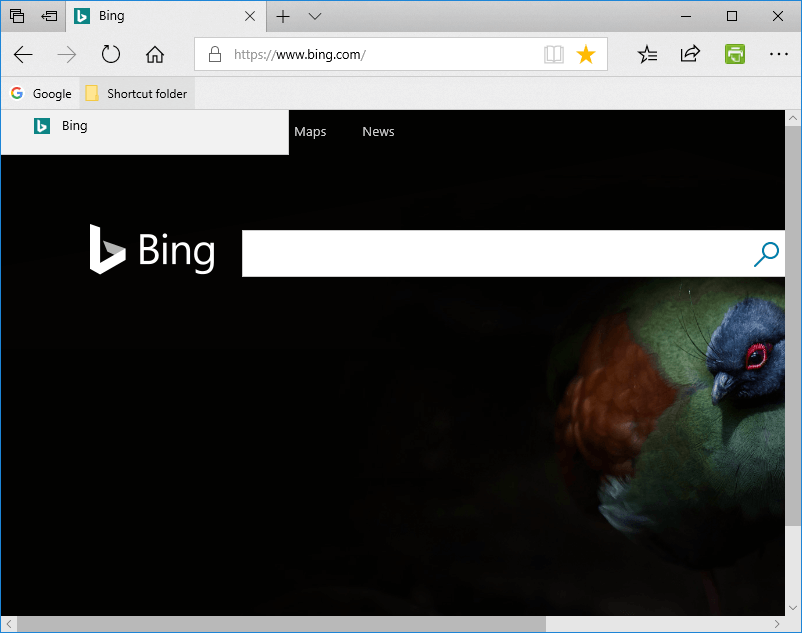
You can also add folders to Edge’s Favorites bar. Then you can drag page shortcuts into the folders, but still open them from the Favorites bar. To add a new folder, right-click the Favorites bar and select Create new folder. Enter a title for the folder, and then drag some page shortcuts into it. You can open the shortcuts by clicking a folder on the Favorites bar and selecting a page to open.

Import Bookmarks to Your Favorites Toolbar

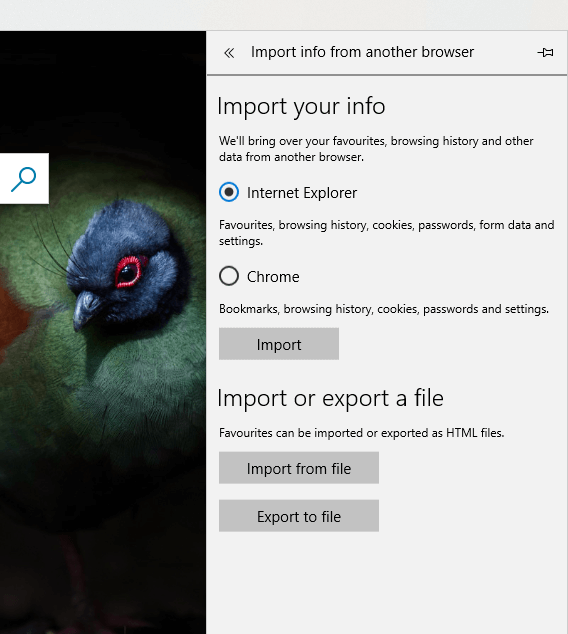
Like most browsers, Edge also includes an option to import bookmarks from other browsers. Then you can move those page bookmarks onto the Favorites bar. You can import bookmarks from Chrome and Internet Explorer to Edge as follows.

  • Press the Settings and more button to open Edge’s menu.
  • Select the Settings option, and press the Import from another browser button.

  • Then you can select to import bookmarks by selecting the Chrome or Internet Explorer options.
  • If you’ve exported bookmarks as HTML, press the Import from file button, select file and click Open.

FAQ

How do I show the favorites bar in Microsoft Edge?

Open Edge, click the three dot menu, choose Settings, select Appearance, and turn on the Show favorites bar option.

Can I make the favorites bar appear only on new tabs?

Yes. In the Show favorites bar dropdown, pick Only on new tabs to keep it hidden while browsing other pages.

Why is my favorites bar not showing even after I enable it?

You may be in full screen mode. Press F11 to exit it, then check the Appearance settings again.

Can I customize what appears on the favorites bar?

Yes. You can drag bookmarks to reorder them or right click any item to rename, delete, or add folders for better organization.

You can also restore missing favorites when Edge fails to show them by using this guide on how to recover lost favorites in Microsoft Edge.

Now that you’ve got the Favorites bar up in Edge, you can open sites more directly from there instead of opening favorite websites via the Hub. As you can expand the Favorites bar with additional folder menus, it’s probably a better alternative to the Favorites sidebar on the Hub.

Power users who want to tweak hidden features can follow this guide on how to enable Edge flags and unlock extra customization options in Microsoft Edge.

To learn more about bookmarks, we have a great guide on how to find Microsoft Edge bookmarks location, so don’t miss it for more information.

How to print webpages with Edge’s new Clutter-free printing option

The Spring Creators Update (or Redstone 4) is the latest update for Windows 10 that is rolling out from April 2018. The update revamps Edge in various ways. One of the new options the updated Edge includes is Clutter-free printing. That enables users to print out website pages without any ads included.

A Clutter-free printing option is something all browsers should include. Some webpages are full of superfluous ads and images that waste lots of printer ink. Consequently, there are numerous extensions for Chrome and Firefox that enable users to strip down page content. With those extensions, you can edit pages before printing them out.

Edge users will not need any extension to remove ads from pages after the Spring Creators Update. However, you will need the updated Edge to select that option. As the Redstone 4 update has only just started rolling out, few Edge users will find a Clutter-free printing option in the browser at the moment. However, those users registered on the Windows Insider Program can now select the browser’s Clutter-free printing option.

How to enable clutter free printing in Edge

To select the Clutter-free printing option, open a page in Edge to print. Click the Settings and more button to open the browser’s menu. Then click Print to open the window below, which includes a page preview.

The latest Edge version includes a Clutter-free printing option directly under the Headings and footer setting. You can select On from the Clutter-free printing drop-down menu. Edge provides a preview of the stripped down website page within the preview window. Then you can press Print to print out the page without ads in it.

If you can’t wait for the Spring Creators Update, add the PrintFriendly and PDF extension to Edge. That’s an extension that you can delete page content with before printing. Press the Get the app button on this webpage to add PrintFriendly and PDF to Edge.

Then you can press a PrintFriendly and PDF button on Edge’s toolbar. Open a page to edit in the browser, and press the PrintFriendly and PDF button to open the editor shown in the snapshot directly below. Hover the cursor over ads and images and click the dustbin icon to erase them. After editing the page, you can press the Print button on the editor window.

Clutter-free printing is just one of the handy new options Microsoft has added to its flagship browser with the Redstone 4 update. The new Edge will also include Mute tab and save EPUB book options. For the full lowdown on what is new in the updated Edge, check out this post.

RELATED STORIES TO CHECK OUT:

Windows 10 April 2018 Update could bring along some BSOD errors

Microsoft recently revealed that it delayed the Windows 10 Spring Creators Update release over BSOD errors. This was actually a very wise decision as it allowed Microsoft to avoid a huge public outcry if the BSOD issues had been discovered after launch.

Dona Sarkar explained in an official blog post that a high BSOD occurrence on PC was the main culprit:

As Build 17133 progressed through the rings, we discovered some reliability issues we wanted to fix. In certain cases, these reliability issues could have led to a higher percentage of (BSOD) on PCs for example

Microsoft quickly rolled out a hotfix to Fast Ring Insiders to check if the OS is stable enough for public release. It is still unclear whether the Redmond giant will follow the usual path and push Windows 10 build 17134 to Slow Ring  and Release Preview Insiders or will simply roll it out to the general public as soon as Fast Ring Insiders have give it the green light.

Dona Sarkar’s team are now under huge pressure to make Windows 10 version 1803 as stable as possible in the shortest amount of time. If Microsoft skips the usual build release path and pushes the new Windows 10 version to the general public without first testing it on all the Insider Rings, chances are that some BSOD errors might go unnoticed.

Of course, BSOD errors can’t be completely avoided. Every single Windows OS version is affected by Blue Screen of Death issues and we’re sure Windows 10 version 1803 is no exception. The only question is how frequent will BSOD errors be on the Windows 10 April 2018 Update? Will users experience more BSOD issues compared to previous OS versions?

Of course, there’s no exact telling at this moment. However, taken into account the recent BSOD issues, maybe it’s best to skip upgrading to the latest Windows 10 version for a few days after release, especially if you use your computer for work. Should the OS be affected by severe technical issues, we’re sure Microsoft will fix them as soon as possible and you’ll be able to install a stable and reliable OS version.

Needless to say, BSOD errors are among the most common issue affecting Windows 10 shortly after launch. In a way, they’re inherent to Windows. However, taken the frequent BSOD error occurrence in the latest Windows 10 builds, it’s safer to wait for a few days before hitting the ‘Check for updates’ button.

RELATED STORIES TO CHECK OUT:

Here’s how to move your OneNote 2016 local notebooks to OneDrive, a new feature

If you still prefer to use OneNote 2016 over the new OneNote UWP app, Microsoft announced some bad news yesterday. Later this year, OneNote for Windows 10 will replace OneNote desktop in Office 2019 and become the most up-to-date version of OneNote.

OneNote 2016 will remain available and be supported through October 2025, but it will no longer receive new features going forward. However, you may continue to use the legacy app if you still need some of its features, such as the ability to store notebooks on your local hard drive instead of the cloud.

If you do use local notebooks and want to make the transition from OneNote 2016 to OneNote for Windows 10 though, the process isn’t exactly intuitive. OneNote for Windows 10 only supports notebooks that are stored on OneDrive, OneDrive for Business or SharePoint, and you can’t use it to open local notebooks. But as noted by OneNote MVP Marjolein Hoekstra (who is behind the OneNote Central Twitter account), OneNote for Windows 10 can now move local notebooks to OneDrive for you. This is apparently a new feature that quietly rolled out last week:

Microsoft explained how it works on a support page. From OneNote for Windows 10, you can see local notebooks by clicking the Show Notebooks button, and then clicking on More Notebooks. After selecting the notebooks you want to open, a Save to OneDrive window will appear and you’ll have to choose the Microsoft account you want to use for the transition.

Once you’re done, your local OneNote notebooks will be uploaded to the OneDrive account of your choice, and your transition to OneNote for Windows 10 will be complete. Be aware you can still open these online notebooks in OneNote 2016, and everything you do is the legacy app will be synced with the Windows 10 app. Yesterday, the company announced that it has been working hard to make its sync engine faster and more reliable on OneNote for Windows 10, as well as on Mac, iOS, Android, and web, and you can see the impressive results in the video below:

Do you still use local notebooks with OneNote 2016? If so, do you plan to continue or will you make the switch to the cloud at some point? Sound off in the comments below.

Microsoft Teams posts developer changelog, vows to keep it up to date

Since Microsoft launched the Microsoft Teams Developer Preview back in November 2016, the company has invited developers to build apps for its new team collaboration platform. Microsoft has made it easy for developers to integrate their own services with Teams, and there is now a healthy number of apps in the dedicated Store.

The Redmond giant is regularly adding new developer features to the Microsoft Teams platform, and the company has acknowledged that it’s not exactly easy to keep track of what’s new. Bill Bliss, Platform Architect and Head of Developer Ecosystem for Microsoft Teams announced this week the creation of a new webpage where devs can find the latest info about the platform:

Bliss promised that he and his team will keep this page up to date, so you might want to add it to your bookmarks. If you want keep track of what’s new in Microsoft Teams for desktop, web and mobile devices, you can also check this support page where you can find detailed changelogs for every new release.

Time magazine lists Satya Nadella as one of the top 100 most influential people

Microsoft CEO Satya Nadella has made it to the Time 100 list. First published in 1999, the annual list of the 100 most influential people in the world is assembled by the American news magazine Time.

In his profile penned by Walter Isaacson, a professor of history at Tulane University and a former managing editor of TIME, the magazine notes that in the four years since he inherited a sticky wicket, Microsoft’s market value has increased 130%. More important, the company is now making products that feel more user-friendly, empathetic, and collaborative.

Since becoming CEO of Microsoft in 2014, Nadella has used those principles to restore the company’s spirit of innovation. Consider its new product strategy, which emphasizes cloud computing and allowing people to collaborate across platforms. Nadella also preaches the importance of empathy and making products that work reliably, traits that deepened in him when his first child was born with brain damage and his son’s life depended on linked machines running Microsoft systems.

Last year, Satya Nadella wrote ‘Hit Refresh: The Quest to Rediscover Microsoft’s Soul and Imagine a Better Future for Everyone‘, a book about individual change, about the transformation happening inside of Microsoft, and the technology that will soon impact all of our lives.

In the book, Satya traced his journey from India to the US, told the inside story of Microsoft’s revival, and shared his vision of the most exciting and disruptive wave of technology – artificial intelligence, mixed reality, and quantum computing. Satya also explored the potential impact of the technology on society and delivered a call to action for world leaders.

Sidenote: Bill Gates also make an appearance on the list but as the writer of tennis great Roger Federer’s profile. ?

Windows Maps lets you share your collections, save searched places with latest Insider update

Microsoft’s Windows Maps app has just picked up two new features with a fresh new update for Fast Ring and Skip Ahead Insiders (via Aggiornamenti Lumia). In the version 5.1804.1021.0 of the app, which is currently only available on PC, you can now share your collections of places with your contacts, or a selection of UWP apps such as Mail or OneNote.

Unfortunately, this new sharing feature doesn’t play well with Windows Sets on the latest Redstone 5 builds. When trying to share a collection with an app, Windows Maps will open a new window instead of a new tab within the existing app window.

Additionally, Microsoft has also updated the search box to add new shortcuts for saving searched places or find nearby points of interests. The app uses data from Yelp and TripAdvisor for suggestions, and you can also read reviews posted in these services right within the app. It’s been quite some time since Windows Maps received new features and we hope these latest additions will roll out to Windows 10 Mobile soon.

How to disable “Do you want Google Chrome to save your password?”

In the era where the general population favors privacy more and more, password managers are a must. Chrome offers its native Smart Lock for storing and managing passwords, but some users find it unfitting for the job. However, like it or not, Chrome will prompt you to save credentials every time you log in.

Today, we’ll instruct you how to do it in a few simple steps. If you’re in a hurry, the step-by-step instructions are to be found below.

How to turn off Chrome Smart Lock

Google Chrome is, to date, the undisputed leader of the browser market with circa 58% of the market share. And for a good reason. Google utilizes this multiplatform browser fully, allowing users to sync between multiple devices, including passwords. Besides that, it has an abundance of extensions and packs a well-recognized and fairly customizable user interface.

Now, even though Chrome offers Smart Lock (you’ll need a Gmail account for that), the built-in password manager, a lot of users don’t want to use it. Some of them don’t need their passwords saved while others use a third-party password manager (like LastPass). Either way, every Chrome users will, by default, get prompts whenever a password field pops-out. The “Do you want Google Chrome to save your password?” prompt can be an annoyance for uninterested users.

In addition, Chrome’s Smart Lock is fairly reliable as it stores your passwords, bookmarks, and browsing history on the cloud storage. However, there are plenty disadvantages and advantages you must count on if you eventually decide to use this built-in password manager. Finally, if you’re certain you’ll do better without it and those frequent prompts, here’s how to disable it for good:

  1. Click on the 3-dot menu in the top right corner and open Settings.do you want google chrome to save your password disable
  2. Click on the 3-line menu in the top left corner and expand Advanced settings.do you want google chrome to save your password disable
  3. Choose Passwords and forms.do you want google chrome to save your password disable
  4. Select Manage passwords.do you want google chrome to save your password disable
  5. Disable Password Management and confirm changes.do you want google chrome to save your password disable
  6. If you want to disable it for all devices, navigate to passwords.google.com and disable Smart Lock there.

Also, here you can delete the previously saved passwords.

That should do it. Hopefully, this was good enough to relieve you of the annoying prompt. In case you have any questions or suggestions, do tell us in the comments section below.

RELATED STORIES YOU SHOULD CHECK OUT:

Fix: Skype latest version is not working on Windows 10/11

When someone mentions “VoIP” and “Windows” in the same sentence, you can be almost certain it refers to Skype. Microsoft’s VoIP and messaging application is there for ages and it’ll be there for days to come. However, the imposing of the Skype app (UWP version) for Windows 10 made a lot of folks mad. Namely, this Skype version is lackluster on its own and the frequent updates which “fix one and break three things in the process”.

Users reported a whole palette of emerging issues after an update. Starting with the messaging features and reaching to audio/video issues, failed subscriptions, missing contacts, and overall downgrades in performance. For that purpose, we enlisted the most common solutions which should tackle most of the issues which affect you. Make sure to check them out below.

How to fix the Skype issues brought by the latest update

  1. Reset app
  2. Run Troubleshooter and sign out/sign in again
  3. Check for possible connection and hardware issues
  4. Update Skype again
  5. Reinstall Skype
  6. Just stick with the classic Skype for the time being

1: Reset the app

Let’s get one thing out of the table before we move to the troubleshooting steps. The UWP Skype app is, in our humble opinion, a poorly designed and even poorer optimized nonsense. Turning the globally-acclaimed VoIP service into an unreliable instant messenger clone is one of those risky changes basically no one ever wanted. Of course, we refer to its current state. Maybe they make it work eventually, even though it’s there for more than a year. So, make your own conclusions. With that said, let’s start with the troubleshooting.

After an update rendered your Skype partially or completely unusable, the best bet to resolve it is to reset it to default settings. The pilled up cache can be the cause of the issue at hand. This can be done by following these instructions:

  1. Press Windows key + I to open the Settings app.
  2. Choose Apps.skype latest version is not working
  3. Under the Apps & features, search for Skype.
  4. Expand Skype and click on Advanced options.skype latest version is not working
  5. Click on the “Reset” button.skype latest version is not working
  6. Start Skype and sign in again.

2: Run Troubleshooter and sign out/sign in again

Windows 10 brought the unified Troubleshooting menu to ease the problem-addressing procedure for even the inexperienced users. Even though we have our reasons to doubt its functionality and overall success rate when it comes to issue-resolving, you can always give it a try. It’ll take less than a minute and it might help determine the cause of the Skype’s temporary malfunctioning.

Follow these steps to run the dedicated “Windows Store apps” troubleshooter in Windows 10:

  1. In the Windows Search bar, type fix and open Troubleshoot from the list of the results.skype latest version is not working
  2. Scroll to the bottom and expand Windows Store apps troubleshooter.
  3. Click on the “Run the troubleshooter” button and follow the instructions.skype latest version is not working

Also, we recommend signing out and signing in again. It helped some affected users so it’s worth a shot.

3: Check for possible connection and hardware issues

Now, even though this is rarely the case, the connectivity issues can affect the Skype performance. We’re aware that chances are everything is fine in regards to your bandwidth, but for the sake of meticulous approach, make sure that there are not any connection-related halts.

  • READ ALSO: Skype Credit and subscriptions are unavailable for some, fix incoming

For that purpose, follow the steps we provided below to confirm everything is fine on your side:

  • Maybe Skype servers are down. Check the dedicated servers status, here.
  • Restart your router.
  • Use LAN instead of the Wi-Fi connection.
  • Disable VPN, proxy or DNS tweaks.
  • Test your speed and latency.
  • Disable bandwidth-hogging background applications and look for changes.

4: Update Skype again

Even though minor bugs (those can have a debilitating effect on the Skype performance, as well) are hardly noted, the responsible development team at least deals with the major bugs. Thus, you can expect the patched update to come soon. So, it’s worth checking for a newly appointed update and maybe (big maybe), the problem will be properly addressed.

The updates are mostly automatically distributed but it’s a simple task to check for those on your own. Here’s how to do it:

  1. Open Microsoft Store.
  2. Click on the 3-dot menu and then choose Downloads & updates.skype latest version is not working
  3. Click on the “Get updates” button.skype latest version is not working

5: Reinstall Skype

Another viable solution for the problem at hand is to reinstall the Skype completely and start from a scratch. The application itself might have been falsely configured and the blank slate is the best way to make it work again. The reinstallation procedure is rather simple and it won’t take you too much time and effort.

Follow these instructions to reinstall Skype on Windows 10:

  1. Press Windows key + I to open the Settings app.
  2. Choose Apps.skype latest version is not working
  3. Under the Apps & features, search for Skype.
  4. Uninstall Skype.
  5. Restart your PC.
  6. Open Microsoft Store and search for Skype.skype latest version is not working
  7. Install Skype, sign in, and look for changes.

6: Just stick with the classic Skype for the time being

And, finally, we reached the workaround which should resolve all your problems. The good old classic Skype for desktop is, at the present time, much better choice than the UWP app. It doesn’t look like a flashy contemporary instant messenger, but functionality-wise, it’s as reliable as a Swiss clock.

Have in mind that you can use only one Skype version at a time, so we recommend uninstalling the app and installing the classic Skype for Windows. Here’s how to do it in a few simple steps:

  1. Remove Skype app from your system and navigate to the official download site.
  2. Download old, standard desktop version and uninstall the UWP app.
  3. Install it in a standard manner and sign in.
  4. Look for improvements.

That should do it. In case you’re aware of some alternative troubleshooting steps, feel free to share them with us in the comments section below.

RELATED STORIES YOU SHOULD CHECK OUT:

VR Software for PC: 4 Bes to Use in 2026

Virtual Reality has been on the rise since the turn of the century with different applications of this technology. VR entails computer-generated scenarios that simulate real-life experiences. This innovation has changed the landscape as architects, game developers and graphic designers rely on VR to generate mind-blowing content. To harness the power of VR, virtual reality software is needed. Windows Report has compiled this list of the best Virtual Reality software solutions available for PC in terms of functionality and features.

Use these virtual reality tools to create VR content on PC

Unreal Engine


virtual reality softwareUnreal Engine is quite popular in the gaming industry. The software offers many interesting features, having versatility in creating various games. Unreal Engine allows the creation of games from simple 2D hand drawn platforms to realistic cinematic movie gaming experiences.

The tools has a custom built-in marketplace where users can discover and buy assets and tools to enhance their projects. Also, Unreal Engine has a large follower base with a large community sharing information, tutorials and the latest trends.

Furthermore, Unreal Engine is free to download. You can download the software and begin to create virtual reality experiences and models at no extra costs.

Download Unreal Engine


Unity 3D

unity VR gaming

Unity 3D is one of the front-runners in Virtual Reality software technology, with the software having grown from a little startup  to one of the best solutions available on the market.

In addition, Unity 3D has a flexible game engine which is super good and works well for solo developers and small developer teams. The software is known for being user-friendly compared to other rivals with cool advanced features.

Furthermore, this software recently launched its VR headset which maximizes the full power of the software — this has earned the software rave reviews. There is also an asset store which helps in saving time on projects with good tutorials and tips about the software.

Unity 3D can be downloaded for free. You can start creating VR without any costs.

Download Unity 3D

Lumberyard


virtual reality softwareLumberyard is a virtual reality game engine recently revealed by Amazon based on the CryEngine software with some few tweaks.

As Lumberyard visual graphics is based on CryEngine, it has awesome an 3D environment and lots of real-time effects to enhance your projects. The unique editor consists of weather effects, camera frameworks, cloth physics, character and animation editors, particle editors, and more.

Lumberyard is free to use with no royalty charges and users have free development license which includes source code for engine editor and every tool in the software.

Download Lumberyard


IrisVR

irisvr

This Virtual Reality software is produced by a team of developers from Vermont. IrisVR is unique in its simplicity and comes with a drag and drop launcher.

The software gives an excellent rendering of VR models and is available for both Mac and Windows. In addition, IrisVR supports SketchUp files, Revit, 3DS Max, IFC Files, Blender and Archicad.

This software has a key feature where users can easily add true scaling to projects within the app. This can culminate in change of scenery and make objects feel more realistic. IrisVR is perfect for professionals working in the building industry.

Download IrisVR

Which of these virtual reality software are you ready to get? Share your favorite in the comments section below.

RELATED STORIES TO CHECK OUT:

Stuck on older Windows 10 Insider builds? Fix incoming

Microsoft wants to offer enhanced support for its Windows Insiders because they are doing a critical job for its OS, so they have to receive more attention.

Windows Insiders’ job is to install new builds to try out the latest Windows 10 features, but sometimes they can’t avoid getting greeted by all kinds of bugs that are lurking in Windows Update.

Some of them can lead to getting stuck in a particular build and being unable to download new ones.

Got stuck on older Windows 10 builds?

Microsoft tweeted the long-awaited announcement, saying that:

We know there are some #WindowsInsiders who are “stuck” on older preview builds.  We’re working on a program to help pull some of your PCs onto newer builds.  Check this forum post for a quick highlight and stay tuned for more details!  https://aka.ms/wipcatchup.

Jason Howard, Senior Program Manager of the Windows Insider Team also posted on a blog to announce the happy news. He raised more awareness over the fact that Windows Insiders’ inability to install new builds because they are stuck on older ones is an issue that definitely deserves increased attention.

A program will fix this issue

Howard explained that the program that’s designed to come to the rescue is a simple one that will help Insiders get their systems unstuck and able to receive new builds.

He didn’t say when is the exact moment that this Insider saving program will get released by he did urge Windows Insiders to stay tuned because future announcements will reach them shortly. He also told them that using ISO file is a useful solution for whenever they get stuck on older builds. The only downside of this potential solution is that it’s only useful to those who already have experience with the whole process.

So, Windows Insiders stuck on older builds, stay put because Microsoft is on its way with a helping hand any day now. Meanwhile, you can read Microsoft’s blog post.

RELATED STORIES TO CHECK OUT:

How to download Microsoft Cruel Solitaire

Microsoft Cruel Solitaire was the part of Windows for more than a decade. Solitaire games are the most popular Windows games ever and the irreplaceable part of the Windows platform. Until, Microsoft decided not to incorporate Cruel into their Solitaire collection. Yes, the one residing in Microsoft Store — the UWP revamp of Solitaire golden classics dating to ancient Microsoft Entertainment Pack.

Why Microsoft is killing off solitaire classics — we can’t be certain. Luckily, there are ways to play Cruel Solitaire on your Windows 10 PC. Check them out below.

Download and install Microsoft Cruel Solitaire on Windows 10

Microsoft Cruel Solitaire was the part of the renowned Microsoft Entertainment Pack, firstly introduced in 1990, 28 years ago. This game is the variation of the standard solitaire, with standard one 52-card deck. The main difference in comparison to other Solitaire games: the tableau consists of 5 aces as the foundation and 12 piles of remaining randomly-shuffled cards.

Now, over time, this card game get various revamps and releases by several third-party sides, but for some reason, Microsoft stopped incorporating it back in the 90’s. For the seasoned Windows users and enthusiasts, this classic was a pure joy and they want it back. Of course, the game was a 16-bit which renders it unplayable on 64-bit systems. But can you run it on Windows 10? The answer is both yes and no.

Due to compatibility reasons, you can’t run the Microsoft Entertainment Pack in Windows 10 without a virtual Windows XP system. This can be an issue and you’ll need an extra mile to get it to work. However, there are some Solitaire packs which incorporate Cruel Solitaire and are obtainable through Microsoft Store. Also, you can download modern 3rd-party remakes of the game.

Third-party online: Novel Games Cruel Solitairedownload microsoft cruel solitaire

Microsoft Store: Solitaire-HD ($4.99)download microsoft cruel solitaire

We can only hope that some of the future iterations of Microsoft Solitaire Collection will include Cruel Solitaire as well. For the time being, you can try the aforementioned sources and enjoy your favorite solitaire variation.

If you’re aware of another way to play the game on Windows 10, make sure to tell us in the comments below.

RELATED STORIES YOU SHOULD CHECK OUT:

Microsoft’s Azure Sphere is a new security platform for IoT devices

Microsoft announced an OS custom built for IoT security and an important cloud security service that will guard every device. Azure Sphere is a new security platform that enables highly secured and connected MCU devices. These are an innovative class of devices connected to the web, and they rely on a small chip called microcontroller unit aka MCU. These include industrial connected equipment, connected appliances, toys and more. Microsoft’s security platform is set to enhance the security of these IoT devices.

Microsoft teams up with more companies

Microsoft is working with its partners to bring Azure Sphere based chipsets, and it’s estimated that a chipset will not be priced above $10. The very first ship will make its debut under the name MediaTek MT3620, and it’s scheduled to hit the market later this year. Azure Sphere is currently in private preview, and Microsoft is working hard with its partners to build products that will be powered by it. Azure Sphere consists of three elements.

Azure Sphere MCUs

MCUs mix real-time and application processors with built-in Microsoft security tech and connectivity. The chips include custom silicon security tech from Microsoft to provide the maximum level of security.

Azure Sphere OS

The operating system combines the security features flaunted by Windows, a security monitor, and a custom Linux kernel to high-security software environment and platform for brand new IoT experiences.

Azure Sphere Security Service

This is a cloud service and a key element that will guard every device. It will feature device-to-device and device-to-cloud communication via certificate-based authentication. It’s also set to detect emerging threats across the whole Azure Sphere ecosystem via online failure reporting and renewing security all the time via software updates.

You can read all the exciting details on Microsoft Azure Sphere and on securing and powering the intelligent edge on the official website.

RELATED STORIES TO CHECK OUT:

Microsoft releases Windows Template Studio 2.0, complete with new interface tweaks

Microsoft announced today they have released Windows Template Studio 2.0, with the primary goal of helping developers build their Windows 10 apps faster. The company has already steadily improved the open source tool, and this latest release does not come with many new features, but just a few under the hood changes.

The lone change in this release is an improved user interface which comes thanks to a partnership with the Visual Studio team. Indeed, developers should now find that the Windows Template Studio interface is even faster. “We feel the new interface is faster and more approachable. We’ve improved our template updating experience, our actual templates and much more. Our wizard also now detects dark, light and high contrast modes of Visual Studio,” explained Microsoft’s Senior Technical Product Manager Clint Rutkas.

A full list of the new changes in this latest release on docs.microsoft.com, which will be the new home for Windows Template Studio documentation and templates. Microsoft, though, does say that GitHub will still host docs about modifying the engine or creating a template for the wizard.

There is more on the road ahead for developers, and Microsoft also says that they will continue to add new features and templates over time. If you’ve already installed Windows Template Studio, you can get this update by Tools->Extensions and Updates. Those just installing can head here and click on download, and then double-click the VSIX installer.  Also feel free to submit your feedback to Microsoft on GitHub.