UsbHub3.sys Blue Screen Error: Causes & How to Fix

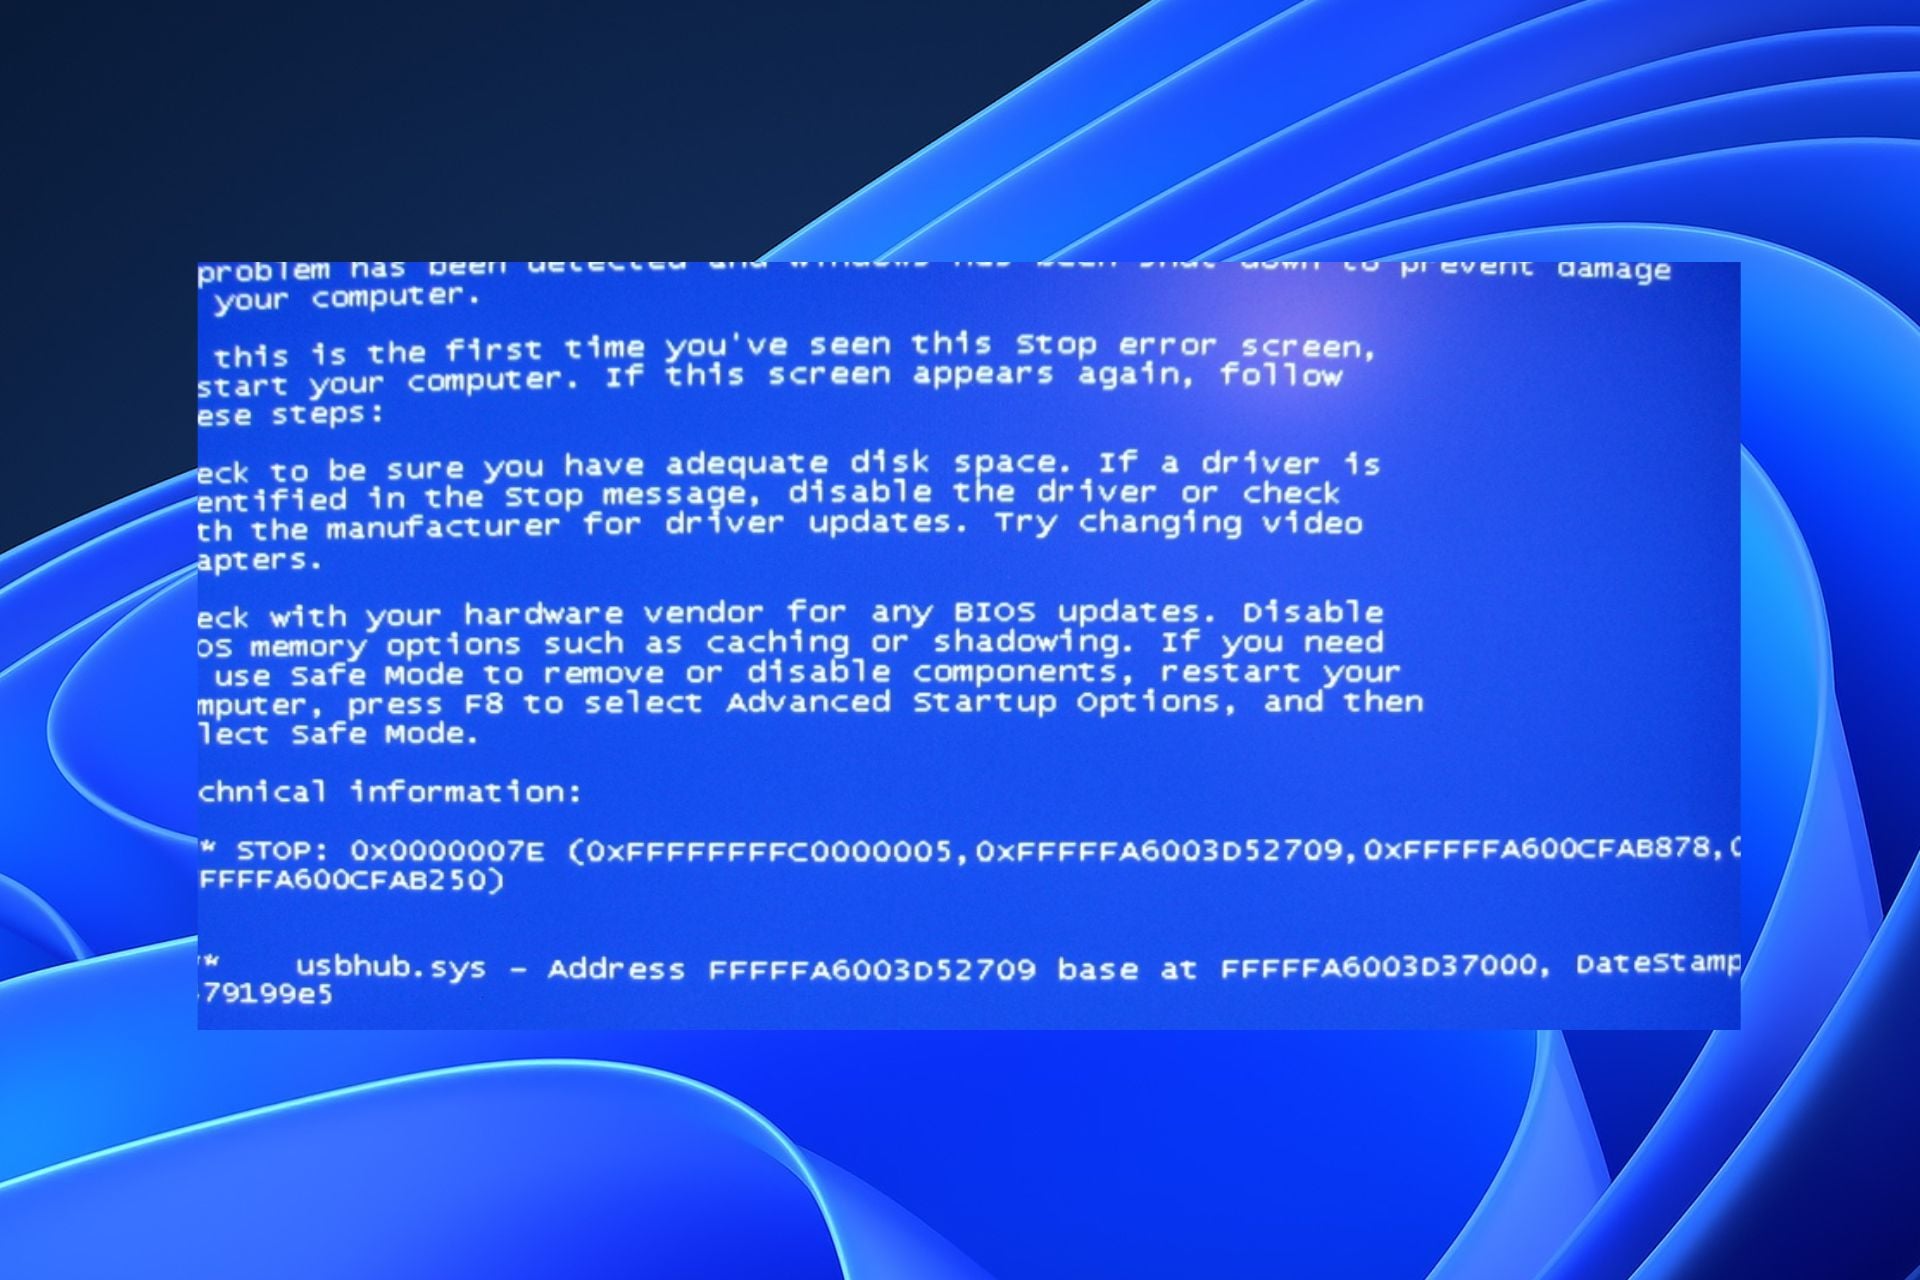
UsbHub3.sys is a Windows driver file but can sometimes cause issues that may lead to Blue Screen errors on the PC. This may be due to numerous problems affecting the file, resulting in the UsbHub3.sys error. Fortunately, this guide will discuss the causes and possible fixes for the error.

Further, you can check the major causes of BSOD and everything you need to know about fixing it.

What causes the UsbHub3.sys error?

Here are some notable factors that can cause the UsbHub3.sys error BSoD to appear on your computer:

  • Corrupt system files – If the system files are corrupted, they can infect other files running the device drivers, resulting in corrupt or virus-contaminated UsbHub3.sys.
  • Conflict with Antivirus programs – Antivirus software may interfere with the activities of the driver files on your PC or pick them as threats to the system.
  • Outdated or conflicting device drivers – When you install a driver not compatible with your system, it can affect other drivers running on your PC.
  • Hardware issues – The error can occur after installing new hardware or software, such as a Windows update on your computer.

Nevertheless, you can fix the UsbHub3.sys error by following the steps below.

How can I fix the UsbHub3.sys error?

Before proceeding with any advanced troubleshooting steps, go through the following:

If you can’t resolve the error, try the steps below:

1. Run SFC and DISM scans

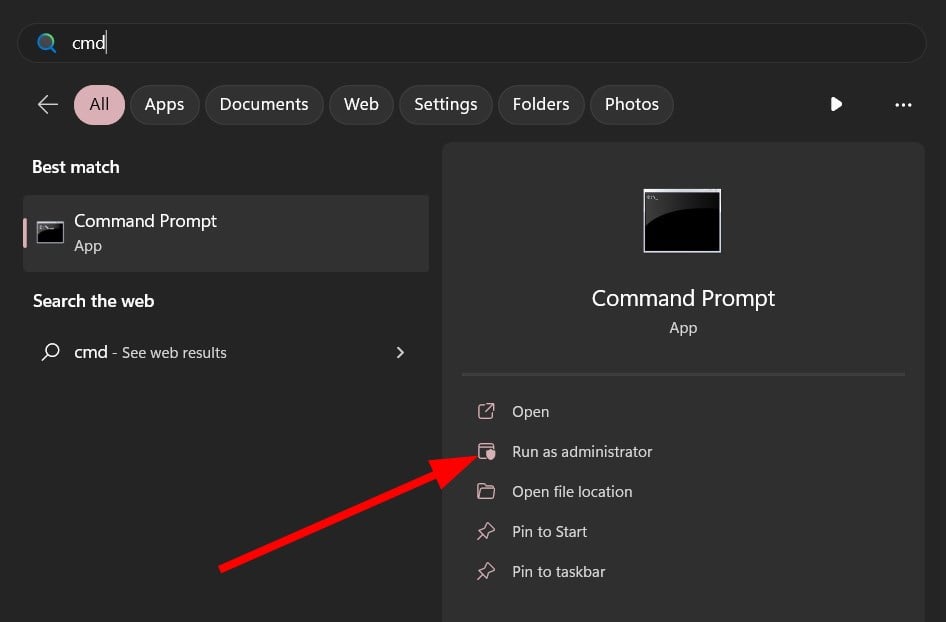
  1. Left-click the Start button, type Command Prompt, and click the Run as administrator option.
  2. Click Yes on the User Account Control (UAC) prompt.
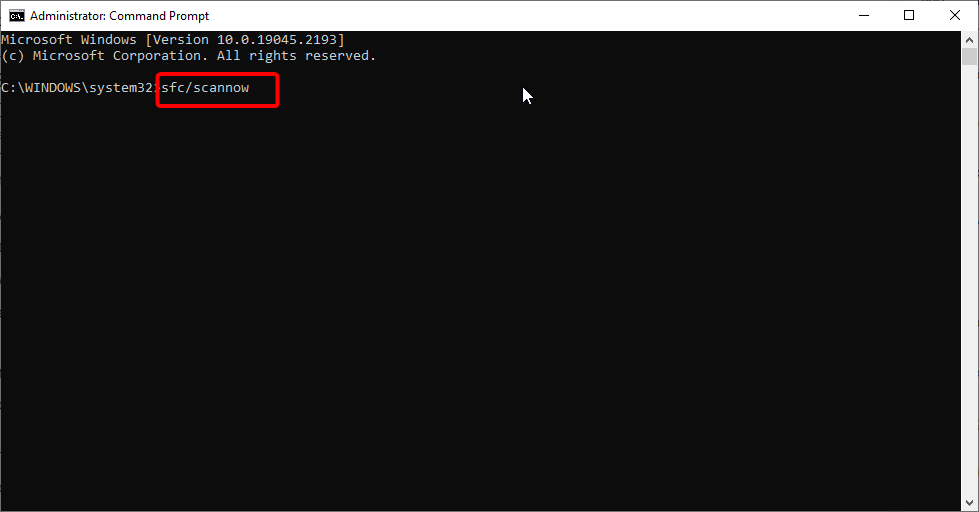
  3. Type the following and press Enter: sfc /scannow
  4. Type the following commands and press Enter: DISM /Online /Cleanup-Image /RestoreHealth
  5. Restart your PC and check if the error persists.

Running an SFC scan will detect and repair corrupt system files. The DISM scan will restore disk health. Check how to fix the run as administrator option if it’s not working on your PC.

2. Run the Check Disk Utility

  1. Left-click the Start button, type Command Prompt, and click the Run as administrator option.
  2. Click Yes on the User Account Control (UAC) prompt.
  3. Type the following command and press Enter: chkdsk C:/r/x
  4. Exit the Command Prompt and restart the PC.

The CHKDSK command allows the system to scan the disk, read partitions, and troubleshoot issues affecting the UsbHub3.sys disk utility driver.

See what to do if you experience chkdsk.exe running on every boot issue on Windows 11.

3. Update driver using Windows update

  1. Press the Windows + I key to open the Windows Settings app.
  2. Go to the Windows Update tab and select the Advanced options.
  3. Click on the Optional Update.
  4. Tap on the drop-down button on the Driver Update and checkmark the list of updates available.
  5. Click the Update and Install button and wait for the drivers to install.

Installing driver updates will fix bugs affecting your devices and improve the performance of the Windows components. Read about ways to diagnose and fix Windows Update not loading on your PC.

4. Run System Restore

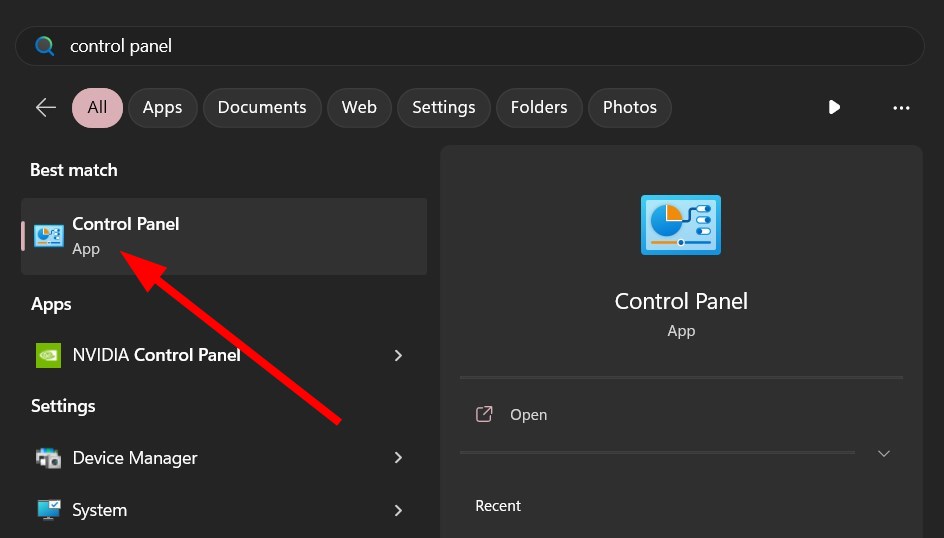
  1. Press Windows + R key to open the Run dialog box, type control, then press Enter to open the Control Panel.
  2. Type recovery in the Control Panel search bar and select Recovery.
  3. Then click Open System Restore.
  4. Click Next in the Restore system files and settings window.
  5. Choose the restore point you want to restore from and click Next.

System Restore will remove recent activities after the restore point, recovering the system to the previous point with its files intact. Read our guide on how to fix Restore Point if it’s not working on your PC.

5. Update Windows OS

  1. Press Windows + I key to open the Windows Settings app.
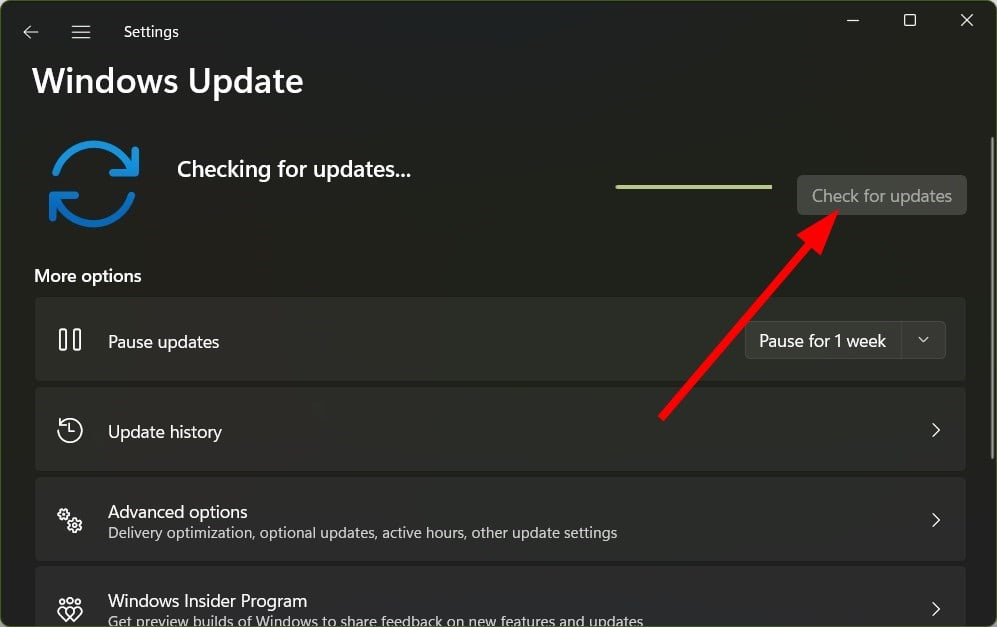
  2. Click on Windows Update and select the Check for updates button. If there are any updates available, it will search for and install them.

Updating Windows will fix system bugs impeding the driver’s processes and install new features to help the system run correctly.

Check our guide about fixing Windows not connecting to update service on your PC.

In addition, our readers can check the Wdcsam64.sys Memory Integrity Error and how to fix it on Windows 11. Also, read about the Brusbsib.sys Incompatible Driver error on Windows PCs.

If you have further questions or suggestions, kindly drop them in the comments section.

How to Access & Use ChatGPT in Italy [Quick Bypass]

Are you wondering how to use ChatGPT in Italy? We have all you need to know in this guide.

We understand that AI is taking the world by storm, and ChatGPT seems to be leading the charge. However, not everyone has access to the Open AI project. For instance, there is a ban in a few countries, including Italy.

Unlike other unavailability errors, users in Italy are at the mercy of this ban. Let us show you how to navigate this situation if you are in Italy.

Why has ChatGPT been banned in Italy?

While we may not be entirely sure of what triggered the ban, we can deduce from the explanations offered by the Wall Street Journal that the ban was triggered because of specific privacy conflicts.

Details were given to customers via email that read:

We regret to inform you that we have disabled ChatGPT for users in Italy at the request of the Italian Garante…

…We are commited to protecting people’s privacy, and we believe we offer ChatGPT in compliance with GDPR and other privacy laws.

While we hope this is restored soon, and you can sign up and return to using your favorite AI. Here are some easy workarounds.

How do I access ChatGPT from Italy?

1. Use a VPN

This would seem like the most reliable means. VPNs allow you to search the web anonymously. This means you may search the web without disclosing the location you are using it from.

We suggest using a paid version of any of the best VPN software. You can go through the VPN tools and pick the one that gives you guaranteed access to this AI platform.

At the same time, it’s advisable to download and install ExpressVPN on your PC and connect to other server locations across the world where ChatGPT is now supported.

ExpressVPN

Make a move and activate this VPN with unrestricted content everywhere and swift navigation.
Check price Visit website

2. Use services that have ChatGPT APIs

  1. Click your profile picture at the top right and click on Snapchat+.
    How to use chatgpt in italy
  2. Complete the subscription by clicking on a plan, selecting the Subscribe button, and making payment.
  3. Lastly, toggle on the My AI entry.
    How to use chatgpt in italy
  4. Now you can use the feature on your Snapchat.

Outside the ChatGPT environment, a few services have integrated the ChatGPT API into their chatbots. Using any of them will be an indirect way of accessing the Open AI service.

The two most prominent options that will work from Italy are Snapchat via My AI and the Microsoft 365 integrations.

3. Use a specialized browser

  1. Visit the official Tor website.
  2. Download a version that works for your OS.
    How to use chatgpt in italy
  3. Click on the downloaded file to install it.
  4. Lastly, launch the browser and navigate to ChatGPT.

Using the Tor browser will work because Tor is an anonymous browser. It also offers a private browsing experience and will bounce your requests through several relays.

If you are wondering how to use ChatGPT in Italy, any of the above solutions should help you work around it successfully. You may no longer be able to integrate it with other third-party services, but you should still be able to use regular queries and responses.

We hope you have success, and lastly, let us know what you feel is the most convenient workaround.

How to Enable the Green Screen on Teams

Microsoft announced that their pearl of collaboration app, Teams, has now featured the support of the green screen feature as an enhanced background effect.

The feature, which is now living inside the public preview, allows users to improve the sharpness of their virtual background during meetings. It can be extremely useful, especially for users who want to change their meetings’ backgrounds and keep things exciting. 

Green screen improves the sharpness and definition of the virtual background effect around your face, head, ears, and hair. It also allows you to show a prop or other object in your hand to be more visible to other meeting participants.

However, not every user gets this enhancement, at least for now. Redmond officials also stated that the green screen feature is only supported on Windows and macOS desktops with Intel chips, meaning that Mac’s latest M1 & M2 processors are not yet welcomed. 

To activate this, you would need to have a solid, flat, and stainless background wall behind you, so it won’t work perfectly if you have pinboards, windows, or anything that could mess up the surface. Only then you can apply a background effect during a meeting to enable this. 

How to enable green screen on Teams

1. Once you’ve applied a background effect in Teams meeting, click More ➜ Video effects.

2. In Backgrounds, go to Green Screen Settings.

3. You’ll see a toggle button under Teams settings ➜ Devices ➜ Green screen. Click on that.

4. Click the backdrop icon.

5. Move your cursor into the Preview box to manually pick the color, then return to the meeting. 

Also, being a public preview-only feature, it’s not out yet for general availability, and it may take a while. Microsoft welcomes any feedback, but until then, we’ll keep you updated once this feature is out for the general public. 

Speaking of which, we’ve also covered what could be the next generation of Teams. Collectively dubbed Teams 2.0, the new app will reportedly cut all energy and data consumption in half while boosting its loading time. 

And before you leave, do check how to change the desktop background before a meeting in Teams to avoid last-minute hassles.

What do you think about this feature? Let us know in the comments!

Adobe After Effects is Running Slow? 5 Ways to Speed It Up

Adobe After Effects running slow is one of the most frustrating problems experienced by editors. It may lead to lags and freezing, making it difficult to review your work accurately. However, this guide will take you through basic fixes to resolve the issue.

Alternatively, you may be interested in learning what to do if Adobe After Effects is not using GPU on PC.

Why is Adobe After Effects running slow?

Many factors may be responsible for Adobe After Effects running slow on your PC. Some are:

  • System requirements issues – Running the tool on a system that doesn’t meet the minimum requirement can cause it to lag and sometimes crash.
  • Interference from other software – Running other programs simultaneously with Adobe After Effects can be problematic. It is so because other programs can consume the system resources, leaving Adobe After Effects with not enough to run its processes.
  • Corrupted installation package – You can experience Adobe After Effects running slow if its files are corrupted or not intact. The app will be unable to access necessary files for its operation, resulting in a delay in processing.
  • Issues with Adobe Media Encoder: If the Adobe Media Encoder is not installed, you will also face this issue.

Nevertheless, you can fix them by troubleshooting Adobe After Effects and your computer.

What can I do if Adobe After Effects is running slow?

Before trying any advanced troubleshooting steps, go through the following:

If the issue persists, proceed with the solutions below:

1. Update your GPU driver

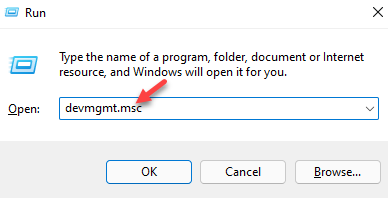
  1. Press Windows + R keys to prompt the Run window, type devmgmt.msc, and click OK to open the Device Manager.
  2. Select the Display Adapter entry, right-click on the graphics driver, then select Update driver from the drop-down menu.
  3. Click on Search Automatically for the updated driver software option.
  4. Restart your PC and check if Adobe After Effects runs faster.

Updating the GPU driver will fix bugs causing the app to run sluggishly and install the latest features to improve performance. Read our post about updating graphics drivers on Windows 11 for more steps.

2. Disable Hardware Accelerator

  1. Launch Adobe After Effects on your PC and to the Menu window.
  2. Click on Preferences from the drop-down, then select Display.
  3. Uncheck the boxes for the Hardware Accelerate Composition, Layer, and Footage Panels options.
  4. Click OK to save the changes.
  5. Restart Adobe After Effects and check if the problem persists.

Disabling Hardware Acceleration will improve your playback by tweaking the Display options for After Effects.

3. Clear After Effects Media Cache

  1. Open Adobe After Effects on your PC and go to the Menu window.
  2. Click on Preferences from the drop-down, then select Media and Disk Cache.
  3. Tap on the Empty Disk Cache button, then OK.
  4. Click Clean Database and Cache, then the OK button to save the preference change.

Clearing the After Effects Media Cache Files will remove corrupt data or file clogging up your device and resolve the app speed issues.

4. Change the Adaptive Resolution

  1. Launch After Effects on your PC.
  2. Click on the Fast Previews icon next to the Playback Resolution drop-down.
  3. Then, select Fast Previews Preferences from the drop-down menu.
  4. Change the Adaptive Resolution to 1/16 and click GPU Information.
  5. Change the Texture Memory to 1152 and click OK.

Adjusting the Adaptive Resolution allows Adobe After Effects to decide how much information to show from a high-resolution clip.

5. Update Windows OS

  1. Press the Windows + I to open the Windows Settings.
  2. Then, click on Check for Updates after clicking on Windows Update. Wait for the Windows update result and click on Install Update if a Windows update is available.
  3. Then restart your PC to take effect.

Updating the Windows OS will install patches for fixing bugs impeding your system from After Effects smoothly.

Read about fixing Windows not connecting to update service if the error occurs on your PC.

In addition, you may be interested in fixing Photoshop has encountered a problem with display driver error. Also, check how to fix Adobe error 16 on Windows 11.

Should you have further issues or questions, kindly drop them in the comments section.

ChatGPT Error in Body Stream: What Is It & How to Fix It?

ChatGPT has been a breath of fresh air and the golden child of AI. However, even though it often feels flawless, there are a few hiccups here and there while we use it. One such problem is the ChatGPT prompt error in body stream.

We have investigated this issue, and in this guide, we introduce you to all essential aspects and solutions to get you through.

Note that there are other problems like ChatGPT not working and unavailable history, but generally, with little effort, you should be able to fix most ChatGPT errors.

What is the ChatGPT error in body stream?

The language model interacts with users after they have inputted a prompt. It uses its prompts to produce a worthy response. However, getting the error in the body stream means ChatGPT can not give you an answer.

You may encounter this error for any of the following reasons:

  • Server problems – Even though it feels like ChatGPT servers are ridiculously steady and always available, there is a rare occurrence when they are down.
  • Ambiguous inputs – There may be conflicts with the input statements, or in some cases, they may be too lengthy and understandable.
  • Cache issues – Even with clarity and a well-defined input, your page may be loading old cached data.

These are common causes, so let us explore your best solutions now.

How do I fix ChatGPT error in body stream?

Before going into any of the solutions we recommend, we suggest you do the following:

  • Use a different browser – In some cases, this error could be specific to your browser, which means changing it will save you a lot of time troubleshooting.
  • Reload the page – Often, this may be a tiny bug that is cleared if you reload the page.
  • Waiting out the problem – If a server issue triggers it, you usually will have no control over the situation, and your only choice will be to try again when ChatgPT has fixed their server issues.

1. Use a different prompt

A simple fix will be rephrasing your initial input. There are chances that what you inputted was ambiguous. In some other cases, it may be too long and exceed the limit the Open AI creation can handle.

2. Use the Regenerate response function

  1. After you receive the error, scroll down to the bottom of the page.
  2. Click Regenerate response.
    chatgpt error in body stream

Note that you may not always have this option. You may have to refresh the page and reinput your query in such a case.

3. Clear your browser cache

  1. Paste the address below in the Address bar and hit Enter (We use Chrome in this example, and the process will slightly differ in other browsers).
    chrome://settings/clearBrowserData
    chatgpt error in body stream
  2. Select your preferred time range, tick all the checkboxes, and click the Clear data button.
  3. Restart the browser.

Clearing the cache is important because the error in the body stream problem in ChatGPT may be stored in your browser cache. If this is the case, clearing it should fix the problem. It can also help you fix similar issues like Error in Moderation; read this guide to learn more.

4. Contact support

If the above solutions do not work, you should contact ChatGPT support. The best option is to send an email to [email protected]. You should receive a response shortly that will give you some direction.

Using the solutions we have discussed in this guide should come in handy. Note that depending on your specific situation, you should try what seems like the most relevant solution.

Also, as a last resort, you may try signing up for a new account. This, however, will mean you lose your history on the former one.

We like to hear from you, so please let us know which of these fixes was the most effective.

How to Integrate ChatGPT With Word [Quickest Ways]

ChatGPT is becoming one of the most used tools on the Web. As you know, you can use this tool for any purpose, and many are wondering how to get ChatGPT for Word.

The AI chatbot is extremely powerful, and the new version was released recently. To learn more, read our guide on ChatGPT 4 vs ChatGPT 3.

In today’s guide, we will show you a couple of ways to use ChatGPT with the popular text processor, so let’s get started.

Is ChatGPT coming to Microsoft Office?

Yes, it seems that Microsoft has plans to bring artificial intelligence to Office. We wrote previously about ChatGPT in Office 365, but unfortunately, we don’t have any information regarding the release date.

Even though this feature isn’t officially available, there are still ways for you to use artificial intelligence in Word.

How can I get ChatGPT for Word?

1. Use the Ghostwriter addon for the desktop version

  1. Open Microsoft Word on your PC.
  2. Next, go to Insert and choose Get Add-ins.
  3. Search for Ghostwriter and click on Add next to it.
  4. Click Continue.
  5. Now go to the Ghostwriter page and purchase the license.
  6. Next, go to the OpenAI page, and sign up to get your API key.
  7. After that, open Ghostwriter in Word and enter your purchase email and API key in the Product key section. Lastly, click on Validate.

After doing that, just input your query and the extension will do the rest.

2. Use the Ghostwriter addon for the web version

  1. Open Office 365 in your web browser.
  2. Select a new Document.
  3. Go to Add-ins and select More Add-ins. If the Add-ins option is grayed out, save your document and open it again.
  4. Search for Ghostwritter and click on Add button.
  5. Click on Continue to proceed with the installation.
  6. Visit the Ghostwriter page and purchase the license.
  7. After that, navigate to the OpenAI page, and sign up to get your API key.
  8. Enter the purchase email and API key and click on Validate.

After that, you’ll have ChatGPT available in Word for the Web.

As you can see, getting ChatGPT for Word is simple, but unfortunately, this feature isn’t free and requires a license before you can use it.

Microsoft also has plans to bring AI to its Office suite, and we can’t wait to try it in action, but currently, these are the only methods that let you use ChatGPT in Word.

Not a fan of ChatGPT? No worries, here are some great ChatGPT alternatives you might want to try.

What do you use ChatGPT for? Let us know in the comments section below.

Google Nearby Share: How to move files effortlessly

Last year, Google said during the 2022 International CES event in Las Vegas that they were building an app that could share files between Windows and Android devices effortlessly. 

Similar to Apple’s AirDrop ecosystem, the app, dubbed Google Nearby Share, can transfer your files with just one click away as long as you have the option turned on.

Now, it seems like we’re finally getting somewhere with this. 

As announced on the company’s blog, Android’s senior product manager Priya Samnerkar said that the Nearby Share app has arrived as a beta on Windows after years of exclusive activity on Android devices. 

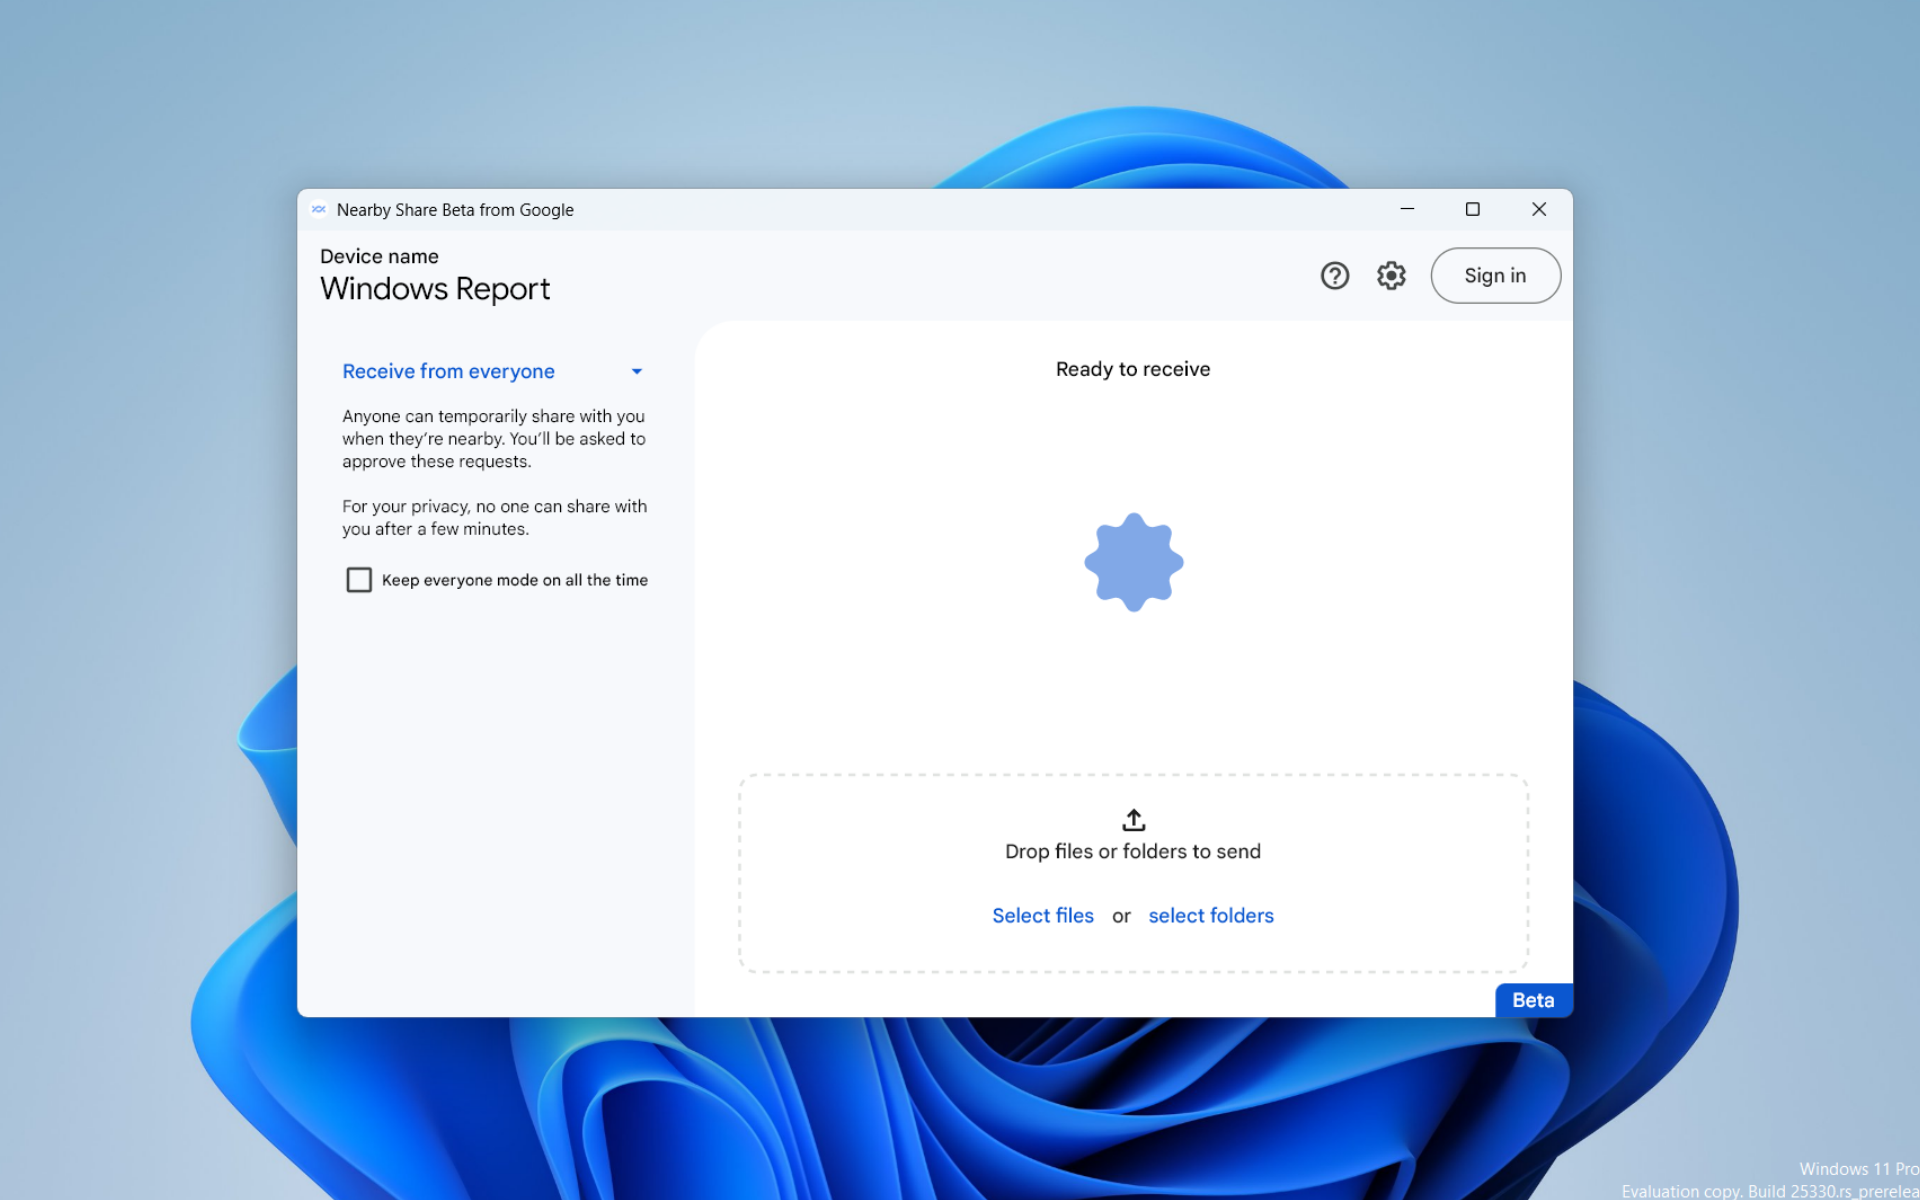
Nearby Share Beta works with your Windows PC whether the app is open on the desktop or running in the background. Sending a photo, video or document from your PC to a nearby Android device is as easy as dragging and dropping it into the app, or by selecting “Send with Nearby Share” in the right-click menu. Just select which Android devices you want to share with from the list that pops up.

The service is currently rolling out for users in the US and most countries globally, but even some European countries like Ireland, Italy, Germany, and France still don’t get the service. While it supports most Windows 11 and Android desktops/mobiles, it’s still not working on ARM devices.

If you’re still curious about how that works, read along to see how to move files effortlessly with Google Nearby Share. Then, once it’s out for general users, we’ll update this article accordingly. 

How to set up Google Nearby Share

1. Open your browser and head over to the download page of the Nearby Share App on Windows.

2. Click Get Started.

3. Once the download is finished, double-click on BetterTogetherSetup.exe.

4. Finish the installation

5. You can click on Sign in or Use without an account. This time, we’ll try to use this without an account, but you’ll need to sign in if you want to connect with your contact list.

6. Set up your local account on Nearby Share.

7. On Device visibility, set it to Everyone and Use everyone mode temporarily. But be mindful to turn it off once the file transfer is finished.

8. Click Done.

9. You’re ready to receive files but if you want to send them, click on Select files or select folders.

With that being said, however, being a beta app means that Nearby Share is still far from perfect, so except for a few hiccups here and there. 

It seems like we’ve been getting a lot of crossovers lately. Speaking of which, Windows’ exclusive Phone Link app is also now available for iPhone users, and it’s interesting how it’ll play out.

What do you think about this feature? Let us know in the comments!

Leaks reveal we will be able to install multiple Cloud PC providers

This is all everyone talks about lately, so we might as well take a closer look at the topic and discover more about it.

On that note, over the last month or so, there have been countless reports and discussions regarding how Microsoft is shaping the future of Windows.

These rumors actually suggest that with Next Valley, or Windows 12, Microsoft could be planning a move back to revive its Windows 10X ambitions with a new CorePC modular approach.

Microsoft is gearing up to further change the OS

In truth, the previously leaked prototype UI for Next Valley also makes sense in this regard. Now, recent leaks caught some by surprise, but the results seem to be what we all expected.

Remember that a senior exec has already presented how cloud and AI are going to play a big role in next-gen systems.

Thus, the tech giant seems to be slowly adding Cloud PC options inside the Settings app. Aside from those, we now have more changes in the recent Canary Insider build 25330.

Taking a quick look at Twitter will reveal the Cloud PC option will soon allow users to link multiple Cloud PC providers.

As the above-mentioned post informs us, there is a prerequisite. And, by that, we mean that a registered Cloud PC remote system will be necessary.

And, just as you might have expected, these features are of course hidden at the moment but can be enabled using ViVeTool IDs (34508225, 40459297, 42354458, 42453017).

Please keep in mind that we don’t recommend you do that though, especially on your own machine, since these features are still a work in progress and hence can be quite unstable.

We will keep a close eye on what happens next and report to you as soon as new information becomes available.

How do you feel about these new changes? Be sure to let us know in the dedicated comments section located below.

rtf64x64.sys: How to Fix This Blue Screen of Death Error

Blue Screen of Death or BSoD errors are quite common and annoying errors that prevent you from accessing your PC. This can happen when playing games, watching movies, or using the PC casually.

In this guide, we will give you a bunch of solutions that will help you fix the rtf64x64 sys BSoD error. This error is associated with the Realtek Windows Packet Filter Kit. Let us understand the problem and its solution in detail.

What is causing the rtf64x64 sys BSoD error?

We did some digging and found many reasons that could trigger the rtf64x64 sys BSoD error on your PC.

Let us go through the effective solutions that will help resolve the rtf64x64 sys BSoD error.

How can I fix the rtf64x64 sys BSoD error?

1. Run SFC and DISM commands

  1. Open the Start menu by pressing the Win key.
  2. Open Command Prompt as an admin.
  3. Type the below command and press Enter. sfc /scannowsfc scan
  4. Let the process complete.
  5. Type the below command and press Enter. DISM /Online /Cleanup-Image /CheckHealth DISM /Online /Cleanup-Image /ScanHealth DISM /Online /Cleanup-Image /RestoreHealth
  6. Restart your PC.

With the help of SFC and DISM commands, you can fix the corrupt and missing system files causing the rtf64x64 sys BSoD error.

However, running these commands in several cases does not yield any results. For that scenario, we would suggest you go for software that helps fix system crashes, fix DLL file errors, fix BSOD errors, protect your PC against ransomware and malware, etc.

2. Scan PC for virus

  1. Open the Start menu by pressing the Win key.
  2. Type Windows Security and open it.Windows Security open SPReview.exe
  3. Click on Virus & threat protection.
  4. Select the Quick Scan option.
  5. Wait for the scan to complete.
  6. Apply the prompted fixes.
  7. You can click on Scan options and select Full scan for an in-depth scan.

Certain viruses or malware can impact your PC’s performance and put you in a BSoD boot loop. You can try clearing the virus from your PC using the Windows Security tool.

However, we would recommend you opt for third-party antivirus software as these tools are proven to be more effective against modern viruses and malware.

3. Update the network driver

  1. Open the Start menu by pressing the Win key.
  2. Open Device Manager.
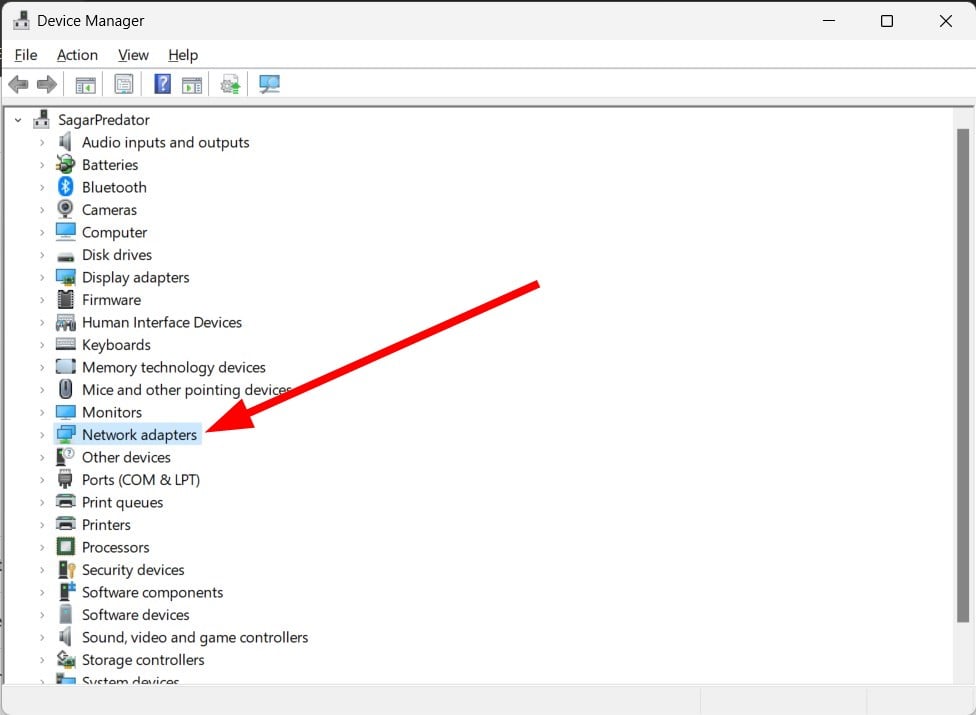
  3. Expand the Network adapters section.
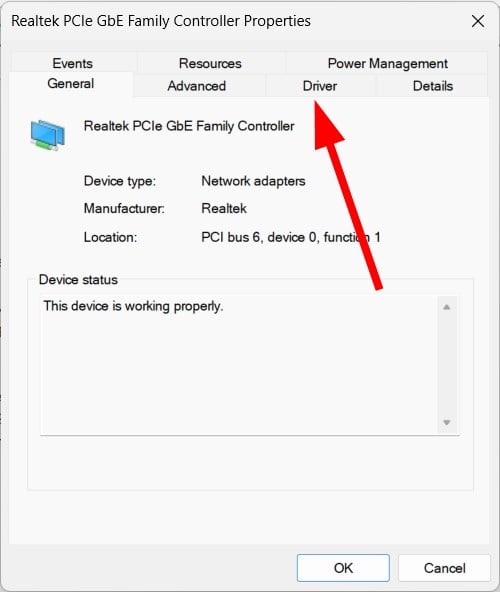
  4. Double-click on your network driver.
  5. Switch to the Driver tab.
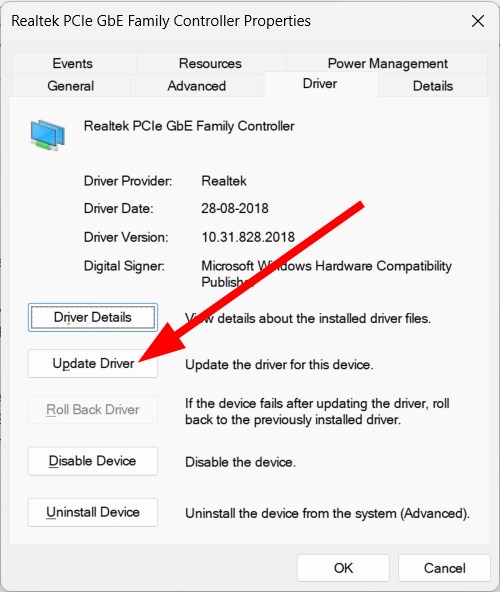
  6. Click on the Update driver option.
  7. Select Search automatically for the drivers option.Search automatically Network drivers
  8. Install the latest driver if available.
  9. Restart your PC.

Several users have fixed the problem of the rtf64x64 sys BSoD error by updating the network driver on their PC. You can also try updating the network driver and check whether this helps resolve the problem.

4. Run the Windows Memory Diagnostic tool

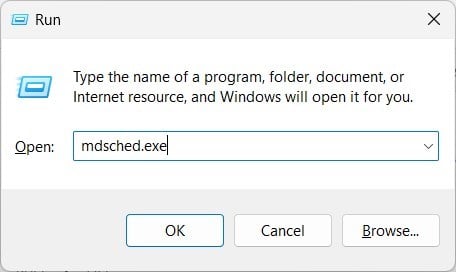
  1. Press the Win + R keys to open the Run dialogue.
  2. Type mdsched.exe and press Enter.
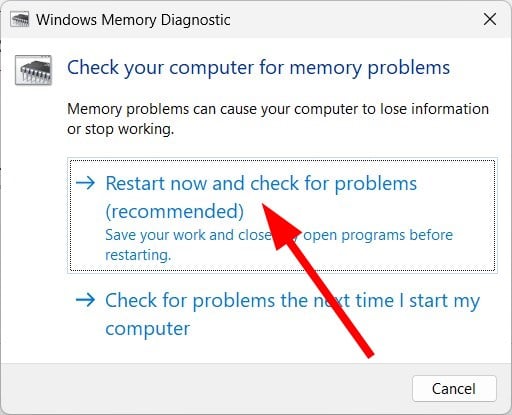
  3. Select the Restart now and check for problems option.
  4. Restart your PC.

Some errors in your Windows Memory can also cause issues, such as the rtf64x64 sys BSoD error. You should ensure that the health of your system memory is perfectly fine to avoid coming across such errors.

You can always run a Windows Memory Diagnostic test that will help fix all memory-related problems along with the ones triggering the issue at hand.

5. Perform a system restore

  1. Repeatedly turn on and off your PC to enter the Advanced Recovery environment.
  2. Alternatively, you can press the F11 key when the PC is booting up to enter the Advanced Recovery environment.
  3. Choose Troubleshoot.
  4. Select Advanced options.
  5. Hit the System Restore option.
  6. Choose your account.
  7. Click Next.
  8. Select the restore point and click Next.restore point
  9. Hit the Finish button to begin the restore process.

When you are stuck with a BSoD error, your PC won’t let you go inside your account and fix the problem. In such a case, you can try to restore the system to its normal state by following the above steps via the Advanced Recovery environment.

We want to inform you that system restore will work only if you have a previously created restore point. You should refer to our guide, which will help you create a system restore point on your PC.

6. Perform Startup Repair

  1. Turn on and off your PC to enter the Advanced Recovery environment.
  2. Else, you can also press the F11 key when the PC is booting up to enter the Advanced Recovery environment.
  3. Choose Troubleshoot.
  4. Select Advanced options.
  5. Select the Startup Repair option.startup repair

With the startup repair process, you can easily fix issues related to the startup, including several BSoD errors, such as the rtf64x64 sys BSoD error.

That is it from us in this guide. We have a complete guide that explains everything you need to know about what is BSoD errors are and the most common reasons you would come across one.

Users have come across the ClipSp.sys BSoD error on their Windows 10 and 11 PCs. You can easily fix this problem by following the solutions in our guide.

We also have a guide that lists five effective solutions to resolve the RNDISMP6.SYS BSoD error. You can also refer to our guide to fix the Btha2dp.sys error.

For users facing the network error Netwtw04.sys Failed, they can apply the solutions in our guide to resolving the issue.

Feel free to let us know in the comments below which one of the above solutions resolved the rtf64x64 sys BSoD error.

Here’s what users are saying about ChatGPT in Office 365

Microsoft announced that the hotly-talked technology of ChatGPT is coming to its Office 365 apps, which include Word, Excel, PowerPoint, and Outlook.

Dubbed Microsoft 365 Copilot, Redmond officials even promised that it’s more than just ChatGPT being slapped into the ecosystem. In fact, AI-powered large language models (LLMs) of this technology are trained on an enormously large amount of data to unlock users’ productivity.

With this addition, you can summarize a long email thread on Outlook, organize presentations with simple prompts on PowerPoint, simplify your data on Excel, and create drafts easily on Word.

Today marks the next major step in the evolution of how we interact with computing, which will fundamentally change the way we work and unlock a new wave of productivity growth … With our new copilot for work, we’re giving people more agency and making technology more accessible through the most universal interface — natural language.

– Satya Nadella, Chairman and CEO, Microsoft.

The news arrived amidst OpenAI’s GPT-4 launch which, if anything, is not a coincidence at all. Equipped with a multi-modal model, the software is way more capable than its predecessor GPT-3 since it’s able to access sound and image input—you can even ask the bot to create a menu by taking a picture of your inside fridge.

And, as noted by Windows enthusiast @XenoPanther, the Copilot feature is coming to Word from Build 16325.20000 onwards.

So far, there are no official words from Redmond officials of when exactly it will roll out, so keep an eye out on our website as we’ll keep you updated.

ChatGPT on Microsoft Office 365 apps: Good news for many?

The launch of GPT-4 is surely a groundbreaking milestone in AI’s use among users, and its integration with Microsoft 365 apps is just the beginning. OpenAI has reached over 100 million active users within the first month of ChatGPT’s launch, but given the stature of Microsoft, it’s safe to say that the reach will expand even further.

According to the tech giant, almost 9 out of 10 developers on GitHub said that its copilot functionality helped them to become more productive, while others admitted that it had helped them to spend less time researching.

The response has been quite exciting for the community, at least. Users on Reddit have said that the big milestone will result in large productivity gains, albeit acknowledging that it may be facing a bumpy road within the first versions.

I know it’s just a flashy marketing video, but watching the trailer for Microsoft 365 copilot gave me legitimate chills. This is going to change every aspect of how we work. Everything is about to go into maximum hyper-productivity overdrive. Presentations and reports that used to take weeks to prepare will now take hours (and employers will expect that). Business decisions will be made orders of magnitude faster, research papers published in weeks instead of months or years.

At the same time, just like every time a new groundbreaking technology gets announced, many people have voiced their concerns that the power of GPT-4 could cost them their jobs since it could potentially cut a few working hours off.

We will be producing so much information that it will be impossible to process unless you have an AI summarizing it for you. It’s not just AI that will accelerate, everything will accelerate.

The AI war is getting heated

The news also arrived not too long after Google announced its first set of AI-powered writing features and assistants on several select users of Docs and Gmail.

Workspace’s mission is to meaningfully connect people so they can create, build and grow together — and advances in generative AI are allowing us to deliver on this mission in new ways. Today, we’re sharing our broader vision for how Workspace is evolving to incorporate AI as a collaborative partner that is always there to help you achieve your goals, across Gmail, Docs, Slides, Sheets, Meet, and Chat.

In short, the search engine giant is testing features to summarize Gmail threads, brainstorm on Docs, simplify slide creation on Slides, generate simple visuals from raw data on Sheets, and more. Just like what Microsoft is doing on 365.

Additionally, Google also revealed its plan to develop an AI speech that could recognize over 1.000 most-spoken languages in the world, while its Bard chatbot is still far from primetime.

Are you excited or worried about GPT-4 integration in Office 365 apps? Let us know in the comments!

Error Code 0x8024500c: 8 Tested Ways to Fix it Quickly

Several readers have reported the Windows update error 0x8024500c, which prevents them from installing the latest update. This issue is also associated with the Windows Store.

So, the error 0x8024500c is associated with both the Windows update and Windows Store and its due to corrupt system or missing files, problems with the Windows update components, or corrupt Microsoft Store cache.

How can I fix the error code 0x8024500c?

1. Run the Windows Update troubleshooter

  1. Press the Win + I keys to open the Settings menu.
  2. Select Troubleshoot.
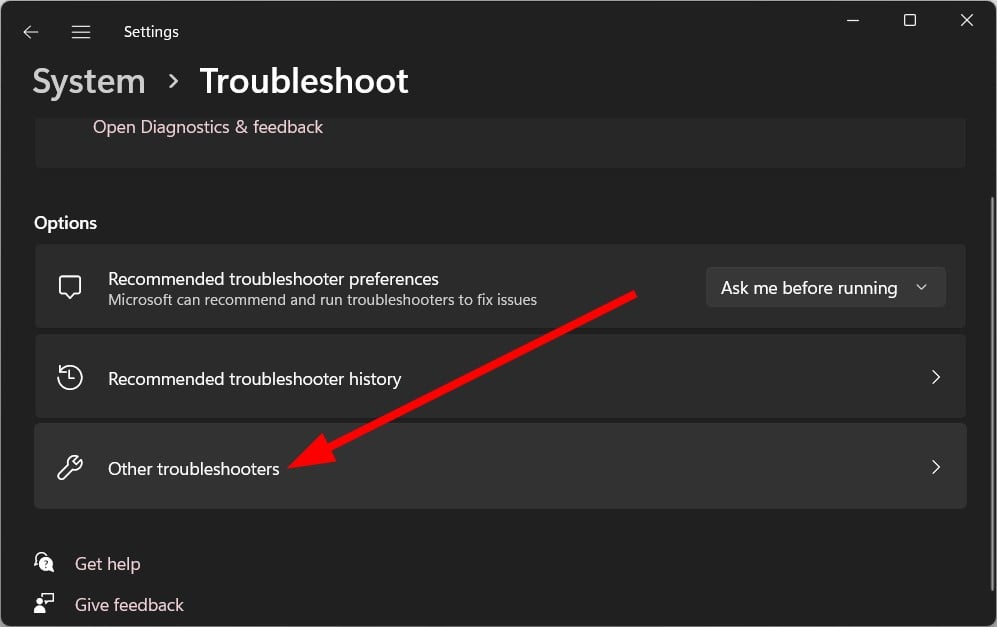
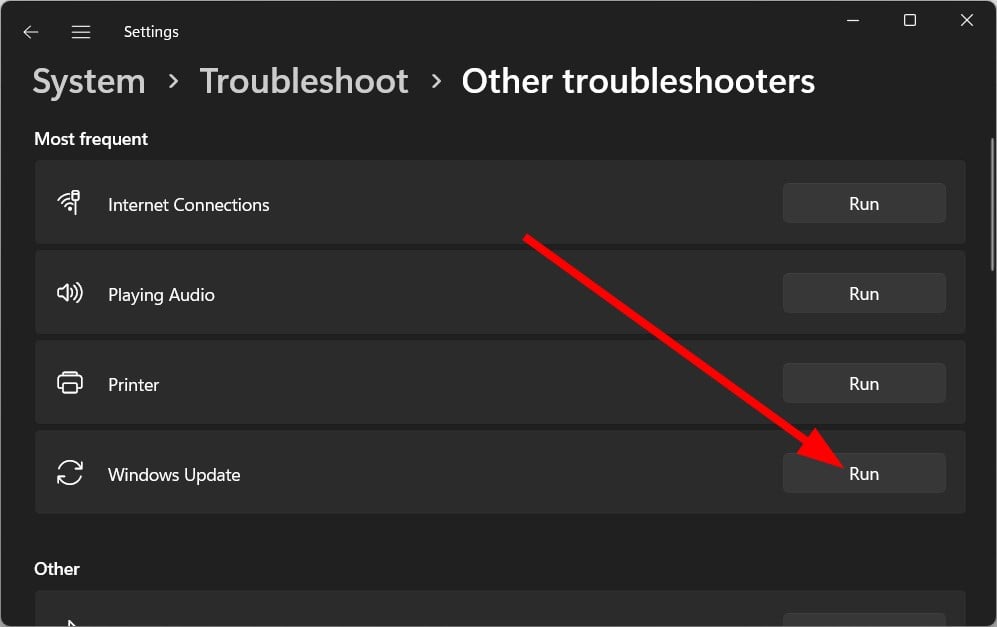
  3. Choose Other troubleshooters.
  4. Click on Run next to Windows Update.
  5. Follow the onscreen prompts.
  6. Apply the fixes.
  7. Restart your PC.
  8. Try downloading the Windows Update and see if this fixes the issue.

Using the Windows Update troubleshooter, you can easily resolve several issues related to the update utility, which could be causing the error 0x8024500c.

2. Run Windows Store troubleshooter

  1. Press the Win + I keys to open the Settings menu.
  2. Select Troubleshoot.
  3. Choose Other troubleshooters.
  4. Click on Run next to Windows Store Apps.
  5. Apply the fixes.
  6. Restart your PC.

Because of some underlying issues with the Microsoft Store, you might be getting the error 0x8024500c. Try using the troubleshooter and hopefully resolve the issue.

3. Reset Windows Update components

  1. Open the Start menu by pressing the Win key.
  2. Run the command prompt as an admin.
  3. Type the below commands and press Enter after each one: net stop bits net stop wuauserv net stop appidsvc net stop cryptsvc Ren %systemroot%\SoftwareDistribution SoftwareDistribution.bak Ren %systemroot%\system32\catroot2 catroot2.bak net start bits net start wuauserv net start appidsvc net start cryptsvc
  4. Restart your PC.

4. Clear the Microsoft Store cache

  1. Open the Start menu by pressing the Win key.
  2. Open Command Prompt as an admin.
  3. Type the below command and press Enter. wsreset.exe
  4. Restart your PC.

You can run the same command in a Run dialogue as well. Clearing the Microsoft Store cache has helped several users fix the error 0x8024500c.

5. Check if the Windows Update service is running

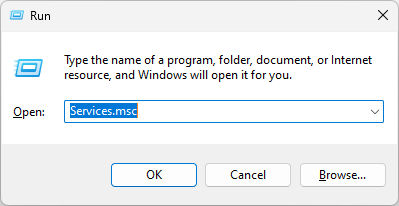
  1. Press the Win + R keys to open the Run dialogue.
  2. Type services.msc and press Enter.
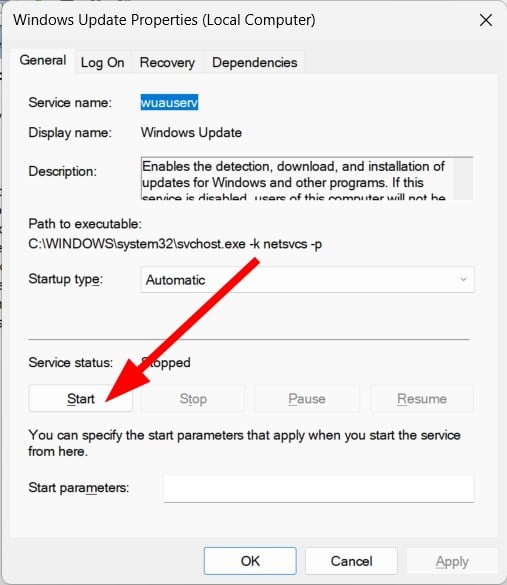
  3. Locate Windows Update service.
  4. Open it.
  5. Press the Start button under Service status to run it.

The Windows Update service should be running on your PC to install the latest Windows update. If there is some issue and this service isn’t running, you will face the error 0x8024500c.

6. Install update manually

  1. Press the Win + I keys to open Windows Settings.
  2. Select Windows Update.
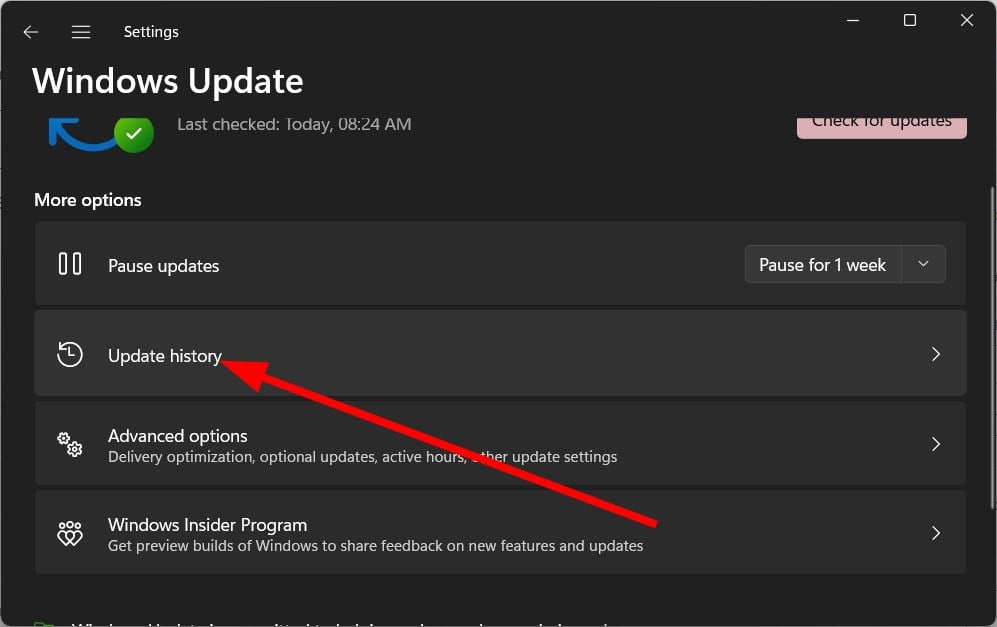
  3. Click on Update history.
  4. Write down the KB number of the problematic update.
  5. Visit this website.
  6. Enter the KB number of the problematic update on the search field.
  7. Download the update.
  8. Install it.
  9. Restart your PC.

Well, chances are that the Windows Update service is having some issues. You can download the problematic update from the Microsoft Update catalog in such a case.

It is a free website with all the updates, from the latest to the old ones, should you need them.

7. Disable Proxy connection

  1. Press the Win key to open the Start menu.
  2. Open Internet Options.
  3. Switch to the Connections tab.
  4. Click on LAN settings.
  5. Uncheck the Use a proxy server for your LAN (These settings not apply to dial-up or VPN connections) option.
  6. Click OK.
  7. Restart your PC.

8. Run the DISM commands

  1. Press the Win key to open the Start menu.
  2. Open Command Prompt as an admin.
  3. Type the below commands and press Enter after each one. Dism /Online /Cleanup-Image /CheckHealth Dism /Online /Cleanup-Image /ScanHealth Dism /Online /Cleanup-Image /RestoreHealth

This solution was suggested by one user on the official Microsoft forum and has helped several users fix the 0x8024500c error code.

Last but not least, if you are having issues downloading the Windows update, and getting error 0x8024500c, then it is better to avoid the update.

This is because the update itself might carry a bug preventing it from getting downloaded.

That is it from us in this guide. If you face the Windows update error 0x80888002, check out our guide for help.

We also have a guide explaining all the steps you need to perform to fix the Windows update error 0x8007000B.

There is another guide that lists down all the solutions you must follow to fix the update error 0x8024402c.

Feel free to let us know in the comments below which one of the above solutions resolves the problem for you.

0x800704C6: How to Fix this Microsoft Store Error

Error code 0x800704C6 restricts you from downloading, installing, and updating apps from the Microsoft Store. Some of our readers have also run into the 0x800704C6 error when trying to launch the apps downloaded from the store.

Why do I encounter the Microsoft Store error code 0x800704c6?

Speaking of the causes behind the Microsoft Store error 0x800704C6 code, one or more of the following may trigger the error code.

  • Server outage – If the Microsoft Store server is down for maintenance or some other purpose, the 0x800704c6 error code can show up.
  • Incorrect Date and Time settings – Inability to synchronize time on Windows when you move from one time zone to another results in error code 0x800704c6.
  • Unstable internet connection – If your internet connection is unstable, downloading and updating apps from Microsoft Store will not be successful.
  • Corrupt Microsoft Store cache – Corrupt system files and Microsoft Store cache makes you incompetent in downloading apps from Microsoft Store.

If you also run into the Microsoft Error code 0x800704c6 on your PC, we’ve got you covered.

How do I resolve the Microsoft Store error 0x800704C6?

1. Modify the Date and Time settings

  1. Right-click the date and time on the taskbar’s right corner and choose the Adjust date and time option from the context menu.0x800704C6
  2. Look for the Set time automatically option and move the toggle next to the Off position.
  3. Next, move to the Set date and time manually option and click the Change button next to it.0x800704C6
  4. Manually pick the date and time values from the drop-down menu in the new pop-up window. Once done, click the Change button to save the desired changes.0x800704C6

Now restart your computer to make the changes effective and resolve the Microsoft error code 0x800704C6.

Several of our readers encountered the error code 0x800704C6 when they traveled across time zones. This happens because the system data and time conflict with the that at the Microsoft Store server.

2. Reset the Microsoft Store cache

  1. Use the Windows + R shortcut to launch the Run dialog box.
  2. Type the following command in the text box and hit the OK button. wsreset.exe 0x800704C6

Upon the command execution, Command Prompt will blink on the screen for a second, and the Microsoft Store cache reset process. Once the Store cache is reset, Microsoft Store will automatically launch on your computer. Now try downloading and or updating apps from the Microsoft Store, you will no longer run into the 0x800704C6 error.

The WSReset.exe command deletes the Microsoft Store cache, ruling out the corrupt store cache files behind the 0x800704C6 error when downloading apps.

3. Reinstall Microsoft Store

  1. Launch the Start menu by pressing the Windows icon on the taskbar. Type powershell in the search bar on top and select Run as Administrator, located on the right.0x800704C6
  2. Click the Yes button on the User Action Control prompt to launch the PowerShell window with elevated permissions.
  3. Type or copy-paste the below command in Powershell and press the Enter key to execute it. Get-AppXPackage Microsoft.WindowsStore | Foreach {Add-AppxPackage -DisableDevelopmentMode -Register "$($_.InstallLocation)\AppXManifest.xml"}0x800704C6
  4. Once you get a message that Microsoft Store is reinstalled, exit the PowerShell window and restart your PC.

Reinstalling the Store on your computer will get rid of the damaged installation files if they were behind the 0x800704C6 error, which prevents you from downloading files from Microsoft Store.

4. Use the Windows Store troubleshooter

  1. Launch the Settings app using the Windows + I shortcut keys.
  2. While in the System settings, scroll down and choose Troubleshoot from the right side. 0x800704C6
  3. Choose Other troubleshooters from the next window.
  4. Scroll down the list of all the troubleshooters present on your PC and press the Run button next to Windows Store Apps. 0x800704C6

The built-in Microsoft Store Apps troubleshooter in Windows is configured to diagnose the problems associated with the Windows Store and the downloaded apps and presents the relevant fixes to tackle the same. Hopefully, it will resolve the underlying problems behind the 0x800704C6 Microsoft error code.

5. Clean boot your PC

  1. Bring up the Run dialog box using the Windows + R shortcut. Type the following command in the text box and press the OK button to execute it. Msconfig0x800704C6
  2. While you are in the General tab of the System Configuration window, uncheck the box preceding the Load startup items and check the one for the Load system services option.0x800704C6
  3. Next, switch to the Services tab, check the Hide all Microsoft services option listed on the bottom left, and press the Disable all button.0x800704C6
  4. Click Apply to save the changes and OK to close the System Configuration window. Now restart your computer as you would normally do.

When your PC restarts in clean boot mode, launch Microsoft Store and try downloading the apps on your Windows PC. If you do not encounter the 0x800704C6 error this time, it indicates that some third-party apps installed on your PC are interfering with app download from Microsoft Store.

You can follow this guide to uninstall apps from Windows, whichever you think might be the culprit.

That’s it! We hope that the solutions mentioned in this guide proved effective in resolving the 0x800704C6 error code, and you can now download apps from the Microsoft Store.

You can refer to this guide if you keep running into the Server Stumbled error on Microsoft Store quite often.

If you have any other suggestions or questions for us, leave them in the comments section below, and we’ll be sure to get back to you.

Check out these new Microsoft Autopatch alerts and functions

As we’re pretty sure you all remember, back in 2022, the Redmond tech giant announced a new service called Windows Autopatch, dedicated to enterprise customers.

Basically, it represents a way to automate updates while empowering IT admins to ensure that endpoints are healthy and compliant through ring-based, staggered deployments.

Thus, IT admins would also have the ability to reverse updates easily if something does go wrong. Now, Microsoft published new information on the topic.

Microsoft made some notable changes to Windows Autopatch

The so-called update reins are handed to Microsoft’s mechanisms with IT admins overseeing the process, and all this became generally available in July 2022.

Back then, we also learned that there were certain prerequisites for using this new service:

  • Licensing: Windows Autopatch is available at no extra cost to Windows Enterprise E3 and above license holders.
  • Specifications: Windows Autopatch works with Windows 10 and 11 Enterprise versions and, when we reach general availability, on virtual machines including Windows 365 Cloud PCs.
  • Hardware requirements: If your corporate-owned devices are running a current. The supported version of Windows 10 or Windows 11, they can be enrolled in Windows Autopatch. Bring-your-own-device (BYOD) scenarios are not currently supported.
  • Management requirements: Your devices must be managed with either Microsoft Intune or via Configuration Manager co-management.
  • Identity requirements: User accounts must be managed by Azure Active Directory or Hybrid Azure Active Directory Join.

Fast forward to today, Microsoft has announced new guidelines for its customers. And, yes, we are going to take a more in-depth look and see what changed.

Starting now, the Tenant Management blade is getting some enhancements in May 2023 so that it can provide more alerts on expiring licenses and access-related issues for Windows Autopatch.

The tech giant has also urged admins to navigate to this blade and take action immediately if they find any such alerts or risk interruptions to the service.

Furthermore, the Windows Autopatch section will also be marked as inactive if changes are required, according to Redmond officials.

Additionally, Microsoft has added new functionalities to Windows Autopatch in the public preview, as you are about to see:

  • Windows Autopatch Groups: set up your own distinct sets of deployment rings, and deployment cadence.
  • Windows feature updates release management: leverage Windows Autopatch Groups and its deployment rings when creating new Windows feature update deployments
  • Reporting: Refresh of our existing reporting, providing insight into update compliance, deployment status and update failures.
  • Policy health and remediation: Initiate actions for the Autopatch service to restore policies and restore deployment rings.

Know that the above-mentioned capabilities can be enabled through the Autopatch Groups (preview) tab in the Intune admin center, general availability is slated for May 1, 2023.

What is your take on these new changes? You can share your thoughts and opinions with us in the comments section below.

Microsoft begins rolling out 3rd party account support for its new Outlook preview app

Microsoft’s new unified Outlook dream comes further into focus as the company begins rolling out third party account support for its Outlook for Windows preview.

Outlook for Windows previews first hit select devices back in September 2022, but it landed with a nice helping of caveats that continue to trip up a larger migration of users looking to do away with Mail for Windows, Outlook for the Web and Outlook Exchange as disparate email destinations and experiences.

One of the largest hurdles for users of the beta preview of Outlook for Windows has been Microsoft’s limited account support for email clients, particularly Gmail accounts. However, that will soon change as Microsoft Group Product Manager Margie Clinton brings news of support for Yahoo, Gmail and iCloud support through IMAP protocols.

Today, we will begin to roll out support for Gmail accounts to those using the preview of the new Outlook for Windows. Soon, we will also add support for Yahoo and iCloud, as well as the ability to connect your mailbox through IMAP. It’s our intention that every person be able to access all of their emails – in one spot – on any Windows 10 or Windows 11 device.

Clinton promises the same level of integration for third party clients as is present with Microsoft email accounts which includes richer Calendar and Contacts support as well as a more comprehensive editing, spelling and autocomplete platform powered by Microsoft Editor. More specifically, Gmail support in the new Outlook for Windows preview will enable the ability to add multiple shared calendars, support for multiple time zones and a new daily weather widget in the Calendar view.

Currently, Outlook for Windows preview can access and display package tracking and flight info, but it is unclear if that level of integration will be extended to data from Google’s email client. Another uncertainty is if Microsoft will bring over labels and filtering sections from Gmail any time soon.

As for what’s next for Outlook for Windows preview, Clinton mentioned the following features should make their way into the company’s next biggest update:

  • The ability to track packages and check in to flights directly from your Inbox.
  • Reminders about important messages that still need a reply.
  • Search folders for quick and easy access to all of your emails.
  • The ability to customize your email density and views.

The update with support for third party email accounts is slowly rolling access out starting today for anyone using the beta and meets the minimum required OS specs of Windows 10 Version 1809 (Build 17763).

AMDRyzenMasterDriver.SYS: 6 Ways to Fix This BSOD Error

AMD Ryzen is a popular computer processor that many gaming laptops use. However, we have encountered many user complaints that point out that they are facing the AMDRyzenMasterDriver.SYS error message.

This error blocks user access to their PCs and throws the frustrating BSOD screen. The PC keeps on restarting in vain. Thankfully, in this guide, we will give you a bunch of solutions that will help you resolve the AMDRyzenMasterDriver.SYS BSOD error. Let us get right into it.

What is causing the AMDRyzenMasterDriver SYS BSOD error?

After some research, we have found the reasons for triggering the AMDRyzenMasterDriver.SYS BSOD error message on your PC.

  • Corrupt system files: Of course, system files are important for your PC to run smoothly, and if they get corrupt then you will face multiple issues.
  • The AMDRyzenMasterDriver.SYS file is corrupt: The main reason that could trigger the AMDRyzenMasterDriver.SYS error is because the file itself is missing from your PC.
  • Your PC isn’t updated: Running an outdated version of Windows can also cause your system to misbehave, as some programs may malfunction and cause the BSOD error.
  • AMD Ryzen Master is causing problems: Reinstall certain AMD drivers and Ryzen Master software to fix AMDRyzenMasterDriver.SYS issue.
  • Drivers aren’t up to date: You should also ensure that all drivers on your PC are updated because outdated drivers can cause issues.

Let us check out the solutions that will help resolve the AMDRyzenMasterDriver.SYS error.

How can I fix the AMDRyzenMasterDriver SYS error?

1. Update your PC

  1. Press the Win + I keys to open the Settings menu.
  2. Click on Windows Update on the left.
  3. Select the Check for updates button.
  4. If there is a pending update, hit the Download and Install button.
  5. Restart your PC.

You should make sure that you are running the latest Windows update on your PC. Not only latest updates bring the latest features but also update the virus and malware database that keeps your PC protected.

2. Fix corrupt system files

  1. Press the Win key to open the Start menu.
  2. Open Command Prompt as an admin.
  3. Type the below command and press Enter. sfc /scannowsfc scan
  4. Wait for the process to complete.
  5. Execute the below command. DISM /Online /Cleanup-Image /CheckHealth DISM /Online /Cleanup-Image /ScanHealth DISM /Online /Cleanup-Image /RestoreHealth
  6. Restart your PC.

Running the SFC Scan and DISM commands will help fix your PC’s corrupt system files. But these aren’t that effective when dealing with errors such as AMDRyzenMasterDriver.SYS error.

In such a case, you should opt for a dedicated tool that can fix system crashes, fix DLL file errors, fix BSOD errors, protect your PC against ransomware and malware, and much more.

3. Reinstall AMD Ryzen Master

  1. Press the Win key to open the Start menu.
  2. Open Control Panel.
  3. Click on Programs and Features.
  4. Click on AMD Ryzen Master and hit the Uninstall button.Programs-and-Features Realtek semiconductor corp
  5. Follow the on-screen prompts to uninstall the program from your PC.
  6. Restart your PC.
  7. Visit the official website.
  8. Download the AMD Ryzen Master program.
  9. Install it and check if this fixes the issue or not.

If some files related to the AMD Ryzen Master overclocking tool get corrupted or missing, you will face this AMDRyzenMasterDriver.SYS error.

4. Run AMD Driver AutoDetect

  1. Visit the official website.
  2. Download the AMD Driver AutoDetect tool.
  3. Install the program.
  4. If new drivers are available for your AMD device, then the tool will install them. Below are the components:
    • AMD Radeon RX Series Graphics
    • AMD Radeon PRO Series Graphics
    • AMD Ryzen Chipsets
  5. After installing the components, restart your PC

The chances are that the AMD Ryzen Master system drivers are on your PC, but the version is outdated. In such a case, you can use the AMD Driver AutoDetect tool to update all the related drivers and fix the AMDRyzenMasterDriver SYS error.

5. Perform System Restore

  1. Either repeatedly turn on and off your PC or press the F11 key when the PC is booting up to enter the Advanced Recovery environment.
  2. Select Troubleshoot.
  3. Click on Advanced options.
  4. Select System Restore option.
  5. Select your account.
  6. Click Next.
  7. Select the restore point and click Next.restore point
  8. Hit the Finish button to begin the restore process.

If your PC is stuck in the BSOD loop, then you can follow the above steps and restore your PC to a state where everything was working normally.

However, do note that system restore will work, if you have previously created a restore point. If you aren’t sure how to do that, you should refer to our guide, which will help you create a system restore point on your PC.

6. Perform Startup Repair

  1. Repeatedly turn on and off your PC or press the F11 key when the PC is booting up to enter the Advanced Recovery environment.
  2. Select Troubleshoot.
  3. Click on Advanced options.
  4. Choose the Startup Repair option.startup repair

Perform the Startup Repair process to fix the issue of BSOD error. This will help negate any underlying issue if it is system-related and resolve the AMDRyzenMasterDriver SYS error.

That is it from us in this guide. AMD users have also reported facing the amdacpbus.sys BSOD error, which you can fix by following the solutions in our dedicated guide.

BSOD errors are also caused if you overclock your PC for a prolonged time. You can learn how you can easily underclock your PC.

If you are getting Windows cannot find AMD installer error, then you can refer to the solutions in our guide to resolve the problem.

Often AMD users complain of coming across Radeon Host Service high GPU usage error. You can resolve the problem by using the solutions in our guide.

You can also refer to our guide, which will help you learn how to stop AMD drivers from updating automatically.

Feel free to let us know in the comments below which one of the above solutions helps fix the AMDRyzenMasterDriver SYS error.

Redmond announces that RDR2 is accessible on Windows 21H2 again

There are some video games that will never die in the hearts of the people that they touched the most. However, playing some of these classics on Windows PCs can sometimes come with challenges.

The same can be said about Rockstar Games’ Red Dead Redemption 2, which at some point, became unaccessible for Windows 11 users running version 21H2.

If you have low FPS while playing RDR2, we can show you how to fix it, regardless of the CPU you are using on your rig.

Also, we’ve prepared a list of the best VPNs for playing Red Dead Redemption 2 Online (RDO), in case your country is not on the supported list.

Microsoft announced that the problem is fixed

There’s no hiding the fact that when Windows 11 version 22H2 first hit, there were plenty of user reports online regarding issues related to gaming on the new feature update.

Soon after, Microsoft confirmed the problems and placed upgrade blocks on affected systems. These issues were finally resolved by around mid-December when Microsoft pushed KB5020044.

And, while Windows 11 21H2 was considered a safe version, it looks like the roles are reversed now as Rockstar Games’ Red Dead Redemption 2 failed to launch on the original Windows 11 release.

The problem was triggered when attempting to launch the title from the Rockstar Games Launcher wherein the game does not open when selecting the Play button from the Launcher.

The tech giant stated that the only workaround to mitigate the issue for those affected was to upgrade Windows 11 21H2 systems to 22H2.

In truth, this pesky issue actually began with the KB5023774 update that was released earlier today. However, you don’t have to worry about that anymore.

Now, Microsoft confirmed that the issue has been fixed with the latest game update. On the Windows release health dashboard, the Redmond company updated the issue status to resolved.

Thus, after updating to the latest version of the game, you should be able to open it as expected. This can be done from the Rockstar launcher and it usually happens automatically.

That being said, users should be able to launch the game via the Rockstar Games launcher on Windows 11 21H2 as well.

Have you encountered any other problems with RDR 2 on Windows 11? Be sure to share these findings with us in the comments section below.

Microsoft officially launches Surface Thunderbolt 4 Dock

Earlier today, we reported on the possibility of Microsoft getting ready to debut a new Surface Dock after the entry featured in an eBay listing. And as it turns out, the company has now officially launched Microsoft Surface Thunderbolt 4 Dock.

It was presumed that the device would go under Microsoft Surface Dock 3, but this is not the case. Instead, Microsoft decided to take an entirely different approach. The new entry “extends the support of Thunderbolt 4 connectivity in Surface Pro 9, Surface Laptop 5, and Surface Laptop Studio.”

Microsoft has indicated that Surface Thunderbolt 4 Dock will allow users to transfer their data at high speeds of up to 40Gbps and maximize their workspace. Additionally, with Thunderbolt support more users can make use of the device compared to previous models that shipped with a magnetic Surface Connector adapter limiting it to Surface devices only.

Additionally, Microsoft has also ascertained its commitment to ensuring that the same standards delivered by previous models are translated to the Surface Thunderbolt 4 Dock in terms of security, sustainability, and accessibility.

According to Microsoft the entry ships with three USB-C ports, three USB-A ports, a 3.5mm audio jack, a 2.5 Gigabit Ethernet port, and a security lock slot. It should be noted that you’ll not be able to charge your Surface device or any device for that matter using the USB-C port for anything above 15W.

Microsoft added that:

Windows 11 also ensures that settings are retained when connecting, so even if multiple devices use the same dock, each of them will have the display and connection settings that let them get right to work.

The dock features ports both at the front and back for easy access. What’s more, the ports at the back ship with raised tactile indicators. Microsoft also reaffirmed its commitment to sustainability and used recycled materials while assembling the new dock.

Surface Thunderbolt 4 Dock

“Surface Thunderbolt 4 Dock improves IT efficiency for commercial customers, with features like Firmware Update through Windows Update, Wake on LAN from Modern Standby, and MAC Address Passthrough‎,” said the company in the blog post.

The entry is available for purchase for $299.99 over at Microsoft.com.

Warner Bros. is looking to launch a new Harry Potter TV series

Warner Bros. is reportedly trying to ink a deal to make a television adaptation of J.K. Rowling’s Harry Potter books. To be clear, this is not to be confused with the recently reported HBO adaptation of the video game Hogwarts Legacy, which itself is based in the Harry Potter universe.

Hogwarts Legacy video game.

This adaptation of the books is also headed for HBO Max presuming the deal goes through (HBO became part of WarnerMedia Studios & Networks after last year’s merger between WarnerMedia and Discovery). Apparently the project will consist of episodic installments based on each of the books, with one book per season.

The news, which was first reported by Bloomberg, comes as other big fantasy book franchises continue to see small screen success with adaptations like Amazon’s House of the Dragon and The Lord of the Rings: The Rings of Power, as well as Netflix’ The Witcher.

The plan for HBO and Discovery to merge into a single streaming platform seems to be on despite reports back in February that the merger was off. It is expected to happen sometime this summer and come with a $20 per month subscription.

Featured image via PInkvilla. 

2023 Opera Rankings Are Going Up Up Up, 2022 Browser Stats Show

2023 Update😕 Having established that Opera was off to go a good start last year, we become even more curious about its evolution throughout 2022, beyond the first quarter. Not so long ago we were wondering if Opera’s rankings and rating will manage to pull off the seemingly impossible and touch the company’s ambitious financial milestones. It turns out, they aced every single target from revenue growth to consumers’ database and everything in between. So, if you’re interested in browser statistics for 2022, and Opera in particular, get ready for an up-to-date comprehensive view of Opera browser ranking, rating, popularity, and a glimpse of what’s to come.

Opera browser revenue & statistics 2022 (4th quarter & full year consolidated financial results)

No more wondering – Opera did it! It not only met the forecasted numbers but even exceeded expectations with an overall 32% revenue growth for the year 2022.

That alone is an impressive achievement if we think about the global economical context dominated by high inflation rates and a lack of predictability across industries and sectors.

As far as the last quarter of 2022 is concerned, we also see a steady (but equally impressive) year-over-year revenue growth of 33%, bringing the yearly figure to $96.3 million.

Opera browser 2023 – What’s in store?

→ The company’s initial estimations place Opera’s 2023 revenue anywhere between $370 and $390 million. Will they bust the records again? We’ll just have to wait and see. (? To be continued…)

→ Another interesting step in Opera’s planned 2023 roadmap is the integration of AI-generated content into its flagship products.

As a true pioneer that’s been constantly at the forefront of web development and innovation, Opera takes a giant step and adds generative AI capabilities such as smart AI prompts and GPT-based chatbot services integrated directly into the sidebar. ? Fun times, right?

Opera

Opera

Get to know the cutting-edge tech that’s always on par with your needs – it’s free & always will be free.

Pretty much everyone has heard about Opera by now, considering the gigantic growth that the browser had over these last few years.

It is currently among the top browsers in the world, with over 350 million active users recorded right before the end of 2021, and is also one of the safest and most private browsers out there.

What Are Opera’s 1st Q Results For 2022?

The company behind this masterpiece, Opera Ltd., recently announced its unaudited consolidated financial results for the first quarter of 2022, which ended on March 31.

Opera’s co-CEO Song Lin confirmed that Opera’s performance in 2022 is off to a great start, stating that the results are ahead of expectations in terms of product portfolio, monetization, and financial results.

Opera officials also mentioned that due to earlier-than-expected core revenue generation, the company has actually exceeded the top of its guidance range for both revenue and adjusted EBITDA.

However, we’re sure that you want more details about this, so we are about to take a more in-depth look at these numbers for a better understanding.

According to the report, core search and advertising revenue have increased by 41% in this first quarter, thanks to a strong ARPU trend for the browser and news user base.

This is also based on Opera’s strong advertiser demand that goes beyond its inventory, through the Opera advertising platform.

The Opera browser actually had an average monthly active user base of 339 million monthly active users in this first quarter.

Available information points out that user growth was strongest in the US, with North America recording a 15% increase, followed by South America with 10%.

There’s also an Opera GX gaming browser, as we all know, which had over 16 million monthly active users across PC and mobile in the first quarter.

These stats represent a continued healthy trajectory with 14% sequential growth compared to the previous quarter.

Opera Ltd. also sold its minority stake in Nanobank and Star X, a transaction that represents cash proceeds of $211 million receivable without contingencies.

It’s important to stress the fact that the second sale, out of the above-mentioned ones, took place after the end of the quarter.

Furthermore, $182 million in cash and marketable securities at the end of Q1 were also present in the report, with the mention that the company continues to hold our 6.44% stake in OPay.

And, during the first quarter of 2022, Opera Ltd. proceeded to repurchase 569 thousand ADS at an average price of $5.33.

The total value of the ads amounted to $3 million while leaving $47 million remaining under the current buyback authorization.

Not to mention that the company provided support for most of the major blockchain ecosystems in Opera Wallet, and it released a beta version for the Opera Web3 browser.

What expectations are there for the rest of 2022?

Since the first-quarter results were impressive, expectations are clearly high for the rest of the year.

In fact, Opera is expecting a revenue of $300-$310 million for the rest of 2022 which, judging from the present numbers, is totally doable.

To be more exact, this actually represents an increase of 22%/midpoint, and of course an adjusted EBITDA somewhere between $50-$60 million/midpoint.

As far as the second quarter of 2022 goes, Opera Ltd. predicts revenue of $71-$74 million. Any person that is good with numbers can tell that that is a 21% year-over-year growth/midpoint.

For the second quarter, the adjusted EBITDA is expected to be situated between $8-$12 million, which is no more than a 14% margin at the midpoint.

These numbers are completely realistic and Opera totally has the resources and knowledge to pull this off, so it will be interesting to observe.

What is your first impression of the first quarter numbers presented by Opera Ltd. for 2022? Share your thoughts with us in the comments section below.

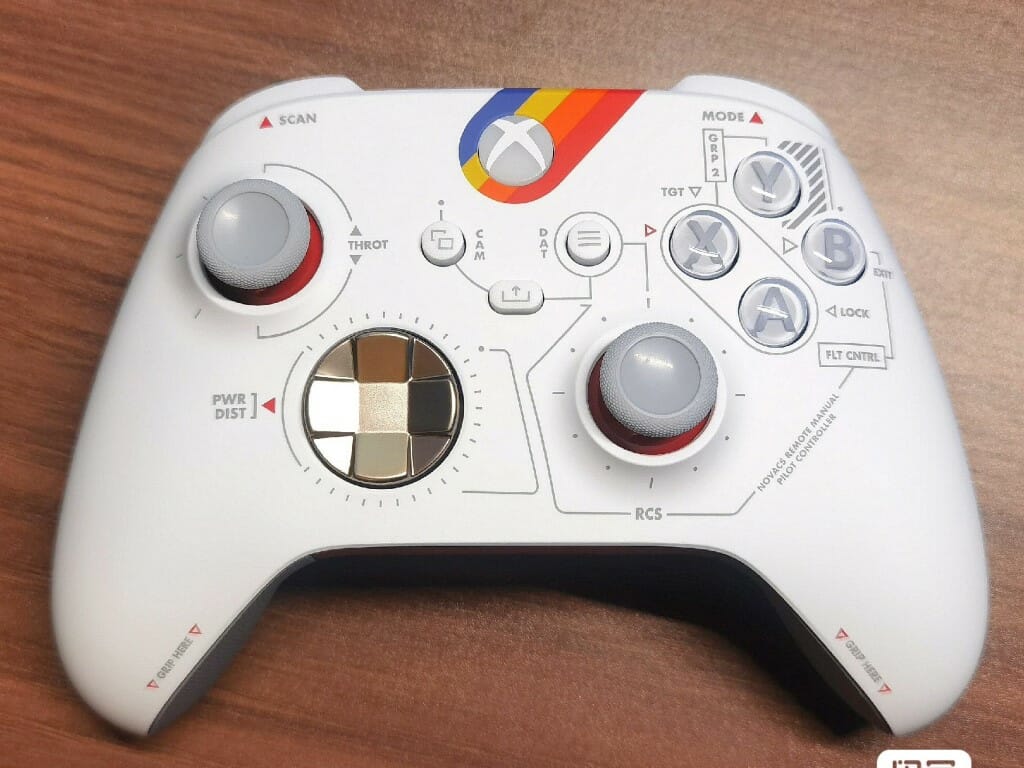
Leaked Starfield Xbox controller might even be the real thing

Earlier this week apparently leaked images of a custom Starfield Xbox controller surfaced online. Whether this leak is the real deal or not remains to be seen, though it has to be said the images certainly look real enough.

These images can also be seen over on Imgur. Here’s hoping it’s real, because the controller looks positively slick. Until we see more of this supposedly official Xbox product it’s probably best to take this “leak” with a grain of salt. The source of the images remains uncertain, with the poster simply stating that the pics “came from the Chinese internet.”

As for Starfield itself, the game is still set to release on September 6, 2023 after years of anticipation. Before that, we’ll be treated to a Starfield Direct showcase on June 11. An epic space role playing adventure from Bethesda, Starfield will likely be one of the biggest game releases of 2023. Expectations for the game are, if you’ll excuse the pun, stratospheric.

What do you think of this custom Starfield Xbox controller? If it is indeed real, will you be getting one? Or do you suppose it might come bundled with the game’ physical release, perhaps in a special edition along with a similarly themed custom Xbox console? Now that would be exciting!

Featured image via @IdleSloth84/Twitter. 

Windows Defender vs Norton: Which One Should You Use?

In today’s world, it is essential to keep your PC updated, not only regarding the latest updates and drivers but also with the latest antivirus tools. While Windows OS comes built-in with Windows Defender, people still prefer opting for a third-party antivirus tool such as Norton.

Norton has been in the business for as long as you can remember talking about computers. This guide will give you a complete and comprehensive Windows Defender Vs Norton differentiation. Let us get right into this guide and get rid of the confusion.

What is Windows Defender?

When installing Windows OS on your PC, the first thing you should turn on is the Windows Defender.

As the name suggests, Windows Defender protects your PC from viruses and malware. It was introduced as a built-in tool with Windows Vista OS and has stuck with the OS since then.

Previously, it was available as a downloadable program in 2001 for Windows XP systems. It then replaced Microsoft Security Essentials in Windows 8 and evolved into Windows Defender.

It provides real-time protection against threats. Also, the SmartScreen feature will warn you if you visit a malicious website.

Installing Windows Defender separately is unnecessary as it comes pre-installed with Windows OS. Some of the notable features of Windows Defender include backing up files to OneDrive, parental control settings, tracking prevention, and more.

Here are some of the notable features of Windows Defender:

  • It is available as a built-in tool, free of cost.
  • Regularly updated with malware database.
  • Real-time threat protection.
  • Parental control settings.
  • Firewall and network protection.
  • Protection against fishing websites.

What is Norton Antivirus?

Norton antivirus is a name that almost goes hand-in-hand with PCs. It is a brand that has been around in this space since 1991.

It started as an antivirus and anti-malware software and later expanded into a proper internet security package known as Norton 360.

Norton antivirus protects your PC from viruses, spyware, worms, trojans, and other threats that could cause harm to your PC.

Also, Norton protects you when you visit malicious websites, download files, or open email. Norton gets updated timely so that it remains up to date with the latest threats.

Norton acquired LifeLock identity protection in 2017 and changed its name to Norton Lifelock. The latest acquisition of Norton Lifelock is with Avast Antivirus in 2021.

Some of the highlighting features of Norton antivirus include:

  • Norton keeps your PC protected automatically.
  • It receives continuous updates.
  • Real-time threat protection.
  • Smart Firewall.
  • PC cloud backup.
  • Parental controls.
  • Password manager.
  • Helps optimize the system performance.

Windows Defender Vs Norton: Comparison

Windows DefenderNorton Antivirus
Windows Defender offers real-time threat protection.Norton provides real-time automated threat protection.
Features anti-spyware protection.Offers anti-spyware protection.
Does not offer webcam protection.It features webcam protection.
It does not offer banking and payment protection.It comes with a built-in tool for banking and payment protection.
Receive antivirus database updates regularly.Norton is updated regularly with an antivirus database.
Offers parental control features.Comes with parental control features.
Does not offer a built-in VPN service.It offers a built-in VPN service for internet protection.
It lets you back up your files to OneDrive.It offers a PC cloud backup facility.
It doesn’t offer an identity threat protection feature.Norton comes with identity threat protection.
Windows Defender is available free of cost, as a built tool with Windows OS.To use Norton, you need to buy among the 4 subscription plans.
Effectively protects you against malware, adware, trojan, or spyware.Offers great protection against malware, adware, trojan, or spyware.
The virus scanning abilities aren’t that great compared to Norton.You can trust Norton to protect and remove viruses from your PC.
Takes more time when you perform a full in-depth scan.Takes comparatively less time for a full in-depth scan.

Windows Defender vs Norton: Which one is better?

While we have gone through the comparison table above, let us understand which one in this Windows Defender vs. Norton comparison is beneficial in the real world.

1. Features

Hands down, Norton antivirus has more features than Windows Defender. However, you should note that Norton is a paid suite of antivirus tools, and Windows Defender comes free of cost.

Windows Defender is good enough to keep you safe if you aren’t involved in regular dealings with threats, downloading files from malicious websites, running pirated apps, etc.

Defender is good enough to detect most widespread malware but fails to detect the ones recently released in the market.

In such a case, Norton antivirus is the one you should opt for because it comes with better security features in its arsenal. It is better than Windows Defender and won’t leave a trace of malware or antivirus on your PC.

2. System performance impact

When selecting an antivirus tool, the one thing you should keep in mind is the impact of that tool on your system performance.

Windows Defender is an integral part of the Windows OS and doesn’t take up that many resources to protect your PC.

The good thing is that Norton, being a third-party antivirus tool also doesn’t impact much your PC’s performance.

As per an AV-Test, when Norton and Windows Defender were compared side-by-side, both tools had less impact on the system performance.

3. UI friendliness

When it comes to ease of understanding, Windows Defender has the best UI, which is straight to the point and gets the job done in a few clicks.

Not that Norton’s UI is that complicated; although it has many features, you have to use the tool before you can comment on Norton’s UI.

All features are placed perfectly in the Norton UI and have an extremely well-designed UI. So, when it comes to UI, it all depends on which software you use.

4. Pricing

This is where Windows Defender leads. Installing Windows OS on your PC gives you access to the Windows Defender free of cost.

All you need to do is enable the feature and let it protect you from threats. On the other hand, if you opt to go for Norton antivirus, you must first purchase a subscription plan and then activate it to use the tool.

As a free antivirus tool, Windows Defender is very well capable of protecting your PC. But you should also take extra precautions when dealing with things on your PC.

For Norton, if you have purchased the plan, then it is almost such that you don’t have to perform that much manual prevention to protect your PC.

Windows Defender vs Norton: Verdict

Suppose you are a business or someone involved with the internet and downloading files from all over the internet, while Windows Defender will protect you. In that case, you should opt for Norton antivirus.

Users don’t need to spend bucks on paid antivirus tools like Norton to protect their PCs.

Moreover, our advice is that when using freeware such as Windows Defender, you should also be extra careful with what you are dealing with. With Norton, you get that liberty of missing a few cues in between.

Our verdict would be casual users should stay away from Norton and continue using Windows Defender, while advanced users should check out Norton antivirus.

To learn more about the all-rounder Norton product, check out our interesting and detailed review of Norton 360 Deluxe to understand how it can protect all your devices.

We hope this guide helped you eliminate the confusion between Windows Defender and Norton. Let us know in the comments below if you have any doubts.

YouTube Playlist Downloader: 10 Best Picks For 2026

YouTube is our go-to source of entertainment. You can open the YouTube app on your mobile, desktop, tablet, or any other device and start streaming content from various content creators.

People have different tastes, and they would like to create a personally curated playlist of videos that they not only can view but can share with others.

What if you would like to take the YouTube playlist with you wherever you go? In such a case, we suggest you read this guide, as here we will show you the best YouTube playlist downloader for PC. Also, you can check the best YouTube apps for Windows 11.

What are the benefits of using a YouTube playlist downloader?

Well, you can stream videos online on YouTube and be done with it. However, it won’t be that convenient if you are on a limited mobile data plan.

Also, if you wish to view your playlists video, you will require access to a good amount of data balance to view the content in your preferred quality.

While you can download the playlist videos on YouTube, it will eat up your data, and you have to download them individually.

In such a case, a YouTube playlist downloaded for PC comes in handy, as it will download all the videos from your playlist in one go.

If you were looking for a tool that lets you download your YouTube playlist, then below is a curated list of YouTube playlist downloader for PC that you can opt for.

What are the best YouTube playlist downloaders for PC?

By Click Downloader – A great tool for Windows users

By Click Downloader is a great program you can install on your PC and back up all your videos. This tool supports YouTube, Dailymotion, Vimeo, Facebook, and 40+ sites.

It lets you download the entire YouTube playlist and channel easily. The By Click Downloader tool lets you choose among different video qualities to download the video, i.e., 720p, 1080p, 4K, and 8K.

You can also choose the format you wish to download the video. Some supported formats are MP3, MP4, AVI, FLV, WMV, 3GP, WEBM, MKV, WAV, AAC, and M4A.

The team behind By Click Downloader works around the clock to keep the software up to date and adds features as and when required.

Here are some of the key highlights of By Click Downloader:

  • It supports more than 40 websites.
  • You can select the format and quality of the video.
  • It is an easy-to-use program.
  • Lets you even download the entire Instagram page in 1 click.

ByClick Downloader

Try this intuitive app to easily back up all your preferred videos from YouTube.
Free download Visit Website

Ddownr – Simple tool to download your YouTube Playlist

If you are looking for a no-nonsense YouTube playlist downloader for your PC, then Ddownr should be your pick to do the task.

It is free and lets you download your entire YouTube playlist or even multiple playlists without any issues.

All you need to do is visit the Ddownr website, paste the video URL or the YouTube playlist you wish to download, and the website will do the rest for you. It works on all platforms as long as it can run a web browser.

Apart from being free, one of the best features is that it lets you download videos or playlists in any format you would like.

Popular supported formats include MP3, WebM, M4A, and MP4. You can also select the quality of the video from which you would like to download the video in.

Here are some of the best features of Ddownr:

  • It is available free of cost.
  • Doesn’t require you to download any program or software.
  • Works without much input.
  • Lets you select the format of the video.
  • You can also select the quality as well.

⇒ Get Ddownr

Snapdownloader – Comes with a built-in video editor

Another option for Windows-faithful is the Snapdownloader. It is a brilliant application that works for Windows and lets you download videos from a plethora of websites, including YouTube, for later viewing.

You can use the Snapdownloader application to download videos in different formats, including 8K, 4K, QHD, 1080p, and HD.

Snapdownloader also comes with the option of converting your videos to different formats such as MP4, MP3, AVI, WMA

One of the best features of this tool is that it comes with a built-in video editor and trimmer. You can easily edit the videos as per your preference using the same app you used to download the YouTube playlist on your PC.

Here are some of the best features of Snapdownloader:

  • It supports over 900 websites.
  • You can convert the video into any popular format.
  • It comes with a built-in video editor.
  • Also features a built-in video trimmer.
  • You can schedule downloads.
  • It lets you extract audio from videos.

⇒ Get Snapdownloader

VideoProc – A powerful all-in-one video solution

If you are looking for a powerful tool that will cater to all of your video and audio-related needs then you should opt for VideoProc.

It lets you download YouTube videos or playlists or videos from a wide range of websites, but it also lets you save them in batches, convert them into your apt format, and all of this is free of cost.

You can also convert your videos or compress large videos to H.265 format. It lets you capture your computer screen using its screen recording functionality.

Here are some of the key features of VideoProc:

  • You can save batch videos or playlists from different websites.
  • Change the output quality of the videos.
  • Convert videos and audio.
  • Use it as a screen recorder.
  • Lets you stabilize, add watermark, cut, trim, merge, etc., to a video.

⇒ Get VideoProc

YouTubePlaylist – Simple option to backup your YouTube playlist

YouTubePlaylist is another option for all platforms. You can easily use this tool on any browser and download the YouTube playlist on your PC.

It can automatically convert your favorite video into popular formats and audio. Apart from YouTube, you can download high-quality videos from Facebook, Vimeo, and other websites.

It has an easy-to-use interface; all you need to do is paste the video URL or playlist and hit the Enter button. You can then choose the entire playlist to download.

Here are the key features of YouTubePlaylist:

  • It is web-based.
  • Available for free.
  • Lets you download videos from other websites as well.
  • Offers conversion features.

⇒ Get YouTubePlaylist

HitPaw Video Converter – Download playlists, audio, and thumbnails

What if you also want to download the YouTube video thumbnail as well? In such a case, we suggest you check out the HitPaw Video Converter.

It lets you download playlists, audio, and thumbnails from 10000+ websites. These websites include Facebook and Vimeo.

Apart from that, you can also use this tool to convert and edit videos. This 3-in-1 tool lets you download YouTube playlists and channels in bulk.

Check out the best features of HitPaw Video Converter:

  • Lets you convert your video.
  • You can edit your videos with this tool.
  • Supports over 10000+ webistes.
  • You can use it to download thumbnails as well.

⇒ Get HitPaw Video Converter

Videoder – Download YouTube playlist at lightning speed

Videoder is another tool you can install on your Windows or Android phone and download all your favorite YouTube playlist at lightning speed.

The app comes in-built with a web browser and adblocker. So, you don’t have to rely on another browser with ads to download your YouTube playlist.

As the Videoder claims, it lets users download YouTube videos 10 times faster speed than competing YouTube playlist downloader for PC.

Check out the key highlights of the Videoder app:

  • Comes with an inbuilt browser with an ad blocker.
  • Up to 10x faster downloading.
  • Lets you download videos in 4K.

⇒ Get Videoder

VideoHunter – Solid tool for downloading YouTube playlist

If you are searching for a downloader that lets you download the YouTube playlist on your PC and gives you a bit more options to choose from, then you should check out VideoHunter.

Apart from YouTube playlists, you can use VideoHunter to download videos in different qualities, including 720p, 1080p Full HD, 4K, and 8K.

You can also use VideoHunter to download playlists, channels, and even subtitles from videos. The developers claim it lets you save video and audio in bulk at 6x faster speed.

Here are some of the best features of VideoHunter:

  • Supports 1000+ websites.
  • Lets you extract playlists, channels, and subtitles.
  • You can download videos of different qualities.
  • The batch download feature is supported.

⇒ Get VideoHunter

iTubeGo – MacOS-supported YouTube playlist downloader

iTubeGo is a YouTube playlist downloader for PC that you can also use for MacOS. It is a nice tool with easy to use and modern user interface.

You can learn more about its features and performance in this detailed iTubeGo YouTube Downloader review.

It lets you download videos from 10000+ websites. You can even use this iTubeGo tool to convert videos into multiple websites.

You can convert your videos in different formats such as mp4, mp3, mov, avi, m4a, and more. It comes with a built-in web browser.

Some of the best features of iTubeGo include:

  • Over 10000+ websites supported.
  • Lets you download high-quality videos.
  • Convert videos into different formats.
  • Comes with a built-in browser.

⇒ Get iTubeGo

4K Video Downloader – Download YouTube playlist in 4K

Last but not least, in our list of the best YouTube playlist downloader for PC, we have a 4K Video Downloader.

As highlighted in the name itself, with this tool, you can download videos of 4K quality. You can even download audio and playlists in high quality.

It lets you download YouTube channels and subtitles in just a single click. If you are into 3D videos, you can download 3D videos with this tool.

Some of the best features of 4K Video Downloader are:

  • Lets you download playlists in 4K.
  • Download support for 3D videos.
  • Download subtitles in a single click.
  • Support all the popular websites.

⇒ Get 4K Video Downloader

That is it from us in this guide. Let us know in the comments below which one of the above tools you opted to download a YouTube playlist on your PC.

Xbox Insiders are now previewing a reworked Friends & Community Updates dashboard channel

Members of the Xbox Insiders program Alpha and Alpha Skip-Ahead rings can now preview the new “Friends & Community Updates” channel. The new channel was announced in a blog post on Xbox Wire. The Friends & Community feature isn’t exactly all-new to the Xbox experience, but it is now much improved with this more streamlined redesign.

We know that friends and community are front and center to your gaming experience. When you scroll down on Home you’ll be able to see a new channel called “Friends & Community Updates.

The Friends & Community Updates channel will bring together all the top things from your activity feed. You will be able to see achievements, game clips, screenshots and text posts from your friends, official clubs, or games that you follow.

The Xbox Insider Program allows fans to get access to the latest updates before they go mainstream, and give feedback. If you are interested in joining the Xbox Insider Program or would just like to learn more, head on over to the Xbox Insider FAQ page.

Featured image via Xbox Wire. 

Unilever goes cloud only with Azure as primary cloud platform

4 Unilever, one of the world’s leading Home Care, Personal Care, Nutrition, Beauty and Wellbeing suppliers, recently completed its complex migration to Microsoft’s Azure Cloud services to help support the company’s 3.4 billion active daily users.

In a press release yesterday, Microsoft highlighted its partnership with Accenture, a global 3rd party digital support company, which helped the company facilitate Unilever’s 148,000 employee base switch to Azure Cloud Services in just over 18 months.

The move to Azure Cloud Services for Unilever is intended to help the company “accelerate product launches,” enhance customer service,” and “improve operational efficiency.” Beyond the corporate boilerplate lingo, Unilever would like specifically take advantage of utilizing industrial metaverse technologies to power its insights and predictions, AI to help forecast and adapt to market changes, expand its automation programs and reduce its own carbon footprint in the process through a new program called Green Cloud Advisor.

The creation of an agile, high-performing digital core that delivers greater efficiency will provide Unilever with increased computing power to explore new ways of working. Unilever’s adoption of a cloud-only approach will significantly improve business resilience, strengthening security and enhancing control of the IT landscape.

Unilever joins hundreds of businesses that are leveraging Microsoft’s Azure Cloud services to build out their own end-to-end digitization platforms for automation, quick innovations, and reimagining lines of business.

Twitter blocks WordPress Jetpack Social API access (updated)

Update: Access has been restored.

We’ve tried a number of WordPress plugins to post to Twitter when we publish a new post, but always come back to WordPress Jetpack. It just works, and while the cost recently went up to $10/mo (for Jetpack Social only, you can pay more and get more Jetpack features, too), it’s been worth it for us to be able to “set it and forget it.”

However this morning WordPress and Jetpack apparently succumbed to the wrath of Elon, and Jetpack is currently blocked from accessing the Twitter APIs:

Twitter has been reconfiguring API access, charging up to $42,000 per month, and late last month began cutting off access for users who didn’t pay. We have no idea what Jetpack’s deal with Twitter is or has been, but we’d be very surprised if they weren’t already paying for access, as WordPress.com runs millions of sites (estimates run from ~24 million to almost 40 million), with many using Jetpack Social.

We know that many of you come to OnMSFT.com via Twitter, so we’re keeping our fingers crossed that this all gets worked out. We also suggest that you might want to follow us on Mastodon, where we are connected (via IFTTT) to publish a “toot” whenever we post.

OneNote for Windows gets enhanced note taking experience in Quick Note

Microsoft has announced a notable number of changes coming to OneNote for Windows to enhance the note taking experience in Quick Note. The enhancements will provide users with “a more efficient and faster way to capture your thoughts, reminders, and notes.”

Here’s everything you need to know:

  • Incorporated a sleek new toolbar with useful text formatting options and inking capabilities.
  • Given you faster access to screen clipping.
  • Made it easier to transition to OneNote on Windows through the overflow menu.

With these new enhancements, users can now quickly insert screenshots into Quick Note using the new Screen Clipping button and make edits.

OneNote for Windows

It’s worth noting that these new enhancements are exclusively rolling out to OneNote for Windows, OneNote for Windows 10 won’t have access to them.

To access these new features, you must be an Insider running Version 2302 (Build 16118.20002) or later. Microsoft hasn’t indicated when we should expect this feature to ship to general availability. Be sure to check out Microsoft’s blog post to learn how to make use of these new features.

In related news, OneNote for Windows’ top-requested feature, the vertical layout option finally hit general availability early this year.

OneNote
OneNote
Price:
Free

Looking for a lightweight Windows 11? Tiny11 is the answer

Developer NTDEV released tiny11, a de-bloated version of Windows 11 that runs on almost every PC/computer with low-end specifications. 

Based on Windows 11 Pro 22H2, tiny11 runs with just as little as 400 MB of storage, compared to Windows 11’s standard of over 20 GB. Some users even reported tiny11’s installation under 200 MB, albeit slow. 

In its latest development, tiny11 can even run Windows 11 with as little as 100 MB storage with only the command prompt and some rudimentary batch files work.

The devs also stated that an even smaller version called live11 is in the work. As they call it, it is a live image of tiny11 that loads completely into RAM and fits neatly on a DVD, and we’ll keep you updated once we have more news on this.

You can do a clean installation with a USB stick with third-party apps like Rufus to make bootable, non-bootable, and FreeDOS drives.

How big is Windows 11?

The original version of Windows 11 requires at least 64 GB of storage and 4 GB of RAM. It can be a complete disadvantage for older PCs. 

As noted on Microsoft’s official website, here’s the minimum specification of Windows 11.

  • Processor: 1 gigahertz (GHz) or faster with two or more cores on a compatible 64-bit processor
  • RAM: 4 gigabytes (GB) or greater.
  • Storage: 64 GB* or greater available storage is required to install Windows 11.
    • Extra storage space might be required to download updates and enable specific features.
  • Graphics card: Compatible with DirectX 12 or later.

A reliable internet connection is also necessary to download, but if you’re running on a slow bandwidth or the installation comes at a slower pace, we recommend you check these tricks. 

What is the downside of tiny11?

To get this working, however, NTDEV has to cut off several Windows features from tiny11 that require a lot of space. 

Designed to bring life to old computers, tiny11 removes Windows Component Store (WinSxS) and disables installation of new features or languages. While it’s not serviceable, the system still supports .NET, drivers, and security definition updates, which can still be installed from Windows Update. 

Additionally, the developer discourages installation on PCs that are powerful enough to run Windows 11 by default, as it’s done previously with tiny10 and Windows 10 in the past. 

“While I can understand that installing modified versions of Windows can pose a security risk, I can assure you (and you can obviously check for yourself) that the image doesn’t have anything from external sources added to it”

Have you tried running Windows 11 on lower-end PCs? Let us know in the comment!

You can now search images on Bing AI chatbot. Here’s how

Microsoft just announced a set of new features that are coming to its Bing AI chatbot. One of them is the image search feature, which works just perfectly. 

From now on, you’ll be able to ask the Bing AI chatbot to pull out images with input searches. 

We integrated image and video search into Bing chat. You’ll see these results appear as answer cards below your chat answers, and you can click “See more” if you want to explore further in Bing image search.

As Redmond officials revealed in a blog post, the feature is currently living on the Preview Release, meaning that only a few selected waitlist users can get their hands on the feature. 

Other than that, they also said that the chat limit has been revamped from 15 to 20 maximum turns per topic, and from 150 to 200 turns daily. Plus, local-related queries will see better answers from now on as Microsoft has been improving that aspect of local grounding since its release. 

How to search images on Bing AI chatbot

1. Open Microsoft Edge.

2. Open Bing.com, and then go to Chat.

3 If you’re not on the waitlist yet, click on Join the waitlist.

4 If you’re already in, type “Show me images of …”

On the other hand, this feature is similar to the Bing Image Creator feature we reported earlier, but instead of AI-generated visuals, the chatbot will bring you real pictures from the real world. 

What do you think about this image search feature addition to Bing AI chatbot? Let us know in the comments.

AI.exe: What is it & should you remove it?

If you found a process called AI.exe running on your system, don’t panic. In this article, we’ll dig into what the file is all about, what it does, and should you remove it or not. 

What is AI.exe?

AI.exe is an executable file that’s run by Microsoft in Windows 11’s ecosystem every time users open Outlook, Word, Excel, or any 365-related applications. 

When you open your Task Manager, you can see that this file is described as Artificial Intelligence (AI) Host for the Microsoft® Windows® Operating System and Platform x64 with a size of a little over 710-something KBs. 

As explained best by Microsoft’s Joshua Burkholder, AI.exe receives inputs for an Office app and runs it, mainly for automated corrections such as grammar, pronunciation, punctuation, etc. 

ai.exe: The executable used to host ai.dll. This executable receives inputs from aitrx.dll in an Office desktop app, runs those inputs through ai.dll to get the associated outputs, and transmits those outputs back to aitrx.dll in the Office desktop app.

So, how do I know if this is safe? Read along to find out how. 

How to check if AI.exe is legit?

1. When an Office app is opened (Word, Excel, Outlook, etc.), right-click on your taskbar and click Task Manager.

2. On Details, look for AI.exe.

3. Right click and click Properties

4. If the description is Artificial Intelligence (AI) Host for the Microsoft® Windows® Operating System and Platform x64., then it’s legit.

This makes more sense, especially since Microsoft has been rigorously testing its AI innovations to their limits. Not too long ago, Redmond officials announced their plans to launch an AI-powered Copilot feature for all Office 365 apps. 

Let us know in the comments if you find these tips helpful! 

NVIDIA GeForce Now Error 0xc0f1103f: 7 Ways to Solve It

If you have encountered NVIDIA GeForce Now error 0xc0f1103f while trying to stream your favorite games, this guide can help! We will explore the possible causes of this error and provide you with expert-recommended solutions to fix it.

What causes NVIDIA GeForce Now error 0xc0f1103f?

There could be several reasons why you face this error on Nvidia; some of the common ones are mentioned here:

  • Network connection issues – If your internet connection is weak or unstable, then Nvidia might not be able to establish a connection with the server, hence the error. Check your internet connection to ensure that’s not the case.
  • Antivirus software interference – Sometimes, antivirus software can interfere with NVIDIA GeForce Now functioning; it can’t connect to the server, hence the error.
  • Corrupt installation – If the NVIDIA GeForce Now’s installation files are missing or corrupted, you might see this error.
  • Outdated drivers – Drivers are important for the smooth functioning of your computer. If the drivers are outdated, then it might lead to this error. You need to update the graphics drivers to fix the issue.
  • Server overload – If the NVIDIA server is overloaded or under maintenance, you might get this error. You need to wait for some time and try again.

What can I do to fix the Nvidia GeForce Now error 0xc0f1103f?

Before engaging in advanced troubleshooting steps, you should consider performing the following checks:

  • Check your internet connection.
  • Disable any VPN if activated.

1. Check GeForce Now server status

  1. Go to the GeForce Now Server Status website.Under Status Geforce 0xc0f1103f
  2. Check the current status of the servers.
  3. If down, wait for a while and try again.

2. Update GeForce drivers

  1. Press Windows + R to open the Run console.Device Manager RUN COMMAND
  2. Type devmgmt.msc and click OK to open Device Manager.
  3. Click Display adapters to expand it.
  4. Right-click GeForce Now and click Update driver.Graphics Driver update 0xc0f1103f
  5. Click Search automatically for drivers.Update driver 2
  6. Follow the onscreen instructions to complete the process.

To ensure you get the latest GeForce driver options, you can try a dedicated tool that will scan your PC for all outdated or malfunctioning drivers.

After the scanning procedure, this tool will check its database and locate the correct and newest options for the best performance.

Outbyte Driver Updater

The most convenient tool you can use for quickly updating all your device drivers.
Free Trial Download now

3. Edit the Power plan

  1. Press the Windows key, type Control Panel, and click Open.CP 0xc0f1103f
  2. Select Large icons as View by and click Power Options.Power options Large icons 0xc0f1103f
  3. Click Change plan settings.Change plan settings 0xc0f1103f
  4. Select Change advanced power settings.Change advanced power settings
  5. Locate Switchable Dynamic Graphics, then click Global settings.Switchable graphics  0xc0f1103f
  6. Now for Plugged in, select Force power saving Graphics.
  7. Click Apply, then OK, and close the window.

4. Run GeForce Experience app as an administrator

  1. Locate NVIDIA GeForce Now.exe.Run as admin 0xc0f1103f
  2. Right-click the executable file and select Run as administrator.

5. Restart NVIDIA services

  1. Press Windows + R to open the Run dialog box.Services Run Command
  2. Type services.msc and click OK to open Services.
  3. Locate all the services related to NVIDIA. Right-click on each service and click Restart.Restart NVIDIA service 0xc0f1103f
  4. Now close the Services app.

6. Disable Proxy Server

  1. Press Windows + I to open the Settings app.
  2. Go to Network & Internet and click Proxy.0xc0f1103f Proxy 1
  3. Under Automatic proxy setup, toggle off the switch Automatically detect settings.Proxy
  4. Now click Set up next to Use a proxy server.Edit proxy 3 0xc0f1103f
  5. Toggle off the switch under Use a proxy server and click Save.

7. Use Integrated Graphics

  1. Launch NVIDIA Control Panel.
  2. Click 3D settings, then Manage 3D Settings.
  3. On the right pane, go to Global Settings.Manage 3d settings 0xc0f1103f
  4. For Preferred Graphics Processor, choose Integrated Graphics from the dropdown.
  5. Click Apply to confirm the changes.

So, these are methods to fix the NVIDIA GeForce Now error 0xc0f1103f. Try them and let us know what worked in the comments section below.

Best Offline Password Manager: 5 Secure Picks for 2026

Password managers are important today, where users possess multiple online and offline accounts. While there are a series of these tools online, offline versions are now gaining traction.

But choosing the ideal one might be difficult with the number of offline password managers available. Thankfully, we have prepared the best tools to help ease your selection process.

What is an offline password manager?

An offline password manager is a secure storage that saves your password away from the internet. It offers an extra layer of protection, keeping your data away from hackers.

The only disadvantage of these tools is that your password will only be available on your present device, as there is no sync option.

Are offline password managers safe?

As mentioned earlier, offline password managers save your data locally on your device. It saves your passwords in an encrypted file that is usually kept separately from the app itself.

So, even if anybody finds out the storage location, they still won’t be able to view your password in plain text.

What are the best offline password managers?

RoboForm – Multifactor authentication

Roboform password manager software

RoboForm is a flexible offline password manager wide range of features. It offers full package features for both offline and online use.

It has both a free and paid version, with a few differences between the two versions. The major difference with the paid version is the ability to sync your password across various devices.

However, there are a host of other features you get on the free version. Among the features, you can get the ability to analyze your password strength.
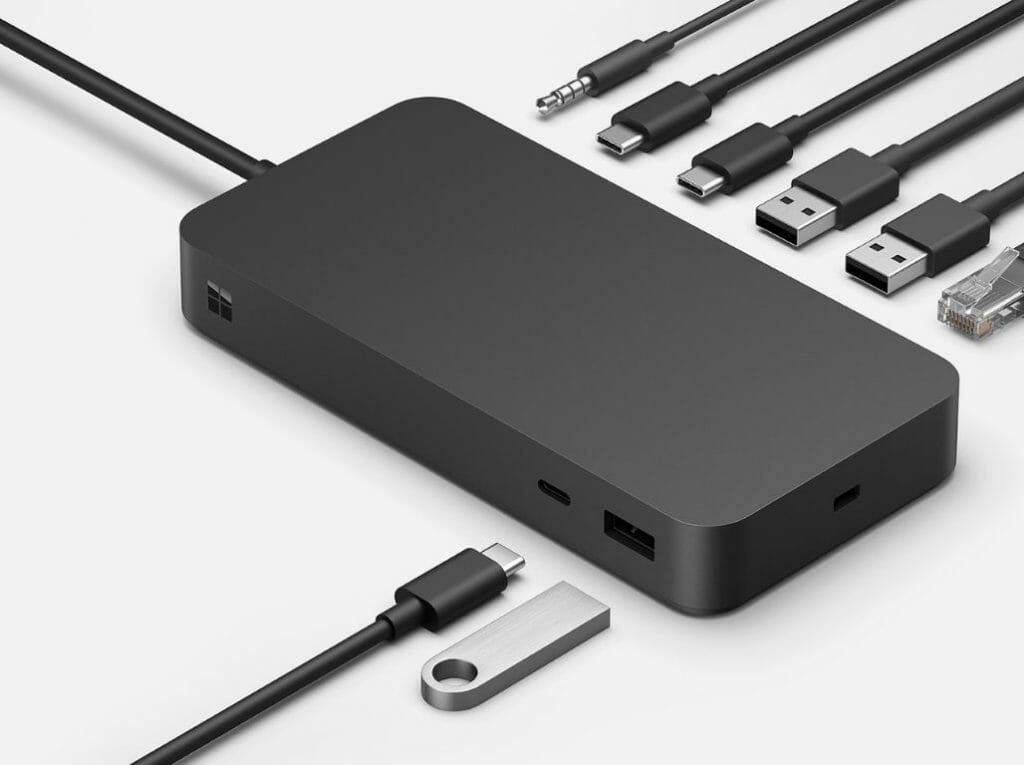
This allows you to know if your password is safe enough. Finally, you can save unlimited passwords and share your passwords with other users. You about get to do anything you want with your password with RoboForm.

Other features:

  • Multifactor authentication
  • Biometric authentication
  • Top customer service
  • Categories data

RoboForm

Never worry about forgetting any passwords with this useful offline password manager.
Check price Visit website

1Password – Saves other data

1password

1Password is a paid password manager that offers both online and offline features. It is a family-based tool that allows you to add as many people as you want.

One of its leading features is the ability to save more than just passwords. It also allows you to save software licenses and sensitive data in a virtual vault.

Another excellent feature is that you can download all your data to your local device. You can also edit your data in this offline mode, but it will be synced once your connection is restored.

What’s more, 1Password has a dedicated extension that works with some of the major browsers. However, you need to have administrative access to make use of the extension.

Other features:

  • Possesses an offline vault
  • Multifactor authentication.
  • Extensions for auto-filling
  • Offline supporting

1Password

Fill out the password fields for any online accounts using this all-in-one password tool.
Check price Visit website

KeepassXC – Top-notch security

keepassxc best offline password manager

KeepassXC is a full-fledged offline password manager that boasts high security. It boasts different security options, allowing you to select your preferred option.

You can choose between AES 256-bit, Twofish, and ChaCha20 encryption, depending on your desired security strength. With this, you are sure of what you are getting before committing to it.

Another excellent feature to look forward to in KeepassXC is autofill. This saves you the stress of entering your password each time you need to access your sites and accounts.

More importantly, KeepassXC is free, and all its features are available to all users. This makes it probably the best free password manager you can use.

Other features:

  • Two-factor authentication (2FA)
  • Password generator
  • Command-line interface
  • Can use Google Drive to sync passwords across devices
  • Open-source and free

⇒ Get KeepasXC

Bitwarden – Versatile tool

bitwarden

Bitwarden is a well-known online offline password manager, thanks to its high security and versatility. Unlike KeepasXC before it, this tool is not an offline-only password manager.

Among its excellent offline feature is the ability to access your vaults without the internet. This allows you to view the passwords you last synced to the cloud.

Bitwarden is not completely free, but most of its features are also available in the free version. However, the paid subscription is about 10 USD yearly, making it one of the cheapest available.

The major features in the paid version are extra security, like extra 2FA methods and emergency access. But the free version is still as secure as the best offline password manager can be.

Other features:

  • Security reports
  • Emergency access
  • Cloud syncing

⇒ Get Bitwarden

Enpass – Data encryption

enpass

The last on our comprehensive guide of best offline password managers is Enpass. This tool is built to provide complete offline security.

One of the excellent features you get with Enpass is the ability to create a backup of your data. With this, you can prevent total data loss and always have access to your data.

Also, it encrypts your passwords and the backup data. This encrypted file can be transferred to another PC but can only be decrypted with the verified master password.

Lastly, there is a mini server available on the desktop app. With this, you get to transfer your files over the same network.

Other features:

  • Paid lifetime access
  • Organization of local files
  • Stores 25 passwords for free
  • Cross-browser support

⇒ Get Enpass

With this, we can conclude this guide on the best offline password manager you can use. Now, you should be able to select the ideal option that suits your needs.

If you need a password manager with emergency access, check our detailed guide for the top options.

Feel free to let us know the option you enjoy using from our list in the comments below.

Fix: Operation Failed With Error 0x00004005

The Operation failed 0x00004005 is one of Windows’ most common printer errors. It occurs when users try adding a network printer to their computers, reading: Windows can’t connect to the printer; the operation failed with error 0x00004005.

In this article, we’ll show you how to fix this error and explain the main causes so you can prevent it in the future.

How can I fix the Operation Failed With Error 0x00004005?

1. Run the Printer Troubleshooter

  1. Press the Windows key + S, type Troubleshoot, and hit Enter.
  2. In the Settings app, click on Other troubleshooters.
  3. Click on Printer, and click Run button.
  4. Follow the on-screen instructions and restart your PC to check if the Operation Failed With Error 0x0000400 is resolved.

Running the Windows troubleshooter is one of the quickest and easiest ways to resolve the 0x00004005 error.

The troubleshooter will detect anomalies with the Printer Spooler and other necessary services and correct them if required.

2. Update the Printer driver

  1. Press the Windows key + R, type in devmgmt.msc, and hit Enter.
  2. In the Device Manager window, locate the Printer driver, right-click on the Printer, and select Update driver.
  3. In the next window, click on Search driver automatically, and wait for Windows to search and install available drivers.
  4. Restart your PC once the search is completed.
Note icon NOTE
Should you encounter any issues with updating the driver here, you can check out our guide for other ways to go about updating your drivers.

Alternatively, if you want to save time and schedule future driver updates, you can use an automated driver updater such as Fortect Driver Updater. It makes the whole process quicker and saves you from potential errors caused by mismatched drivers.

⇒ Fortect Driver Updater

3. Uninstall and reinstall Printer driver

  1. Press the Windows key + S, type in Device Manager, and hit Enter.
  2. Locate the printer, and double-click on it to expand the selection. Right-click on the device and select Uninstall device.
  3. Click Uninstall to confirm the driver removal.
  4. Restart your PC once the driver is completely uninstalled.

4. Uninstall Latest Windows Updates

  1. Press the Windows key + I to open the Settings app.
  2. Click on Windows Update and click on Update History.
  3. Then, select Uninstall Updates.
  4. Under the Microsoft Windows section, click on any recent update, and select Uninstall.
  5. Click on Yes in the confirmation prompt to confirm the deletion.

5. Configure the LAN Manager Authentication Level

  1. Press the Windows key + R, type in gpedit.msc, and hit Enter.
  2. In the Group Policy window, navigate to this path: Computer Configuration\Windows Settings\Security Settings\Local Policies\Security Options\Network security: LAN Manager authentication level
  3. Double-click on Network security: LAN Manager authentication level to open the Properties window.
  4. In the Properties window, click the drop-down menu and select Send LM and NTLM – Use NTLMv2 session security if negotiated.
  5. Click Apply and then click OK.
  6. Close the Group Policy window and restart your PC.

6. Add the Printer Manually

  1. Press the Windows key + I to open the Settings app.
  2. Click on Bluetooth and devices and select Printers & Scanners.
  3. Click Add device.
  4. After a few seconds, you’ll see a link: The printer I want isn’t listed. Then select Add manually.
  5. Click the link, check the box next to Add a printer using a TCP/IP address or hostname, and click Next.
  6. On the next window, type in your local Hostname or IP Address.
  7. Type in your Port name, click Next and follow the on-screen instructions to finish adding the printer.

In some cases, Windows might not detect the printer automatically. When this happens, you must manually add the printer to solve the 0x00004005 error.

7. Restart Printer Spooler Service

  1. Press the Windows key, type in services.msc, and hit Enter.
  2. On the Services window, right-click on the Printer Spooler service and select Restart.
  3. Close the Services window and check if the error persists.

8. Update Windows

  1. Press the Windows key + I to open the Settings app.
  2. Click on Windows Update and select Check for Updates. Wait for Windows to scan for available updates. If there are available updates, click on Download to install them.
  3. Once the updates are installed, click the Restart now button to restart your PC.

What causes Operation Failed With Error 0x00004005?

Some of the most common causes of the Operation Failed Error 0x0004005 include:

  • Outdated Drivers – Printers, like most devices we connect to your computers, require specific drivers to run correctly. If the Printer drivers are outdated, you’ll run into errors like the 0x00004005 code.
  • Print Spooler Service – The Print Spooler service is built into Windows to temporarily store print jobs in the computer’s memory until the Printer is ready to print them. If this service stops functioning, it’ll lead to lots of printer-related errors.
  • Misconfigured Network Settings -The 0x00004005 usually arises when you’re trying to add a shared network printer to their PC. If there’s a misconfiguration in your PC’s network settings, it can cause the 0x00004005 error code.
  • Windows Update – Windows users are usually advised to update their PCs regularly. However, installing certain updates can lead to several errors on your PC.  In such cases, a Windows recovery point is beneficial as you can restore your PC to an earlier state where it was completely functional.

Wrapping up

The 0x00004005 error is common among Windows users and involves little technicality. By following the steps listed above, you should get your printer up and running in no time.

However, if you’ve stumbled upon this error in the past and have alternative solutions to help resolve it, feel free to drop them in the comments.

Fix: ChatGPT Signup Is Currently Unavailable Error

You probably just ran into the ChatGPT message signup is currently unavailable. You are in luck because we have explored this message and will show you the best fixes.

This error should not put you back because it is only expected that as certain services and tech expand, people will experience new problems while using them. Let us get straight into some causes and the best fixes.

Why is ChatGPT Signup currently unavailable?

From what we have noticed from interactions with several users, you may be getting this message for any of the following reasons:

  • Limitations of the system – There are chances that there is a limit of possible signups at any given time. Even though this is unclear, it seems like a possible explanation.
  • Demand – Cahnaces are that when you try to access the service, there’s a surge in demand, and this temporal suspension helps manage the load.
  • Technical problems – Sometimes, this could be routine maintenance or specific issues the service faces when you demand to use it.

As you have seen, it will often not be in your hand when this problem occurs. This means you may consider an AI alternative; however, let us examine what you may do.

What can I do if ChatGPT signup is currently unavailable?

Here’s what you should keep in mind:

  • As we just said, in most cases, you will be powerless to solve this problem; hence you must contemplate waiting it out rather than digging into solutions. However, if you have waited a while and the problem persists, you may try our suggested resolutions.

1. Clear your browser cache

  1. Press Crtl + Shift + Del (on Chrome browsers).
  2. Select All time, tick the three checkboxes, and click Clear data.
    chatgpt signup is currently unavailable
  3. You may need to restart your browser afterward.

These solutions should work in all browsers, even though the methods to get to the cache page may differ.

2. Disable plugins or extensions

  1. Click the ellipses at the top right corner of the browser, select More tools, then Extensions.
    chatgpt signup is currently unavailable
  2. Either click on the switch or select Remove for any potentially problematic extensions.
    chatgpt signup is currently unavailable
  3. Repeat the second step for as many extensions as possible, then restart the browser.

Once again, we have carried out this step using Chrome; it may slightly differ from other browsers.

Hopefully, you should find resolutions using either solution we have suggested. If none work, you may consider using an alternative to ChatGPT, as there are a few excellent options.

You may consider using a different browser to access the service or simply upgrading to ChatGPT Plus.

That is as much as we will discuss in this guide. We hope you have found it helpful. Let us know in the comments section below.

How to Quickly Reset Your GPU with a Shortcut Key/Hotkey

Whenever there is any problem with the display, users tend to think about the graphics card that is installed on any device.

Sometimes there is not much effort needed to resolve the issues involving the display. Users simply have to reset the graphics card.

Usually, this kind of stuff is faced by gamers who often get display issues that are linked to the graphics card.

A very few users also face issues where they get an error that says unsupported graphics card in Epic games.

What happens when you reset your graphics driver?

When you reset your graphics driver, this will restore the graphics card’s settings to their default values. Resetting the graphics driver will fix any issues related to the display of the system.

In this article below, we have listed a few methods to reset the graphics driver on any Windows system.

How do I reset my GPU with a shortcut and not only?

1. Use a shortcut key/hotkey

  1. In order to reset the GPU on your system, you simply have to press Windows, Ctrl, Shift and B keys together at a time on your keyboard.


  2. Resetting the GPU using the keyboard shortcut mentioned above will make the system beep once.
  3. You might see the system’s screen completely black and not responsive for some time.
  4. Don’t worry! Everything is gonna get back to normal soon and all the apps, folders, or files that are open won’t be closed.

2. Reinstall the graphics driver

  1. Press the Windows and X keys together to view the context menu of the Start button on the Taskbar.
  2. Next, press the M key again on the keyboard which opens the Device Manager.
  3. In the Device Manager, you need to go to the Display Adapters option from the list.
  4. Double-click on it to expand it.
  5. Then right-click on the Display adapter listed and select Uninstall device from the menu.


  6. This uninstalls the graphics driver from the system.
  7. Now reboot the system and while the system starts, it will install the appropriate default graphics driver on the system.
  8. You can also visit your graphics card manufacturer’s website to download and install the graphics driver.

3. Update the graphics driver

  1. Press the Windows and R keys together on the keyboard to open the run box.
  2. Type devmgmt.msc in the run box and press the Enter key which launches the Device Manager.

    Windows 11 touch screen won't calibrate
  3. Go to the Display Adapters and expand it.
  4. Then double-click on the graphics adapter which opens the Properties window.


  5. Under the Driver tab and click Update driver.


  6. This will pop up the update window and click Search automatically for drivers.


  7. It will start searching for the latest version of the graphics driver online.
  8. Once done, you can close the device manager.

Graphics card drivers are quite intricate. They adjust fan speeds, interpret CPU commands, cache data from several sources, decode and encode video, and use specific hardware such as RTX or CUDA.

Driver updates make the Graphics Card’s work routes faster by reducing needless activities or better dividing the workload.

You may rely on Outbyte Driver Updater to make such enhancements to ensure a proper update with the most recent graphics card drivers. This is an automated solution to keep your drivers always up and running without wasting time searching for them manually.

Outbyte Driver Updater

Check out this easy way to update the graphics drivers and achieve your desired result.
Free trial Download now

Several users claimed that they were able to fix most of the issues by resetting the graphics driver.

Whether your graphics card is from NVIDIA, Intel, or AMD, you can always go to their website’s downloads page and download the newest version to install it on your device.

You should also check our guide on how to easily install graphics card drivers on Windows 10. The solutions also work on Windows 11.

If you found this article to be informative, please leave us a comment below to let us know more!

Fix: ChatGPT too Many Signups From the Same IP

Artificial intelligence (AI) has taken the world by storm, and even though it is still early days, the signs are clear enough to show it will shape our future.

ChatGPT is indeed the service of the moment, and as it grows in popularity, the more adoption it sees. This explains why recently we have faced some errors using the service.

ChatGPT too many signups from the same IP is just one such error, and in this guide, we walk you through steps on fixing it so that you can get back to using your favorite AI.

Why am I getting a ChatGPT too many signups from the same IP message?

This error points to the fact that the same IP has tried to signup for the Open AI service too many times.

The main reason is that you try to sign up using the same internet connection. You should know that you are often assigned an IP address to identify your network and device.

So, you may still get this message even if you try to sign up for the service from a different device while on the same network.

Let us show you how to fix this.

What should I do if I can not signup for ChatGPT using the same IP?

Before attempting any fix:

  • It would be best if you considered waiting it out. While this does not involve doing anything, it is very effective. Like many services, users have discovered that your signup attempts are time bound. So, if multiple accounts have signed up using the same IP, you should try later or the next day.

1. Use a VPN

  1. Press Windows + I to open the Settings app.
  2. On the right pane, click on Network & internet, then on the left, select VPN.
    ChatGPT too many signups from the same IP
  3. If you do not have a VPN already added, click the Add VPN button.
    ChatGPT too many signups from the same IP
  4. Input your VPN details and connect to it.
  5. Now launch your browser and try signing up to ChatGPT again.

Alternatively, you could use a VPN service with many options. They will mask your IP address and help you bypass too many signups from the same IP on ChatGPT.

The ideal choice for this is a VPN that offers guaranteed online privacy and extremely fast navigation across 94 different regions all over the world.

Having that said, ExpressVPN is the ultimate pick that won’t let you down due to its high-speed servers and unrestricted content regardless of location.

ExpressVPN

Get thousands of different IP addresses to sign up on ChatGPT using this speedy VPN.
Check price Visit website

2. Reset your Modem

Note that this solution is only relevant if you use a dynamic IP address. This may often be the case if you use your mobile data.

If you fall into this category, you need a hard reset. This involves turning off your devices for a few seconds, maybe up to 60 seconds.

When you restart, your Internet Service Provider (ISP) may assign you a new IP. You may have to repeat this several times and probably wait longer after turning off your devices.

You may also stop creating accounts from your current network and use a different one. This is often the easiest solution if you have a readily available second option.

The ChatGPT, too many signups from the same IP, is not a severe problem. It does not also mean you are banned from using the service. Simply try any suggested solutions, and you should be well on your way.

That will be all for this article. Please let us know if you found any success using these solutions.

Excel Running Slow? 4 Quick Ways to Make It Faster

Excel running slow is one of the most common problems faced by users. It can vary in occurrence for different users as some can experience it when it’s opening, while some when working on files. However, this guide will discuss the reasons behind the problem and how to fix it effectively.

Also, you can read our guide on Excel file format and extension not matching and how to fix the problem.

Why is Excel running slow and freezing?

Some probable reasons behind Excel processing slow are:

  • Excessive Volatile functions – Using volatile functions such as VLOOKUP in large amounts can be why Excel is running slow and freezing on your PC. It is because the volatile functions take up more Excel data space and can be problematic if excessive in a single file.
  • Outdated GPU drivers – You can also experience the Excel app running slowly due to outdated graphics drivers running on your computer.
  • Outdated Excel program – Running an outdated Excel app means the Office app doesn’t have the necessary updates to fix bugs. So, these bugs can corrupt Excel cells, causing them to work slowly.
  • Too big spreadsheet in Excel – Storing several large-sized spreadsheets in your Microsoft Excel may be the culprit. Also, if you have a sheet whose cell has a value>0, it means a cell has unresolved formulas and can result in sluggish performance or freezing.

As we go further in the article, we’ll take you through some basic steps for fixing Excel if it’s running slow.

What can I do if Excel is running slow and freezing on my PC?

Before trying any advanced troubleshooting steps, go through the following:

If the issue persists, proceed with the solutions below:

1. Update your GPU driver

  1. Press Windows + R keys to prompt the Run window, type devmgmt.msc, and click OK to open the Device Manager.
  2. Open the Display adapter entry, right-click on the device driver, then select Update driver from the drop-down menu.
  3. Click on Search automatically for the updated driver software option.
  4. Restart your PC and check if Microsoft Excel runs smoothly.

Updating the graphics driver will resolve bugs affecting the game and install the latest features to your app performance.

Furthermore, specialized programs, such as Outbyte Driver Updater, can also be an efficient method of updating your graphics driver because these kinds of software will immediately find the latest versions from an extensive repository.

Check other steps for updating graphics drivers on Windows 11 if you have any issues.

2. Start Excel in Safe Mode and Disable the Excel Add-Ins

  1. Press Windows + R key to open the Run dialog box, type excel.exe /safe, then click OK to start Microsoft Excel in Safe Mode.
  2. Click on File in the top menu bar, then select Options from the menu on the left.
  3. Click Add-ins on the right, select Excel Add-ins, then click the Go button.
  4. Uncheck the boxes next to the active Add-Ins and click OK to save the changes.
  5. Restart Excel and check it works faster.

Running Excel in Safe Mode will fix third-party app interference. Also, disabling the Add-ins will fix any corrupt add-ins impeding Excel performance.

3. Disable the Hardware Graphics Acceleration

  1. Launch Excel, click on Files in the top menu bar, then select Options from the menu on the left.
  2. Click the Advanced option.
  3. Select Display, check the box for Disable hardware graphics acceleration, and click OK to save the changes.
  4. Restart Excel to see if there are any changes in how fast it runs.

Disabling the hardware graphics acceleration will fix graphics settings causing Excel to run slowly or freeze.

4. Download the latest updates for Excel

  1. Launch Excel and click on Files in the top-right corner.
  2. Click on Account from the menu on the left.
  3. Click Update Options, then tap on the Update Now option. If any update is available, it will automatically install it.
  4. Restart your PC and check if Excel works faster.

Updating Excel will fix bugs causing issues with it and install the latest features to help it run faster.

In addition, you can check ways to fix the Excel file that could not be found error on your PC. Also, our readers can read about fixing the errors that were detected while saving Excel error messages on Windows 11.

Should you have further questions, kindly drop them in the comments section below.