Can’t Connect to VPN in Windows 10? Here’s How to Unblock it

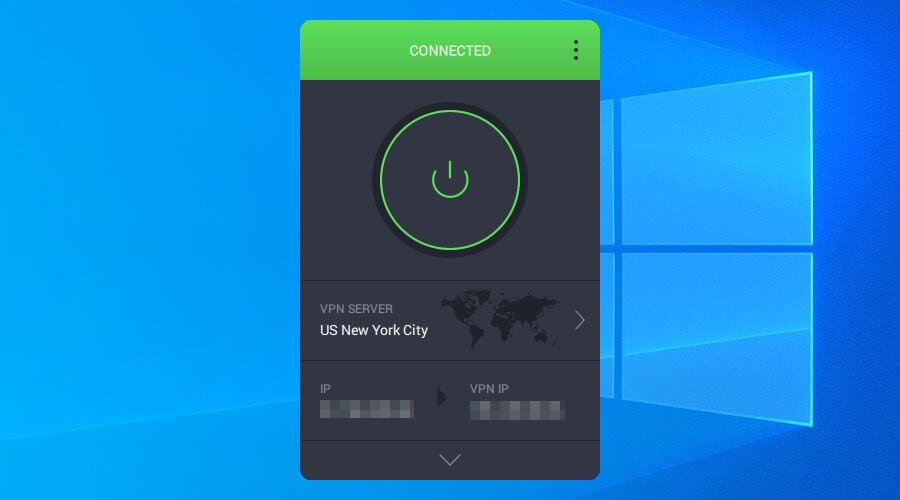
Is your VPN blocked on Windows 10? Windows Report has got you covered. A Virtual Private Network (VPN) is a network that enables you to surf the web anonymously without fear of being snooped on by government agencies. Also, VPN is used to access geo-restricted or censored websites.

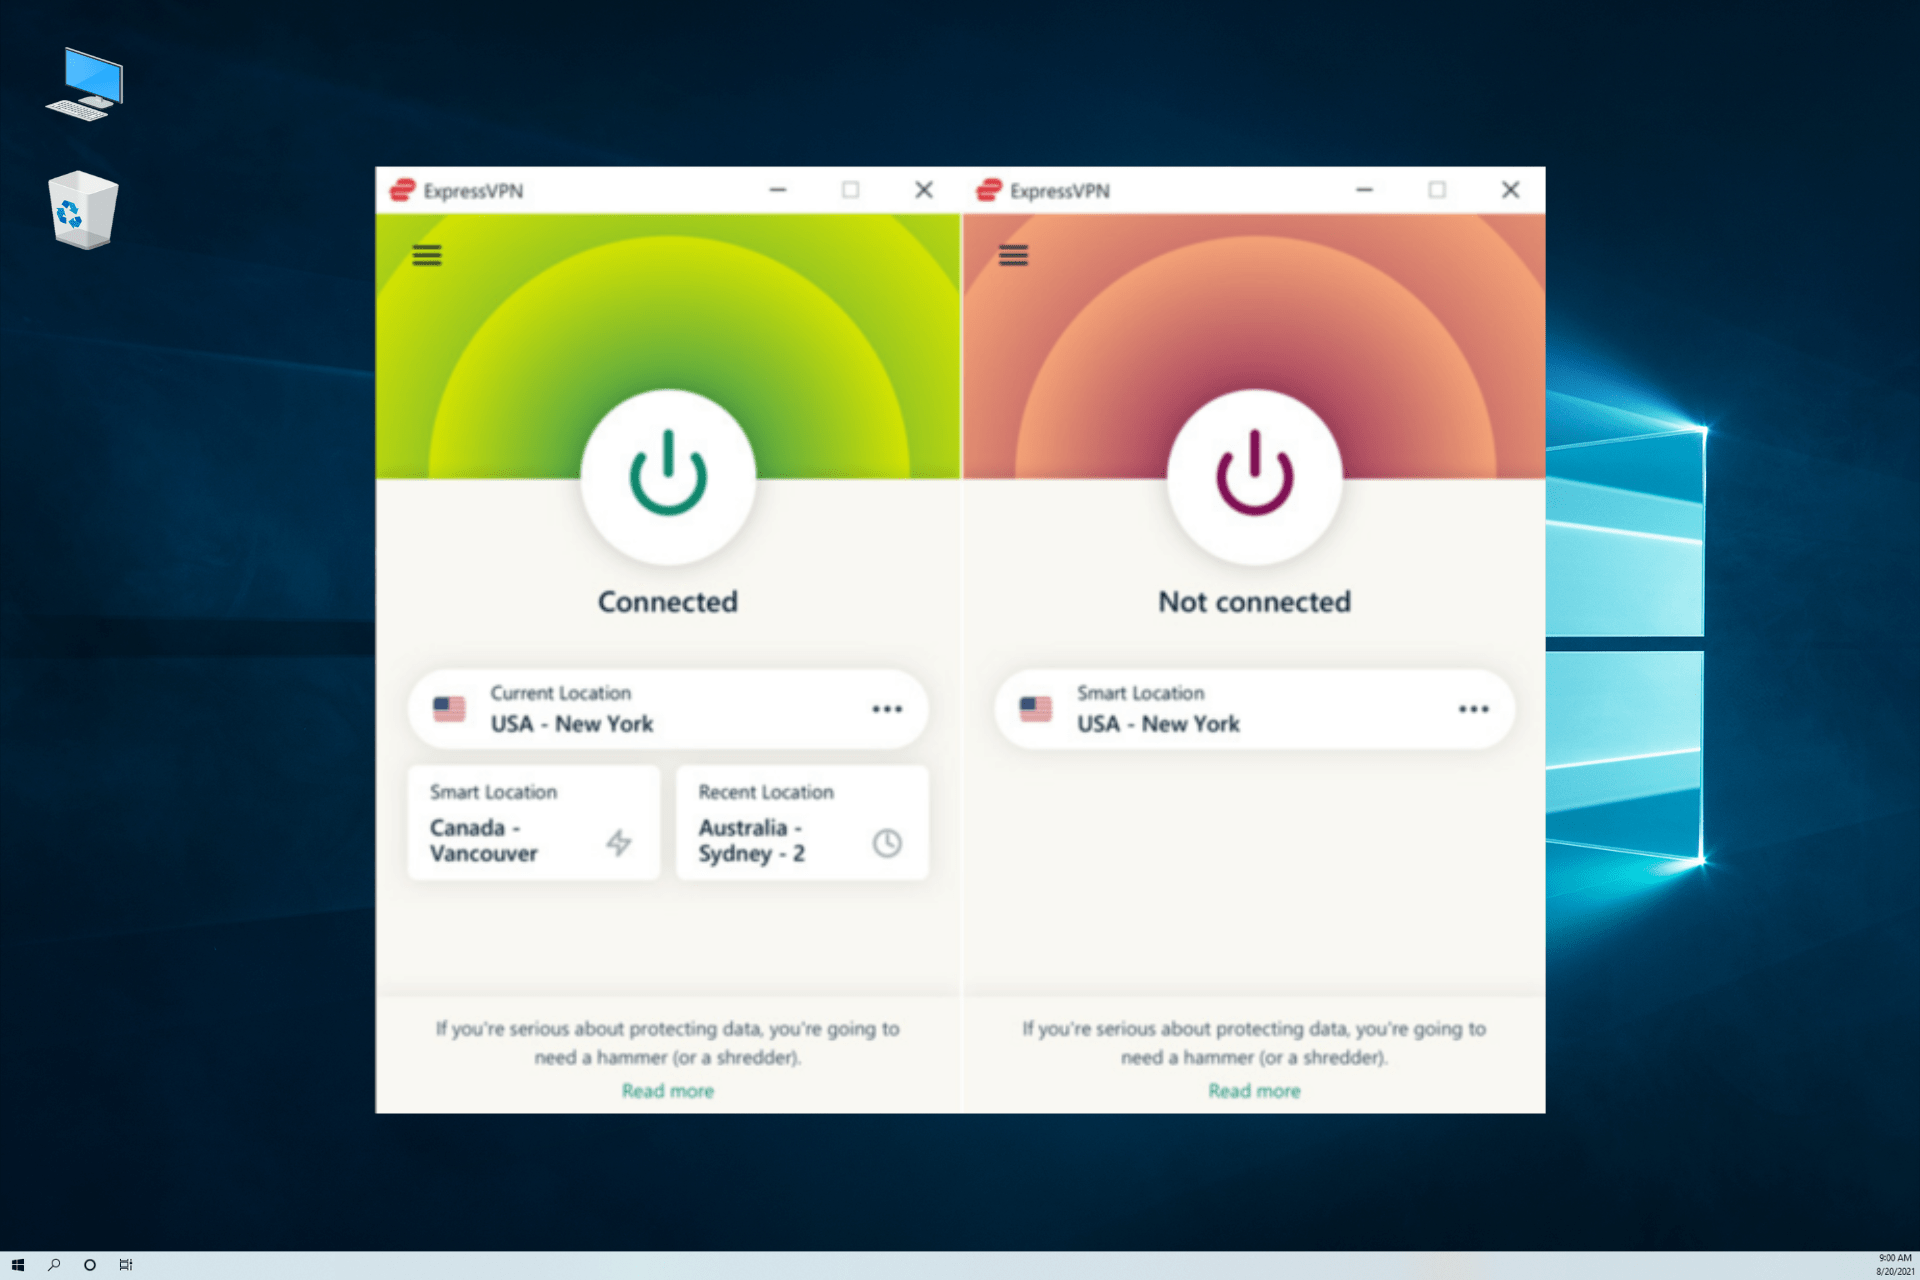
However, Windows 10 users reported that their VPN was blocked after connecting to the Internet.

There are several reasons for this blockage which could be due to the Windows 10 settings, Internet connection settings, and also the VPN itself.

If you experience VPN blockage on your Windows 10 computer, we’ve got the applicable workarounds to fix this problem. Use the solutions below to do this.

Why can’t my PC connect to a VPN?

You have specific causes for your PC not being able to connect to your VPN software. Usually, that have to do with wrong network settings or incorrect VPN configuration.

To give you a better idea, these are the main issues you should look for to resolve this problem on your PC:

➡️ Double-check your VPN credentials

➡️ Be sure your WiFi network is stable

➡️ Look for different VPN software running issues

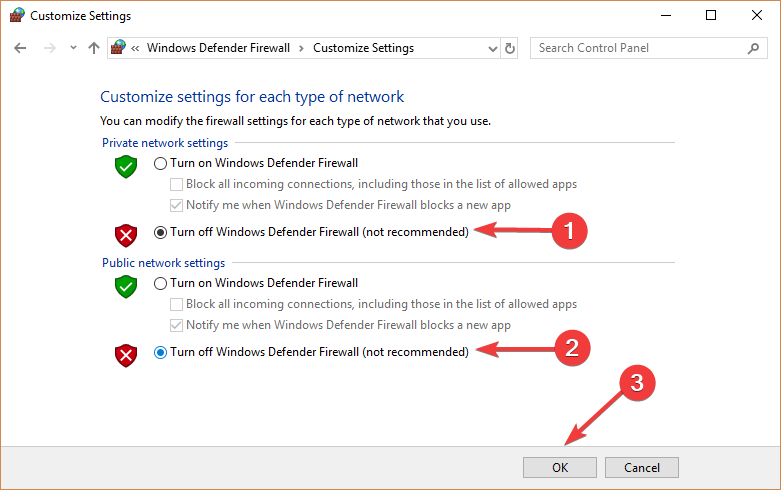
➡️ Check if your firewall settings block the VPN

➡️ See if your VPN server network is working

Generally speaking, you should verify all the tips enumerated below to easily find a workaround for this unpleasant error on your computer.

How to fix VPN not working in Windows 10?

If you’re stuck with your VPN service on the Windows 10 device, you can solve it briefly from the Windows settings. 

Firstly, check the system time and date to see if it’s not properly set up. In case you operate on an incorrect date and time the VPN can get blocked as well.

Another fix is to set up your VPN as an exclusion in the antivirus settings. This is required because your antivirus may block the software. 

In addition, other users reported multiple issues regarding VPN usage on their Windows 10 or 11 devices:

  • Windows 10 VPN L2TP not working – the L2TP connection attempt failed because the security layer encountered a processing error
  • Windows 11 VPN not working
  • Windows 10 PPTP VPN not working
  • A connection to the remote computer could not be established you might need to change the network
  • Windows 10 21h2 vpn not working
  • No internet when connected to VPN
  • Windows 10 built-in VPN not connecting
  • VPN connection not showing in network connections Windows 10
  • Can’t connect to VPN after Windows update

You should get more in-depth instructions checking the solutions presented down below.

1. Change your system date and time

One of the quick fixes to fix the VPN blocked on Windows 10 problem is to change your system date and time. Sometimes, incorrect date and time settings on your Windows 10 PC can block your VPN.

Hence, you need to check the date and time settings to ensure they are correct. You can disable the automatic update of date and time using the Internet, and set the date/time parameters manually.

Also, you should change the region/location to be the same as the selected server location on your VPN settings.

Alternatively, you can change your Internet connection and try to use the VPN afterward. If you are using a dial-up modem Internet connection, then you may need to consider changing your Internet connection mode to LAN, broadband, Wi-Fi connection, or any other Internet connection modes available to you.

However, if you still get the error after trying out this fix, you may proceed to the next solution.

2. Switch to another VPN

A practical method to fix the VPN connection on Windows 10 would be to replace your current VPN with a more effective one.

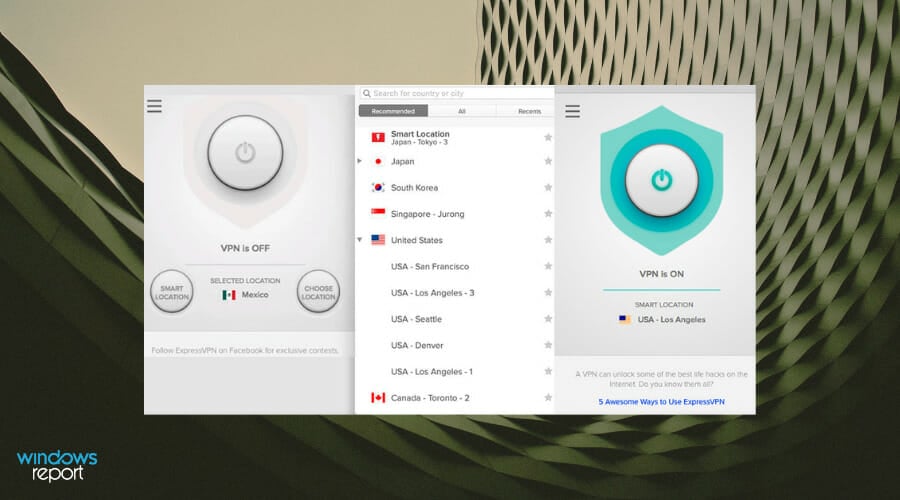
There are several VPN providers available that do an excellent job. We evaluated a bunch of the top-rated options and believe Express VPN is one of the top choices for the task.

Express VPN, comes with a beneficial tool capable to guard your digital presence, with stable servers in +94 regions and hiding IP addresses on multiple devices.

To have a better idea, you can use advanced features to increase your privacy as we speak. For example, there is a VPN split-tunneling to route traffic, a network kill switch, an encrypted DNS for every server, and more so.

It’s also worth knowing about the TrustedServer technology capable to keep any information from being stored on a hard drive.

ExpressVPN

Unblock your protection and get a more stable server connection with this VPN on your Windows 10 device.
Check price Visit website

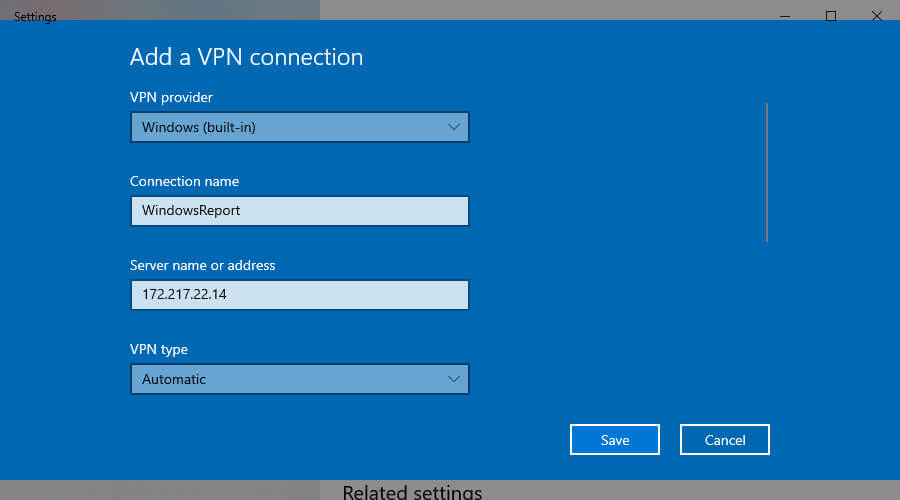
3. Manually configure VPN connection

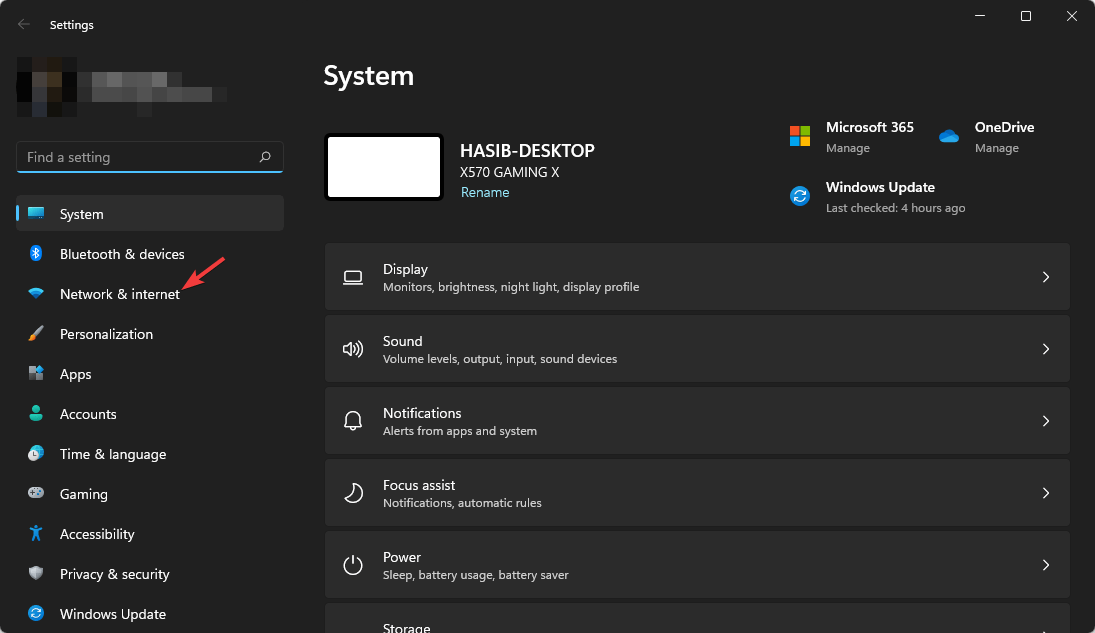
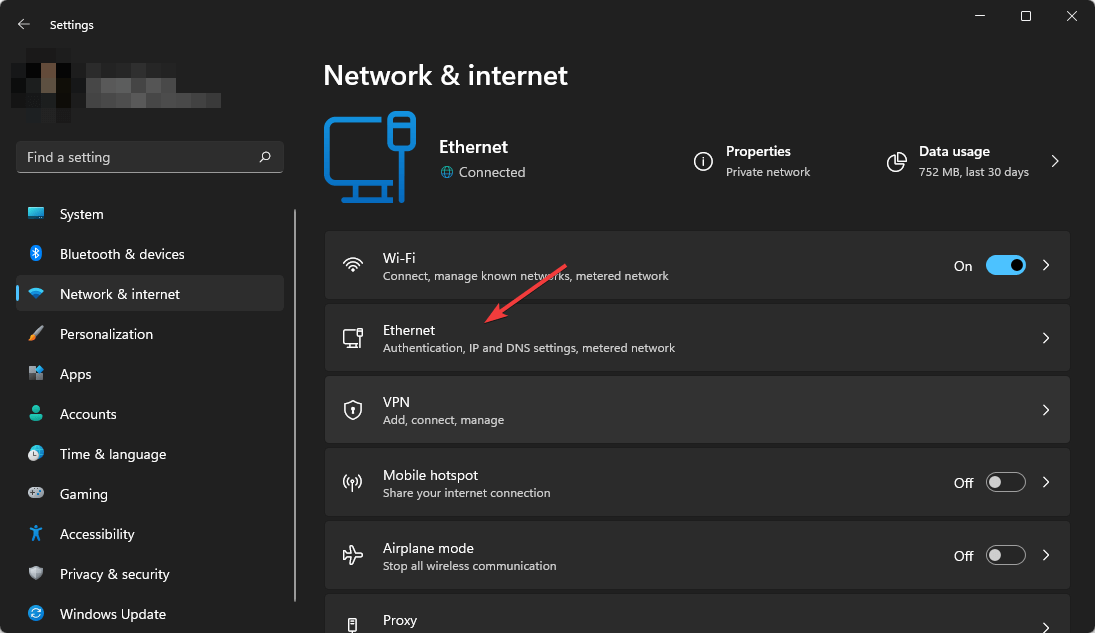
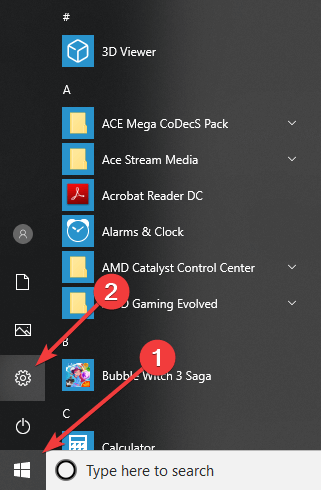
  1. Right-click Start > Settings> Click Network and Internet > Click VPN
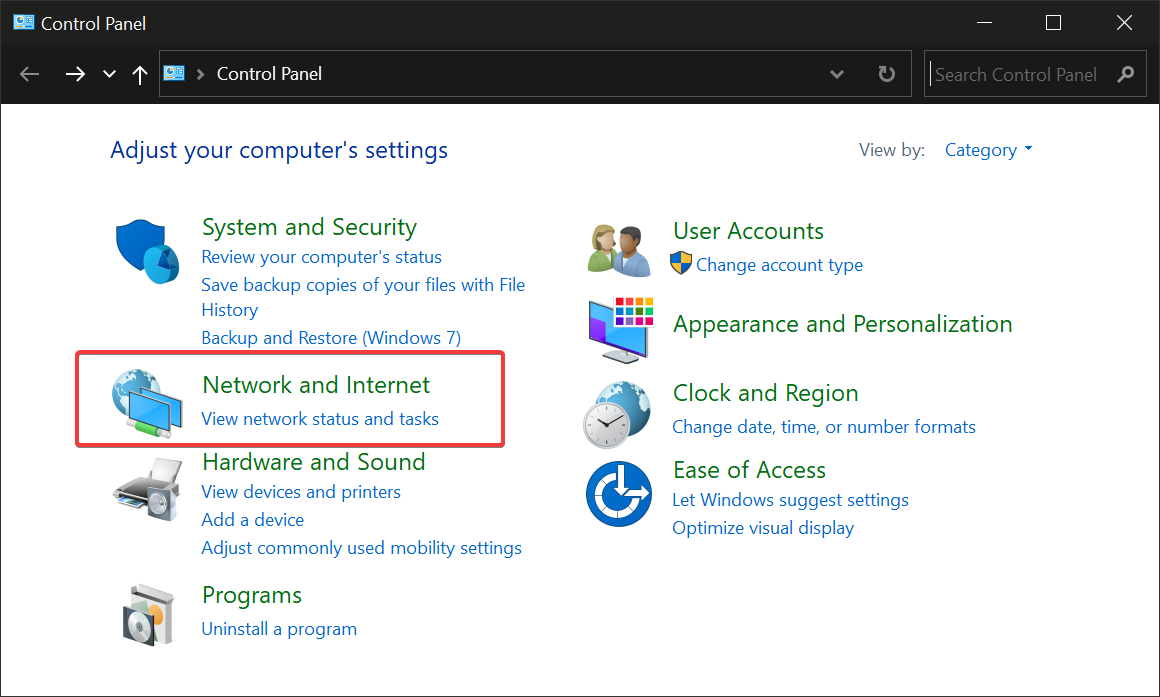
  2. Now, Click Add a VPN connection and then click the dropdown menu
  3. Check Windows (built-in), and then click the Connection name field
  4. Type a name for the VPN connection
    • (You can use the name of your VPN provider and the server location.)
  5. Click the Server name or address field and enter the server’s address. (You will be provided with your server name and address by your VPN provider.)
  6. Click the dropdown menu below VPN type and select a connection protocol.
  7. Now, click the dropdown menu below “Type of sign-in info”, tick a sign-in method, and then click on Save
  8. To connect, click on the VPN you just set up., and click Connect

Another workaround for VPN blocked on Windows 10 problem is to manually configure VPN connection using Windows built-in feature.

Please note that you need a working Internet connection and VPN account before you proceed. Here’s how to do this:

Alternatively, you will be provided with the executable VPN client software by the VPN provider as well.

You can double-click on the executable file and follow the prompts to complete the installation of the VPN client software. After, installing the software, you should be able to use your VPN.

However, if your VPN is still blocked on Windows 10, you may proceed to the next step.

4. Exclude VPN in your antivirus settings

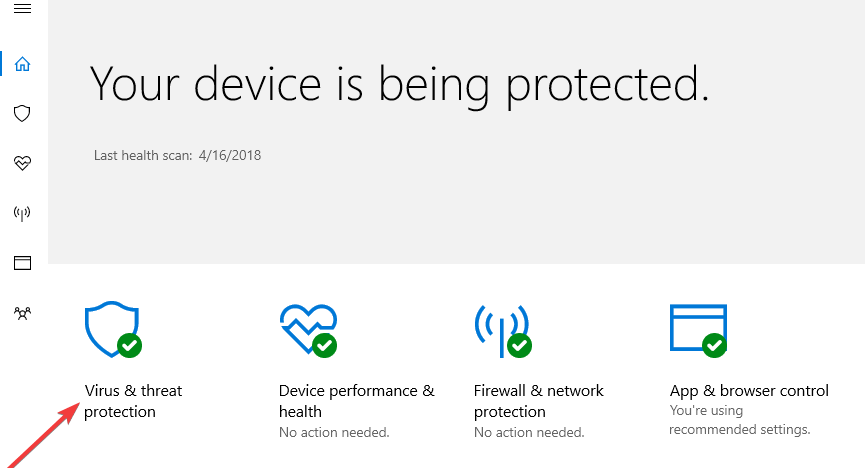
  1. Launch Windows Defender Security Center
  2. Now, go to Virus & Threat protection settingsvpn blocked on windows 10
  3. Select Exclusions
  4. Now, select Add or remove exclusions
  5. Select Add an exclusion and add your VPN client software

Sometimes, antivirus programs can block VPNs on Windows 10. Hence, the best workaround is to exclude your VPN from your antivirus protection settings. Here’s how to do this in Windows Defender:

Note icon NOTE
Some VPN clients utilize ports 4500 UDP and 500, and port 1723 for TCP. If your VPN remains blocked, you need to enable them in Windows Firewall Advanced settings.

If your Windows Firewall is blocking the VPN, check out this simple guide to solve the issue in no time.

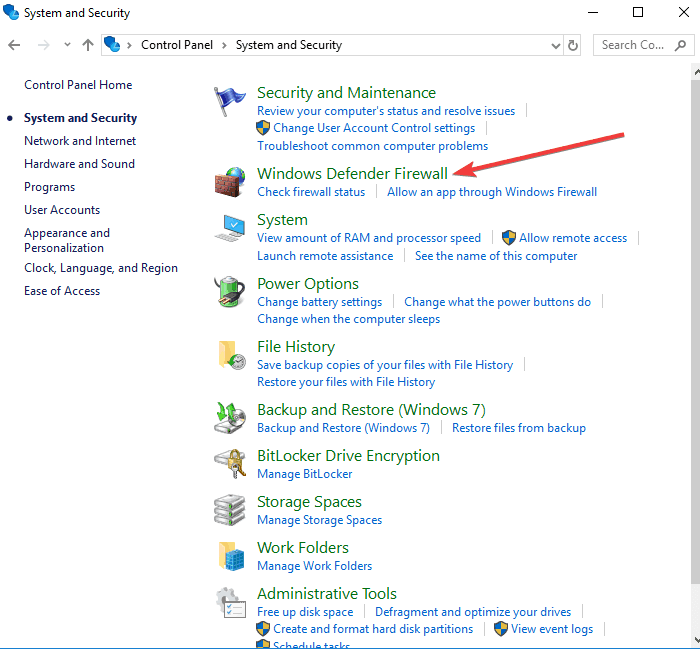
5. Enable VPN software in Windows Firewall

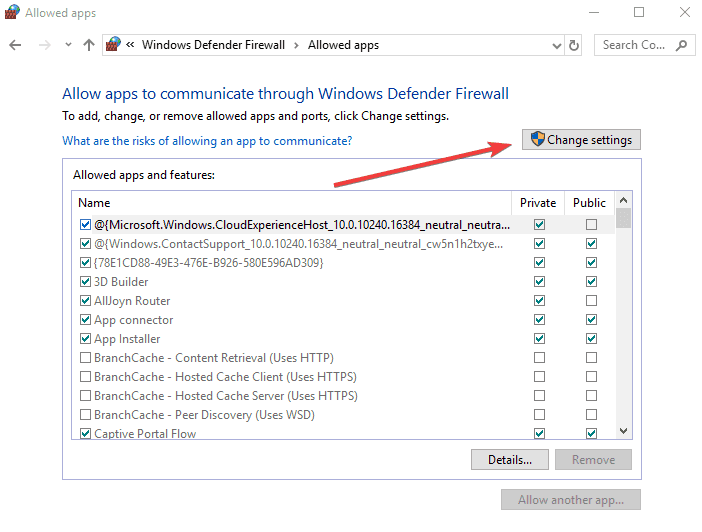
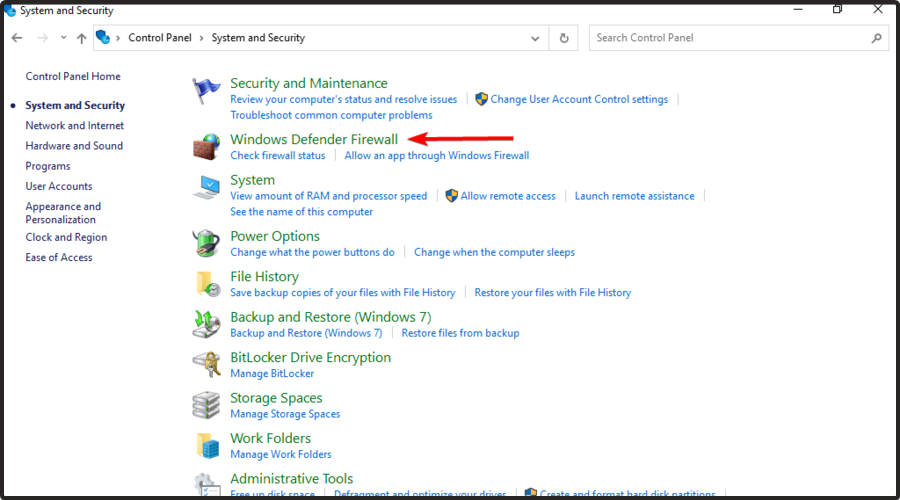
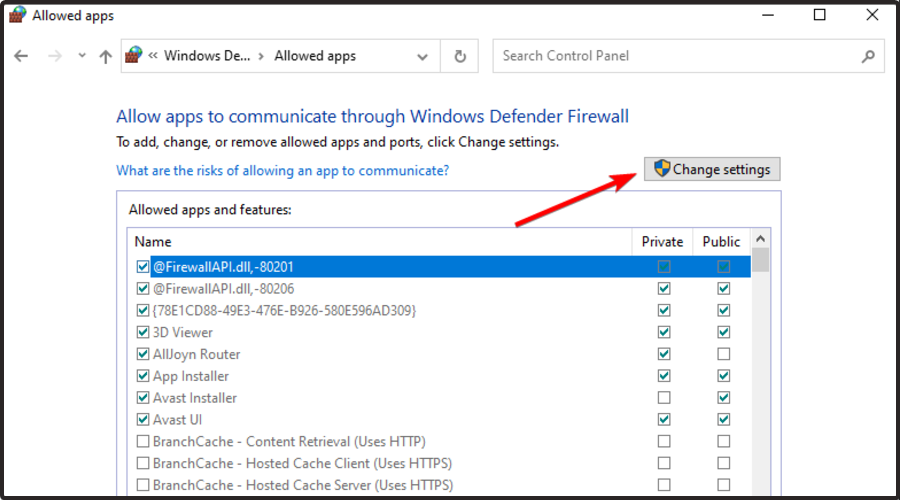
  1. Go to Start > Type Allow a program through Windows firewall and then hit the Enter key
  2. Click on Change Settings optionsvpn blocked on windows 10
  3. Now, click on Allow another program
  4. Select the VPN software you want to add or click Browse to find the VPN software, and then click OK
  5. Check if you can connect to your VPN.

If your VPN was blocked by the Windows firewall, resolve this issue efficiently by adding the privacy tool to the Firewall allowed apps. 

Another reason why VPN is blocked on Windows 10 is due to Windows Firewall settings. Hence, you also need to enable your VPN in Windows Firewall. Here’s how to do this:

6. Flush DNS/Clear Cache

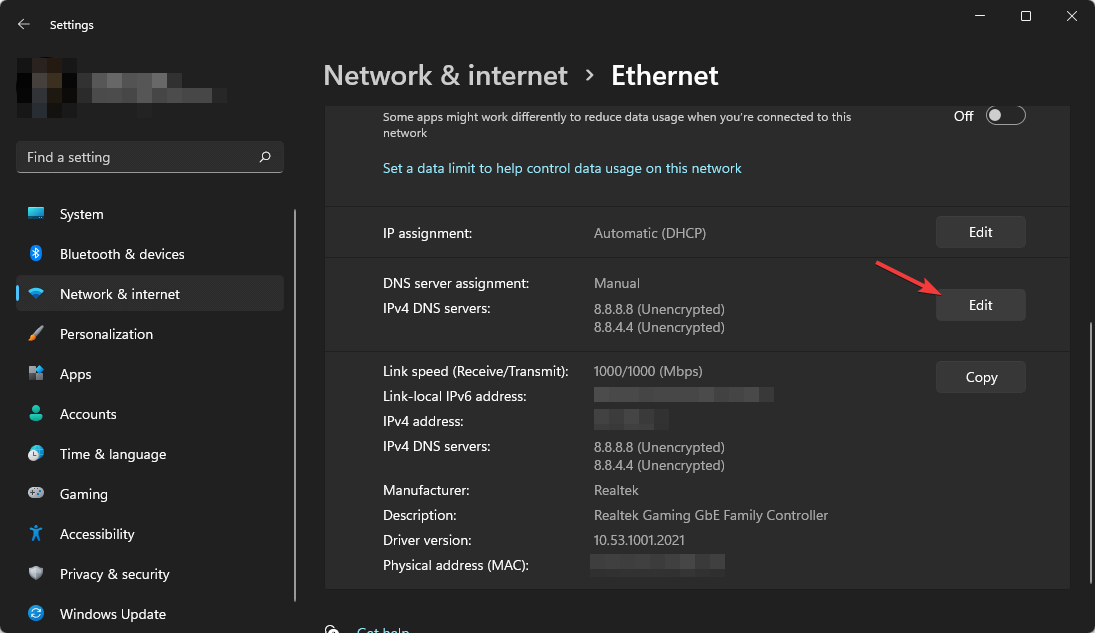
Step 1: Flush the DNS

  1. Go to Start > Type command prompt
  2. Right-click Start and select Command Prompt (Admin)
  3. Type ipconfig /flushdns and press Enter. You should get a confirmation that says: Windows IP Configuration Successfully flushed the DNS Resolver Cache
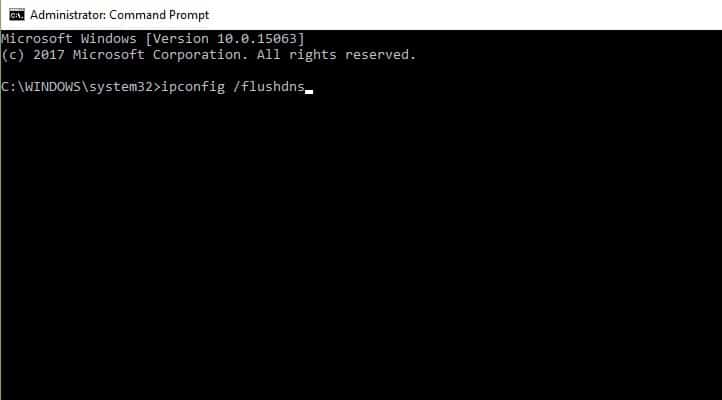
ipconfig /flushdns not working


Step 2: Clear Web Browser Cache

  1. Launch your web browser e.g. Mozilla Firefox
  2. Press Ctrl + Shift + Delete to access the Clear recent history dialog box
  3. Under the Time range to clear drop-down menu, select Everything
  4. Make sure to check the Cache box
  5. Click on Clear Now

Sometimes DNS entries from your Internet Service Provider (ISP) may be wrong. Hence, you need to flush your DNS and clear your web browser’s cache afterward. Here’s how to do this:

Note: Ctrl + Shift + Delete can also be used to clear the cache on other web browsers such as Mozilla Firefox, Internet Explorer, Opera, Microsoft Edge, Google Chrome, etc.

7. Reinstall your VPN client

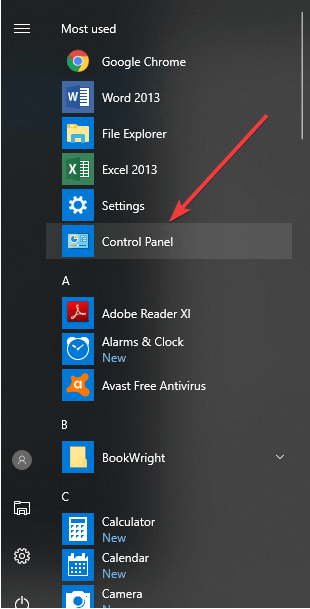
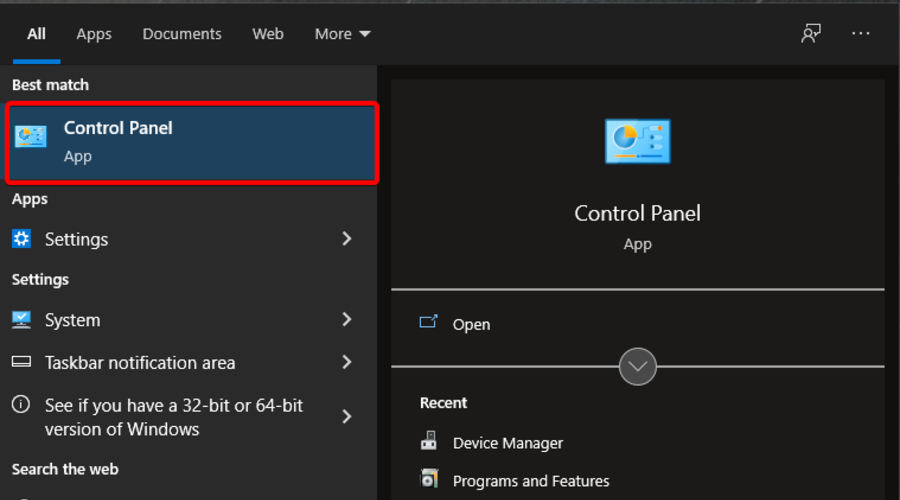
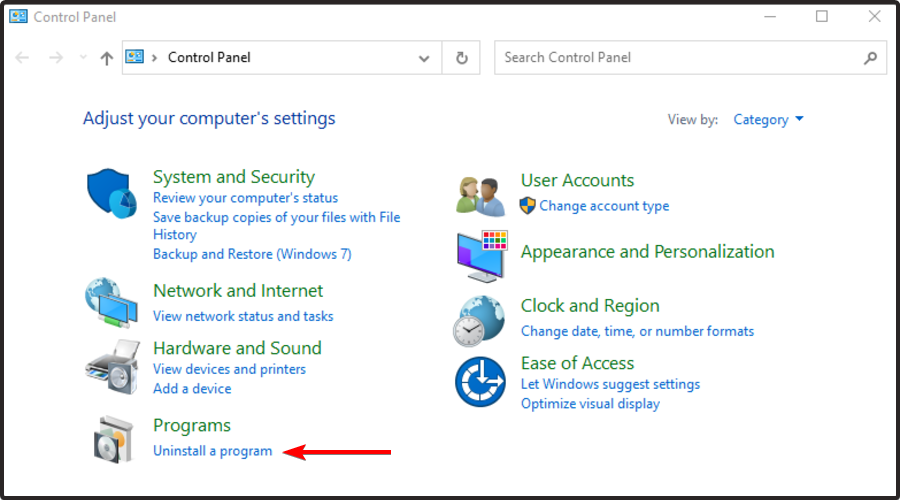
  1. Go to Start > type control panel > hit Enter to launch Control Panel
  2. Select Uninstall a program under the program’s menu
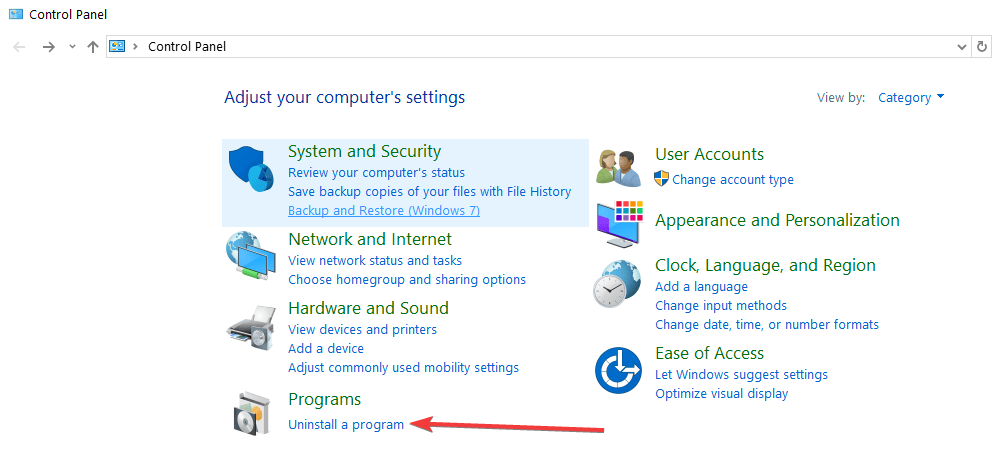
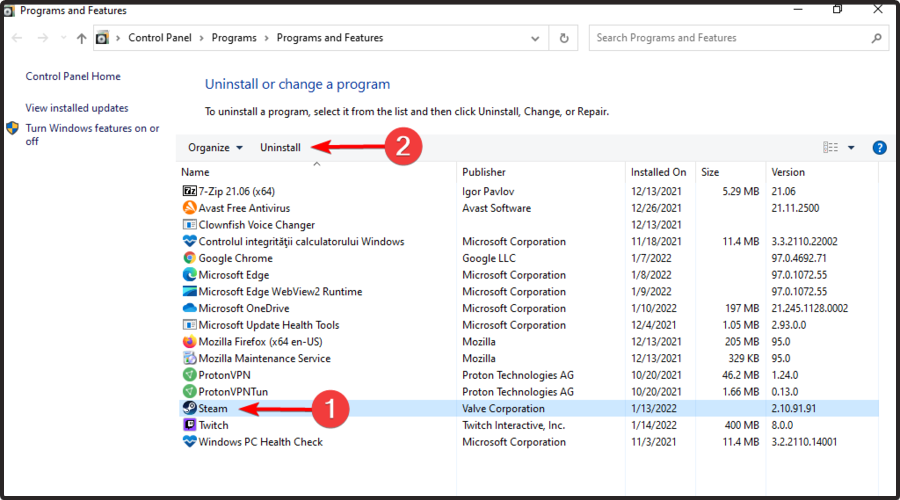
  3. uninstall program control panel windows 10
  4. Find your VPN from the list of programs and select Uninstall
  5. In the Setup Wizard, click you’ll get a notification after a successful uninstall, so click Close to exit the wizard.
  6. If the VPN is still listed as available after uninstalling it, go to Start > Run
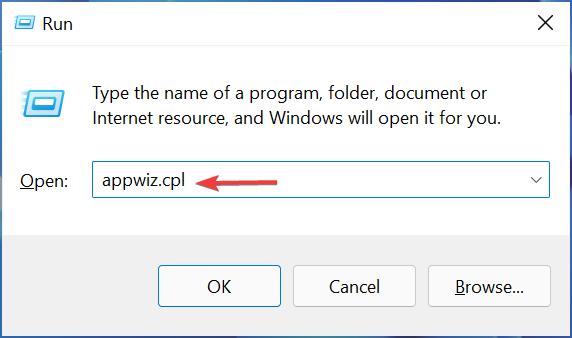
  7. Type ncpa.cpl and press Enter to open the Network Connections window
  8. Under Network Connections, right-click on the WAN Miniport labeled as your VPN
  9. Select Delete
  10. Go to Start > Type Network Connections, and press Enter. Right-click a VPN connection and use the Delete option
  11. Select VPN. If you see your VPN as available, delete it.

In addition, reinstalling your VPN client can also fix VPN blocked on Windows 10 issue. Here’s how to do this:

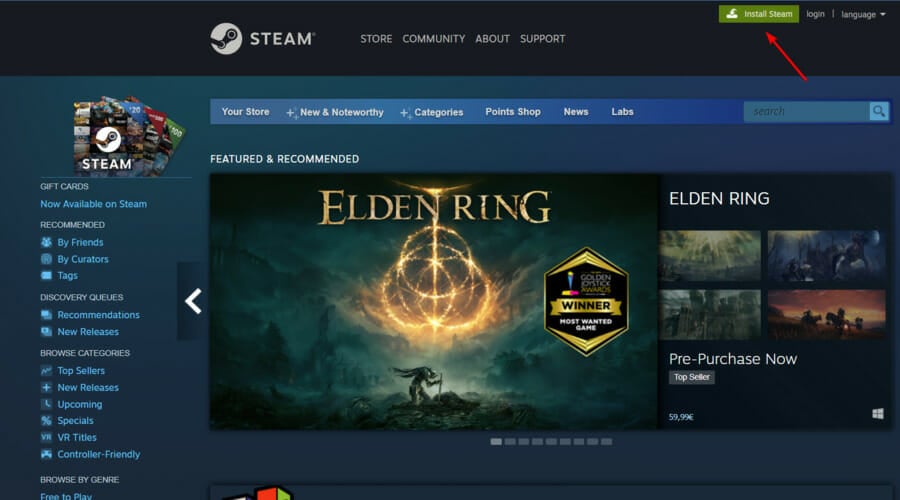
After complete uninstall, you can then install the VPN client on your Windows 10 PC afterward.

8. Enable rule for PPTP

  1. Go to Start > Control Panelvpn blocked on windows 10
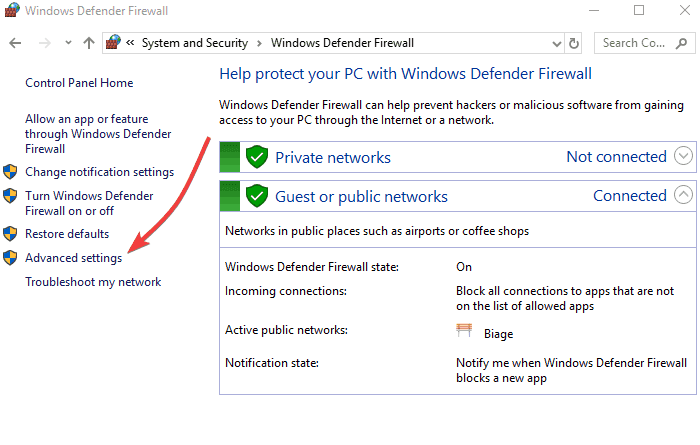
  2. Now, go to Windows Firewall > Select Advanced Settingsvpn blocked on windows 10
  3. Search for the Routing and Remote Access under Inbound Rules and Outbound Rules

Some VPNs require PPTP; hence, you need to enable the rule for PPTP.

For Inbound Rules: right-click “Routing and Remote Access (PPTP-In)”, and select “Enable Rule”.   For Outbound Rules: right-click “Routing and Remote Access (PPTP-Out)”, select “Enable Rule”.

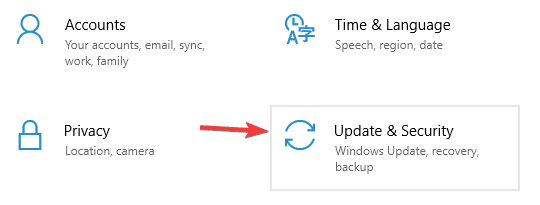
9. Install the latest Windows updates

  1. Go to Start>type “windows update” in the search box and then click on Windows Update to proceed.
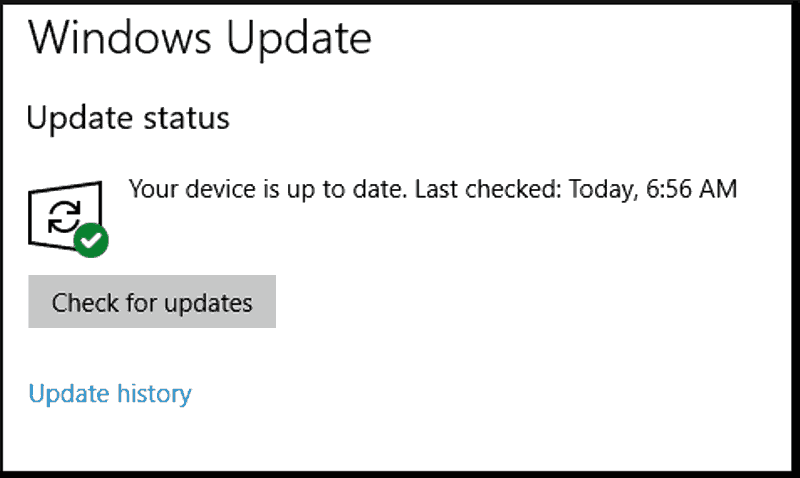
  2. In the Windows Update window, check for updates and install the available updates.vpn blocked on windows 10
  3. After the update is complete, restart your Windows PC.

The latest Windows updates improve the system’s stability and fix various issues including VPN blocked on Windows 10 issue. Hence, you can follow these steps to update any Windows OS:

That being said, with one of the presented guides you should be able to get through the blocked VPN problem.

In addition, we provide a resourceful guide in case you need to solve Windows 11 VPN not working on your PC.

Have you fixed the VPN blocked on Windows 10 issue using the solutions above? Let us know by leaving a comment in the section below.

You can now shop smarter with Microsoft Bing thanks to these changes

Microsoft has found new ways to monetize Bing with new money-saving annotations additions that might actually benefit users while improving the overall search experience.

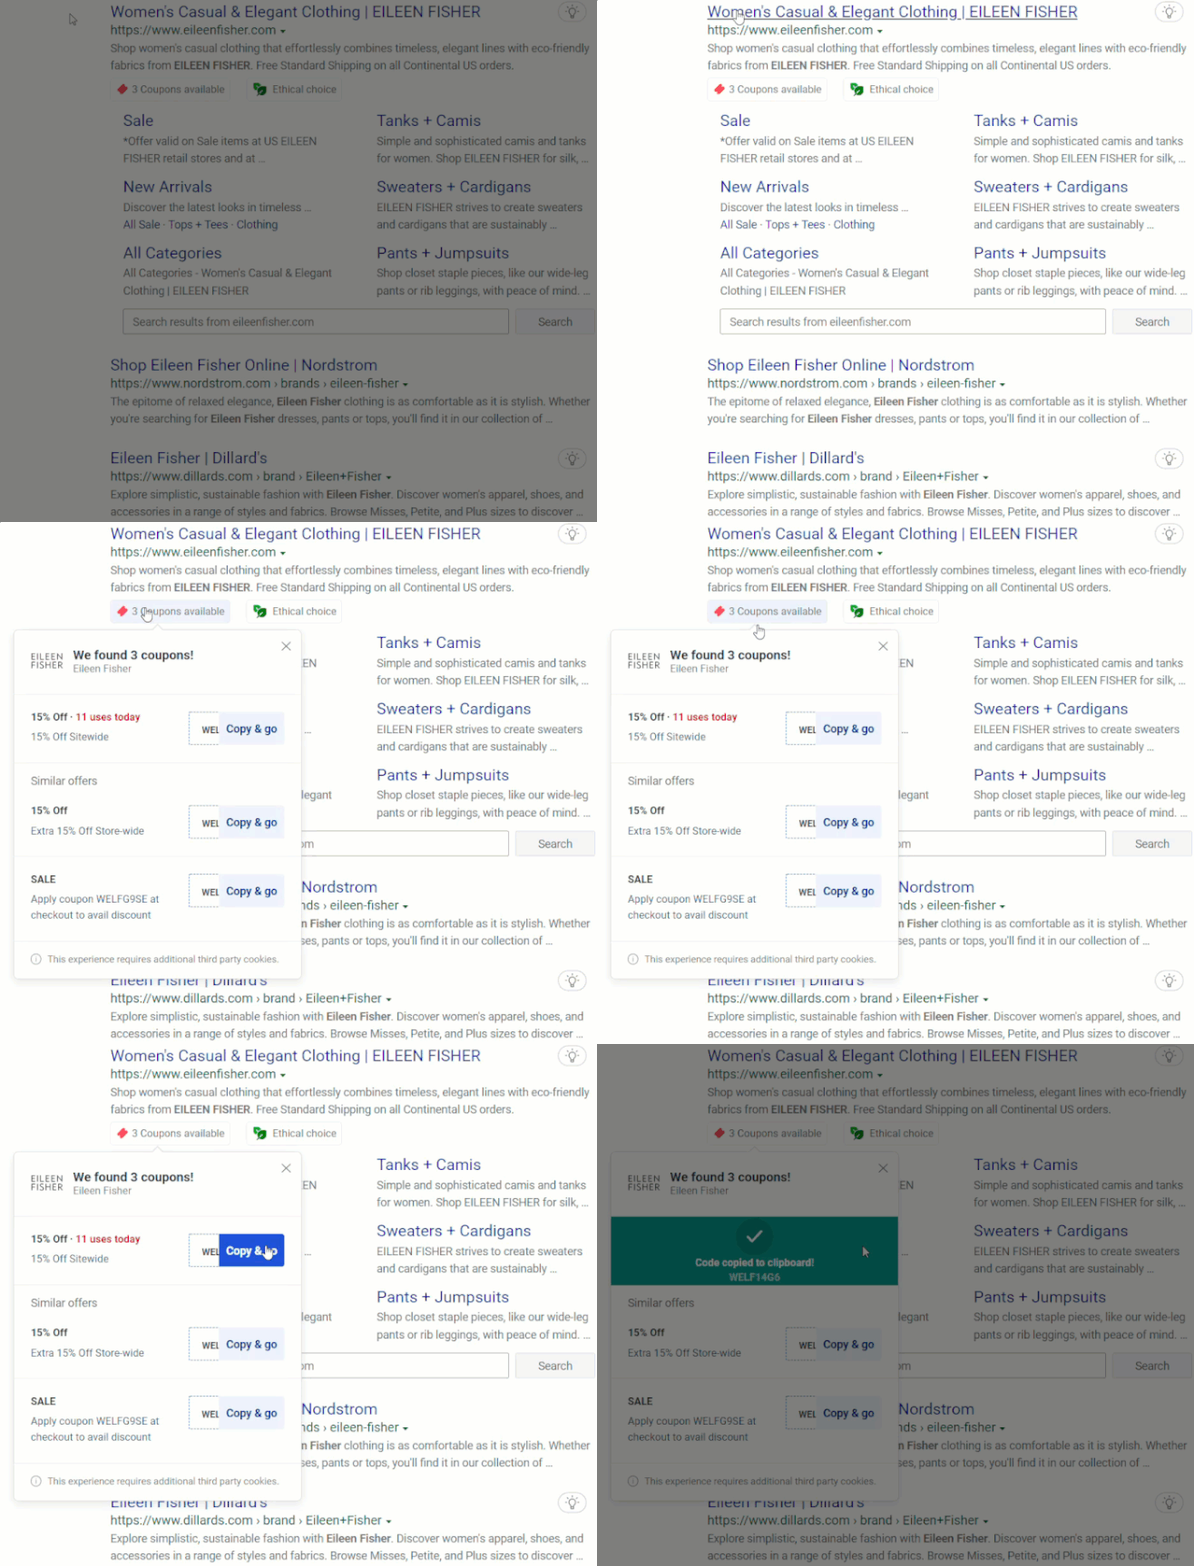
Yesterday, the Microsoft Bing team announced on its blog that its shopping search results would now be imbued with neatly nestled coupon annotations that accompany shopping results.

Bing Shopping annotations

Let’s say you are shopping for a new outfit for a girls’ night on the town. Or maybe you are just window shopping for some back-to-the-office fashions. A search for the Eileen Fisher website on Bing reveals that some coupons are available, even before you click to enter the site. No need to do a separate search for a code. And if you decide to click in and do some shopping, the coupon will be automatically copied and applied to your purchase. All of this is made possible by quick and easy annotation links found within your search results.

Perhaps the best part of the new annotations is that there is no need for a 3rd party browser extension or plugin to get the savings display. The accompanying coupons are built right into the search functionality of Bing and come with a variety of functionality that includes the aforementioned couponing, but also a new Ethical Choice badge that is powered by Good On You fashion that offers brand ratings based on their impact on people, the planet and animals.

Bing - Good on you - annotations

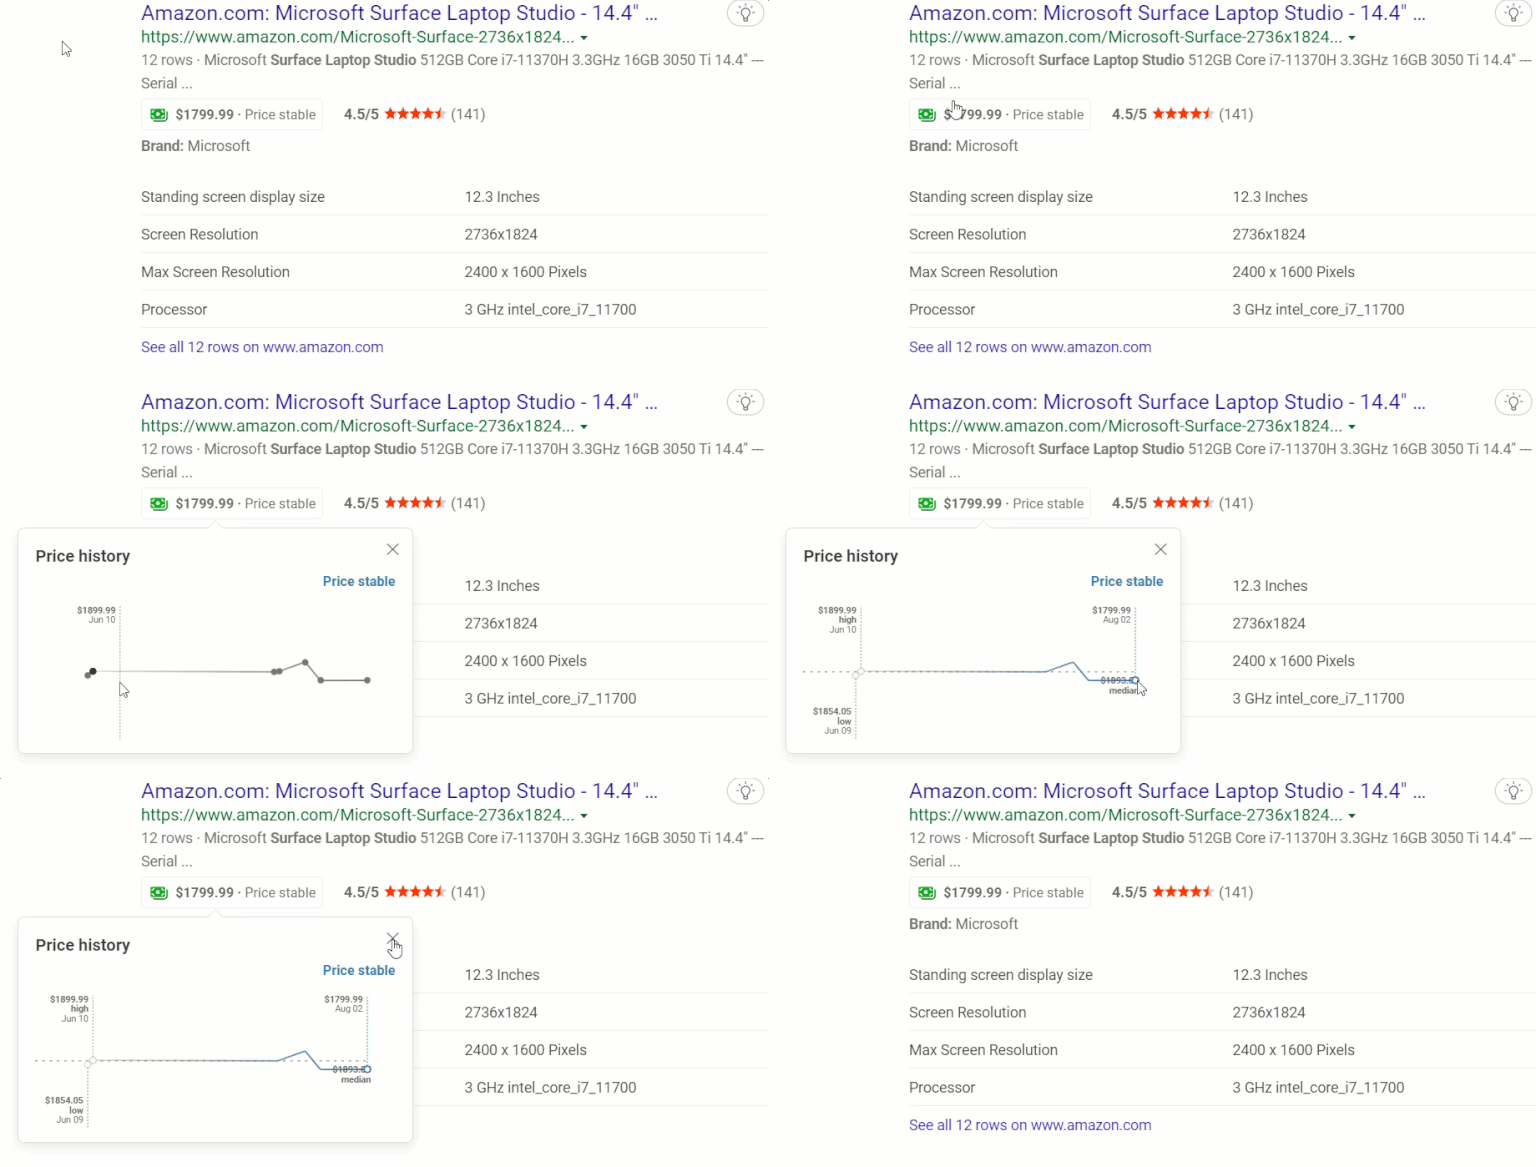
Another annotation that will begin showing up is price history which will display a graph of the products pricing over time to help shoppers see if there may be cyclical buying periods for an item.

Bing pricing annotations

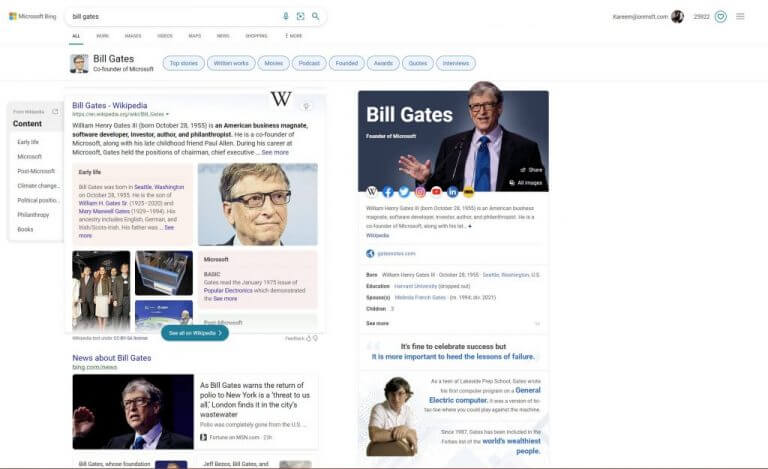
Microsoft’s Bing Search remains a very distant second option to Google’s well-established search service, however, the Bing team has added several quality-of-life features to its alternative over time and the overall user experience has benefited from those contrasts in my opinion.

These new features unfortunately, or rolling out to limited locales that include the US, UK, Canada, Australia, Germany, and France for the new coupon and Good on You ratings annotations and the additions of Great Britain and India for the price annotation.

From layout of information and context-worthy highlights with scrollable notes to Microsoft Rewards, looking things up on Microsoft Bing has become more than just clone of Google.

Firefox vs Firefox Focus: Real-world Comparison & Key Differences

Firefox has long been one of the most popular browsers for PC users, but it’s not the only option out there. The Firefox Focus browser is a good choice if you want to keep your browsing habits private and avoid ads.

The two versions: Firefox and Firefox Focus are two different browsers. Both are available on Android and iOS, but they have very different purposes.

If you are wondering which browser to go for, this article is a good place to start. We explore the features, privacy, and performance of each to help you narrow down the most appropriate browser for you.

Does Firefox Focus sync with Firefox? 

Sync is such an important feature on browsers. It helps you to keep your passwords and browsing history in sync between your devices and access your information with ease. However, Firefox Focus doesn’t sync your data across devices as Firefox does.

What is the point of Firefox Focus?

Firefox Focus is a stripped-down version of Firefox. It focuses on privacy by blocking all trackers and other third-party content from loading when you browse the web.

The browser doesn’t collect or share any of your personal data and it doesn’t include any apps, bookmarks, or saved passwords from other browsers. 

This makes it ideal if you’re concerned about privacy while browsing the web on your phone. If you’re using public Wi-Fi networks or other networks where others might be able to access your phone or computer, it is a good option.

So, if you’re looking for a faster, safer, and more private way to browse the web on Android, Firefox Focus is worth a try.

Quick Tip:

If you are not sure about Firefox, another great option is Opera One. It’s light and fast, plus it has a lot of privacy-oriented features like anti-tracking, ad blocker and a free VPN.

Other notable features of Opera One include a personalized workspace, tab islands, native AI, a social media sidebar and modular AI-ready design.

Opera One

Protect your privacy and customize your experience with Opera One!
Free Download Visit website

What are the differences between Firefox and Firefox focus? 

Features

The main difference between Firefox and Firefox Focus is that the former has a lot of features and an add-ons store, but the latter does not.

Firefox is a full-featured browser with many of the same features as other browsers like Safari and Chrome, including tabbed browsing and syncing across devices. 

Whereas Firefox has more features and functions to choose from, it also means there are more opportunities for something to go wrong. 

The other major difference between these two browsers is that Focus doesn’t have any of the add-ons available in Firefox. Given how add-ons have increasingly become important in browsers, this is such a miss for Focus.

In addition, Firefox Focus has limited functionality compared to Firefox. When it comes to stability, users complain that Firefox Focus is less stable and not a fit browser for downloading large files.

Privacy

Both Firefox and Firefox Focus will protect your privacy by blocking trackers and keeping your data private. However, the way each browser handles this is slightly different.

Focus is designed for one thing: privacy protection. It blocks all trackers by default and gives users more control over what’s blocked or allowed through its site permissions page.

Firefox also has a feature called tracking protection, but it’s not enabled by default. Tracking protection blocks scripts from loading when you visit a site, which can make your browsing faster and more secure. But it can also cause certain elements on the page to not work properly.

To enhance privacy on Firefox, you will need to install privacy extensions.

Security

In terms of security, Firefox Focus doesn’t have the same privacy features as Firefox. Firefox Focus is more focused on your privacy than other browsers, but it doesn’t have all of the same features that are in Firefox.

Focus doesn’t have any extensions or plugins by default. This makes it much harder for attackers to exploit vulnerabilities in these components to gain access to your device or your data.

It also does not auto-fill forms with information you enter on other sites. This helps protect you against scripting attacks.

Speed and performance

Because Firefox has many useful features and extensions, it also has more data collection. This means it will take a little bit longer to start because it needs to load all of them before it can open the browser window.

Firefox Focus is an even faster version of Firefox because it doesn’t have to load all of the extra tools and functions of the full browser. It also uses less memory, so it can run on older phones or devices with less RAM than you would need for the full version of Firefox.

In terms of performance, the Firefox Focus browser is noticeably faster than the default version of Mozilla Firefox. 

When comparing both browsers, we used a test device (a Samsung A30 smartphone). We found that Firefox Focus was faster at loading pages than Mozilla Firefox by about half a second on average.

What is the best browser for privacy? 

There are several browsers that claim to be good for privacy, but which ones are actually any good? Well, it depends on what you’re looking for. There are a lot of factors to consider when choosing a browser. The first is how you use your computer and what you want to get out of it

If you’re just looking for some basic protection from advertisers, most browsers will do the job just fine. But if you want a browser that can protect you from government surveillance and keep your data private from companies, there are only a few options.

We have a list of browsers with no tracking and that guarantee to keep your data safe. If you are looking for more, we also have an expert list of browsers that protect your online privacy by not saving cookies.

With this comparison, we hope you are now able to differentiate the key features and can make an informed choice on which Firefox browser is best for you.

Let us know which browser appeals to you most in the comments section below.

Internet Explorer Automatically Opens Edge: How to Fix it

Internet Explorer has fallen from grace and it isn’t used that much anymore, however, a few users reported that Internet Explorer opens Edge for some reason.

In today’s guide, we’re going to take a closer look at this issue, and see how to fix it properly.

Why does Edge open when I open Internet Explorer?

This can appear due to your Edge settings or because Edge is set as the default browser. In some instances, your registry can cause this issue.

How do I stop Internet Explorer from opening in Edge?

1. Enable and use IE Mode in Edge

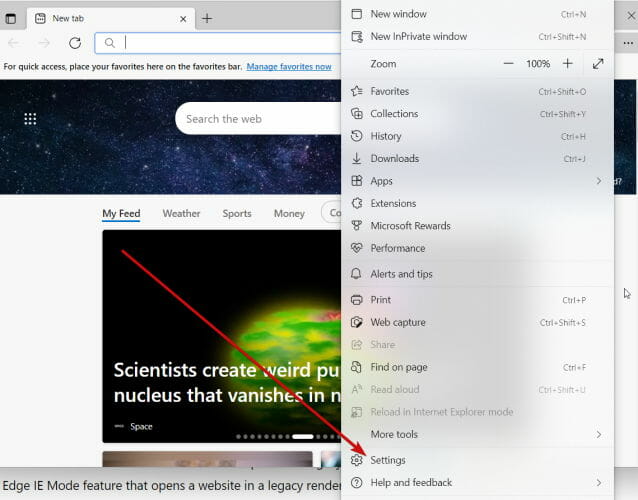
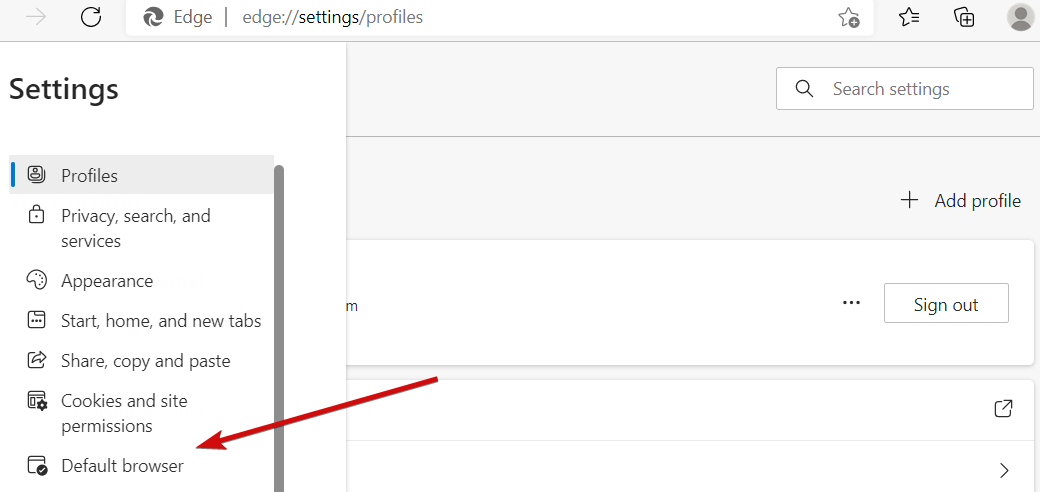
  1. Launch MS Edge and click the top-right corner button. Click Settings.
  2. Pick Default browser from the list and enable all IE-related options as follows:
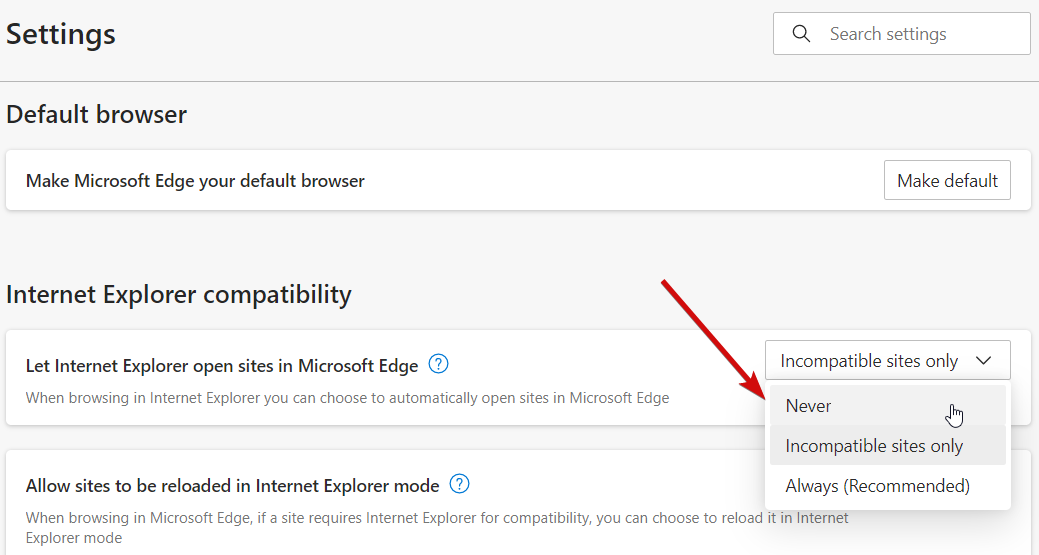
  3. Under Internet Explorer compatibility, click the Let Internet Explorer open sites in Microsoft Edge menu.
  4. Select Never.
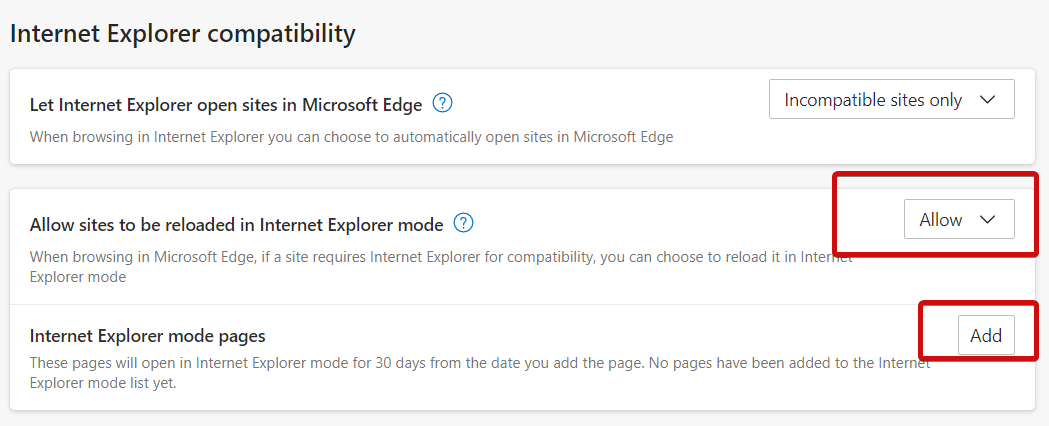
  5. Remain on the Internet Explorer compatibility section, and click Allow sites to be reloaded in Internet Explorer mode.
  6. Select Allow and press the Restart button.
  7. Under Internet Explorer mode pages, click the Add button.
  8. Paste the desired website and click Add again (this will provide the option to Reload in Internet Explorer mode from now).

2. Change the default browser in Windows 11

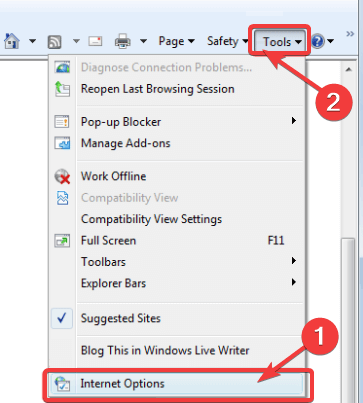
  1. Launch the old Internet Explorer browser and click Tools.
  2. From the list, select Internet Options. internet explorer tools
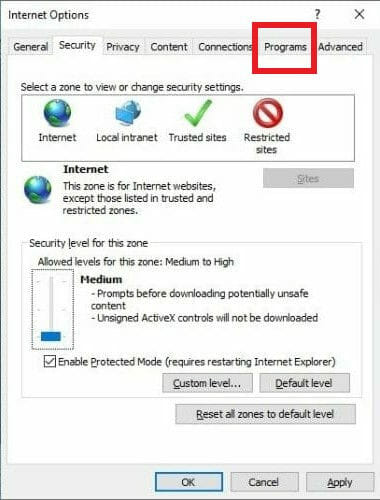
  3. Next, go to the Programs tab.
  4. Click Make default and confirm by pressing OK.
  5. Now, you must change all the file and link associations to prevent Edge redirects.
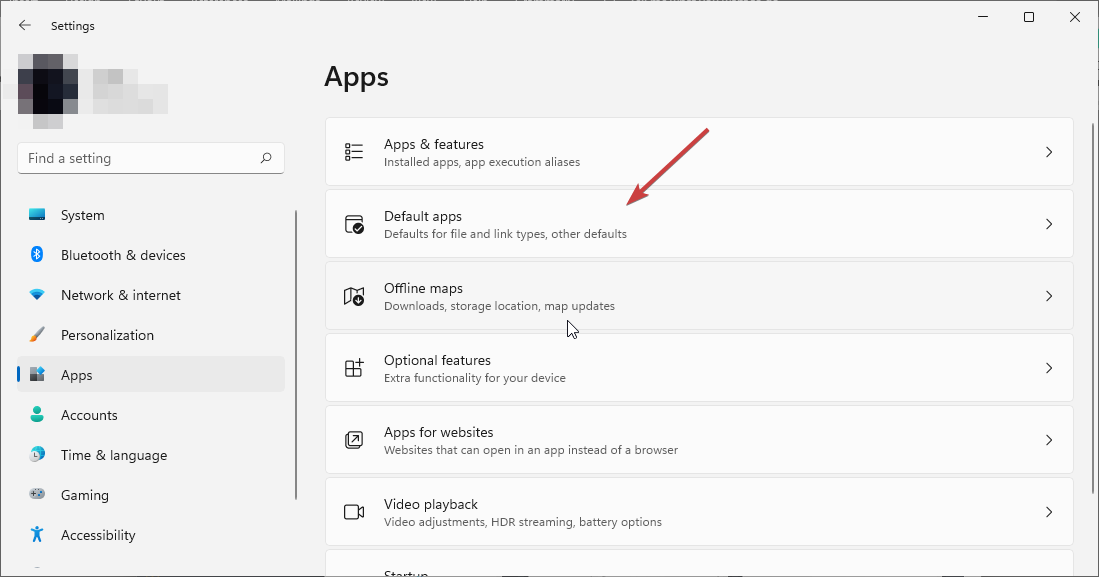
  6. To do that, open the Settings and go to Apps.
  7. In the right pane, click Default apps. default - apps (windows 11 widgets not working)
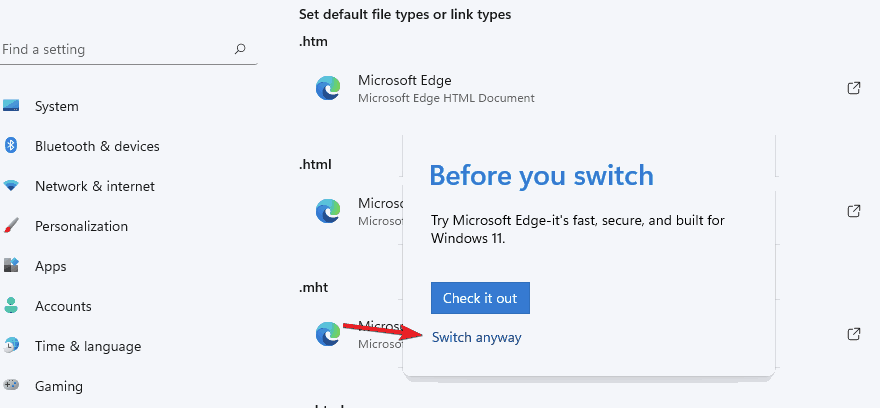
  8. Here, select Microsoft Edge, open the first file type, and choose Switch anyway.
  9. Select IE, Opera One, or any other browser from the results list and press OK.
  10. Repeat the process for all desired instances.

If you have trouble with Edge/Internet Explorer, we recommend trying out Opera One. It’s very lightweight and includes all the standard features you need.

It’s one of the fastest and most responsive browsers on the market and includes impressive features like an adblocker, a battery saver, social media integrations, and VPN.

Opera One

Have a taste of this enhanced browser for a secure and fast web experience!

3. Use the Registry to disable Edge

  1. Use the Windows key + R shortcut to open the Run menu.
  2. In the typing field, type in regedit and press OK. open regedit
  3. Navigate to the following path or paste the path directly into the Registry Editor’s address bar:
    ComputerHKEY_LOCAL_MACHINESOFTWAREPoliciesMicrosoftMicrosoftEdgeMain
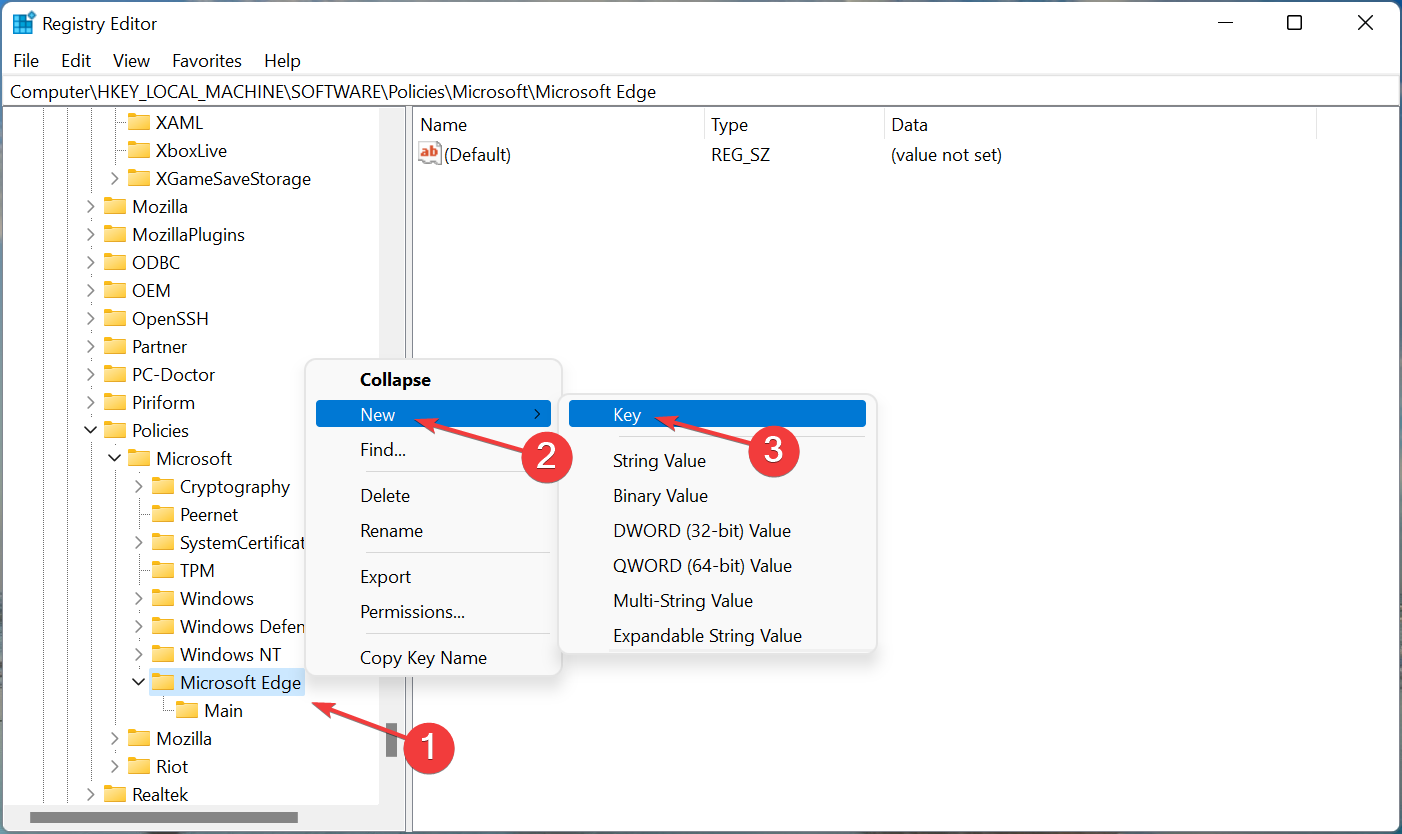
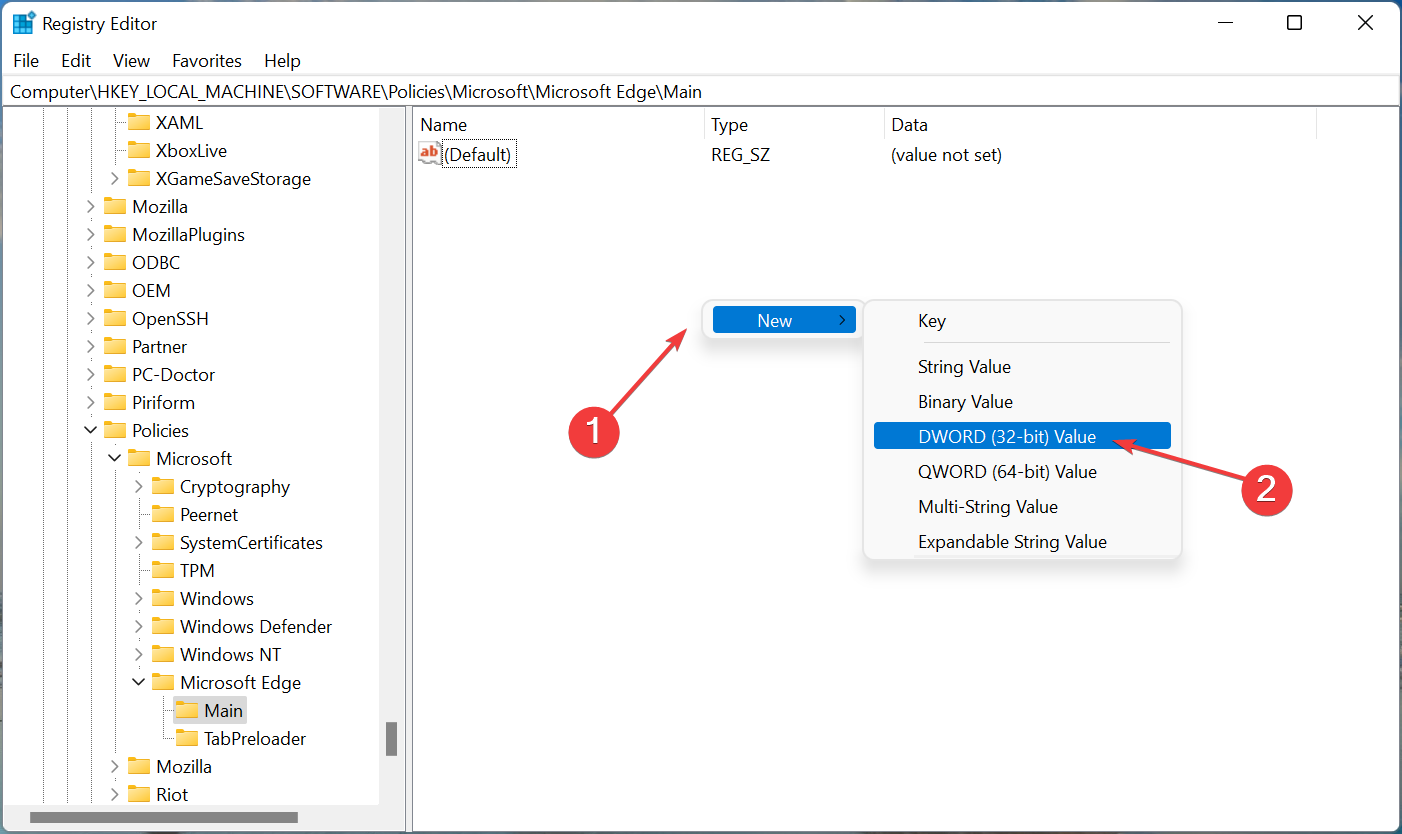
  4. Go to the main folder, and right-click the empty area on the right side.
  5. Select New and choose the DWORD (32-bit) Value.
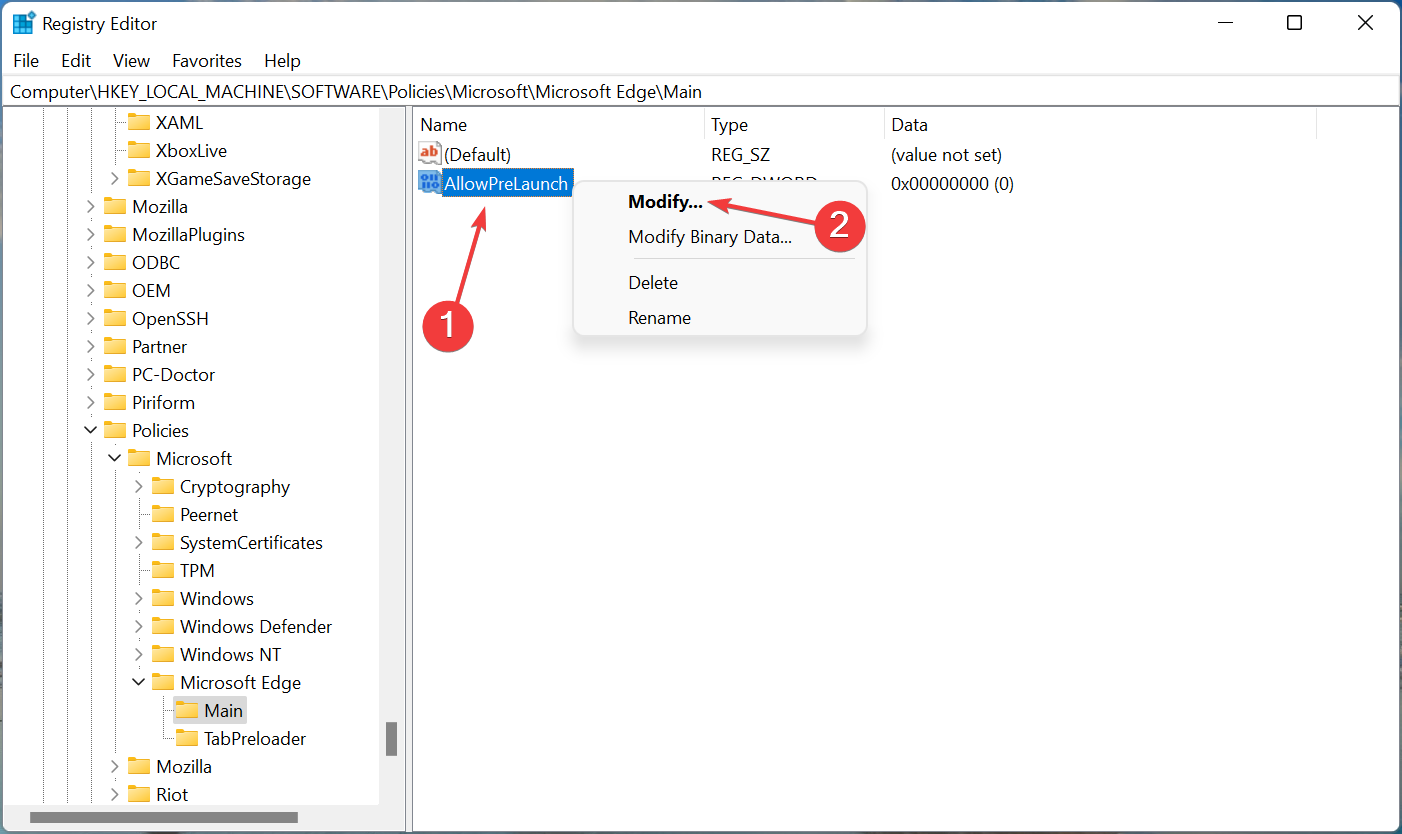
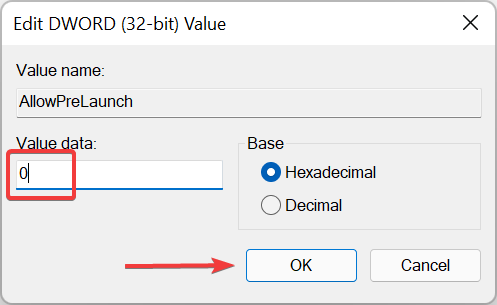
  6. Name it AllowPrelaunch. Then, double-click the key and set its value to 0.
  7. Also, don’t forget to delete Edge in the Startup folder if it’s the case.

By preventing it from automatically opening in the Windows Registry, you should be able to stop Microsoft Edge from running in the background and other problems.

3 ways to disable Internet Explorer redirects to Edge browser

1. Rename the Microsoft Edge installation directory

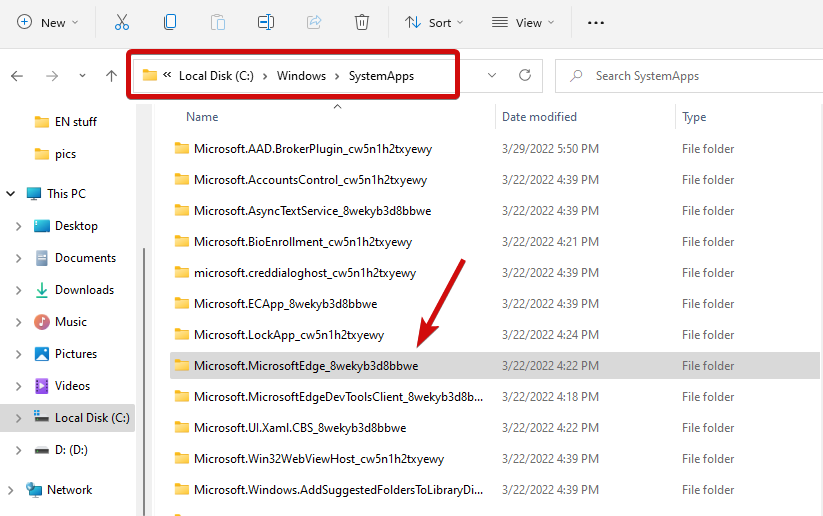
  1. To do this, paste the following path into File Explorer: C:WindowsSystemAppsMicrosoft.MicrosoftEdge_8wekyb3d8bbwe
  2. Right-click on this directory to open its Properties.
  3. Select Rename by right-clicking it again, and set the name to MicrosoftEdge_8wekyb3d8bbwe­_OLD.
  4. Restart your PC.

By renaming the file directory, Edge won’t be able to access its installation files and launch opening instructions. So this way, you can disable things when Internet Explorer automatically opens Edge.

2. Empty the MS Edge active folder from your C drive

  1. If renaming the directory did not work, go ahead and use File Explorer again.
  2. Now, paste in the following: C:Users%Username%AppDataLocalPackagesMicrosoft.MicrosoftEdge_8wekyb3d8bbweACMicrosoftEdgeUserDefaultRecoveryActive
  3. Use the Ctrl + A shortcut on your keyboard to select everything and delete all the files.

3. Disable Edge tasks in the Task Scheduler/Task Manager

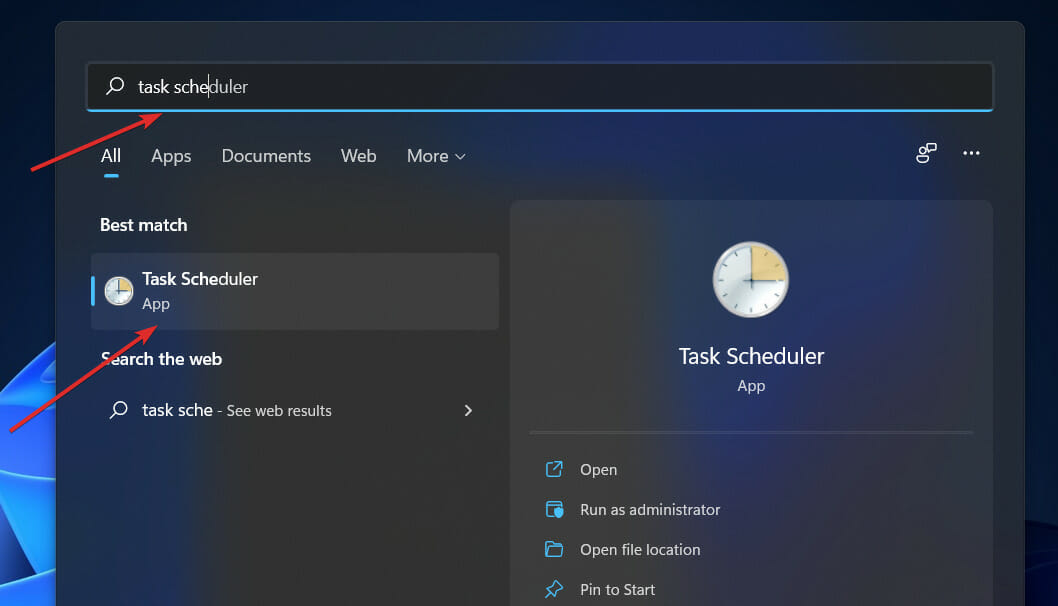
  1. Use the search area on your taskbar to locate the Task Scheduler app and open it. task-scheduler disable windows 11 telemetry
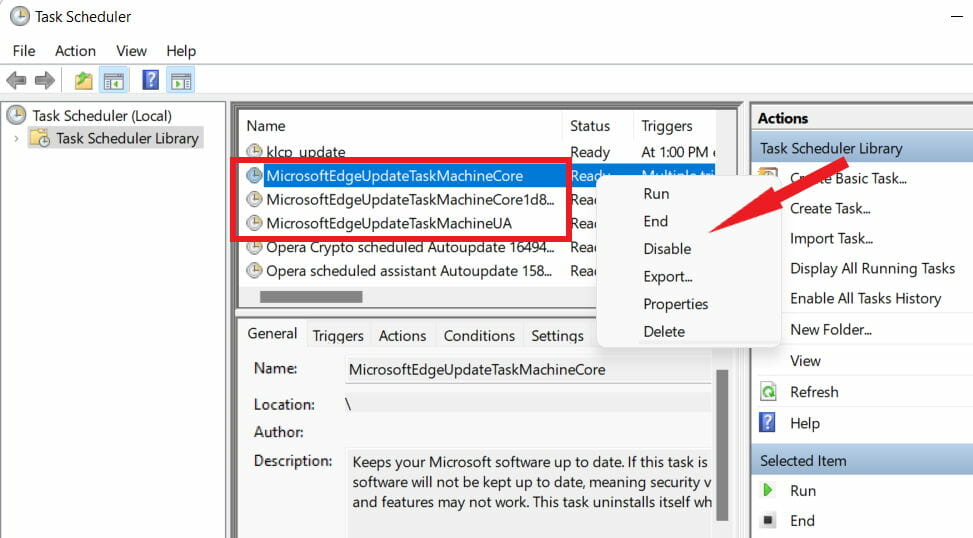
  2. In the left pane, you will see the Task Scheduler Library. Open it.
  3. In the main area, identify MicrosoftEdgeUpdateTaskMachineCore and all MS Edge-related tasks.
  4. Right-click them one by one and choose Disable.
  5. As for the Task Manager, identify all MS Edge-related processes and select End task.

With this feature disabled, Microsoft Edge will not open automatically when you sign in or start your PC. For more ways to stop Microsoft Edge from opening on startup, check our detailed guide on the topic.

On the one hand, Edge makes it hard to change your default browser. But if IE is not equipped to render specific content, or worse, if Internet Explorer keeps crashing, you might be dealing with a case of severe malware infestation.

If trying to open Internet Explorer opens Edge, it might be a good idea to disable Microsoft Edge in Windows 11 by changing the file associations.

How would you know that is the case? If Internet Explorer opens then closes, and Edge opens, you might be on to something.

4 Best Cross-Platform Chess Apps to Play Chess on Any Device

Nothing beats the fun of a game of chess with a friend. Unfortunately, most regular chess apps are designed to run on specific devices.

This implies that if you, for example, have an iPad and your pal owns a laptop, you’re not likely to play unless you spend money on an equivalent device. And this is where cross-platform chess apps come in.

These apps support iOS, Android, Windows, Linux, and various browsers, and your game will work regardless if you’re on mobile or a Mac and your pal is on a PC.

So, which is the very best cross-platform chess app? These apps differ in levels (beginner/average/expert), analysis models, user interface, responsiveness, and more.

Check our recommendations on the best cross-platform chess app below.

Can you play chess cross-platform?

Yes, a series of apps allow you to play chess across different platforms with your friends. Some of these apps are available on PC and mobile, and each player’s device doesn’t matter.

Also, there are browser chess games that you can play cross-platform online. So, there are many options available to you.

Quick Tip:

Consider playing Chess on a dedicated browser for gaming like Opera GX. It’s built to support lag-free sessions and allows you to download new games from the GX Corner.

With this browser you’ll be able to load and play games even on lower-end PCs, thanks to its RAM, CPU, and bandwidth limiter options.

Opera GX

Focus on winning with this fast and gaming-optimized browser!

What are the best cross-platform chess apps?

Mobialia Chess – Multi-level cross-platform app

Mobialia Chess best cross-platform chess app

The Mobile Chess app is available for Kindle, Android, and HTML5 (for playing on your desktop browser) and is among the leaders in the pack, thanks to its immense possibilities.

You can test your mettle against AI, and you will have different selectable ELO Levels to pick from as you go from strength to strength.

Even the time per move is selectable to help you choose more difficulty levels.

The Opening book comes with more than 30.000 different positions ensuring you always enjoy varied, funny games.

Also, the simple PGN browser gives you numerous options, including allowing you to open your PGN files from an SD card (or email).

And by the way, you can send your PGNs to email to help you deeply analyze your games later on your PC. Regarding game analysis, Mobialia supports a couple of easier-to-use UCI(Universal Chess Interface) chess engines.

Lastly, the app interface is clean, straightforward, and intuitive, not to mention that you can choose a 2D/3D board depending on your preferences.

⇒ Register for Mobialia Chess app free

Chess Time – Different themes and game set

chess time

Chess Time is one of the best free multiplayer cross-platform chess apps that allows you to battle it out with real people on Windows, iOS, and Android. Just log in and engage players from the UK, Germany, USA, and more for an early morning match!

You can even tag your favorite opponents to cheer you up as you take on the top-rated challengers from different countries. When we come to the game, the program, for many, the best cross-platform chess app, has enormous alternatives.

To start with, players can choose their favorite chess themes and sets. Then, as I had mentioned, all your rivals are human, and you have players on standby every minute!

Furthermore, you can train against tougher opponents by opening an unrated game, as you are warming up for the next match.

Still, conveniently, it calculates each player’s ELO ratings automatically, so you’re updated about how you’re faring.

The analysis tool is very detailed; you can export your games as PGN and/or screenshots for further review.

⇒ Download Chess Time app (Windows)  or Android or iPhone

Chess Free – Best free cross-platform chess app

chess free

Chess Free is widely regarded as the best free chess gaming app on various platforms.

Whether you’re a beginner taking baby steps toward becoming the next grandmaster or a veteran seeking to up their game, the Chess free app has covered you.

For starters (Casual mode), the powerful class tutor will help you quickly learn how to craft winning chess strategies and build your chess skills.

Plus, you can progress at your own pace from the novice to expert levels (12 play levels in total).

Also, you won’t feel overwhelmed as the application deliberately weakens its intelligence (at the entry levels) to ensure you are also scoring.

At the master level (Pro mode), the app deduces your ELO rating according to your results against the computer. You can even steal a march on the CPU by clicking Show CPU thinking to learn the machine’s next move!

All your chess stats are accessible online (via your Google+ account), and you can invite your friends for an online tussle.

⇒ Get Chess Free app from Play Store

Pure Chess – Game with stunning visuals

pure chess

Pure chess is one of the few old board games to have remained at the top largely due to its ability to keep up with emerging gaming technologies.

A fully-fledged Grandmaster designed it, so if you harbor dreams of becoming a legend in your own right, then you’re in the right hands here.

The program packs breathtaking visuals, appealing chess pieces, step-by-step tutorials, and a phenomenal multiplayer environment.

Above all, you can play from practically any device/operating system: Steam, Wii U, iPhone, iPod touch, Nintendo 3DS™, iPad, and Android devices.

And against anyone you desire from the leaderboards worldwide.

The three trial tournaments and the 100 tough chess puzzles for training should help you upgrade your tactics play.

In a nutshell, Pure Chess could be the best cross-platform chess app. for upcoming champions.

⇒ Get Pure Chess App

How can I play chess with my friends remotely?

Playing chess remotely with your friends is easier now than ever. You can choose any of the cross-platform chess apps listed in this guide for a friendly competition.

Also, you can play browser chess games with your friends online. Lastly, there are also platform-based chess games to download.

The thrills of playing chess with friends exceed any excitement that comes with playing with an AI. With the apps listed in this guide, you can no more be limited by platform differences when you want to play chess with your pals.

Tip icon Tip
There is a perfect way to improve your chess skills if your friends are challenging you. DecodeChess is AI-based software that examines every chess game and suggests in real time which move is better in some situations., what mistakes you made, and what strategy to follow.

Do you need a list of the best browser games to play with your friends? Then, check our article on the topic for carefully selected options to try today.

Feel free to let us know the chess app that piques your interest in the comments below.

Xbox is accusing Sony of paying developers “block fees” to keep games off Xbox Game Pass

Things are getting a bit spicy between Sony and Microsoft as the Activision Blizzard deal moves closer toward finalization. In the latest development, Microsoft has claimed that Sony pays for blocking rights to keep games from appearing on competing gaming services such as Game Pass.

The claim was made in a document sent to Brazil’s Administrative Council for Economic Defense (CADE) pertaining to Microsoft’s acquisition of Activision Blizzard. Microsoft’s statements on the matter read in part,

Indeed, Microsoft’s ability to continue expanding Game Pass has been obstructed by Sony’s desire to inhibit such growth. Sony pays for ‘blocking rights’ to prevent developers from adding content to Game Pass and other competing subscription services.

It only reveals, once again, a fear about an innovative business model that offers high-quality content at low costs to gamers, threatening a leadership that has been forged from a device-centric and exclusivity-focused strategy over the years.

Considering that exclusivity strategies have been at the core of Sony’s strategy to strengthen its presence in the games industry, and that Sony is a leader in the distribution of digital games, Sony’s concern with possible exclusivity of Activision‘s content is incoherent, to say the least.

These comments were part of Microsoft’s response to Sony’s claims that the Activision Blizzard deal is anti-competitive and therefore in violation of most countries’ antitrust laws. Particularly, Sony has pointed out the importance of the Call of Duty franchise, stating that

Call of Duty is so popular that it influences users’ choice of console, and its community of loyal users is entrenched enough that even if a competitor had the budget to develop a similar product, it would not be able to rival it.

 While platform exclusivity deals have been part of the gaming industry for a long time, Sony’s practice of blocking third-party games from appearing on rival subscription services hasn’t been widely known, though documented reference to it exists.

For its part Microsoft has stated that it does not intend to make Activision Blizzard’s games Xbox exclusive. It even went on to explain that such a strategy “would simply not be profitable” for them.

So what’s your take on all this? Is Sony playing dirty with its ploy to “inhibit growth” of rival subscription services like Game Pass, or is this just business as usual? Let us know what you think in the comments.


Firefox Multi-Account Containers: What Is It & How to Use It?

Do you have multiple accounts for your email, social media, or other services? Have you been using the same browser for all of them? If so, then you should consider using multi-account containers in Firefox. 

Containers allow you to compartmentalize your online life and keep it separate from one another. With the rapid growth of internet users, the number of accounts that we need to maintain has also increased.

You may be wondering: why use multi-account containers? Well, for one, everyone values their privacy. Some even go as far as installing privacy protector software for their PCs. Containers allow you to protect your privacy by keeping different accounts separate from each other.

This means that if someone hacks into one account, they won’t be able to get access to any of your other accounts. It’s also easier to keep track of things when they’re divided into different containers because it’s easier to remember which account belongs to which service.

What is Firefox multi-account containers? 

Firefox multi-account containers is a browser extension that lets you have multiple profiles in one browser window. This is useful for people who have more than one online persona, or for people who want to keep their work and personal lives separate.

It is a way to help you stay organized when you’re online. Firefox uses containers to separate your activity from the sites and services you use to personalize your browsing experience. For example, you could use a container for work and another for shopping.

When you’re in a container tab, it will look different than regular tabs: it has a colored background and a Containers icon in the address bar. It’s easy to switch between containers when you’re looking for something specific.

Each container is essentially a private tab. It’s like having multiple browser windows open at once, but without needing to switch between them.

Quick Tip:

If you have trouble with Firefox, try Opera One for multiple accounts. The browser is secure and fast and lets you create your own personalized workspaces. Plus, it comes with it’s own AI.

Opera One lets you create different user profiles for all your activities. It’s Chromium-based, so it supports all Chrome extensions, including Session Box which lets you keep login details of multiple accounts.

Opera One

Easily switch between accounts and create multiple user profiles with this modern browser!
Free Download Visit website

How do I use multi-account containers in Firefox? 

1. Install the extension

  1. Navigate to the Firefox addons site and search for Firefox multi-account containers.
  2. Click on Add to Firefox.
  3. Confirm on the next prompt box by clicking Add.

2. Customize the containers

  1. Click on the container’s icon at the top right corner.
  2. Select Get Started with multi-account containers and follow the prompts.
  3. Now click on Manage Containers to separate accounts.
  4. Click on the entry name of a select container to edit the container by choosing a color and icon to differentiate amongst them.

To use multi-account containers, you must turn on the feature and then create containers for each of your online identities. It is also recommended that you install the Firefox multi-account containers VPN alongside the Firefox multi-account containers extension to enhance privacy protection.

After you’ve created your containers, you can tweak the settings by installing extensions or apps into them to customize the browsing experience for each identity. For example, you could install a different browser theme for each container.

It is also important to note that you can’t use Firefox multi-account containers in private mode since the containers already provide a private experience.

Firefox multi-account containers for Chrome 

Firefox multi-account containers is a Firefox extension that lets you use multiple accounts in one browser window, without logging out.

While browsers normally have extensions available in other browsers, this particular one is not available for Chrome.

If you want the same functionality in Chrome, the MultiLogin extension available in the Chrome Web Store comes pretty close.

The Chrome MultiLogin extension allows you to log in to multiple accounts at the same time, switch between them, and even open new tabs with different accounts.

You may also be interested in tools to organize your browser bookmarks so don’t hesitate to check out our article on the same.

Now that you are conversant with multi-account containers as a valuable extension in your Firefox browser, once you install it, let us know what feature you enjoy most in the comment section below.

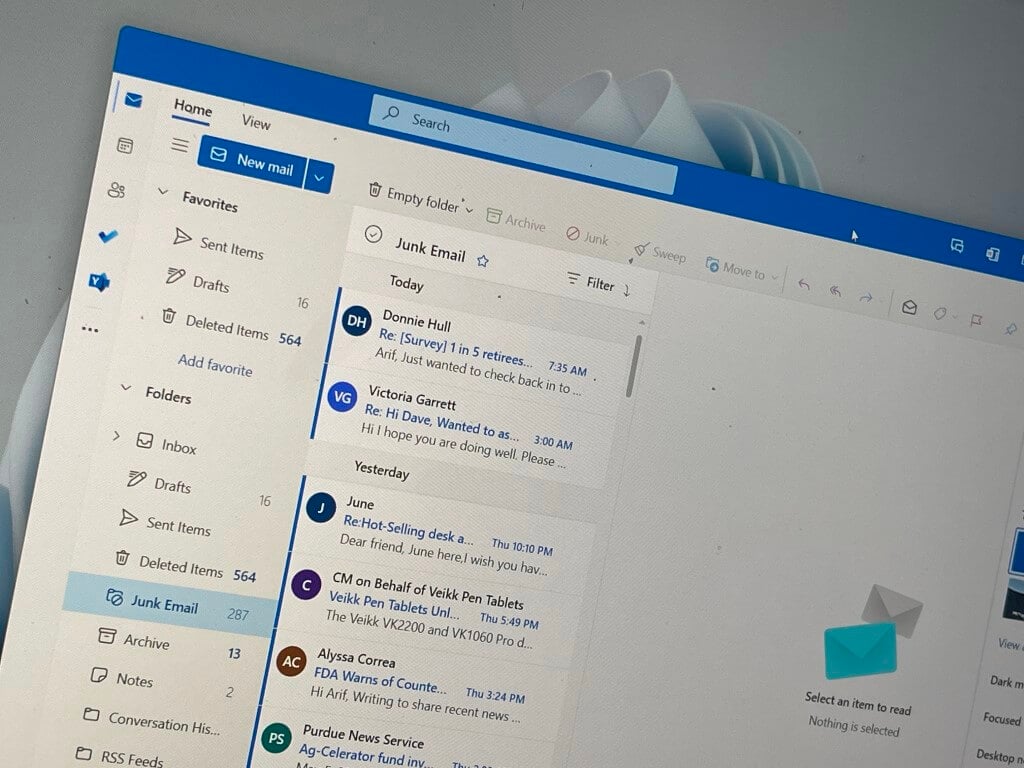
There’s now a new location for the mail, calendar, people, and apps modules in Outlook on Windows

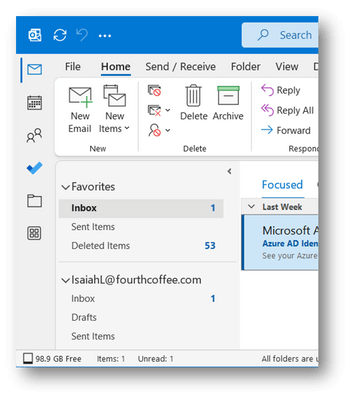
Microsoft is now changing the location where you could previously access mail, calendar, people, and apps modules in Outlook on Windows from the bottom to the left. Here’s a glimpse of how it will appear on Outlook.

Microsoft Outlook

Microsoft has been testing out this new experience with Outlook users on the Current Channel since March 2022 and further indicated that this will become the default experience starting with Current Channel version 2207.

By moving these links from the bottom to the left, Microsoft aims to provide users with a “consistent experience” across Outlook, Teams, and Office.com thus allowing them to switch apps seamlessly and at the same time create additional space in Outlook’s user interface for the integration of more apps. What’s more, users will be able to pin the apps used frequently by right-clicking on them.

However. once you make this update you will not be able to revert to the previous navigation experience. In other Outlook related news, Microsoft recently launched an Outlook Lite Android App designed to provide users with low-end Android devices with the best mailing experience.


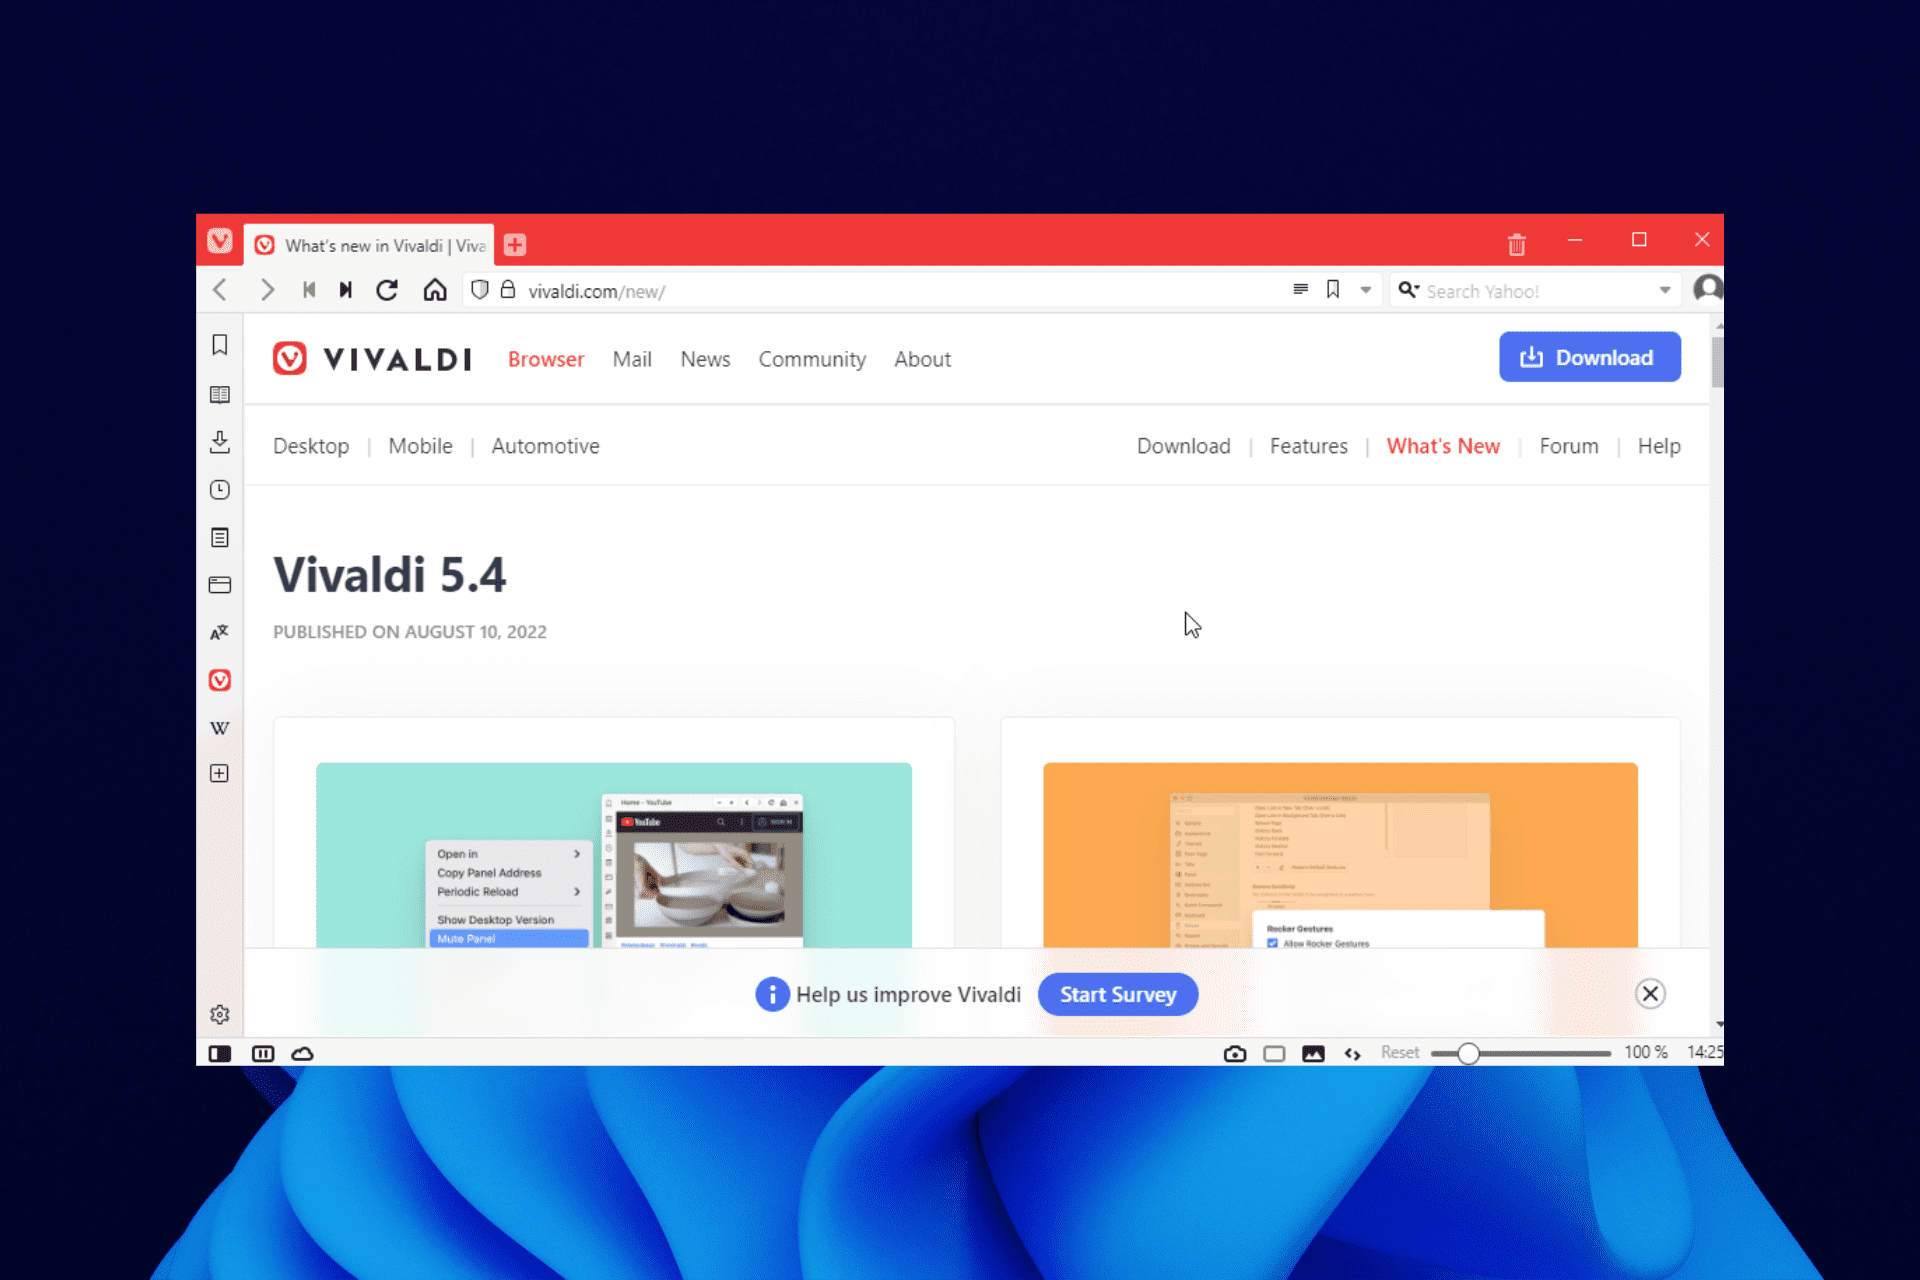
8 Fixes That Will Help You if Vivaldi is Not Loading Pages

Vivaldi is one of the best web browsers on all devices. However, recently many users reported issues with it. According to them, it seems Vivaldi is not loading pages at all.

This can be a big problem since you won’t be able to browse the web with this software, so it’s important to fix this issue as soon as possible.

Luckily, there are multiple methods that you can use to fix this problem, and in today’s guide, we’re going to show you the best ways to fix this issue.

Why is Vivaldi not loading pages?

This issue occurs if your user profile is damaged or corrupted, so recreating it might be the best way to fix the problem. Another cause can be your extensions, so make sure to disable all the problematic ones.

Certain settings and Windows features can also prevent pages from loading, and to learn which settings you need to disable to fix this, be sure to keep reading.

Does Vivaldi use a lot of RAM?

When you open many tabs on Vivaldi, it consumes a lot of RAM. However, it still uses lesser RAM than Chrome and some other browsers.

Also, it has a feature that allows you to hibernate tabs you are not currently using. But the best way to keep its RAM usage in check is to open fewer tabs. Finally, if you want to control Vivaldi’s high CPU usage, we have a detailed article on the topic.

Quick Tip:

While Vivaldi is a great browser, switching to a different browser in some instances could be a better solution, and if you’re looking for such a browser, Opera might be the best choice.

The browser offers built-in tracking protection, an ad blocker, and a VPN so that it will protect your online privacy. Just like Vivaldi, it’s based on a Chromium engine, so you’ll feel familiar while using it.

Opera

Load pages error-free using this performance-oriented browser!

What do I do if Vivaldi is not loading pages?

1. Recreate your Vivaldi profile

  1. Open Vivaldi.
  2. In the address bar, type: vivaldi://version
  3. Now check the Profile path value.
  4. Close Vivaldi.
  5. Now press Windows key + R and enter %localappdata%\Vivaldi\User Data\
  6. Locate your profile directory. In our case, it was Default, and rename it or move it to Desktop.
  7. Start Vivaldi again.
  8. Check if the problem is still there.

2. Disable all extensions

  1. Open Vivaldi.
  2. Now click the Menu button in the top left corner and expand the Tools section. Now pick Extensions from the list.
  3. A list of installed extensions will now appear.
  4. Click the switch icon next to the extension name to disable it.
  5. Do this for all installed extensions.
  6. Restart your browser and check if the problem is gone.

If the Vivaldi not loading pages issue doesn’t appear anymore, enable extensions one by one until you find the one causing this problem.

If you can’t access the extensions page, you can disable all extensions by doing the following:

  1. Locate the Vivaldi shortcut and right-click it. Choose Properties from the menu.
  2. Now in the Target field at the end add: --disable-extensions
  3. Save changes and start the browser.

3. Turn off IPv6

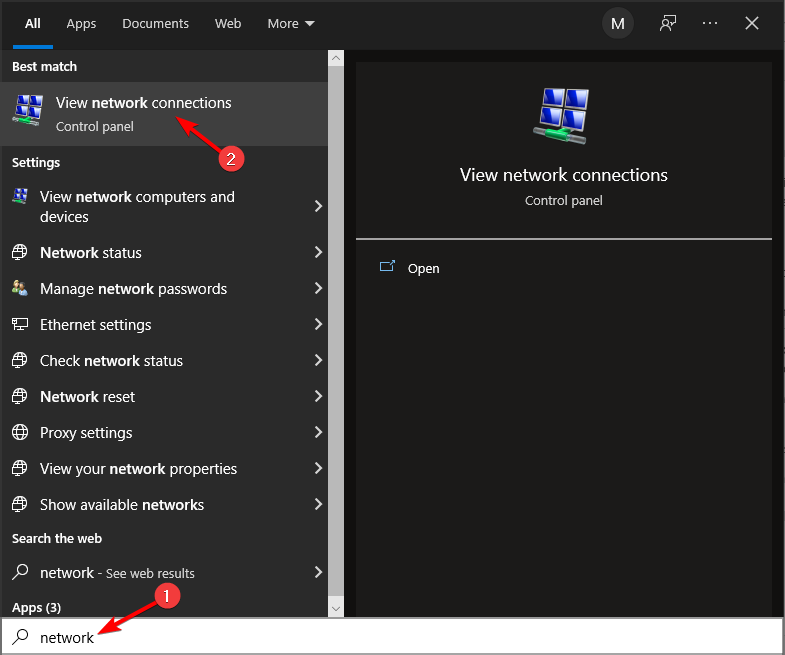
  1. Press Windows key + S and type network. Select View network connections.
  2. Right-click your connection and choose Properties.
  3. Locate Internet Protocol Version 6 (IPv6) and uncheck it. Now click the OK button to save changes.

Remember that disabling IPv6 can cause issues with certain applications or features on your PC.

4. Disable certain policies

  1. Open Vivaldi.
  2. In the address bar, enter: vivaldi://flags
  3. Now search for cross origin.
  4. Locate the Cross-Origin Opener Policy entry and disable it.
  5. Restart your browser.

5. Hibernate other tabs

  1. Open the page that you want to view.
  2. Now open a new tab.
  3. Right-click the new tab and choose Hibernate background tabs.
  4. Go back to the desired page.

As mentioned earlier, Vivaldi consumes many resources with many active tabs. This could be the reason Vivaldi is not loading the other pages. So, try to hibernate any tab you are not using.

Note icon NOTE
Keep in mind that this is just a workaround, but a few users reported that it worked for them, so you might want to try it out.

6. Check the Vivaldi shortcut

  1. Right-click the Vivaldi shortcut that you use to launch the software and choose Properties.
    properties vivaldi not loading pages
  2. In the Target field, check the path. Make sure it says vivaldi.exe at the end. If it says vivaldi_proxy.exe, change it to vivaldi.exe.
    edit vivaldi not loading pages
  3. Save changes and launch the browser again.

If Vivaldi is not loading pages, it might be because of an issue with the browser shortcut. In case the path of the shortcut is correct, proceed to the next fix.

7. Check for updates

  1. Open Vivaldi.
  2. Click the Menu icon in the top left. Now expand the Help section and select Check for updates.
    menu vivaldi not loading pages
  3. If any updates are available, they will be downloaded automatically.
    up to date vivaldi not loading pages

An outdated browser is the root of many problems, including the Vivaldi not loading pages issue. Ensure to restart your browser after the update before reloading the pages.

8. Reinstall the software

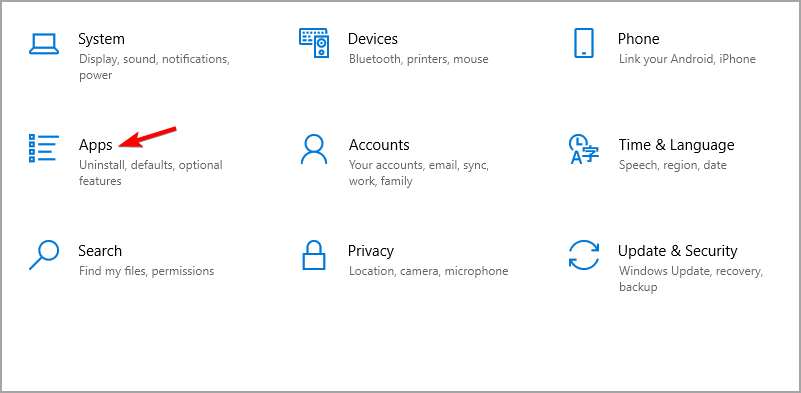
  1. Press Windows key + I to open the Settings app.
  2. Navigate to the Apps section.
    apps vivaldi not loading pages
  3. A list of installed applications will now appear.
  4. Select Vivaldi and click on Uninstall.
    uninstall vivaldi not loading pages
  5. Follow the instructions on the screen to complete the process.
  6. Go to the official Vivaldi website to download the latest browser version.
    download button vivaldi not loading pages
  7. Click on the downloaded installer and follow the simple onscreen instructions to complete the installation.

If Vivaldi is not loading pages, it might be down to your browser version. Uninstalling and reinstalling should do the trick here.

How can I fix the Vivaldi update error on my PC?

A corrupted installation usually causes this issue, so you might have to remove the software and its leftover files to fix it.

It’s also possible that certain values in the registry aren’t correct, thus causing this issue to occur.

Does Vivaldi steal your data?

Vivaldi has strict data privacy. According to the official privacy policy, Vivaldi does not collect your data.

The browser does not sell your data. Also, the developers do not see the sites you visit or the downloads you make. All these are data stored locally on your PC or encrypted. So, be assured that Vivaldi does not steal your data.

If Vivaldi is not loading pages on your PC, certain settings may interfere with it, but hopefully, this guide will help you fix the problem.

This isn’t the only problem users encounter in Vivaldi, and we already wrote about what to do if Vivaldi is very slow in a separate guide, so be sure to check it out.

Have you found an alternative solution for this issue? If so, feel free to share it with us in the comments section below.

Opera GX Dark Mode: How to Force it on All Websites

Opera GX is one of the best browsers with a built-in VPN and ad blocker, specifically designed for gamers. It comes with a default dark theme with red highlights all over.

It thrives on all major features of modern browsers. Whether it is the ease of use, privacy, security, or customization, it is up there with the best in the industry. 

The Dark mode is one of the defining features in most modern-day apps and devices. You can activate the Dark mode on Windows 11, just like on the Opera browser.

However, although Opera GX has a dark theme, it is only limited to the home page. 

This guide will explain everything about the Opera GX Dark mode, from applying it on all websites to how to disable it and make exceptions.

Is there a Dark mode for Opera GX?

is dark mode available opera gx

Opera GX, like the Opera browser, has a feature that allows you to enable Dark mode on most websites. Irrespective of the website’s default theme, this feature changes it to Dark mode once enabled. 

Also, you can get this much-needed Dark mode with the help of extensions from the Opera addons store. These extensions offer a lot of flexibility, customization, and functionality. 

Hence, you are not short of brilliant options in turning any website you want to Dark mode on Opera GX.

Opera GX

Go for this customizable browser with integrated Dark Mode and useful gaming tools.

How do I make websites dark in Opera GX?

To make websites dark in Opera GX, you need to force the Dark mode from the settings. This is because enabling the Dark mode will only make the taskbar and sidebar black. The main page of the website will not have a dark theme.

We will show how to do this later in this article.

What are the best Dark mode extensions for Opera GX?

Dark Mode – Easiest to use

dark mode extension

This is a popular Opera GX Dark mode extension with over 1.5 million downloads in the Opera addons store. It is simple to use, allowing you to switch it on and off with the Toolbar.

The Dark Mode extension allows you to choose different themes if you dislike the default one. What’s more, it has a whitelist feature that will enable you to add a domain you want to exclude from the Dark mode. 

Other features:

  • Over 50 themes are available
  • Bug report page
  • Light on resource usage

⇒ Get Dark Mode

Custom Dark Mode – Easy to customize

custom dark mode opera gx

The Custom Dark Mode is a stunning Opera GX extension that allows much tweaking and manipulation. It gives you the control of designing a dark style of your own on any website.

You can adjust the color settings from its popup UI, change the background color, font color, header color, and lots more on any website. You can also tweak the opacity of any website to your liking.

Furthermore, it can whitelist a website from the Dark mode settings. You only need to enter the domain, and the site will not be affected.

Other features: 

  • Auto-saved settings on memory
  • Easy to use
  • Settings are global except for whitelist pages

⇒ Get Custom Dark Mode

Gentle Night Mode – Least system resource usage

gentle night mode

Gentle Night Mode is in a world of its own in what it does. This extension aims at reducing the effects of the contents of websites on your eyes.

Whether dark or light theme, this extension allows you to soften the color from the sharp default you are used to. This gives you total control over the intensity. 

Lastly, you can effectively turn any light page dark with the Gentle Dark Mode.

Other features: 

  • Full customization
  • Not heavy on system resources
  • Easy to use

⇒ Get Gentle Dark Mode

Night Mode Pro – Highest functionality

night pro opera dark mode

This is another top-notch Opera GX Dark mode extension. It does not just allow you to switch to Dark mode on any website and gives you control over your screen’s luminosity. 

With the Night Mode Pro extension, you can adjust your screen brightness in light and Dark mode. This makes it less stressful for the eyes.

Its Dark mode also adjusts the background on the entire page and changes all the text colors to a matching dark color. 

Other features:

  • Whitelist feature for websites from night mode
  • Customization in Light and Dark mode
  • Easy to use

⇒ Get Night Mode Pro

How do I enable Dark mode in Opera GX?

  1. Launch Opera GX and click the Settings icon in the sidebar. 
    settings opera gx dark mode
  2. Set the Theme to Dark under the GX section.
    dark theme
  3. Scroll down in the same section and toggle the switch for Force dark pages forward to enable it.
    force opera gx dark mode

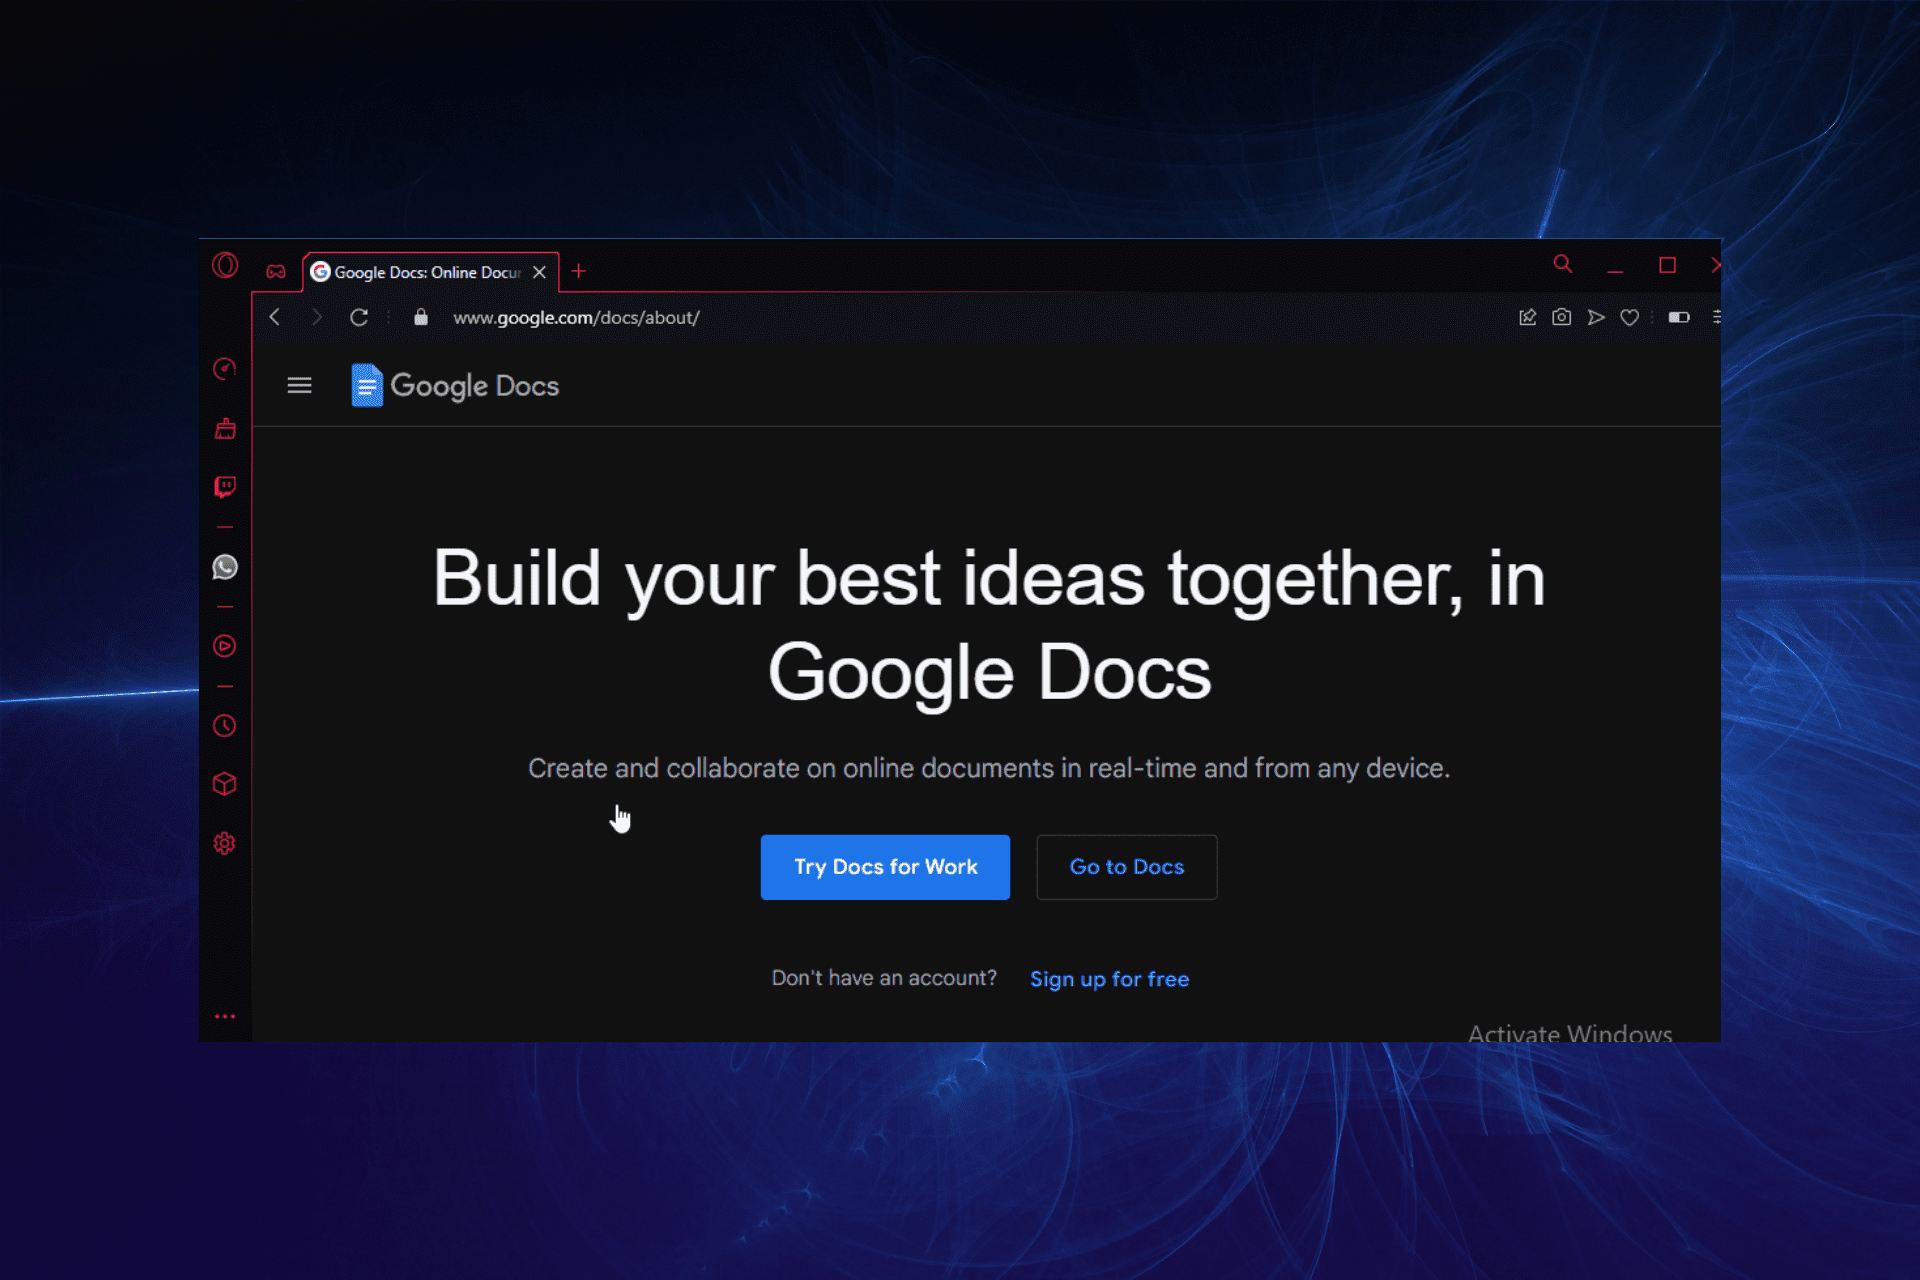
The force dark pages feature is the only way to switch most websites like Messenger, Google Docs, and other popular sites to the Dark mode on Opera GX. 

Note that you have to use Opera GX in a dark theme to make everything dark. Otherwise, the sidebar and your browser’s tabs will remain light while the page will be dark.

It is also worth noting that some websites cannot switch to Dark mode. So, this feature might not work on them. However, this is a common feature on most websites. 

Lastly, the steps are the same to disable the Dark mode on Opera GX. You only need to toggle the Force Dark mode feature switch backward.

How do I add exclusions from the Dark mode in Opera GX?

  1. Visit the site you want to exclude.
  2. Right-click on any space on the site.
    disable force mode
  3. Choose the Disable force dark page option.

Adding exceptions to Opera Dark mode helps remove a website that does not support Dark mode fully or is troubled by a bug.

The contents of such websites sometimes appear broken and scattered. But by excluding it, you can enjoy the Dark mode on other websites.

Can you change the Opera GX theme?

Opera GX comes with a default dark theme that gives it a special aesthetic look. However, you can change the theme to a light one from the settings.

Also, you can download themes from the Opera Addons store to change the look.

The Opera GX Dark mode is increasingly becoming important with the time users spend on the browser. This helps to protect the eyes and make things more comfortable. 

We have explained how to enable and disable the Dark mode. Also, we have explained how you can add exceptions in Opera GX Dark mode for a site that does not support it.

Do you need an in-depth Opera GX review? Check our detailed guide for everything you need to know about the browser. 

Feel free to discuss any issue you have enabling or disabling the Opera GX Dark mode with us in the comments section below.

3 Ways to Fix the Chrome YouTube Embed if It’s Not Working

The YouTube embed video not working on Chrome issue is not the first problem users have faced concerning these two Google-owned services. Fortunately, unlike other problems like YouTube freezes on Chrome, the causes of this issue can be easily traced.

Some popular ones are outdated browsers and corrupt cache data and history. And with the causes within a close circle, the fixes too, are not far-fetched.

This guide contains proven solutions not just for YouTube videos but for all types of embedded videos not playing in Chrome on Android, iPhone, or PC.

Why are embedded videos not playing in Chrome?

When embed video cannot be played, it could be a problem with the website itself. A hard refresh using the Ctrl + Shift + R keyboard shortcut might come to your aid in this situation.

Several third-party extensions, too, are found to affect the functionality of a website and cause it to run into issues. If you have any installed, disable them and verify if they are the reason behind embed videos not working in Chrome.

Besides, running an outdated version of the browser, corrupt browsing data, or misconfigured settings can lead to the error. But, fret not! The solutions listed in the following section will help eliminate all of these.

Quick Tip:

If you keep having problems, use another browser. We recommend Opera One because it’s lightweight and capable to display any webpage/media content correctly.

It also boasts an intuitive interface that can be customized to your liking. What’s more, it is one of the most secure browsers available, thanks to its built-in VPN. And it also features a native AI.

Opera One

Use this browser for error-free and secure web surfing, on any type of page or platform!
Free Download Visit website

How can I fix the YouTube embed not working in Chrome?

1. Update Chrome

  1. Click the menu button (three vertical dots) in the top right corner.
    menu settings
  2. Choose the Settings option.
    about chrome youtube embed not working
  3. Select About Chrome on the left pane. It will show if there is an update available.

An outdated browser causes a series of problems, and some users have pointed to it being the reason YouTube embedded video is not working on Google Chrome.

Developers release updates to eliminate bugs and errors in the previous browser version. So, the problem might be with your browser version.

After the update, relaunch the browser and check if the HTML5 MP4 video not playing in Chrome the problem persists. In case it does, head to the next method.

2. Clear cache and browsing history

  1. Click the menu button and select the Settings option.
    menu settings
  2. Select Privacy and security on the left pane.
    privacy and security
  3. Choose the Clear browsing data option.
  4. Check the checkboxes for Browsing history and Cached images and files.
    clear data chrome youtube embed not working
  5. Click the Clear data button.
  6. Wait for the process to complete and relaunch Chrome.

Browser data such as cache and history help to improve your browsing experience. They are especially useful for a website you have visited.

But they can also cause YouTube embed not working on a website in Chrome. This is because the stored browser data might be corrupt, consequently affecting the performance of your browser.

Otherwise, you can use CCleaner as a tool to clear all cache and clean up your search engine in depth as well as your cookie history.

In this case, clearing them and allowing Chrome to gather fresh data should be enough. Once done, check if the Chrome not playing videos problem is resolved.

3. Disable hardware acceleration

  1. Click the menu button and choose Settings from the options.
    settings menu
  2. Choose the Advanced option on the left pane.
    advanced chrome embed youtube not working
  3. Select System from the dropdown in the Advanced section.
    disable hardware
  4. Toggle the switch before Use hardware acceleration when available backward to disable it.

The hardware acceleration setting helps load pages faster on Chrome by taking advantage of the computer’s GPU. However, it is one of the usual suspects when videos, animations, and games are not working on Chrome.

Hence, it might be the reason why YouTube videos are not playing in Chrome. Disabling it does not lead to a noticeable drop in the performance of Chrome. So, you have nothing to lose.

Why won’t YouTube videos play on my website?

If YouTube videos on your website won’t play, likely, they have not been appropriately embedded. Issues while embedding can cause the problem, and the best option is to re-embed the videos.

Also, verify that the video you have added to the website is still available on YouTube. Because if it has been removed, the videos won’t play on any browser for the visitors

Other than that, check for compatibility issues and third-party app conflicts at the user’s end in case only a handful are facing the problem.

If YouTube embeds autoplay is not working in Chrome, that can be a small but rather annoying issue. Fortunately, it is not impossible to solve, as we have shown in this guide.

Also, find out what to do if YouTube thumbnails are not showing on Chrome.

Feel free to discuss the solution that helped you get back to watching YouTube embedded videos again on Chrome in the comments section below.

Stop Microsoft Edge from Opening on Startup: 4 Easy Ways

Microsoft Edge is a popular browser known for its low resource consumption and high performance. However, many users still prefer other browsers over it and have been looking for ways to prevent Microsoft Edge from opening on Startup in Windows 11.

Microsoft is keen on pushing users to switch the browser and has made some considerable improvements in terms of design and performance on Edge on Windows 11. Also, Edge is now listed as Microsoft Recommended Browser.

However, some users reported that no matter what they did, Edge kept opening on startup in Windows 11. Read the following sections to find out all about the problem and the confirmed solutions to it.

How do I stop Microsoft Edge from popping up on startup?

1. Disable Edge from the Task Manager

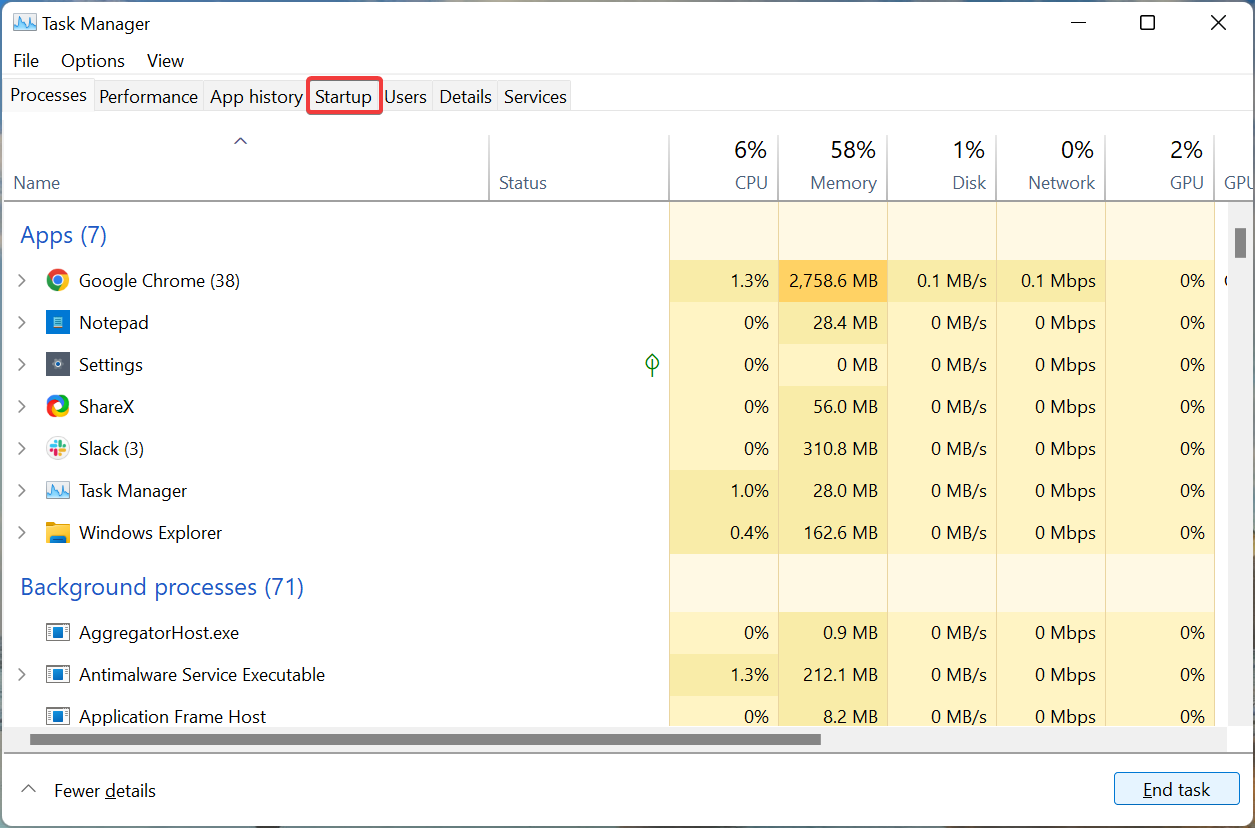
  1. Press Ctrl + Shift + Esc to launch the Task Manager, and go to the Startup tab from the top.Startup tab
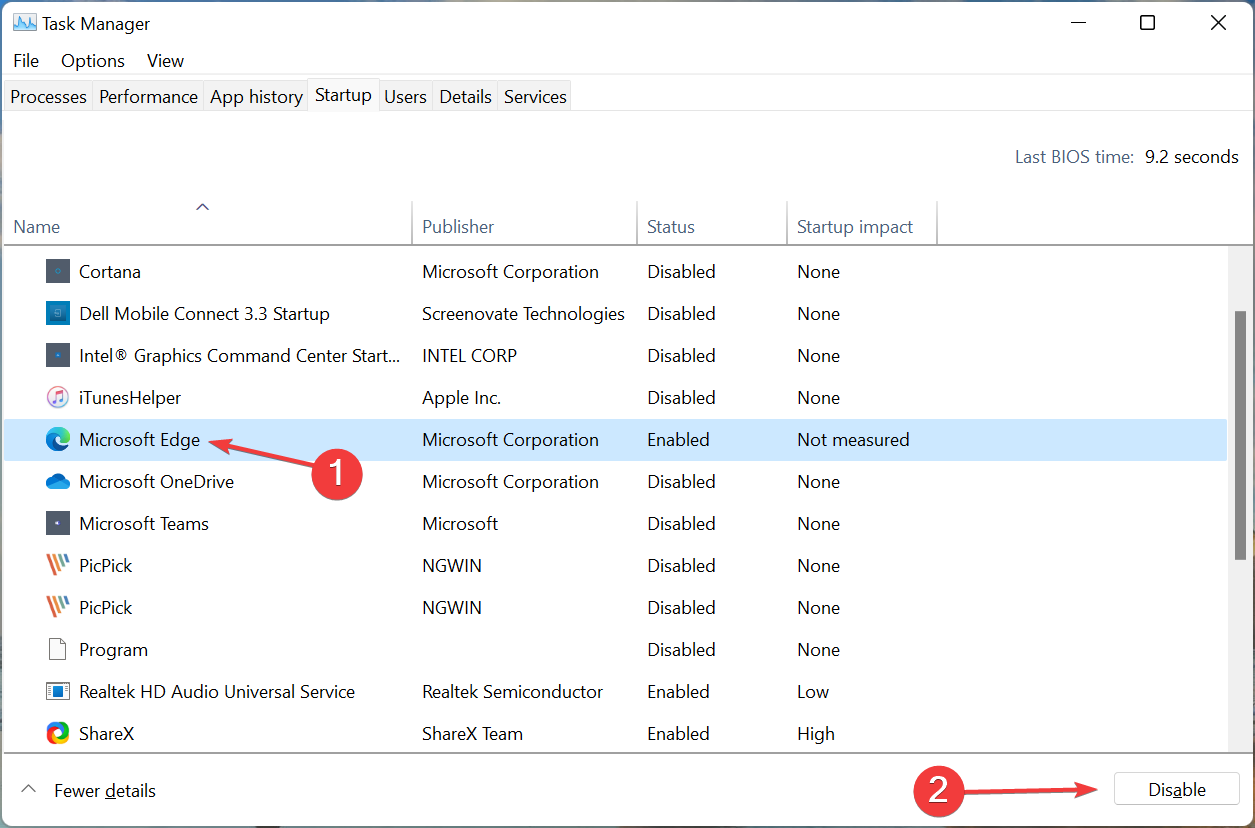
  2. Now, select Microsoft Edge from the applications listed here, and click on the Disable button.Disable to Stop Microsoft Edge from opening on startup Windows 11

If Microsoft Edge automatically opens in Windows 11, this is probably the simplest fix for it. Here, you can disable other non-critical startup apps as well to boost the system performance.

In case Microsoft Edge is not listed in the Task Manager or disabling it didn’t work, try the next method.

2. Delete Edge from the Startup folder

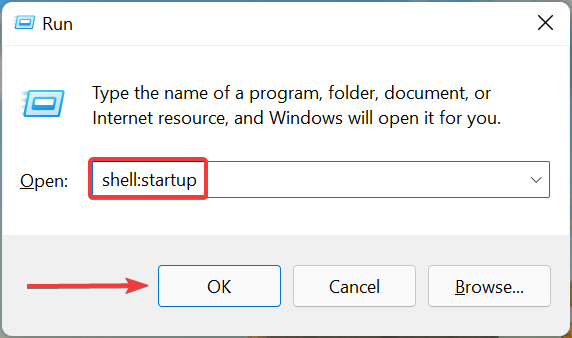
  1. Press Windows + R to launch the Run command, enter shell:startup in the text field, and either click on OK or hit Enter to launch the Startup folder.shell:startup
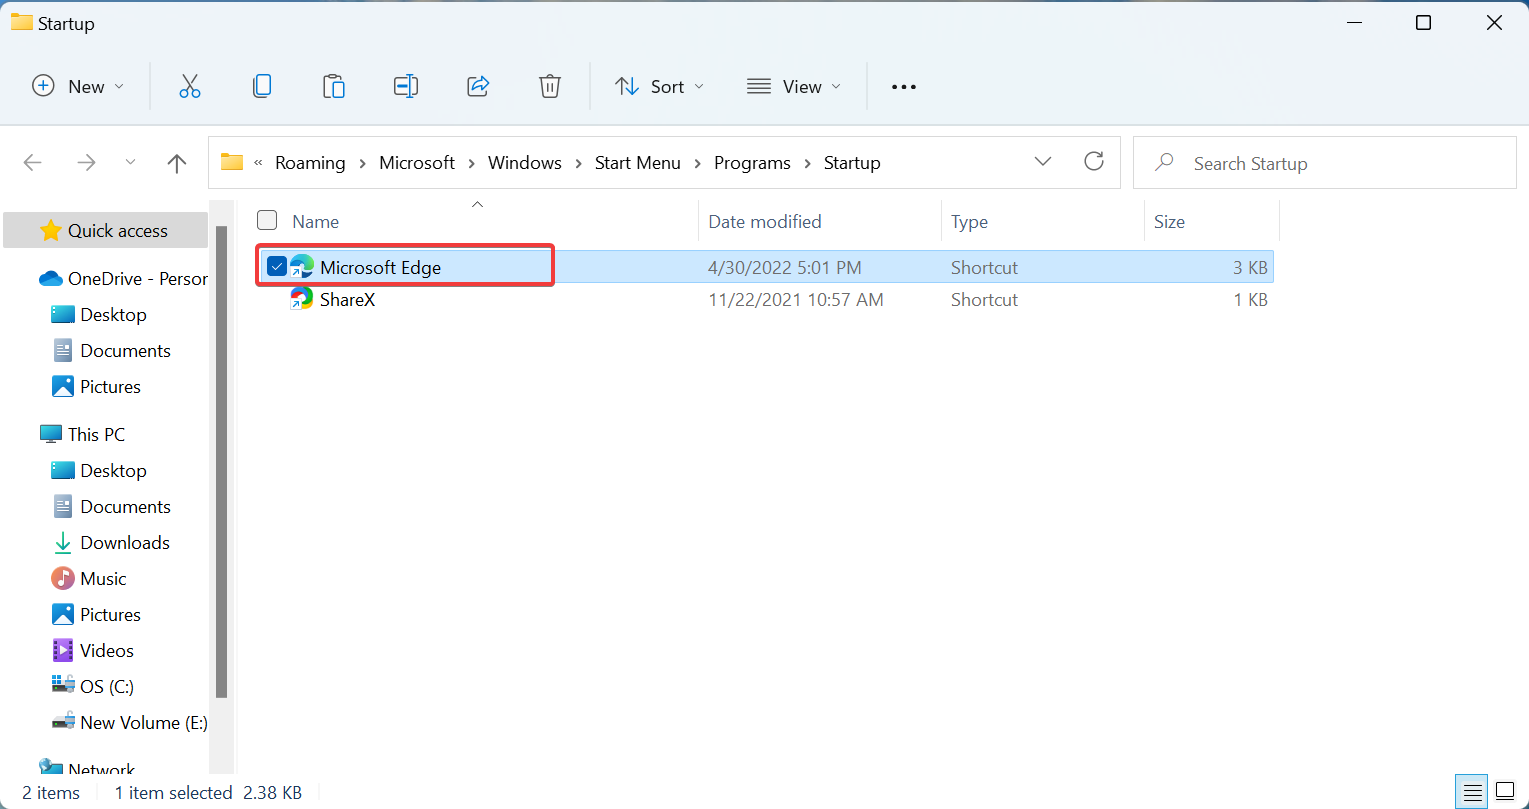
  2. Now, if you find a shortcut for Microsoft Edge listed here, select it, and hit the Delete key.Delete to Stop Microsoft Edge from opening on startup Windows 11
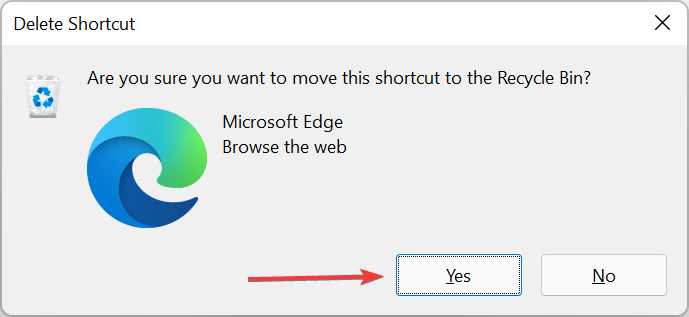
  3. Click Yes, in case a confirmation prompt pops up.Click Yes

Another way to stop Microsoft Edge from opening at startup in Windows 10 and Windows 11 is to delete the shortcut for it in the Startup folder. The apps in this folder load automatically when you boot the OS. If this method too doesn’t work, head to the next one.

3. Modify the Registry

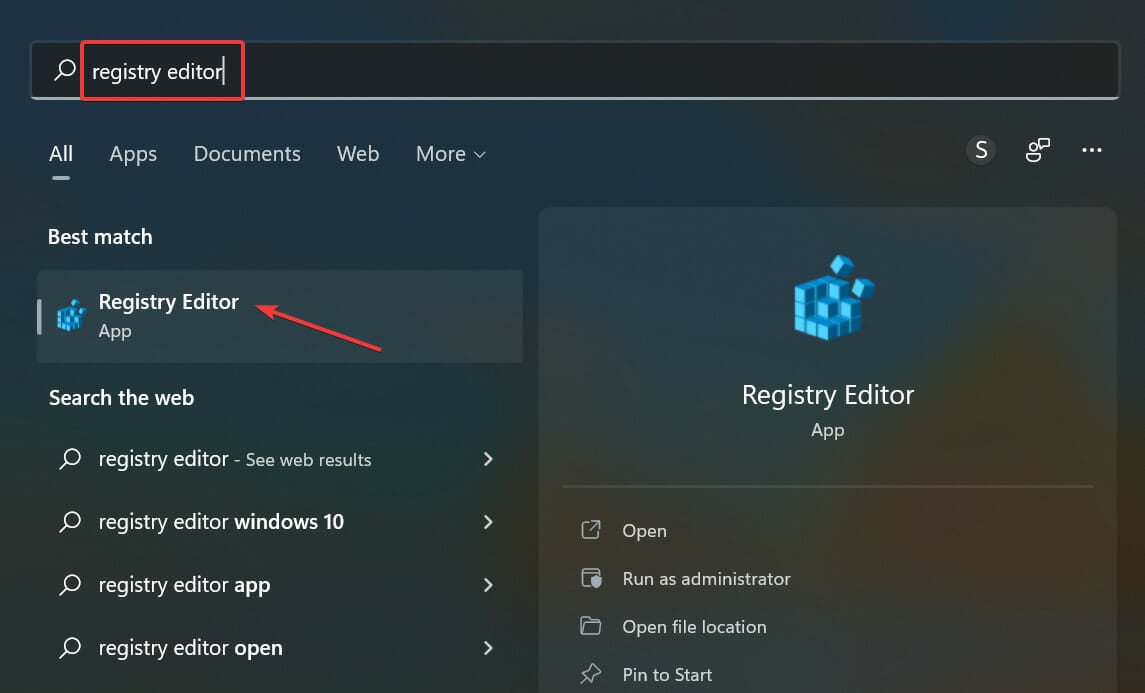
  1. Press Windows + S to launch the Search menu, enter Registry Editor in the text field at the top, and click on the relevant search result.Registry Editor
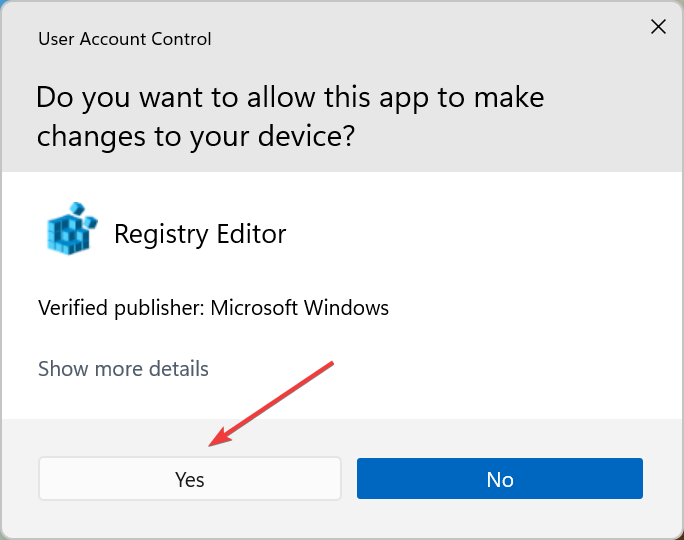
  2. Click Yes in the UAC (User Account Control) prompt that pops up.Click Yes
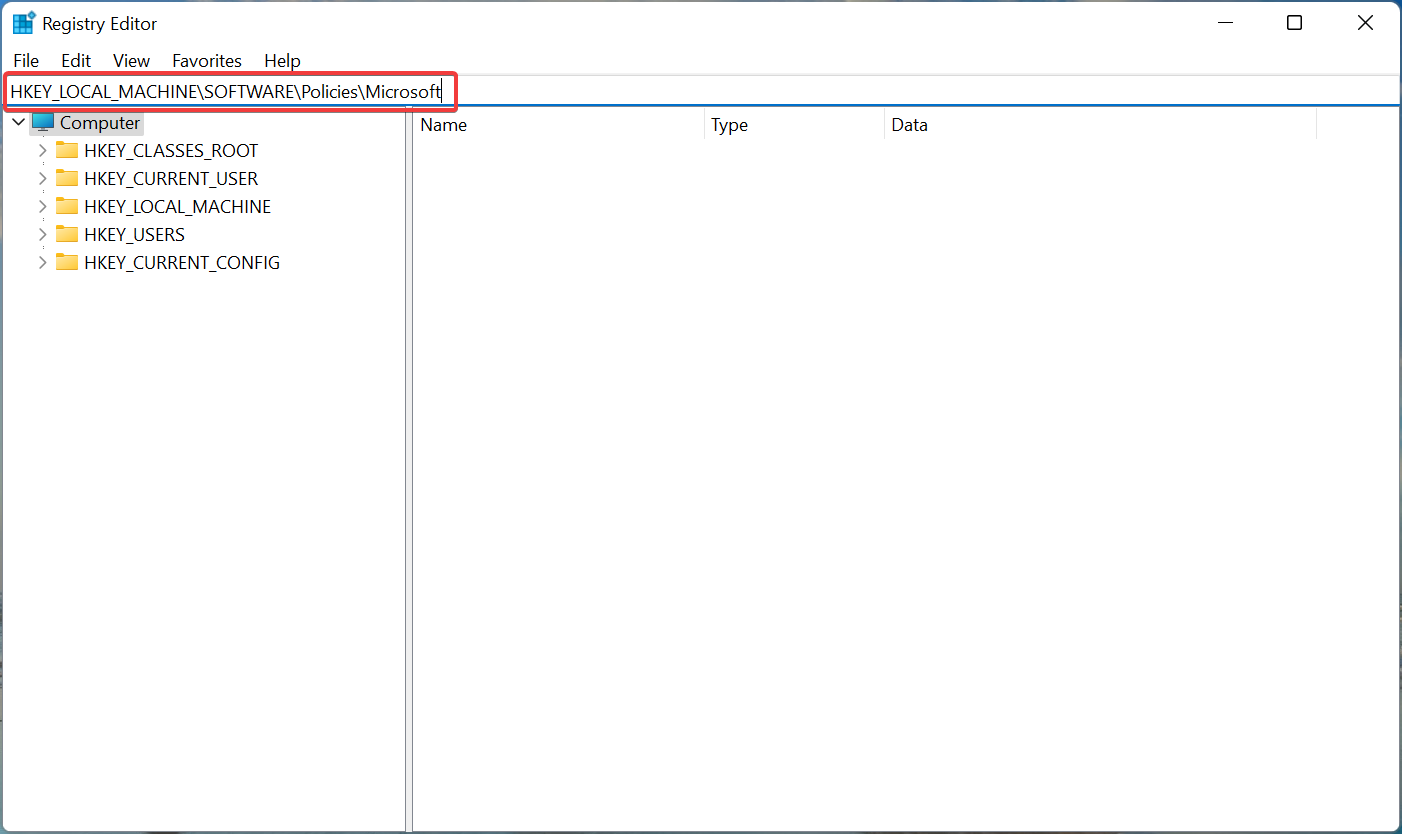
  3. Paste the following path in the address bar at the top, and hit Enter:HKEY_LOCAL_MACHINE\SOFTWARE\Policies\MicrosoftPaste address
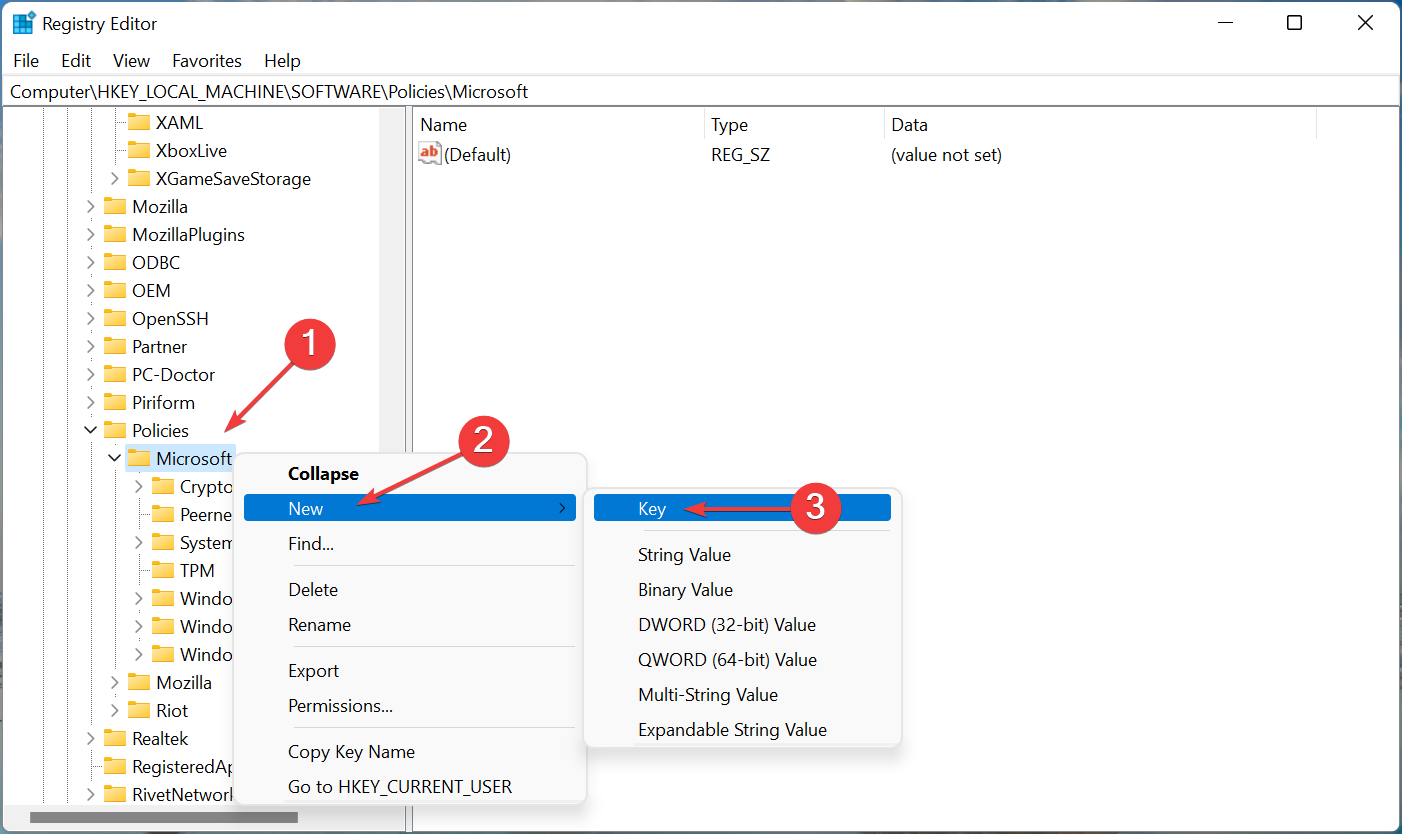
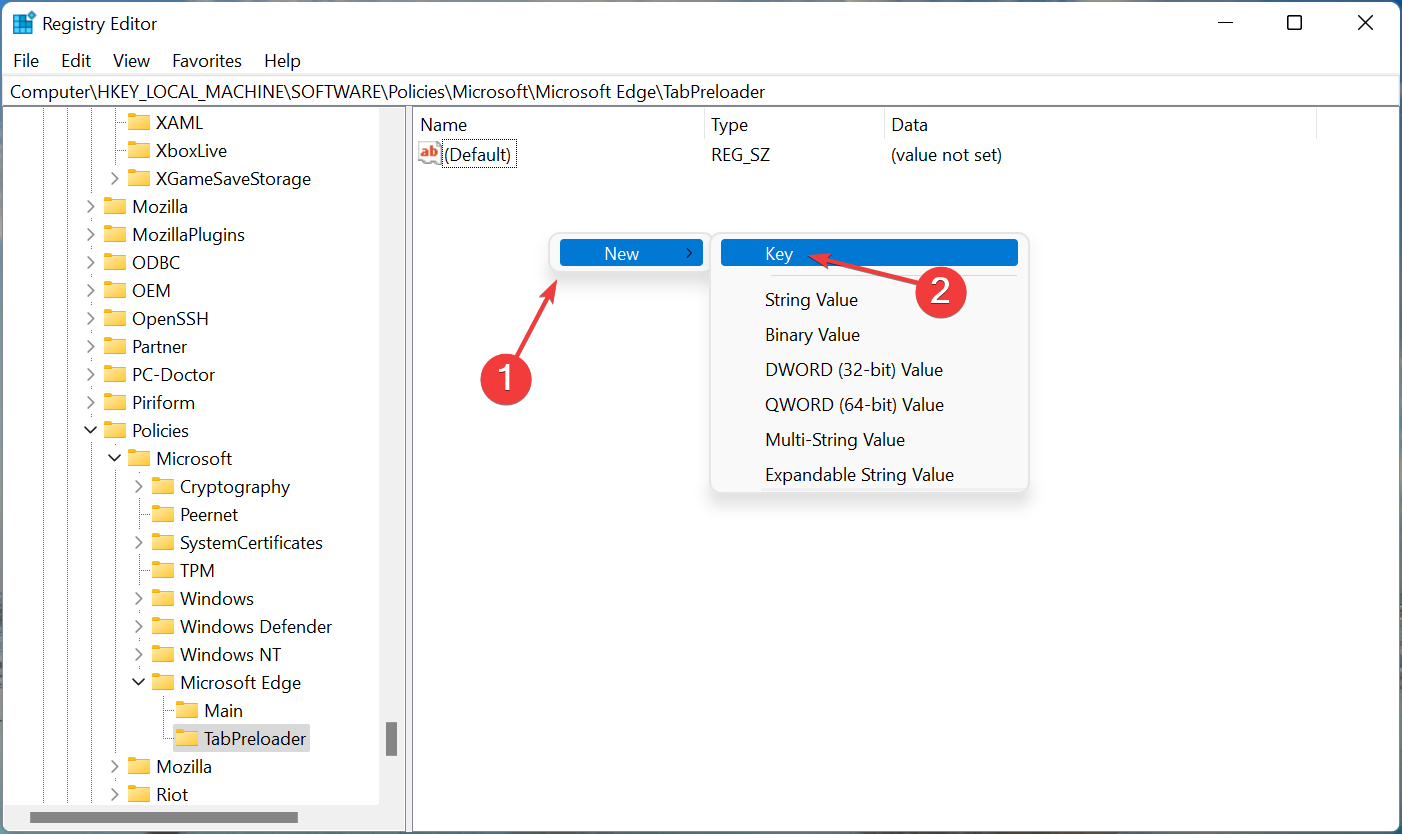
  4. Right-click on Microsoft in the navigation pane on the left, hover the cursor over New, and select Key from the context menu. Name this key as MicrosoftEdge.New key
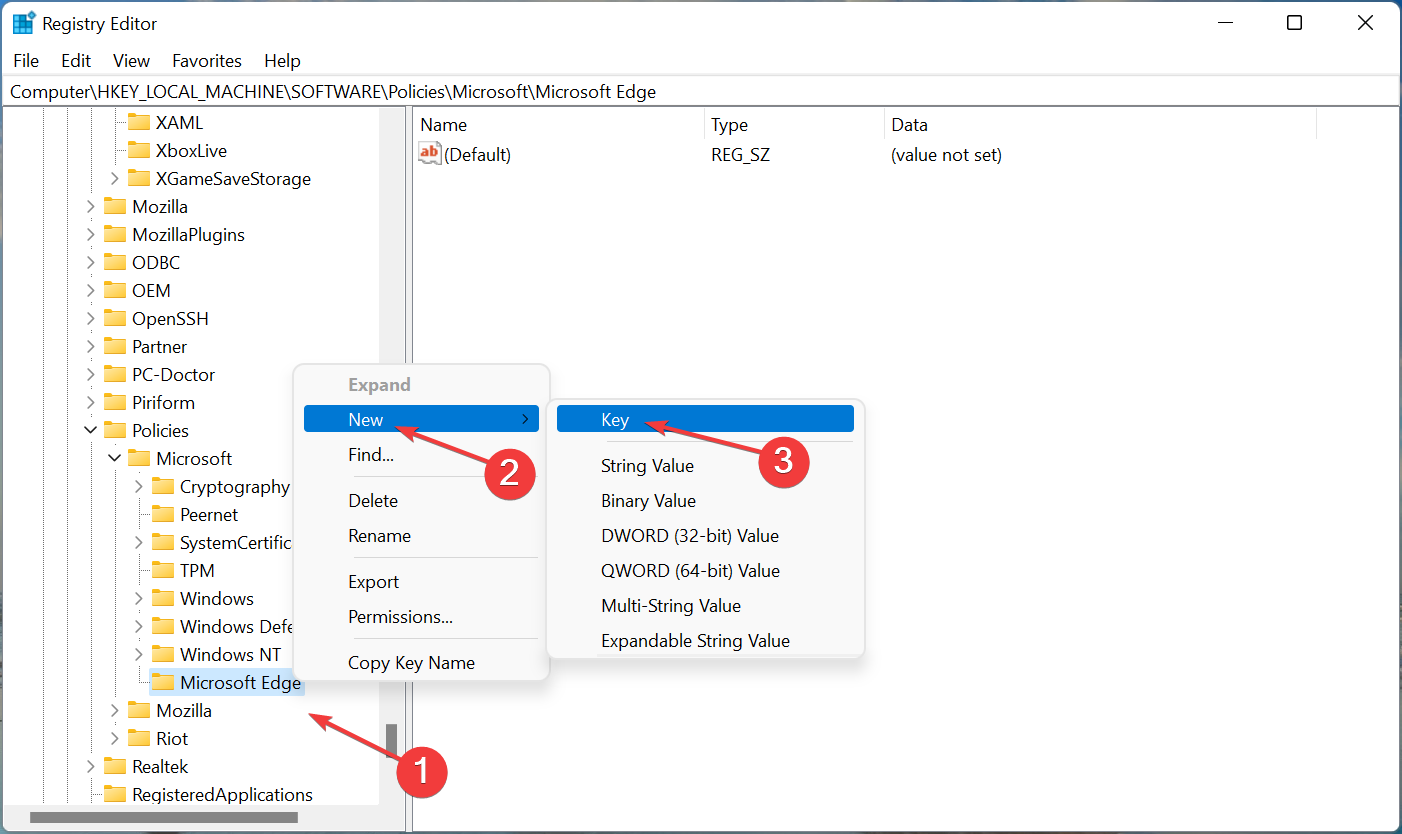
  5. Now, right-click on MicrosoftEdge, hover the cursor over New, select Key, and name it Main.TabPreloader to Stop Microsoft Edge from opening on startup Windows 11
  6. Similarly, create a new key under MicrosoftEdge and name this one as TabPreloader.TabPreloader
  7. Next, go to the Main key, right-click on the empty portion, hover the cursor over New, and select DWORD (32-bit) Value. Name this DWORD as AllowPrelaunch.TabPrelaunch to Stop Microsoft Edge from opening on startup Windows 11
  8. Right-click on it, and select Modify from the context menu.Modify
  9. Make sure 0 is entered under Value data, and then click on OK to save the changes.Enter 0 to Stop Microsoft Edge from opening on startup Windows 11
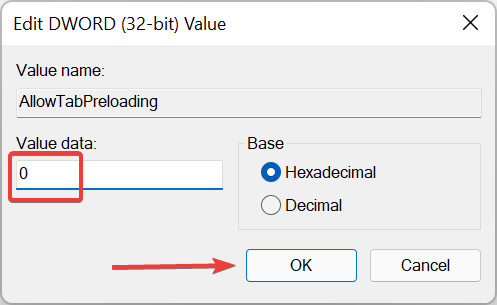
  10. Next, go to the TabPreloader key (the second one you created) from the navigation pane, right-click on the other side, hover the cursor over New, select DWORD (32-bit) Value, and name it as AllowTabPreloading.Create DWORD to Stop Microsoft Edge from opening on startup Windows 11
  11. Right-click on the DWORD, and select Modify from the context menu.Modify to Stop Microsoft Edge from opening on startup Windows 11
  12. Now, enter 0 under Value data if it’s not already there, and click on OK.Enter 0
  13. Finally, restart the computer for the changes to come into effect.

That’s it! Once you are done making the changes, the system will stop Microsoft Edge from opening on startup in Windows 7 and Windows 11 anymore.

Modifying the registry should disable Microsoft Edge auto launch and is one of the most effective solutions.

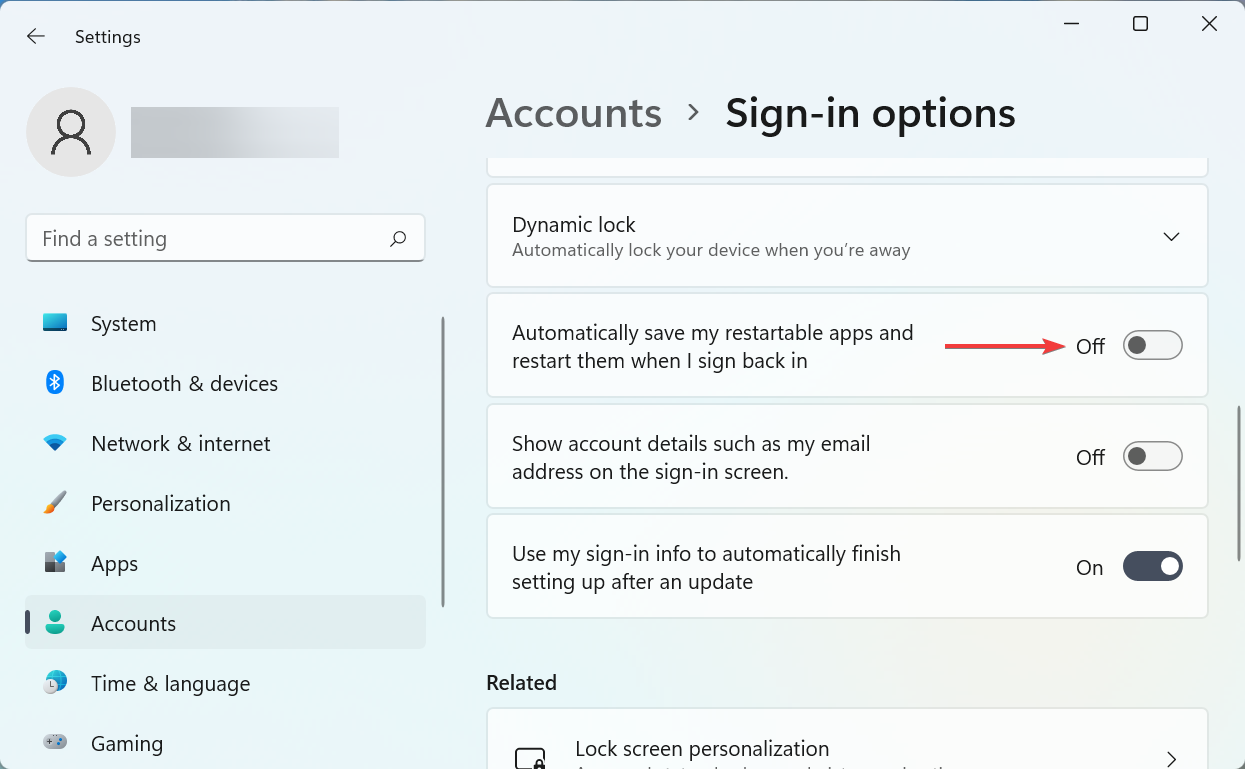
4. Change the sign-in settings

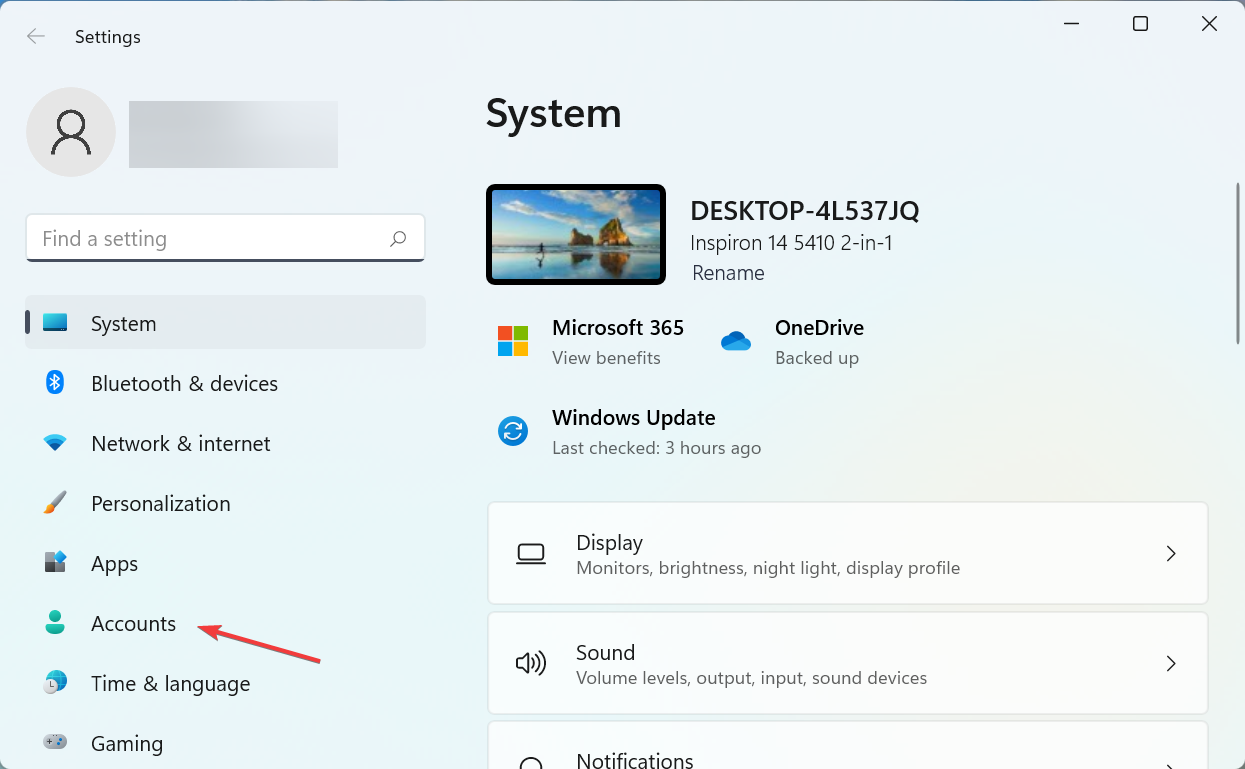
  1. Press Windows + I to launch the Settings app, and select Accounts from the tabs listed in the navigation pane on the left.Accounts
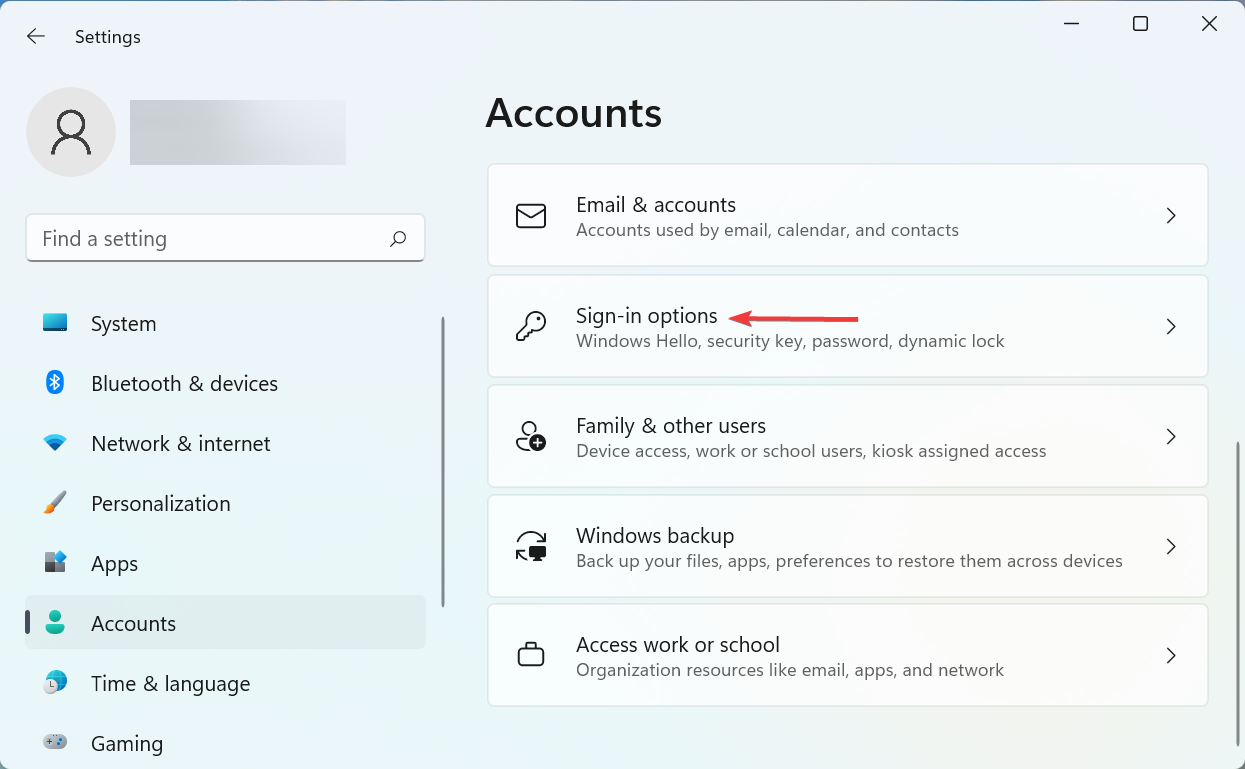
  2. Click on Sign-in options on the right.Sign-in options
  3. Now, disable the toggle for Automatically save my restartable apps and restart them when I sign back in.Disable toggle to Stop Microsoft Edge from opening on startup Windows 11

Certain system settings can also be behind Microsoft Edge opening on startup in Windows 11, so make sure to reconfigure these accordingly.

Why does Microsoft Edge open automatically in Windows 11?

For many who face the problem, Edge may be added as a startup app that loads whenever the computer is turned on. Fixing this is simple.

However, some could not stop Microsoft Edge from popping up even after removing it as a startup app. This is due to a bug in Edge, for which a patch was released.

Certain browser and computer settings may also cause this problem, but the solutions listed in this guide will fix all of them.

Why can’t I remove Microsoft Edge?

Microsoft has clarified on its support page that Edge cannot be uninstalled. Here is the reason mentioned by Microsoft:

Microsoft Edge is the web browser recommended by Microsoft and is the default web browser for Windows. Because Windows supports applications that rely on the web platform, our default web browser is an essential component of our operating system and can’t be uninstalled. 

So, if Microsoft Edge keeps opening by itself in Windows 11 and you want to remove it, there’s no built-in way. However, third-party uninstaller software might help.

But before you go through the trouble, try the fixes above to find out how to disable Microsoft Edge.

How do I permanently disable Microsoft Edge?

Some recommend changing the name of the Edge folder, but the fix has not worked for most users. Other solutions don’t work either, and it only makes sense because Microsoft intends for users to switch to Edge.

If you want to permanently disable Edge, the best bet would be to change the default browser to Chrome, Opera One, Firefox, or any other that you use. It would limit Edge to a great extent.

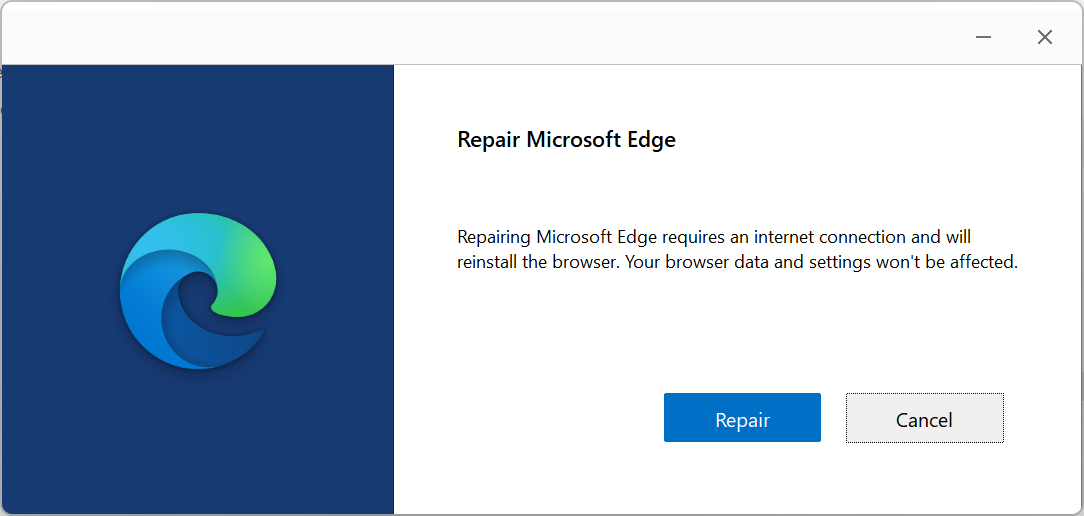
Repairing Microsoft Edge

If you want to permanently disable Edge due to issues, try repairing the app instead of using the built-in tool. Once you’ve completed the repair process, check if the problem is resolved and decide whether to disable it.

By reaching this part of the article, the problem should be long gone, and you shouldn’t face it anymore. In case this started recently, you can also perform a system restore, but remember to choose a point that was created before the problem started.

Also, find out how to disable Microsoft Edge in Windows 11 or stop Edge from importing in just a few easy steps.

We also have a guide on what to do if Internet Explorer starts Edge, so don’t miss it.

Tell us which fix worked and your review of the new Microsoft Edge, in the comments section below.

Install Opera Without Losing Data [How to]

Sometimes you need to reinstall your browser, and many users wonder how to install Opera without losing data. This guide will show you how to do that properly.

How can I install Opera without losing data?

If you’re reinstalling Opera, as long as you don’t choose Delete my Opera user data option while uninstalling the software, it should be preserved when you reinstall the software.

1. Use the synchronization feature

  1. Open Opera Browser and go to the Settings menu.opera settings selected from sidebar
  2. Under Basic settings, go to the Synchronization tab. opera settings synchronization
  3. Open Advanced settings and ensure that it is set to Sync everything.Opera Sync Everything checkbox
  4. Wait for the process to finish.
  5. Once you finish reinstalling Opera, open the Settings menu and click on Sign In under the Synchronization tab to log in with your Opera account. opera sychronization sign in button
Note icon NOTE
For this method to work, you need to have an Opera account and use it to sign in to the browser.

Before installing, it’s always a good idea to check Opera system requirements and ensure your PC can handle it.

2. Backup your data and settings manually

  1. Close your Opera Browser and open Windows Explorer.
  2. Insert the address below in the Windows address bar to open the Opera files directory (replace WindowsReport with your username).
    C:\Users\WindowsReport\AppData\Roaming\Opera Software\Opera StableOpera file directory address bar
  3. Select all the files and copy them to your desktop in an Opera Backup folder. Opera files all selected
  4. Reinstall Opera.
  5. Open the Opera backup folder you created in step 3 and copy all the files. Opera Backup folder copy files
  6. Open Windows Explorer and insert the address below in the Windows address bar to open the Opera files directory (replace WindowsReport with your username).
    C:\Users\WindowsReport\AppData\Roaming\Opera Software\Opera Stable
  7. Select all the files in the directory using Ctrl + A and paste the files. Then, replace all the files in the destination folder. Opera backup replace all files

If you have issues finding this data, we have an in-depth guide on how to find Opera browsing history.

If you’re switching between different Opera browsers, we have a great guide on how to transfer data from Opera to Opera GX, so don’t miss it.

This information can be useful if you encounter problems such as Opera GX keeps crashing, and your only option is to reinstall the browser.

Before you go, don’t miss our guide on what to do if Opera has installed itself on your PC. We also have step-by-step guide on how to download Opera on Windows 11, so don’t miss it.

Let us know in the comments section below if you have any suggestions or alternative methods that work for you.

You can now read over 2,000 reviews for items in the Microsoft Store app store

Updated December 8, 2022

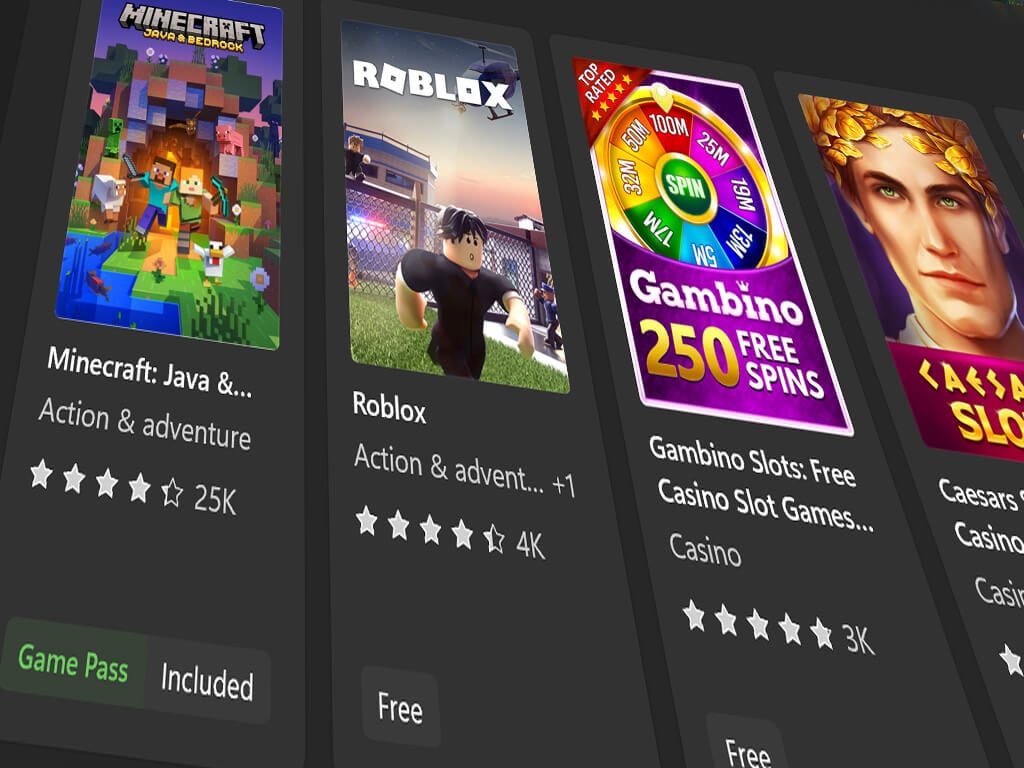
Microsoft Store users should now be able to view and read all of the user reviews posted for each Windows app, Xbox video game, movie, and TV episode after a bug, which limited the viewable reviews to 2,000, was squashed this week.

Microsoft Store reviews

“An old technical limitation prevented the #MicrosoftStore from displaying more than 2,000 reviews per product in the past,” the Microsoft Store’s principal architect lead, Rudy Huyn, announced on Twitter. “This is something we had to fix and we are now very glad to announce that this limitation is finally gone!”

While most apps and video games don’t have anywhere near 2,000 reviews written by users, there are some mega-successful titles such as Minecraft and Roblox that have well over that number.

Need more Microsoft news updates in your feed? Give us a follow on Twitter and Facebook.

7 Best VPNs To Watch TNT Online [Tested Outside US]

TNT is a popular satellite television channel run by Turner Broadcasting System. This is a subsidiary of Time Warner.

Moreover, TNT is popular for broadcasting NBA games and has a series of programs that make it highly viewed in the US.

If you are away from the US, you are not able to view TNT online as it is only accessible to USA residents.

Hence, you’ll need a VPN (Virtual Private Network) to give you the chance to access TNT programs from any location worldwide.

VPNs hide your location and make TNT servers believe you are accessing content from the US. That’s how you can easily bypass geo-restrictions.

Windows Report team has compiled this list of the best VPN software for TNT streaming.

How do I use VPN to watch TNT?

If you are a fan of TNT channel movies, you most probably need to watch them anywhere and from multiple devices.

Well, using a VPN will help you watch TNT online from any location. Discover how following the next steps:

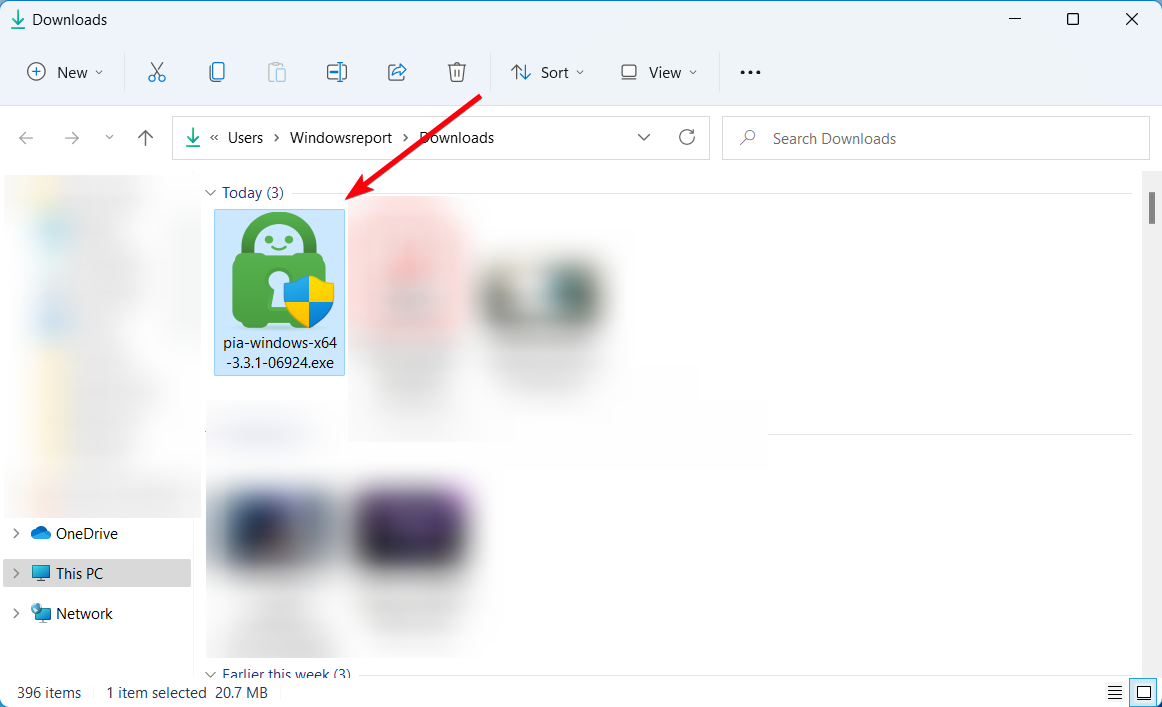
  1. Install a high-speed VPN on your PC. (PIA is your best call)
  2. Open the VPN and login into your registered account.
    pia login
  3. Connect to a server location where TNT is available
  4. Press the Connect button and you’re all done.
  5. Start watching TNT productions online.

How can I watch TNT outside the US?

Simply put, you just need to follow the same steps as shown above in order to connect to US servers from another regions.

In case you’re living on different continents or you are traveling and still need to watch TNT, you can choose any servers in the US where this channel is available.

What is the best VPN for TNT?

Private Internet Access (recommended) – Highest speed for streaming

Private Internet Access is the very best VPN tool for TNT with unlimited bandwidth and consistent speed.

As the name suggests, this Kape Technologies VPN service gives you total privacy services at a surprisingly affordable price.

With over 3200 VPN servers located strategically in 46 countries, you have enough options to access the TNT website from pretty much any location you desire.

In addition, this VPN gives you access to their ultra-speed servers; hence, you don’t have to worry about connection lags any longer.

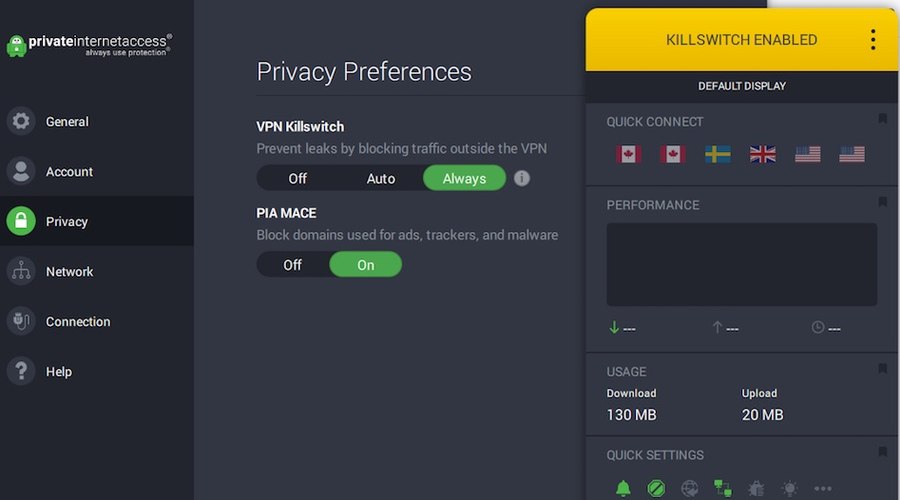
Private Internet Access also has a handy kill switch ready to prevent traffic from leaking onto the network if your connection ever drops.

These are some key features that you’ll most likely enjoy:

  • Intuitive interface that makes it a breeze to set up and start TNT streaming
  • Fast connection speeds
  • Total privacy is a priority as this VPN keeps no logs of personal data
  • Unblocks Netflix, HBO Go, Hulu, and other streaming services
  • You may connect up to ten devices at a time on a single account
  • 30-day reimbursement guarantee

Private Internet Access

Private Internet Access easily lets you watch TNT online. Claim the best deal with no hesitation!
Check price Visit website

NordVPN – Greatest number of servers

NordVPN is one of the reputable VPN tools available as they offer reliable and quality services. You have access to over 5400 servers which are located in strategic positions around the world.

You also get safe and secure access to servers based in the USA. With NordVPN, you can easily bypass the geo-block checks by TNT and gain full access to content.

Comprehensive security measures are provided with your connections routed through their servers which are encrypted with 256-bit encryption.

This ensures your connection is kept safe from your ISP detection and government trackers.

In addition, this Tefincom & Co., S.A. service also makes your IP address undetected by TNT systems with its stealth mode which enables you to browse completely anonymously.

However, NordVPN’s plan starts at $3.49 per month which is billed annually and you can also pay in bitcoin for extra security.

NordVPN

Live TNT streaming has never been easier! Get the best NordVPN deal right away!
Check price Visit website

Surfshark – Undetectable VPN usage

Surfshark is an award-winning VPN solution with all the security tools needed to safeguard your online activity. 

This VPN can offer valuable features designed to hide your digital presence and give you access to unlimited content on your favorite streaming or VoD platforms, such as the TNT service. 

No matter of location you can access your favorite content and avoid government regulations that may restrict this platform. 

Choosing from over 2000 servers from around the world, you will certainly find one that will hide your IP address and unblock your content. 

More so, the NoBorder mode will ensure secured access to uncensored internet, so you can relish that breath-taking TV series you’ve been waiting for.    

That being said, if you need privacy support to watch your TNT shows regardless of your country, go ahead with Surfshark. 

Surfshark

Disguise your online footprints and enjoy qualitative content now with Surfshark. 
Check price Visit website

ExpressVPN – High-speed online connection

ExpressVPN has a large number of high-speed servers. It is optimized to surpass potential anti-VPN restrictions.

If you decide to use it, you will be able to access TNT with no hassle, regardless of where you are geographically located.

You will get the best possible speed as the software automatically finds the best servers for your network.

In terms of security, you’re all set. The software runs its own private DNS with AES-256 encryption. It doesn’t collect any traffic data, or DNS queries, you’re completely anonymous.

When it comes to devices, ExpressVPN is compatible with most of them and has specific apps for each device and OS. On top of that, one account can be used on 5 different devices at the same time.

ExpressVPN is accessed via a wide range of subscription plans and can be tried for free for 30 days.

ExpressVPN

Watch TNT wherever, with no limitations.
Check Price Visit Website

CyberGhost – Best privacy tools

CyberGhost server locations

CyberGhost is a popular VPN for TNT which offers comprehensive features. Users have access to numerous servers in 80+ countries.

Since TNT is an American-based service, CyberGhost enables you to select the best server for the job.

You don’t need to worry about connection reliability as they own their servers (this clearly increases performance).

Also, CyberGhost takes your security very seriously as your connections are secured by military standard encryption and DNS leak protection.

CyberGhost servers keep no logs, so they don’t track your activity over the Internet. Also, it is user-friendly software and with just one click, you become totally anonymous.

Furthermore, CyberGhost offers a 30-day money-back guarantee with their basic plan starting at a great price.

CyberGhost

Check out CyberGhost if you want to watch TNT online with no interruptions.
Check price Visit website

VyprVPN – Unrestricted content globally

VyprVPN has a reputation for offering secured services; they are one of the most secured VPN tools for TNT.

If you’re focused on being anonymous, this Golden Frog GmbH service is the ideal VPN service for you.

Although they offer fewer servers than other services on this list, they are located in regions where the TNT website is accessible.

Security is one of these VPNs ‘ strengths. To be more precise, VyprVPN adheres to a strict no-logs policy, not to mention that connections are secured with military-grade encryptions.

In addition, the DNS leak protection feature also prevents your IP address from leaking to TNT servers.

This means you can watch full content on TNT without any fear of being blocked.

VyprVPN

Trying to watch TNT online but geoblocking stops you? Try VyprVPN for a change
Check price Visit website

IPVanish – Fast US servers

Developed by StackPath, LLC, IPVanish is a popular VPN service used by millions worldwide to access TNT.

You can get access to 1400+ servers; this enables more options as they are not placed in a few countries.

In addition, their servers are known for their speed; this is achieved by the service rerouting your connections through their servers.

This gives you fast speeds and connection performance which is important for streaming programs from the TNT website.

Your browsing is completely secured by the latest kill switch technology which enables your IP address and location information to be hidden from your ISP.

You also get cross-platform versions for the VPN with as many as five simultaneous connections enabled.

IPVanish comes with a great 30-day money-back guarantee and reliable 24/7 customer support.

IPVanish

Need a VPN that will unblock TNT online streaming for you? Check out IPVanish.
Check price Visit website

Coming to an end, these VPNs listed above have been tested and proven to give quick and reliable access to TNT website content.

Do you know any other VPN which should have been made to our list? Feel free to tell us by commenting below.

Please Disconnect From VPNs or Proxies and Try Again [Steam Fix]

Steam has some strict rules against using a VPN, but that doesn’t stop users from trying anyway. It’s only problematic when you get banned or when Steam doesn’t work with your VPN, no matter what you try.

Don’t worry since we’re here to point on the right path. But first, let’s clear the air on Steam’s policy against VPN and proxy usage.

Can you get banned for using a VPN on Steam?

Yes, under certain conditions. Let’s take a closer look:

”You agree that you will not use IP proxying or other methods to disguise the place of your residence, whether to circumvent geographical restrictions on game content, to purchase at pricing not applicable to your geography, or for any other purpose. If you do this, Valve may terminate your access to your Account.”

What we can draw from this is that:

  • You can’t use a VPN on Steam to bypass geo-blocks and access games early
  • Similarly, you can’t use a VPN to buy games cheaper

The third part mentions that you can’t use a VPN for any other purpose. However, when a Reddit user contacted Steam support to ask for clarification on this issue, they got the following message:

Playing games or operating Steam while using a VPN is not strictly prohibited.

However, it may affect gameplay and the Steam client itself.

A Steam account will only be restricted for actions that violate the Steam Subscriber Agreement or Steam Online Conduct Rules, so please keep in mind that purchasing games while your VPN is active is a violation of our Terms of Service.

This should tell you that it’s OK to use a VPN to stay secure and protect your privacy when using a VPN.

Does VPN work on Steam?

You can use a VPN indeed to hide your actual location and gain complete privacy on the Steam client.

Moreover, it’s advised to utilize trustful VPN software in order to improve game speeds or reduce lag on your affected games on Steam.

What can I do if VPN is not working on Steam?

1. Change your Steam store country

  1. Connect to a VPN server in the country you wish to reach on Steam
  2. Hit the Windows key, type Steam, then open the app.
  3. From the top-left cornre of the window, click on your profile account name, then navigate to Account details.
  4. Click on Update store country, then set the new country.

Some users have reported that Steam doesn’t work with their VPN when trying to connect to another country.

However, the problem isn’t caused by the VPN. It’s still necessary to manually update your store location in Steam, even after already connecting to a VPN server from another region.

2. Use a specialized tool to bypass Steam VPN detection

  1. Get a reliable VPN subscription from PIA (Private Internet Access).
  2. Install the VPN software on your computer.
    download-pia
  3. After the installation, launch the software on your PC and log in.
  4. Then, connect to high-speed servers to bypass Steam detection.
    use PIA US servers
  5. Enjoy your games on Steam.

Although it’s incredibly tempting, we have to consider whether or not a free VPN can be trusted to always keep you safe when navigating online.

They have few VPN servers and rarely work properly. Plus, most free VPNs log your VPN traffic.

It’s essential to turn to a premium VPN service that’s continuously maintained by a team of professionals. A market-leading VPN like PIA has more than 3,300 VPN servers in 48 countries.

This VPN also supports modern and secure VPN protocols: OpenVPN and WireGuard. It’s one of the best VPNs for reducing ping.

And, if you encounter any connectivity issues with Steam, you can get in touch with the PIA support team using 24/7 live chat.

Private Internet Access

Looking for a VPN that will always work with Steam? Make sure you try PIA.
Check price Visit website

3. Allow Steam traffic on your VPN

Some VPN services can negatively affect Steam’s performance. But it’s possible that your VPN isn’t wired to work on Steam.

For example, if you have VPN split tunneling enabled on your PC, make sure that you haven’t accidentally excluded Steam from the secure tunnel.

To summarize, if your VPN isn’t working on Steam, you can fix this problem by changing your store location and allowing Steam traffic on the secure tunnel.

But we also recommend avoiding free VPNs and resorting to a premium VPN service instead, such as Private Internet Access.

How does Steam detect VPN?

There are various ways that Steam service can use to detect your VPN. For instance, their algorithms may detect blacklisted IP addresses used by VPNs or inspect data packets from your Internet traffic.

If you receive the Steam please disconnect from VPNs or proxies and try again error message on Steam means that your IP address is not recognized.

However, you don’t have to worry about Steam banning your account unless you make restricted purchases from other countries.

So, these are the best options to try if it seems like Steam is not working on a VPN.

For any other additional questions related to this subject, do not hesitate to leave a comment in the section below.

Here Are 3 Easy Methods to Auto Connect VPN [Windows 10/11]

If you’re wondering how to make Windows 10 automatically connect to a VPN, we’ve got you covered.

You have to create a simple BAT file with your VPN connection details and add it to the Windows autostart sequence.

This way, the VPN connection you created using the Windows 10 built-in VPN provider will autostart every time you switch on your computer, just like Skype, Steam, or an antivirus.

However, if you have a VPN desktop client installed, things become significantly easier since you have to find and activate the autostart and auto-connect options in the UI.

Follow our easy instructions below to find out how to make Windows 10 automatically connect to a VPN using a manual VPN connection and a VPN desktop client.

We’re also showing you how to stop your VPN from auto-connecting if you need to temporarily or permanently off this feature.

How do I keep the VPN on all the time in Windows 10?

There are a few ways to do this, depending on your VPN type. If you use the built-in option, you will have to add the VPN BAT file to the Windows 10 autostart file.

If you use a third-party VPN client, chances are that their dedicated app already has an option to connect to a VPN at startup. 

If not, you can also do the same BAT file trick to your third-party VPN app. 

How do I make Windows 10 automatically connect to VPN?

1. Create a VPN connection

add a VPN connection in Windows 10
  1. Right-click the Start button and go to Network Connections.
  2. Select VPN and press Add a VPN connection.
  3. Add the required VPN connection details.
  4. Copy the Connection name, User name, and Password.
  5. Click Save.

You can also use a third-party VPN client. Paid VPNs offer a more extensive server network, many of which come with built-in auto-connect features, so you won’t have to go through much trouble.

We recommend using Private Internet Access. It’s the best VPN for Windows 10, thanks to high-speed VPN servers, military-grade encryption, and its user-friendly interface.

Here’s how to configure it on your PC:

  1. Sign up for a Private Internet Access subscription.
  2. Download and install PIA on your PC.
  3. In the systray, click the PIA icon.
  4. Open Settings and go to the General tab.
  5. Enable Launch on System Startup and Connect on Launch.edit PIA general preferences
  6. Restart your PC.

After making these changes, PIA will auto-launch every time you turn your PC and connect to the last used VPN server.

Furthermore, it’s easier to change VPN servers in PIA for Windows 10 to automatically connect to the new VPN server instead of editing the VPN connection info in the OS and manually updating the BAT file every time you do this.

Windows 10 has limited native support for VPN protocols, some considered obsolete (PPTP, L2TP).

On the other hand, PIA supports OpenVPN and WireGuard, which are safer and more versatile protocols.

Moreover, PIA comes with a bunch of security features that Windows 10 lacks, including a kill switch that cuts off Internet access in case the VPN connection drops, to protect you from IP leaks.

Private Internet Access

Make Windows 10/11 automatically connect to PIA’s VPN servers fast and easily.
Check price Visit website

2. Create a shortcut

  1. Right-click on an empty space on your desktop and select New, then Shortcut.
  2. Now, paste the following path and click on Next (make sure to replace ConnectionName with the actual data, as shown in our screenshot): C:\windows\system32\rasdial.exe ConnectionName
  3. Enter a name for your connection and click on Finish.
  4. Double-clicking the new shortcut will automatically start your VPN connection.

Before this, you must configure the connection with your credentials just like in Solution 1.

3. Create a BAT file

Configure a BAT file for your VPN

create a BAT file to autoconnect to VPN
  1. Open the Windows 10 Notepad (press Ctrl + R, type notepad, press Enter).
  2. Paste the following code:C:\windows\system32\rasdial.exe YourConnectionName YourUsername YourPassword
  3. Replace the connection details with what you copied in the previous stage.
  4. Save the Notepad file and exit.
  5. Change the file extension of the Notepad file from TXT to BAT.

If you can’t see the format of your files, find out how to show file extensions in Windows 10.

How to add the BAT file to Windows 10 autostart?

add the VPN BAT file to shell startup
  1. Press Ctrl + R, type shell:startup, and press Enter.
  2. Copy the BAT file to this location.
  3. Restart your PC.

From this point on, Windows 10 will automatically connect to the VPN at every system startup. Command Prompt briefly opens a console window and shows how it verifies the username and password, registers your PC over the network, and connects to the VPN.

If you need to switch VPN servers, you only have to edit the VPN connection details in Windows 10. The changes will get automatically picked up by the BAT file.

However, if you also modify the VPN connection name, username, or password, then you will need to manually update the BAT file, too. Otherwise, Windows 10 won’t be able to automatically connect to the VPN.

How do I stop my VPN from automatically connecting?

disable VPN autoconnect in Windows 10
  1. Right-click the Windows taskbar and go to Task Manager.
  2. Go to the Startup tab.
  3. Right-click the VPN connection’s BAT file and click Disable.

If you change your mind and want to re-enable Windows 10 to automatically connect to the VPN, follow the same steps as above and click Enable on the disabled entry.

To make a permanent change, head over to the startup folder using Ctrl+R and shell:startup to delete the BAT file.

If you used a VPN desktop client like PIA, simply find and disable the autostart and auto-connect options in the user interface.

You can also use Task Manager to prevent PIA from autostarting at every Windows startup (same steps as disabling the BAT file).

In conclusion, it’s a good idea to make Windows 10 automatically connect to a VPN as soon as you turn on your PC.

This way, you can immediately connect to another computer over the Internet, like accessing your work PC from home.

However, using a premium VPN solution like PIA is significantly easier and unlocks more possibilities. For example, you can use PIA to access blocked websites, defeat government censorship, host game servers for you and your friends, and unlock Netflix catalogs.

Plus, PIA is among the best VPNs for BBC iPlayer.

Steam Maintenance Tuesday: Schedule, How to Check Server Status & More

If you are unable to connect to the Steam servers, can’t play your favorite games, or the in-game progress is missing, it’s likely that the platform is undergoing regular maintenance.

So, let’s find out all about the Steam maintenance Tuesday and what changes, if any, you can expect after it.

What is Steam maintenance Tuesday?

For any platform to run efficiently without encountering any glitches, it’s necessary to have everything in order. It can only be achieved through regular maintenance, and this is what happens during the Steam maintenance Tuesday.

The platform deploys its team to introduce patches for bugs, eliminate any security threats, and release features. And while all this is being done, the servers would be down. So, if you are playing a multiplayer game, it might automatically disconnect.

But, remember not all downtimes or server failures fall under Steam maintenance Tuesday. Some of these are rather unplanned and stem from hardware failure or problems with the network. So, it’s imperative to find out when Steam schedules the maintenance.

When is Steam maintenance Tuesday?

Steam’s Tuesday maintenance typically starts at 1:00 PM Pacific Time (PT) and lasts 30 minutes to an hour. The timing varies globally due to time zones, impacting Steam-dependent games more.

It doesn’t happen all at once for all games and time zones. Typically, games like World of Warcraft get maintenance at 7 AM PT while League of Legends gets it at 3 AM PT.

How long does Steam maintenance last?

Steam maintenance may last anywhere between 10 minutes to a few hours, depending on the changes being introduced. If the platform has to add a couple of features, introduce patches, and other performance enhancements, the maintenance time would be longer.

Steam pointed out in an official post that downtime during maintenance would generally be under an hour in most cases. In case Steam plans an extended downtime, it will be scheduled late in the evening.

Besides, the time for maintenance is chosen considering the number of users active during that particular part of the day, so that minimum players are affected. Yet, some users will always have to face issues unless Steam decides to do away with the whole regular maintenance thing.

How do I check Steam’s server status?

Often there are reports that users in certain parts or across the globe are facing issues connecting to the Steam server. And, there’s a way you can check the number of players currently online and the ones who are playing a game on Steam.

Just head to SteamDB, an unofficial but highly reliable platform that offers a live report of how the Steam servers are performing. Or you could try other online tools like Downdetector to check if other users are facing issues with Steam.

How can I find out if there’s a Steam maintenance scheduled?

Actually, there’s no way to find out when the Steam maintenance is scheduled, but you already know that it’s done on Tuesday and sometime between 3 AM to 7 PM Pacific Time.

Just make sure to not try any critical missions and if possible avoid using the platform for a while. Anyway, the Steam maintenance schedule for Tuesday generally doesn’t last more than 10 minutes, so you should have no real trouble.

What should I expect during Steam’s maintenance?

Many times, it’s just a few changes, and these wouldn’t be visible to users. But they are as critical as any since they help Steam run efficiently.

On other occasions, you may see new features added to Steam after a maintenance Tuesday downtime. All you have to do is remain patient and wait to find out what Steam has in store for you!

How do I fix the Could not connect to the Steam network error?

This error is often encountered by users when launching Steam, and if it doesn’t disappear on its own in a while, there are a bunch of fixes you can try.

1. Switch to TCP

  1. Right-click on the Steam shortcut, and select Properties from the context menu.Properties to fix steam maintenance tuesday
  2. In the Target field, enter -tcp at the end, click on Apply, and then on OK at the bottom.-tcp

Now, check if Steam starts working on your computer and the Could not connect to the Steam network error is fixed.

2. Update the network drivers

  1. Press Windows + S to launch the Search menu, type Device Manager, and open it.Device Manager
  2. Now, double-click on the Network adapters entry.Network adapters
  3. Right-click on the Wi-Fi or Ethernet adapter depending on the one you use, and select Update driver from the context menu.Update driver
  4. Select Search automatically for drivers in the Update Drivers window.Search automatically for drivers

An outdated driver can cause issues with the network connectivity and lead to this error. Updating the network driver would do the trick here.

3. Disable Windows Firewall

  1. Press Windows + R to launch the Run command, enter control panel, and click OK.Control Panel
  2. Click on System and Security.System and Security
  3. Next, click on Windows Defender Firewall.Windows Defender Firewall for steam maintenance tuesday
  4. Select Turn Windows Defender Firewall on or off from the options on the left.Turn windows defender firewall on or off
  5. Now, tick the Turn off Windows Defender Firewall (not recommended) option under both Private network settings and Public network settings, and click on OK to save the changes.Select for steam maintenance tuesday

One of these methods should help fix the Could not connect to the Steam network error. In case these don’t work, you can check our dedicated guide to solve the problem.

That’s all there’s to Steam maintenance Tuesday, along with the relevant troubleshooting methods. So, the next time Steam is not working on a Tuesday, you know the reason and how long it would take to get things up and running.

Also, find out the most reviewed games on Steam, and play them today!

If you have any other queries, drop a comment below.

How to Download and Install DuckDuckGo on PC (Easy Guide)

Learn how to download and install DuckDuckGo on your PC in just a few steps. Whether you want the privacy-focused browser or simply want to add DuckDuckGo as your main search engine, this guide has you covered.

Install DuckDuckGo Browser on Your PC

1. Visit the DuckDuckGo Official Site

Head to the DuckDuckGo official site using any browser like Chrome, Edge, or Firefox.

2. Download the DuckDuckGo for Windows

  • Once on the site, click the Download DuckDuckGo for Windows button.
  • You’ll be redirected to the Microsoft Store to install the DuckDuckGo browser.

3. Install via Microsoft Store

  • In the Microsoft Store, click Get to start downloading.
  • The browser will automatically install once the download completes.

4. Launch DuckDuckGo Browser

  • After installation, click Open or find DuckDuckGo in the Start menu.
  • The browser launches with default privacy settings enabled.
  • The new version even lets you sync your data across devices, making multi-device use seamless.

Set DuckDuckGo as Your Main Search Engine

If you prefer to keep your current browser but want to use the DuckDuckGo search engine on your computer, here’s how:

Chrome

  • Open Chrome > click the three dots (⋮) > Settings
  • Go to Search Engine > Manage search engines
  • Add a new search engine:
    • Name: DuckDuckGo
    • URL: https://duckduckgo.com/?q=%s
  • Set it as default.
  • Having issues? Here’s what to do if DuckDuckGo is not working in Chrome.

Microsoft Edge

  • Click the three dots (…) > Settings > Privacy, search, and services
  • Under Address bar and search, choose DuckDuckGo from the dropdown.

Firefox

  • Click the hamburger menu ☰ > Settings
  • Go to Search > Default Search Engine
  • Select DuckDuckGo.

Key Features of DuckDuckGo

  • 🔒 Privacy First: Blocks trackers and never stores your personal data.
  • 🧠 Smarter Search: No filter bubbles—everyone sees the same results.
  • 🚀 Built-in Encryption: Automatically forces encrypted connections (HTTPS).
  • 🧭 Bang Shortcuts: Quickly search sites like !yt for YouTube or !w for Wikipedia.
  • 📦 Simple Interface: Lightweight and easy-to-use browser.
  • 🧩 The browser now includes a scam and scareware blocker, helping you stay safe online.
  • 🔄 Wondering how it stacks up against competitors? See our full DuckDuckGo vs Brave comparison.

To learn more about how the search engine works behind the scenes, read our complete guide on the DuckDuckGo browser.


FAQs

How do I download DuckDuckGo browser for PC?

Visit duckduckgo.com and click on the download option for Windows to install via the Microsoft Store.

Is DuckDuckGo available as a full browser on Windows?

Yes, the DuckDuckGo Browser is now available for Windows PCs through the Microsoft Store.

Can I just add DuckDuckGo to Chrome or Edge instead of installing a new browser?

Absolutely. You can set DuckDuckGo as your default search engine in any browser.

Is DuckDuckGo better for privacy than Google?

Yes. DuckDuckGo does not track or profile users and shows the same results for everyone.

3 Tested Methods to Play UNO Browser Games on Your PC

UNO is a popular card game, but the game is also available online. This is great if you want to practice your UNO skills or play online with others.

Speaking of which, we’ll show you how to play UNO games in your web browser today, so let’s get started.

What is the best browser to play UNO games?

If you’re a gamer and tend to play online games, you should consider getting a gaming browser such as Opera GX.

This browser is light on your system resources, thus ensuring that all your games will run smoothly in the browser.

Since online games like UNO usually come with ads, you’ll be pleased to hear that Opera GX has its ad-blocker.

Opera GX Corner - gaming browser

One feature that separates this browser from the rest is GX Control. Thanks to it, you can set resource limitations on your browser, thus ensuring that other processes run smoothly.

The browser has a built-in messenger that might be handy during gaming sessions. Also, there’s a built-in Discord integration so you can keep an eye on the news and challenge your friends with UNO games.

Regarding privacy, the browser has its native VPN with unlimited bandwidth that will be useful as an additional layer of protection.

The Opera GX browser is under continuous development. The company is closely listening to user feedback and implementing new features suggested by the community.

Opera GX

A browser fit for playing a multitude of games, including UNO.

Can you play UNO on a browser?

You can play the well-known card game UNO for free on your computer browser with UNO Online. Similar to other card games in the Crazy Eights genre, the object of UNO is to be the first player without any cards.

How can I play UNO browser games?

1. UNO Freak

  1. Visit the UNO Freak website.
  2. Now click the Join button for any room next to the Room name.
  3. Wait for other players to join and play the game.

If needed, you can also create your account and use it to make your game rooms.

2. Play UNO

  1. Head over to the Play UNO website.
  2. Now select New Game from the header.
    play uno new game uno browser game
  3. Configure your game settings. Once you’re done, click the Let’s go button.
    game settings uno browser game

3. Play UNO on game websites

  1. Visit your favorite game website.
  2. Search for UNO, and select the desired game.
    uno games uno browser game
  3. Click the Play button and enjoy the game.

Is UNO online multiplayer?

UNO is a multiplayer game that supports 2 to 6 players. First, input your name and the room’s name to get started. Then, watch as gamers from around the globe fill your room, and you start having fun.

UNO is one of the most popular card games, and if you want to play it on your own or with friends, you should be able to do it from your browser after reading this article.

For other online games, you can try using any of the best browsers for gaming.

3 Tips on How to Add & Use MetaMask in Firefox [Beginners Guide]

Metamask is a popular crypto browser wallet on Chrome, brave, Microsoft Edge, Opera, and Firefox. However, since Chrome is favored, most users do not know how to use MetaMask on Firefox. Hence, we will discuss that in this article.

This cryptocurrency wallet helps to store tokens, NFTs, and other cryptocurrency valuables. By default, it is connected to the Ethereum blockchain network. However, it can connect networks like the Binance Smart Chain, Arbitrum, and others.

Users can easily store Ethereum and other cryptocurrencies or enable them to transact with any Ethereum address. In addition, users can easily connect MetaMask to Ethereum-based apps to spend their coins in games and other activities that transact in cryptocurrencies.

Also, the MetaMask can connect to crypto games like Axie Infinity, Cryptoblades, and others. Ensure the proper network chain is actively used on Firefox’s Metamask extension.

While there are app versions, most users prefer the accessibility of the web versions. Hence, this article will detail how to install MetaMask on Firefox, set it up, and use it.

How do I access MetaMask in my browser?

Since Metamask is a browser extension or add-on, you can access it through the shortcut section for the add-on on your browser. This is located at the upper right-hand corner of the screen with a puzzle piece logo. Click on the Metamask logo (Foxface), and the extension will load.

How do I get the MetaMask browser extension for Firefox?

  1. Launch your Firefox browser and search for Metamask.
  2. Click the official download site for Metamask, click the Firefox tab, and select Install Metamask for Firefox.
  3. On the Firefox add-ons page, click Add to Firefox, and wait for the installation to be completed.
  4. Click Add to permit installation. (You can also help it to work in the private tabs)

Alternatively, you can go directly to the Firefox add-on store and search for the MetaMask. Once the installation is complete, click on the Fox head logo to launch your MetaMask.

How do I use MetaMask in Firefox?

-Setup MetaMask

  1. Open your Firefox browser and launch the MetaMask extension by clicking on the Fox head logo.
  2. On the Welcome page, click Get started to continue.
  3. Select Create a wallet if you are just getting started or import Wallet if you have one.
  4. Click I Agree after reading the disclaimer pop-up message.
  5. Create a password, check the agree to the Terms of Use box, and click Create.
  6. Watch the video on Securing your wallet with the secret recovery phrase and click Next.
  7. Unlock your secret recovery phrases and write them down in a secure place. (These phrases, in the particular order, will help recover your account if you forget your password)
  8. You will get the congratulatory message, then click All done.

-Use MetaMask Directly

  1. Click the Ethereum Mainnet to display the available Networks.
  2. Choose either Buy, Send, or Swap to kick-start a transaction.
  3. Select Assets to check your various coins, tokens, and NFTs, while the activity stores your transaction details.

-Connect MetaMask to Sites

  1. Click the menu button (three dots), and select Connected sites.
  2. Choose MetaMask to connect to the site manually.
  3. Select an account and click next.
  4. Then press the connect button.

These are the ways to get started with using MetaMask without hassles. First, ensure the sites connected share the same network as the active network on your MetaMask wallet.

What browser is best for MetaMask?

In web extension management, Chrome is the best bet for using MetaMask. Although promising, most other browsers share its features but are not as perfect as Chrome.

However, with the integration of the dedicated Opera browser, it might be better to use it. Opera also directly integrates with Telegram and Discord, giving it a crypto-native solid feel.

These are the various tips we could develop about MetaMask on Firefox and how to use it. Of course, the essential part is setting it up. Once done, connection and integration to crypto sites become easy.

We have an article on the best browsers that support MetaMask here, and you can check it out before deciding on a browser to use.

Also, if there’s an issue with your MetaMask, our guide on fixing MetaMask not working might be ideal for you. If you’re looking for an alternative, why not give a Phantom Wallet Firefox extension a try?

You can leave your questions and suggestions in the comments section below. We’d like to hear from you.
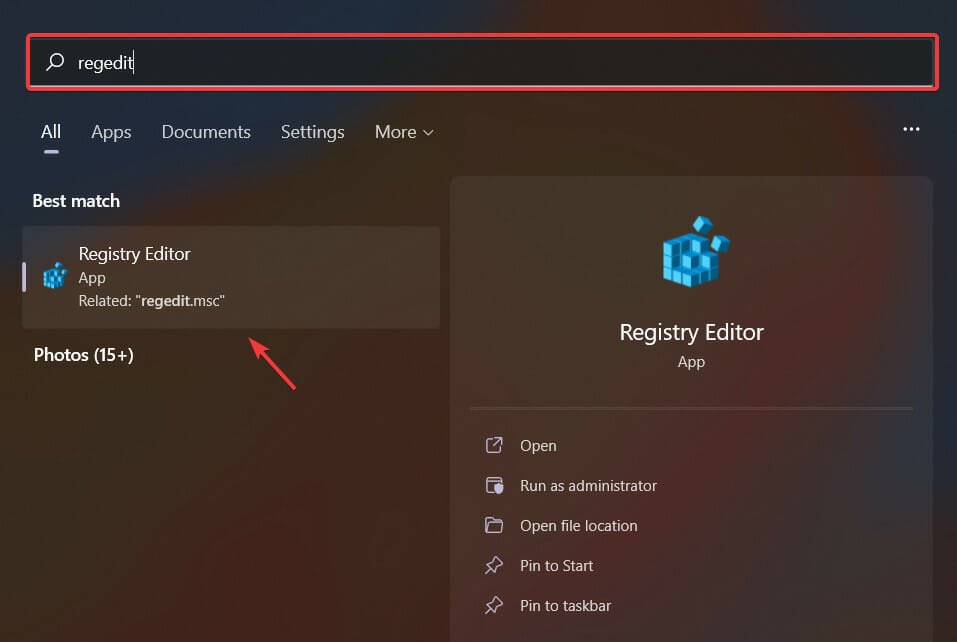
GameStop Access Denied? Here are 3 Quick Ways to Fix it

GameStop is a US-based retailer that specializes in consumer electronics, gaming merchandise, and game-themed clothing.

It offers numerous daily deals at awesome prices, trade-ins, and redeemable rewards based on your purchases.

Unfortunately, GameStop is only available in select countries, offering personalized content for each region. It shouldn’t come as a surprise that the American version strives when it comes to variety.

GameStop operates retail stores in the United States, Canada, Australia, New Zealand, and some parts of Europe.

Even so, you might find it impossible to access the website if you’re outside of the US. In that case, you will receive the following error in your web browser:

Access Denied
You don’t have permission to access https://www.gamestop.com/ on this server.

What does it mean when access is denied?

Access denied or similar messages indicate that there is something wrong from your side or the service provider’s side. If you see this error on GameStop, it means any of the followings:

  • Your browser’s cache and cookies are corrupted
  • GameStop is preventing you from accessing its portal
  • Your ISP doesn’t allow you to access this service
  • GameStop is not accessible due to security settings

Whatever the reasons or whatever the access denied message represents, is not a matter. You can always fix the GameStop Access Denied error code 16. For this, check out our solutions below.

How do I fix GameStop Access Denied?

1. Use a different browser

  1. Open another browser, we’re going to use Opera.
  2. Go to the following location using the address bar: opera://settings/privacy
  3. Scroll down and click on Advanced.
  4. Enable VPN.enabling VPN Opera
  5. Click on the VPN icon and set the VPN server location to Americas.change location opera vpn
  6. Try to access GameStop again.

If you’re looking for a completely free VPN service, you can’t go wrong with Opera VPN. Besides delivering excellent page loading speed, Opera has an integrated VPN tool that you can use at no cost.

Opera browser: browsing gamestop

Plus, it’s one of the fastest and most secure web browsers on the market. However, it’s not as reliable as a premium VPN service like PIA because it uses free IP addresses that can be detected and blocked by GameStop.

Sometimes, you may notice that the GameStop access denied error is appearing on Chrome, Firefox, or Safari only. In this case, a different and better browser like Opera can be the ultimate solution.

Nevertheless, it’s worth trying. And, if Opera VPN doesn’t work, make sure to check out our quick-fix guide.

All being said, consider this modern web browser with a lot of features, including a VPN that can fix the GameStop error.

2. Use a premium VPN to bypass geo-blocking

  1. Sign up for a VPN subscription plan (we suggest PIA).
  2. Download and set up the VPN on your device.
  3. Launch the app and log in using your credentials.
  4. Connect to a US VPN server.PIA is connected to a US VPN server
  5. Try to access GameStop again.

With the aid of a virtual private network (VPN) service, you can change your IP address and geo-location to bypass the GameStop Access Denied error and unblock the gaming retailer outside the USA.

The reason we recommended Private Internet Access (PIA) above is that it’s the best VPN for accessing blocked websites, including GameStop.

Created by Kape Technologies, PIA is used by more than 15 million users worldwide, which is proof that its performance and features are simply top-notch.

This VPN can be used on all major operating systems, including Windows, macOS, Linux, Android, and iOS. It is also available as a browser extension for Chrome, Firefox, and Opera.

In addition, you can configure it on your router as well. This way, all of your devices connected to the router can also use the VPN to benefit from its great features.

PIA has no equal among other VPN competitors in terms of the number of servers available, which are distributed across multiple locations all over the world.

Moreover, it has servers in 16 US locations, so you have where to choose if you want to access GameStop from outside the USA.

use PIA US servers

In addition to helping you bypass geo-blocking, namely, get around the GameStop Access Denied error when visiting the website, Private Internet Access will also take care of your online privacy and security.

So you can surf the web without worrying about surveillance, spying, or hackers. The VPN service also protects your DNS queries using private DNS servers.

PIA ensures your privacy and security by routing all of your traffic via a secure VPN tunnel, which is realized via AES-128 or AES-256 military-grade encryption and the fast and reliable OpenVPN and WireGuard VPN protocols.

It also comes bundled with the following features: VPN Killswitch, PIA MACE (ads and malware blocker), Split Tunnel, Port forwarding, Connection Automation, Dedicated IP, P2P, torrenting support, and unlimited bandwidth.

Other features of PIA:

  • 32,000+ servers in 101 locations across 78 countries
  • No traffic or request logs
  • Up to 10 simultaneous connections
  • Risk-free 30-day money-back guarantee
  • 24/7 live chat customer support

In conclusion, Private Internet Access is a very powerful VPN service that will effectively allow you to bypass geo-blocks and will also help you surf the web privately and securely.

Because of that, if you want to fix the Access Denied error and access GameStop no matter where you’re located, you should confidently try it out to see whether it’s worth your money.

Private Internet Access

Quickly and easily fix the GameStop Access Denied error by turning to this reliable VPN.
Check price Visit website

3. Use a smart DNS

You can easily configure your device to use a smart DNS service by accessing and changing the settings of your operating system, as shown in the example below with Windows 10 and 11.

Before proceeding with the steps, you should make sure to get a smart DNS free or premium subscription to configure your device to use it.

For example, you can use a smart DNS Proxy – which is shown in the picture above – since it offers a generous 14-day free trial to test it or any other service of your choice for that matter.

  1. Press Win + I on the keyboard to open Windows Settings.
  2. Go to Network & Internet.clicking network internet win11 settings
  3. Click on Ethernet or WiFi, depending on the connection you are using.
  4. Click on the Edit next to the DNS server assignment.clicking edit dns win11
  5. Type your smart DNS server addresses.
  6. Click on Save.

A smart DNS service is a proven solution that is very effective at circumventing geo-blocking, so many use it especially to unblock popular streaming services.

It is also a very suitable solution if the GameStop access denied error occurs on consoles like PS5 or Xbox Series X.

As a result, you should have no problems accessing GameStop from outside the USA if you configure your device to use a smart DNS server in the US.

However, a smart DNS will not mask your IP address as a proxy or VPN does, nor will it encrypt your traffic as a VPN does.

What a smart DNS does is it replaces your ISP-assigned DNS address – which can reveal your real location – with the address of a new dedicated smart DNS server.

Therefore, when you connect to that server, all of your traffic will be routed through it.

Smart DNS servers can be located in many locations worldwide, so you should use one in a country – the USA in our case – where the content you want to access is available.

How do I unlock my GameStop account?

If you cannot access your GameStop account, you can reset the password. You can do it by clicking on Forgot password while signing in.

If the account seems to be blocked or locked by the GameStop authority, you should contact their support. They will assist you in getting your account back.

This article has explained how you can fix GameStop access denied problem. If you know any better solution, feel free to let us know in the comment box.

Refresh Your Browser on Windows and Mac in a Few Steps

The best browsers sometimes encounter problems, as there is no perfect app. One of the quick ways to fix most of these issues is to refresh your browser.

While refreshing a browser is incredibly simple, you still need the right information to do it across different browsers.

This guide will show you the simple methods to apply on all major browsers across different devices. We all also have extra bits added to help spice things up.

Quick Tip:

Opera One is built on the Chromium engine, so it’s quite similar in terms of functionality, and it can also work with Chrome extensions, so you won’t miss the features you love.

As for the actual refreshing, you just need to hold the Ctrl key and click the Refresh button on the toolbar. That’s how easy it is!

Opera One

Install Opera One, and rest assured that refreshing it is incredibly simple!

What does a browser refresh mean?

Refreshing pages on your browsers mean that you want to load the most recent version of the page. This is a standard function in most modern browsers and is pretty easy to do.

You can also refresh your browser’s content by clearing the cache and cookies. With this, you can remove corrupt browser data and allow it to load new information.

How do I refresh my browser and clear my cache?

1. Refresh the Chrome browser

  1. Click the Reload icon in the toolbar.
    refresh icon browser
  2. Wait for the page to refresh.

This is a bit different from how to refresh the Chrome browser on mobile, as you will need to tap the menu button before you can find the refresh icon.

1.1 Hard browser refresh

  1. Hold Shift and click the Reload icon to perform a hard refresh.
  2. Wait for the page to load again.

By performing a hard refresh, the cache for that page will be removed and created again.

1.2 Refresh browser keyboard shortcut

In Chrome, there are two shortcuts for refreshing:

  • Ctrl + R for normal refresh
  • Ctrl + Shift + R for hard refresh

1.3 Browser auto-refresh
You’ll need to rely on extensions to refresh pages in Google Chrome automatically. The two most popular extensions for this are Easy Auto Refresh and Super Auto Refresh Plus.

1.4 Refresh browser cache on Chrome

  1. Click the Menu icon in the top-right.
  2. Select More tools.
  3. Choose the Clear browsing data option.
    more tools
  4. Click the dropdown next to Time range and select All time.
    all time
  5. Check the boxes for Cookies and other site data and Cached images and files.
  6. Now, click the Clear data button.
    clear button

Remember to restart Chrome after clearing the cache to sync the changes made.

2. Refresh the Firefox browser

  1. Locate the Refresh icon and click it.
    refresh icon firefox refresh browser
  2. Wait for the page to load again.

With the steps above, you can refresh Firefox and get the updated version of the page you are loading.

2.1 Hard refresh Firefox

  1. Press and hold the Shift key.
  2. Without releasing the key, click the Reload icon.
  3. Wait for the page to load.

2.2 Refresh browser shortcut

Firefox browser shortcuts are the following:

  • F5 to refresh the page
  • Ctrl + F5 or Ctrl + Shift + R for hard refresh

2.3 Auto refresh in Firefox

tab reloader firefox refresh browser

To auto-refresh Firefox, you need to rely on extensions. You can download Tab Auto Refresh, Auto Reload Tab, and Tab Reloader from the Mozilla Addons Store.

2.4 Refresh cache on Firefox

  1. Click the menu button and select Settings.
    menu firefox
  2. Click on Privacy & Security in the left pane.
    privacy
  3. Scroll down and click the Clear Data… button in the Cookies and Site Data section.
    clear data
  4. Now click the Clear button to confirm.
    clear

Make sure you restart your browser before loading any page to sync the changes.

3. How to refresh the browser on Mac

The refresh process is almost identical if you use the Firefox or Chrome browser on your Mac laptop. On Safari, the refresh process is a bit different. So, we’ll focus on it in this section.

3.1. Refresh Safari

To refresh your Safari browser, you just need to click the Refresh icon on the toolbar.

3.2. Hard browser refresh on Safari

  1. Press and hold the Shift.
  2. Without releasing the key, click the Refresh icon.

3.2 Refresh shortcuts in Safari

  • Command + R for the normal refresh
  • Command + Option + R for hard refresh

3.3 Auto-refresh in Safari

autorefresh safari extension refresh browser

Just like Chrome and Firefox, to auto-refresh pages in Safari, you need to use extensions such as Auto Refresh.

3.4 Refresh browser cache in Safari

Refreshing cache in Safari is simple. You need to use Command + Option + E shortcut.

Refreshing your browser and pages is quite simple. We have shown the different ways you can complete the task on other browsers in this guide. You now have everything you need to take control of your favorite browser refresh process.

If you need the list of best cookie cleaner software on PC to make the data clearing process faster, check our detailed guide for the top options to install today.

Feel free to let us know if you have any problem refreshing your browser in the comments below.

7 Fixes for Steam Failed To Load Web Pages 118/310 Error

Recently, some users reported that Steam failed to load a web page. This error also may come with error codes like 118 or 310. When this happens, you’re still allowed access to your Library but cannot browse the Steam website for a while.

After doing some deep analysis, we have found that this issue is mostly due to Steam server problems or glitches with the app itself, including a corrupt cache. There might be also problems with your internet connection or firewall.

What can I do if I face the Steam error: Failed to load a web page?

1. Restart your Steam client

  1. Press CTRL + ALT + Del on the keyboard and click on Task Manager on the newly appeared screen.
  2. Go to the Processes section.
  3. Click on the Steam process and then click on End.ending steam process task manager windows
  4. Re-open your Steam client and check if the issue persists.

To fix Failed to load web page error on Steam, it’s advised to close Steam entirely and then restart it.

2. Clear your cache

  1. Hit the Windows key, search for Steam, then open the app.
  2. From the upper-left corner of the opened window, click on Steam, and go to Settings.going steam settings
  3. From the left window pane, select Downloads, then click on Clear Download Cache.clearing steam cache
  4. You’re all set.

Your cache folder stores temporary files associated with games or programs in your Library. However, if these files are corrupted, you might get Failed to load web page error in Steam.

3. Disable Compatibility Mode

  1. First, end any Steam process that may be running through Task Manager.
  2. Now right-click on any Steam shortcut or executable file and select Properties.going steam properties
  3. Go to the Compatibility tab, and uncheck all options.disabling compatibility mode steam shortcut
  4. Click Apply and try to open Steam again.

The Compatibility Mode does exactly what it says, but it’s primarily useful for running older programs. Therefore, if you’re getting Failed to load a web page in Steam, try disabling Compatibility Mode for it.

4. Repair Steam

  1. Exit any instance of Steam.
  2. Press Win + E to open File Explorer.
  3. Go to the following location: C:\Program Files (x86)\Steam\bin
  4. Launch the SteamService.exe.launching steam service

In some cases, an issue with a Steam client can lead to Failed to load web page error.

5. Disable extensions

5.1 For Google Chrome

  1. Open Google Chrome.
  2. Click on the Menu icon (3-dots menu) at the top right of the browser window.
  3. Now choose More tools and select Extensions.
  4. Toggle Off the button located next to the extension you want to disable.
  5. Restart Chrome.

5.2 For Mozilla Firefox

  1. Hit the Windows key, type Firefox, then go to the browser.
  2. Use the following keyboard shortcut to open the Firefox extensions page: Ctrl + Shift + A.
  3. Select the add-on you wish to disable.
  4. Toggle the button next to it on Off (or Remove if you wish to discard the extension permanently).
  5. Click Restart now if it pops up. Your information will be saved and restored after the restart.

6. Check your Firewall

  1. Click on the search bar in the bottom-left corner of your Windows Taskbar.
  2. Type Control Panel, then open the first result.
  3. Then click on Windows Defender Firewall.
  4. Now, click on Allow an app or feature through Windows Firewall.
  5. Click on the Change Settings button.
  6. Make sure that Private and Public options are checked for Steam. If Steam isn’t on the list, be sure to add it.
  7. Click OK to save your new settings.

You can temporarily disable your Windows Firewall if it’s causing Failed to load web page error in Steam.

7. Reinstall Steam

  1. Press the Windows key, search for Control Panel, then navigate to the first result.
  2. Click on the Uninstall a program option.
  3. In the opened list, search for Steam.
  4. Click on the app, then choose to Uninstall it.
  5. Now, navigate to the Steam official page.
  6. From the top-right corner of the page, choose to Install Steam (green button).
  7. Follow the on-screen instructions to reinstall the app.
  8. After completing the process, check if you managed to eliminate today’s annoying issue.

When everything else fails, the best bet is to uninstall your Steam client and reinstall it using the official Steam website.

What errors can I fix with the solutions listed above?

Keep in mind that the solutions listed above will also help you if you encounter the following issues:

  • Steam error code 118 failed to load the web page – This indicates something is preventing the Steam services from connecting to the server. One of the most common causes is the Windows Firewall, which does not allow the Steam client to communicate through the firewall.
  • Error code 7 Steam – In general terms, an error 7 code is related to incorrect or failed installation or uninstallation of software that may have left invalid entries in system elements.
  • Steam error code 310 – Last but not least, this one occurs when trying to browse the Steam website either via a third-party browser. Most of the time, the problem disappears on its own, but if yours persists, it may be caused by a corrupted browser cache. However, there’s more to discover about it.

If you follow the above steps, you will reinstall the app without any issue. However, there is another workaround that won’t consume that much time.

In these terms, keep in mind that you can choose to uninstall Steam automatically by using a specialized tool.

CCleaner is the software you should consider. It makes it easy to remove programs and clean their leftovers thoroughly. Plus, it aims to give you a cleaner PC and a securer online surfing experience.

To offer you a secure experience, CCleaner automatically removes malicious and advertising plug-ins for safe Internet browsing.

So, what stops you from giving it a try right now?

What browser can I use to never face Steam error: Failed to load a web page?

If you don’t have the time to go through the troubleshooting solutions listed above, you can switch to another browser and test if the issue persists.

Many gamers confirmed they had enjoyed smoother Steam gaming sessions since switching to Opera GX.

This browser is the world’s first and best browser dedicated to gamers, having all the tools needed to make your gaming session smoother.

Opera GX automatically blocks ads and third-party trackers; thus, the browser supports faster navigation speeds.

It has clever Steam integrations, allowing you to get the latest news and deals on your homepage without visiting the Steam website.

Plus, it offers a powerful built-in VPN that will let you unblock any secure site on the Internet.

Opera GX is easy to use and has a user-friendly interface, so do not worry if you’re a beginner.

Check out the best features of Opera GX:

  • Automatically blocks online threats
  • Built-in VPN
  • Easy to use and user-friendly interface

Opera GX

Looking for a browser that will allow you to run Steam without problems? Try Opera GX.

What are the most common Steam error messages?

Steam failed to load URL or web page showing error code 138, 310, 105, or even unknown error is one of the most common problems with Steam.

Else, you may find other error messages randomly as well. It includes the followings:

  • An error occurred while updating a game
  • Steam game stuck at preparing to launch
  • Failed to start a game
  • The steam download is stuck at a certain percentage like 0%, 99%, etc.

You may find many other errors randomly. But, these are the most common ones you may experience while gaming on Steam.


So, you can do this if Steam fails to load web pages. As you can see, all the listed processes are pretty simple.

The comment section below is dedicated only to you if you encounter any related questions.

3 Ways to Fix Steam Verifying Login Information Error

The Steam client is an application where all types of games can be easily found, downloaded, and installed on any Windows device.

This platform allows passionate gamers to play even the most vintage games. Some of these games are free, and you might need to pay money for some games.

Several Steam client users have complained lately that they received an error while logging into the Steam client app.

The error that they are facing is verifying login information. Some users reported that they could not log in without any errors displayed on the Steam client app.

Some other users couldn’t launch the games that were downloaded and installed using the Steam app.

Why can’t I log into Steam right now?

  • Internet connection – If the internet connection on the system is unstable, this can lead to such errors. The Steam client app needs a stable internet connection to connect and download games.
  • Downloads cache – This type of error occurs on the Steam app when there are corrupted files in the Downloads cache.
  • Background programs – Sometimes, there are chances of third-party applications running in the background, which can create such errors.
  • Firewall and antivirus software – Firewall and antivirus interrupt the Steam app for logging, etc. to ensure extra security and safety from the internet. So, disable them and try if the problem still exists.
  • Steam server – Just like any other website server that goes down during the maintenance period, the same applies to the Steam client app server. So try logging in after a few hours.

This article explains three quick and easy ways to resolve this error on the Steam app and continue using it without any issues.

How do I Fix the Steam Verifying Login Information Error?

1. Clear the Downloads Cache in the Steam client app

  1. First of all, launch the Steam app on your Windows system.
  2. Click Steam on the top menu bar and select Settings from the dropdown list.


  3. In the Settings window, click the Downloads option on the left panel.
  4. On the right side of the Settings window, click Clear Download Cache.


  5. This clears the download cache of the Steam app.
  6. When done, close the Steam app once and relaunch it again on the system.

2. Check the Internet connection

When the internet connection on the system is fluctuating or unstable, all the applications that need the internet to run will throw some errors. This includes the Chivalry 2 login error. Here’s what to do:

  • You need first to check the internet connection, and if it is unstable, disconnect the Wi-Fi connection, restart your Wi-Fi router once, and then reconnect the Wi-Fi connection.
  • If you use a cable internet connection via ethernet, please disable the ethernet connection.
  • Then unplug the internet cable from the system and wait for some time.
  • Later, plug the internet cable again into the system.
  • Still, if you are facing issues with the internet connection, contact your service provider and get a stable connection.

3. Reinstall the Steam app

  1. Open the Run command box by right-clicking on the Start button on the taskbar and clicking on Run from the context menu.


  2. In the Run box, type appwiz.cpl and press Enter key.

    Type appwiz.cpl in Run dialog box
  3. In the Programs and Features window, select the Steam app from the programs and click Uninstall.


  4. This starts by uninstalling the Steam app from your system.
  5. Once done, close the Programs and Features window.
  6. Restart the system.
  7. After the system startup, visit the Steam app website.
  8. Download the latest version by clicking Install Steam.


  9. Go to the Downloads folder on the system and double-click the SteamSetup.exe file.


  10. Perform onscreen instructions to install the Steam app carefully on the system.
  11. After installing, launch the Steam app, and you can log in to the app without any issues.

Does uninstalling Steam delete games?

After downloading and installing the games, they will be stored in the folder called steamapps, in the location given below.

For a 64-bit system:

C:\Program Files (x86)\Steam

For a 32-bit system:

C:\Program Files\Steam

When you uninstall the Steam app from your system using the Programs and Features wizard, it will delete all the games downloaded and installed on the system via Steam.

If you do not want all your games to get deleted, you can move all the contents of the Steamapps folder into some other folder before uninstalling the Steam app. The Steam application can also be accessed through the web.

Did you find this article informative and help you in resolving this issue? If yes, please leave us a comment below.

Fix: Epic Privacy Browser Assertion Failed on Windows 10/11

Epic is one of the best free browsers based on Chromium and is focused on security and user privacy. Its main goal is to create a safe environment and eliminate all online tracking.

However, many users reported Assertion failed messages in Epic Privacy Browser. Here’s how one user described this issue on the Epic Browser forum:

Team, hoping all is well. I had installed Epic, but some days ago I got this pop-up saying:
Assertion (Assert) failed!
Program C:\Users\Cecil\AppData\Local\Epic Privacy Browser\InstallerEpicUpdate.exe\Version: 1.3.27.13
I prefet to reinstall it. Now, I got the same pop-up. When I click “Ignore”, it continues and finished the installation, but nothing happens.

This guide will show you how to fix the problem easily.

Is Epic Privacy Browser safe?

Epic Privacy Browser is one of the best private browsers that do not save your history. It clears your cache, cookies, and browsing history immediately after you close the app.

Also, it keeps you safe online, offering protection from threats like spyware and malware. Overall, it is one of the safest browsers you can use.

What is the Epic Privacy Browser installer?

The Epic Privacy Browser installer is the file you download on the official website to install the app. This installer exists for all major websites for installation.

The good thing about the Epic Privacy Browser installer is that it installs in a few minutes.

Quick Tip:

Opera One is a secure browser focused on user privacy, with all the functionalities on your homepage. You have useful privacy offered by a free VPN when having connection issues with other browsers.

In terms of utility, Opera One offers you workspaces and tab islands for your organizational needs. Also you’ll get built-in Ad blocker, tracker blocker and AI.

Opera One

A great alternative for Epic browser in terms of privacy and organized workflow.
Free Download Visit website

How can I fix Epic Privacy Browser assertion failed errors?

1. Change the Read-only attribute

  1. In the Windows search bar, type regedit, and click on the first result. It should be Registry Editor. registry editor search epic browser assertion problem on windows 10
  2. In Registry Editor, navigate to HKEY_CURRENT_USER\Software\Microsoft\Windows\CurrentVersion\Run
  3. Right-click on Run and select the Permissions… option.permissions solve epic assertion registry editor
  4. If the Permissions are set to Read, change them to Full Control. full control permissions fix epic on windows 10
  5. Click Apply and then OK.

After this, try to install the Epic browser and see if it works. We recommend proceeding with caution: modifying registry keys can lead to system errors, so if you’re unsure, best follow the next steps.

2. Update your Windows 10

  1. Go to Start and select Settings. settings start menu epic privacy browser assertion failed
  2. Now click on Update & Security. update and security settings app epic browser assertion failed on windows 10
  3. In the left side panel, ensure that Windows Update is selected, and then click on Check for updates in the right section.check for updates windows update how to fix epic browser assertion issue
  4. If there are any new updates, install them and then check the Epic Privacy Browser.

3. Disable the Firewall

  1. In the Windows search box, type Control Panel and hit Enter. control panel solve epic browser problems on windows 10
  2. Select System and Security followed by Windows Defender Firewall.windows defender firewall control panel fix epic privacy browser assertion problem
  3. In the left side-panel select Turn Windows Defender Firewall on or off.
  4. Now click on the checkmark before Turn off Windows Firewall (not recommended). turn off windows defender firewall how to solve epic browser issues on windows 10
  5. Click OK.

Is Epic Privacy Browser a VPN?

The Epic Privacy Browser is not a VPN. It is a standard browser that is focused on privacy and security.

However, it has an encrypted proxy extension in the Epic Extension Store that works as a VPN for the browser.

That’s it. You have all the right information to solve the assertion problem with the Epic browser. All you need to do is follow the steps carefully, and the issue should be history.

If you need a list of the best browsers without cookies to protect your privacy online, check our detailed guide to get the top options to download today.

If you’re aware of another method to fix the issue or if you have any more questions, share them in the comments section below, and we’ll certainly take a look.

Just released Visual Studio 2022 17.3 brings .Net Maui, Teams apps support

Microsoft’s Visual Studio 2022 just released its latest update 2022 17.3 which delivers .NET MAUI GA tooling, Azure Container Apps and a few other new features.

According to the Visual Studio blog, the new 17.3 update is generally available for download and among its features lists is .NET Multi-Platform App UI moving from the Preview channel to the Release Channel for developers.

Developers will now have full access to the stable version of .NET MAUI to build Android, iOS, macOS and Windows apps more efficiently from a single codebase.

dotnet_MAUI_podcastapp_in_VS

Visual Studio is also extending its Teams Toolkit to help communications developers create broader experiences for Microsoft’s enterprise chat app. Specifically, developers can take advantage of tools to build apps “that can post a notification to a chat or channel from an ASP.NET web API or Azure Function trigger,” all by making use of the Teams App templates.

MicrosoftTeams-image-3

There were also C++ improvements that came to Visual Studio through the 17.3 update as the team addressing known issues, comments or feedback. Addressing the feedback by the Visual Studio community also led to a new static analysis check on std::optional to help refine undefined behaviors with subsequent releases.

Users may also notice that Visual Studio can now index and colorize C++ code faster, and C++ using Unreal Engine 5 solutions may see up to 2x boost in speed performance on this build.

Another big feature coming with the 17.3 update are Azure Container Apps which will now enable developers to run microservices and containerized applications on a serverless platform.

With Container Apps, you enjoy the benefits of running containers while leaving behind the concerns of manually configuring cloud infrastructure and complex container orchestrators.

Smaller quality of life improvements that also come with today’s update include Live Unit Testing which now scales better for larger solutions, an easier way to see what’s been included in each update with an improved What’s New section, Git Line-staging, arranging tabs in multiple rows, filtering and theming in IEnumerable Visualizer, and keyboard shortcuts for reopening closed documents.

WhatsNewVS

To check all the details on the new features and improvements in build 17.3 as well as download it for use, visit the Visual Studio blog here or grab the download from here.

3 Ways to Fix Minecraft Realms Internal Server Error

Are you getting Minecraft Realms internal server error messages and looking for solutions?

If so, then you are in the right place. Because in this guide, we will give you 3 ways via which you will be able to get rid of the frustrating Minecraft Realms internal server error.

Minecraft allows its players to either create their own realms or create their own servers, via which they can organize their own multiplayer servers. This would let them play with other players across the globe. Furthermore, you can also join servers that are official or managed by others.

When this error pops up, you will be shown an error message Connecting to the realm…Internal Server Error – 500. This error has been troubling users for quite some time, and you are not the only one getting this error.

Users who want to play Minecraft in different realms have reported facing this error. There could be multiple reasons behind this error, which we will discuss in this guide, along with the 3 effective solutions that will help you fix it. Let us get right into it.

Why do I keep getting internal server error in Minecraft?

You will come across the Minecraft realms internal server error when you are trying to log into a realm or a private server.

There will be multiple private servers that are liked by many gamers, but it is not perfect or contains errors.

After thorough research, we have deduced a list of the common reasons behind this issue, which you can find below:

  • Due to poor internet connection
  • Due to Minecraft server outages
  • You are running an old version of Minecraft
  • The MOD that you have installed for Minecraft is either corrupt or conflicting with the game
  • The installation might be corrupt
  • There is an issue with the temporary data
  • Some additional plugins are causing the problem

Now that you know what the most common reasons that would trigger the Minecraft realm internal server error are, let us take a look at the solutions that will help you fix it.

Quick Tip:

Try opening Minecraft from a browser. There’s probably a no better option than Opera GX because it’s built with gaming in mind. It’s light, responsive, and fast, capable to support uninterrupted gaming.

What’s more is that Opera GX lets you select how much RAM and CPU each tab is using, for even better performance. Plus, you can follow the latest gaming news and download games from the GX Corner.

Opera GX

Access Minecraft from this browser to avoid error messages and focus on lag-free gaming!

How do I fix Minecraft realms internal server error?

1. Delete the UUID folder

  1. Head over to this website.
  2. Enter the details asked to get your UUID.
  3. Log into the server.
  4. Go to your server files and open the world folder.
  5. Open the players folder.
  6. Here you need to delete the person’s user name and UUID for who you are getting the error message.
  7. Restart your PC.
  8. Try connecting to the server and check if this fixes the issue or not.

This solution is pretty effective and has been reportedly able to fix the problem for many users for whom Minecraft was working fine and all of a sudden started showing Minecraft realm internal server error.

Deleting the UUID folder could also help in the situation where only a specific user wasn’t able to connect to the server, while others did with no issues.

2. Remove MODS and Plugins

If you are not enjoying the normal gameplay, you can install MODs and plugins to make the game interesting and fun.

Moreover, MODs also give the user more control over how they look and add new features. However, some MODs can interfere with game play and cause errors such as Minecraft realm internal server error.

Additionally, Minecraft gives the user the ability to install plugins to change the gameplay or modify the feature list. You can install Plugins very simply by dragging and dropping.

However, if you have installed an incompatible MOD or plugin, then you will come across multiple errors. In such a scenario, you can simply disable all MODs and plugins, restart the game, and check if this fixes the problem or not.

3. Update or Reinstall Minecraft

Update Minecraft Realm

  1. Launch the Minecraft app.
  2. Navigate to the installation tab and click on New Installation.
  3. Under Version, select Latest Release.
  4. Click on the Create button to create the installation.
  5. This will download the latest version of the game.

Reinstall

  1. Open the Start menu.
  2. Search for Control Panel and open it.
  3. Click on Programs and Features.
  4. Select Minecraft and hit the Uninstall button at the top.
  5. Visit the official Minecraft website.
  6. Input your credentials and download the game.
  7. Follow the on-screen instructions to install the game.

How do I give Minecraft more RAM?

Default launcher

  1. Open Minecraft default launcher.
  2. Click on the Installations tab.
  3. Click on the 3-dot icon on the right to the Minecraft version and select Edit.
  4. Select More options.
  5. From the drop-down locate JVM ARGUMENTS. Here you will see Xmx1G -XX:+UnlockExperimentalVMOptions.
  6. In the Xmx2G, the 2 stands for the amount of RAM allocated to the Minecraft launcher.
  7. Change it to your desired amount.
  8. Tap Save to confirm your changes.

CurseForge Minecraft launcher

  1. Launch the app.
  2. Click on Settings in the lower left corner of your screen.
  3. Under the Game Specific section, select Minecraft.
  4. Scroll down, under Java Settings, you will see Allocate Memory with a slider.
  5. Drag the slider and allocate as much memory as you want to Minecraft.
  6. Changes will be saved automatically.

Minecraft lets you launch the game from different launchers. We have discussed teh steps for the default launcher and the CurseForge launcher to give you an idea of how you can allocate RAM to the game.

Let us know in the comments section, if this guide helped you fix the Minecraft realms internal server error or not.

Windows 11 Arm x64 Emulation: Does it Work?

We’re not really sure if everyone remembers, but back in June 2021, Microsoft actually announced ARM64EC for its new Windows 11 operating system.

The Redmond tech giant described ARM64EC as a new way to bring your existing x64 applications up to speed with the native performance you would expect on ARM.

Keep in mind that Microsoft specified that this would be possible even if you utilize plugins and dependencies that don’t support the architecture yet.

Now, a little over a year after the initial announcement, ARM64EC is now fully supported by the latest Microsoft-designed operating system, which is Windows 11.

And, since we’re talking about Windows 11 emulation, know that there were a lot of gaming and other improvements coming with Parallels Desktop 18.

Arm64EC brings full Windows 11 ARM support

Just in case you might be unaware of the abbreviation’s meaning, the EC in the name is actually for Emulation Compatible, which is really self-explanatory.

As Microsoft said, the general idea here is to offer an application binary interface (ABI) that allows developers to build applications using both x64 and ARM code.

Getting a bit deeper into the subject, this means that ARM code will run natively on Windows 11 on ARM devices while x64-specific code will run via emulation.

It goes without saying that this is actually a major milestone for Windows 11 on ARM since it is the only supported Microsoft OS to feature x64 emulation, which is the backbone of ARM64EC.

The ARM64EC ABI differs slightly from the existing ARM64 ABI in ways that make it binary compatible with x64 code.

Specifically, the ARM64EC ABI follows x64 software conventions including calling convention, stack usage, and data alignment, making ARM64EC and x64 interoperable. Apps built as ARM64EC may contain x64 code but do not have to, since ARM64EC is its own complete, first-class ABI for Windows.

Following all the work that has been put into this project, the tech giant now believes that the ABI is stable enough to transition from its experimental phase and on to general release.

Furthermore, ARM64EC also comes with some major benefits for developers, where instead of making sure that their entire codebase is ARM-compatible, they can now update their code and have both x64 and ARM functionalities running simultaneously.

On a Windows on ARM device, the latter will have better performance, which means you have to actually continuously update the codebase to improve native ARM performance without losing any functionalities in the process.

Prerequisites

You didn’t think that this would just work without any conditions, did you? Yes, there are some prerequisites for this to actually function, and here they are:

  • The latest Windows 11 SDK build. If using the Windows 11 SDK version 22000, the updated version on July 29, 2022 includes key fixes for building Arm64EC apps.
  • Visual Studio 2022 version 17.3 or later.
  • Arm64EC tools installed with the Visual Studio Installer.

Happy with the latest improvements brought to Windows 11 for ARM? Share your opinions with us in the comments section below.
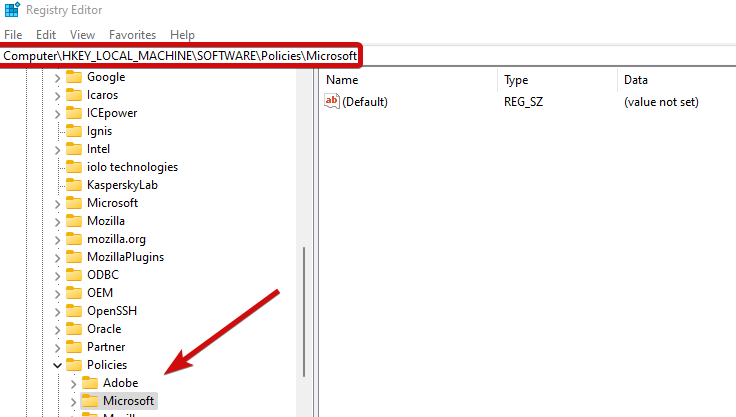
6 Best Pac-Man Games to Play Today for Windows 10/11

It goes without saying that Pacman is definitely one of the most played and beloved games in the world and the love for this arcade game has spread to more modern operating systems, such as Windows 10 and 11.

Also, one of the highest-grossing video games of all time, Pacman or Pac-man was actually released back in 1980 as an arcade game, same as Pinball, by Japanese company Namco.

As we said, you can play this popular title on your Windows PC as well, but you can’t really know which of the hundreds of versions out there are the best, so we will help you with that by featuring six of the best Pacman apps and games you can play right now.

Of course, you can install the traditional desktop Pacman games on Windows 10 and 11, but we are not focusing on that, but on Pacman games that can also potentially be used on the touchscreen interface.

Can you get Pac-Man on PC?

Yes, as a matter of fact, you can! And that’s what we are about to get into in the continuation of this article, so make sure to read it all.

There are quite a few Pac-Man games out there for your Windows 10 and Windows 11 PC, and we’re about to go through the best ones right now.

How do I install Pac-Man on Windows 10?

First of all, as you would have imagined, you need to decide which of the Pac-Man game variants out there you want to play.

After that, simply click the links we provided, which will take you to the specific website, where you need to download the game.

Once downloaded, you will either be prompted to install the vintage title, or you can start the installation process yourself by double clicking on the executable you downloaded. That’s all there is to it.

As we’ve said before, there are many Pacman games that you can find, but most of them are of very low quality, despite the fact that they are paid. What you will see below are games that you can trust and come from reliable sources.

What are the best Pac-Man games for Windows 10 & 11?

1. PAC-MAN Championship Edition DX+ – The most challenging

pacman game windows 8

Yes, this is not a cheap game, as ten dollars is considered a big amount these days, especially when we’re talking about such a casual game as Pacman.

However, the developer of this game is Namco itself, so this explains a lot! Also, the fact that the game can also be played on Xbox adds to its functionality.

PAC-MAN Championship Edition DX+ for Windows 10 is actually the sequel to the original PAC-MAN game. Being compatible with Windows RT devices, as well, this is a game for loyal Pacman players.

⇒ Get Pac-Man Championship Edition DX+

2. Pac-Man 80′ – Throwback to the good old days

pac-man windows 8

The Pac-Man 80′ game from the Windows Store is a loyal reproduction of Namco’s best-selling edition of the Pac-Man game.

As the developer says, it perfectly matches the arcade game from the 80′, and those of you that are old enough to remember those times will definitely appreciate this specific game.

⇒ Get Pac-Man 80

3. .: Pacman :. – A classic arcade game

pacman windows 8

Just like the above-mentioned Pacman game, this one also takes the shape of the classic game version from 1980.

However, this game comes with a nice graphical background and with slight improvements in the visual aspect. We can see that the fences that separate the Pacman look much better.

For me, this is one of the best Pacman games to play in Windows 10, mainly becomes it keeps the old format but slightly improves it.

⇒ Get .: Pacman :.

4. EVAC – The most futuristic looking

evac pacman windows 8

EVAC is not a Pacman game per se, but is a Pacman-styled game, which is definitely more fun if you think the old game was too boring.

There are 32 levels that will keep you glued to the screen of your Windows 10 device. For increased gaming, you can also connect your Xbox 360 Controller.

“Be creative – play stealthily to avoid encounters, prepare traps for your enemies, or just rush as fast as you can right in front of their eyes. Figure out how to beat the system and destroy your captors in 32 action-packed levels. Steal from your dark adversary and leave his world in ruins!”

⇒ Get EVAC

5. 3D Ladybird – A more 3D version of PacMan

3d ladybird pacman windows 8

Just like EVAC, 3D Ladybird is another Windows 10 Pacman-styled game, which will definitely appeal to the little ones, so you can add it to your collection of best Windows 10 games for kids.

This is a very light PacMan-like game, the download measuring only 8 megabytes.  The description of this Pacman game goes like this, and I couldn’t say it better myself:

Flick the ladybug around the maze, collecting flowers and strawberries. Collect letters to form the word ‘EXTRA’ and win a life. Grab the honey from bees’ nest to score big. Use turnstiles strategically to cut predator bees’ path!

This is really a free demo, it doesn’t have any paid in-app purchases. There is also a global leaderboard, so you can test your skills against other Pacman players all around the world.

⇒ Get 3D Ladybird

6. PAC-MAN Original – The OG Pac-Man

PAC-MAN Original windows 10 game

This game brings the original Pacman game to the Microsoft Store and is one of the most popular Pacman games among Windows 10 users.

The gameplay follows the classic Pacman rules: as you eat fruit and run away from Ghosts, you get rewarded.

Dodge all the ghosts, and you can earn high scores. If you’re tired of running away from ghosts, grab a Power Pellet and destroy the Ghosts before they get you.

⇒ Get PAC-MAN Original

Is Pacman free for PC?

Yes, most Pac-Man games for your Windows device are free. There are, however, also paid versions, but it all comes down to you choosing one.

If you decide to go for the Pac-Man Classic on the Microsoft Store, know that the 40 first levels can be played for free.

If you want different levels you can buy two level packs: the Master Pack that contains 60 hard levels, and the Elite Pack that contains 60 very difficult levels.

We all go through phases where we want to relive our youth or try something vintage, which is why people still play the Pac-Man game today.

There are also some PAC-MAN multiplayer versions out there, and all you need to do is find a reliable Pac-Man download source for your PC.

If you’re planning to download this game on a tablet, keep in mind that it doesn’t support touch input.

Did we miss any Pacman games? Let us know in the comments below.

VPN Is Temporarily Unavailable. Opera Is Resolving the Problem [Fixed]

You just got the error message that reads VPN is temporarily unavailable. Opera is resolving the problem? You’re not alone. Let us tell you all you need to know.

Opera One’s built-in VPN doesn’t always connect. That might happen because of slow or bad internet connections, down network servers, or faulty network settings. Regardless, here’s how to fix it.

How do I fix Opera One VPN is temporarily unavailable?

1. Toggle VPN Off/On

  1. Launch the Opera One browser.
  2. Click on the VPN icon beside the Address bar, then click the power icon to toggle it on.
    vpn is temporarily unavailable opera is resolving the problem
  3. Toggle it off and on again.

Some Opera users have stated that they’ve got the browser’s VPN working by toggling it off and then back on again.

If you want to stop worrying about the VPN, you can permanently abandon Opera’s VPN and opt for a full-featured third-party VPN service.

2. Clear Opera One’s cache

  1. Launch the Opera One browser.
  2. Press the hotkeys Crtl + Shift + Delete.
  3. Select a Time range, select all the checkboxes on the Clear browsing data window, then click the Clear data button.
    vpn is temporarily unavailable opera is resolving the problem
  4. Restart the Opera One browser.
  5. Try the VPN again and check if the error message VPN is temporarily unavailable Opera One is resolving the problem has disappeared.

3. Disable Opera One Extensions

  1. Launch the Opera One browser.
  2. Press the Menu button at the top left of Opera One’s window, select Extensions, then Extensions to open the extensions window.
    vpn is temporarily unavailable opera is resolving the problem
  3. Toggle off the switches for the different extensions to disable them.

Opera One extensions might undermine the VPN connection. To ensure that isn’t the case, turn off all the extensions. You can turn them back on individually to ascertain which one is triggering the error.

4. Add Opera One to antivirus utilities’ exceptions lists

  1. Click the Start menu, type windows security, and click on the Windows Security app.
    vpn is temporarily unavailable opera is resolving the problem
  2. Click on Allow an app through the firewall.
  3. Scroll down and click any options for opera.exe, then click OK.
  4. Try the VPN again and check if the error message VPN is temporarily unavailable Opera One is resolving the problem has disappeared.

Instead of switching antivirus software off before opening Opera One, add the Opera VPN to your antivirus utility’s exceptions list.

Most antivirus packages include exception (or exclusions) lists that you can add software and URLs to exclude them from the antivirus shields.

How you add the Opera One VPN to alternative antivirus utilities’ exception lists varies, but in some cases, you can find Exclusions tabs on their settings pages.

5. Switch off your antivirus software

  1. Click the Start menu, type windows security, and click on the Windows Security app.
    vpn is temporarily unavailable opera is resolving the problem
  2. Click on the Manage settings option.
    vpn is temporarily unavailable opera is resolving the problem
  3. Toggle off the switch for Real-time protection.
  4. Try again and check if the error message VPN is temporarily unavailable Opera One is resolving the problem has disappeared.

This process will differ for third-party antivirus software. And when you get the error message VPN is temporarily unavailable, Opera One is resolving the problem compatibility issues, especially with third-party antivirus, which may be the cause.

Sometimes, you can temporarily disable most antivirus software by right-clicking the system tray icons and selecting a disabled or turn-off option.

You should always enable your antivirus after you are done using your VPN; if not, you will increase the chances of your computer being compromised.

6. Switch off the Windows Firewall

  1. Click on the Start menu, type Windows Defender firewall, and then click on the Windows Defender Firewall app.
  2. Click Turn Windows Defender on or off.
    vpn is temporarily unavailable opera is resolving the problem
  3. Select the Turn off Windows Defender Firewall options, and press the OK button.

The Windows Defender Firewall might also block Opera One’s VPN connection, and switching Windows Defender off might be another fix for Opera One’s VPN.

7. Switch Opera One to an Optimal location

  1. Launch the Opera One browser.
  2. Click on the VPN icon by the Address bar, and select Optimal location.
  3. Verify the VPN works correctly.

Wrapping up

One or more of these resolutions will probably kick-start Opera’s VPN. Note that a few VPN extensions for Opera One, such as ZenMate VPN, provide an alternative to the built-in option.

How to Get the YouTube Dislike Extension for Firefox

Firefox is one of the best browsers for protecting your privacy. You don’t need to use an incognito mode to prevent tracking because the browser’s stealth mode is already turned on.

It is a great browser for all browsing requirements, and Firefox offers a YouTube dislike extension. Although the lack of tabs could be annoying, it is still a fantastic browser app.

Recently, YouTube has disabled the dislike feature. Unfortunately, this has left users clueless that an essay better contains good or wrong information. Due to this, fake news and missed information is being spread.

However, using some extensions, you can get this feature back on Firefox. Keep reading this post to learn how to do it.

Why did YouTube stop showing dislikes?

No matter what device you are using, you won’t be able to see dislikes on YouTube. However, the like count is still tracked in the backend; you won’t be able to see how many other people have disliked a particular video.

According to YouTube, the main reason behind this was increased creators who were unfairly targeted by dislikes.

Can I get the dislike button back on Firefox?

Yes, it’s possible to get the dislike button back on YouTube. You can do so by installing YouTube dislike extension on Firefox.

These extensions crowdsource the dislike data by making the hidden data visible. Further, it estimates dislikes for known devices via machine learning.

Quick Tip:

If you want to watch YouTube ad-free and without buffering, try using Opera instead. The browser includes a built-in adblocker and is very lightweight and fast.

Plus, its add-on shop has an easy-to-install YouTube Like-Dislike extension that should fix your issue in no time. Also, thanks to the built-in VPN, you can access geo-restricted videos on YouTube.

Opera

Watch unlimited YouTube videos with Opera’s dedicated support!

How do I get back the dislike button on YouTube?

  1. Open the Firefox browser and open the Firefox add-ons page.
  2. Search your preferred extension.
    youtube dislike extension firefox
  3. Click on Add to Firefox.
    add to firefox
  4. Once added to the extension, restart your browser, and the extension will start working automatically.
  5. Open YouTube, and you’ll be able to see dislikes on videos.
    youtube dislike extension firefox

Several users complain about the fact that Firefox encountered a problem with Windows. Rest assured that our guide shows you what to do if that happens.

There are a variety of Firefox extensions available to enable YouTube dislikes. Below is a list of some of the best extensions:

  • Return YouTube Dislike – This add-on will enable you to see dislike statistics on YouTube. But it isn’t monitored actively for security by Mozilla, so make sure before you install it.
  • YouTube Dislike Viewer – It is an extension that permits users to view dislikes on any YouTube video for nothing. It also allows customizing your YouTube experience.
  • YouTube Dislike Button count – This extension allows users to visit their dislike out and enhance their youtube experience. However, it will access browser activity and data during navigation.

This was how you could get the YouTube dislike extension for Firefox. We hope that the steps mentioned above helped you.

If you still have any issues, feel free to comment below. We will be eager to hear from you.

Fix: Oops, the System Encountered a Problem Gmail Error

You found this article because while using Gmail; you got hit with the error message, oops the system encountered a problem #001. So let us tell you all you should know about this error.

Gmail is one of the most popular email clients, helped in no small way by the massive popularity of its parent, search monolith Google. But the Mail User Agent (MUA) is not without issues.

Some users have had to battle one pesky issue: the system encountered a problem error.

There are several possible causes for this error. But essentially, the error prevents you from enjoying the conveniences you have come to expect from your email client.

Why does my email say oops, something went wrong?

For some people, the issue crops up somewhat infrequently; it works well for a stretch, and then the oops message comes back out of the blue.

However, for others, it happens so frequently that they lose access to their email. This is not good and may mean you miss important correspondence with severe implications for your work.

Different users have observed this error get triggered when performing the following functions:

  • Opening messages
  • Deleting old emails
  • Moving emails to folders

Just as there are many possible causes for this error, there are several fixes. First, we will go through the usual and sneakier suspects, which aren’t as easy to isolate.

You will want to consider and check off each one until the problem is fixed.

Before you try the fixes, we will consider whether you access your email through your browser or a desktop application. Therefore, you may want to check if it is still correctly configured and if the case is the latter.

You could even uninstall it and reinstall a more up-to-date version.

The following are the different iterations to this error you may encounter:

  • Oops… the system encountered a problem (#001) Gmail
  • Gmail oops, the system encountered a problem #2007
  • Oops… the system encountered a problem (#001) Gmail Firefox
  • Gmail, oops the system encountered a problem in 2009
  • Oops… the system encountered a problem (#2014) Gmail
  • Oops, the system encountered a problem (#2005)

Please note that the fixes discussed in this article should fix most Gmail oops errors regardless of the error message.

Quick Tip:

If clearing cookies and cache data from your browser do not resolve the problem, the next best option may be to switch browsers.

One great browser that you should try is Opera One. It is fast and robust, thanks to the Chromium engine. But it has none of its well-known limitations, such as high resource demand.

Opera One

Eliminate errors by using this modern and performance-oriented browser!

How do I fix the system encountered a problem error?

1. Clear your browser’s caches and cookies

  1. Launch your browser.
  2. Click on the menu, select More tools, and Clear browser data.
    oops the system encountered a problem #001 gmail
  3. Select a Time range, tick the options for Browsing history, Cookies and other site data, and Cached images and files, then click the Clear data button.
    oops the system encountered a problem #001 gmail

Both cache and cookies improve your browsing experience, but both can sometimes hurt it.

Caches are files that store information on the individual pages you visit, so the browser won’t have to make database calls and load page objects the next time you visit the same page.

This reduces the time it takes your browser to load pages. Speaking of which, if Google Chrome is slow, check these 9 solutions to speed up the Chrome browser.

But cache data takes disk space and may include info from unimportant pages or malware. So it would help if you cleared them regularly.

On the other hand, cookies are applications websites use to store browsing information every time you visit. They can then use this information to personalize your browsing experience, including the ads you see.

Both cookies and cache can get corrupted and end up causing this oops the system encountered a problem error.

Clearing cookies and caches will also help solve other Chrome issues like the page not responding error.

Clearing cache and cookies data from your browser will hopefully eliminate all the corrupted data that could be causing the oops the system has encountered a problem error.

2. Check your Internet connection

Some Gmail features struggle to load if your internet connection is prolonged. If there is something you can do to improve your internet speed, try that first.

Or you could try switching to an Ethernet, wireless, or Wi-Fi connection, depending on what you use currently, to see if this is the source of your problem.

But in most cases, this is rarely the issue. When it is, you can tell by the slow speed at which the Gmail application itself loads on your PC. If this is true for you, consider this next fix.

3. Switch to the Basic HTML version of Gmail

  1. Launch your browser.
  2. Visit the HTML Gmail site.
  3. Click on I’d like to use HTML Gmail.
    oops the system encountered a problem #001 gmail

Gmail is a feature-rich program that takes a while to load completely. On the other hand, the HTML version is lighter, often loads quicker, and requires fewer system resources than the standard version since it mainly contains plain text.

The HTML version was created for older, unsupported browsers and sluggish internet connections.

There is a drawback to utilizing this watered-down version of Gmail, however. If you choose it, you will be without features like Chat, Rich Formatting, Keyboard Shortcuts, Spell-Checker, and others.

4. Disable browser extensions and add-ons

  1. Launch your browser.
  2. Click the menu, select More tools, then Extensions.
  3. Toggle off the switches for each extension.

If you’re thinking about switching browsers, you may first want to ensure that the issue isn’t being brought on by an extension you just installed.

On occasion, third-party software, such as browser add-ons and extensions, might conflict with other programs and settings on your computer.

Occasionally, a patch or update on outdated compatible software might introduce bugs like this oops the system has encountered a problem error that wasn’t there previously.

Make a record of all the extensions you installed when this issue first appeared. Then, disable them one at a time till you figure out the faulty one.

Go to the previous extensions you have had. There’s a possibility that a recent update to one of them is what’s causing your Gmail issue.

5. Temporarily disable antivirus and other Internet security programs

  1. Click on the Start menu, type Windows security, and then click on the Windows Security app.
    oops the system encountered a problem #001 gmail
  2. On the left pane, click on Manage Settings.
    oops the system encountered a problem #001 gmail
  3. Turn off Real-time protection.

Some people who have faced the oops the system encountered a problem in Gmail have reported the problem going away after disabling their internet security software, like your anti-malware and antivirus tools.

Like you have done with your extensions, the good thing is you won’t have to disable your internet security software permanently. Instead, disable them once and check if the error still recurs.

Some users have reported the Avast antivirus software to cause this problem, so you may not have to disable it.

There is no specific fix for the oops the system encountered problem #001 in Gmail; the aim is to find the cause of the issue and find a way of isolating it or disabling it.

In extreme cases, you may consider browser resets, but please note that this may lead to data loss.

Before Google can develop a more permanent solution, the best option is to try all different solutions that have worked for others, as discussed here.

How to Uninstall Chromium When It Won’t Uninstall Directly

Chromium is Google’s open-source web browser, initially released in 2008. But it’s still in use today, thanks to its speed and minimalistic interface.

Also, the Chromium code is accessible and frequently used by other developers to create various browsers. Sometimes, the developers of those browsers use them as a platform for malicious content.

This leads to many security risks for your Windows computers. If you can’t uninstall Chromium, chances are you’ve downloaded Chromium from other places than Google’s official website.

The pretend Chromium installs a toolbar at the top of your screen, corrupting the built-in uninstaller so that you cannot remove it.

We have some solutions for you on how to remove Chromium. But for a more lasting effect, we advise the use of good antivirus software to clean any infected files after you’re done uninstalling Chromium.

Why can I not Uninstall Chromium?

In most cases, uninstalling software should be easy, but when you can not, there may be a few typical suspects. In the case of the Chromium browser, uninstallation problems may be caused by the following:

  • Malware within the computer
  • Viruses built into a dubious version of Chromium
  • Ongoing third-party processes.
  • Ongoing uninstallation or installations.

Is Chromium malware?

While Chromium is a trustworthy browser, it may become a virus. This is because malware authors who use the name Chromium and utilize Chromium to spread harmful programs on Windows machines may abuse its open-source functionality.

They may thus inject it with vulnerabilities and malicious scripts to propagate infections while disguising it as the official Chromium browser.

Quick Tip:

When it comes to browsers that do not slow down your computer or utilize too much memory, Opera One is the option to consider.

One of Opera One’s outstanding features is Speed Dial, which, as the name indicates, makes it easier and quicker than ever to access your favorite sites. Plus, you have built-in Ad blocker, free VPN and AI.

Opera One

If you want a reliable and error-free browser, this should be your best choice!
Free Download Visit website

What can I do if I can’t uninstall Chromium?

1. Use an uninstaller software

Before trying any of the steps listed below, you can install a dedicated tool that automatically removes Chromium from your computer.

Uninstaller software is a full-featured utility that can remove any stubborn or malicious software from your PC. They are very user-friendly; you must select the app you want to remove.

Moreover, many uninstaller software integrate some optimization features that keep your PC clean and well-performing

2. Remove Chromium using Control Panel

  1. Click on the Start menu, type control panel, and select the Uninstall a program option.
    can't uninstall Chromium
  2. Select Chromium from the list of programs, then click on the Uninstall option.
  3. Follow the wizard to complete the uninstallation.
  4. Then go to your AppData folder by navigating the path below and deleting the Chromium folder. (Please replace afamo with your user name in the path below).
    C:\Users\afamo\AppData\Local
  5. Empty your Recycle Bin to ensure all Chromium files and folders have been completely removed.
  6. Restart your computer.

3. Using the Task Manager

  1. Right-click on the Start menu and select Task Manager.
    can't uninstall Chromium
  2. Right-click on the Chromium process and select Open file location.
  3. Select all the files and press Shift + Delete to delete them permanently.
  4. Once more, open the Task Manager, right-click on Chromium and select End task.
    can't uninstall Chromium

If you are wondering how to uninstall Chromium when it is not showing in the control panel, you should try this Task Manager method.

Do I need Chromium if I have Chrome?

Google Inc. is the company that created and oversees Chrome, a project built on Chromium. Even though it uses the Chromium source code, it has a few more features. 

Although Chrome is a free browser, you cannot alter its source code to create new software from it.

However, Chromium is distinct in that you can modify its source code and create new apps using it, and the Chromium Project is in charge of the open-source, free Chromium web browser.

With that in mind, you can utilize both on your computer, depending on your requirements.

Irrespective of the browser solution you choose on your computer, keep in mind that hackers often use browser extensions or add-ons to steal information from your computer or gain control over it.

As a result, locate all recently-installed suspicious browser add-ons, select those that look suspicious, and uninstall them. Of course, prevention is better than cure, so uninstalling extensions that seem unsafe is always best.

If you are wondering how to uninstall Chromium on Windows 7, 10, or 11, you will find the fixes in the guide helpful. Also, users searching for how to uninstall Chromium on Raspberry Pi, Ubuntu, Linux, or Mac may attempt manually deleting the Chromium files.

Finally, we recommend using an excellent antivirus to protect your computer against malicious software like a disguised Chromium browser.

Have the above procedures made any difference? Let us know by using the comments area below.

Download the August 2022 Adobe Patch Tuesday updates

Yes, we actually already know that many of you are waiting for the Patch Tuesday monthly batch of security updates and we’re here to make it a bit easier for you to find what you’re looking for.

You should know that Microsoft isn’t the only company that has such a rollout on a monthly basis. So, in this article, we’re going to talk about Adobe and some of the patches for their products.

As we’re pretty sure you know by now, we will also include links to the download source, so you don’t have to scour the internet to find them.

Adobe releases updates for 25 CVEs

Before we get into it, let’s also take a look at what happened in July 2022, when Adobe released 27 CVEs in four patches for Acrobat and Reader, Photoshop, RoboHelp, and Adobe Character Animator.

The highlight of last month’s release was definitely the Acrobat and Reader update which addressed a combination of 22 different Critical- and Important-rated bugs.

It goes without saying that the most severe of these could allow code execution if an attacker convinces a target to open a specially crafted PDF document.

Now, let’s get back to the present and explore what the company has prepared for its users as a part of the August batch of patches.

Acrobat Reader

Just as last month, we will kick off this list with the update for Acrobat and Reader, which addresses three Critical-rated and four Important-rated bugs.

These above-mentioned critical vulnerabilities could allow code execution if an attacker could convince a user to open a specially crafted file.

Affected versions

ProductTrackAffected VersionsPlatform
Acrobat DC Continuous 
22.001.20169 and earlier versionsWindows &  macOS
Acrobat Reader DCContinuous 22.001.20169 and earlier versions
 
Windows & macOS


Acrobat 2020Classic 2020           20.005.30362 and earlier versions Windows & macOS
Acrobat Reader 2020Classic 2020           20.005.30362 and earlier versionsWindows & macOS
    
Acrobat 2017Classic 201717.012.30249 and earlier versions  
       
Windows & macOS
Acrobat Reader 2017Classic 201717.012.30249 and earlier versions  
  
Windows & macOS

Commerce

Next, let’s take a look at the seven fixes that were released for the Commerce app, which actually includes four Critical-rated bugs.

You should know that two of these could allow code execution and two could indeed lead to a privilege escalation.

Needless to say, the XML injection bug fixed by this has the highest CVSS of Adobe’s release at 9.1.

Affected versions

ProductVersionPlatform
 Adobe Commerce2.4.3-p2 and earlier versions  All
2.3.7-p3 and earlier versions  All
Adobe Commerce2.4.4 and earlier versions  All
Magento Open Source2.4.3-p2 and earlier versions       All
2.3.7-p3 and earlier versionsAll
Magento Open Source2.4.4 and earlier versions  All

Illustrator

You surely want to also hear about the patch that was issued for Illustrator, one that contains two Critical and two Important fixes for some nasty bugs submitted.

The most severe out of these above-mentioned application bugs could lead to code execution and memory leak. when opening a specially crafted file.

Affected versions

ProductVersionPlatform
Illustrator 202226.3.1 and earlier versions Windows and macOS
Illustrator 202125.4.6 and earlier versions Windows and macOS

FrameMaker

Even though we haven’t seen this adobe software in the Patch Tuesday bulletin for quite some time, know that there are also six FrameMaker bugs, five of which could lead to code execution.

This update addresses multiple critical and important vulnerabilities, which means a fix update was mandatory and Adobe has acknowledged and delivered.

Affected versions

ProductVersionPlatform
Adobe FrameMaker2019 Release Update 8 and earlier  
Windows
Adobe FrameMaker2020 Release Update 4 and earlier    Windows

Premiere Elements

We are going to conclude this list by saying that there’s only a single Critical-rated CVE in the Premier Elements patch, which is resulting from an uncontrolled search path element.

The company wants us to know that successful exploitation could lead to privilege escalation
in the context of the current user.      

Affected versions

ProductVersionPlatform
Adobe Premiere Elements2022 (Version 20.0) Windows and macOS

Please keep in mind that none of the bugs fixed by Adobe this month are listed as publicly known or under active attack at the time of release.

Adobe actively categorizes the majority of these updates as a deployment priority rating of 3, with the Acrobat patch being the lone exception at 2.

This is what you are looking at in terms of Patch Tuesday releases for Adobe for the month of August 2022, so hurry up and get the software.

What’s your take on this month’s release? Share your thoughts with us in the comments section below.
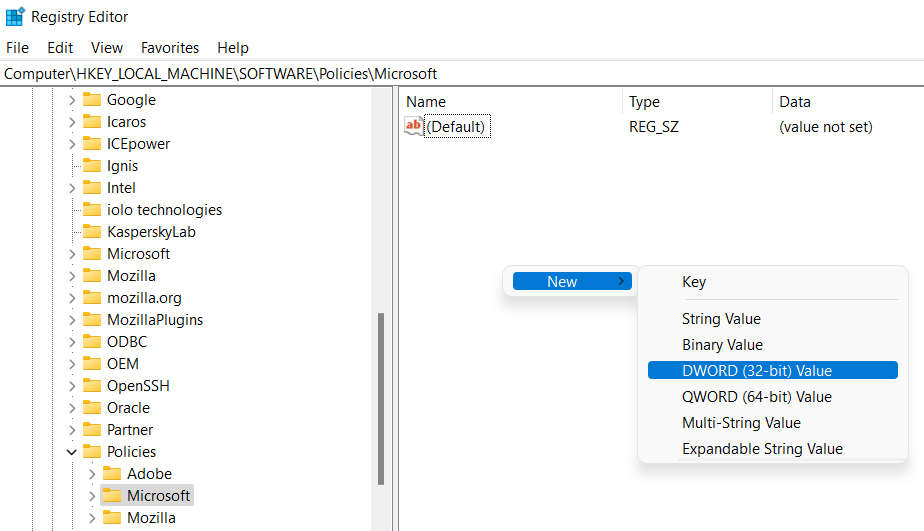
Google Pixel Buds Pro Review: Great earbuds for Windows and Android

Google has had a bit of trouble with earbuds, and I’m sure you know why at this point. That’s left great chances for Microsoft, Samsung, and other companies to make great products like Surface Earbuds, Galaxy Buds, and even the Nothing Ear 1 earbuds.

A lot of Google’s problems were due to hardware issues, but in mid-2022, Google returned with Pixel Buds Pro to try and redeem itself. These new earbuds take a lot of what’s great from the second-generation Pixel Buds, and for Microsoft fans like myself, perform a bit like Surface Earbuds. Here’s my take on Google’s Pixel Buds Pro when used across Android, Windows, and iPhone.

Specs & Price

You can buy the Pixel Buds Pro for $200 from Google or other major retailers. Pixel Buds Pro pairs with any Bluetooth 4.0 device, including Android, iOS, tablets, and laptops. The earbuds are sweat and water-resistant, with the earbuds being IPX4 rated, and the case IPX2 rated. Each earbud measures 0.88 x 0.87 x 0.93 inches, and the charging case is 0.98 x 1.97 x 2.49 inches.

Each earbud has an 11 mm dynamic speaker driver, and three microphones on board. Battery life is rated at 7 hours with ANC on, and 11 hours with ANC off and you can get up to 31 hours of listening time with the charging case.  More specs and features are below.

  • Active Noise Cancellation
  • Transparency Mode
  • Volume EQ
  • Active in-ear pressure relief
  • Voice accellerormeter
  • Mesh covers to block wind
  • Tap and swipe sensors

Note that Google doesn’t give you a USB-C cable to charge Pixel Buds Pro in the box, you’ll need to provide your own, or use a wireless charger. You can also buy the Pixel Buds Pro in Charcoal, Fog, Lemongrass, or Coral. All three are the same price. Google even includes 3 types of ear tips for you to try out. Small, medium, and large. I tested with the small.

Case, Design, and fit.

If you’ve ever seen the Pixel Buds A-Series, or the second-gen Pixel Buds, then the case of the Pixel Buds Pro should feel familiar. It’s designed to look and feel like a pebble when you pick it up and hold it in your hands. It has a matte finish, and the lid is angular. There’s also a nice weight to the case when you grip it in your hands. That definitely sets it apart from the AirPods case which has a smoother glossy finish, or even the Surface Earbuds case which are much wider and longer.

I do think the case is also durable. I took my Pixel Buds Pro on a trip to visit Fenway Park in Boston, and the security at the stadium accidentally dropped the case on the ground when she opened my bag for inspection. I picked it back up and noticed no visual damage.

As far as the design of the actual earbuds, Google is going for something different. When you put these in your ears, they might look like an original Pixel Buds or Pixel Buds A-series to the casual observer, but don’t be fooled. Google has dropped out the signature wingtips on the Pixel Buds Pro, so it is now more of a fit, shape, and feel similar to Samsung’s Galaxy Buds Pro. And yes, this is less crazy of a design than the Surface Earbuds, which have a giant awkward touchpad on the outside.

After wearing Pixel Buds Pro for four hours on an Amtrak ride from NYC to Boston, I think this design choice helps the Pixel Buds Pro feels natural. Putting in these earbuds is a bit similar to Surface Earbuds. Rest it in your ear, and then twist it in to secure it. Once in, you’ll barely feel that you have earbuds on.

The fact that the Pixel Buds Pro has no stem adds to the comfort, as it means the earbuds don’t slide off when walking, jumping, or exercising. I tried all of these things in the lead-up to my trip, and the Pixel Buds Pro always stayed secure in my ear no matter what, even during a heatwave where I was sweating. The only exception was when I got a case of common cold, and my ear canals closed up, the Pixel Buds Pro struggled to stay in my ear.

This is one of the comfiest earbuds I’ve ever tried, even more than my AirPods Pro which tends to slip out of my ear and feel uncomfortable after an hour (even with foam tips.) Google actually uses sensors and vents to keep the fit feeling natural and secure. Those sensors measure the ear pressure in your ears, and the earbuds are able to relieve it and stay comfy.

Pairing, software

Pixel Buds Pro is best used with Android, as you get access to Pixel Buds software to let you customize your experience a bit. The software isn’t yet cross-platform and won’t work on iOS or Windows, though, unlike the Surface app for managing Surface Earbuds. Without an Android phone, you can’t customize the Pixel Buds Pro as much.

Anyway, pairing Pixel Buds Pro with Android is easy. Open the lid, and you can pair it automatically thanks to Google’s Fast Pair technology. On Windows, you pair by holding down the button on the case and selecting it manually through Bluetooth settings. The same goes for iOS or an iPhone.

I mentioned pairing because Pixel Buds Pro supports audio-switching with signed-in Android devices. In my example, I was listening to Spotify on Android, and Teams rang on my Chromebook, and the Pixel Buds Pro switched over to Chromebook automatically. Other than that, the Pixel Buds can remember two devices with Multipoint, so you can worry less about repairing constantly between PC and Android, or Android and iOS. With this, when you play media the earbuds can switch to calls on previously connected devices. Again, in my test, I did this with Teams ringing on Windows. I stopped media on my phone and selected my Pixel Buds as the output on my PC. It was pretty seamless.

As for the Pixel Buds app on Android, it has a couple of things to know about. The first is a fit test, which will let you know if you’ve chosen the right ear tip. I used the small one because my ears are weird like that. Other than the ear tip, the app is also used for a few other tasks. This includes setting up Google Assistant settings, ringing the earbuds if lost, boosting the volume EQ at lower levels, managing noise cancellation, and transparency, and managing firmware updates. It’s great to sell all these controls up front, but I wish Google could port these controls to iOS and Windows, too.

Touch sensors

The best feature of Pixel Buds Pro is the touch sensors. These aren’t that customizable, but they still work great on Android, iOS, and Windows, as there’s a touch control for everything you need for music. These are really fun to use, unlike the tap or press and hold controls on AirPod Pros. It’s very reminiscent of the touch pads on Surface Earbuds.

You can swipe forward on any earbuds to raise the volume, and swipe backward to lower the volume. A single tap plays or pauses music, and a double tap will take you to the next track or reject a call. A triple tap will take you to the previous track. Finally, pressing and holding will toggle between active noise cancellation and transparency mode. Only this control can be customized so that either the right or left earbud can be configured for a long press to activate Google Assistant. (Google Assistant only works on Android, and this touch control can’t be mapped to Siri or Cortana.)

In my four-hour Amtrak journey to Boston, touch controls proved crucial. I was falling asleep at one point, and my head was braced up against the train’s window. Feeling comfy, I didn’t want to take my Pixel 6 Pro out of my pocket, so I instead depended on the touch controls to change volume, switch songs, and talk to my Google Assistant to respond to messages.

Audio Performance

Just as I said when I reviewed Surface Earbuds, I am not an audio expert, so I can’t comment very specifically on the full details of audio performance. For my basics, though, I feel like the audio on Pixel Buds Pro is a mix between Surface Earbuds and AirPods Pro. There’s definitely not a lot of bass on these buds, but most of your music should sound great at medium to high levels like I listened to in my tests.

I noticed the lack of bass when listening to a playlist on Spotify which remixed hit songs (like Ava Max’s Sweet but Psycho) from the past decade. Lyrics, guitars, and voices, though still sound rich and deep, especially on a rock song like Dear Maria, Count me in by All Time Low. Even a classic song like Frank Sinatra’s New York, New York, sounded pleasing. Sinatra’s voice sounded quite deep, as the trumpet and piano riffs during the signature portion of the song.
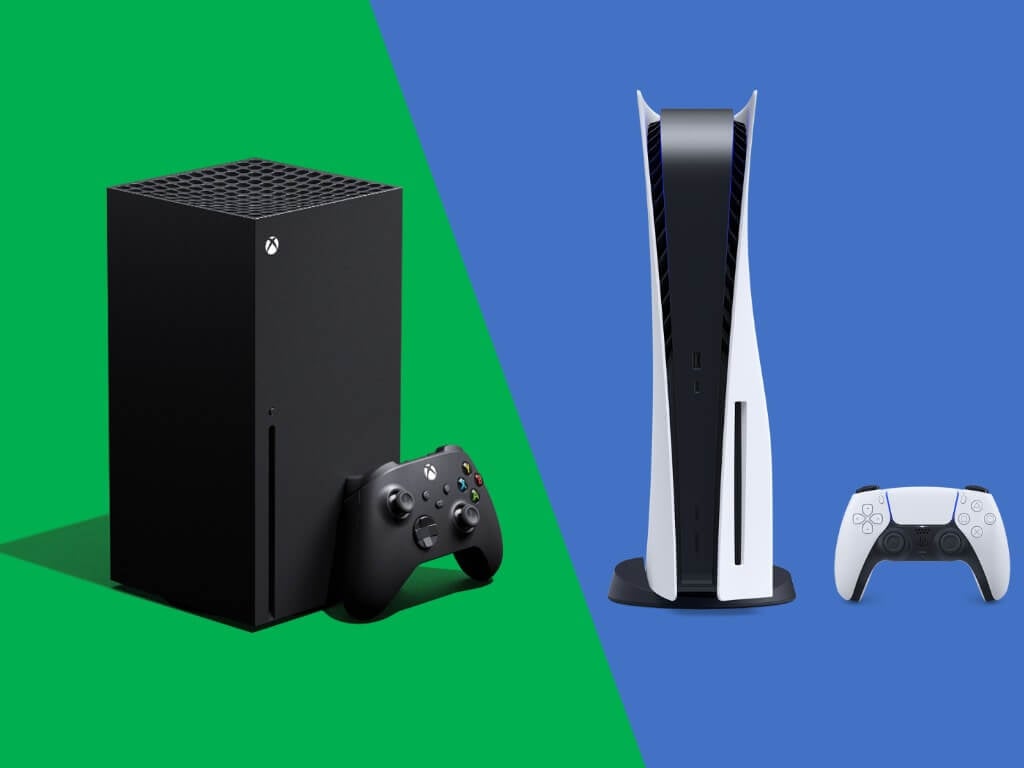
Note that the EQ feature was turned on in all my music tests. It’s supposed to enhance bass and treble at a lower volume, but I don’t think it made much of a difference in loud scenarios like my Amtrak train ride. At home, I think it made more of a difference when listening to music in quiet places like my home office.

The noise cancellation, though is amazing and is almost exactly like what Apple has done on AirPods Pro. In my tests during a four-hour train ride, the noises you typically expect from trains were muted for me. I heard nothing but my music during my entire ride. Even the chatter from fellow passengers and the Amtrak crew was muted. When I did want to hear announcements about the next stops, though, a tap on the buds enabled the transparency mode, which instantly let me hear the voices around me.

As someone who uses AirPods Pro on my iPhone, these definitely feel like the Android version, but just with a lack of bass and spatial audio (Google is adding spatial audio later.) It’s also sad to see that Google is only using the HD Audio AAC codec, aptX is next-gen, and I hope these can be added in the future through software. Most people though, should not notice the difference, as most audio is AAC.

On latency and connection issues, I’ll say these problems from the original Google Pixel Buds are gone. I had none of these issues with Pixel Buds Pro, and leaving my phone at my seat, then going to the rest room which was about 10 feet away, music still keep playing.

Microphone performance

To test the microphones on the Pixel Buds Pro, I put my SIM card in my Pixel 6 Pro and daily driver the phone for a few hours. On phone calls that I made when sitting on my Amtrak train, people on the other end of the call said I sounded very well, and when I told them I was using my Pixel Buds Pro, they were surprised. Outside, though, in a loud stadium, the performance wasn’t the best, and my dad said he had trouble hearing me when I answered his call when at Fenway Park. I think that’s due to noise cancellation kicking in.

Back home when I used the Pixel Buds Pro on Teams calls, the experience was great. I used the transparency mode to hear my voice and had my earbuds to around 40% volume. I clearly heard my colleagues, as well as myself. It’s a great experience that I liked a lot with Surface Earbuds, which let you hear yourself speak while you present.

Battery Life

Depending on how you use your Pixel Buds Pro, battery life will vary for you. Google advertises 31 hours total listening time with the charging case when active noise cancellation is off, with 11 hours of earbuds listening time. Active noise cancellation being on drops that to 7 hours or earbuds listening time and 20 hours of total listening time with charging. And about the case, you can get 1 hour of listening time with a 5-minute change with active noise cancellation.

I used active noise cancellation a lot in my time with the Pixel Buds Pro, and my average battery life was around 18 hours. That accounts for my entire trip to Boston, which lasted me about 12 hours (8 hours of music listening in between and 1 hour of calls), and the rest is the time I spent playing with the earbuds at home.

I didn’t have to connect my Pixel Buds Pro case to a battery pack or power outlet to recharge. I did, though, notice some uneven drain between the left and right earbuds, but Google continues to hold that this is normal, as the earbuds do the processing.

Your mileage might vary, obviously as battery tests with earbuds are different for everyone. Just keep in mind that, unlike Pixel Phones, these earbuds don’t have a fast charge so you might want to ensure you fully charge it to 100% before going on a long trip like I did.

Great earbuds

There’s no doubt that there are a ton of different headphones and earbuds that you can buy right now. All are not created equal, but if you’re well-invested in Android and Windows, then the Google Pixel Buds Pro is a great buy. These are true AirPod Pro competitors that work great with Windows. with a comfy fit, and decent sound performance, great touch controls, you’ll enjoy the Google Pixel Buds Pro.