AOL Mail Won’t Open PDF Attachments: How to Fix

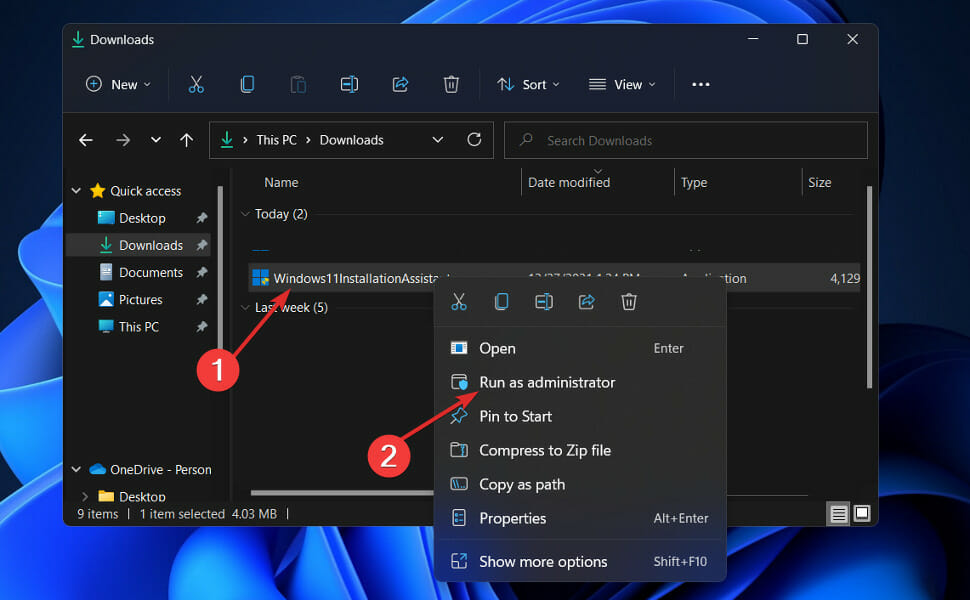
If you can’t open a PDF file in AOL mail, probably the most frustrating issue is when you receive an attachment but AOL PDFs are not opening.

The error could originate from your PC, the sender’s computer, or AOL. AOL PDFs often fail to open due to misconfiguration in the mail-handling environment.

No matter the exact cause, here’s how to fix it:

How do I fix AOL Mail not opening PDF files?

Tip icon Tip
The most popular PDF reader is Adobe Acrobat Reader, so we will troubleshoot AOL mail attachment problems using Adobe Acrobat Reader as our PDF reader.

1. Install a PDF reader

PDF readers enable your browser to open PDF attachments directly or with the reader. To resolve AOL PDF attachment issues, install a compatible PDF reader like Adobe Acrobat Reader on your PC.

Adobe Acrobat Reader is the most popular PDF reader and editor globally. It is frequently updated with new features and bug fixes, resolving most errors in subsequent updates.

⇒ Get Adobe Acrobat Reader

1.1 Check PDF compatibility

If the PDF originates from an Apple computer, attempting to view it from a Windows system may cause AOL attachment problems. Let the sender know that you use a Windows PC.

Additionally, AOL mail attachment problems can arise from your web browser and hardware configuration. Ensure these meet the minimum specifications to handle AOL mail to avoid issues.

2. Disable antivirus temporarily

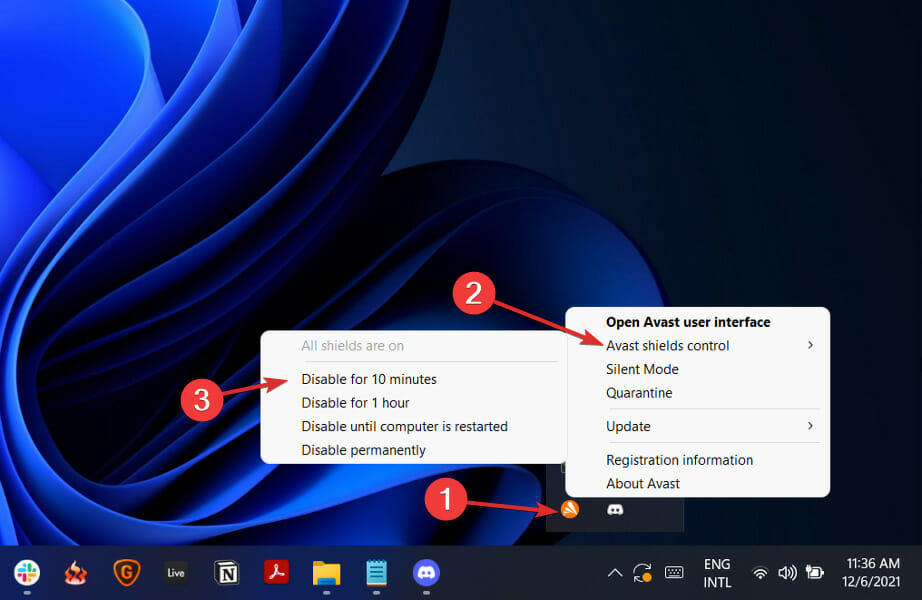
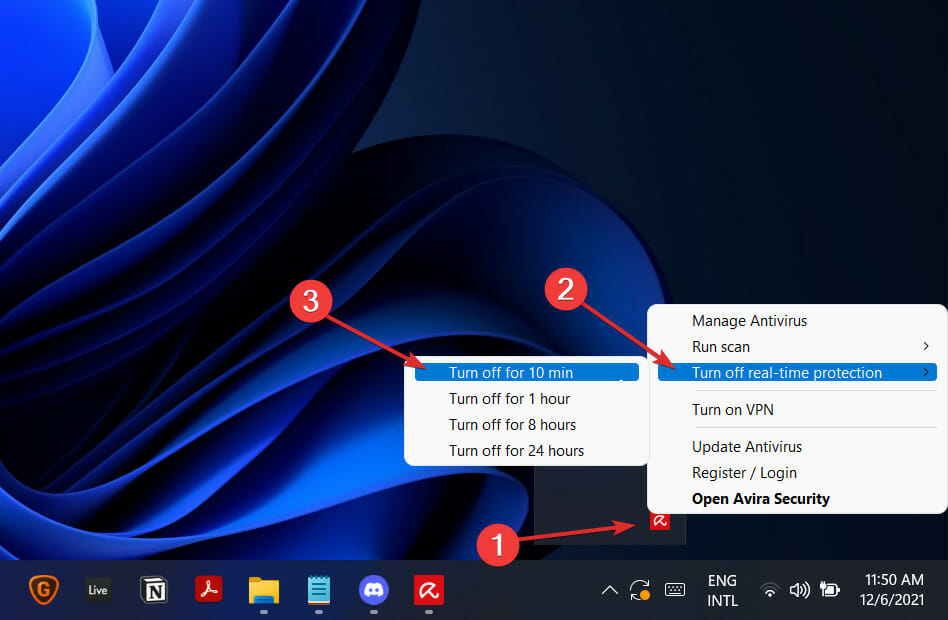
Sometimes, antiviruses flag AOL mail attachments as risky and block these files. This leads to AOL mail attachment problems as well as AOL email not sending reminders. If your PDF reader works correctly but AOL PDF not opening still, disable your antivirus program now and retry.

3. Repair PDF reader Installation

repairing pdf reader can fix aol pdf not opening

Navigate to the following location on Windows Explorer:

C:Program FilesCommon FilesAdobeAcrobatActiveX

In the ActiveX folder, look for the following files: AcroPDF.dll, pdfshell.dll, and AcroIEHelper.dll. The absence of any of these files can cause AOL mail attachment problems.

To get back the files, fix Acrobat Reader by reinstalling the software. Alternatively, you can repair your installation by clicking the Help menu and selecting Repair installation from the dropdown.

4. Perform an AOL Quick Restore

  1. To perform a Quick Restore, search for AOL system information from the Start menu and launch the utility.
  2. Next, navigate to the left-hand side of the screen and click on the AOL Software tab.
  3. Hit Quick Restore, and on the next screen, click OK.
  4. Wait for the Quick Restore to complete, and then close the window.
  5. Restart your AOL application.

Note that the Quick Restore function is available only on the AOL desktop software.

5. Configure AOL attachments to open in Acrobat Reader or another PDF reader

if aol pdfs won't open set pdf to open with adobe reader
  1. Launch Adobe Acrobat Reader, but close your browser first.
  2. Click the Edit menu and choose Preferences.
  3. From the list to the left, click on Internet.
  4. Next, uncheck Display PDF in Browser and then hit OK.
  5. Finally, restart your browser.

6. Choose a different email client

If you notice that the PDF issue does not originate from your PC and it is just AOL-related, then the next obvious solution is to replace AOL.

Many alternative email clients include similar features such as virus and spam protection, large attachment size, unlimited mailbox size, integrated spell checker, and more.

You can also find email clients with productivity features such as calendars, task management, advanced categorization and tags, up-to-date search function, and more.

Most email clients provide a similar user experience, so if you keep experiencing issues with AOL, don’t hesitate to look for a different option.

Summary

AOL PDF not opening is a frustrating problem, but these solutions are proven to resolve this issue without you losing any emails or attachments.

You only need a compatible PDF reader configured to handle AOL PDF attachments, and if that fails, simply perform a Quick Restore.

Windows 10 Mail sent items not showing

Live Mail is a free email application provided by Microsoft. It has been discontinued and no upgrades will ever be made to it, yet you can still use it if you can keep up with the encountered errors.

One of the most common ones encountered is Windows Live Mail emails are no longer appearing in Sent Items. Your sent email messages are not showing up in your Windows Live Mail Sent Items folder, but they aren’t gone for good.

Therefore, in the following section, we are going to discuss a few methods to show you how to make Windows Live Mail emails reappear in the folder they belong to.

What can I do if I can’t find sent emails in Windows Live Mail?

1. Uninstall/reinstall Windows Essentials

remove Windows Essentials
  1. Click the Start icon.
  2. Then, click Control Panel.
  3. Under Programs, click Uninstall a program.
  4. While in the Uninstall or change program list, click Windows Live Essentials.
  5. Click Uninstall/Change.
  6. After removing Windows Live programs, also delete the following folders:
    C:Program FilesWindows Live
    C:Program FilesCommon FilesWindows Live
  7. Double click on Program Files x86 if there are more program files folders upon opening C drive.
  8. Up next, reinstall Windows Essentials.

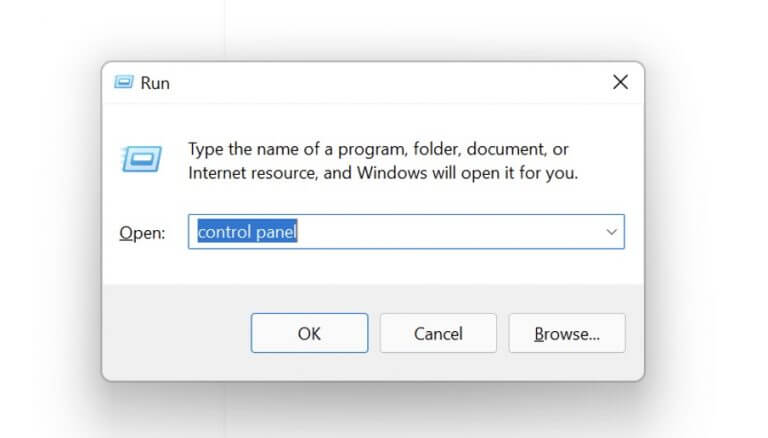
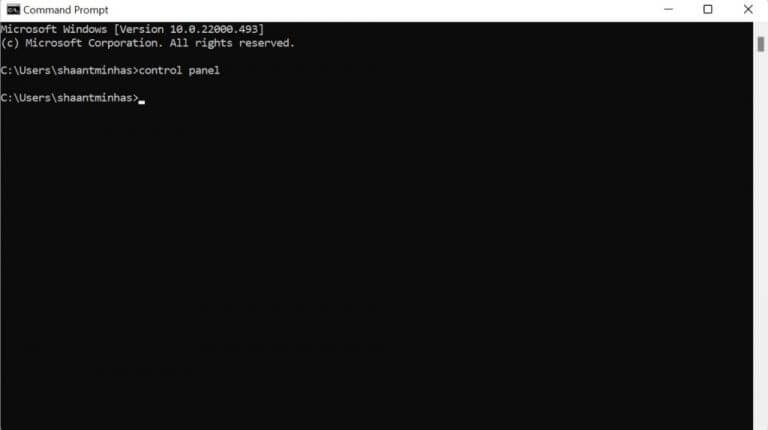
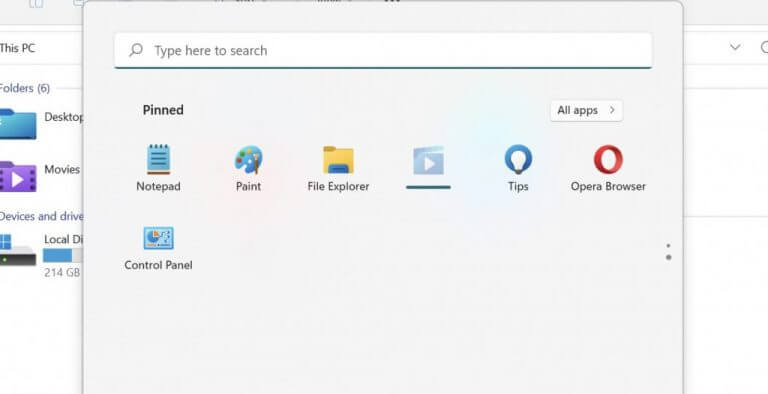
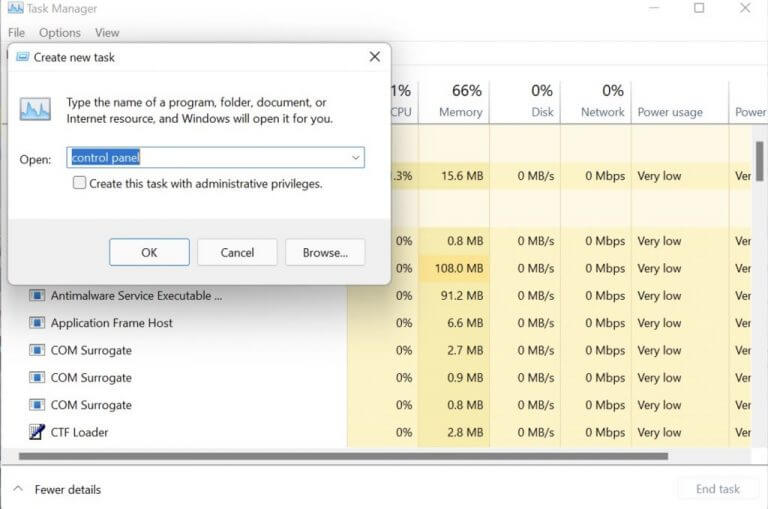
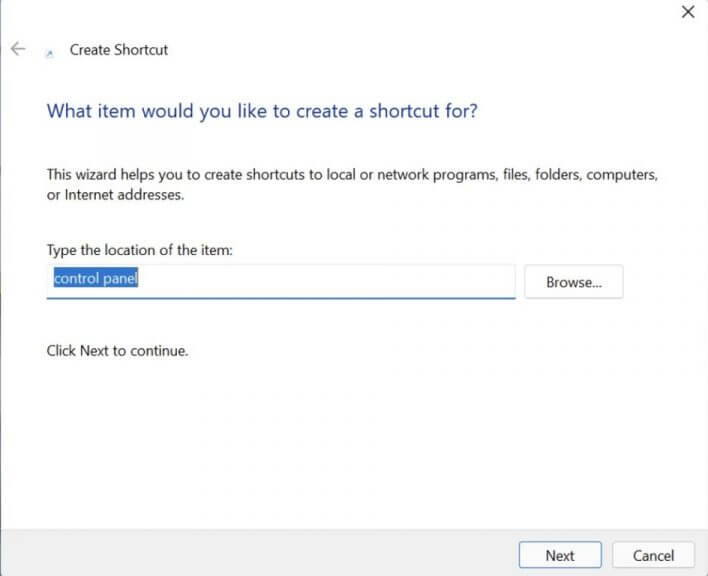
You can’t open Control Panel? Take a look at this step-by-step guide to find a solution.

Well, you can always turn to a reinstallation when all other fixes made no difference. This is one of the best-suited remedies for various Windows Live Mail issues, so apply the steps to force synchronization and update the Inbox folder.

You can also make use of professional third-party uninstaller software for quicker and more effective results.

Not only are they easy-to-use, but they will remove all traces of Live Mail from your PC, including the residual files that would otherwise be left behind.

To get started, install and open your uninstaller. Choose Live Mail as the software you want to uninstall, confirm, and wait for the process to complete.

With all of the files deleted, it will be as if Live Mail was never on your PC, so a fresh reinstall will be guaranteed to go without any unfortunate surprises.

2. Switch off conversations

how to switch off conversations

Try clicking Conversations on the View tab and selecting Off. Switching off conversations fixed the problem for most Windows Live Mail users, so this should be your first stop.

3. Make sure Inbox was set as the Root folder path

Experienced users further recommend checking if no folder was set as the Root folder path. Take a closer look under Properties > IMAP.

Enter the appropriate Root folder (Inbox) and you are likely to get the emails back in the correct subfolder.

4. Check Windows Live Mail sent email settings

Windows Live Mail settings

Alternately, go to File > Tools > Options which should pop up a window with different tabs. Click on the Send tab. Here you would see the option to Save copy of sent messages in the Sent Items folder.

If it’s unchecked, tick the box and click Save. If it is ticked already, then uncheck the box and save the changes. Once done, go back to the same window and recheck the box.

5. Remove the affected email and restart

If Windows Live Mail is not saving sent messages even with the option above checked, you have reasons to believe that the Sent Items folder file is corrupted. In this case, remove the affected email and restart.

6. Change the view to apply to All Messages

You could also try to open the Views tab on top of Live Mail. While there, click the Views icon and select Modify view in the dropdown.

Change the view to apply to All Messages and set the rule to Show. You have accidentally modified the view to hide messages, but correcting this is as easy as described.

7. Try an alternative email software

Live Mail is pretty updated, and many users have migrated from it because of that, and you should do the same, choosing Mailbird as an alternative.

This program is not only modern, it spearheaded the email client market with its revolutionary features and tools.

More so, you can migrate all of your email addresses with this client, since it supports pretty much all email providers.

⇒ Get Mailbird

To avoid a long and annoying process of looking for solutions over forums, we provide you with this list of the best fixes. Even as a very non-techy user, take them into consideration and you should be able to resolve the error.

Windows 10 is Not Showing Disk Drive: 6 Fixes that Really Work

Whenever you encounter an issue such as Windows 10 not showing disk drive, or you cannot find or see it under File Explorer, there are several telltale errors that accompany it.

The Windows 10 not showing disk drive issue may come up after you upgrade Windows, uninstall Microsoft Digital Image, or install or uninstall CD or DVD recording programs.

At the same time, under Device Manager, the disk drive is also marked with a yellow exclamation point right next to it.

You’ll also get some of the errors listed in the Device Status section including:

  • Windows cannot start this device because its configuration information is incomplete or damaged
  • The device is not working properly because Windows cannot load drivers required for this device
  • A driver for this device has been disabled.
  • Windows cannot load the device driver for this hardware. The driver may be corrupted or missing
  • Windows successfully loaded the device driver for this hardware but cannot find the device

If Windows 10 doesn’t show your disk drive or detect it, try some of the solutions in this article and see whether it helps display your disk drive again.

What to do if Windows 10 won’t display disk drive?

  1. Run Hardware and Devices troubleshooter
  2. Check BIOS settings and chipset drivers
  3. Update or reinstall drivers
  4. Remove and re-install IDE/ATAPI drivers
  5. Fix corrupted registry entries
  6. Create registry subkey

1. Run Hardware and Devices troubleshooter

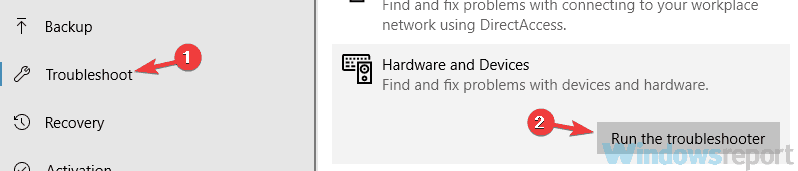
If Windows 10 is not showing disk drive, then run the Hardware and Devices troubleshooter to resolve the issue. This checks for commonly occurring issues and ensures any new device or hardware is correctly installed on your computer.

Here’s how to go about it:

  1. Right click Start
  2. Select Control Panel
  3. Go to View by option on the top right corner
  4. Click the drop down arrow and select Large icons
  5. Click Troubleshooting
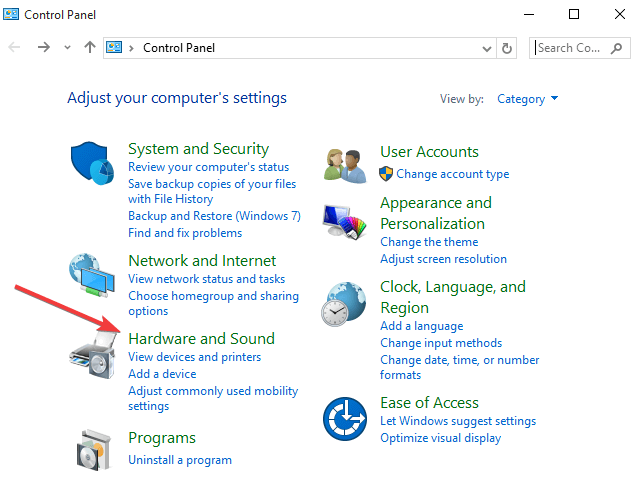
  6. Click Hardware and Sound
  7. Click Configure a Device
  8. Click Next to run the troubleshooter

Follow the instructions to run the Hardware and Devices troubleshooter.  The troubleshooter will begin detecting any issues that may be causing the Windows 10 not to show disk drive problems.

Are you able to see the disk drive again? If not, try the next solution.

2. Check BIOS settings and chipset drivers

Confirm that the drive is activated in the BIOS settings. If you don’t know how to do this, check with the device’s manufacturer.

Also check with the manufacturer whether the drive came with the device, or if it was separately purchased. Ask the driver’s manufacturer if the chipset drivers are current.

3. Update or reinstall drivers

There are three ways to update the drivers:

  1. Check Windows Updates for latest driver updates and install them
  2. Install drivers from manufacturer website
  3. Install drivers from Device Manager

Check Windows Updates for the latest driver updates and install them

If you check Windows Updates and find that driver updates are available, install them and check if it helps fix the problem.

Follow these steps to do this:

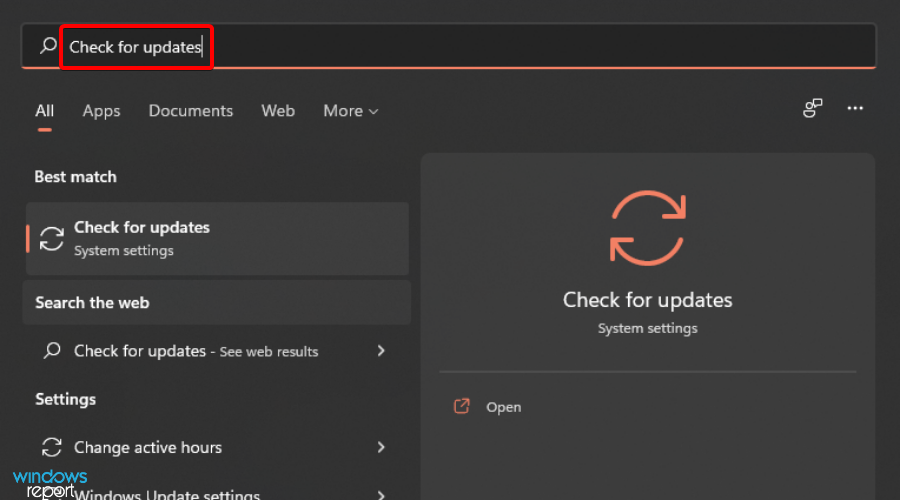
  1. Click Start
  2. Go to the search field box
  3. Typed Updates
  4. Click Windows Update Settings
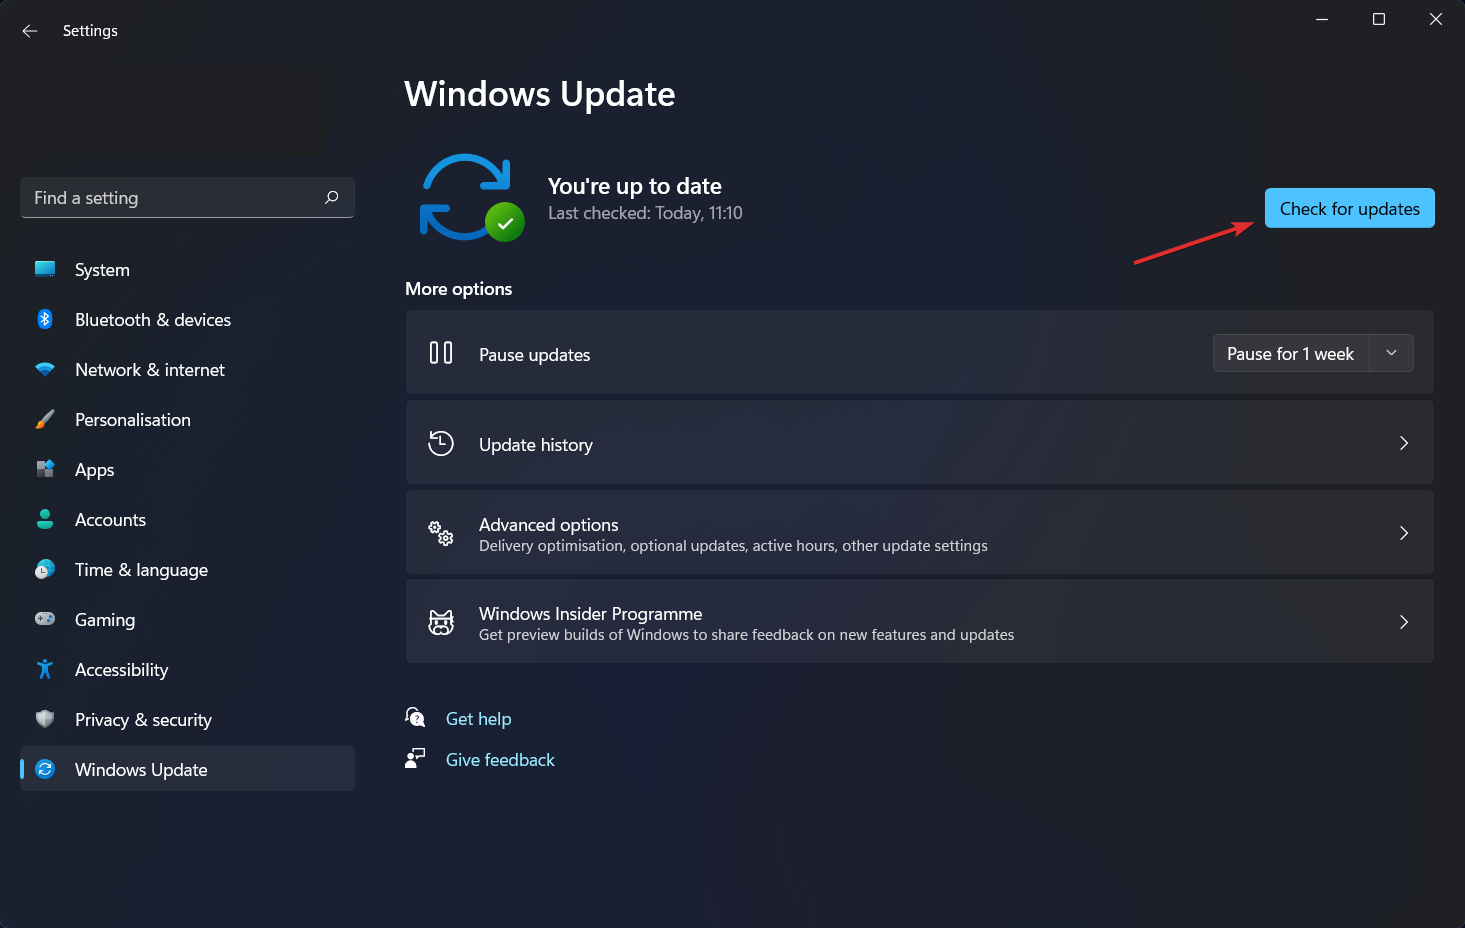
  5. In the Windows Update settings window, click Check for Updates, and install all updates listed.check for updates

Windows will immediately detect your system’s configuration and download appropriate drivers for it.

Important drivers you need to download after installing or upgrading to Windows 10 include chipset, video, audio, and network (Ethernet/wireless) drivers.

For laptops specifically, download also the latest Touchpad drivers.

Install drivers from the manufacturer’s website

You can also find drivers from the manufacturer’s website’s support section for your laptop type. Go to the Software and Drivers sub-section (depending on the laptop brand this name can change), or search for drivers using Google so you can get a direct link to your device’s manufacturer website.

Once you’re on the website, find and download, then install the appropriate drivers missing from your laptop that can cause Windows 10 not to show disk drive.

Install drivers from Device Manager

In case of Windows Update didn’t detect your driver, or you couldn’t get it from the manufacturer website, you can try using Device Manager on your laptop and manually install the driver using the steps below:

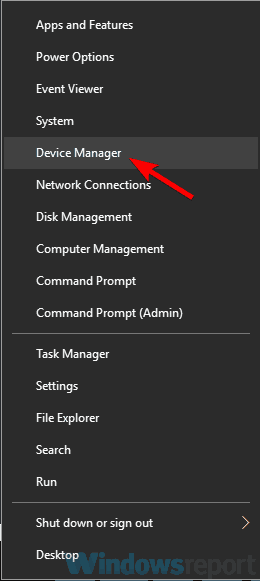
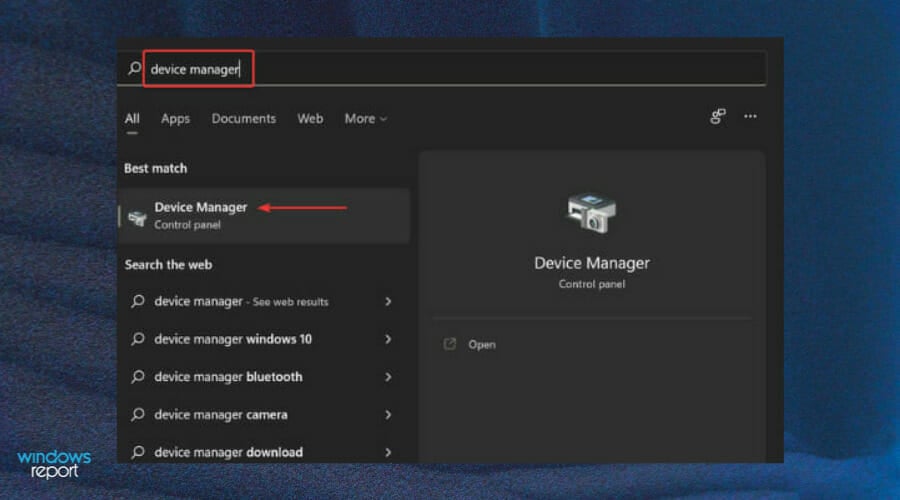
  1. Right click Start
  2. Select Device Manager
  3. Select DVD/CD-ROM drives to expand the list
  4. Right click on it
    device manager
  5. Select Update Driver Software
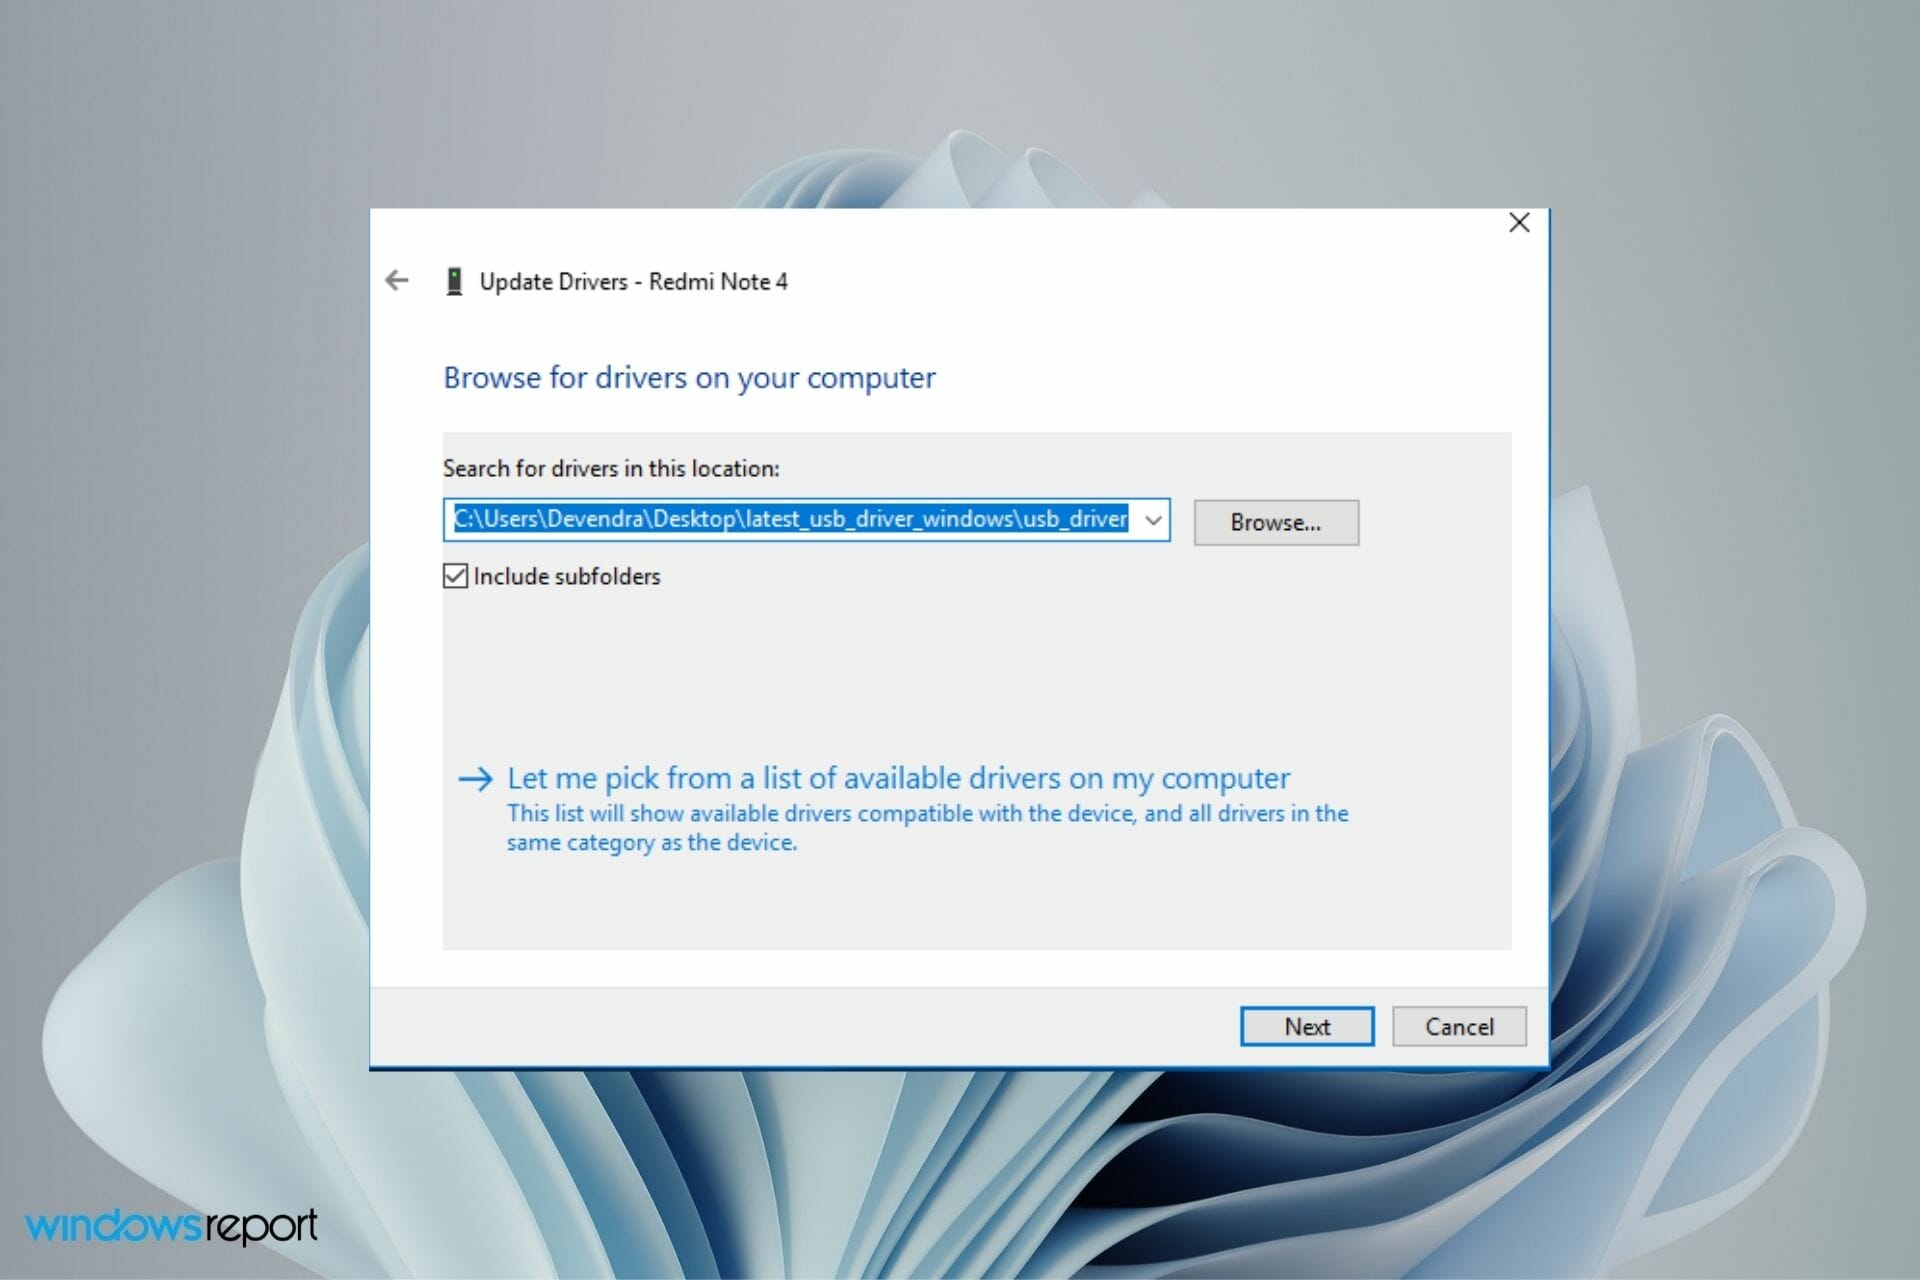
  6. The update driver wizard will launch. Select either Search automatically for updated driver software, or Browse my computer for driver software.

To reinstall the drivers, here’s what you need to do:

  1. Right click Start
  2. Select Device Manager
  3. Select DVD/CD-ROM drives to expand the list
  4. Right click on it
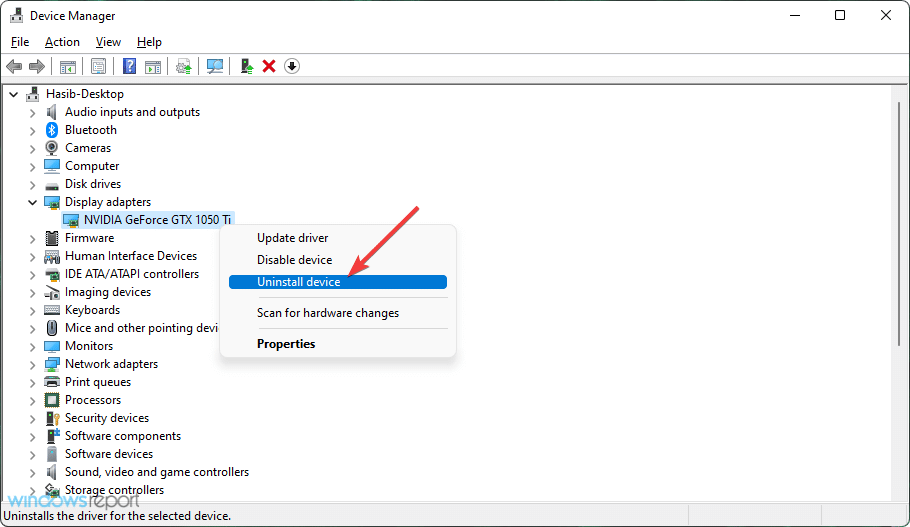
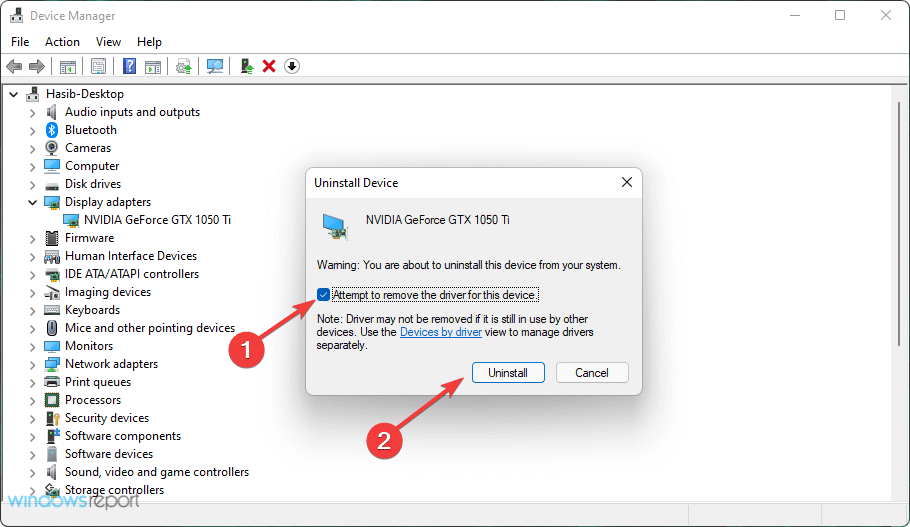
  5. Select Uninstall
  6. Select OK to confirm removal of the device
  7. Restart your computer

Once you restart, the drivers will be automatically re-installed.

Install drivers automatically with dedicated software

Another option is to use dedicated software. It is the safest and most time-saving since it will eliminate most of the above-mentioned steps.

Driver updaters such as Outbyte Driver Updater will scan your device and identify out-of-date, damaged, or missing drivers. They will install the best version available for your specific hardware.

You can set it up to do regular scans and updates so you won’t have to worry about driver issues again. The UI is very simple and easy to use, you can get started in just a few minutes.

⇒ Get Outbyte Driver Updater

4. Remove and re-install IDE/ATAPI drivers

IDE/ATAPI are software development tools used to write and test programs or software. Some users said the IDE/ATAPI interface is obsolete today because newer motherboards don’t have it anymore. The interface has been replaced with Serial ATA, found on most desktops and laptops.

However, in order to remove and reinstall the IDE/ATAPI drivers on your computer, take these steps:

  1. Right click Start
  2. Click on Device Manager
  3. Click View on the menu
  4. Select Show Hidden Devices
  5. Click on the arrow next to IDE/ATAPI controllers to expand the list
  6. Select and right click ATA Channel 0, and click Uninstall. Do the same for the other entries on the list
  7. Restart your device or computer
  8. Your drivers will be installed automatically once your device or computer restarts

If you still get the Windows 10 not showing disk drive even after doing this, use the next solution.

5. Fix corrupted registry entries

The reason the Windows 10 not showing disk drive issue occurs may be that there are two Windows registry entries that have been corrupted.

Follow these steps to use your computer’s Registry Editor to remove and delete the corrupted entries:

  1. Right click Start button
  2. Click Run
  3. Type regedit in the Run box
  4. Click OK or press Enter
  5. If a password or administrator permission is required, click Yes or Allow
  6. Find and select this registry subkey: HKEY_LOCAL_MACHINESYSTEMCurrentControlSetControlClass{4D36E965-E325-11CE-BFC1-08002BE10318}
    Windows 10 not showing disk drive
  7. On the right pane, choose Upper Filters (if you see bak, don’t remove it)
  8. Click Upper Filters (you can also remove Lower Filters if Upper Filters doesn’t show)
  9. On the Edit menu, select Delete
  10. Select Yes if prompted to confirm deletion
  11. Select Lower Filters in the right pane

Note: if Lower Filters doesn’t show under registry entry, use these steps:

  1. On Edit menu, select Delete
  2. Confirm deletion by selecting Yes
  3. Exit Registry Editor
  4. Reboot your computer

In order to use this method, you need to have logged into Windows as an administrator.

If you want to verify that you are logged in as administrator, do the following:

  1. Right click on Start
  2. Click Control Panel
  3. Select User Accounts
  4. Select Manage User Accounts

Note: The steps outlined above for Registry Editor must be followed carefully because any incorrect modifications to the registry may cause serious damage to your computer.

Before making any changes, back up the registry for restoration in case of any problems.

Sometimes, this method may cause CD/DVD recording software to have bugs or not work correctly. In case this happens, try to uninstall and reinstall the affected app, and check with its creator for an updated version.

If this method still didn’t work to resolve the Windows 10 not showing disk drive issue, use the next solution.

6. Create registry subkey

In order to create a registry subkey, take the following steps:

  1. Right click Start button
  2. Click Run
  3. Type regedit in the Run box
  4. Click OK or press Enter
  5. If a password or administrator permission is required, click Yes or Allow
  6. Find and select this registry subkey: HKEY_LOCAL_MACHINESYSTEMCurrentControlSetServicesatapi
  7. Right click ATAPI then point on New and select Key
  8. Type Controller0
  9. Press Enter
  10. Right click Controller0 then point New and select DWORD(32-bit) Value
  11. Type EnumDevice1
  12. Press Enter
  13. Right click EnumDevice1
  14. Select Modify…
  15. Type 1 in Value data box
  16. Click OK
  17. Exit Registry Editor
  18. Reboot your computer

In order to use this method, you need to have logged into Windows as an administrator.

If you want to verify that you are logged in as administrator, do the following:

  1. Right click on Start
  2. Click Control Panel
  3. Select User Accounts
  4. Select Manage User Accounts

Use this method on Windows 7, 8/8.1, or Windows 10 (version 1507). These issues are not found in Windows 10 version 1511 or later versions.

Note icon NOTE
The steps outlined above for Registry Editor must be followed carefully because any incorrect modifications to the registry may cause serious damage to your computer. Before making any changes, back up the registry for restoration in case of any problems.

You might also be interested in reading our guide on what to do if the D drive is missing in Windows 11.

Did any of these six solutions help resolve the Windows 10 not showing disk drive issue? Let us know in the comments section below.

How to fix corrupted CSV files in Windows 10

A CSV file, otherwise known as a comma-separated values file is a format that stores alphanumeric tabular structure data but in plain text format.

Such files have data records, each of which is a collection of at least two (or more) fields separated by commas. These can be imported or exported from software programs such as Excel or Open Office Calc, which store data in the row-column structure.

Among the causes of a corrupted CSV file are:

  • ASCII control characters at the end of line that cannot be printed
  • Separator characters in the text of the CSV files
  • Line breaks in the fields that have no double quotes enclosing them
  • Using invalid characters such as -, (), .,:, * and others
  • Blank lines at the end of the corrupted CSV file that have a separator
  • Long numbers that have leading zeros
  • An invalid CSV file format
  • CSV file not using UTS (8 encoding)

To fix a corrupted CSV file, we’ve listed below some solutions to help you recover your document back in a usable format.

How can I recover corrupted CSV files?

  1. Use another software to open the CSV file or Import and repair in Excel
  2. Use a third-party tool
  3. Use Unicode UTF-8 encoding
  4. Specific solutions
  5. Use Notepad or Excel to create a CSV file and repair it
  6. Recover using Autorecover feature
  7. Recover using TMP file
  8. Recover the corrupted CSV file from a previous version

1. Use another software to open the CSV file or Import and repair in Excel

  1. Open Excel – new workbook.
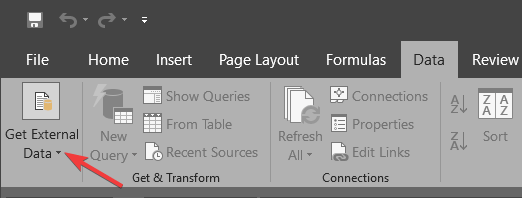
  2. Click Data tab.
  3. Select From Text under the Get External Data section.get external data excel
  4. Browse the corrupted CSV file.
  5. Click Import.
  6. Choose Delimiter and Next.
  7. Select Comma and click Next.
  8. Click the column with the numbers and click Text.
  9. Repeat the steps for all the columns with numbers and click OK.

Note: Do the above each time the file is opened in Excel.

If you need to open .csv files (or other Spreadsheet files) on Windows 10 and you can’t do this, you can always use third-party solutions.

We recommend File Viewer Plus, a universal file viewer for Windows that can open over 300 different file types, CSV included. Other file types are documents, photos, videos, archives, or source code files.

Not only do you view the desired documents, but you can also edit, convert to other formats or print them.

2. Use a third-party tool

Before jumping to solutions, we might as well suggest that you use a third-party recovery tool that will do the job for you. It might be less time-consuming, especially if you’re less of a tech geek.

On this note, Stellar Data Recovery is an excellent option. In order to discover more about this tool, just check out our awesome Stellar Data Recovery review.

That’s your chance to recover for free up to 1 GB of lost or deleted documents, email data files, videos, photos, including data from a corrupt or malware-infected drive.

You can use it for both your Windows 10 PC and an external hard drive and it is compatible with hundreds of file formats, CSV. included.

3. Use Unicode UTF-8 encoding

  1. Open the CSV file.
  2. Click File, then Save As.
  3. Enter the file name.
  4. Select Save as File Type CSV from the drop-down menu.
  5. Click Tools and go to Web options.
  6. Go to Encoding under Save this document as.
  7. Select Unicode (UTF-8)

4. Specific solutions

Foreign characters corrupted or missing: use Google sheets, or Open Office, Libre Office, Notepad++ advance apps to repair the corrupted CSV file.

Error message Line 1 has too many columns…: create a new CSV file with data in 14 columns using Excel, Notepad++ or other apps to recover the CSV data.

Corrupt CSV because of ASCII control, special or extra delimiter characters:

  1. Delete the spaces at the end of the file
  2. Fix the extra commas from the corrupted CSV file by deleting extra delimiter characters that separate the handler fields and retrieve the file data

5. Use Notepad or Excel to create a CSV file and repair it

Using Notepad

  1. Enter the text data in a file with each of the fields separated by a comma.
  2. Separate each row using a new line.
  3. Save the file using a .csv extension.

Use Excel Spreadsheet

  1. Enter the data in an Excel spreadsheet.
  2. Click File.
  3. Select Save As.
  4. Choose Save as Type.
  5. Select CSV (comma delimited).

6. Recover using Autorecover feature

This feature can be found in Excel. Open a spreadsheet and look for the Autorecover window (usually on the left pane of the window). The screen has a list from where you can select the CSV file. It works with unsaved files.

7. Recover using TMP file

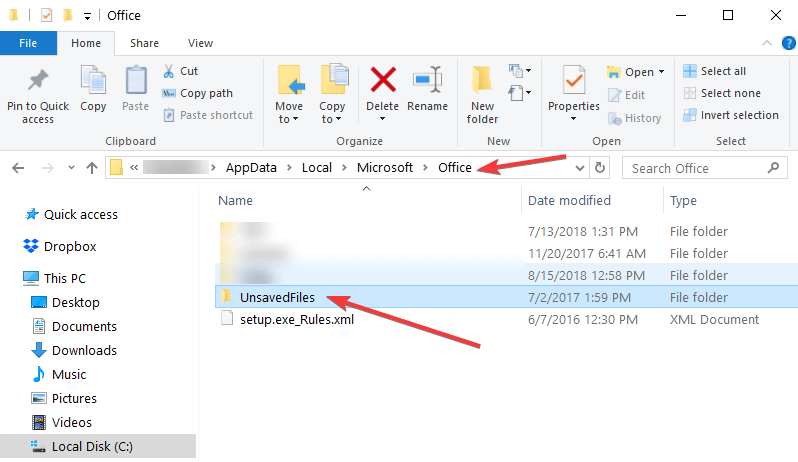
  1. Go to where the Temp file folder is located: C:UsersAppDataLocalMicrosoftOfficeUnsavedFilesmicrosoft office unsaved files
  2. Search the Excel files with .TMP extension.
  3. Select the right one by verifying the data.
  4. Copy and paste or save it to a different destination using .CSV extension.

8. Recover the corrupted CSV file from a previous version

  1. Go to the corrupted CSV file and right-click on it.
  2. Select Properties.
  3. Click Previous Versions.
  4. Select the last version before saving/replacing.
  5. Click Restore (ensure restore points are enabled).

So, were you able to find a solution among the ones listed here? If the file is still corrupted, your only option would be to find the original source and then convert Excel to CSV file.

Let us know which one worked for you by leaving a comment in the section below.

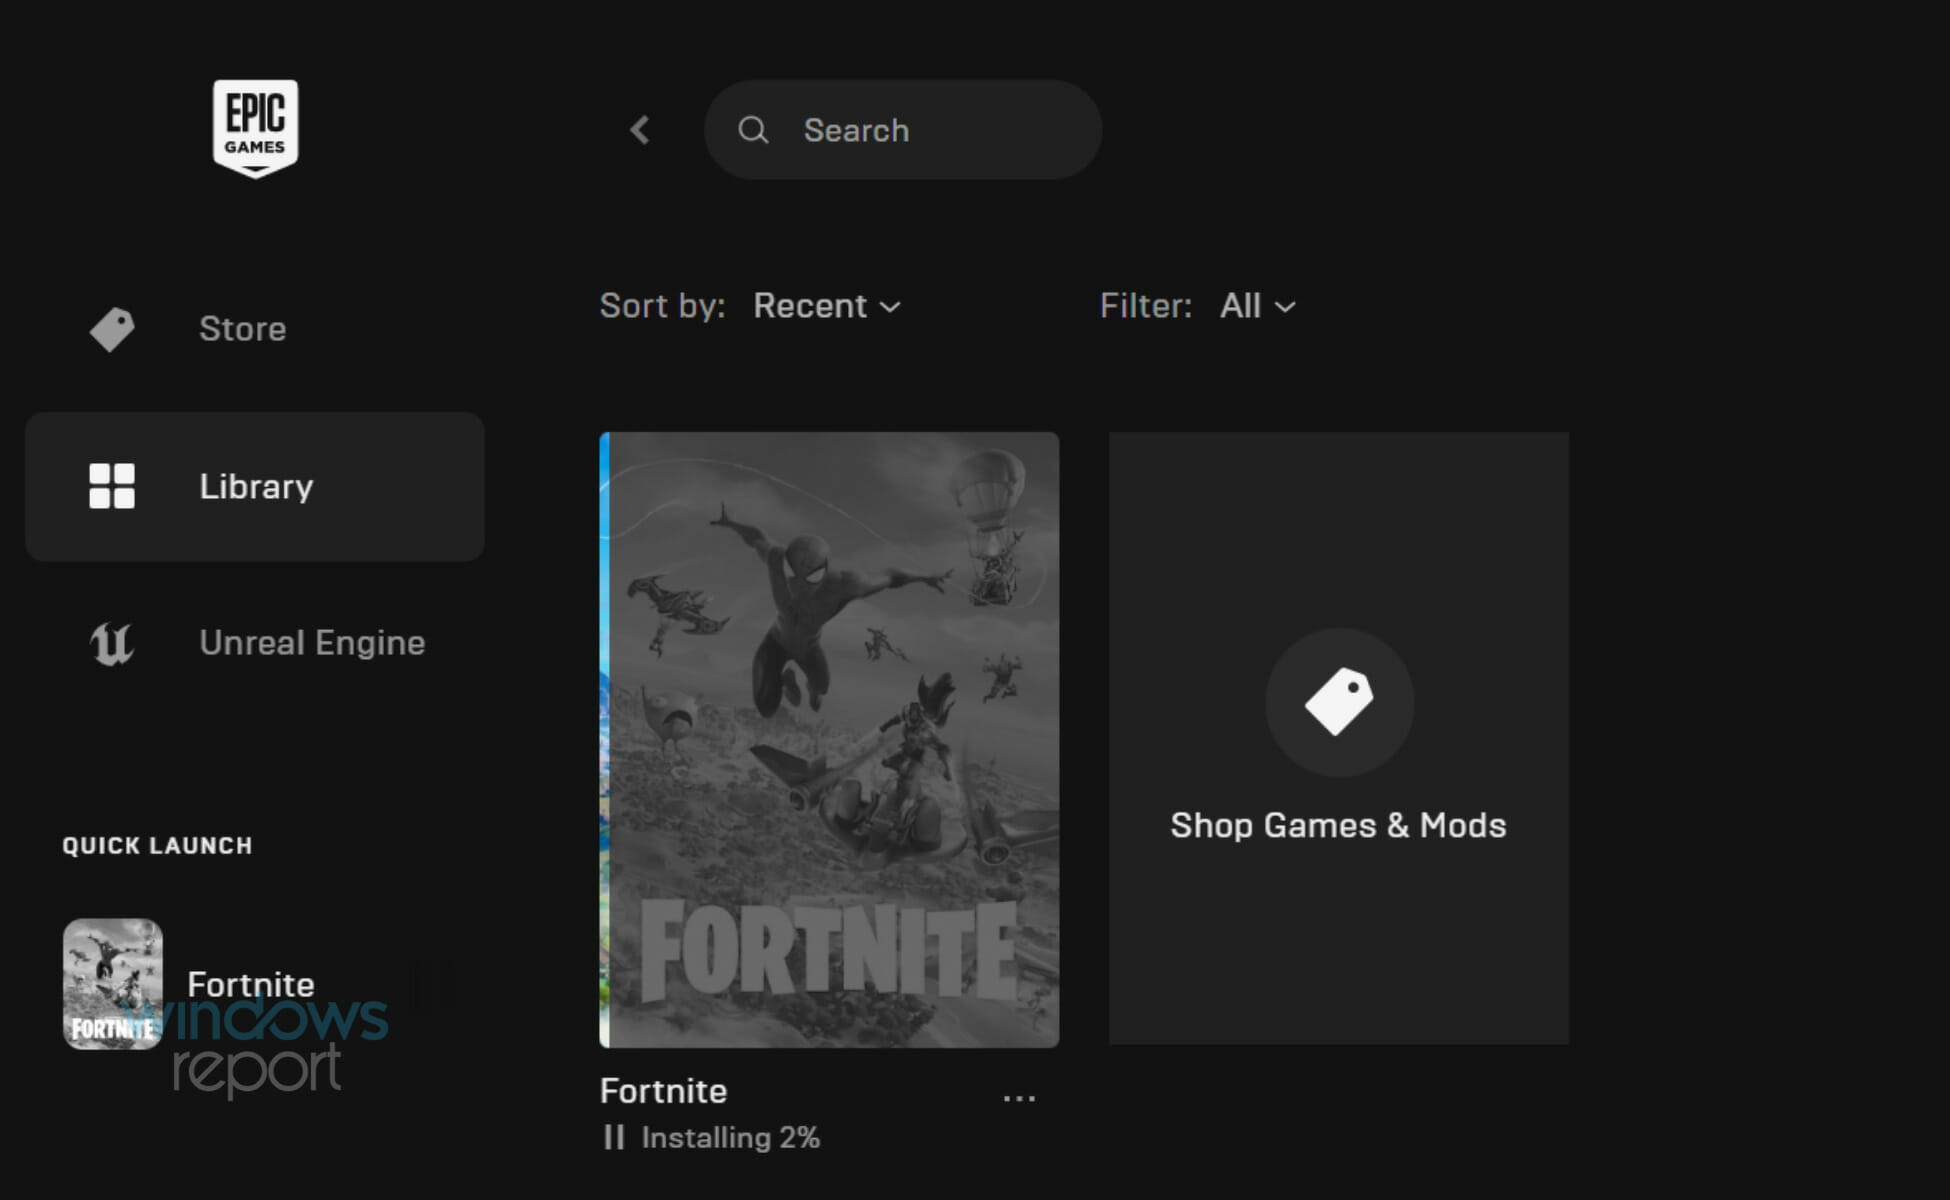
Epic Games OS Unsupported [Fortnite]: How to Fix

Today, we will show you how to run Fortnite on an unsupported OS. This is a popular Windows PC game by Epic Games.

Fortnite is the living, action-building survival game where you and your friends lead a group of Heroes to reclaim and rebuild a homeland left empty by a mysterious darkness called “The Storm”.

It is about crafting weapons, building fortified structures, exploring, scavenging items, and fighting massive monsters. It’s a milder version of PlayerUnknown’s Battleground if you like.

However, Fortnite’s system requirements are as shown below.

Fortnite recommended system requirements:

  • Nvidia GTX 660 or AMD Radeon HD 7870 equivalent DX11 GPU
  • 2 GB VRAM
  • Core i5 2.8 Ghz
  • 8 GB RAM
  • Windows 7/8/10 64-bit

Fortnite minimum system requirements:

  • Intel HD 4000
  • Core i3 2.4 Ghz
  • 4 GB RAM
  • Windows 7/8/10 64-bit

Hence, the game can only be installed on a 64-bit processor. However, in order to install and play the game on an unsupported OS, Windows Report has compiled applicable fixes listed in this post.

How can I run Fortnite on unsupported OS?

  1. Update your PC hardware
  2. Buy a 64-bit PC
  3. Use PC emulator
  4. Install 64-bit partition on your drive

1. Update your PC hardware

First, you may need to consider meeting Fortnite system requirements by updating your PC. Hence, replacing your PC’s RAM with 64-bit RAM may be all you need, or changing your hard drive and then reinstalling Windows OS.

However, before updating your PC’s hardware, you should carefully backup all your important files and restore them after updating your Windows PC. You can easily get this done with the help of a computer engineer/technician around you.

2. Use a 64-bit PC

Sometimes, having a dedicated gaming PC with a 64-bit partition is not a bad idea. Some PCs are not built to handle heavy-duty games such as Fortnite.

Hence, if you want to play Fortnite and other games with similar resource requirements, we recommend you do so on a 64-bit PC.

There are some impressive listings of 64-bit partition Windows 10 OS PCs available on Amazon. This is a good place to start if you want to upgrade your equipment; you will find all the necessary information, plus a real-time review from users who have already tried the device.

3. Use a PC emulator

Some Windows users reported getting Fortnite to play simply by using a PC emulator to run the game.

However, some emulators might not work with your PC depending on the configuration settings, but the following emulators are known to be able to work with Fortnite:

Meanwhile, you may proceed to the next step if this solution does not get Fortnite to run.

4. Install a 64-bit partition on your drive

Lastly, another way of getting Fortnite to run is by installing a 64-bit partition on your Windows 10 PC. Windows 10 64-bit version gives you much more advanced productivity giving you more options like a PC user.

However, this method is limited because the upgrade path allows moving a qualifying version to its similar edition on the software.

So, the best way to upgrade is to wipe clean the installation and reconfigure the settings by installing the new 64-bit version. Follow these steps to install a 64-bit partition on your drive:

4.1 Check your PC compatibility

Verify if your PC is compatible to install Windows 10 64-bit.

Windows 64-bit can only work on a PC with a 64-bit processor. The first thing to do is verify if your PC has a 64-bit processor. This can be easily checked from the system settings tab

  • Use the keyboard shortcut Windows Key + I to open the Setting Menu.
  • Click on System > then click on About.
  • This will open a tab where you would see two distinct information.
windows 10 system info

If it displays a 32-bit operating system, and x64-based processor, this shows your PC is compatible with Windows 10(64-bit). But if it says 32-bit operating system, x86-based processor, then your PC is not compatible with Windows 10 (64-bit)

4.2 Check if your drivers are compatible with the x64 processor

It is vital to check if other components of your PC are 64-bit compatible, as 32-bit drivers will not work with 64-bit Windows 10.

This is not usually a problem for new PCs, but if you are using an older PC, be sure to check the Manufacturer’s website to update your drivers to the 64-bit version.

Alternatively, to eliminate any risk of error, you can use dedicated driver management software to do this task automatically. It will scan your driver and, if necessary, automatically fix any mismatch issue.

⇒ Get Outbyte Driver Updater

4.3 Backup your PC

In addition, you need to back up your system anytime you make a significant change to your computer.

Ensure you back up your personal files on an external storage device or online storage websites, as they could be deleted during the upgrading process.

4.4 Install a Fresh Copy of Windows 10

Microsoft does not permit a direct path from a 32-bit to a 64-bit version of Windows 10; the only way to upgrade is to install a fresh copy of Windows 10.

You have to create an installation media. This can be done by following these steps:

  • Connect a USB flash drive with at least 8GB of free space.
  • Go to Microsoft’s Windows 10 download page and download the Media. Creation Tool on your desktop.
  • Double-click on MediaCreationTool.exe file.
  • Check the license terms and conditions and click Accept.
  • Choose the Create installation media for another PC option.
  • Click on Next
  • Uncheck the box with Use the recommended options for this PC option
  • In the menu, select your language, edition, and, most notably, the architecture, which is 64-bit (x64).
  • Click Next.
  • Choose the USB flash drive option in the menu.
  • Select the removable drive from the drop list.
  • Click Next.
  • After the installation media is created, exit the Media Creation Tool.

5. Install the Fresh Copy 64-bit version of Windows 10

  • Restart your PC with the installation flash media connected and begin the installation of Windows 10.
  • On the Windows Setup Menu, click “Next”.
  • Click on Install now.
  • If you previously have an activated version of Windows 10, you can skip this option if you’re prompted to enter a product key.
  • Click on the licensing agreement and click Next.
  • Click the Custom: Install Windows only (advanced) option.
  • Choose and delete system partitions: Drive 0 Partition 1 and Drive 0 Partition 2.
  • Click “Next” and follow the screen directions to complete the installation.
  • After installation, ensure you go to Settings > Update & security > Windows Update to download the latest updates and drivers.
  • If some drivers are unavailable through the Windows Update,   check your computer’s manufacturer’s website to download and install the 64-bit version of the drivers needed.
  • Install any previous app and restore your files from your backup.
Note icon NOTE
The significant advantage of 64-bit Windows is that it fixes the 3.5GB of RAM limitation in the 32-bit version of the operating system. A PC with at least 4GB RAM can run more applications simultaneously. You’ll be able to run more memory-intensive applications, such as Photoshop and, most significantly, Fortnite.

Unfortunately, as new updates for Fortnite are released, you may experience issues such as Chapter 5 crashing because of compatibility issues.

We hope that this was helpful. Feel free to share your experience with us in the comments section below. You can also leave any other questions you may have there.

Full Fix: Frequent Tom Clancy’s Ghost Recon: Wildlands bugs

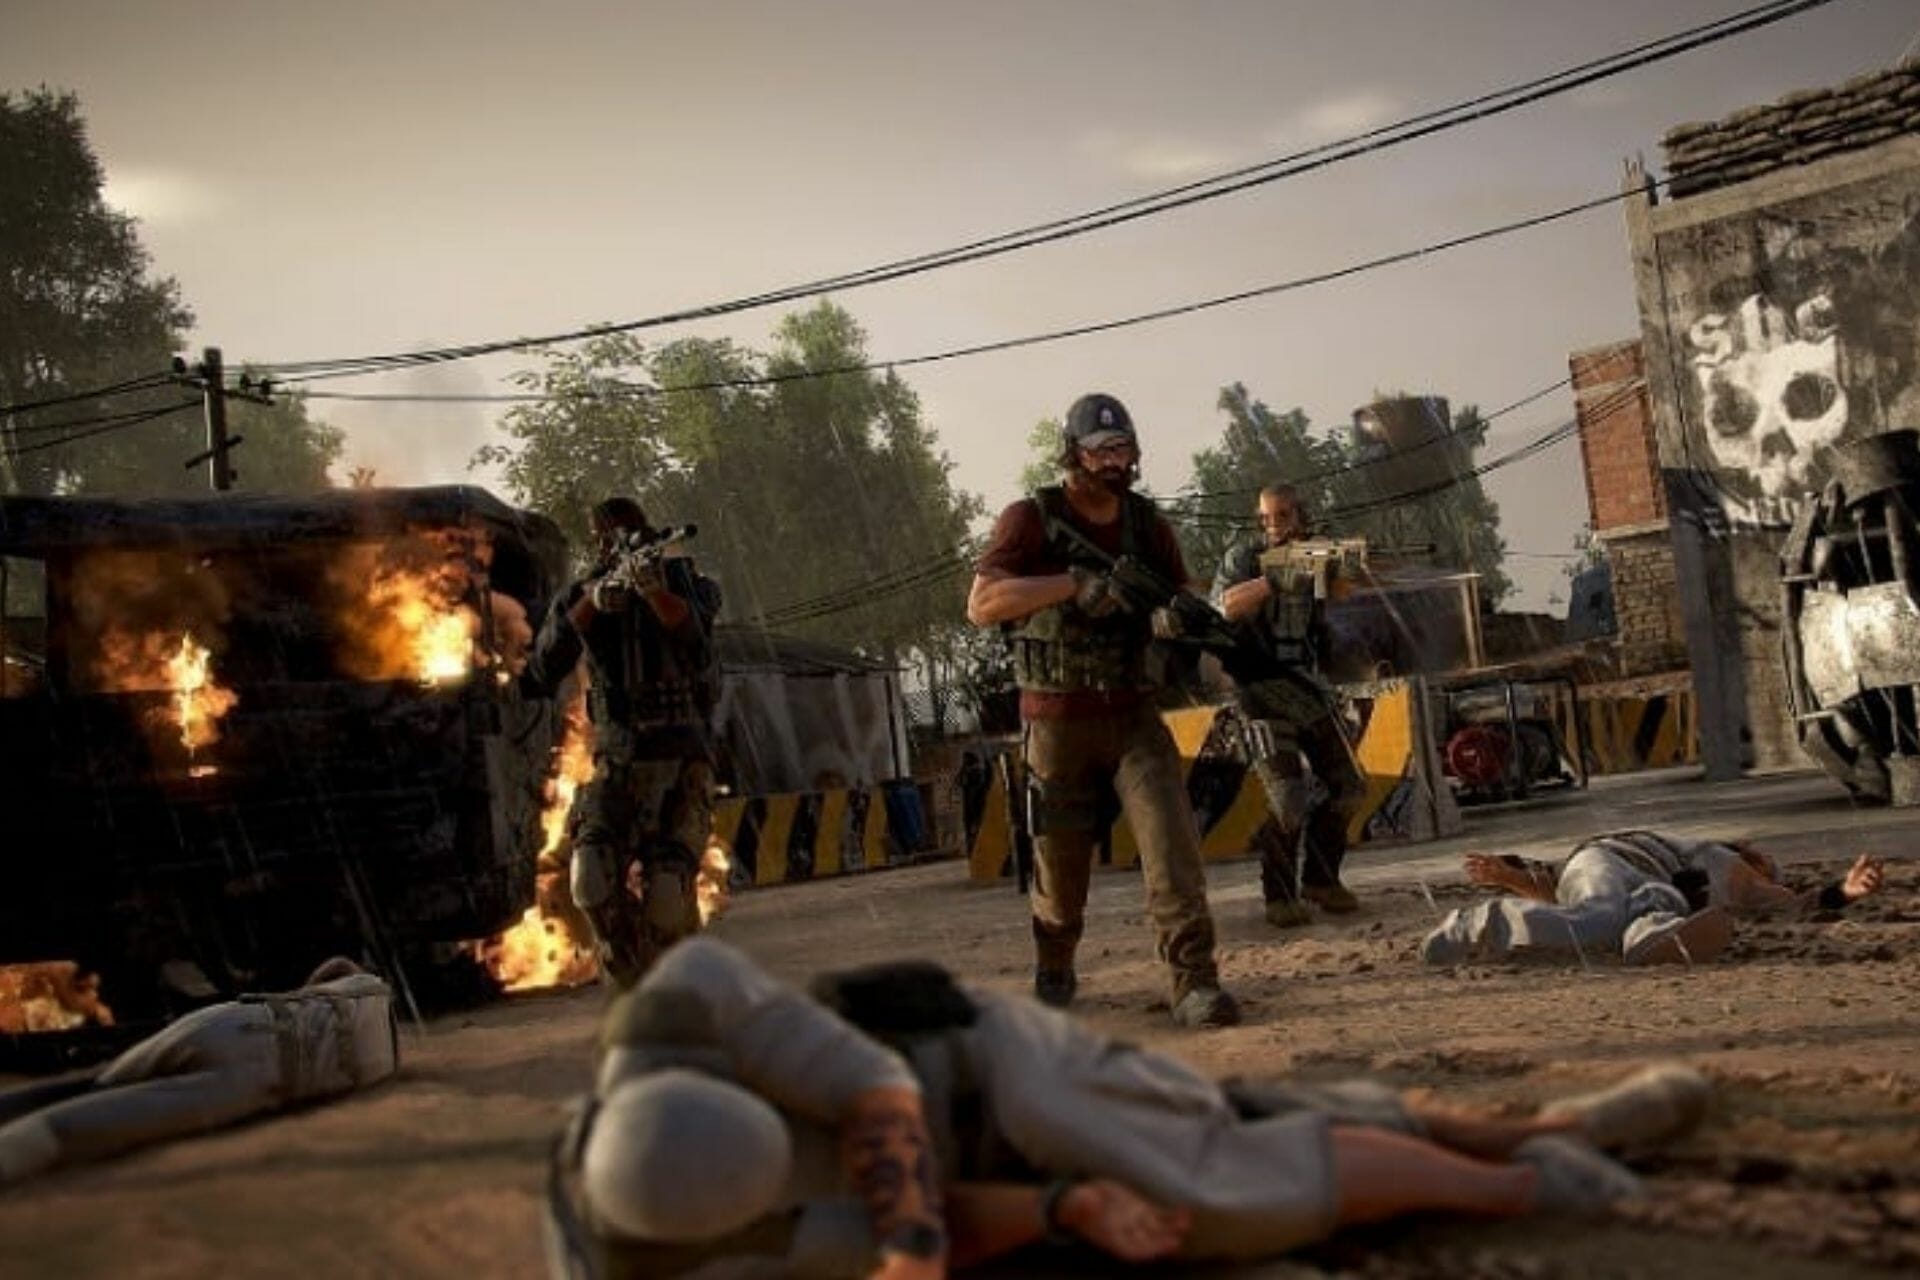
Tom Clancy’s Ghost Recon: Wildlands is now available on both the Xbox One and Windows PCs and while the game went through a beta testing period prior to launching, it appears that some of the technical issues detected in beta are still present in the final version of the game. Unfortunately, the number of fixes available is really limited.

As always, if you’re planning to buy Tom Clancy’s Ghost Recon: Wildlands, don’t forget to check the system requirements first in order to avoid potentially severe technical issues.

Fix: Tom Clancy’s Ghost Recon: Wildlands common bugs

Speaking of Tom Clancy’s Ghost Recon: Wildlands issues, here are some common problems that users reported:

  • Ghost Recon Wildlands services are not available at this time – This issue can occur if you have any problems with your network connection. If everything is in order, it’s possible that the game server has some issues.
  • Ghost Recon Wildlands connection issues PC – There are various issues that can occur and cause network problems with the game. To fix the problem, forward the required ports, reset the hosts file and restart your router.
  • Tom Clancy’s Ghost Recon Wildlands low fps – Low fps can be a big problem, but in most cases you can fix it by changing your graphics card settings.
  • Tom Clancy’s Ghost Recon Wildlands crash – If the game crashes frequently, the issue might be Uplay overlay, so be sure to disable it.

1. Install the latest updates

If you’re having problems with Tom Clancy’s Ghost Recon: Wildlands on your PC, it’s advised that you keep your system up to date. An outdated system can have certain bugs that can affect your games and other applications.

Luckily, Windows 10 installs the missing updates automatically, but you can always check for updates manually by doing the following:

  1. Open the Settings app. You can do that by pressing Windows Key + I shortcut.
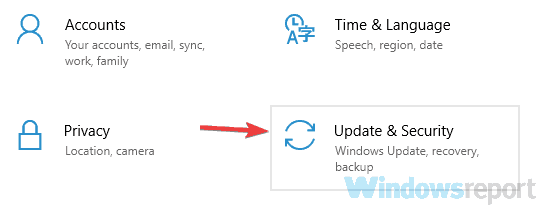
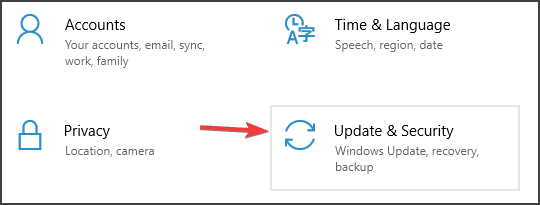
  2. Navigate to Update & Security section.
    Tom Clancy's Ghost Recon Wildlands low fps
  3. Now click Check for updates button.
    Ghost Recon Wildlands services are not available at this time

If any updates are available, they will be downloaded in the background and installed as soon as you restart your PC. Once the latest updates are installed, check if the problem is still there.

2. Restart your router

According to users, if you’re having Tom Clancy’s Ghost Recon: Wildlands issues, especially network-related issues, the problem might be your router/modem. To fix the problem, you just need to restart your modem/router.

To do that, press the power button on the modem or router and wait for 30 seconds. Now press the power button again and wait while the modem boots. Once your Internet connection starts working, try to start the game and check if the issues are resolved.

If your connection drops with specific error codes like Tarija 00019 or 00014, follow this guide to fix Ghost Recon Wildlands error Tarija 00019 and 00014.

3. Check your antivirus

According to users, sometimes Tom Clancy’s Ghost Recon: Wildlands issues can occur due to your antivirus. To fix that, it’s advised to add the game to the exceptions list in your antivirus and firewall. If that doesn’t work, you can try disabling certain antivirus features or disable your antivirus entirely.

In some cases, in order to fix the problem, you might even have to remove your antivirus. If removing the antivirus solves the problem, this might be a good time to consider switching to a new antivirus. Many antivirus applications have a Gaming Mode feature, and thanks to this feature, your antivirus won’t interfere with your games in any way.

If you’re looking for a good antivirus that won’t interfere with your games, we strongly suggest that you consider TotalAV.

It has a gamer mode feature that prioritizes gaming by temporarily disabling unnecessary processes. It also stops intrusive notifications both from the AV itself and other applications while you are in game. 

4. Forward the required ports

If you’re having network issues in Tom Clancy’s Ghost Recon: Wildlands, the cause might be your ports. The game requires certain ports to be forwarded in order to work properly. As for the required ports, you need to forward these ports:

Uplay PC:
TCP: 443, 14000

Game Ports:
UDP: 3074 to 3083, 6000, 6180, 7000

To see how to forward these ports, be sure to check your router’s manual for detailed instructions.

5. Reset the hosts file to the default

According to users, many network issues can occur in Tom Clancy’s Ghost Recon: Wildlands due to your hosts file. If the hosts file is altered, you might not be able to connect to the game server.

To fix this problem, it’s required that you reset your hosts file. Keep in mind that sometimes you might encounter Access denied message while editing hosts file, but there’s a way to fix this problem.

Once you reset the hosts file, the issue should be resolved.

6. Flush your DNS cache

DNS cache can also lead to various Tom Clancy’s Ghost Recon: Wildlands issues, and in order to fix them, it’s advised to remove DNS cache. This is quite simple to do, and you can do it by following these steps:

  1. Press Windows Key + X to open Win + X menu. Select Command Prompt (Admin) or PowerShell (Admin) from the list of results.
    Ghost Recon Wildlands services are not available at this time
  2. Type in the command ipconfig /flushdns and press Enter.
    Ghost Recon Wildlands connection issues PC

After clearing the cache, check if the problem is still there.

7. Change GRW.ini file

Several users reported that their game launches on the secondary screen. This can be an annoying problem, but you can fix it by doing the following.

  1. Go to Ghost Recon Wildlands’s folder > copy the GRW.ini file.
  2. Open it in Notepad.
  3. Find the Output Monitor line > change its value to 0, 1 or 2 until the game launches on the right monitor
  4. Save the file and hit the play button.

Once you make the changes, the game should start on your main screen.

8. Delete the problematic files

There are various Tom Clancy’s Ghost Recon: Wildlands issues that can appear, but one common problem is the Outdated error message. This issue is caused by problematic files, and in order to fix the issue, it’s advised to delete certain files. To do that, follow these steps:

  1. Go to the game’s installation folder
  2. Locate the following files: Events.xml, Uyuni.grw, VersionDescription.ini, and NvGsa.x64.dll.
  3. Delete them > launch the game again.

9. Delete save files

Many users reported hidden characters during the character creation. This can be a big problem, but you can fix the issue by deleting certain files. To do that, follow these steps:

  1. Disconnect from the Internet.
  2. Go to the following directory: C:Program Files (x86)UbisoftUbisoft Game Launchersavegamesa8f05897-544b-4f39-a5ef-81914e20cf123559. Bear in mind that the string of numbers may be different for you, and you should go to the last numbered directory.
  3. There, you’ll find a list of save files, such as 1.save, 2.save, and so on > delete all those files.
  4. Start the game with the Internet still disconnected.
  5. Create your character > exit the game to desktop > reconnect to the Internet.
  6. Restart the game > the launcher is going to display a “Saved game file out of sync” message > chose Local File (the save file you created while offline).
  7. Once in the game, chose either Continue campaign or select Campaign save.

10. Adjust your settings for maximum performance

According to users, one of the most annoying Tom Clancy’s Ghost Recon: Wildlands issues is FPS lag. This issue can drastically impact your performance and gameplay, but there are a few tips that can help you improve your frame rate:

  1. Turn off CPU multithreading in BIOS.
  2. Turn off “vegetation realism”, the NVIDIA turf effect for grass shadows. You can find the option in Settings.
  3. Use DSR instead of AntiAliasing.
  4. Install the game on SSD.

11. Disable overlays

If Tom Clancy’s Ghost Recon: Wildlands is crashing on your PC, the issue might be due to your overlay. However, you can fix this issue simply by disabling overlay in Uplay. To do that, just follow these steps:

  1. Start Uplay Launcher.
  2. Navigate to Settings > General.
  3. Now uncheck Enable in-game overlay for supported games option.

After doing that, try to start the game and check if the issue is still there.

We hope the ideas listed above help you to fix some of the most common bugs affecting Tom Clancy’s Ghost Recon: Wildlands. For more solutions, don’t miss our guide on what to do if Ghost Recon Wildlands is not launching.

If you’ve got any other tips and tricks to share, list them in the comment section below.

Is Cyberpunk 2077 update about to launch on Xbox Game Pass?

CD Projekt Red studios, the creators behind Cyberpunk 2077 hosted a digital event February 15, 2022 at 4 p.m. CET to cover the release of the next big update to the game.

A lot can be said about the initial release of Cyberpunk 2077 which saw critics pan the futuristic open world RPG, for bugs, fidelity issues, multiplayer connectivity frustrations and delayed updates. The list of issues with Cyberpunk back in late 2020 and early 2021 grew so long that both Sony and Microsoft were forced to issue apologies to customers regarding refunds due to its incomplete status as a game.

With some of those issues in CDPR Cyberpunk 2077 addressed, the studio is introducing a next-gun update/upgrade to the game that targets Series X|S and PlayStation 5 consoles and is kicking off the announcement over on its Twitch channel.

CDPR will be offering a 5-hour free trial of the game to Series X|S via Game Pass until March 5th, with any progress carried over if you decide to buy the game.

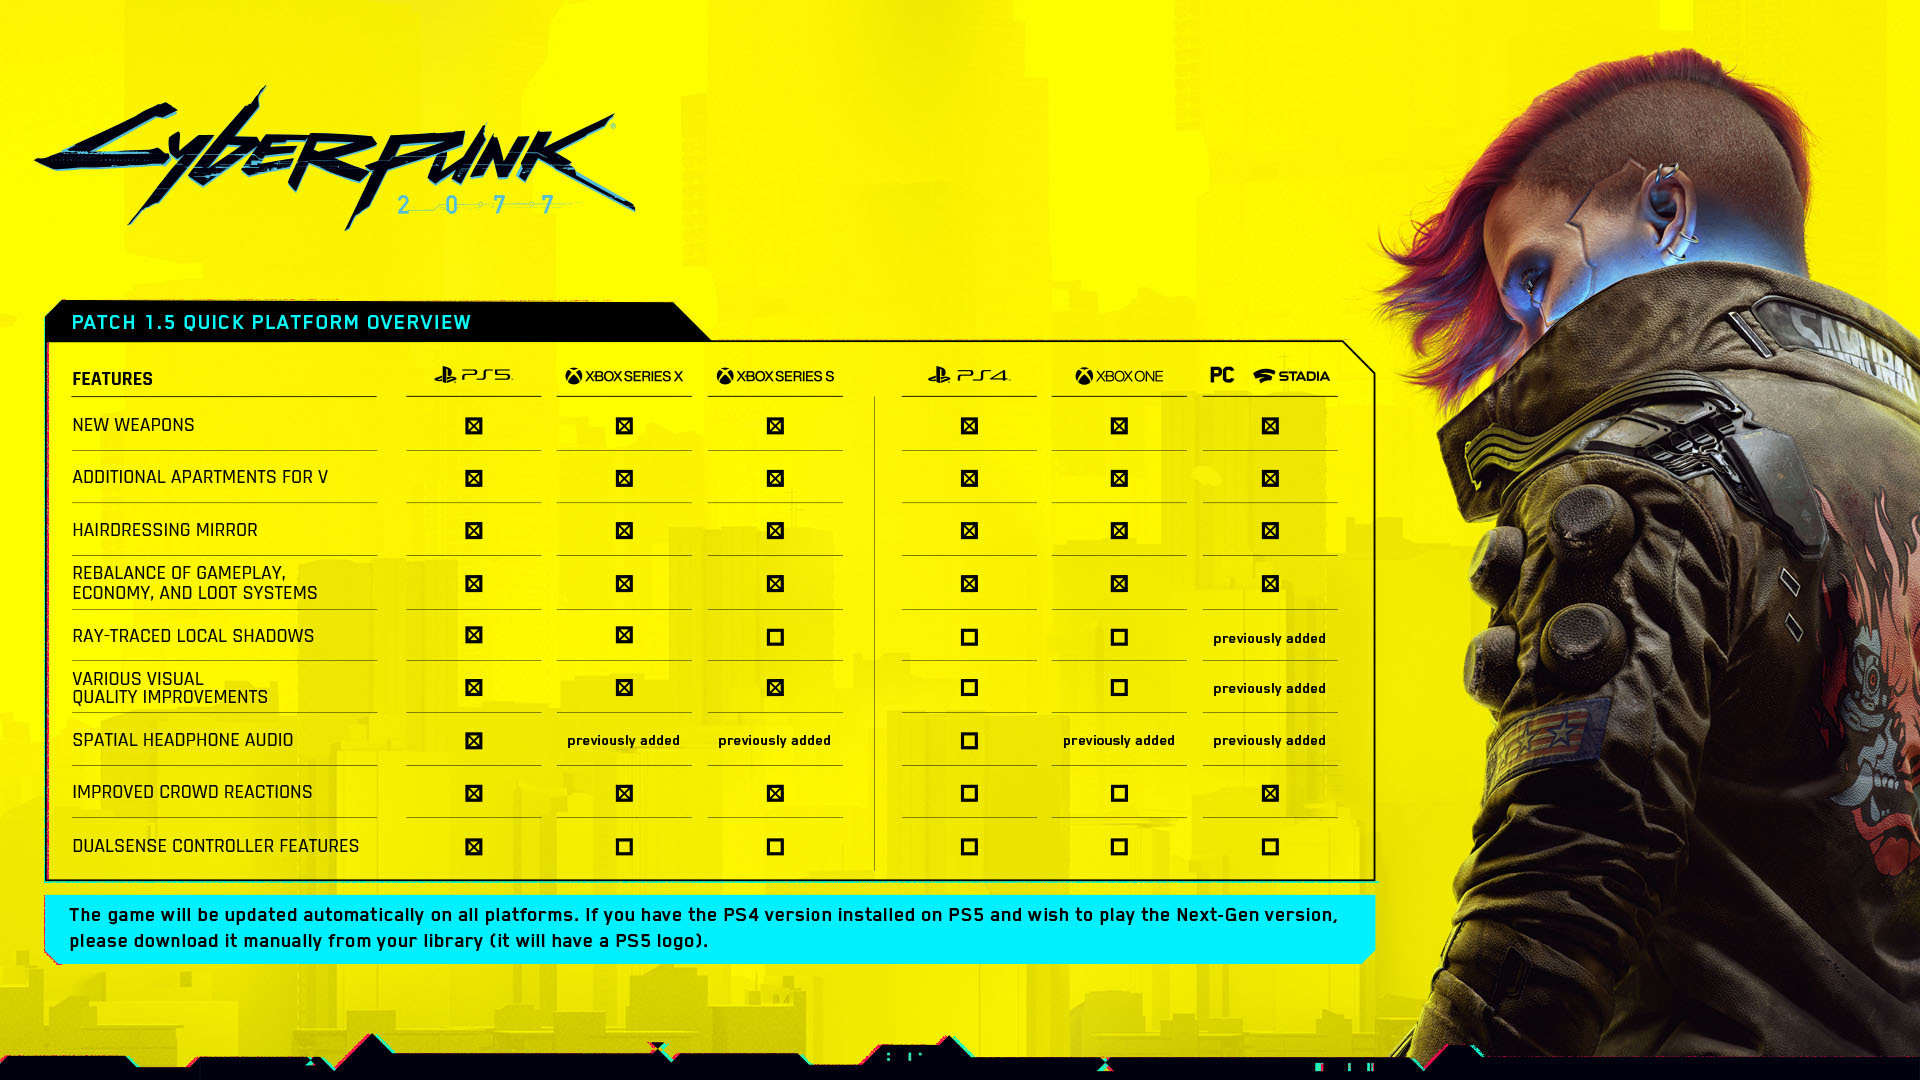
Regardless of the free trial, Cyberpunk 2077 gamers are destined for a massive next generation patch dubbed Patch 1.5 that will include improvements to local ray tracing support for shadows at 30fps, faster load times, true 4K 60fps resolution support and dynamic scaling.

Next Gen Exclusives

  • Added ray-traced local light shadows.
    Implemented native achievement support on next-gen consoles. Note that as the next-gen version has a different SKU, PlayStation trophies obtained in backward compatibility will not be transferred. Xbox achievements will automatically appear on the new version using the
  • Smart Delivery feature.
  • Introduced two graphics modes on PlayStation®5 and Xbox Series X:
    Ensures smooth gameplay at 60fps with dynamic 4K scaling.

For PlayStation 5 gamers, Patch 1.5 will update support for the console’s adaptive triggers, haptic feedback and on the audio DualSense controller.

Across the gaming divide, Xbox Series owners will be capped at 30fps at 1440p.

Aside from the additional spec support, the in-game experience has also been tweaked to include improvements for NPCs, perk trees, throwing knife and combat mechanics, overall animations, LEDs on vehicles, vehicle mechanics, rebalancing of in-game economics for greater cash payouts after events, and new weapons.

Part of the 50GB update will also include improvements to mid-game character editing, new home base location with additional theme options. CDPR promises more untold features to come with the massive Cyberpunk 2077 update.

CDPR promised an update like Patch 1.5 back in January of 2021 as reviews poured in complaining about the myriad of Day One issues, a full year has passed and it looks as though the company finally delivering on its overdue promise.

If you have Cyberpunk 2077 already, you should be able to upgrade to Patch 1.5 now. If not, it’s on sale from Xbox for $30:

Cyberpunk 2077
Cyberpunk 2077
Developer:
CD PROJEKT RED
Price:
$29.99

Fix: Disk Defragmenter Was Scheduled Using Another Program

Defragmentation is a critical process that optimally rearranges the data on the drive so that the information for a specific file is stored together. But when initiating the operation, many get the Disk Defragmenter was scheduled using another program message.

Disk defragmentation helps improve the PC’s performance by reducing the time spent accessing files. So, if another app has gained access to it and scheduled defragmentation, let’s find out all there’s to know.

Why does Disk Defragmenter was scheduled using another program message appear?

Here are a few reasons you might be getting the error:

  • Another app is performing defragmentation: One of the common reasons you get the error is when another app, usually an antivirus or a PC tuner, has taken up the task of defragmentation.
  • Malware on the PC: A PC infected with malware can also throw the error.
  • Corrupt system files: When the system files are corrupt, certain built-in tools, tasks, and processes malfunction.

How do I fix Disk Defragmenter was scheduled using another program error?

Before we head to the slightly complex solutions, try these quick ones:

  • When you see the error prompt, click on Remove settings.
  • Restart the computer.
  • Disable any third-party antivirus, especially Norton and Avast, or PC tuner apps like CCleaner, since these schedule defragmentation and run it in the background.
  • Update to the latest version of Windows.

If these don’t work, move to the solutions listed next.

1. Terminate all non-critical processes

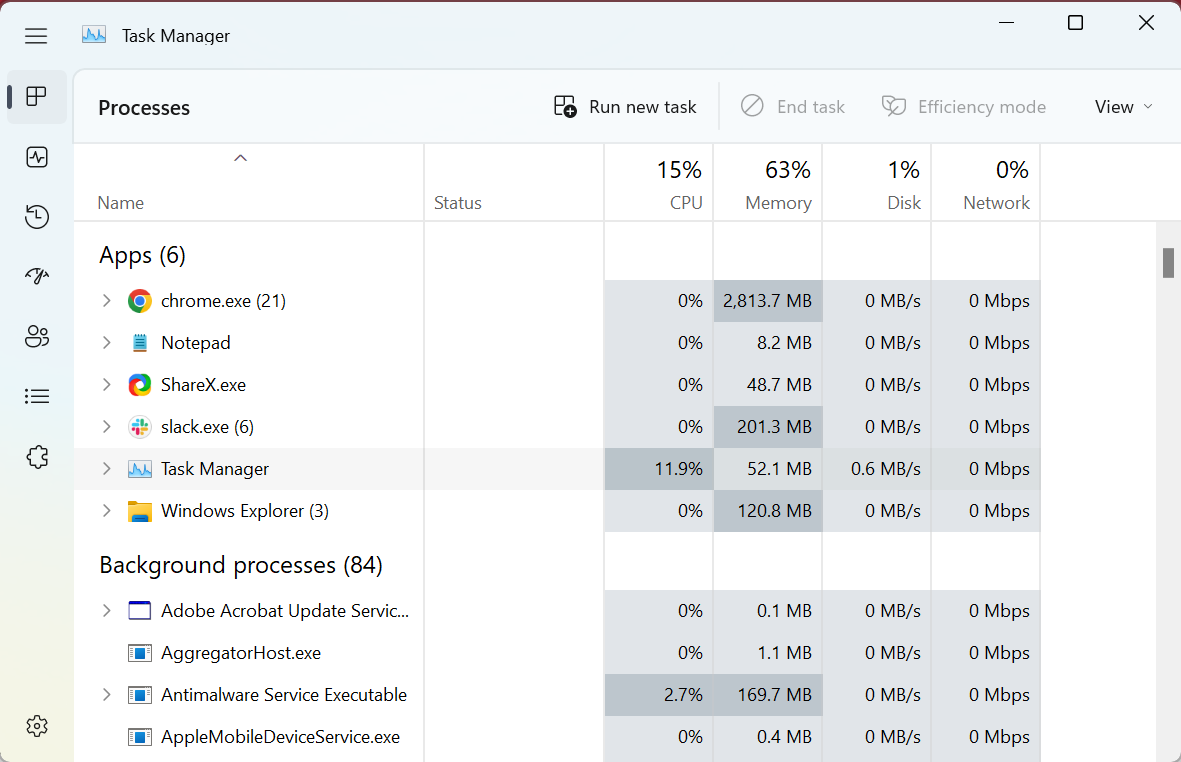
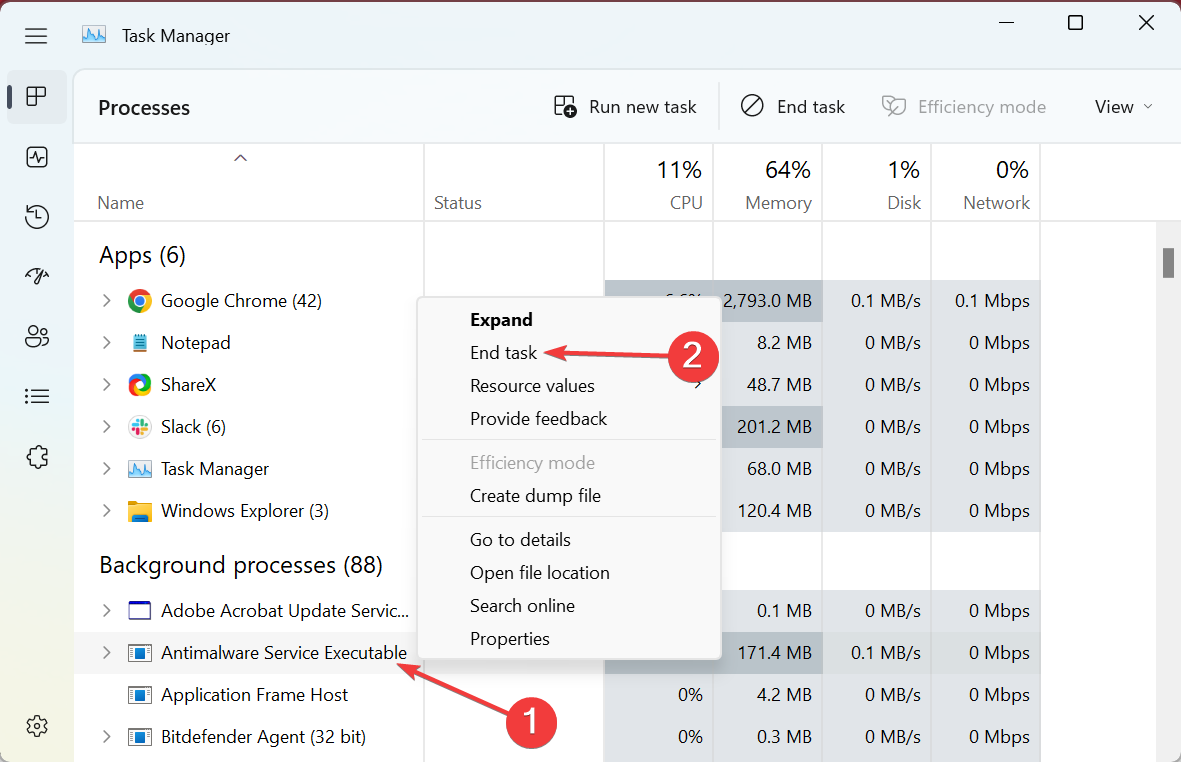
  1. Press Ctrl + Shift + Esc to open Task Manager.task manager
  2. Now, right-click on the process you believe could be triggering the error, and select End task.end task to fix disk defragmenter was scheduled using another program
  3. Check whether you can now initiate defragmentation. If not, similarly, terminate the other processes and verify after each.

An easy solution when you get the Disk defragmenter was scheduled using another program error is to terminate the process triggering it. Though it doesn’t work all the time, there’s no harm in trying.

2. Scan the disk for errors

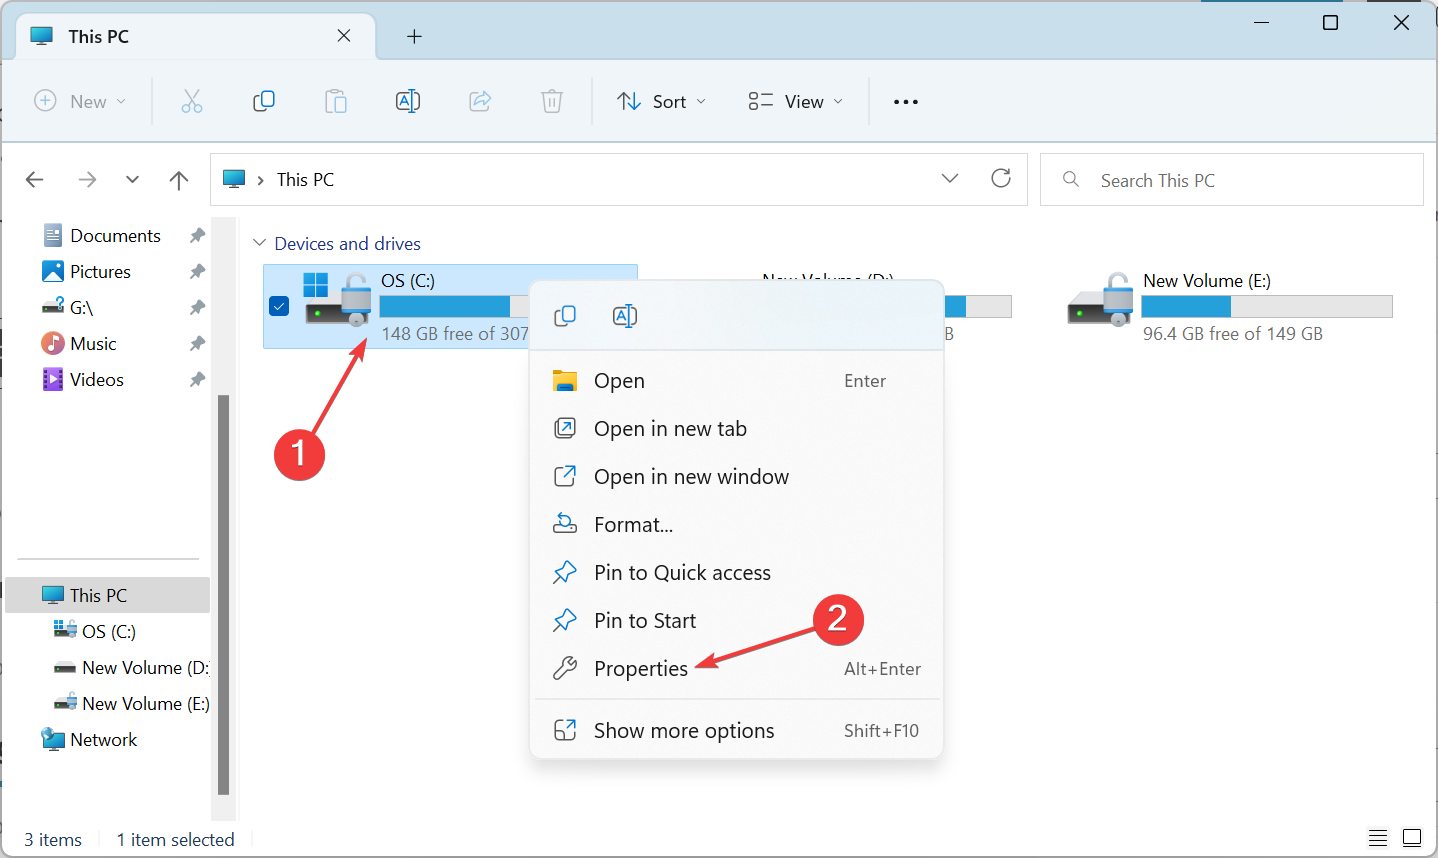
  1. Press Windows + E to open File Explorer, go to This PC, right-click on the drive you are unable to defragment, and choose Properties.properties
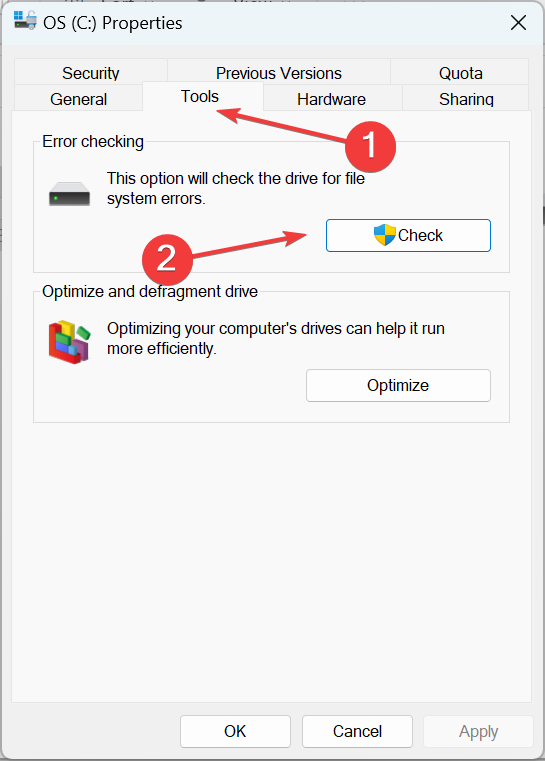
  2. Now, navigate to the Tools tab, and click on Check under Error checking.check
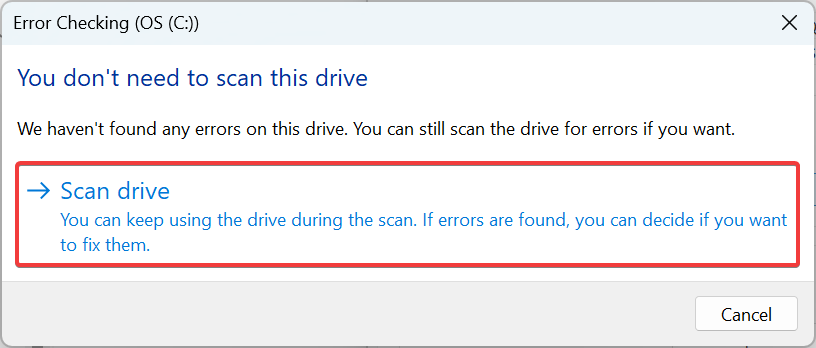
  3. Choose the Scan drive option.scan drive to fix disk defragmenter was scheduled using another program
  4. Wait for the scan to run, and then try manually defragmenting the drive.

3. Enable defrag in Task Scheduler

  1. Press Windows + R to open Run, type taskschd.msc in the text field, and hit Enter.task scheduler
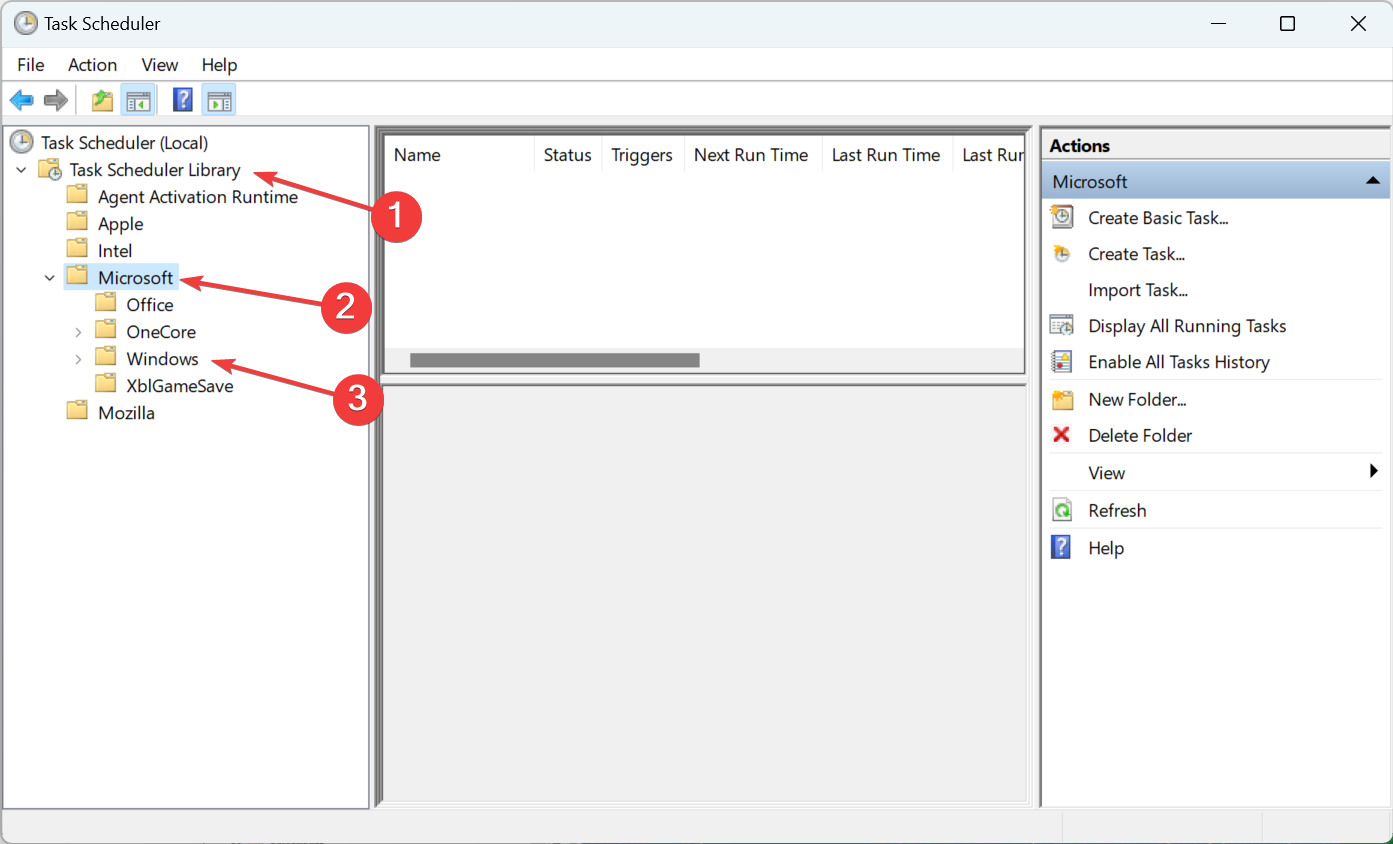
  2. Now, expand Task Scheduler Library on the left, double-click on Microsoft, and then choose Windows.task scheduler library
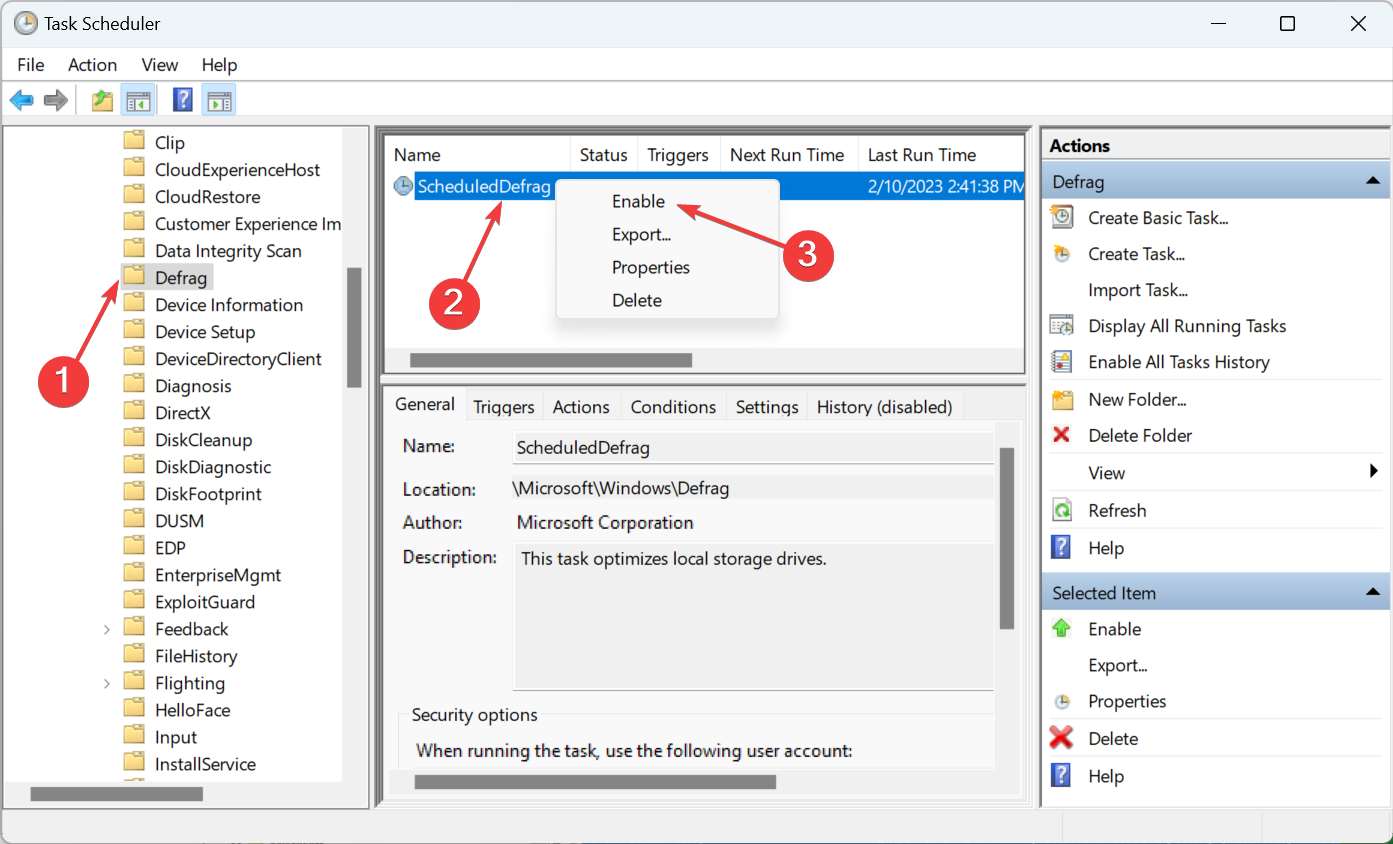
  3. Now, select Defrag from the navigation pane, right-click on ScheduledDefrag, and choose Enable.enable to fix disk defragmenter was scheduled using another program

If you keep noticing that disk defrag was scheduled using another program, there’s a possibility that ScheduledDefrag is disabled. Enable it, and you are good to go! In case it was already enabled, head to the next solution.

4. Manually configure the defragmentation schedule

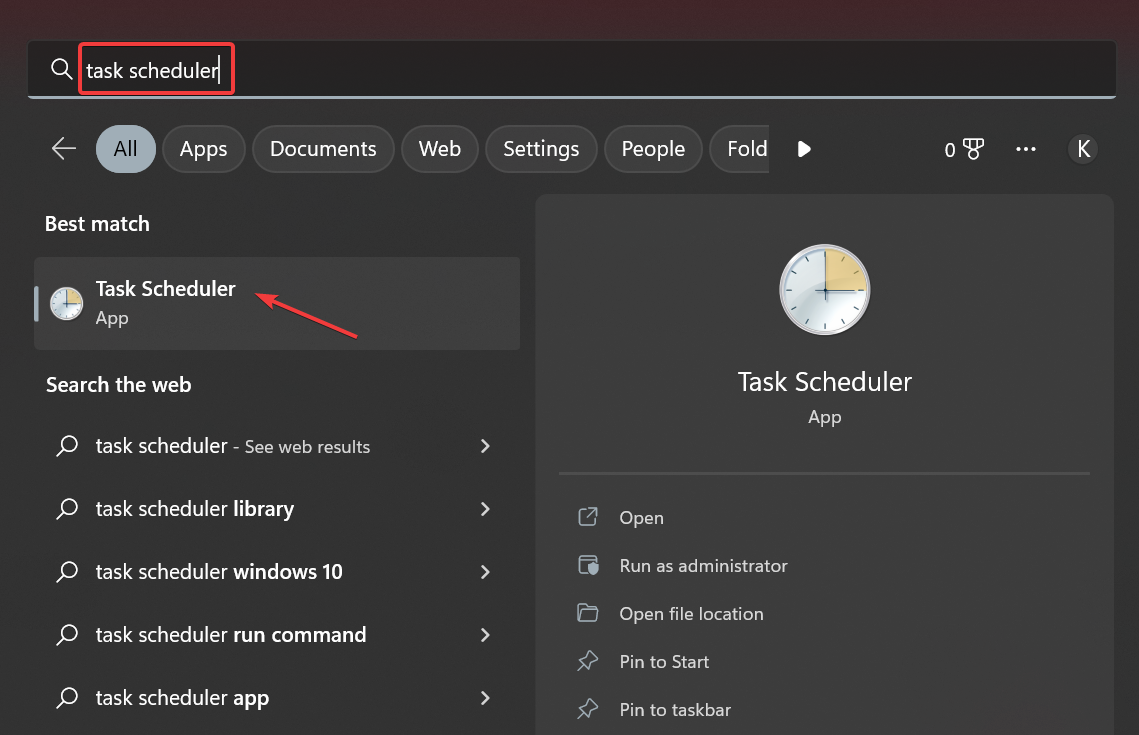
  1. Press Windows + S to open Search, type Task Scheduler in the text field, and click on the relevant search result.task scheduler
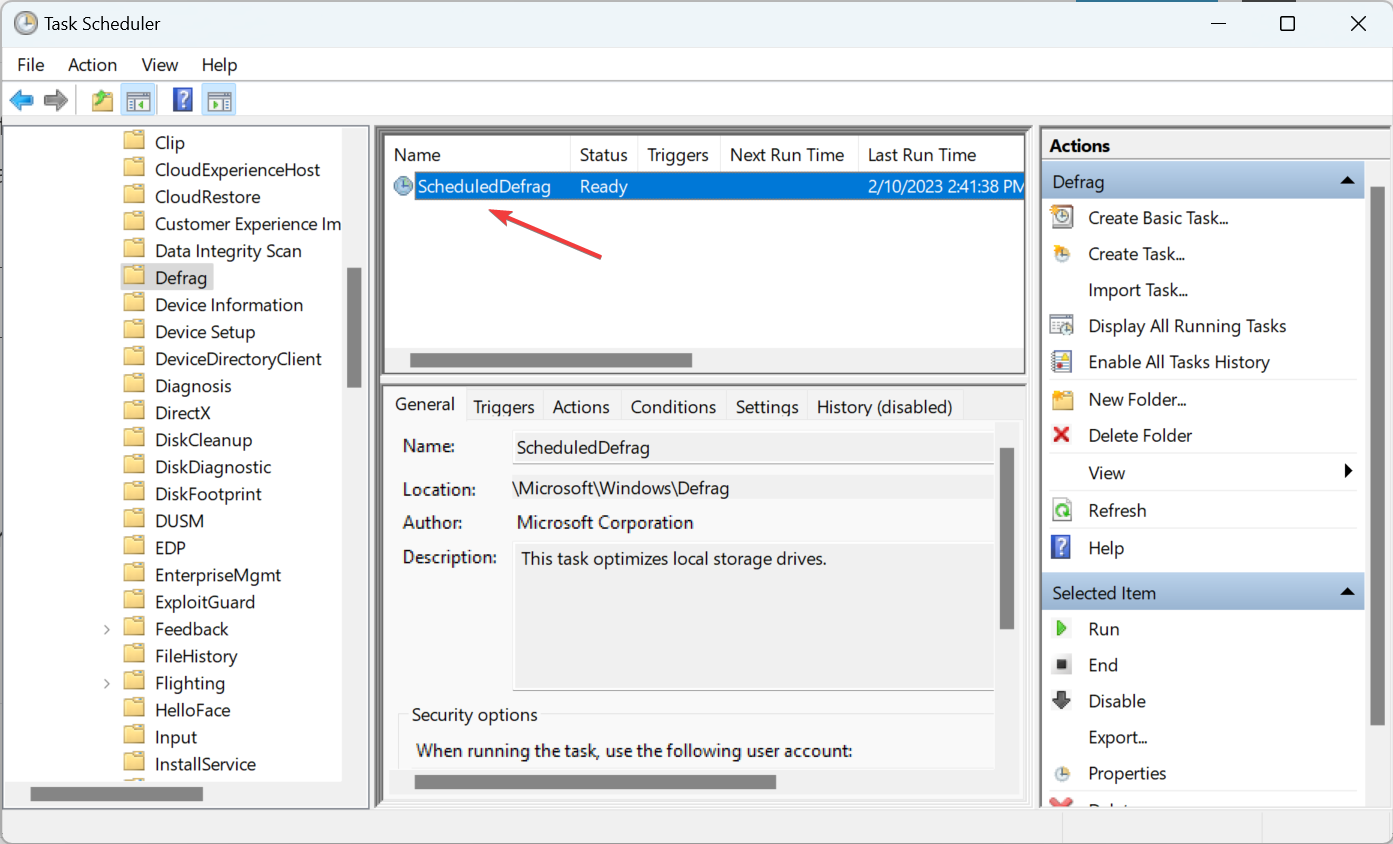
  2. Locate the ScheduledDefrag task as explained earlier, and double-click on it.task
  3. Navigate to the Triggers tab, and click New.trigger
  4. Select On a schedule from the Begin the task dropdown menu, set the frequency, and then click on OK.set frequency to fix disk defragmenter was scheduled using another program
  5. Click OK on all previous windows to save the changes, and then restart the computer.

Once done, now try defragmenting the drive and verify whether you still get the Disk defragmenter was scheduled using another program error. If yes, head to the last solution.

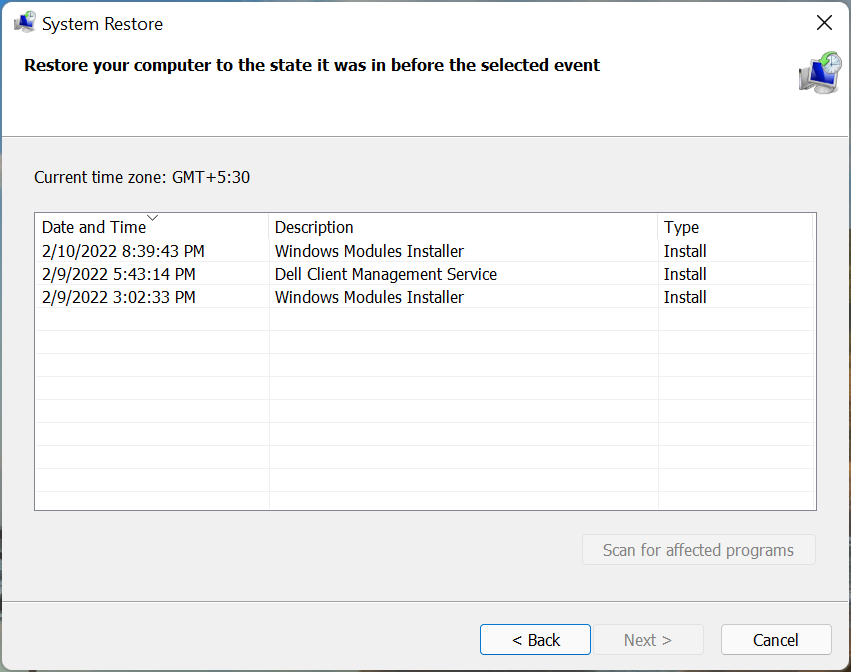
5. Perform a system restore

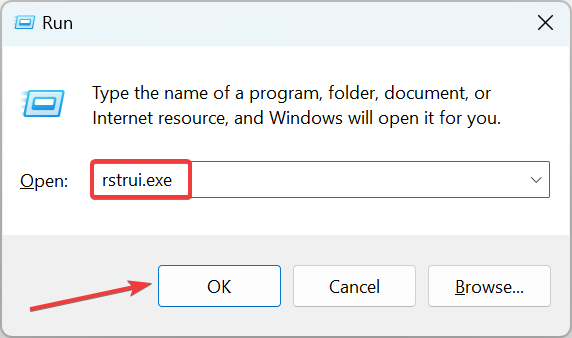
  1. Press Windows + R to open Run, type rstrui.exe, and click OK.rstrui.exe
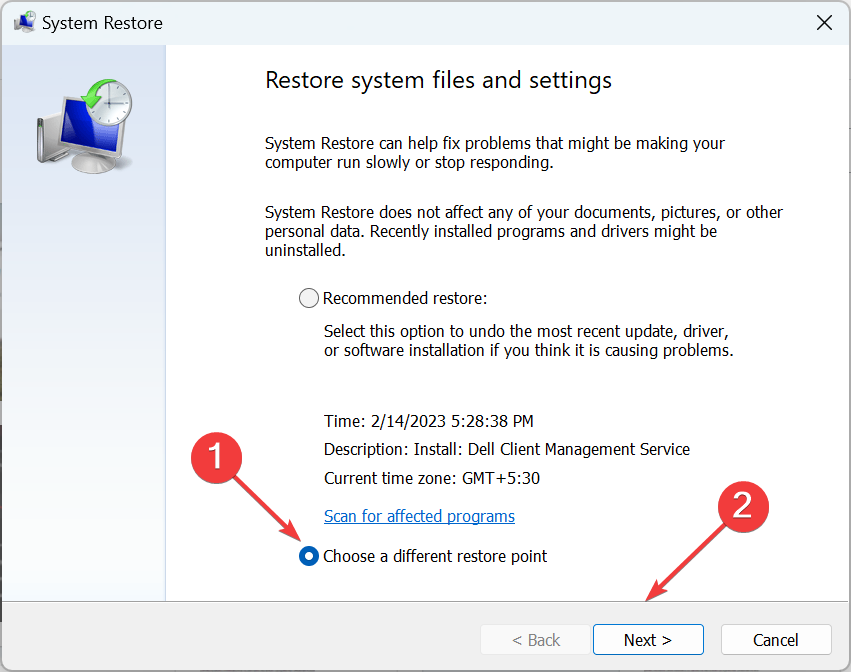
  2. Select the Choose a different restore point option, and click on Next to proceed.next
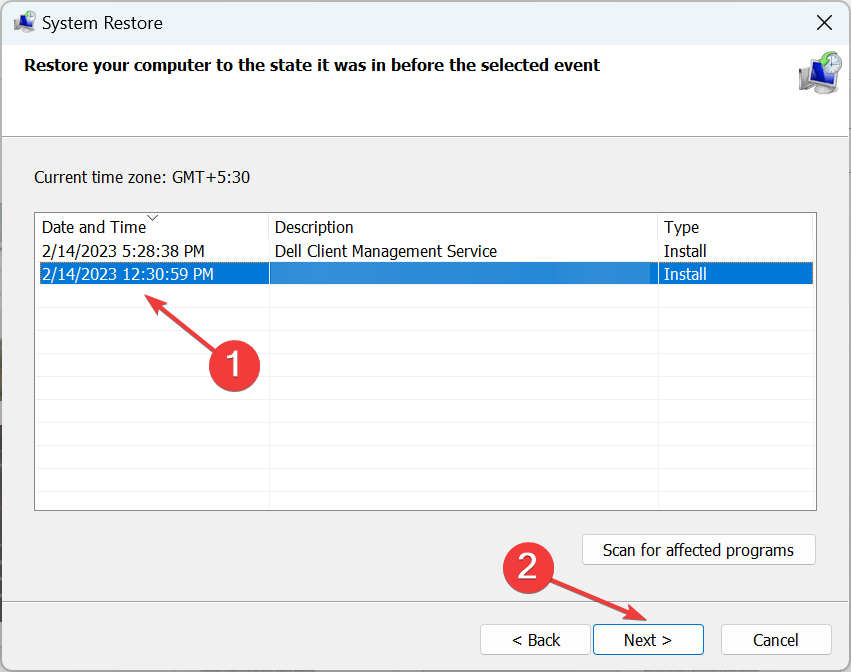
  3. Select a restore point from the list and click Next.system restore to fix disk defragmenter was scheduled using another program
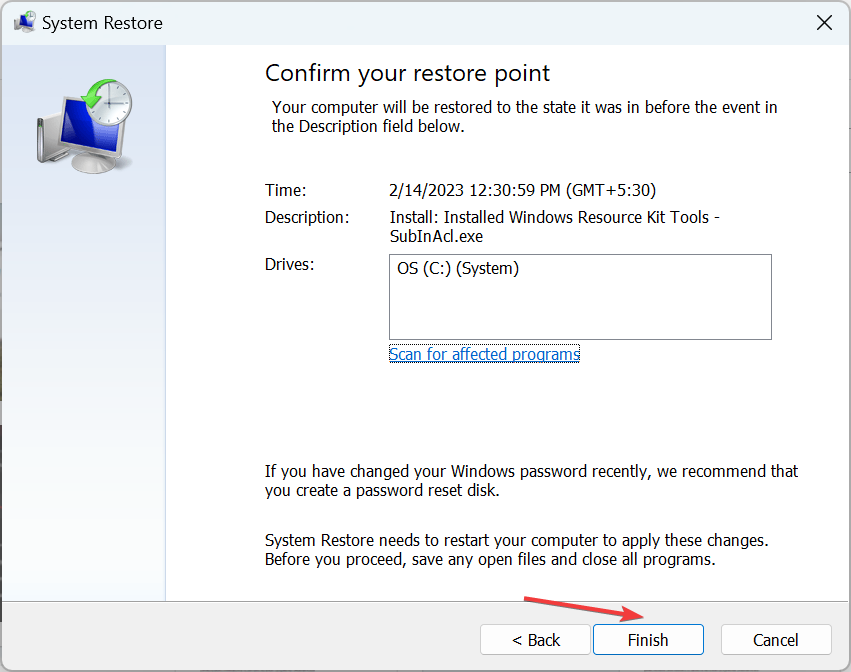
  4. Finally, verify the details and click Finish to start the restore process.start process

If you recently started seeing the Storage optimization is currently using customized setting prompt, it might be recent changes to the system that triggered it. And a system restore is the best way to get things up and running.

By now, you should have fixed the Disk defragmenter was scheduled using another program error, and can manually defragment the drive at will. In case the problem persists, the last option is to create a bootable drive and reinstall Windows through it.

And since we are on the topic, find out how to make Windows faster and enjoy a superior experience.

Tell us which fix worked for you in the comments section below.

Cortana Not Working in Windows 11? Fix it With These Steps

There is an equal and opposite reaction to every action, and it appears that for every new feature in Windows 11, there is a feature from Windows 10 that has been deprecated or removed.

However, Cortana is still with us, but you will no longer have it activated right away after you install the operating system.

It is no surprise that Windows 11 has some bugs and issues here and there. Cortana is not an exception either as users reported it is not working properly. We have prepared below a list of actions you can take to solve your current inconveniences. Follow along!

Does Windows 11 really have Cortana?

Cortana is a voice assistant that is still part of Windows 11. Microsoft, on the other hand, has altered the way it operates.
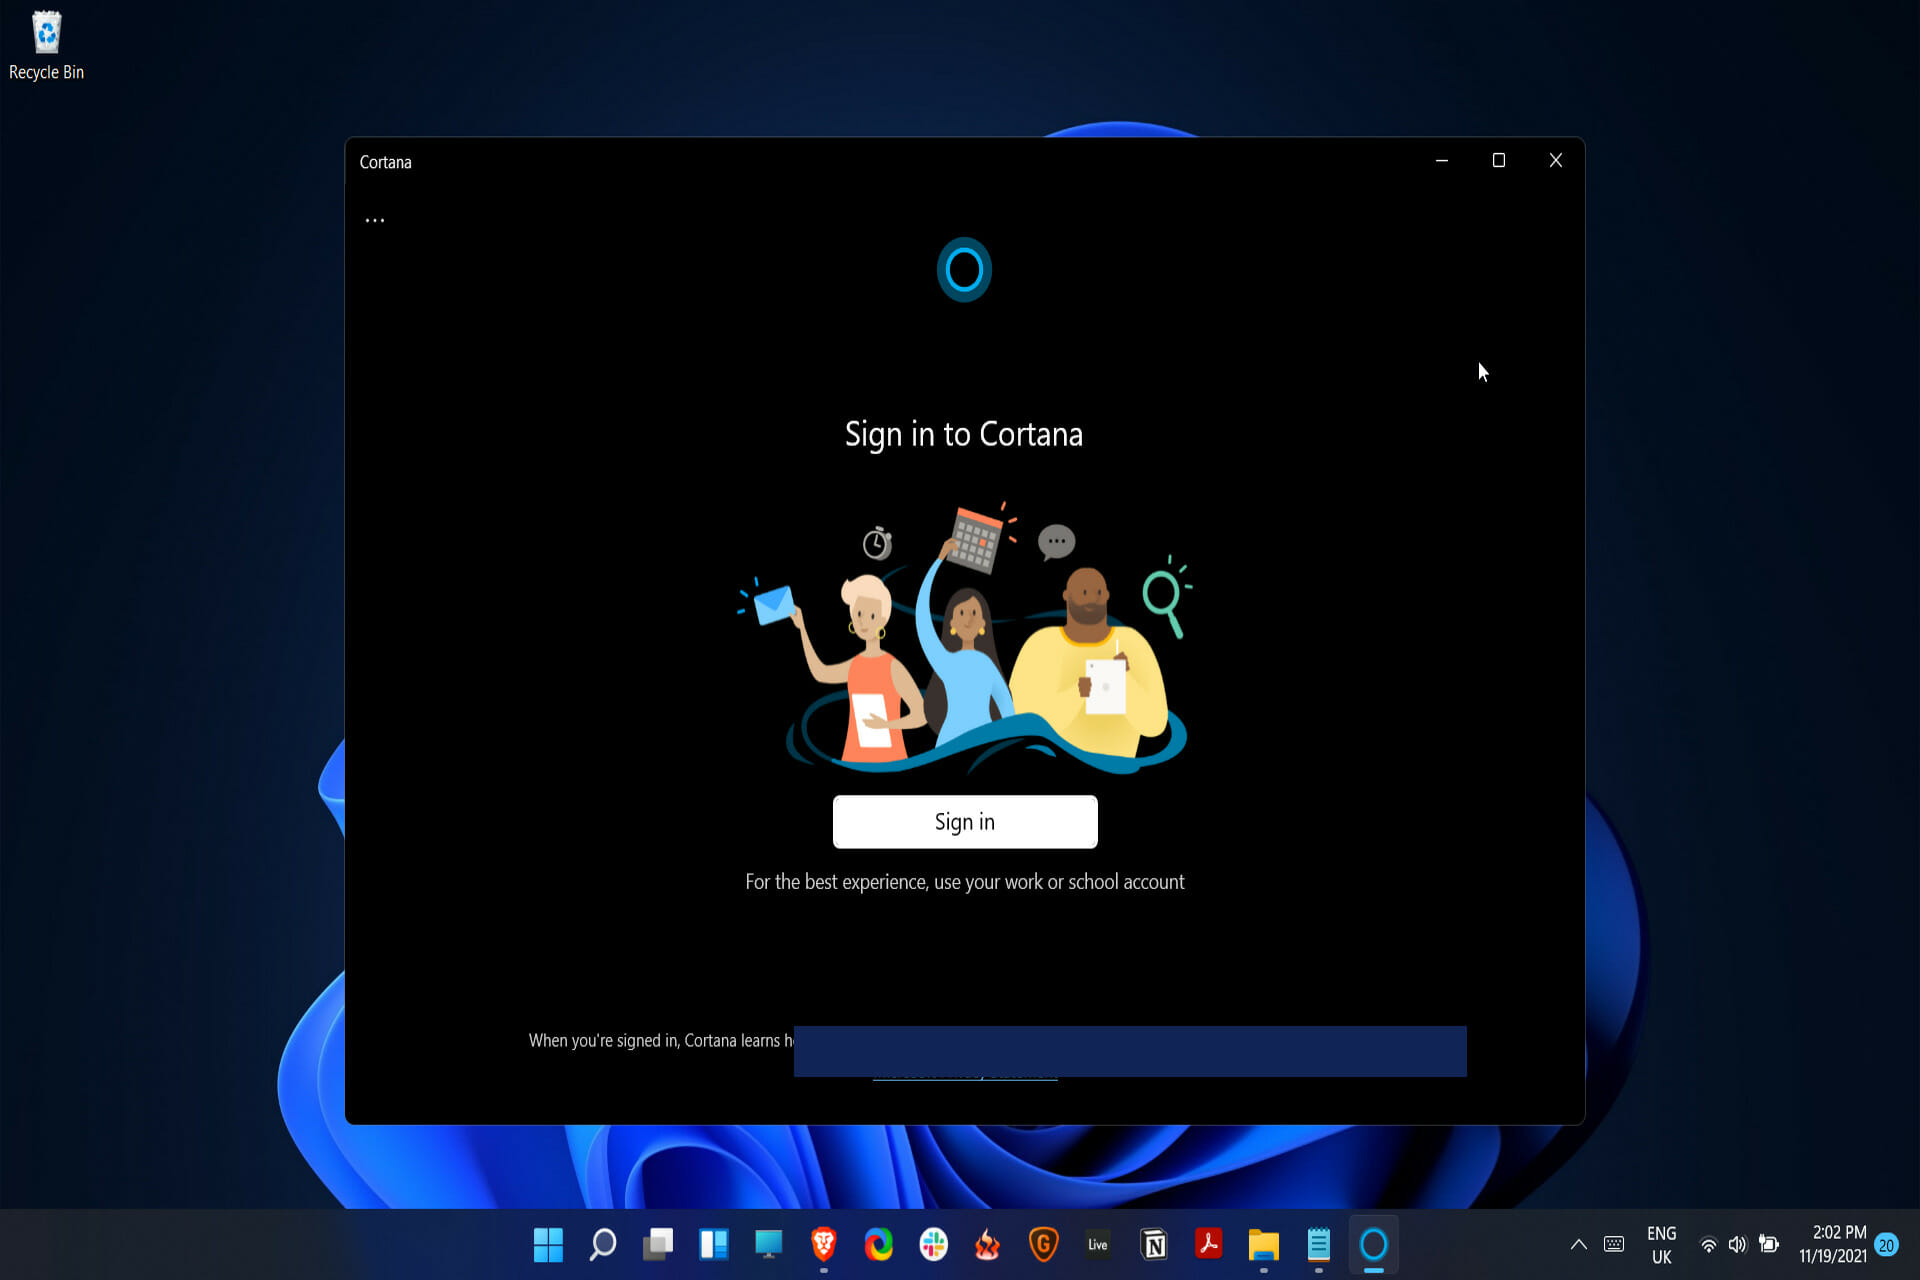
cortana search cortana not working windows 11

The service is no longer included in the basic installation or boot experience of Microsoft Windows 11. You won’t hear Cortana introduce itself as you begin to install Windows, and you won’t see it on the Windows taskbar after you have completed the installation of the operating system.

The feature can only be activated by speaking the activation phrase Hey Cortana, which requires you to sign in to the Cortana application first.

Immediately after signing in to Windows, Cortana will respond by appearing in a small pop-up window that will be displayed to your right of the taskbar.

If necessary, it may also launch other applications, such as the Microsoft Edge web browser or the Microsoft Office suite of applications.

On the other hand, the service is no longer integrated with the Windows Search experience, even if you have signed into the Cortana app after doing so. It will not react to any queries entered into the Windows Search box.

Instead, you’ll need to open the Cortana app and type your question into the chat window that appears in the app.

How do I fix Cortana issues in Windows 11?

1. Change your region

  1. Open the Settings app by pressing the Windows key + I, then navigate to the Time & language section, and select the Language & region option.
    time-language-region cortana not working windows 11
  2. Now set your Country or region to the United States, under the Region section.
    region-us cortana not working windows 11

Using this simple approach, you may restore regular operation to your Cortana.

2. Check your firewall

  1. Press the Windows + S keys to open the search bar and type in allow an app through Windows firewall, then click on the most relevant result.
    allow-an-app-firewall cortana not working windows 11
  2. Inside the Allowed apps and features window, go to Change settings.
    change settings firewall cortana not working windows 11
  3. Next, check all the Cortana features and press the OK button.
    cortana-allow-firewall cortana not working windows 11

3. Run the SFC scan

  1. Press the Windows + S keys, then search for Command Prompt by typing in cmd. Now right click on the top result and run it as an administrator.cmd-search-admin cortana not working windows 11
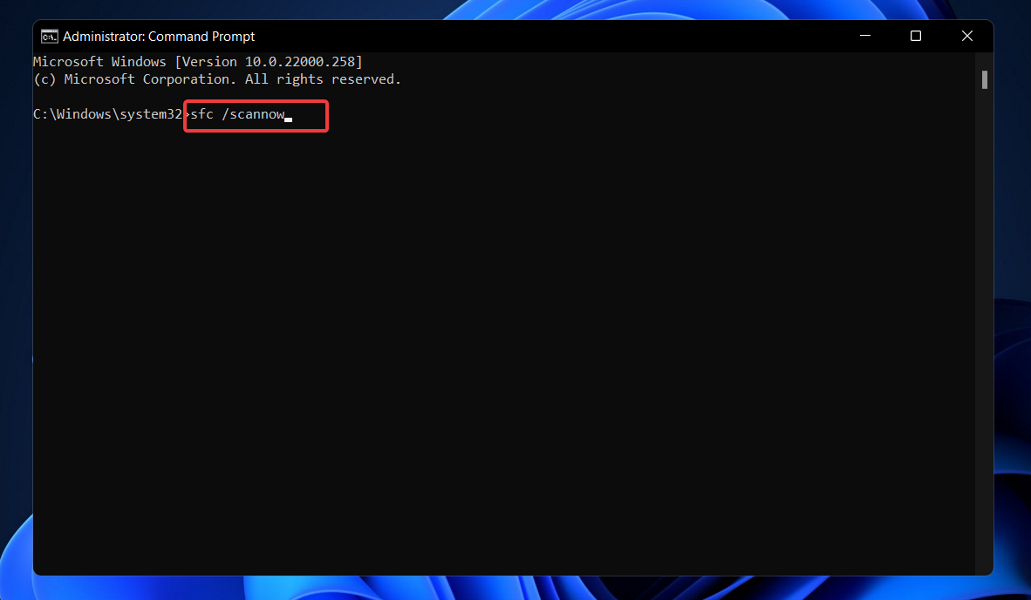
  2. Type or paste in the command below and press Enter to run the scan of your PC’s files:sfc /scannowsfc-scan-windows-11 cortana not working windows 11

Wait for the completion of the process. After you’ve finished, restart your computer and launch the Cortana app to test if everything is working properly.

4. Perform the DISM scan

  1. Tap on the Windows + S keys, then search for cmd. Now right-click on the most relevant result to open it as an administrator in a new window.cmd-search-admin cortana not working windows 11
  2. Type or even paste in the window the following command, don’t forget to press Enter:Dism /Online /Cleanup-Image /RestoreHealthdimns command cortana not working windows 11

The DISM scan will now begin. Don’t interrupt this procedure because it can take up to 20 minutes. Check to see whether the problem persists after it has been resolved.

Corrupted files are a common source of problems, and if Cortana won’t work, SFC and DISM scan might be the best ways to fix it.

Alternatively, you can use a specialized repair tool and perform a deep scan efficiently. Thus, you will restore potentially damaged files automatically and fix this issue in a few steps.

5. Run the CHKDSK scan

  1. Press the Windows key + S to open the search bar, then look for Command Prompt by typing in cmd. Finally right-click on the most relevant result and tap on Run as administrator.cmd-search-admin cortana not working windows 11
  2. After the Command Prompt launches, type in the following command and press Enter:chkdsk C: /f /r /xchkdsk  cortana not working windows 11

6. Install the latest updates

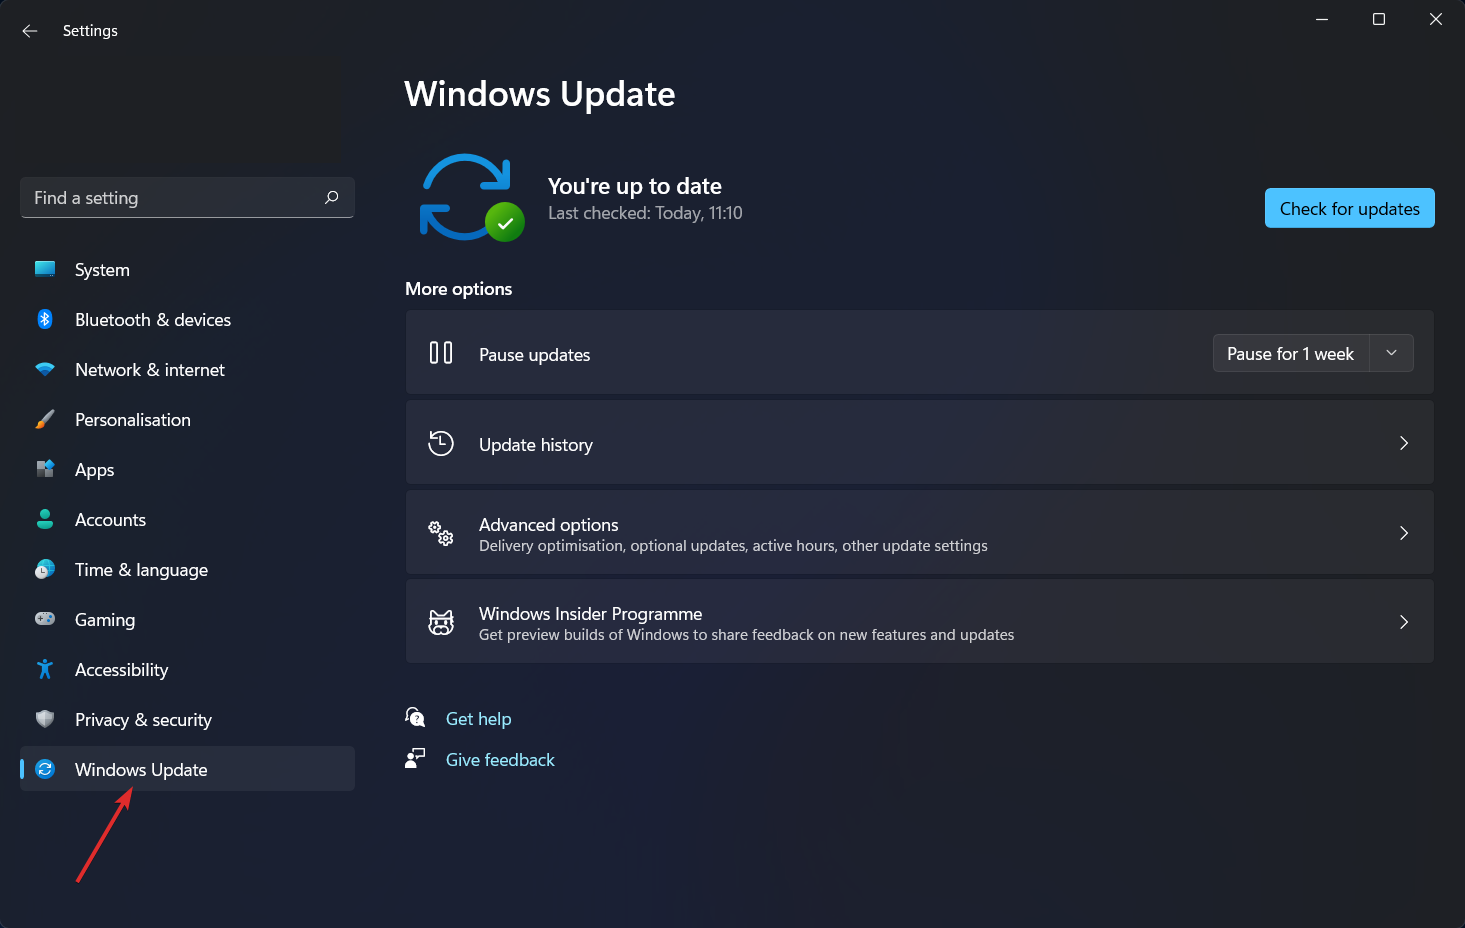
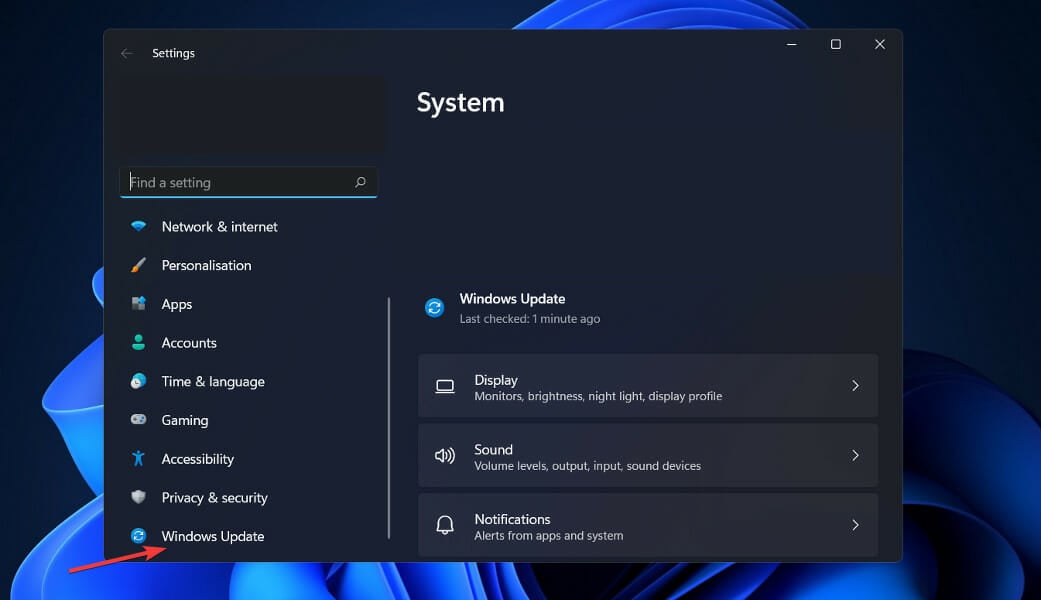
  1. Press the Windows key + I to open the Settings app, then click on Windows Update in the left panel.windows-update-settings cortana not working windows 11
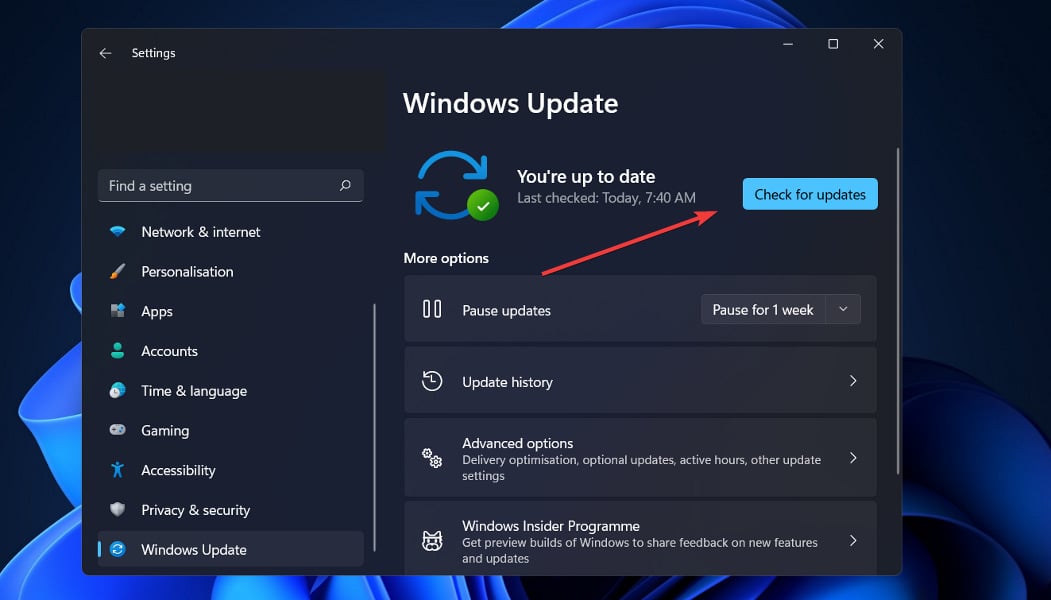
  2. If you have any new updates to download, click on the Install now button and wait for the process to complete. However if the button isn’t displayed for you, click on the Check for updates button.check for updates cortana not working windows 11

7. Check your antivirus

Sometimes, third-party antivirus software can cause issues with Cortana, which may be resolved by uninstalling the software. It is recommended that you disable specific antivirus functions or totally disable your antivirus in order to resolve the problem.

It was claimed by some users that the only way to resolve this issue was to totally uninstall their antivirus software.

If deleting your antivirus software resolves your Cortana problems, it may be a good opportunity to explore switching to a new antivirus software package in the future.

Check out our article with the best antiviruses for Windows 11 that you can install after you get rid of your current one.

How do I uninstall Cortana?

It’s not like Cortana takes up a lot of space on a computer’s hard drive or bothers users with its behavior. Nonetheless, some may wish to clean the All Apps list in the Start menu and uninstall any apps that are no longer needed.

On top of that, disabling the service will help you regain some privacy by prohibiting it from transmitting information about our personal computer activities back to Microsoft.

Due to Microsoft’s ongoing efforts to make its digital assistant less and less prevalent on devices, it is quite straightforward to turn it off.
cortana-advanced-options cortana not working windows 11

The question of whether or not they’ll cede territory to Alexa, Google Assistant, and possibly Siri will have to wait for another day. In the meantime, we’ve got step-by-step instructions on how to uninstall Cortana to your liking.

Open the Settings app by pressing the Windows key and I simultaneously. Next, you need to select the Apps option from the left sidebar, followed by Apps and Features from the right menu. Scroll down to Cortana and click the three dots icon to select the Advanced options.

Once you’re inside the Advanced options panel, flip the Run at login toggle to the off position. That’s it, you’ve successfully closed Cortana and eliminated its presence.

In addition to Cortana, Windows 11 has lost a number of additional previously-native functions. Check out our article on the apps that were removed from Windows 11 to view a complete list of the services that were eliminated.

It is no longer a surprise that the latest Microsoft OS comes up with impressive features, which create a brand new environment. If you want to improve your user experience, take a look at our guide on how to make Windows 11 faster and more responsive.

From what we found, it seems like there are plenty of users who are wondering how to take advantage of Windows 11’s Voice Typing Tool. We got your back as we have already put together a comprehensive guide on how to use the tool.

Speaking of changes, Microsoft has altered how you assign the default applications in this version. The process is similar to the one from the older editions, with one minor drawback. To fully comprehend the subject at hand, check out our guide on how to set default apps in Windows 11.

If Cortana still doesn’t work after these fixes, and you also use Google Assistant, check our guide on Hey Google not working to troubleshoot issues with voice commands across devices.

Let us know which solution worked best for you in the comments below, as well as how often you use the Cortana feature.

Here’s what’s new and coming to Xbox Game Pass – Madden NFL 22, more

If you are big on gaming, then there’s plenty in store for you because there are many entries coming to Xbox Game Pass as we approach the end of the month, especially after surpassing 25 million subscribers.

Up first is Mass Effect Legendary Edition (Cloud) EA Play, which is already available for play with Xbox Cloud Gaming, via EA Play. The Legendary Edition includes “single-player base content and over 40 DLC from the highly acclaimed Mass Effect, Mass Effect 2, and Mass Effect 3 games, including promo weapons, armors, and packs.”

Gamers can also take part in Battlefield: Bad Company 2 (PC) EA Play and Peggle Nights (PC) EA Play which are also available for play.

Here are some entries expected to be released during this month:

  • Lawn Mowing Simulator (Xbox One) ID@Xbox – February 17-The entry is available for all PC and Xbox Series X|S gamers. However, it is expected to make its way to Xbox One sometime soon.
  • Madden NFL 22 (Console and PC) EA Play – February 17-Gamers should expect this entry to come to PC Game Pass and Ultimate via EA Play. Moreover, gamers now have the option to enjoy their gaming experience on any platform they want.
  • Total War: Warhammer III (PC) – February 17
  • Sea of Thieves: Shrouded Islands – February 17-which is actually more of an update as the game progresses with new adventures to explore as the storyline progresses.
  • Roboquest (Game Preview) (PC) ID@Xbox – February 22
  • Galactic Civilizations III (PC) ID@Xbox – February 24
  • Super Mega Baseball 3 (Console) EA Play – February 24
  • Alice: Madness Returns (PC) EA Play – February 28

On top of the new releases, there are more advantages that you stand to enjoy, dubbed the Xbox Game Pass Ultimate Perks. Users can take full advantage of these perks by navigating to the Perk Gallery on the Xbox console, Windows PC, or Xbox Game Pass mobile app.

The main perks include access to Hulu without any advertisement interruptions for 2 months, “customizable multiplayer arsenal with the exclusive “Pass Tense” BR75 Battle Rifle Coating, four 2XP Boosts, and four Challenge Swaps for Halo Infinite on Cloud, Console, and PC.”

Moreover, Ultimate Game Pass members have access to the Xbox Touch Control feature which can actually be used by gamers in over 100 games with cloud gaming. Among the many titles are Lake, Firewatcher, and Dreamscaper.

Gamers are also anticipating the new update that is set to come to Grounded especially after hitting 10 million active players earlier this month. We have to wait for the thrills and adventures in store.

On February 28, a couple of titles will be exiting the Game Pass Library, that is, Killer Queen Black, Stealth Inc 2, and, Hypnospace Outlaw among others. However, gamers can take advantage of their membership to get a discount and even retain the titles in their libraries.

Fix: Windows 11 Sound Distorted or Headphones Sound Weird

Crisp and clear sound is something critical for all users, but it becomes non-negotiable for those in the field of recording or editing. But several users have reported the Windows 11 sound distorted problem.

This issue could affect speakers and headsets alike, both built-in and external. And since Windows 11 is relatively new, the chances of encountering the issue are even higher.

We went through several such forums where users have shared their problems but couldn’t find many effective solutions. Therefore, we have dedicated this guide to walk you through the Windows 11 sound distorted issue, and the fixes for it.

Why am I facing the distored sound problem in Windows 11?

This is one of the issues where the list of underlying causes is endless, which makes troubleshooting even more difficult. Improper connections are still one of the most common causes for Windows 11 USB audio not working problem.

Apart from that, if you started facing the problem right after upgrading to Windows 11, it could be that the current set of audio drivers is not compatible with the latest iteration. In which case, updating them seems like the ideal solution.

Misconfigured settings too are known to lead to Windows 11 bad audio quality. The problem is generally faced by those who keep reconfiguring the settings in order to get the optimal output and end up messing things.

Sound settings in Windows 11

Several users have also reported that the issue started as soon as they updated Windows 11 which points to a bug in the current version of the OS.

This basically covers the most common underlying causes for distorted sound in Windows 11. Let’s now head to the most effective fixes for it.

How do I fix Windows 11’s audio crackling and sound distortion?

1. Check connections (for external speakers)

If you are using an external set of speakers or headsets, your primary approach should be to check for issues with the connection itself. Many users proceed with making changes to the settings, only to later realize that the connection was improper.

Disconnect the speakers or headsets, clean the jack or USB, blow light air into the port, and then reconnect it. Now, check if the sound is still distorted in Windows 11. In case it is, connect the peripheral to another system and verify the same.

If it works fine on the other computer, reconnect the speaker or headset to the first system, and execute the fixes listed below to eliminate the error.

However, if the problem persists, it’s most likely that the headsets or speakers are malfunctioning and you have to get them replaced. But before you do that, we do recommend giving a shot at the methods listed below.

In case you are using wireless speakers or headphones, learn how to fix problems with a Bluetooth connection.

2. Run the Playing Audio troubleshooter

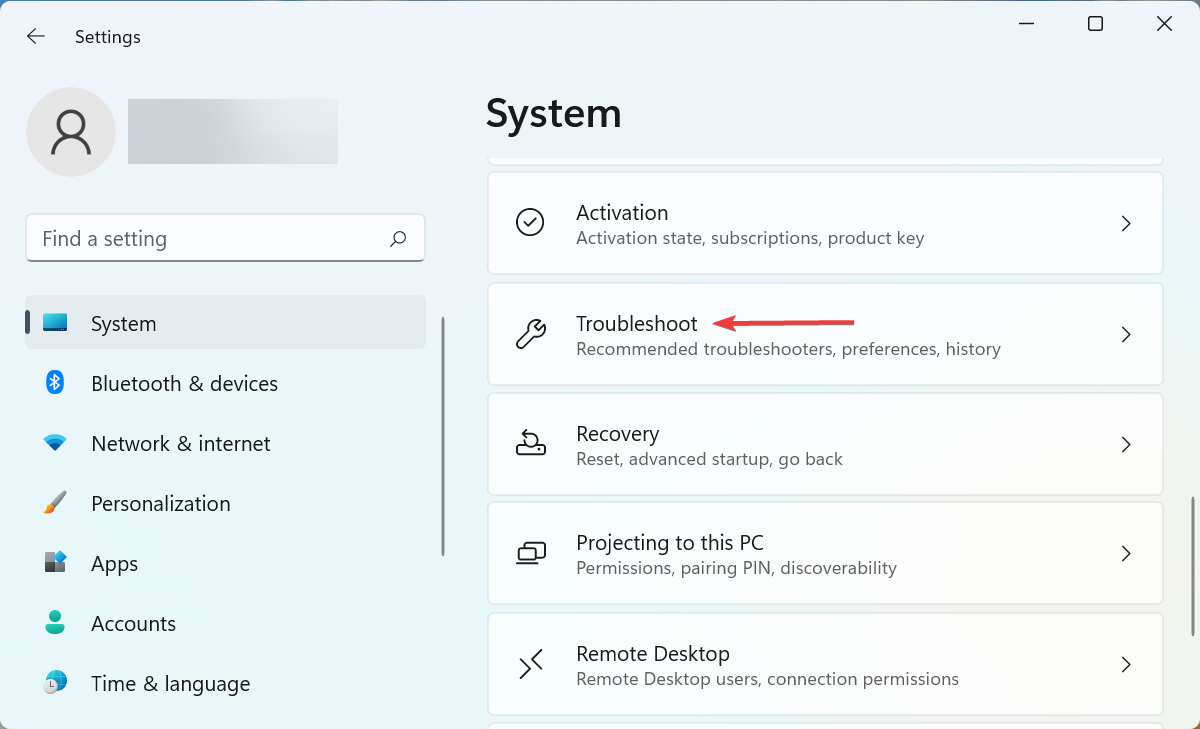
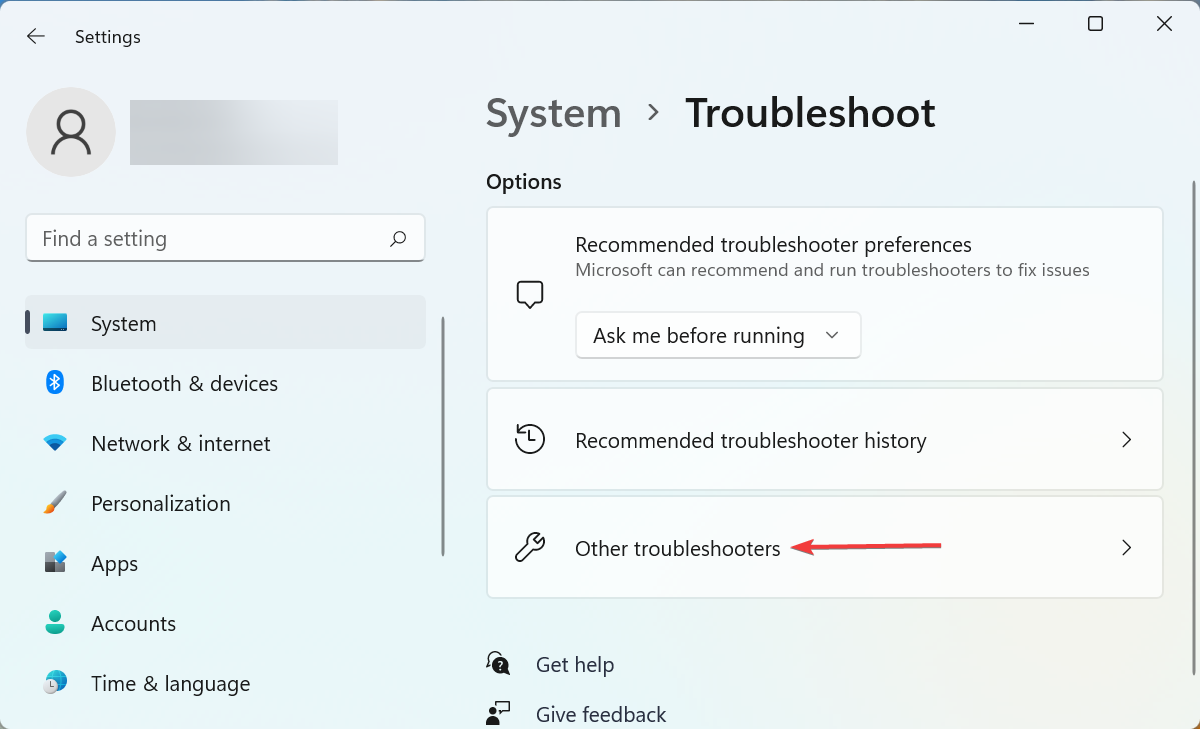
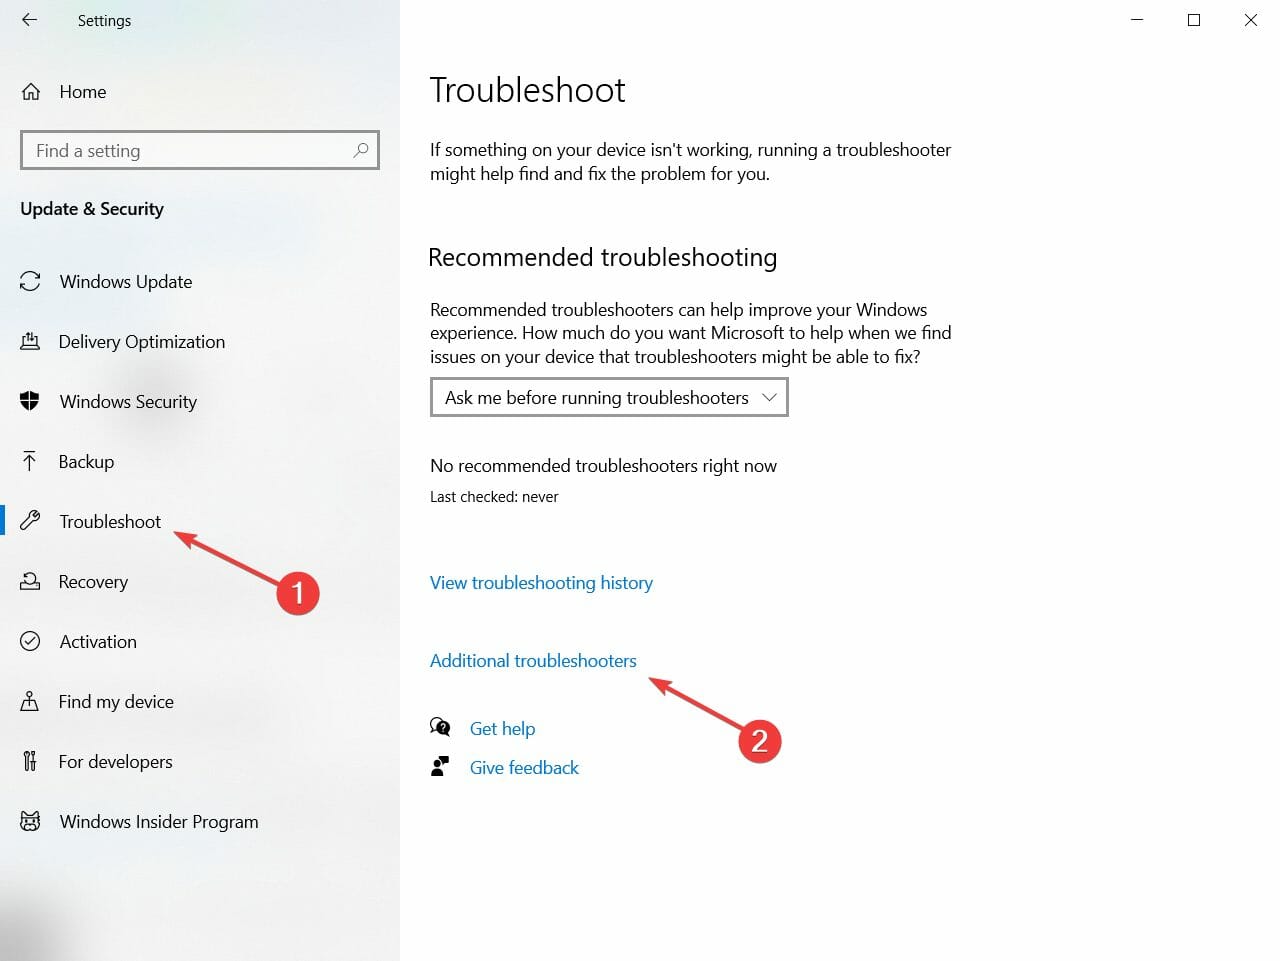
  1. Press Windows + I to launch the Settings app, and click on Troubleshoot on the right in the System tab.Troubleshoot
  2. Click on Other troubleshooters on the right.Other troubleshooters
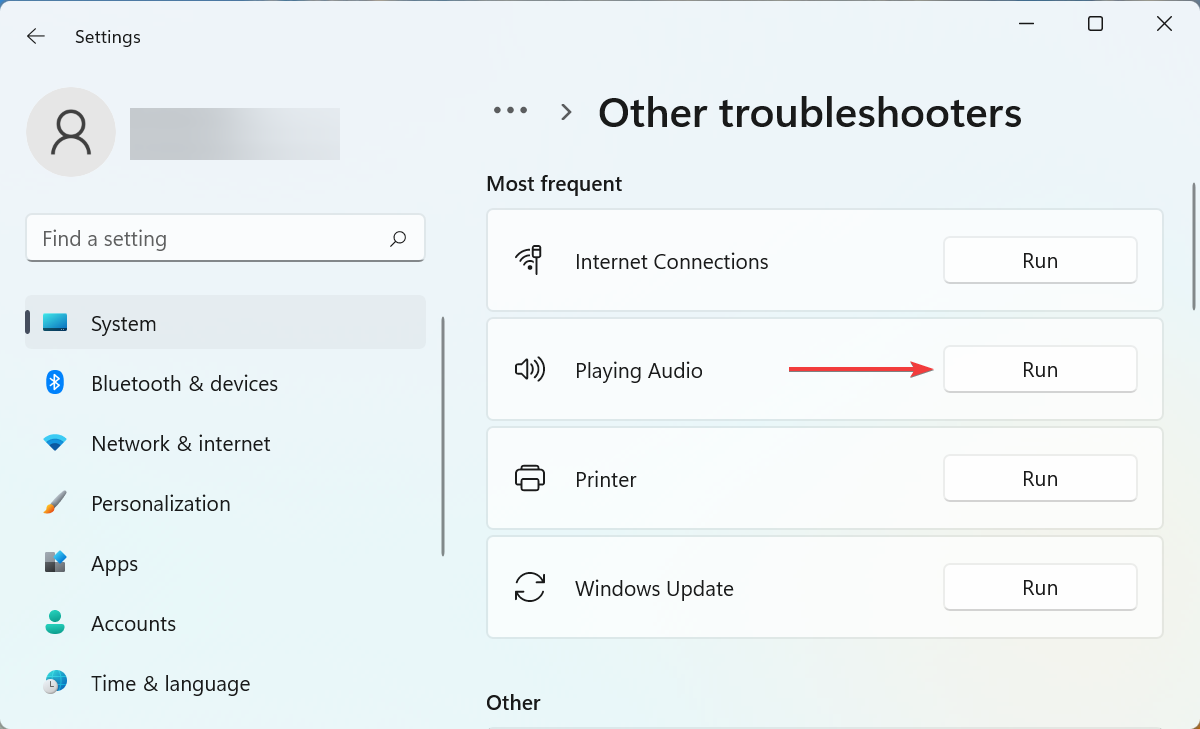
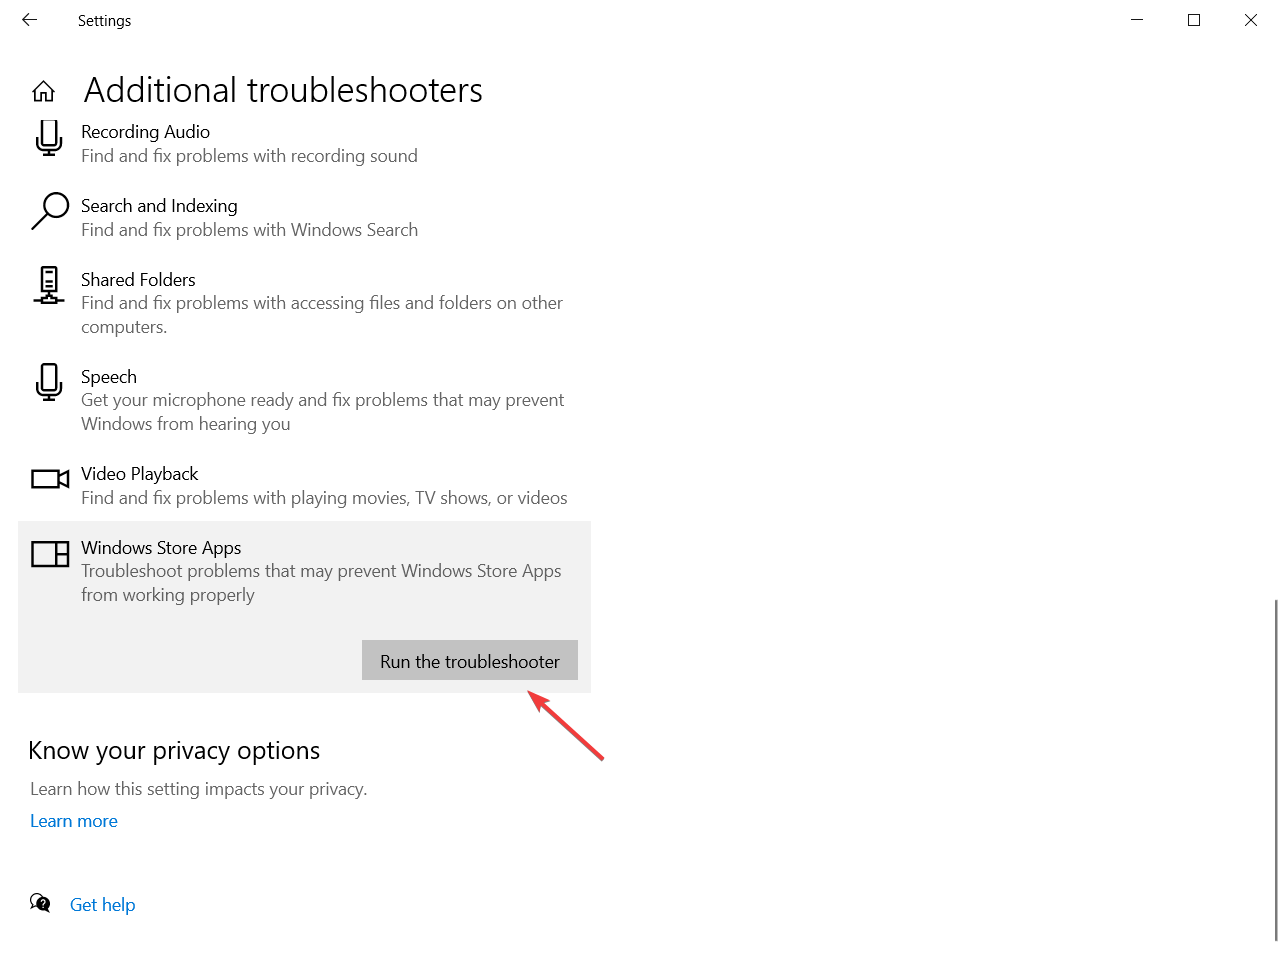
  3. Next, locate the Playing Audio troubleshooter and click on the Run button next to it.Run playing audio troubleshooter to fix windows 11 sound distorted
  4. Follow the on-screen instructions, and choose the appropriate response when prompted.

The built-in troubleshooters offered by Microsoft are more than capable of identifying and fixing a plethora of errors, both with the Windows device and connected peripherals.

After running the Playing Audio troubleshooter, check if the Windows 11 sound distorted problem is eliminated.

3. Update the sound drivers

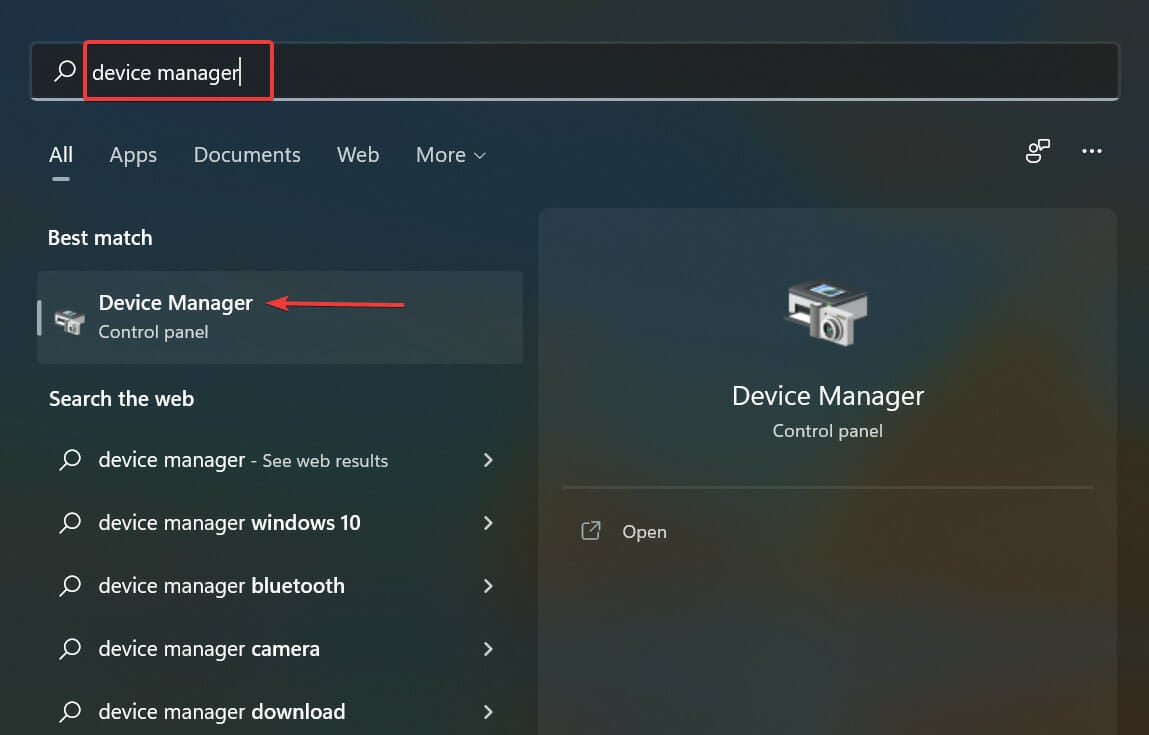
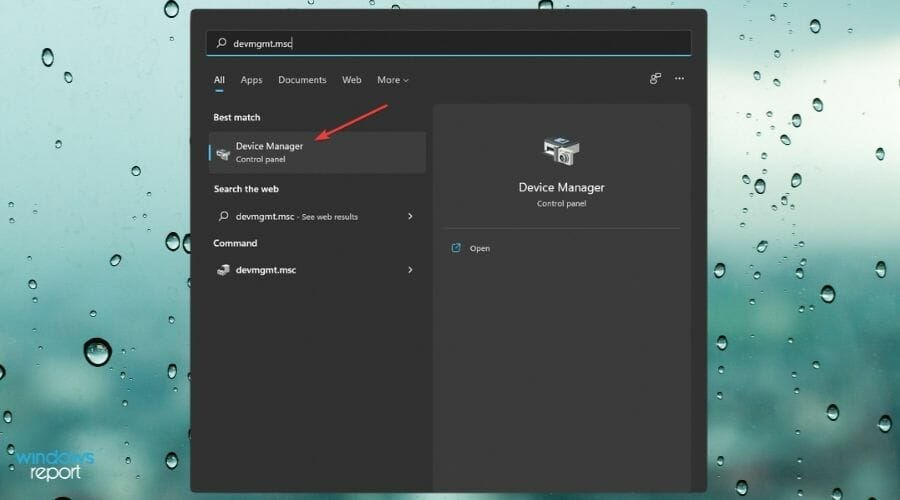
  1. Press Windows + S to launch the Search menu, enter Device Manager in the text field at the top, and click on the relevant search result that appears.Device manager to fix windows 11 sound distorted
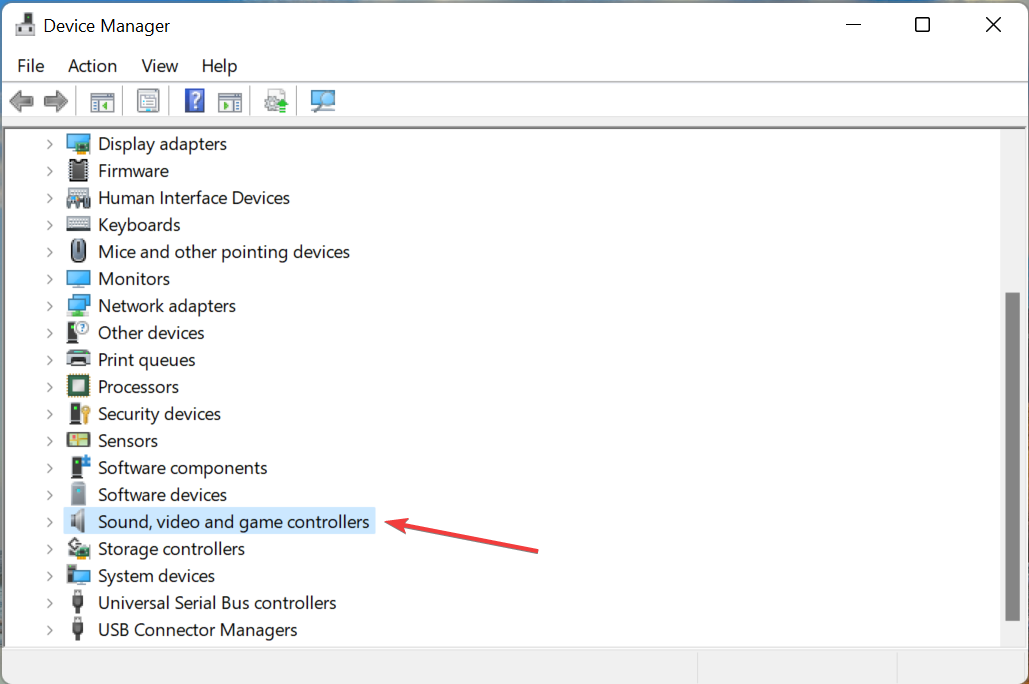
  2. Double-click on the Sound, video and game controllers entry to view the devices under it.Sound, video and game controllers
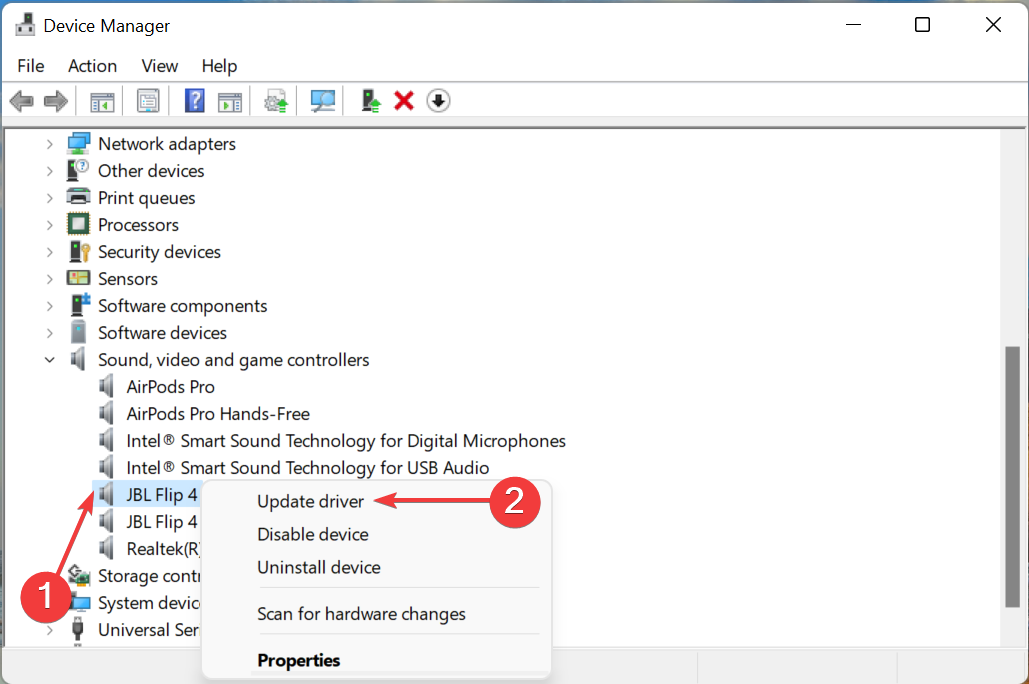
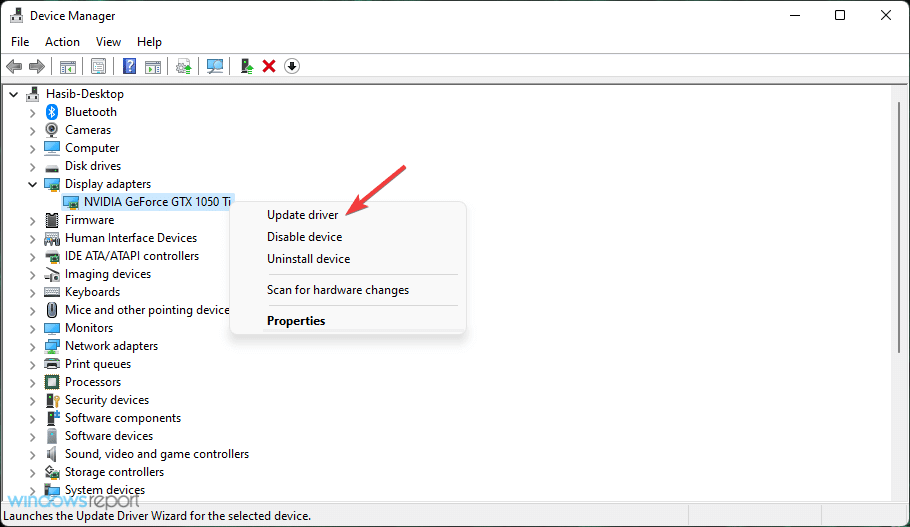
  3. Right-click on the speakers or headsets producing crackled or distorted sounds, and select Update driver from the context menu.Update driver to fix windows 11 sound distorted
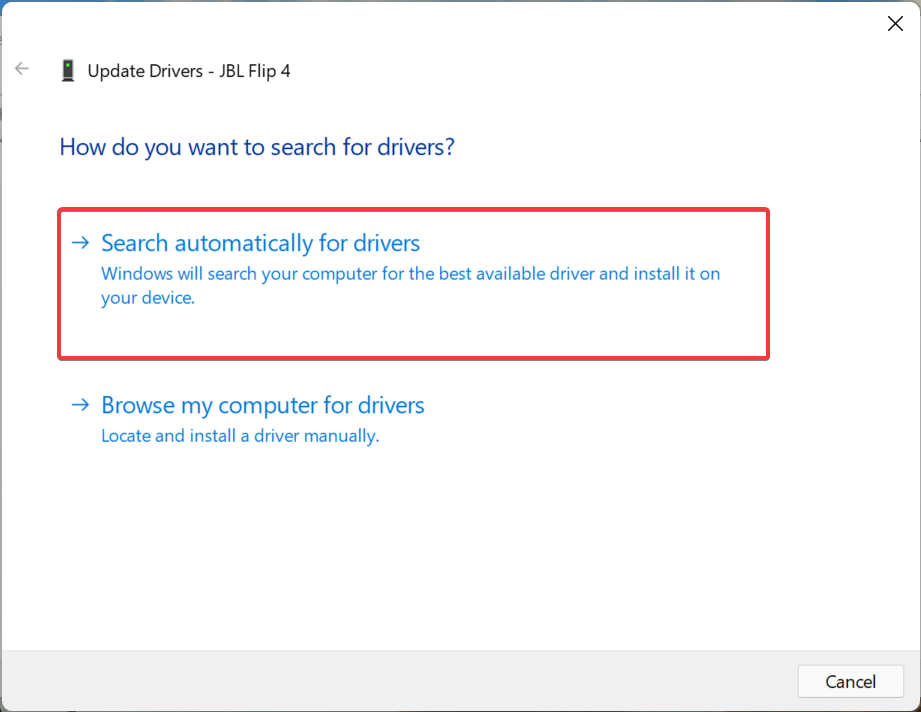
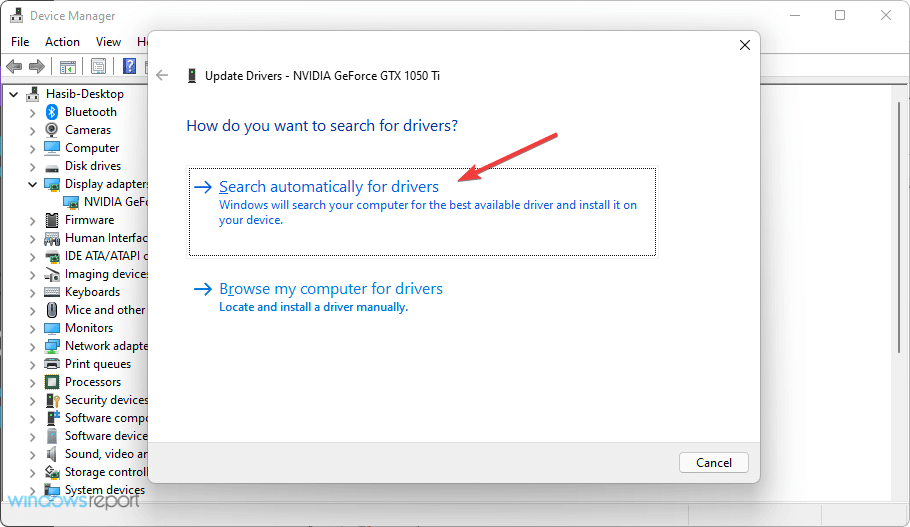
  4. Next, select Search automatically for drivers in the Update Drivers window.Search automatically for drivers
  5. Windows will now scan for the best available driver on the system and install it for the problematic device.

Drivers play a critical role in the effective functioning of every piece of hardware by relaying commands between it and the OS. And hence, it’s recommended that you keep them updated.

If the Device Manager is unable to find an updated version for the peripheral, you can check for the latest driver version in Windows Update or download the setup from the manufacturer’s website and install it on the computer.

Or, you can use a dedicated third-party tool, to automatically keep the installed drivers up-to-date.

Updating the relevant driver should eliminate the Windows 11 distorted sound problem. In case the audio playback does not improve, try the next method.

4. Modify sound settings

Note icon NOTE
We will be making a couple of changes to the playback device here. If certain options or tabs are missing in the case of your device, simply skip that step and move to the next one.
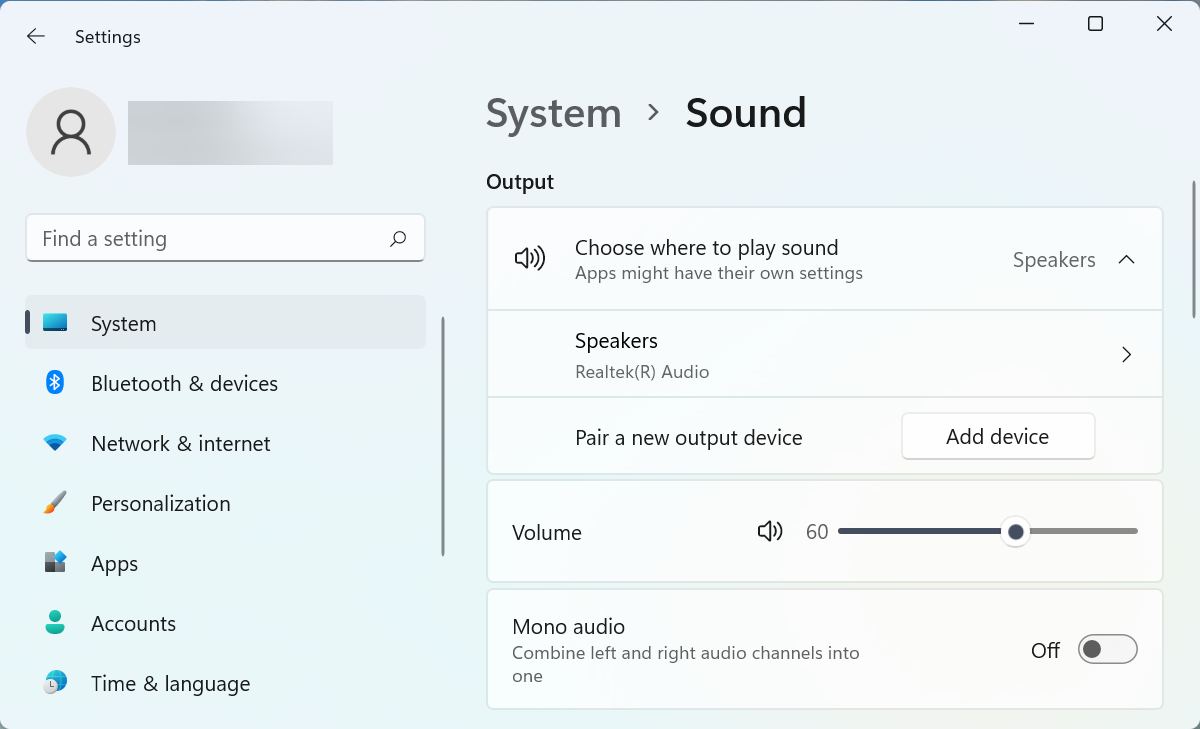
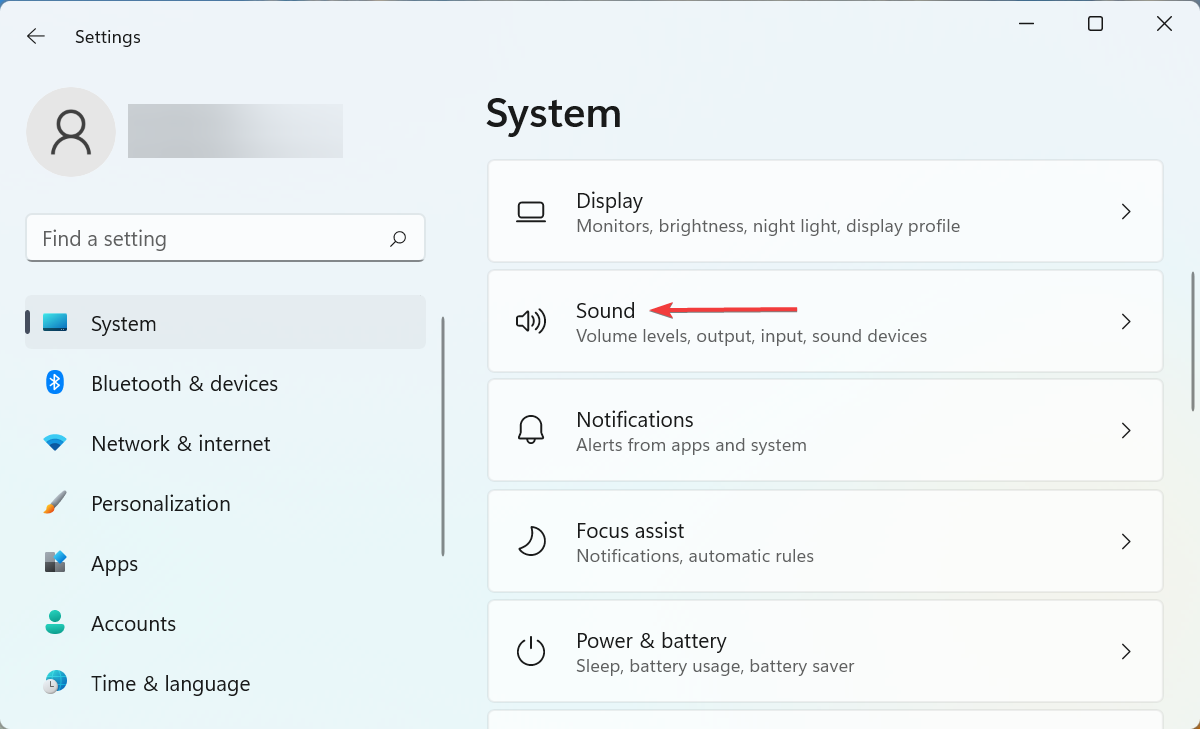
  1. Press Windows + I to launch the Settings app, and click on Sound on the right.Sound to fix windows 11 sound distorted
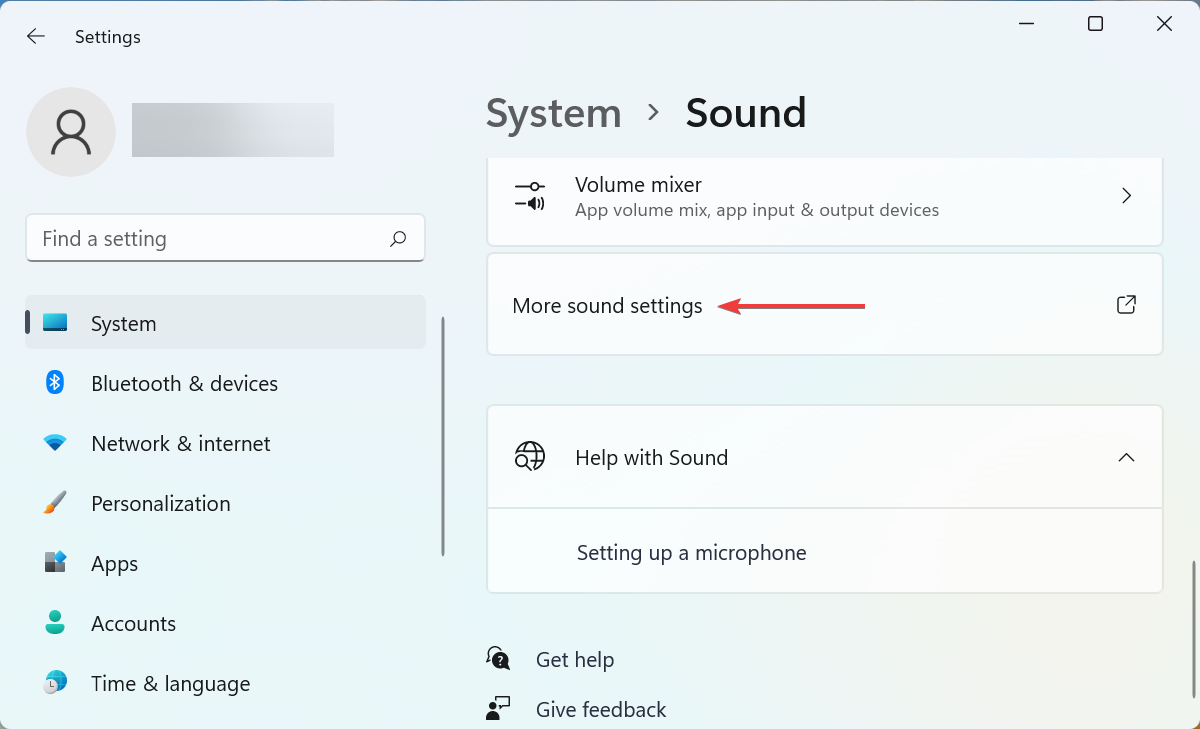
  2. Scroll down to the bottom and click on More sound settings.More sound settings
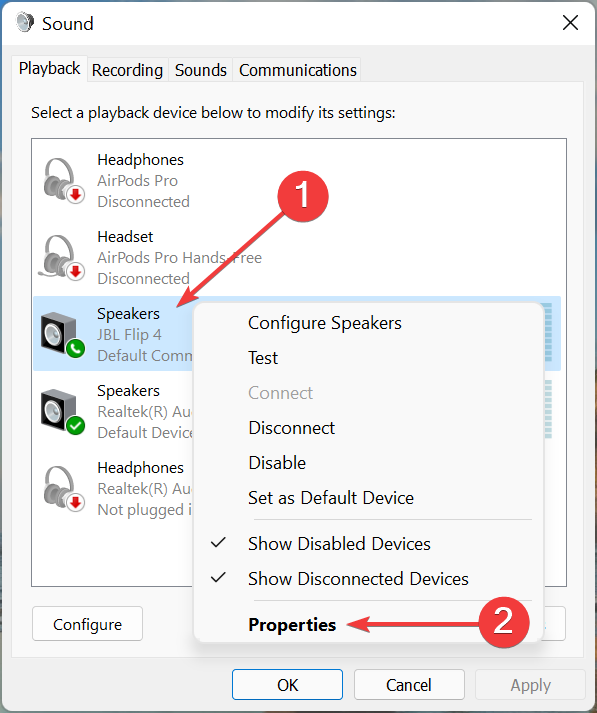
  3. Now right-click on the speakers producing bad quality audio, and select Properties from the context menu.Playback device properties
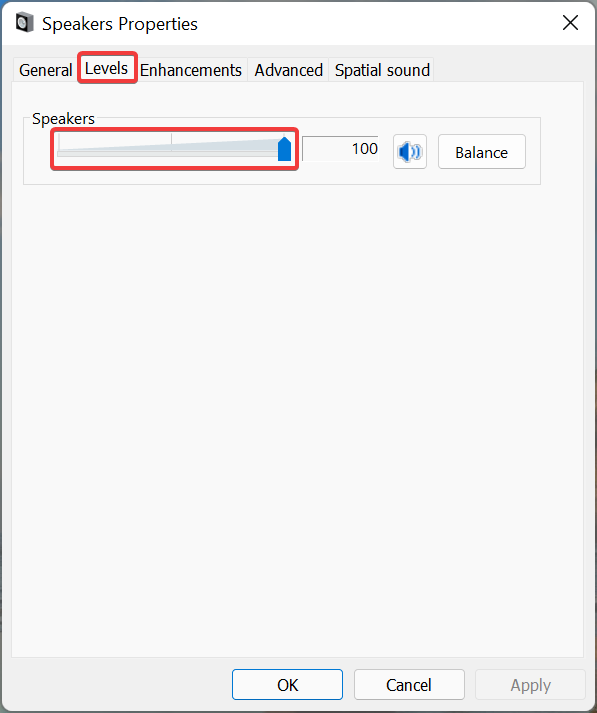
  4. Go the Levels tab and drag the volume slider completely to the right.Change level to fix windows 11 sound distorted
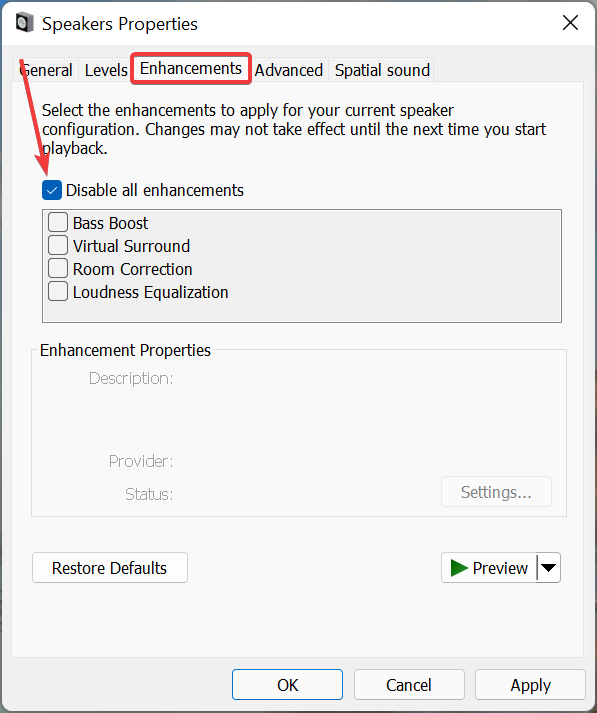
  5. Next, navigate to the Enhancements tab and tick the checkbox for Disable all enhancements.Disable all enhancements to fix windows 11 sound distorted
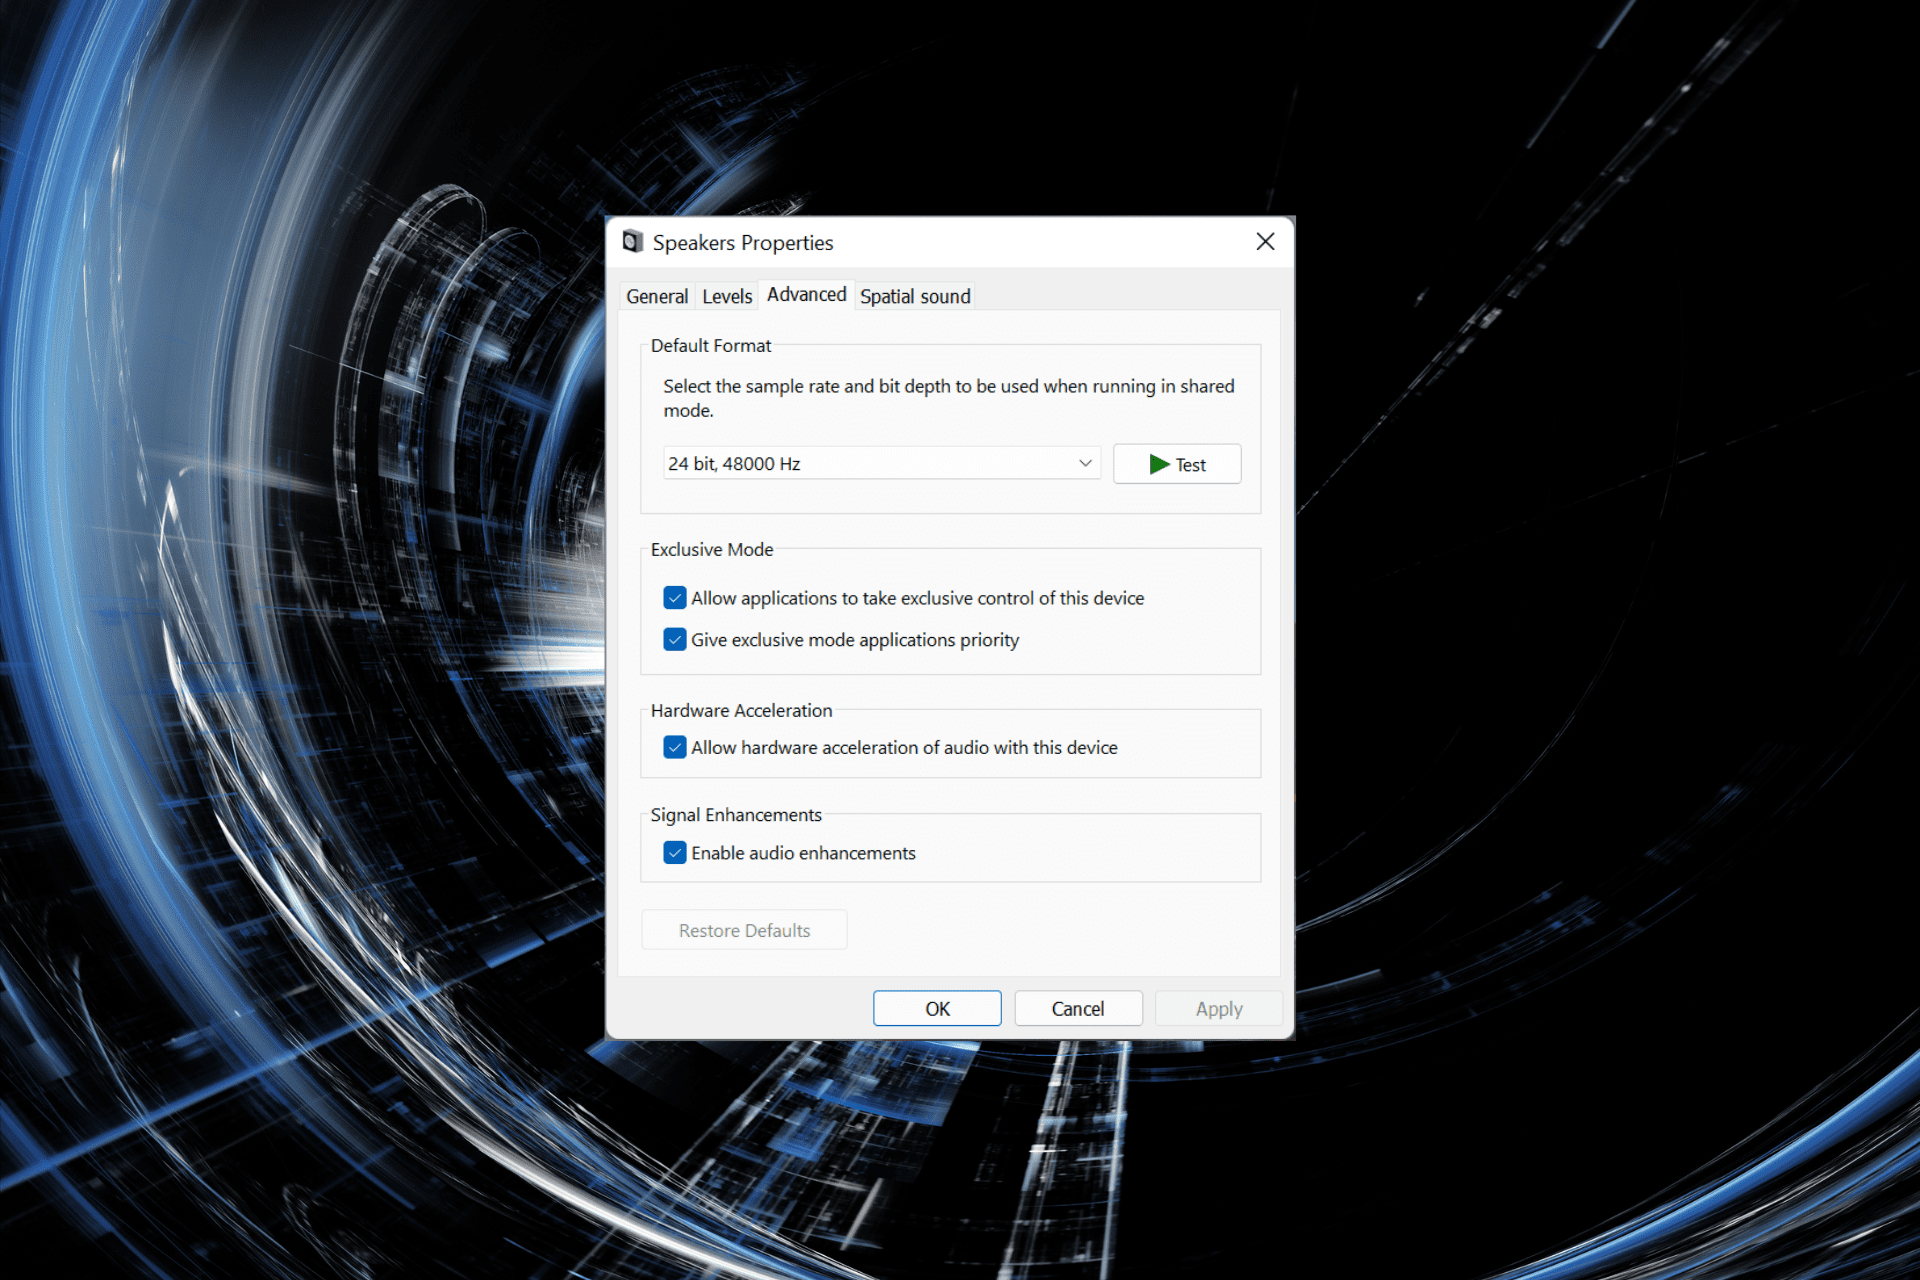
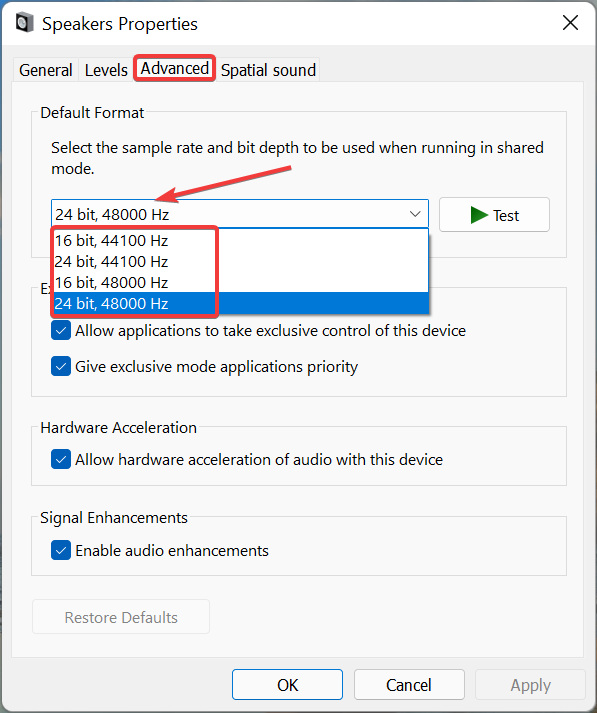
  6. Now, go to the Advanced tab, click on the Default Format dropdown menu, select a different format from the list of options, and check if the distorted sound problem in Windows 11 is fixed. Be sure to check the various options listed here.Change format
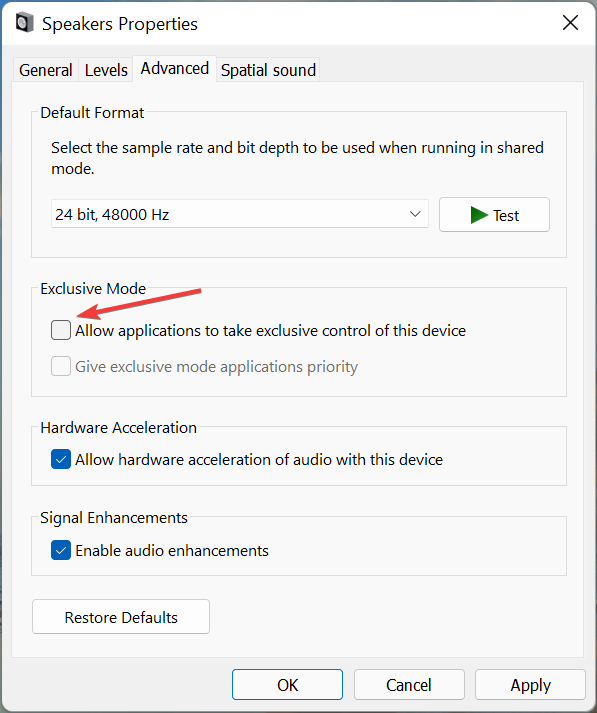
  7. Untick the checkbox for Allow applications to take exclusive control of the device.Disable option to fix windows 11 sound distorted
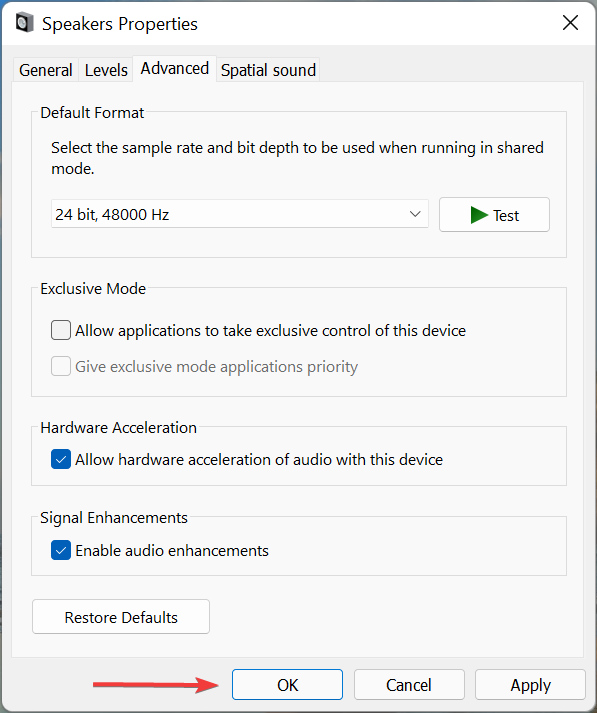
  8. Finally, click on OK at the bottom to save the changes.Save changes

Even though you may not have manually modified the properties, making certain changes here could get things up and running like before. After saving the changes, check if Windows 11 bad audio quality problem is fixed.

5. Reconfigure audio services

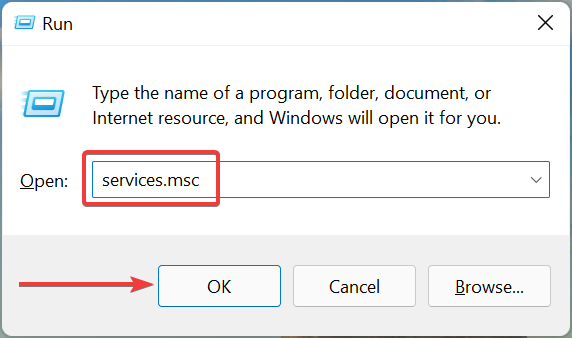
  1. Press Windows + R to launch the Run command, enter services.msc in the text field, and either hit Enter or click on OK to launch the Services app.Launch services
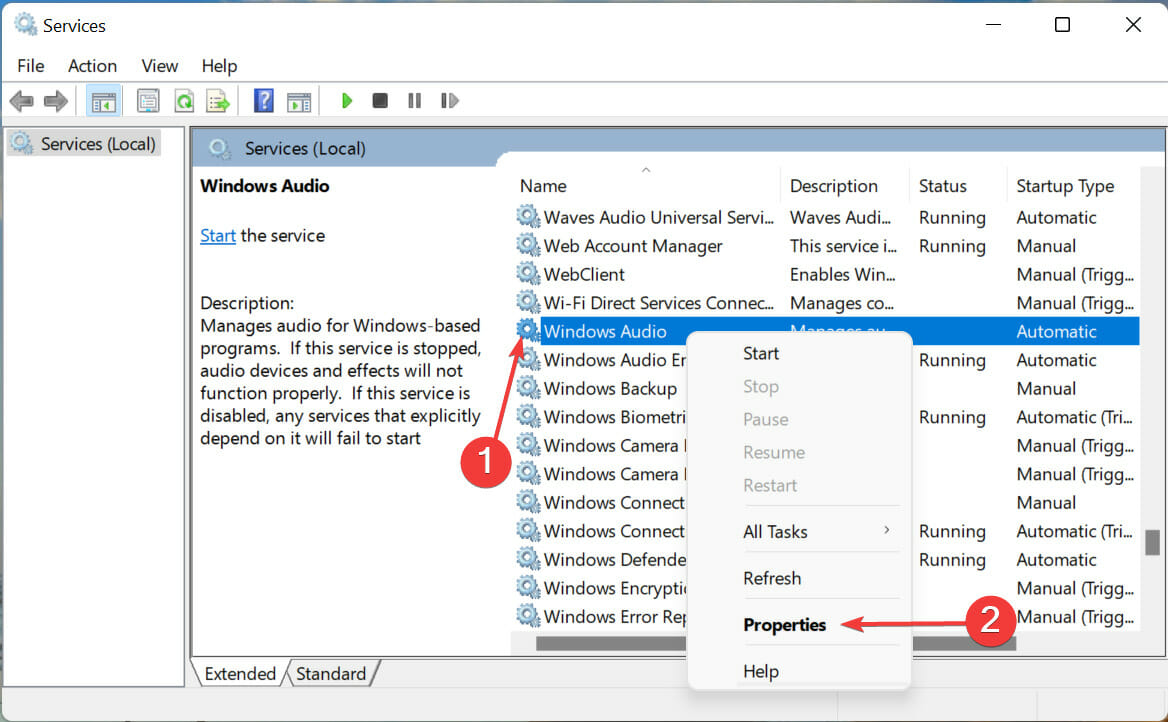
  2. Now, scroll down to locate the Windows Audio service, right-click on it, and select Properties from the context menu. Windows Audio properties to fix windows 11 sound distorted
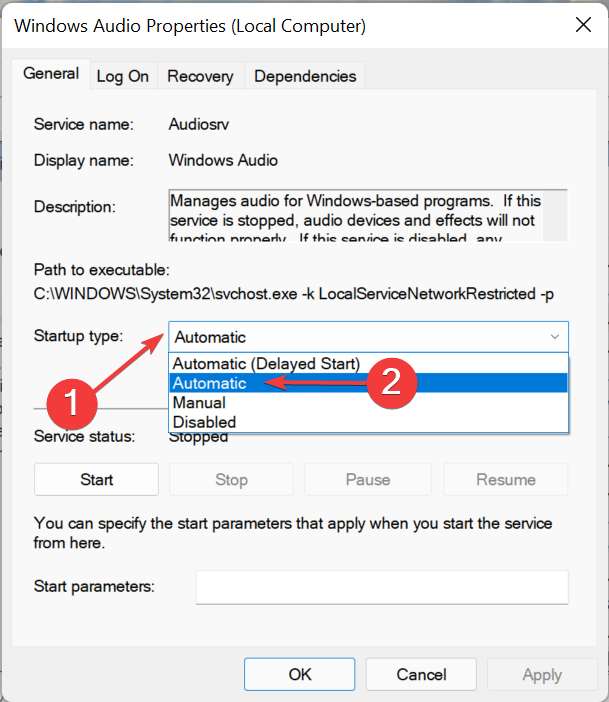
  3. Click on the Startup type dropdown menu, and select Automatic from the list of options.Set startup type to automatic to fix windows 11 sound distorted
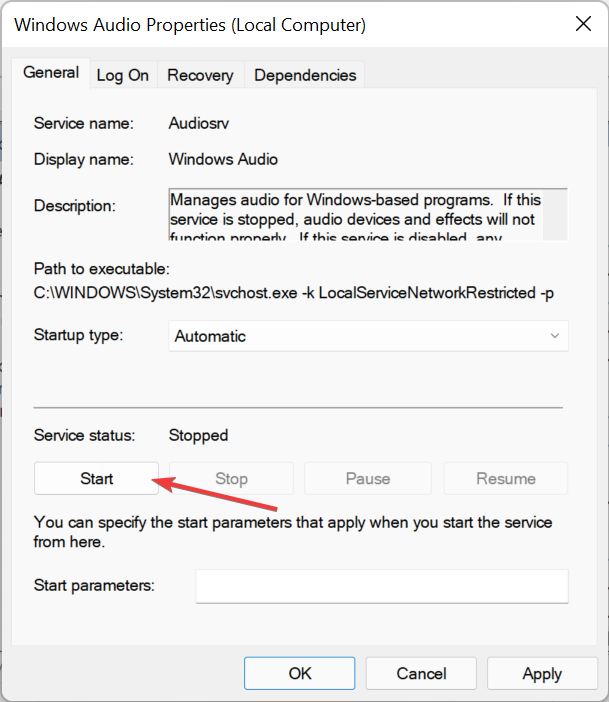
  4. Now, if the service is not running, click on the Start button under Service status to run it.Run service
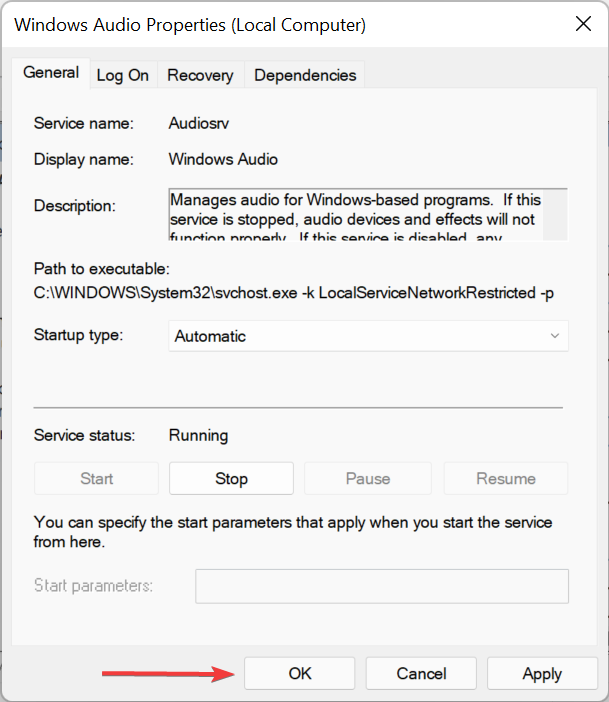
  5. After making the changes, click on OK at the bottom to save these and close the window.Save changes
  6. Similarly, make these changes to two other critical services responsible for the audio output in Windows 11.
    • Remote Procedure Call
    • Windows Audio Endpoint Builder
  7. Once done, restart the computer for the changes to come into effect.

6. Uninstall recent Windows 11 updates

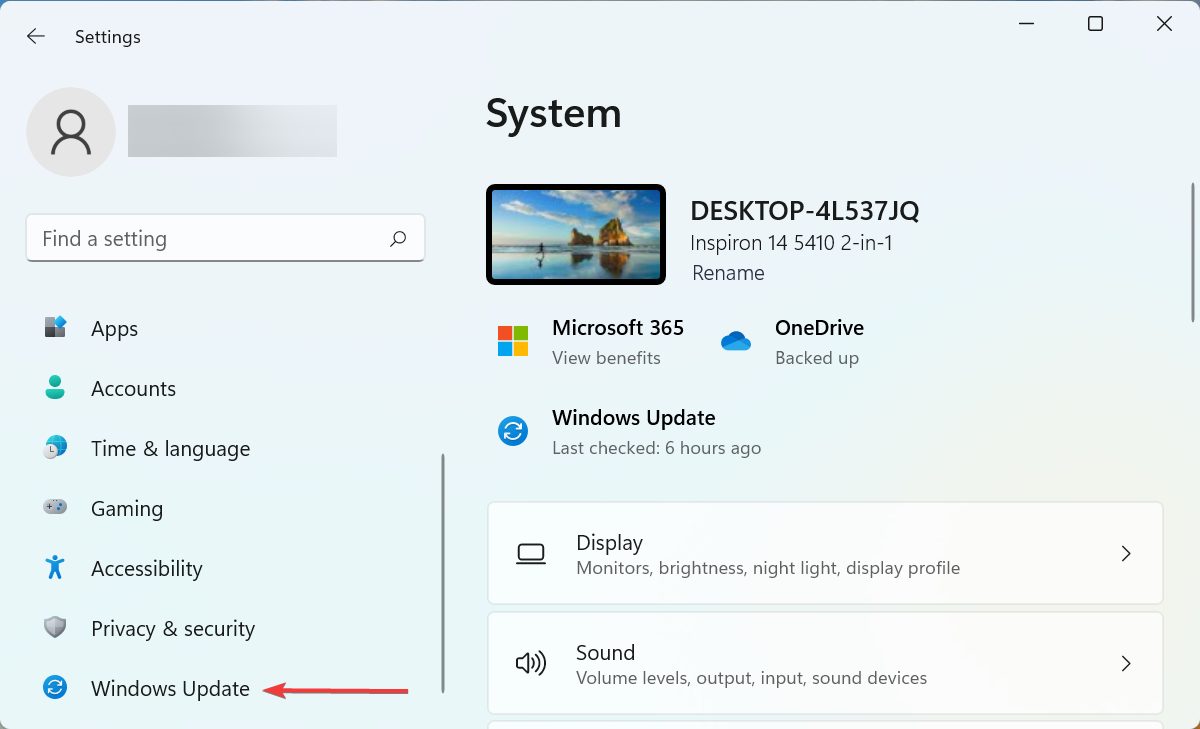
  1. Press Windows + I to launch the Settings, and select Windows Update from list of tabs in the navigation pane on the left.Windows Update to fix windows 11 sound distorted
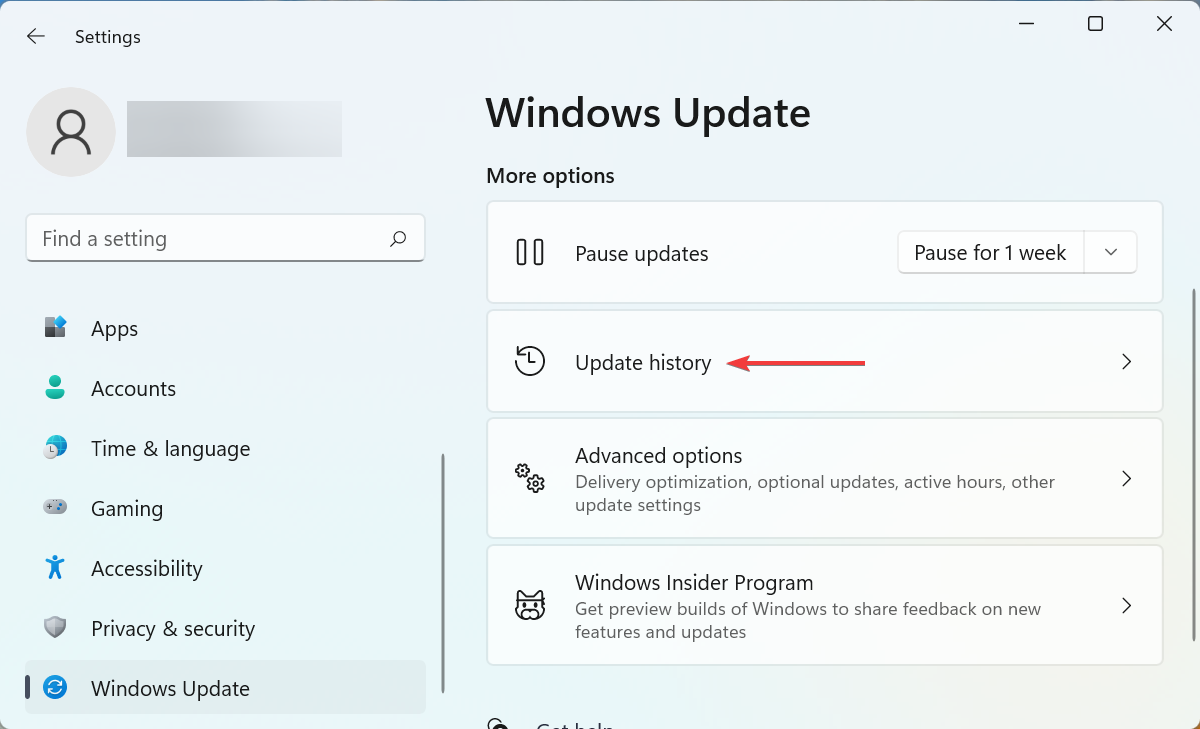
  2. Next, click on Update history on the right.Update history
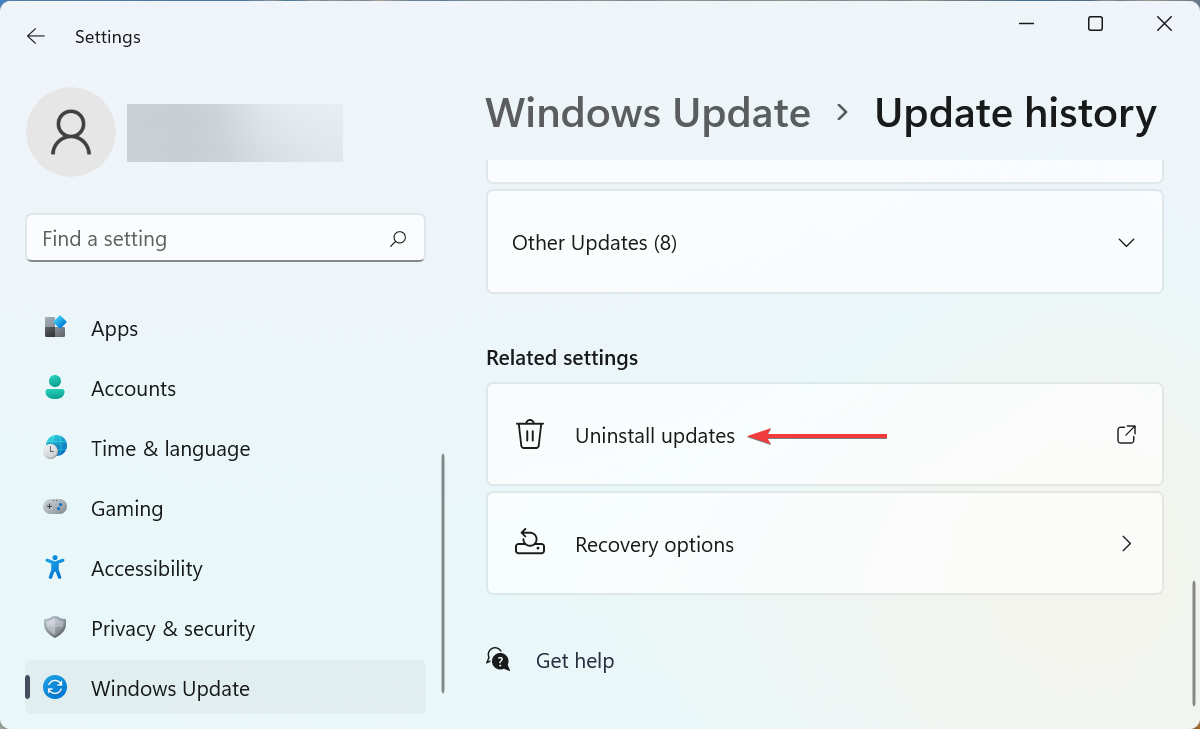
  3. Scroll down to the bottom and click on Uninstall updates.Uninstall update to fix windows 11 sound distorted
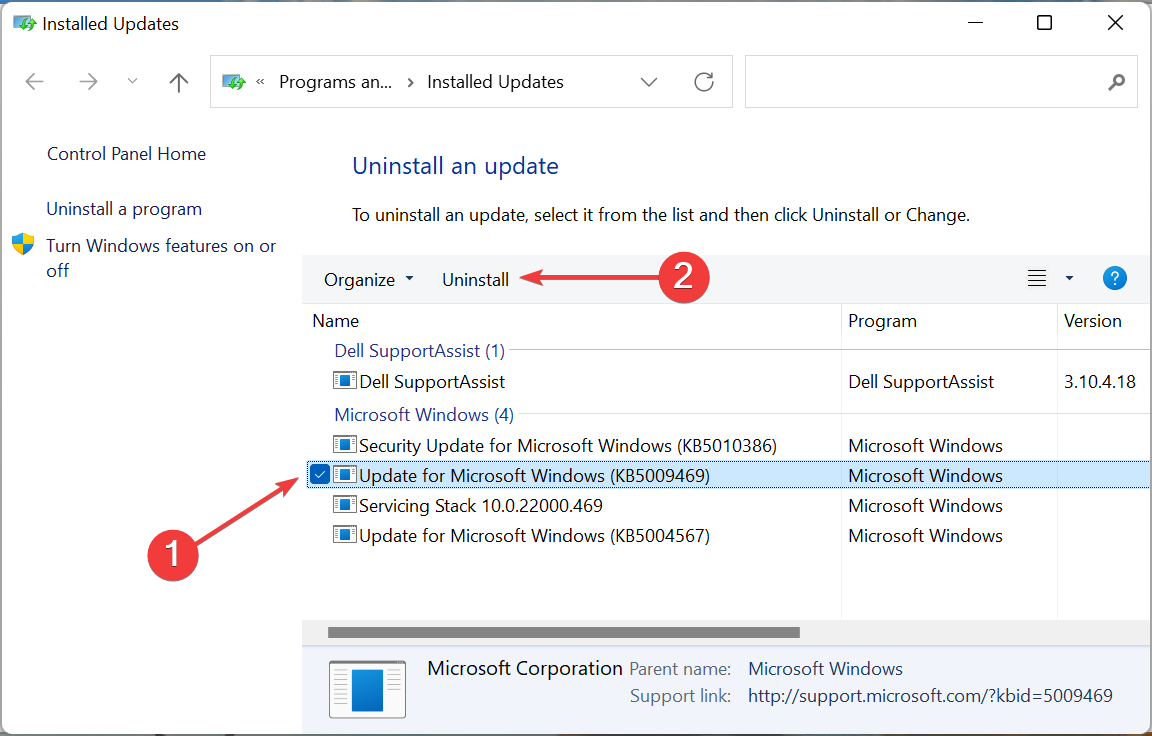
  4. Locate and select the problematic update, and click on Uninstall.select update
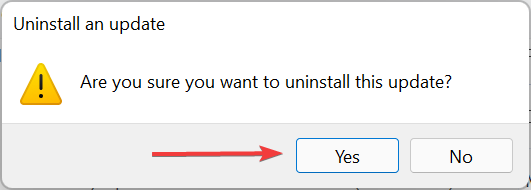
  5. Click Yes on the confirmation prompt that pops up.Confirm uninstall

If you started encountering distorted or bad quality sound in Windows 11 after updating it, uninstalling that particular update could help, since it could be a bug in the update itself.

But, do thorough research to identify whether the update is indeed causing the error. If that’s the case, other users too should be facing the problem and you would find them posting about it on several dedicated forums.

7. Restore or reset Windows 11

If none of the fixes listed above have worked, you are left with no option but to perform a system restore in Windows 11.

The idea here is to take your computer back in time to a point when the error did not exist. This is achieved by making certain modifications to the system, namely removing apps and reconfiguring the settings, according to the restore point.

System restore in Windows 11

The restore process will not affect the files stored on the drive. Also, find out how to undo a system restore, in case it’s unable to fix the Windows 11 sound crackling error.

If the system restore too fails to work, most likely because no restore points exist or they were created after you first encountered the error, you can always reset Windows 11 to its factory settings.

Remember that reset will wipe all the data on the system, be it apps or settings, and the computer will be as good as new once the process is complete.

What are the best earphones, headphones, and speakers for high-quality audio output?

The methods listed above would, in all certainty, eliminate problems causing crackling or distorted sound in Windows 11. But, you may still want to upgrade the headset or speaker for high-quality audio output.

So, check out the best earbuds and headphones available in the market, and choose the one that suits your requirement and fits your budget.

For those of you planning to get a new set of speakers, take a look at our curated list including the best ones. Some of these may even be available at discounted rates, so make sure to check them out.

With the bad audio quality and distorted sound problem in Windows 11 fixed, you can resume playing videos or games, and enjoy the audio output the way it’s meant to be. In case you encounter distorted sound in Windows 10, check this guide.

Also, find out what to do if there’s no sound in Windows 11. Besides, if no audio output devices are found, learn how to solve the problem.

Do not hesitate to tell us which fix worked for you in the comments section below.

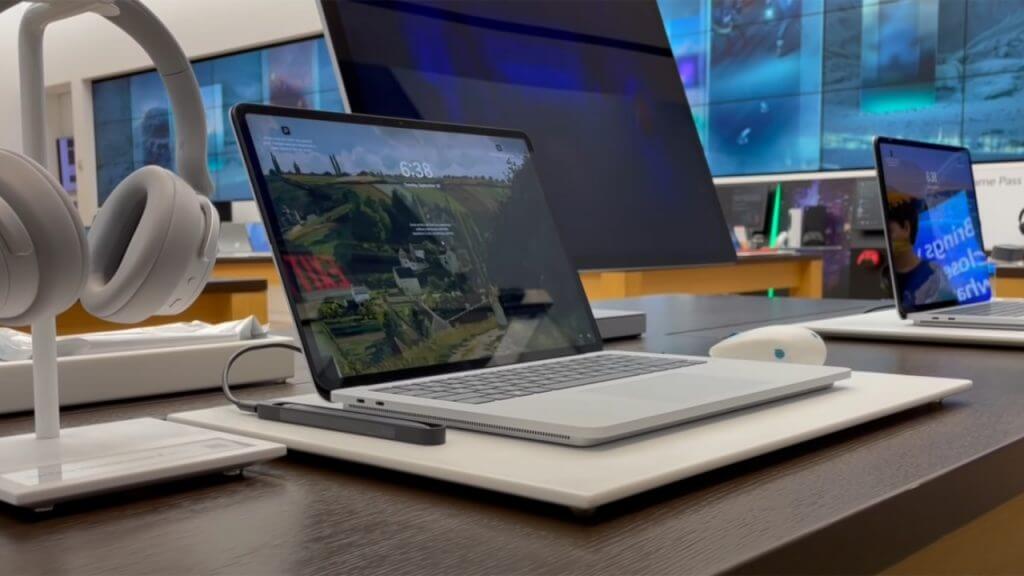
Microsoft launches Surface Laptop Studio in India

Microsoft India today announced the availability of the new Surface Laptop Studio in the country starting next month. While the pre-orders via authorized retail and online partners will commence today, February 15th, the device will be available via both commercial authorized resellers and retail and online partners next month from March 8.

It’s been a good start to the year for Surface enthusiasts in India. In January, Microsoft India announced the launch of the Surface Pro 8 in the market (in fact, it will be available in India starting today, along with the Surface Pro 7+).

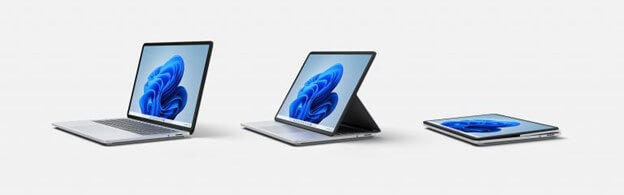
The most powerful device in the Surface portfolio as yet, the Surface Laptop Studio is a Windows 11 convertible laptop aimed at developers, creative professionals, and gamers. Surface Laptop Studio is also the first of its kind from Microsoft (an aberration from the Surface Book line-up) and features an ultra-durable Dynamic Woven Hinge allowing it to transition from one mode – Laptop, Stage, Studio – to another seamlessly.

Surface Laptop Studio

It features a 14.4-inch PixelSense Flow touchscreen, a vibrant 120Hz display, and Quad Omnisonic speakers with immersive Dolby Atmos. With 11th Gen Intel Core H35 processors, DirectX 12 Ultimate, and NVIDIA GeForce RTX GPUs, the Laptop Studio also packs in a punch.

Surface Laptop Studio will be generally available from March 8 in India starting at ₹1,56,999 ($2075) for the entry-level Core i5/16GB RAM/256GB SSD configuration. The top-of-the-line variant will set you back by a whopping ₹3,43,499 ($4541) though. Customers booking during the pre-order period (February 15-March 7, 2022) will be eligible for a free Slim Pen 2 worth ₹11,399.

Run Windows 11 on your Android 13 right now

Google’s app ecosystem has always been an interesting topic. A lot of companies have developed apps for Android, but getting them onto the platform has sometimes been hard. Some companies have succeeded; others haven’t.

As a result, we’ve seen some fragmentation between devices with different versions of the OS.

Why would Google do this? It turns out you can get a lot more computing power from much less code. And virtualized systems tend to be better in many ways.

Android 13 on top of it

Android 13 is designed to address that fragmentation. You’ll start seeing it in your apps soon enough: Apps using Android 13 will run on any device with an OS 13 or later version installed.

Virtual machines are incredibly useful, but they’re also surprisingly brittle. They require hypervisor software, which is both complex and not very well documented.

It’s not exactly like Windows 11, but it is pretty close. You can boot into Windows and install things pretty much like you would on Windows 11.

There are many tweaks necessary to get it working perfectly, but once you have all of these things in place, you can run Windows 11 right on your Google Pixel 6 without any other software.

To make the virtual machine running on the Pixel 6, Google is using a similar system to their Chromebooks. It’s based on the same “pKVM” technology that has its roots in mainstream virtualization projects like Xen, KVM and VMWare.

Security will be an issue

Google has not yet revealed whether it is giving virtual machines full access to Android devices, but the threat of malware and other third-party apps that target Google’s operating system is a concern for many.

This brings us back to the bigger issue of security. The fact that you are running Windows 11 on an Android phone may not be the most secure solution, but there are ways to make it more secure.

Google’s microdroid is a curious thing. It’s really a stripped-down version of Android, but it isn’t supposed to be used in apps that aren’t compiled on the phone itself. And Google doesn’t say what components of the operating system will be given microdroid treatment.

One of the things the ChromeOS operating system does very well is boot. It’s a good piece of software, and it works well on Chromebooks. Google’s next step could be to allow running Windows in some basic way on Chromebooks, even if it can’t run full-blown Windows itself.

As of now, the details are still a bit vague but it looks promising so far.

Would you try Windows 11 on an Android device once available? Let us know in the comment section below.

Microsoft is bringing Your Teams to OneDrive

Microsoft Teams is set to get a new integration with OneDrive, according to a new report.

According to a report, Microsoft is working on a Your Teams section of OneDrive, so you can get to your favorite Teams files faster.

Microsoft has also been working on an integration between Teams and Outlook that would allow users to create a meeting in Outlook and then add it to a channel in teams. The feature was spotted recently, but it should be rolling out soon for all users.

Microsoft has been making it easier for users to collaborate between its services. Microsoft Office apps have already integrated with Teams, allowing users to easily create word documents and excel spreadsheets within the platform.

How it works

According to Microsoft, users can find and work with all their files in Teams via a More Places section on the web. 

This change is being made from the current version of OneDrive on the web, where users can find a Microsoft Teams Chat Files and Microsoft Teams Data section in My Files.

The OneDrive integration will also allow you to search for shared files from within the app itself, as well as use Microsoft’s Fluent Design System-inspired Acrylic material design elements. 

Additionally, users that have been given permissions will also be able to restore deleted items from the Recycle Bin directly from the new Your Teams section on OneDrive.

Listed features

Microsoft announced the new Your Teams section in OneDrive at its recent meeting of the Windows 365 Roadmap and aims to release it to select people soon. 

The company may have to wait a few months after that for general availability, so don’t expect it immediately. 

The team organizer will get a new preview panel that can show different files on different devices. You’ll also be able to see which files have been shared with other users and assign permissions so that only specific users can access them.

Microsoft app integration

The company is building integrations into its Office apps to make them more useful and convenient on the desktop, and it’s making Teams available on more platforms.

 As part of the Microsoft 365 family, it’s also opening up the software to more hardware manufacturers.

The latest round of updates includes a Teams app for Chrome, bringing that service to the world’s second-most-used browser. It also includes a new Teams integration with OneDrive, so you can access files right from your desktop.

With Teams, you’ll be able to define your own workspace from within the app itself. Furthermore, you’ll be able to add users from your Outlook or Windows accounts, letting you use your favorite apps right from within Teams rather than having them tethered to Skype.

Microsoft is also looking at letting users control their Teams calls with Bluetooth headsets, which would go beyond the current functionality by letting you switch between devices while a call is going on.

What is your take on the formation of Your Team section in OneDrive? Share your thoughts in the comments section below and don’t hesitate to learn all about optimizing Microsoft 365 file management with OneDrive in Teams.

FULL FIX: Slow file transfer on Windows 10

We transfer various files on our PCs and oftentimes, slow transfers are possible. This can be especially annoying if you’re in a hurry.

As you might have noticed, slowdown happens whether you’re transferring files from a USB to a computer or when transferring between hard drives.

The most common causes are outdated drivers, missing Windows features, antivirus settings, or hardware issues.

So today, we’re going to show you how to fix this problem on your Windows 10 PC.

How do I fix slow file transfer on Windows 10?

  1. Install the latest drivers
  2. Run Hardware and Devices troubleshooter
  3. Reinstall Universal Serial Bus controller drivers
  4. Perform a Clean boot
  5. Check your antivirus
  6. Disable Remote Differential Compression
  7. Check the Optimize drives service
  8. Disable Windows Search service
  9. Check your BIOS
  10. Connect the hard drive to a different port

1. Install the latest drivers

If you’re experiencing slow file transfer, it’s possible that the cause is your drivers. Sometimes outdated drivers can cause various functionality issues.

So in order to fix the problem, you need to update your drivers.

Start by visiting your motherboard manufacturer’s website and downloading the latest chipset drivers for your device model.

If you don’t want to search for drivers manually, or if you simply can’t find a suitable driver, use Outbyte Driver Updater.

This is a third-party application, that you can use to automatically update all your drivers with just a couple of clicks.

Download the tool using the button below, allow it to scan your device, and check the recommended actions. You can update either all outdated drivers at once or one by one.

Outbyte Driver Updater

Outbyte Driver Updater

Visibly improve the file transfer speed on your device by keeping your drivers up to date with this efficient tool.
Free trial Visit website

2. Run Hardware and Devices troubleshooter

  1. Open the Settings app by pressing Windows Key + I on your keyboard.
  2. Go to the Update & Security section.
    Windows 10 network file transfer slow
  3. Choose Troubleshoot from the menu.
  4. Now pick Hardware and Devices from the list and click the Run the troubleshooter button.
    Slow data transfer Windows 10
  5. Follow the instructions on the screen to complete the troubleshooter.

Once the troubleshooter is finished, check if the problem is still there. If the issue is still present, move to the next solution.

3. Reinstall Universal Serial Bus controller drivers

  1. Open the Device Manager by pressing Windows Key + X.
    Slow file transfer between hard drives
  2. Locate the Universal Serial Bus controllers section and expand it.
  3. Right-click the first item on the list and choose Uninstall device.
    Slow USB 3.0 transfer Windows 10
  4. When the confirmation dialog appears, click Uninstall.
    Windows 10 network file transfer slow
  5. Repeat these steps for all devices under the Universal Serial Bus controller section.
  6. After you remove all drivers, restart your PC.

Once your PC restarts, Windows will automatically install the missing drivers and the problem should be resolved. Many users reported that this solution worked for them, so be sure to try it out.

4. Perform a Clean boot

  1. Press Windows Key + R to open the Run dialog. Type msconfig and click OK or press Enter.
    Slow USB file transfer Windows 10
  2. When the System Configuration window appears, navigate to the Services tab.
  3. Check Hide all Microsoft services option and click the Disable all button.
    Slow file transfer between hard drives
  4. Go to the Startup tab and click Open Task Manager.
    Slow USB 3.0 transfer Windows 10
  5. Task Manager will now appear with the list of startup applications. Right-click the first entry on the list and select Disable from the menu. Do this for all entries on the list.
    Windows 10 network file transfer slow
  6. Go back to the System Configuration window. Now you just have to click Apply and OK to and restart your PC.
    Slow data transfer Windows 10

After doing that, check if the problem is still there. If the issue doesn’t appear anymore the problem definitely related to one of the disabled applications or services.

To find the exact cause, enable disabled applications and services one by one or in groups until you find the cause of the problem.

5. Check your antivirus

According to users, sometimes antivirus software can lead to slow file transfer speeds on your PC.

Third-party antiviruses can sometimes be quite invasive, but you can just disable some antivirus features. Alternatively, you can try disabling your antivirus altogether.

Removing the antivirus is another option, although not recommended. Your best option is to get an antivirus that won’t interfere with your system.

The antivirus market has a lot of good and stable options that will protect your system against all threats without creating errors, false positives, or interfering with other apps.

We recommend you get antivirus software with low CPU usage and a small footprint because these are proven to perform well on all sorts of devices without having any negative impact on response rates.

6. Disable Remote Differential Compression

  1. Press Windows Key + S and enter windows features. Select Turn Windows features on or off.
    Slow file transfer between hard drives
  2. Disable Remote Differential Compression and click OK.
    Slow USB 3.0 transfer Windows 10
  3. Restart your PC.

After your PC restarts, check if the problem is still there. Keep in mind that you need to repeat this on all PCs on your network in order to permanently fix the problem.

7. Check the Optimize drives service

  1. Press Windows Key + R and enter services.msc. Press Enter or click OK.
    Windows 10 network file transfer slow
  2. Locate Optimize drives and double-click it to check its properties.
    Slow USB file transfer Windows 10
  3. Set the Startup type to Automatic.
  4. Now click the Start button to start the service. Once the service starts, click Apply and OK to save changes.
    Slow file transfer between hard drives

After this service is up and running, the problem with slow file transfer speed should be completely fixed.

8. Disable Windows Search service

  1. Open the Services window.
  2. Locate Windows Search service and double-click it to reveal its properties.
    Slow USB 3.0 transfer Windows 10
  3. Set Startup type to Disabled.
  4. Now click the Stop button to stop the service. Lastly, click Apply and OK to save changes.
    Windows 10 network file transfer slow

Restart your PC and check if the problem is resolved. If any new issues occur after disabling this service, be sure to enable the service once again.

9. Check your BIOS

If you’re encountering slow file transfer speeds on your PC, the problem might be your BIOS configuration.

Several users reported that their hard drives were configured as IDE drives in BIOS, and that caused the issue.

In case you don’t know, IDE is an older standard, and by using it with newer hardware you might encounter various problems. However, you can fix the issue simply by changing the hardware configuration from IDE to AHCI in BIOS.

To see how to do that, we advise you to check your motherboard manual for detailed information.

10. Connect the hard drive to a different port

If other solutions didn’t work for you, perhaps this is a good time to check your hardware.

Several users reported that a SATA port can sometimes slow down transfer speeds.  So simply connect your hard drive to a different SATA port on your motherboard.

After doing that, check if the problem is still there.

Slow file transfer speeds can be quite annoying, but we hope that you managed to solve this issue by using one of our solutions.

If you need further help with Windows 10 issues, you’ll find more easy-to-follow tutorials in the Windows 10 Troubleshooting Hub.

If you’re interested in file management tools, visit the Software Hub for useful recommendations.

Windows cannot find explorer.exe [8 fixes that really work]

The File Explorer in Windows 10 earlier known as Windows Explorer in 7 and earlier version is a file manager that allows you to manage files and folders.

File Explorer is one of the most frequently used tools by any Windows user. Unless you are good with the Command prompt, File Explorer is the way to go.

However, at times Windows may fail to find or read the explore.exe file and throw this Windows cannot find explorer.exe error.

This error leads to system crashes, BSOD, black screen, and missing taskbar.

What causes Windows cannot find explorer.exe errors?

There is no specific reason why you may see this error on your Windows PC. In fact, different users had given different reasons when this error first popped up on the screen.

Some users have reported that the error only appears if an administrator or the new user tries to access the account.

Others have reported the error to be random and appear on PCs that were not in use for an extended period.

An external peripheral device can also cause this error.

If Windows fails to recognize any of your external peripheral devices like a keyboard or mouse and if the device creates conflict with the explorer.exe file you may end up with this error.

Another reason for Windows cannot find explorer.exe error could be a virus-infected PC or file corruption. You may also face this error while trying to access the Desktop properties function.

It is also possible that you or someone else may have accidentally deleted the explorer.exe file resulting in this error.

How can I fix Windows cannot find explorer.exe errors?

Depending on whether your PC has a hardware issue or infected with a virus, there are multiple solutions to this problem.

In this article, I have listed all the possible solutions to fix this error on Windows. Here they are:

  1. Check your computer for Virus Infection
  2. Manually Start Explorer.exe from Task Manager
  3. Change File Explorer Options
  4. Run System File Checker Sfc / Scannow
  5. Delete Explorer keys from the Registry Editor
  6. Restore PC using Restore Point
  7. Check your External Peripheral devices
  8. Perform Clean Install

1. Check your computer for Virus Infection

One of the common causes of Windows cannot find explorer.exe error is the possibility of a virus-infected PC.

The virus may disable the filexplorer.exe file altogether to prevent the user from accessing the local drive thus saving itself from being deleted.

We have a detailed guide on the best Windows 10 compatible antivirus software. Follow the guide to download the best antivirus in case you don’t have one already installed.

If you have an antivirus installed, scan the PC for a potential virus. If found, quarantine the virus and restart your PC. Some traces of viruses may remain even after removing the file.

After removing the virus, check the report in your Antivirus program and find the location where the virus was installed.

Navigate to the location and delete any file and folder associated with the virus.

2. Manually Start Explorer.exe from Task Manager

You can try to restart the explorer.exe process manually from the task manager.

You can open the task manager by right-clicking on the Taskbar and Start button. If these options are inaccessible, do the following.

1. Press the Control + Alt + Delete keys on your keyboard. From the options, click on Task Manager to open it.

Or

2. Press Ctrl + Shift + Esc to open Task Manager.

3. From the Task Manager window, click on File and select the Run a New Task option.

Task manager - Run new task

4.  Type explorer.exe and check the option Create this task with administrative privilege and click OK.

Explorer- exe run manually

This will run the explorer.exe process. In a few seconds, you should see the File Explorer window and get it to work again.

If that didn’t work, try the following steps.

  1. After running a scan for Virus infection, open the Task Manager.
  2. Click on File > Run a new Task.
  3. In the Task Runner, type C:Windows and hit enter.
    Task Manager - New Task - open C folder
  4. Now search for Explorer.exe file. Right-click on Explorer.exe and select Run as Administrator.
    Explorer Exe Run as Admin

Wait for a few seconds, and the Windows File Explorer should start working again.

3. Change File Explorer Options

You can tweak the preference in File Explorer Options to fix the Windows cannot find explorer.exe error in Windows. Here is how to do it.

  1. In the Cortana/Search bar type, File Explorer Options and open it from the result.
  2. In the General tab, click the drop button for Open File Explorer to: and select Quick Access. If the option is already set to Quick Access, set it to This PC.
    File Explorer Options
  3. Click OK and then Apply to save the changes.

Now try to open the File Explorer to see whether the error is resolved or not.

4. Run System File Checker Sfc / Scannow

Windows 10 comes with a built-in system file checker tool that scans the PC for missing or corrupt system files and replaces it with fresh system files from the local drive.

Here is how to run the System File Checker tool on Windows.

Open Command Prompt as admin. To do this, click the Search / Cortana bar and type cmd. Right-click on Command Prompt and select Run as administrator.

Or

Press Windows Key + R. Type cmd but don’t hit enter yet. After typing cmd, press Ctrl + Shift and hit enter. This will open the Command Prompt with administrative privileges.

In the Command Prompt enter the following command and hit enter:

Sfc /scannow

Now the System File Checker will scan and check for the corrupted or missing files and fix them. If Filexplorer.exe file has been altered in any way, this scan should fix it.

5. Delete Explorer keys from the Registry Editor

You can try to fix the problem by deleting two key entries from the Registry Editor. Here is how to do it.

Note icon NOTE
Before making any changes to the Registry Editor, it is recommended to create a Restore Point using the guide. Proceed with the below steps after the Restore Point is created.

Press Windows Key + R. Type regedit and hit enter.

In the Registry Editor, navigate to the following path. You can copy and paste this path in the registry editor for easier navigation.

HKEY_LOCAL_MACHINE\SOFTWARE\Microsoft\Windows NT\CurrentVersion\Image File Execution Options

Under this key, you will find two subkeys named Explorer.exe and iexplorer.exe. Delete both the keys completely.

Next, you need to navigate to the following path in the registry editor.

Computer\HKEY_LOCAL_MACHINE\SOFTWARE\Microsoft\Windows NT\CurrentVersion\Winlogon

Click on the Winlogon key and from the right pane and look for an entry named Shell.

Regedit - fix FileExplorer_exe not found

Double click on Shell. Under its Value Data: You should see explorer.exe. If there are other entries apart from explorer.exe in the field, highlight and delete them.

Close the Registry Editor and restart the PC.

Upon restart, you should be able to access the File Explorer without any error.

6. Restore PC using Restore Point

Windows PCs automatically create Restore Points in your local drive. These Restore Points consist of a working image of your Windows System that can be restored in case of file corruption or system crash.

Here is how to use Restore Point to fix Filexplore.exe not found error in Windows.

  1. In the Cortana/Search bar, type Restore, and select Create a Restore Point from the result.
    System Restore - System Properties
  2. Next, click on the System Restore button.
  3. In the System Restore Window, you will see two options. Select Choose a different restore point and click Next.
    System Restore Point Select
  4. Next, check the Show more restore points option. This will show all the Restore Points in your system.
  5. Select one of the Restore Points and click on Scan for affected programs. This will display all the programs that will be installed/reinstalled during the restoration process.
  6. Click Finish to initiate the process.

Wait for the System Restore process to complete. The PC will automatically restart possibly fixing your problem.

7. Check your External Peripheral devices

At times, an incompatible peripheral device can cause the explorer.exe related error on Windows.

Begin by removing all the external devices connected to your PC like the USB drive, USB dongle for Bluetooth device, USB mouse, keyboard, external hard drive, webcam, etc.

Restart your PC after removing all the devices and see if the error is resolved.

8. Perform a clean install

If none of the above solutions work for you, you may try to clean install Windows.

By doing so, you will be able to install the latest version of Windows but also lose all the installed programs on your PC.

Make sure you create a complete backup of your data before proceeding with the clean install.

To clean install Windows, you need installation media. You can create a Bootable USB flash drive using Windows ISO. Follow the guide for more instructions.

Conclusion

The Windows cannot find explorer.exe error can occur due to several reasons. Prime reasons are virus infection and system file corruption.

Follow the solution given in this article, and you should be able to fix the problem on your computer.

There are plenty of other File Explorer problems but if you have another one, you can find a solution in our Fix File Explorer errors hub

Most of our articles focus on Windows 10 errors since they are pre predominant cause of distress for the users. Check our Windows 10 errors hub to find solutions for any such problems.

Let us know which of these solutions helped you fix the problem or if you have a new fix in the comments.


Why you should install the new Microsoft PowerToys update now

PowerToys is an app that allows a user to tweak and customize Windows software for better performance.

While some may consider “tweaking” windows for higher performance to be unnecessary or even wrong, in many cases there are features that can be added to maximize efficiency and productivity.

In addition, Microsoft also added a new Always-on-Top feature to PowerToys that will boost productivity.

PowerToys latest version is available for download now, but don’t be fooled by the release number. It’s actually a minor update that rolls out without any new features or upgrades, but enables an important security patch for the previous release instead!

This should however not make it less important given the importance of security updates. After all, PowerToys introduced a new mouse function recently so when it comes to updates, it is definitely not lacking.

New security update

While you’re waiting for the next big Windows update to arrive with new features, a new update is now available for those who installed Microsoft’s PowerToys utility program.

Microsoft has now updated its PowerToys suite in an apparent attempt to add on some light security measures to every user’s system.

This is a patch release to fix issues in v0.55.1. due to an installer bug and .NET 5 doing an update for the runtime, We deemed (it) important for stability based on incoming rates.

PowerToys has been synonymous with tiny tools for Microsoft software users and the concept began as a way to rapidly iterate on small tools and other apps. 

Since its reboot in 2019, it has provided new tools and features regularly. The latest release is no different, with a feature you cannot afford to ignore.

The new version is already available for download on Microsoft Store so do not hesitate to keep your system protected.

Do you feel this feature is underwhelming and more updates should have been included? Share your thoughts in the comment section below.

FIX: Facebook app is not working in Windows 10

More and more social networks find their place in Microsoft Store. The Facebook app is there for a while, followed by the Facebook Messenger app which is mandatory for the chat.

However, even though this Windows 10 integration works rather well, there are still some internal issues plaguing users.

Some users weren’t even able to open the Facebook app upon installation. This is a reoccurring issue and the app just won’t work for some Windows 10 users.

In order to address this, we suggest following the steps below. Hopefully, you’ll be able to resolve the issue with one of the enlisted solutions.

We also have a small guide on how to reinstall Facebook on your computer so real the entire article and bookmark it for further reference.

How can I fix Facebook app issues on Windows 10?

  1. Run the Store Apps troubleshooter
  2. Update DirectX and check display drivers
  3. Reset the Facebook app
  4. Reinstall the Facebook app
  5. Try alternatives until the problem is sorted out

1. Run the Store Apps troubleshooter

  1. Click the Start button and select Settings.
  2. Chose Update & Security.
  3. Click on Troubleshoot from the left pane, then select Additional troubleshooters from the right.
  4. Now scroll down and click on Windows Store Apps, then hit the Run the troubleshooter button.
  5. Follow the steps to get through with the troubleshooter.

Let’s start with the built-in troubleshooter which deals with app-related issues on Windows 10.

Due to a slow integration and frequent changes in Microsoft Store apps, this tool is a valuable asset in dealing with all major in-app issues.

If you’re unable to open the Facebook app for Windows 10 or the app underperforms, running the dedicated troubleshooter might help.

Follow the simple steps above to learn how to run the Windows Store Apps troubleshooter.

2. Update DirectX and check display drivers

Some users who experienced issues with the Facebook app resolved the problem by checking the DirectX and updating the display driver.

Updating the DirectX shouldn’t be a problem, but display adapters are somewhat hard to address, even though the generic driver looks up to date.

You’ll need to find that’s not what always works the best. Rather, you should navigate to the OEM’s official support website and download the official driver compatible with your device.

These are the 3 main graphics cards manufacturers. Follow the links to get directly to their driver download page:

And here’s where to find the DirectX installer:

You can also use dedicated driver updater software such as Outbyte Driver Updater. This kind of tool will automatically update your drivers whenever necessary, without requiring you to manually check for updates.

⇒ Get Outbyte Driver Updater

3. Reset the Facebook app

  1. Press Windows key + I to open Settings.
  2. Choose Apps.
  3. Under the Apps & features, search for Facebook.
  4. Expand Facebook and select Advanced options.facebook windows 10 app not working
  5. Scroll down and click Reset.facebook windows 10 app not working
  6. Check the app permissions.facebook windows 10 app not working
  7. Repeat this for Facebook Messenger.
  8. Restart your PC.

In addition, if an app is underperforming or you experience repetitive issues, you can always reset it to factory values.

This option was introduced to improve the troubleshooting of Windows UWP apps. Once you reset it, the app should start working properly.

Of course, this isn’t a rule, but we suggest trying it out. Also, make sure that the essential permissions are granted to Facebook and you can also reset Messenger as well.

Follow the steps above to reset the Facebook app and get things back to normal again.

4. Reinstall the Facebook app

  1. Open Settings.
  2. Choose Apps.
  3. Under the Apps & features, search for Facebook and expand it.
  4. Click Uninstall.facebook windows 10 app not working
  5. Run the third-party tool recommended below to clean the remaining associated files.
  6. Open the Microsoft Store and search for Facebook.
  7. Install Facebook.facebook windows 10 app not working

If the previous step fails, you can still have another solution to try, and that is to reinstall the app.

Now, we suggest (and it’s recommended by users who resolved the issue), to use some kind of a third-party cleaner or uninstaller to remove the associated files before installing the app again.

Uninstaller software can force uninstall stubborn or malicious apps that won’t be removed with Windows Settings. Nonetheless, it guarantees a clean procedure by removing any leftover that may have remained on your device from previous installation.

5. Try alternatives until the problem is sorted out

Finally, if the official app falls short, we suggest trying out the 3rd-party alternatives available in the Store. There’s a limited number of apps at your disposal, but we can point out 2 or 3, for sure.

You can browse the Store on your own and find the fitting one, and the majority is free so there’s that, as well.

So, check out our special selection of the best apps to get on Facebook from your favorite devices.

With these at your disposal, we can conclude the article. We also hope that you managed to fix Facebook Messenger if it’s not working on your computer.

You can try getting back to Facebook after some time, as the error might be resolved and you’re finally able to access the app.

This isn’t the only issue you can encounter, many also reported error performing a query on Facebook message, but we have a guide that addresses that issue.

We also have a guide on what to do if Messanger is not working on a Windows 11 PC, so don’t miss it.

Don’t forget to tell us how the enlisted step worked for you. The comments section is just below, so don’t shy away from leaving a comment.

Fix: WiFi certificate error on Windows 10 [Can’t Connect]

There’s a variety of Wi-Fi errors in Windows 10 platform and some of them are quite hard to deal with. One problem, albeit not as common as others, concerns the Wi-Fi Certification and it prevents users from connecting to a network or access a certain website.

We enlisted some solutions below so make sure to give them a try.

How do I fix Wi-Fi Certificate error in Windows 10?

  1. Check Time & Time Zone
  2. Update your network drivers
  3. Set the Windows Time service startup to Automatic
  4. Restore Advanced Network Settings to defaults
  5. Enable Hyper-V Hypervisor

1. Check Time & Time Zone

  1. Right-click on Start and open Settings.
  2. Choose Time & Language.
  3. Disable and re-enable the time and time zone automatic settings.windows 10 wifi certificate error
  4. Restart your PC.
  5. If the problem persists, set the time and time zone manually.

Let’s start by making sure that the time and date are properly set. This seemed to be a problem for some users, due to the discrepancy between the system and the regional time.

Resetting the Automatic time and date settings should resolve the problem, but you might also go for the manual approach if it fails.

2. Update your network drivers

Certificate errors with both WiFi and ethernet connections can also be caused by outdated network drivers.

You can look up and download the latest drivers for your hardware online, but be careful because faulty drivers may cause even more problems.

You can also update your drivers from Windows settings. Just open the Device Manager panel from the taskbar, find your network drivers, right-click on them and select update.

Alternatively, use a third-party driver updater like Outbyte Driver Updater to easily get rid of the problem instantly.

The program is portable, meaning that you just need to download it and you can run it straight for the client. It will then proceed to scan your system for outdated, damaged, or missing drivers, and then automatically fix them.

Outbyte Driver Updater is packed with libraries containing all known drivers, and as long as you are connected to the Internet, you can thus gain access to all the latest versions of your required drivers.

3. Set the Windows Time service startup to Automatic

  1. In the Windows Search bar, type Services and open Services.
  2. Search for Windows Time service. Right-click on it and click Restart in the contextual menu.
  3. If the problem is persistent, right-click on the Windows Time service and open Properties.
  4. Change the Startup type from Manual to Automatic and confirm changes.

Windows Time Service regulates and maintains the date and time synchronization on a network. This service should start manually, when necessary.

However, it can get into a stall and thus invoke the error at hand. Restarting this service should be enough, but you can also go for the Automatic Startup type which will ensure the service is always on as soon as the system boots.

4. Restore Advanced Network Settings to defaults

  1. In the Windows Search bar, type Internet Options and open Internet Options.windows 10 wifi certificate error
  2. Choose the Advanced tab.
  3. Click on the Restore advanced settings.windows 10 wifi certificate error
  4. Scroll down through the Settings list until you find the ” Warn about certificate address mismatch” setting. Uncheck the box.windows 10 wifi certificate error
  5. Confirm changes and reset your PC.

It usually isn’t necessary to meddle with the Advanced Network Settings, at least not for home users. And that’s how they should stay in order to address this issue.

With one option being the only exception and that’s the Warn about certificate address mismatch which should be disabled.

5. Enable Hyper-V

  1. In the Windows Search bar, Windows Features and open Turn Windows features on or off.windows 10 wifi certificate error
  2. Check the Hyper-V box to enable it.windows 10 wifi certificate error
  3. Confirm changes and restart your PC.

Finally, we suggest enabling the Hyper-V system feature. This, of course, applies only to users who have issues with servers. These issues started after the update to Windows 10 1803 so you can also roll back the update as your last resort.

That should do it. In case you have any questions or suggestions concerning Wi-Fi Certificate errors, we encourage you to post them in the comments section.

Android Fastboot Drivers For Windows 11: How to Install Them

If you want to configure your Android device, you will need to install Fastboot drivers for Windows 11, and this guide will show you how to do it.

How do I install Fastboot drivers on Windows 11?

1. Use Windows Update

  1. Press the Windows + I keys simultaneously to open the Start Menu.
  2. Enter Check for updates on the search bar and click to open.
  3. Select Advanced options.
  4. Select Optional updates.
  5. Click on Driver updates and select Download & install.

2. Use an APK

  1. Navigate to your browser on your PC and download Android SDK Platform Tools.
  2. Set up and install the APK.
  3. Check the Android SDK Tools and Android SDK Platform tools boxes.
  4. Select Accept License and click on Install.
  5. Wait for installation to finish until you see the message: Done loading packages at the bottom and your Fastboot drivers will be installed.

3. Use a third-party driver software

If you need to install Fastboot drivers automatically on Windows 11 OS, you should best consider a specialized driver software like Fortect Driver Updater.

This automated tool will perform a complete scan on your system and detect missing drivers, plus install them in a few simple steps without requiring complicated actions.

With a very large cloud database, this software solution has all it takes to provide you with Fastboot drivers and update or fix other broken drivers from your PC without compromising your system.

⇒ Get Fortect Driver Updater

4. Use Google USB drivers

  1. Navigate to your browser and download the Google USB driver.
  2. Extract the zip files.
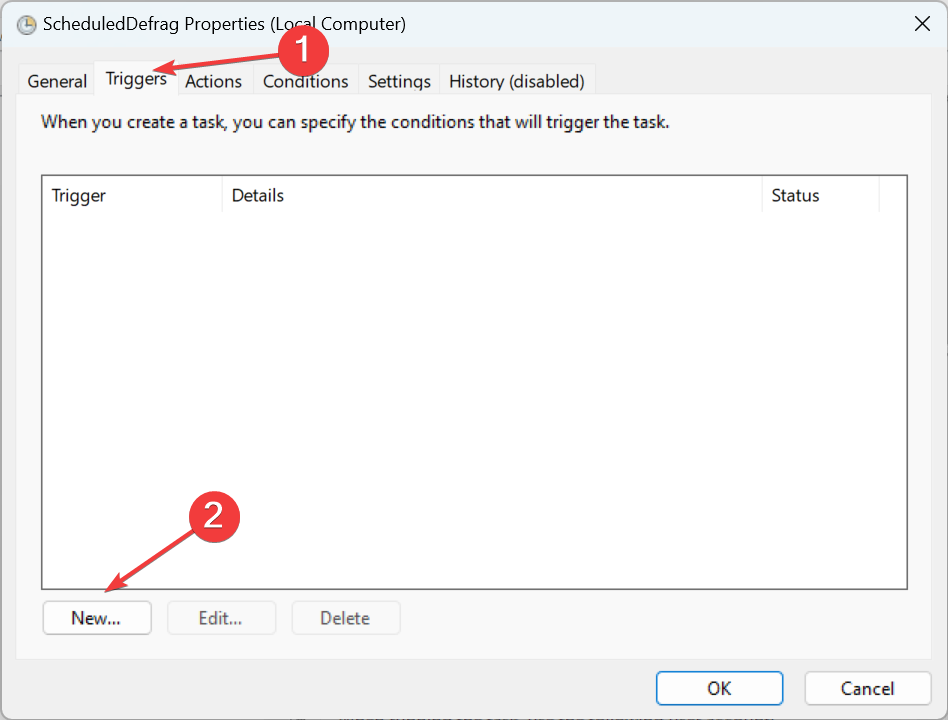
  3. Hit the Windows key, search for Device Manager, and select to open.
  4. Find your phone under the Portable devices, right-click and select Update driver.
  5. Select Browse my computer for driver software.
  6. In the driver window, select the Browse button, click on Include subfolders then select Next.
  7. Your PC should now be able to recognize your phone.

You can also learn more about how to install Google USB driver on Windows by checking this install Google USB driver guide which helps improve phone detection on your PC.

What do I need in order to install Fastboot drivers?

  1. Navigate to Settings on your phone.
  2. Select About phone.
  3. Select Software information and tap on Build number seven times to enable Developer mode.
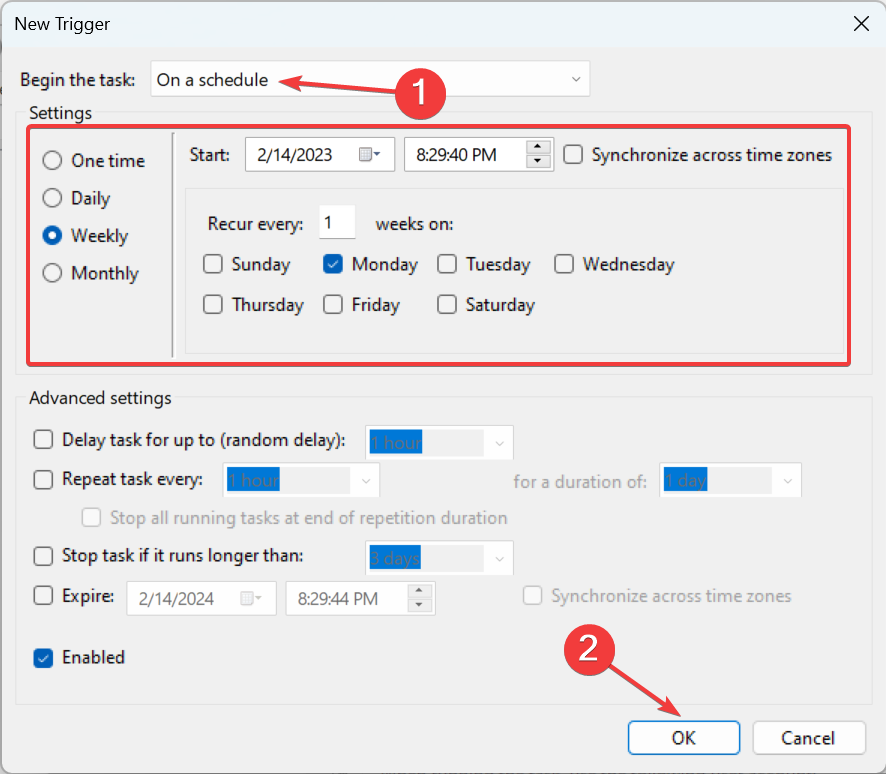
  4. Go back to Settings and open Developer options.
  5. Navigate to USB debugging and toggle on.

Sometimes, your OS may be unable to install drivers but worry not as our excellent guide on how to install your Android device drivers can help you resolve the issue.

Are Fastboot drivers safe to use?

Fastboot is a special diagnostic and engineering protocol that you can boot your Android device into. It offers a variety of features and perks that allow you to perform a number of operations on your device, including installing custom ROMs or unrooted updates.

If you know what you are doing, it is a very useful tool. However, the risk comes in when you have no idea about the operations you are performing. You may enter commands that erase your data or install firmware that is incompatible with your phone.

As a precaution, back up all your data and files on both your PC and phone before installing any Fastboot drivers. Have a look at our recommended backup software solutions and select one that works for you.

If the ADB driver is not installing, visit our dedicated guide for for a quick fix. We also have an article on how to download ADB drivers for Windows 11, so don’t miss it.

We hope you were able to proceed without any hiccups and that you got everything you needed when you came looking for a solution to install ADB fastboot drivers for Windows 11.

A few users reported that Fastboot is not detecting the device, but we have a whole guide dedicated to this issue, so don’t miss it.

For any comments, queries, and suggestions, feel free to share in the comments section below.

Fastboot Not Detecting Device on Windows 11 [Fix]

Fastboot is a useful protocol for sending commands to Android devices over USB. It is commonly used with unlocked bootloaders as it provides a way of flashing images onto the phone.

It is an essential tool for Android users as it allows you to perform a number of actions on your smartphone from the computer, including installing and debugging apps.

However, just like other drivers, they too tend to fail and may stop working. A common reason for this is that the computer doesn’t recognize the phone. This can be caused by a number of things, including not having the correct drivers installed or an issue with your USB cable or port. 

If your device does not show up in Windows Device Manager as an Android Bootloader Interface, then it probably needs to have the driver installed again. 

Why does Fastboot not recognize my device?

Whereas installing Fastboot drivers is easy, sometimes your device may not be recognized. The problem is when users get stuck in Fastboot mode and have no idea how to get out of it.

Some of the reasons why your device cannot be detected include:

  • Fastboot is not included in some builds of Android and there are several versions of itself, so it may or may not work for you.
  • The USB port may be damaged or the cable may be faulty – Try using another USB port on your computer (if available).
  • On your device, there are at least 2 USB modes: Charge only and MTP (Media Transfer Protocol) – In order to get into Fastboot mode, you need to set your USB mode to Charge only.
  • Missing device drivers – The problem is that Windows cannot locate the drivers for the device. Fastboot can only be used when the drivers are installed so if you have not installed them, then you will get the Fastboot not working error.
  • Drivers not installed properly is a common cause – This means that you might have a problem with the drivers for your phone. Normally, Windows will automatically install them for your device and you’ll be able to use Fastboot with no problem.
  • The next most common reason is that Fastboot can’t communicate with your device – This usually happens when you have the wrong drivers or there’s something blocking Fastboot such as a required signature.

What can I do if Fastboot is not working?

1. Update Fastboot drivers

  1. Press the Windows key, search for Device Manager, and click to open.
  2. Navigate to your selected driver, right-click and select Update Driver Software.
  3. Next, select the Browser my computer for driver software option.
  4. Click on Let me pick from a list of available drivers on my computer then click Next.
  5. Uncheck the Show compatible hardware option and click Next.
  6. Double-click on your phone brand, select Android Bootloader Interface and click on Next.
  7. This should install according to your manufacturer and drivers will start working.

If you happen to encounter any difficulties, we strongly advise using a dedicated program for automatic scans of outdated drivers such as Outbyte Driver Updater.

2. Deactivate driver signature

  1. Press the Windows key and select the Power button while holding down the Shift button.
  2. Your PC will restart in Advanced Options mode.
  3. Select Troubleshoot option.
  4. Navigate to Advanced options.
  5. Select Startup settings.
  6. Next click on Restart.
  7. Select Disable driver signature enforcement. 
  8. Your PC will reboot again and you can now try installing your Fastboot drivers.

3. Update Windows driver updates

  1. Press the Windows key, search Check for updates, and click to open.
  2. Select Advanced options.
  3. Go to Optional updates.
  4. Select Driver updates and proceed to Download & install then restart your system.

What can I do if I’m stuck at Fastboot mode?

Unfortunately, things don’t always go so smoothly. Some users have reportedly found their phone stuck in Fastboot mode with no way out. If that happened to you as well, don’t worry.

So what happens when your phone gets stuck in Fastboot mode? Well, it becomes useless for most practical purposes because you can’t make calls, send messages, or do anything productive with it.

If your Android phone is stuck on the Fastboot screen, it means that your device is not able to boot normally and it has landed itself in this mode. 

This problem can occur due to various reasons but the most common ones are:

  • The bootloader is corrupted
  • Also, the system partition might be corrupted
  • There are issues with the firmware
  • You forgot the PIN or password of your phone

To fix the issue, you simply need to restart your phone. Hold the Power + Volume Down buttons simultaneously until you see the Fastboot text on-screen. Then, use the volume keys to choose Recovery mode from the menu that appears and press the Power button. 

Your phone will boot into recovery mode. You may need to use your Volume down button several times to select Recovery Mode because it first displays FASTBOOT MODE text at the top of the screen. Once it displays the Recovery mode option, select it by pressing the power button once.

If this also doesn’t work, then you should try to reset your phone to factory settings by following these steps:

  1. Hold the Power + Volume buttons and select Recovery Mode.
  2. Use the Volume keys to highlight wipe data/factory reset and press the Power button to confirm it.
  3. Go back to main menu by pressing Back button once and select reboot system now option with help of Volume keys.

We hope this guide was able to help you get your Fastboot drivers working again. We also have a comprehensive guide on how to install drivers if you experience any difficulties.

Do not hesitate to share with us what method worked for you and any other additional comments you may have in our comments section below.

How to stop Microsoft Edge from opening Bing links in new tabs on Windows 10, Windows 11, macOS, and Linux

Microsoft Edge does something weird any time you use Microsoft Bing to search. A new Edge tab automatically opens to display your searched content, while the search page stays open in a different tab. On the onset, it’s not clear if Microsoft Edge or Microsoft Bing is at fault for this.

As I quickly learned, opening a new tab for every search you make is frustrating issue for some people. But as a Microsoft Rewards member, I can’t pass up the chance to search using Bing for points to get movies, gift cards, and Xbox swag from the Microsoft Store.

MICROSOFT EDGE ON MICROSOFT BING

You do a search on Microsoft Bing, click a link from the results and you are taken to a new tab. You click on the back button to return to the results, but it keeps you in the new tab that was just opened. Now, you click a different search result, and you get taken to yet another tab.

When you click a link from the search results, you go to a new tab, and the results are left open on the original tab. But going back won’t take you back to the original tab, so before you know it, you will have an overwhelming number of tabs open.

This issue is not only a problem for Windows users, but also happens when using Edge on Bing.com for macOS and Linux users too. After searching through every Microsoft Edge setting possible, the solution is surprisingly located within Microsoft Bing’s SafeSearch settings.

Microsoft Edge on Windows, macOS, and Linux

Here’s how to change the settings so any time you click a search or news link on Bing, it won’t open in a new browser tab.

  1. Use Microsoft Edge to go to Bing.com on Windows, macOS, or Linux
  2. Click the hamburger menu in the upper-right and choose SafeSearch
  3. Go to Results section
  4. Uncheck both “Open links from search results in a new tab or window” and “Open links from news results in a new tab or window”microsoft edge
  5. Click Save to confirm the changes

That is all there is to it. Of course, Microsoft wants you to keep Bing open as much as possible when you search. Some people have also said that SafeSearch settings get reset every so often, so be on the lookout in case you need to repeat these steps again.

Another option is turning off SafeSearch completely.

microsoft edge
Turn off SafeSearch

Keep in mind, there doesn’t seem to be a real “confirmation” that your Bing.com settings are saved and applied to your actual Microsoft Bing search preferences.

Interested in learning more? Check out the latest OnPodcast episode also available on SoundCloud. Are there any other Microsoft Bing “features” that you find frustrating? Let us know in the comments!

Windows 11 Refresh Rate Bug: Fix Dynamic Rate Not Showing

You may measure your screen’s refresh rate by counting the number of times per second that an image is updated. DRR is a new feature included in Windows 11 that helps you conserve battery life while giving a more fluid display, but it is no surprise when it is not working as it should.

Screens with higher refresh rates are expected to become more common as more manufacturers announce plans to discontinue the production of 60Hz displays. This would result in smoother scrolling and better gaming, but it would come at the expense of reducing the battery life.

However, the Dynamic Refresh Rate feature in this iteration of OS is a beautiful addition that can have a major impact on your overall experience. Continue reading as we will go over what you can do if Windows 11’s dynamic refresh rate is not showing or not working properly. Follow along!

What does dynamic refresh rate do?

DRR dynamically adjusts the refresh rate of your device in response to what you’re doing. It will automatically vary between a 60Hz and a 120Hz refresh rate on a compatible system to balance power and performance.

If you perform ordinary chores such as word processing or streaming video material, your PC will use a 60Hz refresh rate to conserve battery power.

When you use suitable apps that require inking and scrolling, Windows 11 will increase the display rate to 120Hz, providing you with a more responsive and fluid display experience.

Users with a compatible display can run either the performance-enhancing 120Hz (or higher) refresh rate or the battery-saving 60Hz refresh rate. With DRR, though, you may have the best of both worlds.

DRR is supported by Adobe Acrobat, Adobe Illustrator, and a few Microsoft applications, including Office, Edge, Whiteboard, and Snip & Sketch. It is anticipated that the number of supported applications will grow over time.
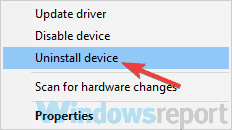
With most contemporary mid-range laptops featuring high refresh rate displays, it’s only logical to want to take advantage of the extra power. The faster the refresh rate, on the other hand, the greater the proportion of battery it consumes.

It is also used by systems with greater refresh rates, which always run on it. When necessary, you must manually reduce the frequency to 60Hz. It is just not viable to perform this every five minutes for apps.

What can I do if Windows 11’s dynamic refresh rate is not working?

1. Check compatibility

  1. Press the Windows + S key to open the Search bar, then type in dxdiag, and open the top result.dxdiag windows 11 dynamic refresh rate not working
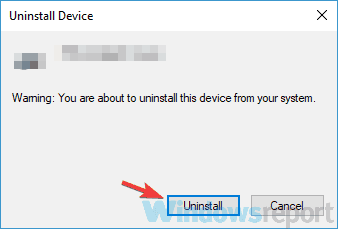
  2. In the DirectX Diagnostic Tool, navigate to the Display tab, then check the Driver Model plus Version.dxdiag-display windows 11 dynamic refresh rate not working

2. Make sure it is enabled

  1. Start by going to the Start menu and searching for Settings, then selecting the top match.settings-search windows 11 dynamic refresh rate not working
  2. From the left panel, click on System and then navigate to Display followed by the Advanced display option.advanced-display-option windows 11 dynamic refresh rate not working
  3. In the Choose a refresh rate dropdown box, select the Dynamic refresh rate option. Some computers will require an aditional reboot.drr  windows 11 dynamic refresh rate not working

For further information on the topic, do not hesitate to check out our article on specifically enabling the DRR feature.

3. Update your OS

  1. Press the Windows key + I to open the Settings program, then select Windows Update from the left-hand navigation bar.windows-update windows 11 dynamic refresh rate not working
  2. In order to determine whether any new updates are required to be downloaded, select the Install now option; otherwise, use the Check for updates button to determine whether any new updates have been issued.check-for-updates windows 11 dynamic refresh rate not working

It is likely that you are using an older version of Windows, and that this is what is creating the problem, which may be fixed by upgrading to the most recent version. It is guaranteed that the problem will be rectified in a subsequent upgrade to the software package.

4. Update your drivers

  1. Press the Windows key + I to launch the Settings program, go to the left panel, and select Windows Update, then Advanced options on the right.windows-advanced  windows 11 dynamic refresh rate not working
  2. Click on Optional updates after scrolling down to the Additional options section.optional-updates-option  windows 11 dynamic refresh rate not working
  3. Now pick Driver Updates from the drop-down menu, then select all of the driver updates that are shown to you, and finally click on the Download and install button. In our case, we don’t have any more updates to install. no-update windows 11 dynamic refresh rate not working

Even though Windows is generally in charge of driver updates if you are experiencing an issue, you can perform a manual search for updates.

We strongly advocate using a specialist program such as Fortect Driver Updater to do an automatic replacement for outdated drivers.

How can I increase my laptop’s battery life?

If you spend a significant amount of time working away from a power outlet, it’s a good idea to get into the habit of adjusting your laptop usage in more battery-saving ways, such as by keeping to one program at a time and shutting everything else when you’re not using it.

It’s similar to shutting off the lights in a room when no one is present. If you’re constantly switching between the kitchen and the pantry, or between Firefox and Microsoft Word, by all means, keep both sets of lights (and programs) on at the same time (and open).

However, if you’re just cooking or viewing a YouTube video, it’s best to turn everything else off and close the door behind you.

Additionally, if you know you’ll be working on a document that doesn’t require web access, consider setting Airplane mode in Windows or turning off Wi-Fi and Bluetooth while shutting down other programs while you single-task.

battery windows 11 dynamic refresh rate not working

Not only does the Airplane mode reduce distractions, but it also removes one of the most major sources of battery depletion: not only the wireless radios themselves but also the background apps and processes that are continuously using them, such as updaters and push notifications.

It will take longer for your system to recharge its battery if you have numerous apps and processes running at the same time, and the chances are that you will not be actively using everything. The Settings app in Windows is the first place to look for programs that consume a lot of energy.

As long as your laptop is equipped with a powerful graphics processor, you may limit its use to only games and other graphics-intensive applications. At the same time, everything else can take advantage of the more efficient graphics processing hardware built into the processor itself.

The Program Settings tab in the GeForce control panel (which is normally placed in the Windows notification area on the right side of the taskbar) is where you may allocate each application to a specific graphics-processing chip if your system is equipped with Nvidia GeForce graphics.

Allocate the GeForce separate graphics processor to games and photo- and video-editing applications like Adobe Photoshop and Premiere while assigning the integrated graphics chip to everything else on the computer.

Since you are interested in optimizing your PC’s performance, take a look at the best FPS counter software for Windows 10/11. DRR is not the only new special feature, instead, here are some amazing new features in Windows 11 you need to know.

Just keep in mind that refresh rate features can make your monitor stuck at 60Hz on Windows 11, but this issue can be easily resolved. And rest assured that our detailed guide will also help you decide whether to keep the variable refresh rate on or off.

Let us know in the comments section below whether the article proved helpful for you or not. Thanks for reading!

Microsoft plans to fully reopen Redmond campus on February 28th after more than 2 years of pandemic closures

Like many/most other businesses, Microsoft has had to significantly restructure during the pandemic, closing most offices and requiring workers to work from home. However, that appears to be finally coming to an end, according to an email to employees from the company’s Chief Marketing Officer Chris Capossela (via GeekWire).

Microsoft is planning to “fully reopen” its Washington state facilities, including its Redmond campus, and Capossela told workers in a post this morning that:

“From this date, employees will have 30 days to make adjustments to their routines and adopt the working preferences they’ve agreed upon with their managers”

Microsoft initially instituted a mandatory work from home policy for its employees in March 2020, and partially reopened again back in March of 2021, but has delayed a full opening a number of times due to the continuing pandemic crisis. Still the company is continuing to offer digital only conferences, like the newly announced Inspire 2022, and it still may be quite some time, if ever, that the company (or the world, for that matter) returns to a pre-2022 “normal.”

(Update: Microsoft has published the full Capossela post, you can read it on the Official Microsoft Blog).


Microsoft will issue warnings to users who run Windows 11 on unsupported devices

Are you using Windows 11 on a device that does not meet the system requirements? Well, Microsoft is onto you. You might soon receive a warning through a new alert within the Windows Settings App to let you know your device isn’t officially supported. (Via Windows Latest.)

The news should not come as too much of a surprise, as Microsoft had previously provided an avenue for users to upgrade their devices to Windows 11 despite them not meeting the set system requirements. These users needed to make a couple of modifications to their Registry to run Windows 11 on their devices and Microsoft officially warned of the potential compatibility issues in doing so.

In recent Windows Insider preview builds, the warning has stepped up a bit. The Settings App header in these builds now bears a message that will inform unsupported users that their device does not meet the system requirements. However, there are no indications that Microsoft could expand the message deeper. It just links out to a Microsoft webpage on the potential risks that one stands to encounter by running Windows 11 on an unsupported device, like the previous incompatibility issues.

It’s a small warning, to say the least, and it’ll be interesting to see if the company takes things further and adds watermarks or other messages about devices being unsupported. Let us know what you think in the comments below.

This developer got Windows 11 running on a Pixel 6 in a VM with Android 13, because, why not?

Windows 11 runs on all different kinds of hardware, both supported and unsupported, but one person has delivered the OS to Google’s own hardware.

Spotted by Wccfetch, Android developer Danny Lin recently managed to get Windows 11 running on a Pixel 6 Pro. The task definitely doesn’t seem like something the average user can do since it requires root access, but it showcases the power of Windows on ARM.

But, how, you might ask? Well, it’s thanks to Android 13’s Developer Preview, which enables virtualization technology. Lin was able to use this to run a full-blown Windows 11 install in a virtual machine on the device.

You might also be wondering how the performance is in a VM, and, well, you might be surprised. Lin says the VM is “really usable,” but also mentioned the lack of graphics acceleration, CPU, I/O, and memory pressure. That might sound worrying, but he did manage to get the device to run Doom.

This isn’t the first time we’ve seen Windows 11 in a strange place. The well-known Windows developer, Gustave Monce, previously got Windows 11 running on the Lumia 950 XL. Windows 11 on the Pixel 6 Pro definitely seems just as strange, so let us know your thoughts in the comments below.

Fix: Decentraland not using GPU

When you notice that Decentraland is not using GPU of your computer, don’t get panicked. This article will show you the way to troubleshoot it effectively.

Metaverse is a new technology that is creating a lot of hype. Decentraland is one of the best examples of it where you can amazingly explore the Virtual World.

This game is browser-based and free to play. So, It has been popular in recent days. However, sometimes, problems like not using GPU can stop you from getting a satisfactory experience with it.

You can easily get rid of Decentraland not using GPU problem. But, before that, you should know why it happens so you can avoid reencountering it in the future.

Why your computer doesn’t utilize GPU power while running Decentraland?

Not only the Decentraland, but any video games may also go through this issue. However, the main reason behind this problem is the outdated driver for your graphics card.

Two other things also may cause this problem in many cases. If your browser configuration does not allow any browser-based games to use GPU with priority or if your PC Settings are in an incorrect state, you can face this problem.

If you can remove all these reasons, the problem won’t appear again on your computer.

How can I fix Decentraland not using GPU issue?

1. Update GPU driver

  1. Open the Start menu.
  2. Type devmgmt.msc and hit enter to open Windows Device Manager.opening windows device manager
  3. Expand Display adapters and right-click on your graphics card driver.
  4. Choose Update driver.updating gpu win11 device manager
  5. Click on Search automatically for drivers. search automatically for drivers
  6. It will check for updates and install if there is an updated version for the GPU driver.

However, Using a driver updating tool is the best way to update the GPU driver. In this case, you can try any of these best driver update software for Windows.

2. Enable hardware acceleration on browser

2.1 Enable in Chrome

  1. Click on three vertical dots on the top-right corner and go to Settings.going settings chrome
  2. Click on Advanced, find System, and click on it.going system chrome
  3. Enable Use hardware acceleration when available.enable hardware acceleration chrome
  4. Relaunch Chrome.

2.2 Enable in Edge

  1. Go to Settings of MS Edge, similarly to Chrome.
  2. Click on System & Performance tab and enable the switch for the hardware acceleration.disabling hardware acceleration edge
  3. Restart the browser.

It should fix Decentraland not using GPU issue. You can start playing it after the necessary changes have been made to verify.

3. Enable High performance mode

  1. Open the Start Menu.
  2. Search for Control Panel and open it.opening control panel
  3. Go to Hardware and Sound.going hardware and sound control panel win11
  4. Click on Choose a power plan.going choose power plan control panel
  5. Check the High performance.set high performance power plan control panel

To save battery, you may have enabled Balanced or low power mode. But, That may restrict your Windows laptop to utilize the dedicated graphics card. In this case, setting the Windows power plan to high performance will help.

4. Set graphics performance to high for browser

  1. Press Win + I to open Windows Settings.
  2. Click on Display.going display in win 11 settings
  3. Scroll down and go to Graphics.going graphics in win 11 settings
  4. Find and click on the browser that you use to run Decentraland.
  5. Click on Options.going graphics option chrome win11 settings
  6. Check High Performance and click on Save.set high performance and save graphic preferences chrome win11

5. Update browser

5.1 Update Chromium-based browsers

  1. Open your browser settings as shown in method 2.
  2. Go to the about page.going about chrome
  3. It will automatically check and update the chromium-based browser.
  4. Click on Relaunch after the update.relaunch chrome after update

5.2 Update Firefox

  1. Click on three vertical lines and then click on Help.going help firefox
  2. Go to About Firefox.going about firefox
  3. Firefox will automatically update itself if any new version is available.firefox checking update

6. Re-Install graphics card driver

  1. Open Windows Device Manager like before.
  2. Expand Network adapters.
  3. Right-click on Video driver and choose Uninstall device.uninstalling graphics device windows
  4. Check Attempt to the driver for this device and click on Uninstall.uninstallin graphics driver windows
  5. Restart your PC.

Your PC will automatically re-install the driver. After that, try to update it as shown in method 1. It should completely fix Decentraland not using GPU issue.

7. Upgrade GPU

GPU crisis is occurring worldwide. As a result, many people have decided to keep their existing GPUs. Though most GPUs should be OK with the latest Windows. But, some GPUs are too old to perform regular tasks.

As a result, Windows 11 and 10 treat them as incompatible for many tasks. This type of GPU may not work with Decentraland. In this case, you should consider upgrading the GPU.

Can I run Decentraland with iGPU?

There is no definite answer to this question. Officially, Decentraland recommends having 2 GB video memory to run this virtual world game smoothly. So, A dedicated GPU should be a safe choice.

However, Some processors with good iGPU also can handle this virtual world. But, the performance may vary. If you don’t have a dedicated Graphics card, you can find your luck with the built-in one.

For the latest Macs, there is no dedicated graphics card. But, These can handle this game perfectly. However, the Macs with less RAM struggle to run Decentraland in many cases.

We can see that only some iGPUs work well with Decentraland. So, a dedicated graphics card is the best option.

However, if Decentraland does not use the GPU, the methods given above are enough to fix it. You are also welcome to share your thought in the comment box if you know any other way that works.

How to Fix Windows 11 Installation Assistant Error 0x8007007f (Quick Guide)

If you’re getting the Windows 11 Installation Assistant error 0x8007007f, you’re likely stuck mid-upgrade and unsure how to proceed. This common Windows 11 update error often pops up when running the Installation Assistant, especially if permissions, drivers, or antivirus software interfere with the process.

The good news? You can fix it in just a few steps. Below, we’ll guide you through all the proven solutions to resolve this error and upgrade to Windows 11 without issues.

What Causes the 0x8007007f Error in Windows 11?

This error typically appears when the Windows 11 Installation Assistant fails to execute due to:

  • Insufficient permissions
  • Driver incompatibility or outdated drivers
  • Antivirus interference
  • Corrupt or missing system files

You may also get related errors like Installation Assistant is already running or Something went wrong.

How to fix the Windows 11 Installation Assistant error 0x8007007f

1. Run the Assistant as an administrator

  1. After you have downloaded the Installation Assistant from Microsoft’s official website, locate the executable program file. It will most probably be in the Downloads folder of your PC.
  2. Once you found it, right-click on the executable file and choose Run as administrator.run-as-admin-installation-assistant windows 11 installation assistant not working
  3. A dialog box will pop up to ask your permission. Click Yes to allow Windows 11 Installation Assistant to run with administrator privilege.

Now continue with the installation steps that are shown to you. Make sure to follow them carefully.

2. Disable your antivirus

  1. Tap on the expand arrow from your taskbar then right-click on your antivirus to choose Avast shields control followed by Disable for 10 minutes.disable-antivirus-icon xbox controller not recognized windows 11
  2. If you have other antivirus programs installed, you can temporarily disable the app by following the same or similar methods as before.avira-disable-icon xbox controller not recognized windows 11

The likelihood that your antivirus application was the source of the problem is high if the problem no longer occurs. In order to secure your computer, you should consider using another antivirus product that is compatible with Windows 11.

3. Run SFC

  1. Press the Windows + S key to open the Search bar, then type cmd. Next, right-click on the most relevant result given to you to run it as an administrator.cmd-run-as-admin avast high cpu windows 11
  2. Type or paste in the following command and press Enter in order to perform the scan:
    sfc /scannowsfc-scan-windows-11 kernel security check failure windows 11

When you’ve finished waiting for the process to complete, restart your computer (which could take some time). Alternatively, you can a specialized third-party repair tool that will scan your PC and fix any issues related to missing or corrupted system files.

4. Set the compatibility mode

  1. After you have downloaded the Installation Assistant from Microsoft’s official website, locate the executable program file. It will most probably be in the Downloads folder of your PC.
  2. Right-click on it, then choose Properties.assistant-properties windows 11 installation assistant not working
  3. Now navigate to the Compatibility tab, click on Run this program in compatibility mode for: and choose Windows 7.windows-7-compatibility windows 11 installation assistant not working
  4. Hit Apply to save the changes, then run the executable normally and see if the window nor remains open long enough for you to perform your tasks.

How to check for new updates in Windows 11?

During the development of Windows 11, the developers made a point of analyzing the data to determine which settings are used the most and which settings are used the least.

Without a question, Windows Updates were given top priority, and a new menu was built specifically for them. Manually updating Windows 11 can be accomplished as follows:

  1. Press the Windows key + I to open the Settings app, then click on Windows Update in the left panel.windows-update-settings kernel security check failure windows 11
  2. If you have any new updates to download, click on the Install now button and wait for the process to finish, otherwise click on the Check for updates button.checl-for-updates kernel security check failure windows 11
  3. If there are any new updates, the system will download and install them right away.

That’s all there is to it! The new OS has been installed on your computer, and we hope that our solutions assisted you in completing the upgrade without difficulty.

Please remember that Windows 11 is recently launched, and there may be a number of glitches and faults to contend with; nevertheless, we will provide solutions for these issues on our website.

If you find that you don’t have the option to upgrade to Windows 11 from the Windows Update settings, you can try to install Windows 11 without the Installation Assistant.

FAQs

What does error 0x8007007f mean in Windows 11?

It’s usually caused by permission issues, outdated drivers, or interference from antivirus software.

Is it safe to run the Installation Assistant?

Yes, as long as it’s downloaded from the official Microsoft website.

Can I install Windows 11 without the Installation Assistant?

Yes, you can use the Media Creation Tool or download the ISO file directly.


Summary

The Windows 11 Installation Assistant error 0x8007007f is frustrating but easy to resolve. Run the tool as admin, disable antivirus, or use compatibility mode. You can also upgrade using alternative tools like the ISO file or Media Creation Tool if problems persist.

Let us know in the comments which fix worked best for you, and whether you’re enjoying Windows 11 or missing Windows 10!


.Net celebrates 20 years with a special webcast today

This February marks the 20-year anniversary of Visual Studio .NET and the team’s month-long celebration is introducing a webcast on Valentine’s Day.

At 9:00am Pacific Time on February 14, 2022, Scott Hunter, Scott Hanselman and a bevy of special guests will broadcast their stories and journeys through .NET development as well as announcing a host of other celebratory events for the remainder of the month with the community.

During the commemorative event, host and guests will presumably cover both past accomplishments as well as what’s to come for .NET as hinted at in the blog post announcement.

We just released .NET 6 in November 2021 and are full speed ahead building .NET 7. In fact, .NET 7 Preview 1 will release this week. With .NET 6 you now have a unified set of base libraries and SDK, a simplified development experience with investments in C# 10 and minimal APIs, high productivity with hot reload, and a whole lot more. .NET 6 is the fasted adopted version of .NET yet, and we’re seeing very good reception from users. I encourage you to give it a try if you haven’t already.

We’re excited to get the .NET Multi-platform App UI (.NET MAUI) release out the door and in your hands very soon. .NET MAUI will let you build native apps for Windows, macOS, iOS and Android with a single codebase and we are now focusing on quality and bugs so now is the time to try the preview and give us feedback while we can act on it.

For those interested, be sure to visit the .Net home page to watch the special webcast as well as get more details on upcoming events for the community.

Microsoft’s post-Super Bowl YouTube spot wants you to “respect the power of Surface”

The talk of the Super Bowl ads might be Coinbase’s QR code, and although Microsoft didn’t pay up for its own ad this year, it did release a fun post-game spot over on YouTube. The short 30-second ad wants you to “respect the power of Surface,” and showcases some superstitions behind the game.

Since Microsoft has a big contract with the NFL, the ad naturally highlights how Surface devices are used on the sidelines. In it, there are a few superstitions that Microsoft plays fun at. The first is swiping with the pen to get the ball back, the second is touching the Surface to get a touchdown, the third is turning around with the Surface to turn the defense around.

Of course, superstitions or not, Surface devices have made headlines because of the NFL and it’s likely the “Respect” part of the ad is a nod to this. Back in December, Tom Brady tossed a Surface tablet on the sidelines, after his team fell to a loss against the Saints. The NFL warned him not to do it again, but even before that, Aaron Rodgers did the same back in 2015.

You’ll soon be able to get into your favorite Teams apps right from Outlook

Ever wanted to use one of your Teams apps in Outlook? Well, it’s something that Microsoft is planning, as the feature was recently added to the Microsoft 365 Roadmap, for release later this year (via Windows Central.)

According to the roadmap entry, Microsoft says that Outlook users will be able to “acquire and use these updated Teams apps,” without leaving Outlook. Presumably, this hints that developers might need to update their Teams apps to support both apps. It also looks as though these cross-Teams and Outlook apps are catered for personal, and/or search, per the roadmap.

The feature is set for release in December of 2022 for both Outlook on the web, as well as desktop. However, seeing as though that’s just Microsoft’s best timing for when you can expect this, it could come even later. Also, with Inspire 2022 coming up in July, you might expect the company to talk more about this then, as the conference always sports a lot of Teams news. Until then, you’ll just have to settle with using your Teams apps separate from Outlook.

8 ways to open Control Panel in Windows 10 or Windows 11

There are many ways to open Windows Control Panel. Still the central hub of Windows, the Control Panel can help you manage almost all aspects of your operating system.

Be it keyword or mouse settings, password and users records, or fiddling with the sound and other hardware settings, Control Panel has access to all. Even though Microsoft is taking steps to replace Control Panel with Windows Settings, you can still control your PC from the Control Panel, and for some settings it’s the only place to go.

It’s therefore not a surprise that there are so many ways one can use to Open the Control Panel in Windows. So let’s first get started with some of the more straightforward ways at our disposal.

1. Start Menu search bar

The Start menu search bar is the place that lets you access almost all of your apps or folders from a single place. Not surprisingly, you can also use it to open Control Panel in your Windows. Here’s how:

Go to the Start menu search bar, type in ‘control panel’ in the search box, and select the Best match. The Control Panel will be opened.

Related: How to customize your Windows 11 Start Menu in the best way

2. File Explorer

You can also open the Control Panel from the File Explorer. The File Explorer, previously also called the Windows Explorer, is a file management application that works as a graphical user interface, which in turn helps you edit, manage data and other file contents.

To open the File Explorer, select the folder icon from the taskbar below.

In the File Explorer, select Desktop and from there, click on Control Panel.

3. Run dialog box

The Run dialog box is a handy utility to help you access all kinds of files on your Windows computer. You can also launch the Control Panel with it. To get started, go to the Start menu, type in ‘run’ and select the Best match. Or alternatively, press Windows key +R.

run dialog box

In the Run dialog box, type ‘control panel,’ and hit Enter. The Windows Control Panel will be launched.

4. Command prompt

You can also use the Windows Command prompt to open the Windows Control Panel. Simply go to the Windows key + X. Or Alternatively, go to the Start menu search bar, type in ‘cmd,’ and hit Enter.

When the Command prompt gets launched, type in the following command and hit Enter:

control panel
command prompt

The Control Panel will be launched in your Windows 10 or 11.

5. Start menu shortcut

If you’ve to open the Control Panel almost every day, then there’s a sneaky way to access it. How? You can simply pin the Control Panel shortcut to the Start menu so that you can launch anytime from there. Here’s how:

Click on the Start button, and type in ‘control panel’. From there, right-click on the Control Panel and select Pin to Start.

Now, whenever you want to open the Control Panel, simply click on the Windows Start button, and you’ll find the Control Panel icon in the Pinned section.

start menu

6. Task Manager

Infamous as a rescuer for any and all hanged Windows processes, the Task Manager is a handy application in the Windows operating system; just any gamer.

But it has many other uses as well. One such use is its feature to launch different Windows apps. Here’s how:

To launch the Task Manager, go to the Windows power menu. Right-click on the Windows Start button, and select the Task Manager. In the Task Manager, click on File > Run new task.

task manager

In the new window, type in ‘control panel’ and hit Enter. The Task Manager will be opened.

7. Desktop shortcut

Desktop shortcuts are a handy way to launch different Windows apps. They are also super convenient, especially if you’ve to use the specified app again and again. Interestingly, you can also open the Control Panel with a simple shortcut. Here’s how:

Right-click anywhere in the desktop and select New > Shortcut. In the new dialog box that pops ups, type in ‘control panel’ in the Browse… box, and hit Enter. Then give a relevant name to the screenshot (we’ve named it Control Panel), and select Finish.

open control panel in windows

8. File Explorer’s address bar

The File Explorer’s address bar is located in the top-left corner of the Windows operating system. Interestingly, you can also use this address bar to open the Control Panel in your Windows. Here’s how:

Click on the > option in front of the computer icon. As soon as you do that, you’ll get a drop-down list from where you can select the Control Panel. Click on that icon of Control Panel, the Control Panel menu will be opened.

Open Control Panel in Windows 10 or Windows 11

And these are all the different ways to open Control Panel in your Windows. We hope one of these methods helped you launch the Windows Control Panel without any hassles. Be sure to also check out our separate guides on how to open Task Manager as well as File Explorer.

These older versions of Visual Studio will soon no longer be supported by Microsoft

In an announcement, Microsoft let users of older versions of Visual Studio know that they will no longer get support. These users are being encouraged to make the update to Visual Studio 2022. which has better security.

Here are the various versions of Visual Studio that will no longer be supported.

  • Visual Studio 2012: support ends on January 9, 2023 for the IDE and its associated products, runtimes, and components. We recommend users upgrade to a newer version of Visual Studio.
  • Visual Studio 2017: mainstream support ends April 12, 2022, and the product will transition to extended support until April 2027. During extended support we’ll provide fixes only for security issues. We recommend users move to the 15.9 supported baseline to remain under support.
  • Visual Studio 2019 version 16.7: support ends April 12, 2022. We recommend users move to the version 16.11 supported baseline, or to Visual Studio 2022.
  • Visual Studio 2019 Preview Channel: after April 2022, we will no longer provide updates to the Preview Channel of Visual Studio 2019. We recommend users migrate to either the Visual Studio 2019 Release Channel or to Visual Studio 2022 Preview to stay secure and receive the latest feature updates.

Once you make the upgrade to Visual Studio 2022, you will have access to three channels which include the Preview channel, the Current Channel, and the Long-term Servicing Channels. The Preview Channel is in place to serve as a platform where users can interact with the developers and give feedback in regards to the latest features and their functionality.

On the other hand, the Current Channel is where you can access these new features once they are ready for use. Microsoft further indicated that users should make all the updates that come to this channel to ensure that they are covered in terms of support. The Long-Term Servicing Channels essentially gives the developer more control over you once you embrace the new feature releases. Furthermore, Microsoft provides 18 months’ worth of security upon release.

Download Visual Studio 2022 to get accustomed to it before Microsoft stops providing support to the current version you are on.

Windows news recap: fake Windows 11 installers warning, WhatsApp Beta gains clean dark mode, and more

Welcome back to our Windows news recap, where we go over the top stories of the past week in the world of Microsoft’s flagship operating system.

Be careful! HP details fake Windows 11 installers that can infect your computer

HP has warned of fake Windows 11 installers doing the rounds. Whilst these aren’t new, and were going around even before the official Windows 11 launch, this particular one has a very similar-looking installation process to the official Windows 11 installer, making it harder to distinguish.

Windows 11

New Your Phone feature to show recently opened Android apps on your Windows 11 Taskbar

Windows Insiders will soon see that the Windows 11 taskbar can show recently opened Android apps, thanks to a new feature in the Your Phone app, making it quicker to access apps you’ve recently used.

New Your Phone feature to show recently opened Android apps on your Windows 11 Taskbar - OnMSFT.com - February 9, 2022

WhatsApp Beta on Windows 10 and 11 gets a clean dark mode

A clean dark mode is being tested in the WhatsApp Beta app on Windows 10 and 11, allowing it to better match your Windows colour theme, and be less demanding on your eyes at night or in different light conditions.

WhatsApp Beta on Windows 10 and 11 gets a clean dark mode - OnMSFT.com - February 9, 2022

That’s it for this week. We’ll be back next week with more Windows news.

Microsoft news recap: Open app store policies, LinkedIn adds option to block political content, and more

Microsoft news recap is a weekly feature highlighting the top Microsoft news stories of the past week. Sit back, grab some coffee, and enjoy the read!

Microsoft lays out new open App Store principles

In what appears to be an effort to butter up regulators, Microsoft has announced a set of Open App Store Policies aimed at putting Microsoft in a positive position as laws and regulations around app stores tighten by appearing more friendly to competition and consumer choice. It’s also likely that this move is, at least in part, to help smooth its acquisition of Activision Blizzard.

Call of Duty WWII on Xbox One

OneNote for web gets a ton of new improvements

OneNote for web has received a fairly significant update, bringing a whole host of improvements, including improved Copy/Paste, a new mode switcher, auto-inking, and more. See the full list here.

Photo showing the OneNote feed in Outlook web app

You can now block out political content from your LinkedIn feed

People often avoid political discussions at work, and now it’s possible to filter out political content on your LinkedIn feed. The new option to block political content means that you’ll no longer see content related to candidates, parties, election results, and more.

LinkedIn sign at conference

Call of Duty, more to stay on PlayStation beyond Sony’s agreements with Activision after acquisition, says Microsoft

Alongside the announcement of Microsoft’s open app store policies, the company also announced that it is committed to keeping Call of Duty and other popular Activision Blizzard titles on PlayStation, even after current agreements end, after its acquisition.

Call of Duty, more to stay on PlayStation beyond Sony's agreements with Activision after acquisition, says Microsoft - OnMSFT.com - February 9, 2022

That’s it for this week. We’ll be back next week with more Microsoft news.

How to Fix Error Code 22 on MSI Afterburner & Safely Close your PC

MSI, or Micro-Star International, is a world-leading gaming laptop brand. Most MSI gaming laptops offer impressive specs and powerful video cards capable of handling the most power-hungry games.

But recently, many users have complained about MSI afterburner error code 22. The entire error message reads CTaskSchedulerinterface::AddTask failed with error code -22!

What is Error Code 22 on MSI Afterburner?

MSI Afterburner is the most popular graphics card program, as we all know, but let’s see what the main causes for Error Code 22 are:

  • Task Scheduler issues – The MSI Afterburner Error Code 22 occurs mainly due to some error in the Task Scheduler that can prevent your PC from auto-shutting down.
  • Registry issues – Indirectly, a clogged Registry may affect MSI Afterburner and produce this error code.

Now that we know why this happens, let’s apply the solutions below to fix the problem quickly.

How can I fix AddTask failed with error code -22?

1. Run a quick SFC scan

  1. Click on Start, search for command prompt, and select Run as Administrator.
  2. Type the following command and hit Enter:
    sfc/scannow
    msi afterburner error code 22
  3. Restart your device once done and check if the MSI afterburner error is resolved. 

Is the System File Checker not working on your device? If yes, read our guide to fix it.

For a more thorough file check, we recommend a specialized tool for finding and repairing damaged or corrupted Windows system files.

2. Run a DISM scan

  1. Click on Start, search for command prompt, and select Run as Administrator.
  2. Type the following commands one by one and hit Enter:
    DISM /Online /Cleanup-Image /CheckHealth
    DISM /Online /Cleanup-Image /RestoreHealth

    Restore health
  3. Restart your device and check if the error message still appears.

System image corruptions are also known to cause MSI afterburner error code 22. Running a DISM Scan will find and repair system image corruptions.

Several users complain about the fact that they are unable to run the DISM scan. Rest assured that our guide shows you what to do if that happens.

3. Use the Registry Editor

Note icon NOTE
Before starting this method, create a System Restore Point or back up your Registry. So, if anything goes wrong, you can restore it, and your Windows system will be back to normal.
  1. Click Windows key + R to open the Run dialog box.
  2. Type regedit and hit Enter.
    msi afterburner error code 22
  3. Once the Registry Editor opens, navigate to the following path:
    Computer\HKEY_LOCAL_MACHINE\SYSTEM\CurrentControlSet\Services\Schedule
  4. Double-click on Start in the right pane.
    regedit start
  5. Type 2 in the Value Data field and click OK to save the changes.
    msi afterburner error code 22

4. Reinstall MSI Afterburner

  1. Click the Start button and select Settings.
  2. Now, click on Apps. In Windows 11, also click on Installed apps from the right pane.
  3. Look for MSI Afterburner in the list of apps, click on it, and select Uninstall. In Windows 11, after finding the app, click on the three dots menu and select Uninstall.
  4. Go through with the uninstallation, then go to the MSI Afterburner download page and download a fresh copy of the software and install it.

This was how to fix the error code 22 in MSI Afterburner, and we hope our solutions helped you solve this issue.

If the troubleshooting methods didn’t solve this error, try our MSI Afterburner fix guide for more information.

If you still have issues or you have other solutions that we overlooked, feel free to drop a comment below.