5 Best Omegle Alternative Clean Chat Websites in 2026

Omegle is one of the most well-known chatting websites in the world, allowing you to connect and talk to strangers all over the world, thus introducing you to new ideas and individuals with different cultural backgrounds.

As a result of Omegle’s popularity and traction, lots of new chatting sites were created, trying to improve and surpass it by implementing new features.

Thanks to all of these sites, we are left with a plethora of choices when it comes to online chatting.

Whether you’re interested in exploring a new chatting platform or got tired of dealing with Omegle server connection issues, we suggest taking a look at these similar sites.

What are the best Omegle alternatives?

TinyChat

TinyChat is an online chat website launched in 2009 that allows video chatting, voice calling, and instant messaging between users.

In addition, you can create separate chatrooms with friends or strangers based on specific topics of your choice.

Since 2017, TinyChat updated its layout and interface to a modernized design, adding video chat rooms with HD quality video streaming, as well as launching the app for Android and iOS.

The site allows up to 12 video feeds per room, and you can log in using your social media accounts.

⇒ Get TinyChat

ChatRandom

ChatRandom strives to become a household name like Facebook or Twitter, and Youtube. It is a webcam site that pairs you up with random strangers.

The site connects people all over the world, constantly adding new countries and languages to their mix.

You can interact randomly with one person, a group, or with a specific gender. In addition, you can select topics and chat preferences.

The site is constantly adding quality-of-life features for its users, and it is also free.

⇒ Get ChatRandom

Chatroulette

Chatroulette is a webcam-based chat service that was created in 2009. Even without advertising, the site grew in popularity fast, becoming one of the biggest in its area.

You can connect to random strangers and keep chatting or press next to move on to the next person if you wish to.

You can chat by typing and you can also use your webcam. The interface is minimalistic and retro-looking, and the site is free.

⇒ Get Chatroulette

FaceFlow

FaceFlow allows its users to have video chats with up to three people at a time.

It offers free video and chat conferencing with your buddies directly from your web browser, without the need to download any software.

Additionally, you can talk with strangers, and create a searchable profile where they can share their favorite images and videos.

Lastly, FaceFlow has released a multiplayer version of the famous and addictive Flappy Bird game.

⇒ Get FaceFlow

Paltalk

paltalk

Paltalk is a video chat app that supports all major formats, including Windows, macOS, Android, and iOS.

It allows you to create your own public virtual chat room and communicate with your friends via voice or text messages. Besides, there are thousands of chat rooms available and you can join any of them based on the topic you’re interested in.

Paltalk has a simple and intuitive interface, with fun features like sticker collections and gifts you can send as a conversation starter.

⇒ Get Paltalk

There are many online chatting websites on the internet, and most of them are easy to use.

Check the aforementioned options if you are looking to make new friends and meet new cool people.

Still exploring the best Omegle alternatives? Expand your options with our guide to Ome TV alternatives for safe, reliable video chat picks.

Feel free to give us any feedback regarding the subject in the comment section below.

5 Best CPUs For RX 5704GB / 8GB [2026 Guide]

Radeon RX 570 is a solid graphics card, but to achieve the best possible performance in games, you need a CPU that is just as powerful.

Finding such CPU won’t be a problem, and in today’s article we’re going to show you the best CPU for Radeon RX 570, so let’s get started.

Radeon’s RX 570 tech specs:

Architecture:Graphics Core Next 1.3
Fabrication process:14 nm
Transistors:5.7 billion
Bus interface:PCI-E 3.0 x 16
Graphics clock:1168 MHz
Boost clock:1244 MHz
Memory size:4096 / 8192 MB
Memory type:GDDR5
Memory clock:1750 MHz
Memory interface width:256 bit
Memory bandwidth:224.0 GB/s
Maximum digital resolution:7680 x 4320

What is the best CPU for Radeon RX 570?

Intel Core i5-9600K

  • Six cores and threads
  • 3.70GHz, up to 4.60GHz with Turbo Boost technology
  • 95W TDP
  • LGA1151 socket
  • Unlocked and overclockable
  • Not intended for high-end gaming

Intel Core i5-9600K is a mid-range processor, and it’s a great CPU for RX 570. The processor comes with 6 cores and 6 threads, and it works at 3.70GHz, but that can be raised to 4.60GHz.

The processor is unlocked, so you can overclock it as you need. Regarding the compatibility, the CPU can work with the LGA1151 socket, and it’s compatible with 300 series chipsets.

Overall, Intel Core i5-9600K is a solid processor, and thanks to its overclocking ability, you should be able to get the maximum performance out of it.

It has a 9 MB cache, and you will need to cover for its 95 W power usage so keep that in mind when choosing your power source.

This pcocessor uses a lot of advance technologies like Intel Optane, Intel Turbo Boost 2.0, Intel vPro, Intel virtualization technologies and more.

It supports a maximum 4096 x 2304 pixels resolution at 60 Hz through the HDMI 1.4 specifications.

Intel Core i7-9700

  • 8 cores and threads
  • 3GHz, can be raised to 4.7GHz
  • LGA 1151 socket
  • 12MB cache
  • TDP 65W
  • High temperature for some users

Another great CPU for Radeon RX 570 is the Intel Core i7-9700. This processor comes with 8 cores and 8 threads, and a base clock speed of 3GHz, but that can be raised to 4.7 GHz.

Regarding the socket, this model uses the LGA1151 socket and 300 Series chipset. As for the cache, there’s 12 MB of cache and TDP is 65W.

Intel Core i7-9700 offers great features, and if you’re a gamer, this processor should be enough for most gaming needs.

Moreover, it supports Intel Optane memory which is also a great thing to consider for gamers.

The CPU is made with a 14 nm architecture and it supports a maximum memory amount of 128 GB, depending on the type used.

It has a memory bandwidth of 41.6 GB/s and it supports resolutions of up to 4096 x 2304 pixels and a 60Hz refresh rate.

Intel Core i7-9700 features Intel Turbo Boost 2.0, Intel vPro and virtualization technology but it doesn’t support Hyper Threading.

Intel Core i7-10700KF

  • Uses LGA1200 socket and 400 Series chipset
  • 8 cores and 12 threads
  • 16MB cache
  • 3.8GHz base clock, can go up to 5GHz
  • 125W TDP
  • No major cons

Intel Core i7-10700KF is another CPU from Intel, but this processor is compatible with the latest LGA1200 socket and 400 series chipsets.

Base speed is 3.8 GHz but thanks to the Turbo Boost Max 3.0 technology it can be raised to 5.1 GHz. It’s important to mention that the CPU has 8 cores and 12 threads, so it’s perfect for all resource-intensive tasks.

Intel Core i7-10700KF is a great CPU, and with a 16 MB cache, and TDP of 125 W, it’s a great choice for gamers and overlockers.

Of course, there is no surprise that it supports Intel Optane memory, but this one also comes with Intel’s Hyper-Threading technology that delivers two processing threads per physical core.

So, assuming that you also have some applications that use this technology, you will be able to crank its powers to the max.

What’s more interesting is that the CPU also features the Intel’s Identity Protection technology that protects your access to your online data from threats and fraud.

It provides a hardware-based proof of a unique user’s PC to websites, financial institutions, and network services and can be used as a two-factor authentification solution.

AMD Ryzen 7 3700X

  • AM4 socket
  • 8 cores and 16 threads
  • 4.4GHz max frequency
  • 36MB cache
  • 65W TDP
  • High temperature

If you’re a fan of AMD, and you need a CPU for RX570, then AMD Ryzen 7 3700X is a perfect choice. The processor has 8 cores and 16 threads, and the maximum frequency is 4.4 GHz.

Regarding the socket, this CPU uses an AM4 socket, so it will work with a wide array of motherboards. It’s important to mention that the CPU has 36MB of game cache and 65W TDP.

Overall, AMD Ryzen 7 3700X is an amazing CPU for gamers, and since it’s unlocked, it’s a perfect choice for overclocking as well.

It’s praised for delivering ultra-fast 100+ FPS performance in the most popular games on the market.

We also need to mention the if you mount it on an advanced socket AM4 platform, it can support PCIe 4.0 on x570 motherboards.

In its package you will also find the Wraith Prism LED Cooler which complements its power with cool LED colors and support for Razer Chroma.

AMD Ryzen 5 3600XT

  • 6 cores and 12 threads
  • Max clock speed 4.5GHz
  • 35MB cache
  • AM4 socket
  • 95W TDP
  • Can get hot after a while

AMD Ryzen 5 3600XT is another great CPU and it comes with 6 cores and 12 threads. Regarding the clock speed, the maximum speed is set at 4.5 GHz.

The CPU has a TDP of 95W and a 35 MB cache. Regarding the socket, this CPU uses an AM4 socket, but you might need to upgrade your firmware to use it.

AMD Ryzen 5 3600XT offers great performance, and it’s a great CPU from AMD for both gaming and other resource-intensive needs.

You should also know that the CPU can support PCIe 4.0 sockets on X570 and B550 motherboards.

The AMD Ryzen Master software will provide real-time monitoring and per-core clock rates and temperatures so you know the performance situation at all times.

In the package you will also get the Wraith Spire cooler, so you don’t need to invest in a different solution for chilling your CPU.

This CPU is a great and affordable solution to pair with the Radeon RX 570 graphics card and it delivers great performance.

If you own an RX 570 graphics, any of the CPUs from this article will work nicely with it and improve its performance.

How to build around your graphics card for a gaming PC

The most important component of a gaming PC is the graphics card. The performance of that piece of technology will determine the quality of gameplay and graphics you will experience.

However, that is not all you should think about because there are more elements in the configuration of a computer that count as much.

The amount of memory is paramount

Games will use the graphics’ card memory, but it will also use a lot of RAM. So, even if you have a high-end GPU, you will still be needing at least 16 GB or RAM for a comfortable outcome.

That’s if you want to play fast-paced, action games that imply lots of movement. For less resource-hungry games, you can go with 8 GB.

Pick up a compatible CPU

If your graphics card can go with a PCI 4.0 slot and your CPU and motherboard only work with PCI 3.0, you will lose important resources.

Also, a slow CPU will also slow down the games because it addresses the memory and other processes used by the game.

Choose the right display

You can have a top-notch configuration, great GPU and lots of memory but if you have a small monitor with low resolution and low refresh rate, it will all be for nothing.

If you’re going to play action games, get a monitor with as high as possible refresh rate and low response time for optimal results.

And if you’re going to use multiple monitors, make sure they are all the same and they match your GPU.

If you’re interested in boosting your PC, we also have a selection of the best gaming graphics cards for your PC.

What is your CPU of choice? If you made a decision or have anything else in mind, let us know in the comments below.

Windows 11 multitasking features follow iPadOS in clearing up the gesture guessing game

As an operating system designed to maximize productivity, Microsoft’s Windows has arguably led the field in windows management to enable users to highlight the most necessary information when needed.

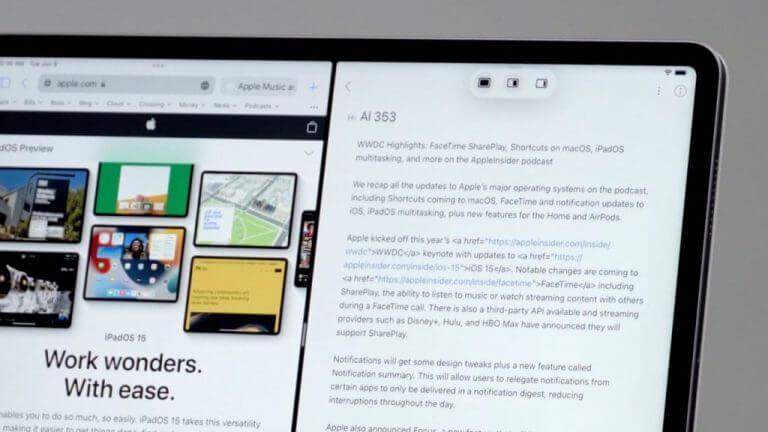
During Apple’s WWDC event, executives rallied around a new visual indicator in iPadOS that would help improve its multitasking, bringing its touch-first operating system closer to parity with Microsoft’s flagship operating systems windows management.

Apple introduced a visual prompt that sits atop apps helping users snap and organize apps on an iPad, with greater convenience. No longer do users need to implement the secret handshake with their devices to get access to the nuances of widow’s management on an iPad.

Apple iPadOS 15

Across the tech divide, Microsoft’s Windows 10 has added some visual cues to help users make the most out its support for 1×1, 1×2 and 4×4 windowed management, or 1x1x1 on ultrawide displays. However, playing around with the leaked build of Windows 11, it seems Microsoft is set to bring some similar intuitive cues to its own windows management, with a big caveat.

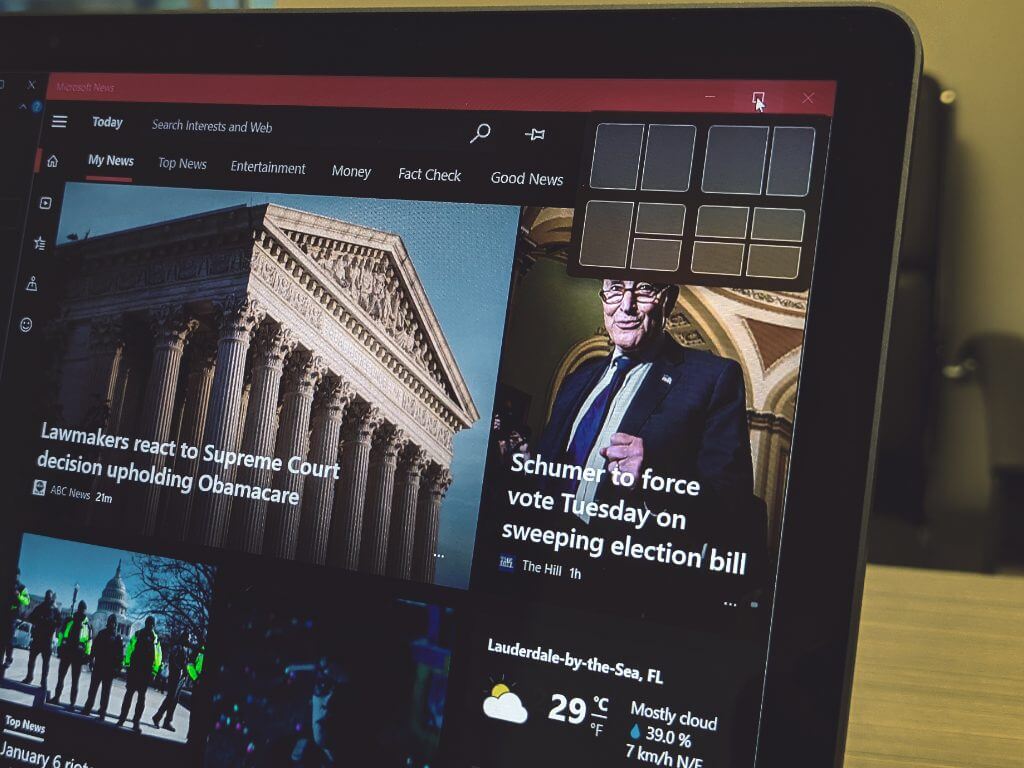
In Windows 11, the windows resizing icon at the top left of windows can now be hovered over to normally display four different windows configurations but up to six if a widescreen monitor is involved. Going a step beyond an added visual cue, the displayed grid support acts as a placeholder for the eventual snapping of windows into desired locations on the desktop.

While the addition is less revolutionary and more evolutionary, it does add to Microsoft’s newfound focus on the usability of Windows. In Windows 10, users could grab a window and toss it into the corners of their desktops to see what their grid and groupings options were based on apps live on the computers.

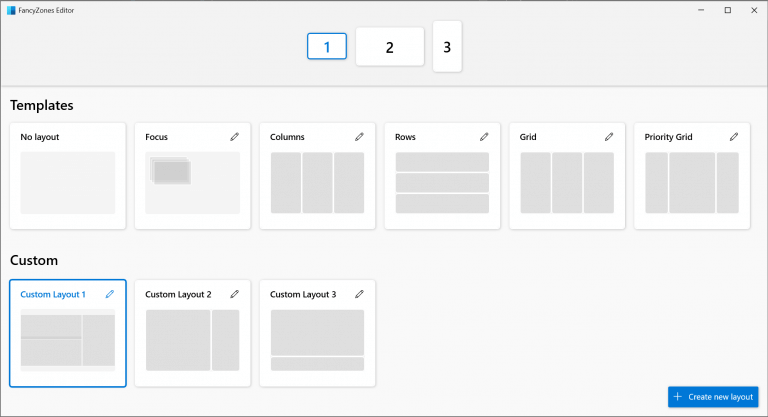
Furthermore, if users made use of Power Toys, they could get a wider range of windows management when using Fancy Zones.

As intuitive as it seems for power users or long-time users of Windows to simply find a corner of the desktop to align the grouping of Windows, there is still a fair bit of guessing that goes when using gestures to group windows on Windows.

Yes, there are keyboard shortcuts that add a bit more mechanical execution of window grouping/snapping, but for those of us who navigate the desktop via a mouse or touch, grouping windows lacks precision and convenience.

From not knowing how far to drop a window into the sides of the desktop before it gets locked into place to having to manually select each app to place in a new grid grouping, windows management could use some additional refinement. Now it seems, Microsoft is addressing some of that refinement with Windows 11.

More than just adding a grouping menu when hovering over the maximize button on windows, Windows 11 users can automatically set their grouping/grip from the maximize menu. Once a grouping/grid is select, it’s just a matter of choosing the app to ‘flow’ it into place, rather than tasking the user with Tetrisizing their way into the corners of the desktop. It’s a small improvement but seconds saved could be dollars earned for some professions.

The intuitiveness extends beyond the grid prompt in the maximize button and is now an accessible feature in the new taskbar. When viewing applications in the taskbar users will now see the groups these apps are associated with. The feature really becomes useful when grouping duplicate windows of the same applications or flipping between desktops with various groups/grids in place.

via GIPHY

The multitasking features coming with Windows 11 should be roundly accepted by Windows users a clear improvement, however,at this point they’re not guaranteed to catch on. As mentioned earlier, there is a caveat to the additional multitasking features which involves developers implementing the Windows 11 supported code into their Windows apps.

As of testing this premature Windows 11 build, it seems that while Microsoft’s native apps make use of the new grouping prompt, 3rd party apps do not. Applicaitons such as Windows Mail, File Explorer, Photos, Edge and others support the new prompt while 3rd party solutions such as Filmora, OBS, and Discord do not yet implement the multitasking prompt from the maximize menu.

There does appear to be a through line between native Windows designed apps from the Microsoft Store that automatically support the new API, as well as PWAs as expected. Perhaps, the proliferation of the new multitasking feature will come with Microsoft “big news” regarding its Store upgrades and developer focus during its June 24th event.

Microsoft to hold separate digital event for Windows developers on June 24

Microsoft has just announced a dedicated event for Windows developers on June 24, which will follow the much-anticipated Windows event at 11 AM ET where the company is expected to officially announce Windows 11. The separate developer event will kick off at 3 PM ET on the same day and will be open to everyone, and early enthusiasts can already set a reminder on the YouTube page.

We don’t have any more details about the developer event yet, though the “what we have in store for developers” wording hints at some important Microsoft Store changes. At Build 2021 last month, Microsoft CEO Satya Nadella promised that the next version of Windows would “unlock greater economic opportunity” for developers and creators. “We will create more opportunity for every Windows developer today and welcome every creator who is looking for the most innovative, new, open platform to build and distribute and monetize applications,” Nadella boldly said.

Back in April, Microsoft made headlines by announcing that it would reduce its cut to 12% on game sales starting in August 2021, and catch up to the more generous terms that a company like Epic Games has been offering to developers. Since then, a previous report suggested that Microsoft could make some big moves to allow apps like Google Chrome on its Store by allowing developers to submit unpackaged Win32 apps that can also circumvent Microsoft’s own systems for payments and updates.

Launching a new major version of Windows is certainly a good opportunity for Microsoft to get more developers to embrace its digital storefront. After trying (and failing) to get developers to build Metro-style apps and then UWP apps, it seems like Microsoft finally ready to reboot its store as a more open platform.

5 best 3D printers to make action figures

From the invention of the first 3D printer in the year 1986, the technology has evolved incredibly, reducing in size and becoming more efficient and user-friendly overall.

It has never been easier to make 3D printed action figures. The most important step is to invest in a good 3D printer that allows you to create detailed action figures, is easy to use, and fits your price range.

Because the market is now full of a large range of 3D printers, it can be overwhelming to do the research required in order to make an informed decision.

That’s where this buying guide comes in handy, offering you a quick and effective overview of the best offers on 3D printers on the market. Read on to find out more details.

Note icon NOTE
Note: Deals are subject to change. Keep in mind that the price tag often varies. We recommend going on the vendor’s website to check the price. Some of the products may be out of stock by the time you’ve made your purchasing decision. So, hurry up and hit the buy button.

What are the best 3D printers for action figures?

Official Creality Ender 3 V2

  • Silent motherboard with strong anti-interference
  • Stable motion performance
  • Can resume printing
  • Customer service is not responsive

The Official Creality Ender 3 V2 printer is one of our picks for the mid-range price category printers that can make action figures from the comfort of your own home.

This printer offers a 220x220x250 mm total building volume and features a very useful technology that allows the machine to automatically fill the resin tank.

Ender-3 V2 comes with an in-house developed silent motherboard, with anti-interference features and low noise operation.

It’s important to have a power supply that can deliver fast and constant heating and this device comes with a MeanWell component that is safely enclosed in the body.

Another included innovation is a rotary knob on the extruder that facilitates the filament feeding process.

Also, the printer comes with a new operation UI and a smart, 4.3-inch color screen that will make your user experience even better.

If the printing has been interrupted about, let’s say, a power outage, you can always resume the process from the exact same moment.

ANYCUBIC Mega S Upgrade FDM 3D Printer

  • Easy to set up in just 3 steps
  • Resume print & sensor detection
  • Lifetime technical support
  • The instruction manual is not so clear

The ANYCUBIC Mega S Upgrade FDM 3D Printer is our second pick in the mid-range 3D printers category that allows you to create beautiful action figures.

This 3D printer uses FDM technology for the drying of resin layers, and the company claims that it can build models 8 times faster, and 9 times more accurately than other printers.

The manufactures states that you can assemble the printer in just three minutes by coupling only 3 cables and mounting 8 screws.

They also specify that the printer’s rigid metal frame will minimize the shaking during printing and thus improve the overall print quality.

This printer can also resume the printing from the last recorded position and also, a dedicated sensor pauses the process and sets off an alarm when you run out of filament.

The printing dimensions cannot exceed 8.27 x 8.27 x 8.07 inches but when you set up the design you won’t be able to load a higher volume 3D construction.

Mega S comes with a very responsive 3.5-inch TFT screen that will display all sorts of important information about the printing job.

ANYCUBIC Photon UV LCD

  • Affordable price
  • Photon Slicer software included u2013 offers a very user-friendly menu
  • Uses a carbon filtration system
  • A minimum layer height of 25 microns
  • The quality of the print could be improved, but it is good considering the price range

The ANYCUBIC Photon 3D printer, the cheapest option found in this buying guide, is a great option that allows you to build action figures easily.

This 3D printer uses a 2560 x 1440 pixels UV LCD screen that dries out each layer of material that was printed and has a volume of 115 x 65 x 155 mm.

The screen is made out of 15 pcs lamp beads that are able to carry out uniform exposure for every layer and thus ensuring great quality models.

The Z-axis guide rail structure and stepper motor have great stability and have an accuracy of 0.01 mm practically eliminating layer patterns.

Its printing speed is 2.5X faster than the regular, extruder-based 3D printers, and that means rapid prototyping and low downtimes. It only takes 1.5 seconds to cure a layer of resin.

The printer comes with a removable one-piece transparent cover that will protect your eyes from the light and will keep away any impurities to get to your resin and model.

Photon 3D printer is great for printing pieces for board games, miniatures and characters from movies and games and all sorts of other creative objects.

FabPro 3D Systems

  • Compact and good looking device
  • The company claims to produce same-quality designs 3 times faster than the competition
  • Very useful software that helps streamline the production of action figures
  • Can be adapted with a UV curing unit
  • Great printing quality
  • Small building surface but enough for making action figures

The FabPro 3D Systems is another great 3D printer that fits into the higher price range section but offers amazing print quality and fast processing speeds.

This 3D printer offers a build volume of 4.92 x 2.76 x 4.72 inches, with a minimum layer thickness of 30 microns.

The printing process implies the use of a 405-nanometer projector to imagine each layer for precise printing. You can also build several smaller parts on a single platform to increase your productivity.

FabPro 3D brings the 3D Sprint print management software that will help you optimize the material usage and waste less.

Although the printer produces high-quality, industrial-grade 3D models, it’s extremely easy to operate and to change the trays and the printing materials.

The downside is that you will also need an optional LC-3DPrint Box UV post-curing unit for cleaning and curing the models properly.

Just to give you a hint about the actual printing speed, it can be up to 21 mm/h which is not the greatest out there but on par with most affordable solutions.

LulzBot Mini 2

  • High-quality E3D Titan Aero extruder with .50 mm nozzle
  • Compatible with flexible and rigid materials
  • Heated print bed: borosilicate glass/PEI
  • 281.4 inches print volume
  • The print volume is pretty low

The LulzBot Mini 2 desktop 3D printer is ideal for any DIY enthusiast that want to create his or her objects and express their creativity.

And the 2 sufix tells you that there has been another iteration of this printer and this is the improved version that has been created from the previous experience of the manufacturers.

As the Mini from its name suggests, the printer doesn’t have a very high printing volume but 6.3 x 6.3 x 7.08 inches is not too small either.

Although it looks very simple, it is made out of very resistant materials and quality components.

We can start with the E3D Titan Aero with .50 mm nozzle that is an excellent piece for high-end results when it comes to extruders.

It also features a heated print bed made out of borosilicate glass/PEI that will ensure quality prints right from the start.

You will get a 1-year with 7-days/week phone and email technical support for any trouble you may get yourself in although the printer is extremely easy to operate.

Owning a fast and reliable 3D printer can streamline the process of creating the best action figures you can imagine.

This list contains 3D printers from all price ranges and offers you an efficient overview of the pros and cons of each model.

How to choose the right 3D printer for your project

Nowadays, there are all sorts of 3D printers for any budget, with different technologies, speeds and precision.

The price can be a starting point but you also want to consider the user’s opinions that already tried the products. Here are some criteria to take into consideration while choosing a 3D printer.

Choose the right technology for your 3D design

In the low price, amator level devices, there are two available technologies. The extruding process is performed by heating a plastic filament and deposing a thin layer over a surface.

The other is by UV-light curing a resin in a small basin, layer by layer, progressively. Both have their advantages and disadvantages.

Differences between extruder and UV curing 3D printers

Extruder printers are slightly cheaper, the materials are also less expensive, and you can use a lot more materials, but they are slower, and the end product needs finishing.

That’s because you will see the lines where the layers have been deposed. You will also lose more plastic in the process.

On the other hand, the UV curing technique is faster, offers a better definition of the finished product, you lose less material, but the resin is slightly more expensive, and you don’t have too many choices.

Check the print volume

If you’re buying the printer for creating some objects with certain dimension specifications that you already know, check the maximum build dimensions of the printer.

The resin curing printers tend to have smaller volumes so check the values first. You can create an object from several components and stick them together afterward. That’s also an option to keep in mind.

After you choose the right device, you can also check our excellent selection of the best 3D printing software for PC.

Please feel free to let us know if you found this guide helpful, and what option you chose to purchase, by using the comment section below.

Microsoft brings back Xbox Design Lab for customizing its new Xbox Wireless Controller

It’s finally happening, Microsoft’s Xbox Design Lab is officially back and ready to let Xbox fans customize the next-gen Xbox Wireless Controllers that made their debut with the Xbox Series X|S consoles last Fall. The customization program will once again let customers create a unique Xbox controller by personalizing its features including the colors of the body, back case, hybrid D-pad, bumpers, triggers, thumbsticks, as well as all buttons.

“With Xbox Design Lab, you can customize a controller to match your creative style, tell a story, or celebrate a special moment. From there, you can further personalize your design with laser engraving to add your name, Gamertag or custom 16-character message. We’ll then hand-make your controller and ship it to your doorstep with free shipping,” the Xbox team explained.

For now, the Xbox Design Lab is only available in the US, Canada, and most Western European Countries, and customized controllers will cost $69.99 (adding a personalized laser engraved message costs $9.99 more). Literally millions of color combinations are now available, and Microsoft said that most of the color options are made with plastics containing 30% post-consumer recycled (PCR) materials.

“We have a bold vision for customization through Xbox Design Lab, and this update is just the beginning. Our team is hard at work developing new processes, testing new materials, and innovating so that we can continue to evolve the Xbox Design Lab experience.” The team said today. You can get started creating your customized Xbox Wireless Controller today on xbox.com.

Windows 11 SE is the first real hint at Microsoft’s newest OS

While every self-respecting Windows 10 user in the world was waiting for some details about the new operating system, scheduled to make an appearance at the June 24 event, something else happened.

A Windows 11 build got leaked earlier this week, much to everyone’s delight, and gave us a pretty good idea of what to expect in the near future.

The first Windows 11 build is highly restrictive

A new SKU, which is called Windows 11 SE, has been discovered recently and it seems to be a primordial version of the OS, but with some pretty tough restrictions to what users can actually do.

Judging by available information, it looks like the new Windows 11 SE is a SKU destined for enterprises.

Users have the ability to switch to other enterprise-focused SKUs as well. You can actually go ahead and change it from Enterprise to Education, Pro for Workstations, and others.

As we mentioned above, this new version of the OS is somewhat of a confining SKU, with many of the basic options that users usually have, being not available at the moment.

Just by accessing the Settings app, you can already observe that we’re not dealing with a complete version of the software yet.

Another basic feature that is missing from this version of Windows 11 is the Microsoft Store. This seems to be an odd restriction, seeing how Microsoft usually trusts its Store to be a safe space for apps.

When trying to access it, the app prompts users with an error, saying that the Store is blocked, and are urged to contact an IT admin.

Note icon NOTE
With such unquestionable issues, 26% of users wonu2019t upgrade to Windows 11, as revealed in our exclusive Windows 11 survey. The results include responses from 6056 readers, coming mostly from US inhabitants, as well as readers from India, United Kingdom, Canada, Australia, and other 147 countries.

You need a Microsoft account for this experience

One of the other important restrictions that users have to face is that the PC has to be set up with a Microsoft account.

So, basically, Microsoft is already nudging users to do this, the only workaround for avoiding having to use a Microsoft account is by not connecting to the internet.

Take into consideration that offline account creation is also broken in this edition, according to users that have shared this information on social media.

You can also switch to a local account after the fact, keeping in mind that it is not possible to have more than one local account through the UI, except by using the command line.

If we really think about it, some of these restrictions could be because of bugs that are plaguing this unfinished state of the build.

Some good news about this Windows 11 SE is that it seems to support Win32 apps that originate from outside the Store, which Windows 10 S didn’t.

The one possible explanation for this is that Microsoft intended for organizations to limit their employees to very specific apps needed just for work.

We will just have to wait and see how Microsoft intends to move forward with their plans, and if they can deliver a more complete version of the OS on the 24th of June.

That’s your chance to watch the Windows 11 unveiling event at 11 am Eastern time. Microsoft likely has quite a few surprises still in store.

How to fix Xbox ventilation error for a smooth gameplay

Your Xbox produces heat as soon as you turn it on, and sometimes you can get a ventilation error on your console due to excessive heat.

This error means that there’s insufficient ventilation, and your Xbox will shut down in order to prevent damage to the system.

This can be a major problem and prevent you from playing all games on your Xbox, but there are few ways to fix this problem.

How can I fix the Xbox ventilation error?

1. Let the console cool down

When you get a ventilator error on your Xbox it will automatically turn itself off, but if that doesn’t happen for some reason, be sure to turn it off manually.

After turning the console off, wait for a few minutes until the red light stops blinking. Turn on your console, and it should start without any problems.

2. Move your console

If you’re getting a ventilation error on your Xbox, you might want to try moving it to a different location.

Before moving your Xbox, be sure that you turn it off completely and place it in an open, well-ventilated area.

You should also try to keep it away from other electronic devices and make sure that other devices and objects don’t obstruct the airflow.

Keep in mind that even small objects near the ventilation openings can obstruct the airflow and cause this error to appear.

In addition, make sure that your console and power supply are positioned on a hard surface. Try to keep your console away from soft surfaces such as rugs.

Lastly, keep your console away from heat sources such as ventilation openings and other heat-emitting devices. If you can, try to keep your console away from direct sunlight as well.

Also, if your Xbox One games and apps won’t open, check out our comprehensive guide and fix these problems in no time.

3. Move the power supply

We already described how to position your console properly, and the same rules apply to your power supply.

Users reported this issue while having their power supply on the ground, but after moving their power supply to a different location, the ventilation error was resolved.

4. Clean your console

Few users suggested that you can fix this problem simply by cleaning your console. To do that, turn off your console and unplug the power cable.

After that, take a dry microfiber cloth and use it to clean the surface of the console. Thereafter, make sure you start it up again safely.

5. Clean the fan

Sometimes you might get a ventilation error because your fan is clogged by dust, and in order to fix it you need to open your console and clean the fan.

We have to warn you that opening your console will violate your warranty, so keep that in mind.

Also, if you encounter the error message The current profile not allowed on Xbox, you should check our step-by-step guide to fix the problem.

6. Remove X-clamps and replace thermal paste

According to users, few of them managed to fix this problem by opening their Xbox, removing X-clamps and putting new thermal paste on the GPU and CPU.

Before you apply the new paste, be sure to clean the old thermal paste completely. After doing that, return X-clamps to their position and close your console.

Some users are suggesting to replace your X-clamps with new ones, so you might want to do that as well.

We have to mention that this is an advanced procedure, therefore be extra cautious.

Keep in mind that opening your Xbox will violate your warranty, therefore it might be best that you take your console to the Microsoft repair center if you’re having this problem.

Xbox’s ventilation error can be caused by a hardware problem, and if that’s the case, you might have to take your console to the repair center.

If your hardware is working properly, you should be able to fix this error by keeping your console clean, and keeping it on a well-ventilated area.

Also, if you want to protect your console, take a closer look at our dedicated guide for the best Xbox One dust cover, and find the proper one for your needs.

We hope that these recommendations helped you to fix the Xbox ventilation error. For more suggestions, please access the comments section below.

Microsoft to hold Xbox Games Showcase Extended at 10AM PT today, watch it here

Microsoft is getting ready to share more details about its upcoming first-party games during the Xbox Games Showcase Extended at 10 AM PT this morning. The event should be an interesting a follow-up to Sunday’s Xbox & Bethesda Games Showcase, which was Microsoft’s most viewed E3 event ever according to Xbox head Phil Spencer.

Today’s event will feature interviews with developers working on various upcoming Xbox Game Studios titles, including games coming later this year such as Halo Infinite, Microsoft Flight Simulator, Psychonauts 2, Age of Empires IV, and Forza Horizon 5. Rare will also be here to discuss the Pirates of the Caribbean crossover event in Sea of Thieves, and Ninja Theory will also share a behind-the-scenes update on Senua’s Saga: Hellblade II, a game that absent from last week’s Xbox E3 2021 showcase.

The Xbox Games Showcase Extended will air on Twitch, Facebook, YouTube this morning, but you can watch it below:

These past couple of days have been pretty crazy for video games fans, and Microsoft even had some big pre-E3 announcements with the expansion of Xbox Cloud Gaming to more platforms including TVs and Xbox consoles. The software giant also revealed that it’s nearly done upgrading its xCloud servers with Xbox Series X hardware, which will make it possible to bring next-gen games like Microsoft Flight Simulator to Xbox One gamers.

If E3 2021 officially finished two days ago, today’s Xbox Games Showcase Extended event is a good way for Microsoft to increase mindshare for the Xbox brand. The “Xbox has no games” memes had a pretty good run, but the Xbox ecosystem now appears stronger than ever with Microsoft showing on Sunday no less than 27 new games coming to Xbox Game Pass on day one.

Microsoft details new features coming to Teams Rooms devices, including the Surface Hub

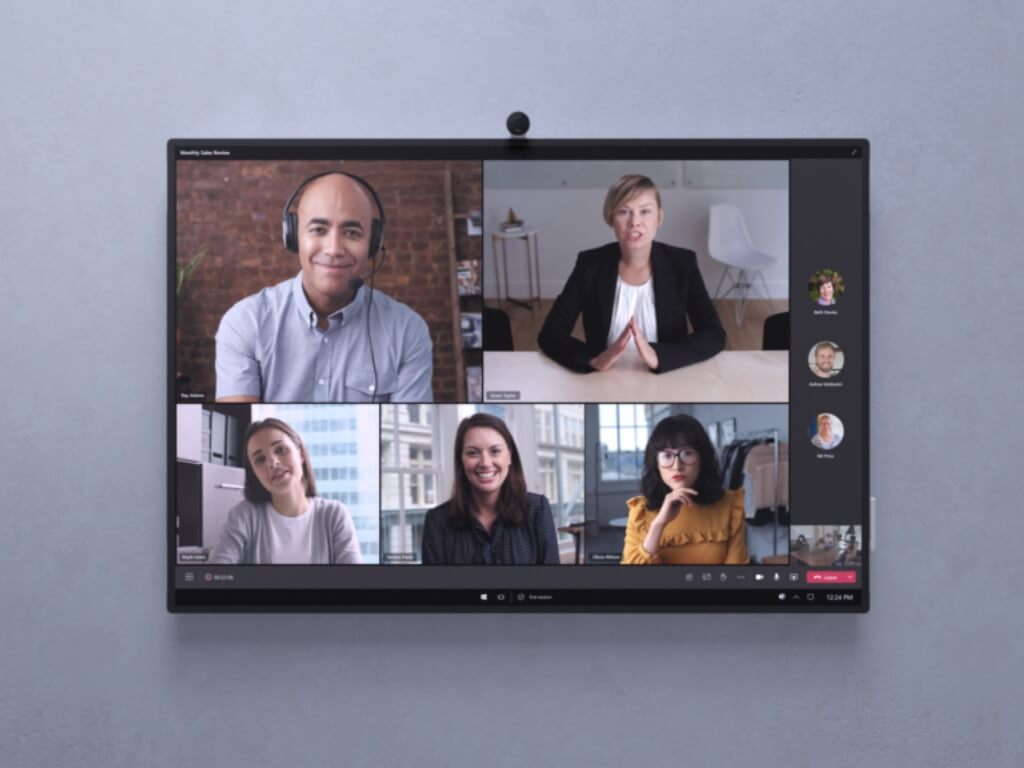
Microsoft announced this morning that it was bringing Fluid components to Teams Meetings and other Office apps, which should empower employees to collaborate more seamlessly across the Microsoft 365 ecosystem. The company also announced some enhancements to Teams Meetings and Teams Rooms devices to make the meeting experience more engaging for everyone, including people not in the room.

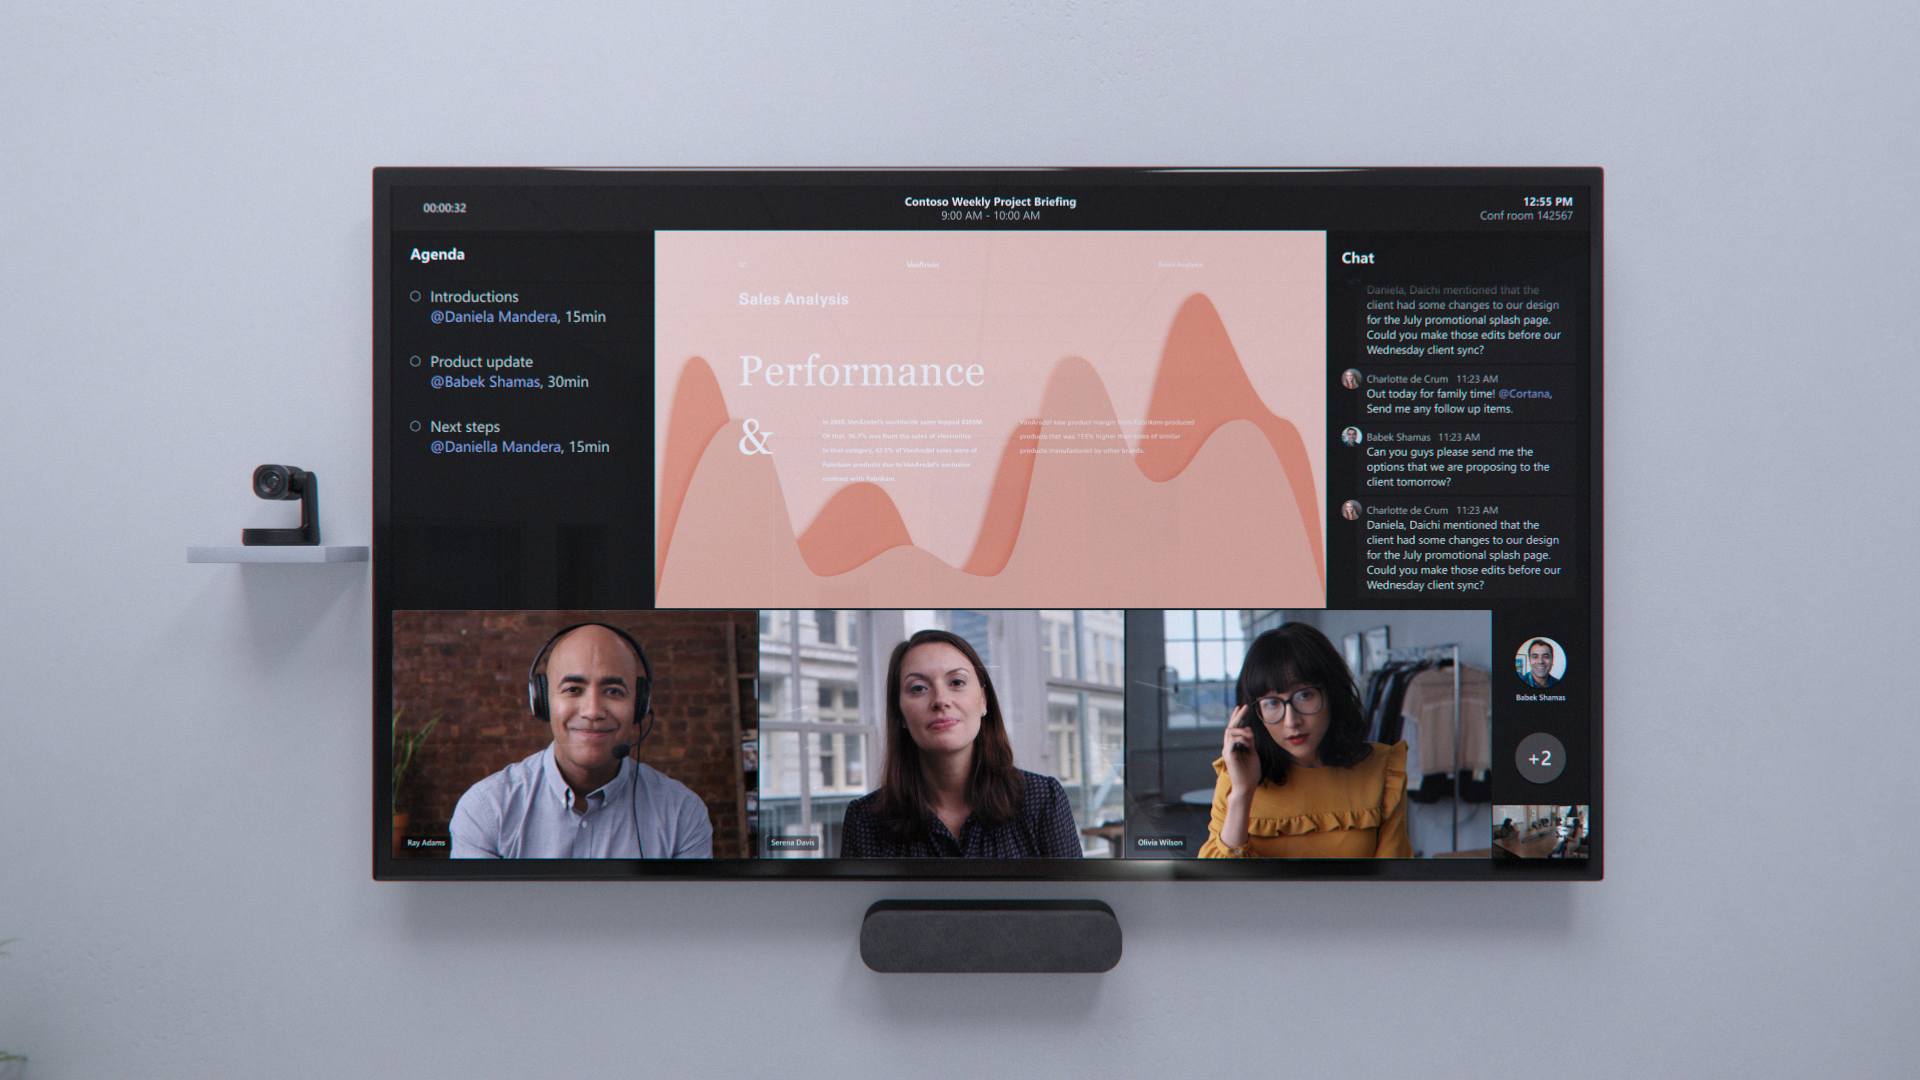
Later this year, Microsoft also plans to roll out a new immersive layout named “front row” on Teams Rooms devices. When enabled, the new meeting layout will move the video gallery at the bottom of the screen and surround meeting content with chat messages on the right and other contextual information such as agenda and tasks on the left.

Teams Rooms devices are also getting support for new video layouts that can split the video gallery across multiple displays when no content is being shared during the meeting. Desktop features including live reactions, spotlight, chat bubbles are also coming to Microsoft Teams Rooms devices this summer, with the ability to pin multiple video streams to follow later this fall.

Microsoft also announced today a new Teams Rooms on Surface Hub experience, which will bring several new Meeting features including a modernized meeting stage, Together Mode scenes, and PowerPoint Live. This summer, a new Microsoft Whiteboard experience will also allow coworkers to collaborate more seamlessly on the same canvas, and the new Whiteboard experience will come to Surface Hub devices later this year.

Support for Xbox 360’s GTA Online, Max Payne 3, and L.A. Noire video games to end this year

Rockstar announced this week that it would be ending support for the Xbox 360 versions of the GTA Online, Max Payne 3, and L.A. Noire video games by the end of the year.

On September 16th, the sale of GTA Online’s in-game Shark Cards items will be discontinued and online support and website stat tracking for Max Payne 3 and L.A. Noire will stop. Online services for GTA Online will continue until December 16th.

These changes only affect the online functionality of the three titles. All offline content, such as the main campaigns or story modes, will continue to work as usual and Xbox Achievements should continue to be unlockable. In GTA Online’s case, this means that the main game it’s a part of, GTAV, won’t be affected.

Those hoping to transfer their GTA Online progress from Xbox 360 to Xbox One, Xbox Series X, or Windows are unfortunately out of luck. “There is no feature available to transfer character data or progress from those platforms,” the official announcement reads.

L.A. Noire launched on Xbox 360 and Windows PC way back in 2011 and was eventually re-released on Xbox One with all of the original’s DLC and a 4K visual upgrade. Max Payne 3 came out on Xbox 360 in 2012. It was the third and final entry in the Max Payne video game series.

GTA Online launched on Xbox 360 in 2013 as part of GTAV. It was soon re-released on Xbox One the following year and got an additional release for Windows PC in 2015. Yet another re-release of GTA Online is expected this November for Microsoft’s new Xbox Series X console.

FIX: flashing black box in Windows 10 [Quick Guide]

In today’s guide, we’re going to talk about a rather unusual error in Windows 10. Namely, a couple of users reported that while they were using their computer, a flashing black box appeared on their screen.

There are a few possible causes of this problem, so be sure we’ll try to find proper solutions for them.

How do I get rid of the black box in Windows 10?

1. Use the DISM command tool

  1. Right-click on the Start Menu button and choose Command Prompt.
  2. When you see the User Account Prompt, simply click Yes to grant admin privileges to the CMD window.
  3. Enter the following line and press Enter: DISM.exe /Online /Cleanup-image /RestorehealthDISM command tool to fix flashing black box
  4. Let the DISM scan your computer for errors and find possible solutions.

Maybe some corrupted system files are the very core of this flashing black box issue, so you can try scanning your computer for broken files and try to fix them.

If DISM failed on Windows 10, just check out this quick guide about DISM failing on Windows 10 and set things right again.

2. Check Video Adapter drivers

  1. On your keyboard, press the Windows Key + R to invoke the run box.
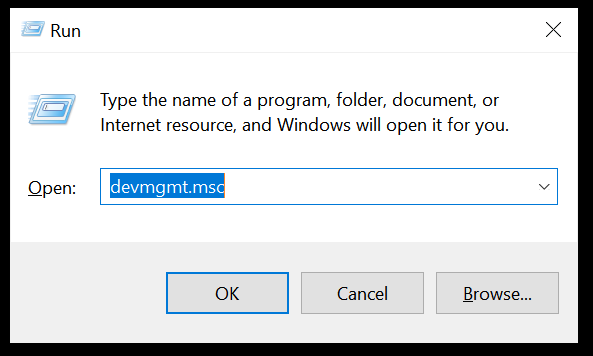
  2. Type devmgmt.msc and click OK.
  3. Find your display adapter and right-click on it.
  4. Go to the Update driver software option.
  5. If the update is available, just let the wizard finish updating.
  6. Restart your PC.

By now, Windows Updates should cover all your drivers. However, if you’re using a display driver for which Microsoft doesn’t offer any official updates, you’ll have to update the driver automatically.

By updating drivers automatically with the help of a dedicated driver updater program, you can save time and update all the drivers you need easily and safely.

However, a program like Outbyte Driver Updater not only downloads and installs drivers, but also manages them by troubleshooting, backing up, and restoring them. For this reason, it is worthwhile to use it!

⇒ Get Outbyte Driver Updater

3. Run an SFC scan

  1. Go to Search, type cmd, and open Command Prompt (as Administrator).
  2. Type in the following line and press Enter: sfc/scannowsfc/scannow command
  3. Wait for the process to finish.
  4. Restart your computer.

The next thing you’re going to try is running the SFC scan. System File Checker is a built-in feature designed to deal with various system issues, so it may help.

You’ll find detailed steps on how to run the SFC scan in Windows 10 above.

Scannow command has stopped before the process finished? Don’t worry, we’ve got an easy fix for you in this guide dedicated to fixing the problem.

4. Run the Troubleshooter

  1. Go to Settings.
  2. Go to Updates & Security, then Troubleshoot.
  3. Then, click Run the troubleshooter and wait for the process to finish.
  4. Restart your computer.

Windows Troubleshooter successfully deals with various problems, including the flashing black box problem.

However, if you’re having trouble opening the Settings app, take a look at this article dedicated to fixing the problem.

5. Disable the onboard graphics

  1. Restart your computer while holding the SHIFT button.
  2. The Advanced Startup menu will open on the boot.  Go to Troubleshoot.
  3. Now, go to Advanced Options then Startup Settings.
  4. Click the Restart button.
  5. A window with various startup options will show up.
  6. Press F5 on your keyboard to choose Enable Safe Mode with Networking.
  7. Wait for your computer to boot.
  8. Now that you’re safe in the Safe Mode, open Device Manager.
  9. Locate your onboard graphics.
  10. Right-click it and from the menu choose Disable.
  11. Restart your computer, and check if the black box is still there.

If you have both onboard and external graphics cards in your configuration, and both are enabled, there can be some interference. So, the best solution, in this case, is to simply disable the onboard graphics card.

Before you can actually disable your onboard graphics card, let’s boot in the Safe Mode, just to avoid any potential problems.

6. Change brightness settings

Another reason for the flashing black box on the screen could be the wrong brightness settings.

Setting display brightness to 100% when your device is plugged in causes this problem, so it’s best that you use a lower value.

  1. In the Power Options, find your current power plan and click Edit plan settings.
  2. Up next, click the Change advanced power settings option.advanced power settings
  3. Locate the Display brightness setting and make sure that you set the display brightness to 99% or 98% when your device is plugged in.
  4. Save changes and restart your computer.

Is the Windows Troubleshooter giving you headaches? Here’s a quick guide dedicated to fixing the Windows Troubleshooter.

If you’re aware of other solutions or need more help, don’t hesitate to contact us by using the comments section below.

MSI Driver CD Not Working in Windows 10/11 [Solved]

MSI is a popular gaming computer, hardware, and peripherals maker. The company offers a CD containing essential drivers to install their peripherals and hardware such as the motherboard and GPUs.

However, quite a few users have reported the MSI driver CD not working when trying to install the drivers.

This problem can occur due to several reasons, including a faulty driver disc or other glitches that may prevent the computer from installing drivers from the computer.

In this article, we show you how to easily solve the MSI driver CD not working issue on your Windows 10 computer.

What can I do if the MSD driver CD is not working?

1. Update motherboard driver using a driver updater software 

If you have access to the Internet, use driver updater software to automatically download and install the required drivers.

Note that using a dedicated driver updater software is better than trying to update device drivers manually. This is because it can look for missing device drivers and determine the best version to install.

2. Clean the hard drive 

  1. Press the Windows key + R shortcut to open Notepad.
  2. Type the following in the Notepad:
    set DEVMGR_SHOW_NONPRESENT_DEVICES=1
    start devmgmt.msc
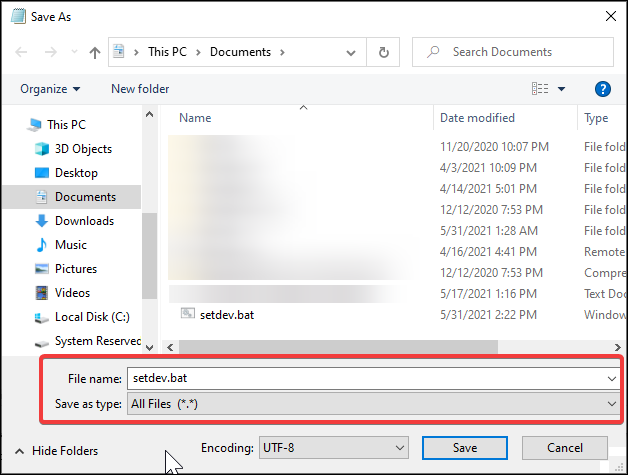
  3. Click on File and choose Save. Name the file as setdev.bat.
  4. Click the Save as Type drop-down button and choose All Files.
  5. Next, click OK to save the changes.
  6. Double-click on the setdev.bat File. This will open the Device Manager with an advanced MSC version.
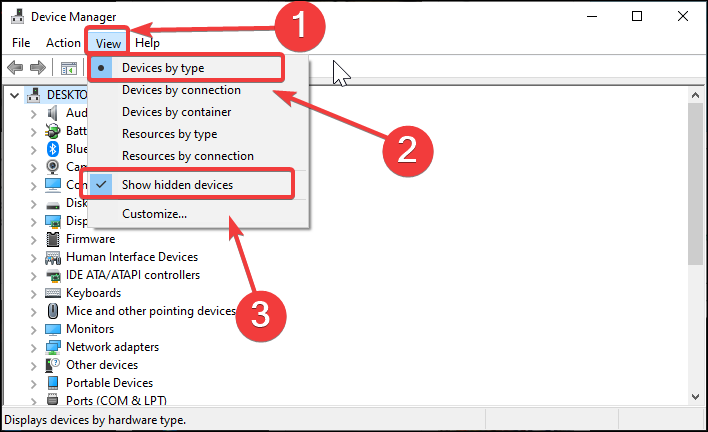
  7. In Device Manager, click on View and choose Devices by type.
  8. Click View again and choose Show hidden devices.
    MSI driver CD not working
  9. Device Manager will populate the screen with all the devices that have ever been installed on your computer. Devices that are currently uninstalled will be grayed out.
  10. Expand each category under Device Manager. Locate the grayed-out devices, right-click and choose Uninstall.
  11. Repeat this until you have removed all the non-existing devices from your system. Reboot the computer once all the devices are removed.

After the reboot, you can remove the hard drive and install it onto new hardware. Removing ghost drivers can help you fix the issue that is preventing the MSI driver disc from installing drivers. 

3. Install the drives from the official website 

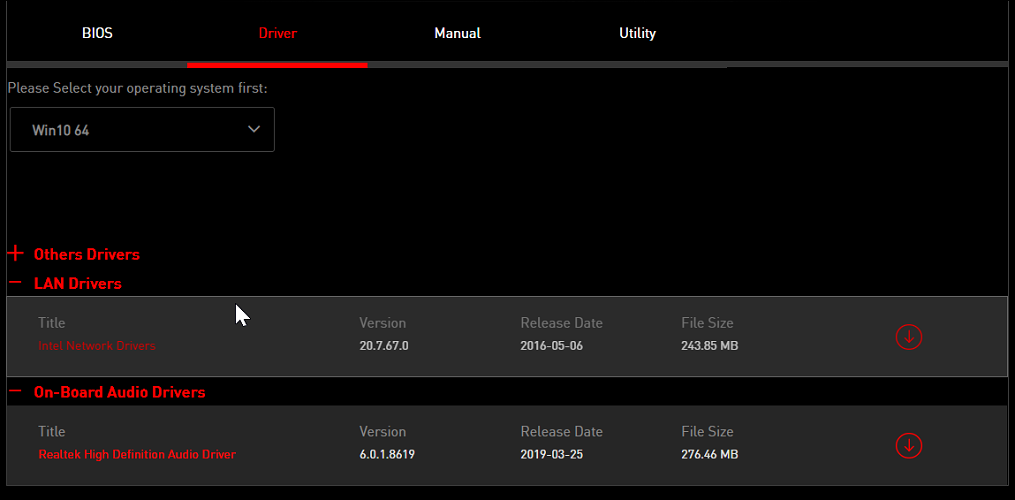
  1. Go to the MSI download center. It consists of all the latest drivers for MSI hardware devices.
    MSI driver CD not working
  2. Choose your motherboard model from the list and download the latest drivers available. If your PC does not have an Ethernet connection, download the driver using a different computer and then move it to your PC.
  3. Run the driver installer and follow on-screen instructions to complete the installation. 

If you have an active Ethernet connection, you can download and install all the required drivers through Windows updates. Microsoft bundles third-party vendor updates depending on your PC’s Windows updates. 

4. Install pending Windows updates 

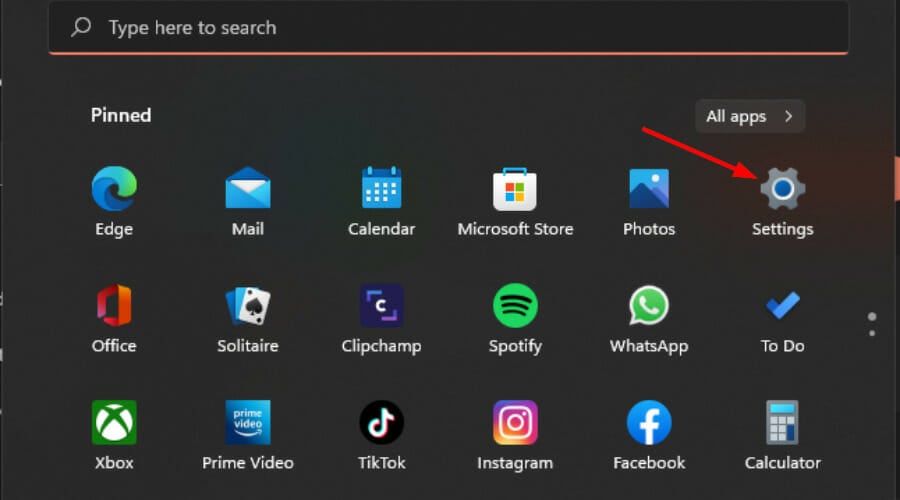
  1. Click on Start and open Settings.
  2. Go to Update & Security.
    MSI driver CD not working
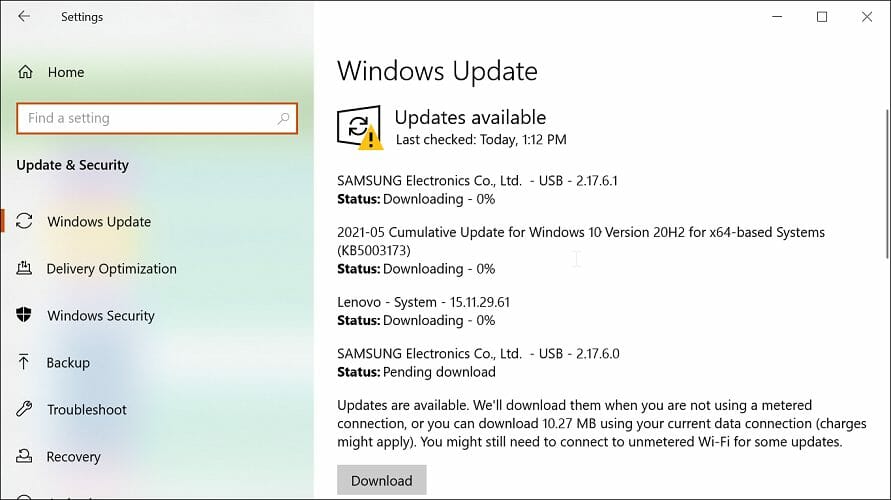
  3. In the Windows Update tab, scan for any pending updates. Download and install all the updates till no new updates are shown as available. 

Installing pending updates will also install all the required drives for your motherboard. MSI driver discs can have outdated drivers depending on when the hardware was released.

If doing so did not help, try reinstalling the Windows OS. Even more, if the MSI driver disc not working issue persists, perform a clean installation of Windows 10. 

We are here to also remind you that it’s essential to constantly back up your drivers. We can only encourage you to use the best driver backup software for Windows 10 in that regard.

As you can see, you may experience the MSI driver CD not working issue due to several reasons. Follow all the steps in this article one by one and let us know which method helped you in the comments.

Canon Inkjet Print Utility Driver is Not Installed [Fix]

Printer software allows you to configure your printer, and if the Canon Inkjet Print utility driver is not installed, you won’t be able to use your printer or scanner.

This can be a big problem since you won’t be able to print any necessary documents, so fixing this issue as soon as possible is important.

Why is my Canon printer driver not available?

  • You might be dealing with a corrupted driver installation, so it might be necessary to reinstall the printer software.
  • Your printer driver might be outdated, or Windows might use the default driver.
  • In some cases, the firewall can block your printer from working properly.

What can I do if the Canon inkjet print utility driver is not installed?

1. Reinstall the scanner software 

  1. Remove any cables that connect your scanner to your PC.
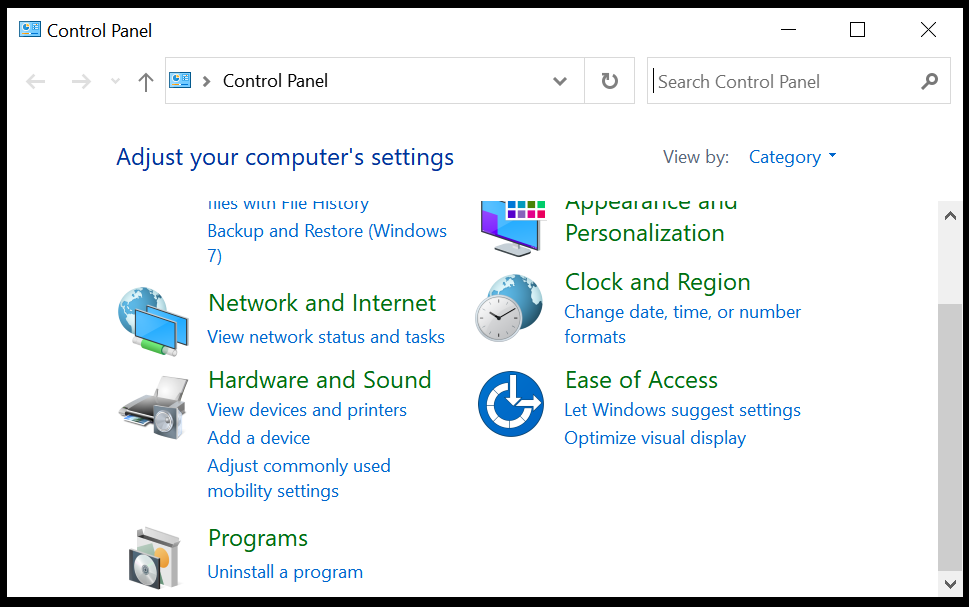
  2. Next, go to Control Panel and click on Programs and Features.
  3. Locate the printer driver and click Uninstall.
  4. Restart your device and go to the manufacturers’ website.
  5. In the search area, type in your product name.
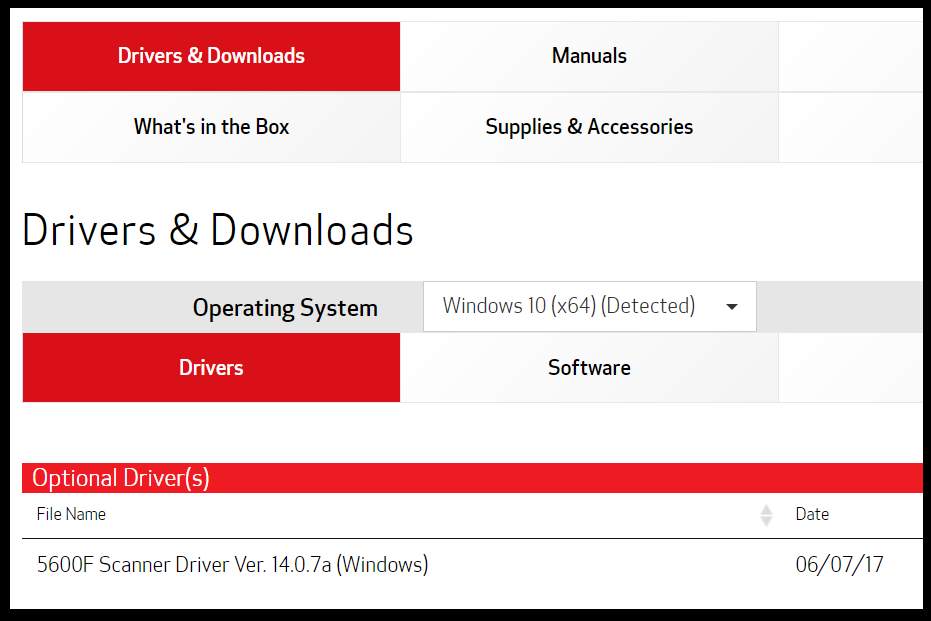
  6. Click on it and go to the Drivers & Downloads section.
  7. Download the displayed driver and install it on your device.

2. Use Device Manager

  1. Simultaneously press the Windows + R key to open the Run box.
  2. Next, type in devmgmt.msc and press OK.
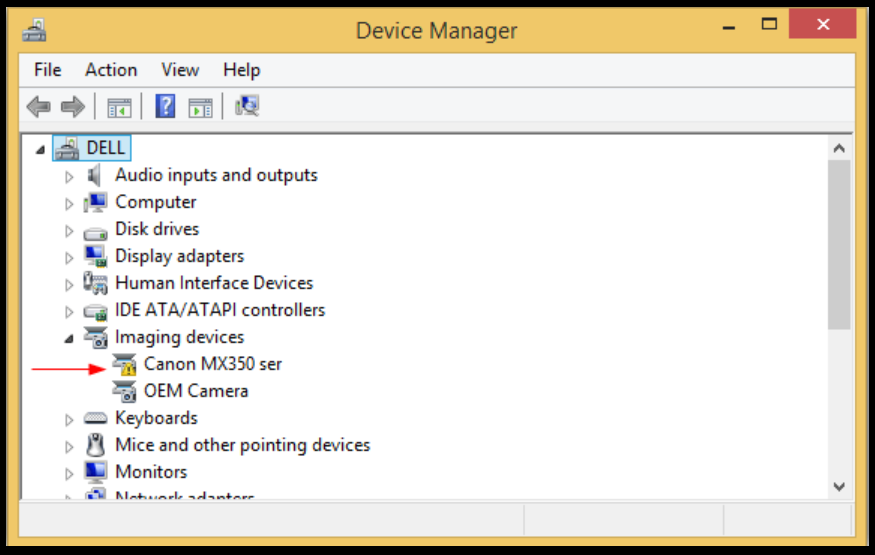
  3. Search for the Imaging devices on the list and locate your scanner.
  4. Check out if there is a yellow mark next to it and if it is, right-click on it.
  5. Select Properties and go to the Driver tab.
  6. Here, click on Update driver and allow for the process to finish.
  7. Restart your device afterward.

If you’re unable to complete this process, we have a great guide on Canon printer is not installing drivers that you might want to check out.

3. Use a dedicated tool

Like all devices, printers may fail to work properly although nothing seems wrong on the surface at least. Most of the time, the malfunction of a printer has a lot to do with the existence of a faulty or outdated driver.

As you can see, there are several ways that will help you figure out what is wrong with the driver, although checking them manually can take some time.

Using a dedicated tool to help update and fix faulty or missing drivers is recommended if you get the message that the MP navigator ex-scanner driver is not installed.

4. Disable your firewall

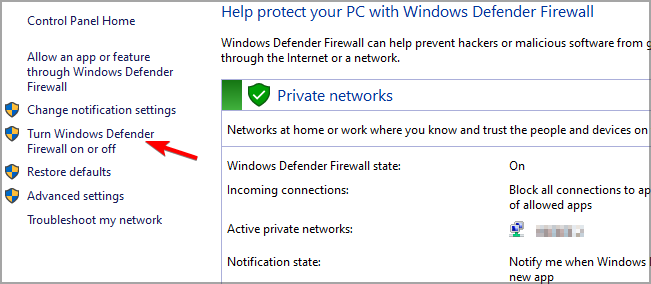
  1. Press Windows key + S and type firewall. Select Windows Defender Firewall.
  2. Now choose Turn Windows Defender Firewall on or off.
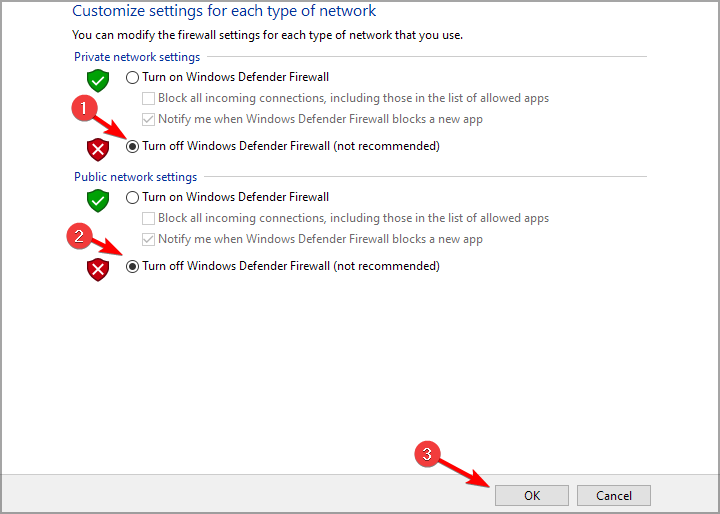
  3. Select the option to turn off firewall for both private and public networks.
  4. Save the changes.

After you disable your firewall, give the scanner another try and see if it works properly now. In case it does, then we would recommend that you add the appropriate ports as exceptions.

Keep in mind that if you’re using firewall software, the disabling process will be different.

5. Run the troubleshooter

  1. Go to Search and type in Settings.
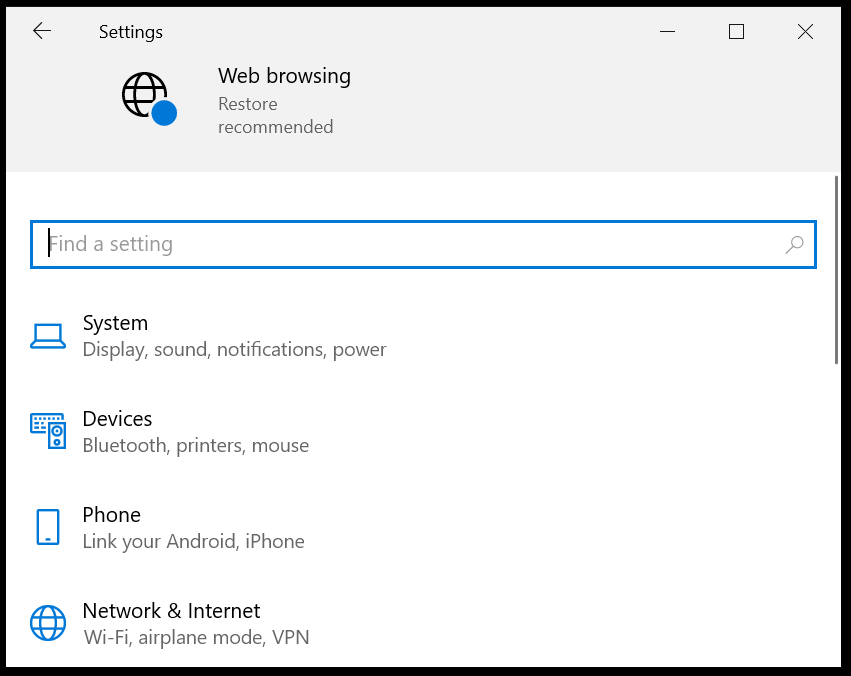
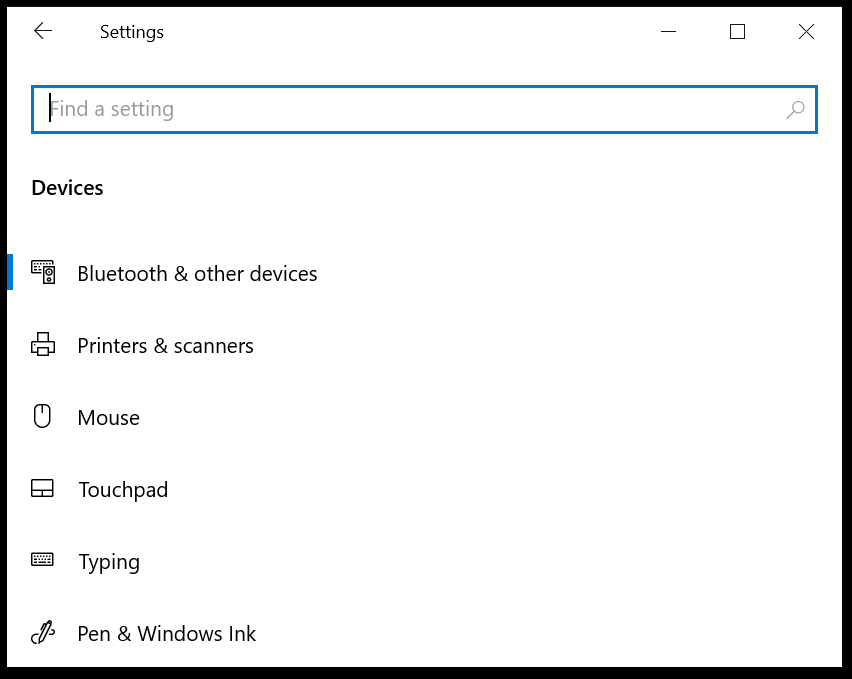
  2. In here, locate the Devices option and click on it.
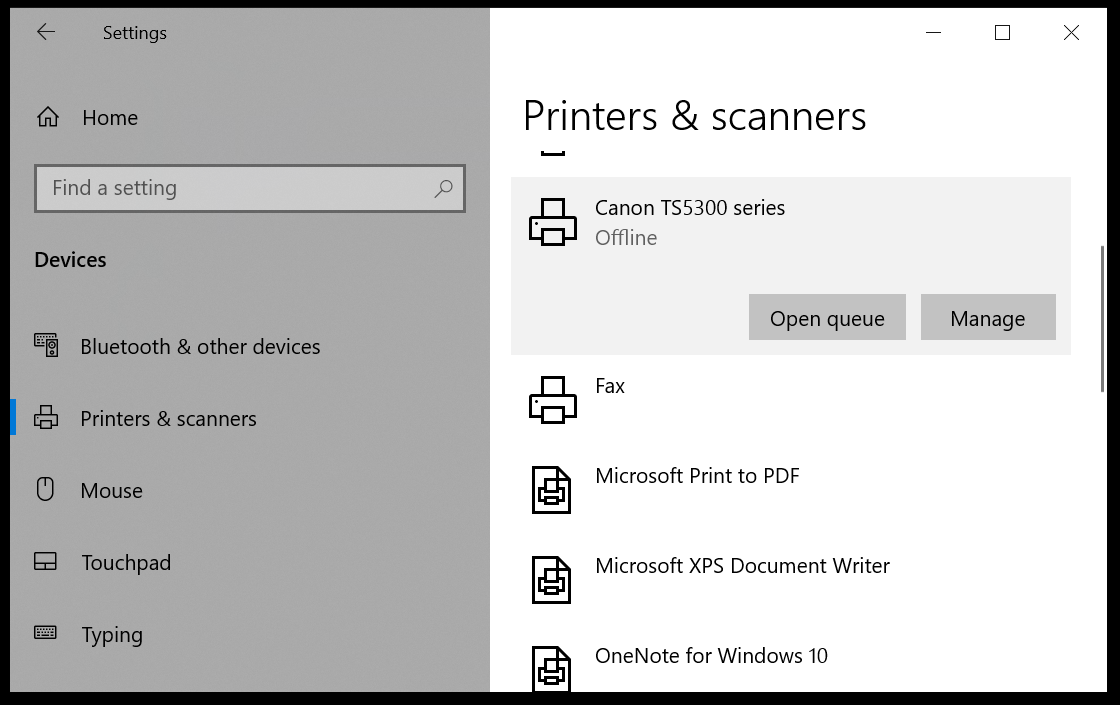
  3. Next, click on Printers & scanners and from the right side, select the scanner.
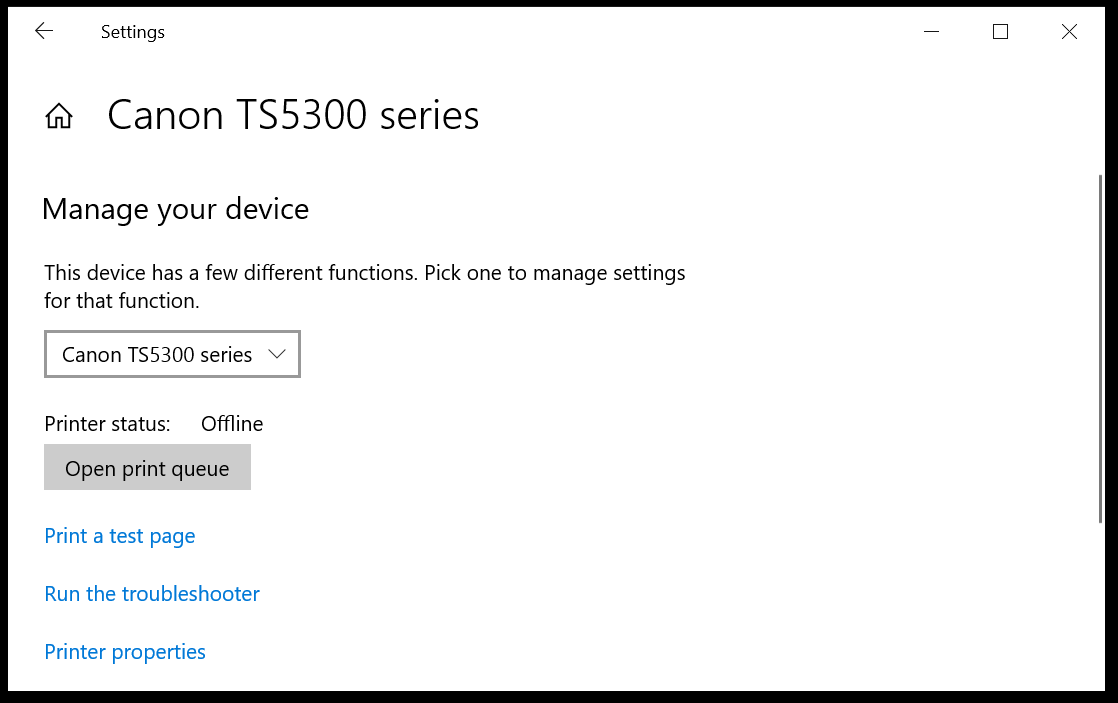
  4. In the Printers & scanners section click on Manage.
  5. Now click on the Run the troubleshooter option.
  6. Allow for the process to finish and follow the indicated steps.

With this last recommendation, we will conclude our list of solutions. Now you know what steps you need to take if you get the error message that this software does not support the scanner driver or is not installed.

By fixing this issue with printer software, you’ll also fix Canon printer not scanning and other matters.

In the dedicated section below, let us know what solution worked best for you. We would love to know.

Fix: Something Went Wrong Error on BBC iPlayer

Many users reported experiencing an annoying issue when trying to use BBC iPlayer on their devices.

When attempting to play content on the BBC iPlayer, the 02001 error pops up on the screen with the following message:

Something went wrong loading this programme. This is usually a temporary problem. You can try this programme again or try a different programme.

Although the software itself is the culprit in most cases, your devices may trigger this problem as well. In order to fix the issue, we compiled a list of solutions that you can use right now.

How can I fix the BBC iPlayer 02001 error?

1. Reset your Internet connection

  1. Firstly, reboot your PC. If that doesn’t help, refreshing your internet connection could fix this iPlayer error. Simply disconnect your device from the internet and connect it back.
  2. If you’re using a wired connection, you can just unplug the cable and plug it back in. A wireless connection would require you to disable and enable the connection through your device settings.
  3. Consider performing a hard reset to your modem/router as well. Turn off the modem/router and wait 10 minutes before turning it back on.

After you complete these tasks, check to see if this fixed the issue. If the 02001 error still occurs, then you can try our solution below.

2. Use a reliable VPN

BBC iPlayer is a great Internet streaming, TV, and radio service from BBC delivered to viewers based in the UK.

For those who are not UK residents but want to enjoy their content, using a VPN service seems the best solution.

Also, due to the geo-restrictions users may encounter the 02001 error which prevents them from continuing streaming. But a reliable VPN service will get rid of this problem in no time.

Private Internet Access allows you to access geo-restricted content, like BBC’s iPlayer and many others. Additionally, you benefit from the highest-grade data encryption and secure connections.

With that being said, it only remains to get informed about the best VPNs for Windows devices and rejoice in your favorite BBC productions.

3. Update the smart TV’s firmware

3.1 Update the firmware automatically

  1. Press the Menu button on your remote control.
  2. Select the Support menu, and choose Software Update.
  3. Choose Update Now, and select Yes if there are updates found.

Also, if you are looking for the best browser to stream movies and TV shows, you can take a closer look at our detailed guide for the best options to choose from. This also helps with the iPlayer Error code: 02062.

3.2 Update the firmware using a USB flash drive

  1. Find the device model on the sticker located on the back of the TV or from the device menu in the Support section.
  2. Access the official Samsung website, input your device model, and download the updates, copying them to the USB flash afterward.
  3. Make sure that you copy the update files after you’ve unzipped the archive and be sure to have the USB flash formatted as a FAT32 type.
  4. Connect the USB flash to the TV, and access the Support menu.
  5. Choose the Software Update option, and find the option to update the software using a USB flash.
  6. The device will automatically find the updated files.
  7. Confirm the update installation, and let the process automatically run.

Normally after updating the firmware using a USB flash drive the error 02001 on the BBC iPlayer should disappear.

4. Try to uninstall and reinstall the app

  1. Press the Home button on your remote control, then choose APPS, and select Options.
  2. Now you can select iPlayer, and choose to Delete.
  3. Press the Home button on your remote control, and go to the APPS menu.
  4. Select the app icon in order to access the Samsung Store.
  5. There you can manually search for iPlayer, and choose to install it.
  6. After installing it, check to see if it fixed the issue.

Many users have confirmed that after reinstalling iPlayer, error 02001 completely disappeared, and they were able to enjoy the streaming.

Before you go, don’t miss our guides on the BBC iPlayer error code 02050, and error code 02062 since they might give you more solutions.

We hope that these solutions helped you to fix the BBC iPlayer 02001 error. For more suggestions or any other questions, please access the comments section below.

How to Split Screen in Portrait Mode [Easy Guide]

Split screen is a feature that allows you to use two apps simultaneously. It’s very useful for multitasking and keeping track of multiple things simultaneously. For example, you can have a video playing on one half of the screen while you browse the web on the other half. 

Before Windows 11, users had to install split screen software if they wanted to split their screens. While these work great, not everyone enjoys installing third-party software, especially if you have limited space. Today, we show you how to split in portrait mode.

Can I split my portrait screen into two?

Before we get into the details of how to split screen in portrait mode, let’s talk about what portrait mode is. For those unfamiliar with this term, portrait mode refers to vertical orientation. The horizontal orientation is called landscape. 

This is an important distinction when it comes to using two apps at once because most apps can only be used in one orientation or another but not both.

How do I split my screen vertically in portrait mode?

1. Use Windows keys 

  1. On the window you wish to split, press the Win + Left or Right keys.
  2. Your main window will move in the direction you selected. Next, select another window you wish to place on the other side, then press the Win + Left or Right keys combination again. This time, press the direction that is yet to be filled up.
  3. If you would like more than two sections, click on one of the two windows and press the Win + Up or Down keys combo to create space.
  4. Now, your screen will be split into different sections. 

2. Use Snap layout 

  1. Click on the Windows key, then open the Settings menu.settings windows 11
  2. Go to System, then navigate to Multitasking.
  3. Find the Snap windows section and turn it On.enable snap windows multitasking
  4. To explore various options, you can expand this section by clicking on it.
  5. There, checkmark whatever you need. Keep in mind that you can choose multiple options.multitasking section snap windows additional options
  6. To split the screen into two sections, you have to open the window you want to split and hover the mouse cursor over the maximize button near the top-right corner of the window. Do not click until the layouts appear.
  7. Select the first layout to split the window into two portrait sections.select number of split windows
  8. Now, your current app window will snap into the selected half of the screen, and the other open apps will be displayed as thumbnails in the other half.
  9. Click on the one you want to add to the other half of the screen.
  10. You’ll now see two app windows. And the best part is that you can access and work on them simultaneously.

3. Use the mouse to resize 

Another alternative to split screen in portrait mode is using your mouse. This will require a lot of manual work as you resize your windows and drag them from side to side until they are your desired size.

If they are two windows, you can easily create a balance, but any more would be too much work, and we recommend using any of the above two methods instead.

If an app or windows fails to split, it does not support the feature. Sometimes, it’s not the app, and you’ll find that the split screen is just not working. If so, feel free to check out our fix guide on how to get it to work again.

You can also enjoy the split screen feature on your Chrome browser. We have compiled a list of split-screen extensions allowing you to view multiple windows simultaneously.

And that’s how to split your screen in portrait mode on your PC. If you have any additional thoughts on this topic, leave us a comment below.

FIX: Scanner driver supporting this software isn’t installed

Many users reported that they are unable to use their scanner due to a repeated message. Well, this message says A scanner driver supporting this software is not installed.

It seems that this message mostly affects Canon devices, and due to this error message, users aren’t able to scan documents anymore.

This can be a big problem, especially if you need to scan documents frequently, but there are several methods that you can use to fix this problem.

What to do if the scanner driver software isn’t installed?

1. Download the latest drivers

  1. Visit the Canon driver download page.
  2. Select Scanners from the list of devices.
  3. Now pick your scanner model.
  4. Click the Download button to get the driver.
  5. Once the driver is downloaded, just double-click the setup file to install it.
Note icon NOTE
Note: If the Windows 10 driver isnu2019t available, you can use the Windows 7 driver instead.

2. Use a specialized driver updater software

Downloading drivers manually can be a tedious task at times, therefore it might be better to use a dedicated driver updater software that can do this automatically.

3. Use Windows 7 or older drivers instead

  1. Go to Cannon’s driver page and locate your device.
  2. While choosing the driver, make sure that you choose a driver for Windows 7.
  3. Extract the contents of the .exe file with WinRAR.
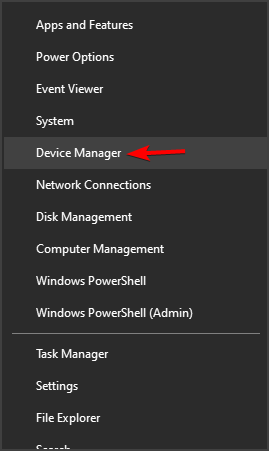
  4. Press Windows Key + X and choose Device Manager from the list.
    device manager
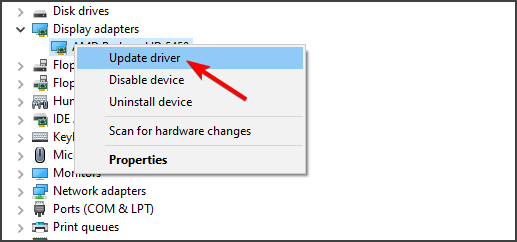
  5. Locate your scanner on the list, right-click it and choose Update driver.
  6. Select the Browse my computer for drivers option.
  7. Click the Browse button and locate the files that you extracted in Step 3.
  8. Click Next and the driver should be manually updated.

Many users reported that this method helped them fix A scanner driver supporting this software is not installed error in the past, so encourage you to try it out as well.

4. Uninstall the driver and the driver software

  1. Open Device Manager.
  2. Locate your device, right-click it and choose Uninstall device.
  3. Check Delete the driver software for this device and click on Uninstall.
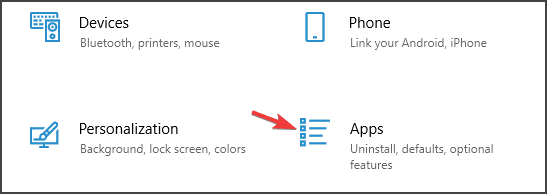
  4. Now go to the Settings app and navigate to the Apps section.
  5. Locate the scanner software, select it and click on Uninstall.
  6. Follow the instructions on the screen to complete the uninstall process.
  7. Press Windows Key + R and enter %localappdata%. Press Enter or click OK.
  8. Navigate to the Temp folder. Delete all files and folders from this folder.
  9. Go back to the Local folder and remove the HP directory. If you’re using a different scanner brand, remove the directory of that brand.
  10. Restart your computer.

This is one way to fix this problem, but this entire process can be a lot faster if you’re using dedicated uninstaller software such as the ones we selected for you below.

Uninstaller tools are useful when the software would not remove normally, which is more often than you believe, or when you think that a program did not entirely uninstall.

Some uninstaller tools further improve the whole program uninstall process by doing things like monitoring the installation process to guarantee a full uninstall when you’re ready, providing quick remove choices to programs via the right-click menu, and much more.

Fixing A scanner driver supporting this software is not installed error doesn’t have to be complicated, and in most cases, this is just a driver issue that can be fixed by using the correct driver.

No less important, keep in mind that you need to constantly back up your drivers. We can only encourage you to use the best driver backup software for Windows 10 to make that happen.

Did you find a solution to this problem on your own? Feel free to share it with us in the comments section below.

MP Navigator EX scanner driver is not installed [Solved]

MP Navigator EX allows you to can scan multiple documents at the same time, or inspect images larger than the platen.

Users often reported that the MP Navigator EX scanner driver is not installed on Windows operating system. This is how they describe the problem:

My PC won’t recognize that my scanner is plugged in – it doesn’t show up under My Devices. The scanner turns on and when it’s plugged in, my laptop makes a sound as something has been plugged into a USB port.

Today’s article will show you a series of options you can try to fix this annoying issue. Make sure you read it completely, so you’ll never worry about this kind of trouble.

How can I install the MP Navigator EX scanner driver?

1. Navigate to Windows updates

  1. Open Settings.
  2. Go to Update & Security.
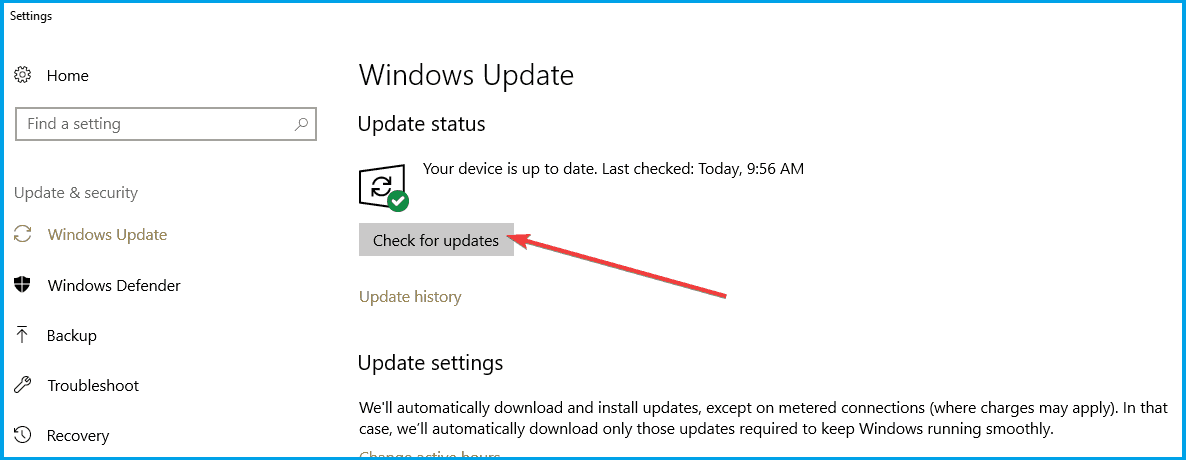
  3. On the left side, select Windows Update, then click on Check for updates, from the right side.

2. Check your Security Software 

  1. Open Settings.
  2. Go to Devices.
  3. On the left side, click on Printers & scanners and, from the right side, under the Related settings, click on Print server properties.
  4. Click on the Drivers tab and check if your scanner is listed.
  5. If you don’t see your scanner listed, select Add, and in the Welcome to the Add Printer Driver Wizard, select Next.
  6. In the Processor Selection dialog box, select your device’s architecture, and then click on Next.
  7. On the left side, in the Printer Driver Selection dialog box select your printer manufacturer.
  8. On the right side, select your printer driver, click on Next, then on Finish. 
  9. Follow the instructions to add your driver.

It is important to check your Security Software to make sure the printer software is not being blocked. 

3. Set the compatible mode

  1. Right-click the driver you want to install and then select Properties.
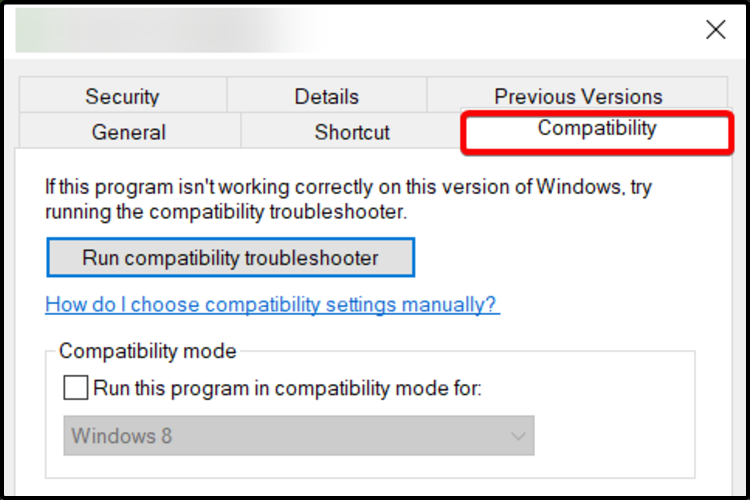
  2. Select the Compatibility tab.
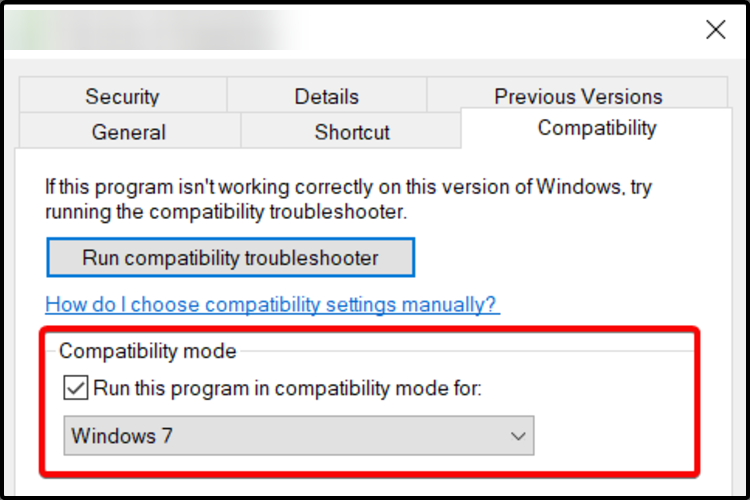
  3. Under Compatibility Mode, click on Run this program in compatibility mode, and then select a compatible Windows version for the driver.
  4. Click on OK and install the driver.

When you install drivers, it is important that they match the Windows operating system you have installed on your PC.

4. Disable your firewall

  1. In the search bar, next to the Windows button, type Windows Defender Firewall.
  2. Click on Windows Defender Firewall to open the Control Panel applet window.
  3. Click on Turn Windows Defender Firewall on or off to open the options shown directly below.
  4. Select the two Turn off Windows Defender Firewall radio buttons to turn off the WDF.
  5. Press the OK button.

This option might be extremely useful considering that sometimes an antivirus or firewall may be set too secure, preventing peripherals (such as your scanner) from communicating effectively.  

5. Use dedicated software

As a time saver option, you should definitely try the support of specialized software.

Unlike the manual methods presented above, this one is able to automatically install, update, scan and fix any of your drivers.

Thus, it is able to provide the latest compatible driver for your particular hardware component, straight from the manufacturer.

Once you install and use this software, it is easy to forget about it, and you’ll probably never use it again until the next driver issue appears. 

If you want to install and update your drivers like an expert, you should use the help of dedicated software.

Such a tool will save plenty of time and keep your drivers in check on a regular basis. It is light so you can let it run in the background as you carry on with more important tasks.

The tool is very easy to use. You just have to install it and let it scan your drivers. It will display all issues found, including outdated, damaged or missing drivers.

You just have to let it download and install the new drivers and wait for the process to complete. It uses its own database and is able to find the exact match for any hardware, with no exception.

⇒ Get Outbyte Driver Updater

There are a few more options you can try to install your MP Navigator EX scanner driver, but those we presented above are the best.

If you need help on how to update drivers in Windows 10, don’t hesitate to check a full guide regarding this subject.

Also, feel free to leave a comment in the section below and let us know which of the listed suggestions worked best for you.

FIX: Lenovo Flex 5 touch screen driver not working

Lenovo Flex 5 is an awesome device, with great capabilities, offering its users a wide range of useful features. However, users complained that its touch screen is not working in some cases.

Most commonly, this issue occurs suddenly, without making any changes. The touch screen is described as not being able to respond properly.

In today’s article we’ll show you some of the best options to make your Lenovo Flex 5 touch screen driver work.

How can I fix the Lenovo Flex 5 touch screen driver?

1. Check for Windows updates

  1. Open Settings.
  2. Go to Update & Security.
  3. From the left side, select Windows Update, then click on Check for updates, from the right side.

2. Use Device Manager

  1. Open Device Manager.
  2. Expand Human Interface Devices.
  3. Right-click on the HID-compliant touch screen or HID-compliant device, then click on Disable device.
  4. When the following question appears Do you really want to disable it?, select Yes.
  5. Repeat the above steps for all the related drivers.
  6. Restart your PC, then choose Enable to bring the touchback.

3. Roll the driver back to a previous version

  1. Open Settings.
  2. Select Update & Security.
  3. From the left side, click on Recovery.
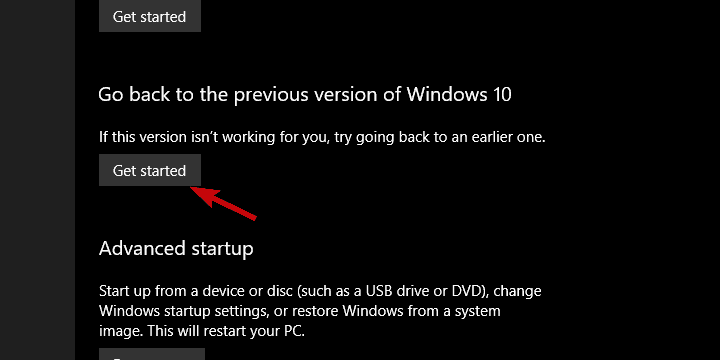
  4. Under Go back to the previous version of Windows 10, click on the Get Started button.
Note icon NOTE
If the Get Started button is not available, you should follow the steps below:
  1. Open Control Panel.Open Control Panel
  2. Type Recovery in the search bar, then choose it from the shown list.
  3. Select Open System Restore.
  4. Click on Next, then select the latest Restore point where the device was working.

4. Recalibrate the screen for touch input

  1. Open Control Panel.Open Control Panel
  2. Select Tablet PC Settings.
  3. Click on the Display tab, then select Calibrate.
  4. Follow the steps shown on your screen.

5. Repair your Registry Editor

  1. Go to Start and type Command Prompt.
  2. Right-click on the result and select Run as administrator.
  3. Type the following command: sfc /scannow
  4. Wait until the scanning process is completed, then restart your PC.
  5. All corrupted files will be replaced on reboot.

6. Use dedicated software

You should also consider the support of specialized driver updating software. Unlike the above methods, this one will automatically scan for driver issues.

Moreover, it will update your components constantly, without being necessary to bother yourself.

What’s best than knowing you have access to such a powerful ally?

These were the best options that can definitely help you to fix your Lenovo Flex 5 touch screen issue.

Before you leave, we have a general guide on what to do if your Lenovo touchscreen is not working, so don’t miss it.

If you have any other additional questions, feel free to leave a comment in the section below.

5 Best KVM Switches For Dual Monitors

While having multiple computers in the same place (and actually using all of them) can be a hassle. Auxiliary devices can take up a lot of space, this situation is nothing that KVM switches can’t handle.

By providing you with multiple, these small devices can make your life easier by making two computers use the same dual monitors.

Moreover, they can also let you control two different PCs with the same peripherals.

Granted, not at the same time, but it still beats plugging and unplugging mice and keyboards into and out of your computers, doesn’t it?

How we chose the best KVM switches with HDMI for dual monitors?

Our team of expert testers works to cover an incredibly wide range of capabilities and features for each of the products that we evaluate.

This in turn produces a good overview of the best KVM switches that exist at this point in time on the market, and there are a few important elements that they take into consideration before scoring the device accordingly.

The evaluation is designed to test the devices both on their own, but also while comparing them with the alternatives.

Tip icon Tip
Editorial tip:

To make absolutely sure that you will make an informed decision while looking at these devices, we recommend that you take the following elements into consideration:

➡ Resolution quality and power setup
➡ Compatibility
➡ Range of switch capabilities
➡ Number and type of ports
➡ Design

Considering these elements not only ensures that you will find the right fit for your setup, but it will also help you understand what you can expect from your newly purchased device.

What to consider when choosing the best KVM switch?

Resolution and video capabilities

As you are planning on using your KVM switch to extend the capability to multiple-monitor setups, the resolution and video output of your device is of paramount importance.

In this case, more is better, as a higher resolution and video frequency (Hz) will surely make the entire experience better.

If you don’t focus that much on the video quality, and you’re more interested in the versatility and compatibility of your system, then we have that option covered below as well.

Compatibility

As no device can be of use if your system or systems are not compatible with your KVM switch, this is another important element to take into consideration.

Depending on the type of devices you own, our list will cover KVM switches that also work with iOS, Mac, Android, and Linux devices, besides the Windows option.

Range of switch capabilities

Because you’re investing your money into a switch, it is in your best interest to feel comfortable while using this device to switch between devices.

As you will see from this guide, switching capabilities will vary from one or two options, to up to 5. Choosing a device with 5 switch options is more versatile.

Beyond the number of switching possibilities, it is also very important to consider the type of switching options themselves, as some might not be very useful in your case.

Number and type of ports

We believe the number of available ports is a very important element to consider.

Because we’re talking about multiple monitor usage, then it is obvious that you will need enough HDMI ports for your situation, but beyond that, you can choose the number of USB ports, and also consider if you need ports for audio input or output.

Design

Even though it’s easy to overlook this element while focusing on features and the number of ports, it’s also good to consider how the device will look in the place where you plan to use it.

You can place some device options anywhere in your home without causing many issues, but some are bulkier and could affect the design of your living arrangements.

Of course, the importance of this element varies from person to person, but we made sure to include some slick-looking devices that don’t lack capabilities in this list as well.

Tip icon Tip
Buyer’s tips:

➡ If you’re looking for a KVM switch that offers the best of all the elements described above, then you don’t have to look any further than the powerful and slick-looking TESmart KVM Switch.

With a beautiful design and amazing features, this device is sure to impress your friends, while also offering unparalleled versatility and image quality.

➡ To get the most switch-changing capabilities, you can’t go wrong by choosing the CKL HDMI KVM Switch, or the JideTech 4 Port KVM switch.

Both of these devices offer you the capability to perform switches with up to 5 methods each, thus being more than enough even for the hardiest customization-inclined users.

➡ If you’re more inclined to choose a device based on its HDMI port number, then choosing the JideTech 4 Port KVM switch will not disappoint you.

➡ If you want a powerful device that also looks good, we recommend you have a look at the powerful TESmart KVM Switch, and also the OREI KVM Switch options.

Now that we’ve covered all the important elements and we know which of the products in the list are better, let’s explore the detailed list with specific information for all the KVM switches we selected.

TESmart KVM Switch

  • 2 HDMI 2.0 ports with 4K resolution
  • 3 ways to switch: hotkeys, remote control, and front push button
  • Great peripheral compatibility with passthrough mode
  • USB sharing with printers, USB headests, webcams, etc.
  • Price is not very accessible, but it's worth every penny

This powerful KVM switch has a multitude of amazing features and it comes packed into a beautifully designed box, with a black finish that looks strong and sturdy.

Looks are not deceiving in this case, as this device offers everything you will ever need when it comes to using a KVM switch, enabling you to easily control 2 computers with two separate screens with 2 HDMI ports.

Beyond this, the ports included on this great-looking box also include a USB 2.0 port that allows you to connect a printer, a scanner, or a camera without the need for any other device.

Offering a 4k 60Hz resolution and Smart EDID, you can get 3840×2160 resolution at the same Herz value.

To round it all up, this device has a great level of keyboard and mouse compatibility, which includes pass-through mode, and Dynamic Device Mapping features.

This device does not require software or drivers to be installed in order to work, making it truly plug-and-play. Even though it might not seem like an important element, this is extremely useful especially for very busy, or people that are not tech-inclined.

To increase its compatibility, even more, the TEsmart KVM switch works with Windows, macOS, Unix/Linux, Raspberry PI, etc. Better said, no matter what type of device you want to use it with, it will work instantly when plugged in.

Even though we mentioned the element of design before, we can’t move on from this device to the next without mentioning it again. The number of features found on this product doesn’t affect the way it looks at all, thus enabling you to place the KVM switch anywhere in your house without worrying that it will ruin your decor.


CKL HDMI KVM Switch

  • 4k quality at 30Hz (3840×2160)
  • 2 HDMI out ports
  • Switching customization
  • 5 switch modes available
  • Some may find it pricy
  • Design is too simple

CKL is a KVM switch that was specifically designed to help dual monitor enthusiasts share their displays with two computers at the same time, eliminating the need for a second pair of display monitors for their other PC.

However, there’s a catch: all four devices (the two computers and the pair of monitors) must have HDMI connection ports since the unit doesn’t support VGA or Display Port connection types.

As the world of displays has evolved considerably in the last years, this shouldn’t be much of an impediment considering that most, if not all good monitors have an HDMI port available, or even more than one.

If you’re using an old-school monitor setup, it is good to know that to get support for  VGA / DVI / DP video output, you will need to invest in an HDMI to VGA quality adapter.

The setup for this device is extremely easy, offering plug-and-play capabilities, and is compatible with Windows, Linux, Mac, and other operating systems.

This great switch enables you to use 5 switching modes, including mouse roller clicks, keyboard hotkeys, pushbuttons, auto-scan switch, and by using a wired remote.

The resolution on this CKL KVM switch has built-in EDID, and supports 4k quality at 30Hz (3840×2160).

To round up this powerful device, you also have the ability to use the extra USB port and audio support to connect more USB-enabled devices and a separate audio and microphone output.

Even though this device doesn’t amaze with its design, it still looks good because of the black box and gold details presented both on the front and on the back.


JideTech 4 Port KVM switch

  • 4 HDMI ports
  • Versatile compatibility with any OS
  • 5 switch-modes
  • 4K at 4096x2160 of 60HZ
  • Supports EDID, HDCP 2.2, and HDR10
  • Simple design

The JideTech 4 Port KVM switch is another very powerful switch device that enables you to experience 4K quality with 2K at 60Hz resolution.

This device offers 2.0 support for a mouse and a wired keyboard and one for printers, scanners, etc.

Most importantly you can use up to 4 HDMI devices, including PCs, servers, external HDDs, NVR, gaming consoles, AppleTV, etc.

Easily supports high-quality video with 4K(HDTV) at 4096×2160@60Hz, and included support for EDID, HDCP2.2, HDR10.

A good KVM switch will always have a variety of switching capabilities, and this one provides you with 5 different ways of performing this action.

You can choose to press the button on the front panel, use mouse switching, hotkey by keyboard, a remote push-button switch, or enable the auto-scan feature which can perform this action at specific intervals.

As mentioned above, this KVM switch works seamlessly with Apple keyboards, as it allows you to change the hotkey to your preference.

Added to this, you can use it with touch screen devices, OLED screens, and works without problem on a variety of operating systems including Windows 10/7/2000/XP/Vista, Linux, Mac, Debian, Ubuntu, Fedora, Raspbian.

A very useful element of the JideTech KVM switch is its capability to automatically go into BIOS mode when needed and can perform switches independently, even without a USB input.

Even though it doesn’t impress when it comes to design, this sturdy box is made of our good-looking materials and can fit any environment you choose to set it up in.


OREI KVM Switch

  • Dual USB + USB-C
  • 4K x 2K at 60Hz
  • Supports Android, PC, Mac, iPad
  • YUV 4:4:4 chroma sampling
  • Supports PCM, Dolby True HD, DTS-HD Master Audio up to 7.1 channels
  • Some more HDMI ports would have helped

The OREI KVM Switch is another switch device that looks very good compared to the other mentions in this article.

Being built out of polished plastic, this device is neither as wide nor as thick as its competitors, but it still offers some great features and doesn’t act like an eye-sore while it does it.

It offers 2 HDMI input + Dual USB + 1 USB-C with EDID and a resolution of 4K x 2K at 60Hz. Added to this, you also get a Full 3D and HDCP 2.2 compliant device.

With this powerful and yet slick-looking device, you can take control of three devices like a PC, computer, laptop, Android smartphone, Streaming Box, PS4/PS5, etc.

Thanks to its USB-C port, it offers full support for Android phones, PC and Mac, iPad Pro.

The exquisite resolution offered by this device also offers YUV 4:4:4 chroma sampling, making the image on your display incredibly crisp and vivid. You can also use it with 3D devices and supports PCM, Dolby True HD, and DTS-HD Master Audio with 7.1 channels.

To wrap everything up even more, if you decide to buy this device, you also get a 1-year warranty, thus you are not only covered in the switch department, but you don’t have to worry about possible issues.

To make it one of the best KVM switches on the market, you can select and change how the switches themselves work, so you can customize it endlessly.


Steetek 2 Port Dual Monitor KVM Switch

  • 2 X USB 2.0 Hub
  • Wireless Keyboard & Mouse
  • Hotkey Switch function
  • No need for an external power adapter
  • 4K x 2K@30Hz/3D/1080P
  • Does not work on PCs with a single display support
  • Only two modes for performing switching which turns into one when using a USB peripheral
  • Bulky in size and heavy

With 4K and High-Res support, you are in for an amazing video experience.

Connect your mouse and keyboard for more comfort and easily switch between 2 PCs or share 2 monitors as you like thanks to the convenient Hotkey switch function.

Since it’s USB cable-powered, you can forget all about adapters or external accessories – just plug in and enjoy.

The 4K x 2K@30Hz/3D/1080P resolution support offers you everything you need when it comes to video processing, making any image look crisp and without showing any pixelation whatsoever.

When it comes to its switching capabilities, it doesn’t offer as many options as the models presented before, but it is still decent.

You can perform the switching by either using a hotkey switch or the two signal sources from the panel itself. To ensure that you always know which one is being used, the signal sources are marked by a useful light.

One very important note is that if you’re using a keyboard and mouse to connect to the device, the hotkey switching will not be available. This of course affects the overall usability of the device.

An advantage to choosing the Steetek KVM switch is the fact that it’s powered by USB cables, so that eliminates the need to use bulky power adapters that just take more of your space.

When it comes to the design of this KVM switch, the black box that protects the components looks sturdy, and the white finishing touches give it a serious but playful look. Should fit right into any home environment you decide to use it in.


How to set up a KVM switch with dual monitors

To get started with this process, first plug the docking station USB into your PC (if you have a laptop without enough HMDI ports). In case you’re using a KVM switch with a desktop, then this shouldn’t be a problem.

Next, connect the HDMI cable to your PC, and connect the KVM cable (both HDMI and USB) to the docking station or back of your desktop setup.

Connect the receiver dongle for your Bluetooth peripherals in the back of the KVM switch, then connect the KVM cable from the PC to the input socket on the KVM switch.

The next step, and the final one, is to connect the displays you want to use to the KVM switch respective ports. For color-sensitive work, it is recommended that you use some great Adobe RGB monitor budget monitors which can help considerably.

Plug in the power cable into the KVM, and you’re good to go!

Bottom runners

Added to the options presented in this guide, there have been other KVM switches that have proven useful enough to deserve a mention in our guide.

Here are the ones that stood out, even if not enough to make it into our thorough 5 best KVM switches list.

➡ TRENDnet 2-Port Dual Monitor

Besides the above-average price and compatibility issue, the TRENDnet KVM switch does the job it has been created for.

It didn’t make our list of the best options because there are many other features that other cheaper devices already contain, and besides that, it will only work with multiple displays if you have DisplayPort capabilities on your devices.

➡ GREATHTEK KVM Switch

This device, even if it’s capable of decent feats, doesn’t provide much in the department of compatibility and versatility. Added to this, the design doesn’t help either, even though it has the capability to use a dual-monitor setup using HDMI ports.


To sum it all up, if you find yourself having to use two computers at the same time and don’t want to waste a lot of space with multiple monitors, you can just turn to KVM switches with multi-monitor support.

Even more, check out the best MacBook M1 Max monitors. They all make text sharper and have an incredible color accuracy, not to mention the several display inputs, those additional features such as PowerSensor that are worthy of your attention, and the reasonable prices on top of these.

Don’t be shy to share your favorite with us via the comments section below.

Fix: Conan Exiles Won’t Launch [Full Guide]

Conan Exiles is one of the most popular games on Steam at the moment. It received tens of thousands of players in the first minutes after launch.

This title puts your survival skills to the test, challenging you to stay alive and build your empire in a very hostile world.

Launching Conan Exiles can sometimes be quite tricky due to various launch issues. Fortunately, there are a few quick workarounds that you can use to solve this problem.

Here’s how one player describes this issue:

I goto launch the game after downloading and installing battleEye and I get this ‘performing first time setup…’ Installing: Microsoft VC Redist Package (Step 2 of 2) Then you can see that my bottom right of screen where my name is turn green to indicate I’m in game! yet I’m not! after this a few seconds later it turns blue to indicate I am not.

What can I do if Conan Exiles won’t launch?

1. Verify the integrity of Conan Exiles’ files

  1. Restart your computer and launch Steam.
  2. From the Library section, right-click on the game, and select Properties from the menu.
  3. Select the Local files tab, and click the Verify integrity of game files… button.
  4. Steam will verify the game’s files – this process may take several minutes.

After the verification process is finished, try to run the game again.

According to users, if Conan Exiles games won’t launch, you might be able to fix the problem by verifying the integrity of game files.

Your files can get corrupted and that will cause issues with the game. However, you can fix the problem simply by verifying the integrity of game files. This also helps fix the Authentication failed error; read this guide to learn more.

2. Update your Windows OS

  1. Press the Windows key + I and go to the Settings app.
  2. Under the Update & Security section, select Windows Update.
  3. Hit the Check for updates button.

Conan Exiles players confirm they solved the launch issues by installing the latest updates on their computers.

If one of the Windows 10 features or apps is unavailable, make sure that you’re running the latest OS version available.

3. Install DirectXwebinstaller

The Microsoft DirectX End-User Runtime is an essential tool for gamers, providing updates to 9.0c and previous versions of DirectX.

After adjusting everything according to the suggestions above, your machine will run Conan Exiles without any setbacks, and you will enjoy your gaming experience to the fullest.

You can download DirectXwebinstaller from Microsoft’s official website.

4. Manually find and replace the faulty files

  1. Go to C:/Program files (X86)/Steam/steamApps/common/Conan Exile/ConanSandbox/Binaries/Win64
  2. Start ConanSanbox.exe as admin, and you’ll see which files are corrupted or bad.
  3. Find the good version of those files on the Internet and download them.
  4. Use them to replace the ones in Windows/system32.
  5. Replace one, and then start ConanSanbox.exe again to see if there is another one.

We hope these four workarounds helped you to launch Conan Exiles. As usual, if you’ve come across other solutions to fix the annoying Conan Exiles launch issues, feel free to list the troubleshooting steps in the comment section below.

5 Best Cable Modems with Voice [Top-Rated List]

Having a good modem is important for accessing the Internet, but what if you want a modem that has support for the landline phone?

There are many great modems that support this feature, and in this article, we’ll show you the best cable modem with voice support.

Note icon NOTE
Note: Deals are subject to change.u00a0Keep in mind that the price tag often varies. We recommend going on the vendor’s website to check the price. Some of the products may be out of stock by the time youu2019ve made your purchasing decision.u00a0So, hurry up and hit the buy button.

What are the best cable modems with voice to buy?

Netgear Nighthawk C7100V

  • DOCSIS 3.0, 24u00d78 channel bonding
  • Works best with cable plans with download speed up to 400Mbps
  • AC1900 Wi-Fi
  • 4x Ethernet ports, 2x USB ports, 2x phone ports
  • Issues with Port Scan and DoS Protection during initial setup

This is a Comcast for Xfinity certified device, so it will work only with Xfinity Internet and voice service.

The device supports DOCSIS 3.0, 24×8 channel bonding and it works best with cable plans up to 400 Mbps.

Additional features include built-in AC1900 Wi-Fi, four Ethernet ports and two USB ports.

There are two ports for the same number of phone lines, and the phone service supports caller ID, conference calls, call forwarding, etc.

What is important to specify is that this equipment replaces your cable modem and Wi-Fi router too so you will be saving money from day one.

And the wireless hotspot is not just average. It covers up to 1800 square feet and connects 30 devices simultaneously.

The device even includes parental controls and supports WEP and WPA/WPA2 wireless security protocols for complete safety.

NETGEAR Nighthawk CM1150V

  • 2Gbps speeds
  • 4 Gigabit Ethernet ports
  • 32u00d78 channel bonding, OFDM 2u00d72, and DOCSIS 3.1
  • Voice phone support for two telephone lines
  • Compatible only with Xfinity Internet and voice service

It’s worth mentioning that this model is compatible only with Xfinity Internet and voice service, so it won’t work with other provides.

As for the features, the modem delivers up to 2 Gbps speed and it has four Gigabit Ethernet ports.

As for additional features, there’s 32×8 channel bonding, OFDM 2×2, and DOCSIS 3.1.

Voice phone support is there, and it allows you to have 2 telephone lines with enhanced call features like caller ID, 3-way conference calling, call forwarding and more.

If you want to create a home wireless hotspot, all you need to do is connect your Wi-Fi router to this modem’s ethernet port to support all your devices.

Of course, you can use the 4 Ethernet ports to ensure ultra-fast broadband cable connection to your PC, laptop or smart TV.

Moreover, you can use the Link aggregation technology that combines two 1G ports into one 2G port for faster wired ethernet speed.

Motorola MT7711

  • 24X8 DOCSIS 3.0
  • Download speeds up to 1000Mbps (recommended 650Mbps)
  • Dual-band AC1900 Wi-Fi
  • Four Ethernet ports
  • Two phone ports
  • Initial setup can be a bit tricky

This modem is certified by Comcast for Xfinity and it won’t work with other ISPs so keep that in mind if you have a purchase intent.

Motorola MT7711 offers 24X8 DOCSIS 3.0, and it supports download speeds up to 1000 Mbps, but it’s recommended to use it with Internet packages of up to 650 Mbps.

There’s also a built-in dual-band AC1900 Wi-Fi router with 4 Ethernet ports so you won’t need any additional network hardware.

The modem has two phone ports that work with Xfinity Voice service.

It’s also worth mentioning that the cable modem comes with a chipset that provides security from Denial of Service attacks so it can be ready even for your business.

The device also comes with a Wireless Power Boost feature that boosts the wireless signals to the legal limit, providing a significant increase in speed and range.

Additionally, you will benefit from the AnyBeam beamforming at both 2.4 GHz and 5 GHz frequencies that focuses the signal on wireless clients to further enhance performance and range.

ARRIS Surfboard TM822R

  • DOCSIS 3.0
  • 8 download and 4 upload channels
  • Download speeds up to 343Mbps
  • Two telephone ports
  • Minor issues with router and DHCP

Just like the previous entries on our list, this device is compatible only with Xfinity voice and Internet service.

This is a DOCSIS 3.0 device and it has 8 download and 4 upload channels. Regarding the download speeds, this modem works with speeds up to 343 Mbps.

The modem has a single Gigabit Ethernet port so you can easily connect your Wi-Fi router or any other device. Of course, two phone ports are available as well.

And if you want to bring things to the next level, you can also rely on the 2 carrier-grade Voice over IP (VoIP) lines for Internet calls.

It’s also important to specify that the device has IPv4 and IPv6 support so it’s up to date with the IP developments.

TM822R comes with a 2 year manufacturer warranty but it’s a pretty simple gadget that probably won’t need any assistance in its lifetime.

Optionally, you can also provide it with a battery backup for emergency services in the event of a power outage in the home.

ARRIS Surfboard SVG2482AC

  • 24×8 DOCSIS 3. 0
  • Works best with plans up to 400 Mbps
  • Dual-band AC1750 router
  • 4 Gigabit Ethernet ports, 2 phone ports
  • Not compatible with Xfinity Gigabit plans

This is a 24×8 DOCSIS 3.0 Xfinity certified modem, and it’s perfect for Internet plans up to 600 Mbps.

That means that you have 24 download and 8 upload channels for a total speed of up to 1750 Mbps.

Bear in mind that this device only works with Xfinity Internet and voice service.

The modem has a built-in AC1750 dual-band router with 4 Gigabit Ethernet ports, so you won’t need any additional network hardware.

In addition, there are two phone ports available for a convenient way of communication at home or at the office.

You can also add a battery backup (sold separately) for guaranteed voice service during power outages.

This product received excellent ratings from the customers and that’s a sign that it’s very reliable and trusted.

What to look for when you’re buying a modem?

Having a modem that supports phone services can be great because you can combine more features in the same device.

However, you should build a list of priorities and checklist because you don’t want to have any regrets after the purchase. Here are some things to consider.

Look for the service provider requirements

The most important aspect is to match the device with your service provider’s requirements.

A lot of modems, as you can see from our list, are not compatible with all the providers so ignoring that information can get you a useless device.

You should also match your data transfer speed with that of the modem. It’s useless to get a high-speed modem if you only have a 400 Mbps plan.

Having a high data plan and a slow modem is even worse because you won’t be able to benefit from your investment.

Check the functionalities of the modem

Some modems have a built-in router with more Ethernet ports and Wireless hotspot, others just give you a LAN port to connect your wireless router.

If you already have a good router, you won’t need more than the basic features from your modem but if you don’t, getting a modem with router capabilities can save you lots of money.

If you also want phone lines and VoIP services, check if your provider offers such services and look for a compatible modem, like the ones from our list.

Changing the modem

Buying the modem is not hard. Installing it, however, is a different story. Some providers offer you the necessary information, but others will consider it a professional service.

In any case, it’s not a job for anyone so it’s better to request assistance from your provider even if there could be a cost attached to this service. In the end, everyone must be happy, right?

If you’re looking for such a modem, be sure to consider the models from this list. You can also check our best DSL modems list to look for a match to your requirements.

Do share your choice with us via the comments section below. Use the same mean of communication if you want to suggest other products.

Windows 11 first impressions – our OnMSFT.com roundtable

Last week, Microsoft announced an event coming on June 24th, to unveil “the next generation of Windows.” Then yesterday the curtains were pulled back a bit as a build of Windows 11 (and yes, that’s the name, all the hints were spot on) was leaked online. Like many of you around the world, some of us here at OnMSFT.com installed the latest version of Windows, here’s some first impressions:

Kip Kniskern

I still have questions. Windows 11 at first glance, installed on my Surface Laptop 3, looks good enough, with rounded corners and smoother animations. I’m impressed with the work to build in formerly tacked on features like Timeline, ink support, and even News and Interests (although I have my doubts about this, do we really need MSN built into the OS?). However, there’s so much we still don’t know. Microsoft hinted as much in a somewhat self-defensive Tweet yesterday:

We still don’t know where Windows 11 fits in – is it meant mainly for new devices and seekers? Will Microsoft push Windows 10 users to upgrade, or will 10 and 11 co-exist for the foreseeable future? And what about the new Microsoft Store? Will the “in box” apps all get a Windows 11 upgrade? Will Microsoft Teams really be built in to the OS?

While getting our hands on Windows 11 has answered some questions, there’s still lots left to learn (and I’m sure that will be true after June 24th, too).

Kareem Anderson

When the ISO and screenshots began flowing yesterday, I was an arm-over-arm nose up hold out in getting swept up in all of the Windows 11 hoopla. To me, the initial look and feel that people were reporting on seemed little improved from what we got back in 2020 this time last year.

However, because I’m a fan of tech and was developing a growing sense of FOMO as my peers bathed in all the new news from early versions of Windows 11, I begrudgingly installed it on two devices last night. Since installing it on a Surface Pro 7 Plus and Surface Laptop 3 (Intel), these early leaked ISOs of Windows 11 have grown on me.

Above the changes to the visuals of the new taskbar, Start window, widgets pane, and multi task section, it’s the fluidity of the overall UI that’s impressed me so far. Jumping through windows and menus “feels” smoother than in previous versions of Windows. I understand it’s a relatively low bar to be impressed by fluidity of animations while there remains larger OS inconsistencies such as Outlook just giving the middle finger to the whole rounded corners move, or volume, battery, OneDrive options in the task still using the squared off edges despite sitting next to the updated ink and Wi-Fi settings. Surprisingly, these more fluid animations go a long way for me to satiate my appetite for the modernization of Windows.

We’ll see how long things like fluid animations, intuitive windows snapping and rounded corners distract me from the long work ahead the Windows team has ahead in pulling all of these disparate concepts and ideas together in fully fleshed out cohesive user experience.

Abhishek Baxi

It’s a tad too early for one’s first impressions of Windows 11 basis a leaked build but the arrival of a new generation of Windows after half a decade is an exciting time, for sure.

The highlight of the first unveil (unofficial one, that is) is the refreshed user interface with a redesigned Start menu. It looks neat and functional, and for someone like me who’s used TaskbarX to center the taskbar all this while, the layout gets a thumbs up. I quite like widgets since like Live Tiles, they offer information at a glance which is handy for things likes weather, to-dos, etc. I do hope there are better customization options than what we have on ‘News and interests’ right now. The easier discovery of features – like snapping of windows – is a welcome step. A lot of Windows features stay hidden from the plain sight and undiscoverable to casual users. This was also a problem with deep, nested menus in Office apps and Microsoft fixed it with a ribbon interface many years ago.

However, the inconsistency in the UI which has been a sore point for Windows 10 all these years, stays on. Even if one ignores the legacy Windows components like Control Panel, etc., there’s still a lot that needs to be done. I thought Windows 11 would take care of it from the get go.

There’s still a lot to unpack, and the leaked build doesn’t offer a chance to do some spelunking there. Especially the Microsoft Store experience. Let’s see what’s in store next week.

Your turn

What are your first impressions of Windows 11? Take our poll below, and let us know what you think in the comments!

Can’t use your Revolut card online? Try these solutions

Revolut enjoys a worldwide reputation as one of the most popular banking services among users.

Many people use it for currency exchange and online payments because it has small or no fees for the majority of its services.

But sometimes, certain websites won’t accept Revolut. Despite the fact that the banking service isn’t yet accepted by all merchants, the problem is with those that accept it.

Many Revolut users are getting declined payments or returns of their funds, even though the app works just fine. Let’s see how you can solve this annoying problem below.

What to do if my Revolut card is declined on certain websites?

1. Check your credentials

Make sure that your credential are properly set up. Check your account in the Revolut app and see if the phone number, address, and personal data are correct.

If you changed any of the info recently, verify that the changes were submitted to the Revolut server, and you got a confirmation of the modifications.

Also, make sure that you have sufficient funds, you entered the right card details, or you didn’t exceed your monthly spending limit for the card.

You should also be aware not to disable certain types of transactions in your card security settings.

We also have a detailed list of the best virtual credit card software you can use if you are interested.

The issue appears because some vendors simply do not accept prepaid cards.

Another reason for this problem is the fact that Revolut doesn’t support MasterCard 3D Secure Code and Verified by VISA.

No matter the account you have, depending on the BIN database the merchant uses, some prepaid cards are seen as not being prepaid while others are not.

This leads to some websites not accepting your Revolut card.

To solve the problem you can link your Revolut account with TransferWise Borderless and use their debit card, use your Revolut card through Curve, or link your card with PayPal.

If you want the best credit card reader software for your PC, take a closer look at our handy guide and choose your favorite.

While most merchants accept prepaid cards, some of them only accept debit cards. Your best bet is to link your Revolut card to another payment service like PayPal or Curve.

If you are facing similar issues with other platforms, here’s a helpful Wealthsimple not working guide that covers common fixes for finance apps.

3. Use a reliable VPN service

A reliable VPN service will always help you get over website blocking issues quickly. On top of that, it also keeps all your personal banking and PC data safe.

We strongly recommend you use one of the best VPN services for Windows 10. Most of them are really easy to use and have a great number of servers across the globe.

VPNs give great connection speeds, whether you’re browsing securely, transacting online on Revolut, or just streaming.

Cybersecurity is always very important, but especially when it comes to online transactions, and this is well known to all users.

That’s why check out our comprehensive guide for the best antivirus software for online banking, and find the proper one for your needs.

If you’re aware of another solution to solve the problem, please share it in the comments section below so that other users can try it as well.

If you want to learn more about this service, check our guide on how to change bank card on Revolut for more information.

Also, leave there any other questions you may have, and we’ll make sure to check them out.

6 Best Gaming Motherboards To Buy [Ranked by Features]

Picking the best motherboard will determine what kind of system you’ll be able to build around it.

Your choice in motherboards dictates how big your final PC can become, what kind of memory and processors you will be able to jam into it.

You have to choose how many graphics cards you can stretch to and also what sort of storage options you will have available as well.

Therefore, it’s really essential to make the right choice because the consequences of getting the wrong one will stick with you for a pretty long time.

There are lots of options to consider on the market when you’re choosing the best gaming motherboard, and it’s important to know a thing or two about their features before you decide what’s best for you.

When it comes to gaming motherboards, features and stability are generally more important than performance claims.

Here are the main things you should look for when getting a new motherboard:

  • Quality VRMs
  • Compatibility
  • Overclock capacity
  • Available ports

What are the best motherboards for gaming?

  • Perfect pairing for 3rd/2nd/1st Gen AMD Ryzen CPUs
  • Intel Gigabit Ethernet
  • 5-Way Optimization
  • Aura Sync RGB
  • Does not have on-board built-in wireless

With the Asus ROG Strix B450-F Gaming motherboard, powered by second-generation AMD Ryzen AM4 processors, you can experience the next level of performance.

This motherboard has the most comprehensive cooling options ever, configurable via Fan Xpert 4 or the UEFI BIOS, and it offers full RGB lighting control.

The pre-mounted I/O shield is classy and has a cool look. It works really well with black-themed builds, and the RGB makes it so much more customizable.

Also, the 5-way optimization automatically tunes your hardware with cooling and overclocking profiles tailored especially for your rig.

If you’re looking for enthusiast features on a motherboard that will not empty your bank account, the ROG Strix B450-F is the right choice for you.

Take into account that you might need to update your BIOS in order to use newer generations of CPUs or GPUs after you install it.

MSI MPG Z390

  • Supports 9th i9-9900K, i7-9700K, i5-9600K and 8th Generation Intel Core / Pentium Gold / Celeron processors
  • Supports dual channel DDR4 Memory
  • 2x TURBO M.2
  • 16.8 million colors / 29 effects
  • Not enough USB headers

The MSI MPG Z390 gaming motherboard provides one of the most intuitive user experiences, and it allows you to take the lighting to the next level.

The Z270 motherboard provides some centric features such as an extended heatsink, the ATX form factor is ready for multi-GPU, and RGB or RAINBOW LED strips. This offers true and bright illuminating for the most expressive aesthetics.

Since it supports DDR4-type of memory, you can install RAM with high frequencies on it. This will provide the fastest speeds, up to 4400 MHz.

As stated above, this motherboard is made for intel CPUs, supporting processors from the 8th and 9th generations flawlessly.

Additionally, you can fully customize the RGB lighting to make it fit with your rig’s thematic. Pulsating colors? Rainbows? You got it.

When it comes to ports, this motherboard has enough for any type of PC. We’re talking about USB 3.1 and 2.0 ports, among the audio jacks, HDMI, and many others.

ASUS ROG Maximus XI Hero

  • Suitable for 9th 8th Generation Intel Core processors
  • Aura Sync RGB lighting
  • Pre-mounted I/O shield
  • Ultimate gaming connectivity
  • Lack of individual key lighting customization

The ROG Maximus XI Hero boasts the perfect balance for enthusiasts and gamers as well.

It provides the necessary features for gaming, ideal performance, and easy-to-use interfaces that place complex control at the users’ fingertips.

This gaming motherboard offers more personalization across your build than ever before, coming with a pre-mounted I/O shield that simplifies the installation process.

The Aura sync feature will synchronize the motherboard’s RGB with your whole system to get a uniform lightning effect on the entire rig.

Compatible with the 9th and 8th generation of Intel processors, this product is ready to deliver the best performance possible.

Yet another stylish choice, the ASUS ROG Maximus motherboard has the company’s emblem which is fully illuminated, and it’s colored in black.

Still not convinced? The product has an included AI for overclocking that is specially optimized to work flawlessly with 8-core CPUs.

  • Support for 3rd Gen AMD Ryzen processors and future AMD Ryzen processors with BIOS update
  • Supports dual channel DDR4 memory up to 128 GB (4866 MHz)
  • 2.5G LAN plus Gigabit LAN
  • RGB LED lighting and extendable pin headers
  • No USB type C

If your gaming computer is powered by an AMD CPU, this MSI motherboard is the perfect combo for you. The hardware supports AMD Ryzen 1st and 2nd generation as well as two-way AMD Crossfire Technology.

Thanks to the new thermal and power design of this motherboard, your high-end gaming machine can run at full speed without any problems.

If you also use overclocking software, this motherboard creates the perfect conditions for using your CPU at max throttle. It supports a multi-core CPU for excellent gaming performance.

The flash BIOS button will come in handy when you are trying to update it with a bootable USB, booting the stick with just the press of a button.

Overheating is not an issue. The motherboard is equipped with great VRMs and heatsinks that allow overclocking without issues.

The black design with grey stripes combined with customizable RGB makes this product a must-have for those who care about aesthetics.

  • Supports 8th Generation Intel Core Processors
  • USB3.1 Gen2 with USB Type-C
  • Front USB 3.1 Gen 2 Type-C header
  • Killer E2500 Gaming Network + Intel Gigabit LAN
  • Complaints about RGB software

The Z370 motherboard is designed for gamers and enthusiasts who want the best performance for their ultimate gaming system.

The motherboard also includes dual-channel DDR4, front USB 3.1 Type C, Smart Fan 5 Cooling, RGB fusion lighting, ultra-durable armor, and multi-way graphics support.

The Z370 has the features and the overclocking to please most gaming enthusiasts and its price is really appealing these days.

Designed with a black theme and orange stripes, the motherboard surely doesn’t fit on any rig (aesthetically speaking), but it looks great on builds that use these colors.

It is an Intel CPU-oriented motherboard that supports the 8th generation of processors. As with all the other motherboards, we suggest updating your BIOS.

This product also comes with RGB, since it’s usually the norm nowadays, having a fully customizable multi-zone LED light show design.

ASUS TUF Z270 Mark 2

  • Designed for 7th generation LGA 1151 socket Intel Core processors
  • Integrated Dual M.2 slots
  • Intel Optane Memory compatibility
  • Thermal Armor and Thermal Radar Core PLUS
  • No Asus AURA connector for the case lighting

The ASUS TUF is ready for hardcore non-stop operation, and it comes with all the durability, looks, and cooling necessary. It comes with a rugged and shielded design that packs the proper features and the most fan connectors.

This motherboard is compatible with the new ASUS AURA SYNC which is a software suite that allows for more choices in additional RGB gear.

Speaking of compatibility, we should mention that this motherboard is compatible with older generations of Intel CPUs, more precisely, the 7th gen.

Additionally, the TUF Fortifier of this motherboard will make sure that it doesn’t buckle under the weight of more massive graphics cards and processor coolers.

How does it do that? By placing additional protective materials that give it a more refined look and that shelter its vulnerable parts.

Thus, It also minimizes the risk of damaged circuitry from bending and bowing, reducing the chances of physical problems and lengthening the lifetime of the product.

Motherboard compatibility

When buying a new motherboard, it is necessary that we know about the different models and their compatibility with other hardware.

Therefore, there are motherboards that are compatible with AMD CPUs, and others that work with Intel ones. They don’t work the other way around, so keep that in mind.

Additionally, even if the motherboard might have dual-channel RAM support, the memory and frequency supported are different from product to product.

Different sizes for different builts

Besides hardware compatibility, one should always make sure that the motherboard he is going to buy fits in their new/old chasis.

There are different types of motherboards:

ATX

Are the standard size that has the most space for plugins, slots, and has the most amount of ports available. They are 12×9 inches in size.

Micro ATX

These motherboards are 2.4 inches shorter than ATX ones and are made to fit in smaller cases, at the expense of space and available ports.

Mini-ITX

Great for a tiny PC that isn’t all about performance. They work well in cases that don’t take up much space, but you’ll have less RAM and GPU, or port connections.

Must have motherboard ports

When you buy a motherboard, it’s best to look for one that has certain ports. Why? Because most of the peripherals connected to the motherboard via those ports.

The most important ones include all types of USB since you’ll find that you run out of available USB ports really fast when you have lots of peripherals.

Nowadays, even headphones and microphones come with a USB anyway. For the video outputs, we suggest looking for HDMI and DisplayPort, since the VGA and DVI aren’t being used anymore.

Are you scared of updating your BIOS? You don’t really have a choice. However, if you take a look at this quick guide about updating your BIOS, you’ll realize how easy it is.

This is the point where our roundup of the best gaming motherboards ends. Check out all their features and decide which one meets all your gaming requirements.

Best Laptop for Playing WoW: 7 Cheap Picks of 2026

World of Warcraft is the biggest and best multiplayer RPG for Windows. Blizzard released the latest expansion, Shadowland, for its World of Warcraft franchise in November 2020.

These are the recommended system requirements for that game:

  • Processor: Intel Core i7-6700K or AMD Ryzen 7 2700X
  • GPU: AMD Radeon RX Vega 64 (DirectX 12 compatible)
  • RAM: 8 GB
  • Storage: 100GB

Shadowlands’ system requirements aren’t really high, but some players with laptops released about five or six years ago might need new PCs to play it.

If your PC doesn’t cut the mustard for Shadowlands, these are some of the best gaming laptops to upgrade to and play the latest WoW expansion on.

Deals are subject to change. Keep in mind that the price tag may vary as some of the discounts may no longer be available by the time you’ve made your purchasing decision.

What are the best gaming laptops for World of Warcraft?

Acer Predator Helios 300

  • Top-notch 10th generation Intel processor
  • Excellent frame rate
  • RGB backlit keyboard
  • Good value
  • Its four-hour battery isn’t great

The Acer Predator Helios 300 boasts a terrific 10th gen Intel Core i7-10750H 6-core processor with a max 5.0 GHz clock speed.

It also incorporates a Full HD 15-inch VDU with an excellent 144Hz frame rate, 16 GB RAM, and NVIDIA GeForce RTX 2060.

Aside from its impressive specs, the Helios 300 has some good additional features. Its 4-zone RGB backlit keyboard gives it a bit more shine.

The special turbo button will instantly overclock your hardware to get the maximum possible performance while playing the game.

Users can also prioritize bandwidth with Killer DoubleShot Pro, which is a handy addition for multiplayer gaming.

The laptop also comes with a Numpad on the keyboard so you have extra buttons available for all the binds and macros you create in the game.

MSI GS66 Stealth

  • Outstanding 300Hz frame rate
  • 10th generation i9 or i7 Intel processor (depending on model)
  • Supports the latest Wi-Fi 6 standard for faster multiplayer gameplay and lower latency
  • Customizable RGB backlit keyboard that’s optimized for gaming
  • Enough RAM
  • It’s pricey

The MSI GS66 Stealth is a widely acclaimed laptop with even more impressive specs than the latest Helios 300.

The best GS66 model is equipped with an i9-Core i9-10980HK CPU, 32 GB RAM, one TB SSD storage, RTX 2070 Super Max-Q GPU, and a VDU with a trail-blazing 300Hz frame rate.

With such strong specifications, GS66 will certainly run World of Warcraft: Shadowlands at its very best. Like the Helios 300, the GS66 includes DoubleShot Pro to minimize lag in WoW and other titles.

It also features a customizable RGB keyboard that can provide in-game status keyboard lighting, equipped with a Numpad.

The NVME SSD will get you the fastest loading speeds possible. This is a huge plus since all the WoW players know how lengthy the loading screens are.

Additionally, the anti-glare screen will stop the sunlight from ruining your gaming experience when you’re riding in the middle of the day.

MSI GF65 Thin

  • 9th generation Intel 9750H processor
  • RTX 2060 GPU that supports ray tracing
  • Best GF65 models include lots of RAM
  • Offers up to two terabytes of drive storage
  • Can get hot when running games

This is another laptop with a top-of-the-range Intel CPU, which can clock up to 4.5 GHz, combined with NVIDIA RTX 2060 GPU.

The GF65 has a decent enough 120Hz frame rate that ensures pretty rapid response times for WoW battles. Its various models are equipped with anywhere between 16-64 GB RAM.

One of the GF65’s most noteworthy features is its pre-installed MSI App Player. That’s an Android emulator (a refined BlueStacks) that enables players to play mobile phone games on Windows.

MSI App Player provides RGB keyboard lighting effects for some of the biggest mobile games.

This laptop also comes with an NVME SSD, which will result in lightning-speed loading times. Be the first to get to the summoning stone with your friends.

Never worry about overheating. The fans are more than capable of cooling down the entire laptop even after intensive gaming sessions.

Razer Blade 15 (Advanced Edition)

  • 4K or 300Hz FHD 15-inch VDU
  • Good battery for a gaming laptop (lasts up to several hours)
  • High-end processor and graphics card
  • One terabyte storage provides plenty of space for games
  • Second Pro
  • Pricey compared with some of the alternative laptops

The Razer Blade 15 Advanced is a laptop that packs in a 10th generation Intel Core i7-10875 processor with eight cores that can clock up to 5.1 GHz.

That processor, combined with the Blade 15’s GeForce RTX 2080 GPU (equipped with eight GB VRAM), ensures top-notch gaming performance.

The Blade 15 has two alternative 300 Hz FHD matte and OLED 4K models. For top-notch picture quality, you can get the Blade 15 model that has a 4K (3,840 x 2,160) resolution display.

The alternative FHD Matte model has a VDU with an excellent 300Hz refresh rate and super quick response times.

This laptop’s case is made out of aluminum, which is a great heat conductor and looks very stylish. If you’re looking for something eye-candy, this laptop is for you.

More so, the display is brightly colored and has great color saturation, which will benefit during raids where you need to constantly watch for spell effects.

ASUS TUF

  • Affordable gaming laptop
  • The FX505DV’s RTX 2060 GPU enables real-time ray tracing
  • Its VDU’s 120Hz refresh rate is pretty good
  • 8 GB RAM is a little limited for a gaming laptop

The ASUS TUF is among the best budget gaming laptops for World of Warcraft. The best TUF FX505DV model packs in a four GHz AMD Ryzen 7 CPU, an NVIDIA GeForce RTX 2060 GPU, 512 GB storage.

Additionally, it is equipped with 16 GB RAM, and a 120Hz VDU. Those specs considerable eclipse Shadowland’s minimum system requirements.

If you want an even more economical gaming laptop, check out the ASUS TUF FX505DT model. That has the same Ryzen 7 CPU and 120Hz VDU, but it includes a GeForce GTX 1650 4GB GPU and eight GM RAM.

The eight GB RAM still meets Shadowland’s recommended system requirement, so you will be able to play with high graphics settings.

As mentioned before, the Numpad is really important for setting up macros and keybinds. There’s also RGB that will light the keyboard when you’re playing in the dark.

The NVME will provide the fastest loading times, the other hardware will make sure you have high framerates and you are fully immersed.

Alienware M15 R3

  • High-end processor and graphics card
  • Lots of RAM
  • Lots of drive storage
  • Blazing-fast 300Hz refresh rate ensures the smoothest gameplay
  • Supports Wi-Fi 6
  • Substandard battery

The M15 R3 is a high-end laptop that’s among the best for Windows gaming generally. It’s not cheap, but seasonal discounts reduce the M15’s cost.

The top model incorporates a 10th generation Intel i7-10875H CPU, GeForce RTX 2080 GPU, 32 GB RAM, one TB SSD storage, and FHD 300 Hz monitor.

The M15 R3’s RTX 2080 GPU is ideal for the real-time ray tracing effects that World of Warcraft: Shadowlands has.

Only players with PCs that incorporate NVIDIA Turing RTX GPUs will be able to play Shadowlands with its advanced ray tracing shadow and lighting effects.

The Alienware laptops are known and really popular among gamers. They are great laptops that can play more demanding titles than WoW.

Additionally, they are known for their futuristic design and iconic alien symbol. This laptop in particular uses a combination of white and black colors.

HP Omen 15 2020

  • Its FHD monitor has a top-notch 300Hz refresh rate
  • Expansive two TB drive storage
  • Command Center includes good additional configuration settings
  • Best models have loads of RAM
  • Powerful GPU
  • Slightly bulky design

The HP Omen 15 is another premium gaming laptop. This PC’s Intel Hexa-Core i7-10750H CPU has a max five GHz clock speed.

The Omen’s NVIDIA GeForce RTX 2060 (or 2070) GPU is another that can handle fancy ray-tracing effects. Its best model packs in a whopping 64 GB RAM and two TB storage.

The HP Omen 15’s Command Center also makes this laptop very flexible. Its users can configure the laptop’s fans, keyboard, and exterior lighting.

The network bandwidth and performance settings can be controlled from the Command Center. That Command Center also enables users to assign macros to keys.

You can also insert an SD card, since the laptop comes with an SD card reader. Store your addons, settings, and screenshots in a safer space.

World of Warcraft should not be a problem for such a beefy laptop. The 6GB NVIDIA GPU coupled with the powerful CPU, and the whooping 64GB of RAM will run any modern game flawlessly.

Shadowlands brings graphic improvements

As with any other expansion of the game, Shadowlands brough, among features, content, and awesome new adventures, a series of graphical improvements.

Actually, the game’s graphics have constantly been improved since its launch in 2004. This included more polygons, different lightning, etc.

Lately, with the addition of RTX, most of the current games implemented it in a way or another. World of Warcraft is no exception. You can now enable it in the video settings.

The difference an SSD makes

If you played WoW, you’re familiar with the tiresome loading screens. They take a lot of time, and when you have to travel between zones every 5 minutes, a 30-second loading screen is going to kill the mood.

Thankfully, the new SSDs don’t have this problem anymore. You can expect loading screens of 10 seconds at worst. You will notice a giant improvement in loading times on all the games, not only in WoW.

What’s better than an SSD? An NVME SSD. They are the fastest storage systems on the market at the moment, reaching speeds of 4000 mb/s!

What to expect from the expansion

Since we’re talking about the expansion’s system requirements, we should talk about the content as well, don’t you think?

Shadowlands continues the captivating story of Azeroth and its inhabitants, but this time, there is much more to explore and new mysteries to unfold.

We won’t give you any spoilers, because you should experience the story yourself. However, we’d like to mention that the game gets periodic content updates even after the expansion has been released.

Are you experiencing problems starting WoW? Here’s a guide about solving WoW not starting 3D acceleration. Take a look and learn how to solve the problem.

Those are several of the best laptops to play World of Warcraft: Shadowlands on. They generally have great CPUs, GPUs, VDU refresh rates, and enough RAM to play any game.

KP Astrology Software: 5 Best Free to Use in 2026

KP Astrology is an often-heard term and is among one of the popular astrology systems. It’s based on Stellar Astrology where the astrologers study the position of the Nakshatras (Stars).

They then create a chart based on the results and predict an event accordingly. To make the calculations easier and obtain results faster, astrologers are now using the best software for KP Astrology.

The online KP horoscope software programs are for those who have been preparing the charts manually all these days. While these programs save time, they also generate predictions accurately.

The KP system is one of the simplest methods that follows an an-easy-to-apply concept. While it’s very similar to the Vedic Astrology, it also borrows some techniques from the Western Astrology.

KP system works on the same 12 zodiac signs that are commonly defined worldwide. Let’s see some of the best software for KP Astrology that makes life simpler for professionals.

Best online and offline KP Horoscope software

KP ASTRO 4.5

KP ASTRO 4.5 Best Software for KP Astrology

KP System or the Krishnamurti Padhdhati works on the Placidus method for which it should get correct calculations. The KP Astro 4.5 software helps achieve that accuracy using the right set of tools.

Beginners can create Natal and Horary charts with different types of significator tables effortlessly.

Simultaneously, experienced astrologers can also benefit from different features like the panchang, birth time correction, transit charts, chart animation, finding eclipse, horoscope matching, and so on.

The ACS atlas can be used to identify the latitude and longitude of different places with accurate precision. The software is used by astrologers all over the world.

Additionally, the tool has attractive prices for group discounts, so if you’re part of a group passionate about astrology, you’ll save up some money.

We have to mention that the software is really accurate, especially in its detailed charts that would otherwise take lots of time to calculate and create manually.

⇒ Get KP Astro 4.5

ASTROWONDER

ASTROWONDER Best Software for KP Astrology

For those who are looking for an exhaustive KP astrology tool that’s loaded with features, Astrowonder can be a great solution.

Designed and developed by top astrologers, this is hands down one of the best software for KP astrology for professional astrologers.

The software is known for its accurate calculation and an extensive collection of tools for charts or analysis.

The program provides support for casting charts that ranges from 4000 BC to 4000 AD. Moreover, it allows users to enter birth time up to milliseconds.

It features a database of over 2.6 lakh cities with DST calculation, over 250 types of charts for Vedic system, over 30 chart types for KP system, and over 20 chart types for Cuspal Link Theory.

Movements charts, horary system, sarvatobhadra chart, or support for geographical positions are some of its other major features.

ASTROWONDER has a rich and intuitive interface that will provide all the tools you need to research, learn, and predict, no matter if you are an experienced astronomer or not.

⇒ Get ASTROWONDER

KPStarOne

KPStarOne is advanced software that’s specially designed for KP system users that don’t necessarily have any background knowledge of the subject.

It offers highly accurate comprehensive KP Ephemeris with sub-level changes in time, Panchang components, and a chart for the moment.

Users get a choice of KPNA that’s an all-time popular Ayanamsa. Best of all, it comes loaded with a database of Latitude, Longitude, Altitude, and time zone of 1.2lakhs plus populated cities or towns.

Moreover, it offers 4 step significators, house rotations, TSP or theory of short prediction, Natal, and Transit ruling planets, or different charts (Varshaphal, Tithi Pravesh, Transit & Navamsa), are some of its other major features.

The software gets constantly updated, and you can see changelogs of the changes on their official website at all times.

As a bonus, the software comes with a new and clean interface that user-friendly and easy to work with.

⇒ Get KPStarOne

KP Software Leostar

KP & Horary systems are considered the best in astrology and also among the most popular when it’s about generating answers as required by the querist.

For this, accurate calculations are required and KP software Leostar makes it easy to generate accurate predictions. In fact, the software comes with a list of questions from where the users can choose the one that matches their query.

Users can also save their own new questions related to the house and the planets in this PC software.

Once the details are saved, the response is generated based on the house and the planet position with possible time and event in percentage.

The response can help users get their answers. When adding a new question that is out of the categories already mentioned in the program, they must mention the planets and the houses related to the question.

Besides KP & Horary, the software also contains complete astrology solutions that are mandatory for an astrologer to make accurate predictions.

These solutions include planet, Bhava, and cusp aspect, Saptvargas, Shodas Vargas, and more than 500 astrological combinations.

⇒ Get KP software Leostar

KP Astrology by Astrosage

KP Astrology Best Software for KP Astrology

Astrosage is a widely used astrology software worldwide that offers all types of astrological solutions for the querist.

Apart from daily, weekly, or yearly horoscopes, panchang, kundli/birth chart, and horoscope matching services, it also offers KP Astrology.

Users can visit the KP System page under the website where they get access to quick links like – KP Panchang Now, Make KP Chart Online, GPS Horary Software, KP Horary Chart Online, and more.

They can simply click on these links based on their requirement and get solutions accordingly. They can also check the KP Astrology Tutorial section or What is KP System to understand the concept before they raise their queries.

The website offers enough help and guidance related to the KP system with direct access links that makes it one of the best software for KP Astrology.

Read more about Zodiac Divisions and other interesting astrology-related things on their official website. You will find everything you need there.

⇒ Get Astrosage

Astrology in a nutshell

Astrology is a pseudoscience that studies the movement of the planets, stellar constellations, and other celestial objects, to determine the outcome of events.

The practice is really old, beginning with our ancestors who used the sky to predict seasonal changes and other things important for agriculture.

Contemporary astrology is often associated with the system of horoscopes, which is widely known and used by lots of modern people.

The popularity of astrology

In terms of popularity, the practice is widespread across all the globe, in different forms. It is believed that western astrology can trace its roots back to the 17th Century.

We can find it in various works of literature from Dante Alighieri, to William Shakespeare, as well as in many political doctrines.

Astrology is closely related to astronomy, alchemy, meteorology, and even medicine, on both theoretical and experimental grounds.

Why should I use astrology software?

The practice requires you to draw charts, calculate lots of details and keep track of information, which is hard to do as normal.

By inserting all the information in specialized software, you can easily change things around and create charts faster than when doing it manually.

More so, most of these apps let you download the results, so you can share them easily with friends or possible clients you’re working with.

While KP Astrology is one of the simplest techniques in Hindu Astrology, it also generates the most accurate predictions for an event.

Are you looking for a nice app to help you put your charts in editable form for your clients? Here’s a list of the best software for editable PDF forms for you to check out.

So, get a precise look into your happening and non-happening moments in your life with the best software for KP astrology.

FIX: Intel graphics driver keeps crashing on Windows 10

Our PC’s graphics cards are essential when it comes to processing the entire interface of both our OS, but also any media or game we would run.

However, users often reported that the Intel graphics driver keeps crashing on their PC. Apparently, this issue occurs after updating the operating system to the latest version.

Our discussion today will involve a series of useful options that will help you fix the Intel graphics driver crashing problem on Windows 10.

How can I fix the Intel graphics driver crash on Windows 10?

1. Use Windows Update

  1. Open Settings.
  2. Go to Update & Security.
  3. On the left side, click on Windows Update, then select Check for updates, from the right side.

2. Use third-party software

You can easily fix your Intel graphics driver crash on Windows 10 issue with the support of a third-party specialized tool.

Unlike the manual methods presented above, this option will help you automatically install, scan, and update any driver you need. Thus, it will be your main ally when coming to identifying and fixing driver issues.

More so, you should know that fixing your drivers automatically with this solution will also optimize the system devices to work at full capacity.

⇒ Get Outbyte Driver Updater

3. Adjust the compatibility mode

  1. Right-click on the driver setup file and click on Properties.
  2. Click on the Compatibility tab.
  3. Checkmark the Run this program in compatibility mode for box and select an older Windows version from the drop-down menu.
  4. Restart your PC and check if the issue is gone.

4. Uninstall and reinstall the graphics card drivers

  1. Open Device Manager.
  2. Expand Display adapters, right-click on the one you need, and select Uninstall device.
  3. On the un-installation window, if you have the option Delete the driver software for this device, you may select that and then remove the corrupted drivers from the computer.
  4. Follow the on-screen instructions.
  5. Restart your PC and reinstall the graphics card drivers.

5. Access manufacturer’s website

  1. Go to the Intel support website.
  2. Search for the latest Windows 10 drivers available for your Graphics Card model.
  3. Download and install it by following the instructions given on the website.

Our suggestions will surely help you to stop the Intel graphics driver from crashing on Windows 10.

Also, if you want to keep your components upgraded, don’t hesitate to check a full guide about how to update the graphics driver on Windows 10.

Your opinion matters to us, so if you want to share it, feel free to leave a comment in the section below.

FIX: Windows Defender fails to remove Trojan threats

Trojans are one of the most common malware types, which, unlike viruses, rely on you to run them on your computer, as they don’t spread on their own.

They often sneak into your device when you visit a hacked or malicious site disguised as a normal and harmless file, hidden from the basic Firewall protection.

This type of malware can use a file name similar to an existing real or legit app, so you may end up downloading one without knowing, and usually they come together with other malware.

Trojans don’t just bring along viruses and worms, among other malware, but they also use your computer for fraud, record key logs and online activity.

Plus, they also send back information such as passwords or log-in credentials to hackers to steal your data and compromise sensitive information.

While Windows Defender antivirus is preinstalled on your Windows 10 PC, it doesn’t really live up to user expectations when it comes to protecting its own OS.

Trojans advance faster than Defender’s updates, which usually leaves users stranded when it comes to removing them completely.

If you are still wondering how to remove the Trojan virus from your PC using Windows Defender, here are a few workarounds that can resolve the problem.

What can I do if Windows Defender doesn’t remove Trojans?

1. Run a virus scan with Microsoft Safety Scanner

Microsoft Safety Scanner is a free downloadable security tool for on-demand scanning, which helps remove malware, and also works with your existing antivirus software.

However, it expires 10 days after downloading it, so to rerun a scan with the latest antimalware definitions, download and install it again.

If you run the virus scan without reinstalling Microsoft Safety Scanner, the program will be deleted, and any infected files and folders can get deleted too.

2. Change your antivirus

If that solution does not work for you, you could try using third-party software to help solve your security problems.

For this, we recommend trying TotalAV as it uses the latest technologies to detect not just the newest malware known in the industry but also emerging and advanced threats that can compromise your system.

Besides, it enables real-time protection to scan all your apps and programs upon launch, to ensure they are safe.

All in all, it offers full protection against the most advanced threats, and it will definitely detect trojans in your system and eliminate them at once.

TotalAV

This antivirus tool will never fail to protect you against harmful viruses, including malware such as Trojans!
Free Trial Visit Website

3. Perform a Clean Boot

  1. Log on as the administrator, and type msconfig in the search box.
  2. Select System Configuration.
  3. Find the Services tab.
    Windows Defender is not removing Trojan
  4. Select Hide all Microsoft services box.Windows Defender is not removing Trojan
  5. Click Disable all.
  6. Go to Startup tab.
    Windows Defender is not removing Trojan
  7. Click Open Task Manager.
    Windows Defender is not removing Trojan
  8. Close Task manager then click OK.
  9. Reboot your computer.

4. Change Windows Defender Service startup to Automatic

  1. Right-click Start and select Run.
  2. Type services.msc and press Enter.
  3. Right-click Windows Defender service.Windows Defender is not removing Trojan
  4. Click Properties.
  5. Ensure that Service Status is running.
    Windows Defender is not removing Trojan
  6. Make sure the Startup type is Automatic.
    Windows Defender is not removing Trojan
  7. Click Apply then click OK and restart your computer.

5. Clear your Temp file/Cache

  1. Go to Internet Explorer.
  2. Click Tools.Windows Defender is not removing Trojan
  3. Click Internet Options.
    Windows Defender is not removing Trojan
  4. Select the General tab.
    Windows Defender is not removing Trojan
  5. Click Browsing history.
    Windows Defender is not removing Trojan
  6. Select Delete.
    Windows Defender is not removing Trojan
  7. Uncheck Preserve favorites website data.
    Windows Defender is not removing Trojan
  8. Delete temporary files, delete cookies, history, passwords, etc.

To verify that your cookies have been deleted, do the following:

  1. Click Start and type inetcpl.cpl in the search box and press Enter.
  2. In the Internet Properties dialog box, go to General tab.
  3. Click Settings under Browsing History.
    Windows Defender is not removing Trojan
  4. In Temporary Internet Files and History settings, click View Files to open the folder where cookies are stored.
  5. In the open folder, press CTRL+A, CTRL+D, then press Enter to delete the cookies.
  6. Exit and restart your computer.
  7. Scan your computer using the antivirus software recommended in the first solution (or another antivirus tool, is available).

6. Run a full scan in Safe mode

  1. Click on Start and select Settings.
  2. Then, click Update & Security.Windows Defender is not removing Trojan
  3. Select Recovery from the left pane.Windows Defender is not removing Trojan
  4. Go to Advanced startup.
  5. Click on Restart now.
  6. Select Troubleshoot from the choose an option screen, then click Advanced options.Windows Defender is not removing Trojan
  7. Go to Startup Settings and click Restart.
  8. Once your computer restarts, a list of options will come up.
  9. Choose 4 or F4 to start your computer in Safe Mode.
  10. Run a full scan using another antivirus software.

Running a System Scan in Safe Mode is the system’s own protection method, and it will solve many of your problems. However, you might need something better when you’re dealing with Trojans.

If you are looking for a security tool that’s similar to Windows Defender, but better, you should take a look at this great list of the best the best antivirus tool with lifetime license.

Have any of these solutions helped fix Windows Defender is not removing Trojan threats? Let us know in the comments section below.

New enhancements coming for Microsoft’s low-code/no-code tools

Microsoft’s low-code/no-code reinforces the tech company’s focus on securing a position as the office standard for end-user process automation tools, for themselves.

And, more important, all this is done without even sacrificing features that developers alike can appreciate.

Microsoft continues to improve Power Platform

Out of all the major tech companies that provice low-code/no-code tools, Microsoft seems to offer, by far, the most robust package.

This could be due to the toolset’s ability to authenticate, as well as communicate with various data sources, across a wide range of Microsoft 365 services.

During the Build conference that took place last month, Microsoft stated that they won’t end the process of enhancing their Power Platform suite of tools.

Company officials added that their main goal is to extend the platform’s capabilities for customers in the Microsoft 365 environment.

Microsoft continues to push Power Platform, as well as low-code/no-code tools, as the de go-to development platform for all users that are working with Microsoft 365 products and services.

Interestingly enough, the new announcements actually help improve the platform, by facilitating collaboration between amateur and professional developers, in an organization.

According to experts, these features will be critical for companies, as they emerge from the COVID-19 pandemic and are looking at a much more hybrid work-style in the future.

Microsoft integrates Power Platform with Microsoft 365 Developer Plan

The tech giant plans to make a move that is meant to acknowledge the value around the low-code/no-code platform, as well as the importance of connecting amateur and professional developers.

Thus, Microsoft will be integrating the Power Platform and Power Apps tools into the overall Microsoft 365 Developer Plan.

This separate, stand-alone Power Apps Developer Plan and learning path, will further help the above-mentioned developers to build, test, and also experience the use of Power Apps and automation flows in this plan.

This solution has been dubbed by Microsoft as fusion development, and the company is offering a Power Platform Fusion Development learning path, via Microsoft Learn.

Know that the Microsoft 365 Developer service is a renewable one, with a free 90-day subscription to Microsoft 365 E5.

This includes over 25 licenses that permit the creation of a sandbox development area, for coding various solutions.

What is your opinion on this new Microsoft initiative? Share your thoughts with us in the comments section below.

How to change Gmail’s chat and video call settings

If we remember exactly, Google revealed, last year. its plans to turn Gmail into a true communication and work powerhouse, by integrating chat, video calls, as well as a Google Docs functionality.

According to the official Google announcement, many of the Workspace apps are actually receiving various improvements and new features.

New chat and video call integrations for Gmail

The company made the decision to keep these functions disabled for the big majority of users, in the beginning.

Also keep in mind that if you were not selected by the company to be a part of this experiment, it could be that you won’t even see the new Gmail interface and its functionality right away.

Consider it a beta testing for the new features, for which Google is still relying on public testing, in order to have it up and running as fast as possible.

How do I use these new integrations?

Here are the steps you need to follow so that you can activate these special features and improve your Gmail experience:

  1. Open the Gmail web interface.
  2. Access the Settings menu, and then the see all settings option.
  3. Go to Chat and Meet.
    1. If you want to enable the new Gmail interface, select Google Chat next to Chat, and select Save Changes.
    2. In order to disable the new Gmail interface, switch to Off.

The new Gmail interface will be loaded once you press the save changes button on the page, and chat, rooms, as well as Meet will all be displayed on the sidebar, right underneath the email folders.

Gmail will also receive a new Google Docs feature

Some more good news is that Google enhanced the integration of the Google Docs service.

How this works is, if a user posts a link to a document, you can now open it in chat, in order to have it displayed right away.

This feature doesn’t always work in some cases currently, as in the situations where you have received a link in an email or or pop-up chat window.

And since we are talking about changes, Google also plans to rename Rooms to Space over the course of this summer.

Some fresh functionalities will be introduced, including an n-line topic threading, presence indicators, as well as custom statuses, expressive reactions.

This means that Gmail users can change their status from the top right corner when the new interface is enabled. The dropdown menu will display options to switch from automatic, to do not disturb, or away.

The only thing that remains to be seen is when exactly Google will start the rollout for these new features, to all users.

What are your thoughts on these new integrations that Google brings to the Gmail service? Share your opinion with us in the comments section below.

Pixel Fixer Software for Windows 10 [2026 Updated List]

If you spot an odd-looking pixel on your computer’s screen, this might be a stuck pixel or a dead one.

Here’s the difference: a stuck pixel appears in any of the colors that its three sub-pixels can form and this means, blue, red, or green.

On the other hand, in a dead pixel, all its sub-pixels are permanently off, and this makes it look black. There are some cases in which even a black pixel may just be stuck there.

Either way, there are ways to fix this. If you see a colored or white pixel, you will be able to fix this, and if you see a black one, chances are little, but there’s still hope out there.

And, on the other hand, a dead pixel may not always be as dead as you think it is, that’s why we’re using the term fixing dead pixels.

We picked out five of the best software for Windows 10 to fix a stuck pixel (that sometimes may seem dead), so make sure you check out their sets of features to know what you can expect from these programs.

What are the best software to fix stuck pixels?

UnDeadPixel

Even if your computer’s monitor seems to be working just fine, there may still be some dead pixels just lingering there that you’re unaware of because they only show up in a single color.

Anyway, it can be pretty annoying to have dead pixels on your computer’s screen. You will be able to see them by showing different colors while you’re in full-screen mode.

You can also try this utility called UnDeadPixel that will change the color of your screen at fixed intervals that will hopefully bring back the stuck pixels on your screens.

The developers of the software say that you need to run this program for a couple of hours. They also say that, as with any other programs, there is no warranty on the results.

The interface is extremely simple. On the left pane, you just need to select how many cycles to run.

On the right side, you need to select how many flash windows you want to have on your screen and what will be the dimension of a flash screen.

Then, the only thing left to do is to set the flash interval in milliseconds and just hit the Start button below. Then, you just have to move the flash screen over the area with the dead pixel.

The software comes with the following features and advantages:

  • The UnDeadPixel software keeps on changing the color of your screen with the delay that you can define yourself
  • All you have to do is enter the delay in milliseconds on the screen that you get right after opening the app and after this just press Enter or click on Proceed
  • In order to exit the program, all you need to do is press the Esc button
  • To change the delay time, just press Space

⇒ Get UnDeadPixel

Rizonesoft Pixel Repair

Rizonesoft Pixel Repair is a tiny tool that you can use to detect and fix stuck pixels on your flat LCD screen.

It’s important to note that this software will not bring completely dead/black pixels back to life, but it will successfully work if they are simply stuck on a particular color.

Even if the market is filled with such software, there are just a few programs packed with all the necessary functions, and this is one of the few.

You can use the Dead pixel locator section on Pixel Repair to look for dead or stuck pixels. You can also use this section to help you find dirty little spots and dust when you clean your screen.

Now, after you’ve located stuck pixels, try to repair them with this tool. You need to set the color mode, then press Go and place the flashy window on the pixel that could be stuck.

Sometimes this unsticks that pixel, but as previously mentioned, it will not always work because the pixel could be really dead.

It’s only a 2 MB file so it’s extremely easy to download and run so the worst it could happen is not to work and delete the software in seconds.

Check out the best features and functionalities that are included in Rizonesoft Pixel Repair:

  • You will be able to use the Dead Pixel Locator section on Pixel Repair in order to look for dead or stuck pixels
  • You can also use the section to help you find dirty spots or dust when you are cleaning your screen; dust will not show on all colors, usually
  • After you located stuck pixels, you will be able to repair the issue using Rizonesoft Pixel Repair
  • All you have to do is set the color mode, press Go, and place the flashy window under the stuck pixel
  • This should unstick the pixel

The software is compatible with Windows, and it has only 2.1 MB.

⇒ Get Rizonesoft Pixel Repair

JScreenFix

JScreenFix will not help you find a stuck pixel, but this tool will definitely help you fix one. This tool will load a black browser window with a square of flashing pixels.

All you have to do is press the green button that you can see in the bottom right to go full-screen.

After that, drag the flashing square to the location where you found the stuck pixel and leave it there for about 10 minutes.

The best part about this tool is that you don’t need to install absolutely anything on your PC. It’s just at a click away, online.

On the page, you will also see some adds but they will magically be relocated when you move the small window on the screen.

The square window is made out of 256 x 256 pixels that constantly flash in all primary colors and cannot be extended.

At the downsides level, you can’t change the flashing interval, and there is no way to identify a stuck or dead pixels.

Here are the best features that you’ll find in this tool:

  • It explains and shows you the essential details on stuck pixels.
  • The software can repair most stuck pixels in less than 10 minutes.
  • JScreenFix fixes most screens, and it’s suitable for LCD and OLED.
  • You will not have to install anything on your computer, and this handy tool uses HTML5 and JavaScript in your web browser.
  • The best thing about JScreenFix is that it’s free and easy to use so that anyone can benefit from it.
  • All you’ll have to do to fix the annoying problem is to simply drag the pixel fixer over the stuck pixel, and that’s it.
  • The online app reports a success rate of more than 60% when it comes to restoring stuck pixels on your computer’s monitor.

⇒ Get JScreenFix

Aurelitech’s PixelHealer

This tool lets you try to fix dead, stuck, or hot pixels by yourself, before running back to the store, this is their motto. A faulty pixel that is displaying the color white all the time is called a hot pixel.

You can download and run PixelHealer without having to install anything and that’s convenient because you can also remove it after you do your job.

The best feature of this solution is that it can also detect dead or stuck pixels unlike other software that don’t provide this feature.

Next, you can cover the dead pixel with the color window and click on the Start Flashing button to begin the healing process.

Let the flashing window run for a bit, and then check to see if the dead pixel has been fixed or revived (which would mean that it was only stuck).

This software can be successfully used on LCD or TFT screens, on desktop monitors, laptops, and tablets as well.

The app can close automatically after a specified period of time. Head over to Aurelitech’s PixelHealer’s official website to get the app and test it on your computer.

You can get this software for Windows for free and here are the main details that you need to know about it:

  • You will get the chance to use the free InjuredPixels portable app in order to check your screen or tablet for dead or stuck pixels
  • This handy tool uses the already successfully tested concept that involves that flashing RGB colors over a dead/stuck pixel revive it
  • You will get the chance to use the mouse or resize the flashing window
  • You can also use the intuitive settings to change the flashing colors or the interval
  • PixelHealer comes with a really intuitive and effortless to use interface

⇒ Get PixelHealer

Pixel Doctor

Pixel Doctor is a lightweight Windows freeware that was developed to help users fix stuck pixels on their LCD monitors.

This software can be considered as more appropriate for users who are a bit more experienced, but on the other hand, it relies on a really friendly approach.

The app is extremely simple, and you can’t configure much about it but it does feature some important settings.

For instance, you can have the choice of the color used for flashing and you also have the choice when it comes to the type of test: simple or cycle.

Another great option is to run the test on a full screen or just on the desired location on the screen. The latter is, of course, better if you know where the stuck pixel is.

This is an interesting app that will be able to fix stuck pixels most of the time, so it’s definitely worth trying.

All the options are displayed in just a single window so you won’t be needing any guidance or a complicated menu to deal with.

Check out the best features and functionalities of this tool:

  • You don’t have to configure lots of settings in Pixel Doctor, and this can only be good news for users who are looking for quick and simple solutions.
  • You will be able to choose the test color, and this is really important if you are trying to deal with stuck pixels.
  • You can also pick from two different types of tests, cycle or single.
  • All the tests can be launched in full-screen mode for the best results, and you’ll have dedicated options to choose full screen and location methods.
  • The software comes with something named “therapies” which are quick color changes that help you get rid of stuck pixels.
  • The software is really lightweight, and it won’t slow down your computer’s performance at all.

⇒ Get Pixel Doctor

There are our five best choices for software that can find and fix stuck or apparently dead pixels.

What are dead and stuck pixels and how to deal with them?

Every pixel on an LCD screen is divided into three little chambers, each for one of the RGB colors that form all the color spectrum on the screen.

It could be that one color can be stuck and inactive, in which case, it can be revived. However, the dead pixels are defective ones that usually don’t receive any current or simply malfunction.

The latter unfortunately cannot be revived with any possible technique and unfortunately you will have to live with that.

Use dedicated software

Of course, before doing anything else, you can use one of the tools we mentioned to try and revive the hopefully stuck pixel.

As you can see, the method used by all of these programs is to flash the light in multiple colors or just the one affected by the problem.

There are also a few solutions that can test the screen and tell you exactly if and where are the dead or stuck pixels.

Send back the screen for replacement

If none of the recovery software turned out effective in reactivate the pixel, there are only two things to do: send the screen/ device back to the manufacturer for replacement or just live with it.

If you noticed where the pixel is, it’s hard to ignore it, especially if you’re very quick in spotting such a defect.

However, if there is only one pixel located in a corner of the screen, maybe you will spare yourself from the hustle of sending it back and waiting for that replacement for days.

The dead pixels can multiply

There are various reasons for the dead pixels. Shocks applied during the transport, electronic problems or simply factory defects can produce them.

However, once you spot one or more dead pixels, there are chances for them to multiply in time.

So, if you spent a lot of money on the device and you just got it with one or more dead pixels, not stuck ones, it’s recommended that you send it back for a quick exchange.

That being said, we hope you found the best software and you managed to revive those inactive pixels.

All the solutions come with their unique capabilities and sets of features, so make sure to check them out. Of course, there’s also the manual technique for finding a dead or stuck pixel.

All you have to do is turn off your monitor, get a damp cloth that won’t scratch your screen, and apply pressure where the stuck pixel is without applying pressure anywhere else (because this may create more stuck pixels).

While applying pressure, turn on the computer and screen and remove the pressure. Usually, the stuck pixel should be gone, but if it isn’t, feel free to try the tools that we listed above. Good luck!

If the problem appeared after the warranty period expired, you should also take a look at our best monitors with speakers and webcam perfect for working from home to replace yours.

If you happen to know about other methods of fixing stuck pixels, leave us a message in a comment below.

Microsoft will turn OneDrive into a Progressive Web App

Looking towards the future means always having a fresh perspective, being keen on innovation and design, and constantly striving to improve services that are already successful.

This being said, it seems that Progressive Web Apps could represent a huge leap towards the future for Windows 10’s app store.

OneDrive, the first step towards more Windows PWAs

Seeing this opportunity, Microsoft is starting to update its web services with some PWA features, like offline mode support, and push notifications.

At the moment though, a lot of the websites and Microsoft services that we constantly use, are not really PWA material, to say the least.

So now it seems that OneDrive will finally become a genuine Progressive Web App. Basically, as a proper web app, users will be able to install OneDrive on Windows 10, as well as on other devices.

This means that by installing OneDrive PWA on your Windows PC, Mac, or Chromebook, you can treat the online storage website more like a native app.

After you install the web version of OneDrive as a Progressive Web App, you can launch it from your desktop, and it will work the same way as it does in your web browser

Know that the OneDrive PWA will no longer have the traditional address bar at the top of the page, and also there won’t be any tabs, meaning that everything will look more like a native app.

Judging by the updated roadmap, OneDrive PWA will be supported by all of the popular browsers, such as Microsoft Edge, Chrome and Firefox.

When will OneDrive become a PWA?

Microsoft is planning to start rolling out the OneDrive PWA update in early July, and also complete the rollout process by the end of the same month.

The OneDrive PWA can also be installed on mobile devices, although Microsoft stated that the web app has only been optimized for Windows 10 and macOS so far.

This means that the experience won’t be by far as good as the standard OneDrive mobile app.

At the moment in which OneDrive is updated with its new PWA features, a new icon will be shown directly in the Omnibox, or address bar of the browser, prompting users to install the app.

This comes shortly after the company announced that they are redesigning the PWA menu for the Edge browser.

What is your take on this new Microsoft initiative? Let us know in the comments section below.

FIX: Unreal Engine 4 Won’t Launch on Windows & Mac

Unreal Engine is rather important for so many developers. And, since it’s free, Unreal Editor and its current version, UE 4, are must-have software in the business of development.

It works well on the latest iteration of Windows 10, but there are some apparent issues at hand for some users. Namely, Unreal Engine is not launching.

Why won’t Unreal Engine launch?

Your antivirus software might be interfering with the software from opening. This is a common occurrence among users who use third-party antivirus software that isn’t really the best on the market.

Another common cause is not having the necessary privileges to open the application. In this case, you will have to run Unreal Engine 4 as an administrator.

We prepared more solutions for the Unreal Engine not launching issue below, so make sure to check them out.

What to do if Unreal Engine 4 won’t launch on Windows & Mac?

  1. Run the UE 4 as admin
  2. Disable the antivirus
  3. Verify the installation
  4. Reinstall the Unreal Engine client
  5. Rollback Windows 10

1. Run the UE 4 as admin

  1. Open the Epic Launcher client, and select the Unreal Engine tab.
  2. Under the Unreal Engine 4, expand the drop-down menu and create the desktop shortcut.unreal engine 4 won't open on Windows 10
  3. Right-click on the desktop shortcut, and open Properties.
  4. Choose the Compatibility tab.
  5. Check the Run this program as an administrator box, and confirm changes. The Unreal Engine not launching issue will be solved.unreal engine 4 won't open on Windows 10

In most reports describing this issues, users were able to run Unreal Engine 4 without issues until it suddenly stops working.

This implies that some system changes were made. Some changes evidently disrupted the game installation.

The most common reason is Windows Update (major updates especially), which seemingly broke both Epic Launcher and Unreal Engine 4.

The first step we suggest is trying to run the Unreal Engine client with administrative permission.

2. Disable the antivirus

  1. Type Control in the Search bar, and select Control Panel from the list of results.control-panel-serarch-w10 opera not responding
  2. With the Category view, choose to Uninstall a program under Programs.unreal engine 4 won't open on Windows 10
  3. Find your antivirus software, then click it and choose Uninstall. avast-uninstall unreal engine not opening
  4. Restart your PC and see if the Unreal Engine not launching issue is gone.

Another possible reason for the malfunction of Unreal Engine 4 is a third-party antivirus. Judging by user reports, the recurring culprit for this is the TotalAV solution.

Many of them tried disabling it, but the only thing that presented a permanent resolution is removing the antivirus completely. Note that you can also use a third-party uninstaller software in order to make sure that every file will be removed completely.

3. Verify the installation

  1. Open the Epic Launcher, and choose the Unreal Engine tab.
  2. Expand the drop-down menu and click Verify.unreal engine 4 won't open on Windows 10
  3. Wait until everything is done. The Unreal Engine not opening error will be fixed.

Before we move to the reinstallation procedure, it’s worth trying to verify the integrity of the Unreal Engine 4 installation files.

You can use the built-in tool on Epic Launcher to check for corruption within the installed files.

4. Reinstall the Unreal Engine client

If the installed files and the files from associated applications get corrupted, the client won’t start for obvious reasons.

Could something like that happen after the major Windows 10 update? Possibly. That’s why reinstallation is another step you should follow through.

In addition, we suggest a clean uninstall which includes clearing everything (registry entries, too) assigned to Epic Launcher and Unreal Engine 4, respectively.

We already explained how to perform a clean uninstall in the second solution, just don’t forget to back up your projects.

5. Rollback Windows 10

  1. Open the Settings app, and choose Update & Security.unreal engine 4 won't open on Windows 10
  2. Select Recovery.
  3. Click Get started under the Go back to the previous version of Windows 10. The Unreal Engine not launching problem will be solved afterward.unreal engine 4 won't open on Windows 10

For more potential solutions, check out our guide on what to do if Windows 10 apps aren’t opening properly.

That’s it. Don’t forget to share your questions or suggestions with us in the comments section below. We look forward to hearing from you.

Posted in Fix

June Xbox Update brings Party Chat Accessibility improvements and Groups reordering from the Guide

The June Xbox Update is now available for Xbox One and Xbox Series X|S consoles, bringing new accessibility features for converting speech into text and text into speech in Xbox Party Chat. The feature has been in testing with Xbox Insiders for a couple of weeks, and Xbox gamers can now enable speech-to-text transcription and text-to-speech synthesis in Settings under Ease of Access > Game and chat transcription.

This update also brings the ability to reorder Groups in the Xbox Guide using the new “Move group” button the “My games & apps” screen. If you’ve been using the Groups feature to organize your various apps and games, it’s now easier than ever to customize the order of your groups.

Microsoft has also made it easier for parents to review and approve their kids’ requests to play with people on Windows PCs and other platforms. Controls for cross-network play requests are now available right from the console, as well as the Xbox Family Settings app for iOS and Android.

Lastly, the Xbox mobile app is also getting an update that will bring official posts from games you play on the home page. These posts will start appearing in the Xbox mobile apps later this month, but there’s still a long way to go before these redesigned Xbox apps bring back other important social features that used to be available on mobile, such as Looking for Groups posts.

5+ best Windows 10/11 USB-C laptops to buy

USB-C is the latest USB technology standard for connectivity and power, letting users connect a series of devices to their laptops without using ten specific cables for every operation.

This revolutionary technology is set to replace the USB interface created more than 20 years ago, and companies using it include Microsoft, Google, Samsung, Apple, Dell, HP, and Intel.

And judging by the number of companies that support this technology, it is just a matter of time until USB-C ports will completely replace classic USB ports.

The USB-C technology was developed by the USB Implementers Forum and has a 24-pin configuration, bringing a series of advances that will allow manufacturers to develop better devices.

For example, USB-C ports are much thinner than standard USB ports, allowing manufacturers to design thinner devices.

They are also twice as fast as USB 3.0 ports and support DisplayPort, HDMI, power, USB and VGA.

Considering all these advantages, the general trend among laptop manufacturers is to focus on USB-C compatible devices.

Let us see what are the best USB-C laptops available on the market at this moment, so keep reading.

What are the best Windows 10 USB-C laptops to buy?

MSI GF63 THIN 9RCX-818

  • Excellent GPU- GTX 980M
  • Outstanding full HD screen
  • Processor Intel Core i7-9750H
  • Tends to overheat

This laptop is one of the world’s fastest gaming notebooks with an SSD boot up speed that is phenomenal.

The new Intel Wi-Fi chip allows for 50Mbps steam downloads making it the perfect choice for its users.

Above all, the laptop is really quiet, the only situations when it gets loud is when gaming on high settings.

It’s worth noting the excellent, Full HD screen with a thin bezel that comes with a 120 Hz refresh rate, excellent for action gaming.

And although the laptop is pretty thin (0.85 inches) and light (4.1 lbs) for a gaming laptop, the MSI rig has an autonomy of over 7 hours.

The only downsides come from the slightly low memory. Both, the 8 GB or RAM and the 512GB Nvme SSD can be upgraded for ideal gaming condition.

However, you can count on the excellent NVIDIA GeForce RTX 2060 graphics card with 6GB of dedicated GDDR6 memory.

Newest HP 14 Inch Premium Laptop

  • Perfect as a work/business laptop
  • Outstanding screen resolution
  • Large SSD capacity-125GB + 500GB Hard Drive Disk
  • Low battery life

This laptop is powered by an i5-7200U processor that will not slow down the speed when running multiple applications altogether.

The 128 GB SSD is fast and will make the device start up in seconds. It comes with a beautiful 14-inch display and is very lightweight making it comfortable to carry around if needed.

This a very inexpensive laptop but it still comes with 8 GB of RAM that will help any student with their tasks.

A little downside to this rig is that it only comes with a Windows S operating system but you can change that with a full-fledged Windows 10 if you want.

It doesn’t have a discrete graphics card but ‎the built-in Intel UHD Graphics will do just fine if you don’t try to use it for complex gaming.

The biggest advantage of this HP laptop is the incredible 10 hour autonomy, perfect for students or people who travel a lot.

Another one is that it weighs only 3.3 pounds and it is only 0.8 inches thin, which are great qualities for portability.

HP 15 15.6″ HD Touchscreen Premium Laptop

  • Fast processor 10th Generation intel core
  • Lithium-ion battery
  • Lightweight
  • Wi-Fi drops when in sleep mode

Here’s what this 15.6-inch Full HD touchscreen laptop hides under its hood: an Intel Core i5-1035G1 processor, 512GB SSD, and video Intel UHD Graphics

This awesome device offers crystal-clear views for more immersive games and more engaging movies.

This laptop is really thin which makes it a great option when carrying it with you and will fit in thin spaces perfectly.

You will definitely be able to run any demanding applications with the 16 GB or RAM even though the built-in graphics processor doesn’t help it too much for gaming.

Another great news is that you don’t need to invest in a license because it already comes with a Windows 10 Home OS that will run right out of the box.

It doesn’t have a DVD player/writer but who needs that when you can use the 802.11ac Wi-Fi or the USB-C port for high-speed transfer from an external drive?

The only downside is that the resolution is only 1366 x 768 pixels so it’s not even Full HD, but it will do just fine if you don’t want it for the latest blockbuster movies.

Dell XPS 13

  • Different placement for webcam
  • Super-trim bezels
  • High performance of speed
  • Super-slim webcam
  • Low battery life

Powered by a 2.3GHz Intel Core i5-6200U (dual-core, 3MB cache, up to 2.8 GHz with Turbo Boost) processor, sporting Intel HD Graphics 520 on a 13.3-inch QHD+ (3,200 x 1,800) InfinityEdge touch display, Dell’s XPS 13 will blow you away.

Here’s how the manufacturer praises the laptop’s form-factor and display:

Erasing borders, starting with the display. The smallest 13-inch laptop on the planet has the world’s first virtually borderless InfinityEdge display — amazing both inside and out.

Indeed, the display is this laptop’s best asset, the stunning display that comes as an optional upgrade giving you eye-popping detail with 5.7 million pixels (276 ppi).

Let us not forget the amazing battery life of 18 hours with an additional 10 hours with the optional Dell Power Companion.

This little technological beast also runs out of the box with a Windows 10 Home OS version so it’s ready to go.

The 128 GB SSD is not the biggest you can get but for a small form-factor portable like this, it’s perfect.

Razer Blade Stealth Ultrabook

  • No sound while running
  • Powerful GPU
  • Lightweight
  • Newest Intel Core i7 processors
  • Gets warm quickly

This gaming state of the art laptop sets the new standard for ultra-mobility and extreme performance.

Dare to demand more for less with this 0.52 x 12.6 x 8.1 inches/ 13.1 x 321 x 206 mm laptop weighing just 2.75 lbs. This laptop also brings external desktop graphics:

The Razer Core is the world’s first true plug and play Thunderbolt™ 3 (USB-C) external graphics enclosure, allowing you to transform your notebook into a desktop gaming experience.

With such a cool name, Blade Stealth comes with an excellent NVIDIA GeForce GTX 1650 Ti Max-Q graphics card that will compliment even the newest games.

As for the display, even though it’s pretty small with its 13.3 inches diagonal, it offers 1080p resolution and a 60Hz refresh rate that is spot on for gaming.

Its CNC Aluminum carved black chassis gives it a sleek look and sturdy construction but also extra lightness, making it a highly portable device.

Apart from the tooted Thunderbolt 3 and USB-C connections, you will also find USB-A ports, a Wireless AX wireless connection and a Windows Hello infrared camera.

Acer Aspire 5 A515-55-56VK

  • Very good battery life
  • Reasonable price
  • 10th gen Intel Core i5-1035G1 processor
  • Intel Wireless Wi-Fi 6 AX201
  • No optical drive

This Acer laptop is great if you’re looking for a middleweight champion for casual computing. However, it has its perks that make it stand out from the crowd.

For instance, it’s powered by a 10th Generation Intel Core i5-1035G1 processor that will help you run even more demanding apps.

It’s also helped by 8 GB of RAM that will run the preinstalled Windows 10 Home OS like a breeze

In the graphics department, you will be looking at a 15.6-inch, Full HD IPS display that is backlit by LEDs. However, the built-in Intel UHD graphics is no match for high-demanding games.

You can benefit from the Intel Wireless Wi-Fi 6 AX201 802.11ax technology for the latest high-speed connection.

And that’s not all, you can secure your laptop with a fingerprint reader, and you will benefit from a HD webcam perfect in work from home situation.

If you need to be away from the outlet, you will also be happy to know that the autonomy will last for about 8 hours in ideal conditions.

We hope that these recommendations from our list were helpful. Select your favorite model, add the USB-C port, and dive into an amazing technology experience.

What are the benefits of the USB-C port?

You’re not looking for a USB-C laptop because that’s one of the latest gimmicks in the portable world, right?

The USB-C port is a great connector that offers a lot of convenience, reversibility, sturdiness and, above all, high-speed data transfer rates.

What is USB-C?

USB-C or USB Type-C is a 24-pin connector system with a rotationally symmetrical connector. In other words, you can flip it and it will still fit into the port, unlike the USB-A connector.

Nowadays, you can find it in most portable devices like smartphones, laptops, peripherals, tablets, and more, both for charging and data transfer purposes.

High-speed data transfer

The greatest advantage of the USB-C connector and cable is that it can offer huge data transfer speeds compared to the previous version.

If it’s combined with the Thunderbolt 3 technology, it can reach speeds of up to 40 Gbps in ideal conditions, of course.

High-power and high-speed charging

Apart from the data transfer speeds, the USB-C combined with the same Thunderbolt technology can provide up to 100 W of power to charge any devices.

That is why you will also find the USB-C charging option to many gadgets nowadays, including the more power demanding laptops or external chargers.

Graphical interface connection

And wait, there’s more! USB-C can also support DisplayPort, HDMI, MHL and superMHL protocols for connecting your monitor or display with just one cable and high-quality video.

That doesn’t mean, however, that all USB-C ports support all those protocols. Some are just adapted for charging, others can only support data transfer and only some can be used for video connection.

That’s why you need to read the specifications for the port and the cables first and see if they meet your requirements.

That’s it! We hope that our list of laptops and guide about USB-C have helped you choose the right product.

And while we-re on the subject, you can also take a look at the best USB-C laptop docking stations list that you can use to extend your PC ports.

For more suggestions and other questions, please access the comments section below.