Road Design Software: 4 Best to Use in 2026

The best software for road design includes a plethora of functions that help to dramatically cut the time it takes to design roads. Even demanding design elements like cul-de-sacs and intersections are automatically created making the whole process super-fast.

In addition, the best software for highway design leads to precise designs and contributes to a smooth process from conceptualization through construction.

How road design software works

Road design software is equipped with a collection of features that automate every step in the design.

Data collection, contouring, terrain modeling, site design, and earthwork quantities are all done automatically. Culverts and corridors design, drainage layers, walls and guardrails, roundabouts, alignments – everything is done fast.

Your role is just to feed the details and let the computer take over. Most will also allow customization to better capture the complexities involved in taxing projects.

Importantly, the road designer is given complete control over relevant design data and has constant access to project information.

Types of road design software

The software varies in design framework with some being 2D and a majority offering interactive 3D.

Other differences can be seen in capabilities, customization, and even in how the software is availed (cloud-based or via downloads).

Some of the software is open-source (and free) while a good number are subject to commercial licenses.

Having said that, engineers will find a solution to meet their needs whether working on a simple rural road project or a mega superhighway.

Here are our nominations for the best software for road design.

What’s the best highway design software for Windows 10?

Autodesk AutoCAD – 3D models for professionals

Autodesk Autocad

This solution is for the best CAD software in order to draw and design any road or object construction.

Firstly, it has a friendly UI that allows designers to create and edit their designs efficiently. Not only that, you can use it to draw and create 3D models for your construction.

More exactly, you can get various editing tools such as lines, shapes, text, and dimensions for your final project to succeed.

In addition, it gives you extensive customization options to tailor the software according to your project specific and goals.

You should also be aware that it’s possible create macros and automate repetitive tasks to streamline the process.

Finally, you should confidently use this solution for the best automatic design and engineering service.

Autodesk AutoCAD

Create realistic road projects with this automated CAD solution.
Free trial Visit website

Autodesk AEC Collection – Total construction tool

best software for road design

This collection is a feature-rich design software designed by the reputable Autodesk development team.

It proves that Autodesk never sleeps and keeps on implementing new features to improve visualization and road design workflows.

From calculating materials quantities within specified areas of interest (AOI) to modeling parametric tunnels to making precise edits for profiles, and even to enhanced terrain contour views, InfraWorks works like a charm.

The program also offers rare qualities such as seamless design management, delaying automatic design regeneration for efficient road centerline modification, and dynamic terrain manipulation.

Well, it has a steep learning curve but with Autodesk publishing tons of interactive tutorials and videos, you should soon find your way no matter the sophistication of the project at hand.

If you’re passionate about delivering more accurate road designs, stunning 3D visualization, and excellent collaboration, InfraWorks 360 could be the way to go.

Autodesk AEC Collection

An all-in-one collection of professional programs to get your most ambitious projects.
Check price Visit website

Civil 3D by Autodesk – Accelerated design automation

Yet another construction design software from Autodesk, this time one dedicated to civil infrastructure.

In terms of roads and bridge design, Civil 3D helps with the project design, but also with the necessary documentation.

Using 3D modeling options, you can create driving corridors, highways, 3-way or 4-way intersections, roundabouts, or drainage systems.

The flexible and visually dynamic features of the program allow you to efficiently plan according to field-captured data or with the already existing infrastructure.

Civil 3D eases your work thanks to the design automation options so that scripts can be reused and reloaded with repetitive data.

Of course, Civil 3D keeps all your project data stored in one single console that can be accessed from various locations or devices.

Civil 3D

Flexible and efficient workflows for civil engineering and documentation software to take your road and bridge planning one step further.
Free trial Visit website

Autodesk Revit LT – 3D BIM software

Our last recommendation, again developed by Autodesk, is Revit LT, a program that used Building Information Modelling technology to produce high-quality architectural designs and documentation.

It’s a simpler software compared to the all-in-one packages presented before, that includes only automated BIM workflows aiming to improve project quality and overall design process.

It also helps with project management challenges by keeping all data in one place and neatly aligned with the schedule.

You can share your Revit LT designs with other users of AutoCAD or Revit, and get feedback to see where you stand with your skills and ideas.

Revit LT

Deliver professional 3D designs using Revit’s automated workflows and stay on track with your road planning projects.
Free trial Visit website

If you’ve already tried one of these tools or if you know of another one worth mentioning, use the comments section to tell us more.

Avast blocking PayPal: best ways to fix this issue

While making payments through PayPal may seem like a breeze each time you log in to your account, each day may not always be the same.

There comes a time when you may see that Avast antivirus is blocking PayPal and you cannot access or even log in to do any transactions.

Most PayPal users may not know what to do when the antivirus program gets in the way of their normal payment activities, but we have some solutions that can help you fix the problem.

Here are the best solutions to try out in order to stop your Avast antivirus from blocking PayPal in Windows 10.

What can I do if Avast is blocking PayPal in Windows 10?

1. Update your Avast antivirus

  1. Open Avast and from the Menu select Settings.
  2. Go to General and then click Update.
  3. Here, click both Check for updates buttons.

There are users who have complained that their antivirus blocks the PayPal website from opening, but what they may not have checked is the version of their antivirus they’re currently using.

Outdated versions usually cause antivirus programs to block other programs from working. Update your Avast antivirus to the latest version then check if the problem persists.

If you encounter issues when trying to update Avast virus definitions, you can use our dedicated guide in order to fix the issue.

2. Add PayPal to trusted websites

  1. Click Start and search for Internet Explorer. Select it in order to open the browser.
  2. Click the Settings icon, then select Internet Options.
  3. In this new window, go to the Security tab.antivirus blocking PayPal
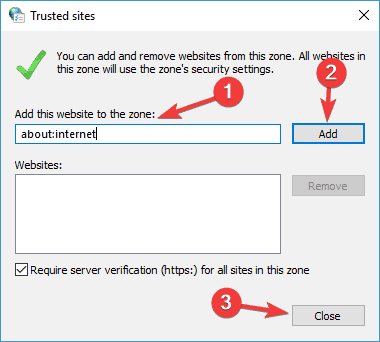
  4. Select Trusted sites, then click the Sites button.
  5. Type PayPal web address in the open box for Add this website to the zone.There is a problem with this website's security certificate Firefox
  6. Click Add and close the Internet options window.

This solution should add the PayPal website to a list with all trusted links, so your antivirus won’t block it. Check if this helps, if not, go to the next solution.

3. Boot in Safe Mode then try to access PayPal

  1. Click on Start button and select Settings.
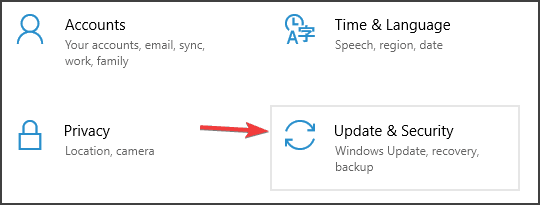
  2. Click Update & Security, then select Recovery.
  3. Go to Advanced startup and click Restart now.
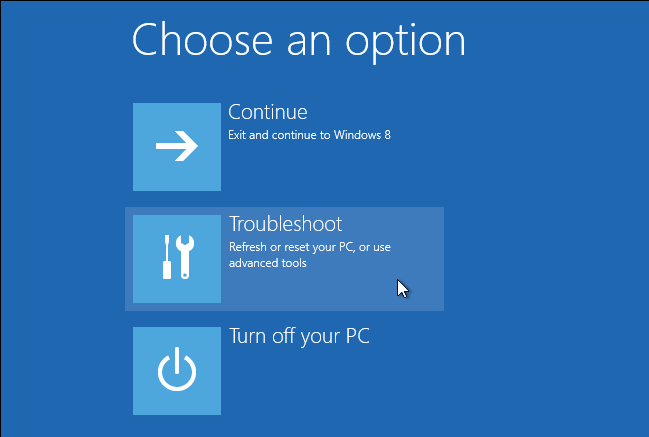
  4. Select Troubleshoot from the Choose an Option screen, then click Advanced options.Windows failed to start. A recent hardware or software change might be the cause
  5. Go to Startup Settings and click Restart.computer stuck on motherboard splash screen
  6. Once your computer restarts, a list of options will come up.
  7. Choose 4 or F4 to start your computer in Safe Mode.startup settings

Safe mode starts up your computer with limited files and drivers but Windows will still run. To know whether you’re in Safe mode, you’ll see the words Safe Mode at the corners of your screen

If the antivirus blocking PayPal issue isn’t there while in Safe mode, then your default settings and basic drivers are not contributing to the issue.

Sometimes, Windows 10 Safe Mode is not working and your computer starts normally. When this happens, you can use our detailed guide to fix the error.

4. Place your system in a Clean Boot mode

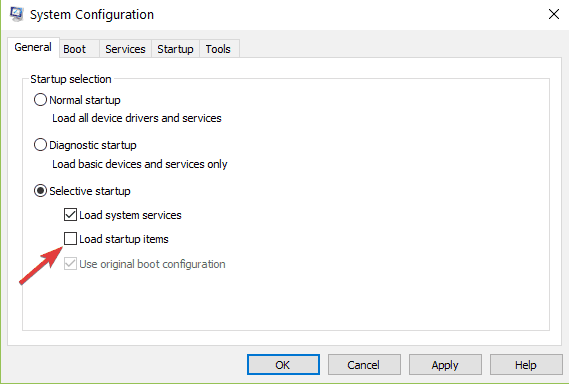
  1. Make sure you are logged on as administrator.
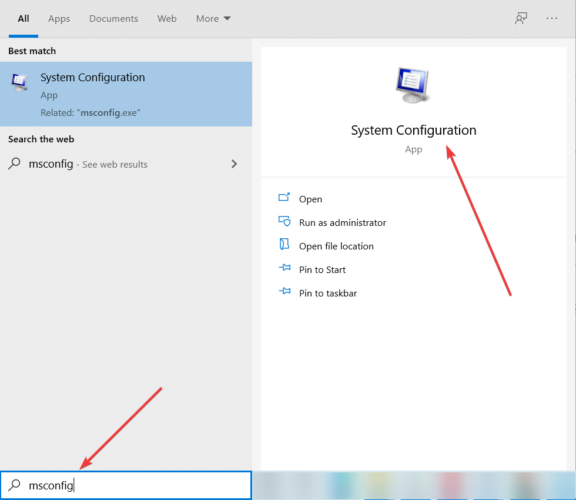
  2. Go to the search box and type msconfig.
  3. Select System Configuration.
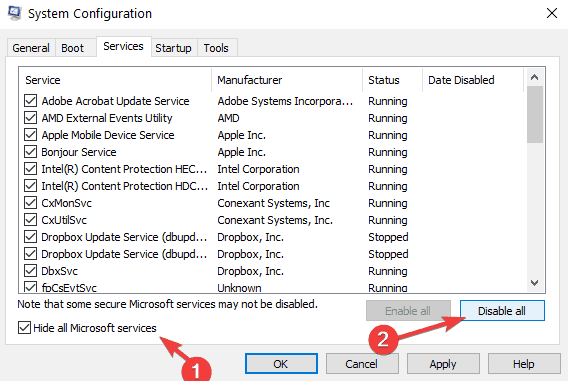
  4. Find Services tab and select Hide all Microsoft services box.
  5. Click Disable all and reboot your computer.

If you manage to boot in Safe Mode, perform a clean boot to eliminate any software conflicts that may be causing Avast to block PayPal in Windows 10.

These conflicts can be caused by applications and services that start up and run in the background whenever you start Windows 10 normally.

You will have a clean boot environment after all these steps are carefully followed, after which you can try and check if you can access PayPal.

5. Perform a system file checker scan

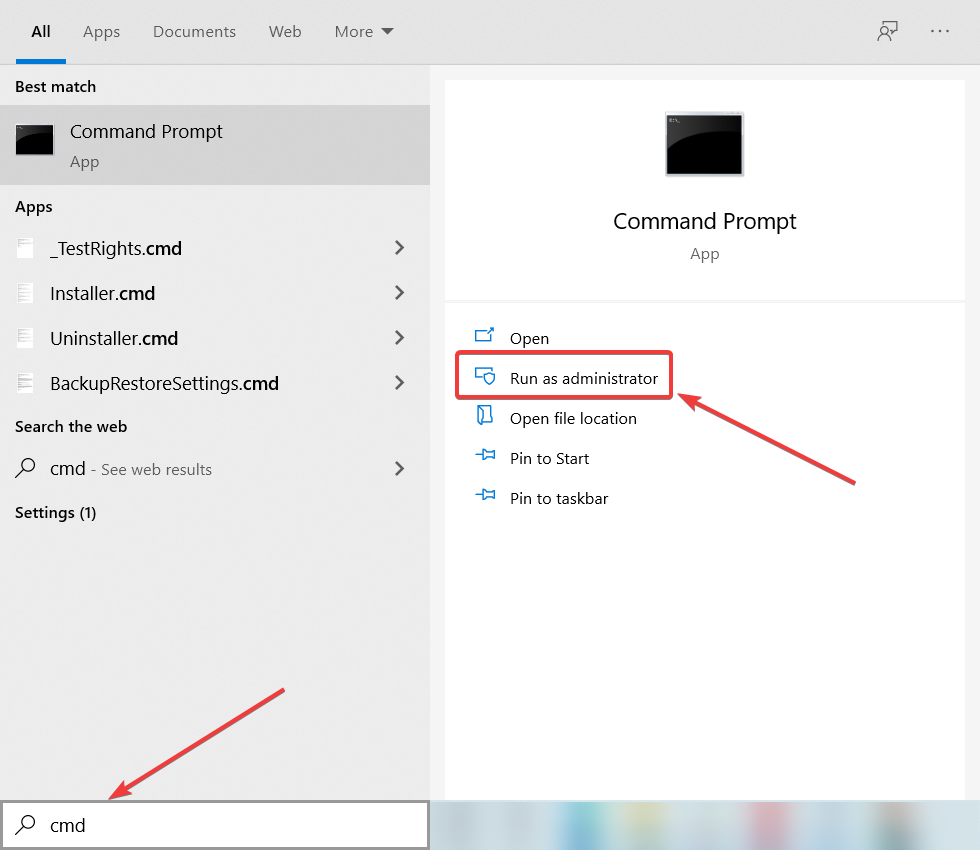
  1. Go to the search field box and type cmd.
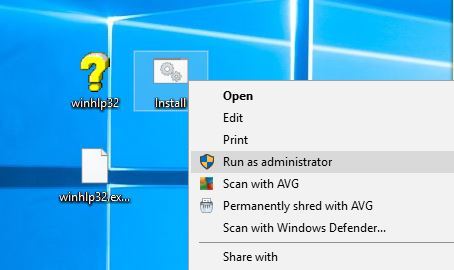
  2. Go to Command Prompt and select Run as Administrator.
  3. Type the following command then press Enter: sfc/scannow
  4. Restart your computer

A System File Checker scan checks or scans all protected system files, and then replaces the incorrect versions, with the genuine, correct Microsoft versions.

If the Sfc /scannow stops on your Windows 10 computer, check our comprehensive guide including the best solutions to solve the problem.

6. Use another reliable antivirus

Avast is a great freeware antivirus that keeps your computer safe from threats. However, if it interferes with your activity, you might consider changing it with another tool.

We recommend you an antivirus that has been ranked highly in independent tests and incorporates innovative multi-layered defenses that block all forms of malicious threats.

Its multi-layered protection combines traditional signature-based protection with behavioral-based protection to guard against known and new malware outbreaks, with industry-leading detection rates.

⇒ Get TotalAV

The above solutions should stop Avast from blocking the PayPal website and let you to manage your account as you need.

If you want to discover even more cybersecurity options to protect your computer that won’t block your trusted websites, take a look at these best antiviruses without false positives.

Has any of the above solutions helped fix the antivirus blocking PayPal problem? Let us know in the comments section below.

MS Teams brings PowerPoint improvements, new emojis, and more

Microsoft Teams is one of the most used chat-based communication and collaborator platform and it does position itself as a better Zoom alternative.

Thanks to the Microsoft 365 integration, although Microsoft Teams did manage to make an impressive appearance and got users’ attention.

Like any respected communication app, Microsoft Teams is constantly being updated and recently there were released some impressive features in the latest public preview.

Microsoft Teams updates

New emoji

This feature was unveiled last week and it seems as though the emoji has been expanded from 85 to an impressive 800.

And not only that but users will be also able to use people and animals emoji to help them bring a more interesting dynamic to the chat messages.

Improved content sharing

The new Share Tray as they named it, will help users find in a more rapid manner the content they want to share with the other participants.

The aim of this feature is to help users decide which content is more appropriate for sharing during the meeting.

Basically, what has changed from the old way of sharing content, is the form in which you share it and how quickly you can now find the content on your device.

You can even select if you also want to share your devices’ sound alongside the file.

Noise suppression Mac

This is a great and useful feature to have during meetings, that will automatically remove background noise. Thanks to the artificial intelligence this option will analyze the audio feed and filter out the unwanted noise.

Moreover, you will be able to control the exact level of noise suppression that should be applied.

Teams on VDI 2×2 Gallery View

This feature allows you to see up to four users’ videos in 2×2 Gallery View. The users must have the latest version of the VDI client installed on theirs. The feature is also available for Citrix and VMWare.

PowerPoint Presenter View

Thanks to this updated feature you will be able to present your PowerPoint more easily. You’ll have access to see the current slide, the notes, and even a view of all slides, in case you want to quickly check something.

No one other than the person presenting the slides will be able to see all these details, so you can rest assured that everything will remain private.

The audience will only be able to see the current slide or the slide they want to navigate to unless you have locked the audience navigation.

As always we would love to hear your thoughts on these updated Microsoft Teams features. Don’t hesitate to leave us a message in the comments section below.

Well-known VPN used to steal credentials on SolarWinds servers

A recent Cybersecurity and Infrastructure Security Agency (CISA) report shows how hackers connected to the SolarWinds Orion server via a popular virtual private network, installed malware known as Supernova, and collected the victims’ credentials.

The VPN depolyed is Pulse Secure. The cyberattack qualified as an advanced persistent threat started back in Mach 2020 and lasted until February 2021.

Cybercriminals used yet another new method

new cyberattack method with vpn

According to CISA, the attackers used a new hacking approach: the Supernova (a .NET webshell) was placed directly on the SolarWinds server making it look as if part of the system.

The threat actor connected via the U.S.-based residential IP addresses […] which allowed them to masquerade as teleworking employees. (Note: these IP addresses belong to routers that are all similar models; based on this activity, CISA suspects that these routers were likely exploited by the threat actor.)

The hackers also took advantage of the fact that the victims didn’t use a two-factor authentication method on their VPNs.

Once authenticated, the attackers used a virtual machine to move laterally to the victim’s SolarWinds Orion software and install Supernova via a PowerShell command, the report explains.

The SUPERNOVA webshell allows a remote operator to dynamically inject C# source code into a web portal provided via the SolarWinds software suite. The injected code is compiled and directly executed in memory.

While VPNs provide an extra layer of security, they don’t act the same as antivirus software or as a firewall.

That is why CISA recommends that all organizations use not only multiple factor authentication methods, but also several cyber-protection tools within the same network, all of them up to date.

Similarly, the company’s workstations and servers should be updated and equipped with only the necessary software. Regular users should not have admin privileges, especially when it comes to installing third-party apps.

You can read more about CISA’s full recommendations and the entire threat scenario in the above-mentioned report.

Win+X Menu is Not Working in Windows 10 [TESTED FIXES]

Over the years Microsoft added many improvements to Windows, and one new addition to Windows 8 was the Power User Menu, also known as the Win+X menu.

This feature made its way to Windows 10, but unfortunately, some users are complaining that the Win+X menu isn’t working on their PC.

What to do if Win+X menu is not working in Windows 10?

Fix – Win+X menu not working

1. Remove QuickSFV

Users reported that the most common cause for this error is the QuickSFV application. This application adds context menu items and that can cause issues with the Win+X menu.

To fix this problem, simply uninstall QuickSFV, and issues with it should be resolved. If you don’t use QuickSFV, be sure to uninstall any application that adds context menu items.

2. Uninstall or update AirDroid

According to users, tools such as AirDroid can also interfere with the Win+X menu and cause issues with it. To fix this problem you can simply uninstall the AirDroid application or update it to the latest version.

Users reported that after updating AirDroid app the issue with the Win+X menu was completely resolved.

3. Add a new item to Win+X menu

The great thing about Win+X menu is that you can customize it by adding new shortcuts to it. According to users, there seems to be a permission problem that prevents the Win+X menu from appearing, but you can easily fix it by adding a new item to the Win+X menu. To do that, follow these steps:

  1. Press Windows Key + R and enter %localappdata%. Press Enter or click OK.
    winx-menu-not-working-run-1
  2. Go to MicrosoftWindowsWinX folder.
  3. You should see three Group folders. Go to any of them and add a new shortcut to it.
    winx-menu-not-working-run-2

After adding a new shortcut, the Win+X menu should start working without any problems.

4. Copy the WinX folder from a Default user

Sometimes you can fix this issue simply by copying the WinX folder from a Default user folder. To do that, follow these simple steps:

  1. Go to C:UsersDefaultAppDataLocalMicrosoftWindows folder.
  2. Locate WinX folder and copy it to your profile. To do that, press Windows Key + R, enter %localappdata% and go to the MicrosoftWindows folder. Paste the WinX folder there.

After copying the WinX folder, the issue should be completely resolved.

5. Install a language pack

A few users reported that they fixed this issue simply by installing a language pack. To do that, follow these steps:

  1. Press Windows Key + I to open the Settings app.
  2. Go to Time & language > Region & language.
  3. Click on Add a language option.
    winx-menu-not-working-add-1
  4. Select the desired language from the list.
    winx-menu-not-working-add-2
  5. After the new language is installed, click it and click on Set as default button.
    winx-menu-not-working-add-3

After the display language is changed, the Win+X menu should start working again. If the Win+X menu works, you can remove the newly added language packs and switch back to your default language.

6. Use a specialized tool

According to users, this issue is caused by shell extensions but you can use specialized third-party software to disable them.

These tools allow you to disable any shell extensions that may cause this problem and also replace broken system files in just a few moments.

7. Use ShellExView

According to users, you can fix this problem by finding and disabling the problematic shell extension. To do that, you can use the ShellExView tool. Simply start this tool and disable all non-Microsoft entries.

Restart Windows Explorer and go back to the ShellExView. Now try enabling shell extensions in groups or one by one until you find the one that is causing this issue.

Keep in mind that you’ll have to restart Windows Explorer every time you disable or enable a shell extension.

8. Check your registry

Sometimes issues with your registry can cause Win+X menu to stop working. Apparently, changing the shortcut settings in the registry can cause this issue, therefore if you made any changes in the registry related to shortcuts, you might want to revert those changes. To fix this problem, you need to do the following:

  1. Press Windows Key + R and enter regedit. Press Enter or click OK.
    winx-menu-not-working-regedit-1
  2. Go to HKEY_CLASSES_ROOTpiffile key in the left pane and make sure that IsShortcut entry is available in the right pane. Apparently, you can change the look of shortcut icon by renaming this entry to ShortcutIs, but that will cause Win+X menu to stop working. Therefore if you remember renaming IsShortcut, be sure to rename it back to the original name.
    winx-menu-not-working-regedit-2
  3. After that, go to HKEY_CLASSES_ROOTlnkfile key and repeat the same steps.

Win+X menu is one useful feature that allows you to quickly access Windows 10 settings, and if you have any issues with it you should be able to fix them by using some of our solutions.

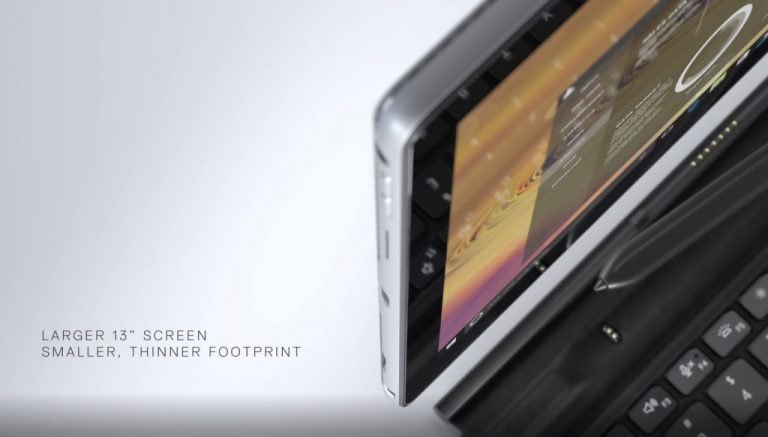
Dell takes on Surface Pro X with Latitude 7320 Detachable

A new player has entered the detachable battle royale this year as Dell unveiled its Latitude 7320 Detachable today.

Word-salad naming convention aside, Dell’s new detachable is a worthy successor to the industry flagship Surface Pro as it comes with a similar design esthetic but more ports and a 10% thinner bezel footprint for an 84% screen to body ratio unmatched by the competition.

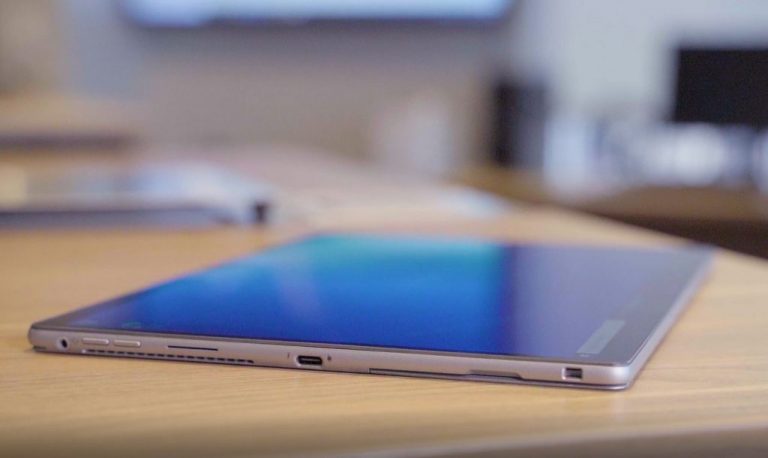
Dell Latitude 7320 Detachable Side

The 7320 Detachable offers Intel’s 11th generation core processors ranging up to i7 vPro configurations and Windows 10 Pro 64 bit or Enterprise (WaaS) options. Interestingly enough Dell list Intel Iris X integrated graphics (UHD for i3) as the graphics onboard and not the more sought-after Iris Xe that’s been impressing the industry as of late. The listed graphical specs could just be a misprint or a negatable variant crafted for Dell, that performs similarly to the Xe, we’ll just have to wait and see.

Dell’s detachable can be outfitted with up to 16GB LPDDR4X memory, which doesn’t look to be replaceable at this point as well as five different SSD M.2.-2230 capacity options that range from 128GB to 1TB.

Where the 7320 Detachable steps out of the shadows of Microsoft’s Surface is its port selection and connectivity in 2021. Microsoft stubbornly continues to take a minimalist approach to port selection where the 7320 comes with two Thunderbolt 4 ports with power and display delivery capabilities, a smartcard reader, and an optional fingerprint reader on the chassis.

Dell Latitude 7320 Detachable Ports

Intel Dual Band Wireless support for the 7320 includes Wi-Fi 6 AX201 2x2ax and Qualcomm Snapdragon X20 LTE-A (DW5821e) for AT&T, Verizon, and Sprint in the US.

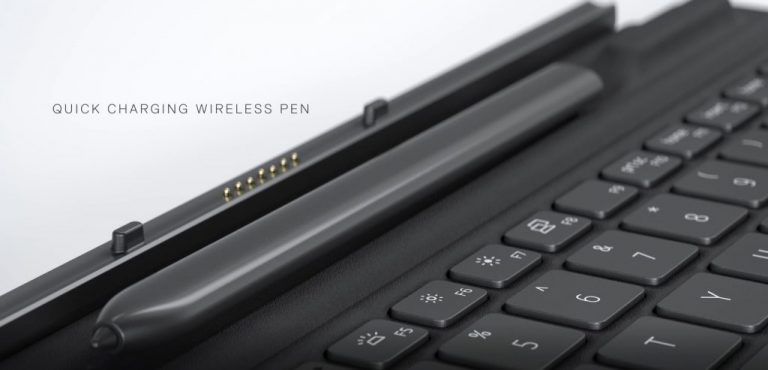
The rest of the 7320 hardware rounds out similarly to a Surface Pro, including a rechargeable dock built into its detachable keyboard made of synthetic suede and aluminum. Speaking of pens and keyboards, Dell, unfortunately, does not include them in the box like Lenovo and other non-Microsoft competitors. On their own, they can cost $99 and $150 respectively, or buyers can tack on $269.99 to their final purchase price at checkout to “bundle” them.

Dell Latitude 7320 Detachable

Dell claims the 7320 can deliver up to 35% of a charge in about 20 mins with its ExpressCharge Boost delivery, and when fully charged, up to 10hrs on a 60W battery.

Dell also lists a plethora of security features and support that IT Admins may gush over such as VMware Carbon Black Endpoint: Standard, Netskope Cloud Access Security Broker (CASB), Dell Endpoint Security Suite Enterprise, and more.

All of this comes in a package that weighs about 1.82lbs (without a keyboard), starting at $1,549.99.

Dell’s 2021 lineup is pretty aggressively priced and power-packed with features and custom software to turn some heads this year.

Microsoft opens registrations for its Build 2021 conference on May 25-27

Microsoft has just opened registrations for its Build 2021 conference, which just like last year will be a free digital event for all developers and enthusiasts. Build 2021 will be on May 25 to 27, and you can register now for free on this page.

The introducing keynote on May 25 will feature Microsoft CEO Satya Nadella and other executives. You can already check out the basic agenda showing the must-see sessions and speakers, and we’ll let you know once the full session catalog will be available.

Hybrid work is expected to one of the main themes of Build 2021, but we hope Windows 10 will, too. Microsoft’s annual developer conference is probably a good opportunity to discuss Windows 10X, which is expected to ship later this year on new devices for the education market.

As we’re getting closer to the release of Windows 10 version 21H1, we also hope to hear some details about the “Sun Valley” design update that should arrive later this year with Windows 10 version 21H2. What are your expectations for Build 2021? Let us know below.

Task Manager Lagging or too Slow to Respond [Fixed]

If Task Manager is lagging or is too slow to respond, it’s probably due to your antivirus or PowerShell interference. We’ll explain below all the steps you have to follow to fix it quickly.

How to fix Task Manager lagging

1. Disable Powershell

  1. Press Win + R, type gpedit.msc, and hit Enter.GPEDIT MSC RUN
  2. Go to Computer Configuration > Windows Settings > Security Settings > Software Restriction Policies.software restrictions policy gpedit
  3. If no policies exist, right-click Software Restriction Policies and choose New Software Restriction Policies.new software restriction policies
  4. Under Additional Rules, right-click and choose New Path Rule.gpedit new path rule
  5. Enter:
    • C:\Windows\System32\WindowsPowerShell\v1.0\powershell.exe.
  6. Set Security Level to Disallowed and hit Apply. disable powershell in gpedit
  7. Restart your PC.

Powershell can sometimes cause issues with Task Manager on your PC. This is an unusual issue, but if your Task Manager is slow to open, you might be able to fix the problem simply by disablingit.

2.Create a new user account

  1. Open the Settings app and navigate to the Accounts section. To open the Settings app quickly, you can just use Windows Key + I shortcut.
  2. Choose Family & other people from the menu on the left. Click Add someone else to this PC in the right pane.
    Task Manager takes forever to open Windows 10, not responding
  3. Select I don’t have this person’s sign-in information.
  4. Now choose Add a user without a Microsoft account.
  5. Enter the desired username and password for the new account and click Next.
    Task Manager very slow

Once you create a new user account, switch to it. If the issue with Task Manager doesn’t appear on the new account, you should move your personal files to it and use it instead of your old account.

3. Check your antivirus

  1. Go to the Block/Allow Files section and click the Add File button.
  2. Now select taskmgr.exe. You can find it in C:Windowssystem32 directory.
  3. Select Task Manager from the list and set it to Allow.
  4. Now you need to do the same in the Application Protection section. Add Task Manager and set it to Allow.

If the issue doesn’t appear after removing your antivirus, you should consider switching to a new antivirus.

There are many great antivirus tools on the market, but if you want reliable protection that won’t interfere with your system in any way, we suggest that you try out TotalAV.

⇒ Get TotalAV

4. Perform a chkdsk scan

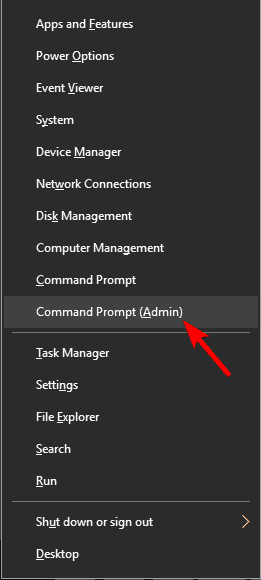
  1. Open Command Prompt as administrator. To do that, press Windows Key + X or right-click the Start button. Now choose Command Prompt (Admin) or PowerShell (Admin) from the menu.
    Windows 10 Task Manager lag
  2. Once the Command Prompt opens, type chkdsk /f :X and press Enter. Be sure to replace :X with your system drive letter. In most cases, that would be C.
    Task Manager slows computer
  3. Command Prompt will now ask you to schedule a scan during the next restart. Press Y to confirm.

5. Use Safe Mode

  1. Open the Settings app and navigate to the Update & Security section.
  2. Now select Recovery from the left pane and in the right pane click the Restart now button.
  3. Choose Troubleshoot > Advanced options > Startup Settings. After doing that, click the Restart button.
    Task Manager very slow
  4. Once your PC restarts, you’ll be presented with a list of options. Choose the desired version of Safe Mode simply by pressing the corresponding key on the keyboard.

If the issue doesn’t appear in Safe Mode, it means that the problem is related to your settings or to your user profile, so you can start troubleshooting the issue.

6. Perform SFC and DISM scans

  1. Open Command Prompt as administrator.
  2. When the Command Prompt starts, enter sfc /scannow and press Enter to run it.
    Windows 10 Task Manager lag
  3. The scan will now start. This process can take about 15 minutes or more, so don’t interfere with it.

Once the SFC scan is finished, you need to check if the problem is still there. If SFC didn’t fix your problem, or if you can’t run SFC scan at all, you’ll need to use DISM instead:

  1. Start Command Prompt as an administrator.
  2. Now enter DISM /Online /Cleanup-Image /RestoreHealth command and press Enter to run it.
    Task Manager takes forever to open Windows 10
  3. DISM scan will now start. This scan can take about 20 minutes or more, so try not to interrupt it.

Once the scan is finished, check if the problem is still there. If you weren’t able to run an SFC scan before, try running it now and check if that helps.

7. Install the latest updates

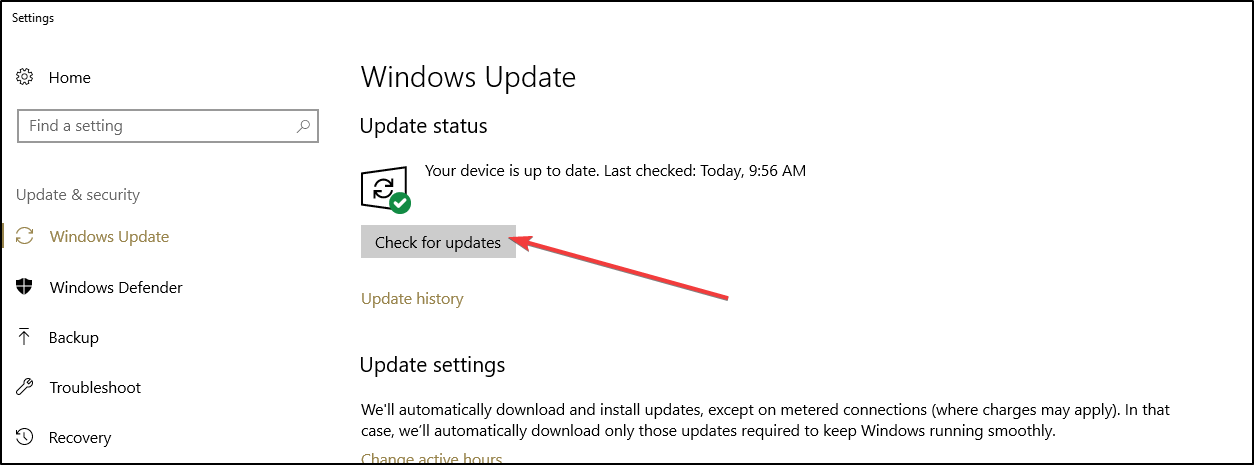
  1. Open the Settings app and go to the Update & Security section.
  2. Now click Check for updates button.
    Task Manager takes forever to open Windows 10

If any updates are available, they will be downloaded automatically in the background and installed as soon as you restart your PC. Once your system is up to date, check if the problem is still there.

There are many problems that can appear with Task Manager, and if Task Manager is slow to open or slow to respond on your PC, the issue is most likely related to your antivirus or to file corruption. However, you should be able to fix the problem using one of our solutions.

7 Best Golf Swing Analysis Software [2026 List]

Are you looking for good software for golf swing analysis? Do you want to become the best golf player on the field? If the answer is yes, check out our list of the best golf swing analysis tools.

The tools listed below are suitable for both beginners, as well as advanced golf players. We selected them using a series of straightforward criteria, such as user reviews, ease of use, features, and more.

Golf swing analysis software to improve your game

Blast Golf Swing and Stroke Analyzer (recommended)

blast golf swing and stroke analyzer

Blast Golf is one of the leading swing analyzers on the market designed to give you real-time feedback. Their sensor goes on the end of your club and captures metrics for a full swing or putting stroke. Stroke and swing metrics allow you to analyze and improve your timing, tempo, face rotation, and much more.

In the box you will get the following:

  • Blast Golf stroke and swing analyzer (sensor)
  • Black standard grip attachment
  • Clear oversized putter attachment
  • Wireless charger and charger cable
  • Free mobile app download included

The app is intuitive and you can easily learn how to use it once you get up and running. The Blast sensor easily and securely attaches to the grip of nearly any regulation putter, driver, iron or wedge. Smart video capture, adaptive slow-mo technology, and automatic video curation are supported in iOS/Android. You can share your metrics and videos instantly via Facebook, Twitter, and E-mail without leaving the mobile app.

This is a great tool, recommended by many players and embraced as a teaching tool as well. The main focus is on putting and it’s the most accurate diagnostic tool for recreational and professional golfers. The retail price is $149.95 at the moment.

⇒ Get Blast Golf Swing and Stroke Analyzer

V1 Home Software

V1 Home is one of the best sport analysis tools available on the market. It also supports golf analysis, allowing you to analyze and improve your style.

Using this tool is very simple, you first capture your golf performance on video and then open it in V1 Home. Then you highlight the areas that you want to improve using V1 Home’s drawing tools.

V1 Home also offers two additional services that will help you progress faster: you can send your videos to instructors for expert analysis and online lessons, as well as activate a complimentary membership to receive online lessons and model videos.

For more information, check out the video below:

You can download the tool for free. If you want to access additional features, you can buy the Premium version.

⇒ Get V1 Home Software 

MotionView video analysis software

MotionView is an advanced video analysis software for golf professionals and amateur golf players. The tool has a very friendly and easy-to-use interface, that will help you to quickly analyze your golf swing and improve your movements.

MotionView supports multi-camera video capture (up to 8 cameras, including high-speed cameras), slow motion video analysis, split-screen video comparison, and more. All these features will help you improve your game in no time.

The built-in video file manager allows you to organize your golf videos easily so that you can track your progress at all times.

For more information about the MotionView golf analysis software, check out the video below:

⇒ Get MotionView

DartFish sports video analysis software

Dartfish is a powerful sports video analysis software that you can use to analyze your golf videos. This tool is very versatile, and you can use it to improve your performance in other sports as well.

Dartfish is suitable for professional golf players, as well as coaches and referees. It comes with many additional analysis tools (such as the dartfish.tv video analysis sharing site) that allow you to analyze golf performance to the tiniest detail. For this reason, you really need an equally powerful computer to process all this information.

Unfortunately, we can’t tell you how much Dartfish costs as there is no price list available. The company explains that the price you pay varies depending on your needs. As a result, you need to contact a Dartfish representative to get more information about the price list.

⇒ Get Dartfish

Swing Catalyst Software

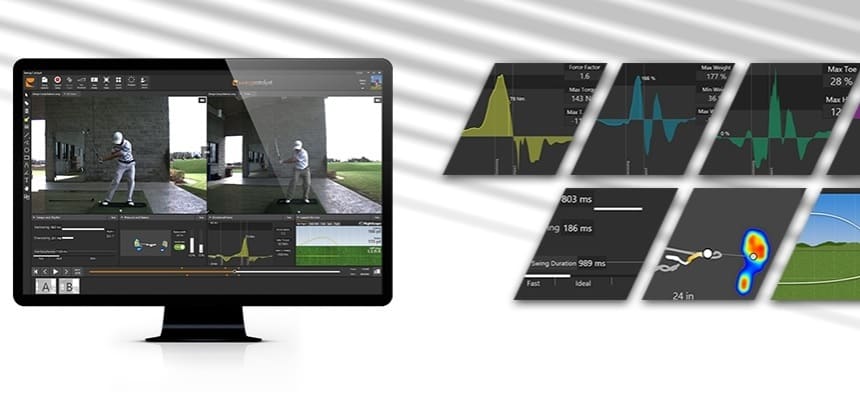
Swing Catalyst is a complex and powerful video analysis software specially developed for golf players. The tool offers you a bevy of features that will help you pinpoint the areas where you need to improve your style. You can use a wide range of drawing tools, slow motion playback, video overlay, side by side video comparison, and more.

If you’re a coach, you can use Swing Catalyst to record video summaries of your lessons and then share them through YouTube, email or the free Swing Catalyst app. You can also organize all your videos by name, date, and time and you can sort your students’ swings based on the type of club and carry distance.

For more information, check out the video below:

⇒ Get Swing Catalyst

GASP Lab

GASP Lab is a versatile golf swing analysis software that can be used by a variety of professionals, including professional coaches and players, amateur golf players, as well as national bodies, and golfing Academies.

The tool offers high-speed video support, integrated 3D motion analysis, force platform data, ball flight data, and club data. It supports single and multiple camera videos.

GASP Lab also offers a series of features that support the communication between coaches and students. These include the Golf Swing App, diary, and email merge, among other features.

⇒ Get GASP Lab

cSwing golf analysis software

cSwing is a useful golf analysis software that will help you improve your movements and become a better golf player. Don’t get fooled by the rather old and unpolished user interface. This tool offers you a long list of features that will help you perfect your game.

You can split the screen and view step-by-step swings alongside a tour professional so that you can pinpoint the exact differences. You can also play the video at different speeds in order to detect faulty movements and correct them.

The tempo trainer allows you to perfect your moves and learn to hit like a Pro. You can also create drawings and annotations in the software that can be edited dynamically.

The tool also comes with a golfer’s notebook compatible with Microsoft Word, allowing you to track your progress.

It is worth mentioning that cSwing is compatible with older Windows versions, including Windows XP. You can also run the software on Windows 10, we installed and tested it and everything went smoothly.

⇒ Get cSwing

Conclusions:

The tools listed above are some of the best golf swing analysis software that you can use to perfect your game. Some of them are suitable for golf coaches (Swing Catalyst), others are perfect for amateur golf players (MotionView). Some tools require a powerful PC to run on, while other are compatible with older Windows version.

Take a sheet of paper and list all the things that you expect to find in a golf swing analysis software and then install the software that best suits your needs.

RELATED: 5 best Windows 10 golf games that you should play

How to easily schedule a Microsoft Teams meeting from Google Calendar

With more than 115 million daily active users, Microsoft Teams is proving to be quite the solution for video conferencing. At the same time, Google’s own mail and calendar solutions (which comes with G Suite for enterprise and business users) are popular, too, with over 2 billion monthly active users.

All that said, did you know that you can actually set up a Teams meetings from within Google Calendar? This might be useful if your company or small business is using a combination of both Teams and G Suite. Here’s a look at how you can schedule a Microsoft Teams meeting from Google Calendar.

Install the Teams meeting add-on for Google Workspace

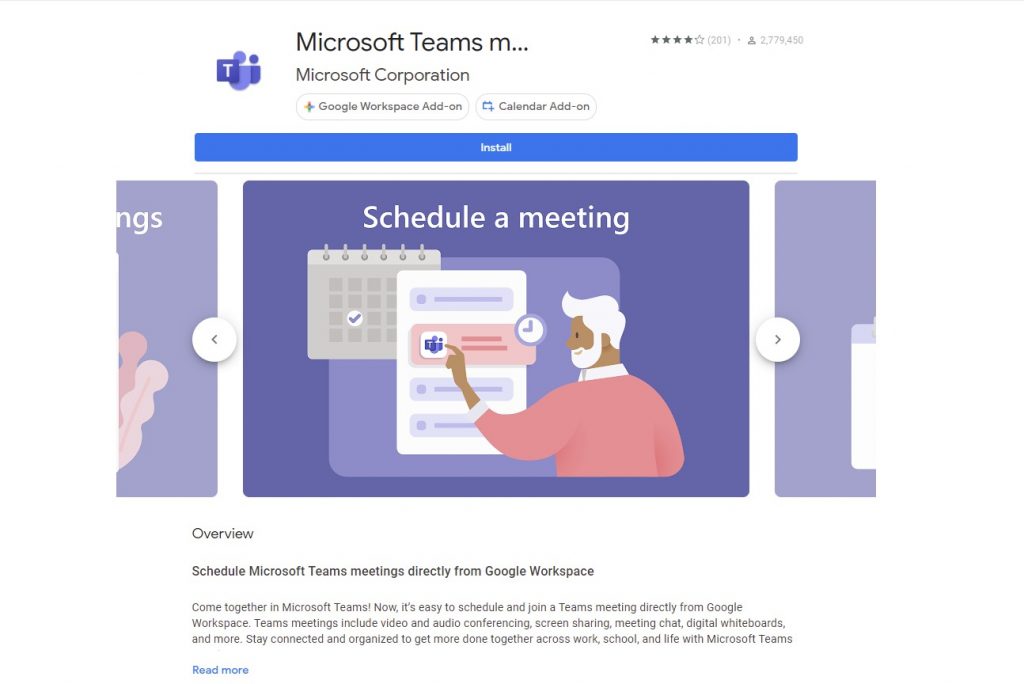
Microsoft Teams Google Workspace Add On

For this first step, you might need to check with your IT Admin first. Usually, it’s up to the IT Admin to enable the features we’re about to discuss. But do note, this also works with both personal Gmail and work Gmail accounts, too, in our testing. So, this means you can add Teams to a personal Gmail, or a non-G-Suite free-tier email, too.

This is all because you’re just adding the Microsoft Teams meeting add-on to your Google account. This is the key to scheduling Teams meeting directly from your Google Calendar. It is also how you’ll view, edit, and join meetings, too.

Anyway, to get started, head to your Google Calendar, and open the right-side panel, then select the plus sign. If this is hidden, you can expand it out with the arrow on the bottom of the screen. This will open up the Google Workspace Store page. From here, search for Teams in the search field, and then select Install, then give it the permission that is needed.

If you’re having trouble, just click this link to launch into the Workspace Store and add Teams through there. This is the quickest way, usually.

Once added, you can launch Teams from your sidebar in Google Calendar by clicking the Teams icon. Select, Login, and then choose Authorize Access. You’ll then be logged in via Teams and have full access to your Teams info on your Google Calendar.

Scheduling a meeting in Google Calendar

Teams Join Meeting Google

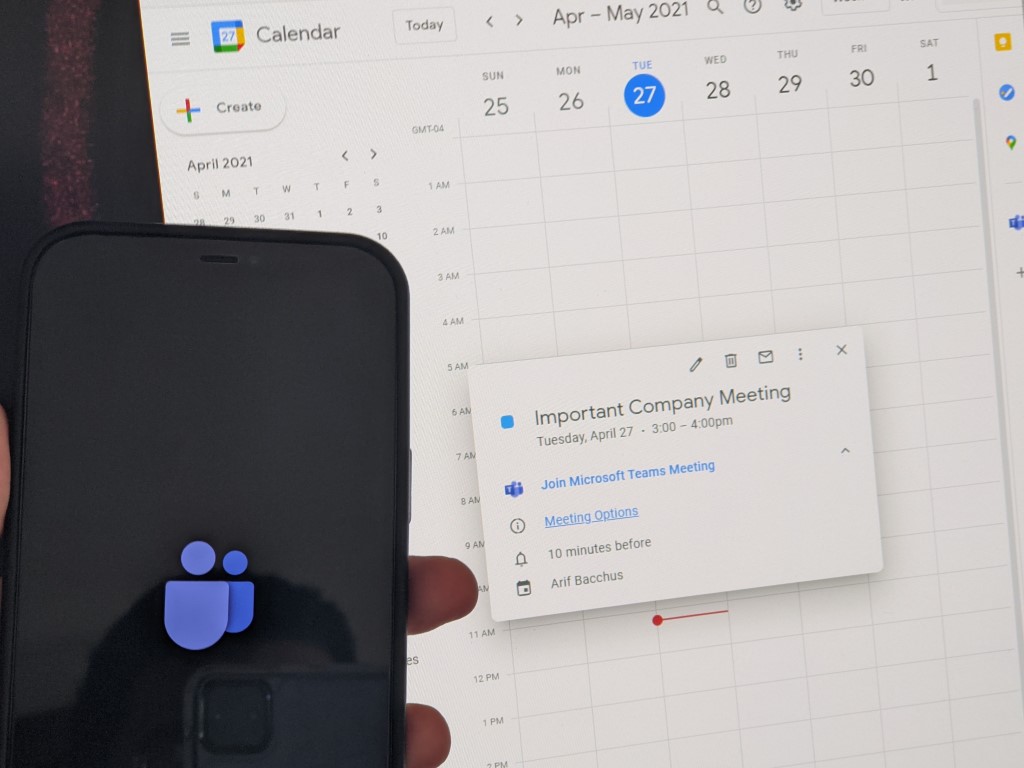
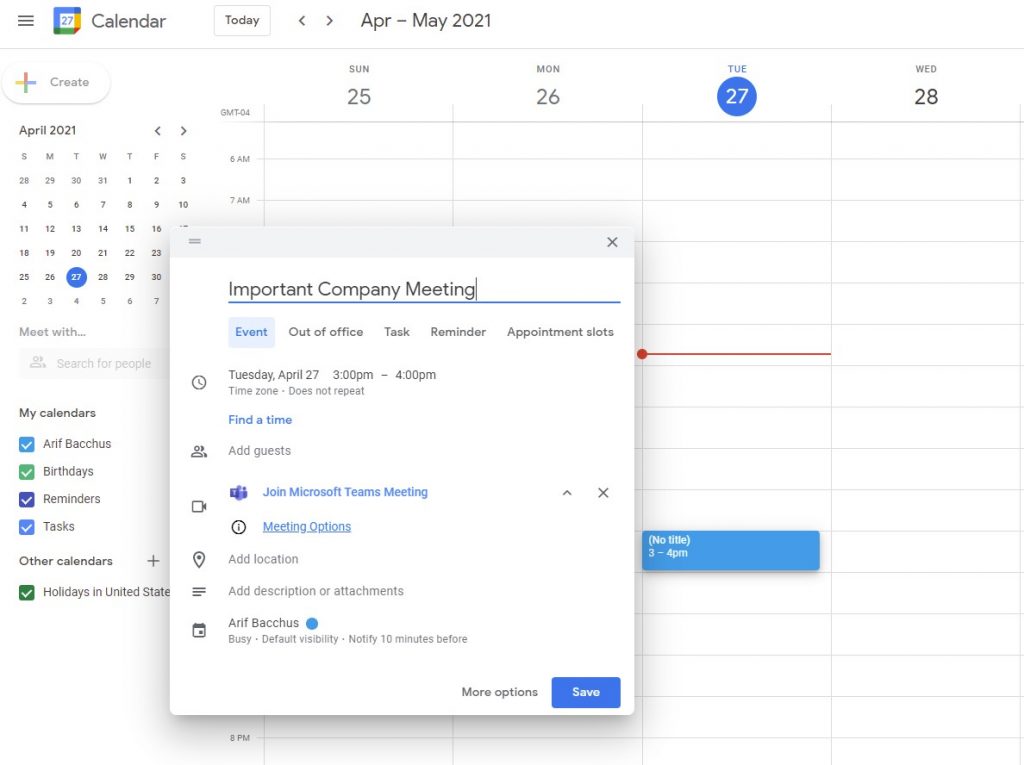
Now that the Teams add-on is installed, you can actually schedule a meeting through Google Calendar. Just click anywhere in your calendar to start a meeting. Give it a name, as well as a time. Then, where it says Add Google Meet video conferencing, or Add Conferencing, you’ll want to click the dropdown menu button and choose Microsoft Teams Meeting. From here, you can add guests to enter the people you’re inviting to the meeting, and you can fill out the remainder of the information via More Options.

When done, the meeting will show up in your Google Calendar. Note that you also can create a meeting by clicking the Create button in Google Calendar, too. It’s a really simple process, isn’t it?

Final thoughts: Viewing, editing, and joining meetings

Teams Edit Meeting

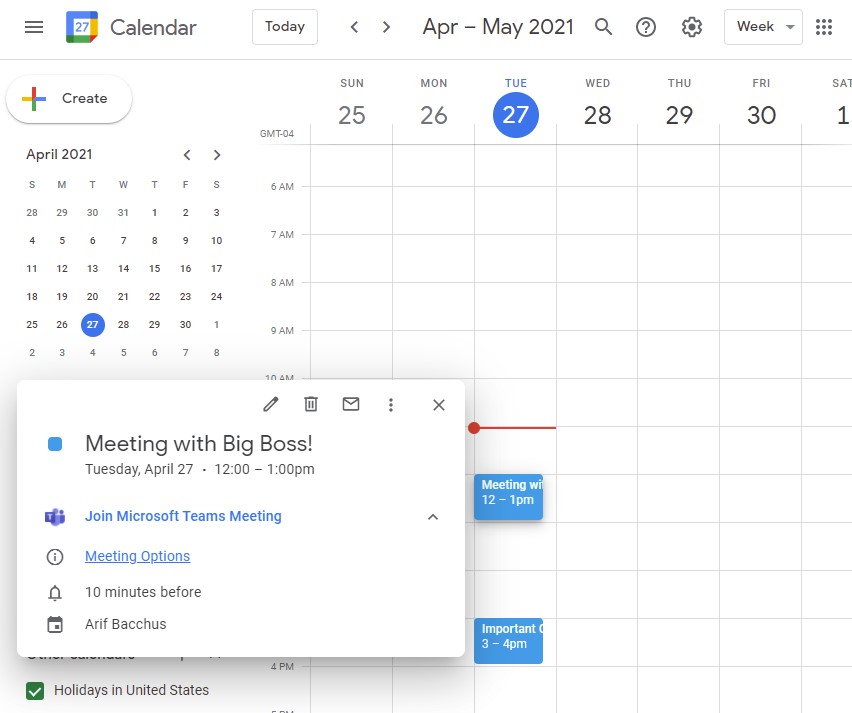
Just like in Outlook, it’s possible to manage all of your Teams meetings directly in Google Calendar. You can manage meetings created on Outlook, or meetings created through Google Calendar — it works both ways. All you need to do is click the Teams icon in the right-side panel of Google Calendar (you might need to expand it out) and then select Join to join the meeting. You should also see a list of other meetings here, too for the day, as well as the week.

If you want to edit or view a meeting, just tap the link to it on your Google Calendar, and then tap or click the pencil icon to edit the meeting details. There should also be a Meeting Options button, too. Clicking this will take you to Teams to change your meeting options, be it who can bypass lobby, who can present, and other meeting controls, too.

We hope you found our guide helpful. Check out our Teams hub for more content like this, and feel free to let us know how you’re using Teams by dropping us a comment in the section below.

FIX: We’re having trouble playing this title Netflix error

Netflix users usually receive this message We’re having trouble playing this title right now. Please try again later or select a different title, whenever there’s an issue with their network.

It points to a network connectivity problem that prevents the device you stream Netflix from reaching the service itself, and is preceded by error code tvq-pb-101 (1.1.6.5).

If you’re getting the We’re having trouble playing this title message on your device, here are some quick workarounds based on the type of device, to help you resolve the issue.

If you’re sick and tired of Netflix’s errors, then you should try a different streaming service.
We suggest you give Disney Plus a shot since it has a wide library of movies and TV shows, not just Disney princesses and family comedies.

Netflix can’t play this title: Error tvq-pb-101

  1. PC/Laptop
  2. Xbox
  3. Blu-ray player
  4. Roku
  5. Set-top box or streaming Media Player
  6. Smart TV

1. PC/Laptop

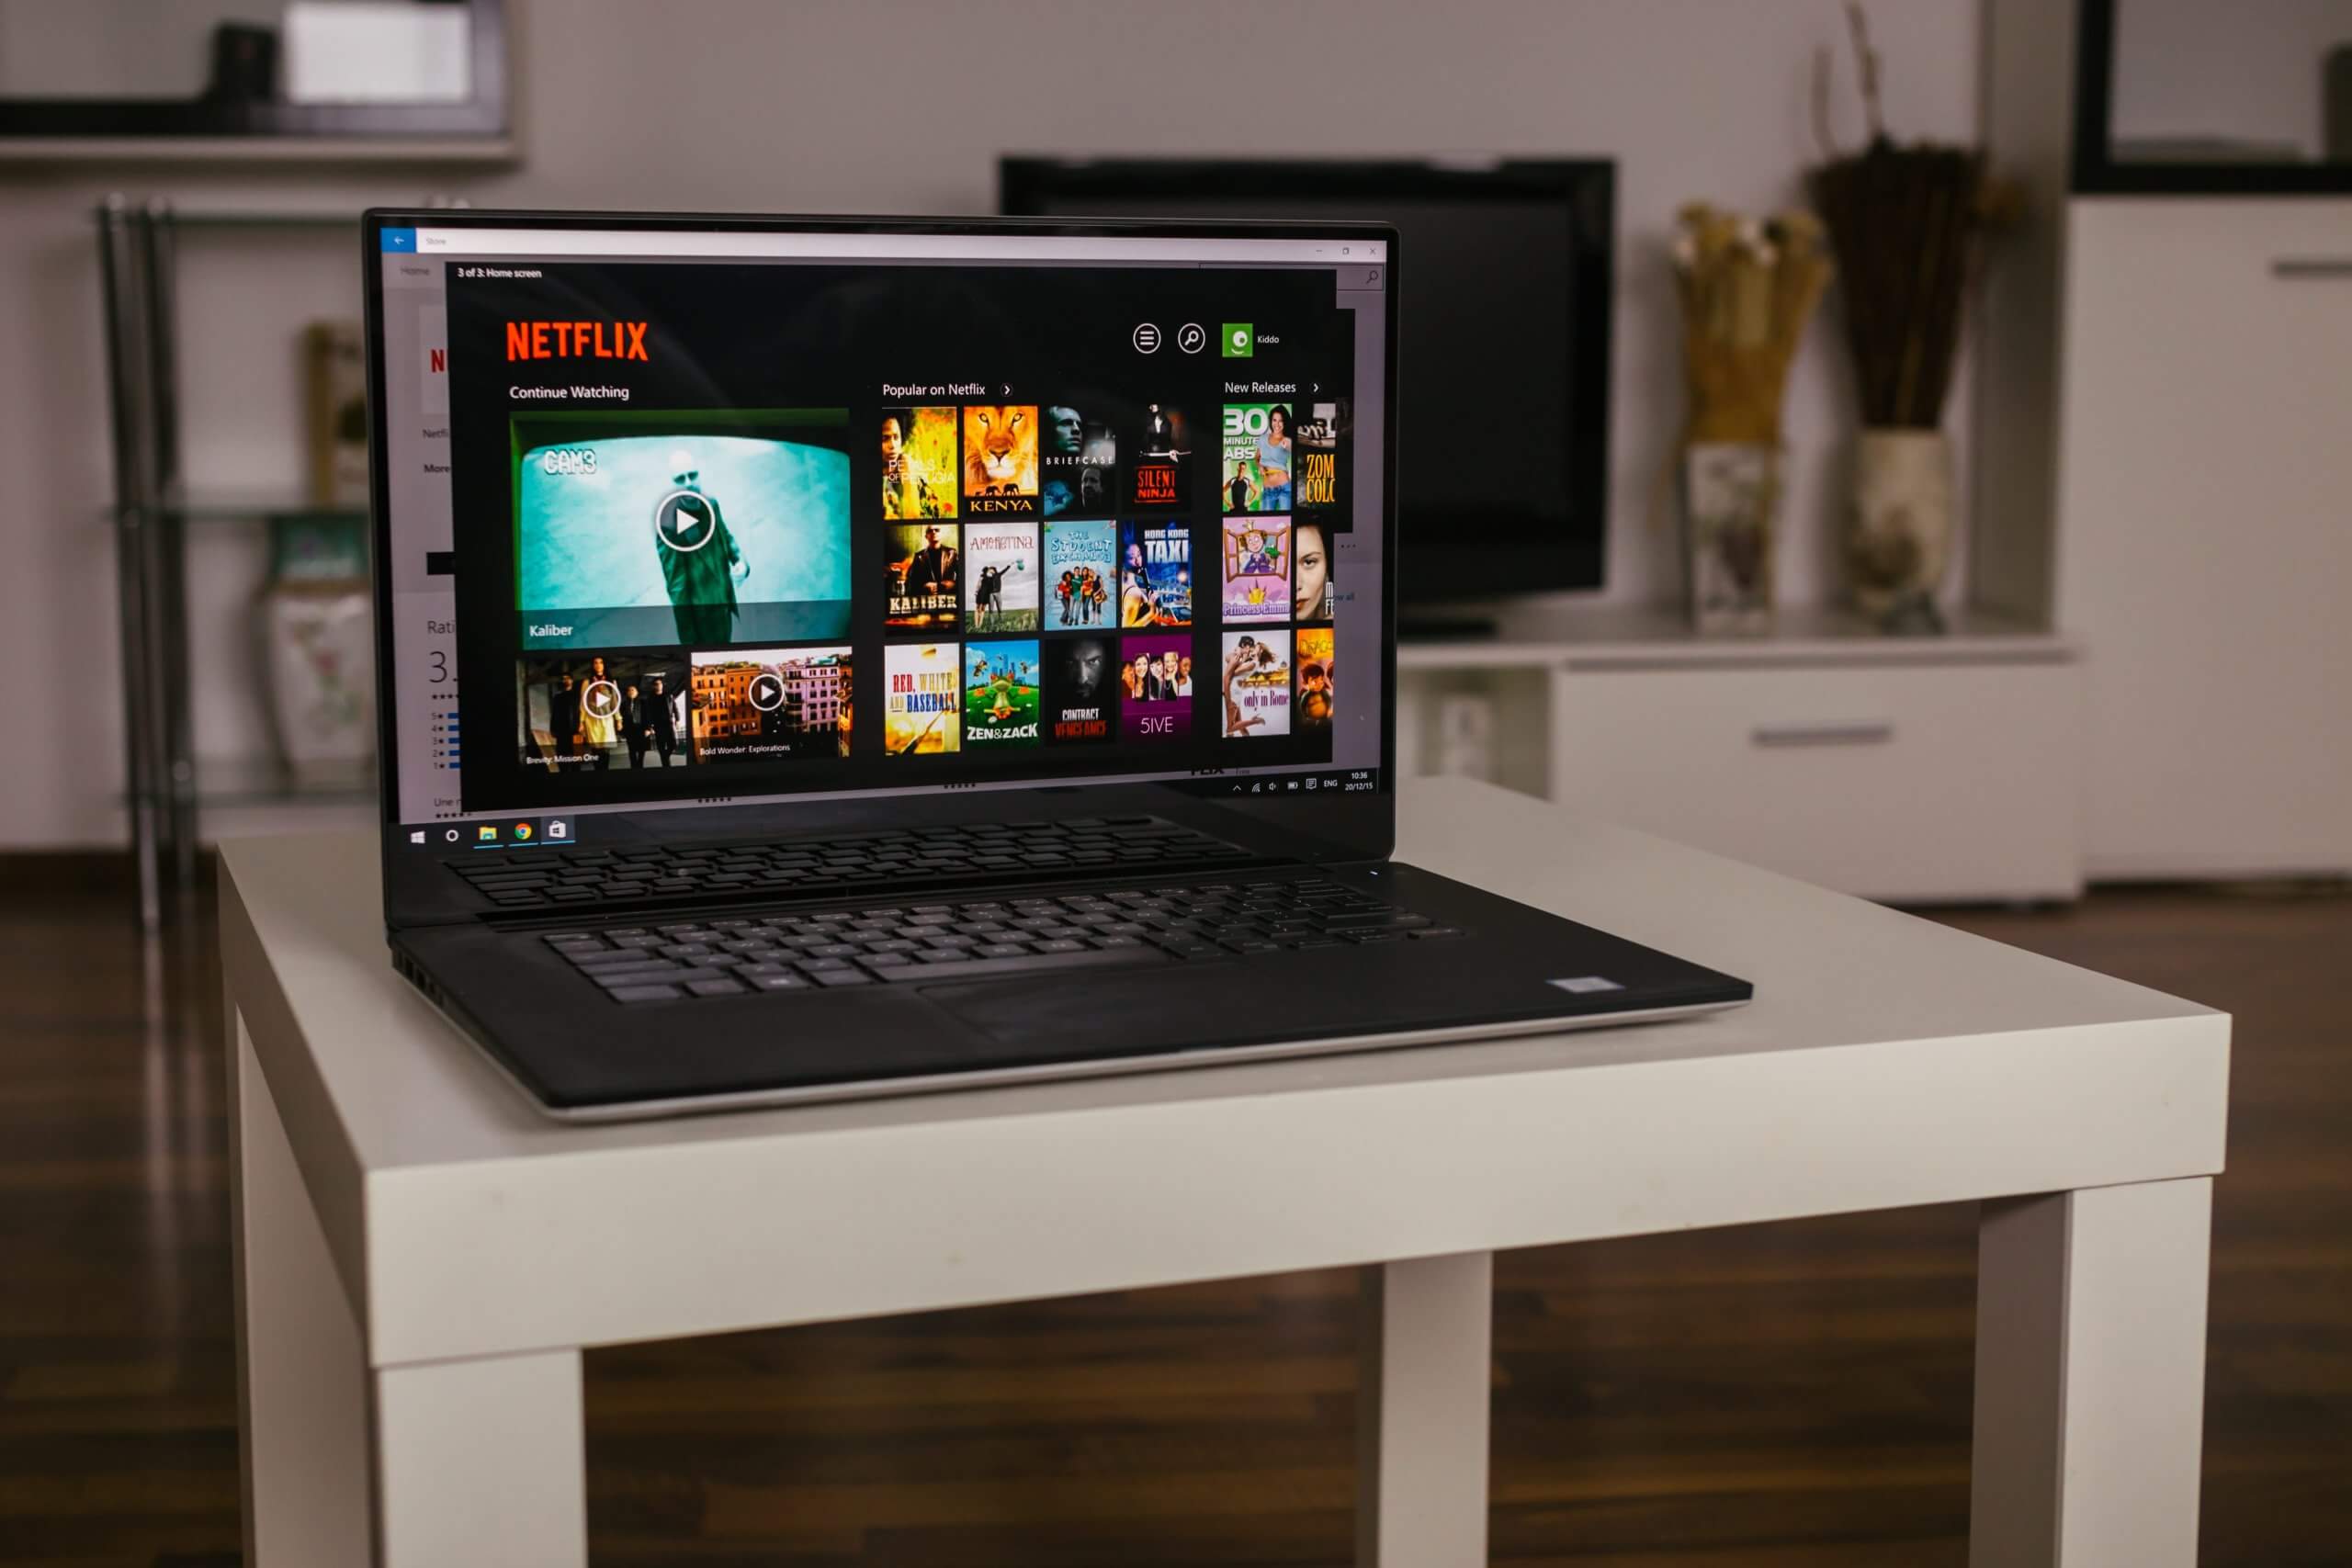
netflix app on laptop

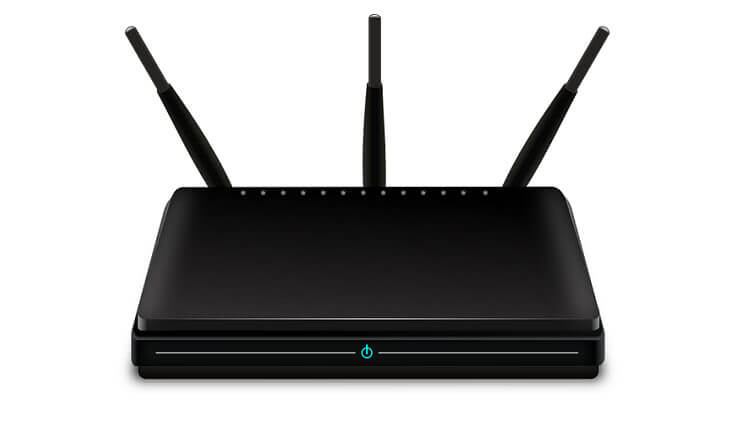
Check your Wi-Fi Router

Most users are having this issue on their computers. In case you encountered it, we suggest you try the following solution:

  • Log on to your Wi-Fi router
  • Go to the Settings tab/button/option
  • Search for Wi-Fi channel (normally your Wi-Fi channel should be set on Auto)
  • Change the Auto option to Manually select channel(if already set to manual, jump to the next step)
  • Select the channel Nr. 13 (you should have the default channel Nr. 1)
  • Try to access Netflix and the content you wanted to watch again

Note: All credits for this solution go to Raymond Potgieter, our Facebook follower. 

Use a VPN to avoid geo-related issues

Netflix errors are often present only in your geo-location. In case it has an error in the region you are accessing it from, you are always able to change your geo-location with a VPN tool in order to dodge it.

A VPN tool will mask your IP and will let you access Netflix as if you were in another country, thus accessing the servers from that country.

This is a good workaround as you not only access your favorite movies and TV shows without any problems but it will also be able to avoid many server-located errors. Moreover, a VPN will allow you to access content that is not available in your location.

We recommend you to use a verified VPN tool as it will not only let you access Netflix, but it will also hide your IP address and keep your online identity private. You can even find solid free VPN tools that surpass Netflix restrictions.

2. Xbox

FIX: We're having trouble playing this title

If you’re streaming Netflix from your Xbox device, whether it is the Xbox 360 or Xbox One, here’s how to resolve “we’re having trouble playing this title” error.

Test your internet connection by going to Settings > System Settings > Network Settings >Wired Network or Wireless Network > Test Xbox LIVE Connection > Continue.

If your connection test is successful, restart your home network as described below.

Restart your home network

  • Unplug your video game console and all of your home network equipment for 30 seconds before plugging each device back in one by one, then do the following:
  • Turn off or unplug your video game console.
  • Unplug your modem (and your wireless router, if it’s a separate device) from power for 30 seconds.
  • Plug in your modem and wait until no new indicator lights are blinking on. If your router is separate from your modem, plug it in and wait until no new indicator lights are blinking on.
  • Turn your game console back on and try Netflix again.

Connect your game console directly to your modem

If yours is a wireless router connected to your modem and still can’t connect after restarting your network, try bypassing the router to find out the cause of the problem by eliminating the router or wireless connectivity problems as a possible cause. To do this:

  • Turn off the console.
  • Plug your console directly into your modem using an Ethernet cable.
  • Unplug your modem from power for at least 30 seconds
  • Pug it back in and wait till no new indicator lights are blinking
  • Turn on your console and try Netflix again.

If you’re able to stream Netflix, and you bypassed your router, then it is the probably source of the problem.

However, bypassing your router isn’t a complete solution, so check with whoever set up your home network to help you reset or reconfigure your router’s settings.

If you cannot stream Netflix after bypassing your router, check with your hardware provider to ensure the modem and internet services are working as they should.

If you couldn’t complete this step, try connecting the console and modem directly as this will help you rule out your router as the cause of the error. If you cannot do this direct connection, try the next solution.

Improve your Wi-Fi signal

If yours is a Wi-Fi connection and the steps to bypass the router didn’t help, try doing the following:

  • Move your router to a different location to improve signal strength. A central location will give you better connection and reception.
  • Move wireless devices away from your router as these may cause wireless interference hence affect your WiFi connection
  • Elevate your router to a higher spot for better reception than placing it on the floor or behind a wall.

3. Blu-ray player

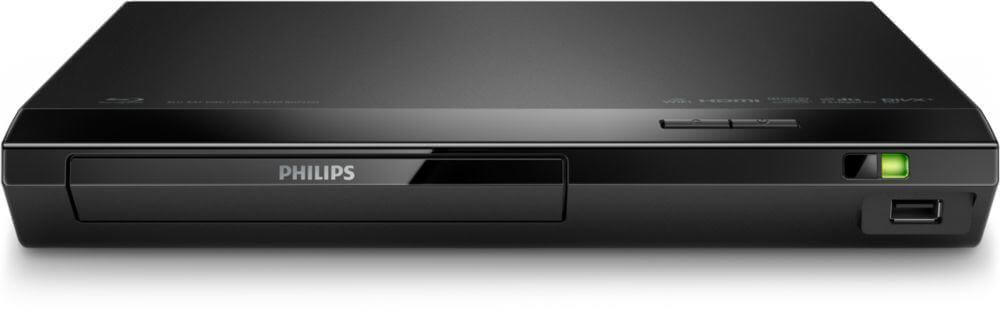
We're having trouble playing this title

If you’re using a Blu-ray player to connect and stream Netflix, and you get ‘we’re having trouble playing this title’ error, do the following:

  • Restart your device
  • Unplug it from power for at least 60 seconds
  • Press the power button on the device to discharge it.
  • Plug it back in.
  • Turn your device on and try Netflix again

4. Roku

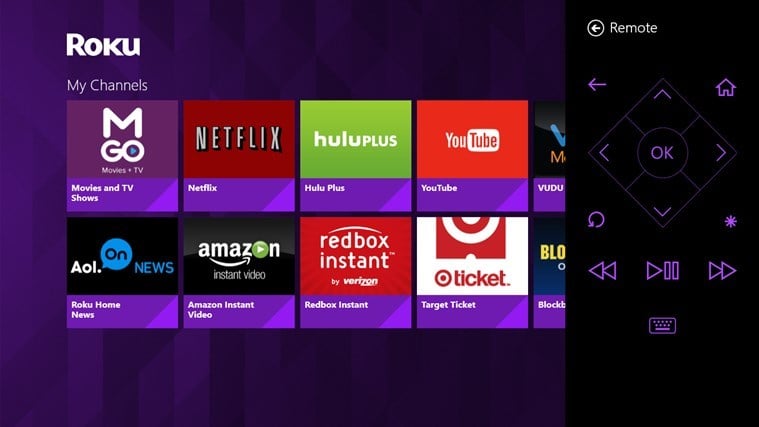
If you’re using the Roku to stream Netflix, and you get ‘we’re having trouble playing this title’ error, ensure your network supports streaming, then test your connection by running a network connection test or launching another internet-connected service or app.

If the test fails or you cannot open another service or app, contact your device manufacturer for assistance. It if is successful or you can open other services or apps, go to the next step.

Restart your Roku

  • Unplug your Roku from power for at least 10 seconds, then plug it back in.
  • Turn your Roku on by pressing any button on the remote and wait one full minute, then try Netflix again.

Restart your home network

  • Unplug your Roku, and both your modem and router from power and wait 30 seconds.
  • Plug in your modem and wait until no new indicator lights are blinking
  • Plug in your router and wait until no new indicator lights are blinking
  • Plug in your Roku and try Netflix again.

Connect your Roku directly to your modem

If you’re connecting through a wireless router connected to your modem and still can’t connect after restarting your network, try bypassing the router to find out the cause of the problem by eliminating the router or wireless connectivity problems as a possible cause.

To do this:

  • Unplug your Roku from power.
  • Plug your Roku directly into your modem using an Ethernet cable.
  • Unplug your modem from power for at least 30 seconds, then plug it back in and wait until no new indicator lights are blinking on.
  • Plug in your Roku and try Netflix again.

If you’re able to stream Netflix, and you bypassed your router, then it is the probably source of the problem.

If you cannot do this direct connection, improve your Wi-Fi signal by using the same steps described on the Xbox solution.

Contact the person who set up your home network to resolve network connectivity issues to see if your router is properly set up to communicate with the other devices on your home network.

5. Set-top box or streaming Media Player

We're having trouble playing this title

Ensure you are connected to the internet and test your connection by running a network connection test, or launch another internet-connected service or app. If the test fails, contact your device manufacturer for help, if it works, try the next step.

Restart your device

  • Unplug your device from power for about 60 seconds
  • While unplugged, press the power button on the device to discharge it.
  • Plug your device back in.
  • Turn your device on and try Netflix again.

Restart your home network

  • Turn off your device.
  • Unplug both your modem and router and wait 30 seconds.
  • Plug in your modem and wait until no new indicator lights are blinking on.
  • Plug in your router and wait until no new indicator lights are blinking on.
  • Turn on your device and try Netflix again.
  • Improve your Wi-Fi signal by using the same steps described on the Xbox solution.

Contact the person who set up your home network to resolve network connectivity issues to see if your router is properly set up to communicate with the other devices on your home network.

6. Smart TV

FIX: We're having trouble playing this title

If you’re using your smart TV to stream Netflix, and you get ‘we’re having trouble playing this title’ error, ensure your network supports streaming.

Test your internet connection – if the test fails or you cannot open another service or app, contact your device manufacturer for assistance. It if is successful or you can open other services or apps, go to the next step.

Restart your Smart TV

  • Unplug your TV from power for at least 60 seconds
  • While your TV is unplugged, press and hold the power button on the TV for 5 seconds to discharge it. If you cannot access the power button or your TV does not have one, leave your TV unplugged for at least three minutes.
  • Plug your TV back in.
  • Turn your TV on and try Netflix again.

Restart your home network

Leave your smart TV and all home network equipment (including modem and router) unplugged for 30 seconds before plugging each device back in one by one. Turn your smart TV back on and try Netflix again.

Connect your smart TV directly to your modem

If you’re connecting through a wireless router connected to your modem and still can’t connect after restarting your network, try bypassing the router to find out the cause of the problem by eliminating the router or wireless connectivity problems as a possible cause.

To do this:

  • Turn off or unplug your smart TV
  • Plug your smart TV directly into your modem using an Ethernet cable.
  • Unplug your modem from power for at least 30 seconds, then plug it back in and wait until no new indicator lights are blinking on.
  • Turn on your smart TV and try Netflix again.
  • Improve your Wi-Fi signal by using the same steps described on the Xbox solution.

Contact the person who set up your home network to resolve network connectivity issues to see if your router is properly set up to communicate with the other devices on your home network.

Did any of these solutions help? Let us know by leaving a comment below.

Microsoft Excel on the web adds custom color palettes, cell styles gallery, and more

Microsoft has announced a slew of new features and capabilities that are coming to Excel on the web. The latest update brings custom color palettes, enhanced table formatting options, a new mini toolbar, and more.

The first new feature that the company highlighted today is support for the custom color palette, which lets users easily format their cells with custom colors. Excel users can now click on the “more colors” option and then use the slider to select a specific color. Similarly, there is also an option to enter Hex values or RGB values to choose the exact color for cells.

thumbnail image 1 of blog post titled What's New in Excel for the web

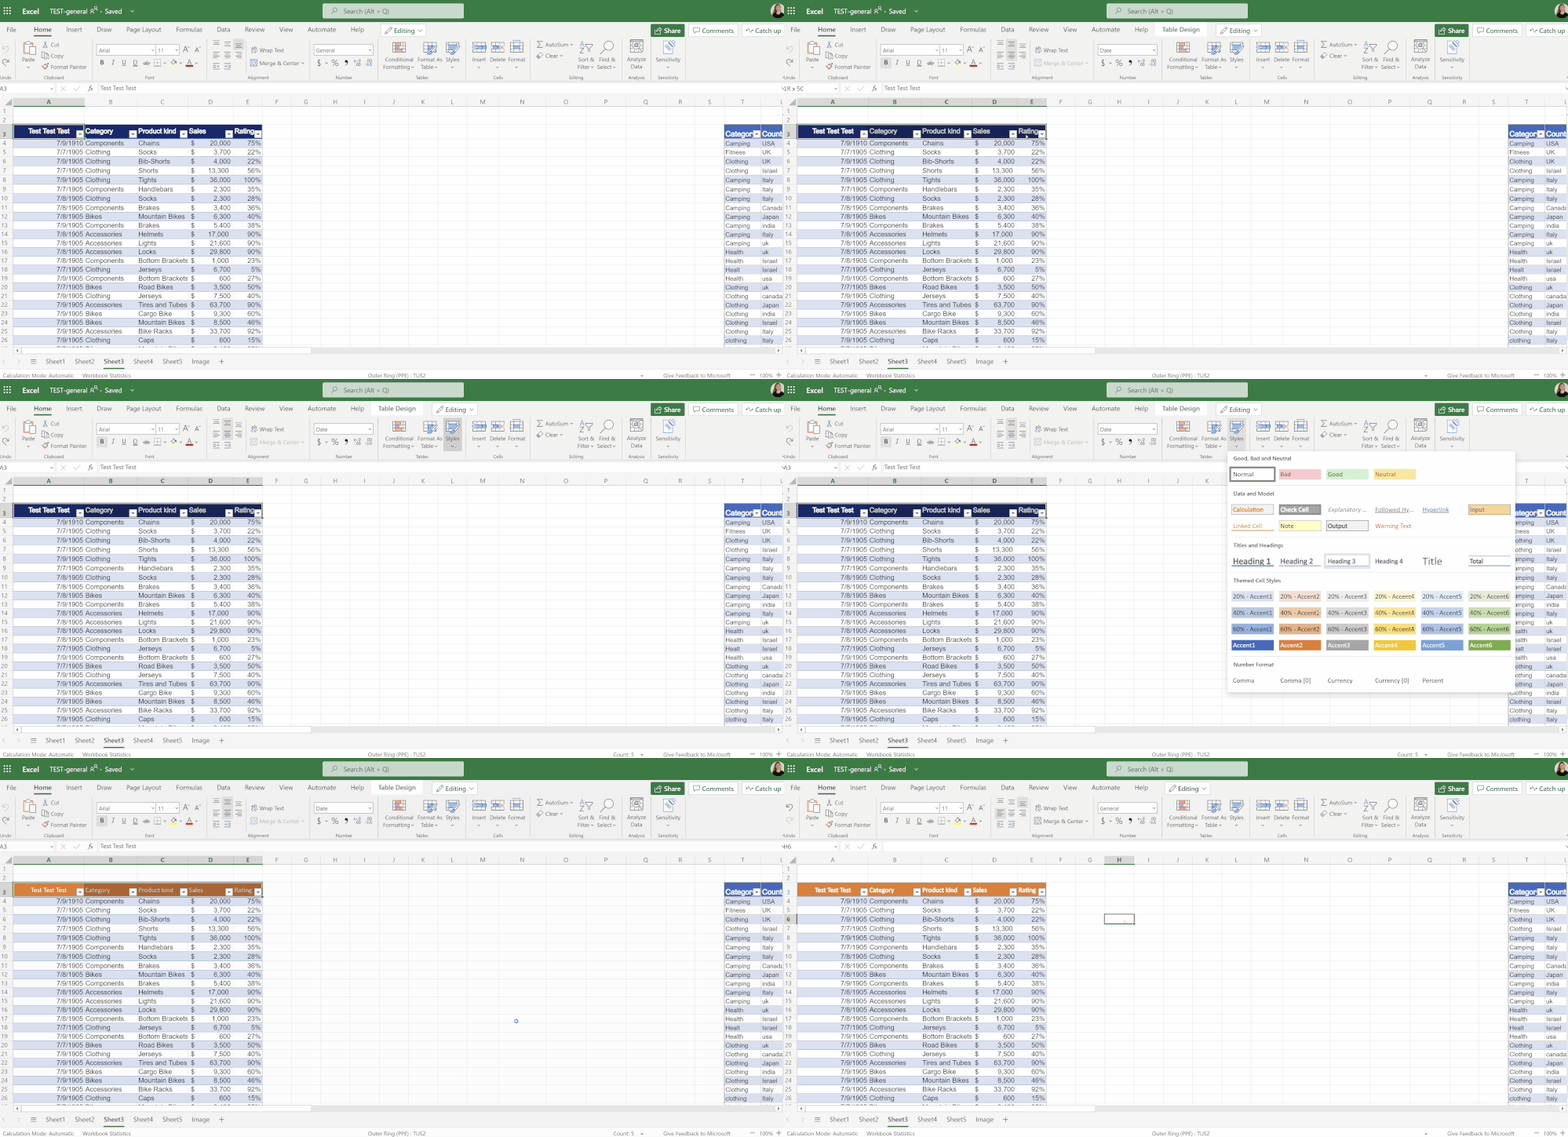
Next up is a new cell styles gallery that helps to ensure consistency of cells. It allows users to apply cell styles to customize fonts, shading, cell borders, and number formats in a worksheet. The latest update also brings new formatting capabilities for web users. They can now head to the Fonts tab to draw borders, border grids, or erase borders.

thumbnail image 2 of blog post titled What's New in Excel for the web

The company has also made it easier to get quick access to common formatting commands, such as bold, understand, and italics. Users can now access the mini toolbar with a right-click to format their cells easily.

There are some improved table formatting capabilities as well. Users can now format any data as a table, choose table designs and styling options, add a total row, and rename tables. These improvements should help to create a consistent user experience across the desktop apps and Excel for the web.

thumbnail image 5 of blog post titled What's New in Excel for the web

Finally, Microsoft noted that a new printing experience is finally coming to Excel for the web. It will introduce support for print preview with page layout options, including setting print area, inserting/deleting page breaks. This update will be available in the coming months.

Full Fix: Can’t connect to Wi-Fi using Intel Centrino Wireless-N 2230

Windows 10 is a wonderful operating system, it’s faster, more secure, and more intuitive than previous Windows versions. However, various issues keep emerging when users accept to upgrade to Microsoft’s latest OS. One such issue that caught our attention is a Wi-Fi connection problem for Intel Centrino Wireless-N 2230 systems.

How to fix Intel Centrino Wireless-N 2230 Wi-Fi connection issues on Windows 10

Many users reported problems with Intel Centrino Wireless-N 2230 network adapter on their PC. Speaking of issues, these are some of the most common problems that users reported:

  • Intel Centrino Wireless N 2230 can’t see 5GHz, limited connectivity, can’t connect – Many users reported that they can’t connect to their wireless network while using this adapter. To fix this issue, update your network driver and check if that solves the problem.
  • Intel Centrino Wireless-N 2230 not working, disconnecting, losing connection, very slow, no Internet access, no networks found, not detected – Users reported various issues regarding this network adapter. If you’re experiencing any of these issues, be sure to try some of our solutions.
  • Intel Centrino Wireless-N 2230 this device cannot start code 10 – Sometimes you might get start code 10 message while trying to use your network adapter. If this happens, be sure to check your power settings.
  • Intel Centrino Wireless-N 2230 won’t enable – This is another problem that many users encountered. If your network connection won’t enable, try disabling Bluetooth and check if that solves the problem.

Solution 1 – Download and install the driver in compatibility mode

Use the Intel Driver Update Utility wireless tool to update your Intel drivers.

  1. Locate the executable file (.exe file) for the driver installation program.
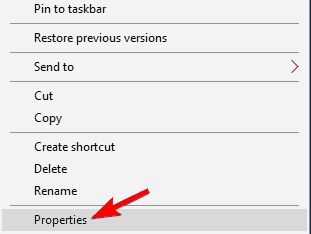
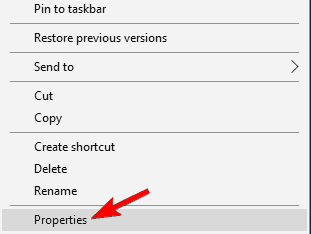
  2. Right-click the file, and then click Properties.
    Intel Centrino Wireless-N 2230 losing connection
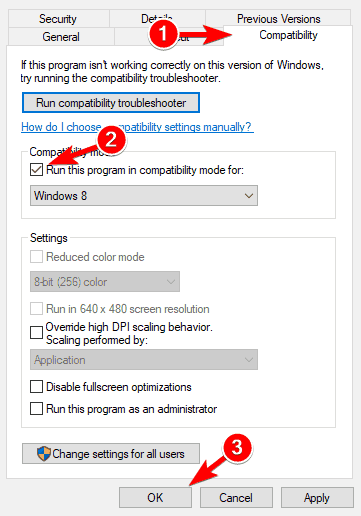
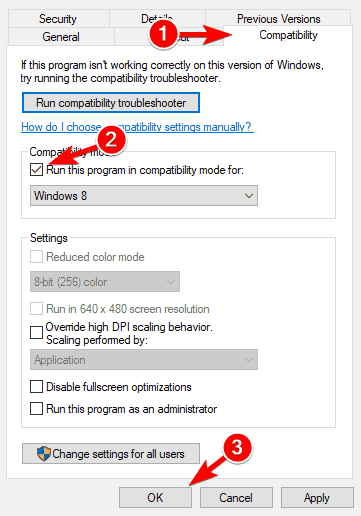
  3. Go to the Compatibility tab. Select the Run this program in compatibility mode for check box, click Windows 8, and then click OK.
    Intel Centrino Wireless-N 2230 this device cannot start code 10
  4. Double-click the executable file and launch the installation program.

It is also possible to install any drivers from your PC with dedicated software that will install the latest versions automatically in no time. To do so, have a try with Outbyte Driver Updater.

Solution 2 – Leave your computer on high performance power setting

  1. Open Power Options.
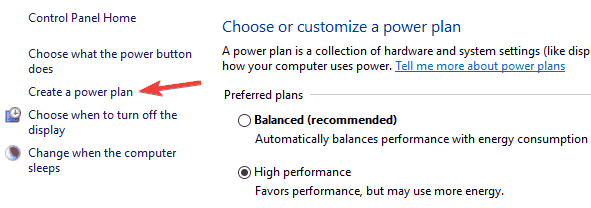
  2. Click on Create a power plan.
    ntel Centrino Wireless-N 2230 not working
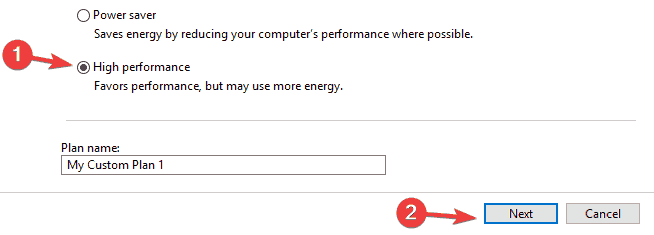
  3. Select the High performance check box.
    Intel Centrino Wireless-N 2230 this device cannot start code 10
  4. Click on Next to personalize display and sleep options.
  5. Click on Create to save your settings.

Solution 3 – Check your VPN

Many users use VPN tools in order to protect their privacy, but sometimes your VPN can cause problems with Intel Centrino Wireless-N 2230. If you’re unable to access the Internet, the issue might be your VPN.

Users reported problems with Cisco VPN and OpenVPN, and if you’re using any of these tools, we encourage you to remove them and check if that solves the problem.

In order to fix this problem, it’s recommended to completely remove the problematic application. This means removing its files and registry entries.

This can be a tedious process, even for advanced users, so it might be better to use uninstaller software.

There are many great tools that can help you remove problematic applications, but IOBit Uninstaller stands out from the rest, so if you need to completely remove any application, be sure to use one of these tools.

Solution 4 – Use the recommended settings for 802.11n Connectivity

You can find the list of settings here. You can change the settings under the Advanced menu on Intel‘s Wireless Software.

Here are the steps to follow:

  1. Go to Device Manager > Network Adapters.
  2. Double click on the Intel Wireless card to open device properties.
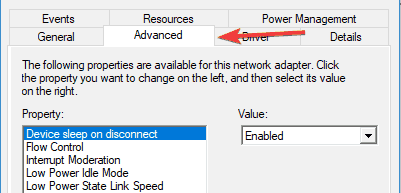
  3. Click on the Advanced tab and use the recommended settings.
    Intel Centrino Wireless-N 2230 this device cannot start code 10

If this Wi-Fi issue made you consider purchasing a new laptop, check out this list if you want a battery life monster or this list if you are looking for a gaming laptop.

Solution 5 – Remove you network card

If you’re having problems with Intel Centrino Wireless-N 2230, the issue might be your network card and its driver. To fix the problem, you need to disable the device and remove it from your computer.

To do that, do the following:

  1. Press Windows Key + X to open Win + X menu. Now select Device Manager from the list.
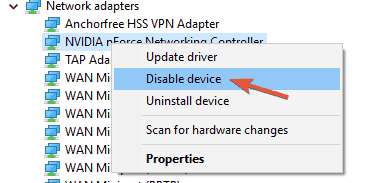
  2. Locate both your network and Bluetooth driver and disable them. To do that, select the desired driver, right click it and choose Disable from the menu. When the confirmation dialog appears, click Yes.
    ntel Centrino Wireless-N 2230 won't enable
  3. After disabling both drivers, you need to uninstall them as well.

Now turn off your PC, open it and remove the network card. Keep in mind that by removing the card you’ll void your warranty. If you don’t know how to do that properly, it might be better to contact a professional.

After removing the network card, turn on your PC and start your PC without the network card. Now turn the PC off again, insert the network card and start your computer again.

Now the missing drivers will be installed and the problem should be resolved.

Keep in mind that this is an advanced solution, and if you don’t know how to properly remove your network card, you might want to skip this solution.

Solution 6 – Change IPv4 settings

Sometimes problems with Intel Centrino Wireless-N 2230 can be caused by your settings, but you might be able to find a workaround simply by changing a few settings. To do that, follow these steps:

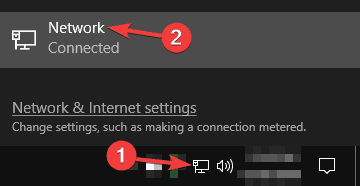
  1. Click the network button in the bottom right corner and select your network.
    Intel Centrino Wireless N 2230 can't see 5GHz
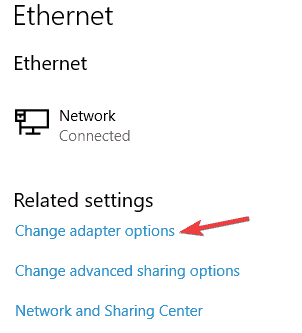
  2. Now click on Change adapter options.
    Intel Centrino Wireless-N 2230 no networks found
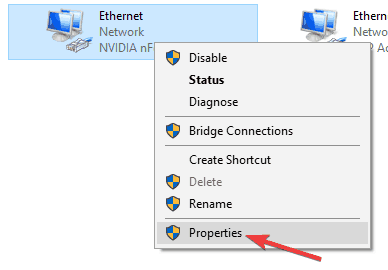
  3. Right click your network connection and choose Properties from the menu.
    Intel Centrino Wireless-N 2230 this device cannot start code 10
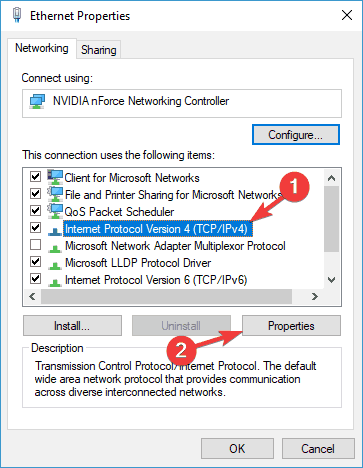
  4. Select Internet Protocol Version 4 (TCP/IPv4) and click Properties.
    Intel Centrino Wireless N 2230 can't see 5GHz
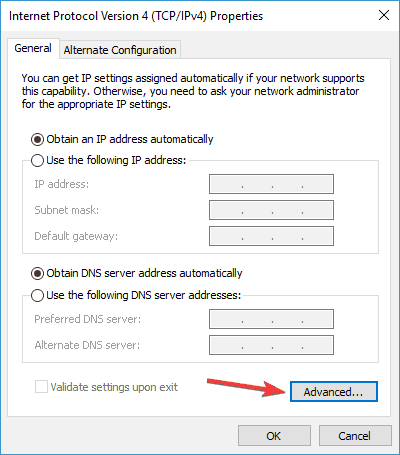
  5. Now click the Advanced button.
    Intel Centrino Wireless-N 2230 won't enable
  6. Set both Gateway and Interface metric to 1 and check if that solves the problem.

Solution 7 – Disable Bluetooth

Intel Centrino Wireless-N 2230 provides both Bluetooth and Wi-Fi, and sometimes Bluetooth can interfere with Wi-Fi and cause network problems to appear. To fix the problem, it’s advised to disable your Bluetooth driver from Device Manager.

To see how to disable a driver properly, be sure to check Steps 1 and 2 from Solution 4 for detailed information. Once you disable Bluetooth, the issue should be completely resolved

Solution 8 – Use Command Prompt

Sometimes you can fix Intel Centrino Wireless-N 2230 problems simply by running a single command in Command Prompt. This is rather simple and you can do it by following these steps:

  1. Press Windows Key + X and select Command Prompt (Admin) from the menu. If Command Prompt isn’t available, you can also use PowerShell (Admin).
    ntel Centrino Wireless-N 2230 won't enable
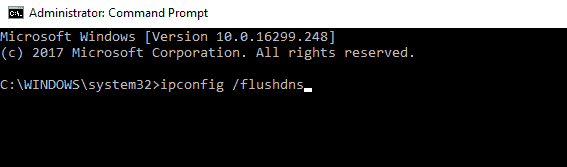
  2. Now run ipconfig /flushdns command.
    Intel Centrino Wireless N 2230 can't connect

After doing that, close Command Prompt and check if the problem with your network adapter is resolved.

Solution 9 – Keep your laptop connected to the charger

Many users reported Intel Centrino Wireless-N 2230 problems on their laptops. If you’re having any problems with this network adapter, you might want to try keeping your laptop connected to the charger while using it.

Several users reported that their network connection works great while the laptop is charging, so you might want to keep your laptop connected to the charger as a workaround until you find a permanent solution.

Solution 10 – Install a different driver

If you’re having problems with Intel Centrino Wireless-N 2230, you might be able to fix them simply by installing a different driver. According to users, they installed Intel Centrino Wireless-N 2200 driver, and it worked perfectly with their network adapter. To install a different driver manually, do the following:

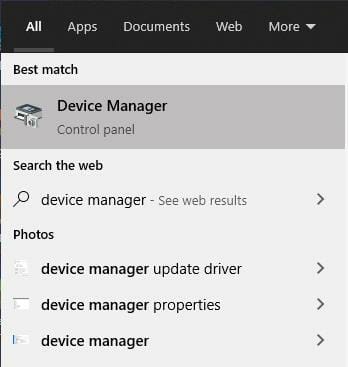
  1. Start Device Manager.
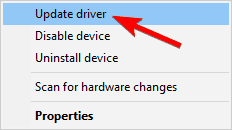
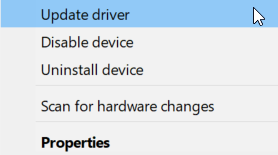
  2. Locate your network driver, right click it and choose Update driver from the menu.
    ntel Centrino Wireless-N 2230 won't enable
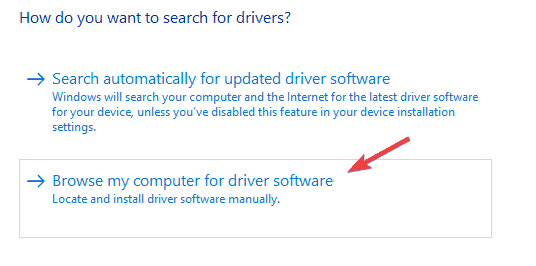
  3. Select Browse my computer for driver software.
    Intel Centrino Wireless N 2230 limited connectivity
  4. Choose Let me pick from a list of available drivers on my computer.
    Intel Centrino Wireless-N 2230 disconnecting
  5. Now you need to find Intel Centrino Wireless-N 2200 driver on your own and install it.

After doing that check if the problem is resolved. You can also download the driver from Intel’s website and install it using the setup file.

We have to mention that Windows will try to update your driver automatically which will cause the issue to reoccur. In order to prevent that, be sure to check our guide on how to prevent Windows 10 from updating drivers automatically.

GitHub app in Microsoft Teams gets new personal app experience, scheduled reminders, and more

Last year, Microsoft launched a new Git Hub integration with its Teams collaboration platform to make it easier for developers to collaborate on projects. The company yesterday announced a bunch of new features and improvements that have made their way to the GitHub app for Teams.

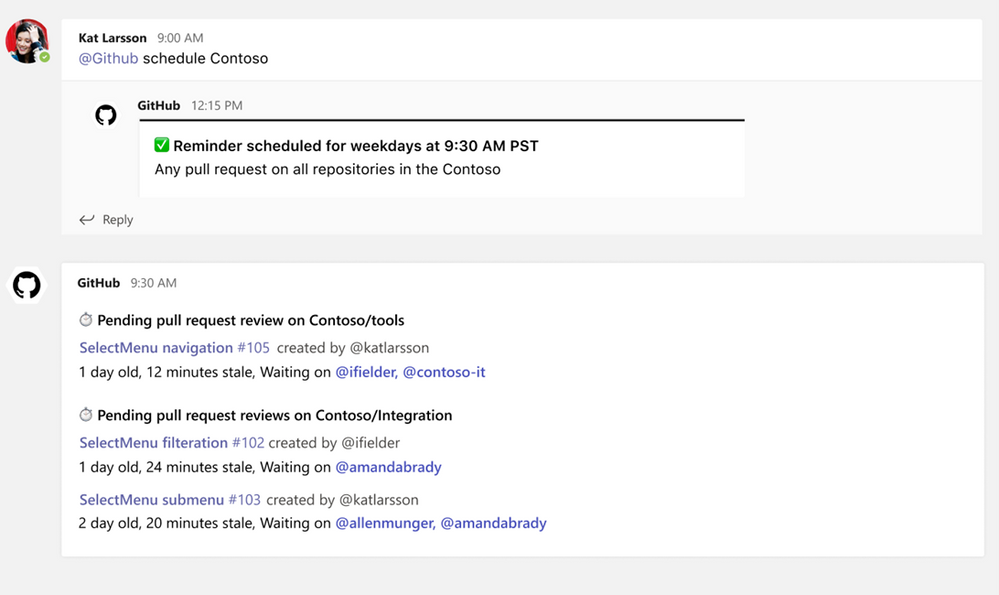
First up, Microsoft has introduced a new personal app experience that enables users to follow their repositories and get notifications for commits, issues, and pull requests directly within Teams. In addition, the app has added the ability to schedule reminders for pending pull requests, allowing users to configure periodic reminders in their Teams chats and channels.

thumbnail image 2 captioned Image showing user setting up scheduled reminders within the GitHub Teams app

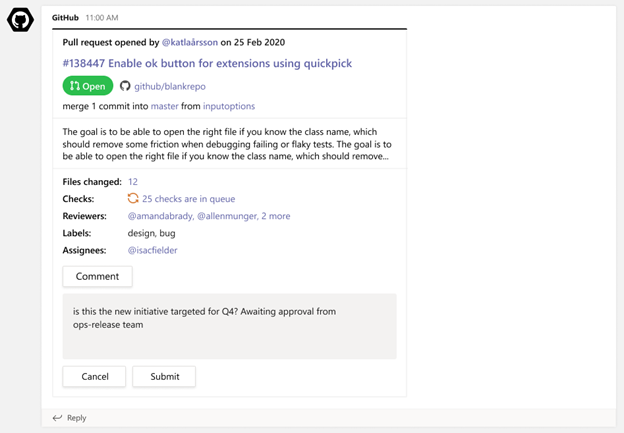
The GitHub app has introduced support for threading to synchronize comments between Microsoft Teams and GitHub repositories. This means that the pull request card will keep users informed about the latest comments and contextual information. The threading feature should help to improve collaboration between team members within channels.

thumbnail image 4 captioned Image showing pull request card staying updated with latest comments and information

Furthermore, the notification card in the channel has new actionable buttons. As the name suggests, these buttons make it easier for users to take action on activities. GitHub developers can use the GitHub app to create new issues, close/reopen them, and leave comments on pull requests and issues.

thumbnail image 5 captioned Image of a GitHub pull request notification on a card and the user from Teams commenting

Finally, Microsoft noted that it is now possible to subscribe to a specific organization and repository via GitHub app, so users can get customized notifications for pull requests and issues. There is also an option to unsubscribe from these repositories if needed. If you haven’t done it yet, you can try out the new GitHub app for Microsoft Teams by installing it from the Teams app store or clicking here.

Windows 10 Telegram app update enables credit card payments in all chats

The Windows 10 Telegram messaging app received a rather notable update today that enabled payments in all types of chats and added support for credit card transactions.

This upgrade to Telegram’s payment system, named Payments 2.0, is notable as it lets anyone accept credit card payments from other users in over 200 countries with no fees being charged by Telegram.

It should be noted, however, that the eight payment providers that Telegram uses, Stripe, Yandex.Money, Sberbank, Tranzzo, Payme, CLICK, LiqPay, and ECOMMPAY, do still charge their usual fees.

In addition to Payments 2.0, this latest app update also added scheduled voice calls. Two new web versions of Telegram were also launched which can now be accessed via any web browser.

Here’s the release notes:

Payments 2.0

  • Offer real goods and services for sale in any group, channel or bot – Telegram doesn’t charge a commission.
  • Pay for goods securely using one of the 8 integrated payment providers – Telegram doesn’t collect your payment info.
  • See how this works in our @TestStore.

Scheduled Voice Chats

  • Schedule voice chats to let participants know about them in advance.
  • View a countdown to the voice chat and get notified when it starts.

New Web Versions

Are you planning to use Telegram’s new payment feature? Let us know in the comments below and then follow us on Twitter for more Windows app news.

Telegram Desktop
Telegram Desktop
Price:
Free

Over 30 classic Capcom video games are coming to Xbox Series X and Xbox One

A massive number of classic Capcom video games are coming to Microsoft’s Xbox One and Xbox Series X consoles in May as part of Capcom Arcade Stadium.

Capcom Arcade Stadium is essentially a single hub for all 32 of these titles which will eventually be available to buy individually or as part of three different bundles. The individual bundles and game purchases aren’t yet live in the Microsoft Store but one massive collection containing all of the games, Capcom Arcade Stadium Packs 1, 2, and 3, is now up for pre-order.

Those who buy this bundle before June 7th will get a number of bonus in-game arcade cabinet skins though it’s worth noting that the official store description does state that this content may be available to buy individually at a later date.

Here’s the listing:

Relive the Capcom classics! 1943 -The Battle of Midway- comes as a free download!

Shooters, fighting, action—all your favorite genres in this exciting collection! Capcom Arcade Stadium brings back all the nostalgia of the arcade, while adding in new and exciting features you’ll wish you had back then!

Just Like the Good Old Days: From 3D-rendered arcade cabinets to scanline filters, there’s everything you need to recreate that arcade atmosphere. Fully customizable display settings let you craft your own personal experience and truly relive the glory days of arcade gaming.

Brand New Ways to Play: With gameplay rewind, speed adjustment, and the ability to save and load your game at any time, your old favorites will feel new all over again! Every game has online leaderboard rankings, so you can see where you stack up against players all over the world! Capcom Arcade Stadium, where retro appeal meets cutting-edge features for a fresh take on Capcom’s classics!

And here’s a very retro announcement trailer:

Which of these classic Capcom video games is your favorite? Let us know in the comments below and then follow us on Twitter and Pinterest for more Xbox gaming news.

The specified disk or diskette cannot be accessed

If you’re getting the ERROR_NOT_DOS_DISK error code with The specified disk or diskette cannot be accessed description, follow the troubleshooting steps listed in this article to fix it.

ERROR_NOT_DOS_DISK: Background

The specified disk or diskette cannot be accessed error occurs if the hard disk is not properly formatted for the appropriate file system. This error code prevents users from accessing and modifying the content of the drive.

How to fix The specified disk cannot be accessed error

1. Unplug and re-plug the external drive

If you’re getting this error with removable storage, unplug the storage device. Close all software on your taskbar and plug the external storage back in. You can also restart Windows before you plug the external HDD back in.

Then, retry the action that triggered the ERROR_NOT_DOS_DISK error code.

2. Reinstall external hard drives

  1. Go to Start > type device manager to launch Device Manager.
  2. Click Disk drives to expand that section > right-click the external disk drive to fix.
  3. Select the Uninstall option on the context menu.
  4. Press the Scan for hardware changes button to reinstall the disk drive.

Reinstalling the storage device might also fix this issue. Of course, you can’t do that for HDDs with Windows on them, but you can reinstall external storage drives affected by the ERROR_NOT_DOS_DISK error code.

3. Run a full system scan

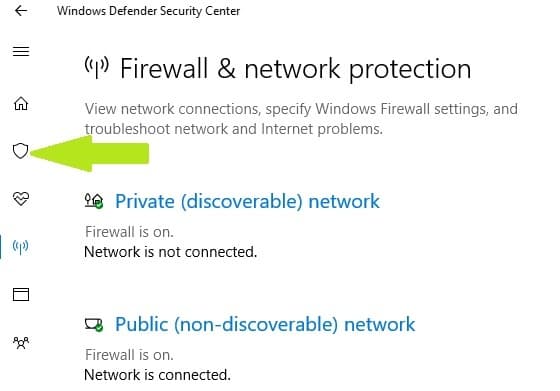
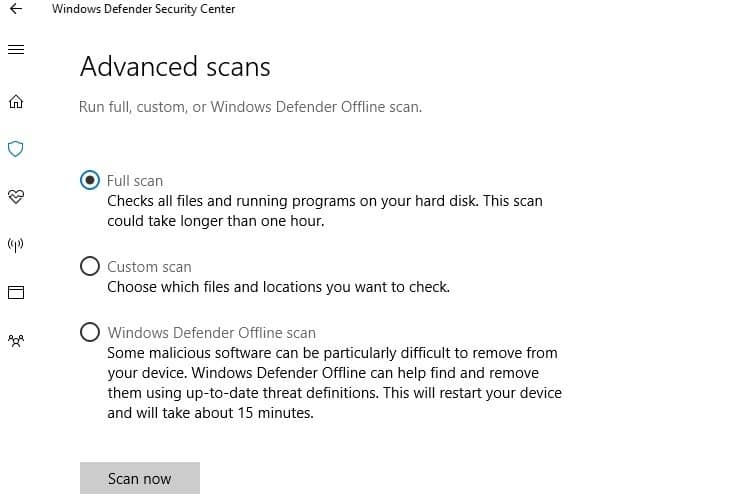
  1. Go to Start > type defender > double click Windows Defender to launch the tool
  2. In the left-hand pane, select the shield icon
  3. In the new window, click the Advanced scan option
  4. Check the full scan option to launch a full system malware scan.

Malware may cause various issues on your computer, including errors. Perform a full system scan in order to detect any malware running on your computer.

You can use Windows’s built-in antivirus, Windows Defender, or third-party antivirus solutions.

4. Check your disk for errors

On Windows 10, you can run a disk check using Command Prompt.

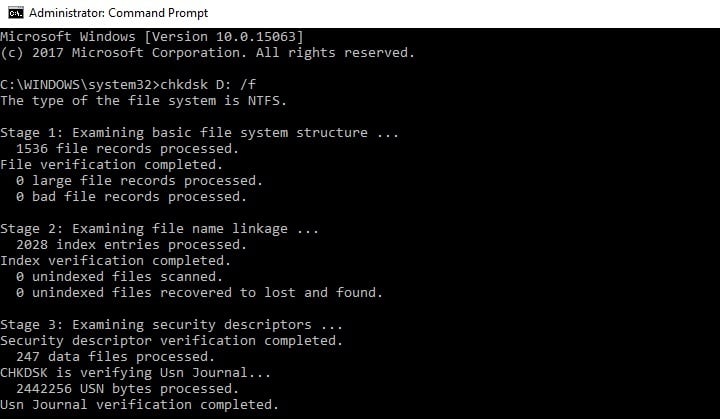
Start Command Prompt as administrator and type the chkdsk C: /f command followed by Enter. Replace C with the letter of your hard drive partition.

As a quick reminder, if you do not use the /f parameter, chkdsk displays a message that the file needs to be fixed, but it does not fix any errors.

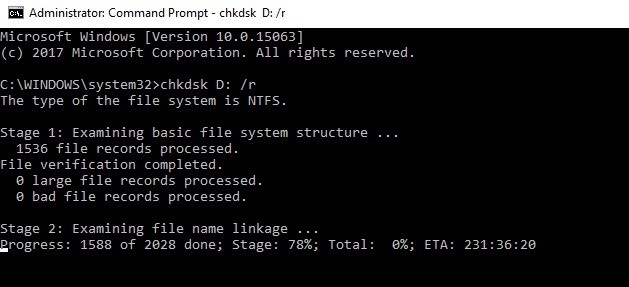
The chkdsk D: /f command detects and repairs logical issues affecting your drive. To repair physical issues, run the /r parameter as well.

5. Install a third-party disk fixers

Third-party partition managers and disk repair tools nowadays come with a host of tools that also make them excellent for checking disk errors and issues, and they are sometimes more efficient than Windows’ native tools.

These include specialized repair tools that help fix disk structure errors, such as the one described in this article, and a lot of these tools come with either a free trial or even a freeware version that you can use forever.

Besides, some of these software tools can perform complete system fixes, refreshing your PC’s registries and DLLs, thus preventing disk issues, BSoD errors, and more.

6. Clean your temporary files and folders

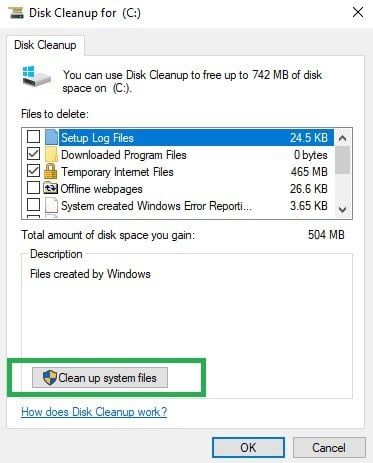
Here’s how to use Disk Cleanup on Windows 10:

  1. Go to Start > type Disk Cleanup > launch the tooll
  2. Select the disk that you want to clean > the tool will tell you how much space you can free upthis app can't run on your pc windows 10 on reddit
  3. Select Clean up system files.

The simplest and quickest manner to delete your temporary files and folders is to use Disk Cleanup. As you use your computer or browse the Internet, your PC accumulates various unnecessary files.

These so called junk files may affect your computer’s performance and also trigger various error codes, including the ERROR_NOT_DOS_DISK error code. Clean your temporary files and then try to use your drive again.

7. Use the previous drive letter/ change the drive letter

  1. Go to Search > type disk management > select the first result > launch the tool
  2. Select the problematic drive > right-click it > select Change driver letters and paths
  3. Click on the Change button > restore the previous driver letter > click OK.

If the ERROR_NOT_DOS_DISK error code occurred after you changed the letter of your drive, try restoring the previous letter.

8. Format your hard drive

  1. Go to Start > type cmd > right-click the cmd search result > select Run as administrator
  2. Type formatC: /FS:exFAT > hit Enter to begin formatting the C drive as exFAT.
    • Replace C: with the letter of the problematic drive.

If the solutions above didn’t work, try formatting the problematic drive. Formatting and restoring the default drive settings should fix this error.

Keep in mind that formatting your drive means deleting all the files and folders stored on the respective drive.

  1. Go to Start > type disk management > select the Disk Management utility
  2. Right-click the drive that you want to format > select the Format option
  3. Follow the on-screen instructions to further customize the format process > click OK on the warning window.
  4. Once the format process finishes, you can use your drive. Try to install the updates again to see if this action fixed the problem.

We hope that the solutions listed above helped you fix the ERROR_NOT_DOS_DISK error code.

As always, if you’ve come across other workarounds to fix this problem, you can help the Windows community by listing the troubleshooting steps in the comments below.

FIX: There was a problem reading this document [Adobe error]

Adobe error 14 pops up for some users when they try to open PDF documents. The full error message states: The document could not be saved. there was a problem reading this document (14).

Consequently, users can’t open PDFs in AR. Obviously, you can try to repair your document in order to eliminate the PDF error 14. But there are other quicker solutions as well. In the end, it’s all up to you.

Here are a few resolutions that might fix Adobe Error 14: There was a problem reading this document.

How do I fix Adobe Reader error 14?

1. Update Adobe Reader

The Adobe error 14 is often due to outdated Adobe software. PDF documents set up with the most recent Adobe software won’t always open in earlier AR versions. Thus, updating your AR software to the latest version will probably fix the issue if there are updates available.

In many cases, the version you have can still have issues after updating it as it has previous function errors. In this case, we strongly suggest you re-check the source if you use genuine software. If it’s not from the official Adobe website, you should uninstall it and delete all its entries.

After that, you can get a copy from the official website. Check the same PDF to see if the error there was a problem reading this document is still there.

2. Repair the PDF File

This error might also pop up if the PDF file is in some way corrupted. Thus, you might need to repair the file in order to open it. And you can do so easily with specialized PDF repair tools.

The guidelines are pretty straightforward and similar to most software available on the market. To ease your search we recommend using Stellar PDF Repair. So, here goes:

  1. Download Stellar PDF Repair tool.
  2. Install the product and then launch it.
  3. Select the PDF file you want to men, and click Repair.
  4. Wait for the software to finish the process, and then try to open the PDF file.

3. Open the PDF with alternative software

This resolution might not exactly be a fix, but there are plenty of alternatives to Adobe Reader. If you get that there was a problem reading this document error in Adobe, you might give it a try from a different PDF reader.

Even browsers such as Edge can view these files now. So why not give it a go? We recommend you pick a fast and lightweight tool that can act as a PDF opener and editor alike.

⇒ Get Soda PDF

4. Extract pages from the PDF

Some users have confirmed that extracting pages from PDF documents can fix Adobe error 14. You’ll need to open the pages separately in Adobe Reader after extracting them.

This is how you can extract pages from PDFs with the Sejda PDF extractor.

  1. Click here to open the Sejda PDF extractor in a browser.
  2. Press the Upload PDF files button to select a document on your HDD.
  3. Or you can click the small arrow to select a file from Google Drive or Dropbox.
  4. Then, select the pages to extract from the document by clicking their thumbnail images.
  5. Press the Extract pages button.
  6. A window then opens from which you can click Download to save the extracted PDF.

By following any of these steps or using any of the software solutions listed below, you should now be able to fix PDF error 14 and any PDF-related issues for that matter.

Let us know what step or which product helped you most sharing your feedback in the comments section below.

4 Best Lossless Audio Converters for Windows 10/11

The digital media boom has created hundreds of file formats for audio and video content and various files compatible with desktops, smartphones, tablets, or audio players.

When music is being recorded in a studio, besides mastering and editing, the sounds go through a compression process.

It allows the artists/record labels to compress the size of the audio file into smaller pieces for burning it on CDs and other optical data storage systems.

One of the best-known and most used audio format is MP3. It is very versatile, compatible with different peripherals, and doesn’t require much storage space.

This allows you to easily store your MP3 files in small-sized containers – MP3 Players, CDs, etc.

The main issue with using the MP3 format is that the quality of the audio file is drastically reduced (at the same time reducing the file size) in the process of compressing.

Sounds are distorted because a machine believes the human ear can’t perceive the change. Listeners can often pick up on these subtle differences, and that gives you the feeling that you’re listening to low-quality music.

This is where ‘losless’ files come into play, allowing you to listen to every single bit of detail from the original recording while reducing file sizes considerably – high bit-rate audio.

Even if your files are not lossless (FLAC), the market offers a wide array of software that can transform MP3 files into lossless audio. Still, note that these files are prone to errors like the property requested was not found that prevent editing.

In this article, we will explore the 4 best options on the market to do just that. Use these tools to get a high-quality audio experience no matter what the base format of your files is.

Which are the best lossless audio converters?

Stellar Audio Video Converter – Best lossless audio converter

This software allows you to convert audio files into various formats easily and helps you transfer them to various portable devices.

Stellar Pheonix Audio Converter has a user-friendly interface and allows you to convert entire music labraries in a batch, saving you time.

Stellar Audio Video Converter key features:

  • Converts audio/video files into popular formats playable on different media players and devices
  • Supports audio-to-audio, video to video, and video to FLAC conversion
  • Facilitates ripping an audio CD to extract specific audio tracks
  • Converts multiple audio or video files simultaneously through batch processing
  • Exports files to MP3, WAV, ACC, Flac, Etc
  • Cost-effective conversion
  • Step-by-step guide to the best optimization of your converted files
  • Adjusting bitrate and sample rate
  • Conversion of stereo audio track to mono

Stellar Audio Video Converter

Just add files, preview them, and convert them into your desired format in one go.
Free trial Visit Website

Xilisoft Audio Converter – Intuitive layout

This software from Xilisoft has a very intuitive layout and can import and export all the important audio formats.

It can also extract audio files from a wide range of video files – MPEG, WMV and MP4. However, keep in mind that both the exporting and extracting of your audio files take longer than the best programs we tested.

This makes it not very efficient when it comes to either transforming large files or for when you need to batch process your music library.

Xilisoft Audio Converter key features :

  • Allows batch processing of audio files
  • Add effects like chorus, normalize the volume, etc
  • You can use it to convert files taken from vinyl recordings or cassettes
  • Compatibility with many HD video files but also audio files – MP3, WMA, WAV, AAC; FLAC, APE, etc.
  • Processing of audio segments
  • Splitting of audio files
  • Option to output files to exact sizes
  • Editing ID3 info
  • Adding and adjusting audio effects
  • Multithreading support
  • Multi-core CPU processing

Xilisoft Audio Converter

Convert almost all audio formats and also extract music files from various video files.
Check price Visit Website

Switch Plus Audio Converter Software – Stable audio file converter

Switch Plus is the most comprehensive and stable audio file converter on the market. It allows you to easily convert your sound files to an endless variety of formats in order to suit the type of experience you want to have.

You can add the files you want to convert, choose the output file type, and simply click the ‘Convert‘ button.

Switch Plus is very vast. Many users confirmed that this tool is almost twice as fast as similar tools.

Of course, the results depend on the type of files used and your machine hardware configuration.

It doesn’t seem like a big-time difference but when you need to transform an entire library of music, a few seconds add up to minutes of your precious time.

Switch offers a batch-converter feature that can transform thousands of files without you needing to supervise the operation. It is compatible with 40 audio formats and can convert audio files to 26 output formats.

Switch Plus Audio Converter also gives you the feature of extracting audio from DVD and other video formats like AVI, MPEG and more but also allows you to easily record audio from popular streaming services like Spotify and Pandora.

Key features:

  • Automatically normalize audio while converting
  • Access to an online database to add song information as you convert
  • Import multiple file formats at the same time and convert to one output format
  • Ability to play tracks prior to conversion
  • Import and convert a playlist (m3u and pls)
  • Import video files and extract audio (avi, mov, mpeg)
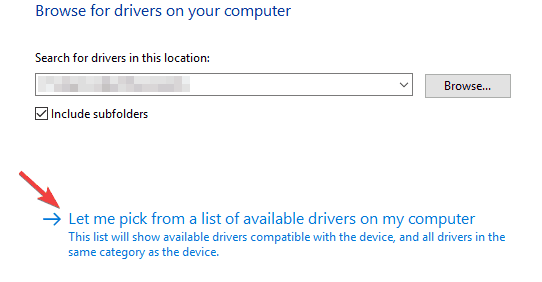
  • Convert audio from DVDs
  • MP3 encoder supports constant or variable bit rates from 8 to 320kbps with optional error correction and stereo modes
  • WAV encoder supports sample rates between 6000 and 196000Hz in PCM as well as a number of other audio codecs
  • Allows up to 32000 files to be converted in one batch
  • Optimized CPU usage and efficient code allows for the fastest conversion times

Switch Audio File Converter

Convert between over 40 audio file formats now with the most comprehensive audio file converter on the market!
Check price Visit Website

AnyMP4 Audio Converter – Super fast conversion

AnyMP4 Audio Converter is one of the simplest programs to use and offers you a wide array of options to convert and process both audio and video files.

It can convert audio files quickly with one of the fastest speeds recorded in our tests, allowing users to transform entire libraries with just a few clicks of the mouse.

AnyMP4 is compatible with tens of audio file formats. At the same time, the tool can convert these audio files to 14 different output formats. This is a very nice feature and places AnyPM4 among the best audio converters.

This simple yet powerful tool also allows you to efficiently extract audio data from different formats of videos: M4V, MOV, MP4, MPG and WMV.

The official site of AnyMP4 Audio Converter offers you a comprehensive FAQ section and you also have the option to contact the company directly via email with a guaranteed answer within 24 hours.

AnyMP4 Audio Converter key features:

  • Simple user interface and super fast conversion
  • Converts audio/video to various audio formats – FLAC, ALAC, MP3, M4A, AAC,etc
  • Extract audio files from video and convert them to the desired audio format
  • Convert audio files for you to be able to listen to them on different mobile devices – iPhone/iPod/iPad, Zune, Creative Zen, Adroid devices, etc.
  • Cuts audio files or merges them into new audio
  • Edit audio effects and listen in advance
  • Fast conversion speed
  • Batch conversion of a maximum 8 audio files

AnyMP4 Audio Converter

This audio converter will let you easily cut audio clips or merge them in a new audio file.
Check price Visit Website

This article covers 4 of the most efficient audio software converters the market has to offer. The choices provided here allow you to make an informed decision about the best options available on the market.

Use these tools when you need to convert any audio file format to lossless (FLAC) or any other format, extract audio from video files, batch process and edit your audio library, and add effects to get the finest and fastest results possible.

5 Best Email Software Picks for Small Businesses

Owning a business and managing every aspect of it perfectly is a task that everybody needs some help with.

Whether you choose to use automated onboarding software, time-off software, or any other software to help you deal with your everyday tasks, having a reliable and safe email client for your business is crucial.

Only the managing of emails received every day, in a small company can be an extremely daunting and time-consuming process.

This activity could take you hours every day, especially if you have multiple email accounts with different email providers (Yahoo, Gmail, etc.).

Owning the right email client allows you to streamline the process of managing your emails, reply to emails easily, manage contacts and calendars, email encryption, and many other useful features.

Let’s explore some of the best email client services for small businesses available on the market in 2019.

What are the best software for managing business emails?

Mailbird Pro – Unlimited number of email accounts

Mailbird Pro is an incredibly useful and lightweight email app for Windows PCs, that can be used by small to medium-sized businesses. Even though it has a very small file size, this app still packs a great range of features.

Mailbird has a great-looking user interface that can be easily customized to suit your needs perfectly, and the fact that it can easily be integrated with other apps allows hassle-free communication across departments and companies.

One of the best features of Mailbird is that it offers you a way to set up keyboard shortcuts, cutting the time invested in email management a lot.

This software was designed to be easy to understand and use, which is why it gives you the possibility to quickly read received emails, reply fast, and also great options for bulk deleting and archiving, at great speeds.

When dealing with a large number of emails, it is very important that we categorize those emails for easy access.

Mailbird achieves this goal by the use of folders, which can be used as labels, making it easier than ever to identify any urgent emails, archiving in specific folders, etc. You can also assign colors to folders to quickly identify them.

Other notable features of Mailbird Pro:

  • Unlimited number of email accounts
  • Has the ability to postpone annoying emails
  • Speed reader features – gives you access to the information in your email fast
  • Can provide a quick preview of your attachments
  • Offers great priority support
  • Mailbird essential options – gives you access to super focus mode with business essentials

There is also a free version available for Windows, with limited features and only licensed for personal use, that offers you multi-account support (IMAP and POP3, etc.).

The free version also gives you access to a contacts manager and supports app integrations.

Mailbird Pro

Power up your business with this powerful email client.
Check Price Visit website

eM Client – Automatically translates emails

eM Client is another great email client that can help you manage every aspect of your email correspondence with ease. This app is designed to migrate any number of messages from clients like Gmail, Exchange, and Outlook.

This software also allows you to import your schedules from your calendar, and also contacts. All these options can be easily deactivated if you choose to do so and manage all these aspects on your own.

eM Client has a great set of useful features that include an integrated chat app, which works perfectly with Google Chat and other platforms of this type.

What really makes eM Client stand out from the crowd is its useful advanced features.

You can use this app for automatically translating emails, and to set up a delayed send of your email, and also offers great encryption, so you don’t have to worry about your information getting stolen (using PGP).

The free version of this software still offers you a great set of tools for your email managing tasks, but it is limited to only 2 accounts.

In order to be able to use an unlimited number of accounts, it is recommended that you pay a one-time fee and get the Pro version.

Beyond the unlimited number of accounts, with the Pro version of eM Client, you also get VIP support, and the right to use this email client in a commercial setting.

eM Client

Stay on top of your mailing lists with this amazing email client.
Check Price Visit website

Office 365 – Protection against data loss

Microsoft offers protection against Office 365 reply all mailstorm

This is another useful and very powerful tool that can manage every aspect of your company’s email. It is suitable for companies that already use the Microsoft Office apps like Word, Excel, and PowerPoint.

If that’s the case, then the Business Premium plan of Office 365 is exactly what you need.

By using this software you get access to services relating to sending and receiving emails, allows you to set custom domains, and also offers you protection against data loss.

Office 365 Business Premium adds a great set of features to the standard Office apps, offering your team members access to a team chat tool called Microsoft Teams, an internal social app called Yammer, and another very useful task management app that is named Microsoft Planner.

The Business Premium plan offers you the power to host up to 300 accounts, 50GB of storage for each account, and access to all the features presented above, and also the Exchange online plan offers you great email hosting, the ability to share calendars, and a worldwide address list.

⇒  Try Microsoft Office 365


Mozilla Thunderbird – Easily search the web

This email client from Mozilla called Thunderbird, is an incredibly powerful app that allows you to manage an unlimited number of accounts, offers a great range of plugins for customization, and has a wide range of other powerful features.

One of the best features of Thunderbird is the fact that it can back up your email messages to a local storage space (PC hard drive, USB stick, etc.), and never have to worry about mistakenly deleting an email.

Thunderbird also reminds you of upcoming appointments, allows you yo use multiple types of calendars, and also includes a RSS reader. This feature allows you to quickly browse through the headlines, and react fast to any important information.

Because all these features are contained under a fresh looking, and easy-to-use interface, you don’t have to open up dozens of tabs in your browser to be able to respond to emails, check calendars and the latest news, make appointments, etc.

Thunderbird is constructed in the same way Mozzila Firefox is built, by the use of tabs, that allow you to keep the information on your screen organized, and also allows you to quickly change between them to reach the information you need.

When you decide to exit Thunderbird, it will automatically save all open tabs, and restore them when you open it next. This option allows you to make sure that none of your important emails can disappear if your computer suddenly shuts down.

Another incredibly useful feature found in Thunderbird is the ability to easily search the web (by choosing your preferred search engine), or quickly sort through your emails by the use of the Quick Filter Toolbar.

This feature works instantly, showing you results as you type. You can also choose to filter your emails by different characteristics – tags, people sending them, etc.

For a full list of features offered by Mozzila Thunderbird, you can check out the official page.

You can find a great set of useful guides in the support section of the official Thunderbird webpage.

⇒  Download Mozzila Thunderbird

Google Suite – Business-level email through Gmail

resize gmail to fit screen

G Suite is a great toolset released by Google that runs entirely in the cloud. Besides having access to this suite from anywhere in the world, G Suite allows you to save your work instantly, create regular back-ups of your emails and files, and easy files sharing.

This suite contains a good range of software, each covering a series of needs for your small company:

Gmail – This email app is incredibly fast and reliable, and offers a wide range of incredible features:

  • Can add labels and filters
  • IMAP/POP support – allows you to set expiry dates for your emails
  • Great integration with Google Calendar and Google Keep

Google Calendar – designed specifically to fit perfectly within Gmail, this app has an easy-to-understand user interface with some great features:

  • Can compare calendars to your colleagues
  • Ability to color code events for easy managing and scheduling
  • Adjusts the time zones according to your trips
  • Has the ability to add guest lists and other files to your events

Google Hangouts – when it comes to chatting, G Suite also contains this useful option. This feature allows you to chat and connect with your friends from anywhere in the world by both video calling and text.

Google Drive – Another very important part of the G Suite, this element allows you to store the entire database of your company in the cloud, and access it easily from anywhere in the world.

It is also worth mentioning that G Suite also includes great online tools like Google Docs, Sheets, Slides and Forms, which form the base of this software option. These features allow you to manage every aspect of your business, in the same way you would by using Microsoft Office tools, but in the cloud.

This software was released in three different ‘flavors’ , each catering to the needs of different types of users.

For individuals, there is a Basic option that offers the office suite with 30GB of storage included, and other useful features like :

  • Business-level email through Gmail
  • Can preview attachments
  • Allows you to see read receipts so you know when the messages have been read
  • Can recover your deleted emails for 30 days
  • Gives you top-of-the-range spam protection
  • Supports multiple aliases
  • Allows you to access your email even without connection to the internet

The Business version contains all the features found in the Basic version and also offers you unlimited storage space, and access to the Vault for eDiscovery and archiving.

The Enterprise version contains all the features found in the two previous options and also adds great features like – data loss protection and the ability to integrate it with third-party archiving tools.

⇒ Try G Suite


Can I have a free business email?

Yes, you can, as long as you have a domain name and a website.

Because it is already hard enough to manage every aspect of your business, in this article we explored some of the best options on the market that are designed to take some weight off your shoulders. This can be achieved by managing every aspect of your company’s email with the software we explored above.

The features included in the software options we presented in this article will surely cover all your company’s needs. These types of apps can help you and your colleagues save time, and become more efficient and productive.

We would love to know what software option you chose from the list above. Please feel free to let us know in the comment section below.

6 Best File Sync Software for Your Windows 7 PC This Year

Synchronization of files and data across related systems is essential in several setups, as it provides access to all necessary files from a single location. But the process is often tricky on older PCs. So, we decided to help you find the best file sync software for Windows 7.

This allows teams to increase productivity and is helpful to a great extent. But when it comes to finding the fastest file sync software, things are not simple. So, let’s find out the best ones!

What is file synchronization software?

File synchronization ensures that data in one location is the same as in another. For computers, it means that the synced files on one PC should reflect in the same format on the other. And any program that helps achieve this is file synchronization software.

Here are some of the benefits of file synchronization:

  • Enhanced accessibility: One of the primary advantages when you download a file sync software is that it allows you to connect a bunch of computers over the network and seamlessly access files available on any without the need to share these.
  • Serves as an alternative for backups: In case of a crash or when required to reinstall Windows, users can always restore the lost files that were synced previously from the other device.
  • Boosts productivity: Corporations usually go with file syncing, given its direct relation with productivity and its huge impact.

What is the best file sync software for Windows 7?

pCloud – For all your needs

pcloud file sync software windows 7

Topping off our list of the best file sync tools for Windows 7 is pCloud, a world-famous cloud storage service that allows you to store, share and access all files using one simple and highly secure platform, regardless of the time and location.

The pCloud software prioritizes security, and its feature, Swiss data protection, ensures the highest grade of data confidentiality. The program is available on all major platforms, both mobile and PC, and all you need is Internet access to connect to the service and sync the files instantly.

As such, the service is divided into three inter-locking sub-services:

  • pCloud for Web: Can be used via any web browser on any PC, be it Windows or macOS.
  • pCloud Drive: The tool is similar to Google Drive or OneDrive’s virtual drive tools. It allows easy syncing and storage of the data on your PC.
  • pCloud for Mobile: It is the Android and iOS versions of the service. Besides the different architecture, there aren’t any differences between the mobile and desktop services in terms of functionality.

More so, the files stored in pCloud can be easily shared with anyone, as it comes packed with multiple file-sharing options so that you can share (send and receive) large files with anyone.
pCloud

Sync your Windows 7 files fast and easily with pCloud, and see what real cloud storage is all about.
Check price Visit website

SyncBack – Free version offers more features than any

syncback file sync software windows 7

SyncBack is one of the best free file sync software for Windows 7. It offers four versions, including a free and professional version. Though the paid ones offer an extensive range of options, the free version should do for most users in a home setup.

SyncBack’s free version, as gathered from reviews, offers more benefits to its users when compared to other free sync software.

In addition, SyncBack offers a backup feature (for your files and folders) that facilitates file retrieval when needed. The software supports cloud storage services, such as Google Drive, Azure, DropBox, and more. It is also compatible with notable cloud servers like FTP, SFTP, and FTPS servers.

SyncBack has a simple interface equipped with a support wizard that assists users in navigating the software with ease. Besides, the software hosts a set of advanced configuration options, which allow you to modify some of its functions to suit your needs.

In fact, SyncBack is supported on almost all Windows versions, including Windows 7, all thanks to its compact size.

SyncBack

Synchronizes files on your computer quickly and easily
Check price Visit website

GoodSync – Easily customizable

good sync file sync software windows 7

GoodSync is one of the best available file sync tools in the market. The software is widely flexible and can easily be customized to suit the needs of your team. The tool offers a user-friendly interface, with a menu and critical options in an organized and easy-to-navigate format.

GoodSync provides a 30-day free trial to test the software, after which you have to subscribe to one of its paid subscription plans.

Typically, GoodSync is equipped to synchronize a minimum of 2 folders. However, you can add more folders to the shared portfolio. All relevant team members can easily access these shared files.

Besides, GoodSync offers the option to connect the software with a smartphone or tablet. Using this feature, you can easily back up your smartphone files on your PC or even import/export files seamlessly from the phone to your computer.

The software is equipped with a scheduler to set time and automate the transfer of time-sensitive files. Also, GoodSync supports a host of popular cloud storage tools like Google Drive, Dropbox, Azure, Office 365, and more. You can also connect to SFTP, WebDAV, and FTP servers.

⇒ Get GoodSync

Allway Sync – Easy-to-use interface

file sync software windows 7

Allway Sync is undoubtedly one of the best file sync software in Windows 7. It hosts every relevant functionality, making it stand out as one of the best. The software offers cloud-sync functionality, thus allowing users to share unlimited files, even large ones.

Allway Sync uses an automated function to detect and execute minor actions like deleting file(s) from paired devices. In this case, once a file is deleted from a synced device, Allway automatically deletes the file from other connected devices.

Also, the syncing tool hosts an easy-to-navigate interface and supports a wide range of languages for its culturally-diverse clientele.

Allway Sync allows you to synchronize the system with removable devices (flash drives, memory drives, and so on). It also supports cloud storage tools like Dropbox, Google Drive, and more.

Lastly, Allway Sync has a free version, specially designed for home setups. And its Pro version (paid) is designed to serve businesses and teams.

⇒ Get Allway Sync

Resilio Sync – Uses peer-to-peer process

resilio sync

Resilio Sync is quite different from other sync tools regarding operational patterns. The software utilizes a peer-peer sync process, making it outstanding as one of the best available sync tools.

Besides, Resilio Sync has risen in prominence over the past few years. Today, it is widely used as the official file sync tool of more than one hundred businesses worldwide.

The file sync software for Windows 7 PC is built on BitTorrent technology, facilitating faster connection and allowing the software to handle vast data.

The peer-to-peer sync function protects Resilio Sync from problems such as a congested central server. Also, it supports cloud storage services like Azure, AWS, Blob storage, and others, besides being compatible with mobile devices.

Resilio Sync offers a free version, which comes with limited features. To access them all, upgrade to the Pro version. If you own a business that operates at the peer-to-peer level, Resilio Sync is the way to go.

⇒ Get Resilio Sync

ViceVersa – Refined and fast

vice versa

ViceVersa offers some of the most refined and up-to-date sync features available. It hosts reliable sync and backup features, which enables you to compare files and replicate target folders.

ViceVersa operates on an intuitive and user-friendly interface, providing a side-by-side view of all features and shared files.

ViceVersa allows you to schedule sync processes, enabling seamless sharing of time-sensitive files and so on. Also, the software supports different connections and options like LAN and external storage devices.

ViceVersa is cost-efficient, and it offers flexible pricing plans. You get an initial 30-day free trial period, after which you will be put on a paid plan and upgraded to ViceVersa Pro.

⇒ Get ViceVersa

These were the best file sync software for Windows 7, each offering a range of dedicated features to meet the needs of individual users and corporations.

Also, if you plan to upgrade the OS, check our curated list of the best folder and file sync programs for Windows 10.

If you want something simpler, you can still get SyncToy for Windows 7, so be sure to give it a try.

Do tell us your favorite pick from the options listed above in the comments section.

New job listing elaborates on Microsoft’s continued “family services” push

Microsoft’s Modern Life Experience (MLX) team could be expanding soon based on a recent job posting that’s focused on “family services.”

At a high level, the Senior Designer employment position listed on Microsoft’s Career job board is seeking an individual who “will concept and craft unique and compelling motion design for Family experiences including Family Safety Mobile, Web, Windows, and Xbox interactions.”

More specifically, Microsoft is looking for someone who can help connect with broader design communities within the company to extend motion experiences across multiple company offerings.

  • Highly adept with After Effects, C4D, Octane, and other software for creating user interface animations and rapid mockups, motion studies, and prototypes
  • Effective at visualizing experiences in the abstract and then driving that vision into concise motion design deliverables and hands-on building with engineering teams
  • Able to lead the definition and communication of motion design guidelines, development best practices, and standards
  • Be a dependable partner with software engineers to leverage the scale offered by our platform, without compromising core experiential principles and customer intent
  • Connect with the broader design community to extend motion experiences across the array of offerings 
  • Ability to collaborate with teams across design, research, product, engineering, etc. 
  • Commitment to diversity of thought, perspectives, and people 

ZDNet reporter Mary Jo Foley, recently elaborated on Microsoft’s “family services” agenda as evident by this new job listing, to explain the company’s continued goal to attract non-enterprise consumers.

Microsoft has repeatedly chased the consumer dragon to varying degrees of success and failure. However, it seems the company has figured out an end-around to its legendary consumer misfires by simply expanding its successful enterprise tools to incorporate and blend families’ needs.

Microsoft 365 Family Services

Microsoft 365 is the growing amalgamation of the company’s efforts to foster a prosumer audience of individuals who use Microsoft software and services at work but could also make use of their work tools for their family endeavors.

Some recent instances of Microsoft’s prosumer push have come in the way of a new feature in Excel called Money in Excel, Teams for Personal Life, “Kids Mode” for Edge, and Viva Learning.

According to Foley, Microsoft’s Modern Life Planning team, a consortium of investment bankers, consultants, and finance professionals, are ironing out details and partnerships to help expand its M365 “family services” to more prosumers in the future.

Best Audio Converter for PC: Top 11 Picks

An audio converter is software used to convert one type of audio file (like an MP3, WMA, WAV, etc) to another. For instance, if you have an audio file whose format is not supported by any of your computer programs, then you won’t be able to play the file without converting it to a format that your computer supports.

This is where audio converter software comes in handy.

To enjoy music stored in exotic formats that your media player doesn’t support, you’ll need to install an audio converter software that promises to convert the audio tracks to a supported format.

Various audio formats exist, and each has its own unique features. Some maintain excellent sound quality, some can be played only on specific devices, some offer compact size, and others are so rare that you have no idea which programs can open them.

The best audio converter software supports multiple input and output file formats like MP4, MP3, WAV, WMA, etc. They also make file conversion task simpler along with maintaining high-quality sound. In this article, we will discuss the best audio converter software that you should use.

What are the best audio converter software?

Aiseesoft Total Media Converter (recommended)


Aiseesoft Total Video Converter can easily convert between various video formats such as MP4, H.264/MP4 AVC, H.265/HEVC, MTS, MXF, MOV, AVI, as well as 4K, HD, and 3D video formats.

It can be as video conversion software that converts any of your videos to MP4, MP3, WMV, MOV, etc. for playback on your TV or mobile device.

Besides its enormous converting potential, this tool is very easy to use. The interface is very intuitive, and it unlocks the most needed/ interesting/ powerful features really easily.

The Converter also gives the users some customizable options,  such as video-enhancing functions and audio conversion preferences.

You can try the converter for free, but after the trial period is up, you will have to pay for a permanent license. However, for the features proposed, this product is worth every cent.

Aiseesoft Total Media Converter

Aiseesoft Total Video Converter has a great converting power and offers large support for a lot of video and audio formats.
Check price Visit website

Xilisoft Audio Converter

Xilisoft can convert audio from multiple file formats as well as rip audio from CD. Its conversion prowess is remarkable. It only takes a few clicks to convert audio, change the bitrate, and rip audio from CDs.

Xilisoft provides an intuitive layout and a very friendly user interface that makes file conversion easy and fun.

Just like Switch, Xilisoft enables you to extract audio from video files. Some of the supported video file formats include MP4, MOV, M4V, MKV, AVC, AVI, WMV, among others.

This converter is compatible with 18 different file formats and is capable of converting files to 16 different output formats. Xilisoft is one of the most versatile audio converter software in our lineup.

Xilisoft Audio Converter

Xilisoft Audio Converter

With Xilisoft Audio Converter you only need a few clicks to convert your audio files or rip audio from your favorite CDs.
Check priceVisit website

GiliSoft Audio Converter Ripper

GiliSoft Audio Converter Ripper allows you to convert over 40 audio formats, including MP3, WMA, WAV, M4A, AMR, OGG, FLAC, MP2, etc. and encode them to any key audio format.

Thanks to the included Clip Audio Segments feature, you may even convert just a certain segment; then, don’t hesitate to adjust a range of basic and advanced output parameters to fully customize your output audio file.

The best bit? That’s also your chance to create the perfect ringtone of your favorite song instead of the standard sound as you can convert audio files to M4A format for Apple devices – iPhone, iPad, iPod, Apple TV, as well as iTunes.

The self-explaining interface makes the process work like a breeze. You finally have your digital audio tracks saved in the desired format, and nothing stops you from loading them to your favorite audio player, be it a portable Apple iPod or Sony’s Walkman.

GiliSoft Audio Converter Ripper

GiliSoft Audio Converter Ripper

This awesome tool helps you convert over 40 audio formats and even create personalized ringtones for your smartphone.
Check priceVisit website

Stellar Video & Audio Converter

Stellar is a fast and affordable converter that not only converts audio files but video files as well. It’s one of the few converters capable of converting both video and audio files.

When you launch the program, it prompts you to select between the various file conversion options it offers: convert video, convert audio, convert video to MP3, or Rip audio CD.

Stellar is compatible with 7 of the most popular audio file formats—MP3, MP4, WMA, WAV, AAC, OGG, and FLAC. Not as broad as the one for the top converters, but good enough to convert most of the popular audio files.

The program is also capable of extracting audio data from video files. And just as the name implies, it does a stellar job converting video file formats to different formats.

Stellar Video & Audio Converter

Stellar Video & Audio Converter

Stellar not only help you convert your audio files but does a very good job with converting videos as well.
Check priceVisit website

Switch

Best audio converter software - Switch

Switch combines exceptional audio compatibility, internet audio recording ability, and an easy-to-use interface all in one program. This is a top-of-the-line converter capable of converting multiple audio formats and fast audio conversion without errors.

One unique feature that you won’t find in many audio converter software is the Audio stream wizard. Switch enables you to stream and record music from the internet, breaks the process into 3 steps, and walks you through the steps.

Not only does it support a dozen of file formats, Switch also converts those formats to any of the 26 file formats it offers. Another amazing feature is its ability to extract audio data from videos.

Switch is capable of extracting audio from a wide variety of video formats, including MP4, WMV, MPG, MOV, and M4V. You can also use it to import CDs and convert audio to any of the formats it supports.

⇒ Get Switch Audio File Converter

Super

super_audio_converter_software

Super is a very popular and free audio converter. You will be surprised at the long list of audio formats it supports. If you have an audio file recorded in a rare format and you want it converted to a more common format, you should try out the Super audio converter.

Input formats include MP3, MP2, WMA, WAV, WV, TTA, RM, RAM, OGG, MPP, M4A, FLAC, MMF, APE, AAC, AMR, and AC3.

Output formats include MP3, MP2, MMF, FLAC, APE, WMA, WAV, WV, TTA, OGG, MPC, AMR, AC3, and AAC. Super also makes it possible to extract audio data from video files and save as any of the above-listed output formats.

⇒ Get Super

Free Studio

free_studio_audio_converter_software

Free Studio is a free and superior audio converter software that supports multiple formats. Since it consists of a group of several programs, you’ve to specify the task i.e. audio conversion. Just navigate the main menu and click convert, then choose the Audio converter option.

It’s not only the best MP3 converter on the internet, but also creates superior MP3 sound with the help of the available lame encoder presets (Insane and Extreme).

This converter is highly customizable with flexible settings. There is a preset editor provided for each format to help you customize it to your style. You can edit, create new presets, or delete olds ones.

Free Studio supports 28 input audio formats including MP3, FLAC, WAV, and WMA. Output formats supported include MP3, WAV, M4R, M4B, OGG, FLAC, AMR, ALAC, AAC, and WMA. It also lets you extract audio from CDs, YouTube, and most video formats.

⇒ Get Free Studio

Freemake Audio Converter

freemake_audio_converter_software

Freemake is a feature-rich and extremely easy to use audio converter that supports multiple input and output audio file formats. With Freemake, you can combine multiple files into one large audio file.

This software also allows you to adjust the output quality before file conversion starts. Input formats supported include MP3, WMA, WAV, OGG, M4R, M4A, FLAC, AC3, AMR, and AAC. Output formats supported include MP3, WMA, WAV, OGG, M4A, FLAC, and AAC.

Note: When installing the Freemake Audio Converter, make sure to uncheck what you don’t want as the Freemake installer will attempt to install other programs not related to the converter.

⇒ Get Freemake Audio Converter 

MediaHuman Audio Converter

mediahuman_audio_converter_software_for _windows

MediaHuman audio converter is neat with a minimalistic design that is easy to work with. Its simplicity makes it a very useful audio converter software. Just drag and drop the audio you want to convert, select the output format and Media Human will take it from there.

It even allows you to set the bitrate before the conversion starts. It supports a long list of 26 audio input formats including MP3, WAV, FLAC, and AAC. Supported output formats include WAV, MP3, FLAC, M4R, ALAC, AIFF, AC3, WMA and AAC.

⇒ Get MediaHuman Audio Converter 

Total Audio Converter

Total_audio_converter_software

Total Audio converter is a flexible software that is capable of converting even the rarest formats such as OPUS to MP3. Some of the output audio formats it support includes MP3, WMA, WAV, FLAC, MP4, MPC, OPUS, and over 20 more formats.

Along with that, it can also rip audio from CDs and convert YouTube videos to the various output formats it supports. Total has been online for over 10 years and is being used by millions of users.

⇒ Get Total Audio Converter

Helium Audio Converter

helium-audio-converter-software

Helium Audio Converter is a fully-featured freeware that makes audio conversion a piece of cake for the user. It has an intuitive interface that offers many options to simplify the conversion process.

Once you’ve installed the software, all you will need to do is add files/folders, select the format option, click the convert button and you are done. You can also drag and drop the files you want to convert. Formats supported include MP4, MP3, FLAC, MPC, M4B, M4A, AAC, WMA, WAVE, and more.

⇒ Get Helium Audio Converter 

While the main purpose of an audio converter software is to convert audio from one format to another, there are other features you should look for to better manipulate the audio.

For instance, a program that can extract audio from the video can save you time as you don’t have to use a separate program to do the same.

A converter that allows you to extract audio data from CDs can help you save your audio in a more useful format. These are some of the top features you will find in most of the products we’ve reviewed.

If you are looking for a way of converting an audio file from M4A to MP3, we recommend you check out this guide for easy steps.

Have you used any of the audio converter software listed above? Let us hear your experiences in the comments section below.

5 Best Motherboard Diagnostic Software for a Complete Overview

Whether you want to check hardware compatibility, update drivers, or are just curious, knowing your motherboard’s information is very important.

There are various situations where knowing your motherboard’s model number can be very useful. For instance, if you intend to upgrade your computer, the upgrade capabilities of your PC are set by the motherboard model you are using. So you will require this information.

Also when buying new hardware or upgrading your drivers, you’ll need the right expansion slots for card-based upgrades. Getting the motherboard information is not easy considering that many manufacturers don’t print the name or model number on the motherboard.

There are various methods you can use to get your motherboard’s information. You can crack open the computer and check the model number, but that would render the warranty void.

If you still have the system manual, you can flip through the pages and look for the motherboard information, which is kind of tedious.

So you’ll need to learn how to get this information the easy way, and that’s where motherboard information software comes in. These are hardware identification programs that display the system’s information including the motherboard particulars. In this article, we’ll discuss the best motherboard information software.

Speccy (suggested)

Created by Piriform, the creators of the famous CCleaner, Speccy is one of the most reliable motherboard information software to use.

Not only does it show the motherboard’s model number, but clicking on the motherboard entry in the left-hand navigation column reveals detailed information about the motherboard including the voltage settings and the chipset.

Speccy provides all the information you need on an uncluttered interface.

There is a page that gives a brief summary of important system information such as the OS, RAM, CPU, Optical drive, and peripherals. More detailed information on each category is organized on the left pane. Additional features include sharing options and the ability to export and print the system’s information.

Speccy is compatible with all versions of Windows from Windows XP through Windows 10. Best of all, it’s available as freeware.

Speccy

Get this freeware software now for all the valuable information about your PC’s hardware components.
Check price Visit website

System Information for Windows (SIW)

SIW is a Windows utility that is portable, easy to use, and very informative. It is so detailed that everything it has is divided into three easy-to-navigate sections named: Software, Hardware, and Network.

Here you’ll find detailed specs for motherboard, CPU, BIOS, network traffic, memory, page file usage, network shares, system uptime, open files, users, serial numbers (CD keys), processes, installed programs, operating system, peripherals, ports, disk drives, videos, hidden passwords, etc.

In addition to the system information, SIW also reveals details about all the installed applications. You can generate a summary report and SIW allows you to export the info to an HTML file.

It’s loaded with so much information that sometimes it takes time for the information to populate once the application is launched.

⇒ Get SIW 

ASTRA32

ASTRA32 is a portable cross-platform tool for Windows designed to give you detailed information about your computer’s hardware. It scans through a wide range of components to give you detailed information about your system’s specs. This tool has 9 sections that give detailed reports about the computer’s motherboard, operating system, networks, video card and monitors, storage devices, memory, and ports.

ASTRA 32 gives very detailed information about the motherboard and the processor. Motherboard details revealed include the model number, vendor, chipset, BIOS date as well as BIOS support features such as ACPI, PnP, and certain boot options.

Processor information revealed includes brand ID, clock speed, voltage, current speed, temperature, cache information, support, etc. ASTRA32 also shows a detailed list of all the applications installed on your computer. The program is available as freeware and is compatible with all versions of Windows.

⇒ Get ASTRA32 

Belarc Advisor

Belarc Advisor is another free utility that gives you all the information about your operating system and hardware specifications by performing a full system scan. Though not as detailed as the other utilities discussed above, basic information about the motherboard, operating system, memory, processor, display, and bus adapters are displayed.

In addition to the hardware information, Belarc Advisor also displays a full list of all the USB storage devices that were connected to your computer for the last 30 days. It even lists for you all the security updates that Windows is missing.

⇒ Get Belarc Advisor

CPU-Z

CPU-Z is a very popular tool for checking all the hardware resources information and it can also be used for checking important information about your motherboard.

After installation, navigate to the ‘Mainboard’ tab and CPU-Z will give you all the motherboard information with respect to the vendor, model, version, chipset, BIOS etc.

If you need to know more about your CPU, it will show you the name, core, clock speed, voltage, cache information, etc. It also gives you information about memory and graphics. If it’s too basic for you, check out CPU-Z alternatives.

⇒ Get CPU-Z

HWiNFO

HWiNFO is an excellent system utility that provides an in-depth review of your computer hardware resources. While other tools also display software specifications, HWiNFO concentrates solely on Hardware information. The information it gathers is categorized into 10 sections: motherboard, CPU, network, audio, drivers, monitor, ports, bus, memory, and video adapter.

The motherboard information gathered includes vendor name, model number, the number of open and used slots, chipset, supported USB versions, and a list of ACPI devices. It also shows BIOS information and detailed information about the processor. HWiNFO is available as freeware and is compatible with all versions of Windows.

⇒ Get HWiNFO

Conclusion

If you are not comfortable with third-party applications, you can also use the System Information utility to check details of your computer hardware including motherboard information. All you have to do is type “System Information” in your Windows start menu and click on the System Information icon that will pop up.

It will display all the details of your hardware including the motherboard model number. However, if you need detailed information about the motherboard, the above mention motherboard information software will display it all.

How to Convert an MBR Partition Table to GUID on a Mac

If you own a Mac PC, then you should know that whenever you need to install your OS, your main partition needs to be GUID (or GPR), and not MBR which is primarily specific to Windows.

Of course, there are situations when you need to convert from MBR to GPR.  These situations include:

  • Upgrading your Mac to a newer version that no longer supports MBR
  • Installing Windows on a Mac
  • Changing the PC’s hard drive, but it comes as MBR by default

Because of this, we’ve decided to make a step-by-step guide on how you can convert an MBR partition to a GUID on a Mac device.

How do I convert my MBR partition to GPT?

1. Use the Disk Utility tool

  1. Boot from your OS X Installer Disc.
  2. Choose your language and click on Continue. A menu bar should appear.
  3. Go to the Utilities menu.
  4. Select Disk Utility.mac disk utility
  5. When the Disk Utility loads select your hard drive.
  6. Under the Volume Scheme heading set the number of partitions to one.
  7. Click Options.
  8. Set the partition scheme to GUID.
  9. Click OK.
  10. Set the format type to Mac OS Extended (Journaled).
  11. Click on the Partition button.
  12. Wait for the process to run its course.
  13. Select the freshly created volume.
  14. Click on the Erase tab.
  15. Set the format type to Mac OS Extended (Journaled).
  16. Click on Security.
  17. Check the button for Zero Data.
  18. Click on OK to return to the Erase window.
  19. Click on Erase.
  20. Wait for the process to run its course.

2. Use a third-party tool

When you want to get the job done quicker and not waste too much time on this, using a dedicated third-party tool is the most convenient solution.

Paragon’s Hard Disk Manager for Mac is an excellent choice to manage your Mac’s disk partitions.

With a simple-to-use interface, Paragon provides powerful solutions to backup, resegment, and wipe your disk. Recovering deleted or lost files is also possible with just a few clicks.

Converting and redistributing the unused space between the partitions is among the most used tool option and you will be able to fully benefit from it.

⇒ Get Paragon Hard Disk Manager for Mac

By following these steps you should now have converted an MBR drive to a GUID (GPR) drive without any issues.

Note icon NOTE
This procedure involves erasing your partition. Backing up your data is recommended.

You can reverse the changes at any time by following the steps mentioned above, only this time you select MBR instead of GUID.

Did you find this article useful? Let us know what your opinions are in the comment section below.

FIX: Can’t hear audio in Movie Maker on Windows 10

Movie Maker is a simple tool that allows you to create and edit videos, but some users report that they can’t hear the audio in their Movie Maker project. This looks like an unusual problem, but fortunately for you, there are few solutions available.

Users report that when they add music to their Movie Maker project, the video works without any problems but there is no music available. This is an unusual problem, and if you’re using Movie Maker on regular basis this could be a big problem for you. If you’re having this issue with Movie Maker you might want to have a closer look at our solutions below.

Movie Maker audio not working, how to fix it??

Movie Maker is popular video editing software, but some users reported audio problems while using Movie Maker. Speaking of audio issues, here are some common problems that users reported:

  • Windows Movie Maker no sound on imported video – This is a common problem, but in most cases you can fix it simply by restarting the Windows Audio service.
  • Windows Movie Maker audio problems, no sound after saving, music not playing, cannot hear sound – These are some common audio problems that can occur with Windows Movie Maker, but you should be able to fix this problem by using one of our solutions.
  • Windows Movie Maker mkv no sound – If you’re having this problem only with MKV files, the issue might be the lack of video codecs. Simply install a codec pack and the problem will be resolved.

Solution 1 – Restart the Windows Audio service

According to users, if you’re having audio problems in Movie Maker, the issue might be your Windows Audio service. Sometimes there might be some issues with this service, and that can cause problems with audio in Movie Maker. To fix the problem, you just have to restart this service. This is relatively simple to do, and you can do it by following these steps:

  1. Press Windows Key + R and enter services.msc. Now press Enter or click OK.
    Windows Movie Maker no sound on imported video
  2. When Services window opens locate Windows Audio in list of services.
  3. Right-click the service and choose Stop from the menu.
  4. Right-click the same service again but this time choose Start from the menu.

Sound should be now working in Movie Maker.

There’s also a different way to do this:

  1. Start Task Manager. You can do that by pressing Ctrl + Shift + Esc on your keyboard.
  2. Go to Services tab.
  3. Locate AudioSrv (Windows Audio), and right-click it.movie maker sound problem
  4. Choose Restart from the list of options and after 10 seconds this service should be restarted.

Although this is a working solution, you’ll have to do it every time you start a Movie Maker project or restart your computer.

Solution 2 – Turn off DTS Sound

If you’re having audio problems in Movie Maker on Windows 10, the issue might be DTS sound. This is a useful feature, but it can sometimes cause this error to appear. To fix the issue, users are suggesting to disable this feature completely. To do that, follow these steps:

  1. In the Search bar type DTS sound and click DTS Sound from list of results.
  2. When the DTS Sound window opens click the power button icon on the left to turn it off. Now the DTS Sound window should become gray meaning that it has been turned off.
  3. Go back to Movie Maker and try if the audio works.

If you need to use DTS sound you can just set it to internal from the main screen instead of turning it off completely. It has reported that this also resolves the issue with Movie Maker.

Solution 3 – Use WMV format instead

This might not be the most practical solution but users have reported that WMV files work without any problems in Movie Maker, so if you’re having any issues with sound, convert your files to WMV format and then use them in Movie Maker. This might not be the fastest or the most elegant solution, but users claim that it works.

In order to convert your files to the WMV format, you’ll need appropriate software. There are many great converters available on the market, but if you want a simple but reliable converter, we suggest you try Any Video Converter Ultimate.

In addition, some users are suggesting converting .mp4 file to .mp4 file in order to solve the audio issues. We know that this sounds unusual, but it works according to users. Alternatively, you can convert the file to .wmv format and then convert it to .mp4.

Some users also reported issues while using .mp3 and . wma files in Movie Maker. However, you might be able to fix this issue by converting those files to .wav format.

Solution 4 – Repair Windows Live Essentials

Movie Maker is a part of Windows Live Essentials, and if you’re having audio problems in Movie Maker, perhaps your installation is damaged. To fix the problem, users are recommending repairing your Windows Live Essentials installation. To do that, follow these steps:

  1. Press Windows Key + S and enter control panel. Select Control Panel from the list of results.
    Windows Movie Maker no sound on imported video
  2. When Control Panel opens, go to Programs and Features section.
    Windows Movie Maker no sound after saving
  3. Now select Windows Live Essentials from the list and click Repair.
    Windows Movie Maker mkv no sound
  4. Follow the instructions on the screen to complete the repair process.

Once the Windows Live Essentials installation is repaired, check if the problem is still there. If the issue is still present, perhaps you should try reinstalling Windows Live Essentials. You can do that right from Control Panel, but that’s not always effective.

Regular uninstall processes can leave certain files and registry entries behind, and those files can cause problems in the future.

However, you can completely remove Windows Live Essentials from your PC with the help of a third-party utility such as CCleaner.

Use the built-in uninstall feature to remove the app, and then the PC cleaning and registry optimization tools to make sure there are no leftovers.

Once you remove Windows Live Essentials using this tool, install Movie Maker once again and the issue should be permanently resolved.

Solution 5 – Install a codec pack

Your PC might not be able to play certain video files unless you have the proper codecs available, and in some cases Movie Maker won’t play any audio. This can be a big problem, but you can fix the issue simply by installing the necessary codecs.

According to users, they managed to fix this issue simply by using the K-Lite codec pack, so if you’re having any problems with Movie Maker, install this codec pack and the issue should be resolved.

Solution 6 – Install QuickTime

According to users, they experienced some Movie Maker audio issues on their PC, but they managed to fix the problem by installing QuickTime. This is a multimedia player, but it comes with certain video codecs, and once you install it, you should install the necessary codecs as well.

Once the codecs are installed, the problem with audio in Movie Maker should be resolved.

Solution 7 – Change your sound settings

If you don’t have audio in Movie Maker, the problem might be your sound settings. According to users, sometimes you need to have Exclusive Mode disabled in order to get sound in Movie Maker. To change your sound settings, just do the following:

  1. Right-click the Sound icon in your Taskbar. Now choose Sounds from the menu.
    Windows Movie Maker music not playing
  2. Go to the Playback tab and double-click your current audio device. In our case that’s Speakers, but it might be different for you.
    Windows Movie Maker mkv no sound
  3. Go to Advanced tab and disable all option in Exclusive Mode section. Now click Apply and OK to save changes.
    Windows Movie Maker no sound on imported video

After making these changes, the issue with audio in Movie Maker should be completely resolved.

Solution 8 – Run the application in Compatibility Mode

According to users, sometimes issues with audio in Movie Maker can occur due to compatibility issues. However, you can fix this issue easily by setting Movie Maker to run in compatibility mode. In case you don’t know, Windows has a Compatibility Mode feature that allows you to run old applications.

To run Movie Maker in Compatibility Mode, you just need to do the following:

  1. Locate the Movie Maker shortcut, right-click it and choose Properties from the menu.
    Windows Movie Maker audio problems
  2. Now navigate to Compatibility tab and check Run this program in compatibility mode for. Select any older version of Windows and click Apply and OK to save changes.
    Windows Movie Maker mkv no sound

After doing that, try to start the application again. If the problem still occurs, you might have to experiment with your settings and try different versions of Compatibility Mode.

Solution 9 – Try using a different video editing tool

If you’re keep having audio problems in Movie Maker, perhaps you should consider switching to a different video editing software. Even though many users are familiar and comfortable with Movie Maker, you should know that Movie Maker is older software, and issues such as this one can occur.

If you’re frequently editing videos, perhaps you should consider switching to a different video editing software. CyberLink PowerDirector 16 offers great features, and it’s great if you want to perform smaller adjustments or create professional videos. If you’re looking for a proper Movie Maker replacement, be sure to try this tool.

Audio problems in Movie Maker can be annoying, but you should be able to fix most of them using one of these solutions.

Error Code exFAT File System: 5 Easy Ways to Fix it

The exFAT_file_system is a BSoD error in Windows 10 that usually indicates something is wrong with the exFAT file system.

This type of error appears more often when trying to upgrade the operating system to a newer version or when a program starts. This guide will show you how to fix the error convincingly.

What causes exFAT file system error?

  • Outdated drivers: An outdated driver or two is among the leading causes of this problem. The solution to this is to update your drivers to the latest version.
  • Memory issues: Sometimes, this issue can be down to problems with your hard drive. You need to check for and fix memory issues on your PC.
  • Outdated PC: If your PC is outdated, you can get the stop code exFAT file system. Updating your operating system should solve the problem.

How do I fix exFAT file system error?

1. Use a dedicated software

Since the exFAT_file_system error can be caused by something faulty with the file, we first recommend using dedicated software to fix it.

2. Update outdated drivers

  1. Press the Windows key + X and select the Device Manager option.
    device manager exfat file system
  2. Select the category you want to update the driver and right-click the device there.
  3. Now, select the Update driver option.
    update driver
  4. Finally, choose Search automatically for drivers and install all available updates.
    search auto

Most BSOD errors, including the exFAT file system, happen due to outdated device drivers. The lack of an up-to-date system can lead to lag and other system issues.

To avoid these types of problems, you can use automatic driver updaters like Fortect Driver Updater to find, download, and install the correct driver version on your Windows PC in just a few clicks.

3. Restrict Windows from automatically restarting

  1. Press Windows key + E to open File Explorer, right-click This PC, and select Properties.
    properties exfat file system error
  2. Choose Advanced system settings.
    advanced system
  3. Now, click the Advanced tab.
  4. Next, click the Settings button under Startup and Recovery.
  5. Uncheck the box from Automatically restart.
  6. Finally, click OK to save the changes.

After you perform these steps, Windows will no longer prompt a sudden reboot. Therefore, once you have used this solution, you should be able to solve the exFAT file system error.

4. Install all available updates

  1. Click on Start and select Settings from the options.
  2. Select Update & Security.
  3. Now, click the Check for updates button and download any available updates.
  4. Finally, allow the installation process to finish and restart your device.

Keeping your system up to date can keep you safe from many errors. Microsoft constantly updates Windows to improve the system’s stability and fix various issues.

5. Check the memory issues

  1. Press the Windows key, type memory, and select the Windows Memory Diagnostic option.
  2. In the wizard window, select Restart now and check for problems (recommended).
  3. Now, Windows will reboot and will proceed to detect any RAM issues.

These are the most effective and efficient ways to solve the exFAT file system error BSOD in Windows 10. We hope that one of the solutions presented has helped you successfully resolve this issue.

If you are facing other issues, like the file being too large for the destination file system, check our detailed guide on switching file systems: exFAT to FAT32 conversion.

Please share which solution worked best for you in the comments below.

Windows 10 Sun Valley’s Floating Taskbar redesign is hidden in latest Windows Insider builds

Though Microsoft hasn’t admitted it, Windows 10 Sun Valley is rumored to be coming this Fall and could finally bring a massive design overhaul to Windows 10. We’ve yet to see any major hints of this redesign in the latest Windows Insider builds, but one software engineer has done some tweaking to expose what could end up becoming Windows 10 Sun Valley’s Floating Taskbar menu (via Windows Latest.)

Naturally, the feature isn’t publicly available and is tucked away under a flag in the Windows Shell Experience Host. Once toggled, it looks quite beautiful. As seen above, the jump menus (also known as right-click menus) in the Windows 10 Taskbar end up looking a lot like what we’ve seen in Windows 10X. Basically, these menus no longer end up being a glued part of the Windows 10 Taskbar and now has a small space between Taskbar and the desktop, hence the “floating” name. You also see that the design language has shifted to more rounded corners, too, instead of the flat rectangular shapes in the current versions of Windows.

This currently only works with a limited scope, as the menus do appear to have borders in some cases, according to Windows Latest. But Microsoft could be moving more of 10X design elements into Windows 10, too. That’s because the software engineer who uncovered this also revealed in a separate tweet that new “gripper” and “expander” elements from Windows 10X are hidden in the Windows 10 Notification Center, too.

As far as we can tell, this is the first time that we’ve seen live-code of elements of Windows 10 Sun Valley inside an active Windows Insider Build. Previously, we only knew of the Sun Valley redesign through floating Start Menu mock-ups released by Windows Central’s Zac Bowden.

It is a bit of a stretch to say so, but this does seemingly hint that more Sun Valley design elements could be on the way since Microsoft has now put it into the code for the Windows Shell. We’ll be keeping an eye on this, so best tune into our Windows 10 news hub if you’re hoping to get the latest, right when we learn more.

How to open .hlp files on Windows 10/11 [Full Guide]

Windows 10 is a modern operating system, therefore it has few compatibility issues with older software. For example, it can’t natively open .hlp files and there are several causes for this problem.

Many programs come with their own help files, and some older applications use .hlp format for those files.

This format was supported by older versions of Windows, but Windows 10 doesn’t have native support for it, which means that you can’t open .hlp files on the newest OS from Microsoft.

Hlp files are commonly used for reading help documentation for older applications. However, according to users, they are unable to view .hlp files.

In this article, we’re going to present you with the solutions to fix this predicament, and how to open hlp files on your Windows 10 computer.

How do I open .hlp files in Windows 10?

1. Use a dedicated third-party tool

If you want to open .hlp files on Windows 10, you can always use third-party solutions. We recommend you a tool that can be used for both authoring and opening these types of files.

It will also help you to create Help, policy, and knowledge base content. Using rich media, you can be sure that your text looks awesome and is easy to understand.

After creating the content, you can choose to generate the output for multiple platforms, web or mobile, or select from a variety of presets, such as PDF, HTML5, and more.

Adobe RoboHelp

Adobe RoboHelp

Open any .hlp files from your Windows 10 with one of the best software solutions available.
Free trialVisit website

2. Copy winhlp32.exe from Windows XP PC

Windows 10 doesn’t have a winhlp32.exe file that is in charge of .hlp files, and to fix this issue you can copy this file from Windows XP if you have any old PC running Windows XP.

Also, if you have a Windows XP installation disc you can set up a virtual machine with Virtualbox on your PC, install Windows XP, and transfer winhlp32.exe.

If you don’t know how to set up a VM or what tools to use, we recommend you to take a look at our dedicated guide and learn everything you need to know.

You might be able to download this file online from third-party sources, but that file can contain malware, therefore, use extra caution and be sure to scan it with your antivirus.

3. Convert .hlp files to PDF documents

Although .hlp files have their advantage, some users are suggesting that the best way to view those files is to convert them to PDF documents.

This is a relatively simple procedure, but in order to do it, you need to find a proper converter online. There are many free converters online, so feel free to try any of them.

4. Use Command Prompt

  1. Create a TEMP folder on your D drive. The location of the directory would be D:TEMP.
  2. Now copy winhelp32.exe to D:TEMP directory.
  3. Open Notepad and paste the following lines:

@echo off

set crtpth=%CD%

takeown /f "%windir%winhlp32.exe" >nul

icacls "%windir%winhlp32.exe" /grant *S-1-5-32-544:F >nul

copy /y "%crtpth%winhlp32.exe" %windir%

icacls "%windir%winhlp32.exe" /setowner "NT ServiceTrustedInstaller" >nul

echo.

echo Done.

echo.

echo Press any key to Exit

pause >nul

exit

  1. Now click on File, then Save as.
    Can't open hlp files in Windows 8.1
  2. Set Save as type to All Files. Enter the desired file name as Win10-Hlp32-Fix.cmd. Select D:TEMP as the save location and click the Save button.
    How to open .hlp files in Windows 10
  3. Now you need to start Command Prompt as administrator. To do that, simply type cmd in the Windows search bar.
  4. When Command Prompt starts, switch to D:TEMP directory and run: Win10-Hlp32-Fix.cmd
  5. If you’re not familiar with Command Prompt, you should be able to switch the directory using the cd command.

According to users, you might be able to open .hlp files on your PC simply by running a few commands from Command Prompt, but you need to copy winhlp32.exe from Windows XP.

Keep in mind that you need to copy the file from a 32-bit version of XP if you’re using a 32-bit version of Windows 10. The same goes for 64-bit versions.

If you copy winhlp32.exe from a 32-bit version of Windows XP to a 64-bit version of Windows 10, this procedure might not work.

After running Win10-Hlp32-Fix.cmd the issue should be resolved and you’ll be able to view .hlp files on your PC. This is an advanced solution, so please read and follow the instructions carefully.

5. Drag the desired file to the winhlp32.exe

According to users, in order to view .hlp file naturally on Windows 10, you need to copy winhlp32.exe from a Windows XP.

However, you might also have to change your security permissions and replace certain system files.

According to users, you might be able to avoid all this trouble simply by finding the .hlp file that you want to open and dragging into the winhlp32.exe file.

This will open the .hlp file automatically without changing your security permissions and you’ll be able to view the contents of the file.

6. Install the patched winhlp32.exe

  1. Download this archive.
  2. Once you download it, extract all files to your PC.
  3. Locate Install file, right-click it and choose Edit.
  4. Notepad will now open. Locate the Settings area and add these two lines if they aren’t there already:
    • set WindowsVersion=7goto
    • BypassVersionError
  5. Now right-click Install file again and choose Run as administrator.
  6. Command Prompt will open and run certain commands. After the procedure is completed you just need to press any key to close Command Prompt.
  7. After you’ve done that, just drag and drop a .hlp file to the winhlp32.exe icon in order to open it.

The default application used to read .hlp files in older Windows platforms is Winhelp32.exe. Thus, we will try to install a version that is compatible with Windows 10.

To do this, you need to be able to open Command Prompt as admin. If you can’t open it as an administrator, you need to resolve this firstly, with the help of our comprehensive guide.

After installing it, you should be able to run .hlp files on your PC. Keep in mind that this solution is rather advanced, and if you’re not careful you can cause damage to your Windows installation.

Windows 10 doesn’t have native support to open .hlp files, but if you have an older application that still uses those files you can try to avoid this limitation by using one of our solutions.

If you have any other files with unknown extension, you can try to open them with these best software to open all types of files on Windows 10.

We’d like to hear your opinions on this issue so feel free to comment in the dedicated section below.

Microsoft admits that a Windows 10 update is affecting games

The latest Windows 10 has caused lots of distress for many PC gamers as it has brought freezing and frame issues as well as outright crashes and body fee drops in video games.

The great thing is that not only Microsoft has acknowledged the issue but they have also rolled out a repair. In a recent post regarding the known issues, Microsoft stated the identified problem:

A small subset of users have reported lower than expected performance in games after installing KB5000842 or later update. Some customers have reported decrease recreation efficiency in the full display or borderless windowed mode when utilizing a number of displays.

Lower game performance

According to Microsoft the affected platforms are

  • Client: Windows 10, version 20H2; Windows 10, version 2004
  • Server: Windows Server, version 20H2; Windows Server, version 2004

The performance issue concerning video games seems to be solved on April 23 by removing the KB5001330 code that was actually causing this issue to occur.

They have used the Known Issue Rollback service to fix the problem, which enables them to quickly revert to a previously released behavior, that worked fine.

Even though the problem has been solved, Microsoft states that it may take up to 24 hours for the problem to subside, and restarting the device is recommended:

It might take up to 24 hours for the resolution to propagate automatically to consumer devices and non-managed business devices. Restarting your device might help the resolution apply to your device faster.

According to gamers’ comments on Reddit, after Microsoft announced the issue has been solved, it does seem to have worked and the efficiency in video games seems to be restored.

As always, your thoughts on this subject are more than welcomed, so don’t hesitate to leave us a comment in the dedicated section below.

Viva Learning is now available in preview in Microsoft Teams

Microsoft has announced that Viva Learning is available in public preview in Microsoft Teams starting today. The Viva Learning app had previously been available in the form of a private preview since February. It is an enterprise learning platform that brings together first and third-party training resources to help employees learn and grow.

“The Viva Learning app for Microsoft Teams is a central hub for learning where people can discover, share, assign, and learn from best-in-class content libraries across the organization—including LinkedIn Learning, Microsoft Learn, third-party content providers, and an organization’s own custom content—to help teams and individuals to make learning a natural part of their day,” the company explained.

Viva Learning will be available as a tab in Microsoft Teams channels, and it allows employees to search for the training content in the learning library to share with their colleagues. Furthermore, the Viva Learning app enables managers to assign courses to employees or track their completion status and helps business leaders improve the skills of their employees for creating an agile work environment.

Keep in mind that Viva Learning is still a work in progress and the preview version of the app still lacks some features that will be delivered in the final product. Microsoft noted that the app will get additional features and integrations with new learning management systems later this year. The firm also plans to expand its availability to Education and Government customers in the coming months.

With regards to pricing, the Viva Learning app is available for all business customers with paid subscription access to Microsoft Teams. IT Admins will be able to configure it for employees in their organization by heading to the Teams Admin Center. If you are interested in signing up for Viva Learning public preview, we invite you to check out the Microsoft Viva blog.

Dragon Quest Builders 2 is coming to Xbox Game Pass for Console and PC on May 4

Dragon Quest Builders 2, an RPG sandbox game previously released on Nintendo Switch, PS4, and Windows is coming to Xbox consoles and Xbox Game Pass next week on May 4. Following Outriders last month, this will be another Square Enix game launching on Xbox Game Pass at the same time as its Xbox release, and Dragon Quest Builders 2 will also be available on Windows 10 and Xbox Game Pass for PC thanks to Xbox Play Anywhere support.

“Dragon Quest Builders 2 is the acclaimed block-building RPG from Dragon Quest series creators Yuji Horii, character designer Akira Toriyama, and composer Koichi Sugiyama. It features a compelling story, charming characters, and the potential for incredible creativity,” explained Duncan Heaney, Content Communications Manager, Square Enix.

Last year, Xbox Game Pass subscribers also got to play Dragon Quest XI S: Echoes of an Elusive Age – Definitive Edition on its launch day, December 4. Along with Sega, Square Enix appears to be one of the biggest supporters of Microsoft’s Xbox Game Pass service. When you also add all the Final Fantasy games that joined the Xbox Game Pass catalog in recent months, it’s interesting to see Microsoft adding more and more J-RPGs titles to its game subscription service.

If you don’t have Xbox Game Pass, Dragon Quest Builders 2 is available for pre-order on the Microsoft Store where it’s priced at $49.99. Thanks to Xbox Play Anywhere, the game can be played on PC and Xbox at no additional cost, with a convenient cross-save system between the two platforms.

DRAGON QUEST BUILDERS 2
Developer:
SQUARE ENIX
Price:
$49.99

NTFS_File_System Error on Windows 10/11 complete fix

Windows 10 brings a lot of tweaks and fixes to Windows 8 that frankly should have been part of Windows 8 from the beginning.

Unfortunately, these tweaks and fixes come at the cost of upgrading – a process known for the various problems it causes.

One of such troubles is the NTFS_File_System blue screen error. BSoD’s happen when the operating system has nowhere else to go – it has tried everything it could and simply cannot handle the error.

A BSOD is an unhandled exception, and sometimes figuring out what is exactly causing this error can get quite a bit tricky.

Here, we are going to attempt to fix this error in the hope of recovering the operating system.

How do I fix The NTFS_File_System Error on Windows 10?

  1. Use a third-party system restoration tool
  2. Check your disk for errors
  3. Clean boot your computer
  4. Run the SFC scan
  5. Use the Media Creation Tool
  6. Format your driver & reinstall Windows

1. Use a third-party system restoration tool

Operating systems have lots of sensible data that, if corrupted or damaged, will break the entire device and cause bugs, errors, and other problems to happen.

When it comes to repairing crucial system files, your safest bet is to download a specialized tool that automatically scans your computer for problems and solves them accordingly.

2. Check your disk for errors

  1. Go to Start > type cmd > launch Command Prompt.
  2. Enter the following command and press Enter: chkdsk C: /f
  3. Replace C with the letter of your hard drive partition where you installed the OS.
  4. To fix the errors and repair physical issues, you need to run a second command: chkdsk C: /r

If the disk where you installed Windows 10 is corrupted, you may get various error codes when booting up your computer.

You can quickly check your disk for errors with the help of a specific command that you can run in Command Prompt.

3. Clean boot your computer

  1. Go to Start > type msconfig > hit Enter to launch System Configuration.
  2. Go to the General tab > select Selective startup > uncheck Load startup itemsdisable startup items
  3. Go to the Services tab > check Hide all Microsoft services > click Disable alldisable microsoft services
  4. Click Apply > click OK > Restart your computer.

Software compatibility issues may also trigger the NTFS_File_System error. You can fix this problem by performing a clean boot and start Windows with minimal set of drivers.

4. Run SFC scan

  1. Go to Start > type cmd and launch Command Prompt as administrator.
  2. In the new Command Prompt window, enter the following command: sfc /scannowscannow
  3. Wait until the scanning process completes and then restart your computer

If certain system files are missing or are corrupted, you can use the System File Checker tool to fix the problem.

5. Use the Media Creation Tool

  1. You need to download the Media Creation Tool from Microsoft.NTFS_File_System Error on WIndows 10
  2. Once you have the Media Creation Tool, open it and select create installation media for another PC.
  3. Then, select the appropriate architecture, language, and edition for the PC you need to fix and start the download.
    • If you don’t know what you need to pick contact someone who can help.
      NTFS_File_System Error on WIndows 10
  4. Once you have selected the correct version etc, select ISO file or USB flash drive depending on whether you want to make a bootable DVD or a bootable USB stick.
  5. Then, click Next and wait for it to finish downloading and creating the bootable media.
  6. Once you have the bootable DVD or USB, restart your PC and boot with it – note that in some cases you might need to go to your BIOS and change your boot priority settings.
  7. Once you are in the Windows setup, click Next and click on Troubleshoot, then click Advanced Options.NTFS_File_System Error on WIndows 10
  8. In Advanced Options, click Startup Repair and simply follow the onscreen instructions from there.
    • It might restart your PC if it needs to do so in order to repair your Windows installation.

Doing this should fix most of your issues with Windows – it will repair any corrupted files and fix most of the errors caused by any misconfiguration.

If for some reason it does not help, you could use similar steps also try a System Image Recovery using the new Windows installation files present in your bootable drive.

Although that will most likely not help if Startup Repair failed.

6. Format your driver & reinstall Windows

You also always have the option to simply format your drive and reinstall Windows.

Windows 10 saves the license information in the cloud and your key is linked to your PC, thus reinstalling Windows should still give you your free copy of Windows 10.

Since we already downloaded the correct installation files for Windows using the Media Creation Tool,  you already have most of the work done for you.

But do remember to backup your data before wiping off your previous Windows installation, as reinstalling Windows will delete all of your data and settings, unlike an upgrade.

We hope that the solutions listed in this article helped you fix the NTFS_File_System error for good. If you’re interested in what causes BSoDs, you should read this thorough article dedicated to the subject.

If you’ve got additional tips and suggestions on how to fix this error, you can list the troubleshooting steps in the comments below.

Download InSpectre to check for CPU performance issues

When a new cyber threat is detected, security specialists jump into the action trying to develop the antidote or at least some means to help users detect and block the respective threats.

InSpectre is an interesting tool that you can use to assess the damage that the latest CPU vulnerabilities, Meltdown and Spectre, have done to your computer.

Microsoft already confirmed that the latest Meltdown and Spectre pacthes may cause various performance issues on your machine.

Windows 10 is less prone to this problem. However, if you’re running Windows 7 on an old computer, chances that you may experience performance problems and computer slowdowns are pretty high.

Taking into account this information, downloading and installing InSpectre is a pretty wise decision.

InSpectre checks your PC’s health

InSpectre is a lightweight tool that runs a series of tests on your computer in order to identify potential performance impact of Microsoft’s Meltdown and Spectre updates.

This InSpectre utility was designed to clarify every system’s current situation so that appropriate measures can be taken to update the system’s hardware and software for maximum security and performance.

You can download InSpectre for free from GRC. Simply double click on the program to launch it and it will instantly display the result of the scan.

For example, in my case, my good old HP ProBook 470 is vulnerable to both of these threats, but its performance has not been affected yet.

InSpectre also offers you more details on the analysis it just run on your system, as well as tips on how to protect your machine.

If you want to enable Meltdown and Spectre protection, all you need to do is click on the corresponding buttons and block the threats.

At the same time, the program offers your the possibility to disable Meltdown and Spectre protection in case Microsoft’s patches significantly  drop your computer’s performance.

InSpectre also works offline as it doesn’t require an Internet connection to check your system.

Microsoft reveals the cost for Windows 7 extended security updates

Microsoft has pretty much made it clear to its users that Windows 7 will no longer be supported by the company beyond January 14, 2020.

That means that the users of the aging operating system will be deprived of free security patches.

We must agree with the fact that despite being an old operating system, Windows 7 is still widely being used by most of organizations around the world.

There are different reasons for most of them to stick to Windows 7 such as an unwillingness to upgrade, a sense of nostalgia, legacy requirements, or lack of funds for upgrading.

While there is bad news for them, they should keep in mind that clinging to an old operating system will cost a significant amount to most organizations.

The tech giant has plans to charge a fee for its Extended Security Updates for Windows 7. While most of the Education, Business, and Enterprise customers have planned their migration to Windows 10 just before the deadline.

Cost Of Windows 7 Extended Security Updates (ESU)

The software gainst has not only revealed the eligibility and cost of the extended security updates but also reached out to most of its users and informed them privately.

Microsoft has decided to offer Windows 7 Extended Security Updates to Microsoft 365 and Enterprise customers on a per device basis.

Sr. NoYear DurationCost
(Windows 7 Pro)
Cost
(Windows Enterprise (add-on))
1Year 1January 2020 - January 2021 $50 per device $25 per device
2Year 2January 2021 - January 2022$100 per device$50 per device
3Year 3January 2022 - January 2023$200 per device$100 per device

Goodbye Windows 7

As we can see that the pricing is on a per-device basis so most of the Windows 7 users (Individual or Personal) are soon going to consider it as a very expensive option.

Moreover, the price is also increasing on a yearly basis.

We can clearly see that things could get expensive Surprisingly, Microsoft is hinting at providing bulk discounts for those who are planning to upgrade to Windows 10.

The news is encouraging for users who want to avoid the expensive fee. It is recommended that you must contact your Microsoft account team asap to grab the opportunity right now.


How to fix Epson printer 0xf errors with ease

Some Epson printer users have posted on the Microsoft forum about a 0xf1 error. While there are 4 similar errors, specifically 0xf1/ 0xf2/ 0xf3/ 0xf4, they all can be solved with the same steps. One user stated:

When I switch on my Epson XP-435, I get a message: Printer error, turn power off and on again. Error code 0xf1.

Consequently, users can’t print when that error arises on Windows 10 PCs. To fix that issue, check out some of the potential resolutions below.

How can I fix the Epson printer error 0xf?

1. Reset the printer

  1. First, try resetting the printer as the 0xf1 error message suggests. Turn off the printer.
  2. Unplug the printer’s USB power cable from both wall and printer.
  3. Turn off your desktop or laptop, if it’s on, as well.
  4. Wait for about 10 minutes.
  5. Then plug the printer back in.
  6. Turn the printer on.

2. Update the printer’s driver

Use Device Manager to manually update your drivers

  1. Go to the Search bar and type device manager.
  2. Click and open Device Manager.
  3. You’ll be opening a list of devices where you must click on Print Queues.
  4. Select your printer device, and right-click on it.
  5. Select Update driver.

The 0xf1 error might also be due to an incompatible or antiquated printer driver.

You can manually update your drivers from Device Manager, but you can simplify your work by updating your drivers with the help of a driver updater software.

Update you drivers automatically with a third-party driver updater tool

Updating the drivers may not be your favorite easiest activity. That’s why a professional driver updater tool is one of the most efficient options to take into consideration in order to install the latest drivers on your Windows 10 PC.

You can save time, stress, and causing even more problems to your PC by choosing to update the drivers automatically with specialized software.

3. Remove jammed printer

  1. Turn off the printer first.
  2. Remove all the paper from the paper feed tray.
  3. Open the printer’s scanner unit to check if there’s any jammed paper from inside.
  4. Remove any jammed sheets you find.
  5. Close the printer.
  6. Then remove the duplexer at the rear of the printer.
  7. Remove any jammed paper from the duplexer.A printer duplexer printer error 0xf1/ 0xf2/ 0xf3/ 0xf4
  8. Place the duplexer back in the printer.

The 0xf1 error can often be due to a printer paper jam.

4. Remove debris from the paper feed

Some users have said they’ve fixed the 0xf1 error by removing debris, such as paperclips, from their printers’ paper feeds.

So, turn off your printer; and then check if there is any debris stuck in the paper feed. If so, remove the debris from the paper feed.

5. Move the Printer Head Assembly to the left

  1. Trn off the printer.
  2. Then unplug the printer’s USB cable.
  3. Next, open up the printer.Open Epson printer printer error 0xf1/ 0xf2/ 0xf3/ 0xf4
  4. Carefully move the Printer Head Assembly to the far left. Don’t force the Printer Head Assembly if it doesn’t easily move.
  5. Then move the Printer Head Assembly to the right to restore it to the original position.
  6. Plug the printer back in, and turn it on.
  7. Repeat the steps above three to four times if required.

Moving the Printer Head Assembly might resolve the 0xf1 error for some users

6. Run the Printer troubleshooter

  1. To open that troubleshooter, click the Type here to search button.
  2. Input the keyword troubleshoot in Windows 10’s search box.
  3. Click Troubleshoot settings to open the Troubleshoot tab in Settings.The Troubleshoot tab printer error 0xf1/ 0xf2/ 0xf3/ 0xf4
  4. Select the Printer troubleshooter.
  5. Press the Run the troubleshooter button to open the Printer troubleshooter.
  6. Select the printer to fix the 0xf1 error for.
  7. Then click Next to go through the troubleshooter.

Windows 10’s Printer troubleshooter might also come in handy for fixing error 0xf1.

If, however, other fixes are needed, check the warranty period for your printer to see if you can return it to Epson for repairs without additional charges.

For any other questions or suggestions, don’t hesitate to reach for the comments section below.