Error Path Not Found: 5 Simple Methods That Can Fix it

While some error codes are specific, others can be encountered in a wide array of problems, thus making it slightly trickier to troubleshoot them. One such is the ERROR_PATH_NOT_FOUND message in Windows.

It indicates that Windows can’t access the disk or the data it’s trying to read. The error has been reported while opening files, running applications, and even during a Windows update. So, let’s find out how you can fix things.

Why does ERROR_PATH_NOT_FOUND error occur?

Here are a few reasons you might be getting the error:

  • Critical files are missing: When critical files, either related to the program, a specific driver, or even Windows Update components, are missing, you may come across the error.
  • Corrupt system files: In case the system files are corrupt, you are bound to face issues using the PC, and there’s a chance that apps crash at launch.
  • Improper installation of the app: If the problem is limited to a particular program, it’s likely that the initial installation didn’t go through properly.
  • Issues with the disk: Corrupt disk sectors can also affect the process of reading data and trigger such errors.

How can I fix ERROR_PATH_NOT_FOUND error?

Before we start making the major changes, here are a few quick things you can try:

  • Restart the computer and then try the operation that failed earlier.
  • Disable any antivirus or security software on the PC and check whether the ERROR_PATH_NOT_FOUND code disappears during installing a Windows update or running a program. If it works, we recommend you switch to a Windows-friendly antivirus.
  • Check for any pending updates and install them.
  • Move the affected file to a different location.
  • Take ownership of the folder where the file throwing the error is stored.
  • Reinstall the app throwing the error. While removing it, use the dedicated tool or an effective uninstaller software to get rid of any leftover files and registry entries.

If none work, head to the solutions listed next.

1. Repair your registry

The simplest way to repair your registry is to use a dedicated tool. Don’t forget first to back up your registry in case anything goes wrong.

Many reasons are causing the ERROR_PATH_NOT_FOUND code, which means that Windows cannot access the main disk where your OS is installed.

We recommend using third-party software to fix it and keep your computer safe from common Windows errors.

2. Repair corrupt system files and check for disk issues

  1. Press Windows + R to open Run, type cmd, and hit Ctrl + Shift + Enter.cmd
  2. Click Yes in the UAC prompt.
  3. Paste the following commands individually and hit Enter after each to run the DISM tool:DISM /Online /Cleanup-Image /CheckHealth DISM /Online /Cleanup-Image /ScanHealth DISM /Online /Cleanup-Image /RestoreHealth
  4. Now, execute the following command to run the SFC scan:sfc /scannowsfc scan to fix error_path_not_found
  5. Once done with both, run the following command for Check Disk:chkdsk /f /r /xcheck disk to fix error_path_not_found
  6. Press Y and then hit Enter to confirm running the utility the next you restart.confirm
  7. Finally, restart the computer and wait for the scan to run.

The DISM (Deployment Image Servicing and Management) and SFC (System File Checker) scans primarily repair the corrupt system files, while Check Disk aims to fix issues with the storage drive, if any. After running the three, check whether the ERROR_PATH_NOT_FOUND message is fixed.

3. Replace the affected file

Some users checked the error logs and were able to identify the affected file. This is usually tricky because once you know what’s causing the trouble, simply replacing the file (or the whole folder) fixes things in no time.

All you have to do is find a healthy computer with the same Windows version and architecture and copy the files from it to the PC throwing the error.

Here are a few of the affected files/folders, replacing which helped users:C:\Windows\System32\DriverStore\FileRepository\hpsamd.inf_amd64_0784fd3ef0d7ec93 C:\Windows\System32\DriverStore\FileRepository\capimg.inf_amd64_5a4379f63bea786c

4. Clean the temporary files and folders

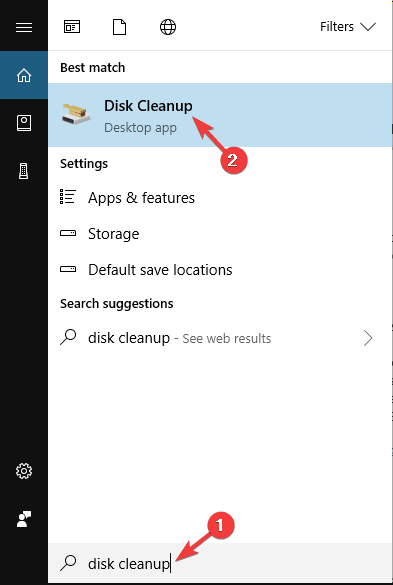
  1. Press Windows + S, search for Disk Cleanup, and then launch the utility.
    Error_path_not_found Windows 7 sp1
  2. Select your system drive and click OK. By default, it should be C:, so choose that from the dropdown menu.
    Error path not found Lenovo
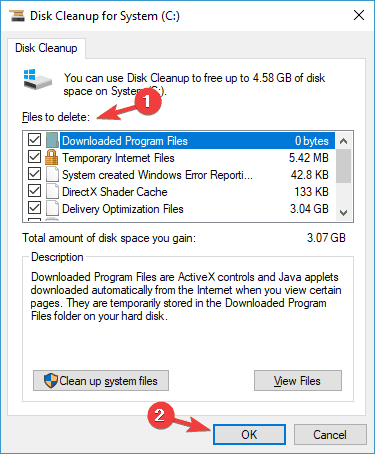
  3. When Disk Cleanup window opens, you’ll see a list of files. Select all files on the list and click OK.
    Error_path_not_found Windows 7 sp1
  4. You may also choose Clean up system files if this doesn’t work, but be extra cautious when deleting any entries there.

After using Disk Cleanup, check if the ERROR_PATH_NOT_FOUND code is still there. Several users claim that Windows.old folder was the cause for this issue, so be sure to select Previous Windows installations in Disk Cleanup to remove it.

5. Perform a System Restore

  1. Press Windows + R to open Run, type rstrui.exe, and hit Enter.system restore
  2. If there’s an option, select Choose a different restore point, or simply click Next.system restore to fix error_path_not_found
  3. Choose a restore point from the list created before the error first appeared, and click Next.restore point
  4. Finally, verify the restore details, and click Finish to start the process.restore to fix error_path_not_found

Wait for the restore process to complete. Your computer will restart during the process, so we recommend you save any open files. And once it’s complete, the ERROR_PATH_NOT_FOUND error should be gone for good.

Also, before you leave, check some quick tips to boost Windows performance and the best repair tools to get rid of such errors easily.

If you’ve encountered other workarounds for this error, please list the troubleshooting steps in the comment section below.

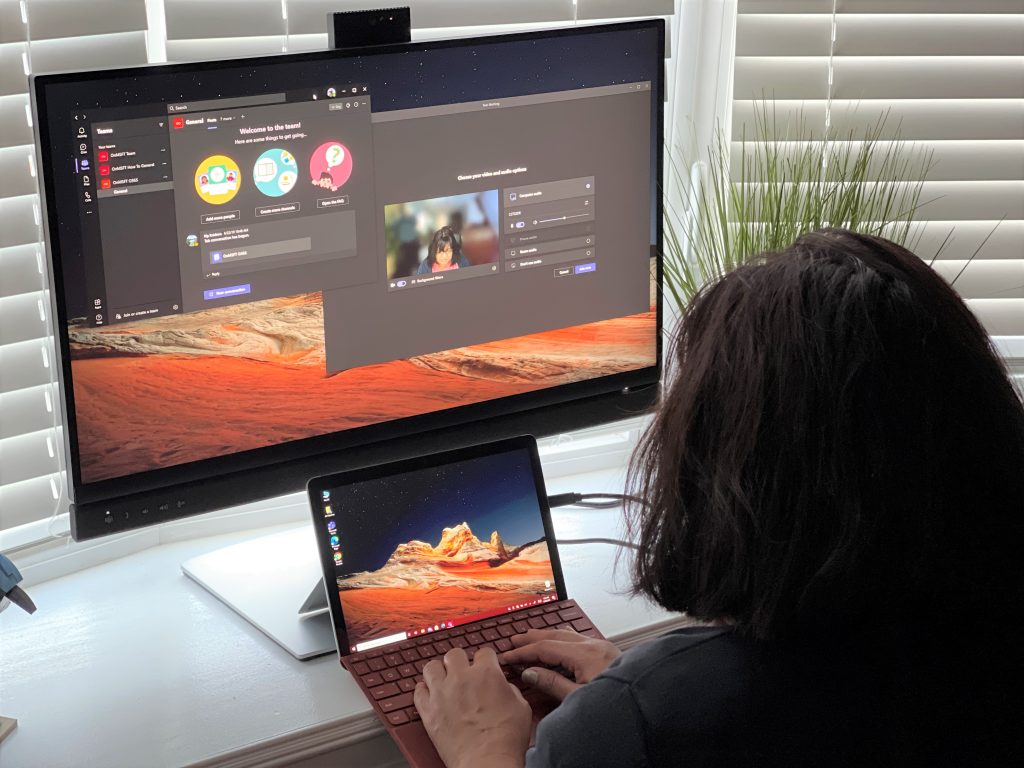
New Calling experience is coming to Microsoft Teams in May

Microsoft unveiled its plans to overhaul the Calling experience in its Teams collaboration service back in December last year. If the software giant initially planned to roll out the enhanced Teams calling experience in April, the company has just updated the timeline in the Microsoft 365 Admin Center with a May 2021 release.

This update is meant to streamline the whole calling experience in the Windows and macOS desktop apps into a single location. Instead of being spread around, the new calling interface will bring all calling features such as the dial pad, contacts, voicemail, call history, and settings together in one tab. Overall, it should make it much easier for users to start a new call or return a call with a single click.

Apart from the new Calling experience on the desktop, Microsoft also announced other upcoming enhancements including CarPlay support on iOS devices and built-in spam call protection capabilities. The app is also getting new call recording options, which will enable Teams Admins to make OneDrive or SharePoint as a default location for saving their recordings.

Microsoft Teams has been growing very fast since the beginning of the COVID-19 pandemic, and it has just reached an important new milestone for the company: Earlier this week, Microsoft announced more than 145 million daily active users for Teams, which is up from 115 million daily users reported in October last year.

5 Best Brewery Software for Automation [2026 List]

Most breweries that exist today were commonly started as small brewing systems developed inside the houses of beer lovers. The systems were generally small units that could produce only a small quantity of beer.

As time passed, some of the breweries that started this way developed into full-fledged beer-producing companies. Because of the substantial growth, companies had to deal face different issues.

Keeping the beer quality at the same level as before the growth is harder because of the increased production. Another very important factor was obviously, the loss in profitability if any of the batches of beer were corrupted in any way.

In order to better manage the scaling up from a home brewing station to company-level production, or manage the brewing company you already own, you can use software designed specifically for this task.

Even better, the brewing software we are going to explore in this article allows you to automate the process of brewing, and get information regarding the state of your batch on your computer, phone or tablet’s screen.

Automate your brewing process with these tools

BruControl

BruControl - automated brewing software

BruControl is a great brewing software that allows you to manage and control processes of different kinds of machinery. It was specifically designed for breweries but can also be used for food manufacturing and processing, or IDS (Industrial Control Systems).

This software uses micro-controller boards that were designed by users, that allow you to control the input and output of the interface. You can use BruControl with a large number of these interfaces that can be connected either via USB, by Ethernet, or by Wi-Fi. This allows you to control a good number of interfaces from the same dashboard.

You can use this application either as a control panel that replaces physical indicators and switches, or, if you don’t mind a bit of programming, even as a logic controller with automated multi-tasking capabilities.

The normal use of BruControl doesn’t require any programming capabilities or for you to install any other software. This app supports a wide range of inputs, algorithms, and outputs that can be analog, digital, counter, PID, etc.

Some of the best features of BruControl include:

  • Customizable interface that’s touchscreen friendly
  • Communicates with one or more local or network microcontroller interfaces
  • Microcontroller interfaces can be used as hardware I/O for physical electronic controls
  • Simple and flexible script language with complete automation capabilities and multitasking options
  • Can be integrated with multiple device types – relays (SSR/mechanical), contacts, switches, sensors, PWM (Pulse Width Modulation) motor control, lights, heaters, etc.
  • Temperature measurement – thermistor/analog, RTD, 1-wire (DS18B20)
  • Effect/pulse sensors – encoders, flowmeters, proximity, etc.
  • Local LCD displays
  • Small CPU impact on PC
  • Multi-page workspaces

BruControl also has a customizable graphical representation of your brewery setup that allows you direct control of the entire range of phisical devices. You can set timers, alarms, and also continually collect data with immediate access to data that was already collected.

This software was released in 2 versions, each offering different features :

  • BruControl Basic – this version can connect one interface only by USB.
  • BruControl Advanced – can connect more interfaces by either USB, Ethernet or Wi-Fi.

If you already own the Basic version of BruControl, then you have the choice to upgrade to the Advanced version by just paying a small fee. You can see more information about prices on BruControl Official Website.

⇒ Try BluControl

CraftBeer Pi

CraftBeerPi - automated brewery software

CraftBeer Pi is a Raspbery Pi based software that is designed to help you automate the process of brewing and controlling the fermentation process.

You have easy access to all the information provided in this app by the use of a web interface, that can accessed directly from your Raspberry Pi, mobile phone, tablet, or desktop.

Some of the most important features of CraftBeer Pi include:

  • Customizable kettle configurations – from single kettle to 3 kettle RIMS or HERMS setup
  • You can configure you own brew steps from the process of mashing to boiling
  • Can import recipes from .xml files of BeerSmith
  • Can be easily extended by the addition of new control logics or hardware
  • Hardware control from the web interface – heater, pump, valves, agitator
  • PID controller – manages the temperature of your kettle
  • Temperature chart option
  • Can define fermentation steps with custom settings
  • Automated temperature control for multiple kettles
  • DS18B20 sensors
  • Supports different outputs (USB-Plugs, GPIO, PiFace)

If you need a bit of guidance regarding how CraftBeer Pi works. you can visit the Official Website.

If you need a tutorial about how to install and use CraftBeer Pi, click here.

⇒ Try CrafBeer Pi

Brewer’s Dashboard

Brewer's Dashboard - brewing software

Brewer’s Dashboard is another great software that is designed to offer you full control over every aspect of your business,and also offers automation capabilities, automated billing, and temperature control.

This software is very reialble because it was built using the SCADA software platform which is compatible with different technologies – SQL databases, Java, Ajax and Flash.

Using this software allows you to easily collect batch data about your brewing process, and offer important information to your brewers as well.

You can manage the entire range of processes included in brewing, and also offers you the capability to manage your tanks, all from a user-friendly interface.

Important features that are worth mentioning include:

  • Temperature control – can be controlled from anywhere in the world by the use of internet connected gauges
  • Reports that display real-time data from testing and the stage of brewing batches
  • You can program stem mashing
  • Remotely turn boiler on before brewing
  • Tank and level monitoring
  • Chiller and glycol monitoring
  • Compatible with oilers, air compressors and other equipment
  • Energy monitoring and management

Besides the basic features of the Brewer’s Dashboard , the company can also provide custom automation solutions that can help you solve specific problems. This includes system design, integration with third party devices, PLC programming and control boxes, user interfaces and more.

⇒ Try Brewer’s Dashboard

BrewMaxx

BrewMaxx - brewing software

Brewmaxx is another great option when it comes to automating the brewing process of your company.

You can use this software to constantly have control over the wide range of processes ranging from production data, recipe based liquid handling, MES (Manufacturing Execution System), and also has good integration with ERP and LIMS systems.

One of the best features found in Brewmaxx is the ability to use parameterisation instead of programming. This allows you to replace using individual programming with parameterisation of all technical functions.

The system architecture allows you to apply changes to it without the need to stop the production. This allows you to save time and is far more efficient than having to stop the entire brewing process for every small change in the setup.

Brewmaxx has a wide range of features, some of the most notable are:

  • Process control system – object-related, open, and PLC-based
  • Automated recipe control and management
  • Library of vector-based process graphics
  • Large module library of predefined classes of automation
  • Equipment modules that are brewing specific
  • Web-based reporting system
  • Great archiving functions
  • Various languages available
  • Can record and export process sequences

Brewmaxx was released in 2 different versions :

  • Brewmaxx Basic – operating,production data acquisition and liquid handling with integrated recipe control.
  • BrewMax Integrate – the MES reporting system for location-independent, web-based reporting. Can be purchased as a stand-alone solution or in combination with Brewmaxx.

There are also two optional modules available :

  • Brewmaxx Material – materials management, can be used on it’s own or as an add-ojn for Brewmaxx Basic
  • Brewmaxx Connect – allows you to create communication interfaces between Brewmaxx and ERP or LIM systems.

⇒ Try Brewmaxx

Vertech

Vertech - brewing software

The software from Vertech is another great software option that offers an efficient and high perfomance way to automate and control the entire production system of your brewery.

Key features include:

  • Manager dashboard – business process consulting, production scheduling, ingredient traceability, recipe management
  • Efficiency monitoring system – shows you comprehensive data about your yield, qulity, efficiency, etc.
  • Brewery automation – automate new or existing equipment in order to improve quality
  • WhiteBox – offers you real-time performance data.

If you want to find out more about how to use Vertech, click here for a good range of video tutorials.

⇒ Try Vertech


Running a brewery is hard work as it is, and you don’t need to constantly worry about physically checking the gauges of every piece of your hardware, temperature scales, water pressure, etc.

You can do all of this from the comfort of your favorite chair, by using the software presented in this article.

Let us know what brewing automation software you chose from this list in the comment section below.

How to get rid of the Malware.Exploit.Agent.Generic message

Recently, users started to describe a similar situation that prevents them from properly enjoying both Microsoft Word and PowerPoint.

Every time they try to use the Save as an option, the Malwarebytes Anti-Exploit module lets them know that it successfully blocked an exploit by showing the Malware.Exploit.Agent.Generic title.

However, this means that they are simply caught up in this never-ending scenario in which saving any file isn’t possible and their security might be at risk.

Here’s what one user looking for answers said:

I believe this is a false positive because this happens even when creating a new word document. I simply create a new Word document from blank template and try to save as -> browse and Malwarebytes exhibits the same behavior.

What does Malware.Exploit.Agent.Generic really mean?

As you can easily guess from the word malware found in the generic detection title, you have to deal with software intentionally designed to cause damage to your computer or data.

More precisely, Malware.Exploit.Agent.Generic is basically the prompt that shows up every time when Malwarebytes detects a new exploit.

Since such exploits are basically threats that take advantage of vulnerabilities in the software you use in order to infiltrate malware, these latest events may raise security concerns.

At the same time, the risks involved when using Microsoft Word and PowerPoint are supposedly kept to a minimum. Therefore, don’t hesitate to confirm that you’re only dealing with a false positive.

What can I do if I get the Malware.Exploit.Agent.Generic prompt?

In order to get rid of the Malware.Exploit.Agent.Generic title, you should try using an award-winning security tool that is well equipped to protect you from any threats.

Microsoft Defender is often a starting point for certain users. However, Here is the solution that offers guaranteed real-time monitoring for viruses, malware, spyware, and ransomware.

Benefit from advanced AI scanning that utilizes machine learning to constantly improve itself and prepare for new threats. No virus or malware will be able to infect your computer.

The protection this antivirus product offers is rock-solid, while never interfering with Office, PowerPoint, and pretty much any other app from the Microsoft suite or with your system, in general.

As for the free support for malware remediation, it might be just what you need in this case.

TotalAV

Get rid of any malware, spyware, and other harmful software thanks to TotalAV.
Check Price Visit Website

This concludes our article today. The Malware.Exploit.Agent.Generic module is a message displayed by Malwarebytes. Thankfully, you can get rid of it if you follow our guide.

Interested in more antivirus tools? Find more premium security apps in this great list containing the best antivirus software with lifetime license.

Let us know in the comments area below if you still see the Malware.Exploit.Agent.Generic prompt or if it happens to show up in other Microsoft Office apps too.

Does VPN protect you from viruses? How can VPN protect you?

VPNs are great tools that can secure your connection and protect your online privacy. You can deploy them on a wide variety of devices and enjoy private, secure browsing in no time.

However, a common misconception is that VPNs are universal security tools, like antiviruses which is wrong.

It’s true that a VPN can protect you from various types of cyberthreats, but they are helpless when facing viruses.

How can a VPN protect you?

A VPN will perform a lot of operations to make sure that your connection is secure.

More so, it will spoof every single bit of data, so that even if someone were to get it, they won’t be able to make anything of it.

Some would even go the distance to implement additional functionality to their service. For instance, you can find VPNs with ad-blockers and even website blockers.

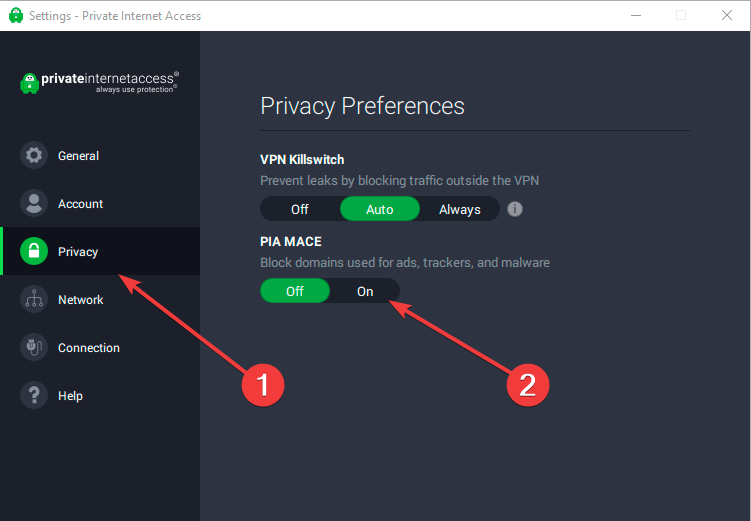
The tool recommended below, for instance, has a feature called MACE, which is a DNS-based ad-blocker. It helps protect you from malicious content by restricting access to ad and malware domains.

Its feature automatically detects and blocks websites that are suspected of hosting phishing scams or malware.

It’s extremely easy to activate the MACE feature. You just need to click on the Privacy tab from the left pane and toggle ON the feature from the right pane just like in the screenshot above.

This is an excellent software to protect your privacy from everyone, even from authorities and your ISP but it will still not be effective against serious threats.

Private Internet Access

Private Internet Access

Want malware blocking with your VPN? PIA has it, together with perfect privacy protection features.
Check priceVisit website

Can a VPN protect you from viruses?

Or does a VPN block viruses? To put it shortly, no, there’s no way a regular VPN can protect you from viruses. As long as you’ll use a VPN, your privacy will be safer than not using one.

But when it comes to clicking suspicious email attachments or downloading sketchy files online, a VPN can do nothing to protect you.

It’s your responsibility to check whether the website you’re browsing is trustworthy or not.

More so, you should practice safety measures by always checking everything you download and avoid warez/crack download websites.

If you’re looking to increase your PC’s security by protecting it from viruses, the answer is simple.

Use dedicated antivirus software and forget anything you heard about VPNs protecting you from viruses, as it’s a load of nonsense.

How can I protect my PC from viruses?

1. Use antivirus software that works well with VPN

Some antivirus tools, especially firewall-enabled ones, might not work well with VPNs. In fact, they might even impair the latter’s functionality to some degree.

Therefore, you can start looking for software that’s at least compatible with your VPN and won’t try to block its every attempt to secure your connection.

Or you could check out our recommendations for the best antiviruses to use with VPN on our website.

2. Try antivirus software with free VPN licenses

Some antivirus providers realized the importance of having a VPN on your home connection. As a result, they started to invest in VPN solutions and embed them in their Internet security bundles.

If you’re looking to improve the security of both your connection and computer at the same time, you can’t go wrong with an antivirus that comes with a VPN.

So, can a VPN stop viruses? All things considered a VPN alone will not help you prevent viruses from wreaking havoc on your PC.

There are some VPNs that offer you extra features such as ad/malware-domain blocking, but that’s as far as it goes.

If you’re looking to protect your PC from viruses, or get rid of them, you should also check our best antiviruses with lifetime license selection and try some of the products.

They will offer great protection and save you some money in the process. Do you have any questions or suggestions? Leave them in a comment below.

FIX: Be careful files from the Internet can contain viruses

You need to be very careful when you are working with Microsoft Excel workbooks and other Office documents because you can easily catch a malicious program or a virus.

Therefore, you may experience the Be careful files from the Internet can contain viruses error message when you tried to open an Excel document.

Due to the fact that many files are sent back and forth between business partners, colleagues, departments and companies via email, and they are randomly modified, this error may occur.

If you receive an Excel document from the Internet or by email and then open it on your own PC, you will first see the Protected View. However, the file cannot be edited with it.

What is the Protected View? It is a security mechanism from Microsoft. If you download a file from the Internet or receive it by email, you do not know whether there are viruses attached to the file.

This protection mode guarantees that you don’t let viruses or malware enter your PC.

How do I fix the Internet files can contain viruses error?

1. Configure your network drive as a trusted location

  1. Open the Microsoft Excel app, and click on the File tab.
  2. Go to the Excel Options window, and select Trust Center.
  3. Click on Trust Center Settings and choose Trusted Sites.
  4. Insert new paths. If the files are stored on a storage location in the network, the checkbox Allow trusted storage locations in the network must be activated.
  5. Click the Add new location button to add as many paths as you need and click OK to finish.

The entered path will be among your storage locations and will no longer be criticized by Microsoft Excel through error messages.

Usually, Microsoft Office files are stored on a file server on the network. This facilitates the control of the access permissions, and also the data backup.

2. Disable the Protected View option

  1. Open the Microsoft Excel app, and click on the File tab.
  2. Go to the Excel Options window, and select Trust Center.
  3. Click the Trust Settings button, and choose Protected View.
  4. Disable the Enabled Protected View for files originating from the Internet option, and click OK to finish.

When you are confirming with OK, the system will remove the NTFS hint that the file is from the Internet, and Microsoft Excel will no longer switch to the Protected View mode.

3. Install a powerful antivirus

The threat can be very real. Some file can contain viruses or otherwise be harmful to your computer.

Online threats are increasingly dangerous as time goes by and nowadays the ransomware and spyware attacks have spiked.

Apart from the dangers of getting infected documents, you still need to protect your PC against all threats and the recommended tool below is the best choice for that.

This security solution is light on your system, easy to handle by anyone without any training and it can counter any such dangerous attacks.

Not only that it protects your PC and your system, but it also covers your IoT devices like your webcam and your router.

Get it now! You can use its 30-day trial period to see if it checks your security needs for protection.

TotalAV

Prevent downloading infected files and cover all possible vulnerabilities with this smart solution.
Free Trial Visit Website

How can I download files safely from the Internet?

To save a file or image from the Internet to your PC, you have to download it first.

You should take caution before you download something from the Internet because viruses, malware, and Trojans can easily attack your PC.

Therefore, the safest way to keep your PC running safely is to use good antivirus programs to scan all documents before they are downloaded.

You can check out our list including the best antivirus software with a lifetime license to make sure you have successfully covered this issue.

One wrong click on the file attachments that are believed to be from a safe sender, and it may be responsible for infecting your entire system.

You should therefore be very careful when opening attachments from emails. If you have any more questions or suggestions, be sure to let us know by using the comments section below.

8 Free Antimalware Tools for Windows XP to Protect your PC

Cybercrime frequency has increased in the past decade with the Internet explosion as more people have become exposed to the Internet.

Attacks generally involve corruption of data, hacking or in extreme cases, ransomware attacks, and more.

Moreover, Windows XP computer users seem to be one of the main targets of malware attacks due to its redundant state in the line of Windows Operating Systems.

If you desire a definite list of some of the best free antimalware for your Windows XP, we got you covered in this post.

All the antimalware solutions we mention below are efficient in protecting your PC against all forms of malware.

How do I remove malware from Windows XP?

Windows XP doesn’t come with any security software so in order to remove malware from Windows XP you need to install a third-party antivirus with malware protection capabilities.

An antivirus will make sure that your Windows XP system is completely protected from any virus or attempt to steal your data.

In the list below you will find the top antiviruses that are still compatible with Windows XP.

What is the best antimalware software for Windows XP?

ESET HOME Security Premium – Most security features

ESET HOME Security Premium is a top antivirus that still offers compatibility with Windows XP. With some of the most advanced security features, ESET is sure to protect your PC 24/7.

The users gain access to ESET LiveGuard, a security protocol that actively protects, scans, and finds all types of threats, even the ones we have never seen before.

Also, it provides military-grade encryption for extra protection of your sensitive data as well as passwords and bank details.

If your PC is used by your kids, you should know that ESET has a very complex parental control feature, so you can easily monitor and prevent your children from being exposed to inappropriate online content.

With its advanced technology, ESET has no resource impact on your computer, provides an anti-phishing feature to secure your data against digital fraud, and with multilayered proactive protection, you can safely explore the internet.

Check other essential features:

  • Great protection against malware and spyware
  • Regular updates that improve the antivirus database
  • Game mode, to prevent pop-us while playing

ESET HOME Security Premium

Complete antivirus protection for Windows XP with all the security features you need.
Free Trial Visit Website

Malwarebytes Endpoint Protection – Most advanced malware security

antivirus tools for Amazon Fire device

Malwarebytes is among the upper echelon of free antimalware for Windows XP available in the market.

The tools utilize different features that ensure that malware, spyware, and suspicious programs are diagnosed effectively.

Its popular Chameleon technology has been lauded by industry aspects as it can detect a whole range of computer infections.

In addition, Malwarebytes for Windows XP is free with full features for a 14-day trial duration after which the premium features are deactivated with only basic features available.

No need to be downcasted after the 1-day trial as you still get top-class protection with the free version.

Furthermore, Malwarebytes is a good choice for those that value multilayered security. Also, Malwarebytes is compatible with several Windows OS including Windows XP.

We dare say that Malwarebytes is the perfect free antimalware for Windows XP.

Take a look at its top features below:

  • Prevents threats in real-time
  • Advanced ransomware protection
  • Defends against harmful sites
  • Powerful malware and cleaning and removal features
  • Extremely easy to operate

Malwarebytes

If your old Windows XP PC needs antimalware protection, there’s no better solution than this.
Free trial Visit Website

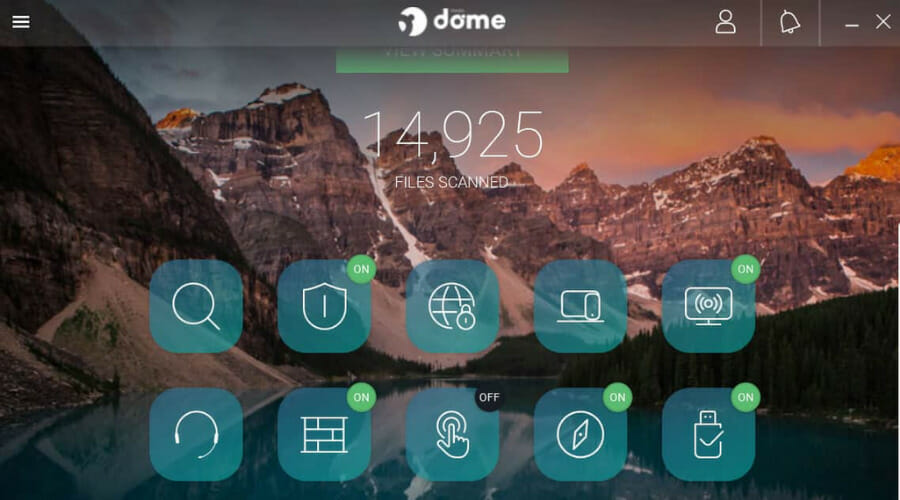
Panda Dome Essential – Most intuitive and user-friendly

router antivirus

Panda incorporates a nice interface alongside some handy features which makes it included on our list for free antimalware for Windows XP.

The tool scored excellently well in AV-Test, although below solutions such as Kaspersky and Avast. However, Panda Pro simplifies real-time protection for Windows XP users through its intuitive user interface.

In addition, Panda incorporates a VPN limited to 150MB daily. Panda Pro is compatible with most Windows versions and lightweight in size with a quick install time.

However, Panda Pro is available as a free antimalware solution for a period of 30 days prior to subscription.

This makes it ideal for Windows XP users to evaluate its functionalities prior to subscription.

Check out Panda’s key features below:

  • Additional firewall for Windows devices
  • VPN for private Internet use (150MB/day)
  • Virus scan for external devices like USB drives and more
  • Wi-Fi protection against hackers
  • Friendly interface

Panda Dome Essential

If you need to enhance Windows XP protection, Panda Dome Essential is both reliable and fast!
Free trial Visit Website

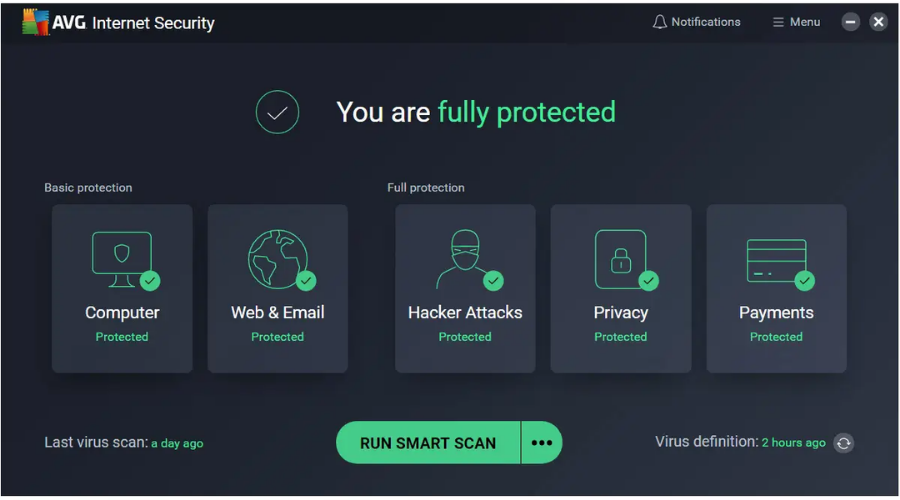
AVG Internet Security – Best free antivirus

windows vista antivirus

AVG has a long rivalry history with Avast as the most popular free antimalware in the past two decades. Despite its purchase by Avast a few years ago, it still retains the features which make it loved by millions worldwide.

For instance, the AVG installer file is less than 10MB which makes the antimalware solution compatible with the barest minimum computer resources. You can install it on older PCs and especially Windows XP computers.

Furthermore, AVG utilizes cloud-based technologies for scanning which makes it more effective in detecting the latest malware threats on the platform.

In addition, AVG offers real-time protection which works quietly in the background in detecting the latest malware. 

AVG is an ideal free antimalware for Windows XP but the free version has some limitations which are offered by the premium version.

Let’s take a closer look at some of its top features:

  • Web and e-mail protection
  • Shop and bank online freely and securely
  • Removes and blocks viruses, ransomware, spyware, rootkits, Trojans, and other malware
  • Automatic updates
  • Artificial Intelligence (AI) and real-time threat analysis

AVG Internet Security

Enjoy using your Windows XP PC without malware or cyber threats with AVG antivirus!
Free trial Visit Website

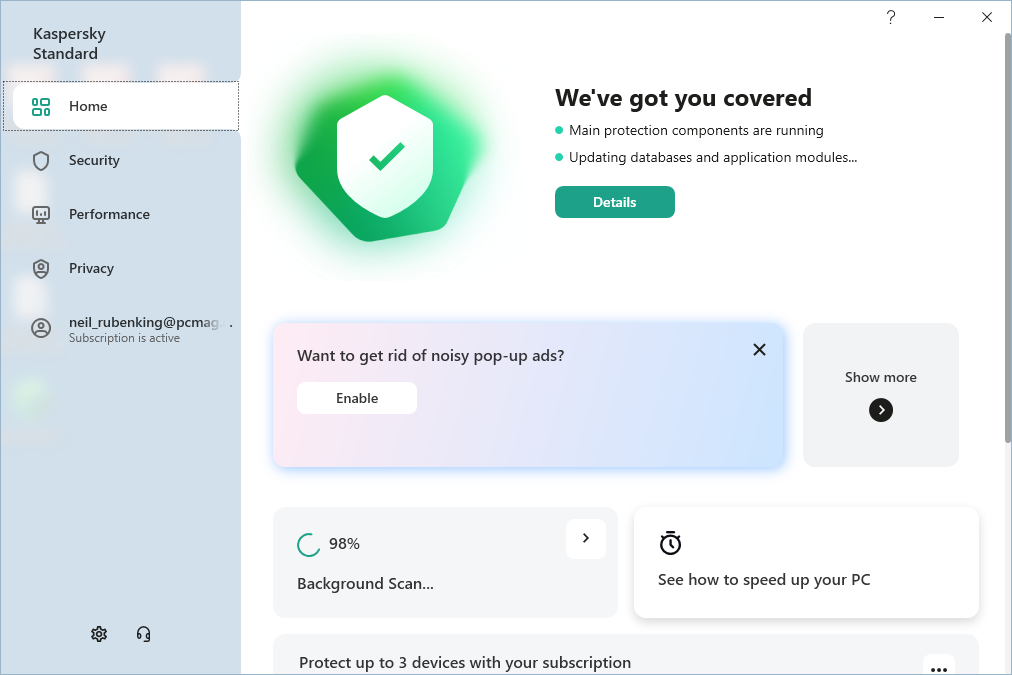
Kaspersky Standard – Great browsing security and virus prevention

Kaspersky is one of the well-known antimalware for Windows XP and is highly rated and ranked by its users worldwide.

This tool is available in a free version with watered-down features from the premium version.

Nevertheless, Kaspersky is easy to use due to its user-friendly interface. Moreover, after installation, this antimalware set up a toolbar on your web browsers to provide added security when surfing the web.

In addition, Kaspersky also conducts regular updates of its malware database in the background.

Besides, Kaspersky provides good value for its antimalware features compared to other free antimalware for Windows XP.

On the other hand, you can try out this tool for a free trial period of 30 days. It is important to note that the premium version is all-inclusive and detailed.

Check out its best features below:

  • Searches out Windows vulnerabilities and threats
  • Isolates and removes immediate dangers
  • Network attack blocker and anti-ransomware
  • An advanced antimalware feature that removes threats including spyware, adware, keyloggers, XSS attacks
  • Easy to use and maintain

Kaspersky Standard

If you need a tool to protect a Windows XP old PC, Kaspersky is a top choice!
Free trial Visit Website

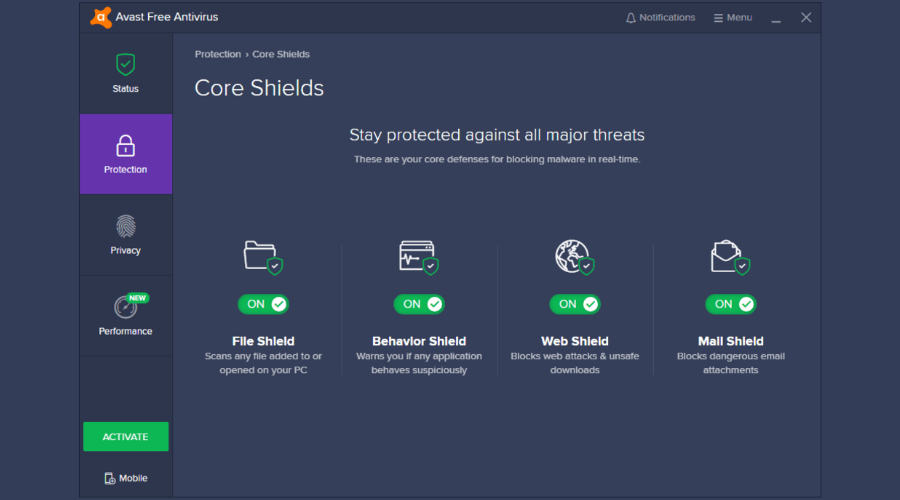
Free Avast Antivirus – Great free malware removal

Avast is probably the biggest free antimalware tool worldwide with over 500 million users.

This antimalware for Windows XP gives users an unparalleled advantage when it comes to offering real-time protection.

In addition, Avast has a vast database of viruses and malware signatures. Also, it has a small size and short installation time which makes it ideal for Windows XP users.

Nevertheless, Avast incorporates a unique feature called intelligent threat detection which gives users an added layer of protection against malware. Besides, Avast scores high in AV-Tests and antimalware tests.

Consequently, Avast gives adequate protection to keep your Windows XP out of risk from major malware and cyber-attacks.

Keep in mind that Avast’s free version is riddled with ads that may not be pleasing but that is the cost to bear for using such powerful features for free.

Let’s see what its best features are:

  • Uninterrupted gaming or movie time thanks to the Do Not Disturb mode
  • Constant monitoring of all apps installed on your PC and their behavior
  • Safely shop and make transactions online
  • Wi-Fi scanner
  • Password manager

Free Avast Antivirus

This ultra-powerful antivirus tool also comes with a webcam protection feature called Webcam Shield.
Free download Visit Website

Comodo Anti-malware Protection – Great antimalware for Windows XP

BOClean Anti-malware Protection is one of the renowned antimalware for Windows XP. This antimalware solution is developed by Comodo — one of the cybersecurity giants in the world today.

This tool has a user-friendly interface that allows users to automate security protection in the background thereby safeguarding their PC from malware threats.

However, BOClean Anti-malware Protection is now part of the Comodo Internet Security software package.

Therefore, Windows XP users can access this antimalware tool by purchasing the Comodo Internet Security suite.

Some of Comodo’s best features are:

  • Instant malware removal
  • Minimal resource usage
  • Optimal “malware deletion reports”
  • Full-spectrum protection

⇒ Get Comodo Internet Security

Cybereason– Great ransomware protection and removal

free antimalware tools Cybereason

Cybereason may not be as popular as AVG or Avast but it pretty much does a decent job of protection against malware.

This free antimalware for Windows XP was developed by former cybersecurity chiefs of the US army and it is renowned for its military-grade protection against malware and even ransomware.

In addition, Cybereason gives specific protection to highly destructive ransomware such as Petya and WannaCry.

Nevertheless, it also offers real-time protection features for free despite its relatively lightweight size.

  • Complete ransomware protection
  • Ransomware spread prevention
  • Artificial intelligence on the endpoint
  • Multi-layered protection
  • Visibility from the kernel to the cloud

⇒ Get Cybereason

In conclusion, all the tools we mentioned above are free Windows XP malware removal and protection solutions for your PC.

You should also check our selection of the best antiviruses for Windows XP because you will find more tools that will help you ensure the needed security for your old PC.

While some of the antimalware is not totally free they come with a free trial period for you to test their services before committing to a premium plan, while the rest are totally free to use.

Dictation Software to Use in 2026 [Most of Them are Free]

When the keyboard and mouse were first created, they created a revolution in the manner humans interacted with computers. But then, the best dictation software for Windows 10 kicked in.

Nowadays, a new trend is becoming more and more popular among computer owners: using their voice and the best speech recognition software for Windows 10 to control their devices.

There are a series of advantages that determine the user to adopt this method: it’s faster, easier, and makes the human-machine interaction more personal.

Speech interaction between users and computers is also very useful for professionals on the go, as it allows them to simply dictate their answer to important emails while embarking on their next flight.

We’re going to answer this question by listing the best voice recognition software for Windows 10, as well as their main features.

What is the best speech recognition software for Windows?

Dragon Home

If you enjoyed the speech recognition experience offered by Windows’ built-in speech app, and you want to take this experience to the next level, we recommend the Dragon Home.

According to Nuance, the company behind this app, you can literally speed through your to-do list simply by speaking.

This best dictation software for Windows 10 allows you to create and edit documents three times faster than you can type, send emails, or search and surf the web.

If you’re often on the go, you can capture notes for later transcription. Dragon Home also lets you keep up with what’s going on on social media. You can post on Facebook, check your friends’ profiles, and communicate with clients and colleagues.

Dragon Home

Dragon Home

Create, format, and edit documents just by speaking with this amazing tool. Get the best deal now!
Check priceVisit website

Windows Speech Recognition

Why first look elsewhere when Microsoft offers you a built-in speech recognition app? To turn this feature on, type speech recognition in the search box, and then enable it.

When you want to activate this app, all you have to do is say Start listening and the microphone activates.

Windows Speech Recognition can basically do anything: it can launch apps for you, write a Word document as you’re dictating it, or reply to emails.

This app is available in six languages: English, French, German, Japanese, Mandarin, and Spanish.

Of course, this is not the best voice recognition software for Windows 10 on the market (curiously, right?) and some improvements to make tool more accurate would come in handy.

⇒ Read more about Windows Speech Recognition

Braina

Braina (Brain Artificial) is a smart personal assistant, human language interface, and automation software that can easily qualify for the title of best speech recognition software for Windows 10.

This tool allows you to control your computer using only your voice, and perform various personal and office tasks much faster. However, the interface is available in English only, which may be a drawback for non-native speakers.

On the other hand, the list of actions Braina can perform is impressive. So here goes: it can take dictations, search information on the web, play the songs you want to hear, open or search files on your computer, or set alarms, and reminders.

It can even do mathematical calculations, remember notes for you, automate various computer tasks, read ebooks, and more.

⇒ Get Braina

VoxCommando

This tool doesn’t offer as many features as the previous entries listed here. In fact, its focus relies mainly on controlling multimedia.

While VoxCommando may not be the best dictation software for Windows 10, it does allow you to voice control your media, home automation, and PC.

You can also customize the settings and commands to make it easier for you to control all your devices. If tinkering is your hobby, this is the perfect tool for you, as it lets you add voice control to almost anything.

VoxCommando uses two speech engine options and supports more than 20 languages and accents. The main advantage of this tool is that it allows for a higher degree of customization.

However, it is not as versatile as the best voice recognition software for Windows 10 listed above. Essentially, VoxCommando is speech recognition software for Windows 10 that caters to tech-savvy users.

⇒ Get VoxCommand

Cortana

cortana speech recognition

Microsoft has managed to significantly improve Cortana in the last years, but the app still has a series of limitations and is still plagued by many bugs. Thus, despite being a native ap, it’s far from being the best speech recognition software for Windows 10.

On the other hand, Cortana works on all your Windows devices. This makes it more familiar and easier to use for Windows users.

You can use Cortana to dictate emails, search for information on the internet, call your contacts, launch apps on your computer, and more.

In order to function at its full potential, Cortana needs to collect private information about you, and this has been bugging users for a long time.

⇒ Read more about Cortana

Have you already used some of these best dictation software for Windows 10 listed above? Tell us more about your experience in the comments section below.

McAfee Client Always Shows the System State as Inactive

A large number of people have complained on different online forums that their McAfee client isn’t working properly.

The application always shows the system state as being inactive, no matter what changes they make in the settings of the software.

This issue can be frustrating over time, as it doesn’t allow you to be sure that you are being protected from online threats.

The error we’re discussing can be caused by either the Windows Boot Loader or Boot Manager not working properly, or a disk space problem.

The McAfee Drive Encryption [DE] process is the source of this error message, and we will need to use an elevated command prompt to fix it.

In today’s fix article we will discuss the best method to apply in this situation and get back to exploring the online realm without any security risks.

Depending on the version of McAfee that you use, the solution to the problem will differ, as it is being caused by different elements.

In one of the cases, the problem is caused by the Boot Loader, and in the other case, it is caused by not having enough free hard disk space available on the drive that you’re trying to encrypt.

How do I fix the McAfee system state error?

1. Use PowerShell to fix the Boot Configuration Data problem

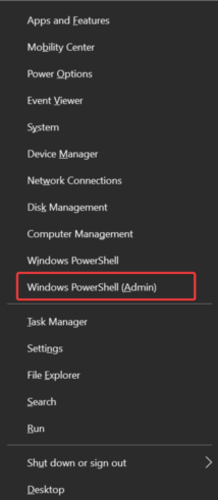
  1. Press the Windows + X keys on your keyboard to open the Start sub-menu.
  2. Choose the Windows PowerShell (Admin) option.powershell admin gog
  3. Copy-paste this command inside the command prompt window: Bcdedit /set {default} path \Windows\System32\Winload.efi
  4. Press Enter to run the command.
  5. Copy-paste the following command: Bcdedit /set {bootmgr} path \Efi\Microsoft\Boot\Bootmgfw.efi
  6. Press Enter to run the command.
  7. Close the PowerShell window and restart your PC.

If Windows PowerShell stopped working, don’t worry, check our step-by-step guide to fix this problem right away.

Moreover, in order to get a full understanding of this problem, you can visit the official McAfee Knowledge Center.

2. Defragment the drive using PowerShell

  1. Press the Windows + X keys and choose the Windows PowerShell (Admin) option.
  2. Inside the elevated command prompt, run this command: chkdsk /r
  3. After the process is completed, please restart your system.
  4. Manually shrink the drive that’s causing the problem using the Microsoft Disk Partition tool named Diskpart (Check the Microsoft Build page for more information about how to do this).

Defragmenting the problematic hard drive will help you get the space needed for McAfee to function properly.

3. Try changing your antivirus with a more reliable one

If McAfee continues to produce more problems than solutions, you need to consider trying another antivirus that is less prone to such issues.

The security tool recommended below is light on your system and it protects all your devices with one license, including the router or the webcam.

Moreover, you will stay protected especially when you perform online payments or banking transactions.

It comes with a 30-day trial period so you will have plenty of time to know if you like it or not.

TotalAV

TotalAV is a reliable, light, and always active antivirus for your PC and your peripherals.
Check Price Visit Website

In today’s fix guide we explored both of the possible causes for the McAfee error that doesn’t allow the software to show the correct system state, and we offered a quick solution for each of them.

Because this can expose your system and data to various risks online, it becomes an even more important issue if it is left unsolved for a long period of time.

If you have the same problem at the office, don’t hesitate to pick one of the best antiviruses for Windows Server to strengthen your security for your company data.

We hope that this guide offered you a solution to fix the McAfee drive encryption system state inactive issue.

Please feel free to let us know if this article helped you, or if you have any suggestions. You can contact us by leaving a comment in the box found under this article and tell us all about it.

FIX: Filename contains a virus and was deleted

When you’re trying to download an email attachment or other file online and you get a message saying the filename contains a virus and was deleted, the issue may be on your computer’s performance after using antivirus.

The error filename contains a virus and was deleted indicates that you had an antivirus that you tried to uninstall, but it wasn’t executed properly, and this is why you’re facing the problem.

It is important also to note the antivirus software you tried to uninstall and uninstall it properly by downloading the appropriate removal tool and removing it completely.

However, you need not worry about this file contained a virus and was deleted issue as we have some quick fixes you can try to resolve it.

What can I do if the file contains a virus and was deleted?

  1. Disable your antivirus program
  2. Boot in Safe Mode with Networking
  3. Perform a Clean Boot
  4. Run the Microsoft Safety Scanner
  5. Check for the issue in another user account or create a new one

1. Disable your antivirus program

Firewalls and your antivirus program software may prevent some functions on your computer and cause the filename contains a virus and was deleted error.

It isn’t recommended to permanently turn the security software off, but you will still be protected by Windows Defender.

If the issue persists, you may need to uninstall your antivirus completely and check if you still get the same error.

However, if the problem disappeared, it means you need another antivirus and we recommend the security solution below for that job.

It’s faster than most other solutions, it offers unsurpassed protection, and, more important, it doesn’t interfere with your system or files.

This tool comes with virus, malware, and spyware protection by using modern machine learning technologies that can identify and block even zero-day threats before they reach your system.

⇒ Get TotalAV

2. Boot in Safe Mode with Networking

  1. Restart your computer.
  2. When the sign-in screen is displayed, hold down the Shift key while you select Power then Restart.
  3. After the computer restarts to the Choose an option screen, select Troubleshoot.
  4. Click Advanced options.
  5. Click Startup Settings.
  6. Click Restart.
  7. Once it restarts, you will see a list of options. select 5 or F5 for Safe Mode with Networking.
filename contains a virus and was deleted

Safe Mode with Networking starts Windows in safe mode, including the network drivers and services you need to access the internet or other computers on the same network.

Once you’re in safe mode, try to perform a clean boot.

3. Perform a Clean Boot and exit Safe Mode

3.1 Perform a clean boot

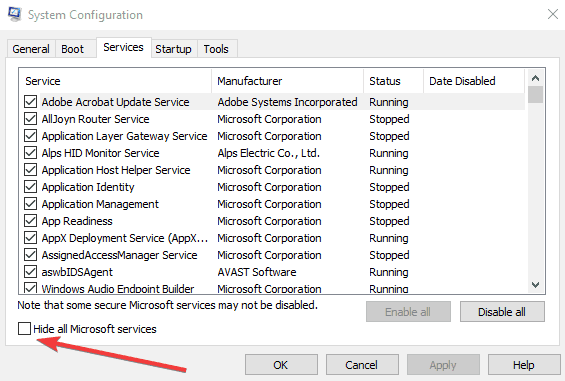
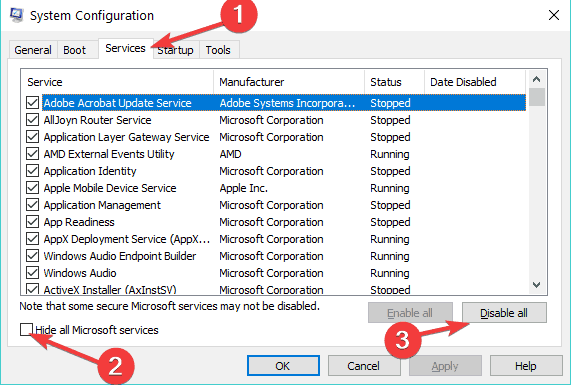
  1. Go to the search box, type msconfig, and select System Configuration
  2. Find the Services tab.
  3. Select Hide all Microsoft services box.
  4. Click Disable all.
  5. Go to the Startup tab.
  6. Click Open Task Manager.
  7. Close Task Manager then click OK.
  8. Reboot your computer.

You will have a clean boot environment after all these steps are carefully followed, after which you can try and check if the problem is gone.

3.2 Exit Safe Mode with Networking

  1. Right-click the Start button.
  2. Select Run, type msconfig, and press Enter.
  3. Go to the Boot tab.
  4. Deselect or uncheck the Safe Boot option box.
  5. Restart your computer.

This procedure will complete the process and next time you restart the computer it will not boot in Safe Mode anymore.

4. Run the Microsoft Safety Scanner

  1. Download the tool from the official Microsoft page.
  2. Open it and select the type of scan you want to run.
  3. Start the scan and review the scan results on the screen, which lists all malware identified on your computer

When a virus infects your computer, it makes the machine’s performance slows down greatly.

Running a virus scan means any infected files may be cleaned by deleting the file completely, meaning you may experience data loss.

Microsoft Safety Scanner is a tool designed to locate and remove malware from Windows PCs. It only scans when manually triggered, then you get to use it 10 days after you download it.

This means you need to download the latest version of the tool before you perform each scan on your computer.

However, the Microsoft Safety Scanner tool doesn’t replace your antimalware program. It helps remove malicious software from your Windows 10 computer.

To remove the Microsoft Safety Scanner tool, just delete the msert.exe file from your computer.

5. Check for the issue in another user account or create a new one

5.1 Create a new account

  1. Click Start.
  2. Select Settings.
  3. Then, select Accounts.
  4. Choose Family & other people.
  5. Click Add someone else to this PC.
  6. Fill in the form with the user name and password. Your new user account will be created.
  7. Click on Change account type.
  8. Click the drop-down arrow and choose Administrator to set the account to administrator level.
  9. Restart your computer.
  10. Login to the new account you just created.

If the issue goes away, then it may mean your other user profile is corrupted.

5.2 Try to repair a corrupt user profile

  1. On your new account, use it to downgrade your usual account.
  2. Click Apply or OK.
  3. Raise back your old account to its default admin level.
  4. Repeat a few times as this will help to remove any corruption.
  5. Leave your account on as Administrator.

Check whether you still get the filename contains a virus and was deleted error when using the newly created account.

If it persists, then you can either fix the old user account or migrate to the new account. If you have different user accounts, log in to each and check if the problem persists or goes away.

As this issue may be caused by your antivirus, it wouldn’t hurt to also look at our selection including the best antiviruses with unlimited license validity.

Did our contained a virus and was deleted fix for Windows 10 worked for you? Let us know by leaving a comment in the section below.

ProtonVPN: Privacy and security at the tip of your fingers

With so many things happening in the online environment, it’s no wonder that everyone is curious about accessing a wide range of information.

Unfortunately, this process can be severely hindered once geo-location restrictions come into play, or when you just want to look up things on the Internet you aren’t keen about letting anyone else know about.

That’s precisely why a good virtual private network is helpful, and while many associates this type of software with PCs, they are available for mobile phones as well, one great example being ProtonVPN.

A great VPN service for pretty much all platforms

ProtonVPN is a community-supported VPN service created by the CERN scientists behind ProtonMail, the world’s largest encrypted email service, and its mission is to create an internet where privacy is the default.

ProtonVPN is a service that is currently available on 7 different platforms:

No matter what device you are using to access the Internet, there’s always an IP address associated with it, making identification and monitoring by third parties extremely easy.

This is especially the case with a mobile device since you always leave it with either the Wi-Fi connection or the Mobile Data turned on, and you never know when you end up in a compromised network.

Fortunately enough, ProtonVPN has thought this through and created Android and iOS apps that anyone can use to protect their mobile devices.

For those of you interested in downloading this VPN service for your mobile device, it is available on the Google Play Store, as well as Apple’s App Store.

This versatility in terms of supported platforms goes hand-in-hand with the community-driven nature of this service, as the active development team listens to everyone’s suggestions and inputs, all for the betterment of ProtonVPN.

Open-source and audited apps

All of ProtonVPN’s apps are open source, meaning anyone can inspect their code to check and see if the app is doing what ProtonVPN claims. They have also been audited by independent security experts, and ProtonVPN has shared the reports.

This transparency also makes it easier to find and fix potential vulnerabilities in ProtonVPN’s apps, because the entire security community can inspect and contribute to their code.

The main reason why anyone ever calls on a VPN for help is privacy and protection, but VPNs can themselves be targeted by attacks, and along with them, everyone connected to the network.

With ProtonVPN, you don’t have to worry about that, especially if you have the Secure Core architecture.

This architecture acts by routing your traffic through multiple servers before leaving the ProtonVPN network.

Because of this, even someone with the ability to monitor the network traffic at the exit server will not be able to discover the true IP address of ProtonVPN users, nor match browsing activity to that IP.

Note icon NOTE
This is a paid feature that is not part of the core service.

A strict no-log policy

Like all VPN services, ProtonVPN can be used to browse anonymously online, and access geo-locked content that not even your own Internet Service Provider can track.

They achieve this by following a strict no-logs policy and being headquartered in Switzerland, home to some of the world’s strongest data privacy laws, being free from American and European surveillance agreements.

Because of this, they are not required to keep logs of users’ Internet activity, providing them with a strict no-logs policy and the ability to protect their users’ privacy.

Servers all over the globe

VPNs are known to reduce some of the users’ bandwidth, especially when they try connecting via servers that are physically very far from them (eg. someone from Europe trying to connect to a New York server).

One way ProtonVPN avoids this is by providing a large number of server locations. It has servers in 55 countries scattered all over the globe, so pretty much every region is covered.

A VPN with minimal bandwidth impact

The ~1300 servers provide high bandwidth to anyone, with low latencies and almost nonexistent downtimes, so it doesn’t matter what website your phone is trying to access, it will feel almost like home.

ProtonVPN offers high-speed VPN servers around the world, with most supporting connection speeds up to 10 Gbps.

This in turn translates into more coverage around the world while still maintaining blazing fast speeds.

Blocks annoying ads from popping up

When using a VPN, one concern that many users encounter is that while they longer see ads from their own countries, they see ads from the country they are connected to at the moment, and that can be very confusing.

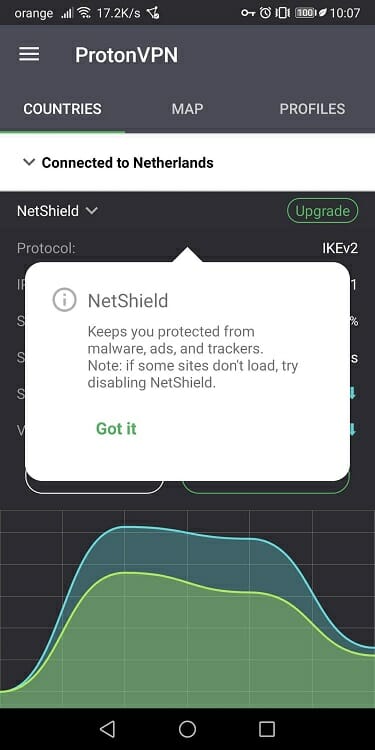
Fortunately enough, ProtonVPN comes with a feature called NetShield that will make all that go away.

NetShield is a feature available to paid ProtonVPN users that protects your device and speeds up your browsing by blocking ads, trackers, and malware.

Price plans for every pocket

All versions of ProtonVPN can be accessed and used with the same account that a user can create.

The subscriptions are account-based, so you can have ProtonVPN installed on one of each of the supported devices at no additional cost.

More so, ProtonVPN is also available for free, and while the limitations are quite significant, you have more than enough features to imagine what a paid version might bring.

Here are the detailed price plans that protonVPN offers:

Subscription typeFreeBasicPlusVisionary
# of VPN connections121010
# of countries with servers3435555
Connection speedMediumHigh speedHighest speed
(Up to 10 GBps)
Highest speed
(Up to 10 GBps)
Strict no-log policy✓✓✓✓
Access blocked content✓✓✓✓
Adblocker (NetShield)XX✓✓
P2P file sharing/BitTorrent supportX✓✓✓
Secure Core VPNXX✓✓
Tor over VPNXX✓✓
Streaming service supportXX✓✓
ProtonMail Visionary accountXXX✓

Closing thoughts on ProtonVPN

We’ve tested ProtonVPN both on PC and mobile, and we’ve concluded that it is indeed a solid when looking for your next VPN.

ProtonVPN behaved flawlessly during our tests, regardless of whether the device was connected to Wi-Fi or via mobile data. If you do encounter connection issues, you can troubleshoot them easily.

The prices are more than affordable compared to what it offers, and the quality of the service makes it worthwhile in the long run, especially if you’re a fan of content that is otherwise unavailable in your country, or if you just love your privacy.

Pros
Open-source code that anyone can enhance
55+ countries and 200 servers worldwide
Secure Core architecture for extra security
Strict no-log policy thanks to Swiss laws
Active community-driven development
Available for all major platforms
Cons
Could use some extra server locations

Navigating the Internet via mobile sounds a little bit safer now that you know there are viable VPN services that you can use.

All in all, we recommend that you give it a try, and let us know what you think about this service for yourself by leaving your feedback in the comments section below.

Factorio: Server not responding [Full Fix]

Factorio is classified as a survival game by some gamers, and it’s one of the better survival games on Steam. However, several users have reported that Factorio server is not responding when trying to join a multiplayer game.

In this article, we have listed a few troubleshooting steps to help you resolve problem and connect to the server successfully.

How can I fix the Factorio server not responding error?

1. Allow Factorio through Firewall 

  1. Press the Windows key + R to open Run.
  2. Type control and click OK to open the Control Panel.
  3. Click on System Security.
  4. Next, click on Windows Defender Firewall.
    Factorio server not responding
  5. From the left pane, click on Allow an app or feature through Windows Defender Firewall.
  6. Click the Change Settings button. Click Yes if prompted by UAC.
  7. Scroll through the apps and locate Factorio.
  8. Make sure both the Private and Public boxes are checked.
  9. Click OK to save the changes and exit the Control Panel.

Relaunch Factorio and check if the Factorio still can’t connect to server. If you have a third-party antivirus with a firewall, make sure the app is not blocking games either.

Play via Steam 

factorio server not responding

If you or your friend is having difficulty joining the Factorio server, ask them to join via Steam. Several users have reported that when playing via Steam, they don’t get the error or server issues. 

2. Check if you have configured port forwarding 

  1. Go to your local connection setting and note down the local IPv4 address. It should look something like this:
    192.168.1.1
  2. Next, open your internet browser and type your local IPv4 DNS address.
  3. Enter your username and password. The username is admin, and the password is admin/password by default for most routers. You can also check your router’s manual to see its login credentials.
  4. In your router configuration page, open Port forwarding.
  5. Type 34197 in the Service Port field. 
    Factorio server not responding
  6. Enter 34197 again in the Internal Port field as well.
  7. Paste your local IPv4 address in the IP address field.
  8. Click Apply/OK to save the changes.
  9. Open Google and search My IP to get your IP address.
  10. Send both your IP address and port forward code 34197 to your friend. 

Try connecting to the game server and check if the Factorio can’t establish connection error is resolved.

3. Disable Windows Defender Firewall 

  1. Click on Start and choose Settings.
  2. Go to Update and Security.
  3. Click on Windows Security.
    Factorio server not responding
  4. Next, choose Windows Firewall.
  5. Choose your currently active profile.
  6. Scroll down and toggle the switch to disable the firewall.

If you have a third-party antivirus with a firewall installed, disable it as well. Disabling the firewall seems to have resolved the Factorio not responding LAN and lag related issues.

Make sure to disable the security program temporarily and try connecting to the server to see if the error is fixed.

4. Run the network troubleshooter 

  1. Press the Windows key + I to open Settings.
  2. Go to Update & Security.
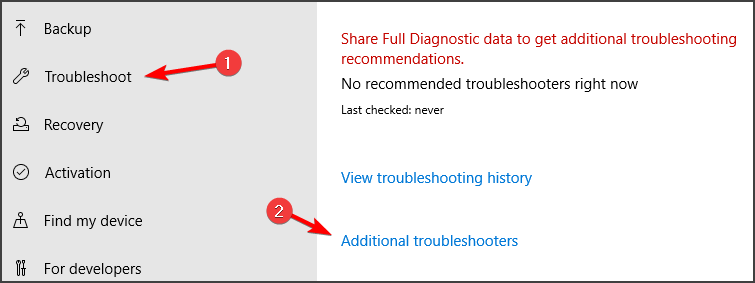
  3. Open the Troubleshoot tab from the left pane and select Additional troubleshooters.
  4. Scroll down and click on Internet Connections.
  5. Click the Run the Troubleshooter button.
  6. Follow on-screen instructions. You may need to choose your internet adapter to proceed.
  7. Once it is completed, in the Troubleshoot window, scroll down and click on Network Adapter.
  8. Click the Run the Troubleshooter button and follow on-screen instructions.

If the error persists, check your WiFi hardware. If you are using external WiFi hardware, check the WiFi receiver for issues. Unplug the card and reboot your computer.

After the reboot, plug the card back and make sure it is detected. Connect your WiFi network and check if the Factorio couldn’t establish network communication with server error is resolved.

5. Switch to GTX Gaming server hosting

If you are a game server owner we recommend switching to GTX Gaming server hosting. This game server hosting may be a better option if none of the mentioned solutions didn’t work.

Using Factorio server hosting is very simple. Easy to use configuration files and offsite backup systems, your server has instantly set up. In case you get stuck, you have 24-hour support that can help you immediately.

Your server may still be installing in the same time you are logged in. This means that your server is updating to the latest Factorio version via a Steam update. You have to refresh your browser after two minutes and your server wil be running and ready for you to configure it out with your own title and admin password.

⇒ Get GTX Gaming


The Factorio server not responding error can occur due to several reasons, and we hope that our guide helped you fix this issue.

Did we miss a certain solution? Let us know in the comments below.

FY21 earnings call confirms business is good for Microsoft

Microsoft has released its FY21 Q3 earnings report in April 2021. That report shows there has been revenue, operating, and net income increases for the big M over the last three months.

Microsoft also announced a notable increase in Windows 10’s user base at its latest earnings call.

The FY21 Q3 report

Microsoft’s FY21 Q3 financial report shows the company’s overall turnover and profit for the period January to March 2021. During that period, Microsoft’s total turnover amounted to approximately 41.7 billion.

The company’s net income (its profit) figure of approx 15.5 billion is also a rosy one.

Those figures are all the better for Microsoft as they are higher than those recorded for the FY20 Q3 finance report. The big M has confirmed its revenue has increased by 19 percent on the FY20 Q3 total.

The 15.5 billion net income figure is up by 44 percent on the previous FY20 Q3 profit total.

Microsoft’s investors will no doubt be encouraged with the latest financial figures.

The big M’s stock market performance has been strong over the last three years as its stock has reputedly increased by 240 percent over that period. The FY21 report shows investors Microsoft is sustaining an upward trend.

The FY21 report highlights Microsoft has benefited from the global pandemic. That pandemic has generated a surge in cloud usage. Microsoft chief, Mr. Nadella, said this:

Over a year into the pandemic, digital adoption curves aren’t slowing down. They’re accelerating, and it’s just the beginning.

Windows 10 installed on 1.3 billion active devices

Aside from its latest financial report, Microsoft had more good news at its FY21 Q3 earnings call. The big M announced that Windows 10 is now installed on 1.3 billion devices. That means Windows 10’s user base has increased by 300 million since 2020.

Windows 10 finally reached the golden one billion device mark in 2020 (later than expected). As Microsoft discontinued Windows 10 Mobile, it took a bit longer for the big M’s flagship OS to reach that milestone.

Nevertheless, the Windows 10 desktop platform has gone from strength to strength.

So, Microsoft has had quite a lot to celebrate in April 2021. The big M’s FY21 Q3 report shows financial increases across the board, and Windows 10 is now comfortably the world’s biggest PC platform with an ever-expanding user base.

Fix: There was a problem reading this document error on Windows 10

There was a problem reading this document error message usually appears when trying to view PDF files. This error message will prevent you from viewing certain documents, and in today’s article we’ll show you how to fix this error.

There was a problem reading this document error message will prevent you from viewing PDF files. This message has several variations, and these are some similar problems that users reported:

  • There was a problem reading this document (14) expected a dict object – This problem can occur for various reasons, and if you encounter it, be sure to resave the problematic file and check if that solves your issue.
  • Adobe there was a problem reading this document (15), (109), (131), 11, (16), (114) – These are some variations of the original error, and if you encounter it in Adobe Reader, be sure to try some of our solutions.
  • There was a problem reading this document PDF, Adobe – This issue can occur when viewing PDF files. To fix it, try updating Adobe Reader to the latest version and check if that helps.
  • Document could not be saved there was a problem reading this document – To fix this message, try using a different PDF viewer or try to open the document in the browser.
  • Adobe reader there was a problem reading this document access denied – Certain issues with Adobe Reader can appear, but you can fix them simply by reinstalling the application.

There was a problem reading this document error message, how to fix it?

  1. Hold the CTRL key to view extra information
  2. Resave the problematic file
  3. Extract the desired pages
  4. Open the file in the browser and save it
  5. Use an older version of Adobe Reader
  6. Disable Display PDF in browser option
  7. Update Adobe Reader to the latest version
  8. Use a third-party reader
  9. Download the PDF again

Solution 1 – Hold the CTRL key to view extra information

There was a problem reading this document error 14 message can appear while trying to open certain PDF documents. According to users, the problem occurs due to file corruption, and in order to see the full error message, users are suggesting to press and hold the Ctrl key when the error appears and click the OK button.

This will show you more information about this error. Bear in mind that this method won’t fix the core problem, but it will give you the additional information that you can use in order to troubleshoot the issue further.

Solution 2 – Resave the problematic file

As previously mentioned, There was a problem reading this document error 15 can occur due to file corruption, and in order to fix the problem, it’s advised to open the document, save it again and try to open it once more.

Several users claim that resaving the document can fix the file corruption issues as long as the file is readable, so be sure to try that.

Solution 3 – Extract the desired pages

According to users, if you keep getting There was a problem reading this document error 14 messages, you might be able to circumvent the issue simply by extracting the pages that you need.

Your PDF file can be corrupted, and if you can’t repair it by using our previous solutions, you can at least try to export the pages that you need. This won’t fix the core problem, but at least you should be able to view the pages that you need.

Solution 4 – Open the file in the browser and save it

In order to fix There was a problem reading this document error 14, you might want to try using a browser to view the file. If the file can’t be rendered in the browser, then it’s advised to save a copy from the browser.

To do that, open the PDF file in the browser, choose File > Print > PDF > Open PDF in Preview. After doing that, choose a save location and save the file and you should be able to open it without any problems.

Bear in mind that you might not be able to open the PDF file in your default browser, so it’s advised to try this solution with several different browsers until you find the one that works for you.

Solution 5 – Use an older version of Adobe Reader

According to users, sometimes this problem can occur due to the version of Adobe Reader you’re using. To fix that, you just need to switch back to the older version of Adobe Reader. To do that, you first need to uninstall the version of Adobe Reader you’re using.

There are several methods you can use to do so, but the most efficient one is to consider the best uninstaller software on the market right now.

In case you don’t know how uninstaller software works, it will remove the selected application, but it will also remove all files and registry entries associated with it.

Once you remove Adobe Reader, download an older version and install it. Keep in mind that the older version might not be available from Adobe’s website, so you’ll need to rely on third-party sources.

Bear in mind that Adobe Reader might try to update itself automatically to the latest version, so be sure to disable this option in settings.

Solution 6 – Disable Display PDF in browser option

Sometimes There was a problem reading this document error 14 message can appear due to your settings in Adobe Reader. However, you might be able to solve this problem simply by disabling the Display PDF in browser feature.

To do that in Adobe Reader, follow these steps:

  1. Open Adobe Reader.
  2. Head over to the Edit > Preferences > Internet section.
  3. Locate Display PDF in browser option and uncheck it.

After doing that, check if that problem is still there. Several users reported that this workaround solved the problem for them, so be sure to try it out.

Solution 7 – Update Adobe Reader to the latest version

In some cases, you might be able to solve There was a problem reading this document error simply by installing the latest updates for Adobe Reader. Adobe Reader usually checks for updates automatically, but sometimes you might skip an update or two.

However, you can always check for updates right from the application itself. Alternatively, you can download the latest version from Adobe’s website and install it. Once Adobe Reader is up to date, the problem should be resolved and everything will start working again.

Solution 8 – Use a third-party reader

If you’re still getting There was a problem reading this document error message, the problem might be your PDF viewer. Issues with Adobe Reader can occur, and in order to fix the problem, perhaps you can try using a different PDF reader.

There are many great PDF viewers on the market besides Adobe, so if you’re an avid user of digital papers or ebooks, you can try the best PDF reader apps on Windows 10.

Once you download and install a different PDF reader, try to open it again and check if the problem is still there.

Solution 9 – Download the PDF again

If There was a problem reading this document error keeps appearing, the problem might be the PDF file. Sometimes the PDF file can get corrupted, and if you tried all of our previous solutions, perhaps you can fix the problem simply by redownloading the PDF file.

Once you do that, try to open it and check if the problem is still there. Alternatively, you can try to open the PDF file on a different PC or on your phone and check if the problem appears there as well.

There was a problem reading this document error can be quite problematic and cause issues while trying to view PDF files, but we hope that you managed to solve this problem using one of our solutions.

5 Best Novel Writing Software For Windows 10 [2026 Guide]

If you’re an aspiring writer or a well-known novelist and you’re looking for a software to put your ideas on paper (or digital paper for that matter), then this post is for you.

Writing a novel requires hard work: you need to invest a lot of time into actually writing it and pressing the keys on your keyboard, then you also need to keep track of your ideas in order to maintain a logical sequence of events.

This is when a dedicated novel writing software comes in very handy.

What software is best for writing novel?

Scrivener

Scrivener is the go-to software for writers. Packed full of features, this app will deliver all the tools you need to create the next award-winning novel from scratch.

Suitable for all kinds of platforms including MacOS, iOS and of course, Windows, you will be able to pursue your literray inspiration whenever and wherever. You can even sync it with Dropbox or transfer with iTunes.

What’s more, Scrivener will automatically save your work so you don’t have to worry about backups and additional security measures – simply take your time to focus on what matter.

The Scrivener provides a fully customizable toolbar with neatly organized options, just one click away.

Let’s quickly look at its key features:

  • Formatting presets and templates to quickly apply and reuse in future projects
  • Import function (Word documents, PDFs, web pages, scripts, and more)
  • Organization tools (labels, status, keywords, metadata fields, and more)
  • Build smart lists of related documents
  • Make snapshot and compare versions of the same document
Scrivener

Scrivener

The best writing app delivers all the tools you need to follow your inspiration freely.
Free trial Visit website

WriteItNow

  • Move chapters around using the storyboard
  • Storyline editor with edits' logs
  • Built-in thesaurus, spelling checker, and readability checker
  • Integrated word counter tool
  • You cannot save your writings in the free version

As its name suggests, WriteItNow really helps you stop procrastinating and start writing the novel you have been thinking about.

This software was specially designed to help anyone write a novel. It has a very intuitive user interface, which makes is very easy to use.

WriteItNow keeps the novel text and all the background information that you need to polish your work in one place.

As a matter of fact, the program is divided into two sections: one for chapters and scenes and the second one for background details.

You can download it for free from the official website and try most of its features, but you can not save your writings unless you buy it.

Writer’s Blocks

Writer’s Block is an interesting novel-writing tool that you should definitely check out.

This book writing software will make your writing faster, easier and smarter, allowing you to finish your novel much faster that you expected.

Writing a novel required hard work and attention. As you all know, the more pages you add to your novel, the more difficult it becomes to manage, navigate and polish our work.

Most word processors, including Microsoft Word, allow you to work with one small piece of your novel at a time.

Writer’s Block allows you to be more productive and create, view, and organize your writing in smart ways.

As its name suggests, the tool lets you create blocks of content and then navigate and arrange them as you like.

  • Create clear writing with visual outlining
  • Intuitive Office-like interface
  • Organize blocks (up to 100 columns)
  • Suitable for any type of complex writing
  • Software is not available on CD/DVD

⇒ Download Writer’s Blocks

FastPencil

FastPencil

FastPencil is not a household name among writers, but once you’ve tested it, you’ll definitely like it.

Although not as powerful as the two tools listed above, this program is unique in its own way.

FastPencil is a cloud software, which means that you don’t need to download anything to your computer.

Most importantly, it also allows you to write, publish, and sell your ebooks and even print them.

In other words, if you’re an aspiring novelist, you are no longer bound to publishing houses — you can publish your novels on your own.

This writing software also makes editing much easier and faster.

If you need help with editing, you can send an invite to your friends or editor, and they’ll be able to access your novel directly on the FastPencil platform.

⇒ Create a FastPencil account here

The Novel Factory

the novel factory

The Novel Factory is the last writing software on our list, but definitely not the least.

This program focuses on productivity, allowing you to successfully avoid the dreaded writer’s blocks.

The tool is perfect for both beginners as well as advanced writers.

It comes with a step-by-step guide on how to get started planning and writing your novel, including theory notions about story structure, plot development, character development, themes, and much more.

It doesn’t require hours to learn how to use it, as it’s 100% intuitive.

The Novel Factory also offers you a very useful feature for those moments when inspiration strikes all of a sudden.

Your notes about plot, characters, and so on are automatically organised so that you can keep focusing on the writing process.

Moreover, the tool also features a Character Questionnaire that you can use to better describe your characters.

⇒ Download The Novel Factory


We hope that this list was helpful.

Download the novel writing software that you like best to start writing and don’t forget to share your choice with us via the comments section below.

[wl_navigator]

There Was a Problem with the Dedicated Server Error [Full Fix]

There was a problem with the dedicated servers usually occurs in Halo 5 on Xbox One, and in today’s article, we’ll show you how to fix the problem. This issue could be caused due to actual server issues or certain user connectivity conflicts.

Here’s how one user described the issue on Halo Waypoint forums:

Well I just tried to join a game and now it’s not letting me, it gets stuck on 2/4 starting dedicated server for about a minute or two and then boots me back out, anyone else getting this? My first 9 games went smoothly.

In this article, we’re presenting you a list of solutions to help you stop getting this error.

What to do if I can’t connect to Halo 5 servers?

1. Check the Xbox Live Status

  1. Check the status of Xbox Live servers online.
  2. If there’s a problem with any of the Xbox Live services, you’ll have to wait for Microsoft to address the issue.
xbox live status There was a problem with the dedicated server

2. Check the Halo service status

check the service status There was a problem with the dedicated server
  1. Visit the game forums, and look for other users with the same problem.
  2. If this is a widespread issue, it will most likely be addressed shortly.

3. Check your network connection

  1. Press the Xbox button > open Settings.
  2. Choose All settings > Network > Network settings
  3. Select Test network connection to check the status of your Internet connection.test network connection xbox one There was a problem with the dedicated server
  4. Use a wired connection instead of a wireless network.
  5. If you notice abnormal internet behavior, contact your Internet provider and let them know about your issues.

4. Have the NAT settings open

check NAT settings There was a problem with the dedicated server
  1. Test your network connection as described above.
  2. If you find that the connection NAT type is closed, reset your modem/router.
  3. Test your connection again and see if it now shows NAT Type: Open.

5. Try another server hosting service

If you tried all the mentioned solutions and you still can’t connect to Halo 5 servers then you should think to try another dedicated server hosting that is secured and ready to run instantly.

We suggest you try Citadel Servers that utilize the latest networking and hardware technology. This server hosting has a custom-powerful TcAdmin panel and instant setup in seconds.

Using Citadel Servers is completely safe and secure, due to Anti-DDoS protection and full network monitoring 24x7h. Also, it is free of lags – all of their game servers run on SSD Drives with a network that has 1 Gbps connections.

Citadel Servers

Run your game without any lags or crashes!
Check price Visit website

6. Make sure that you are not banned

check if you're banned There was a problem with the dedicated server
  1. If your Xbox account was banned, you will not be able to access the Xbox Live features.
  2. Go to the Xbox Enforcement section and check your account status.
  3. If you feel that you were banned unfairly, contact the support center.

There you go, 5 quick and easy solutions that can help you fix There was a problem with the dedicated servers error.

If you’re on a PC, you might be interested in solving ‘Host Core Dumps Cannot be Saved’ with these methods.

In most cases, this is a server issue, so you’ll just have to wait for Microsoft or the development team to fix it.

IoT Simulation Software: Best to Use in 2026 [15 Tested]

IoT simulators allow you to design, create, and test IoT apps and devices without using real IoT boards.

If you’re looking for an IoT simulator but can’t decide which one to get, read this article to learn the best IoT simulators you can use on your Windows PC.

Which are the best simulators for IoT?

Iotify

Iotify is a powerful IoT simulator that allows you to develop IoT solutions in the cloud quickly. This tool lets you simulate large-scale IoT installations in your virtual lab.

You can generate customizable traffic from thousands of virtual endpoints and test your platform for scale, security, and reliability to identify and fix issues before rolling out the final product. You can simulate heavy network traffic to see how latency affects your overall system performance.

Simulating a connected vehicle fleet or a network of surveillance cameras has never been easier. You can develop your IoT models using Javascript templates and generate traffic in real-time via MQTT, HTTP, or CoAP to any cloud platform provider.

⇒ Get Iotify

MATLAB


MATLAB features an interesting IoT module that allows you to develop and test smart devices, as well as collect and analyze IoT data in the cloud.

Iot platforms collect data from smart devices, aggregate it in the cloud, and then analyze it in real time. Patterns and algorithms are extracted, and engineers can use this information to create prototype algorithms and execute them in the cloud.

You can use MATLAB to prototype and build IoT systems. More specifically, you can develop algorithms in Simulink and then deploy them on your embedded hardware. You can also prototype your smart devices using Arduino and Raspberry Pi.

⇒ Get MATLAB

Netsim

NetSim is a powerful network simulator that you can use to simulate IoT systems. You can use it to test the performance of real apps over a virtual network. If you’re building a new IoT network from the ground or expanding an existing one, you can use NetSim to predict how the respective network will perform.

This simulator supports multiple sources and destinations and can be scaled to hundreds of nodes. You can simulate various situations with the help of the what-if scenarios and test metrics such as loss, delay, error, quality of service, and more.

⇒ Get Netsim

BevyWise IoT Simulator

This IoT Simulator is a complex and easy-to-use MQTT simulation tool that simulates thousands of IoT devices.

The clean and powerful UI lets you quickly create and add the necessary devices. You can configure the simulated IoT devices to publish messages at an exact time. IoT Simulator can store simulation data in FLAT files or MySQL and SQLite databases.

The tool supports thousands of IoT devices on Windows 7 and later.

⇒ Get BevyWise IoT Simulator

Ansys IoT Simulator

This IoT simulator can help you develop and test tomorrow’s IoT devices and networks. Ansys collaborated with the best IoT leaders worldwide across industries to build this comprehensive framework for IoT engineering simulation.

You can use this tool in various fields, including wearables and medical devices, drones, connected cars, industrial equipment, and more. Ansys’ IoT simulation solutions help you build more affordable and profitable devices.

⇒ Get Ansys IoT Simulator

IBM Bluemix

IBM’s Bluemix is an innovative cloud platform that allows you to sample the company’s Internet of Things Platform even if you don’t have a physical device using simulated data.

The built-in web console dashboards lets you monitor and analyze your simulated IoT data and then use it to build and optimize your own apps. The tool supports various functions for manipulating data, storing it, and even interfacing with social media.

For more information, go to IBM’s Bluemix webpage.

⇒ Get IBM Bluemix

IoT simulators are great tools to build and test future IoT devices and networks in a virtual lab. They allow developers to reduce cost, take their ideas from zero to one, and then scale from one to a million in order to roll out products faster.

If interested, you should check out the latest IoT statistics and understand how it has impacted our economy worldwide.

The IoT simulators listed above are powerful tools that support complex simulations. Use them to build and test the IoT devices of tomorrow.

360° VR Walkthrough Software: 5 Best to Use in 2026

Whether you are an event manager, travel blogger/company, professional photographer or a realtor, being able to stand out from the crowd is an essential aspect of any successful business.

This is where the walkthrough software gives you an upper hand as you can create a 360° virtual tour of any property using your 360° camera, smartphone or DSLR, and put it on your website or send it to your client for a review.

Some of the best walkthrough software allows you to create 360-degree virtual reality videos and show it to the client by hosting on your website or the software provider’s server. In addition, you can also create and show scenes from the property, pre-recorded tour guide videos with voiceover, floor plan and more.

Anyone can create a virtual tour using any 360 camera or even your smartphone. You can also stitch panorama shots from DSLR to create a virtual tour video. For a smartphone, you would need a motorized rotator to capture lag-free and stable panorama shots.

Now if you don’t want to spend a fortune on the popular and more sophisticated virtual tour solutions offered companies like Matterport, there are cheaper walkthrough software alternatives. While Matterport is an excellent solution, it is not for everyone.

In this article, we take a look at the best walkthrough software to create a virtual home tour and create a 360-degree interactive tour video with ease.

5 walkthrough tools to create a virtual home tour

My360 (recommended)

My360 Virtual Tour Software

MY360 is an easy to use online virtual tour software that allows you to use your own interactive virtual tours using panorama image captured on any 360-degree camera or even manually stiched DLSR panorama shots.

My360 comes with a free 2-weeks trial. However, it has only one premium plan on offer which offers everything unlimited.

My360 Virtual Editor takes four steps to create virtual tours. The user needs to upload the images, arrange them, customise and publish on your own website, social media or public websites.

You can add buttons to the virtual tour for easier navigation, add images along with a tour description and your brand logo. The virtual tour can be added to Google Street View for no additional cost.

In addition, My360 allows you to embed your virtual tours on the website, has email marketing feature, ability to add contact forms to the tour, add a video intro and quick menu, analytics support and multiple account support to share your subscription with other agents.

My360 is a straight forward online property virtual tour creating software with one single plan and unlimited possibilities.

My360

My360

Enjoy your 360 tour close to reality!
Check priceVisit website

IStaging (suggested)

LiveTour iStagging

LiveTour by iStagging is a top class cloud-based tool to create a cost-effective professional grade virtual reality tour of your properties with exceptional ease of use.

LiveTour is a cloud-based software solution. The company also offers a VR kit that consists of a camera lens and rotator. The kit comes in handy if you don’t have access to a 360-degree camera and decide to shoot the panorama shots using your mobile phone.

There are multiple tier plans on offer from starters to advanced users. The basic free plan offers 3 Live Tours, VR editor, free educational workshop and access to TouringApp that allows you to live chat with your clients.

On the pro plan, you get all the features of free plan + VR Maker app for smartphone, floor plan builder, custom branding, Free LiveTour capturing kit and standard shipping. The ultimate plan gets additional storage space and access to Google Street View feature.

LiveTour VR Editor is responsible for creating an online virtual tour and comes with wide 360° Panorama support that allows you to import panorama pictures from any 360° camera or manually stitched DSLR shots to the editor.

To create a connection between rooms, you can add hotspots within your panoramas making the virtual tour feel like a real walk-through experience. For promotion, you can add your business information and logo to the virtual tour as well.

You can also add floor plans to virtual tour for creating interactive virtual tour experience. Similar to EyeSpy 360, here too you can add tags to objects in your virtual tour providing more information about the objects with text and images.

LiveTour allows you to add up to 20+ team members (agents) to the same subscription and each of them can create virtual tours for their own listings.

Other handy features offered LiveTour include the ability to add videos, music and 3D models to the videos, option to embed virtual tour onto your website, and VR headset support.

⇒ Get IStaging

EyeSpy 360

EyeSpy 360

EyeSpy 360 is a self-service 360 virtual tour platform. Realtors can use the platform to capture and upload panoramic photos captured from any 360 VR camera to the website and create a virtual tour in no time.

Once the tour is ready, you can publish it and give access to your clients on the web, tablets and mobile. There is a video chatting option EyeSpy Live to interact with your clients while giving them a virtual tour of your property from anywhere in the country.

The EyeSpy Play feature enables you to add voice narration to the virtual tour video to provide more information about the property to the customers as if you are doing a live demonstration with commentary.

Using any 360 camera, you can create 3D floor plans for marketing and promotion of properties. The videos are also compatible with VR headset including Google Cardboard VR devices.

Once you upload the Panorama shots, you need to rearrange the photos and then link them keeping doorways in mind. You can mark and add information to any object inside the tour using labels that contain text and images.

Other features supported by EyeSpy 360 include the ability to add company logos and information in the tour, analytics status showing traffic demographics and API integration to embed virtual tour on your property portal (website) or Android and iOS apps.

⇒ Get EyeSpy 360 

Kuula

Kuula

Kuula is a virtual tour and 360 image sharing platform used by real estate agents, architects and interior designers and most popular in the US.

It is a cloud-based virtual tour creating software that comes in three plans. You can start with the basic free plan with limited features and gradually upgrade to the Pro plan that starts at $12 per month or Business plan for $48 a month with additional features such as own domain, free SSL certificate, website builder etc.

The free plan does not have a virtual tour editor, but only virtual tour player. With the Pro plan, you can upload multiple panoramic images and use the drag and drop feature to arrange them in order.

The Virtual Tour Editor’s user interface is simple and easy to use. You can customise the virtual tour to meet your client needs by adding custom hotspot icons, images and audio for voice narration.

For real estate agents, floor plans and maps can be added to the virtual tour. You can also add Labels to any object in the tour with text and images to provide more information.

The virtual tour can be embedded onto your website on smartphone and tablet. It also supports VR platform for VR headsets including Oculus Go, Samsung Gear VR and more.

Kuula is easy to use. It may not be as glittery as EyeSpy or LiveTour, but it gets the job done with ease.

⇒ Get Kuula 

Virtual Tour Pro/Standard – 3D Vista Software

Virtual Tour Pro - 3D Vista

3D Vista’s Virtual Tour is a professional grade software that comes in two versions. Virtual Tour Standard for amateurs and beginners and Virtual Pro for professional looking for a standalone tool with a perpetual license to create a stunning virtual tour for the clients or own property listing portal.

You can download the trial version for your PC and Mac for evaluation. Virtual Tour allows you to create virtual reality tour for your property from panorama images and 360° videos. In addition, you can embed music and voice narration, videos, photos and floor plans into the tour, and customise the frames as per client needs.

Virtual tours created using Virtual Tour Pro or Standard can be hosted on user’s own server or on Vista3D’s server which costs extra. The virtual tours are compatible with all the devices and users can view the tour on the computer, mobile phones and tablets both online and offline.

It is also VR compatible and works with Oculus, Vive, VR Box, DayDream and Google Cardboard headset among others.

Virtual Tour is compatible with 3D walkthroughs created with CAD software. It allows the user to create an animated panorama, live panorama for timelapse shots and tourist interactive 360 videos to add static and dynamic hotspots.

From Floor plans to hotspots and Street view to taking virtual tour videos offline, Virtual Tour Pro can do a lot. However, it is not for everyone.

Download the trial version for your Mac and Windows PC to see if your business can benefit from the software before purchasing the license for the software.

⇒ Get Virtual Tour Pro 

Conclusion

Whether you are a property owner or a realtor or even a travel blogger or agent, having a virtual tour of your property offers a more immersive experience and helps you to grow your business.

Virtual Tours or walk through are a great way to give the customer a look at what you have to offer. So that both the clients and agents can proceed further after the client is satisfied with the virtual tour of the house.

While you can capture panorama images using your smartphone with the help of a rotator and a lens, it is recommended that you invest in a 360-degree camera for better results and more convenience.

There are 360-degree cameras from Chinese brands like Xiaomi which offer high-quality images without breaking your bank.

If we missed any brilliant alternative that you think deserves to be on this list, go ahead and let us know your thoughts in the comments below.

Microsoft Forms starts rolling out text formatting capabilities

Back in January, Microsoft announced new text formatting capabilities for Microsoft Forms to make it easier for users to design professional-looking surveys and quizzes. This update is currently rolling out to all Office 365 subscribers, according to the Microsoft 365 roadmap.

The new formatting experience will let users bold, italicize, or underline any text content in Microsoft Forms. This should make it easier for business education users to emphasize and differentiate content to make sure that people understand it. This feature will put the quizzing tool on par with all other Office 365 products.

thumbnail image 1 captioned Bold, Italicize, or Underline Form Title

To try out this feature, open the quiz or form you want to edit. Highlight the text in the title or questions, and finally choose the underline, italics, or bold option from the floating toolbar. Users can also format text by using the following keyboard shortcuts:

  • CTRL/Cmd+B for bold
  • CTRL/Cmd+I for italics
  • CTRL/Cmd+U for underline

Microsoft says that this feature is enabled by default for all Microsoft Forms users. However, it’s going to be a gradual rollout over the next few weeks, and the deployment is expected to be complete in late May. Let us know in the comments down below if you have already spotted the formatting options on your PCs.

New Windows Feature Experience Pack is available for Beta and Release Preview Insiders

Microsoft has released today a new Windows Feature Experience Pack for Insiders in the Beta and Release Preview channels. Microsoft has been using this new process to ship new feature improvements to Windows Insiders instead of forcing them to install full builds, and today’s update will once again be available via Windows Update.

The only change in the new Windows Feature Experience Pack 120.2212.3740.0 is that Microsoft has removed nonfunctional hyperlinks from being displayed in the Input Method Editor (IME) candidate window. Please note that today’s update is optional for Release Preview Insiders, and it’s also not available for commercial devices in the Release Preview Channel.

In addition to this new Windows Feature Experience pack, Microsoft has also released the cumulative update Build 21364.1011 (KB5003402) for Insiders in the Dev Channel, but this is just another servicing pipeline test. There are no new features or bug fixes in this build, as the Windows Insider team is only testing its ability to release servicing updates on top of previous servicing updates.

The Windows 10 Insider build 21364 released last week included several new features including Linux GUI apps support and a new Eco Mode for Task Manager. We hope to see another Dev Channel flight later this week with more new features, though we’ll have to wait and see what happens.

Running .NET Framework 4.5.2, 4.6, or 4.6.1? Upgrade now!

.NET Framework versions 4.5.2, 4.6, and 4.6.1. reached end-of-life on April 26th, with Microsoft announcing that devices should run on .NET Framework 4.6.2 at least to still receive updates.

Microsoft will continue to support .NET Framework 4.6 on Windows 10 Enterprise LTSC 2015 until October 2025, when the OS reaches EOL.

Additionally, other .NET framework versions will continue to be supported according to the official lifecycle map, the announcement mentions.

What happens if my .NET Framework version is deprecated?

Technically, devices can still use the outdated .NET Framework versions. However, they will be exposed to security threats.

Moreover, if technical support is needed for whatever reasons and the framework is out of date, the first request will be to upgrade it.

The grace period to upgrade from .NET Framework versions 4.5.2, 4.6, or 4.6.1 to at least .NET Framework 4.6.2 to still get updates is May 2022.

Additionally, Microsoft mentions that after April 26th devices can still use the old frameworks, but they won’t receive any updates or security patches.

Starting May 2022, we won’t be issuing security updates for .NET Framework 4.5.2, 4.6, and 4.6.1 when we issue these security updates for .NET Framework 4.6.2 and later versions. This means that starting May 2022, if a computer has .NET Framework 4.5.2, 4.6, or 4.6.1 installed, it may be unsecure.

The decision to cut support for the mentioned framework versions is that they use insecure digital certificates.

On the other hand, according to Microsoft research, the vast majority of users are eligible to upgrade to (or already use) newer framework versions and have safer digital certificates.

If an organization has automatic upgrades activated, it’s possible that the .NET Framework is already up-to-date and in this case, no further action on the admins’ side is necessary.

Also, if .NET Framework 4.6.2 isn’t already in place, admins only need to update the runtime on which the app is running. Using the official guide for application compatibility in the .NET Framework is highly recommended.

We strongly recommend you validate that the functionality of your app is unaffected when running on the newer runtime version before you deploy the updated runtime in your production environment.

If an app isn’t compatible with newer .NET Framework versions, some code changes have to be performed in Visual Studio, as shown in the official documentation.

Fix: Vpn.exe System Error on Windows: [Step-by-Step]

Many users are concerned about their online privacy, and in order to protect it, they tend to use VPN tools that will change their IP addresses.

VPN software can be great, but sometimes you can encounter errors with your VPN program, and today we’re going to show you how to fix VPN errors on Windows 10.

How can I fix VPN errors on Windows 10?

  1. General guide to fix VPN errors
  2. VPN error 807 Windows 10
  3. VPN error 619 Windows 10
  4. VPN error 812 Windows 10
  5. VPN error 720 Windows 10
  6. VPN error 721 Windows 10
  7. VPN error 412 Windows 10
  8. VPN error 691 Windows 10

1. General guide to fix VPN errors

1.1. Make changes to your registry

  1. Press Windows Key + R and enter regedit. Press Enter or click OK.
  2. When the Registry Editor opens, go to the following path: HKEY_CURRENT_USER\Software\Microsoft\Windows\CurrentVersion\Internet Settings
  3. Right-click the Internet Settings key and choose New > Key from the menu.
  4. Enter GlobalUserOffline as the name of the new key and select it.
  5. In the right pane, double click the (Default) DWORD to open its properties.
  6. Enter 1 in the Value data field and click OK to save changes.
  7. After doing that, close Registry Editor and check if the Cisco software is working properly.

Users reported the Failed to initialize connection subsystem error on their PC while trying to use Cisco VPN software, but you can easily fix this problem simply by adding one value to your registry.

If you can’t edit your Windows 10’s registry, read this handy guide dedicated to fixing regedit and find the quickest solutions to the issue.

Note icon NOTE
Before we start changing the registry, we have to warn you that modifying it can lead to all sorts of problems, therefore it’s recommended that you create a backup before you continue.

1.2. Run Cisco AnyConnect in Compatibility mode

  1. Locate the Cisco AnyConnect shortcut, right-click it and choose Properties.
  2. Go to Compatibility tab.
  3. Check Run this program in compatibility mode for and select an older version of Windows.
  4. Click Apply and OK to fix the problem.

Compatibility mode is a great feature that allows you to run older software on Windows 10 without any problems. To do that, you need to follow these steps above.

Few users reported that this Cisco AnyConnect issue can also be solved by running the setup file in compatibility mode, so you might want to try that as well.

1.3. Delete the WAN Miniport (IP), WAN Miniport (IPv6) and WAN Miniport (PPTP) device

  1. Press Windows Key + X to open Win + X menu. Choose Device Manager from the list.
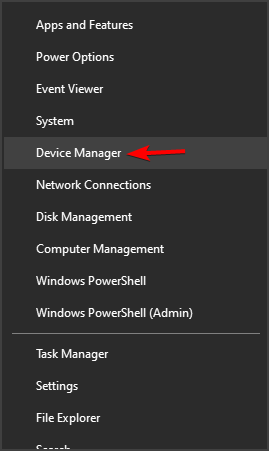
    device manager
  2. When Device Manager opens, go to View > Show hidden devices.
  3. Locate all WAN Miniport devices and delete them.
  4. After deleting all Miniport devices your VPN connection should start working without any problems.

Certain devices, such as WAN Miniport, can interfere with the built-in Windows VPN feature and cause all sorts of problems to appear.

Users reported A Connection to the remote computer could not be established error while trying to use VPN on Windows 10, and one of the suggested solutions is to delete all WAN Miniport devices.

1.4. Install Cisco VPN tool properly

  1. Download the latest Cisco VPN software. Don’t run the setup file yet.
  2. Download DNE software from Cisco and install it. Make sure to download 32-bit or 64-bit version so it matches your operating system.
  3. Install the DNE software.
  4. After that, install Cisco VPN.

Others reported that they are getting the Cisco VPN error 27850 during the installation, and one way to fix this problem is to properly install the tool.

Users also reported the error 442 which means that the Virtual Adapter couldn’t be enabled. To fix this problem, simply open the Registry Editor and follow these steps:

  1. Go to the following path: HKLM\SYSTEM\CurrentControl\Set\Services\CVirtA
  2. Double click the DisplayName string in the right panel and change its value to Cisco Systems VPN Adapter for 64-bit Windows.
  3. Close Registry Editor and check if the problem is resolved.

Can’t access the Registry Editor? Things aren’t as scary as they seem. Check out this guide about accessing the Regedit and solve the issue quickly.

1.5. Use Microsoft CHAP Version 2

  1. Locate your VPN connection, right-click it and choose Properties from the menu.
  2. When the Properties window opens, go to the Security tab, select Allow these protocols, and check Microsoft CHAP Version 2 (MS-CHAP v2).
  3. After enabling Microsoft CHAP Version 2, your VPN should start working without any problems.

You can fix some errors with your VPN simply by allowing certain protocols. Users reported that they fixed the problem with the VPN connection by following the steps.

1.6. Diagnose and disable your connection

  1. Press Windows Key + X and select Network Connections from the menu.
  2. When the Network Connections window opens locate your VPN connection, right-click it and choose Diagnose from the menu.
  3. Wait for the scan to finish.
  4. If the problem still persists, right-click the VPN connection and choose Disable.
  5. Wait for a few seconds and enable your VPN connection by following the same steps.

One way to fix problems with VPN is to diagnose your connection. By diagnosing your connection Windows 10 will fix some of the common VPN errors.

This is a simple solution and few users reported that it worked for them, so you might want to try it out.

1.7. Uninstall Citrix DNE Updater

If you’re using the Cisco’s IPSEC VPN client, you can fix many errors simply by uninstalling Citrix DNE Updater.

After uninstalling this tool, download and install SonicWall VPN 64-bit Client from Dell. After doing that, the issue with the VPN should be completely resolved.

1.8. Make changes to the registry before installing Cisco VPN

  1. When Registry Editor opens, in the left pane navigate to the following path: HKEY_LOCAL_MACHINE\SYSTEM\CurrentControl\Set\Control\Network
  2. In the right panel, locate MaxNumFilters and double click it. Change the Value data from 8 to 14 and save changes.
  3. Close Registry Editor and restart your PC.

Sometimes you can fix the Error 27850 while installing Cisco VPN simply by making one small change to your registry. Before installing Cisco VPN, open Registry Editor and follow the steps above.

After changing this value in the Registry Editor, you should be able to install Cisco VPN without any errors.

1.9. Restart LogMeIn Hamachi tunneling engine service

  1. Press Windows Key + R and enter services.msc. Click OK or press Enter.
  2. When Services window opens, locate LogMeIn Hamachi Tunnelling Engine service and double click it.
  3. If the service is running, click the Stop button.
  4. Wait for few seconds and click the Start button to start it again.

If you’re using LogMeIn as your VPN tool, you might encounter certain problems with it. The simplest way to fix most LogMeIn errors is to restart the LogMeIn Hamachi Tunneling Engine service.

1.10. Check if your clock is correct

  1. In the bottom right corner right click your clock and choose to Adjust date/time.
  2. Check if your clock is correct. If it’s not, disable the Set time automatically option and turn it back on.

Users reported Error Code 1 while using SoftEther VPN client, and one of the fastest ways to fix this problem is to check your time and date. You can easily do that by following these steps:

After doing that, your clock should be correct and the VPN error will be resolved.

1.11. Enable Allow service to interact with the desktop option

  1. Open Services window.
  2. Locate Cisco AnyConnect Secure Mobility Agent and double-click it.
  3. Navigate to the Log On tab and check the Allow service to interact with the desktop option.

If you’re having a Cisco VPN Client Driver error, you should be able to solve it by enabling one option.

1.12. Use Command Prompt

  1. Press Windows Key + X and select Command Prompt (Admin).
  2. When Command Prompt opens, enter the following commands: net stop CryptSvc esentutl /p %systemroot%System32catroot2{F750E6C3-38EE-11D1-85E5-00C04FC295EE}catdb
  3. When asked, be sure to select OK to attempt the repair.
  4. After the repair process is finished, exit Command Prompt and restart your PC.

Another way to fix Cisco VPN Client Driver error is to use Command Prompt. If you’re having trouble accessing Command Prompt as an admin, take a look at this guide dedicated to using CMD with admin rights.

1.13. Configure Hamachi properly

  1. Open Hamachi and write down your Hamachi IP address.
  2. Open Network Connections window.
  3. Locate your Hamachi adapter, right-click it and choose Properties.
  4. Select Internet Protocol (TCP/IP) and click the Properties button.
  5. In the General tab make sure that Obtain an IP address automatically and Obtain DNS server address automatically options are selected.
  6. Go to Alternate Configuration tab.
  7. Select User configured option.
  8. In the IP address field enter the Hamachi IP address that you got in Step 1.
  9. Enter 255.0.0.0 as the Subnet mask and 5.0.0.0 as Default Gateway.
  10. Click OK to save changes and restart your PC.

Problems with LogMeIn VPN can occur if you don’t configure it properly, but fortunately, you can fix this error by following these aforementioned steps.

1.14. Stop AviraPhantomVPN service

  1. Open Command Prompt as administrator.
  2. When Command Prompt opens, enter the following lines: net stop AviraPhantomVPN net start AviraPhantomVPN
  3. After that, try to start Avira Phantom VPN again.

If you’re using Avira Phantom VPN, you should be able to fix some of its problems simply by restarting the AviraPhantomVPN service.

1.15. Reinstall your VPN software (suggested)

If you’re using third-party VPN software, you might be able to fix its errors simply by performing a reinstall, so be sure to try that. Keep in mind that this solution applies to all third-party VPN tools.

2. VPN error 807 Windows 10

2.1. Disable IPv6

  1. Open Registry Editor.
  2. When Registry Editor opens, navigate to the following path: HKEY_LOCAL_MACHINE\SYSTEM\CurrentControl\Set\Services\Tcpip6\Parameters
  3. In the right panel, look for DisabledComponents DWORD.
    • If this DWORD isn’t available, create it by clicking the empty space and choosing New > DWORD (32-bit) Value.
  4. Enter DisabledComponents as the name of the new DWORD.
  5. Double click the DisabledComponents DWORD and enter FFFFFFFF as Value data.
  6. Click OK to save changes.
  7. Close Registry Editor and restart your PC.
  8. After disabling IPv6 completely, VPN error 807 should be fixed.

There are two types of IP addresses: IPv4 and IPv6. According to some users, IPv6 can cause VPN error 807 to appear. One way to fix this problem is to disable IPv6 by following these steps:

2.2. Use flushdns command

  1. Open Command Prompt as administrator.
  2. When Command Prompt opens, enter the following command: ipconfig /flushdns
  3. After the command is executed, close Command Prompt and check if the problem is resolved.

Users reported that they fixed the VPN error 807 simply by running the ipconfig /flushdns command in Command Prompt. To do that, follow these simple steps:

2.3. Disable the wireless connection

Few users reported that they fixed error 807 simply by disabling the wireless connection. For some unknown reason, the wireless connection would interfere with the VPN and cause this error to appear.

One way to fix this error is to turn off your wireless connection completely. Users reported that they solved the problem by disabling the wireless connection on their router completely, so you might want to try that.

2.4. Change VPN connection properties

  1. Open Network Connections window.
  2. Locate your VPN connection. Right-click it and choose Properties.
  3. Navigate to the Security tab.
  4. Set the Type of VPN to Automatic.

Few users reported that they fixed the problem simply by changing their VPN connection properties. The type of VPN was set to PPTP, but after setting it to Automatic, the issue was completely resolved.

2.5. Edit your hosts file

  1. Press Windows Key + S, enter notepad, right-click it and choose Run as administrator.
  2. Choose File > Open.
  3. Go to the following path: C:\Windows\System32\driversetc
  4. Change Text Documents to All files in the bottom right corner and select the host’s file.
  5. When the host file opens, at the end of the file add your VPN’s server IP address and the address that you want to use.
  6. Save changes to the host’s file and try accessing the VPN by using the assigned name.

Users reported that they fixed error 807 after editing the host’s file. According to users, they were trying to access the VPN server by using the server’s IP address, and that was causing this error to appear.

2.6. Check your VPN configuration

This error can occur if your VPN configuration isn’t correct, and you should be able to fix this problem by making the proper adjustments.

Users reported that they fixed this problem by removing https:// from the beginning of server address.

In addition, you can also remove / at the end of the server address. Users also suggested to change the connection type to Point to Point Tunneling Protocol in the Security tab.

Want to know how to properly create a VPN connection on Windows 10? Find out more in this dedicated article.

2.7. Check your firewall and antivirus

This error can occur due to your firewall settings, and many users are suggesting to enable GRE protocol 47 and open port 1723 in the firewall configuration.

After doing that, your VPN connection should work without any problems. In addition to your firewall, you might want to temporarily disable your antivirus software while you’re configuring the VPN connection.

3. VPN error 619 Windows 10

Change your router startup commands

  1. Open your router configuration, navigate to Administration, then Commands.
  2. Add the following commands:  /sbin/insmod xt_mark /sbin/insmod nf_conntrack_proto_gre /sbin/insmod nf_conntrack_pptp /sbin/insmod nf_nat_proto_gre /sbin/insmod nf_nat_pptp

It seems that DD-WRT isn’t forwarding GRE PPTP packets, and that can sometimes cause error 619 to appear.

Bear in mind that this is an advanced solution, therefore be extra cautious while performing it. Check this article dedicated to accessing your router’s configuration to learn more.

4. VPN error 812 Windows 10

4.1. Change your DNS settings

  1. Open Network Connections, locate your VPN connection, and open its properties.
  2. Select Internet Protocol (TCP/IP) and click the Properties button.
  3. Check the Use the following DNS server address option and change the Primary DNS to domain controller address and the Alternate DNS server to an external server, for example, 8.8.8.8.
  4. Save changes and check if the problem is resolved.

According to users, you should be able to fix error 812 simply by changing the DNS settings. Take a closer look at this useful guide dedicated to fixing DNS issues to learn more about it.

4.2. Check your username

Users reported this issue while creating a VPN server, and the cause for this problem was the user name. According to users, they used their Microsoft account username while creating a server, but that caused error 812 to appear.

To fix this problem you need to enter your username in the following format: Domain nameusername. After doing that, the issue should be resolved.

4.3. Add users to the Windows SBS Virtual Private Network Users group

According to users, VPN error 812 can occur if your users aren’t in the proper group. To fix this problem, just add users to the Windows SBS Virtual Private Network Users group and the problem should be resolved.

5. VPN error 720 Windows 10

5.1. Check the DHCP server address

  1. On the VPN server go to Administrative Tools and select Routing and Remote Access.
  2. Select DHCP Relay Agent and check the DHCP server IP address.

Sometimes this error can occur if the DHCP server address isn’t correct. To fix this problem, you need to do the following:

Some users are also suggesting not to use DHCP at all. Instead of using DHCP, they are suggesting specifying the IP range manually on the RAS server.

5.2. Change the user account properties

According to users, you can fix the VPN error 720 by opening the Active Directory, opening user’s account properties and checking the Control access through NPS Network Policy option.

5.3. Delete the Miniports and your VPN connection

Miniports can be the cause for this problem, therefore we suggest that you delete them all. We already explained how to do this in one of our previous solutions, so be sure to check it out.

In addition to deleting Miniports, you can also try deleting your VPN connection and recreating it again.

5.4. Set the range of IP addresses

  1. Locate your VPN connection in the Network Connections window, right-click it and choose Properties.
  2. Select Internet Protocol Version 4 (TCP/IPv4) and click Properties.
  3. Click Specify IP addresses and change the IP range so that it matches the range defined by your router.
  4. Click OK and check if the problem was resolved.

If there is a problem with assigning the IP addresses to the VPN users, one way to fix this problem was to set the IP address range that matches the IP address range assigned by your router.

6. VPN error 721 Windows 10

6.1. Change the router settings

According to users, you can fix error 721 by changing your router settings. Users reported that they fixed this error by enabling PPTP passthrough option, so you might want to try that.

Another potential solution might be to change the LAN-to-LAN to L2TP over IPSEC. After that, turn off PPTP as the endpoint on the router and the problem should be fixed.

6.2. Update router firmware

If you want to fix error 721, one suggested solution is to update your router firmware.

This is an advanced process and in order to avoid causing any damage to your router, we strongly suggest that you check your router manual for detailed instructions.

If you need more useful info about the subject, take a closer look at this article dedicated to updating your firmware.

6.3. Replace your router

Few users reported that this problem couldn’t be resolved, and the only solution was to replace the router.

It seems that certain ISPs and routers can’t fully support certain VPN settings, therefore, you might want to consider replacing your router.

7. VPN error 412 Windows 10

7.1. Don’t use Run as administrator option

According to users, 412 error can occur if you’re using Cisco VPN software. To fix this problem, you have to disable Run as Administrator option.

After that, save changes and check if the problem is resolved.

7.2. Change your router configuration

Users reported that they managed to fix this problem on their Linksys router simply by adding a few lines to the pcf file. To do that, simply add UseLegacyIKEPort=1 line to the pcf file and save the changes.

7.3. Check your firewall settings

This error can be caused by your firewall settings, but you should be able to fix it by unblocking certain ports. According to users, port 500, port 4500, and ESP protocol need to be enabled.

In addition, enable NAT-T/TCP protocol and open port 10000. If you’re using a Cisco VPN client, enable UDP ports 500 and 62515 ports. Follow this simple guide about checking blocked firewall ports to learn more.

8. VPN error 691 Windows 10

8.1. Change your username

Error 691 can occur if your username isn’t correct, therefore be sure to enter your username in the Username@DomainName format. After doing that, the issue with error VPN error 691 should be resolved.

8.2. Change LAN Manager authentication level

  1. Press Windows Key + S and enter local security policy.
  2. Select Local Security Policy from the menu.
  3. In the left pane, navigate to the Local Policies > Security Options.
  4. In the right pane, double click the LAN Manager authentication level.
  5. From the menu select Send LM & NTLM responses. Click Apply and OK to save changes.
  6. Locate Minimum Minimum session security for NTLM SSP option and double click it.
  7. Disable Require 128-bit encryption and click Apply and OK.
  8. Restart your PC and check if the problem was resolved.

8.3. Disable CHAP security protocol

Sometimes this error can appear if both CHAP and MS-CHAPv2 are enabled, but you can easily fix this problem. To do that, simply disable CHAP and the error 691 will be fixed completely.

VPN is useful if you want to protect your privacy online, but many errors with VPN can occur. If you experience any VPN errors be sure to check some of our solutions.

IF you have any other questions, suggestions, or experience with some of our methods, don’t hesitate to leave them in the comments section below.


Microsoft reveals new five year plan to bridge the ‘Disability Divide’

Microsoft announced today a new five-year plan to help bridge the “disability divide” for over 1 billion people living with disabilities. The various initiatives aim to make technology more accessible for disabled people, increase skills and education, and make the workplace environment more inclusive for everyone.

On the technology front, Microsoft is committed to making its products accessible by design. Some of the Microsoft 365 accessibility features Microsoft highlighted today include Dictate in Microsoft 365, Immersive Reader support coming to PowerPoint, as well as Microsoft Teams’ high-contrast mode.

Microsoft will also continue to work with the best accessibility researchers across the world, and the company announced today a new partnership with the University of Washington in the US and the nonprofit SeeAbility in the UK to develop new accessible technologies. The company will also create a new Low-Cost Assistive Technology Fund this fall to make accessibility technologies more affordable for everyone.

Because the development of accessible technology is not enough, Microsoft is also investing in skills development programs for disabled people and plans to offer new curriculum across Microsoft Learn and LinkedIn Learning. The company also detailed new efforts to connect skilled workers with jobs, including the new Career Coach app in Microsoft Teams that is powered by LinkedIn.

Last but not least, Microsoft will encourage inclusive hiring by bringing its Supported Employment program from one to 12 countries. The company’s Autism Hiring program, which will soon include neurodiversity and learning disabilities, will also be expanded to Asia and Europe over the next 12 to 18 months.

If the Redmond giant is now taking accessibility very seriously with an internal Disability Employee Resource Group including more than 22 disability communities, the company also wants to create promote a culture of accessibility among its partners. “Since 2015 we have expressly included accessibility in our procurement processes, and it’s now a requirement for working with us,” Microsoft President Brad Smith emphasized today.

Fix: Windows cannot find windir system32 systempropertiesadvanced.exe

Windows cannot find windir system32 systempropertiesadvanced.exe error message can appear on any version of Windows and it can cause various issues. However, there’s a way to fix this issue, and in this article, we’re going to show you how to do it.

Windows cannot find windir system32 systempropertiesadvanced.exe message can be problematic, and speaking of problems, users reported some similar issues:

  • Windows cannot find windir system32 rundll32.exe, optionalfeatures.exe, msdt.exe, slui.exe, mmc.exe – Sometimes other files can be missing from System32 directory, but you should be able to fix the problem by using one of our solutions.
  • Advanced system settings Windows 7 not working – This issue can appear on almost any version of Widows, but you should be able to apply most of our solutions, regardless of the version of Windows you’re using.

Windows cannot find windir system32 systempropertiesadvanced.exe error, how to fix it?


  1. Use Safe Mode
  2. Check your antivirus
  3. Check the PATH variable
  4. Restart Windows Explorer
  5. Use Registry Editor
  6. Perform a System Restore
  7. Perform an in-place upgrade

Solution 1 – Use Safe Mode

Sometimes Windows cannot find windir system32 systempropertiesadvanced.exe error message can appear while trying to install certain applications or simply while trying to perform everyday tasks. However, several users reported that this error doesn’t appear in Safe Mode.

Safe Mode is great for troubleshooting since it runs with default settings and drivers, so if you keep having this problem, you might be able to troubleshoot it by entering Safe Mode. To do that, follow these steps:

  1. Press Windows Key + I to open the Settings app. Go to the Update & Security section.
    Windows cannot find windir system32 rundll32.exe
  2. Choose Recovery from the menu on the left. In the right pane, the Restart now button.
    Advanced system settings Windows 7 not working
  3. A list of options should appear. Navigate to Troubleshoot > Advanced options > Startup Settings.
  4. Click the Restart button to restart your PC.
  5. You’ll now see a list of options. Press the appropriate key to select the desired version of Safe Mode.

Once you enter Safe Mode, check if the issue still appears. If the problem is still there, you can use Safe Mode to fix it.


Solution 2 – Check your antivirus

According to users, sometimes Windows cannot find windir system32 systempropertiesadvanced.exe error can appear due to malware infection. That’s why it’s advised to perform a full scan of your system.

After making sure that your system is clean from malware, you need to check your antivirus. Although your antivirus is a crucial component, sometimes it can interfere with Windows, and that can lead to this and many other problems.

To fix this problem, users are suggesting to temporarily disable certain antivirus features and check if that helps. In some cases, you might even have to disable your antivirus entirely. If that doesn’t work, your next step would be to remove your antivirus. Even if you remove your third-party antivirus, Windows Defender will keep your system safe, so there’s no need to worry.

If the issue disappears once you remove your antivirus, you should consider switching to a different antivirus solution. There are many great antiviruses on the market, but if you want maximum protection that won’t interfere with your system, TotalAV might be the perfect antivirus for you.

⇒ Get TotalAV

Solution 3 – Check the PATH variable

According to users, Windows cannot find windir system32 systempropertiesadvanced.exe message can occur if your PATH environment variable is modified. This can occur for various reasons, but you can manually fix this problem and change the PATH variable yourself. To do that, follow these steps:

  1. Press Windows Key + S and enter advanced. Choose View advanced system settings from the list of results. If that doesn’t work, just go to the C:\Windows\System 32 directory and run systempropertiesadvanced.exe.
    Advanced system settings Windows 7 not working
  2. When System Properties window opens, click the Environment Variables button.
    Windows cannot find windir system32 msdt.exe
  3. Now double-click the Path variable to see its value.
    Advanced system settings Windows 7 not working
  4. Remove the duplicated values and click OK to save changes.
    Windows cannot find windir system32 slui.exe
  5. You also have another Path variable for your system, so you should remove duplicated entries from it as well.

Apparently, this issue occurs because the Path variable is too long, but by removing the duplicated entries, the issue should be resolved. To be on the safe side, it’s always a good idea to create a System Restore point before making any drastic system changes.

Several users reported that SQL Server 2012 caused this issue to appear by adding its entries to the Path variable, but after removing these values, the issue was resolved.

Solution 4 – Restart Windows Explorer

Sometimes Windows cannot find windir system32 systempropertiesadvanced.exe error can occur due to glitches with Windows Explorer. One way to temporarily fix this problem is to restart Windows Explorer. You can do that easily by following these steps:

  1. Open Task Manager. You can do that quickly by pressing Ctrl + Shift + Esc.
  2. When Task Manager opens, locate Windows Explorer on the process list, right-click it and choose Restart from the menu.
    Advanced system settings Windows 7 not working

After Task Manager restarts, check if the problem is still there. According to users, this is just a temporary solution, so it’s rather likely that the problem will reappear after a while.

Solution 5 – Use Registry Editor

As we already mentioned in one of our previous solutions, the cause for Windows cannot find windir system32 systempropertiesadvanced.exe can be your Path variable. In order to fix this problem, you need to modify this value and remove any unnecessary or duplicated values.

If you want, you can do that right from Registry Editor by following these steps:

  1. Press Windows Key + R and enter regedit. Now press Enter or click OK.
    Windows cannot find windir system32 mmc.exe
  2. When Registry Editor opens, navigate to the HKEY_LOCAL_MACHINE\SYSTEM\CurrentControlSet\Control\Session Manager\Environment in the left pane.
  3. Right-click the Environment key and choose Export.
    Advanced system settings Windows 7 not working
  4. Enter the name for your backup, choose a save location and click the Save button. Once you create a backup, you can easily restore your registry if anything goes wrong. To do that, simply run the file you create in this step and the registry will be restored.
    Windows cannot find windir system32 rundll32.exe
  5. Now double-click the Path variable to see its contents.
    Advanced system settings Windows 7 not working
  6. Edit the Value date field and remove any duplicates or unnecessary entries. This can be an issue because the value is quite long and hard to read, so we advise you to be extra careful while editing it. Once you’re done, click the OK button to save changes.
    Windows cannot find windir system32 optionalfeatures.exe

After making these changes, the issue should be resolved and everything will start working again.

Solution 6 – Perform a System Restore

If this problem started appearing recently, you might be able to solve it simply by performing a System Restore. In case you don’t know, System Restore allows you to revert any recent changes and restore your system.

If you’re getting Windows cannot find windir system32 systempropertiesadvanced.exe error, you might be able to fix the problem by doing the following:

  1. Press Windows Key + S and enter system restore. Choose to Create a restore point from the list.
    Windows cannot find windir system32 msdt.exe
  2. A new window will now appear. Click the System Restore button.
    Advanced system settings Windows 7 not working
  3. In System Restore window click Next.
    Windows cannot find windir system32 slui.exe
  4. Check Show more restore points option, if available. Choose the desired restore point and click Next.
    Advanced system settings Windows 7 not working
  5. Follow the instructions on the screen to finish the process.

Once you restore your system, check if the problem is still there.


Solution 7 – Perform an in-place upgrade

If other solutions didn’t fix your problem, your last option would be to perform an in-place upgrade. Basically, an in-place upgrade will reinstall Windows 10 while keeping all your files and applications. To perform an in-place upgrade, just do the following:

  1. Download Media Creation Tool and run it.
  2. When the Media Creation Tool starts, choose to Upgrade this PC now.
  3. Now select Download and install updates (recommended) and click Next. Keep in mind that this step isn’t mandatory, so you can skip it if you want.
  4. Follow the instructions on the screen. When you reach Ready to install screen, choose Change what to keep option.
  5. Be sure to select Keep personal files and apps option in order to keep all your files and applications.
  6. Follow the instructions on the screen to finish the process.

Once the process is finished, you’ll have a fresh version of Windows installed, and the problem should be completely resolved. If the issue is still there, we suggest performing a Windows 10 reset in order to fix the issue.

Windows cannot find windir system32 systempropertiesadvanced.exe message can be problematic, but we hope that you managed to fix this issue using the solutions from this article.

Microsoft announces more than 1.3 billion Windows 10 active devices

Microsoft shared a new milestone for the Windows 10 ecosystem during its earning calls for its FY2021 Q3 results. Microsoft CEO Satya Nadella announced that Windows 10 now has more than 1.3 billion monthly active devices, a number that includes PCs and all devices running a Windows 10-based OS such as HoloLens headsets or Xbox consoles.

Windows remains a big money maker for Microsoft, especially since PC sales increased with the ongoing COVID-19 pandemic. Microsoft announced yesterday a Windows OEM revenue growth of 10 percent for the past quarter, as well as a 44% growth for OEM non-Pro revenue and a 2% decrease for OEM Pro revenue.

As Windows 10 is about to celebrate its sixth anniversary in July, 2021 should be a very important year for the OS. Earlier this year, a job posting mentioned the company’s ambition to deliver “a sweeping visual rejuvenation of Windows experiences to signal to our customers that Windows is BACK.” Microsoft’s Chief Product Officer for Windows and Devices Panos Panay continued the teasing at Ignite last month and said that “it’s going to be a massive year” for Windows.

In the second half of the year, Windows 10 version 21H2 is expected to introduce a big design update codenamed “Sun Valley,” and we already had a glimpse of upcoming taskbar changes in recent Windows Insider builds. Windows 10X, a new version of the OS for Chromebook-like devices is also expected to make its debut later this year, with the first series of devices targeting the education market.

How to Prevent a NukeBot Trojan Attack

While most of us use the Internet daily, not many of us are aware of the dark Web, a digital black market one can use to get their hands on literally anything.

And that includes even malware that can create havoc on your system, steal passwords and data, or just destroy them.

Nukebot is one such malware that was put up for sale in the cyber community. IBM X-Force Researchers were the first to find the malware advertised for sale.

However, unlike other malware that usually generates interest in the Dark Web community, NukeBot went almost unnoticed. The publisher of the malware was instead banned from several forums.

Thanks to the dented ego, the malware developer himself published/leaked the source code.

NukeBot turned out to be a Trojan that comes with a web-based admin panel that lets attackers control infected endpoints.

With the source code in the open apparently, the malware has been picked up, and NukeBot is currently being employed for attacks on the financial system.

As it happens with most of the leaked malware, the source code is most likely to be embedded into some other malware, and due to the variations, it is difficult to detect.

As the age-old saying goes, it is always better to be safe than sorry. One of the ways to do this is to put an end to malware even before it starts spreading and causing damage.

Banks and other financial services can actually take proactive measures before the malware hits their network. I have mentioned some elementary but practical steps in combating Nukebot.

How can I prevent NukeBot attacks?

1. Perform basic email hygiene

In most of cases, the threat’s first point of interaction is the PC or mobile endpoint. Social engineering is one of the most preferred methods to gain access.

It’s also advisable to install a comprehensive antivirus. Ensure that you toggle on the Safe Browsing feature on it.

Overwhelmed by an email attachment, you were not expecting? Think twice before opening such attachments, as this is one of the common ways to offload malware in your system.

Malicious e-mails usually seem to convey a rather exciting proposal and are most likely to have spell and other formatting errors.

Even if you are sure of the source, it’s always better to scan the attachments for malware before actually opening it.

2. Avoid transactions on the public networks

Malware is often injected via public Wi-Fi, so it’s advisable to use a VPN. This will help you prevent NukeBot from infecting your device.

And if you don’t know what solution to choose, we have an excellent selection with the best VPNs for Windows 10 that you can use right now.

3. Install a powerful antivirus

The danger is lurking everywhere online and in your inbox. Although you know precisely not to roam around dark places on the Internet, mistakes can happen anytime.

And if you make the mistake, you need a safety net that can identify, block, or delete the threat right away and that’s what the recommended antivirus below is for.

It will act as an active shield for your PC and protect your other devices, like the router and even the webcam.

This tool has a 30-day free trial period to see its protective power immediately before you buy it.

TotalAV

TotalAV’s security solution can protect your devices and stop all threats with a single license.
Check Price Visit Website

4. Stay away from free stuff

As a rule of thumb, stay away from free stuff, especially on a computer that you use for online transactions. Malware is often baked into free campaigns and exploit kits are injected into the victim’s computer.

The free offers usually come with a backdoor to the endpoint eventually pushing the spyware, ransomware, or banking trojans to the endpoint.

5. Update all your devices

  1. Type update in the Windows Search bar and click in Check for updates.
  2. Click Check for updates and install all available updates.
  3. Restart your PC for the changes to take effect.

A healthy and updated system is always harder to penetrate than a neglected one so start by updating your Windows 10 as shown above.

Make sure that you update all your devices, including smartphones, to the latest security update. This is very crucial as the manufacturer usually deploys a patch for exploits in every security update.

Lock both your smartphone and computer with a password. It’s also advisable to not root or jailbreak your phone as this might help intruders find more back doors.

6. Use additional security measures

Look out for odd behavior and ensure that you switch on the two-factor authentication for all the third-party apps. Furthermore, it’s also advisable to use a security app for mobile devices as well.

The steps above will help you prevent a NukeBot attack and safeguard you from other malware with similar traits like Zeus malware.

As this malware’s point of entry is regularly the e-mail, you should also consider installing one of the best e-mail scanning software for your PC.

If you’ve been a victim of this NukeBot virus or have any other suggestions on tackling this problem, tell us everything about it in a comment below.

May’s Fortnite Crew Pack permanently unlocks Fortnite’s Save the World game mode

The Fortnite Crew Pack for May 2021 has been revealed and it’s arguably one of the biggest yet.

In addition to the new skin, which is exclusive to active Fortnite Crew members in the month of May, and the bonus 1,000 V-Bucks, next month’s pack also includes a permanent access to the Save the World game mode.

With one month of Fortnite Crew costing $11.99 and the current bundle to unlock Save the World costing $15.99, this really is a no-brainer for those players who had been thinking of playing Save the World sometime in the future. It’s especially good value considering the fact that this is a permanent unlock. Players could do Fortnite Crew for one month and then cancel it if they like.

The free skin, 1,000 V-Bucks (valued at $7.99), Battle Pass unlock (which usually costs 950 V-Bucks), and three months of Spotify Premium (for new users only) also add extra value for players.

May 2021 Fortnite Crew content

As for the skin, May’s Fortnite Crew character is Deimos, a “skeletal soul-snatcher.” In addition to the popular Battle Royale mode, Deimos will also be playable in Save the World as well. All of the accessories are described as being part of the “upcoming” Neo Underworld Set which suggests that they may be buyable by non-Crew members at a later date. Right now, it’s unclear though.

While the April Fortnite Crew skin was a bit of a letdown, this month has been pretty exciting for players with the arrival of content inspired by the Horizon Zero Dawn video game franchise and the unlock of the Neymar Jr content for Battle Pass owners.

The current season of Fortnite, Chapter 2 Season 6, is set to end in early-June so the in-game story is likely to pick up speed again soon as we get closer to the finale. It’s unclear what Season 7 could look though it’s probably safe to assume there’ll be at least a mention of The Seven and possibly some clues about the nature of “The Loop.”

Do you like May’s Crew Pass content? Have you ever played Save the World? Let us know in the comments below and then follow us on Pinterest and Twitter for more gaming news.

Fortnite
Fortnite
Developer:
Epic Games Inc.
Price:
Free


Fortnite - Robo-Ray Pack


Wondershare Helper Compact: what it is and how to remove it

If you have installed the Wondershare Video Converter app, you may have noticed the Wondershare Helper Compact was also installed on your computer.

Being part of the converter app, the Helper Compact’s purpose is to assist you during video conversations with a pop-up notification.

However, a quick search through the Internet and you would find the app is usually in the news for causing errors and issues with the Windows 10 and Mac computers.

The app prevents the users from performing any tasks on their computer and at times may force shutdown the computer resulting in crashes.

What is the Wondershare Helper Compact app?

As discussed earlier, the Wondershare Helper Compact is part of the Wondershare Video Converter app installed during the app installation.

The app may also come bundled with the Wondershare Recoverit program. It usually pop-ups when you try to convert videos or burn to DVDs.

Unfortunately, for most people, the Helper Compact has caused the system to crash soon after installing the app.

The app seems to exhibit similar behavior as some malware where a hidden piece of software is installed and set to run constantly in the background. 

Even after uninstalling the Wondershare Video Converter app, the Helper Compact keeps running in the background.

Should I delete Wondershare Helper Compact?

Yes. The app seems to serve no real purpose but runs in the background wasting system resources and at times causing serious issues with the system, including frequent crashes.

If you are experiencing issues with the app and want to remove it from your system, here is a detailed guide on how to remove the app.

How do I remove the Wondershare Helper Compact?

1. Use a third-party uninstaller tool

If you want to remove any program from your computer, you can do it with the built-in uninstaller, but that doesn’t always prove to be successful.

Unfortunately, some programs or harmful files hide by tricking the default uninstaller, so you won’t be able to remove them from your PC.

Therefore, you need a professional uninstaller and cleaner software that will find even the most hidden programs. Thankfully, there are plenty of options for you to do that.

Not only you will find every program that can be removed on your PC, but the tool will also make sure there are no leftover files and bloatware after the uninstallation.

By removing Wondershre Helper Compact completely, you will have room for a new installation of any similar apps, and even this one.

2. Uninstall using Control Panel

  1. Press the Windows key + R to open Run.
  2. Type appwiz.cpl and click OK to open the Control Panel.
  3. Under Programs, select Uninstall a program.
  4. Locate and select Wondershare Helper Compact from the list of installed apps and click Uninstall.
  5. Confirm the action by clicking Yes.
  6. Once uninstalled, you would have to remove the leftover files manually.

Remove leftover files 

  1. Open File Explorer and navigate to the following locations one by one:
    C:Program Files (x86)Common FilesWondershare
    C:Program Files (x86)
    C:Program Data
    C:Users<Username>Documents
    C:Users<Username>AppDataRoaming
    C:Users<Username>AppDataLocal
    C:Program Files (x86)Common Files
  2. Delete all the files and folders associated with Wondershare.
  3. Next, navigate to the following location:
    C:Users<Username>Downloadsmobile-transfer.exe
  4. Delete the above file if present.
  5. Make sure not to delete any other file or folder that is not associated with Wondershare to prevent system issues.

Once the files and folder are deleted, restart your computer and check if the Wondershare Helper Compact Mac is removed.

3. Use an antivirus software to scan your system

One other way to completely remove the software, and any other hidden one that could put the integrity of your data, your sensitive information, and your PC as a whole at risk, is using an antivirus.

Precisely, you should use strong antivirus software that uses advanced AI and other machine learning methods to scan your computer and remove any suspicious files.

Additionally, the antivirus utility will protect you from future viruses, malware, data theft, and much more. Whatever you use your computer for, having antivirus software allows you to explore and do tasks on it safely.

4. Perform a system restore

  1. Press the Windows Key, type restore and click on Create a Restore Point.
  2. In the System Properties window, click on System Restore and click Next.
  3. Click the Show more restore points box in the bottom left corner.
  4. Choose the most recently created system restore that was created before installing the Wondershare app.
  5. Click Next, read the description, and then click the Finish button.

The system restore process may take some time to restore your PC to an earlier point. After the reboot, you will see a success message. Check if the Wondershare Helper Compact is removed.

The Wondershare Helper Compact application causes several issues with the system, including system crashes.

You can prevent such files from infecting your computer by checking this awesome list of the best antivirus software with a lifetime license.

Fortunately, you can remove the app using a third-party app. Alternatively, try to remove the app manually using the steps listed in the article above.

This wraps the article up today. Make sure you follow all of your steps thoroughly and feel free to give us any feedback regarding the subject in the comment section below.

FIX: Product key cannot be used on this machine [Error 25004]

Error 25004 occurs when users try to install MS Office 2013. The full error message states: Error 25004.

The product key you entered cannot be used on this machine. This is most likely due to previous Office 2013 trials being installed. Consequently, users can’t install the Office 2013 suite when that error message pops up.

These are a few resolutions that might fix Office Error Code 25004.

How do I fix product key errors in Microsoft Office?

  1. Open the Program Install and Uninstall troubleshooter
  2. Uninstall existing Office 2013 versions
  3. Edit the Tokens.dat file title
  4. Erase the Temp Folder
  5. Scan the registry

1. Open the Program Install and Uninstall troubleshooter

  1. Download it from this webpage as you can’t open it from the Settings window.
  2. Thereafter, open the Program Install and Uninstall troubleshooter from the folder you downloaded it to.
  3. First, click Advanced to select the Apply repairs automatically option.
  4. Click the Next button on the troubleshooter‘s window.
  5. Then press the Installing button.
  6. Select MS Office 2013 if it’s listed. If the suite isn’t on the software list, you can select Not Listed instead.
  7. Press the Next button to proceed.

2. Uninstall existing Office 2013 versions

The 25004 error message states:

This is most likely due to previous Office 2013 trials being installed.

Thus, the error message usually pops up if there’s an MS Office trial package version already installed, which might have come pre-installed on your laptop or desktop. As such, thoroughly uninstalling that Office software might fix the issue.

You could uninstall the MS Office software the usual way via the Control Panel’s Programs and Features applet.

However, it’s better to remove the software with third-party uninstallers that will also erase leftover registry entries. 

If you need an effective solution for uninstalling MS Office for good without any traces left, thus you should better use reliable uninstaller software on your PC.

3. Edit the Tokens.dat file title

  1. Click the File Explorer button on the Windows 10 taskbar.
  2. Open this folder path in File Explorer: Windows > System32 > app > store > 2.0.
  3. Right-click the tokens.dat file in 2.0 folder and select the Rename option.
  4. Then enter tokens.dat.old as the new file title, and press the Return key.

Office Error Code 25004 can also be due to a token.dat file interfering with the MS Office 2013 activation. So renaming the tokens.dat is another potential resolution for the 25004 error code. 

4. Erase the Temp folder

  1. Open the Win + X menu by pressing the Windows key + X hotkey.
  2. Select Run on the menu to open that accessory.
  3. Enter %temp% in Run, and click the OK button.
  4. You can press Ctrl + A to select all the files in the Temp folder.
  5. Then press the Delete button to erase them.

Corrupted files in the Temp folder can be another factor behind Office Error Code 25004. So clearing the Temp folder might resolve the 25004 issues. 

5. Scan the registry

Invalid registry entries are another thing that can bring 25004 error messages. Thus, a registry cleaner utility might be what you need to fix Office Error Code 25004.

Windows doesn’t include one, but there’s always the choice of using a third-party registry cleaner to do the job for you, and most of the time they are the fastest and safest bet yet.

They basically take your entire registry and compare it to their online libraries, fixing and downloading anything that is either broken or missing from your PC.

Those resolutions will probably fix Office Error Code 25004 so that you can install MS Office 2013. They aren’t necessarily guaranteed fixes, but there’s a good chance that one of them will resolve the 25004 error message.

Fix: Minecraft Server Could not Reserve Enough Space

It is always beneficial to add more RAM to your Minecraft server. However, at times while adding more RAM or allocating more space, you may encounter the could not reserve enough space for object heap. This error can occur due to incorrect version of Java JRE.

Several users have reported similar errors in the Reddit community forum.

I hope this is the right sub-reddit anyway, i am making a survival server with my friends and when i add more ram i am getting this error
C:\UsersmeandDesktopServer>java -Xmx2048M -Xms2048M -jar server.jar nogui
Error occurred during initialization of VM

Could not reserve enough space for 2097152KB object heap
C:UsersmeandDesktopServer>PAUSE
Press any key to continue . . .

If you are also troubled by this error, here are a couple of troubleshooting tips to help you resolve the Minecraft server could not reserve enough space issues in Windows.

How do I fix the could not reserve enough space Minecraft error?

1. Install 64-bit Java JRE

could not reserve enough space
  1. Go to the Java JRE download page.
  2. Click on Windows Offline (64-bit). Wait for the download to complete.
  3. Double-click on the Java installer to install the 64-bit edition of the Java runtime environment.
  4. Launch your Minecraft server and try to allocate more RAM to the server.
  5. Check if the could not reserve enough space error is resolved.

If the issue persists even after installing the 64-bit version of Java JRE, follow these steps.

  1. Press Windows Key + R to open Run.
  2. Type cmd and click OK to open Command Prompt.
    could not reserve enough space
  3. In Command Prompt, type the following command and click OK:
    java -version 
  4. The above command will display the Java version installed on your computer. The result will look something like this:
    C:>java -version
    java version "1.8.0_221"
    Java(TM) SE Runtime Environment (build 1.8.0_221-b11)
    Java HotSpot(TM) 64-Bit Server VM (build 25.221-b11, mixed mode)
  5. If it doesn’t say “64-bit Server VM”, it means Minecraft is still finding the 32-bit version.
  6. To fix this, you need to remove the older version and reinstall the 64-bit edition again.

Remove and reinstall 64-bit Java JRE

could not reserve enough space
  1. Press Windows Key + R.
  2. Type appwiz.cpl and click OK to open Control Panel.
  3. Choose the 32-bit edition of Java and click on Uninstall.
  4. Also, uninstall Java JRE 64-bit edition.
  5. Once done, install the 64-bit Java JRE downloaded in the first step.
  6. Try allocating more space to your Minecraft server and check for any improvements.

Not using a Java 64-bit version can also cause the Error occurred during initialization of VM. Read the highlighted guide for more information.

2. Add a new system variable

Note: Before proceeding with the below steps, create a system restore point.

could not reserve enough space
  1. Press Windows Key + R to open Run.
  2. Type control and click OK to open Control Panel.
  3. Go to System and Security > System.
  4. Click on View advanced system settings from the left pane.
  5. In the System Properties window, click on the Environmental Variables button.
    Java Minecraft RAM error
  6. Under the System Variables section, click the New button.
    Java Minecraft RAM error
  7. Enter the following for Variable name and value:
    Variable name: _JAVA_OPTIONS
    Variable value: –Xmx512M
  8. Click OK to save the changes.
  9. Click OK on all the open Windows.

The above process will set the memory size to 512MB and fix the could not reserve enough space Minecraft server error.

The Minecraft server could not reserve enough space error can be resolved by installing the 64-bit edition of Java JRE. Since the 32-bit edition is limited on the memory front, installing the 64-bit edition of Java will remove the limitation.

However, if the error occurs without making any changes, try limiting the memory allocation to 512MB by adding a new system variable in Control Panel.

3. Try another Minecraft server alternative

apex-hosting-minecraft-server

One of the key aspects of running a server is RAM. If you don’t have enough RAM, you won’t be able to run the server without lags.

With Minecraft Server Hosting, you can upgrade or downgrade your RAM wherever you want to ensure you get the correct balance you need. The first step in creating a server is to know what server plan to choose.

RAM is required by the server to support all of the connected players and run all of the software. The player amount, type of plugins, or mods will affect the amount of ram you will need on your server. That’s why with considerable RAM you can do more with your server.

The Minecraft Server Hosting’s plans are:

  • 1GB – the recommended plan for basic small vanilla servers.
  • 2GB – you can add some base plugins or mods and increase your player base on your server.
  • 3GB – to install medium-sized modpacks or plugin packs – up to 25 mods or plugins.
  • 4GB – includes most modpacks – up to 35-40 mods or plugins
  • 5-10GB – supports over 40 mods or plugins.
  • 15GB EX Series – for very large communities and extreme modpacks/ plugins.

Upgrade or downgrade your plan at anytime by choosing one of the most secured server hosting.

⇒ Get Apex MineCraft Hosting

Did you manage to solve the issue? Let us know in the comments area below.

Minecraft server not working? Try these fixes

Configuring a Minecraft server is easy. However, at times you may encounter the Minecraft server not working issue when accessing the server. Minecraft network errors are most likely to occur due to an unstable network connection, security programs, and other temporary issues.

Several users have reported similar issues in the Reddit community forum.

So me and some friends were trying to start up a 1.14 server. Me and my friend R both downloaded the new minecraft server file (from .net) and after setting it up we can’t connect.

If you are also troubled by this error, here are a couple of troubleshooting tips to help you resolve the Minecraft could not connect to server issues in Windows.

What can I do if Minecraft could not connect to the server?

1. Install the latest version of the server

Minecraft server not working
  1. One of the common causes of Minecraft not working problem is the outdated Minecraft server.
  2. Even if you have recently installed the Minecraft server, check for any pending updates.
  3. Go to the Minecraft JAVA edition server page and check if a new version is available.
  4. Download and install the update.
  5. Restart the computer and try accessing the Minecraft server.

If the issue persists, check Reddit and Minecraft forums to see if other users are also experiencing this issue.

2. Try Apex MineCraft Hosting

apex-hosting-minecraft-server

If you still encounter the Minecraft server not working issue when accessing the server we suggest you try Minecraft Server Hosting developed by Apex Hosting.

This dedicated server uses the latest and most powerful hardware to ensure that your Minecraft server runs without lags or downtime.

You can easily control your Minecraft Server Hosting account by having access to the edit configurations and console and to change server versions.

You can enjoy all these following features:

  • Free Server Transfers
  • Java & Bedrock Edition Servers
  • One-Click Modpacks
  • 24/7 Servers & Support
  • Instant Setup
  • Automated Backups
  • DDoS Protection

Apex Hosting server is one of the best server hosters with an affordable managed Minecraft host and extremely secure to use.

⇒ Get Apex MineCraft Hosting

3. Disable your firewall

Turn off Windows Defender Firewall

Minecraft server not working
  1. Press Windows Key + I to open Settings.
  2. Go to Windows Update & Security.
  3. Click on the Windows Security tab from the left pane.
  4. Open Firewall and network protection.
  5. Click on your currently active network.
  6. Scroll down and toggle the little switch to turn off Windows Defender Firewall.

Disable third-party firewall

  1. If your antivirus solution comes with a firewall, try disabling it as well.
  2. You can disable the firewall from the antivirus settings.

After disabling the firewall, try connecting to the Minecraft server. If connected, add the Minecraft server to the exception list.

4. Sign out of Minecraft account

Minecraft server not working
  1. Launch Minecraft.
  2. Click the Log Out button on the bottom right corner of the launcher.
  3. Relaunch Minecraft.
  4. Sign in with your Minecraft credentials and check for any improvements.

  Restart your modem/router

Minecraft could not connect to server
  1. Additionally, try restarting your modem or router.
  2. Unplug the power cord from the back of the modem.
  3. Make sure all the lights on the modem are off.
  4. Leave the modem idle for a minute.
  5. Plug the power cord back into the modem.
  6. Wait for the modem’s lights to turn green and stop blinking.
  7. Try connecting to your Minecraft server and check if the Minecraft server not connecting issue is resolved.

If the issue persists, check if the issue is caused by a third-party Minecraft mod installed on the computer. Disabling or uninstalling the problematic mods can help you resolve the Minecraft server not showing up problem.

The Minecraft server not working issue can occur due to several reasons, including network issues as well as server issues. Follow all the steps in this article and let us know which method helped you resolve the issue in the comments.

ARK: Survival Evolved Server Not Responding Error

ARK: Survival Evolved is still in the Early Access phase, with many issues that must be resolved before its final release. Nevertheless, players can already experience this unique adventure with the proper setup and functioning server.

The server is one of the issues we have all had while playing online. This is especially the case with games that feature many custom servers created by players. Both have pros and cons, but we advise you to inform yourself before starting the game.

Today, we will try to fix the annoying server issues and help you stay on track.

What can I do if ARK: Survival Evolved server is not responding?

1. Make sure the server up to date

If you are playing on a dedicated server, the first thing you should do in case of an error is to restart it. Doing this updates the server since the client and the server are on the same version.

You must be aware that the game is occasionally unstable, and sometimes, you can only wait for the next patch that may fix the issue.

2. Verify the game integrity

Occasionally, a game’s installation files may become corrupted or incomplete. This can cause various problems, and server connectivity is not an exception. Therefore, you need to verify your game’s integrity in order to experience stable online gameplay. To do so, follow these instructions:

  1. Go to the Steam client.
  2. Open Library.
  3. Right-click Ark: Survival Evolved.
  4. Open Properties.
  5. Go to Local files.
  6. Choose Verify integrity of game files.
  7. The tool will find and replace missing or corrupted files.

3. Disable background programs

Background programs can slow down your bandwidth or even interfere with the game.  We advise you to disable antivirus and firewalls temporarily while playing. Additionally, you may want to add the exception for Windows Firewall.

On many occasions, firewalls block connections and prevent you from connecting to a dedicated server. Moreover, you may want to stop all downloads and try restarting your router and PC.

4. Disable Port Forwarding

Some users presented a workaround for UPnP IGD. If your router has this protocol besides forwarded ports, it may cause lag and faulty connection issues. We advise you to do the following:

  1. Open your router web interface (The procedure differs for different routers).
  2. Disable Steam ports and other ports forwarding you have set.
  3. Save your selection and restart your router and PC.
  4. Start Ark: Survival Evolved and see is the problem resolved.

As the community members stated, this workaround vastly improved connectivity.

5. Reset your Network Adapter in Command Prompt

You can use the built-in command prompt to restart your network adapter winshock protocol. This can resolve some known connection issues, so it’s worth trying.

  1. Go to Search Windows and type cmd
  2. Right-click the command prompt and run as administrator.
  3. In the command line type netsh winsock reset
  4. After restart confirmation, reboot your PC.

6. Use alternative DNS address

Frequent connection issues can be easily resolved by changing your DNS address with an alternative one. You can do so by following these instructions:

  1. Right-click the Start button and open the Control panel.
  2. Choose Network and Internet.
  3. Open Network and Sharing center.
  4. Click Change Adapter Settings.
  5. Right-click your active network and open Properties.
  6. Highlight Internet Protocol Version 4 and open Properties.
  7. Click Use the following DNS server addresses.
  8. As alternative address enter 8.8.4.4 (Google DNS).
  9. Save and try out the game.

7. Forward additional port

Steam ports are mandatorily forwarded for you to play games online. However, you may try to forward an additional port and resolve the issue that way. That can be done by following this path:

  1. Open your router’s web interface (login procedure may differ from router to router).
  2. Open and forward 25147 port.
  3. Make sure your IP address is static by configuring it with router DHCP.
  4. Restart your PC and try out the game.

Your IP address must be static, or you may need to forward the port whenever it changes. Dynamic IP and port forwarding are not going well together.

Adding the additional port can also help you resolve other issues, like the Ark Survival Ascended server not showing up; read this guide to learn more.

8. Try an alternative game server hosting

ARK has become one of the most popular games for private game server hosting, but unfortunately, errors can occur. What you need to have is prompt support that helps you fix the issues quickly.

If you followed all the steps above and you still have the “Server Not Responding” error, we suggest you try another game server hosting that is carefully tuned as necessary to keep today’s errors at bay.

Finding the best private game hosting might indeed be time-consuming. As a result, we’ve devised a workaround until the dedicated server for ARK: Survival Evolved is fixed.

You can choose a hosting service for your games to obtain the greatest service and experience possible. Numerous suppliers are prepared to assist individuals in need; all you have to do is look through the list we’ve compiled for you and pick one you consider best.

These workarounds should at least temporarily resolve your server problems. If the problems are persistent, be sure to contact the server administrator for further help. It’s important to know that, in most cases, the problem isn’t on your side. However, ensuring your configuration isn’t the one to blame is essential.

If you have some questions or suggestions, we look forward to seeing them in the comments section below.

Virtual CD/DVD Drive Software for Windows 10: Best in 2026

CD’s appearance was a revolutionary thing in computer history because finally, we were able to store a significant amount of information on a small and easy to carry object. Then we tried to find a method that can completely copy the content of a CD and save it in a different location.

This is how ISO images appeared. Even Microsoft is using ISO images these days, so this technology still has a high degree of applicability.

To create these images all you need is dedicated software for this which can be found free on the internet. The ISO can be burned to a new CD or DVD or even on a USB flash drive to install different software or operating systems more rapidly.

Another feature of ISO images is that it behaves like a real disk. It convinces the computer to behave with this kind of file as a physical disk.

The software that get this kind of file are called virtual drive software because there is no physical support for information, all data is stored in the computer memory. Here is a list with the best virtual drive software available completely for Windows 10.

DVDFab Virtual Drive

burn MKV files to DVD

This software is oriented more on the media domain: conversion and video playback. It is a virtual emulator for both DVD and Blu-ray formats. It can emulate up to 18 drives and mount ISO images created in DVDFab and ISO images created by other similar software.

This tool has introduced a new extension in the program emulation area, .miniso. We know that an ISO image file contains 2 parts: the image header with the identifier role and other files and folders. The .miniso file is like the image header, and using it DVDFab can simulate a normal ISO, using it with the specific folders.

This software has many settings which are fully customizable. You can choose one language from the almost 20 available, you can let the software mount the last image automatically and unmount all the drivers when you will exit, you can even set manually the number of drives from 0 to 18. 

It is a professional program that does not require a powerful computer to run. The recommended system requirements are available for any computer from these days. Everybody has a newer version than Windows XP and a much more powerful processor than Pentium II.

DVDFab

DVDFab

DVDFab is more than a virtual drive software that can emulate up to 18 drives, it’s multimedia powerhouse.
Check priceVisit website

Daemon Tools

Daemon Tools is one of the veterans of this domain as it is currently on the market for over 15 years and it has the largest number of users at this moment. It is available in 4 versions that bring 3 million users every month.

The most popular version is Daemon Tools Lite which also is the only one that has a free version. It is regarded as one of the best programs of its kind because it can perform operations with any known type of image file and can emulate up to 4 DTS + SCSI + HDD devices.

The Lite version has 3 license types: Commercial License, Personal License, Free License at different prices.

The Commercial License is dedicated to institutions and developers because it is one of the most complete versions of Lite with unlimited number of installations.

Each update will be done automatically and you will have dedicated technical support from developers.

The Personal License allows you to install the software on 3 computers where you will get a free update every time you need and you will benefit from 24/7 technical support.

The Free License is a basic form of the software that can perform most of the operations, but you will not receive technical support from developers and you have to accept the large number of commercials.

The developers are also offering a pack that includes the facilities of the 3 types of license.

⇒ Download Daemon Tools


WinCDEmu

WinCDEmu from Sysprogs is one of the easiest to use tools of this kind. This software allows you to mount optical images by simply clicking on them. It has many facilities that reserve a place for him among the most efficient virtual drive software.

It can work with ISO, CUE, NRG, MDS/MDF, CCD, and IMG images, it supports an unlimited amount of drives, the installer size is less than 2 MB, you do not have to reboot your system after its installation, it has more than 20 languages to choose from, it is free for any kind of use and one of the best features is that it does not occupy any drive letters when you are not using it.

Installation is very easy and does not require a long time to do it because it comes with predefined settings that you can change at any time by checking the Customize installation options box. Check out our comprehensive WinCDEmu review for more.

⇒ Download WinCDEmu


Microsoft Virtual CDRom Control Panel

The first version of this software wa introduced on the market in 2001, but Microsoft has revised it in 2013, improving it. This program works for XP, Vista and Windows 7.

Unfortunately, Microsoft informs us that they do not provide any support for this program, but this should not concern you because it cannot create any damage as long as you are sure that the source of the ISO file is safe.

This software do not have any special requirements. All you need to have is a newer version of the operating system than Windows Server 2003.

It is very easy to install it because it comes in a self-extracting ZIP archive. After downloading the file all you have to do is to execute it. Click Unzip and select the folder where you want to be installed.

Before using this program we advise you to read the file readme.txt to fully understand how it works with your system.

⇒ Download Microsoft Virtual CDRom

This was our selection with the best virtual drive software for Windows 10. We hope that you found the proper tool for your needs but if you have any suggestions leave them in a comment below.

[wl_navigator]

Keyboard and mouse not working after Windows 10 update [FIX]

Installing Windows 10 updates or upgrading to Windows 10 is not always a smooth process, and sometimes there might be some issues.

One of the most annoying issues with Windows 10 is that the keyboard and mouse no longer work after the update to Windows 10.

As far as we can tell, this issue is more common with USB peripherals, so here’s what can you do about it. Before we start, make sure that you connect the PS/2 keyboard and mouse to your computer.

How can I fix keyboard/ mouse issues after an update?

  1. Remove previous updates
  2. Disable USB 3.0 support from BIOS
  3. Use a different USB port
  4. Update your keyboard/ mouse drivers
  5. Run the Hardware and Devices troubleshooter
  6. Clean boot your computer

1. Remove previous updates

  1. Open Control Panel and go to Programs.
  2. Click on Programs and Features. Now go to View installed features.
  3. Now you need to find the update that is causing you this issue.
  4. If the problem started recently it’s probably the latest installed update. So you need to click Uninstall to remove it.

Also, be ready to enter your administrator password if you’re asked to.

Sometimes Windows updates can make more harm than good, and in the past, it has been known that optional updates can cause some issues.

2. Disable USB 3.0 support from BIOS

  1. While booting, press Del or F8 to enter BIOS (the key might vary depending on the motherboard manufacturer).
  2. Here navigate to Advanced settings.
  3. Locate USB configuration and disable USB 3 support. Depending on your manufacturer, you might have to take a different route to disable USB 3 support.
  4. Save and exit.

3. Use a different USB port

If the keyboard and mouse aren’t working try plugging them into different USB ports. Sometimes, it’s only the port that’s faulty while the hardware is functional.

Connecting your peripherals to other devices, if available, is also useful.

4. Update your keyboard/ mouse drivers

If your keyboard or mouse starts working, go to Settings > Device Manager. Find the USB controllers with exclamation marks next to them, right-click to disable and enable them again, and everything should start working normally.

If this process doesn’t change anything, you should uninstall the drivers to force-update them.

If you want to do this quicker and safer, you can use dedicated driver updater software such as Outbyte Driver Updater. It will detect outdated, damaged, and missing drivers and install the best versions available.

5. Run the Hardware and Devices troubleshooter

Since this problem is related to your peripherals, you can also run the Hardware and Devices troubleshooter to fix it. With the help of this tool, your computer will automatically scan your keyboard and mouse for issues and repair them on the spot.

troubleshoot hardware and devices

To run the troubleshooter, go to Settings > Update & Security > Troubleshoot > locate the Hardware and Devices troubleshooter and launch it.

6. Clean boot your computer

  1. Go to Start and type msconfig then hit Enter.
  2. Navigate to System Configuration the to Services.
  3. here, choose to hide all Microsoft services.
  4. Click Disable all.hide all microsoft services
  5. Go to the Startup tab and open Task Manager.
  6. Select each startup item and click Disable.disable startup programs
  7. Restart your computer.

Particular apps and programs may interfere with your keyboard and mouse. As a result, your mouse may move by itself, your keyboard may freeze, and so on.

The above steps should clear any glitch these apps might cause and restore the functionality of your peripherals.

And these were our solutions to fix keyboard and mouse issues after a Windows update. If you have successfully used other methods, please share them in the comments.

7 Best iPad File Explorers for Windows [2026 List]

iPad file managers are specialized tools that allow users to view and open the files stored on their devices, copy them to another device, send them via email, and more.

iOS is a great mobile operating system, but it has some limitations. For example, iOS users can’t manage their files as easily as Android or Windows users. This task becomes even more difficult when it comes to managing iPad files on Windows. You need a dedicated file manager for this task.

You can use iPad file managers to perform these tasks:

  • Cut/copy/paste files and folders
  • Create or delete files and folders
  • (On some of the apps) edit files in real-time
  • Create Dropbox/Box.net/iCloud sync
  • Access/open files of various types (images, pdf, zip, etc.)

Transferring files from an iPad to a Windows PC is quite hard due to iTunes’ limitations. To help you better manage your iPad files on your PC, we will list five apps that will allow you to do that without jailbreaking your device.

What are the best iPad file managers?

iExploreriFun BoxiToolsiMobie's AnyTransiMazingSynciosIOTransfer 2 PRO
RANK (1 to 5)4,543.54.53.54,54.0
Free/PaidPaidFreeFree (Trial)FreePaidFreeFree(Trial)
BackupYesAppsYesN/AYesYesYes
Using device as storageYesYesN/AYesYesYesYes
Selective file chooseYesYesYesYesYesYesYes
Keeps metadataYesYesYesN/AN/AYesN/A
Mobile Device ManagementYesYesYesYesYesYesYes
View Only ModeNoNoNoYesNoN/AN/A
Support 24/7 NoNoNoNoNoN/AN/A
iTunes requiredNoNoNoNoNoNoNo

IOTransfer 2 PRO – Great photo organizer

iotransfer ipad manager for windows 10

This is a great tool for whoever wants to manage files on their iPad but also on iPhone. What can it do? First of all, its interface allows you to easily manage all your files, including all formats available on your iOS devices, especially iPad. You can organize your photos, images, videos, and music into collections, but you can also delete the files you do not need anymore.

Another great feature is that you can transfer files from your PC to your iPad with ease. You will be able to sync anything that literally can run on your iPad. It also includes a video download feature that allows you to download videos from different platforms like Facebook, YouTube, Instagram, Vimeo, etc.

One more important feature, but not the last, is iPad/iPhone cleaning. You will be able to free storage space and optimize the work of your device. All you have to do is to select the necessary parameters. Try it for free and see if it fits your needs.

IOTransfer

IOTransfer lets you freely and easily transfer your files and back your data between all your Apple devices.
Check price Visit Website

Syncios – Phone libraries synchronizer

Syncios is a software meant to allow its users to manage their iOS and Android devices with great ease. The software allows you to transfer your data between phones with different operating systems.

Usually, it is a pain to try and transfer your files from your PC to your personal mobile device. However, with Syncios, you can transfer all your music, photos, apps, videos, and files between your devices, in a simplified way, with just a few clicks.

Besides data transfer, the program can also synchronize your phone libraries and back up all your data to keep it safe. Thus, you can recover any damaged or deleted data.

Syncios

A simple yet effective solution for transferring content between Android and iOS.
Check price Visit Website

iMobie’s AnyTrans – All-in-one manager

Anytrans is a free iPhone Explorer software developed to access, explore, and manage your iPhone, iPad, and iPod touch file system without jailbreaking your device.

This is another 100% free file explorer and app manager app for iOS devices. The tool provides a free iOS file manager app that will allow you to manage files on your device. You will be able to transfer the docs and files from your PC to your iPad and vice versa.

The tool also allows you to use advanced customization of the iPad. For instance, you will be able to change the apps’ text, icons, sounds, and so on.

Anytrans is one of the most decent and safest free iOS file browsing software that gives you full control over your iPhone, iPad, and iPod touch file system. By bringing about an intuitive File Explorer interface, this thoroughly developed iPhone backup extractor will help you to instantly access and manipulate the iOS file system.

Anytrans has an impressive facility over iTunes and other similar iPhone Explorer. It’s great for uploading your music from one iPhone to the new iPad or rebuilding your iTunes library with music and playlists. 

Easy to export your app data, game saves, and personal settings onto your new iPhone 7, iPhone 7 Plus, or iPad Pro. It’s free to try out all new and exciting AnyTrans features by downloading the trial version below.

AnyTrans

AnyTrans is an all-in-one manager that allows you to transfer, manage, and back up your iOS data with ease.
Check price Visit Website

iFun Box – Batch-install option

iFunBox is an excellent File Manager for your iOS device. iFunBox may be defined as an alternative to Explorer, but it has some additional features, including App Management. You can use it to install or remove apps from your iPad.

The software also allows you to install apps from .ipa files from your PC to your device. The installation process is safe because the apps are installed in a secured sandbox.

You can also batch-install apps and manage your device apps and games very quickly. iFunbox can easily manage equipment apps, photos, music, videos, mobile phone ringtones, voice memos, and more.

iOS apps store data such as user accounts, chat history, saved games, in-app purchases, and so on. iFunBox provides an easy way to manipulate this data to clean the track of usage, chat games, backup messages of chats, and more.

⇒ Check out iFunBox

iTools – Offline backup

iTools allows you to create a backup of your iPhone and iPad apps and even restore them or uninstall them. The tool allows you to sync your music, contacts, and message data right on your PC. You can also browse Apps files and folders on your device.

iTools also allows you to configure iBooks, Media, and Photos settings, and you can also make an offline backup.

You can also use iTools to directly install IPA files on your iPhone/iPad and design your HomeScreen look.

The software also comes bundled with a built-in PXL to IPA converter, which allows you to convert PXL apps into IPA apps as the IPA app format is the most secure one.

⇒ Check out iTools

iExplorer – Intuitive usage

iExplorer is a great software that you can use to browse all your iPad files and explore app data files.

To export files to your PC, follow the steps below:

  1. Go to the folder or file that you want to export.
  2. Right-click it > choose the Export option and the destination folder in the pop-up window.
  3. Press the OK button, and you’re done. Now, your files will be exported to your PC.

The requirements include the following:

  • An iOS device (iPad/iPhone/iPod)
  • iTunes 10 or later installed on the system
  • Windows XP /Vista/7/8/8.1/10

To download the tool, go to the iBrowse app page, and download iExplorer. Once the download completes, run the iBrowse .dmg file. After you open it, drag the icon into your Applications folder to install it.

⇒ Check out iExplorer

iMazing – Backup scheduling feature

iMazing is a reliable tool to transfer and save music, files, messages, and data. You can use it to safely back up any iPhone, iPod touch, or iPad. The tool is one of the best iOS device managers for PCs.

You can now quickly transfer your data to a new iPhone. Without iCloud or iTunes, you can copy everything or select the right content to transfer.

You can now copy your music back and forth between your iPhone, iPad, iPod, and PC. There are no more iTunes syncs necessary.

You can also export your pics and videos, without iCloud or iTunes. Save your favorite moments on your Mac or PC.

Unlike iTunes and iCloud, this tool will never overwrite your iPhone and iPad backups. It doesn’t require paid cloud storage. iMazing is reliable and innovative, and it just might be the only software on the market that offers an automatic backup and archive solution, for free.

You can now keep control and never lose precious information. With every backup, iMazing creates a new photo of your Apple device. Your iPhone and iPad archives will be able to get secure encryption from now on. They are also optimized for minimum disk use. The tool is very safe and efficient.

You will be able to schedule your backups for every evening, or weekly after 6 PM, it will be up to you. And if for any reason, your next backup expires, iMazing can notify you. This way, you can always stay ahead of your backups.

⇒ Check out iMazing

There are many different options for using an alternative to iTunes for managing iOS devices. The five alternatives that we offered you bring many useful features that you will definitely enjoy. Check them all out and select the tool that best suits your needs.

And before you leave, find out how to use the iPad as a second monitor in Windows, something most users don’t know.

Please leave us feedback regarding the subject in the comment section below.

Best 4 WiFi Repeater Software for Your Wireless Network

When the WiFi signal is not strong enough to cover the entire space, you might experience annoying connectivity problems. So, you use WiFi repeater software to extend the power of your router otherwise, you won’t be able to use your network properly.

This article will list the best WiFi repeater software solutions available. You can use your computer, notebook, or laptop as a wireless repeater through these software options.

Ultimately, you can extend the WiFi signal from your device without buying another hardware product.

Is there a WiFi repeater app?

As we will discuss in this guide, you will see that there are many great options for WiFi repeater apps. You just need to pick the very best options, and you should be able to say goodbye to some of your network woes.

These applications serve some major functions, and here is what you may expect:

  • Data sharing – Some devices allow you to share mobile data with other devices within its range.
  • Data boosting – A major function of these devices is magnifying or boosting the strength of your WiFi signal.
  • Range extending – Most of these applications will allow you to create virtual access points, thereby converting your device to a repeater.

Now let us discuss some of the better options you may try.

What are the best Wi-Fi repeater tools for Windows 10?

Connectify Hotspot – Robust repeater solution

Connectify is maybe the best software that can be used as a WiFi repeater solution. The program offers an intuitive user interface, can be easily and quickly installed on the Windows 10 platform, and comes patched with different and useful features.

This virtual router is available in 9 languages. It contains a built-in Ad Blocker, through which you can add Unicode and Emoji to your hotspot name, which can easily extend your network through its integrated Hotspot MAX software.

The premium version of the software is available under three packages and only works on Windows devices.

Some important features of Connectify Hotspot include:

  • Compatible with Windows 11, 10, 8 and 7
  • Usage monitoring by device
  • Hotspot name customization
  • Ad and tracker blocking

Connectify Hotspot

Extend your WiFi signal and create a reliable and stable network connection for your household.
Check price Visit website

MyPublicWiFi – Great free option

MyPublicWiFi is free software that can easily turn your Windows 10 computer into a WiFi wireless access point. It is great if you are always on the go – for example, you can share the wireless network in hotel rooms where charges for Internet might be applied per device.

The software also secures your network as you can restrict certain Internet services, such as file sharing apps, and you can record and track the visited URLs right on your virtual WiFi hotspot.

The program can be easily installed on any Windows 10 system. You can customize its built-in settings through an intuitive interface – don’t worry, you can set everything as required, even if you are a newbie.

Some important features of MyPublicWiFi include:

  • Access restriction
  • Network usage monitoring
  • Windows compatibility
  • Splash page customization

⇒ Get MyPublicWiFi

Virtual Router Plus – Open source solution

wifi repeater software

If you are a fan of open source, this is the option you should try out. It is originally a tool to turn your PC into a hotspot but also includes the capacity to repeat your connection.

We like it because it is very easy to use. You only need to download the app, and you are virtually set up. Its interface makes it almost plug-and-play.

It has support for multiple devices. A feature that makes it the ideal choice for friends and families. You also enjoy network security since it supports WPA2 encryption.

It may not be the most elaborate on our list, but it does the job.

Some important features of Virtual Plus include:

  • Easy to use
  • Decent feature range
  • Multiple concurrent devices
  • Compatibility with different WIndows editions

⇒ Get Virtual Router Plus

Windows 10’s built-in WiFi extender – Native Windows option

wifi repeater software

The Windows 10 system has a built-in WiFi extender solution that can be used for free. However, the OS will create a new, different network.

In other words, with some of your devices, you will have to connect to the router network, while with others, you will have to connect to the newly created Windows wireless network.

You can enable this Windows 10 functionality by helping and setting up the Mobile Hotspot feature:

  1. Press the Win+I hotkeys.
  2. Click on Network & Internet.
  3. Then choose Mobile hotspot – from the left panel of the main window.
  4. Next, the Share my Internet connection with other devices option must be turned on.
  5. Now, click on Edit and set a new network name and password for this new network.
  6. Save your changes.

Of course, if you want to use a specialized WiFi repeater, we recommend buying a hardware one.

That’s how you can get the best results – the software programs will work just fine. Still, the hardware solution is recommended if you want to extend the WiFi signal constantly.

The above solutions can help you smartly manage different situations when you constantly move from one place to another and require a quick and cheap Internet alternative.

If you tested other similar programs, you could share your experience and your observations with our readers and with us through the comments field below – we will afterward update this review accordingly.