How to fix Razer Chroma issues in Gears 5

The list of Gears of War 5 problems is endless. Players reported that mouse sensitivity does not feel smooth while playing the game on Razer Chroma devices.

The Coalition confirmed this is a known issue. Here is a quick workaround to resolve this problem.

If your mouse does not feel as smooth as you expect, adjust the in game sensitivity to 0 and increase the mouse DPI instead.

You may experience this problem on older drivers for Chroma devices. It is recommended that you update your software to the latest version.

TC listed the following steps you need to follow:

  1. Go to Start > enter Razer Synapse > select Razer Synapse
  2. Left click on the gear icon
  3. Go the the About tab
  4. Click on Check For Updates
  5. Go to Razer Synapse and select install
  6. Launch the game again.

If your Razer mouse is too slow on Gears 5, use these solutions to fix the problem.


Gears of War 5 is plagued by all these issues

It is worth mentioning that it is not the only problem that you should expect while playing Gears 5.

Here is a list of some major issues that have been reported at the time of writing this article.

  1. Arcade takes forever to load, once map has loaded there is still a loading screen faded with the gameplay in background, takes a while to actually play.
  2. When actually playing Arcade couldn’t change characters, stuck as Kait and when I went to change the same loading screen was there everytime.
  3. Kept finding matches in KOTH but the lobby dissolved constantly, as soon as it said loading map it would prompt with a message saying “Failed to load game.”
  4. Connectivity to servers issues.
  5. Wait time frozen.
  6. Tour of Duty not loading.

The gaming community is pretty much annoyed by the issues that have experienced so far. We can not even predict how many more problems you can expect until its release.

Players actually believe that its a stress test for the servers as well as the players. Someone commented on Gears of War forum:

Awful. Was excited to get my hands on this but now I am going to play Apex. I could understand this if this was a totally new game and stuff, but its pretty much updated Gears of War 4. Gears of war 4 had a better beta launch. and this is a newer and built on game and engine.

Have you experienced any other problems with your Razer  Chroma devices? Let us know in the comments section below.

RELATED ARTICLES YOU NEED TO CHECK OUT:

Here’s How to Remove Pinned Tiles that Won’t Go Away [FIXED]

Tiles on Windows 10 can provide you with useful information, but many users reported that pinned tiles won’t go away on their PC. This can be a frustrating issue for some users, but there’s a way to fix it.

Here’s how one user described the issue on Microsoft Answers forums:

The tiles won’t go away and it’s not allowing me to see my background.

This issue usually occurs if you have Tablet Mode feature enabled on your PC. Sometimes you might enable this feature by accident and that can lead to issues with pinned tiles on Windows 10.

Although this feature might be useful while using a hybrid device or a Windows 10 tablet, it can be an annoyance on a desktop PC. Therefore, in today’s article, we’re going to show you how to fix this problem once and for all.

How do I get rid of pinned tiles in Windows 10?

1. Disable the Tablet Mode

  1. Open the Action Center. You can do that by pressing Windows Key + A.
  2. Look for Tablet Mode option and disable it. If it’s not available, click the Expand button to reveal all options.
    tablet mode disable vpn pinned tiles won’t go away

2. Disable Tablet Mode from the Settings app

  1. Open the Settings app. You can do that quickly by using Windows Key + I
  2. When Settings app opens, head over to the Personalization.
  3. Select Start from the left pane. Now disable Use Start full screen

    use start full screen disable pinned tiles won’t go away

There you go, a quick way to fix the problem with pinned tiles that won’t go away. In most cases, this issue is caused by Tablet Mode, and by disabling the Tablet Mode you’ll fix the problem for good.

Feel free to try both of our solutions and let us know in the comments section if you found our solutions helpful.

How to generate an SSH key in Windows 10

Generating SSH keys in a Windows environment used to be a convoluted process which required the installation of third-party tools. Since the Windows 10 April 2018 update, Windows has shipped with a preinstalled OpenSSH client, which means you can use ssh-keygen to generate SSH keys. Read on as we walk you through the entire process.

Managing optional features in Windows 10

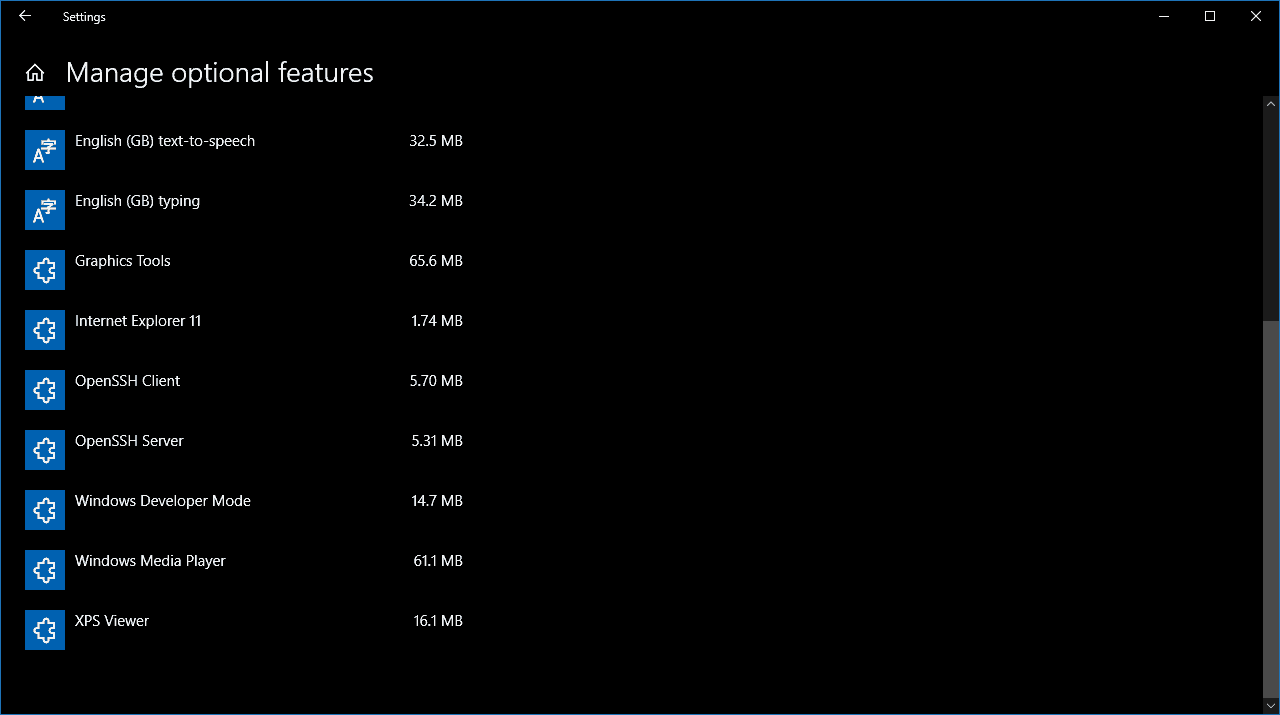
First, you’ll need to make sure OpenSSH is installed on your machine – if you upgraded from an earlier version of Windows 10, you may need to manually enable it. Launch the Settings app and click the “Apps” category. Next, click the “Manage optional features” link. If you don’t see “OpenSSH Client” in the list which appears, click the “Add a feature” button and install it. You might need to reboot your PC after the installation.

Adding OpenSSH Client in Windows 10

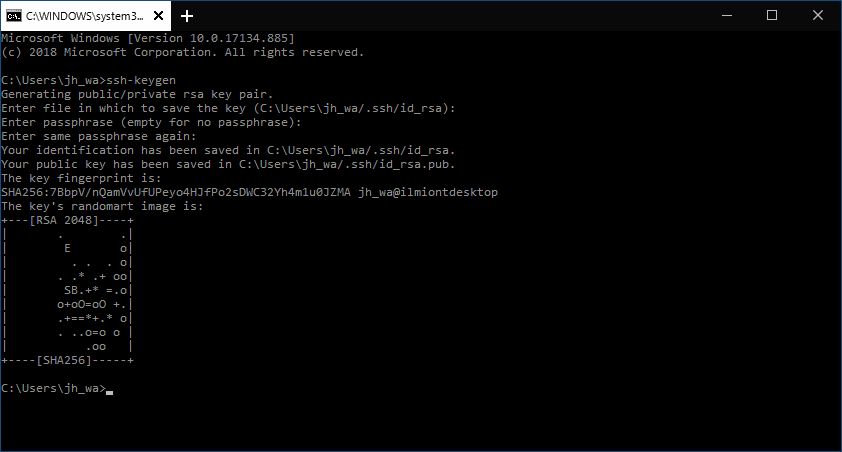
Once OpenSSH is installed, you’re ready to proceed. Open Command Prompt from the Start menu. Type “ssh-keygen” (without the quotes) into the terminal window and press enter. You’ll be prompted to confirm the save location. We recommend pressing enter to use the default location in your user directory. Otherwise, type a path to save the key in and then press enter.

Generating an SSH key with Windows 10

You can now choose to add a passphrase (password) to the key. If you add one, you’ll need to supply it whenever you use the key. Either type a passphrase and press enter or press enter immediately to proceed without one.

Windows will now generate your RSA public/private key pair. The public key will be stored as “id_rsa.pub” in the directory you specified. Upload this key to any machines you need to SSH into. You can then open a connection using Windows’ built-in SSH client – type “ssh user@hostname” to connect and authenticate using your generated credentials.

Microsoft releases new firmware update for Surface Go and Surface Go LTE

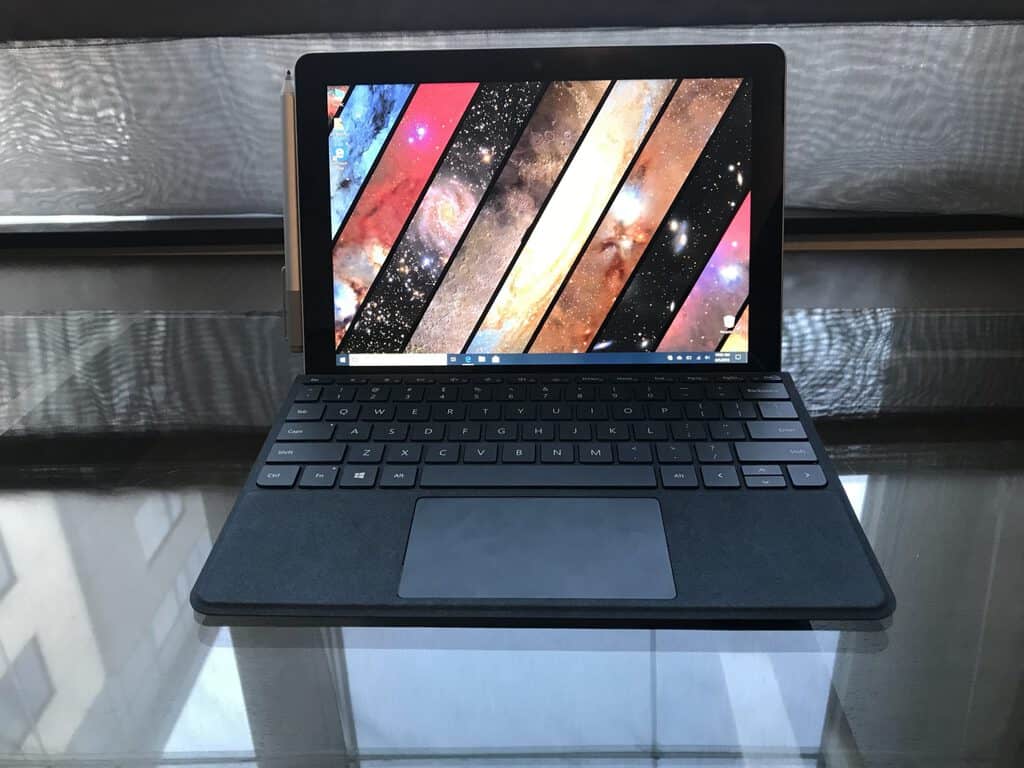
Microsoft has just released new firmware updates for the Surface Go and its LTE variant (via Windows Central). First of all, the Surface UEFI version 1.0.19.0 has been released for both devices, and Microsoft says that it should resolve potential security vulnerabilities, including Microsoft security advisory 190013.

If you have the LTE variant of the Surface Go, you can also download the version 1.5.5.0 of “Generic IO & Memory Access – System devices,” which also resolves potential security vulnerabilities and includes the same Microsoft security advisory 190013 mentioned right above.

As usual, these firmware updates are rolling out gradually, so don’t worry if you’re not seeing them immediately in Wndows Update. The Surface Go will celebrate its first anniversary in August, and the LTE variant was released a couple months later in November. It remains the most affordable Surface ever a year later, but its entry-level Pentium Gold CPU may start to show its age in 2019. It’s not clear if we’ll see a Surface Go 2 this year, but Microsoft is expected to hold a Surface event later this Fall.

How to fix Steam browser error 137 [QUICK FIX]

Steam is the most popular gaming platform on PC, but many users reported Steam browser error 137 while using Steam. This error can prevent you from accessing certain features, and in today’s article, we’ll show you how to fix it.

How can I fix Steam browser error 137 on my PC?

1. Use Google DNS

  1. Open Network and Sharing Center and select Change adapter settings.
  2. Right-click your network connection and choose Properties from the menu.
    network adapter properties steam browser error 137
  3. Select Internet Protocol Version 4 (TCP/IPv4) and click the Properties.
    internet protocol version 4 steam browser error 137
  4. Select the Use the following DNS server addresses option and set the following values:
    • Preferred DNS server: 8.8.8
    • Alternate DNS server: 8.4.4
      use the following DNS server addresses Steam browser gives me error 137
  5. Click the OK button to save changes.

Some users are also suggesting to set Google DNS for IPv6. To do that, just follow these steps:

  1. Repeat steps 1-2 from the above.
  2. Select Internet Protocol Version 6 (TCP/IPv4) and click on the Properties
  3. Set the following values:
    • Preferred DNS server: 2001:4860:4860::8888
    • Alternate DNS server: 2001:4860:4860::8844

Save changes and restart your network connection.

2. Check your antivirus/firewall

  1. Make sure that your antivirus/firewall isn’t interfering with Steam.
  2. If the problem is still there, temporarily disable/remove your antivirus and firewall. Users reported issues with Comodo Firewall and AVG Antivirus but other antivirus applications can also cause this problem.
  3. Once you remove the security software, check if the problem is still there.

If you want to avoid these kinds of problems in the future, we suggest that you consider TotalAV.

With this robust antivirus software, you can keep your PC completely secure and not block any other services, including Steam games.

3. Run ipconfig /flushdns command

  1. Press Windows Key + X and choose Command Prompt (Admin) or PowerShell (Admin) from the menu.
    command prompt administrator steam browser error 137
  2. Now enter ipconfig /flushdns and press Enter to run the command.
  3. Check if the problem is still there.

There you go, three simple solutions that might help you fix Steam browser error 137 on your PC. If our solutions worked for you, feel free to let us know in the comments section below.

Fortnite video game’s v9.41 update is now live on Xbox One with new weapons and birthday items

The v9.41 Content Update for the popular Fortnite video game is now live for players on Windows PC and Microsoft’s family of Xbox One consoles.

This update is relatively small compared to previous updated buts contains several items that celebrate Fortnite’s second anniversary and a new Storm Scout Sniper Rifle for gamers to try in the Battle Royale mode.

Here’s the patch notes:

Battle Royale

Weapons + Items

  • Storm Scout Sniper Rifle: The scope on this sniper rifle contains an embedded weather map that displays upcoming storm circles before they are revealed on the minimap. Available at Epic and Legendary Rarities. Damage: 81/85, Headshot: 202/212, 1.1 Rounds per second. Uses Heavy Ammo. Reload Speed: 2.84s/2.7s.
  • Birthday Presents: Available in Legendary Rarity. Can be found from Floor loot, Chests, Vending Machines, Supply Drops, and Llamas. Not available in Arena and Tournament playlists. Presents have six possible packages of loot.
  • Birthday Cake: Found around various POIs. Not available in Arena and Tournament playlists.Grants 5 Health and 5 Shield. The Birthday Cakes and Birthday Presents will be available on July 25th.

Gameplay

  • Overtime Challenges: Unlock rewards and gain XP with the Season 9 Overtime Challenges. Jump in-game now for more details!
  • UI: PiP (Picture-in-Picture) Streaming. Drop into the Fortnite lobby to begin your viewing of the Fortnite World Cup Pro-Am and Finals… while playing the game! Get wins while you watch your favorite competitors do the same. For more information, check out our blog.

Creative

Bug Fixes

  • Players can now edit pre-built structures during a game.
  • Coins are no longer disappearing while in Create mode after finishing a game.

Prefabs & Galleries

  • 4 New Movie Set Prefabs: Movie Set Warehouse, Movie Set Helicopter Crash, Movie Set Docks, Movie Set Ceremony
  • 3 New Galleries: Movie Set Gallery, Movie Set Prop Gallery, Nature Tree Gallery B

Weapons + Items

  • Storm Scout Sniper Rifle: The scope on this sniper rifle contains an embedded weather map that displays upcoming storm circles before they are revealed on the minimap. Available at Epic and Legendary Rarities. Damage: 81/85, Headshot: 202/212, 1.1 Rounds per second. Uses Heavy Ammo. Reload Speed: 2.84s/2.7s.

Save The World

Weapons + Items

  • Pulsar 9000 added to the Weekly Store. Energy shotgun that shoots large rings of plasma. Shots pierce enemies! Available in the Weekly Store from Wednesday, July 24th at 8 PM ET until Wednesday, July 31st at 8 PM ET.

Fortnite is a free-to-play title and is one of the most-popular games on mobile, console, and PC right now. The game continues to get frequent updates and special events with a new Xbox One tournament announced just a few days ago and a very cool Fortnite Xbox One controller coming in September.

Are you a Fortnite fan? Let us know why or why not in the comments below and then follow us on Pinterest for more Xbox gaming content.

Fortnite
Fortnite
Developer:
Epic Games Inc.
Price:
Free

New Microsoft Edge Dev channel build (77.0.223.0) adds cool new data privacy feature

Build 77.0.223.0 is now available for Edge Insiders in the Dev channel. This latest test build for Microsoft’s upcoming revamped Edge browser contains a variety of fixes and improvements but the most-notable one is the addition of a new feature that automatically deletes browsing data as soon as the app is closed.

This is a pretty ingenious feature that will definitely appeal to those who are worried about their data security. The feature can be enabled or disabled within the Privacy and services menu.

Here’s the full notes for build 77.0.223.0:

  • Fixed an issue which was preventing Hulu playback for some users. Hulu would not play on a supported monitor if there was a second unsupported monitor attached.
  • The user interface now uses Windows system settings and colors for high contrast.
  • When importing your data from other browsers in profile settings, a new option to import cookies is available.
  • Website permissions like access to location and devices are now migrated from the current version of Microsoft Edge when you install an insider channel.
  • When Microsoft Defender SmartScreen identifies a malicious site, if you open the site information flyout from the left side of the address box you will see new options to “Report as safe” and “Show unsafe content”.
  • SmartScreen protection is now built-in on macOS, and the SmartScreen extension has been disabled.
  • The option to disable SmartScreen is no longer available in guest mode.
  • In response to feedback, we increased the width of pinned tabs to make them easier to see and click.
  • The ability to export passwords to a CSV file has been restored.
  • Updated the error messages seen when the PDF reader is disabled in site permissions. Different errors are now shown for local files versus web files, and the messages offer a quick link to the setting.
  • In the download page, canceled downloads are now shown with gray color and strikethrough title.
  • You can now use spacebar to choose items in menus, in addition to the enter key.
  • When opening a menu with the keyboard, the first item in the menu is now selected by default.

Are you an Edge Insider? Let us know what you think of the changes made with this build in the comments down below and then follow us on Twitter for more Microsoft app news.

Microsoft’s Mixer gets new features and a toxic-free environment

Microsoft’s Mixer will go through some major changes in the near future. The main focus is on reducing harmful content, help streamers evolve, and build a positive community.

The live streaming platform has known an incredible growth in the past couple of years, as Chad Gibson, Mixer general manager confirms:

Since Mixer’s launch in May 2017, the total number of hours that viewers have spent watching content each month has grown nearly 17x – that’s based on an average growth rate of more than 12% each month for the past 25 months. Of course… we’re not done yet.

He also acknowledges that the community was a big help throughout the evolution of the platform:

The Mixer community is positive, welcoming and supportive, and you have consistently given us insightful feedback, ideas and support. 

What are the biggest changes to Microsoft’s Mixer?

Some of the most noticeable changes to Mixer are:

  • You can now report inappropriate content directly from the player window.
  • A new Streamer Review system to better monitor new streamers on Mixer.
  • A new Toxicity Screen system to give streamers information and control over the interactions on their channel.
  • More focus on digital safety and increased security.
  • A new monetization program for streamers, starting with Mixer Embers and channel subscriptions followed by other features over the time.
  • An overhaul of the Streamer Analytics.
  • New Streamer Progression dashboard to better understand what to do to earn access to additional promotion, streamer perks, support and monetization features on Mixer.
  • The launch of Mixer Academy later this year – a program that will help you improve in areas like audience engagement, monetization, and branding.

Maybe the most important change is that Mixer is removing the Mixer Create app from mobile app stores and removing the ability to stream from that app:

This does not affect the main Mixer Mobile app for viewers; and streamers can continue to use the main Mixer Mobile app as a companion experience to monitor chat during their broadcasts.

If your an Xbox gamer, a Windows 10 streamer, or you just simply like to watch video games online, than this is great news for you. These changes will make Mixer a lot more secure, toxic-free, and user-friendly.

Software That Collects Data About Users: 5 Best for 2026

User data is the next big thing, and the organizations and business are trying to outrun each other in the race. Collecting user data is a common practice, and when you visit a website, you must have seen privacy policy. It is perfectly legal to collect user data in accordance with the law. The user data helps the businesses improve their services and products, launch new services as well as provide insights into problems in the current implementation. There are several ways to collect user data including form builders, short surveys tools and the contact forums on your business website. But what if you want to collect data for conducting a privilege review or trying to replace papers form in your office? The user data collection software can help. Today, we take a look at the best software to collect user data that allows you to conduct a privilege review, replace office paper forms and store the data in a highly secure central repository. Note: User data collection software needs to be used in compliance with the user and local regulatory requirement.

Best software to collect user data for your organization

Logikcull

Logikcully

  • Price – Free trial / Premium

Logikcull is a cloud-based software solution for user data collection and helps you to reduce the costs of disputes, investigation and offers high record requests percentage.

Logikcull offers a straightforward user interface making it easier for any organization to train its managers. The user can search for any report and data using the search function followed by a single or bulk keyword.

It also allows you to build complex searches with metadata, identify privileged documents automatically, faster document redaction and apply custom or pre-built template tags.

On the security front, all the data records are stored in AWS data centers for faster and safer access on the cloud, and the admin can assign permission-based user roles.

The company also boasts of bank-level security encryption and SPC-11, GDPR and Privacy Shield compliance.

Try Logikcull 

Tableau


tableu

  • Price – Free trial / Premium

Tableau helps the business and collect and understand data like never before. It is a cloud-based software data collection solution for small and medium business enterprises.


If you’re looking for advanced automated surveying solutions, check our top picks.


For individuals, Tableau helps to stay in the flow of analysis with an eye on data preparation, analytics, and collaboration. It can also help you to clean and format the data to extract the essential part of the user data to achieve the goals.

For teams and organizations, Tableau offers more. It allows the teams to work faster and efficient by choosing a seamless analytics experience, prepare analysis reports, build data sources and dashboard and publish and share content.

Tableau works on all the major platforms including Desktop computer, web browser, mobile platforms, and custom websites through integration.

Download Tableau 

Looker

Looker

  • Price – Free trial / Premium

Looker is a premium business intelligence software and big data analytics platform that helps the businesses to analyze, explore and share real-time analytics with the team.

Looker is suitable for all three small, medium and large corporations. The software offers more than just BI tools. You get access to the top-notch analytics tools built on the modern data stack, business website integration, connected services as well as customizable data applications.

Some of the notable features offered by Looker include Robust Security, direct database connection, Looker Blocks, LookML Data Model, Data action, Internal embedding, APU and much more.

Looker is an excellent tool to analyze and extract the information related to the crucial aspect of your data, access right data on time and pre-made analytical blocks that you use templates for certain data and analyses.

Try Looker 

Nexticy


nexticy

  • Price – Free account / $9.99 per month

Nexticy is a professional grade, desktop software solution for Windows and Mac users to collect and analyze user data. The software allows simplifying the digital form creation and management process. It can also be used to managed daily reports for small and medium scale businesses.

The main objective of Nexticy is to offers the users a platform to create and organize report and surveys, perform client registration and collect freed and reviews.


What is the best automated survey software to use on Windows 10 PCs?


Using Nexticy, you can create forms from scratch and distribute them with multiple filling options. The recipient can fill up the forms from any device through the link sent by the organization.

Nexticy collects all the responses into a convenient spreadsheet with filters and stores its securely for the data analysis. Nexticy also supports third-party app integration including Zoho, Evernote, SalesForce and Office 365.

Try Nexticy

GoFormz

GoFormz

  • Price – Free trial / $15 per month

GoFormz is a fully automated mobile form and reports solution. Business can use the service to create digital forums and get it filled up from the users online on their mobile devices.

The mobile forms app allows you to convert your existing forms into mobile compatible forms for data collection. It also supports features like the ability to add maps and location data, embed images, scan barcodes and QR codes and captures signatures on the forums.

The collected data is instantly made available on across all the device and synced with your business systems. For storage, GoFromz support Box, Google Drive, and Dropbox cloud storage services.

In addition, it also allows you to monitor productivity, accuracy and compliance and more through the real-time reports. For seamless team workflow, GoFormz offers powerful collaboration features including Auto-transfer, text or email notifications and data access on all the devices.

Try GoFormz


Conclusion

Whether you are a corporation, big law, boutique law, government or Non-profit, the user data collection software listed in this article allows you to manage thousands of pages of discovery, conduct internal investigations, subpoena response, litigated matters and more while keeping the cost lower and improving transparency.

RELATED STORIES YOU MAY LIKE:

There was a problem starting HP Deskjet [EXPERT FIX]

The HP Deskjet users are reporting issues with the startup error in Windows 10. Namely, at every startup, they see the There was a problem starting HP Deskjet. This usually points towards an old printer that’s not in use anymore, but it’s still in the Registry and its related software still starts with the system.

Here’s what one user said about the error on the TechSupport subreddit.

Not sure if I’m in the right place, but every time I start-up my PC, I get this error message pop up: There was a problem starting C:Program FilesHPHP Deskjet 2540 seriesbinHPStatusBL.dll. The specified module could not be found. Its from an old printer I got rid of, but I cant get rid of the error no matter what I try. Why is it still there and how do I get it gone? Any help is appreciated!

Follow the steps below to fix the error for good.

How do I fix the HP Deskjet startup problem?

1: Disable the program from startup

  1. Right-click on the Taskbar and open Task Manager.
  2. Select the Startup tab.startup task manager there was a problem starting hp deskjet
  3. Locate the HP Deskjet associated startup entry and disable it.
  4. Additionally, you can right-click on the entry and Open file location.
  5. From there, you can delete the assigned file, if you have administrative permissions.

Deal with HP printer drivers errors with these guaranteed fixes


2: Run HP Print and Scan Doctor

  1. If the error occurs and affects your current HP Deskjet printer, download the HP Print and Scan Doctor utility, here.
  2.  Run the utility and select the model of the affected printer you own.
  3. If the troubleshooter isn’t of any help, uninstall all associated applications, unplug the printer, and reboot your PC.
  4. Navigate to Printer Management. Press Windows key + R and type in printmanagement.msc. Press Enter.
  5. Find your printer and remove it.Print Management there was a problem starting hp deskjet
  6.  Connect your HP printer and install its drivers again.
  7. Check for improvements.

3: Remove remaining associated files from old printers

  1. Even after removing the printer, the printer trace and drivers are still in the system. So, in the Windows Search bar, type Print management, and open Print Management.open Print Management there was a problem starting hp deskjet
  2. Expand the Print Servers section.
  3. Expand your Local print server.
  4. Open Drivers in the left pane.
  5. Right-click on the old printer that’s causing the error in the right pane and choose to Remove driver package.
  6. Reboot your PC and the problem should be gone.

RELATED STORIES YOU SHOULD CHECK OUT:

Steam has failed to add firewall exception [QUICK FIX]

Sometimes while trying to start Steam you might encounter Steam failed to add firewall exception error. This error will prevent you from starting Steam, and in today’s article, we’re going to show you how to fix it once and for all.

Here’s how one user described the issue on Steam Forums:

I started getting this Error today in windows event viewer. But the only way i can seem to stop it is forcing steam to run in administator mode
Failed to add firewall exception for E:\Steam\bin\steamwebhelper.exe

What to do if Steam fails to add firewall exception?

1. Copy steamwebhelper.exe to a different directory

  1. Go to Steam’s installation directory.
  2. Now navigate to bin > cef > cef.winxp
  3. Locate exe and copy it to the bin folder in the Steam installation directory.
  4. After doing that, check if the problem is resolved.

2. Try to repair SteamSerivce.exe

  1. End all Steam processes using the Task Manager.
  2. Press Windows Key + R and enter “C:\Program Files (x86)\Steam\bin\SteamService.exe” /repair now press Enter.
    steam service repair run window Steam failed to add firewall exception
  3. Be sure to use the correct file path that matches the Steam’s installation directory.

3. Reinstall Steam and clear the registry

  1. Back up your games. They are usually stored in the steamapps
  2. Now uninstall Steam.
  3. Clear all Steam registry with a third-party cleaner
  4. Install Steam again.
  5. Install your games again or move them from the backup of steamapps

Another way to completely remove Steam and its registry entries is to use uninstaller software. By doing so, you’ll completely remove all files and registry entries associated with Steam.

There you go, three simple and easy-to-follow solutions that can help you with Steam failed to add firewall exception error. Most users reported that copying the steamwebhelper.exe to a different directory fixed the problem for them, so be sure to try that.

This is how you can fix Gears 5 stuttering on Xbox X

The gaming community is eagerly waiting for the release of Gears of War 5.

The Coalition confirmed that this version is bringing many different modes. However, the installation may take a little longer than usual. You should expect a range of single and multiplayer modes in the game.

Some of these modes are Tour of Duty, Horde, Campaign, Escalation, Arms Race, Guardian, Team Deathmatch, King of the Hill, Bootcamp, Arcade, Escape, Execution, Dodgeball and Warzone.

Moreover, some additional modes will be revealed at the time of its release. The game brings some new map-building and sharing tools as well.

However, it looks like the developers need to fix a bunch of issues before the official release. Many players who recently participated in the Gears 5 Tech Test reported tens of issues of Reddit.

The reports suggest that the game is stuttering on Xbox One X.

Game is stuttering like crazy on my One X.

There’s a quick fix that really works

Thankfully, there is a quick workaround available to fix this issue. Someone confirmed that you can resolve this issue by changing your TV to Game Mode.

It was for me too, bad frame rate. Changed my tv to “game mode” and that worked

The game developers are yet to confirm the issue. We hope that this problem will be resolved in the final release. We will let you know once more information is available.

RELATED ARTICLES YOU NEED TO CHECK OUT:

Posted in Fix

Recover product key from an unbootable hard drive [HOW TO]

Windows product key is important on several counts, especially if you’re trying to reinstall Windows 10. And you never know when that is going to happen. Worse, you might require the Windows 10 product key for a computer that simply won’t boot.

That said, no matter how daunting the task might seem, it in fact is quite easy to retrieve the Windows 10 product key from even an unbootable hard drive.

How do I recover my Windows 10 product key?

1. Recovering Windows 10 product key using NirSoft’s ProduKey software

ProduKey software can recover windows 10 product key from unbootable hard drive

  1. The method works for a computer that might not be booting but its hard disk is still functional.
  2. In that case, remove the drive from the dysfunctional computer.
  3. Insert it into a working computer or a SATA hard drive docking station and make sure it is accessible. It should be visible as a drive under This PC on your computer.
  4. Launch ProduKey. (It is assumed you have already downloaded and installed ProduKey on your device.)
  5. In ProduKey, click on File > Select Source.
  6. In the Select Source window that opens, click on the Load the product keys from external Windows directory.
  7. Click on the Browse button and select the drive of the external hard disk.
  8. ProduKey will display the product keys of the external computer.

Want to find your Windows product key quickly? Here’s how to do it in just 1 minute


2. Recovering Windows 10 product using Superfly Inc.’s ShowKeyPlus

Use ShowKeyPlus app to recover Windows 10 product key from unbootable hard drive

  1. Launch the Microsoft Store and search for ShowKeyPlus.
  2. Click on the Install.
  3. Once the installation is complete, click on the Launch.
  4. A ShowKeyPlus window opens up showing the product key of the Windows 10 version installed on your PC.
  5. ShowKeyPlus also reveals a whole lot of info, like the product name and ID, original version and keys of the software installed and so on.
  6. You can either click on the Save button for the info to be saved, or copy/ paste the Product Key and save it at your desired location. It’s as simple as that.

3. Windows 10 product key stored in BIOS

Unable to recover Windows 10 product key from unbootable hard drive? Its stored in PC BIOS and gets automatically activated

  1. Windows 10 product key is also saved in the BIOS in the PC.
  2. The key gets converted into a digital entity and is paired with the device. This way, the key becomes tied to the particular PC and can’t be used in any other device.
  3. The key is also stored at Microsoft’s servers and is not accessible from anywhere within the OS.
  4. Windows 10 uses this key when reinstalled but make sure it’s the same build of Windows 10 used for re-installation as the one that was running on your PC.

This should help deal with the situation where you need to retrieve the Windows 10 product key from an unbootable hard drive.

READ ALSO:

Estimated Download queue feature makes a comeback in latest Xbox One 1908 preview build

The Xbox One is about to get another system update next month, and today the Estimated Download queue feature that was briefly tested earlier this year is making a comeback in the latest 1908 build for Preview Beta testers. This new feature will allow Xbox Insiders to see the estimated time to finish downloads in My Games and Apps, and Microsoft is inviting Insiders to share their feedback about it in a Xbox Insider Hub survey.

It’s worth noting that this feature isn’t live in the more advanced 1910 preview builds related to the next major Xbox One update coming in October. However, head of the Xbox Insider Program Brad Rossetti explained on Twitter today that the Xbox team is looking into bringing this Estimated Download queue feature into 1910 builds.

It’s not guaranteed yet that the Estimated Download queue feature will make it to the Xbox One 1908 update, and it will all depend on Insider feedback. Microsoft has released a couple of minor Xbox One system updates in recent months, and the Xbox team has yet to share more details about other new features currently in the pipeline for the 1908 and 1910 updates.

Xbox Controller Fortnite Special Edition to be available to purchase separately starting September 17

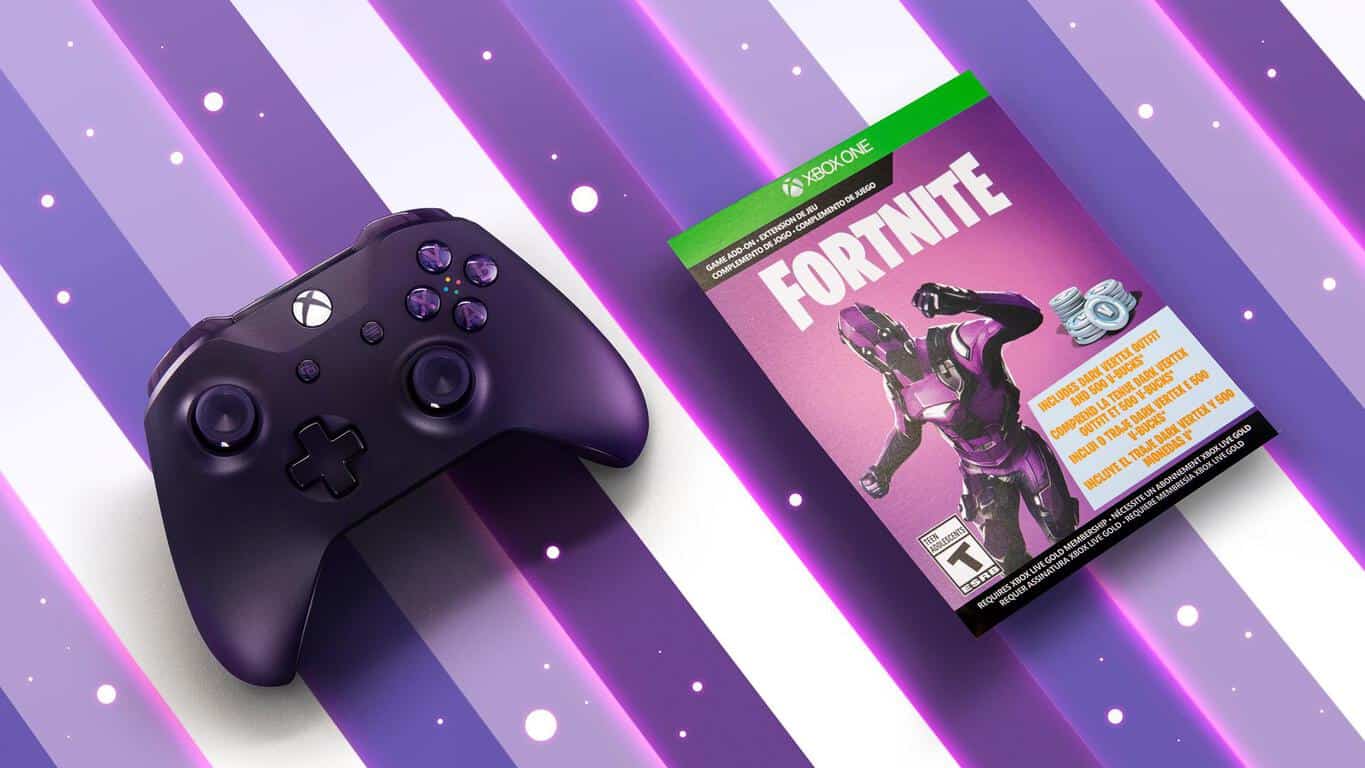
A couple of weeks ago, Microsoft released an Xbox One S Fortnite Battle Royale Special Edition Bundle that came with a purple controller matching the gradient purple console. This Xbox Wireless Controller Fortnite Special Edition may have its fans as Microsoft announced today that it will sell it separately for $64.99 USD starting September 17, and you can pre-order it now.

In addition to the unique purple design, the limited edition controller comes with a Dark Vertex Cosmetic Set download, as well as 500 V-Bucks to spend in Fortnite. If you’re interested, be aware that the $299 Xbox One S Fortnite Battle Royale Special Edition Bundle includes the same Dark Vertex Cosmetic Set download plus an Epic Glider, a Rare Pickaxe (available in Fortnite Battle Royale and Fortnite Creative modes), and 2000 V-Bucks.

Fortnite remains one of the most popular video games ever created, and it’s interesting to see Microsoft trying to capitalize on it. Truth be told, we probably reached peak Fortnite a couple of months ago, but the game is now an esports phenomenon with the Fortnite World Cup Finals about to kick off this Friday, July 26.

Invalid IP address range on Linksys router [EXPERT FIX]

A number of Linksys users have reported that their routers show them this error message: Invalid IP address range. Having this issue will not allow you to use your Linksys router to connect to the Internet.

No matter what your reason for needing access to the Internet is, it can be extremely frustrating not being able to do so because of an error message.

For these reasons, in today’s article, we will discuss some of the best methods that will allow you to get back online in a jiffy. Read on to find out how to do it.

How can I fix Invalid IP address range error on Linksys router?

1. Check and upgrade the firmware of your Linksys router

linksys router - Invalid IP address range linksys
To check:

  1. Connect to your Linksys cloud account by accessing your router’s default IP address, 192.168.1.1 inside your browser.
  2. Enter your router password and click Log in (default password is admin).
  3. Click Connectivity.
  4. Under the Basic tab -> locate the Firmware Update section and check version.

To upgrade:

  1. Download the latest firmware for your router by accessing this link and entering your router model number.
  2. Log into your Cloud account by following the steps above.
  3. Click Connectivity.
  4. Inside the Basic tab -> Firmware Update section -> click the Choose file button.
  5. Navigate to the download location of the firmware -> select it -> click Open.
  6. Click the Start button inside the software -> click Yes.
  7. Wait for the firmware to install and then restart your router.

Want to update your router firmware? It’s easier than you think!


2. Change your Linksys router IP address to fix the error

ethernet cable - invalid IP address range linksys

  1. Connect to your Linksys cloud account.
  2. Click the Connectivity button.
  3. Select the Local Network tab.
  4. Next to Router Details -> click Edit.
  5. Enter the IP address you want to use: (10.0.0.0 to 10.255.255.255; 172.16.0.0 to 172.31.255.255; or 192.168.0.0 to 192.168.255.255)
  6. Under DHCP Server -> change Start IP address to the same IP range of your router (2-254).
  7. Click the Apply button found in the lower right corner of the page.
  8. Click OK on the pop-up message that appears.
  9. Power Off your router for 30 seconds -> power it back On.

In this article, we explored a quick fix for the error message Invalid IP address range on your Linksys router. We would love to know if this guide helped you solve your router error message.

Please feel free to let us know, by using the comment section found below.

READ ALSO:

How to use Smart Lists in Microsoft To-Do

Microsoft To-Do has support for “Smart Lists,” which automatically aggregate items from your regular task lists. To-Do ships with a set of Smart Lists which provide an overview of your pending tasks, so you don’t need to view individual lists. Users of Wunderlist should find the concept familiar.

Smart lists in Microsoft To-Do

You’ll find the Smart Lists in the top section of the To-Do navigation menu. Because they’re provided by the app, you can’t create or customise Smart Lists directly. However, it is possible to remove Smart Lists from display if you’re not going to use them. The following steps were written using the Windows 10 version of the app but also apply to the mobile versions.

The available Smart Lists are My Day, Important, Planned, Flagged Email and Assigned to Me. My Day can’t be removed as it displays tasks you’ve scheduled to complete today, a core feature of To-Do. Important aggregates all the tasks you’ve starred, so you can quickly review high-priority items.

Smart lists in Microsoft To-Do

The Planned list amasses all tasks which have been given a due date, so you can get a view of what’s coming up. Flagged Email shows only tasks which have been created by flagging an email using Outlook. Finally, Assigned by Me, which is only available to Office 365 Business customers, shows tasks created in Microsoft Planner which have been assigned to you using Planner.

To customise the lists which appear, click your profile picture in the To-Do app and press “Settings.” Scroll down to the “Smart lists” section and use the toggle buttons to hide or show individual Smart Lists. You can optionally hide smart lists whenever they’re empty using the “Auto-hide empty smart lists” button. The Flagged Email list is controlled separately, using the “Flagged Email” toggle button in the “Connections” section of the Settings page.

Smart lists in Microsoft To-Do

Because smart lists are fully automated, you should find them a helpful assistant within the To-Do app. Using these lists, you can get a quick overview of your upcoming tasks, without having to click through each list individually. Tasks can appear in multiple Smart Lists – if a task has both a due date and a star, it will appear in the Planned and Important lists. This gives you an easy way to categorise and stay on top of your tasks, without having to manually move them between lists.

Unable to Join Domain on Windows 10 [GUARANTEED FIX]

Did you ever encounter Unable to join domain message on Windows 10? This can be a problem, but in today’s article, we’ll show you how to fix it once and for all.

Why can’t I join a domain in Windows 10?

1. Modify the registry

  1. Press Windows Key + R and enter regedit. Press Enter or click OK.
  2. In the left pane, navigate to HKEY_LOCAL_MACHINE\SYSTEM.
  3. Then go to CurrentControlSet\Services\Netlogon\Parameters.netlogon parameters
  4. In the right pane, locate AllowSingleLabelDnsDomain key and double-click it. Set its value data to 1 and save changes.
  5. If the aforementioned key isn’t available, right-click the right pane and choose New > DWORD (32-bit value) and set the name of the new DWORD to AllowSingleLabelDnsDomain. Now repeat the previous step.
  6. Exit Registry Editor and try to join the domain again. Hopefully, this will address the Unable to join domain error.

2. Check your antivirus

  1. Disable your antivirus and firewall protection temporarily and check if that helps.
  2. If not, try removing third-party antivirus/firewall from your PC.
  3. If your antivirus was the problem, perhaps you should switch to a different antivirus solution.

Luckily enough, the security market has come a long way and you can find several great alternatives. Many antivirus software with high detection rates will not interfere with your system.

Make sure to get an up-to-date security tool with a powerful firewall, large threat database, and multiple layers of protection.

3. Enable SMB v1

  1. Press Windows Key + S and type windows features. Select Turn Windows Features on or Off.
  2. A new window will now appear. Locate SMB 1.0/CIFS File Sharing Support and make sure it’s checked.
    smb enable windows features Unable to join domain message
  3. Now click OK to save changes and restart your PC.
  4. Once your PC restarts, check if the Unable to join domain error is still there.

4. Disable IPv6 on the client side

  1. Open Network and Sharing Center and choose Change adapter settings.
  2. Locate your network adapter and right-click it. Choose Properties from the menu.
  3. Locate Internet Protocol Version 6 (TCP/IPv6) and uncheck it. Now click OK to save changes.
    disable ipv6 Ethernet properties

There you go, four simple solutions that might help you fix Unable to join domain error on your PC. If one of these solutions was helpful to you, feel free to let us know by leaving a comment in the comments section below.

Anthem, Just Cause 4, and more video games discounted on Xbox One this week

Microsoft has refreshed their discounted video games for this week and there are a massive number of titles on Xbox 360 and Xbox One worth checking out.

Note that these discounts are from a combination of the weekly Spotlight Sale, Deals With Gold, and the ongoing Xbox Super Game Sale. An Xbox Live Gold subscription is needed to get the Deals With Gold discount.

On Xbox One, some titles to check out include ABZU (with a 50% discount), Anthem (40%), Apex Legends Founder’s Pack (33%), Assassin’s Creed Odyssey: Ultimate Edition (50%), Dark Souls III – Deluxe Edition (75%), Star Wars Battlefront II (70%), Just Cause 4 (67%), Life Is Strange 2 – Complete Season (25%), and DmC Devil May Cry: Definitive Edition (67%).

On the Xbox 360, some video games worth keeping an eye on are Aliens: Colonial Marines (60%), Bayonetta (60%), Borderlands 2 (60%), Catherine (80%), and Darksiders II (85%).

A full listing of the discounted games are available within the Store tab of the Xbox One dashboard and it’s worth a look due to the sheer volume of video games that have had their prices slashed.

Have you bought any new Xbox games this week? Let us know what they are in the comments below and then follow us on Pinterest for more Xbox gaming content.

Here’s why Windows 10 users are switching to other platforms

People have been dealing with Windows 10 issues since the OS was first introduced in 2015. There are many die-heart Windows fans who prefer to deal with these issues rather than looking for other platforms.

Well, Linux has been around for years but many people are still reluctant to adopt Linux.

Recently, YouTuber Chris Titus Tech published a video to discuss the matter. The video discusses why Windows 10 keeps getting worse with each passing day.

Microsoft really needs to fix these issues

No default Registry Backup

The last three major updates in Windows 10 didn’t include a registry back up. Microsoft apparently made a conscious decision not to back up your system to save disk space.

Privacy issues everywhere

Secondly, Windows 10 has some privacy issues as well. Information related to your PC is continuously being synced to your Microsoft account. Many people don’t want Microsoft to collect their private data.


Check out these privacy breach detection software to keep your data safe.


Moreover, customization has been difficult in Windows 10 v1803 and later versions. The latest OS version, Windows 10 v1903 brings plenty of BSoD errors and other issues.

The same old forced update stories

People hated Windows 10 forced updates. That is why Microsoft introduced a new feature that allows Windows users to delay Windows updates.

However, Microsoft is making it hard for Windows 10 users to access these advanced features. People noticed that these features sometimes disappeared in the early version of  1903.

Windows 10 users started switching to Linux and Mac

Just because of these bad practices, more and more users started switching to Linux. As a matter of fact, Microsoft was the one who pushed them to do so.

However, there are some people who shifted to Mac. Advanced users prefer Mac over Linux as they have to use Microsoft Office and Adobe Creative Suite on a daily basis.

Although they are expensive, people are still ready to go for an expensive option.

The video encouraged users to learn how to use Linux. However, it sparked a lengthy discussion on Reddit. People started discussing the factors why people are not switching to Linux or Mac.

We have listed some of the major reasons why people still prefer Windows over Linux.


Need another reason to switch to Linux? It beat Windows 10 at multi-threaded performance.


Windows 10’s advantages over other platforms

Lack of software support

As discussed before, many content creators and graphic designers prefer to use Windows because it supports tools such as Adobe Photoshop.

However, Linux does not support Adobe Creative Suite. That is why they are reluctant to switch to Linux. Notably, an average user still goes for unpaid options on Windows as well.

There are many tools available on Linux that can do the job for you. Moreover, once people start switching to Linux, Adobe would be forced to develop Linux versions as well.

Linux is not user-friendly

Many people like Windows because of the fact that it has a user-friendly interface. Speaking of the novice users, they still face some issues to get used to Mac and Linux environments.

As a matter of fact, Linux offers a lot more flexibility as compared to Windows. You can change anything from desktop to the File Manager.

Random compatibility issues

Some Linux users highlighted that the battery life on Linux is below average. Moreover, users have to face some other issues “keyboard backlight not working”, installations get stuck on Grub.

Most importantly, Linux has hardware compatibility issues as well.

Windows offers Linux like features

Microsoft recently improved its platform and it now supports Linux features. These features provide enough reasons for many who want to stick to Windows.

Linux is slow

Many people who switched to Linux experienced different issues on the platform. One of the major issues is that Linux is slower than Windows 10. One of the users explained:

That and it’s slower than windows 10 on my laptop. Launch times are annoyingly slow and animations are stuttery. This is with Ubuntu, Linux mint, Zorin and Elementary OS.

However, the Reddit conversation confirms that many people confirmed that they have already shifted to Linux. They are tired of dealing with Windows issues.

The majority of them are gamers who are looking for high performance. Some of them are still using Windows 10 for Oculus games. But they will eventually shift once Linux focuses on VR space.

The security and malware protection offered by Linux is another reason that may force many to switch platforms.

RELATED ARTICLES YOU NEED TO CHECK OUT:

TrickBot malware campaign is after your Office 365 passwords

A new malware campaign surfaced up, and this time the target is user passwords. The campaign is directed at Windows 10 users, but other platforms may be affected, as well.

It uses a password-stealing Trojan called TrickBot. The novelty of this malware, and also the dangerous part, is that it uses real-life information to deliver the payload.

What is this TrickBot malware and what does it do?

More specifically, as discovered by MalwareHunterTeam, a fake Office 365 page that is incredibly similar to a real one, providing even the links that lead to Microsoft, is prompting users to update their browser. trickbot malware password-stealing trojan

The main browsers affected by this are Google Chrome and Mozilla Firefox, and after accessing the page, a message saying that your browser is out of date and you need to update it appears.

For the Chrome users, the message is called Chrome Update Center, and for the Firefox users, the message is entitled Firefox Update Center.

If you click on the Update button, the TrickBot information-stealing Trojan will automatically install on the PC and it will hide behind a svchost.exe process that will not raise any doubts in Task Manager.

After that, it will send sensitive information to a server. First, it’ll send info about the PC, programs, or services. Then, browsing data, login credentials, autofill information, and more importantly, passwords.

How can I protect my data from the TrickBot password-stealing Trojan?

If you’ve already encountered this malware campaign and clicked on the update button, we recommend that you immediately perform a full system scan to try to get rid of the Trojan.


Perform a full system scan directly from Windows Defender. Find out how it’s done right here!


To stay protected at all times, make sure that you use an anti-malware tool, or even better, an antivirus solution to keep you PC and your personal data safe.

If you’re looking for the best antivirus software to protect your data, check out this list with our best picks.

Don’t hesitate to take a look on that list and choose an antivirus that best fits your needs. And don’t forget to always keep your Windows updated, as this may save you from a lot of headaches.

How to enable Clear Browsing Data on Exit in Chromium Edge

Microsoft recently added a new feature to the new Chromium-based Edge browser. This option allows you to choose what information you want to delete from the browser once you close it.

The feature was first spotted by Reddit user Leopeva64. It is currently available in Microsoft Edge Canary 77.0.222.0.

You can configure this feature with the help of a new option named Choose what to clear in Edge Settings.

It allows you to delete download history, cached images and files, passwords, hosted app data, autofill form data, browsing history, site permissions, cookies and other side data.

In case if you don’t want to use this feature, you can still delete your browsing history manually.


Are you looking to switch to a new browser that’s fast, secure, privacy compliant and fully customizable?

UR Browser is the answer.

Editor's recommendation
ur browser
  • Fast page loading
  • VPN-level privacy
  • Enhanced security
  • Built-in virus scanner

Steps to enable Clear Browsing Data on Exit

Keep in mind this option is only available in Edge 77.0.222.0. You need to follow these steps to enable it on your system.

  1. Navigate to the Start Menu and launch Microsoft Edge.
  2. Now, navigate to the right side of the browser and click the menu button.
  3. Click the Settings option and select Privacy and services available on the left-hand side.
  4. Navigate to the right pane and click the button Choose what to clear. You will be navigated to another page.Privacy and Settings
  5. Use the toggle buttons beside each option to close the items that you want to delete. Clear browsing data

Note: If you don’t want to follow the entire procedure, paste the following link into your address bar.

edge://settings/clearBrowserDataOnExit

Choose what to clear feature seems pretty impressive and handy for those who don’t want to clear their entire history. You can save time that is required to manually delete some specific items from your browsing.

If you are interested to try out the new Microsoft Edge, you can download it from the official Microsoft Edge Insider page.

Have you already tried the Choose what to clear feature? Let us know in the comments section below.

RELATED ARTICLES YOU NEED TO CHECK OUT:
Gears 5 Audio Issues on PC and Xbox: How to Fix it

The Coalition announced that the anticipated Gears of War 5 would be released, and players have, since then, been excited to play the game. But many reported audio issues with Gear 5.

Recently, the developers allowed many users to play the game by joining the test drive. Apparently, the test drive was successful, as players reported many bugs in the game. And muffled audio or stutter in Gears 5 was a commonly reported problem.

It is important to understand that different problems can lead to distorted or choppy audio. Keep reading to find out how you can fix audio issues in Gears 5!

How do I fix the sound on my Gears 5 PC?

1. Directly plug the headset

Please keep in mind that you may experience this issue when your headset is plugged into a controller on the PC. It is recommended that you should connect the headset directly to your PC to resolve this issue.

After doing so, check whether you get rid of Gears 5 audio issues. In case the issue persists, verify that the connections are in order and the headset itself is not the problem.

2. Change the sample rate

  1. Open the Control Panel and click on Hardware and Sound.
    hardware and sound
  2. Click on Change system sounds.
    change system sounds to fix gears 5 audio issues
  3. Navigate to the Playback tab, and then double-click on the active headset to open its Properties.
  4. Go to the Advanced tab, and then select the 16 bit, 48000 Hz option from the Default format dropdown menu.
    default format
  5. Finally, click the Apply and OK buttons to save the changes.

The Gears 5 team confirmed that audio issues could be caused by playing the game with a 44.1 kHz sample rate, and changing it to 16-bit, 48000 Hz should fix things.

This audio issue in Gears 5 should be resolved now, and you can continue playing your favorite game.

Before you leave, check some quick tips to improve the sound quality on your Windows PC. If sound is fixed but multiplayer still gives you trouble, see our detailed guide on Gears of War Reloaded multiplayer not working to solve online connectivity issues.

How many of you are experiencing a similar problem while playing the game, and which fix worked for you? Let us know in the comments section below.

Gears 5 Versus Tech Test Trailer revealed and it’s purely awesome

Gears 5 is the latest instalment in the Gears of War third-person shooter franchise, and is set to be released on September 10, 2019.

Yesterday, a Teaser Trailer for the highly anticipated third-person shooter video game Gears 5 was posted on YouTube.

The trailer starts off by introducing a new game mode called “Arcade Mode”, a brand new type of Versus experience for all types of players.

The goal of Arcade mode is to pit two teams against each other and the first team to reach 50 kills wins.

What can we tell so far?

The trailer demonstrates a few of the mechanics, some of which are:

  • Firepower getting increased by killing opponents, in what seems to be a form of leveling system
  • Spectacular finishing moves for opponents that are low on health.

Like all previous Gears of War titles, the game is filled with mature elements such as blood and gore, intense violence and strong language, so user discretion is advised.

As with all previous installments, the trailer mustn’t be taken too seriously.

This is due to the many occasions where you alternate between looking in awe at the bloody visuals and laughing at whatever the characters are doing or saying.

The trailer looks promising as far as the visuals go, especially considering that this is footage from a game still in development.

Speaking of which, the video in no way reflects what the game will look like or how it will behave in its final form.


Curious about what your laptop’s current frame rate? Install one of these FPS counter tools.


Be the first to try it out

Fans eagerly await the launch of this beloved Xbox title and now they have the chance to try it out before the official launch.

All you need to do to join the Tech test is to pre-order Gears 5 or subscribe to Xbox Game Pass or Xbox Game Pass Ultimate.

The Tech Test is completely free of charge.

RELATED POSTS:

How to add the YouTube app in Microsoft Teams

We’ve already touched on some of our favorite tips an tricks in Microsoft Teams, but did you know that a YouTube app can be added to the collaboration service as well? That’s right, you can search for YouTube videos directly from Teams — without ever having to open a new tab or web browser. As we continue our series on Microsoft Teams we’ll now take a look at how you can share the enjoyment of YouTube videos within your company or organization.

Set up is as easy as 1-2-3

Granted that your admin has enabled the feature, adding the YouTube app in Teams is a similar process to adding OneNote. You’ll first need to head to the team channel where you’d like to enjoy YouTube. Next, click on the top bar (under where the name of your channel shows up) and then click the “Add a Tab” (+) button. Finally, you can choose YouTube from the list.

The pop-up dialogue will give you some information as to what privacy and permissions will be required to proceed. Keep in mind, YouTube will have access to the Team member’s email addresses and information, and data might be sent to a third party service. For more information, you also can click on “About” to see more about the YouTube app for Teams. Finally, clicking on “Add to a team” will show you more about what happens with YouTube and Teams under the hood. We’ll have more on that later, but you can proceed with setting up YouTube by clicking on the purple “Install” button.

Adding YouTube to Teams

What can you do with YouTube in Teams?

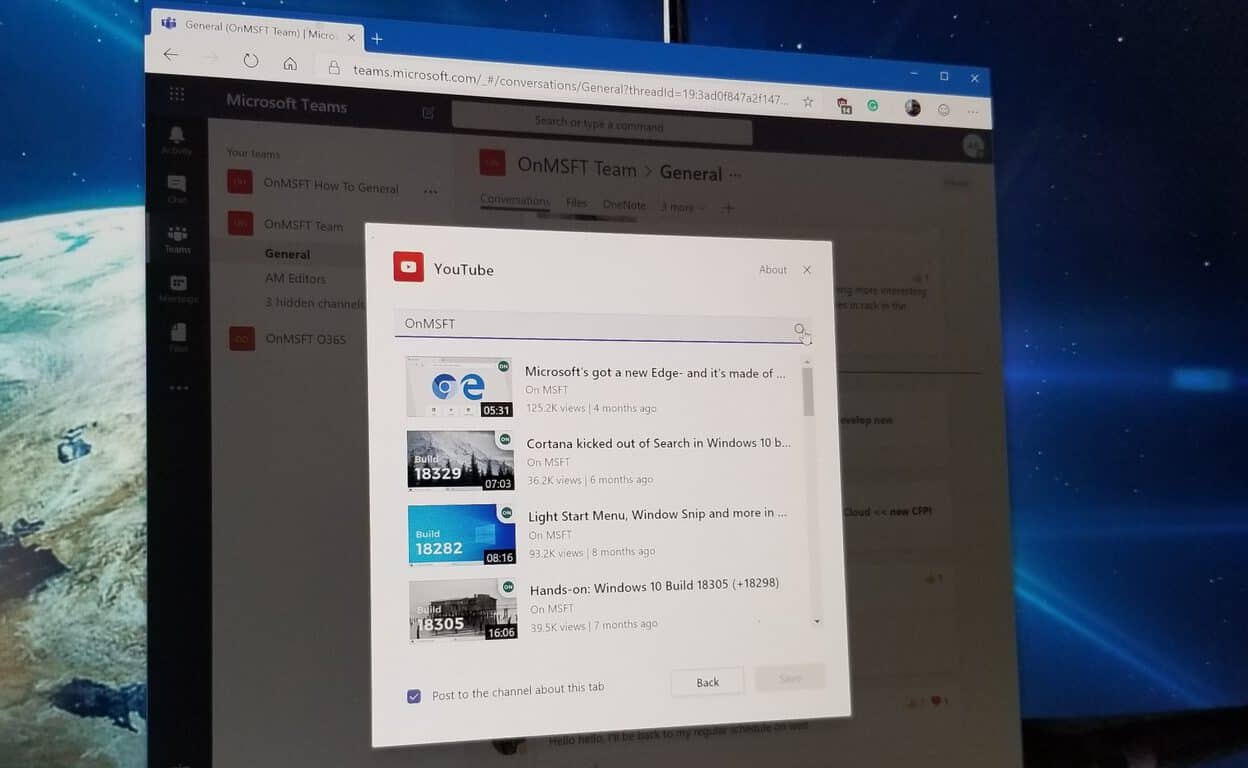
So, what can you do with YouTube in Teams once it is added to a channel? The answer to that question, plenty. For instance, you can share links to playlists and channels. You can also look for videos using the in-built search bar, paste a link, and then share the results to the channel, or pin a video to the tab of the channel itself by clicking on “Save.”

This can be particularly useful in training scenarios, or for sharing important videos across your company or organization. It’s also a nice shortcut to having manually open YouTube and search for content. You could, however, always open YouTube videos in a new tab by searching for, and then right-clicking the video and choosing “Watch on youtube.com.”

Searching for YouTube videos in Teams

How will you use YouTube in Teams?

YouTube in Microsoft Teams is just one small drop in the productivity bucket. There are other apps you can add to Teams as well, including Trello, Asana, Wikipedia, Quizlet, and more. How will you use the YouTube app in Teams, or Microsoft Teams to increase your productivity? Let us know in the comments below, and be sure to keep tuned for more as we continue to dive into the world of Office 365.

Autochk Not Found on Windows 10/11 [QUICK FIX]

Have you received Autochk program not found – skipping autocheck message during a reboot performed by Windows setup? Actually, this error happened to a lot of users and some of them declared that they have also received this error message while trying to clone their operating system to a new drive or on the resized partition.

What to do if the autochk program isn’t found?

1. Run a check disk for the drives and let it repair them

  1. Open Command Prompt as administrator.
    command prompt administrator windows 10 autochk not found
  2. When Command Prompt opens enter chkdsk /R X: (X: represents the drive letter of the volume that you want to check), and press Enter.
    chkdsk command prompt windows 10 autochk not found
  3. If asked to schedule a scan, press Y.
  4. Restart your PC.
  5. During a reboot, your system will perform a chkdsk scan. Bear in mind that this process can take a while, so don’t interrupt it.
  6. Once the scan is finished, check if the problem is resolved. If not, be sure to scan other drives as well.

2. Create a new drive

Attention: You will be asked to work now in your system registry hive, so please make sure to create a copy of it, just to be sure that you are on the safe side.

  1. Go to the Startup recovery environment and to choose Command Prompt. Type regedit and press Enter.
  2. After this, you will have to select the HKEY_Local_Machine hive, then to click on File>Load Hive.
  3. Navigate to Windowssystem32config to search the new drive/partition that you have cloned and select the file named SYSTEM.
  4. Now, you will have to put a name for the hive that will be displayed in the Registry Editor.
  5.  After this, you will have to go to the HKEY_Local_MachineSYSTEMMountedDevices and now search in the list for an entry named DosDevicesC:.

If you don’t have MountedDevice, you’ll have to recreate it manually. To do that, follow these steps:

  1. Type diskpart in Command Prompt.
    diskpart commant prompt windows 10 autochk not found
  2. Enter list disk to see all available storage disks on your PC.
  3. Look for the new disk (you can recognize it by its size) and then write sel disk X (X = this will be the number of the disk).
  4. Now, just write uniqueid disk to see the disk ID.
  5. After this, you will have to compare this ID to the volume IDs from the registry window and find one that matches.
  6. After this, just right-click on Registry, then new-binary value and name it DosDeviceC:.
  7. Then double-click the entry with ??Volume at the beginning and copy the first line.
  8. Now, just paste this into the new entry C: and repeat this for the second line.
  9. In this moment, the first volume entry should have the same Data with your new entry’s data.
  10. In order to finalize this and save your changes in the registry, you will have to select system_new hive and then click on File>Unload hive.
  11. Now you can boot into Windows.

An easier alternative would be to use a reliable partition manager that can seamlessly run separate operating systems on your hard drive and provides you with backup functionality.

⇒ Get Paragon

We hope that these solutions helped you resolve the Autochk not found error. If you found our solutions helpful, let us know in the comments section below.

This Will Cancel All Transfers in Progress [Fix]

Have you ever received the This will cancel all transfers in progress. Are you sure you want to cancel all transfers? message whenever you are trying to shut down or reboot your computer?

A lot of users have complained about having this issue, and in today’s article, we’ll show you how to fix it once and for all.

How can I fix This will cancel all transfers in progress?

Before we proceed to the slightly complex solutions, here are a few quick tricks:

  • Restart the computer.
  • Install all pending Windows updates.

If none work, move to the fixes listed next.

1. Perform a clean boot

  1. Press Windows + R to open Run, type msconfig, and hit Enter.
  2. Navigate to the Services tab and check Hide all Microsoft services. Then, click the Disable all button.
    hide all microsoft services this will cancel all transfers in progress are you sure you want to cancel all transfers
  3. Head over to the Startup tab and click the Open Task Manager.
  4. Right-click the first entry in the Task Manager and choose Disable. Repeat this for all entries on the list.
    disable startup applications this will cancel all transfers in progress are you sure you want to cancel all transfers
  5. Go back to the System Configuration window and click Apply and OK to save changes and restart your PC.

A clean boot starts the PC in a relatively simpler environment without third-party apps or services running. If you don’t find the This will cancel all transfers in progress again, it’s one of the services of apps you disabled earlier to blame.

Turn them on one at a time and, as soon as the message pops up, the one enabled last is the culprit. Once that part is figured out, keep that item disabled.

2. Check for Microsoft Office Upload Center or OneDrive pending updates

  1. Open Microsoft Office Upload Center or OneDrive.
  2. Check if you have any updates pending or downloading.
  3. Wait for the updates to download or cancel them.
  4. Verify if the problem is still there.

3. Check the Recycle Bin properties

  1. Locate the Recycle Bin, right-click it, and choose Properties from the menu.
  2. Now make sure that the Display delete confirmation dialog entry is checked, then click OK to save changes.
    recycle bin properties this will cancel all transfers in progress are you sure you want to cancel all transfers

There you go! One of these quick and simple solutions should help you deal with This will cancel all transfers in progress error message.

Before you leave, check some quick tips to speed up data transfer on Windows.

Let us know which solution worked for you using the comments section below.

Windows Has Blocked Access to This File: How to Fix it

Windows 10 is an amazing platform, but sometimes you won’t be able to access certain files due to an error, with the message reading, To help protect your computer, Windows has blocked access to this file.

This issue can hinder your work, and in today’s article, we’re going to show you how to fix this pesky error once and for all.

How do I unblock files on Windows 10?

1. Change file properties

  1. Right-click on the file that Windows has blocked, and select Properties.properties
  2. In the General tab, check the Unblock option under the Security section, and click OK to save the changes.

That’s it! One of the easiest ways to fix things when Windows has blocked access to a file is to unblock it manually.

2. Run the file anyway

  1. When the error message appears, click on More info.more info to fix windows has blocked access to this file
  2. Click on Run anyway, and you will be able to open the file or app.

3. Edit Local Policy settings

Tip icon Tip
The Local Group Policy Editor is only available on Pro and Enterprise editions of Windows. Users running the Home edition will have to manually install the Group Policy Editor.
  1. Press Windows + R to open Run, type gpedit.msc and hit Enter.
  2. From the options on the left, select User Configuration, expand Administrative Templates, choose Windows Components, and then click on Attachment Manager.
  3. Double click the Do not preserve zone information in file attachments policy.
    Enable 'Do not preserve zone information in file attachments' if PC has blocked access to this file
  4. Select Enabled.
    enable do not preserve zone information PC has blocked access to this file
  5. Click on Apply and OK.
  6. Restart your PC.

This way, Windows won’t tally the file attachments with their zone information anymore, and Windows has blocked access to this file error shouldn’t appear anymore.

Before you leave, check the best antivirus for Windows and get one today if Windows Security keeps blocking files.

If these methods worked for you, feel free to let us know using the comments section below.

Automatically Adjust Selected Columns to Fit Text [How to]

While using the table function in Microsoft Word application you may have noticed that Word will automatically adjust the columns of the selected table to fit the text.

These features are useful, but they can interfere with some users. In the past, we wrote how to remove paragraph symbol, so be sure to check it out.

Today we’re going to focus on the adjustment issue and show you how to fix it.

Where is the AutoFit command in Word?

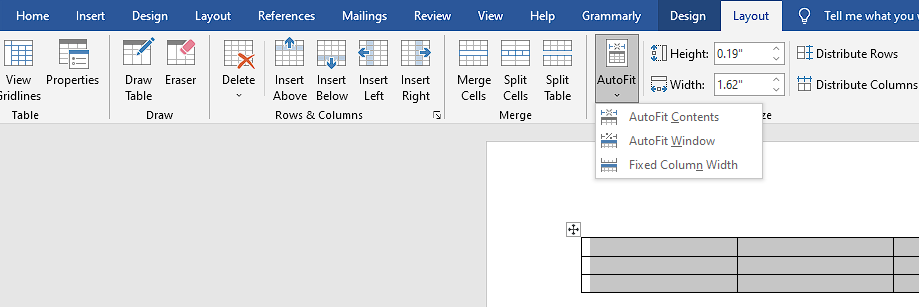
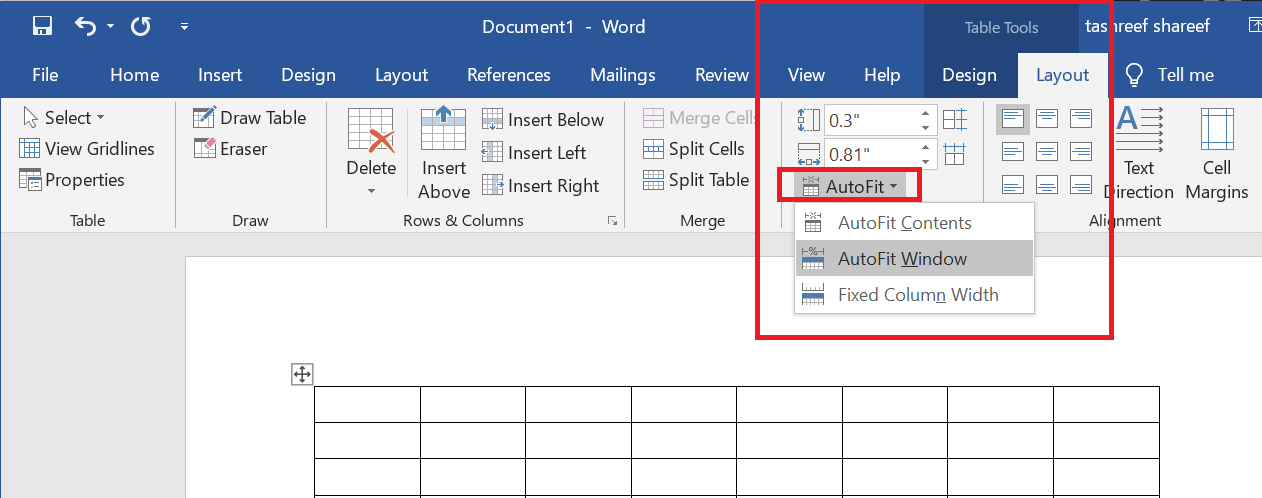
AutoFit command is located in the Layout panel in Microsoft Word. Keep in mind that in order for this feature to show up, first you need to create and select a table.

How do I turn off AutoFit in the table?

1. Turn Off AutoFit

  1. Launch Microsoft Word and open any document with a table in it.
  2. Open the Layout tab and select your table.
    Note: There are two Layout tabs, you need to select the one under Table Tools section (on the right-hand side).
  3. In the Cell Size group, click on AutoFit and select “Fixed Column Width“.
  4. That should turn off AutoFit and set your table to a Fixed Column Width.
  5. Now try to create a  new table and check if the issue persists.

After doing that, Word won’t automatically adjust the selected tables columns to fit the text.

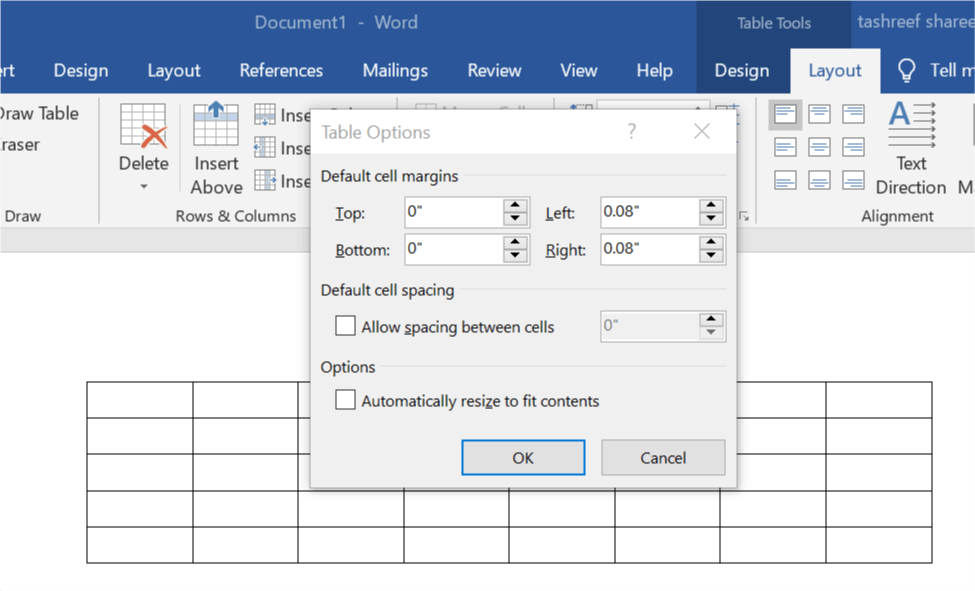
2. Add or change the space inside the table

  1. If you want to manage the Space Inside and between the table cells, here is how to do it.
  2. Click on your Table.
  3. Go to the Layout tab, and in the Alignment group, click on Cell Margins.
  4. Next, click on the Table Options dialog box.
  5. Now do one of the following.
    Customize Table Options
  6. Under Default Cell Margins, enter the measurement you want to add adjust for top, bottom, right and left margins.
  7. Under Default Cell Spacing, Check the “Allow Spacing Between Cells” box and enter the measurement as your per your requirement.
  8. Click OK to apply the changes.

That’s it. The first method should help you to when Word automatically adjust the selected tables columns to fit the text.

To learn more about Word, we have a great guide on how to disable protected view in Word, so you might want to check it out.

Did you find a different way to fix this issue? If so, let us know in the comments below.

Are you sure you want to add remove or change a mail account? [FIX]

Are you sure you want to add, remove or change a mail account message can sometimes appear while using the Mail app. If this happens,  you don’t have to worry too much since this message is usually harmless, albeit a bit annoying.

That being said, let’s see how can we solve this situation once and for all.

How to fix Are you sure you want to add, remove or change a mail account message?

1. Delete your email account from the Mail app

  1. Open the Mail app, then on the left pane, right-click on the email account that you will want to remove from the Mail app.
  2. After this, click on the option Account settings.
  3. While the Account setting page is open, click on the option Delete account from this device.
  4. Now, you will receive a confirmation message.
  5. Click on the Delete button, in order to remove the account from the Windows 10 Mail App.
  6. After the process is complete, a message will appear saying Your account has been successfully deleted.

Need a good email client that works with multiple accounts? Try one of these!


2. Manage accounts in the Mail app

  1. First, you will need to open the Mail App, click the Settings or Gear icon on the left-pane, in order to open Mail settings.
  2. After this, select Manage accounts.

  3. Then, you will have to select the email account that you want to remove from the app.
  4. Now, the Account settings page will be open and you will have to select the option Delete account from this device.
  5. Once you receive the confirmation dialog, just select the Delete button in order to remove the account from the app.
  6. After doing that, you should see the confirmation message on your screen.

We hope that this article helped you fix the problem with Are you sure you want to add, update, or remove your mail account message. If you found our solutions helpful, let us know in the comments section below.

READ ALSO:

Minecraft Invisible Blocks Bug: How to Fix it for Good

A wide number of users have encountered a Minecraft invisible blocks bug that makes it impossible for them to mine the affected block.

This issue can be extremely annoying, especially if you need to mine a large area of blocks that turn into invisible blocks (ghost blocks). For these reasons, in this article, we will detail excellent solutions that have helped some users fix the issue.

How can I fix the invisible blocks bug in Minecraft?

1. Temporarily solve the issue by clicking your mouse

minecraft scene - invisible block glitch minecraft
  1. This method is recommended only in the case that your problem area includes only a few blocks. In order to be able to clear ghost blocks, it is recommended that you right-click on each of them.
  2. If you have to mine a large area of blocks, then follow the 5th method presented in this article.

2. New block trick

minecraft skyscraper resize - invisible block glitch minecraft
  1. Place another normal block inside of it. This method, of course, only applies if the area that you want to clear is pretty small. Otherwise, it would take a long time to achieve noticeable results.
  2. Even though this might seem too easy to be true, in the case of some users, this method helped, so it is worth a try.

3. Modify your view distance in-game settings

  1. In the case of some users, modifying the view distance setting allowed them to get rid of a considerable amount of ghost blocks easily.
  2. To do that, just open your options and change the view distance a bit and check if that solves the problem.

4. Reload all chunks using your keyboard

minecraft image - invisible block glitch minecraft
  1. If you encounter an invisible block, just press the keys F3 + A on the keyboard.
  2. This reloaded all of the chunks, including the ones that went invisible because of the glitch.

5. Disconnect and reconnect

  1. If all of the above-mentioned methods didn’t help you, you could try disconnecting from the server and reconnecting immediately after.
  2. This method seems to reset the entire range of ghost blocks, and it can be a good method in the case that you need to remove a great number of blocks.

With this, you should be able to fix the Minecraft Invisible Blocks Bug effortlessly. If Minecraft LAN is not showing up, check our detailed guide to fix it.

Please let us know in the comment section below if this guide helped you solve the invisible block glitch in Minecraft.

The latest Windows 10 builds break Remote Desktop connections

The recent Windows 10 Insider Preview builds didn’t go well for all users. According to Windows 10 users, many are experiencing problems while using Remote Desktop connections.

Here’s how one user describes the problem on Reddit:

I am running Build 18936-190705-133 on my computers. When I try to connect locally to map a network drive, I get the prompt to enter my account credentials. When I do, it says they are wrong. The same thing happens when I use the RDC program. Any ideas? I have tested both my account passwords and a Pin for the computer.

The Windows Remote Desktop is a useful feature that helps many people to access other systems. However, there are chances that the RDP stops working in certain conditions.

Windows 10 has a history of Windows 10 remote desktop issues. If you search Windows 10 remote desktop issues online you will find thousands of articles covering the topic.

You should try the following step-by-step guide if you are also experiencing similar problems after the installation of the latest updates.

Microsoft needs to work at a fast pace

We can not deny the fact that Microsoft is working to resolve Windows 10 issues. The company has recently resolved three major issues in Windows 10 May 2019 Update.

However, Microsoft is apparently working at a slower pace than it should. We can see that each and every new update brings new issues for Windows 10 users.

Many advanced-level users manage to resolve these issues by searching online. But it is difficult for the average user to read/understand update support articles. They fail to get rid of them and eventually switch their operating system.

Microsoft needs to improve its update process if it really wants to encourage users to upgrade to Windows 10.

Meanwhile, it is better to delay updates on your system to avoid potential issues. You can wait until a stable release is available.

At the time of writing this article, Microsoft has yet to respond to RDC issues. We’ll keep an eye on the matter and will update this article once a permanent fix is available.

An alternative solution you can try is using another remote management software. We recommend taking a look at some of the best remote control tools and see which one suits your needs the most. Mikogo is a popular alternative that needs no downloading.

Have you tried to resolve RDC issues on your system? Which method worked for you? Let us know in the comments section below.

RELATED ARTICLES YOU NEED TO CHECK OUT:
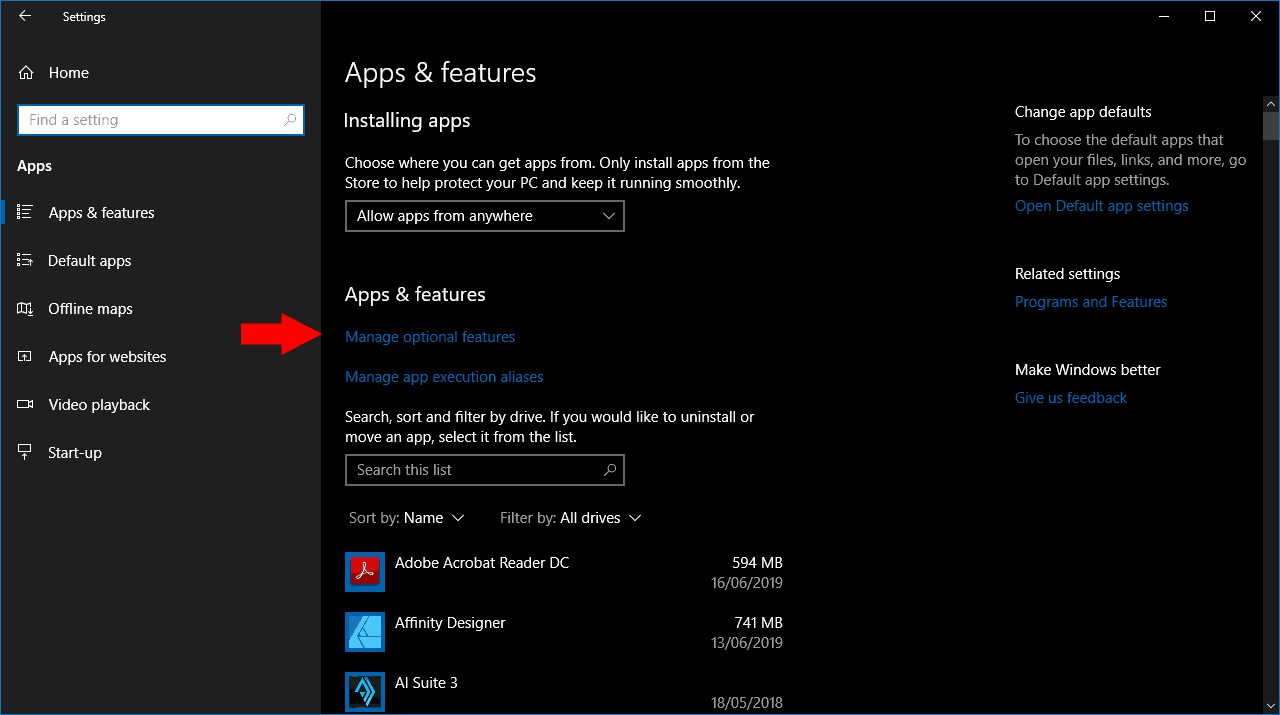
Microsoft To Do is Not Syncing: 3 Ways to Fix it

Microsoft To-Do is an exceptional productivity app available for the Windows platform, but many reported that Microsoft To Do is not syncing.

This can be a problem since you’ll miss important tasks and reminders and that can cause a lot of issues along the way. In case you’re not familiar, we have a great guide on how to assign tasks in Microsoft To Do, so be sure to read it.

As for syncing issues, they can be fixed and today we’re going to show you the best ways to do that.

How do I sync Microsoft To Do between devices?

  • Sign in on multiple devices with the same user account.
  • Syncing will be enabled by default.
  • Every 5 seconds your data will sync between all devices.

Why is Microsoft To-Do not syncing?

1. Check for app bugs

  1. If the issue is not with your Windows computer, then the app on your smartphone can be buggy. For iOS users, the bug was confirmed to have created issues with synching.
  2. Make sure you have updated your app on the phone to the latest version available.
  3. Also, check for any pending updates for the app in the Windows Store.

2. Check your Antivirus and Firewall Settings

  1. If you have an antivirus solution installed, you may want to make sure that your antivirus solution is not blocking the connection preventing successful syncing between the apps.
  2. Try to disable the antivirus temporarily and then try to sync again. Check for any improvements. If the issue persists, turn off the Firewall offered by your antivirus software.
  3. If the issue persists, turn off the Windows Firewall by following these steps.
  4. Click on Start and select Settings.
  5. Select Update and Security > Windows Security.

  6. Click on Firewall and Network Protection.
  7. Select your currently active network ( Domain, Private, Public Network).
  8. Click the toggle switch below Windows Defender Firewall to turn off the Firewall.
    Disable Firewall Windows 10
  9. Now try to sync the to-do list on your app again and check for any improvements.

After doing that, check if Microsoft To Do is not syncing on your PC.

3. Sign out and sign in

  1. If the error is occurring while using Microsoft To-Do web app, try to sign out and sign into the account to resolve the sync issue.
  2. Many users have reported that they were able to resolve the sync issues with their To-Do web app after a quick sign-out and sign-in.
  3. If necessary, do this for your app on the phone and computer as well.

These are just a couple of quick solutions you can use if Microsoft To Do is not syncing on your PC.

This is usually related to your Microsoft account, and if you can’t sync with Microsoft apps, this probably means that you can’t sync your settings in Windows as well.

Did you find a different way to fix this issue? If so, share it with us in the comments section below.

You don’t have permission to build here error in Minecraft [FIXED]

A great number of Minecraft players have reported encountering an error message that says: You don’t have permission to build here. This error seems to appear in a variety of environments, in worlds both new and old, and no matter the permission levels of the users.

This can be extremely frustrating, as it is close to impossible to pinpoint the exact reason for this error. The complexity that all the players of this game appreciate can be a problem in itself when trying to understand the issue. Considering the variety of available plug-ins and settings for each of the plugins, one command can create a wide range of conflicts.

Even though this error message hasn’t been solved completely yet, in this article we will discuss some of the best suggestions moderators and players alike have suggested. Read on to find out more.


How to fix You don’t have permission to build here error in Minecraft?

1. Disable all the plug-ins that you use and re-enable them

minecraft skyscraper resize - you don't have permission to build here minecraft

  1. Disable one of the plug-ins that you suspect might be causing the issue.
  2. Log into your Minecraft world and check to see if the issue persists.
  3. Repeat steps 1 and 2 until you identify the plugin that is causing the issue.
  4. Remove that plugin and install the latest version of it.
  5. Try to see if that allows you to build.

Have a problem with a black screen in Minecraft? Fix it now with this guide!


2. Modify settings inside the WorldGuard plug-in

minecraft pig - you don't have permission to build here minecraft

  1. Open your WorldGuard plugin.
  2. Pull out a command string.
  3. Right-click on a block -> check to see if it lists a region.
  4. If you can see a region being listed, it means that the issue is caused by it.

3. Use Essentials Config

minecraft screen - you don't have permission to build here minecraft

  1. Open up Essentials Configuration window.
  2. Scroll down to the bottom and look for the Essentials AntiBuild section.
  3. Inside that section -> find the option Build (it should be the first option)
  4. Modify it and make sure it is set to False.
  5. If this option is set to True, that means that all the players require to have the Essential Build permission.
  6. As an alternative, you can give all your groups the permanent essentials.build command.

In this article, we explored some of the best suggestions made by experienced users and moderators off the official forums of Minecraft.

We hope this guide helped you. Please try all these methods mentioned above and let us know if this guide helped you solve, or at least identify where the issue is coming from. You can inform us about your experience by using the comment section found below.

READ ALSO:

Are you sure you want to move this folder to the Recycle Bin [FIXED]

You have most likely encountered Are you sure you want to move this folder to the Recycle Bin message on your PC at least once. This message appears when you try to remove files from your PC, and it’s just a standard warning message that appears on every Windows PC.

However, if you’re bothered by this message, and you don’t want to deal with it whenever you try to delete a file, in this guide we’ll show you how to disable it once and for all.

Bear in mind that by disabling this warning the deleted files will be sent to Recycle Bin without confirmation, so you might accidentally remove certain files.

How to get rid of Are you sure you want to delete this file message?

1. Modify Group Policy settings

  1. Press Windows Key + R and type gpedit.msc, then select OK.
  2. Then, you will have to go to Local Computer Policy -> User configuration -> Administrative templates -> Windows components -> File Explorer.
  3. Select Display confirmation dialog when deleting files.
    group policy confirmation dialog deleting files Are You Sure You Want to Move This Folder to The Recycle Bin
  4. Select the Disabled option and click Apply and OK to save changes.

Delete all files from your Recycle Bin automatically with this simple guide!


2. Go to Local Settings

  1. Right-click on the Recycle Bin and select Properties.
  2. Uncheck the Display delete confirmation dialog option. and click OK.
    recycle bin properties window Are You Sure You Want to Move This Folder to The Recycle Bin

We really hope that this article helped you and hope you aren’t receiving the Are you sure you want to move this folder to the Recycle Bin warning message anymore.

Bear in mind that you can revert these settings at any time by just repeating these solutions. If you found these solutions helpful, be sure to let us know in the comments section below.

READ ALSO:

FIX: Copy this file without its properties warning

Have you ever received Are you sure you want to copy this file without its properties message from Windows when you were trying to move or to copy a file? If the answer is Yes, but you don’t know why you received this message and how to stop it from appearing, keep reading this article to find out.

Usually, this pop-up message shows up when you are trying to copy or to move a file from an NTFS drive to another drive that has FAT (FAT16. FAT32 and any other type of FAT). Basically, the NTFS file system is capable of storing some properties, that the ones formatted with the FAT file system cannot, thus causing the message to appear.

This pop-up message is actually a good thing because is a warning, and not a problem to be solved. However, if you don’t want to receive this pop-up message anymore in the future, we have a few solutions for you.

How can I fix the error: Copy file without properties?

1. Convert the destination drive to NTFS

  1. The first thing that you will need to do it will be to connect the FAT drive to your computer.
  2. Open This PC.
  3. Back up all files from the FAT drive.
  4. Now right-click the drive and choose Format from the menu.
    format are you sure you want to copy this file without its properties
  5. Now set the File System to NTFS or exFAT and click Format.
    format settings are you sure you want to copy this file without its properties
  6. After the process is finished, check if the warning message is gone. If the problem is still there, try using different File system setting file formatting.

Need to convert MBR to GPT disk? Here’s how to do it without file loss!


2. You can use a third-party file manager

frigate3 are you sure you want to copy this file without its properties

  1. Some file managers don’t support this warning message, and if you want to avoid it, just switch to an alternative file manager such as Frigate3.
  2. Bear in mind that you don’t have to completely switch to a new file manager, you can use it only if this warning message appears.

There you go, two quick workarounds that might help you deal with Are you sure you want to copy this file without its properties message. If you found our solutions helpful, let us know in the comments section below.

READ ALSO: