Microsoft to disable outdated TLS 1.0, 1.1 for Edge and IE early next year

Microsoft announced today its plans to drop support for Transport Layer Security (TLS) protocol version 1.0 and 1.1 in Microsoft Edge and Internet Explorer 11 in the first half of 2020. This early notice comes just a couple of months before the 20th anniversary of TLS 1.0 on January 19, 2019.

“We are announcing our intent to disable these versions by default early, to allow the small portion  of remaining sites sufficient time to upgrade to a newer version,” said Kyle Pflug, Senior Program Manager, Microsoft Edge. According to data from SSL Labs that Microsoft’s blog post mentioned, 94% of the top websites already support the more recent TLS 1.2 cryptographic protocol, and less than 1% of secure connections in Microsoft Edge are currently using TLS 1.0 and 1.1.

“Most sites should not be impacted by this change,” said Pflug. If most websites already support the TLS 1.2 protocol, its successor TLS 1.3, which will allow faster and more secure connections has been defined by the Internet Engineering Task Force (IETF) in August of this year. Microsoft is already working to bring support for this new version of the protocol in Microsoft Edge.

Microsoft launches new “blush” Surface Laptop 2 for the Chinese market

As Microsoft’s new Surface Pro 6 and Surface Laptop 2 are set to launch in select market this week, Surface head Panos Panay revealed today that a pink variant of the Surface Laptop 2 will be available exclusively in the Chinese market. The new “Blush” variant is a first for a Surface device, though you may remind that the original Surface Laptop was the first in the family to be available in different colours including Burgundy.

Microsoft making a pink version of its notebook is reminiscent of what Apple did with its 12-inch MacBook, which is also available in a “Rose Gold” colour. The Surface Laptop itself has often be referred to as a MacBook Air killer, with some unique characteristics such as a keyboard covered by Alcantara. If the original Surface Laptop was targeted at students, Microsoft seems to be aiming to reach a broader audience with its successor. There’s a new black variant for Surface fans who liked this particular finishing on the original Surface Pro or Surface RT, and Microsoft also ditched the potentially confusing Windows 10 in S Mode on the Surface Laptop 2 in favor of Windows 10 Home.

According to AdDuplex, the original Surface Laptop remains one the least popular Surface devices, with the brand new Surface Go being close to surpass it in usage share. It remains to be seen if the Surface Laptop 2 will be able to stand out next to other Surface devices and premium notebooks from competitors, but it’s definitely one the most stylish Surface devices to date. And with Microsoft launching its first Surface headphones next month, it’s almost like Surface is about to become a new lifestyle brand.

Windows 10 news recap: Microsoft Store preparing for Windows Core OS apps, Feedback Hub gets changes following multiple bugs, and more

Welcome back to our Windows 10 news recap, where we go over the top stories of the past week in the world of Microsoft’s flagship operating system.

Microsoft Store is reportedly getting ready to accept apps targeting Windows Core OS

Microsoft is quietly working on a different operating system, Windows Core OS, which is a modular operating system. Now, a new report suggests that the Microsoft Store is preparing to accept apps that target Windows Core OS, bringing its fruition ever-closer.

Windows 10’s October 2018 update brings audio issues, Microsoft explains the cause

The Windows 10 October 2018 update has been somewhat of a bug-ridden garden. The latest issue to affect users involves a driver update that was sent out via Windows Update, resulting in audio playback not working. Microsoft has explained the cause and released a further update to fix it.

Windows 10 Logo White Featured Hero Generic

More woes for Windows 10 October 2018 update as some HP owners report BSODs

Those who own a HP computer haven’t managed to avoid the issues that others are encountering with Windows 10’s October 2018 update either, with HP users experiencing BSODs. No known fix, other than user-provided workarounds, is available.

Microsoft updates its Windows Insider Feedback Hub in the wake of botched update

Following the number of bugs that have made it into the public release of the October 2018 update, Microsoft is making some changes to the Feedback Hub, asking users to add further information, such as the severity of the issue.

Feedback Hub

That’s it for this week – we’ll be back next week with more Windows 10 news!

FIX: External applications crash while using Outlook


What to do when external applications crash when sending emails via Outlook

  1. Make sure your Outlook is up to date
  2. Repair Outlook from Control Panel
  3. Unpack the executable file for the 3rd party application that crashes

It is not unusual to read that many online users claim their external applications crash while they are trying to send an e-mail through Outlook. This problem has also been addressed by Microsoft through an update in June 2018.

So if you are one of those users who are still experiencing this problem, you can use the solutions listed below.

How do I fix external application crashes related to Outlook?

Solution 1: Make sure your Outlook is up to date

In order to get the last update for Outlook, please follow the steps below:

  1. Open Outlook, go to File and click on Office Account
  2. Navigate to Update Options and click on Update now

According to Microsoft, changes have been made to Outlook in June 2018 to mitigate instances of a crash that happens if you are using a POP or IMAP account.

That is the reason why a good idea is to restart your Outlook up to three times to ensure that the service change is applied. These restarts ensure that the service change is recognized, downloaded and applied successfully to Outlook.

Solution 2: Repair Outlook from Control Panel

If your Outlook keeps causing you problems with other external applications you are using, a good suggestion is to try repair it. If you are using Windows 10, please follow the steps below according to the way your Office is installed:

A) Click-to-run installation

  1. Right-click the Start button and select Apps and Features
  2. Select Outlook and then click on Modify
  3. In the window How would you like to repair your Office Programs, select Online Repair
  4. Click on Repair
  5. Follow the instructions on the screen to complete the repair
  6. Restart your computer

B) MSI installation

  1. Right-click the Start button and select Apps and Features
  2. Select Outlook and then click on Modify
  3. In Change your installation, select Repair and then click Continue
  4. Follow the instructions on the screen to complete the repair
  5. Restart your computer

In order to check whether your Office is Click-to-run or MSI based:

  1. Open Outlook and go to File
  2. Click on Account or Office Account
  3. If you see an Update Options item, you have a Click-to-Run installation. If you do not see the Update Options item, you have an MSI-based install.

Solution 3: Unpack the executable file for the 3rd party application that crashes

Users reported that third-party applications crash when the executable file is packed with an exe-packer such as ASPack. Uncompressed executable file seems to work fine so please do try this solution as well.

We hope that you found this article to be useful and it helped you solve the fact that your third party applications crash while using Outlook.

If you have tried other methods as well that proved to be functional, please let us know in the comments section down below.

READ ALSO:

Posted in Fix

Microsoft heads to the arctic circle to bring STEM skills to girls in Lapland

Getting more women and girls involved and participating in the tech industry has been no short feat and in many instances has been a monumental uphill battle for schools, investors, and companies as most efforts buck against a systemic gender bias decades in the making.

With that said, Microsoft and others, continue to put forth efforts to stimulate a curiosity of technology amongst girls.

In partnership with the citizens of Äkäslompolo, the Junior Achievement Finland group and the European Social Fund, the company co-hosted the recent Arctic Girlz in Tech event for some odd 50 girls between the ages of 15 and 16.

The AGT comprised of several inspirational workshops fully equipped with latest and greatest from Microsoft, encouraging young women who have a passion for science, technology, engineering and maths (STEM) to explore a future in the technology industry.

The young ladies attending the event were able to explore technologies such as Microsoft’s HoloLens, 3D Printing, and more. Another perk of attending the world’s northernmost tech event of 2018, was the inclusion of courses on entrepreneurship that should help many of them work towards owning their business or funding their first incubator.

More importantly, the young ladies were also taught code through coding workshops and the use of Kodu Game Lap – a program designed to let children build their own games using rudimentary programming language.

With all things considered, the event was a relative success and according to the Coordinator of the European Social Fund Kaisa Kylä-Kaila, “we need more events like this where students have a chance to try technology.”

FIX: Free Reservation for Windows 10 not Working

The first version of Windows 10 was released more than two years ago. As a result, users of Windows 7 and Windows 8 operating systems are constantly reserving their free version of Windows 10 through the ‘Get Windows 10′ app.

But a lot of users are complaining that the free reservation of Windows 10 is not working for them, and they’re worried if they’ll managed to get their free copy of Windows on time.
get windows 10 for free wind8apps

How to reserve your free upgrade to Windows 10?

Well, there is a solution for this problem, but before we get to it, we’re going to give you a list of common problems which could prevent you from reserving a free version of Windows 10. Here’s the list of the most common issues:

  1. You didn’t receive necessary update which gives you the Get Windows 10 app
  2. You deleted the necessary Windows Update functionality
  3. You don’t have a genuine version of Windows
  4. Your computer is running Windows 7 Enterprise, Windows 8/8.1 Enterprise, or Windows RT/RT 8.1, which are excluded from Get Windows 10 for free offer

How to fix Windows 10 Free Reservation issues

Running Windows Update will fix the first two issues, and you’ll be able to get Windows 10 for free. But if you don’t have a problem with any of issues mentioned above, you can try some more actual fix, which will require a system tweak. Here’s what you need to do:

  1. Open Notepad
  2. Copy the following text and paste it in Notepad:
    • REG QUERY “HKLMSOFTWAREMicrosoftWindows NTCurrentVersionAppCompatFlagsUpgradeExperienceIndicators” /v UpgEx | findstr UpgExif “%errorlevel%” == “0” GOTO RunGWXreg add “HKLMSOFTWAREMicrosoftWindows NTCurrentVersionAppCompatFlagsAppraiser” /v UtcOnetimeSend /t REG_DWORD /d 1 /fschtasks /run /TN “MicrosoftWindowsApplication ExperienceMicrosoft Compatibility Appraiser”

      :CompatCheckRunning

      schtasks /query /TN “MicrosoftWindowsApplication ExperienceMicrosoft Compatibility Appraiser”

      schtasks /query /TN “MicrosoftWindowsApplication ExperienceMicrosoft Compatibility Appraiser” | findstr Ready

      if NOT “%errorlevel%” == “0” ping localhost >nul &goto :CompatCheckRunning

      :RunGWX

      schtasks /run /TN “MicrosoftWindowsSetupgwxrefreshgwxconfig”

  3. Click File, Save As
  4. Name the file ReserveWindows10.cmd
  5. In the dropdown menu Save as type select All Files
  6. Select the location for the file (for example C:Usersyour_nameDesktop) and click Save
  7. Now, right click on the Start Menu button and open Command Prompt (Admin)
  8. Run the file you just saved by entering its location in the Command Prompt (C:Usersyour_nameDesktop) and hit Enter

The Microsoft Compatibility Appraiser could take some time until it finishes the process, so be patient. If the process gets stuck, then you don’t have the necessary update. So, check for updates once again, and then repeat the process.

This should solve your problem with the free reservation of Windows 10, but if you’re unable to even see the Get Windows 10 app icon in the taskbar, you can try some solutions listed in this article.

UPDATE: Windows 10 Free Reservation is no longer available for users. However, this doesn’t mean that you can’t upgrade to Windows 10 for free.

Indeed, although the free upgrade offer is officially over, you can still download the latest Windows 10 OS version at any moment. All you need to do is make sure that your computer meets the minimum system requirements necessary to run the OS. Once you’ve checked this off your list, you can go to the Windows 10 Upgrade page and install the OS on your machine.

For more information on how to download the Windows 10 October 2018 Update on your computer (which is the newest OS version at the time of writing), you can check out this guide.

RELATED GUIDES TO CHECK OUT:

How to Take a Screenshot in Windows 10

Taking a screenshot is always useful. You never know when you might need to capture your screen image. And in Windows 10, taking a screenshot is not much more complicated than in previous versions of Windows. Here are a few methods that you can use to capture a screenshot in Windows 10.

Methods to take a screenshot in Windows 10

1. Press Print Screen on your keyboard

Probably the fastest way to create a screenshot in Windows is to press the Print Screen key on your keyboard. Pressing this button will automatically capture the current scene on your screen and you’ll be able to save the picture through some picture-editing software, like Paint. Here’s exactly what you need to do:

  1. When you want to make a screenshot, press Print Screen key on your keyboard
  2. Open Paint and go to Paste
  3. If you want to, you can crop your image or edit it
  4. Go to Save, name your screenshot and save it to a desired location

This is probably the most common way of taking a screenshot in Windows operating systems, but you can try some other way if you prefer.

2. Use Microsoft Snipping Tool

Using Windows’ built-in Snipping Tool is probably the fastest way of capturing a screenshot in Windows, but it’s not as popular as using the Print Screen key. To take a screenshot with Snipping Tool, do the following:

  1. Go To Search, type snipping tool, and open Snipping Tool
  2. Go to New
  3. Mark the part of the screen you want to capture with a rectangle
  4. Go to Save Snip

As we expect Snipping Tool to receive the first update since its introduction in Windows 10, you will have even more options of taking a screenshot.

3. Use a screenshot taking tool

You can also use some third-party software for taking screenshots, but since Windows itself offers a couple of options for this, using third-party software is not necessary, and I recommend you to stick with the methods I showed you above.

But if you’re still seeking for a useful tool, Loom appears to offer the best value for the money. You may record and edit your videos and pictures in addition to record internal audio.

How to take screenshots on HP laptops

Taking a screenshot on HP laptops is not that straightforward. On most HP laptop models, hitting the Print Screen key is not enough. In order to take a screenshot on your HP computer, you need to press the Fn key and the Print Screen key at the same time.

How to take screenshots on Dell and Asus laptops

On particular Dell and Asus computers, you need to use the same method described above in order to take a screenshot. So, press the Fn key and the Print Screen key at the same time to capture your screenshot.

How to take a screenshot on your Windows 10 Surface device

There are several methods that you can use in order to take a screenshot on your Microsoft Surface device.

  1. Press the Windows logo located in the front of the device and push the volume down button
  2. Press the Windows key and the Print Screen key
  3. Press the Alt and Print Screen keys to capture only the active window
  4. Press the top button of your Surface Pen twice.

There you go, this is how you can take screenshots on your Windows 10 devices.

FIX: Two Control Panel Windows Open in Windows 10/11

multiple control panels wind8apps

Although Windows 10 is far more stable than it was when the Insider Program started, users are still facing some strange issues. This time, some users complained about how every time they open Control Panel, two windows show up. But this is a minor issue, and it can be resolved easily.

Why does Windows open two Control Panel screens?

Users report that when they try to open Control Panel, two windows of Explorer open instead of one, which is expected. This problem occurs when they try to open Control Panel with Cortana, but also when they access it from Win + X menu. Simply said, howsoever they open Control Panel, two windows show up, and it’s very annoying.

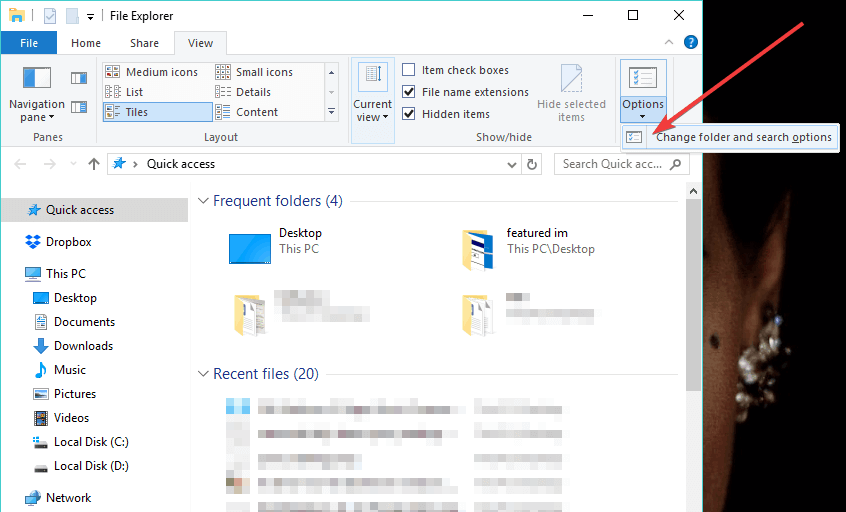
1. Edit folder and search options

But, there’s an explanation why this happens. Due some kind of bug in Windows 10, whenever you try to open Control Panel, it will open twice if the option “Lanuch folder windows in a separate process” in File Explorer is enabled. To fix this issue, just follow these steps:

  1. Open File Explorer
  2. Click the File button and choose Change folder and search optionsChange folder search options
  3. Go to the View tab and untick Launch folder windows in a separate process

That would be all, you can open Control Panel again and you’ll see that only one window will open. We’re sure that Microsoft will get rid of this and other small bugs of the kind by the time the next Windows 10 version comes out, or maybe even in some of the coming builds. But until then, small workarounds like this will get the job done.

2. Update your computer

Make sure that you’re running the latest OS updates on your machine. Microsoft regularly rolls out new system updates to make the OS more stable and add various bug fixes and improvements.

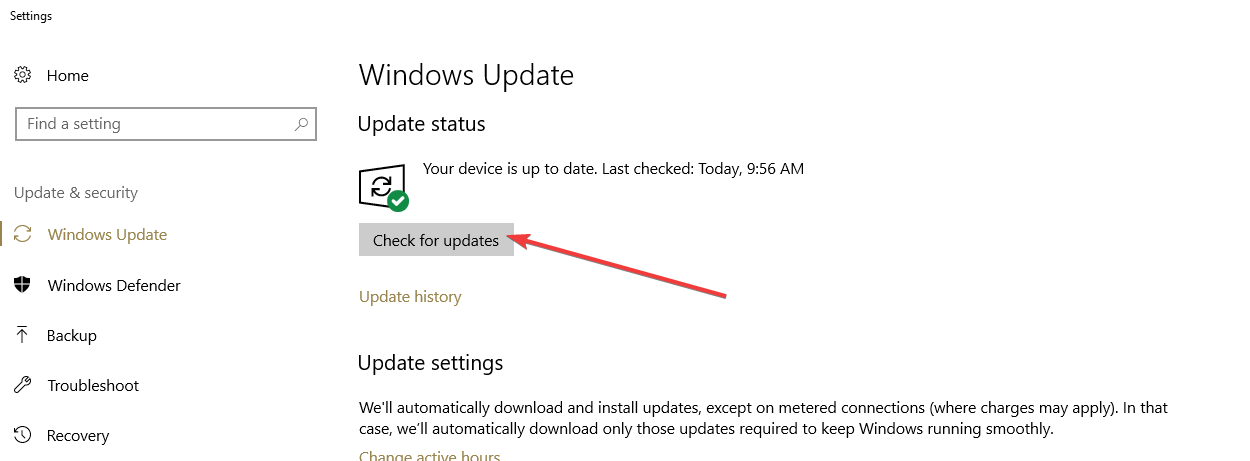
Go to Settings > Update & Security > Windows Update > Check for updates.

windows 10 october update check for updates

If you have any comments or suggestions, write them down in the comments section below, we’d certainly like to read your thoughts.

How to Fix “The Drivers for This Device Are Not Installed. (Code 28) “Bluetooth Error

Error Code 28 means the driver for a specific device is not installed or Windows just cannot install it for some reason.

This can affect various drivers, including the Bluetooth driver on your computer. To help you ou,t we have put together a few workarounds that should get your Bluetooth driver installed and working on your laptop.

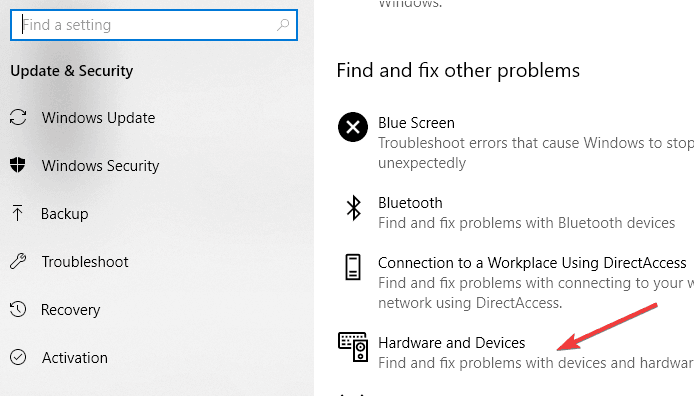
Solution 1: Run the Hardware and Devices Troubleshooter

You can run Hardware and Devices Troubleshooter to see if something’s wrong with your Bluetooth device. If Windows finds some errors, it will provide you with the appropriate solution. Here’s what you need to do to run Hardware and Devices Troubleshooter:

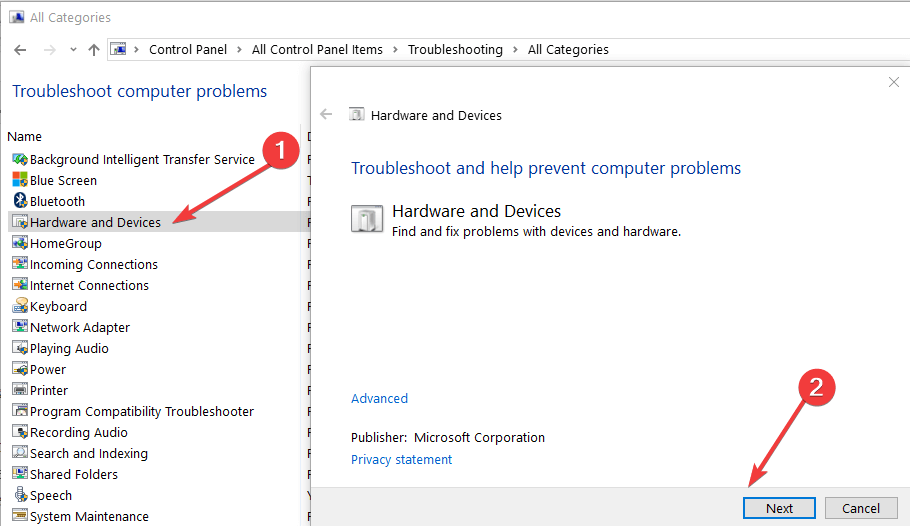
  1. Go to Search, type troubleshoot, and open Troubleshooting
  2. Click on Hardware and Sound, and click on Hardware and Deviceshardware and devices troubleshooter control panel
  3. Let the wizard scan your devices for errors

Solution 2: Update your Bluetooth driver

Many users confirmed that updating their Bluetooth drivers fixes this issue. Here are the steps to follow:

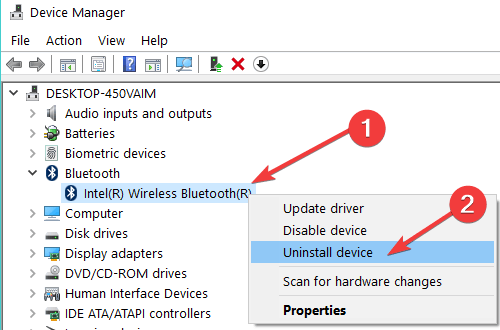
  1. Open Device Manager > select Bluetooth driversuninstall bluetooth drivers device manager
  2. Right-click on the driver > select Uninstall
  3. Now, go to View > Check for hardware changes to install the latest Bluetooth drivers.

An easier and safe alternative would be to use third-party software that updates the latest drivers automatically. The tool will initiate a deep scan and find the most suitable Bluetooth drivers within seconds.

Fortect Driver Updater has a library of practically all the drivers that updates itself on a regular basis. With a single click, it also detects and installs all the drivers for regularly used utilities, such as a Bluetooth driver.

It works with all versions of Windows and makes updating drivers a breeze. Fortect Driver Updater may be set to find outdated drivers automatically. It analyzes the computer, generates a status report, and restores the system to its original configuration, without the hassle of looking for the right compatible Bluetooth driver.

⇒ Get Fortect Driver Updater

Solution 3: Run the Update Troubleshooter

If everything is okay with your Bluetooth device, you can run an Update Troubleshooter. This step especially applies to users of Windows 10 TP who have problems with their Bluetooth driver.

Microsoft delivers new drivers through Update almost every day, and if your Update service doesn’t work properly, you’ll be unable to receive a driver update for your Bluetooth device.

To open Updates Troubleshooter, open Windows Troubleshooter (as shown in step 1 above), and click on Fix problems with Windows Update, under System and Security.

windows update troubleshooter control panel

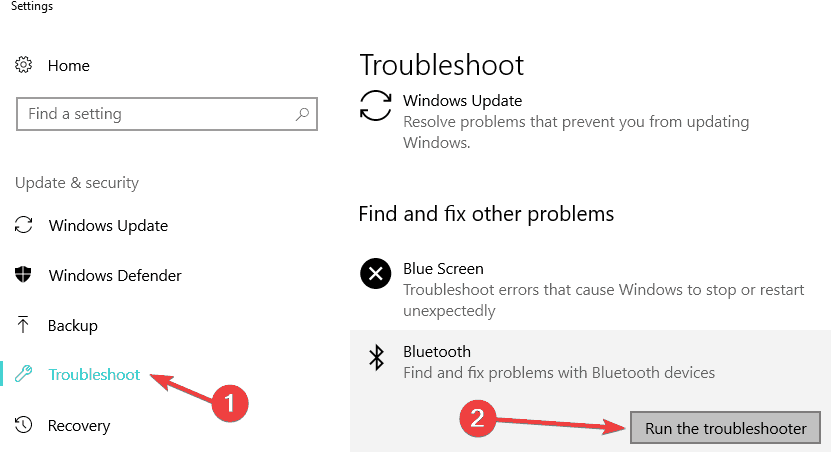
On newer Windows 10 versions, you can launch both these troubleshooters from the Settings page. Go to Settings > Update & Security > Troubleshoot and simply launch the tools.

troubleshoot hardware and devices

Solution 4: Run the Bluetooth troubleshooter

Since error 28 is a Bluetooth-specific error code, you can also run the Bluetooth troubleshooter, as shown in the screenshot below.

bluetooth troubleshooter windows 10

Solution 5: Contact manufacturer support

Laptop manufacturers usually provide all need support to their users. So, go to your laptop’s manufacturer’s website and search for a Bluetooth driver. You can also contact their support service, and I’m sure they’ll give you any needed assistance.

While I was searching for solutions to this problem, I noticed one interesting thing. Some laptops have only one button for turning on both WiFi and Bluetooth, so if this is the case with your laptop, press that button a couple of times, and your Bluetooth should activate, letting Windows install drivers normally.

If you need help with Bluetooth drivers, check out how to download for Windows 11, install on Windows 10, or reinstall on both Windows 10 and Windows 11, plus the latest updates from Intel and their Bluetooth driver releases.

How did you manage to resolve this issue? Let us know in the comment area below.

Keep Your PC on Until This is Done: 3 Ways to Fix it

Keep your PC on until this is done message appears while updating or installing Windows. However, many reported that they are stuck on this message.

This can be a problem since you won’t be able to complete the installation and access your files at all. However, there are ways to fix this problem, and today, we’ll show you how.

Why is the update restart taking so long?

  • There might be issues with driver compatibility.
  • Installation files might be corrupted.
  • In some rare instances, hardware issues can cause this problem.

How can I fix Keep your PC on until this is done message?

1. Restart your computer

  1. Press and hold the Power button for a couple of settings, until your computer shuts down.
  2. After that, turn on your computer and check if you’re able to boot normally.
  3. Alternatively, you can press the Restart button on your PC.

2. Use System Restore

  1. Restart your PC several times during the boot.
  2. From the list of options, select Troubleshoot.
  3. Next, select Advanced options.
  4. After that, go to System Restore.
     
  5. Select your user account and enter its password.
  6. When System Restore opens, click Next.
  7. Select the desired restore point and follow the instructions on the screen.

Your system should be restored to the latest working configuration now.

3. Use the Windows install disc

  1. Insert Windows installation media and boot from it.
  2. Select the Upgrade option.
  3. Follow the instructions on the screen to complete the process.

Keep your PC on until this is done error message can prevent you from installing updates, but hopefully, this guide helped you fix the issue.

If you’re having more issues, our guide on Windows 10 installation is stuck should be able to help you fix the problem.

Did you find a different solution? If so, share it with us in the comments below.

Microsoft sets October 24th for 1st qtr earnings release, gets some good news after a tough week in the market

If you follow the US stock market (and recently I do, a little bit too closely), you’ll know that this was a tough week for stocks, especially tech ones. Microsoft, before rebounding slightly today, took quite a hit for the week, dropping from an early high of 112.97 to a low of 105.46, and other tech stocks and the market in general took a beating. Luckily the news is a bit better today, and the company got a bit of extra help this morning as financial analysis firm Macquarie upgraded Microsoft stocks from “Neutral” to “Outperform,” suggesting a target price of $121.

In somewhat related news, Microsoft is set to share its first quarter earnings, announcing that it will publish fiscal year 2019 first-quarter financial results on October 24th. As usual, there will be a live webcast of the earnings conference call at 2:30 Pacific time. We’ll be watching closely, but expect the company to continue on the roll it’s been on, market glitches or no.

Can’t find your Windows 10/11 Product Key? Check this out

If you want to perform a fresh installation of your Windows 10, 8.1 but you didn’t remember your product key, don’t worry there’s a way to find it.
How To Find Your Windows Product Key

Use Jelly Bean Key Finder

To find your product key, you’re going to need a help from third-party software Jelly Bean Key Finder. You’ll probably think that this is some sort of tool for Android devices, but don’t worry, it works in Windows too. It will help you to quickly locate your product key on your computer. Here’s what you need to do:

  1. Download Magical Jelly Bean and follow the installation process to install it on your computer.
  2. Open the program, the shortcut will probably be placed on your Desktop.
  3. Go ahead and scan your installations to find product keys of supported programs, this will include your Windows and Office versions, but also other listed programs
  4. When the scan is complete, the tool will display a window with entries in the left pane for whatever installed versions of Microsoft Windows it detected.
  5. Click the entry of Microsoft Windows to see the key and other information about your system (Don’t confuse it with Product ID, because it’s not what we’re looking for). You’ll find the key under CD Key on the right side of the window. Copy or write this information down in order to use it in your Windows installation later

That’s all, now you have your Windows product key again and you can install a fresh copy of Windows whenever you want. Maybe you don’t like the idea of using a third-party software for system task like this, but don’t worry this tool is trustworthy and you shouldn’t be afraid to use it.

How to find your Windows 10 product key

If you`re using Windows 10, here’s what you should know. First of all, if you purchased a boxed copy of Windows 10, you`ll find the key on a label in the box. If bought online, you should receive the key in an email. In case your Windows 10 it’s a free upgrade or it came with a new PC, there may be no key due to a ‘digital entitlement’ method.

Another method is ProduKey, a product that can retrieve your Microsoft Windows original key. Here is a link where you can download the software. For more information about this product, you can check out this guide.

For additional information on how to change your product key or fix Windows 10 product key related issues, you can check out the posts listed below:

If you have any additional comments or suggestions related to this article, please write them down in the comments section below.

Tune it to the Windows Insider webcast this morning at 10:30AM PDT

The Windows Insider webcast is making a comeback this Friday, and you can tune in on the dedicated Mixer channel starting at 10:30AM PDT. This episode may be pretty special considering that Microsoft has finally explained what went wrong with the October 2018 Update release, and we may hear more about it this morning.

Additionally, Microsoft invited the winners of the #Insiders2Campus contest to visit Microsoft’s headquarters this week, and the lucky winners will apparently make an appearance during the webcast.

Microsoft rarely releases new Windows 10 Insider builds on Fridays, but the webcast could be a good opportunity to ship a new 19H1 build to Fast and Skip Ahead Insiders. Both rings received the build 18252 last week, and we know many of you are ready for a new one. Make sure to listen to the webcast as an announcement may be made this morning, buy we’ll all have to tune in to find out.

Microsoft Store is reportedly getting ready to accept apps targeting Windows Core OS

A couple of weeks ago, Microsoft demoed at Ignite its new Surface Hub 2 running Windows Core OS. This new operating system will replace what is currently called “Windows 10 Team” on the first-generation Surface Hub, and it’s also expected to power the HoloLens 2 as well as Microsoft’s rumored “Surface Phone.” From what we’ve learned, Windows Core OS will be a modular version of Windows that has been created for new form factors, and it will get rid of all the legacy stuff that is unecessary on non-PC devices.

We still don’t know many details about Windows Core OS except from what we’ve seen from that this Surface Hub 2 demo. However, Italian blog Aggiornamenti Lumia reported yesterday that the Microsoft Store is getting ready to accept apps targeting the new OS (via Neowin). According to the report, the first applications exclusively compiled for Windows Core OS already exist: The file in the screenshot below mentions an app named “DogfoodAppWCore1” which targets “Windows.Core.”

The Italian blog also claims that Microsoft has already updated its Windows Dev Center to allow select developers to distribute Windows Core OS apps through the Microsoft Store. The Redmond giant has yet to discuss the new OS in details, and explain what this new platform means for existing UWP apps and legacy desktop apps. We’ll likely hear more next year as Microsoft gets ready to release its Surface Hub 2 (and maybe HoloLens 2) in the market.

Microsoft powers former Indian captain Anil Kumble’s new tech for enhanced cricket-watching experience

Microsoft has partnered with Spektacom to help the Indian startup launch Power Bat, a new technology to help players improve their game and offer commentators, fans, and viewers with a new and unique way to engage with the sport.

Spektacom Technologies is founded by Anil Kumble, former captain of the Indian cricket team and one of the greatest bowlers the game has ever seen. The startup was incubated by Microsoft as part of its ScaleUp program in India.

The partnership is geared towards bringing a revolutionary broadcast experience to Star India, the leading cricket broadcaster in India. Star Sports used the technology successfully in local cricket leagues in India recently to provide real-time statistics and insights straight off the oval. For the first time ever, a broadcaster was able to provide data behind any shot played in a game for experts to comment and analyze.

Anil’s vision is to bring sports closer to fans through interesting ways of engagement using real-time sports analytics without disrupting the game or obstructing the players.

Power Bat is an IoT-based sensor sticker the size of a credit card that weighs just 5 grams – all powered by the Microsoft Azure cloud platform using AI and Internet of Things (IoT) services. The unique sticker sticks to the rear blade of the bat under a regular sponsor sticker, achieving the aim of being non-intrusive.

It captures details such as the bat speed, the twist of the bat at the time of the impact with the ball, quality of the shot, and the power of the shot. All this information is analyzed to get the power of the shot, which the team calls the ‘Power Spek’ score.

Using Bluetooth Low Energy (BLE), the sensor connects with an edge device called Stump Box that is buried behind the wicket. The data from the stump box is transferred and analyzed in Azure and shot characteristics are provided to broadcasters in real-time. During practice or coaching, the same data can be viewed through a mobile app, to do away with guesswork and a selector’s ‘gut feeling’ to spot new talent.

Given that cricket stadiums have wireless access restrictions, to ensure secure communication between the bat, edge device, and Azure, the Stump Box has been powered by Microsoft Azure Sphere-based hardware platform.


Technologies like AI and IoT have the potential to usher in a new era for sports, unlocking data-driven insights for players and coaches and creating more immersive fan experiences. Together with Spektacom and Star Sports, we are bringing the power of Azure and Azure Sphere to one of the world’s most celebrated games – cricket – transforming how it’s played, coached and watched.

– Satya Nadella, CEO, Microsoft, who’s also a big cricket fan

At the launch, Peggy Johnson, Executive Vice President at Microsoft, said that while we are already seeing the impact of connected devices in other industries, the company believes that with the advancements in its AI and cloud services, this is just the beginning of what’s possible for not only cricket but all sports.

Microsoft is looking to leverage its intelligent cloud and productivity solutions to help sports organizations worldwide to connect with fans, optimize team and player performance, and manage their operations in new, innovative ways.

Xbox One PUBG test server returns with new weapons, vehicles, and improved BP system

The PTS test server for PlayerUnknown’s Battlegrounds (PUBG) returns to the Xbox One playerbase today. Anyone who owns PUBG on Xbox One can download the Test Server files from the Microsoft Store and participate in the testing of new weapons, vehicles, and other new gameplay features.

The test server is kind of like an open beta and allows the game’s developers to test specific additions before bringing them over to the main game servers for everyone to experience.

Those who choose to play on the test server will get to try out the new Beryl M762 and MK47 Mutant guns and ride the Sanhok-exclusive scooter and tukshai vehicles. Gamers will also be able to try the new MP system (which now rewards by time played and rank) and see the Xbox Controller loading screen.

Here’s the official list of smaller gameplay changes:

  • Added ‘TPP Aim Camera Position’ to options
  • Reset to Right Shoulder (default setting)
  • Camera will always be positioned above the character’s right shoulder
  • Reset to Left Shoulder
  • Camera will always be positioned above the character’s left shoulder
  • Latest Peek Shoulder
  • Camera position automatically moves to the direction you last leaned
  • Latest Aim Shoulder
  • Camera remains in the last ADS direction
  • In this setting, the camera position won’t be changed by leaning while not in ADS or scoping
  • Added a new attachment: the Laser Sight
  • Bullet spread is reduced when hip firing and soft-aiming
  • The Laser Sight fits on weapons with a lower rail slot available, taking up the grip slot.
  • Added the improved Marker/Ping System first introduced for testing on the 8/1 test server update
  • Using (R) button, you can create a marker where you are aiming on the compass at the top of the screen (not visible in the world)
  • All team members can see this marker on the compass
  • After setting the marker, there is a 2 second cooldown before you can mark again
  • The marker on the compass will automatically disappear after 5 seconds
  • When the ping markers overlap, the closest located marker will be shown on top.
  • Increased maximum sensitivity (10 → 20)

Will give the PUBG test server a go or do you prefer to only play on games that are perfected for public gameplay? Share your thoughts with the community in the comments below and then follow us on Pinterest for more Xbox gaming content.

PUBG: BATTLEGROUNDS
PUBG: BATTLEGROUNDS
Developer:
KRAFTON, Inc.
Price:
Free


KB4464330 causes BSOD errors, deletes audio drivers, and more

The very first Windows 10 October 2018 Update patch is here. Microsoft rolled out cumulative update KB4464330 for Windows 10 v1809 on Patch Tuesday, adding a series of security improvements to the new OS.

However, not all Windows 10 version 1809 users are satisfied with the update — quite on the contrary. Update KB4464330 also brings issues of its own, and some of these problems are quite severe.

KB4464330 reported bugs

KB4464330 won’t install

Many users haven’t been able to install this patch due to error 0x80070020.

i’m trying to install “2018-10 Cumulative Update for Windows 10 Version 1809 for x64-based Systems (KB4464330)” update, but it keeps failing with error code “Error 0x80070020”, i’m currently running the Oct 2018 update (1809 OS build 17763.1) it already failed 4 times, please any help?

The good news is that we may have the solution to your problem. In this 7-step guide, we listed the best methods to use in order to get rid of this error code for good.

Blue Screen of Death issues

Many users complained about getting BSOD errors after installing this patch. Apparently, the only solution to fix this problem was to use a System Restore point. Judging by the user reports, it seems that this issue mostly occurs on HP computers.

This update has hit several computers in our organization and it’s causing them to all blue screen and prompts the user to perform a Windows repair. Performing a system restore from the day before seems to fix it for now.

Intel HD Audio Device Driver disappears

If audio won’t work on your computer after installing KB4464330, don’t worry, you’re not the only. Other users encountered this bug as well.

Last night I installed the Cumulative Update KB4464330 on to my HP laptop which is running Windows 10 Version 1809. The install went fine and the laptop came back up. However, when it came back up it had removed/deleted the Intel High Definition Audio device driver […] I currently have NO sound and the system tray says ‘No Audio Output Device Is Installed’.

In this case, try to manually download the audio driver from Intel’s website. If this solution doesn’t work, check out these troubleshooting guides for additional information:

OneDrive online is unavailable

Some users can’t access their OneDrive and SharePoint accounts due to an error message indicating their accounts are being set up.

After the latest Windows update KB4464330 I cant access OneDrive online. This is an account that I have used daily, so I see no reason why OneDrive and SharePoint are are still being “set up.” I have nearly everything set as a placeholder so this is worrying

Here are some possible fixes for this issue:

Fingerprint reader won’t work

Other users complained about fingerprint reader issues. More specifically, the device fails to read fingerprints and uninstalling the driver doesn’t fix the problem. Fortunately, Microsoft’s support agents officially acknowledged the issue and confirmed the company’s engineers are working on a fix.

These are some of the most frequent KB4464330 problems reported by users. Have you encountered any of them? How did you solve them? Let us know in the comments below.

How To Make Windows 10 Icons Look Like Windows 8 Icons

One of the most discussed features of Windows 10 is its icons. But people sure don’t talk about them in a positive way, and they’re constantly demanding a change from Microsoft. If you want to use different icons, but can’t wait for Microsoft to officially introduce them, with a couple of tricks, you can get your old Windows 8 icons back.
windows 10 icons wind8apps

How to bring Windows 8 icons back to Windows 10

To change your icons to Windows 8 style, you’ll first have to download Windows 8 icons pack, provided by WinAero. Extract the .rar folder to the location on your computer where you want to store your Windows 8 icons. After you download the icons, we can get to work.

Step 1: Replace Windows 10 Desktop icons with Windows 8 Desktop icons

  1. Right-click anywhere on the Desktop and click on Personalize from the context menu
  2. When the Personalization window opens, click Change desktop icons from on the left pane
  3. In Desktop Icon Settings, change all the icons you want to the ones you previously downloaded

Step 2: Replace Windows 10 folder icons with Windows 8 folder icons

You can get the old folder icons simply by performing a couple of tasks in the Registry Editor. Here’s what you should do:

  1. Go to Search, type regedit, and open Registry Editor
  2. Go to the following Registry key:
    • HKEY_LOCAL_MACHINESOFTWAREMicrosoftWindowsCurrentVersionExplorer
  3. Create a new subkey and name it Shell Icons (but there’s a possibility that you already have this key in your Registry)
  4. Create new string values named 3 and 4. Set the value data of both values to the following value:
    • C:IconsFolder.ico
  5. Now create the c:Icons folder and move the Folder.ico file that you extracted from the ZIP archive there
  6. Restart the computer.

Step 3: Replace Windows 10 icons for user profile with Windows 8 icons

Here is how you can change icons for folders in your user profile:

  1. Open the “Contacts” folder ( which is probably on this address: C:UsersYour user nameContacts)
  2. In the address bar of File Explorer add desktop.ini to the end of the current folder path and press Enter (For example, C:UsersYour user nameContactsdesktop.ini)
  3. The Notepad document will be opened. Find the line starting with “IconResource” and add a semicolon before the IconResource word
  4. Add a new line to the end of the file (For example, IconResource=C:UsersWinaeroDesktopIcon4sContacts.ico)
  5. Save the file and close Notepad
  6. Close your User Profile, and open it again to see the changes

Step 4: Fix large icons problem

You might have a problem with large icons in your File Explorer. To resolve this issue, do the following:

  1. Press Win + R on the keyboard
  2. Type the following in the Run box and press Enter:
    • SystemPropertiesAdvanced
  3. Click Settings in the Performance group
  4. Untick Show thumbnails instead of icons
  5. Press Apply

That would be all, you’ll now have your old icons from Windows 8 in Windows 10, and you won’t have to look at ‘ugly’ Windows 10’s icons all the time.

Speaking of icons, did you now that you can customize your PC icons according to your very own preferences? There are plenty of tools that allow you to design your own icons. If you’re interested, you can read more about these tools in this guide.

In case you’re experiencing any issues with your Windows icons, here are three guides that you can use to fix them in no time:

FIX: Download and Install a Missing Driver for Your Hotkey Utility

If you noticed strange message that says “Download And Install a Missing Driver For Your Hotkey Utility” in your Action Center, we’ll try to give you a proper solution in order to remove this probably annoying message from your Action Center.
action center wind8apps
Various factors could cause this problem, like some third party software which deleted your hotkey utility drive, etc. Windows Update should probably handle this, but if it doesn’t, here are a few alternative workaround you can try.

How to fix Hotkey Utility issues on Windows 10

  1. Run the Windows Update Troubleshooter
  2. Update your computer
  3. Download hotkey utility driver from the manufacturer’s website
  4. Additional solutions

Method 1: Run the Windows Update Troubleshooter

Maybe Windows Update indeed offers a solution, but it’s somehow damaged or it has certain problems to deliver updates to your computer. In order to make sure that Windows Update is working properly, we’re going to run a Windows Update Troubleshooter and see if it finds any issues.

Microsoft created automated troubleshooter for Windows Updates as a part of the Fix It tool. You just need to download it from here, run it and let the wizard do all the work for you. You can also run Windows Update troubleshooter on your own. Go to Search> type troubleshooter and open Find and fix problems> under System and Security click on Fix problems with Windows Update.

UPDATE: Microsoft’s Fix It tool is no longer available for download. The company no longer supports it.

Method 2: Update your computer

check for updates

When you install the latest system updates for Windows 10, you also install the latest driver versions for your machine. So, hit the ‘Check for updates’ button to install the missing driver for your Hotkey Utility.

Method 3: Download hotkey utility driver from your device manufacturer’s website

We assume that you received this error message on your laptop, because people who complained about this issue said that it occurred on their laptops. So if Windows Update doesn’t help, reach for your laptop’s manufacturer website, find utility driver and download it on your own.

Method 4: Additional solutions

You can also try some other solutions like performing a system restore or clean boot, but be careful, because these operations could damage your computer if you don’t know what you’re doing.

If you have any comments or suggestions, write them in the comments below, we would love to read it.

RELATED GUIDES TO CHECK OUT:

FIX: Apps and Programs Crash When Opening File Explorer

If you’re using Windows 10 Technical Preview builds or the stable Windows 10 OS versions, you may experience a lot of bugs. The system is work on progress as Microsoft always tries to create better OS versions.

Of course, just like some other features of the system, File Explorer still isn’t completely bug-free, and it could crash sometimes. In this article, we’ll tell you what you can try in order to fix this File Explorer crashing issue.
file explorer crashes wind8apps

What to do if apps and programs crash when you open File Explorer

  1. Update your computer
  2. Run the Windows Troubleshooter
  3. Run SFC scan
  4. Run the Windows Store App troubleshooter
  5. Fix corrupted user profile

Solution 1: Update your computer

Windows 10 doesn’t work the same way on every computer. For example, while some users have problems with Start Menu, others are having problems with sound in Windows 10, etc.

Luckily Microsoft is working hard to provide solutions for most users’ problems in Windows 10. So, try to reach for the Update section and see if Microsoft prepared some solution for this.

Also, you can download ISO image from Microsoft’s website and repair your current system. You can do this if you-re using Windows other than Windows 10, as well, just use your system installation disk to repair your system and see if the problem is gone. But don’t perform a fresh installation of Windows, because all your files and software will be deleted.

Solution 2: Run the Windows Troubleshooter

You can also try to run some of Windows’ built-in features for solving problems, like the Windows Troubleshooter. Windows Troubleshooter will help you to determine if your program is compatible with Windows 10. So if your program isn’t compatible with Windows 10, it could cause File Explorer to crash. To run Windows Troubleshooter, do the following:

  1. Go to Search, type troubleshooter and open Find and fix problems
  2. Go to Programs and then to Program Compatibility Troubleshooter
  3. program compatibility troubleshooter windows 10
  4. Select the program which causes File Explorer to crash
  5. Let the Troubleshooter check for solutions.

Solution 3: Run SFC scan

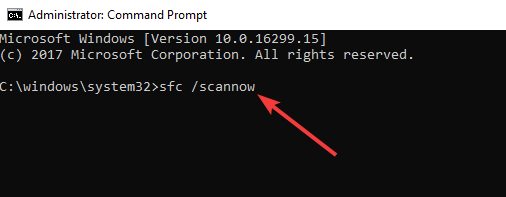
Another powerful (maybe even more than Troubleshooter) tool for solving Windows problems is sfc/scannow command. It will completely scan your computer for errors and provide appropriate solution. To run this command do the following:

  1. Go to Search, type cmd and open Command Prompt
  2. Type sfc/scannow in the command line and press Entersfc scannow
  3. Wait until the process is finished

Solution 4: Run the Windows Store App troubleshooter

If this problem affects only Windows Store apps, then you need to run Windows 10’s built-in Windows Store App troubleshooter.

  1. Go to Settings > Update & Security > Troubleshoot
  2. Select and run the troubleshooter as shown in the screenshot below

windows store app troubleshooter

Solution 5: Fix corrupted user profile

Your apps and programs may crash because your user profile got corrupted. For more information on how to fix this problem, check out this troubleshooting guide. If the problems persists, go ahead and create a new user profile.

That would be all, but if you have some other solution for this problem, write it down in the comments, I’m sure our readers who have this kind of issue would love to read it. Thanks!

RELATED STORIES TO CHECK OUT:

How to Remove Files or Folders From Quick Access in Windows 10

Microsoft changed a couple of things in File Explorer in Windows 10 Technical Preview builds, as well as the stable Windows 10 OS versions. One of these changes/additions is Quick Access, which allows you to open the files you recently used. But if you want to remove a certain file from Quick Access, we’ll show you how in this article.

In Windows 10, a new File Explorer location, Quick Access opens automatically whenever you open File Explorer. It collects information about files and folders you recently used and shows them in the File Explorer, so you can easily access them again.

How to stop Quick Access from adding folders?

But sometimes, you might not want your private files to appear in Quick Access, and you’ll want to hide them. You can delete the file, but it will also be deleted from its original location, so we don’t recommend this.

But you can also hide the file from Quick Access section and prevent it from further showing up, and here’s how to do that:

  1. Open File Explorer and Quick Access will probably be opened by default, if not, click on Quick Access
  2. Right-click any file or folder you want to hide from Quick Access
  3. Choose Remove from Quick Access to hide the selected file or folder
remove file from quick access

That would be all, the file or folder you selected will never show up in the Quick access again.

The Quick Access location in File Explorer is the successor of Recent files feature, which was placed in the Start Menu in older versions of Windows.

Since the Recent Files feature is removed in Windows 10 Technical Preview, using Quick Access is probably the easiest and fastest way to access your recent files.

How to customize Quick Access in Windows 10?

If you want to fully configure Quick Access on your computer, you can also set it to show only pinned items and choose what folder you want it to open first. Or you could remove the Home icon from File Explorer. We’ll list the steps to follow below.

Display pinned folders in Quick Access

  1. Open Quick Access > go to the View tab > select Options.
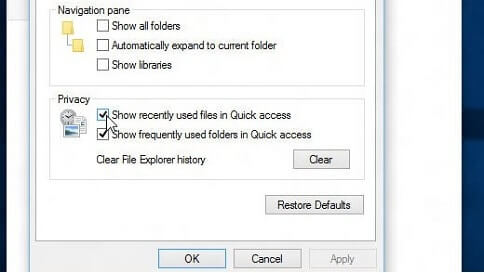
  2. Clear the check boxes listed in the Privacy section > hit Apply and that’s it.
Display pinned folders Quick Access

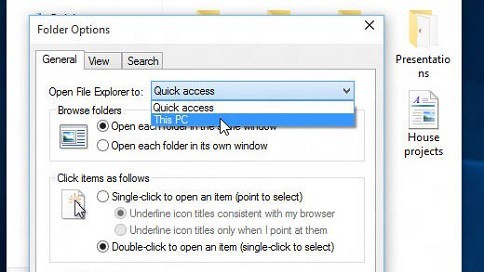
Open Windows 10 to This PC

  1. In this case, navigate to the View tab > select Options.
  2. Go to ‘Open File Explorer to’ > use the drop-down menu to select This PC > hit Apply.
open file explorer this PC

If you have any comments or suggestions, please write to us in the comments section below. We would love to hear your thoughts.

How to Prevent New Windows 10 Build Installs

As you probably noticed, Microsoft is installing new Windows 10 Technical Preview builds automatically via Windows Update. But if you don’t like this approach, and you want to stick with your current build, you can disable the automatic installation of a new build with a couple of registry tweaks. Here’s how to prevent the new Windows 10 build from install.

How to stop Insider builds on Windows 10

Method 1: Tweak your Registry

  1. Go to Search, type regedit and open Registry Editor
  2. Go to the following key:
    • HKEY_LOCAL_MACHINESOFTWAREMicrosoftWindowsSelfHostApplicabilityRecoveredFromWindowsSelfHost applicability
  3. Within RecoveredFor, create a new DWORD value named after the number of the build available in the Windows Update which you don’t want to install (For example, if you’re running a build 10074, and you want to prevent the 100125 build from installing, create a DWORD value named 100125). Set the values as shown in the picture below: windows 10 prevent from updating wind8apps

Now your Windows 10 Technical Preview build won’t be updated to the next build. If you eventually change your mind, just delete this value and your system will be able to update again. If you’re not sure in what you’re doing you can download this sample Registry file crated by WinAero, and it will do all the work for you.

Method 2: Stop the Windows Update Service

If you’re not feeling too comfortable tweaking your Registry, you can use another method. Since new Windows 10 builds are delivered directly via Windows Update, all you need to do to block them is to stop the Windows Update Service.

Of course, there are several ways to do that:

  1. You can use the Services App, right-click on Windows Update and select End Task
  2. You can also set up a metered connection
  3. Or you can defer updates (the option is available on Windows 10 Pro only).

For more information, you can check out this guide. Although the guide has been written for the Windows 10 OS, the same solutions apply when it comes to blocking new Insider builds as well.

Method 3: Leave the Insider Program

Of course, if you’re sure you don’t want to test new builds in the future, you can simply leave the Insider Program.

RELATED STORIES TO CHECK OUT:

Add a Switch Power Plan Option to Desktop in Windows 10

Windows 10 lets you customize your various PC settings, including Power Plan options, to have a personalized experience.

Power plans control various settings, such as display brightness, processor performance, and sleep timers, to optimize computer performance or conserve energy.

However, despite the numerous power plan options available in Windows 10, users have long desired a convenient and accessible way to switch between them directly from the desktop.

In this article, we will discuss the steps to add a submenu to your Desktop on Windows 10 to switch Power Plan with 2 clicks.

How can I create a desktop shortcut to switch Power Plans?

Before proceeding with any steps to create a desktop shortcut to switch Power Plans, go through the following preliminary checks:

Once done, move to the step-by-step instructions to get the job done.

1. Know the GUIDs of Power Plan options

Note icon NOTE
Usually, the GUIDs are the same for all the systems; however, if you have created a customized power plan and want to add it to the subcontext menu, then you need to know the GUID for the same. Follow this method to find that.
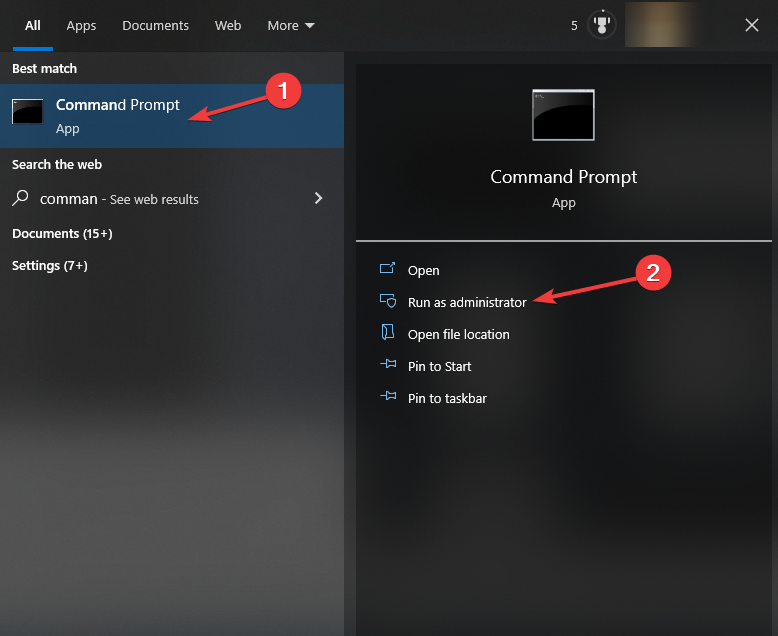
  1. Press the Windows key, type cmd, and click Run as administrator.
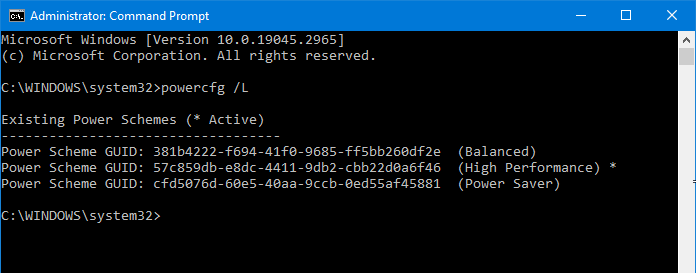
  2. Type the following command to know the existing power schemes and hit Enter: powercfg /L Switch Power Plan Option Desktop
  3. You will get the list of Power plans along with the GUIDs. Note down the GUID for the customized plan.

2. Save the script in Notepad

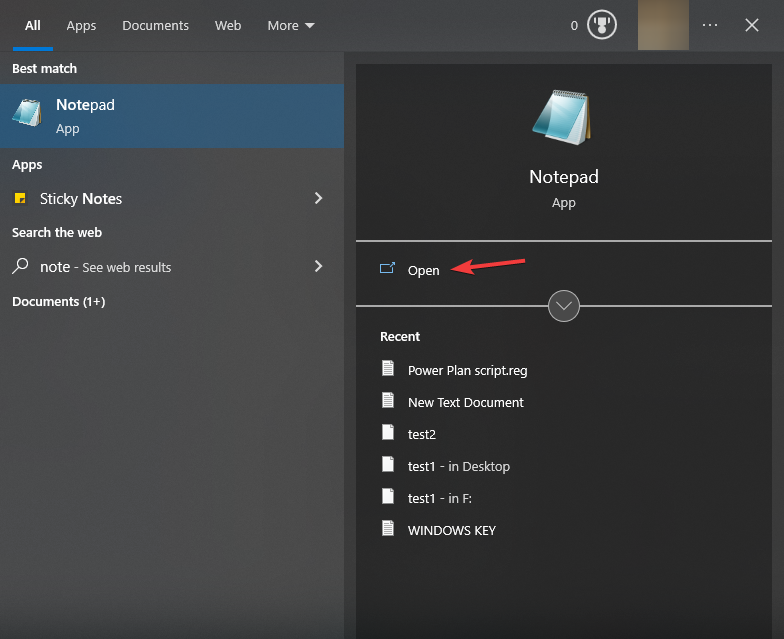
  1. Press the Windows key, type notepad, and click Open.Open Notepad Switch Power Plan Option Desktop
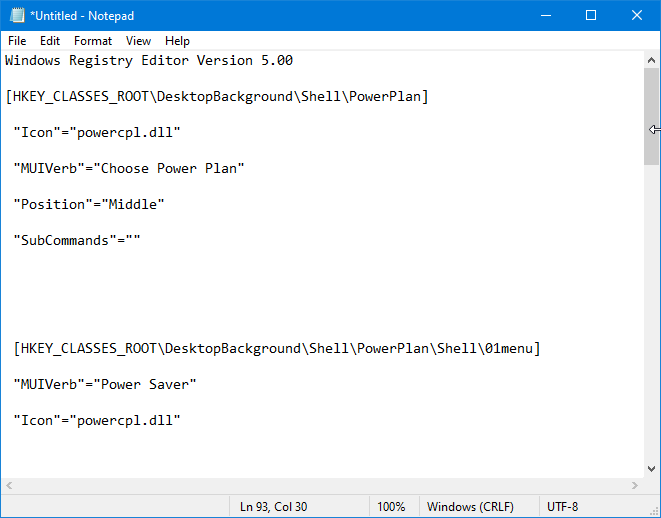
  2. Copy & paste the following script and press Enter:notepad_Powerplan script
    • Windows Registry Editor Version 5.00
      [HKEY_CLASSES_ROOT\DesktopBackground\Shell\PowerPlan]
      "Icon"="powercpl.dll"
      "MUIVerb"="Choose Power Plan"
      "Position"="Middle"
      "SubCommands"=""
      [HKEY_CLASSES_ROOT\DesktopBackground\Shell\PowerPlan\Shell\01menu]
      "MUIVerb"="Power Saver"
      "Icon"="powercpl.dll"
      [HKEY_CLASSES_ROOT\DesktopBackground\Shell\PowerPlan\Shell\01menu\command]
      @="powercfg.exe /setactive a1841308-3541-4fab-bc81-f71556f20b4a"
      [HKEY_CLASSES_ROOT\DesktopBackground\Shell\PowerPlan\Shell\02menu]
      "MUIVerb"="Balanced"
      "Icon"="powercpl.dll"
      [HKEY_CLASSES_ROOT\DesktopBackground\Shell\PowerPlan\Shell\02menu\command]
      @="powercfg.exe /setactive 381b4222-f694-41f0-9685-ff5bb260df2e"
      [HKEY_CLASSES_ROOT\DesktopBackground\Shell\PowerPlan\Shell\03menu]
      "MUIVerb"="High Performance"
      "Icon"="powercpl.dll"
      [HKEY_CLASSES_ROOT\DesktopBackground\Shell\PowerPlan\Shell\03menu\command]
      @="powercfg.exe /setactive 8c5e7fda-e8bf-4a96-9a85-a6e23a8c635c"
      [HKEY_CLASSES_ROOT\DesktopBackground\Shell\PowerPlan\Shell\04menu]
      "MUIVerb"="Ultimate Performance"
      "Icon"="powercpl.dll"
      [HKEY_CLASSES_ROOT\DesktopBackground\Shell\PowerPlan\Shell\04menu\command]
      @="powercfg.exe /setactive e9a42b02-d5df-448d-aa00-03f14749eb61"
      [HKEY_CLASSES_ROOT\DesktopBackground\Shell\PowerPlan\Shell\05menu]
      "MUIVerb"="Power Options"
      "Icon"="powercpl.dll"
      "CommandFlags"=dword:00000020
      [HKEY_CLASSES_ROOT\DesktopBackground\Shell\PowerPlan\Shell\05menu\command]
      @="control.exe powercfg.cpl"
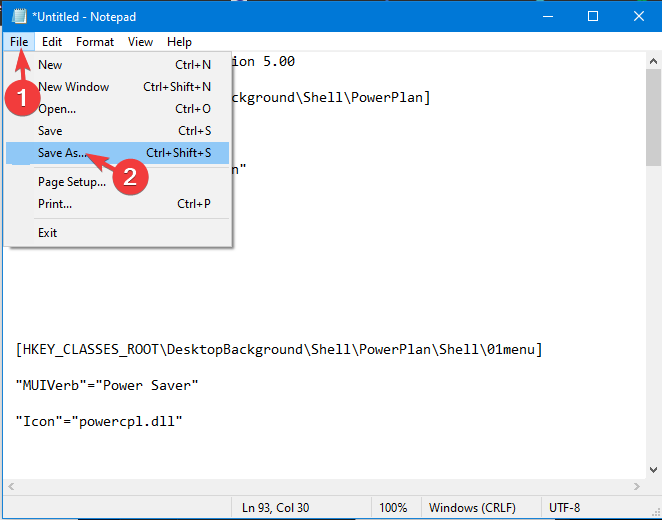
  3. Click File, then Save as.File Save
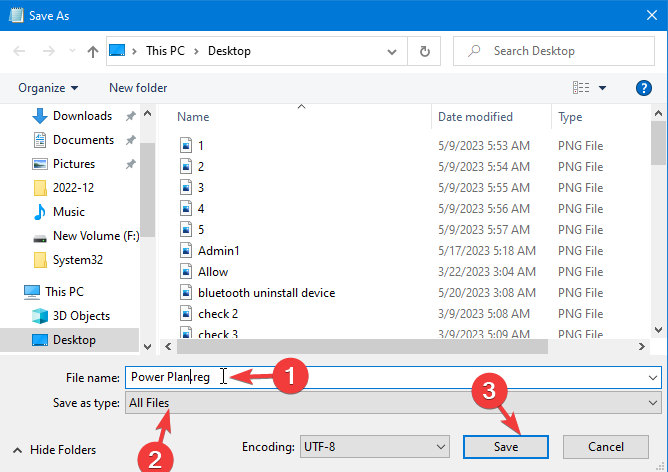
  4. Now for the File name, type Power Plan.reg, and for Save as type, choose All Files from the drop-down.Save as
  5. Save it on the Desktop and click Save.
  6. Double-click the file to run, and click Yes on the UAC prompt by Registry Editor.
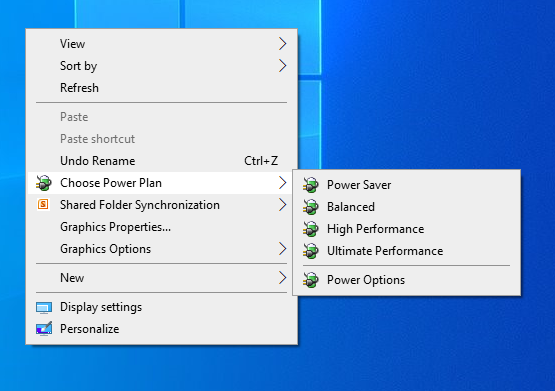
  7. Once the script has run, right-click on the desktop, select Choose Power Plan, and choose any of the plans you want.Power Plan options

If you have created a customized Power Plan, you can add it to the script along with its GUID to make it appear on the Desktop menu.

How can I remove the Change Power Plan submenu from Desktop?

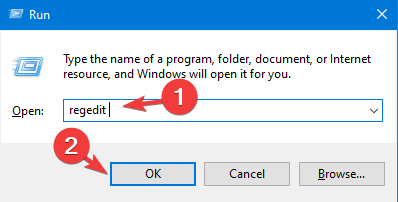
  1. Press Windows + R to open the Run window.Regedit Run command
  2. Type regedit and click OK to open the Registry Editor.
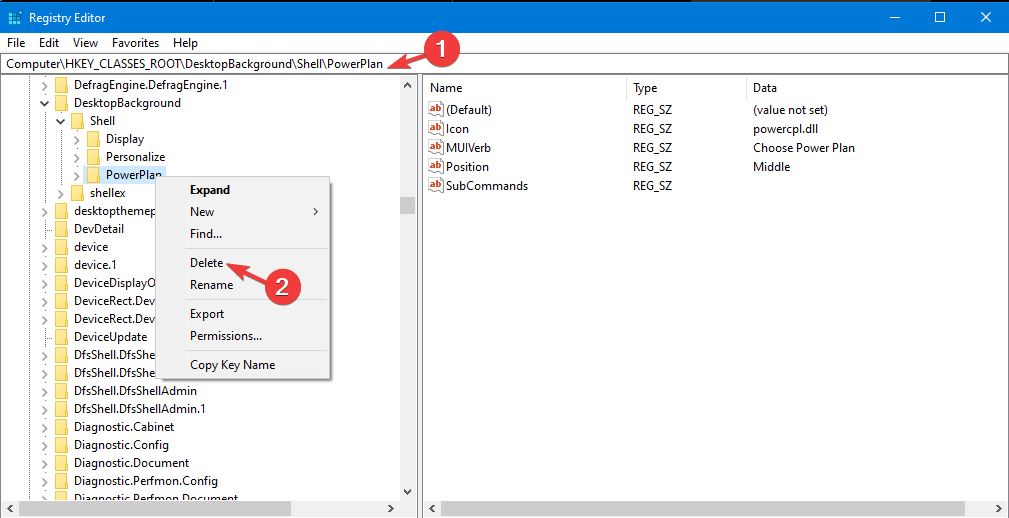
  3. Navigate to this path: Computer\HKEY_CLASSES_ROOT\DesktopBackground\Shell\PowerPlan
  4. Right-click the Power Plan key and choose Delete to remove it.Registry Entry delete Switch Power Plan Option Desktop
  5. Restart your computer to let the changes take effect.

So, these are steps that you can use to add switch power plan options on your Desktop for quick access to Power Plans and get better control over your computer’s performance.

If your Power Plan keeps on changing and you are looking for solutions, we suggest you check out this guide for solutions.

Please feel free to give us any information, tips, and your experience with the subject in the comments section below.

How to Adjust Brightness & Contrast on Your Windows 11 PC [Step-by-Step]

Adjusting contrast in Windows 11 can make your screen easier on the eyes and help reduce strain. You can change contrast settings, boost gamma, or tweak brightness on your laptop to get a clearer, more comfortable display.

These tips work great on Windows 11, and most of them apply to Windows 10 too. In this guide, you’ll learn how to adjust contrast step by step to get the best look for your screen.

How to change contrast and brightness on a Windows PC

1. Turn On High Contrast Mode (Quickest Option)

High Contrast Mode dramatically changes screen colors for better legibility.

  • Press Left Alt + Left Shift + Print Screen to toggle it instantly.
  • Or go to Settings > Accessibility > Contrast themes.
  • Choose a theme like “High Contrast #1” and click Apply.


2. Calibrate Display Color (Fine-Tune Gamma and Contrast)

Windows 11 includes a built-in calibration tool:

  • Go to Settings > System > Display.
  • Click Advanced display settings > Display adapter properties.
  • Open the Color Management tab > click Color Management…
  • Under the Advanced tab, choose Calibrate display.

Follow the wizard to adjust:

  • Gamma settings (controls midtones)
  • Brightness & contrast
  • Color balance

💡 This helps fix screen contrast on computer screens that look washed out or too dark.


3. Adjust Brightness and Contrast on a Laptop Screen

If you’re on a laptop:

  • Press Fn + Brightness keys (usually F1–F3).
  • Or go to Settings > System > Display, then use the Brightness slider.

Note: Some laptops also offer graphics control panels (like Intel or NVIDIA) to tweak contrast directly.


4. Use Graphics Driver Settings (Advanced)

Your GPU may let you manually adjust gamma, contrast, and brightness.

For Intel Graphics:

  • Right-click desktop > Intel Graphics Settings
  • Go to Display > Color Settings

For NVIDIA:

  • Right-click desktop > NVIDIA Control Panel
  • Navigate to Display > Adjust desktop color settings
  • Modify Contrast, Gamma, and Brightness

5. Change Color Filters (Alternative to High Contrast)

Another way to change color contrast:

  • Go to Settings > Accessibility > Color filters
  • Turn on and choose filters like Inverted or Grayscale Inverted.

Speaking of the Settings page, you can use it to tweak other screen settings as well. For example, you can change the font size, screen resolution, orientation, set up multiple display configurations, enable high contrast mode, and so on.

Calibrating your screen’s color, contrast, gamma, and brightness is a good way to improve the overall performance of the screen and draw the best from your monitor.

Before you go, you can also check our guide on the best monitor brightness and contrast settings for your eyes.

If you know other ways to enhance display performance, write those down in the comments. Our readers would love to read your suggestions.

How to Create New Folders Using Keyboard Shortcuts in Windows 10

new folder wind8apps

And now something for all of you who like to use keyboard shortcuts more than moving and clicking the mouse. In this short article, we’re going to show you how to easily create a new folder with just a few keyboard buttons.

Shortcut keys to create new folders in Windows 10

You can create a new folder on Desktop by right-clicking on it > New > Folder, but there’s even a quicker way to create a new folder in Windows. Just press Ctrl + Shift + N and the new folder will automatically be created on your Desktop, ready to be renamed or to store some of your important files.

This shortcut doesn’t work just on Desktop, because you can create a new folder in the File Explorer, as well. The method is the same, just open the File Explorer or location where you want to create a new folder, press Ctrl, Shift, and N at the same time and the new folder will be created in seconds.

If you are still struggling in managing and creating a new folder this guide can help you out.

How to create a new folder in File Explorer

Here’s another useful tip: if you want to create a folder in the File Explorer, and then you also want to create it on your desktop, just press Windows key + D, and all folders or programs will be minimized, leaving you just with Desktop open. Then just do as we showed you in this article, and you’re good to go.

This shortcut also works in Windows 8 and Windows 7, as Microsoft decided not to change it in Windows 10, but it won’t work in Windows XP. If you want to create a new folder on Desktop in Windows XP, using just keyboard shortcuts, you’ll have to try a different combination of keys. To create a new folder in Windows XP, you have to hold Alt + F keys first, and then release them and quickly press W key, followed by F.

That would be all, now you know how to create a new folder in Windows, using just a couple of keys of your keyboard.

Using keyboard shortcuts is very useful as you can get things done more quickly. Of course, you need to know what key combinations to use in order to get the result you want. In case you’re not very familiar with the most useful keyboard shortcuts supported on Windows 10, here’s a guide that you can use to learn more about Windows shortcuts.

Let’s suppose that you no longer want to use keyboard shortcuts on your computer. Well, there are a few methods that you can use to disable these shortcuts. For example, you can turn off hotkeys, use a dedicated script for your Registry or you can disable absolutely all the keyboard shortcuts on your machine using the Windows Registry. For detailed instructions on the steps to follow, you can use this guide.

Unfortunately, your keyboard may break sometimes and you won’t be able to use it. Luckily, we already tacked this issue and we compiled a few lists of solutions to help you out:

If the solutions above didn’t work, and you still can’t use your keyboard, maybe it’s time to get a new one. If you don’t know what are the best keyboards to buy for your Windows 10 computer, you can check out these lists:

There you go, we hope this guide offered you all the information that you needed.

Xbox Insiders gain early access to Fallout 76 Stress Test

Bethesda, the developers of the Fallout and Elder Scrolls games, will officially release the stress test for their new Fallout 76 game for lucky Xbox Insiders who pre-ordered the game before its November 14th release date.

The game developer stated that the beta will run for only a few hours each day starting Saturday and ending a few days before release, which is expected to bring a large volume of players to the server at a given time. The team will examine the server’s performance in its limited resources each day and deploy optimizations where necessary before finally releasing the game to the general public. The developers even encourage players to go wild, find bugs and break things. This way, potential problems can be addressed before the game is released.

Gamers who are on the waitlist of the game’s official release can potentially try it early by joining the Xbox Insider Program through the Xbox Insider Hub app. Gamers who digitally pre-ordered the game can sign in the app with the same Microsoft account that was used to pre-order the game, and then search for the “Fallout 76 Stress Test” to see if they are able to participate in the beta test.

On the other hand, people who pre-ordered a physical copy can log into their Bethesda.net account (or create one if they don’t yet have it) and see if a digital token is available under their Transaction History account section. If a token is available, the player will be able to use the code to redeem a temporary copy of the game from the Xbox Store.

Those not-so-lucky Xbox gamers who pre-ordered the game will still be able to get early access to the B.E.T.A. (Break-It Early Test Application) before its full release on Windows 10 and PS4. And to top the icing on the cake, Microsoft is also offering an Xbox One X Robot White Special Edition Fallout 76 Bundle for consumers for just $499.

Also, it might be worth pointing out that an Xbox Live Gold account is required to enter the stress test program, should the player be lucky enough to try the game early. Also worth mentioning is that since this is just a stress test, all progress will be wiped prior to the game’s full release.

New Xbox Avatar Editor is now available for everyone on Windows 10

If you can’t wait to play with the redesigned Xbox Live Avatars, you can now do so with the new Xbox Avatar Editor on Windows 10. Previously, this app was only available for Xbox Insiders through the Xbox Insider Hub app, but the new Avatar Editor now appears to be generally available on the Microsoft Store (thanks, Richard Hay!).

The new Xbox Live Avatars have been designed to be more inclusive, and they’re much modern than the ones from the Xbox 360 era. They’re still in beta as of this writing, but they will ship on the Xbox One 1810 system update later this month. Microsoft has also created a built-in Xbox Avatar Store where you can purchase additional customization items for your avatar.

On Windows 10, you can still run the new Xbox Avatar Editor and the old Xbox Original Avatars apps side by side. The new Xbox avatars do show up on the Xbox Windows 10 app, but they’re still static images like the old Xbox 360 avatars. You can download the new Xbox Avatar Editor from the link below, let us know in the comments if you managed to create something that better reflects your gamer identity.

Xbox Avatar Editor
Xbox Avatar Editor
Price:
Free

Microsoft becomes the 5th biggest maker of PC hardware

A report by Gartner (via The Verge) reveals that Microsoft, for the first time, is now one of the top five manufacturers of PCs in the US market.

According to the report, Microsoft accounted for 4.1 percent of the US PC market in 2018’s third quarter, below Apple (at 13.7 percent), Lenovo (15.4), Dell (25.9), and HP (30.7). These numbers include Surface devices such as the Surface Pro and Surface Laptop but exclude Chromebooks and tablets such as Apple’s iPad. With the blurring of the lines between computers and tablets, these numbers are likely to be controversial for some in the industry as well as consumers.

Gartner report on PC sales

Worldwide, Microsoft is currently being outperformed by all of the previously mentioned companies in addition to Acer and Asus. Overall there was just a 0.1 percent increase in worldwide PC sales year-over-year.

Gartner’s principal analyst, Mikako Kitagawa, said of the findings, “The PC market continued to be driven by steady corporate PC demand, which was driven by Windows 10 PC hardware upgrades. We expect the Windows 10 upgrade cycle to continue through 2020 at which point the upgrade demand will diminish. Despite the third quarter typically showing strong consumer PC sales due to the back-to-school season, weakness in consumer PC demand continued, offsetting the strong sales in the business market.”

Do these findings surprise you and do you consider Surface devices to be PCs? Share your thoughts with the community in the comments below and then follow us on Pinterest for more Microsoft content.

50 classic Atari video games just launched on Microsoft’s Xbox One consoles

50 classic Atari video games have just been added to the Xbox One thanks to the launch of Atari Flashback Classics Volume 3.

Atari Flashback Classics Volume 3 retails for $19.99 which makes each video game in the bundle valued at just $0.40. Titles included in this pack support both local and online multiplayer and a variety of retro graphics to frame the gameplay on today’s modern widescreen TVs.

Here’s the official game description:

Atari Flashback Classics Volume 3 brings more classic arcade, Atari 2600 and 5200 games to the latest generation of consoles and, for the first time, vintage hits from M Network. Kick, fight, dunk, race and blast your way through 50 timeless games from Atari’s vast library of hits. Gain fame by landing your initials on the top of the leaderboards or challenge others online and show your mettle against classic gamers from around the world.

Are you a fan of classic video games and will you be giving this a go? Let us know in the comments below and then follow us on Pinterest for more gaming content.

Atari Flashback Classics Vol. 3
Developer:
Atari
Price:
$9.99

13 Tips to Extend Your Laptop Battery Life That Really Work


Solutions to improve battery life

  1. Adjust screen brightness
  2. Turn Off Your Display after some time of inactivity
  3. Disable Bluetooth and Wi-Fi devices
  4. Change your Power Plan
  5. Hibernate instead of sleep
  6. Disable data sync
  7. Mute your computer
  8. Enable AirPlane mode
  9. Unplug power draining peripherals
  10. Disable screensaver
  11. Stop background programs
  12. Reduce CPU usage
  13. Free some RAM space

extend laptop battery life wind8apps

One of the oldest problems of all laptop users is the short battery life of their devices. People are trying everything just to extend the life of their laptop batteries a little bit more. In this article, we’ll list a few pieces of advice that will help you to increase your laptop‘s battery life as much as possible.

Does Windows 10 improve battery life?

Many users asked this question before hitting the update button or shortly after they installed the new OS. The answer is ‘Yes’. Indeed, Windows 10 packs a series of battery features that better optimize battery consumption. For more information, you can check out these posts:

How do I improve Windows 10’s battery life?

Method 1: Adjust Screen Brightness

One of the biggest battery eaters on any modern portable device, which is laptop in our case, is the display. Reducing your screen’s brightness is a great way to significantly increase the battery life of your laptop. To reduce the brightness of your screen, hold the Function (Fn) key and press the brightness buttons on the keyboard of your laptop.

You can also use Microsoft Mobility Center to quickly reduce screen brightness. You can access Microsoft Mobility Center from Control Panel. Remember, the less bright your screen is, your battery will last more.

Method 2: Turn Off Your Display After Some Time Of Inactivity

If you leave your laptop for a couple of minutes, its screen will still be on, unnecessarily  draining battery. So you can set your screen to turn off after a short period of time, and save some energy while you’re not using your laptop.

Go to Control Panel, open Power Options and set your display to turn off after some time of inactivity (for example 3 or 5 minutes). You can instantly turn your screen back on, simply by moving your mouse cursor or pressing any key on your keyboard, so this could be a great power saver.

You should not have any problems with screen, as long as it doesn’t turn off while you’re working. You shouldn’t worry that it will turn your screen off while you’re watching a movie, or something, because media players set the display to stay awake while the video is playing.

Method 3: Disable Bluetooth and Wi-Fi Devices

Your laptop probably has Bluetooth port, which also could be a big battery drainer. Because Bluetooth ports and similar components use laptop’s battery simply for being enabled. And since you probably don’t use Bluetooth all the time, you can disable it and save some battery. To disable Bluetooth, press the Function (Fn) key and press the Bluetooth key on your laptop.

Same story with your Wi-Fi, because Wi-Fi is also a huge battery consumer, and disabling it could definitely save some battery power. For example, if you’re working on some project that doesn’t require internet connection, there’s no need for Wi-Fi to be turned on. Wi-Fi could be simply turned off by using function keys of your laptop.

Method 4: Change The Power Plan

power plan

Windows offers various power plans for various purposes. You can choose from power saving plan, to high performance plan, or even find the balance between them. So logically, since we want our laptop‘s battery to last longer, we’re going to set our laptop‘s power plan to power saving mode. To do that, go to Control Panel, open Power Options, and set your power plan to Power Saver.

You can make your power plan save even more battery power, with some advanced settings. Just Change plan settings, then go to Change advanced power settings, and you’ll get a handful of options which will help you to save even more power with your power saving power plan.

Method 5: Hibernate Instead of Sleep

When your laptop goes to sleep mode, it uses really small amount of power to power its RAM and keep the current state of your system in the memory, which allows your laptop to wake up from sleep mode in just a few seconds. But, when your laptop goes to hibernate mode, it saves even more battery, because it places its system state to disk and powers off, using almost no power at all.

So, if you’re not going to use your laptop for some time, it’s probably the best choice to keep it hibernated. In that way you’ll be able to save even more battery than putting your computer to sleep or just letting it to turn off the screen.

Method 6: Disable data sync

File sync software working in the background put a strain on your laptop‘s battery. Don’t be surprised if your battery depletes faster than usual. The best approach is to simply disable these tools, OneDrive included and use them only when you actually need to sync data.

Don’t forget to disable email, calendar and contact sync as well by going to Settings > Accounts > Email & app accounts > select the account that you want to change > select Manage > Change mailbox sync settings and choose a longer syncing interval.

Method 7: Mute your computer

You probably didn’t know that your speaker contributes to your fast battery depletion. Mute your computer when you’re running tasks that don’t require sound. Also, when watching movies, keep your volume to a minimum level.

Method 8: Enable AirPlane mode

If your Bluetooth is enabled, yet you rarely use it, you should disable it as soon as possible. The quickest way to do that is by using AirPlane mode. Enabling this feature will completely turn off any Bluetooth and wireless connections. Use this mode only if you don’t need Internet connection.

Method 9: Unplug power draining peripherals

We’re sure you identified the golden rule when it comes to saving your laptop‘s battery: if you don’t use it, turn it off. The same goes for peripherals. How many peripherals have you plugged in to your computer? How many of them are you actually using right now? Go ahead and disconnect all unnecessary peripherals to extend your laptop‘s battery life.

We’re not done yet. Here are some more  tips on increasing your laptop‘s battery life.

Method 10: Disable screensaver

Screensaver is completely unnecessary for you, because it will simply drain your laptop‘s battery for nothing. Instead of screensaver, you should set your display to turn off after some time, as mentioned above.

Method 11: Stop background programs

Now it’s time to declutter your background processes. Open Task Manager and see which unnecessary processes are running. Close all unnecessary processes, and you will save some battery power.

Another way to do this is by clean booting your computer so that it starts using only a minimal set of drivers and programs.

  1. Go to Start > type msconfig > hit Enter
  2. Go to System Configuration > click on the Services tab >  check the Hide all Microsoft services check box > click Disable all.hide all microsoft services
  3. Go to the Startup tab > Open Task Manager.
  4. Select each startup item > click Disable > close Task Manager > restart the computer.
disable startup programs

Method 12: Reduce CPU usage

If you’re running some heavy, demanding programs, the usage of your CPU will be big, which will lead to battery drain. So consider to switch to less demanding programs, and your CPU won’t use as much battery power as it used before.

Method 13: Free some RAM space

If your laptop fills its RAM memory, and needs more memory, it will move data to the file on your hard drive, and this extra usage of the hard drive could also lead to the battery drain. However, this shouldn’t be an issue on modern laptops with more RAM, but if you’re using an older machine, you may consider closing all unnecessary programs in the background or even upgrading your RAM memory.

There you go, if you use all of these suggestions, you’ll notice that your battery life has significantly been improved.

In case the laptop battery drains when off, it’s possible that you have a hardware problem that needs to be addressed.

If you have other tips, tricks and ways to improve battery life, let us know in the comments below.

NASA is using HoloLens to build new Orion spacecraft

Microsoft’s HoloLens may not be receiving the same sort of attention its more consumer focused competitors are such as NVIDIA’s 3d Vision glasses, the Epson Moverio BT, Garmin’s Varia Vision or Magic Leap’s ML1, but it seems to have fans in at least one really cool industry.

MIT Technology Review is reporting that NASA has chosen to use Microsoft’s HoloLens headset to help build a new spacecraft.

According to the report, Lockheed Martin engineers are wearing HoloLens headsets to assemble portions of the new Orion crew capsule.

In the headset, the workers can see holograms displaying models that are created through engineering design software from Scope AR. Models of parts and labels are overlaid on already assembled pieces of spacecraft. Information like torquing instructions—how to twist things—can be displayed right on top of the holes to which they are relevant, and workers can see what the finished product will look like.

The virtual models around the workers are even color-coded to the role of the person using the headset. For Jory’s team, which is currently constructing the heat shield skeleton of Orion, the new technology takes the place of a 1,500-page binder full of written work instructions.

There are some limitations to the use of HoloLens as noted by spacecraft technician Decker Jory, that involve the weight and comfort of the headset. Jory claims that he can wear the headset up to three hours at time but chooses to rather use the HoloLens in 15-minute increments to learn task, check directions and confirm assembly construction.

Thanks in part to the successful use of HoloLens, Lockheed plans to expand its use of AR for its technicians to save time in task oriented projects. Eventually, Lockheed would like to use the HoloLens technology in space, according to the company’s head of emerging technologies, Shelley Preston.

“What we want astronauts to be able to do is have maintenance capability that’s much more intuitive than going through text or drawing content.”

While manufacturing vice president of Lockheed Martin, Brian O’Conner does rightly point out the need for Microsoft to make some wearability and platform development adjustments to HoloLens, he also believes that in five years time, “I don’t think you will find an efficient manufacturing operation that doesn’t have this type of augmented reality to assist the operators.”

Perhaps, Microsoft’s seemingly boring ambition to favor HoloLens in the commercial sector and not the more consumer-entertainment arena, is already paying off.

Microsoft further commits to open source, releases two thirds of its patents to the Open Invention Network

Microsoft has officially joined the Open Innovation Network (OIN) and will share their massive portfolio of patents with the 2,650 members of the community. Microsoft’s corporate vice president and chief intellectual property (IP) counsel, Erich Andersen, stated that the company will bring their “valuable and deep portfolio of over 60,000 issued patents to OIN for the benefit of Linux and other open source technologies”

For those unfamiliar, the Open Innovation Network is the world’s largest patent consortium where members share their patents with other members loyalty-free, with each member agreeing not to sue Linux developers for their use of the shared patents in their applications. Members of the organization include Google, Sony, IBM, and Red Hat.

Microsoft says that it understands that companies and developers don’t want just a “binary choice between Windows vs Linux, or .NET vs Java,” stating that access to all technologies for their platforms.

In a press release, ION’s CEO Keith Bergelt stated,

“Microsoft’s participation in OIN adds to our strong community, which through its breadth and depth has reduced patent risk in core technologies, and unequivocally signals for all companies who are using OSS but have yet to join OIN that the litmus test for authentic behavior in the OSS community includes OIN participation.”

Microsoft’s commitment to the open source world didn’t start there. Previously, the company acquired GitHub for $7.5 billion in stock. It has since open-sourced some of its older projects including MS-DOS earlier this month.

What are your thoughts about Microsoft’s decision to join the OIN? Let us know in the comment box below.

Discord explained: what it is and why you should care, even if you’re not a gamer

Not so long ago, Skype used to be a popular option among PC gamers looking for a simple app for voice chat and light messaging. But unfortunately for Microsoft, quality problems, questionable UI changes and the rise of more focused competitors led many gamers to leave Skype for better alternatives.

One of these alternatives is Discord, a chat and VoIP app that has seen a meteoric growth since its launch three years ago. Back in May, Discord claimed to have crossed 130 million registered users, up from 45 million users in May 2017. The ambitious company, which boldly claims on its website that “It’s time to ditch Skype and TeamSpeak” seems poised to become an unstoppable force in the gaming world.

Despite its obvious gaming focus, especially after the company recently opened its own digital store with “First on Discord” games, Discord isn’t used exclusively by gamers. The app is actually quite similar to Slack or Microsoft Teams, and it lets you create servers with multiple channels for discussing different topics of your choice. Discord also supports bots, roles with custom permissions, and integrates with many third-party services like Twitch, Spotify, and even Xbox Live. None of this wouldn’t matter if Discord wasn’t a well-designed and fast app, and in our own experience the app is consistenly fast on all platforms (including mobile), and it won’t slow down even if you join multiple servers with thousands of users.

For PC gamers, Discord lets you display what game you’re currently playing or streaming, and there’s an Overlay mode that lets you access chat and VoIP features while you’re in your game. Discord also has a “Streamer mode” that can automatically disable Windows sounds and notifications, and as a matter of fact, the most popular streamers out there are all using Discord to build their communities. For those who don’t stream, Discord can be the ultimate friends list that follows you across all platforms, and the app recently added a Game tab where you can see at a glance what games you’re friends are playing.

The interesting thing I’ve personally observed is that Microsoft and many other video game companies have become a big Discord supporter. There are official servers for the biggest video games out there such as Fortnite, PUBG, Rocket League, or Minecraft, but Microsoft has also created official servers for Xbox, Mixer, the Xbox Ambassadors program, Halo, Gears of War, and Sea of Thieves. There’s even an official “Microsoft community” server, where you can chat with some Microsoft employees in real time.

The Windows Insider team is pretty active on Discord.

Recently, I’ve seen that members of the Windows Insider team have often been teasing new Windows 10 Insider builds on this server, and you should definitely check it out if you’re a Windows 10 fan. The cool thing about this server is that certain roles like “Patch Tuesday” or “Windows Insiders” are self-assignable, and those who have them will get a bot notification every time a new Windows 10 build is released.

Earlier this year, Microsoft also teamed up with Discord to integrate its Xbox Live service with it. By connecting your Xbox Live account to Discord, you can display your gamertag on your Discord profile, and also show your Discord contacts which Xbox games you’re playing in real-time. Mixer, Microsoft’s Twitch competitor, also lets you link your Discord account and add a Mixer bot to your Discord server: By doing so, you’ll be able to automatically send announcements when you go live on Mixer, invite Mixer users to your channel, and sync chat between Mixer and your Discord server.

Discord integrates with a lot of different third-party services.

In some ways, Microsoft seems to be using Discord more than its own social tools like Skype or Xbox Live Clubs. Two years ago, Microsoft experimented with using Skype to let e-sports fans interact with professional gamers like Ninja, who has since become the biggest video games streamer on Twitch and created a massive community on Discord. I was part of this little Skype experiment back in the day, and came away very disappointed.

The truth is, Skype group chats are simply not designed for these kind of live interactions, and creating a Skype group chat with more than 50 users will quickly become unmanageable. That’s really too bad, and I wish Skype had a special “community” mode with a new UI that combined the best of Discord and Microsoft Teams.

Skype may have lost gamers to Discord in recent years, but the same can be said about Microsoft’s Xbox Live platform. Xbox Live Clubs are really slow and use a clunky UI on all platforms, and the few official clubs that I joined aren’t really active at all. Worse, Xbox Live will regularly show you “popular” content you probably don’t care about, and recommend you to follow complete strangers. Just like Google and Apple, Microsoft doesn’t seem to “get” social, as we’ve recently seen with the company’s desperate attempt to copy Snapchat Stories in Skype.

The information density on Xbox Live Clubs is really problematic.

Back at E3, Xbox head Phil Spencer said that the company was well aware that its Xbox app on Windows 10 doesn’t really appeal to PC gamers. “We’re reworking how we’re thinking about the PC audience to try to be more reflective of the PC community that’s out there instead of trying to pull people into the things that come from the console space,” the exec said at the time.

According to Windows Central, Microsoft is planning to revamp its Xbox Live Clubs so that they work more like Discord servers, with different channels replacing the single group chat panel that exists today. While that seems to be a step in the right direction, I’m not sure if this will be enough for PC gamers to finally care about the Windows 10 Xbox app. Discord remain light years ahead thanks to its better design, cross-platform availability and integrations with third-party services, and a true desktop app like Discord can probably do things that the UWP Xbox app will never be able to do.

Microsoft may be working on a Discord-inspired update for Xbox Live Clubs.

In the end, it seems that Discord could be a great acquisition for Microsoft. Discord is growing very fast, it’s already making money with its $4.99 “Nitro” premium subscription, and the company launching a new digital games store is probably something that Amazon, Valve and Microsoft are all watching very closely. Discord has become a force to be reckoned with in just three years, and I wouldn’t be surprised if Amazon, Google or Facebook wanted to acquire it.

The Redmond giant previously let Amazon purchase Twitch back in 2014, and it’s now playing catchup with its own Mixer service. Microsoft still owns one of the biggest gaming platforms out there with Windows, so Discord would definitely be a great fit at Microsoft. The app could coexist with Skype and Microsoft Teams, with all three apps keeping their own purpose. However, Phil Spencer’s recent E3 comments suggests that Microsoft is still more interested in improving its own Xbox Live platform, for better or worse.

It would be perfectly fine if Discord remains independent, and so far the company is doing all the right things to sustain its impressive growth. If you already tried Slack or Microsoft Teams, we really encourage you to check out Discord. The official Microsoft Discord server is a great place to start, and you’ll find here a very active community of 11K+ members where you can discuss everything Microsoft. And now that Google+ will be soon closing its doors, we wonder if all the Microsoft-owned Google+ communities dedicated to the company’s Android apps may soon make the move to Discord.

Microsoft’s new Grey/Blue Xbox Wireless Controller launches today

Microsoft’s latest Xbox Wireless Controller launches today and is available to buy from the Microsoft Store and Amazon.

This new Xbox Wireless Controller sports a gray and blue color theme and, like other Xbox Wireless Controllers, can be used to play video games on an Xbox One console or a Windows 10 laptop or tablet. The controller also features a 3.5mm stereo headset jack for traditional wired headphones or earphones and has a texture grip on each side.

Microsoft also launched the Phantom Black Special Edition Controller last month which has the same features in addition to a translucent case that showcases some of the interior tech.

Do you enjoying buying new Xbox Wireless Controllers or do you prefer to stick with your current accessories? Let us know in the comments below and then follow us on Pinterest for more Xbox content.

How to Make Text Larger or Smaller in Windows 10

Windows is a very customizable operating system, and you can change its look by your desire. For, example if you want to change the text size of a certain Windows feature, you can do that with just a few clicks. In this article, we’ll show you how to do that.

It is well known that Microsoft removed a lot of features of Windows 7 in Windows 8 and Windows 10 (read more about it in our article about which features have been removed from Windows 7), and one of them is Advanced Appearance settings dialog. This dialog allowed you to perform various appearance customizations, like changing colors and windows metrics. In Windows 8, 8.1 and Windows 10 all that’s left are a few settings of the text size.

But we can’t guarantee that this will stay like that, because Windows 10 is work in progress and the final release of the operating system always bring some changes. However, changing only the text size is definitely better choice than changing the entire DPI, because changing DPI often causes some scaling issues.

How do I change the font size on Windows 10?

To increase the size of various texts of your system, do the following :

  1. Right click on the Desktop and go to Display Settings
  2. Under Display section, go to Advanced display settings
  3. In Advanced display settings window go to Advanced sizing of text and other items
  4. Under Change only text sizes, you’ll notice a drop-down menu, it features settings for text sizes of various system texts (Title bars, Menus, Message Boxes, Palette titles, Icons and Tooltips). Select the desired text, and change its size from the drop-down menu next to itchange text size wind8apps
  5. You can also set fonts to bold, by checking Bold check box
  6. Click Apply and close all Display settings window.

Note: The steps listed above apply to older Windows 10 versions.

On newer versions of Windows 10, you can change the font size from the Settings page. Go to Settings > System > Display > Change the size of text, apps and other items. Use the drop-down menu to select the font that you want.

change size of text apps other items

How to change the font size in browsers?

If you only want to increase or decrease the font size in your browser, then you can simply press the CTRL key and use your mouse wheel to do that. If you want to undo the changes, all you need to do is press CTRL and 0 (zero) at the same time.

You can also bold letters in Discord if you want to communicate more effectively.

That would be all, if you have any questions, suggestions or some additional comments, please write the down in the comments section.

RELATED GUIDES TO CHECK OUT:

FIX: Windows Apps Crash Because Of Corrupted User Account

In Windows 10 everything is connected. Sometimes an error with one thing could prevent other from working. And the most things in Windows 10 are connected to the User Account, so a corrupted User Account could cause a lot of damage.Windows Resource Protection Found a Corrupt File, But It's Unable To Remove It

Create a new User Account

One user of Microsoft forum complained about how his apps (Word, Excel, VLC Player, etc.) are crashing every time he tries to add a file to them. We assume that cause of this problem is corrupted User Account.

So if you also have this problem, all you have to do is to create a new User Account, restore your data from the old one and all your problems will be solved.

Here’s how to create a new User Account:

  1. Go to search, type settings and go to Change PC settings
  2. Click on Accounts, and then click Other accounts
  3. Click Add an account
  4. Enter the account info to sign in to Windows. There are four ways to do this:
    • If  you already have a Microsoft account, enter it now
    • If you don’t have a Microsoft account, you can use your email address to create one
    • If you don’t have email address, you should go to outlook.com and create one
    • If you’re adding an account for your kid, click Add a child’s account
  5. Follow the instructions to finish setting up the account

Transfer data from old account to the new one

Now you have a new Windows User Account, after that, all you need to do is to transfer your data from your old account to this one you just created. Here’s how to do that:

  1. Log on as a user other than the new user you just created or the user that you want to copy files from
  2. Open the My Documents folder
  3. Click the Tools menu, and then click Folder Options (If you don’t see the Tools menu, press Alt, click the View tab, and then click Show hidden files, folders, and drives)
  4. Clear the Hide protected operating system files check box, click Yes to confirm, and then click OK.
  5. Locate the C:UsersOld_Username folder (C stands for the drive that Windows is installed on, and Old_Username is the name of the profile you want to copy files from)
  6. Select all of the files and folders in this folder, except the following files:
    • Ntuser.dat
    • Ntuser.dat.log
    • Ntuser.ini
  7. Click the Edit menu, and then click Copy
  8. Locate the C:UsersNew_Username folder (where C is the drive that Windows is installed on, and New_Username is the name of the new user profile you created)
  9. Click the Edit menu, and then click Paste
  10. Log off, and then log back on as the new user

Additional solutions

There are a few more solutions to consider, depending on when did the issues occur. We have covered a couple of instances as many users reported windows apps crashed after update. Try these solutions and let us know how it worked out for you.

That would be all, if you have any other comments, or suggestions, please write them down in the comments.

RELATED ARTICLES TO CHECK OUT NOW: