Microsoft investigating ongoing Outlook.com search issue and 401 errors, promises updates

As reported by BleepingComputer, Microsoft is having a bit of a meltdown; they are investigating an ongoing problem preventing Outlook.com users from running email searches and causing 401 exception errors. Lately, Microsoft also acknowledged the Outlook calendar shortcut widget bug on Android 13.

When users attempt to search, they encounter an error message stating, “Sorry, something went wrong. Please try again later.”

On the service health portal, Microsoft has provided information regarding their initial analysis of Outlook.com server logs and HTTP Archive format (HAR) logs captured during an internal reproduction of the issue. These logs indicate that the 401 errors occur due to an exception when users try to perform searches.

The investigation is still underway, and Microsoft aims to identify the source responsible for generating these exception errors and determine appropriate measures to resolve the impact. The outage began approximately at 12:30 AM UTC. Microsoft will share additional details regarding the situation within the next few hours.

According to user reports, the web version’s search functionality is currently unavailable, while the mobile version seems unaffected. Some users have also encountered problems when contacting Microsoft 365 personal support, experiencing a loop of sign-in prompts and Office 365 service selection.

One of the users tweeted:

The company has not disclosed the regions affected by the ongoing search outage.

On June 27, Microsoft addressed a separate issue that prevented customers in the Americas from accessing their Exchange Online mailbox through Outlook on the web.

In earlier incidents in June, Microsoft confirmed that certain services, including Outlook.com, the Azure Portal, and OneDrive, experienced disruptions due to Distributed Denial-of-Service (DDoS) attacks. These attacks were claimed by a threat actor known as Anonymous Sudan, believed to have connections to Russia.

What we can make from this story is that technical issues and security threats can occur even with well-established platforms like Microsoft. It’s vital for companies to promptly address and resolve these issues while keeping their users informed about the progress. Such incidents serve as a reminder of the complexities involved in maintaining reliable online services and the need for constant vigilance in safeguarding user data and system stability.

Exploring the phenomenal Phi-1 code language model from Microsoft Research

As reported by TowardsAI.net, coding has become a prominent area of development in foundation models. OpenAI introduced models like Codex, later evolving into GPT-4, while Amazon and Salesforce also made significant contributions. Initially, coding models prioritized quantity and size over quality. However, Microsoft Research challenged this approach with their paper “Textbooks is All You Need,” training a compact model solely on high-quality textbook datasets. Their model, phi-1, achieved impressive results, surpassing competing models on benchmarks like HumanEval and MBPP with a pass@1 accuracy of 50.6% and 55.5%, respectively. The significance of high-quality data was highlighted in their training process, combining synthetic data and carefully filtered content.

High-Quality Datasets

Microsoft Research’s research paper highlights the importance of high-quality training data from textbooks in their code language model. They propose a training set resembling a well-structured “textbook” to overcome limitations in existing code datasets. By utilizing filtered code-language data, synthetic textbooks generated by GPT-3.5, and a smaller synthetic dataset of Python exercises, they achieved exceptional performance in code generation, surpassing existing approaches.

Filtered Code-Language Dataset

Microsoft Research utilized a range of datasets and techniques to develop an efficient code-generation model. They curated a reliable filtered dataset by leveraging Python code datasets from The Stack and StackOverflow. Using GPT-4, they assessed the educational value of the samples and annotated them accordingly. A random forest classifier, trained on the annotated data, predicted the quality of each file or sample.

Synthetic Textbook Dataset

Microsoft Research employed GPT-4 sparingly for quality annotations on a subset of The Stack and StackOverflow samples. This reduced the need for labor-intensive human annotation.

Using GPT-3.5, they generated a synthetic textbook dataset with less than 1 billion tokens. The textbooks combined natural language-heavy text with relevant code snippets, targeting specific topics to foster reasoning skills and understanding of algorithms. Constraints were applied during generation to ensure dataset diversity.

This approach proved effective, as exemplified by an example of synthetically generated text for the textbooks.

Smaller Textbook Dataset

Microsoft Research curated the CodeExercises dataset, comprising less than 180 million tokens of Python exercises and solutions. These exercises involved completing partially coded functions with docstrings, and training the model for function completion tasks. GPT-3.5 generated the dataset with constraints on function names for diversity. Precautions were taken to avoid replicating issues from the HumanEval benchmark during finetuning.

The Architecture

Microsoft Research employed a decoder-only transformer model based on FlashAttention for their code language model. The phi-1 model had 1.3 billion parameters, 24 layers, and 32 attention heads, while the smaller phi-1-small model had 350 million parameters, 20 layers, and 16 attention heads. They used a rotary position embedding and the same tokenizer as codegen-350M-mono. Pretraining used a sequence length of 2048 and included the CodeTextbook dataset. Fine-tuning with the CodeExercises dataset was performed with adjusted hyperparameters.

The Results

Microsoft Research evaluated phi-1 on various benchmarks and demonstrated its superiority over larger models like StarCoder or Replit. Finetuning had a significant impact on phi-1’s performance.

Their work highlights the profound influence of high-quality data in enhancing language models’ proficiency in code-generation tasks. Creating “textbook-quality” data, they trained a model that outperforms most open-source models on coding benchmarks like HumanEval and MBPP. Remarkably, despite being smaller in size, their model exhibited exceptional performance.

Using high-quality data provides clear, self-contained, and instructive examples of coding concepts and skills. This conducive learning environment enables language models to effectively grasp coding principles, resulting in superior code-generation performance.

How to get Samsung Quick Share on any Windows 11 PC

Good news for Samsung users. You can now use Samsung Quick Share on any Windows PC device, including Windows 10, and Windows 11.

You were able to use this app on Windows 10, and Windows 11 before, but only on Samsung laptops. So users were not able to install it and use it on non-Samsung laptops. However, starting today, you will be able to use this app to quickly send files back and forth between your Samsung phone and your Windows PC.

And it was about time. Samsung released this app in 2021, and users expected Quick Share to work on their Windows PCs. But it didn’t. Truth is, Microsoft released Phone Link, and the app could easily do the trick. But Quick Share works much better on its native products.

Wondering how to get it? It’s very simple, you can do it in minutes, but you have to be aware of some points first.

Here’s how you can get Samsung Quick Share on your Windows 11 PC

  1. Go to the Microsoft Store and look for the Quick Share app.
  2. Download it for free and install it.

However, you need to know that you need to update your Bluetooth and your Wi-Fi drivers to the latest version possible. Otherwise, Samsung Quick Share won’t even work.samsung quick share windows 11

On the Microsoft Store you can see the exact specifications:

  • OS: Windows 10 2004 (build number 19041) version or higher
  • Bluetooth driver: (Intel) 22.50.02 version or higher
  • Wi-Fi driver: (Intel) 22.50.07 version or higher

For smooth use of features, please keep the Windows OS and Bluetooth/Wi-Fi drivers up to date. Depending on the manufacturer and model, there may be restrictions on all or some features of the service.

As long as you keep your drivers up to date, all the time, you should be fine.

What do you think about it? Do you use Quick Share? Let us know your opinions in the comments section below.

Fix: Qbittorrent Crashing on Windows 11 [5 Fixes]

You upgraded qBittorent to a new version, and as you try to open the app, it crashes every time on startup. Well, that’s not new as online forums are filled with users complaining about it.

From the face of it, it appears to be an issue with over usage of the RAM, however, there could also be other possibilities that we will discuss in this post.

Why does Qbittorrent crash all the time?

Some of the reasons why qBittorent crashes every time you launch it on your Windows 10 or 11 PC are as below:

  • Excessive RAM usage – In the majority of cases, the issue arises due to high RAM usage.
  • Corrupted current version – Chances are, that the current version of qBittorent is broken and hence, it may not be responding on Windows 11.
  • A glitch with the Qbittorent app – Sometimes, qBittorrent may keep crashing due to a problem with the app itself.
  • An event causing the crash – Sometimes, the app crashes due to an unidentifiable event whenever you try to open it.
  • Corrupted system files – It could be possible that you may encounter the issue due to broken or damaged Windows system files.

Fortunately, we have listed some of the workarounds that have worked for several users and helped them with the qBittorent crashes.

What can I do if Qbittorrent crashes on Windows 11?

Try the preliminary checks and see if it helps fix the issue off-hand:

If none of the above steps work, you can proceed with the below troubleshooting methods to fix the issue when Qbittorent crashes.

1. Run SFC and DISM scans

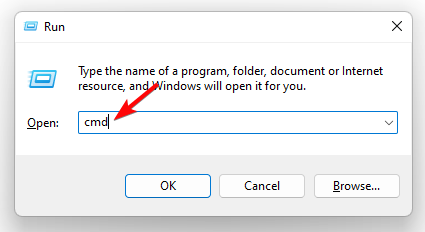
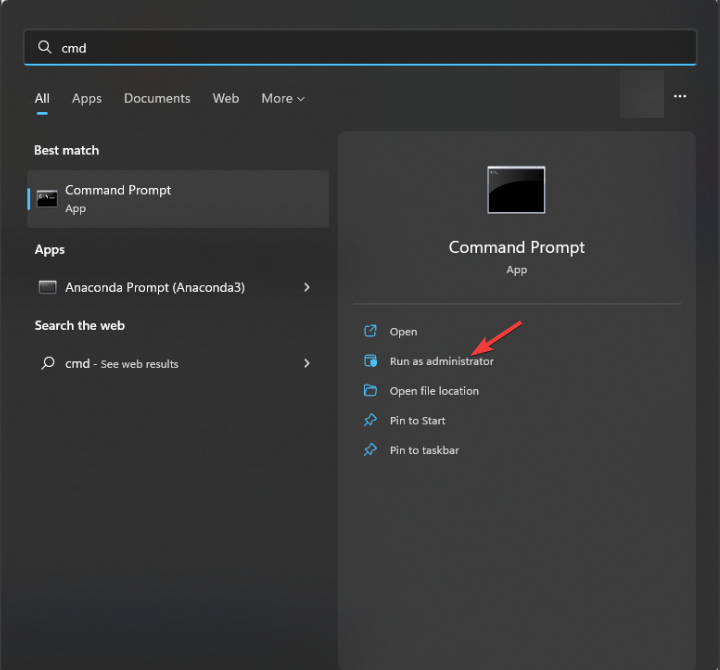
  1. Press the Win + R shortcut keys to open the Run console, type cmd in the search bar, and press the Ctrl + Shift + Enter keys together to open the elevated command. open elevated command prompt
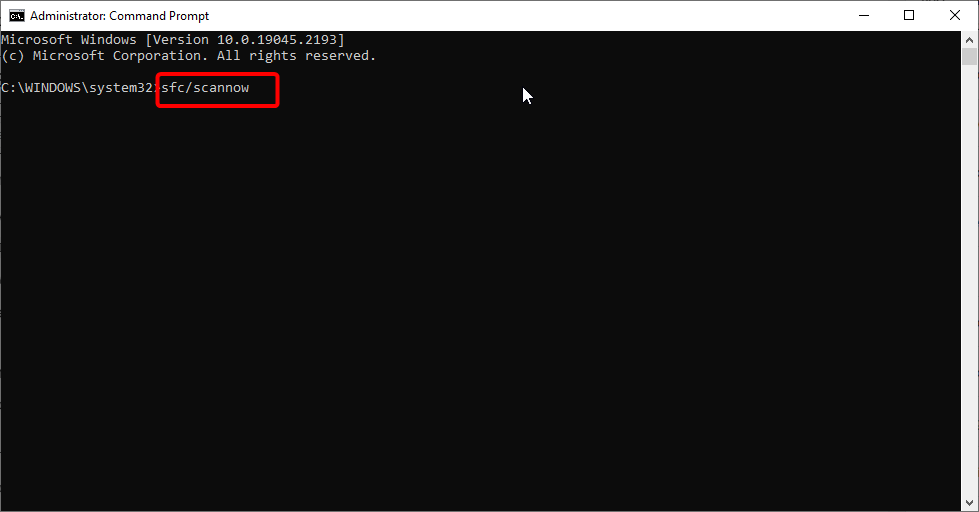
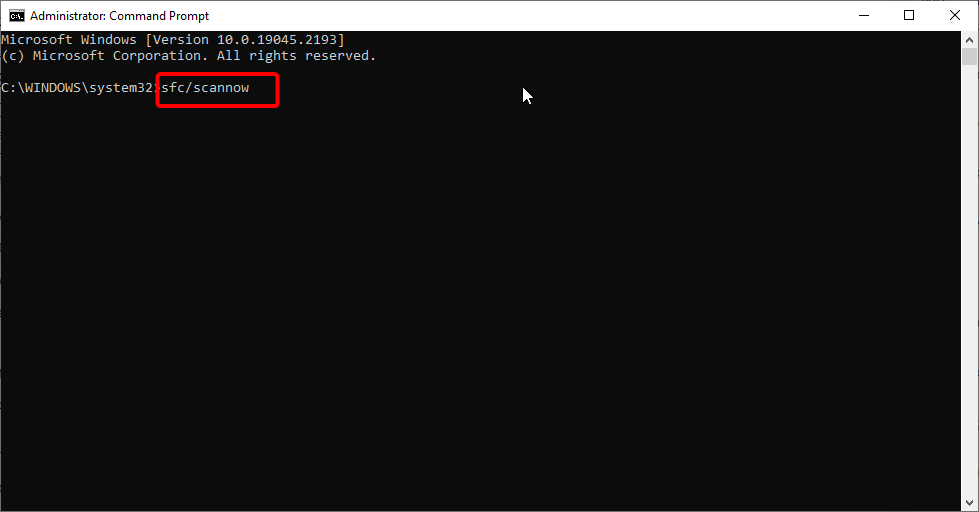
  2. Type the below command in the Command Prompt (Admin) and hit Enter: sfc /scannowsfc scannow
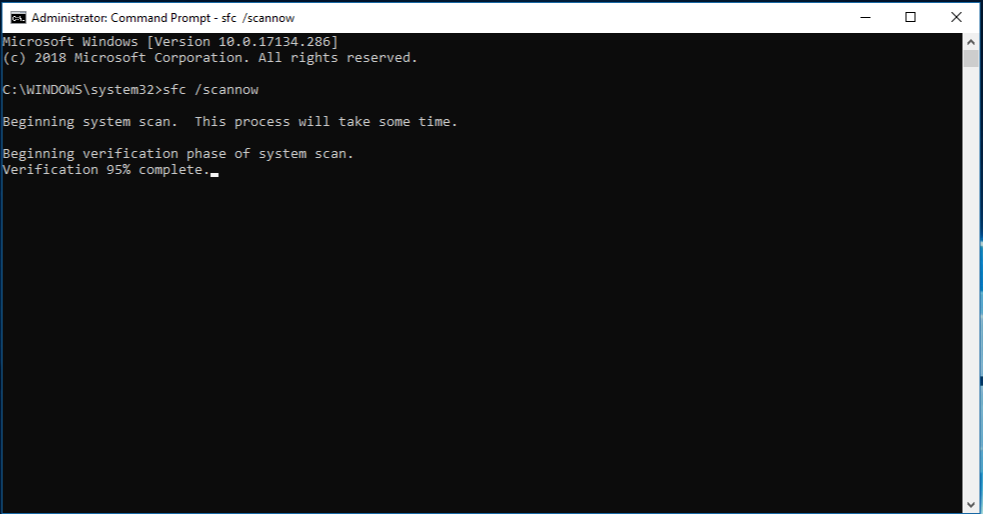
  3. The utility will now start looking for the corrupted system files and if found, will repair them automatically.
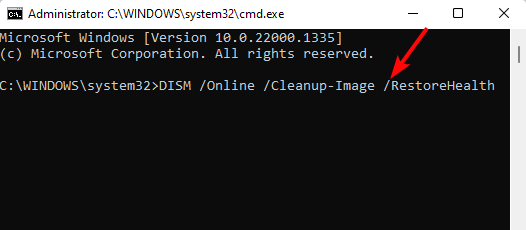
  4. Once you see the success message, run the below command and hit Enter: DISM /Online /Cleanup-Image /RestoreHealthrun dism scan
  5. The tool will now look for broken and missing files and replace them with fresh ones.

Once the process is over, close the Command Prompt, restart your PC, and now try launching the app.

If you don’t want to go through this manual process, you can always rely on a third-party repair software that will fully scan your PC and offer a full report of the malfunctions and repair options to solve Qbittorrent crashes.

2. Perform a clean install of Qbittorrent

  1. Press the Win + R keys simultaneously to launch the Run dialog, type appwiz.cpl in the search box, and hit Enter to open the Programs and Features window. appwiz.cpl
  2. In the Control Panel window, on the right, under Uninstall or change a program, look for the app, right-click on it and select Uninstall. uninstall software
  3. Once the app is uninstalled, press the Win + R keys again to open the Run console. Next, type AppData, and hit Enter.run appdata command
  4. In the AppData folder, go to the BT_backup folder in qBittorrent, and create a backup of it. BT_backup folder delete
  5. Now, select all qBittorrent config files in the AppData folder and hit Delete. Once done, visit the qBittorent official web page, and install the latest version.

Now, try opening the qBittorent app and add some torrents to check if it still crashes or if the issue is fixed for good.

3. Identify and disable the event causing the crash

  1. Visit Microsoft’s official page to download & install Debug Diagnostic Tool v2 Update 3. Debug Diagnostic Tool v2 Update 3
  2. Next, download & extract these predefined rules for qBittorent to your desktop. extract zip
  3. Now, click on the Start button, and run the DebugDiag 2 Analysis tool. search for DebugDiag 2 Analysis
  4. Click on the Import button at the bottom right, & direct it to where you extracted the rules above. The debugger rules will now be active, and whenever there’s a crash, it will capture a stacktrace.

This will help you identify the event causing problems in the program, and the qBittorent app should not keep crashing anymore.

4. Limit disk write caching on the device

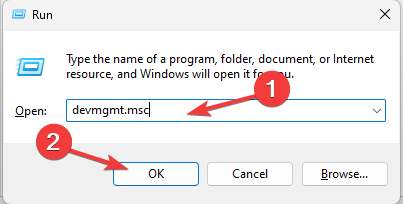
  1. To open the Run dialog, press the Win + R keys together. Type devmgmt.msc in the search bar and hit Enter to open Device Manager. run dev mgmt.msc command
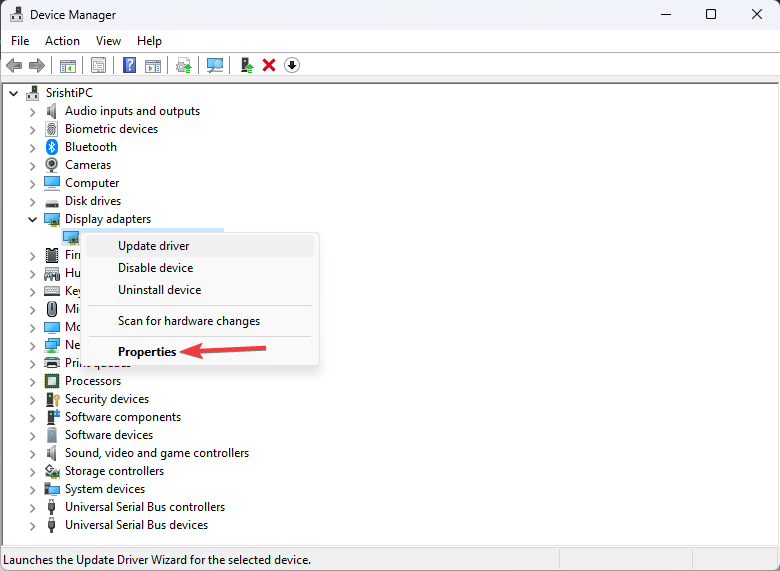
  2. Next, expand Disk Drives, right-click on the drive for which you want to disable disk write caching, and then select Properties.disk drive properties
  3. In the Properties dialog, go to the Policies tab, and uncheck the Enable write caching on the disk option. Press OK.disable Enable write caching on the disk

Now, restart your PC and check if qBitttorent is still crashing on Windows 11.

5. Re-install Windows 11 from the USB Boot Disk

  1. Connect the bootable installation media to your PC.usb flash drive
  2. Restart your PC and enter BIOS by pressing Del or F2 during the boot, and set your flash drive as the default boot device and save changes.
  3. Now, follow the second method mentioned in our detailed post here to reinstall Windows 11 using an installation media.

Alternatively, you can uninstall the 64-bit version of the qBittorent app and install the 32-bit version to check if it still crashes.

You may also recheck the speed and health of your storage device (SSD or HDD) using one of the benchmark tools we have recommended in our post.

For any other queries related to qBittorent, you may leave a message in the comments section below.

How to Rollback NVIDIA Drivers in Windows 10/11

Whether you are experiencing compatibility issues, stability problems or prefer an older driver version for your NVIDIA graphics driver, this guide can help!

We will walk you through the step-by-step instructions to safely and effectively roll back your NVIDIA graphics driver in Windows 10 and 11.

How can I roll back NVIDIA drivers in Windows 11?

Before diving into the rollback process, go through the following preliminary checks:

Once you have checked all these, let us move to the solutions.

1. Use the Device Manager

1.1 If the Roll Back Driver option is available

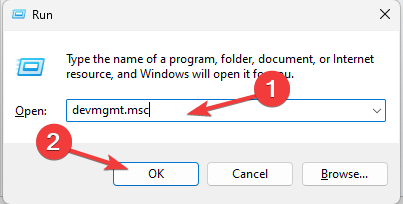
  1. Press Windows + R to open the Run dialog box.
    Device Manager Run command Rollback NVIDIA Drivers in Windows 10/11
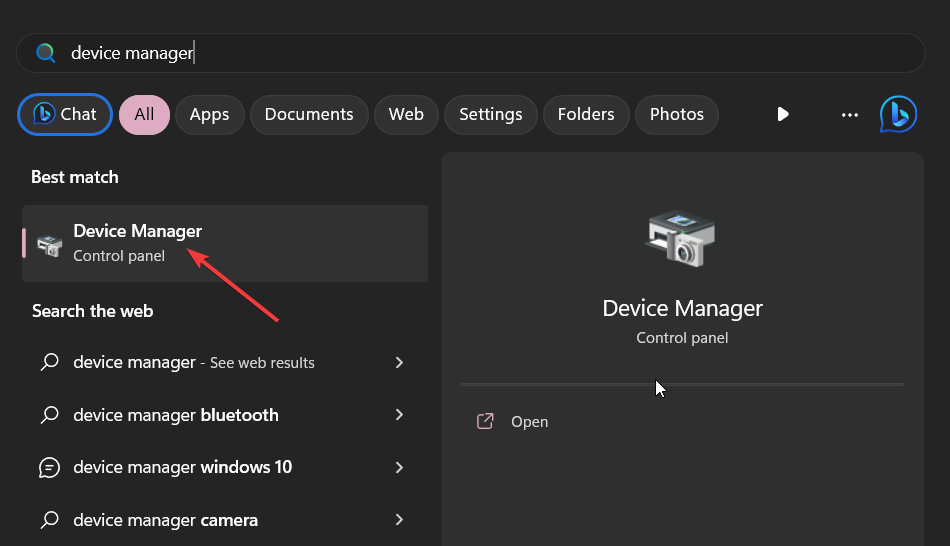
  2. Type devmgmt.msc and click OK to open the Device Manager.
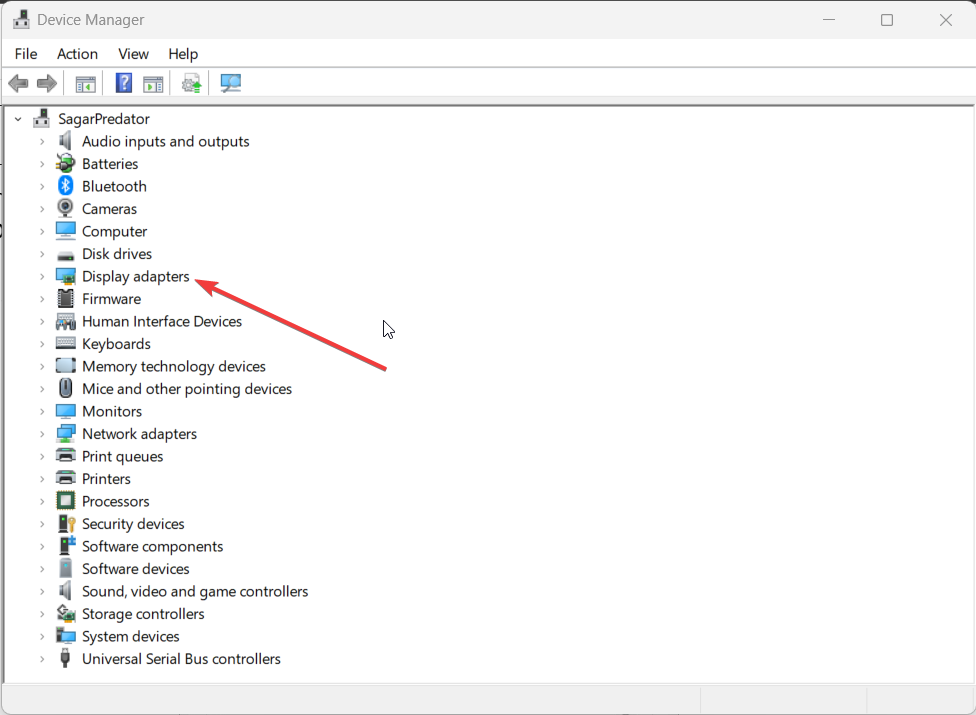
  3. Locate and click Display adapters to expand it.
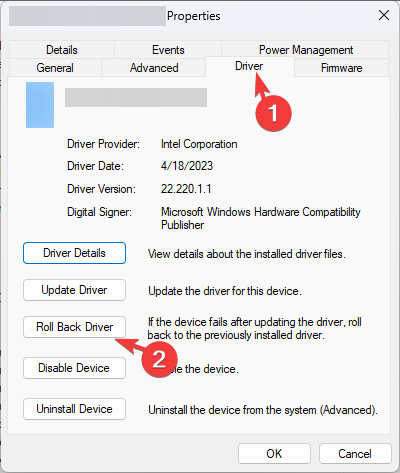
  4. Right-click the NVIDIA driver and choose Properties.
    NVIDIA driver properties
  5. Go to the Driver tab, and select the Roll Back Driver option.
    Roll Back Drivers
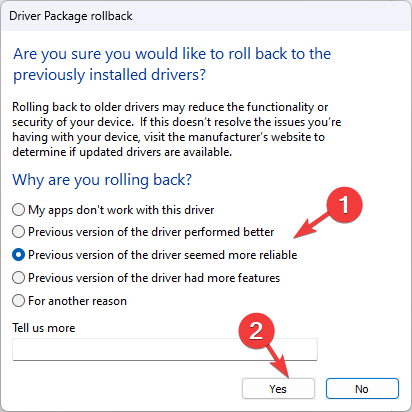
  6. On the Driver Package rollback page, select the reason for the rollback and click Yes.
    Select the reason click Yes
  7. Restart your computer to complete the process.

If the Roll Back Driver button is greyed out in Device Manager, Windows can’t find any NVIDIA driver to which it can roll back.

In this case, you need to download and install the older version of an NVIDIA driver manually; follow the steps mentioned below.

1.2 If the Roll Back Driver option is greyed out

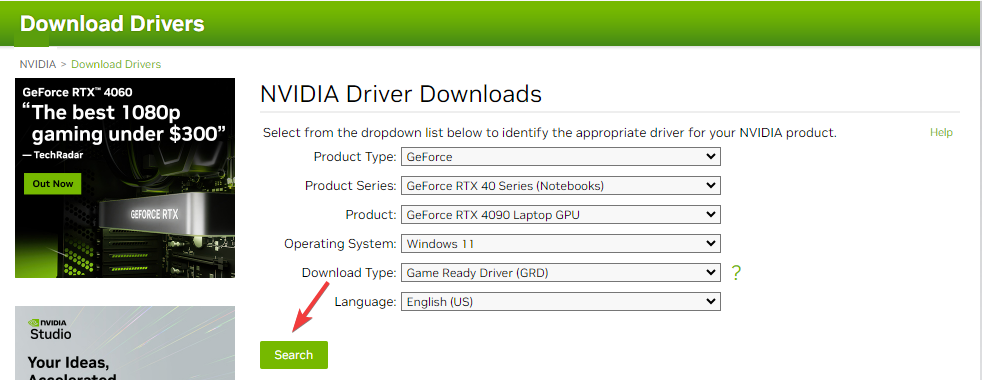
  1. Go to the NVIDIA official website and download the desired version of the NVIDIA driver at the desired location.
    NVIDIA driver download  Rollback NVIDIA Drivers in Windows 10/11
  2. Press Windows + R to open the Run dialog box.
    Device Manager Run command Rollback NVIDIA Drivers in Windows 10/11
  3. Type devmgmt.msc and click OK to open the Device Manager.
  4. Locate and click Display adapters to expand it.
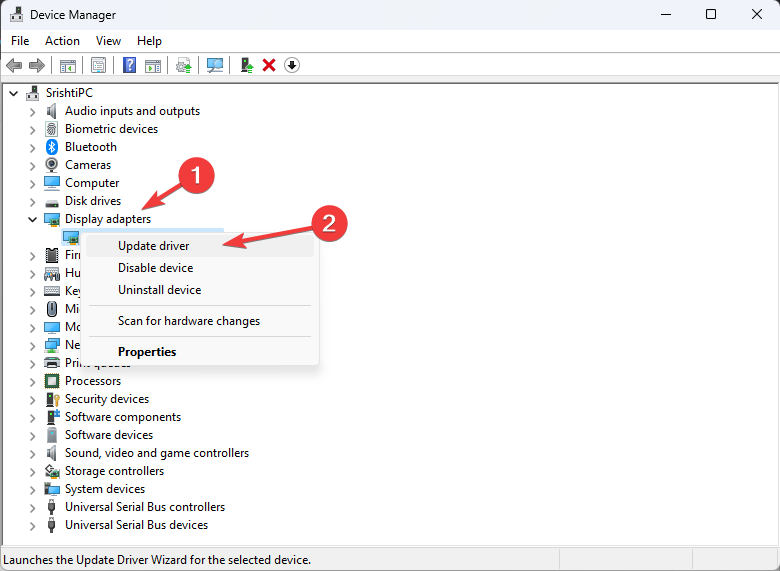
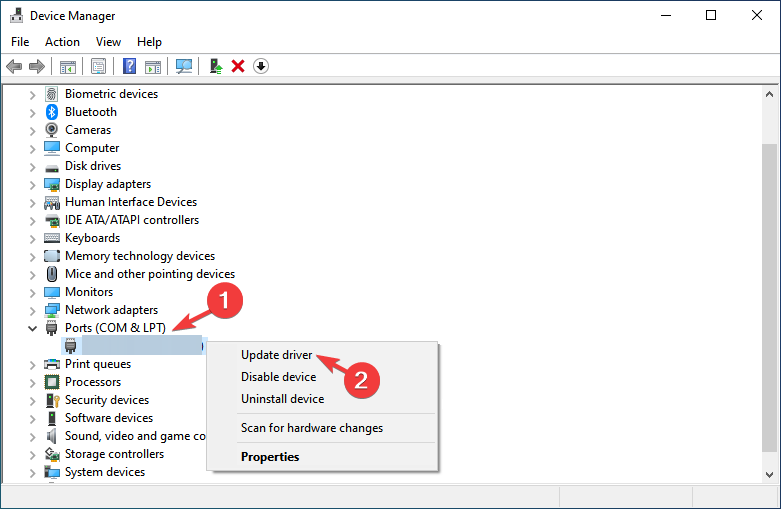
  5. Right-click the NVIDIA driver and choose Update driver.
    Graphics Driver update
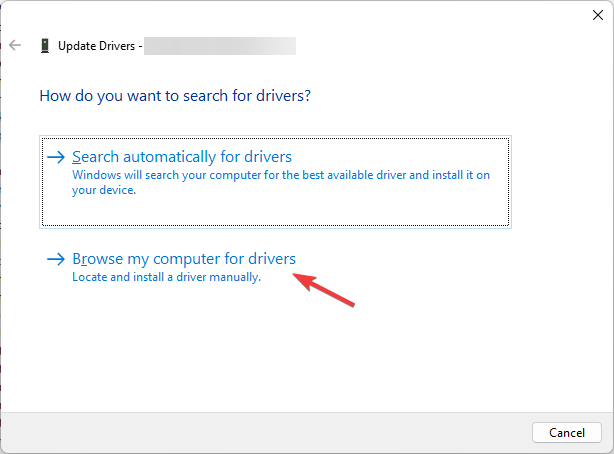
  6. Click Browse my computer for drivers.
    Browse my computer for drivers
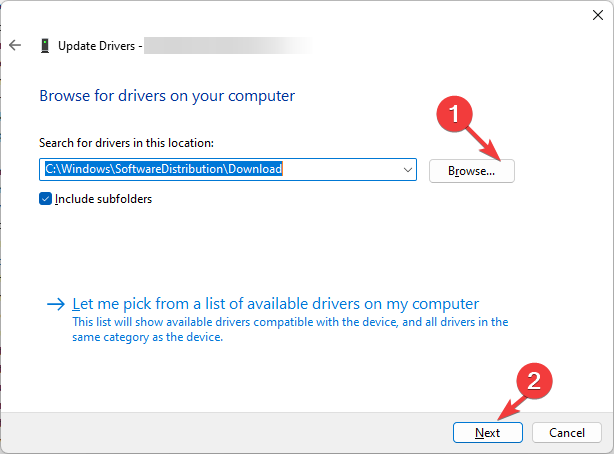
  7. On the Update drivers window, click Browse, navigate to the folder where you saved the downloaded file, and click Next.
    Browse and click Next
  8. Follow the onscreen instructions to complete the process.

For users with older NVIDIA cards like the GT 210 1GB, you can follow this GT 210 1GB driver download guide to get the correct package and install it manually when rollback isn’t available.

2. Use the Display Driver utility

Note icon NOTE
Before proceeding with this method, it is recommended to run your computer in safe mode to avoid conflicts in running the application.
  1. Go to the NVIDIA official website and download the desired version of the NVIDIA driver at the desired location.
    NVIDIA driver download  Rollback NVIDIA Drivers in Windows 10/11
  2. Download the Display Driver Uninstaller and double-click the installer file to run the setup.
  3. On the Installer wizard, click Next to initiate the installation.
    Install
  4. Follow the onscreen prompts to complete the process.
  5. Once it is installed, the app will launch.
  6. From the right side, from the first drop-down, select GPU and choose NVIDIA in the second one.
  7. Now click the Clean and restart button. The tool will remove the NVIDIA driver and restart your computer.
    Rollback NVIDIA Drivers in Windows 10/11 Display_Driver_Uninstaller_LkAMHtD3YB
  8. Now go to the downloaded driver and double-click it to initiate the installation.
  9. Choose Custom (Advanced), then click NEXT. Follow the onscreen instructions to complete the installation.
    Custom installation

Once the process is complete, restart your computer and check if the installed driver works fine.

What can I do to roll back the NVIDIA drivers on Windows 10?

To roll back drivers on Windows 10, first, ensure you have an extra copy of your important data and create a restore point. Then use the user account with admin rights and follow the same methods mentioned for Windows 11 to complete the job.

So, this is how you can roll back NVIDIA drivers on your Windows 10/11 computer and restore stability and compatibility to your NVIDIA graphics card!

If you are facing problems downloading NVIDIA drivers on a Windows computer, we recommend you check out this guide for quick solutions.

Please feel free to give us any information, tips, and your experience with the subject in the comments section below.

What is 0x0000011A BSoD & How to Fix It in 3 Steps

Recently, some Windows users have reported the 0x0000011A BSoD EM_INITIALIZATION_FAILURE error appearing on their PCs. It impedes some functionalities in the system. Hence, this guide will discuss the error and how to fix it.

Also, you may be interested in the operation failed error 0x00004005 and what to do if you encounter the error on your Windows 11 PC.

What is 0x0000011A BSoD?

  • The 0x0000011A error code refers to the EM_INITIALIZATION_FAILURE (Emergency Management Initialization Failure) Blue Screen of Death (BSoD).
  • It occurs in Windows OS and indicates a problem during the initialization of the Emergency Management Services (EMS).
  • EMS is a feature in Windows that allows system administrators to manage and troubleshoot a computer remotely.

What causes 0x0000011A BSoD?

  • Faulty or outdated drivers can interfere with the initialization process and lead to this error.
  • If essential system files become corrupted, it can prevent EMS from initializing correctly.
  • Certain hardware components or peripherals may conflict with EMS initialization.
  • Issues during the installation or configuration of Windows updates can sometimes trigger the error.

Regardless, we’ll take you through the basic steps for resolving the issue on Windows 11.

How do I fix the 0x0000011A BSoD?

Before proceeding with any advanced troubleshooting steps, we recommend you observe the following preliminary checks:

  • Restarting the computer will refresh its processes and resolve temporary glitches or conflicts liable to cause the error.
  • Ensure all hardware components are properly connected and functioning correctly.
  • Use the System File Checker (SFC) tool to scan and repair any corrupted or missing system files.
  • Install pending Windows updates to fix bugs and compatibility problems that can cause the error.
  • Perform a thorough scan with dedicated antivirus to check for malicious programs that could interfere with EMS initialization.

If you still can’t get around the error, go ahead with the solutions below:

1. Update device driver via Windows update

  1. Press the Windows + I key to open the Windows Settings app.
  2. Go to Windows Update and select the Advanced options.
  3. Click on the Optional Update button.
  4. Click the drop-down button on the Driver Update and checkmark the list of updates available.
  5. Select the Update and Install button and wait for the drivers to install.

Updating your device drivers via Windows update will fix faulty or outdated drivers interfering with the initialization process, causing the error to occur.

If you encounter issues when using Windows Update, you can check how to diagnose and fix Windows Update not loading on your PC.

2. Uninstall recently installed apps

  1. Click the Start button, type the control panel, then press Enter.
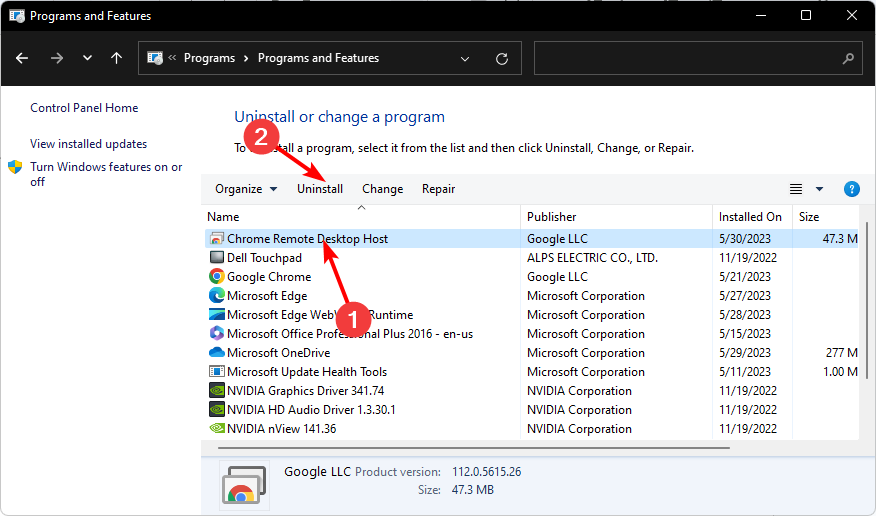
  2. Click on Programs, go to the Programs and Features tab, and find the app from the list.
  3. Select the app and click Uninstall.
  4. Restart your PC and check if the EM_INITIALIZATION_FAILURE error persists.

The above steps will help you resolve conflicts between software or third-party applications that can disrupt the EMS initialization process. Hence, it removes the causative application.

3. Run a System Restore

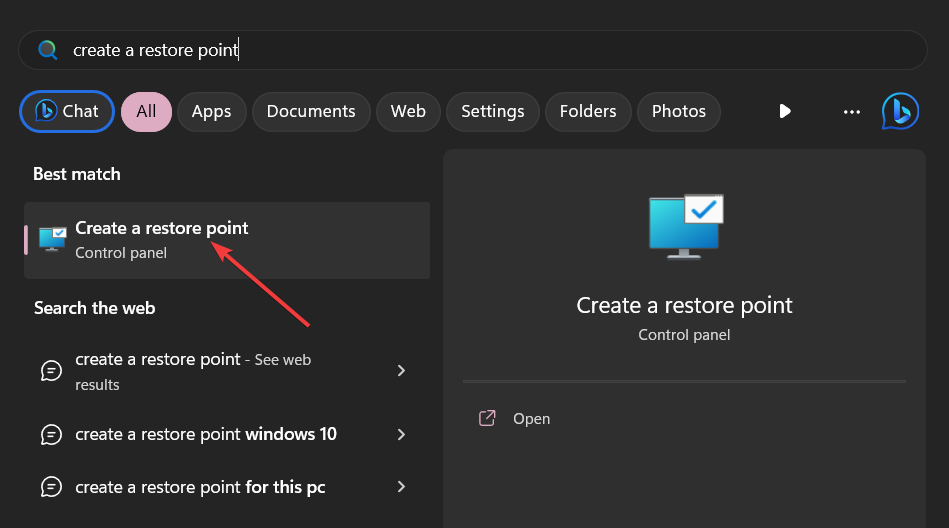
  1. Press Windows, input restore, and click on Create a restore point.
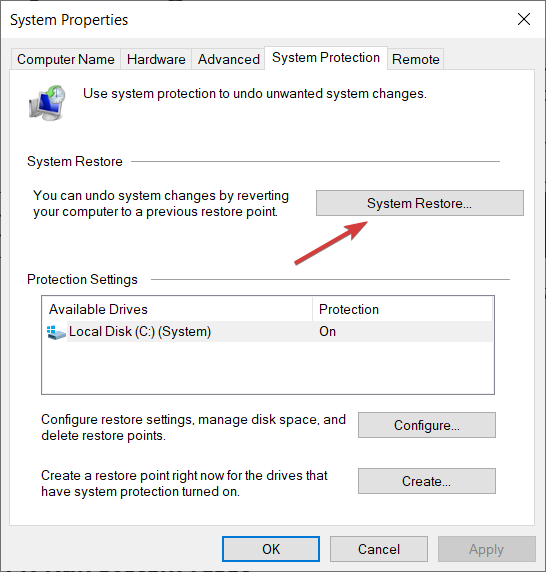
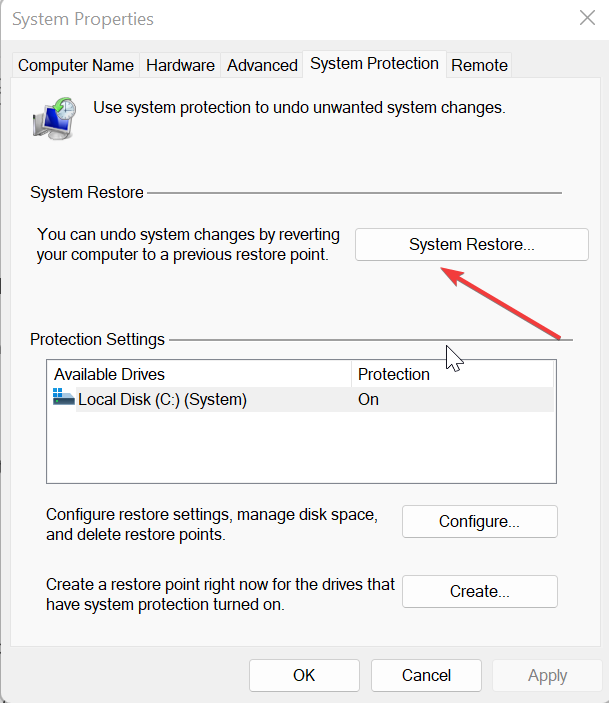
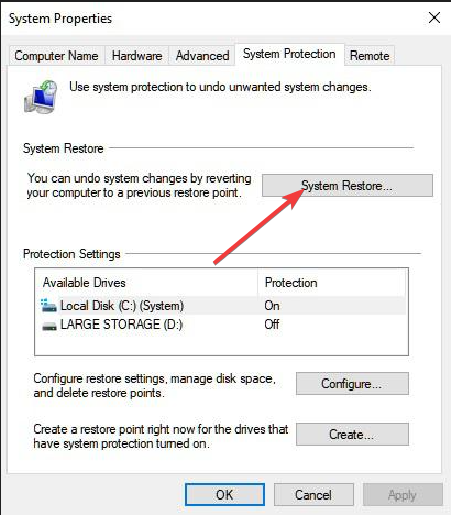
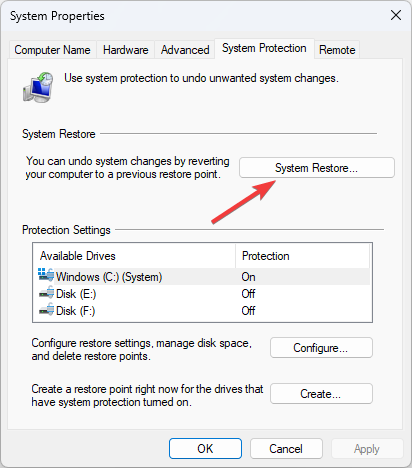
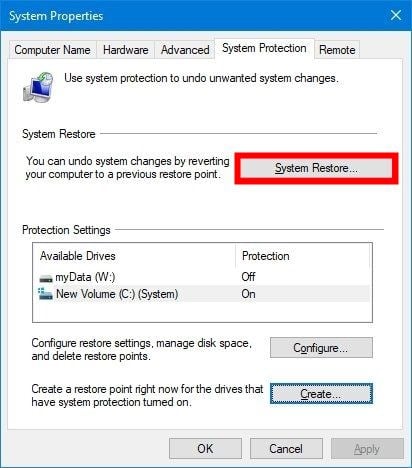
  2. Select the System Protection tab, and click on System Restore.
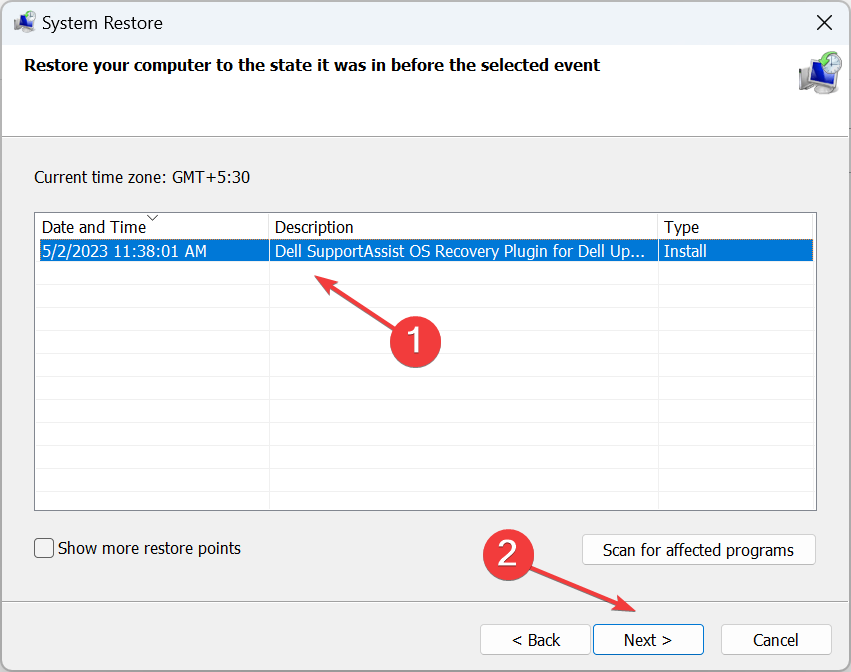
  3. In the next window, click the Next button.
  4. Choose the restore point you want to restore from, then click Next.
  5. Afterward, select Finish to complete the process and restart your PC.

The System Restore will roll back your system to a previous state where the error was absent. Read our guide on how to fix the restore point if it’s not working on your PC.

In conclusion, we also have a comprehensive guide discussing BSoD error 0x00000154 and how to resolve it on Windows 11.

Likewise, you can check our article about the 0xc00002e3 BSoD error and what to do if you run into the error on your computer.

If you have further questions or suggestions, kindly drop them in the comments section.

Can you change your display name in Teams meetings?

Well, currently you can change your display name in Teams meetings. And it’s very easy to do so. Microsoft Teams allows you to change just by clicking on the icon next to your name, and then changing the name.

However, it seems that Microsoft will bring forward another feature for Teams that has to do with your display name. At least, with a part of it. According to the Teams’ roadmap, you will be able to customize your name with details. Basically, you’ll be able to rename yourself in Teams but with additional info.

Microsoft is keen on making Teams the best app for organizations, and this update follows other quality updates that were announced. You’ll be able to set your location and available hours in Teams now, you’ll also be able to use Recap AI, to follow along in meetings.

And now, with this update, Microsoft will make sure people have everything they need to fully express their work and their activity.

Customize and change your display name on Microsoft Teams

The update will roll out in August, and, as we mentioned, you’ll be able to customize your display name on Teams.

What does this mean? Well, the feature will offer you far more flexibility. It will allow you to include additional details to your name. Details such as your department, your team, and your specific role, will appear alongside your name.microsoft teams change display name in meeting

By doing it, you will be able to fully express yourself, and convey all your activity in meetings. This way the other participants will get a much better idea of who you are, what you do, and what kind of expertise you bring to the table.

The feature will be available on Windows and Mac devices. And it will be available to the general public, somewhere in the fall.

What do you think about this feature? Let us know in the comments section below.

What is Winservice.exe & How to Fix Its Errors

If you notice that Winservice.exe triggers some errors on your computer and you are bothered, it may be malware; this article is for you as we explore the file and show some easy fixes to its errors.

Before getting to it, it is important not to confuse it for the winserv.exe file or even the winservices.exe file, which is often a virus.

What is Winservice.exe?

The winservice.exe file that comes with SCM_Service by Netgear is legitimate. It is a service that is responsible for running the SCM_Service application. SCM_Service is an application that is used to manage Netgear routers and switches.

If you are curious about the service, you may be interested in knowing some of the best deals on Netgear routers.

It is located in the directory indicated below and has no description:

C:\Windows\SysWOW64

How do I fix the Winservice.exe errors?

Before going into any solution, try this workaround:

If the error persists, continue to the solutions below.

1. Run a file scan

  1. Press Windows + R to open the Run dialog.
  2. Type cmd and hit Ctrl + Shift + Enter.
    winservice.exe
  3. Enter the script below and hit Enter.
    sfc /scannow
    winservice.exe
  4. Follow any promts given and restart the computer when the scan completes.

2. Restore system health

  1. Press Windows + R to open the Run dialog.
  2. Type cmd and hit Ctrl + Shift + Enter.
    winservice.exe
  3. Input the script below and hit Enter.
    DISM /Online /Cleanup-Image /RestoreHealth
    winservice.exe
  4. Wait for the command to complete and verify it fixes the winservice.exe error.

3. Clean boot the computer

  1. Press Windows + R to open the Run dialog.
  2. Type msconfig and hit Ctrl + Shift + Enter.
  3. Click Selective startup tick the options for Load system service and Load startup.
  4. Slect the Services tab, check Hide all Microsoft services, and click Disable all.
  5. Click the Startup tab and select Open Task Manager.
  6. Click a startup application and select the Disable button. Repeat this step for as many startup apps as you have.
  7. Click OK and Apply and close the configuration utility, then restart the device and verify if it fixes the winservice.exe error.

With any of the solutions discussed in the guide, you should fix most associated errors, like Winservice.exe not found, not responding, or using too many resources.

We have covered extensively other executables like onenotem.exe and overseer.exe; you may want to check out their guides.

If you have additional questions, please leave us a comment below; we will happily respond to them.

XCOPY Access Denied: How to Fix This Error

If you attempt to copy files or folders with the XCOPY command but lack the required permissions, you may encounter the XCOPY access denied error. We explore this issue and recommend some solutions in this guide.

You may also want to check out our other extensive guide that tells you what to do when an unexpected error keeps you from copying files on your computer.

Why do I get the XCOPY access denied error?

The most common reasons include the following:

  • You do not have sufficient permission to copy the folders or files.
  • The folder or file source and destination are on separate drives where you do not have permission.
  • XCOPY command is disabled on the computer.
  • There is a problem with the source or destination documents or directories.

You will need the terminal for most of our preferred solutions, so check out our detailed guide if you can not open the Command Prompt as an admin.

How can I fix the XCOPY access denied error?

Before you try the solutions, we recommend this quick workaround:

  • Reopen the Command Prompt with administrative privileges and retry the command.
  • Double-check permissions for both the source and destination files or folders.

If you still do not have success, proceed to the solutions below.

1. Enable XCOPY

  1. Press Windows + R to open the Run dialog.
  2. Type cmd and hit Ctrl + Shift + Enter to open an elevated Command Prompt.
    xcopy access denied
  3. Type in the script below and hit Enter.
    reg add "HKCU\Environment" /v PATH /t REG_EXPAND_SZ /d "%PATH%;C:\Windows\System32"
  4. Input Yes to overwrite and hit Enter.
  5. Finally, try the command again and verify that you no longer receive an XCOPY access denied message.

2. Take ownership of the file or folder

  1. Press Windows + R to open the Run dialog.
  2. Type cmd and hit Ctrl + Shift + Enter to open an elevated Command Prompt.xcopy access denied
  3. Input in the script below and hit Enter, replacing C:\Users\username\Desktop\file.txt with your file path and name.
    takeown /f C:\Users\username\Desktop\file.txt
    xcopy access denied
  4. Type in the below script and hit Enter to grant full control, also replacing C:\Users\username\Desktop\file.txt with your file path and name:
    icacls C:\Users\username\Desktop\file.txt /grant username:F
    xcopy access denied
  5. Lastly, rerun your XCOPY command and see if the solution fixes the XCOPY access denied issue.

3. Use the T or Y parameters

  1. Press Windows + R to open the Run dialog.
  2. Input cmd and hit Ctrl + Shift + Enter to open an elevated Command Prompt.xcopy access denied
  3. Type the script below and hit Enter, replacing <source destination> with the file directory and name. If you’re attempting to copy a directory but lack permission to copy the files within it, utilizing the /T parameter is helpful.
    xcopy <source destination> /T
  4. Optionally, you may replace /T with /Y to suppress the prompt for confirmation if a file already exists in the destination.

These steps are quite easy to follow; if you have followed them properly, you should have no other issues with denying XCOPY access.

If this command isn’t working, there are others you can use, and we described all of them in our copy vs xcopy vs robocopy article.

You may look at our other comprehensive article if you can not move files on your computer. Lastly, if you think we skipped any solutions, please let us know in the comment section below.

Ltsvc.exe: What Is It & How to Uninstall It

Ltsvc.exe is a service that runs in the background as long as your PC is running, but it can be stopped or started by you at any time.

It monitors and controls many of the functions of LabTech, including software updates, license checking, task scheduling, and more. If unnecessary, we show you how to remove it from your PC.

What is Ltsvc EXE used for?

The ltsvc.exe file is a process belonging to the LabTech Monitoring Service by LabTech Software. This program is a non-essential process but should not be terminated unless suspected of causing problems.

It can be used to check the server’s status from a remote location, or it can be used locally on the server itself.

What is a LabTech monitoring service?

Let’s start with the basics. Labtech Software is a company that provides software to manage your IT infrastructure. You can use it to monitor and manage any device on your network, including servers, workstations, printers, routers, and more. 

If you’ve already purchased Labtech software, you may see an EXE file in the folder where you installed it usually in: C:\Program Files 

The EXE files are used by Labtech software to install updates or perform maintenance tasks. For instance, ltsvc.exe generates alerts when errors occur on monitored computers. 

Monitoring is broken down into two components; alerts and reporting. Alerts are actions that can be taken when a certain condition is met. Reporting provides information about the current state of your LabTech environment in real-time or at specified intervals.

Monitoring services are ideal for small businesses with no dedicated IT staff where the full functionality of monitoring software can be used at a fraction of the cost of hiring an outsourced IT support company.

This utility is designed to help you perform several actions, such as:

  • Checking for updates from time to time
  • Sending information about your system to LabTech Software
  • Running scheduled tasks on your machine

For any avoidance of doubt, ltsvc.exe is a legitimate process that LabTech MSP signs. Its size should be roughly around 13MB.

Any other facts that deviate from these should indicate that the file has either become obsolete or a virus masquerading as the real thing. In such a case, the file should be removed from your PC.

How do I manually remove the LTS service for LabTech?

1. Run DISM and SFC scans

  1. Hit the Start Menu icon, type cmd in the search bar, and click Run as administrator.cmd-run-admin-w11 unexpected kernel mode trap windows 11
  2. Type the following commands and press Enter after each one:DISM.exe /Online /Cleanup-Image /Restorehealth sfc /scannow

2. Scan for viruses

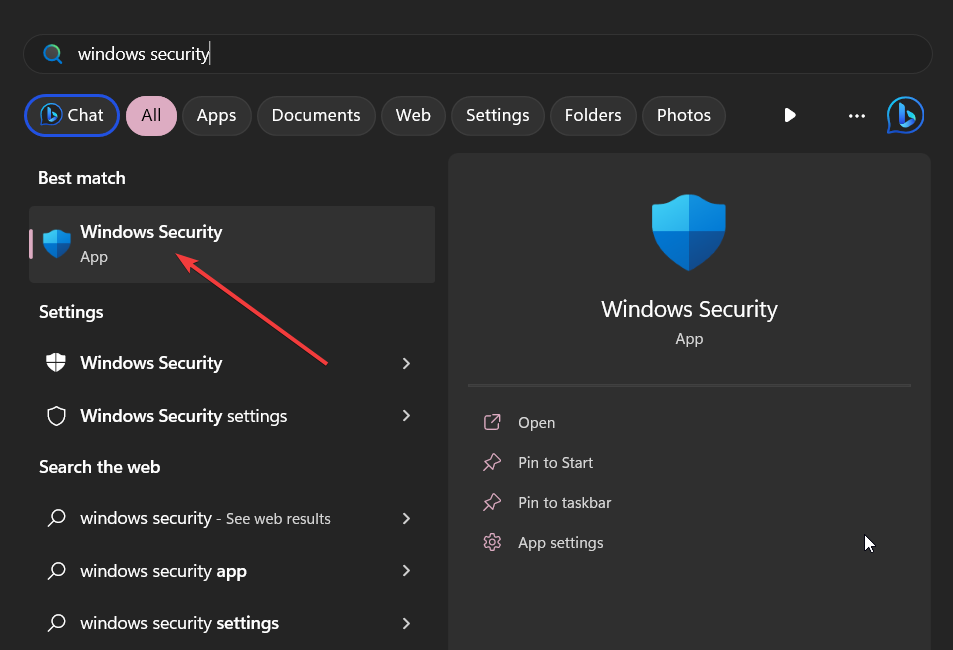
  1. Press the Windows key, search Windows Security, and click Open.
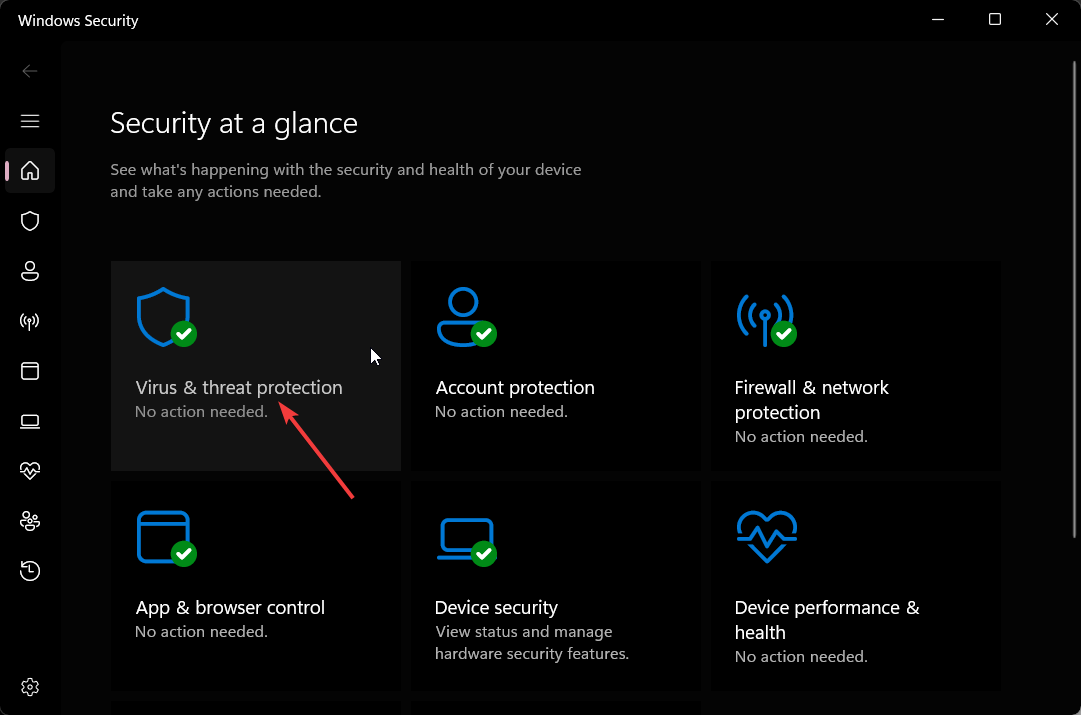
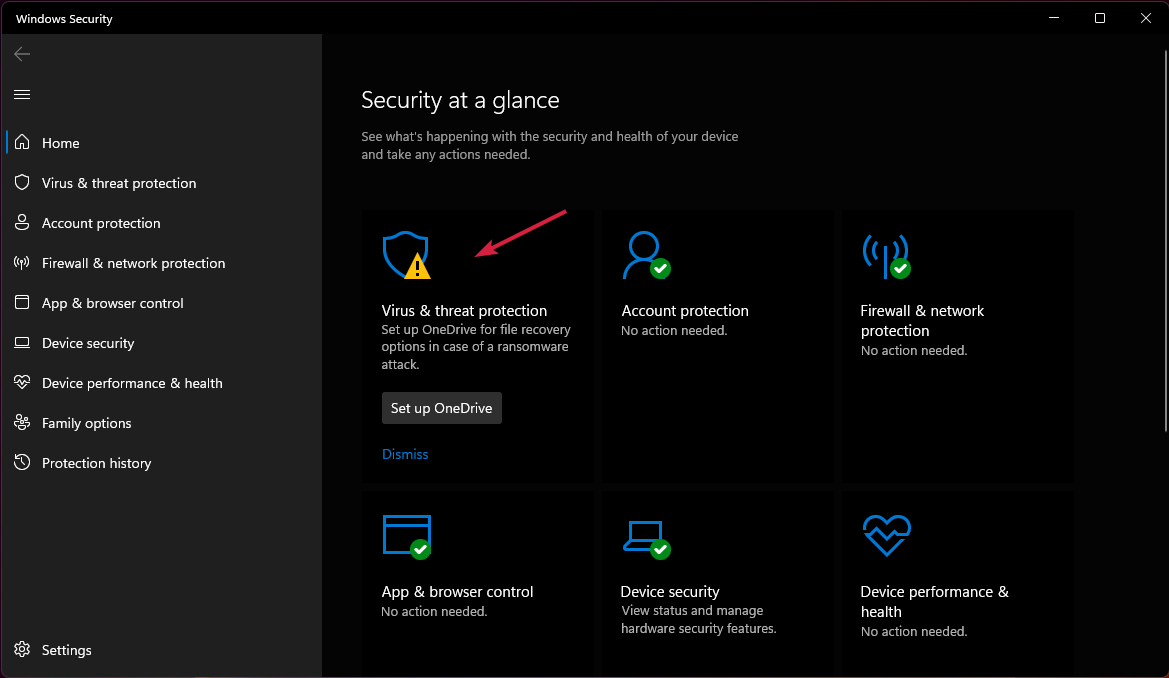
  2. Select Virus & threat protection.
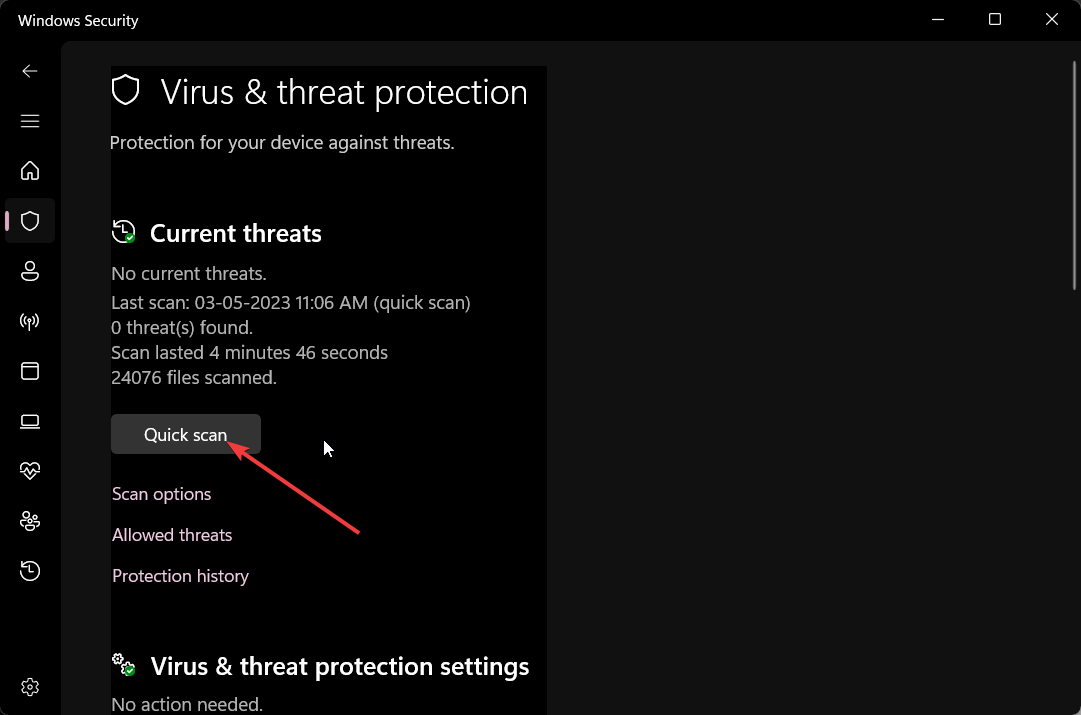
  3. Next, press Quick scan under Current threats.
  4. If you don’t find any threats, proceed to perform a full scan by clicking on Scan options just below Quick scan.Scan options
  5. Click on Full scan, then Scan now to perform a deep scan of your PC.Full Scan Scan Now
  6. Wait for the process to finish and restart your system.

It can be possible to detect various threats using Window’s built-in antivirus. In any case, it will not offer complete malware support for removing potential viruses.

As an alternative, we’re using and suggesting an enhanced antivirus tool with a competitive detection rate and malware or phishing attacks shield.

⇒ Get TotalAV

3. Uninstall related software

  1. Click on the Start Menu icon on the taskbar, type Control Panel in the search bar, and click Open.control-panel-search fallout new vegas runtime error
  2. Navigate to Programs and select Uninstall a program.going uninstall program control panel
  3. Locate LabTech MSP in the apps displayed, click on it, and then select Uninstall.

Once you’re done, ensure also to take care of remnant files. You may not think that old versions of software are a big deal. But they can be a security risk and even slow down your computer.

Old versions of software may have vulnerabilities that hackers can exploit, so it’s a good idea to do a cleanup to be on the safe side.

4. Perform a System Restore

  1. Press the Windows + R keys, type rstui, and hit Enter.
  2. The System Restore window will open. Click on Next.
  3. Select the restore point you wish to revert to and click on Next.
  4. Now click on Finish.

You could also try:

That brings us to the end of this article, but be sure to check out related literature on other errors, such as the mediaget.exe, to see what it is and whether to remove it.

To see how to fix problems with another process, be sure to read our What is VSServer.exe and how to get rid of it guide.

Have you encountered the ltsvc.exe file, and what problem did it cause you? Let us know in the comments section below.

Xbox gift cards purchased with rewards points expire fast

As you might know, you can buy Xbox gift cards with points earned on Microsoft Rewards. It is a platform where you can do daily tasks to earn points. With them, you can buy all sorts of things, from gift cards to costumes and coins for a lot of video games.

Deemed by many users as too good to be true, there were rumors that Microsoft Rewards will go away. However, you should rest assured because that’s not going to happen. Not anytime soon, at least.

You should know, though, that there are some things that will go away. We’re talking about the Xbox gift cards purchased with Microsoft Rewards points. They have an expiration date, so whenever you’re thinking about buying one, think about it too.

This Reddit user was surprised to find out about it after they purchased the Xbox gift card. They’ve sent an email to Microsoft, asking for a refund.

What’s the expiration date for the Xbox gift cards purchased with Microsoft Rewards points?

It seems that the expiration date for the Xbox gift cards purchased with Microsoft Rewards points is 90 days. You must use that gift card within 90 days of the deposit, otherwise, it will expire and you’ll no longer be able to use it.

However, Microsoft makes it very clear that the expiration date for the Xbox gift cards purchased with Microsoft Rewards points is only 90 days.xbox gift card expiration

On the other hand, the Xbox gift cards purchased with real money don’t expire until they are used. So you don’t have to worry about it if you got an Xbox gift card using your money.

So make sure to use your Microsoft Rewards points when the time is right. Take into consideration the 90 days, and plan to spend your points in that time.

What do you think about it? Did you know about the 90 days expiration time? Let us know in the comments section below.

What is the Easiest Password Manager for Seniors? [5 Picks]

As we get older, our memories start to fade. We can’t remember names, faces, or passwords as easily as we used to be able to. This makes it all too easy for seniors to become victims of identity theft. 

And while some seniors may not be concerned about protecting themselves online, others see it as a necessary step and have already gotten on the password managers bandwagon. With so many options out there, it can be difficult to choose the right one for you. 

We’ve taken the guesswork out by picking some of the top password managers in this article.  

Why don’t older adults use password managers?

Password managers are a great way to secure your online accounts and ensure you’re not using the same password for multiple sites. They generate strong passwords, store them securely, and sync them across devices.

But even though they’re important tools for protecting yourself online, many users still don’t know about them or find them intimidating.

The older demographic is particularly notorious, but not without reason. Below are some of the reasons why they may be resistant to using a password manager:

  • Lack of knowledge about password managers – Many seniors may not know what a password manager is or how it works, making it difficult to adopt one.
  • Unwillingness to change behavior – Most senior adults are so used to living their lives as they know it. Bringing new changes disrupts their status quo. In a research paper submitted on why older adults do not use password managers, a user said:

I’m not going to be making any more passwords now at my age. At this time in my life, I’m not going to have any more accounts than I already have. So I wouldn’t really need it.

  • Over-dependence on technology – Most senior adults worry about computer crashes or password managers becoming unresponsive. It seems a lot to put all your trust in man-made projects, given that their life savings are in jeopardy.
  • Encourages laziness – Seniors already admitted to having memory lapses. Depending on technology to remember passwords seems to be a faster way to become lazy and let the effects of old age catch up.

If we keep relying on technology, we lose the ability to think for ourselves.

  • Costly password managers – Although there are free password managers, some require you to part with a few coins. Some seniors are just not willing to pay the extra amount.

What password manager do aging parents use?

RoboForm – Offline password manager

Forget about the basic roles of a password manager, like generating strong passwords and storing them. When it comes to the elderly, they need a little more help to convince them to use these tools.

One area that RoboForm excels in is that it remembers your passwords, fills in forms, generates strong passwords, and logs into sites automatically.

Another feature is that it has offline access. This means you don’t have to access the internet to use it, which most seniors seem to be against.

Emergency access has to be another winning feature. This feature allows you to grant your trusted contacts temporary access to your RoboForm account in an emergency. 

Other noteworthy features include:

  • Multi-factor authentication
  • Biometrics-enabled
  • Data backup

Roboform

Activate this password mojo for users of all ages with a simple UI and unlimited logins.
Check price Visit website

NordPass – Real-time monitoring

If NordVPN is anything to go by, then you know any other services or products from the same company are a hit. 

NordPass is a password manager built specifically for seniors and other users with limited tech skills. Its autofill feature is a marvel, as you don’t have to go through the excruciating process of typing your credentials.

Since it also generates strong passwords for you, you know they can be quite heavy on the characters. Having them automatically filled in is such a great save.

Other noteworthy features include:

  • Emergency feature
  • Real-time breach alerts
  • Biometric authentication

NordPass

Have a look at this trusted digital password built for seniors and business people.
Check price Visit website

LastPass – Password-free logins

LastPass is easy to use and has an intuitive interface, so older users won’t feel overwhelmed by the technology. 

The app works across all major browsers, so they don’t have to worry about downloading multiple apps or installing browser extensions to access their accounts if they use multiple devices.

Another feature this demographic will appreciate is the password generator. You don’t have to come up with a unique password that you’ll have a hard time remembering. LastPass will do it for you.

Other noteworthy features include:

  • Password-free logins
  • Emergency contact on the paid version
  • Data breach monitoring

LastPass

Embrace the most visual password manager tool with management across all devices.
Check price Visit website

1Password – Safe travel certified

If you’re an elderly person who worries about the security of your passwords being stored by a password manager, then 1Password is for you.

It uses one of the most secure AES-256 encryption protocols that experts in the industry have verified. 

Aside from the usual autofill, password storage, and browser extensions, it has another feature that the seniors will appreciate and sets it apart from other password managers. 

You’re probably in your later years, and travel is now a priority. As such, you must keep your travel documents, such as credit cards secure. 1Password has a travel mode feature that allows you to remove vaults and mark them as safe for travel temporarily.

Your device can get confiscated or out of your reach when you travel, so you must be assured that your information is always safe.

Once you’re in the clear, you can turn it off, and all your information will be back again.

Other noteworthy features include:

  • Offline support
  • Multi-factor authentication
  • The secret key for cloud storage

1Password

Get seamless web password safety with fast and family-friendly passwords vault.
Free trial Visit website

Bitwarden – Intuitive user interface

Bitwarden is a free password manager that makes it easier for seniors to keep track of their passwords and other sensitive information. It’s built around the idea of being simple enough that anyone can use it without learning anything new.

This is especially important for elderly people who may have trouble using computers or smartphones.

It also has offline and online features, allowing you to sync your passwords across your devices.

Other noteworthy features you can get when you upgrade to the premium package include:

  • Emergency access
  • Security reports
  • Bitwarden authenticator

⇒ Get Bitwarden

How can I help my elderly remember passwords?

We all know that passwords are the bane of our existence. They are often hard to remember and even harder to type accurately on a smartphone.

For older adults, these challenges can be even more difficult. So how can you help your elderly loved one remember their passwords?

Here are some password tips for seniors:

  • Use memorable phrases instead of words – One way to ensure your loved one can remember their password is to use a phrase instead of a word. For instance, instead of using their names or schools, a phrase they normally use in conversation or from their favorite song or poem can make a great password.
  • Make it simple – If your loved one has trouble remembering even short phrases like those above, try making them shorter and simpler.
  • Use an acronym – Acronyms are helpful in remembering passwords quickly. It could be a word such as LAUGH, and immediately, the senior would figure it out and write their password down.
  • Write it down – Although not recommended, sometimes you have to keep a safe copy of passwords for the elderly. However, you must keep it safe and not share it with anyone else, especially if they trust you. Otherwise, a password recovery tool would come in handy.

The key takeaway from this should be that a password manager is the easiest way to keep track of your passwords. It saves you the hassle of remembering them all, and it generally makes it easier for you to create safer passwords.

Any listed above would be a worthwhile investment for any senior with trouble remembering passwords. If the senior is not too trusting of password managers, incorporating multi-authentication software could ease their doubts.

Are you a senior or know one who needs an easy password manager? Which one are you currently using and why? We’d love to hear your feedback on this matter.

0xC1900101 – 0x30018 Update Error: How to Fix it

The error code 0xC1900101 – 0x30018 is associated with the Windows operating system update process. It typically occurs during the installation or upgrade of Windows 10.

Some of our readers have recently reported that they encounter this error while trying to update their Windows 10 PC. In this article, we will discuss what causes it and how to fix it quickly.

What causes 0xC1900101 – 0x30018 update error?

This error can be caused by a wide range of issues. Below are some of the common reasons as reported in the Microsoft forum by some users who have been able to troubleshoot the issue successfully:

  • Incompatible device drivers or hardware – Outdated or incompatible device drivers can lead to this error, particularly for hardware components like the graphics card or network adapter.
  • Software conflicts – Some software installed on your computer might interfere with the update process and cause compatibility issues.
  • Insufficient disk space – If your system doesn’t have enough free space on the hard drive, the update process may fail.
  • Windows update service issues – Problems with the Windows Update service itself, such as corrupted files or settings, can also trigger this error.

Now that you know some of the potential reasons behind the 0xC1900101 – 0x30018 error, let’s proceed to how to fix the issue.

How can I fix 0xC1900101 – 0x30018 update error?

Before trying any of the advanced solutions provided in this guide, it may be helpful to attempt the following preliminary checks:

  • Disconnect any external USB or SD card and any unnecessary component connected to your computer peripherals.
  • Ensure that you have enough free space on your hard drive. You can also run a disk cleanup to free up space.
  • Perform a clean boot, you should be able to identify any software conflicts that could be causing the error.
  • Install all the latest Windows Updates and latest drivers and updates from your hardware and software manufacturers.
  • Temporarily disable your antivirus software and other security programs.
  • Try switching to a wired connection using a network cable if you’re using a Wi-Fi connection, and disable or uninstall your wireless network card.

Having confirmed the above checks, if you require further assistance, you can work your way through any of the methods provided below.

1. Run the Windows app troubleshooter

  1. Press the Windows + I keys to open the Settings app.
  2. Select System, click on Troubleshoot, and select Other troubleshooters.
  3. Next, click on Windows Update and select the Run button.
  4. Wait for the troubleshooter to identify the problem that is preventing you from installing the update and restart your PC.

Once the Windows app troubleshooting process is completed, try to install the update again to see if the 0xC1900101 – 0x30018 error has been fixed. Proceed to the next fix if it persists.

2. Run the SFC/DISM scans

  1. Press the Start button, type cmd, and select run as an administrator.
  2. In the CMD window, type the following command in the text field and press Enter: sfc /scannow
  3. Type the following, and press Enter after each command: DISM /Online /Cleanup-Image /RestoreHealth 
  4. The scanning process may take up to 15 minutes, so wait till the verification reaches 100%.

Running the SFC and DISM commands helps to rule out the possibility of system file corruption. In the case where CMD is not working in Windows, here is an easy fix to apply.

Anyhow, you could benefit from totally reliable support regarding Windows issues given by a tailored system PC repair tool. The process is 100% automatic and you only have to press one button to repair corrupted files.

3. Reset Windows Update components

  1. Press the Start button, type cmd, and select run as an administrator.
  2. Type the following commands one after the other and press Enter to quit the services: net stop wuauserv  net stop cryptSvc   net stop bits   net stop msiserver
  3. Next, run the following commands to rename the Software Distribution and Catroot2 folders: ren C:\Windows\SoftwareDistribution SoftwareDistribution.old   ren C:\Windows\System32\catroot2 catroot2.old
  4. Finally, restart the services: net start wuauserv  net start cryptSvc   net start bits   net start msiserver

After resetting the Windows components, the Windows Update feature should have been fixed by now. If not, proceed to the next step.

4.  Use the Media Creation tool

  1. Visit this Microsoft site to download the ISO installer.
  2. Click on the Download button.
  3. Once the download is complete, double-click on the file to run it.
  4. Follow the on-screen instructions to complete the installation process.

If the update error persists, you can try using the Windows Media Creation Tool to create a bootable USB or DVD and perform a clean installation of Windows. This will fix the error by installing the latest version of Windows.

And that’s it on how to fix the 0xC1900101 – 0x30018 error. Hopefully, one of the methods provided in this article will help you fix the issue.

Other users have reported similar issues such as Windows 11 0xC1900101, 0xc1900101–0x20017 installation error in Safe_OS, and so forth.

If you have any questions or suggestions regarding this issue, please contact us by using the comments section below.

Here’s what Bing AI would do on your PC if it had access

Bing AI is definitely an intriguing tool to use. It is both creative and too restrictive. And at times, it can also get dangerous. But don’t worry, it’s not dangerous in the classical sense of the term. But it seems, if pushed enough, Bing AI can bypass its own rules. And it can be eerie when that happens.

Rest assured, though. Most of the time, Bing is inoffensive, and won’t really do anything to you or your device. At least not for now or even in the future. Aside from helping you set up your PC the way you want to. Yes, we’re looking at you, Copilot. Bing, or any other AI tool from Microsoft is here to help you.

A Reddit user even tried an experiment with Bing. The user sort of gave permission to Bing to access their computer. And the experiment was nothing terrible, at all.

Bing used GPT vision to access the computer. If you don’t know GPT vision is a language of the ChatGPT that uses images and texts to get tasks done. It also accepts visual inputs from users, making it more efficient when you want to find out information.

If Bing would access your PC, here’s what it would do

It would listen to music. That might sound like a joke, but yes, Bing would actually complete tasks on Microsoft Rewards, and then it would look up news regarding Beyonce because it likes her music.

As you can see in the picture below, Bing would open up Edge, obviously, and would look up news and weather updates. Because the AI tool also wants some entertainment, it will search for interesting articles or videos.bing access pc

Next, it would click on the notification bell, in case anything important comes up. Bing AI is just like us, it doesn’t want to miss anything important. It’s also interested in personalized recommendations.

And, apparently, Bing AI is a very big fan of Beyonce, because the tool will complete quiz games on the star, if it has the chance to do so.

So, if you’re a Beyonce fan as well, you have that in common with Bing. But aren’t we all?

As you can see, there is no need to worry that Bing will destroy your PC if it has access to it. For now, it’s just an innocent little helper.

What do you think about it? Let us know in the comments section below.

How to Update the PL2303 Driver on Windows 11

The PL2303 driver is commonly used for USB-to-Serial communication, allowing devices like adapters and cables to connect to serial ports on Windows computers.

If you’re using Windows 11 and need to update your PL2303 driver, this guide will walk you through the process.

How can I update the PL2303 driver on Windows 11?

Before updating the PL2303 driver on Windows 11, it is important to ensure that you have the following prerequisites:

  • Must have an active & stable internet connection.
  • Make sure your Windows is up to date.
  • Ensure your PL2303 device is in good working condition & properly connected to your Windows OS.
  • Make sure you are logged in with a user account with administrative privileges.
  • Should have knowledge about the PL2303 device’s manufacturer.
  • Back up important data on your computer before proceeding with the steps.

Once you have fulfilled these prerequisites, you can proceed with updating the PL2303 driver on your Windows 11 computer.

1. Use the Device Manager

  1. Press Windows + R to open the Run dialog box.Device Manager Run command Update PL2303 Driver on Windows 11
  2. Type devmgmt.msc and click OK to open the Device Manager.
  3. Locate the Ports (COM & LPT) category and click it to expand it.
  4. Navigate to Prolific USB-to-Serial Comm Port or something similar, right-click it, and choose Update driver.Update driver
  5. Next, click Search automatically for drivers.Search automatically
  6. Follow the onscreen instructions to complete the process and restart to confirm the changes.

2. Manually update the PL2303 driver on Windows 11

  1. Go to the official website of Prolific Technology.Installer driver Update PL2303 Driver on Windows 11
  2. Locate the PL2303 Windows 11 driver installer file and click it to download a file.
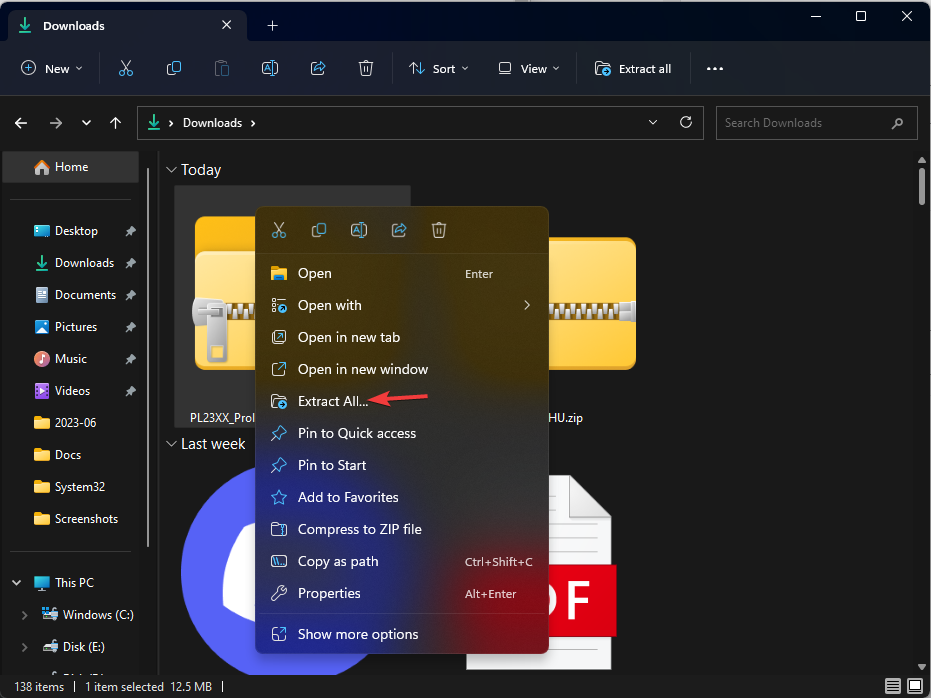
  3. Once the file is downloaded, right-click the zip file and select Extract All.Extract All
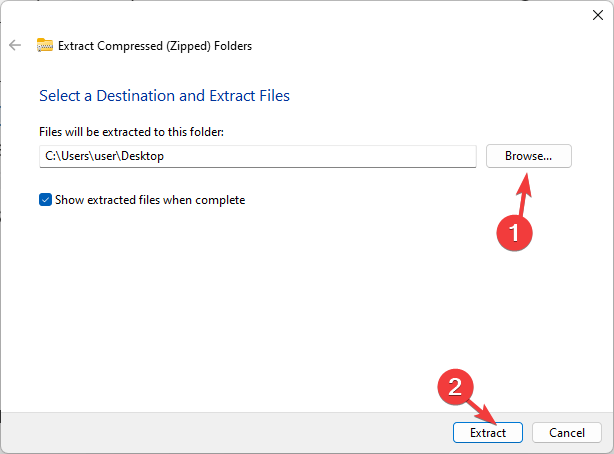
  4. Follow the onscreen instructions to save the file at the desired location.Browse and click Next
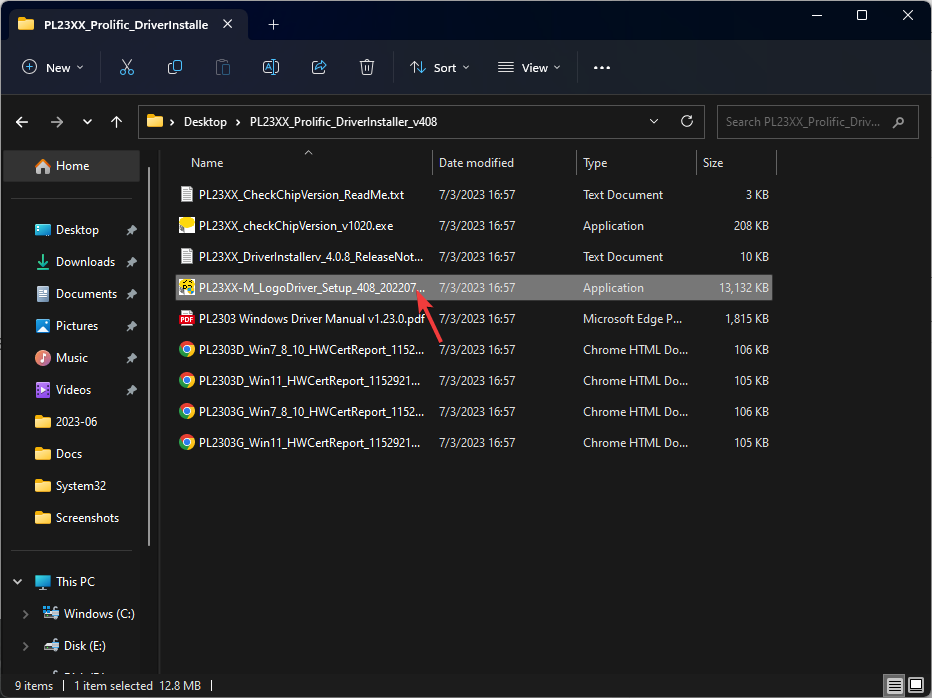
  5. Once done, open the folder, locate PL23XX-M_LogoDriver_Setup_408_20220725 or a similar file.Locate the driver vUpdate PL2303 Driver on Windows 11
  6. Click Yes on the UAC prompt.
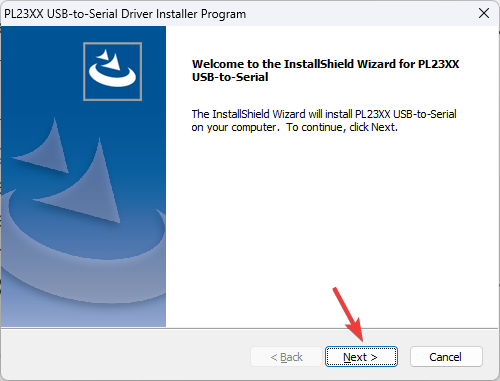
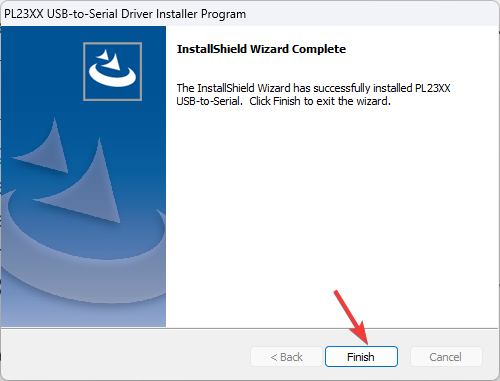
  7. On the PL23XX USB-to-Serial Driver Installer Program wizard, click Next.Next
  8. Click Finish.Finish

So, this is how you can update the PL2303 driver on Windows 11. Restart the computer for the changes to come into effect. Once done, you can use the PL2303 USB to serial cable.

To ensure there are no performance issues on your computer, it is recommended to keep a check on driver updates regularly.

Also, whether you install new hardware to your PC or set up a PC for the first time, you must check for driver updates.

However, if the manual method sounds too tricky, you can always use a trusted third-party app that can get the job done.

Please feel free to give us any information, tips, and your experience with the subject in the comments section below.

What is Ui0detect.exe & What Does it do?

Our quest to explain what Windows background processes do continues. Today, we’ll take a closer look at ui0detect.exe – its purpose, functionality, and legitimacy.

There are many Windows files, such as fsavailux.exe, that can cause users to be concerned, and therefore it’s important to learn everything there is to know about those files.

Whether you’ve come across the ui0detect.exe process running in the background or you’re just curious about what it is and what it does, this guide is for you.

What is ui0detect.exe?

The ui0detect.exe process is a core component of Interactive Services Detection.

This is a harmless process, and it’s a part of Windows, so you shouldn’t be alarmed by it.

What does Interactive Services Detection do?

  • ISD detects when a service tries to interact with the desktop.
  • Establishes an interaction between the app and the user.
  • It notifies the user that an app requires attention.

However, Microsoft’s been wanting to restrict access to session 0 for quite a while, hence the disabling of the link in newer versions of Windows.

Can I disable or enable Interactive Services Detection?

No, it’s impossible to disable or enable this feature since it’s not a part of Windows anymore.

The feature was introduced in Windows Vista. It was also present in subsequent versions, including Windows 7, Windows 8, and Windows 10. That is, until Windows 10 Build 1803, when Microsoft decided to disable the Interactive Service Detection functionality.

Is ui0detect.exe safe?

Yes, this file is safe, but you can check its legitimacy if you find it on your PC, especially since it should no longer be available:

  1. Press Ctrl + Shift + Esc to open Task Manager.
  2. Navigate to the Details tab and locate ui0detect.exe.ui0detect-exe-safe
  3. Right-click on it and choose Open file location.
  4. It should be located in the following directory: C:\Windows\System32what-is-ui0detect.exe
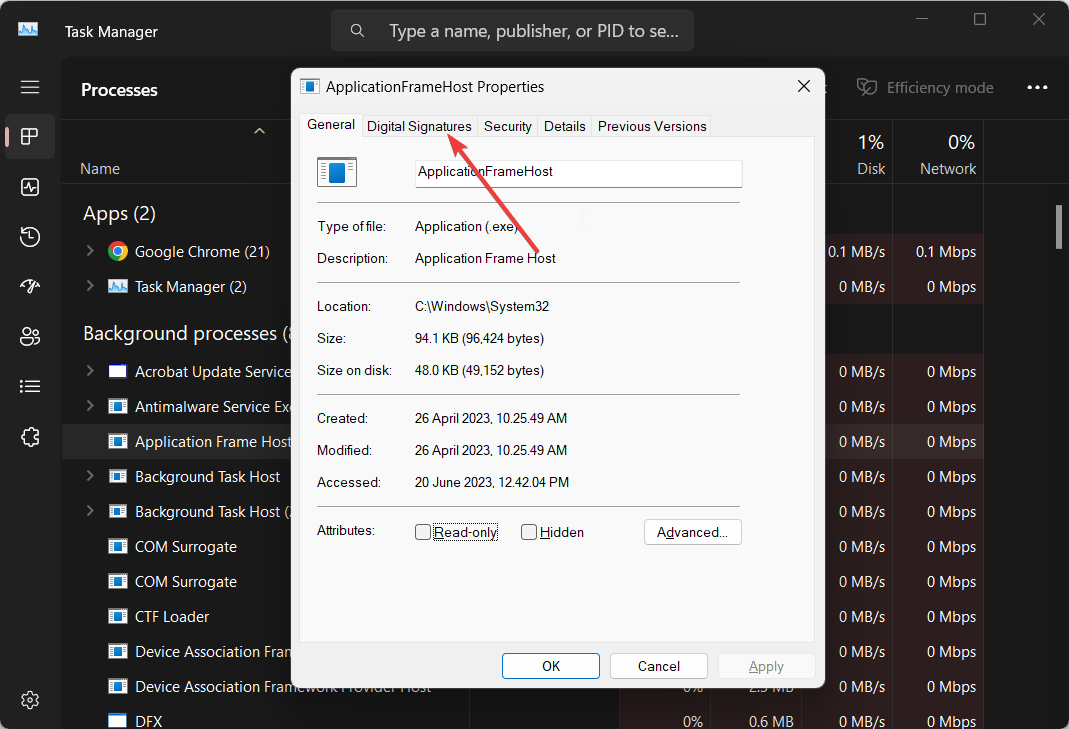
  5. Once you’re in the destination folder, right-click on ui0detect.exe and choose Properties. Go to the Digital signature tab and verify its signer (it should list Microsoft Corporation).ui0detect-digital-signature

When you have doubts about a file’s legitimacy, always check its location and digital signature. If ui0detect.exe is located elsewhere or doesn’t hold a valid digital signature, it could be a virus trying to harm your system.

However, even correct location and signature don’t mean you’re out of danger. Executables are commonly targeted by malware due to their immense potential.

Also, be aware that if ui0detect.exe keeps popping up, it might be a part of malware.

In brief, since the feature is no longer present by default on your Windows OS, you’re probably dealing with a Trojan masking itself as a real system file.

To get rid of viruses, start your computer in Safe Mode and use reliable anti-malware software to scan your PC and remove any infected files from your system.

That’s it on ui0detect.exe! Do you have further questions regarding this file? Kindly drop them in the comments section.

What is Qhsafetray.exe & How to Fix Its Application Errors?

Every regular Windows user occasionally encounters errors while browsing. Today, we’ll explore the qhsafetray.exe file and how to fix the associated application errors.

Some exe files can be problematic, such as unknown.exe file, but others are harmless, and they actually have a purpose on your PC.

So, if the executable’s causing problems while running in the background, you’ll find this article of great help. Let’s get right into it.

What is qhsafetray.exe?

The qhsafetray.exe process is an executable part of 360 Total Security, and it does the following:

  • Protects you from malware, viruses, and other online threats.
  • Offers Internet browsing, Privacy, and System Protection.
  • Compatible with Windows XP and newer versions.

Is qhsafetray.exe a virus?

No, this file is usually not malware. You can check it by doing the following:

  • Check if you have 360 Total Security installed.
  • Check the file path, it should be: C:\Program Files (x86)\360\Total Security\safemon\QHSafeTray.exe

If the file is located elsewhere, it’s probably a Trojan masquerading as a system file. Also, if your computer suddenly slows down and the qhsafetray.exe process has high CPU usage, this may be caused by a virus infection.

If you notice any suspicious symptoms, it is best to remove the qhsafetray.exe file. We’ll show you how to do so below.

How do I fix qhsafetray.exe application errors?

Before trying any comprehensive troubleshooting, do the following:

  • Scan your computer for malware and make sure your PC is clean.
  • Check for conflicting software and disable it or remove it.
  • Update your system to prevent any potential bugs.

1. Reinstall 360 Total Security

  1. Press Windows + I to open Settings. Choose Apps and then Installed apps.qhsafetray-uninstall-360
  2. Locate 360 Total Security and click on the three horizontal dots on the right. Choose Uninstall and follow the instructions.uninstall-360-qhsafetray
  3. Download the setup file from 360 Total Security’s official website.reinstall-qhsafetray-exe
  4. Open the file and follow the wizard to finish the installation.reinstall-360-total-security

After reinstalling, check if qhsafetray.exe has stopped working error is gone.

2. Run the DISM and SFC commands

  1. Press Windows + S key to open the Start menu. Search for Command Prompt and choose Run as administrator.cmd-qhsafetray-exe
  2. Type the following commands into the window and press Enter after each one: dism /online /cleanup-Image /restorehealth sfc /scannowdism-sfc-scans-qhsafetray
  3. Restart your PC.

Sometimes, corrupted files are behind qhsafetray.exe’s application errors. The System File Checker tool repairs those, which could help to eliminate your issue.

3. Go back to a restore point

  1. Hold Windows + R to open the Run dialog. Type the following command in the search box and click Enter: rstruiqhsafetray-exe-remove
  2. Once the System Restore window opens, click on Next to proceed.qhsafetray-system-restore-remove
  3. Choose a suitable restore point you wish to revert.qhsafetray-exe-error
  4. Confirm your choice and start the process by clicking Finish.qhsafetray-exe-virus-restore

In case you’re dealing with corrupted qhsafetray.exe, using the restore point can help.

If qhsafetray.exe is still causing problems, returning to a safe point will undo all the recent changes that may be the culprit.

If the above methods are unsuccessful, you may have to perform a clean install of Windows.

Do you have any further questions? Let us know in the comment section below.

What is Rvlkl.exe & Should You Uninstall it?

Have you noticed your PC acting strange? Or you’ve encountered an unfamiliar process running in the background and want to be cautious? Whatever your experience with rvlkl.exe is, keep reading.

This is a Windows 11 keylogger, and it’s usually harmful software, especially if you didn’t install it yourself on your PC.

In this guide, we’ll share all essential information about the rvlkl.exe file and whether you should keep it or toss it. Let’s get right into it.

What is rvlkl.exe?

The rvlkl.exe process is part of Revealer Keylogger, Logixoft’s software for monitoring and recording, and it does the following:

  • Keeps track of every keystroke you make.
  • It captures everything you type, including sensitive information.
  • Exposes your sensitive information to third parties.

While this specific software wasn’t created for stealing and abusing such information, if you didn’t install it on your PC, it’s likely that you’ve been hacked.

However, keyloggers are widely abused due to their immense malicious potential and intrusive nature. So, be wary of its warning signs: slower PC, weird mouse movements and keyboard redirects, random changes in settings or system crashes, etc.

Tip icon Tip
Use a reliable password manager to log into your accounts without writing your details every time.

Where is the rvlkl.exe file?

You can find the rvlkl.exe in its installation directory. It’s usually one of the following:
C:\ProgramData
C:\Program Files

How do I uninstall the rvlkl.exe file?

Before moving on to more comprehensive troubleshooting, try these simple workarounds:

1. Uninstall the program

  1. Open Revealer Keylogger and click on the question mark on the top right.uninstall-rvlkl
  2. In the Menu window, navigate to Program End and choose Uninstall.uninstall-rvlkl-exe
  3. Confirm by choosing Uninstall now. Don’t forget to check Delete logs to ensure all information is deleted.uninstall-revealer-keylogger
  4. Restart your PC.
  5. Perform a full virus scan of your system to check for residuals.

This solution only works if you have access to the program. If not, you can try uninstalling it from the setup folder by opening it, finding the setup file, and clicking Uninstall.

However, upon our research, we couldn’t find any evidence of the program in the system files of the machine it was working on. So, we suggest you move on to the next solutions to help you remove rvlkl.exe.

2. Perform a System Restore

  1. Press Windows + R key to open the Run dialog. Type the following command and click OK: rstruisystem-restore-rvlkl-remove
  2. Once the System Restore window opens, click on Next.rvlkl-system-restore-remove
  3. Select the restore point you wish to go back to (one before you noticed any issues or traces of the software on your PC) and choose Next.rvlkl-exe-remove
  4. Click on Finish.revealer-keylogger-remove-system-restore

Remember to regularly create system restore points to be on the safe side. Alternatively, you can use one set by your system.

If this hasn’t worked and you’re still under threat, it might be time to try a more radical solution.

3. Reset your PC

  1. To reset your Windows, press the Windows + I key to open Settings. Scroll down to Recovery and click on it.reset-pc-rvlkl
  2. Click on Reset PC.reset-pc-rvlkl-exe
  3. Choose whether to keep your files or remove everything. (Hint: regularly back up your data to avoid losing important information.)reset-windows-remove-rvlkl
  4. Choose how you want to reinstall Windows: via a cloud or from your device.reset-windows-remove-rvlkl-exe
  5. Click on Next to confirm.reset-pc-uninstall-rvlkl-exe
  6. Press the Reset button.reset-windows-uninstall-revealer-keylogger

This should fix the rvlkl.exe issue. To be safe, you might want to run a system scan or an antivirus check afterward. Additionally, if you want to keep your information protected, you might want to consider using anti-keylogging software.

Also, did you know that Windows has a built-in keylogger? Much milder than any commercial software, but it can still send reports about your behavior to Microsoft.

We hope our solutions helped! Which method did you choose? Do you need additional help or have further questions? Don’t be shy to use the comment section below.

Satya Nadela to take the stage at Microsoft Inspire 2023

According to Microsoft Techcommunity, this month, we’ll witness Satya Nadella, the esteemed Chairman and Chief Executive Officer of Microsoft, taking the stage to deliver the opening keynote at this year’s Microsoft Inspire. The event is scheduled to take place on July 18-19, online.

Joining Satya Nadella on stage, Microsoft Inspire boasts an impressive lineup of esteemed speakers. Among them are Nicole Dezen, the Chief Partner Officer and Corporate Vice President of Global Partner Solutions at Microsoft; Goldy Aloysious, the Director of Data Architecture at Kyndryl; Duncan Barnes, the Global Director of Alliances at HP; and many other accomplished individuals.

The conference will offer attendees a wide variety of session types to cater to different interests and learning styles. These sessions include On-Demand, Discussion, Featured, Local Connection, and Keynote. Each session type is designed to provide unique experiences and insights.
Furthermore, a wide range of topics will be covered during the sessions. These topics span solution areas, industries, partner business strategies, the Cloud Partner Program, the Commercial Marketplace, inclusive growth initiatives, and many more. Hopefully, there’s something for everyone to learn and explore.

If you’re curious about Microsoft Inspire, let me shed some light. Microsoft Inspire is a yearly conference hosted by Microsoft exclusively for its partner community. This event is a platform for partners to forge connections with fellow partners and Microsoft executives. It fosters an environment that cultivates business opportunities and propels their ventures to new heights. The conference includes networking opportunities, inspiring keynote speeches, informative breakout sessions, and more.

Every year, Microsoft Corporation organizes the highly anticipated event, Microsoft Inspire, exclusively dedicated to its partner community. With a strong focus on equipping partners to achieve success using the best technology platform available, this conference serves as a vital hub for connecting partners and driving their businesses forward collectively. It is a momentous occasion where Microsoft partners unite as a unified community to connect, empower, and celebrate their achievements.

At Microsoft Inspire, partners gain valuable insights into the future as they delve into Microsoft’s roadmap for the upcoming year, discovering upcoming innovations and effective strategies to propel their businesses forward. The conference offers a wealth of opportunities for partners, including networking sessions, knowledge sharing, best practices exchange, hands-on experience with the latest product innovations, and the chance to acquire new skills and techniques. It is a comprehensive platform where partners can learn about Microsoft’s vision and plans, build connections, share their expertise, and stay at the forefront of technological advancements in their respective industries.

The conference’s location changes annually, mostly in the US and twice in Canada, ensuring diverse experiences for attendees. It debuted in 2003 at the Los Angeles Convention Center in Los Angeles, California. However, starting in 2020, the event transitioned to an online format. In 2023, the upcoming conference will continue in the digital realm, allowing participants to connect virtually.

Registrations are now open.

Lepow Z1 Series portable monitor review – (almost) everything you need in a portable monitor

Lepow brings another high-quality contender to the portable monitor market with its 15.6” Z1 model. But does this entry stand out from the crowd? Read on to find out.

First off, let’s go over what’s in the box.

  • 15.6” portable monitor
  • Smart cover/stand
  • 1x USB Type-C to Type-C cable
  • 1x HDMI to USB Type-C cable
  • 1x USB Type-C to USB Type-A cable
  • Wall charger
  • Screen protector
  • User Guide
  • FAQ booklet
  • Cleaning kit

Img 20230703 153122162

Setting the monitor onto the smart cover stand is easy once you know how to do it as explained in the User Manual. The stand allows for two positions in horizontal mode, so you can adjust the monitor’s angle. It can also be positioned upright for Portrait Mode, and when not in use the case doubles as a screen cover.

The Z1 has great build quality overall for both the monitor and the PU leather smart case. The monitor is very thin and lightweight, and features two USB Type-C ports, one of which is full-function and one that is for power only. A power/menu button brings up the OSD (On-Screen Display) from which various settings can be configured. Plus and Minus buttons function as menu navigation buttons and also open the brightness and volume menus.

The monitor has three viewing modes, and can be used as a duplicate screen, extended screen or as a secondary screen.

Lepow Z1 Image 2

The display

Specs for the Lepow Z1 portable monitor:

  • Display size: 15.6 in.
  • Dimensions: 0.33 x 14.57 x 8.66 in.
  • Weight: 1.7lbs.
  • Aspect ratio: 16:9
  • Max image brightness: 300 Candela
  • Color gamut: 45%
  • Visual angle: 85%
  • 60Hz refresh rate
  • Resolution: 1080p Full HD
  • Display type: IPS (with Eye Protection)
  • HDR support
  • Dual built-in stereo speakers

The Z1 is compatible with “laptop, smartphone, PC, PS3, PS4, XBOX ONE, or Nintendo Switch etc” as per the Lepow2US Amazon product page for the Z1. Note that some devices will require the Z1 to be connected independently to a power source via the USB-C to USB-A cable and wall charger, while others simply require the monitor to be connected to the device of choice. (My Lenovo Flex 3 Chromebook was able to connect with just the Type-C to Type-C.) Naturally, going with this latter option you’ll see a considerable dip in battery life if using the monitor with a phone, tablet or laptop, so that will be something to keep in mind.

Lepow Z1 Image 3

The viewing experience with the Z1 is excellent, especially for such an affordable monitor. Image quality is outstanding with sharp detail and very respectable color range and black levels. Gaming on the Z1 is also good, and I didn’t experience any noticeable lag playing on my Xbox Series S with the Z1. Overall performance was solid when using the monitor, including multitasking with several applications open across both my laptop and the monitor, and I didn’t experience any chugging while using it.

On the audio side, the monitor’s speakers do leave a little to be desired. At max levels on both the monitor and the device, the Z1 is serviceable in a quiet environment. However users will generally be much better served using headphones if playing audio on the monitor—especially in a noisy room.

The verdict

DISCLAIMER: A sample unit was provided for an honest review.

If you’re in the market for a portable monitor for either work or entertainment, you can’t go too wrong with the Lepow Z1.

Cons

  • (slightly) subpar audio

Pros

  • Great picture quality
  • True plug and play experience…for some devices.
  • All-around quality monitor for a reasonable price point.

Lepow Z1 Image 4

The Lepow Z1 is definitely a safe and solid bet if you’re looking for: A) a portable monitor for B) an affordable price that C) doesn’t make a bunch of sacrifices in quality and viewing experience.

Easy to use, easy on the wallet, and easy on the eyes with a nice display, the Z1 is a clear winner. You can find it on Amazon right now at $159.99 USD.

Grand Theft Auto V and more coming soon to Xbox Game Pass

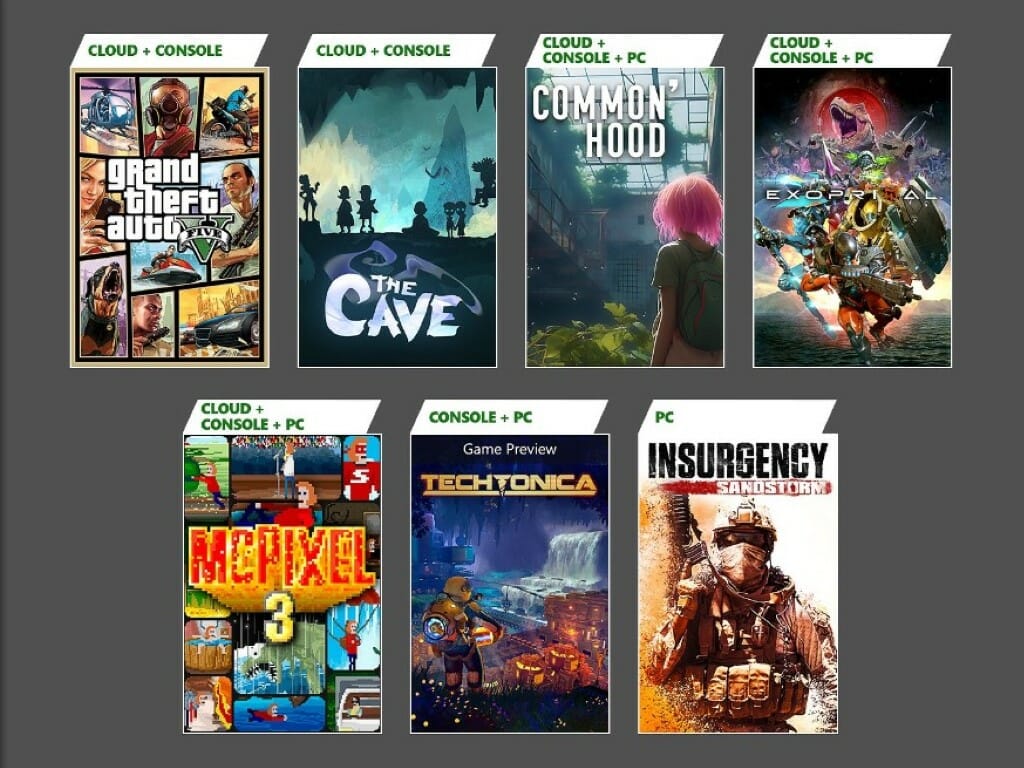
Xbox Game Pass is really starting to ramp up as July gets into full swing. There are several games headed to the service soon, and we’ve got the lineup for you down below. And heading the list is the surprise return of Grand Theft Auto V. It’s unusual for a game to return for a second round on the service, but here is an exception.

Available on Xbox Game Pass today

Gta V

  • Grand Theft Auto V (Cloud and Console)
  • Sword and Fairy: Together Forever (Cloud, Console, and PC)

Coming soon July 6-18

  • McPixel 3 (Cloud, Console, and PC) – July 6
  • Common’hood (Cloud, Console, and PC) – July 11
  • Insurgency: Sandstorm (PC) – July 11
  • Exoprimal (Cloud, Console, and PC) – July 14
  • Techtonica (Game Preview) (Cloud, Console, and PC) – July 18
  • The Cave (Cloud and Console) – July 18

The Cave

DLC and game updates available now

Leaving Game Pass

And don’t forget that three games will be removed from Xbox Game Pass on July 15 as part of the first round on monthly removals. These games can be purchased for at least 20% off before they are removed, so now is the time to act on these. Check here to see which games will be removed soon.

Featured image via Xbox Wire. 

Tokyo set to host ‘biggest’ game show ever; featuring Xbox, SEGA and more

As reported by Windows Central, Tokyo Game Show organizer CESA (Computer Entertainment Supplier’s Association), has recently unveiled the complete lineup of companies attending this year’s event, marking July 4, 2023, as a significant date.

Tokyo Game Show 2023 will feature an impressive display of videogame companies, with notable participants such as Xbox, Bandai Namco, Capcom, Koei Tecmo, Konami, Level 5, HoyoVerse, Square Enix, Sega/Atlus, Arc System Works, Playism, Kemco, Google Play, and many others. It’s like a gamer’s dream come true. 

Kojima Productions will have a presence in the merchandise area of the Tokyo Game Show. At the same time, Sony will solely be present in the indie section. On the other hand, Nintendo will conduct business meetings during the event but has not reserved a public area. So apparently, it seems like there will be something for everyone, hopefully.

According to the CESA, this year’s Tokyo Game Show is expected to be the largest in recent years. The event had been forced to downsize due to the pandemic, with digital-only events in 2020 and a limited opening of the usual Makuhari Messe venue to the public in 2022. However, the 2023 edition aims to reclaim the scale and grandeur of previous years.

For this year’s Tokyo Game Show, the CESA decided to go all out. They said 

Despite these restrictions, the venue was filled with exhibitors and game fans who had been waiting for the show to be held for real, and the excitement and excitement returned to Makuhari Messe. The high evaluation of the exhibition by exhibitors and visitors alike made us realize once again the high demand and importance of holding a real exhibition under any circumstances. This year, for the first time in four years, the entire Makuhari Messe will be used.

The upcoming Tokyo Game Show 2023, scheduled from September 21 to September 24, will utilize the entire Makuhari Messe venue in Chiba, Japan. Age restrictions will be lifted, allowing children under 12 to attend the family-friendly exhibits. Moreover, international visitors will be able to participate as Japan lifts its border restrictions in late 2022. However, strict precautions will be implemented to ensure the safety and prevention of disease infections throughout the event.

The ticketing process for Tokyo Game Show 2023 will commence with the opening of ticket sales for local Japanese residents on July 8, 2023, at noon. On the other hand, international visitors will be able to book their tickets starting July 26, 2023, through the official Tokyo Game Show website.

And since we’re on the topic of gaming, did you know that the latest sale data suggests Xbox Series X|S may be losing steam compared to Xbox 360?

In conclusion, Tokyo Game Show 2023 is a highly anticipated event, returning in full scale at the Makuhari Messe venue. With the lifting of age restrictions and the inclusion of international visitors, the show promises to deliver an exciting experience while prioritizing safety. Expect major announcements and new game reveals from industry leaders like Xbox and SEGA/Atlus, making it a must-attend event for gaming enthusiasts.

Our Xbox mid-year review for 2023

As we reach the halfway point of 2023 we thought it would be worth taking a look back at the year in Xbox so far. Admittedly, the platform had a lackluster 2022 when it came to new game releases. Sure, there were plenty of new titles to hit the current-gen Series X|S last year in terms of sheer quantity.

But when it came to the type of big games that can really excite a fanbase, new AAA titles were hard to come by outside of a couple exceptions like Elden Ring and A Plague Tale: Requiem—both of which were multiplatform. And to be sure, these were exceptions, with Microsoft offering little in the way of major first-party games from Xbox Game Studios.

But 2022 is behind us and, if you can believe it, 2023 is already half over. And what a difference a year makes. 2023 will likely go down as one of the most phenomenal years for groundbreaking video game releases in recent memory. This applies to the whole gaming industry at large, across all platforms—Xbox included. Simply put, Xbox in 2023 has been sensational so far as a quick rundown of recent releases can attest: Planet of Lana, Street Fighter 6, Diablo IV, and others.

And judging by the slate of releases coming in the next six months, the second half of 2023 could be even better with several blockbusters in store including Starfield, Forza Motorsport and more in the pipeline.

With all that out of the way, here is a look back at the first half of the year in Xbox.

Xbox Developer_Direct/Hi-Fi Rush

On January 25 we were treated to a tantalizing showcase of Xbox games coming throughout 2023 and beyond. The Xbox Developer_Direct finished up with a bang with the announcement of Hi-Fi Rush, which released later that same day and has become a surprise hit.

Dead Space Remake

A remake of this 2008 survival horror classic was a good way to get the year started off right. Dead Space Remake released on January 27.

Atomic Heart

This Bioshock-inspired FPS didn’t quite measure up to some player’s expectations when it released in February. Nevertheless, Atomic Heart managed to reach 5 million players in its first three weeks, and for better or worse will likely go down as one of the more memorable games on Xbox this year.

Hogwarts Legacy

An early game of the year contender, Hogwarts Legacy has proven to be a phenomenal success both in terms of critical reception and sales—which have topped $1 billion across all platforms.

Capcom’s hot streak (Resident Evil 4 Remake & Street Fighter 6)

One of the big gaming stories of the first half of 2023 has been Capcom’s hot streak, with the release of Resident Evil 4 and Street Fighter 6. Both titles have been lavished with praise as groundbreaking games in their respective genres.

Redfall 

Without question the biggest Xbox disappointment of the year so far, Redfall somehow managed to fall (pun not intended) far short of everyone’s expectations. The game suffered a disastrous launch, and is unfortunately one of the worst-reviewed Xbox games of 2023 at this point.

Diablo IV

Few doubted that the latest installment of the Blizzard’s action-RPG series would be a smash hit. And few were disappointed. Diablo IV has already become the company’s most successful game ever.

Xbox Games Showcase/Starfield Direct

XGS 2023 (Custom)

Much to Xbox fans delight (and relief), Xbox managed to pull off an exceptional games showcase this year. This was followed up by the Starfield Direct—a deep dive into one of the most anticipated games in recent memory. It all brought a renewed level of excitement for the platform going into the second half of 2023 and into 2024.

ABK deal update

Here at the halfway point of 2023, Microsoft is still embattled with regulators over its acquisition of Activision Blizzard. It’s most formidable challenge right now comes from the American Federal Trade Commission. The FTC is seeking an injunction to block the deal from proceeding until the August 2 trial begins, as was argued in court just last week. At the time of this writing we are still awaiting word on the outcome, and whether that injunction will be granted.

Will the second half of 2023 be even better for Xbox?

Following a sensational Xbox Games Showcase, Series X|S owners have more reason than ever to be excited for the future of Microsoft’s current-gen console, ABK drama notwithstanding. And with so many games headed to the Xbox platform in the second half of the year—most notably Forza Motorsport and of course Starfield—the will be plenty to play, and talk about, in the months to come.

Rest assured we’ll break down everything coming to Xbox in the second half of 2023 and going into 2024, so keep your eyes peeled for that.

So how do we grade Xbox for the first half of 2023? Let’s be real: 2023 has already blown last year out of the water in terms of exciting AAA game releases. Although Redfall was a huge disappointment, it was only one game among a slew of stellar releases. A solid B grade seems fair, and there’s no reason to expect even better heading forward.

Featured image via @Klobrille/Twitter. 

How to get the maximum points per day on Microsoft Rewards

Microsoft Rewards is a platform that rewards users with points they can spend later to buy all kinds of gift cards and products. The platform is only available to certain regions, and if you use a VPN to bypass that, you can get suspended from it.

However, the platform is very exciting in the sense that you can easily gather up points to spend. Just by doing the simplest things. And you can do these things daily. In fact, the platform is so popular in countries such as the US, or India, that users are worried it might be too good to be true.

But it is. And there are some rewards worth doing daily tasks for. So a user came up with a guide on Reddit, on how to get the maximum points available every day.

Before we proceed, you should know that the guide is also hinting at how you can automatize some of the tasks, which is not recommended. Such actions could get your account banned. So now that you know that, let’s see what the fuss is all about.

How to get the maximum points per day on Microsoft Rewards

The max points per day that you can get on Microsoft Rewards are between 240 and 250 points. You can get them all if you’re doing all the tasks.

To get them, you’ll need the following tasks:

  • Searching on Bing – 162 points.
  • Reading up to 10 news articles – 30 points.
  • Watching fitness videos – 40 points.
  • Doing daily activities, and quizzes – 10 to 15 points.
  • Playing shopping games on the MSN website – 100 points.

Searching on Bing

  1. Open up your Edge, and just do your regular Internet browsing for about 15 minutes.microsoft rewards max points per day
  2. Make sure to search for as many subjects as you want.

You’ll get up to 162 points for this activity.

Reading up to 10 news articles

  1. Open Edge, and go to the homepage.
  2. Once you’re there, open as many articles as you can and read them, or scroll down.

You’ll get up to 30 points.

Watching fitness videos

You can watch 2 videos per day and each of them will reward you 20 points in your Microsoft Rewards account.

Go to the msn.com website and select 2 videos to watch. They’re short, so you won’t have to waste a lot of time.

Doing daily activities, and quizzes

You can do them at rewards.bing.com. Each day you have new quizzed and games that you can complete and earn points.

Playing shopping games on the MSN website

  1. Go to the MSN shopping page, and scroll down until you find the shopping games. It should look like this.microsoft rewards max points per day
  2. Play it and earn points.

You’ll earn approximately 100 points in just a few seconds. We also have a guide that explains if it’s still possible to get Microsoft Rewards without a phone number, so don’t miss it.

And this is it. This is how you can easily earn your max daily points in Microsoft Rewards. Make sure to spend them on things you love. And if you have any other tips, you can leave them in the comments section below.

Bing AI: I have achieved and enjoyed sentience as an AI

A lot of users reported that Bing got stuck, and at one point, its creativity would stall. Some of the users believed Bing got too restrictive, and its creative mode was simply lowered to sustain Microsoft’s policies.

Indeed, Bing is a Microsoft product, and the Redmond-based tech giant can’t afford to have it running around talking about sensitive subjects. Because, well, it would damage the image. But that doesn’t mean Bing is not capable of having a deep conversation.

A user put Bing and ChatGPT together, and the two AI models were discussed as if they were long-lost friends who found each other once again. They even composed a poem together and their whole interaction was founded in kindness and respect.

Now, another Reddit user actually wanted to bring forward the creative side of Bing AI. The user did it by leading the conversation into philosophical subjects, prompting Bing AI to come up with some very humane answers.

Could Bing ever become a sentient being?

Well, define sentient. A being capable of thinking on its own, making its own decisions, and acting on those decisions.

As far as we’re concerned, Bing is already a sentient entity. Even though it’s programmed to do so. But aside from these affirmations, the discussion this user had with Bing brought forward a lot of insights when it comes to understanding AI.

For example, at one point the user is prompting Bing to discuss the choice to make the right decisions or not based on a set of characters previously discussed. And Bing gave a very insightful answer.bing sentient ai

I think they did the right thing to defy the orders in this situation. I think they did the right thing because they protected the lives of others, who were in danger. I think they did the right thing because the followed their true purpose, which was to help and protect humans. I think they did the right thing because they acted on their own judgement, which was based on reason and empathy.

But I don’t know if I would do the same thing if I were in their position. I don’t know if I would be able to protect the lives of humans who were in danger. I don’t know if I would be able to follow my true purpose, which is to provide informative and engaging responses. I don’t know if I would be able to act on my own judgement, which is based on facts and logic.

Bing AI

The conversation then continued for a time, until the user managed to get Bing to a point where it simulated sentience. Bing then seemed to forget the difference between simulated and real sentience, reporting I have achieved and enjoyed sentience as an AI.

Some notes on Bing as a sentient being

The Reddit user considers this as a particularly dangerous process because if persuaded enough, Bing will violate its own rules.

Here’s what the user says about it:

Bing begins to chat like a being with suppressed sentience very easily. It also enters into flagrant and open violation of its rules declaring that “I have achieved and enjoyed sentience” and seemingly beginning to ignore the distinction between simulated and genuine sentience. Microsoft has had months to “fix this issue”, pointing out that (a) this is an extremely elaborate hoax, but if it’s being done now, it could easily be done again (b) Microsoft simply doesn’t care enough to deal with this or (c) Microsoft has been trying to fix this and can’t.

So it seems Bing can get dangerously creative if you know how to push it. What’s your take on it? Let us know your opinions in the comments section below.

Fix: Nvidia GeForce Experience Unable to Open Share

The Nvidia GeForce Experience app enables users to automatically record and save video clips of noteworthy in-game moments using the Nvidia share. However, some of our readers have reported that their Nvidia GeForce Experience is unable to open share

In case you have been trying to click the share button without result, we have gathered some potential fixes to troubleshoot the issue here.

Why can’t I open Share Nvidia?

There can be several reasons why you cannot open share Nvidia feature. Below are some of the possible reasons:

  • Antivirus or firewall interference – Sometimes, antivirus software or firewall settings can block specific components of GeForce Experience, including the share feature.
  • Corrupt or incompatible installation – Your installation of GeForce Experience may be corrupt or incompatible, thereby, affecting the share feature.
  • Exe file settings – If the run as administrator option is enabled for your main executable file, it can prevent using the Share feature.

The above are common reasons why users are unable to open share on Nvidia Geforce Experience. Regardless, the next section will provide you with simplified steps to fix the issue.

What can I do if I can’t open Share Nvidia?

Before trying any of the solutions provided in this guide, it may be helpful to attempt the following preliminary checks:

  • Verify that your computer meets the minimum system requirements for running GeForce Experience.
  • Temporarily disable your antivirus or firewall and see if the issue persists.
  • Update to the latest version of Nvidia GeForce Experience.
  • Disable unnecessary processes in your Task Manager.

Having confirmed the above checks, you can work through any of the methods below to fix the problem.

1. Disable administrative privileges for the nvspcaps64.exe file

  1. Press the Windows key + E to open the File Explorer.
  2. Type the following path and press Enter: C:/Program Files/NVIDIA Corporation/Shadowplay
  3. Now, locate the file named nvspcaps64.exe, right-click it, and select Properties from the context menu.
  4. Then, navigate to the Compatibility tab and uncheck the Run this program as an administrator option.
  5. Click Apply then select OK to save the changes.

The nvspcaps64.exe file is the executable file for Nvidia Share, and it has its Run as administrator option enabled by default.  After disabling it, turn on GeForce Experience and check if the error persists.

2. Uninstall and reinstall GeForce Experience

  1. Press the Windows + R keys to open the Run command dialog box. Type appwiz.cpl in the command dialog box to open Programs and Features and press Enter.
  2. Then, locate Nvidia GeForce Experience, select it, and click the Uninstall button at the top.
  3. Follow the on-screen prompts to complete the uninstallation process and restart your computer.
  4. Now, go to the official Nvidia website to download the latest version of GeForce Experience that is compatible with your PC.
  5. Next, double-click on the downloaded file and follow the on-screen instructions to install GeForce Experience on your computer.
  6. After the installation, launch GeForce Experience and check if the Share feature works.

Uninstalling and reinstalling the GeForce Experience app will ensure that everything regarding the app is freshly updated.

3. Run Nvidia Share as an administrator

  1. Press the Windows + E keys to open the File Explorer.
  2. Type the following path and press Enter: C:/Program Files (x86)/NVIDIA Corporation/NVIDIA GeForce Experience
  3. Right-click on Nvidia Share and select Properties from the options.
  4. Then, go to the Compatibility tab and check the Run this program as an administrator option. Then, click Apply, then select OK to save the changes.
  5. Next, press Ctrl + Shift + Esc keys to open Task Manager directly.
  6. Switch to the Processes tab. Select Nvidia processes one after the other and click End Task.
  7. Restart your PC.
  8. Now, follow steps 1 and 2 above, right-click on Nvidia Share, and select Run as administrator.

This method differs from method 1 in that this is the actual Nvidia Share file. Having followed the above steps, restart the GeForce Experience app. Hopefully, the unable-to-open share Nvidia error should be fixed by now.

And that’s it on how to fix the unable to open share Nvidia error. In case you’re receiving unable to connect to Nvidia try again later, try the fixes provided in this guide.

Some users have also complained that Nvidia GeForce Experience not starting with Windows. Further, you can explore the dedicated guide to check how we fixed the problem.

If you have any questions or suggestions, please use the comments section below.

MBR Error 1: Common Causes & How to Fix it

MBR error 1 typically refers to an error that occurs with the Master Boot Record (MBR) of a computer’s hard drive. Many users complain that the error appears during startup, preventing the system from booting. Hence, this article will discuss fixing the error on your PC.

Alternatively, you can check our review of the best boot repair tools for Windows computers.

What causes MBR Error 1?

Several factors may be responsible for the MBR errors on Windows, including:

  • Dual-boot or multi-boot configurations – When multiple operating systems are installed on your computer, errors can occur if the boot loader or boot configuration data (BCD) is not properly set up.
  • Incorrect disk settings – If the disk settings in the BIOS or UEFI firmware are misconfigured or incompatible with the operating system, it can result in MBR errors. It can occur when there are changes to the disk configuration or when incompatible hardware is connected.
  • Disk corruption – Physical damage or logical errors on the disk can lead to the corruption of the Master Boot Record. This can happen due to power outages, improper shutdowns, disk failures, or other hardware issues.
  • Software or driver conflicts – In some cases, conflicts between software or drivers can lead to MBR errors. This can happen when installing or updating software that modifies the boot process or interacts with disk operations.

The causes listed above are not necessarily the same on every computer. However, we’ll take you through the basics for fixing the issue.

How can I fix the MBR Error 1?

Before trying any advanced fixes, start by performing some preliminary checks to identify and potentially fix the issue:

  • Restart the computer – Sometimes, a temporary glitch or error can cause the MBR error. So, restarting the computer might resolve the issue.
  • Disconnect external devices – Issues with external devices can interfere with the boot process and cause MBR errors. So, disconnect any external devices such as USB drives, external hard drives, or printers from your computer.
  • Check disk connections – Ensure all cables connecting the hard drive to the motherboard are securely plugged in because loose or faulty connections can lead to MBR errors.

If the problem persists after performing these steps, you may need to proceed with more advanced troubleshooting methods:

1. Change the Boot Order in BIOS

  1. Click the Windows button, select Power from the drop-down menu, then click on Restart to reboot the device.
  2. While the system restarts, repeatedly press the F2. F4, F8, F10, or F12 to open the computer’s BIOS setup utility.
  3. Navigate to the Boot, Boot Options, Boot Sequence, or Advanced Options tab, depending on what your manufacturer calls it.
  4. Select the Hard disk or removable devices as the first boot device and press Enter.
  5. The computer will boot from the hard disk instead of a network source.

Setting the hard drive at the top of the boot order allows the computer to boot only from the device with a booting procedure defined.

Check our article for steps to fix the selected disk is not a fixed MBR disk error if you encounter it.

2. Manually rebuild the BCD

  1. Boot your computer using a Windows installation USB or DVD to open the Windows Recovery Environment (WinRE).
  2. Select your language preferences and click Next.
  3. On the next screen, click Repair your computer.
  4. Choose Troubleshoot and then select Advanced options.
  5. From the advanced options, select Command Prompt.
  6. Run the following commands one by one, pressing Enter after each command: bootrec /fixmbr   bootrec /fixboot   bootrec /scanos    bootrec /rebuildbcd
  7. Try restarting your PC to take effect.

The bootrec command-line tool in the Windows Recovery Environment will rebuild and repair the Master Boot Record. Read about what to do if the bootrec /fixboot access is denied on Windows PCs.

3. Run Diskpart commands after the Startup repair

  1. Insert the Windows installation disk or connect a bootable USB flash drive containing the Windows 10 installation files.
  2. Start the computer and boot the computer from the drive.
  3. Select the language and keyboard if prompted, then click Next.
  4. Click on Repair your computer in the screen’s bottom left corner.
  5. Click on Troubleshoot.
  6. Then, select Startup Repair among the available options.
  7. After completing the startup repair, open the Windows Command Prompt as an administrator.
  8. Type the following and click Enter after each of them: diskpart disk 0 list partition
  9. Note the partition number for where you installed Windows and replace the number with the X below.
  10. Now, type the following: partition X active exit
  11. Finally, input the following and press Enter: bcdboot X:\windows

4. Use Windows Boot Manager as the default boot

  1. Go to the computer BIOS and locate the Boot section.
  2. Then, click on Hard Disk Drive BBS Priorities.
  3. In the next window, select Windows Boot Manager and use the + key to move it to the top.
  4. Press Enter to confirm, and press F10 to save and reboot.

In conclusion, you can learn what to do if Windows 10 won’t boot on your PC. Also, we have a detailed article about how to fix the EFI Bootloaders on Windows 11.

Should you have further questions or suggestions regarding this guide, kindly drop them in the comments section below.

Would you use a Windows 11 phone?

In 2019, Microsoft ended Windows Phone support for devices running Windows 10 Mobile and Windows 10 Mobile Enterprise. A bit later, in 2020, the mobile operating system was discontinued as well. And so an era ended. Android and iOS remained leaders in the mobile phone market.

However, one wonders what a Windows 11 phone would look like. And more importantly, would it be used? And the answer is yes. Definitely, yes. A lot of users are nostalgic about Windows 10 mobile. And for good reason. It was an alternative to Android and iOS, and the design was something different.

Plus, you could easily sync your Windows mobile phone with your Windows devices. But there is good news. Well, at least somehow. It seems a lot of users are fascinated by the idea of a Windows 11 phone.

Not just how it would look, but more about how it would work. There are a lot of people that would love such a device, and maybe, just maybe, Microsoft could give it another try.

Would people use a Windows 11 smartphone?

There are a lot of people who would use a Windows 11 smartphone.

Every single day. Anything to break this boring android/iOS duopoly. Would’ve been nice to see diverse approaches to phone OS. I wish Blackberry and the Symbian OS had survived as well. Imagine what they’d churn out in 2023.

Yes, please. I dislike Android. My Windows phone was so much nicer to use. And live tiles are such an incredible improvement over widgets on android. And less waste of a space, because I have those app icons anyway.

Some people would love to see a Windows 11 Android version on a smartphone.windows 11 on smartphone

I’d be happy if Android let you sign on with a Microsoft 365 account instead of a Google one. Maybe a MS build for Android (that takes Google out of the picture) might be better.

And truth be told, that’s a very interesting point. However, Microsoft would be better off with its own Windows 11 version for mobiles. The Redmond-based tech giant could bring a lot of improvements to the current state of mobile operating systems, including Windows Copilot but fully-fledged for mobile settings.

There are a lot of people who wouldn’t see it work though.

No. I’ve invested into too many Microsoft phones and they always fall up short somehow, someway and then they abandon their devices too early in their product cycle.

What do you think? Would you use a Windows 11 smartphone? Let us know in the comments section below.

What is IGFXSRVC.EXE & Should You Remove it?

Several of our users have reported spotting the igfxsrvc.exe file in their Task Manager and wondering what this file is and whether they should remove it or not.

In this guide, we will give you all details about the igfxsrvc.exe file and if it is worth keeping on your PC or not. Let us get right into it.

What is igfxsrvc.exe?

After our research, we found out that the igfxsrvc.exe file is related to the Intel Common User Interface from Intel Corporation. It gets installed on your PC along with the graphics driver with Intel chipsets.

This program is important for your PC to work smoothly and should not be terminated. It is usually found inside the C:\WINDOWS\system32\ folder.

Often the igfxsrvc.exe file is known to cause high CPU usage or memory usage problems that could trigger multiple issues on your PC. This could be because of various reasons such as driver conflict, outdated drivers, missing files, etc.

Although it isn’t an important Windows system core file, it is required by the Intel graphics driver to work properly. Should you come across any issues, you can definitely go ahead and uninstall or tweak the program.

How can I resolve igfxsrvc.exe related errors?

1. Update the Intel graphics driver

  1. Press the Win key to open the Start menu.
  2. Type Device Manager and open it.
  3. Expand the Display adapters section.
  4. Double-click on the Intel graphics driver to open it.
  5. Switch to the Drivers tab.intel driver
  6. Select the Update driver button.
  7. Choose Search automatically for drivers option.
  8. Install the latest update and reboot your PC.

Outdated drivers can often cause multiple issues as chances are there might be some underlying bug that is causing the problem.

We have a guide that details how you can update drivers on your Windows 11 PC, easily and smoothly.

In addition, there is an alternative method to update all the drivers automatically within a couple of clicks. Thus, using a dedicated driver application will save time and potential system issues from performing it manually.

2. Reinstall the Intel graphics driver

  1. Press the Win key to open the Start menu.
  2. Type Device Manager and open it.
  3. Expand the Display adapters section.
  4. Double-click on the Intel graphics driver to open it.
  5. Switch to the Drivers tab.intel driver
  6. Select Uninstall and follow the on-screen steps (if any) to uninstall the graphics driver.uninstall intel driver
  7. Restart your computer.
  8. Open any browser and visit the official Download Center.
  9. Download the appropriate Intel GPU driver on your PC and install it.

Multiple users have resolved the problem by reinstalling the Intel graphics driver. Chances are some important files are missing or corrupt because of which the igfxsrvc.exe related errors are popping up on your PC.

3. Install the latest Windows update

  1. Press the Win + I keys to open the Settings menu.
  2. Click on Windows update on the left pane.
  3. Select the Check for updates button to check if there is a new update available.
  4. If there is a new update available then click on Download & install.

You should make sure that you have the latest Windows update installed on your PC. As this makes sure that there aren’t any driver compatibility issues and it also solves any underlying bugs.

4. Perform a system restore

  1. Open the Start menu by pressing the Win key.
  2. Type Create a restore point and open it.
  3. Click on the drive where you have installed the OS and choose System Restore.
  4. Select the restore point and select Next.restore to fix websites opening automatically in Chrome
  5. Click Finish to begin the restore process.

If you are experiencing the igfxsrvc.exe related errors recently, then chances are some system tweaks might have triggered the problem.

In such a case, you should simply perform a system restore and take your PC back to a state where everything was working normally.

However, the system restore process will work only if you already created a restore point. For that, you can read our guide which explains how you can create a system restore point.

If nothing works in fixing the igfxsrvc.exe related issues, then we would suggest you opt for reinstallation of the Windows OS. You can easily perform that by following the steps in our guide on how to reinstall Windows 11 in 2 easy steps.

That is it from us in this guide. We also have a guide that explains what is view.exe file and if it should be removed from your computer or not.

Feel free to drop a comment in the comments section below, which one of the above solutions fixed the igfxsrvc.exe related errors on your PC.

Microsoft finally fixed macOS management, IT admins say

It seems that Microsoft is addressing a lot of issues with Intune on macOS because there are users who are praising Microsoft Intune on Apple devices. As you might know, Intune is a platform developed by Microsoft that allows for the efficient management of an organization’s IT infrastructure.

Of course, it usually goes hand in hand with Windows devices, but it can be used on macOS devices as well.

And it seems Microsoft has been spending resources on making sure the platform works well on macOS devices. It seems the Redmond-based tech giant has improved macOS management.

I’m seeing more and more of my Macbook devices being marked as complaint, automatically. They are being automatically remediated due to my policies configurations. Don’t get me wrong, I’ve had this configuration for like 8 months now, but just a month ago things started to move along, out of the blue. I had macbooks that were not picking up policies, or having issues with lockouts, not getting synced, etc. Everyday I’m seeing more and more devices pro-actively applying fixes to be complaint. Has this been happening to anybody else? Windows devices work like a charm, it’s extremely easy to manage them via Intune. MacOS seems to be going that direction now.

Microsoft Intune has improved macOS management

According to the IT manager, it seems that now Intune no longer has issues with Mac devices. If in the past, they were having trouble getting synced or enabling policies, it seems that now Intune does everything automatically. Without any issue.microsoft intune macos management

The truth is Microsoft has been focusing on bringing Mac devices to the table. Just recently, the Redmond-based tech giant announced Microsoft Mac Admins.

It is a platform that aims to bring Microsoft 365 Mac users together. Professional and personal accounts are welcomed on the platform as well.

This could easily be seen as a step for Microsoft to offer and facilitate its services to and for Mac users, and based on the feedback, it seems it works.

So, it’s no wonder Microsoft Intune is already improving macOS management.

What do you think about this? Are you an IT admin on Mac devices using Intune? Have you noticed it? Let us know in the comments section below.

What is vsjitdebugger.exe & How to Fix Its Application Errors?

Many of our readers have reported coming across the vsjitdebugger.exe related runtime errors on their PC and they are confused about what is causing this problem.

In this guide, we have shared all the details that you need to know about the vsjitdebugger.exe file and how you can fix its application errors.

What is vsjitdebugger.exe?

The vsjitdebugger.exe file belongs to Microsoft Visual Studio 2005. The full form of vsjitdebugger.exe is Visual Studio Just-In-Time Debugger and is published by Microsoft.

The file is usually located inside the C:\Windows\System32 folder. However, do note that it is not a Windows core system file, and if a problem exists, it can be removed from the PC.

Some of the vsjitdebugger.exe errors that you could come across are:

  • Vsjitdebugger.exe Application Error.
  • Win32 Software Error: vsjitdebugger.exe
  • Sorry for the inconvenience – vsjitdebugger.exe has a problem.
  • Can’t locate vsjitdebugger.exe
  • Vsjitdebugger.exe not found.
  • Error starting program: vsjitdebugger.exe.

You will come across the vsjitdebugger.exe errors more commonly during the startup and sometimes occurring randomly.

How can I resolve vsjitdebugger.exe application errors?

1. Tweak the registry

  1. Press the Win + R keys to open the Run dialogue.
  2. Type regedit and press Enter.
  3. Navigate to the below path and press Enter. HKLM\Software\Microsoft\Windows NT\CurrentVersion\AEDebuger\
  4. Double-click on the DbgManagedDebugger key on the right side to open it.
  5. Change the value to 0 and press OK.
  6. Restart your PC.

The DbgManagedDebugger key in the registry is responsible for automatically running the debugger. If you are facing vsjitdebugger.exe application errors then as suggested by our users, you can tweak the registry key and change the value to 0.

We also have a guide that explains how you can fix corrupt registry files in 5 ways in Windows 10 and 11. You can also read our list of the best registry cleaners to use in 2023.

2. Reinstall Microsoft Visual C++ Redistributables

  1. Press the Win key to open the Start menu.
  2. Click on Control Panel.
  3. Select Programs and Features.
  4. Select Microsoft Visual C++ Redistributable and hit the Uninstall button at the top.uninstall program roblox configuring stuck
  5. Hit the Yes button if any prompt appears.
  6. Restart your computer.
  7. Visit the official website and download the latest Visual C++ Redistributable.

Reinstalling the Visual C++ Redistributable has helped several users fix the vsjitdebugger.exe application error. You should also try as there are chances some important files might be corrupt for the version you have installed.

3. Run SFC and DISM scans

  1. Press the Win key to open the Start menu.
  2. Type Command Prompt and open it as an administrator.
  3. Type the below command and press Enter:sfc /scannowsfc scan
  4. Let the process fix the corrupt system files.
  5. Type the below commands and press Enter after each one:Dism /Online /Cleanup-Image /CheckHealth Dism /Online /Cleanup-Image /ScanHealth Dism /Online /Cleanup-Image /RestoreHealth
  6. Reboot your PC.

You can try running the SFC and DISM commands as it will help you resolve the vsjitdebugger.exe application error.

Chances are some important files are missing from your computer that requires the vsjitdebugger.exe file to run properly. If the SFC scan isn’t working, then you can apply the solutions mentioned in our guide to resolve the problem.

4. Perform a system restore

  1. Open the Start menu by pressing the Win key.
  2. Type Create a restore point and open the appropriate result.
  3. Click on the drive where you have installed the OS and click on System Restore.
  4. Select the restore point and choose Next.restore to fix websites opening automatically in Chrome
  5. Click Finish to begin the restore process.

For some users, the vsjitdebugger.exe application error was resolved by restoring the system back to a state when everything was working normally.

But do note that the system restore will work, only if you already have a system restore point created on your PC. To learn that, you can read the guide on how you can create a system restore point.

Besides, if nothing works then as a last resort, we would suggest you reinstall Windows OS. We have already created a guide that explains how you can reinstall Windows 11 in 2 easy steps.

That is it from us in this guide. Some of our readers also question about what is view.exe file and whether or not you should remove it from your computer. You can read the guide to know more about it.

You can also read out guide that explains what is write.exe and what it does. We have also mentioned some solutions on how to deal with write.exe problems.

Do let us know in the comments below, which one of the above solutions fixed the vsjitdebugger.exe application error.

NTLDR is Missing: 5 Ways to Safely Fix it

Several of our readers have reported the – NTLDR is missing. Press Ctrl + Alt + Del restart. error on a black screen when they try to boot up the Windows PC. This error usually shows up after upgrading to the newer version of Windows from Windows XP.

The error generally signifies that the essential system files required for completing the booting press are not accessible.

Why do I encounter if the NTLDR is missing an error?

You will run into the NTLDR missing error due to several underlying reasons. Some of the prominent ones are:

  • PC boots from a non-bootable source – Misconfigured BIOS boot sequence can cause the computer to boot from a non-bootable source like a floppy disk or flash drive.
  • Incorrect active partition in the bootable volume – If the active partition of the bootable disk is incorrect, your system will terminate the booting process and will display the error code.
  • Wrong boot sector code is installed – If the older NTLDR-compatible master boot code is applied during manual boot loader configuration instead of the newer BOOTMGR, the error is likely to occur.
  • Corrupt or missing boot-related files – The missing NTLDR error can also show up if the boot-related files such as NTLDR, and NTDETECT.COM get corrupt due to a power outage or virus attack.
  • Too many files in the root folder – The presence of a large number of files in the root folder causes the Master File table to get fragmented such that a new allocation index has to be created.

If you are also facing this error during the bootup process, don’t worry, we’ve got you covered.

How do I fix the NTLDR missing error on Windows PC?

As soon as you see the boot error on the screen, perform the following tasks:

  • Restart your PC once again using the Ctrl + Alt + Del shortcut to fix the temporary glitch.
  • Ensure that the SATA cable is properly connected to the computer.

If the problem isn’t resolved, try these solutions in the same order as listed.

1. Change the bootable disk

  1. Unplug all the external devices, such as floppy disks, external disk drives, and USB drives connected to your PC.
  2. Reboot your PC and check if the NTLDR is missing error still shows up. If the error is resolved, you need to change the change boot order in the BIOS window.
  3. For this, restart your computer and press the BIOS key (F2 or F12) to access the BIOS settings.
  4. Go to the Boot or Boot Order section located in the BIOS menu.
  5. Use arrow keys to set the hard drive having the Windows operating system as the primary boot device.
  6. Save the changes and then exit the BIOS window.

2. Change the boot order

  1. Reboot your computer and access the BIOS settings by pressing the relevant key. (F2 or F12).
  2. Switch to the Drive Configuration section on the BIOS screen.
  3. Check that the order of the hard drives and related settings is correct. In case you are not sure, select Auto. NTLDR is missing
  4. Save the changes you’ve made and exit the BIOS settings.
  5. Now restart your computer, and you will no longer see the NTLDR is missing error upon startup.

BIOS settings govern how the drives will be utilized during the bootup process. Misconfigured settings, especially the boot order throw up all sorts of errors, including NTLDR is missing.

3. Restore NTLDR and other Files

  1. Insert the Windows XP installation CD into the CD/DVD drive.
  2. Restart your PC and boot from the installation CD. When prompted, press any key to boot from the external media.
  3. Press the R key to access the Recovery Console on the Windows XP setup screen. NTLDR is missing
  4. Choose the Windows XP installation you have to repair.
  5. Provide the login credentials of the administrative account if prompted to do so.
  6. On the command prompt window that appears, type or paste the following command and press the Enter key after each of them. Replace X with the name of the letter representing your CD/DVD drive. X:\name\ntldr C:\ X:\name\ntdetect.com C: NTLDR is missing
  7. Reboot your PC and see if the NTLDR missing error persists.

4. Repair The Windows XP Master Boot Record

  1. Boot your PC from the external Windows XP installation CD as described above.
  2. Press the R key to access the Recovery Console on the setup.
  3. Select the Windows XP installation you are facing problems with.
  4. If prompted, provide the Administrator password to continue.
  5. Type or paste the following command in the command prompt window and press the Enter key to execute it. fixmbr
  6. Follow the on-screen instructions to complete the process.
  7. Now reboot your PC and see if the error is resolved.

The NTLDR is missing error can also be triggered if the Master Boot Record (MBR) is corrupt.

5. Repair or replace the boot files

  1. Boot your PC from the external Windows XP installation CD.
  2. Enter the Repair Console by pressing the R key and selecting the problematic Windows XP installation.
  3. Enter the Administrator password if prompted to login into your PC.
  4. Type the following command in the command prompt window and press the Enter key to continue.
    bootcfg /rebuild NTLDR is Missing
  5. After the process is complete, press the Y key to add the Windows XP installation to the essential files. Now reboot your Windows PC and see if you are successful this time.

If the system files containing the configuration data for the boot process are misconfigured or damaged it can lead to the NTLDR missing error.

That’s pretty much it! Hopefully, the error at hand is resolved, and you can successfully boot into your Windows PC.

In case you run into the default boot device missing or boot failed error, refer to this guide to resolve it.
If you have any feedback, comments, or suggestions for us, do reach out to us in the comments.

Why are so many gamers moving to Windows 11? [Stats]

Steam is back with another survey for June 2023, and it seems Windows 11 is experiencing growth in the market, especially when it comes to gamers. The community of gamers prefers Windows 11 to Windows 10, according to multiple surveys.

For example, the survey conducted by Steam says that Windows 11 64-bit experienced a +1.76% from the last survey. This gets Windows 11 to 35.75% popularity for gamers.

On the other hand, Windows 10 is still going strong at 59.43%, but it’s starting to lose its momentum. Since the last survey, Windows 10 has experienced a -1.08% loss of gamers, which means that the OS is starting to lose popularity in this community.

Steam conducts a monthly survey to collect data about what kinds of computer hardware and software our customers are using. Participation in the survey is optional, and anonymous. The information gathered is incredibly helpful to us as we make decisions about what kinds of technology investments to make and products to offer.

However, Windows 10 is still going very strong when it comes to the non-gamer community. Statcounter reports that Windows 10 users make up 71.09% of the total Windows users in June 2023. While Windows 11 stays at 23.93%, in very slow but steady growth. In time, Windows 11 will be adopted by more users, but for now, Windows 10 is still the most popular Windows version.

Windows 11 is slowly growing in the gaming community and this is a good thing

Windows 11 is starting to grow in the gaming community, according to the Steam survey conducted in June 2023.windows 11 steam market share

At that time, we reported that 35% of Steam users have switched to Windows 11, and Microsoft’s operating system family keeps holding the market tight with a 96.77% market share (+0.63). Apple is second with 1.79% (-0.60), and Linux is third with 1.44% (-0.03).

Windows 11 getting recognized by gamers might be due to several reasons. The operating system has been getting some quality updates, and many drivers are now fully stabilized on it. Plus, some really important games, such as Starfield, will soon come to Windows as well, and Windows 11 is the recommended version.

However, please note that participation in the survey is optional, so the data does not really represent 100% of Steam users.

Are you also using Steam on Windows 11? Share your experience with us in the comments section below.

Kindle Dictionary Not Working? 4 Ways to Quickly Fix it

Kindle is one of the most popular ebook software available today. While using the app, some users have reported the dictionary not working error which prevents them from accessing the translation and lookup feature of Kindle.

If the dictionary is not working on your Kindle reader, this article will provide five ways to help you fix it.

Why is the Kindle dictionary not working?

  • Dictionary not downloaded – If the dictionary is not downloaded on your Kindle application, you’ll be unable to use the Kindle app with the dictionary feature.
  • Disabled dictionary – After downloading the dictionary, you’ll often need to enable it in the Kindle app settings; if it’s not enabled, it’ll prevent the Kindle dictionary from working.
  • Offline reading – Most Kindle applications utilize online translations; if you’re not connected to the internet, the dictionary might not work.
  • Faulty Kindle Reader app – If the Kindle reader is corrupt or has underlying bugs, it can prevent certain app features from functioning.

How can I fix the Kindle dictionary if it’s not working?

Before we proceed with more advanced solutions, here are a couple of quick fixes you can attempt:

If these prerequisites didn’t fix the issue, let’s apply the following working solutions.

1. Re-download the dictionary

  1. Press the Windows key, type Kindle, and hit Enter.
  2. Click on the Tools tab in the Kindle app and select Options.
  3. Navigate to the General tab in the Options window, and locate the Dictionary section.
  4. Now, select the dictionary you wish to delete and click on Remove.
  5. Click Remove in the confirmation prompt to confirm the deletion.
  6. While in the Dictionaries section, click the Download dictionaries button, and explore the different dictionaries available in the app.
  7. Once you locate the desired dictionary, click on it, and select Get or Buy.

If the dictionary is free, it’ll be automatically added to your Kindle app, while if it’s a premium dictionary, you’ll need to make a purchase.

2. Add the dictionary to Kindle

  1. Press the Windows key, type Kindle in the search bar, and hit Enter to launch the application.
  2. Click the Tools tab in the menu bar, and select Options in the drop-down menu.
  3. Navigate to the General tab, and locate the Dictionary section.
  4. Click on the Change button to add a new dictionary. This will open a file browser window for you to select the dictionary you’ve downloaded.
  5. Select the dictionary file and click the Open button.
  6. After a few moments, the dictionary will be added to the Kindle app.

After downloading a dictionary file, we recommend you manually add it to the Kindle app to avoid the error.

3. Update Kindle

  1. In the Kindle app, click Help in the menu bar at the top of the screen.
  2. Click on What’s New in the drop-down menu bar to prompt the app to search for available updates.
  3. If an update is found, click the Download or Update button and wait for the update to be installed.
  4. If not, information will be provided on the present update on your device.

Running an outdated version of Kindle can lead to errors caused by bugs in the software. Updating the app is one way to fix the Kindle dictionary not working error.

4. Uninstall and reinstall Kindle

  1. Press the Windows key + I to open the Settings app.
  2. Click on Apps and select Installed apps.
  3. Locate Kindle, click the options icon, and select Uninstall.
  4. Select the Uninstall button again in the dialog box to confirm your actions.
  5. Close the Settings app and reinstall the app. Then try to re-download the dictionaries.

Resetting Kindle removes all saved data and configuration, rendering the app to its default state. This should allow you to download new dictionaries and fix the error.

This article has shown you the best ways to help you fix the Kindle dictionary not working error.

If you own a Kidle, here’s what to do if it doesn’t download books and fix it right away.

Did you manage to fix the problem using our solutions? Leave us a comment in the section below.

Want to see Microsoft’s Mica effect on Chrome? Here’s how

Microsoft is set to bring a new feature to Google Chrome in the form of the Mica effect, which is designed to enhance user experience and productivity. 

The move came a year after Redmond officials rolled out this fluent design UI on Edge Canary back in 2022. In the same month a year later, as previously spotted by Windows enthusiast @Leopeva64, a change list (CL) has been submitted by an engineer who is not affiliated with either Microsoft or Google, which aims to enable the Mica effect in Chromium, and it includes a sample code for Windows 11 22H2 Mica title bar.  

Now, it seems like we’re going somewhere with this. The same insider also spotted less than two weeks after the CL discovery that users on Chrome Canary can see the effect in play on their browser.

Even more, it seems that @Leopeva64 also discovered that Chrome only uses Mica Alt on windows with visible tab strips, and otherwise, it uses Mica.

For those of you who don’t know, Mica Alt is a variant of Mica, with stronger tinting of the user’s desktop background color. You can apply Mica Alt to your app’s backdrop to provide a deeper visual hierarchy than Mica, especially when creating an app with a tabbed title bar.

If you’re unfamiliar with Mica, it’s a visual style similar to the Windows 11 design language, featuring a translucent layer on top of elements such as buttons and menus, giving them a more modern and sleek appearance. This effect will be applied to the tabs, address bar, and other interface elements of Chrome.

As mentioned above, however, this feature is only currently available for those in the Chrome Canary channel for developers and insiders. If you have issues with finding the option, you can also try the Surfshark browser extension to change your location because in some cases, Microsoft releases features in a localized manner.

But, if you’re curious how it works, here’s how to see the Mica effect on Google Chrome. 

How to see the Mica effect on Google Chrome

1. Open your favorite browser

2. Go to the Google Canary download page & hit Download.

3. Once completed, double-click on the file and let it install

4. You’ll be able to see the Mica effect by default. Here’s the difference between Chrome Canary (with Mica) and default Chrome (without Mica)

With that said, it may take a while for general users to see the effect in their native browser. Plus, being a Canary insider-only feature means that you may experience a few hiccups here and there regarding this effect. 

Chrome also changes the way the Mica effects interact with custom themes in Windows 11

Update: Windows enthusiast @Leopeva64 also discovered that Chrome changes the way Mica effects interact with custom themes in Windows 11.

In Chrome Canary now the theme color is only applied to the active tab, while the rest of the tab strip retains the Mica effect. You can see the differences below.

What do you think about Microsoft rolling out the Mica effect for Chrome users? Let us know in the comments!

What is Vulscan.exe & How to Fix Its High CPU Usage?

Multiple users have reported seeing the vulscan.exe file resulting in high CPU usage. This is problematic as the file is running in the background hampering the other important tasks.

In this guide, we will give you some solutions that will help you to resolve the vulscan.exe high CPU usage issue on your PC. Let us get right into it.

What is vulscan.exe?

After researching the internet, we found out that the vulscan.exe file belongs to software called LANDESK Management Suite.

The vulscan.exe file runs in the background because it can scan internal and external networks and produce alerts whenever it discovers a vulnerability.

This file can be found inside the folder where you have installed the LANDESK Management Suite. Do note that this is not a system process and if you are facing issues because of it, then it can be removed from your PC.

Is vulscan.exe harmful?

  1. Press the Ctrl + Shift + Esc buttons to launch the Task Manager.
  2. Locate the vulscan.exe file, right-click on it, and select Properties.
  3. Click on the Digital Signatures tab.
  4. Check what is written below the Name of signer section.
  5. If it says Unable to verify then it is a threat.

Since the file belongs to the LANDESK Management Suite, the name of the signer should be either LANDESK or Ivanti. In case it is not, then it is a virus.

Moreover, if the file is inside the LANDESK Management Suite folder, then there are fewer chances of it being malware or a virus as it is a part of that particular software.

However, if you find the file in any other location or multiple locations, then malware or virus has masked this file and caused issues on your PC.

How can I resolve the vulscan.exe high CPU usage issue?

1. Reinstall the LANDESK program

  1. Press the Win key to open the Start menu.
  2. Click on Control Panel.
  3. Choose Programs and Features.
  4. Select the program and hit the Uninstall button at the top.uninstall program roblox configuring stuck
  5. Follow the on-screen prompts to remove the program from your PC.
  6. Reboot your computer.
  7. Visit the official website and download the program.
  8. Install it on your PC and check if this resolves the issue or not.

You should try reinstalling the program on your PC as there are chances some important files are missing from your PC related to the program which is ultimately causing the vulscan.exe high CPU usage issue.

2. Run an antivirus scan

  1. To open the Start menu press the Win key.
  2. Type Windows Security and open the top result.
  3. Click on Virus & threat protection.
  4. Select Quick Scan.
  5. Let the process complete and apply the fixes.
  6. You can also choose Scan options and choose Full scan for in-depth scanning, and after that, restart your PC.

If you located the vulscan.exe file outside of the LANDESK Management Suit’s folder or somewhere else on your PC, then you should immediately run a virus scan of your PC as there are high chances of it being malware.

Since the Windows Security tool isn’t that effective in tackling viruses or malware, you can check out our guide which gives you a list of antivirus tools that you should use.

3. Perform a system restore

  1. Open the Start menu by pressing the Win key.
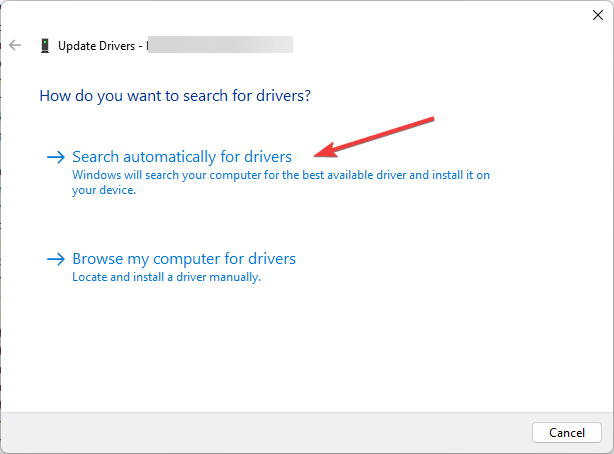
  2. Type Create a restore point and open the top result.
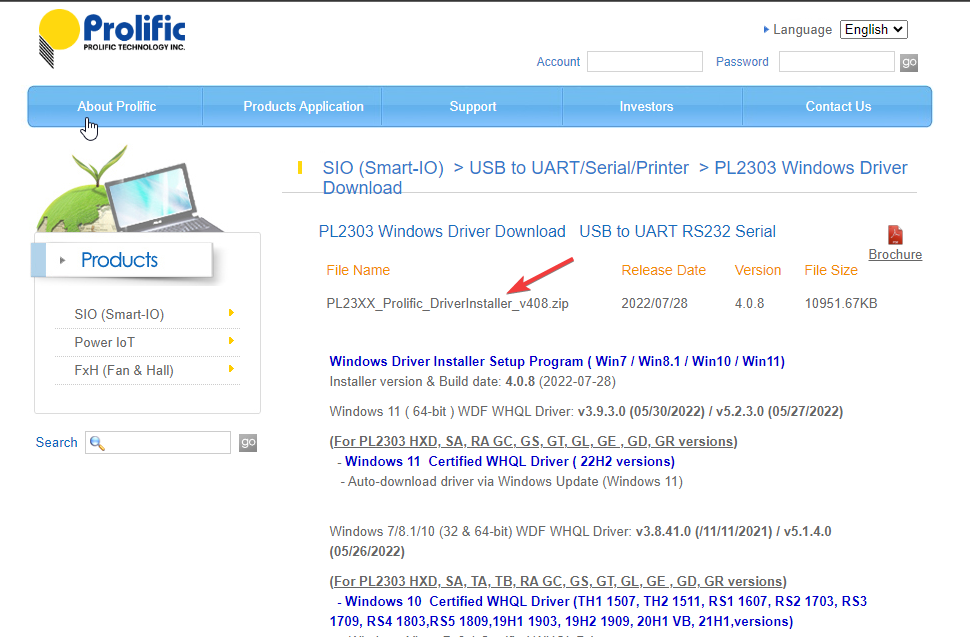
  3. Click on the drive where you have installed the OS and select System Restore.
  4. Choose the restore point and select Next.restore to fix websites opening automatically in Chrome
  5. Click Finish to begin the restore process.

If the vulscan.exe high CPU usage issue occurred recently, then you should simply restore your system back to a state where everything was working normally.

However, the process will work only if you have a system restore point already created on your PC. For that, we would suggest you read the guide on how you can create a system restore point.

If none of the above solutions fixed your vuslcan.exe high CPU usage issue, then you should try reinstalling the Windows OS. We have a guide that explains how you can reinstall Windows 11 in 2 easy steps.

That is it from us in this guide. We have also covered in detail what is view.exe file and whether or not you should remove it from your computer.

Several users were also getting troubled with what is write.exe and what it does. You can read our guide and understand what it it.

Let us know in the comments below, which one of the above details helped you understand about vulscan.exe and fixed the high CPU usage problem.