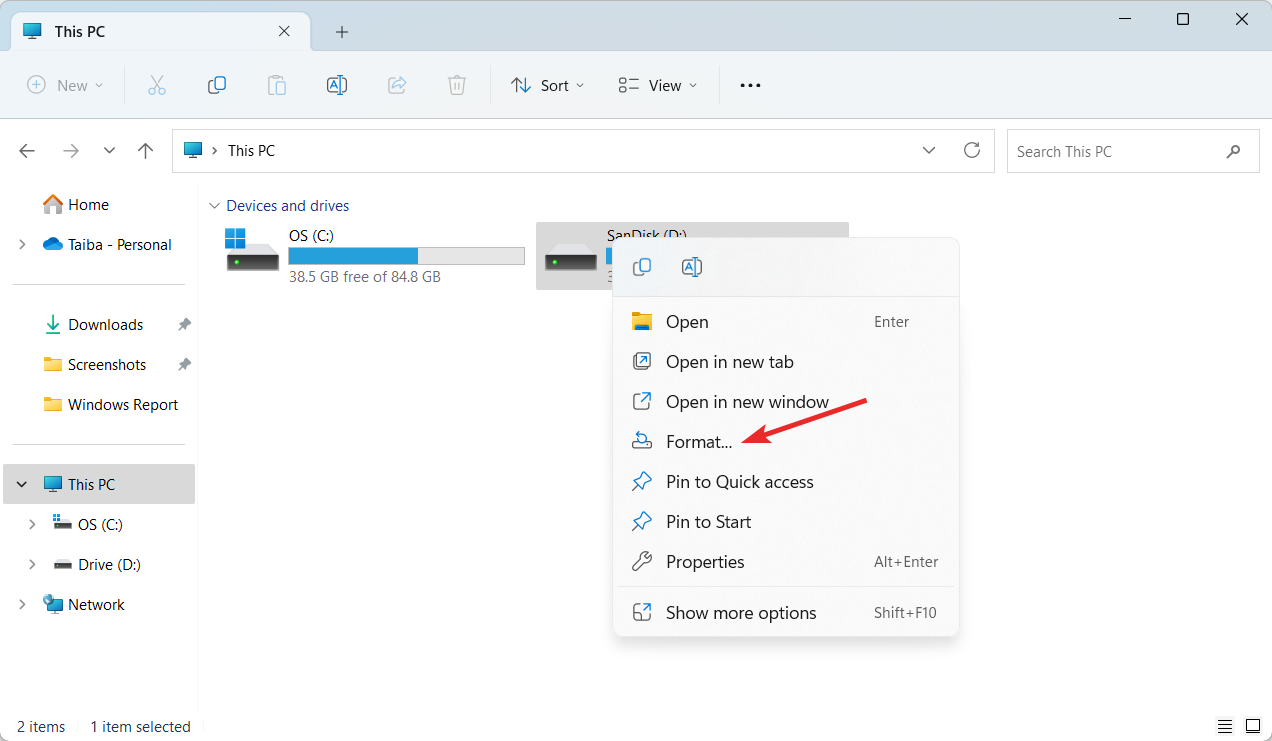
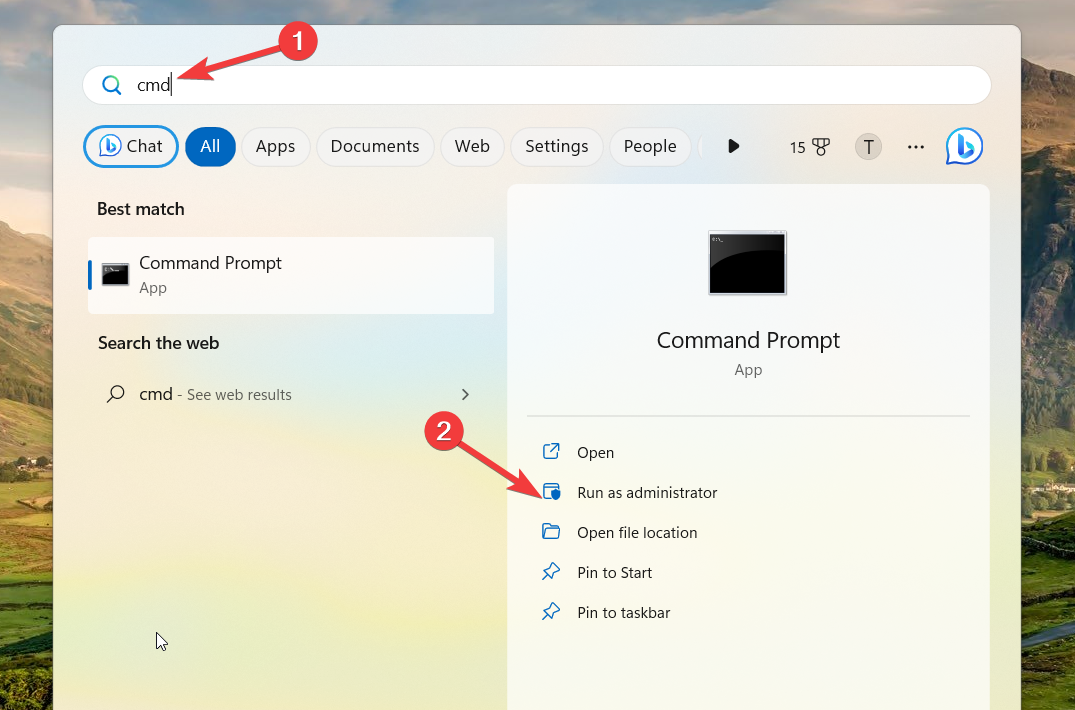
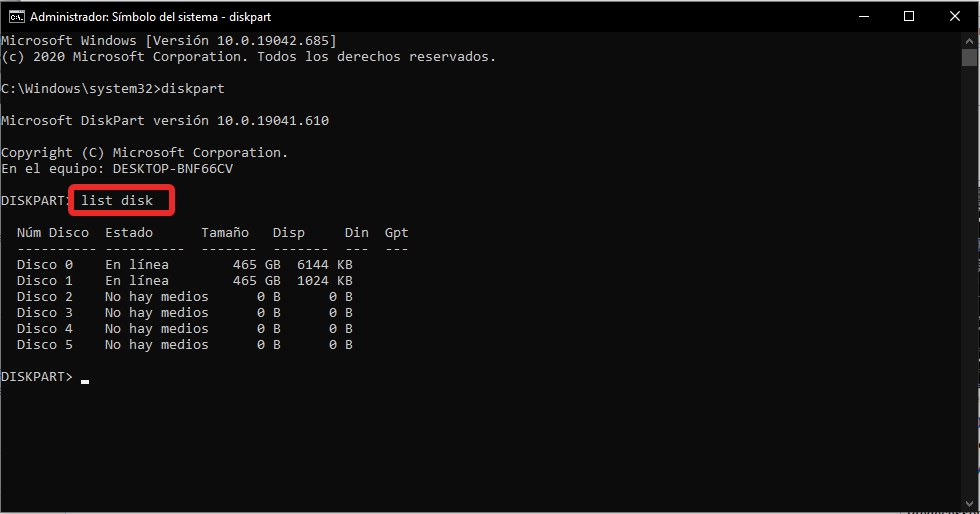
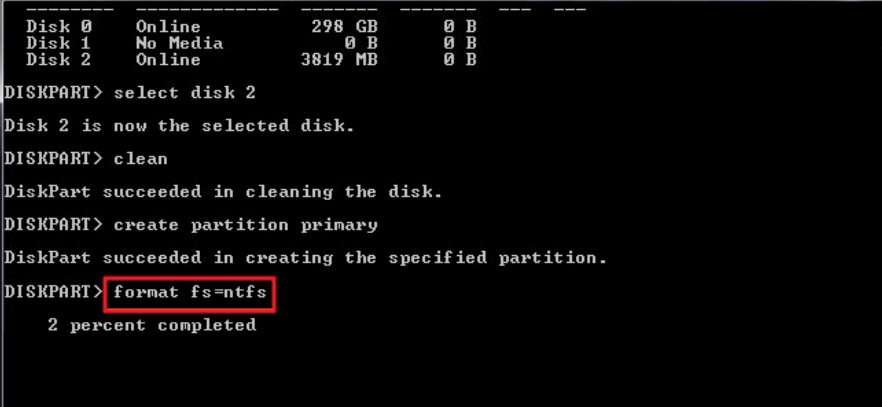
External Monitor is Not Using Your GPU? How to Force it

Many use external monitors with their laptops because they offer more space and better quality. However, many users reported that an external monitor not using GPU.

Unfortunately, this isn’t the only issue, and many reported that a second monitor is not detected on their PC.

This can be a problem and affect your performance, so it’s important to fix it, and this guide will show you the best ways to do it, so let’s get started.

Why is my monitor not using GPU?

  • The monitor isn’t compatible with HDMI standards or HDMI cables.
  • Dedicated graphics isn’t set as the default graphics processor.

Do external monitors use GPU?

On laptops, integrated graphics render the user interface and other graphics components. This means that integrated graphics will be used on external monitors as well.

Only if you start a demanding application, such as a video game, will your laptop be forced to switch to a dedicated GPU.

After doing that, it doesn’t matter if the game is displayed on an internal or external display, it will run on your dedicated GPU.

What can I do if an external monitor is not using GPU?

Before we start, there’s one thing you need to check:

  • Make sure that your cables and ports are compatible with your monitor.

1. Reinstall the graphics driver

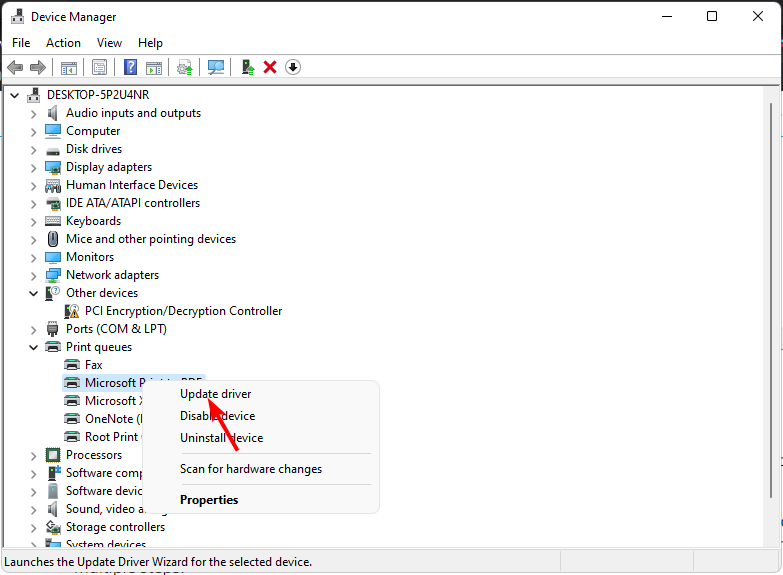
  1. Press Windows key + X and choose Device Manager.
  2. Locate your graphics card. Right-click it and choose Uninstall device.
  3. If available, check the Remove driver software for this device and click Uninstall.

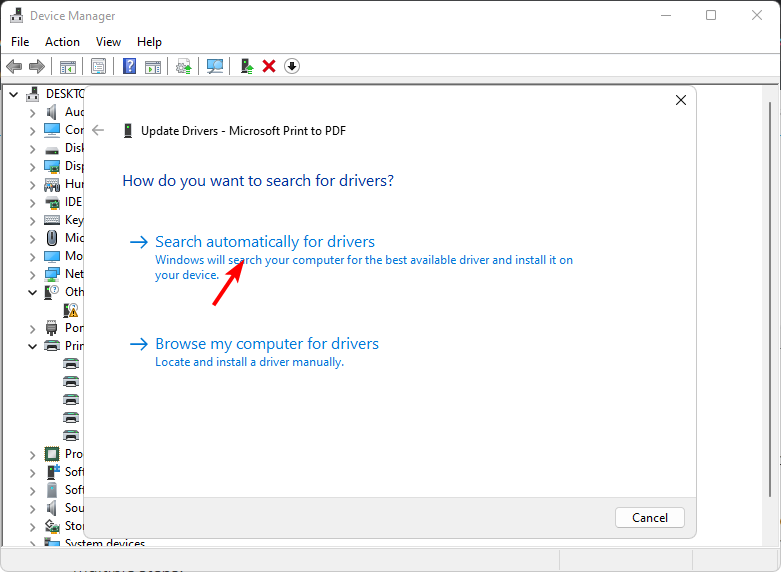
After the driver is uninstalled, you need to update the graphics driver and check if that solves the problem.

While uninstalling your drivers, some users recommend using Display Driver Uninstaller, so you might want to try that as well.

2. Set a preferred GPU

  1. Open Nvidia Control Panel.
  2. Select Manage 3D Settings.
  3. Now go to Program Settings.
  4. Select the application that you want to use for your GPU.
  5. Set Preferred graphics processor to High-performance Nvidia processor.
  6. Start the application and move it to the external display.

As you can see, this is a minor issue, and it’s normal behavior since the external monitor not using GPU by default.

However, there are more serious issues you can encounter, one of them being the external monitor not being detected after sleep, however, we fixed that in a separate guide.

What method did you use to fix this issue, let us know in the comments below.

Ticketmaster One Time Code Not Sending – Quick Troubleshooting Guide

Having trouble logging into your Ticketmaster account because the one time code is not sending? Whether you’re trying to sign in, reset your password, or verify your ID, it’s incredibly frustrating when the verification code doesn’t arrive.

Many users experience delays or never receive the reset code or ID verification for authentication. In this guide, we’ll break down the possible reasons behind this issue and provide simple troubleshooting steps to help you regain access to your account quickly.

What can I do if Ticketmaster is not sending code?

Tip icon Tip
Before you start, make sure the phone number you entered is correct and check for the code in filtered messages/spam. Some Ticketmaster users also say the messages are delayed, so consider waiting a few minutes.

1. Check your Ticketmaster account

  1. Press the Windows key, type in your browser’s name, and hit Enter.
  2. Then, navigate to the Ticketmaster sign-in page, and enter your credentials to log in.
  3. In your account dashboard, navigate to the My Tickets or Order History section to see if your ticket confirmation code is already available.

2. Contact Ticketmaster support

If all else fails and you still can’t get your code, consider contacting Ticketmaster. Visit their support page and pick the Ticket Delivery Category.

You’ll have to fill out a form where you need to describe your issue and then submit your request.

Sometimes, Ticketmaster may not require separate confirmation codes to purchase tickets. If so, the confirmation code may already be visible in your account.

A slow internet connection can cause other errors like Ticketmaster error code U533, which prevents you form completing the purchase, so make sure to keep it in check.

In addition, some of our readers have also encountered the pardon the interruption error on Ticketmaster. So, feel free to check the easy fixes provided in the above guide.

Likewise, error 5005 on Ticketmaster and error 504 also share similar causes with the problem addressed in this guide. So, you can check it for more options to fix this issue.

You may also want to check out this guide on fixing Ticketmaster error code U533 as well as the solution for Ticketmaster error code U521. These resources offer step-by-step troubleshooting tips to help resolve common issues you might encounter when using Ticketmaster.

We also have a guide on error code 0011 on Ticketmaster when purchasing tickets, so don’t miss it.

If you’ve successfully resolved the error, please let us know which steps resolved it.

0x8004e4f1 OneDrive Error Code: How To Fix It

Signing up and using the Microsoft 365 apps, including OneDrive on Windows PC, is a matter of seconds. However, several users have been encountering an error message: Your OneDrive has not been set up. For help, contact your IT department. followed by the error code 0x8004e4f1. 

The error code 0x8004e4f1 indicates an explicit sign-in scenario that can be easily resolved by the solutions listed in this guide. 

Why do I get the 0x8004e4f1 OneDrive error code?

The 0x8004e4f1 error code occurs when the User Principal Name (UPN) commonly known as the email domain address of Microsoft 365, is replaced with a new domain. 

For the uninitiated, UPN or email domain is a default attribute required for generating the email address, which like an email address, can be used to sign in to Windows devices. 

To uncomplicate the process, users usually prefer to have the same UPN and email address but can be changed if necessary. For instance, The old UPN [email protected] can be changed to [email protected]. However, it is important to ensure that both of these domains should belong to the same Microsoft 365 tenant.

When the changes are made to the UPN, the primary email address (SMTP) automatically updates itself to match the UPN, but the process is time taking.

To tackle this, users can explicitly set up all Microsoft 365 apps from scratch. Unfortunately, the procedure accomplishes the desired results for all the Microsoft apps, excluding OneDrive. As a result, you are interrupted by the error code 0x8004e4f1 during the setup process. 

How do I fix the 0x8004e4f1 OneDrive error code? 

Before you try the advanced troubleshooting steps, here are some preliminary steps you should perform the fix the issue: 

  • Wait for an hour or two to ensure that the domain change has been propagated to access the network. 
  • Check the OneDriver server status and see if it is up and running. 
  • Temporarily disable Windows Defender or a third-party antivirus. 
  • Uninstall the MS Office 365 app and download and install it from the official website. 

If these workarounds do not help, jump to the solutions listed below.

1. Clear OneDrive credential cache 

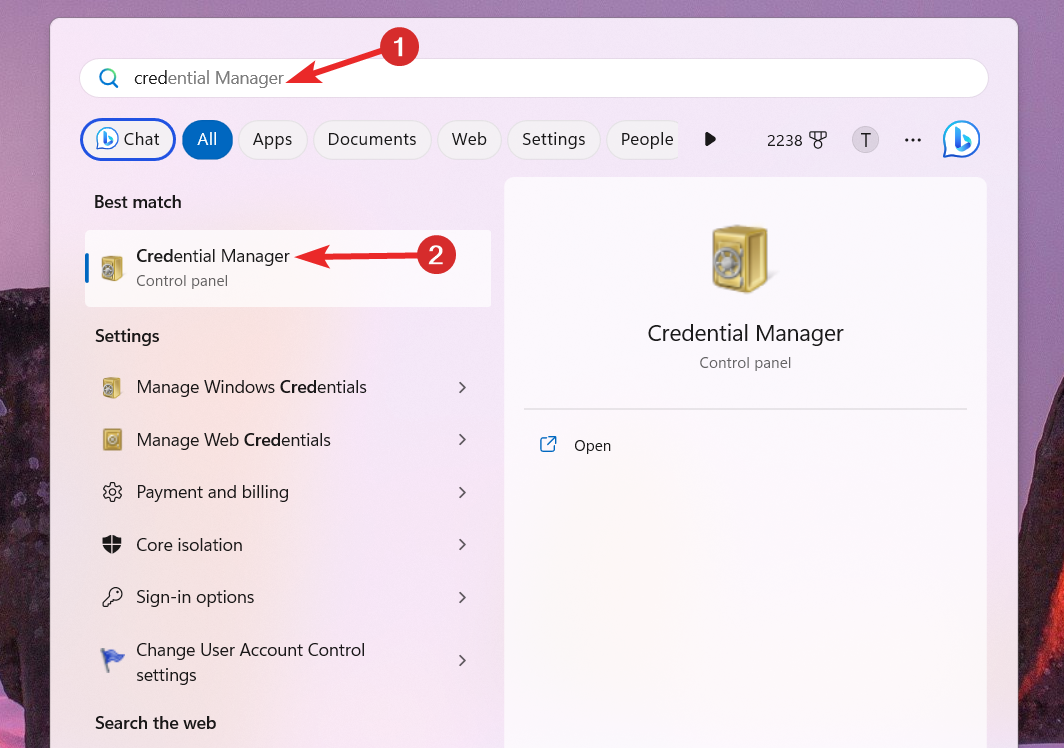
  1. Press the Windows key, type credential manager in the search bar, and choose the relevant search result. 0x8004e4f1
  2. Switch to the Windows credentials tab on the Manage your credentials window. 
  3. Look for the OneDrive cached credentials under the Generic Credentials section and click to view the related settings. 0x8004e4f1
  4. Click Remove to delete the OneDrive credential cache. 0x8004e4f1
  5. Press the Yes button on the confirmation pop-up that appears. 

The credential cache of OneDrive maintained by the Credential Manager is the primary reason for the 0x8004e4f1 error. Removing this Windows Credentials cache prove to be an easy fix. 

2. Relink the user UPN

  1. Press the Windows key, type powershell in the search bar on top, and select the Run as administrator option from the search result. 0x8004e4f1
  2. Click Yes on the User Action Control dialog box to launch Windows PowerShell with elevated permissions. 
  3. Type or paste the following command in the PowerShell window and press the Enter key to execute the command. Press Y if prompted to change the execution policy. Set-ExecutionPolicy RemoteSigned 0x8004e4f1
  4. Now type or paste the following commands one by one and press the Enter key after each of them. Add the old email address and new email address in their respective placeholders. Install-Module -Name ExchangeOnlineManagement -Force Import-Module ExchangeOnlineManagement Connect-ExchangeOnline Set-MsolUserPrincipalName -UserPrincipalName old email address -NewUserPrincipalName new email address

As reported by several Microsoft users, using Windows PowerShell to re-link the old user UPN to a newly generated one resolves the Ox8004e4f1 error code such that the OneDrive setup is successful. 

However, it might take several hours for the changes to show up for your Microsoft 365 account. Hence you should skip 24 hours and attempt to sign into the OneDrive app. 

3. Create a new OneDrive account 

  1. Visit the signup webpage of OneDrive from your preferred web browser and follow the Create one link. 0x8004e4f1
  2. Enter a new email address in the text box or click the Use a phone number instead option and press the Next button. 0x8004e4f1
  3. Provide a new password in the Create a password field and press Next. 
  4. Follow the step-by-step process to create a new user account for the OneDrive app. 

You may also struggle with OneDrive if your user account has become corrupt. Creating a new user account to step up OneDrive will help fix the 0x8004e4f1 error code. 

4. Reset OneDrive 

  1. Use the Windows + R shortcut key to launch the Run dialog box.
  2. Copy and paste the following path in the text box and press Enter to reset the OneDrive app. %localappdata%\Microsoft\OneDrive\onedrive.exe /reset 0x8004e4f1
  3. As soon as you will execute the command, the OneDrive icon in the notification tray will blink and re-appear. 
  4. Resetting OneDrive to the default values may take some time. Once complete, relaunch and set up the OneDrive app; the 0x8004e4f1 will no longer interrupt the process.

Hopefully, you could successfully troubleshoot the error code 0x8004e4f1 such that the setup process is complete.

In case, the error persists, you should uninstall OneDrive from your Windows PC and reinstall it by following the step-by-step process mentioned in this guide. 

If you have any comments, feedback, or solutions for us, do let us know in the comments section. 

How to get Cold Waters to properly run on Windows 11

Sometimes older games can run into problems when trying to play them on Windows 11. Gothic 2 and Mirror’s Edge, for example, are two games that sometimes run into compatibility issues on Windows 11.

So when that happens, it’s always the question: can older games run on newer Windows versions? Well, they can. And Windows 11 has a lot of compatibility settings to turn on for this kind of issue.

But one solution that will almost fix any compatibility issues you have, is to make sure you can get the game from an official platform. Let’s take Cold Waters, for instance. This game is not particularly old, but Windows 11 was not around when the game was released, so a lot of you will ask: does it run on Windows 11?

The answer is yes.

Here’s how you can get Cold Waters to properly run on Windows 11

Make sure you buy Cold Waters from official gaming platforms such as Steam, or GOG. Usually, they have older games in their catalog that have no compatibility issues. On GOG, for example, the platform explicitly tells you if the game is running or not on Windows 11.

Get Cold Waters on Steam

  1. Go to the Cold Waters’ Steam page.
  2. Once you’re there, buy the game by clicking on Add to Card.cold waters windows 11
  3. Download it and install it.

You should have no problems running Cold Waters on Windows 11 from Steam. There is also a community there if you encounter any problems with the game.

Get Cold Waters from GOG

  1. Go to the Cold Waters’ GOG page.
  2. Once you’re there, get it by clicking the Add to Cart button.cold waters windows 11
  3. Download and install it.

You should also have no problems playing Cold Wars from GOG. The game runs through the GOG platform for additional achievements in the game. Also, the GOG platform makes it explicit that the game runs on Windows 11.cold waters windows 11

This is how you properly run Cold Water on Windows 11. You should make sure to always get your games from official sources, this way you won’t run into any problems with the games.

Are you playing Cold Waters? Do you like it? Let us know in the comments section below what you like about this game.

Fix: There is an Issue With Your Account or Order

Microsoft Rewards is a loyalty program that allows users to earn points by performing tasks and activities. However, some of our readers complain about encountering there is an issue with your account or order error message on Microsoft Reward when redeeming points.

Hence, this guide will discuss how to fix the problem. Alternatively, you may be interested in our article about what to do if you run into Oops! looks like you’re on the go error on Microsoft Rewards.

Why is my Microsoft Rewards not working?

  • Microsoft Rewards may flag your account for verification if any suspicious activity is detected.
  • Issues with the payment method can cause this problem to appear.
  • Inaccurate information on your Microsoft Account can cause this problem.
  • Technical issues or temporary service disruptions on the Microsoft Rewards platform can result in error messages.
  • It can also occur if the particular reward service’s region or location settings are restricted.
  • Violating the terms and conditions of the Microsoft Rewards program will lead to this issue.

Check our article about what to do if you encounter Microsoft Rewards is not available in this Country or Region error.

How can I fix There is an issue with your account or order in Microsoft Rewards?

Before trying any advanced troubleshooting steps, we recommend you go through the following preliminary checks:

  • Refresh the Microsoft Rewards page or restart the program to fix the underlying problems causing the points redemption error.
  • Double-check and ensure your account details, such as your name, email address, and contact information, are accurate.
  • Ensure your VPN isn’t active, as it can cause Microsoft Rewards redemption issues.
  • Check if your Microsoft account is eligible for the reward you are trying to claim.
  • Be patient for Microsoft to auto-fix the issue within 2-3 days.
  • Contact the Microsoft Support team for a personalized guide to troubleshoot the issue.

Use a mobile phone or landline number instead of a VoIP phone number

  1. Visit the Microsoft account sign-in page and enter your credentials to log in to your account.
  2. Click on your profile picture or the Profile icon in the top right corner of the page.
  3. Click on My Account or Account settings to access your account settings page.
  4. Navigate to the Security section and click on the Security dashboard.
  5. Click on the Advanced Security option.
  6. In the new window, click on Remove beside your phone number.
  7. Then confirm the selection by clicking the Remove button.
  8. Now, click on Add security info.
  9. Then, select a phone number, input your mobile number, and click Next.
  10. Input the verification code and complete the process.
  11. Review the changes and confirm the update.

Using a VoIP phone number violates Microsoft’s policy and can cause errors when redeeming on Microsoft Rewards.

Hence, the above steps will change the phone number associated with your Microsoft account.

In conclusion, we have a comprehensive guide about fixing the Microsoft Rewards errors with easy steps on your device.

Also, you can check our review of the best VPN for Microsoft Rewards to bypass any restrictions.

Should you have further questions or suggestions regarding this guide, kindly drop them in the comments section.

Bing AI and other OpenAI would soon be capable of emotions

AGI and ASI stand for Artificial General Intelligence and Artificial Super Intelligence. When we talk about AGI or Artificial General Intelligence, then it means that a robot with AGI will be able to think like a human mind. AGI is similar to the human mind.

On the other hand, ASI, or Artificial Super Intelligence surpasses the human mind, and it would even be capable of showing emotions. Or even forming relationships. And to the scientists from the Superalignment project, Bing AI and other OpenAI tools will reach ASI this decade.

Truth is, Microsoft, for example, has poured a lot of budget into investing in AI research, and the results are fascinating. There is Orca 13B, which the Redmond-based tech giant will release open-source. 

You’ll have LongMem, which will train your AI model to have an unlimited context length. Kosmos-2 is gaining visual knowledge, and it’s a Microsoft-funded project.

And now there is the Superalignment project, which is not Microsoft-funded, but will help BingAI as well since the AI tool is based on GPT.

OpenAI AGI timeline – in 4 years AI will reach AGI

According to Superalignment’s statements, superintelligence will be the most impactful technology humanity will ever discover. We will be able to solve a lot of the world’s problems when we’ll discover it.

We need scientific and technical breakthroughs to steer and control AI systems much smarter than us. To solve this problem within four years, we’re starting a new team, co-led by Ilya Sutskever and Jan Leike, and dedicating 20% of the compute we’ve secured to date to this effort.

The team’s honesty is prevalent. They don’t have a solution for controlling a potentially superintelligent AI or preventing it from going rogue. According to them, the current alignment techniques will not scale to superintelligence. There is a need for new scientific and technical breakthroughs.openai agi timeline

So they came up with a plan. The goal is to build a roughly human-level automated alignment researcher. Then they will use vast amounts of computing to scale the efforts and align superintelligence to their needs.

The team wants to reach this goal in four years. Go to their website here, if you want to read more about the project. And if you’re interested in the subject, or you have expertise in it, then you can sign up to join the team.

What do you think? Will AI reach superintelligence in 4 years? Let us know what you think in the comments section below.

Fix: RSAT is Not Available in Optional Features

Optional Features is a Windows OS component for adding or removing specific functionality such as RSAT. However, people reported issues with RSAT missing in Optional Features encountering an unexpected installation hurdle. Therefore, we will discuss fixing RSAT not available in Optional Features.

What is RSAT?

RSAT stands for Remote Server Administration Tools. It is a collection of tools developed by Microsoft, and it does the following:

  • Provides tools for managing and administering Active Directory services.
  • RSAT includes the Group Policy Management Console (GPMC), allowing administrators to create, edit, and manage group policies across the network.
  • It offers tools for managing and configuring Domain Name System (DNS) servers.
  • It manages and configures Dynamic Host Configuration Protocol (DHCP) servers. Administrators can allocate and control IP addresses for client computers.
  • RSAT provides PowerShell cmdlets and modules for automating administrative tasks and performing various management operations on remote servers.

Why is RSAT not available in Optional features?

  • RSAT may not be available in the Optional Features list if your  Windows edition does not support it.
  • Specific Windows features need to be enabled before RSAT will appear in the Optional Features list.
  • If your OS doesn’t have the necessary components for RSAT, you won’t be able to install it.
  • RSAT availability can sometimes be affected by the Windows update status.

What do I do if RSAT is not available in optional features?

Observe the following preliminary checks before proceeding with advanced troubleshooting.

  • Update your Windows operating system to install all the missing requirements needed for RSAT to work.
  • Check your Windows edition to ensure your OS is compatible with the administrative tool.
  • Check for RSAT availability in your region, as it is limited in some locations.

1. Install from PowerShell

  1. Right-click the Windows icon and select Terminal(admin).
  2. Type in the following command and press Enter: Get-WindowsCapability -Name RSAT* -Online | Select-Object -Property Name, State 
  3. Navigate through, and copy the RSAT name and feature you want.
  4. Then, paste the copied name down in the blinking console and press Enter.
  5. Close the Terminal Window when the successful message appears.

You can add RSAT to the Operational features using PowerShell. Check our guide about fixing PowerShell if it’s not working or opening on Windows.

2. Turn on Windows Features

  1. Press the Windows button, type Control Panel, and press Enter.
  2. Then, right-click the Programs category, select Programs and Features and click Turn Windows features on or off.
  3. Expand the Remote Server Administration Tools in the Windows feature dialogue box and click on the Feature Administration Tools.
  4. Then, clear all the boxes you want to turn off and check all the boxes you want to turn on.
  5. Accessible from the Tools menu of Server Manager must be opened from the Administrative Tools folder and click on OK.

Look for features related to RSAT, such as Hyper-V or Windows Hypervisor Platform. If any relevant features are disabled, enable them by selecting the checkbox.

3. Add RSAT manually

  1. Open your browser and visit the Microsoft official webpage to download RSAT.
  2. Then, wait for the downloading process to complete and double-click on it.
  3. Follow the on-screen command to complete the installation process.

Downloading the file will add the RSAT to the operational features. Check our detailed guide on how to download & enable RSAT on Windows 10. For more solutions, we have a detailed guide on installing RSAT on Windows 11 that you shouldn’t miss.

In conclusion, you can read how to fix RSAT crashes on Windows 10/11. Also, check out our guide on resolving couldn’t Install RSAT in Windows 11.

As for optional features, you need better management on which ones to add or remove so check out our guide on how to manage optional features on your Windows 11.

If you have any questions or suggestions, kindly drop them in the comments section below.

Zoom Error Code 10002: What is it & How to Fix it

You’re not alone if you’re experiencing the Zoom error code 10002 on your computer. The error can be annoying as it renders the Zoom client unresponsive till the error is resolved. However, this article will take you through some steps for fixing it.

Also, we have a detailed guide discussing the Zoom error code 100000502 that occurs when joining a meeting and how you can resolve it.

What is the error code 10002 on Zoom?

The error code 1002 on Zoom is accompanied by an error message indicating Unable to install updates, causing it to crash or close abruptly. The error is most common with macOS users but also occurs on Windows PCs.

However, the Zoom Unable to Install Updates Error Code 10002 means the Zoom installer is experiencing difficulties accessing the source file.

What causes Zoom error code 10002?

  • If the source link of the Zoom installer package is broken or corrupted, you’ll get this error.
  • Unstable Internet connection will prevent the update from downloading or installing.
  • Sometimes, security software or firewalls can interfere with Zoom.
  • You may not have the necessary permissions to install software updates on your computer.
  • Lack of storage space can lead to this and other Zoom errors.
  • Other software or applications on your computer may conflict with the Zoom update process.

These are just a few possible causes, and the actual cause of the error may vary on different devices. Regardless, we’ll discuss ways to fix the error in the next section and get your Zoom client working again.

How do I fix Zoom error code 10002?

Go through the following preliminary checks before attempting any advanced troubleshooting steps:

  • Restart your device to resolve temporary software glitches interfering with Zoom installation.
  • Right-click on the Zoom installation file and select Run as administrator to ensure you have the necessary permissions.
  • Use a Disk Cleanup tool to clear temporary files and free up disk space.
  • Contact Zoom’s customer support to open a ticket query and get personalized help.

If the above steps can’t resolve the error, proceed with the solutions below:

1. Uninstall and reinstall Zoom

  1. Click the Start button, type control panel, then press Enter.
  2. Click on Programs, go to the Programs and Features tab, and find the app from the list.
  3. Select the Zoom app, click the Uninstall button, and follow the on-screen instructions to complete the uninstallation process.
  4. Once completed, download and reinstall Zoom to see if the error persists.

Reinstalling Zoom will resolve broken installer files and replace them with a new copy in the source folder. Also, it allows you to install the latest version automatically.

2. Allow Zoom through Windows Firewall

  1. Left-click the Start button, type firewall, and open Windows Defender Firewall.
  2. Go to Allow an app or feature through Windows Defender Firewall.
  3. Click on Change Settings.
  4. Scroll down, select Zoom from the list of apps, and check the boxes for both Private and Public.
  5. Click OK to save the changes and restart your PC.

Allowing Zoom as an exception in Windows Firewall prevents the firewall from checking or delaying its processes.

Also, temporarily disable third-party antivirus software as they may be blocking the Zoom update. You can check how to fix Windows Firewall blocking other app features on your PC.

Conclusively, you can check our guide on fixing error code 5003 on Zoom and get it working. Likewise, read about Zoom error code 1001 if you encounter it while using the app.

Should you have further questions or suggestions regarding this guide, kindly drop them in the comments section below.

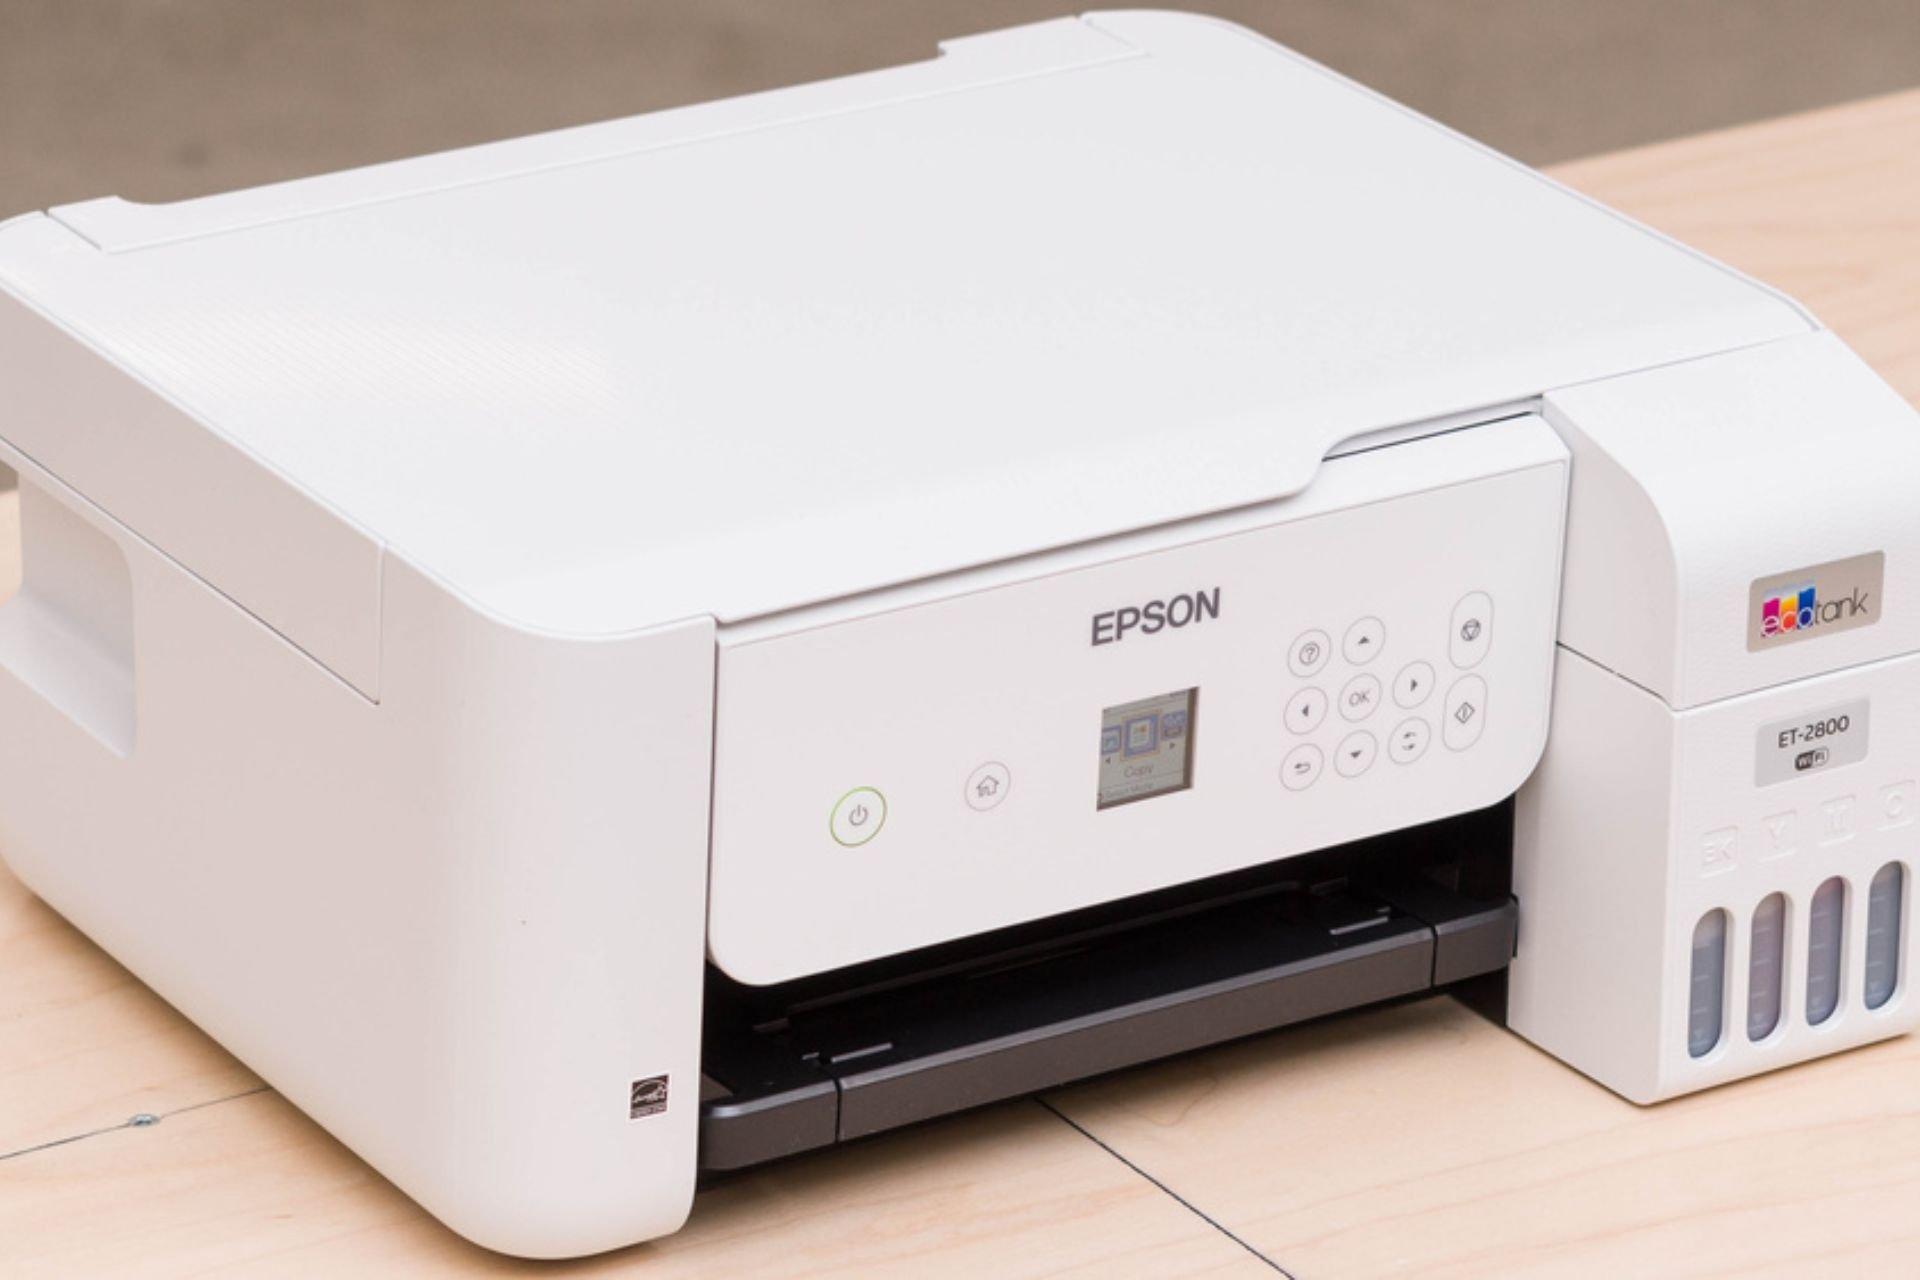
Epson Printer Keeps Saying Paper Jam? Reset it in 2 steps

Paper jams are one of the most common problems faced by printers. Even well-known printers like Epson experience paper jams. Sometimes, it can be resolved simply by following the printer’s troubleshooting procedure. 

However, there may be times when you need to take more drastic measures to remove a paper jam from your printer. We show you how to get out of this fix if you’ve experienced this before.

Why does paper keep jamming in the Epson printer?

There are a few reasons why paper keeps jamming in Epson printers:

  • Paper not loaded correctly – If the paper is not loaded correctly, or there is not enough paper loaded into the tray, your Epson printer may experience a paper jam.
  • Poor paper quality – The quality of the paper you use has a lot to do with how well it works in your printer. Using poor-quality paper in your printer can cause frustration as it tends not to feed properly.
  • Dust accumulation – Dust accumulation inside the machine may lead to paper jams as it clogs up the feeder mechanism inside the printer. 
  • Rollers are not properly lubricated – The rollers can lose their proper function due to overuse or poor maintenance, which may cause paper jams. If you also subject your Epson printer to heavy printing without regular lubrication, it can easily get damaged.

How do I fix my Epson printer jam?

Before embarking on the somewhat complex solutions, try the following preliminary steps:

  • Make sure all cables are connected securely and that no loose ends are hanging from the back of your computer or printer.
  • Ensure you only use the recommended type of paper for your printer.
  • Check the condition of your toner cartridge and ensure it is not dried out or empty.
  • Verify that there are no foreign objects inside, such as staples or paper clips, stuck inside your printer carriage.
  • Turn off your computer, unplug it from any power source, and wait about 10 seconds before plugging it back in.

1. Remove the jammed paper

  1. On your PC, cancel the print job.
  2. Press the OK button and follow the on-screen instructions.
  3. Lift the scanner and check for any visible paper jam. Be careful not to touch the white cable inside the printer.
  4. If there’s no paper, press the two buttons on the rear to remove the rear cover. This will depend on your printer’s model. Some have one button.
  5. Check for any paper in the rear cover and slowly remove it. Be careful not to touch the rollers.
  6. Restore the rear cover and resume printing.

2. Reset the Epson printer

  1. Turn the printer off.
  2. Press and hold the reset button on the back of the printer. The reset button could also be at the front depending on your printer model.
  3. Still holding the reset button, turn on the printer.
  4. Wait for the warning print out, then release the reset button.
  5. A few seconds later, another sheet will print out with the default IP address, and your Epson printer will have been successfully reset.

What do I do when my Epson printer says paper jam but there is none?

If the printer is saying there is a jam, but you don’t have any paper in it, then there is most likely a problem with the rollers inside. You can try cleaning them out with a damp cloth and see if that works.

Start by unplugging your printer from its power source and turning off your computer. Then remove all of the ink cartridges from the printer, wipe them clean with a dry cloth, and then replace them into their slots in their proper positions.

Now plug your printer back into its power source and turn on your computer. Wait for about 15 minutes for everything to initialize before proceeding further with this process. If it still says there’s a paper jam, you may need to take it in to be serviced by an expert.

Since there are a lot of printers in the market, make sure you also check out how to solve the same issue when your Brother printer gets a paper jam.

In case your printer has given out and it’s time to get a new one, we also have a recommended list of printers compatible with Windows 11.

And that’s how to remove a paper jam from an Epson printer. For any additional thoughts on this topic, leave us a comment below.

Bing AI was visited by almost 1.5 billion users, charts say

Bing AI is definitely one of the most popular AI tools out there, just second to ChatGPT in popularity. The tool is very useful in schools, projects, or getting work done more efficiently. Recently, a lot of users have been experimenting with Bing AI, pushing the model to the limits of creativity.

For example, one user made Bing claim that it’s a sentient entity already, while other users claim the opposite: Bing is too restrictive. Either way, the tool is very popular. According to the latest charts, in 2023, Bing has been visited by almost 1.5 billion users. And the year it’s not over yet.

And it makes sense. Microsoft has invested a lot of resources in AI, and when it comes to this topic, it seems that the Redmond-based tech giant is dominating the conversation. Windows Copilot is coming to Windows 11, Microsoft Teams got a lot of AI features, and even Microsoft Store makes use of AI now.

The year is not over yet, and Bing has the potential to become the most visited and used AI platform on the market.

What does the AI market share look like?

According to the chart, ChatGPT is still the most popular AI tool in the world right now. For example, ChatGPT crossed 1.5 billion monthly visits in March 2023 and it kept rising until May 2023.bing ai market share

Ever since Chat GPT’s usage has been decreasing. But many suspect this is because school time is over, and the summer vacations are happening.

It is summer…I’m an undergrad and use it for summer research but during the semester, almost every class/seminar had us using chatgpt for something. Could be less students checking it out since school is out.

It is possible ChatGPT will rise again coming September when schools will open again. But so can Bing. Actually, the two were very close in visitors number in March 2023. But before that, Bing AI was the dominant AI tool.

Given how much emphasis Microsoft is putting on AI, Bing AI will probably dominate the market share by the end of this year.

What do you think about this? Let us know in the comments section below.

4 Quick Ways to Turn Off a Monitor With The Keyboard

Efficiently controlling your computer can significantly optimize your workflow, saving time and energy. Thus, leveraging keyboard shortcuts can be a game-changer when turning off your monitor. Therefore, we will examine four quick ways to turn off the monitor using the keyboard.

Alternatively, you can check our guide about fixing the screen not turning off in Windows 11.

Which shortcut key is used to black screen on or off?

The shortcut key to quickly turn off the screen on Windows isn’t available by default.

The only way to achieve this is to use third-party software that supports this functionality or adjust your power settings as a workaround.

How can I turn off a monitor with the keyboard?

1. Via Windows Power Management

  1. Click the Windows icon, type Control Panel, and press Enter to open it.
  2. Select Power Option.
  3. Click on Choose what the power buttons do option from the left pane.
  4. Go to the When I press the power button category, click the drop-down arrow below the On battery option, and select Turn off display.
  5. Click the drop-down arrow below the Plugged-in option and select Turn off display.
  6. Click on Save Changes to finish the setup.

The procedure above will work only if you have a keyboard with a dedicated Power button, so keep that in mind.

Check our guide about fixing the missing Window Power Management tab on Windows.

2. Create a PowerShell shortcut

  1. Right-click on the blank space on your Desktop screen, select New from the context menu and click on Shortcut from the sub-context menu.
  2. Copy and paste the following command into the address bar and click Next: powershell.exe -Command “(Add-Type ‘[DllImport(\”user32.dll\”)]public static extern int SendMessage(int hWnd,int hMsg,int wParam,int lParam);’ -Name a -Pas)::SendMessage(-1,0×0112,0xF170,2)”
  3. Type the name you want for the shortcut as Push Monitor Off, and select Finish to create a new icon on your Desktop.
  4. Right-click the shortcut on your Desktop and select Properties from the context menu.
  5. Click the Shortcut tab and select the Shortcut Key field.
  6. Type the keyboard shortcut of your choice (e.g. Shift +Ctrl + M) to execute the PowerShell Shortcut and click on OK.

The computer’s monitor will turn off anytime you press the shortcut key you assign to execute the PowerShell command.

We have a detailed guide on ways to fix Desktop shortcuts that aren’t working on your PC.

3. Via Display Power Off Utility

  1. Open your web browser, download, and extract the Display Power Off Utility.
  2. Open the extracted folder, which contains various files. The files needed will be Doff application, Doff screensaver, and Doff tray.
  3. Right-click on the doff application, select Send to, and click on Desktop.
  4. Right-click the Doff application shortcut on the Desktop and select Properties.
  5. Click the Shortcut tab and select the Shortcut Key address bar.
  6. Type the keyboard shortcut key you want and click on OK to assign a hotkey to doff application.
  7. Repeat steps 3-6 for Doff screensaver and Doff tray.

You should note that the Doff application immediately turns off the screen, Doff screensaver activates a black screensaver, and Doff tray adds a feature to the system tray when double-clicked to turn off the monitor.

4. Deploying Turn off screen.bat

  1. Launch your browser search and download the TurnOffscreen.Bat file.
  2. Open the File Explorer from the Taskbar and go to the Downloads folder.
  3. Then, extract the zip file and open the extracted folder.
  4. Right-click the TurnOffscreen.Bat file in the extracted folder, click on Send to, and select Desktop.
  5. Follow steps 5-7 in the second method to create a hotkey.

Downloading the TurnOffscreen.Bat on your pc will allow turn off the monitor. Note: be sure the file is from a trustworthy website.

We hope you found this guide helpful, and to learn more about screenshots, we have a complete guide on the best Windows 11 shortcuts.

Conclusively, please read our complete guide about how to create a shutdown shortcut on Windows 11. Also, you can read about creating and using the Windows sleep shortcut.

Should you have further questions or suggestions, kindly drop them in the comments section.

0x8004de25 OneDrive Error Code: 3 Ways to Fix it

If you’ve encountered the 0x8004de25 error code with the There was a problem connecting to OneDrive message while trying to sign in to your account, you’re not alone.

OneDrive errors are pretty common, and we already wrote about an issue where OneDrive is constantly syncing. Today, we’ll show you the steps to fix the annoying 0x8004de25 issue. Let’s get right into it!

What is error code 0x8004de25?

This is a pretty common OneDrive error, and it’s usually caused by the following:

  • Network connection issues can cause issues while accessing OneDrive and cause this error.
  • Incorrect credentials will often cause a 0x8004de25 error because authentication fails.
  • A faulty or outdated OneDrive app can lead to various login problems.

How do I fix the OneDrive 0x8004de25 error?

Before we move on to our tested solutions, try these simple workarounds first:

  • Check your Internet connection because a slow Internet connection can sometimes cause issues.
  • Install pending Windows or OneDrive updates to ensure no bugs are causing the issue.
  • Verify your login credentials and ensure your login data is correct.

1. Unlink your PC

  1. Open your OneDrive app by clicking on its icon in the system tray.0x8004de25-onedrive
  2. Click on Help & Settings (the gear-shaped icon) and then choose Settings from the drop-down menu.0x8004de25-onedrive-fix
  3. Once the Settings window opens, make sure you’re on the Account tab. Press on Unlink this PC.0x8004de25-onedrive-unlink
  4. Confirm by clicking the Unlink account button.0x8004de25-onedrive-app-unlink

A linking issue could commonly result in a sign-in error such as 0x8004de25. After unlinking your account, try reconnecting again to see if this resolves the issue. If the error persists, move on to the next step.

2. Reset the OneDrive app

  1. Press Windows + R key to open the Run dialog. Type the following command in the search box and press Enter: %localappdata%\Microsoft\OneDrive\onedrive.exe /reset0x8004de25-onedrive-reset
  2. If a Windows can’t find… error message pops up, type the following command instead and press OK: C:\Program Files (x86)\Microsoft OneDrive\onedrive.exe /reset0x8004de25-onedrive-error
  3. Restart your PC.

Resetting OneDrive signs you out of the app and clear its settings and corrupt cache data. According to our research, this solution is the one that resolves various OneDrive sync issues, including the 0x8004de25 error code.

It may be useful to learn how to reset an app in Windows 11 if you had issues with the above steps. Alternatively, if that didn’t work, it might be time to take more radical measures.

3. Reinstall OneDrive

  1. Press Windows + R key, type the following in the dialog box, and click OK: appwiz.cpl0x8004de25-onedrive-uninstall
  2. Locate Microsoft OneDrive in the list of installed programs, right-click on it, and select Uninstall. Follow the on-screen prompts to complete the uninstallation process.0x8004de25-onedrive-error-uninstall
  3. Visit Microsoft’s website to download the latest version of OneDrive. Run the installer and follow the steps to reinstall the app.download-onedrive
  4. Alternatively, you can download it from Microsoft Store. Press the Windows key, type Microsoft Store, and hit Enter.onedrive-reset
  5. Search for OneDrive, click on the app, and choose the Get button.install-onedrive
  6. Launch OneDrive and sign in using your credentials to see if the error is fixed.onedrive-sign-in-error

A corrupt OneDrive app can lead to various operational errors. Reinstalling it might be a last resort, but this is surely set to fix error 0x8004de25.

The process deletes all previous app data and restores it to its default state, ensuring you have the latest version and that any faulty files or settings are removed.

In the unlikely case that none of the methods managed to help you, it might be helpful to learn what to do when you still can’t access your OneDrive files. Or you could check out the most reliable backup software and make the switch.

We hope our guide helped you solve the 0x8004de25 error and your OneDrive app is working fine now. Please comment below and let us know which method proved most effective. Feel free to use the comment section if you need further assistance.

What is Uiwatchdog.exe & How to Fix Its System Errors

You boot up your PC and encounter a random uiwatchdog.exe error? This can be alarming since we have many unknown exe files running on our computers.

Speaking of which, we recently covered poqexec.exe file, so if you want to learn more, we suggest reading that guide as well.

Whatever the case, today, you’ll learn all you need to know about the uiwatchdog.exe file – what it is, what it does, and how to fix its system errors. Let’s get right into it!

What is uiwatchdog.exe?

  • Uiwatchdog.exe process is an integral part of the Trend Micro Security suite.
  • It can detect if the agent is running and start it if it’s not
  • It’s required in order for the Trend Micro software to work properly

Should I remove uiwatchdog.exe?

No, you shouldn’t remove this file due to the following reasons:

  • It’s part of legitimate security software.
  • Removing it can cause issues with the software and leave your PC vulnerable.

Remove the file only in the following circumstances:

  • You’re having issues with it.
  • You suspect that the file is not legitimate.
  • If you’re planning to remove Trend Micro software.
  • You don’t recall installing Trend Micro on your PC.

The process is usually stored in the following path: C:\Program Files (x86)\Trend Micro\

Remember that if you find a file with the same name in a different directory or haven’t installed the security software on your PC, it’s probably malware. Perform an independent scan with an efficient antivirus program to protect your system.

The uiwatchdog.exe is known to display system errors stating that certain DLL files are missing, so it’s important to fix any issues you may have with this file.

How do I fix uiwatchdog.exe’s system errors?

Before trying our proven solutions, you should:

  • Make sure your Windows is up to date by installing the latest Windows updates.
  • Check for software conflicts and remove software that might clash with the file.
  • Install missing Visual C++ Redistributable from Microsoft’s official website

1. Reinstall Trend Micro’s antivirus

  1. Press Windows + R to open the Run dialog. Type the following command and click Enter: supporttool.exeremove-trend-micro-antivirus
  2. If prompted by a UAC (User Access Control) message, confirm by clicking Yes. (If the file’s missing or the program isn’t showing any results, follow this alternative guide from Trend Micro’s official support page.)
  3. You should be in the Trend Micro Diagnostic Toolkit. Go to the Uninstall tab and click on Uninstall Software.
  4. Confirm your intention by clicking Yes in the popup window.
  5. Copy your security number, check the I copied my serial number prompt, and click on Uninstall.
  6. Restart your PC.
  7. Download the software from Trend Micro’s website. Open the installation file and follow the on-screen instructions to complete the process.

You can try uninstalling the app by accessing Windows settings. However, since it’s an antivirus, this will surely leave some residuals. Instead, we suggest you follow the steps above.

According to our research, in most cases, this solution fixed uiwatchdog.exe’s system errors. However, if that didn’t work, move on to the other suggestions:

2. Run DISM and SFC commands

  1. Press the Windows key, search for Command Prompt, and choose Run as administrator.uiwatchdog-exe-cmd
  2. Copy & paste the following commands and hit Enter after each one: dism /online /cleanup-Image /restorehealth sfc /scannowuiwatchdog-exe-dism-sfc-scan
  3. Reboot your PC.

System files can become corrupted or damaged over time, leading to errors. To fix this, you can run the System File Checker tool, which scans your system for any damaged files and replaces them with a cached copy.

Alternatively, we entirely recommend you consider specialized support from a dedicated PC repair solution that can actually fix damaged system files. Within a few clicks, your Windows will be diagnosed and ready to repair all the detected issues.

3. Perform a System Restore

  1. Press Windows + R key. Type the following in the search window and click OK: rstruiuiwatchdog-exe-remove
  2. Choose Next.uiwatchdog-exe-system-error
  3. Select the restore point you wish to revert to. Click on Next.uiwatchdog-exe-system-errors-dll
  4. Confirm by clicking on Finish.fix-uiwatchdog-exe-error

If you started experiencing issues with uiwatchdog.exe after making system changes, you can use the System Restore feature. This allows you to revert your settings to when everything was working fine.

It’s a common solution to various system issues. So, if System Restore is not working for you, we recommend you learn how to fix it.

Well, that was it on uiwatchdog.exe, and its system errors! If the above methods are unsuccessful, you might have to reset or reinstall Windows. To learn more, check our reset vs clean install guide.

Alternatively, you may try different antivirus programs, saving you considerable troubleshooting effort. Moreover, there are many great security software with free trials for up to a year.

Do you need further assistance? Feel free to use the comment section below.

0x80a40021 Xbox Suspension Code: How to Fix it

Multiple Xbox users have reported that they are facing the 0x80a40021 suspension code. For some, the reason is genuine, while some are not able to exactly point out why this happened with their account.

In this guide, we will explain what this 0x80a40021 Xbox suspension code is and offer possible solutions to fix the problem.

Why did my Xbox account get suspended?

You will get the 0x80a40021 suspension code from Xbox Enforcement, a division of Microsoft. Such enforcement suspension codes are given to users who violate the Xbox Live Code of Conduct or the Xbox Terms of Service.

Moreover, when the Xbox account of a user is suspended, they will be restricted from using certain Xbox Live features or services for a particular period of time specified by the Enforcement.

There are multiple reasons why you could get the Xbox suspension code such as the 0x80a40021, which are listed below:

  • Violation of communication – When you are found to be a part of harassment, hate speech, threats, or inappropriate communication with other players on the Xbox community.
  • Cheating or modding – Cheating, modding, or usage of trainers are the most common reasons why your account could get suspended.
  • Piracy – The usage of pirated copies of games, downloadable content (DLC), or other copyrighted materials on the Xbox platform is a cause for account suspension.
  • Fraudulent activities – Engaging in fraudulent activities, such as stealing or sharing accounts, and personal information, or using unfair practices for personal gains, can lead to account suspension.
  • Inappropriate content – Your account can also get suspended if you are sharing or creating content that is inappropriate and does not go in line with the Xbox community guidelines.
  • Payment issues – If you are engaged in fraudulent transactions including usage of stolen credit cards, can also result in suspension.

Many of our readers have reported that they got the 0x80a40021 suspension code without any reason while playing a game. They confirmed that they weren’t involved in any fraudulent or any of the above activities that could ban them. So, there’s that.

Let us now take a look at the process that will help you at least appeal to get your Xbox account unbanned.

How can I fix the 0x80a40021 Xbox suspension code?

1. Submit a case review

  1. Visit the official Xbox page and sign in with your Xbox account.
  2. Navigate to the Enforcement history page.
  3. Under Enforcement history or Active suspensions, you may find active enforcement for your account or one that you’ve selected.
  4. You need to choose an enforcement action to get more info about the cause and effect of the suspension.
  5. If your enforcement action qualifies for case review, you can then hit the Submit an appeal button to receive more info from Xbox Safety.
  6. Once the form is filled, click on Submit.

The only way you can appeal against the ban on your Xbox account or if you have received the 0x80a40021 suspension code, is to contact the Xbox enforcement team and submit a case review.

To do that simply follow the above steps and wait for the enforcement or support team to get back to you and discuss your issue with them. In case you are not found guilty under any circumstances, Xbox would revert the suspension on your account.

2. Review your case status

  1. Visit the official Xbox page and sign in with your Xbox account.
  2. Navigate to the Enforcement history page.
  3. Here, you can check the case review status, and it may display one of the below:
    • Under Review: Xbox enforcement team is still investigating your case.
    • Need Info: The Xbox team needs more info from you. For that, you can check for any latest comments from the support agent. Also, do not forget to give additional info that is requested. Then submit it to continue the case review process.
    • Decision: The Xbox team has finalized a decision on your case review. The team will list answers to your questions and any other decision info in the agent’s comments. The status is given, immediately after the case review is complete.
    • Summary: The case review is close ed and a summary of the outcome is provided to the submitter. This status remains in your enforcement history for you to review at any time.

That is it from us in this guide. You should also read our guide that explains how you can resolve the 0x803f800e error when launching a game.

Feel free to comment below, if you also come across the 0x80a40021 suspension code. Also, mention what steps you took to get your account out of suspension.

How to Check Mouse DPI in Windows 10 [Easy Steps]

DPI or Dots Per Inch is the most important characteristic of a mouse. If your mouse has a higher DPI then it will be more fast and responsive, and if the DPI is low, then your mouse will lag.

In this guide, we will share with you a guide on how to check mouse DPI in Windows 10. We have listed different ways to check out your mouse DPI. Let us get right into it.

What is mouse DPI?

DPI or Dots Per Inch refers to how your mouse measures physical distance. It is the speed at which your mouse travels from one point to another on your screen.

If your mouse has a low DPI and you move it one inch on your screen, then your mouse will travel less distance. However, if the mouse has a higher DPI and you move it an inch, then the mouse with a higher DPI will travel more distance, even though the sensor size is the same.

So, DPI measures how smoothly or how far your mouse can travel the distance on your screen.

Is a high DPI always preferable?

This is a highly debatable question. While some may think high DPI will help them have a smooth experience when using a mouse and could be better for gaming and editing-related tasks.

However, several gaming companies have said that a high DPI mouse is an irrelevant specification to talk about. Often high DPI mouse could fly across your screens resulting in not so better gaming or editing experience.

So, you should choose a mouse with a DPI that is suitable for your needs. If you are a gamer, then you should check which is the appropriate DPI mouse for that game or the type of games you play. This applies to other professions as well.

How can I check the mouse DPI in Windows 10?

1. Visit the official website

The best way to know or check the mouse DPI in Windows 10 or any OS for that matter is to visit the official website of your mouse.

There you will see the exact DPI of your mouse along with other details, you might need. The DPI is usually written in the spec sheet of the device. So, you may want to scroll through the specifications sheet.

You will find different ways of mentioning DPI. Some manufacturers mention the exact DPI or the highest DPI the mouse supports. While some, such as Logitech, would only specify a range the mouse supports.

2. Use an online tool

  1. Visit the DPI analyzer website.
  2. Make sure any pointer acceleration option is disabled in your mouse driver software.
  3. Draw inch or centimeter lines on a blank paper that will serve as your mousepad.
  4. Measure the rough distance that you need your mouse to move from the left to the right side of the screen and enter the distance inside the Target distance box. Leave the Configured DPI box blank.
  5. Click the red crosshair and move your mouse from the left side to the right moving the mouse to the distance specified in the Target distance box. Do not move your mouse fast, you have to be accurate.
  6. A figure will appear in the Actual DPI box, which will be the approximate DPI of your mouse.

The above steps will not let you know the actual DPI of your mouse. However, it will at least let you know the approximate DPI of your mouse.

3. Use Microsoft Paint

  1. Press the Win key to open the Start menu.
  2. Type Mouse and open the Mouse Settings.
  3. Click on Additional mouse settings.
  4. Click on the Pointer options tab.
  5. Uncheck the Enhance pointer precision box and click OK.
  6. Launch the Paint program on your PC.
  7. Make sure the zoom level is set to 100%.
  8. Click on the Pencil tool in Paint.
  9. Move the mouse to the leftmost side of the working area, where it reads 0 pixels. For example, you will see something like 0, 200px.
  10. Place a ruler below your mouse and move the mouse by left-clicking to draw a line until you reach the one-inch mark.
  11. Note down the pixel movement (i.e., check the number in place of 0 in the above example 0, 200px) and note it down.
  12. Repeat step number 10 multiple times.
  13. Take out the average of the px number, that will be your approximate DPI.

This way you can at least know the approximate DPI of your mouse. Although this is not a precision method and you don’t get to know the actual DPI, something is better than nothing, in case you urgently require it.

That is it from us in this guide. If you are experiencing erratic mouse movements in Windows 10, then you should read our guide which lists the best solutions to resolve the problem.

We also have a guide that explains in detail how you can resolve the mouse flickering issue in Windows 10 computers.

Feel free to let us know in the comments below, which one of the above methods you used to know the DPI of your mouse in Windows 10.

Fix: CHKDSK is Not Available for RAW Drives Error

CHKDSK is a handy system utility of the Windows ecosystem known to resolve several disk errors with minimum effort. However, some of our readers received the message The type of the file system is RAW. CHKDSK is not available for RAW drives when using the CHKDSK command on the drive. 

In case you are facing the same issue, go through this guide to discover effective solutions to fix the problem.

Why is CHKDSK not available for RAW drives? 

CHKDSK is a well-known inbuilt Windows utility that fails to use fix hard drive errors on FAT32 or NTFS file systems. Hence, if the file system is in a format that cannot be recognized by Windows, the OS will consider it to be a RAW file and the in-built command like CHKDSK will not be available. Apart from this, there can be several other reasons for the problem: 

  • Your hard drive has suffered a physical damage 
  • There is some issue with the file format
  • Windows is unable to read or access the file system and its contents 

Now that have a clear idea of why the CHKDSK is not available for raw drives error shows up, let’s proceed towards the effective solutions.  

What do I do if CHKDSK is not available for RAW drives? 

1. Boot your PC in Safe Mode 

  1. Shut down your PC completely by pressing the Power button for a few seconds. 
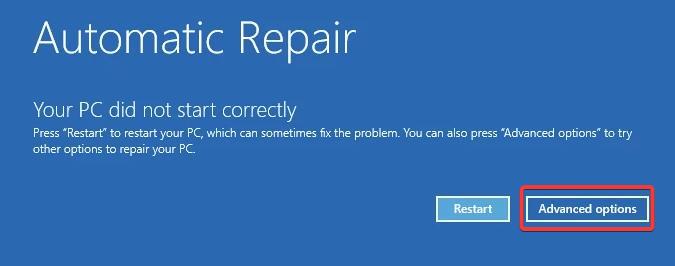
  2. Press the Power button to reboot and long press the button to restart your computer. Repeat these steps until you access the Automatic Repair screen.
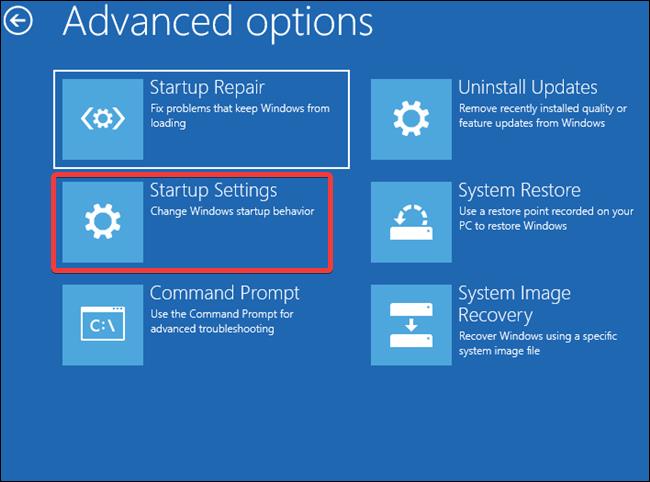
  3. Start the automatic repair process by pressing the Advanced options button. 
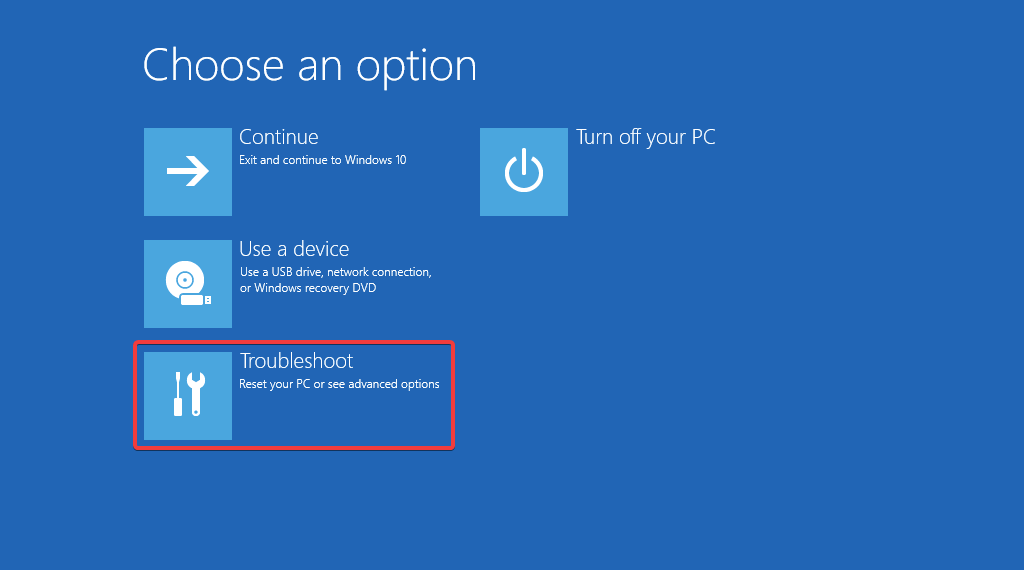
  4. Select Troubleshoot option from the next screen. Chkdsk is not Available for RAW Drives
  5. Go to Advanced options. 
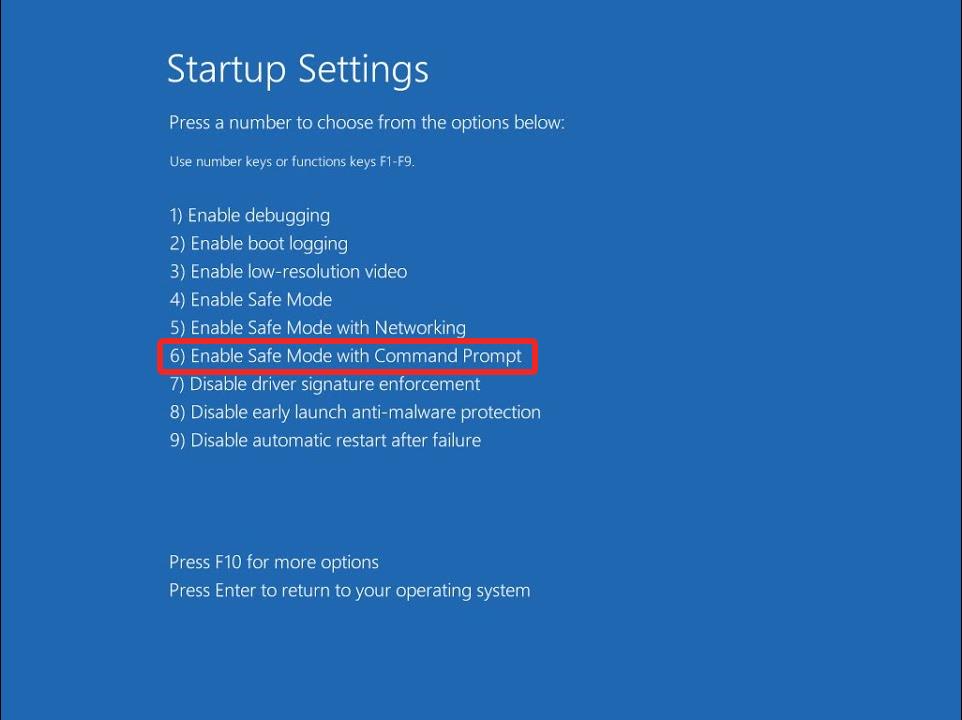
  6. Select Startup settings from the Advanced options window.
  7. Press the F8 key to choose Safe Mode with Command Prompt from the list of safe mode variants. 

In the Safe mode, your computer will function in a basic state with only essential drivers, folders, and apps. Now that there is no interference from the third-party services, execute the CHKDSK command once again. 

If the command does not work, proceed to the next method. 

2. Check and repair the RAW drive 

  1. Connect the external hard drive to your PC. 
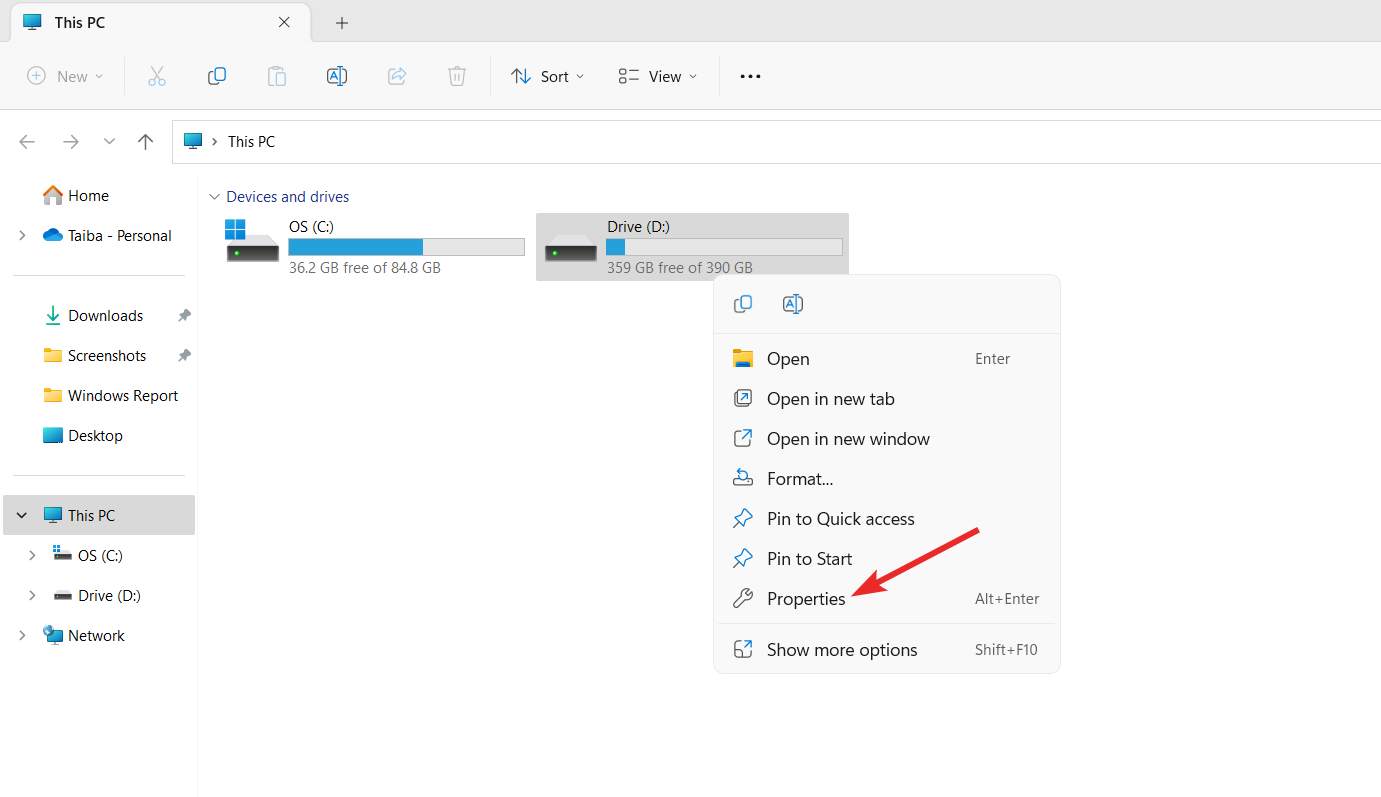
  2. Launch the File Explorer using the Windows + E shortcut and select This PC from the left navigation pane. 
  3. Right-click the external hard drive and choose Properties from the context menu. 
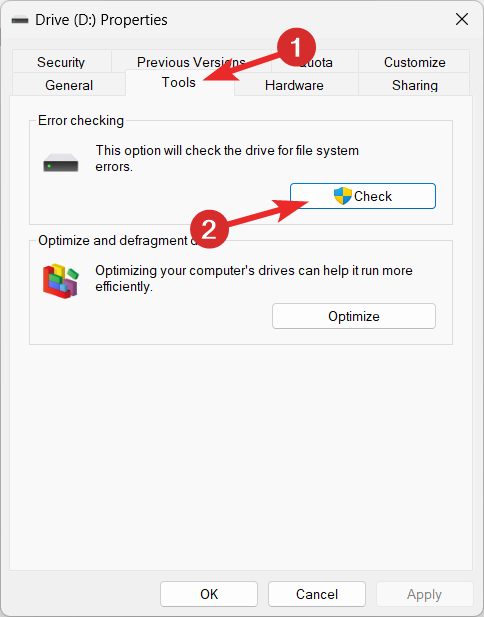
  4. Switch to the Tools tab of the Properties window and press the Check button located under the Error Checking section. 
  5. If prompted, type the administrative credentials and wait until the Windows operating system repair the drive with RAW status. 

If the CHKDSK command fails to work, you can use the Check tool, another error-fixing utility of Windows to fix the issue with the RAW drive. 

3. Format the disk drive

  1. Connect the external hard drive to the computer and wait for it to get detected by the PC. 
  2. Bring up the File Explorer window using the Windows + E shortcut and select the external hard drive. 
  3. Right-click the external hard drive and choose Format from the list of options in the context menu. 
  4. A format drive window will open on the screen. Select NTFS in the File system drop-down and press the Start menu to format the hard drive. 

Formatting the external drive with an unsupported file system will convert it to a compatible file system such as NTFS. 

You should remember that formatting the drive will delete all the contents stored on it. 

4. Repair the RAW drive using the diskpart command

  1. Press the Windows key to bring up the Start menu, type cmd in the search bar on top, and choose Run as administrator from the search result.  chkdsk is not available for raw drives
  2. Now type or paste the following command in the command prompt to launch the disk utility tool. Diskpart 
  3. Next, execute the following command to see if the list of disk drives currently connected to your PC aligns with their identifiers. List disk 
  4. Note down the name of the RAW disk drive and type or paste the following command to select the problematic disk. Replace N with the number representing your disk: select disk N 
  5. Execute the following command to remove the write-protected attribute of the file: attributes disk clear read only
  6. Next, delete all the disk drive data by executing the following command: clean 
  7. Now you need to create a primary partition of the disk using this command: create partition primary
  8. Finally, execute the following command to format the hard disk and convert it to a compatible file system: format fs=ntfs

If the CHKDSK command is not available for the RAW hard drive, you can use the disk part utility command to repair and format the hard drive to the required file system. 

That’s all about this guide! Hopefully, you were able to repair the RAW hard disk such that the CHKDSK command is now available for the drive. 

You might also be interested in what to do if you can’t create a new partition in Windows. 

In case you have any queries or suggestions for us, do let us know in the comments section. 

Microsoft Edge takes action against spam notifications, blocks them

Microsoft has announced its Edge web browser can now block spam notifications, including those that deceive users into granting permission for notifications.

According to the announcement post from the Microsoft Edge team, “Website notifications are great for staying up to date on your favorite web apps, but they can also be used to spam you with messages that can be unwanted or even misleading,”. To tackle this problem and improve user satisfaction, Microsoft has brought modifications to assist users in evading these notifications and promoting a sense of peace. It seems like times are good for Microsoft Edge as it is close to 300 million users thanks to ChatGPT integration.

The newly blocked notifications on Edge primarily originate from unfamiliar websites and encompass notifications that attempt to trick users. Microsoft is actively collaborating with law enforcement authorities to tackle genuinely hazardous spam notifications, such as those posing as virus warnings that prompt users to download malware disguised as a solution.

Although notification spam usually causes annoyance rather than harm, Microsoft has identified and examined various types of spammy notifications that most users deem undesirable. It’s like giving them a warning shot without causing too much disturbance. As part of this process, notification privileges have been revoked from websites that transmit spammy notifications, effectively blocking billions of misleading alerts.

Based on their analysis, Microsoft discovered that most spam notifications originate from unfamiliar sites. Consequently, starting from Edge version 113 and onwards, initial notifications from such sites will be displayed discreetly, with only a subtle message appearing in the address bar.

via Thurrott

Fix: PowerPoint Found a Problem With The Content

Many users run into PowerPoint encountered a problem with the content error on their PC. The error can occur when there is an issue with the file or the content within a PowerPoint presentation. Hence, this article will outline the cause and fixes for resolving the error.

Likewise, you can check our guide discussing how to fix the PowerPoint cannot insert a video from the selected file error on your PC.

Why does PowerPoint found a problem with the content appear?

  • The presentation’s elements that violate the security settings may trigger an error.
  • The file you’re opening is in a synchronized folder (e.g., OneDrive, Dropbox), or backup software monitors the folder.
  • Corrupted PowerPoint files can cause errors when trying to open the presentation.
  • Compatibility issues can cause an error if the PowerPoint file was created in a different version.
  • It can occur if the hosting folder of the file does not exist in the trust list of PowerPoint.

How do I fix PowerPoint found a problem with content error?

Before attempting any advanced troubleshooting steps, try the following preliminary checks:

  • Close and reopen the app on your PC to refresh its process and fix temporary problems affecting it.
  • Check for and install the latest version of PowerPoint to resolve bugs from the outdated version and compatibility issues.
  • Save a presentation copy with a different file name or format (e.g., PPTX to PPT) and try opening it again.
  • Disable any recently installed third-party add-ins or plugins and see if the error is resolved.
  • Try opening the file on a different computer to see if the issue is device specific or persists on other devices.

1. Disable Protected Views in PowerPoint

  1. Open PowerPoint on your computer.
  2. Click on the File tab in the top left corner of the PowerPoint window and select Options.
  3. Click on the Trust Center tab on the left-hand side, then tap on the Trust Center Settings button on the right pane.
  4. Select Protected View from the options on the left-hand side. Uncheck the boxes for the three scenarios on the right side of the page to disable Protected View.
  5. Click OK to apply the changes and close the Trust Center dialog box.
  6. Relaunch PowerPoint and check if you can access the content without errors.

After disabling Protected View, PowerPoint will no longer open files in the protected view mode for the scenarios you have unchecked. Read about PowerPoint not opening in Windows and ways to fix it.

2. Add the file location to the trust list

  1. Launch the PowerPoint on your PC.
  2. Tap on the File tab in the top left corner and select Options.
  3. Tap on the Trust Center tab on the left-hand side, then click on the Trust Center Settings button on the right.
  4. Select Trusted Locations from the drop-down menu on the left pane and click on the Add new location button.
  5. In the Microsoft Office Trusted Location dialog box, click the Browse button to select the folder location of the file you want to add to the trust list, then click OK.
  6. Save the changes and see if the error persists.

Adding the file location to the trust list allows you to open files from the specified folder without encountering any view restrictions.

3. Move the file out from the synchronized folder

  1. Go to the synchronized directory where you currently have stored the file.
  2. Right-click on the file, select Cut from the drop-down menu or press Ctrl + X.
  3. Go to any regular directory, right-click, and press Ctrl + V to paste the file into any other folder.
  4. Try to open the file and check if the error appears.

The above steps will make the file available in another folder, unaffected by synchronization or other backup services and the PowerPoint encountered a problem with the content error will be gone.

4. Unblock the Security option for the file

  1. Right-click on the file and select Properties from the drop-down menu.
  2. Go to the General window, select the Security tab at the bottom, then click Unblock.
  3. Launch the PowerPoint and check if you can open the file.

Unblocking the Security option for the .pptx file removes any restrictions preventing it from being accessible.

Alternatively, you can learn to enable presentation mode in Microsoft PowerPoint on Windows PC.

Should you have further questions or suggestions regarding this guide, kindly drop them in the comments section.

Microsoft implements transparent pricing strategy for cloud services

According to Microsoft, in October 2022, they announced a clear and transparent schedule for aligning the pricing of Microsoft Cloud services worldwide with the U.S. dollar. This initiative aims to provide customers from various regions and currencies with consistent pricing that reflects the exchange rate between their local currency and the U.S. dollar (USD).

Now that we’re on the topic of pricing, did you know Xbox Free Play Days are on from Thursday, July 6 through Sunday, July 9, with some amazing games?

Continuing on this path of pricing, Microsoft is now introducing updates to its pricelist, ensuring that the prices for Microsoft cloud services are adjusted to meet global standards. Additionally, the company emphasizes maintaining local pricing stability for OnPrem, prioritizing customers’ needs in specific regions.

Effective September 1, 2023, Microsoft will be implementing pricing adjustments for its Cloud and software services in the currencies listed below:

Adjusted Currencies

Microsoft will maintain its practice of evaluating pricing in local currency on a biannual basis, carefully considering fluctuations in currency exchange rates compared to the USD. This approach aims to enhance customer transparency and predictability worldwide, aligning with prevailing industry pricing models.

Microsoft Cloud services will continue to be competitively priced, demonstrating the company’s steadfast dedication to the success of its customers and partners. Microsoft will persist in investing in solutions that empower customers to drive innovation, streamline operations, reduce costs, improve business performance and efficiency, and establish robust security strategies. These efforts ensure that customers around the globe can rely on Microsoft as a trusted provider.

Let’s hope these adjustments bring smiles to customers’ faces and not just to Microsoft’s bank account.

How to get a tablet-optimized taskbar on your Steam Deck

The Steam Deck device is a handheld gaming device that supports Windows 11. And it’s a beast in itself. But if you want to keep it at a peak performance level, you’ll need to choose which apps you want to install. So say no to those Android apps that you are able to run.

So far the device hasn’t had any serious issues. It seems that sometimes Steam Deck encounters a fatal error, which can be easily fixed.

However, some users appreciate the taskbar design from the latest handheld gaming device Rog Ally. As you might know, this device also runs on Windows 11, and similar to the Steam Deck, it’s a beast in itself. And it seems it comes with good features because some users were fascinated with the taskbar that they wanted to replicate it on Steam Deck.

Fortunately, there is a very simple walkthrough to get the optimized taskbar on your Steam Deck as well. But you need to know something. You need to be running Windows 11 Version: 22H2, 22621.755 or higher, so make sure you update your Steam Deck to the latest Windows version possible.

Here’s how to get a tablet-optimized taskbar on your Steam Deck

  1. Open Registry Editor from the Search boxwindows 11 tablet optimized taskbar
  2. Once you’re there Navigate to HKEY_CURRENT_USER\Software\Microsoft\Windows\CurrentVersion\Explorer
  3. Here you should add a new Dword value (32-bit)windows 11 tablet optimized taskbar
  4. Name it TabletPostureTaskbar
  5. Click it and change the Value data to 1windows 11 tablet optimized taskbar
  6. Exit out and right-click the Desktop to select Display settings
  7. Now set the scale to 100%
  8. Reboot your Steam Deck.

Now you should experience the Windows 11 tablet-optimized taskbar in all its glory. The taskbar will change its size, hence optimize, while doing all kinds of activities on your Steam Deck.

For example, on your Desktop, the taskbar will appear in a regular way. When you’re browsing the Internet, it will optimize to its tablet mode.

What do you think about this? Let us know in the comments section below.

What is Uhelper.exe & Should You Uninstall it?

The uhelper.exe process is a third-party process developed and signed by iSkySoft software company.

If you use any of the applications from iSkysoft, such as Filmora or Uniconverter,  you may have encountered the uhelper.exe file.

There are many services that you should disable on Windows 11, but is this one of them? Keep reading to find out.

What is uhelper.exe?

Should I uninstall uhelper.exe?

If you installed any iSkysoft software on your computer, it’s up to you to decide whether you want to keep uhelper.exe or remove it.

If everything is running smoothly, it is recommended not to uninstall uhelper.exe in Windows because it is necessary for receiving updates for your iSkysoft software.

1. Stop the process

  1. Press the Windows + X and select Task Manager.Task Manager
  2. Go to the Details tab and locate the uhelper.exe entry.
  3. Right-click on the uhelper.exe entry and choose End task.End Task
  4. Also, check for its parent software and close it if it’s running.
  5. Finally, restart your PC.

If the uhelper.exe process is causing issues on your computer, such as high CPU or memory usage, you can resolve it by terminating the process in Task Manager.

2. Perform a malware scan

  1. Press the Windows + S, type Windows security, and select the Windows Security app.Windows security
  2. Select the Virus & threat protection tab and click on Scan options.Scan options
  3. Select Full Scan and click Scan now.Scan now

Sometimes, viruses or malware pretend to be the uhelper.exe process or take control of it to misuse your computer’s resources without permission. Running a virus scan using Windows Security can resolve this problem.

On the other hand, the security of your PC deserves professional antivirus software that includes advanced malware prevention and mighty virus monitoring tools to be always covered.

⇒ Get TotalAV

3. Uninstall parent software

  1. Press the Windows + R, type control panel, and click the OK button.356
  2. Select Uninstall a program option under the Programs section.Uninstall a program
  3. Locate the parent software, right-click on it, and choose Uninstall.Uninstall

Before you go, make sure to check out other processes in Windows that you can disable to enhance your PC’s performance.

We also have a great guide on abDocsDllLoader, so check it out to learn more about this file.

If you feel we have missed any valuable information, please share it with us in the comments section below.

AI is helping AMD grow its market share vs. Nvidia

We all know 2023 is truly the year of AI. Or at least the first year of the AI reign in the technological world. Everywhere you would go, AI would be there. AI is in Microsoft Teams. Microsoft Store has AI now. Edge, and Opera One have AI. And Windows 11 is getting Copilot later this year, which is an AI assistant just for you.

Even more, Microsoft, for example, has poured a lot of budget into investing in AI research, and the results are more fascinating. There is Orca 13B, which the Redmond-based tech giant will release open-source. You have LongMem, which will train your AI model to have an unlimited context length.

And it seems, Microsoft has also invested in Kosmos-2, an AI language capable of spatial context. Basically, AI will now be able to describe space and have knowledge of space. Shorter, AI will have a body.

It’s clearly the age of AI. And to put an emphasis on just how important it is, it seems that AMD is using AI software to improve their chips. Thus, effectively improving the gap between its main competitor, Nvidia’s GPUs. In this analysis by SemiAnalysis, AMD chips are almost closing the gap in performance all due to AI software.

AI is closing the gap between Nvidia and AMD’s market share

But here’s the catch. Nvidia’s GPUs are seeing the gap closing not because AMD chips are so great, but because the AI software that makes it possible to train the models, is rapidly improving AMD’s efficiency.

Mosaic ML, the company behind the open-source AI software that AMD and Nvidia are using, has just recently started its activity. Founded in 2021, the company has already been purchased for $1.3B by Databricks.

So it’s safe to say the future is here. The company has proved that the performance of the hardware wired with this AI software only develops AI further. So, in a way, there are no losses. AI keeps on improving itself while working to get the performances in the first place.nvidia amd market share

Mosaic ML helped AMD’s Instinct MI250 GPU achieve 80% of the performance of an Nvidia A100-40GB, and 73% of the A100-80GB. All these with zero code changes.

And MosaicML has announced that the performance is expected to increase to 94% and 85% with further software improvements. The gain on the gap was also obtained in a quarter, so 3 months.

So, it’s time to buckle up for AI. What do you think about it? Let us know in the comments section below.

How to Quickly Get Unbanned From Omegle [3 Tips]

The Omegle platform would allow you to have anonymous texts and video chats. A few users may get banned, and we believe you must have found this app because you need to know how to get unbanned on Omegle.

There are a few steps to take, and we explore them all with you. However, you may also consider using some Omegle alternatives and save yourself the stress of troubleshooting the ban.

Why am I permanently banned from Omegle?

You may be banned from the service for any of the following reasons:

  • You have gone again some of their terms of service, some of which include:
    • Using sexually explicit content.
    • Abuse or harassment of other users.
    • Advertising or spamming.
    • Using the service commercially.
    • Impersonation of another user.
    • Using the service to carry out illegal activities.
  • Other users reported you. 
  • Your IP address has been banned. 

You may want to check out some of the best VPNs for Windows that will help you navigate an Omegle ban.

How do I get unbanned from Omegle?

1. Wait it out

In some instances, there is nothing you may be able to do to speed up the process, and you will have to wait till the ban period is over.

omegle how to get unbanned

This wait may range from a few hours to a couple of days, but as long as it is a temporal ban, once the time limit is reached, you will have access and be able to use the service once more.

2. Use a VPN

This may be the most effective way of getting unbanned from the Omegle service. Changing your VPN connection will immediately fix the issue because the Omegle website keeps your IP address to identify you. Omegle can only remember you by your IP address; it cannot identify you personally.

There are several VPN services to use while browsing the web, and in this case, we always recommend the ExpressVPN service.

It has 256-bit encryption, a kill switch, zero-knowledge DNS servers, and many others so you can enjoy streaming Omegle without negative encounters.

It also has excellent speed scores to help you access streaming services and other websites without slowing down your internet performance.

ExpressVPN

Try ExpressVPN and enjoy using Omegle without facing any issues.
Free Trial Visit Website

3. Connect using a different network

As we stated earlier, the Omegle service only knows your IP address; if you have been banned and use a static IP address, you must connect from a different network.

This may imply connecting from your mobile phone. The aim is to get a new IP address for the service.

How long does an Omegle ban last?

Depending on the infringement’s seriousness, an Omegle ban might last for a certain period. The duration of a temporary restriction might range from a few hours to a few days. There is no way to get unbanned on Omegle if it is a permanent ban; it is indefinite.

What happens if Omegle bans you?

After a ban from the service, you will experience the following:

  • You won’t be able to access Omegle’s features, such as text and video conversations.
  • Your device’s IP address can be blocked by Omegle, making it impossible to use the service even with several accounts.
  • If you participate, you will lose any history of ongoing chats.
  • There may be a delay in assistance or support from the Omegle support staff regarding your ban.

That is all we cover in this guide. The aim behind all the solutions we provide is that you get a new IP address. This will always do the trick.

You may also consider using browsers with robust privacy features or VPN browsers for PC when navigating services like Omegle.

Lastly, let us know in the comments section if you have other easy solutions for how to get unbanned on Omegle.

The Xbox consoles are very far from failing, people agree

The Microsoft acquisition of Activision Blizzard has revealed some interesting secrets behind the scenes, for everyone involved. It seems that Microsoft blames Sony for the console’s exclusive games; it was revealed that Microsoft also paid Ninja Theory $117 million, back in 2018; and probably one of the most revealing news is that Xbox is apparently losing the console war.

But Xbox is not really losing the war, at least this is not what the people agree. In a Reddit thread, a user is actually praising the Microsoft console, while also agreeing that Xbox is far from failing.

Now this wouldn’t be of such importance if there had been only one opinion, but lots of people shared the same opinion. Xbox is not really failing, in fact, for some people, Xbox is the only console they and their friends are using.

This is a very interesting thing, considering Xbox still needs a lot to catch up in sales with PlayStation or Nintendo. But it seems the console is really popular among people, especially the American audience.

Here’s why people are thinking that Xbox is not failing

The way the gaming community talks about the Xbox platform is like it’s a failure of a brand, and no one has an Xbox. Whereas in my experience this is the complete opposite. One, the recently revealed 21+m units sold for series X|S is nothing to scoff at. If you look at those numbers on their own, that is FAAAAAR from a failure. Also this last point is anecdotal, but I find in my real life world, when I ask people what platform they play on. A good chunk of those people say xbox, it’s about 50% in my experience.

There are some people for which Xbox 360 really made them fall in love with the Xbox console as a whole.is xbox failing

In the US and some other countries Xbox is quite a bit more popular than the average globally so that’s probably why you feel that way. I actually know more people with Xbox than PS but I also grew up during a time where most people’s first consoles were a 360 so a lot of them just stuck with it.

And while there are a lot of people who don’t agree with this approach, generally Xbox has been doing great. Xbox X/S has sold over 21+ million units since its release, and there are big plans for the console.

There is an exciting roadmap ahead for Xbox, with titles such as Starfield, new Halo games, and many more exclusives. And if we’re paying attention, people are starting to consider buying an Xbox, because Microsoft is doing great things to it.

It’s good to know people actually love the console. That could turn the tide in the long run for Microsoft and Xbox.

What do you think about this? Let us know your opinions in the comments section below.

Fix: Windows Cannot Connect to the Printer (0x00000006)

When you try to add a printer on a shared network, you may receive an error message with the error code 0x00000006. This problem may occur if you try to add a printer on a server, but the computers are not on the same network.

For further information on resolving this error, keep reading to find out how to troubleshoot it.

What is Windows error code 0x00000006? 

This error code means you cannot connect or add a printer on a server. This is a generic Windows error and can be caused by many factors, such as:

How do I fix Windows error code 0x00000006?

Attempt the following workarounds before any technical steps:

  • Disconnect all other peripherals that could be causing conflicts and reconnect only for the printer.
  • Check for any loose or damaged cables and replace them where necessary.
  • Verify that your PC and printer are on the same network.
  • Change your internet connection if possible and see if the error persists.
  • Log in as an administrator or use a different user account to access the printer.
  • Perform a system file check to check for corrupt files.
  • Restart or reset your printer and see if it works.
  • Finally, restart your PC and try printing again.

1. Disable your antivirus temporarily 

  1. Hit the Start menu icon, type Windows Security in the search bar, and click Open.
  2. Click on Firewall & network protection, then select Public network.league of legends black screen after champion select
  3. Locate Microsoft Defender Firewall and toggle the off button.turning off Microsoft Defender Firewall Windows

2. Delete the Printer Spooler folder

  1. Hit the Windows + E keys to open File Explorer.
  2. Navigate to the following location: C:\Windows\System32\spool
  3. Locate the Printers folder and click to open.
  4. Select all items in the folder and delete them.
  5. Restart your PC.

3. Update Printer drivers

  1. Hit the Windows key, type Device Manager in the search bar, and click Open.device manager w11
  2. Navigate to Printers, find your printer, right-click on it, and select Update driver.
  3. Select Search automatically for updated drivers.
  4. Windows will find the most suitable driver and recommend you install it.

In some peculiar but still possible cases, Windows may be unable to find the right driver for your printer. In such cases, you’ll have to consider another way of getting the correct drivers. 

We recommend you try the Outbyte driver updater as it will automatically scan and match you with the right driver. As a bonus, you will also get a system optimization.

⇒ Get Outbyte Driver Updater

4. Run the Printer troubleshooter

  1. Hit the Windows key and click on Settings.settings windows 11
  2. Select System on the left pane, then click Troubleshoot on the right.Open system troubleshooter
  3. Click on Other troubleshooters.other troubleshooters
  4. Find the Printer troubleshooter and click the Run button next to it.0x0000052e System Troubleshooter - Printer - Run

5. Restart the Print Spooler service

  1. Hit the Windows + R keys to open the Run command.
  2. Type services.msc in the dialog box and hit Enter.run services.msc command
  3. Locate the Print Spooler service, right-click on it, and select Stop.Stop Printer Spooler
  4. Right-click on it again, then select Start.Start Print Spooler 0x00000057

6. Delete a registry key

  1. Press the Windows + R keys to open the Run command.
  2. Type regedit in the dialog box and click Enter to open the Registry Editor.
  3. Navigate to the following path: HKLM\Software\Microsoft\Windows NT\CurrentVersion\Print\Providers\Client Side Rendering Print Provider\Servers\
  4. Right-click on the server key and hit Delete.

Remember that editing the registry is not recommended unless it is absolutely necessary. Since this is the most upvoted solution by users who encountered the error 0x00000006, you may have to try it if you find that other actions don’t bear fruit.

Ensure you back up your registry and create a restore point. This way, you can have a safe point of return in case anything goes wrong. 

Don’t hesitate to check out our other articles on printer errors, such as the error code 0x00003e3, and see our recommended fixes.

That brings us to the end of this article. Keep it interactive in the comment section by letting us know of any other solutions not mentioned here that may have helped you get out of this error.

Xbox Series X is a very good choice for a beginner gamer

Xbox Series X is Microsoft’s most powerful gaming console. It’s also a console designed for gamers, the ones that want to play at high resolutions and don’t miss anything. If you’re a casual gamer, however, you can always buy Xbox Series S which is a lighter and cheaper option.

But if you were to choose a console for a beginner gamer, then you have to do a lot of research. Which console is the funniest one to play on? What are the benefits? Will it last? And so many more similar questions like this.

While it is tough to choose, you must take into consideration a lot of things. It’s not just about the price of the console, but all the other benefits of having that console. And on this regard, Xbox Series X seems to be the natural choice.

Should you buy an Xbox Series X console for your kid?

Yes, and not just for your kid. Everyone can play on this console, from the casual gamers in your family to the most hardcore ones. But let’s get into the more realistic perks.

For starters, you’ll have Game Pass. This is absolutely useful because this way you won’t have to buy games individually. You’ll pay for a monthly subscription, but you’ll have access to hundreds and thousands of games.should you buy an xbox series x

Plus, titles such as Starfield, are coming to Game Pass, so you’ll be able to enjoy it when it will be released. And if you ever get bored, just think that there are currently over 5000 new games in development for Xbox. And they’re coming to Game Pass.

Second, you’ll be able to use Microsoft Rewards to pay for Game Pass and other games on Xbox. If you’re already using Microsoft products, and you’re browsing the web with Microsoft Edge, you should consider getting on Microsoft Rewards as well.

It’s simple, and you can literally buy other consoles with it.

Thirdly, and probably the most important thing is the Xbox/Microsoft Family Safety apps. If you’re buying the console for a child, you will be able to monitor and restrict certain titles and apps, limit game time, and more.

So, is buying an Xbox Series X worth it? Most definitely.

But we’re eager to hear your opinions on this, so let us know what you think in the comments section below.

How to Turn on Google Chrome Memory Saver

Your PC has probably run low on memory a few times. And you have taken the initiative to reduce the RAM-hungry processes in your system. Now, there’s a feature that has been shipped on Google Chrome known as memory saver.

If you usually have a bunch of tabs open simultaneously, you know they can lag and become unresponsive. This feature can save you some memory and keep things running smoothly. Find out how to enable it here.

Why is Chrome using 50% of my memory?

Chrome is a memory hog. It’s not just you, it’s everyone else as well. Sometimes the browser can use 50% or even 100% of your computer’s memory and then crashes the entire system.

If you have a lot of tabs open in Chrome or use extensions that keep their own history, this can cause problems with your computer running smoothly and quickly. 

You might notice slowdowns when opening new tabs or switching between them. This is because these processes take longer due to the extra background tabs being kept active.

Chrome’s memory usage has been known to be off the roof for a long time. And it’s because of its memory-intensive architecture. Every tab and extension, as well as the browser itself, is run in its own process. 

There are also some built-in features that can lead to your browser eating up more RAM over time. This makes it harder for other programs to run since they don’t have access to the memory they need.

Luckily, Chrome introduced a memory saver feature that helps ease up on the deficient memory and enhance your browsing experience.

How does Chrome memory saver work?

The memory saver in Chrome is a feature that allows you to limit the amount of RAM that your browser uses. This can help improve performance and reduce memory consumption when playing games or running other applications that use large amounts of RAM.

It works by discarding the least important tabs to free up RAM, which can be useful when running out of memory. 

When you open a new tab, the browser will scan through your existing tabs and close the ones that are no longer needed. 

This can help with memory issues on low-end computers, but it also means losing any state associated with those tabs. 

How do I enable memory saver in Chrome?

  1. Navigate to your Chrome browser and click the three ellipses.
  2. Select Settings.
  3. Click on Performance and toggle on Memory Saver.
  4. If you’d like some specific sites not to be affected by the memory saver feature, you can click on Add next to Always keep these sites active.

If, for some reason, the Chrome performance settings are missing, you may be using an outdated version of the browser. Check if any updates are available, or reinstall your browser to register any new updates.

What are the disadvantages of memory saving in Chrome?

It takes longer to load pages when you open them again after closing them down because they have to be reloaded from scratch after memory saver closed them down. 

This is especially true if the page has many images or videos. These files will be downloaded again when you open them, so it will take longer to load these pages than if they were opened normally without using memory saver.

Another disadvantage is that it will not work in all cases and may cause your browser to crash. A good example is when you have a lot of tabs opened at once or if you are running a script that requires more memory than your computer has available.

This can cause the browser to crash because it does not have enough memory to continue running.

Additionally, some extensions may not work correctly because they need access to all tabs simultaneously or can’t be used when running in separate processes.

Ultimately, you have to consider whether enabling the Google Chrome memory saver feature is worth your while. 

You can resort to opening a few tabs at a time if your browser gets extremely slow or use Chrome split screen extensions to view different tabs simultaneously.

Have you used the Google Chrome memory saver feature? Is there a difference between having it enabled or disabled? We’d love to get your feedback on your experience, so leave us a comment below.

Microsoft will allegedly open source Orca 13B

In some flashing news about AI, Microsoft will allegedly open source Orca 13B, according to some passionate AI enthusiasts.

What is Orca? Well, Microsoft says Orca is a 13-billion parameter model that learns to imitate the reasoning process of LFMs. In our case, LFMs are large foundation models. Think about chatGPT, openAI, or another large comprehensive AI tool that generates responses.

The research funded by Microsoft has founded that Orca learns how to develop answers from GPT 4, including explanation traces, step-by-step thought processes, and other complex instructions. Despite not even being as big as ChatGPT, Orca manages to reach parity with it when it comes to BBH benchmarks.

Orca even shows competitive performance in professional and academic examinations like the SAT, LSAT, GRE, and GMAT.

Why is this important? Well, Orca is a very small AI-model, compared to ChatGPT. The fact that it can be easily built by a few people and still perform the same as ChatGPT is an important breakthrough in technology.

When will Microsoft open source Orca 13B?

While we don’t have a definite answer, Microsoft will most likely open source Orca 13B in the following months, especially after it has proved its capabilities.

If the model becomes open source, then users will be able to dissect it and learn how to develop and train their own models as well. Or Orca can simply become enhanced with the users’ input and ideas.

This initiative is closely following Microsoft’s huge interest in AI. Remember that a lot of AI features are coming to Windows 11 very soon, including the native Copilot. In the next update, you’ll be able to work seamlessly with Copilot’s help.microsoft orca open source

Microsoft Fabric will be another tool that will benefit from AI to make your work much easier. Microsoft Teams is already enhanced with the power of artificial intelligence to ease the work of organizations. Not to mention, Microsoft Store is also getting an AI revamp.

So naturally, Microsoft’s research on the latest Orca models once proves the validity of AI in the modern world, especially when it comes to technology.

Encouraging users to observe, learn, and develop their models while using an already small AI model such as Orca. This will open the possibility to build and incorporate AI technology in every field.

Make sure to check Microsoft’s research on the Orca, to see just how interesting it could learn to rival the big AI models.

There is an Open Orca, developed by a team of software engineers

Until Microsoft open-sources Orca 13B, there is already an open variant of it, suggestively called Open Orca. Made by a team of software developers, there is in fact a dataset that allows for open source AI models to learn and think like GPT.

We call this Open Orca, as a tribute to the team who has released the Orca paper describing the data collection methods we have attempted to replicate in an open-source manner for the benefit of humanity.

Check out Open Orca if you want to build your own AI model.

As we’re sure this AI trend continues, we’re very curious about your opinion on the subject. Where do you think this will go? Let us hear what you think in the comments section below.

Fix: Emails With Attachments Are Not Searchable

There are many of our readers that have reported that emails with attachments are not searchable in MS Outlook. They have tried all bits of searching but to no favorable results.

In this guide, we will give you some solutions that will hopefully help you resolve the problem at your end. Let us check out the solutions.

Why am I not able to search emails with attachments in Outlook?

There are multiple user reports confirming the error in Outlook. However, there are a few common reasons that might trigger this problem for you. Some of these are listed below.

  • Corrupt or old version app – There might be some issues with the version of Outlook installed on your PC which is triggering the error.
  • The search catalog might be problematic – The search catalog might be missing to read some important files which is why the emails with attachments are not searchable in Outlook.
  • Your profile might be corrupted – If your Outlook profile is corrupted then you won’t be able to use Outlook without any issues.
  • The Data files are not selected – Chances are the data files are not selected in the Search Tools which is why the emails with attachments are not showing.
  • Add-ins are conflicting – The add-ins that you might have selected for Outlook might be interfering with the search process and causing issues.

Now, let us check out the solutions that will help you to resolve the emails with attachments that are not searchable issue in Outlook.

What can I do if the emails with attachments are not searchable in Outlook?

Here are a few quick things that you can check out before applying the advanced solutions to fix the problem.

  • Restart Outlook and see if the issue resolves.
  • You should always make sure that the Outlook version that you have installed on your PC is up to date. Because some underlying bug might be causing the problem.

If the above doesn’t help, then apply the below solutions.

1. Repair Outlook

  1. Press the Win key to open the Start menu.
  2. Open Control Panel.
  3. Select Programs and Features.
  4. Click on Microsoft Office and click on the Change button at the top.
  5. Choose the Repair option.
  6. If Outlook is open, click Continue to close the app and start the repair process.
  7. Wait for the repair process to complete.

The repair process will check for any underlying problems with the Microsoft Office apps and resolve them. Once the process completes, you can try to search the emails with attachments and resolve the problem.

2. Disable Outlook Add-ins

  1. Open Outlook.
  2. Click on the File tab.
  3. Select Options from the left pane.Options
  4. Choose Add-ins and click on the Go button on the right side of the dialog.Select Add-ins
  5. Uncheck the boxes next to all the listed extensions and click OK to save the changes.disable extensions
  6. Relaunch the app.

Some extensions that you might have installed to enhance the features of Outlook, might be interfering with the general Outlook processes, and not allowing you to search emails with attachments. Check the above steps and see if this helps or not.

3. Repair the Outlook inbox

  1. Press the Win + E to open File Explorer.
  2. Navigate to any of the below paths: C:\Program Files C:\Program Files (x86)
  3. Search for scanpst in the search bar and double-click on SCANPST.EXE from the search results.scanpst
  4. Launch Outlook and click on the File tab.
  5. Click on Account Settings and select Account Settings again.
  6. Switch to the Data Files tab, select the data file in the list, and click on Open File Location.select data file
  7. From the new File Explorer window, copy the file’s location.
  8. Right-click on the data file (.ost) and select Copy as path.copy as path
  9. In the Microsoft Outlook Inbox Repair tool, paste the file’s path into the text box.
  10. Remove the double-quotation marks from the file’s path and click Start.
  11. After the scan finishes click on Repair.
  12. Click OK to finish the task.

4. Create a new Outlook profile

  1. Close Outlook on your PC.
  2. Press the Win + R keys to open the Run dialogue.
  3. Type control mlcfg32.cpl and press OK.
  4. Select Show Profiles.
  5. Choose your Outlook profile and click on Remove.
  6. Once the profile is deleted, click on Add.
  7. Specify a new name for the profile and click OK.
  8. Follow the on-screen instructions to create a new profile and select Finish.
  9. Return to the Mail dialogue box and choose Always use this profile.
  10. Click Apply and Restart your PC.

That is it from us in this guide. You can read our guide that explains how you can restore the missing toolbar in Outlook on your PC.

Moreover, if the Zoom plugin isn’t working in Outlook, then apply the solutions suggested in our dedicated guide to resolving the problem.

Let us know in the comments below, which one of the above solutions fixed the problem for you.

0x8E5E0643 Microsoft Store Error: How to Fix It

The error code 0x8E5E0643 is a Microsoft Store error that can occur when you try to install an app from the Microsoft Store. It hinders the installation, and we will show you how to fix it in this guide.

You may also read about the Microsoft Store error 0x80073cf3, similar to this installation error.

Why do I get the Microsoft Store 0x8E5E0643 error?

There are a few possible reasons, including:

  • Corrupted Microsoft Store cache.
  • Problem with your internet connection.
  • In rare cases, the Microsoft Store servers may be down or experiencing technical difficulties.
  • Problem with your Windows operating system.
  • Problem with your Microsoft account.

You may check out our guide, where we discuss the best ways to fix your Microsoft account. This may be helpful if an account problem triggers the error.

How do I fix the 0x8E5E0643 Microsoft Store error?

Before you go to the solutions, try these workarounds:

  • Change your ISP or use a wired internet connection.
  • Run a virus and file scan to eliminate problems on your OS.

However, if you are still unsuccessful, proceed to some detailed fixes below.

1. Clear the Microsoft Store cache

  1. Press Windows + R to open the Run dialog.
  2. Type cmd and hit Ctrl + Shift + Enter.
    0x8E5E0643
  3. Enter the script below and hit Enter.
    wsreset.exe
  4. Lastly, verify if it fixes the 0x8E5E0643 error.

2. Run the troubleshooter

  1. Press Windows + I to open the Settings app.
  2. On the left pane, click on System, then click Troubleshoot on the left.
    0x8E5E0643
  3. Select Other troubleshooters.
  4. Click on Run for the Microsoft Store Apps option.
  5. Lastly, apply any recommendations and verify it fixes the 0x8E5E0643 error.

3. Remove proxy settings

  1. Press the Windows button, type internet options, and choose the Internet Options applet.
    0x8E5E0643
  2. Select the Connections tab, and click the LAN settings button.
  3. Uncheck the option for Use a proxy server for your LAN.
    0x8E5E0643
  4. Finally, click OK and verify if it fixes the 0x8E5E0643 error.

4. Create a new user account

  1. Press Windows + I to open the Settings app.
  2. On the left pane, click Accounts and then select Other users on the right.
    0x8E5E0643
  3. Click the Add account button.
  4. Pick I don’t have this person’s sign-in information, then select Add a user without a Microsoft account on the next page.
    0x8E5E0643
  5. Complete the form and hit Next.
  6. Expand the newly created user by clicking the tiny arrow at the right corner, and select Change account type.
  7. Select Administrator from the dropdown and click OK.
    0x8E5E0643
  8. Finally, verify if the 0x8E5E0643 is fixed.

Any of the solutions above should be handy in fixing the error. We recommend you start with whichever feels the most appropriate.

You may also be interested in reading about the 0x8A150006 error on Microsoft Store, and if you have any further questions or solutions you feel we may have skipped, let us know in the comment section below.

Right-Click Menu Stuck on Screen? 4 Ways to Get Rid of It

A few of our readers have complained that their right-click menu is stuck on the screen. This is an inconvenience and may damper the user experience on a computer.

You should not panic as some of these problems with the GUI on the OS are common, and we will help you resolve them. You may also want to check out our other guide, where we help users fix problems with a crashing File Explorer.

Why is my right-click menu stuck on the screen?

The following may be the causes of the problem.

  • A software glitch caused by a problem with Windows itself or by a third-party program.
  • In rare cases, a problem with your mouse or keyboard may trigger the problem.
  • A corrupt software or system file.
  • Virus or malware infection.

If you believe the problem is hardware related, we have a comprehensive guide on the best Mouse for PC.

What do I do if the right-click menu is stuck on the screen?

Before exploring our solutions, you may consider the following workarounds:

  • Restart your computer.
  • Use a different mouse.

If the problem persists, try the solutions below.

1. Run a file scan

  1. Press Windows + R to open the Run dialog.
  2. Type cmd, then press Ctrl + Shift + Enter to open an elevated Command Prompt.
  3. Type the script below and hit Enter.
    sfc /scannow
    Right-click menu stuck on screen
  4. Follow any prompts, restart your computer, and check if the right-click menu is still stuck on the screen.

Sometimes. there might be corrupt files that can still affect your computer and cause errors, so a reliable repair tool can be a great help.

2. Run the online virus scan

  1. Launch your browser and navigate to the Microsoft safety scanner page.
  2. Click on a download link that matches your system architecture. In this case, we go for the 64-bit version.
    Right-click menu stuck on screen
  3. Double-click the downloaded MSERT to start the program.
    Right-click menu stuck on screen
  4. Follow the wizard, click on Full scan, and hit Next.
  5. Follow any recommendations at the end of the scan and see if the right-click menu is still stuck on your screen.

3. Create a new user account

  1. Press Windows + I to open the Settings app.
  2. On the left pane, click Accounts and then select Other users on the right.
  3. Click the Add account button.
  4. Pick I don’t have this person’s sign-in information, then select Add a user without a Microsoft account on the next page.
  5. Complete the form and hit Next.
    Right-click menu stuck on screen
  6. Expand the newly created user by clicking the tiny arrow at the right corner, and select Change account type.
    Right-click menu stuck on screen
  7. Select Administrator from the dropdown and click OK.
  8. Finally, verify if the right-click menu stuck on your screen is fixed.

4. Remove the Fade performance options

  1. Press Windows + R to open the Settings app.
  2. Scroll down on the right pane and click the About option.
  3. Select Advanced system settings.
  4. Click the Settings button under the Performance category.
    Right-click menu stuck on screen
  5. Uncheck all the Fade options and click OK.

If you have read this far, you should have resolved the stuck right-click menu on the screen. We have not written the solutions in any particular order and recommend you start with the most appropriate ones.

You may also read our other guide, where we show solutions for the Windows 11 touch screen not working.

Lastly, reach out to us in the comments section if you have any additional questions.

Windows 11 Preview Build 23493 introduces new badge feature for indicating system apps in Start Menu

The recently released Windows 11 preview build, version 23493, comes packed with an array of exciting features and enhancements. Among these updates, one intriguing addition is the introduction of a new “System” badge for the Start menu. This badge aims to provide users with a clear distinction between default applications and other software installed on their systems.

The “System” badge was quietly implemented a few builds ago without any official announcement from Microsoft. Initially labeled as “Microsoft,” the badge appeared next to certain stock applications. However, in build 23493, Microsoft made a notable change, replacing “Microsoft” with “System.” This alteration offers a more descriptive and precise indicator, allowing users to differentiate between pre-installed apps and other software they have installed.

Interestingly, the “System” badge is not limited to non-removable programs, as the presence or absence of the badge does not necessarily indicate an app’s uninstallability. For instance, the Tips app, despite carrying the badge, can be deleted by users. This highlights the ongoing development and refinement of the badge system as Microsoft seeks to establish consistent guidelines and distinctions.

While the exact reasoning behind the “System” badge remains speculative, its implementation aims to enhance user experience and offer a clearer visual representation of default apps within the Start menu. This distinction can be particularly useful for users who prefer to customize their Windows environment by installing alternative applications that align with their preferences and needs.

As Windows 11 continues to evolve through preview builds, the addition of the “System” badge serves as a testament to Microsoft’s commitment to refining the operating system and providing users with a more intuitive and personalized computing experience. With each new update, Windows 11 takes further steps towards offering an enhanced interface, improved functionality, and a seamless user journey.

Via: Neowin

Xbox Series X|S owners can download Starfield right now

Starfield’s pre-install has gone live exactly two months before the game’s release. This means gamers on Xbox Series X|S can download the game right now—or rather, a placeholder for it. The pre-install is roughly 314MB (the full game will be a 125GB download), and has drawn the amusement of fans online as seen in the r/XboxSeriesX subreddit. Here’s what a few of them had to say,

Comment
by u/Fender6187 from discussion Starfield Pre-Install?
in XboxSeriesX

Comment
by u/Dudedrinksbeer from discussion Starfield Pre-Install?
in XboxSeriesX

Meanwhile, some have been quick to jump on the “pre-install,” which again is really just a placeholder file. No doubt the full pre-installation will come sometime sooner to Starfield’s September 6 release.

As one user reported, the initial pre-install for the upcoming Forza Motorsport has also become available. That game’s release is even further out on October 10—a full three months.

Got Starfield Pre-Installed on Series S ????
by u/ChardRealistic in XboxSeriesS

Bethesda’s open world sci-fi epic is one of the most anticipated video games of the last decade. It got a dedicated deep dive showcase last month, delivering a ton of new info about Starfield’s game world, story, gameplay mechanics and more. Starfield will release as a day one Xbox Game Pass title.

Starfield
Starfield
Developer:
Bethesda Softworks
Price:
Free

How to Quickly Uninstall Apps From the Microsoft Store

Microsoft Store is the built-in repository where users can download, update, and uninstall apps for Windows Operating System. Sadly, many users don’t know how to uninstall apps on Microsoft Store. Hence, this article will take you through ways to uninstall apps from the Microsoft Store quickly.

Alternatively, we have a detailed guide on downloading and installing the Microsoft Store app if it is missing on your Windows 11 PC.

Can I uninstall apps directly from the Microsoft Store?

No, Microsoft Store does not provide the option to uninstall an app directly from the platform. You are only permitted to install and update applications via the platform.

Depending on your OS version, the installed applications are stored directly under the Installed Apps section in your Settings.

Where are Microsoft Store apps installed?

Microsoft Store apps have a decided directory in which they are stored by default.

You can find all Microsoft Store apps in the following directory: C:/Program Files/WindowsApps

How do I uninstall apps from Microsoft Store?

1. Via Settings

  1. Left-click the Start menu, and click the Settings app.
  2. Click on Apps and locate Installed Apps.
  3. Find the app you want to uninstall, click the options menu beside it, and click Uninstall.
  4. Then, select Uninstall again to complete the process.

Uninstalling from Settings is similar to removing the apps directly from the Microsoft Store since all installed apps are directly accessible from here and can be modified.

2. Uninstall apps using the Control Panel

  1. Click the Start button, type control panel, then press Enter.
  2. Click on Programs, go to the Programs and Features tab, and find the app from the list.
  3. Select the app, click the Uninstall button, and follow the on-screen instructions to complete the uninstallation process.

Similar to the first solution, this is an alternative to remove apps directly installed from the Microsoft Store.

How do I uninstall an app that can’t be uninstalled?

1. Uninstall apps using the .exe uninstaller provided by the application

  1. Press the Windows + E keys to open File Explorer or click on the folder icon in the taskbar.
  2. Navigate to the app installation folder. (Applications are installed in the Program Files or Program Files (x86) folder in the system drive).
  3. Find and open the application folder you want to uninstall. Look for the Uninstall.exe or Uninstaller.exe.
  4. Double-click the uninstaller.exe file to launch the uninstallation program.
  5. Follow the on-screen instructions to remove the app from your system. The exact steps may vary depending on the application.
  6. Once the uninstallation process is complete, the application should be removed from your PC.

Note that some applications may not have their own uninstaller or require more steps. So, you can always refer to other ways to uninstall such apps.

2. Force uninstall apps via Command Prompt

  1. Left-click the Start button, type Command Prompt, and click the Run as administrator option.
  2. Click Yes on the User Account Control (UAC).
  3. Type the following command and press Enter: wmic
  4. Input this command and press Enter to display the list of all installed programs on your PC: product get name
  5. Scroll through the list and find the app you want to uninstall. Note down its exact name.
  6. Type the following command and press Enter: product where name="ExactNameOfApp" call uninstall 
  7. Replace ExactNameOfApp with the actual name of the app you want to uninstall.
  8. Follow any on-screen prompts or confirmations to complete the uninstallation process.

The above command will call the app and run the uninstall command to remove it from your PC. Check how to fix the run-as-administrator option if it’s not working on your PC.

In conclusion, you may be interested in our post about how to fix the Microsoft Store’s blocked 0x800704ec error message on Windows 11.

Also, read this article about steps for downloading Microsoft Store apps without the Store on your computer.

If you have further questions or suggestions regarding this guide, kindly drop them in the comments section.

Unable to Load Conversation on GroupMe? How to Fix it

GroupMe is a free group messaging app owned by Microsoft that helps you stay in touch with friends and family. However, many users complain about seeing the Unable to load conversation error in GroupMe. This article will take you through the basic steps for resolving it on your PC.

On the same hand, you can check our guide on effortlessly making Microsoft Teams video calls inside GroupMe in a few steps.

Why aren’t my GroupMe messages loading?

  • The error may occur if an invite goes unanswered for over 14 days.
  • If your Internet connection is weak or intermittent.
  • Server problems such as maintenance, updates, or other technical issues on GroupMe’s end.
  • Issues related to account settings or synchronization problems can cause the problem.
  • An outdated version of the GroupMe app may not be compatible with the current features.
  • Temporary data or cache stored by the GroupMe app on your device may become corrupted.
  • Certain device configurations or operating systems may be incompatible with the GroupMe app.

Is there a limit on GroupMe messages?

No, there’s no 160-character limit on GroupMe messages. As for the number of members you can have, that number is set to 5000.

However, since there is no message limit, those large groups can be hard to follow.

What can I do if GroupMe is unable to load the conversation?

Observe the preliminary checks outlined below before attempting any advanced fixes for the problem:

  • Close the GroupMe app and restart your device to resolve temporary issues.
  • Try restarting your modem/router or connecting to a different network to fix network congestion and other network-related issues causing the error.
  • Visit the GroupMe Status website to see if there are any reported service outages or issues.

1. Access the link via other devices

  1. Copy the invite link to another device, preferably an Apple device or via the web version.
  2. Click the link to join the group and ensure this reflects on your initial device. (Mobile or PC)
  3. Once it reflects, log out from other devices besides your default GroupMe device.

Some users have claimed that accessing the link on other devices helped troubleshoot the inability to load conversation error.

2. Update the GroupMe app

  1. Left-click the Start button, type MS store, and click on the result to launch.
  2. Search GroupMe and tap on it to open the app page.
  3. If it is available, click the Update button on the app page. It will download and install the latest version of GroupMe on your device.
  4. Once the update is complete, you can open the GroupMe app and log in to see if you can access your conversations.

The above steps are for Windows PC. You can attempt a similar approach for both Androids and iPhones.

3. Reset the app to clear the cache

  1. Left-click the Start menu and click Settings.
  2. Locate Apps and click on Installed Apps.
  3. Then, search for GroupMe, select the options menu, and click on Advanced options.
  4. Now, locate and select the Reset button. Then, click on the Reset button again to confirm the selection.
  5. Now, restart the app and check if the issue is fixed.

After the reset, GroupMe will start with a clean cache, removing any temporary data stored by the app, causing it to be unable to load conversations.

Alternatively, you can read our guide on fixing Microsoft Teams status stuck on Out of Office on your PC.

If you have further questions or suggestions, kindly drop them in the comments section below.

Xbox Free Play Days: MLB The Show 23, The Crew 2 and more

Xbox Free Play Days is back this week and this time with a stacked lineup of four games. These will be available from Thursday, July 6 through Sunday, July 9 for subscribers of Xbox Live Gold and Xbox Game Pass Ultimate. This week’s offerings are especially attractive for sports fans. See the lineup below.

MLB The Show 23

MLB® The Show™ 23 gets you closer than ever to living your Baseball dreams on the diamond. Shock The Game and Own The Show with your favorite players, your favorite rivalries, and all your favorite MLB moments.
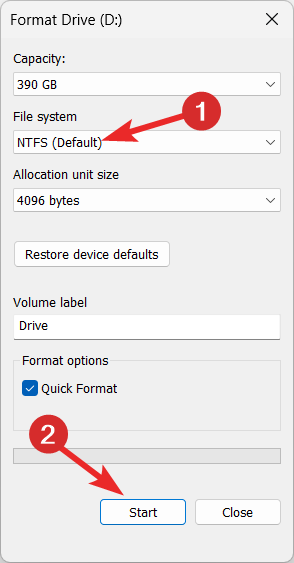
Super Mega Baseball 4

Grab your glove and your bat, it’s time to go yard with the best to ever play the game because Super Mega Baseball™ 4 is here–and it’s where the Legends play. More than 200 larger-than-life versions of fan-favorite former pros like Vladimir Guerrero, Johnny Damon, Ozzie Smith, and Jason Giambi are ready to step onto the field and join the roster of beloved Super Mega League All-Stars.

The Crew 2

JOIN A COMMUNITY OF 30 MILLION PLAYERS! Get ready for a high-speed trip across the USA and enjoy one of the most complete open-world action driving experiences ever created. With access to free content, new game modes, tracks, vehicles, events, and more added every season, The Crew® 2 has all you need for an unforgettable ride.

EA Sports UFC 4

In EA SPORTS UFC 4 the fighter you become is shaped by your fight style, your achievements, and your personality. Develop and customize your character through a unified progression system across all modes. Go from unknown amateur to UFC superstar in the new Career Mode, experience the origins of combat sports in two all-new environments; The Kumite and The Backyard, or challenge the world in new Blitz Battles or Online World Championships to become the undisputed champ.

Learn more about Xbox Free Play Days

See anything of interest in this week’s lineup? Xbox Free Play Days brings a new set of games (nearly) each and every week for XLG and GP Ultimate to try out free of additional charge. To learn more about the program, head over to the Xbox Free Play Days FAQ page.