Trojan:Script/Wacatac.H!ml: 5 Ways to Get Rid of It

Viruses mess with your PC, and in the worst cases, they can destroy it. One recent malware that’s been bugging users is Trojan:Script/Wacatac.H!ml.

This trojan pops up on Windows Defender as a potential threat and, sometimes, on the quarantined list. In this guide, we will show you how to get rid of this malware on your PC.

What is Trojan:Script/Wacatac.H!ml?

The Trojan:Script/Wacatac.H!ml virus usually comes with some third-party cracking software. Also, it can be due to problems with some programs on your PC.

The good thing is that Windows Defender usually detects this virus. Most times, the built-in security software will either quarantine the virus or eliminate it.

However, you might still receive a false prompt that the virus is still on your PC. But that can be cleared too, and we will show you how in the ensuing section of this article.

How do I get rid of Trojan:Script/Wacatac.H!ml?

Below are some basic troubleshooting steps to try before proceeding to the sophisticated solutions:

  • Restart your PC.
  • Delete the faulty file.

If you still can’t get rid of the virus, you can now proceed to the fixes below:

1. Check if it is a false positive

  1. Press the Windows key + E to launch File Explorer.
  2. Click View > Show at the top and check the Hidden items box.
    show trojan:script/wacatac.h!ml
  3. Now, navigate to the path below: C:\ProgramData\Microsoft\Windows Defender\Scans\History\Serviceservice
  4. Delete the content of the Service folder.
  5. Next, navigate to the path below: C:\ProgramData\Microsoft\Windows Defender\Quarantinequarantine
  6. Delete the content of the Quarantine folder.
  7. Now, press the Windows key, type virus, and select Virus & threat protection.
    virus trojan:script/wacatac.h!ml
  8. Select Scan options.
    scan options
  9. Tick the radio button for Microsoft Defender Antivirus (Offline) option and click the Scan now button.
    scan nowtrojan:script/wacatac.h!ml
  10. Finally, your PC will restart to perform the scan. Wait for the scan to complete and check if the virus is still on your PC.

Sometimes, the Trojan:Script/Wacatac.H!ml prompt can be a false positive, especially if you have taken action against it in the past. What you need to do here is to clear some of the Windows Defender files and check if the virus is still present.

2. Perform a malware scan

  1. Press the Windows key, type virus, and select Virus & threat protection.
    virus
  2. Click Scan options.
    scan options
  3. Now, select your preferred scan option and click the Scan now button.
    scan now trojan:script/wacatac.h!ml

In the case that the Trojan:Script/Wacatac.H!ml virus is actually present on your PC, you need to perform a full system scan to eliminate it.

While Windows Defender does a good job, it still leaves much to be desired. So, you are better off using excellent antivirus software in TotalAV to eliminate even the most hidden malware on your PC.

This software takes a no-nonsense stand against malware, as it detects and removes the most stubborn viruses before they can cause problems on your PC.

3. Scan for malware in Safe Mode

  1. Press the Windows key + I and select the Recovery option in the right pane.
    recovery
  2. Click the Restart now button before the Advanced Startup option.
    restart now
  3. When your PC restarts, click the Troubleshoot option.
    troubleshoot
  4. Now, select Advanced options.
    advanced trojan:script/wacatac.h!ml
  5. Select Startup Settings.
    startup settings
  6. Next, click the Restart button.
    restart
  7. When your PC restarts, press 5 or F5 to Enable Safe Mode with networking.
    enable safe  trojan:script/wacatac.h!ml
  8. Finally, repeat the steps in solution 2 above when your PC boots up.

If you can’t get rid of the Trojan:Script/Wacatac.H!ml virus normally on your PC, you should consider eliminating it in Safe Mode. That has proved effective for some users, and you should try it too.

4. Perform a system restore

  1. Press the Windows key + R, type rstrui.exe, and click OK.
    rstrui
  2. Now, click Next.
    next trojan:script/wacatac.h!ml
  3. Select your preferred restore point and click Next.
    restore point
  4. Finally, click the Finish button.
    finish

If you started noticing the Trojan:Script/Wacatac.H!ml virus on your PC after installing an app on your PC, you need to perform a system restore. However, you need to have created a restore point to do this.

5. Reset the PC

  1. Press the Windows key + I to open the Settings app and select Recovery in the right pane.
    recovery
  2. Now, click the Reset PC button before the Reset this PC option.
    reset trojan:script/wacatac.h!ml
  3. Finally, choose whether to keep your files or remove everything and follow the onscreen instructions to complete the process.

If you still can’t get rid of the Trojan:Script/Wacatac.H!ml virus on your PC, you might need to reset it. If you have a backup of your files, you should consider removing everything to get rid of the virus for good.

We have reached the end of the detailed guide on eliminating the Trojan:Script/Wacatac.H!ml virus. All you need to do now is to follow the instructions carefully, and things should be back to normal.

If you need a list of the best antivirus software for Windows 11, this guide contains a carefully picked list of the most reliable options available.

Feel free to let us know the fix that helped you remove this malware for good in the comments below.
Windows Backup app will soon save your Chrome passwords

You will soon be able to backup Chrome passwords on Windows 11, as spotted by Windows enthusiast @PhantomOfEarth, on Twitter.

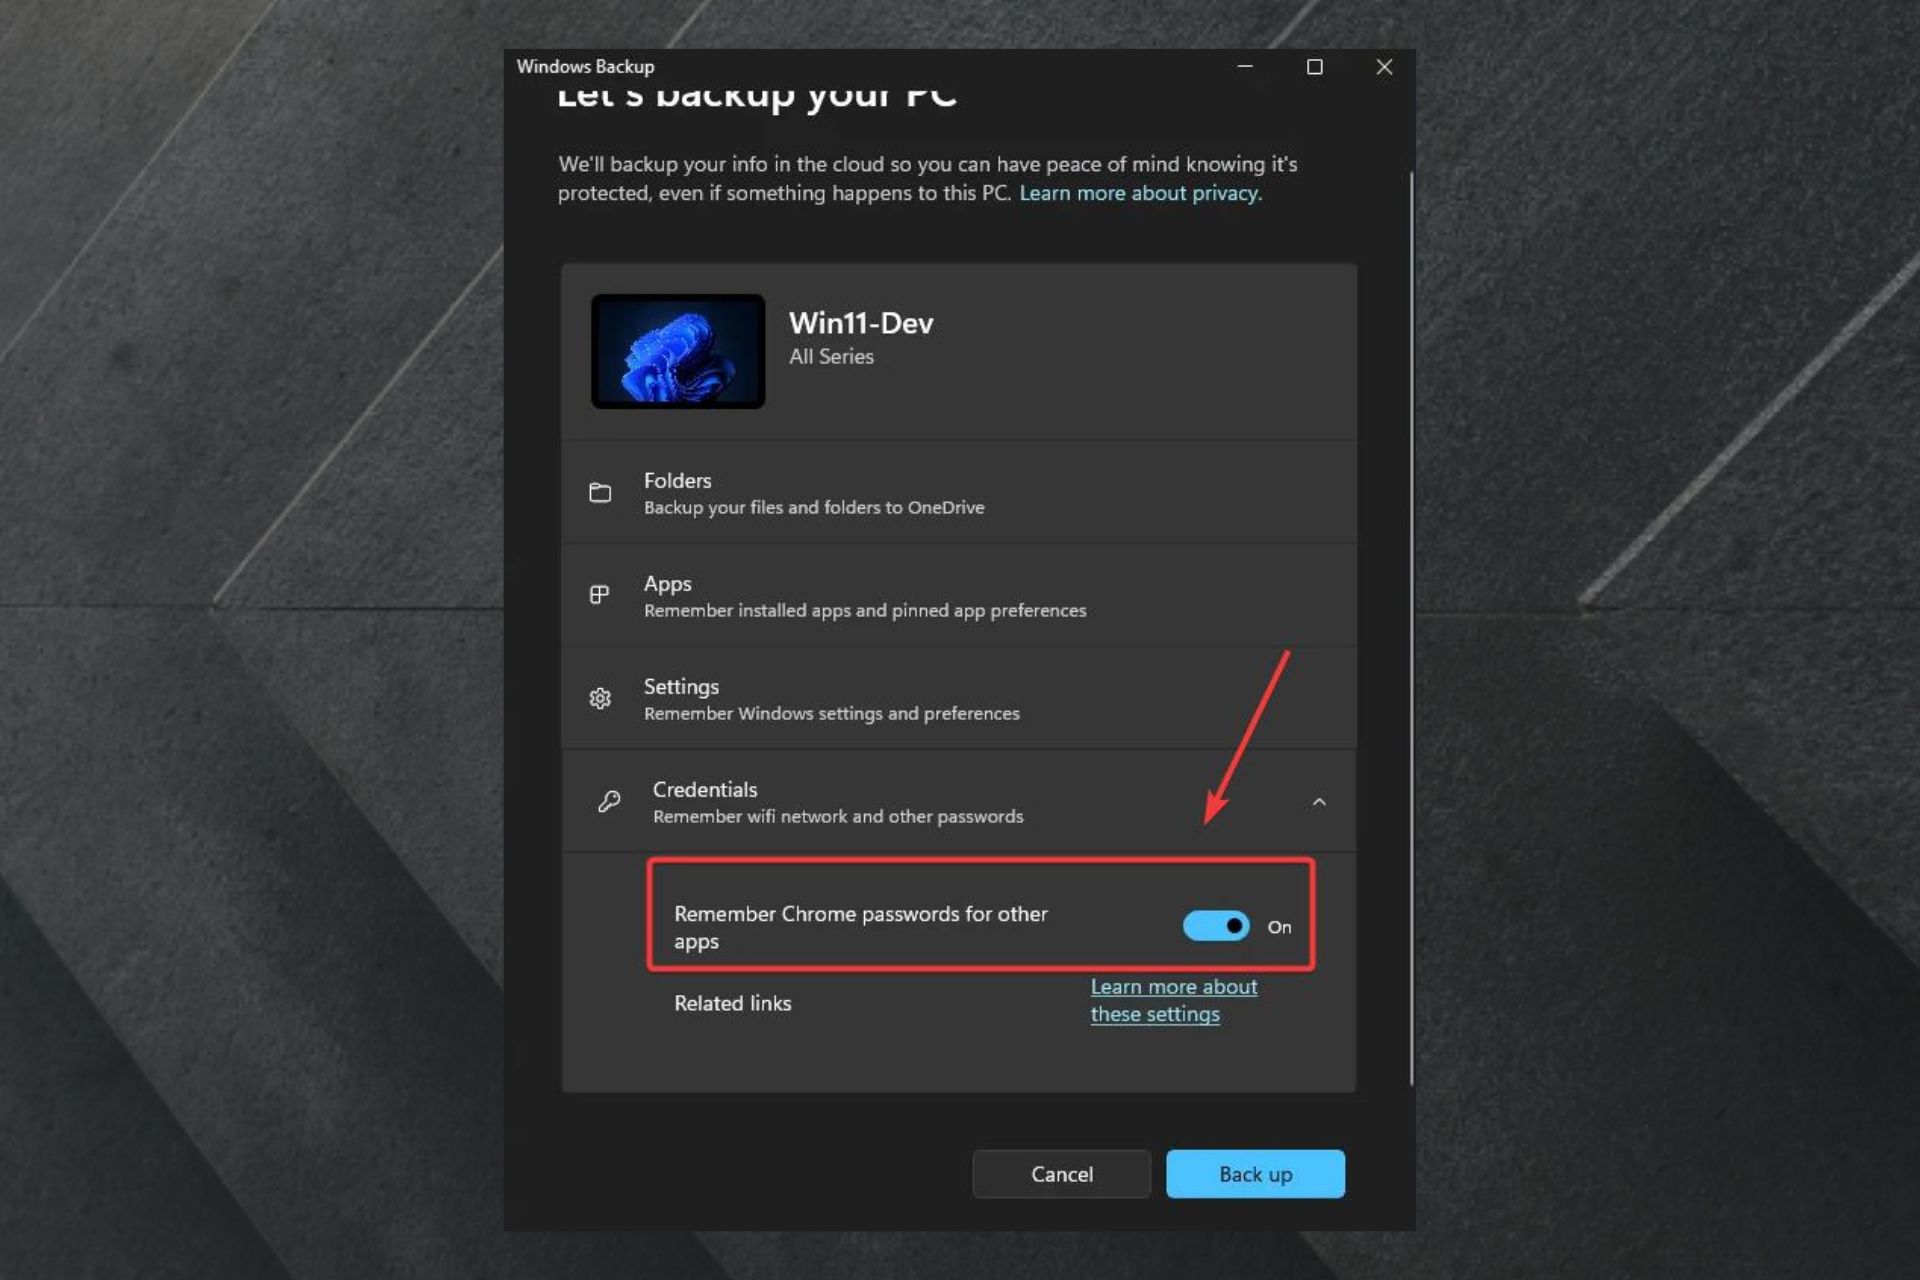
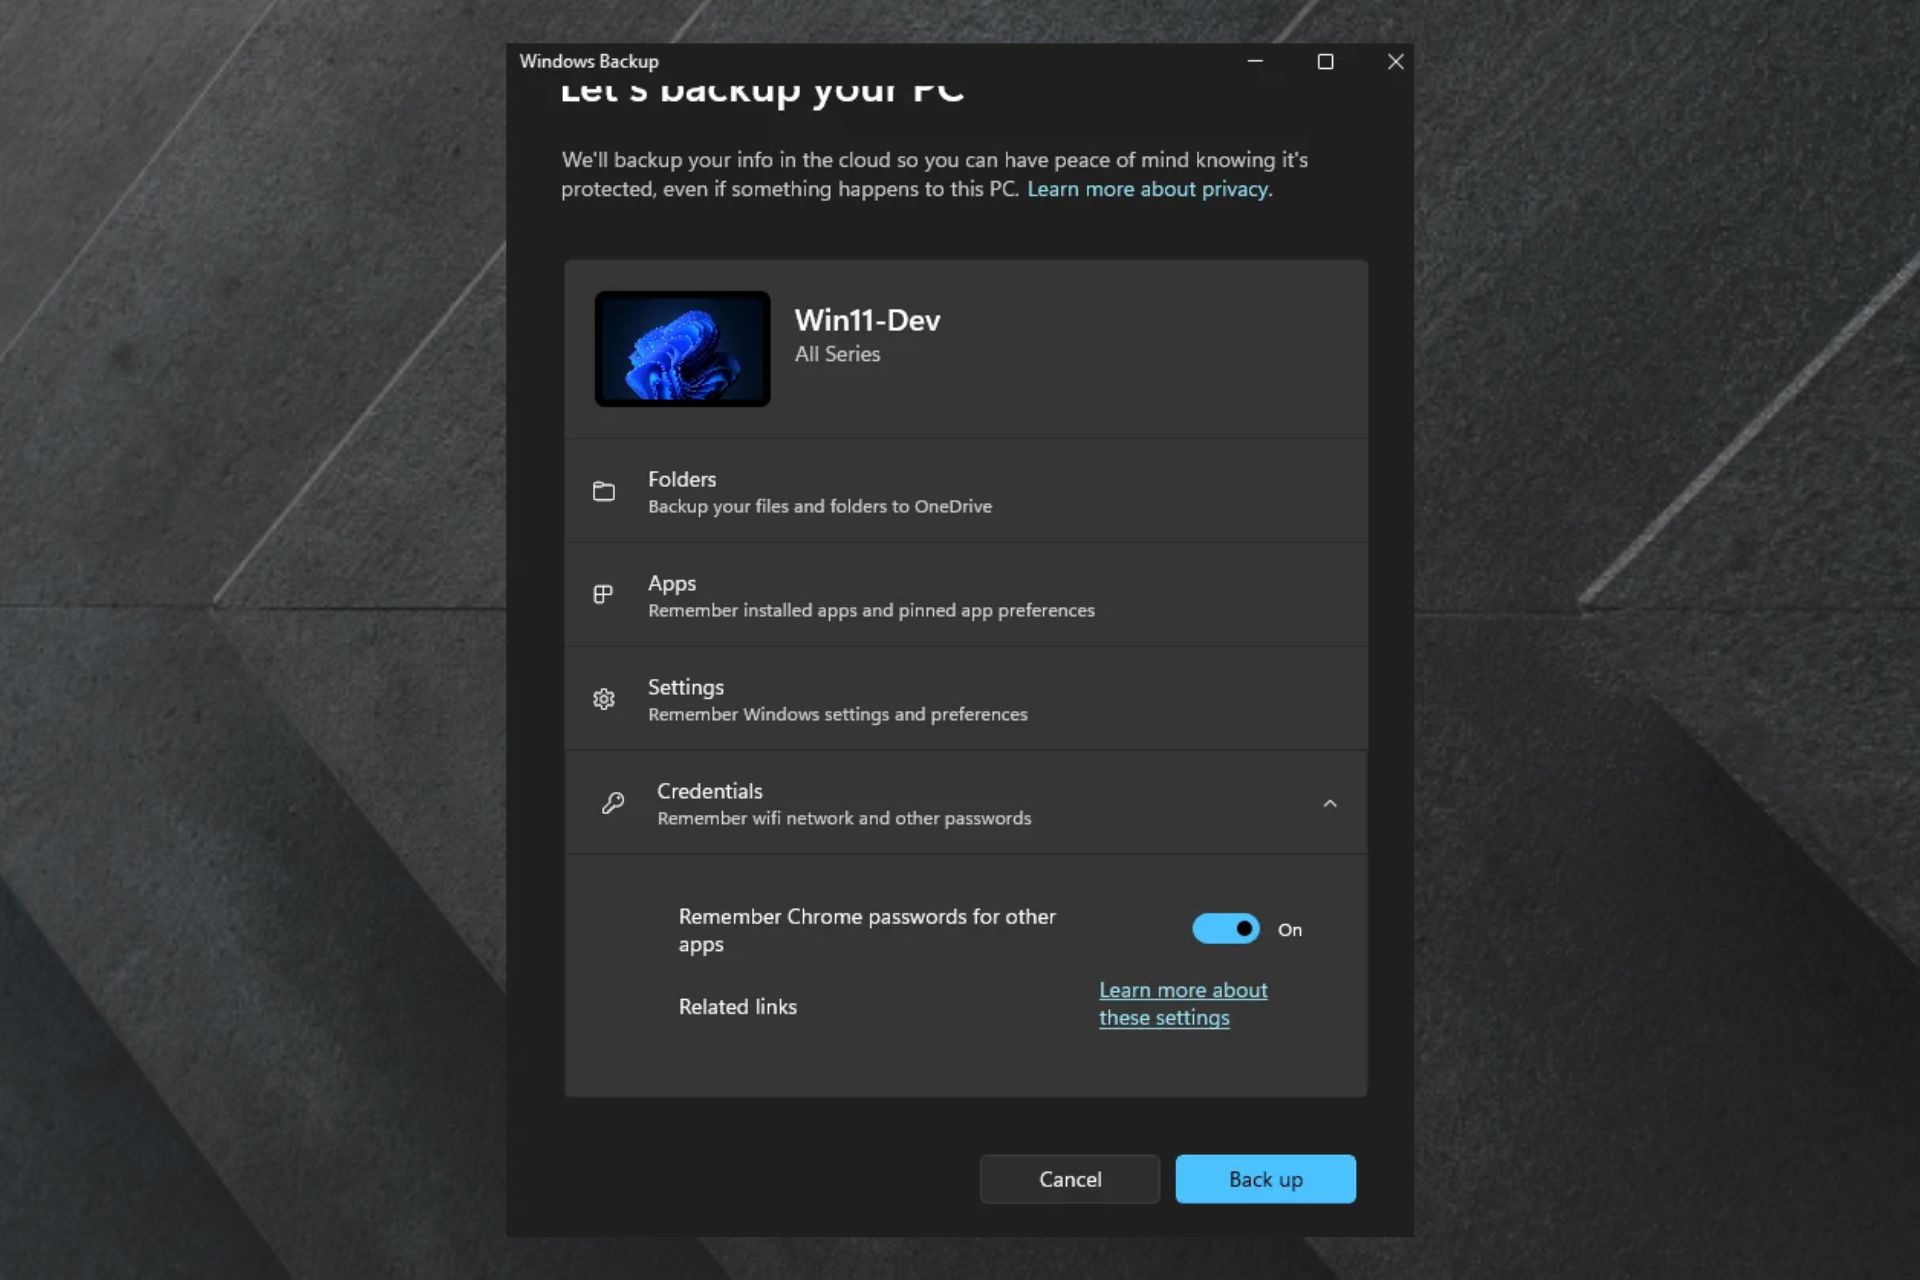
The Windows Backup app will feature an option to remember Chrome passwords for other apps. You will have to enable the option and you should be able to use the Chrome passwords on the apps that you need them.

So far, the built-in app hasn’t been able to store Chrome passwords, but as @PhantomOfEarth agrees, the feature sort of exists already, but not like this. Plus, it might not even be functional. So it makes sense, Microsoft would enable a feature specifically for Chrome.

Speaking of passwords, there were issues with Chrome on Windows, such as the browser not asking to save passwords, but there is a fix for it now. So Windows history with Chrome is not the brightest, but it’s nice to know the Redmond-based tech giant is interested in offering users this feature.

How to backup Chrome passwords in Windows 11

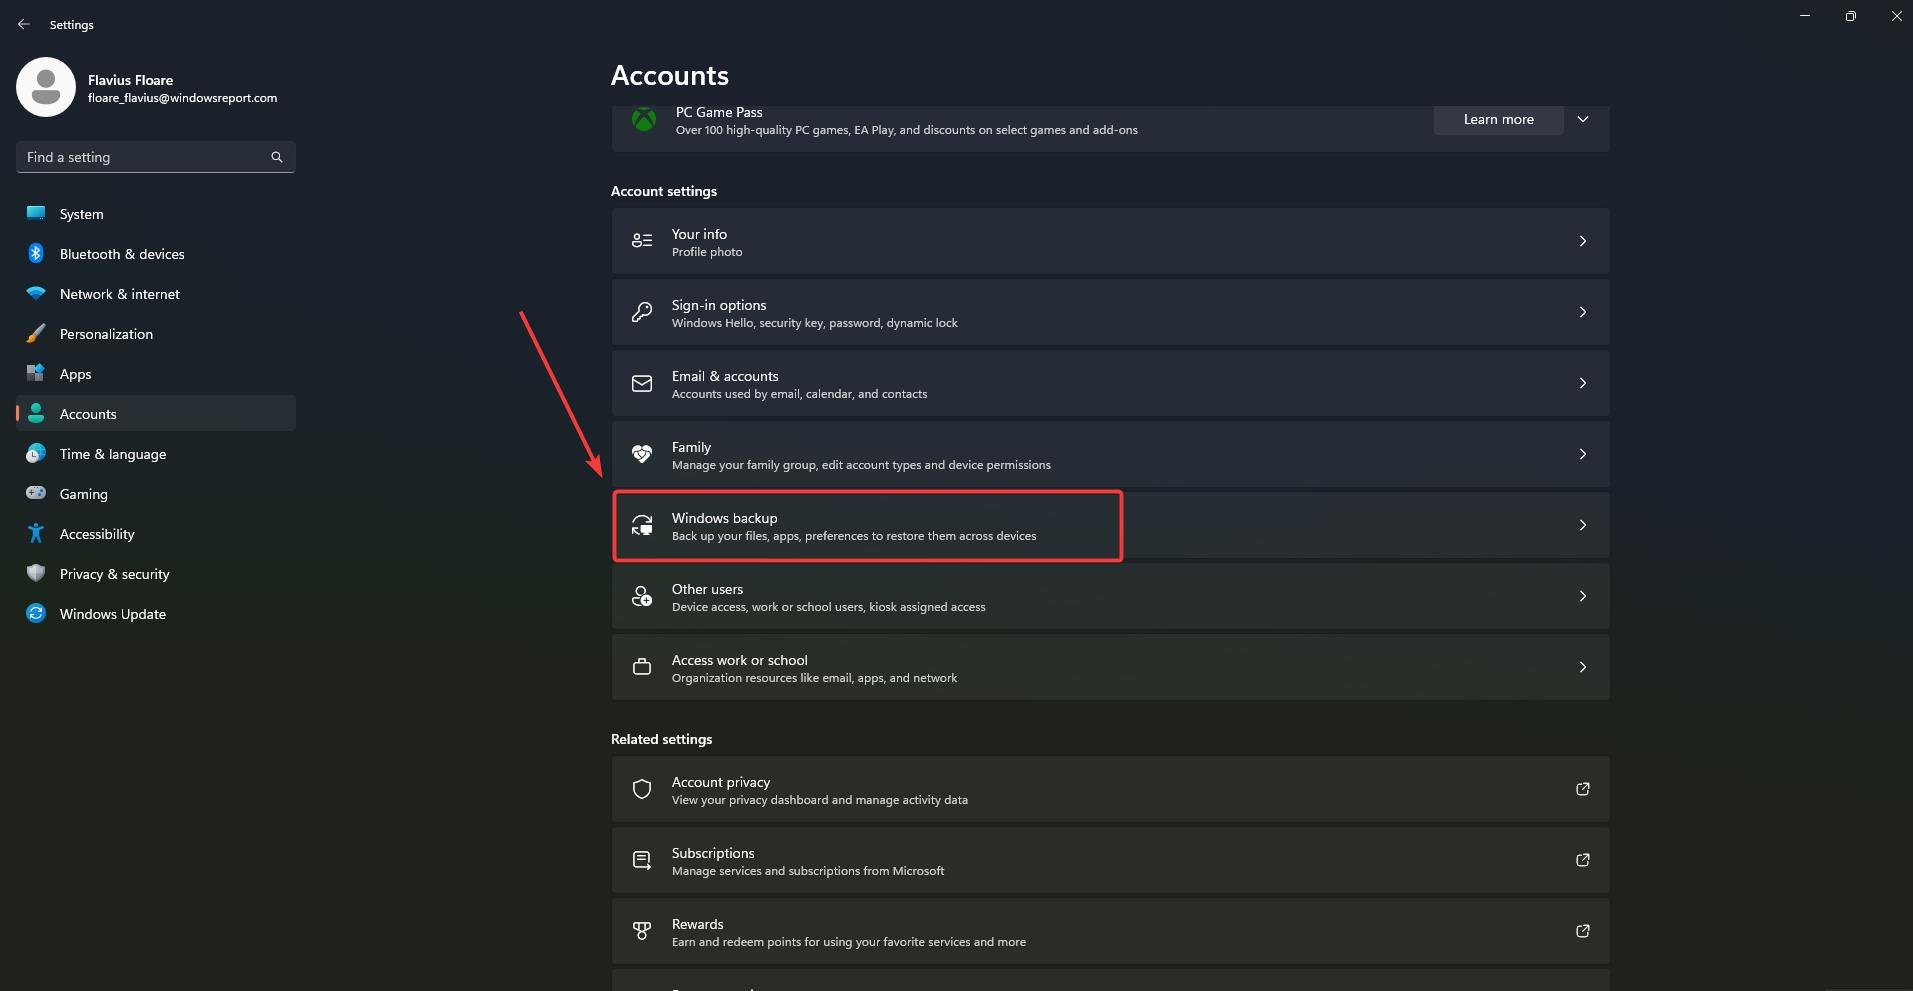
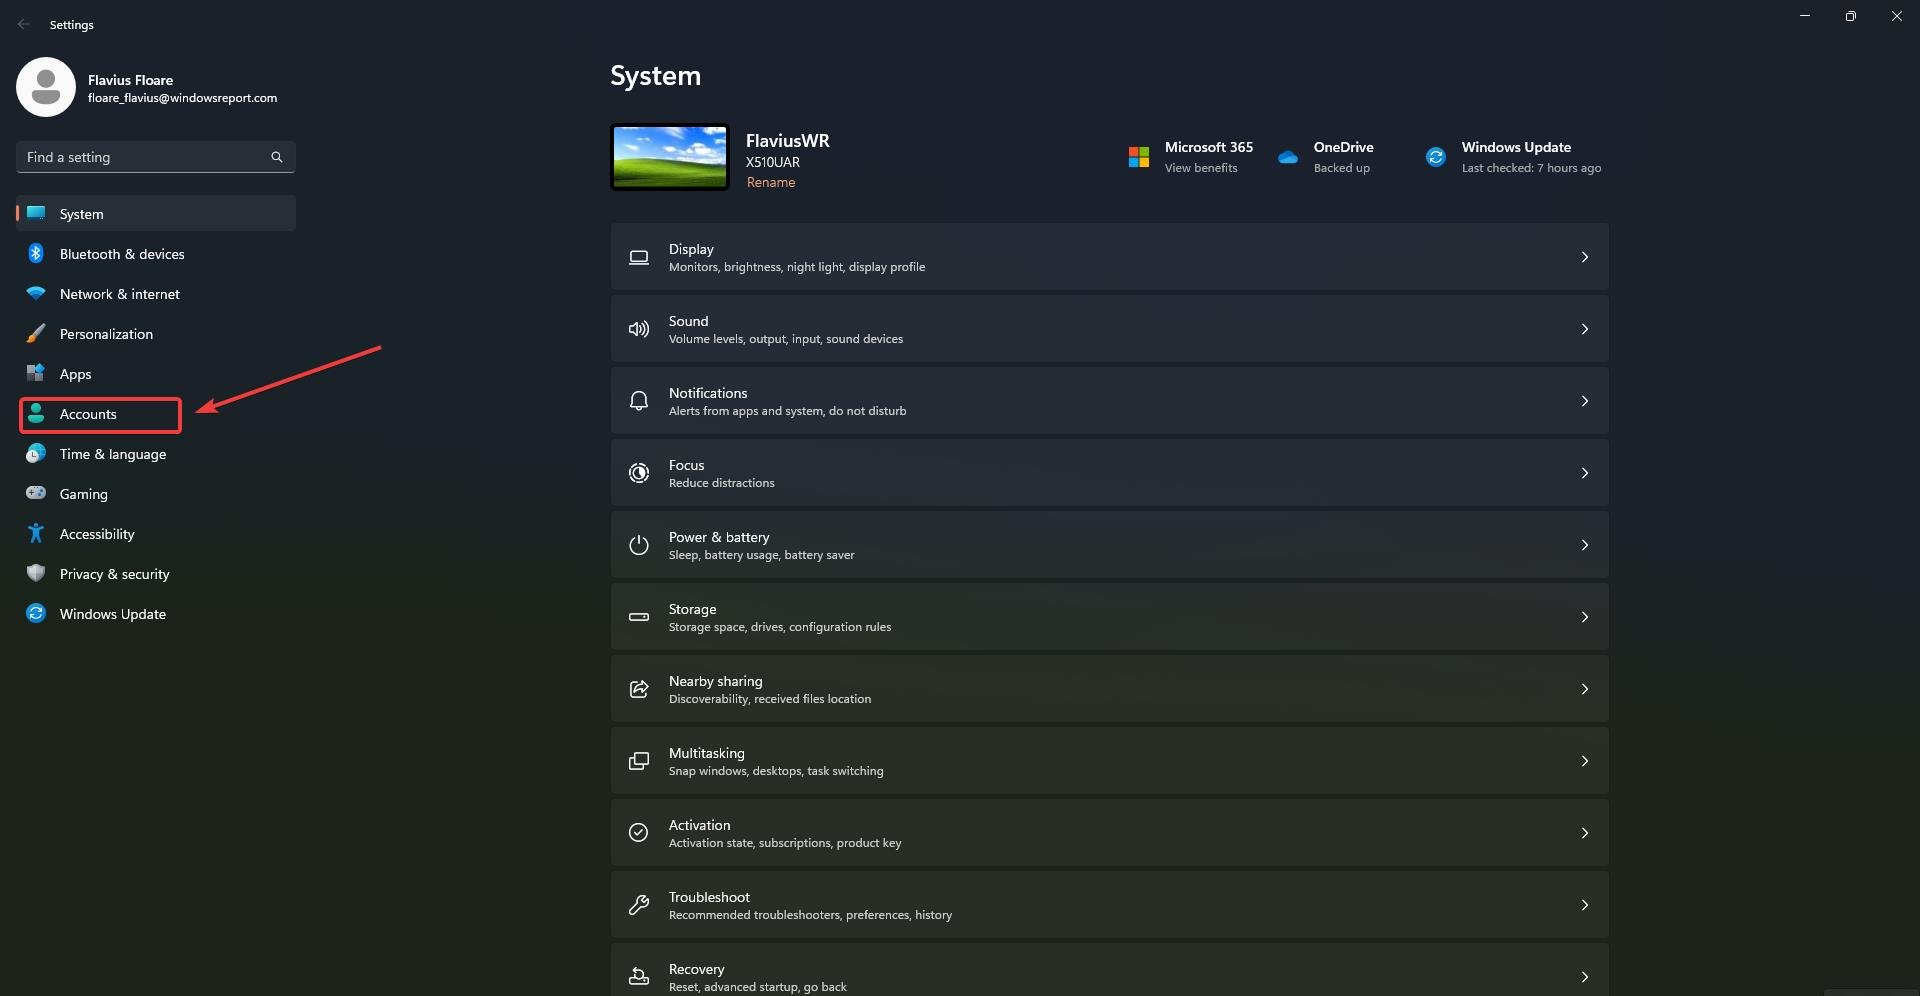
  1. Press Windows + I and go to Accounts.backup chrome passwords windows 11
  2. Once you’re there, head over to Windows backup.backup chrome passwords windows 11
  3. In this panel, you should be able to backup your PC.
  4. Once the window pops-up, head over to the bottom and turn on Remember Chrome passwords for other apps.

You should know that currently the feature is only in the Insider Built. So it won’t show in your current Windows, but it will be implemented in the next patches.

And if you’re using ViveTool, it seem that you can already enable a command for the backup Chrome passwords feature to show up in Windows 11.

Here’s the command:

vivetool /enable /id:43358915

But take it with a bit of salt, as insider-only features are insider for a reason: they might mess up with your perfomance and power usage, aside from being unstable most probably, so you’ve been warned.

Are you excited about this new feature? Are you using Chrome on your Windows 11 or Microsoft Edge? Which one do you like more? Let us know in the comments section below.

How to Test Your Microphone on Windows 11 [5 Tips]

Whether preparing for an important video conference, recording voiceovers, or engaging in online gaming, these tips will help you optimize your microphone settings and troubleshoot any potential issues.

In this guide, we provide you with a set of expert tips and step-by-step instructions on how to test your microphone effectively.

What can I do to test my microphone on Windows 11?

Before you move to the steps to test your microphone, let us consider performing these checks:

  • If you are testing an external one, verify the microphone cable and jack are working fine.
  • Ensure your Windows is up to date.
  • Verify you have connected the microphone to the correct port.
  • Check the privacy settings to ensure the apps have access to the microphone.

Once you are through these preliminary checks, let us move on to the methods.

1. Use the Settings app to test sound

  1. Press Windows + I to open Settings.
  2. Go to System, then click Sound.System - Sound  how to test microphone windows 11
  3. Locate Input; you will see the Microphones listed, including the internal one available with your device. Click the one you want to test.Sound Input Settings
  4. Go to Input settings, locate Test your microphone and click Start test.Click Test
  5. Start speaking; you will see the indicator showing the voice response. Once you are done, click Stop test.System - Sound  how to test microphone windows 11

Windows will show you the results; if the test result is above 50%, then the microphone is functioning properly. However, if it is lower, adjust the Input volume using the slider to increase it and test again.

2. Use the Control Panel to check the sound settings

  1. Press the Windows key, type control panel, and click Open.Control Panel start menu how to test microphone windows 11
  2. Select View by as Category and click Hardware and Sound.Hardware and Sound
  3. Under Sound, click Manage audio devices.Manage audio device
  4. Go to the Recording tab, select Microphone Array, and click Configure.Microphone Configure
  5. Select Set up microphone.Set up Microphone and click Next
  6. Choose the type of microphone and click Next.Microphone setup wizard
  7. Read the instructions and click Next.Click NEXT
  8. You would get a sentence to speak aloud; read it. If the indicator is within the green region, your microphone is working fine. Click Next.Click Green and click NExt
  9. Click Finish.Click Finish

3. Use an inbuilt recorder app

  1. Press the Windows key, type sound recorder, and click Open.Sound recorder and click Open Press the Windows key, type sound recorder, and click Open. Click the Record button to initiate the recording. Try speaking to record yourselves. Click the Stop button to stop the recording. Go to the recording file and replay it to check if the microphone is working fine.
  2. Click the Record button to initiate the recording. Try speaking to record yourselves.Click Start
  3. Click the Stop button to stop the recording.Click Stop
  4. Go to the recording file and play it to check if the microphone works.Sound recorder Recording

4. Use an online website

  1. Go to the videoform website and connect your microphone.
  2. Click Test Your Microphone.Online Mic test
  3. Now click Allow to let the website use your microphone.Allow
  4. Speak into your microphone; if you see a bar expand or contract when you speak, your mic works correctly.Bars that you see when you speak

5. Use a video conference app

  1. Launch the video conferencing app. Here we are using the Zoom app for demonstration.
  2. Go to Settings.Click Settings
  3. Click Audio from the left pane.
  4. Locate the Microphone and click Test Mic.Test your mic
  5. Start speaking into the mic, and you can see the bar move next to the Input Level, indicating the microphone is working.Input Level for mic working

You can also test your call on Teams if you don’t have Zoom installed. If you think you have not enabled and set up your microphone on Windows 11 correctly, we advise you to check this guide to know the right steps.

So, these are some methods to test your microphone on Windows 11. If you have any questions or suggestions, feel free to mention them in the comments section below.

Fix: 0x80030001 Error When Copying Files

Several of our readers have been annoyed by an unexpected error prompt with the message 0x80030001: Unable to perform a requested operation which keeps you from copying files when trying to transfer or import media files from an Android or iOS phone to the Windows PC, it is connected to.

The prompt presents an option to Try Again but triggers the exact prompt all over again upon doing so, forcing you to cancel the operation. 

What does error 0x80030001 mean?

Normally, the error 0x80030001 occurs when you search for the file you intend to copy to the Windows PC instead of finding it manually and then trying to copy or move the file that is returned from the Windows Explorer’s search result. 

In case you are unable to transfer or import the desired media files in File Explorer because of an unexpected error code 0x80030001, walk through this guide to learn how to fix this error and successfully copy the files from your mobile phone to your Windows computer. 

How do I fix the 0x80030001 error when copying files?

  1. Plug in your smartphone and launch File Explorer using the Windows + E shortcut.
  2. Select This PC from the left pane and select your mobile phone or any other plugged-in device visible located under the Devices and drives section to access its contents. 0x80030001
  3. Now, go to the search bar located on the top right of the File Explorer window and type the name of the file or the file extension to quickly locate the media file present in your phone storage. For instance, if you want to copy an mp3 file, you should type *.mp3 to view the list of mp3 files present on your phone device. 0x80030001
  4. When the required media appears in the search result, do not copy the file here. Instead, right-click the file and choose Open file location from the context menu. 0x80030001
  5. After you access the actual location of the image or media you wish to copy from the mobile phone, right-click it and choose Copy from the context menu. 
  6. Now, navigate to the folder location on your Windows PC where you want to paste the file and use the Ctrl + V shortcut to paste it there.

Hopefully, you won’t encounter the 0x80030001 error code when copying the media files from the actual file location on the phone storage. 

That’s how easy it is to overcome the 0x80030001 error prompt, which prevents you from performing the copy or move operation from phone storage to your Windows PC. 

Before you leave, you want to check out the best file sharing and related software for your Windows PC to get better performance. 

If you are looking for the best tools to store, share, manage, and transfer media files from Android and iOS to Windows PC, this guide will help you find the best option to cater to your needs. 

In case you have any queries or feedback, feel free to drop them in the comments section below. 

How to use the AI-based Intelligent Recap in Teams

Intelligent Recap, a new AI-based feature for Microsoft Teams, is finally out for general use and it looks exciting.

Microsoft announced the feature a while ago for Team Premium, a version of the platform suited for business, and now it has arrived.

So what is Intelligent Recap? Basically, it’s a tool that leverages AI to provide a detailed overview of your professional meetings. But there is more. Intelligent Recap comes with its own plan of action based on the discussions from the meeting.

This way, by taking notes and making suggestions based on the notes, the tool saves up a lot of time for people who, for different reasons, don’t manage to get all the necessary info from a meeting. According to a study conducted by Microsoft:

  • 55% of people attending a meeting report that the next steps are unclear at the end of it
  • 56% of people attending a meeting report that it’s hard to summarize what happened in that meeting

So it makes sense such a feature exists now. How does it work, you would ask? Follow along and we’ll show you.

Here’s how you can use Intelligent Recap in your Teams meetings

First things first, you need a Team Premium license and meeting recording and transcription enabled. Intelligent Recap works after the meetings are recorded and transcribed.

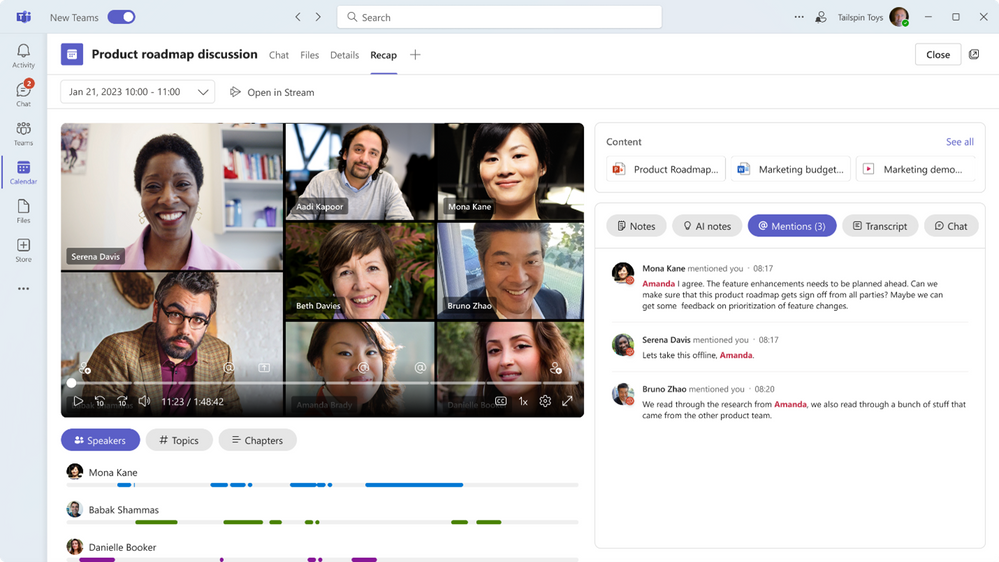
  1. On the Microsoft Teams platform, you have a new panel, called Recap. Head over there and click on it.teams intelligent recap
  2. In the Recap panel, you can now watch the recorded meeting and you can find valuable info here. At first glance, you can check the meeting for your mentions. You can do that by clicking on the @ over the video.
  3. Or by going over to the Mentions option.
  4. The Recap panel is intuitive, you can access Notes left by your team members. However, you can also check the AI notes, by clicking on them, right next to Notes.
  5. If you scroll down, you can also find the AI-suggested tasks.teams intelligent recap

You can also you the Intelligent Recap to see the Transcript of the meeting, and the Chat option will give insights into the discussions that happened in the meeting.

Microsoft Teams is surely becoming the best platform for work. Recently, Teams has enjoyed a lot of popularity, and a lot of new features will come to the platform soon.

And since AI has Microsoft’s biggest focus, it only comes naturally that Intelligent Recap is an AI-based feature.

What do you think about this feature? Are you excited about it? Let us know in the comments section below.

System Interrupts 100% CPU Usage: How to Fix it

System Interrupts is one of the important Windows components, but some users are complaining that the process is registering 100 percent CPU usage.

This is quite rare, as the process is not usually resource hungry. But if you are dealing with this CPU usage spike, this detailed guide will show you how to fix it for good.

What causes the system interrupts high CPU usage?

Several factors can be responsible for the system interrupting 100 percent CPU usage. Below are some of the well-known causes of this issue:

  • Outdated drivers: One of the major causes of this issue is a faulty or outdated driver. You can fix this by updating your drivers and restarting your PC.
  • Conflicting apps: If you are experiencing system interrupts 100% CPU usage on startup, it might be due to conflicting apps. You need to perform a clean boot here to know the apps causing the problem.
  • Outdated PC: If your PC is outdated, it is prone to all sorts of errors. Hence, you need to update your operating system at all times.
  • Presence of malware: Sometimes, this unusual CPU usage can be caused by the activities of viruses on your PC. Performing a deep malware scan with trusted antivirus software should do the trick here.

How can I fix system interrupts if it is using 100% CPU?

Listed below are some basic troubleshooting steps to try before moving to the more sophisticated solutions:

  • Restart your PC.
  • End the process in Task Manager.
  • Update your BIOS.
  • Perform a clean boot.
  • Update your PC.
  • Remove all external hardware.

If the issue persists, proceed to the solutions below:

1. Update drivers

  1. Press the Windows key + X and select the Device Manager option.
    device manager system interrupts 100 cpu
  2. Double-click the section you want to update driver for and right-click each of the devices under it.
  3. Now, select the Update driver option.
    update driver
  4. Finally, choose Search automatically for drivers and install all available updates.
    search auto

If your PC drivers are outdated, system interrupts might register 100 percent CPU usage. While you can always update your drivers manually, the process can be overwhelming.

Hence, we recommend using a dedicated tool for this task. This software will automatically scan and update all outdated drivers and also repair the faulty ones.

⇒ Get Outbyte Driver Updater

2. Disable audio enhancements

  1. Right-click the sound icon on your Taskbar and select the Sound settings option.
    sound settings
  2. Choose More sound settings.
    more sound
  3. Now, double-click your sound device.
    audio device system interrupts 100 cpu
  4. Click the Enhancement tab at the top.
  5. Finally, check the Disable all sound effects option.
    disable

In some cases, your sound effects and enhancements can lead to the system interrupts 100 percent CPU usage. You need to disable this feature to get past this error.

3. Disable the USB Root hub

  1. Press the Windows key + X and select the Device Manager option.
    device manager system interrupts 100 cpu
  2. Expand the Universal Serial Bus controllers option and right-click the USB Root Hub option.
  3. Now, select the Disable device option.
    disable device
  4. Finally, click the Yes button to confirm the action.
    yes

If you are experiencing the system interrupt 100 percent CPU usage issue, it might be due to problems with the USB Root hub. So, you need to disable it temporarily.

4. Run the CHKDSK command

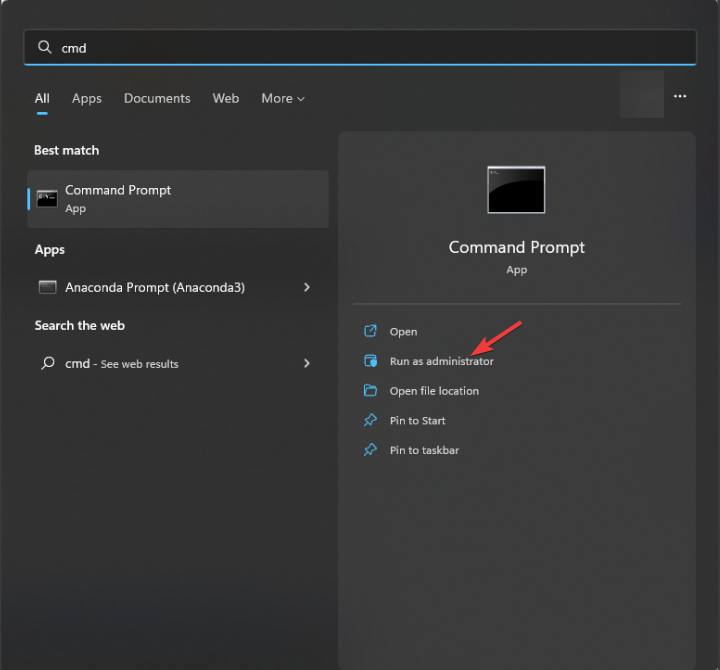
  1. Press the Windows key, type cmd, and select Run as administrator under Command Prompt.
    cmd admin system interrupts 100 cpu
  2. Type the command below and hit Enter to run it: chkdsk c: /f /rchkdsk
  3. Now, press Y when prompted.
  4. Finally, wait for the process to start automatically when your PC restarts.

In some cases, this 100 percent system interrupts CPU usage can be due to problems with your hard drive. The solution to this is to repair the bad sectors running the CHKDSK command.

5. Scan for malware

  1. Press the Windows key, type virus, and select Virus & threat protection.
    virus
  2. Click Scan options.
    scan options
  3. Now, select your preferred scan option and click the Scan now button.
    scan now

Sometimes, this system interrupts 100% CPU usage on Windows 10 and 11 can be due to system file corruption caused by viruses. Performing a malware scan should solve the problem.

6. Disable your network adapters

  1. Launch the Device Manager and expand the Network adapters option.
  2. Right-click your network adapter and select the Properties option.
    properties system interrupts 100 cpu
  3. Now, click the Advanced tab at the top.
  4. Select Wake on Magic Packet and set it to Disabled.
    wake packet
  5. Finally, set Wake on Pattern match to Disabled too, and click OK.
    wake system interrupts 100 cpu

Another excellent solution to the system interrupts high CPU usage problem is to disable some of your network adapter’s properties. This will prevent your adapter from waking unnecessarily.

With this, we can now conclude this guide on how to fix the system interrupts 100 percent CPU usage. Follow the instructions therein, and things should be back to normal.

Feel free to let us know the solution that helped you fix this issue in the comments below.

How to activate voice narrator in Microsoft Excel

Here’s some good news. Microsoft has announced the introduction of enhanced voice Narrator support in Excel, aimed at providing a more accessible and efficient reading experience for users, and you can activate it straight away.

As we’ve recorded from the release note of Windows 11 Build 23451 from the Dev channel, this new feature prioritizes announcements based on the information necessary for users to navigate and skim through workbooks, while also allowing for customization through convenient keyboard shortcuts.

What does it do? Well, with the enhanced Narrator support, Excel users like you can now enjoy a more succinct and streamlined reading experience. Announcements are grouped into four categories: Value, Name, Context, and Properties, ensuring that users receive the most relevant information as they navigate through their spreadsheets.

To access the new Narrator announcements in Excel, however, you’d need to ensure their device meets the installation requirements. This includes running Windows 11 and enrolling your device into the Windows Insider Program. 

If you’re curious to try out this feature, make sure to enroll in the Windows Insider Program, get Build 23451 from the Dev channel, and follow these steps. 

How to activate voice Narrator support in Excel 

1. Open any Excel document

2. Press Ctrl + Windows + Enter to start Narrator.

3. Click Install now to get the latest natural voices and you’re good to go!

With that being said, however, there are a few known issues, as the feature is currently limited to several select insiders. Users may experience extraneous speech when navigating from cell to cell, and full support for Braille is not yet available.

Have you tried to activate voice Narrator in Microsoft Excel? Let us know in the comments!

0x800f0907 Error Code: How to Fix it on Windows 10 & 11

Many of our readers have reported coming across the 0x800f0907 error code on their Windows 10 and 11 PCs. This error basically pops up when there is some issue with the .NET Framework component.

In this guide, we will share with you a list of solutions that have helped our readers resolve the 0x800f0907 error code on Windows 10 and 11. Let us get right into it.

What is the 0x800f0907 error on my PC?

When you will come across the 0x800f0907 error, you will see the below error message displayed on your desktop.

Windows couldn’t complete the requested changes.
Windows couldn’t find the required files to complete the requested changes. Make sure you’re connected to the Internet and try again.
Error: 0x800F0907

Here are some of the common reasons why you would come across the 0x800f0907 error:

  • The internet connection is faulty: The network to which your PC is connected might be problematic and cause this problem.
  • Incorrectly configured Group Policy: There are some Group Policy settings that need to be selected to avoid coming across the 0x800f0907 error.
  • Repair Windows: Chances are some important system files related to the Net Framework are corrupt and it needs repairing.
  • Install the latest Net Framework: You might be running an old version of the Net Framework which is why you are getting the 0x800f0907 error.

Let us check the solutions to resolve the 0x800f0907 error quickly on your PC.

How do I fix the 0x800f0907 error on Windows 10 & 11?

Note icon NOTE
The below solutions can be applied on both Windows 10 and Windows 11 PCs to resolve the 0x800f0907 error.

1. Use the .NET Framework repair tool

  1. Download the .NET Framework repair tool.
  2. Launch the program on your PC.
  3. Accept the terms and agreement and click Next to begin the diagnosing process.
  4. It will give you the changes that are required for the .NET Framework to run properly.
  5. Click Next to apply the changes.

The .NET Framework repair tool is one of the best tools that is provided by Microsoft to fix any issues related to the .NET Framework.

However, we have a guide that lists some other solutions that will help you resolve any issues related to the .NET Framework quickly.

2. Tweak the Group Policy

  1. Press the Win + R keys to open the Run dialogue.
  2. Type gpedit.msc and press Enter.
  3. Navigate to the below path: Computer Configuration\ Administrative Templates\ System
  4. Locate Specify settings for optional component installation and component repair and open it.
  5. Select the Enable radio button.
  6. Check the boxes for Never attempt to download payload from Windows Update and Download repair content optional features directly from Windows Update instead of Windows Server Update Services (WSUS).
  7. Click Apply and OK to save the changes.
  8. Press Win + R keys to open the Run dialogue.
  9. Type gpupdate /force and click OK to update the Group Policy Editor.
  10. Restart your PC.

Many of our readers have reported that tweaking the Group Policy as shown above has helped them resolve the 0x800f0907 error.

3. Manually update the .NET Framework

  1. Note down the KB number of the failing .NET Framework.
  2. Visit Microsoft’s Update Catalog website.
  3. Search for the KB number of the .NET Framework and download it.
  4. Open the setup file and run the installation.
  5. Restart your PC.

This way you will be able to install the failing .NET Framework update on your PC. Microsoft Update Catalog is a safe and official website and it fetches the download files right from the official source.

4. Run the SFC scan

  1. Press the Win key to open the Start menu.
  2. Type Command Prompt and run it as an administrator.
  3. Type the below command and press Enter. sfc /scannow
  4. Wait for the process to complete and restart your computer.

Some system files associated with the .NET Framework might be causing the 0x800f0907 error on your Windows 10 and Windows 11 PC. You can always try to run the SFC Scan to resolve the corrupt or missing system files.

5. Repair Windows using the installation media

  1. Download the Media Creation Tool.
  2. Insert a USB Drive to create a bootable media.
  3. Restart your Windows PC and press the Boot menu key (usually the Del key) to enter Windows Setup.
  4. Click the Repair your computer option.
  5. Wait for the process to complete.

If nothing works then as a last resort, we recommend using the installation media and repairing your computer. This will definitely resolve the 0x800f0907 error on your PC.

That is it from us in this guide. Let us know in the comments below, which one of the above solutions fixed the 0x800f0907 error on your Windows 10 and Windows 11 PC.

Microsoft Teams Organization Chart: How to Set Up & Use

An organization chart can help you visualize your organization and its structure. It can also give you an overview of who works in different teams, the hierarchy, and other information such as job titles or locations.

Microsoft Teams has enabled you to integrate an organization chart, and we show you how to set it up in this article.

Can I export an organization chart from Microsoft Teams?

Yes. Microsoft Teams has a built-in organization chart tool that can help you create a team structure, assign tasks and projects, and visually organize your employees.

The tool is mainly used to visualize a hierarchy within your organization, but it can also be used for other purposes, such as delegation or resource allocation.

Some of the main purposes it aims to serve include:

  • Define roles and responsibilities – It helps people to understand who does what in a company or team and how they relate to one another. This is especially useful for new hires to get acquainted with the team and ask for help from appropriate persons.
  • Keep track of duties/deadlines – By organizing information by project or department, you make sure everyone knows who to contact when certain reports or tasks need to be completed.
  • Assign tasks efficiently – By creating an organization chart in Microsoft Teams, you can easily assign tasks to different members of your team based on their skills and experience levels.
  • Identify gaps in reporting relationships – You also get a sense of your team’s structure and identify any gaps that may require your intervention in restructuring.

How do I create an organizational chart in Microsoft Teams?

1. Create an organizational chart

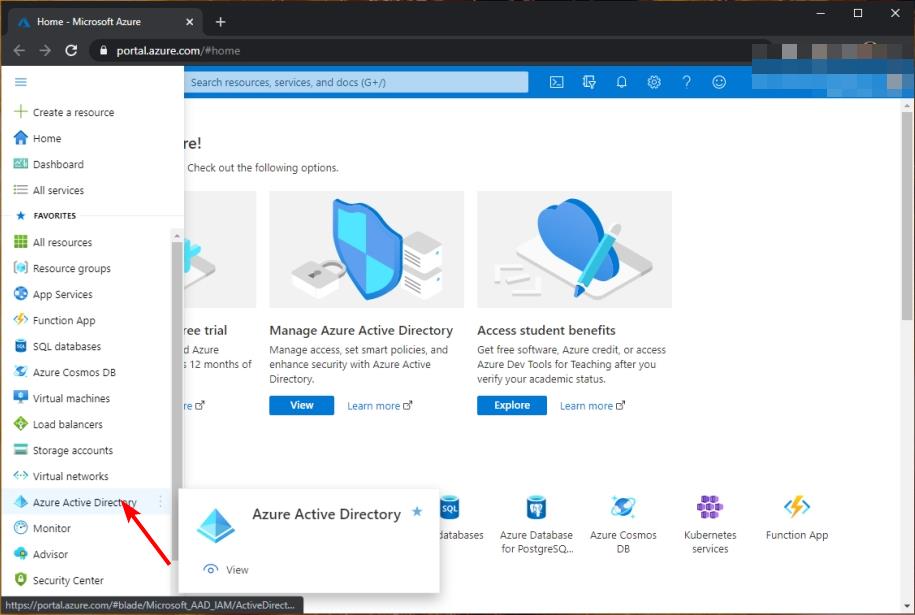
  1. Launch your Azure Active Directory portal and sign in as admin.
  2. Click on Azure Active Directory to edit your AD settings.
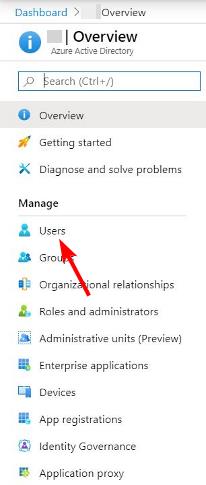
  3. On the left pane, click on Users under the Manage section.
  4. Now, select a user whose profile you’d like to add to the chart by assigning them a title.
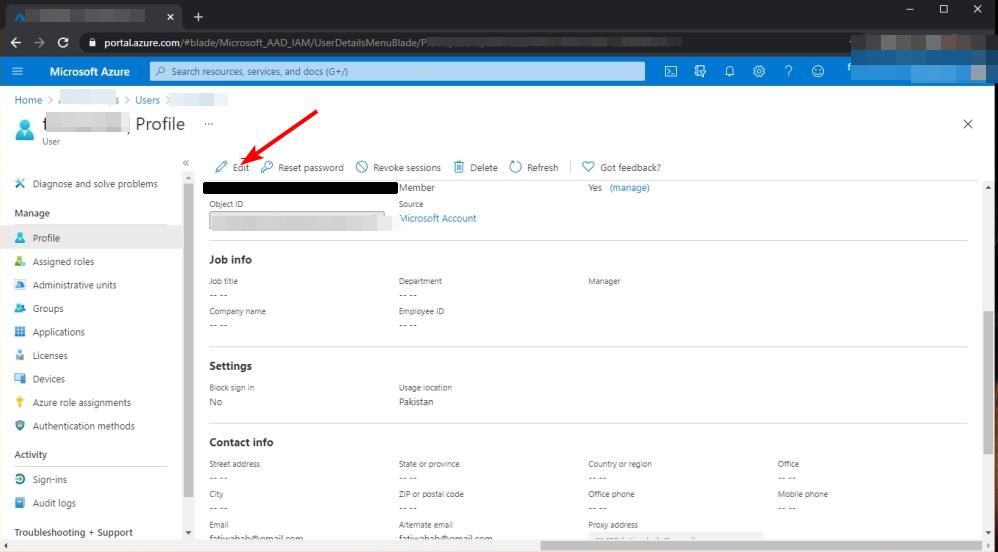
  5. Click on Edit.
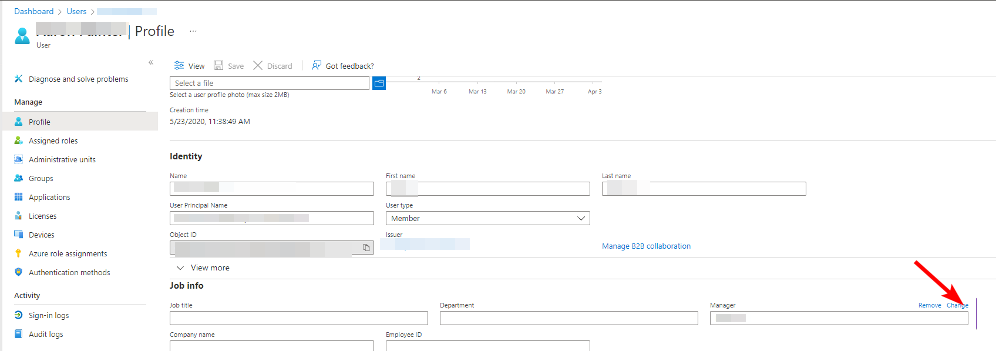
  6. Scroll to the Job information section and fill out the necessary information required. In the Manager section, select the corresponding user with that title, and add their name.
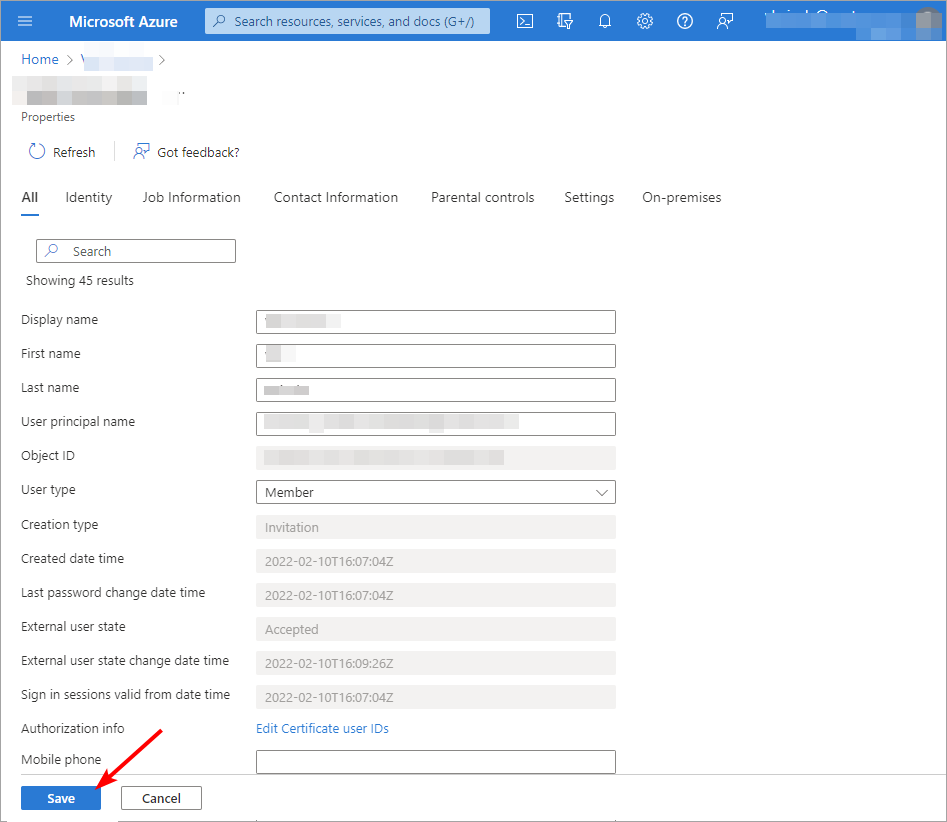
  7. Hit Save.
  8. Repeat these steps for all users who belong to that organizational chart until you have covered everyone.

Since you can’t create job titles in Teams, you need first to do it in the AD and then integrate it with Teams to display it.

2. View the org chart

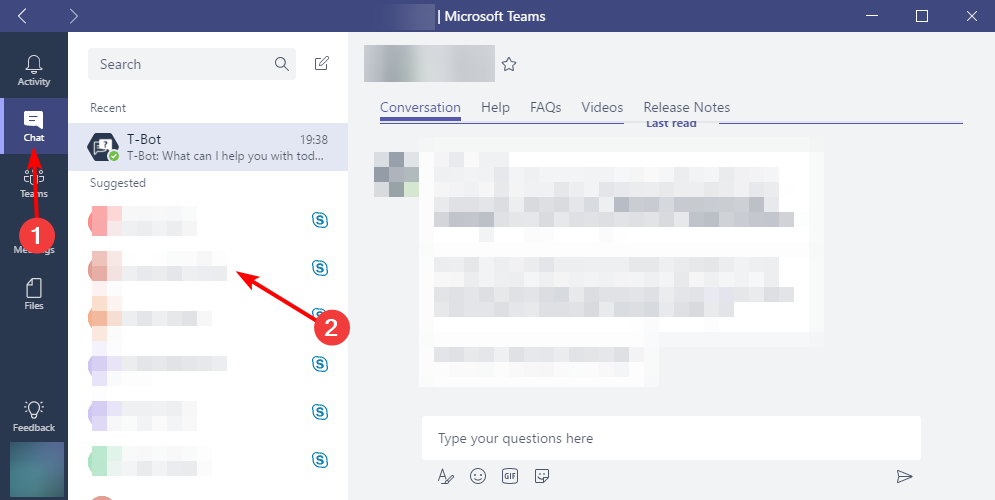
  1. Login to your Microsoft Teams account and navigate to the Chat tab.
  2. Now, select a chat thread containing a user you added to be part of the organizational chart when you were creating it.
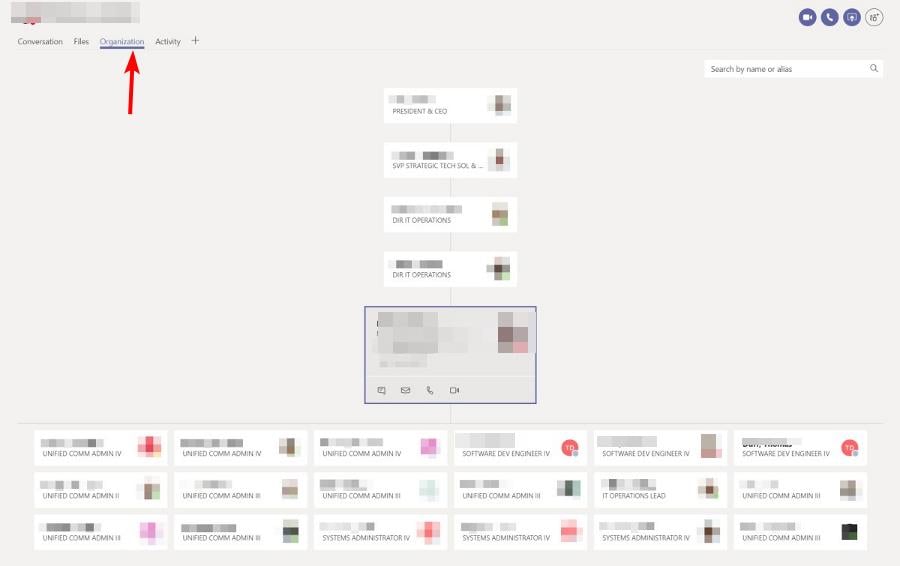
  3. Go to the Organization tab.
  4. A pictorial diagram will show up displaying the user you just selected and who they report to. Their job profile can also be seen just below their name.
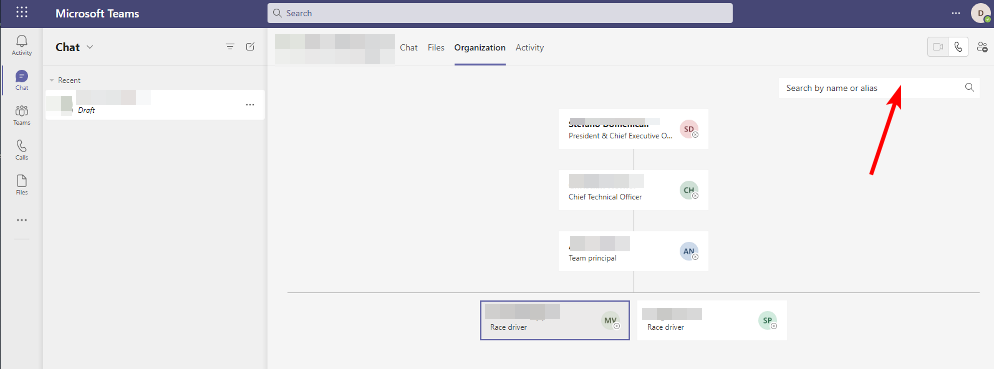
  5. To find out more about other users in the chart, click on their names. To find other users, try searching for their names.

Now that you know how to use the Microsoft Teams Organization chart, you can create yours.

We also have an interesting article on how to create and customize organizational charts in Visio, so be sure to check that out too.

Speaking of staying organized, we explore some of the best productivity apps to help you stay efficient while working.

Have you created an organizational chart in Teams? What was your experience like, and how easy is it to use? We’d love your feedback on this, so drop us a comment below.

Sticky Notes for Windows 10: How to Download, Use & Backup

Whether you need quick reminders, to-do lists, or a space to jot down creative ideas, Sticky Notes provides a versatile and user-friendly platform right on your Windows 10 desktop.

In this guide, we will discuss the process of downloading, using, and backing up Sticky Notes, enabling you to harness the full potential of this powerful note-taking solution.

How can I download and install Sticky Notes?

Before engaging in the instructions to install the app, you should consider performing the following checks:

  • Make sure your PC is running Windows 10 licensed version.
  • Need a Microsoft account to download and install the app.
  • A stable internet connection.
  • Sufficient storage space on your device to accommodate the installation.
  • Check if you have administrative rights.

Once checked all these, move to the step to install Sticky Notes, a seamless and intuitive platform for all your note-taking needs.

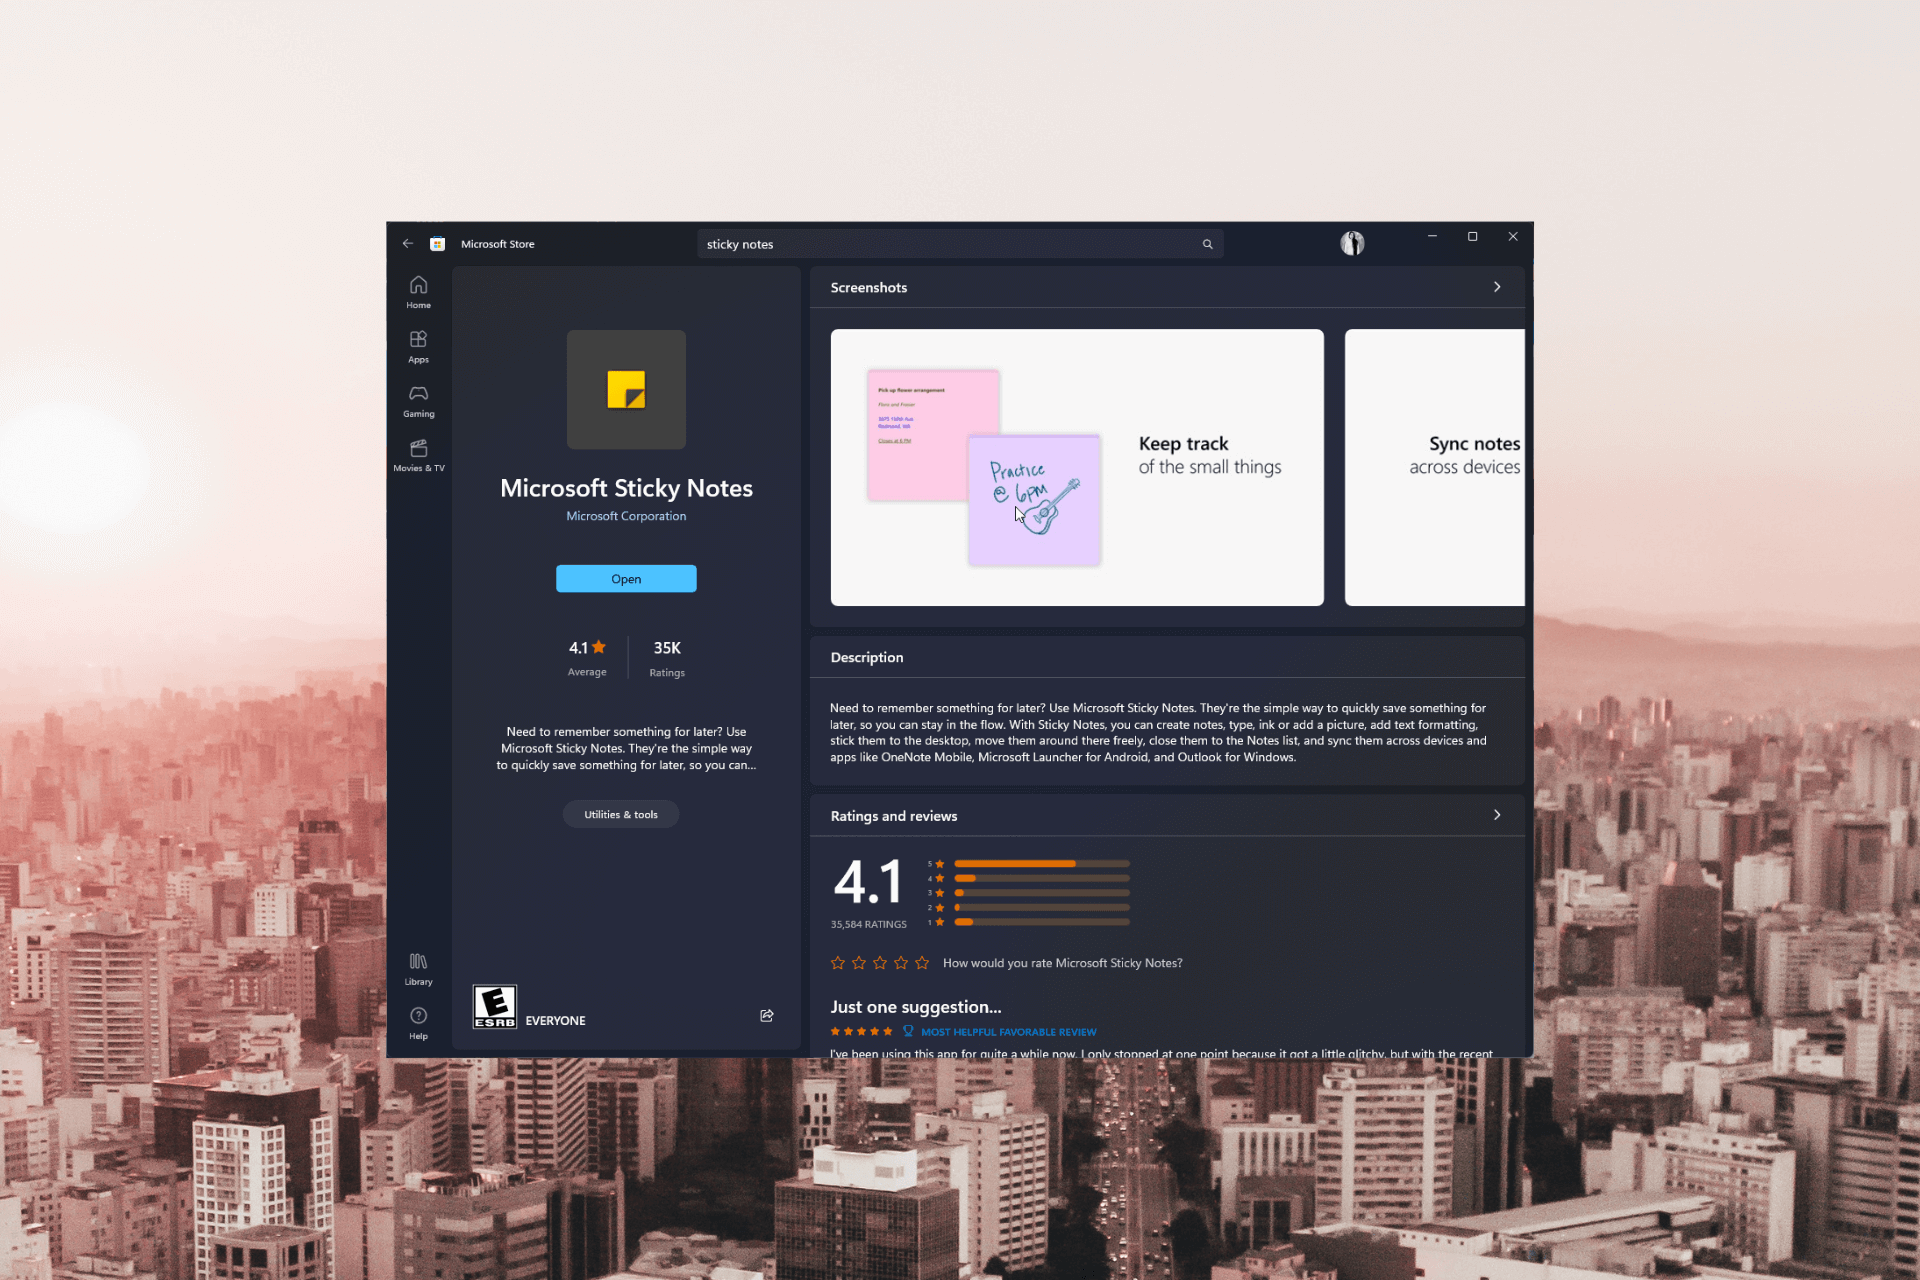
  1. Launch Microsoft Store.
  2. Search for Sticky Notes in the search bar and click Get. The Sticky Notes app will be installed on your computer.Microsoft Store get sticky notes windows 10
  3. You can sign in to your Microsoft account to sync it across your devices.Sign in Microsoft Store

How can I use Sticky Notes for Windows 10?

  1. Once Sticky Notes is installed, press the Windows key, type sticky notes, and click Open.Sticky Notes open  sticky notes windows 10
  2. Click on + to create a blank note. Now add content to the note, and it will be saved automatically.Add new sticky notes
  3. You can make the content appear bold, italic, underline, and bullet points.
  4. Click on the three dots.Click three dots
  5. Select any color you like to change the note’s background color.New note color

How can I back up & restore Sticky Notes on Windows 10?

1. Backup the notes

  1. Press Windows + R to open the Run window.
  2. Type the following path and click OK: %LocalAppData%\Packages\Microsoft.MicrosoftStickyNotes_8wekyb3d8bbwe\LocalStateRun window sticky notes Windows 10
  3. Right-click the plum.sqlite file and choose Copy.Copy the file
  4. Press Windows + E to open Windows Explorer and choose where you want to export the backup.
  5. Right-click in the folder location, and select the Paste button or press Ctrl + V to save them in the folder.

This is how you can back up the notes. Now you can restore your notes on the same computer or move them to another machine.

2. Restore the notes

Note icon NOTE
To restore the notes, you need to replace the existing plum.sqlite, this will delete the previous notes on the device.
  1. Press Windows + E to open Windows Explorer.
  2. Go to the location wherein you have saved the Sticky Notes. Locate the plum.sqlite file, select it and press Ctrl + C to copy it.
  3. Press Windows + R to open the Run dialog box.
  4. Type the following path: %LocalAppData%\Packages\Microsoft.MicrosoftStickyNotes_8wekyb3d8bbwe\LocalStateRun windows Sticky notes Windows 10
  5. Right-click on the folder, and press Ctrl + V. The sticky notes will be restored on your computer.

Once done, open Sticky Notes, and you can see the notes in the exact location where they were when you backed up.

So, this is how you can download, use & back up Sticky Notes on Windows 10 and, enhance your workflow, and never miss a crucial detail.

If you want your notes to be on top of your desktop, read our informative article to check out the steps.

If you have any questions or suggestions, feel free to mention them in the comments section below.

Mortal Kombat 1 is officially coming on September 19

Mortal Kombat fans all over the world will surely rejoice in knowing that one of their oldest favorite games will be continued this year.

Yes, we are actually talking about Mortal Kombat 12, the upcoming sequel to this worldwide beloved video game.

Many thought that a sequel wouldn’t become available until late 2024, but apparently, NetherRealm Studios had different plans.

Mortal Kombat 1 Beta will be accessible in August 2023

You’ve heard correctly! Fans of the long-running Mortal Kombat gaming franchise got some excellent news today.

The Mortal Kombat universe may be about to get a complete reboot, and the highly anticipated full reveal is almost here.

Following the recent cryptic teasers, NetherRealm Studios and Warner Bros. Games have announced fans can find out what’s incoming on May 18 at 6am PT (9 am ET).

Watch the accompanying teaser video below, which once again uses the face of a clock to seemingly signify a new beginning after 2019’s Mortal Kombat 11.

In fact, Sony is about to kick off the middle of the year gaming showcases next week with a special PlayStation Showcase.

And, NetherRealm may drop a quick reveal trailer today and do a gameplay presentation next week on Sony’s show, or at one of the numerous upcoming events.

As we all know by now, multiple leaks have alluded to this being a complete reboot of the long-running fighting game franchise.

The title is reportedly named Mortal Kombat 1 and cross-over characters from other franchises are already planned for the title.

As we can see from the official website, the game will introduce a reborn Mortal Kombat Universe that has been created by the Fire God Liu Kang.

And, of course, featuring reimagined versions of iconic characters as they’ve never been seen before, along with a new fighting system, game modes, bone-crushing finishing moves, and more.

We are also getting Kameo Fighters, which are a unique roster of partner characters to assist during matches, creating expanded gameplay possibilities for players.

These characters are chosen separately from the main roster of fighters. Mortal Kombat 1 will be coming out for the PlayStation 5, Xbox Series S and X, the Nintendo Switch, and for the PC via Steam and the Epic Games Store.

Pre-orders start on Friday, May 19, and will include adding Shang Tsung as a playable character immediately.

Please keep in mind that only Xbox and PS5 pre-orders will also be able to enter a beta test for Mortal Kombat 1 in August.

How much is Mortal Kombat 1 going to cost?

Now, let’s talk specifics. Mortal Kombat 1 Premium Edition will be available physically and digitally for $109.99 (SRP) on PlayStation 5, Xbox Series X|S, Nintendo Switch, and PC.)

The package will include all Standard Edition content, along with the Kombat Pack, early access to the game beginning Sept. 14, and 1,250 Dragon Krystals (in-game currency).

Looking at the The Kombat Pack, it will feature a Johnny Cage character skin with the likeness of famed actor and martial artist, Jean-Claude Van Damme (available at launch).

Furthermore, you get early access to six new playable characters (available post-launch), and five new Kameo Fighters (available post-launch).

There were rumors that the reboot is targeting PC, Xbox Series X|S, PlayStation 5, and Switch as platforms, with three versions incoming for pre-purchase, including a $249.99 Kollector’s Edition.

In fact, the Mortal Kombat 1 Kollector’s Edition will be available physically at select retailers for $249.99 (SRP) on PlayStation 5 and Xbox Series X|S only and will include all Premium Edition content.

Besides all that, you also get early access, along with a 16.5-inch Liu Kang sculpture designed by COARSE and an inspired Liu Kang in-game character skin, three exclusive art prints, a steel case, and 1,450 additional Dragon Krystals (2,700 total).

These big plans also extend to another highly-expected upcoming game, Suicide Squad: Kill the Justice League, which is due on May 26.

What fighters have been confirmed so far?

The truth is that much like similar titles such as Street Fighter or Injustice, a fighting game is only as strong as its cast of characters.

A few names on the launch roster have been announced, while leaks have revealed some of the DLC fighters from popular franchises that could arrive down the line.

So far, 9 Mortal Kombat 1 characters have been confirmed to appear in the game. These are all familiar faces that have become staples of the series, appearing in most, if not every entry to date.

Thus, for now, we know about Liu Kang, Scorpion, Sub-Zero, Raiden, Kung Lao, Kitana, Mileena, Shang Tsung, and Johnny Cage.

The prequel launched with a huge roster of 25 fighters, so fans can expect more fighters to be announced as we edge closer to Mortal Kombat 1’s release date.

Are there any leaked fighters so far?

We’re glad you asked that because there have been some recent leaks that depict some of the playable and Kameo fighters.

In fact, shortly after Mortal Kombat 1 was announced, there were online reports that a number of DLC characters had leaked via an Amazon listing, revealing the contents of the first Kombat Pack.

You will be pleased to know that we are also getting Quan Chi, Ermac, Takeda, Peacemaker (DC), Homelander (The Boys), and Omni-Man (Invincible).

We’re going to keep an eye open for future leaks, as we’re sure that we will find out much more until the release date.

Everyone is very curious about the fighter list since in Mortal Kombat 11 we had amazing appearances from Rambo, Robocop, The Terminator, Spawn (Marvel), and The Joker (DC).

In what month do you think this new Mortal Kombat game will launch? Share your opinions with us in the comments section below.

OneNote for Windows 10: How to Download & Install

OneNote is a powerful note-taking application that lets you capture and organize your thoughts, ideas, and information in one convenient digital notebook.

In this guide, we will walk you through downloading and installing OneNote on your Windows 10 machine.

How can I download & install OneNote for Windows 10?

Before engaging in the steps to download and install the app, you should consider performing the following checks:

  • Ensure your PC is running Windows 10 or a compatible version.
  • Need a Microsoft account to download and install the app.
  • A stable internet connection.
  • Sufficient storage space on your device to accommodate the installation.
  • Check if you have administrative privileges.

Once checked all these, move to the step to install OneNote, a seamless and intuitive platform for all your note-taking needs.

1. Download & Install OneNote

Note icon NOTE
If you have any Office app running, save your work and close it before installation.
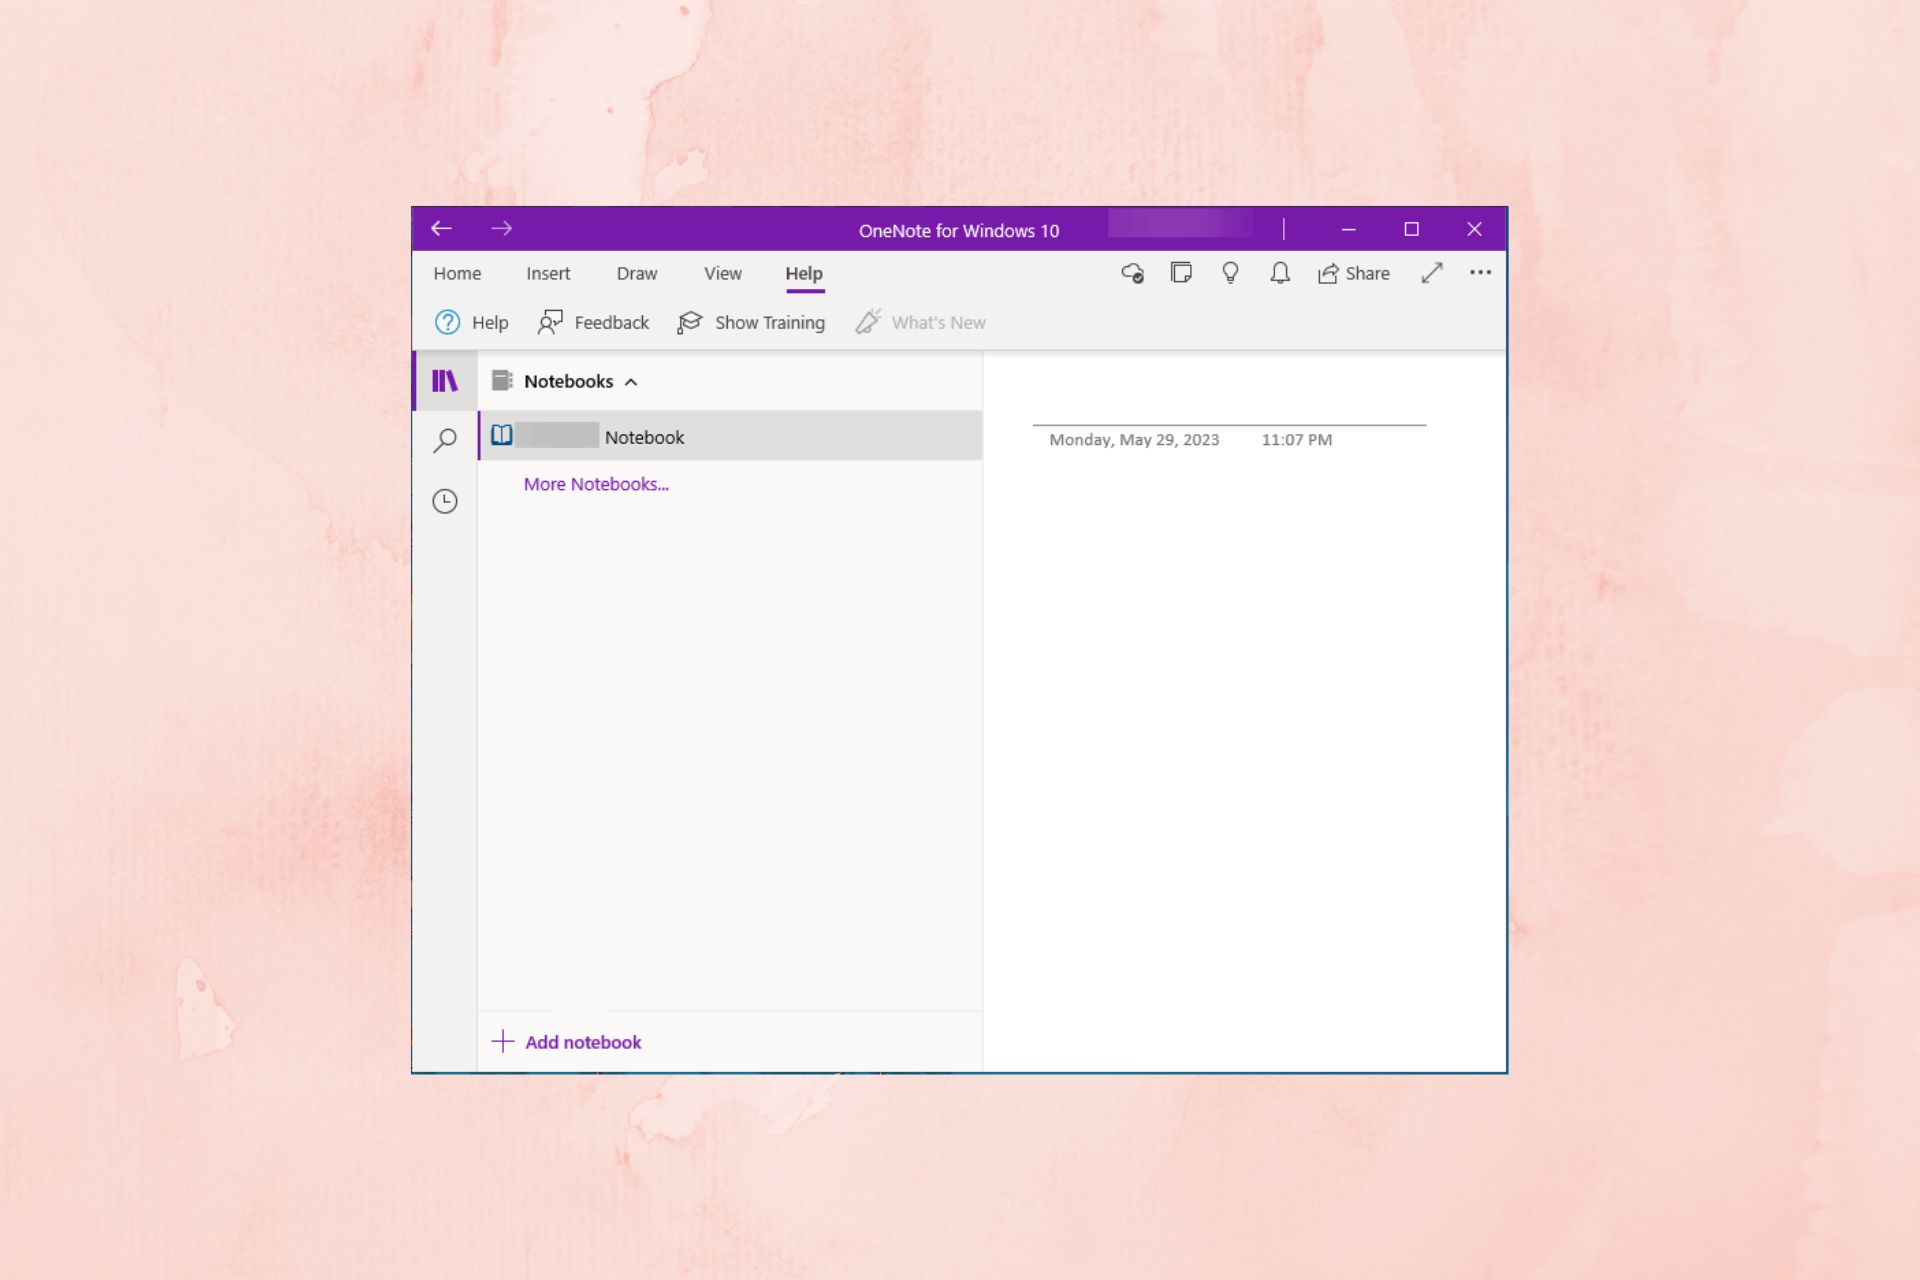
  1. Download the OneNote app.OneNote Download & Install Windows 10
  2. Once the .exe file is downloaded, double-click the downloaded file to initiate the setup.
  3. Click Yes on the UAC prompt to continue. The installer will detect the Microsoft 365 or Office app version and install the correct OneNote version.
  4. Follow the onscreen instructions to complete the process, then click Close.OneNote Download & Install Windows 10

You can now launch OneNote and use it to take notes.

2. Use OneNote

  1. Press the Windows key, type onenote, and click Open.
  2. Click on Add Notebook in the top left corner.Add notebook  OneNote Windows 10
  3. Name the Notebook and click Create Notebook.Create a Notebook
  4. Click on the + icon next to Add section option to the current notebook.Add section
  5. You can click + Add Page to add another page.Add page
  6. Click Insert to add spreadsheets, tables, pictures, audio recordings, media, and more.
  7. Once you are done with the notebook, click the Share button from the top right corner to share it with your friends or coworkers if you like.Share

What are the benefits of using OneNote?

Using OneNote offers many benefits that can greatly enhance your productivity and organization. Some of the key advantages are:

  • Versatile note-taking – It is a flexible and feature-rich platform for taking notes, wherein you can include text, images, web clippings, and audio recordings, making it perfect for storing all types of content.
  • Seamless synchronization – You can sync your notes across devices and platforms, enabling you to access and edit your content from anywhere, be it your computer, tablet, or smartphone.
  • Makes organization easier – It allows you to create sections, notebooks, and pages and organize them logically.
  • Collaborative features – This note-taking app enables real-time collaboration, which makes it ideal for teamwork and group projects, thereby enhancing productivity.
  • Accessibility features – It offers accessibility features like text-to-speech, dictation, and screen reader compatibility, ensuring that users with different abilities can utilize the application effectively.
  • Powerful search capabilities – The robust search functionality can help quickly locate specific notes, keywords, or even handwritten text within your notebooks, saving you valuable time.

So, this is how you can download and install OneNote, a powerful tool for personal and professional use, empowering you to capture, organize, and retrieve information efficiently and collaboratively.

If you are looking for a way to download and install OneNote on Windows 11, you can check out this detailed guide for steps.

If you have any questions or suggestions, feel free to mention them in the comments section below.

Brave Browser Not Blocking Ads Anymore: How to Get Rid of Ads

If you are using this browser, we’re pretty sure you have just one question in mind and that is: why is Brave not blocking ads? From specific settings to cache piling up, there can be plenty of reasons why Brave browser stopped blocking ads. Don’t worry, we got your back.

Brave is dedicated to stopping the barrage of ads and trackers that we are all hit with every day and it does so with its own set of tools, while most browsers offer plugins and extensions to block ads.

However, even if you use third-party solutions, you can still encounter inconveniences. For instance, an Adblock subscription requires management and sometimes fixing, not to mention that many sites have a way of bypassing it. They can place the ads at the bottom of the screen where you can’t see them.

Even though the browser does a great job at blocking the ads, sometimes, something could go wrong. And this can happen to any other browser too (see Vivaldi not blocking ads or Firefox pop-up blockers not working anymore.)

Quick Tip:

And speaking of that, if you’re open to new options and want to test a different browser with a built-in ad blocker and anti-tracker, you should consider Opera.

There is no need for installation or setup, simply enable ad blocking in the browser settings and change this as you see appropriate.

   Opera

Opera

With the built-in ad blocker, you may enjoy fresher and speedier browsing with fewer distractions.

Now, moving back to our situation. The theory is clear enough but how does this work in reality? Does Brave actually block trackers and ads? Let’s find out.

Why am I getting ads in Brave browser?

Brave Browser is often referred to as a privacy-first adult browser. This is because it prevents ads, trackers, and other elements of the web you’d rather not see from appearing on your screen. 

The browser also has a Brave Adblock list that you can check for sites on which you don’t want to block ads. Since some sites require you to unblock your Adblocker to access them, you might have to whitelist those particular sites.

So, does Brave not block ads anymore? It does but it’s not infallible. In fact, users reported more similar issues, such as:

  • Brave not blocking YouTube ads/pop ups
  • Brave not blocking Twitch ads, Spotify ads
  • Also, Brave iOS not blocking ads (on iPhone)

For additional security, you may want to add another Adblocker to catch those that the built-in Adblocker may miss. 

However, it is important to remember that too many extensions may slow down your performance and drain your battery but we have a guide on how you can stop the Brave browser from draining your PC’s battery.

How do I get rid of ads on Brave?

1. Update to the latest version

The first thing you need to do before trying any of the fixes below is to update your browser to the latest version. 

Usually, the browser is set to update itself automatically and download the latest version for you if there is one available. If not, you need to check for updates from the menu and install any new updates manually.

If you’re using an outdated browser, you will not only miss out on new opportunities and features but most likely end up encountering compatibility or performance issues over time, so take your time to address this.

2. Clear your browser cache and cookies

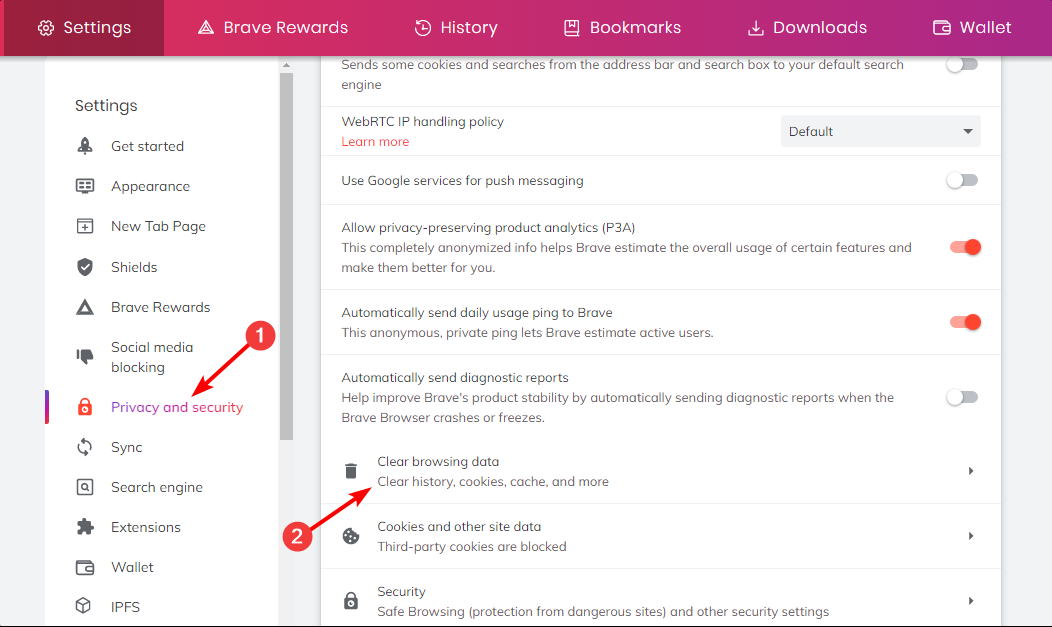
  1. Click on the menu at the top right corner of your browser and select Settings.
  2. Navigate to Privacy and security then select Clear browsing data.
  3. In the next window, hit the Clear data button.

3. Disable Adblockers

  1. Click on the menu at the top right corner of your browser and select Settings.
  2. Select Extensions and click on Manage extensions.
  3. Find the Adblocker and toggle off the disable button.

3.1 How do you turn Adblocker on in Brave

  1. Click on the menu at the top right corner of your browser and select Settings.
  2. Select Extensions and click on Manage extensions.
  3. Toggle on the enable button.

4. Reset Brave browser settings

  1. Click on the menu at the top right corner of your browser and select Settings.
  2. Scroll down, select Reset settings, and click on Restore settings to their original defaults.
  3. Hit Reset settings.

5. Submit a support ticket 

  1. Click on the menu at the top right corner of your browser and select Report a broken site.
  2. Enter all the details in the next window then Submit the ticket.

Is there a totally free ad blocker?

There are many free Adblockers out there that you can use to block ads on your computer and mobile devices. If you’re looking for an Adblocker that gets the job done without any fuss or bother, the Chrome Web Store has a library of capable extensions.

Brave Adblock is based on Chrome since it is built using Chromium (the open-source version of Google Chrome), meaning it can use any extensions that are available for Google Chrome.

You can search for an Adblocker on the web store and check for reviews to see which one is the best fit for you. While you’re at it, check out these awesome adblockers for Android browsers.

Finally, not all ads are bad and sometimes we may even enjoy particular types of commercials. Should you need help finding old advertisements, let’s say, don’t be shy to take a closer look at our dedicated guide.

Let us know whether our recommended solutions were able to help you get rid of ads in the comments section below.

0xC000015B Error: How to Fix This Logon Failure

Many users have complained that after making some changes to their computer, they could not log in using their PIN and encountered the 0xC000015B error.

The simple solution for this problem could be logging in using an alternate method and then changing the PIN. However, you can’t see other login options; this guide can help! We will explore effective ways to address the error and help you regain access.

What causes the 0xC000015B error?

There could be various reasons for this logon error; some of the common ones are listed here:

  • Incorrect user credentials – This error could occur if you have entered an incorrect or invalid username and password while logging in to your computer. Verify the credentials to fix it.
  • Corrupted system files – If critical system files related to the login process become damaged, it can result in login failures and errors. Run an SFC scan to repair the files.
  • User rights and permissions -Insufficient user rights and permissions can prevent successful logons and cause problems.
  • Network connectivity issues – If the Windows system relies on network authentication, the connectivity problems can cause logon failures and result in this error.
  • Corrupted user profile – A corrupted user profile can lead to logon failures and trigger the error. You need to create a new user account to access the computer.

Now that you know the causes, let us check the troubleshooting methods.

What can I do to fix the 0xC000015B error?

Before engaging in advanced troubleshooting steps, you should consider performing the following checks:

  • Try restarting your computer.
  • Use a different login method and then change the PIN.
  • Restart your router.
  • You must have administrative access to the PC to perform troubleshooting steps.

Once you checked all these, move to the solutions mentioned below.

1. Reset the PIN

  1. On the sign-in screen, click I forgot my PIN.0xc000015b Sign in
  2. On the next screen, enter your Microsoft account password.
  3. Verify your identity using your phone number, then enter the last four digits of your number.
  4. A code will be sent to your number; enter it and click VerifyVerify account`
  5. On the Are you sure screen, click Continue to change the PIN.PIN code
  6. Now on the Set up a PIN page, enter New PIN and confirm it, then click OK.Set up a PIN

If this is not working for you, you must follow advanced methods to fix the issue.

2. Run your computer in a Safe Mode

  1. Press and hold the Shift key on the Windows sign-in screen, click Power, then select Restart.
  2. Once your PC restarts, you will get Choose an option screen, and click Troubleshoot.Choose an option - Troubleshoot
  3. On the Troubleshoot screen, click Advanced options.Advanced options on Troubleshoot screen
  4. Select Startup Settings.0xc000015b Startup Settings
  5. Click Restart. It may prompt you to enter your BitLocker recovery key.
  6. After your PC restarts, you will get a list of options. Choose 4 or F4 to restart your computer in safe mode. If you want to use the internet, select 5 or F5 for Safe Mode with Networking.Sae mode with networking

Your computer will restart in safe mode; try changing the PIN now from the sign-in screen using Solution 1.

3. Perform the Startup Repair

  1. Press and hold the Shift key on the Windows sign-in screen, then click Power, then select Restart.
  2. From the Choose an option page, click Troubleshoot.Choose an option - Troubleshoot
  3. Click Advanced options.Advanced options on Troubleshoot screen
  4. Select Startup Repair.Startup Repair

Now Windows will attempt to diagnose and repair any issues preventing your system from starting up correctly.

Follow the on-screen instructions and wait for the repair process to complete. This may take some time. If it is successful, your Windows 11 system should boot up correctly.

4. Perform a System Restore

  1. On the Windows sign-in screen, press and hold the Shift key, then click Power, then select Restart.
  2. From the Choose an option page, click Troubleshoot.Choose an option - Troubleshoot
  3. Click Advanced options.Advanced options on Troubleshoot screen
  4. On the Advanced options page, click System Restore.Click System Restore
  5. Select Choose a different restore point in the System Restore window and click Next.Next Choose a different restore point
  6. Now select a point you want to revert to and click Next.Choose a point 0xc000015b
  7. Click Finish to start the process.Finish

Windows will restart & restore the selected version, and now try to log in. If System Restore doesn’t work for you, we advise you to check out our detailed guide to find solutions.

So, these are methods to fix the 0xc000015b on your Windows. If nothing worked for you, you must perform a clean installation of Windows to resolve the issue.

For any questions or suggestions, feel free to use the comments section below.

Xbox strongly hints Fable appearance at upcoming Xbox Games Showcase

It has been over half a decade since the reboot of the Fable franchise was first rumored. The game was formally announced at the Xbox Games Showcase back in 2020 and now, three years later, we may finally get to see something of the highly anticipated game.

A video post from the official Xbox Twitter account teases a glitter trail leading eventually to a computer screen displaying the Xbox Games Showcase logo. The glitter trail is an obvious allusion to that used in the Fable games to point the player to the next quest objective. The music accompanying the video is also unmistakably Fable.

This can only mean one thing: the new Fable game will be present in some form or another at the upcoming Xbox Games Showcase on June 11! All the more reason to get excited for the event, which will be followed up by the Starfield Direct.

Like with last year’s showcase, there will be a follow-up Xbox Games Showcase Extended 2 days later on June 13th. Find all the info you need to watch the Xbox Games Showcase 2023 right here.

Additional Authentication Needed on Xbox: 4 Working Fixes

Some of our readers owning an Xbox have reported encountering the Additional authentication needed error out of nowhere whenever they try connecting their gaming console to their home network. The error shows up abruptly despite no changes were made to the network settings. 

The Additional authentication error on Xbox can occur due to router issues, ISP restrictions, your router is blacklisted by the router, or you have a slow internet connection.

It is recommended to restart your router or modem, switch to a cable connection and check the Xbox Live server status. 

How do I fix the Additional authentication needed error on Xbox? 

1. Clear Alternate MAC address

  1. Press the Xbox button located on your controller to open the vertical menu and select Settings. 
  2. Next, switch General from the left vertical menu, then select Network Settings from the right-side panel. Additional authentication needed Xbox
  3. Next, click on the Advanced Settings menu from the next screen. Additional authentication needed Xbox
  4. Choose an Alternate MAC address from the sub-menu.
  5. Finally, select the Alternate Wired MAC/Alternate Wireless MAC option and press the Clear button to erase all the currently stored Alternate MAC addresses. 
  6. Once done, reset the gaming console and check if you get the Additional Authentication needed error upon connecting to a network.

2. Use your computer’s physical address

Note icon NOTE
To execute this method, your PC should be using the same wireless connection as your Xbox. Otherwise, you won’t be able to locate its physical address and copy it on the Xbox console. 
  1. Press the Windows key to launch the Start menu, type cmd in the search bar on top, and choose Run as administrator from the right search results section. Additional authentication needed Xbox
  2. Click the Yes button on the User Account Control (UAC) prompt to grant administrative privileges. 
  3. In the command prompt window, type or paste the following command and press the Enter key to view your current IP configuration. ipconfig/all Additional Authentication Needed
  4. Scroll down to access the physical address of the network shared by your PC and Xbox and note it down somewhere to use it later. 
  5. Once done, press the Xbox button on the controller and choose Settings from the Guide menu. 
  6. Click Network to access the network settings and choose Manual present under Alternate Wireless MAC address.
  7. Now paste the physical address that you copied earlier and save the changes. 
  8. Reboot your Xbox console and see if the additional authentication needed problem persists.

Using the Physical address of your PC as the default MAC address helps bypass the restrictions imposed by your ISP, which may be a possible reason for the additional authentication needed error.  

3. Interrupt a test connection

  1. Press the Xbox button on your console to access the Guide menu and choose Settings. 
  2. Select the Network from the right side of the General settings. Additional Authentication needed
  3. Next, click the Test network connection menu located in the Troubleshooting menu.
  4. After the test begins, press and hold the Xbox button until your controller shuts it down.
  5. Restart your Xbox console again and wait patiently until the corruption scan finishes. 
  6. After this, try to reconnect to the home network and see if the additional authentication needed error is solved. 

Interrupting your Xbox when testing the strength of your internet connection forces your gaming console to expunge all the temporary data and reboot as new, thus resolving the issue we are currently facing. 

4. Perform a power cycling

Note icon NOTE
Before performing this step, you need to ensure that your Xbox is fully booted (not in hibernate mode ) and currently in idle mode and not installing anything. 
  1. Press the Xbox button on your console for more than 10 seconds until the front LED lights stop blinking. Additional authentication needed
  2. After the console shuts down completely, release the button and disconnect its power cable on the rear end from the back of the power socket. 
  3. Now wait for at least thirty seconds to ensure that the capacitors are completely drained off then press the Power button once again to turn on the Xbox console. 
  4. Now reconnect to the internet once again, and you will no longer be prompted to perform additional authentication.

Performing the power cycling procedure will delete all the temporary data resolving the firmware-related issues with your Xbox which may be hindering your console’s ability to establish a successful connection.

That’s all about it! Hopefully, you can now successfully connect to the home network without running into the additional authentication needed error on Xbox.

Before you leave, you may want to fix the Xbox error 0x87DD0013, which prevents you from joining a chat game on Xbox.

Which of these methods worked in your case? Do let us know in the comments section. 

Microsoft launches Jugalbandi: an AI-powered platform and chatbot to bridge information gap in India

Microsoft, a pioneer in the artificial intelligence (AI) field, has made significant strides with its latest venture, Jugalbandi. This generative AI-driven platform and chatbot aim to revolutionize access to information about government initiatives and public programs in India. With nearly 22 official languages and considerable linguistic variations in the country, Jugalbandi seeks to address the challenges in disseminating information effectively.

The name “Jugalbandi” pays homage to Indian classical music, referring to a friendly competition between two musicians exchanging compositions. In this context, Jugalbandi signifies the dynamic exchange between the user and the AI system, fostering productive conversations.

Jugalbandi’s mission is clear and ambitious: to provide a free and open platform that combines the power of ChatGPT and Indian language translation models. By doing so, it aspires to break down barriers of literacy and language, enabling citizens to access vital information across various sectors, such as justice, education, and health.

The developers of Jugalbandi have tailored the platform to cater specifically to the Indian population. Notably, they have integrated the chatbot directly with WhatsApp, the most popular mobile communication platform in India. With over 480 million users nationwide, WhatsApp serves as a primary mode of social interaction, news consumption, and even financial transactions.

In addition, Jugalbandi benefits from the expertise of AI4Bharat, a government-backed initiative focused on developing open-source language AI systems for Indian languages. Powered by language and learning models from AI4Bharat, Jugalbandi leverages datasets, models, and applications created by an interdisciplinary team of researchers, language experts, and software developers. The initiative is primarily based at the renowned Indian Institute of Technology (IIT) in Madras.

Overall, this initiative has the potential to greatly benefit India by positively impacting the lives of its over 1.4 billion citizens, many of whom live in rural areas. Fortunately, India has invested heavily in developing the necessary technology and infrastructure to bring high-speed internet access to these areas, making it possible for Jugalbandi to serve and assist these communities.

Additionally, the platform has endless potential applications beyond its current use for government programs, such as connecting Indians in various sectors, including law, healthcare, banking, public health, and other important social initiatives.

Via: Forbes

Microsoft’s CMA appeal hearing set for July 24

Yesterday we reported on the latest in Microsoft’s bid to acquire gaming giant Activision Blizzard. We reported that Microsoft is requesting a quick resolution of its appeal of the CMA’s decision to block the deal in the U.K. A day later, it looks like Microsoft will get its way in this regard, as the hearing has now been set for late July.

The hearings will be conducted by the UK’s Competition Appeal Tribunal (CAT) between July 24 through July 31. The judge in the case, Marcus Smith, said

I’m not expecting it to take the whole of those 10 days but I would like the parties to err on the side of longer rather than shorter oral submissions. It seems to me that that is an excess that we can afford.

There is a tendency—and it’s very much driven by the Tribunal rather than the parties—to cut submissions to shorter than they perhaps ought to be. I want to do the reverse in this case. I want to have the parties understand that we will want to give them every opportunity to unpack the difficulties of this case in oral submissions and for us to have the time to do that.”

Cloud gaming is at the forefront of the CMA’s decision to block the Activision Blizzard deal.

The CMA had been requesting more time to prepare for the appeal, pushing for a late September/October window for the hearing. For its part, Activision was also pushing for an accelerated appeal process, with CEO Bobby Kotick saying “I think we and Microsoft and our barristers…think that there’s a way to accelerate the process…we should be able to get an accelerated result.”

In any case, the FTC in the United States has sued to block the merger, and that of course will present an entirely separate challenge. That case won’t begin until August, well after the initial merger agreement between Microsoft and Activision expires on July 18.

Via Pure Xbox.

Featured image via Pymnts.com. 

Intelligent meeting recap ships to general availability for Teams Premium

At the beginning of this year, Microsoft launched Teams Premium in general availability. It’s a new tier built on Microsoft Teams that is designed to enhance the tool’s meeting experience more personalized, intelligent, and secure. The offering is powered by GPT-3.5, OpenAI’s language model.

The Teams Premium Microsoft 365 add-on subscription ships with features such as real-time translation of captions, recommended tasks, personalized highlights customized meeting templates, watermarking, recording capability limiting, branded meetings, and more. And now, Microsoft has announced the general availability of the Intelligent meeting recap feature in Teams Premium.

The COVID-19 pandemic saw a lot of organizations transition to hybrid work in a bid to mitigate the spread of the virus. As such, most of organizations became dependent on online communication tools like Microsoft Teams, though the process hasn’t been as smooth. “55% of people report that next-steps at the end of a meeting are unclear, and 56% report that it’s hard to summarize what happens in a meeting,” explained Microsoft in the blog post.

But with the general availability of the Intelligent meeting recap feature in Teams Premium, Microsoft will be able to counter these issues. It generates meeting notes, recommended tasks, and personalized highlights automatically.

Additionally, it will help users cut down on unnecessary administrative work like taking notes or figuring out important takeaways that shift their focus from what truly matters. In turn, you are able to work smarter rather than harder.

What’s more, you can even use the automatically generated meeting notes powered by GPT-3.5 as well as highlights to catch up with important details shared during the meeting in case you were engaged elsewhere at the time.

thumbnail image 3 of blog post titled Intelligent meeting recap in Teams Premium, now available

Additionally, Teams Premium makes it easier for you to quickly review meeting recordings. The offering features a neat tool, AI-generated chapters which splits the recording into sections based on the meeting transcript.

Aside from that, Microsoft has also indicated that it’ll be revamping the meeting recap experience for all Teams users. Users can already catch up on all the meeting contents via the ‘Details’ tab of a meeting which includes links to the meeting transcript, recording, and any manual notes that were taken.

The new meeting recap experience will now be incorporated into the ‘Recap’ tab where users can catch up on meeting recording directly within Teams, as well as provide co-created collaborative meeting notes, meeting transcripts, and content shared. However, it is worth noting that not all Teams users will have access to the AI-powered insights that ship with the intelligent recap feature. You’ll need a Microsoft Teams Premium subscription for that.

To access the Intelligent meeting recap feature and more, Microsoft is offering an introductory fee of $7 per month that will be valid till June 30. From July, users will be required to make a payment of $10 per month. Be sure to check out our detailed post highlighting what Teams Premium is and how you can leverage its capabilities.

via Neowin

Remember Surface Book 2? Well, we’ve got some bad news

Back in November 2017, Microsoft unveiled the Surface Book 2, a groundbreaking 2-in-1 laptop that captured the attention of tech enthusiasts worldwide. After almost six years of providing users with exceptional performance and versatility, the Surface Book 2 has now reached its end of life (servicing date) on May 30, 2023, as we’ve noted from the tech giant’s firmware lifecycle document.

Build for Windows 10, the Surface Book 2 boasts a 15-inch/13-inch display, an eighth-gen Intel Quad-Core i7, 16GB RAM, and a variety of storage from 256GB, 512GB, or 1TB SSD. The price started at $1,499 for the 13-inch model and $2,499 for the 15-inch one.

At the time of its release, Surface Book 2 was a testament to Microsoft’s commitment to pushing the boundaries of technology. With its sleek design, detachable display, and powerful hardware, it quickly garnered a reputation as a game-changer in the laptop industry. The device boasted impressive features, including high-resolution touchscreens, detachable keyboards, and a range of configurations to cater to various user needs.

What does ‘End of Servicing’ mean for Surface Book 2?

The end of servicing date for the Surface Book 2 means that Microsoft will no longer release software updates or provide technical support specific to this device. However, it is important to note that the Surface Book 2 will still function as a reliable device even after the end of servicing, with users able to continue using their devices with the existing software.

Not too long ago, other products like Windows 10 20H2, also faced the end of its servicing cycle. The Home and Pro 21H2 version of the operating system is also coming to an end in June 2023, followed by Outlook and PowerPoint 2019 for Mac in October.

What do you think about Surface Book 2 end of life? Have you used the device? Let us know in the comments!

0xa3ea00c9 Error: How to Fix This EA Play Install Issue

It seems like gamers are always facing an issue on a daily basis. For instance, some users have trouble downloading games on their EA Play with the error code 0xa3ea00c9 displayed.

Such errors are not new, but they’re still annoying. If you encounter such an issue, it’s possible that you can’t connect to the EA servers, but let’s delve deeper and see what it means and how we can resolve it.

Why can’t I play EA games on Game Pass?

If you’ve been wondering why the error 0xa3ea00c9 is appearing when you try to download a game, below are some possible reasons:

  • Outdated EA app – If EA is yet to update its app, you may face compatibility issues, especially when downloading newer games.
  • Unlinked accounts – If your Xbox Game Pass and EA Play accounts are not linked, it is impossible to download any games.
  • Insufficient space – This may be the issue if you’re using an older computer with less storage space than newer machines. Most EA games come with extra features which require more storage space than the actual game itself. 
  • Wrong account – While EA Play allows you to link to Xbox Game Pass Ultimate account, certain accounts, such as child accounts, can’t be linked because of safety and security measures.

How do I get EA Play with Game Pass?

Ensure you meet the following prerequisites before moving on to the more technical solutions:

  • Close all running apps on your Xbox console.
  • Disconnect all peripherals, then reinstate only those needed for the game.
  • Verify that you have an active Game Pass subscription.
  • Check and free up some storage space in your PC.
  • Ensure you meet the age settings requirement for both Xbox and EA Play to link accounts.
  • Try downloading another game to isolate whether the issue is game-related or app-related.
  • Sign out of your EA Play account, then sign in back again.
  • Restart your PC and try again.
  1. Log out of your Xbox, EA Play, and Microsoft accounts.
  2. Hit the Windows key, type Powershell in the search bar, and click Run as administrator.
  3. Type the following command and hit Enter: Get-AppxPackage *gamingservices* -allusers | remove-appxpackage -allusers
  4. Next, type the following commands and press Enter after each one: Remove-Item -Path "HKLM:\System\CurrentControlSet\Services\GamingServices" -recurse Remove-Item -Path "HKLM:\System\CurrentControlSet\Services\GamingServicesNet" -recurse
  5. Restart your PC and sign into the respective accounts. 

The idea behind relinking is to ensure that your account IDs match throughout the three accounts: Microsoft Store, Xbox, and EA Play. Otherwise, you’ll have trouble accessing games.

If re-linking does not resolve the issue, you may have to contact EA Play support. Some users reported that they were extremely helpful in resolving this matter, so it’s worth a try if you’ve run out of options.

There you have it. That’s how to resolve the error 0xa3ea00c9. You may also encounter another error where you can’t play EA games online, but we’ve already covered how to bypass this issue in our detailed guide.

To learn more about EA Play, we have an entire guide dedicated to EA Play early access, so be sure to check it out.

We’d love your feedback on this issue, so let us know if this solution worked for you in the comment section below.

How to Set Up a Dev Drive on Windows 11

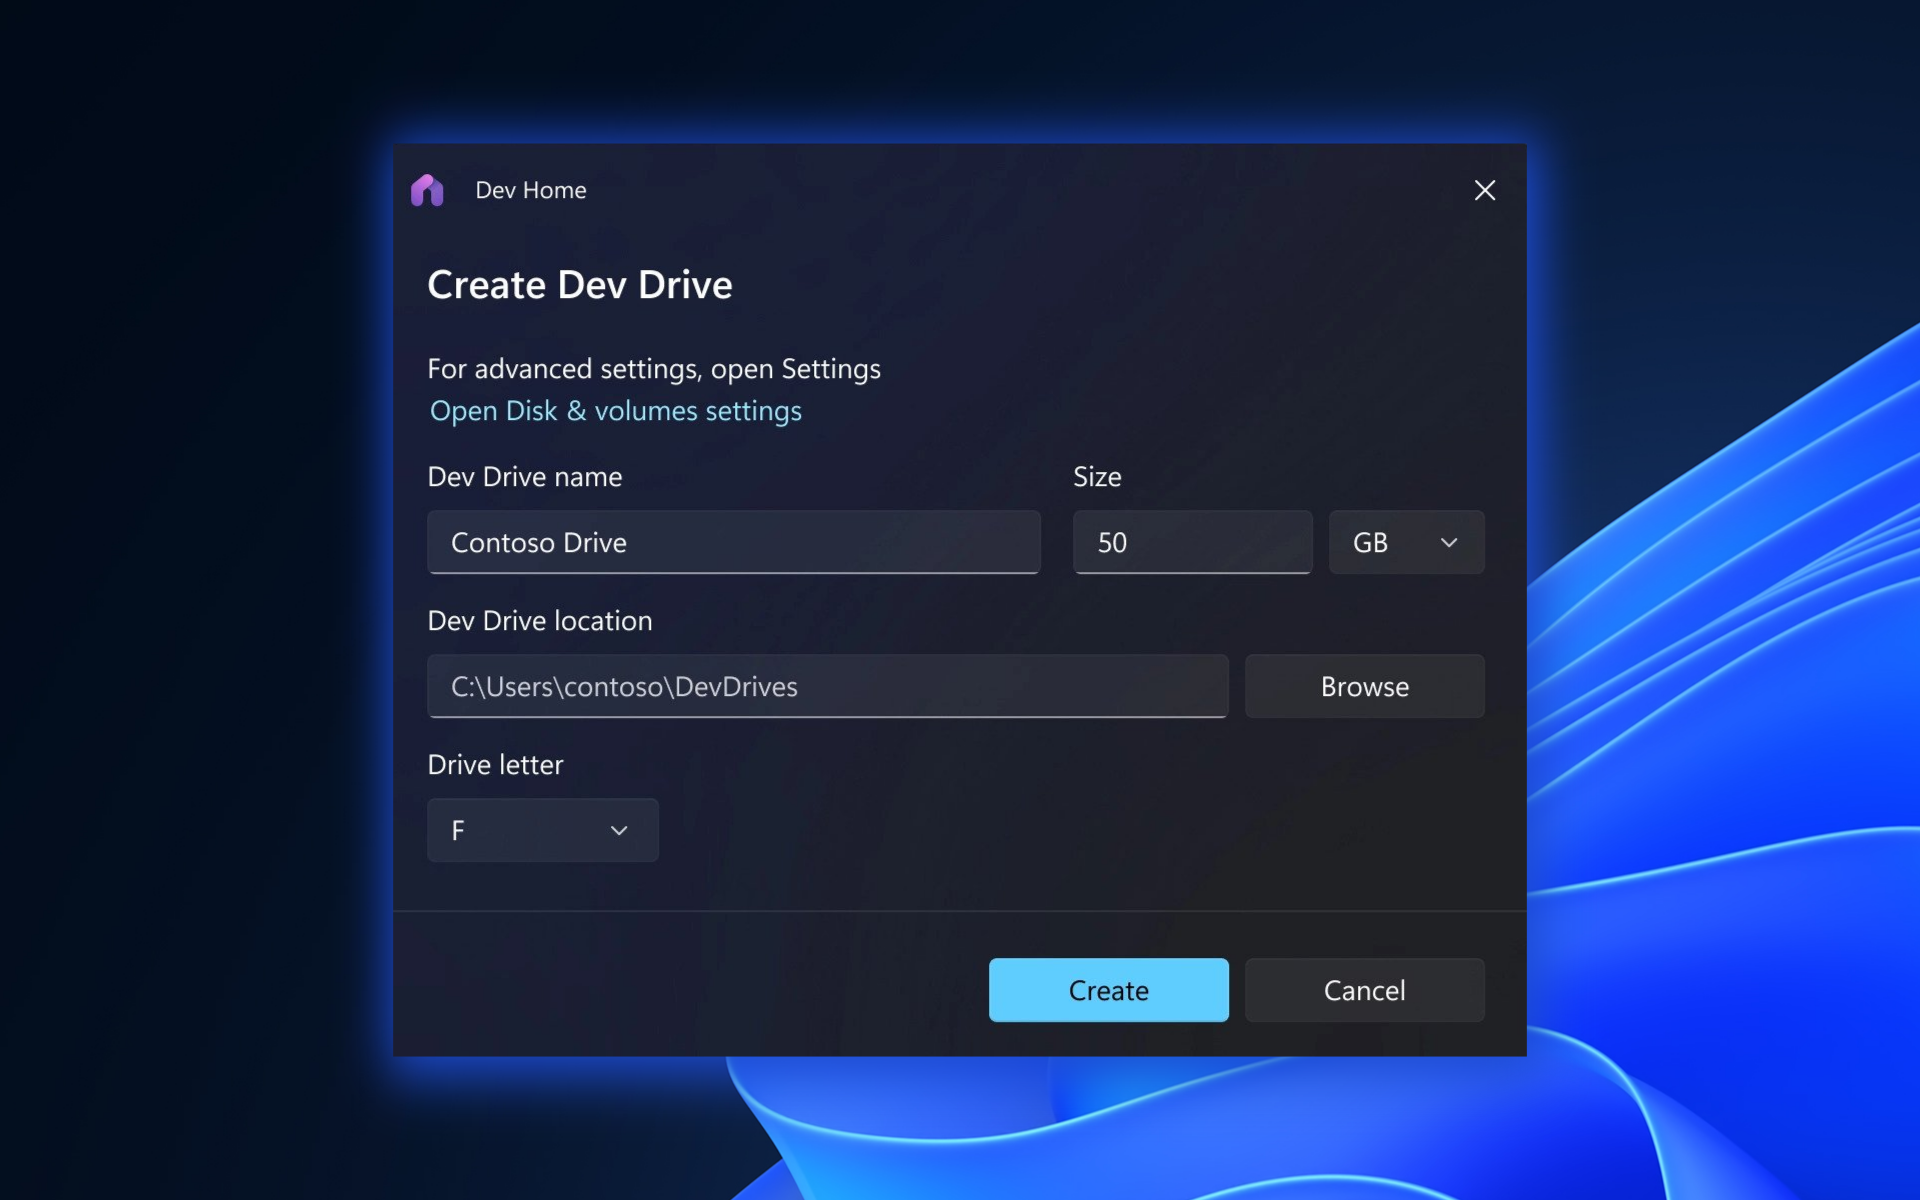
As a developer, dealing with repositories containing thousands of files and directories can be challenging, especially when it comes to heavy I/O operations like builds. Fortunately, here comes the good news: Microsoft introduced a new storage volume feature set called Dev Drive, specifically designed for developers, offering enhanced performance and security on Windows 11. 

As the Redmond-based tech giant’s blog post noted, your system needs to run on Windows 11 and have sufficient available storage. Dev Drive should also not be used to store developer tools like Visual Studio, MSBuild, .NET SDK, Windows SDK, etc. These tools should be stored on your main C:\ drive.

Nevertheless, Microsoft has announced that this feature will be available in the Preview channel within this week, indicating that it may take some more time before it becomes widely accessible to the general public. We’ll keep you updated as we go. 

And, as spotted by Windows insider @PhantomOfEarth, if you have the For developers setting opted in, you will see all your Dev Drives within the Settings app. 

If you’re still curious how it will work, we’ll walk you through setting up a Dev Drive to supercharge your development workflow.

How to set up a Dev Drive on Windows 11?

1. Click on the Start menu and select the gear icon to open the Windows Settings window.

2. In the Windows Settings window, click on the System category and choose Storage from the left-hand sidebar

3. Click on Advanced Store Settings under the Storage section.

4. Within the Advanced Store Settings, locate and click on the Disks & Volumes option to open the configuration settings for your system’s disks and volumes.

4 In the Disks & Volumes settings, click on the Create dev drive option.

5. A setup wizard will guide you through creating your Dev Drive. Choose the appropriate size and follow the wizard’s instructions.

6. After specifying your Dev Drive’s size, follow the instructions provided by the setup wizard to finalize the creation. 

With the introduction of Dev Drive on Windows 11, developers now have a specialized storage volume to enhance their productivity. And, if you’re a developer on the market for some good browsers, we’ve also got you covered.

Before you leave, find out all about Windows SDK and start developing apps today! In case you want to know how to enable/disable Dev Drive Protection on your computer, we have a detailed guide to help you with that.

What do you think about the introduction of Dev Drive on Windows 11? Let us know in the comments!

Xbox Gamertag Search: How to Find Any Player

If you’ve played games online, you know that your Gamertag is your identity in the game world. It’s how other players see you and how they’ll recognize you.

This guide will walk you through all the steps to find Xbox Live Gamertags on your own and share them with others.

Is there a need to look up Gamertags?

For gamers, this is important because you want to make friends when playing online. Your Gamertag is also the only way to identify players when searching for opponents online. 

Other reasons include:

  • Unable to log in to Xbox – If you’re unable to log into your Xbox account because you have forgotten your email, searching for your Gamertag can help you find the email linked to your account and regain access.
  • Add a friend – If your friend has recently joined Xbox and you want to play with them, finding their Gamertag will allow you to add them as a friend.
  • Find your own profile – Sometimes, your Xbox profile may not show your Xbox Gamertag, so the only way is to find your own profile. This is especially if you want to recommend yourself to another friend and don’t have the correct name.

How do I look up an Xbox Gamertag?

1. Use the official site 

  1. Navigate to your browser and log in to your Xbox account.sign in to Xbox with Microsoft account
  2. Switch to the Friends tab and start searching for their Gamertags.
  3. If it’s available, you’ll see a list of results appear. You can then click on one of these results to view more details about that player, including their real name and location.

It’s important to note that with this method, you cannot partially enter a Gamertag to generate search results. You need to know the entire ID to search.

2. Use a search engine

You can also use a free search engine, Xbox Gamertag, to look up your friends. Provided the user you’re searching for is not private, you can access their Gamerscore, the number of games played, recent game clips, and games history.

This information may look basic, but for gamers, it is a gold mine because, from here, you’re able to evaluate worthy opponents. Their game history also lets you know whether your taste in games is aligned or whether you should keep looking.

Can you check if an Xbox Gamertag is taken?

Yes, you can. The recommended search engine above makes it easy to find any Gamertag. Gamertags are usually unique, so finding more than one person with the same Gamertag is impossible.

Once you have verified it is available and want to use it, you can follow through the Xbox guide on changing your Gamertag. Xbox allows you to change your Gamertag once for free, but it will be charged any other time.

So, if you’ve been wondering why it costs 10 dollars to change a Gamertag, It is because you have exhausted your free chances. However, the actual reason is to tame the number of change requests.

Gamertag changes require server space and result in extra expenses for Xbox. The price is also not fixed, and it may go up the next time you want to change it.

If you have problems changing your Gamertag, check out our article for quick fixes. Also, check out the highest Gamerscore leaderboard to see who you could be potential opponents.

That brings us to the end of how to search for an Xbox Gamertag. If you’d like to know how to find someone on Xbox without a Gamertag, you can go through your suggested friends list.

It may be tedious to go through it, so you should consider the methods recommended above.

Leave any additional thoughts you may have on this topic.

Why has Firefox ended support for Windows 7, 8, and 8.1?

In a recent blog post, Firefox announced that it has ended support for Windows 7, 8, and 8.1. So if you’re still using this browser on these Windows versions, then you might have to update.

Extended support for these Windows versions is still guaranteed until September 2024. So you have a few months before Firefox shuts its doors to the older Windows OSes.

The current version, Firefox 115, is also the last Firefox version for Windows 7, Windows 8, and Windows 8.1. You will be moved to the Firefox Extended Support Release and you will receive security updates until the browser version becomes obsolete.

However, after that date, no more security updates will be provided, and browsing on Firefox can leave you very vulnerable to attacks, viruses, and malware.

So why has Firefox ended support for Windows 7, 8, and 8.1?

It seems that Mozilla is following Microsoft’s roadmap for Windows. Microsoft ended support for Windows 7, 8, and 8.1, so Firefox agrees that it is no longer suitable to provide support for these Windows versions.firefox windows 7 support

Microsoft ended official support for Windows 7, 8 and 8.1 in January of 2023. Unsupported operating systems receive no security updates and have known exploits. With no official support from Microsoft, maintaining Firefox for obsolete operating systems becomes costly for Mozilla and dangerous for users.

Mozilla

As we said earlier, these versions will still get critical security updates that will allow you to safely browse the internet. Still, Mozilla advises you to update your Windows to the latest version, even if you’re still on Windows 7.

What to do then? You can either update to Windows 10, or you can update to Windows 11, and then you will be able to enjoy Firefox’s newest features. You need to know, though, that Windows 10 will officially reach the end of support on October 14, 2025, so Windows 11 seems to be the better idea.

Are you using Firefox on Windows 7 still? What’s your experience with it? Let us know in the comments sections below.

Windows is Scrolling By Itself: 8 Ways to Fix This

Whether browsing the web, working on a document, or simply navigating through your files, the sudden and uncontrollable scrolling can disrupt your workflow and make using your computer challenging.

Fortunately, several methods exist to address the Windows 10 scrolling bug and regain control over your experience.

What causes the Windows scrolling itself issue?

There could be several reasons for this scrolling bug; some of the common ones are mentioned here:

  • Driver or software conflicts – Conflicting or outdated drivers related to input devices such as mice could lead to erratic scrolling behavior. Try updating the driver.
  • Malfunctioning or dirty input devices – Physical issues with the input devices, such as a malfunctioning mouse scroll wheel or a sticky touchpad, can cause unintended scrolling.
  • Background apps – Running applications or processes that consume excessive system resources can lead to lag or delays in input responsiveness.
  • Malware infection – Malicious software or viruses can interfere with system operations, including input devices, resulting in abnormal scrolling behavior. Run a deep scan using an antivirus tool.
  • Accessibility settings – If the accessibility settings in Windows, such as Scroll inactive windows when I hover over them, are enabled, you could face this issue.

How can I fix the Windows scrolling itself issue?

1. Run a hardware troubleshooter

  1. Press Windows + R to open the Run window.Hardware and device troubleshooters windows 10 scrolling bug
  2. Type msdt.exe -id DeviceDiagnostic and click OK to open Hardware and device troubleshooter.
  3. Click Next.Initiate the scan
  4. It will start detecting issues and will list if there will be any. Click Apply this fix.Apply this fix
  5. Follow the onscreen prompts to complete the process

2. Remove the hidden devices

  1. Press Windows +R to open the Run dialog box.Device Manager Run command
  2. Type devmgmt.msc and click OK to open the Device Manager app.
  3. Go to View and click Show hidden devices.Shoe hidden devices Device Manager Run command
  4. Locate and expand Mice and other pointing devices. If too many mouse devices are installed, right-click and select Uninstall device.Uninstall device
  5. Then, plug in the mouse and reboot your computer.

3. Tweak the mouse settings

  1. Press Windows + I to open the Settings app.
  2. Click Devices.Devices windows 10 scrolling bug
  3. Select Mouse from the left pane.
  4. Locate Scroll inactive windows when hovering over them and toggle off the switch next to it.
  5. For the Roll the mouse wheel to scroll option, select the Multiple lines at a time option.Mouse settings scroll window
  6. Click the Additional mouse settings link. Additional settings
  7. Go to Wheel, and make sure Vertical Scrolling and Horizontal Scrolling are set too high. Once done, click Apply, then OK.Vertical and horizontal scrolling

4. Reinstall the mouse driver

  1. Press Windows + R to open the Run dialog box.device manager windows 10 scrolling bug
  2. Type devmgmt.msc and click OK to open the Device Manager app.
  3. Locate, expand Mice and other pointing devices, & right-click Uninstall device.Update device
  4. Now click Action from the top menu and select Scan for hardware devices.Scan for hardware changes
  5. Reboot your computer to save the changes.

5. Uninstall the Windows Updates

  1. Press Windows + I to open the Settings app.
  2. Click Update & security.Update & security windows 10 scrolling bug
  3. Go to Windows Update, and click View update history.View installed updates
  4. Click Uninstall updates.Uninstall updates
  5. Locate the recently installed Windows Update and click Uninstall.Uninstall Windows update
  6. Follow the onscreen instructions to complete the process.

6. Run SFC & DISM scans

  1. Press the Windows key, type cmd, and click Run as administrator.windows 10 scrolling bug Command Prompt Windows Run as Administrator
  2. Copy & paste the following command to repair system files and hit Enter: sfc/scannowScan now Windows 10
  3. Wait for the process to complete, and type the following command to restore the Windows OS image and press Enter: Dism /Online /Cleanup-Image /RestorehealthRestore health
  4. Restart your computer to save the changes.

7. Perform a System Restore

  1. Press the Windows key, type control panel, and click Open.CP windows 10 scrolling bug
  2. Select View by as Large icons and click Recovery.Recovery Windows 10
  3. Click Open System Restore.Open System restore
  4. On the System Restore window, click NextNext Restore point.
  5. Select the restore point and click Next.Restore your computer
  6. Click Finish to initiate the process.Restore

Windows will restart and restore the old version on your computer. If System Restore didn’t successfully complete, we recommend you check out this informative guide for solutions.

8. Change the background settings

  1. Right-click the empty space and click Personalize.Personalize
  2. Click Colors from the left pane.
  3. Remove the checkmark Automatically pick an accent color from my background.Colors

This solution only applies to people with a Slideshow background as it constantly changes; the automatic accent color picks a new color every time. So, due to this, Windows refreshes every time the image changes.

Youcan also:

  • Try restarting your machine and checking if all Windows updates are installed.
  • Examine the mouse wheel to check if there is dust or dirt.
  • Check the mouse cable for damage, and remove & replug it.
  • Use a different USB port to connect the mouse.
  • Disconnect all the external peripherals if not in use.
  • Check if any key is stuck on your keyboard, and gently release it.
  • For the wireless mouse, try changing the batteries.
  • Boot your computer in safe mode and check if the issue persists.
  • Use a different mouse or try a different keyboard.
  • Sign out of your user account and sign in again.

So, these are methods you can use to fix the Windows 10 scrolling bug and take back control over the scrolling behavior of your Windows machine for a more productive computing experience.

If you’ve ever experienced the frustrating issue of Windows Settings endlessly scrolling down, check our guide that addresses this problem.

We also recommend reading our guide on how to stop the autoscrolling on Windows 11 if you have upgraded your OS.

If you have any questions or suggestions, feel free to use the comments section below.

How to add more clocks to Windows 11

There are times when you need to check what time is in other parts of the world, especially if you work with people who live in different countries. Fortunately, Windows 11 has a feature that lets you add more clocks to your desktop.

Whether you’re managing international projects, planning meetings, or simply keeping in touch with friends and family around the world, Windows 11 makes it easier than ever to stay synchronized. Gone are the days of mentally calculating time differences or switching between multiple timekeeping apps. With this feature, Windows 11 offers a streamlined solution to manage time across the globe.

Once toggled, you can see additional clocks being displayed on top of your calendar from the taskbar. You’re also free to customize them however you want – add an Eiffel Tower emoji for France (GMT+2). Or a Japan flag for Tokyo (GMT+9)? It’s your call. 

With this simple guide, you’ll be able to add more clocks to your Windows 11 desktop. 

How to add more clocks to Windows 11

1. Open the Settings app.

2. Go to Time & language ➜ Date & time.

3. Scroll down and click on Additional clocks.

4. Click on the toggle that says Show this clock for it to appear.

5. Select the desired time zone, and you can also rename it with emojis. 

6. Click Apply and OK.

Speaking of which, there’s also a feature that lets you show seconds on your clock, which began rolling out starting from the KB5023780 update back in March 2023. We’ve also reported on other features and fixes that came with the update. It’s worth checking out.

What do you think about the feature to add more clocks to Windows 11? Have you tried it? Let us know in the comments!

Enable File and Folder Compression: What is it & How it Works

Reducing the size of the file or folder gives you some extra space on your PC for other important things. We usually ZIP the file and decompress them when needed.

But Windows OS has a new feature that facilitates enabling file and folder compression. In this guide, we will learn more about this feature and see how it works.

What is Enable File and Folder Compression feature?

Windows OS comes with a feature called Enable File and Folder Compression, that lets you compress the file and folders and use them without decompressing them.

This feature is available within the Disk Management tool. Using the File and Folder Compression feature, a file’s redundant data, text characters in the file, etc. are removed and compressed to save space.

However, do note that since the files are compressed using the Enable File and Folder Compression feature, your PC will take some time to open it since it isn’t practically decompressing it.

The good thing about the Enable File and Folder Compression feature is that it simply allows you to compress the data, you can access everything without losing anything. This is called Lossless Compression.

What is the connection between NTFS and the Enable File and Folder Compression feature?

A lot of our readers have asked the question that what is the relation between NTFS and the Enable File and Folder Compression feature.

They pointed out why the file and folder compression feature isn’t visible for all the drivers or partitions on their PCs.

The answer to this question is that the Windows File Compression technique compresses a drive that is a part of the NTFS file system. Notably, the Enable File and Folder Compression feature uses a built-in compression feature called NTFS compression.

So, you are actually using the NTFS compression feature which drives the data into the control unit and compresses each unit automatically and individually.

What are the ideal cases for enabling file and folder compression?

Not always you would want to use the Enable File and Folder Compression feature. Below are some of the best most apt scenarios where you can opt for this compression feature.

  • You can compress files and folders that aren’t used regularly. Compressing them will let you open them whenever you need them, while the rest of them won’t eat up the space.
  • File compression can come in handy, especially for SSDs that have a limited quota of space available.
  • Files that are required to be shared over the network can be compressed using the compression feature and data can be saved while the transfer process can occur at a good speed.
  • Also, if the processing power of your PC is slow, you can compress the files freeing up more resources for other important tasks.

How to use Enable File and Folder Compression on Windows?

  1. Press the Win key to open the Start menu.
  2. Type Disk Management and open the top result.
  3. Right-click on the already created NTFS partition or the NTFS partition that you have recently created and select Format.
  4. Check the box for Enable file and folder compression. Choosing this option will automatically compress everything within the partition.

The above steps are good if you have a NTFS file system partition as the file and folder compression is available for NTFS only.

In case you have a FAT32 file system, you can first convert them into NTFS and then use the File and Folder Compression feature.

When should I not use the file compression feature?

Here are some kinds of files that you should not compress or think of compressing:

  • Windows system files and folders. Since compressing these files can affect your system performance, in fact, can break your system.
  • Files that are already compressed should not be compressed. This is because you won’t see many improvements and there will be negligible file space saving.
  • We would advise you from using the file and folder compression for game folders as it will make the game lag and you won’t get optimal performance.

That is it from us in this guide. In case you want to compress other file formats, you can check out the list of some of the best file compression tools that you can opt for on your Windows PC.

Feel free to let us know in the comments below if you understood how the file and folder compression feature works and when should you use this feature.

How to Update Your Gigabyte BIOS [3 ways]

Fixing any motherboard-related issues require you to make sure that you are running the latest version of the BIOS. Updating the BIOS of a Gigabyte motherboard can be a complex task and you should follow proper steps to accomplish it.

In this guide, we will share with you all the different ways via which you can easily update Gigabyte BIOS on your PC. Let us check out the methods.

How to check the BIOS version you currently have?

  1. Open the Start menu by pressing the Win key.
  2. Type System Information and open the top result.
  3. Locate BIOS Version/Date section on the right side.

Note down the version of the BIOS you are running. This will let you decide whether you are running the latest version or not.

How can I update Gigabyte BIOS?

1. Use the Gigabyte App Center

  1. Download the Gigabyte app center.
  2. Install the App Center on your PC and launch the program.
  3. Click on the downward arrow in the top-right corner.
  4. Click on @BIOS.
  5. Switch to the Update from Server tab.
  6. Choose the closest server.
  7. The App Center will automatically detect your motherboard details and provide you with the latest BIOS update.
  8. Click on the file and select Next.
  9. Follow the on-screen prompts and install the BIOS update.

Updating the Gigabyte motherboard BIOS using the App Center is probably the easiest way. It simply needs you to perform some clicks and you are all set.

Apart from updating BIOS, you can also use the Gigabyte App Center to update the drivers as well. You can manually update the BIOS using the App Center as well. For that, you need to download the BIOS update file onto a USB drive and then select it within the App Center.

2. Use Gigabyte Q-Flash

2.1 Format the USB drive to FAT32

  1. Insert the USB flash drive to your PC.
  2. Press Win + E to open the File Explorer.
  3. Right-click on your USB drive and click on Format.
  4. Choose FAT32 from the File system dropdown menu.
  5. Click on the Start button.

2.2 Download the Gigabyte BIOS update

  1. Visit the official Gigabyte motherboard support page.
  2. You can search for the BIOS file based on your processor, chipset, or even your computer’s model name.
  3. Select BIOS for your computer model.
  4. Under the BIOS section, download the latest available update.
  5. Once the download is complete, extract the contents onto your FAT32 formatted USB drive.

2.3 Update the BIOS

  1. Insert the USB drive containing the Gigabyte BIOS update file into any USB port on your PC.
  2. Restart your PC and when it is booting up enter the BIOS menu by pressing the Del key.
  3. Select Q-Flash menu.
  4. Choose Update BIOS option.
  5. Locate the BIOS update file and select it.
  6. Start the BIOS update process.
  7. Once the BIOS is updated, switch to the Save & Exit tab, and select Load optimized defaults.

This process of the Q-Flash method may look a bit complex, but in reality, it isn’t. All you need to do is follow the steps mentioned above carefully and you will be done with the Gigabyte BIOS update process without any issues.

Make sure that the USB drive onto which you have copied the BIOS update file is in FAT32 format.

3. Use the Q-Flash+ update method

  1. Copy the BIOS update file downloaded from the Gigabyte official website to the FAT32 formatted USB drive.
  2. Insert the USB drive into the white USB port on your motherboard.
  3. Turn on the motherboard.
  4. The LED light next to the USB will flicker indicating the BIOS update is in progress.
  5. Once the update is complete, the LED will stop blinking.
  6. Start your PC and wait for the BIOS update process to complete.

This is another one of the Gigabyte exclusive ways of updating the BIOS. However, there are some other manufacturers that offer the same process of updating the BIOS. You should check with your manufacturer about that.

That is it from us in this guide. You can check out our guide that gives you a proper explanation of what is BIOS and everything that you need to know about BIOS.

We have also listed 3 different ways to access the BIOS menu on your computer that will be beneficial to update the BIOS. In case you come across any issues, you can read our guide to fixing the BIOS corruption issue on a Windows PC.

Feel free to let us know in the comments below, which one of the above methods you used to update the Gigabyte BIOS.

Fix: BEDaisy.sys Blue Screen When Launching Games

Many of our readers have reported that when they launch any game on their PCs, they are treated with the BEDaisy.sys BSoD error. This Blue Screen of Death error crashes their PC and they are unable to play certain games.

In this guide, we will give you a list of solutions that will help you resolve the BEDaisy.sys BSoD error on your PC, after which you will be able to play games without any issues. Let us get right into it.

What is causing the BEDaisy.sys BSoD error?

We did some research and after going through multiple user reports, we have prepared a list of reasons that could trigger the BEDaisy.sys BSoD error when launching games.

  • There is a problem with the game: Chances are some important game files are corrupt or could not load properly because of which you are getting the error.
  • Corrupt system files: System files when corrupt or go missing can cause multiple issues when the programs are installed on the computer.
  • The overclocking tool is causing the problem: The overclocking tool that you are using might be malfunctioning the system resources because of which you are getting the BEDaisy.sys BSoD error.
  • The issue with the network driver: There are chances that this BEDaisy.sys BSoD error is related to the network driver.

Now let us apply the different solutions and try resolving the BEDaisy.sys BSOD error.

How can I resolve the BEDaisy.sys BSoD error?

1. Reinstall the problematic game

  1. Press the Win key to open the Start menu.
  2. Open Control Panel.
  3. Select Programs and Features.
  4. Click on the game and hit the Uninstall button.uninstall program roblox configuring stuck
  5. Follow the on-screen steps to completely remove the game.
  6. Visit the official website of the game and reinstall the game without interruptions.

2. Check the game file integrity

  1. Launch Steam client.
  2. Click on Library at the top.
  3. Right-click on your game from the left pane and select Properties.
  4. Click on LOCAL FILES.
  5. Select Verify the integrity of game files option.
  6. Steam will begin verifying the games files and fix if found any problems.

Chances are the game files are corrupt or have some issues, which can be resolved or at least identified by verifying the integrity of the game files.

3. Run SFC and DISM scans

  1. Press the Win key to open the Start menu.
  2. Type command prompt and run it as an administrator.
  3. Type the below command and press Enter. sfc /scannowFvevol.sys
  4. Wait for the process to finish.
  5. Type the below commands and press Enter after each one. Dism /Online /Cleanup-Image /CheckHealth Dism /Online /Cleanup-Image /ScanHealth Dism /Online /Cleanup-Image /RestoreHealth
  6. Restart your PC.

Fixing corrupt system files can also help resolve the BEDaisy.sys BSoD error as there might be chances that some important system files are unable to load that are required by the game.

In any case, we suggest specialized repair software that runs automatically on your PC and fixes corrupted files that generate screen issues.

4. Reinstall the network drivers

  1. Press the Win key to open the Start menu.
  2. Type Device Manager and open it.
  3. Expand the Network adapters section.
  4. Right-click on your network driver and select Update driver option.
  5. Select Search automatically for drivers option.
  6. Install the latest update and restart your PC.

Failure to communicate with the server can often cause games to crash and throw BSoD errors such as BEDaisy.sys. You can try updating the network driver and check if this resolves the issue or not.

5. Disable the Intel Turbo Boost Technology

  1. Power off your computer.
  2. Press Esc to enter the BIOS menu.
  3. Select BIOS/Platform Configuration (RBSU).
  4. Choose Performance Options.
  5. Change the Intel Turbo Boost Technology option to Disabled.
  6. Save the changes by pressing F10 key and reboot your PC.

Many of our reader reports suggest that disabling the Intel Turbo Boost Technology helped them resolve the BEDaisy.sys error.

This is because turning this feature on utilizes more resources and in turn increases the temperature of the PC causing all sorts of crashes. Simply disable it and check if this fixes the issue or not.

That is it from us in this guide. We have a guide that will help you with a list of the best BSOD fixers that will resolve the issue automatically. And if it’s a BSoD on only one game, we’ve got that covered too.

You can also check out our guide that explains how you can resolve the Wdfilter.sys BSOD error on your Windows PC.

Let us know in the comments below, which one of the above solutions fixed the problem of BEDaisy.sys error.

4 Ways to Quickly Reinstall Your Mouse Driver

There are certain instances when one of the essential input devices of your PC, the mouse, won’t work correctly. In such cases, you might need to reinstall the mouse driver.

In this guide, we will explain to you the different ways you can follow to reinstall the mouse driver on your Windows PC. Let us get right into it.

Why do I need to reinstall the mouse driver?

Reinstalling drivers not only comes in handy when the device is malfunctioning, but it also comes in handy when you have moved to a new PC or cannot update your device’s drivers.

Here are a few reasons why you would need to reinstall the mouse driver.

  • The mouse isn’t functioning properly – The mouse does not act on your inputs and isn’t doing a perfect job.
  • The mouse driver is outdated – Chances are some important files are missing because of this you cannot update the mouse driver.
  • There is a driver conflict – Often third-party apps can interfere with the system drivers and can cause them to misbehave, which is when you would need to reinstall the mouse driver.

Now, let us check out the different ways via which you can easily and quickly reinstall the mouse driver.

How can I reinstall the mouse driver?

1. Reinstall using Device Manager

  1. Press the Win key to open the Start menu.
  2. Type Device Manager and open it.
  3. Expand the Mice and other pointing devices.
  4. Right-click on your mouse and select the Uninstall device option.
  5. Make sure that the box for Delete the Driver Software for This Device is selected.
  6. Restart your computer.
  7. Once your PC restarts, the mouse driver will be automatically installed.

This is one of the most effective ways of reinstalling the mouse driver on your PC. You do not need to install the driver again from the website, the system will do that for you once your PC boots up.

2. Download and install the driver manually

  1. Visit the official website of the mouse manufacturer.
  2. Download the compatible mouse driver for your mouse.
  3. Launch the EXE, it will ask you whether you would like to Repair or Reinstall the driver. Select Reinstall.
  4. Restart your computer.

For your mouse brand, there is a dedicated mouse driver download page that you can visit using any web browser. To install Microsoft mouse and keyboard drivers, you can visit this official driver download center.

3. Using a dedicated tool

In case you have uninstalled the mouse driver on your PC and the driver fails to reinstall, you can always rely on a dedicated driver downloader tool.

A dedicated driver updating tool will help you update all outdated drivers on your PC. Also, it will remind you when you need to update your drivers to avoid any mishaps.

Reinstalling drivers can also help you get the latest update when you install the driver back on your PC.

Hence, you should employ this standalone application to install or update any driver on your PC entirely safely.

Outbyte Driver Updater

Reinstall any type of mouse driver using this rich database driver solution.
Free trial Visit website

4. Use Windows Update

  1. Press the Win + I keys to open the Settings menu.
  2. Click on Windows Update on the left pane.
  3. Select the Check for updates button.
  4. Install all the pending updates.
  5. Click on Advanced options.
  6. Select Optional updates.
  7. Check the boxes for the available updates and press Download & install button.
  8. Restart your PC.

Often mouse drivers arrive as a part of the Windows update, where you can download and install them to reinstall the mouse driver on your PC. Also, do not forget to check the Optional Updates section for the mouse drivers.

Mouse drivers aren’t necessary in case you have a simple mouse with un-customizable buttons. However, if you own a mouse with multiple buttons and RGB lighting then you need to install the mouse drivers to customize them according to your needs.

That is it from us in this guide. We have a guide that explains how you can resolve Event ID 5379 where the mouse disconnects frequently.

For some users, the right-click context menu doesn’t show up. If you are also facing the same issue, then you should apply the solutions in our guide to resolve the problem.

Also, Windows 11 users have complained that the mouse sensitivity on their PCs changes without their input. Such issues can be easily resolved by applying the solutions in our guide.

Let us know in the comments below, which one of the above solutions you used to reinstall mouse driver on your PC.

0x800704f1 Windows Update Error: How to Fix It

Windows updates are important for the effortless running of your PC. However, the update process is not always smooth, as some users complain of a Windows update error 0x800704f1.

Unlike some update errors, this one does not go away with a simple PC restart. Thankfully, it is not the most difficult issue to fix, provided you apply the fixes in this guide.

What is error code 0x800704f1?

The error 0x800704f1 usually occurs when users initiate the update process manually instead of allowing their PCs to perform the task automatically.

Below are some of the causes of this error:

  • Faulty system files: Sometimes, this issue can be due to corrupt or broken system files on your PC. The solution to this is to repair and restore these files and restart your PC.
  • Issues with some system services: System services like the Background Intelligent Transfer Service are important for the Windows update process to work normally. Restarting these services should do the trick here.

How do I fix the Windows update error code 0x800704f1?

1. Reset Windows update components

  1. Press the Windows key, type cmd, and select Run as administrator under Command Prompt.
    cmd admin
  2. Type the commands below and press Enter after each: Net stop bits Net stop wuauserv Net stop appidsvc Net stop cryptsvc Del %ALLUSERSPROFILE%\Microsoft\Network\Downloader\qmgr*.dat /Q Del "%HOMEDRIVE%\Users\All Users\Microsoft\Network\Downloader\qmgr*.dat" /Q Del %WINDIR%\SoftwareDistribution\*.* /s /Q Net start bits Net start wuauserv Net start appidsvc Net start cryptsvc
  3. Finally, wait for the commands to finish running and restart your PC.

Issues with the Windows update components can cause the error 0x800f0841. This problem can be resolved by restarting the required components and renaming the update folders.

This is made easy by running the commands above.

2. Restart some services

  1. Press the Windows key + R, type services.msc, and click the OK button.
    services
  2. Double-click the Background Intelligent Transfer Service to open its properties.
    background
  3. Now, set its Startup type to Automatic and click the Start button.
    automatic 0x800704f1
  4. Next, click the Apply button, followed by OK.
    apply ok
  5. Finally, repeat Steps 2 to 4 for the Windows Update service and restart your PC.

The Windows Update and Background Intelligence Transfer Service are important to the working of the update process. So, if these services are not working properly, it can lead to errors like the 0x800704f1 code.

Restarting the services should help restore normalcy in this case.

3. Repair system files

  1. Press the Windows key, type cmd, and select Run as administrator under Command Prompt.
    cmd admin
  2. Type the command below and hit Enter to run it: DISM /online /cleanup-image /restorehealthdism restore 0x800704f1
  3. Wait for the command to finish running. Now, run the command below: sfc /scannowsfc scan
  4. Finally, wait for the command to finish running and restart your PC.

Corrupt or broken system files can cause many issues, and this is true with the 0x800704f1 error. You can rectify this by running the dedicated commands, as shown above.

Another option is to use a special repair tool to help you restore your system file automatically to perfect condition.

4. Run the Windows Update troubleshooter

  1. Press the Windows key + I and choose Troubleshoot in the right pane.
    troubleshoot
  2. Click the Other troubleshooters option on the next page.
    other troubleshooters 0x800704f1
  3. Finally, click the Run button before the Windows Update option.
    run update

Glitches with the update services and processes can cause the 0x800704f1 error on Windows 10 and 11. The quickest way to fix this is to run the Windows update troubleshooter.

5. Download the update manually

  1. Press the Windows key, type update history, and select View your update history.
    view 0x800704f1
  2. Note the KB number of the update giving the error.
  3. Now, visit the Microsoft Update Catalog and search for the update in Step 2.
    update catalog
  4. Next, choose your specifications and select the Update that matches it.
  5. Finally, run the downloaded file to install it.

If using the Windows updater to update your PC keeps returning the 0x800704f1 error, you can download and install the update manually. This will allow you to bypass the glitches that might be causing the error.

There you have it: tested and proven fixes to eliminate the 0x800704f1 error. You should now be able to fix the issue with these detailed solutions.

If you are dealing with other update errors like 0x800f0841, check our detailed guide to fix them.

Feel free to let us know the solutions that helped you fix this issue in the comments below.

How to Update Your MSI BIOS [3 ways]

BIOS is the motherboard’s OS to handle the basic I/O functions. Your PC must be running the latest version of it on your PC.

In this guide, we will discuss how you can update the MSI BIOS on your Windows PC. Notably, we will show you the different ways to update the MSI BIOS.

How do I check the BIOS version?

  1. Open the Start menu by pressing the Win key.
  2. Type System Information and open the top result.
  3. Look for BIOS Version/Date section on the right side.

Make sure to note down or take a screenshot of the BIOS settings such as default settings, whether it’s for custom overclocking, enabling XMP, or setting RAM timings of your PC. This will come in handy when things go south.

There are three different update methods that we will be discussing in this guide that will help you update the MSI BIOS.

How can I update the MSI BIOS?

1. Update the BIOS using a USB flash drive

1.1 Format the USB drive to FAT32

Note icon NOTE
The action from this solution will erase all data on your USB drive so if you have any important files, back them up first.
  1. Plug in the USB to your PC.
  2. Press Win + E to open the File Explorer.
  3. Right-click on the USB drive and select Format.
  4. Choose FAT32 from the File system dropdown.
  5. Click on the Start button.

1.2 Download the MSI BIOS update file

  1. Find your laptop’s model name, which is usually written on the lower right side of the computer where you rest your palm.
  2. Visit the official MSI website to download the latest BIOS version.
  3. Enter your laptop’s model number in the search field and hit the magnifying glass icon.
  4. Hit the Download button for your laptop’s model.

1.3 Update the MSI BIOS

  1. Paste the downloaded BIOS file to the USB drive that you have formatted to FAT32.
  2. Insert the USB drive on the computer on which you wish to update the MSI BIOS and restart your PC.
  3. When the PC is booting up, hit the Del key to enter the BIOS menu.
  4. Use the Arrow keys to navigate to the Advanced page.
  5. Use the Volume keys to move to the UEFI BIOS Update option and press Enter key.
  6. Again, select the UEFI BIOS Update option and hit Enter key.
  7. Select the location of the BIOS file, which in our case is the USB drive and press Enter.
  8. Select the BIOS update file from the USB drive and press Enter to select it.
  9. Choose Yes if a prompt appears.
  10. Select OK to restart your computer to begin the update process.
  11. After the PC boots up, it will load to the BIOS update page, here you have to select Proceed with flash update option.
  12. Once the update completes press OK when the Flash update completed. Press any key to reset the system prompt appears.

This is the best way to update the MSI BIOS on your PC. Following the steps correctly, you will be able to safely update the MSI BIOS, however, do not skip any step as it could prove to be fatal for your PC.

2. Use BIOS Flashback

  1. Copy the downloaded BIOS update file onto a USB drive.
  2. Insert it inside the BIOS Flashback port. It should be right next to the dedicated button.
  3. Tap and hold the Flashback button of BIOS.
  4. It will take about 15-20 seconds to the BIOS update process. It will be indicated with blinking lights.

An alternative to updating the BIOS via USB drive is to use the Flashback button. This button isn’t found on many motherboards, but MSI has this.

The advantage of this method is that you do not need to enter the BIOS menu manually in order to update the MSI BIOS. However, that may not be the case every time.

3. Update using the Device Manager

  1. Press the Win key to open the Start menu.
  2. Type Device Manager and open it.Start Device Manager reinstall bluetooth driver windows 10
  3. Expand the Firmware section.
  4. Right-click on your motherboard and select Update driver.
  5. Hit the Search automatically for driver option.
  6. Install the latest MSI BIOS driver is available.

This is another way of updating the motherboard firmware. However, do note that this may not be beneficial for all brand’s PCs.

That is it from us in this guide. We have a guide that properly explains what is BIOS and everything else that you need to know about it.

You can also check out our guide that lists 3 different ways to access the BIOS menu on your computer. Also, read our guide to fix the BIOS corruption issue on a Windows PC.

You can also update drivers using specialized tools from MSI. However, it might be easy to download the MSI Driver Utility Installer application. We also have a guide on how to update BIOS using MSI Dragon Center, and you might want to visit it for more information.

Let us know in the comments below, which one of the above solutions you went ahead with to update the MSI BIOS.

What to Do if You Discover You Are Using an Outdated Browser

What should you do if you discover you are using an outdated browser? You should get it up to date ASAP as it’s a must-have browser security setting. Having clarified that, let’s take a closer look at the how, when, and why.

Most people are simply unaware that browsers need updating. If you are not a heavy Internet user, yours may not have key performance issues. So, it’s not that hard to skip or ignore this aspect entirely.

That’s why some users rarely update them. So, when should you update your browser? Ideally, this operation should be done regularly but let’s be honest here – who needs another task added to their hectic agenda?

The right time to do this is whenever you see an outdated browser message or warning. That’s when you need to intervene and launch the update process.

But what is an outdated browser? What does it mean when it says your browser is out of date? If you are using an outdated browser, it might be slowing down your computer or leaving you vulnerable to hackers. 

By keeping up-to-date with the latest version of your browser, you’ll also be protecting yourself against hackers who might try to use these vulnerabilities against you.

New features can make your life easier by letting you do things faster and more easily. Sometimes new versions come with fixes for security vulnerabilities.

What happens if the browser is not updated?

If you’re wondering what issues can an outdated browser cause, here are a few things to consider:

  • ❌ You’ll miss out on essential security updates. Security holes in your browser can be used by other websites and programs to install malware on your computer (see cases where people are struggling to uninstall the Browser Assistant virus from their PCs).
  • ❌ Updates for browsers are especially important because they can prevent cyber-attacks against your computer. Hackers can take advantage of vulnerabilities in older versions to steal your data.
  • ❌ Your browser can also become slower and less stable as it ages. Without an update, you won’t be able to visit some websites or use certain functions on them.

So, is it safe to use an outdated browser? Absolutely not and you should immediately update to the latest version.

Quick Tip:

Get yourself an efficient browser that gets updated automatically. You can easily import all your saved data in a few clicks.

⇒ Get Opera

What should you do if you discover you are using an outdated browser?

1. Enable automatic updates

Some browsers come with in-built features that enable you to auto-update your browser whenever a new version is available.

This is particularly useful especially if you are too busy and don’t always remember to check for new updates.

If you don’t pay much attention to the version of your browser as long as it is working for you, this feature will come in handy.

2. Manually check for updates

Each browser has a page where you can check for updates. You can visit the official website and see if there is a new release or directly from your browser.

The pages list all versions and indicate which version of the browser is up-to-date and which ones are behind by one or more versions.

This way, you’ll know exactly which version needs updating and how many updates there are available at any given time.

3. Update your browser when available

Some browsers always send users notifications whenever a new update of the browser is available. This way, you don’t have to keep checking for them.

You may be working on your computer and receive a notification to update to the latest versions. In some cases, the updates will tell you when your current version will stop being supported.

4. Uninstall and reinstall the browser 

If you’ve changed your computer recently, it could be that the problem is a software conflict. Uninstalling the old browser and reinstalling it will solve this issue.

Sometimes, your browser won’t update even when you install the new update until you completely remove all the files from your PC.

5. Clear your browsing history and cache

If you keep getting the You are using an outdated browser Chrome message but can’t update, clearing your browsing history might do the trick.

It is a quick and easy way to get rid of some of the things that are slowing down your browser and get rid of files that may be blocking an update for your browser. Once you clear them, try checking for updates again.

At the same time, you can best use CCleaner as a specialized cleaning tool created to help you delete browsing data like cookies or cache with automated tools.

6. Update your operating system

Oftentimes, outdated browsers are also caused by outdated operating systems (OS). Make sure that your OS is updated as well so that it doesn’t clash with your browser’s features or functionality. 

This ensures that your computer has the latest security updates and patches, which reduces the chance of being compromised.

7. Clear storage space

If you’re having trouble updating your browser, it’s possible that your PC doesn’t have enough storage space to install the update. 

So, what should you do if you discover you are using an outdated browser? Try clearing some space on your PC by uninstalling apps or backing up pictures to cloud storage or an external hard drive.

Now, there are lots of reasons for you to update your browser. Some of them include:

  • More secure – Older browsers are more likely to have security holes that allow malicious software to infect your computer or get stuck in endless site connection loops. 
  • Compatibility – Older browsers may not support some of the features of a website such as new forms.
  • Speed – Browsers are constantly changing and improving their features. You may have heard that the latest browser versions are faster than older versions. 

We hope that with these tips, you now know how to update your browser and the importance of keeping up-to-date with the latest versions.

You may also want to check out some of the best-equipped browsers for accessing high-traffic websites, so be sure to scan through our list to find one that meets your needs.

Let us know of any additional thoughts you may have regarding this topic in the comments section below.

What is Dw20.exe & How to Disable It?

If you have encountered the dw20.exe process in the Task Manager and want to know about it, this guide can help!

In this guide, we will explore dw20.exe in more detail, understand its purpose, and discuss the steps you can take to disable Dw20.exe if necessary.

What is dw20.exe?

Dw20.exe is an executable file that runs in the background and is associated with the Windows Error Reporting (WER) feature in Microsoft Windows operating systems.

It is usually located in the following folder: C:\Windows\Microsoft.NET\Framework\v2.0.50727

Whenever an application crashes or experiences an error, it becomes active and collects data about the issue, including information about the software, system configuration, and the error itself. This data is then sent to Microsoft for analysis.

While dw20.exe serves a vital purpose in helping Microsoft address software issues, the file may be an easy target to disguise viruses or malware.

So, if you didn’t install Microsoft Office or some of the software from the suite, you shouldn’t see the dw20 process running on your PC. If you don’t have Office installed, that’s a pretty clear sign that the dw20.exe running is actually a harmful piece of software.

Also, if you find the process somewhere other than the location mentioned above, you can run a deep scan using an antivirus tool to remove it and proceed with the solutions below.

What can I do to disable dw20.exe?

1. Use the Task Manager

  1. Press Ctrl + Shift + Esc to open the Task Manager.End taskwindows 10 scrolling bug
  2. Go to the Processes or Details tab, locate and right-click dw20.exe and click End task.

2. Use the Services app

  1. Press Windows + R to open the Run dialog box.Services windows 10 scrolling bug
  2. Type services.msc and click OK to open the Services app.
  3. Locate and double-click Windows Error Reporting Service to open Properties.Windows error reporting service
  4. For the Startup type, select Disabled from the dropdown list.Disabled
  5. Click Apply, then OK.

3. Use the Group Policy Editor

  1. Press Windows + R to open the Run window.GPEDIT MSC RUN GPEDIT MSC RUN
  2. Type gpedit.msc and click OK to open the Group Policy Editor.
  3. Navigate to this path: Computer Configuration\Administrative Templates\Windows Components\Windows Error ReportingWindows Reporting service
  4. Double-click Windows Error Reporting to open Properties.Enabled Click Apply
  5. Select the Enabled option and click Apply, then OK.

4. Modify the registry entry

  1. Press Windows + R to open the Run window.Regedit windows 10 scrolling bug
  2. Type regedit and click OK to open the Registry Editor.
  3. Navigate to this path: Computer\HKEY_LOCAL_MACHINE\SOFTWARE\Microsoft\Windows\Windows Error Reporting
  4. Right-click the right pane, choose New, then select DWORD (32-bit).New Dword
  5. Right-click the new DWORD and click Rename and name it Disabled.
  6. Now double-click the DWORD, set the Value data to 1, and select HexaDecimal, then click OK.Value data 1 Disabled
  7. Close the Registry Editor and reboot your computer to save the changes.

So, these are the methods to disable the dw20.exe if needed. If you have any questions or suggestions, feel free to mention them in the comments section below.

Microsoft goes after CMA, demands quick turnaround of its appeal case

Microsoft has unleashed a fresh round of criticism of the British Competition & Markets Authority (CMA), which last month decided to block the Activision Blizzard deal in the U.K. It delivered a major obstacle to Microsoft’s chances of finalizing the merger in doing so, and Microsoft has already moved to appeal the decision.
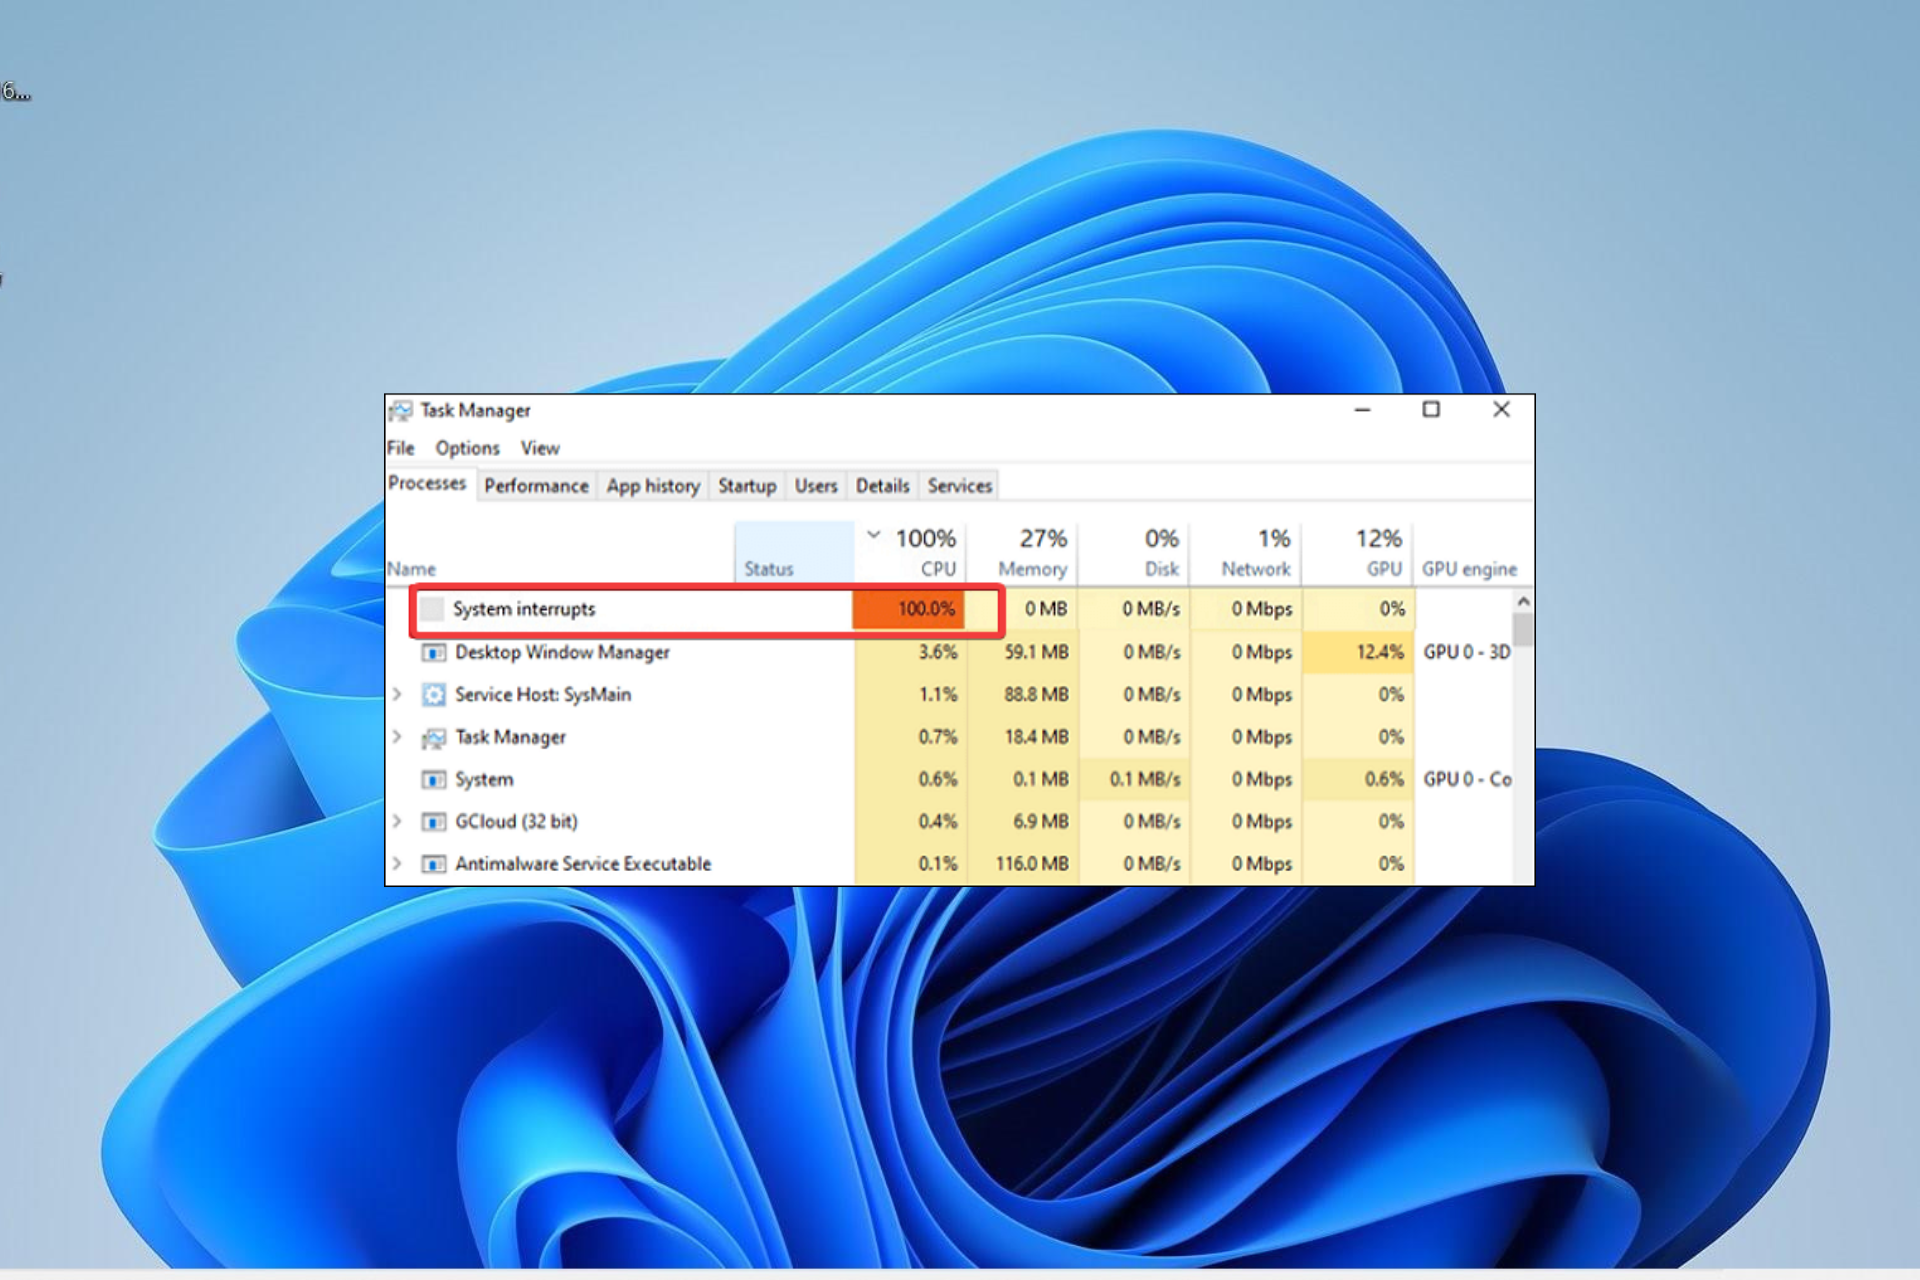
Microsoft’s lawyer in the case, Daniel Beard, called the CMA the outlier in its decision. Beard pointed out that with the announcement today that South Korea’s FTC had approved the deal, the merger now has 10 clearances. Beard added that “it (the CMA’s decision) creates the uncertainty that risks delaying the deal.”

South Korea Ftc Custom
South Korea is the latest country to approve Microsoft’s buyout of Activision Blizzard

Activision also had some fresh criticism of the CMA’s conclusion, saying it “ignores the facts, the law, and all commercial reality.”

Microsoft is requesting a quick settlement of the appeal, and has asked the court to set a date for a four-day substantive hearing beginning on July 17. On Beard’s point that the appeal process could deal the acquisition a substantial delay, the CMA responded that a later hearing in September or October would cause “no incremental delay to the transaction.”

Then there is the FTC in the United States, which has filed a lawsuit to block the deal. That case is set to begin in August.

Fix: League of Legends Error Connecting with Maestro

Recently, many players have reported running into an error message indicating a League of Legends error connecting with Maestro. It can occur while playing a game or at some other random time. However, this article will look into how to fix the issue.

Also, you may be interested in our guide on fixing the League of Legends unable to connect to an authentication service error.

What causes the error connecting with Maestro on League of Legends?

Some factors that can cause the There was an error connecting with Maestro. League of Legends will now exit. Please try restarting the client error are:

  • Inability to access specific game files – The first probable reason for this error is the game having a hard time accessing specific game files needed for its operation. It can be due to a lack of administrator permissions, resulting in the failure.
  • Interference from security software – Having numerous antibody software running on your computer can cause issues with League of Legends as they can block the connection between the game and its servers. Also, firewall services can interfere with the game connection to Maestro.
  • Outdated League of Legends game – When the game app is outdated, it can impede its functionality due to the bugs affecting the current version causing issues connecting to the servers.

The factors listed above can vary from each other on different PCs depending on the circumstances. Nevertheless, you can fix the problem by following the steps discussed in the next section.

How can I fix the League of Legends error connecting with Maestro?

  • Restart your PC – Restarting the PC is the quickest way to fix underlying problems affecting its performance, and it refreshes its system to help the game run smoothly.
  • Relaunch the League of Legends game – It will reload the game and re-establish the connection between it and the necessary files on the computer.
  • Temporarily disable security apps – It will prevent the security services running on the computer from intercepting your gaming activities.
  • Repair the game client – Few users reported that repairing the game client helped, so be sure to try that.

1. Run the League of Legends client as an administrator

  1. Find the League of Legends app icon on the desktop, right-click it, and select Properties from the drop-down menu.
  2. Go to the Compatibility tab and check the box for the Run this program as an administrator option.
  3. Now, go to the Compatibility mode tab, check the box for Run this program in compatibility mode, then choose a Windows version from the drop-down.
  4. Click OK to save the changes.

Running the game as an administrator will resolve permission issues preventing it from accessing its files and compatibility issues causing the error.

Also, check our guide for what to do if running as administrator is not working on your PC.

2. Turn off user account control

  1. Left-click the Start button, type Control Panel in the search box, and open it from the search results.
  2. Then, locate the User Accounts option, then click the Change User Account Control Settings button.
  3. On the security slider that appears on the next page, drag the slider Never to Notify, then click OK to save the change.
  4. Restart the PC and try launching the game to see if the error persists.

In addition, we recommend you read through our article about what to do if League of Legends keeps crashing on your PC.

Also, you can check how to fix the League of the Legends unable to log into account issue.

Feel free to leave your suggestions or questions on this guide if you have any. We’d like to hear from you in the comments section.