WordPerfect Spell Check is not working? Try this

Users often try to take advantage of Spell Check but they get an error box saying Corel WordPerfect Version executable has encountered a problem and needs to close. The program then closes and wants to send an error report. This isn’t of any immediate help, so what can they do?

The latest versions also behave differently related to words beginning with capital letters especially. Moreover, testing Skip All in combination with Spell Checker options leads to conflicting results.

On top of that, WordPerfect isn’t picking up all spelling errors like other professional tools that catch any misspelled words. If you are also struggling to understand why Spell Check quit working properly, here we have jotted down the best potential solutions to troubleshoot this with ease.

Don’t hesitate to go through the fixes below as described.

What can I do when WordPerfect Spell Check is not working?

1. Untick Correct other mistyped words when possible

Untick Correct other mistyped words When the Spell Check feature continues to highlight words even after you tell it to Skip All, try unchecking the option that says Correct other mistyped words when possible. You may find it under Tools > QuickCorrect.

In spite of using it for a long time, keeping it unchecked is recommended. If you keep it enabled, not only does it make WordPerfect ready to replace typographical errors that have only one possible correction without notifying you of the change, but it also changes proper names.


2. Install the Writing Tools for the proper language

Writing Tools for the proper language

If the Correct other mistyped words option is already unchecked or your problems go beyond that, go back to the basics. If you open a file that is written in a language that is different from the writing tools you have installed, they run in the installed language.

For example, suppose you’ve installed the English Writing Tools and you open a French file. Language Codes may cause trouble as the writing tools run in English. You can only imagine the result. If you want to use the function in a different language, install the Writing Tools for that language.


3. Take a closer look at some essential settings

WordPerfect file

  • Make sure that Recheck All Text (under Spell Check options) is not checked. If it is, it continues to recheck all the text you have skipped or added. This makes your job a lot harder than it’s supposed to be.
  • Don’t forget how easy is to disable a word list when you don’t use it any longer. Click Tools, then go to the Spell checker. Click Options > Use word lists and disable the checkbox that corresponds to the appropriate word list.
  • Untick the prompt before Auto Replacement. Otherwise, it will prompt you for words you previously entered in the QuickCorrect options.
  • Double-check the QuickCorrect words to make sure problem words have not been added in there.

You can also try to update the build of your WordPerfect program. And if you have recently installed Windows XP, learn a few tips to keep using Windows XP forever and do note that the two applications use completely different dictionaries for spell checking.

The quickest solution is to re-install the dictionary for WordPerfect. As always, you can let us know how it goes.

If you have any other suggestions or questions, don’t hesitate to leave them in the comments section below and we’ll surely check them out.

[wl_navigator]


FIX: Remove Everything recovery option won’t work

One of the most common Windows 10 reported issues concerns the Remove Everything recovery option. Namely, something prevents it from restoring your PC from scratch.

How do you delete everything off your computer Windows 10? In case you have a large variety of issues and lack the enthusiasm for the ISO/USB reinstall, the Remove Everything tool comes in handy.

As a short recap, it reinstalls Windows 10 and removes all your personal files, deletes apps and drivers you installed, and removes changes you made to settings. It also removes any apps your PC manufacturer installed.

If you’ve tried this advanced feature and ran into problems, be sure that these possible workarounds will help you resolve the issue. Just don’t postpone applying the solutions described below.

How can I fix the Remove Everything recovery option?

1. Uninstall Office 365

  1. Right-click Start.
  2. Open Programs and Features.
  3. Right-click Office 365 and choose Uninstall.choose Uninstall to fix Remove Everything recovery option

The main culprit for this issue is, as stated by Microsoft, Office 365. So, your best bet to resolve this issue is to uninstall Office 365 prior to performing any restoring procedures.

Hopefully, once you’ve finished with the restoring process, you can download Office 365 from the official Microsoft site.


2. Fire up DISM and SFC Scans

  1. Open the Start menu and type cmd in the search bar.
  2. Don’t hesitate to right-click Command Prompt.
  3. When prompted by the UAC, hit Yes to open it with administrator privileges.
  4. An elevated Command Prompt window will now appear, so type the following commands and press Enter:
    Dism.exe /online /cleanup-image /scanhealth
    Dism.exe /online /cleanup-image /restorehealthfire up DISM command
  5. The system will commence the verification phase to identify the corrupt files and resolve the issue for you. Do not close the command line window until you see the message verification 100% complete.
  6. Up next, you may restart your PC.
  7. You need to open Command Prompt as an administrator again.
  8. Once the Administrator: Command Prompt window opens, you can run sfc /scannow.command scannow
  9. Since it is an extensive scan, it could take some time to complete.
  10. The system will inform you once the procedure has been completed successfully and you may restart your computer.

SFC and DISM are advanced tools that hold the potential to detect the deeply rooted problems which cause the Remove Everything recovery option issues. Give them a try as described above.

Don’t know what to do when DISM failed? Check out this quick guide and get rid of the worries.


scannow command has stopped before the process finished? Don’t worry, we’ve got an easy fix for you.


3. Keep your system updated


update your system

In case you uninstalled Office 365, tried the above tools, and the Remove Everything feature is still malfunctioning, remember this. Fresh updates could be your best bet, so don’t hesitate to look for any new ones.

Having trouble updating your Windows? Check out this detailed guide that will help you solve them in no time.

Users also describe performing a clean Windows 10 install as a working solution. For the complete reinstallation process walkthrough, look here.

Moreover, if you have any questions related to the subject, do not hesitate to ask. You may use the comments area below in that regard.

[wl_navigator]

WoW Update Stuck on Initializing: Why and How to Fix

Many users reported that their Blizzard app is stuck on initializing, and this can be a big problem since it will prevent you from playing your favorite games. Although this is an issue, you can fix it easily with one of our solutions.

Blizzard, the sovereign leader in MMO genre, offers a great desktop client that still doesn’t shy from issues of its own. One of the recently-reported problems concerns a stuck in the initializing screen.

This, so to say error, occurs especially during the download and installation process of one of the offered games. Mostly with the recently-introduced Destiny 2.

In order to help you overcome this issue and finally put your hands on long-expected FPS title, we provided 6 viable solutions. So, make sure to check them out and, hopefully, address the problem at hand.

How can I fix Blizzard downloader stuck at 0 b/s?

  1. Run Blizzard app with administrative permissions
  2. Disable background programs
  3. Check the connection
  4. Clear app’s cache
  5. Restart download with different folder location
  6. Update the client

1. Run Blizzard app with administrative permissions

If your Blizzard app is stuck while initializing, the issue can be caused by the lack of privileges.

However, there’s a quick way to solve this problem, and all that you have to do is to run the application as an administrator. To do that, follow these simple steps:

  1. Right-click on the Blizzard app’s desktop shortcut and open Properties.compatibility tab blizzard app stuck initializing
  2. Select the Compatibility tab.
  3. Check the ”Run this program as an administrator” box.run this program as an administrator blizzard app stuck
  4. Save changes and start the app.

That should resolve the halt. On the other hand, if you’re still stuck at the initializing screen, make sure to move on.

Learn everything there is to know about the administrator account and how you can enable/disable it right here!


Nothing happens when you click on Run as administrator? Don’t worry, we’ve got the right fix for you.


2. Disable background programs

This here is paramount. Programs that function in the background have caused and can cause a lot of issues. In addition, the special emphasizes goes to connection-dependent programs that hog on your bandwidth.

These can slow down downloads and even prevent the client updates. Furthermore, some other programs like third-party solutions, VPNs, or firewalls can stop the connection in the first place.

These are some background programs that can provoke issues:

  • Download managers and torrent clients.
  • VoIP programs like Skype.
  • Voice chat in-game programs like Ventrilo.

For that purpose, we advise you to, either ”kill” these programs individually within the Task Manager or start your PC in with a selective startup. Follow the instructions below to perform the latter:

  1. In the Windows Search bar, type msconfig.msc and open System Configuration.system configuration blizzard app stuck
  2. Under the General tab, select the Selective startup.selective startup blizzard app stuck initializing
  3. Uncheck the ”Load startup items” box.
  4. Now, navigate to the Services tab.
  5. Check the ”Hide all Microsoft services” box.
  6. Click on the Disable all and then OK to confirm changes.disable all blizzard app stuck
  7. Finally, restart your PC and start the Blizzard again.

If you want to know how to add or remove startup apps on Windows 10, check out this simple guide.


Windows won’t end a task in Task Manager? Count on us to solve the problem.


3. Check the connection

In 90% of situations, the main culprit for the initializing stall lies within the connection issues. Either your bandwidth is too slow, Blizzard servers are busy (that’s common with every new game introductions), or something’s wrong with your router or modem.

In order to make sure that everything in this department is working as intended, make sure to try the workarounds we presented below:

  • Use wired, LAN connection instead of the wireless one. The wireless connection is mostly unstable and it’s not recommended for downloading or updating games.
  • Enable the highest download rate.
    1. Open the Blizzard app.
    2. Click on Blizzard and choose Settings from the drop-down menu.settings menu blizzard app stuck initializing
    3. Open the Game Install/Update section from the left pane.
    4. Under Network Bandwidth, set both Latest updates and Future patch data values to 0 (0 means Unlimited).game install/update blizzard app stuck
    5. Confirm changes.
  • Restart your router and modem. Wait for a minute or so and power on your equipment.
  • Reset router to default settings.
  • Make sure that needed ports are open.
  • Flash the DNS.
    1. In the Windows Search bar, type command prompt.
    2. Right-click on the Command Prompt and run it as an administrator.
    3. Type in the following command and press Enter:
      • ipconfig /flushdnscommand prompt blizzard app stuck initializing
    4. Close Command Prompt and reconnect.
  • Run Internet connection or Network adapter troubleshooters. Navigate to Settings > Update & security > Troubleshoot, and run both tools, respectively.network adapter troubleshooter blizzard app stuck initializing

If you’re having trouble accessing Command Prompt as an admin, then you better take a closer look at this guide. 

Also, if you can’t flush the DNS Resolver Cache in Windows 10, follow the simple steps from this article to fix the problem.


If the Troubleshooter stops before completing the process, fix it with the help of this complete guide.


4. Clear app’s cache

  1. Close the Blizzard app completely. This includes closing the client from the notification area, too.
  2. Right-click on the Taskbar and open Task Manager.
  3. Kill all Blizzard app-related processes.
  4. Now, navigate to the system partition (C:).
  5. Enable Hidden items.program data blizzard app stuck
  6. Open Program Data.
  7. Delete Battle.net folder and restart your Blizzard desktop client.battle.net blizzard app stuck initializing

Additionally, after some time of extensive use, the Blizzard app will accumulate a lot of redundant files. Those can slow down the app and cause various issues.

Moreover, some stored app files can get corrupted or incomplete which will, eventually, result in additional issues. Therefore, it’s advised to delete those files and move from there.


Can’t open Task Manager? Don’t worry, we’ve got the right solution for you.


5. Restart download with a simple trick

blizzard app stuck initializing

  1. Stop the downloading process within the Blizzard app.
  2. Navigate to C:Program Files (x86) and drag the game‘s installation folder to the Desktop background.
  3. Open the Blizzard app and navigate to the game which caused the halt.
  4. Click ”Install” and leave it at the Location selection screen.
  5. Move the installation folder back in Program Files.
  6. Select the default location and resume with the installation.

Some resourceful users decided to take matters into their own hands and managed to resolve the problem with certain games that get stuck at the initialization screen.

Namely, it seems that the stall is resolved with one simple trick. Allegedly, all you need to do is to move the installation folder from the original path, move it back again, and continue with the downloading.

Therefore, follow the steps above to do so on your PC and maybe you’ll overcome the initializing screen. Moreover, the download should resume as intended.

After that, the download speed vastly improved and, which is more important, the initializing screen halt was gone.


6. Update the client and wait

Finally, if none of the previous solutions worked, we can only advise you to keep your Blizzard app up-to-date and wait.

We’re aware that Blizzard is being sloppy sometimes, but, eventually, the problems like the one with the Destiny 2 distribution, we’ll be sorted out.

That should conclude it.

In case you have questions or additional solutions regarding the stuck on the initializing screen, make sure to share them with us. You can do so in the comments section below.


[wl_navigator]

WordPerfect has not been installed correctly? Try this

Have you also got the error message which says WordPerfect has not been installed correctly? You are now looking for a way to fix this instead of creating impressive presentations, spreadsheets, and more. Let us help you out.

WordPerfect by Corel is a reliable word processing program. Sometimes, due to any number of factors, you’re getting this popup, but it shouldn’t be there to stay.

A number of different fixes can be applied, as detailed below.

What can I do if getting WordPerfect has not been installed correctly?

1. Temporarily turn off the antivirus

disable antivirus program

This problem often arises when you have the antivirus software running when you try to start WordPerfect. That’s why you should disable all antivirus programs and firewalls before installing any new software or even completely remove them from your PC by using specialized uninstaller software.

If this sounds a bit too much for you, remember that most antivirus programs have a Snooze option these days. You may often choose the snooze duration, so the program does come on automatically at the end of the time period you’ve set.


Thinking that it’s time to change your antivirus with a better one? Here’s a list with our top picks.


2. Remove the checkmark from Load Start Up Items

MsConfig

  1. At first, use the keyboard shortcut Windows Key + R to launch the Run dialog box.
  2. In the text box, type MSConfig.
  3. Press Enter or click OK and the MsConfig window will open.
  4. Find your way into General > Selective Startup.
  5. Now, you need to remove the checkmark from Load Start Up Items.
  6. Reboot the PC for any changes to take effect.

Plenty of users report successfully installing WordPerfect by following the above procedure. It works flowerless, with the exception of a desktop icon that you can manually add.


3. Follow a repair installation procedure

start repair installation procedure

  1. To begin the procedure, close all open applications including WordPerfect by Corel.
  2. Open the Run window by pressing the Windows logo and the R key.
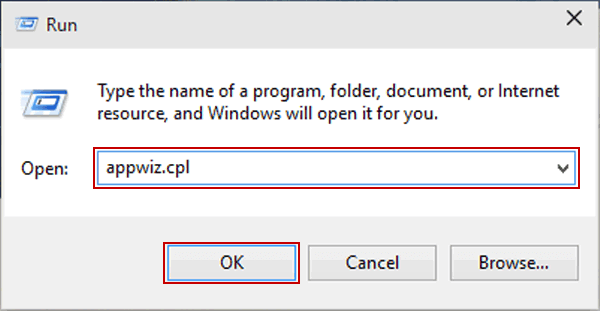
  3. Type: appwiz.cpl and press Enter or click OK to open the Programs and Features folder window.
  4. Right-click on WordPerfect Office from the currently installed programs list.
  5. Left-click to Uninstall.
  6. Click Next.
  7. Follow the given prompts.
  8. Finally, restart your computer.

Keep getting the WordPerfect has not been installed correctly error message? Then, try a repair installation of the software to help resolve this.

Have you successfully fixed the issue? For any other questions or suggestions, don’t hesitate to reach for the comments section below.

[wl_navigator]

Here’s how IT admins can delete Office 365 accounts and users

Whenever someone leaves a job or is no longer with an organization it makes sense to delete their data and remove them from Office 365. This not only frees up a spot for future employees but it prevents the user from going back and accessing their data. It also eliminates paying an extra Office 365 subscription fee for the user. In this guide, we’ll take a look at how IT admins can delete old Office 365 accounts.

Some information

Before getting into anything, we’ll mention that this is a guide for IT admins only. Only people who have Office 365 global admin or user management permissions for a business or school can delete user accounts. It’s also worth noting that an IT admin will only have 30 days to restore the account before the user’s data is permanently deleted.

We’ll also mention that even if you delete an Office 365 user, you’ll still be paying for their license. You’ll need to take the extra step of stop paying for the license or move it to another user, to avoid paying extra.

If losing critical company information is a concern, there are ways to back up a former user’s data, if need be. Finally, it is still possible to keep the user’s email, before you delete the account by moving the email to a different location. IT Admins with enterprise-level Office 365 subscriptions can also preserve the mailbox data of a deleted Office 365 user account by turning it into an inactive mailbox.

Step 1: Delete a user

If you’re deleting a user’s account that you’ve converted to a shared mailbox, there is a special consideration before deleting a user. There’s also special consideration if you have set up email forwarding on the account.

The reason why? When a person replies to a message sent to the shared mailbox, the email will appear to be from the shared mailbox and not from the individual user. Additionally, email forwarding also depends on having the actual account still active and if you delete the account the mailbox will become inactive. In these situations, Microsoft recommends for you to stop paying for the license instead of deleting the account (which we describe in the next section.)

Anyway, to get started with deleting an Office 365 account or user, you’ll need to visit the Microsoft 365 Admin Center. From here, you’ll want to make sure the Try the new admin center switch is toggled on the top. You can then click Users in the sidebar, select the user you want to delete and choose Delete User.

IT Admins with more in-depth experience can also remove many users at the same time with the Remove-MsolUser PowerShell cmdlet. We won’t get into the technical aspects of that, but you can read about it here if wanted.

Step 2: Stop paying for their license

Again, deleting an Office 365 account still means that you’ll be paying for the license. You can stop paying for the license by doing the following. You’ll first want to go to the Billing page of the Microsoft 365 Admin Center. Then, you’ll want to click the Products & Services page. You can then select the subscription and then select Add/Remove licenses to delete the license. You also can reassign the license to someone else from the same page, if need be. Just be aware it won’t be won’t be assigned to someone automatically.

Other Notes

Depending on your situation, you might not be able to remove the corresponding license once you’ve removed an Office 365 user (in this case, you could still re-assign the now freed-up license to a new user). This will happen if you’ve purchased licenses through a Partner or volume licensing. You also might not be able to remove licenses if If you are paying for an annual plan or if you are in the middle of a billing cycle. In this case, you won’t be able to remove the license from your subscription until your commitment is completed. You can learn more about deleting Office 365 accounts from Microsoft here.

FIX: I can’t delete files in Microsoft Teams

Sharing files in files in Teams.

One user said the following on the official Microsoft forum:

This is a brand new team and there are only two people in it and neither of them are online today. I created several help files for the team and needed to delete the one named Test, and cannot. I just want to delete this test file, and I cannot figure out how to do it. Help?

Also, the user added that he tried to delete this file from SharePoint, but received this message: “The file is currently checked out or locked for editing by another user”. However, there are no other users and it is not open anywhere.

Luckily, there are some solutions to this issue and today we will show you how to delete files in Microsoft Teams.

What to do if Microsoft Teams won’t delete certain files?

1. Wait patiently

If the file was opened by another client program, Windows SharePoint Services puts a write lock on the document on the server. So, it will take some time before the time lock expires.

Therefore, wait a little longer and try again later to see if the problem persists.

2. Clear cache and cookies from the browser

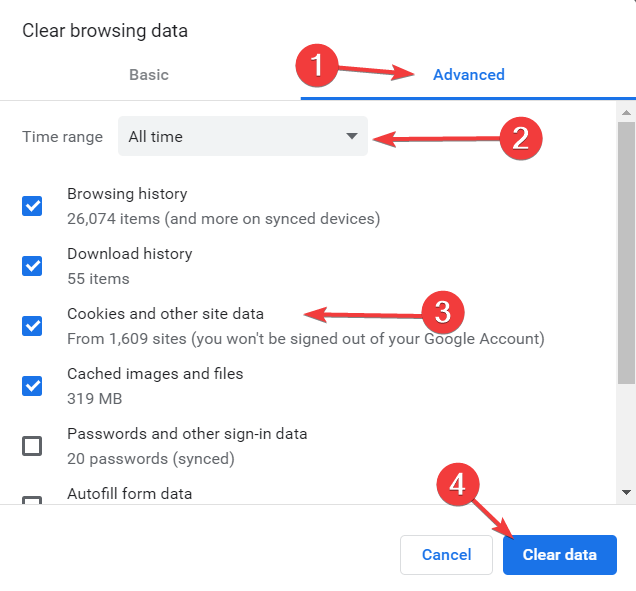
If the solution above didn’t work, try clearing the cache from the browser. In Google Chrome, you can do this by following the steps below.

  1. Go to the three vertical dots from the upper-right corner of your window.
  2. Select More tools and Clear browsing data.clear browsing data can't delete files in Microsoft Teams
  3. Go to Advanced and select All time.
  4. Check the Cookies and other site data box and click on Clear data.chrome clear browsing data can't delete files in Microsoft Teams

3. Try a different browser

If you’re having this problem, perhaps you can fix it by trying a different browser.

Opera Browser is a great alternative to Google Chrome that prioritizes user security and privacy.

Regarding privacy, you should know that Opera doesn’t send your data to Google. In addition, there’s a built-in tracking and phishing protection, as well as an adblocker.

For extra security, there’s a VPN and a malware scanner for downloaded files. For what is worth, Opera has even a Turbo utility, that compresses data so you can download files fast and efficiently.

4. Restore an earlier version

  1. In the documents library, select the three dots next to a document.sharepoint can't delete files in Microsoft Teams
  2. Click on Version history.
  3. Restore to an earlier version.
  4. Check if you can delete the file.

Conclusion

Sharing files in Microsoft Teams is easy, but as we can all see, deleting documents could be problematic. However, this problem can be solved in no time with the solutions above.

Alternatively, you can also check out our list of the best software you can use to delete stubborn files.

Did our methods work for you? Do let us know in the comments section below!

  1. Launch the SharePoint document library where the respective files are located
  2. Locate the files or folders you want to delete
  3. Right-click on the respective file or folder and click on Delete.
  • What happens when you delete a team in Microsoft Teams?

Once a team in Microsoft Teams is deleted, all the data associated with that team gets deleted as well. This includes channels, files, chats, contacts, etc. Office 365 admins are the only persons who can restore deleted teams provided that this happens within 30 days from the deletion.

  • How do I delete a conversation in Microsoft Teams?

Currently, Microsoft Teams users are not allowed to delete the whole conversation in private chats. They can hide or archive the conversation or delete the messages they sent, but not the entire conversation.

[wl_navigator]

Assassin’s Creed Odyssey will be free to play on Xbox One and PC on March 19-22

Assassin’s Creed Odyssey offers the most realistic open-world experience of Ancient Greece. Odyssey is arguably the best Assassin’s Creed title yet, offering plenty of challenging missions to keep you playing for hours. As noted in a post by Ubisoft, starting March 19, anyone can download and play Assassin’s Creed Odyssey for free this weekend on Windows 10, Xbox One, and PS4.

Players can download Assassin’s Creed Odyssey now and start playing the game for free on March 19, by downloading the Uplay launcher on Windows 10. When the free weekend ends on March 22, any progress you make during the free weekend will be carried over if you decide to purchase Assassin’s Creed Odyssey directly from the Ubisoft Store.

Assassin’s Creed Odyssey will be on sale on Xbox One from March 20 to March 30, 2020, and up to 67% off via the Ubisoft Store from now until March 26, 2020. Another added bonus is that anyone who plays Assassin’s Creed Odyssey will unlock Ezio’s Roman Set, including the Milanese Sword and Legendary armor set based on Ezio’s outfit from Assassin’s Creed Brotherhood. All Assassin’s Creed Odyssey editions are available for 75% off in the Ubisoft Store.

Buy Assassin’s Creed Odyssey Standard Edition for $15.00
Buy Assassin’s Creed Odyssey Deluxe Edition for $17.50
Buy Assassin’s Creed Odyssey Gold Edition for $25.00

Will you be playing Assassin’s Creed Odyssey this weekend? What edition will you buy? Let us know in the comments.

Fix ERROR_INVALID_FUNCTION

If you’re getting the ERROR_INVALID_FUNCTION error, follow the troubleshooting steps listed in this article to fix it.

ERROR_INVALID_FUNCTION affects all Windows versions but occurs more frequently on older Windows versions. This error type can occur in a variety of situations:

  • when upgrading your PC to Windows 10
  • after installing the latest Windows updates
  • when downloading apps from the Windows Store
  • when launching various apps
  • when performing various tasks, such as printing, opening media files, etc.

There are many invalid_function errors. The most common ones are the following:

  • ERROR_INVALID_FUNCTION 1 (0x1). This error mainly occurs if the files you are trying to access corrupted files.
  • ERROR_INVALID_FUNCTION Incorrect function.

ERROR_INVALID_FUNCTION: How to fix it?

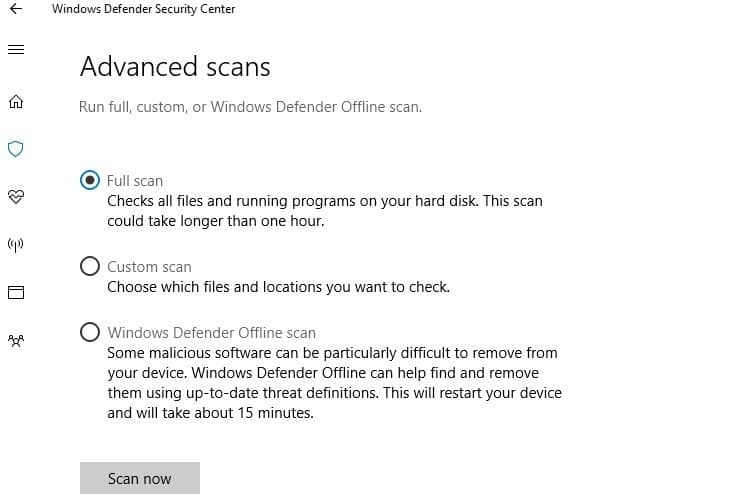
1. Run a full system scan

Malware may cause various issues on your computer, including errors. Perform a full system scan in order to detect any malware running on your computer. You can use Windows’ built-in antivirus, Windows Defender, or third-party antivirus solutions.

2. Repair your registry

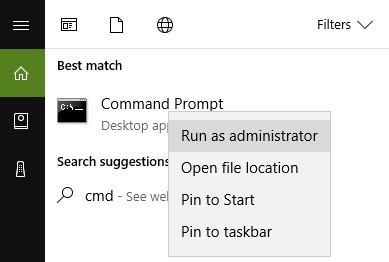
1. Go to Start > type cmd > right-click Command Prompt > select Run as Administrator

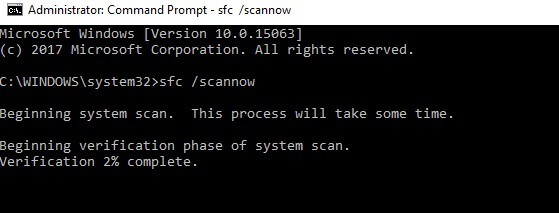
2. Now type the sfc /scannow command

3. Wait for the scanning process to complete and then restart your computer. All corrupted files will be replaced on reboot.

In addition, you can use automated tools capable of repairing malfunctioning operating systems. So, you can scan and find all corrupted files that need to be removed from your PC using a professional tool.

Thus, with such a complete repair service, you will fix damaged Windows files, virus errors, or freezing computer errors in a few steps.

3. Update your OS

Make sure that you’re running the latest Windows OS updates on your machine. As a quick reminder, Microsoft constantly rolls out Windows updates in order to improve the system’s stability and fix various issues.

Go to Windows Update, check for updates and install the available updates. To access the Windows Update section, you can simply type “update” in the search box. This method works on all Windows versions.

If you’re looking for a particular update, go to Microsoft’s Update Catalog website. Simply type the KB number of the respective update, hit Enter, and then click on the download button.

Windows updates are meant to improve the operating system’s stability and reliability, but sometimes they bring issues of their own. For this reason, it’s possible that some updates cause various INVALID_FUNCTION errors.

4. Update your PC drivers

  1. For Windows 10 type update in the Search box, and click Check for Updates to download and install the latest updates.
  2. You can also launch Device Manager. Expand the available categories and select the device that you wish to update the driver for. To install the latest driver updates for that device, right-click on it and select Update Driver.
  3. A third option is to download the available driver updates directly from the manufacturer’s website.
  4. For Windows 7, go to Start > click Devices and Printers, right-click the name of your computer and select Device installation settings. Click Yes, do this automatically, and then click Save changes.

You can also use Windows Update to install the latest driver updates on your machine. If Windows can’t find a driver for your device, you can download the available driver updates directly from the manufacturer’s website.

5. Perform a clean boot

  1. Type System Configuration in the search box > hit Enter
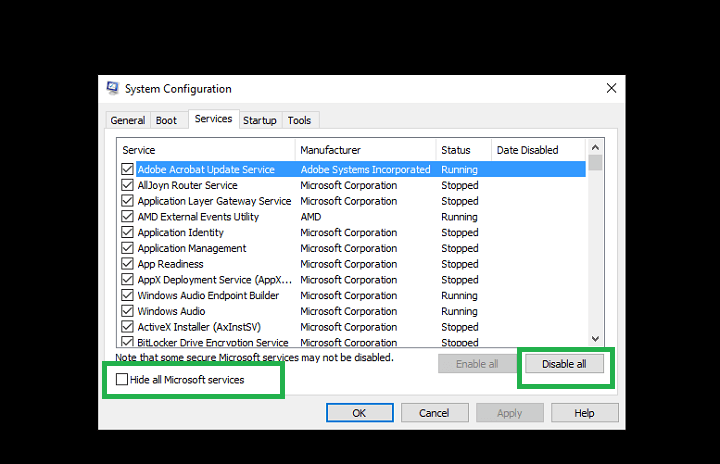
  2. On the Services tab >  select the Hide all Microsoft services check box > click Disable all.
hide all microsoft services windows 10

3. On the Startup tab > click on Open Task Manager.

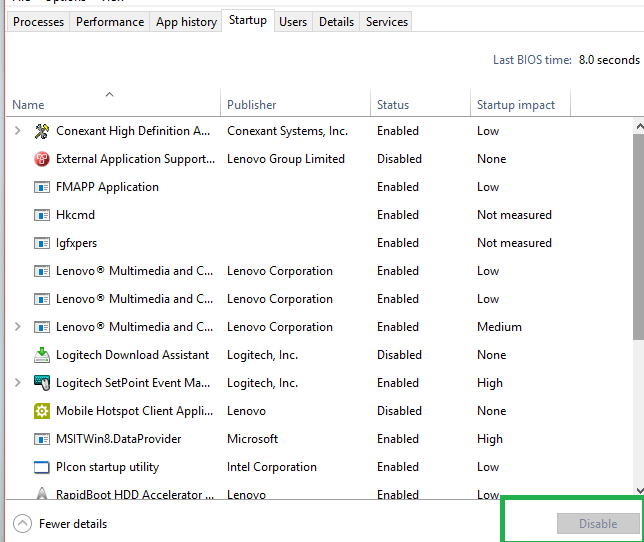
4. On the Startup tab in Task Manager > select all items > click Disable.

disable start up items windows 10

5. Close the Task Manager.

6. On the Startup tab of the System Configuration dialog box >click OK > restart your computer.

6. Perform a clean boot on Windows 7

1. Go to Start > type msconfig.exe > select the System Configuration utility.
2. On the General tab, click the Selective startup option > uncheck the Load startup items checkbox.


3. On the Services tab, check the Hide all Microsoft services check box > click Disable all > click OK > Restart.

For more information on how to perform a clean boot on other Windows versions, check out Microsoft’s support page.

7. Uninstall and reinstall the apps and programs affected by the INVALID_FUNCTION error

If the INVALID_FUNCTION error occurs when using a particular app or program, try uninstalling and reinstalling the respective programs. Also, if this error occurs shortly after installing a new app or program, try uninstalling the respective app or program.

8. Clean your temporary files and folders using Disk Cleanup on Windows 10

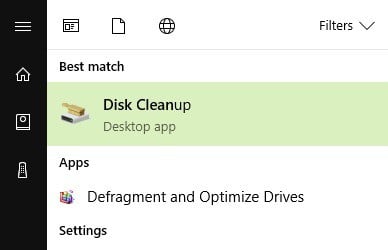
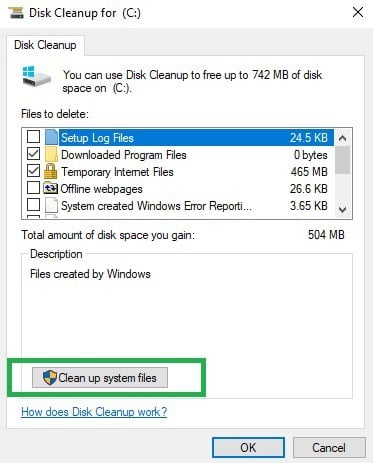
1. Go to Start > type Disk Cleanup > launch the tool

2. Select the disk that you want to clean > the tool will them tell you how much space you can free up

Disk Cleanup for cleaning system files

3. Select Clean up system files

4. On Windows 7 go to Start > type Disk Cleanup > open Disk Cleanup. In Disk Cleanup’s description section, select Clean up system files and select the drive that you want to clean up > click OK.

On the Disk Cleanup tab, select the checkboxes for the file types that you want to delete > click OK > select Delete files.

The good news is that the ERROR_INVALID_FUNCTION error occurs quite rarely. If you’ve come across other workarounds to fix ERROR_INVALID_FUNCTION, feel free to list the troubleshooting steps in the comment section below.

  • What are the hardware problems in PC?
The most common hardware problems on your PC are blank monitors, mouse problems, PC won’t recognize the USB camera, the smartphone doesn’t sync with the PC, keyboard issues, problems with the power cord, problems with the motherboard.
  • What happens when windows get corrupted?
The system gets corrupted with one or more system files become corrupted. This happens usually happens when you have problems saving a file. If your computer crashes or if the power gets disconnected from the PC, the file being saved will sometimes become corrupted.

FIX: Current security settings do not allow this file to be downloaded

Keeping your PC safe from online threats is a priority, but sometimes your security settings can interfere with your work.

Windows 10 users reported Current security settings do not allow this file to be downloaded error on their PC, and since this error will prevent you from downloading files, it’s crucial to know how to fix it.

Current security settings do not allow this file to be downloaded, how to fix it?

1. Change Internet options

  1. Press Windows Key + S and enter internet options. Select Internet Options from the menu.
    current-security-settings-allow-this-file-downloaded-internet-options-1
  2. Go to Security tab. Select Internet and click the Custom level button.
    current-security-settings-allow-this-file-downloaded-internet-options-2
  3. A list of settings will appear. Scroll down to the Downloads section and enable File download and Font download.
    current-security-settings-allow-this-file-downloaded-internet-options-3
  4. Optional: In the Miscellaneous section check the Prompt option for Launching applications and unsafe files and Launching programs and files in an IFRAME.
  5. After doing that, click OK to save changes.

As you can see, sometimes just one setting can prevent you from downloading files, but you can easily fix that by following the instructions above.

2. Reset Internet Explorer settings

  1. Open Internet Options and go to the Advanced tab.
  2. While you’re in the Advanced tab, locate Reset Internet Explorer settings section and click the Reset button.
    current-security-settings-allow-this-file-downloaded-reset-1
  3. A confirmation dialog will appear. Check the Delete personal settings option if you want to delete your browsing history, cookies, password, and other data. Click the Reset button.
    current-security-settings-allow-this-file-downloaded-reset-2
  4. After the reset process is completed, restart your browser and check if the problem is resolved.

3. Temporarily disable your antivirus software

Antivirus software is important because it protects you from malicious files, but sometimes your antivirus can cause these types of problems to appear.

Many antivirus tools will scan files before you download them in order to protect you from malicious users, but that can sometimes cause this problem to appear.

To fix this problem, you might want to temporarily disable your antivirus and check if that fixes the problem. If the problem still exists, you might want to try removing your third-party antivirus software and check if that solves the issue.

4. Change your mail settings

Users reported that they are unable to download XPS files on their PC, but you can easily fix that problem by changing one setting.

To fix this problem, simply go to Mail settings, select Tools > Options and uncheck Do not allow attachments to be saved or opened that could potentially be a virus.

It seems that Windows sees XPS documents as potentially dangerous for some unknown reason, but after disabling this option the problem should be completely resolved.


Read our complete guide about handling XPS files in Windows 10 


5. Unblock this file

According to users, sometimes certain files can’t run simply because they are blocked by your PC. This might be useful if you download a malicious file by accident, but this option will block all non-malicious downloaded files as well.

To fix this issue, you need to right-click the problematic file and select the Properties option from the menu. When the Properties window opens, look for the Unblock option and click it.

After doing that, the problem should be completely resolved. Keep in mind that you’ll have to repeat this process for every downloaded file.

6. Set the security level to default

  1. Open Internet Options and go to Security tab.
  2. Select Internet Zone and click the Default level button.
    current-security-settings-allow-this-file-downloaded-default-1
  3. Restart your browser and try to download the file again.

Some users are also suggesting to use Reset all zones to the default level option, so you might want to try that as well.

7. Disable User Account Control

  1. Press Windows Key + S and enter user accounts. Select User Accounts from the menu.
    current-security-settings-allow-this-file-downloaded-user-accounts-1
  2. When the User Accounts window opens, click on Change User Account Control settings option.
    current-security-settings-allow-this-file-downloaded-user-accounts-2
  3. Lower the slider all the way down to Never notify and click OK to save changes.
    user accouont control settings

After turning off the User Account Control check if the problem is resolved.

Bear in mind that turning this feature off poses a slight security risk, but as long as you don’t download any malicious files and you have your antivirus software running, you shouldn’t have any problems.

User Account Control is a useful feature of Windows that prevents you from running certain commands that require administrator privileges.

Thanks to this feature malicious applications won’t be able to perform any changes to your system unless you allow them. We can see why this feature is so useful, but sometimes this feature can interfere with your work and cause certain problems to appear.

8. Add the site to Trusted sites zone

  1. Open Internet Options.
  2. Go to Security tab and select Trusted sites. Click the Sites button.
    adding the site to trusted sites
  3. When Trusted sites window opens, enter the name of the site from which you’re trying to download this file and click Add. For extra security, you can check Require server verification (https:) for all sites in this zone option. Click Close.
    current-security-settings-allow-this-file-downloaded-trusted-sites-2
  4. After that, click Apply and OK to save changes.

Few users reported that adding the download site to the Trusted sites zone fixes the problem for them, so be sure to try this solution.

9. Run Command Prompt

  1. Press Windows Key + X to open Win + X menu and select Command Prompt (Admin) from the list.
    starting command prompt
  2. When Command Prompt opens, enter regsvr32 urlmon.dll and press Enter.
  3. After the command is executed, close Command Prompt and check if the problem is resolved.

10. Export registry keys from a working computer

  1. Go to the healthy PC or user account, press Windows Key + R and enter regedit. Press Enter or click OK.
    current-security-settings-allow-this-file-downloaded-regedit-1
  2. When Registry Editor opens, go to HKEY_CURRENT_USERSoftwareMicrosoftWindowsCurrentVersionInternet SettingsZones key in the left pane.
  3. Right-click Zones key and choose the Export option from the menu. Select the save location and enter the name for the registry file, for example, working_zones.reg. Click the Save button.
    current-security-settings-allow-this-file-downloaded-regedit-2
  4. Close Registry Editor and switch back to problematic PC / user.
  5. Open Registry Editor on a problematic user account / PC and go to HKEY_CURRENT_USERSoftwareMicrosoftWindowsCurrentVersionInternet SettingsZones key and export it. You’ll use this file as a backup in case anything goes wrong.
  6. Rename the Zones key to Zones_error or delete it and close the Registry Editor. Now locate working_zones.reg file that you created in Step 3 and run it. This will add the exported key to your registry.

After adding the key to your registry, check if the problem is resolved.

Users reported that they managed to fix this problem by exporting registry keys from a working computer or from another user account on the same computer.

If you want this process to work, we suggest exporting these keys from a user account that doesn’t have this problem. If necessary, you can even create a new user account just for this purpose.

If all user accounts are affected by this problem, you can transfer the necessary registry keys from a different computer that runs on the same version of Windows 10.


If you’re not happy with how Command Prompt looks, read our guide about how to customize it to your own desire


11. Enable Allow active content to run in My computer option

  1. Open Internet Options.
  2. Go to Advanced tab. A list of settings will appear.
  3. In the Security section check Allow active content to run in files on My Computer.
    current-security-settings-allow-this-file-downloaded-allow-1
  4. Click Apply and OK to save changes.

We provided the solution above in case you are getting the Current security settings do not allow this file to be downloaded message while trying to view or download .pdf files.

11. Add the website to the Trusted sites zone

Many webmasters and web developers user FTP to upload files to the server, but sometimes this type of problem can appear.

To fix this problem, first, you need to add the website that you’re trying to establish an FTP connection to the Trusted sites zone. We already explained how to do that in one of our previous solutions so be sure to check it out.

After adding the website to the Trusted sites, start Internet Explorer and go to the following url: ftp://username:[email protected]_website_name.com/.

After doing that, you should see the list of all available files. Simply right-click the file that you want to download and select Copy to Folder option and you should be able to download it without any problems.

Current security settings do not allow this file to be downloaded error can interfere with your work, but you can fix this problem in most cases simply by changing your Internet Options. If that doesn’t work, feel free to try any other solution from this article.

  • Click on the taskbar search box and type internet options, then click on the Internet Options in the results.
  • Start Internet Explorer, click on the Tools button in the top right corner of the window, then choose the Internet Options in the drop-down menu.
  • Start Internet Explorer, click on the gear symbol in the top right corner of the windows, then choose Internet Options in the drop-down menu.
  • Go to Control Panel. In the top right corner, you will see a search bar where you type Internet Options. Choose the options from the results.
    • How do I unhide my toolbar?

    If you don’t see the toolbar in Internet Explorer just hit the F10 button. Then, in the View option, you can select the Toolbars option and check the one you want to unhide.

    • How do I turn on Internet Explorer?

    Go to Control Panel, then click on the Programs and Features option. On the left side of the screen click on the Turn Windows features on or off and check the box corresponding to the Internet Explorer program from the list. You need to restart the computer for the settings to change.

    [wl_navigator]

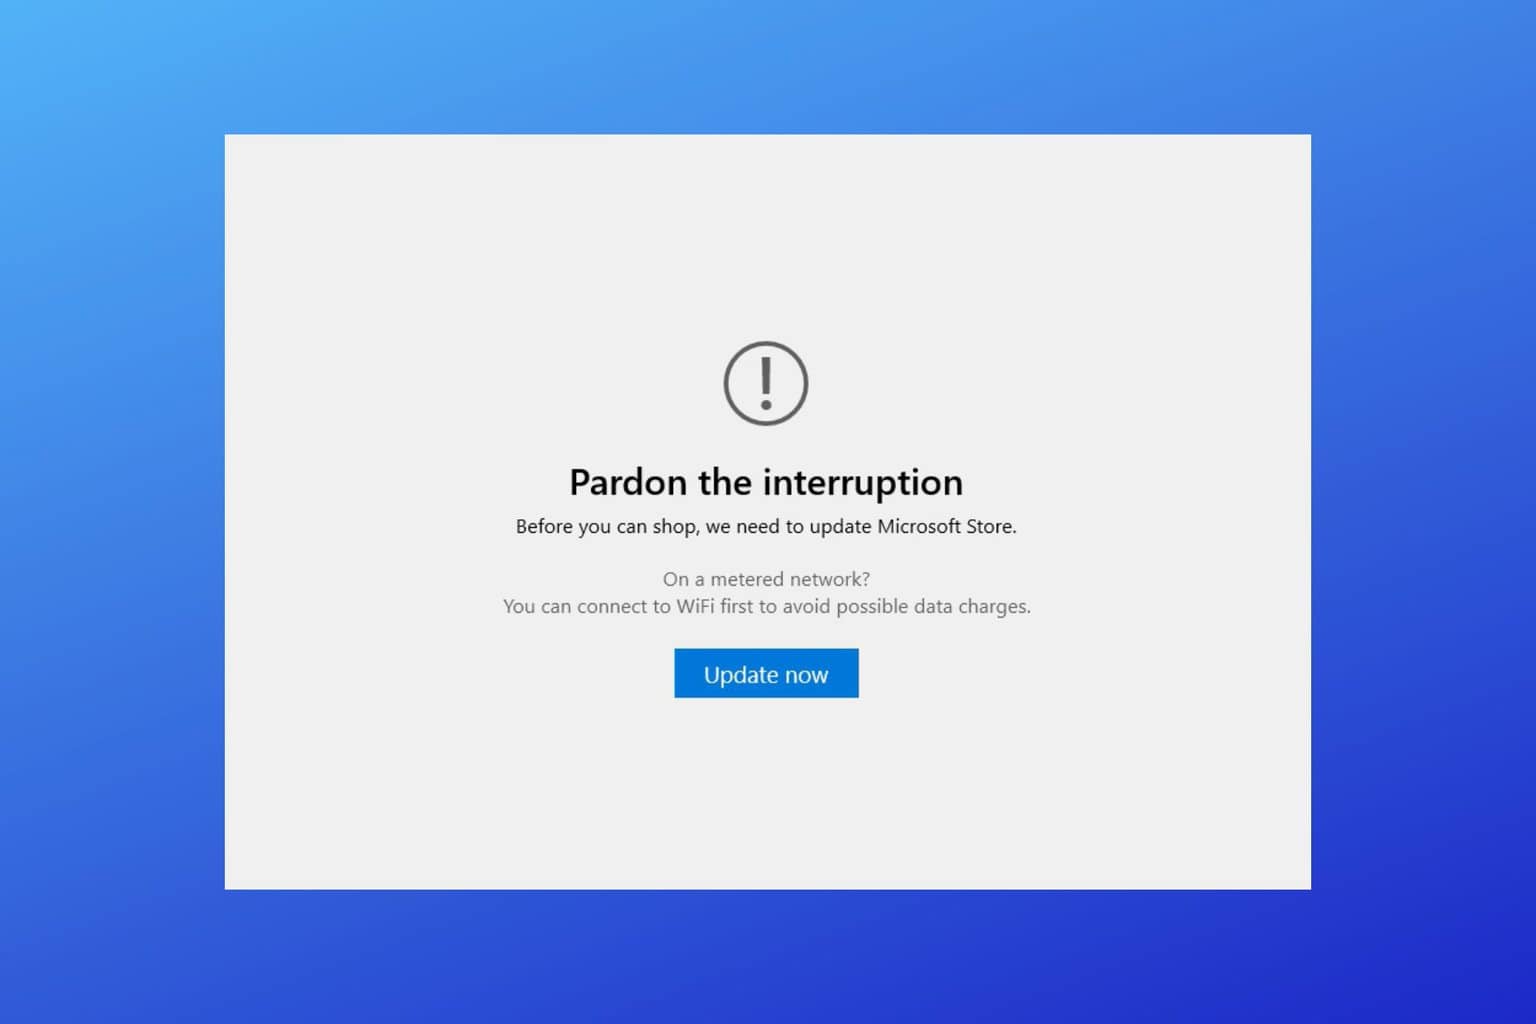
    How to Fix Microsoft Store Pardon the Interruption Error

    You may want to stick around if you cannot get past the Pardon the interruption error message in the Microsoft Store. We’ll help you fix it so you can download, install, and update your favorite apps.

    Here’s how:

    How to fix the Microsoft Store Pardon the interruption error?

    1. Update your operating system

    1. Open a command prompt window, right-click on the Start icon and choose Command Prompt.
    2. In the cmd window type: winver.find out windows store version
    3. All the details related to the Windows build number should be now listed.
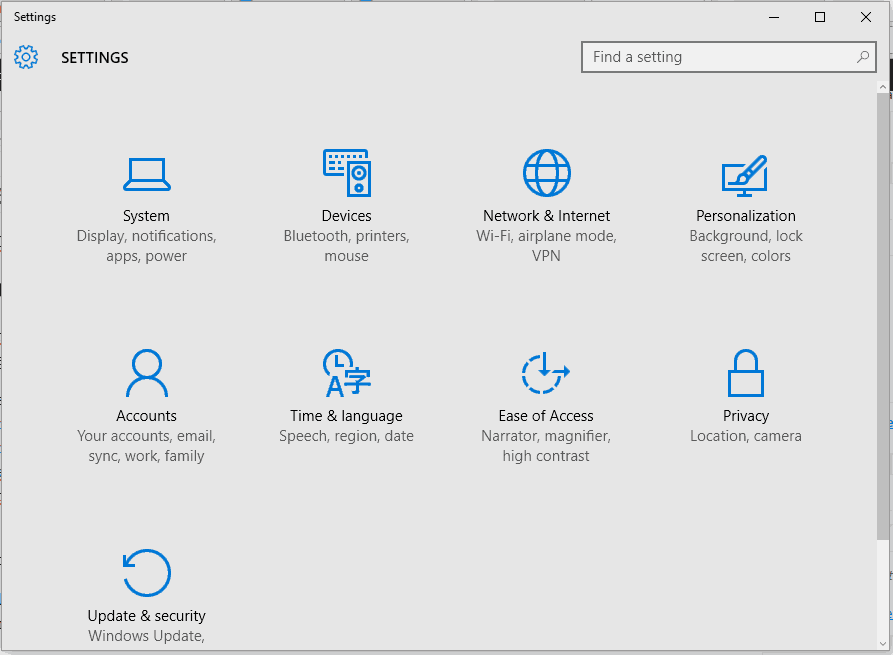
    4. If you’re not running on the latest Windows 10 update, go to System Settings and apply all the available patches: press Win+I hotkeys, choose Update & Security and under Windows Update select the pending update.check for updates windows 10

    When bothered by the Pardon the interruption error in Microsoft Store, you need to make sure that you have the latest version of Windows installed on your computer. So, first of all, check the build number for your software.

    2. Update the Microsoft Store app

    1. Firstly, launch the Microsoft Store software on your computer.
    2. Click on your account icon.ms store account picture
    3. Then, select Settings.account settings
    4. The Store version is listed here. If you’re running on an older Microsoft Store build, you will receive the Pardon the interruption error message.
    5. Click on the Update button and wait while all the updates are applied.
    6. If, in the end, you receive an error message saying this app can’t open, don’t panic; just restart your Windows 10 PC.

    Once you ensured that the latest Windows 10 software is installed, it’s time to do the same thing for the Microsoft app.

    3. Reset Microsoft Store cache

    1. Press Win+R keyboard hotkeys.
    2. The Run box should be displayed next, so you may type wsreset and press Enter.reset windows store cache
    3. Go and run the Microsoft Store app and try to update it.

    If you cannot update your Microsoft Store app, or if you just receive the same Pardon the interruption message again, your next move should be resetting the cache.

    4. Reinstall Microsoft Store

    1. Click on the Search button first.
    2. There, you need to type powershell and right-click on the result with the same name and then choose Run as administrator.
    3. In PowerShell, enter the following command: $manifest = (Get-AppxPackage Microsoft.WindowsStore).InstallLocation + ‘AppxManifest.xml’ ; Add-AppxPackage -DisableDevelopmentMode -Register $manifest.reinstall Microsoft Store
    4. Press Enter in the end.
    5. If the command from above cannot be executed, enter instead: Get-AppXPackage -AllUsers | Foreach {Add-AppxPackage -DisableDevelopmentMode -Register “$($_.InstallLocation)AppXManifest.xml”}.
    6. Don’t forget to restart your Windows 10 system.

    If the problem is still there, a good idea will be to reinstall the software from scratch. You may use the native PowerShell and since it does not require much effort, it’s worth trying.

    5. Disable proxy connection

    1. Press Win+I and from System Settings choose Network & Internet.Network & Internet
    2. From there, choose Proxy (located in the left panel of the main window).
    3. Make sure the Automatically detect settings option is turned On.change proxy settings windows 10
    4. Turn off the option saying use a proxy server.
    5. Save and close everything.
    6. Open the Microsoft Store and try to update the app again.

    As you can see, there are a few ways to fix the Microsoft Store Pardon the interruption error. You can also try to run a system restore if the solutions listed above didn’t help.

    Don’t forget to tell us how you managed to fix this issue in the end or if you need any help. You can use the comments field from below in that respect.

    KB4541331 boosts the installation success of Windows 10 updates

    Cumulative update KB4541331 is now live.

    The CU comes with numerous non-security fixes and enhancements. These improvements  are for all  Windows 10 version 1809, Windows Server version 1809, and Windows Server 2019.

    Device and app compatibility with Windows update

    Several of the issues that Windows updates have been causing lately have something to do with device or app incompatibility.

    For example, some Windows 10 users have been reporting the malfunction of system hardware like graphics and sound cards after installing an update.

    In severe cases, incompatibility has resulted in 100% update failure.

    Well, Microsoft said that CU KB4541331 fixes that problem.

    Addresses an issue with evaluating the compatibility status of the Windows ecosystem to help ensure application and device compatibility for all updates to Windows.

    The company does not specify the applications or devices that this fix is targeting, though.

    BattlEye is one of the apps that have in the past caused Windows 10 update errors due to incompatibility. So severe is the bug that sometimes Microsoft blocks PCs with affected versions of the anti-cheat software from updating.

    Windows 10 updates that are compatible with such applications install with fewer post-upgrade issues.

    Touch keyboard, printing, and calendar updates

    Installing KB4541331 should ensure that your PC’s touch keyboard appears as required during sign up, according to Microsoft. It also fixes a problem arising from printing to a document-sharing repository.

    Likewise, Windows 10 users in the Samoa time zone must have had it with the system’s date and day mismatch issue, prompting Microsoft’s latest intervention.

    Even with the correct date and time settings, their PCs would display dates on the wrong day of the week in the notification area. You would be getting most of your schedules or appointments wrong with a discrepancy like that.

    Fortunately, KB4541331 has a fix for the issue.

    Updates an issue that causes calendar dates to appear on the wrong day of the week in the clock and date region of the notification area when you select the Samoa time zone.

    How to install the update

    CU KB4541331 is optional, so you do not have to install it if the issues it fixes do not affect your Windows 10 PC.

    Still, you may upgrade by going to Settings, Update & Security, and finally Windows Update. The Optional updates available area has a link you can click to download and install the CU on your device.

    Alternatively, visit the online Microsoft Update Catalog to download a standalone package for the latest Windows 10 fixes and improvements.


    Windows 10 KB4551762 causes BSoD and thumb drive issues

    Microsoft frequently releases Windows 10 updates to deliver new improvements and security fixes as fastest as possible, to the delight of many users. But just like KB4551762, these upgrades do not always go as planned.

    The company rolled out KB4551762 OS files on March 12, 2020 to fix the CVE-2020-0796 vulnerability it had inadvertently revealed earlier. The security issue affected the Microsoft Server Message Block 3.1.1 (SMBv3) protocol.

    Ironically, the update is now attracting a barrage of complaints as users express their frustrations with its undesirable outcomes, such as the blue screen of death (BSoD) and audio complications.

    Thumb drive failure

    A security fix should not cause your USB flash drive to malfunction. But in the Microsoft Answers forum, one user complained that they could not use their thumb drive anymore after installing KB4551762.

    The physical drive did not seem to be the problem there because the user tried using three of them that had not had any defect before.

    The BSoD error and performance issues

    Looking at all the issues that Windows 10 updates cause these days, PC crashes appear to be the common denominator. Multiple reports in the Windows 10 Subreddit can confirm this.

    Worse still, the latest update is keeping people out of their own operating system. One user reported that they could no longer boot into Windows.

    I only get BSOD, audio stuttering and other issues and on top of that I couldn’t even boot into Windows today.

    Fortunately, the user utilized System Restore to take their PC back to its healthy status before updating.

    Another Reddit user complained that their PC failed to boot past the welcome screen after installing updates KB4551762 and KB4540673.

    After spending hours trying to login, I somehow managed to uninstall both the updates, rebooted, disabled and re-enabled HyperV but my system won’t go back to being normal.

    All these issues have many Windows 10 users questioning the point of updating. They cannot even tell what update is compatible with what piece of hardware until after upgrading or midway through the process.

    Yesterday, Microsoft announced that Windows 10 has reached 1 billion active monthly users. It attributed that growth to customer-focused feature design and development.

    As such, more people have moved from having to use to loving the OS, the company claimed. Unfortunately, not every Windows 10 user shares this sentiment, especially with its erratic updates.

    The only reliable workaround for now is to always back up your files and data before updating your PC.

    Microsoft Teams Won’t Uninstall? Use These Solutions

    Microsoft Teams may be a great communication platform for some, but not for all. Therefore, quite a few users want it gone from their computers.

    However, there are major issues with uninstalling Microsoft Teams. Our readers are getting frustrated that after deleting the app and restarting the PC, Teams is back on his system.

    As a consequence, even if you uninstall it from Apps, the program refuses to go. This is an annoying issue and today we will show you how to get rid of Microsoft Teams permanently.

    How can I uninstall Microsoft Teams?

    1. Clear the cache in Teams

    1. Press Ctrl+Alt+Delete and open Task Manager.
    2. Search Microsoft Teams and click on End Task.
    3. Go to File Explorer and paste “%appdata%Microsoftteams” in the location box.file explorer
    4. Open and delete all files from Application Cache, Cache folder, database folder, GPUCache folder, IndexedDB folder, Local Storage folder, and tmp folder.

    After you completed all of the above, you can go on and uninstall Microsoft Teams.

    2. Use a PowerShell script

    1. Press the Windows Key and type PowerShell.
    2. Right-click on the app and Run as administrator.open powershell
    3. Type this command that allows scripts to run and press Enter: Set-ExecutionPolicy RemoteSigned
    4. Type A and press Enter.powershell command

    Copy the following script in PowerShell:

    # Removal Machine-Wide Installer - This needs to be done before removing the .exe below!
    Get-WmiObject -Class Win32_Product | Where-Object {$_.IdentifyingNumber -eq "{39AF0813-FA7B-4860-ADBE-93B9B214B914}"} | Remove-WmiObject
    #Variables
    $TeamsUsers = Get-ChildItem -Path "$($ENV:SystemDrive)Users"
    $TeamsUsers | ForEach-Object {
    Try {
    if (Test-Path "$($ENV:SystemDrive)Users$($_.Name)AppDataLocalMicrosoftTeams") {
    Start-Process -FilePath "$($ENV:SystemDrive)Users$($_.Name)AppDataLocalMicrosoftTeamsUpdate.exe" -ArgumentList "-uninstall -s"
    }
    } Catch {
    Out-Null
    }
    }
    # Remove AppData folder for $($_.Name).
    $TeamsUsers | ForEach-Object {
    Try {
    if (Test-Path "$($ENV:SystemDrive)Users$($_.Name)AppDataLocalMicrosoftTeams") {
    Remove-Item –Path "$($ENV:SystemDrive)Users$($_.Name)AppDataLocalMicrosoftTeams" -Recurse -Force -ErrorAction Ignore
    }
    } Catch {
    Out-Null
    }
    }

    So, there it is. These somewhat easy solutions will fix for you an annoying issue. Use them and Microsoft Teams will be history.

    Also, if you want to install it back on your computer, you will find it on the Microsoft website. Check out our article that will guide you step-by-step in this process.

    Did these solutions solve the problem for you? Do let us know in the comments section below!

    1. Go to Apps & Features, and type teams in the search bar
    2. Select Microsoft Teams in the list of results
    3. Select Uninstall and confirm your choice
    • Why does Microsoft Teams keep reinstalling?

    Microsoft Teams will keep on reinstalling itself if you only remove the Microsoft Teams app, but don’t delete the Teams Machine-Wide Installer. Use a dedicated tool to uninstall software leftovers to fix the problem for good.

    • Is Microsoft Teams a virus?

    Microsoft Teams is not a virus, it’s a workplace collaboration software the company has built with employee productivity in mind. Teams is a secure platform offering multiple security layers.

    If you want to install the Teams app for all user profiles on a computer, read this guide to learn the detailed steps.

    FIX: We couldn’t save your tab settings on Microsoft Teams

    A wide number of users have reported the error message saying We couldn’t save your tab settings inside Microsoft Teams.

    The error is usually caused by a wrong syntax inside the code of the page, and finding the specific error will require you to check the entire range of coding to find the issue. In order to do so, you will need to use the web-based version of Teams by using the website.

    Even though the issue we’re covering in this article might be caused by other errors found inside your code, there a few concepts that apply across the board.

    In today’s article, we will explore some of the best troubleshooting methods to deal with this issue. Please follow the steps presented here closely to avoid causing any other problems.


    How to fix tab settings errors in Microsoft Teams

    1. Modify the value for 3-app.min-*.js inside the debugger


    Note: You can find the 3-app.min-*.js  at the path: https://statics.teams.microsoft.com/hashedjs/3-app.min-*.js or by pressing the Ctrl+P on your keyboard and search for the filename.

    1. Open Chrome development tools by pressing the F12 key on your keyboard.
    2. Search for handleSaveSuccess and put a breakpoint on it.
    3. Click the Save button.

    2. Check if your website URLs are typed correctly

    check URL microsoft teams
    In the case your URLs are not the same for both the value validDomains and websiteURL inside your computer code.

    Not doing so will make Microsoft Teams show you the error message mentioned above.

    The value validDomains needs to contain the exact copy of the websiteURL so no conflict can arise between these two elements.

    In today’s article, we explored some of the most common errors found inside the code of Microsoft Teams. In order to fix the error We couldn’t save your tab settings, you will need to access the developer tools, and then debug your entire code.

    Please make sure to check for the issues we mentioned in this article first, and then follow your normal debugging method.

    We would love to know if this guide helped you identify the problem. Please feel free to let us know if that is the case, by using the comment section below.

    [wl_navigator]

    How to Blur Backgrounds in Microsoft Teams

    Microsoft Teams is a messaging app for Windows, iOS, and Android devices. In 2018, Microsoft added a new blurred background feature to Teams. That’s a great feature for video calls that enables users to blur their backgrounds. Thus, users can essentially join their video meetings without any silly backgrounds.

    There are some system requirements for Teams’ blurred background effect. The effect needs hardware with an Advanced Vector Extensions 2 (AVX2) processor. Users with hardware that doesn’t incorporate Advanced Vector Extensions 2 processors cannot utilize the blurred background effect in Teams. Teams users will also need an Office 365 subscription.

    How can I blur backgrounds in Microsoft Teams?

    1. First, open the Teams app, which is a pretty essential (and perhaps obvious) step.
    2. Select a scheduled meeting to join in Teams. Note that it’s essential for the meeting to be a scheduled one.
    3. Press the Join button, which will open the video settings shown directly below.microsoft teams how to blur background
    4. Then toggle the middle slider option to activate background blur. That should blur the background in the video before users select to join the meeting.
    5. Press the Join now button.
    6. Users can still blur videos’ backgrounds after joining meetings. To do that, click the … dots button to open a menu as in the snapshot directly below.Blur my background option microsoft teams how to blur background
    7. Click the Blur my background option.
    8. Users can remove the blurred background effect by clicking the … button and selecting the Don’t blur background option.

    That’s all users need to do to enable the blurred background effect in Microsoft Teams. Some users might consider blurred backgrounds to be more of a gimmick, but they might sometimes come in handy for video calls.

    So, if you want to avoid any embarrassing moments during video conferences, go ahead and blur your background before joining the call.

    In case you can’t disable the background blur of the login screen on Windows 11, read this guide to learn the solutions.

    Instead of blurring the background, you may also change it with a nice Teams Halloween background.

    Note: We recommend PerfectCam that will help you blur your background during your video calls in MS Teams.

    ⇒ Get now PerfectCam

    Discord crashes the Microsoft Teams party and waves at teachers and students

    Microsoft Teams, Google Hangouts, and Zoom have become the best ways for teachers to continue education during the Coronavirus crisis, but they can now count on Discord, too. The platform that is usually associated with video gaming communities today released a new blog post, showing how teachers can use Discord as a virtual classroom.

    According to the post, Discord, as a company, recently made the decision to change the user limit on the Go Live feature of its platform from 10 to 50 people. This popular feature allows gamers to stream their screen, and “present” their content to their viewers. The decision was apparently designed to help teachers, as the company was “flooded with requests from educators asking: What can I do with Discord?”

    In the post, Discord essentially explains that on its own platform, teachers have access to many features found on other services like Microsoft Teams. From chats, video conferencing, and more, the list of what’s possible on Discord includes the following:

    • A dedicated, free to use, invite only class space
    • Text channels to organize things like lessons, homework, or study groups
    • Voice channels for both one-to-one and group discussions, or even office hours
    • A real-time teaching environment where lessons can be shared with up to 50 people at a time
    • Discord is made up of invite only spaces known as servers — think of your server as your classroom.
    • Servers are organized into individual channels where you’ll interact with students or other teachers.
    • There are text channels, where anyone can post messages, upload files, and share images for others to read at any time.
    • And also voice channels, where teachers can conduct classes with Go Live, and students can get together to talk and collaborate

    Discord has also created a server template to help teachers get started with using the platform in education. It’s worth noting, though, that there is an age limit, as the minimum age to join Discord is 13. This might be problematic for younger students in grade-school; but for older teenagers, it may very well help as they are likely familiar with the platform anyway.

    It’s quite interesting to see the Discord suddenly push its services for use outside of gaming and in education. But, knowing the dangers of Coronavirus, it’s great to see another player join in to help support remote-education. Do you think you’d use Discord for learning? Let us know in the comments below.

    Microsoft Teams bad request error? Here is a quick fix!

    Microsoft Teams is a popular collaboration software for the organizations to help their team be on the same page. However, at times you may encounter several minor problems like Microsoft Team bad request error while trying to access a file or edit it.

    The error can occur due to many reasons including permission issues. Many users have reported a similar error in the Microsoft tech forums.

    Teams is up and running in our tenant but when I browse tohttps://teams.microsoft.com/it redirects tohttps://teams.microsoft.com/undefined/_and displays the text “Bad Request”. The client is working fine and the web portal was previously working fine too.

    If you are also troubled by this error, here are a couple of troubleshooting tips to help you fix Microsoft Teams bad request error.

    How to fix Microsoft Teams bad request error

    1. Change Read Only Recommended Settings

    1. The Microsoft Teams bad request error can occur if you have enabled the Read Only Recommended setting for the file.
    2. Open the file in the native app. That is if it is a Word File, open the file in Microsoft Word.
    3. Click on File > Saves As.
    4. Click on Browser.
      save dialog Microsoft Teams bad request error
    5. In the Save window, click on Tools and Select Generation Options.
      general options window Microsoft Teams bad request error
    6. Locate “Read Only Recommended” and uncheck the option.
    7. Click OK and then save the file.
    8. Go back to Microsoft Teams and then try to re-upload the file with the bad request error and check for any improvements.

    2. Check the File Compatibility

    1. The Microsoft Teams bad request error can also occur in case the file you are trying to access is not compatible with the current version of Microsoft Office app.
      save as type Microsoft Teams bad request error
    2. For example, if the file you are trying to edit is in .xls format or .doc format then try to change it to .xlsx and .docx format respectively.
    3. Save the file in a new format and reupload the file in Microsoft Teams app.
    4. The users should be able to access the file without any error this time.

    3. Change the web browser

    UR browser Microsoft Teams bad request error

    1. If you are trying to access the web client of Microsoft Teams, try changing the web browser to fix the error.
    2. At times, the bad cache can create issues with the browser functionality for any specific URL.
    3. If you are using Google Chrome, try accessing Microsoft Teams using Edge or Firefox. If the error is resolved after changing the browser, clear the browser cache to resolve the issue.

    Another browser that you should try is UR Browser. This is privacy-focused browser built on Chromium engine.

    The browser comes with built-in malware scanner for downloaded files, adblocker, tracking protection, and a built-in VPN, so it will be a perfect choice if you want to secure your privacy while browsing the web.


    UR Browser is a great alternative to Chrome. Read our in-depth review to find out why!


    Clear Browser Cache for Chrome

    1. Click the Menu icon and select Settings.
    2. Click on Advanced to expand the section.
    3. Scroll down to Security and Privacy section.
      clear browsing data Microsoft Teams bad request error
    4. Click on the “Clear browsing data” option.clear browsing data settings Microsoft Teams bad request error
    5. Select a time range and then check ” Cookies and other site data” and “Cached images and files” option.
    6. Click the Clear Data button.
    7. Relaunch Chrome and check if the error is resolved.

    If the issue persists, try to check Microsoft Teams Dekstop client for any pending update and install it.

    1. Click on the Files tab
    2. Click on Get link
    3. Now, click on the SharePoint tab and copy the respective link.
    4. Paste the link you just copied in the file name section on the save screen.
    • Does Microsoft Teams have version control?

    Microsoft Teams supports file and document version control but it is not stored directly on the platform.

    Here are the steps to follow to access the version control file:

    1. In Microsoft Teams, go to the Files page and select the document you want to open
    2. Click on the option that allows you to open it SharePoint
    3. The SharePoint library should now appear on the screen
    4. Locate the document you’re interested in
    5. Scroll down to version history and check the first version of the document

    [wl_navigator]

    Microsoft Teams keeps installing or launching on start-up

    Microsoft launched its unified communications platform Microsoft Teams back in 2017. Thousands of people prefer to use it on a regular basis for workplace chats, video meetings and more.

    However, in some cases, this application opens on your system every time you turn it on. Recently, one Redditor shared a similar experience and asked for help from the community.

    My laptop automatically installs and opens the Office Teams app whenever I turn on my computer not matter how many times I uninstall it. Please help me stop this.

    Someone came up with an explanation about why the Teams app launches at startup.

    If your computer is Azure AD joined then the administrator can make Office get installed, and some Office 365 licenses include Teams which installs to start with Windows, whether you want it or not.

    Those who are experiencing similar issues can try one of the following solutions to solve the problem.

    Steps to prevent Microsoft Team from installing or launching itself

    There is a solution that works in most cases, go to your programs list and locate Teams-machine wide installer. Simply remove the uninstaller and that should prevent Microsoft Team from installing on its own on your PC.

    If the issue persists, go to the next solution.

    1. Change the settings

    We often don’t bother to check the settings of the apps installed on our systems. There is a built-in option that allows users to launch the app on system startup.

    Open the settings page of the Teams app and uncheck the “Startup at login” option.

    2.Disable unnecessary apps

    There are many applications that are running in the background. You need to manually disable any unnecessary apps.

    1. Press Ctrl+Shift+Esc keys to open Task Manager. Task Manager windows 10
    2. Navigate to the Startup tab and look for Office Teams app.
    3. Right-click and select Disable to fix the issue.

    3. Check your account type

    Many Windows users don’t have any idea that a work account comes with predefined settings.

    Therefore, your work account might be responsible for forced installations. Switching to a personal account can be a temporary solution to prevent Microsoft Team from installing itself on start up.

    4. Reinstall Office 365 suite

    If none of the above solutions works, you can uninstall and reinstall the entire Office 365 Suite.

    Comment down below if you have experienced similar issues.

    [wl_navigator]

    FIX: Windows 10/11 couldn’t be installed

    Windows 10 is a great operating system, and it got even better after the latest updates. Unfortunately, installing Windows 10 isn’t always easy and users reported that Windows 10 couldn’t be installed on their PC.

    How to fix the “Windows installation has failed” error?

    Solution 1 – Run Windows Update troubleshooter

    If you’re downloading the latest build of Windows 10 via Windows Update, you might encounter this error. To fix it, run the Windows Update troubleshooter by following these steps:

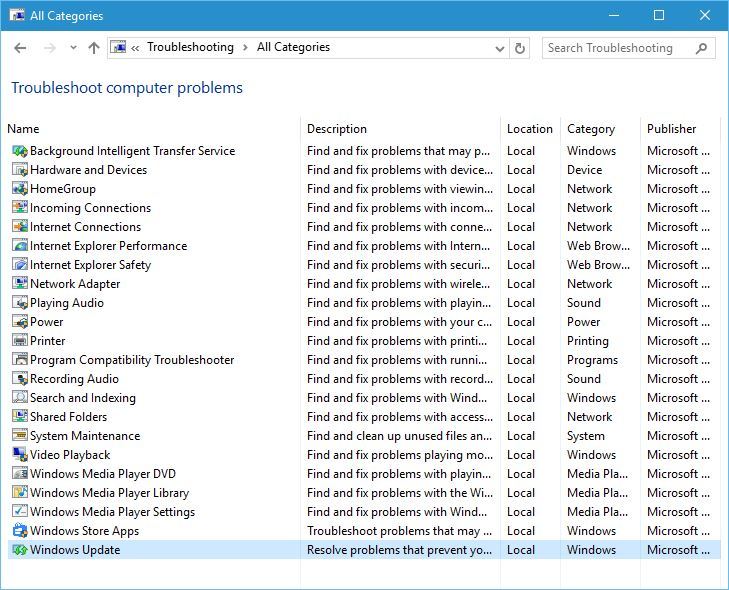
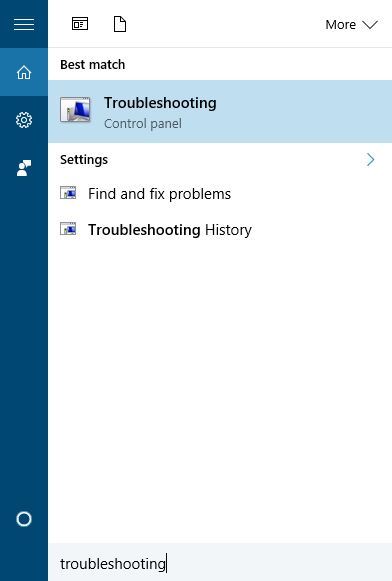
    1. Press Windows Key + S and enter troubleshooting. Select Troubleshooting from the menu.
      windows-10-couldnt-be-installed-troubleshooting-1
    2. Choose View all from the menu on the left.
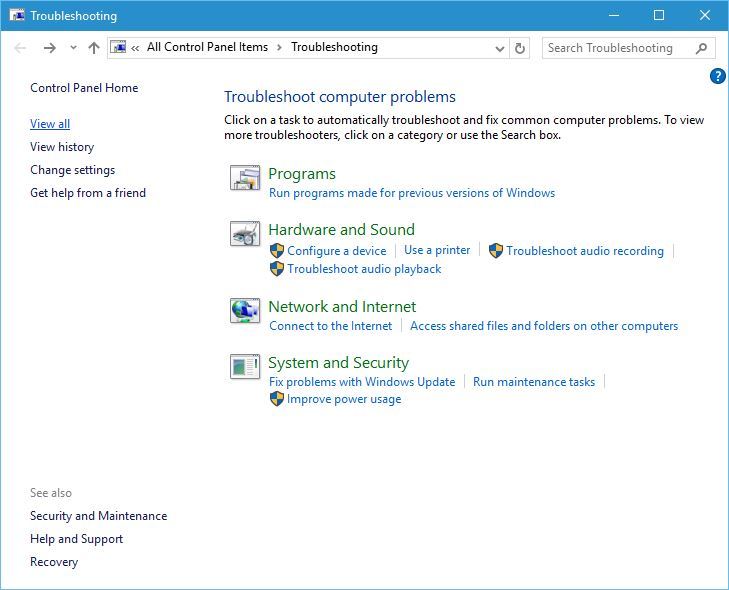
      windows-10-couldnt-be-installed-troubleshooting-2
    3. Select Windows Update.
      windows-10-couldnt-be-installed-troubleshooting-3
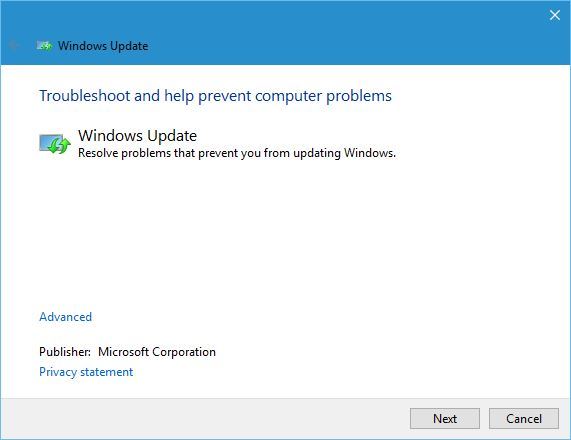
    4. Click Next to start the wizard.
      windows-10-couldnt-be-installed-troubleshooting-4

    After the wizard completes the scan and fixes the errors, you should be able to install the new build of Windows 10.

    Solution 2 – Install Windows 10 using Media Creation Tool

    You might want to try using Media Creation Tool to download the new build. To complete this process you’ll need an empty USB flash drive. Once you download Windows 10 ISO, you can create a bootable installation media using the Windows Media Creation tool. Now you just need to start the installation from the USB flash drive.

    Solution 3 – Change registry values

    You might be able to fix this problem simply by changing one value in your registry. We have to mention that changing the registry can lead to certain issues if you’re not careful, so it might be a good idea to create a backup of your registry in case anything goes wrong.

    To edit the registry follow these steps:

    1. Press Windows Key + R and enter regedit. Press Enter or click OK.
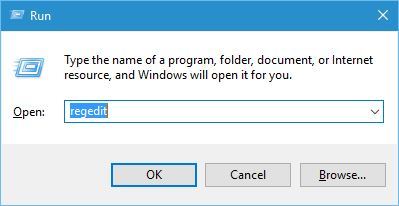
      windows-10-couldnt-be-installed-regedit-1
    2. Go to the HKEY_LOCAL_MACHINESYSTEMCurrentControlSetControl key in the left pane.
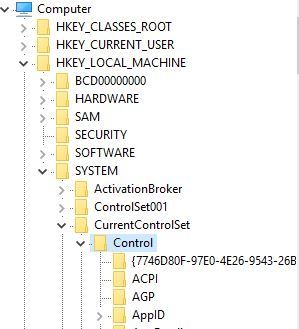
      windows-10-couldnt-be-installed-regedit-2
    3. In right pane locate PortableOperatingSystem value and double click it to open its properties.
    4. Change Value data from 1 to 0. Some users claim that changing the value from 0 to 1 also fixes the issue, so you might want to try that as well.
    5. Close Registry Editor, restart your PC and check if the problem is resolved.

    Solution 4 – Turn off your firewall and antivirus

    If you’re getting error code 8024402C while trying to download the latest Windows 10 build, you might want to temporarily disable your antivirus and firewall.

    These tools can sometimes interfere with Windows Update. In some cases, you might even have to delete your third-party antivirus and firewall. You can also use a dedicated uninstaller tool to get the job done.

    We also have to mention that you’ll have to disable Windows Firewall to fix this problem, and you can do that by following these steps:

    1. Press Windows Key + S and enter firewall. Select Windows Firewall from the list.
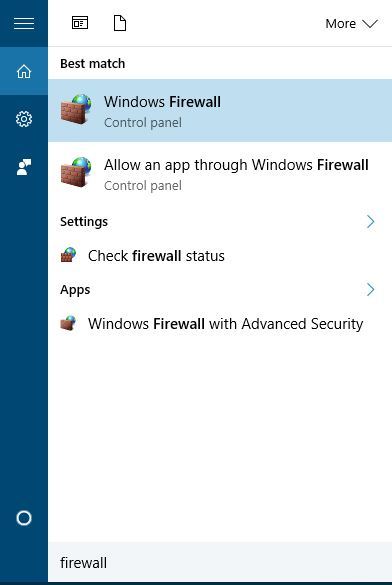
      windows-10-couldnt-be-installed-firewall-1
    2. Choose Turn Windows Firewall on or off from the menu.
      windows-10-couldnt-be-installed-firewall-2
    3. Select Turn off Windows Firewall (not recommended) for both Public and Private network settings.
      windows-10-couldnt-be-installed-firewall-3
    4. Click OK to save changes.

    Solution 5 – Restart Windows Update service

    You might want to try restarting Windows Update service. To do that, follow these simple steps:

    1. Press Windows Key + X to open the Power User Menu and choose Command Prompt (Admin).
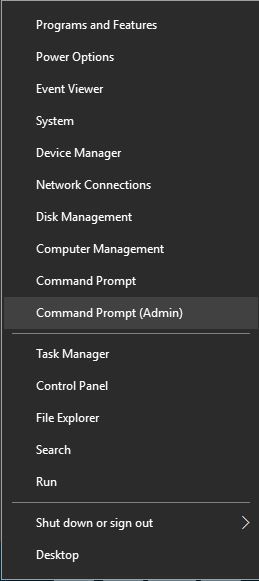
      windows-10-couldnt-be-installed-cmd-1
    2. When Command Prompt opens, enter the following lines:
      • net stop wuauserv
      • net start wuauserv
    3. Once both commands are successfully executed, close Command Prompt and check if the problem is resolved.

    Solution 6 – Create a new administrator account and rename the Temp folder

    Users claim that you can fix this issue simply by renaming the Temp folder. Before you can do that, you’ll need to create a new administrator account. To do that, follow these steps:

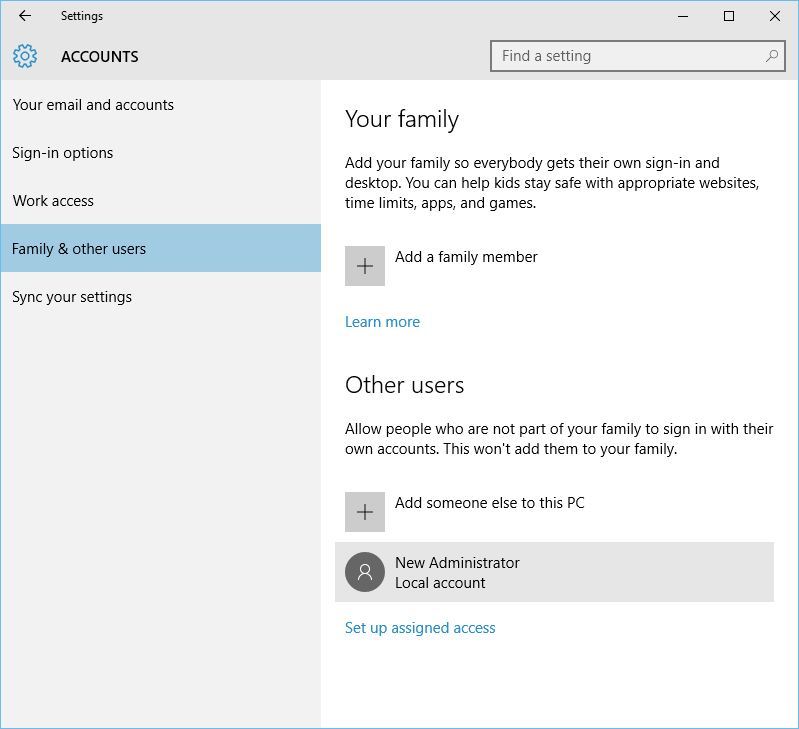
    1. Open the Settings app and go to Accounts.
    2. Go to Family & other users tab and click on Add someone else to this PC.
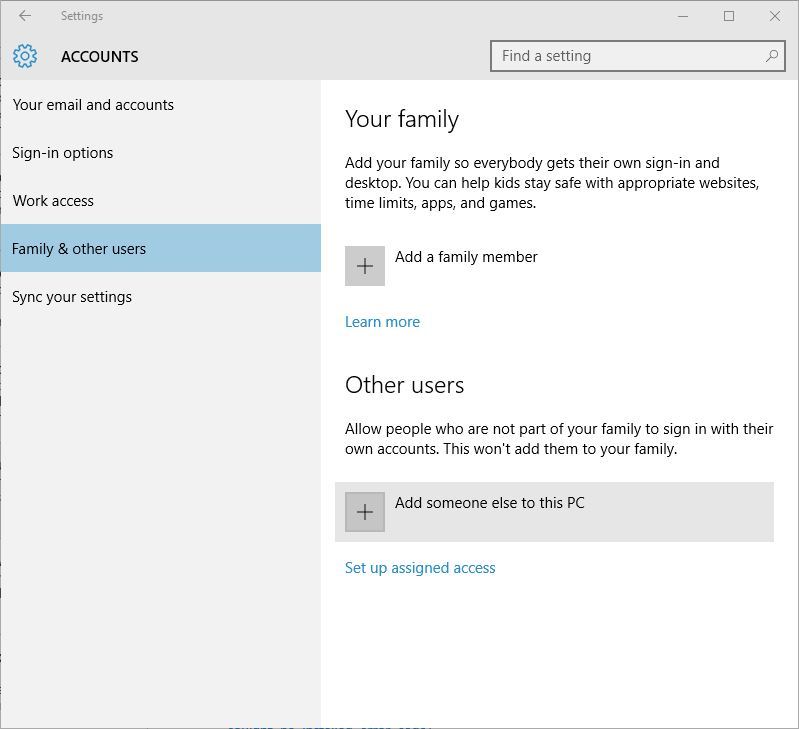
      windows-10-couldnt-be-installed-account-1
    3. Choose I don’t have this person’s sign-in information.
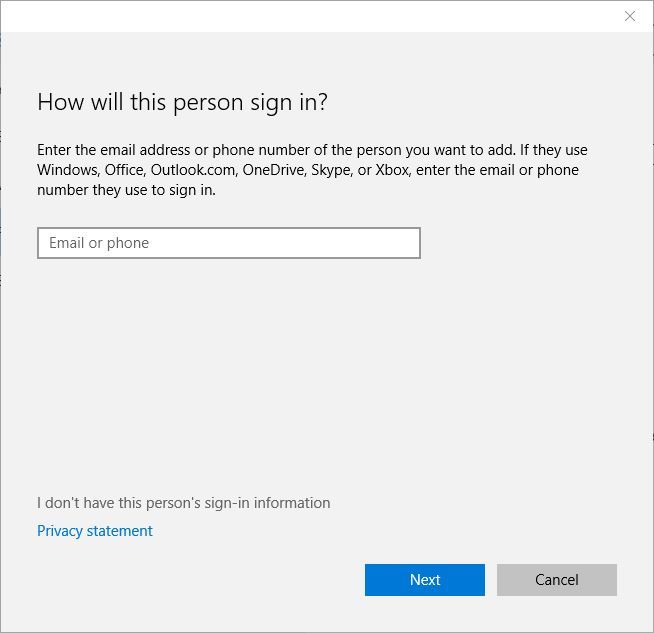
      windows-10-couldnt-be-installed-account-2
    4. Click on Add a user without a Microsoft account.
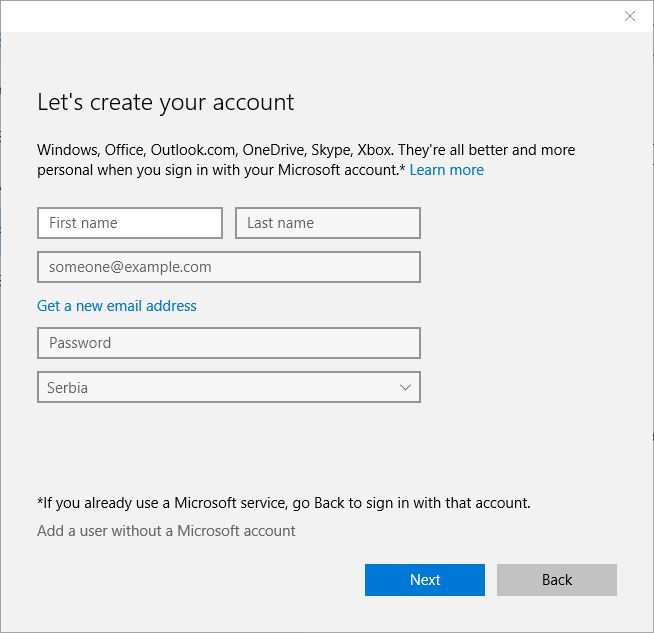
      windows-10-couldnt-be-installed-account-3
    5. Enter the username of your new administrator account and click Next.

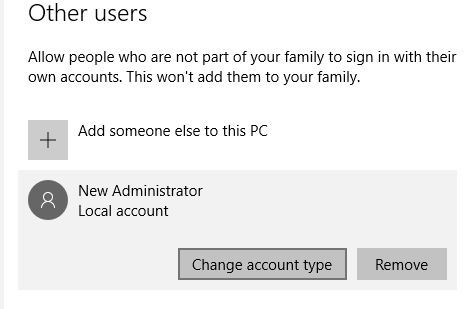
    After doing this, your new account should be added to Other users section. Keep in mind that all new accounts are created as Standard users which means that they don’t have any administrator privileges.

    You can simply fix this problem by doing the following:

    1. In Other users section you’ll see the new account that you just created. Click on it.
      windows-10-couldnt-be-installed-change-1
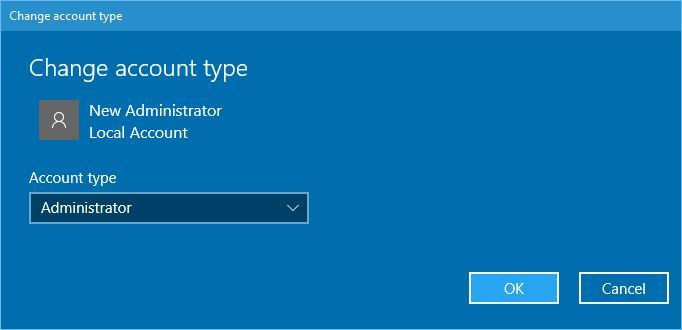
    2. Click Change account type button.
      windows-10-couldnt-be-installed-change-2
    3. Change Account type from Standard to Administrator. Click OK to save changes.
      windows-10-couldnt-be-installed-change-3

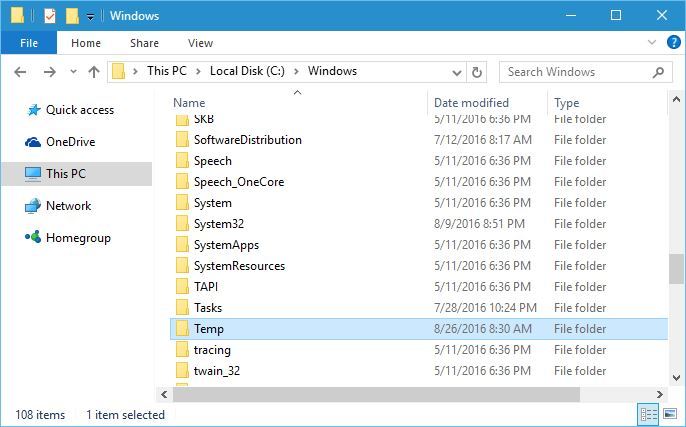
    After creating a new account, log out of your main account and switch to the new one. Go to C:Windows folder, locate Temp folder and rename it to Temp2.

    windows-10-couldnt-be-installed-temp-1

    Log out from your new account and switch back to your main one. Try to download the latest build of Windows 10 again. If everything works, you should delete the new account that you created.

    Solution 7 – Check if your registry configuration is correct

    If you’re trying to download the latest Windows 10 build, you need to make sure that your registry configuration is correct. To do that, follow these steps:

    1. Open Registry Editor.
    2. Go to the
      HKEY_LOCAL_MACHINESOFTWAREMicrosoftWindowsCurrentVersion
    3. Look for ProgramFilesDir and ProgramFilesDir (x86) entries in the right pane. Bear in mind that you’ll have ProgramFilesDir (x86) entry only if you use 64-bit version of Windows.
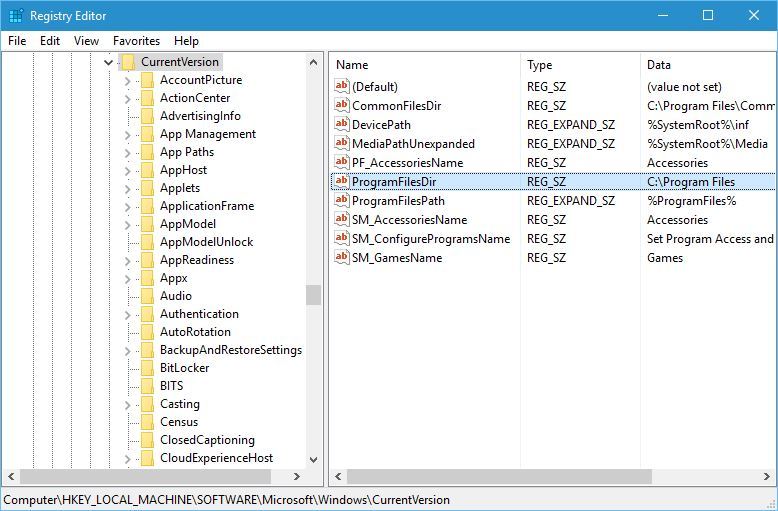
      windows-10-couldnt-be-installed-program-files-1
    4. Double click ProgramFilesDir entry and change the Value data to C:Program Files. If you have ProgramFilesDir (x86) entry, be sure to set its data value to C:Program Files (x86).
    5. After you’re done, close Registry Editor and check if the issue is resolved.

    Solution 8 – Uninstall My Rapport Banking software

    If you’re trying to install the latest build of Windows 10, you might encounter certain issues due to third-party software. Users reported that My Rapport Banking software can sometimes interfere with Windows 10 installation, therefore if you have this tool installed we suggest that you remove it and check if that fixes the problem.

    Fix – Windows 10 couldn’t be installed system reserved partition

    Solution 1 – Change the size of System Reserved Partition

    If you have problems installing Windows 10, you might need to increase the size of Reserved Partition. To do that, you can use tools such as Partition Magic. Simply download the tool and create a bootable USB flash drive with the tool on it. Connect the USB flash drive and boot your PC from it.

    After booting from the USB flash drive, you need to use Partition Magic to expand your System Reserved partition. Before you can do that, you’ll need to shrink one of your partitions by 350MB.

    Now just add that space to the System Reserved partition and Windows 10 should install without any problems. We have to mention that this procedure can be somewhat dangerous and cause data loss, so use extra caution and install a tool that prevents data loss.

    Solution 2 – Make sure that your C partition is set as active

    According to users, you can fix this problem by settings your C partition as active. To do that, follow these steps:

    1. Press Windows Key + X and choose Disk Management.
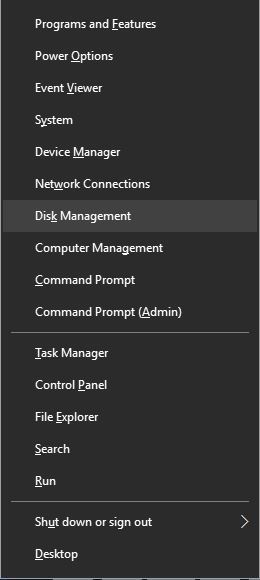
      windows-10-couldnt-be-installed-disk-1
    2. When Disk Management opens, locate your C partition, right click it and choose Mark Partition as Active.
    3. Close Disk Management and try to install Windows 10 again.

    Solution 3 – Use Disk Management and Command Prompt

    Users reported We couldn’t update the system reserved partition error message while trying to install Windows 10, and if you’re getting this error you can fix it by following these steps:

    1. Start Disk Management.
    2. You should see a Data partition that has a size of 100 MB.
    3. Right click that partition and choose Change Drive Letter and Paths.
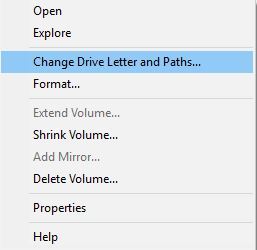
      windows-10-couldnt-be-installed-partition-1
    4. Click the Add button and set Y as the partition letter.
    5. Start Command Prompt as administrator.
    6. When Command Prompt starts, enter the following commands:
      • takeown /f . /r /d y
      • icacls . /grant administrators:F /t
      • attrib -h -s -r bootmgr
    7. Open File Explorer and open Y: drive.
    8. Make sure that hidden files and folders are visible. You can show hidden files and folders by clicking the View tab and checking Hidden items option.
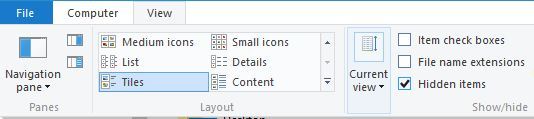
      windows-10-couldnt-be-installed-partition-2
    9. Go to Boot folder and delete all other folders except en-US.
    10. Go back to Command Prompt and run the chkdsk Y: /F /X /sdcleanup /L:5000 command. If you’re getting an error message while trying to run this command, try running chkdsk Y: /F /X /L:5000 command instead.
    11. Now try to install Windows 10 again.
    12. If the installation is successful, go back to the Disk Management and remove the letter of the boot partition.

    Fix – Windows 10 couldn’t be installed 80200056, 80072ee2

    Solution – Restart BITS

    If you’re getting error 80200056, you might want to try restarting BITS service. To do that just start Command Prompt as administrator and enter bitsadmin.exe /reset /allusers. After the command is executed, restart your PC and try to install Windows 10 again.

    We covered this error in the past, so if you need more information on how to fix error 80200056, we suggest that you read some of our previous articles.

    The same applies to error 80072ee2.

    Fix – Windows 10 couldn’t be installed 8007003

    Solution 1 – Remove dual boot and merge all partitions

    This might not be the best solution because you’ll most likely lose all your important files, therefore we advise you to create a backup and copy all your important files.

    Users reported that dual boot with Linux can sometimes cause this error to appear, and in order to fix this problem you need to disable dual boot option and merge all partitions into one. After merging the partitions, you should be able to install Windows 10.

    Solution 2 – Check the WIMMount path

    Sometimes this error can occur if the WimMount path isn’t properly set in your registry. To fix this problem follow these steps:

    1. Open Registry Editor.
    2. Go to the
      HKEY_LOCAL_MACHINESYSTEMCurrentControlSetServicesWIMMount

      key in the left pane.

    3. In the right pane locate ImagePath entry and check its value. By default it should be set to system32driverswimmount.sys. If it’s set to a different value, be sure to change it to system32driverswimmount.sys.
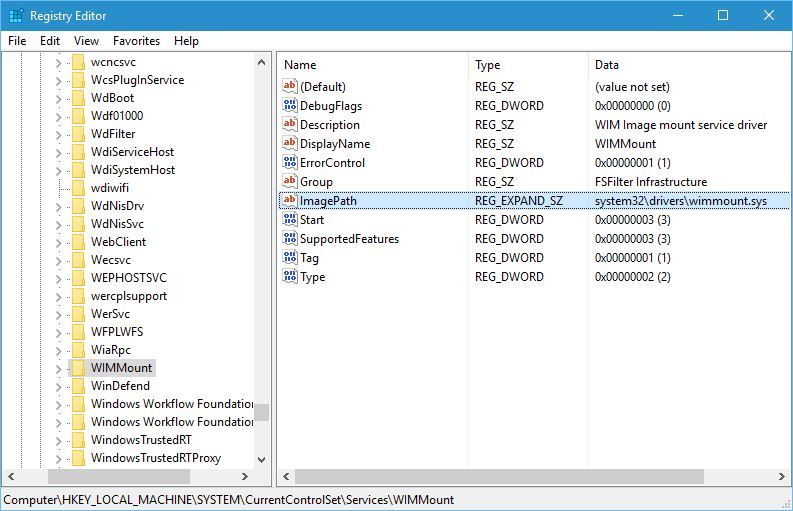
      windows-10-couldnt-be-installed-wimmount-1
    4. Close Registry Editor and check if the problem is resolved.

    Fix – Windows 10 couldn’t be installed c1900101-40017

    Solution – Be sure that your drivers are up to date

    If you’re getting this error while trying to download the latest Windows 10 build, we suggest that you try updating your graphics card drivers. Users reported that this error was fixed after installing the latest AMD drivers, so be sure to try that. The same solution applies to Nvidia owners.

    Updating drivers manually is very annoying, so we recommend you to download a driver updater tool to do it automatically.

    Not being able to install Windows 10 can be a big problem, but we hope that one of our solutions helped you fix this issue.

    How to open WordPerfect in Windows 10

    Any file with the extension of .wpd is created in WordPerfect, the word-processing software program by Corel that many users enjoy. They can open these documents by double-clicking them, but this doesn’t do the trick unless WordPerfect is installed on the computer.

    If it isn’t, is there any chance to open WordPerfect in Windows 10? Having a copy of Corel WordPerfect installed is not mandatory for opening this type of file. Users can take advantage of another word processing application.

    For example, Microsoft Word is capable of opening a wide range of document file formats, including WordPerfect ones. If this topic is of interest to you, don’t hesitate to keep on reading.

    Here you’ll find step by step instructions for easily opening WordPerfect in Windows 10.

    How can I establish WordPerfect and Windows 10 compatibility?

    1. Open WordPerfect file with Microsoft Word

    WordPerfect file

    1. Open the Microsoft Word application.
    2. Up next, click the Microsoft button to display all program options.
    3. Click the Open button.
    4. In certain versions, you need to select File first followed by Open.
    5. Click the File Type drop-down menu at the bottom of the dialog box.
    6. Change it to All Files.
    7. Browse to the WordPerfect file.
    8. Select it and click Open.
    9. The file will open up in Microsoft Word after it is automatically converted.
    10. From the File menu, choose Save as.
    11. When the save window opens, make sure the Save As Type drop-down menu reads Word Document (.docx).
    12. If it doesn’t, click to find Word Document (.docx) in the drop-down menu.
    13. Finally, click Save.
    14. If a window appears warning you about changes related to the new file format, click Yes.

    If no conversion filter is set, the document may contain all sorts of formatting errors relating to text size, font, or layout. Prevent that from happening by adding an appropriate filter.


    2. Rename the extension from .wpd to .doc

    rename extension

    1. Place the WordPerfect file on your desktop or some.
    2. Right-click on the file and select Rename.
    3. Change the file extension from .wpd to .doc.
    4. Double-click on the file.
    5. The file should immediately open up in Microsoft Word.
    6. At this point, you can either leave it in .doc file type or convert it to .docx file type.

    3. Change your file associations

    Corel WordPerfect Office

    1. Put the file on your desktop.
    2. Right-click on the file and select Open with.
    3. Select the option that says Choose default program next.

    4. Highlight Microsoft Word and place a check next to the option on the bottom that says Always use the selected program to open this kind of file.
    5. If you can’t find Word as a choice, click the Browse button to locate Winword.exe.
    6. Up next, click on OK.
    7. The current .wpdfile will immediately open in Word.
    8. For all the upcoming .wpd files, you just need to double-click them and they’ll open up in Word going forward.

    Another recommendation for a successful result is to set up your computer to always open .wpd files in Word. It is ideal when you receive a great number of WordPerfect files. In this case, opening and converting the files from Word or changing the filename each time is time-consuming.

    In this article, we have tried to cover some of the most convenient ways to open WordPerfect files in Windows 10.

    Which one of these procedures sounds more tempting? Let us know by leaving a message in the comments section below.

    [wl_navigator]

    Microsoft throttles down some “non-essential” Office 365 capabilities to accommodate new growth and demand

    As more and more companies are making employees work from home due to the Coronavirus pandemic, online collaboration services like Microsoft’s Office 365 are facing extra stress. In light of the situation, Microsoft recently sent out an email to Office 365 subscribers notifying that it will be making temporary adjustments to select “non-essential capabilities” of the service.

    We received an email about these changes on our end, and it has surfaced on Reddit too. According to the email, any changes are not expected to have a significant impact on the end-user experience. The company explains that some changes include how often it checks for presence, the interval in which it is shown that the other party is typing, and video resolution. A full copy of the email message from Microsoft can be seen below.

    This move isn’t really too surprising, as demand for Microsoft’s Office 365 services is on the surge. As per a Reuters report, Microsoft experienced 100% growth in usage of in Teams in Italy, alone. Microsoft is also offering a free six month free trial of paid Teams plans.  Such moves will not only ensure that business goes on and that workers can do their jobs from home, but also ensure that service interruptions are minimized.

    Microsoft Teams free vs Microsoft Teams paid, what’s the difference?

    Updated: 3/16/2023

    Like many other teleconferencing services, Microsoft offers both a free and paid version of Microsoft Teams. But, due to the Coronavirus pandemic, the company recently announced it would offer a free six-month free trial of paid Teams plans.

    As a result, you might be wondering what is the difference between free and paid plans, to begin with. In this Office 365 guide, we’ll give you a look at that.

    As a quick summary, the differences between the free and paid versions of Microsoft Teams comes down to a couple of things. The list includes the maximum number of members, file storage sizes, and extra features for recording meetings as well as phone calls. You’ll also find that there are lots of extra administrative options with paid plans, too.

    Now, for the in-depth details. The free version of Microsoft Teams only allows you to have up to 300 members (users) per organization. Paid plans, meanwhile, up that up to a potentially unlimited amount of members, with an enterprise license.

    Moving on to file storage, the difference between paid and free is quite substantial. Free Microsoft Teams plans limit storage to 2GB per user, with 10GB shared storage. Paid plans, meanwhile, bump the storage up to 1TB per user.

    Feature Teams Free Teams Paid
    Maximum members (users) 300 per org Unlimited, with an enterprise license
    Storage 1GB per user, and 10GB of shared storage 1TB per user
    Scheduled meetings, meeting recordings, phone calls, and audio conferencing Not Available Available
    Online and video conferencing meetings for up to 250 people. Online events for up to 10,000 Not Available Available
    Unlimited chat messages and search in Teams Available Available
    Background blur on video calls Avaialble Available
    1:1 calling, group audio and video calls, channel meetings, screen sharing Available Available
    Apps and Office 365 Integrations Avaialble Available

    When it comes to calling, meetings, and screen sharing, free and paid versions of Teams share a bit. Teams free and paid both let you have guest access, 1:1 and group online and audio-video calls as well as unlimited chats and search.

    Naturally, both free and paid Teams plans also let you enjoy real-time collaboration using your favorite Office apps on Office on the web. Features like background blur are common across both free and paid plans, too.

    In both tiers, you’re also able to have Channel meetings and enjoy screen sharing. However, the free version of Teams doesn’t have access to scheduled meetings, meeting recordings, or phone calls and audio conferencing. These three features are only available in the paid version of Teams.

    Finally, there’s the administrative stuff. Naturally, Teams paid is the only plan which has access to certain administrative tools. The list includes tools for managing users and apps, usage reporting, financially backed uptime, as well as configurable user settings and policies.

    Teams paid plans also have phone and web support around the clock and additional compliance and security features. On that front, the list includes: Single sign-on to all Office 365 apps and services, and enforced multi-factor authentication.

    If you’re hoping to keep a paid tier of Microsoft Teams once your six-month trial ends, we’ve got a more in-depth guide as to which Office 365 plans include Teams for no added cost. These plans range from $5 per user with an annual commitment or all the way up to $12.50 per user.

    In 2023. Microsoft announced the general availability of Teams Premium, a new tier built on Microsoft Teams that is designed to enhance the tool’s meeting experience more personalized, intelligent, and secure. The offering is powered by GPT-3.5, OpenAI’s language model.

    You can get the Teams Premium add-on at $10 per month. Be sure to check out our separate guide where we highlight its offerings and more.

    Keep it tuned to OnMSFT for news and information and guides about all things related to Microsoft Teams. And, check out our Microsoft Teams news hub for more.

    FIX: Sorry, we’re having trouble getting your notebook

    OneNoteClass Notebook and Microsoft OneNote helps the entire class to store notes, links, audios, videos, attachments, and more. Unfortunately, certain errors can appear, and in today’s article we’ll show you how to fix them.

    How to fix Microsoft Teams We’re having trouble finding your notebook error?

    1. Check if the link is broken
    2. Refresh the user profile
    3. Try accessing OneNote through an app
    4. There could be a temporary outage/server issue
    5. Change the site’s address

    1. Check if the link is broken

    Based on a discussion thread in the Microsoft forum, in some cases, it appears that the link from OneNote Teams that was broken. In such cases, to get access to the OneNote files:

    • You can access the files directly.
    • Alternatively, you can also open the OneNote application if it’s syncing.

    2. Refresh the user profile

    If you’re getting this error, perhaps you can fix it simply by refreshing your profile. Sometimes, the simplest solutions work best.


    3. Try accessing OneNote through an app

    onenote 2016 onenote desktop
    Some of the most efficient workarounds that you can use are the following:

    • Access OneNote through a different app or a browser.
    • You can install OneNote from the Microsoft Store as usual or download the desktop edition (OneNote 2016).
    • Alternatively, you can also install the app on any Android or iOS device. Now, you can simply log back into your Microsoft account and attempt to access their notes from this location.

    4. There could be a temporary outage/server issue

    This error can appear due to a temporary outage. If that’s the case you may wait for some time to see if the server is back up and working.

    Alternatively, you can try to access their notebooks via OneNote.com.


    5. Change the site’s address

    If the Sorry we’re having trouble getting your notebook Teams error still appears, you can fix it by doing the following:

    1. Open the teams’ website in SharePoint designer (download it from Microsoft‘s website).
    2. Once it’s installed and opened, select Open site.
    3. Now add this part of the address in front of the /General_Notes.one and it should open the site.
    4. For instance, paste the address in the format https:/XXXXX/XXXXXXXXXX/XXXXX/ into the Site name box in SP Designer.
    5. Now click on it to open the site. No need to choose a folder or file here.
    6. Click All Files in the folder list.
    7. Open SiteAssets option and the team name folder. This is the place where you should see the OneNote files.

    But, if the tab is still intact and it yet cannot open OneNote, here’s what you can do:

    1. Simply remove the Notebook section using the below steps on the Team site.
    2. Click on the Home option and select Edit from the dropdown which is right at the bottom.
      We're having trouble finding your notebook edit
    3. Now, click under the Notebooks section.
    4. Choose the Remove option.
    5. The notebook section is now deleted from the SharePoint quick links navigation.

    Alternatively, you can also remove the notebook via the below steps:

    1. Go to the site.
    2. Click on SiteContent.
    3. Select the option Site Assets
    4. Remove the notebook.

    Here you are deleting the notebook that was opened when you clicked on the Notebook tab. But, if you want to remove the team tab since it won’t reconnect with the notebook again, here’s what you can do:

    1. Right-click on the OneNote tab and two options show up – Rename and Remove.
      oneote select We're having trouble finding your notebook
    2. Click the Remove option in the dropdown

    remove notebook We're having trouble finding your notebook
    If as an admin you still cannot remove the tab (no Remove option) and the error still shows up, go to Team settings and check permission.

    Alternatively, the tab can also be deleted from the Team browser version.

    The final thing to check would be the subscription, since only Office 365 for Education automatically comes with a OneNote Tab. So, if you are not using Office 365, you may create a new team and re-check if the OneNote Tab will be a default option.

    Sorry we’re having trouble getting your notebook has been a consistent issue with the OneNote and Microsoft Teams. The error still keeps affecting users randomly every now and then. It mostly turns out to be a server issue.

    We hope that we could help you fix the error with one of the above solutions.

    1. Teams is fully integrated with the Office 365 Suite
    2. OneNote does not offer near as many features as Teams
    3. Teams offers video and audio support
    4. Microsoft Teams in a fully-fledged remote work solution
    5. NoteNote is suitable for individual users, while Teams targets business users
    • How do you use Staff Notebook in Teams?

    To use Staff Notebook, go to your class team, navigate to the General channel and click on the Staff Notebook tab where you can edit the existing pages or add new ones.

    • Can you duplicate a notebook in OneNote?

    To duplicate notebooks in OneNote, navigate to the EDU Notebooks tab, right-click on the notebook you want to duplicate, and click on Save a copy.

    [wl_navigator]

    Fix: Microsoft Teams Something Went Wrong

    Since Microsoft introduced Microsoft Teams as a replacement for Skype Enterprise, this part of Office365 invoked mostly positive reactions. However, this well-designed chat-based workplace application has its share of issues.

    One of those is easily recognizable and it’s quite common. Namely, users who tried to log in bumped into an error message informing them that something is wrong. Of course, they were unable to log in.

    This initially looks like a minor detour, but it’s, as the matter of fact, a quite complex problem. We have two possible solutions for this issue, so make sure to continue reading.

    What to do if Microsoft Teams won’t load

    1. Make sure that you’re using proper e-mail address
    2. Tweak the credentials

    1. Make sure that you’re using proper e-mail address

    Firstly, we’ll need you to confirm your login credentials. Make sure to use exclusively the e-mail address related to Microsoft Teams.

    In addition, try signing in multiple times, since some persistent users resolved the issue that way. Try restarting the app multiple times, as well.

    In case you’re still stuck with the issue at hand, make sure to move to additional steps.

    2. Tweak the credentials

    Thanks to one experienced user, we got the hold of the possible solution for the problem and it concerns the Windows Credentials. Namely, there might be a self-imposed error hidden within the Windows Credentials, the place where Windows stores all passwords and login credentials.

    Therefore, in order to resolve this issue, you’ll need to delete the latest Team’s credential input Windows have stored, and try again.

    Here’s how to do it:

    1. In the Windows Search bar, type Control, and open Control Panel.
    2. From the Category view, open User Accounts.
    3. Open Credentials Manager.credential manager windows 10
    4. Select Windows Credentials.control panel windows credentials
    5. Under the ”Generic credentials” section, locate msteams_adalsso/adal_context_segments.
    6. Right-click and delete this generic credential. Have in mind that you’ll need the administrative permission to do so.
    7. Restart your PC.

    After that, you should be able to log into Teams without any problems whatsoever. In addition, you can try to log into the web version of the app and avoid the desktopapp.

    That’s not the solution but it’s an optional workaround that will, at least, enable you to use the Microsoft Teams.

    Alternatively, you can switch to a different collaboration software. For more information on the best collaboration tools for Windows 10, you can check out this in-depth guide.

    That should do it. In case you have questions or suggestions regarding the issue at hand, make sure to tell us in the comments section below.

    [wl_navigator]

    Here’s how to fix error 500 on Microsoft Teams

    Have you encountered error 500 on the Microsoft Teams application? If so, it could mean one of several things.

    Here are some of the common causes of error 500 on Microsoft Teams:

    • Corrupted system files
    • Improper removal of previous installation files
    • Failure to install Office
    • Your Office installation was blocked by either the antivirus program or your computer’s firewall
    • The Office can’t install because your internet connection may be preventing it from doing so
    • Proxy settings are preventing Office installation
    • A previous version of Office existing in your computer is blocking the installation of the newer version (this could be due to an incomplete, partial, change, installation, and/or failed repair or removal of the previous version)

    Here are some solutions that show you how to fix error 500 on Microsoft Teams.

    How to solve error 500 on Microsoft Teams

    1. Clear credential cache to fix error 500 on Microsoft Teams
    2. Repair the Office application
    3. Remove Office to fix error 500 on Microsoft Teams
    4. Remove Office manually to fix error 500 on Microsoft Teams
    5. Download and install Office again to fix error 500 on Microsoft Teams

    1. Clear credential cache to fix error 500 on Microsoft Teams

    Here’s how to do this:

    1. Right-click Start.
    2. Select Control Panel.
    3. Click User Accounts.
    4. Open Credential Manager.credential manager windows 10
    5. Clear the credential cache.
    6. Restart Microsoft Team client.
    7. Go to the System Tray.
    8. Right-click on Teams icon.
    9. Log out then restart.

    Once you log out, then restart, Microsoft Teams app will request for your credentials.

    Enter your Office 365 credentials.


    2. Repair the Office application

    This helps to fix and/or replace any corrupted system files in your computer that may have caused error 500 on Microsoft Teams.

    Take these steps:

    1. Right-click Start.
    2. Select Control Panel.
    3. Click Programs.
    4. Click Programs and Features.
    5. Click on the Office version you want to repair.Repair Microsoft Office
    6. Click Change.
    7. Choose Quick Repair.office 365 repair feature
    8. Click Repair.

    Note: In case Quick Repair doesn’t fix it, select Online Repair, then click Repair.

    Did this solution help? If not, try the next solution.


    3. Remove Office

    If error 500 persists after trying to repair Office, try uninstalling Office from your computer using these steps:

    1. Right-click Start.
    2. Select Control Panel.
    3. Click Programs.
    4. Click Programs and Features.
    5. Choose Office Suite.Uninstall-microsoft-office
    6. Click Uninstall.

    Sometimes there can be files and data that remain, even after the removal of Office from Control panel. Just to be sure, you can check out the link below and follow the quick steps in the guide.


    4. Remove Office manually

    If removing Office using solution 2 didn’t work, try manually uninstalling Office to remove it completely using the steps below:

    1. Remove Windows Installer package.
    2. Remove scheduled tasks on Office.
    3. End Click-to-Run tasks on Task Manager.
    4. Delete shortcuts from Start menu.
    5. Delete registry sub keys related to Office.
    6. Delete Office files.

    Step 1: Remove Windows Installer package

    Do the following:

    1. Go to Office installation folder by going to C:Program Files Microsoft Office.
    2. Right-click the relevant Office installation folder, for example, Office 15 or Office 16.
    3. Click Delete.

    Step 2: Remove scheduled tasks on Office

    1. Right-click Start
    2. Type CMD in the search field box
    3. From the search results, go to Command Prompt and right-click on it.
    4. Select Run as administrator.
    5. Type the following commands, then press Enter after each:
      exe /delete /tn “MicrosoftOfficeOffice Automatic Updates”
      exe /delete /tn “MicrosoftOfficeOffice Subscription Maintenance”
      exe /delete /tn “MicrosoftOfficeOffice ClickToRun Service Monitor”

    Step 3: End Click-to-Run tasks on Task Manager

    1. Right-click Start
    2. Select Task Manager
    3. Click the Process tab
    4. Check if these processes are running then right-click on each and click End Task
      • .exe
      • Setup*.exe

    Step 4: Delete shortcuts from Start menu

    1. Right-click Start.
    2. Type CMD in the search field box.
    3. Right-click Command Prompt in the search results.
    4. Select Run as administrator.
    5. Type
      %ALLUSERSPROFILE%MicrosoftWindowsStartMenuPrograms
    6. Press Enter.
    7. Delete Microsoft Office 16 folder (or the folder for Office on your computer).

    Step 5: Delete registry sub keys related to Office

    1. Right-click Start.
    2. Select Run.
    3. Type regedit.
    4. Click Ok or press Enter
    5. The Registry Editor will open. Delete these sub keys:
      HKEY_LOCAL_MACHINESOFTWAREMicrosoftOfficeClickToRun
      HKEY_LOCAL-MACHINESOFTWAREMicrosoftAppVISV
      HKEY_CURRENT_USERSOFTWAREMicrosoftOffice
    6. Once you’re done, delete the Office key

    Step 6: Delete the Office files

    1. Right-click Start
    2. Select Run
    3. Type %ProgramFiles%
    4. Click Ok or press Enter
    5. Delete the Microsoft Office 16 folder (or the folder Office in your computer)microsoft office local disk
    6. Open Run dialog box again
    7. Type %ProgramFiles(x86)%
    8. Click Ok or Press Enter
    9. Delete the Microsoft Office folder.

    If you could not remove Microsoft Office after following the steps listed above, you may want to check out some of the additional solutions that we listed in this guide.


    5. Download and install office again

    Here’s how to do this:

    1. Sign in to your Microsoft account
    2. Select Install
    3. Click Run
    4. If you see You’re good to go’, click All done

    Did any of these solutions work for you? Let us know in the comments section.

    [wl_navigator]

    FIX: HP printer error code oxc4eb827f

    When you try to start a printing job, the machine may become completely unresponsive to commands sent from any device and finally stops unexpectedly. In many cases, the power light is also blinking on and off and the error code oxc4eb827f hwlmicci2c appears on the screen.

    If you’ve never seen this message before, you’re probably at a loss about how to fix it. Fortunately, remedying the situation is not rocket science. These methods can fix the error for you, so let’s check them in detail.

    What can I do when getting HP printer error code oxc4eb827f?

    1. Power reset your printer

    power reset HP Envy 4500

    1. With the printer turned on, remove the ink cartridges.
    2. Disconnect the power cord from the printer and the power outlet.
    3. Power off both the PC and the wireless router.
    4. Complete the process and wait for at least 60 seconds.
    5. After the small pause, plug the printer back in. Ensure you plug it directly to a wall outlet.
    6. You may now install the cartridge.
    7. Power on the router and the computer.

    If the carriage is firmly stuck on the right and you have a hard time removing the ink cartridges, try performing a power reset on the printer.


    2. Use the printer troubleshooter

    use printer troubleshooter

    If the previous procedure fails to resolve the oxc4eb827f error, click on the Start button, then type troubleshoot and click Troubleshooting. In the new window, click View, then scroll down to Printer.

    You may now click Advanced, then Run as administrator. Click Next, right-click on the icon representing the printer you want to troubleshoot and click Next once more.

    Work your way through the Troubleshooter, answering all questions in an effort to resolve the issue for good.


    Windows Troubleshooter has stopped working? Count on us to help you solve the issue quickly!


    3. Turn off the firewallturn off firewall

    There’s another strong possibility that the oxc4eb827f error may be the result of interferences with your firewall. The next step is to check if this has anything to do with the situation you are in.

    When confirmed, open your preferences on the firewall and add the executable file for the printer software as an exception. If this makes no difference, disable the firewall temporarily to see if it helps.


    Don’t know how to check if Windows Firewall is blocking a program? Follow the steps in this handy guide.


    If none of the methods listed above could manage to get rid of this error for you, others reported jiggling the ink cartridge area as the printer is powering on. Checking the correct installation of the HP printer software is also described as a potentially successful solution.

    We hope you have cleared this error message. If you haven’t been able to fix it by following the mentioned procedures, then you need to take into consideration potential hardware-related causes.

    Contact your nearest HP service center and set up an appointment to have your printer fixed and let us know if you need further assistance by using the comments area below.

    READ NEXT:

    Windows 10 version 2004 will let you disable Reserved Storage

    When it comes to working on a PC, regardless if it is for professional or personal reasons, disk space never seems to be enough, no matter how big our hard drives are.

    While it is true that you could always buy an external one, not everyone can afford one. That being said, making use of every bit of what you have is essential.

    You could also opt for some good disk management tools to free up space, but those too are most often pay-to-use.

    Reserved Storage can now be used again

    However, things are about to change for Windows 10 users. Reserved Storage is a relatively new feature that arrived with the May 2019 Update. The mai9n purpose of this feature is to reserve a portion of the disk for future updates and drivers.

    While the concept in itself is a good one, it still takes up space that isn’t actually being used until an actual update. However, it seems that Reserved Storage isn’t a system partition and it could be disabled by editing your Windows Registry.

    Note: The Registry Editor is a powerful tool that is used to modify, create and delete sensitive Windows files. Incorrectly editing or deleting a protected key can render your system completely unusable.

    Things are about to change since Windows 10 version 2004 will make it easier for administrators and common users to manage Reserved Storage. This new Windows version will include DISM options for Reserved Storage.

    This will allow you to disable it on your devices, and you can also use the new DISM features to check the status of the occupied storage.

    Additionally, by using the Command Prompt, users can type the following line to check the status of the Reserved Storage:

    • DISM.exe /Online /Get-ReservedStorageState

    More so, the following commands can be used to enable and disable the use of Reserved Storage:

    • Enable Reserved Storage: DISM.exe /Online /Set-ReservedStorageState /State:Enabled
    • Disable Reserved Storage: DISM.exe /Online /Set-ReservedStorageState /State:Disabled

    What do you think about this extra bit of control that Microsoft is giving users? Let us know what you think by leaving a message in the comments section below.

    [wl_navigator]

    How to Fix Printer Busy or Error With Ease

    Are you seeing the dreadful Printer Busy or Error message? Like most printer-related errors, this prevents you from printing anything starting from the moment you’re seeing it.

    There can be a variety of reasons triggering this particular error – multiple print jobs, a defective Print Spooler, a virus infection, or even hardware failure.

    In this article, you will get the necessary solutions to refresh your printer in the hope of helping it to carry out the printing tasks properly. Just try the following steps one by one.

    What can I do if getting Printer Busy or Error?

    1. Clear the print queue

    clear the print queue
    1. Select Start.
    2. Then, type Command.
    3. Right-click Command Prompt and select Run as administrator.
    4. Type net stop spooler then hit Enter.
    5. Then, type del %systemroot%System32spoolprinters* /Q followed by Enter.
    6. Type net start spooler and press Enter.
    7. Type exit first, then press Enter to fully exit the command window.

    If you have a long list of print jobs in Microsoft Windows 10, the tasks are usually set in a queue and completed in a row. Documents waiting in line to be printed are displayed in the print queue.

    If this ends up being too large or if a document in the queue is corrupted, you can clear and restart the print queue by using the steps detailed above. Let’s hope that the Printer Busy or Error message goes away.

    You may also use one of the best tools to repair corrupted files and set things right again.

    2. Remove the Print Spooler

    type control printers
    1. Press the Windows key + R keyboard hotkey to open the Run dialog. You could also open the Command Prompt.
    2. Type control printers and press Enter.
    3. The Devices and Printers window should appear next.
    4. Right-click on the printer you currently use and click on Properties.
    5. Up next, set the printer to print directly and not use the spooler.
    6. Confirm by clicking OK and rebooting.

    Note: Before completing the procedure, you may receive a print spooler error message. This happens if you have the wrong printer drivers installed on your computer.

    Visit the printer manufacturer’s website to download the latest drivers.

    3. Uninstall the printer and re-install

    1. Go to Control Panel >Devices and Printers.
    2. Right-click on the printer you wish to remove and select Printer Properties.
    3. Up next, select Remove device.
    4. Click Print server properties at the top of the window.
    5. Then, click on the Drivers tab and highlight the printer driver to uninstall.
    6. Click the Remove button.
    7. Select Remove driver and driver package and click OK.
    8. If the printer is plugged into the computer via USB, you need to unplug the USB cable.
    9. Go to Control Panel > Programs and Features, and look for and uninstall any printer software related to the printer you removed from Devices and Printers.
    10. If a message appears about access being denied or the printer in use, reboot the computer.
    11. Finally, locate driver software to reinstall this printer.

    When you are still facing issues and none of the previous solutions are working, try uninstalling the printer and reinstalling it.

    If the driver cannot be removed after applying the above steps, restart the computer in a diagnostic startup. Then, remove the driver packages using the printui /s /t2 command.

    If these steps do not correct the problem, do a firmware upgrade on the printer and make sure the printer is not out of paper. It’s also worth checking whether it’s malware or not causing the Printer Busy or Error message you’re seeing.

    If it is, you may use the best antivirus tools that can initiate a boot scan to remove hidden malware.

    These are some of the solutions that you may apply to get the Printer Busy or Error fixed. If you need any extra advice or are still struggling to get past this error, let us know by using the comments area below.

    Windows 10 upgrade nag screens are annoying users

    The third round of Patch Tuesday updates that rolled out last week came in with a lot of new features for Windows 10. However, Microsoft hasn’t thought of a very clever advertising method for these new features.

    Instead, they seem to have opted for the old-fashioned, and extremely annoying, nag screens.

    Microsoft is nagging users about their new features

    After the latest Windows 10 updates, there appears to be an increase in notifications that urge users to:

    Get even more out of Windows

    Back before the updates, these prompts would appear only after a clean installation of Windows 10, or when you start of the device for the very first time.

    However, Microsoft later started pushing even more notifications onto users’ screens. You may receive the notification that gives you information about additional services such as Your Phone or Office 365 that you can set up.

    According to users, the notification started appearing after a recent Windows Update, possibly the March or February Patch Tuesday updates.

    Microsoft states the prompts are meant to help

    The Windows prompt showcases a number of services that you can acquire after creating a Microsoft Account. As an example, the notification gives brief info on some of the following Microsoft services:

    • Your Phone
    • Windows Hello
    • Office 365 
    • Cross-platform and device experiences with  your Microsoft account
    • OneDrive

    Microsoft claims that these notifications are in no way meant to be an annoyance, and they simply want them to be a way for users to discover more things they can do with their OS.

    However, if you still consider these notifications to be more of a nuisance, you can always opt to disable them.

    What’s your take on these Microsoft notifications? Let us know if you consider them helpful or not by leaving us a message in the comments section below.

    [wl_navigator]

    See how Xbox Series X will reduce loading times and resume paused games in video

    As Sony has yet to share more information about its PlayStation 5, Microsoft continues to own the next-gen consoles narrative by sharing new information about Xbox Series X today. We previously covered all the new hardware details shared by Xbox Wire and Digital Foundry, but the official Xbox YouTube channel has two Xbox Series X video worth looking at.

    The first video shows how the Xbox Series X will significantly improve loading times thanks to its custom-designed NVMe SSD. The next-gen Xbox console is put next to an Xbox One X which uses a regular 5400rpm hard Drive, and you can see a comparison of loading times on the first-party game State of Decay 2. Xbox Series X can go from the game’s menu to the map in approximately 10 seconds, while the Xbox One X needs roughly 50 seconds to do the same.

    It’s worth noting that State of Decay 2 hasn’t been optimized for Xbox Series X yet, but these are definitely impressive results. Loading time should hopefully be slightly faster for games that will be enhanced for the new console, and hopefully even faster for games designed for the ground up for the new hardware.

    The second video shows the Quick Resume Technology that will allow Xbox Series X to keep multiple games in a suspended state in memory, and resume them in an instant. As seen in a video, it takes less than 10 seconds for the console to resume multiple games such as Forza Motorsport 7, Hellblade: Senua’s Sacrifice, or Ori and the Blind Forest, and it’s quite amazing to see the console remember when the gamer has paused the action. The feature even works for backwards-compatible Xbox 360 games, in case you were wondering.

    This video also shows that Xbox Series X currently uses the same Xbox Guide found on Xbox One consoles today. It’s still not clear if Xbox Series X will use the exact same Windows 10-based OS, but it would definitely make sense to provide a consistent experience across Xbox consoles from different generations.

    Put together, Quick Resume and faster loading times seem to be two game-changing experiences. If the slow hard drives in the Xbox One X has been holding the console down, the custom NVMe SSD in the Xbox Series will deliver a 2.4 GB/s bandwidth (4.8 GB/s compressed, with custom hardware decompression block), which is much faster than regular SSDs you can find on the market today.

    Working from home? Check out our top tips for video conferencing in Microsoft Teams

    Working from home means that you might end up in a video call with your boss or coworkers in some of the most awkward places. Not everyone has a home office or knows the go-tos of how to video chat. You might be sitting in your bedroom, kitchen, hallway, or some other place which isn’t quite professional looking. Microsoft Teams, though, can help you out. There are features in Teams designed to help you enhance your video conferencing, and in this guide, we’ll give you a look at some of them.

    Tip 1: Use the background blur feature in Teams

    Our first tip is to use the background blur feature in Microsoft Teams. As we’ve covered before, this feature puts you in focus and conceals everything behind you. Please be aware, though, that since it is powered by AI, it only works with objects, and isn’t intended to conceal humans. Anyway, you can enable it before a call by clicking the purple slider next to the video icon. It also can be enabled during a call by hovering your mouse over the bottom middle part of your screen and clicking the “…” icon. You’ll then want to choose the blur my background option.

    Tip 2: Check your audio and video outputs

    When you’re working from home and you’re on a conference call, you might not want your computer to pick up background noise in your house. That often means plugging in a microphone to your laptop or desktop or using a headset. This makes sure that your voice is more clear and concise when teleconferencing.

    Sometimes, though, Microsoft Teams might not properly pick up on your microphone or headset and will use your computer’s input and output by default. You’ll want to check our audio and video outputs before joining any call. You can do this by clicking the settings cog in the “Choose your audio and video settings” page that you see before you enter a meeting or call. This will show you all the detected audio devices on your PC or laptop, You can choose from all the connected speakers, microphones, and cameras. You also can make a test call to help make sure that you won’t run into any troubles during your call.

    Tip 3: Know your call controls

    During a call in Microsoft Teams, you’ll want to know your controls so that you can change certain settings. These are important and will be especially useful if you suddenly need to disable your video or webcam or change your audio due to something happening in the room you’re in. You can summon these controls by hovering over in the middle part of the screen. We’ll be looking at them from left to right.

    First, there’s the timer, this indicates how long the call has been going on. Next to that is the option to turn your webcam on and off. You’ll then find the option to mute your microphone. That’s followed up by a button to share your screen, which we will discuss in the next section. You can then find a more options menu, where you’ll see additional device settings controls, meeting notes, or an option to enter fullscreen.

    Other options here also include bringing up the keypad, and options to start recording your call in Teams. Finally, on the far right is a toggle switch for the chat, and showing the participants. This can be useful if you’re having technical issues and need to drop a message in the chat.

    Tip 4: Be careful when sharing your screen

    One way or another, there might come a time when you’ll need to share your screen with your coworker or boss when on a call. Of course, this isn’t something that every company will require you to do when you work from home, but you still might want to protect your privacy and hide your personal information when sharing your screen. We’ve talked about this topic before, but there are a few tips which can help.

    As a recap, to share your screen, you’ll move your mouse to the bottom-middle corner of the screen and choose the chat control options. You’ll then see an icon with a square box and an arrow. Once you click it, you’ll be able to initiate a screen sharing session. For extra privacy, make sure that you choose the option to share a specific program only. This will safeguard your other programs or apps, as everything else over the program will show up as a gray box for the viewer. You also might want to be careful with sharing your audio, as you never know what can happen in the background on your PC during a call. You can change this setting by ticking the include system audio option.

    Tip 5: Turn on Live Captions

    Our final tip for video conferencing is to turn on Live Captions during your call. This feature might be useful for you if you’re in an environment where you have to mute your computer’s audio, or if you don’t have access to a headset for privacy during a call. Of course, we never recommend going into a call with muted audio, but it is something that some might want to do. Anyway, you can enable it by clicking the settings menu as we described in tip 3, and choosing the Turn on live captions (preview) option. Keep in mind, this isn’t fool-proof as sometimes the captions won’t be correct, but it’s still nice to have anyway if you’re the type of person that likes to read out what’s happening during an audio call.

    Check out our Teams coverage for more

    These are just some of our top tips for video conferencing in Microsoft Teams. We cover Microsoft Teams extensively here at OnMSFT, so feel free to check out our news hub here for more information. And, if you have any tips or tricks of your own, feel free to let us know in the comments below.

    Hands-on with File Explorer beta in Windows 10X build 19578 (emulator)

    Earlier this week, Microsoft released an updated version of the Windows 10X Emulator Image, which is available now in the Microsoft Store. This Emulator Image (build 19578) no longer requires installation on an Insider Preview version of Windows 10, requiring only an up-to-date version of Windows 10 Pro and the Microsoft Emulator app. The emulator app has its own list of hardware and software requirements that haven’t changed since the last release. This software is intended for developers who want to begin testing their apps on Windows 10X before an official release.

    Because this software is running on an emulator, performance won’t be anywhere near as smooth as if it were running on an actual machine.

    Minor changes in Windows 10X Build 19578

    Unfortunately for the average Windows Insider, there isn’t much new to see in this build of Windows 10X. Progress is progress, though. Action center now responds to your Windows theme properly, and more of the pre-installed apps have been updated to align with Microsoft’s new design language.

    Another significant change in this build of Windows 10X is how the operating system handles windowing Win32-container apps. Win32 apps will open filling one screen and can be dragged to or spanned across the other. This change brings the windowing behavior in alignment with all other apps in Windows 10X.

    File Explorer Windows 10x
    Left: UWP File Explorer. Right: File Explorer (beta)

    File Explorer Beta

    File Explorer (Beta) is the most significant new feature present in this build of Windows 10X. This new app can be found listed on the start menu in addition to the UWP file explorer we’ve seen already. At the moment, this new File Explorer is just a OneDrive app for Windows 10X. The app resembles the OneDrive web experience, using the same layout and icons when browsing through files. Unlike the OneDrive website, however, this app relies on the OneDrive sync client to function. The files you see here can be synced to local or online-only status, just like in Windows 10 for desktop.

    At this point, the File Explorer (beta) app can’t view local directories and has fewer features than the UWP app that preceded it. Like other mobile operating systems, OneDrive sync will be a prominent feature of file management in Windows 10X.

    Windows 10X is beginning to look like the modern mobile operating system Microsoft needs to stay competitive in the ever-changing world of personal computing devices. Windows 10 made up for Windows 8’s failure in the legacy desktop space, and never really focused on providing a good software experience for Mobile devices. It seems Windows 10X will try again what Windows 8 couldn’t achieve in mobile.

    Canon Printer Error 5c20: 4 Ways to Fix it

    Canon printers are high-quality devices, but many reported Canon printer error 5c20 that prevents them from printing correctly on their PC.

    This can be a big problem since you can’t print anything, but luckily, there are a couple of solutions that you can try.

    What is error code 5C20 on Canon mx860?

    • This is a hardware error, and hardware glitches can cause it.
    • Issues with the print head and carriage belt can lead to this error.
    • A faulty purge drive system unit can also cause this problem.

    How can I fix Canon printer error 5c20?

    Before you start any troubleshooting, ensure your Canon printer drivers are up-to-date.

    1. Reset your printer

    1. Start by pressing the Power button on the printer and wait for it to turn off completely.
    2. Unplug the printer from its power outlet.
    3. Wait for a minimum of 30 seconds and reconnect the printer to its power source.
    4. Turn on the printer.
    5. Once it is powered on, try to print a test page.

    2. Check the printer’s printhead

    1. Unplug the machine from its power outlet and take off the cover panel.
    2. While inside, lift the orange/grey lever to the lift of the ink cartridges.
    3. Remove the ink cartridges and clean the printhead.

    3. Make sure the carriage belt is in position

    1. The belt can be found behind the carriage section.
    2. The best is to remove the carriage and check on the belt with a flashlight to confirm whether it has slipped or not.
    3. You might have to adjust the belt to fix the issue manually.

    4. Replace purge drive system unit

    1. Open your printer.
    2. Locate the purge drive system unit and replace it.
    3. Contact a professional if you don’t know how to do this properly.

    In the above article, we have briefly defined the Canon printer 5c20 error and the symptoms behind the problem.

    Unfortunately, this is just one of many errors you can encounter. Many reported that their Canon printer is not turning off or that ink may have run out error.

    In some cases, your Canon printer is not detected by Windows, if it’s not configured correctly. Luckily, we have guides for all these types of problems.

    We also have a guide on Canon error 5B00, so don’t miss our dedicated guide to see how to fix it.

    If none of these methods worked for you, contact the printer support helpdesk or let us know via comments if you need more help from our team.

    Fix: Something went Wrong Adding Gmail or Outlook Account

    Many Windows 10 users are complaining they cannot add a Gmail or Outlook.com account to Windows 10’s Mail app, with the something went wrong prompt as the stumbling block.

    When trying to add one of these email accounts, users encounter various errors, like 0x8007042b, 0x80040154, 0x8000ffff, 0x8007000d, 0x80c8043e, 0x80070435, 0x8007006d, 0x80070425, etc.

    If you are also dealing with this issue, the solutions in this guide will help you fix it effortlessly.

    What can I do if I can’t add Gmail and Outlook accounts to Windows 10 Mail App?

    Before proceeding to the solutions in this section, try the following troubleshooting steps:

    • Connect your Google account to your Windows 10 computer one more time.
    • Enable IMAP on your Google account.
    • Create a new IMAP account.
    • Disable the Credential Manager Service.

    If the issue persists, delve into the solutions below:

    1. Add your Gmail account manually

    1. Open the Mail app, and click the Settings icon at the bottom left.
    2. Choose Manage Accounts, then select Add account.
    3. Now, select Advanced setup.unable to save outlook gmail to windows 10 mail app 1
    4. Select Internet email.unable to save outlook gmail to windows 10 mail app 2
    5. Now, add the following info:
      • Account name
      • Your name
      • Incoming email server: imap.gmail.com:993
      • Account type: IMAP4
      • User name
      • Email address
      • Password
      • Outgoing (SMTP) email server: smtp.gmail.com:465
      • Leave all checkboxes checkedunable to save outlook gmail to windows 10 mail app 3
    6. Now click Sign-in, and you’re done.

    If you still can’t add your Gmail account to Windows Mail, check our detailed guide for other surefire solutions.

    2. Add your Outlook account manually

    1. Open the Mail app and select Manage Accounts.
    2. Choose Add account.
    3. Select Exchange (instead of Outlook).
    4. Enter your Outlook login info.
      unable to save outlook gmail to windows 10 mail app 4
    5. Click Sign-in.

    That’s about it. Now, you know how to add your Gmail and Outlook accounts to Windows 10 Mail app without getting any errors.

    We hope Microsoft will finally fix this issue in one of the upcoming updates, but until then, you have a solution.

    However, if you still have problems with your Windows 10 Mail app, you can check out our article about the problems with Windows 10 Mail app for additional solutions.

    Also, you can try the best Windows 10 email clients and apps to use from our list.

    OneDrive Error Codes 1, 2, 6: What they are and how to Fix

    Most error codes on OneDrive are usually sync related. However, there are a few exceptions to this rule, as some could arise as you try to sign in or work on files on your personal or business account.

    Three of such OneDrive error codes are errors 1, 2, and 6. In this guide, we will provide you with everything you need to know about these errors and how to fix them.

    What are error codes 1, 2, and 6 on OneDrive?

    Whenever you get OneDrive error codes 1, 2, or 6, the following are the reasons they came up:

    • Error code 1 – It indicates that an unknown error that has occurred on your computer with OneDrive program.
    • Error code 2 – It means that the OneDrive program has experienced a problem while trying to get your account details. In this case, you need to sign in to your Microsoft account and ensure no authentication issues.
    • Error code 6 – It just means a timeout error has occurred, so you can resolve it simply by restarting your computer or device.

    How can I fix OneDrive error codes 1, 2, and 6?

    You may get frustrated when you don’t know what to do upfront, and the first thing you do may be either restart your computer or install updates.

    If this doesn’t work, then you head online to contact tech support, but before you do this, try the following simple troubleshooting steps:

    • Check the internet connectivity on the computer or device that has the OneDrive problem
    • Check the status of Microsoft Office Online Services
    • Check if you can access other Microsoft services like Outlook or people.live.com. if you’re able to access these services, then the issue may be a temporary one with OneDrive. If you’re not able to access these services, then the issue could be related to your account or a whole different and bigger issue altogether.

    If all else is fine and constant, and you still feel you need to talk to someone at support, you can email the OneDrive support team.

    If OneDrive error codes 1, 2, and 6 only for a short time, then it is most likely a malfunction or a temporary issue on the server’s side.

    In this case, be patient and give it some time, and if you still experience the same problem, you can reach out to the tech support team for further assistance related to your specific issue.

    If, however, you wait for it to come around and the issue persists, you can check if it occurs on other browsers or another computer.

    If you choose to get in touch with tech support, then make sure you send your server address from Microsoft services along with the error codes and other specific information.

    Here’s how to check the server address:

    • Go to the OneDrive webpage and log into your account.
      sign in onedrive error code
    • Click on the OneDrive icon towards the top left corner.
    • You will see other Microsoft Services. Select Outlook.com.
    • Copy the address link from the address box and share it with tech support.

    Your account may be under server maintenance, so check the Microsoft Services status page for any known interruptions or outages and share that with the OneDrive tech support team.

    Similarly, if you are dealing with the 0x8004e4c3 OneDrive error code, check our detailed guide to fix it.

    Was this information of any help to you? Let us know by dropping your comment in the section below.

    FIX: Google Chrome doesn’t show YouTube comments

    Some users have said on the YouTube forum that YT video comments don’t appear in their Chrome browsers. The loading messages for comments hang below the YouTube videos for those users.

    Therefore, Chrome doesn’t display the YouTube comments when the issue arises. Does that sound like a familiar scenario? If so, check out some of the potential fixes below.


    This is how you can fix Chrome not showing YouTube comments?

    1. Clear Chrome’s Browser data

    1. Click the Customize Google Chrome menu button.
    2. Select More tools to expand a submenu.Clear browsing data option google chrome not showing youtube comments
    3. Click the Clear browsing data option to open the window in the snapshot directly below.Clear browsing data window google chrome not showing youtube comments
    4. Select All time on the drop-down menu.
    5. Select the Browsing history, Cookies and other site data, and Cached images and files check boxes.
    6. Press the Clear data button.

    2. Open Chrome in incognito mode

    Chrome might display YouTube comments in incognito mode. To switch to that mode, press the Ctrl + Shift + N hotkey. Then a new window will open as shown in the snapshot directly below. If that fixes the issue, you might need to disable some broken extensions within the browser.

    Chrome's incognito mode google chrome not showing youtube comments


    3. Reset Google Chrome

    1. Open Chrome’s primary menu by clicking the button at the top right of its window.
    2. Click Settings to open the tab shown directly below.Settings tab google chrome not showing youtube comments
    3. Click Advanced, and scroll to the bottom of the tab.
    4. Press the Restore settings to their original defaults button.Restore settings option google chrome not showing youtube comments
    5. Press the Reset settings button.

    4. Turn off proxy connections

    1. To turn off a proxy connection via Chrome, enter chrome://settings/ in the browser’s URL bar.
    2. Press the Advanced button to expand the Settings tab.
    3. Scroll down to the Open your computer’s proxy settings option.Open your computer's proxy settings option google chrome not showing youtube comments
    4. Click the Open your computer’s proxy settings option, which will open the Settings window as below.Use a proxy server option google chrome not showing youtube comments
    5. Toggle the Use a proxy server option off option.
    6. Click Save to apply the new setting.

    The above resolutions have fixed YouTube video comments for some Chrome users. So, they might also fix the YT comments within your Google Chrome browser. If not, however, you can always open YouTube pages in another browser that will probably display all YT video comments.

    If you have any other questions or suggestions regarding Google Chrome-related issues, don’t hesitate to reach for the comments section below.

    [wl_navigator]