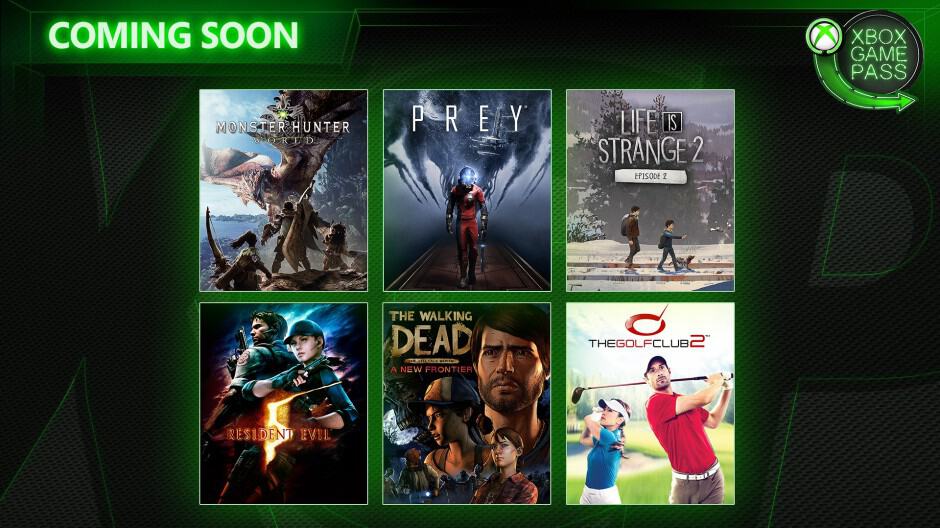
Monster Hunter World, Prey, and Life is Strange 2 episode 2 are coming to Xbox Game Pass in April

Microsoft has just announced the next six new games coming to Xbox Game Pass this month. First of all, Arkane Studios’ survival horror game Prey will join the catalog tomorrow, April 11, along with The Golf Club 2. Prey will be the latest Bethesda game to join the Xbox Game Pass line-up after Doom, Fallout 3 and 4, and The Elder Scrolls Online: Tamriel Unlimited.

The other big new game coming to Xbox Game Pass this month is Monster Hunter: World, Capcom’s critically-acclaimed action RPG title released back in January 2018. The game will be available on Game Pass on April 18, along with The Walking Dead: A New Frontier. The latter is the third season of Telltale Games’ The Walking Dead series of episodic games, and we remind you that the seasons one and two are already available on Xbox Game Pass.

The episode 2 of Life is Strange 2 will also be available on Game Pass on April 24, three months after the first episode was added to the catalog. Square Enix said back in January that all future episodes will be added to Game Pass three months after their official release, which means that the upcoming episode 3 (to be released on May 9) should join the Xbox Game Pass catalog in August.

Lastly, Resident Evil 5 will be available on Xbox Game Pass on April 25. A couple of Resident Evil games have left the catalog in recent months, so it’s nice to see a new episode being added to the game subscription service. That’s six new Xbox Game Pass games in total that Microsoft announced today, but as asual, there may be a few more surprises coming later this month.

Microsoft increases its presence in the UK by doubling the size of its local Azure regions

Microsoft has announced that it has expanded its UK Azure regions by as much as double their original size thanks to the addition of Availability Zones within the South region. This adds up to a whopping fifteen times the computing power since they were first made available back in 2016.

According to the company’s blog post, the zones will give businesses increased protection, as businesses leasing at least two zones within the same region (either West or South) are guaranteed to have access to at least one 99.99% in case of a failure of another area. As Microsoft UK’s chief executive, Cindy Rose, states,

“The Microsoft cloud has become a core component to the strategies of thousands of UK organizations since the launch of services from our UK cloud regions in 2016. We continue to make significant investments to ensure that our customers are able accelerate their digital transformation journeys and their adoption of cloud services. By doubling our UK regions and increasing our compute capacity by more than 1,500%, our customers can have the confidence they can access any Azure services available in UK regions whenever they want. The launch of Availability Zones takes Azure to a new level in the UK by offering customers increased reliability, business continuity and peace of mind for their data and services.”

In addition to the new Availability Zones, the company has also announced the general availability of Azure DevOps in the South Region. This will allow users residing in the area enhanced access to the company’s suite of software development tools.

Microsoft has long been invested in the UK, and notes its customer base of as many as tens of thousands of businesses invested in their platform from within the country. One of these customer’s is ClearBank, with its COO Nigel Walder noting that: “We welcome Availability Zones in UK South as it will enable us to provide improved resilience and scalability more effectively as ClearBank continues with the launch of new products. Since the inception of ClearBank, Azure has been a core component of our platform and the enhanced zonal resiliency will ensure we can serve our customers even more effectively.”

Reset to Device \Device\Raidport0 Was Issued: How to Fix it

If your system freezes, you might get Reset to device, DeviceRaidPort0, was issued error in the Event Viewer.

This issue is related to SATA controllers, and to fix the freezes and other disruptions, today we’re going to show you how to fix that.

Why does Reset to device device raidport0 was issued message appear?

  • Corrupted system files can sometimes lead to this error message.
  • If your power settings aren’t configured properly, you might encounter this issue.
  • In some rare cases, outdated drivers will cause this problem.

How can I fix Reset to device device raidport0 was issued error?

1. Run a System File Checker scan

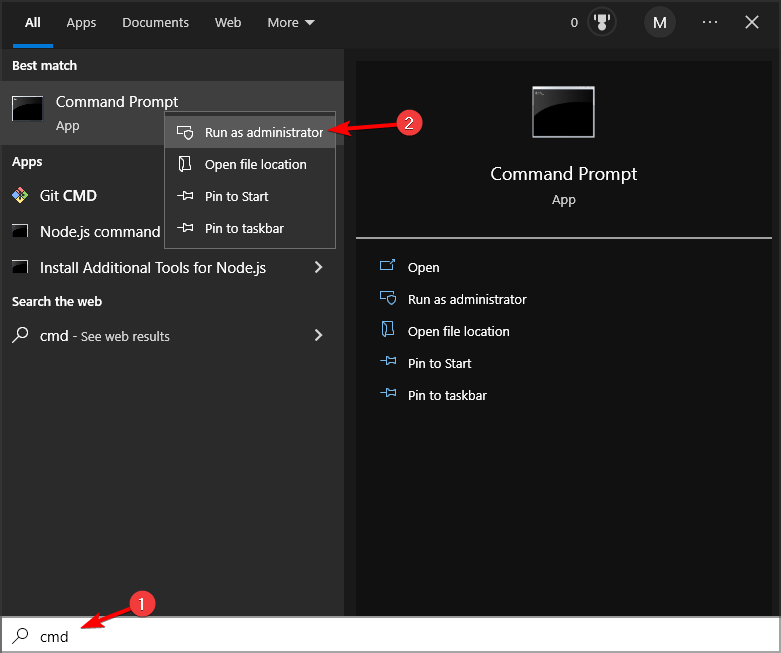
  1. Click the Cortana or Start menu button to open your Windows search box. Enter the keyword cmd in the search box.
  2. Right-click the Command Prompt and select Run as administrator.
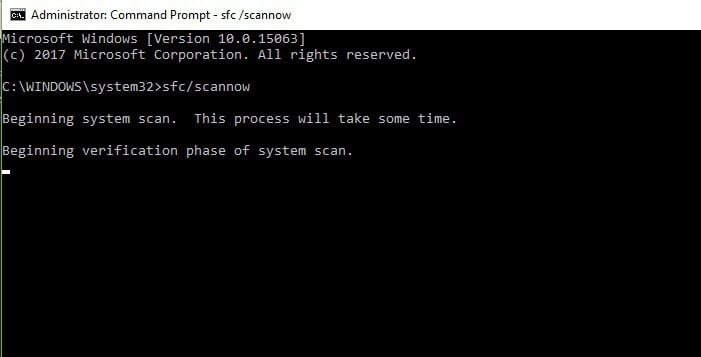
  3. Enter the following command and run it: sfc /scannow
  4. When the SFC scan has finished, restart Windows if it has fixed any files.
  5. If the SFC has no impact, run a DSIM (Deployment Image Servicing and Management) scan by entering DISM /Online /Cleanup-Image /RestoreHealth
  6. Then, scan with the SFC tool again.

For more information, check our guide on how to fix corrupted system files. You can also try using a good repair tool to avoid further errors.

2. Run a Check Disk scan

  1. Open the Command Prompt as an administrator.
  2. Input the following command: chkdsk /r
  3. The Command Prompt will request that you schedule the volume to be checked when you restart Windows. Press the Y key to confirm.
  4. Restart your desktop or laptop. Check Disk will scan and repair volumes during the restart.

3. Adjust the Power settings

  1. Open Run by pressing its Win key + R keyboard shortcut.
  2. Enter regedit in Run’s text box and click OK to open the Registry Editor.
  3. First, you can back up the registry by clicking File > Save and selecting All. Enter a file title in the text box, and press the Save button.
  4. Now open
    Computer\HKEY_LOCAL_MACHINE\SYSTEM
    CurrentControlSet\Control\Power\PowerSettings\
    012ee47-9041-4b5d-9b77-535fba8b1442b2d69d7-a2a1-449c-9680-f91c70521c60
  5. Right-click Attributes on the right of the window and select Modify to open the Edit DWORD window.
  6. Enter 2 in the Value data box, and press the OK button.dword set value to 2
  7. Next, navigate to this Registry Editor location:
    HKEY_LOCAL_MACHINE\SYSTEM\CurrentControlSet
    \Control\Power\PowerSettings\
    012ee47-9041-4b5d-9b77-535fba8b1442dab60367-53fe-4fbc-825e-521d069d2456
    reset to device device raidport0 was issued registry
  8. Right-click the Attributes DWORD and select Modify from its context menu.
  9. Input 2 in the Edit DWORD window’s text box, and click the OK button. 
  10. Now you can close the Registry Editor.

Now adjust the power settings by doing the following:

  1. Enter powercfg.cpl in Run to open the window below.reset to device device raidport0 was issued control panel power options
  2. Click Change plan settings > Change advanced power settings to open the Power Options window.
  3. Double-click Hard disk to expand its options.
  4. Double-click AHCI Link Power Management – HIPM/DIPM and switch both its On battery and Plugged in options to Active.AHCI Link Power Management – HIPM/DIPM
  5. Next, double-click AHCI Link Power Management – Adaptive and switch the On battery and Plugged in settings to 0.
  6. Double-click Turn off hard disk after and adjust it is On battery and Plugged in options to Never.reset to device device raidport0 was issued turn off hard disk after never
  7. Press Apply > OK to apply the settings and close the window.

4. Configure the power plan settings

  1. Press the Windows key + S and type power. Select Choose a power plan.
  2. Select the High Performance power plan.
  3. Close the Power options window.

5. Update the AHCI Driver

  1. Press the Win + X hotkey, and select Device Manager on the menu.
  2. Double-click IDE ATA/ATAPI controllers on the Device Manager window.reset to device device raidport0 was issued device manager
  3. Right-click your listed AHCI driver and select Update driver from the context menu.
  4. Click the Search automatically for updated driver software option to install an updated driver.update drivers
  5. Alternatively, you can manually download a suitable AHCI driver from the manufacturer website. For example, this is the update Rapid Storage Technology (Intel® RST) Driver for Intel systems.
  6. After downloading the driver, select the Browse my computer for driver software option on the Update Drivers window directly above. Then click the Browse button to select the driver to install.

To learn more about drivers, we have a great guide on how to update outdated drivers.

6. Turn off the Fast Startup Option in Windows 10

  1. Press the Win key + X hotkey and select Power Options on the menu.reset to device device raidport0 was issued power plan
  2. Click the Additional power setting to open the tab directly below.
  3. Click Choose what the power buttons do on the left of the window to open the System Settings tab below.
  4. Select Change settings that are currently unavailable to configure the Turn on fast start-up option.power plan system settings disable fast startup
  5. Deselect the Turn on fast start-up (recommended) checkbox if it’s selected.
  6. Press the Save Changes button at the bottom of the tab.
  7. Then restart the Windows OS.

Those remedies might resolve the Reset to device Raidport0 error, so Windows doesn’t freeze. You could also try changing your SATA drive port and replacing the SATA or ATA cable.

Raid errors can be serious, and many reported Rcraid.sys BSoD failure, but we tackled that issue in a different guide.

We want to hear from you. Did you use a different method to fix this problem? If so, share it with us in the comments below.

Windows 10 May 2019 Update hit by install issues

The long-awaited Windows 10 May 2019 Update is now available to Insiders enrolled in the Release Preview Ring.

So, if you can’t wait to test the new OS features, go ahead and install the Windows 10 May 2019 RTM build on your computer. However, don’t be surprised if the build won’t install.

Many Insiders reported they can’t download and install Windows 10 May 2019 Update as their devices are not yet eligible for the build.

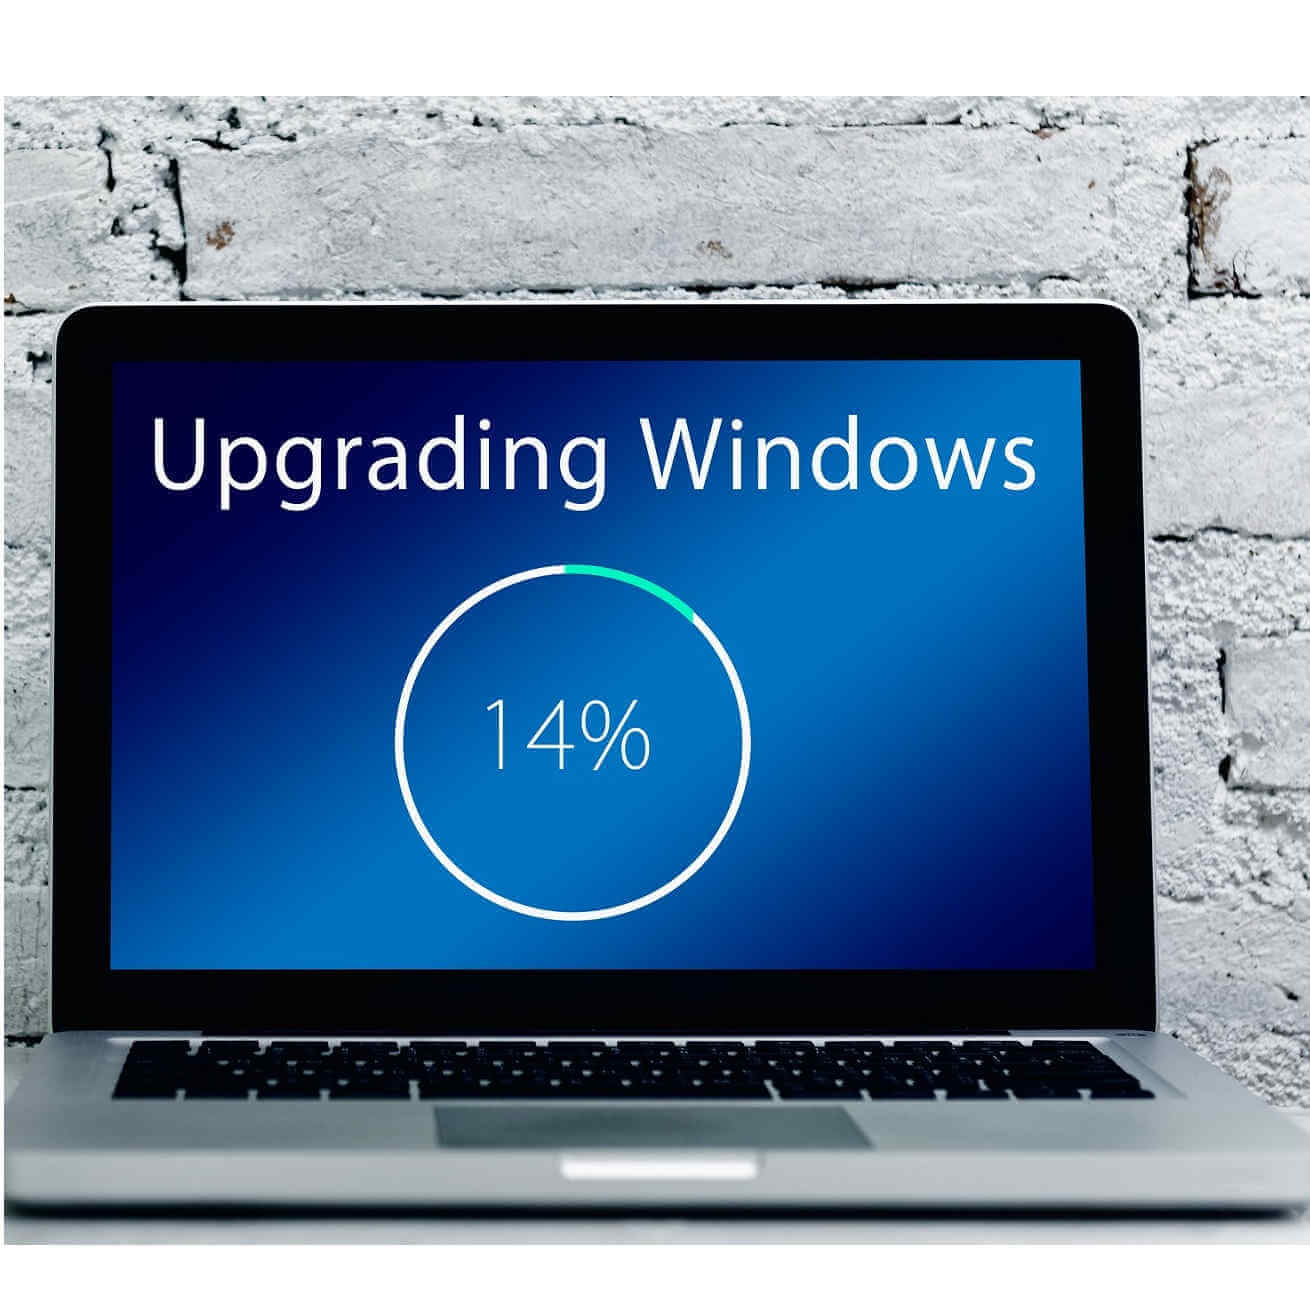
The error message that appears on the screen is the following: This PC can’t be upgraded to Windows 10. Although you are enrolled in the Windows Insider Program this device isn’t yet eligible for this build.

And this is a screenshot of the error:

This PC can't be upgraded to Windows 10 Although you are enrolled in the Windows Insider Program

Anti-cheat software might be the culprit

Fortunately, the OP was able to quickly fix this problem by uninstalling games protected by anti-cheat software solutions.

I figured out the problem its happens if you have battleeye anti cheat software in your system, it my case it was bundled with a game called planetsides 2 which I don’t play anymore so I just removed it and it worked. Looks like there are still problems with battleeye software and this update is not yet for everyone

Indeed, it seems there may still be some blocks in place related to BattleEye and anti cheat software. Hopefully, Microsoft will have fixed all these technical limitations by the time the new OS version is available to all users.

Some users suggested that uninstalling BattleEye or anti-cheat software and then installing the May 2019 Update RTM might fix this problem. Once you’ve installed the latest build, you can then reinstall BattleEye.

However, keep in mind that you may encounter various issues while playing online games on Windows 10 May 2019 Update PCs, such as memory corruption issues.

If you already downloaded the Windows 10 May 2019 Update RTM build on your computer, tell us more about your experience in the comments below.

This is why Skype appears offline and what you can do to solve it

In order to understand why Skype appears offline, you need to grasp the meaning of the different statuses in the app.

There are 8 possible statuses at any one given time on Skype.

Here’s what each of these eight types means:

  • Online: this is the default setting once you’re signed in to Skype. It lights up a green dot with a white checkmark in it that lets your contacts know you are online and they can contact you.
  • Away: this shows your contacts you are signed in but may not be on your computer or desk at the time. You can get instant messages and calls though. It is indicated by a yellow clock icon.
  • Offline: this is when you’re not signed in to Skype. However, you can click on the status icon and select Offline as your status but you won’t be able to send messages or make/receive calls. Skype for Web doesn’t have this option.
  • Invisible: this status neither shows you as online, or away, but your contacts see you as offline, though you can still contact them or use Skype normally. It is marked with a blank circle.
  • Do not Disturb: this is marked by a red circle with a white line across it like a stop sign of sorts. Your contacts see you online, but they get the message – you don’t want disturbance. You can still get messages and calls but with no sound alerts.
  • Calls forwarded: this status can be used when you’re not available but set call forwarding or voice messaging to your phone, or home so that you never miss a call. It is only available on Windows Desktop though, and is marked by a white circle with a green lining and a little green arrow inside it.
  • Contact Request pending: this appears next to a contact you requested to add, but they’ve not accepted your request yet. It is indicated by a grey lined circle with a question mark.
  • Blocked: this is for contacts you don’t want to communicate with or reach for one reason or another. It is marked with a red lined circle with a diagonal line inside it.

We’ve written extensively about Skype issues before. Bookmark this page in case you need it later.


Now that you know what each of these statuses means, let’s see the reasons why Skype appears offline yet you are signed in, and what to do about it.

Why Skype appears offline and how to solve it

  1. Your status is set to invisible
  2. You’re signed in but not connected to the Internet
  3. Check whether you have the latest version of Skype
  4. Check Skype for Web
  5. Uninstall and reinstall Skype
  6. Check Skype settings

1. Your status is set to invisible

Probably your contacts have tried to engage you on Skype and they’re asking why you appear as offline, yet you can still communicate.

This is one of the most common reasons why Skype appears offline, and all you need to do to resolve it is change from Invisible to Online, if you’re signed in to your Skype account.

2. You’re signed in but not connected to the Internet

Sometimes you may have logged in to your account, but still your Skype appears offline.

In this case, you may need to check whether your internet connection is working, because if it is down or goes off, your contacts will see your status as offline, even though you hadn’t signed out.

3. Check whether you have the latest version of Skype

You can update this by going to Windows Store, plus ensure your supported operating system is also up to date.

4. Check Skype for Web

You can use Skype for Web to check whether your status on Skype appears offline there as well, or it is just on other devices. If they appear as online, then restart the application, ensuring you’re using the updated version.

5. Uninstall and reinstall Skype

If your Skype appears offline, sometimes uninstalling the app may help.

You can do either of two things:

  • A simple uninstall and reinstall
  • A complete uninstall and reinstall

Before you do either of the two, back up your chat history and personal files so that you can restore them at a later point in time.

Here’s how to back up your history:

  1. Right click Start
  2. Select Run
  3. Type %appdata%skypeRun %appdata%skype
  4. Press Enter or click OK
  5. Copy the My Skype Received Files folder and the Skype Name folder (if using a Microsoft account, check for a folder that starts with live#3).
  6. Paste the copied folders to a different location like the desktop for later use

Need more ideas on how to uninstall Skype? Check out this guide.


How to perform a simple uninstall and reinstall of Skype

Follow the steps below to do this:

  1. Quit Skype by logging out and closing it
  2. Go to your taskbar and right click on the Skype icon
  3. Select Quit
  4. Right click Start
  5. Select Run
  6. Type appwiz.cplappwiz.cpl run
  7. Click OK or press Enter
  8. Find Skype in the list
  9. Right click on it
  10. Select Remove or Uninstall
  11. Download and install the latest version of Skype

If you still experience the Skype appears offline issue, try to completely uninstall and reinstall Skype.

How to perform a complete uninstall and reinstall of Skype

Follow the steps below to do this:

  1. Quit Skype by logging out and closing it
  2. Go to your taskbar and right click on the Skype icon
  3. Select Quit
  4. Right click Start
  5. Select Run
  6. Type appwiz.cpl
  7. Click OK or press Enter
  8. Right click Start
  9. Select Run
  10. Type %appdata%skypeRun %appdata%skype
  11. Press Enter or click OK
  12. Right click Skype folder and click Delete
  13. Go to C:Program Files (x86)
  14. Delete the Skype folder and SkypePM if they’re there
  15. Right click Start
  16. Select Run
  17. Type regedit
  18. Press Enter or click OK
  19. Back up the registry, then delete any Skype entries from it
  20. Right click Start
  21. Select Run
  22. Type regeditregedit find skype
  23. Press Enter or click OK
  24. Go to Edit in the registry


  1. Click Find Next  and type Skype
  2. For each result, right click on it and select delete
  3. Download and install the latest version of Skype
  4. Restore your personal information
  5. Quit Skype again
  6. Right click Start
  7. Select Run
  8. Type regeditregedit find skype
  9. Press Enter or click OK
  10. Type %appdata%skype
  11. Press Enter or click OK
  12. Copy the two folders you saved previously on the desktop and paste them into this folder

Note: Reinstalling Skype can outdate your firewall settings, thus affect your audio calls on Skype. In order to fix this, update your firewall settings.

6. Check Skype settings

Follow these steps to do this:

  1. Go to your Skype account and sign in
  2. Click on Tools then click Optionsskype tools
  3. Click General Settings tab on the left pane
  4. Check the Show me as Away when I’ve been inactive for box, and change your status to online

Skype appears offline

Did any of these solutions help resolve why Skype appears offline? Let us know in the comments section below.

RELATED STORIES TO CHECK OUT:

Download Windows 10 May 2019 RTM on your PC

Microsoft started rolling out the Windows 10 May 2019 Update to Release Preview ring Insiders. If you want to install the new OS version, hit the Check for updates button.

Earlier this month, Microsoft announced it would use the stable channel to release Windows 10 May 2019 builds to the general public. The roll out to the general public should start in late May.

Keep in mind that Microsoft plans to release the build in different phases. This means that the new OS version won’t be available to all Insiders at the same time.

Download Windows 10 May 2019 RTM build

You need to be enrolled in the Windows Insider Program to download the build.

  1. Go to Settings >> Update & Security >> Windows Insider Program and hit the Get started button to join Windows Insider Program.windows insider program
  2. At this step, you will have to Sign-in to your Microsoft account.
  3. You can join the Release Preview ring by clicking Just fixes, apps, and drivers in the Settings app.
  4. Now you will have to follow the instructions available on the screen and reboot your system to apply the new settings.
  5. Double check the Windows Insider program setup after your PC has been rebooted.
  6. Navigate to Settings >> Windows Update and then click check for update. 

You can install the Windows 10 May 2019 Update on your computer.

Microsoft has made the right decision to push the May 2019 Update to the Release Preview ring and have the build tested for about one month.

The company is heading towards a public release in late May.  This allows Insiders to identify additional bugs in the build. Microsoft wants to go for a bug-free update as Windows 10 version 1809 release was hit by a major setback due to technical glitches.

At this point, we can not say that all the bugs will have been fixed by the time the final OS version is available for all users.

New OS version for Fast Ring Insiders

As a quick reminder, Microsoft is also pushing 20H1 builds to the Fast Ring so that Insiders can start testing the upcoming OS. Furthermore, the company is also merging the Skip Ahead and Fast rings in the coming weeks. 

As far as these changes are concerned, users can now decide if they want to install the update or not. Microsoft will force users to install the update only if your version is heading towards the end-of-service timeline.

Apart from this situation, Windows 10 cumulative updates and feature update will be available as separate downloads.

RELATED ARTICLES YOU NEED TO CHECK OUT:

Best Antivirus Solutions For Windows 10 [AV Tested]

A recent research study conducted by an independent German institute confirmed that Windows Defender is everything you need to keep your Windows 10 PCs safe from cyber threats.

AV-TEST institute examined 15000 pieces of malware by conducting a series of in-depth experiments.

The institute detected Zero-Day malware by carefully analyzing Web and attachments during the first phase. The second phase involved the study of known vulnerabilities. AV-TEST created a frame of reference for carrying out the tests.

The research methodology involved assessing three basic factors usability, system load, and detection capacity. Researchers examined the standard configuration of 19 security products that are being used in Windows 10.

We focused on realistic test scenarios and challenged the products against real-world threats. Products had to demonstrate their capabilities using all components and protection layers.

These tests were conducted during the months of January and February. The results of these tests were published online to rank security products including Symantec Norton Security, McAfee Internet Security and F-Secure.

All of these suites scored 6 points in protection, performance and usability and thus got the maximum of 18 points.

So, if these solutions ranked high in February, they can definitely fully protect your PC in March as well. So, check out these results to learn what are the best antivirus solutions to use in 2020.

Antivirus performance results on Windows 10

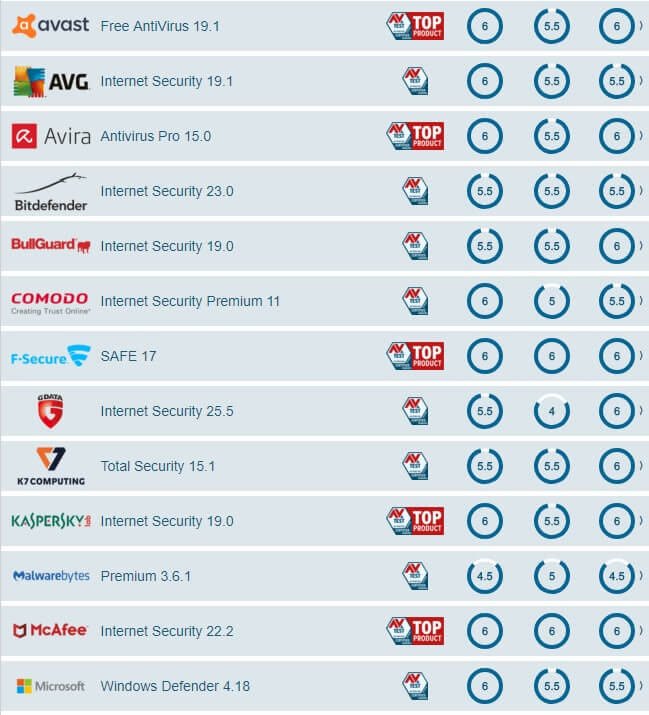
AV TEST antivirus test results
You might be surprised to learn that Kaspersky Internet Security did not achieve the highest score.

Bitdefender also did not manage to reach within the top positions and the score for both of these products was recorded to be 17.5 and 16.5, respectively.

AhnLab V3 Internet Security and Microworld eScan Internet Security Suite also obtained 16.5 points. Bitdefender can improve in all areas as it obtained 5.5 points for protection, 5.5 points for performance, and 5.5 points for usability.

Another candidate of the top positions Trend Micro Internet Security also scored 16.5 points. This product was rated by the researchers as 5.5 points for protection, 5.0 points for performance, and 6.0 for usability.

However, the lowest score of 14 points was obtained by Malwarebytes Premium. The security solution got 4.5 points for protection, 5 points for performance, and 4.5 points for usability.

Windows Defender got a pretty high score

This research proved that Windows Defender left behind many security products and scored a total of 17 points.

It scored high in protection (5.5 points) for both performance and usability. These results prove once again that Windows 10 users have been underestimating the capabilities of their system’s default antivirus solution.

Speaking of cybersecurity issues, you may also want to check out these posts:

Microsoft merges Fast Ring and Skip Ahead Insider rings

Microsoft is planning for some major changes in its Windows Insider Program. These changes are related to the Insider Rings as the company will soon merge the Fast Ring and Skip Ahead rings.

The announcement was made just before Microsoft shipped Windows 10 May 2019 Update to the Release Preview ring.

As you all know, before the May 2019 Update is available to the general public, it will stay in the Release Preview Ring for about a month for testing purposes.

The company announced that Windows 10 19H1 builds would no longer be available to Fast Ring Insiders. Moreover, Microsoft plans to move Fast Ring Insiders directly to Windows 10 20H1 builds.

With the Windows 10 May 2019 Update being shared to the Release Preview ring soon (see this blog post for details), we’re planning to move Windows Insiders in the Fast ring forward to 20H1. We will also be merging the small group of Insiders who opted-in to Skip Ahead back into the Fast ring. We are looking to make this change in the coming weeks.

As a quick reminder, Windows 10 20H1 will be available to all Windows 10 users next year.

Microsoft has not shared any information about the exact release date of 20H1 update to Fast ring Insiders. However, the tech giant confirmed the change is expected to arrive in the next few weeks.

It should be noted that Microsoft has not shared the reason behind this decision. Rumors suggest that Microsoft has some master plan that forced the company to push Insiders to the next year’s builds. We will have to wait for an official statement from Microsoft in this regard.

The trend was initially broken by the tech giant when Skip Ahead Ring Insiders spotted Windows 10 20H1 in mid-February. The latest changes suggest that Microsoft is essentially moving towards merging the Skip Ahead and Fast rings.

Microsoft already started warning Insiders about its 20H1 builds by stating that the builds may come with some bugs.

20H1 builds are from our development branch (RS_PRERELEASE) and as is normal with builds early in the development cycle, these builds may contain bugs that might be painful for some. If you are in the Fast ring and your PC gets updated to 20H1, you won’t be able to switch your ring to the Slow or Release Preview rings without doing a clean-install on your PC and starting over.

What do you think about Microsoft’s decision to merge the two Insider rings? Let us know in the comments section below.

RELATED ARTICLES YOU NEED TO CHECK OUT:

How to enable Focus Mode in Chromium-based Edge browser

A Reddit user recently spotted Focus Mode in Chromium-based Edge browser. Are you curious to learn how to use this new feature? Then read on.

Microsoft is currently working on perfecting its Chromium-based Microsoft Edge browser. The browser already reached the final stages of development. Most of the users are still unaware of the benefits that come along with this browser version.

As a matter of fact, the Chromium-based Microsoft Edge browser will inherit many features of both Google Chrome and the original version of Edge.

Moreover, the browser supports Chrome’s collection of extensions. In other words, Microsoft Edge is compatible with all of Chrome’s add-ons.

Furthermore, Chromium-based Edge offers a couple of additional features apart from the extensions. Recent reports confirmed the browser will also support Focus Mode.

The feature has been recently spotted by a Reddit user stating that Microsoft is currently testing Focus Mode as an experimental feature in Chrome Canary.

Understanding Focus Mode

This feature has been introduced to minimize distractions for users while reading any content. When a user enables the Focus Mode, a simplified interface for a particular tab will be enabled.

Most of the users are unaware of the fact that the Chromium Edge leaked version 75.0.111.0 has been spotted with a Focus Mode feature. If you are interested in this feature, you can enable the Focus Mode flag in the browser.

If you don’t know how to do that, follow the instructions listed below.

How to turn on Focus Mode in Chromium-based Edge

  1. As a first step, you will have to download and install the Chromium-based Edge version Microsoft Chromium Edge version 75.0.111.0.
  2. Now navigate to browser‘s address bar, type edge://flags/#focus-mode and press the Enter key.
  3. You will see that the Focus mode flag will be highlighted with a Yellow color. Change the settings by using the drop-down button from Default to Enabled.
  4. At this step, the browser needs to be restarted to apply these changes. Hit the Relaunch Now button to apply recent changes.
  5. Finally, you can now right-click on your current tab to use the Focus mode feature. Click Focus this tab from the context menu. 

You will see that the Focus Mode for your desired tab has now been activated. 

RELATED ARTICLES YOU NEED TO CHECK OUT:

Windows 10 Creators Update Mouse Issues: How to Fix Quickly

If you’ve experienced various mouse problems after installing Windows 10 Creators Update, you’re not alone – this is a recurring issue for many users, ranging from minor lag to general unresponsiveness.

Our readers complained that the mouse is not working in a lower resolution fullscreen application. They see the cursor moving for 1-2 seconds, and then it stops responding.

How do I fix mouse issues in Windows 10 Creators Update?

1. Run the new native hardware troubleshooter

  1. Press the Windows + R key combination to start the Run console.
  2. Type the following command and press Enter to run it: msdt.exe -id DeviceDiagnostic
  3. Wait for the troubleshooting process to complete then test your mouse.
  4. If the issue is still present, unplug your mouse and plug it back in.

2. Update your NVIDIA drivers

Many users noticed that mouse problems in Creators Update are prevalent for NVIDIA drivers. Try installing the latest motherboard driver after you’ve upgraded your PC. You can manually download the available drivers for your NVIDIA computer from the company’s official website.

We also have a full guide on what to do if you can’t download the Windows 10 Nvidia driver.

Additionally, you could as well manage all the PC drivers with the right tool. We’re happy to introduce you to standalone driver software with an extensive database and strong updating functionality.

⇒ Get Fortect Driver Updater

3. Perform a Clean Boot

  1. Go to Start, type msconfig, then select System Configuration.
  2. On the Services tab, select the Hide all Microsoft services check box and then click Disable all.
  3. On the Startup tab and click Open Task Manager.
  4. On the Startup tab, for each startup item, select the item and then click Disable.
  5. Close the Task Manager, Click OK, then restart the computer.

Other third-party apps and programs may also be causing mouse issues in Windows 10 Creators Update. Place the system in Clean Boot in order to identify any third-party applications or startup items causing the issue.

4. Roll back to the previous version of Windows 10

  1. Press Windows key + I to open Settings.
  2. Choose Update & Security.
  3. Open Recovery.
  4. Click Get Started under Go back to the previous version of Windows 10.
  5. Follow instructions.

Finally, if you’re unable to deal with the problem and it’s something you can’t ignore for the time being, there are some radical options at your disposal. Thanks to built-in Recovery options, you can roll back to the previous iteration of Windows 10.

That’s it! We hope that now, your mouse works in Windows Creators Update, and everything is back to normal.

Scripted diagnostics native host has stopped working [Fix]

The Scripted diagnostics native host has stopped working error message is one that can pop up for some users when utilizing troubleshooting utilities in Windows.

In addition, the error message states, A problem caused this program to stop working correctly. Some users have also stated that the error message pops up more randomly in Windows 10 every few hours. These are resolutions users have fixed the Scripted diagnostics error with.

What to do if Scripted diagnostics native host is not working?

  1. Run a System File Checker Scan
  2. Run the Check Disk Utility
  3. Clean boot Windows
  4. Open the Reliability Monitor
  5. Roll Back Windows Updates

1. Run a System File Checker scan

A few users have said that they fixed the Scripted diagnostics error with the System File Checker. The SFC utility will scan for and fix corrupted system files. Follow the guidelines below to run an SFC scan in Windows 10.

  1. Open Cortana’s search box by pressing the Windows key + Q hotkey.
  2. Enter the keyword cmd in the search box.
  3. Right-click Command Prompt and select Run as administrator.
  4. First, enter DISM.exe /Online /Cleanup-image /Restorehealth in the Prompt; and press the Enter key.
  5. To initiate a system file scan, enter sfc /scannow and press Return.sfc scannow Scripted diagnostics native host has stopped working
  6. The scan will probably take at least 30 minutes. Thereafter, restart Windows if the scan results say that WRP repaired files.

2. Run the Check Disk Utility

  1. Users have also confirmed that running the Check Disk utility fixed the Scripted diagnostics error for them. To do so, open the Cortana app.
  2. Enter cmd in Cortana’s search box.
  3. Open an elevated Command Prompt by right-clicking it and selecting Run as administrator.
  4. Next, input CHKDSK /R in the Command Prompt and press Return.chkdsk Scripted diagnostics
  5. If prompted for a restart, restart Windows as requested.

3. Clean boot Windows

The Scripted diagnostics error can often be due to third-party programs or services that users don’t really utilize themselves. Remember that the error message states, A problem caused this program to stop working correctly.

Clean-booting Windows will remove superfluous programs and services that might be generating the error. So, that’s another potential resolution for it. Users can clean boot Windows 10 as follows.

  1. First, launch Run with the Windows key + R keyboard shortcut.
  2. Input msconfig in Run’s text box, and click the OK button.
  3. Select the Services tab shown directly below.system configuration Scripted diagnostics native host has stopped working
  4. Select the Hide all Microsoft services option, which will exclude those services.
  5. Then press the Disable all button.
  6. Next, select the General tab on the System Configuration window.system configuration selective startup Scripted diagnostics
  7. Click the Selective startup radio button.
  8. Select both the Load system services and Use original boot configuration checkboxes.
  9. Deselect the Load startup items option.
  10. Click the Apply and OK buttons.
  11. Then click Restart on the dialog box that opens.system configuration restart native host has stopped working

4. Open the Reliability Monitor

The Reliability Monitor is a Control Panel utility that can come in handy for fixing the Scripted diagnostics error. That utility documents program & system crashes.

That utility might show users what program or process generated the Scripted diagnostics error message. Users can open the Reliability Monitor as follows.

  1. Open Run with its hotkey.
  2. Enter perfmon /rel in the Open box and click OK to open the Reliability Monitor shown directly below.performance monitor Scripted diagnostics
  3. Then select the red cross for the Scripted diagnostics error. That will show users what program or process stopped working within the Source box.
  4. Click View technical details to get further info that will include a path for the program.problem details Scripted diagnostics
  5. Users can uninstall any third-party program that generated the error via the Programs and Features Control Panel applet.
  6. If the Source box references a system process, users might need to disable the service for it via the Services or Task Manager windows.

5. Roll Back Windows Updates

The Scripted diagnostics error can also arise after Windows updates. Some users have even said that uninstalling certain Windows updates fixed the error for them.

So, the System Restore utility, which will roll back cumulative updates after a selected restore point, might fix the Scripted diagnostics error. Follow the guidelines below to roll back Windows.

  1. First, open the Run accessory.
  2. Input rstrui in the Open text box and click OK to open System Restore.
  3. Click Next and select Show more restore points.system restore native host has stopped working
  4. Choose a restore point that will roll back recent updates. Some of the restore points might even be listed as Windows Update.
  5. Click Next and select the Finish option to confirm.

Those are a few of the confirmed resolutions for the Scripted diagnostics error. However, there isn’t necessarily a guaranteed resolution for the issue.

RELATED ARTICLES TO CHECK OUT:

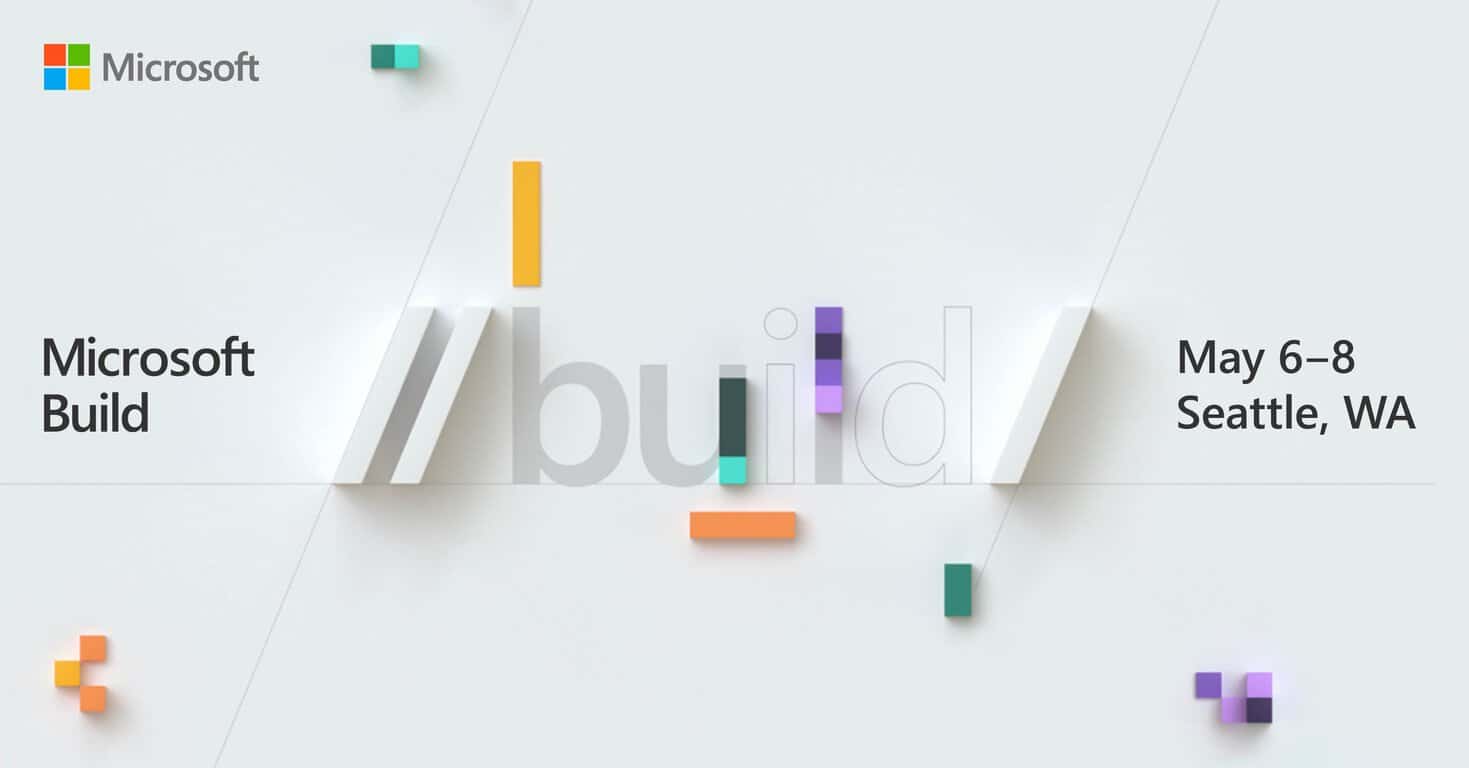
Microsoft releases the first, partial, schedule for Build 2019

As Microsoft’s largest developer conference of the year looms over the horizon, the company has finally released a partial schedule for the event.

The current publishing covers a number of sessions that will be offered over the four-day event but leaves out the other conference tangibles such as roundtables, happy hours, breakfast and the like.

Developers attending BUILD 2019 can look forward to choosing between 123 sessions to sit through that include topics ranging from building Hybrid Cloud apps to Code-free data integration at scale. Compared to BUILD 2018, the current listing of sessions is only a partial unveiling as it is roughly 300 sessions short from last year.

Either Microsoft has really cut the cruft from its conference or developers can anticipate more Windows and Microsoft 365 sessions crop up as the conference grows near; with company perhaps, wanting to keep spoiler-like session titles out of the public domain for now.

As it was in 2018, developers should expect to hear a lot more about Azure, Machine Learning, AI and Open source development at this year’s conference, but for the more casual audience, many are looking forward to news about Windows Lite, Chromium powered Edge, PWAs and Windows Core OS. Hopefully, Microsoft will deliver on both fronts at BUILD 2019.

With only one third of the sessions listed, we recommend checking back here for updates and additions as the days go by.


Slack announces new integrations with Outlook and OneDrive

Despite Microsoft Teams being a direct competitor to Slack, the latter has just announced some useful new integrations with Office 365. First of all, the new Outlook Calendar app for Slack will be able to display actionable notifications for calendar invites, or Skype meetings, with direct links to Skype for Business.

The new Outlook Calendar app for Slack is also capable of automatically changing someone’s Slack status using information from Outlook calendar. As an example, a user’s Slack status will automatically change to “in a meeting” when Outlook indicates it.

This new Outlook Calendar app for Slack isn’t the whole story, as there’s also a new Slack for Outlook add-in. Once installed, the add-in will make it possible to forward any emails in Outlook to a Slack channel, or private messages.

Lastly, the existing OneDrive app for Slack has been updated with the ability to quickly import and search files from the cloud storage service. Slack is also now able to display previews of Word, Excel and PowerPoint right within the app. “From responding to calendar invites to sharing files, these updates are the first in a series of steps to integrate the work you create in Office 365 with the collaboration taking place in Slack,” the company said today.

Microsoft wants the US government to do a better job counting those with broadband access

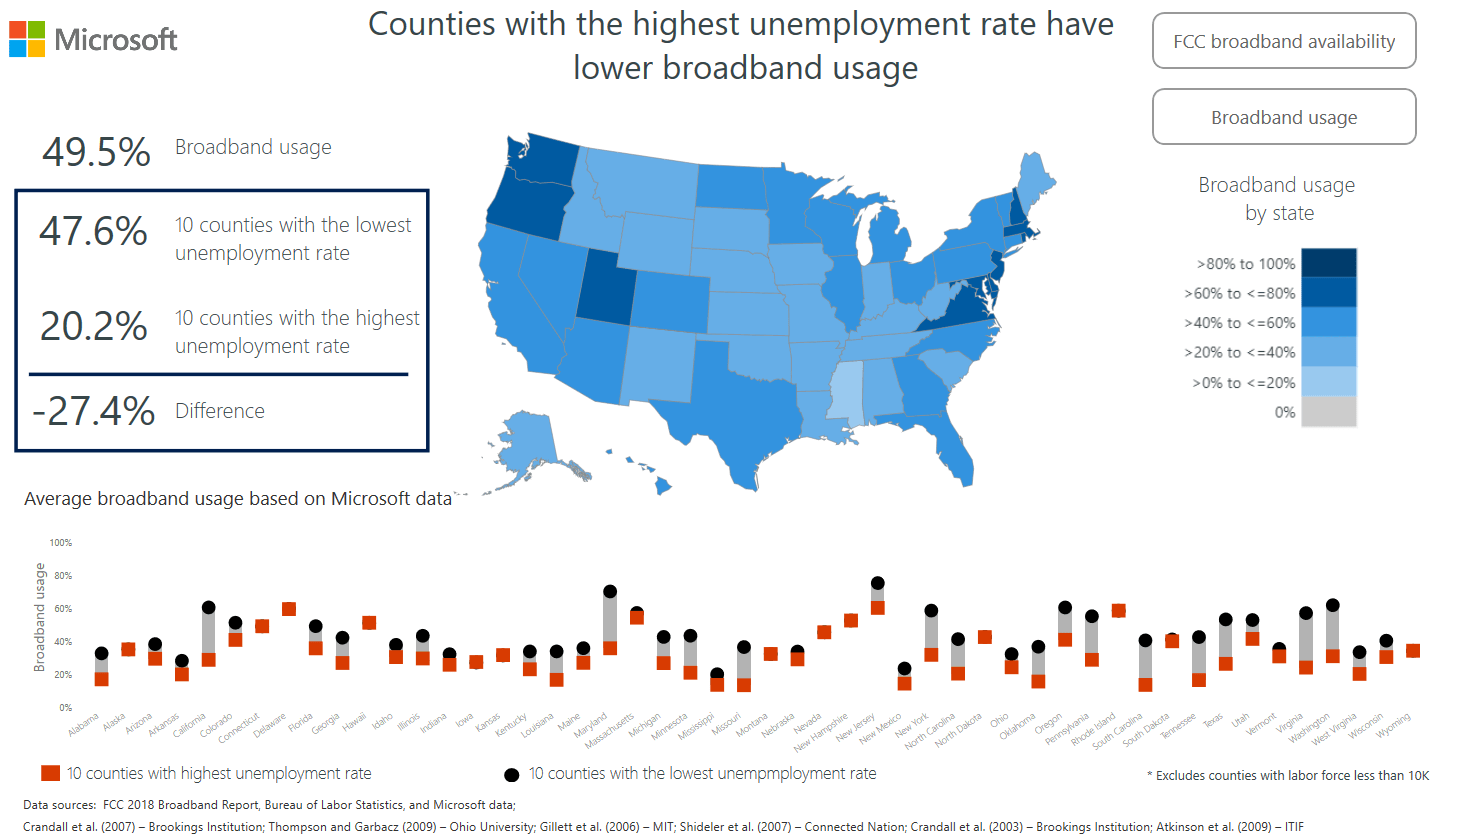
Microsoft has released new statistics that explains the differences of the availability of broadband in the United States per statistics from the FCC versus its actual usage, and has called for the FCC to make changes in collecting the data. According to the company’s blog post, The FCC estimates that there are as many as 24.7 million people without access to Broadband Internet of at least 25 megabits per second. However, according to Microsoft’s own anonymous data, as many as 162.8 million people do not use the Internet at such speeds.

To help fix this ongoing issue, Microsoft recommends that the FCC make various changes in the way that it collects and counts the data. For starters, it suggests that the committee should remove the “could provide” option from the Form 477 submitted to ISPs, and only measure fully covered areas. Right now, the form asks them if ISPs are “providing or could …without an extraordinary commitment of resources provide broadband service to an area.” Since the ISP can check yes to either question, many of the areas that aren’t yet fully covered are counted as having full access to high speed broadband Internet.

The committee should also measure both the availability of as well as the actual usage of high-speed broadband Internet, according to the Redmond giant, and make other changes to improve its data collection of broadband availability before it releases its new report on the issue. For example, the FCC counts data within blocks, and ISP’s can check a whole block as covered even if access is available to only a few households within a large area.

Microsoft has been committed to closing the “broadband gap” for some time now with its Airband Initiative, and has said that it will remain so as it to works with members of the Commerse Committee and with Congress to expand broadband access as quickly as possible. Because as the company says, much of the U.S. economy relies heavily on broadband access, so much so that the issue has major impacts on other problems such as unemployment.

Want to try Edge Insider on Windows 7 now? Here’s how to get it working

Microsoft finally made its new Chromium-based Edge browser available for Windows 10 users yesterday, and it’s currently possible to choose between two different channels, Dev and Canary. The company said that preview builds for the new browser would be coming soon for Windows 7, Windows 8, Windows 8.1 and macOS, but it’s actually already possible to install the new browser on older version of Windows.

As a matter of fact, the leaked Microsoft Edge build that was discovered last month already worked on Windows 7, and it looked pretty good with the Aero interface and built-in support for PWAs.

As reported by Bleeping Computer today, the Edge Dev and Canary installers do work on Windows 7, it’s just that the .exe files are hidden when you visit the new Microsoft Edge Insider website with a non-Windows 10 PC. Fortunately, you should be able to find the installers on this download page, even when you visit it on a non-Windows 10 PC.

Bleeping Computer had no issue running the Edge Insider Dev build on a Windows 7 PC, though the report notes that watching videos on Netflix didn’t work, probably because of missing DRMs on the OS. We don’t have a Windows 8 or Windows 8.1 PC around to test the new Edge browser on these versions of Windows, but it would be surprising if it didn’t work.

Image credit: Bleeping Computer.

If you have yet to try Microsoft’s Edge Insider web browser, we remind you that you can install the Dev and Canary versions side by side: The Dev version will get new builds every week, while the Canary version will be updated daily. There’s already a lot to like in these Insider builds, even though Microsoft is still in the process of removing or replacing some features available in the Chromium open source project.

Download the April 2019 Patch Tuesday updates today

Microsoft will be rolling out the April 2019 Patch Tuesday cumulative updates in just a few hours’ time. As a quick reminder, these updates mark the end of support for the Windows 10 Fall Creators Update OS.

Since 2015, Microsoft has been following a tradition of releasing cumulative updates on the second Tuesday of every month.

This month’s April 2019 Patch Tuesday is coming today with both security and non-security fixes.

As a matter of fact, Windows 10 users have been reporting a bunch of issues that have been introduced by previous builds.

Most of the vulnerabilities will hopefuly be addressed in the April 2019 Patch Tuesday cumulative updates.


Which is the latest version of Windows 10? Find out from our constantly updated article!


Install Windows 10 April 2019 Patch Tuesday updates

If you enabled automatic updates, all you need to do is go to Settings and hit the Check for updates button.check for updates

You can also download the latest Windows 10 update directly from Microsoft’s Update Catalog website.

Microsoft is releasing the April 2019 cumulative updates today but these patches are available for systems running the Fall Creators Update or newer versions.

Windows 10 May 2019 Update coming soon

Speaking of updates, keep in mind that the Windows 10 May 2019 Update lands at the end of May.

This time, Microsoft listened to all the users who have been complaining about the disruptive Windows update process.

The Windows 10 May 2019 update allows users to choose when they want to initiate the update download and install processes.

Fall Creators Update support ends today

As reported earlier, a final batch of updates for Windows 10 v1709 Home and Pro SKUs will be released tomorrow as a part of the April 2019 Patch Tuesday cycle.

Microsoft recommends users to upgrade to the latest version as soon as possible.

If you are looking for a stable and secure OS version, upgrade to Windows 10 v1809 also known as October 2018 Update. 

Microsoft is expected to fix some critical security issues as a part of Windows 10 cumulative updates today. Let’s wait and see if the company manages to patch all the existing vulnerabilities.

Hopefully, the April 2019 Patch Tuesday updates won’t bring issues of their own.

RELATED ARTICLES YOU NEED TO CHECK OUT:

How to fix common Borderlands Game of the Year Edition bugs

What an interesting spring we’re having. Numerous game releases so far, but let’s not forget that Borderlands Game of the Year Edition is out.

You’re back in the shoes of a vault hunter, and the story picks up in the same way the first game did, with the added feature of importing save games from the first game to the game of the year edition now.

With instances of bugs being reported on the game, we’ve gathered up some tips and tricks, that will keep the vault hunting going for a long time. This time it’ll be awesome, I promise!

How to fix common Borderlands GOTY issues

  1. Graphic Issues
  2. Weapon duplicates
  3. Audio issues
  4. Connection issues
  5. Game menu freeze
  6. Screen tearing

Graphic issues

For this fix, we’re going to try to optimize your game running on your Nvidia card.

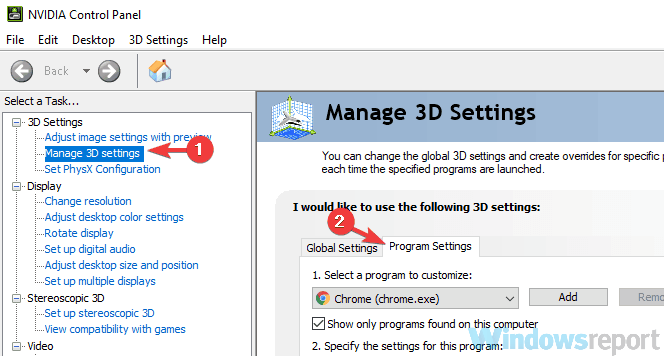
  1. Firstly, open your Nvidia Control Panel;
  2. Go to Manage 3D settings and then select Program Settings;nvidia control panel andy os
  3. Add the Borderlands game executable from the list and select High-performance NVIDIA processor from the drop-down box and press Apply;

Additionally, you have the chance to manage your graphic drivers automatically with dedicated software like Fortect Driver Updater, skilled for installing and updating any driver correctly.

Weapon duplicates

steam overlay not working windows 10

More or less, this issue can be traced to faulty game files, maybe some got corrupted at some point. But we’ve got a solution for this, simply follow these steps:

  1. Start your Steam client;
  2. In the Library section, right-click on Borderlands GOTY game and click on Properties from the menu;
  3. Now select the Local files tab and click on the Verify integrity of game files;
  4. After this is done, try running the game again.

Audio issues

For this fix to work, go to Sounds and select Properties, now make sure to disable every sound device except for your speakers. Also, keep in mind to update your sound drivers if this problem persists. 

For additional troubleshooting solutions, check out the guides listed below:

Connection issues

Simply add your game to an exception list for both your antivirus or Windows Firewall. The same solution for weapon duplicates works for this as well, you can reproduce the same steps to verify your game files.

Game menu freeze

uninstall game via steam

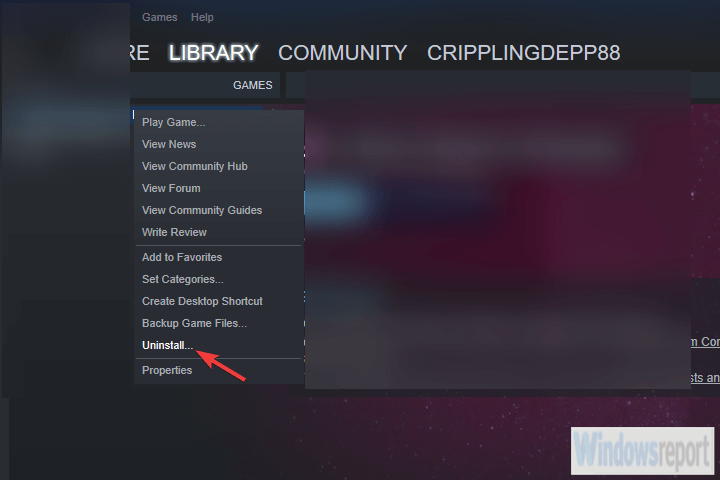
You should try running the game in Windowed Mode, as a first solution. Or alternatively, repair and verify your files can do the trick. But if that doesn’t work you should uninstall and reinstall your game.

Screen tearing

For this fix, head on over to your game menu, and select Graphic options, and disable Shadowplay, then  turn off V-Sync, and disable Anti-aliasing. Alternately, you can opt which one you wish to disable, and test which feature allows a smoother look.

General tips to run Borderlands GOTY smoothly

Always remember the minimum requirements whenever running a game, here are the specs for Borderlands GOTY:

  • OS: Windows 7 64-Bit.
  • Processor: Intel Core i3 530 @2.93GHz/AMD Phenom 9950 @2.6GHz.
  • Memory: 4 GB RAM.
  • Graphics: Geforce GTX 660, Radeon HD 6970.
  • DirectX: Version 11.
  • Storage: 25 GB available space.

If you’re running the game from your Steam library, remember to whitelist your game on Windows Firewall or to add an exception for it in your antivirus.

Always keep your graphic card’s drivers up to date at all times when running your games.

We hope that these fixes were helpful for you. And in the meantime, let us know what you think of the game so far in the comment section down below.

Windows 10 20H1 builds coming to Fast ring Insiders in May

Microsoft is planning to push the gas pedal for Windows 10 20H1, commonly known as the Windows 10 April 2020 Update. The company will start shipping 20H1 preview builds to Fast ring Insiders starting May 9, 2019.

The Windows 10 May 2019 Update is currently in the final stages of development, and Microsoft is all set to release it later in May.

The big M will add for some major improvements to the Action Center, Start menu, Settings app and other UI elements.

Furthermore, the company will introduce Windows Sandbox, a new Windows light theme experience as a part of its Windows 10 May 2019.

This update will be released to Release Preview Ring Insiders very soon. Before the company rolls out the Windows 10 May 2019 Update to the general public, Windows Insiders will have been testing for one month. Hopefully, the final OS version won’t bring too many bugs.

Windows 10 April 2020 Update released sooner than you expected

The development of Windows 10 20H1 (April 2020 Update) is also under progress. In order to align its development plans with the Windows Insider rings, the tech giant will also push the Windows 10 April 2020 Update update to the Skip Ahead Ring.

This will be done by speeding up the work on Windows 10 20H1. In this way, the preview builds of the update will be available to Fast ring insiders as well.

Currently, just the Skip Ahead Insiders have access to the Windows 10 20H1 builds. Microsoft also decided to merge the Fast Ring and Skip Ahead rings in the next few weeks. 

Last week, the Redmond giant rolled out Windows 10 Insider Preview build 18845 to Skip Ahead Insiders. Although the update did not come with any new features, it includes some general changes and improvements.

Notably, it fixed the issues related to launching Microsoft Edge and Start menu bugs that existed in previous builds.

How to check for updates?

If you are enrolled in the Windows Insider program, you can check for updates by navigating towards Settings >> Update & Security >> Windows Insider Program.

RELATED ARTICLES YOU NEED TO CHECK OUT:

Windows 10 Game Bar gets Chat, Spotify, and Mixer integration

Microsoft is adding some exciting new features to its Windows 10 Game Bar. Insiders running Windows 10 v1809 or higher can now test the new features.

Microsoft is interested in convincing more gamers to adopt the Windows 10 platform. Microsoft made this recent move in order to improve the gaming experience with an enhanced Game Bar along many new features.

These features include Spotify integration and shareable in-game content. Moreover, users will be able to personalize their very own Game bar.

Microsoft confirmed that Spotify, Chat and Mixer will work fine with Windows 10’s Game bar. The new features will support all your PC games and will show up as an overlay when gamer press the Windows key + G keys.

This will help users record video and grab screenshots much faster. The beta version of the Windows 10 Game Bar allows users to instantly control their Spotify playlists during gaming and chat sessions.

User don’t need to leave their game while capturing, editing, adding text and finally tweeting gameplay footage.

The captured screenshots can then be easily turned into memes. Windows 10 users can keep an eye on the activities of their fellow gamers.

Get Game Bar beta in Windows 10

You can get Game bar beta in your Windows 10 OS.

  • On your Windows 10 PC, launch the Xbox Insider Hub
  • On the upper left corner of your screen click Insider Content
  • Click Windows Gaming, the user can enroll automatically into the Game bar flight if he has a Window 10 build #17763 or higher
  • When you are playing any game, you can press Win+G to show Game bar

Right now, Microsoft is testing the new Xbox Game Bar for PC gamers. The company wants to thoroughly test the feature before releasing it to the general public.

We can see that Microsoft is finally addressing the shortcomings that have existed for years. Happy gaming!

RELATED STORIES TO CHECK OUT:

Kaizala becomes part of Microsoft Teams in 2020

Microsoft is planning to integrate Kaizala messaging service into its Teams group-chat. Kaizala is basically a messaging service that is available for large-group communication to both Android and iPhone users.

The move has been made as a part of Microsoft’s strategy to expand its services to more first-line workers.

Back in 2017, the messaging service was launched as a Microsoft Garage incubation and was initially a simple productivity tool. Its distribution has been constantly being extended since then.

Kaizala’s Pro version has now been made part of the worldwide Office 365 commercial plans without any additional charges.

Microsoft made an official announcement stating that it would launch Kaizala to all eligible Microsoft 365 and Office 365 users around the world.

The tool will be available in 180-plus markets and 40 languages as an integrated offering.

The integration should take place over the next 12-18 months in different phases.

Better workplace communication thanks to Kaizala and Microsoft Teams

Kaizala brings unique capabilities to Microsoft 365, with its ability to connect and engage people both inside and outside of an organization’s directory – including contract workers, vendors, partners, suppliers, customers, and citizens – using large and flexible group types. Kaizala enables phone number-based identity for easy onboarding, and a simple user experience for messaging and work management through the open directory.

The company also added some new features to Kaizala. Users can now delete the messages they sent in group or one-on-one chat conversations.

The time duration for this action has been restricted to an hour after the message has been sent.

Secondly, just like other social media services out there, the app now supports tagging individuals in a conversation by using @mentions.

This year, Microsoft is also launching a new Kaizala web app adding new video calling and image annotation features.

Microsoft is also planning to add many more new features in future. Some of these features include email user invites, right-to-left language support and more.

Admins will also be able to designate specific policy management tasks to specific admins. Microsoft Teams users will have to wait for a few months until these features have been integrated into the app.

Microsoft has yet to announce an official date when these new features will be available to the public.

RELATED STORIES TO CHECK OUT:

WindowsReport is attending Affiliate Summit Europe – 2019

The conference rooster starts a bit early this year and the first one on the line for the WindowsReport team will be Affiliate Summit Europe. Held in Amsterdam on the RAI Amsterdam conference center, this event will last three days, between 12th and 14th of March. After the success we’ve had at last year in London, we’ve decided to give it another go.

ASEURO19, as online advertisers call it, promises to be an event filled with various networking chances and the opportunity to connect with other big names from the industry. As usual, we’re going to be particularly interested into discovering new players in the tech industry, while also consolidating bonds with key partners.

This annual event will soon be the home of representatives of big companies, such as Uber, Skyscanner, Adidas and a lot more. Software wise, companies such as PropellerAds, BullGuard, Bitdefender are going to join as well.

We’re also interested into hearing what key-speakers have to say about the latest trends in the industry. Some of the most notable present and perhaps, on my own agenda, are the following:

  • Justin Rondeau – Director of marketing at DigitalMarketer
  • Todd Crawford – VP Strategic Initiatives, Impact
  • Anthony Capano – Managing Director Europe, Rakuten
  • Adam Ross – COO, Awin
  • Ami Spencer – International Publisher Director, Webgains

And many more.

Let’s meet

This year we’re going to send three representatives from our team to this event, including our founder, the head of affiliate sales and a press member.

Are you attending ASEURO19 as well and want to meet us in person? You can book a meeting by sending an email to alex [at] windowsreport.com.

Conclusions:

We’ve had a blast. Thanks to all the partners that managed to reach Amsterdam for getting a chance to meet and chat. Looking forward to next year’s event !

ASEuro_2019_after

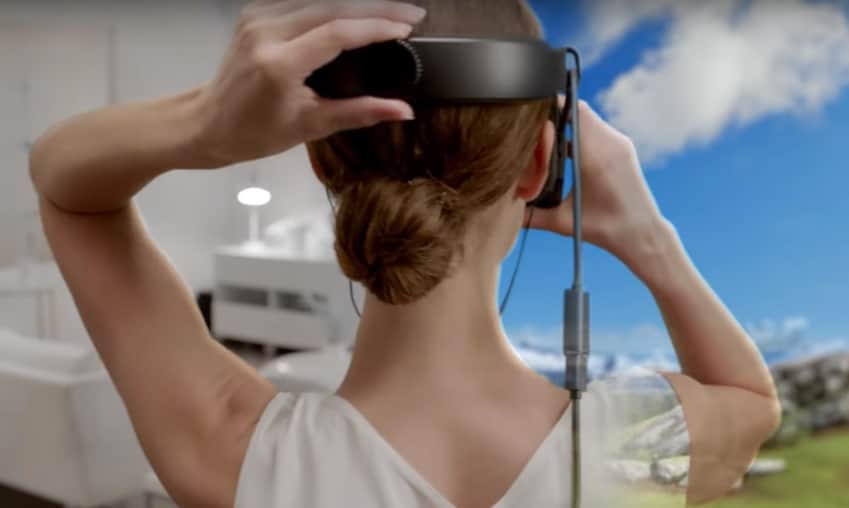
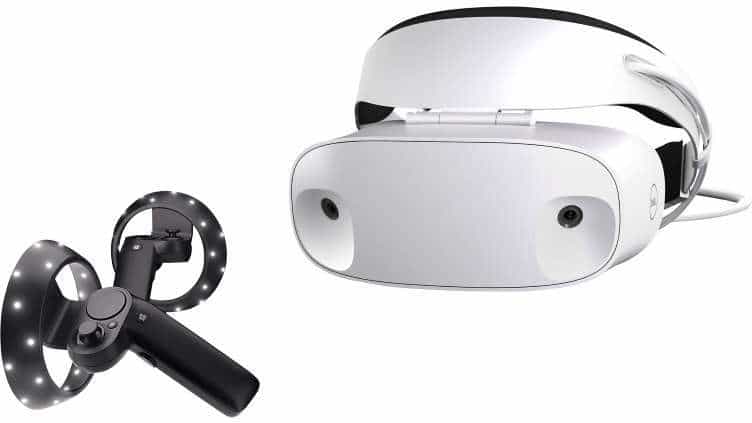
How to Fix Frequent Windows Mixed Reality Issues

Windows Mixed Reality is an impressive technology developed by Microsoft that blends reality and virtual worlds.

This so-called hybrid reality is becoming more and more affordable and popular among users.

Unfortunately, Microsoft still has a lot of work to do in order to polish Windows Mixed Reality so as to make it more stable and reliable because several users reported that Mixed Reality is not installing.

Many potential Windows Mixed Reality errors and issues may occur. In this article, we’ll show you how to fix the most common ones.

How can I fix Windows Mixed Reality bugs and errors?

1. PC can’t run Windows Mixed Reality

Make sure your computer’s hardware setup is compatible with Windows Mixed Reality.
Install the latest Windows 10 updates or upgrade your system to the latest Windows 10 OS version, which is currently the Fall Creators Update.

2. Xbox One controller won’t work on Windows Mixed Reality

Make sure your controller is turned on, fully charged, and connected to the PC. Replace its batteries.
If you’re using a Bluetooth controller, make sure it’s paired. Go to Settings > Devices > Bluetooth & other devices to see if it’s listed on the page.

3. Windows Mixed Reality headset stopped tracking

  1. Make sure the lights are turned on. Check to see if anything obstructs your headset’s inside-out tracking cameras.
  2. Wait for a few seconds for tracking to resume.
  3. Restart the Windows Mixed Reality Portal.

ALSO READ: Samsung’s new Windows Mixed Reality headset lands November 6

4. Something Went Wrong error 2181038087-12

This error usually occurs when HMD is plugged into a USB port on which a non-Microsoft USB device driver is running.
To fix error 2181038087-12, launch Device Manager > expand the Universal Serial Bus controllers category > uninstall the driver for each item that includes the text “eXtensible Host Controller” and doesn’t have “Microsoft” in the name.

Now, ensure that all the drivers containing the text “eXtensible Host Controller” have “Microsoft” at the end.

5. Something Went Wrong error 2181038087-4

fix windows mixed reality bugs

This error occurs when the headset driver failed to initialize the two tracking cameras. Unplug and replug your headset to solve this problem. You can also try reinstalling the driver if the problem persists.

6. Something Went Wrong error 2181038087-11

This error indicates that your CPU is too old and incompatible with Windows Mixed Reality. You need to buy a new Windows Mixed Reality-compatible PC to fix this error. Check out the list of compatible devices here.

There is also a tool available that automatically checks if your computer is compatible with WMR.

7. Wi-fi speed is slow when motion controllers are turned on

windows mixed reality bug fix

Your notebook may share a Wi-Fi antenna with Bluetooth when using 2.4GHz access points. Open Device Manager and switch band preference to 5GHz.

8. Windows Mixed Reality overheats PC

This is a common issue when using WMR. Ensure that the fans that blow air into/out of your PC are not blocked, and try to use the PC in a cool environment. Remove all heat sources pointed at the PC.

For more information on how to prevent overheating issues on PC, check out the articles below:

9. The Mixed Reality world often freezes

This issue could be caused by an app or system fatal error or a temporary memory or CPU abnormal usage level.

  1. Open task manager and make sure that you have at least 20% CPU free and 400MB memory free
  2. Check to see if any processes crashed. Open event viewer, navigate to Windows Logs -> Application and Error level event entries.
  3. Reboot your PC if this problem persists.

10. Steam VR is crashing

Launch the Mixed Reality Portal first, and then try relaunching SteamVR. Ensure you’re not running a Beta version of the Steam client.

For more information on how to fix other Windows Mixed Reality issues, go to Microsoft’s Support page.

New Chromium Edge is a lot like Chrome but with several things missing

While Microsoft has officially taken the wraps off its Insider and developer-focused Edge browser replacement, the work to a finished consumer product is still miles ahead of the company’s engineers.

However, there are some kudos to give the Edge team as they have gone from announcement in late December to a relatively usable product in roughly five months.

The expediency in the release of Microsoft’s new Chromium-powered browser has come at cost and the Edge team has noted all the missing, removed and perhaps, soon-to-be-replaced features users have come to expect from the industry leading web browsing alternatives.

According to a recently published list, Chromium Edge testers will find that their builds lack the following:

While that is a long list of missing features a traditional Chrome user might come to long for if switching to the new developer and insider builds of Edge, Microsoft does note that it has simply replaced some of these features with their own solutions.

Which ones?

The 27-slide Power Point identifies Identity and Single Sign-On (SSO), PlayerReady DRM, and Services integration as early changes, alongside more subtle additions such as smoother scrolling protocols in BlinkGen Property Tree (BGPT) Memory Reduction in DLL prefetching and Native Caret browsing among others.

There are several other areas of interest and investigation the Edge team is looking into and would love contribute to, but for now, testers will have to settle with waiting for build updates to get the incremental changes they need, to make Chromium Edge their go-to browser of choice.

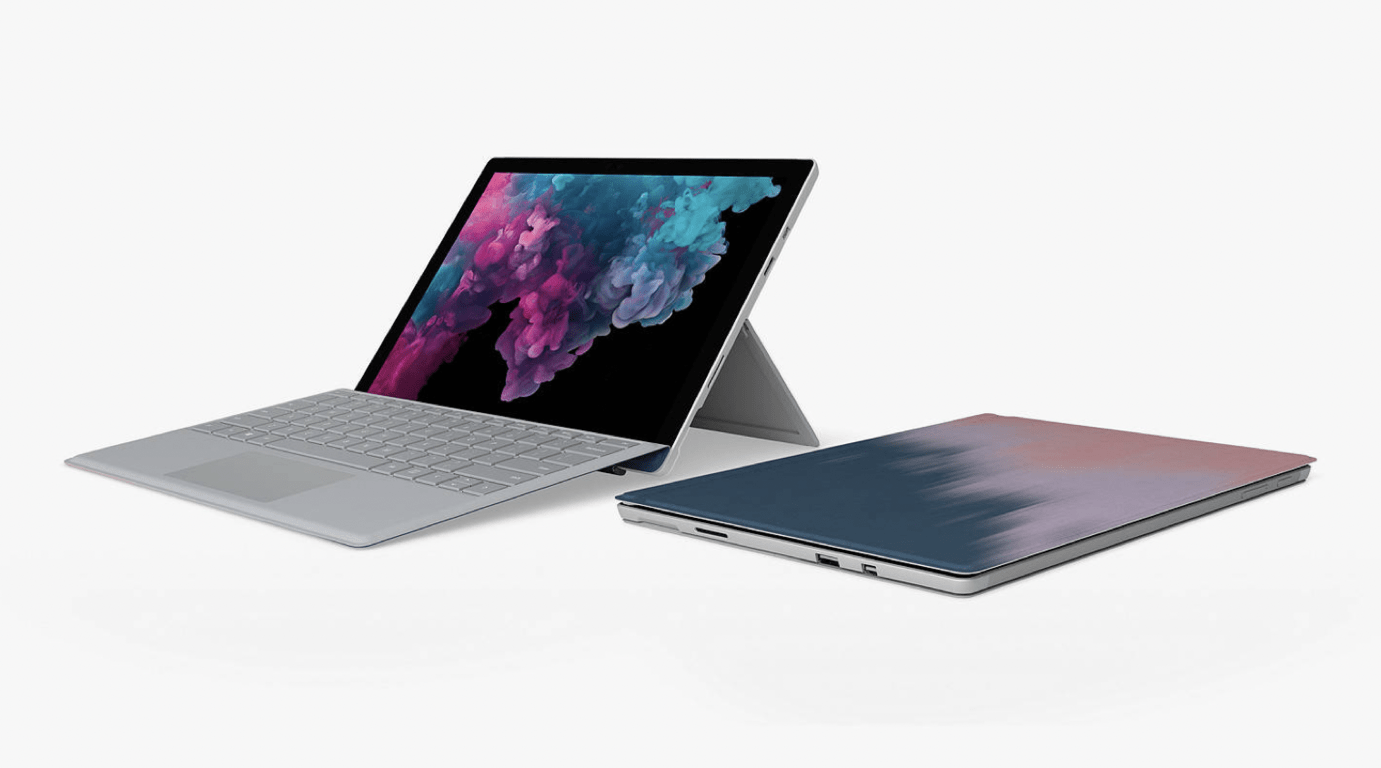
Microsoft unveils new ‘Blush Blend’ Surface Pro Signature Type Cover

Perhaps, because the design of the main unit of the Surface Pro has remained relatively consistent, owners have sought to add customization through its accessories as a way to differentiate their device from the next persons. Microsoft has released many different Surface Type Covers over the years, adding a model with a built-in Fingerprint ID as well as the various Signature Type Cover models with alcantara finish.

Today, the company unveiled the Surface Pro Signature Type Cover in Blush Blend, which will be exclusive to John Lewis & Partners in the UK. The exclusive offering keeps the same feel of Microsoft’s Signature Type Cover experience with Alcantara fabric, but comes in a new two-tone blended color scheme reminiscent of dry and wet sand on the shore.

The Blush Blend Type Cover comes in one option for now and it’s a cross blend of navy blue to light peach (it looks like) and offers a color changing dynamic dependant on light and motion. If you live in the UK, the JL&P Type Cove can be snagged for £149.99 starting today at the JL&P website, here.

Disable spell check in Skype permanently with these solutions

Spell check and auto-correct are useful features, but sometimes users want to disable spell check in Skype. The main problem with spell check is that it will automatically correct your words to English, even if you’re not using English while typing.

This can be rather annoying, so today we’ll show you how to disable auto-correct in Skype.

How to disable Skype autocorrect on Windows 10?

1. Disable spell check in the Settings app and Skype

In order to disable spell check in Skype, it’s advised to disable spell check in both Settings app and Skype. This is rather simple and you can do it by following these steps:

  1. Open the Start Menu and go to Settings.
  2. Next, click on Devices and go to Typing.
  3. Turn off the slider for Autocorrect misspelled words and Highlight misspelled words options.
    typing settings skype spell check disable

This procedure works well for Windows 10 since the auto-correct feature is built-in.

After doing that, you can disable spell check in Skype. To do that by following these steps:

  1. Launch the Skype application.
  2. Click on Tools, then Options.
  3. Go to IM & SMS, select IM Settings and click on the Show advanced options.
  4. Here uncheck Auto correct, then Highlight the misspelled words options.
  5. Save changes and check if the problem is still there.

2. Modify your registry

With some users, the Typing tab might not be available in the Settings app. This can be a problem when trying to disable spell check in Skype.

However, you can fix this problem by making a couple of changes in your registry. Bear in mind that modifying the registry is an advanced procedure, so back up your registry before making any changes.

  1. Press Windows Key + R and enter regedit. Click on OK or press Enter.
  2. Once the Registry Editor starts, navigate to this key: HKEY_USER\Software\Microsoft\Tablet\Tip1.7.
  3. Go to the right pane and double click EnableAutocorrection DWORD. Next, set the Value data to 0.  The same steps can be used to enable spell checking. If this value isn’t available, create it manually.
    registry editor how to disable spellcheck skype
  4. Once done, exit the Registry Editor and check if the issue is resolved.

There you go, these are some of the solutions that you can use to disable spell check in Skype. Be sure to try all of our solutions, and let us know in the comments section which solution worked for you.

READ ALSO:

Common Wolfenstein 2: The New Colossus bugs with solutions

Wolfenstein 2 is now live. You can download and install the game on your Windows 10 PC and enjoy an amazing first-shooter experience.

As it happens with every newly launched game, Wolfenstein 2: The New Colossus is affected by a series of bugs that may sometimes severely limit your gaming experience.

In this article, we’re going to list the most frequent Wolfenstein 2 bugs reported by gamers, as well as their corresponding solutions whenever available.

We’re sure that the game developers are already working at full speed to fix these problems and will roll out a patch as soon as possible.

Wolfenstein 2 reported issues:

  1. Game crashes
  2. Changing graphics settings, resolution, brightness crashes the game
  3. Game won’t launch
  4. Screen tearing
  5. Low graphics quality
  6. Black screen with sound
  7. Game freezes
  8. PC restarts
  9. “Could not write crashdump”
  10. Bonus: Optimize the game

1. Game crashes

Game crashes are quite frequent in Wolfenstein 2. Many gamers already sent refund requests because they couldn’t play for more than 5 minutes.

Well, these gamers should consider themselves lucky because other players experienced crashes as soon as they hit the play button:

“I still cant start the game, getting a crash dump error as soon as I start it. It’s been 12 hours, the file size on my end is 15gb .. any solutions? Im running the latest Nvidia drivers 388.10.”

Some players said that this problem is prevalent for gamers who are on servers in the Middle East and Japan. Apparently, players downloaded corrupted game files.

Here are a few solutions to fix Wolfenstein 2 crashes:

  1. Make sure you run the game on your dedicated GPU and not the integrated GPU.
  2. Disable “Async compute” from the Advanced Video Settings and then restart the game.
  3. Install the latest Windows 10 updates on your PC
  4. Run a full system antivirus scan
  5. Run System File Checker or use a dedicated registry cleaner to get the job done.

Update: Both AMD and NVidia released Game Ready hotfix drivers which, according to many players, fix the crashing problem in Wolfenstein: The New Colossus. So, all you have to do is install the latest drivers for your GPU, and crashing issues should be gone.

2. Changing graphics settings, resolution, brightness crashes the game

Speaking of crashes, there is one particular instance where Wolfenstein 2 immediately crashes and that is when players change the graphics settings.

“Same. First time booted up, defaulted to 1080p. Upped it to 1440p and instant crash into restart. Now, when I start the game, I get an error message on the brightness adjust screen. After that, I go to the title menu, and it’s blank. Can’t do anything.”

Here is what you can do when Wolfenstein 2 crashes after adjusting graphics settings:

  1. Enable borderless window. Many players confirmed that this action fixes crashes: “just try borderless window, it didnt crash for me then and it changed the resolution.“
  2. Make sure your GPU drivers are up to date. You can use third-party software to safely update your drivers.
  3. Turn off DPI and turn on Administrator mode for the game.
  4. Delete the game’s Save Game folder in your user directory. Then, uninstall and re-install the game.

3. Game won’t launch

Many players reported that Wolfenstein 2 won’t start due to a series of fatal errors.

Here is what you can do in this case:

  1. Verify the integrity of game cache
  2. Uninstall your GPU drivers, reinstall them clean. Update to the latest driver.
  3. Run the game and Steam as administrator: right-click on the Steam shortcut > go to Properties > Compatibility tab > check the ‘Run this program as an administrator’ checkbox.
  4. Make sure you run the game on your dedicated GPU and not the integrated GPU.

Other players reported that the game simply won’t load and nothing happens when they hit the play button:

“I’m unsure if this has been discussed but when I click to open my game up, it just wont start. I’ll click to start it, it’ll say it’s running, then go to syncing and won’t boot up.”

4. Screen tearing

If you’re experiencing screen tearing, you’re not the only one. Many gamers said they skipped the game due to this annoying issue:

“I’ve got horrible screen tearing as well. if i move my mouse just a little bit the screen tears.“

Try using Gsync/Freesync to see if this eliminates tearing and let us know if this fixed the problem for you.

5. Low graphics quality

Many gamers can’t fully enjoy gaming due to graphics issues. Game textures sometimes leave a lot to be desired, as this gamer reports:

“The game looks awful, look at his hands jeez. change graphic settings makes no sense, game looks equally bad on all settings. graphics worse than the original game, what the heck.”

If you’re experiencing graphics issues, try updating graphics drivers and check your computer’s memory.

6. Black screen with sound

Sometimes, the game may display a black screen shortly after launch. Sound is available but the black screen won’t go away, forcing players to quit the game.

“Game launches, after a few seconds I get the Bethesda intro, the MachineGames intro and then black screen. I can here the sound of options moving, when I press either “B” on the controller or Escape on keyboard I see the in-game window asking if I want to quit the game. Otherwise everything is black screen :x.”

Try updating your graphics drivers, and verify the integrity of the game cache. We also have a dedicated article on how to fix black screen issues on PC, so you may want to follow the troubleshooting steps listed in the article below.

7. Game freezes

Wolfenstein 2 sometimes freezes for about 10-20 seconds. Here is how one game describes this issue:

“Just like that, after 15-20 seconds the game is frozen, only music is playing. If I manage to start the game, cinematics plays fine, game starts and again after couple of seconds it’s dead.
Got latest NVIDIA hotfix, no use.”

The game also freezes when players change the aspect ratio:

“Anyone else having this issue? Changing the aspect ratio to 21:9 causes the game to freeze. Haven’t gotten past the settings, yet. Pretty bummed.”

Players confirmed that the following solutions solved the problem:

  • Turn off ‘Async computing’ in advanced options.
  • Deactivate the integrated Intel HD GPU.
  • Disable motion blur.

We strongly recommend using a PC game booster application that analyzes the status of your computer and then stabilizes it so that you may play a game on it.

Additionally, game booster features such as Defrag, Recovering Space, FPS Boosting can increase the general performance of the PC, which in turn enhances your gaming experience.

8. PC restarts

Changing the game resolution also causes computers to restart. This happens even in Safe Mode:

“After i change resolution in options and hit apply my pc just restarts every time“

For the time being, there is no solution available to fix this problem. Unfortunately, gamers will have to wait for Bethesda to release a patch.

9. “Could not write crashdump”

A lot of people have reported that a strange “could not write crashdump” error occurs during the gameplay.

There’s no confirmed solution for this issue, yet. However, we recommend installing the above-mentioned Game Ready driver. Maybe it includes the solution for this issue, as well.

Bonus: Optimize the game

And finally, if you want to get the best possible experience in Wolfenstein 2: The New Colossus, there’s some extra work to do. We recently wrote a simple guide that will make your life in the game easier.

Make sure to check it out.

These are the most frequent Wolfenstein 2 bugs reported by gamers.

If you installed the game on your PC, tell us more about your experience in the comments section below.

Developer gets Chromium web browser working on Windows 10 ARM – it’s fast!

After Mozilla Firefox became available on Windows 10 on ARM PCs earlier this year, Google has yet to release an ARM64 version of its Chrome web browser. The Mountain View giant is said to be working on it with the help from Qualcomm and Microsoft, but in the meantime developer Jemery Sinclair has managed to make Chromium, the open-source version of Google Chrome, work on Windows 10 on ARM (via Softpedia News).

In a series of tweets, the developer said that he has been trying to compile an ARM64 version of Chromium since January, and that the web browser runs “super fast” on Windows 10 on ARM. Sinclair published the short video below showing how Chromium’s running on a Windows 10 on ARM PC.

This is promising news for the upcoming ARM64 version of Google Chrome, as well as Microsoft’s own Chromium-based Edge browser. “Now I have absolutely no doubt for how well Edge: Chromium Edition will run,” Sinclair said in another tweet. To our knowledge, Microsoft only said that its Chromium-based Edge browser would be available on Windows 10, Windows 7, Windows 8.1 as well as macOS, but an ARM64 version seems evident now that Microsoft has pretty much given up on the existing version of Microsoft Edge.

How to stop Windows 10 from asking you for feedback

With Windows 10, Microsoft has taken a more proactive approach towards gathering user feedback. Since Windows now follows a service-driven development approach, the company considers user feedback while designing new features and improvements.

Occasionally, you may receive a notification in Action Center asking you about your Windows experience. Although these alerts are generally sent infrequently, you may well find them annoying or distracting. Turning them off requires a single trip to the Settings app to silence them forever.

Windows 10 privacy settings category on settings app homepage

Launch Settings using your preferred method, such as the Start menu or Win+I keyboard shortcut. On the homepage, click the “Privacy” tile. Next, click the “Diagnostics & feedback” page under the “Windows permissions” heading in the left sidebar.

Scroll down to the very bottom of the page which appears. Here, under “Feedback frequency,” you can choose how often Windows should prompt you to supply feedback. By default, it’s set to “Automatic,” which lets Microsoft send you survey notifications when they’re deemed relevant to you.

Disabling Windows 10 feedback notifications

You can reduce the frequency to once a day or once a week. It’s also possible to specify “Always,” if you’re keen to supply more feedback to Microsoft. The final option, “Never,” is the one we’re looking for though – it’ll suppress every feedback notification, so you won’t be bothered again.

Disabling notifications doesn’t prevent you from filing feedback manually. You can use the Feedback Hub app to report bugs and request improvements independently of Microsoft’s survey notifications. You can even get meta with your feedback – the “Diagnostics & feedback” page includes a link (“Share your opinion about Feedback Hub survey notifications”) to let you share feedback about the feedback alerts!

Microsoft news recap: Xbox Game Pass Ultimate subscription info, Microsoft’s HR investigating sexual harassment, and more

Microsoft news recap is a weekly feature highlighting the top Microsoft news stories of the past week. Sit back, grab some coffee, and enjoy the read!

New Xbox Game Pass Ultimate subscription will reportedly come with Xbox Live Gold for $14.99 a month

It looks like Microsoft is gearing up to combine its Xbox Live Gold and Xbox Game Pass subscriptions into one. A new report suggests that for $14.99 per month, users will be able to get their hands on with both Xbox Live Gold and Xbox Game Pass in one monthly subscription, called Xbox Game Pass Ultimate.

https://twitter.com/h0x0d/status/1114159135048646657

Email chain rife with sexual harassment claims prompts investigation by Microsoft’s head of HR

Microsoft’s head of HR has opened an investigation into sexual harassment throughout the company after an email chain rife with claims of sexual harassment came to light. Head of HR at Microsoft has announced she will personally review and investigate the claims made.

Microsoft’s HealthVault is set to close on November 20

HealthVault, Microsoft’s service to store personal health records, is set to close on November 20, according to an email sent out to registered users. It follows the service having a rocky existence with apps being launched and later abandoned.

Microsoft's HealthVault app

Xbox, PlayStation, and Nintendo are being investigated by the UKs Competition and Markets Authority

The UKs Competition and Markets Authority has opened an investigation into auto-renewal online gaming subscriptions, focusing on the biggest online gaming companies – Xbox, PlayStation, and Nintendo – to see whether or not the terms and conditions are unfair.

Xbox One X at Gamescom 2017 in Germany

That’s it for this week. We’ll be back next week with more Microsoft news.

Windows 10 Start Menu is Blank or Icons Not Showing [Fix]

Windows 10 has one of the greatest Start menus. Its Start menu is slick, modern and includes app tile shortcuts that give it a whole new dimension. But to their dismay, many find the Windows 10 Start menu blank.

In some cases, the Start menu icons are not displaying properly, or the Windows 10 tiles are not showing. Keep reading to find out the solutions!

What can I do if the Start menu is blank in Windows 10?

1. Pin the Tiles to the Start Menu again

First, unpin the blank app tiles on the Start menu and pin them back on. Right-click an app tile on the Start menu and select Unpin from Start.

Scroll to the app on the Start menu‘s app list, right-click it, and select Pin to Start to pin the tile back on.

2. Restart Windows Explorer with Task Manager

  1. Press Ctrl + Shift + Esc to open the Task Manager.
  2. In the Processes tab, select Windows Explorer, and click Restart.restart to fix windows 10 start menu blank

A quick solution for issues with the Start menu or the Taskbar, especially when these are blank or the icons are missing, is to restart the Windows Explorer process.

3. Run a System File Scan

  1. Press Windows + X and select Command Prompt (Admin).power user start menu
  2. Paste the following command and hit Enter:sfc /scannowThe exclusive semaphore is owned by another process sfc scannow
  3. Restart the PC if Windows Resource Protection does repair files.

Blank app tile shortcuts could be due to corrupted system files. System File Checker is probably the best Windows tool for repairing corrupted files.

Instead of relying on that, you can fix this Windows 10 trouble with specialized support from a standalone repair tool.

4. Run the Start Menu troubleshooter

The Start Menu troubleshooter is an effective tool but is not included in the default Windows installation. So, you will have to download the Start Menu troubleshooter.

start menu troubleshooter

The troubleshooter has been found to fix issues when the Windows 10 Start menu is blank. So, make sure to run it and make the changes it recommends.

5. Set up a new user account

Often, it’s a corrupt user profile to blame when the Windows 10 Start menu is blank. And in that case, the only option is to create a new user profile.

And do not forget to make the user an administrator to secure advanced permissions and privileges.

6. Restore Windows to a Restore Point

A System Restore will revert Windows back to an earlier date. It might remove recently installed third-party software conflicting with the Start menu.

In addition, it also rolls back minor updates and can repair system files. As such, System Restore could feasibly fix blank app tiles in the Windows 10 Start menu and get things up and running.

Before you leave, find out how to customize the Start Menu in Windows.

Tell us which fix worked for you in the comments section below.

Conan Exiles Errors: How to Fix Them All

Conan Exiles is a challenging open-world survival game set in the brutal lands of Conan the Barbarian. As a player, your main tasks are to survive in a hostile world, build your kingdom, and dominate your enemies. But Conan Exiles’ errors trouble many!

The game is still affected by several technical issues, as gamers report, but the good news is that Funcom is working at full thrust to fix them. Funcom rolled out a major Conan Exiles update, patching several server connection issues.

Conan Exiles’ developers also published a list of quick workarounds that players can use to fix common game issues.

How do I fix errors on Conan Exiles?

Tip icon Tip
Before proceeding with the solutions, verifying that you are running an updated version of Conan Exiles is important.

1. Keybindings won’t save

  1. Press Windows + E to open File Explorer, and go to: C:\Program Files (x86)\Steam\steamapps\common\ConanExiles\ConanSandbox\Configpath
  2. Open the DefaultInput.ini file with Notepad.
  3. Find the lines that have PreviousMessage and NextMessage.
  4. Where it says Key=, change the assigned key to whatever other key you would prefer to use.

This temporary solution involves editing a vital game file. Avoid changing and deleting any characters in any of the lines in the file, as this can break the game.

2. There are no servers in the browser

If you cannot see any servers listed in the browser, ensure that the Combat and Community lists are set to All. The filter should be set to Internet.

If the settings are correct, but you still can’t see any Conan Exiles servers and encounter errors, then you may use the Steam server list tool accessible from the View menu.

3. Black screen on startup in Conan Exiles

If the game hangs on the loading screen and is not progressing beyond a black screen, wait a little longer. If nothing happens after a few minutes, end the task from the Task Manager.

It is good to know that this issue may be caused by hardware close to the minimum specifications. Also, try running the Steam client’s built-in integrity checker.

Here’s what you need to do:

  1. Open Steam and go to the Library.
  2. Right-click on Conan Exiles and open Properties.
  3. Under the Installed files tab, click Verify integrity of game files.verify files to fix conan exiles error

That’s it! Once all the available game files are fixed or replaced, you shouldn’t face any Conan Exiles’ errors.

4. C++ or UE4 Prerequisites errors

  1. Download any pending Windows updates.
  2. Install the Visual C++ Redistributable for Visual Studio 2015.
  3. Finally, install Conan Exiles.

Conan Exiles C++ errors are most likely due to out-of-date Windows versions. Make sure that your computer is running the latest Windows version.

5. Optional parameters error

When Conan Exiles is trying to launch with optional parameters that don’t exist, restart Steam and try again. If the issue persists, close Steam and launch the app as an Administrator.

If this doesn’t fix the error, contact Funcom’s support team.

6. Craftable tents are unavailable

To fix this problem, you need to remove the tents from your toolbar, and everything should return to normal.

That’s how you can fix most, if not all, Conan Exiles errors. Before you leave, find out some quick tricks to optimize the PC for gaming and get better performance.

If you’ve come across other workarounds for various Conan Exiles issues, help the gaming community by listing the troubleshooting steps in the comment section below. We’ll continue to scour the forums to find more solutions and update this post as soon as possible.

Netflix error M7361-1253: Quick solutions to resolve it within minutes

Imagine getting yourself a great laptop or computer, then when you try to play your favorite Netflix video, you get an error message that says ‘Oops, something went wrong Netflix Error M7361-1253‘.

Your first instinct is probably ‘what is that’?

If you’ve received such a response from your computer or laptop, there are quick-fix solutions that can reignite your movie excitement, and your favorite flicks back up on your screen in no time.

Here’s how to resolve the Netflix Error M7361-1253

  1. Reboot your computer to resolve Netflix Error M7361-1253
  2. Check your browser to resolve Netflix Error M7361-1253
  3. Check that your network supports streaming to resolve Netflix Error M7361-1253
  4. Check your antivirus software to resolve Netflix Error M7361-1253

Solution 1: Reboot your computer to resolve Netflix Error M7361-1253

This is perhaps the first line of action for most computer users, especially when they don’t know what else to do. Sometimes it works, but to fix Netflix Error M7361-1253, you can start with this most basic solution.

  • Shut down your computer completely
  • Restart your computer
  • Launch Netflix again

If this doesn’t help resolve the Netflix Error M7361-1253 issue, try the next solution.

Solution 2: Check your browser to resolve Netflix Error M7361-1253

Sometimes your browser may be the underlying cause behind the Netflix Error M7361-1253.

In order to check and resolve the error, take these steps:

  • Clear browser cookies
  • Restart your browser
  • Try using a different browser

Clearing your browser’s cookies

This helps to check and clean out any outdated or corrupt settings that your browser may be referencing, within the cookies file.

In order to clear your browser cookies to resolve Netflix Error M7361-1253, do the following:

  1. Go to this link: netflix.com/clearcookies. This helps clear the Netflix cookie
  2. Once you do that, you will be signed out of Netflix and redirected back to the Netflix home screen
  3. Click Sign In
  4. Play your favorite series or movie

Restart your browser

This may clear the Netflix Error M7361-1253 issue as well. Do the following:

  • Quit your browser
  • Restart your browser
  • Try playing your favorite series or movie

Try using a different browser

It is recommended that you update to a browser that supports HTML5 so as to make sure your computer is well optimized for the Netflix web player.

The Netflix web player is supported best by Google Chrome on Windows XP Service Pack 2 or later, Mozilla Firefox on Windows Vista or later, and Opera on Windows Vista Service Pack 2 or later.

To resolve the Netflix Error M7361-1253 issue, download the latest version of Google Chrome, Mozilla Firefox, or Opera, then try launching Netflix again.

We recommend trying a browser that has built-in tools that aim to boost your browsing and provide you with an error-free streaming experience. Browsers with a clean interface and integrated ad blockers shield your online activity and help content load faster.

⇒ Get Opera

Solution 3: Check that your network supports streaming to resolve Netflix Error M7361-1253

Sometimes you may be trying to stream Netflix on your computer but the issue is not your system, or Netflix itself.

It could be your WiFi provider, so yo need to check whether the network supports streaming.

In order to do this and fix the Netflix Error M7361-1253 issue, do the following:

  • Check with your network operator or administrator (if on a work or school network), to confirm that Netflix is not blocked from access.

Note: Many public networks, be it at home, school or at work have limited bandwidth, and to stream video content, especially, takes up much of the available capacity so you need to be sure Netflix is not blocked on your network.

If, however, you’re using cellular data, or satellite internet, you could try using a different network altogether for streaming your favorite series or movie content on Netflix.

The downside though, is that cellular data and/or satellite internet have slower connection or streaming speeds compared to cable internet, or DSL.

Didn’t work? Try the next solution.

Solution 4: Check your antivirus software to resolve Netflix Error M7361-1253

As mentioned above, your antivirus software (and/or firewall) can cause interference with the Netflix web player, leading to the Netflix Error M7361-1253 issue.

Follow these steps to resolve this:

  • Disable your antivirus software
  • Try to play your favorite series or movie on Netflix again. If it resumes play after disabling or quitting your antivirus, then it’s an indicator that your software is outdated, or it is preventing Netflix from playing on your computer. Check with your antivirus software manufacturer if you are experiencing this specific issue.

Let us know whether you managed to resolve the Netflix Error M7361-1253 issue using these four solutions.

RELATED STORIES TO CHECK OUT:

Xbox, PlayStation, and Nintendo are being investigated by the UKs Competition and Markets Authority

Some of the largest gaming companies, including Microsoft’s Xbox, Sony’s PlayStation, and Nintendo, are all being investigated by the UK Government’s Competition and Markets Authority. They are being investigated to find out whether their auto-renewal terms or roll-over contracts are “unfair”.

The CMA is interested in the companies online gaming memberships, such as Xbox Live. It is concerned about the auto-renewal terms, cancellation and refunds policies and terms and conditions of these services. It says it has “written to Nintendo Switch, PlayStation and Xbox requesting information about their online gaming contracts to help better understand their practices.”

As part of its investigation, the CMA has noted the 3 areas it is interested in:

  • are the contract terms unfair? – do the companies’ terms give them wide discretion to change the quality of the deal, for example, by reducing the number of games included or increasing the price?
  • how easy it is to cancel or obtain a refund? – are there any factors that make it difficult for people to cancel their contract or get their money back?
  • how fair is the auto-renewal process? – are customers clearly told that their membership will be rolled over, are they regularly reminded that they are on a roll-over contract before further payments are taken, and is auto-renewal set as the default option?

It is important to note that the CMA has not yet taken a view on whether the companies being investigated have breached any consumer laws, but it does want to find out if the biggest online gaming companies are being fair with their membership services.

You can read the CMA’s full announcement here.

Something went wrong 0x803f8003 Xbox error [Fix]

Xbox One is great console, but many users encountered Something went wrong 0x803f8003 error whenever they try to login to their account or access any Xbox service. This can be a big problem, but there’s a way to fix it.

How can I fix Something went wrong 0x803f8003 Xbox error?

  1. Check your subscription status
  2. Relaunch the game
  3. Restart your console
  4. Perform a hard reboot
  5. Soft / hard factory reset Xbox Console
  6. Delete and Reinstall the Game
  7. Contact Xbox Support

1. Check your subscription status

According to Microsoft, Something went wrong 0x803f8003 Xbox error occurs if your Xbox Live subscription is expired and you try to access a game that requires the subscription.

The first thing to do is to check the status of your subscription. Sign into your Services and subscription page using your Microsoft account and check the status.


2. Relaunch the game

You can fix any temporary problems such as Something went wrong 0x803f8003 by relaunching the game from the Home screen. To do that, follow these steps:

  1. Press the Xbox button on your Controller to launch Home.
  2. Select the Game tile and press the Menu button on your controller.
  3. Select Quit from the options.
  4. Wait for a minute and then try relaunching the game.

3. Restart your console

restart console xbox error 0x803f8003 Something went wrong

Another quick fix for this problem is to restart the console.

  1. Double press the Xbox button on your controller. It will bring up the Guide.
  2. Scroll down and select Settings.
  3. Select Restart Console and select Yes to confirm.
  4. The console will now restart.
  5. Sign in to your account and relaunch the game.

4. Perform a hard reboot

Like your computer, a non-working console can be fixed with a hard reboot. In some cases that can help you fix Something went wrong 0x803f8003 error.

  1. Make sure your Xbox is turned on.
  2. Press and hold the Power button until the power goes off.
  3. Unplug the console from the power outlet and disconnect all cables.
  4. Wait for a few minutes and reconnect the power brick as well the controller.
  5. Press the Power button to power up the console. Check for any improvements.

5. Soft / hard factory reset Xbox Console

Factory resetting Xbox console for troubleshooting purpose is nothing new, and it is also fix errors such as Something went wrong 0x803f8003 . To perform a reset, do the following:

  1. Press the Xbox button on your controller to open the guide.
  2. Go to System and select Settings.
  3. Select System again and select Console Info.
  4. Select Reset Console option.
  5. Under Reset your console screen, you have two options.
    • Reset and Keep my games and apps: Select this option first. This will remove only the settings and other data. All your apps and games will be preserved if you choose this option.
    • Reset and remove everything:  This is a second option. If the first option didn’t work, you could hard reset the console with this option. However, this option will delete all the games and apps installed on your console. Your game progress data stored in your Xbox cloud account won’t be deleted.
  • Also Read: Project xCloud brings the Xbox pad to your phone screen

6. Delete and Reinstall the Game

Corrupted entries in a game can cause Something went wrong 0x803f8003 Xbox error on your console. One way to fix this issue is to reinstall the game. Here is how to uninstall any game on Xbox.

  1. Go to Home and select My games and apps.
  2. Select See all option to show all installed apps and games.
  3. Highlight the games you want to uninstall, and press the Menu button on your controller.
  4. Select Manage games and add-ons and select Uninstall all.
  5. Reboot your Console and try to install the game from the Store or a physical copy.

7. Contact Xbox Support

contact support xbox error 0x803f8003 Something went wrong

If none of the above solutions did the trick for you, the problem could be related to Microsoft’s end. You can contact the support on their official website and ask for a solution.

If this is an account issue, the Microsoft Xbox support should resolve the error or provide an ETA for the ticket

You are most likely to resolve the Something went wrong 0x803f8003 error by resetting the console to its factory default settings. If not, you may have to contact the support after trying other solutions listed in this article.

Do let us know in the comments below which of these solutions have worked for you or if you have an alternate solution.

RELATED STORIES YOU MAY LIKE:

Check out these Windows 95 emulators on Windows 10/11

The Windows we know and love today owes much to Windows 95. Windows 95 transformed the series with the introduction of a taskbar, notification area, and the legendary Start menu. No longer was Windows just a subsidiary addition to DOS; for the first time, it was a full replacement for an increasingly antiquated command-line platform.

Although there are numerous emulators that run DOS software, Windows 95 remains a copyrighted platform. Consequently, there are no emulators you can install on Windows 10 to run ’90s games. However, that doesn’t mean there aren’t any Windows 95 emulators at all. Check out the few websites that include emulators that restore the operating system in all its glory.

Windows 95 in Your Browser

Check out the Windows 95 in your browser with an emulator that can run Windows 95 in another tabThe programmer behind the site developed the emulator largely for the sake of nostalgia more than anything else. However, the developer still concedes that the emulator may or may not violate copyright law.

  1. Click here to open the Windows 95 in your browser website shown in the snapshot directly below. Then press the Start Windows 95 button on the page.windows 95 in your browser
  2. Press the OK button on the pop-up window that opens to launch the emulator. It shouldn’t take any longer than 10 minutes for the emulator to open as in the snapshot below.emscripten windows 95 emulator
  3. When the emulator has loaded, close any background tabs open in your browser. This will reduce lag and ensure the emulator runs at its quickest.
  4. Then click on the emulator‘s display box to move the mouse cursor within Windows 95. You can press Esc to restore the original cursor.
  5. The emulator also has a full-screen mode that you can open by pressing the Fullscreen button at the top right.
  6. Now you can have some fun in the emulator by clicking the Start button and selecting Programs > Accessories > Games to open the submenu in the snapshot below. Select to open Solitaire, Hearts (which isn’t included in Windows 10), Minesweeper or Freecell in Win 95.windows 95 on windows 10
  7. Check out the platform’s Media Player by clicking Start > Programs > Accessories > Multimedia > Media Player. That will open the default Media Player shown in the shot below.windows 95 media player on windows 10
  8. Click File > Open in the Media Player window. Then you can select a few audio clips to playback in the Media Player.
  9. You can customize the desktop by right-clicking it and selecting Properties. That opens the Display Properties window from which you can select alternative wallpapers.


change background windows 95 on windows 10

The Play DOS Games Online Emulator

Play DOS Games Online primarily includes DOS games to play in browsers. However, the website also has its very own Windows 95 emulator that’s the same as the one on the Windows 95 in your browser site. Click here to open the emulator‘s web page.

windows 95 emulator on windows 10

Click within the emulator‘s display to launch Windows 95. It doesn’t take long for this one to get going. Click inside its display to move the cursor in the Windows 95 emulator. You can also press a Fullscreen button to expand the emulator in the browser.

These are two browser emulators that provide a fascinating glimpse at Windows 95. They include most of the accessories, system tools and customization settings from the original operating system, so have a great time going down memory lane.

RELATED STORIES YOU SHOULD CHECK OUT:

Windows Insider program prepares for a reset as development moves to 20H1 (and 19H2)

Yesterday, Microsoft announced that unlike previous releases, the Windows 10 May 2019 Update (19H1) will undergo a full cycle of Release Preview testing. In addition, perhaps due to a reset to more closely align Windows with the Azure development cycle, or as many have speculated, to move to a major/minor release cycle, something that enterprise customers have been clamoring for, the company has been taking the term “Skip Ahead” to heart. Recently, the Windows Insider program released a series of 20H1 builds to the Skip Ahead ring, without in fact releasing a single 19H2 build, as would be customary.

Now today, The Windows Insider team has announced that Insider testing will soon move more completely to the 20H1 branch of Windows development. Current (19H1) Fast Ring testers will be moved to a 20H1 fast ring, as will the current 20H1 Skip Ahead testers. This will create a single 20H1 Fast Ring, which would not be unusual if we weren’t skipping over 19H2. With Skip Ahead and Fast Ring testers soon to be on 20H1, and Slow and Release Preview testers on 19H1, there don’t appear to be any rings left for testing 19H2 builds. Windows Insider team member Brandon LeBlanc promises, however that all will soon be revealed:

We will begin releasing 19H2 bits to Insiders later this spring and will talk more about what that will look like in the near future.

So if you’re in 20H1 Skip Ahead, you’ll soon be joined by 19H1 Fast Ring testers in a new 20H1 Fast Ring. If you’d prefer to stay on 19H1, you’ll need to reset your Windows Insider settings (go to Settings > Update & Security > Windows Insider Settings) to either the Slow or Release Preview Rings. And if you’re just itching to test Windows 10 19H2 (which is shaping up to be the most uneventful new version in the history of Windows), you’ll have to wait a bit to see just where you’ll sit in the scheme of things.

One thing for certain, for a company that likes to toot its own transparency horn, this has been a very confusing couple of days.