Microsoft Viva Connections introduces cards for OneDrive, Quick Links, and Playlists

Microsoft released its latest update to Viva Connections, which includes three new out-of-the-box cards for OneDrive, Quick Links, and Playlists. Imagine having all your frequently accessed, shared, and favorite files from OneDrive at your fingertips without any need for configuration by your Viva Connections admin. That’s precisely what the new cards offer.

It’s a simple yet powerful tool that ensures effortless access to your essential files on desktop, tablet, and mobile devices.

The Quick Links card is a godsend for anyone who’s ever spent too much time searching for relevant links. Whether you’re a frontline worker needing quick access to vital information on your smartphone or a department head wanting to keep your team in the loop, this card has you covered.

The Playlist card is a real game-changer for scenarios like employee onboarding. Imagine a new hire being able to watch a curated list of videos to get up to speed with their new role. It’s not just about onboarding, though. This card can be tailored for any scenario that involves a collection of videos, making it a versatile tool for engaging and educating employees.

But here’s the catch – according to the official blog post, these cards won’t be available to everyone immediately. Microsoft plans to roll them out gradually in the summer/autumn of 2024.

What is Rsync in Windows & How to Install it?

You might be familiar with rsync if you’re a Linux user, but many don’t know what is rsync on Windows and how to use it. Today we’re going to answer this question and help you learn about this tool.

What is rsync in Windows and how can I install it?

What is rsync in Windows?

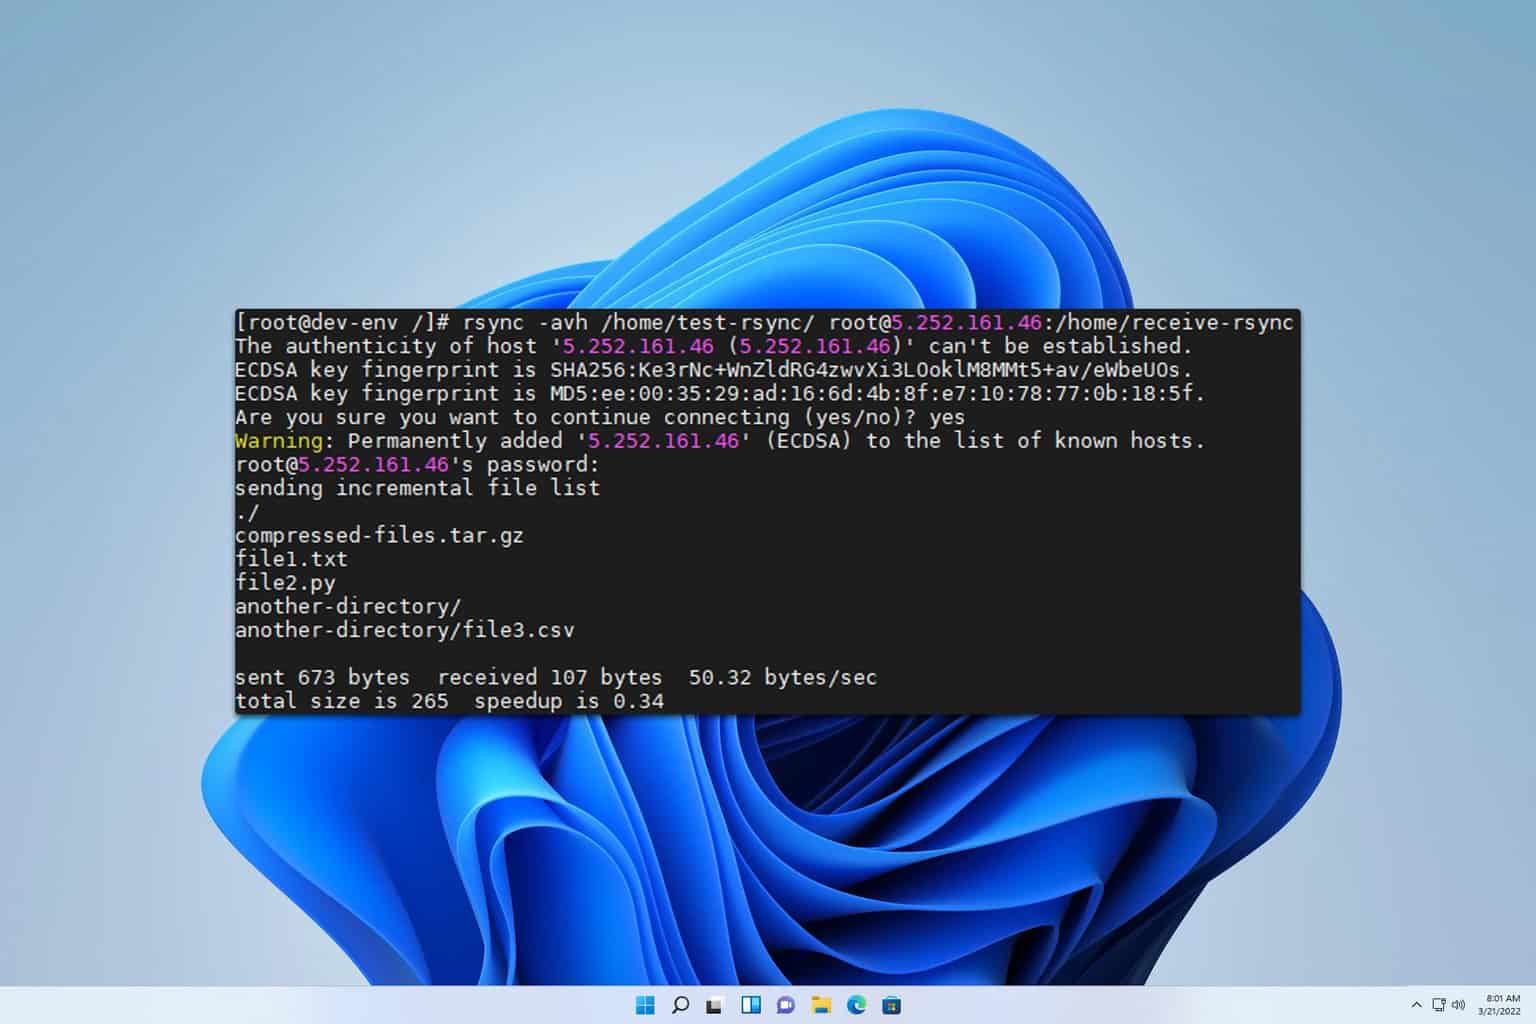
Rsync is a command line utility for transferring and syncing files on a local PC or remotely. This is a Linux feature and it’s not available natively on Windows.

How to install rsync in Windows?

1. Use MSYS2

  1. Download and install MSYS2 from msys2.org.
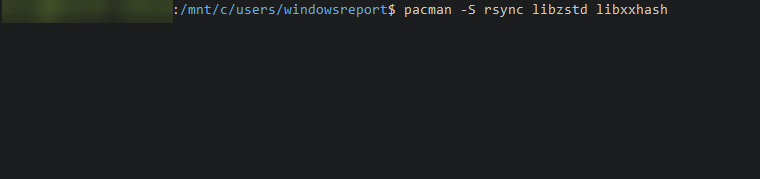
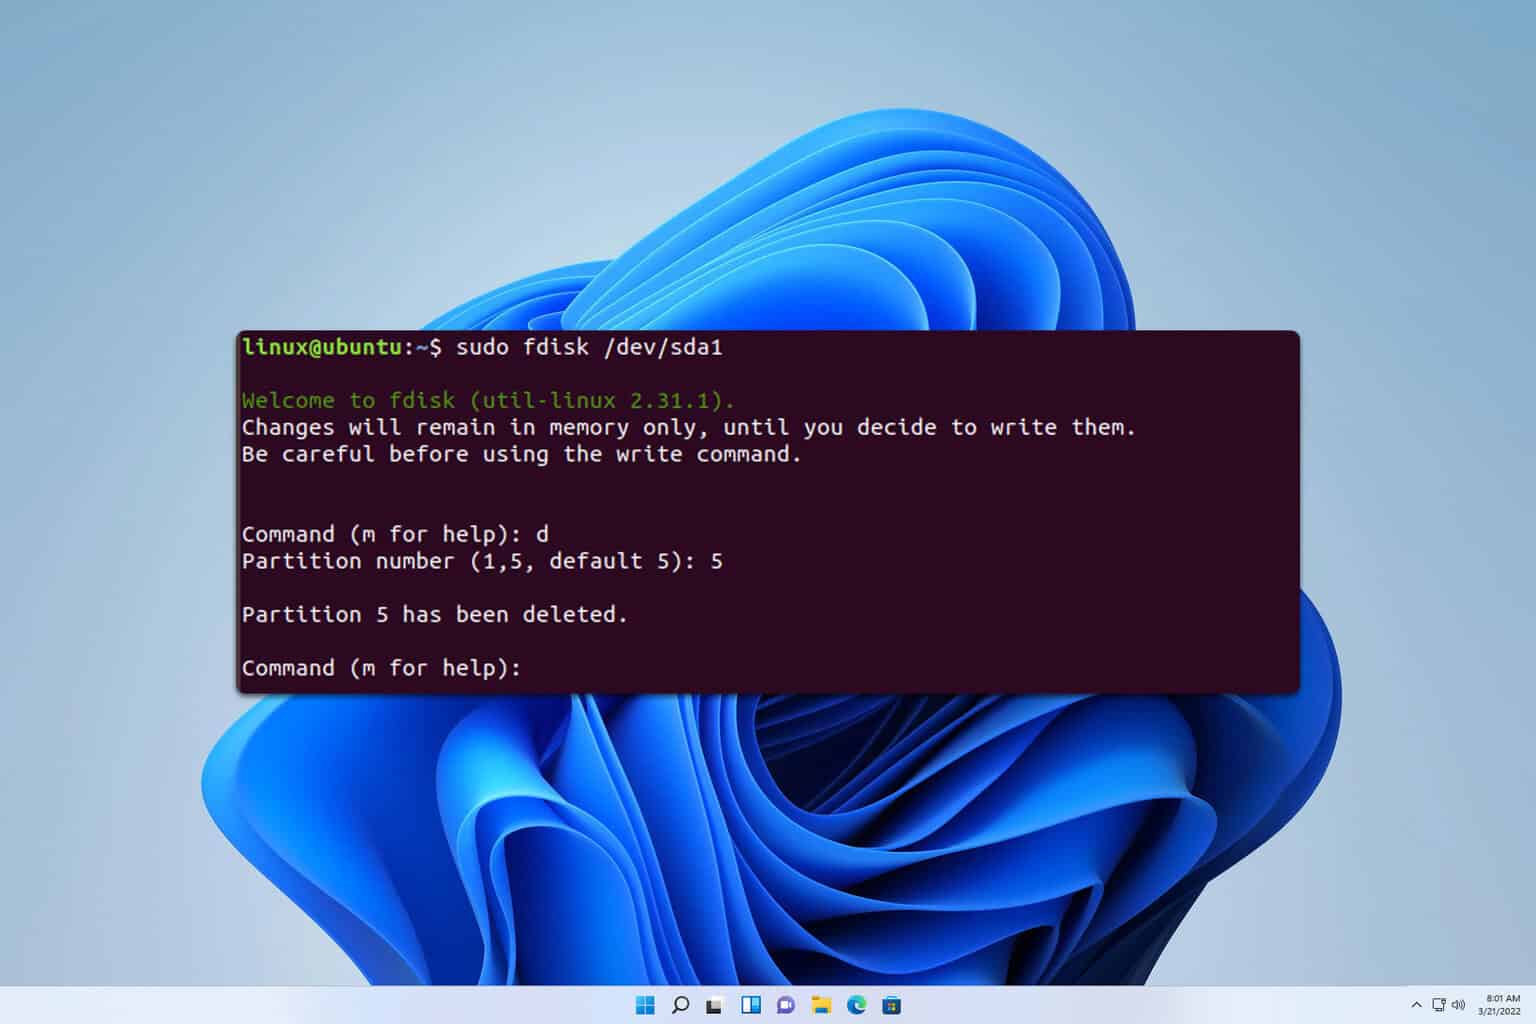
  2. Open the MSYS2 shell and execute the following command to install Rsync along with the required libraries:
    pacman -S rsync libzstd libxxhash
    pacman rysnc
  3. Verify the installation by typing: rsync --version

2. Use cwRsync

  1. Download cwRsync from itefix.net.
  2. Run the installer and follow the default installation settings, typically installing to: C:\Program Files\cwRsync
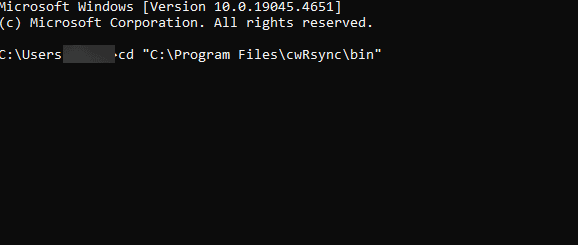
  3. After installation, open Command Prompt (cmd) and navigate to the cwRsync bin directory: cd "C:\Program Files\cwRsync\bin"
    cd cwrysnc bin
  4. Type the following command to check if Rsync is installed correctly: rsync --version

3. Use Windows Subsystem for Linux (WSL)

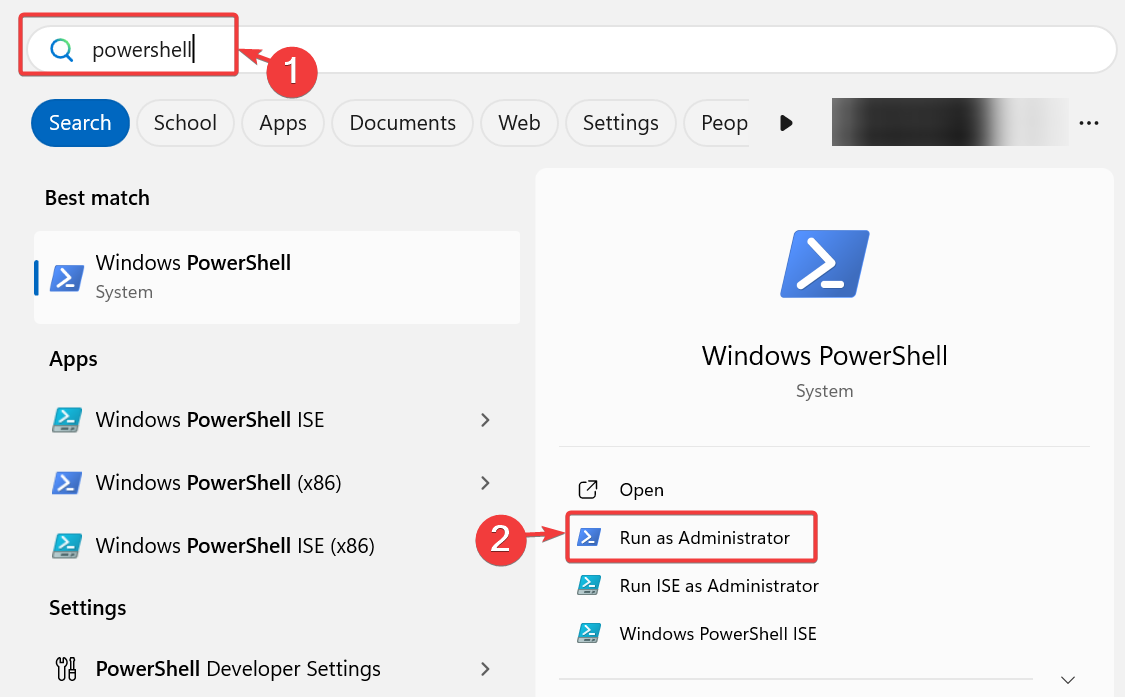
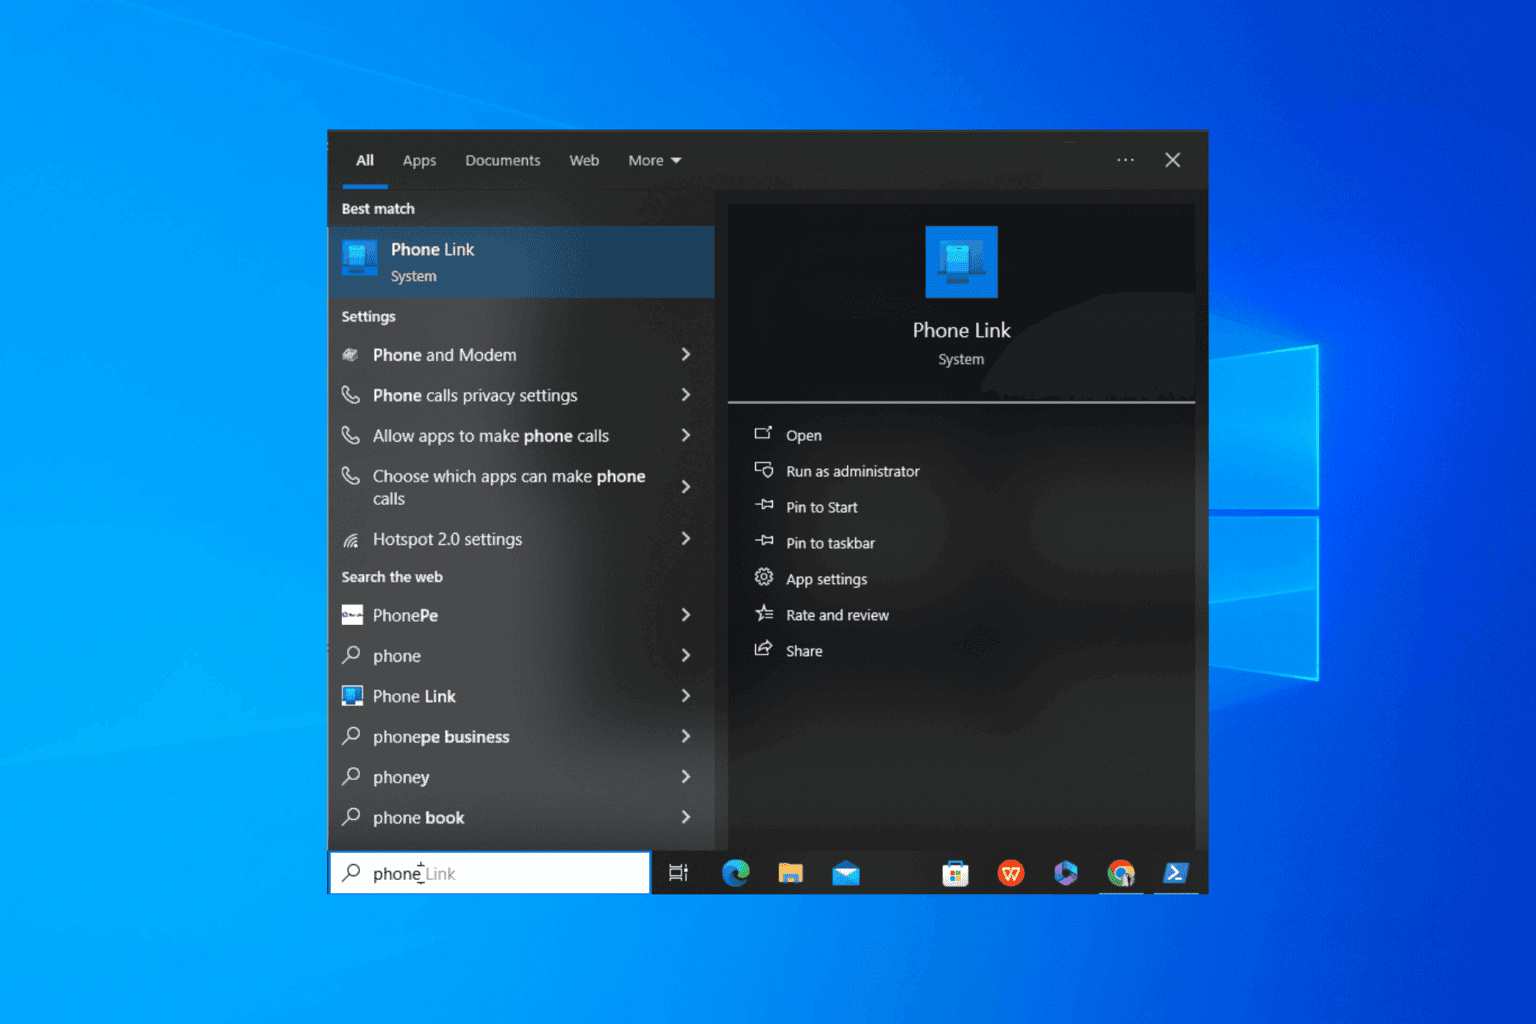
  1. Open PowerShell as Administrator. You can do this by typing PowerShell in the Start menu, right-clicking on Windows PowerShell, and selecting Run as administrator.
    run windows powershell as administrator
  2. Type the following command and press Enter to enable the WSL feature: wsl --install
  3. Wait for the installation to complete. This command enables optional components, downloads the Linux kernel, sets WSL 2 as the default, and installs a Linux distribution (Ubuntu by default).
  4. Restart your computer as prompted.
  5. After restarting, open PowerShell again and type the following command to install Rsync in your Linux distribution: sudo apt-get install rsync
    sudo apt get rsync
  6. Once installed, you can use Rsync commands in the Linux terminal.

    Keep in mind that you’ll need to run WSL every time you want to use rsync, and WSL can be cumbersome to install.

    If you’re not familiar with WSL, don’t miss our guide on how to access files in WSL for more information.

    What is the advantage of rsync?

    • Incremental transfer – This allows rsync to transfer only parts of the file that have changed, thus making the process faster and reducing data usage.
    • Data compression – With rsync your data will be compressed which makes it a great option for remote syncing.
    • Checksum verification – To ensure that all your files are transferred completely, there’s checksum verification available.
    • Various options – With support for various flags, you can preserve file permissions, modify timestamps, exclude specific files or directories, and more.
    • Interruption handling – Rsync can resume the transfer if the interruption occurs.
    • Support for scripting and scheduling – Since this is a command line tool, you can use various scripts or schedule it with ease.

    What are some disadvantages of using rsync?

    • Complexity – Rsync is a command-line tool, so some users might find it difficult to use. It also has a learning curve that is daunting to new users.
    • No native encryption – Rsync doesn’t have native encryption, but that can be mitigated by using an SSH connection.
    • No native scheduling –The tool relies on other services and applications for scheduling.
    • No native support for cloud storage – If you’re using AWS, Google Drive, and other cloud storage services, rsync might not be the best choice.
    • No versioning –There’s no version control with rsync so there’s a chance for you to overwrite or delete files if you’re not careful.
    • Performance issues with large data sets – You might experience high CPU and memory usage when working with large files or directories. Issues can also occur with very frequent synchronization tasks.

    What is the Windows equivalent of rsync?

    The closest to rsync on Windows is robocopy, but many users prefer using file sync software instead. If you’re looking for command line tools, our copy vs xcopy vs robocopy will tell you everything you need to know.

    By mastering rsync on Windows, you can ensure your files are always backed up efficiently. This isn’t the only Linux tool available on Windows, and we also have a great guide on how to use sudo on Windows, so don’t miss it.

    Quick Ways to Shrink Volume With Unmovable Files

    Part of managing disk space requires you to shrink volume to create room for more partitions but what do you do when there are unmovable files in your drive?

    If you cannot shrink a volume, it’s probably because it contains unmovable files. Unmovable files usually contain critical data like restore points. Oftentimes, these files also take up a huge chunk of your disk space prompting you to shrink volume in the first place. 

    Unmovable files are tricky because you can’t even see them because they’re hidden. Your first task should be to unhide these files and then proceed to disable them.

    How do I shrink a disk with unmovable files?

    1. Unhide files

    1. Hit the Windows + E keys to open File Explorer.
    2. Locate the folder you wish to hide, right-click on it, and select Properties.
    3. Navigate to the General tab, check the Hidden box, click Apply, then OK.
    4. In the next dialog box, check the Apply changes to this folder, subfolders and files option box, then hit OK.
    5. Go back to File Explorer, click on View>Show>Hidden, and ensure the tick is not there.

    2. Disable System Protection

    1. To check if System Restore is enabled in Windows, press the Windows key + X hotkey.
    2. Then click Run to open that accessory.
    3. Input sysdm.cpl in Run’s Open box and click OK to open the window shown directly below.
      System Properties window you must enable system protection on this drive
    4. Click the System Protection tab.
      System Protection tab you must enable system protection on this drive
    5. Press the Configure button.
    6. Select the Disable system protection option if that setting isn’t selected.
      Turn on system protection option you must enable system protection on this drive
    7. Click the Apply option, and press the OK button to exit.

    Disabling System Protection will stop the creation of new restore points and delete old ones therefore creating new space.

    3. Disable hibernation

    1. Click the Search icon in the Taskbar, type control panel and select the app from the results.Control Panel start menu - PC crashes after closing game
    2. Select System and Security.
    3. Under Power Options, click on Change what the power button do.
    4. Next, select the Change settings that are currently unavailable option.
    5. Now check the Hibernate box and click on Save changes.
    6. You will now see the Hibernate option when you click the Start button and then the Power button.

    4. Disable kernel dump

    1. Press the Windows key to open the Start menu.
    2. Open the Control Panel.
    3. Select System.
    4. Click on Advanced System Settings.
    5. Under Startup and Recovery, click on Settings.
    6. From the Write debugging information drop-down, select None to disable the Kernel memory dump.
    7. Click OK and restart your PC.

    5. Delete page files

    1. Press the Windows key to open the Start menu.
    2. Open Control Panel.
    3. Select System.
    4. Click on Advanced System Settings.
    5. Under Performance, click on Settings.
    6. Switch to the Advanced tab.
    7. Click on Change.
    8. Uncheck the Automatically manage paging file size for all drives option.
    9. Select No paging file and click OK.

    Remember to enable all the above steps again once you’re done shrinking your drive because they help maintain stability in your system.

    Additional tips for dealing with unmovable files

    • Use Disk Management Software – The beauty of software is that it automates a lot of tasks. Instead of manually going through all the aforementioned steps, installing disk management software would provide you with advanced options to shrink volume and deal with unmovable files minimizing errors.
    • Backup solutions – Ensure you have reliable backup options since you risk data loss as disk management can affect alter or delta files stored in your drive.
    • Cleanup regularly – Make use of Disk Cleanup and other tools that can optimize your disk space and performance. Getting rid of unnecessary files will create more storage space and minimize built-up cache that can easily become corrupt.

    When it comes to shrinking volume, the unmovable files is just one among many issues. Sometimes, the shrinking volume option may be greyed out. Other times, Disk Management fails to load.

    If all these seem too complex, perhaps you can try moving universal apps to another partition to create more space or shrinking file size may be an easier alternative.

    How do you deal with unmovable files and optimize your device’s storage? We’d love to know your tips so feel free to share them with us in the comment section below.

    If your Microsoft Edge crashes when uploading files to certain websites, then it’s time to update

    Have you ever been in the middle of uploading a document on Microsoft Edge, only for the browser to crash unexpectedly? If so, you’re not alone. Microsoft has recently rolled out a small but crucial update for its Edge browser in the Stable Channel, specifically targeting this issue.

    The update, which brings Edge to version 127.0.2651.105, addresses a bug that caused the browser to crash with the error code STATUS_BREAKPOINT when users attempted to upload documents on certain websites.

    But that’s not all; the update also patches a Microsoft Edge-specific vulnerability identified as CVE-2024-43472. Details about this vulnerability are currently under wraps, as the Microsoft Security Response Center’s website returns a 404 error when trying to access it.

    Updating is straightforward if you’re eager to get your hands on the latest version of Microsoft Edge and enjoy a smoother, crash-free document-uploading experience. Head to the Menu, then Help and Feedback, and finally, About Microsoft Edge, or type edge://settings/help into your browser. The browser will automatically check for updates and prompt you to restart. Alternatively, keep using Edge as usual, and it’ll update itself in the background.

    In other news, Microsoft Edge is making waves in the browser market. According to Statcounter, Edge’s desktop browser market share continued to climb in July 2024, reaching an all-time high of 13.74%. This surge in popularity secures Microsoft Edge a solid second place among its competitors, trailing behind Safari and Firefox.

    How to Fix the DEREF_UNKNOWN_LOGON_SESSION Bug Check 0x46

    Dealing with the DEREF_UNKNOWN_LOGON_SESSION error (0x46) in Windows can be a real headache, especially when it disrupts your workflow. This error often appears as a blue screen and can be caused by various issues, from outdated drivers to faulty hardware.

    How do I fix the DEREF_UNKNOWN_LOGON_SESSION BSoD?

    1. Uninstall Recently Installed Software

    1. Type Control Panel in the Search box and click the result.
    2. Under Programs and Features, look for programs that were installed recently, especially around the time the error started occurring.
    3. Select the program and click Uninstall, then follow the on-screen instructions to complete the uninstallation.
    4. Once the uninstallation is complete, restart your computer.

    Uninstalling recent software that may have caused the issue can help you get back to a stable system.

    2. Check for faulty hardware

    1. Right-click the Start button and select Device Manager.
    2. Right-click on the computer icon at the top and select Scan for hardware changes.
    3. Look for any devices with a yellow exclamation mark, which indicates a problem.
    4. Right-click the problematic device and select Update driver. Follow the prompts to search for and install updated drivers.
    5. If updating drivers does not resolve the issue, you may need to replace the faulty hardware.

    Checking for and resolving hardware issues can prevent blue screen errors related to hardware faults. Also, if possible, open the case of your PC and look for any pottential hardware issues or malfunctioning coolers that may cause overheating.

    3. Perform a System Restore

    1. Type System Restore in the search box and select Create a restore point. Then click System Restore.
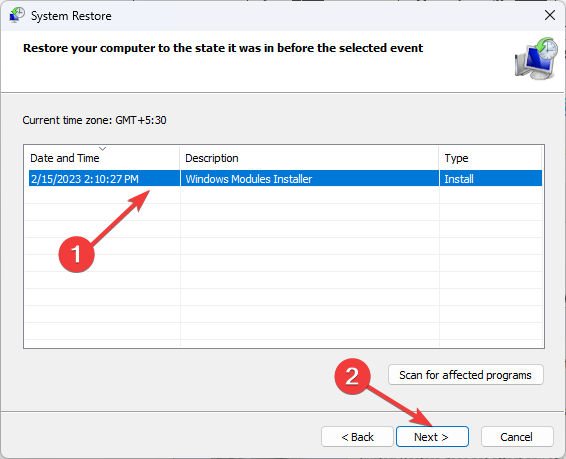
    2. Select a restore point from before the issue began. Follow the on-screen instructions to complete the restoration process.
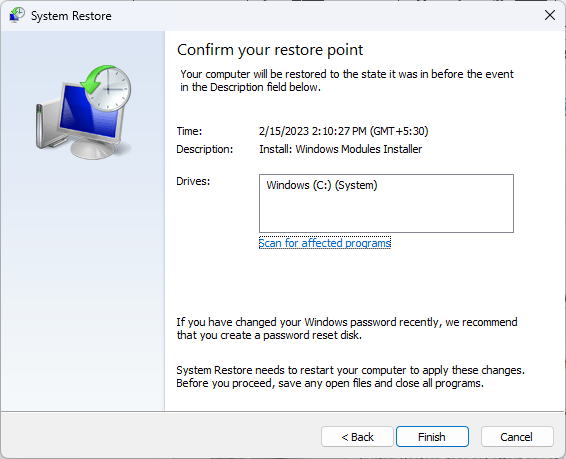
    3. Confirm the restore point selection and allow the computer to restore and restart.

    System Restore can revert your system to a previous state, potentially resolving the blue screen error by undoing recent changes.

    4. Use Driver Verifier

    1. Type cmd in the search box, right-click Command Prompt, and select Run as administrator.
    2. Type verifier and press Enter.
    3. Select Create standard settings and click Next.
    4. Choose Automatically select all drivers installed on this computer or manually select specific drivers to verify and click Next.
    5. Follow the prompts to restart your computer.
    6. After the verifier runs, check its output to see if any drivers were problematic.

    Driver Verifier helps you identify faulty drivers that may be causing the blue screen errors.

    5. Run System File Checker (SFC)

    1. Type cmd in the search box, right-click Command Prompt, and select Run as administrator.
    2. Type sfc /scannow and press Enter. The system will scan and attempt to repair any corrupted system files.
    3. Once the scan is complete and any repairs are made, restart your computer.

    Running the System File Checker helps repair any corrupted or missing system files that might cause blue screen errors.

    By following these steps, you should be able to resolve the DEREF_UNKNOWN_LOGON_SESSION error and get your system running smoothly again. To avoid similar issues in the future, regularly update your system and drivers, and be cautious when installing new software.

    If the Windows logon server is not available, check the highlighted guide for detailed solutions to fix. You may also check our guide on how to fix the 0xC000015B error because it’s similar.

    Did our guide help you fix the DEREF_UNKNOWN_LOGON_SESSION error? Let us know in the comments below.

    Solved: There Are No Previous Versions Available

    When you make changes to a file and need to access its previous version but get a There are no previous versions available, you can access it with a few tweaks.

    A previous version is a file history that acts as a backup. They are automatically created but you must have enabled the file history feature. 

    Among the major reasons why you may get There are no previous versions available include a misconfigured file history settings, corrupt files or insufficient disk space.

    How do I fix there are no previous versions available?

    1. Re-enable file history

    1. First, press the Windows + R keys simultaneously, which will open the Run accessory.
    2. To open Group Policy Editor, type this text in the Open box and click OK: gpedit.msc
    3. Next, open this policy location within Group Policy Editor: Computer Configuration\ Administrative Templates\ Windows Components\File History
    4. Select File History on the left of the window.
    5. Double-click the Turn off File History policy.
      Turn off File History policy windows 11 file history
    6. Select the Enabled or Disabled option on the Turn off File History window depending on preference.
      The Enabled and Disabled options windows 11 file history
    7. Press the Apply button to save the new policy setting.
    8. Click OK to exit the Turn off File History window.

    2. Restart the File History service

    1. Press the Windows key + S shortcut for the search box.
    2. Type services in the search tool’s text box.
    3. Then click Services in your search results to open that window.
      Services window windows 11 file history
    4. Double-click the File History Service to bring up the properties window for it.
    5. Click the Startup type drop-down menu and select Automatic.
      File History Service Properties window windows 11 file history
    6. Press the Start button if the service is stopped.
    7. Click the Apply and OK buttons.
    8. Repeat steps five to seven for the Windows Search service.

    Windows File History may crash and lose connection to its service. This can be due to a new problematic Windows update. Restarting it will allow it to refresh an reinitialize its service and restore it to its previous working state. 

    3. Use Windows backup 

    1. Hit the Windows key, type Control Panel in the search bar and click Open.
    2. Select Backup and Restore (Windows 7) under System and Security.
    3. Click the Set up backup button.
    4. Select the Backup destination then click Next.
    5. Select one of the two backup options then click Next.
    6. Click on Change schedule and set up your preferred time then select Save settings and run backup.

    Windows Backup comes in handy especially if you have overwritten your file and can’t access the previous versions.

    4. Restore from OneDrive

    1. Open your preferred browser and go to OneDrive.com.
    2. Locate the file you wish to restore to a previous version and right-click it.
    3. Select Version history: This reveals the modification record of the particular file. It also indicates the date of all previous versions alongside the names of users who made the changes.
    4. Choose the desired version and click Restore on it.
    5. In case you need to confirm the contents of the file before doing anything else, click Open File. There is also the option of downloading the preferred file version from OneDrive to your PC.

    5. System Restore

    1. Press the Windows key, type Control Panel, and click Open.control-panel-search fallout new vegas runtime error
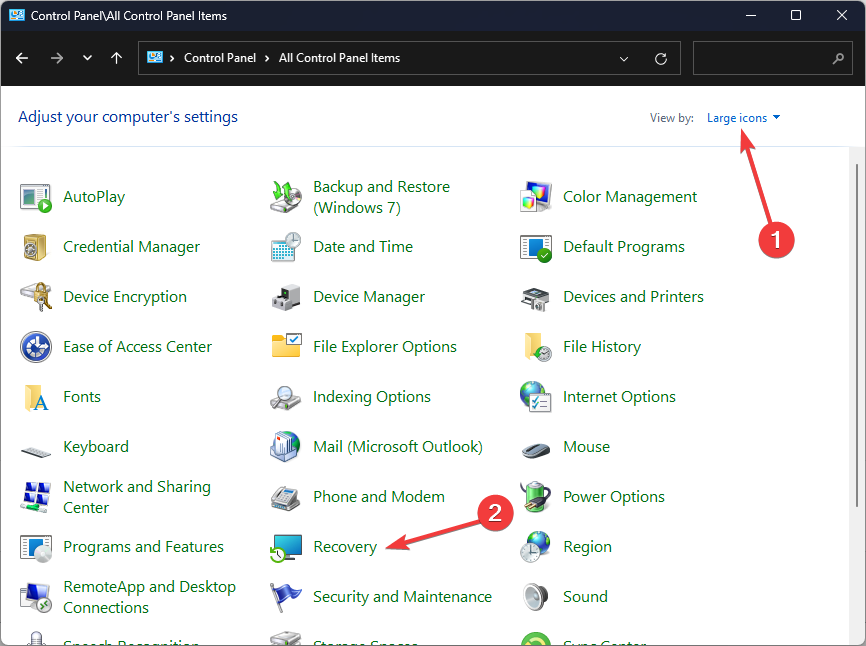
    2. Select Large icons as View by and click Recovery.Recovery Control Panel Advrcntr6.dll
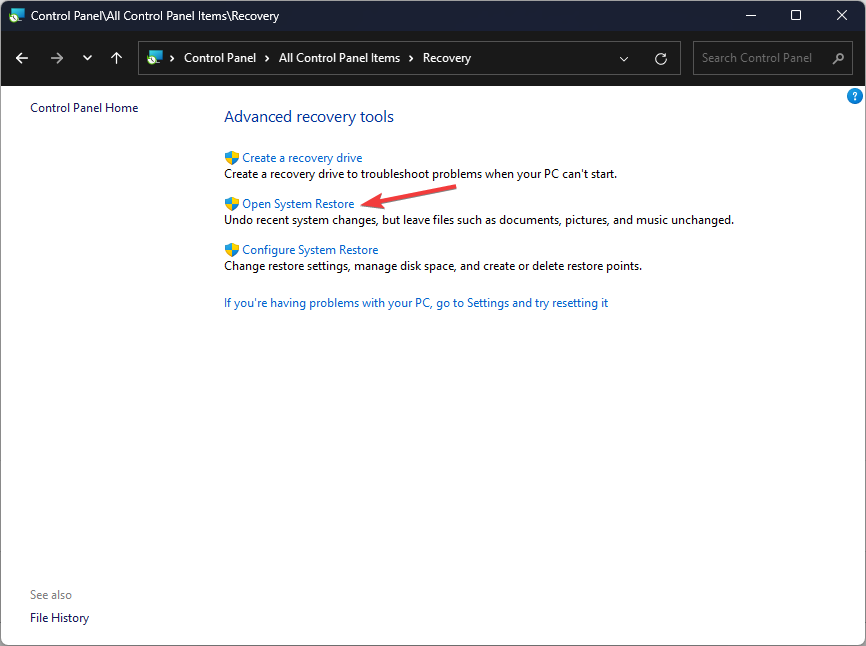
    3. Click Open System Restore.Open system restore
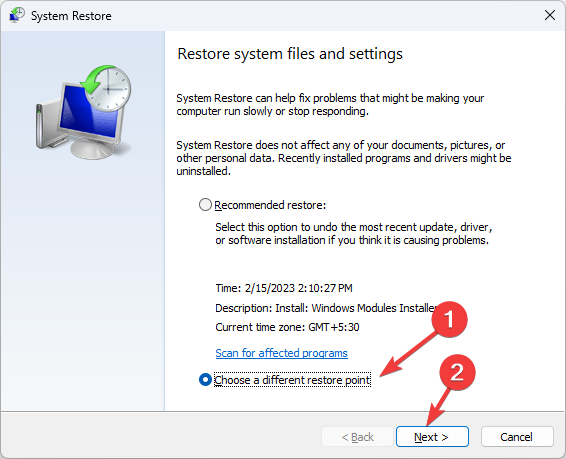
    4. Select Choose a different restore point and click Next.Next Choose a different restore point
    5. Now select the restore point and click Next. Choose a point
    6. Click Finish to restore the previous settings, and Windows will restart.Finish Restore point

    6. Use alternative backup and restore solutions

    Although File History does a decent job at storing your backup files, it may stop working at times. This can be due to a corrupt file or directory preventing access. To prevent loss of data, you’ll need a reliable third party backup solution. 

    We recommend cloud backup because of its many advantages such as cross platform compatibility and syncing across multiple devices.

    While all these solutions may be viable if your drive has malfunctioned, none of them will work. When this happens, File History will not be able to recognize your drive. You can check for drive errors and see if Windows can repair them.

    Aside from older file versions, did you know you can revert to the older Microsoft Teams classic version? If not, we have a step-by-step walk-through for you.

    That’s all we had but do let us know which solution worked for you. Further, if you have any other solutions you’d recommend, let us know in the comment section below.

    FTDISK_INTERNAL_ERROR – 6 Tried and Tested Fixes

    Getting the 0x00000058 FTDISK_INTERNAL_ERROR on your PC can be frustrating, as it often leads to sudden system crashes and potential data loss. This blue screen error is caused by issues with the file system, disk corruption, or faulty drivers on Windows systems.

    Luckily, I can show you how to troubleshoot and resolve it in a few steps. But before we begin, scan your PC for any potential viruses.  Open Windows Security through the search bar > Virus & threat protection > Quick scan.

    If this doesn’t solve the error, proceed to the in-depth solutions.

    6 Ways to Fix FTDISK_INTERNAL_ERROR

    Simply follow these instructions:

    Run Disk Cleanup

    Disk Cleanup helps remove unnecessary files that might be causing the error. Follow the below steps:

    1. Press Windows + S, type “cmd,” then select Run as administrator.
    Run as administrator
    1. Type “cleanmgr” and hit Enter.
    Type “cleanmgr”
    1. Disk Cleanup will calculate how much space you can free up. Once done, select the file types to delete then hit OK.
    Select the file types

    Restart your computer to see if the error is resolved. If this doesn’t fix the issue, try the next solution.

    Update Drivers

    Outdated or corrupt drivers can also trigger the FTDISK_INTERNAL_ERROR. Updating them can often fix the problem and here’s how to do it:

    1. Press Windows + X and tap Device Manager.
    Device Manager
    1. Identify drivers that need updating. Most of them have a yellow exclamation mark. Right-click on it and select Update driver.
    Update driver
    1. Choose Search automatically for drivers.
    Search automatically for drivers

    Follow the onscreen instructions then restart your computer after all updates are completed.

    Run SFC (System File Checker)

    If you suspect the error is due to corrupted system files, then running the System File Checker can help. These are the steps:

    1. Press Windows + X and select Windows PowerShell (Admin).
     Windows PowerShell (Admin)
    1. Type sfc /scannow and hit Enter.
    Type sfc /scannow

    The scan will take some time to complete. If any issues are found, SFC will automatically attempt to fix them. Remember to restart your computer and check if the error persists.

    Run CHKDSK

    CHKDSK (Check Disk) is a utility that checks the integrity of your hard drive and can fix file system errors that might be causing the FTDISK_INTERNAL_ERROR.

    Below are the steps:

    1. Press Windows + X and choose Windows PowerShell (Admin).
    2. Type chkdsk /f /r and press Enter. 
    Type chkdsk /f /r
    1. You might be prompted to schedule the scan for the next reboot. Press Y and restart your computer.
     Schedule the scan

    CHKDSK will scan and repair any disk errors during the reboot process.

    Restore Windows to a Previous State

    If the FTDISK_INTERNAL_ERROR started appearing after a recent system update, reverting Windows to a previous state can help.

    Follow the below steps:

    1. Press the Windows key + S, type “Create a restore point,” then hit Enter to open the System Properties window.
    2. Click on the System Restore button.
    System Restore button
    1. Tap Next on the Restore system files and settings window.
    Tap Next
    1. Select a restore point from before the error began and click Next.
    Select a restore point
    1. Click Finish.
    Finish

    Once the process is complete, your computer will restart, and the error should be resolved.

    Reinstall Windows OS

    If all else fails, reinstalling Windows may be necessary to eliminate the FTDISK_INTERNAL_ERROR. This should be a last resort, as it’ll erase all data on your system. Here are the steps to follow:

    1. Back up all important files to an external drive or cloud storage if necessary.
    2. Download the Windows 10 installation media from the official Microsoft website.
    Windows 10 installation media
    1. Create a bootable USB drive or burn the installation files to a DVD.
    2. Insert the installation media and restart your computer. Boot from the USB or DVD.
    3. Follow the on-screen instructions to reinstall Windows.
    4. After it’s done, reinstall your drivers and applications.

    It’s important to address the FTDISK_INTERNAL_ERROR as soon as possible. The above steps will help your computer continue to perform optimally, minimizing the risk of unexpected crashes and data loss. 

    Additionally, you can learn to fix the INSUFFICIENT_SYSTEM_MAP_REGS and MISMATCHED_HAL errors with ease or what to do when your PC is unable to start.

    A strange bug is hitting several Microsoft Office apps, but there is a workaround

    If you’ve been trying to write essential documents in Word, draft an email in Outlook, or jot down notes in OneNote, only for the apps to crash unexpectedly, you should know that a bug is currently occurring with them.

    Microsoft acknowledged the bug in Office version 2407, build number 17830.20138 and higher, causing crashes during typing, spell-checking, or other authoring tasks. This issue has been a thorn in the side of many users, prompting Microsoft to publish a support document detailing the problem and offering a workaround.

    Microsoft suggests looking at the Windows Event Viewer Application Log for Event 1000 or Event 1001 to check if you’re affected. The faulting application name will vary, but if you see something like OUTLOOK.EXE with a specific version and time stamp, along with a faulting module name such as mscss7it.dll or mscss7de.dll (depending on your language packs), you’re likely facing this issue. The root cause? An out-of-date language pack might be to blame.

    But don’t worry—there’s a relatively simple fix. Microsoft recommends repairing your Office apps online or reinstalling your language packs to mitigate the bug.

    1. Do an online repair of the Office application, Repair an Office application.
    2. If the event log event shows the faulting module with a version such as 16.0.4288.1000 then this means you have an older MSI version of the language installed. Go to Windows Settings > Apps > Installed Apps and look for the old Office language installation and uninstall it.
    3. Uninstall and reinstall the language pack, see “Step 2: Configure Microsoft 365 language”, Language Accessory Pack for Microsoft 365.

    If you’re unsure how to proceed, Microsoft’s official “Repair an Office application” and “Language Accessory Pack for Microsoft 365” documentation can guide you through the process.

    In other news, Microsoft Word is getting a Quick Fix capability, which corrects many accessibility issues with just one click.

    STREAMS_INTERNAL_ERROR: 7 Ways to Fix the BSOD

    The STREAMS_INTERNAL_ERROR BSOD (Blue Screen of Death), with a value (bug check) of 0x0000004B, is usually caused by outdated or buggy drivers, corrupt system files, low available storage, malware infection, or conflicting third-party apps.

    Since it’s rarely encountered by users, there’s very little valuable information available on the web. But troubleshooting isn’t that tricky. You should start by installing all pending Windows updates, fixing overheating issues, and disconnecting non-critical peripherals!

    How do I fix the STREAMS_INTERNAL_ERROR BSOD in Windows?

    1. Clear storage space on the PC

    1. Press Windows + S to open Search, type Disk Cleanup in the text field, and click on the relevant result.
    2. Select the system drive from the dropdown menu, and click on OK. It’s the C: drive for most.select system drive
    3. Tick the checkboxes for all non-critical files, especially Temporary Internet Files and Recycle Bin, and click OK.disk cleanup to fix STREAMS_INTERNAL_ERROR
    4. Click on Delete Files in the confirmation prompt.

    If you regularly run out of space on the PC, consider setting up Storage Sense in Windows to automatically clear non-critical files on a periodic basis.

    2. Repair the corrupt system files

    1. Press Windows + S to open Search, type Command Prompt in the text field, and click on Run as administrator.command prompt
    2. Click Yes in the UAC prompt.
    3. Paste the following three commands individually and hit Enter after each: DISM /Online /Cleanup-Image /CheckHealth DISM /Online /Cleanup-Image /ScanHealth DISM /Online /Cleanup-Image /RestoreHealth
    4. Now, run this SFC scan command: sfc /scannowsfc scan to fix STREAMS_INTERNAL_ERROR
    5. Finally, restart the computer and check for improvements.

    When the STREAMS_INTERNAL_ERROR blue screen error is caused by corrupt system files, running the DISM (Deployment Image Servicing and Management) and SFC (System File Checker) scans should get things up and running in no time by replacing corrupt protected files with their cached copy!

    3. Update all the drivers

    1. Press Windows + X to open the Power User menu, and select Device Manager.
    2. Expand the different entries here, right-click on the devices listed underneath individually, and choose Update driver.update driver to fix STREAMS_INTERNAL_ERROR
    3. Click on Search automatically for drivers and let Windows install the best locally available version.driver search
    4. Similarly, update the driver for other devices.

    While updating the drivers, if Windows can’t find a better version, go to the manufacturer’s website, check for recent releases, and then manually install the latest driver!

    Or, for a hassle-free experience, go with a top-rated driver update tool, which automatically detects connected devices, fetches the latest version, and updates the driver for each.

    4. Roll back driver update

    1. Press Windows + R to open Run, type devmgmt.msc in the text field, and hit Enter.
    2. Expand all the entries, right-click on the individual devices one at a time, and choose Properties.properties
    3. Go to the Driver tab and click on Roll Back Driver.roll back to fix STREAMS_INTERNAL_ERROR
    4. Pick a reason for the roll back and click on Yes to confirm.confirm rollback

    If the Roll Back Driver option is greyed out, either the driver wasn’t updated recently, or Windows didn’t store the files for the previous version. Ignore any such cases and roll back drivers where the option is available!

    5. Scan the PC for malware

    1. Press Windows + S to open Search, type Windows Security in the text field, and click on the relevant result.
    2. Click on Virus & threat protection.windows security
    3. Now, click on Scan options.
    4. Select the Full scan entry, and then click on Scan now.malware scan to fix STREAMS_INTERNAL_ERROR
    5. Let the built-in antivirus detect and eliminate any active threats.

    6. Uninstall conflicting apps

    1. Press Windows + R to open Run, type appwiz.cpl in the text field, and hit Enter.
    2. Select any recently added app you believe might be conflicting with the OS, and click on Uninstall.uninstall apps
    3. Follow the on-screen instructions to complete the process, then restart the computer and check for improvements.
    4. If the STREAMS_INTERNAL_ERROR bug check 0x4B remains unresolved, uninstall other recent apps.

    7. Perform a system restore

    1. Press Windows + S to open Search, type Create a restore point, and click on the relevant result.
    2. Click on the System Restore button.restore to fix STREAMS_INTERNAL_ERROR
    3. Select the Choose a different restore point option, and click on Next.restore point
    4. Pick the oldest restore point from the list and click on Next.oldest restore point
    5. Verify the details, and click on Finish to start the restore process. It should take between 15-45 minutes.

    When nothing else helps fix the STREAMS_INTERNAL_ERROR BSOD in Windows, you should perform a system restore and revert the PC to a previous stable state. If this, too, fails, contact a professional for more help because, at this point, a hardware issue could be to blame for the blue screen error!

    Also, you could check our expert fixes for Blue Screen of Death on Windows 11 and see if any of these work.

    For any queries or to share what worked for you, drop a comment below.

    Fix: Could Not Initialize Graphics Device Windows 11

    You may encounter the could not initialize graphics device error on your Windows 11 device when you try to launch a graphic-intensive game or any other app that uses significant GPU resources.

    The causes usually revolve around your GPU so it could be outdated, missing, incompatible or corrupt drivers, incorrect graphic settings or your GPU is failing. When this happens, you’ll notice some display issues and an overall degraded performance from your PC.

    How do I fix the could not initialize graphics device error in Windows 11?

    1. Reinstall DirectX12 and re-enable DirectDraw and Direct3D

    1. Press Windows + R to open the Run window.DirectX - directx 12 initialization failed
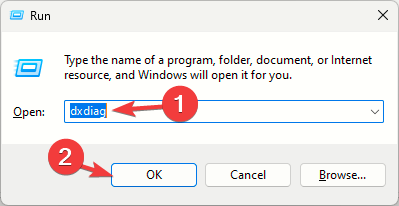
    2. Type dxdiag and click OK to open DirectX Diagnostic Tool.
    3. Go to the System tab and check the DirectX Version; it should be DirectX 12.Check the version
    4. If not, you need to update it; visit the Microsoft official page for DirectX.
    5. Select your preferred language and click Download.Download - directx 12 initialization failed
    6. A file will be downloaded, double-click it, and initiate the installation of DirectX12.
    7. Follow the on-screen instructions to complete the process.
    8. Press the Windows key + R, type dxdiag, and click OK.explorer_DXDIAG - directx error mw3
    9. Click the No button when prompted to check if you want to check if your driver is signed.
    10. Next, click the Display tab at the top and check if DirectDraw Acceleration and Direct3D Acceleration are enabled.
      enabled
    11. Next, press the Windows key, type turn windows, and select Turn Windows features on or off.Turn Windows Features on or off Internet Explorer Won’t Close?
    12. Check the Legacy Components box and press the + sign next to it to expand it.
    13. Finally, check the box next to Direct3D and click the OK button.
      legacy directdraw error

    2. Address graphics card issues

    2.1 Update video card driver

    1. Press the Windows key + X and select Device Manager.
      device manager
    2. Double-click the Display adapters option to expand it and right-click the device there.
    3. Now, select Update driver.
      update driver
    4. Finally, click Search automatically for drivers and install any available updates.
      search auto

    2.2 Disable graphics card

    1. Click the Search icon, type Device Manager in the search bar, and click Open.device manager w11
    2. Navigate to Display adapters to expand, right-click on your graphics card and select Disable.
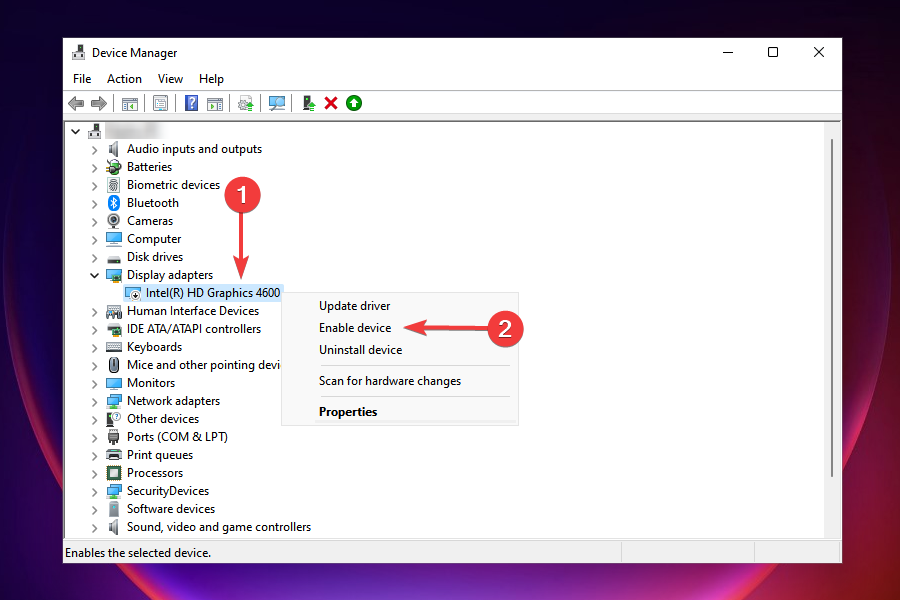
    3. Restart your PC then repeat steps 1 to 2 only this time, select Enable device.Enable graphics driver

    2.3 Reinstall the device driver 

    1. Hit the Windows key, type Device Manager in the search bar, and click Open.device manager w11
    2. Navigate to Display adapters to expand, right-click on your graphics card and select Uninstall device.Uninstall graphics driver -the ue4 game has crashed fatal error
    3. Click on Uninstall in the next pop-up box.
    4. Restart your device, and your drivers will automatically be installed.

    3. Lower your resolution settings 

    1. Hit the Start menu icon and select Settings.settings windows 11
    2. Click on System then select Display.Settings - System - Display High CPU usage New World
    3. Navigate to the Scale & layout section then under Display resolution, click on the drop-down menu and pick a lower resolution setting than your current one.Display resolution
    4. You may need to restart your PC for the changes to take effect.

    If the could not initialize graphics device error occurs on a particular game, you can also try adjusting the in-game resolution settings and see if there are any improvements.

    4. Try different compatibility settings

    1. Click on the Start Menu icon, type Control Panel on the search bar, and click Open.control-panel-search fallout new vegas runtime error
    2. Select Uninstall a Program under Programs.going uninstall program control panel
    3. Find the problematic app, click on it, and select Uninstall.
    4. Confirm uninstallation in the next pop-up.
    5. Install the app again from the official website.
    6. Locate the .exe file of the problematic app usually in one of the following paths depending on your version of Windows: C:\Program Files (x86) or C:\Program Files
    7. Scroll down until you find the program you’re looking for. 
    8. Right-click on the .exe file of the program and select Properties.    
    9. Navigate to the Compatibility tab, check the Run this program in Compatibility mode option, and select Windows 8  from the drop-down menu.  Also, uncheck
      • Run in 640×480 screen resolution
      • Run this program as an administrator
      • Disable full screen optimizations
    10. Allow the program to finish installing, then check whether the error persists.

    5. Enable hardware acceleration

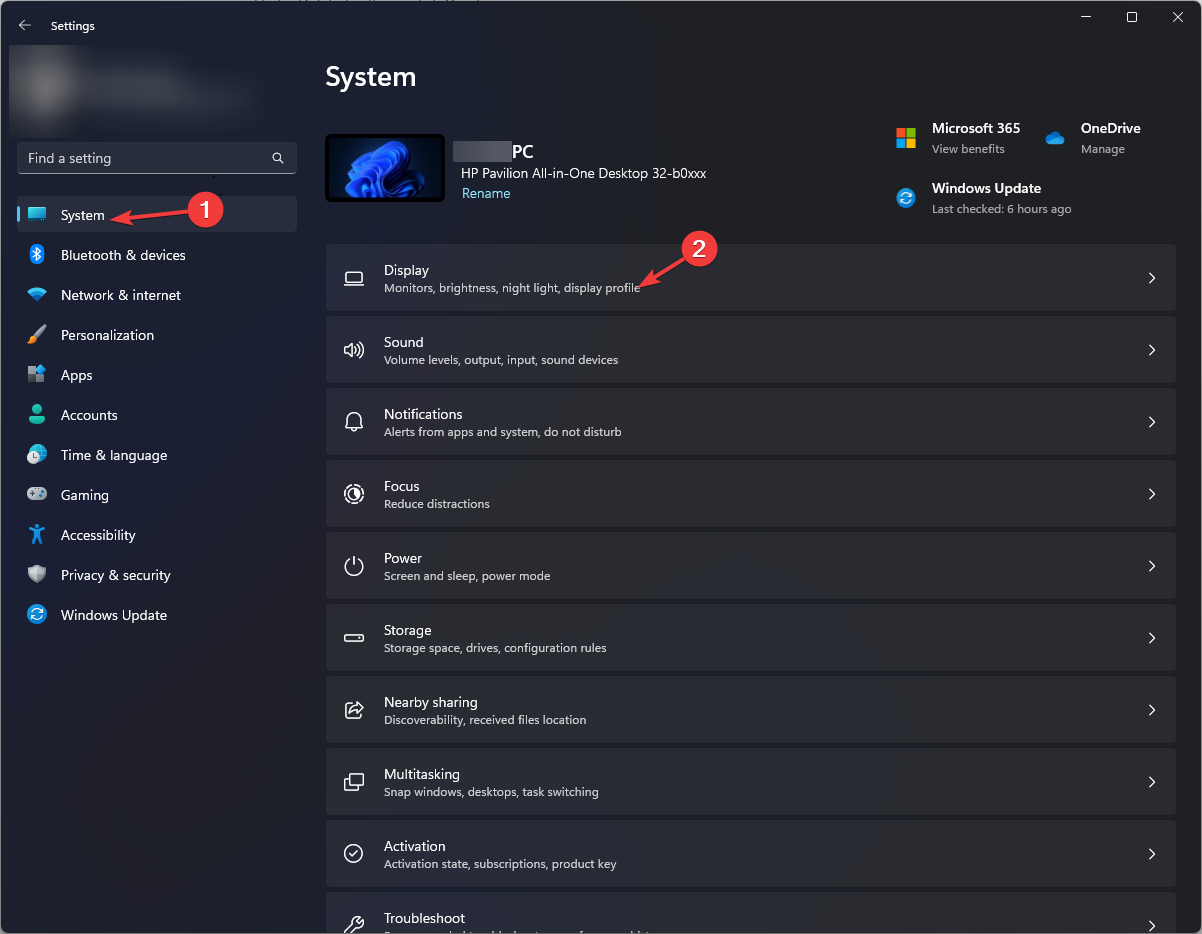
    1. Hit the Windows key and select Settings.settings windows 11
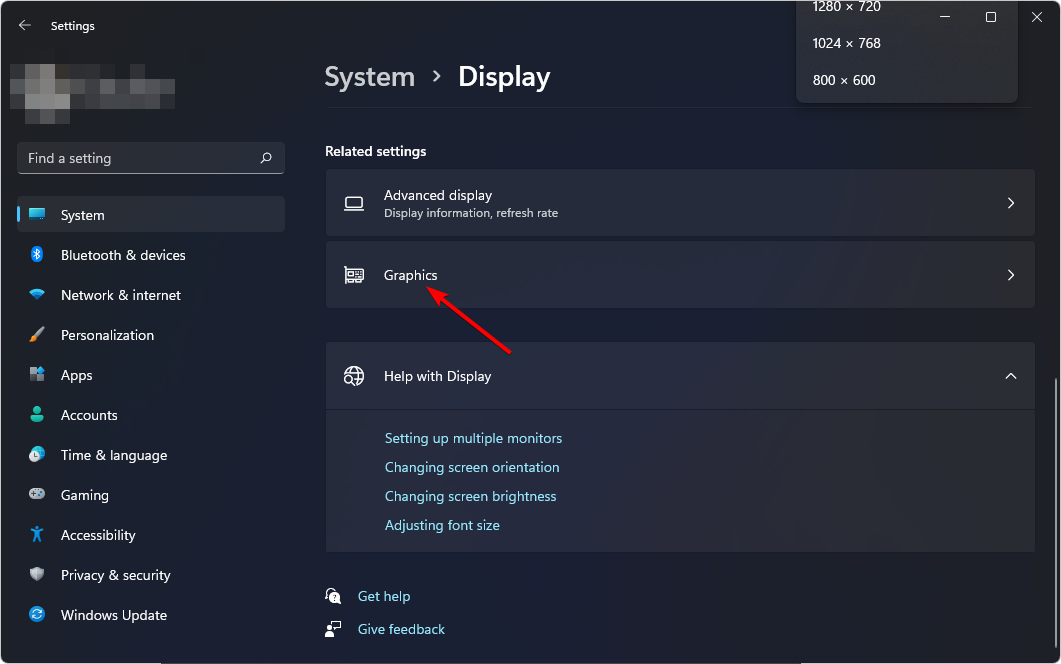
    2. Click on System on the left pane, then Display on the right pane.Settings - System - Display High CPU usage New World
    3. Scroll down and select Graphics.
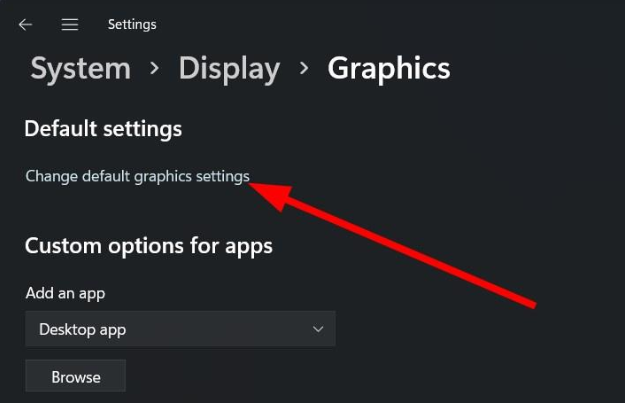
    4. Select the Change default graphics settings option.
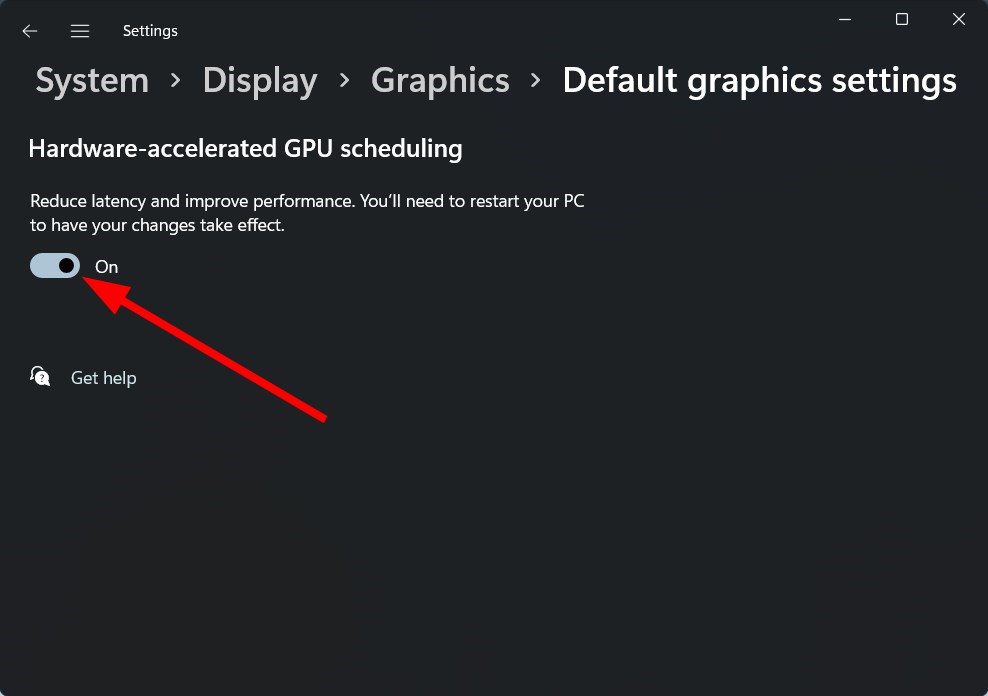
    5. Now, toggle on the Hardware-accelerated GPU scheduling option.disable Hardware-accelerated GPU scheduling

    6. Disable your integrated GPU

    1. Click on the Start Menu icon, type Device Manager in the search bar, and click Open.device manager w11
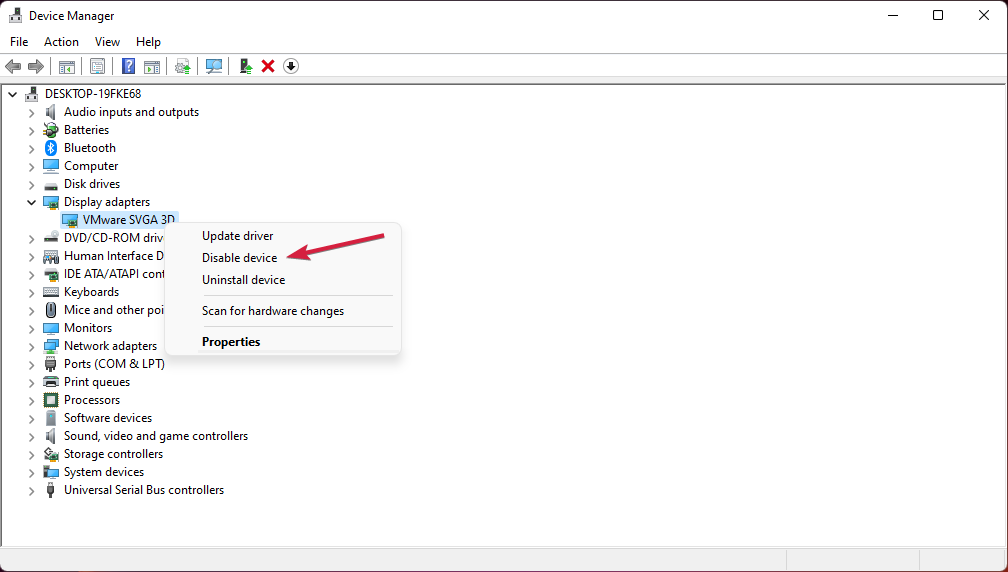
    2. Navigate to Display adapters to expand, right-click on your graphics card, and select Disable device.
    3. Next, launch your dedicated graphics card control panel (In this case, Nvidia Control Panel).
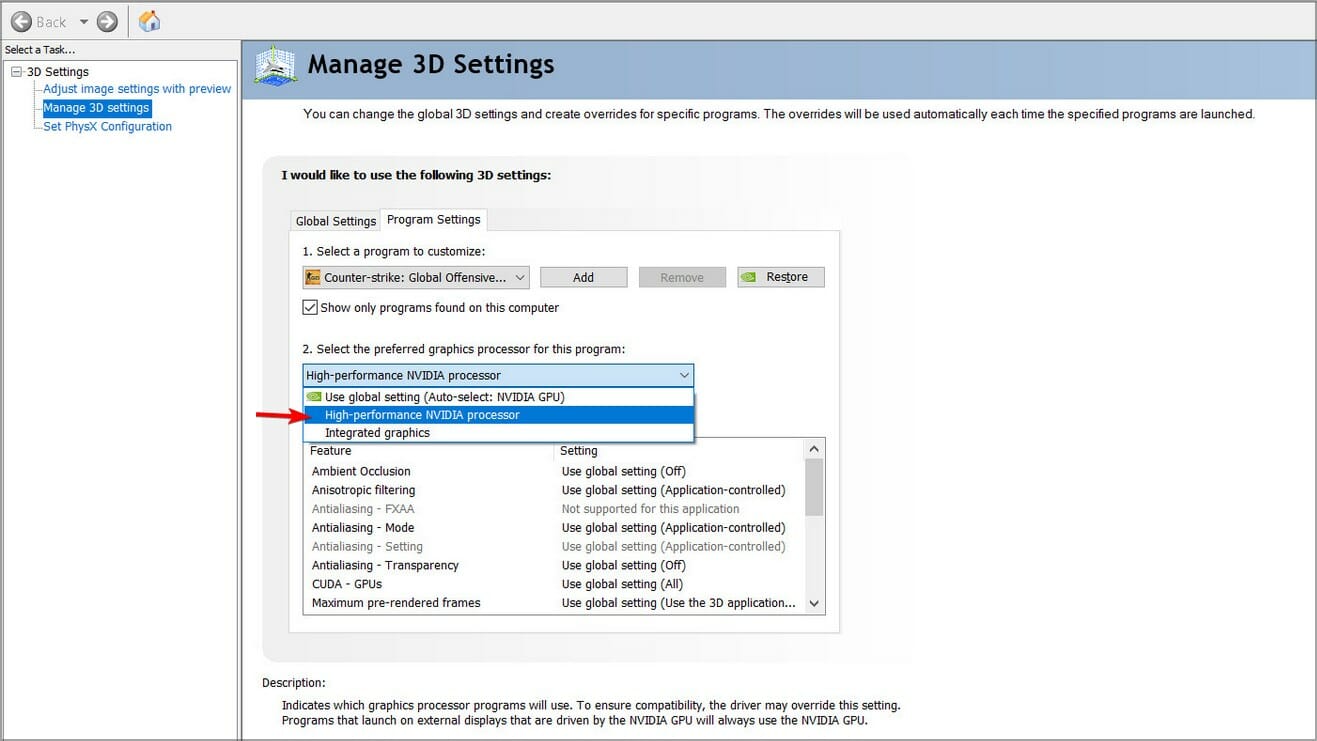
    4. Select Manage 3D settings from the navigation pane on the left.manage 3d settings in nvidia.
    5. Choose a High-performance NVIDIA processor from the Preferred graphics processor dropdown menu.

    Whenever your PC fails to detect your GPU, there’s a miscommunication when apps attempt to use the GPU.

    And if your secondary graphics card cannot be detected, the fallback will be on your integrated one which in most cases, cannot handle graphics-intensive tasks and will result in more errors.

    This error is not unique to your graphics card. You might also encounter a similar situation when you insert a drive and get a can’t initialize disk or cannot initialize device driver for this hardware error so check out our guide on how to fix it.

    That’s all we had for this article but if you have any other solutions you’d like to share, drop them in the comment section below.

    Microsoft finally pauses the Windows 11 upgrade ads in Windows 10

    Microsoft decided to pause the full-screen Windows 11 upgrade prompt ads on Windows 10 after users’ feedback that the alerts were more intrusive than informative. Initially, these alerts were part of Microsoft’s strategy to encourage users to transition to Windows 11. However, not everyone was ready or willing to make the switch.

    The plan to expand these upgrade prompts to more Windows 10 users was set for April 2024 but was quickly shelved. In an update to the Microsoft 365 advisory (spotted by Windows Latest), Microsoft subtly announced the pause, stating it was a response to user feedback.

    This change was primarily aimed at non-managed Windows 10 PCs, which include a variety of professional and workstation editions not overseen by IT departments. Microsoft’s distinction between managed and non-managed devices became a focal point, clarifying who would be affected by this pause.

    Despite the halt, Windows 10 Home PCs that meet Windows 11’s hardware requirements still see the upgrade prompts, highlighting Microsoft’s selective approach. This move has sparked discussions about the future of Windows 10, especially with its retirement date looming.

    The Extended Security Updates program offers a solution that allows users to receive security updates for a fee after the official end-of-support date. Still, it doesn’t address the underlying push toward Windows 11.

    How to Fix the INSTRUCTION_COHERENCY_EXCEPTION BSoD

    The INSTRUCTION_COHERENCY_EXCEPTION error has a value of 0x00000056. This BSoD often signals underlying issues with your system’s software or hardware. Before anything, if you can boot your system normally, check for any new Windows updates and install them if possible.

    How do I fix the INSTRUCTION_COHERENCY_EXCEPTION BSoD?

    1. Boot Windows 11 in Safe Mode from Power Off

    1. Hold the power button for 10 seconds to turn off your PC.
    2. Press the power button again to turn on your PC. Repeat this process until you get to the Automatic Repair panel.
    3. Select Advanced Options.
    4. Choose the Troubleshoot option and you will get the Safe Mode option.

    This method is useful in case your operating system has serious problems and you cannot start it up as normal or access Safe Mode. Once you boot into Safe Mode, you will be able to perform the solutions below.

    2. Uninstall recently installed software

    1. While in Safe Mode, open Control Panel by typing Control Panel in the search bar and pressing Enter.
    2. Click on Programs and Features.
    3. Look for recently installed programs that might coincide with the start of the error.
    4. Select the program and click Uninstall.
    5. Follow the prompts to remove the software and restart your computer.

    Uninstalling recently installed software can remove potential sources of conflict or corruption that might be causing the INSTRUCTION_COHERENCY_EXCEPTION error.

    3. Run System Restore

    1. Open Start, type System Restore, and press Enter.
    2. Click Next in the System Restore window.
    3. Select a restore point from a date when your system was working fine and click Next.
    4. Confirm your restore point and click Finish.
    5. Follow the prompts to restore your system and reboot.

    Running System Restore helps in reverting your system to a previous state where it was functioning correctly, thereby resolving the INSTRUCTION_COHERENCY_EXCEPTION error caused by recent changes.

    4. Unplug or uninstall external hardware

    1. Remove any external hardware devices (like printers, USB drives) connected to the computer.
    2. Restart your computer to see if the error persists.
    3. If the error is resolved, try reconnecting the devices one at a time to identify the problematic hardware.
    4. For drivers, go to Device Manager, right-click the problematic device, and select Uninstall device.
    5. Reboot your computer to reinstall the drivers.

    Sometimes, external hardware or their drivers can cause system conflicts leading to the INSTRUCTION_COHERENCY_EXCEPTION error. Disconnecting them helps in identifying the root cause.

    5. Toggle Fast Startup

    1. Open Control Panel by typing Control Panel in the search bar and pressing Enter.
    2. Click on Power Options.
    3. On the left sidebar, click Choose what the power buttons do.
    4. Click Change settings that are currently unavailable.
    5. Scroll down to Shutdown settings and toggle the setting for Turn on Fast Startup (turn off if it’s on, turn on if it’s off).
    6. Click Save changes and restart your computer.

    Toggling fast startup can resolve boot-related issues that might be causing the INSTRUCTION_COHERENCY_EXCEPTION error, making the system boot process more stable.

    Keeping your system updated and regularly scanning for performance issues can help prevent the INSTRUCTION_COHERENCY_EXCEPTION error in the future. Always ensure to back up important data before making significant changes to your system.

    If the software solutions didn’t help, inspect all the hardware components carefully for any signs of overheating or malfunctioning.

    This stop code is pretty rare, but if you want to learn more about the causes of BSoD, follow the highlighted guide. We also have a step-by-step general guide on how to fix BSoD on Windows 11.

    Did our guide help you fix the INSTRUCTION_COHERENCY_EXCEPTION BSoD? Let us know in the comments below.

    Microsoft acknowledges the issue with the emoji panel vanishing in Windows 11, and it’s working on a fix

    Last week, Microsoft rolled out a new Windows 11 build for Insiders in the Dev Channel. This wasn’t just any update; it was built number 26120.1350, packed with exciting changes like an AirDrop-esque file-sharing feature between PCs and Android phones and much-needed fixes for the Task Manager and Windows Sandbox.

    However, Microsoft seems to have uncovered a bug in this build that might have you scratching your head if you’re a fan of expressing yourself with emojis. Apparently, the emoji panel disappears when users try switching to the kaomoji and symbols sections or after selecting an emoji. It’s a minor hiccup that Microsoft is already on the case to fix.

    [ADDED 6/13] We are working on the fix for an issue causing the emoji panel to close when trying to switch to the kaomoji and symbols sections, or after selecting an emoji.

    Now, you might be thinking, “Should I be worried?” The answer is a comforting no. This emoji panel bug, while annoying, isn’t a deal-breaker, especially when you consider the nature of preview builds. They’re essentially test drives for new features, and bumps in the road are to be expected.

    That said, avoiding using these builds on devices you rely on daily for work or essential tasks is always wise. After all, no one wants their Task Manager to crash when they’re in the middle of something crucial, right?

    You can read the updated changelog here.

    Pikashow For Windows 11: How to Download & Install it

    Looking to enjoy Pikashow on your Windows 11 PC? Whether you’re streaming movies, TV shows, or live sports, this guide will walk you through the easy installation process using different methods. Let’s dive into the steps to get Pikashow up and running on your Windows 11 device.

    How can I download Pikashow for Windows 11?

    Use Android emulator

    1. Download LDPlayer from the official LDPlayer from the official website.
    2. Open the downloaded file and follow the setup instructions to install LDPlayer on your PC.
    3. Launch LDPlayer and sign in to your Google account.
    4. Download the Pikashow APK from a reputable source (such as the official website).
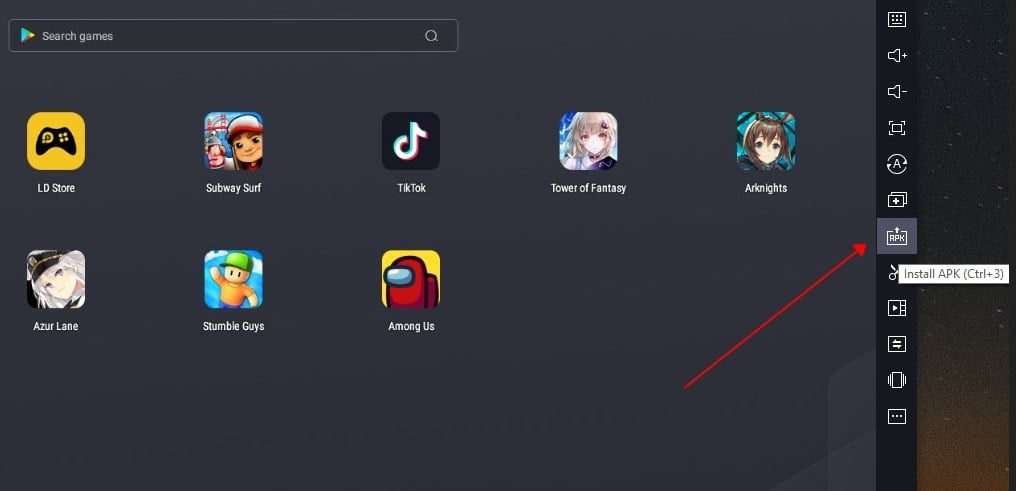
    5. Click on the Install APK buttoninstall apk ldplayer in LDPlayer (located at the bottom right).
    6. Browse for the Pikashow APK file you downloaded and click Open to begin the installation.
    7. Once the installation is complete, you can access Pikashow from the LDPlayer home screen.

    ⇒ Get LDPlayer

    How to download Pikashow for Windows 11 laptop?

    Regardless if you’re using a Windows 11 laptop or desktop PC, the only way to download and install it is by using an Android emulator.

    Can I install APK on Windows 11?

    Microsoft dropped support for the Windows Subsystem for Android early this year, meaning that the OS won’t be able to handle Android apps and APK files anymore. However, it might be possible to install APK files on Windows 11 for the time being.

    If you want to install APK files, you’ll need to use Android emulator software.

    This solution will help you run Pikashow on Windows 11, ensuring you can enjoy your favorite movies, TV shows, and live sports on your PC. If you’re looking for similar tools, we have a guide on how to install Sportzfy on Windows 11. Moreover, you can learn how to get Celtx on Windows 10.

    Microsoft Word’s newest Quick Fix corrects multiple accessibility issues with just one click

    The Microsoft 365 Insiders can now play with the Quick Fix accessibility feature in Word for Windows. This tool is designed to make your documents more accessible to everyone, correcting many issues with just one click.

    According to the official blog post, Quick Fix is a feature about efficiency. With it, you can tackle multiple accessibility issues simultaneously, saving time and hassle.

    Here’s how it works: you’ve got a Word document open, and it’s a bit of a mess, accessibility-wise. Head to the Review tab, click Check Accessibility, and the Accessibility Assistant pops up, grouping all those pesky issues into one Quick Fix card.

    With a few clicks, you make color suggestions, apply fixes across the document, and even review auto-generated alt text for images. It’s that simple.

    It’s currently available for those running Windows Beta Version 16.0.17726.10000 or later. And if you’re not seeing it yet, don’t worry. These features take a little time to roll out to everyone.

    But here’s the thing: your feedback is crucial. Microsoft wants to know what you think of Quick Fix. So, if you’re one of the lucky Insiders testing it out, don’t be shy. Let them know if it’s hitting the mark or if there’s room for improvement. After all, it’s all about making Word a better, more inclusive tool for everyone.

    So, what do you think? Is Quick Fix the accessibility hero we’ve been waiting for in Microsoft Word?

    Speaking of Word, Microsoft recently enhanced the platform with dynamic watermarking, making it challenging to leak confidential documents.

    Age of Empires Mobile will be released this October on Android and iOS devices

    Age of Empires is going mobile. The classic RTS game that has kept us glued to our screens, strategizing and conquering, is making its grand entrance onto our smartphones. Mark your calendars for October 17 because Age of Empires Mobile will officially launch on iOS and Android platforms.

    First, Microsoft is pulling out all the stops to make this mobile version as epic as its PC counterpart. We’re talking about a game that’s not just a mere adaptation but a full-fledged experience with multiple single-player modes.

    In the official announcement, the game promises immersive battlefields where you can engage in large-scale castle sieges. These aren’t your run-of-the-mill skirmishes but strategic confrontations requiring real-time micro-control over your troops. You’ll be doing this while managing realistic terrain and weather conditions. It’s strategy gaming on a whole new level.

    Timi Studios, the developer behind Age of Empires Mobile, is shaking things up by introducing support for 1v1 battles and pre-battle features that are a fresh twist on the classic gameplay. You can pre-register for the game right now. Doing so not only means you’ll be among the first to dive into this adventure, but you’ll also snag some extra in-game goodies. If enough players preregister, there’s even a chance to unlock Cleopatra VII as a hero character.

    2024 is shaping to be an exciting year for Age of Empires enthusiasts. We have the mobile game to watch, but there’s also a significant remake of Age of Mythology on the horizon, dubbed Age of Mythology: Retold. It’s set to hit PC and Xbox platforms on September 4, with early access for those who get the Premium Edition and Xbox Game Pass subscribers on day one.

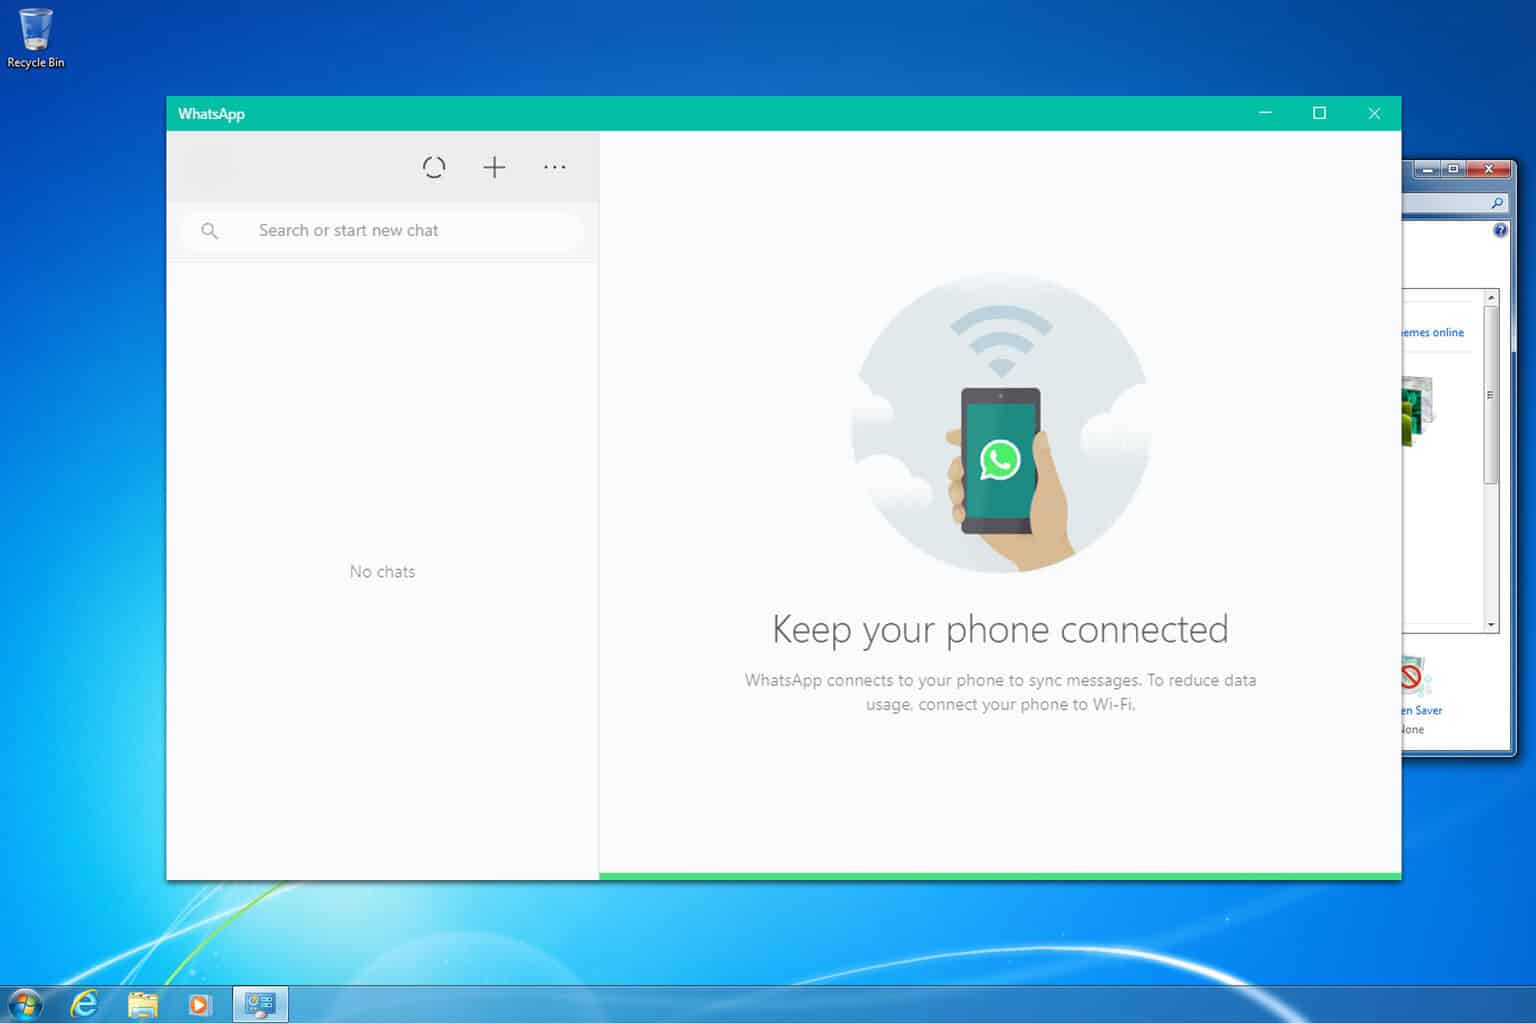
    WhatsApp For Windows 7 PC: Can You Still Install it?

    Getting WhatsApp running on a Windows 7 PC can be a bit tricky since the official desktop app is designed for Windows 10 and above. However, there are several workarounds to help you stay connected. Let’s dive into some practical solutions to get WhatsApp up and running on your Windows 7 machine.

    How do I use WhatsApp on Windows 7?

    1. Use WhatsApp Web via a browser

    1. Navigate to your preferred web browser (like Chrome, Firefox, or Edge).
    2. Navigate to WhatsApp Web page.
       whatsapp web
    3. Unlock your smartphone and open the WhatsApp application.
    4. Tap the three dots (menu) in the top right corner and tap Linked devices. Next, choose Link device.
      Linked Devices -whatsapp web not syncing messages
    5. Point your phone’s camera at the QR code displayed on your computer screen to link your account.

    If you have any issues, we have a great guide on how to use WhatsApp Web in the browser, so don’t miss it.

    2. Use an Android emulator

    1. Download an Android emulator like LDPlayer from its official website.
    2. Run the downloaded setup file and follow the installation instructions.
    3. Open the emulator and follow the setup instructions, including logging into your Google account.
    4. Open the Google Play Store in the emulator, search for WhatsApp, and install it.
      playstore ldplayer
    5. Open WhatsApp within the emulator, enter your phone number and follow the verification steps.

    ⇒ Get LDPlayer

    Can I install WhatsApp on Windows 7?

    There’s no WhatsApp client for Windows 7, so you can’t install it. If you want to use it, you’ll need to use the Web version or use it via an Android emulator.

    If you’re using a newer version of Windows, such as Windows 11, you can follow our guide to easily install WhatsApp on your PC by visiting WhatsApp for Windows 11.

    Why WhatsApp is not working on Windows 7?

    WhatsApp app requires Windows 10 or newer since the app has been converted to the Universal app, so it can’t run on older systems.

    How to install WhatsApp without the Microsoft Store?

    This isn’t possible since WhatsApp has been converted to a Universal app and it requires Microsoft Store to download. You can install it via an Android emulator if you don’t want to use Microsoft Store.

    By following these steps, you can successfully use WhatsApp on your Windows 7 PC, ensuring you stay connected with your contacts.

    If any issues appear, we have a guide on what to do if WhatsApp for Web isn’t working or what to do if WhatsApp is showing browser is not supported.

    Windows’ hidden Admin Account significantly boosts the performance of the AMD Ryzen 9000 Series

    It seems that Windows’ hidden Admin Account might be the secret sauce to boosting the performance of AMD’s latest Ryzen 9000 and 7000 series CPUs.

    AMD, known for its fierce competition with Intel, especially in the CPU arena, recently launched its Zen 5-based Ryzen 9000 series. These chips were already turning heads with a 16% IPC boost announced at Computex 2024. But despite this, comparisons with the previous Zen 4-based Ryzen 7000 series left some feeling underwhelmed, pointing towards a need for better optimization, particularly on Windows.

    The plot thickened when comparative tests between Windows 11 24H2 and Linux suggested that the latter outperformed in gaming and other workloads. This hinted at a potential issue with Windows slowing down AMD’s chips.

    AMD and YouTube’s Hardware Unboxed found that a bug related to Account privileges in Windows was indeed impacting the performance of the Ryzen 9000 series desktop CPUs. By switching to the Administrator Account, the Ryzen 7 9700X saw a performance jump of close to 4% in average frame rates and just over 3.5% in percentile lows.

    For those curious, accessing this hidden Administrator Account is as easy as executing a simple command:

    net user administrator /active:yes.

    Interestingly, this performance boost wasn’t exclusive to the Zen 5 chips; the Zen 4-based 7700X also saw improvements, suggesting a broader issue affecting the entire Socket AM5 lineup. AMD even hinted that incorrect driver provisioning on Windows could contribute to the problem, advising reviewers to clean up Windows or reinstall the chipset driver when swapping CPUs.

    If you’re using an AMD Ryzen 9000 or 7000 series CPU and are not getting the performance you expected, this little trick might be worth a try.

    MAILSLOT_FILE_SYSTEM BSOD: 5 Ways to Fix it

    The MAILSLOT_FILE_SYSTEM BSOD (Blue Screen of Death), with error code 0x00000052, is tricky to fix, given the lack of any official troubleshooting steps or reliable information. Even Microsoft’s official website doesn’t say much!

    The MAILSLOT_FILE_SYSTEM error 0x52 is caused by a corrupted msfs.sys system file, malware infection, buggy Windows updates, and conflicts triggered by third-party apps. The msfs.sys file is stored in: C:\Windows\System32

    When you start troubleshooting, start by replacing the msfs.sys file, installing all pending Windows updates, disconnecting any non-critical peripherals, and turning off fast startup. If none work, head to the solutions listed next!

    How can I fix the MAILSLOT_FILE_SYSTEM blue screen error?

    1. Repair the corrupt system files

    1. Press Windows + S to open Search, type Command Prompt in the text field, and then click on Run as administrator.command prompt
    2. Click Yes in the UAC prompt.
    3. Paste the following DISM commands individually and hit Enter after each: DISM /Online /Cleanup-Image /CheckHealth DISM /Online /Cleanup-Image /ScanHealth DISM /Online /Cleanup-Image /RestoreHealth
    4. Now, run this command for the SFC scan: sfc /scannowsfc scan to fix MAILSLOT_FILE_SYSTEM
    5. Finally, reboot the PC and check for improvements.

    Corrupt system files often trigger blue screen errors. And since msfs.sys is a system file, running the DISM (Deployment Image Servicing and Management) commands and SFC (System File Checker) scan should fix MAILSLOT_FILE_SYSTEM in no time!

    2. Scan the PC for malware

    1. Press Windows + S to open Search, type Windows Security, and click on the relevant result.
    2. Click on Virus & threat protection.windows security
    3. Click on Scan options.
    4. Choose the Full scan entry and click on Scan now. scan to fix MAILSLOT_FILE_SYSTEM
    5. Wait for Windows Security to detect and eliminate all active threats.

    If Windows Security is unable to detect malware infection, I recommend you go with a top-rated antivirus solution. These can run more advanced scans to identify even the latest threats!

    3. Uninstall recent Windows updates

    1. Press Windows + I to open Settings, go to Windows Update from the left pane, and click on Update history.windows update
    2. Scroll down to the bottom and click on Uninstall updates.
    3. Locate the last installed update and click Uninstall next to it.uninstall update
    4. Again, click Uninstall in the confirmation prompt.

    4. Uninstall conflicting third-party applications

    1. Press Windows + R to open Run, type appwiz.cpl in the text field, and hit Enter.appwiz.cpl
    2. Select any recently added app from the list, and click on Uninstall.uninstall app
    3. Follow the on-screen instructions to complete the process.
    4. Restart the PC and check whether MAILSLOT_FILE_SYSTEM (0x00000052) is fixed.
    5. If not, similarly remove other recent apps until you identify the conflicting one. You can then reinstall the other apps removed during the process.

    5. Perform an in-place upgrade

    Note icon NOTE
    The steps listed below are for Windows 11. If you are still on the previous iteration, check our dedicated article for performing an in-place upgrade on Windows 10.
    1. Go to Microsoft’s official website, select the OS edition and product language, and then download the Windows 11 ISO.windows 11
    2. Right-click on the ISO, then choose Mount, and click on Open in the confirmation prompt.
    3. Run the setup.exe file.setup.exe
    4. Click Yes in the UAC prompt.
    5. Now, click on Next to proceed.
    6. Click Accept to agree to Microsoft’s license terms.
    7. Make sure the setup reads, Keep personal files and apps, and then click on Install.in-place upgrade to fix MAILSLOT_FILE_SYSTEM
    8. Wait for the in-place upgrade to complete. It typically takes 1-3 hours.

    An in-place or repair upgrade is akin to reinstalling Windows, but you don’t lose stored files or apps in the process, making it a viable solution when faced with the MAILSLOT_FILE_SYSTEM blue screen error. If this, too, fails to work, the last option is to reset Windows to factory defaults!

    Before you leave, discover expert-recommended tips to keep your PC safe and secure. We also have a new guide that tackles Error_System_Trace, so feel free to visit it.

    For any queries or to share which fix worked for you, drop a comment below.

    How to Fix the SET_ENV_VAR_FAILED Bug Check 0x5B

    The SET_ENV_VAR_FAILED error comes with the value of 0x0000005B and it is associated with problematic system environment variables. We have a few tested solutions that helped most of the users who encountered this BSoD.

    How do I fix the SET_ENV_VAR_FAILED BSoD?

    1. Checking system variables

    1. Press Win + X and select System from the menu.
    2. Click on Advanced system settings.
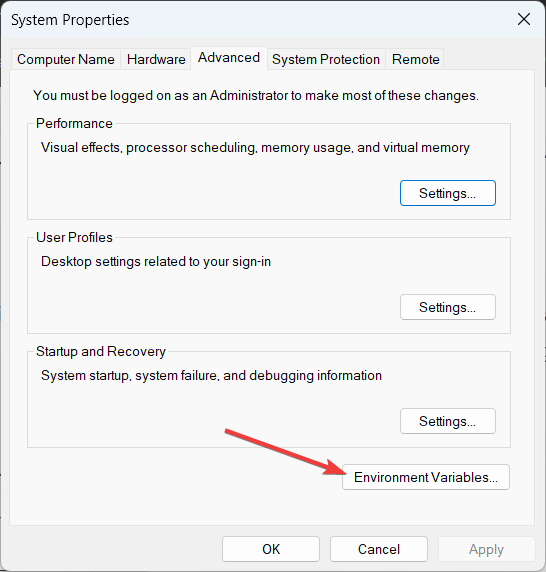
    3. In the System Properties window, click on the Environment Variables button.
    4. Check if any variables are missing or incorrectly set. Look through both user and system variables.
    5. If variables are missing or incorrect, add or modify the variables as necessary by clicking on New or Edit.

    Ensuring that environment variables are correctly set can resolve issues related to system functionality and application performance since incorrect or missing variables may cause the SET_ENV_VAR_FAILED error.

    2. Temporarily disable the third-party antivirus

    1. Open the antivirus program by double-clicking its icon in the taskbar or searching for it through the Start menu.
    2. Navigate to the settings or options menu within the antivirus software.
    3. Look for an option to temporarily disable the antivirus protection. This might be under sections like Real-time protection or Shield control.
    4. Disable the antivirus temporarily and check if the SET_ENV_VAR_FAILED error persists.

    If the error resolves after disabling the antivirus, consider adding an exception for the affected application or switching to a different antivirus program.

    Some antivirus programs may interfere with environment variable settings. Disabling the antivirus helps determine if it is the cause of the error.

    3. Run a System File Checker (SFC) scan

    1. Type cmd in the Start menu, right-click on Command Prompt and select Run as administrator.
    2. In the Command Prompt window, type sfc /scannow and press Enter.
    3. Follow any instructions provided at the end of the scan.
    4. Restart your system and check if the error is resolved.

    The System File Checker (SFC) tool scans for and restores corrupt system files. This can fix errors related to the misconfiguration of environment variables that lead to the SET_ENV_VAR_FAILED bug check.

    4. Run the DISM tool

    1. Click the Start button, type cmd and select Run as administrator from the results.
    2. In the Command Prompt window, type the following command and press Enter: DISM /Online /Cleanup-Image /RestoreHealth
    3. Restart your system once the process is finished.

    The Deployment Imaging Service and Management Tool (DISM) repairs system image files and can resolve deeper system corruption that might be causing the SET_ENV_VAR_FAILED error.

    5. Update device drivers

    1. Press Win + X and select Device Manager.
    2. Expand the categories to find the device you want to update (e.g., Display adapters, Network adapters). If you find a device that has a yellow exclamation mark next to it, treat it with priority.
    3. Right-click on the device and select Update driver.
    4. Choose Search automatically for drivers and follow the prompts.
    5. Repeat for all major devices to ensure they are up to date.

    Outdated or incompatible drivers can cause various system errors, including the SET_ENV_VAR_FAILED bug check. Updating drivers ensures that all hardware components work correctly with the OS. It’s also very useful to check for any Windows updates and install them because they also come with new drivers.

    6. Perform a Clean Boot

    1. Press Win + R, type msconfig, and press Enter.
    2. In the System Configuration window, go to the Services tab.
    3. Check Hide all Microsoft services and then click Disable all.
    4. Go to the Startup tab and click on Open Task Manager.
    5. Disable all startup items by right-clicking on each and selecting Disable.
    6. Close Task Manager and click OK in the System Configuration window.
    7. Restart your computer and check if the error persists.

    Performing a clean boot helps identify if background services or startup programs are causing the SET_ENV_VAR_FAILED error by starting the computer with a minimal set of drivers and startup programs.

    By following these steps, users can systematically troubleshoot and resolve the SET_ENV_VAR_FAILED error, ensuring their Windows system runs smoothly. To prevent similar issues in the future, regularly update your system and drivers, and periodically check your environment variables.

    That being said, we have a guide on how to set environment variables in Windows 11. It will help you determine which ones are legitimate and which not.

    You may also print environment variables using PowerShell to make things even easier.

    For any other questions or suggestions, don’t hesitate to use the comments section below and leave a line.

    Microsoft will offer free Enterprise Data Protection (EDP) to Entra users and an ad-free Copilot Experience

    Microsoft is now offering free enterprise data protection for users of Microsoft Copilot with Microsoft Entra accounts. This move, announced in August 2024, is a testament to Microsoft’s commitment to safeguarding user data across its platforms.

    Microsoft’s Enterprise Data Protection (EDP) isn’t a new concept; it’s been around, providing businesses of all sizes with the tools to protect their data within the Microsoft 365 ecosystem. The free expansion of EDP to Microsoft Copilot users means that the prompts you enter and the responses generated by Copilot are shielded under the same robust contractual terms and commitments that Microsoft applies to other services like Outlook and SharePoint.

    With this update, Microsoft ensures data encryption at rest and in transit, alongside stringent physical security controls and data isolation between tenants. Plus, with support for GDPR and ISO/IEC 27018, Microsoft’s commitment to privacy is straightforward and robust.

    But it’s not just about keeping data locked up. The access controls and policies you’ve set up apply to Copilot, too. Your identity model, permissions, sensitivity labels, and retention policies extend to how Copilot interacts with your data.

    With EDP in Microsoft Copilot:  

    • We secure your data: We help protect your data with encryption, at rest and in transit, rigorous physical security controls, and data isolation between tenants.  
    • Your data is private: We won’t use your data except as you instruct. Our commitments to privacy include support for GDPR, ISO/IEC 27018 [4], and the Data Protection Addendum.
    • Your access controls and policies apply to Copilot [5]: Prompts and responses are logged, retained, and available for audit, eDiscovery, and advanced Microsoft Purview capabilities. The specific controls will vary depending on the underlying subscription plan. 
    • You are protected against AI security risks: We help safeguard against AI-focused risks such as harmful content and prompt injections.   
    • Your data isn’t used to train foundation models: Prompts and responses are not used to train foundation models.  

    One aspect that particularly stands out is the protection against AI security risks. In an era where AI is both a powerful tool and a potential threat, Microsoft’s proactive measures to safeguard against harmful content and prompt injections are commendable. And for those concerned about their data being used to train AI models, Microsoft clarifies that Copilot uses the user’s context to create relevant responses without feeding your data into foundation models.

    In addition to enhancing data protection, Microsoft is also rolling out a simplified, ad-free Copilot experience focused on work and education customers. This streamlined interface, set to launch in mid-September, promises to make it easier for users to leverage Copilot’s capabilities without the clutter of ads and irrelevant features.

    It is recommended that IT admins enable in-app access to Microsoft Copilot by pinning it. This step ensures that users across the organization benefit from the enhanced security and user experience updates. Microsoft has also prepared an FAQ page for those looking to dive deeper into these updates, providing a valuable resource for admins and users alike.

    Microsoft’s latest updates to Copilot, including the extension of Enterprise Data Protection and the introduction of a simplified user interface, mark a significant stride in data security and user experience. Whether you’re an IT professional managing an organization’s data protection strategy or a user relying on Microsoft’s suite of services for productivity, these updates offer peace of mind and a more focused, secure way to leverage AI-driven assistance.

    In other news, the Redmond-based tech giant will introduce prompt suggestions to Microsoft Copilot to encourage users to interact with the AI model more.

    What Is The Root Directory & How to Find it

    Understanding the root directory can be a bit daunting for beginners, but it’s a fundamental concept in navigating and managing your computer’s file system. Whether you’re using Windows, or Linux, or managing a website, knowing where the root directory is and how to access it is crucial.

    What is the root directory, and how does it work?

    What is a root directory?

    Root Directory is the highest-level directory in a computer’s file system. It’s like the trunk of a tree where all branches (other directories and files) originate from.

    The root directory contains all other directories and files on a system. Every file path starts from the root directory.

    For Unix-like operating systems, the root directory is often denoted by a slash (/). On Windows, each partition (like C:) has its root directory.

    How can I find my root directory?

    On Windows:

    1. Open File Explorer.
    2. Click on This PC or Computer in the left pane.
       this pc sidebar file explorer
    3. Double-click on the drive you want to access (e.g., C:).
      local disk c
    4. You are now at the root directory of that drive (e.g., C:).

    On Unix-like systems (Linux, macOS):

    1. Open a terminal.
    2. Type the following and press Enter: cd /
    3. You are now in the root directory.

    How do I access the root folder from the command line?

    1. Open the Command Prompt or Terminal.
    2. Use the cd command to navigate to the root directory.
    3. On Windows, type the following and press Enter: cd \
      cd root cmd
    4. On Unix-like systems, use the following command: cd /

    To learn more, we have a useful guide on how to change directories in CMD that might help you.

    How do I get to the root directory of a website?

    1. Identify that the root directory of a website contains essential files like index.html. It is also known as the web root or document root.
    2. Log in to your web hosting account.
    3. Navigate to the File Manager.
    4. Look for directories named public_html, www, or wwwroot. This is your root directory.

    Is C :\ A root directory?

    Yes, C:\ is the best example of a root directory. If you have multiple drives, such as C, D, and E, then both D:\ and E:\ can be considered root directories for their respective drives.

    Understanding the root directory is essential for efficient file management and system navigation.

    Now you can use your knowledge to open a folder in Command Prompt. To learn more about folder structure, we have a great guide on how to show the full directory path in title bar, so don’t miss it.

    Microsoft teases PowerToys Workspaces, a place where users can launch their entire digital workspace with a single click

    Launching your entire digital workspace with a single click will soon become a reality thanks to a new capability called PowerToys Workspaces. Microsoft developers have been working on it, and the new utility is set to revolutionize how we interact with our computers, especially for those who juggle multiple applications throughout our workday.

    What can you do with PowerToys Workspaces? You can group applications, arrange them like on your screen, and even add specific commands or arguments. Then, with a single click, you can launch this custom setup.

    Imagine having Visual Studio, Terminal, and Microsoft Edge all pop up in their designated spots on your screen, ready for you to dive back into work. It’s like having a personal assistant for your computer, ensuring everything is where you left it.

    However, according to the Windows Dev Chat presentation, which took place earlier this week, PowerToys Workspaces isn’t just about launching apps. It lets you capture existing layouts, even with apps on different monitors or minimized applications. You can specify window sizes, states, and more. This level of customization and efficiency promises to make our digital lives a whole lot easier.

    You might wonder, “When can I get it?” There’s no specific release date yet, but PowerToys tends to update pretty regularly, so it’s probably safe to say we won’t have to wait too long. Of course, this update will also improve the existing suite of PowerToys utilities.

    PowerToys Workspaces is set to be a game-changer. It’s not just for developers; anyone looking to streamline their digital workflow will find this tool invaluable. So, keep your eyes peeled for the PowerToys 0.84 update. It will make those repetitive tasks a breeze, giving you more time to focus on what truly matters.

    Meanwhile, PowerToys 0.83, which is one of the biggest updates in a while, is available to download and install.

    6 Simple Ways to Fix System Restore Greyed Out Issue

    Many readers have complained that they cannot create a System Restore on their Windows computer, as the System Restore option is greyed out.

    This could occur if System Protection is turned off, you are not logged in as an administrator, the computer has corrupt system files, security software interferes, or there is less disk space. To begin with, ensure you have logged in with an account with administrator rights.

    How can I fix the System Restore greyed out issue?

    1. Turn on System Protection

    1. Press Windows + R to open the Run window.System Properties - system restore greyed out
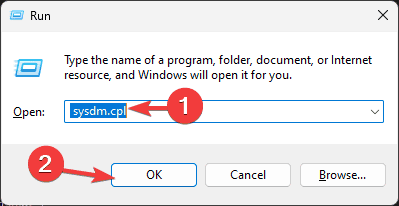
    2. Type sysdm.cpl and click OK to open the System Properties.
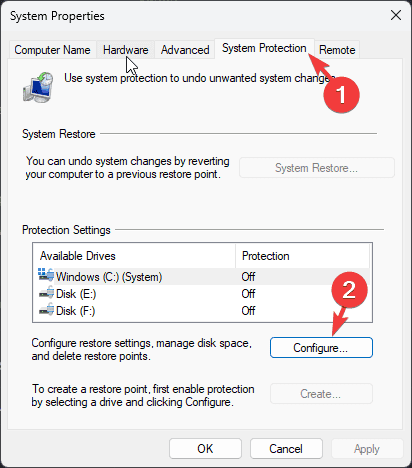
    3. Go to the System Protection tab and click the Configure button. Configure - system restore greyed out
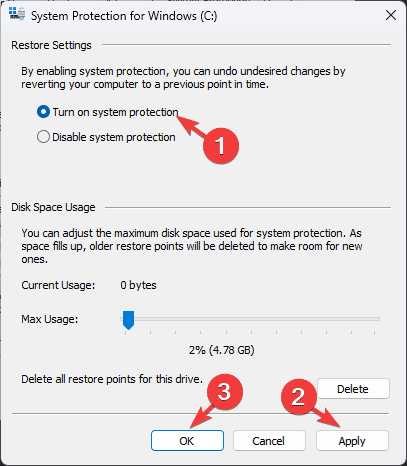
    4. On the following window, place a checkmark next to Turn on system protection, then click Apply and OK.Turn on system protection

    2. Set the Volume Shadow Copy Service to automatic

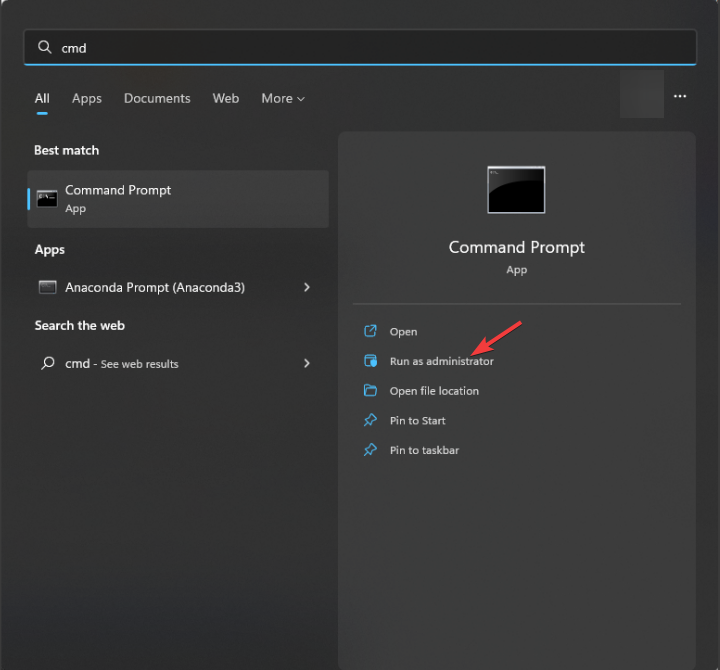
    1. Press the Windows key, type cmd in the search box, and click Run as administrator.CMD elevated - system restore greyed out
    2. Copy & paste this command and hit Enter: %windir%\system32\rundll32.exe /d srrstr.dll,ExecuteScheduledSPPCreation

    The Volume Shadow Copy Service might not be running in the background therefore you need to start it. To do so, follow these steps:

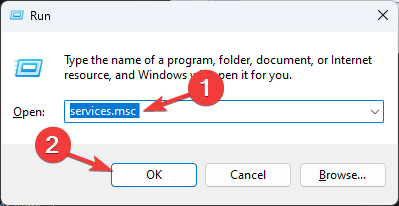
    1. Press Windows + R to open the Run window.Services message
    2. Type services.msc and click OK to open the Services app.
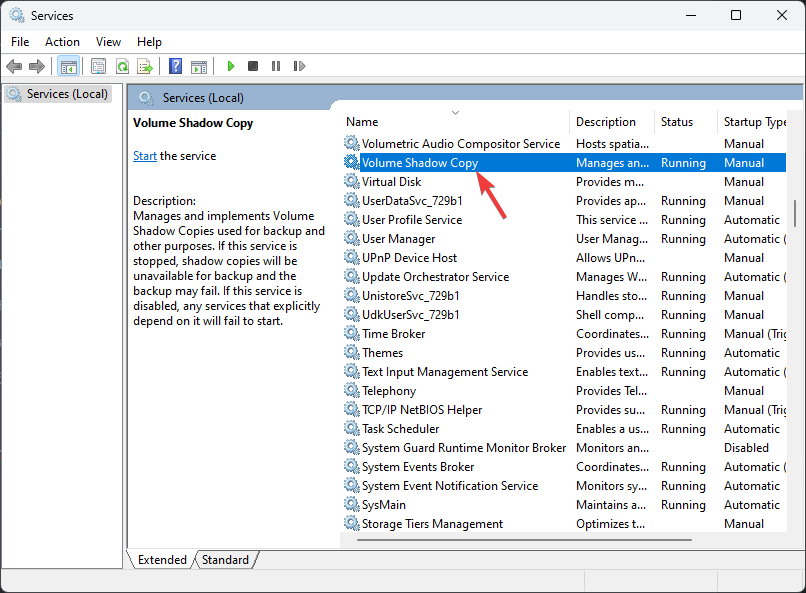
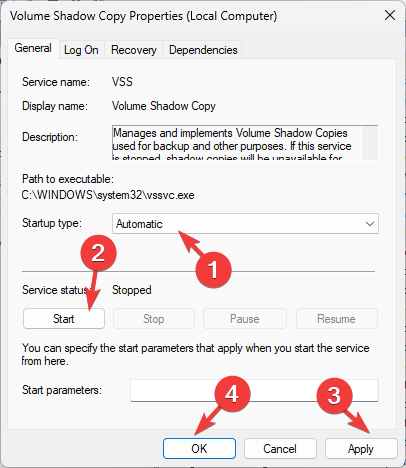
    3. Locate and double-click the Volume Shadow Copy Service to open properties.Volume Shadow - system restore greyed out
    4. On the following window, select Automatic for Startup type, then locate and click Start under Service Status.Volume Shadow Automatic - system restore greyed out
    5. Click Apply and OK to save the changes.

    3. Using the Windows PowerShell

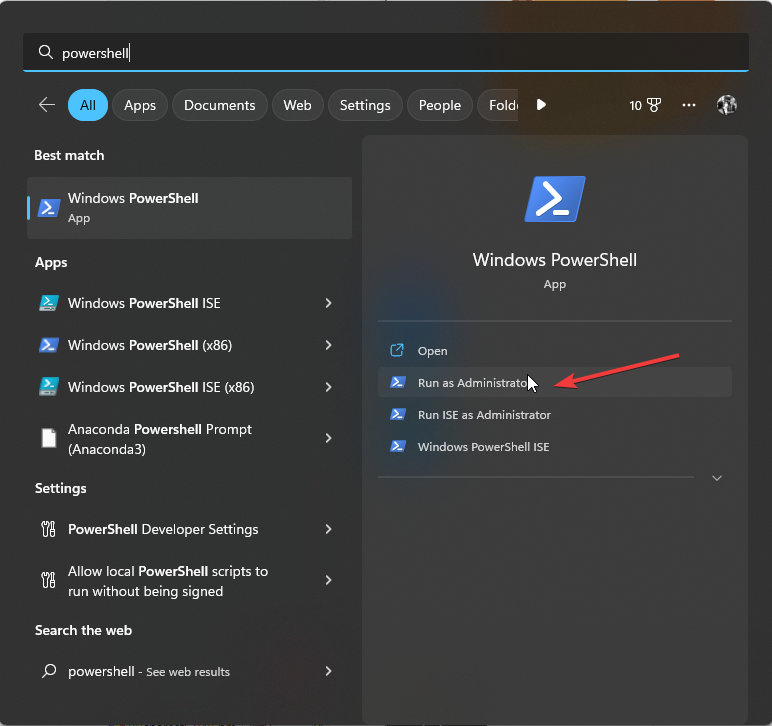
    1. Press the Windows key, type powershell in the search box, and click Run as administrator.Powershell - system restore greyed out
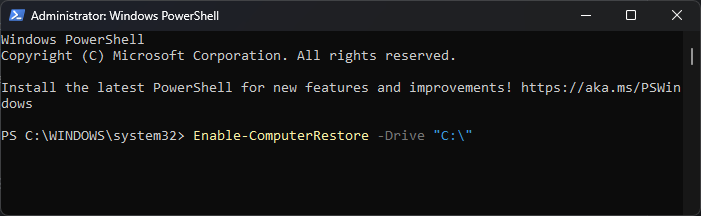
    2. Type the following command after replacing C with the system drive letter on your computer and hit Enter: Enable-ComputerRestore -Drive "C:\"Enable System Restore
    3. If you want to disable these settings again, you can copy & paste this command after replacing C with the system drive letter on your computer and press Enter: Disable-ComputerRestore -Drive "C:\"

    4. Using the Registry Editor

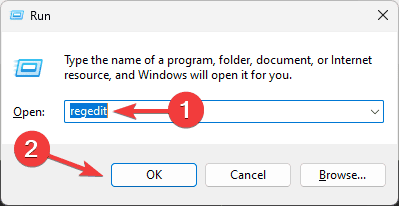
    1. Press Windows + R to open the Run window.Regedit - system restore greyed out
    2. Type regedit and click OK to open the Registry Editor app.
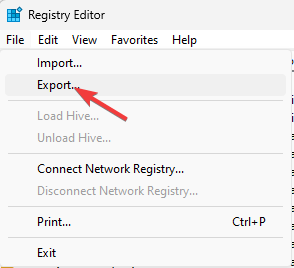
    3. Before making changes, you should backup registry entries. To do so, go to File, then click Export. On the following window, name the .reg file and save it to an accessible location.File - Export
    4. Go to this path: Computer\HKEY_LOCAL_MACHINE\SOFTWARE\Policies\Microsoft\Windows NT\SystemRestore
    5. Alternatively, you can copy and paste this path into the Registry Editor’s address bar.
    6. On the right pane, locate Disableconfig and DisableSR, press Ctrl, then select them both and press Delete on your keyboard.
    7. Click Yes on a prompt confirming the choice.

    5. Using the Group Policy Editor

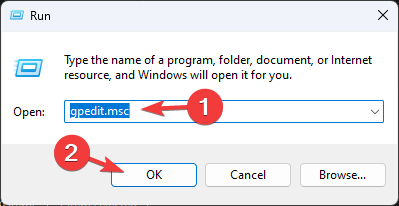
    1. Press Windows + R to open the Run window.GPEDIT MSC RUN - system restore greyed out
    2. Type gpedit.msc and click OK to open the Group Policy Editor app.
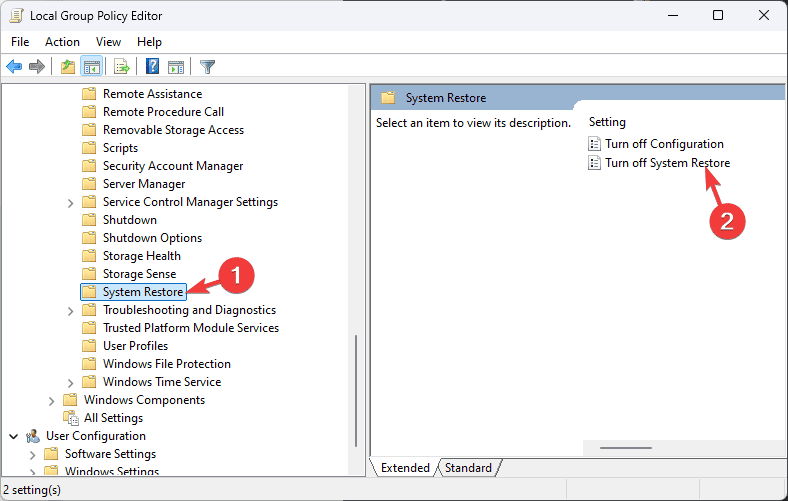
    3. Go to this path: Computer Configuration\Administrative Templates\System\System Restore
    4. Locate and double-click the Turn off System Restore policy to open its properties. Turn off System Restore - system restore greyed out
    5. On the following window, select Disabled.Disabled
    6. Click Apply, then OK.
    7. Reboot your computer to let the changes take effect.

    Disabling System Restore policy from Group Policy Editor can also help you fix the restore point not working on Windows 10; read this guide to learn more.

    6. Using the Command Prompt

    1. Press the Windows key, type cmd in the search box, and click Run as administrator.CMD elevated - system restore greyed out
    2. Copy & paste these commands one by one and hit Enter after every command:
      • reg delete "HKLM\SOFTWARE\Policies\Microsoft\Windows NT\SystemRestore" /v "DisableSR" /f
        reg delete "HKLM\SOFTWARE\Policies\Microsoft\Windows NT\SystemRestore" /v "DisableConfig" /f
        reg add "HKLM\SOFTWARE\Microsoft\Windows NT\CurrentVersion\SPP\Clients" /v " {09F7EDC5-294E-4180-AF6A-FB0E6A0E9513}" /t REG_MULTI_SZ /d "1" /f
    3. Close the Command Prompt window and restart your computer to save the changes.

    These methods allow you to easily enable System Protection and quickly create System Restore points whenever needed, ensuring you can restore your system settings if unexpected issues arise.

    If while restoring your system to a previous setting, you get the System Restore did not complete successfully. Your computer’s system files were not changed message, it could be due to conflicting apps, driver issues, or startup apps; read this guide to learn quick solutions.

    If you have any questions or suggestions on the topic, feel free to mention them in the comments section below.

    The latest Build 27686 finally introduces the new Windows Sandbox Client Preview

    Microsoft released the latest Windows 11 Insider Preview Build 27686 to the Canary Channel with significant new features, enhancements, fixes, and changes. Let’s take a look.

    First off, the spotlight is on the Windows Sandbox Client Preview. This feature, filled with all the tech goodies, lets users play with it without messing up the actual system. This new preview, updated via the Microsoft Store, has some cool features. We’re talking about runtime clipboard redirection, audio/video input control, and the ability to share folders with the host at runtime. And for those who love tinkering with commands, there’s a super early version of command line support. Just a heads-up, though: the commands might change over time. If you want to enable it, follow our comprehensive guide.

    Now, onto the changes and improvements. Some features previously rolled out to Insiders in the Canary Channel might disappear as newer builds come into play. But here’s the good news: optimizations have been made to improve battery life for PCs running Build 27686 and beyond in the Canary Channel. And if you’re not seeing the battery life you expected, the Feedback Hub is your go-to place to voice out.

    In response to feedback, there’s now a detach virtual hard disk (VHD/VHDx) button in Settings, making it a breeze to detach your VHD/VHDx as needed. Plus, for those interested in network performance, your device might run network tests in the background to collect diagnostic data, using a small amount of data and only on non-metered connections.

    For command-line enthusiasts, there’s a treat, too. The FAT32 size limit for formatting disks has been increased from 32GB to a whopping 2TB. Talk about an upgrade, right?

    But, as with all things tech, it’s not all smooth sailing. There are a few issues, such as the emoji panel closing unexpectedly or the Windows Hello pin and biometrics getting a bit wonky on new Copilot+ PCs joining the Canary Channel. That’s what feedback and updates are for to improve things step by step.

    You can read the full changelog of the Build 27686 here.

    Fix: The Operation Cannot Be Performed Because The Message Has Been Changed

    Many people have reported encountering the operation cannot be performed because the message has been changed issue on Microsoft Outlook while sending an email. This could appear due to corrupt installation of Microsoft Office, incorrect Outlook settings, or issues with add-ins.

    First, save the email as a draft and wait for some time, then try to send it again. If you are still facing the problem, try the fixes mentioned below.

    How can I fix the operation cannot be performed because the message has been changed issue?

    1. Delete the add-ins

    1. On the Outlook app, go to File.File tab - the operation cannot be performed because the message has been changed
    2. Click Options.OPtions -
    3. From the left pane, select Add-ins, and you will get all the add-ins in Microsoft Office.
    4. Click Go.Add-ins Go
    5. In the following window, select the add-ins and click Remove.Remove Add-ins - the operation cannot be performed because the message has been changed
    6. Once done, click OK to save the changes.
    7. Restart Outlook and try sending the message.

    2. Turn off the Conversation Clean Up option

    1. On the Outlook app, go to File.File tab - the operation cannot be performed because the message has been changed
    2. Click Options.OPtions -
    3. Select Mail from the left pane.
    4. Locate Conversation Clean Up and remove the checkmark from all the options available in the section.Mail - the operation cannot be performed because the message has been changed 
    5. If you don’t want to do that, remove the tickmark next to the When a reply modifies a message, don’t move the original option.When a reply modifies a message, don’t move the original
    6. Click OK to save the changes.

    3. Updating the IMAP path prefix

    1. On the Outlook app, go to File.File tab - the operation cannot be performed because the message has been changed
    2. Click Account Settings, then select Account Settings.Account Settings
    3. On the following window, double-click the email address.Double-click the email address - he operation cannot be performed because the message has been changed
    4. Click More Settings.
    5. Select the Advanced tab.
    6. Locate the Folder Settings section, for the Root folder path field, and type Inbox.Root folder path
    7. Click Next, then click OK to save the changes.

    4. Disable autosave in Outlook

    1. On the Outlook app, go to File.File tab - the operation cannot be performed because the message has been changed
    2. Click Options.OPtions -
    3. Select Mail from the left pane.
    4. Scroll down to find the Save messages section, and remove the checkmark next to Automatically save items that have not been sent after this many minutes.Mail - Automatically save items that have not been sent after this many minutes - the operation cannot be performed because the message has been changed
    5. Click OK to save the changes.

    5. Repair the Microsoft Office app

    1. Press Windows + R to open the Run window.APPWIZ RUN COMMAND with signs - the operation cannot be performed because the message has been changed
    2. Type appwiz.cpl and click OK to open the Programs and Features window.
    3. In the Programs and Features window, select the Microsoft Office app and click Change.change - the operation cannot be performed because the message has been changed 
    4. Click Yes on the UAC prompt.
    5. Select Quick Repair and click the Repair button.Repair Office
    6. Click Repair again to initiate the process.

    Repairing the Microsoft Office can also help you restore the Microsoft Office app, if it is missing from your Windows computer.

    You can also use the Microsoft SARA (Support and Recovery Assistant) tool to fix the Microsoft Office and Windows issues. All you need to do is download the tool, run the setup and follow the on-screen instructions to complete the process.

    If this doesn’t work, you can reinstall Microsoft Office to fix the operation cannot be performed because the message has been changed.

    In conclusion, to fix this Outlook error, you can disable the Conversation Clean Up option, remove the add-ins, and repair the Microsoft Office app.

    If you are unable to open any of the Microsoft Office apps, it could be due to corrupt installation files; read this guide to learn the solutions.

    If you have any questions or suggestions about the topic, feel free to mention them in the comments section below.

    Everything You Should Know About Bootrec.exe

    If you are dealing with a device that fails to boot or you are encountering issues with dual-boot setups, you can use Bootrec.exe commands to repair the boot process. Let’s learn more about this command and its primary functions.

    What is Bootrec.exe?

    Bootrec.exe is a command-line tool included in the Windows Recovery Environment (WinRe). It is designed to address and fix system boot process-related issues, such as boot failures and system crashes.

    You can repair the Master Boot Record (MBR), fix damaged boot sectors, rebuild the Boot Configuration Data (BCD), and scan for missing operating systems.

    How can I access Bootrec.exe?

    Note icon NOTE
    You can’t directly access Bootrec.exe; you need to create an installation media and change the boot order first.

    1. Create an installation media

    1. Visit the official Windows 10 download site.
    2. Click the Download Now button.Download now - upgrade from 32-bit to 64-bit version of windows 10
    3. Choose the download location on your device and click Save.
    4. Once the file is downloaded, double-click to launch the setup.
    5. Click Accept to agree to license terms.Windows 10 setup
    6. Choose Create installation media (USB flash drive, DVD, or ISO file) and click Next.Create installation media
    7. On the next screen, remove the checkmark next to Use the recommended options for this PC.Setup Recommedned language and setting - upgrade from 32-bit to 64-bit version of windows 10
    8. Then, Select the following and click Next:
      • Language – The language you want to use on the PC
      • Edition – Choose the same edition of Windows
      • Architecture – 64-bit (x64)
    9. Select the USB flash drive option and click Next.Choose USB drive
    10. Choose the USB drive connected to your device, and click Next to let Windows 10 prepare the flash drive. Choose the USB drive
    11. You will get a notification after the process completes, and click Finish to close the setup.Click Finish - how to upgrade from 32-bit to 64-bit version of windows 10

    If don’t have the USB drive or disc handy, you can follow these steps to use Bootrec.exe without CD and fix the MBR issues on Windows 10/11.

    2. Change the boot order

    1. Press Windows + I to open the Settings app.
    2. Click Update & Security.Update &; Security - upgrade from 32-bit to 64-bit version of windows 10
    3. From the left pane, select Recovery.
    4. Locate Advanced Startup, and click Restart now.Restart now
    5. On the Choose an Option screen, select Troubleshoot.Troubleshoot
    6. Click Advanced options.Advandcec options - upgrade from 32-bit to 64-bit version of windows 10
    7. Select UEFI Firmware Settings.UEFI settings
    8. Click Restart.Restart to entter BIOS mode - how to upgrade from 32-bit to 64-bit version of windows 10
    9. In the BIOS menu, go to Boot, then select the USB drive to change the boot order.
    10. Press F10 to save and exit.

    3. Use the bootrec command

    1. Now that your computer will boot using a USB drive, the Windows 10 Setup screen will appear.
    2. Click Repair your computer.
    3. On the Choose an Option screen, select Troubleshoot.Troubleshoot
    4. Click Advanced options.Advandcec options - upgrade from 32-bit to 64-bit version of windows 10
    5. Select Command Prompt to launch the Command Prompt window.
    6. Now, use any of the Bootrec commands to fix the booting issues.

    Primary functions and their use

    PurposeCommand Description & Use
    Fix MBR (Master Boot Record)bootrec /fixmbrRepairs the MBR of the system partition. This can be useful if the MBR is corrupted or overwritten by another operating system’s boot loader.
    Fix Boot Sectorbootrec /fixbootWrites a new boot sector to the system partition, allowing you to resolve issues related to a corrupted or damaged boot sector.
    Rebuild BCD (Boot Configuration Data)bootrec /rebuildbcdScans for installed Windows installations and allows you to add them to the BCD store. This can be useful if the BCD is corrupted or missing and prevents Windows from booting.
    Scan OS Installationsbootrec /scanosScans for installed Windows operating systems(OSs) not currently listed in the BCD and help identify OSs present but not properly configured in the boot manager.

    Bootec.exe is a powerful command, so it should be used carefully. Remember to back up your important data, use the correct commands, and always use them in a sequence; start with bootrec /fixmbr, followed by bootrec /fixboot, then bootrec /scanos, and finally bootrec /rebuildbcd

    In case the Bootrec command is not recognized on your Windows 11, read this guide to find solutions.

    If you have any suggestions or concerns about the subject, feel free to mention them in the comments section below.

    How To Use the Magnifier in Windows 10 – Quick Guide

    Wondering how to use the magnifier in Windows 10? The steps are simple.

    Windows 10 has accessibility tools that make computing easier for everyone. The Magnifier allows you to zoom in on different parts of the screen. This feature benefits users with low vision, the blind, and anyone who needs to look closely at something on the screen, such as tiny text or detailed images.

    But before we begin, where is the tool located?

    How To Access the Magnifier Tool

    You can find this feature in three ways:

    1. Using keyboard shortcuts: The quickest way to launch the Magnifier is by pressing the Windows key and the + key together.
    2. Using the Start menu: Type “Magnifier” in the Start menu search bar and open it from the results.
    3. Through the Settings menu: Press Windows + I to open Windows settings > Ease of Access > Magnifier > Turn on magnifier.

    How To Use the Magnifier in Windows 10

    Here’s how to use it:

    Reading

    Follow the below steps:

    1. Ensure you have access to the magnifier.
    Access to the magnifier
    1. To start reading from the cursor, press Ctrl + Alt + Enter.
    Press Ctrl + Alt + Enter
    1. Alternatively, press and hold Ctrl + Alt and left-click where you want to start using your mouse.
    Ctrl + Alt and left-click
    1. Press Ctrl + Alt + K to read the next sentence only.
    2. Press Ctrl + Alt + H to read the previous sentence only.
    3. Press any key to stop reading.
    4. Press the Windows Icon + plus sign to increase the Zoom level, or tap the “+” icon on the magnifier. The magnifier can zoom up to 1600%.
    Increase the Zoom level
    1. To reduce the zoom level, press the Windows icon + – or tap the “-” icon on the magnifier.
    Reduce the zoom level

    Choose the Reading Modifier Key

    By default, this key combination is set to Ctrl + Alt, but you can customize it in the Magnifier settings if you prefer a different combination. You can use a Mouse or keyboard and a narrator.

    Using a Mouse

    Follow the below steps:

    1. Tap the Start button then click the Settings gear.
    Settings
    1. Tap Ease of Access.
    Ease of Access
    1. Select Magnifier, scroll down to Reading, click the drop-down menu, then choose a modifier key.
    Reading modifier key

    Using Keyboard and Narrator

    Follow these instructions:

    1. Press the Windows key + Ctrl + M. The magnifier setting will open.
    Magnifier setting
    1. Press the Tab key repeatedly until you hear “Reading, choose a modifier key” and the option that’s currently selected.
    Choose a modifier key
    1. Press Enter to open the menu, use the Up and Down arrow keys to pick your desired key, and then hit Enter. 
    Pick a modifier key

    Change Magnifier View

    The Magnifier in Windows 10 offers several viewing options to enhance your screen experience.

    Press:

    1. Ctrl + Alt + I to invert colors.
    Ctrl + Alt + I
    1. Ctrl + Alt + F to switch to full-screen mode. However, the magnifier has this mode by default.
    Ctrl + Alt + F
    1. Ctrl + Alt + L to switch to lens mode.
    Ctrl + Alt + L
    1. Ctrl + Alt + D to switch to docked mode.
    Ctrl + Alt + D

    So, now you know how to use the Magnifier tool in Windows 10. You can zoom in on small details, adjust your view, or customize reading options. These functions and shortcuts can help you tailor the Magnifier to suit your needs.

    How to Upgrade From 32-Bit to 64-Bit Version on Windows 10

    Upgrading from a 32-bit to a 64-bit version of Windows can provide significant performance improvements and enable you to utilize more RAM, which can be helpful if you often use modern applications or handle large files.

    However, it is not a simple process, as it is not like installing a regular update; you need to clean install the 64-bit version of Windows 10 to upgrade it from 32-bit. Read on to learn the detailed steps!

    How can I upgrade from a 32-bit to a 64-bit version of Windows 10?

    Note icon NOTE
    Before moving to the steps, ensure you have access to your Windows 10 license key, if needed, and a USB drive with 8 GB free space (try getting the one with no data).

    1. Check your PC’s compatibility

    1. Press Windows + I to open the Settings app.
    2. Go to System.System Windows 10 - How to Upgrade From 32-Bit to 64-Bit Version on Windows 10
    3. From the left pane, select About.Start type
    4. Under Device specifications, check System type. You might see one of these options:
      • 32-bit operating system, x86-based processor – Your computer has a 32-bit processor and can’t be upgraded to a 64-bit operating system on Windows 10.
      • 32-bit operating system, x64-based processor – Your computer has a 32-bit processor but can be upgraded to a 64-bit operating system on Windows 10.
      • 64-bit operating system, x64-based processor – You already have the 64-bit version of Windows 10.

    If you find that you have a 32-bit operating system, x86-based processor and can’t upgrade to 64-bit but want to run a 64-bit program on 32-bit Windows, we have a detailed guide to help you.

    2. Backup your data

    The upgrading process includes a clean installation, which will delete the primary storage; therefore, you must back up all your important data.

    You can use an external drive or an online cloud service like OneDrive to carefully transfer your important data, including files, documents, photos, and videos. You can use free backup tools to save your data if you prefer not to do so.

    3. Create an installation media

    1. Go to the official Windows 10 download site.
    2. Click the Download Now button.Download now - upgrade from 32-bit to 64-bit version of windows 10
    3. Choose the download location and click Save.
    4. Once the file is downloaded, double-click the MediaCreationTool.exe file.
    5. Click Accept to agree to license terms.Windows 10 setup
    6. Select Create installation media (USB flash drive, DVD, or ISO file) and click Next.Create installation media
    7. On the next screen, remove the checkmark next to Use the recommended options for this PC.Setup Recommedned language and setting - upgrade from 32-bit to 64-bit version of windows 10
    8. Select the following and click Next:
      • Language – The language you want to use on the PC
      • Edition – Choose the same edition of Windows
      • Architecture – 64-bit (x64)
    9. Select USB flash drive and click Next.Choose USB drive
    10. Choose the USB drive connected to your device, and click Next to let Windows 10 prepare the flash drive. Choose the USB drive
    11. Once it is done, you will be notified, and you can click Finish to complete it.Click Finish - how to upgrade from 32-bit to 64-bit version of windows 10

    4. Change the boot order

    1. Press Alt + F4 and select Shut down to turn off your computer.
    2. Plug in the USB flash drive and turn on your computer.
    3. If your computer boots into Windows, you must change the boot order in your BIOS or UEFI.
    4. Press Windows + I to open the Settings app.
    5. Click Update & Security.Update &; Security - upgrade from 32-bit to 64-bit version of windows 10
    6. From the left pane, select Recovery.
    7. Locate Advanced Startup, and click Restart now.Restart now
    8. On the Choose an Option screen, select Troubleshoot.Troubleshoot
    9. Click Advanced options.Advandcec options - upgrade from 32-bit to 64-bit version of windows 10
    10. Select UEFI Firmware Settings.UEFI settings
    11. Click Restart.Restart to entter BIOS mode - how to upgrade from 32-bit to 64-bit version of windows 10
    12. In the BIOS menu, go to Boot, then select the USB drive to change the boot order.
    13. Press F10 to save and exit.

    5. Perform a clean installation

    1. Once your computer boots up, you will see the Windows Setup screen; click Next.
    2. Click Install Now.
    3. Select I don’t have a product key or Skip for now.I don'
t have the product key
    4. If prompted, choose the Windows 10 edition to install and click Next.
    5. Click I accept the license terms, then click Next.
    6. Select Custom: Install Windows only (advanced).Custom advanced
    7. Choose the drive and partition where the Windows 10 operating system is currently installed, then click Next.Select disk partition
    8. Follow the on-screen instructions to complete the process.

    6. Install the Windows updates

    1. Press Windows + I to open the Settings app.
    2. Go to Update & Security.Update &; Security - upgrade from 32-bit to 64-bit version of windows 10
    3. Select Windows Update, then click Check for updates.
    4. Once installed, click Restart to complete the process.

    To ensure the drivers are updated, you can either try using a third-party driver updater and fixer, as it is a quick solution to easily update the drivers on your computer, or head to the manufacturer’s official website and manually install the driver!

    Once all the drivers and Windows updates are installed, you can move the files from your external storage or cloud to your PC. You can also open the Microsoft Store to install the 64-bit versions of the applications on your computer.

    In case you want to upgrade from the 32-bit version of Windows 7 and 8 to 64-bit Windows without formatting, we have a detailed guide.

    If you have any suggestions or concerns about the subject, feel free to mention them in the comments section below.

    What Is Virtual Machine Manager? – Hypervisors Explained

    Wondering what is a virtual machine manager? Keep reading!

    Virtual computing devices, like Windows, Mac, Linux, etc., have become highly popular among IT professionals, businesses, developers, and content creators. This technology allows you to set up and use multiple types of computers from the local PC or an online server.

    That’s where a virtual machine manager (VMM) steps in. It’s at the core of operating system and hardware virtualization.

    If you’re new to virtual computers, read the article until the end to learn all about them and their benefits.

    What Is a Virtual Machine Manager?

    A virtual machine manager supplies the necessary virtualization programs and interfaces for virtual computers. It’s like a central control system from which you can control many local and virtual desktops. Also, a VMM tool efficiently partitions system drives, CPU, RAM, GPU, network card, audio system, etc., and distributes these resources.

    a virtual machine manager

    You might come across the following alternative names:

    • Hypervisor
    • Virtualization layer
    • Virtual machine monitor
    • Virtualization software
    • Platform virtualization software
    • OS virtualization software.

    A VMM also lets you customize the allocated resources of an existing virtual PC for performance tweaking and troubleshooting. Moreover, you can encrypt your virtual devices to prevent unauthorized access to hardware and software.

    Types of VMMs or Hypervisors

    Primarily, there are two types. I’ve outlined their description and examples below:

    Type 1 Hypervisors (Bare-Metal Hypervisors)

    These run directly on the computation hardware, similar to a Windows 11 OS. The only difference is a Windows OS sets up only one computer whereas a Type 1 Hypervisor sets up an environment where you can configure more than one operating system.

    Moreover, Type 1 virtual machine managers are extremely fast and highly reliable since they can access system hardware directly without the intervention of a host operating system. For this reason, you’ll mostly find such a VMM in data centers, managed virtual desktop service-providing platforms, large organizations, etc.

    Here are some examples of Type 1 VMMs:

    • VMware ESXi
    • Xen / Citrix Hypervisor
    • Oracle VM Server for x86
    • Red Hat Enterprise Virtualization (RHEV)
    • Microsoft Hyper-V.

    Installing and managing them has a steep learning curve. Often, businesses hire highly skilled professionals for this job.

    Type 2 Hypervisors (Hosted Hypervisors)

    Type 2 VMMs run on top of an operating system, like Windows, Mac, Linux, etc. Hence, their performance is poorer than Type 1 Hypervisors.

    However, configuring them is much easier. It’s just like installing any other third-party app. Also, these tools mainly contain a graphical user interface with adequate instructions so anyone with basic computer knowledge can set up a virtual computer in less than an hour.

    Here are some popular examples:

    • VMware Workstation
    • Oracle VirtualBox
    • Parallels Desktop
    • Windows Hyper-V.

    Example of a Windows VMM

    Hyper-V Manager on Windows is the built-in virtualization software for Windows 11 and 10 PCs. It’s available for free for Windows Pro and Enterprise OS editions users.

    Since Microsoft ships the tool as embedded in select editions, you don’t need to license your individual or commercial use cases.

    However, you might not find the tool readily in the installed programs list. You’ll need to enable it from the Windows Features tool.

    It has a fairly simple graphical user interface with adequate instructions. However, the virtual hardware customization options are limited. Find below the major features of Hyper-V Manager:

    Hyper-V Manager on Windows
    • A Quick Create menu that allows you to create Windows 10, 11, and Ubuntu virtual machines from an online image server hosted by Microsoft.
    • A New Virtual Machine wizard that lets you create a virtual machine from scratch by assigning virtual RAM, ROM, network, etc.
    • You can also import a virtual desktop from a third-party VMM or a local directory.
    • There’s a Connect to Server feature for linking up with remote virtual machines on a third-party server.

    How Does a Virtual Machine Manager Work?

    A VMM creates a virtualization layer on top of the host operating system. Then, it utilizes the host device’s hardware resources and partially distributes those to one or many virtual PCs. For it to work seamlessly, you must enable the Intel Virtualization Technology (VT-x) feature for your host CPU. You can do so from the UEFI or BIOS interface.

    A modern tool like VMware Workstation comes with many functionalities so you can create a wide variety of virtual machines. Find some of the common VMM components of this leading hypervisor tool below:

    Virtual Machine Wizard

    It guides you through all the steps of virtual machine configuration from start to end. You can choose between Typical and Custom modes depending on your VM requirements. For most users, Typical is the best option since it configures most of the complicated virtual layers in the backend.

    Virtual Machine Wizard

    It also asks you for the ISO image of the OS disc and tests the bootable media automatically for errors. You can also choose to install the OS later. The best thing about the setup wizard is that you can choose from the following guest operating system types:

    • Microsoft Windows
    • Linux
    • Apple Mac OS X
    • VMware ESX

    They all include many editions so you won’t come across any problems for backward compatibility.

    A Library of VMs

    You’ll find a virtual machine library listing all the virtual desktops you’ve added to the VMM. If you’ve created them on top of the local PC, they’ll show below the My Computer header.

    A Library of VMs

    If you’ve imported VMs from remote servers, those will also show up below the server IP address trees. You can quickly open a VM by clicking on the library.

    Advanced VM Settings

    The VM Settings dialog allows you to customize hardware and software options at the granular levels.

    In the Hardware tab, you can personalize the values and preferences for Memory, Processors, Hard Disk, CD/DVD, Network Adapter, USB Controller, Sound Card, Printer, Display, and TPM.

    vmware hardware

    From the Options tab, you can customize the preferences for Power management, Shared Folders, Snapshots, AutoProtect, Guest Isolation, Access Control, VMware Tools, VNC Connections, Autologin, etc.

    vmware software

    You can adjust these settings for a new or existing VM whenever you want.

    Ad Hoc VM Controls

    Often VMs get stuck when processing complex problems. However, you don’t have the privilege to manually press any physical power button to restart or shut down the system. To overcome this bottleneck, modern VMMs like VMware include ad hoc power management tools.

    ad hoc power

    For instance, you can use the following commands in VMware Workstation:

    • Shut Down Guest
    • Suspend Guest
    • Restart Guest
    • Reset.

    If you need to access the BIOS of the VM, you can use the Power On to Firmware command.

    Virtual Machine Backup and Restore

    Premium VMMs like Vmware Workstation offer built-in backup and restore tools. You can take manual snapshots of a VM every day.

    Virtual Machine Backup and Restore

    Alternatively, you can set up a schedule of snapshots for automatic backup. You can use these to revert to a previous version if the latest VM gets corrupted.

    Advanced Display Settings

    Modern VMMs include various display settings. For example, the VMware Workstation comes with display scaling commands, like the following to modify the display area:

    display modes
    • Show or hide the library
    • Show or hide the thumbnail bar
    • Enter full screen mode
    • Free stretch.

    Interface for Device Connectivity and Data Transfer

    Modern VMMs can route the connections of external devices to the virtual machine. For this, the manager will show a dialog box to select whether you want to interface the external device to the host physical device or the guest OS.

    You can also use VMware Workstation to set up shared drives from and to guest operating systems. Also, you can easily copy and paste data from the host device to the virtual device using Ctrl + C and Ctrl + V commands.

    Why Should You Use a VMM?

    A virtual machine manager helps you with the following tasks:

    • Configure VMs using a command line or graphical user interface.
    • Keep all the VMs in one place for easier access.
    • Customize hardware resource allocation using a GUI.
    • Interface the virtual desktop with the USB controllers, Wi-Fi, Ethernet, etc.
    • Create snapshots of the VMs for backup and restore purposes.
    • Implement VM security settings like encryption to prevent unauthorized access.
    • Import remote VMs to the VMM library and save server credentials like user IDs, passwords, etc., for future use.

    Summary

    If you’re here, congratulations! Now, you should be able to answer the question “What is a virtual machine manager?”

    You might also want to learn what is CPU Virtualization & how to enable it in BIOS and how to fix VT-x to troubleshoot problems.

    What is Direct Memory Access: Benefits & Use Cases

    Direct Memory Access (DMA) is a crucial feature in computer systems that significantly enhances data transfer efficiency. If you’ve ever wondered how your system manages to handle large data transfers without bogging down the CPU, DMA is the answer. Let’s dive into the details of what DMA is and why it’s so important.

    What is Direct Memory Access (DMA)?

    What is meant by direct access memory?

    Direct Memory Access (DMA) is a feature in computer systems that allows hardware subsystems to access the main system memory independently of the CPU.

    It allows hardware devices like disk drive controllers, network cards, and sound cards to transfer data to and from memory without involving the CPU.

    By using DMA, the CPU can perform other tasks while data transfers occur in the background, improving overall system efficiency.

    How does DMA work?

    1. The CPU initializes the DMA controller by providing the data transfer parameters (e.g., source address, destination address, count of bytes).
    2. The DMA controller takes over the bus from the CPU and handles the data transfer directly between the device and the main memory.
    3. Once the data transfer is complete, the DMA controller sends an interrupt to the CPU to signal the completion.
    DMA chart

    What are the three types of direct memory access?

    • Burst Mode – It transfers the entire block of data in one go, the CPU is inactive during the transfer.
    • Cycle-Stealing Mode – The DMA controller transfers one byte of data per cycle while the CPU can perform tasks in between data transfers.
    • Transparent Mode – Transfers data only when the CPU is not using the bus, thus maximizing system efficiency as the CPU continues executing instructions.

    What are the different types of DMA controllers?

    • Single-Ended DMA: Handles a single address for both reading and writing.
    • Dual-Ended DMA: Can manage two addresses, one for reading and one for writing.
    • Arbitrated-Ended DMA: Reads and writes to multiple addresses.
    • Interleaved DMA: Reads from one address and writes to another.

    When should I use DMA?

    DMA should be used for slow tasks that rely on the CPU to communicate with memory or if the CPU can’t handle the rate of data transfer. Instead of handling the data, the CPU can focus on more important tasks.

    How do I disable direct memory access?

    Disabling DMA is not possible, since most modern hardware uses DMA daily.

    What are the benefits of a DMA?

    • Improved performance – Offloading data transfer to DMA frees up your CPU allowing it to focus on more important tasks. It will also lower the number of CPU cycles.
    • Faster data transfer – DMA offers higher data transfer rates, which makes it a better option for video streaming, network communications and other tasks that need frequent data transfer.
    • Lower power consumption – By freeing up the CPU to focus on other processes, the DMA reduces the overall power consumption of the device.
    • Improved responsiveness – By using DMA for data transfer the system can respond faster to user input and other events thus making the whole system faster.

    Understanding and implementing DMA can significantly boost your system’s performance, and we hope you found this guide informative.

    To learn more about memory, we have a great guide on what is RAM, and an article on Windows 11 RAM limit, so don’t miss them.

    If you’re looking to optimize your performance, we also have a guide that explains what happens if RAM is faster than CPU, so you might want to check it out.

    Win32 Disk Imager Alternative: Top 5 Novice-Friendly Options

    Searching for a Win32 Disk Imager alternative? You’ll find several options that offer unique features and advantages. Whether you’re looking for simplicity, advanced functions, or platform flexibility, there’s a tool that meets your needs.

    I’ll discuss five of the best alternatives, highlighting their pros and cons to help you make an informed choice.

    Let’s get into it!

    5 Best Win32 Disk Imager Alternatives

    Here are my picks!

    BalenaEtcher – Best Overall Performance

    BalenaEtcher

    BalenaEtcher is an alternative to Win32 Disk Imager, known for its simplicity and speed in flashing disk images to USB drives and SD cards. What sets it apart is its user-friendly interface, simplifying the process of creating bootable drives. 

    It’s designed to be accessible to users of all skill levels. The process is straightforward: select the image, target, and flash. 

    Select the image, target, and flash

    BalenaEtcher also features built-in validation, ensuring the disk image is correctly written to the drive without errors. Additionally, it’s cross-platform, so you can use it on Windows, macOS, and Linux. Win32 Disk Imager is limited to Windows, on the other hand.

    Cross-platform

    But that’s not all.

    BalenaEtcher is built with open-source tools. The code is publicly available for anyone to see, use, and contribute to. Best of all, it’s completely free to use.

    Pros:

    • User-friendly interface.
    • Cross-platform compatibility.
    • Built-in validation for error-free flashing.
    • Open-source and free to use.

    Cons:

    • Limited advanced customization options.

    Get BalenaEtcher

    Rufus – Best Feature-rich Option

    Rufus

    Rufus is a popular alternative to Win32 Disk Imager. It’s widely recognized for its simplicity and efficiency in creating bootable USB drives. However, it only supports Windows 8 or later versions.

    Unlike the Win32 Disk Imager, it doesn’t require an installation procedure. You only need to download the executable file to open it. Rufus also has advanced options like partition scheme selection, file system customization, and cluster size adjustments. It’s an excellent choice for beginners and advanced users. 

    Rufus features

    Additionally, it supports over 30 languages. You can also view all the logs through the show the log button.

    Show the log

    Pros:

    • Supports various file systems and partition schemes.
    • Portable, no installation required.
    • Advanced customization for experienced users.
    • Multi-language support.
    • Has log history.

    Cons:

    • It only supports Windows 8 and later.
    • Lacks built-in validation.

    Get Rufus

    UNetbootin – Best Free Option

    UNetbootin

    UNetbootin is a reliable Win32 Disk Imager alternative for users who need a straightforward way to create bootable USB drives. You can install various Linux distributions and other utilities without burning a CD. 

    UNetbootin is also cross-platform (Windows, macOS, and Linux) which gives it a broader appeal than Win32 Disk Imager. Its simple interface makes it accessible for users who might not be as tech-savvy. Also, its open-source ensures that the community continually updates and improves it. 

    UNetbootin  interface

    One of its standout features is downloading and installing Linux distributions directly from the Internet. Users can select their preferred OS from a list within the application.

    Different Linux versions

    Pros:

    • Cross-platform support.
    • Direct download and installation of Linux distributions.
    • Simple interface.
    • Open-source and regularly updated.

    Cons:

    • Limited to Linux and utility distributions.

    Get UNetbootin

    Fedora Media Writer – Best for Fedora Users

    Fedora Media Writer

    Fedora Media Writer is a specialized alternative for creating bootable USB drives to install Fedora, a popular Linux distribution. Unlike Win32 Disk Imager, a general tool for writing disk images to USB drives and SD cards, this is optimized specifically for Fedora installations. 

    One of the standout features is its automatic detection and configuration of USB drives.

    Fedora Media Writer

    After you install Fedora Media Writer, it prepares your flash drive to run a “Live” version of Fedora Workstation. This lets you boot Fedora directly from the flash drive and try it out immediately without permanently changing your computer.

    It can also create bootable drives for other Linux distributions, making it more versatile. It’s a great choice for users who primarily work with Fedora but also need a straightforward way to create bootable USB drives.

    Pros:

    • Optimized for Fedora installations.
    • Automatic detection and configuration of USB drives.
    • Can create bootable drives for other Linux distributions.
    • Simple and reliable for Fedora users.

    Cons:

    • Primarily focused on Fedora, less versatile for other OS.

    Get Fedora Media Writer

    USBImager – Best User-friendly Option

    USBImager

    USBImager is a lightweight and straightforward alternative to Win32 Disk Imager. It’s designed for users who need a simple tool for writing disk images to USB drives and SD cards. Unlike Win32 Disk Imager, which offers several features, USBImager focuses on flashing images to USB drives quickly and efficiently. 

    Flashing images to USB drives

    Its minimalistic design makes it easy to use, even for those with limited technical experience. Moreover, it’s highly portable, has a small file size, and requires no installation.

    Despite its simplicity, USBImager supports various image formats and is compatible with multiple operating systems, including Windows, Linux, and macOS.

    Pros:

    • Lightweight and portable.
    • No installation is required.
    • Supports various image formats.
    • Compatible with multiple operating systems.

    Cons:

    • Minimalistic with fewer features.
    • Lacks advanced customization.

    Get USBImager

    How I Chose the Best Win32 Disk Imager Alternative

    To identify the top alternatives, I considered several key factors that ensure the tools meet several user needs. Here’s a breakdown of the criteria I used:

    • Ease of use: I prioritized tools with intuitive interfaces suitable for beginners and advanced users.
    • Platform compatibility: I selected alternatives across multiple operating systems, including Windows, macOS, and Linux.
    • Feature set: I evaluated essential features like image validation, partition customization, and support for various file systems.
    • Performance: I focused on tools known for speed and efficiency in creating bootable drives or writing disk images.
    • Open-source availability: I preferred open-source options, which allow for community-driven improvements and transparency.
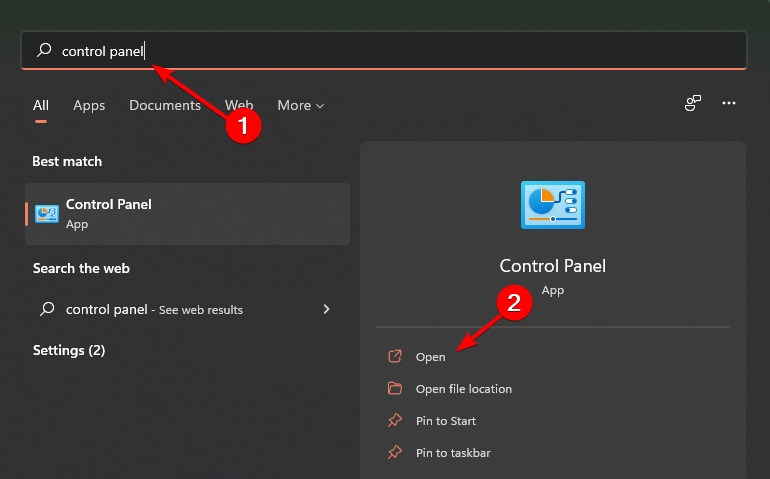
    Selecting the right Win32 Disk Imager alternative depends on your specific needs. Whether you prioritize simplicity, feature richness, or platform compatibility, these five options offer solid choices for different user requirements.

    You can also check out Rufus alternatives if you want to widen your search for a suitable app.

    What is Fdisk & Which Tasks Can it Perform?

    When it comes to managing your hard disk, understanding fdisk can be a useful tool, and in today’s guide, we’re going to show you everything you need to know about it.

    What is fdisk and how does it work?

    What is fdisk?

    FDISK is a disk utility included in all versions of MS-DOS, Windows, and Linux for formatting, partitioning, or deleting portions of a hard disk drive.

    It allows the creation of multiple partitions on a hard drive and can be used to prepare the disk for new operating systems or manage partitions on existing drives.

    In Linux, the FDISK utility provides commands to create, delete, resize, change, and move partitions.

    What does the fdisk do?

    Fdisk allows you to see the current partition table along with all partitions on a specific disk, including information about disk size, type, and other attributes.

    It also allows you to create partitions, delete them, and change their type. It can also be used to fix problems with corrupted partition tables.

    Basic Commands for FDISK in MS-DOS and Windows

    fdisk /mbr Rewrites the master boot record.

    fdisk 1/pri:100 Creates a 100 MB partition on the hard drive.

    fdisk 1/log:250 Creates a logical drive of size 250 MB.

    fdisk /status Shows the current status of the hard drive.

    fdisk /q Prevents the FDISK utility from automatically booting the system after exiting.

    Basic commands for fdisk in Linux

    sudo fdisk -l Views details of available disk partitions.

    sudo fdisk -l /dev/sda Views the partitions on a specific disk.

    sudo fdisk /dev/sda Starts FDISK to create or manage partitions on a specific disk.

    sudo fdisk -s /dev/sda Views the partition size.

    What replaced fdisk?

    Fdisk hasn’t been a part of Windows for a while, and modern versions of Windows don’t support it, so it has been replaced with diskpart.

    To learn more, we have an in-depth guide on diskpart commands, so you might want to check it out. However, fdisk is still available on Linux.

    Does fdisk erase data?

    No fdisk doesn’t delete data, but if you choose to create a new partition table on data that has files on it, all data will be erased.

    What is the limitation of fdisk?

    Fdisk works only with the MBR partition scheme, so if you’re using the GPT scheme you won’t be able to use fdisk.

    This means that you won’t be able to work with disks larger than 2TB. The command can’t be used to resize existing partitions, so you can’t change their size.

    It’s worth mentioning that fdisk doesn’t have a graphical interface, so using it can be hard for users who aren’t used to the command line.

    Lastly, fdisk doesn’t automatically align partitions for optimal performance on modern storage devices which can result in performance issues on SSDs.

    When to use fdisk?

    Fdisk is a legacy tool and in most cases, you’re better off using a different tool such as diskpart or gparted.

    By mastering fdisk you can effectively manage your disk partitions, but this is a legacy tool and you’ll be better off using a different application.

    For this purpose, don’t miss our guides on how to open Disk Management in Windows 11 and how to use it to split disk space in Windows 11.

    How to Transfer Data From One Internal Hard Drive To Another

    Transferring data from one internal hard drive to another can seem daunting, but with the right tools and methods, it can be a breeze. Whether you’re upgrading your storage or simply moving files, here’s a comprehensive guide to help you through the process.

    How can I transfer data from one internal hard drive to another?

    1. Manually copy and paste data

    1. Open File Explorer and go to the old drive.
    2. Select the files and folders you want to transfer (Ctrl + A to select all).
    3. Right-click on the selected files and choose Copy.
       copy windows 11
    4. Navigate to the new drive in File Explorer.
    5. Right-click in a space and choose Paste.
      paste context menu
    6. Ensure the transfer process is complete and verify the files on the new drive.

    This method is great if you want to transfer only specific files or if you don’t need to transfer any installed applications or your operating system.

    2. Clone the drive with EaseUS Disk Copy

    1. Visit the EaseUS website and download the EaseUS Disk Copy.
    2. Install the program by following the on-screen instructions.
    3. Open the software after installation is completed.
    4. Select Disk Mode and choose the source hard drive (the one you want to copy from).
       disk mode easeus disk copy
    5. Choose the new hard drive as the destination. Ensure the destination disk is equal to or larger than the source disk.
      target disk easeus disk copy
    6. Confirm the disk layout for the destination disk.
    7. If the destination disk is an SSD, check the option If the target is an SSD.
    8. Click Proceed to begin the cloning process.
    9. Follow the prompts and wait for the process to complete.

    Keep in mind that this method will copy all files from your source drive to the destination drive. All files on the destination drive will be removed before copying new files.

    3. Use MiniTool ShadowMaker

    1. Install the MiniTool ShadowMaker software from the official website.
    2. Go to the Tools tab and select Clone Disk.
       clone disk minitool shadowmaker
    3. Choose your old drive as the source and the new drive as the destination.
      select disk source minitool shadowmaker
    4. Confirm the settings and click Start to clone the disk.

    Similar to the previous solution, the cloning process will copy all files and remove all files on the destination drive before overwriting them.

    ⇒ Get MiniTool ShadowMaker

    Can I just copy one hard drive to another?

    This depends on the type of files that you have on the drive. You can’t copy the system drive to another drive. However, you can clone it using disk cloning software and achieve the same results.

    While it’s technically possible to copy a drive that has installed applications on it, you might end up with issues while trying to run those applications. We have a guide on how to transfer programs from C drive to D drive that might help you pass this limitation.

    However, if you just have regular data on your drive, you can seamlessly copy all files from one hard drive to another.

    What is the fastest way to transfer files from one hard drive to another?

    Manual transfer is the simplest, but it might encounter performance issues when dealing with smaller files. This is why some users use file-copying software such as TeraCopy. More advanced users use command-line tools such as robocopy.

    To learn how this feature works, head to our copy vs xcopy vs robocopy guide.

    Remember to always back up your data before starting any transfer process to avoid data loss. Regularly updating your backup ensures that you have a recent copy of your data in case of any mishaps.

    How to Uninstall Your Phone App on Windows 10?

    The Your Phone app on Windows 10 is a native app that replaced the legacy Phone companion app in Windows 10 October 2018 Update (1809). It was rebranded again on March 31, 2022, and is now called Phone Link.

    It lets you integrate your mobile device with your computer. You can seamlessly connect your Android mobile phone to your PC to access notifications, send and receive messages, make calls, view photos, and transfer files.

    However, if you don’t use the app, it is better to uninstall it to recover storage space and declutter your system. Uninstalling Your Phone app on Windows is not simple, as you can’t delete it from the Programs and Features list in the Control Panel or the Installed Apps list in Settings. Instead, you need to access PowerShell; read on for detailed steps.

    How do I uninstall Your Phone app on Windows 10?

    1. Press the Windows key, type powershell in the search box, and click Run as administrator.Windows Powershell - uninstall your phone app windows 10
    2. Type the following command to remove Your Phone app from your computer, then hit Enter: Get-AppxPackage Microsoft.YourPhone -AllUsers | Remove-AppxPackagepowershell_ uninstall your phone app windows 10
    3. Restart your computer to save the changes.

    If you want to reinstall the app, go to the Microsoft Store, search for the Your Phone app, and click Install. You can use the same steps, if you wish to uninstall the app from your Windows 11 computer.

    To conclude, whether you want to free up space, have no use of the app, or use a different method to manage your mobile device, you can remove the Your Phone app using these steps.

    In case you are not able to connect your phone to your computer via the Your Phone app, it could be battery saver mode or corrupt app; check out this detailed guide for solutions.

    If you need any assistance or have any suggestions about the topic, feel free to mention them in the comments section below.

    How to Enter MSI Boot Menu?

    The MSI boot menu is the startup interface of your computer with an MSI motherboard. It offers basic and advanced boot options. Generally, a normal user doesn’t need to access it; however, if you want to upgrade your hardware, install a new operating system, or explore advanced features on your MSI motherboard, you must enter the Boot menu.

    How can I enter the MSI boot menu?

    1. Using the F11 key

    1. Press the Power button to boot up your computer.
    2. Then, press & hold the MSI boot menu key, F11, until you enter the boot device selection screen.

    2. Using the Del key

    1. Press the Power button to boot up your PC.
    2. Press the Del key to enter the BIOS menu.
    3. Next, navigate to Boot, then click Boot mode select.
    4. Choose LEGACY + UEFI & UEFI.
    5. Select Boot Option 1 to choose UEFI hard disk or Hard Disk.
    6. Choose UEFI Hard disk Driver BBS Priority or Hard disk driver BBS Priority.
    7. Set Boot Option 1 as the boot device.

    What can I do if I can’t access the MSI boot menu?

    1. Use the Advanced options

    1. Press Windows + I to open the Settings app.
    2. Go to System, then select Recovery.System - Recovery Windows 11  how to enter msi boot menu  
    3. Locate Advanced startup, and click the Restart now button next to it.Recovery Advanced Startup
    4. Your computer will reboot and show a Bluescreen with options; select Troubleshoot.Troubleshoot
    5. On the following page, choose Advanced Options.Advanced options - how to enter msi boot menu
    6. Next, select UEFI Firmware Settings.UEFI 2 - how to enter msi boot menu
    7. Click Restart to open the MSI button menu. Your computer will restart, and you will be redirected to the boot menu.UEFI Restart - how to enter msi boot menu

    2. Disable Fast Startup

    1. Press the Windows key, type control panel in the search box, and click Open.Control Panel start menu - SCSI_DISK_DRIVER_INTERNAL
    2. Go to View by, click Large icons, and select Power options from the list.Power options
    3. From the left side of the following window, click Choose what the power button does.change what the buttons do
    4. Click Change settings that are currently unavailable.CHange the settings
    5. Remove the checkmark next to Turn on fast startup(recommended), then click Save changes.disable

    Once you have disabled Fast Startup, use any of the above methods to access the Boot menu on your computer with an MSI motherboard.

    The Boot menu allows you to change your device’s boot order, which is especially useful for performing a clean installation of Windows OS or switching between multiple operating systems installed.

    You can also access safe mode from BIOS on Windows 11 in 8 steps; check out this guide to learn the step-by-step instructions.

    If you want to boot straight to the command prompt to execute commands on Windows 11, we have a separate guide for you.

    If you have any questions or suggestions about the topic, feel free to mention them in the comments section below.