Logitech G430 Headset is Not Working: Fix Your Mic & Sound

The Logitech G430 headset is compatible with Windows 11 and older versions of Windows. You should be able to use this headset without any problems but recently, users have complained that it is not working after a Windows update.

The headset is not the only bone of contention as the Logitech mic is not working at times. We have already covered the mic issue so let’s focus on the headset not working for today.

Why is my Logitech wireless headset not working?

If you are wondering why your Logitech G430 headset is not working, it could be because of one or more of the following reasons:

  • Outdated/incompatible drivers – Make sure that your computer has installed drivers for your Logitech wireless headset by updating your drivers.
  • The battery is dead – If the battery is low, your Logitech headset mic might stop working randomly. The battery light will flash red when the battery needs to be recharged.
  • Bad connection between the USB dongle and your PC – If you’re using a USB dongle, check that your computer has recognized it.
  • Corrupt Windows update – If you have recently updated your Windows operating system, then it might be the culprit for the problem.
  • Bluetooth incompatibility – It is also possible that your Bluetooth hardware isn’t compatible with your Logitech wireless headset. 
  • Faulty USB ports – If your computer’s USB ports are not working, they may be faulty. This means it may not be able to detect the device and transmit data from it.
  • Software conflicts – If you’re using another application to manage audio output or input devices, it may cause issues with your Logitech headset.

In general, headsets and headphones differ in their performance. If you are looking to make a decision, we have a comprehensive comparison of headsets and headphones for you.

How can I fix my Logitech headset audio?

Before moving on to technical solutions, try these out first:

  • Ensure that your headset is turned on and charged. 
  • Make sure that the USB cable is securely connected to both your headset and your computer. 
  • Turn off any Bluetooth devices on your computer, such as a mouse or keyboard.
  • Try plugging it into different ports on your computer (especially ones that weren’t used before) to see if this helps resolve any issues with connectivity.
  • Test with other Bluetooth devices and see if they are working properly on your computer or not. Sometimes, you can’t add a Bluetooth device to Windows.
  • Try rebooting your computer. Your headset may have been disconnected due to an error during use or by an automatic update of your operating system. 

1. Set Logitech as the default audio device 

  1. Hit the Windows key and select Settings.settings windows 11
  2. Click on System and select Sound.
  3. Under Input, select Logitech.
  4. Click the drop-down menu beside Set as default sound device and select Use as default for audio.

2. Allow mic permissions

  1. Hit the Windows key and select Settings.settings windows 11
  2. Select the Privacy & security tab in the left pane.
  3. Scroll down to the Apps permissions section and click on Microphone.
  4. Make sure the Microphone access option and Let apps access your microphone are set to On.

3. Update the Logitech drivers

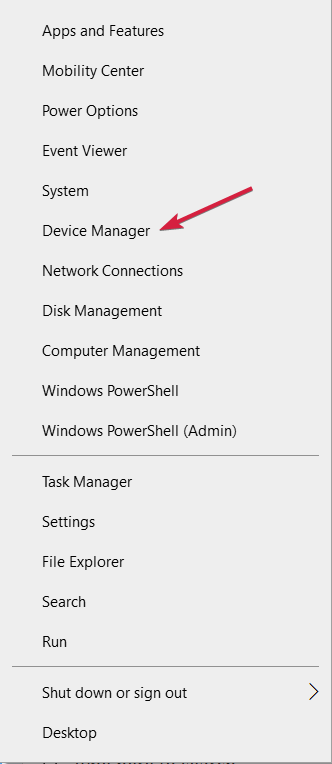
  1. Press the Windows Key, type Device Manager in the search bar and click Open.
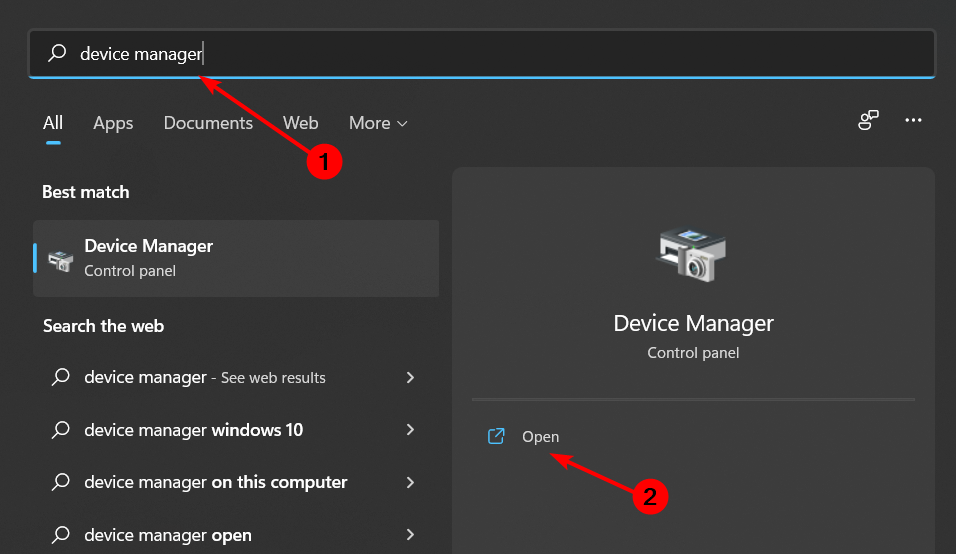
  2. Expand the Sound, video and game controllers section, locate the Logitech G430, right-click and select Update driver.
  3. Select Search automatically for drivers.Search automatically for drivers

Alternatively, you can opt for a more precise and quicker method by using a third-party tool to update the drivers for you. 

Outbyte Driver Updater is a program that can help you to update your Logitech headset mic driver. It doesn’t only update the driver, but it also scans your computer for other out-of-date drivers.

Outbyte Driver Updater

Great software with a solid database to help you find the latest updates for your drivers.
Free Trial Download now

4. Run the sound troubleshooter

  1. Press the Windows key and select Settings.settings windows 11
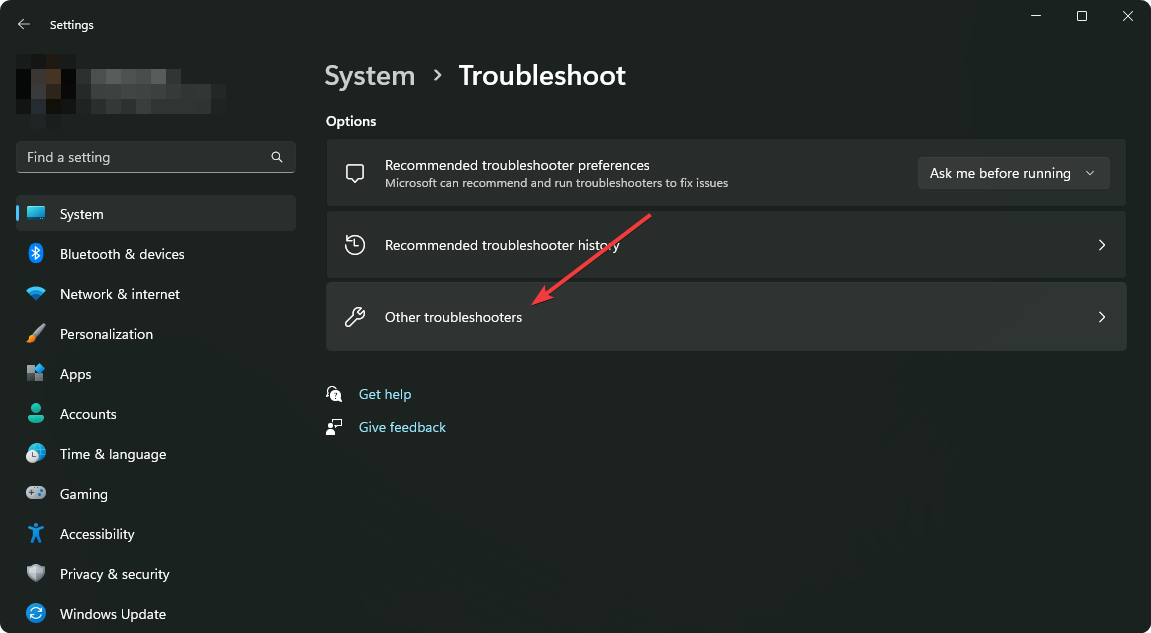
  2. Select System then click on Troubleshoot on the left pane.
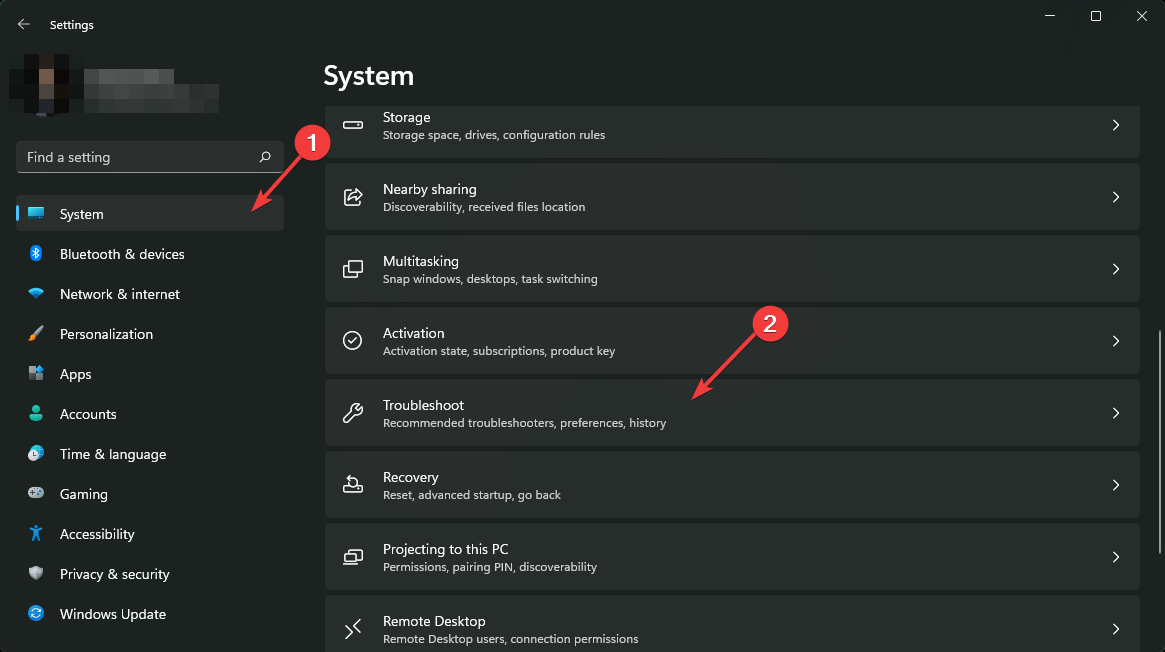
  3. Click on Other troubleshooters.going other troubleshooters win11
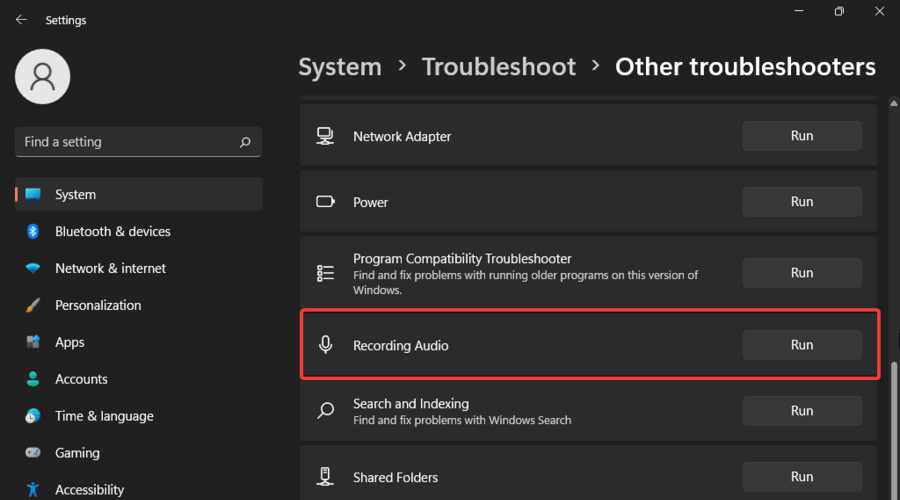
  4. Scroll down to the Recording Audio section, then click on the Run button.troubleshoot audio devices

5. Uninstall recent Windows update

  1. Press the Windows + I keys simultaneously to open Settings.settings windows 11
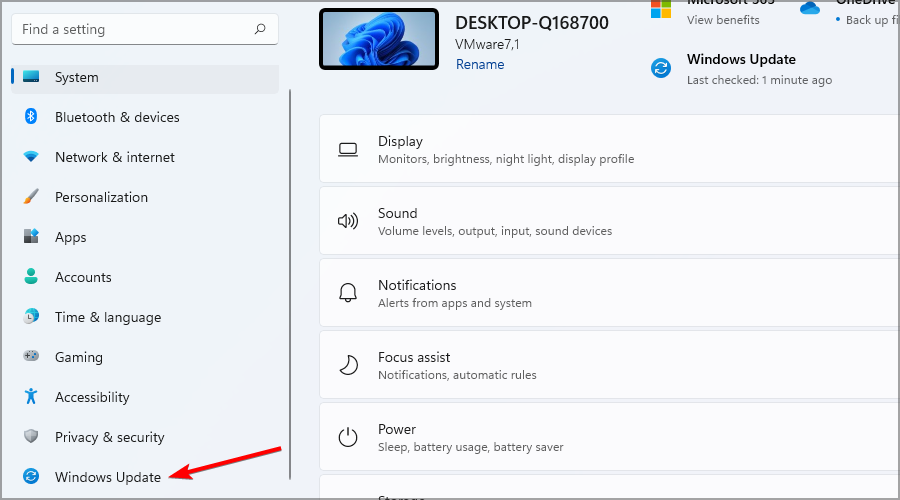
  2. Navigate to Windows Updates and go to Update history.
  3. Click on Uninstall updates.
  4. Select the most recent update then click Uninstall.

If none of these methods work out for you, there’s a possibility that your Logitech G430 headset is broken. You may need to purchase another or explore other brands. 

We have an awesome collection from cross-platform headsets to gaming headsets so don’t hesitate to check out our articles for more variety.

In another instance, users had problems with the Logitech keyboard not working but worry not as we have already covered the fixes in our guide.

Do let us know of any other additional solutions you tried not mentioned here but worked for you in the comment section below.


Play these three games free this weekend with Xbox Free Play Days

Xbox Free Play Days is back with three more games for subscribers of Xbox Live Gold and Xbox Game Pass Ultimate. This week’s Xbox Free Play Days lineup is a pretty eclectic one. Let’s have a look at the three games on offer from Thursday, November 17th through Sunday, November 20th.

Deep Rock Galactic

Deep Rock Galactic
Deep Rock Galactic

Deep Rock Galactic is a 1-4 player co-op FPS featuring badass space Dwarves, 100% destructible environments, procedurally-generated caves, and endless hordes of alien monsters.

NARUTO TO BORUTO: SHINOBI STRIKER

The Naruto franchise is back with a brand new experience in NARUTO TO BORUTO: SHINOBI STRIKER! This new game lets gamers battle as a team of 4 to compete against other teams online! Graphically, SHINOBI STRIKER is also built from the ground up in a completely new graphic style. Lead your team and fight online to see who the best ninjas are!

NBA 2K23

NBA 2K23 for Xbox Series X|S
Developer:
2K
Price:
$69.99

Rise to the occasion and realize your full potential in NBA 2K23. Prove yourself against the best players in the world and showcase your talent in MyCAREER or The W. Pair today’s All-Stars with timeless legends in MyTEAM. Build a dynasty of your own as a GM, or lead the league in a new direction as the Commissioner in MyNBA. Take on NBA or WNBA teams in PLAY NOW and experience true-to-life gameplay. How will you Answer The Call?

A pretty solid lineup for this week’s Xbox Free Play Days. Note that both the Xbox One and Xbox Series X|S versions of NBA 2K23 are part of this week’s event. Which of these games are you most excited to try out this week? Tell us in the comments. To learn more head on over to the Xbox Free Play Days FAQ page.

Featured image via Meristation USA. 

Windows Biometric Service High CPU: How to Fix It?

Windows Biometric Service High CPU usage usually comes up when there is a compatibility issue. Dealing with this problem is essential as it slows down your computer and makes it impossible to carry on tasks on your PC.

In this guide, we will discuss how to fix this issue with six simple methods right after examining the cause of the problem. Let’s proceed!

What is the Windows Biometric service?

Windows Hello is a Biometric-based tech that comes with Windows 10 and above. It is used to authenticate secure access to apps, devices, services, and networks via fingerprint, facial recognition, or iris scan.

Why is Windows Biometric Service causing high CPU usage?

Upon checking, we came to the conclusion that there could be a few reasons behind the issue. Listed below are the probable causes: 

  • Compatibility issue – Usually, after an update, there can be compatibility issues between Biometrics and OS, which can cause the service to use CPU more than needed.
  • Missing camera driver– If your camera driver is obsolete, it can cause an issue. Therefore it is recommended to update the driver promptly.
  • Biometric driver with a corrupted signature – If Windows 11 build installation has rewritten the files related to the Biometric driver, this could cause the issue.

How do I fix Windows Biometric Service Causing high CPU usage?

1. Clean Boot your PC 

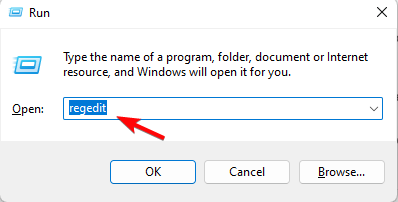
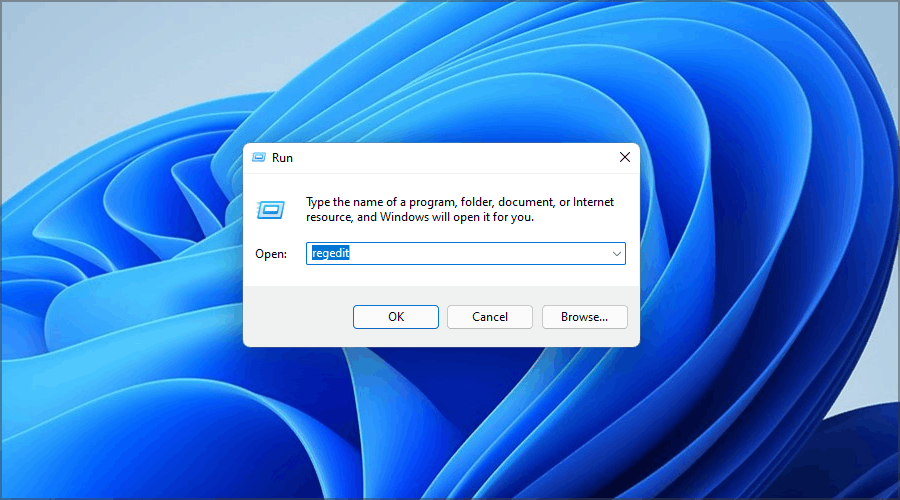
  1. Press Windows + R to get the Run console.
  2. Type msconfig to open System Configuration and press Enter. CLEAN BOOT 1
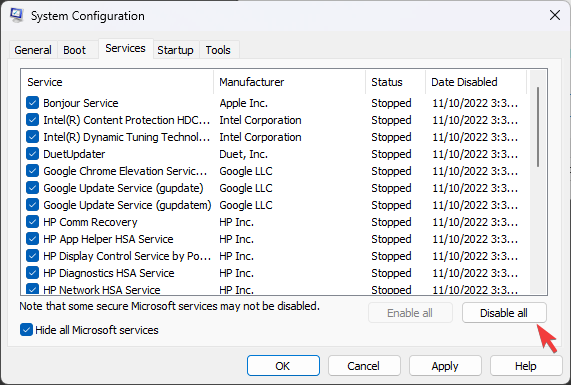
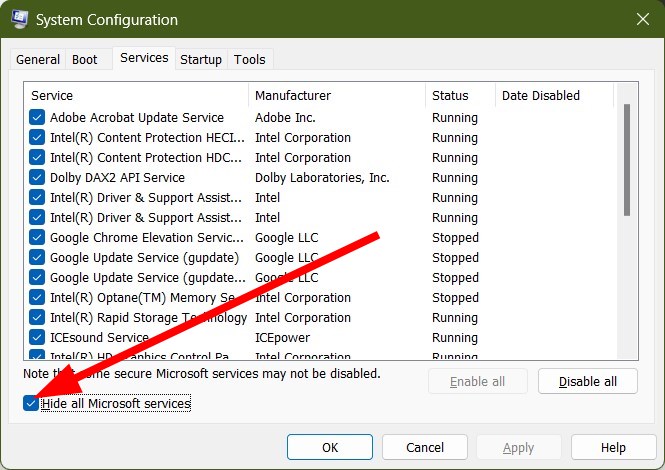
  3. On the Services tab, put a checkmark on Hide all Microsoft Services and then click Disable all. Clean BOOT 2
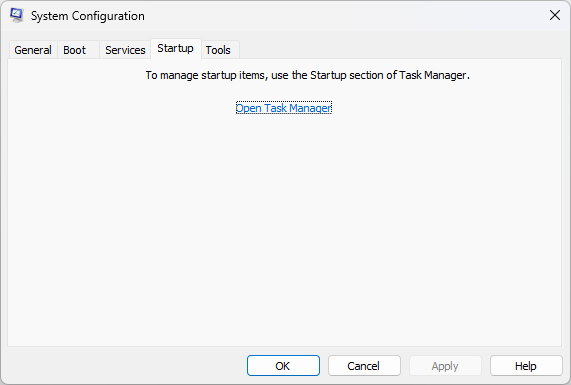
  4. Go to the Startup tab, and click Open Task Manager. CLEAN BOOT 3
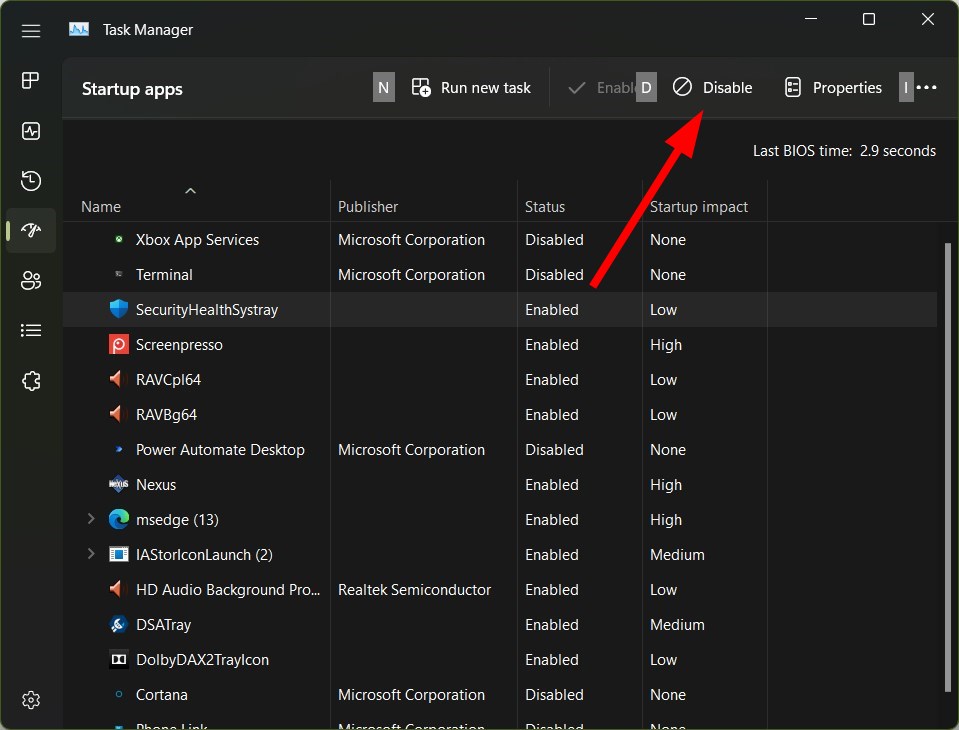
  5. On the Startup tab, go to each Enabled item and right-click on it. Select Disable.Clean BOOT 4
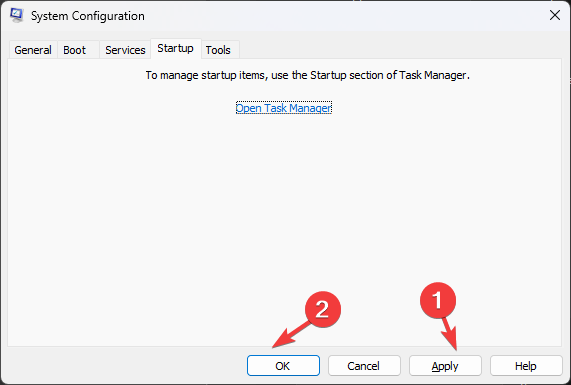
  6. Close Task Manager, and on System Configuration, click Apply and OK. CLEAN BOOT 5
  7. Restart your computer.

2. Run the memory diagnostic tool

  1. Press Windows + R to get the Run window. 
  2. Type mdsched.exe and press Enter. DIagnostic tool
  3. Select Restart now and check for problems.MdSched
  4. Windows will restart and check for issues. Please wait for the process to complete.memory-diag-tool.

3. Use the Group Policy Editor

  1. Press Windows + R to get the Run console. 
  2. Type gpedit.msc and press Enter. 
  3. Follow the below-mentioned path: Computer Configuration\Administrative Templates\Windows Components\Biometrics
  4. Navigate to Allow the use of biometrics and double-click on it.Capture-1
  5. Click on the radio button beside the Disabled option.GPE 
  6. Click Apply and then the OK button. 
  7. Restart your computer.

4 Run SFC and DISM commands

  1. Press the Windows key and type CMD and click Run as administrator. 
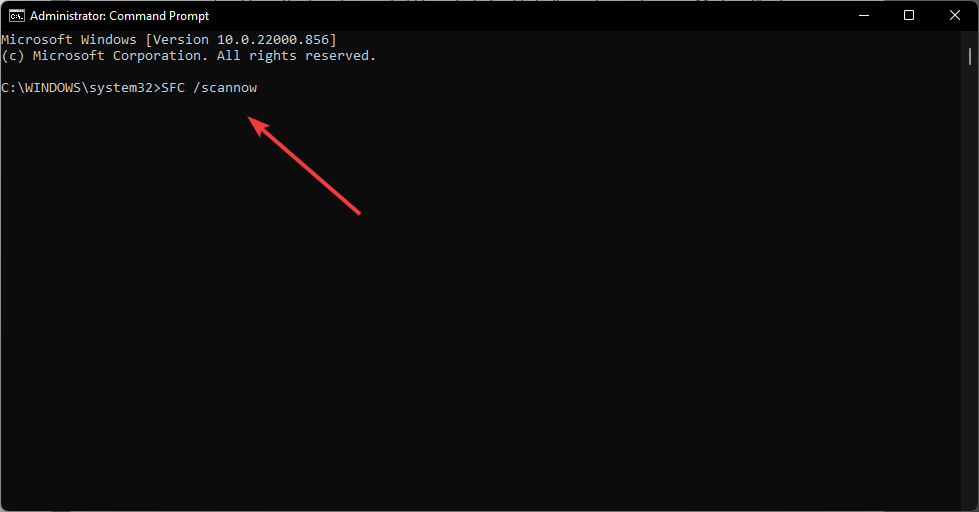
  2. Type the following command and press Enter: SFC/scannow
  3. Copy and paste the following commands one by one and press Enter after every command: CMD

DISM /Online /Cleanup-Image /ScanHealth DISM /Online /Cleanup-Image /CheckHealth DISM /Online /Cleanup-Image /RestoreHealth

5. Update the driver for Biometric

5.1 Via Windows Update

  1. Press Windows + I to get Settings.
  2. Locate the Windows Update option from the navigation pane. 
  3. Click Advanced Options. Windows Settings
  4. Click Optional Updates. Windows Settings 2
  5. Select Driver Updates. 
  6. Put a checkmark beside all the Driver Updates.
  7. Click Download and Install. 

5.2 Via Manufacturers’ Website

  1. Launch any preferred browser. 
  2. Go to the manufacturer’s official website and enter your product name and model number.
  3. Search for driver updates and click on Download.
  4. Double-click on the file to launch the installer.
  5. Follow the on-screen instructions.
  6. Restart your PC after the process is completed.

It is not suggested to update drivers manually, as it might cause compatibility issues if downloaded from an unreliable and unsecured source. Instead, it is recommended to take help from third-party drivers such as Outbyte Driver Updater. 

This is a specialized program that can help you scan your device and safely install not only the most recent versions but the correct ones for your drivers. 

Outbyte Driver Updater

The most efficient tool when it comes to guardedly updating your drivers with up-to-date versions.
Free Trial Download now

6. Use the HP SimplePass (exclusively for HP devices)

6.1 Check for Update

  1. Launch HP SimplePass. 
  2. Go to the Update icon.  Check for updates
  3. Check for updates. 
  4. If available, update it. 

6.2 Remove HPSimplePass

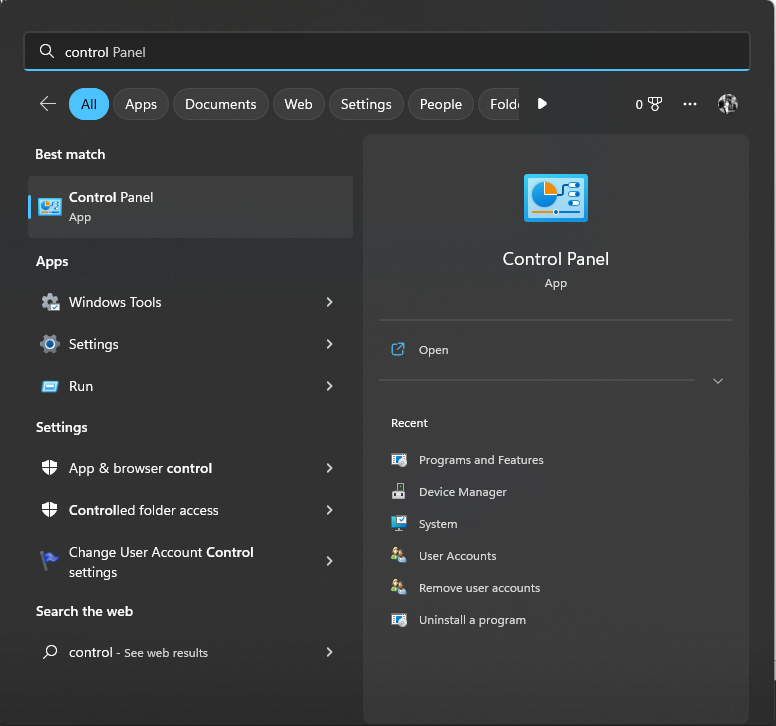
  1. Press the Windows key and type Control Panel and click Open.Control Panel
  2. You will get a list of apps. Select HP SimplePass and click Uninstall.Uninstall
  3. Restart the computer.

7. In-place Upgrade

  1. Go to Windows 11 website.
  2. Download Windows 11 ISO and select Windows 11 (multi-edition ISO)
  3. Select the product language option, choose English or your preferred language, and click Confirm.Inplace upgrade 2
  4. Now click Download.
  5. Right-click on ISO and click Mount. Now click Setup.exe
  6. On Install Windows 11 dialog box, select Next.
  7. Then on the Next page, click Accept.
  8. Follow the on-screen instructions to complete the process.

Note: Please select Keep personal files and apps on the Ready to Install page.

Can I end Windows biometric service?

Although the service is helpful, it is often not used by people. Moreover, it might be the reason for high CPU usage. So, it is safe to say that you can disable the Windows Hello biometric service. To disable it, follow these steps:

  1. Go to Search, type Services, and hit Enter.
  2. Next, look for Windows biometric service and double-click it. Click Disabled and OK to confirm.

So, these are the fixes to resolve high CPU usage for Windows Biometric service. If none of the six methods has worked for you so far, it is advised that you do an in-place upgrade.

Feel free to let us know which method worked for you in the comments section below. 

15 Best IPS Monitor Cyber Monday Deals to Get

Having monstrous PC specs is only effective if your monitor keeps up. Gamers usually go for the TN monitors, avoiding the ISP monitors, while the IT and photography/video professionals embrace them fully.

The truth is, they are unmatched when it comes to colors and viewing angles. The refresh frequency is the only downside.

With that in mind, we can strongly suggest a few ISP monitors with different capabilities and price ranges.

IPS monitors are well sought after but we have a whole monitor buying guide hub where you can pick any type you want.

Which are the best Black Friday deals on IPS monitors?

Samsung Odyssey G7

  • 32-Inch WQHD (2560×1440) gaming monitor
  • High frequency 240Hz curved display
  • 1ms response time
  • HDMI, G-Sync, FreeSync Premium Pro
  • QLED technology
  • Price

When looking for the ultimate gaming monitor for your PC, you can’t overlook Samsung Odyssey G7.

This 32-inch monitor is packing 1.7 times the pixel density of Full HD for crisply detailed, sharp images and the curved design will contribute to an excellent immersion.

With Odyssey’s lightning-fast 240Hz refresh rate, means up to four times than what you get on a traditional screen.

And that speed is doubled by the 1ms response time. This makes the ideal combo for any fast-paced gaming action you can find.

ASUS ProArt PA278CV

  • 27-inch, WQHD (2560 x 1440) resolution, IPS display
  • Reproduces 100% of the sRGB gamut
  • USB Hub, USB-C, DisplayPort Daisy-chaining, and HDMI connectivities
  • Eye Care, height adjustable
  • Doesn’t wake from sleep when plugged in through USB-C.

Although ASUS ProArt PA278CV was not designed for gaming, its 75Hz refresh rate is not so bad for strategy or adventure titles.

However, this 27-inch IPS screen is great for graphic design because it reproduces 100% of the sRGB gamut.

It also excels in the connectivity department, featuring DP over USB-C with 65W power delivery, DisplayPort, HDMI, and a very convenient USB 3.1 hub.

And with the daisy-chaining option, you will be able to link up to four monitors for a multi-display workstation via DisplayPort.

Alienware AW2521H

  • 360Hz refresh rate
  • 24.5 inch Full HD 1920 x 1080p
  • NVIDIA G-SYNC Certified
  • 100mm x 100mm VESA mounting support
  • 99% sRGB color coverage
  • Thick case

Alienware AW2521H was designed for gaming and even though it only has Full HD resolution, if you combine that with its 24.5 inch diagonal you get a decent pixel per inch ratio.

After all, the monitor comes with the NVIDIA G-SYNC certification that enables a smooth, tear-free gaming experience.

And if you need more reasons to consider it as a choice, the display has a 360Hz refresh rate which qualifies it as a premium action gaming monitor.

The swivel and height adjusting stand also allows you to personalize your experience down to the perfect viewing angle.

This is an awesome display but we can also suggest visiting our best Black Friday gaming monitors with 144Hz and check out other awesome deals.

Acer Nitro VG240Y

  • 23.8 Inches Full HD (1920 x 1080) IPS Gaming Monitor
  • AMD Radeon FreeSync Technology
  • Zero Frame
  • 144Hz refresh rate and 1ms VRB
  • 2 x HDMI 2.0 Ports & 1 x Display Port
  • No swivel or high adjustment

If you have a low budget but still want to enjoy your hardcore gaming lifestyle, Acer Nitro VG240Y will make a great choice.

Although it doesn’t look like a premium monitor and you don’t have any height or swivel adjustment features, this 23.8-inch monitor will impress you with its 144Hz refresh rate.

And if you add the AMD Radeon FreeSync Technology and the Full HD resolution to that, you got yourself a great gaming monitor.

In fact, the frameless design is not bad at all and you still get 2 HDMI ports and a Display Port to make the right connections.

ASUS TUF VG259Q

  • Full HD, IPS display
  • 144Hz refresh rate and 1ms response time
  • Extreme Low Motion Blur
  • Built-in speaker
  • Adaptive-Sync, G-SYNC Compatible
  • Height tilt adjustable
  • Some backlight issues reported

ASUS TUF VG259Q is another budget gaming monitor that you can add to your list, if not for the Full HD resolution, at least for the 144Hz refresh rate and the 1 ms time response.

For a 25-inch monitor, this ASUS model also features some interesting features like the Shadow Boost Technology clarifies dark areas without overexposing brighter areas.

That will help you a lot for spotting enemies hidden in dark areas. Another helpful technology is the Extreme low motion blur (ELMB) that reduces ghosting.

Lastly, the height and tilt adjustment from the stand is a great addition in order to customize the viewing conditions.

LG 24QP500-B

  • QHD (2560 x 1440) IPS Display
  • HDR 10
  • sRGB 99% Color Gamut
  • AMD FreeSync
  • Refresh Rate 75Hz
  • 3-side Virtually Borderless Design
  • Bleeding issues

LG 24QP500-B would be an excellent buy for a graphic designer or editor because the 24-inch monitor has a great QHD resolution ready with HDR 10 technology.

Its 3-sided borderless design also makes it a good choice for a multi-monitor setup. However, the best feature for a designer would be the 99% reproduction of the sRGB color gamut.

However, the monitor has Radeon FreeSync technology and a 75Hz refresh rate that also recommend it for super-smooth gameplay.

Unfortunately, it can’t be adjusted in height but with its slim design and the stylish stand, the display would look great in any office.

GIGABYTE M27Q

  • 2560 x 1440 pixels IPS Display
  • 0.5ms (MPRT) response time
  • 92% DCI-P3
  • HDR Ready and FreeSync Premium
  • 1x Display Port 1.2, 2x HDMI 2.0, 2x USB 3.0
  • Support issues

Get ready for smooth gameplay because Gigabyte M27Q comes with AMD FreeSync Premium and a 2560 x 1440 pixels resolution.

You can also add the 170Hz refresh rate and the 0.5 ms response time and you know you are in for a treat when playing any of the latest titles.

The 27-inch monitor has tilt and height adjustments to personalize the viewing experience and comfort.

And speaking of comfort, this monitor also is embedded with Low Blue Light & Flicker technology to reduce the fatigue on your eyes.

BenQ GW2480

  • Ultra-slim bezel
  • Adaptive brightness for image quality
  • Built-in stereo speakers
  • IPS wide viewing angle technology
  • Some users reported backlight bleeding

BenQ GW2480 is a great 24-inch monitor best suited for photo and image editing thanks to the IPS technology.

It’s flicker-free so you can spend extended periods of time working without any eye fatigue and the slim bezel gives you a great perspective of the Full HD content.

The stand is not height adjustable but it offers a great cable management solution inside so you will eliminate any clutter from your desktop. It comes with HDMI, Display Port, and even the old D-sub port.

HP 24mh FHD Monitor

  • Built-in speakers and VESA mounting
  • Height/ tilt adjustment
  • 75 Hz refresh rate
  • Ultra-slim bezels on 3 sides
  • Great price
  • The stand's design could be nicer

If you want a great monitor for working and watching movies, then the HP 24mh FHD monitor might be the best choice. Moreover, it offers interesting features for a great price.

It’s a Full HD screen with a 75 Hz refresh rate and built-in speakers but the best thing can be the moment when you realize that the bezel on three sides is almost invisible.

For connectivity, it offers HDMI, DisplayPort, and VGA ports so you are covered for any possibilities.

LG 34UC80-B

  • 34-inch UltraWide curved IPS display
  • 2 x USB 3.0 Quick Charge ports
  • 3840 x 1440 resolution
  • 21:9 aspect ratio
  • Very expensive

A masterpiece monitor made by renowned LG. Whether you’re a gamer, professional, or enjoy multimedia content (21:9 aspect ratio is perfect for movies), this monitor will suit your needs.

The list of distinctive features includes sRGB over 99% color accuracy, USB 3.0 Quick Charge ports, and Screen Split 2.0 (Picture-in-Picture mode).

HP VH240a

  • Very affordable price
  • Perfect for office work
  • Built-in speakers and VESA mounting
  • Very slim bezels
  • The sound lacks quality

Quite a competitor in the IPS market. For a fairly affordable price, you get a large, 23.8-inch display with IPS-standard viewing angles, integrated speakers, and 2 million pixels for crystal-clear visuals and vibrant image quality.

It’s a great choice for work but it will also offer a great view for a movie night. Worthy acquisition if it checks your requirements.

LG 27UK650-W

LG 27UK650-W

Built to meet the HDR10 high dynamic range standards and with the sRGB 99% Color Gamut, the content comes out vivid and lifelike.

A special value we add to the HDCP 2.2 port which allows you to view a variety of 4K content, be that streaming, consoles, or BluRay disc players.

LG 27UK650-W specs:

  • Screen size: 27-inch
  • Resolution: 3840 x 2160 4K UHD
  • Viewing angles: 178°
  • Response time and refresh rate: 5ms and 75Hz
  • Aspect ratio: 16:9
  • Signal inputs: HDMI 2.0 and HDCP 2.2

⇒ Get it now from Amazon

BenQ EW2770QZ

BenQ EW2770QZ

Some monitor OEM’s offer various gimmicky features, but this one has more than a few that add to its selling point.

A smart Brightness Intelligence Technology will reduce the brightness automatically based on the on-screen content, while the Smart Focus feature lets you choose a focal point and dims all around it.

Basically, they are perfect features to reduce eye strain and fatigue in everyday use.

BenQ EW2770QZ specs:

  • Screen size: 27-inch
  • Resolution: QHD 2560×1440 pixels
  • Viewing angles: 178°
  • Response time and refresh rate: 5ms and 60Hz
  • Aspect ratio: 16:9
  • Signal inputs: HDMI and DisplayPort

⇒ Get it now from Amazon

LG 34UM69G-B

The selling points for this particular LG monitor are 1ms Motion Blur Reduction and AMD FreeSync technologies, closely followed by 3 game modes for FPS and RTS games.

Along the way, you’ll find the Black Stabilizer making the best of the dark on-screen objects while the Crosshair Stabilizer will ensure the best experience in any fast-paced FPS.

LG 34UM69G-B specs:

  • Screen size: 34″ Widescreen
  • Resolution: Full HD 2560x1080p
  • Viewing angles: 178°
  • Response time and refresh rate: 1ms and 75Hz
  • Aspect ratio: 16:9
  • Signal inputs: HDMI, Display Port, USB-C

⇒ Get it now from Amazon

Dell P2214H

dell IPS monitor black friday

Excellent picture quality with a high 2 million:1 dynamic contrast ratio is only surpassed with the fully adjustable design which is unprecedented at this price range.

Great suit for professionals or home users, but it will do rather well with gaming as the ghosting or lag are not an issue here.

Dell P2214H specs:

  • Screen size: 22-Inch Widescreen
  • Resolution: FHD 1920 x 1080
  • Viewing angles: 178°
  • Response time and refresh rate: 8ms and 76 Hz
  • Aspect ratio: 1.78:1
  • Signal inputs: VGA, DisplayPort, DVI-D, USB

⇒ Get it now from Amazon

That concludes our list including the best IPS monitor deals you should take advantage of right now.

How to choose the best IPS monitor?

Our team of expert testers, with a combined experience of 15 years, has tackled a variety of testing tasks for any device you could imagine.

Their experience comes into play as a very important element when choosing the products we described in this guide, and a large variety of factors have been taken into consideration.

The options that have been chosen offer great quality and cover the entire spectrum of price ranges, thus enabling everybody to find something that fits their needs both financially and otherwise.

You should also take a look at our selection of the best ultrawide monitor offers and get extra products on your favorites list.

Have you decided? Tell us about your choice in the comments section below because other readers may need your input.

Krispy Kreme’s Xbox donuts make their way to Australia

The Krispy Kreme Xbox donuts are back, this time in South Australia, down in, well, Australia.

The green and white Xbox logo branded donuts (or doughnuts as they’re spelt in most regions outside of the US) are part of a competition which gives customers the chance to wine one of 10 Xbox Series S video game consoles or one of 100 three-month Xbox Game Pass subscriptions.

To enter, participants simply need to buy an Xbox donut and scan the included unique barcode with the OTR app.

The Krispy Kreme Xbox donuts are available to buy online and in participating stores in South Australia until December 6th and, unfortunately, the competition is also limited to the southern state. Full terms can be read here.

Krispy Kreme’s Xbox donuts originally debuted in United Kingdom and Ireland in 2021 and returned to the UK in mid-2022.

For more Xbox news, follow us on Twitter.

Source: PS.

5 best laptops for MATLAB [Black Friday & Cyber Monday]

Since MATLAB currently is one of the most popular programming languages and computing environments, it requires a powerful machine to run smoothly.

While a laptop with 8GB RAM and modest specs can be enough for lots of people, certain MATLAB scripts can easily require at least 32GB of RAM and high-end features.

If you’re wondering which laptop to get in order to use MATLAB, rest assured that our top picks are ideal in that regard.

If you prefer to be proactive and have a laptop that makes as efficient as possible the process of visualizing data, analyzing it with ease, and writing algorithms, none of the below choices can disappoint you.

Note: All the prices and offers in this article are subject to change, so be sure to check the official product page to get the latest deal. If the product/offer you’re looking for is no longer available, you can try to find it on its official manufacturer page or get another one from our list.

Which laptop is best for MATLAB programming?

To find out more specs and the pros and cons of each laptop, check out the list below.

HP Pavilion 17t – Fast charging battery

  • Full-size island-style backlit keyboard
  • HP Wide Vision HD Camera with integrated dual array digital microphone
  • Supports battery fast charge
  • No Thunderbolt 3 port

Assuming that you want the very best laptop for MATLAB, don’t hesitate to take a closer look at HP Pavilion 17t. For MATLAB you need a powerful laptop. HP Pavilion 17t meets the technical specs.

Do note that it is equipped with an Intel 10th Generation Core i5-10750 processor that provides maximum high-efficiency power.

Moreover, you’re about to get 32GB DDR4 RAM, while the 1TB PCIe SSD saves files fast and lets you store even more data.

HP Envy – 17t – Great screen & dedicated graphics

  • Intel Core i7
  • NVIDIA GeForce MX450
  • Supports battery fast charge
  • Modern design – natural silver
  • No Kensington lock port

Another great entry in our list is none other than the HP Envy – 17t laptop. You should know from the start that it comes with an Intel Core i7-10510U processor and no less than 32GB DDR4 SODIMM RAM.

The vivid 17.3″ Full HD (1920×1080) touchscreen is also worth to be mentioned, and the setup is quick and efficient.

Rest assured that the laptop turns on and boots up very fast. Even the keyboard has a great tactile response, so there won’t be a thing to stop you from continuing your MATLAB projects.

Acer Aspire 5 – Best bang for your buck

  • RAM is upgraded to 32GB high-bandwidth
  • AMD Ryzen 5-3500U processor
  • Full HD backlit anti-glare display
  • Windows 10 Home
  • Authorized PConline365 bundle
  • Moderate volume

The notorious Acer Aspire 5 is one of the best budget laptops for MATLAB that you can find these days. For those of you who don’t know it, keep in mind that the RAM is upgraded.

Thanks to that, it can smoothly run multiple applications and browser tabs all at once. As for the hard drive, it is also upgraded to 1TB PCIe NVMe M.2 SSD – ideal for fast boot-up and data transfer.

Moreover, it comes bundled with KKE Mouse Pad and it’s surprisingly lightweight too. Overall, this laptop is fast and responsive, so you won’t regret buying it.

Lenovo ThinkPad E15 – Suited for business users

  • Upgraded RAM / SSD
  • Intel 10th Gen Core i5-10210U
  • Integrated Intel UHD Graphics 620
  • Windows 10 Professional 64-bi
  • Bonus IST HDMI cable
  • Non-backlit keyboard

If you like the idea of owning a powerful business laptop, then consider the Lenovo ThinkPad E15 one. One of the main advantages of this laptop is how slim and elegant it is.

Besides that, it is equipped with an Intel 10th Gen Core i5-10210U with UHD 620 and runs on Windows 10 Professional 64-bit.

As for the one-year warranty for upgraded RAM / SSD from Issaquah Highlands Tech and the one-year original warranty for remaining components from Lenovo, they’ll most likely give you peace of mind. Lenovo ThinkPad E15 is indeed a great choice!

HP Stream 14-ds0020nr – Small yet powerful

  • AMD Dual-Core a4-9120e processor
  • HD SVA bright View WLED-backlit display
  • Bios recovery and protection
  • Thin and light
  • Affordable
  • Not ideal for Hulu/Netflix streaming

From HP, our next option packs a decent AMD Dual-Core a4-9120e processor, while the 14-inch diagonal HD SVA bright View WLED-backlit Display (1366 x 768) might be perfect for some of you.

Do note that it comes with BIOS recovery and protection. This automatically checks the health of your PC, protects against unauthorized access, and recovers itself from boot-up issues.

For the price, this laptop has a good build quality, not to mention the great keyboard and Office 365 personal for one year.

All the laptops in this list meet the recommended specifications as set out by MathWorks for deep learning, control systems, computer vision, and not only. You can now make an informed choice with ease

Moreover, this specific article is part of our generous selection of great laptops. You might also want to check it out, then let us know your choice in the comments section below.

VideoProc Converter Black Friday Offer – 5 Useful Media Tools Giveaway

VideoProc Converter is developed by Digiarty Software, a leading provider of multimedia video processing solutions. As an all-in-one video tool, it helps you to edit, convert, compress and enhance videos, record screens, and save videos from 1000+ online sites for fair use.

What can VideoProc Converter do?

  • Edit: split, trim, cut, crop, merge, rotate, and adjust color easily.
  • Convert: video and audio, HEVC, 4K, MP4, MOV, WebM (Alpha), GIF, MP3, FLAC, WAV.
  • Compress: make videos smaller, save up to 90% storage space, and balance quality and size.
  • Fix & Enhance: solve incompatible format errors, stabilize, de-noise, and fix low-light videos.
  • Record: capture screen/webcam, record streaming videos. Never miss a show.

Giveaway and Black Friday special offers

For this Black Friday deal, VideoProc Converter joins forces with industry-leading software providers, bringing you all-time low prices (up to 75% OFF) and extra giveaways ($0 for 5 apps).

⇒ Grab the biggest Black Friday deals from VideoProc now

How to save up to 75% with VideoProc Converter Black Friday deals?

Click the link above to visit VideoProc Converter’s Black Friday deals page, from there you can enjoy huge discounts on different license types or bundles:

  1. 62% OFF Lifetime License for 1PC/Mac: only $29.95 now (was $78.90).
  2. 68% OFF Lifetime License for 2-5PC/Mac: only $37.95 now (was $119.0).
  3. 75% OFF Black Friday Gift Pack: only $45.95 to grab VideoProc Converter + 4 Software. The pack includes all of the following goodies:
    • VideoProc Converter Lifetime License for 1PC/Mac
    • DearMob iPhone Manager
    • Bounce Color Animated Elements bundle
    • Wise Data Recovery Pro
    • VideoProc Vlogger: beginner-friendly video editing software

How to score the VideoProc Black Friday giveaway?

On the deals page mentioned above, everyone can participate in the Black Friday Giveaway sponsored by VideoProc to unlock all these 5 powerful tools (list prices add up to $208.79, now $0):

  • Wise Care 365
  • Ashampoo Photo Optimizer 8
  • 100 Filmmaking LUTs and Presets Bundle
  • GeekerPDF Monthly License
  • VideoProc Vlogger

The first four tools offer 3,000 free copies each, join the giveaway now before it’s too late.

What makes VideoProc Converter special?

VideoProc Converter is a robust video processing tool, and it makes tech easier for every user dealing with videos, audio, DVDs: convert, edit, compress, record, download, and enhance videos.

Fast, stable, and listen to your needs with every major update

Compared with other converters, VideoProc Converter loads large videos faster and performs stably. The recent major update keeps pace with the latest tech trends, adding GoPro Hero11 8:7 aspect ratio, profile for iPad M2.

Reacting immediately upon users’ requests, VideoProc Converter also updates to include WebM/MOV Alpha transparency support and more bitrate options for better quality.

Unique level-3 Hardware Acceleration tech to boost video processing

Video conversion and editing are computing-intensive processes. To achieve a better balance between exporting time and quality, VideoProc Converter allows you to take advantage of NVIDIA/AMD/Intel with its unique level-3 hardware acceleration tech – 47x real-time performance boost.

Best mate for GoPro/drones/camera/smartphone/TV videos

With 370+ input formats and 420+ output formats support, you can handle everything: 5.3K, 4K, GoPro long-GOP videos, HEVC/H265, 10bit HDR, iPhone 14 ProRes, etc.

VideoProc Converter has pre-configured profiles for hot gadgets and platforms: PS5/4, Xbox, Smart TV, Web videos, DVD (NTSC/PAL), ready to use in one click.

Make life easier for non-techie, families, content creators, and everyone

Certain video formats won’t play on your device? Want to edit home videos easily to share with loved ones? Churning out videos in batches to upload to social media? Looking for ways to digitize DVD collections to cherish forever?

VideoProc Converter has you covered, with 29 quick-edit tools, 3 recording modes, comprehensive formats, streamlined workflow, and above all: easier and faster to use.

⇒ Enter the best VideoProc Converter Black Friday deals now

6 Best Steering Wheels For Windows 10 [High-Rated Picks]

Playing racing games is an incredible experience, especially if you have the right steering wheel.

What better way to spend your weekends than to play Forza Horizon 3 with a powerful Thrustmaster TMX Force Feedback racing wheel in your hands?

Having a top-notch gaming steering wheel almost guarantees you’ll win the race.

Note: All the prices and offers in this article are subject to change, so be sure to check the official product page to get the latest deal. If the product/offer you’re looking for is no longer available, you can try to find it on its official manufacturer page or get another one from our list.

What is the best steering wheel for Windows 10?

  • Thrustmaster TMX Force Feedback – best overall racing wheel
  • Logitech G29 Racing Wheel – some of the best pedals
  • Logitech G27 Racing Wheel – one of the most popular on the market
  • Logitech Driving Force G920 Racing Wheel – realistic force feedback
  • Thrustmaster T300 Ferrari Alcantara Edition Racing Wheel – great option on Windows
  • Thrustmaster T150 Force Feedback Racing Wheel – large pedal set

To find out more about the pros and cons of each racing wheel, take a look at the list below.

Thrustmaster TMX Force Feedback – best overall racing wheel

  • 900° force feedback base
  • Mixed belt-pulley and gears system
  • Metal ball-bearing axle - provides real-life driving sensation
  • Full integration with Xbox One/ PC
  • Ergonomic design
  • The pedal set is lightweight

Thanks to this gaming steering wheel, you’ll simply forget you’re actually playing a game. The driving experience will feel so real you could swear you’re driving a real car.

The Thrustmaster TMX Force Feedback offers an impressive 900° force feedback base with mixed belt-pulley and gears system on a metal ball-bearing axle.

The wheel is 11″/28 cm in diameter, and it can easily adapt to all racing games thanks to its ergonomic design. It is fully compatible with Windows 10, and you can also use it on the Xbox One console.

The pedal set is very comfortable, and it features a wide footrest, each pedal’s angle of inclination can be adjusted, and the brake pedal features progressive resistance.

The drive system with adjustable Force Feedback allows you to literally feel every detail while you’re racing: the road relief, loss of tire grip, braking, bumps, and impacts.

Logitech G29 Racing Wheel – some of the best pedals

  • Great feedback
  • Pleasent feel while playing
  • Great set of pedals that feel real
  • Very durable build
  • The pedals can be loud

The Logitech G29 racing wheel is a very useful peripheral device that can convince you that you’re on the track and not in front of the TV.

It is fully compatible with PS3, PS4, and PC, so you never have to worry when you want to play your favorite racing game, no matter the platform.

The pedals of this racing wheel are some of the most realistic from this range of products, offering good stability and quick response times.

This racing wheel has a 900 degrees lock-to-lock rotation, making it one of the best on the market in this department.

Added to that, the dual-motor Force Feedback ensures that you will get lost in the idea that you’re driving a real racing car.

To ensure your safety while gaming, it also includes an overheat safeguard, thus enabling you to game without any worries.

Logitech G27 Racing Wheel – one of the most popular on the market

  •  Dual-motor force feedback 
  • Helical gear changing mechanism
  • Six-speed shifter
  • RPM/Shift indicator LED
  • Large numbers of cables needed

Logitech G27 is one of the most popular gaming racing wheels, and for a good reason. This wheel packs many useful features that accurately simulate car races.

It comes with a powerful dual-motor force feedback mechanism, a six-speed shifter with push-down reverse gear, and RPM/shift indicator LEDs that quickly prompts you when you should shift gears.

The 11-inch leather-wrapped wheel is very comfortable, while the steel gas, brake, and clutch pedals deliver precise throttle, braking, and shifting for a high degree of realism.

Make sure you’ve installed the latest Logitech G27 driver if you use this wheel on Windows 10, otherwise you may encounter various bugs that could prevent you from properly controlling your car.

Logitech Driving Force G920 Racing Wheel – realistic force feedback

  • Realistic force feedback
  • Helical gears setup
  • Easily accessible game controls
  • Fast response pedals
  • Extra resistance for brake pedal halfway through its course

Buy the latest racing titles and add the Logitech Driving Force G920 racing wheel for an impressive driving experience.

The dual-motor force feedback realistically simulates the racing experience, while the on-wheel D-pad will remind of the classic Xbox One controller.

The responsive floor pedal unit allows you to accelerate, break, and change gears with the feel of an actual car. The semi-automatic paddle shifters give you smooth gear transitions on hairpin turns and straightaways.

Thrustmaster T300 Ferrari Alcantara Edition Racing Wheel – great option on Windows

  • T300 Servo Base
  • Officially licensed by Ferrari
  • The build is exactly fitting to automotive standards
  • 100% metal pedals
  • Attachment array perfectly fits any desk/table
  • Warranty of one year might be considered small

Thrustmaster developed the T300 Ferrari Alcantara racing wheel in close collaboration with Microsoft. This wheel is actually a 7:10 scale replica of the emblematic Ferrari 458 Italia wheel and it’s designed for true racers.

The wheel is made of high-quality materials that will last for a very long time under intense usage.

The brushed metal frame and metal paddle shifters add an industrial design note to the product. 

The Force Feedback base offers smooth, seamless, and realistic effects. Before you use the Thrustmaster T300 Ferrari Alcantara racing wheel on a Windows 10 PC, don’t forget to download the latest Thrustmaster drivers.

Thrustmaster T150 Force Feedback Racing Wheel – large pedal set

  •  PS4/PS3 sliding switch for fast access
  • 1080 degree force feedback
  • Immersion Touch Sense technology
  • Adjustable force feedback
  • Wide footrest pedals
  • Some problems with the support team have been reported

The Thrustmaster T150 is a 1080 degree force feedback racing wheel that comes with a large pedal set.

The drive system with adjustable force feedback lets you feel every detail while you’re racing. Each pedal’s angle of inclination can be adjusted and the brake pedal comes with progressive resistance.

The wheel features reinforced rubber-coated grips and all controls are within easy reach so that you never need to take your hands off the wheel. Windows 10 PC compatibility is ensured thanks to the Thrustmaster drivers.

The Thrustmaster T150 offers the best quality/ price rapport and you’ll definitely love this racing wheel.

Have you already used one of these racing wheels on your Windows 10 computer? Tell us more about your experience in the comment section below.
Deal Alert: SanDisk’s 1TB MicroSD Card [Cyber Monday]

Earlier this year we reported that SanDisk was going to launch the world’s first 1TB microSD card. The company kept its promise and the 1TB card is now available for pre-order.

Almost all of us often face issues with smartphones, cameras, and other devices. Now SanDisk offers you a way to increase your storage capacity with the new 1TB SanDisk Extreme UHS-I microSD card.

This card reads at an incredible speed of 160MB/s and writes up to 90MB/s. It can easily handle 240Mbps bitrate and sustains X-ray, shock, water, and high temperature.

SanDisk also offers a 512GB variant of the new SanDisk Extreme card. The 1TB microSD card comes with an A2 specification which promises better performance for applications stored on the card.

What is the best 1TB SD card?

The much-awaited 1TB microSD was available for sale starting at a price of $176.57. However, if you think that this price is high, you still have the option to buy multiple SanDisk cards or get a discount during this Holiday season.

⇒ Get SanDisk Extreme 1TB microSD

Do I really need a 1TB MicroSD card?

Most people, especially those in the media industry are always short of memory in their cameras, drones and smartphones, and even PCs.

Oftentimes, we have to record long videos and we don’t have the time to swap SD cards.

And this is where 1TB of storage comes to the rescue. You can use this card to transfer thousands of videos and pictures stored on your phone’s memory. That is the only sure way we can make room for more clips and apps on your phones.

Although the 1TB microSD seems to be a lifesaver in most situations, its price tag remains pretty high for many users.

Users from the United Kingdom, Germany, and Spain can also place an order on Amazon. 

Have you ever thought about purchasing a 1TB microSD card? Do you think this microSD card will satisfy your needs? Let us know in the comments section below.

5 best Ducky keyboards to buy [Black Friday & Cyber Monday]

Ducky is a popular brand of mechanical keyboards. That company’s keyboards are especially notable for their unique aesthetic designs.

There are also some noteworthy 60 percent Ducky keyboards with smaller designs and fewer keys that you should check out.

In fact, these are some of the more highly rated Ducky keyboards, so feel free to take a closer look at our top picks right away.

Note: All the prices and offers in this article are subject to change, so be sure to check the official product page to get the latest deal. If the product/offer you’re looking for is no longer available, you can try to find it on its official manufacturer page or get another one from our list.

What are the best Ducky keyboards to get?

  • Ducky One Mini RGB – best in class
  • Ducky One 2 SF RGB LED – has RGB LED
  • Ducky Miya Pro Panda – small sized
  • Ducky One 2 Horizon – uses Cherry MX switches
  • Ducky One 2 Skyline – colorful option

To find out more about the pros and cons of each keyboard, keep reading the list below.

Ducky One Mini RGB – best in class

  • Colorful and customizable RGB lighting
  • Zodiac spacebar accessory
  • Increased portability
  • Intuitive keyboard layout
  • Fast shipment
  • No dedicated arrow keys

The Ducky One Mini RGB is among the more highly rated 60 percent keyboards. This keyboard boasts quality PBT double-shot keycaps, which incorporate shine-through legends, for super crisp word processing.

It offers users six alternative Cherry MX switches to choose from. The Ducky One 2 Mini’s diverse and customizable lighting effects are also one of its greatest attractions.

Moreover, there’s simply a huge amount of customization potential with its programmable keys. Just feel free to save settings for six alternative profiles and learn a few useful keyboard shortcuts.

Ducky One 2 SF RGB LED – has RGB LED

  • Intuitive all new petite bezel design
  • Additional PBT double-shot colorful keycaps
  • Keycaps German Cherry MX key switches
  • 3528 SMD RGB LEDs
  • Detachable USB Type-C
  • Limited Mac compatibility

If you’re looking for a great keyboard for your PC, then you need to take a closer look at Ducky One 2 SF RGB LED 65% Double Shot PBT. The new bezel design shares a similar sleek frame as its predecessor.

In spite of that, it incorporates dual colors on the bezel to match multiple keycap colorways. No less important, it utilizes 3528 SMD RGB LED longer life expectancy & signal stability.

Moreover, since it uses USB HID with the highest frequency of 1000Hz polling rate, you can rest assured that the keyboard is sending its input signal to your PC 1000 times per second.

Ducky Miya Pro Panda – small sized

  • Novel panda-themed design
  • Doesn’t take up much desk space
  • Comes with a panda desk pad
  • Ideal for FPS gamers
  • Extremely sturdy
  • A little pricey

This is a Ducky and Varmilo keyboard that has had rave user reviews. It is a 60 percent mechanical keyboard that takes up less desk space than full-size keyboards.

The most notable thing about this keyboard is its unique panda-themed design with panda art on the keys.

In addition to these, do note that it also features pinkish hue backlit keys that users can configure with the Fn keys in no time.

Ducky One 2 Horizon – uses Cherry MX switches

  • Robust keyboard with very solid keys
  • Incorporates double-shot PBT keycaps
  • Utilizes a USB-Type C cable
  • Decent clack & thock sound when pressed
  • Great customer service
  • Lacks RGB lighting effect

The Ducky One 2 Horizon is a robust keyboard with five alternative Cherry MX switches available for users to tailor to their requirements.

It has a unique dual-color design with light and dark blue keys mixed in with a few orange ones. Users can press any number of key combinations simultaneously for games thanks to the Horizon’s USB-N-key rollover.

This keyboard also has three backlit versions with lighting effects and one non-backlit version for users to choose from.

Ducky One 2 Skyline – colorful option

  • Its users can program macros
  • Great PBT keycaps
  • Includes lock key indicator lights
  • No more than 1.85 pounds
  • Clean and intuitive design choice
  • No RGB lighting

The Skyline is more of a variation of the Ducky One 2 Horizon. It’s pretty much the same keyboard except for its alternative frame and keycap colors that give it a dark and light grey colorway.

So, it’s got the same quality PBT keycaps, Cherry MX switches, and USB cable that you’re expecting as a potential daily user.

As if these weren’t enough, do note that it also features USB N-Key rollover so users can press as many keys simultaneously as required.

Ducky’s keyboards are some of the best mechanical boards around. The aforementioned keyboards are extremely versatile, with programmable macros and numerous switches to choose from.

Moreover, do note that this article is part of a bigger selection of great PC keyboards. Don’t hesitate to make a choice as soon as possible and share it with us in the comments area below.

Microsoft Teams Meeting Add-In: How to Download & Install

Here’s how to download and install the Teams Meeting add-in for Outlook.

Though it used to be built-in, the MS Teams add-in is now missing or is disabled from Outlook. This is because Microsoft decided to split Teams from Office 365.

That doesn’t mean you can’t add it back and use it as part of your Office Suite. Here’s how:

How do I install the Microsoft Teams Meeting add-in for Outlook?

Insert the add-in in Outlook

  1. 1. Launch Outlook on your device.

  2. 2. Click on the Home button.

  3. 3. Press the Add-ins button. This will open another window featuring all add-ins that you can install.

    add ins outlook
  4. 4. Click on All, then write Microsoft Teams in the search field.

    how to download microsoft teams add-in for outlook
  5. 5. Toggle the add-in on using the controls next to it. Teams and Outlook should now be connected on your device.

  6. 6. To make sure you installed the add-in, go to File, then click on Manage Add-ins or Manage Apps, and check whether Teams is in the list.

  7. After following the steps from above, our team of experts was able to install Microsoft Teams add-on successfully. Once the installation was finished, the add-on became visible in the Ribbon menu on the top.

How can I create a Teams meeting in Outlook?

  1. In Outlook, click on New items and select Teams Meeting.
  2. Set the date of the meeting and add the attendees.
  3. Send the meeting.

For a more detailed tutorial on setting up a Microsoft Teams meeting directly in Outlook, check out this step-by-step guide: Schedule Microsoft Teams Meeting in Outlook.

  1. In Outlook, open the Calendar and select the desired meeting.
  2. Click on Teams Meeting in the top menu.
  3. Lastly, click on Send update.

Wrapping up

Microsoft Teams add-on for Outlook can be quite useful and allow you to easily organize meetings with your coworkers. It’s easy to install.

Lately, there have been users complaining about the fact that they can’t download files in Teams, which, too, is easily fixable. Also, find out how to repair a corrupt profile in Outlook and eliminate various issues.

In case Teams is disabled, we have a great guide on how to enable Teams Meeting add-in from Outlook. Many reported that Microsoft Teams is not appearing in Outlook, but we tackled that in a different guide.

Many reported that Teams is not working on Windows 11, but we have a guide addressing it. Also, don’t miss our guide on what to do if Teams calendar is not syncing with Outlook.

If you have any questions, please don’t hesitate to drop them in the comments section below.

3 Best KEF Speakers to Buy [Cyber Monday deals]

KEF is one of the leading producers of high-quality speaker systems on the market since its creation in the year 1961.

Since then, this company has amazed the public with the latest innovations in the field of sound engineering and has offered the very best speakers to the most renowned names in the music industry.

Because KEF has such a great number of products on the market, we have scoured the web for the best options available on Amazon this year.

We will explore 3 of the best speakers found online, and we will offer you a comprehensive guide that includes a pros and cons list for easily understanding which features are included and which could be improved.

Read on to find out more details.

Note: All the prices and offers in this article are subject to change, so be sure to check the official product page to get the latest deal. If the product or offer you’re looking for is no longer available, you can try to find it on its official manufacturer page or get another one from our list.

What are the best Kef speaker deals?

KEF Q150

KEF Q150 - Black friday Kef speakers

The KEF Q150 speakers offer an incredibly crisp sound, with crystal-clear mids and impressive bass, all contained in a slick and compact wooden box.

The Uni-Q Driver Array enables the treble frequencies to be even clearer than in previous models, and the crossover was redesigned to provide an even deeper and more accurate bass.

The price range of these bookshelf speakers is well above the price range of other speakers of this size, but they are worth every cent.

In this list, the Q150 speakers are the best option for a good price.

Pros:

  • Part of the award-winning Q series from KEF
  • Redesigned for better sound quality
  • Available in two colorways – matte black and white vinyl – enables you to easily integrate the speakers into your home no matter the design
  • Compact yet powerful for a beautiful sound experience

Cons:

  • Even though it is justified, the price range might be too steep for some users

⇒ Check price

KEF LS50

KEF LS50 - Black friday KEF speakers

The model LS50 is an amazing middle-range KEF speaker system that produces an incredibly clear sound quality by using the state-of-the-art Uni-Q driver array.

The materials used to build the LS50’s cabinets use a custom baffle shape and port design to offer you a very wide audio sweet spot without distorting the sound in any way.

Pros:

  • The most highly appraised speakers ever released by KEF with praises from such publications as Stereophile, What Hi-Fi, and The Absolute Sound.
  • Two-bay bass reflex for a deep and well-rounded bass
  • 106 dB maximum output
  • Three design finishes are available – gloss black with a rose gold driver, gloss white with an electric blue driver, and matte black with a black driver
  • Flexible ports that maximize the turbulence and unnecessary noises

Cons:

  • Small issue with mid-range frequencies at high volume levels

⇒ Check price

KEF Q750

KEF Q750 - Black friday Kef speakers

The Q750 model from KEF is our top-of-the-range pick for the best speakers from this company. This speaker offers unprecedented sound quality, it is built out of quality materials, and the amazing design completes every home setup effortlessly.

This slick-looking tower speaker features a Unit-Q driver Array that makes the treble frequencies smooth and clear and uses top-of-the-line crossover technology to create deep bass.

Pros:

  • New surround and rear suspension for a truly immersive sound experience
  • The latest low-frequency drivers for crisp treble
  • 6.5-inches Unit-Q driver Array
  • 6.5-inches bass driver
  • Two 6.5-inches auxiliary bass radiators
  • Two finishes available – matte black and white vinyl

Cons:

  • For a complete surround sound crystal-clear sound experience it is recommended that the entire set is used, and not just one speaker

⇒ Check price

KEF has an amazing array of super high-quality speakers available on the market, offering the latest advancements in sound tech, and uses the best materials to build them.

This guide was written to enable you to make an informed decision about the best KEF speaker for your circumstances, and we hope you found it helpful.

This specific deal is part of our bigger selection of the best speaker deals you can find. You might also want to check out our dedicated Black Friday hub for tech deals.

Please feel free to let us know what product you chose to buy by using the comment section below.

4 Best Star Citizen Hotas / Joysticks [Cyber Monday]

Simulation video games like the Star Citizen and Elite Dangerous have 6 DoF (Degree of Freedom). You need a HOTAS (Hands on Throttle and Stick) or HOSAS (Hands-on Stick and Stick / Dual-Stick) to control the six axes of your aircraft optimally.

While the keyboard and mouse do work, the best way to play games with 6DoF is to use a HOTAS or joysticks. While Dual Joysticks are the preferred method to control a virtual aircraft, a single joystick controller can work for less PvP combat-oriented games.

In this article, let’s find out the best Star Citizen HOTAS/Joystick that takes your virtual flight simulation experience to a new level.

Note: All the prices and offers in this article are subject to change, so be sure to check the official product page to get the latest deal. If the product/offer you’re looking for is no longer available, you can try to find it on its official manufacturer page or get another one from our list.

What are the best Joysticks / HOTAS for Star Citizen?

  • Thrustmaster T16000M FCS – best overall value
  • Thrustmaster 2960778 – great if you’re on a budget
  • Thrustmaster HOTAS Warthog – high-end & premium feeling
  • Logitech Extreme 3D Pro – great option for beginners

Now let’s find out more about the pros and cons of each joystick.

Thrustmaster T16000M FCS – best overall value

  • Excellent joystick control
  • Comfortable to use
  • Configurable controls
  • Detachable components for left/right-hand use
  • Buttons on the stick feel clumsy

The Thrustmaster T16000M FCS offers the best bang for your bucks when it comes to dual sticks. It features ambidextrous 16k, allowing you to operate the joystick with your left or right hand with equal precision.

However, you need to work with the detachable components to make it work for left-handed use.

Thrustmaster T16000M FCS comes with the decent build quality, and the throw of the stick is as smooth as it gets.

There are tons of buttons that you probably won’t use for Start Citizen, but it is there, and you can configure if required.


Thrustmaster 2960778 – great if you’re on a budget

  • Classic joystick design
  • Excellent sliding throttle action
  • Tons of button on the throttle
  • Number of compatible accessories
  • Looks dated

The HOTAS variant of Thrustmaster 2960778 T.16000M FCS is a good budget option for Start Citizen player who wants to go with HOTAS only.

Thrustmaster 2960778 T.16000M FCS is an excellent option if you are not much into PvP combat but want to do trade runs, exploration, and stuff.

It offers enough axes to achieve the 6DoF needed for Start Citizen. It also offers exclusive precision featuring the Hall Effect accurate technology magnetic sensors paired with 14 action buttons.


Thrustmaster HOTAS Warthog – high-end & premium feeling

  • Excellent build quality
  • Plenty of button and switches
  • Throttles offer surgical precision during gameplay
  • Stable because of its heavy build
  • Second Pro
  • Expensive

Thrustmaster HOTAS Warthog offers everything you need from high-end flight sticks, except the price. With incredible build quality, enough buttons and switches for customization, and excellent joystick, throttle, and hat switches, it lets you control almost any sort of movement.

It features dual replica throttles 3D magnetic sensors that allow you to enjoy surgical precision over a USB connection to your PC.

Included TARGET software lets you configure and program the controllers using the Drag and Drop inches principle.


Logitech Extreme 3D Pro – great option for beginners

  • Easy to use
  • Durable
  • 12 configurable action buttons
  • Reliable
  • Doesn't include a separate thruster

Logitech Extreme 3D Pro is a surprisingly well-built joystick for the price. It has no LED lighting or LCD screen, nor does it offers hundreds of programmable buttons, but what it does offers is a durable and reliable flight stick for Start Citizen and other simulation games.

Logitech Extreme 3D Pro excels in ease-of-use. It offers 12 action buttons, an eight-way hat switch, and a rapid-fire trigger. All the controls can be customized and assigned multiple controller configurations.

This buying guide will surely help you choose the best joystick for your circumstances.

Don’t hesitate to share your experience with us by using the comment section below.

Windows 10 KB5020030 Cumulative Update brings multiple fixes

Microsoft is constantly releasing new Windows updates to ensure that its operating system is running smoothly and without bugs, and after KB5018482 cumulative update, we finally got a new one.

A new optional KB5020030 Preview cumulative update has been released, so let’s see what it has to offer.

A quick overview of Windows 10 KB5020030 Preview cumulative update

The update is available for Windows 10 Builds 19042.2311, 19043.2311, 19044.2311, and 19045.2311.

This is an optional update and it doesn’t include any security updates, but it allows administrators to test the upcoming bug fixes that are coming in December.

Regarding the bug fixes, here are the most prominent ones:

  • Search box – The search box will now appear on the Taskbar when you position it on the top of the screen or if you use small Taskbar buttons.
  • Microsoft Store updates – Issues with constant update failures in Microsoft Store have been fixed.
  • Printing issues – Problems with certain printers have been resolved. This includes misaligned print outputs.
  • Daylight saving time – Issues that affect daylight savings time for the Republic of Fiji have been fixed.
  • Quick Assist – Quick Assist is now available for your client’s device.
  • Improved app installation – Issues with app installation on devices managed by the enterprise have been fixed.
  • CNO fixes – Issues with cluster name objects are addressed in this update.
  • Microsoft Direct3D 9 – The problem with D3D9 and Remote Desktop is fixed. No longer will D3D9 crash during Remote Desktop sessions.
  • WLDP – Fixed the issue with applications that run on Windows Lock Down Policy.
  • Windows Defender for Endpoint – Fixed issues that blocked live response investigations.

As previously mentioned, the update is optional, and you can get it manually from the Microsoft Update Catalog.

Have you tried this update yet? Let us know in the comments section below!

Incorrect Safe Mode Password: 3 Ways to Start It Without a Password

Windows Safe Mode was always a way out of software-related issues. Uninstalling applications in the Safe Mode is much easier than in the standard system state.

Unfortunately, some users weren’t able to access Safe Mode due to a password bug. Even though they typed in the password (the correct one, we hope), they could not log into the system.

We offer solutions for this problem below, just like we did for the PC automatically starting in Safe Mode. So, feel free to try them out and tell us whether they addressed the problem.

Why is my Safe Mode password incorrect?

Some of the reasons Windows 10 is stuck in Safe Mode with an incorrect password can be your mistake or device issues.

Below are some of these causes:

  • Entering PIN instead of the password: Most users confuse their PIN for the password. When the Safe Mode with Command Prompt or the usual Safe Mode requires a password, you need to enter your password, not the 4-digit PIN. This should give you access to your PC.
  • Issues with your PC: You might be entering the correct password at times, but some hard-to-trace problems might prevent you from logging in. In this case, you might need to reinstall Windows 10.

How can I fix the incorrect Safe Mode password?

We advise trying the troubleshooting steps below to see if they fix this issue before proceeding to the solutions in this section:

  • Enter your password and not your PIN.
  • Try different iterations of your old passwords if the present one is not working.

If all of these are not working, you can now proceed to the fixes below:

1. Use Safe mode with Networking

  1. Press and hold the Shift key, click the Power icon and choose the Restart option.
  2. When your PC restarts, choose Troubleshoot > Advanced Options.
    advanced options safe mode password incorrect
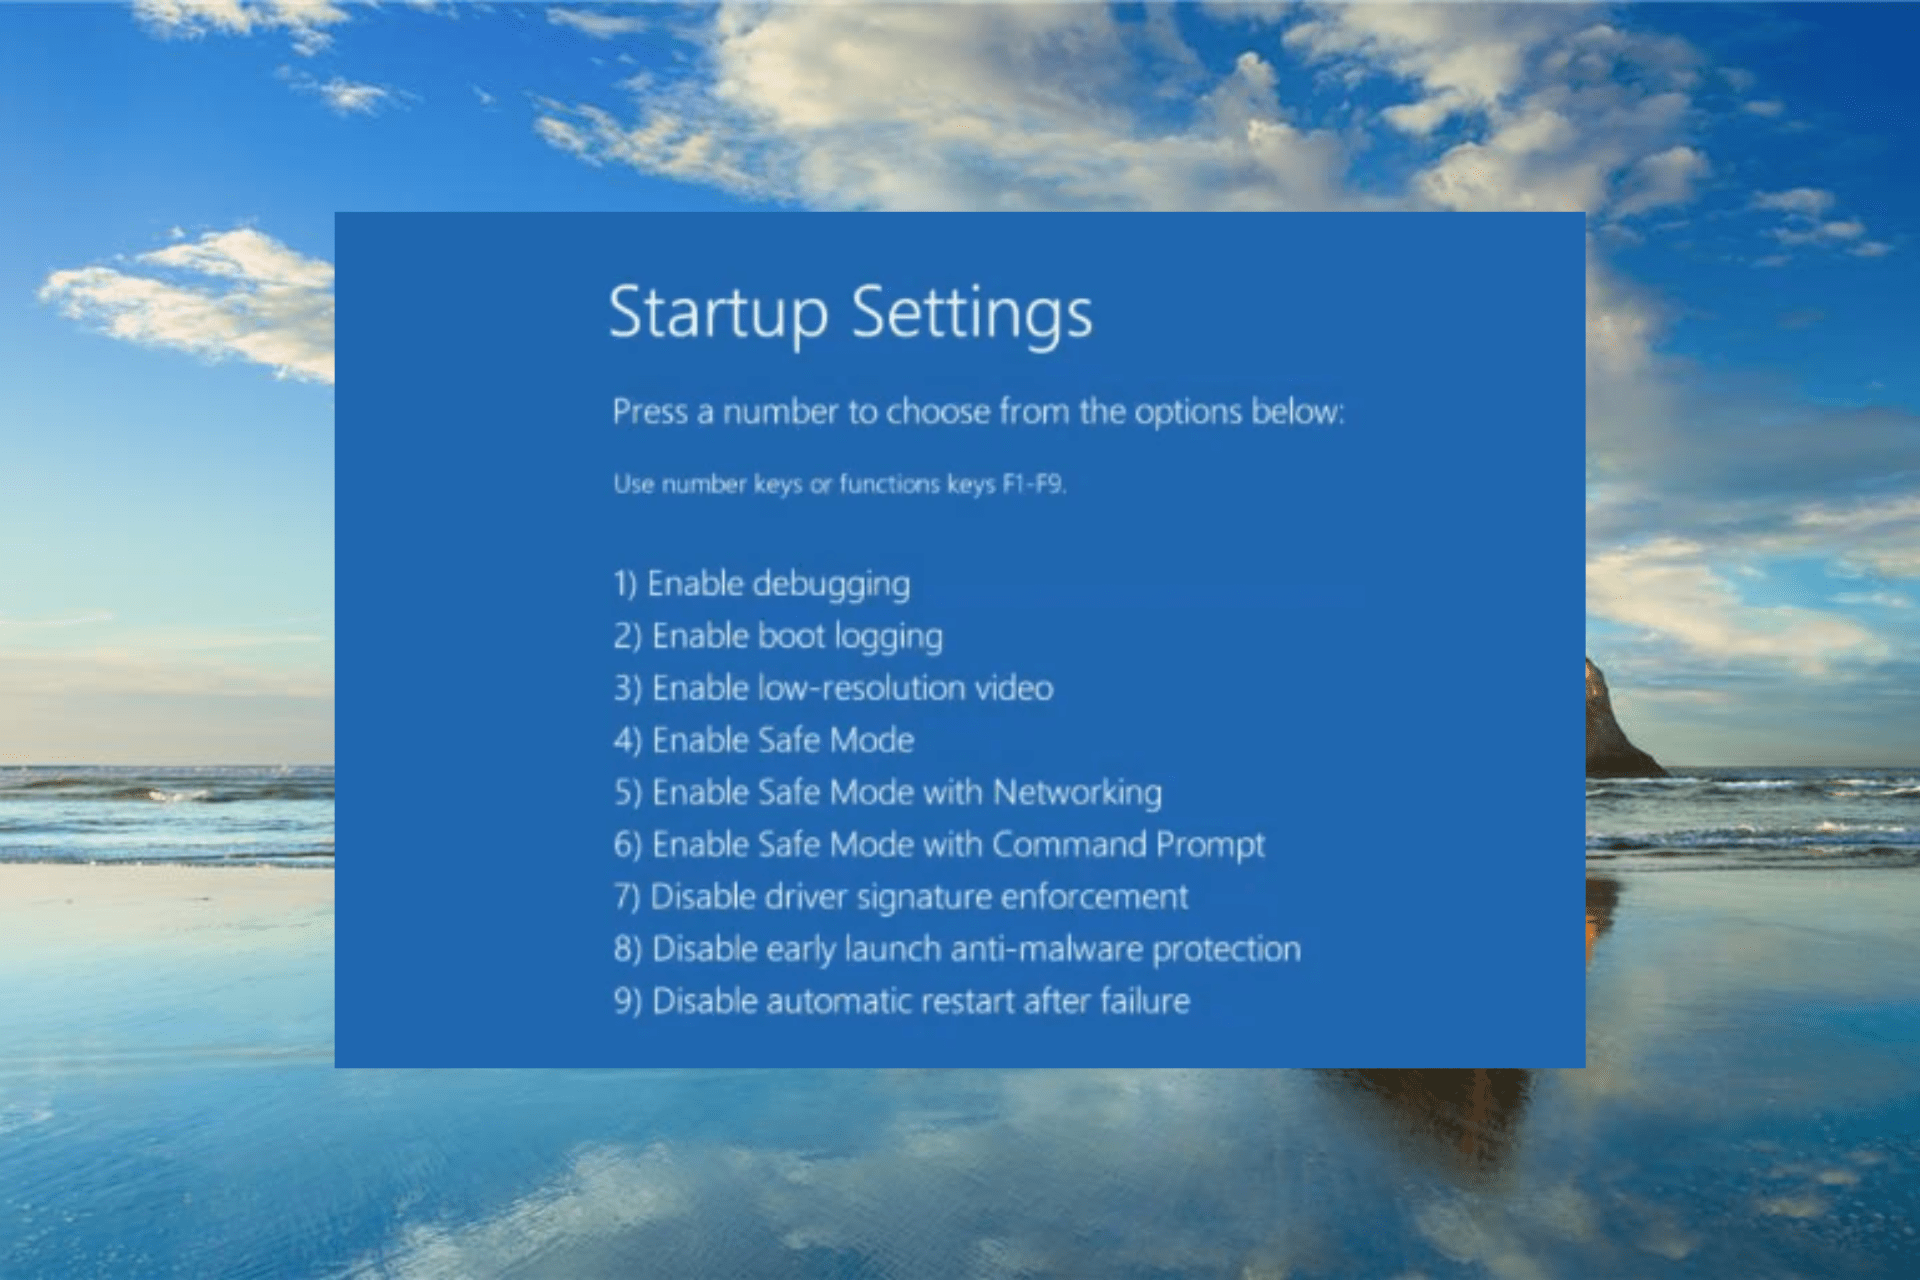
  3. Select Startup settings.
    startup settings
  4. Now, click the Restart button.
    restart
  5. Finally, choose the Enable Safe Mode with Networking option from the list.
    enable safe mode

Booting into the Safe Mode with Networking is a must if you’re using a Microsoft domain account on your administrative Windows 10 account.

The standard boot might work without an internet connection, but this doesn’t apply to the Safe mode due to a bug. So this might be why you’re incorrectly dealing with the Safe Mode password.

With that in mind, we suggest rebooting your PC again and trying Safe mode with Networking this time.

2. Use a Windows 10 bootable drive to remove the password

  1. Download the Media Creation Tool.
  2. Plug in the USB stick in the fastest port. It needs to have at least 8 GB of free storage space (Have in mind that the procedure will delete everything from the USB flash drive, so backup your data timely).
  3. Select the Create installation media (USB flash drive, DVD, or ISO file) for another PC option and click Next.
    create safe mode password incorrect
  4. Choose Language and Architecture. Click Next.safe mode won't accept password
  5. Choose the USB flash drive option.media creation tool safe mode won't accept password
  6. Please wait until the tool downloads the file and mounts them onto the USB.
  7. Boot with the bootable installation drive and choose Repair from the left corner.
  8. Choose Troubleshoot > Advanced options.
    advanced options safe mode password incorrect
  9. Now, choose Command Prompt.
    command prompt
  10. In the command line, type the following command and press Enter: C: bcdedit /deletevalue {default} safeboot or bcdedit /deletevalue safeboot
  11. Remember to replace C in the command above with the letter of the drive where your system is installed. Now, exit Command Prompt and restart your PC.

This workaround proved to be the solution for the incorrect Safe Mode password issue. But, to do it, you’ll need to acquire the bootable installation media. Nevertheless, you should be able to do it by following the steps above.

3. Clean install Windows 10

Finally, if you can’t boot Windows 10 in a standard manner and the Safe Mode password is still a no-go, we suggest reinstalling Windows 10, following the steps in the linked guide.

The article contains a detailed explanation of what is needed and the various ways to do it. So, check it out if no solution works for you.

That’s it! We hope that you managed to fix the problem with the incorrect password in Windows 10 Safe Mode.

If you are facing other issues like Safe Mode crashes on Windows 10, check our detailed guide to know how to fix it quickly.

Please tell us whether this helped you in the comments section below.

4 Best In-Wall and Ceiling Speakers on Cyber Monday Deals

We all love listening to music in order to relax after a long day or to dance to music with our friends at a house party, but sometimes having speakers mounted on the wall or sitting on the furniture is not an option.

Thankfully, there is a more ‘hidden’ way of using a set of speakers, and the best way to hide them is inside the wall or the ceiling of your preferred room.

In wall or ceiling speakers are designed in such a way that they don’t attract attention to themselves but can offer a great sound experience nonetheless.

Note: All the prices and offers in this article are subject to change, so be sure to check the official product page to get the latest deal. If the product or offer you’re looking for is no longer available, you can try to find it on its official manufacturer page or get another one from our list.

Which ceiling or in-wall speaker is best?

Monoprice Caliber Series

  • Oversized magnets
  • Kevlar fiber cone woofers
  • Titanium silk membrane dome tweeters
  • Adjustable crossover switch
  • If only one pair of speakers is used, the bass produced might not be strong enough

The Caliber Series in-ceiling speakers from Monoprice are a very good mid-range audio setup that is 6.5-inches in size and offers 160 W in power.

The cone drivers installed on this set of speakers are made out of DuPont kevlar fiber and allow the bass to be heard without any significant distortion, no matter the volume.

The tweeters feature a pivoting titanium silk dome, managing to reproduce perfect mid and high-frequency sounds without any reverberation or muffled noises.

Klipsch CDT-2650-C

  • Low-profile design for easy integration into any home setup
  • Magnetic grille with a simple design that can be easily removed for clean-up
  • Great sound quality both in low, medium and high frequency
  • Amazing volume levels
  • Might be hard to install if the Klipsch IK-650-C Install Kit is not purchased as well

The CDT-2650-C in-ceiling speakers from Klipsch are one other great choice for this type of speaker, offering amazing quality for the price.

This model of a speaker from Klipsch doesn’t come in pairs like the other options we presented in this list, making it a bit more expensive.

The price is well justified by the quality of the sound they produce using the 1-inch (2.54cm) silk dome tweeter to create crisp sounds without distortion.

The cone woofer is made out of Polypropylene and is 6.5-inches (16.51cm) in size. The material is perfectly chosen in order to minimize unwanted reverberations.

Polk Audio RC55i

  • 5.25-inches woofer
  • 0.75-inch tweeter
  • Incredibly crisp sound
  • Slim design with a paintable mesh
  • The price tag

Pyle Home PIC62A

  • 250 Watts rated peak power with 125 Watts RM
  • Adjustable treble control
  • Great price for the sound quality offered
  • Slick design that merges seamlessly with any room
  • At high volume levels, the sound can feel distorted

The Pyle Home PIC62A in-ceiling speakers are a classy and discrete way of listening to your favorite music at home without the need to have space occupied by your sound system.

This 250 Watt speaker system bolsters high-performance two-way directional sound and is 6.5-inches in size.

One of the best features of these speakers is the fact that you can adjust the treble to suit the room size and specific location for a better and clearer sound.

The Polk Audio RC55i is a premium set of in-wall speakers that offer amazing sound quality.

Even if they are more expensive than all the other options presented in this list, they are worth every cent.

This set of speakers has a 5.25-inches woofer with dynamic-balance capabilities and a 0.75-inch tweeter that guarantee a crisp and crystal clear sound.

The cone is made out of a mineral-filled polymer and in the combination with the composite driver baskets can create a balanced and even sound coverage no matter the volume level.

We hope you found this guide helpful. Please let us know by using the comment section below.

5 best dual USB car Chargers to Buy [Cyber Monday]

Whenever you hit the road, you are bound to forget at least something. If that something happens to be a charger for your phone or tablet then you will be in a bit of trouble.

Fortunately, USB car chargers have been around for quite some time and those that have multiple USB ports are the best.

Because of their wide use, we’ve decided to make a list of the ones we consider to be the best. This is so that choosing one will be easier for you.

Note: All the prices and offers in this article are subject to change, so be sure to check the official product page to get the latest deal. If the product or offer you’re looking for is no longer available, you can try to find it on its official manufacturer page or get another one from our list.

What is the best USB multi-charger for cars?

Anker PowerDrive 2

  • PowerIQ and VoltageBoost combine to provide the fastest possible charge
  • Up to 4.8 amps or 2.4 amps per port.
  • One of the smallest ever USB car chargers, featuring two USB ports and an LED light for after dark.
  • Does not support Qualcomm Quick Charge

The PowerDrive 2 is a neat dual USB car charger that condenses twin-port high-speed charging into an incredibly compact power source for any phone or tablet on the road.

The small size makes it so that it is easy to store in the car, but it still manages to deliver enough power to make it a very reliable charger.

HUSSELL Car Charger

  • 5.4A 30W dual USB charging ports
  • 3A Qualcomm Quick Charge 3.0: provides 4x faster charging speed to compatible devices
  • Compatible with any Android and iOS mobile devices
  • Built-in protection system against over-current, over-charging and over-heating
  • May have issues fast-charging with both ports simultaneously

If your electronic devices use up a lot of power or are the type that works with fast charging abilities, then the HUSSELL Car Charger is the car accessory that you need.

It has 2 5.4A 30W USB charging ports, allowing for your devices to be charged up to 100% before you even reach the destination.

It also has built-in protection against shocks, so you don’t have to worry about your gadget’s lifespan.

AINOPE Car Charger

  • Total power of 4.8A
  • Works for all USB-powered devices
  • Full zinc alloy body features scratch-resistant, nice in design and long-lasting in use
  • Does not support Qualcomm Quick Charge

If you’re looking for a car charger that will give off a feeling of durability, then the AINOPE Car Charger is indeed a good option to consider.

It is compact in size and features a full zinc alloy body, making it resistant to damage, scratches, and more of the sort.

AINOPE USB Dual Port Car Charger

  • Compatible with all USB C and USB A devices
  • Light and portable
  • Input voltage of 12 Volts
  • Due to its small size, may pop out on its own in some vehicels

If you’re looking for a charger that supports multiple simultaneous inputs while being very small and portable, then this AINOPE product certainly deserves your attention.

It fits the cigarette lighter outlet in your car and supports charging two devices at the same for USB c and USB A. Users are generally impressed with its fast-charging capabilities and portability.

AUKEY USB Car Charger

  • Optimal Charging: Charge two devices simultaneously at full speed with 5V 2.4A
  • Works with all USB-powered devices including Android and Apple smartphones and tablets
  • Built-in protection against excessive current, overheating, and overcharging
  • Plastic components may feel cheap

If you’re looking for a car charger that will take care of your devices, then the AUKEY USB Car Charger is the right model for you.

It manages to deliver power to both USB ports efficiently, while the safeguards protect your devices from sudden shocks of current.

Anker Quick Charge

  • Quick Charge 3.0 charges devices up to 80% in just 35 minutes
  • PowerIQ and VoltageBoost deliver the fastest possible charge to all non-Quick Charge devices
  • Dual ports pump out 39W
  • May have issues fast-charging 2 devices at once

Yet another Anker entry on our list, the Anker Quick Charge is a reliable option if you want to efficiently charge an electronic device while on the road.

It comes with Quick Charge, while the PowerIQ and VoltageBoost features make it so that devices are charged at the fastest possible speed, even on non-Quick Charge devices.

Car chargers are made to be more and more compact, and the latest models feature protective guards against shocks and overheating.

Furthermore, a lot of them come with Quick Charge options, so you don’t have to worry about slowly watching your phone die in your hands as the battery gives out.

Which one is your favorite? Tell us in the comments section.

Faulty Hardware Corrupted Page Error: 4 Methods to Fix It

Many users have reported the FAULTY_HARDWARE_CORRUPTED_PAGE error on Asus laptops, but Dell or HP devices have also been affected. So this Blue Screen of Death error could be down to hardware issues, as the name implies.

Irrespective of your PC type, we have gathered the fixes to help you solve this problem in this guide.

What is a Faulty Corrupted Hardware Page?

The Faulty Hardware Corrupted Page BSOD is usually down to problems with one or two hardware components on your PC. Below are some of the known causes of the issue:

  • Faulty RAM: The chief cause of the Faulty Hardware Corrupted Page on Surface Pro 7 and 8 and other devices is the RAM. This can be due to some glitches with the RAM or some settings. You need to run the Memory Diagnostic tool to check and fix these issues.
  • Outdated PC: Windows updates are released for a reason. If you are facing this issue, it might be because you have not updated your PC for some time. You need to update Windows 10 to the latest version to fix this.
  • Faulty system files: Broken system files are part of what causes the Faulty Hardware Corrupted Page error. You need to repair these corrupt files to restore normalcy on your PC.

How can I fix the Faulty Hardware Corrupted Page?

1. Repair system files

  1. Press the Windows key, type cmd, and select Run as administrator under Command Prompt.
    cmd admin faulty hardware corrupted page
  2. Type the command below and hit Enter: sfc/scannowsfc scan
  3. Wait for the command to finish running, copy-paste the commands below, and press Enter after each: DISM /Online /Cleanup-Image /ScanHealthdism scan DISM /Online /Cleanup-Image /RestoreHealthdism faulty hardware corrupted page
  4. These commands might take some time, so you need to wait till they finish.

System files are essential for the well-being of your PC. You can experience the Faulty Hardware Corrupted Page error if any of them is corrupt or broken.

Running the DISM and SFC scans should detect and fix the issues with these files.

Alternatively, you can use a dedicated system file fixer to repair these files. These tools can restore any broken files and replace the corrupt ones.

This helps to restore your PC to top shape. Also, they can fix most BSOD issues without running any code. So this tool might be all you need to keep your PC running smoothly.

2. Run the memory diagnostic tool

  1. Press the Windows key + R, type mdsched.exe, and click OK.
    mdsched
  2. Choose Restart now and check for problems (recommended) option.
    restart now
  3. Now, wait for the diagnosis to be complete and apply any recommendations.

Most users have found the RAM to cause the Faulty Hardware Corrupted Page error. The Windows Memory Diagnostic tool should diagnose the issues and recommend possible fixes.

You can also use a third-party tool like MemTest86 to scan for issues with your RAM.

3. Update drivers

3.1. Update drivers manually

  1. Press the Windows key + X and select the Device Manager option.
    device faulty hardware corrupted page
  2. Double-click the option you want to update the driver for and right-click the driver there.
  3. Select the Update driver option.
    update driver
  4. Choose the Search automatically for drivers option.
    search auto
  5. Now, wait for the search to complete and install the available drivers.

Drivers are an essential connecting medium between your PC’s hardware and software components. You can keep getting the Faulty Hardware Corrupted Page error if they are outdated.

Aside from using the built-in driver updater, you can go to your PC manufacturer’s website to download the latest driver. Also, you can check our detailed guide for more ways to update your Windows 10 drivers manually.

3.2. Update drivers automatically

Updating all the drivers on your PC manually is not only tasking but also prone to problems. To help ease this and fix this issue and many other BSoD errors, it’s strongly recommended that you install the latest drivers using an automatic driver installer.

⇒ Get Outbyte Driver Updater

4. Update Windows PC

  1. Press the Windows key + I to open the Settings app and select the Update & Security option.
    update and faulty hardware corrupted page
  2. Click the Check for updates button.
    check for
  3. Now, install the available updates, including the optional ones.

The Faulty Hardware Corrupted Page error can occur because you miss essential updates on your PC. Installing the latest updates, including the optional ones, should help you fix this issue.

The Faulty Hardware Corrupted Page error can be frustrating and lead to more significant problems when left unattended. However, with the information in this guide, you should be able to fix it effectively.

Are you facing other BSOD issues, like system service exceptions in Windows 10? Then, check our detailed guide to fix it effortlessly.

Feel free to let us know if this guide’s fixes helped you solve this problem in the comments below.

E Drive low Disk Space: Fix it With These 3 Methods

Notifications that your E drive is low disk space usually appear periodically in desktop view or while trying to open your recovery drive; it could be that the drive is full and you can’t store any more files on it.

In a few other cases, this is a false alarm triggered by another element on your computer.

Whatever the case is, we will explore the best solutions in this guide.

Why is my E drive automatically filling up?

The E drive is a recovery drive that lets you store files needed during an emergency recovery, like when your system is unstable. It is a partition on the main hard drive, with less space than the local C: drive.

  • File storage – If you store files in a recovery E drive or a backup program uses it to store files, it gets full quickly, which can cause problems when you want to use the system recovery function.
  • OS threshold – Windows has drawn a 200MB threshold line for optimal performance; it takes automatic actions to maintain minimum performance capabilities below this. For example, if it goes below 80MB, you’ll get a strong warning message as the system tries to free up drive space.
  • Presence of malware – For computers exposed to malware, you can expect different erratic behavior. Automatic filling of the E drive is an example, and users will have to do a PC scan with a reliable antivirus.

To resolve the E drive low disc space warning, there are some fixes you can perform to get some free space back.

One of them is first to find out how much space is in your operating system and what data or apps are taking up space, then decide what to remove or delete.

How do I fix the E drive if it’s low on disk space?

1. Turn off the System Protection

  1. Right-click Start and select System.Fix E drive low disc space issues on Windows 10
  2. Scroll down and find Related settings, then click System info.Fix low disk issues on Windows 10
  3. On the right pane of the open window, click System Protection.
  4. Under Protection Settings. Look for Recovery Drive in the list of available drives. If E drive is listed, check if the protection is turned off or on, but close the windows if it is turned Off. If it is On, click the recovery drive name to highlight it and click Configure.
  5. Select Disable system protection, then click Apply and OK to confirm the message.
  6. Now, click Start and select File Explorer.
  7. Click the View tab.
  8. Select Options.
  9. Select the View tab, tick Show Hidden files, folders and drives, untick Hide protected operating system files, then click Apply and OK.
  10. From the Explorer window, double-click your Recovery drive.
    • If you get a window saying You don’t currently have permission to access this folder, click Continue.
  11. Copy the files to another drive if you created or copied any of them to the recovery drive and want to keep them.
  12. Find and delete previously saved files saved in the recovery drive by selecting them and pressing Shift + Delete to remove them permanently.

2. Use a system optimizer tool

Another great way to reclaim precious space on your E drive or any hard drive is by using a specialized system optimization tool.

3. Scan for viruses

  1. Open Settings by pressing the Windows + I hotkey.
  2. Choose Update & Security.
    E drive low disk space
  3. From the left pane, select Windows Security.

    E drive low disk space
  4. Select Virus & threat protection from Protection Areas.
    E drive low disk space
  5. Click on Scan Options, then select Windows Defender Offline Scan and click the Scan now button.
  6. Finally, your PC will restart, and the scanning procedure will commence.

If you have read this far, you should have successfully fixed all low disk space problems on the E drive. However, in some cases, this may be a hardware issue, and you may need to replace your hard drive.

Reclaim your system resources, free up precious disk space and get more available memory to enjoy faster startup and loading times.

Did this solution help fix the E drive’s low disc space? Let us know in the comments section below.

5 best NAS for Plex to buy [Black Friday & Cyber Monday]

Plex has already gained a whole lot of popularity among TV series and movie enthusiasts who like to keep things nice and organized.

But this wouldn’t have happened if it wasn’t for specialized hardware solutions such as NAS (Network-Attached Storage) units.

These devices made it possible for users all over the world to store their favorite multimedia content and stream it (by using Plex) whenever they saw fit.

In order to find some of the best NAS units that you can buy, don’t hesitate to take a closer look at the list below.

Note: All the prices and offers in this article are subject to change, so be sure to check the official product page to get the latest deal. If the product or offer you’re looking for is no longer available, you can try to find it on its official manufacturer page or get another one from our list.

What is the best NAS for Plex?

Synology 2

  • Dual-core processor
  • Low noise level
  • Two camera licenses are already installed
  • AES-NI encryption engine
  • Advanced Bars file system
  • Synology expansion bay needed for expanding the NAS

Synology 2 is a NAS that requires no further introduction, as the reputation of Synology is unquestionable.

This NAS unit can help Plex users organize and enjoy multimedia content without significant effort, thanks to its live transcoding and video streaming capabilities.

As its name subtly suggests, Synology 2 can hold up to two disks at the same time, and also read at 113 MB/s or write at 112 MB/s.

QNAP TS-451

  • Intel Celeron Quad-Core 2
  • QNAP remote included
  • Supports offline and hardware transcoding
  • 4 drive bays give more space if needed
  • Many third-party apps are supported
  • Speed issues

QNAP TS-451 is a 4-Bay NAS unit that can enable Plex users to organize their multimedia content in a more effective manner and enjoy it via streaming without significant effort.

This unit comes with an Intel Celeron Quad-Core 2. 0GHz CPU, as well as 2GBs RAM (DDR3L) that you can upgrade up to 8GBs, and hardware transcoding capabilities.

It’s practically your chance to run multiple Windows/Linux/UNIX/Android-based virtual machines with the virtualization station, so don’t hesitate to buy it.

TerraMaster F2-221

  • Apollo J3355 2.0GHz dual-core CPU
  • AES hardware encryption engine
  • Advanced Btrfs file system
  • Real-time hardware transcoding
  • Ultra-quiet fan
  • Not the most affordable option

TerraMaster F2-221 is one of the best NAS that you can use for all your Plex needs, including but not limited to streaming multimedia content and storing it in a neat, organized fashion.

This diskless unit comes with powerful specs that include an Intel Apollo J3355 2.0 GHz dual-core CPU, as well as 2GBs of RAM (which you can extend up to 4GBs).

As for the Advanced Btrfs file system, it offers 71,680 system-wide snapshots and 1,024 snapshots per shared folder.

TerraMaster F5-221

  • AES hardware encryption engine
  • Intelligent temperature control fan
  • Features an aluminum-alloy shell
  • Accessible price
  • Sturdy unit
  • Linux incompatibility

TerraMaster F5-221 is the 5-Bay version of the TerraMaster F2-221, but you can still use it with Plex to satisfy your need for TV show or movie streaming and/or keeping multimedia content neatly organized.

Like its predecessor, TerraMaster F5-221 comes with an Intel Apollo 2.0GHz dual-core CPU, and 2GB of RAM that can be easily upgraded to 4GBs, depending on your needs.

Even more, it features an aluminum-alloy shell and intelligent temperature control ultra-quiet fan, being ideal for heat dissipation.

Synology 5

  • Can hold up to 5 disks
  • More powerful than Synology 2
  • Can be scaled to up to 10 drives with one expansion unit
  • Quad-core CPU with AES-NI encryption engine
  • Built-in two M.2 NVMe SSD slots
  • Backup not working random issues

Synology 5 is the 5-Bay version of Synology 2 and it offers greater support for Plex users who just need more space to store their multimedia content, in order to stream and enjoy it later.

This NAS unit packs a quad-core CPU with AES-NI encryption capabilities and can read and write at over 225 MB/s, even when data fragments are encrypted.

The built-in two M.2 NVMe SSD slots are ideal for system cache support, not to mention that there are also dual 1GbE (RJ-45) ports with failover and Link Aggregation support.

To wrap it up, you can’t really use Plex as it was intended if you don’t have a serious home server setup going on, and we can all agree that NAS units can really fill those shoes (and then some).

Therefore, whether you consider investing top dollar in Synology 5, QNAP TS-451, or TerraMaster F5-221, you can’t really go wrong with either of those products.

Best KRK speakers to buy [Black Friday & Cyber Monday]

Owning a pair of good speakers can make or break a party, but even if you’re not planning on throwing the ultimate New Year’s get-together, a good set of speakers can make a big difference.

Wheater you enjoy listening to your favorite music from the comfort of your own couch, work in a music studio or just want to have a full sound experience when watching your favorite shows and movies, KRK has the perfect set of speakers for you.

In order to help you choose from the wide range of speaker options from KRK, this buying guide will give you an important overview of what each option has to offer, and also a link, so you can purchase them fast.

Note: All the prices and offers in this article are subject to change, so be sure to check the official product page to get the latest deal. If the product/offers you’re looking for is no longer available, you can try to find it on its official manufacturer page or get another one from our list.

Which krk rokit should I buy?

  • KRK RP5 G-4 – most affordable option
  • KRK RP7 G-4 – perfect balance between price and sound
  • KRK RP10 G-4 – suited for professionals

Now let’s take a closer look at the features of each set.

KRK RP5 G-4 – most affordable option

KRK RP5 G-4 - KRK speakers

The KRK RP5 speaker set is the first in this list as the price range is the most accessible, but still offers an incredibly powerful and crisp sound experience.

This set of speakers from KRK has a professional-grade 5-inches studio monitor that can play almost any frequency in existence, and it uses a bi-amp set up for those of you that want really powerful volume.

Pros:

  • One 5-inch woofer and a 1-inch tweeter on each speaker
  • The built-in amplifier is a Class D power
  • Drivers that were built from scratch to bolster the latest KRK advancements
  • LCD visual ds-driven equalizer

Cons:

  • Even though the set can be bought at an affordable price for this quality, the overall maximum sound volume could be louder

⇒ Check price

KRK RP7 G-4 – perfect balance between price and sound

KRK RP7 G-4 - KRK speakers

The KRK  speakers model RP7 G-4 is the middle-ground set of speakers released in the acclaimed KRK generation 4 speaker models.

This set of speakers has all the capabilities of the previous model presented in this list, but feature a bigger (7-inches) professional-grade studio monitor that flaunts its double amplifier.

Because of the size of the 7 inches matching woofers, this set sounds a lot louder than the predecessor model.

Pros:

  • Tweeter and woofers made with Kevlar for a crisp sound with no reverberations
  • Class D power amp
  • More powerful sound than the KRK RP5 G-4
  • The same incredible quality of sound with no problem replaying both low, mid, and high-pitch sounds to perfection

Cons:

  • No problems have been reported with these speakers

⇒ Check price

KRK RP10 G-4 – suited for professionals

KRK RP10 - KRK speakers

The RP10 G-4 is the top-of-the-range 3-way speaker from KRK’s 4th Generation series, offering crystal-clear studio-level sound quality, no reverberations, and more power than the previous versions.

The big difference between the RP8 and RP7 models from KRK is the extra set of features available for it, a bigger woofer for a more well-dispersed sound, a mid-frequency driver, and the total sound volume power.

Pros:

  • KRK application that allows you to correct the way the speaker emits sounds (depending on the size and type of room you’re using it in)
  • Built-in visual DSP EQ with 25 available presets
  • Enclosure made with low resonance materials for reduced distortion
  • 10-inches woofer made with Kevlar Aramid Fiber
  • 4,5-inches mid-driver
  • 1-inch tweeter

Cons:

  • Even though the price is well justified for the quality of sound that this model produces, it might be too big for some users considering it’s for only one speaker and not the pair

⇒ Check price

Conclusion on KRK speakers

KRK has released the latest 4th generation speakers that offer a great improvement from the last generation, and they have an option for every price range.

If you don’t want to invest too much in a set of KRK speakers but still appreciate sound quality, the KRK RP5 G-4 is perfect for you.

In case you don’t mind spending a bit more for a bigger woofer setup, then the KRK RP7 G-4 is the best option for you.

If you want top-of-the-range quality with other amazing features and a 3-way setup, the best option is the KRK RP10 model from the 4th generation.

This specific deal is part of our bigger selection of the best speaker deals you can find. You might also want to check out our dedicated Black Friday hub for tech deals.

Best USB-C laptop docking stations [Cyber Monday]

A laptop docking station literally organizes your life.

Here’s why: when you have multiple devices such as a keyboard, mouse, your smart devices like a smartphone or tablet, and thrown in a small printer, you want all these devices connected while you use your laptop right?

The common scenario when all this hardware is together, is a cluttered desk with cables all over the floor, while there are other cables on your desk, but the crazy bit is when you’re done working and you have to unplug each one of them.

The cycle begins all over again when you come back to your desk the next day.

To eliminate the stresses that come with plugging and unplugging cables and chargers, and all that wiring stuff, you need a good docking station for your laptop.

These days, the trend is to get a good USB-C laptop docking station because most modern laptops are built with the USB type C port, including smart devices, so you’re better off with a compatible docking station.

So which are the best USB-C laptop docking station devices available for this Christmas early sales?

We took the stress out of your search, and here are our top picks for the best USB-type C laptop docking stations.

Note: All the prices and offers in this article are subject to change, so be sure to check the official product page to get the latest deal. If the product/offer you’re looking for is no longer available, you can try to find it on its official manufacturer page or get another one from our list.

What are the best USB-C laptop docking stations?

  • Plugable 13-in-1 USB-C Triple Monitor Docking Station
  • WAVLINK USB 3.0 and USB C Universal Laptop Docking Station
  • Dell Universal Docking Station

Now let’s take an in-depth look at the features of each laptop docking station.

1. Plugable 13-in-1 USB-C Triple Monitor Docking Station

  • 60W power adapter (100V-240V) with a US power plug
  • Comes with a quick start guide
  • DVI/VGA passive port adapter,
  • Relatively short cable

This USB-C laptop docking station is currently enjoying the top spot if user reviews are anything to go by. It is one of the bestselling docking stations in the market right now.

Features include compatibility with Windows USB-C and Thunderbolt 3 systems, with up to three added displays and 60W charging power.

It uses cutting-edge USB 3.1 features, plus the tried and tested features of the UD-3900 dock, which is Plugable’s best seller. It also has two added video outputs to HDMI and DVI/VGA, and Gigabit Ethernet via DisplayLink.

It is however not recommended for gaming.

Plugable USB-C laptop docking station is revolutionary in connectivity, as it is the first device of its kind designed to showcase the new Triple Display Docking station standard that delivers flexibility and scalability.

USB-C connector has Alternate Modes that allow other non-USB connectors to be used with it.

These modes include DisplayPort, HDMI, and MHL as alternate display modes, and this docking station features support for the Alternate Modes and PowerDelivery (which enables you to power and charge a supported system without needing an OEM charger.

When it comes to power and charging, this USB-C laptop docking station can charge host systems with up to 60 watts of power (20V/3A) via PowerDelivery standard.

Some devices that support video output over USB-C won’t charge via USB-C, so for such, a charger from your laptop’s manufacturer will be required.

2. WAVLINK USB 3.0 and USB C Universal Laptop Docking Station

  • Supports Windows XP/7/8/8.1/10
  • Delivers superfast transfer speeds of up to 5 Gbps
  • Two USB-C ports for fast charging of up to 3A/5V
  • Slow in connecting to the external monitor

This docking station literally brings technology to life. You can perform multiple functions from one laptop such as multi-monitor, dual video, hub, audio, and Gigabit Ethernet adapter, for different user experiences.

Its performance is super strong, the audio is 5.1 channel surround sound through its HDMI interface, and it is a plug and play with the maximum expansion of up to 6 display units for primary, extended and mirror video mode.

In order to use this docking station, you need 2GB RAM, i3/i5/i7 core processor and 4GB RAM for full-screen video playback, and 2GHz Core2Duo.

With just one USB cable, you can transform your laptop into a professional workstation, easily add two displays to see your work better, and you also get to use your microphone or earphones.

3. Dell Universal Docking Station

Dell is a well-known brand in the computer and accessories industry, so you can trust that they’ll create one of the best USB-C laptop docking station gadgets in the market.

For single cable connectivity, you get a powerful DisplayPort over USB-C cable with the Dell Dock, and quickly connect your laptop to a single data and power source of up to 130W.

It is an easy, reliable use docking station with a connection from your laptop to dual FHD displays, or a single 4K display, with all essential peripherals.

The Dell Dock is small and lightweight, and you can place it anywhere you want to work whether at home, your office, or a conference room regardless of the space.

You can also do presentations by connecting a display screen or projector, as this USB-C laptop docking station is one dock for all.

The USB-C connectivity is the latest and most reliable technology for video performance, owing to the Alternate Modes feature.

Dell Dock provides one docking experience for Dell and non-Dell platforms via the Display Port over USB-C connector, ensuring a crisp display and reliable connection.

With a single cable, you’ll free up desk space and have a clutter-free workspace, with the added ability to mount a monitor behind or on your desk.

⇒ Check price

Have you found the best USB-C laptop docking station you want to get for yourself?

If you rely on USB-C for your setup, the right dock can unlock faster speeds and more ports. Explore the top picks in this guide to the best USB-C docking stations for laptops.

For even more premium solutions, explore this roundup of the best Dell docking stations designed for performance and versatility.

Let us know your choice, or if you know a good one that deserves to be on this list, share with us in the comments section below.

Monitor Not Turning on: Why is It Happening & How to Fix It

Is your monitor not turning on after starting the PC? Do not panic; you’re not in it alone. Many users have recently reported that they are experiencing the same issue.

Be assured that you can fix the problem by trying any proven fixes and checks for your black screen issues provided in this article.

Why is my monitor not turning on?

There can be several reasons why your monitor may not turn on. Some of the factors responsible for this are:

  • Connection problems – If your monitor is not well-plugged into the power supply, or if your cables are not well-connected at both ends or are damaged, likely, your monitor will not work on laptop or desktop PC.
  • The video connector may be faulty – One of the pins in the video connector may be bent or broken. Once you notice any bent pin in the connector, carefully straighten it.
  • Wrong BIOS configuration – If your BIOS is not configured with the dedicated graphics, it could result in your monitor not turning on. Also, BIOS corruption may affect the performance of the monitor.
  • Hardware failure – It is possible that your monitor is experiencing a hardware fault, and you may need to replace it with a good PC monitor.

There can be multiple issues affecting your monitor. You may experience certain black screen issues even when it eventually comes up.

Now that you know some potential reasons why your monitor may not turn on let’s proceed to how you can fix this problem.

How do I fix my monitor if it’s not turning on?

Before anything, perform the following:

  • Ensure that your monitor is connected tightly and that it receives power from the wall outlet or the power adapter.
  • If your monitor uses a detachable video cable, ensure you get a second monitor cable that you can use for testing purposes whenever your primary cable fails.
  • Confirm if your monitor’s power lights come up whenever you try to power it on.
  • Ensure to use a dedicated graphics driver. Many Nvidia owners that use DisplayPort connection reported that updating DisplayPort firmware fixed the issue for them.
  • Try to connect your monitor to another computer. This will help you determine if the monitor is working.
  • Connect the monitor to the motherboard graphics. This will help you determine if your dedicated GPU is the cause of the problem.

Having confirmed the above checks, if the problem persists, you can work through any of the advanced solutions below.

1. Perform an inspectional restart on your laptop

  1. Remove your laptop battery and put it back. Then you can try to turn on your computer again. It should come up.
  2. If you can’t remove the battery, wait for at least 30 minutes, then try to restart your computer.
  3. If you press the power button. Still, if the fan is silent, you should know that the monitor is not faulty but the computer itself.
  4. On the contrary, if your fan runs without a display on your screen, your monitor may be broken, or you may try to replace your video card.

If you put your computer to sleep, but it is not waking up, you can also check our detailed guide on how to fix your computer if it won’t wake up from sleep mode.

2. Disable USB standby on the monitor

Note icon NOTE
This solution works for Iiyama monitors, but you can try it on any monitor that has a USB hub.
  1. Start your PC.
  2. Press the configuration button on your monitor.
  3. Locate the USB Standby setting and disable it.

3. Drain the monitor power

  1. Turn off your PC.
  2. Now disconnect all the cables from the monitor.
  3. Press the Power button and keep it pressed for 30 seconds.
  4. Leave the monitor disconnected overnight or for a few hours.
  5. Connect the cables and check if the problem is resolved.

4. Reset BIOS to default

  1. Press and hold the power button until your computer turns off.
  2. Disconnect the computer case from the power outlet. Next, unplug all devices connected your computer.
  3. Open the case and access the motherboard, then disconnect your CMOS battery.
  4. Reconnect the battery after 5 mins and connect the computer to the power source and on it.

If you’ve tried the above solutions, and none seems to work for your monitor, you should change the monitor. You can decide by following our guide on the best PC monitors.

Please feel free to leave your comments, suggestions, or questions about this article in the comments below.

CMD Keeps Popping up on Windows 11? Stop it in 5 Steps

The CMD prompt popping up is not a new issue and has been reported by users for quite some time. This is why many users want to change the default terminal in Windows 11.

Thankfully in this guide, we will give you 5 ways via which you can easily fix the CMD prompt that keeps popping up issue. Let us get right into it.

What causes the CMD prompt to keep popping up?

After some research, we have found some common reasons the CMD prompt is popping up on your PC.

  • CMD.EXE might be added to the startup folder: By accident, you might have added CMD.EXE to the startup folder because of which it is starting up randomly.
  • Your PC is infected with virus: A virus or malware-infected PC can cause it to malfunction and throw multiple errors. You should always install an antivirus on your PC to keep it safe.
  • Some system files are missing: If a system file is missing or corrupt, then this could cause multiple issues with your PC.
  • The latest Windows update isn’t installed: It could be because of a bug in the version of the Windows update you are currently operating.
  • Scheduled task is running in the background: The most common reason this issue gets triggered is that the scheduled task is running in the background.

What can I do if the CMD prompt keeps popping up?

Here are a bunch of general solutions that you can apply before heading over to the advanced procedures:.

  • It could be because there is a temporary glitch or bug in your PC that is causing the problem. To fix this, you can simply try a restart and see if this resolves the issue or not.
  • Try creating a new user account. Often such glitches are associated with faulty account profiles. You can either try creating a new user profile or try using an admin account to see if the problem exists there or not.

Let us check out the advanced solutions to resolve the error.

1. Disable Office tasks

  1. Press the Win + R keys to open the Run dialogue.
  2. Type taskschd.msc and press Enter.
  3. Expand the Task Scheduler Library.
  4. Double-click the Microsoft folder.
  5. Select the Office folder.
  6. Locate the task named OfficeBackgroundTaskHandlerRegistration.
  7. Right-click on OfficeBackgroundTaskHandlerRegistration and select Disable.

In case you see that the Office task isn’t the one causing problems for you like others, then you can click the Task Scheduler Library from the left pane and look at the scheduled tasks on the right.

You can disable any one of the tasks that you might find odd or unnecessary.

2. Scan your PC for viruses

  1. Open the Start menu by pressing the Windows button.
  2. Search for Windows Security and open it.
  3. Click on Virus & threat protection.
  4. Hit the Quick Scan button.
  5. The system will be scanned and if found any virus, will prompt you to perform necessary actions.
  6. You can also click on Scan options.
  7. Click on Full Scan to perform a deep scan of your PC.

The above options are shown for the in-built Windows Security tool. But even if you have a third-party antivirus installed on your PC, it gives you an idea that you need to perform a virus scan on your PC. You can choose from our best antivirus solutions listed and see what suits your needs best.

3. Run SFC Scan

  1. Open the Start menu.
  2. Search for Command Prompt and run it as an administrator.command prompt admin windows 11
  3. Type in the the following command and press Enter: sfc /scannowsfc scan command in command prompt.
  4. The tool will check for missing or corrupt system files and will replace them with working ones.
  5. After the process completes, restart your PC.

SFC Scan is an inbuilt command line that scans your PC for corrupt or missing system files. You can easily fix all the problematic files by running this simple command on your PC and also correct the CMD prompt issue.

If you want an easier and quicker solution then you might want to try a dedicated tool that can perform this process automatically.

4. Perform a clean boot

  1. Open the Start menu.
  2. Type msconfig and open System Configuration.
  3. Switch to the Services tab.
  4. Select Hide all Microsoft services.
  5. Click on the Disable all button.
  6. Hit the Apply button to save the changes.
  7. Click on the Startup tab.
  8. Select Open Task Manager.
  9. In the Startup tab of the Task Manager, Disable all the Enabled startup items.
  10. Close Task Manager.
  11. Restart your PC.

This can help you determine if a Microsoft service was causing the CMD prompt keeps popping up an issue or not.

5. Remove CMD.exe from the Registry Editor

  1. Press the Win + R keys to open the Run dialogue.
  2. Type regedit and press Enter.run regedit command
  3. Navigate to the below path: HKEY_CURRENT_USER\SOFTWARE\Microsoft\Windows\CurrentVersion\Run
  4. If you find CMD.exe on the right side, then right-click on it and select Delete.

That is it from us in this guide. In case you can’t run the Command Prompt as an administrator, you can check out our guide that gives you some easy steps to resolve the issue.

If you can’t view the product key in the Command Prompt, then you can refer to our guide that gives you a proper solution to fix the issue. Consequently, you may want to disable CMD altogether so here’s how to go about it.

Let us know in the comments below, which one of the above-mentioned methods helped you resolve the CMD prompt problem.

Kernel Data Inpage Error on Windows 11: How to Fix it

Let us discuss the Windows 11 kernel data inpage error. The OS has many new features and a great design, but it also inherited some bugs from Windows 10.

For instance, the KERNEL DATA INPAGE ERROR known by Windows 10 users is pretty severe because it can lead to corrupted files and even data loss.

The kernel data inpage error BSoD is directly related to storage drive issues, which you need to address as soon as possible.

What does Kernel_data_inpage_error mean?

The kernel is often characterized as a computer’s central processing unit (CPU) because it is at the core of all your computer operations and is responsible for managing the whole operating system.

This inpage error can signal problems with your storage drive. It is often associated with the BSOD and may represent bad drive sectors, bad connections, and disk failure. It is usually caused by one of the following:

  • Hardware components – For many users, it is triggered by failing RAM or disk controller errors.
  • Driver errors – If you have damaged, unsupported or outdated drivers, it may trigger this error.
  • Bad system files – In some cases, it is triggered because some essential system files have become corrupted.

This error has different variations and may come with error codes that can help you quickly identify the cause. Here are some of the possible error codes:

  • 0x0000007A – File access errors can cause this error. 
  • 0xC000009C – Bad hard drive sectors may be the reason for this code.
  • 0xC000009D – The code signals possible imperfect connections or hard disk failure. 
  • 0xC000016A – Bad sectors on your hard drive trigger it.
  • 0xC0000185 – Check the cables for any damage or improper connections.

How can I fix the KERNEL DATA INPAGE error in Windows 11?

Before you try any of these solutions, do the following checks:

  • Back up your data – Back up your data as soon as possible. If your drive has any malfunctioning problems, this can get even worse, and you might lose your data. So, you can manually copy and paste your sensitive data on an external drive or another drive installed on your PC.
  • Check the cables and connections – Check all the cable connections to and from your hard drive. One of them might be loose or have an improper connection, which might cause the KERNEL DATA INPAGE ERROR.

1. Use the Startup Repair

  1. Start Windows 11 with a bootable media or use a hard power off three times in a row to boot the OS into Recovery Mode.
  2. Select Troubleshoot.
  3. Click on Advanced options.
  4. Next, choose Startup Repair.
  5. If the system detects any issues, it will start fixing them. If you get the message that Startup Repair couldn’t repair your PC, click on the Advanced options button.
  6. You will get back to the main screen. Select again Troubleshoot, then Advanced options, and in the new window, click on Startup Settings.
  7. Next, click on Restart to boot the PC in Safe Mode.
  8. After the PC restarts in Safe Mode, check if the problem occurs again. If it doesn’t, third-party software is causing this issue, and you need to uninstall it. If the issue persists, start the PC again in Recovery Mode.
  9. Select Advanced options again from the main window.
  10. Now select Uninstall Updates and roll back any recent updates if you suspect they caused this issue.
  11. If the previous step doesn’t solve the problem, you can choose System Restore from the same menu and roll back your system to an earlier restore point.

If you don’t have a bootable media yet, learn how to create a Windows 11 bootable USB drive and keep it safe for other occasions when you want to restore your system.

2. Run a CHKDSK scan

  1. Press the Search icon from the Taskbar, type cmd, and click on Run as administrator to start Command Prompt with full privileges.
  2. Type or paste the following command and press Enter to run it (C: is the default drive for the system, but you can replace it with the drive letter of your corresponding system partition):
    chkdsk /r /f C:
  3. CHKDSK will attempt to fix any problems found on your drive so wait patiently for the process to finish and then restart your PC.

3. Run a full antivirus scan

  1. Click the Search icon on the Taskbar, type windows security, and click on the app from the results.
  2. Now click on Virus & threat protection.
  3. Select Scan options right under the Quick scan button.
  4. Check the Microsoft Defender Offline scan and hit the Scan now button.
  5. It would be best if you restarted your PC for the scan procedure to start.

Now check if the kernel data inpage error is resolved.

4. Update or reinstall the disk driver

4.1 Update the driver

  1. Click the Search icon, type device manager, and select the app from the results.
  2. Right-click, the driver from the Disk drives section and select Properties.
  3. Select the Driver tab, then click on the Update driver button.
  4. Choose the first option, and Search automatically for drivers.
  5. If the system finds any new drivers, it will install them. If not, you can also click on Search for updated drivers on Windows Update.
  6. You will be redirected to the Windows Update menu, so hit the Check for updates button.
  7. If there are any system updates, they will be downloaded and installed, and some updates may also contain new disk drive drivers.

For automatic driver updates, we recommend Outbyte Driver Updater, which will scan your entire PC and prompt you to choose which outdated or missing drivers to update.

⇒ Get Outbyte Driver Updater

4.2 Reinstall the disk driver

  1. Select the Search icon from the Taskbar, type device manager, and select the app from the results.
  2. Expand the Disk drives section, right-click the driver, and select Properties.
  3. Select the Driver tab and then select Uninstall device.
  4. Click on Uninstall to confirm your choice.
  5. Right-click on the Disk drives section and select Scan for hardware changes.
  6. The system will reinstall the latest driver for the drive.

5. Perform an SFC scan

  1. Click the Search button from the Taskbar, type cmd, and select Run as administrator to start Command Prompt with admin privileges.
  2. Type or paste the following command and press Enter to run it: sfc /scannow
  3. Wait for the scan to complete the scanning process. If there are any corrupted system files, the tool will detect and repair them. First, check if the Windows 11 kernel data inpage error is fixed.

6. Set the Paging system to Automatic

  1. Press the Windows key + E to start File Explorer.
  2. Right-click on This PC and select Properties.
  3. Select Advanced system settings from the right pane.
  4. Hit the Settings button under the Performance section.
  5. Click on the Advanced tab, then click the Change button.
  6. Check the Automatically manage paging file size for all drives box and click OK.
  7. Restart the PC for the changes to take effect.

We hope our solutions helped you fix the Windows 11 kernel data inpage error, and now your computer works perfectly again.

When the drive shows signs of fatigue or malfunctioning, it’s much wiser to use the best backup software and look for a new component.

Tell us in the comments section below if you have any other suggestions or have experienced this problem firsthand.

Cyber Monday Deal on Acer Predator Triton 500 Saves You $300

If your intention is to push the levels of graphics quality beyond the limits of any regular console that you may currently use, then you clearly need a new gaming laptop.

To help you decide where to start, check out our top choice for you – none other than the Acer Predator Triton 500 laptop.

This deal on Acer Predator Triton 500 PT515-52-71K5 saves you no less than $300, so let’s take a closer look at this laptop in order to make an informed decision.

Although BF has ended, Acer Predator Triton 500 can be found at special discounts, just make sure to check frequently for some flash sales.

Where to buy Acer Predator Triton 500?

Acer Predator Triton 500 gaming laptop

You need to know from the very start that Acer Predator Triton 500 is a feature-packed gaming laptop with a powerful Intel Core i7-10750H processor that comes with 16GB memory and a trim design.

On the surface, it may look a lot like other consumer laptops. However, the feel of that nicely crafted chassis is unique.

Gaming laptops have higher-end components than regular ones, comfortable keyboards with excellent RGB lighting, and stylish cooling vents, and Acer Predator Triton 500 truly is the perfect mix of all these.

If you’re still undecided, consider that you can save 20% on PerformanceGuard if you choose to add Microsoft 365 and PerformanceGuard to your order.

  • Responsive 300Hz panel
  • Ethernet and multiple USB ports included
  • Turbo/overclocking settings
  • Lightning-fast SSD
  • Slim and sleek design
  • Questionable battery life

Don’t forget that we’re here to keep you up-to-date on the very best promotions. Let us know if this Acer Predator Triton 500 Cyber Monday sale meets your demands by leaving a comment in the area below.

5 Best Deals for Radeon RX5700 XT [Cyber Monday]

If you want faster gameplay or just to power up your computer, you need to renew your graphics card. You finally have the chance to buy an excellent graphics card from our top picks on the market.

Just continue reading our list to find a plethora of impressive offers for you to grab, so let’s dive in right away.

Note: All the prices and offers in this article are subject to change, so be sure to check the official product page to get the latest deal. If the product or offer you’re looking for is no longer available, you can try to find it on its official manufacturer page or get another one from our list.

What is the best AMD Radeon RX 5700 XT deal?

Gigabyte Gaming OC 8G (rev 2.0)

  • 7nm Radeon RDNA architecture
  • Accelerated game fidelity
  • FreeSync & FreeSync 2 HDR technology
  • WINDFORCE 3
  • Not enough RGB

The Gigabyte Radeon RX 5700 XT gaming OC 8G (rev 2.0) graphics card is powered by 7nm Radeon RDNA architecture and it offers you the best-accelerated game fidelity thanks to its Radeon Image Sharpening & FidelityFX feature.

You can now take the advantage of an immersive gaming experience thanks to the FreeSync & FreeSync 2 HDR technology.

Now you have WINDFORCE 3X with alternate spinning fans and direct-touch copper heat pipes.

XFX thicc III ultra

  • XFX zero DB autoload sensing fans
  • Ultra HD support
  • AMD VR ready premium
  • Intuitive gaming features
  • Large dimensions

The new XFX thicc III ultra 5700 XT features a dynamic cooling power technology that keeps lower temperatures and heightened performance perfectly adapted to the intensity of the moment, thanks to its 2.90-millimeter fans and 100-millimeter fans.

This amazing graphics card is built for high-performance and high-resolution gameplay. You can now experience smooth gameplay performance at 1440P and 4K.

PowerColor Red Devil 8GB GDDR6

  • 7 nanometer technology
  • Radeon image sharpening
  • AMD FidelityFX. Dual BIOS
  • 8GB GDDR6
  • Large dimensions

The PowerColor Red Devil Radeon RX 5700 XT 8GB GDDR6 graphics card has dual BIOS (silent mode and Oc mode), a 1,5mm metal black plate, and a triple fan design of 90mm each fan.

Thanks to the included DrMOS, the high polymer capacitors deliver better performance of 00 phase PWM.

It also includes 5 heat pipes and an extended heatsinkSink. Of course, the RGB side and backplate logo signature are worth to be mentioned.

XFX Triple Dissipation 8GB GDDR6

  • Dual BIOS
  • 1440p and 4k
  • Boost clock: Up to 1905MHz
  • 2 90mm fans and 100mm fan
  • A bit noisy

The new XFX Triple Dissipation 5700 XT is built with style and dynamic cooling power to get temperatures low and to heighten the performance that adapts to the intensity of the moment.

This graphics card is equipped with dual BIOS, the latest 8GB of GDDR6 high-speed memory, and PCI Express 4.0 support, to deliver twice the bandwidth.

Thanks to the 2 90mm fans and 100mm fan and copper GDDR Heatsink this graphics card stays cool and quiet.

PowerColor 8GBD6-3DH

  • 8GB GDDR6
  • 1755 MHz game clock
  • PCIe 4 0
  • Output HDMI/ DisplayPort x3
  • Noisy fans when in heavy use

The PowerColor 8GBD6-3DH graphics card was designed to power high-fidelity gaming for immersive explosions, physics, and lighting effects.

This graphics card is equipped with 8GB of advanced GDDR6 memory to provide high bandwidth of up to 448 GB/s, enabling 1440p performance for most games.

Radeon RX 5700 XT features PCI Express 4.0 support, with a throughput of 16 GT/s.

As you can see in our list, the market offers a variety of graphics cards that suit your needs. Which Radeon RX5700 XT are you going to buy? Let us know in the comments section below.

5 best jukeboxes for home to buy [Cyber Monday]

Whenever you think about a jukebox, you probably think about an old bar somewhere in the ’80s or ’90s that had few songs on it, and half of them were country songs.

Well, jukeboxes exist today as well. However, except for the exterior design that caters to the nostalgic, they have been upgraded to XXIst century standards.

There are even miniature jukeboxes that you can have in the comfort of your home. If you too are a fan of such novelty devices, then you should take a look at our top picks.

Note: All the prices and offers in this article are subject to change, so be sure to check the official product page to get the latest deal. If the product/offer you’re looking for is no longer available, you can try to find it on its official manufacturer page or get another one from our list.

What are the best jukeboxes for home that I can buy?

  • Crosley Bluetooth & CD player Jukebox – 4 built-in stereo speakers
  • ARKROCKET 200 Wall-O-Matic – Can be attached to a wall
  • ARKROCKET Saturn V Jukebox Vinyl Record Player – Amazing speaker quality
  • Roxby Retro Full-Size Jukebox – Great sleek wood finish
  • Victrola Nostalgic Wood Countertop Jukebox – Smallest jukebox

Now let’s take a look at the pros and cons of each one and see what’s the right one for you.

Crosley Bluetooth & CD player Jukebox – 4 built-in stereo speakers

  • Bluetooth receiver for fast streaming of your favorite music
  • Front-loading CD player and built-in AM/FM radio
  • Color-shifting LED lighting and a decorative musical playlist
  • Remote included so you can control both the playlist and the lights
  • Must pay extra for the stand

Enjoy all your favorite music in style with the Crosley Bluetooth Jukebox.

This massive full-sized will take any medium or large room and turn it into a dancefloor thanks to the vintage design.

Instead of vinyl, this jukebox features a front-loading CD player and built-in AM/FM radio, and the hardwood finish brings a note of elegance, making it suitable for rooms with matching furniture.

You can get this beauty at a 20% discount right now for only 1,595$. Don’t miss the opportunity!

ARKROCKET 200 Wall-O-Matic – Can be attached to a wall

  • All-in-One with radio, USB, SD slot, and Bluetooth
  • Special brackets that allow wall-mounting
  • A dynamic retro disco lighting system
  • Real buttons for song selection with access to 200 songs
  • The design may not suit everyone’s taste

This jukebox represents a harmonious mix of classic style and modern technology and is the perfect addition to your home.

If you are looking for a jukebox with an amazing 50’s American diner-style, you are looking at the winner.

Boasting a cool classic look paired with dynamic retro LED lighting that will cheer up even the dullest of designs and advanced technology to support all your favorite Bluetooth devices, you simply cannot go wrong with this piece.

The jukebox comes packed with radio, USB, and SD card readers, with classic style buttons that you can use to choose from a playlist of 200 songs.

The is one of the cheapest you can find, at only 338$.

ARKROCKET Saturn V Jukebox Vinyl Record Player – Amazing speaker quality

  • Vinyl record player, audio CD player, FM radio with PLL & AUX input
  • Bluetooth, USB port & SD/MMC memory card slot
  • Includes remote control with batteries
  • Full-size floor-standing retro-style jukebox & wooden cabinet with chrome trim 
  • Pretty heavy for its size

Boasting a classic jukebox design with rainbow LED lighting that spreads the good old retro vibes in the most charming way, this is the perfect entertainment partner for nostalgia.

Surprisingly, the technology within is anything but dated. With MP3 and WAV compatibility, and full Bluetooth support, you can put modern technology to good use easily.

Get the best out of the built-in 100-Watt amplifier that delivers rich sound along with two full-range 40-watt Speakers, 2 x 5″ tweeters, and a 6 1/2″ woofer.

Right now it has a 100$ discount for the price of 1,799$.

Roxby Retro Full-Size Jukebox – Great sleek wood finish

  • Retro color-changing LED light tubing in 7 bright color
  • Sleek wooden finish for the best vintage speaker looks
  • With full compatibility, radio, AUX, USB, SD, record player, and Bluetooth
  • Remote controlled and equalizer for the best sounds
  • Back panel is hard to access if next to the wall

Another awesome jukebox on our list is the Roxby Retro Full-Size Jukebox, a home jukebox that can fit into pretty much anyone’s apartment and bring the vintage American feel.

This jukebox is great for any party, music festival, man cave, gift, or just to amp up the room, exactly like a jukebox you would see in a ’50s cafe somewhere in New York.

It features retro-looking color-changing LEDs, and it can read music off of CDs or via Bluetooth connection from pretty much any compatible device.

The price is only 799$ since is a smaller version, but if you want the additional stand, the full price for both is 949#.

Victrola Nostalgic Wood Countertop Jukebox – Smallest jukebox

  • AM/FM Radio and a 3.5 mm Aux-in jack at the back to connect all device
  • Features a volume knob, FM tuner buttons, and a complete set of music playback buttons
  • Built-in Bluetooth pairs quickly with iPhone & Android smartphones from 33 feet away
  • The superb sound quality is perfectly paired with 5 jazzy color-changing LED tubes
  • Instructions could be more explicit

Victrola’s 115-year commitment to craftsmanship is evident in this compact, retro diner-style player. Its striking looks, strong build, and well-balanced sound make it a perfect choice to gift to your loved ones

This jukebox is an excellent choice in jukeboxes if you’re trying to gift it to someone, or if you’re trying to give your children or grandchildren a hands-on experience of what the good old times used to look like.

It can read music off of CDs and it can also be connected to a Bluetooth-compatible device, and the neon LED lights and pink outer exterior make it a joy to look at, not just listen to.

The cheapest out of all, small and perfect for countertop, with a discount of 17%, right now it’s only 99$.

If you like to listen to music, you could very easily just go buy a Sony or a Yamaha sound system and be done with it in no time.

But if you like to live in style and you’re also the nostalgic type, then a jukebox could be a good alternative.

These devices will not only make you the envy of the neighborhood, but they have been brought to speed with the latest technologies, so in the end, you don’t actually have anything to lose.

How to Run .Exe Files on a Chromebook [Fastest Ways]

Chromebook is a resourceful tool with many features for surfing the internet, schooling, and working. It runs on Google operating system Chrome OS. However, its major shortcoming is that it doesn’t support Windows programs or full Microsoft apps.

Nevertheless, we’ll take you through how to run .exe files on Chromebook.

Can I run .exe files on Chromebook?

Even though Chromebook doesn’t support running Windows programs because of its operating system, there are ways around it. You can run .exe files, which are installers for Windows programs on your Chromebook, and they’ll work fine.

Furthermore, running .exe files on a Chromebook allows you to conveniently run most apps and games. The process involves installing specific third/party tools on your Chromebook to help run the .exe files.

However, installing the Windows operating system on your Chromebook is the best way to run Windows applications. It is a reliable and efficient method, but it can’t work with all Chromebook.

Nevertheless, anyone can run .exe files on their Chromebook with the right tools. Hence, we’ll take you through the methods you can follow to run .exe files on Chromebook.

How do I run .exe files on Chromebook?

Before trying any steps for running .exe files on your Chromebook, go through the following preliminary checks:

  • Disable offline files on your Chromebook.
  • Connect your Chromebook to WiFi or a fast cable connection.
  • Make sure your device is well-charged or plugged into a stable power source.

The steps above will prepare your Chromebook for the process. So, try the steps below to run .exe files.

1. Use Wine to run .exe files on Chromebook

  1. Restart your Chromebook and hold the Esc + Refresh + Power button while restarting.
  2. Press and hold the Ctrl + D key simultaneously when a warning prompt appears.
  3. Click ENTER when a prompt asking about OS verification appears (The device will restart and set up Developer Mode).
  4. Download the latest version of Wine on your Chromebook.
  5. Press Ctrl + Alt + T keys to launch the terminal window.
  6. Type the following command for 32-bit Ubuntu: sudo apt update sudo apt install wine
  7. Or, type this for 64-bit Ubuntu: sudo dpkg –add-architecture i386
  8. Type the following commands to create a fake C: drive where your .exe programs will be installed before installing Wine: Winecfg
  9. Download the .exe file for the Windows app you want to run with Wine.
  10. Open the terminal and go to the directory where you saved the .exe file, then type: wine filename.exe
  11. The Windows installer will run using Wine. Choose the C: drive on the new prompt asking for the directory.

You can repeat the steps for as many Windows apps as you want. Steps 1-3 will help start the Developer Mode, while the others help initiate the running process with Wine.

2. Use Crossover to run .exe files on Chromebook

  1. Repeat steps 1-3 in the procedure above (The device will restart and set up Developer Mode).
  2. Download a version of Crossover that your Chromebook supports and install it.
  3. Download the .exe file for the Windows app, then save it under the Linux Files folder.
  4. Launch the Crossover app, search for unknown app, and select Install Unlisted Applications.
  5. Click Create an empty environment.
  6. Click the down arrow button beside Launch and select File Explorer from the drop-down.
  7. Right-click the .exe file and select Open.
  8. Select Installer Files.

The Windows .exe file should start running on your Chromebook.

3. Remotely access a Windows computer to use its apps

  1. Go to the Chrome Remote Desktop web app page and install the Chrome Remote Desktop on your Windows PC.
  2. Input the necessary information, set a pin, and click Start.
  3. Then click on Remote Support and click on the Generate Code button to get the secured code for accessing your PC from the Chromebook.
  4. Go to https://remotedesktop.google.com/access on your Chromebook.
  5. Click the Access button, then enter the code generated on Windows earlier.

The two devices should be connected now, so you can use the programs you want. The Remote Desktop connection will give you full access to remotely control the Windows PC.

Nonetheless, it may interest you to check which is better between Windows 11 and Chrome OS and why you should care.

Did you know that you can put apps on the desktop on a Chromebook? That’s right, and we have a guide that shows you how to do it.

Should you have further questions, and suggestions, kindly leave them in the comments section below.

5 Best Studio Microphones to Buy [Cyber Monday]

The beauty of items that can be used in a dedicated field is that when you search for them, you more or less know that they should have some basic specs that make them good for that particular job.

Such would be the case with studio microphones, as you know that all microphones that have that tag will have everything needed to make them more than good for use in studios.

If you work for a radio station or are simply looking to open up your own personal recording studio, podcast station, or streaming setup, then a studio microphone is the right type of microphone for you.

Note: All the prices and offers in this article are subject to change, so be sure to check the official product page to get the latest deal. If the product or offer you’re looking for is no longer available, you can try to find it on its official manufacturer page or get another one from our list.

What is the best studio microphone?

BLUE Condenser Microphone

  • Boasts 3 condenser capsules that can record almost any situation
  • Perfect for vocals, musical instruments, podcasting, and more
  • Compatible with all major Windows OS versions
  • Legendary Blue Broadcast sound
  • Some customers find the mic’s life expectancy to be questionable

The BLUE mic is already a resounding name, as it also holds a top spot as far as condenser microphones go in general.

The robust metallic body, as well as the incredible price-to-quality ratio, make it a customer favorite on Amazon already.

The four distinct pickup patterns offer you the chance to record and stream in ways that would normally require multiple microphones.

TONOR XLR Condenser Microphone Kit

  • Package includes a microphone, shock mount, adjustable suspension scissor arm stand, table mounting clamp, pop filter, windscreen, 3.5mm XLR cable and manual
  • TONOR offers a 12-month repair or replacement warranty and a 30-day hassle-free return policy
  • Cardioid polar pattern
  • Great for all manner of recording sessions
  • Needs an additional power supply that has to be bought separately

The TONOR XLR Condenser Microphone Kit comes in a package that contains almost all the accessories that you would need besides the actual microphone for a good studio recording session.

While each individual product in the package may not be all that impressive, the price is incredibly low considering everything you will be getting.

Audio-Technica AT2020

  • Great price to performance ratio
  • Ideal for both professional project, as well as home studio applications
  • Cardioid polar pattern
  • High spl handling
  • Doesn’t come with an XLR cable

The Audio-Technica AT2020 boasts a rugged construction for durable performance while offering a wide dynamic range and handling high SPLs with ease.

Most customers described the difference between top-end microphones and this one as simply nothing more than a matter of price.

Neewer NW-800

  • Ball-type anti-wind foam
  • Can capture rich
  • Good cardioid pickup output
  • High sensitivity
  • Some user report that the sound may sometimes echo without reason

The Neewer NW-800 uses a precision electronic circuit to eliminate crossover distortion and harmonic distortion.

It also has a good cardioid pickup output and high sensitivity with low noise and a wide dynamic range.

It also comes in a fashionable design, with a noble and elegant appearance, while still being sturdy and durable.

ZINGYOU ZY-007

  • Improved performance
  • Can provide better sound for studio recording, vocals, instruments, podcasts than the previous version
  • Comes bundled with a complete set of mic accessories
  • Cardioid pick-up pattern
  • Some users have reported issues with the mic’s ability to pick up sound, even at max volum

The ZINGYOU ZY-007 microphone presents itself as a leading condenser microphone solution for delivering high-quality sounds for memorable recordings.

This mic comes in yet another affordable bundle that can be considered an all-in-one package.

The ZINGYOU ZY-007 features extremely quiet self-noise. This amazing condenser microphone is a cardioid pick-up pattern, which is the most widely used pattern in professional microphones.

If you plan to seriously invest in studio work, then you better make sure you have the right equipment for the job.

While studio microphones can be a bit costly, they eventually are well worth the investment once you see how your customers appreciate the pristine sound quality.

No Speakers or Headphones are Plugged in: Use These 7 Fixes

There is a common problem circulating on the web about Windows 10 not recognizing audio devices plugged into the machine. This is accompanied by no speakers or headphones plugged in error despite connecting the devices.

While some users complain that this issue started after upgrading their PCs, other factors can still be responsible. Irrespective of the causes, this guide will show you the surefire fixes to get back sound on your PC.

Why is my PC not detecting my speakers?

The issue of no speakers or headphones are plugged into Windows 10 after the update issue can be caused by various factors. Below are some of these causes:

  • Outdated audio drivers: The first thing to look at when facing the no speakers or headphones plugged in Windows 10 issue on an HP or Dell computer is your audio drivers. If they are outdated, you need to update the drivers to restore normalcy.
  • Faulty update: If you started noticing this issue after updating your PC, the problem might be with the update. You need to remove this update to solve this problem.
  • Wrong sound settings: Sometimes, selecting the faulty playback device is why you are getting this error. You need to change the playback device to your speaker or headphone to make them work in this case.
  • Outdated BIOS: Many users have found their BIOS to be the cause of the headphone not plugged in Windows 10 issue. The quick way to fix this is to update your system BIOS from the manufacturer’s website.

How do I fix No speakers or headphones are plugged in error?

Before delving into the detailed fixes in this section, we recommend going to your PC manufacturer’s website to update your BIOS. This has worked for many users and can save you a lot of stress.

Also, if you use a PC with more than one audio port, change the line positions to your speaker by trial. There is no need to follow the color code, as some updates might have tampered with it. If these do not work, you can now proceed to the fix below:

1. Update the audio driver

1.1 Manually update your drivers

  1. 1. Right-click the Start button and select Device Manager.

    open device manager in windows 10
  2. 2. Expand the Sound, video and game controllers section.

  3. 3. Right-click the audio driver and select Update driver.

    update-sound no speakers or headphones are plugged in
  4. 4. If you have multiple drivers, do the same for all of them.

  5. 5. Choose Search automatically for drivers then restart your computer once the process is done.

  6. If you’re encountering the No Speaker or Headphones are plugged in issue, the first recommended fix is to update your drivers. Aside using the built-in driver updater, you can also go to the manufacturer’s website to download and install the latest driver.

    This has proved effective in solving the no speakers or headphones are plugged in issue for some users.

1.2. Update drivers automatically

Downloading and updating drivers manually can permanently damage your system by installing the wrong versions. To prevent that, we strongly suggest doing it automatically by using a third-party driver updating program.

This tool will also prevent any damage to your PC by downloading and installing the wrong driver versions. It will show you what drivers are outdated and let you choose manually which one to update and which to leave in the current state.

2. Rollback driver

  1. Press the Windows key + X and select Device Manager.
    device no headphones or speakers are plugged in
  2. Click the arrow next to the Sound, video and game controllers option to expand it and double-click the driver there.
    sound driver
  3. Click the Driver tab at the top, followed by the Roll Back Driver button.
    roll back no headphones or speakers are plugged in

If you started noticing the no speakers or headphones are plugged in issue after installing a driver update; you need to roll back your driver. Remember to restart your PC after doing so.

3. Use Command Prompt

  1. Press the Windows key, type cmd, and select Run as administrator under Command Prompt.
    cmd admin
  2. Type the commands below and hit Enter after each: net localgroup Administrators /add networkservicenetwork service net localgroup Administrators /add localservicelocal no headphones or speakers are plugged in exitexit
  3. Finally, restart your PC.

Another cause of the no speakers or headphones are plugged in issue is your PC settings. The commands below will help set the needed settings and fix the audio problem.

4. Change the default playback device

  1. Right-click the sound icon in the Taskbar and select the System Sound Events option.
    system sound
  2. Click on the Playback tab.
  3. Right-click anywhere there and choose Show Disabled Devices.
    show disabled
  4. Now, right-click your speaker or headphone and select Enable, followed by Set as Default device.
    enable  no headphones or speakers are plugged in
  5. Finally, click the Apply button, OK, and restart your PC.
    apply ok

At times, you are simply getting the no speakers or headphones plugged in error because the device is disabled. Enabling and setting it as the default audio device should remedy this.

5. Disable the Front Panel Jack detection

  1. Go to Search, type realtek hd audio manager, and open Realtek Audio HD Manager. You will need to download the Audio Manager if you don’t have it.
  2. Then go to the Speakers tab, and click the folder under Device Advanced settings.
  3. Select Disable front panel jack detection.
  4. Restart your computer.

If your Realtek HD Audio Manager isn’t opening in Windows 10, look at this article dedicated to fixing Realtek issues and learn what to do.

6. Run Sound Troubleshooter

  1. Press the Windows key + I to open the Settings app and select Update & Security.
    update adn security no speakers or headphones are plugged in
  2. Then click on Troubleshoot followed by Additional troubleshooters.
    additional troubleshooters
  3. Click Playing Audio, and select Run the troubleshooter.
    run trouble
  4. Follow further on-screen instructions and restart your computer.

Sometimes, it will be hard to trace the cause of the no speakers or headphones plugged in the issue. Running the troubleshooter will help diagnose it and recommend possible solutions.

7. Delete Windows updates

  1. Open Settings and click on Updates & Security.
  2. Select the View update history.
    view no speakers or headphones are plugged in
  3. Click on Uninstall updates.
    uninstall updates
  4. Find the troublesome update (usually the latest installed update on your computer), right-click it, and choose Uninstall.
    uninstall option
  5. Reboot your computer.

If you keep getting the audio peripheral doesn’t appear to be plugged in error, it might be the last installed Windows update messing with your PC. Therefore, you must remove and wait for newer patches to fix this issue.

That’s about it; we hope at least one of these solutions helped you resolve the annoying No speaker or headphones are plugged in problem in Windows 10.

If your headphones are causing sound problems and you are experiencing no sound, check out our article to solve the problem.

If you have any comments, questions, or suggestions, feel free to let us know in the comments below.

5 best USB audio interfaces for streaming [Cyber Monday]

For those of you that don’t know, audio interfaces are devices that let you plug pro mics, instruments, and other signals into a PC. When an audio interface is used with a computer, it can act as the PC’s sound card.

If you’re on the lookout to buy an audio interface, it’s important to determine the specific port that’s available on your computer for its use. Otherwise, they won’t be compatible, and you’ll need extra adapters.

If you’re interested in buying a USB audio interface specifically for streaming, then you should take a look over our list of top choices.

Note: All the prices and offers in this article are subject to change, so be sure to check the official product page to get the latest deal. If the product/offer you’re looking for is no longer available, you can try to find it on its official manufacturer page or get another one from our list.

What audio interface has the best audio quality?

  • Behringer UM2 – most popular device
  • Behringer U-Control UCA202 – easy setup
  • Focusrite Scarlett 2i2 – made of aluminum
  • Behringer UMC22 – for proffessional workflows
  • Focusrite Scarlett Solo – comes with a bundle

Now let’s take a closer look at the pros and cons of each device.

Behringer UM2 – most popular device

  • Audiophile 48 kHz resolution
  • Maximum Sampling Rate: 48 kHz
  • Compatible with popular recording software
  • Streams 2 inputs / 2 outputs
  • Zero-latency direct monitoring
  • Sound quality is a bit low

The Behringer UM2 is a neat USB audio interface that can even use professional-grade studio condenser mics to create outstanding tracks and studio-level music.

As expected, on the rear panel of the UMC404HD, you can easily find the USB 2.0 port for an easy connection to your PC.

It also features the ability to switch between 48 kHz and 96kHz, and both sampling rates offer better than CD recording quality for professional results quickly and efficiently.

Behringer U-Control UCA202 – easy setup

  • Ultra-flexible audio interface
  • High-resolution 48 kHz converters
  • Stereo Headphone output with dedicated Level control
  • Additional S/PDIF optical output
  • Powered via USB
  • Requires computer-specific drivers

If you’re looking for a first audio interface that doesn’t require much setup beforehand, you can’t go wrong with the Behringer U-Control UCA202.

This neat USB audio interface only needs to be plugged into your PC and you are ready to go. This includes both your Windows PC and Macbook.

Long story short, this makes activities such as song recording sessions or streaming to be extremely easy to start.

Focusrite Scarlett 2i2 – made of aluminum

  • Excellent digital performance
  • The rugged metal unibody case
  • Truly portable interface
  • Authorization code for Ableton Live Lite
  • Bold color choice
  • The software may be difficult to handle

The Focusrite’s Scarlett 2i2 is a 2 in/2 out USB recording interface that is housed in an attractive anodized aluminum unibody chassis, making it look extremely stylish and modern.

It is also equipped with some of the most popular microphone preamps in the industry, which allows the creation of transparent, low-noise and low-distortion preamps.

All these eventually provide a great audio recording and streaming experience. That’s why Focusrite Scarlett 2i2 is part of this list.

Behringer UMC22 – for proffessional workflows

  • Audiophile 48 kHz resolution
  • No drivers required
  • Compatible with popular recording software
  • Streams 2 inputs / 2 outputs
  • Preamplifier with +48 V phantom power
  • Some units have been reported to emit static

If you’re the type that likes to take your tracks seriously, then Behringer UMC22 is the audio interface for you, providing 48 kHz resolution.

That’s simply perfect if you want to enjoy the amazingly-detailed and pristine recording quality that others talk about.

Not only is the device great from a sound-quality point of view, but the fact that it is compatible with all popular OS and recording programs makes it one of the most versatile audio interfaces on the market.

Focusrite Scarlett Solo – comes with a bundle

  • Class-leading conversion
  • Super-low latency
  • Compatible with Windows 7/Mac OS X 10.10 and higher
  • Range of 104dB (A-weighted)
  • Crisp and cleat board sound
  • Quality control issues

The Focusrite Scarlett Solo is a USB audio interface that comes with a variety of extra in the package when you buy it.

Not only is it a great device all in itself, but it also comes with Pro Tools, the first Focusrite Creative Pack and Ableton Live Lite, Softube Time and Tone Bundle, and more.

No less important, Focusrite is known for making high-quality equipment and this one is no exception to the rule.

If you’re the type of person that would love to start recording some music, but hates the bulkiness of professional consoles, then using a USB audio interface to connect to your PC is the next best thing.

Not only are most of the entries on our list easy to install and use, but they also provide pristine sound quality, which is essential if you are also trying to use the interface for streaming.

3 Best Xbox Elite Controllers to Buy [Cyber Monday]

Those of you that are avid Xbox gamers probably know about the Xbox wireless controller Elite and how it is a premium controller released for the Xbox One range of consoles and Windows 10 PCs.

The controller was originally bundled with the Xbox One Elite console, but it is sold separately as well.

A couple of versions of the Xbox Elite controllers were already released, and we’ve ranked them based on their functionality.

Note: All the prices and offers in this article are subject to change, so be sure to check the official product page to get the latest deal. If the product or offer you’re looking for is no longer available, you can try to find it on its official manufacturer page or get another one from our list.

What is the best Xbox Elite controller?

Xbox Elite Wireless Controller Series 2 Core – White

  • Adjustable-tension thumbsticks, wrap-around rubberized grip, and shorter hair trigger locks.
  • It comes with an app that lets you customize performance and controls
  • Brings your FPS games to a whole new level with a variety of fire modes
  • First-time users may not know how to make use of it

On the opposite end of the spectrum, you may be just fine with a product’s exterior design, and the only thing that you actually want to change is the way it behaves.

Save up to 3 custom profiles on the controller and switch between them on the fly. Besides the actual controller, you also get an app that can help you reconfigure it so that whatever game you’re playing, it will respond just as efficiently.

Custom Elite Series 2 Controller (Orange)

  • Several great color schemes to choose from
  • Made specifically for all FPS games
  • Simple-plug-and-play use
  • The price tag considering the improvements

The Elite 2 Custom Controller for Xbox One is just a recolor of the Xbox One Elite Controller Rapid Fire Mod featuring a great gradient color pattern.

Not only will you now be able to play FPS games like a pro, but you will look good doing it as well, and it will give your favorite controller a little bit of extra personality.

You can choose from several different color schemes, so it suits a wider variety of tastes

Xbox Elite Wireless Controller Series 2 Limited Edition by DreamController

  • Amazingly build and painted design on the controller
  • Tailor the controller with the new interchangeable thumbstick and paddle shapes
  • Use Xbox Wireless, Bluetooth, or the included USB-C cable
  • Up to 40 hours of rechargeable battery life
  • None

The Xbox Elite Wireless Controller Series 2 is the second generation in the Elite series and it allows you to play like a pro and feel like a legend.

The interchangeable thumbstick and paddle shapes can be customized to fit your own needs, and the long battery life means you can go for days of playing without a recharge.

Just as specialized gaming gear costs a little extra but is made to specifically target the PC gaming industry, the same can be said about the Xbox Elite controllers.

While in theory all Xbox controllers are designed for gaming, the Elite series was created for those that game on a competitive level, and need all the help that they can get.

Onedrive is not Syncing: How to Force Your Files to Upload

OneDrive is an important part of Windows 10. It helps to save your files on the cloud and constantly sync them.

Also, it offers protection against ransomware that can attack your files locally. However, some users are complaining that OneDrive is not syncing for some reason.

If you are facing this issue, rest assured that the fixes here will help you force your files to upload.

Why are my files not syncing in OneDrive?

Many of the reasons OneDrive is not syncing new and old files is down to the app settings. Below are some of the causes:

  • Insufficient memory: Each of the OneDrive plans has a memory size attached to it. When your quota is filled, you can face the OneDrive not syncing issue while trying to sync the document or desktop folder. You can copy the files to another OneDrive account, buy more memory storage, or switch to another file-syncing software.
  • Incomplete account setting: Sometimes, you face the OneDrive sync pending issue if your account setting is not complete. You need to check if your account is linked and complete it if need be.
  • Wrong internet setting: If your network is set as a metered connection, the OneDrive sync will be paused automatically. To ensure your files are synced, you need to disable the metered connection or reset your network.

How do I fix OneDrive sync issues?

1. Restart the OneDrive desktop app

  1. Right-click on the OneDrive icon on the Taskbar and click the Settings icon.
  2. Choose the Quit OneDrive option.
    quit onedrive not syncing
  3. Click the Close OneDrive button.
    close onedrive not syncing
  4. Now, press the Windows key, type onedrive, and click the OneDrive option to restart the app.
    start one drive

The first line of action if OneDrive is not syncing Excel files or any other folder is to restart the app. This should fix the glitches causing it to misbehave.

2. Unlink and Link account

  1. Right-click on the cloud icon in the Taskbar and click the Gear icon.
  2. Click the Settings option.
    settings onedrive not syncing
  3. Select the Account tab at the top and click Unlink this PC.
    unlink pc
  4. Now, click the Unlink account button to confirm the action.
    unlink account
  5. Finally, restart the OneDrive app and complete the setup.

3. Pause and resume sync

  1. Right-click the OneDrive icon in the Taskbar and click the Gear icon in the top right corner.
  2. Select the Pause syncing option. and choose the duration to pause the sync.
    pause
  3. Now, click the Gear icon again and select the Resume syncing option.
    resume onedrive not syncing

In most cases, the OneDrive not syncing issue is down to little glitches. Pausing and resuming the sync should help clear them.

4. Check the memory amount

  1. Right-click the cloud icon on the Taskbar and click the Gear icon and select the Settings option.
    settings onedrive not syncing
  2. Now, click the Account tab at the top. Check the available space.
  3. If you need more memory, you can move some files out of OneDrive or click the Get more storage option.
    get more
  4. From here, you can pay for any of the available packages.

If OneDrive is not syncing your files, it might be because you don’t have enough storage. If you have the means, it is advisable to purchase more memory. Else, you can just move some files out of OneDrive.

5. Disable metered connection

  1. Right-click your active network from the Taskbar and select Open Network & Internet settings.
    troubleshoot
  2. Click the Properties button.
    properties onedrive not syncing
  3. Toggle the switch for Set as metered connection backward.
    metered
  4. Now, restart OneDrive.

The metered connection helps you save data. It prevents the automatic download of updates and usage of data without your permission.

This feature also stops OneDrive from syncing automatically. You need to disable this feature to allow the app to sync your files at all times.

6. Disable the sync pausing in battery mode feature

  1. Click the cloud icon on the Taskbar, select the Gear icon in the top right corner, and click the Settings option.
    settings onedrive not syncing
  2. Now, select the Settings tab, uncheck the box for Automatically pause sync when this device is in battery saver mode and click OK.
    auto pause
  3. Finally, restart the OneDrive app.

The sync pausing in battery saver mode automatically halts your file sync when your PC enters the battery saver mode. This might be why OneDrive is not syncing at the time you are trying to use it.

Thus, you need to disable the feature to use the app normally.

7. Uninstall and reinstall OneDrive

  1. Press the Windows + I key and select the Apps option.
    apps
  2. Select the Microsoft OneDrive option and click the Uninstall button.
    uninstall onedrive not syncing
  3. Now, follow the onscreen instructions to complete the removal.
  4. Finally, download the latest version of the app from official sources.

If all the fixes above fail to help you fix this issue, then you need to reinstall the OneDrive app. Downloading a fresh version of the app should get rid of the issue.

There you have it: Everything you need to fix the OneDrive not syncing issue. The only thing you need to do now is to follow the instructions carefully.

If you need a list of third-party software to sync your files on Windows 10, check our guide for the excellent options to use today.

Feel free to let us the solution that helped you fix this issue in the comments below.

Posted in Fix

5 best condenser microphones to buy [Cyber Monday]

In an era where having your voice heard is far easier than before, having the right tools can make you stand apart. In this case, the right tools literally refer to having proper hardware at your disposal.

Regardless of whether you are making a podcast, or recording a YouTube video, you will need some really good microphones. Here’s a quick preview of our favorite picks:

  • Audio-Technica AT2020USB+ – Best for home use
  • Blue Yeti USB Microphone – Best for hassle-free installation
  • Audio-Technica AT2020 – Best for studio use
  • Rode NT1-A Large-Diaphragm – Best for limited budgets
  • HyperX QuadCast – USB – Best for gaming

Note: All the prices and offers in this article are subject to change, so be sure to check the official product page to get the latest deal. If the product or offer you’re looking for is no longer available, you can try to find it on its official manufacturer page or get another one from our list.

What is the best cheap condenser microphone?

Audio-Technica AT2020USB+ – Best for home use

  • Condenser microphone with USB output
  • High quality A/D converter with 16 bit
  • Headphone jack
  • Mix control
  • Only cardioid polar pattern

The Audio Technica AT2020USB+ is a plug-and-play. Once plugged into the USB port, the PC will find it and with a couple of mouse clicks, you are ready to record.

This microphone was designed for home studio or office use. It is ideal for live-streaming or home-recording work. 

Blue Yeti USB Microphone – Best for hassle-free installation

  • Tri-capsule array
  • Multiple pattern selection – cardioid, bidirectional, omnidirectional & stereo
  • Signal to noise: 100dB
  • Zero-latency headphone output
  • The product has a knack for breaking after about a year

The BLUE Yeti Silver Edition is probably the most popular condenser microphone on Amazon, and this is entirely justified, as it offers the best value for your money.

Thanks to the fact that you can simply plug it in using USB ports, and because it has no drivers to install, Yeti is the most versatile USB mic available today.

Audio-Technica AT2020 – Best for studio use

  • The noise level is 20 db SPL
  • Ideal for project or home studio applications
  • Output connector:integral 3 pin XLRM type
  • The price and performance ratio is top-notch
  • XLR cable doesn't suit

The Sennheiser MKH416-P48U3 is a condenser microphone that is in a league of its own. It is designed for loud/challenging exterior environments like film and broadcast.

This makes its usage rather niched, but when those precise occasions come, you couldn’t ask for a better product.

Rode NT1-A Large-Diaphragm – Best for limited budgets

  • Large diaphragm 1 inch gold-sputtered capsule
  • Cardioid polar pattern
  • Ultra low noise, self noise of only 5dB
  • Includes RØDE SM6 shock mount, pop filter and dust cover
  • Packages may not include all accessories

The Rode NT1-A is a microphone that is indeed very good for the money you will have to pay, but the real winner with this entry is the assortment of accessories that you receive along with the mic itself.

These include a studio-grade pop shield and shock mount is included, along with a 20′ microphone cable, dust cover, and an instructional video.

HyperX QuadCast – USB – Best for gaming

  • Anti-vibration shock mount
  • Tap to mute sensor
  • Convenient gain control adjustment
  • Multi device and chat program compatibility
  • The LED is not RGB and can't be disabled

The HyperX QuadCast is probably the niched product on our list, seeing that it is a microphone specially dedicated to gaming.

However, what it lacks in versatility more than makes up for in how well it gets the job done.

If you’re a vlogger, YouTube influencer, or just your amateur singer doing covers, then you probably want the best sound equipment that is both good and affordable.

While Amazon may be full of other condenser microphones, the ones listed by us are the ones that we think strike the perfect balance between price, and performance, and that can be used in a wide variety of scenarios.

Windows 11 Antivirus Keeps Turning Off? Stop it in 4 Steps

Windows 11 is here, but if you haven’t tried it already, you should know that it has its share of bugs. Speaking of bugs, many reported that the Windows 11 antivirus keep turning off. This can be a problem since it will leave you without built-in protection.

Without a proper antivirus, your computer is prone to data loss, malware, and phishing attacks; therefore, it’s crucial to solve this issue as soon as possible.

There are ways to fix this problem, and in this guide, we’ll show you the best methods to use and enable Windows Defender again.

Why does Windows Defender keep turning off Windows 11?

The reason Windows 11 Security virus protection feature keeps turning off is within a close circle. Below are some of them:

  • Outdated PC: If your PC is obsolete, it can lead to different issues, including the Windows 11 Virus and threat protection keeps turning off point. You must update Windows 11 to the latest version to restore regular service here.
  • Activity of third-party antivirus: Most antivirus software cannot work alongside another security tool on the same PC. If you have any other antivirus aside the Windows Defender, it might be the one causing this issue. Thus, you need to remove it with one of the best uninstaller software.
  • Wrong Group Policy setting: At times, it might be that Windows Defender is turned off by Group Policy. In this case, you need to adjust your policy settings and re-enable them.

What do I do if Windows Defender is turned off in Windows 11?

1. Install the latest updates

  1. Press Windows Key + I to open Settings.
  2. Go to the Windows Update in the left pane.
  3. In the right pane, click on Check for updates button.
  4. If any updates are available, Windows will download them automatically.
  5. Once the updates are downloaded, restart your PC to install the updates.

The Windows 11 antivirus keep turning off issue seems to appear if you have Antimalware Platform Update .2106. Microsoft has fixed this problem, and after installing Antimalware Platform Update .2107, the issue should be resolved.

Keep in mind that this update isn’t available to everybody, so you might not be able to download it right now. If you’re having issues with the Settings app, check our guide on what to do if the Settings app crashes in Windows 11.

2. Modify your registry

  1. Press Windows Key + R and enter regedit. Next, press Enter or click OK.
  2. In the left pane, go to the following key: Computer\HKEY_LOCAL_MACHINE\SOFTWARE\Policies\Microsoft\Windows Defender
  3. Right-click the Windows Defender key. Expand the New section and select Key.
  4. Enter Spynet as the name of the new key.
  5. Go to the Spynet key you just created, right-click the space in the right pane, and select the option to create a new DWORD (32-bit) Value.
  6. Create three DWORDs:
    • DisableBlockAtFristSeen
    • SpynetReporting
    • SubmitSamplesConsent
  7. Double-click each of the three created DWORDs and set their Value Data like this: DisableBlockAtFristSeen: 0, SpynetReporting: 1, SubmitSamplesConsent: 1.
  8. After doing that, close Registry Editor.

With this, the Windows 11 antivirus keeps turning off issue should be fixed for good. Remember to restart your PC after applying this fix.

3. Add the Windows Defender shortcut to the Startup folder

  1. Press Windows Key + R and enter shell:startup. Press Enter or click OK.
  2. When the Startup directory opens, right-click the space and expand the New menu. Select Shortcut from the menu.
  3. Click Browse.
  4. Go to the Windows Defender directory and select MsMpEng.exe. For example, you can find this file in the following location:
    C:\ProgramData\Microsoft\Windows Defender\Platform\version_number
  5. Now name the shortcut Windows Defender and click Finish.

After adding the shortcut, the Windows 11 antivirus keeps turning off issue should be resolved

4. Remove third-party antivirus

  1. Press the Windows key + I and select Apps in the left pane.
  2. Choose Apps & features.
    apps windows 11 antivirus keep turning off
  3. Click the three vertical dots before the antivirus and select Uninstall.
    uninstall windows 11 antivirus keep turning off
  4. Now, follow the onscreen instruction to complete the process.

Using third-party security software can cause Windows 11 antivirus to keep turning off. But, in most cases, the Microsoft Defender alone should be able to protect you. So, you can remove the third-party antivirus.

If the Windows 11 antivirus keeps turning off, your system might be vulnerable to all sorts of online threats, but hopefully, our guide was able to help you with this problem.

You can also look closely at this guide on what to do if Windows Defender won’t turn on in Windows 10. If the issue persists, you can also reinstall Windows Security on Windows 11 and check if that helps.

Feel free to let us know the solution that helped you fix the issue in the comments below.