5 Best Cross Browser Testing Tools

Cross browser testing tools are game-changers in the website and app development industry. In the past, developers and QA experts tested their websites manually. This was not only time-consuming but expensive.

With time, developers came up with automated testing tools that simplified the website testing process. This, with other improvements like the release of the best coding browser extensions, has made working with browsers enticing for developers.

However, choosing the right testing tool might be difficult due to the number of products out there. To ease your search, we have picked five of the best cross browser testing tools for you.

What is cross browser testing?

Cross browser testing is a nonfunctional test that ensures websites and web apps work as planned on different browsers across various devices.

The goal is to ensure end-users get the intended performance level irrespective of browser or device. Some of the tested parameters are speed, style, and other UI elements.

How is cross browser testing handled?

Cross browser testing could either be done manually or automatically. The choice depends on the complexity of the task and preferences.

Below is a quick rundown on the two methods:

1. Manual cross browser testing
cross browser manual testiing

In manual testing, you need to install the browsers you want to use for the test and their various versions. This will be done for different operating systems on desktop and mobile.

Also, you will write out the test cases for testing. This will be run on each browser on various devices, with debugging done manually.

Manual testing is effective for small projects. However, it can be time-consuming, and stressful when dealing with medium to complex websites.

2. Automated cross browser testing
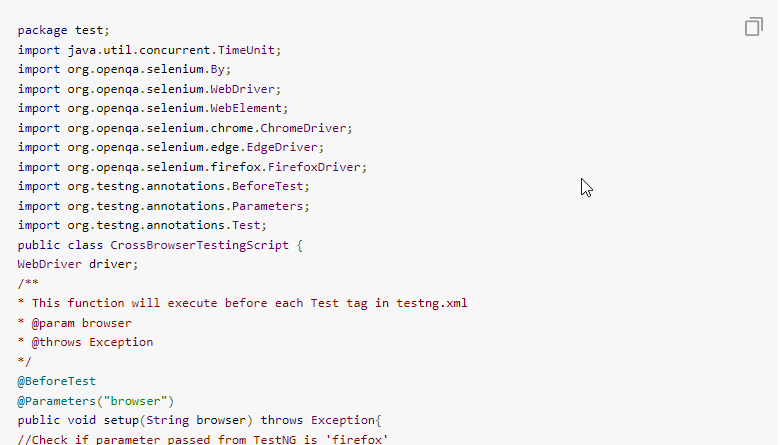
automated test

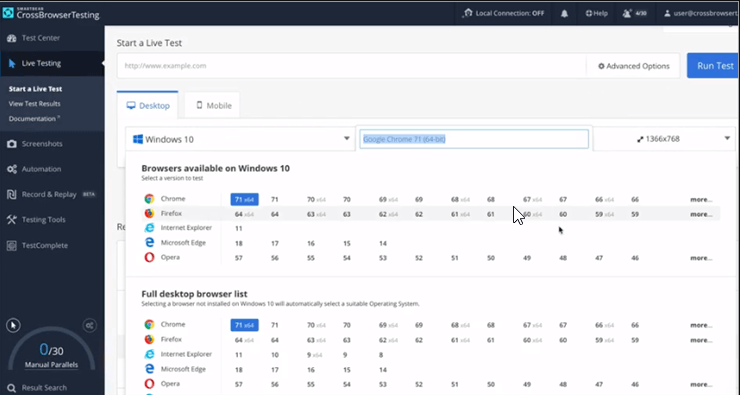
Automated testing is done with online testing tools. These tools have been built to carry out all the difficult tasks. You only need to enter your website name or URL, the test cases, the browsers, and the operating systems to test.

More importantly, some of these automated tools provide the option of manual testing. This allows you to write custom codes to test your websites and pages to your satisfaction.

What are the best tools for cross browser testing?

LambdaTest – Best for online testing

lambdatest

LambdaTest is a tool that allows you to carry out cross-browser testing online on over 2000+ real browsers.

You can test with various operating systems, using different screen resolutions. Whether it is a mobile or desktop app, LambdaTest ensures its compatibility with all browsers across devices.

What’s more, it supports the oldest versions of popular browsers like Opera, Chrome, and Safari. With this, you are sure your web page will work with all versions of the browsers.

Other features:

  • Local testing on hosted pages.
  • Provides Smart Visual Regression testing option.
  • Allows automation tests on a Selenium grid.
  • Live chat support.

LambdaTest

Test all the browsers out there and decide what is the best choice for your needs and online activities.
Check price Visit website

Selenium – High-level automated testing
selenium browser testing

Selenium is a popular open-source cross browser testing tool. It has an interface that allows you to write test scripts in languages like PHP, Python, and Java.

This allows you to automate your web page and app testing process. Selenium testing tool is simple to use, thanks to its components that cover all you need.

With its IDE, WebDriver, and Grid components, you can carry out the same test cases on various browsers. It just about puts the control of your website testing in your hands.

Other features:

  • Automation-aided exploratory testing.
  • Regression automation testing.
  • Record and playback feedback on tests with browsers.

⇒ Get Selenium

CrossBrowserTesting – Free lifetime testing
crossbroswertesting tool

This is a cross browser testing tool created by SmartBear for easy website and app testing. It ensures you get the perfect web experience on all devices with its cloud-based lab.

CrossBrowserTesting is a paid tool with a free lifetime trial. It allows you to live test and debug your website on over 2050 real mobile and PC browsers. This makes it the best free cross browser testing tool you will find.

With this tool, you can view the performance of your website on multiple browsers at once for live debugging.

Lastly, it is one of the few tools that run automated cross browser testing in Selenium and Appium.

Other features:

  • Allows running of regression tests.
  • Offers tools and extensions like Chrome Dev.
  • Visual testing is available.
  • Record and replay for recording live tests.

⇒ Get CrossBrowserTesting

BrowserStack – Effective manual testing
browserstack

BrowserStack is a household name in the industry. It allows its over 50,000 users to perform cross browser testing manually. Note that it is also one of the best tools for automated testing.

It claims to drive over 2 million tests daily with little to no delay. This shows the power of its 15 data centers across the world.

Finally, it gives you access to over 3000 devices and browsers to test your website and app. Based on a reliable cloud structure, it easily scales its resources to the requirements of its users.

Other features:

  • Offers integration with all major CI/CD tools.
  • Automated Visual tests.
  • Offers support firewall and Active Directory.
  • Works with the major test automation frameworks.

⇒ Get BrowserStack

HeadSpin – The highest number of real devices for testing
headspin cross browser testing

This top-level cross browser testing tool allows you to test apps and websites on thousands of real devices. One of its biggest advantages is the level of accuracy.

It helps test core parameters such as load testing in mobile apps or web pages. This test is carried out in real environments for 100% accuracy.

What’s more, HeadSpin provides a scalable and distributed system to improve automated testing. There are also the Appium, Selenium, and Appium Inspector integrations to easily test website and mobile apps.

Other features:

  • Compatible with a host of apps like Slack, Flutter, Jenkins, etc.
  • Can monitor non-noise interference data.
  • Resources are scalable.

⇒ Get HeadSpin

When can I perform cross browser testing?

The time to perform cross browser testing depends on your preference. Generally, there are three stages for testing:

  • At the start of website development: This involves testing a website or web app immediately after a page is developed. This test will be repeated for every page till the project is complete. While this can be time-consuming and tiring, it helps to detect errors at early stages.
  • After development: This is the process of testing the functionality of the app or web page after the development is complete. This allows you to fix the errors at once before releasing it to the end-users. This method does not usually take much time, but it might be problematic if you run into complex problems.
  • After the release of the website: In this case, you release the website to end-users before testing. This can be costly, as it might require multiple deployments based on the bugs fixed.

With the rate at which websites are developed, cross browser tools are now more important than ever. The best of them gives you so many options and delivers accurate results.

Do you need the tools that will ease your website design task? Check out our list of best website design software without coding to make an informed decision.

Be free to discuss the tool you used from our list in the comments section below.
Is Y8 Browser Safe to Download? All You Need To Know

Y8 Browser is generally safe. It uses HTTPS security protocols and gets regular updates and security patches.

However, it doesn’t have as many advanced data protection features as other mainstream browsers do. Its support of the outdated Flash Player could also pose some risks.

Let’s take a closer look.

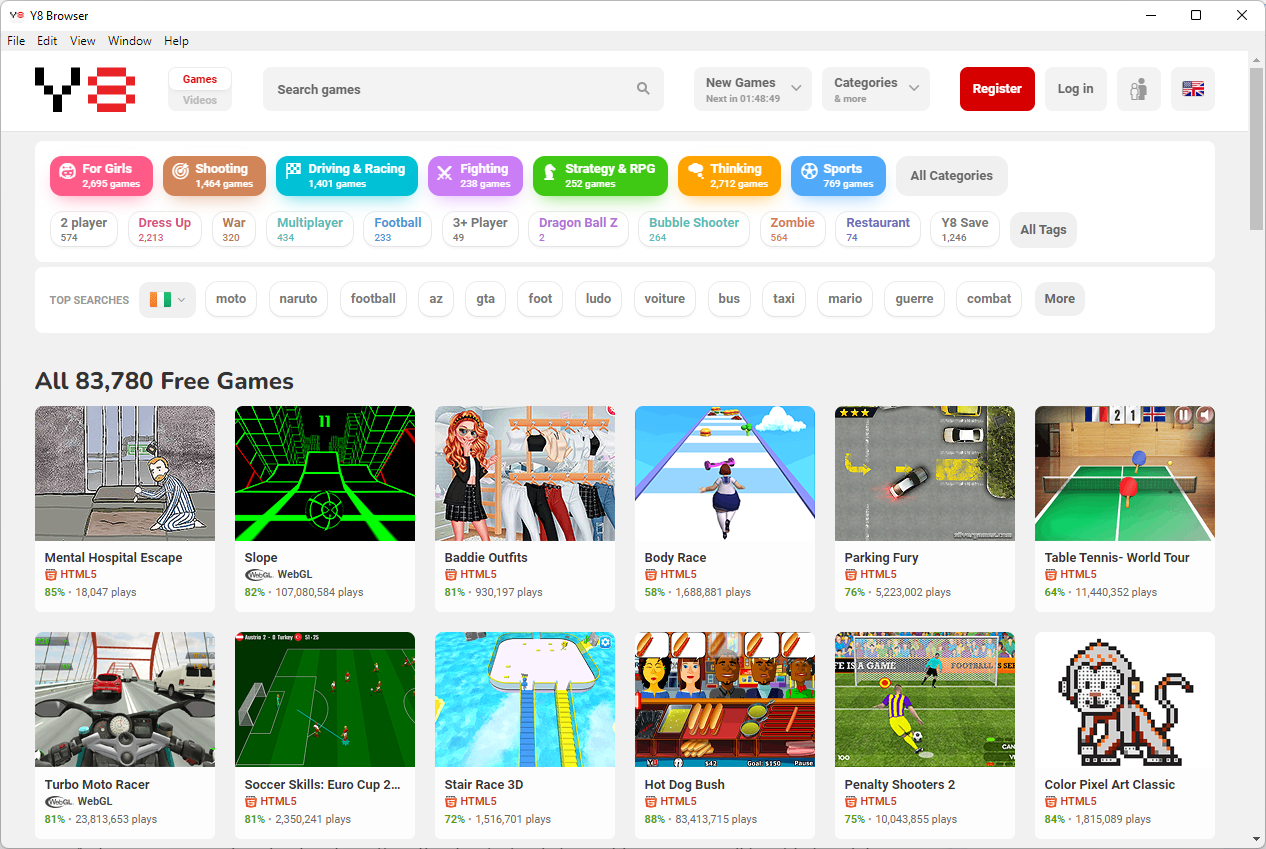
What is the Y8 browser?

y8 browser

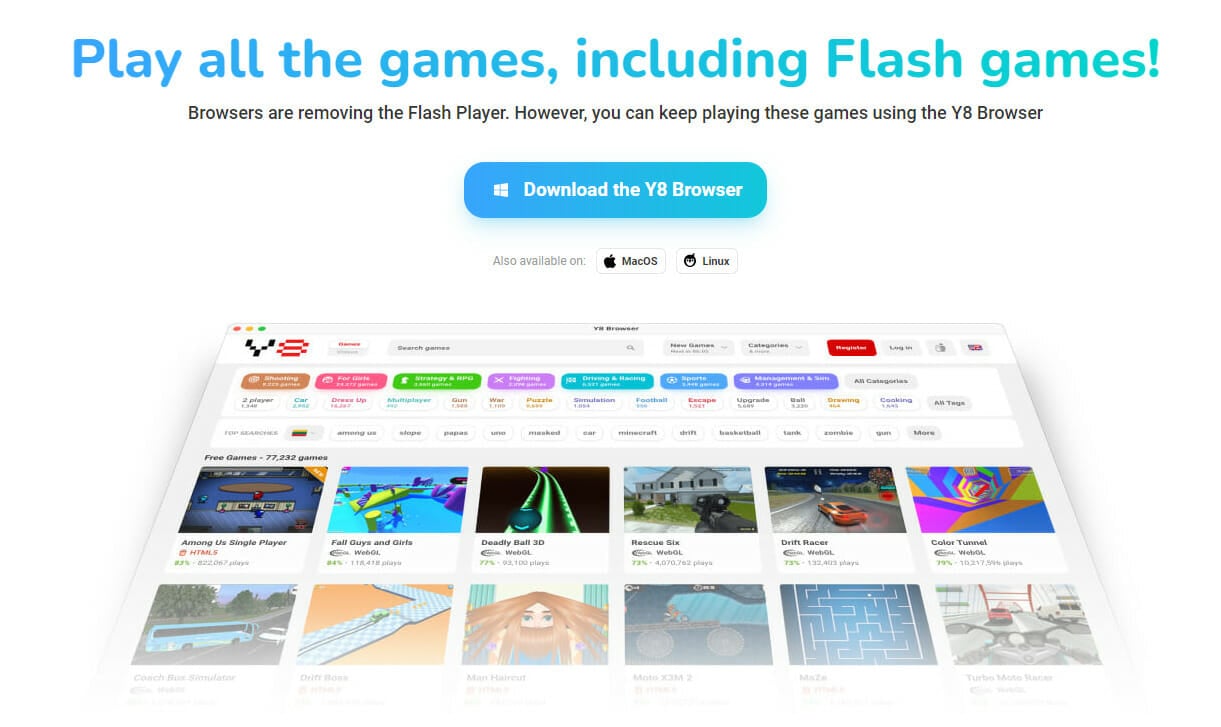
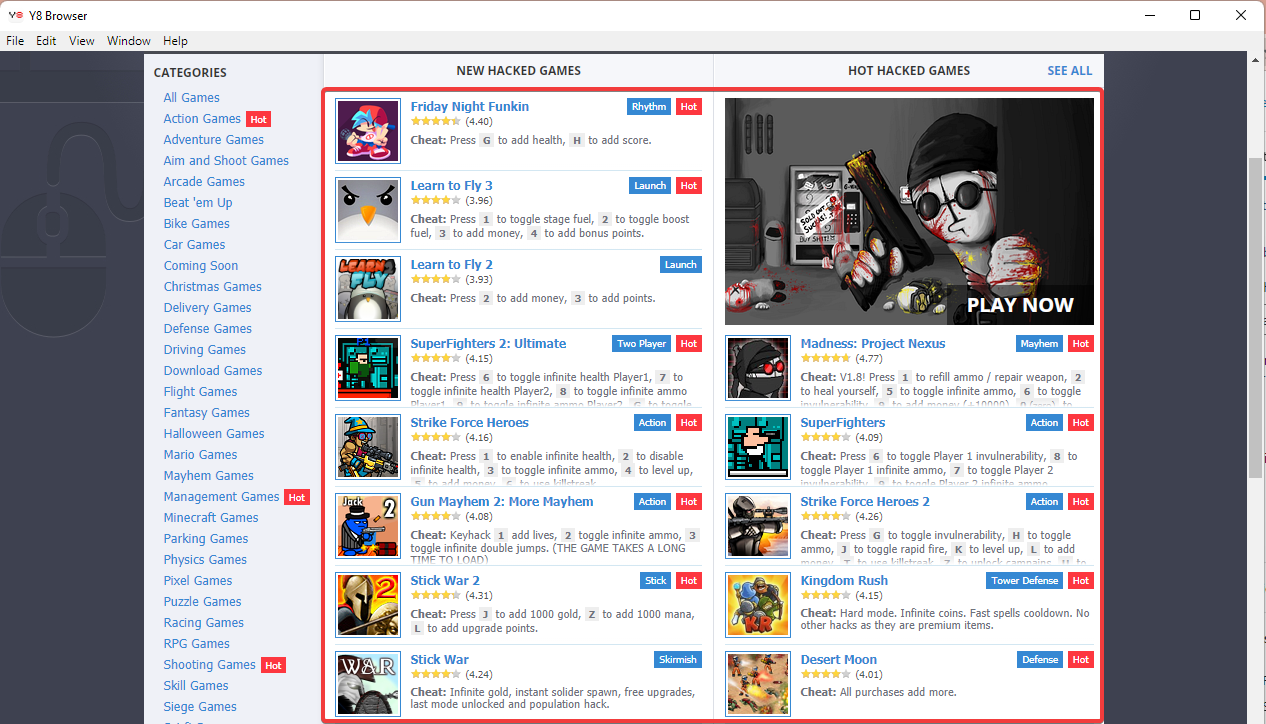
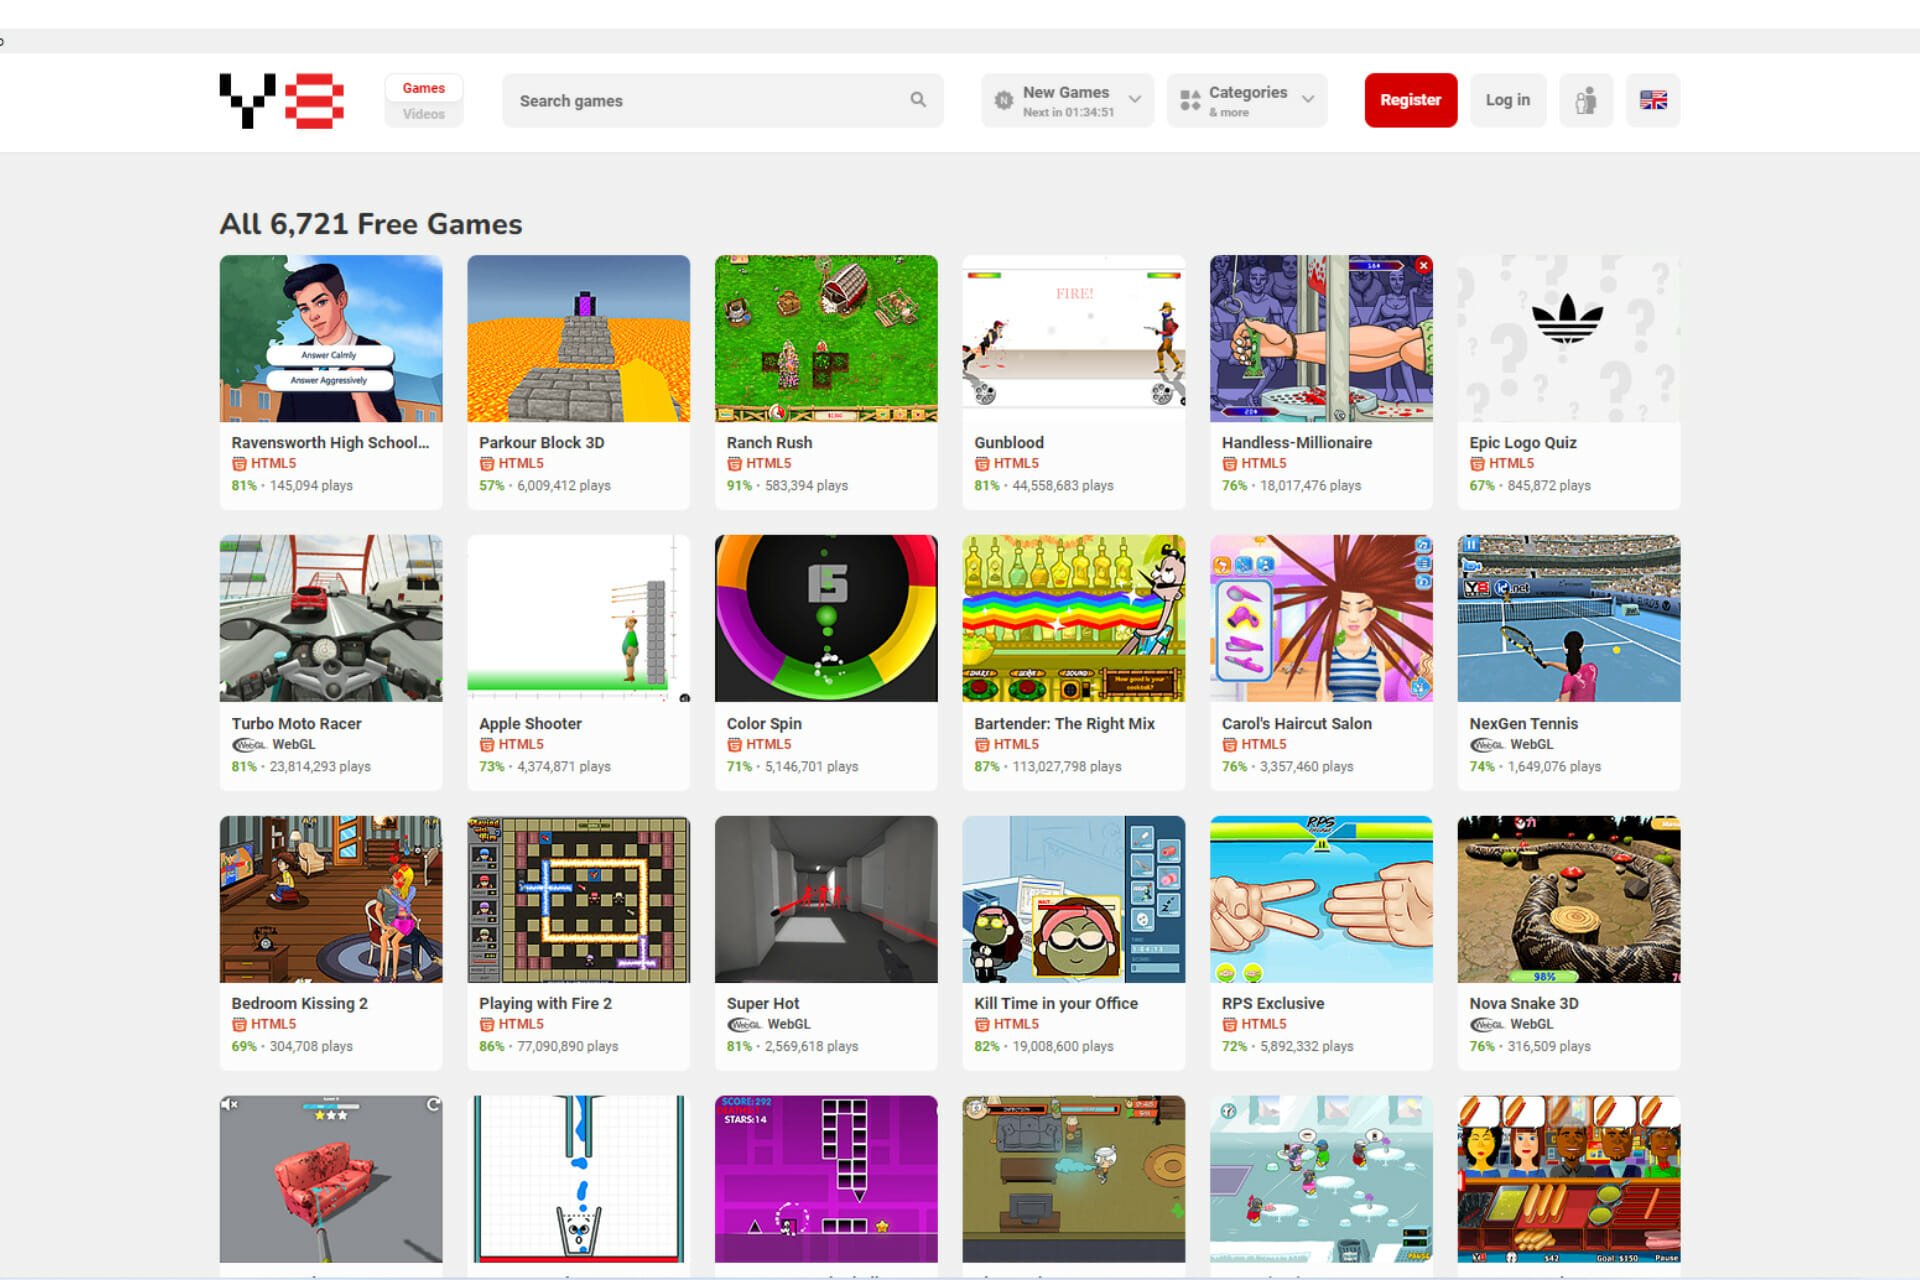
Y8.com is a prominent website with free online games. The Y8 Browser is built specifically to offer support for these games. The platform’s gaming library comprises WebGL, Adobe Flash, and HTML5 games.

It hosts more than 60,000 online browser games at Y8 Games, including dress-up and Unity3D automobile games.

Is the Y8 browser trustworthy?

Yes, the Y8 browser is trustworthy. Just make sure to download it from the official website. The tool is legit and has been around for over 10 years, with millions of downloads.

⇒ Get Y8 browser

Do Y8 games have viruses?

The Y8 website doesn’t have any known virus reports or problems. However, it hosts a lot of ads which could lead to suspicious pages and services, so be cautious about what you click on.

In general, just playing games on the site should be safe. However, for maximum protection, consider using an antivirus with real-time protection so it can quickly detect and stop any potential threat.

Is Y8 games still working?

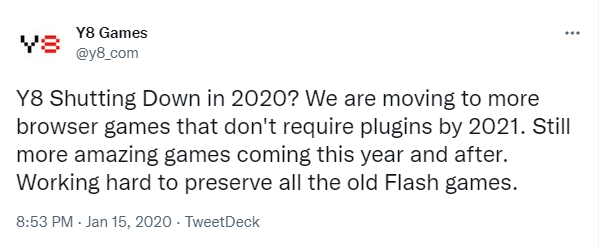
Yes, Y8 games is still working. In 2020 there were rumors that Y8 would be closing down, but these misrepresented the company’s Twitter post that talked about fading out some types of games.

y8 browser safe

4 years since that scare, Y8 games are still working, and you will still be able to enjoy many of your favorites.

If some of the phased-out games are classics you would still love to play, then you should consider playing browser games on Opera GX. This is the first and most robust browser dedicated to gaming.

It has all the cool advantages of the Opera browser. This includes customization and a vast extension library, and the added benefit of gaming features like a RAM and CPU limiter.

⇒ Get Opera GX

How can I play Y8 browser hacked games?

  1. Launch the Y8 game browser.
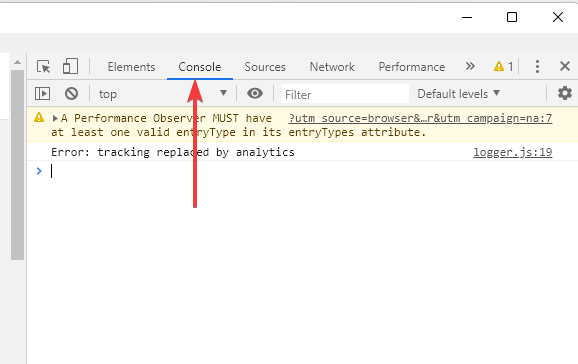
  2. On the menu tab, click View, then from the list of options, select Toggle Developer Tools.
    y8 browser safe
  3. Click on the Console tab.
  4. Enter the following code and hit Enter.
    location.href="https://nameofthewebsite.com"
  5. Click on any of the new hacked games to start playing.

Now you will be able to play any of your favorite hacked games on the Y8 browser.

We hope this article has been helpful. Browser games are increasingly becoming popular, and as browser tech improves, you can expect more quality games on your favorite browsers.

If you would like an alternative for playing flash games, you could pick from any of the best browsers to play Flash games.

Eligible Hulu subscribers can get three months free of PC Game Pass

Hulu has announced that it is partnering with Microsoft to give gamers an interesting offer. Subscribers to The Walt Disney Company’s streaming service in the U.S. in “good standing” can now get three free months of PC Game Pass if they have never tried PC Game Pass before.

Available on this webpage, Hulu says that this offer is part of its ongoing commitment to providing its subscribers with added value. This offer will be available through July 23, 2022, and will give members access to over 100 high-quality games on Windows PCs like Minecraft, Microsoft Flight Simulator, and even titles from the EA Play on PC catalog. The offer is a perk from the Hulu Friends with Benefits program, which is a way to reward fans the way a friend would.

“At Hulu, every decision we make starts with the viewer. We do this through the stories we bring to life, and by giving Hulu subscribers the opportunity to engage with their favorite shows, films, and brands through select perks and activations, including the “Hulu Friends with Benefits” initiative, Hulu’s way of thanking you for simply being a fan – because that’s what friends are for,” explained Hulu in an emailed press release.

OBS Studio Virtual Camera Not Showing Up? 5 Simple Solutions

OBS Studio is one of the best screen recording and streaming software. With Window’s built-in recording tools not offering many options, users go with third-party apps like this. However, some reported that the virtual camera is not showing up in OBS Studio.

The virtual camera in OBS is a great utility since it allows us to modify the video output of the webcam, and enhance the video quality. This becomes all the more important in present times when video conferences have become a part of life.

So, let’s walk you through the OBS Studio virtual camera not showing up problem and the most effective fixes for it.

Why is the OBS Studio virtual camera not showing up?

The problem can be encountered on several apps, but generally, users talk about the following apps as being affected:

  • OBS Studio camera not showing up in Zoom – most commonly encountered due to incorrect camera selection
  • Also, the OBS Studio camera is not showing up in Teams – the issue is not as frequent as the other three
  • OBS Studio camera not showing up in Discord – it could be due to a lot of reasons, both on Windows and macOS, and requires proper troubleshooting
  • Another issue is that the OBS Studio camera is not showing up with Google Meet – incorrect webcam selection or a problem with OBS Studio itself is most likely the underlying cause

In most cases, users later realized that the Virtual Camera feature was not enabled in OBS Studio. Apart from that, if you are using an older version of the software, chances are that it doesn’t include the virtual camera feature. Updating the software is the best option in this case.

Also, if OBS Studio does not have the necessary permissions while running, you might come across the issue. This can be seen when the OBS Studio virtual cam is not showing up in Google Chrome. Besides, it could have to do with hardware acceleration as well.

Now that you have a basic understanding of the underlying causes, it’s time we head to the fixes.

What do I do if OBS Studio virtual camera is not showing up on Windows 11?

1. Restart the computer

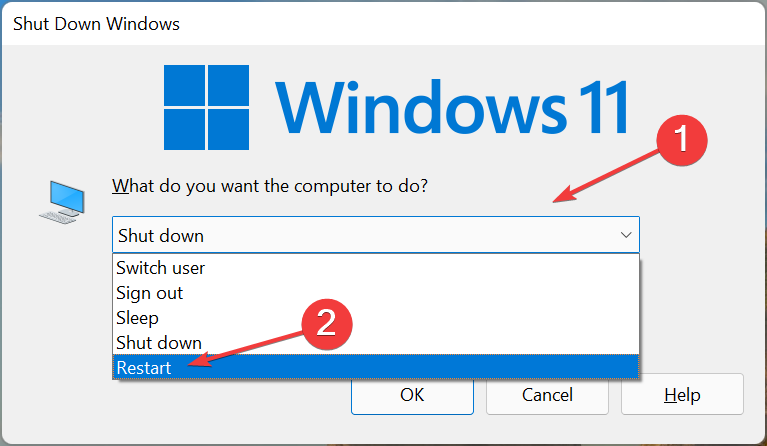
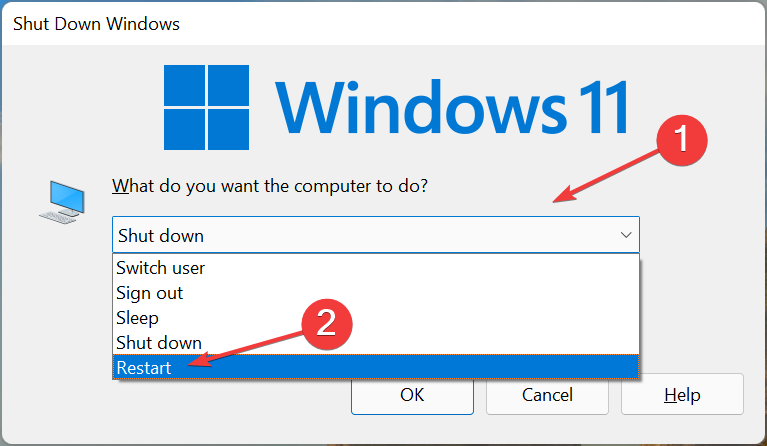
  1. Press Alt + F4 to launch the Shut Down Windows box and select Restart from the dropdown menu.Restart to fix obs studio virtual camera not showing up
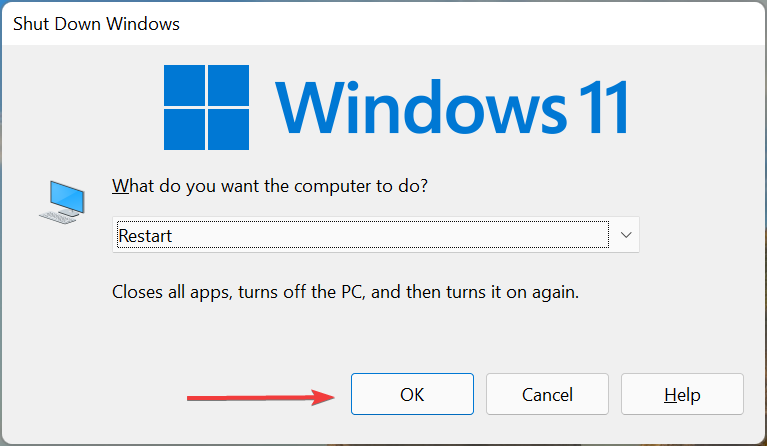
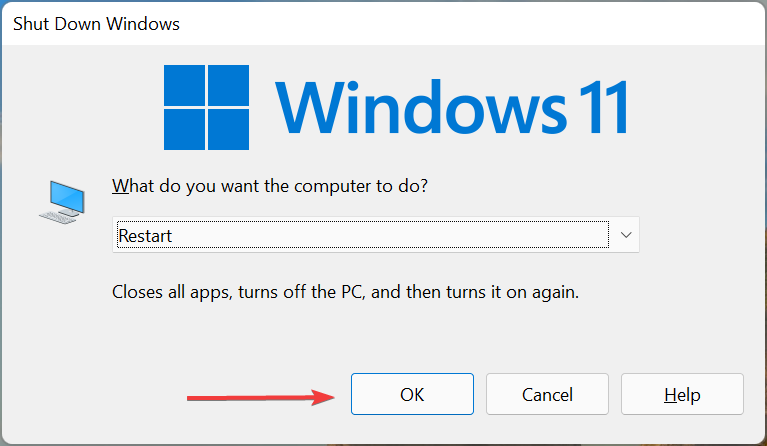
  2. Next, click on OK to restart the computer.OK

Several users reported that OBS Studio is not showing up in Teams due to a conflict. Here it’s generally a minor bug or some background process that’s conflicting with the functioning of the software. If restart the PC doesn’t fix the issue, head to the next method.

2. Run OBS Studio as administrator

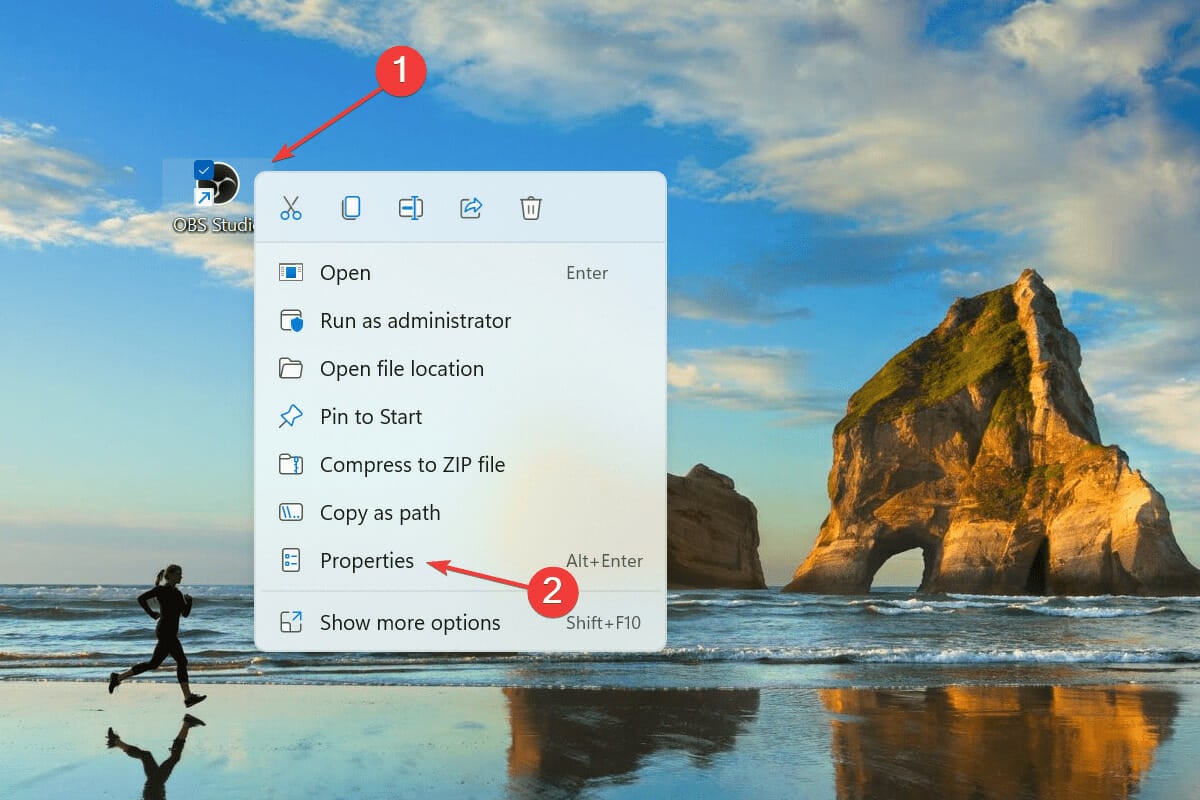
  1. Locate the shortcut for OBS Studio, right-click on it, and select Properties from the context menu. Alternatively, you can select it and hit Alt + Enter.Properties
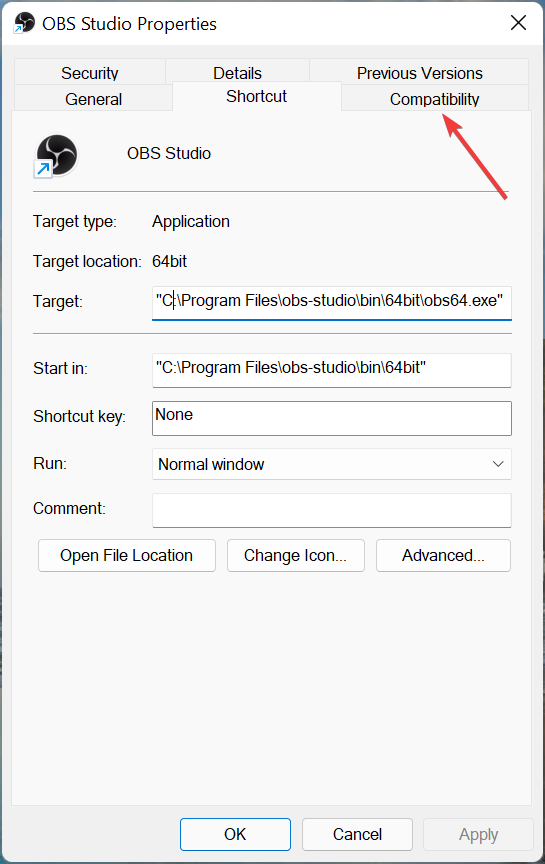
  2. Navigate to the Compatibility tab.Compatibility tab
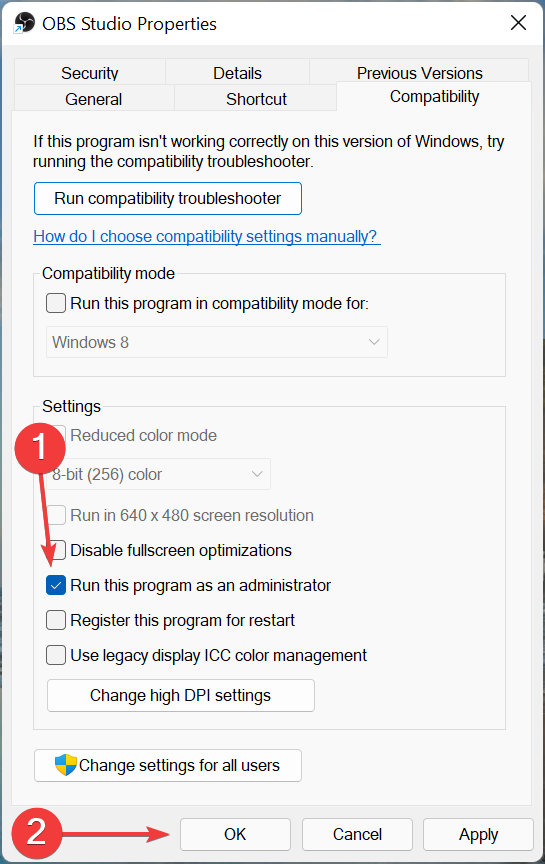
  3. Now, tick the checkbox for Run this program as an administrator, and click on OK at the bottom to save the changes.Run this program as administrator to fix obs studio virtual camera not showing up

There are several permissions a program may require to run, and while some programs are good to go with just a few of these, others may require administrative privileges. So, set OBS Studio to run as an administrator and check if the virtual camera starts showing up in Windows 11.

3. Make sure the virtual camera is turned on

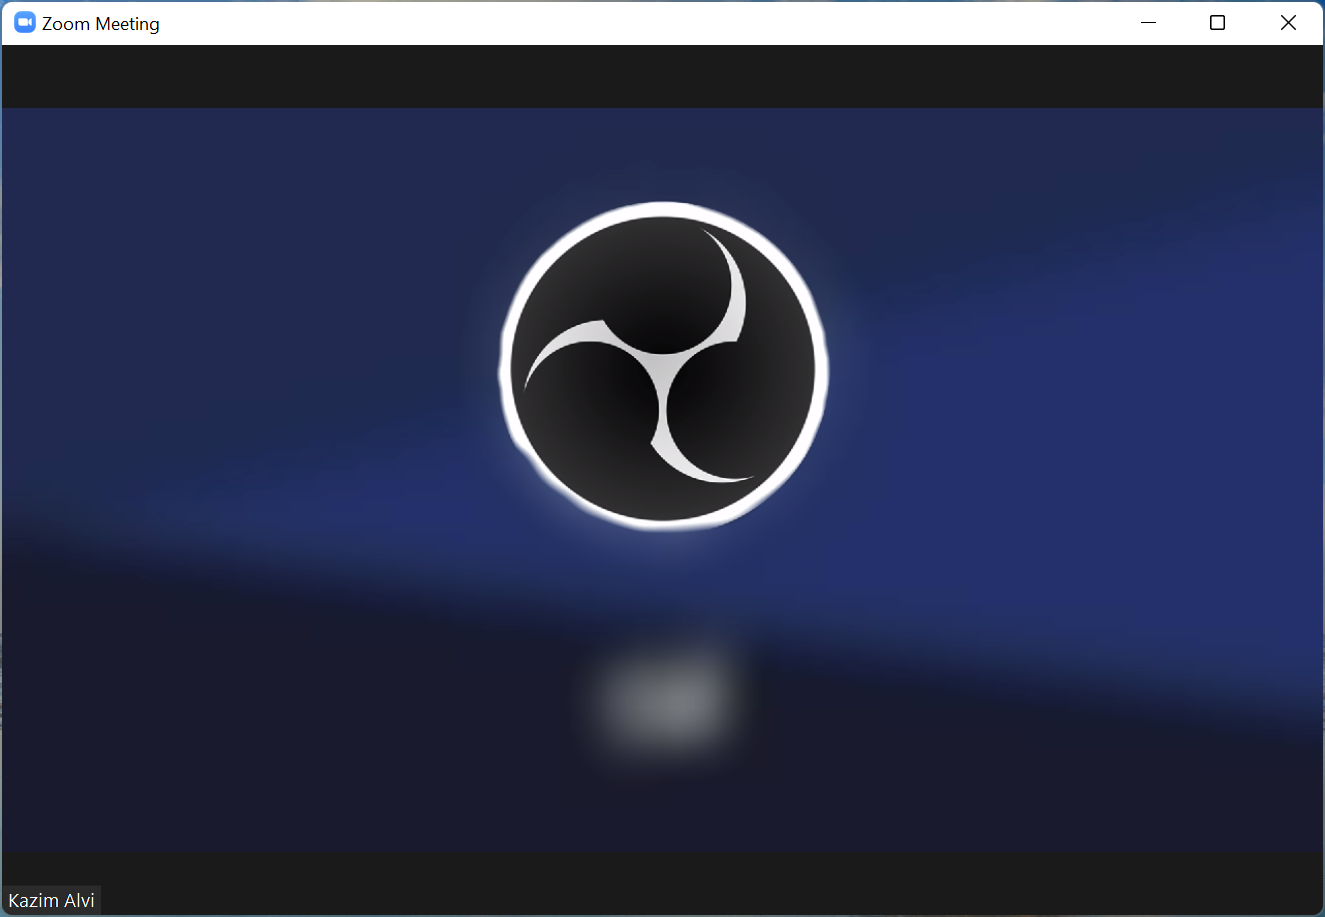
  1. If you see a screen like this on Zoom or other apps when using OBS Virtual Camera, it indicates that the feature is not turned on.Screen
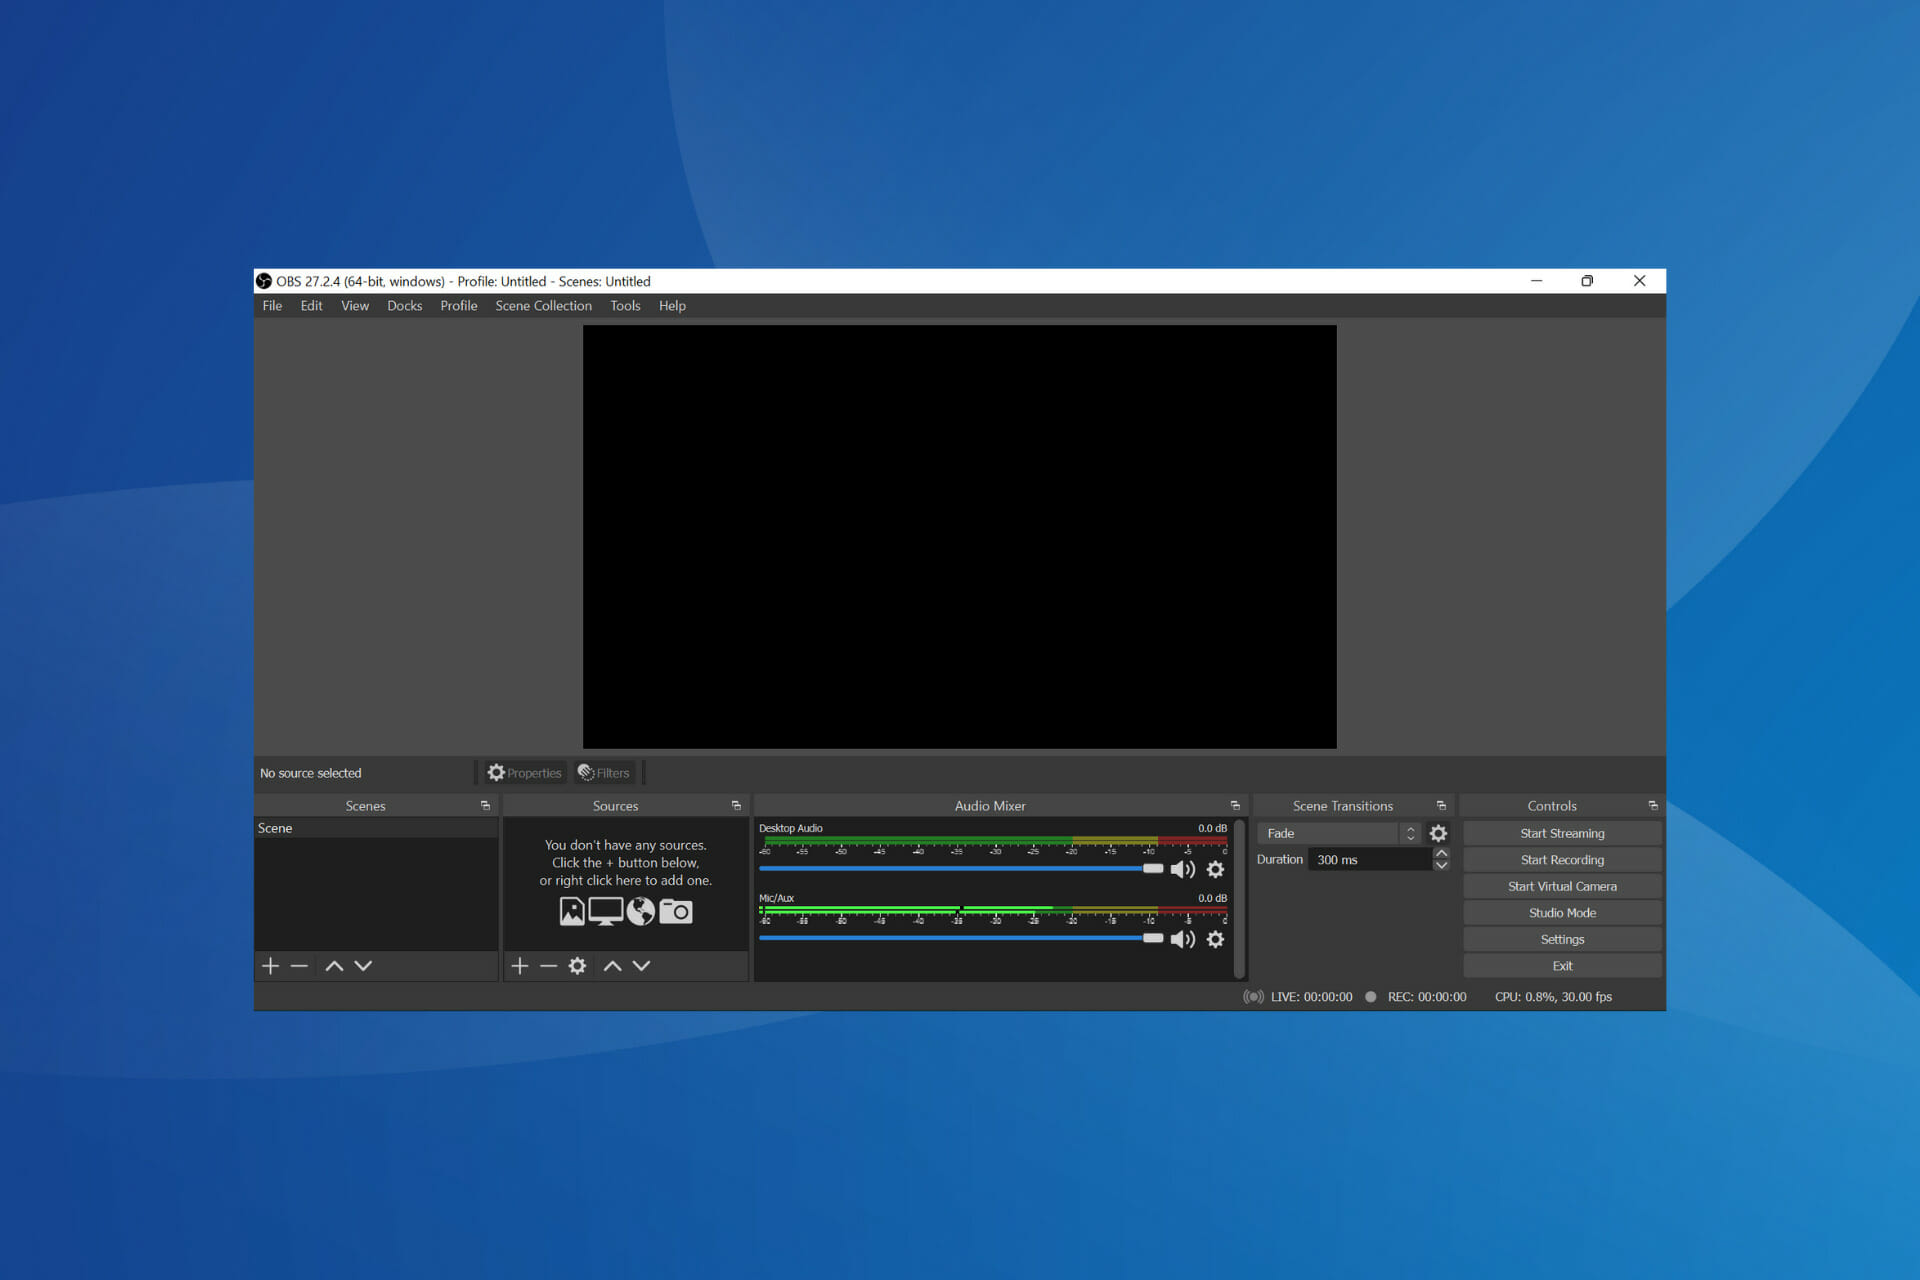
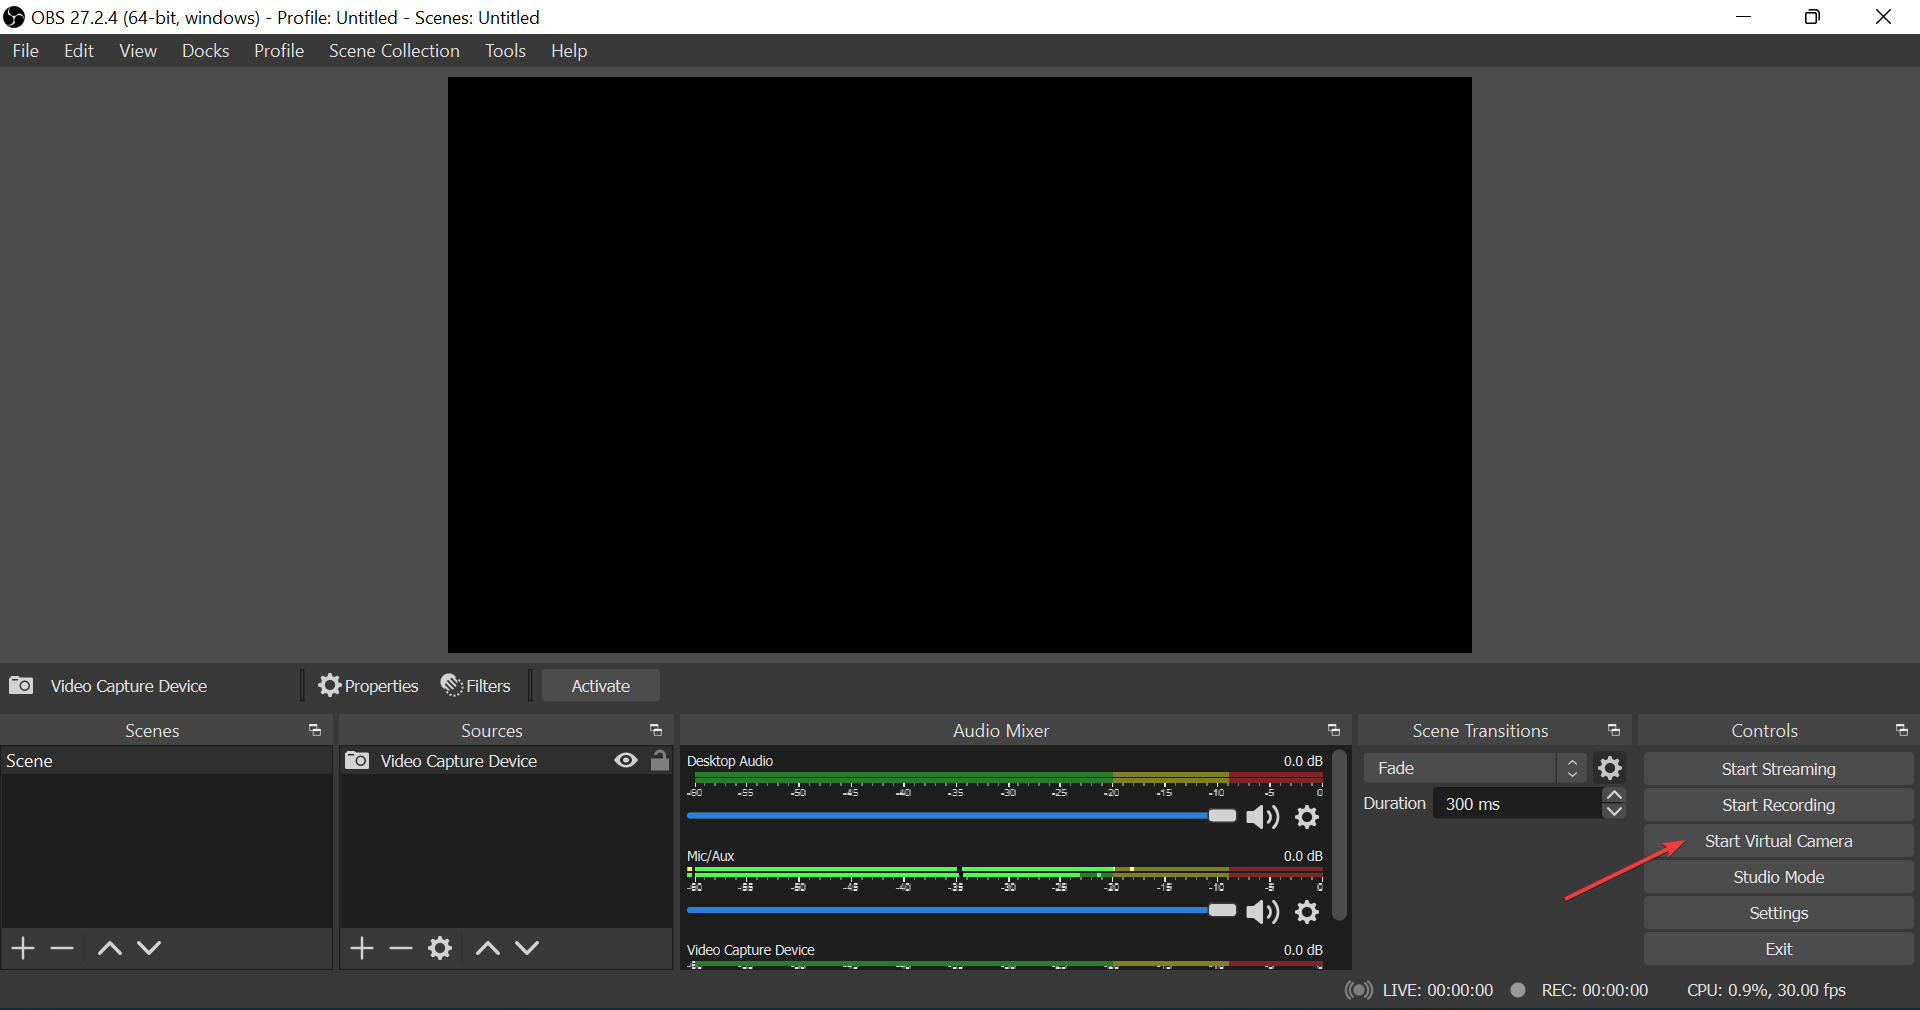
  2. Open the OBS Studio app, and click on the Start Virtual Camera option near the bottom-right corner.Start Virtual Camera to fix obs studio virtual camera not showing up
  3. Once done, also verify that it’s been Activated. For that, just make sure the button next to Filters reads Deactivate.Activate to fix obs studio virtual camera not showing up

After you are done making the changes, the OBS Studio virtual camera not showing up in Zoom issue should be eliminated, and you should have the software effectively projecting video on other apps. If this method doesn’t work, head to the next one.

4. Update OBS Studio

  1. Launch the OBS Studio app, and click on the Tools menu from the top.Help menu
  2. Now, select Check For Updates from the listed options.Check fo updates to fix obs studio virtual camera not showing up

As discussed earlier, the feature was not present in the previous versions of the app, and therefore, if you haven’t updated OBS Studio in a while, make sure to do that. Once done, check if the OBS Studio virtual camera not showing up with the Google Meet problem is fixed.

5. Reinstall OBS Studio

  1. Press Windows + R to launch the Run command, enter appwiz.cpl in the text field, and either click on OK or hit Enter to launch the Programs and Features window.appwiz.cpl
  2. Now, locate the OBS Studio and OBS-virtualcam entries here, select each individually, and click on the Uninstall button.Uninstall to fix obs studio virtual camera not showing up
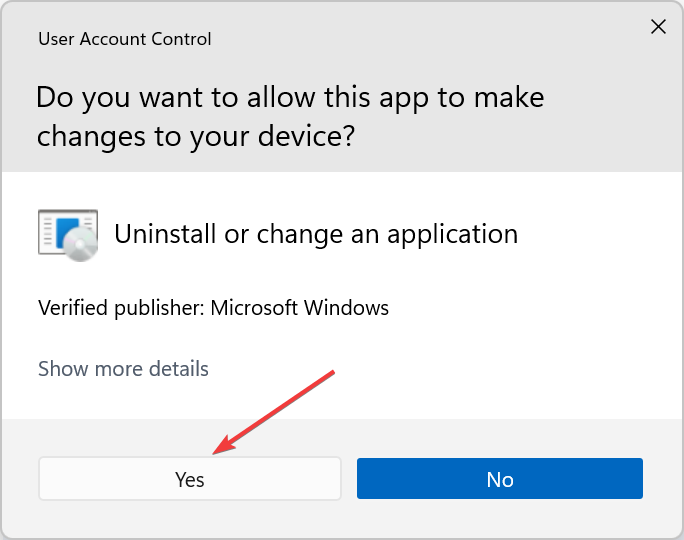
  3. Click Yes on the UAC (User Account Control) prompt that appears.Yes
  4. Follow the on-screen instructions to complete the process.
  5. After uninstalling both, restart the computer for the changes to come into effect, and then again download OBS Studio.

If none of the methods listed earlier worked to fix the OBS Studio virtual camera not showing up in Windows 10, you are left with no option but to reinstall the app. When you reinstall it, any issues that might have crept in during the installation process will be eliminated.

In case you are running the latest iteration, find out here how to install OBS Studio in Windows 11. Also, if the OBS Studio virtual camera is not showing up in the Tools menu, just download the OBS-VirtualCam plugin.

6. Use an alternative video recording software

If you have tried all these solutions and don’t seem to solve the issue, a quick fix would be to try an alternative software.

There are other reliable screen recording software that offer a similar feature set to OBS Studio. One of the best alternatives is Camtasia.

It comprises both a screen recorder and a video editor. You can use only this app to create videos from start to finish.

It includes everything you need to create professional-level content. It offers templates, presets, drag-and-drop video editing, built-in royalty-free music and images, web camera capture, and many more.

⇒ Get Camtasia

What do I do if OBS Studio virtual camera is not showing on Mac?

1. Run code in Terminal on Mac

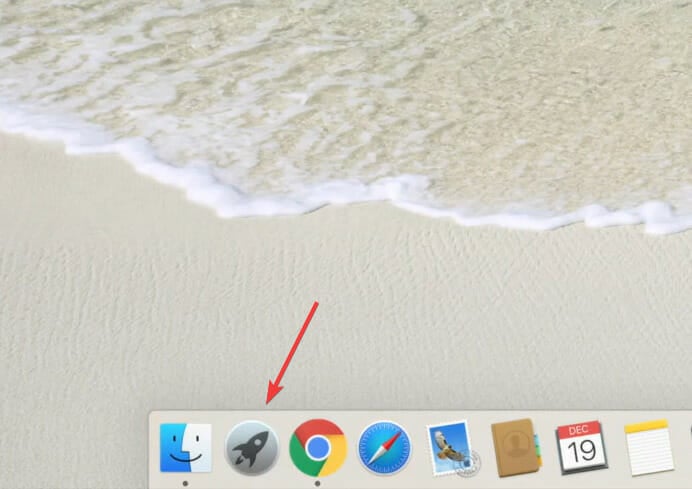
  1. Click on the Launchpad icon at the bottom.launchpad
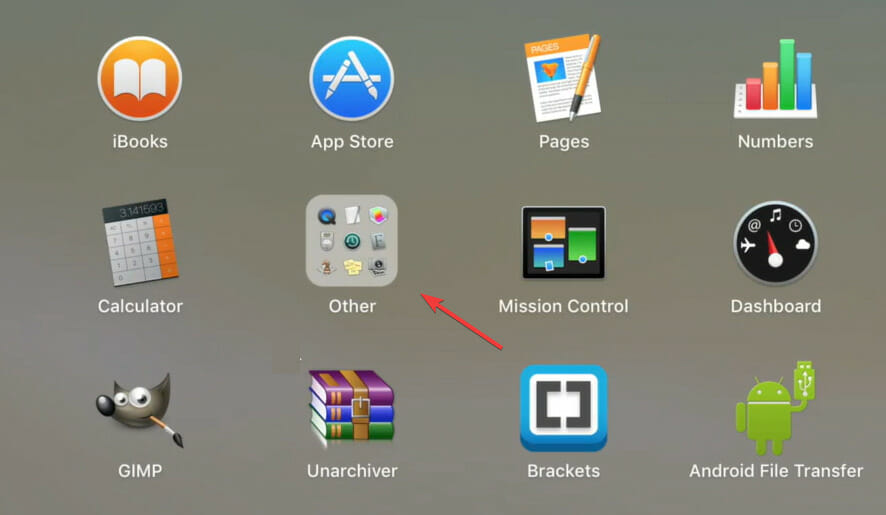
  2. Next, click on Other from the options listed here.Other
  3. Select, Terminal.Terminal to fix obs studio virtual camera not showing up
  4. Now, run the following code here:sudo codesign --remove-signature /Applications/Discord.app/Contents/Frameworks/Discord\ Helper\ (GPU).app /Applications/Discord.app/Contents/Frameworks/Discord\ Helper\ (Plugin).app /Applications/Discord.app/Contents/Frameworks/Discord\ Helper\ (Renderer).app /Applications/Discord.app/Contents/Frameworks/Discord\ Helper.app

Once done, restart your MacBook for the changes to fully come into effect. This method has worked for users facing the OBS Studio virtual camera not showing up in Discord issue on macOS. So if you too are unable to access the virtual camera on Discord, try this.

2. Reinstall an older version of OBS Studio

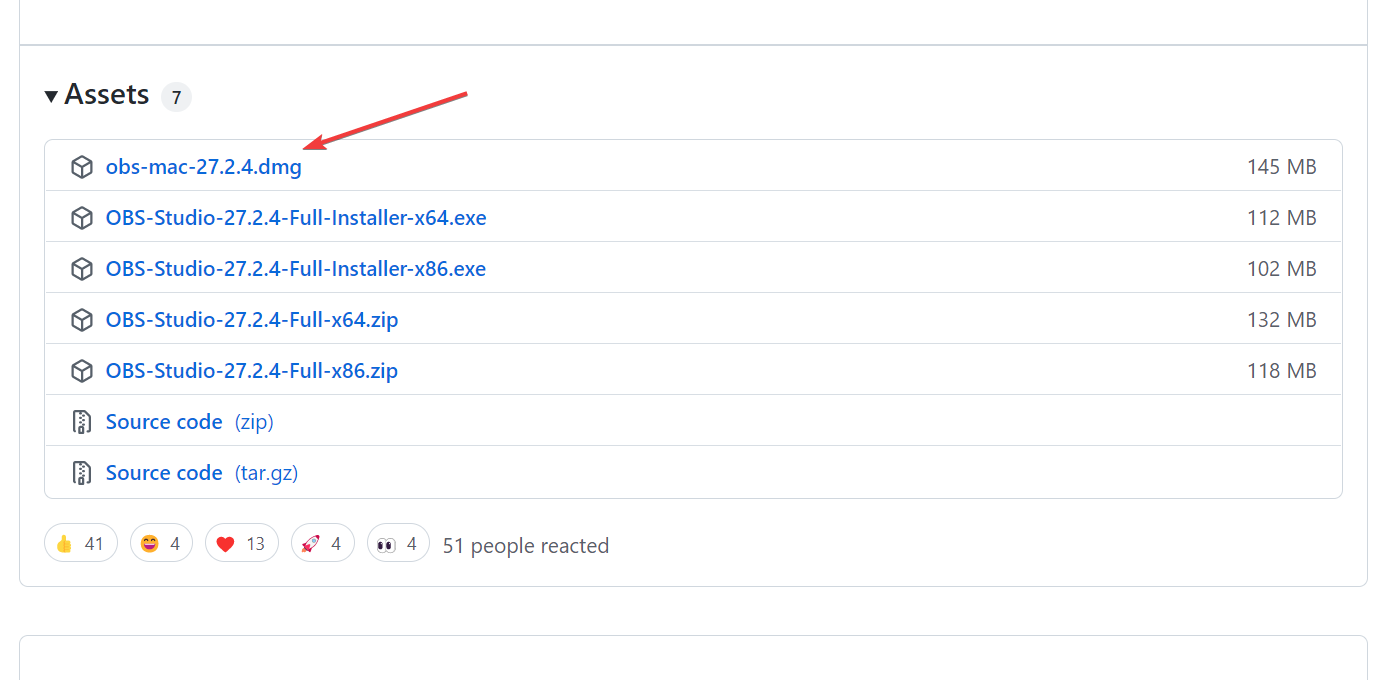
  1. Go to the Download page for OBS Studio, and click on the Previous Releases option.Previous releases
  2. Now, locate the previously installed version here, and click on the relevant link to download it.Dowload to fix obs studio virtual camera not showing up
  3. Once the download is complete, run the installer.

Though it’s not generally recommended, you can try installing an older version of OBS Studio if the problem started after an update. Many a time, it’s a bug in the current version that leads to the OBS studio camera not showing up on apps on Mac.

How do I enable the virtual camera in OBS Studio?

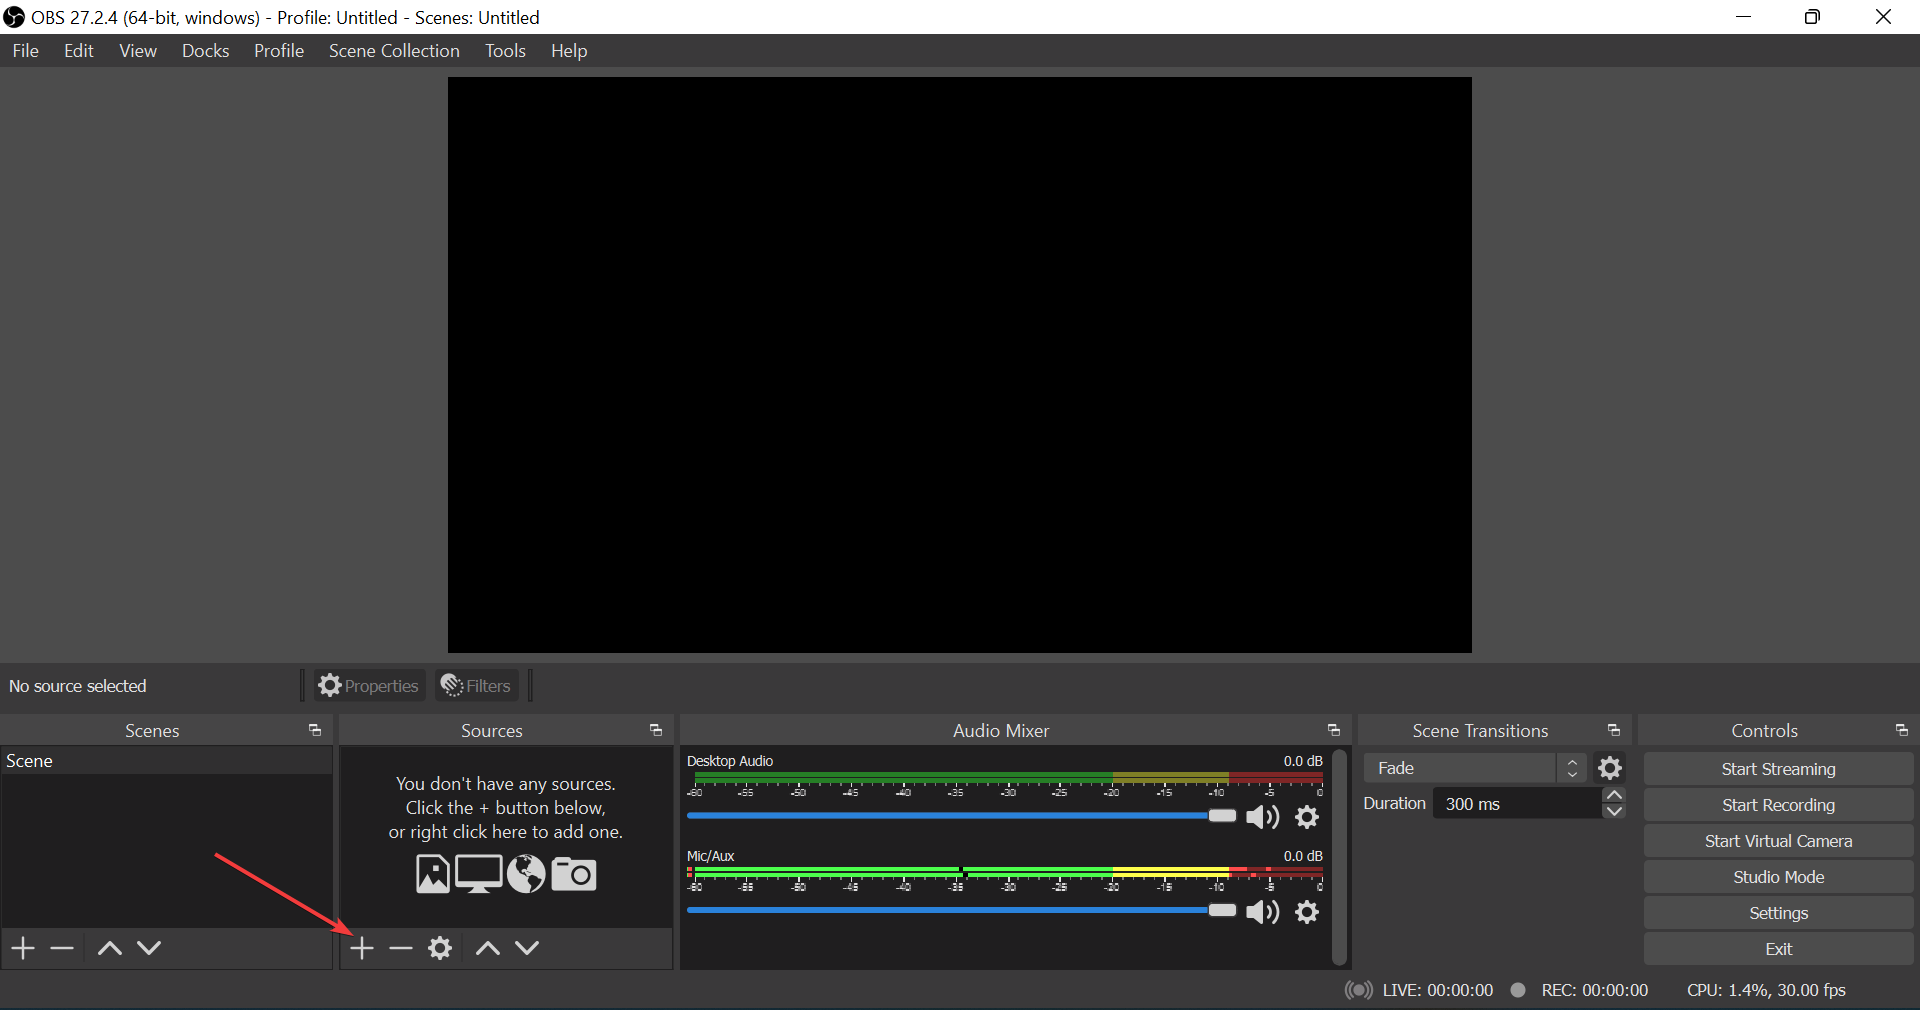
  1. Launch the OBS Studio app, and click on the Add icon under Sources at the bottom.Add to fix obs studio virtual camera not showing up
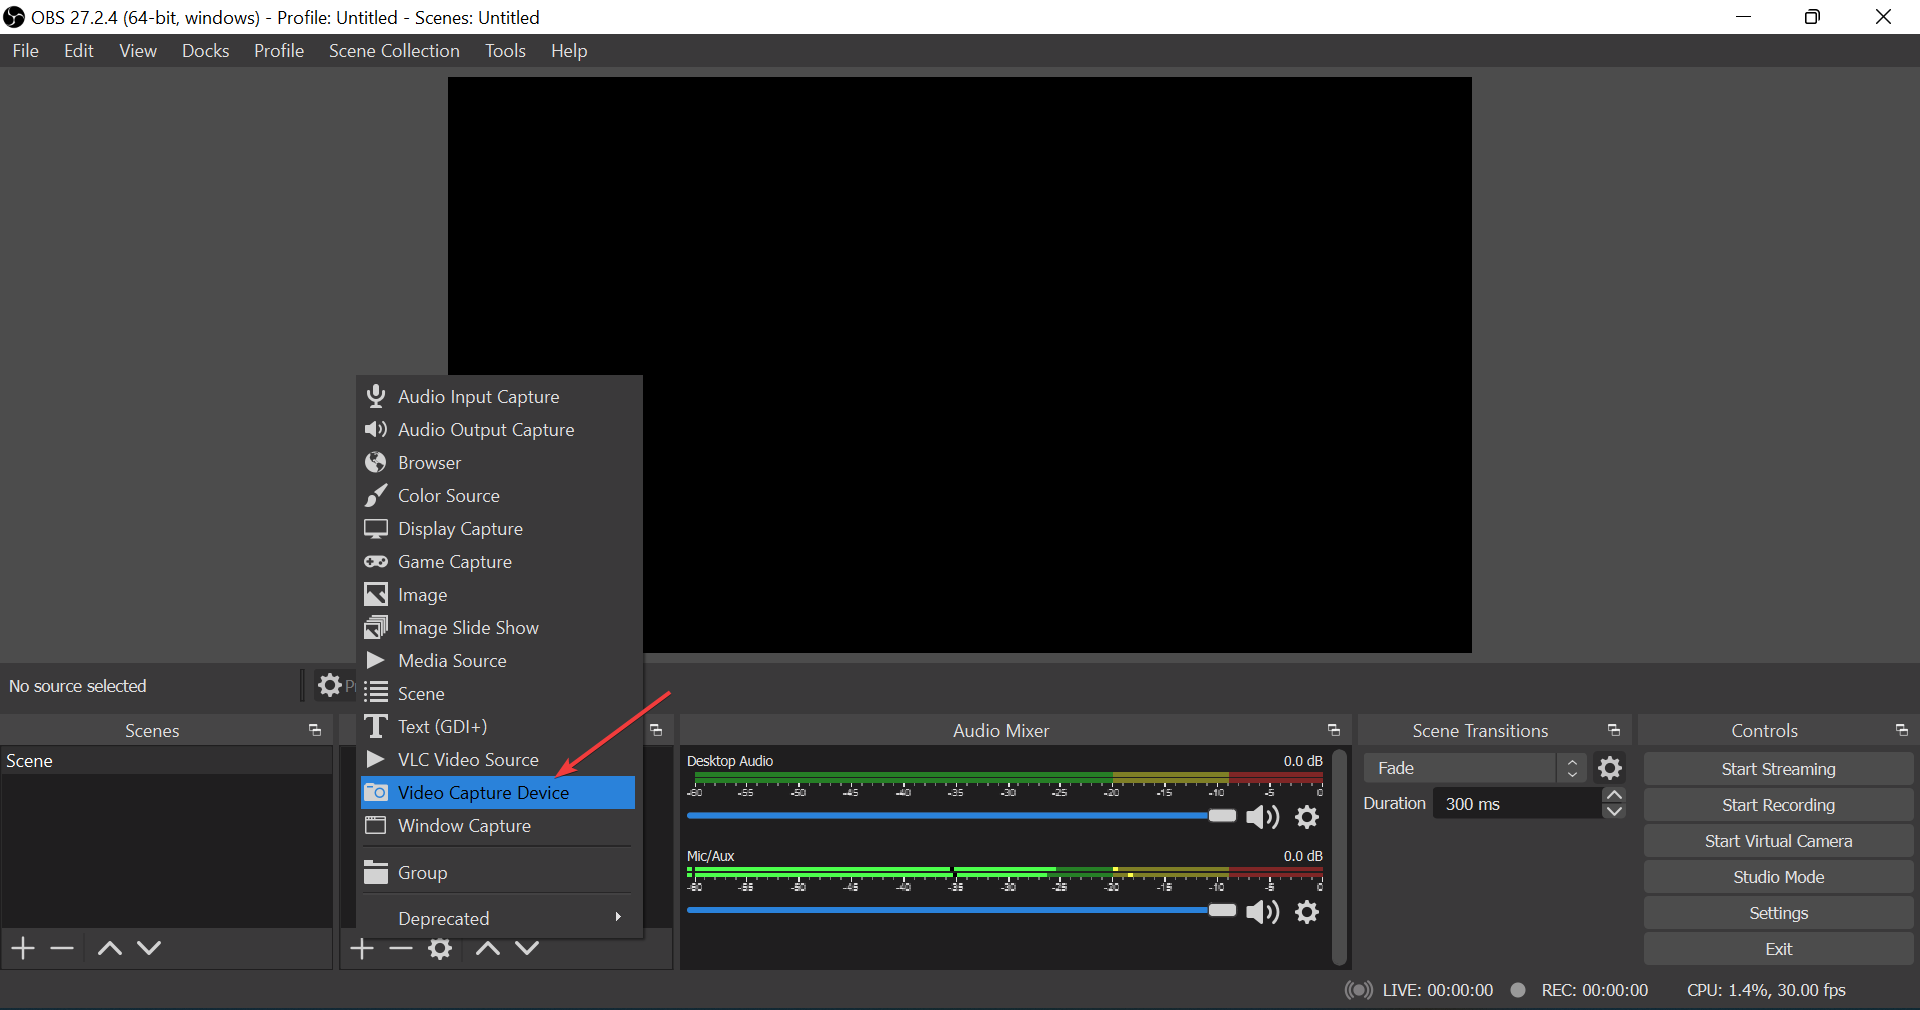
  2. Now, select Video Capture Device from the flyout menu.Video capture device
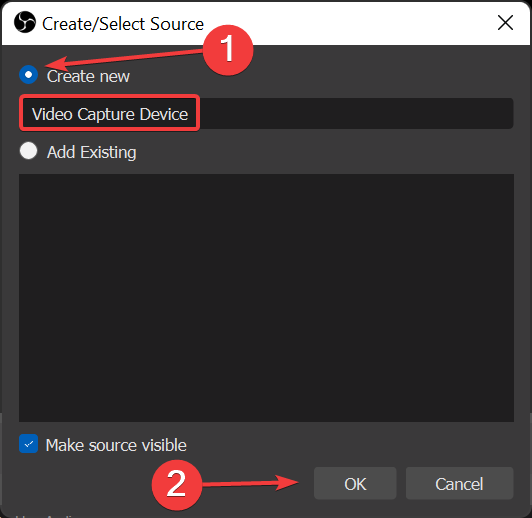
  3. Make sure that option for Create new is selected, enter a name in the text field or go with the default one, and click on OK at the bottom.Create new
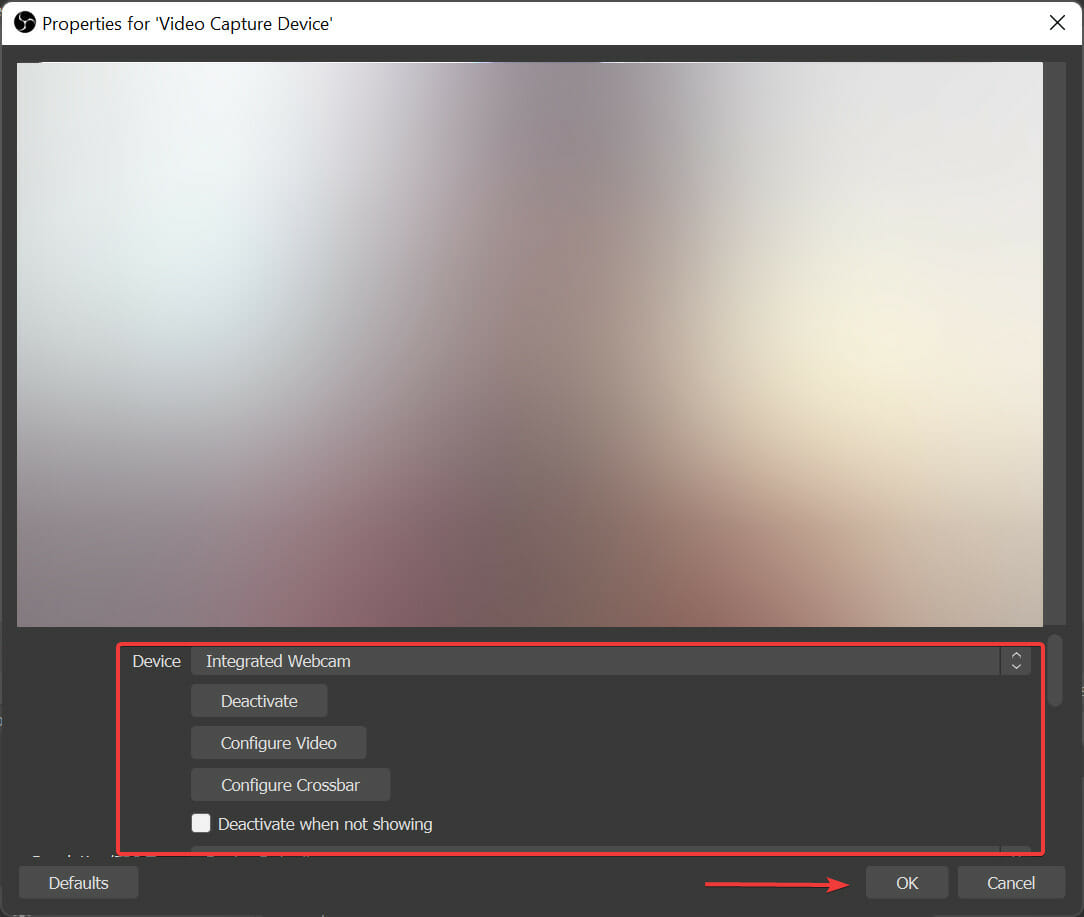
  4. You can now modify the various properties here, but we recommend keeping it as is for now. Finally, click on OK.OK

That’s it! A virtual camera has now been added to OBS Studio and it will appear in other apps from now on.

These are all the ways that might help if OBS Studio virtual camera is not showing up on other applications on the Windows 7, 10, 11, and macOS ecosystems.

Also, find out what to do if OBS Studio keeps crashing in Windows.

Tell us which fix worked and your experience of OBS Studio, in the comments section below.
Asus Touchpad Not Working on Windows 11: How to Enable it

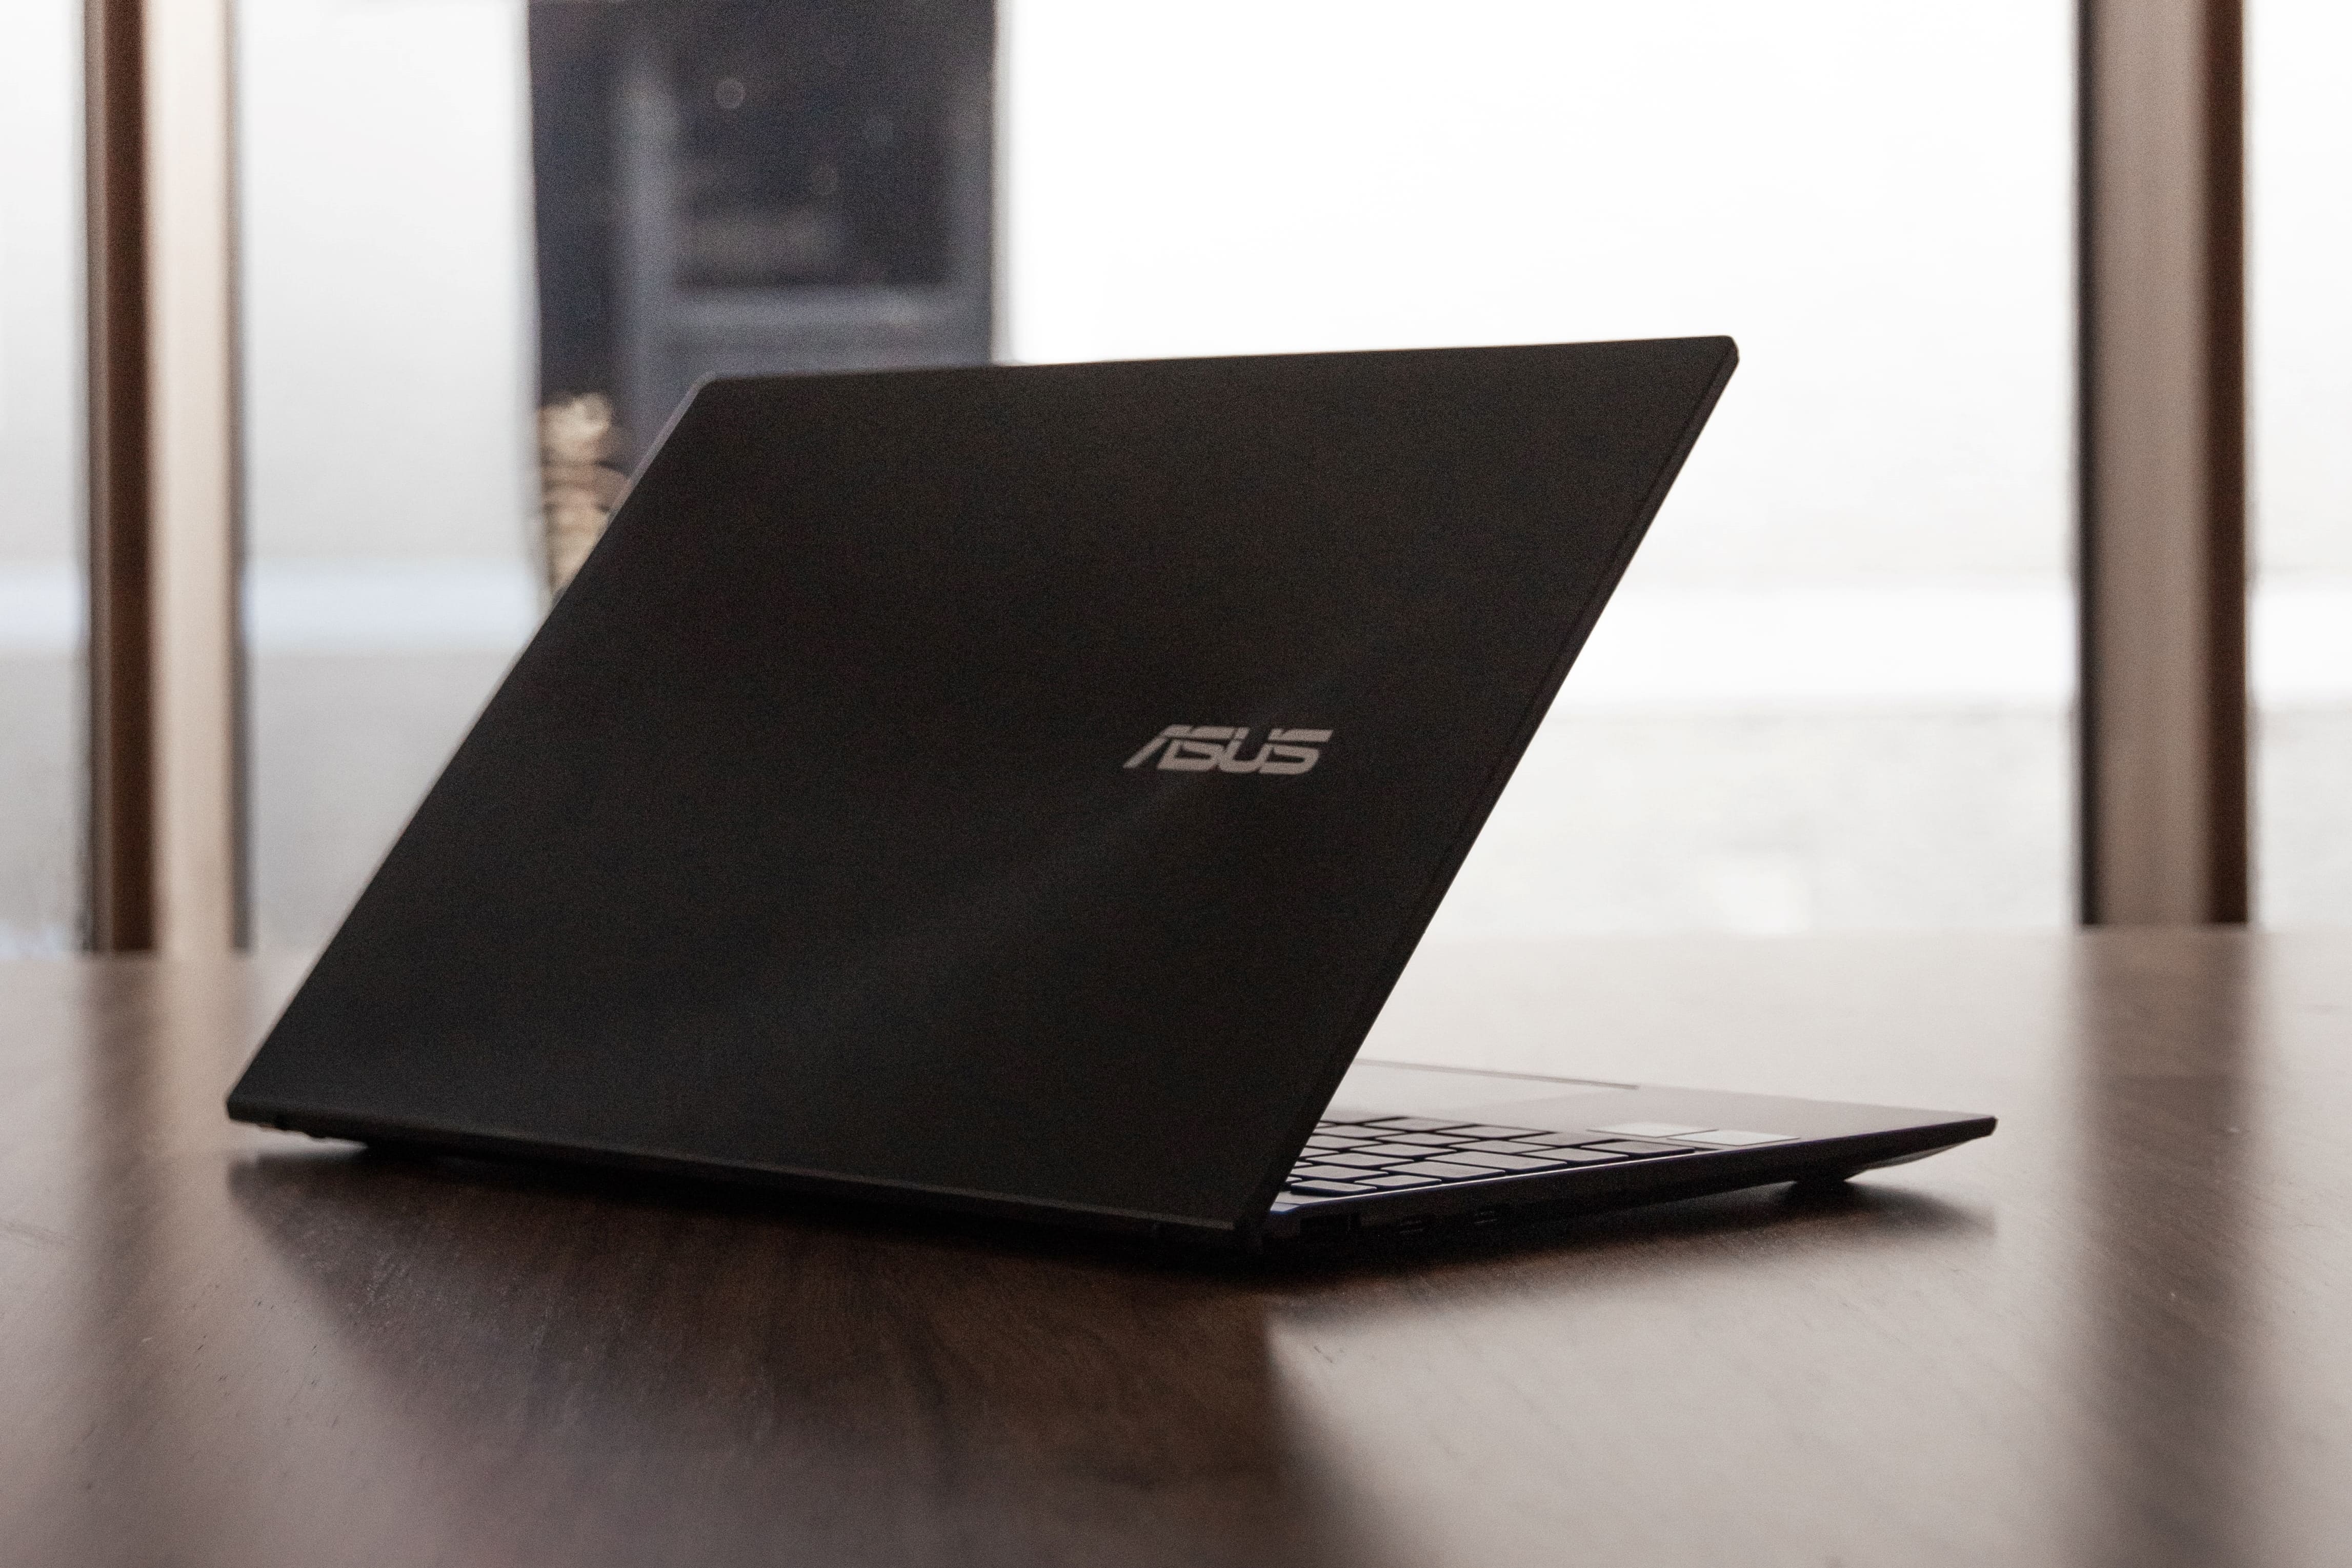
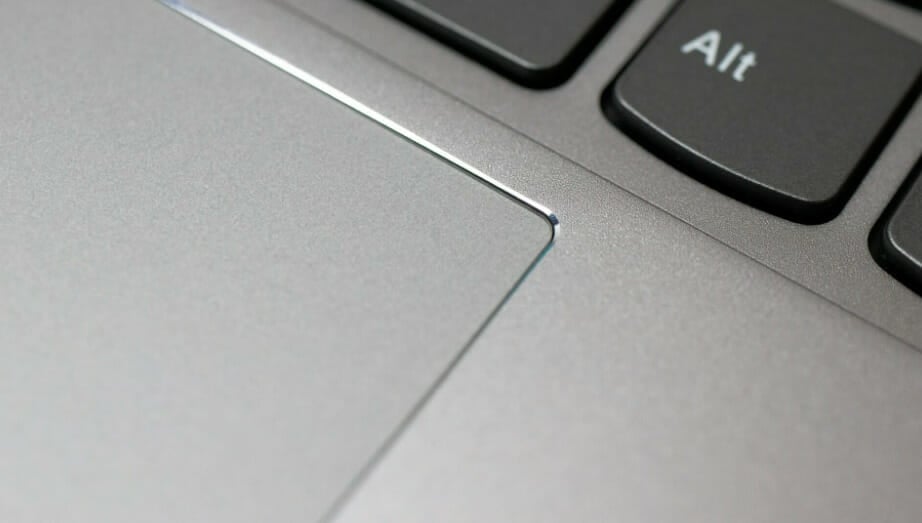
A touchpad is similar to a mouse and helps control the cursor. It’s the first choice for many laptop users, given that it’s inbuilt and to some extent, more convenient. However, several users reported that their Asus touchpad is not working in Windows 11.

For most users, the problem arises out of the blue without any indication whatsoever which leaves them perplexed. But, don’t worry! It’s most likely not a hardware issue and can easily be fixed. Other users with different laptops too face issues with the touchpad in Windows 11.

To find out all about why the Asus touchpad is not working in Windows 11 and the most relevant fixes for it, read the following sections.

Why is the Asus touchpad not working in Windows 11?

The most common reason here is that you might have mistakenly disabled the touchpad. There is an option for it in the Settings.

Also, if you started encountering the problem after updating the OS, it’s could be that a new driver was downloaded for the touchpad which is not functioning properly.

Besides, third-party applications are often found to conflict with the functioning of the touchpad. If you have installed a software to alter the touchpad’s performance, this could be the reason why the one on your Asus laptop is not working in Windows 11.

Another reason, though not as likely as the ones mentioned earlier, is the presence of conflicting hardware. Here, simply remove all the non-critical ones and reconnect them one at a time to identify the faulty device.

Let’s see the various models where the problem can be encountered:

  • Asus ZenBook touchpad not working
  • Touchpad not working in Asus VivoBook on Windows 11
  • Many also found the Asus ExpertBook touchpad to be not working
  • Another model with the touchpad not working is Asus Rog

The problem also arises in different situations for users. For some, the Asus touchpad stopped working when it was plugged in, while others reported that the Asus touchpad stopped working when the mouse is disconnected. In the case of the latter, a simple restart should do.

Let’s now walk you through the most effective fixes.

What do I do if the Asus touchpad is not working in Windows 11?

1. Make sure the touchpad on your Asus laptop is enabled

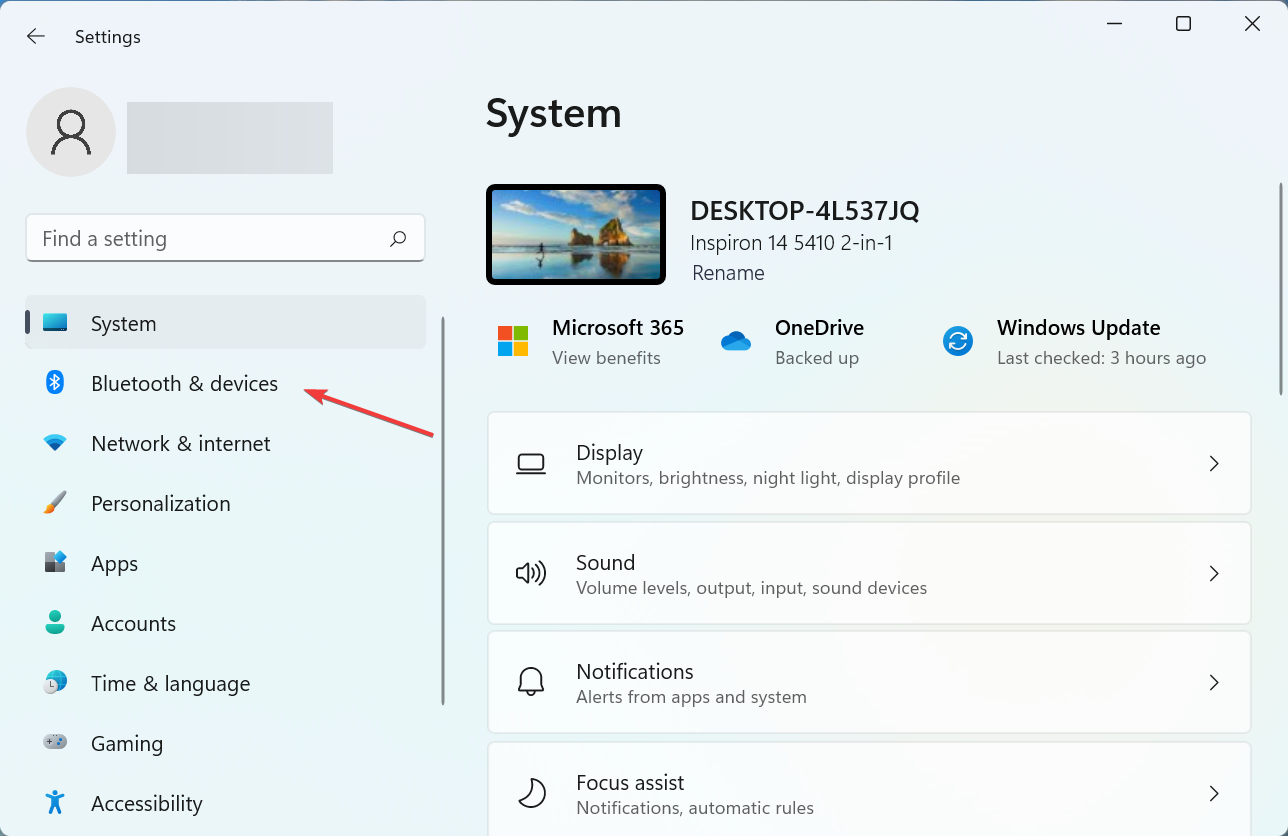
  1. Press Windows + I to launch the Settings app, and select Bluetooth & devices from the tabs listed in the navigation pane on the left.Bluetooth and devices to fix asus touchpad not working windows 11
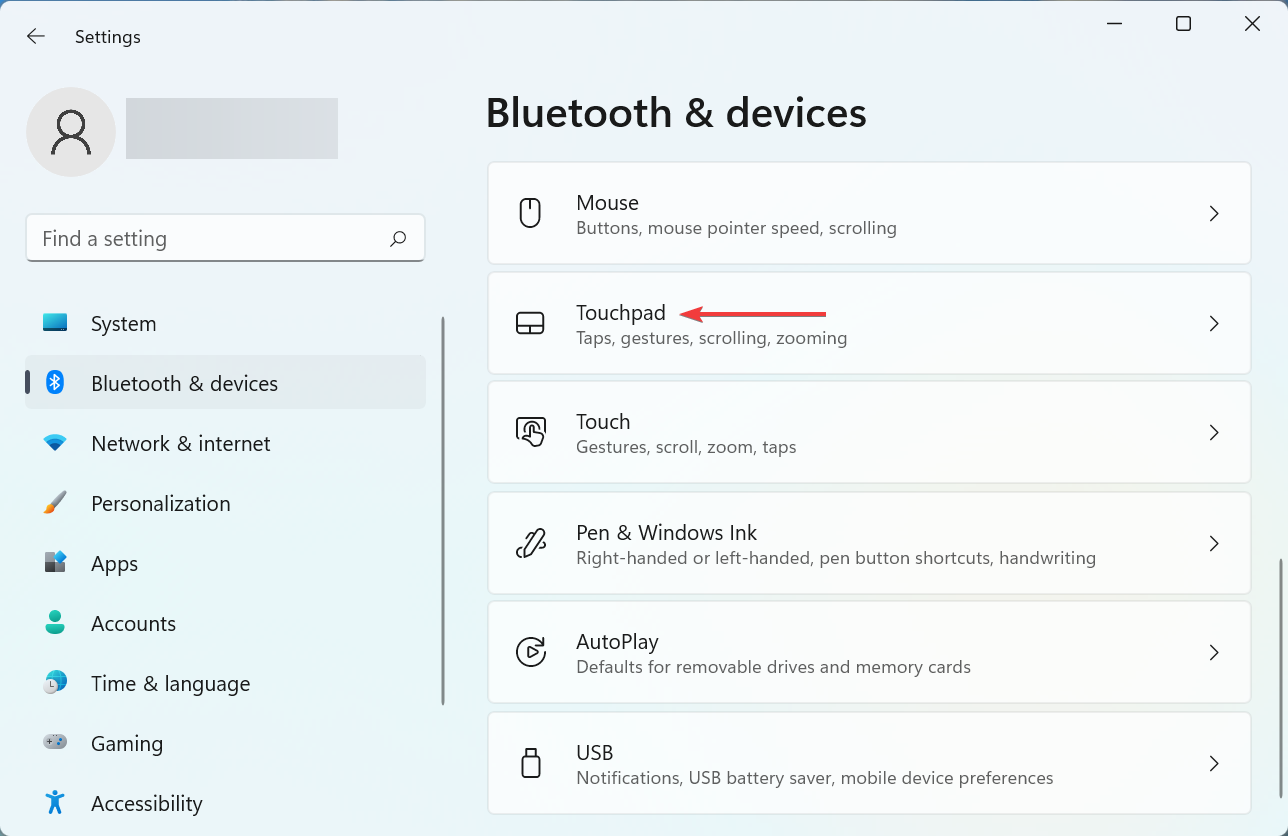
  2. Next, click on the Touchpad entry here.Touchpad
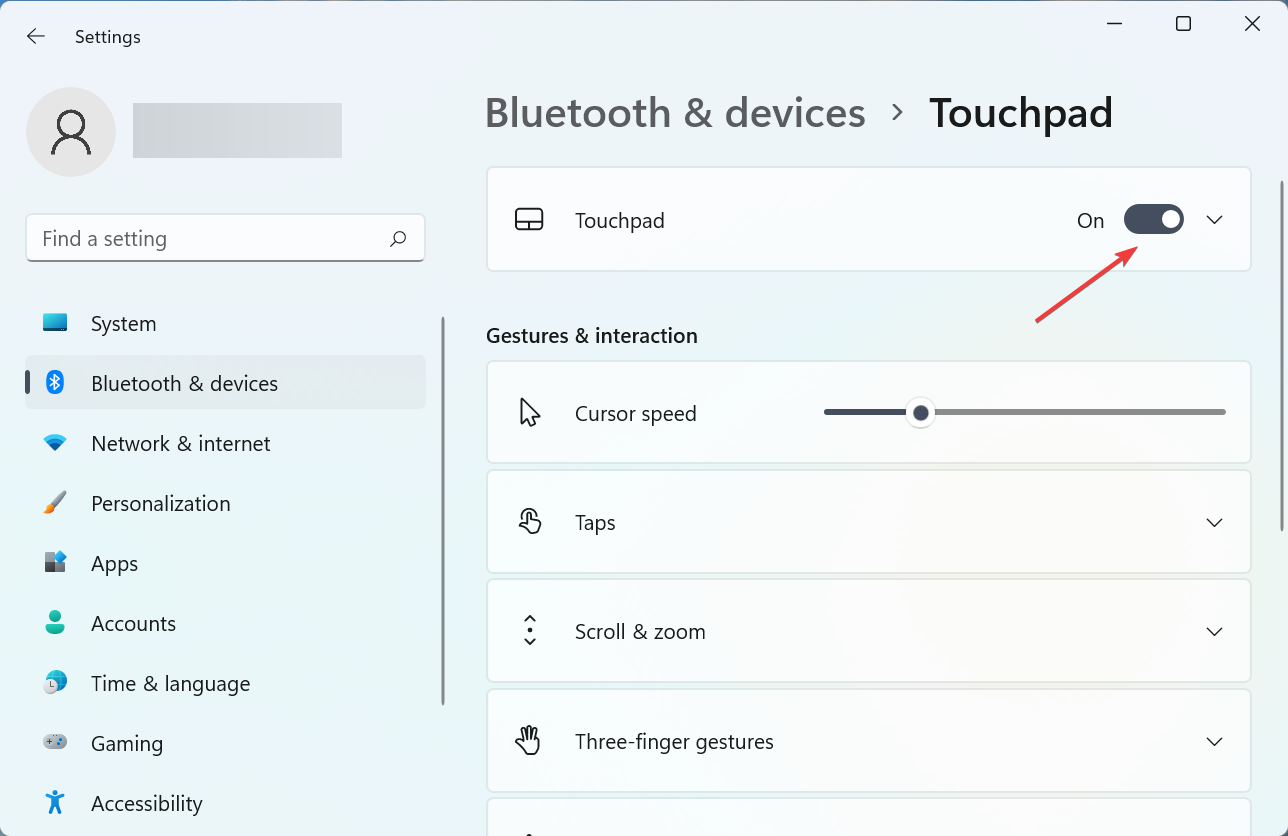
  3. Now, make sure that the toggle for Touchpad is enabled, and if it is not, click on the toggle.Enable to fix asus touchpad not working windows 11
  4. Also, check that the configured touchpad settings match the expected behavior and make the necessary changes if required.check settings

Once you are done making the changes, restart the computer for these to fully come into effect, and check if the Asus touchpad now starts working in Windows 11.

2. Update the touchpad driver

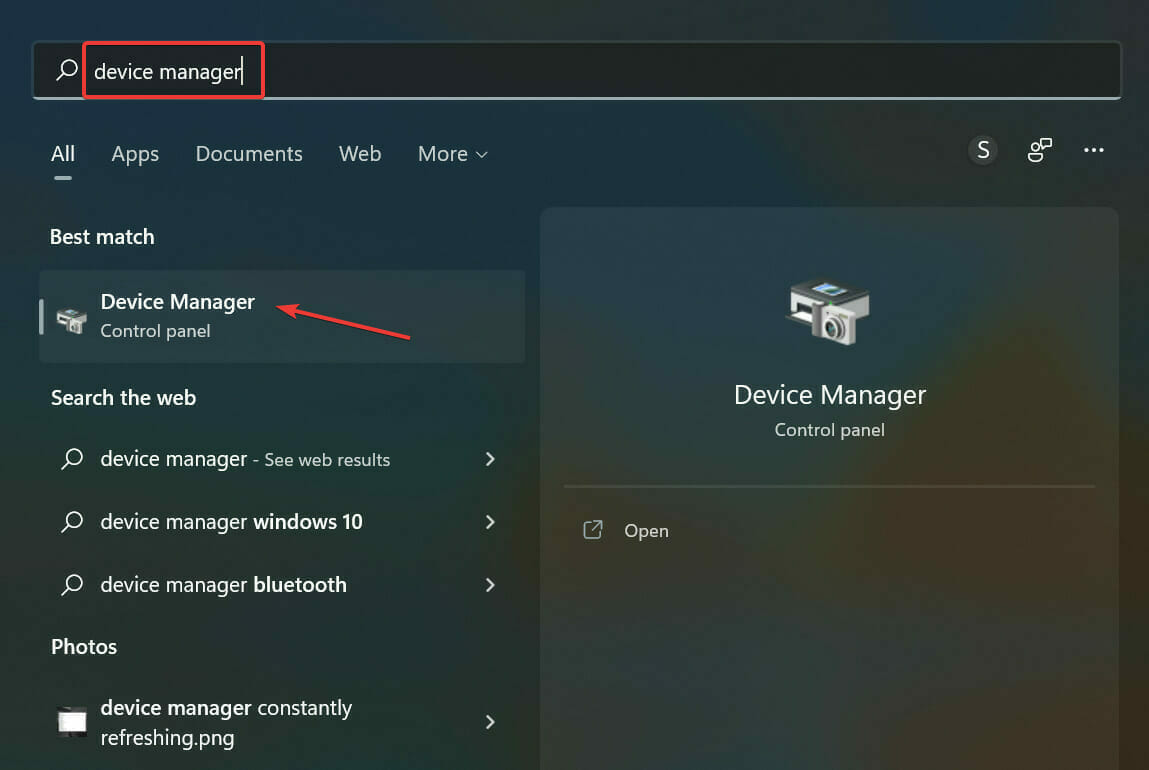
  1. Press Windows + S to launch the Search menu, enter Device Manager in the text field at the top, and click on the relevant search result.Device Manager
  2. Double-click on the Mice and other pointing devices entry here.Mice and other pointing devices
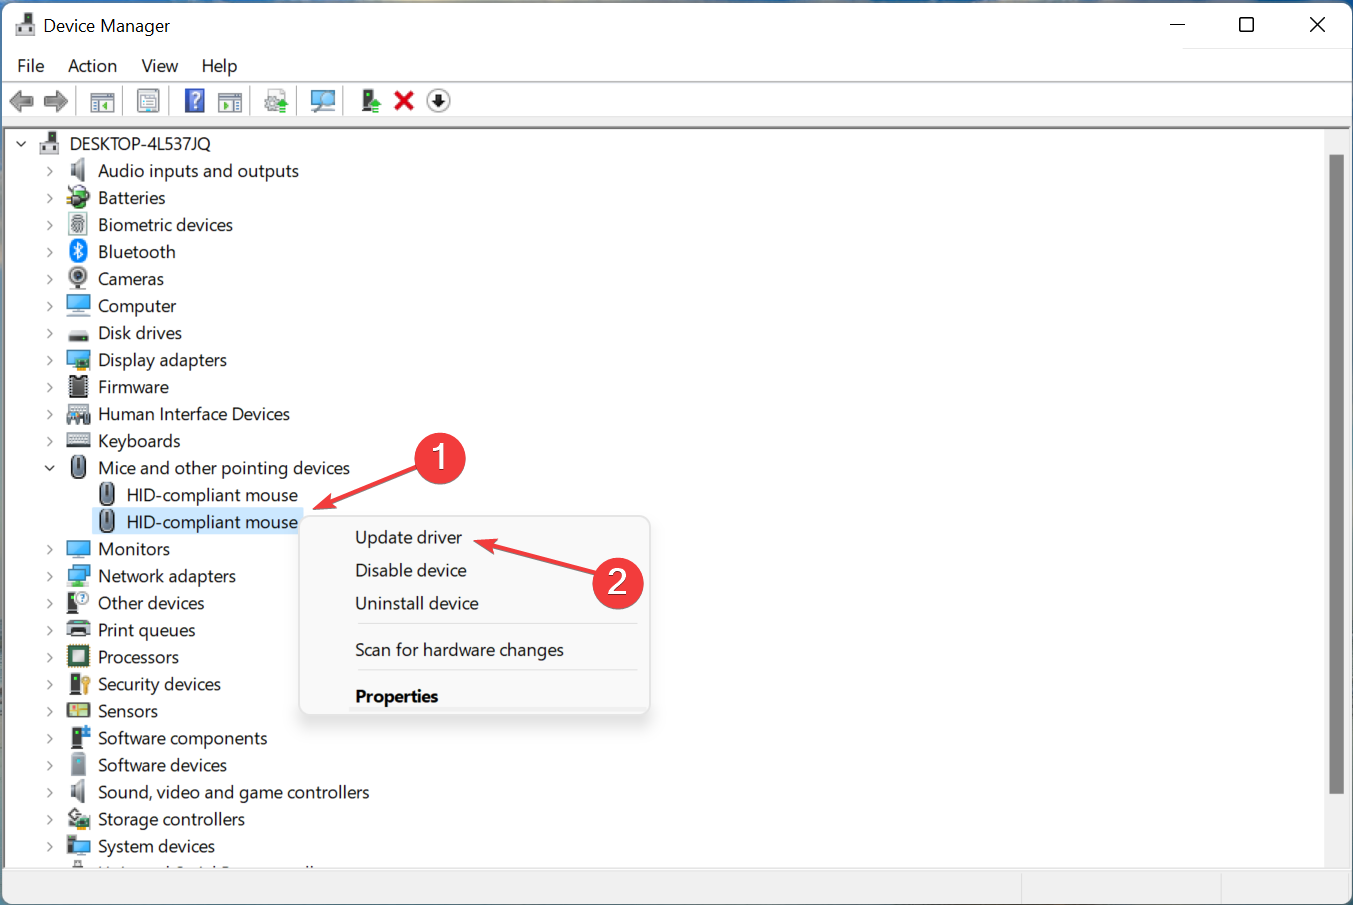
  3. Now, right-click on the malfunctioning touchpad and select Update driver from the context menu.Update driver to fix asus touchpad not working windows 11
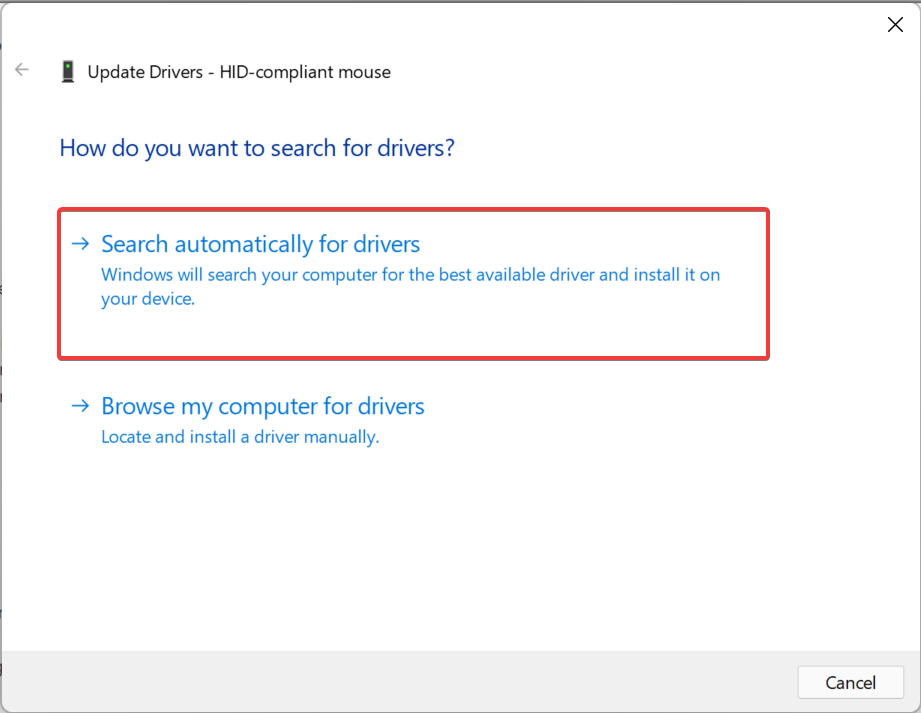
  4. Finally, select Search automatically for drivers from the two options in the Update Drivers window.Search automatically for drivers
  5. Wait for your computer to install the best available driver.

If the Asus touchpad stopped working after an update, installing the latest driver version could fix the issue. If that’s the case, a newer version with a patch for the bug would be released soon.

In case the Device Manager method didn’t work, you can also manually install the latest driver in Windows 11. Besides, if the Asus touchpad driver is not showing in Device Manager, there are a few quick ways to access it.

Alternatively, to save time and automate the task, you can use dedicated software. We recommend Outbyte Driver Updater because it’s up-to-date, error-free, and easy to use.

3. Remove conflicting third-party apps

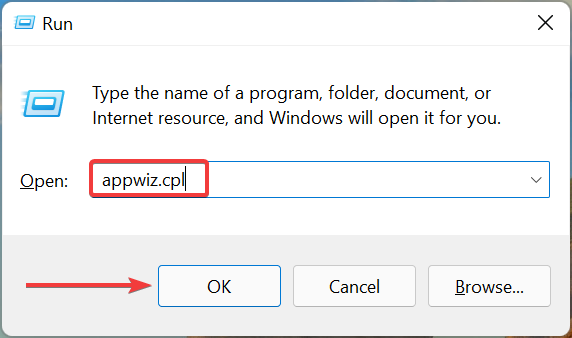
  1. Press Windows + R to launch the Run command, enter appwiz.cpl in the text field, and either click OK or hit Enter to launch Programs and Features.appwiz.cpl
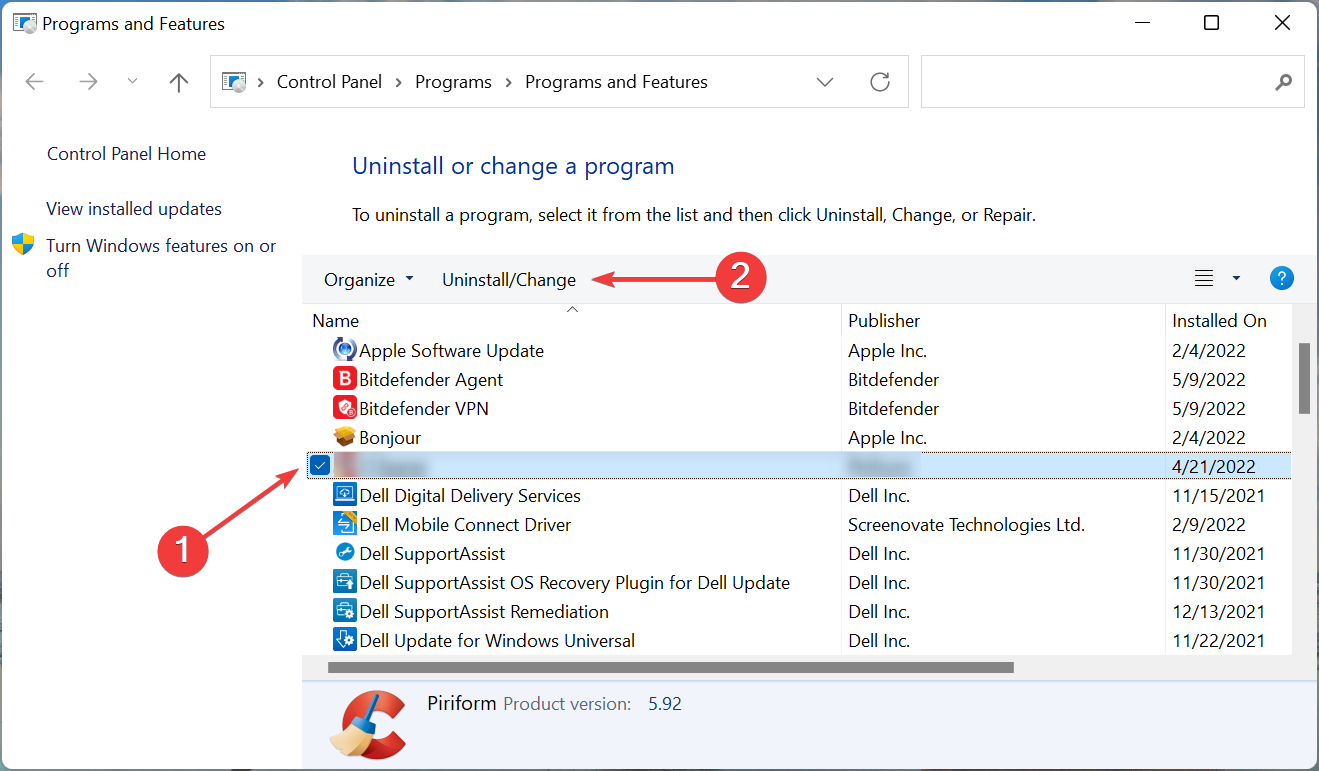
  2. Now, locate the problematic program, select it, and click on Uninstall.Remove app to fix asus touchpad not working windows 11
  3. Follow the on-screen instructions to complete the process.

If the Asus touchpad is not working after a few minutes, it could be a third-party application conflicting with the functioning of the system.

Just, recollect when you first encountered the problem, and individually remove the apps installed around the same time until you identify the problematic one.

These are the three ways you can fix the problem in Windows 11. Also, the methods listed here would work just fine if the Asus touchpad is not working in Windows 10 or Windows 7.

In case you are looking for ways to customize the OS, learn how to set touchpad gestures in Windows 11.

Tell us which fix worked for you in the comments section below.
KB5013943 causes apps like Discord and Teams to crash inexplicably

More problems for Windows users that went ahead and installed the May 2022 security updates from Microsoft.

It seems that KB5013943, which is the mandatory security update, is crashing apps that use .NET framework with the error code: 0xc0000135.

As detailed by affected users, these crashes are common among apps that use .NET Framework and apps like Discord or Microsoft Teams are also affected.

.NET Framework apps affected by another Windows update

It was only days ago when we were talking about yet another Windows security update that was messing with the .NET Framework apps.

Now, we appear to have another compatibility issue between the .NET framework and Windows 11. Of course, users took to social media and forums to report these issues.

People reported issues with ShareX, KeePass, Microsoft Teams, Visual Studio installer, and Discord, which is concerning, to say the least.

Another user posted on the Feedback Hub that he is unable to start the Teams app due to the error message process exited with code 3221225781 (0xc0000135).

What can I do to fix this issue?

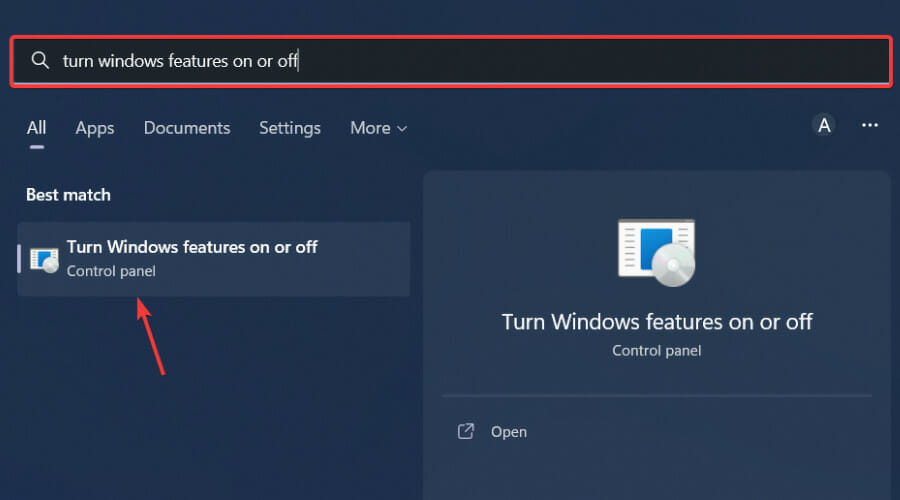
  1. Open the Start menu and search for Turn Windows features on or off.turn windows
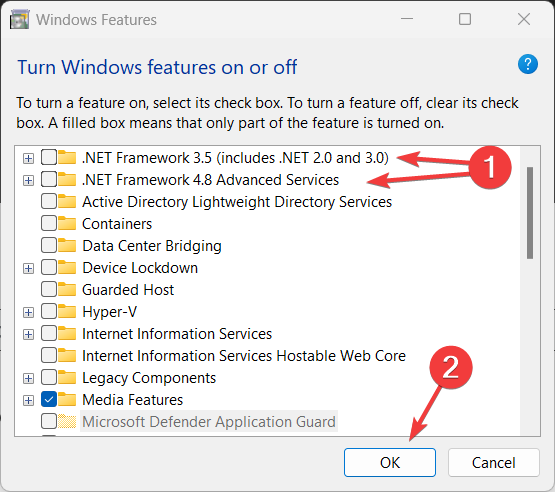
  2. Disable and enable all .NET frameworks and press the OK button.framework
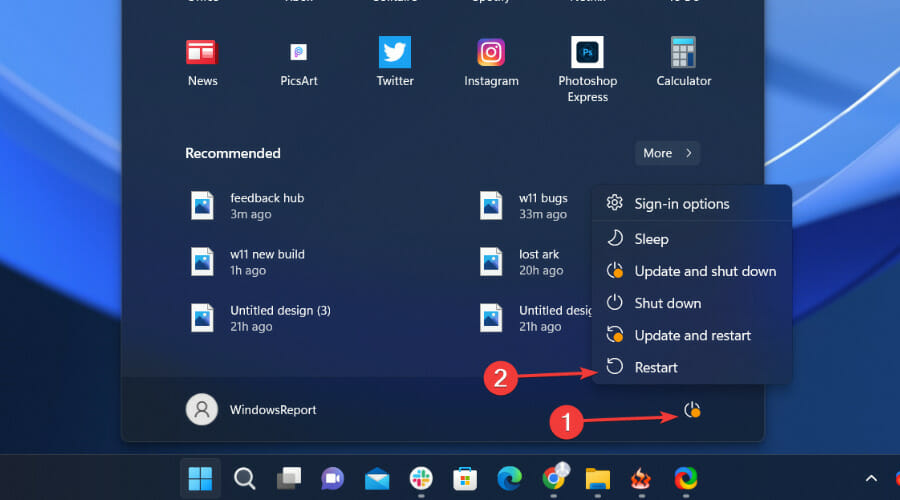
  3. Reboot your system.reboot pc

This is the recommended path to take until Microsoft deals with this problem from their end, only to avoid unpleasant experiences.

How do I uninstall KB5013943?

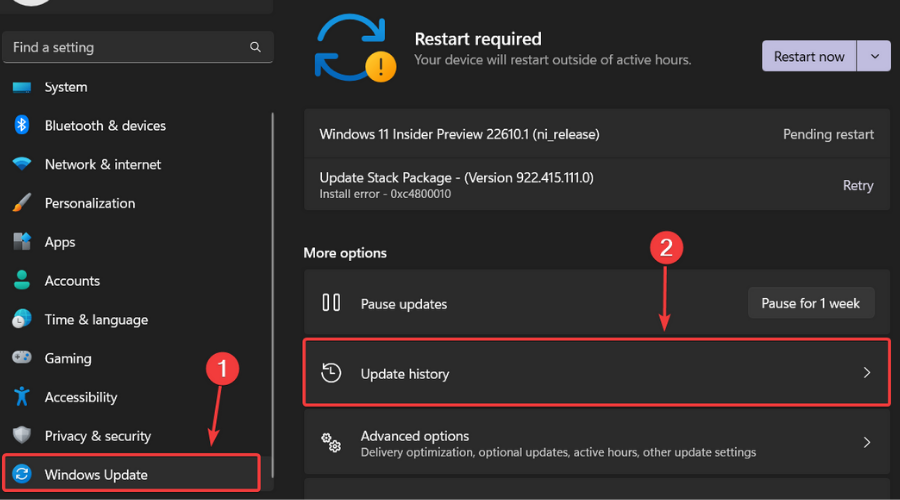
  1. Press Windows + I in order to open Settings.
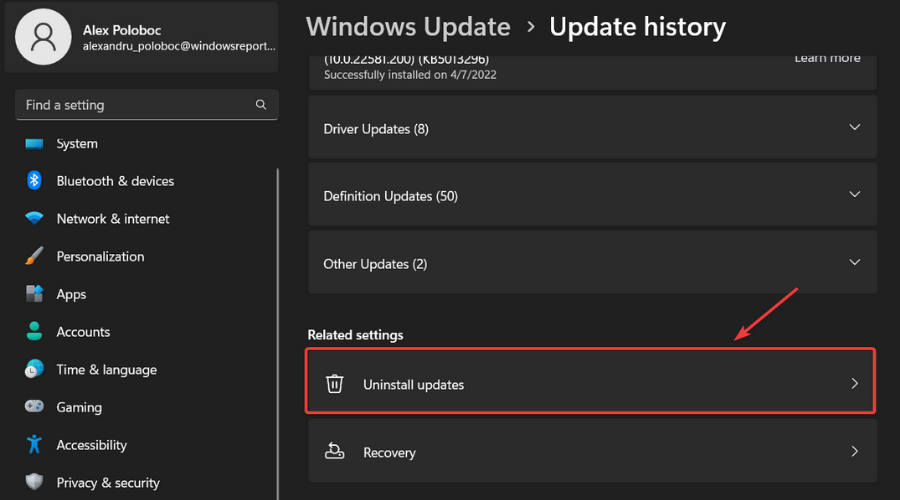
  2. Select the Windows Updates tab, then click on Updates history.update
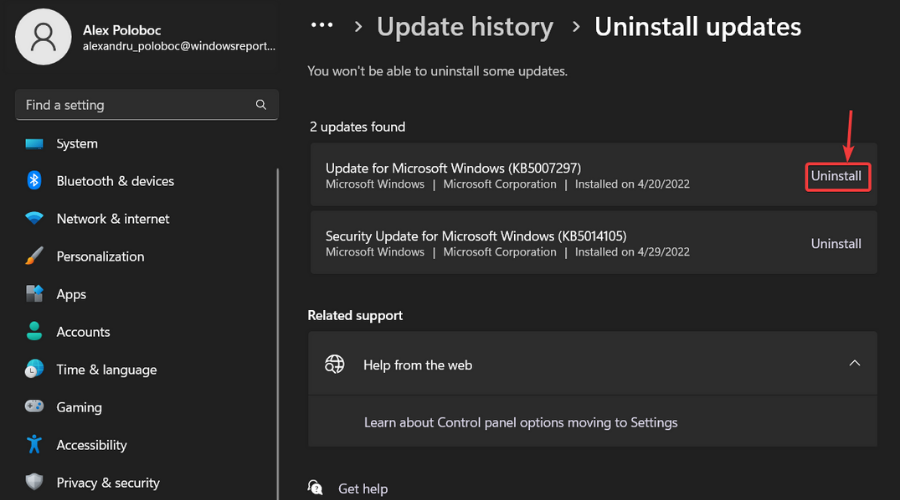
  3. Click on Uninstall updates.uninstall updates
  4. Click the Uninstall button for the update you want to remove.update uninstall

We will keep you posted on any development in this situation, so rest assured you will be among the first ones to know when anything changes.

Were you also affected by this annoying bug delivered by KB5013943? Share your experience with us in the comments section below.
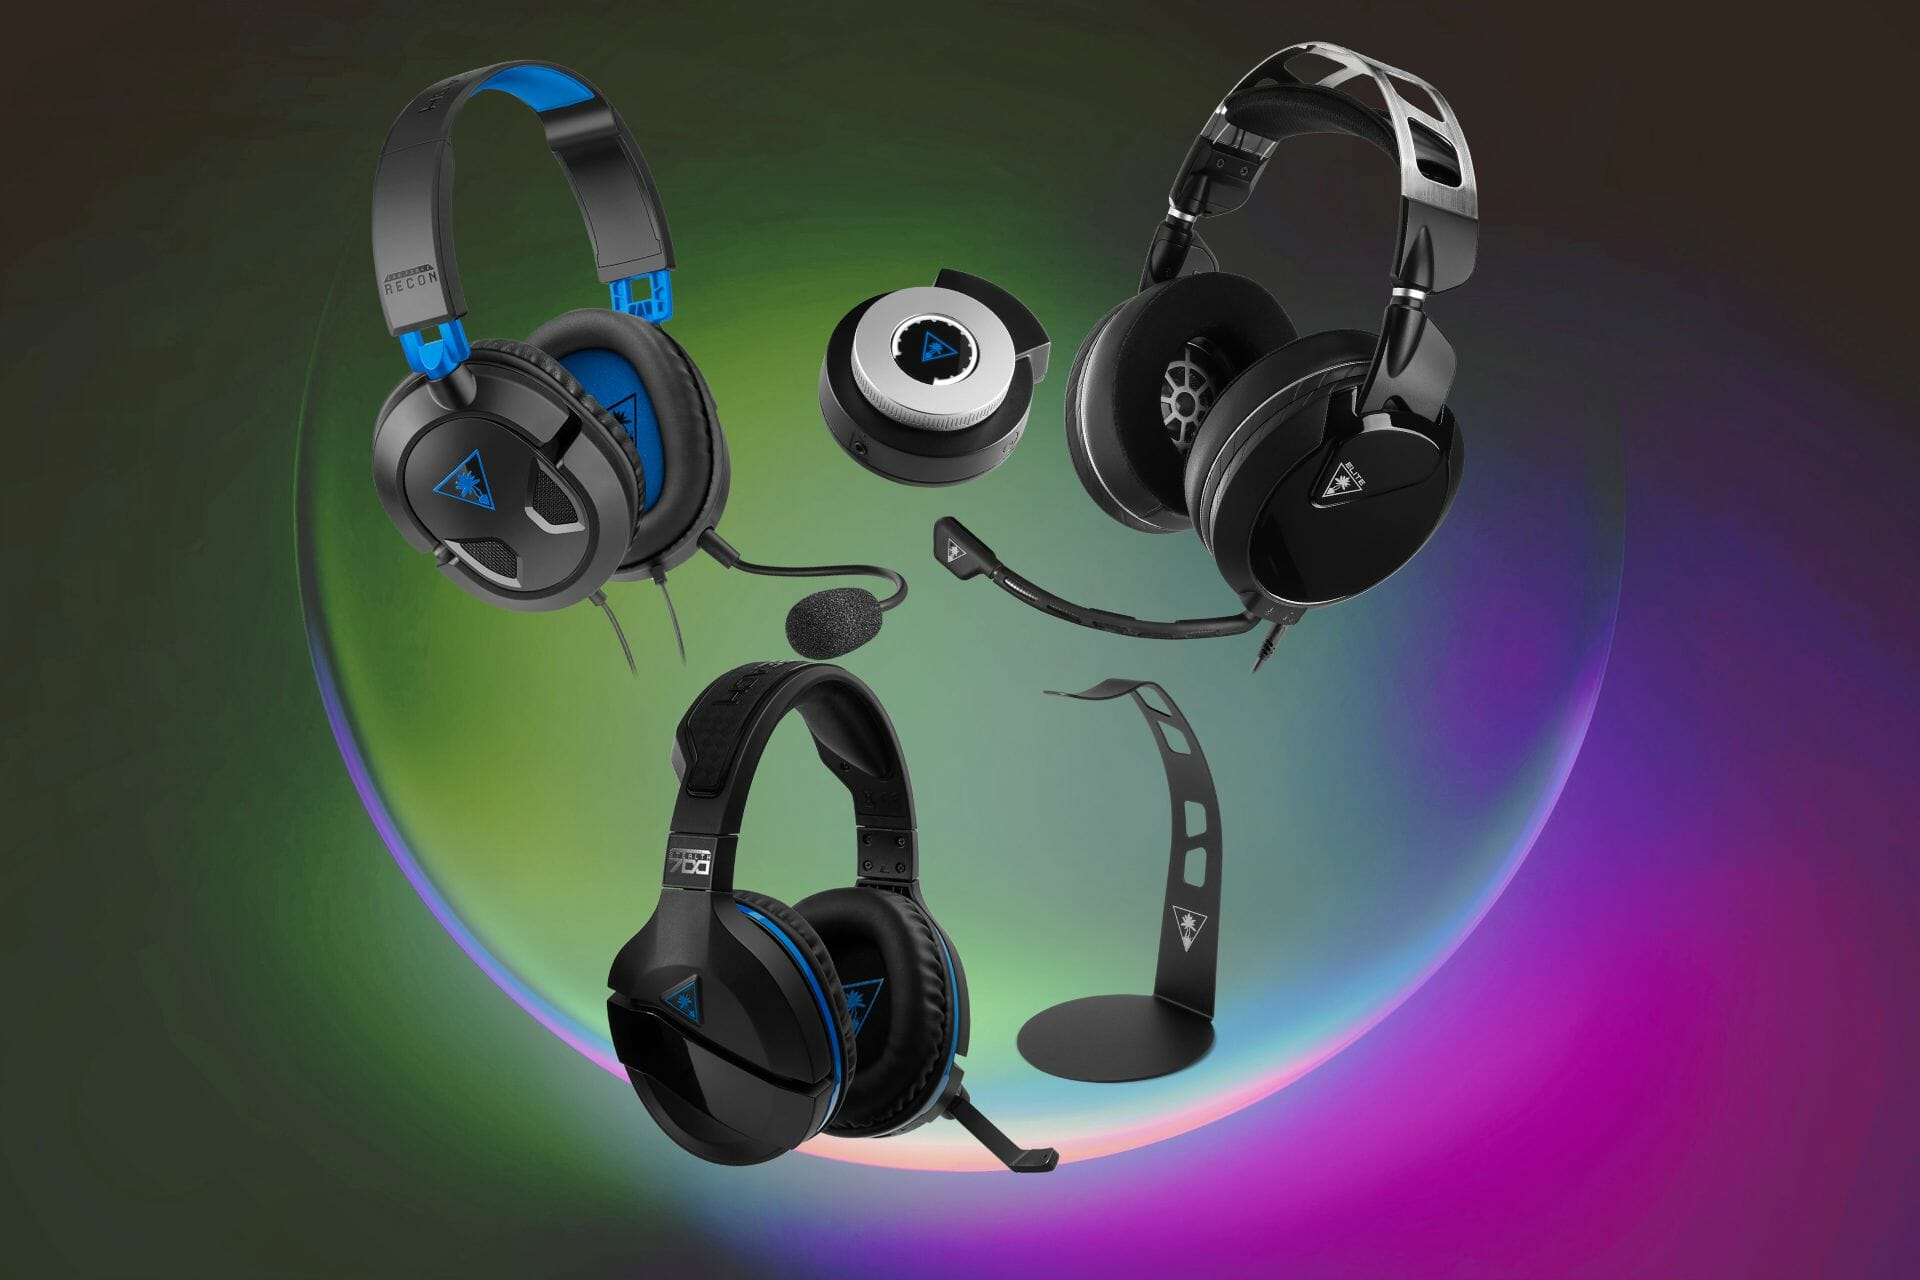
8 Best Turtle Beach Headsets To Buy Today

Whether you are looking for the most premium gaming headset that money can buy or you’re on a budget, Turtle Beach has got you covered.

Turtle Beach is known for its premium quality gaming accessories, and its gaming headset are no different. These headsets are usually compatible with PCs as well as gaming consoles and come in both wired and wireless connectivity options.

In this article, we have listed the best Turtle Beach gaming headsets to hear every move that your opponent makes and stay a step ahead during intense gaming sessions.

Note: Deals are subject to change. Keep in mind that the price tag often varies. We recommend going on the vendor’s website to check the price. Some of the products may be out of stock by the time you’ve made your purchasing decision. So, hurry up and hit the buy button.

What are the best Turtle Beach headset deals to get?

Turtle Beach Stealth 700 Gen 2 Headset – Bluetooth connection accuracy

The Turtle Beach® Stealth 700 Gen 2 is the successor to the best-selling premium gaming headset built for the PlayStation 5 and PlayStation 4.

Long-lasting durability and comfort are provided by new Aerofit cooling gel-infused memory foam ear cushions enclosing improved 50mm Nanoclear Speakers and a redesigned metal-reinforced headband.

The Stealth 700 Gen 2’s battery life has also been greatly improved, with a 20-hour life at a far cheaper price than the competitors. A new wireless mini-USB Transmitter wirelessly links your PlayStation to the headset, making connectivity simple. The Stealth 700 Gen 2 also supports Sony 3D Audio for PS5.

  • Excellent audio quality
  • There are two types of wireless connections.
  • Excellent microphone
  • Tight earcups
  • Unstable volume levels

Turtle Beach Stealth 600 Gen 2 MAX – Best battery life

The Turtle Beach Stealth 600 Gen 2 offers simple Xbox Wireless networking, as well as rich Windows Sonic, surround sound.

A bigger flip-to-mute mic for better conversation clarity that blends into the headset when muted is new for Stealth 600 Gen 2, and distinctively re-shaped, ventilated ear cushions with ProSpecs technology enable glasses-friendly comfort throughout lengthy gaming sessions.

Turtle Beach’s acclaimed Superhuman Hearing technology provides you with an unrivaled auditory edge, delivered via precision-tuned 50mm speakers for a highly immersive, distortion-free audio experience. In addition, it has dual-foam ear cushions with softer foam in the area that sits against your glasses.

  • Lightweight and comfy.
  • Excellent value that works on multiple systems.
  • Extremely long battery life.
  • Solid audio with a variety of preset choices.
  • No Bluetooth support.
  • Additional cost for improved audio quality

ROCCAT Syn Pro Air Headset – Immersive 3D Audio surround sound

Turtle Beach and ROCCAT have joined forces, and headsets like Syn Pro Air exemplify the two brands’ ideology. The AIMO light system, which is integrated into either side of each earcup, sends pulses of neon light shimmering across either side in a hexagonal, honeycomb pattern.

Each earcup has a digital volume wheel on the rear, with the left controlling system volume and the right controlling microphone monitoring/sidetone volume. The power button and USB Type-C charging connector are also located on the left earcup. There’s a Type-A to Type-C charging cable, a Type-A transceiver, and a Type-C to Type-A converter in the package, so you should be covered for all possible connections.

  • The surround sound in 3D is excellent.
  • The microphone is of average quality
  • The shape is comfortable.
  • Compatibility with consoles and mobile devices
  • The RGB lighting isn’t very bright.
  • Slow to connect to the dongle
  • No cable connection.

Turtle Beach Elite Atlas Aero – Best audio adjustment

Turtle Beach Elite Atlas Aero is a premium wireless headset designed for gamers mainly. 

It comes with  Waves Nx 3D Audio and  PC-optimized Superhuman Hearing for crisp audio performance.

Turtle Beach Elite Atlas Aero features large 50-millimeter Nanoclear speakers for better audio tuning. The Pro Gaming Mic with Truespeak Technology with optimized noise-canceling ensures your voice is loud and clear.

  • Excellent build quality
  • Various audio enhancing features
  • Works on a variety of platforms
  • Bends easily
  • Low microphone quality
  • Headband is tight-fit

Turtle Beach Recon Spark – Powerful sound and crystal-clear chat

Turtle Beach Recon Spark is the latest mid-range offering from the company. It comes in cool color schemes for people who like funky stuff with solid build quality.

Turtle Beach Recon Spark has a flip-up mic that allows you to mute the mic when flipped up. It is a highly sensitive mic that picks up the user’s voice with little to no background noise. You can connect the headset with Xbox One, PSD4, Nintendo Switch as well as your PC.

  • Excellent for music or TV
  • Innate noise canceling.
  • Glasses-friendly cushions.
  • Responsive to different equalizer mixes.
  • Shorted wires
  • Due to the tight fit of the ear cups, it gets a little warmer in a short time

Turtle Beach Recon 70 – Best cross-platform adaptability

Turtle Beach Recon 70 is a budget gaming headset from the company with premium ear cushions providing added comfort, improved bass response, and better noise isolation.

Similar to other Turtle Beach headsets, Turtle Beach Recon 70 also comes with a Flip-up mic offering crystal clear voice and auto-mute function. It also features high-quality 400mm speaker drivers allowing you to hear every footstep heading your way.

  • Lightweight and comfy
  • Flip-to-mute microphone
  • Compatible with any system
  • Super-affordable
  • Rigid microphone
  • Sharp highs and muddy bass

Turtle Beach Stealth 600 Gen 2 – rock-solid connection and precision

Stealth 600 is Turtle Beach’s premium wireless gaming headset for a competitive price tag. It is available for Xbox, PC, and PS4; however, make sure you buy the right model.

Coming to the aesthetics of the device, it looks like a typical gaming headset with two color schemes and the company’s logo in multiple places. That said, Turtle Beach Stealth 600 offers Windows Sonic Surround Sound delivering virtual surround sound to bring your games to life.

  • Excellent gaming and music audio quality
  • Soft ear cups
  • Steady wireless connections
  • Tight-fit earcups
  • Low-end microphone design
  • Limited PC compatibility

Turtle Beach Elite Pro 2 – cooling comfort and passive noise isolation

While the newer version of this headphone is already available, Turtle Beach Elite Pro is still one of the best gaming headsets you can buy in the price range.

Turtle Beach Elite Pro is a wired gaming headset with Aerofit Ear Cushions for ultimate comfort along with ComforTec Fit System for personalized fit and comfort. Under the hood, it comes equipped with a 50mm Nanoclear speaker.

  • Extremely comfortable
  • Average sound quality
  • Fully adjustable
  • Sturdy build and design
  • Simple stereo headphones
  • Over budget and pricey accessories

Turtle Beach makes some of the finest gaming headsets for everyone. From sub $50 headsets to the more premium $300+ gear, these headsets offer superior comfort, ergonomic design, and excellent performance for the right price.

Have you made your choice yet?

Windows 11 Insider Preview Build 22621 (Beta): All you need to know

Were you thinking it was about time for a new Insider Build? If that’s the case, know that Microsoft thought the same, thus a new Build has been released to the Beta Channel.

This new software update comes with changes to the Taskbar and File Explorer, among others. Let’s get right into it and discover what’s new together.

What’s new with Windows 11 Beta Build 22621?

This is a pretty light update even by Microsoft standards, so don’t expect anything spectacular to have happened while you weren’t paying attention.

Here is the full changelog of Build 22621, as detailed by the tech giant on the official release page:

Changes and improvements

[General]

  • [REMINDER] The build watermark at the lower right-hand corner of the desktop is no longer present in this build. This doesn’t mean we’re done, and the watermark will return to Insiders in a future build.

Fixes

[General]

  • Updated the underlying speech platform to improve voice activity detection for voice access, live captions, and voice typing, as well as address some issues with how punctuation is recognized.

[File Explorer]

  • Fixed an issue leading to Insiders seeing error 0x800703E6 when copying files from Google Drive.
  • Fixed an issue where if you had ever opened the context menu, doing CTRL + ALT + DEL and cancelling would lead to explorer.exe crashing.

[Taskbar]

  • Fixed an issue related to loading the system tray icons in Settings > Personalization > Taskbar which could cause Settings to crash when opening that page recently. This issue may have also led to some explorer.exe crashes for impacted Insiders.

[Windows Security]

  • Fixed an issue which could result in Smart App Control unexpectedly blocking correctly signed applications.

Known issues

[Live captions]

  • Certain apps in full screen (e.g., video players) prevent live captions from being visible.
  • Certain apps positioned near the top of the screen and closed before live captions is run will re-launch behind the live captions window positioned at top. Use the system menu (ALT + Spacebar) while the app has focus to move the app’s window further down.

How do I get this update?

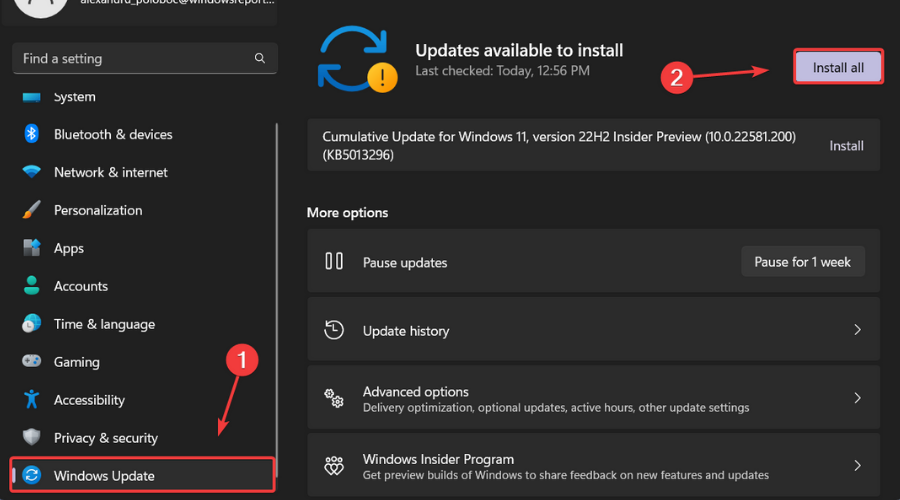
  1. Press Windows + I to access Settings.
  2. Select the Windows updates tab and click Install all.install Windows updates
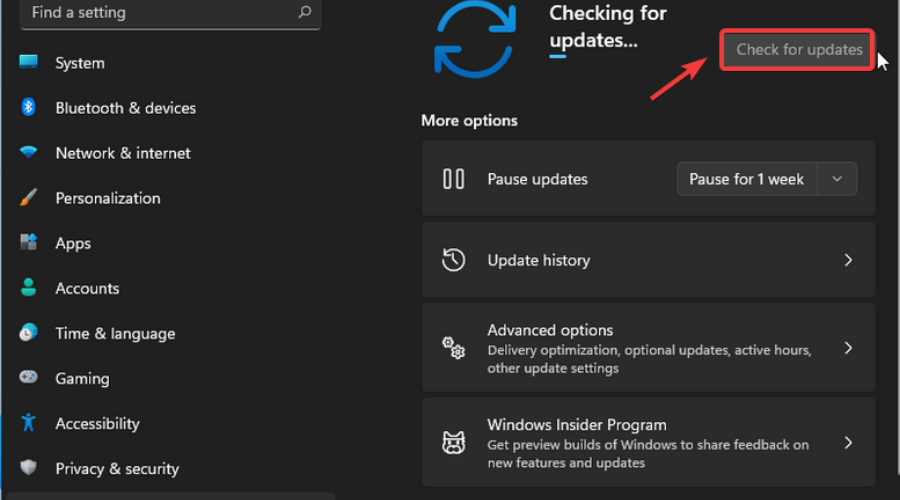
  3. If no updates are queued for installation, press the Check for updates button.check for updates

Have you found any bugs while experiencing this new Windows 11 Beta Channel build? Let us know in the comments section below.
Hate the new Windows 11 Start Menu layout? Replace it with these 5 freeware apps and skins instead

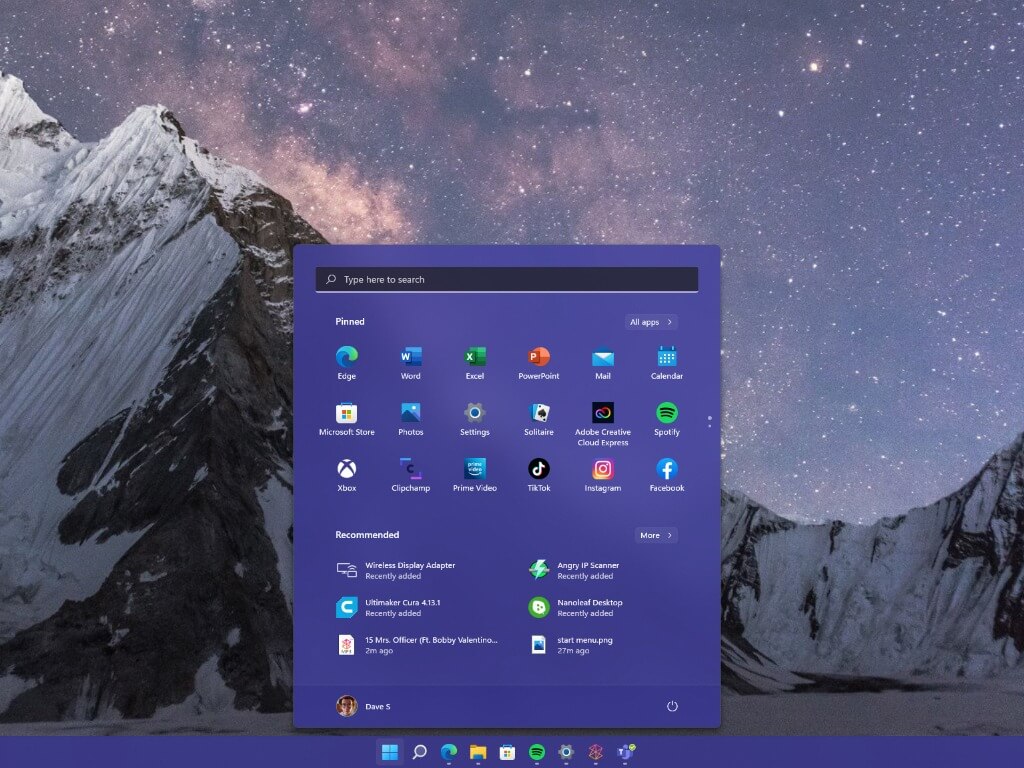
Microsoft provides plenty of documentation about how the Windows 11 Start Menu layout can be customized to look the way you want it. For various reasons, many users are dissatisfied with the new Start Menu on Windows 11. Freeware is just free software

This guide won’t show you how to customize your Windows Start Menu, but instead show you the free (freeware) apps that are available in the Microsoft Store, GitHub, and elsewhere to use to replace the Start Menu on Windows 11.

Replace the Windows 11 Start menu layout

The new Windows 11 Start Menu layout has limited options for customization. Using applications such as Stardock’s Start11 allow you to make Windows 11 look and act more like Windows 10. The problem is Start11 is not free, and I am not sure I want to pay for another app that doesn’t have all the features I want.

There are similar paid apps out there, but they are often outdated. StartAllBack (formerly StartIsBack) is a tool to edit the Windows 10 Start Menu only, but it can’t be used on Windows 11.

Another, Start Menu X is free to download, but  charges $10 for the “pro version” of software that looks like it was created in the very early days of Windows 10,

Windows 11 users (and those remaining on Windows 10) want the power to edit and customize their Start Menu how they want it. In this guide, we will look at the best free Github projects to customize Start menu layout on Windows 11.

1. SystemTrayMenu

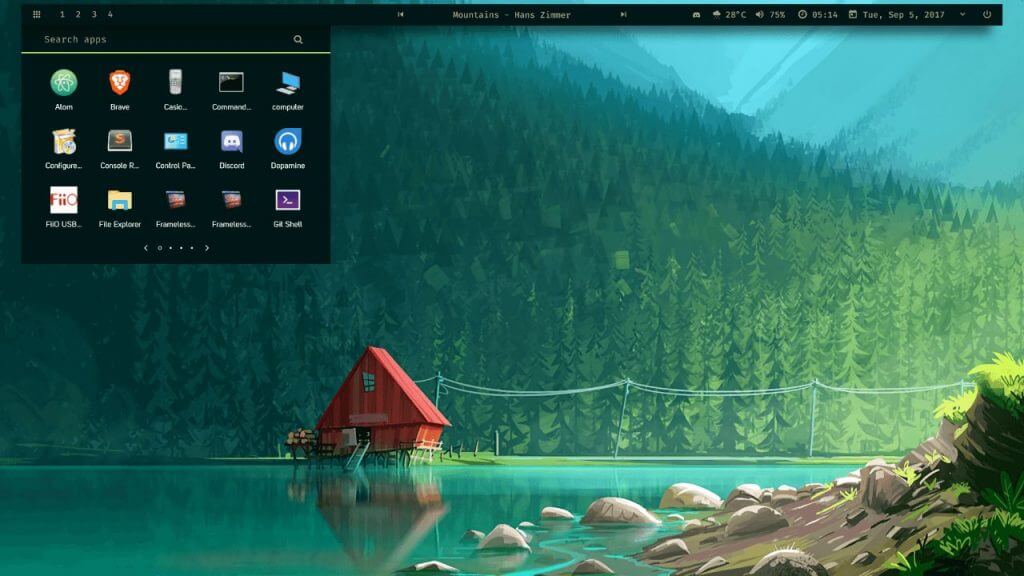
SystemTrayMenu is an “open source ‘Desktop Toolbar’ or ‘Start Menu’ alternative” available on GitHub. SystemTrayMenu expands the System Tray menu to act as a Start Menu from the right side of your screen.

windows 11 start menu layout
(via SystemTrayMenu on GitHub)

SystemTrayMenu also gives the user more control over access to specific file and folder paths to launch apps, folders, and files.

An added bonus is SystemTrayMenu is portable, so it doesn’t need to be installed right away. After downloading it, you can install it whenever you want by unzipping the folder and clicking SystemTrayMenu.exe to start. If you prefer to install the app on Windows 11, you can download SystemTrayMenu from the Microsoft Store.

2. Open-Shell-Menu

Open-Shell-Menu, otherwise known as “Classic Shell Reborn,” is available on GitHub (Classic Shell was discontinued in December 2017). Open-Shell-Menu is free software that allows you to set your Start Menu layout to your favorite Windows operating system (Windows 7, 8, 8.1, 10).

windows 11 start menu layout

Though Open-Shell-Menu does not specifically indicate it is compatible with Windows 11, your best option to install this software is to download the Open-Shell-Menu setup file from the home page.

3. Rainmeter

Rainmeter is a desktop customization tool that can help you customize your whole Windows 11 desktop, not just the Start Menu.
windows 11 start menu layout

Rainmeter has a vast array of customization options in available, with the ability to add customizable skins to your desktop, that include PC (and peripherals) hardware usage meters, audio visualizers for Spotify, and more!

Rainmeter has a large GitHub repository, but you will have to download the tool from their website.

4. Launchy

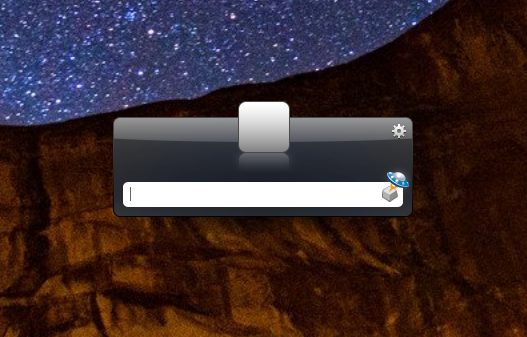
Launchy is an open source, and cross-platform keystroke launcher utility that helps you get rid of your Windows 11 Start Menu layout completely. Launchy is a free download on Windows 11, but the developer does ask for an optional $3 donation to keep the app up and running.

windows 11 start menu layout

Launchy can also help you get rid of Windows 10 and Windows 11 icons and File Explorer too. Launchy indexes the programs in your Windows Start Menu, so you can launch documents, project files, folders, and bookmarks with just a few keystrokes.

Launchy has plugins available for additional features, including the ability to allow you to index special system folders and files.

5. ValliStart (Rainmeter Skin)

windows 11 start menu layout

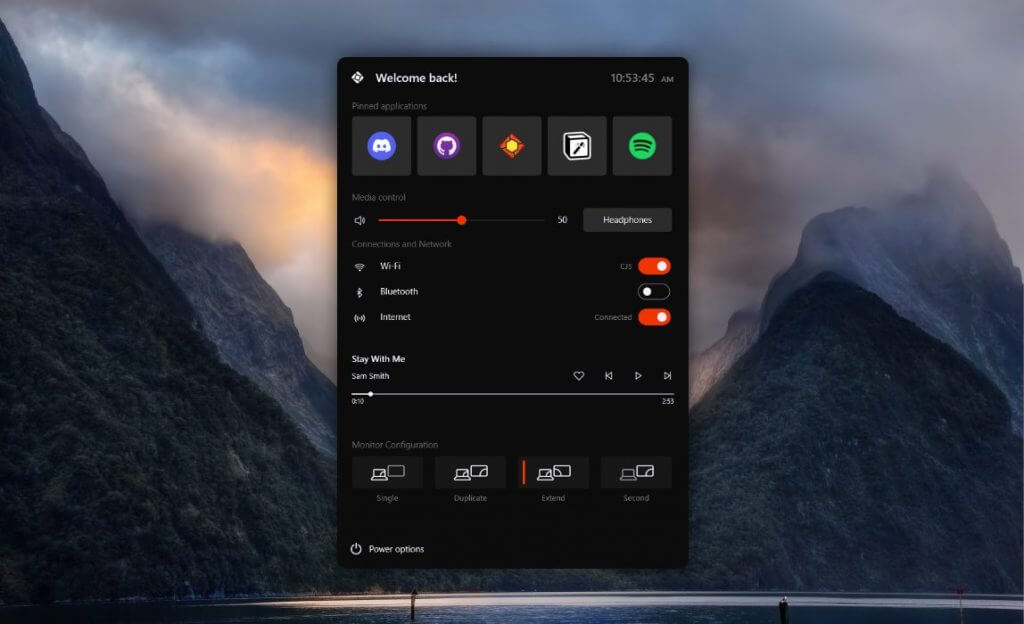
ValliStart is a Start Menu replacement to change the default one on Windows 11. ValliStart is not an app, but rather a Rainmeter skin you can download and install the skin into Rainmeter. ValliStart features 8 different color schemes and 15 other customizations.

Be sure to check out all of the other JaxOriginals Rainmeter skins and modules.

What you use to replace the Start menu on Windows 11? Let us know in the comments!

Windows Resource Protection Found Corrupt Files [Error Fix]

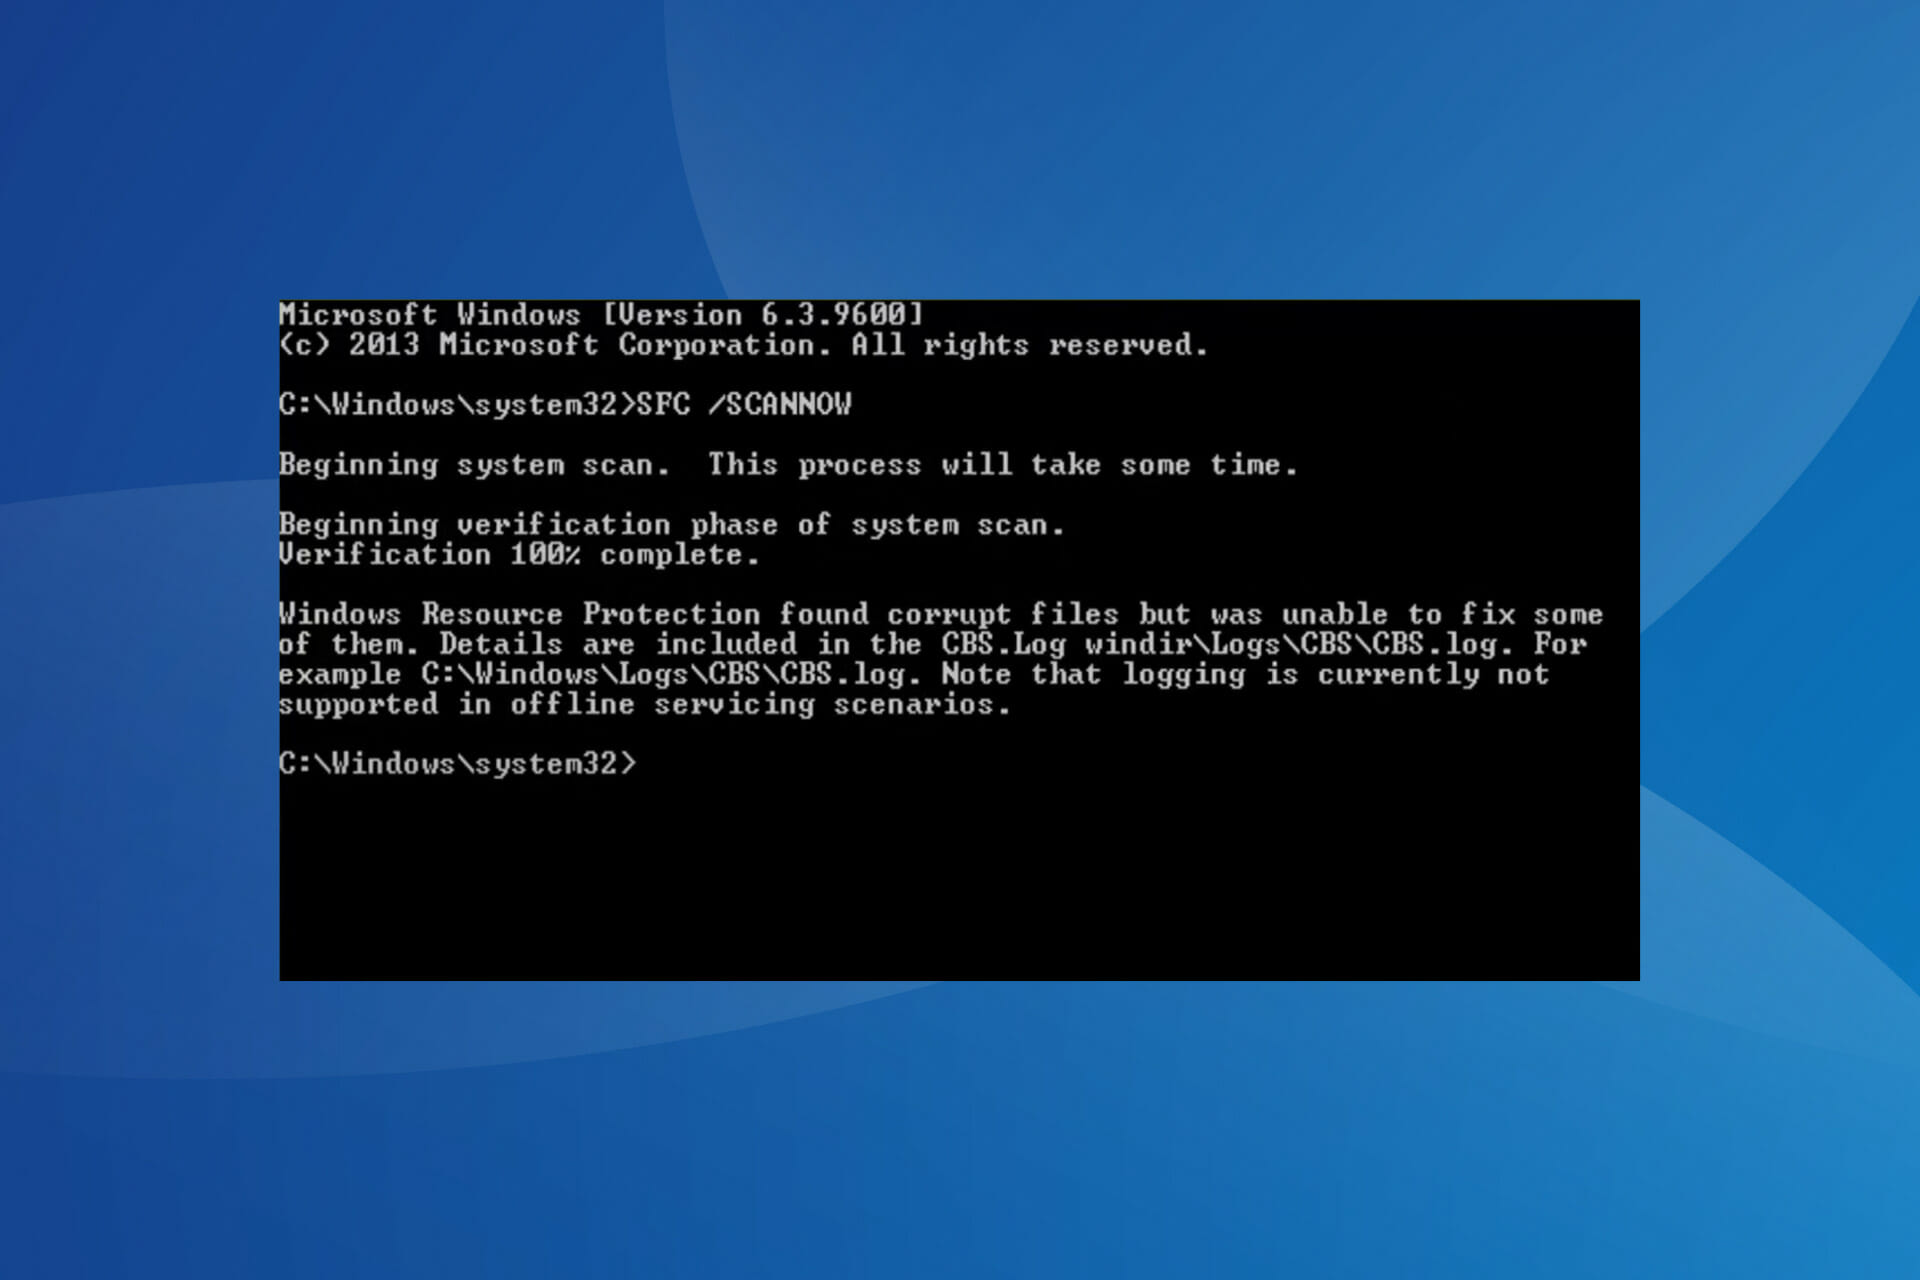
Whenever the computer feels buggy or does not respond to commands properly, our first hunch is to check for corrupt system files. However, many users came across the Windows Resource Protection found corrupt files but was unable to fix some of them message.

The message is seen when running the SFC (System File Checker) scan to automatically identify and replace the corrupt system files on the computer.

But, as is the case with other errors, there are many ways to fix this problem as well. Read the following sections to find out all about it and the most effective solutions.

What are corrupt files?

Corrupt files are often confusing since these exhibit a behavior similar to malware or virus. If you try to open one, it would either lead to a crash or display an error. Distinguishing these is a tricky affair but with the built-in tools provided in Windows, you can easily fix these.

A file may corrupt due to a number of reasons. One of the common ones includes power failure and the subsequent crash of the PC. If you are trying to save the file during this period, there’s a likelihood that it would corrupt.

Also, several third-party applications may corrupt a file while modifying it, though if you are careful with the apps you install on the system, this wouldn’t happen. Oftentimes, the bad sectors on the disk too can lead to corruption of the files stored on them.

Therefore, it’s recommended that you periodically defragment the hard drive to ensure that it remains in a healthy state. But, never defragment an SSD (Solid State Drive), since it could affect the state of the drive and reduce its life.

Whatever be the underlying cause, the SFC scan is usually able to take care of things. However, if the SFC scan found corrupt files but is unable to fix them in Windows 11, there are a bunch of ways to fix the problem.

What do I do if Windows Resource Protection is unable to fix corrupt system files?

1. Run the DISM tool

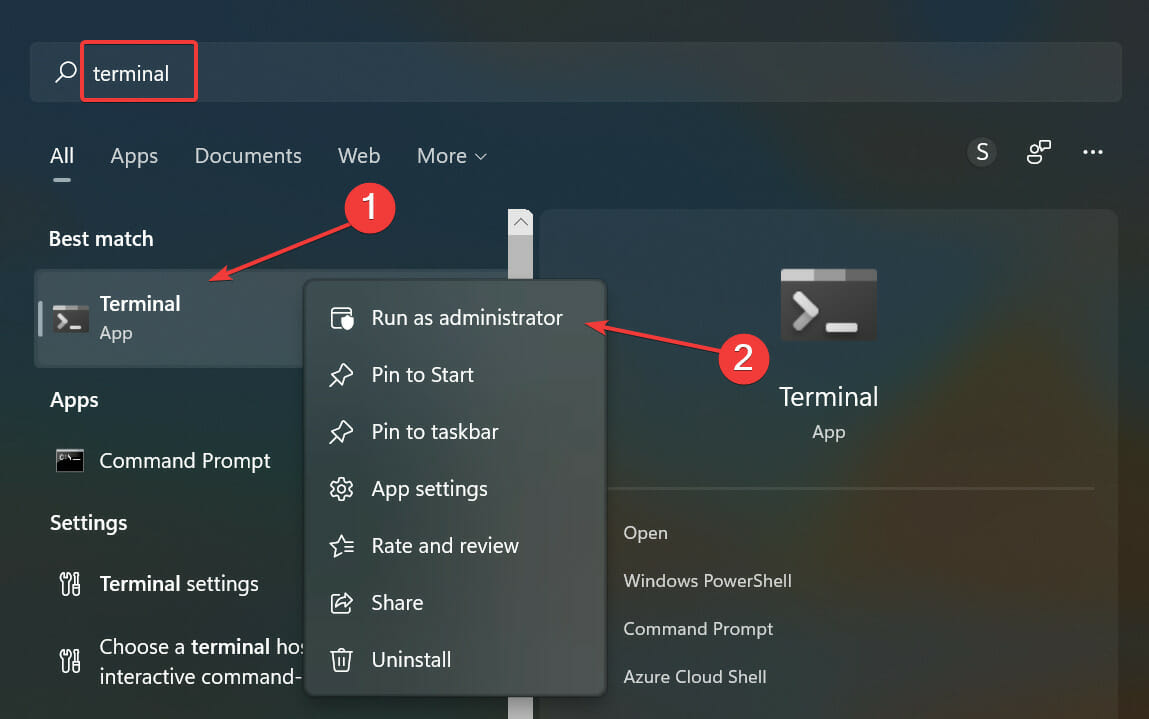
  1. Press Windows + S to launch the Search menu, enter Terminal in the text field at the top, right-click on the relevant search result, and select Run as administrator from the context menu.Windows Terminal to fix windows resource protection found corrupt files but was unable to fix some of them
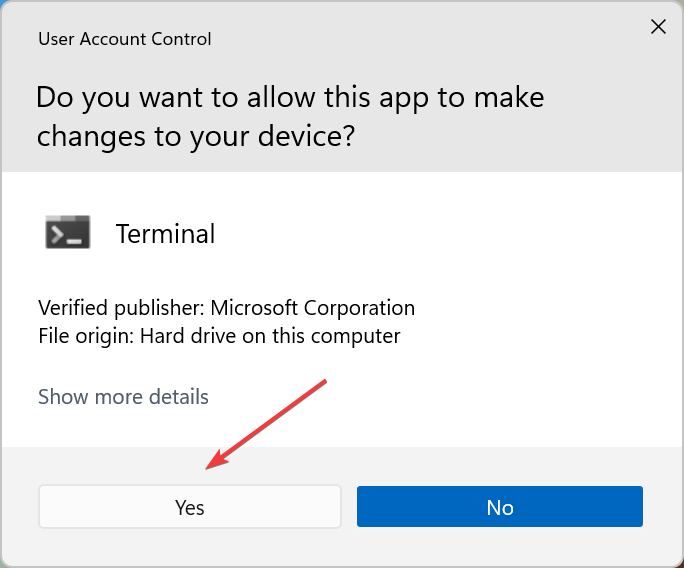
  2. Click Yes in the UAC (User Account Control) prompt that pops up.Click Yes
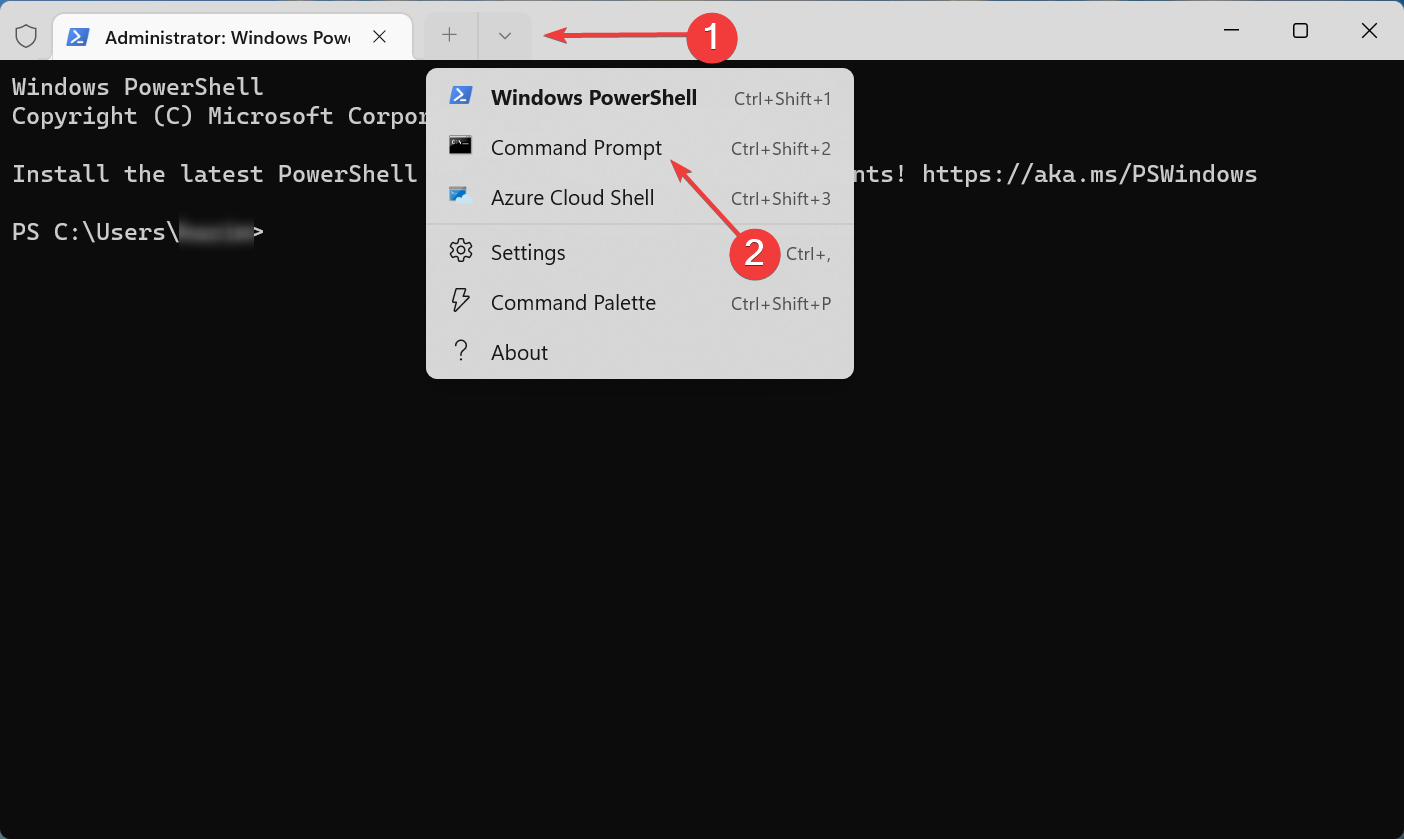
  3. In Windows Terminal, click on the downward-facing arrow and select Command Prompt from the menu to open it in a new tab. Alternatively, you can hit Ctrl + Shift + 2 to launch Command Prompt.Command Prompt
  4. Now, paste the following three commands one at a time and hit Enter after each:DISM /Online /Cleanup-Image /CheckHealth DISM /Online /Cleanup-Image /ScanHealth DISM /Online /Cleanup-Image /RestoreHealth

Once done, restart the computer for the changes to come into effect, and check if the Windows Resource Protection found corrupt files but was unable to fix some of them error is eliminated. In case, the SFC scan is still unable to fix corrupt system files, head to the next method.

2. Perform a Startup repair

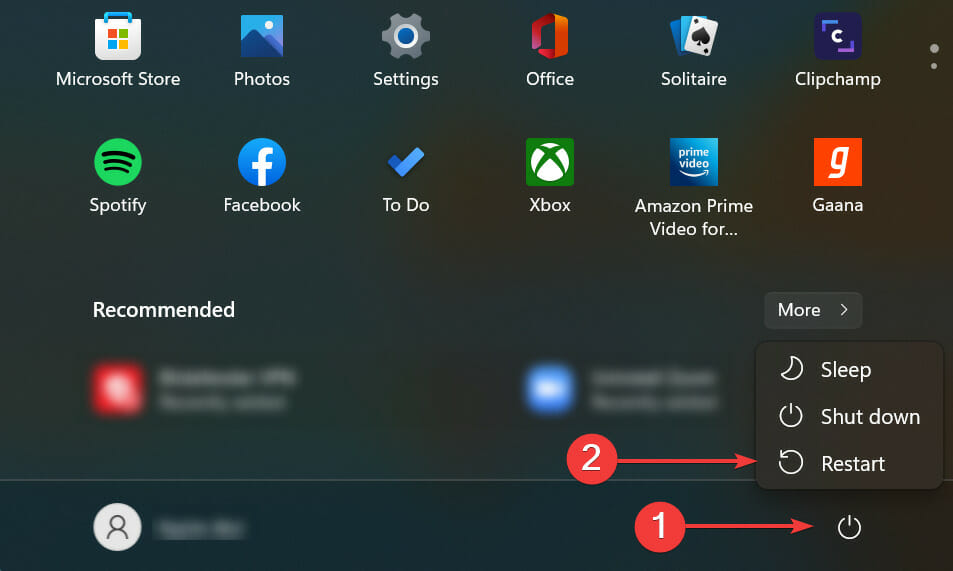
  1. Press the Windows key to launch the Start menu, click on the Power icon, hold the Shift key and then select Restart from the list of options.Restart
  2. Your computer will now restart in the Windows RE (Recovery Environment).
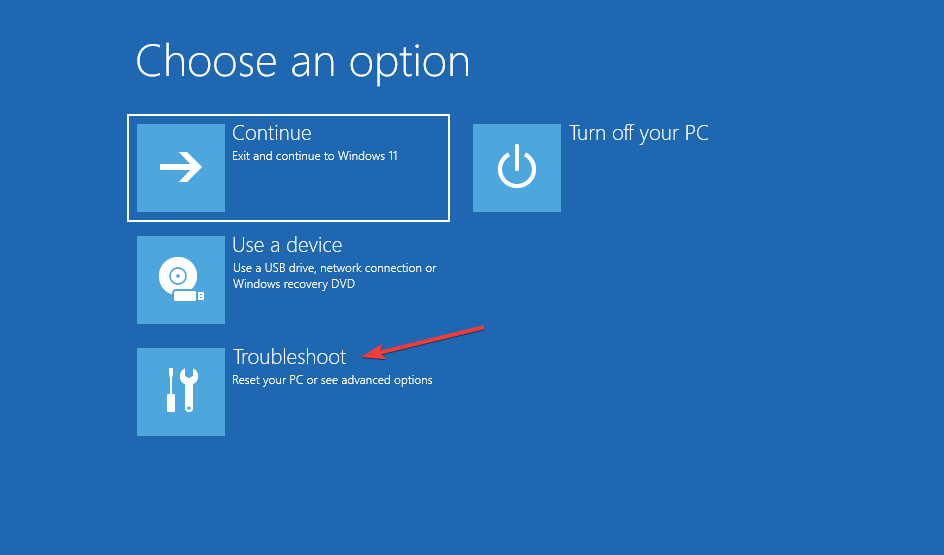
  3. Select Troubleshoot from the options that appear here.Troubleshoot to fix windows resource protection found corrupt files but was unable to fix some of them
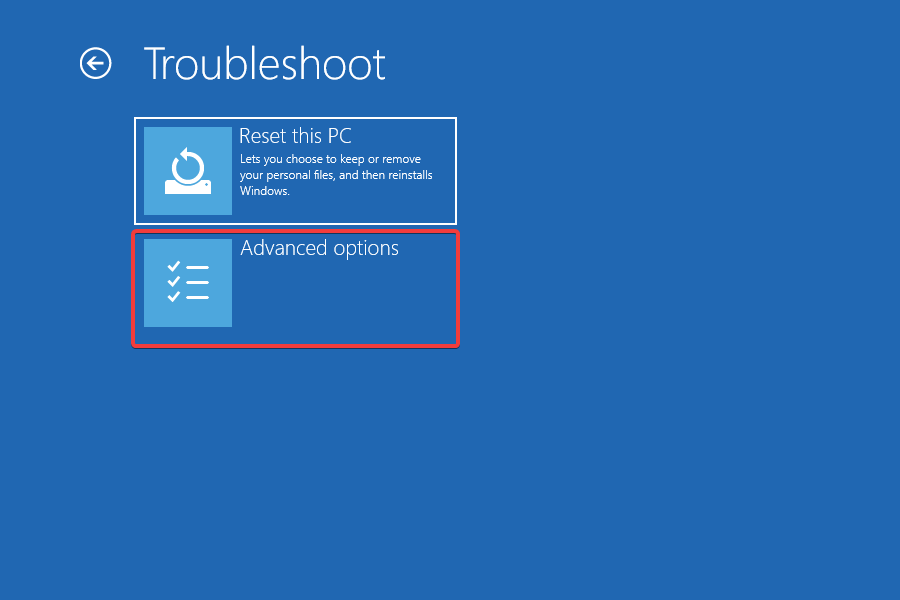
  4. Next, click on Advanced options.Advanced options
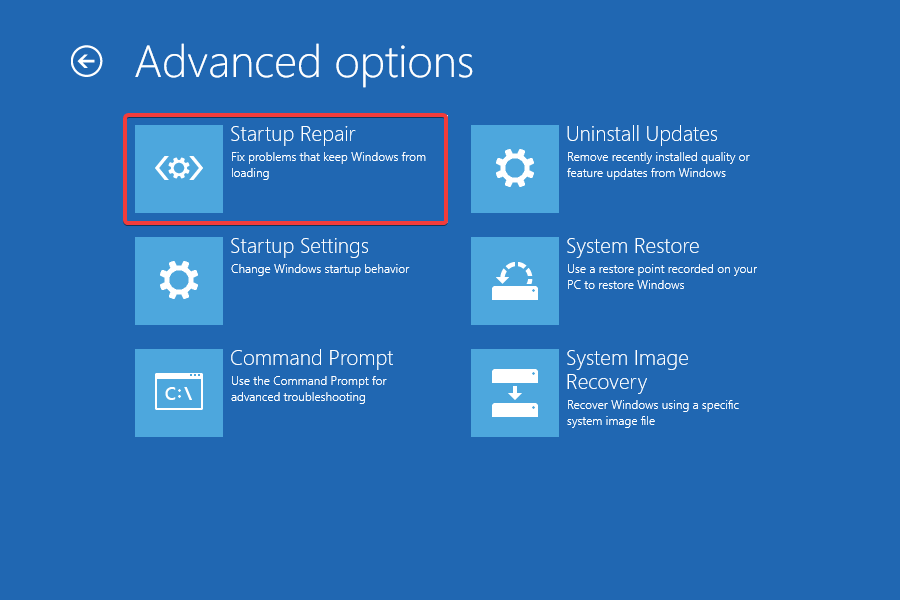
  5. Now, select Startup Repair from the options listed here.Startup repair to fix windows resource protection found corrupt files but was unable to fix some of them
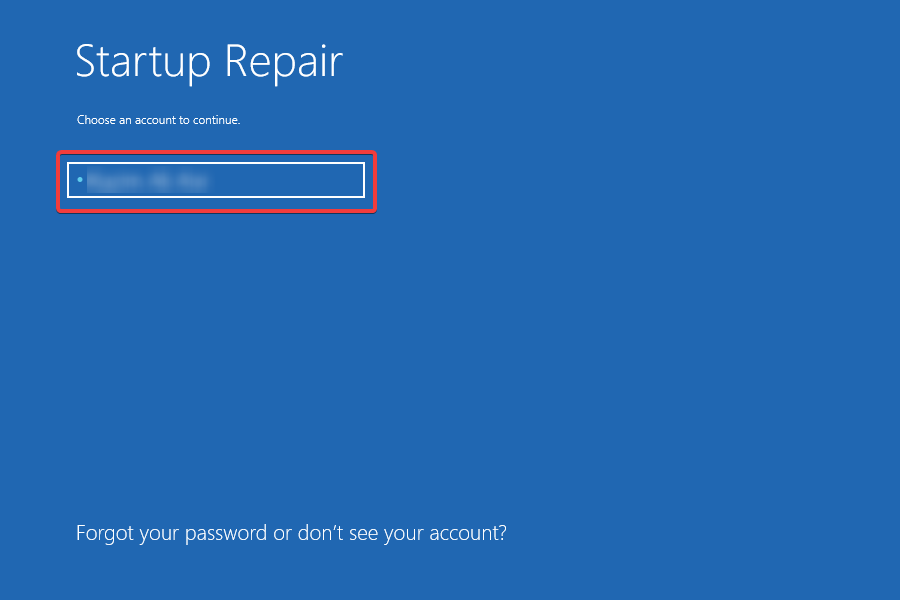
  6. Choose an account to proceed with.choose account
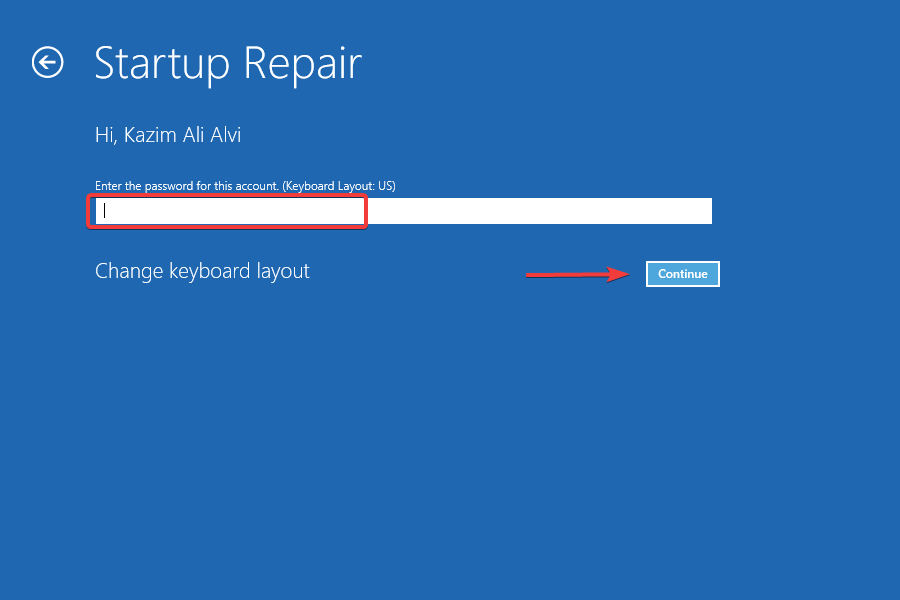
  7. Enter the password for the account and click on Continue. If you haven’t set a password, simply leave the field blank.enter password
  8. Now, wait for the repair process to complete.

Startup repair is a great built-in utility that automatically checks for corrupt or missing system files and takes the necessary action. As the name suggests, it usually comes in handy when you are unable to start the computer and boot Windows.

Run it and check if the Windows Resource Protection found corrupt files but was unable to fix some of them error is resolved, and the corrupt system files are replaced with their original versions.

3. Run the Check Disk (CHKDSK) tool

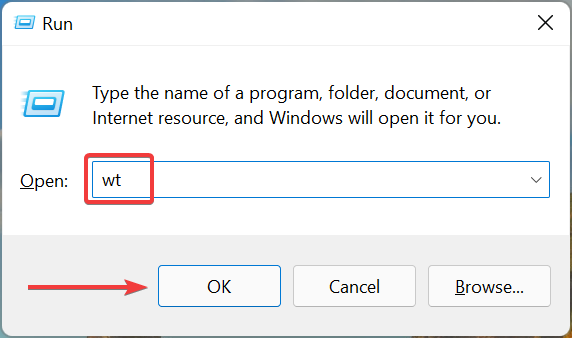
  1. Press Windows + R to launch the Run command, enter wt in the text field, hold the Ctrl + Shift keys, and click on OK to launch Windows Terminal.wt
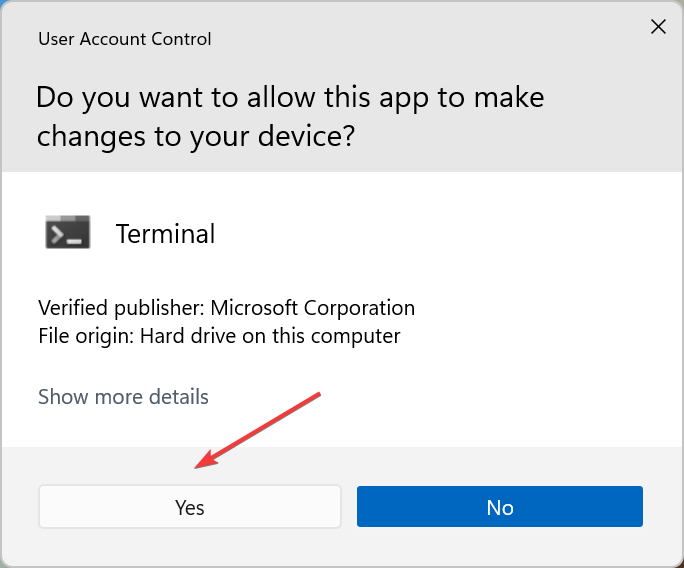
  2. Click Yes in the UAC prompt that appears.Yes
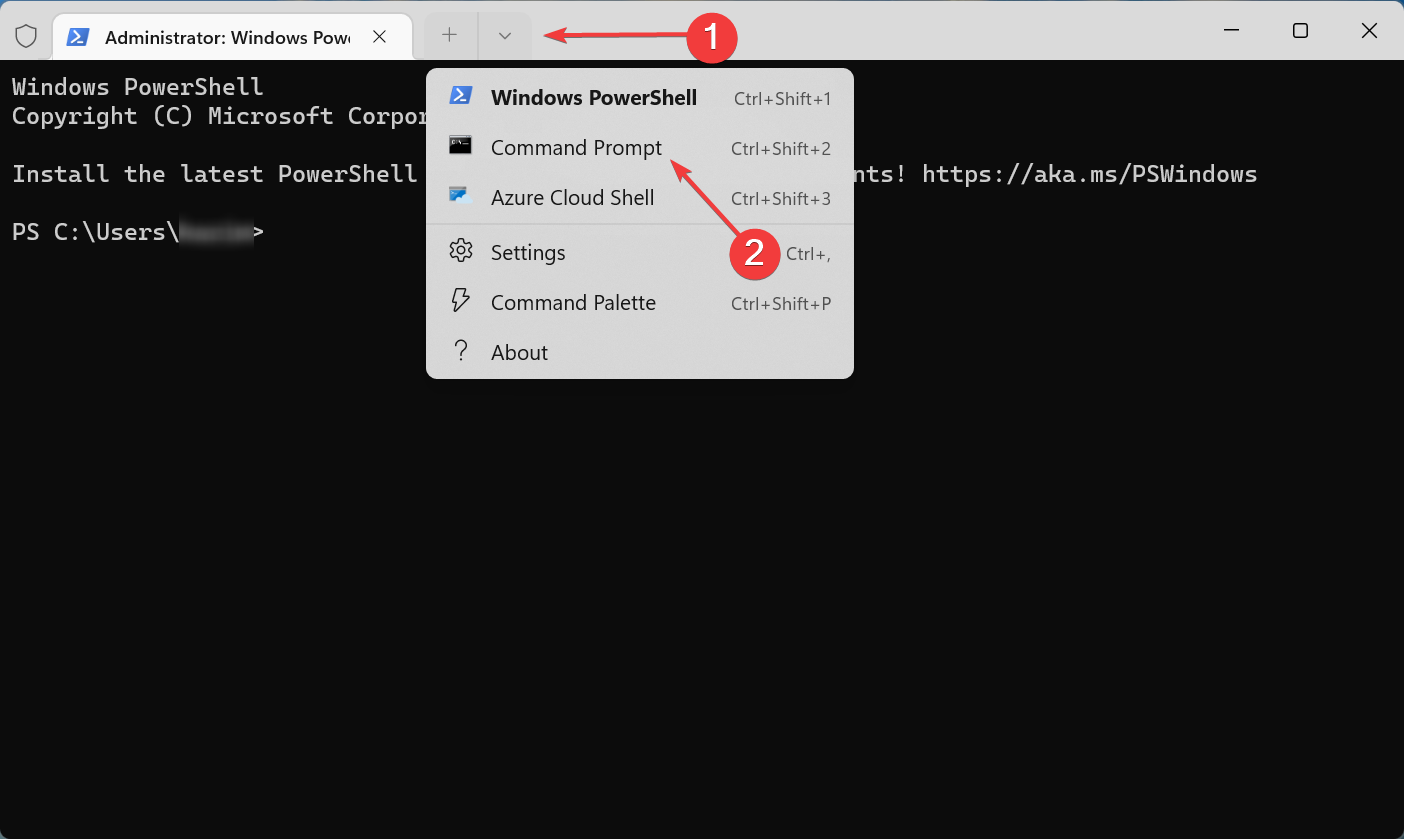
  3. Now, click on the arrow at the top, and select Command Prompt.Command Prompt to fix windows resource protection found corrupt files but was unable to fix some of them
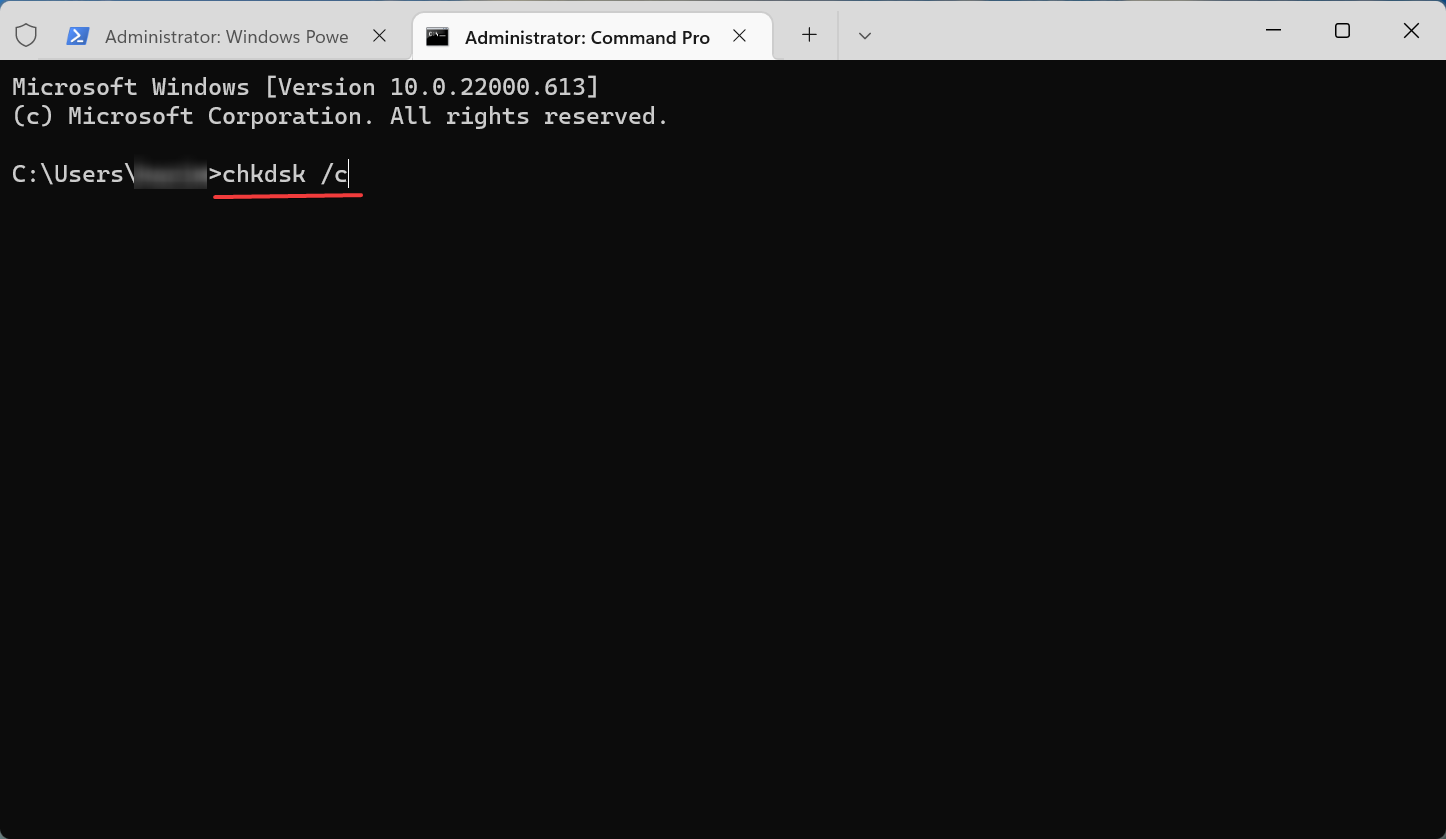
  4. Type/paste the following command and hit Enter to run the Check Disk tool:chkdsk /cCheckdisk to fix windows resource protection found corrupt files but was unable to fix some of them

The command listed above will scan the files on the C: drive. In case you want to run a scan for the others, simply add their drive letter in the command instead of the C: drive. The scan might take some time to complete depending on the data stored and the health of the disk.

In case the problem persists after the scan, head to the next method.

4. Perform a clean boot

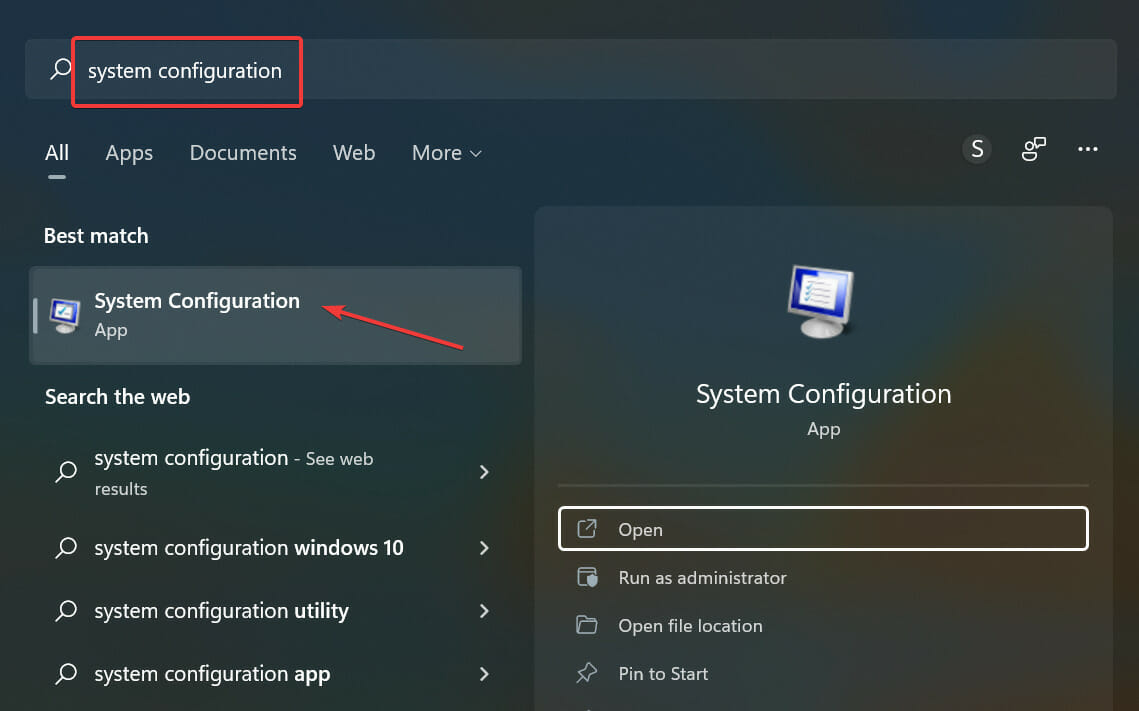
  1. Press Windows + S to launch the Search menu, enter System Configuration in the text field, and click on the relevant search result.System configuration to fix windows resource protection found corrupt files but was unable to fix some of them
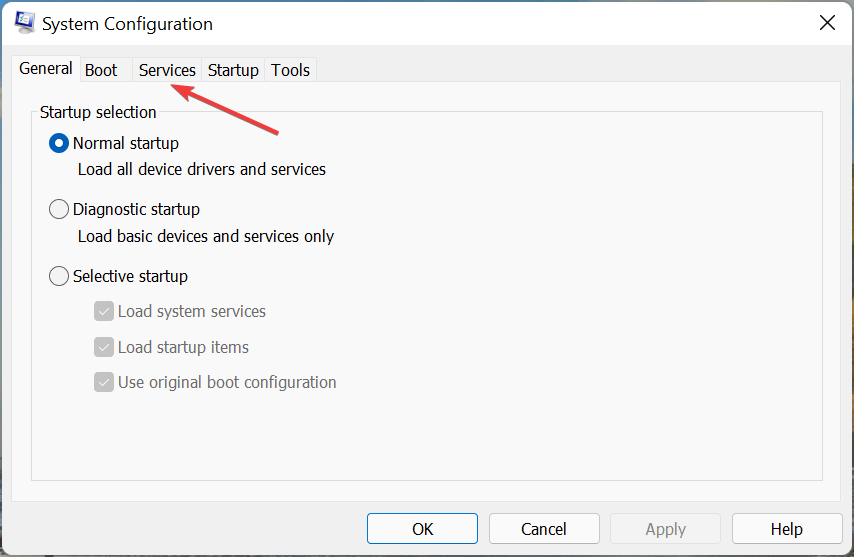
  2. Navigate to the Services tab from the top.Services tab
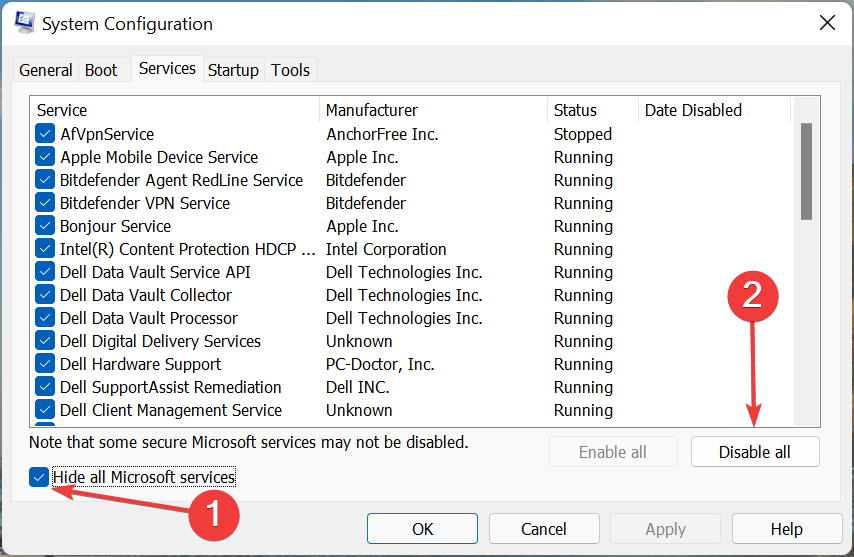
  3. Tick the checkbox for Hide all Microsoft services, and click on Disable all.Disable to fix windows resource protection found corrupt files but was unable to fix some of them
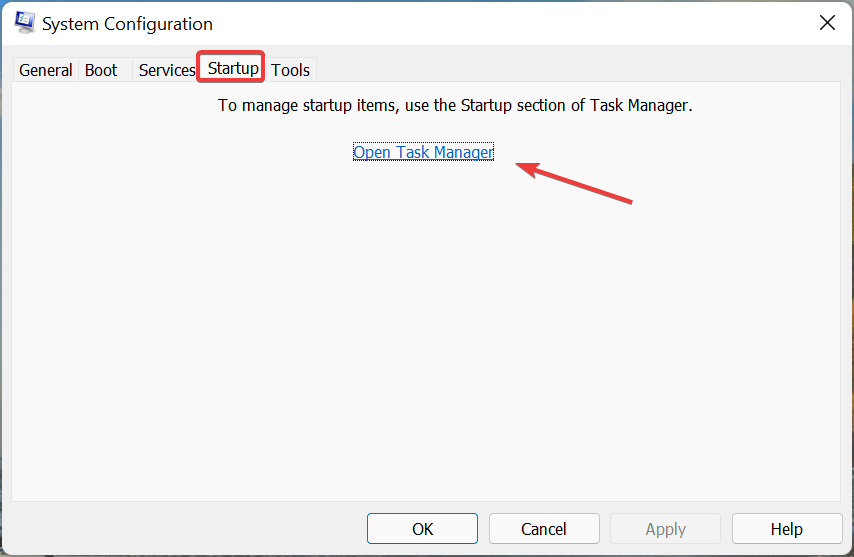
  4. Now, go to the Startup tab and click on Open Task Manager.Open Task Manager
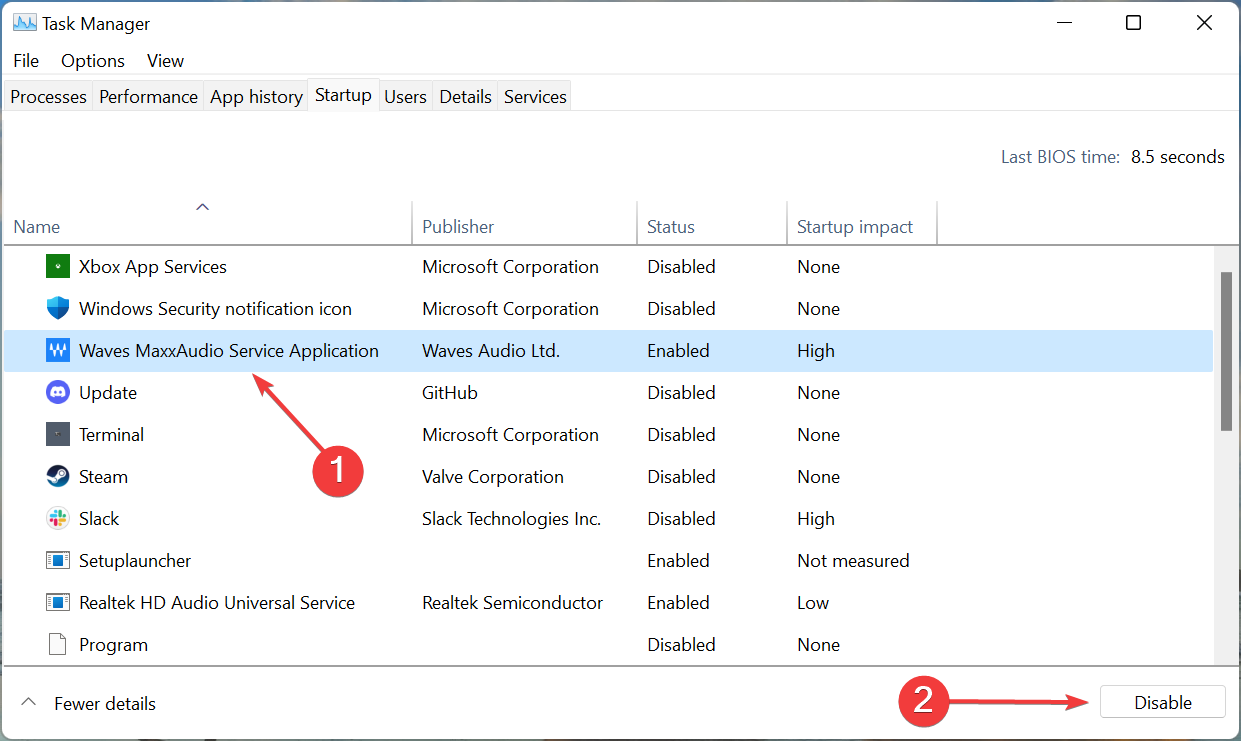
  5. Locate the programs that are configured to launch at boot, select them individually, and click on the Disable button. Once done close the Task Manager.Disable startup apps to fix windows resource protection found corrupt files but was unable to fix some of them
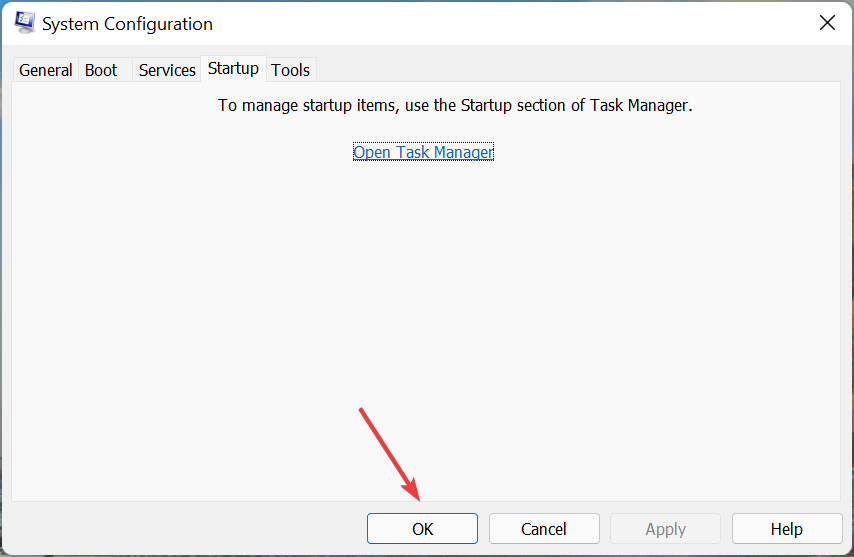
  6. Now, click OK in the System Configuration window.OK
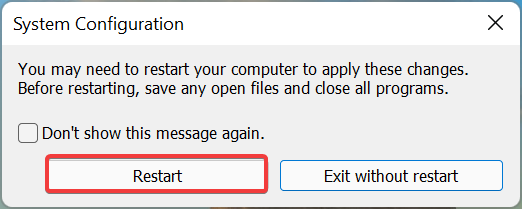
  7. Finally, click Restart to launch Windows in a clean boot environment.Restart

Clean boot is a state where Windows runs with just the critical drivers, services, and programs. Once in clean boot mode, check if you still encounter the Windows Resource Protection found corrupt files but was unable to fix some of them error on running the SFC scan.

If not, then it’s most likely a conflicting driver, service, or program that’s causing the issue. The quickest way to identify the one conflicting with the SFC scan is to enable half of them at a time.

For instance, you can enable the first half of the services disabled earlier, and check if the problem reappears. If it does, one of these is responsible for the conflict. In case you don’t encounter the problem, it’s a process or service from the other half.

Now, further, divide the problematic half into two, and proceed similarly until the problematic service is identified. Also, you can follow the same approach with the startup programs disabled earlier, and check if any of these are responsible for the error.

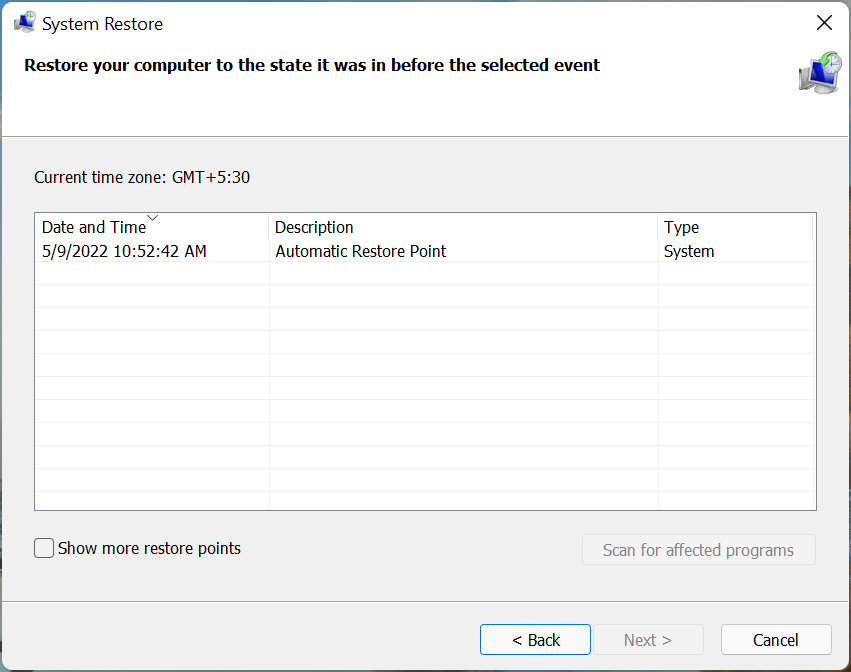
5. Perform a System Restore

Many a time, the error is caused to a combination of several factors, and identifying and fixing each of them is a tricky and time-consuming task.

In this case, performing a system restore would do the trick. It’s one of the best troubleshooting techniques that can fix even the most intricate of the issues. But, remember to choose a restore point created before you first encountered the problem.

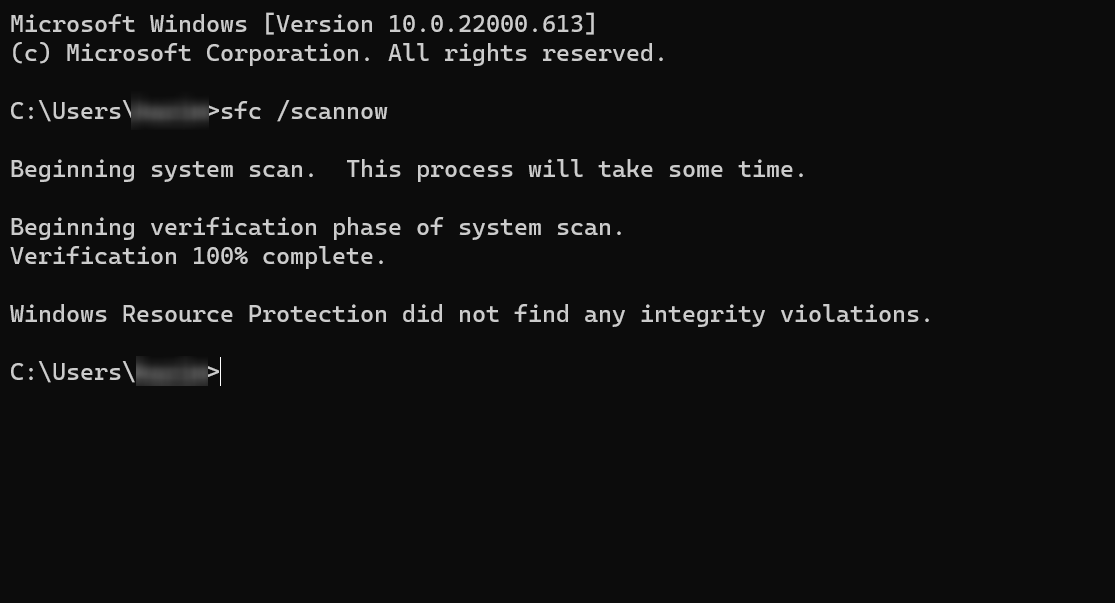
Can SFC (sfc /scannow) scan cause problems?

The SFC scan is a built-in tool and completely safe to run. However, you should run it only if there seems to be an issue due to corrupt system files. In most cases, after running the SFC scan, you will receive the Windows Resource Protection did not find any integrity violations message.

Though the SFC scan has been found to provide unreliable results and false positives. So, you cannot always depend on it and should try running the DISM tool or the Startup Repair utility to fix problems.

How do I manually fix a corrupted file?

In all likelihood, the Windows Resource Protection found corrupt files but was unable to fix some of them issue should be fixed by now, but you might need to manually fix a corrupted file in the future.

To do that, simply identify and replace the corrupt file with a fresh one, that’s exactly what these tools do. For instance, if a game file is corrupt, just head to the official download source and look for that particular file.

There’s also a simple way out here, use a reliable third-party tool. The best part about using software is that it will automatically scan and fix/replace the corrupt files. So, you wouldn’t come across any errors or have to execute these lengthy troubleshooting methods.

These are all the ways you can fix the error in Windows 11 and get your computer up and running. Also, if the SFC scan found integrity violations but was unable to fix them in Windows 10 and Windows 7, the methods listed here would work.

Besides, find out how to fix a corrupt ZIP file after download.

Tell us which fix worked for you in the comments section below.
Play these 3 video games for free on Xbox consoles this weekend

The Free Play Days section on the Xbox dashboard updated today with the three video games that will be free to play for all Xbox Live Gold subscribers this weekend.

The three Free Play games for both Xbox One and Xbox Series X console owners this weekend are Tom Clancy’s The Division 2, WRC 10 FIA World Rally Championship, and Lawn Mowing Simulator.

Note that there are separate Xbox Series X and Xbox One versions of WRC 10 so that, while Xbox Series X console owners will be able to play both versions, they should select the one made for the Series X if they want the superior gameplay and visual experience.

As is usual with Free Play Day promotions, all of the above games will be completely free to play from Friday night until Monday morning as if the titles were owned outright. After the period is over, gamers will have to buy them to continue playing.

However, there is one exception this weekend as Lawn Mower Simulator is currently in Xbox Game Pass which means that anyone with an active Xbox Game Pass subscription will be able to play it for free until it leaves the Game Pass library sometime in the future.

After more Xbox news? Follow us on Facebook and Twitter.

Here’s How to Export Bookmarks from Chrome to Opera

With Opera being one of the best modern-day browsers with a built-in VPN, users are looking to switch from other popular browsers like Chrome or at least combine them.

However, there is a holdback in knowing how to export bookmarks from Chrome to Opera for continuity. This is especially important if you have bookmarked some pages without knowing their URLs.

Thankfully, most browsers now have features that allow you to transfer your favorite sites across different platforms.

In this guide, we will take you through how to effortlessly export your bookmarks transfer from Chrome to Opera. All you need to do is follow the steps to the letter, and it will be a cakewalk.

Can I transfer bookmarks from Chrome to Opera?

Yes, you can export your bookmarks from Chrome to Opera. Opera has an import feature that allows you to transfer your bookmarks and other browsing data from other browsers.

Some of the supported browsers, aside from Chrome, are Firefox, Internet Explorer, Safari, Microsoft Edge, and even older versions of Opera. What’s more, the process is simple and only takes a few minutes.

How can I export bookmarks from Chrome to Opera?

1. Use the Opera import feature

  1. Open Opera and click the menu button (three horizontal lines) in the top right corner.
  2. Select the Go to full browser settings option.
    full browser setting chrome export bookmarks to Chrome
  3. Scroll down to the Synchronization section and select Import bookmarks and settings.
    import bookmarks and settings
  4. Select Chrome from the dropdown in the prompt displayed.
    Chrome export bookmarks  from to opera how
  5. Check the checkbox for Favorites/Bookmarks and click the Import button.
    bookmarks import buttton

The process is the simplest of the two and does not take time. It is also the go-to method if you are wondering how to import bookmarks and other data from Chrome to Opera GX.

2. Use Chrome Export feature

  1. Open Chrome and click the menu button (three vertical dots) at the top right corner.
  2. Select the Bookmarks option.
  3. Choose Bookmark Manager from the options displayed.
    settings bookmarks manager
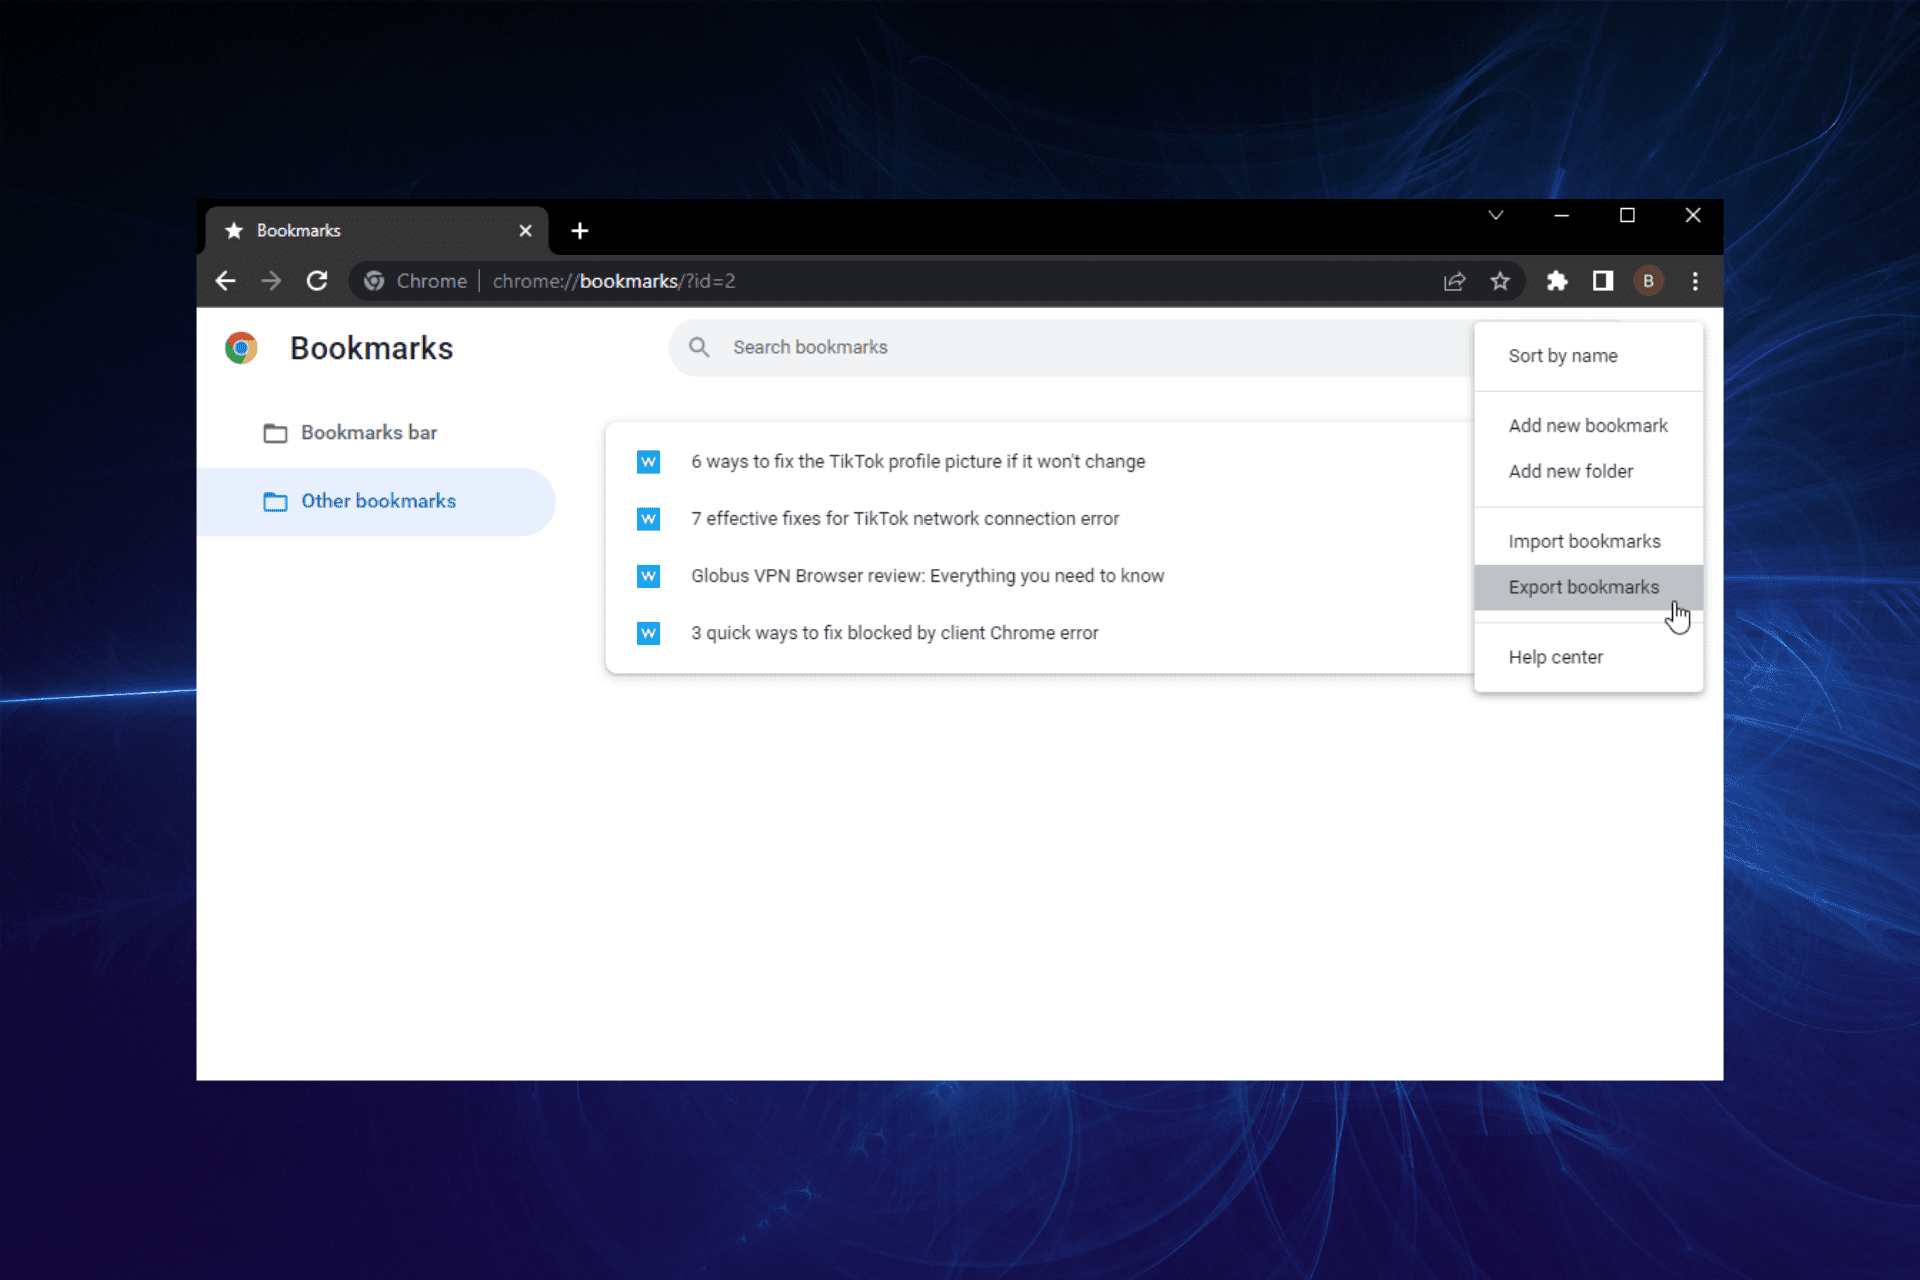
  4. Click the menu button beside the bookmarks search box and select the Export bookmarks option.
    export bookmarks from chrome to opera
  5. Save the file as HTML Document.
    save bookmarks as html chrome from opera to export
  6. Open Opera and copy the command below in the Address bar. opera://settings/importData
  7. Select Bookmarks HTML file from the dropdown at the top and click the Import button.
    import button
  8. Click the Choose file button.
  9. Select the bookmark file you saved in step 6 and click the Open button.
    select bookmarks
  10. Click the Done button when Your bookmarks and settings are ready prompt is displayed.
    bookmarks successful chrome to opera export

While this is a lengthy process, it is particularly useful if you want to import bookmarks to Android Opera from Chrome, just like you did on PC.

How do I Sync my Chrome bookmarks with Opera?

There is no way to sync bookmarks across different browser platforms. Instead, you can only export your bookmarks from Chrome to Opera, as shown above.

However, you can sync your bookmarks on the same browser across different devices. Below are the steps to follow on Opera and Chrome:

How to Sync bookmarks on Opera

  1. Open an Opera account.
    sign up opera account
  2. Log in on the account in Opera on all your devices.
    opera sign in export from chrome how to
  3. Your bookmarks and other browsing data will be displayed automatically.

How to Sync bookmarks on Chrome

  1. Sign in to Chrome on all your devices with your Google account.
  2. Open Chrome on your PC and click on the menu button.
  3. Select the Settings option.
    settings chrome bookmarks
  4. Click the Sync and Google services option.
    sync and google services
  5. Select the Manage what you sync option.
    manage what you sync
  6. Check the Customize sync radio button.
  7. Finally, toggle the Bookmarks switch forward to activate it.
    customize sync chrome bookmarks export to opera

There you have it: everything you need to know on how to export bookmarks from Chrome to Opera GX and the regular version.

The solutions in this guide are not just limited to PC but can also be used to import bookmarks to your Android Opera.

Are you looking to export bookmarks from Opera instead? Check this guide on how to do it with ease.

To learn more about this feature in Opera, we have a great guide on favorites in Opera, so don’t forget to check it out.

Feel free to let us know if you have any problem exporting your Bookmarks from Chrome in the comments section below.
Unable to Log in or Reset Password for Discord in Browser [Solved]

Discord login not working on browser can be a daunting experience, especially when you don’t want to go through the stress of downloading the desktop app.

While it is not as serious an issue as Discord won’t open on PC or Mac, it denies you access to your account and eliminates the convenience of using Discord on the browser.

The causes of this problem vary, ranging from issues with Discord itself to problems with your browser. Irrespective of the reason, this guide will take you through five simple yet effective fixes for this issue.

Note that we have used Chrome as an example, as it is one of the most used browsers. But the fixes can be applied in other browsers, albeit with slightly different steps.

Why can’t I login on Discord in browser?

The reason for Discord login not working on browser is diverse and can sometimes be difficult to pinpoint. Below are some of the well-known ones:

  • Problems with Discord server.
  • Corrupt browser data.
  • Activation of VPN
  • A browser setting is disrupting the activity of Discord.

How do I fix Discord login issues in browser?

1. Check Discord server

  1. Open Chrome and type discord server status in the Address bar.
  2. Select the Discord Status option (it is usually the first result).
    discord server status result
  3. You will see a full report on the status of the Discord server.
    discord server status browser login not working

Sometimes, the predictable fix might be the most effective. If you can’t login to Discord on your mobile browser or PC, it might be because of Discord server downtime.

While this rarely occurs, it still happens once in a while. If the problem is with the server, there is little you can do than wait for it to be resolved.

2. Temporarily deactivate VPN or Proxy server

  1. Press the Windows key + I to the open settings app.
  2. Select the Network & Internet option.
    network settings
  3. Choose VPN on the left pane.
    vpn option discord browser not login working
  4. Choose your VPN service and click the Disconnect button.

Using VPN keeps your identity safe online. However, it has been proven to be why Discord login is not working on the Chrome browser at times.

This is because the VPN might route your connection to a location where Discord is not supported. Hence, you should temporarily disable your VPN and check if the issue is fixed.

3. Restart Chrome

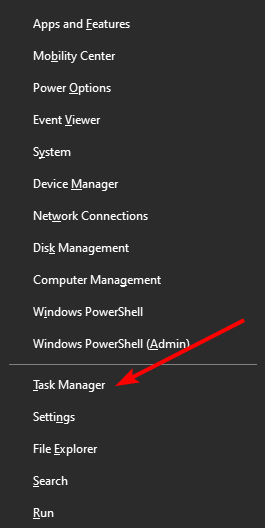
  1. Press the Windows key + X and select Task Manager.
    task manager discord browser login not working
  2. Select Google Chrome from the options and right-click on it.
  3. Choose the End task option.
    end task

Your Discord login might not be working on the Chrome browser because of some glitches. Before getting to the other sophisticated fixes, you should force close Chrome and relaunch it.

This will allow Chrome to restart its processes, including those with the problems stopping you from logging in.

4. Clear browsing data

  1. Click on the menu button in the top right corner and select the Settings option
    settings discord browser login not working
  2. Choose Privacy and security on the left pane.
  3. Select the Clear browsing data option.
    privacy and security
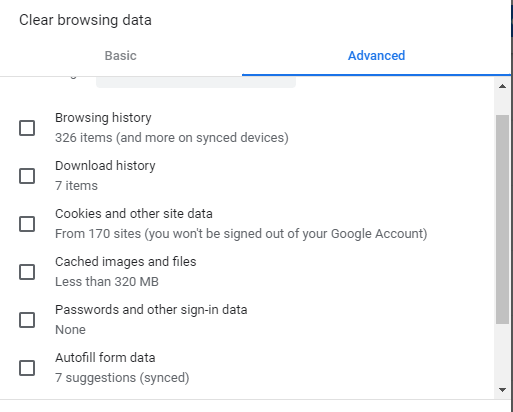
  4. Check the checkboxes for Browsing history, Cookies and other site data, and Cached images and files.
  5. Click the Clear data button.
    clear browsing data button

If you have been using Discord on your Chrome browser in the past, it (your browser) would have accumulated some site data. This is to help improve your experience and automate some processes on Discord when you visit again.

While deleting your cookies is beneficial for freeing up space on your hard drive and boosting PC speed, doing it manually every time might get tedious.

A professional tool like CCleaner can search your computer for cookies and browser history and erase them all at once, so you don’t have to do it separately for each browser.

CCleaner program removes browser cache, image cache, typeface cache, DNS cache, and other data with a single click when you are unable to log in or reset the password for Discord in the browser.

However, if this data gets corrupted, it might lead to issues like invalid Discord login, despite entering the correct info. In this case, clearing the browser data and relaunching Chrome should help restore normalcy.

5. Reset Chrome settings

  1. Click the menu button and choose Settings from the options.
    settings discord browser login not working
  2. Select the Advanced option.
  3. Click the Reset and clean up option from the dropdown.
    advanced clean up and reset
  4. Now, choose the Restore settings to their original defaults option
    reset and clean discord browser login not working
  5. Finally, click the Reset settings button
    reset settings button

If all the fixes above fail to solve the Discord login not working on the browser issue, you might’ve tampered with the wrong settings on Chrome. Resetting Chrome helps to return all the settings to the default.

Ensure to relaunch Chrome after the process is complete to effect the changes.

Lastly, it is worth noting that resetting Chrome to default does not affect your important data like saved passwords and bookmarks. So, you don’t have anything to lose.  

What is the best browser for Discord?

Discord works on different browsers like Chrome, Firefox, and Microsoft Edge. While these are reputable options, the undoubted best browser for Discord is Opera GX.

Opera GX is widely accepted as the first web browser specifically built for gamers. And with Discord being a VoIP service primarily dedicated to gamers, it is a match made in heaven.

This browser has a sleek design that enhances its gaming feel. The GX control panel also gives you access to a CPU, RAM, and bandwidth limiter. This ensures that Opera GX does not interfere with your gaming activities.

What’s more, this browser is not just limited to gaming. It has all the regular and security features of the native Opera.

It just combines the best features of the modern browsers with a unique gaming edge that ensures Discord issues such as login not working is never a problem again.

⇒ Get Opera GX

Being denied access to your Discord account on your browser because the login is not working can be exasperating. But it is not an issue that is impossible to solve, as shown by the fixes above.

If you face other issues like Discord not playing any sounds in browsers, you can check our guide to fixing it.

Feel free to discuss the solution that helped you regain access to your Discord account on your browser in the comments section below.
Reddit Unauthorized Error 401? 5 Solutions to Fix It

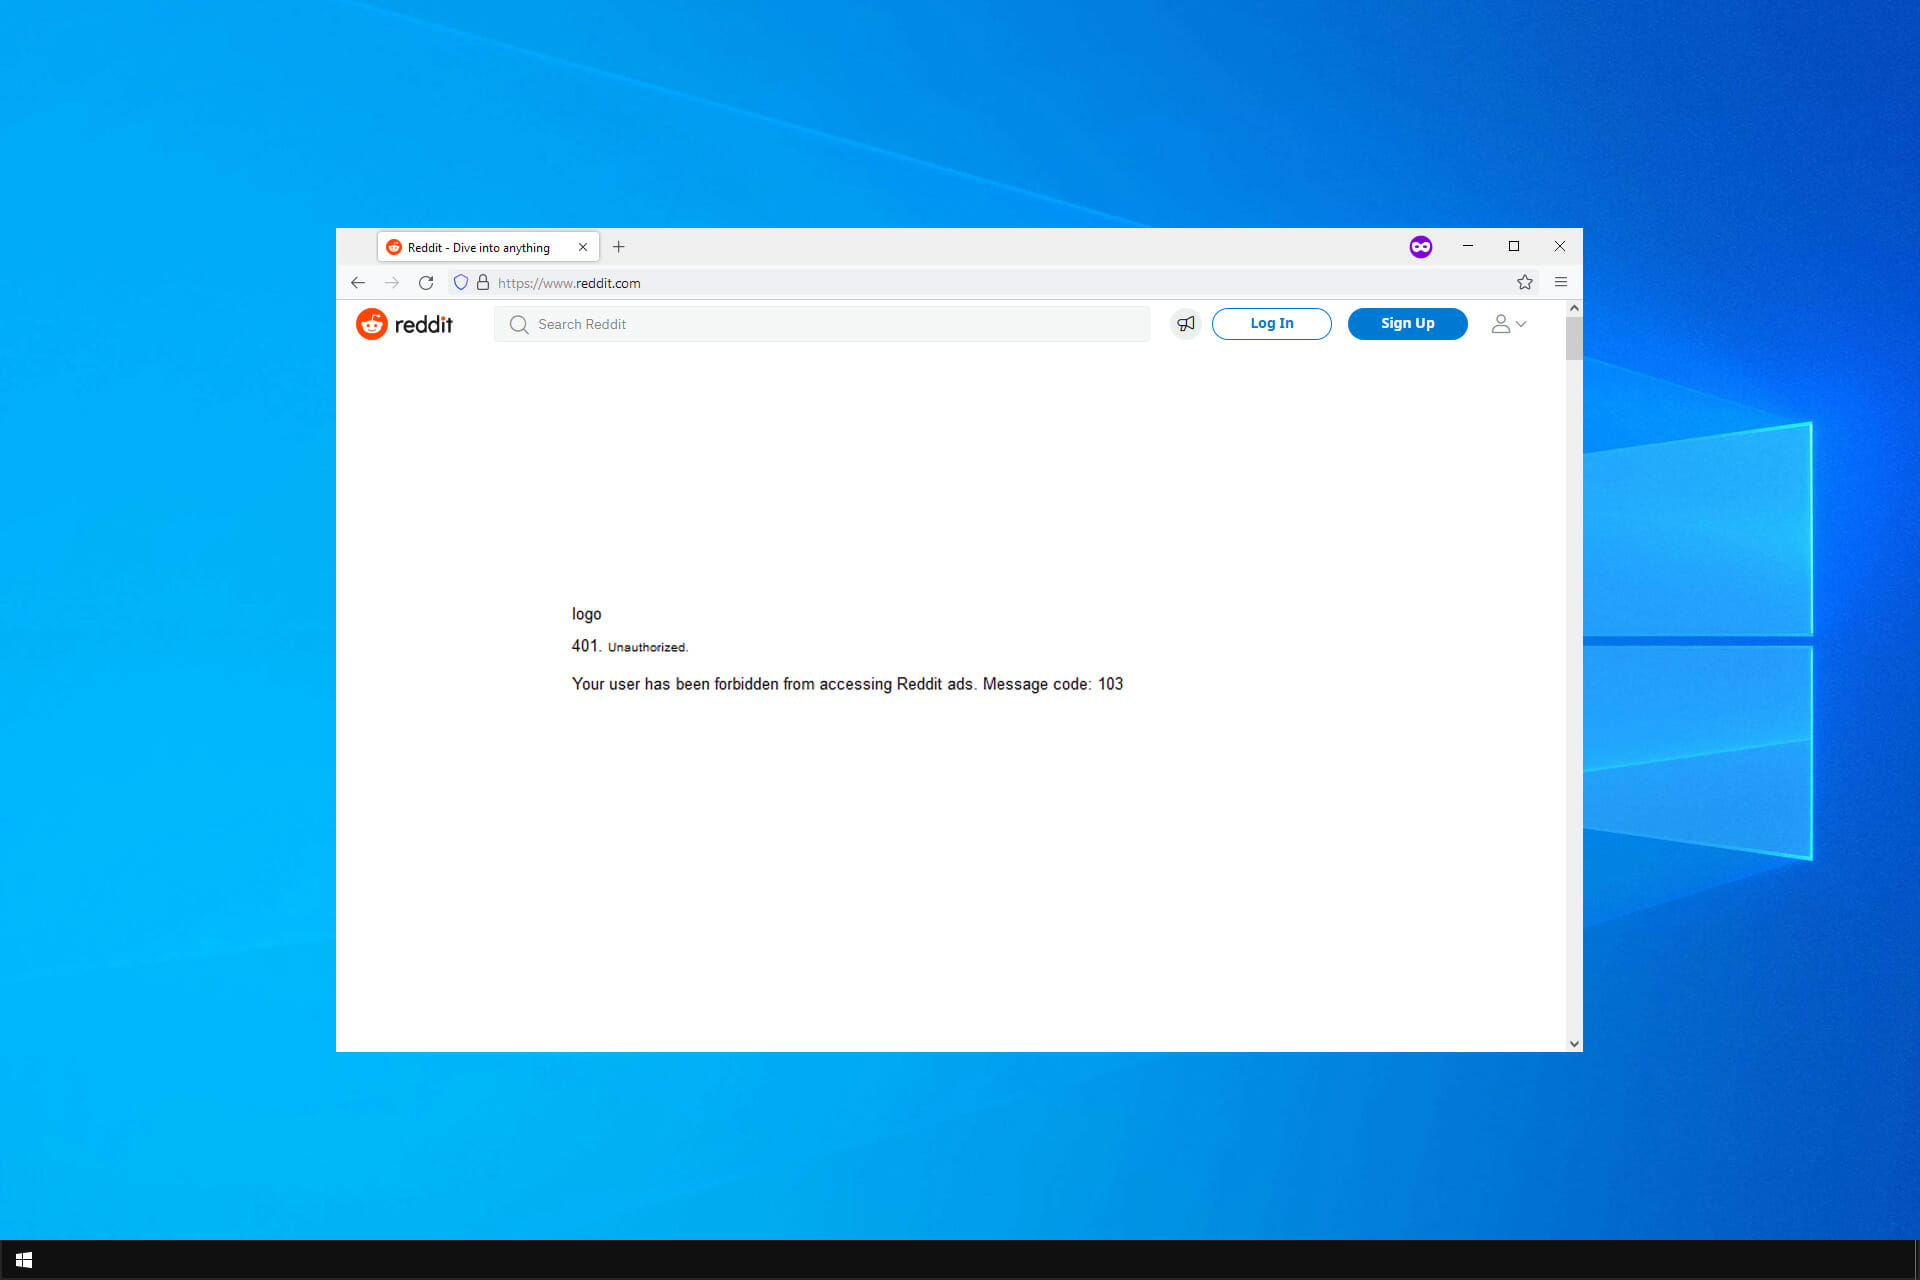
Reddit unauthorized 401 error code means that Reddit has blocked you from accessing the website. You’ll see this error ‌because it lacks valid authentication credentials for the requested resources.

Aside from the error code 401 access denied, another common error you can run into is your Reddit session expired error.

You often see this error when accessing membership websites that require a username and password, such as Reddit. Here are ways you can fix this 401 error.

How do I fix Reddit unauthorized 401 error?

1. Check the URL of the website

  1. Ensure you’ve entered the correct URL address.
  2. If it’s wrong, re-enter the right one.reddit unauthorized error
  3. Press Enter to gain access to the website.

Sometimes Reddit blocks access to its content because of an incorrect URL. Check the URL you’ve entered to ensure it’s correct, and reload the webpage.

The wrong URL address is a widespread error that’s easy to overlook.

2. Check your authentication credentials

  1. Close the Reddit webpage you’re trying to open.
  2. Reload and click on Login.
  3. Enter your login credentials.

Sometimes a wrong username or password can cause the Reddit unauthorized access error. One way to troubleshoot is to sign out and sign again.

Logging out and logging in usually solve the problem. However, if that doesn’t solve the problem, move on to the next solution.

3. Flush your DNS records on Windows

  1. Press Windows + R simultaneously to open the Run search box.
  2. Type cmd and then press Enter.cmd dialog box
  3. In the command prompt window, type ipconfig/flushdnsflush dns
  4. Press Enter to clear the DNS.
  5. You’ll receive a message showing the successful clearance of the DNS records.dns cleared

You can clear the DNS to resolve the Reddit unauthorized error 401. The old record may contain outdated information, making it difficult to access the website.

Clearing the DNS cache will help resolve connectivity issues, such as unauthorized 401 errors and other security issues.

4. Clear your browser’s cache

  1. Open the Chrome browser on your PC.
  2. At the top right, click on More.reddit unauthorized error 401
  3. Click on More Tools and then select Clear browsing data.reddit unauthorized error
  4. Select the Advanced tab.error 401 unauthorized
  5. Choose a time frame, such as Last hour or All time.
  6. Ensure that you only check the cache images and files box.reddit unauthorized error 401
  7. Click on Clear data.error 401 unauthorized
  8. Reload the website.

Browsers store local copies on your computer data so that they don’t have to load the website from scratch every time you visit a website.

It’s essential to clear your browser’s cached data because it might store old and incorrect login information. 

Clearing the browser cache data will help the website load from scratch with updated information.

5. Try another browser

Have you tried all the above solutions in your current browser, but you’re still facing a Reddit unauthorized access error?

Try switching to the Opera One browser. It’s a Chromium-based browser like Google Chrome.

The Opera One browser has many unique features that make it an excellent alternative for anyone fed up with Google Chrome. Plus, it comes with built-in AI.

It has integrated ad-blocking and track-prevention components. Using the Opera One browser can help you bypass the Reddit access denied error.

⇒ Get Opera One

These are the methods you can use to regain access to the Reddit website. These 401 error doesn’t occur only when you’re trying to log into a password-protected such as Reddit.

Another common error you’ll see is that the website is not allowed when you try accessing a website.

Which of the above solutions discussed did you find helpful? Let us know in the comment section below.

5 Fixes You Must Try When Tabs Won’t Open in Chrome

In the article, we will focus on helping you if tabs won’t open in Chrome. Some of the solutions are general and will be handy in some related browser problems.

What should I do when tabs won’t open in Chrome?

1. Restart the Chrome browser

  1. Right-click on the Start menu and select the Task Manager option.
    tabs won't open in chrome
  2. Click on the Processes tab, right-click on the Google Chrome process, and then select End task in the context menu.
  3. Double click on your Chrome icon to relaunch it.

Now you should check to see if you can load new tabs.

Restarting the browser is very effective, as it serves as a mini reset. It clears the memory and helps your browser return to its defaults. If there are minor browser issues, like Chrome not loading pages or tabs, it could be a valuable fix.

2. Restart the computer

  1. Click on the Start menu.
    tabs won't open in chrome
  2. Click on the Power icon.
  3. From the options, select Restart.
  4. Double click on the Chrome icon to relaunch it when your computer has rebooted.

Your computer will function more smoothly if you reboot it. This process clears the memory, putting an end to any processes using RAM.

An app can use your memory even after you’ve closed it. Restarting Chrome ensures it performs as optimally as possible. With many users reporting that tabs won’t open in Chrome on Windows 10, Windows 11, Mac, and Android, this should serve as a useful fix as well.

3. Select Open the New Tabe page setting

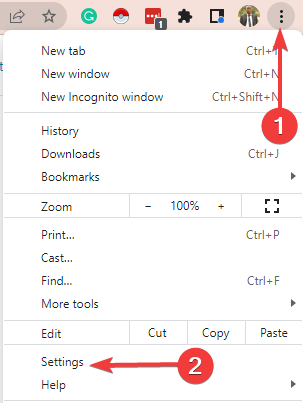
  1. Click on the ellipsis at the top right of your browser and select Settings from the options.
  2. On the left pane, click on the On startup option.
  3. Select the Open the New Tabe page radio button on the On startup options.
    tabs won't open in chrome
  4. Close and restart the Chrome browser.

4. Keep browser window active

  1. Open the Chrome browser.
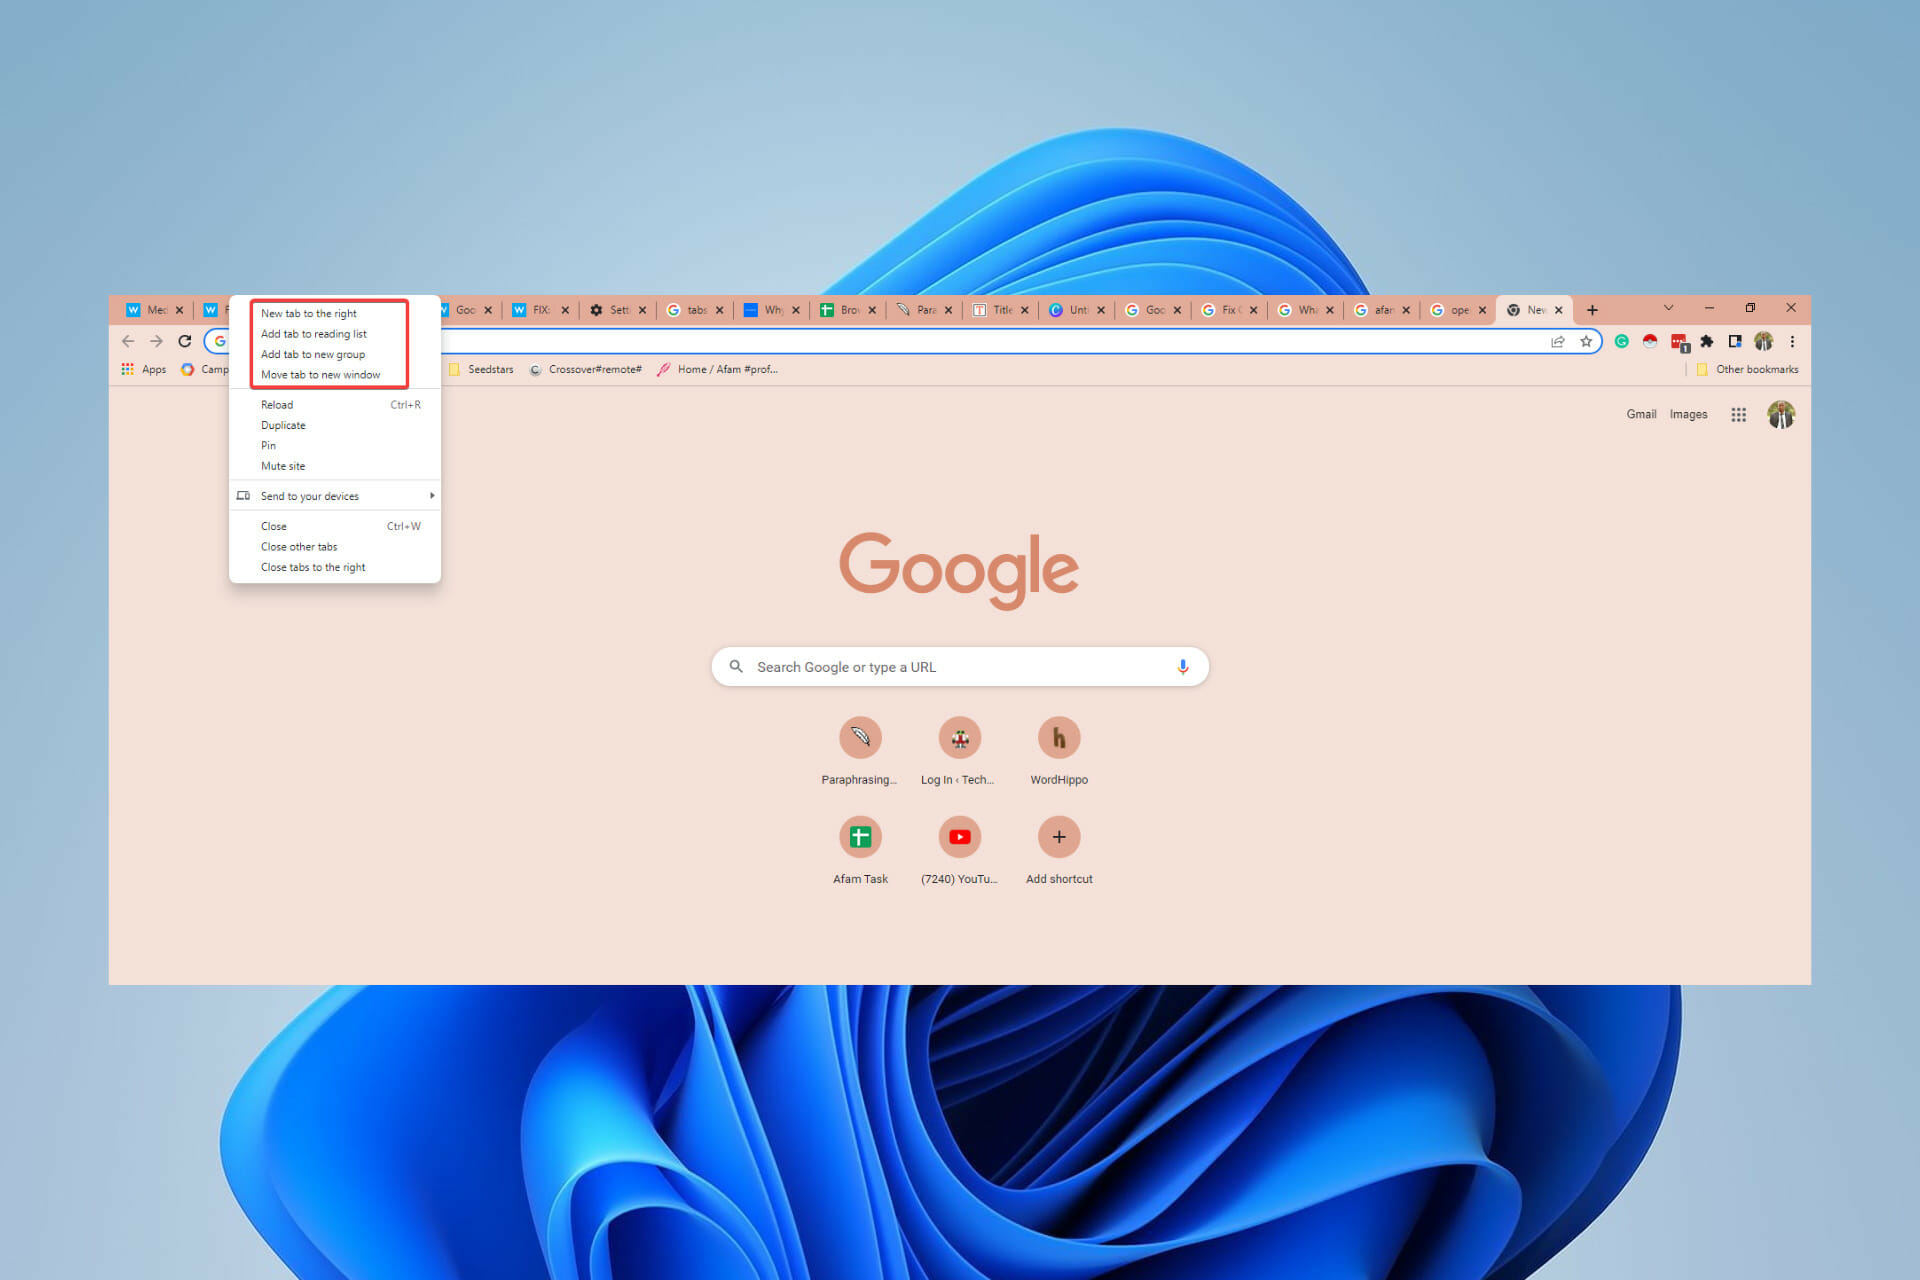
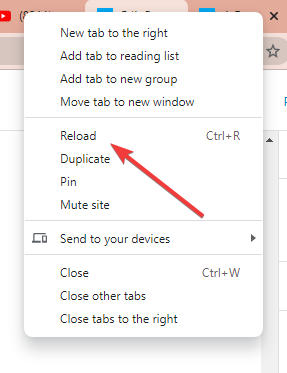
  2. Right-click on the unresponsive tab.
    tabs won't open in chrome
  3. Select Reload from the options.

Chrome tabs not loading in background is not uncommon. So, when you open a new tab, you may have to keep it active to load correctly.

This will be a solution if the tabs open but remain inactive. The problem often happens when you right-click and use the Open link in new tab function without clicking on the new tab while it loads.

5. Reinstall the browser

  1. On the Start menu, type control panel, then select the option to Uninstall a program.
    tabs won't open in chrome
  2. From the list of programs, click on Google Chrome, and select the Uninstall option at the top.
    tabs won't open in chrome
  3. Download a new Chrome executable file.
  4. Double-click on the download to start the installation.
  5. Relaunch Chrome after the installation is completed.

You may also want to consider switching browsers. Opera One is a very advanced option and will guarantee you do not have to battle with as many browser errors.

⇒ Get Opera One

Why are tabs not opening in Chrome?

We can not be sure why tabs on the Chrome browser may not open. A corrupt installation is one of the few known culprits.

Whatever the case is, issues relating to tabs on your browsers should be easily fixed with a few steps.

We, however, recommend that you have a good antivirus running to eliminate the risk of computer issues triggered by malware.

Tabs are an essential feature of every browser. They make it possible to search the web for multiple entries concurrently. When they stop working, you should try the fixes in this article to repair the problem.

Some of the fixes here are general and would be helpful for other problems, including when peripherals like your keyboard stop working with Chrome.

What solution did you use to fix this problem? Let us know in the comments section below!

How to Uninstall McAfee Completely on Windows 11

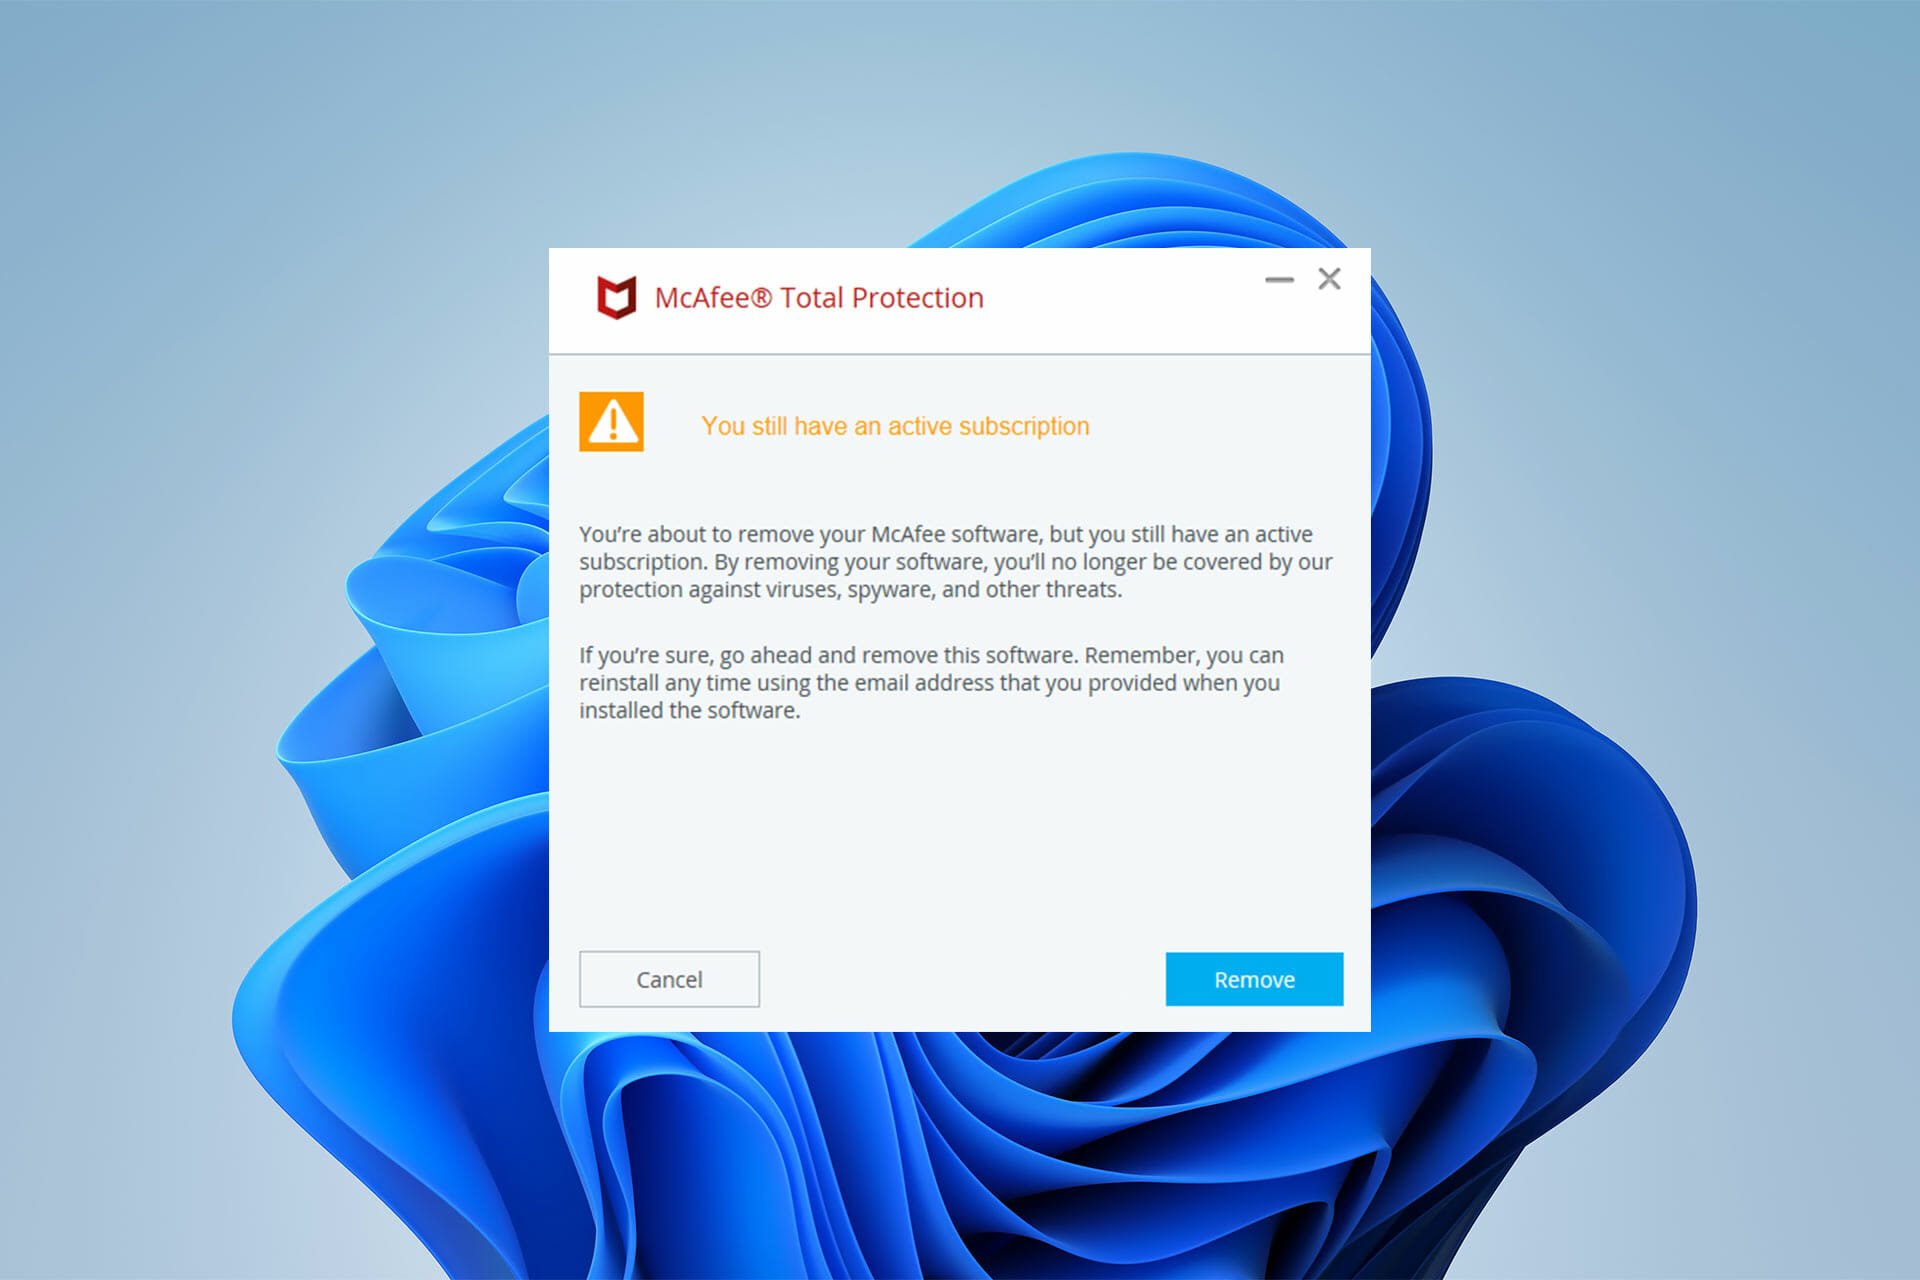
Removing McAfee completely on Windows 11 can be frustrating, especially when the built-in uninstaller fails or the program keeps coming back.

Whether you’re dealing with an expired trial, a stubborn pre-installed version, or just want a clean system, this guide will show you how to uninstall McAfee completely. We’ll walk through every method, starting from the simplest and ending with the more advanced fixes.

How do I uninstall McAfee from Windows 11 completely?

1. Use the Settings app

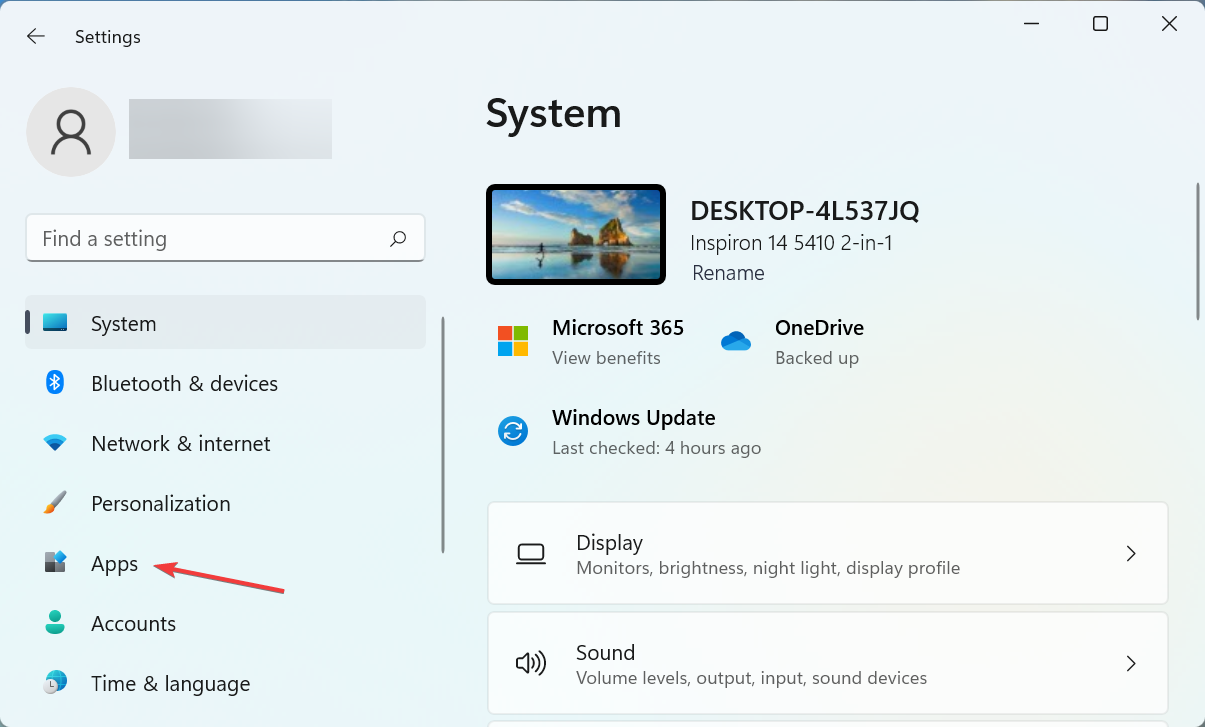
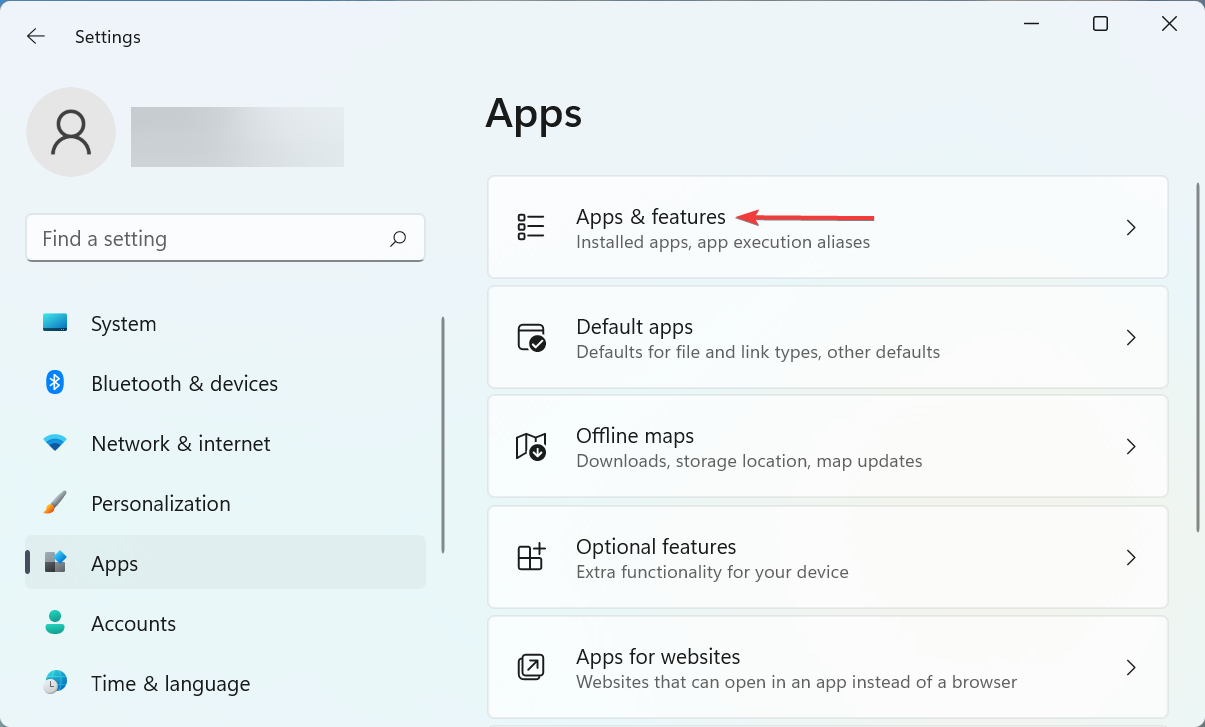
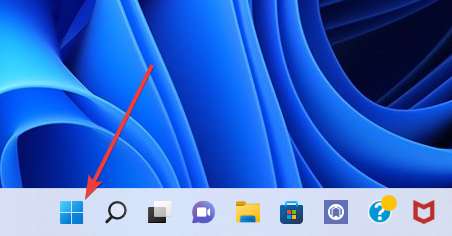
  1. Search Apps and Features in the taskbar and choose the first option.search apps and features in the taskbar
  2. Scroll down to find the McAfee product you’re trying to uninstall and click the three-dot menu next to the mentioned size.find mcafee product in the apps and features then remove
  3. The uninstaller should now appear. Select all of the McAfee products that are currently installed from this list and then click Remove.remove button on uninstaler
  4. Click on Remove again. remove button again on the uninstaler of mcafee

2. Use a reliable removal tool

  1. First, download the CCleaner tool.
  2. Run the application.
  3. Launch the CCleaner app on your PC.
  4. Go to Tools.
  5. Search the McAfee antivirus in the list and press Uninstall.

You can as well use the Custom Clean function to analyze your computer and erase junk files or registry entries left behind from uninstalled apps.

This way, your system will get rid of useless software files and increase the overall speed and performance while performing more complex tasks.

3. Use CMD

  1. In the taskbar search for CMD. Right-click on it and select Run as administrator once the Command Prompt app shows up in your search results.search cmd in task bar - uninstalling mcafee
  2. Now enter the following command and press Enter on your keyboard.
    wmicrun wmic command
  3. Following that, type this command to get a list of all installed programs.
    product get namerun product name command - uninstalling mcafee
  4. Look for McAfee products in the list on your screen and note down their names. list of the product names
  5. Once done, enter the following command, and press Enter on your keyboard to execute it. Replace PROGRAMNAME with the name you noted down earlier.
    product where name="PROGRAMNAME" call uninstall unistalling mcafee using command prompt

4. Use PowerShell

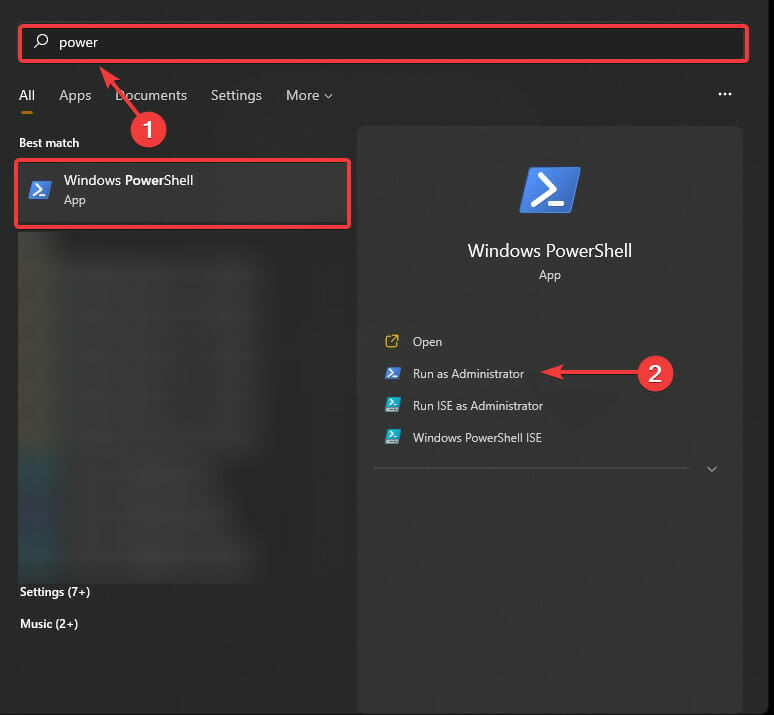
  1. To begin, open the taskbar and type in PowerShell. Click on Run as administrator once the app shows up in your search results. run powershell as administrator
  2. Run this command: Get-WmiObject -Class Win32_Product | Select-Object -Property Name.the powershell command first step
  3. Note down the product name for the concerned McAfee app.list of product name in powershel
  4. Now to uninstall the app run the following command but replace the PRODUCTNAME with the name of the concerned McAfee product:
    $app = Get-WmiObject -Class Win32_Product `
    -Filter "Name="PRODUCTNAME"".

The official Microsoft virus detection program hasn’t bothered many users, but McAfee users have complained.

Read this article if you encounter a communication error with the Event Log in McAfee.

Overall, removing McAfee can save users headaches as well as some system energy and CPU consumption. It can also help with Uihost.exe application error. Users can get rid of this anti-virus by following the techniques above. Do not hesitate to apply them if you can’t uninstall McAfee from Windows 10.

If you want to learn about Vsmain.exe errors on your computer, we have a separate guide with detailed solutions for you. McAfee is the common culprit for error code 2738 in Epic Installer, so it’s important to know how to properly remove it.

If you could successfully uninstall McAfee on your Windows PC, please let us know in the comments section below.
Quick Guide to Install Java JDK 11 in Windows 10

Java is an object-orientated programming language that programmers use to develop Java software. For that, they need to download a JDK 11 (Java Development Kit) installer for Windows.

Java 18 is the latest JDK development kit for Windows, Linux, and macOS platforms. If you are a beginner and looking for regular updates for a prolonged period, we recommend going with Java SE 11.

So without further ado, let’s walk you through the process of downloading JDK 11 installer for Windows.

How do I check if my computer is compatible with JDK 11? Open System information and see if you have a 64-bit system. If so, you are ready to go.

Once you have verified that your PC is compatible, let’s go straight to the process to download JDK 11 installer in Windows 10.

How can I install JDK 11 in Windows 10?

1. Download and install Java SE 11

  1. To get Java SE 11, open the Java SE Downloads page in a browser.
  2. Scroll down, select Java 11, and then click on the Windows option from the available ecosystems.Windows and Java 11
  3. Next, click on the download link next to the installer package (.exe file).Download to jdk 11 download windows installer
  4. Tick the checkbox for I reviewed and accept the Oracle Technology Network License Agreement for Oracle Java SE, and then click on the download button at the bottom.access terms
  5. If you have already signed up, enter the credentials to log in. Otherwise, you can create an account to proceed.Login or create to account to jdk 11 download windows installer
  6. Once the download is completed, press Windows + E to launch the File Explorer and head to the location where the downloaded file is stored.
  7. Now, right-click the jdk-11.0.15.1_windows-x64_bin (version may differ) file, and select Run as administrator from the context menu.Run as administrator tojdk 11 download windows installer
  8. Click Yes in the UAC (User Account Control) prompt that pops up.Click Yes
  9. Click the Next button.Next
  10. You can click Change to select an alternative folder to install Java SE 11 or click on Next to continue with the default location right away.Change location
  11. Now, wait for the installation to complete.

Once it’s done, you have completed half the task, i.e, downloaded and installed JDK 11 in Windows 11. However, you still have to set up a path variable for it to get things up and running. Follow the steps in the next section to do that.

2. Set Up a Path Environment Variable

  1. Press Windows + S to launch the Search menu, enter View advanced system settings in the text field, and click on the relevant search result.View advanced system settings to jdk 11 download windows installer
  2. Click on the Environment Variables button in the Advanced tab.Environment variables
  3. Select the PATH variable, and click on the Edit button.Path
  4. Next, click on New on the right.New to jdk 11 download windows installer
  5. Paste the full JDK 11 bin folder path as given below. It may differ on your computer if you have changed the location earlier during the installation process, so make sure to verify it once.C:\Program Files\Java\jdk-11.0.15.1\binPaste path
  6. Click the OK button after entering the bin folder path.OK
  7. Again, click OK in the Environment Variables window to save the changes.OK to jdk 11 download windows installer

That’s it! You can start working on it right away.

How do I check if JDK 11 is installed on my computer?

  1. Press Windows + R to launch the Run command, enter cmd in the text field, and either click OK or hit Enter to launch the Command Prompt.cmd
  2. Now, type or paste the following command and hit Enter to view the Java version.java -versionjava version to check jdk 11 download windows installer
  3. If the Command Prompt lists the version number along with other relevant information, you have JDK installed on the computer.check
  4. However, if you receive a response that ‘java’ is not recognized as an internal or external command, operable program or batch file, it means that you don’t have JDK installed yet, and can follow the steps above to get it.run command

While earlier, there were ways to download JDK 11 Windows installer without login, you now have to create an account. Looks like Oracle found a way to disable all these.

So, that’s how users can download and install JDK 11 in Windows 10 for free. Thereafter, they can compile their Java code text files with the javac command. Also, the methods listed here would help download JDK 11 in Windows 7 as well.

Besides, find out how to install Java in Windows 11, in case you are running the latest iteration of the OS from Microsoft.

If you have any other queries, drop a comment in the section below.

Bitdefender Services Not Responding? 4 Ways to Fix it

Bitdefender is one of the best antimalware software that helps keeps the system secure and is relatively prone to errors. However, several users have reported that its icon in the system tray reads Bitdefender services are not responding.

Also, in this case, the icon would be greyed out and you wouldn’t be able to open the Bitdefender interface. This leaves your computer unprotected and makes it all the more important to identify the underlying cause and eliminate it.

So, read the following sections to find out all about the Bitdefender services are not responding problem and the most effective fixes for it.

Why is Bitdefender not working?

There are various issues that could affect the functioning of Bitdefender, however, three of them are primarily found to lead to the Bitdefender services are not responding issue.

First, if your PC does not meet the minimum requirements for the antivirus software, it could lead to this problem. Another reason behind it is the presence of other antiviruses on the computer, thus leading to a conflict between them and Bitdefender.

The third reason why you might be encountering the issue is due to problems with the current version of Bitdefender or if the installation did not go through successfully.

In the next section, we have listed the solution for each of these problems, and once you are done executing these, the Bitdefender services are not responding issue should be fixed.

What do I do if the Bitdefender services are not responding?

1. Make sure the minimum requirements for Bitdefender are met

First, check the system specifications and verify that they meet the minimum requirements for Bitdefender because it’s often incompatibility that leads to issues, and may cause the software to malfunction. The requirements are as follows:

  • OS: Windows 11, Windows 10, Windows 8.1, Windows 8, Windows 7
  • Architecture: 64-bit and 32-bit
  • Processor: Minimum Intel Core 2 Duo or equivalent CPU
  • Memory: 2GB RAM or higher
  • Storage: Minimum 2.5 GB of free space

If your computer meets these requirements, the methods listed below would help eliminate the Bitdefender services are not responding issue. However, even if your PC doesn’t meet these, you can still try the methods, in case they work.

2. Restart the computer

  1. Press Alt + F4 to launch the Shut Down Windows box, click on the dropdown menu, and select Restart.Restart to fix bitdefender services not responding
  2. Now, click on OK to restart the computer.OK

When you encounter the Bitdefender services are not responding issue, the software would itself recommend you to restart the computer. Thus, that should be your primary approach. If the issue persists after a restart, head to the next method.

3. Uninstall other third-party antiviruses

  1. Press Windows + I to launch Settings, and select Apps from the tabs listed in the navigation pane on the left.Apps
  2. Click on Apps & features on right.Apps & features
  3. Locate the third-party antivirus, click on the ellipsis next to it, and select Uninstall from the flyout menu.Uninstall to fix bitdefender services not responding
  4. Again, click Uninstall in the confirmation prompt that appears.Confirm
  5. Similarly, remove the other antiviruses, if any, installed on the computer.

You can also use an application like CCleaner, which displays a list of your installed programs and allows you to instantly eliminate files with ease.

Once you have uninstalled all the other antiviruses, restart the computer for the change to come into effect and check if the Bitdefender services are not responding issue is fixed.

4. Reinstall Bitdefender

  1. Press Windows + R to launch the Run command dialog box, enter appwiz.cpl in the text field, and either click OK or hit Enter to launch the Programs and Features window.appwiz.cpl
  2. Now, locate all the Bitdefender entries, select them individually, and click on Uninstall.Uninstall to fix bitdefender services not responding
  3. Click Yes in the UAC (User Account Control) prompt that pops up.Click Yes
  4. Now, click on the Remove button under I want to uninstall Bitdefender, and wait for the process to complete.Remove
  5. Once done with the uninstallation, again download Bitdefender on the computer and go through with the installation like you did the last time.

If there was an issue with the installation initially, you may come across a bunch of errors with the software including Bitdefender services are not responding. Here, the best option is to remove the program and then reinstall it.

These are the ways you can get Bitdefender up and running on your system in no time. The methods listed here would also work if you encounter the Bitdefender services are not responding issue in Windows 10 or Windows 7.

Also, find out what to do if you receive an unsafe Wi-Fi network notification from Bitdefender. Besides, if you are looking for another software, check the best antivirus for Windows 11.

If you have any other queries or know of a method that’s not listed here, drop a comment in the section below.

Chrome Incognito vs Safari Private Browsing: Who Wins? [Detailed Comparison]

The web holds essential information on all subjects, making surfing the internet invaluable to our daily routines.

There are thousands of resources to answer our teeming questions, from music to sports to politics to tech. However, leaving digital footprints and being exploited of sensitive info on the web has raised concerns in recent years.

Browsers adopt incognito or private modes to ensure that we are not tracked and that our information is safe.

This article compares Google Chrome’s incognito mode against Safari private browsing. We like to show you how they stack up against each other and help you determine which is the better way to go.

This feature is a valuable part of your browser, and it takes only a few steps to start a private browsing session.

Chrome incognito vs Safari private browsing; which do I use?

Google Chrome Incognito Mode

chrome incognito vs safari private browsing

Before using the Google Chrome incognito mode to perform any work, be sure you understand what is or isn’t recorded.

Although this private mode prevents Chrome from saving files that you download, they are still stored on your local computer once you exit it.

Google Chrome also saves all of your bookmarks and your accessibility and preferences settings.

The incognito option disables storing your browsing history by your web browser. However, your activities and location may still be exposed to the following:

  • Your system administrators (if you are on a public network)
  • Your ISP (Internet service provider)
  • The firms behind the resources and  advertisements used on the websites you visit

Incognito mode in Chrome also allows search engines, internet providers, and online services to see:

  • Your geographical location using your IP address 
  • Activities performed on a web service
  • The user identity if you have signed up for some service with your email

Even if you have a VPN, you will still have this level of exposure. As long as you are logged in to your Google account, the browser remembers your location.  

In fact, the location restrictions you have on your Google account will still apply if the same accounts are logged into an incognito browser. 

⇒ Get Google Chrome

Safari Private Browsing

Many individuals have trusted Apple’s ecosystem, which includes a wide range of items tied to a single account. Kind of similar to Chrome, which is connected by a single email account. 

This singular account model is critical, as it connects your preferences, bookmarks, and searches across devices and services. 

The ability to use them across a range of products is time-conserving. But the real question is if a private browser mode is worth it if it doesn’t hide your tracks?

On the plus side, Safari’s private browsing mode does not record your search history, but it comes with certain downsides:

  • Services and websites you use may still see your IP address
  • Your search history is still visible to the service provider
  • Your internet activities will still be visible to your network administrator
chrome incognito vs safari private browsing

Unfortunately, it does not stop here. Your privacy on a particular device may be preserved, but it won’t hide the user’s behavior or prevent you from identity theft.

Your internet protocol (IP) address will be revealed, allowing third parties to monitor your online activities.

Above all, it will not prevent websites from employing near-perfect browser fingerprinting methods to identify you.

⇒ Get Safari

The verdict: Is incognito better than private browsing?

Chrome and Safari private browser mode serve the same purpose.  They prohibit your device from storing any browser history or data linked with a specific browsing session. 

This means that anybody else who uses your smartphone, computer, or whatever device you have used won’t be able to know what web services you had visited or what Google searches you performed.

However, none of them is the solution to total internet protection. So we can say they are very similar, and in this chrome incognito vs safari private browsing comparison, there is not much to tear them apart.

Does private browsing show up on other devices?

When you launch in a private browsing session, your local computer shops logging history and browser session. This means that at the end of the session when you close the window, it will all be lost.

This is also true for all your autofill information. Since they are lost after the session, if you switch devices, you will not be able to transfer them.

Can private browsing be traced on Wifi?

Just like we mentioned above, your browsing history and auto-fills are not logged in private mode. But this only applies to the computer you use for surfing.

chrome incognito vs safari private browsing

Your browsing habits are still logged by your Wifi routers. This implies that an admin may still be able to access your history even though it no longer exists on your computer.

Is private browsing safe?

Browsing in private mode is safe, and relatively a better option than normal surfing if privacy and security are your concerns. It gives you a degree of anonymity. If you use public computers, it will ensure that your credentials are not logged on the computer.

However, if you are on public networks, you must note that the network admin will still be able to access your browsing trends and history.

Modern browsers however can make your browsing experience safer and more protected. We like to recommend Opera One because it comes with a built-in VPN. This means your browser location is masked, a feature that private/incognito browsing will not offer.

Combining its private mode, and VPN makes it the most secure browser option.

⇒ Get Opera One

How to turn on private browsing in Chrome?

1. Use the private browsing shortcut

  1. Click on the Start menu.
  2. Type Chrome in the search field.
  3. From the options beneath the Google Chrome app, select the New Incognito window option.

2. Open new incognito window

  1. Launch the Chrome browser.
  2. Click on the ellipsis at the top right of the browser.
  3. From the options list, select the option for New Incognito window.
    chrome incognito vs safari private browsing

How to turn on private browsing in Safari

  1. At the top left corner of your computer, click on the Safari File menu.
  2. Then from the dropdown menu, click on New Private Window.
    chrome incognito vs safari private browsing

That is it for this chrome incognito vs safari private browsing comparison. They both are among the best browsers you have on the market. However, their private modes may not be all you need to stay safe.

But you may not be offered 100% privacy and protection using any of them; you can ensure your IP is protected and your data is not stolen by using a good VPN or a browser with a built-in VPN.

Which browser do you prefer and why? Let us know in the comments section below.
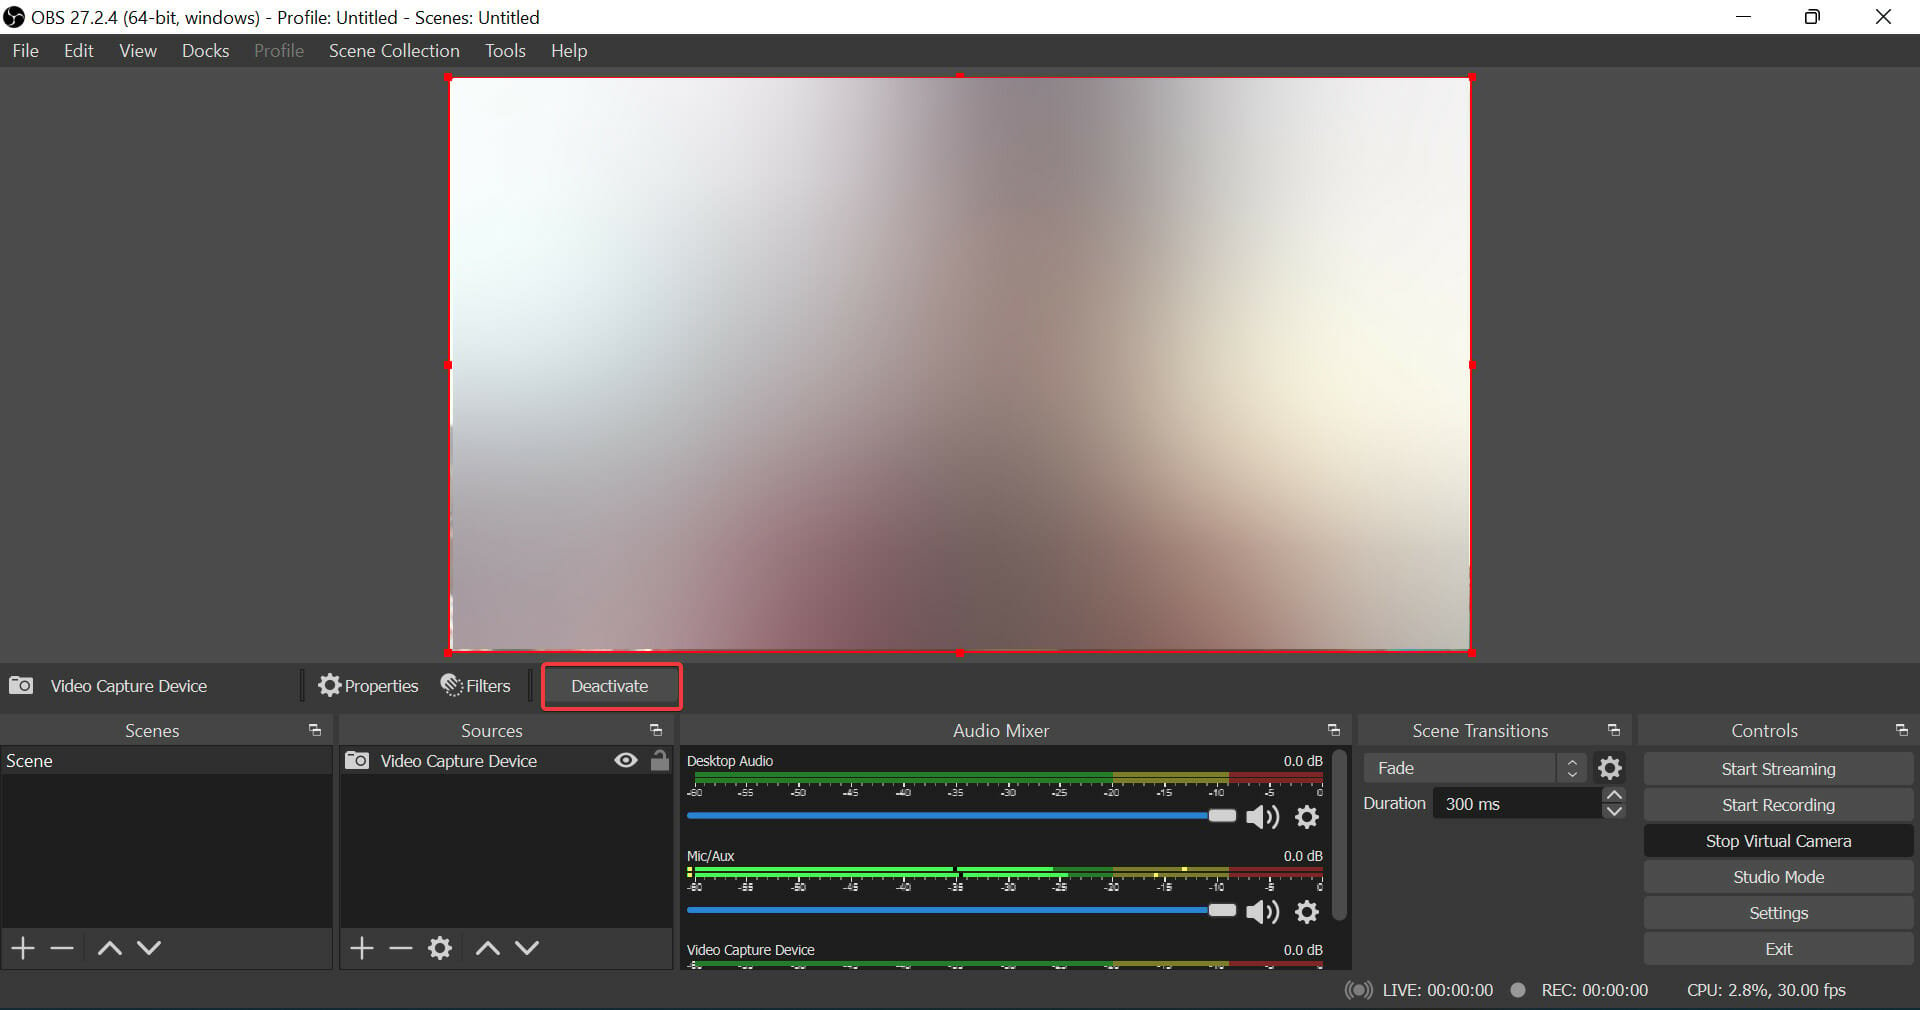
8 Best Tips To Get the Most of the Firefox Kiosk Mode

As people increasingly depend on the web to do their tasks, Firefox Kiosk Mode becomes an increasingly appealing option.

Whatever the reason, internet surfing has significantly influenced practically every aspect of life, and its role in transforming corporate procedures is almost apparent.

However, browsers are the most common attack points for hackers looking to target enterprises. For example, identity theft and cyber-attacks are possible on unattended public surfing locations and shared devices, necessitating adequate endpoint protection.

Staying ahead of cyber dangers requires an adequately configured secure browser that does not complicate the end-user experience. As a result, kiosk browsers have become a valuable security tool.

In fact, you can also set up a Kiosk Mode on Windows 11, and we wrote in great detail how to do that in a separate guide.

In this article, we will explore the Firefox Kiosk Mode and explain some of the best tips to help you get by in this mode.

What is browser Kiosk Mode?

Kiosk Mode is a computer configuration that shuts down your whole computer, leaving just one program available.

Computers running this mode, also known as Kiosk Machines, are put in various locations for customers to use, but exclusively for the purpose of accessing a specific program.

This is frequently done so that you may concentrate your attention on a particular task at hand rather than using the computer for broader purposes.

Because Kiosk Mode focuses on a single program, it’s good to impose these limits on computers in malls, libraries, stores, and other terminals like sales presentations and vending machines.

These restrictions or limits are implemented when Firefox is launched in Kiosk Mode:

  • The browser runs in full-screen mode, which you cannot escape.
  • You can’t access any menus or choices since all toolbars, bookmarks bar, tab bar, title bar, navigation bar, and menu bar have been removed/disabled.
  • The close, maximize, and minimize buttons have also been deleted, making it impossible to shut down the Firefox window.
  • Using the F11 key will not help you exit the full-screen mode.
  • There is no contextual menu when you right-click on any web page.
  • The status bar is concealed, so lingering over hyperlinks does not reveal website URLs.

Note that there is no Firefox Kiosk Mode multiple tabs support, so you will have to go one tab at a time.

What are the best tips for using Kiosk Mode on Firefox?

1. Open Firefox Kiosk Mode from the Run command

  1. Press keyboard shortcut Windows + R.
  2. In the Run dialog, type the following command and hit Enter: Firefox -kiosk

This is the fastest way to open Kiosk Mode, and unlike in the method described later, you do not want to go through the multiple steps of creating desktop shortcuts.

2. Open websites in Kiosk Mode from the Run dialog

  1. Press keyboard shortcut Windows + R.
  2. Type the following command in Run dialog and hit Enter.
    Firefox -kiosk https://windowsreport.com/

You will have to replace https://windowsreport.com/ with the website you want to visit.

3. Open websites in Private Mode

  1. Press keyboard shortcut Windows + R.
  2. Input the Firefox Kiosk Mode command line in the Run dialog and hit Enter:
    Firefox -kiosk -private-window https://windowsreport.com/

You will have to replace https://windowsreport.com/ with the website you want to visit.

4. Hotkeys on Kiosk Mode

  • New blank tab: Ctrl + T
  • Reopening closed tabs: Ctrl + Shift + T
  • Find page features: Ctrl + F
  • Storage Inspector: Shift + F9
  • Open Browser Toolbox: Ctrl + Alt + Shift + I
  • Launch Browser Console: Ctrl + Shift + J
  • Open Toolbox (with the most current tool turned on): Ctrl + Shift + I
  • Inspect Element: Ctrl + Shift + C
  • Open the Web Console: Ctrl + Shift + K
  • Firefox kiosk mode back button: Ctrl + Back button

These hotkeys will save you a ton while running Kiosk Mode since you will not have all the regular buttons and navigations.

5. Print from Firefox Kiosk Mode

  1. Press keyboard shortcut Windows + R.
  2. Type the following in the Run dialog and hit Enter: Firefox –kiosk –printing

This command prints the present page in Firefox’s Kiosk Mode without bringing up the browser’s default Print dialog box.

6. How do I start Firefox in Kiosk Mode?

  1. Navigate to where you have your Mozilla app; this is in the Programs Files by default.
    C:\Program Files\Mozilla Firefox
  2. Right-click on the Mozilla app and select Show more options.
    Firefox kiosk mode
  3. In the context menu, select Create shortcut.
    Firefox kiosk mode
  4. Right-click on the newly created shortcut and select Properties.
  5. Click the Shortcut tab, add the and the end of the Target field add –kiosk. Now click OK, then Apply.

  6. Now go ahead and double-click on the shortcut.

This Firefox kiosk mode shortcut is an easy way to always get into Kiosk Mode, and when your Firefox is running on Kiosk Mode, all you have is a plain screen with a few widgets.

7. How do I get my Firefox out of Kiosk Mode?

  1. Use the keyboard hotkeys Alt + Spacebar.
  2. Click on the Close option.

Alternatively, use the keyboard hotkeys Alt + F4 or Ctrl + T.

8. How do I get my Firefox out of Kiosk Mode using the Task Manager?

  1. Use hotkeys Ctrl + Alt + Delete.
  2. Select the Task Manager option.
  3. Select the Processes tab, Right-click on Firefox from the list of apps, then select the End task option.
    Firefox kiosk mode

If you have read this far, you probably now know all that there is to know about the special browser mode. You will accomplish all you normally will do when the browser is run normally, however, we advise mastering some of the shortcuts.

Before you run your browser in kiosk mode ensure that any Firefox issues you are having are first resolved.

We have enjoyed sharing this with you and will love to know which of the tips you find most helpful. Please drop us your comments below.

Voice Recorder for Windows 11 just got revamped

Ever since the new operating system came out, the Redmond-based tech giant took it upon itself to also revamp each and every corner of it.

That means applying the same sleek Windows 11 design to all of the apps and elements of the OS, to make it feel more like a whole than just a makeover.

Now, the Voice recorder app has been modernized and brought to the year 2022 with the same Windows 11 design language that everyone fell in love with.

Say hello to the new and improved Sound Recorder

After Paint, Clock, Notepad, Task Manager, Snipping Tool, Photos, and Media Player, Microsoft decided to also redesign Voice Recorder.

Not only the design has changed, but also the software’s name. Voice Recorder is now Sound Recorder for Windows Insiders in the Dev channel, and the update is available in the Microsoft Store for public testing.

Packaged with this stylish new look are icons, controls, and layouts. There is also a new visualization for audio during recording and playback that looks somewhat iOS-inspired.

Besides all the bells and whistles, the tech giant also added the option to change the recording device and select file format within the app.

Thus, if you have more than one microphone connected to your PC, you can choose the one you need directly on the app’s main screen.

Furthermore, different recording formats are available in the settings, and you can pick m4a, mp3, wma, flac, and wav.

Sound Recorder also allows you to change audio quality and select the theme (light, dark, or system).

Where can I get the new Sound Recorder?

If you want to take it for a spin, you can download the new Sound Recorder from the Microsoft Store with just a few clicks.

That is if you aren’t already a Dev Channel Insider, in which case you already have it after the latest update, along with the new Task Manager for Windows 11 22H2.

More good things are to come for the latest operating system, according to voices from the Redmond company, so we just have to wait and see.

Don’t forget that Sun Valley 2, as Windows 11 22H2 is also called, is RTM and we should see it available pretty soon.

Have you tried out the new and improved Sound Recorder? Share your experience with us in the comments section below.
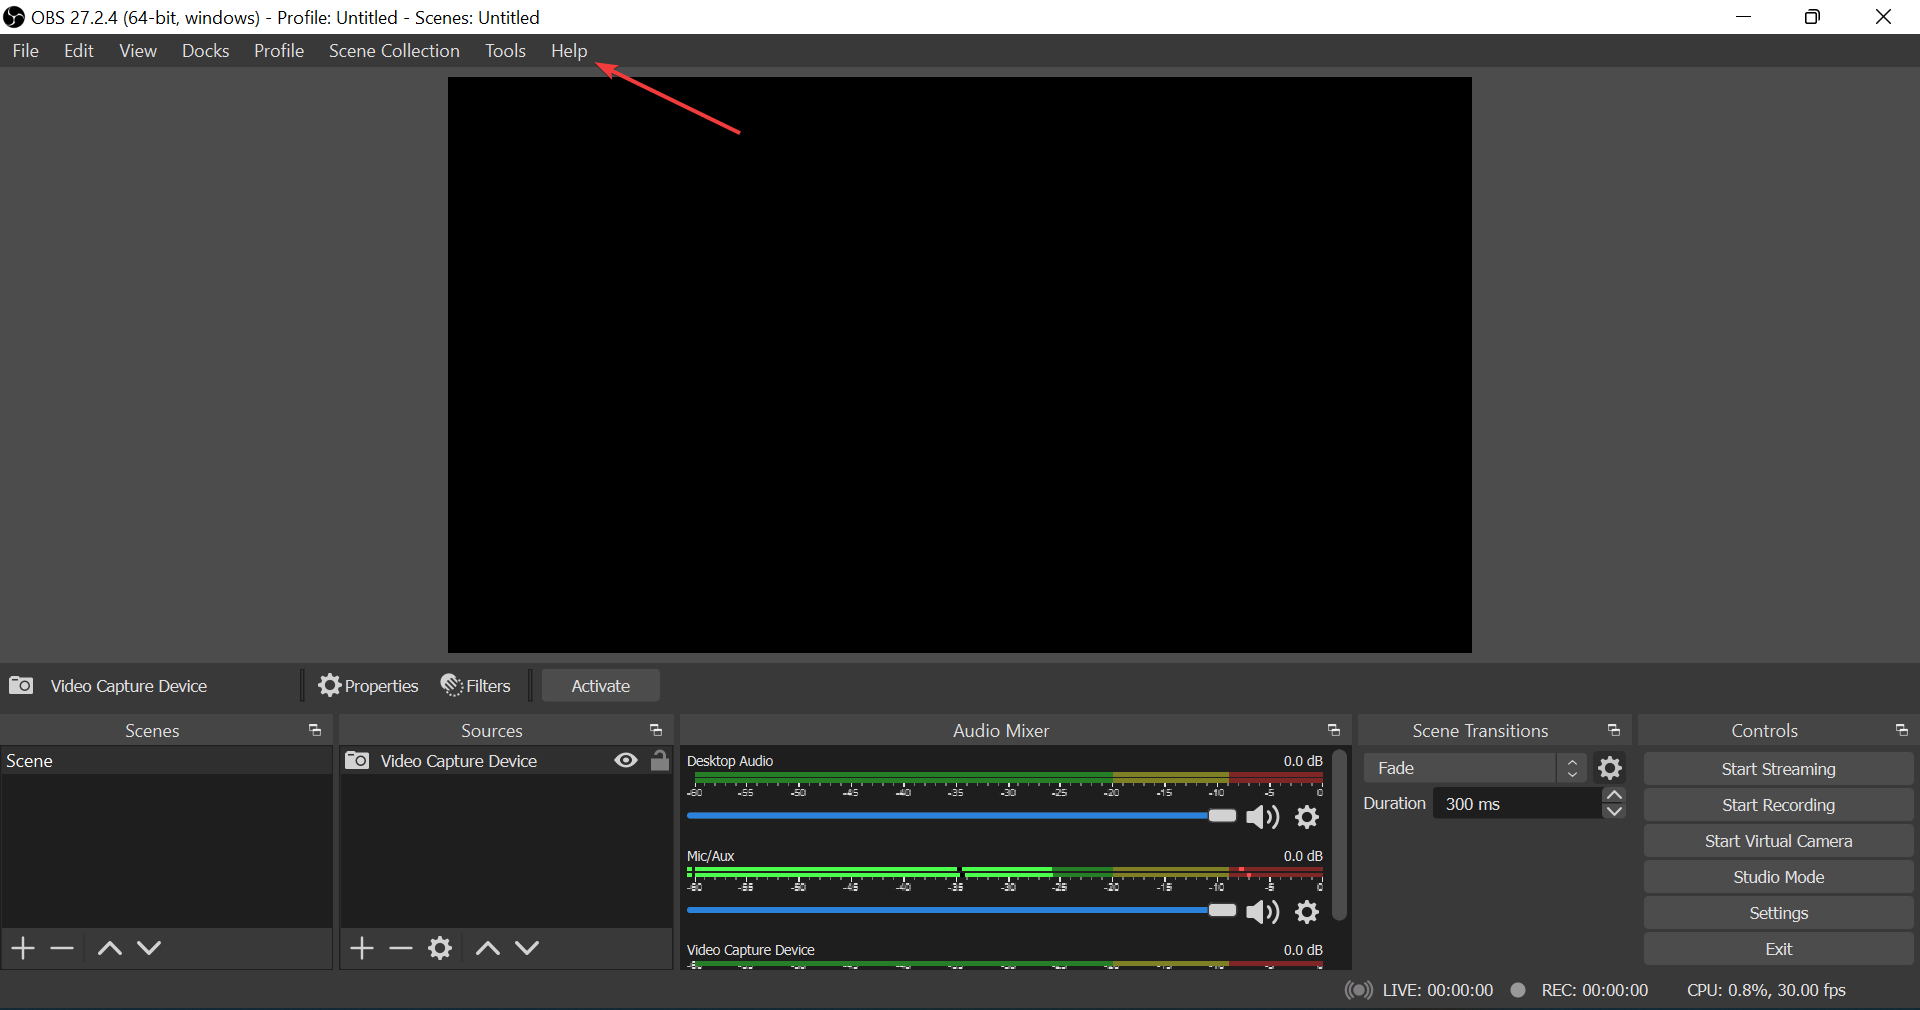
Salon Booking Software: 6 Best for 2026

Managing a wellness center, a beauty center, or a salon can be very stressful and demanding without proper salon appointment software.

Some businesses still use post-it notes, paper notes, or other traditional methods to organize their work.

The decision to computerize your beauty center with online management software allows taking a new step toward boosting your business.

In this manner, you’ll improve the internal organization of your own activity and the quality of the services you’re offering.

How can a salon appointment app help me?

A salon appointment software is of real help for businesses, ensuring maximum efficiency for all your activities. It offers a complete and always updated picture of the personnel availability.

Therefore, the operations performed by the personnel are transparent and you can always see who’s doing what.

All this translates into many advantages in terms of efficiency, quality of service, customer loyalty, and therefore greater competitiveness.

Specialized salon booking software represents a safe investment with tangible and verifiable benefits in the short term.

And that’s because they improve efficiency, reduce errors, and optimize staff work time.

In this article, we will show you what is the best salon appointment software to grow your business.

What is the best salon appointment software?

Square Appointments – Ideal for appointments

Square Appointments is great salon appointment software from all aspects of the hairstyling and nails business.

It interacts with the Square POS system, which you may use to manage the retail part of your business. 

Another wonderful feature is that you can use the simple website builder to establish a free, shoppable website in minutes.

Allow clients to purchase online or to order online and pick up the desired product in your salon.

The Square system will be responsible for sending reminders via e-mail or SMS to customers, which is supposed to reduce the rate of cites not presented.

It also synchronizes the calendar with your preferred application (imagine that offering an iCal or access via CalDAV).

Notifications via SMS, e-mail, or even automatic phone calls are also supported.

Square Assistant is a smart, automated messaging tool that responds to your clients on your behalf to confirm, cancel, or reschedule appointments 24 hours a day, seven days a week.

It’s possible to sync your schedules across various locations, even if your consumers live in different time zones.

The key features of Square Appointments include:

  • Mobile app for iOS and Android available
  • Website for free client reservations
  • Automates email and SMS reminders
  • Appointments that repeat themselves
  • Integration with Instagram and Google
  • Fees for cancellations and no-shows 
  • Allow customers to book numerous services with different suppliers online

Square Appointments

Simplify your day, automate tasks, and sell products with this great web-based appointment scheduling app.
Free trial Visit website

Salon Booking – Best dedicated salon scheduling software

Salon Booking is another great choice for helping you juggle all the administrative parts of your salon.

This salon appointment software comes equipped with useful integrations, such as SMS notifications and integration with google calendar.

Your customers will be announced and reminded in regard to their appointment, so they won’t miss the meeting.

The Google Calendar integration will synchronize all existing reservations with your calendar, and you can also add new bookings inside the Booking System plugin.

Moreover, you can create rules, and unlimited discounts to keep your customers rewarded for their loyalty and accept online payments as a whole payment or a partial deposit, depending on each situation.

These are the key features of Salon Booking:

  • Flexible scheduling rules for the whole store
  • Each assistant has its own set of rules, and each service has its own set of rules
  • Rules with a date range, and holidays are the only exceptions
  • Edit upcoming reservations and send instant notification to the customer
  • Manage comments on your website.
  • Gather feedback using Google My Business evaluations and Facebook reviews.

Salon Booking

Stay in control and keep everything organized with this amazing booking software. Get the best deal now!
Free trial Visit website

Salon Calendar – Great calendar app for salons

Salon Calendar is a software tool designed to make schedule management a simple and pleasant activity.

It is created to meet the needs of aesthetic shops, hair salons, beauty and manicure salons, tanning salons, wedding planning activities, fashion shops, fitness studios, plastic and cosmetic surgery clinics, beauty care, health, and fitness centers.

Salon Calendar is an amazing tool that is handy and easy to use. It also allows any employee to create a profile and save his/her schedule.

This tool facilitates the work of specialists from different industries that need an exact and specific management tool to organize their activity.

The program has a built-in Print Designer, which offers a variety of original templates and multiple options. This feature helps you to make a clear and beautiful printout of a schedule.

Salon Calendar is available for all versions of Microsoft Windows.

The key features include:

  • View the schedule of any person on your team
  • Complete image of your team’s agenda
  • Date Navigator allows you to open the required date, edit reception hours, and master client data
  • Salon Calendar highlights the importance of accurate scheduling, so you can set different work ranges
  • Choose vertical or horizontal timelines and formats of 12 or 24 hours
  • Auto Backup helps you save the data to the secured archive
  • Export into different formats the data from Salon Calendar (MS Outlook, XML, HTML, XLS, and TXT)
  • Exchange data with other applications (Apple iCal, Microsoft Exchange Server, Android apps)

⇒ Get Salon Calendar

Simply Schedule Appointments – Best for scheduling appointments

Simply Schedule Appointments is a WordPress plugin for your salon business website that allows you to schedule existing customers.

But it will also help you make new appointments, indicate availability, accept money in advance, and more.

Because you have complete control over Social Security Administration, which runs fully on your own WordPress website, integration is a huge asset.

With a simple click, you can enable conversion monitoring and transmit your data to Google Analytics, Segment, and other services.

Moreover, this way, you discover where the clients drop out in your booking funnel and make changes to improve your bookings.

Set and show your availability, blackout days, and lead time for forthcoming appointments on a 24/7 basis.

It’s a very convenient feature for the clients. Therefore, they can schedule their own appointments while you concentrate on offering them your service.

The most notable features include:

  • Works as an integrated plugin into your WordPress salon website
  • Ad a booking calendar on any page of your website
  • New appointment notifications, reminders, and cancellation warnings are sent out automatically via email and SMS
  • Integrate with Stripe and PayPal, and sync with Google Calendar
  • Receive quick, high-quality assistance from a specialized customer service staff
  • Other popular WordPress plugins can be integrated
  • Additional translations into Spanish, German, and other languages are in the works

⇒ Get Simply Salon Appointments

Fresha – Best salon scheduling tool for business

Fresha is a leading global beauty and wellness platform, connecting thousands of salons, spas, and barbershops with millions of customers worldwide.

Each month, tens of millions of appointments are discovered, booked, and paid through Fresha’s partner businesses.

With Fresha, you can easily find the salon that best fits your needs and budget. In addition, Fresha offers a wide range of features and services that can help you save time and money.

You can browse and book your favorite treatments and services with over 50,000 businesses and 150,000 professionals in over 120 countries worldwide.

This 24/7 booking platform lets you book at a time that suits you and at a price that suits your budget, and reliable client reviews will help you decide which service or venue works for you.

With so many benefits, it’s no wonder that Fresha is becoming the go-to software for finding the right beauty salon.

The key features of Fresha include:

  • Appointment scheduling
  • Payment processing
  • Point of sale (POS)
  • Marketing promotions
  • Product inventory and online store
  • Reporting and analytics

⇒ Get Fresha

NoiSPA – Great free app for spas

NoiSPA is a program that runs on the Windows platform or on MAC computers with a virtualizer. It was created with the aim of facilitating the administration of your salon.

In a market where customers fly away easily, NoiSPA is the weapon you need to fight competition.

With its 43 additional modules, you will have all the tools you need to face any challenge.

The data storage of NoiSPA resides on your computer, not on an internet website, so it also works without an internet connection. Data is therefore safe from prying eyes.

If you request the USB pen drive (Pen Drive), you will enjoy maximum data security and have your beauty center with you at any moment.

You can use only the version with remote archives or the Cloud version through additional modules.

This way, the salon appointment software makes your data available from anywhere in the world.

The key features include:

  • Automatic customer management
  • Automatic management of articulated appointments by operator or machine
  • All calculations make them the search engine available for NoiSPA
  • Automatic management of treatments and promotions (more treatments and/or products together)
  • Automatic collection management

⇒ Get NoiSPA

Salon appointment software helps you to earn time, not waste it. For this reason, it is important to choose programs that are easy to use.

The heart of your beauty center or your hairstylist 2.0 must be your management and appointment software.

These salon appointment software tools allow you to store information about your customers, your business, and your appointments.

You might also be interested in our selection of the best calendar software to help you organize your life better.

We hope this guide was useful to you. Let us know what you think about these options in the comments section below.
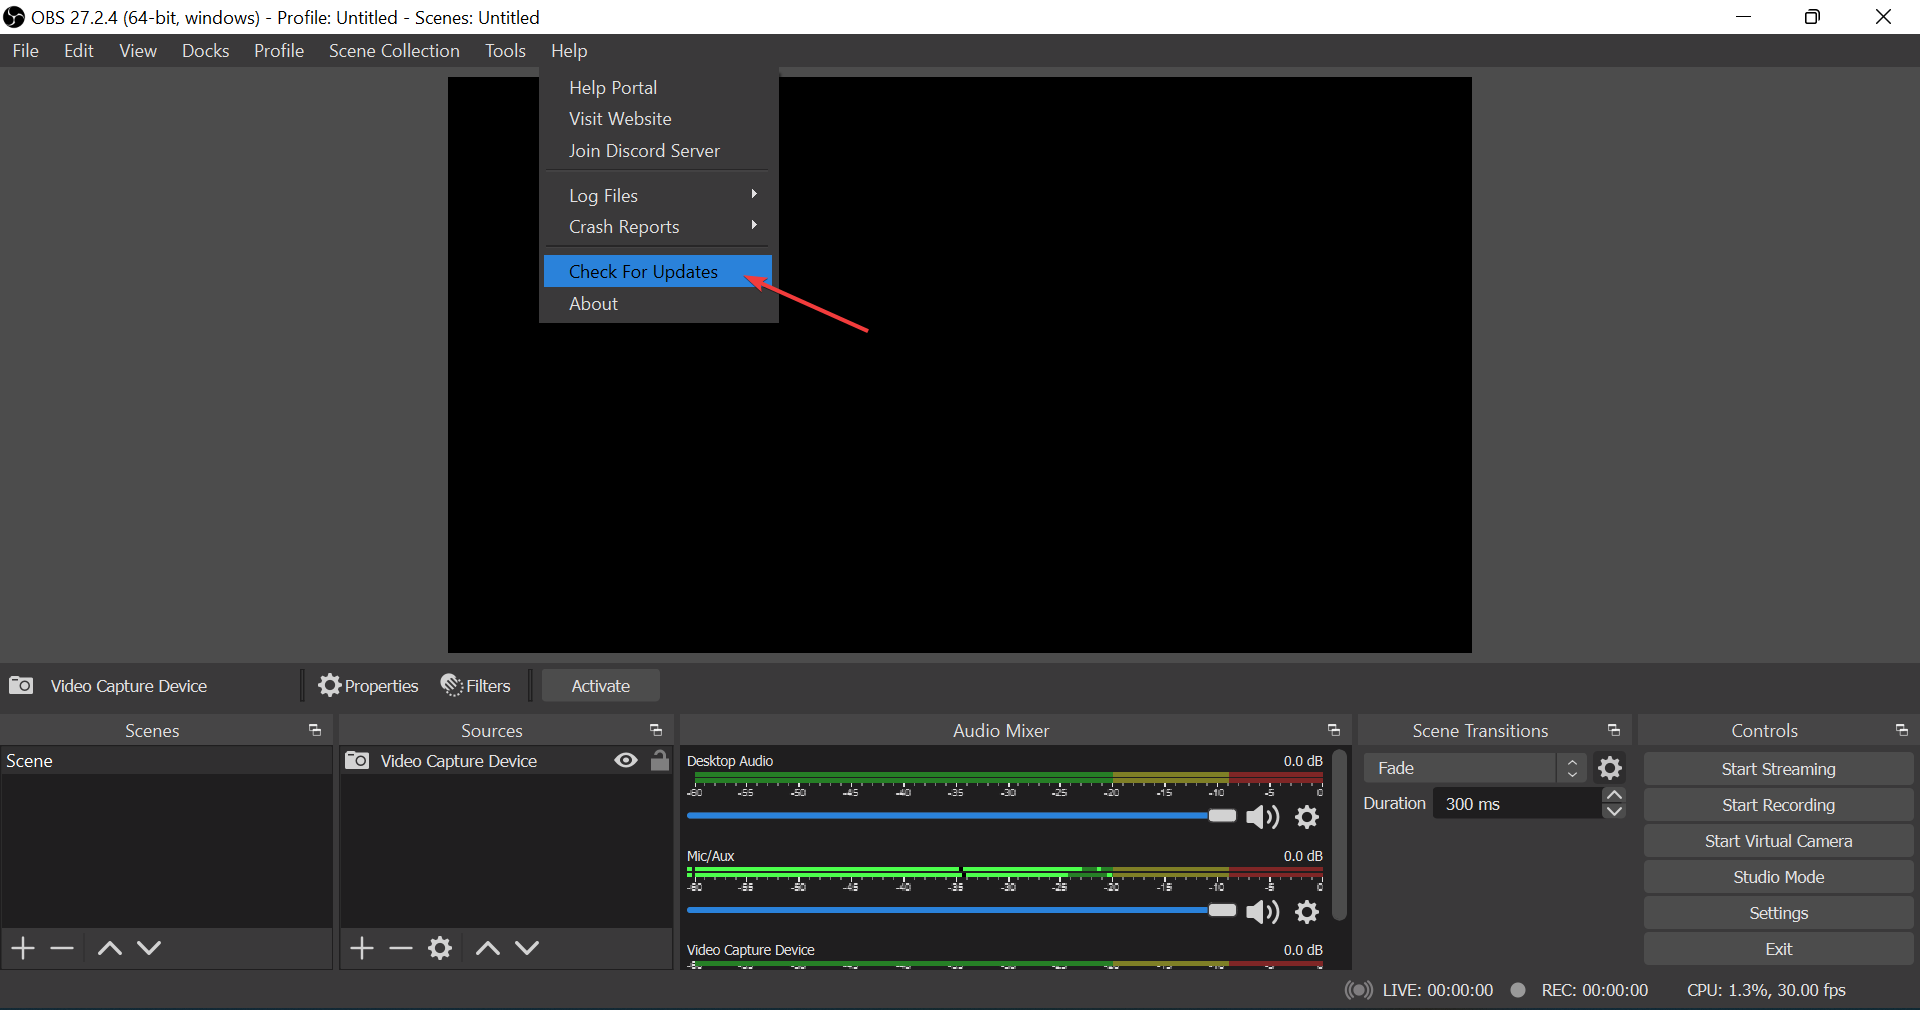
7 Best Aluminum Mousepads To Pick From

Aluminum mousepads give your mouse a smooth, uniform surface on which it may move swiftly and accurately, capturing your hand movement.

These products reduce friction because there will be no friction holding the mouse back from moving if there is no material catching on the bottom of the mouse.

Additionally, aluminum mousepads could make a noticeable difference in your gameplay by making your mouse movement faster if you know you can maintain precise handling without the help of friction.

Are aluminum mousepads good?

The answer is yes. Having a flat surface for your mouse guarantees that your motions are monitored precisely, which aluminum mousepads can do.

There are different types of aluminum mousepads, some are intended to protect your desk, while others include luxurious features such as RGB lighting and wireless charging.

These are the best mousepads for home, office, and even gaming, which we’ve included in this list.

What are the best aluminum mousepads?

Satechi Aluminum – Stylish choice

  • Solid aluminum plate, so it will not bend easily
  • The massive, rubber backing prevents the pad from moving
  • Stylish appearance
  • Get decolored after some time
  • The surface can be noisy

The Satechi aluminum mousepad is an excellent product that does its job well and costs far less than you might expect.

Moreover, the slanted and polished to a mirror-like reflective trim of the surface, as well as the rounded corners, give the product a fashionable appearance.

An aluminum mousepad is nothing but a plate of aluminum, and it will, unfortunately, make noise as the mouse moves across it.

Also, the scratching sound of plastic against metal can be distracting at first, but after applying tape to the mouse feet, the user will be pleased with the result, as well as the cleaner surface.

HONKID – Different texture and design on each side

  • Two-sided, modern
  • Easy to keep clean
  • The leather side offers good friction and is smooth
  • Can be noisy without mouse stickers
  • Silver side can make the mouse hard to control

A two-sided mouse with a different texture and design on each side. The hard mousepad’s silver metal aluminum side has a sleek and stylish design that complements desk computers and laptops. 

The other side has a black PU leather texture that has been meticulously designed with tiny lines; either side can be used.

You can use the non-slip stickers that come with the mousepad to make it less slippery.

Vaydeer ‎Xunli-0007 – Sturdy and noiseless

  • Noiseless
  • Good underside texture
  • Stylish
  • Harsh on the wrist

This aluminum metal mousepad was created to work with the majority of gaming mice currently available.

The leather is well-knit, and the mousepad does not have an unpleasant odor. It’s a sturdy, thin gaming mousepad that’s suitable for both gaming and everyday use. 

Furthermore, the textured underside keeps it stable on a variety of surfaces. This one looks great on any business desk, and it performs as well as it looks.

Qcute FB-216-GD – Ideal for small mouse models

  • Great for a small mouse
  • Comfortable for wrist
  • Can be noisy
  • Doesn’t stick to the surface well

Qcute is a great gaming aluminum mousepad for small mouse models. If you have a smaller gaming setup and don’t mind having a smaller gaming mouse, Qcute is a great fit.

The mousepad maintains a comfortable wrist angle and is soothing to the wrist, resulting in a pleasurable gaming experience.

Additionally, the pad makes scratching noises because it is made of metal and does not adhere to the table as well as one might expect.

ENHANCE 8541655950 – Non-slip surface

  • Durable
  • Great design and appearance
  • Bigger than standard mousepads
  • Lesser-known brand

ENHANCE 8541655950 is a lesser-known brand in the industry, but the company’s products have excellent aesthetics and performance.

After all, these pads will not necessitate the installation of any additional software. It makes no difference who made them as long as they are well-made.

Also, the surface is completely non-slip and works perfectly with optical and laser mice.

MSI THUNDERSTORM – Premium choice

  • From a popular brand
  • Frictionless surface
  • Great adherence to the surface 
  • Expensive than most mousepads
  • L-shape design

One of the most awkward yet interesting designs among the best aluminum mousepads, MSI Thunderstorm’s unique keyboard-friendly edge design allows for maximum positioning flexibility. 

Moreover, it allows gamers to position their keyboard and mousepad in the most comfortable and appropriate battle position without having to worry about seam transitions.

A solid aluminum base with a conversion coating and a hairline finish ensures a tough pad that won’t bend while still providing a low-friction gaming surface.

Razer Invicta – Top grade material

  • Suitable for everyday use
  • Increased speed and accuracy in games
  • Top grade material
  • Expensive
  • Minimalistic appearance

The Razer Invicta is a dual-sided gaming mouse mat that rests on an Aluminum base with a rubber backing to keep it from sliding around on your desk.

Also, this product is a brand-new, lab-tested coating on both sides with a specially selected finish to improve the surface’s reflective quality.

The Razer Invicta is a symbol of quality design and manufacturing, with an aircraft-grade aluminum base for extra durability and to keep the mouse mat from shifting no matter how hard you swipe.

What’s the difference between cloth and aluminum mousepads?

Cloth mousepads provide more friction, which slows the mouse down but improves the handling. Aluminum mousepads reduce friction, which can help you move faster.

Furthermore, an aluminum mousepad is usually better if you want to free your speed and skillful accuracy, and if you want something that is easy to clean on a regular basis.

Because of the huge variety of items available in stores, choosing a mousepad based on your preferences might be difficult.

Customer reviews can be extremely useful because the majority of them highlight both the positive and negative aspects of the product.

The best aluminum mousepads list was created to assist people in identifying excellent mousepads on the market.

In the end, it is up to you to decide whether or not a product will meet your requirements.

If you’re looking for the best computer mice for Windows 11, check out this article.

In the comments section below, let us know which of these aluminum mousepads you think is the best and which one you prefer.

Email productivity solution Superhuman now available for Outlook

Time conservation has been Superhuman’s ultimate goal since its inception. The email productivity tool features a “visually gorgeous” interface, insights from LinkedIn, Facebook, and Twitter built in, an Undo Send feature, AI powered important mail detection, built in read statuses, follow up reminders, email send scheduling, and the ability to “snooze” conversations.

In the initial stages, they focused on Gmail, but over time, the demand for Outlook has grown tremendously.

A huge chunk of these requests came from organizations that heavily rely on Office 365. Microsoft translates this to 345M paid seats, which is 6 times more than Google Workspace’s usage in organizations.

Today, Superhuman announced the official launch of Superhuman for Outlook. They built Superhuman for Outlook from the ground up since Gmail’s API is quite different from Outlook, and Superhuman has been tailored to specifically serve Outlook.

Superhuman told us that,

Superhuman for Outlook will feature the same famous keyboard shortcuts and features that our Gmail users know and love, including the emphasis on speed, with every interaction taking less than 100 milliseconds. In fact, Superhuman actually works faster than Outlook, thanks to our constant optimizations, hybrid architecture, and specialized rendering pipeline. Outlook users will also be able to do the same actions they’re used to, including flagging important messages and organizing messages into folders. And in a feature that our beta users really loved, they can instantly toggle their Gmail and Outlook accounts.

Try out Superhuman for Outlook, which costs $30/mo., to experience the array of features it provides like its relentlessly refined design, and the ability to recall emails with grammatical errors and block strangers who keep on spamming your inbox.

New Microsoft patent may allow users to convert Xbox game discs to digital versions

Microsoft has created a new patent that demonstrates a method for validating physical Xbox game discs to digital game entitlements. This disc-to-digital patent seems to have been created recently, though the concept is not a new one: as far back as 2018 (two years before the Series X|S was released) it was reported that such as disc-to-digital scheme would be implemented for the digital-only iteration of the next-gen Xbox.

Digital distribution of games is becoming more and more common, with both Sony and Microsoft releasing digital-only versions of their next-gen hardware. And even in the case of some physical releases (Halo Infinite being one well-known example), a digital download is required to fully install and play the game.

How exactly the disc-to-digital conversion would work remains unclear, but it seems that the process would begin with users uploading a physical game’s licensing details to a server network to gain access to a digital version of the game. The patent information doesn’t seem to address whether the game disc would be usable from there, though it would be likely that if so, users would be required to check in from time to time.

No doubt this would be a very exciting feature for Xbox Series S users and those who haven’t made the next-gen leap from Xbox One as of yet. Though many patent ideas don’t see the light of day, it seems highly likely that Microsoft would want to implement such a feature. Love it or hate it, it appears that the future is digital when it come to gaming.


Intel’s 12th generation family of mobile processors expands with HX series that has up to 16 cores

Intel’s 12th-generation mobile processor line is expanding. The chipmaker recently announced the addition of a new “HX” series of CPUs, which are targeted at higher-end machines utilized for CAD, animation, and visual effects.

As you’d expect, these new chips come in Core i5, Core i7, and Core i9 variants. Per Intel, the HX series processors can provide 65 percent more performance in multi-threaded workloads with more cores, more memory, and more I/O while utilizing Intel Thread Director technology to leverage high-power Performance-cores and Efficient-cores. The mobile processors are also unlocked, and overclockable, which is an industry first.

The HX chips go up to 16 cores, with 8 performance cories and 8 efficiency cores, and 24 threads. It also includes access to x16 PCIe Gen 5.0 via the processor and 4×4 PCIe Gen 4.0 from a dedicated platform controller hub (PCH) for increased bandwidth and faster data transfers. Other features include Memory support for up to 128GBs of DDR5/LPDDR5 and DDR4 with Error Correcting Code (ECC) capability.

“With the new core architecture and higher power limits of 12th Gen Intel Core HX processors, we’re enabling content creators to tackle the most demanding work flows like never before,” said Chris Walker, Intel corporate vice president and general manager of Mobility Client Platforms.

More importantly, these chips offer up to 55 watts of power delivery, or 157 watts under heavy load. Intel worked with different laptop makers on this new chip, and 10 workstation and gaming designs powered by 12th Gen Intel Core HX processors are expected to be launched this year.

With the new HX series of processors, you’ll now find four different 12th-generation chips from Intel. There’s the U-series for budget devices, the P-series for thin and light laptops, the H-series for gaming machines, and now the HX-series for high-end workstations, replacing the W-series of the past.

Microsoft rolls out second Xbox update for May, with unspecified improvements

For the first time this year Microsoft has bucked its trend of releasing one update per month for its Xbox consoles. The newest update (OS version: 10.2.22000.4558) released on May 10 for Xbox One and Xbox Series X|S, less than a week following the usual monthly update that released on May 4.

According to the patch notes section, the update features “General stability and performance improvements” that are otherwise unspecified. One has to wonder if the new update has anything to do with the recent Xbox Network outage that occurred over the weekend, though as stated no real details have been given on what actual fixes and improvements the second May update brings.

Users can install the update manually by pressing the Xbox button, then navigating to Profile & system > Settings > System > Updates. On the Updates page you will be able to see available updates that have yet to be installed, and opt to install them now.

Microphone not Showing up in Device Manager: 3 Ways to Fix

If microphone not showing up in Device Manager, you won’t be able to use it at all, and this can be a problem. However, this can be fixed by following the steps from this guide.

Why is my microphone missing from Device Manager?

This is caused by faulty or outdated drivers. Also, this can happen if your Microphone is disabled.

What can I do if the microphone is not showing up in Device Manager?

1. Re-enable your microphone from Control Panel

  1. Go to Control Panel by typing its name in the Windows Search function.
    control-panel-search microphone not showing up in device manager
  2. Click on Sound and then go to the Recording tab.
    recording microphone not showing up in device manager
  3. Right-click on the window and click on Show Disabled Devices.
    show microphone not showing up in device manager

If your laptop microphone is not showing up in Device Manager, it’s possible that your microphone not working.

A few users also reported that a built-in microphone is not working, so check this guide if you own a laptop.

2. Reinstall microphone drivers

  1. Right-click on the Windows Search bar and select Device Manager.
    device manager
  2. Double-click the Audio inputs and outputs option to expand it. Right-click on the Microphone driver option and press Uninstall device.
    uninstall device
  3. Restart your computer to reinstall the driver automatically.

3. Run the Recording Audio troubleshooter

  1. Press the Windows key + I and select Troubleshoot in the right pane.
    troubleshoot
  2. Select the Other troubleshooters option.
    other troubleshooters
  3. Finally, click the Run button before Recording Audio and follow the onscreen instructions.
    recording audio

That’s about it for this issue. With the solutions in this guide, the microphone not showing up in the Device Manager problem should now be history.

If no microphone works on your Windows 11 PC, check our detailed guide to rectify the issue quickly. We also have a great guide on how to set up mic on Windows 11, so don’t miss it for more information.

Feel free to let us know the solution that helped you fix this issue in the comments below.

Microsoft opens new headquarters in Canada

On May 3, Microsoft officially launched its new headquarters in Canada. The launch also coincided with the launch of new research from EY about Microsoft’s impact on the Canadian economy.

The move will help Microsoft further its cause, helping Canada grow its innovation economy. “With the launch of our new headquarters, the official opening of our Data Innovation Centre of Excellence, and expansion of our regional presence, even more organizations of all sizes and sectors can leverage the power of cloud and data to accelerate their organization’s growth and drive new economic opportunity for Canada,” said Kevin Peesker, President of Microsoft Canada.

An Economic Impact Study by EY revealed that Microsoft, through its vast investments that spread over 40 years contribute more than $37 billion to Canada’s GDP. Furthermore, Microsoft has collaborated with the Digital Technology Supercluster, the company has been able to support 30 projects currently valued at $190 million with the aim of enhancing technological advancements and industry growth. All this is geared toward better preparing the Canadian workforce for the ever-evolving digital economy.

Microsoft specifically chose Toronto to be the center where its headquarters will be situated because of “its strong technology ecosystem”, the depth of multicultural talent, and the large number of internationally recognized institutions. The headquarter houses Microsoft’s Data Innovation Centre of Excellence and an Envisioning Centre which build upon the company’s inclusive hybrid culture which goes a long way when it comes to empowering employees.

The headquarters in Toronto will be able to provide adequate space for startups, students, and community organizations, thus, allowing them to unlock their full potential at the innovation hub due to the availability of vast resources.

Top 6 EPUB Readers for Windows 10 [Free & Paid]

The ability to read is one of the traits that propel humans on top of the trophic pyramid. Reading has been part of the human culture for millennia, but the way it is done has changed significantly.

Today’s generation prefers to read from the comfort of their screens – and why wouldn’t they, it removes the bulk of heavy books and adds infinite options that enhance the experience of reading.

Being able to read from whatever screen you like is the key though, so you need a good ePub reader. This is a list with some of the best epub readers for Windows 10 and other previous versions.

Editor’s Note: if you don’t prefer reading, below you will find a video quickly describing our top 5 choices when it comes to finding a good eBook reader for your Windows PC. However, in order to learn more about each product, we suggest you check out the overview for each one of them.


Which are the best EPUB readers for Windows 10?

Icecream Ebook Reader

Icecream Reader is much less of a sore to the eyes in terms of its UI design. It features a full-screen mode, a night mode, the ability to add bookmarks – things that are essential to an eBook reader for your Windows PC.

While it might not be as light or as simple as some of the other options on this list, it does look a lot more intuitive than some of its competition.

Among its special features, we will find a fullscreen mode, bookmarks that allow you to revisit the most memorable parts of your book, night mode that enables lecture in low light or no lighting at all.

There’s also a book mode where your screen virtually becomes a real book.

Let’s quickly look at its key features:

  • Library (Manage your digital ebook library in FB2, EPUB, PDF, MOBI, and other formats
  • Reading progress (Check how many pages are left to read and continue from where you left off)
  • Book search (Find a book that you’re looking for either by author or title)
  • Copy, Translate, Search (Select eBook text to copy, translate, or search Google)
  • Annotate (Add notes or highlight text with our EPUB reader)
  • Better navigation (Use navigation scrollbar to browse pages faster)

The best way to see if this eBook reader is indeed what you’re searching for is to try it out.

Go ahead and download it following the link below (no strings attached), and you will be able to decide for yourself if this is the software you would like to have on your PC or not.

Icecream Ebook Reader

Icecream Ebook Reader

Transform your PC screen into a cutting-edge ebook-reader instantly with this awesome software.
Check priceView website

Adobe Digital Editions

Now also available on the App Store & Google play, the very best eBook reader is unbeatable when it comes to optimizing your reading experience and the best part is that it works seamlessly across any platform.

Borrow and purchase digital content, which can be read both online and offline, proof-read, make bookmarks and highlights, and better organize your files across all the devices with Adobe Digital Editions.

Let’s quickly look at its key features:

  • Cross-platform functionality (download and transfer books between devices)
  • EPUB 3 support (render audio and video content; support for right to left reading; dynamic image resizing and more)
  • Full-text search functionality and better navigation
  • Various screen readers (including JAWS, Window-eyes, and NVDA)
  • Bookmarking, Highlights & Notes
  • Borrow eBooks from many public libraries
  • File Organization (create custom bookshelves sorted by title, author, and publisher)
  • Multiple File formats (EPUB, EPUB3, and PDF)
Adobe Digital Editions

Adobe Digital Editions

Read your favourite books, articles, and content online in the easiest possible way with Adobe Digital Editions.
Check priceVisit website

Soda PDF

With its modern interface and useful cloud-computing component, Soda PDF has become a popular choice among users, even when it comes to eBook reading.

The software has enhanced editing abilities and unique features designed to give you a more immersive experience, such as the 3D viewing technology. Plus, the numerous viewing options allow you to zoom into the page for clearance, or even change the orientation of the eBook.

Using the sticky notes feature, you can make notes as you go or highlight your favorite passages. Bookmarking and the ability to jump backward or forward to any part of the book by entering the page number will make your experience more enjoyable.

Here are the key features of Soda PDF:

·         Unique 3D page-flipping technology.

·         The Read Out Loud function.

·         Various import options.

·         Adjustable layout and font size.

·         EPUB support.

·         In-built Optical Character Recognition (OCR) system.

·         Cross-platform functionality.

Soda PDF offers two cloud-based pricing packages, but there is also a free version that gives you access to the software’s standard tools.

Soda PDF

Soda PDF

Convert your ePub files into readable, editable PDF files with Soda PDF!
Check priceVisit website

Calibre

Calibre is more than just an eBook reader – it is a complete solution.

It is a full package that can do your library management, convert your eBooks into different formats, sync with your eBook reader devices; it even helps you to find the cheapest price for whatever books you want to buy.

Let’s quickly look at its key features:

  • News feature – which allows it to fetch news from different websites all over the world in many major languages and pack the news as a book
  • One-stop solution for all of your eBook needs
  • Library management tools
  • Conversion and sync tools for different devices

⇒ Get Calibre


Bookviser

Bookviser has a unique interface that looks like a book, it supports not only bookmarking but also highlighting certain text – even with different colors.

It supports various formats such as FB2, TXT, and EPUB. You can also get any book from the library at Project Guttenberg for free.

It is one of the few very modern eBook readers for your Windows PC with features that will suit the generation obsessed with Twitter.

The app comes with a really simple and clean interface and a realistic page-turning animation that will make you feel that you’re reading a real book.

Let’s quickly look at its key features:

  • Set color themes for day and night and to set font type and size
  • Adjust margins and line spacing
  • Select page-turning animation for landscape and portrait modes
  • Add/remove on-page indicators (battery, time, page number and reading progress bar)
  • Easily adjust brightness while reading
  • Easily switch between day/night mode
  • Block/unblock automatic screen orientation

⇒ Get Bookviser


EpubReader

EpubReader – as the name suggests – is an EPUB reader, however a premium one. It lets you manage your local library of ebooks as well as download ebooks from various online repositories like Project Gutenberg.

You can also fully customize everything in the reader itself from font size to the font itself and if you own a Windows tablet – this app also has full touch screen support.

⇒ Get EpubReader


These are 5 of the best Windows 10 EPUB readers for all your eBook needs. There are of course hundreds of other readers to choose from, but these are surely going to please you.

Some of the readers are full of features for power users, but some like to keep it simple and opt for a basic eReader. We hope you have found the right one for your lecture.

If you want to share other EPUB readers for Windows 10 or your experience with one of the already mentioned ones, feel free to reach for the comments section below.
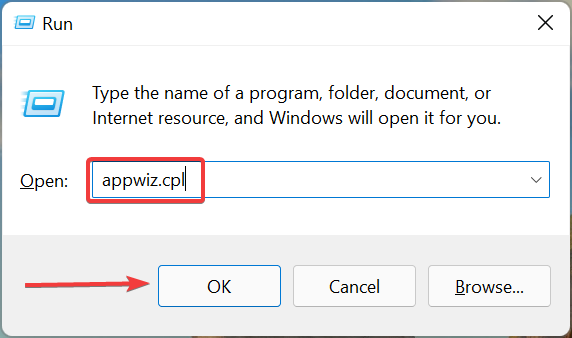

  • What opens EPUB on Windows?

By default, Windows cannot open ePub files. Take a look at our detailed article dedicated to ePub file conversion software to solve your problem.

4 Fast Fixes for Error 0x8000000b in Mail App [+Video]

You’ve got an important email to send, but you receive the error 0x8000000b while trying to send your email. What now? To first understand why this happened, we have to understand the nature of this error.

This error is related to syncing issues, and it appears when you’re trying to set up your email app. Whether you use Gmail or Yahoo, this can happen when you’re configuring them in the Windows 10 email app.

When you click on that Send button, your email app will try to connect with the email server automatically to get the server settings, but sometimes this error occurs. But fear not, we’ve created a list of tips and fixes for you. So let’s get to solving.

How can I fix error 0x8000000b?

  1. Setting up your mail in Windows 10
  2. Resetting Windows apps
  3. Allow access through Firewall
  4. Disable your Firewall

1. Setting up your mail in Windows 10

Let’s try adding your proffered email account into the Mail app. This should help you solve error 0x8000000b. To do this, follow these steps:

  1. Launch your Mail app and click on the Settings icon.
    error 0x8000000b mail app
  2. Select Manage accounts, and then click Add account and then click on the Advanced setup option.
  3. Next, in the same Add an account section, click the Internet email option.
  4. On the next screen, provide your desired email account details.
  5. Now, click Sign in and wait for a few minutes, your email account will be added successfully to the Mail app.

2. Reset the Mail app

You might be able to fix error 0x8000000b by resetting the Windows 10 apps which are not working properly. When you’re done, check if the Mail app works for you.

  1. Press the Windows logo + I keys on the keyboard, and open the Settings.
  2. Click on System and then click on Apps & Features, and select the Mail app.
  3. You will see Advanced options, click on it.
  4. In the Advanced options, click on Reset.
    error 0x8000000b reset mail app
  5. Click once more on the Reset button to confirm.
  6. You can now close the Settings app and return to your desktop.

3. Allow access through Firewall

In the event that you are using an antivirus or your Windows Defender is enabled, they can potentially be the cause for error 0x8000000b. So let’s get on it.

  1. Open Start and type Windows Defender Security Center.
  2. Select the Firewall and network protection.
  3. Now choose Allow an app through firewall, and click on Change settings.

    change firewall settings error 0x8000000b

  4. You will see a list of allowed applications, make sure to select both Private and Public boxes for Mail.
  5. Click OK, and you’re all set.

4. Disable your Firewall

In the event that you’re still having error 0x8000000b, you can try to disable your Firewall, and see if that works. To do this, follow these steps:

  1. Open your Windows Defender Center again.
  2. Head to the Firewall and network protection section.
  3. Now select a network profile and turn off Windows firewall for it.
  4. Try running your Mail app now.

You can remove and add your account if it doesn’t sync at first. In order to do this, follow these steps:

  1. Type Mail in your Start Menu.
  2. Once you’ve clicked on the app, you should head over to the Settings icon.
  3. Choose your account and select Delete account.
  4. After this, add your account back in.

We hope that these solutions were of use to you and that you’ve managed to fix error 0x8000000b.

RELATED STORIES TO CHECK OUT:


Gotham Knights game cancelled on Xbox One, Xbox Series X pre-orders now open

Digital pre-orders just went live for Gotham Knights and it’s now been confirmed that the last-gen Xbox One version of the video game has been completely shelved and that the title will now only release on Microsoft’s current-gen Xbox Series X generation of Xbox consoles.

This decision was reconfirmed in a new video released on the official Warner Bros Games YouTube channel that made a brief mention of the new focus on current-gen consoles only where the usual rationale of wanting to give gamers the best possible version of the game was used.

For the most part, the video focuses on Gotham Knights’ gameplay though so it’s also worth a watch if you’re interested in how Robin, Nightwing, Batgirl, and Red Hood will move.

Gotham Knights will release in both a regular version and a special Deluxe Edition version on the Xbox Series X. The Deluxe Edition of Gotham Knights includes the base game and all of the following content:

  • Exclusive ‘’Knightwatch by Jim Lee’’ Transmog
  • Beyond Suitstyle, inspired by Batman Beyond universe
  • Salvage to build new Gear
  • Boosted Gear
  • Exclusive Emote
  • 3 Exclusive Suit Colorways
  • Ultra Zur-En-Arrh
  • Chroma Frost
  • Tribute Asylum

Pre-orders for both versions also include a 233 Kustom Batcycle skin.

Are you excited for Gotham Knights and are you disappointed by the canning of the Xbox One version? Let us know in the comments below and then follow us on Pinterest, Twitter, and Facebook.

Download the May 2022 Adobe Patch Tuesday updates

No doubt, many of you are waiting for the Patch Tuesday monthly batch of security updates and we’re here to make it a bit easier for you to find what you’re looking for.

It goes without saying that Microsoft isn’t the only company that has such a rollout on a monthly basis. So, in this article, we’re going to talk about Adobe and some of the patches for their products.

As we’re pretty sure you know by now, we will also include links to the download source, so you don’t have to scour the internet to find them.

Adobe Framemaker needed the most work this month

Although many didn’t foresee it, last month was a pretty busy one for Adobe, with four updates addressing 70 CVEs in Acrobat and Reader, Photoshop, After Effects, and Adobe Commerce.

May is a lot more light in terms of updates volume, so there really wasn’t that much to fix this time around.

This month, Adobe only released five updates addressing 18 CVEs in Adobe CloudFusion, InCopy, Framemaker, InDesign, and Adobe Character Animator.

Out of all the updates in this rollout, the largest one is the fix for Framemaker, with 10 CVEs in total, out of which nine are Critical-rated bugs that could lead to code execution.

Security experts explained that this could be the case mostly due to Out-of-Bounds (OOB) Write vulnerabilities.

Vulnerability CategoryVulnerability ImpactSeverityCVSS base score CVSS vectorCVE Numbers
Out-of-bounds Write(CWE-787)Arbitrary code executionCritical7.8CVSS:3.0/AV:L/AC:L/PR:N/UI:R/S:U/C:H/I:H/A:HCVE-2022-28821
Out-of-bounds Write(CWE-787)Arbitrary code executionCritical7.8CVSS:3.0/AV:L/AC:L/PR:N/UI:R/S:U/C:H/I:H/A:HCVE-2022-28822
Use After Free (CWE-416)Arbitrary code executionCritical7.8CVSS:3.0/AV:L/AC:L/PR:N/UI:R/S:U/C:H/I:H/A:HCVE-2022-28823
Use After Free (CWE-416)Arbitrary code executionCritical7.8CVSS:3.0/AV:L/AC:L/PR:N/UI:R/S:U/C:H/I:H/A:HCVE-2022-28824
Out-of-bounds Write(CWE-787)Arbitrary code executionCritical7.8CVSS:3.0/AV:L/AC:L/PR:N/UI:R/S:U/C:H/I:H/A:HCVE-2022-28825
Out-of-bounds Write(CWE-787)Arbitrary code executionCritical7.8CVSS:3.0/AV:L/AC:L/PR:N/UI:R/S:U/C:H/I:H/A:HCVE-2022-28826
Out-of-bounds Write(CWE-787)Arbitrary code executionCritical7.8CVSS:3.0/AV:L/AC:L/PR:N/UI:R/S:U/C:H/I:H/A:HCVE-2022-28827
Out-of-bounds Write(CWE-787)Arbitrary code executionCritical7.8CVSS:3.0/AV:L/AC:L/PR:N/UI:R/S:U/C:H/I:H/A:HCVE-2022-28828
Out-of-bounds Write(CWE-787)Arbitrary code executionCritical7.8CVSS:3.0/AV:L/AC:L/PR:N/UI:R/S:U/C:H/I:H/A:HCVE-2022-28829
Out-of-bounds Read (CWE-125)Memory LeakImportant5.5CVSS:3.1/AV:L/AC:L/PR:N/UI:R/S:U/C:H/I:N/A:NCVE-2022-28830

Moving on, the software fixes for InDesign address three Critical-rated bugs that could also lead to code execution, out of which two are due to OOB Writes while one is an OOB Read.

Adobe also issued fix patches for InCopy. In this case, we’re talking about three Critical-rated code execution bugs.

Two OOB Writes plus a Use-After-Free (UAF), just in case that was going to be your next question on this subject.

We also got a patch for Character Animator, one that fixes a single, Critical-rated OOB Write code execution bug.

And, last but not least, the ColdFusion patch corrects an Important-rated reflected cross-site scripting (XSS) bug.

It’s also important to know that none of the bugs fixed by Adobe this month are listed as publicly known or under active attack at the time of release.

What’s your take on this month’s release? Share your thoughts with us in the comments section below.
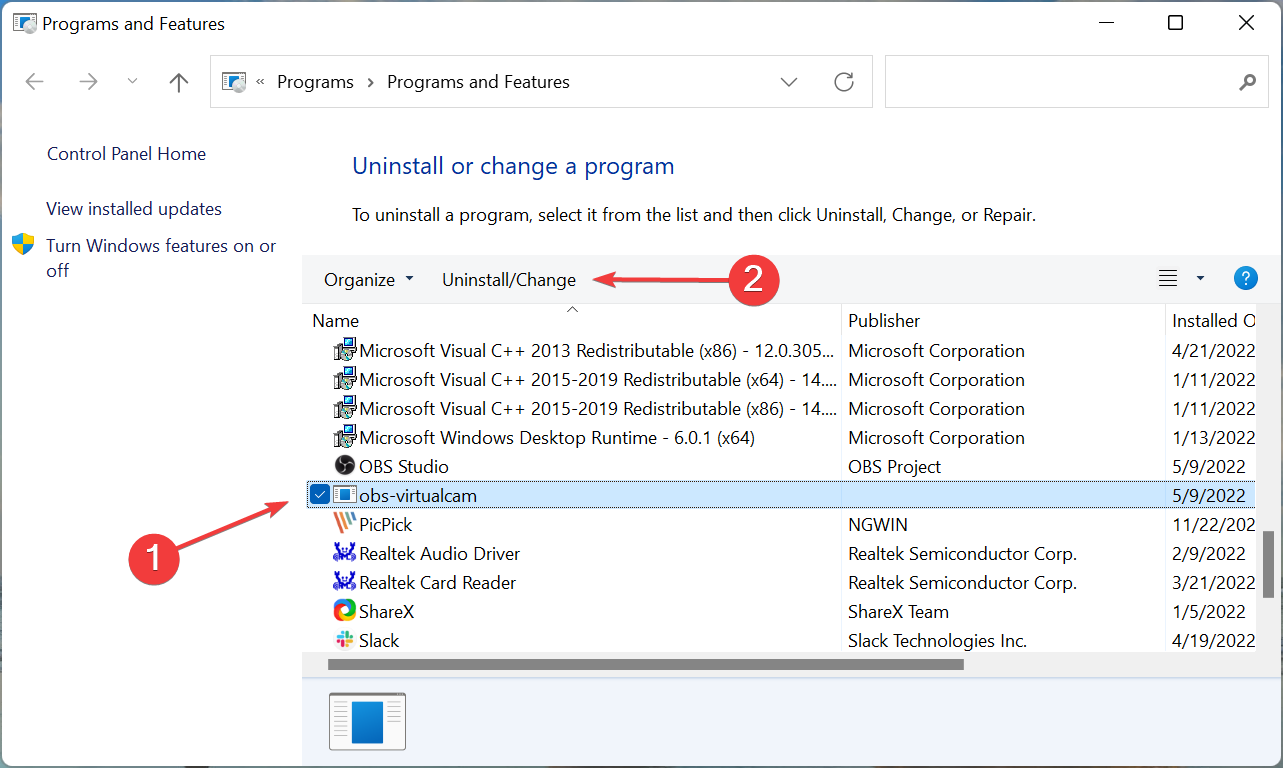
Error Code 1020 Crunchyroll Access Denied: 7 Ways to Fix it

The error code 1020 Crunchyroll Access Denied can block you from accessing the content on the website. The error can frustrate you because the website does not recognize your IP address.

This is similar to error code 1005 Access Denied when trying to access some websites, but fixing this issue is easier than you think.

Join us while we take a closer look at this issue and explore all the available solutions.

Why does the error code 1020 occur in Crunchyroll? This issue occurs when the internal settings block your IP address. This means Cloudflare does not allow connecting your computer and the desired website.

You can also experience Crunchyroll error code 1020 on your Xbox console. It may be because you turned off the console without closing the app properly.

Another reason is a conflict between the cookies stored on your computer and the current version of the website.

How do I fix error code 1020 on Crunchyroll?

1. Restart your internet router

  1. Press the Power button on.
  2. When it turns off, unplug the power cable from the power source.
  3. Insert the power cable into the power source and turn it on.

Sometimes, the router may be why the Crunchyroll website blocks your computer from accessing its content.

2. Restart your computer

  1. Press Alt + F4 to open the Windows shutdown pop-up menu.
  2. Use the arrow keys to highlight the restart option.error code 1020 crunchyroll
  3. Press Enter to restart your computer.

3. Disable Adblockers on the Chrome browser on your PC

  1. Open the Chrome browser on your PC.
  2. Click on the Extension icon.
  3. Select Manage Extensions.error code 1020 crunchyroll
  4. Highlight the adblocker extension.error code 1020 access denied
  5. Toggle off the adblocker extension.error code 1020 crunchyroll
  1. Toggle off other extensions.error code 1020 crunchyroll
  2. Reload the Crunchyroll website.

Some browser extensions can block access to a particular website without you knowing. It’s, therefore, essential to disable the extensions you’ve installed one after the other to see if you can re-access the website.

Crunchyroll is a freemium streaming platform that provides 1000s of anime for users worldwide. People who use the premium version have no problem with ads.

The free version of Crunchyroll has ads turned on. Suppose you have an ad blocker extension installed on your browser; it might cause the app to malfunction. In most cases, when you disable the ad blocker alone to resolve the error code 1020.

4. Clear your browsing data

  1. Open the Chrome browser on your PC.
  2. At the top right, click on More.error code 1020 access denied
  3. Click on More Tools.
  4. Under Privacy and security, select Clear browsing data or press Ctrl + Shift + Del. error code 1020 crunchyroll
  5. Select the Advanced tab.error code 1020 access denied
  6. Choose a time range, such as Last hour or All time.
  7. Select the type of information that you want to remove.error code 1020 crunchyroll
  8. Click on the precise data you want to delete, including the browser cache.
  9. Click on Clear data.error code 1020 crunchyroll

The Crunchyroll website uses cached data and cookies to provide optimal performance and a personalized viewing experience.

When you don’t have the latest saved cookies on your browser, it can cause the error code 1020 anytime you open the website.

Clearing the browsing data will refresh the website and help you fix issues like Crunchyroll Error P-DASH-114. Removing the browsing data can delete your saved data, like passwords, depending on the information you choose to delete.

To have more control over what type of data you remove and keep, use CCleaner. This application breaks down your browser data into multiple categories, allowing you to pick exactly what you want to delete.

5. Turn off the Microsoft Defender Firewall

  1. Press Win + I to open the Settings app.
  2. Select Update & Security.windows update & security
  3. Click on Windows Security, and select Open Windows Security.
  4. Select the Firewall & network protection option.
  5. Select any network profiles: Domain network, Private network, or Public network.windows firewall network profile
  6. Under Microsoft Defender Firewall, switch the settings to off.turn off firewall

6. Check your VPN settings

Many Crunchyroll content is available only to the US audience. Users outside the US ‌use a VPN service to access some of their favorite anime.

The Crunchyroll server can block your VPN IP address from watching the videos on the website. If Crunchyroll blocks your VPN’s server, you can resolve the issue by changing the location.

7. Contact Customer Support

If none of the above solutions work, you can contact the customer support of Crunchyroll. It will be best if you send a screenshot of the error.

To contact the Crunchyroll support team, head over to the official forum. Fill out a form detailing the issues you have. And someone from their support team will reach out to help you.

You may see the error code 1020 when you try to create an account on Crunchyroll. Any of the troubleshooting methods above can help you resolve the problem.

The solutions outlined above will help access the content on the Crunchyroll website. Sometimes, the error code 1020 isn’t the only error you’ll face when accessing the web.

One of the most common errors is a website not allowed, but we covered that one in a separate guide. Sadly, this isn’t the only issue, and many reported Crunchyroll Error Code Shak-6007-Generic as well.

Which of the solutions helped you to solve the error code 1020? Let us know in the comment section below.
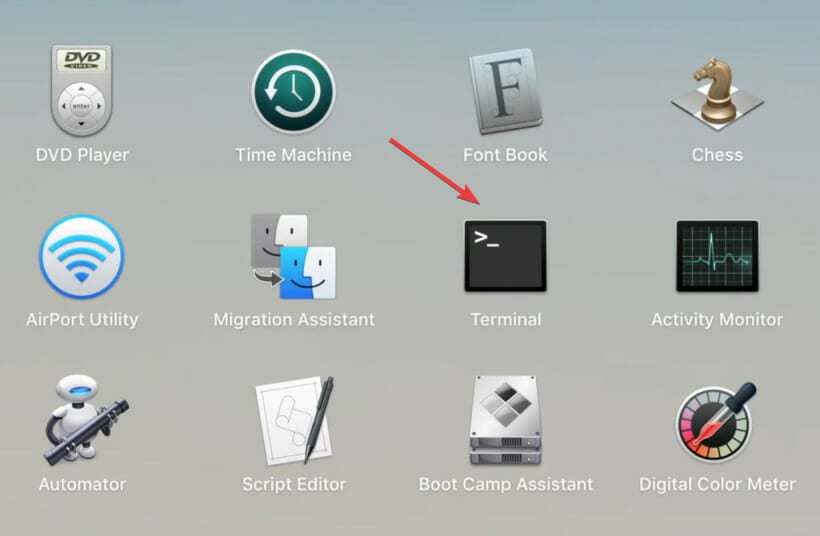
Microsoft finally lists all the Build 2022 sessions

Microsoft Build 2022 is now about two weeks away, and Microsoft has just updated its webpage for the developer conference with session lists. First noted by Walking Cat, there are now a total of 524 different sessions available across the three-day event.

Unlike years past, there do seem to be a lot of different sessions this year specifically mentioning WIndows, with a search on the site showing 51 different Windows-themed sessions across various different languages. There’s even one that specifically features Panos Panay titled “Create next-gen experiences at scale with Windows.”

Other than that, from our quick search, there are also 7 different Android-themed sessions and plenty of sessions dedicated to Microsoft Teams. As spotted by Thurrott.com, these might be some of the most interesting if you’re registered for Build.

Due to the pandemic, Microsoft Build 2022 is again virtual, and you don’t need to pay to attend. It’s free, and a signup link is available right here. You can even plan your Build experience by adding things to your schedule or saving it to a virtual backpack.

Microsoft Build will be the second major tech conference of this year. Google I/O is set to kick off tomorrow on May 15. After Google, comes Microsoft Build, and then Apple has its own WWDC on June 6. Some Build 2022 sessions previously leaked, but Microsoft was quick to take them offline, only for them to return today.

Music Software for Windows: 30 Best Programs to Use

Making music is a passion, and with scores of applications accessible on the internet, it’s no longer a difficult task. You will however need music software for Windows to begin with.

Because Windows is the most widely used operating system on the planet, we’ve compiled a comprehensive list of the best music production software for Windows in this article.

While some are free to download and use, others provide a free trial version before purchasing the paid version.

You will be able to enjoy the sounds you’ve created using the best music players for Windows 11. So keep reading to find out which app will be most suitable for you.

How do I record music directly on my computer?

Before recording your music, you will need to acquire the proper gear. Some musts haves are:

  • A digital audio workstation or your music production software. We will discuss many of these in this article.
  • An audio interface unit for recording midi, vocals, and instruments.
  • A microphone to aid the capture of vocals or an acoustic instrument.
  • Vocal isolation shields for recording when there is so much noise.

With these tools in hand, you will usually follow these steps to record music on your PC:

  1. Connect the different devices.
  2. Launch and preset the music production software.
  3. Click on the record button.
  4. Repeat the recording process for all tracks.
  5. Save your work.

What software do most musicians use?

As a musician, the tool you use will depend on what you are trying to achieve. There is software, for recording, editing audio, automatic composition, beat making, as well as music analysis, etc.

Additionally, we have software that combines more than one of these functions. So, what a musician hopes to achieve will determine the tools that they use.

That said, in this article, we have covered all the popular ones used by musicians, so anyone you choose to go with will be a good option.

What is the best software for making music on PC?

Adobe Audition – The most advanced

Audition is a complete suite of tools for editing, mixing, generating, and recovering audio files, including waveform, multitrack, and spectral display.

This powerful DAW is designed to speed up your video and audio production workflows and your audio post-production so you can have the highest quality mix with crystal-clear sound.

Additional features:

  • Smart track colors
  • Custom channelization
  • Professional multitrack UI

It includes DeNoise and DeReverb effects and powerful playback and recording capabilities. You will also be able to restore audio as well as experience real-time clip stretching.

Adobe Audition

Learn how to utilize the spectrum frequency display, Diagnostics panel, effects, and other tools for audio correction.
Check price Visit website

Avid Pro Tools – Optimized for after production

Using this app, you’ll have all you want to create songs, produce beats, and record instruments as well as vocals on major platforms.

You can quickly produce songs and realistic-sounding effects and tracks with simple MIDI tools.

It’s also simple to integrate loops that adapt to the speed of your session, and you may freely develop and explore without having to stop the playback.

Additional features:

  • mixing automation
  • Extensive plugin list
  • Pitch and audio timing

We like it because it features a Cloud Collaboration, so, you will be able to exchange ideas and collaborate on projects with anybody, wherever.

Avid Pro Tools

Thousands of instrument sounds are included, including GrooveCell, SynthCell, Boom, Mini Grand, Xpand, and more.
Check price Visit website

Sound Forge Pro – Great for sound engineering

For many users, this program has been the go-to audio editing software of choice for almost 30 years.

Many sound engineers and producers across the globe use it because of its vast set of professional capabilities.

You can now edit, record, master, and restore with ease thanks to new workflow enhancements. You will love that it allows you to mix, create, as well as design sound effects.

Additional features:

  • Analog modeling suite
  • Vintage effects suite
  • Celemony Melodyne

And finally, its audio finishing, quicker video production procedure, and finished mix with clean sound are all features you will enjoy.

Sound Forge Pro

True-peak analysis in dbTP, which may be set up using simple presets, supports EBU R 128 and ITU-R BS.1770-4 formats.
Free trial Visit website

NCH WavePad Audio – Most basic audio recorder

NCH WavePad Audio is a recording program with many valuable features included in the free version.  Its UI may not be as pretty as many others on this list, but it’s simple to set up and use.

It supports an extensive range of audio file formats, giving you more creative flexibility. Also, you can use it to record and edit audio tracks for movies and podcasts, and it’s a dependable and productive tool.

NCH WavePad Audio is available in three versions: a free version with restricted functionality, a Standard version, and a Master’s version. 

Additional features are available for $60 in the Standard Edition, while complete exposure to all the possible features is available for $99.

Additional features:

  • DirectX and virtual studio support
  • Batch processing
  • Spectral Analysis

NCH WavePad Audio

You may record and edit music, and voice, as well as cut, copy, and paste sections of recordings and apply effects.

Acid Pro 10 – Simple to use

Magix Program now develops Acid Pro, a professional audio software.

Sonic Foundry first released it as Acid pH1, then it was acquired by Magix in April 2018.

It isn’t the fanciest tool, but it includes all of the essential functions. There’s also the ability to record, MIDI support, and track looping.

The tool comes with roughly 90 VSTs to play around with, and this is great to use with your MIDI controller. In addition, it has nice track series loops.

Additional features:

  • Morph pads
  • Brainworx Plug-in suite
  • Multitrack recording

It’s pretty inexpensive, so if you’re searching for a low-cost music app that’s existed for a long time, you should give it a try.

Acid Pro 10

Its game-changing technology automatically matches loops to the tempo and key of your project and paints loops straight into your timeline.
Free trial Visit website

AmpliTube Custom Shop – Amazing guitar rig

This music software is a guitar rig modeling program that is fully functional.

It has nine stompboxes, three microphones, a digital chromatic tuner, five cabs, four amps, as well as two rack effects, among other features.

Furthermore, when recording straight into a laptop, there are sufficient features to keep any guitarist satisfied. The tones are realistic, and the range of customization is astounding.

Additional features:

  • Several effects
  • Several models
  • Fully developed guitar rig

However, if you want to extend your collection of stompboxes, amp models, and cab simulators, you’ll have to spend extra.

Amplitube Custom Shop

You’ll get the most authentic tone possible, as well as strong workflow tools to allow you play, practice, and record directly on your PC.

FL Studio – Perfect for music production

30 best music software for windows

FL Studio is one of the biggest digital audio workstations, but is FL Studio worth it? Well, here is what you should know.

If you’re a newbie seeking to get started with music production software, FL Studio is an excellent place to start.
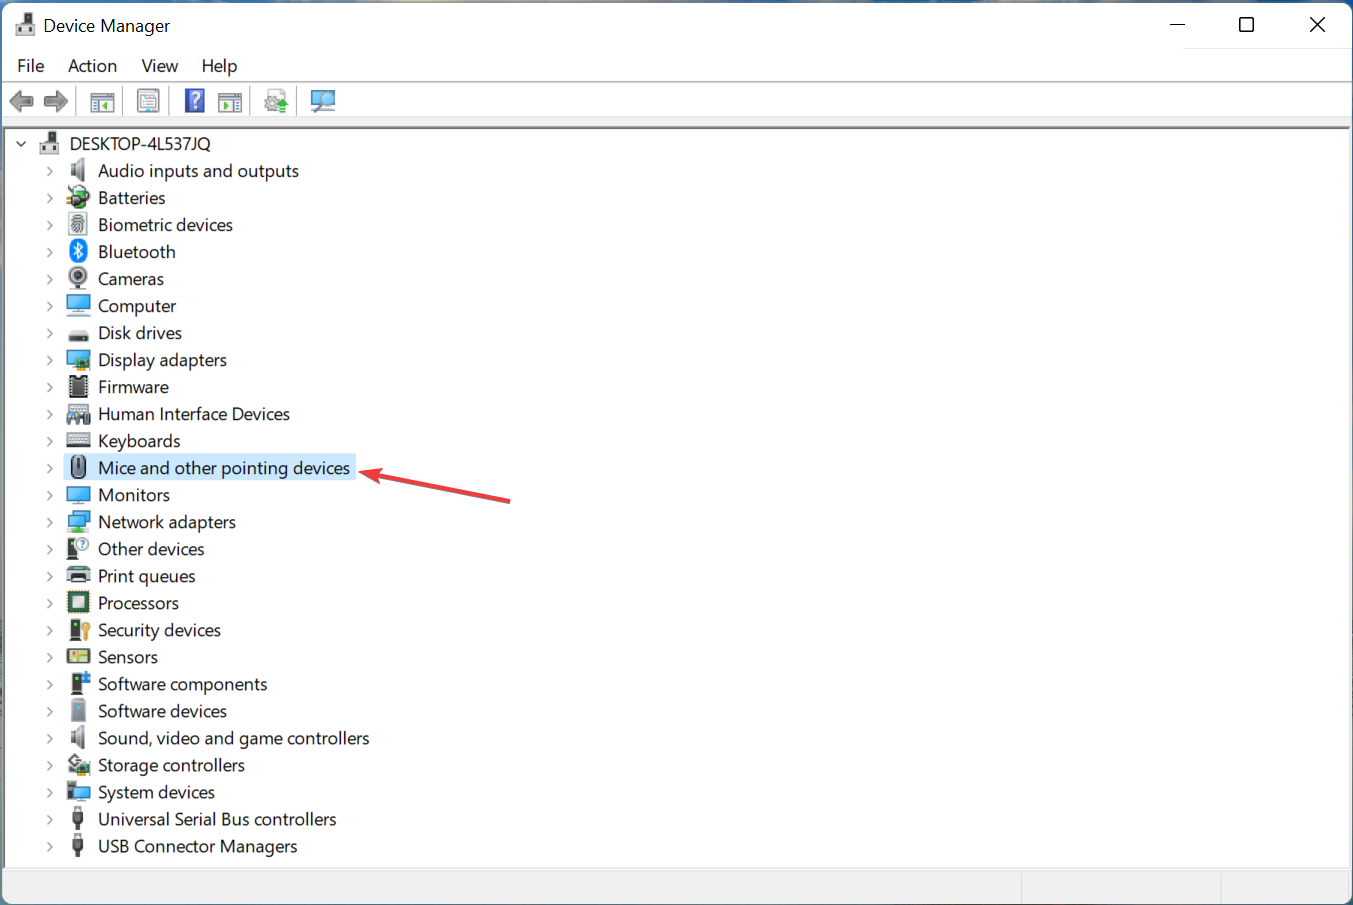
It uses standard protocols, such as cut and paste, sound correction, stretching, and pitch shifting. However, the most appealing feature is its UI, which was created with novices in mind.
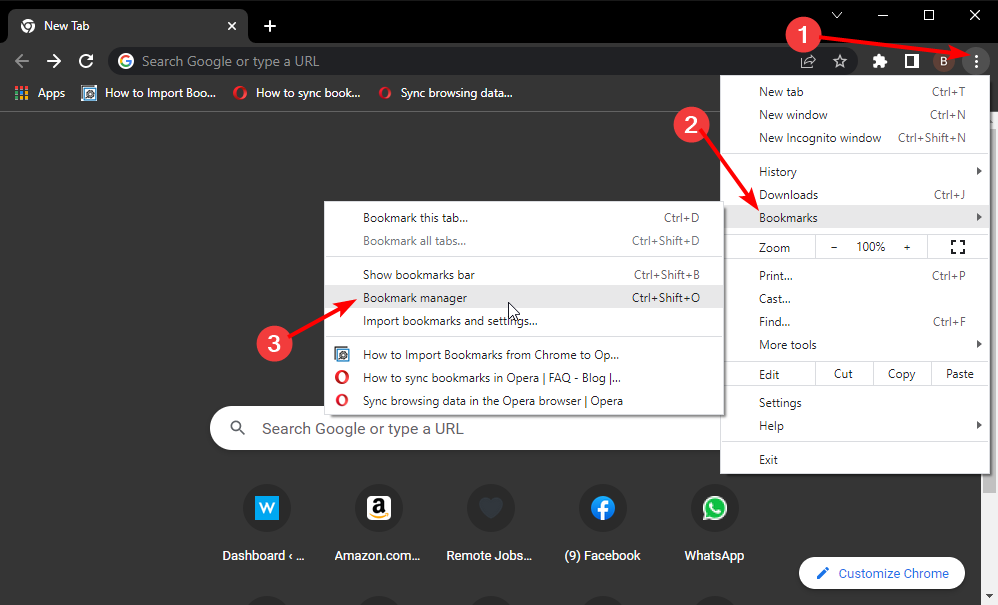
In addition to that, you receive 30 out-of-the-pack synth software, and it has so much learning material distributed to get you up to speed.

So, if you’ve just purchased a controller and would like to check out some sounds right away, you won’t have to invest the extra money.

It meets all the main criteria of a music tool, whether you want to record with a microphone, use MIDI keyboards, or conduct standard mixing and editing.

Additional features:

  • Beat slicing
  • Up to 125 simultaneous audio track recording
  • Mobile compatibility
  • Easy and pretty UI

FL Studio

Get the best music experience with this fully-featured music software.
Free Trial Visit Website

Audacity – Versatile and open-source

30 best music software for windows

Audacity is an audio recording and editing open-source music software that works across different platforms, including Windows, Linux, and macOS.

This tool enables you to record music from a variety of sources as well as post-process almost any sort of audio format.

Furthermore, using its frequency analysis tool, you can apply various music effects, treble, bass, fine-tune the pitch, and evaluate files.

The program displays your music as editable waveforms that anyone may manipulate.

You can also use the copy and paste to change the music track, and the extra plug-ins to enhance the sequence of effects.

Additional features:

  • Extensive plug-ins
  • Keyboard manipulation support
  • Spectrogram view mode

⇒ Get Audacity

Ableton Live – Extensive recording features

30 best music software for windows

The typical design rules were discarded when the initial edition of Ableton Live was published in 2001.

Now, it is recognized as being more than a recording software for composers, but also as a performing tool in its own right. 

Ableton Live’s popularity has skyrocketed, and it has encouraged the creation of a slew of additional mobile and desktop applications.

It has a new Live 11 version and while some of the improvements may take some getting accustomed to, Ableton has improved Live’s capabilities without adding baggage.

We believe that it maintains its position as one of the most advanced music programs for Windows.

Additional features:

  • Multitrack recording
  • Powerful MIDI sequencing
  • Advanced warping

⇒ Get Ableton Live

Reason Studios – Advanced rack-based DAW

Reason has experienced significant adjustments. For example, the rack-based digital audio workstation’s creator, Propellerhead Software, changed its name to Reason Studios in 2019.

Reason’s Rack Plugin was produced due to this, allowing the digital audio workstation’s main tools to be used as an AU plugin or VST 3 inside other DAWs.

However, Reason can still be used as your primary DAW, but with the standard effects and instruments now accessible for cross-software use, it is even more appealing as a third-party integration.

Additionally, it features a powerful and versatile Combinator, a new sampler, and high-res visuals, making it even more appealing.

Additional features:

  • SSL mixer
  • Rack-modeled workflow
  • Multiple plugins

⇒ Get Reason Studios

Steinberg Cubase – Music production veteran

30 best music software for windows

For nearly 30 years, Steinberg has been at the forefront of the development of music software.

Cubase, which began as a MIDI sequencer, was responsible for introducing a generation of screens with a block-based arrangement.  that is now found in the majority of music software. 

Despite rising competition, Cubase remains at the top of the market. Cubase 11, the most recent edition, is a great upgrade that improves on a lot of fronts.

For example, the enormous sound library, several outstanding plugins, and vast functionality make it well worth its value for new buyers.

Additional features:

  • Refined workflow
  • MIDI Remote integration
  • FX Modulator

⇒ Get Steinberg Cubase

DarkWave Studio – Lightweight and easy to use

This application takes up very little space on your computer compared to other music-making tools for Windows PC.

Its Pattern Editor allows you to pick and alter digital music patterns. On top of that, the Sequence Editor lets you blend songs and put up patterns to play in any order. Also, Live audio is recorded using the Hard Disk Recorder. 

This music app also comes with 19 special plug-ins that you may use to enhance your songs with virtual effects.

The different features may create a learning curve, but several courses and resources are available online.

And finally, it is free music software for Windows but you will have to put up with the constant advertisements.

Additional features:

  • Multitrack hard disk recorder
  • Multi-core and multi CPU support
  • DirectSound full duplex support

⇒ Get DarkWave Studio

LMMS – Beginner-friendly

Linux MultiMedia Studio (LMMS) is a Linux and Windows-based cross-platform music creation program. It’s appropriate for all types of music creation and is an excellent free software alternative for novices.

To assist you in creating music, LMMS employs numerous windows. For example, the Piano Roll may be used to alter tunes, while the Beat/Bassline Editor can be used to construct a rhythm section.

Also, the Song Editor will provide you with a summary of the audio structure, and the FX Mixer will bring it all together. You may even use the Automation Editor to automate multiple effects and loudness.

Additionally, it has many instrument synthesizers, making it an excellent tool for creating music using MIDI controllers for free.

Additional features:

  • Bassline-Editor
  • Full automation support
  • 64 effect channels

⇒ Get LMMS

PreSonus Studio One – Designed for singer-songwriters

This music app has kept gaining traction for many years and is now a powerful digital audio workstation.

With a fully developed Clip Gain Envelopes and Score Editor that enables precise volume automation, version 5 marks the software’s true maturation.

In reality, it’s rated as one of the greatest DAWs available, and whether you’re a long-time fan or a newbie, you will find it a handy app.

Studio One genuinely reflects modern virtual studio design with its seamless workflow, contemporary interface, responsiveness, and innovative feature set.

Additional features:

  • Export multiple formats
  • Backup and archive support
  • Drum notation

⇒ Get PreSonus Studio One

Cakewalk – All in one production package

Cakewalk – originally called Cakewalk SONAR – was among the earliest DAWs, but development was suspended by its owner.

Fortunately for musicians, BandLab, a cloud music composition platform, purchased the program and offered it free to download.

Cakewalk is a full-featured music production suite that includes extensive mixing and mastering capabilities, as well as instruments and songwriting tools.

Also, it gives you access to audio tracks, limitless MIDI, and comprehensive editing tools. After you’ve completed your work, you may upload it to Youtube, SoundCloud, Facebook, and various other platforms.

Additional features:

  • Real-time collaboration
  • Tip jar
  • Studio-quality effects

⇒ Get Cakewalk

Waveform – Feature-packed DAW

Waveform is different from other music software and has more features than most of them. Hence, it is ideal for even the professional producer. 

There are no limitations of any kind, and you may use popular plugins as well as the extensive feature set to get more out of it. 

This tool is compatible with Windows, Linux, and Mac OS X, and a Subtractive Synthesizer, and Groove Doctor are included in the Pro version.

What we like the most is that you could get a Waveform free download and enjoy the app without any payment.

Additional features:

  • No timeouts
  • Unlimited track count
  • Unrestricted rendering

⇒ Get Waveform

Cockos Reaper – Complex audio workstation

Reaper is a complex digital audio software, but the capability it can provide if you put in the effort to understand it is unrivaled.

A small group of people created it to provide you with the basics of music software without a slew of other features you’ll probably never use. However, it turned out to be very feature-rich.

You can easily map your MIDI controllers, drag and drop FX and VSTs, use plug-ins from various developers, as well as edit individual songs. Additionally, it supports most audio interfaces, effects, and plug-ins.

You have a 60-day window to try it before paying, which is enough time to decide if it is the tool for you.

Additional features:

  • Audio and MIDI routing
  • Several third-party plug-in effects
  • Custom skins and layouts

⇒ Get Cockos Reaper

Surge XT – Advanced synthesizer features

We believe this is the best free synthesizer available because it is very versatile and adaptable.

It is open-source and was created based on the discontinued Vember Audio’s Surge virtual instrument. Surge XT was made public, and this made the open-source community improve the program.

For example, they added three oscillators with built-in effects, sophisticated modulation, several synthesis methods, and many presets.

Surge XT now has a more straightforward UI than earlier versions, making it ideal for novices.

Additional features:

  • 27 effect algorithms
  • Cross-platform
  • Enhanced modulation options

⇒ Get Surge XT

TDR Nova – Parallel dynamic equalizer

TDR NOVA is a dynamic equalizer that works in parallel. Each band has a robust dynamics section; this means its processor can handle an extensive range of functions. 

The tool offers an easy solution for different problems, for example, a master missing depth, a drum bus requesting more crispness, or a sibilance issue in your ideal take.

In addition, it gives quick and easy access to different settings controlling NOVA’s outstanding processing features. For example, a WYSIWYG drag-and-drop interface is mixed with a conventional knob interface.

NOVA can handle even the most unusual requests with its extra high and low-pass filter and four dynamic EQ bands.

In conclusion, equal loudness features are intuitive and let you select the best setting without being distracted by loudness discrepancies.

Additional features:

  • Multi-band compression
  • Dynamic equalization
  • Wideband compression

⇒ TDR Nova

Ohm Studio – Optimized for collaboration

Ohm Studio is a free digital audio workstation with a lot of features. It’s the music software project of Ohmforce, a well-known plugin vendor.

This software gives you unlimited access to all of the main music-making capabilities of any premium music software.

It’s designed for collaboration, so it integrates tools that let you share your songs with co-workers.

Additional features:

  • Essential and additional tracks
  • Real-time collaboration
  • Multiple pre-sets

⇒ Get Ohm Studio

MPC Beats – Extensive plugin support

The iconic MPC range of groove boxes from AKAI is well-known. So it’s only natural that they’re branching out into beat-making software with MPC Beats, their MPC-inspired music software.

This digital audio workstation is primarily aimed at hip hop producers and beatmakers and is designed with a DAW-style timeline UI.

It also has some basic recording capabilities and a few effects to bend and change sounds.

The app has 8 tracks, and features 2 sound recording tracks, but is only on Windows OS.

Additional features:

  • Piano roles for MIDI notes
  • Sample editor
  • SOund and audio browser

⇒ Get MPC Beats

Podium Free – Perfect for beginners

Here is a free music application accessible solely to Windows users.

It features a unique modern workflow, but its UI looks outdated. The tool comes packed with a digital audio workstation-style mixer as well as a timeline.

An unlimited amount of tracks and a total VST compatibility are also included in the free Windows music program.

Its sole flaw is its lack of support for multicore PCs, so you might experience CPU overclocking.

That aside, it is a robust tool and a good entry point for music creation on PC. 

Additional features:

  • 64-bit mixer engine
  • MIDI interface setup
  • Surround-sound playback support

⇒ Get Podium Free

Spek – Powerful acoustic spectrum analyzer

Spek displays the spectrogram of audio files and analysis them. It’s a free music program that runs on Windows, Linux, and Mac OS.

The FFmpeg libraries provide support for all main audio file formats. Also, it has many analysis threads, so, you’ll get ultra-fast signal processing.

For the finest spectrogram quality, the music program includes several frequency bands, and a display of audio signals as well as the codec name.

You’ll be able to use drag-and-drop to move image files saved as a spectrum.

Additional features:

  • Auto-fitting time
  • Multi-language support
  • Frequency and spectral density rulers

⇒ Get Spek

orDrumbox – Advanced acoustic synthesizer

The orDrumbox music software is a drum machine program that includes a bespoke arpeggiator.

You will also enjoy custom softsynths, polyrhythms, auto-composition, automated sound matching, low-fi rendering, and other unique features.

It’s perfect for quick results and experimentation multiprocessing.

This free Windows music software can automatically generate melodic patterns, bass lines, as well as whole songs.

Furthermore, it has a sound and rhythms database and music objects that may be completely altered.

Lastly, the completely configurable softsynth component will appeal to you, and you may add various synthetic sounds as presets to your soundbank.

Additional features:

  • Automatic composition
  • Audio Mixer/ FX
  • Automatic sound assignations

⇒ Get orDrumbox

Acoustica Mixcraft – For professionals

Mixcraft is unequaled for its sheer power and ease of use, and it has been designed for the musician.

With its pitch-shifting, lightning-fast sound engine, and amazingly intuitive interface, you can record and mix your songs to perfection.

It has a time-stretching capability and virtually universal compatibility for third-party extensions, hardware controls, as well as audio interfaces.

You may easily record an infinite amount of virtual instruments and audio tracks and cut, edit, and crossfade them.

Acoustica Mixcraft allows you to automate a variety of effects and master your production to MP3, WAV, and other formats.

Finally, Its enormous loop collection includes music beds and more than 7,500 professionally created loops.

Additional features:

  • Live Performance
  • MIDI scoring and editing
  • Integrated Melodyne tuning

⇒ Get Acoustica Mixcraft

Bitwig Studio – Most imaginative

The software has gone a long way since its inception.

It has had to break free from the constraints of its unavoidable Ableton Live comparisons because the two share a lot of original creators and some key workflow similarities.

The addition of many features has boosted Bitwig’s reputation, so it is currently regarded as arguably the most imaginative music software on the market.

Take for example, in version 4, the inclusion of Comping, a seemingly fundamental element revolutionalized the product.

Its Comping is handled beautifully, and lastly, if you’re searching for additional creative capabilities, check out its Operators, which provide a different way to event triggering in audio or MIDI.

Additional features:

  • Easy hardware integration
  • Studio sampler
  • advanced modulation system

⇒ Get Bitwig Studio

Wavosaur – Optimized for loops

This is a free Wav editor, audio editor, sound editor, and program that allows you to edit, record, and process mp3 and Wav files.

Wavosaur includes all of the tools you’ll need, for example, copy, edit, paste, analyze, audio loops, batch convert, as well as record.

The program supports ASIO driver, VST plugins, real-time effect processing, and multichannel Wav files.

There is no installation for this software, so it does not write to the registry.

Finally, it may be used as a free mp3 editor, mastering software, or sound design software.

Additional features:

  • Batch convert
  • Vocal removal
  • Bit-depth convert

⇒ Get Wavosaur

Ocenaudio – Designed for simultaneous editing

Ocenaudio is an audio editing program that allows users to edit, record, and analyze audio files in various formats on Windows, Linux, and Mac OS platforms.

Firstly, you may use the preview tool to sample processed audio while configuring and adding EQ effects simultaneously.

It has a powerful memory management module that allows you to copy, paste, and save without using the system’s memory.

Ocenaudio’s spectrogram view allows you to study the signals while changing window dynamic range displays, as well as frequency bands.

The multi-selection feature is included in the program, allowing producers to edit several regions of sound recordings for sophisticated editing tasks.

Lastly, VST plugins are supported, allowing experts to apply various effects to audio files.

Additional features: 

  • Audio manipulation
  • Configuration management
  • Real-time preview of effects

⇒ Get Ocenaudio

Traverso – Incredibly fast

Traverso-DAW is a music software meant to complement your productivity and creativity. So, with this software, you will compose, edit, and record your audio with unparalleled simplicity and speed.

The software allows you to record a microphone to single tracks or multiple hardware channels.

To maximize audio quality while minimizing storage space, save your work as standard wave files or straight into an audio file format like Ogg.

The early learning experience will pay off many times as you will save time by employing Traverso’s rapid mouse + keyboard controls, however, the interface is not modern.

Additional features:

  • Nonlinear audio editing interface
  • Multiple editing features
  • Contextual menu

⇒ Get Traverso

Celemony Melodyne Editor – Highly customizable with plugins

If you are searching for a good-quality tool to assist you in perfecting your notes and chords or repairing audio buried inside chords, try Celemony’s Melodyne.

It allows you to extract notes inside polyphonic content and use them to enhance keyboards, guitars, and other instruments.

In addition, you will find features like its percussive and melodic pitched algorithms, the Leveling Macro, the Fade Tool, and Sibilant Tool to be important music building blocks.

Furthermore, you will have the most potent pitch and time-correction programs available when you add in ARA compatibility.

Additional features:

  • Multitrack note editing
  • Innovative sound design
  • Notes instead of waveforms

⇒ Get Celemony Melodyne Editor

What is the easiest software to make music?

We have discussed our best selection of music making software for PC, but you may be wondering which of these is the easiest to use.

There are a few factors to consider, but generally, these may be great options if you want to prioritize ease of use:

  • Audacity
  • Cakewalk by BandLab
  • LMMS

What these three have in common are very easy-to-follow UI, plenty of learning resources online, and of course a little learning curve, as well as being free music making software for beginners.

In conclusion, we have not made this list of the 30 best music software for Windows in any particular order. But, it only serves as a guide and proper education to help inform your decision.

In the end, your choice should be based on your personal preferences. However, it is good practice to use free trials first when available before paying a subscription.

While the software discussed will be useful in some aspects of music creation, you may need separate software to organize your libraries and play your favorites.

And if you are facing performance issues, check the music.ui.exe disable guide for help.