Looking for a way to export Outlook distribution list to Gmail? It’s time to discover how to do it since copying and pasting the same email addresses repeatedly until everyone gets your message is unproductive.
Microsoft Outlook has the ability to create a contact group (formerly known as a Distribution List) from your Contacts list, and conveniently store that list in the Contacts folder.
Then, you can use it to send the same email to multiple people – a project team, your coworkers, or simply a group of friends. Or you can share the entire contact group with other users, and they, too, can do the same.
Gmail‘s contact manager cannot import distribution groups from Outlook contacts, but you can set up a different email distribution list from any email client. This way, you make sure everyone stays in the communication loop.
Remember that exporting your Outlook Distribution List to Gmail is a four-step process. Don’t hesitate to read the instructions thoroughly before applying these directions.
How can I export Outlook Distribution List to Gmail?
1. Save Outlook Distribution List as Text file
Open Outlook.
Browse to Contacts.
Open the Distribution List to be moved to Gmail.
Go to File > Save As.
Save it as a .txt file. Choose an accessible location on your computer to temporarily save the file.
2. Open the Text file in Microsoft Excel
Launch Microsoft Excel.
Open the saved file.
Now, make sure the Files of Type is set to All Files, or Text Files.
Selecting the .txt file created before starts the Text Import Wizard.
Here, accept all the default to complete the import process.
Make sure the first column has last name, the next column has first name, and the third one has email address.
Insert a row above data.
There, insert these labels: last name, first name, email address.
3. Save the Excel file as CSV file
Click on File > Save As.
Make sure to save as type: CSV (comma delimited).
Name your file.
If you get the prompt, click Yes to confirm that you wish to save the Excel file in .csv format and complete the exporting.
4. Import CVS files into Gmail
Open your Gmail account.
Then, browse to Contacts page.
Select import link from the left column in Contacts list.
Select Choose File on the Import contacts popup box.
Navigate to your .csv file and click Import.
Once complete, a summary will display. Now, this group can be used just like any contact.
Some people want to be addressed personally and don’t fancy being lumped into a huge group. Don’t worry about that. A personalized email for an entire group solves the problem, so don’t give up on exporting your Outlook Distribution List to Gmail.
If you have any other suggestions or questions, please leave them in the comments section below.
Your server location could not be determined. Contact your administrator – that’s an issue you are no stranger to. When Outlook users try to create a new appointment in Outlook and go to Scheduling Assistant, the Free/Busy information for other people and rooms is nowhere to be found.
They see this server location error message instead. You might have looked up and down for a work-around to this problem, but you have not been able to find an answer.
Let us assist you this time. Below are the simple things that you can start doing to solve the problem.
How can I fix Outlook’s server location error?
1. Change your Outlook time zone
At first, click the File tab.
Click Options.
On the Calendar tab, under Time zones, type a name for the current time zone in the Label box.
Then, in the Time zone list, click the time zone that you prefer using.
Most Outlook users found the issue comes from the time zone, so they changed it and everything went back to normal.
Keep in mind that when you change the time zone setting, all Calendar views are updated as well so that they display the new time zone, and all Calendar items reflect the new time zone.
Note: Some time zones don’t have the daylight saving time option. When Outlook is set to a time zone that doesn’t observe daylight saving time, such as Arizona, you cannot turn on the daylight saving time adjustment.
2. Check potential cached credentials saved
Go to Start > Control Panel > User Accounts.
Click Credential Manager.
If View by is set to Category, then click User Accounts first, followed by Credential Manager.
Locate the set of credentials that has either Outlook or Microsoft Office in the name.
Up next, select Web Credentials or Windows Credentials to access the credentials you want to further manage.
Click Remove from Vault or Remove.
Check in Credential Manager to see if there are any cached credentials saved. If so, just remove them and try again.
The Autodiscover functionality may not appear to be important if everything is working. However, if problems show up and the other troubleshooting steps didn’t work, you may end up wanting to take a closer look here.
When a user’s Exchange information changes, Outlook normally uses the Autodiscover service to automatically reconfigure the user’s profile. Therefore, you could also check DNS to make sure that the Autodiscover service is functioning properly. This should point to the Client Access role server.
Have you completed the above procedures? Remember, if at any time you experience a difficulty with Outlook, don’t hesitate to contact us by using the comments section below.
In the meantime, learn more tips and tricks for fixing some of the most common Outlook errors.
For many users, computers are extensions of their personality. What better way to leave your mark on a computer than to personalize it as you wish?
In this article, we’re going to list a series of sound set resources for Windows 7 you can use to customize your machine.
Most users prefer to download game or movie sound sets, and oftentimes they can be extracted by users themselves. Indeed, the best way is to extract the sound sets from games directly.
Most games often have a community of hackers who have access to the tools necessary for that task. Also, sometimes, the sound files are available on disk.
I made Star Wars sounds on my old Windows 7. C-3PO said “Please don’t deactivate me!” when you turned off the computer and Darth Vader “Yes, my master…” when you turned it on.
If you’re looking for a quick solution and you prefer to download the sound file directly, check out the resources listed below.
Best sound schemes for Windows 7
WinCustomize
This website has an impressive collection of sound sets for Windows. There are three categories you can choose from: Last Updated, Most Popular, and Recently Featured.
All the sounds available on this website are free. Another advantage is that these sound sets are compatible with Windows 7, Windows 8 and 8.1, Windows Vista and Windows XP.
For more information, check out the WinCustomize website. Unfortunately, you can’t preview sounds.
SoundPackager
If you’re tired of the default Windows sound scheme, you can download SoundPackager to instantly change the default sounds with high quality sound sets.
SoundPackager is pre-loaded with a series of sound packages you can activate with just one click. In this manner, you don’t need to download sounds one at a time and then match them to Windows events.
This website offers a series of interesting sounds you can download on your Windows 7 computer. The sounds are organized in several categories: animals, birds, people, TV and movies, etc.
You simply click on the sound you’re interested in, preview it and you can download it if you like it.
The website also allows users to filter the sound results depending on the file formats, the number of channels, resolution and sample rate.
Freesound is a collaborative database of audio snippets, samples, recordings, and other sounds that everyone can contribute to. Some sound samples are shorter, lasting only for a few seconds, while other are 10 minute long.
You can preview all the sounds, and read the user review for more information. The main advantage of this platform is that the sound data base is constantly updated.
SoundBible.com hosts thousands of free sound effects that you can download on your Windows 7 computer. Sounds are updated three times a week, so you’re definitely find the right sounds to customize your device.
Important note: Microsoft officially ended Windows 7 support. If you’re planning to upgrade to Windows 10, make sure to check out our wide collection of guides on how to make the transition as smooth as possible.
If you’re looking to multiboot Windows 7, alongside Windows 10, Ubuntu, or even Windows XP, WinSetupFromUSB is one of the best tools that you can use to do it.
Many frustrated users with the performance of other operating systems might choose to install Windows 7 over the other OSs.
But you need to know that a nifty simple tool will let you multiboot Windows 7, Windows XP, or Windows 10 from a single USB drive.
This way, you won’t have to create separate bootable USB drives for Windows 7 or other operating systems with the help of the WinSetupFromUSB software.
The best multi-boot tool for any Windows version
WinSetupFromUSB is a Windows program, which prepares multiboot USB flash or fixed disk to install any Windows versions since 2000/XP, boot various Linux and *BSD flavors, as well as many Windows, Linux, DOS based and other utilities. The install Windows from USB project started as a challenge back in 2006 at the msfn.org forum. With the invaluable contribution of several forum members, it was the first method to have regular XP setup run from a USB disk, just like if started from a CD media. WinSetupFromUSB program was made later on to offer graphical interface, and program functionality was slowly extended to allow many other sources in a multiboot USB disk.
The tool fully supports Windows 8.1 as well as UEFI, which, for those who don’t know, is an “evolved” version of BIOS.
This isn’t the single Windows multi-boot tool, but it’s without a doubt one of the best to use, as it is very easy to set up. Follow the link below to download it.
Does WinSetupFromUSB support customized Windows sources? WinSetupFromUSB generally supports customized Windows sources, but particular sources that have been heavily modified may not install.
Can I use multiple sources of the same type? WinSetupFromUSB supports multiple sources of the same type, except for PE1 and Syslinux based sources. You can quickly add multiple sources one after the other without restarting the first program.
Does WinSetupFromUSB support Windows Secure Boot? WinSetupFromUSB supports unmodified Windows Secure Boot sources.
What you need to know about Windows 10 dual-boot [update]
For those interested in installing any OS alongside Windows 10, don’t do it because it’ll simply not work.
You will find all the necessary information about that in this article, but the main point is that Microsoft is destroying the dual boot feature in Windows 10.
The frame rate is one of the most important specifications for gaming monitors. That is the frames-per-second (FPS) spec that tells uses how quickly a VDU (Visual Display Unit) refreshes picture frames.
In 2019, 240Hz monitors had the highest frame rates. However, ASUS has now raised the bar for frame rate speeds with the ROG Swift 360 monitor.
ROG Swift 360 is the new standard for Esports
ASUS and its NVIDIA partner unveiled the ROG Swift 360Hz at CES 2020. That is, as its title suggests, a monitor with a 360Hz frame rate. ASUS proudly boasts that the Swift 360 is the world’s fastest monitor.
That VDU also incorporates NVIDIA’s G-Sync Variable Refresh Rate tech to eliminate screen tearing.
Aside from its lightening frame rate, the ROG Swift has a 24.5-inch display. That is a pretty standard display size for a gaming VDU. Of course, ASUS has had to compromise the Swift 360’s resolution, which amounts to a 1,920 x 1,080 FHD display, for the high frame rate.
ASUS has primarily released the ROG Swift 360 for Windows gaming. The Swift 360’s super-fast refresh rate combined with NVIDIA G-Sync will ensure super smooth and responsive gameplay and minimize latency. ASUS is touting the Swift 360 as an Esports monitor for competitive gaming.
360Hz is noticeably smoother than 240Hz
NVIDIA even invited a five-time Counter-Strike: Global Offensive champion to try out the Swift 360. He was initially sceptical that a 360Hz VDU would be noticeably different than one with a 240Hz frame rate. However, he could tell there was a notable difference after playing the game on the Swift 360.
ASUS also showcased the ROG Swift PG32UQX monitor at CES 2020, which is another NVIDIA G-Sync monitor. The PG32UQX is a 32-inch 4K high-dynamic-range gaming monitor with stunning picture quality.
That monitor’s 144Hz frame rate is more modest compared with the Swift 360’s FPS specification. However, a 144Hz frame rate will still be perfectly sufficient for most players.
So, ASUS is raising the bar for gaming monitors with the ROG Swift 360 and PG32UQX . ASUS has not confirmed specific release dates or prices for either monitor. However, ASUS has confirmed that it will release those VDUs later in 2020.
This year marks a very important event in Windows 7‘s history: 2020 is the year Microsoft officially ends mainstream support for this OS version. Starting January 14, 2020, Windows 7 computers no longer receive security and quality updates. The Windows 7 end support countdown clock is on and nobody can stop it.
In this guide, we’ll tell you what this means for the average user. We’ll also answer some of the most common questions related to the Windows 7 to Windows 10 transition. Keep on reading to learn everything you need to know about this matter.
The main reason why you should give up using Windows 7 is security-related. Starting January 14, 2020, your Windows 7 computer will no longer receive security updates. This means that your device is more vulnerable to threats than ever. Hackers will definitely try to take advantage of each and every security vulnerability they can find in order to get their hands on your data.
As a quick reminder, it was Windows 7 that facilitated the spread of the Wannacry ransomware. Malware and ransomware attacks will only get worse after January 14, 2020. Why expose your computer to cyber attacks when you can upgrade to an OS that’s safer and gets new security updates every month on Patch Tuesday?
Apart from cybersecurity reasons, upgrading to Windows 10 lets you enjoy the latest OS features developed by Microsoft on a much faster platform. Why settle with just enough (Windows 7) when you can take your Windows experience to a whole new level?
For more information about the differences between Windows 7 and Windows 10, check out the guides below:
At the same time, there is a series of Windows 7 features removed in Windows 10. When you turn on your newly upgraded computer for the first time, you’ll notice Desktop Gadgets are gone, libraries are disabled by default, games like Minesweeper and Solitaire are no longer available by default, and so on. For more information, see Top Windows 7 Features Removed in Windows 10.
Before you hit the upgrade button, there is a checklist you should go through in order to make sure the whole update process goes as smoothly as possible.
Windows 7 to Windows 10 upgrade checklist
1. Check the system requirements
There is a minimum set of hardware requirements your computer needs to meet in order to run Windows 10 without any problems. Failure to meet any of these requirements may lead to severe technical issues. We already compiled a useful checklist for you to go through before you hit the update button.
Stay on the safe side and make sure your computer meets these minimum Windows 10 hardware requirements:
1GHz CPU (or faster)
1GB of RAM for the 32-bit version, or 2GB of RAM for the 64-bit version
At least 16GB of storage space for the 32-bit version, or 20GB for the 64-bit version
DirectX 9 compatible graphics card and WDDM 1.0 driver.
As a matter of fact, Microsoft recommends Windows 7 users to upgrade their hardware configuration as well. In plain English, this means buying a new Windows 10 computer.
We recommend that you don’t install Windows 10 on an older device, as some Windows 7 devices are not compatible with Windows 10 or could experience reduced feature availability.
Now that you made sure your hardware is compatible with Windows 10, you need to backup your Windows 7 data. In this manner, you should be able to retrieve your files and folders in case anything goes wrong during the upgrade process. Not only that, but when it comes to migrating to a new OS, you may want to transfer all your files to the new platform. In both cases, the solution is to simply backup your data.
We recommend installing a dedicated Windows 7 backup software as this will help you to get the job done faster than Windows 7‘s built-in Back and Restore feature. This is the safest method to upgrade from Windows 7 to Windows without losing data.
So, up until now, we’ve got the system requirements checked, and data backup checked. It’s time to launch the update process — the simplest way is to hit the update button.
Indeed, Microsoft does allow you to upgrade from one OS version to a new one using the Windows 10 Update Assistant. However, this may often result in data loss. In order to avoid such unpleasant events, we recommend installing Laplink PCMover. This a program that you can use to move all your Windows 7 files, settings, and user profiles to your new PC.
Simply download PCMover to both your computer and follow the on-screen instructions displayed by the wizard.
However, this step is different for every user type. Of course, the process is much more complex for Enterprise and Business users than for average Windows 7 Home users but Laplink PCMover can help both users categories.
If you don’t want to use any third-party tools for the upgrade, we compiled the following additional upgrade guides involving different upgrade methods:
On the other hand, if you just want to move particular Windows 7 files to another drives, here are two useful guides that you can use to get the job done:
Windows 7 to Windows 10 migration tips for network administrators
The Windows 10 upgrade process is more complex for business users as any mistake might trigger money loss. Here are some useful migration guides for network admins:
Troubleshoot Windows 7 to Windows 10 upgrade issues
Sometimes, despite going through the checklist above, technical problems may occur during or shortly after the update process. We hope you never need to use the troubleshooting guides listed below. However, bookmarking this page is a good idea in case the upgrade process doesn’t go as expected.
There you go, with the help of this guide, you should be able to safely transition from Windows 7 to Windows 10 without losing any files or folders. If you’ve got other tips and tricks you’d like to share with our readers, hit the comment section below.
Those that are part of the Windows Insider program are always lucky, or unlucky when it comes to testing out the latest features that Microsoft is bringing to Windows 10.
One good example is this latest update where Microsoft rolled out a new Windows 10 feature update test build, and the Fast Ring Insiders are the ones that get to test it
As the first Fast Ring update to be launched in 2020, the new Windows 10 build 19541, includes a couple of minor new options for Task Manager and Notifications, along with a number of fixes and updates.
What is this Task Manager update all about?
Microsoft added a new option in the Details tab in Task Manager that will show users the architecture of each process, just as we reported back in December. This allows the user to see the architecture of process such as x86, x64 or Arm32. Similar functionality was already present in the Details tab, but it’s limited to 64-bit and 32-bit.
This was announced back in 2019 when, according to a post on social media, the Windows 10Task Manager would be enriched with a new tab.
taskmgr will have an ‘Architecture’ column to display the architecture of process, like x86/x64/Arm32
As for the notification updates from Build 19541, Microsoft is adding an icon to let users know when an app is using their location, and it will show up in your notification area.
Additionally, Bing Instant Answers and Timers are now back online, so users that frequently use Cortana can rejoice.
However, keep in mind that Microsoft changed the way they release updates to the Fast Ring. New features that appear here are no longer guaranteed to make it to live.
Microsoft’s next feature update for Windows 10, is scheduled to release somewhere later this spring. Users are eager to know what other new features it will bring.
Do you think that these updates are an improvement for Windows 10? Let us know in the comment section below.
Microsoft is set to announced new tools for retail companies next week at the National Retail Federation in New York. Today, the company has introduced two solutions to help retailers online: Bing for Commerce, and Microsoft PromoteIQ.
Bing for Commerce is a search solution that retailers can use to power their websites, giving shoppers “intelligent search, personalization and product recommendation solution that helps gives retailers the power to meet today’s shopper expectations and grow revenue,” according to the announcement blog post. It’s powered by the tech giant’s search engine and Microsoft AI to tailer the search results.
In addition to Bing for Commerce, the company has also announced Microsoft PromoteIQ. Having initially acquiring the brand back in August 2019, PromoteIQ is a marketing platform that allows retailers to insert relevant ads to their homepages for boosting revenue from various brands, with full integration with Microsoft Advertising. The company is expected to show samples during the retail event next week.
The most common cause for this type of issue can easily be eliminated because users have confirmed they had disabled their antivirus program during the update attempt.
This issue is so annoying that users are even considering upgrading to Windows 8.1, hoping that a new Windows will unblock the Windows Update center.
Windows 7 users are complaining that Windows Update gets stuck while checking for updates
I reinstalled windows 7 after a error with windows automatic repair, and now windows update will not work.[…] I have tried the automatic repairs from Microsoft, removing downloaded files in software distribution folder, using CCleaner, and disk cleanup. I am running no antivirus programs because of this to make sure that’s not a problem. I am also considering updating to windows 8.1 because maybe a new windows will help. My only issue with that is I don’t want to loose any files.
On top of that, here are some more common error messages related to this issue:
Windows 7 update checking for updates forever – Sometimes, Windows is not even able to find updates, leaving you stuck in an infinite loop of checking for updates.
Windows 7 update stuck installing – There’s a chance Windows will actually download updates, but actually get stuck installing them.
Windows 8.1 update stuck on checking for updates – It’s also common for Windows 8.1 to get stuck during installing updates.
Windows 10 update stuck on checking for updates – The same thing goes for Windows 10.
Windows 7 update stuck downloading – There’s a chance Windows 7 will manage to find updates, but get stuck downloading them.
Select the latest updates > download them on your computer.
Double-click them > wait for the installation to complete.
Restart your computer.
There you go, you can update your Windows 7 without using the automatic update feature.
For a focused walkthrough that fixes the endless check and stalled installs, open the guide Windows 7 not updating and follow the steps to rebuild services, clear the cache, and apply updates successfully.
Solution 3 – Run the Windows Update troubleshooter
Download the troubleshooter from Microsoft, launch it, and follow the on-screen indications. Once the process is completed, restart your computer.
Solution 4 – Run the built-in Update troubleshooter
Besides Microsoft’s troubleshooting tool from above, Windows 7 also has a built-in troubleshooter. So, you can also run this tool to solve your update problems.
In case you don’t know how to run Windows 7’s troubleshooting tool, follow the instructions below:
Go to Control Panel
Now, head over to Troubleshooting
Under System and Security, choose Fix Problems with Windows Updates
Solution 5 – Delete the Software Distribution folder
The Software Distribution folder is a specific folder where all data and files of Windows updates are temporarily stored. If there’s something wrong with this folder, you won’t be able to install updates.
So, we’re going to delete this folder, in order to make your Windows Update mechanism work again. Here’s how to do that:
Right-click the Start menu and run the Command Prompt (Admin).
In the command line, type the following commands and press Enter after each:
Now, try to run Windows Update and check for changes.
Solution 6 – Make sure the Update service is running
As its name says, Windows Update service is essential for installing Windows updates. Now, if you’ve wanted to skip some update in the past, there’s a chance you got this service disabled.
So, we’re going to check if this service is disabled and re-enable it, if needed. Here’s how to do that:
Go to Control Panel
Click on System and Security
Go to Administrative Tools > Services
Find the Windows Update service
If the service is disabled, right-click it and go to Enable
Solution 7 – Run the System File Checker tool (SFC.exe)
Solution 8 – Reset the content of the Catroot2 folder
Launch Command Prompt
Type the following commands, hitting Enter after each command: net stop cryptsvc md %systemroot%system32catroot2.old xcopy %systemroot%system32catroot2 %systemroot%system32catroot2.old /s
Delete the content of the catroot2 folder, but keep the folder itself. You should find it here: C:Windowssystem32CatRoot2.
Type the command net start cryptsvc.
Exit the Command Prompt window.
Solution 9 – Run the System Update Readiness tool (CheckSur.exe)
This tool runs a scan for inconsistencies that may prevent servicing operations. After you run the tool, the CheckSur.log file is saved in the following location: .
In the Windows Update Standalone Installer dialog box, click Yes.
Wait for about 15 minutes for the tool to install. When installation is complete, click Close. Try to install the latest Windows 7 updates again.
Solution 10 – Change DNS server settings
Some users also suggest that changing the DNS server can also help with faulty updates. That’s mainly because your network operator’s default DNS servers are not working so well.
So, we’re going to change the DNS server settings to widely-used Google DNS.
Here’s how to do that:
Open Network Connections. You can do that by pressing Windows Key + X on your keyboard and choosing Network Connections option.
Locate your network connection, right click it and choose Properties from the menu.
When Properties window opens, select Internet Protocol Version 4 (TCP/IPv4) and click the Properties button.
Now select Use the following DNS server addresses option.
As Preferred DNS server enter 8.8.8.8. As for Alternate DNS server, you need to enter 8.8.4.4. If you want, you can also use 208.67.222.222 as Prefferedand 208.67.220.220 as Alternate DNS server.
And finally, if none of the previous solutions worked, we’ll perform System Restore. There’s a chance something got disrupted in your system, so (hopefully) System Restore will solve that.
Here’s how to perform System Restore in Windows 7:
Go to Control Panel.
Go to System and Security > System.
Under the Control Panel Home menu, click System protection.
Click System Restore.
Choose the Restore point.
Follow further on-screen instructions.
Once you initiate the process, your computer will restart, and System Restore will get it to the selected previous state.
Solution 12 – Use WindowsUpdateLoopFix
If you want to quickly fix this problem, it’s advised to use the WindowsUpdateLoopFix script. This script was available on the Microsoft Answers forum, but it has since moved to GitHub for ease of management. At the time of writing, the original post on Microsoft Answer’s forum has over 1600 upvotes, so the script should be safe to use and it won’t cause any damage to your PC.
It seems that this issue appears because KB3020369, KB3172605 and Windows Update Agent for Windows 7 (v7.6.7600.256) updates are missing from your PC. By using this script, the updates will be downloaded and installed automatically. To use this script, just follow these steps:
Microsoft introduced a couple of new policies with Windows 10, like making the system available as a preview, before its actual release, offering it as a free upgrade to all legitimate Windows 7 and Windows 8.1 users, and more. And since the company offers Windows 10 as a free upgrade, it also have chosen to ‘force’ all users who are currently on Windows 7 and Windows 8.1 to upgrade to the new system.
Some users who still find using one of the previous versions of Windows better, don’t agree with this Microsoft’s decision, but there wasn’t much they could do about it. Until now!
How do I prevent my PC from upgrading to Windows 10?
1. Use GWX Control Panel
You probably noticed that various third-part developers are making apps which offer some services and features that Windows 10 itself doesn’t. And this time, we have a revolutionary tool which will prevent Windows 10 from installing on your computer.
The tool is called GWX Control Panel, and it’s developed to stop the installation of Windows 10 on your computer without your permission. As Windows Update automatically installs files need for Windows 10 Upgrade, and changes certain settings to make the installation happen, this tool will prevent your settings from being changed, which will keep Windows 10 out of your computer, as long as you run this tool.
The latest version of the app allows you to run this software in the background, and it will continuously ‘keep an eye’ on any attempts to change your settings without any interruption of your work. Ultimate Outsider, the developer of GWX Control Panel, calls this ability the Monitor Mode.
The only noticeable change this tool will bring to your computer is a small icon in the system try. By clicking on this icon, you can access GWX Control Panel, where you can see various info about the current state of your system, like if ‘Get Windows 10’ app is enabled, or if there are any Windows 10 download folders installed on your computer.
Besides monitoring all Windows’ attempts to change your settings, this tool also offers some other useful features:
The ability to check for updates, so you can always run the latest version of the software.
The ability to save all your diagnostics info, such as error messages, or reports of an unexpected behavior, as a .txt file, so you can reach the developer for help.
“More comprehensive protection,” which allows you to disable or enable Automatic Updates on your Windows (but it’s not recommended, though)
The developer also joked a little with Microsoft’s way of installing Windows 10 through “Get Windows 10” feature, by saying: “Unlike the Get Windows 10 app, this one includes an Exit option! Just click Enable Monitor Mode to turn the feature on.” You can read the full presentation of the tool on Ultimate Outsider’s Blogspot page.
So if you’re unsatisfied with Microsoft decision to install Windows 10 against your will, and if you want to stick with your current Windows operating system, this tool will be very helpful to you.
Another third-party software that will help you prevent Windows 10 upgrade is Never10. The application is incredibly simple to use, and you just have to do the following to stop the update:
Start the application and click Disable Win10 Upgrade If your system has already downloaded Windows 10 files, click on Remove Win10 Files button.
After doing that, restart your PC and you shouldn’t see any notifications asking you to install Windows 10.
3. Download the updates manually
In order to prevent Windows 10 update from installing, it’s important not to download its update. Windows 10 update is labeled as KB3035583, so if you have it on your system, be sure to remove it.
To do that, follow these steps:
Go to Control Panel > Programs and Features > View installed updates.
Now locate KB3035583 update and remove it.
After removing the update, you need to change your Windows Update settings. To do that, follow these steps:
Go to Control Panel > System and Security > Turn automatic updating on or off.
Now set Important updates to Check for updates but let me choose whether to download and install them.
In Recommended updates section check the Give me recommended updates the same way I receive important updates.
Save changes.
After doing that, you’ll be able to choose which updates you want to download. Be sure to download all security updates in order to keep your system safe, but don’t download the KB3035583 update since this update will force you to upgrade to Windows 10.
There you go, these are several quick and easy methods that you can use in order to prevent your PC from automatically upgrading to Windows 10.
Lumini is an atmospheric adventure game designed to create a sense of calm and tranquillity. Players are tasked with guiding a swarm of mysterious creatures through a variety of areas while collecting energy.
Here’s the official game description and trailer:
A long-forgotten species, a hostile planet and a journey of discovery – welcome to the world of Lumini…
Having vanished without trace for thousands of years, an innocent race of creatures known as the Lumini have returned to their home world. Sadly, time has not been kind and the balance of the planet has shifted, turning the once gentle environment into a hostile landscape. Only the Lumini themselves can restore balance and help revive their long-dormant race, before adapting to preserve the future for generations to come.
Explore the Lumini home world in this relaxing flow-style adventure, overcoming obstacles and keeping your swarm safe while collecting the planet’s energy to bring back your fallen comrades. Split and reform your swarm, evolve and discover new abilities to bring the Lumini back to their former glory…
The Facebook Messenger (Beta) app designed for Windows 10 devices has updated (via AL) with an introduction of a new feature; voice recording.
After installing the app update, users will be able to record an audio message directly from within the app and attach it to a DM by clicking on the + button next to the text field.
Facebook Messenger (Beta) is used to test new features for stability and useability before rolling them out to the main Facebook Messenger app. The Beta app updated just last month with a rather significant update which changed the app to Electron-based, added several new features, and refreshed the app icon.
The only problem with both choices is that they both involve paying a hefty sum of money. Thus users are looking for methods through which they can get their hands on a free Windows 10 license.
The good news is that that with Windows 10, Microsoft brought a way for people using Windows 7 and assistive technologies to upgrade to Windows 10 for free.
This method still works today, and this article will show you how assistive technologies users can get their free copy of Windows 10.
What are assistive technologies?
For those of you that don’t know, assistive technology is a much larger term which refers to multiple types of aids that help adults and children with disabilities in their daily lives. These include all programs meant to help users with disabilities, including:
Screen readers
Voice commands and dictation
Magnification and contrast
Audio descriptions
How can I get a free copy of Windows 10?
All a user needs to do is upgrade to Windows 10 is to simply use their Windows 7 product key that had assistive technologies attached to it.
Note: Before starting off, you should backup all your files and applications or licenses to a removable hard drive or to the cloud. That way, if something goes wrong, you can restore your data without losing it.
The program will now proceed to download all the Windows 10 installation files.
You will need to choose what to transfer from Windows 7 to Windows 10 and there are 3 choices:
Data only:
You will transfer only the files, folders, images, etc to the new operating system
Data and apps:
You will also transfer the apps, not just the data
Nothing:
This is basically something akin to a clean install
Click Next
Finish the install
You should now be able to now use Windows 10 freely, and benefit from the latest generation of assistive technology that it has to offer.
Do you think this free upgrade is useful for people who need assistive technologies to make their lives easier? Let us know in the comment section below.
If you plan on using Windows 7 for a longer period of time, but the hardware you currently have has malfunction or is simply dated, then you are probably wondering whether you can move your Windows installation from one PC to another.
The short answer would be yes, but the truth of the matter is that it is a bit complicated.
How do I move Windows 7 from one computer to another?
1. Move Windows 7 to a different motherboard
The simplest method one can think of when moving a WIndows install from one PC to another would be to simply put the motherboard of the old PC into the new one.
Additionally, you could just transfer the WIndows install from one motherboard to another. In theory, this should pretty much do it, but there are a number of complications linked to this method.
First of all, your Windows 7 install is calibrated to the drivers of your old PC. Because of this, when you move it into another PC (most likely one with a whole different set of specs), you may get error,s or even BSODs when trying to boot.
2. Use Sysprep
This tool is designed for large organizations and PC manufacturers, and it prepares an installation of Windows for duplication, auditing, and customer delivery.
Unfortunately, this isn’t available for the general public, and it can only be used with fresh installs anyway.
Issues with transferring Windows from one PC to another
Besides the hardware issues mentioned above, there is also the matter of activating your Windows install once moved to a new PC. First of all, it all depends on the type of license that you have.
1. If you have a retail license
You can move it to another computer as long as it’s only installed on one computer at a time.
This is because activating it on the second computer will automatically deactivate the license for the first computer. The key will work with both 32 and 64 bit, but only one can be installed at a time.
2. If you have an OEM license
OEM licenses are tied to the first computer they are installed on and can not be transferred to a different computer.
However, one workaround would be to move the motherboard into a computer that has the exact same hardware components. This way you can still use the OEM license without any of the driver issues mentioned above.
Conclusion
Given how many complications there are with transferring an entire Windows install to another computer, you might as well go for a clean install.
However, if personal data is your main concern, you can always simply make a backup of all of your files, and then transfer them to a new computer.
Did you find this article useful? Let us know in the comments section below.
Microsoft no longer supportsWindows 7, and because of that many users are now flocking to Windows 10.
Of course, the only thing more complicated than the upgrade process itself is transferring their olddata from Windows 7 to the new OS.
Fortunately enough, there are tons of methods that you can use to safely migrate your data. Even more so, many of these methods revolve around you using a Windows 7 image backup file.
However, these files tend to be quite larger, so moving them around to other drives can be important. This is specially the case if there isn’t much storage space to go around.
That is precisely why we’ve created this step-by-step guide on how to transfer Windows 7 backup files to different drives, while still keeping them functional.
How do I move Windows 7 backup files to another drive?
Fortunately enough, moving Windows backup files is simply a matter of copying and pasting the files from one directory to another. The only catch is that while this method may be simple, there are a few rules that you should follow if you want the files to be also functional:
You can move your images anywhere you want. However, in order to restore from them, the WindowsImageBackup folder needs to be moved to the root of a drive.
This usually looks something like this:
J:\WindowsImageBackup
As you can see, the WindowsImageBackup files are available as soon as you open the external drive, and are not stored in any other folder or subfolder.
One neat treat you should know about is how you can manipulate Windows’ tendency to override backup files. For example, you know that whenever you create a new Windows backup ina directory, any backup already present there will be overridden with the new data.
You can avoid this issue by creating the backup files, then moving them to properly labeled subfolders. You can even include text documents in the subfolders to make it even easier to identify what backup it is exactly.
Whenever you need to restore, simply take the backup files from the subfolder, and place it back into the root of your drive.
Conclusion
As you can see, as long as you follow one simple rule, there isn’t much to moving WIndows 7 backup files between different drives. In fact, you can store different backups at the same time precisely because of this key limitation.
Did you find this article useful? Let us know in the comment section below.
As you probably know, the partition on which you have your OS installed (usually the C drive) should always have enough free space. This is usually due to future updates, and that to make sure Windows has enough space for temporary files.
In fact, you may even come across an error stating that you cannot install a certain program or game, simply because you don’t have enough free space in your system partition.
Thus, moving files between partitions to free up some space is always a good idea.
The problem is that not all files can be moved simply by using Copy and Paste. One good example being the My Documents folder, which is usually the first that grows in size the more you use your PC.
That is why we’ve created this article to show you in a step-by-step manner just how you can transfer such personal files to another partition, and still keep them functional.
How can I transfer personal folders to another drive?
The method involves modifying some of the folder’s file properties, and it is done as follows:
Right-click the personal folder you want to redirect
Select Properties
Click the tab Location
Click Move
Browse to the location where you want to redirect this folder
You can select a number of different locations, such as:
Another location on this computer
A different drive attached to this computer
Another computer on the network
Choose the folder where you want to store the files
Click Select Folder
Click OK
Choose Yes when asked to move all the files to the new location
By doing this, you will be able to transfer folders to a different drive, without affecting their functionality as a Copy-Paste operation would.
Notice: While the method mentioned above is extremely effective in transferring personal folders, it won’t work on all of them. Here’s a list of personal folders that this method has proven to be effective on:
Contacts
Desktop
(My) Documents
Downloads
Favorites
Links
(My) Music
(My) Pictures
Saved Games
Searches
(My) Videos
Any other personal folders moved through this method may lose functionality, and may even cause problems when trying to update.
What other methods do you use to free up the System drive? Let us know in the comment section below.
Ever since Microsoft pulled the plug on Windows 7, users have been rushing to upgrade to keep their data safe. Of course, those that belong to business groups could always opt to go for the Windows 7 Extended Support for Business.
However, the vast majority will probably go for the upgrade. As such, the biggest concern after the upgrade itself is how will users migrate all of their data from their Windows 7 computers to Windows 10.
Normally’ the first thing that may pop in your hear would be to just copy everything on an external hard drive, and then paste it back on the PC when it is upgraded.
While this indeed a good idea for general files and folders, it doesn’t work with complex data, such as user profiles, installed programs or games, or other similar items.
Fortunately enough, there are plenty of methods you can use to upgrade to Windows 10 and take your data along with you. One good example is by using the WindowsEasy Transfer tool, and this article will show exactly how you can use it.
Search for WindowsEasy Transfer, and open the first result
Choose the method you want to use to transfer between the old PC and the Windows 10 PC
You can choose from:
Easy Transfer Cable
Network
An external hard disk or USB flash drive
If you’re going for a Windows 10 upgrade, most likely you will be performing an in-place upgrade. Thus, you can choose an external hard disk or USB flash drive since the old and the new computer is actually the same computer.
Select An external hard disk or USB Flash drive
Select This is my old computer
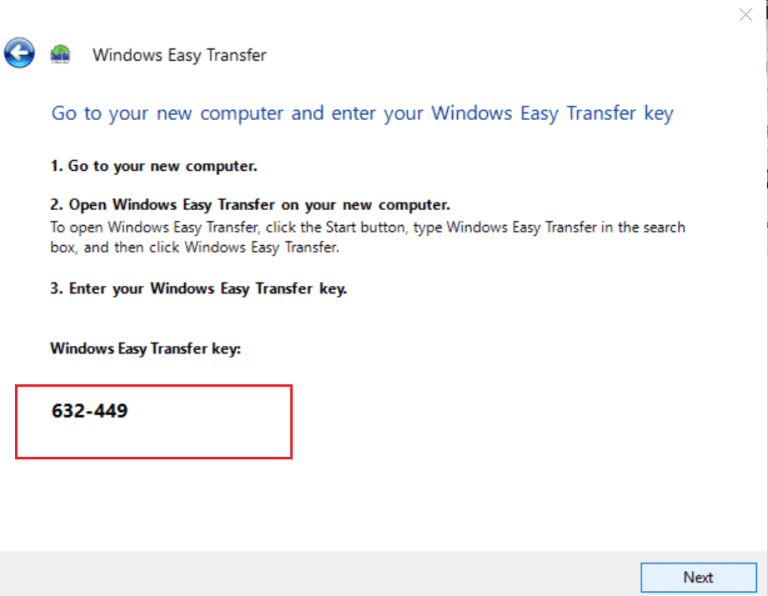
The next window will present you with a WindowsEasy Transfer key. Write it down
Prefer a dedicated profile migration utility when you need to keep user settings, app data, and permissions intact; try User Profile Wizard to move a Windows 7 profile to Windows 10 without recreating accounts.
Now that you have copied the profile on the USB stick, it is time to transfer it to the new Windows 10 PC
Insert the external drive in the PC once you upgrade it
Launch migwiz.exe from the external hard drive
Click Next
Select This is my new PC
Click Next
Select My old computer is running Windows 7
Insert the WindowsEasy Transfer key
Finish the setup
By following this method, you should be able to efficiently use WindowsEasy Transfer to migrate data from your Windows 7 PC to your Windows 10 PC.
This method has been proven to be quite secure, and it doesn’t require you to use any third-party migration tools.
Did you find this article useful? Let us know in the comment section below.
Microsoft Outlook users have been reporting all sorts of problems as of late. One such error is that OutlookScheduling Assistant’s Free/Busy data could not be retrieved.
This error usually occurs when users try to schedule a meeting or after a mailbox is moved to Microsoft Office 365. If your account is hosted on an Exchange server and the Free/Busy data couldn’t be retrieved by Outlook, the information for other users will be displayed as slash marks.
Keep reading to find out what to do when Scheduling Assistant in Outlook is not showing free/busy!
How can I fix Scheduling Assistant Free/Busy data could not be retrieved?
1. Change the default permissions
NOTE
The user has to be granted at least Reviewer permission to view calendar item details.
Right-click on the calendar and select Properties.
Go to the Permissions tab, and set the desired permissions/settings.
Once done, click OK to save the changes.
It’s frustrating not having the chance to see the Free/Busy information for the mailbox in Scheduling Assistant. The issue sometimes further extends to no longer viewing the Calendar folder either.
You just receive a Could not be updatederror message instead. Long story short, Scheduling Assistant makes cross-forest requests on behalf of the organization relationship instead of on behalf of the actual user who is requesting.
In a hybrid deployment, with the default permissions set to None or Contributor, no Free/Busy information can ever be natively displayed for remote users.
The mailbox owner can though solve this issue by changing the default permissions to Free/Busy time or Free/Busy time, subject, and location.
2. Clear the Auto-Complete caches
Go to the File menu and select Options.
Navigate to the Mail tab, and under Send messages, click the Empty Auto-Complete List button.
Changing permissions on Outlook Calendar solves the Scheduling Assistant Free/Busy data issues for most users.
3. Verify Autodiscover CNAME record
There’s also a high chance to find out that the Autodiscover record is missing or is incorrectly set up. Verify that the Autodiscover CNAME record has been created for your domain.
Outlook 2007 and up discovers the Availability Service URL using the AutoDiscovery feature in the Exchange environment.
4. Turn on Public Folders when Scheduling Assistant is not showing conflicts
You’re used to creating meeting requests using the Scheduling Assistant in Outlook, but there’s a problem when the notification Conflicts with another appointment is missing.
This indication of potential conflicting appointments is often related to improperly configured Public Folders.
If turned off, turn them back on. The Scheduling Assistant should start telling users once again that resources are already booked, and invitations cannot be sent without changing the room or the time.
We hope these methods were helpful in solving Outlook Scheduling Assistant’s No free/busy information could be retrieved error.
In case you still face issues, switch to another reliable email client for an error-free experience.
If you have any other questions or suggestions, don’t hesitate to leave them in the comments section below.
Microsoft has just launched a beta of a new program that allows individuals to control how they appear on its Bing search engine and other Microsoft services (via Windows Central). Currently in beta, Bing Pages allows users to customize their page with content such as social media feeds that they can easily manage.
Looks like Bing might be letting people create "Profiles" for themselves, similar to what you see in search results for people who are well known.
Microsoft is also making this a great way for individuals to promote their media profiles at no cost, allowing them to better show up on Bing search. Businesses will also benefit from being able to manage their online personas on Microsoft’s various other services, such as Outlook.
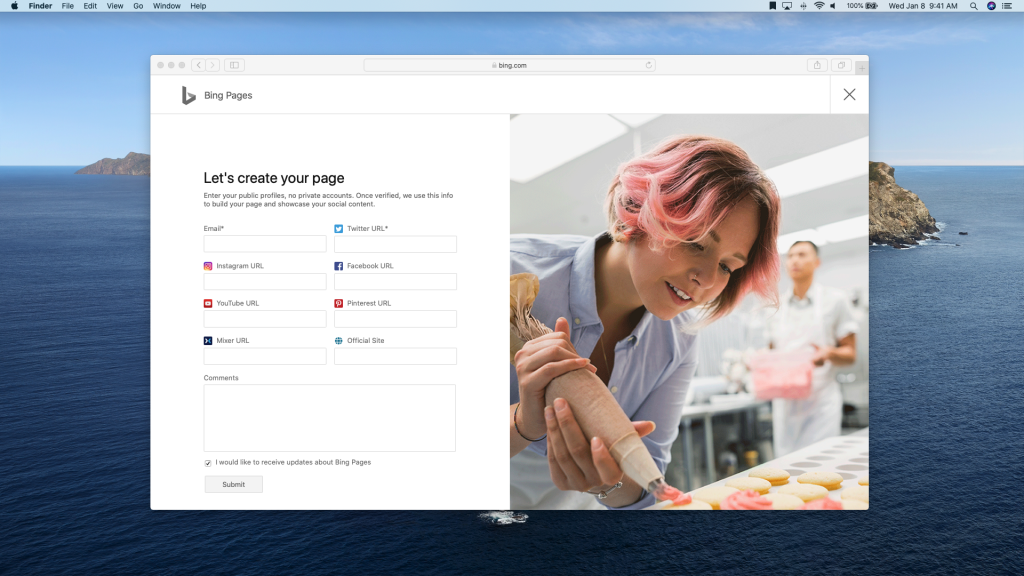
Heading to the Bing Pages sign-up page will allow you to enter various bits of information, including email, social media accounts, and website address. Interestingly, a Twitter account is required as a means of authenticating your account, however all of the other social media boxes can be filled out optionally.
Details on how the whole process works are a little bit are a little short on its website, likely due to that the program is still in beta. We’ve filled out the form for On MSFT, and will let you know more about the process in the future (so follow us on Twitter).
What do you think about the new customizable Bing Pages? Feel free to let us know what you think in the comments area below.
Daedalic Entertainment has announced that they’re working on a new video game based on the popular The Lord of the Rings franchise set for release in 2021.
The game will be called The Lord of the Rings: Gollum and, as its name implies, will focus on the character of Gollum and will be set before the events of the main The Lord of the Rings trilogy.
“We have the story that we all know from the book, but everything that happens to him before he appears in the book are the main things we will see in our game. We will tell the story before he first appears in the books,” Daedalic’s Fichtelmann said in an interview with the HR.
Little is known about the upcoming title’s gameplay but it is hinted that decision-making will be involved in some capacity.
The Lord of the Rings: Gollum is confirmed for release on PC and “all relevant console platforms at that time” which will likely include the Xbox Series X consoles, which launches later this year.
Those that have business licenses for their Windows OS can also opt to get the Windows 7Extended Support, although this too is just a temporary solution.
Thus, upgrading does seem like the best choice, if not for the many concerns users are having for their personal data. One good example is how users are wondering how they could transfer their Windows Live Mail messages from their Windows 7 PC to Windows 10.
How do I transfer my Live Mail messages to Windows 10?
One neat feature that will help us in our endeavor is that Windows Live Mail includes functions for exporting and importing mail messages and newsgroup posts.
This is a useful way of backing up to avoid data loss in the event of a computer malfunction. Additionally, it also helps transfer data from one installation of the program to another.
1. Export the Live Mail messages
In order to successfully export the emails, follow these steps:
Before starting, set Windows Live Mail to Work offline
This is mainly to minimize interference
All you need to do is disconnect from the network and disable your anti-virus before starting
Create a folder on your desktop
This is where you will export the messages
Open the Export wizard
Select the temporary folder and select All folders
Check that the number of files in each folder within the temporary folder
Make sure it is one more than the number of messages in the corresponding folder in Windows Live Mail
Copy the temporary folder to its final destination on your Windows 10 PC
The messages will be stored in EML format, and if Windows 10‘s Outlook is the default program to open EML files, then all you will need to do to add them si double-click them.
Once the message is open, you can use the Save button to store it in the Inbox folder or the Move command to save it to the folder of your choice.
Conclusion
By following these steps, you should be able to successfully migrate Live Mail messages from a Windows 7 PC to Windows 10‘s Outlook.
The only noticeable drawback of this method is that once the EML files have been exported, adding them in Outlook can only be done one at a time. Thankfully enough, this isn’t a process that takes long at all, but it can get frustrating if the number or EMLs that need adding is large.
Did you find this article useful? Let us know in the comments section below.
The end of Windows 7 means that pretty much everyone has no other choice but to upgrade to Windows 10. While companies and businesses can still choose to remain with Windows 7 via the Windows 7 Extended Support for Business, this is just a temporary solution.
Thus, with a Windows 10 upgrade left as the only viable option, users are now wondering what will happen now to all of their data. For example, their Internet Explorer bookmarks are probably something they would like to take with them.
Unfortunately, bookmarks are regularly the first thing to get deleted during an upgrade. That is precisely why we’ve created this step-by-step guide on how you can transfer your Internet Explorer bookmarks from Windows 7 to Windows 10.
How do I transfer Windows 7 IE favorites to Windows 10?
Select the folder that you’d like to export your Favorites from
Click Next
Type in the file path where you want the exported file to be saved
Select Export
Select Finish
By following these steps, your Favorites should now be saved as an HTM file. You will then need to somehow transfer the HTM file to your Windows 10 PC. You can do this via an external drive, or by using a cloud service such as OneDrive.
The next phase will be to import the HTM file into your default Windows 10 browser, which is Microsoft Edge
Browser for the location of your exported Internet Explorer Favorites file
By doing this, you should be able to access all of the favorites and Bookmarks you had saved on Internet Explorer in your Windows 7 computer with full functionality.
Did you find this article useful? let us know what other data you want to take with you when you migrate to Windows 10 in the comment section below.
The first thing that was on the user’s mind when Microsoft announced that it will cease support for Windows 7 was probably that they should upgrade as soon as possible.
Of course, no one is thinking about going to Windows 8, thus Windows 10 is the go-to answer. While those that belong to business environments could always opt to use the Windows 7 Extended Support for Business, this is just a temporary solution that will only buy you another 2 years at best.
As such, with a Windows 10 upgrade left as the only viable long-term solution, users will just have to comply.
The only problem is that when you migrate from one OS to another, the first thing that may be on your mind is what will happen with all of your data?
While personal files and folders can always be Copy and Pasted to an external hard drive and then move back onto the computer after the upgrade, your installed programs are a whole different story.
Fortunately enough, there are solutions for you to transfer installed programs from Windows 7 to Windows 10, without losing time having to reinstall them again.
How do I transfer programs from Windows 7 to Windows 10?
1. Use a dedicated transfer software
There are plenty of backup tools on the market, and many of them do a pretty good job. However, Laplink PCmover is the only third-party tool specifically designed to help users migrate from Windows 7 to Windows 10.
Down to its essence, it helps migrate pretty much everything from one computer to another, including personal files, folders, installed games or programs, user profiles, and more.
Since most applications are installed ready-to-use on the new PC, you won’t need to find old CDs, previously downloaded programs, serial numbers or license codes.
Another advantage to using this program is the interface, which pretty much guides you every step of the way, so you always know exactly what to do and when.
This method is a bit more complicated, and it uses tools provided by Microsoft itself. The only advantage that it has over using Laplink PCmover is that it can be used in in-place upgrades, while Laplink requires that you have a secondary external hard drive.
Before using this tool, you must know that you must first buy Windows 10 or have a valid Windows 10 serial number.
Using the Media Creation Tool is fairly simple, as you need to just follow these steps:
Launch the installer once the download is finished
In the What do you want to do menu, select Upgrade this PC now
Enter your Windows 10 license key
Select Next
Agree with the licensing terms and conditions
Select Keep personal files and apps
Click on Install
While the Microsoft Media Creation Tool may be free of charge, it does not guarantee that all of your files and folders will remain untouched during the upgrade. Thus, if your data is your priority, using Laplink PCmover is your safest bet.
By following the methods mentioned above, you should be able to transfer any programs you have installed on your Windows 7 PC to Windows 10 without having to reinstall anything else.
Did you find this article helpful? Let us know what else you want to read about in the comment section below.
Windows 7 has been discontinued, and because of this, many users are now forced to either upgrade to Windows 10, or risk remaining with a now unsupported OS.
While companies and business owners can always opt for the Windows 7Extended Support for Business, this, too, is nothing more but a temporary measure.
Of course, moving to a new OS is not without any drawbacks since users may want to take some of their personal files or folders with them during the transition.
For example, many users wonder if moving their Outlook contacts from Windows 7 to Windows 10 is possible. While the short answer is yes, we’ve created this step-by-step guide to show you how it is done.
How do I export contacts from Windows 7 to Windows 10?
The first thing you need to understand is that if you are running Outlook on Windows 7 you are probably using an older version of Outlook. Unfortunately, there is no way to migrate contacts directly from one client to another.
Fortunately enough, one workaround is exporting your entire contact list as a CSV file, and then importing it into the Outlook client of your Windows 10 PC.
The advantage of this method is that regardless of the version of Outlook you are using, CSV files are universally supported, even by the web version. As such, this is how you export Outlook contacts from Windows 7 to Windows 10.
1. Export your Outlook contacts as a CSV file
Open Outlookon your Windows 10 PC
Click File
Select Open & Export
Click Import/Export
Select Export to a file
Choose Comma Separated Values (CSV)
Go to the Select folder to export from box
Select the contacts that are under your account
Choose Browse
Name your file
Choose OK
Confirm the location where you will save your contacts, and click Next
Since Windows 7 no longer receives any support from Microsoft, it has become vulnerable to cyberattacks. As such, Users are advised to upgrade to the newer Windows 10, as it poses a number of advantages.
Unfortunately, most users would probably want to take some of their data with them, such as programs, files, user profiles, etc.
Those of you that have an extensive music library may even be wondering what will happen to your iTunes library once you migrate to Windows 10.
That is precisely why we’ve created this step-by-step guide, that will show you exactly how to transfer your iTunes files from Windows 7 to a Windows 10 PC.
How do I transfer iTunes from Windows 7 to Windows 10?
Fortunately enough, transferring iTunes files from one PC to another is extremely simple, and it all revolves copying and pasting certain files from one PC to another.
You can also do this in case of an in-place upgrade, but you’ll need an external storage media to keep the iTunes files in during the upgrade.
Right-click the folder named iTunes then click Copy
Click Start
Go to My Computer
Open your external hard disk
Paste or press Ctrl + V to copy the contents
Eject your external hard disk
2. Paste the iTunes data in the Windows 10 PC
Connect the external hard drive to your Windows 10 computer
Click Start
Open the File Explorer
Go to This PC
Open your external hard disk then copy the iTunes folder
Press Windows + R
Type the following line:
%userprofile%
Hit Enter or click OK
Open the Music folder
Click Paste
Launch iTunes
iTunes will automatically populate the files and folders, and adapt them to the Windows 10 OS.
By following these steps, you should be able to successfully transfer all of your iTunes data from a Windows 7 PC to a Windows 10 PC. This includes profiles, songs, playlists, etc.
To learn more about iTunes, we also have a guide on how to download iTunes for Windows 7, so don’t miss it.
Did you find this guide useful? Let us know in the comment section below.
Users who utilize Outlook with Exchange Server can usually download an offline address book. That enables them to access the contact details within it even when not connected to Exchange Server.
However, some Outlook users might not always be able to download that offline address book when errors arise. Error 0X80072f06 is one OutlookExchange sync issue that stops the OAB downloading.
What can I do if Outlook’s Offline Address Book isn’t downloading?
Before we proceed, here are some quick solutions to try:
Restart the computer.
Make sure you are running the latest version of Outlook. In case not, download all the pending updates.
If none work, head to the fixes listed next.
1. Manually update the Offline Address Book
In Outlook 2010-16, go to the Send/Receive tab.
Click on the Download Address Book option.
Now, select the Download changes since last Send/Receive option.
Select Offline Global Address List from the drop-down menu, and press the OK button.
Press Windows + E to open File Explorer, and navigate the following path where %username% is the current user profile:C:\Users\%username%\AppData\Local\MicrosoftOutlook
Then right-click the Offline Address Book folder and select the Rename option.
Edit the folder title to Offline Address Books.old.
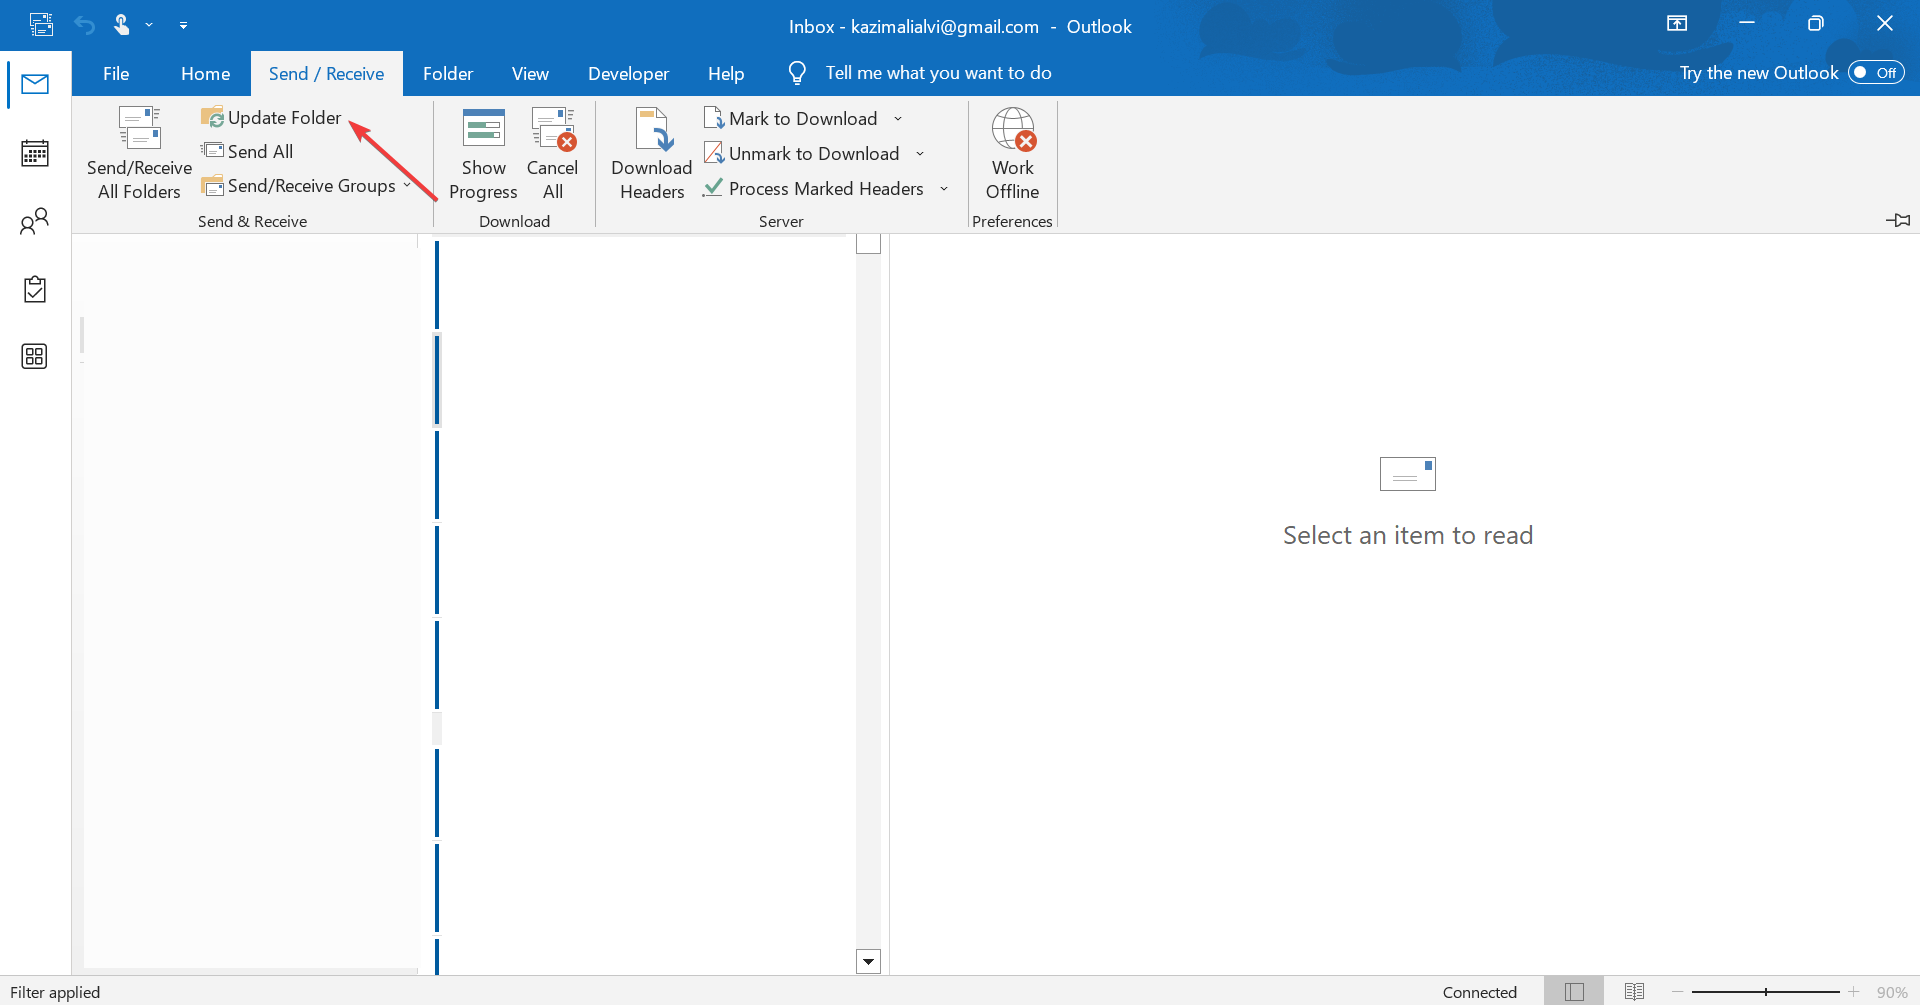
Then click the Update Folder option on Outlook’s Send/Receive tab.
Renaming the Outlook Address Book will refresh the OAB files, which is another potential resolution when you can’t download the address book in Outlook 2016.
5. Set up a new Outlook profile
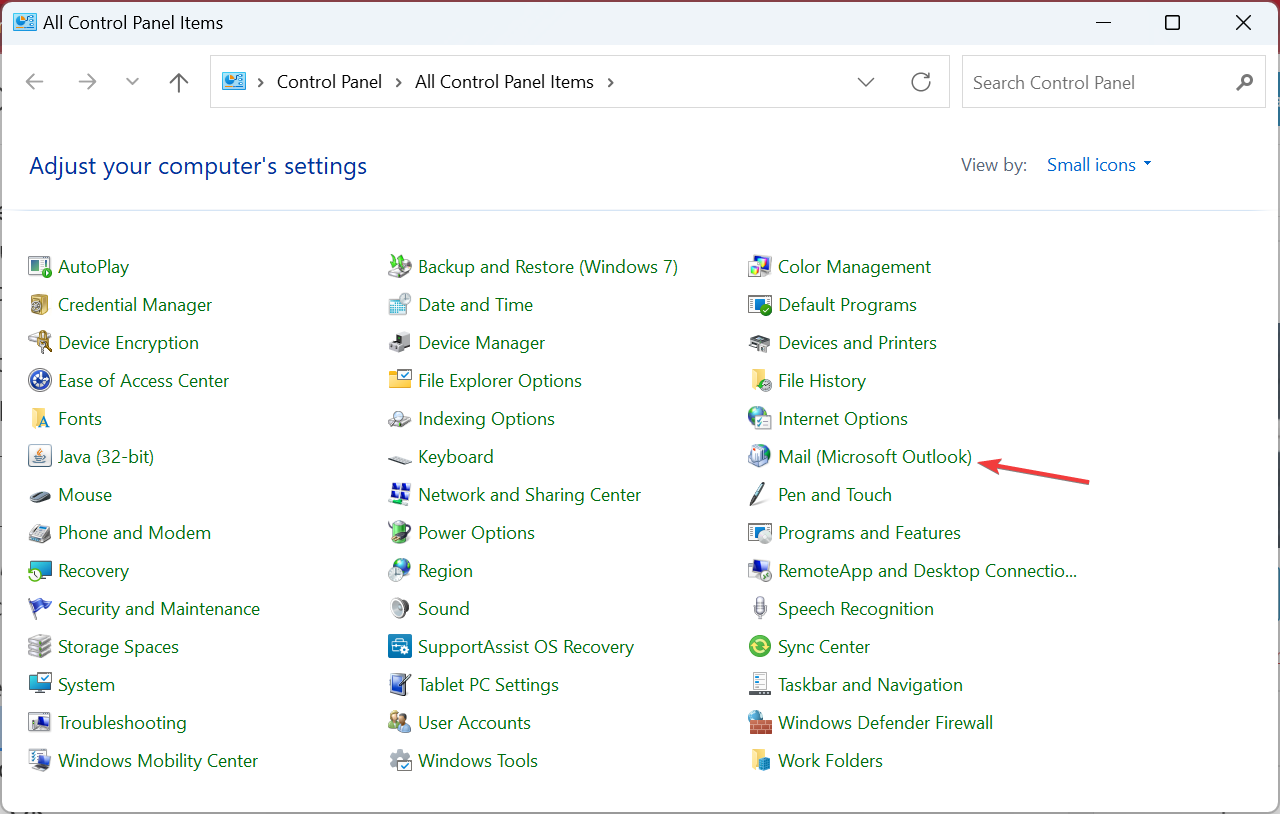
Open the Control Panel, and select Small icons from the View by menu near the top-right.
Click on Mail.
Now, click the Show Profiles button.
Click on Add.
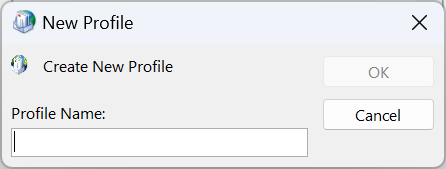
Enter the new profile title in the text box, and click the OK button.
Fill out the other details and click the Finish button.
Then select the Always use this profile option.
Click the Apply and OK buttons.
Those are some potential resolutions that might fix things when the download Outlook address book is missing, and you can get it again.
There’s only so much that can go wrong whenever you’re using a wireless connection. It gets worse when the connection drags, drops, or cannot connect at all.
Some of the common causes when WiFi is showing limited access in Windows 7 include:
Missing updates
Incorrect network connection settings
Damaged or incompatible drivers
Hardware or software problems
Incorrect WEP, WPA, or WPA2 security keys or passphrases
Boot in Safe Mode with Networking
Configure WLAN settings
Check router settings
Configure WinHTTP proxy setting to use direct access
Here are some tips and solutions you can use when WiFi is showing limited access in Windows 7.
What to do if WiFi is showing limited access in Windows 7
If your computer has a wireless key or button, press it to enable your wireless adapter. Once the wireless activity comes on or a light turns on, it is enabled. Try connecting to the internet again.
However, if you don’t have a wireless key or the lights are off, try the solutions below.
1. Use automatic troubleshooting
Use the automated troubleshooter built into Windows 7. The Windows 7 Network and Internet Troubleshooter tests your network for problems and tries to repair any issues found, automatically.
Right click Start
Select Control Panel
Click View by and choose Large icons
Click Troubleshooting
Click Network and Internet
Click Advanced
Ensure the Apply repairs automatically box is checked then click next
Click Troubleshoot my connection to the Internet and follow the instructions to check for problems
If any problems are found, you will see detailed information on these issues, or actions you can take. Windows can also show you what it fixed.
Try connecting again, and if WiFi is showing limited access in Windows 7, go the next step.
This clears registry values and resets configurations so that drivers can set up properly for access by Windows. You can do this via Device Manager as described below:
Right click Start > type Device Manager > launch the tool
Find Network adapters and click to expand it
Right click the name of your wireless network adapter and select Uninstall
Click OK and wait for the uninstall process to be completed
Go to Action under Device Manager
Select Scan for Hardware changes. Your computer will reinstall wireless networks and the network adapter name will reflect in the category.
Close Device Manager and restart your computer then try connecting to the internet again
2.1 Update drivers automatically
However, manual updates can be very stressful, if you want to do it quickly and securely, we strongly recommend using a specialized tool designed for that use.
Moreover, this tool avoids PC damage from updating the wrong version of drivers and compromising system functionality.
When you download and install the latest driver for your wireless adapter, it resolves any issues such as when WiFi is showing limited access in Windows 7.
You can either get driver updates from your device’s manufacturer website, or from other sites, or install using Device Manager (but this is when an internet connection is available).
Here’s how to use Device Manager to update your wireless network drivers:
Right click Start
Select Device Manager
Find Network adapters and click to expand it
Right click the name of your wireless network adapter and select Update Driver software
Click Search automatically for updated driver software. If one is found, follow the instructions to install it. if not, check the manufacturer’s website.
4. Check and reset hardware
Click Start
Select Power and click Shut Down
Unplug the power cord from your wireless router/gateway or wireless modem/router
Unplug the power cord from your broadband modem
Wait five seconds and then plug the power cord back to the wireless router and wait for the lights to come on and reflect the normal internet and computer activity.
Turn on your computer and perform a hard set once Windows loads. If it doesn’t connect automatically, click the Network Connection icon on the notification area and select your network.
Click Connect
If this doesn’t help when WiFi is showing limited access in Windows 7, try performing a System Restore.
5. Perform a System Restore
Click Start
Go to the search field box and type System Restore
Click Create a restore point
Enter your administrator account password or grant permissions if prompted to
In the System Restore dialog box, click System restore then click Choose a different restore point
Click Next
Click a restore point created before you experienced the problem
Click Next
Click Finish
To go back to a restore point, do the following:
Right click Start
Select Control Panel
In the control panel search box, type Recovery
Select Recovery
Click Open System Restore
Click Next
Choose the restore point related to the problematic program/app, driver or update
Click Next
Click Finish
6. Change your wireless environment
You can do the following when Windows WiFi is showing limited access in Windows 7:
Move your computer and router closer to each other for a stronger signal
Remove any metal objects near or between the router and computer as these can block connections
Limit the number of devices using the network simultaneously as performance drops and when many devices are connected
Note: If WiFi is showing limited access in Windows 7 after doing these things, you can buy a different antenna for your router or set up a different router as a signal repeater.
7. Update router firmware
When your firmware is outdated, it can affect performance, your computer’s security or prevent the router from connecting to the internet.
To update the firmware, log in to the configuration men on your router, and use it to update. Check your router’s user guide for instructions on how to do this.
Connect your computer directly to the router using the network cable when performing the firmware update.
8. Boot in Safe Mode with Networking
Safe Mode with Networking starts Windows in safe mode, including the network drivers and services you need to access the internet or other computers on the same network.
Restart your PC and before Windows 7 splash screen appears on your computer’s display, hit F8 to enable Advanced Boot Options.
The Advanced Boot Options screen should now be available. Select ‘Safe Mode with Command Prompt‘.
Keep in mind that if you are not fast enough when pressing F8, Windows 7 will boot up normally. In this case, restart your computer and try to press F8 faster.
Right click Command Prompt and select Run as Administrator
Type sfc/scannow
Press Enter
Restart your computer
Do the following to exit Safe Mode:
Right click Start
Select Run
Type msconfig
A pop up will open
Go to the Boot tab
Deselect or uncheck Safe Boot option box
Restart your computer
9. Configure WLAN settings
Right click Start
Select Run
Type services.msc
Right click WLAN Autoconfig
Select Properties
On Startup Type drop down menu, select Automatic
Click Apply and then OK
Restart your computer
10. Check router settings
Ensure that your router is set to broadcast its SSID or network name and you are connecting to the correct SSID, using the correct WEP/WPA passkey on both devices.
Once you confirm this, use ‘Windows Connect Now or WiFi Protected setup if available on your router. If you’re trying to use WPA or WPA2, ensure the network adapter and your router support this protocol.
If you can only connect using WEP, then your hardware needs a firmware upgrade (see solution 7).
11. Configure WinHTTP proxy setting to use direct access
Click Start
Search for Command Prompt
Right click Command Prompt and select Run as administrator
Type this command: netsh winhttp show proxy. If it says Direct access (no proxy server), then you already have WinHTTP access.
Type the commands below:
netsh winhttp reset proxy net stop wuauserv net start wuauserv
Has any of these 11 solutions helped fix the WiFi limited access issue on Windows 7? Let us know in the comments section below.
Important note: Microsoft officially ended Windows 7 support. If you’re planning to upgrade to Windows 10, make sure to check out our wide collection of guides on how to make the transition as smooth as possible.
Tech enthusiasts were probably thrilled last year when Microsoft announced the Surface Neo and Surface Duo devices. Additionally, they could not wait to see what other devices would be launched that would follow the concept.
These devices would revolutionize the way users interact with Windows 10, thanks to the dual-screen feature. Ever since then, several partners were promised to follow the trend.
Concept Ori and Concept Duet have joined the market
Concept Ori
It seems that Dell is one of the partners, as they have shown great interest in the field of dual-screen and foldable devices. In fact, their interest in this market is backed by the presence of Concept Ori and Concept Duet.
As far as hardware capabilities go, not much is known about Concept Ori. This is most likely because the project has just started development, and it would be unwise to promise something they couldn’t manage to pull through.
Nonetheless, Ori follows the same trend as the first dual-screen foldable devices, having one large screen that folds, creating two separate screens, which can most likely be used individually or together for increased screen coverage.
Concept Duet
As far as design goes, Concept Duet follows the same pattern as Microsoft’s Surface Neo, thus being closer to a laptop. What reinforces this idea even further is that Concept Duet can have a separate keyboard attached to it, essentially turning it into a traditional laptop.
If that is not your thing, you can always use one of the screens as the keyboard and touchpad.
One common denominator for both devices is that they run on Windows 10 Pro. This makes them different from the foldable devices created by Microsoft that run on Windows 10X.
One thing to remember is that both Microsoft and Dell‘s concept creations are in the design stage. This means that many changes can come along the way until they are officially released.
Speaking of which, no word has come out on when the devices will be made available to the general public. One safe bet regarding the launch date is that Concept Ori and Duet will most likely launch after the official launch of Microsoft’s very own Surface Neo and Surface Duo.
Recovery drive vs system repair disc: which one should you use for system repair? Both tools are rather similar, but they do have a few minor differences.
In this guide, we’ll show you how to create a recovery drive and a repair disk and explain what each does, so let’s get started.
Recovery drive vs system repair disc, everything you need to know
How to set up a recovery drive?
To set up a USB recovery drive in Windows 10, insert a USB stick (with more than 8 GB storage) into the desktop or laptop.
Click the Type here to search taskbar button.
Enter ‘recovery drive’ as the search keyword in the text box.
Click Create a recovery drive to open the window shown directly below.
The Back up system files to the recovery drive option will probably be selected by default. However, select that option’s check box if it isn’t.
Click the Next button.
Select the USB stick to turn into the recovery drive, and click the Next option.
Press the Create button.
How to set up a repair disc?
You can set up a repair disc in Windows 10 via the Control Panel. Insert a blank, rewritable DVD into the disc drive.
Launch Run by pressing the Windows key + R keyboard shortcut.
Input ‘Control Panel’ in the Run box, and click the OK button.
Click System and Security in the Control Panel.
Click Back up and Restore Windows 7/10 to open the options shown directly below.
Click Create a system repair disc, which opens the window in the snapshot directly below.
Select DVD RW Drive on the on Drive drop-down menu.
Click the Create disc option.
Thereafter, a Create a system repair disc window will open requesting that you label the disc. Click the Close button.
Is the system repair disk the same as the recovery drive?
Both tools can troubleshoot Windows startup issues and have the same features. However, a recovery drive allows you to reinstall Windows, unlike a repair disk, and that’s the only difference.
Repair disc is a legacy feature, and while it can be useful, there are superior tools to use. Windows already offers similar features from the Recovery Mode or a Windows installation media.
Most users will probably never really need a recovery drive or system repair disc, and in most cases, it is usually better to create bootable Windows installation media and use it instead.
If you have any other questions or suggestions, leave them in the comments section below, and we’ll be sure to check them out.
Some users have posted on numerous software forums about a Stack overflow line 20 error that arises in their web browsers (especially Internet Explorer). That error can occur when you try to log in to sites. One user stated:
Message from webpage… Stack overflow at line __. You can click OK on it & it will keep popping up with a different line number.
The stack mentioned in the error message is a memory (RAM) section for software to store variables and program parameters. Stack errors (otherwise overflows) arise when programs exceed their call stack memory allocations.
Those stack overflows often arise from Java, C++, and Perl runtime environments for browser applets.
How can I fix the Stack overflow line 20 error?
1. Disable ActiveX Scripting
As stack errors arise from browser scripts, turning ActiveX scripting off might help fix the Stack overflow line error. Open the search box with the Windows key + Shotkey.
Input ‘Internet Options’ in the search box. Then click Internet Options to open the window like in the snapshot below.
Click the Security tab.
Select Internet, and click the Custom level button.
Scroll down to the Scripting options.
Select Disable for the Active Scripting option.
Click the OK button to exit the window.
Press the Apply button to confirm the new settings.
2. Reset Internet Explorer
As the Stack overflow line error often arises for Explorer users, resetting that browser might help fix it. Open the Internet Options window by clicking the gear button in IE and selecting Internet options.
Select the Advanced tab shown directly below.
Press the Reset button.
Select the Delete personal settings option on the dialog box that opens.
Click Reset again.
Click the Close button.
3. Run a malware scan
The Stack overflow line error can be due to spyware. To purge spyware, you need to run a malware scan. ESET HOME Security Essential includes proven antivirus, antispyware, firewall, anti-rootkit, and anti-spam features, so there’s no need to look around for a professional program to perform this scan.
You just need to download the software from the official website, and run a thorough scan and detect the cause of stack overflow line 20 error, if it’s malware related.
Make sure that you have the latest Java version. Click the Verify Java version button on the Java website to check that. If you don’t have the latest version, click the Agree and Start Free Download button on the Java download page. Then open and go through the Java installer to install the latest version.
5. Disable script debugging
You can also turn off script debugging notifications for the Stack overflow line error to ensure they don’t pop up. Input ‘Internet Options’ in Windows’ search box.
Click Internet Options to open that window.
Select the Advanced tab.
Select the Disable script debugging (Internet Options) check box.
Select the Disable script debugging (other) setting.
Then deselect the Display a notification about every script error check box if selected.
Select the Enable automatic crash recovery check box.
Click the Apply and OK options.
Those are some potential fixes for the Stack overflow line error. Remember, however, that stack errors can often be due to webpage coding, which browser users can’t fix.
Also, read more about overflow errors and prevent these from reappearing.
If you have any other questions or suggestions, feel free to leave them in the comments section below.
Perhaps, Xbox partner AMD thought it would be titillating to show off a render of its latest accomplishment in full form by having a mock-up of the Xbox Series X hardware floating around in the background of its CES 2020 keynote as it discussed some details of its custom silicon made in conjunction with Microsoft’s next-gen console.
The only problem was that pixel peeping fans thought they were getting some exclusive news about the hardware alongside the details about the custom silicon, when in fact they were just being fed false information at the time.
Fortunately, it has only taken 24 hours for the misinformation floating around on the internet to begin to clear up as sources close to the matter release more accurate details about the Xbox Series X and I/O.
Brad Sams over at Thurrott.com is going on record with what is believed to be the right I/O setup for the Xbox Series X.
Following this snafu, I was able to confirm with several insiders about the actual ports on the current early iterations of the hardware. Keep in mind, these may not be final and are subject to change but do come from multiple people familiar with the hardware.
As it stands right now, the series X features, on the back of the hardware, two USB-A ports (of the SuperSpeed variety), ethernet, a single HDMI port, optical audio, and a power connection. There is also another port on the back that may be used for debugging but there wasn’t an agreement on the nature of its functionality. The image at the top of this post shows a basic outline of how those ports appear on the actual hardware.
Also, on the back of the device are openings for air intake as well; all of the ports are located on the lower half of the hardware. Keep in mind, there is also a USB-A port on the front of the console but for now, it looks like Microsoft is sticking with the older USB style port.
While it would seem that Microsoft should be putting the finishing touches on the XSX as mass production and shipping are relatively around the corner, Sams does highlight that things could change.
For now, the promise of the dual USB-C ports found in AMD’s purchased render from TurboSquid will have to remain an artist’s fantasy for now.
A major component of the Microsoft Office Suite has been discovered to have an extremely concerning vulnerability.
It has been labeled CVE-2019-0560, which is extremely similar to yet another vulnerability (CVE-2019-1463). This older vulnerability was also discovered in Microsoft’s Access database application on December 10, 2019.
What does this vulnerability involve?
The most concerning issue about this vulnerability is that if it is left unpatched, it could leave more than 85,000 companies exposed to a leak of sensitive data.
Unfortunately enough, no current solution has been found for this vulnerability, leaving all of those companies, most of which are from the U.S., to be vulnerable.
Both of these vulnerabilities stem from a common coding error that causes improper management of system memory by an application. If exploited accordingly, it could lead to the unintended disclosure of sensitive or private information.
In simple words, sensitive data is present in a database’s MDB files. Normally, data unintentionally saved into the file could often be valueless content fragments.
However, this may not always be the case, since the data can also be sensitive information such as passwords, certificates, web requests, and domain/user information.
Thus, all that a hacker would need to do to access this information is simply gain access to the MDB files, and search for the information.
With that in mind, users should patch their Microsoft Access database executables as soon as possible.
Do you think your company is among the 85.000 affected? Let us know what you think about this vulnerability in the comment section below.
You can read more about this Microsoft Access vulnerability in Mimecast’s report.
Maybe we talked about Windows 10 a lot these days, but we didn’t forget older Windows operating system. Now, we’re going to solve one really annoying Windows 7 problem.
Here’s how you can solve the issue with extended display in Windows 7.
As you probably know, you can run your Windows OS on multiple monitors or screens. Windows integrated a few options that will help you manage what will be showed on each screen.
You have the PC screen only option, which is used when you have just one monitor
The Duplicate option allows you to have the same thing on both screens
The Extended mode allows you to extend your display to both screens
The Projector only allows you to use only your alternate monitor.
If you’re using just one monitor, the PC screen option should be enabled by default, because other options could mess up your display.
And this is why this error occurs. If you’re using a single monitor, and you have Extended option enabled, you’ll most likely see only the half of your display, and you won’t be able to work normally.
So to solve this issue, you just have to switch your ‘screen mode’ back to Computer only. Here’s how you can do that
Press Windows key and P at the same time
Window with screen modes will show up, so choose Computer only
After you switched to Computer only mode, your extended screen should be back to normal size.
Step 2: Update your drivers
In case this simple workaround didn’t get the job done, you can always check if your display driver is installed correctly, because corrupted or outdated display driver could also cause some graphical issues.
This method should basically fix your Windows 7 extended display problem.
Step 3: Run the hardware troubleshooter
However, if you’re experiencing extended display resolution problems, you can run Windows 7‘s built-in Hardware and Devices troubleshooter from Control Panel.
Step 4: Check your cables
If nothing worked, then most likely this problem is caused by hardware incompatibilities or faulty hardware pieces. Make sure you’re using the right cables to connect your Windows 7 computer to your monitor.
If you have any comments or suggestions, feel free to contact us using the comments section below.
Newer isn’t always better, and it seems that Microsoft is working hard to update some of its most popular apps. One of these apps is Calculator.
Even though this app got many updates, many users wish to bring Windows 7 calculator to Windows 10, and today we’re going to show you how to do it.
As you probably know Microsoft decided to replace standard Calculator app with a modern version in Windows 10.
Although the new Calculator app comes with sleek design, it lacks many of the features that old Calculator app had.
The old Calculator app had support for scientific, programmer or statistic calculations while the new version lacks these features. Speaking of calculators, if you need one that supports advanced features, check out the guides below:
In addition to advanced calculations, the old application was faster and optimized for keyboard and mouse while the new Calculator app is optimized for touchscreen devices. The Windows 7 Calculator is indeed more compact is easier to use that Windows 10’s calculator.
One major advantage of old Calculator was that you could launch it simply by opening Run dialog and typing calc in it, and the new version doesn’t support that.
Follow the instructions to complete the installation.
Now you should be able to start the Calculator by using the desktop shortcut.
We have to mention that this version of Calculator can be launched by typing calc.exe in the Run dialog just like in the previous versions of Windows which is a welcome addition.
As for the Calculator, all your favorite features are here with a familiar design, so you shouldn’t have any problems.
If for some reason you wish to switch back to Modern Calculator app all that you have to do is to uninstall Old Calculator just like any other application by going to the Settings app > Uninstall a program section.
Now, if you don’t really like neither Windows 7‘s old calculator or Windows 10’s new calculator app, there are plenty of third-party calculator software that you can install on your computer.
We already compiled a list of the best calculator apps to use on your Windows computer. Some of them are very basic, while other support advanced calculation functions.
You can also learn how to use the built in Calculator on Windows 11 for standard, scientific, and conversion tasks by following our complete guide on how to use Calculator on Windows 11.
Windows 7 is still being updated although, in January 2015, Microsoft ended mainstream support for this version. There is good news for those of you who are still running Windows 7. Microsoft won’t end security updates until January 14, 2020.
All the security and non-security updates are published through Windows Update. When you install the most recent update you get all of the previous updates, as well, including important security fixes.
What time is Windows 7 Patch Tuesday?
Patch Tuesday is taking place on the second and rarely on the fourth Tuesday of every month and it begins at 17:00 or 18:00 UTC.
Well, until January 2020, “the latest” is always changing. As of January 07, 2020, the latest updates are those released in December 2019, namely Monthly Rollup KB4530734 and security update KB4530692.
They brought important security features but also they triggered slow startup issues. See more about these updates from our article.
That depends. Microsoft could launch a security update immediately if Windows 7 PCs are extremely vulnerable to cyber attacks. One thing the user should understand is that the way Microsoft releases updates is not a rigid and predetermined scheme.
Also, they could be cumulative, so you might find them in this form. As we said before, until January 14, 2020, Microsoft is launching Patch Tuesday containing security updates, as well as non-security updates.
How do I update Windows 7 security patches?
Usually, these updates come automatically, but if not, you can check for updates in a few easy steps:
Open the Start Menu > Control Panel > Go to “System and Security” and click on the green header > Open Windows Update and select “Windows Update” from the middle of the list > click the Check for updates button on the main screen.
How often are Windows 7 updates released?
As often as it is necessary. Like we said before, updates are released every second Tuesday of every month, but this doesn’t mean they are launched only in that time frame.
What is Windows monthly quality rollup?
Besides showing us this ‘convenience rollup tool,’ Microsoft introduced the idea of monthly rollups.
Monthly rollups are released at the end of each month and contain all non-security updates for Windows 7 (or Windows 8.1 for that matter) released during that month.
Monthly rollups will be offered to users through Windows Update, WSUS, SCCM, and Windows Update Catalog.
Are Windows updates really necessary?
Generally, yes, especially security updates and updates that fix serious bugs. Speaking of bugs, some updates cause more problems than solve issues, so they should be avoided.
How do I check the Windows 7 Update Schedule?
Click Start button > Type “Windows Update” in the search box > click “Windows Update” > select “Change Settings”
To make your work easier, you can select “Install updates automatically (Recommended).”
Alternatively, you can choose when Windows 7 will perform updates.
What are security patches in Windows 7?
Security patches are pieces of software that are meant to protect your Windows 7 computer.
Why is patching needed?
Patching is essential because it brings changes to a computer program that makes it less vulnerable to cyber attacks and less predisposed to crashing.
SharePoint Spaces, a tool originally revealed in 2018 at the SharePoint Virtual Summit, is now available in private preview. As noted in a post by Upload, SharePoint Spaces is one step closer to being generally available. SharePoint Spaces will be available for use with the Microsoft HoloLens and Oculus Quest, along with other Windows Mixed Reality headsets sometime in the next few months.
According to Microsoft, SharePoint Spaces will allow anyone to create mixed reality experiences where data, documents, and files can be used “empowering everyone to create visually compelling spaces that are available to anyone, on any device.” SharePoint Spaces will allow users to create content in these three areas.
Recruiting and onboarding—Recruits or new employees can learn about a company in a compelling, 360-degee virtual welcome and orientation, including a 360-degree video message from leadership. They can navigate the campus or building with 3D maps, learn the organizational structure with an interactive organization chart, or explore rich information about coworkers and the organization’s products.
Learning—With mixed reality, learning comes to life by captivating your focus and attention. Gain broad perspective with a panoramic view of a topic and learning objectives. Then explore personalized, relevant, and dynamic content. Ignite your curiosity by discovering new insights, and dive deep into topics that matter to you. Learn not just by reading or watching, but by experiencing, with your senses engaged.
Product development—Create an inspiring space for your team to spark innovation. Surround yourself with experts to look at data, content, and processes from every angle. Explore a prototype in 3D to identify new opportunities, attach annotations, and visualize improvements.SharePoint Spaces will be integrated within SharePoint offering users a user-friendly experience. SharePoint users will be able to see a preview of their work in a VR space once uploaded. SharePoint Spaces will also support other media content, including 360 photos and videos, and 3D models and objects.
If you are interested in taking part in the SharePoint Spaces private preview, sign-ups are here. Do you think SharePoint Spaces will be a useful VR tool for companies? Let us know in the comments.