Nvidia GameStream not working with Windows 10/11 [FIX]

Many users encountered a pretty severe issue with Nvidia. They couldn’t stream games in Windows 10. No matter what they tried, they didn’t manage to connect Nvidia GameStream to PC.

Also, some users reported that an orange triangle which signifies an error appeared next to their name after trying to update Shield Hub.

These users encountered the “Cannot launch game. Check network configuration.” when trying to start a game. 

So, this is a major problem with Nvidia GameStream. Luckily, there are many easy solutions to solve this problem in no time. Today we will show you what to do if Nvidia GameStream cannot connect to PC.

What to do if Nvidia GameStream cannot connect to PC

1. Log out of GameStream

Sometimes, this issue can be solved if you log out of GameStream from all your devices. Restart them and log back in.

Several users reported that this procedure allowed them to stream again in Windows 10.

2. Update Shield Hub

Updates are extremely important for Shield Hub. So, don’t forget to install the latest version of Hub.

3. Clear the Shield Hub cache

Quite a few users reported that clearing the cache from Shield Hub solved this problem.

4. Check the Wi-Fi strength

Because this is a connection issue, you should check your Wi-Fi strength. If you have a poor Wi-Fi signal in Windows 10, try one of these solutions from our detailed guide.

Alternatively, you can connect to the Internet through cable. Although this is not always practical, it might do the trick for you. As we all know, the cable connection is stronger.

5. Reinstall GeForce Experience

  1. Uninstall GeForce Experience.
  2. Close all NVidia services or containers that might still be running.
  3. Completely remove the Nvidia directory at “C:Program FilesNVIDIA Corporation”.
  4. Fresh install the latest GeForce Experience.

You don’t need to reboot to reinstall GeForce Experience. Furthermore, this procedure will not uninstall the card driver.

Conclusion

As you can see, this connection issue with Nvidia GameStream has many solutions. Try them to see what solves the issue for you.

Also, keep in mind that updating your drivers is crucial for your programs to run smoothly. Learn everything there is to know about updating your Nvidia drivers from our comprehensive guide.

Did our solutions help you connect Nvidia GameStream with Windows 10? Do let us know in the comments section below.

RELATED ARTICLES YOU NEED TO CHECK OUT:

Can’t open Power BI files? Use these solutions

Power BI users have been frequently complaining about not being able to open their Power BI files at times. They have experienced error messages when trying to open Power BI files.

Unable to open document; we weren’t able to restore saved database to the model

Before following any of the steps, make sure you’ve already checked that the file you are trying to open is actually Power BI compatible, which include

  1. Power BI Desktop files (.pbix)
  2. Microsoft Excel spreadsheets (.xlsx or .xlsm)
  3. Comma Separated Value databases (.csv)

I can’t open Power BI files: What can I do about it?

1. Make sure Power Bi files are named appropriately

Rename files if needed

Similar to other services, Power Bi may experience difficulties when trying to open and read off of files named using special characters.

As such, it is recommended that you keep your filenames simple and made up of only upper and lowercase letters as well as digits. Do not include special characters such as “@”, “&”, “^” etc.

2. Consider a fresh Power BI install

Getting rid of your old Power BI installation

  1. Go to the install directory of your Power BI client
  2. Uninstall Power BI Desktop
  3. Delete the Cache and CEF folders from the following path:
    C:UsersyourusernameAppDataLocalMicrosoftPower BI Desktop
  4. Restart your Computer

Access the Power BI client with UR Browser and avoid issues with the desktop client for good.


3. Get the latest version of the Power BI desktop client

Power BI is constantly subjected to updates, so make sure you have the latest Desktop or Store App version installed. 

4. Use the Web version

The web version of Power BI is the first one to automatically update, so if you find any issues with the desktop version, just switch to the web version.

You can use the web version to open your locally stored Power BI file, thus removing the need to use any third-party data recovery software

If all else fails, you could consider looking at their forums for frequent discussions and patch notes.

Additionally, you can contact customer support and report your problem directly and follow their instructions afterward.

Dropbox not allowing me to share files [SOLVED]

Dropbox is a very efficient tool to share documents and other files. By all means, the app shouldn’t be complicated. Also, the features should be intuitive and user-friendly.

This is not always the case. Many people encountered issues when trying to share files in Dropbox. The following error messages usually pop up when this happens:

  • Sharing was unsuccessful
  • You don’t have permission to create a link to this file
  • You don’t have permission to perform this action
  • There are too many files

So in this article we will show you how to fix these annoying problems once and for all.

Why can’t I share folders in Dropbox?

1. Sharing was unsuccessful

sharing was unsuccessful error

If the Sharing was unsuccessful error message appears, check if this option is disabled for the person you’re trying to share a file with.

Probably, the user is on a Dropbox Business team that doesn’t allow the members to receive invites or files from users outside the team.

The team admin is the one who can change the settings to enable file sharing.


2. You don’t have permission to perform this action

you don't have permission dropbox error

The error You don’t have permission to perform this action (alternatively, You don’t have permission to create a link to this file) appears when the owner of the file or folder doesn’t allow other people to share it with other users.

Also, you might have view-only access to the file. To solve this, contact the owner of the file to change your privileges.


3. There are too many files

  1. Open Dropbox from browser.
  2. Click on Files.files dropbox
  3. Rename the folder with too many files.
  4. Click on New shared folder.
  5. Choose I’d like to create and share a new folder.
  6. Click on Next.
  7. Add a name for this folder.
  8. Add the email addresses of the people you want to share with.
  9. Select Share.
  10. In the Dropbox app from your computer, open the old folder you wanted to share.
  11. Open your new shared folder.
  12. Paste files from the old folder into the new folder that’s shared on Dropbox.

These are the solutions to some of the major issues with sharing files and folders in Dropbox.

For other errors in Dropbox, you can check out our comprehensive article.

Did our solutions help you? Do let us know in the comments section below.

Dropbox not saving to Camera Roll [FIX]

Dropbox is a great tool to sync your files from computers to mobile devices. This way, you can access your data from any device.

However, many users encountered several issues with this app. In this case, the export function is not working. Many users complained that this problem appeared after an update.

Fortunately, there are some simple workarounds available for this problem.

Save to Camera Roll option not available in Dropbox

1. Use the simple Save option

  1. Go to the three dots from the upper-right corner of your phone.
  2. Select Share via.
  3. Tap on Save image.

Many people said that this is not a very user-friendly feature. It is not so intuitive and the option is difficult to come by from the first try if you don’t know the app very well.

2. Save to an SD card

You can export a file to your external SD card in an easy way. Follow the steps below on your Dropbox app from your mobile device.

  1. Tap the Quick Action button to the right of the filename.
  2. Find and tap Export.
  3. Select Save to device.
  4. Select your external SD card.

Saving to an external SD card is extremely important. Having your data on hardware as well diminishes the chances to lose important information.


Use UR Browser to access Dropbox online and avoid all issues with the desktop client.


3. Save the files in DCIM folder

  1. Save all your files to your computer’s Dropbox folder.
  2. Open Dropbox mobile app.
  3. Select your photos, then choose Save to device.
  4. Go to your phone’s DCIM folder and save the photos there.
  5. Now all the photos will appear in your phone’s gallery.

This method is useful if you want to load some photos on Instagram or other mobile applications.

Conclusion

These workarounds allow you to export your files to your mobile phone.

However, these methods are not so intuitive, and this syncing option should be extremely easy to access for a tool such as Dropbox.

For this reason, you might consider installing a similar app. As it happens, we have a fresh list of the best cloud software. These tools have encryption as well. So, you can sleep well knowing your data is secured and protected from prying eyes.

Did you find our workarounds useful? How do you save to camera roll on your phone? Do let us know in the comments section below.

RELATED ARTICLES YOU NEED TO CHECK OUT:

Gmail not Receiving Yahoo Emails: 3 Solutions That Can Help

Many users reported that Gmail is not receiving Yahoo emails on their PC. This can be a big problem, especially if you’re waiting for a response from someone using Yahoo Mail.

Fortunately, it is not a problem that is impossible to fix, and we will show you how to go about it in this guide.

Why is my Gmail not receiving some emails?

Below are some of the potential reasons Gmail is not receiving Yahoo emails:

  • Wrong settings: In some cases, you might have set Yahoo emails to be filtered and blocked. The solution to this is to remove it from the filtered list.
  • Issues with Yahoo and Gmail: These Gmail to Yahoo email problems often occur due to issues between the two email clients. In this case, you need to report the issue and wait for it to be resolved.

What can I do if Gmail is not receiving Yahoo emails?

1. Use an alternative email client program

Gmail supports IMAP and SMTP, two protocols that enable you to check your emails using other desktop programs. In addition, Mailbird is a popular email client service that automatically detects your Gmail server settings and lets you access your emails via its platform.

All you need to do is open the Mailbird app and add your Gmail account details via the Settings tab from the main menu. In this way, by using a third-party service, you won’t have any problems receiving and opening emails from Yahoo users.

Mailbird

Connect to your Gmail account with this professional email client program!
Try it now Visit website

2. Remove Yahoo emails from the blocked list

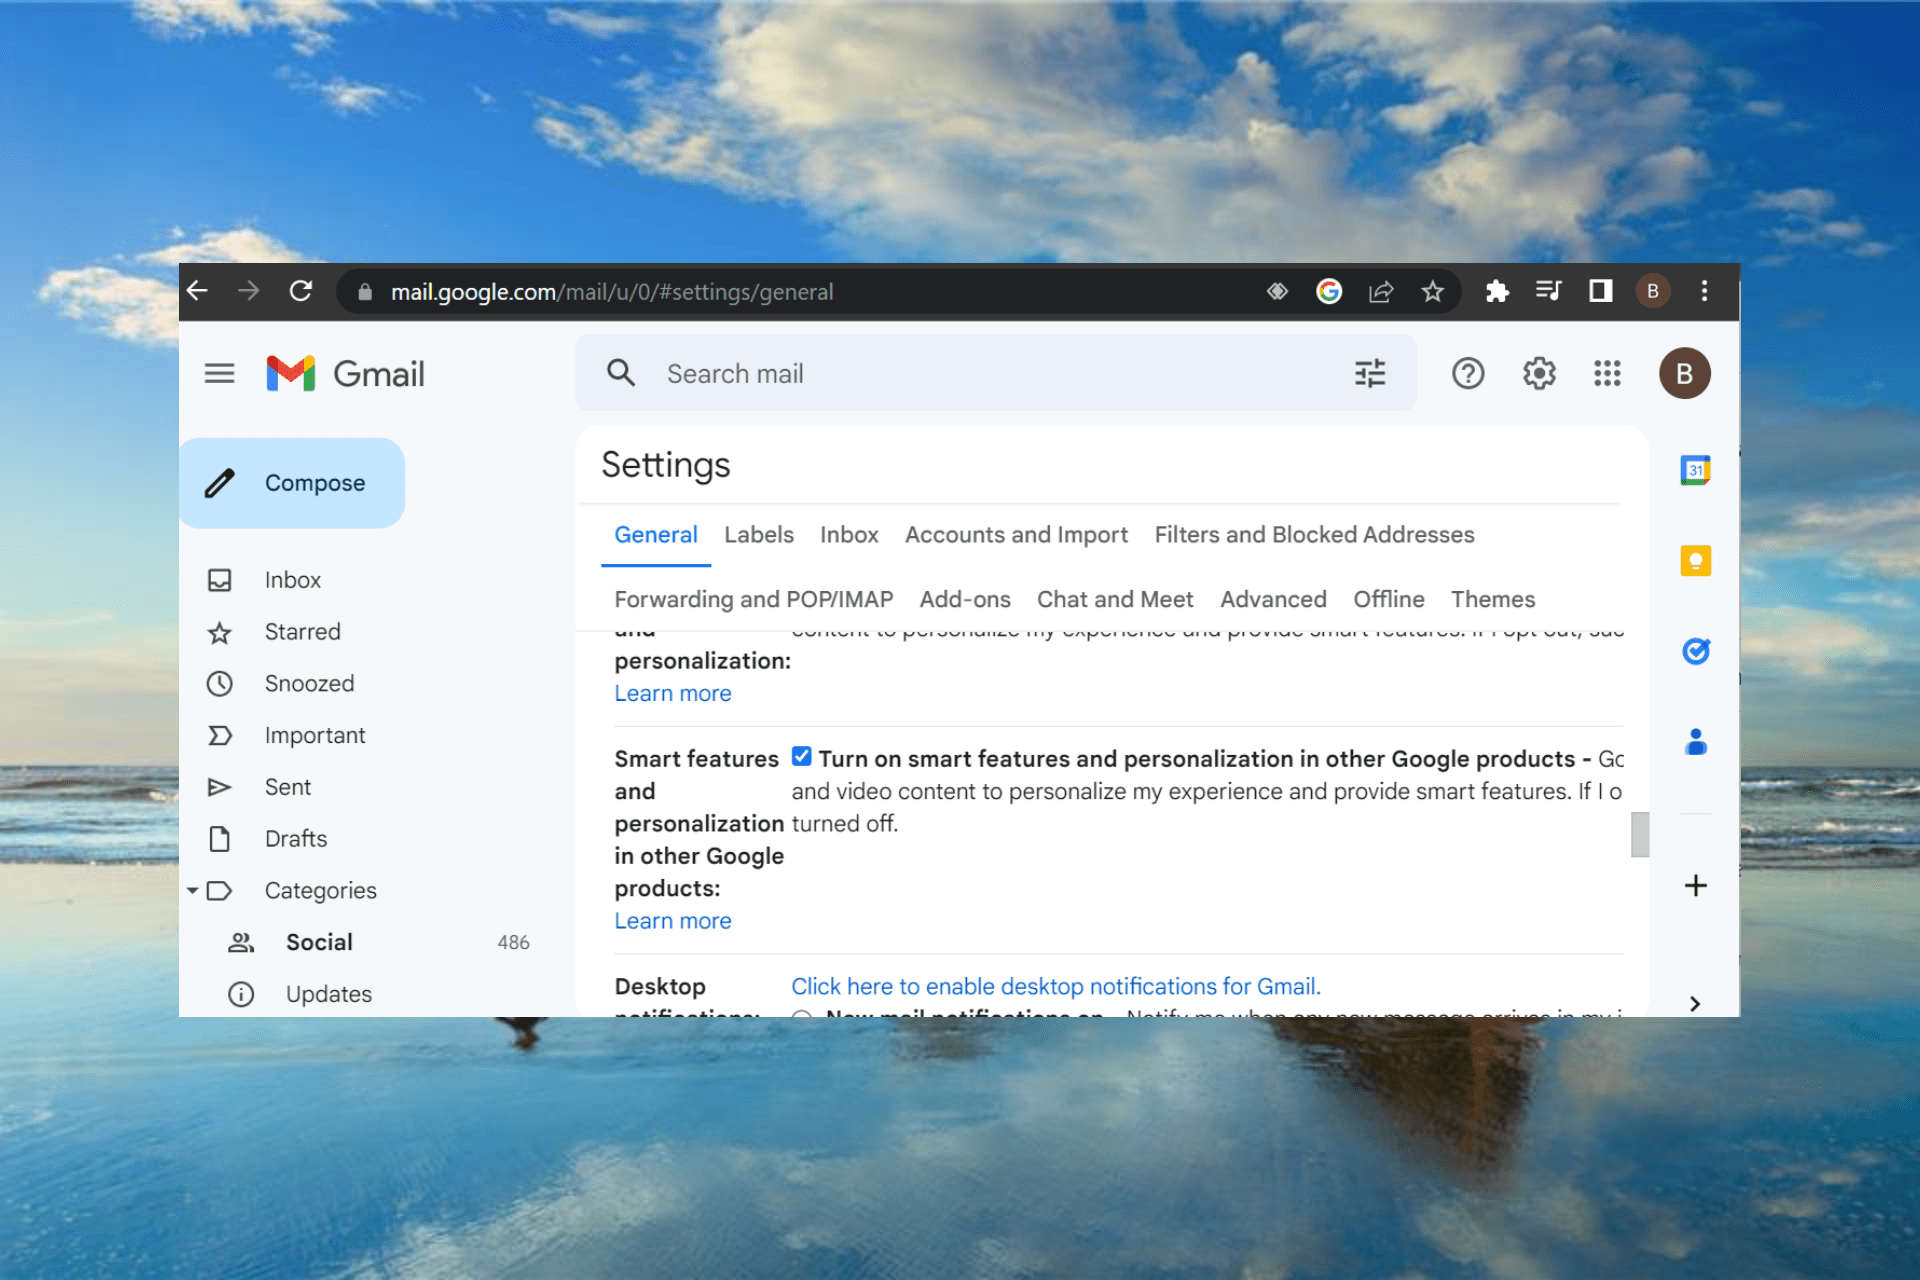
  1. Launch Gmail and click the Settings icon at the top.
  2. Select See all settings.
    see all gmail not receiving yahoo emails
  3. Now, click the Filters and Blocked Addresses tab at the top.
    filters
  4. Finally, check if there are any strange settings there.

Sometimes, Gmail is not receiving Yahoo emails because of your settings. If you find any strange settings in the Filters and Blocked Addresses section, remove them.

3. Contact Google/Yahoo support

Gmail not being able to receive Yahoo emails can be frustrating, but in most cases, these issues are caused by email providers.

Since this is a server-side issue, there’s not much you can do as an end-user except to report the problem and wait for the issue to get resolved. Yahoo and Google are usually quick to fix these kinds of errors.

So you won’t have to wait for too long.

There are a few solutions you can try if Gmail isn’t receiving Yahoo emails. As you can see, this is usually a server-side problem and has been reported to be fixed already.

Similarly, if Gmails is not receiving emails, check our detailed guide to fix it.

Feel free to let us know the solution that helped you solve this problem in the comments below.

Windows image file handling information disclosure vulnerability

Have you ever encountered Windows image file handling information disclosure vulnerability alerts?

Having this issue on your computer system could allow remote third-party attackers to access important and private information stored on your hard-drive.

This can cause a wide range of issues – from losing payment data to completely losing control over your system, to different malicious software being installed on your machine.

Nobody wants to deal with this in the 21st century’s online environment.

In today’s article, we will explore some of the most important questions regarding this vulnerability, and also what can you do about it. Read on to find out more.


What are vulnerabilities and what Microsoft software was exposed to this exploit?

keyboard with logo - windows image file handling information disclosure vulnerability
Vulnerabilities are caused by conflicts between memory operations and different software applications.

An online attacker can take advantage of that opening inside your system security and can use different tactics to exploit the target.

Microsoft has confirmed that they observed this vulnerability and released software updates to deal with this issue.

Here is a list of Microsoft products that were affected:

  • Windows Server 2003 for 32-bit and x64-based Systems SP2
  • Windows Vista SP2
  • Windows Vista x64 Edition SP2
  • Windows Server 2008 for 32-bit and x64-based Systems SP2
  • Windows Server 2008 for Itanium-based Systems SP2
  • Windows 7 for 32-bit and x64-based Systems SP1
  • Windows Server 2008 R2 for x64-based Systems SP1
  • Windows Server 2008 R2 for Itanium-based Systems SP1
  • Windows 8 for 32-bit and x64-based Systems
  • Windows 8.1 for 32-bit and x64-based Systems
  • Windows Server 2012
  • Windows Server 2012 R2
  • Windows RT
  • Windows RT 8.1

Worried about the SWAPGS vulnerability affecting your Windows 10 PC? Here’s the fix


How can an attacker get access to your files?

Computer user - windows image file handling information disclosure vulnerability
This specific vulnerability can be caused by your computer system by conflicting memory operations being performed while modifying PNG (.png) image files.

An attacker can use this opening in your security to convince you that the links or files they created are genuine original files.

If you fall into the trap and click/open one of the links/files, then the attacker gets access. He does so by exploiting the faulty way your PC is processing the information required.

If this point is reached, then (depending on your PC‘s security settings), the attacker might get access to sensitive files on your PC.


What can you do to keep your computer’s data safe?

keyboard - windows image file handling information disclosure vulnerability
Microsoft has released a series of actions that the user with administrator privileges could take to prevent the vulnerability affecting your privacy.

Here are some of the best actions you can take to make sure that never happens:

  • Update your system to the latest Windows 10 release.
  • Allow access to the network only to trusted users.
  • Use the Microsoft Baseline Security Analyzer (MBSA) tool
  • Configure the Microsoft Enhanced Mitigation Experience Toolkit (EMET) to work with the problematic software.
  • Avoid opening email messages from suspicious sources.
  • Do not use the administrator account when browsing the Internet.

Conclusion

In today’s article, we discussed what the Windows image file handling information disclosure vulnerability is, what causes it, on what products does it apply, and also what you can do about it.

Please feel free to let us know if this guide offered you comprehensive information about this issue.

You can do so by simply using the comment section found below.

READ ALSO:

Keyboard stops working when playing Uplay games

If we’re talking about gaming, peripherals problems are the most common.

From mice and keyboards to speakers and headsets, every Windows 10 gamer has had at least one problem with them.

That’s because when you play games, you tend to overuse your peripherals and push them to the limit. And that’s OK because you get some kind of use out of them.

But what do you do when your keyboard stops working for no reason at all?

That’s a pretty annoying situation and exactly the issue that many Uplay gamers report more often than not. Many of them said that when playing a game on their Windows 10 PC, the keyboard simply stops responding.

If you’ve bumped into the same problem, keep reading to find out how to solve it.

How can I fix the keyboard if it stops working in Uplay games?

1. Common checks

  1. If you’re using a wired keyboard, make sure that nothing’s wrong with the cable.
  2. Plug your keyboard into another USB port.
  3. If you’re using a Bluetooth keyboard, make sure that it didn’t disconnect from your PC.
  4. Check the battery level of the keyboard.
  5. Go to Settings > Update & Security > Troubleshoot > scroll down until you see Keyboard > click on it > click on Run the troubleshooter. If there’s a problem with the keyboard, the Keyboard troubleshooter may be able to fix it.

2. Disable overlays

It seems like Uplay and Ubisoft games don’t get along very well with overlays.

If you’re using Discord, Mumble, or Twitch, make sure to disable their overlays. Whenever the issue happens, check your background apps and overlays because one of them is probably the cause.

Many Uplay gamers solved the problem by disabling the Discord overlay. We recommend you to try it as well, as it may solve your problem.

3. Start the game with administrative rights

how to fix keyboard not working in uplay games
  1. If you’re experiencing the problem in a certain game, close it. Also, close Uplay.
  2. Now go to the installation folder of the game.
  3. Right-click on its shortcut (game.exe) and click on “Run as administrator.”
  4. The game should start normally and your keyboard problem should be gone.

Keep in mind that this is only a workaround and you’ll have to repeat it every time you open the game. If you want a more permanent fix, you can set the game to always start with administrative rights:

  1. Locate the game’s shortcut and right-click on it.
  2. Select Proprieties.
  3. Now click on the Compatibility tab.
  4. Under Settings, check the Run this program as an administrator option.
  5. Click Apply and then OK.

4. Update your keyboard driver

uplay keyboard not responding
  1. In your Windows search box, type “device” and click on the first result. Alternatively, you can press the Windows key + X and select Device Manager.
  2. In Device Manager, locate your keyboard driver and right-click it.
  3. Now click on Update Driver.
  4. In the window that appears, click on “Search automatically for updated driver software.”
  5. When a new driver is found, install it.

Check that you’re using the most recent versions of your drivers. A computer cannot manage video cards, computer programs, sound cards, or other hardware; they must be managed by a driver.

There are third-party tools that can do this for you automatically. Otherwise, doing it manually takes time and requires extensive knowledge of the drivers you’re looking for.

You may rely on Fortect Driver Updater to make such changes to ensure a proper update with the most recent keyboard drivers suitable for your PC. With a few clicks, the software will scan your PC’s hardware and peripherals for potential driver upgrades.

⇒ Get Fortect Driver Updater

You can also try to reinstall the Uplay client, but a lot of users have already tried that with no success. Your best bet is to run the game with administrative rights or disable overlays.

After following these steps, your keyboard should work just fine in Uplay and in Ubisoft games.

If you have any other suggestions or questions, don’t hesitate to reach in the comments section below.

FIX: Microsoft Publisher won’t send emails

Microsoft Publisher includes options for sending documents in emails. That application enables users to send embedded newsletter documents in emails to contacts. However, Publisher’s embedded email feature doesn’t always work for some users. Publisher cannot complete the operation is one error message that might pop up when users can’t send emails with the application. Here are a few troubleshooting tips for fixing Publisher when it doesn’t send emails.

How to Fix Publisher’s Emailing

1. Select Outlook as the Default Email Software

  1. Outlook must be Windows’ default email software for users to send documents within Publisher. To change the default mail software in Windows 10, click the Type here to search button.
  2. Then enter the keyword ‘default’ in the search box.
  3. Select Default apps to open the window shown directly below.The Default apps tab microsoft publisher won't send email
  4. Click the current default Mail app to open the Choose an application window.Choose an application window microsoft publisher won't send email
  5. Select Outlook to be the default email software.

2. Check the Publisher and Outlook Versions Match

Users won’t be able to send embedded document emails from Publisher if they don’t have matching Publisher and Outlook versions. For example, users with Publisher 2013 will need Outlook 2013. So, some users might need to check that their Publisher and Outlook versions match up.

MS Publisher microsoft publisher won't send email

Users who have updated their Outlook software might need to revert back to the previous versions that match the Publisher applications they’re utilzing, or vice versa. Uninstall the more update software, and then reinstall the old Outlook or Publisher versions.


3. Change the Document’s Fonts

Errors can arise when users try to send Publisher document emails that include non-standard web fonts and formatting. Publisher sends newsletter emails with HTML formatting. Thus, some users might need to replace unusual fonts in the documents they’re trying to send with standard web fonts. Arial, Times New Roman, Helvetica, and Times are some of the most standard web fonts.

Note that it’s better to utilize Publisher’s email newsletter templates for emailing documents with the application. Those are HTML formatted newsletters that should work just fine with Publisher’s embedded email feature. To do that, select E-mail and Newsletter within Publisher’s template type list.

Publisher newsletter templates microsoft publisher won't send email


4. Repair MS Office

  1. Some Publisher users have confirmed they’ve fixed Publisher cannot complete the operation errors for sending emails with MS Office’s repair utility. Users can do that by opening Run with its Windows key + R keyboard shortcut.
  2. Open Programs and Features by entering ‘appwiz.cpl’ in Run and clicking OK.The Windows uninstaller microsoft publisher won't send email
  3. Select the MS Office suite in Programs and Features.
  4. Select the Change option.The Change button microsoft publisher won't send email
  5. Users can then select either a Quick Repair or Online Repair option. Select the more thorough Online Repair option.
  6. If it’s an MSI-based Office, users will need to select the Repair option; and then click the Continue button.

5. Send the Email as a PDF Attachment

If the above fixes don’t do the trick, try sending the document as a PDF email attachment from Publisher instead, which is usually a more reliable method. The PDF will also retain the exact formatting of the Publisher document. To do that, click File, Share, and E-mail within Publisher; and then select the Send as PDF option.

The Send as PDF button microsoft publisher won't send email

The resolutions above might fix Publisher’s email feature for some users. Remember, however, that users can also send email newsletters with web apps such as MailChimp.

RELATED ARTICLES TO CHECK OUT: 

Posted in Fix

System restore error: Specify which Windows installation to restore

Every time files get corrupted on your PC, or you make an irreversible change you wish you didn’t, you can always count on using System restore.

The problem is that not even the System Restore feature is foolproof, and errors can be encountered along the way.

One good example is when a corrupted system file is detected during the restore process.

If that happens, you might be prompted with an error message labeled: To use System Restore, you must specify which Windows installation to restore.

What causes this error?

  • Corrupted system files caused by mishandling of your files, faulty installation and even malware.
  • BCD corruption, a.k.a. a Boot Configuration Data corruption, can be the cause of the error since this is where all the boot data is being stored.

FIX: Specify which Windows installation to restore

1. Perform a CHKDSK

  1. Perform a system boot
  2. When the Windows logo appears, press F8, taking you to the Recovery Options
  3. In the Recovery Options, select Troubleshoot
  4. From here, choose Advanced Options
  5. Select Command Prompt.
  6. Check the integrity of your volumes.
  7. You will need to scan the Primary Partition type volumes
  8. Type in the following command (replace C: accordingly): chkdsk C: /offlinescanandfix

2. Perform a SFC scan

  1. Click Start
  2. Type Run in the search bar
  3. If you don’t already know which partition is your system drive, when the command prompt appears type in the following:
    • Cd /
    • Dir
  4. If you see the Users folder in the list, this means that that is your system drive. If you don’t see the folder, change your drive by typing alphabets of your volumes, for example G:
  5. After you’ve found your system volume, in the command prompt, type in the following, (where C: is your system drive.):
    • sfc /scannow /offbootdir=C: /offwindir=C:Windows

3. Use Deployment Image Servicing and Management

  1. Click Start
  2. Type Run in the search bar
  3. When the command prompt appears, type in the following (here, C: is your system volume):
    • DISM /Image:C:Windows /Cleanup-Image /RestoreHealth/Source:C:WindowsWinSxS
  4. If an error is shown,  insert a windows bootable USB or DVD and then type in the following:
    • DISM /Image:C:Windows /Cleanup-Image /RestoreHealth /Source:esd:E:SourcesInstall.esd:1 /limitaccess
  5. In this line, E: is the removable drive meaning USB drive or DVD drive
  6. In a few cases, the install.esd may be install.wim. If that’s the case, enter the following command:
    • DISM /Image:C:Windows /Cleanup-Image /RestoreHealth /Source:wim:E:SourcesInstall.wim /limitaccess

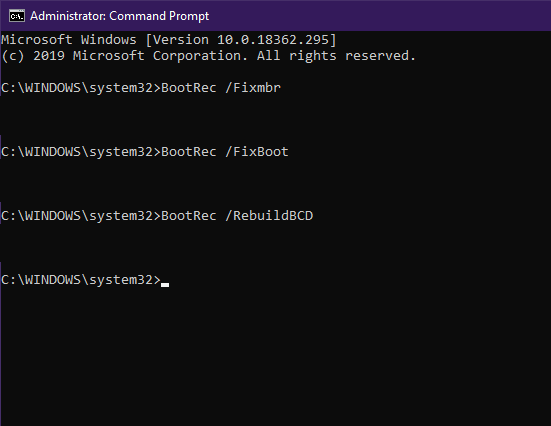
4. Use Bootrec

  1. Click Start
  2. Type Run in the search bar
  3. When the command prompt appears, type in the following:
    • BootRec /Fixmbr
    • BootRec /FixBoot
    • BootRec /RebuildBCD
  1. Reboot your system (make sure a bootable USB or DVD is inserted into your system before running the commands.)

5. Run your basic Windows Repair

  1. Insert your bootable USB or DVD.
  2. Boot from the USB or DVD.
  3. Select Repair your computer

RELATED STORIES YOU SHOULD CHECK OUT:

Uplay Mic won’t Turn on? How to Fix it Quickly

Voice communication is a big part of online multiplayer gaming in Windows 10. But what do you do when they stop working? That’s the case with a lot of Uplay gamers who reported that their mic won’t turn on.

If you bumped into the same problem, then you’ll be happy to know that there are some solutions to fix it.

What can I do if my mic won’t turn on in Uplay?

Before proceeding to the sophisticated solutions in this section, try the troubleshooting steps below:

  • Make sure that your microphone/headset is plugged in
  • If your mic/headset has separate volume controls, raise the sound to an appropriate level.
  • If your mic/headset has a mute button, make sure it’s not pressed.
  • Make sure that the mic is not muted from Windows 10‘s settings.
  • Connect your mic/headset to another device to confirm that it is working properly.
  • Use the Sound troubleshooter from Windows 10

1. Set your microphone as the default device 

  1. In the bottom-right of your screen, right-click the speaker icon in the system tray.
  2. Select Sound settings.
  3. Under Input, you’ll see an option called Choose a device for speaking or recording. Click it and select your microphone as the default device.
    choose

Uplay and games won’t recognize the microphone if there are non-English characters in its name. Make sure that the name of your mic contains only Latin characters. Here’s what you need to do if you want to rename your mic:

  1. Follow the steps above to open Sound settings.
    sound settings
  2. Under Input, click on Device proprieties.
  3. In the Device proprieties window,  click on the first box from the top.
  4. Now enter the name of your microphone (Latin characters only) and then click on Rename.
  5. Open Uplay.
  6. Go to Settings.
  7. Under the Audio tab, make sure that your renamed microphone is selected. If not, select it.

2. Change an option in Realtek HD Audio Manager

  1. Open Realtek HD Audio Manager.
  2. Click on the gear icon to access Settings.
  3. Under Recording Device, find the Separate all input jacks as independent input devices option.
  4. Make sure that it’s checked.
  5. Go again in the Sound setting as explained in solution 2, and make sure that your mic is still set as the default device.

And there you go. After following these simple solutions, your microphone should work just fine in Uplay.

Don’t forget to perform the usual checks mentioned in the preliminary steps, as sometimes the problem is just a muted mic or a Windows 10 setting. To aid with this, check our guide on how to turn on Windows 10 mic.

If you have any other suggestions or questions, don’t hesitate to leave them in the comments section below.

Ubisoft Connect Chat not Working: How to Fix it

While it is fun to play games with friends, things become problematic when you are unable to communicate with them. This is what is happening to Ubisoft users as they complain that the Connect chat is not working.

Usually, the chat returns the following message: We are unable to deliver that message. Try again. Furthermore, others said that all their conversations and discussion groups have disappeared on the Uplay Overlay.

This is a pretty annoying issue and is most likely related to the connection. Fortunately, there are some solutions to fix it.

How can I fix Ubisoft Connect chat if its not working?

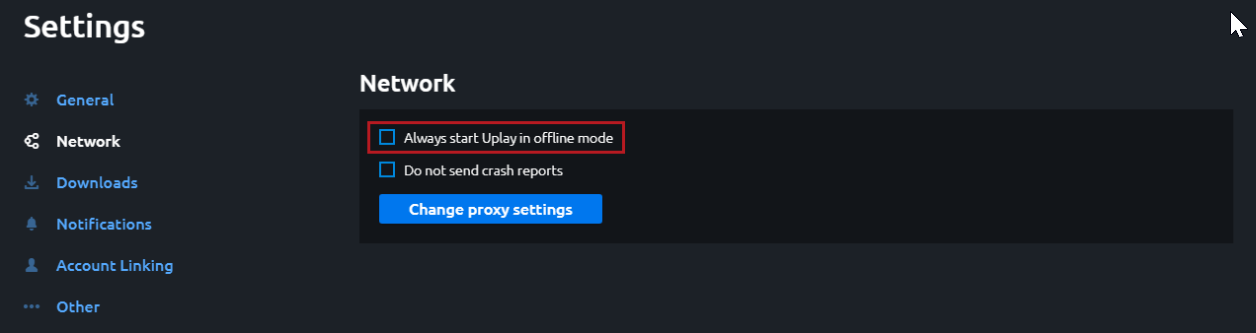
1. Make sure Uplay doesn’t start in Offline Mode

  1. Open Uplay.
  2. In the top-left corner, click on the menu icon.
  3. Click on Settings.
  4. Now select the Network tab.
  5. Under the Network tab, make sure that Always Start Uplay in Offline Mode is unchecked.
    always start Ubisoft connect chat not working

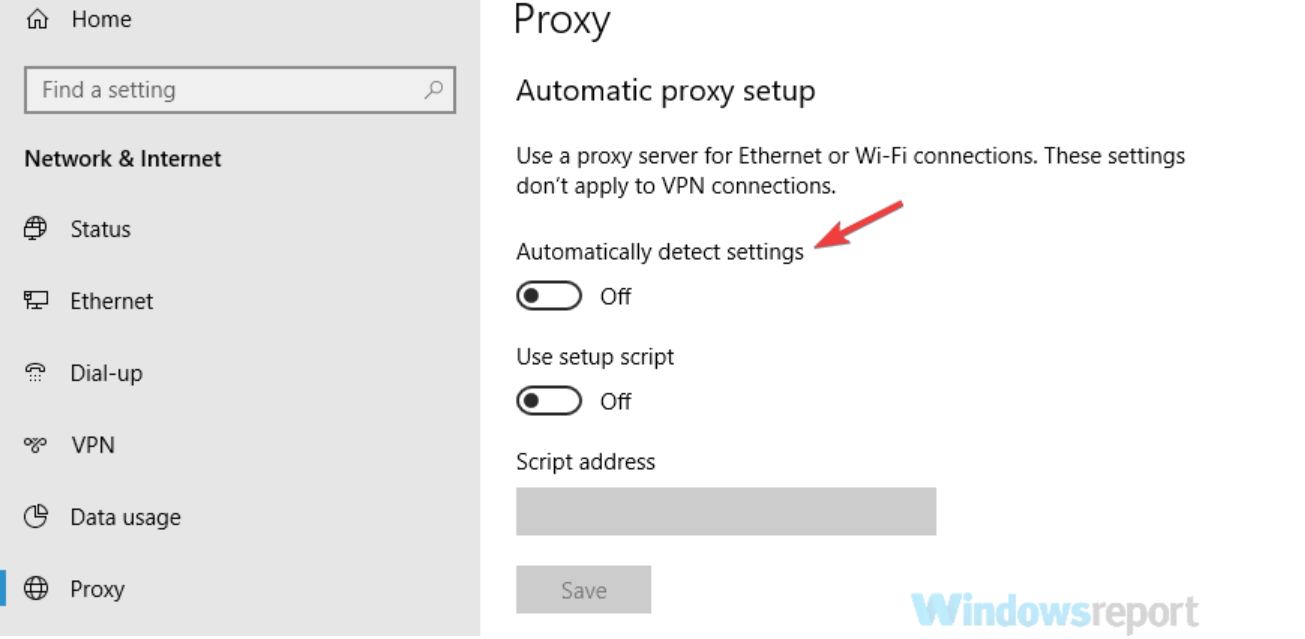
2. Change proxy settings

  1. In your Windows search box, type proxy and click on the first result.
  2. In the Proxy settings window that appears, check if you have a manual proxy set up.
  3. If so, under Manual proxy setup, uncheck Use a proxy server.
  4. On the top of the window, under Automatic proxy setup, check Automatically detect settings.
    auto detect

Proxy server issues are pretty annoying. Make them a thing of the past with the help of this guide.

3. Disable your antivirus and VPN

If you are using an antivirus solution or one of the best VPNs, make sure to disable them. Sometimes, antiviruses or the Windows Firewall can interfere with your internet connection or your apps and block certain features.

To make sure that’s not the case, disable your antivirus and check if the chat in Uplay is working. In certain cases, you might have to uninstall your antivirus.

For Norton users, we’ve got a dedicated guide on how to remove it from your PC completely. There’s a similar guide for McAfee users, as well.

If uninstalling the antivirus worked, and the Uplay chat doesn’t have issues anymore, you can install another antivirus solution.

4. Forward ports

uplay message not delivered


If you can’t stop your firewall, you’ll need to configure it to follow some network ports. The Uplay Launcher ports are TCP: 80, 443, 13000, 13005, 13200, 14000, 14001, 14008.

After that, your Chat should be working properly. If you need more info on how to open firewall ports in Windows 10, we’ve prepared this useful guide to help you do it with ease.

5. Flush the DNS cache

  1. In your Windows search box, type cmd, right-click on the first result, and select Run as administrator.
  2. A Command Prompt (Admin) window should appear.
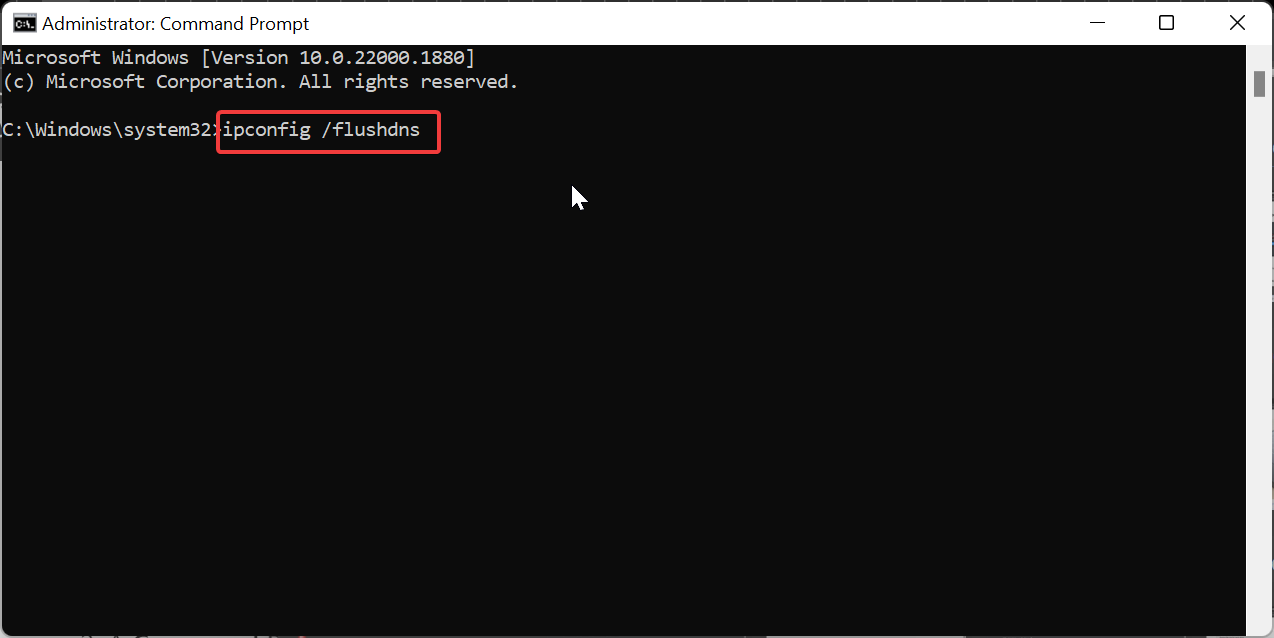
  3. Now type the command below and hit Enter: ipconfig /flushdnsipconfig
  4. After the process finishes, you should get the Windows IP Configuration Successfully flushed the DNS Resolver Cache message.

If you’re having trouble accessing Command Prompt as an admin, then you better take a closer look at this guide.

6. Reinstall Uplay

  1. Completely close Uplay.
  2. Optionally, before uninstalling the client you can backup your save files.
  3. Uninstall the current Uplay client from your Windows 10 PC. Usually, you can find the uninstaller in: C:/Program Files (x86)/Ubisoft/Ubisoft Game Launcher
  4. Also, remember to delete the cache folder from the same location after the process is completed.
  5. When you uninstall Uplay, you’ll get the option to uninstall your games. Check the box to uninstall them, or leave it unchecked if you want to keep your games.
  6. Download the latest version of Uplay from Ubisoft’s official site.
    download
  7.  After you download the installer, run it with Administrator rights.
  8. Follow the on-screen steps to finish the process.

If you want to make sure that you completely remove an app from your Windows 10 PC, follow this guide with the best uninstaller software available.

After following these solutions, you should be able to fix the Ubisoft connect chat not working issue and communicate with your friends without any issues.

If you have any other suggestions or questions, leave them in the comments section below.

Controller not detected in Uplay? Here’s what you can do

In the last couple of years, Windows 10 gaming PCs got a lot more accessible to the average consumer.

Gamers don’t have to rely exclusively on their gaming consoles for their daily sessions and can play their favorite games on Windows 10 through digital distribution services like Steam and Uplay.

A lot of them like to use gaming controllers. If you also like to use a controller with your Windows 10 games, what do you do when Uplay is not detecting your controller?

Well, today we’ll take a look at how to fix your controller if it’s not detected in Uplay.

What can I do if Uplay is not detecting my controller?

1. Install the latest drivers

uplay not detecting controller
  1. First, go to your device manufacturer’s website and download the latest driver for your controller.
  2. After the download finishes, in your Windows search box type device and click on the first result. Alternatively, you can press the Windows key + X and choose Device Manager.
  3. Make sure that your controller is connected to your PC. In Device Manager, right-click on your controller and select Update driver.
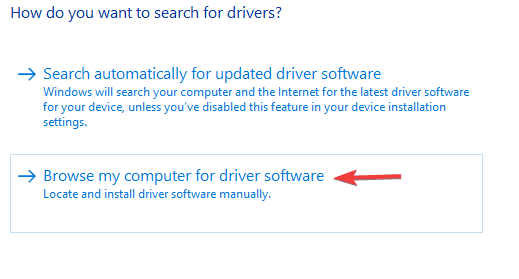
  4. In the new window that appears, click on Browse my computer for driver software.
  5. Now click on Browse, locate the driver that you downloaded on step 1, and click on it.
  6. After that, click on Next and wait for the process to finish.
  7. Disconnect and reconnect your controller to your Windows 10 PC.

If you want to reinstall the latest version of your drivers automatically, without spending too much time or effort, you have dedicated software like Fortect Driver Updater.

Plus, you have the guarantee of reliable driver installation without causing other system malfunctions due to faulty drivers.

2. Check for in-game controller settings


If Uplay doesn’t recognize your controller but in other apps works, check for any in-game controller settings when you start a new game.

In some games the default input device is set to keyboard and mouse. You’ll have to change it to controller/gamepad.

Make sure to also check the installation folder of your game for any config files, as some titles use dedicated apps for choosing the input device and additional settings.

So make sure that your device is enabled and set up properly in every game.

If you’re interested in how to use your Xbox One controller in Windows 10, check out this dedicated guide. There’s a similar guide for PlayStation controllers as well.

3. Configure your controller in Control Panel

controller not working in uplay
  1. In your Windows search box type control and click on Control Panel.
  2. Now click on Hardware and Sound > Device and Printers.
  3. Here you’ll have a list of all your devices. Your controller should be among them.
  4. Right-click on your controller and select Proprieties.
  5. Make sure that all the settings are in order and the device is configured properly.

4. Install the default drivers

uplay isn't detecting controller on windows 10
  1. In your Windows search box type device and click on the first result. Alternatively, you can press the Windows key + X and choose Device Manager.
  2. Make sure that your controller is connected to your PC.
  3. In Device Manager, right-click on your controller and select Uninstall device.
  4. Confirm by clicking Uninstall.
  5. Disconnect your controller from the PC.
  6. Restart your PC and reconnect your controller.
  7. Now let Windows to automatically install the driver for your device.

After following these steps, your controller should work as intended in Uplay and in games.

If you have any other suggestions or questions, don’t hesitate to leave them in the comments section below and we’ll be sure to check them out.

Uplay Not Compatible with Operating System Error on PC

A lot of Windows 10 gamers use Ubisoft‘s Uplay desktop client for their gaming sessions. Despite not being as big as other digital distribution services like Steam, Uplay is especially useful if you like playing Ubisoft‘s games. But sometimes, the client doesn’t work as intended on Windows 10 PCs.

Lots of gamers have problems starting the client and bump in to This program is not compatible with your current operating system error message when trying to open it.

This is a pretty annoying problem and is usually encountered after a client update. If you’ve experienced it as well, you’ll be happy to know that there are some solutions to fix it.

What can I do if Uplay is not compatible with my operating system?

1. Run Uplay in compatibility mode

compatibility mode Uplay client
  1. Go to Uplay’s installation folder (usually C:\Program Files (x86)\Ubisoft\Ubisoft Game Launcher).
  2. Locate Uplay.exe and right-click it.
  3. Click on Proprieties.
  4. Click on the Compatibility tab.
  5. Under Compatibility mode, check Run this program in compatibility mode for:.
  6. Now, choose one of the older versions of Windows. You can try several to see which works for you.
  7. Click Apply and OK.

2. Run Uplay as an Administrator

run uplay client as administrator
  1. Go to Uplay’s installation folder (usually C:\Program Files (x86)\Ubisoft\Ubisoft Game Launcher).
  2. Locate Uplay.exe and right-click it.
  3. Click on Proprieties.
  4. Click on the Compatibility tab.
  5. Under Settings, check Run this program as an administrator.
  6. Click Apply and the OK.

If you want to set program permissions only temporary, right-click on the Uplay shortcut and select Run as administrator from the app‘s context menu.

Alternatively, if you want to change permissions for multiple users, after step 4, click on Change settings for all users and then follow the next steps.

3. Clean install Uplay

uplay not compatible with os
  1. Completely close Uplay. If needed, go to Task Manager and end any related Uplay process.
  2. Optionally, before uninstalling the client you can backup your save files.
  3. Uninstall the current Uplay client from your Windows 10 PC. Usually, you can find the uninstaller in C:\Program Files (x86)\Ubisoft\Ubisoft Game Launcher. Also remember to delete the cache folder from the same location after the process is completed.
  4. When you uninstall Uplay, you’ll have the option to uninstall your games as well. Check the box to uninstall them or leave it unchecked if you want to keep your games.
  5. Download the latest version of Uplay from Ubisoft’s official site.
  6.  After you download the installer, run it with Administrator rights.
  7. Follow the on-screen steps to finish the process.

To make sure that you completely uninstall the old version of Uplay from your PC, you can use an uninstaller tool. Find the best ones available right now in this useful guide.

After following the solutions presented above, you shouldn’t get the This program is not compatible with your current operating system error anymore.

For those facing Uplay compatibility problems, our article provides solutions for ‘Uplay_r164.dll Not Found or Untrusted System File’ errors.

If you have any other suggestions or questions, please leave them in the comments section below.

Surface Pro 7 may launch with an Intel Core i3 variant according to new leak

As we’re getting closer to Microsoft’s next Surface event on October 2, Roland Quandt from German blog WinFuture.de apparently got a tip from European retailers detailing all the different configurations of Microsoft’s upcoming Surface Pro 7. According to the report, Microsoft plans to offer Intel Core i3, i5, and i7 variants of the new tablet, with the i3 model serving as the entry model.

Here are the five different Surface Pro 7 models that will be available at launch according to WinFuture:

  • Microsoft Surface Pro 7, Intel Core i3, 4 GB RAM, 128 GB SSD
  • Microsoft Surface Pro 7, Intel Core i5, 8 GB RAM, 128 GB SSD
  • Microsoft Surface Pro 7, Intel Core i5, 8 GB RAM, 256 GB SSD
  • Microsoft Surface Pro 7, Intel Core i7, 16 GB RAM, 256 GB SSD
  • Microsoft Surface Pro 7, Intel Core i7, 16 GB RAM, 512 GB SSD

Microsoft offering a Core i3 variant of the Surface Pro 7 is quite interesting, especially since the Surface Pro 6 was only available with Core i5 or Core i7 chips. As you may recall, the Surface Pro 3 from 2014 was the last Surface model to be offered with a Core i3 processor, while the Surface Pro 4 and 5 were available with a Core m3 processor, a low-power chip that didn’t require a fan. However, design improvements from the Surface team later gave us fanless designs for the Core i5 Surface Pro 5 and 6.

According to various reports, Microsoft may also introduce a Surface Pro with an ARM processor codenamed “Excalibur” next month. Qualcomm is launching its new Snapdragon 8cx SoC this Fall that has been designed for the ground up for Always Connected PC, but “Excalibur” could actually be the name of a custom-designed SoC from Microsoft.

“Unlike previous attempts with ARM, I am told that Microsoft worked extremely closely with Qualcomm to build this chipset, based on their own specifications, to design a chip that would work better with Windows 10,” wrote Brad Sams on Petri.com today. “This new SoC may be used as a reference device for other OEMs who are looking to use the 8cx (or similar) in upcoming products.”

We won’t have to wait much longer to get all the details about the Surface Pro 7 and other new Surface devices from Microsoft, though we hope 2019 is the year Microsoft finally embraces USB-C across the whole Surface family. The company may also use this event to reveal Windows Lite and its “Centaurus” dual-screen device, and we may also see new accessories such as a Surface-branded earbuds and a connected speaker for the enterprise.

How to search the web with Bing in Notepad

As part of the ongoing improvements to Windows 10’s Notepad, Microsoft added a built-in web search feature with last year’s Windows 10 October 2018 update. This lets you quickly search for highlighted text, without having to copy-and-paste a selection into your browser.

This is a quick convenience tip but one which is buried in Notepad’s “Edit” menu. To perform a quick search, highlight a word or phrase in your document. You can then press the Ctrl+E keyboard shortcut to launch a new web search for the text.

Search with Bing in Notepad

Notepad will respect your default browser, so you don’t need to worry about Edge suddenly launching itself. You will be stuck with Bing though, as there’s no way to customise the search engine which is used.

Microsoft has embarked on a significant enhancement program for Notepad, years after the program last got an update. Changes coming in future Windows 10 updates include a move to the Microsoft Store, which will decouple Notepad from Windows and enable Microsoft to push future updates through more quickly. Although Search with Bing is a minor feature in comparison, it further improves Notepad’s all-round usability and is easily ignored if you don’t need it.

Windows 10 Telegram app updates with new scheduled messages and theme color options

The official Telegram Desktop app updated this week for Windows 10 devices with the new scheduled messages feature, more customization options, and improved privacy settings.

The scheduled messages feature actually rolled out to the mobile versions of the Telegram app on iOS and Android just over a week ago and allows users to set specific day and times for messages to send or publish. With this update, Telegram pretty much has feature parity among most of its main apps.

Here’s the full release notes containing details on all of the new features:

Scheduled Messages

  • Right click the ‘Send’ button and select ‘Schedule Message’ to automatically send something at a specified time.
  • Schedule reminders for yourself in the ‘Saved Messages’ chat.
  • Get a notification when any of your scheduled messages are sent.

New Colors

  • Customize your app’s appearance by choosing accent colors for the ‘Day’, ‘Night’ and ‘Tinted’ themes.

New Privacy Settings and More

  • Choose who can find you on Telegram when they add your number to their phone contacts.
  • Send a single ????, ????, ????, ????, ???? or ???? to check out what’s new in the animated emoji department.

Telegram is a popular messaging app which prides itself on its privacy and advanced features. Do you use Telegram on your Windows device? Let us know why or why not in the comments below and then follow us on Twitter for more Windows app news.

Telegram Desktop
Telegram Desktop
Price:
Free

Borderlands 3 video game is now live on Microsoft’s Xbox One consoles

The highly-anticipated video game, Borderlands 3, is now available to play on Microsoft’s family of Xbox One consoles.

The video game is the third main entry within the Borderlands franchise and supports online multiplayer for up to four players, local multiplayer for two players, and 4K Ultra HD visuals when played on an Xbox One X console.

Here’s the official game description and launch trailer:

The original shooter-looter returns, packing bazillions of guns and an all-new mayhem-fueled adventure! Blast through new worlds and enemies as one of four brand new Vault Hunters, each with deep skill trees, abilities, and customization. Play solo or join with friends to take on insane enemies, score loads of loot and save your home from the most ruthless cult leaders in the galaxy.

Borderlands 3 is currently available to buy in three different versions. The regular release comes with the base game while the Borderlands 3 Deluxe Edition comes with the game and the Retro Cosmetic Pack, the Neon Cosmetic Pack, the Gearbox Cosmetic Pack, the Toy Box Weapons Pack, and Equippable XP & Loot Drop Boost Mods.

The Borderlands 3 Super Deluxe Edition comes with everything in the Deluxe Edition plus the season pass for future downloadable content.

Have you had a chance to play Borderlands 3 yet on your Xbox One console? Share your thoughts on it with the community in the comments below and then follow us on Pinterest for more Xbox gaming content.

Borderlands 3
Borderlands 3
Developer:
2K
Price:
$8.99


Borderlands 3 Deluxe Edition
Developer:
2K
Price:
Free


Borderlands 3: Super Deluxe Edition
Developer:
2K
Price:
$19.99

Why does the Store tab in the Uplay client disappear?

Users have reported that sometimes the Store tab from within the Uplay client disappears.

Official staff from Ubisoft stated in their forums that this is a temporary problem, and it will be fixed immediately.

Players weren’t very pleased with their answers, as you can see below:

Shouldn’t you guys try to fix it?? I really hope that “alternative” is temporary and a fix is on its way. Also, I just started uplay on its own and store didn’t show up, so its not only from steam or start of a game.

This is indeed a troublesome bug, since a lot of players don’t like the idea of going and making purchases through their browsers.

What makes the Store tab in Uplay disappear?

Further researched revealed why some user’s Store tab disappears.

Apparently , if you own Ubisoft games purchased through Steam, the Store tab disappears.

This happens so that you cannot buy DLCs for those games.

It would seem that there is an issue with purchasing the base game on Steam but trying to buy the DLC through Uplay.

This is because it will not transfer that content, treating them as incompatible.

While the explanation may be good enough, users suggested a different approach.

The suggested that instead of removing the Store app altogether, Ubisoft should filter out the said DLCs.

Fair enough, good reasoning to hide that tab. but, I reckon it would be better to maybe notify the user not being able to buy DLCs through uplay or even block buying DLC for that game that is owned or activated through steam.

One silver lining is that there is a solution if you own any Ubisoft games through Steam, but still can’t see the Store.

Apparently, it is just a visual bug, and simply restarting Uplay will fix the issue.

There is no telling when purchases made between the two platforms may become compatible.

Until then, you’ll just have to either buy all of your Ubisoft games through Uplay or through Steam.

How to fix Gears 5 crashing at startup

The long-awaited Gears of War 5 is here and many players are thrilled. However, the game didn’t work for everybody.

Quite a few users encountered an error that caused Gears 5 to crash on startup.

One user reported the following on the official forum:

Gears 5 is crashing on startup for myself after completing the easy anti cheat splash screen, then the gears splash screen, then it goes full screen with a black background for 1-2 seconds then force closes.

Many players have encountered this issue and no one knows how to fix it. The problem might be caused by a bug that the developers need to address.

Until then, we have a few workarounds that might help you.

What to do if Gears 5 can’t launch

1. Reinstall Gears 5

A faulty installing process of the program might cause the issue. So, uninstall and reinstall the game. Also, make sure you install it in the C directory to avoid errors.

The method will take some time, but it might solve the problem.

2. Update your Windows and graphic drivers

Everyone knows that an outdated Windows causes a lot of issues. One of the main errors is not being able to launch apps. Therefore, we recommend you to keep your Windows up to date.

Also, your graphics drivers should be up to date. To learn how to do that, check out our comprehensive guide.

If Gears 5 finally launches after reinstalling or updating but you still hit online issues, check our guide to Gears of War Reloaded multiplayer not working for network and server fixes.

Conclusion

We remind you that these are only workarounds and the problem might reappear. It remains to be seen what the developers will do. A patch might solve this issue once and for all.

Did you find our methods useful? Do let us know in the comments section below!

RELATED ARTICLES YOU NEED TO CHECK OUT:

How to remove Power BI filters in two easy steps

Users have reported that there is no built-in option for removing filters when using Power BI, and this makes it difficult to navigate, especially in very extensive files with tens or maybe even hundreds of filters.

My report has 12,541 rows and one of the applied filters on the report has filtered it down to 19 rows, now I want to get my report back to its original position ie; 12,541 rows.
I have tried many ways to clear the filter which I applied previously while working on the report. I have tried all possible ways to clear it however, the report isn’t removing the applied filter.

Steps to remove Power BI filters

1. Restart Power BI

Some users confirmed that restarting Power BiI fixed the problem. So, if you haven’t tried this solution yet, please do so as this may quickly fix your problem. If the issue persists, go to the next solution.

2. Create a custom “Removes Filter” button using Bookmarks

  1. Make sure all of your filters are clear before starting
  2. Create a bookmark of your current screen and name it Clear Filters
  3. Link the bookmark to the page
  4. Select Home
  5. Click Image, and upload a picture that will be representative to your task
  6. Place it in an area on your worksheet
  7. Name it Clear Filters
  8. Link the image to the bookmark you’ve previously created
  9. Perform whatever tasks you want, and press this custom button to clear all of your filters

You will basically be creating a “restore point” for your Power BI file. Thus, pressing the button you’ve just created will simply make the file go back to the previous state it was in, when no filter was applied.

Note: This can be considered more of a workaround, and you will have to repeat the process for each different Power BI file that share this issue.

What to do if your Xbox One shuts off randomly

Users are reporting that their Xbox One consoles appear to randomly shut down.

Some describe the problem as follows:

My Xbox one keeps shutting off. I can use apps to watch stuff just fine, but when i go to play a game, my Xbox will just shut off about 15 minutes in. My power brick isn’t turning red or anything.

If you are experiencing any similar issues, you most likely have overheating issues with your console. 

More so, unexpected shut downs can happen because of faulty power supplies, or because of lack of storage.

FIX: My Xbox One keeps turning off by itself

1. Fix overheating issues

Like any other machine that has a fan inside meant to keep it cool,  your Xbox is bound to end up filled with dust at one point or another.

If that’s the case, consider doing a cleanse using a can of compressed air to blow out all the dust through the ventilation shafts.

One thing you should remember is that cans of compressed air can cause your fans to spin past their designed maximum velocity.

As such, try securing them with various objects ( pencils, toothpicks) so that the fans can’t spin and end up damaged.

You should also place your Xbox in an area of the room where it will have plenty of space around it for air to circulate.


Your Xbox One X shut down but you can’t turn it back on? We have the right solutions for you.


2. Check the power supply

  1. Make sure the power supply cable is in good shape
  2. Insure that the power outlet supplying the Xbox is functional
  3. Perform a power cycling by turning your Xbox off, unplugging it for 10 seconds, then plugging it back in and starting again.

3. In Xbox shuts down while streaming

1. Clear persistent storage

  1. Press the Xbox button
  2. Select System
  3. Navigate to Settings
  4. Choose Disc & Blu-ray.
  5. Select Blu-ray.
  6. Go to Persistent storage.
  7. Select Clear persistent storage.
  8. Turn off and unplug your console
  9. Wait 5 minutes.
  10. Plug in and turn on your console
  11. Start streaming the content again and see if the problem persists

2. Switch to a wired Internet connection

Various routers have internal settings that may cause your Xbox to suddenly shut down while streaming.

If you want to test whether that is the case , switch from using a Wi-Fi to a wired connection

4. Leave the serious issues to the professionals

Lastly, it could also be an issue with your console’s ventilator not working at full speed, or not working at all.

If that seems to be the case, do not make any attempts at opening and dismantling the console to clean it piece-by-piece yourself.

Not only would this render your Xbox‘s warranty void, but you may end up making things worse.

Instead, leave it to the professionals or service shops that are authorized by the original manufacturers.

RELATED XBOX POSTS TO CHECK OUT:

FIX: This Theme cannot be applied to the desktop

Those of you that are fans of customizing your desktop are probably used to frequently changing your themes, wallpapers etc.

However, at some point you may be greeted with an error that prevents you from doing so.

This error is usually labeled: This Theme cannot be applied to the desktop Windows 10.

While not a system breaker at all, it can be quite annoying.

What prevents you from applying desktop themes?

These are the most common reasons why you may be encountering this error:

  • Syncing themes across multiple accounts
  • Themes or Desktop Window Manager services may not be running properly
  • The Remove background images (where available) option.

What to do if you can’t apply desktop themes

1. Disable Theme Syncing across your accounts

  1. Press Windows Key + I
  2. Locate and click on Accounts
  3. Go to Sync your Settings tab
  4. Check under the individual sync settings section for the entry called Theme
  5. Drag the slider so that you can disable automatic theme syncing across your accounts
  6. Restart your PC

2. Be sure that Themes and Desktop Window Manager Services are running

  1. Press Windows Key + R
  2. Type control.exe
  3. Once the Control Panel window opens, click on View by
  4. Select Large Icons
  5. Find the Administrative Tools entry
  6. Find the Themes or the Desktop Window Manager service on the list
  7. Right-click it and select Properties
  8. Set Startup type to Automatic

There is a chance you may receive an error message labeled:

Windows could not start the service on Local Computer. Error 1079: The account specified for this service differs from the account specified for other services running in the same process.

If that is the case:

  1. Re-do steps 1 to 7 from above
  2. Go to the Log On tab
  3. Click on the Browse button
  4. Type in your account’s name under the Enter the object name to select entry box
  5. Click OK
  6. Type in your account’s password into the Password box

3. Uncheck the Remove background images (where available) option

  1. Press Windows Key + R
  2. Type control.exe
  3. Once the Control Panel window opens, click on View by
  4. Select Category
  5. Click Ease of Access
  6. Select Optimize visual display
  7. Uncheck the box next to the Remove background images
  8. Apply the changes you have made

Follow these steps, you will be able to once again change your PC’s theme, and make it suit your ever-changing taste.

Posted in Fix

Kibana Server is not Ready yet: 3 Quick Ways to Fix it

Known widely for handling large amounts of data, Kibana is a powerful visualization tool for transforming data into useful pie charts, line graphs, maps, and other forms.

Unfortunately, many users have until now inquired about it, saying that an error has been persisting and that the Kibana server is not ready yet. If the same error is creating trouble for you, follow the instructions given in this article to get rid of it easily.

What can I do if the Kibana server is not ready yet on Windows?

1. Update the Helm Chart values

  1. Firstly, you are to upgrade the values within the Helm Chart in the following way: helm upgrade -f new-values.yml {release name} {package name or path}
  2. The default values for yml for Elastic-stack Helm Chart can be found online.
  3. Replace ElasticSearch_URL environment variable concerning Kibana deployment as: kubectl edit deployment elk-kibanakubectl delete pod <elk-kibana-Pod-name>
  4. Wait until the newly applied values are executed properly by Kubernetes.

If you, while setting up ELK services, face an error, which says that the Kibana server is not ready yet, you can fix it by updating the values within the Helm Chart.

This should fix the Kibana server is not ready yet issue and Kubernetes should execute the values.

2. Delete the versioned indices

Another way to tackle this problem is by deleting the versioned indices and restarting Kibana. It involves the following stages.

Kibana Server Is Not Ready Yet
  1. Firstly, try to delete the versioned indices: curl -XDELETE https://localhost:9200/.kibana_1 systemctl restart cabana
  2. Restart.
  3. If still, this does not work, verify if you have a versioned index.
  4. If there is, delete the original .kibana: curl -XDELETE https://localhost:9200/.kibana
  5. Now, alias it as: curl -X POST "localhost:9200/_aliases" -H 'Content-Type: application/json' -d' { "actions" : [ { "add" : { "index" : ".kibana_1", "alias" : ".kibana" } } ] }'
  6. Restart Kibana again.

3. Match the versions of Elasticsearch and Kibana

Kibana Server Is Not Ready Yet

The simplest way to resolve this issue, in this specific case, is to match the versions of Elasticsearch and Kibana. Sometimes users facing this error are unaware that they are using two different versions of both programs.

So it’s crucial for the removal of this error that you must use the same version of Elasticsearch and Kibana.

Make sure that you are using both Elasticsearch and Kibana 6.5.0, as this will create harmony between both, thereby avoiding the possibility of many errors.

Why are there so many Uplay and Steam compatibility issues?

If you’re an avid fan of Ubisoft titles, you most likely have Uplay installed somewhere on your PC.

Uplay is a proprietary game distribution platform where you can buy Ubisoft games, DLCs and other content.

It is known that Ubisoft games can be brought through other gaming platforms as well, such as Valve’s Steam.

Is Uplay content compatible with Steam?

The problem is that players are reporting having issue with their Ubisoft content which they’ve bot through the other platforms.

An official post from Ubisoft’s support page shed some light on the matter:

In most cases, players will run into compatibility issues if they buy the game from Steam or from the Epic Games Store and the Season Pass (or any other additional content) from the Ubisoft Store.

So, if you’ve downloaded a Ubisoft game through Steam, it is strongly recommended that you also buy the DLCs from Steam.

They went on to add that:

Unless stated otherwise, the game and the content are not going to be compatible. This means that players will not be able to use the extra content they purchased in the main game.

So, unless the publishers clearly specifies that you can download a title and its content form multiple platform, try not to.

Generally, it is strongly recommend that players buy games and extra content for the game from the same digital store.

Players are speculating whether or not this is Ubisoft‘s indirect attempt as protecting it’s own IP.

More so, it seems Ubisoft has released no further comments on the matter for the time being.

Until (or if) this issue gets fixed, game content downloaded from two different platforms will be treated as incompatible.

This means that you need to pay again to get a full feature game on one of the platforms.

Microsoft Apps & Services want to take over Gmail emails

There are a lot or trustworthy email services out there, but unfortunately, the one hosted by Microsoft services aren’t exactly the most popular among them.

As such, it should come as no surprise when users came across a notification stating that:

Microsoft Apps & Services would like to read compose send and permanently delete all your email from Gmail.

A lot of users thought that maybe it was a joke, or maybe even the effects or a virus:

Is this legit or a virus? Don’t understand why it needs permission to permanently delete, etc.

Explanations were soon to follow, stating the Microsoft simply detected that they were using Gmail as their mail client and simply wants to take over.

More so, this in itself wouldn’t be much of an issue, but users reported that they can’t select “No” as an answer.

If they do so, they are usually prompted with an error message, as you can see below:

Thank you for responding so quickly. I am running Gmail through Outlook 2016 and have successfully done so for years. Based on your response, I shouldnt have to accept these permissions. But when I click “deny” I get the send/receive error.

Microsoft Apps & Services want to replace Gmail

What’s curious is that this only seems to happen to users that have Gmail account logged in Outlook. Those that use any other email service don’t seem to be affected at all.

All manner of solutions were tried, from uninstalling and re-installing Outlook, to using the client while “less secure access” is turned off.


Tired of looking at Outlook’s bland interface? How about you try these email clients instead?


As such, if you don’t want to see this error anymore, your only safe bet is to use the browser service of gmail, and use Outlook for pretty much every other email accounts you may have.

This seems to be just one of the many times Microsoft has tried to force features and updates onto users.

If history repeats itself, a pretty sure guess is that user outcry will be soon to follow.

Gears 5 campaign ending is raising a lot of questions [SPOILERS]

Before you start reading this article,  you should know the text contains spoilers. If you haven’t finished the campaign, bookmark this page to read our article later.

When it comes to the campaign mode, all versions of Gears of War were extremely interesting and they enjoyed high popularity among gamers.

Gears 5 is no exception, but the campaign ending raised some eyebrows. At the very end, you can save either JD or Del. So, the campaign can have two endings.

It is interesting to see what will happen in Gears 6. Developers might create two campaigns, one for each ending. Also, they might diminish the importance of these characters in the next campaign.

Gears 5 players are not happy with the campaign ending

Even if Gears 5 gives players a choice, quite a few people are upset with the campaign ending. They think this is a complication of the storyline that doesn’t add anything of value to the plot.

Also, some players said that this is a major downside of the game. According to them, they don’t have to choose between one or the other. This is the authors’ job.

Maybe the creators didn’t come to an agreement on which character should die, so they let the players decide.

However, the campaign ending might not be that important in Gears 6. Still, for the sake of the storyline, it should have some meaning. Otherwise, the authors would not have put this at the end of the campaign.

We don’t know what Gears 6 will have in store for us. So, it remains to be seen how the storyline will develop.

What’s your take on the Gears 5 campaign ending? What character did you save? Let us know in the comments section below!

RELATED STORIES YOU NEED TO CHECK OUT:

Windows 10 now displays the battery level of Bluetooth devices

Bluetooth devices are perfect if you want to get rid of all those messy cables and keep your desk tidy. I, for one, like to connect my Bluetooth speaker to my laptop and listen to music while working.

But there’s something that’s always driving me crazy: my Bluetooth speaker is running out of battery just when I’m listening to one of my favorite songs.

If you really hate it when your Bluetooth device runs out of battery and disconnects from your computer, we’ve got some good news for you.

Windows 10 will display the battery level of Bluetooth devices so that you won’t be caught by surprise by low battery issues.

Insiders can already test this feature

If you’re an Insider, you can already test this new feature by installing Windows 10 build 17639. This build release is available only Insiders who opted into Skip Ahead.

To access the new feature, go to Settings > Devices > Bluetooth & other devices Settings.

windows 10 bluetooth battery level


If you’re having trouble opening the Setting app, take a look at this article to solve the issue.


It is worth mentioning that this new feature won’t be compatible with all Bluetooth devices.

For Bluetooth devices that do support this feature, Windows 10 will update the battery percentage whenever the computer and the device are connected.

Unfortunately, we don’t have a list of Bluetooth devices that won’t support this battery indicator feature.

Otherwise, you’ll just have to connect your Bluetooth device and navigate to Bluetooth & other devices Settings to check if the battery level is displayed.

Being able to check the battery level of Bluetooth devices is very useful if you use many Bluetooth devices with your Windows 10 computer.


Your Bluetooth mouse is not working on Windows 10? Don’t worry, we’ve got the right solution for you.


In this manner, you’ll know when you need to charge them and avoid unpleasant situations where you simply can’t use them because they’ve run out of battery.

Microsoft could also improve this Bluetooth battery indicator by adding alerts. In this manner, users won’t have to open the Settings apps every time they want to check the battery level of their Bluetooth devices.

RELATED STORIES TO CHECK OUT:</p>

How to change Gears 5 game language

Gears 5 officially came out and a lot of gamers are excited to download it and play it.

With great graphics, immersive sound, and a lot of modes, the game promises to be one of the great releases from this year.

Despite some having issues with bugs in Gears 5, and others complaining about multiplayer and the ranking system, the game still enjoys huge popularity between Windows 10 gamers.

But what if you downloaded the game and you want to change the language? Lots of players are asking the same question:

I recently downloaded Gears 4 to catch up on the story but the game is totally in Spanish and the translation is quite awful, I will like to play in English where the VAs are actually talented. is there a way to do this? MS forcing the native language and not giving an option in-game to change it is quite sad.

Keep reading and you’ll find out how you can change Gears 5’s language on your Windows 10 PC.


Looking to rank up faster in Gears 5? Check out this awesome guide and learn how you can do it with ease.


How can I change the language in Gears 5 on Windows 10?

Sometimes, when you download a game, it will run by default with the system language of your OS. If you don’t have an in-game option to change the language, it can became pretty annoying.

Sure, you can change the default language by going to Settings > Time & Language > Region > Regional format, but that’s not always the best solution.

If you want to change the language in Gears 5, you can do it by modifying some files from the appdata folder. Follow the steps to do so:

  1. Open File Explorer. gears 5 language change
  2. Navigate to Gears 5 directory ( usually C:\Users\username\AppData\Loca\lGears5\Saved\Config\PC) change gears 5 language
  3. In the folder, locate GameUserSettings.ini file and double-click it.
  4. After opening the file, find the PreferredLanguageCode= and fill in with your language of choice. For example, if you want the game to be in English, fill in with EN. The result should look like this PreferredLanguageCode=EN.
  5. Now start the game.

After following these steps, Gears 5 should now be in the language of your choosing. 

As you can see, changing the language in Gears 5 is pretty easy. If you want to avoid changing the system language, follow the steps above and you’ll be done in no time.

If you have any additional suggestions or questions, don’t hesitate to leave them in the comments section below.

READ ALSO:

MS Project Not Installing With Office 365 [Fix]

Microsoft Project is a project management application that’s part of the MS Office software series. However, many reported that MS Project is not installing with Office 365.

In today’s guide, we’re going to focus on install issues and show you the best ways to fix this problem.

Why isn’t MS Project not installing with Office 365?

  • Issues with the Office installation can cause this problem.
  • Improper installation methods can also lead to this issue.

Is MS Project part of Office 365 personal?

No, MS Project isn’t available for personal Office users.

To get access to it, you need to purchase a subscription first.

How can I fix MS Project if it’s not installing with Office 365?

1. Uninstall the MSI Office Version

  1. Press the Windows key + R hotkey.
  2. Then open the Windows uninstaller by entering appwiz.cpl in Run and clicking OK.The uninstaller window microsoft project won't install
  3. Select the MSI Office software and click Uninstall.
  4. Select the Yes option to confirm and uninstall the software.
  5. Restart Windows after uninstalling the MS Office software.
  6. Then try installing Microsoft Project.

Removing MS Office with the Windows uninstaller might leave some leftover files and registry entries. Therefore it’s advised to go to Uninstall Office page and download the Recovery Assistant software.

The uninstall Office option microsoft project won't install

After making the changes, check if Microsoft Project is still not downloading on your PC.

2. Install Project with the Office Deployment Tool

  1. Click the Download button on the Office Deployment Tool page.
  2. Open the folder that includes the officedeploymenttool.exe.
  3. Click the officedeploymenttool.exe to extract the Office Deployment Tool.
  4. Open the Click-To-Run Configuration XML Editor page in a browser.Configuration XML Editor microsoft project won't install
  5. Select the required Microsoft Project software on the Product drop-down menu. In addition, select a bit version and language option in the other drop-down menus.
  6. Click the Edit product button.
  7. Then select the configuration code text displayed on the right of the page, and press the Ctrl + C hotkey to copy it.MS Project code microsoft project won't install
  8. Users will then need to open the configuration text file in the folder that they extracted the Office Deployment Tool to.The Configuration file microsoft project won't install
  9. Delete all the text in the configuration file. Then paste the copied code text into the configuration file by pressing the Ctrl + V hotkey.Edited configuration file microsoft project won't install
  10. Click File and then Save to save the edited file.
  11. Then open the Command Prompt by pressing the Windows key + R, entering cmd in Run, and clicking OK.
  12. Open the Office Deployment Tool’s folder by entering cd in the Prompt followed by the full path of the folder you extracted the Office Deployment Tool to.
  13. Optional: Users who aren’t sure what the path of that folder is can select the extracted Office Deployment Tool folders in File Explorer and click Copy path to paste its full path into the Command Prompt or a text document for reference with the Ctrl + V hotkey.The Copy path option microsoft project won't install
  14. Press the Return key after entering the cd command, which should open the Office Deployment Tool’s folder in the Command Prompt.
  15. Then run the following command: setup /configure configuration.xml
    configuration xml command microsoft project won't install

Thereafter, a Microsoft setup window should open that will download files and install Project. It will also remove and redownload Office installations if required. Thus, users might also need to enter product keys again.

That’s how users can fix Project Click-to-run installation errors. Also remember that the 32 or 64-bit Project version must also match the system version of existing MS Office installations.

Microsoft Project is known for its issues, and we already covered MS Project file won’t open issue in one of our earlier guides.

If you’re having further errors, we have a great guide on Microsoft Office issues that we recommend checking out.

What method did you use to fix this issue? Let us know in the comments below.

Gears 5: This is how you can rank up fast

Gears 5 has three main types of Leveling systems and you can take advantage of them to reach a new rank as soon as possible.

If you’re not just a casual player and you like the multiplayer experience, leveling up will get you new aesthetics and bragging rights in your circle of friends.

But, as it’s the case with most of the games, leveling up usually takes a lot of time and effort. Well, that’s not the case today, as we will show you how you climb the leaderboards quickly in Gears 5.

How can I rank up faster in Gears 5?

Starting with the basics, next to your name you’ll find your leaderboard and lobbies number, also called Multiplayer Core Level.

When you play Gears 5 in Horde Mode and Escape Mode, you can raise your Multiplayer Level by doing certain challenges. Doing so, you’ll earn points and level up.

Also, you can level up the unique skills of each character and get improved aesthetics and other specific perks.

But if you want to increase your level as fast as possible, you’ll have to take into consideration a couple of things.


Need a game booster to enjoy the best Gears 5 experience? Check out this list with our top picks.


1. Choosing the best Game Modes

This is a very important thing to keep in mind while trying to level up faster. Some game modes are quicker and and don’t involve much action, while others are meant for improving skills, but don’t offer too much points.

One of the most popular game modes in Gears 5 is Deathmatch. While this is a very fun to play game mode, is not very good for ranking up quickly.

You’ll have to play game modes that help you gather more kills and points faster. The best for that are King Of The Hill and Escalation.

Playing them will keep you on the move at all times, thus gathering more points and leveling up faster.


Looking for the best gaming rig to play Gears 5 on? Check out this article and find some amazing picks.


2. Choosing the right objectives

It’s important that you focus on the right things when playing Gears 5.

As we already said, King Of The Hill and Escalation help you gather a lot of kills and points, but this shouldn’t be your only goal.

Getting a lot of kills ca get you around 150-250 points, which is pretty good, but if you want to level up faster you’ll need to get double or more points.

To do that, you’ll have to choose and finish your objectives. Claiming rings can get you 750-850 points. So this should be your main objective if you want to rank up faster.

3. Using XP boosts

Like many other games, Gears 5 offers boost packs to help you rank up faster.

The Ultimate Edition comes with some boost packs included, but in the Standard Edition you’ll have to buy them from the shop for 250, 600, and 1200 Iron.

The most important thing is not to have the largest amount of boost, but to use them wisely while playing the game modes mentioned above.

This way, you’ll make sure that you get the most out of them. As a reminder, you can look in the top-right of your screen to see if you have any boosts active.


Want to improve gaming performance in Windows 10? Follow this guide and learn how you can do it.


And that’s it. You know now the fastest ways to level up in Gears 5. Remember, objectives are more important than kills and choosing your game mode makes all the difference in the world.

If you’re aware of other ways to quickly rank up in Gears 5, share them in the comments section below so other players can try them.

Also, leave there any other questions that you may have.

READ ALSO:

Microsoft will live stream its October 2 Surface event (but we’ll be there too)

A few weeks after announcing that it will be holding a media event in New York City, Microsoft has followed up to reveal that it will also live stream the event on its social media platforms. The event can be watched in full on Twitter, starting at 10:00 AM ET.

For those who closely follow Microsoft, this announcement should be quite surprising as the last two major Surface hardware events have not been live streamed. Last year’s Surface Headphones, Surface Pro 6, Surface Laptop 2, and Surface Studio 2 reveal was well-covered across Microsoft’s social media channels and blogs — but it never featured live videos. Before that, with the reveal of the Surface Pro 2017 and Surface Pro LTE and the Surface Book 2, Microsoft also didn’t live stream. Instead, the company simply revealed the devices via blog posts or with social media.

Even for this year’s reveal of this year’s Surface Hub 2S, Microsoft didn’t hold a public live stream. The last time Microsoft showcased a Surface event for the entire world to watch live dates back to May of 2017. That was then the unexpected reveal of the original Surface Laptop.

With this year’s event being live-streamed, Microsoft could have a lot of surprises and goodies to reveal, perhaps even the long talked about Surface Centaurus. We might even see a Surface Go with a Core M3 processor or Surface Pro with Intel’s latest Ice Lake processors.

OnMSFT is attending this year’s October 2 Surface event live so be sure to keep it tuned here as the event unfolds live.

How to use priorities in Microsoft Planner

Microsoft Planner has been updated to support a dedicated Priority field on all tasks. Previously, many Planner users manually configured Labels to act as priority options. The use of Labels to represent priorities is now redundant, as Planner’s new field gives you four priority options within the app itself.

Priorities in Microsoft Planner

Planner users should now see the Priority field show up on all tasks. The priorities available are labelled as Urgent, Important, Medium and Low. Every task starts off with a default priority of Medium.

Priorities in Microsoft Planner

To change a task’s priority, click it to open the task details view. Use the Priority dropdown to set the new priority. The Urgent and Important priorities will add a new icon to tasks on your Planner board. This means you can always see if you’ve got high-priority tasks to tackle.

Priorities in Microsoft Planner

One of the advantages of using built-in priorities instead of Labels is Planner now has extra view options to support Priorities. There’s a new “Group by” option for priorities, which allows you to visualise how many tasks you have within each priority. Urgent tasks show on the left of the board, with low-priority tasks appearing on the right.

Priorities in Microsoft Planner

Priorities also show up in Planner’s Charts screen. The task view on the right-side of the page now separates tasks into groups by their priority, giving you yet more visibility into the relative importance of different tasks.

As with most of Planner’s features, use of Priorities is completely optional. If you don’t need them, or are happy using Labels, you can ignore them and use the default “Medium” priority for each task. Priorities can be helpful in maintaining order on busy boards though, letting everyone see at-a-glance what should be worked on next.

Orange screenshot issue in Windows 10 May 2019 Update linked to Lenovo Vantage, update settings to fix

Earlier this week, some Windows 10 users complained of an issue in the Windows 10 May 2019 Update where screenshots would turn out with an orange hue. Many presumed it was a problem introduced with the KB4512941 cumulative update, but, turns out that the issue was linked to Lenovo Advantage and has now officially been marked as resolved by Microsoft.

As a solution to the problem, Microsoft is recommending for impacted users to visit the Lenovo advantage app and tweak their settings. Apparently, this orange screenshot issue was caused by the Eye Care mode feature of Lenovo Advantage. There is no need to update Windows for the problem, and instead, users should disable Eye Care mode and reset the color temperature in Lenovo Vantage.

In Lenovo Vantage 4, this can be accomplished by going to Hardware Settings, clicking Audio/Visual, and then turning off Eye Care Mode and click on the Reset button. With the Lenovo Vantage version 10, users should go to My Device Settings click to Display & Camera and then click on the reset button for Daytime Color Temperature. Users should also turn off Eye Care Mode, and uncheck the box titled Schedule eye-care mode.

Failed to load sharing screen in Dropbox [SOLVED]

Nowadays, people share documents, pictures and any sort of data easily and securely. There are a lot of apps that allow users to do that efficiently.

Dropbox is popular among users. It is a lightweight tool for managing and storing data that can be used on almost every device.

However, people encountered the “Failed to load sharing screen” error message in Dropbox. This is a major issue because users can’t share data, so, they can’t use Dropbox.

Today we will show you how to make this issue a thing of the past.

Does Dropbox fail to load the sharing screen? Here’s the fix

1. Make sure you run the latest version of Dropbox

Dropbox is plagued by many issues if you don’t have the last version. Don’t forget to update the app periodically to fix or prevent errors.

2. Clear cache

Not only the tool itself needs to run smoothly, but your browser as well. Of course, this is for those who use a browser to open Dropbox.

Here we will show you how to clear your cache in Google Chrome, but the operation is not so different on other browsers.

  1. Open the settings menu by clicking on the three vertical dots from the upper-right corner of your window.
  2. Go to More tools, and then click on Clear browsing data.clear browsing data
  3. Under the Advanced tab, choose All time and select the first four checkboxes.
  4. Click on Clear data.chrome clear browsing data

3. Open Dropbox with another browser

If the solutions above didn’t solve the problem, try another browser.

We recommend UR Browser. It is a lightweight and reliable tool to surf the Internet. Moreover, being privacy-oriented, your files will be safe from hackers.

Check out our in-depth review to learn more about UR Browser!

Conclusion

So, for this problem, there are some easy solutions available.

Don’t forget to update Dropbox, clear your cache or install another browser.

Also, if you still encounter errors with Dropbox, we got you covered. Check out this guide to solve them easily.

If you decide Dropbox is not for you, we prepared a list with the best cloud software with encryption because we all know how important privacy is.

Did you find this article helpful? Let us know in the comments section below!

RELATED ARTICLES YOU NEED TO CHECK OUT:
 

How to use System Restore in Windows 10

System Restore is a recovery feature in the Windows operating system that allows you to restore your PC to an earlier state. By using System Restore, you’ll revert Windows files and settings, system files, installed programs and drivers to their previous state.

System Restore will allow you to restore your system to a working state after making changes to the system files or after installing new software. Bear in mind that System Restore won’t affect files such as your documents, pictures, etc., so you can’t use it to restore files that you’ve recently removed.

In order to restore your PC using System Restore, you need to have a restore point available. You can create restore points manually at any time, but your PC will usually create them on its own when installing new software, driver or system update.

How to create a System Restore point in Windows 10

  1. Press the Start button and search for system restore.
  2. Choose Create a restore point
  3. Click on the Create button to start the process.

How to do a System Restore

To use System Restore, follow these steps:
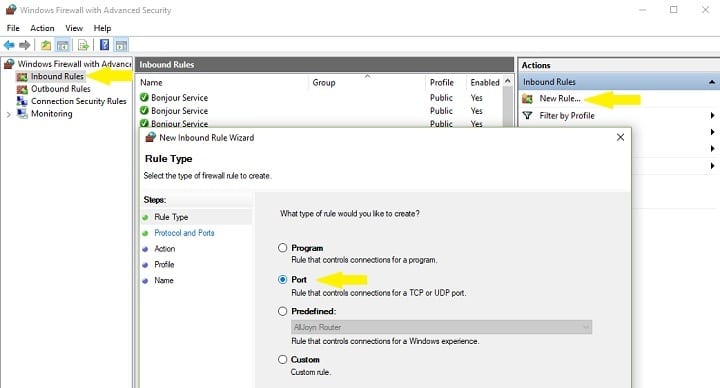
  1. Press Windows Key and type system restore. Choose Create a restore point option.
    corrupted-system-files-restore-1
  2. Click on System Restore button.
    corrupted-system-files-restore-2
  3. Check Show more restore points. Select the available restore point and click Next.
    corrupted-system-files-restore-3
  4. Follow the instructions to perform the restore.

Although System Restore is a great feature, sometimes issues with it can appear. If you encounter any problems with it, be sure to check our wide collection of troubleshooting guides.

Now that you know how to perform a System Restore, let’s see some of the common questions related to this process.

How long does a system restore take?

A normal operation of restoring the system with the tools already built-in Windows takes somewhere between 15 – 35 minutes. It depends on the size of the restore point, the hardware of the device and the speed of the disk drive.

Does system restore delete files?

First, you should always make a backup copy of your files when performing any outside of the ordinary operation.

Now, are you worried that you would lose files if you do a System Restore? No need to worry – it will not delete any personal files such as documents, images, videos etc.

You will lose some of the programs that are already installed and you would need to re-install them though.

[wl_navigator]

How to make someone a presenter in a Skype conference

Skype is a telecommunications app used both for personal use, as well as within enterprises.

It provides users video chat and voice calls between computers, mobile devices and the Xbox One console via the Internet.

You can make someone a presenter in a Skype conference

As mentioned above, Skype is also an excellent means of communicating between colleagues within work environments.

Because of this, it goes without saying that it boasts plenty of features to enhances this experience.

These features include the ability to allow more than two people to join a chat room, and it can even be used to host conferences.

As you may already know, a conference is usually made up of one presenter, while the others are participants that listen.


If you’re not keen on using Skype for whatever reason, check out these 9 great alternatives.


How to appoint someone as a Skype conference presenter

This step-by-step guide will help you figure out how to appoint a person to be a presenter during a Skype for Business conference.

  1. Launch and log into your Skype for Business client
  2. In the Skype for Business main window, in your Contacts list
  3. Hold down the Ctrl key and click the names of your contacts to select them for your meeting.
  4. Right-click the selection, and click Start a Conference Call
  5. In case you’ve missed out some people, in the participants pane, click Invite More People.
  6. Select someone from the list, and then click OK. Skype for Business will call person for you, adding them to the meeting
  7. Go to the top-right corner of the window during the conference
  8. Select the participants icon from the main meeting window.
  9. From the participants’ list, right-click on the desired attendee and select make a presenter.

Make someone a Skype conference presenter

RELATED STORIES YOU SHOULD CHECK OUT: