New Alliance Intelligent Cloud will bring the power of Azure to Renault, Nissan and Mitsubishi cars

The Renault-Nissan-Mitsubishi alliance has released its new Alliance Intelligent Cloud, a service that will use the cloud, artificial intelligence, and Internet of Things technologies to power connected vehicles from the three automotive companies. As a result, the automotive alliance will use the Azure to power these services, which Microsoft says will allow them to capture and analyze the data in a secure manner, and use it to deliver intelligence services. Additionally, with Microsoft infrastructure, the alliance will be able to provide diagnostic services, firmware update, and infotainment services.

Microsoft says that the new Renault Clio along with the Nissan Leaf will not only be the first cars to use the Alliance Intelligent Cloud technology, but will also be the first vehicles powered by the Microsoft Connected Vehicle platform available immediately to consumers at sale. The vehicles in question will be sold in either Japan or Europe, but hopefully it won’t be long before these services reach the other 200+ markets where the vehicles are sold. Microsoft’s EVP and president of Global Sales, Jean-Philippe Courtois, stated that:

“Renault-Nissan-Mitsubishi is a longstanding partner and our first strategic partner for the Microsoft Connected Vehicle Platform. Today’s production release of the Alliance Intelligent Cloud enables a new generation of connected services powered by Microsoft Azure to come to market.”

In addition to this smart the benefits that we just mentioned, Microsoft says that multiple vehicles across the automotive companies in the alliance will be able to benefit from the same shared technologies. These might include monitoring, connected navigation and assistance, remote services, as well as firmware updates and other services.

While the partnership is certainly interesting, it isn’t exactly new for the automotive companies. A couple years back, Renault and Nissan signed a global multiyear contract to use Azure services to power it’s connected vehicles.


Fix Windows 10/11 error code 0xc0000034 with these solutions

Most of us often encounter the annoying Blue screens of death problems on our different versions of Windows.

You will see that the screen will simply turn blue or the system will completely fail to boot. 

What causes error 0xc0000034?

1. Bad sectors on Hard drive

All the critical system files will not be readable if you have bad sectors on your hard drive.

2. Corrupted Windows installation

You might have a corrupted installation of Windows as your OS crashed due to a malware or other reasons.

3. Missing boot files

Damaged BCD is a possible cause of the 0xc0000034 error. It occurs because your boot-related files are either corrupt, missing, misconfigured and damaged.

4. Compatibility Issues

Some of the users face the error because the recently changed hardware or software has compatibility issues with their PCs.

If you are a Windows 10 user you will see the following error message on your blue screen:

Recovery. Your PC needs to be repaired.
The Boot Configuration Data file is missing some required information.
File: \BCD
Error code: 0xc0000034
You’ll need to use the recovery tools on your installation media. If you don’t have any installation media (like a disc or USB device), contact your system administrator or PC manufacturer.
Press ESC for UEFI Firmware Settings.

How to get rid of  Windows 10 error code 0xc0000034?

  1. Run Windows automatic repair
  2. Manually repair the error
  3. Refresh Your PC

1. Run Windows automatic repair

automatic repair error code 0xc0000034

Windows provides an Automatic Repair tool that uses the Windows installation media (DVD, CD or USB drive) to fix the issue in a few steps. Here are some simple steps that you need to follow:

  1. Insert the Windows 10 DVD or USB stick and restart your system.
  2. Make sure to boot your system using the Windows installation media instead of your hard drive. You need to constantly press the specified key (F8 or F11 key depending upon your system) and choose the correct boot device.
  3. You will be navigated through the startup menu, select Next > Repair your computer.
  4. On the next screen select Troubleshoot and then click Automatic Repair.
  5. You will see a list of operating systems, select the one you currently have. A repairing process will start to check your Windows for problems and fix them.
  6. Wait patiently until the end of the process.

If the first solution fails to fix the error, try the next solution. 


2. Manually repair the error

error code 0xc0000034 command line

This method requires a Windows 10 setup bootable media, so you can fix the error by following these steps.

  1. First, plug in Windows 10 DVD or USB stick after starting your PC. The system will prompt you to select your keyboard and language settings.
  2. Select the Repair your computer option.
  3. On the next screen select Troubleshoot and then click Advanced Options.
  4. You will now see a Command Prompt option.  Click on it.
  5. As soon as you see a Command Prompt window, enter the following commands and press Enter key after entering each of them.
    • bootrec /fixMBR
    • bootrec /fixBoot
    • bootrec/scanos
    • bootrec /rebuildBCD
  6. At this step add the installation to the boot list by typing A and pressing the Enter key.
  7. Finally, exit the setup by closing the Command Prompt window and click the Continue button.
  8. In the end, you will proceed to the Windows 10 home screen.

As you have finished the entire process the Windows 10 Error Code 0xc0000034 should be fixed and your system should boot normally. If the problem still persists try the next solution.


3. Refresh Your PC

When you are unable to repair your PC using any of the above-mentioned solutions you can use Windows Recovery Environment (WinRE) to perform Automatic repair.

Please follow the following steps to refresh your Windows 10 PC:

  1. At the first step, you have to Reboot your PC.
  2. Next, you need to hit the F8 or F11 key (depending upon your system) to open Advanced boot options.
  3. On the next screen select Troubleshoot and then Refresh your PC. 
  4. Follow the instructions to complete the process.

How can I avoid the error in the future?

You have to care about the health of your Windows OS if you want to avoid this error in future. You should avoid downloading any suspicious programs that can be potentially harmful to your system. In case your system gets infected with any malware, scan your PC with antivirus software.

Most importantly, regularly updating your PC is the best solution to keep your system bug-free. Microsoft regularly releases updates including bugs and fixes to protect your PC. Following these simple steps can protect your PC from unnecessary damage and future issues. 

RELATED ARTICLES YOU NEED TO CHECK OUT:

Apex Legends’ first season is now live on Xbox One consoles

The first season event for the hit Apex Legends video game, Wild Frontier, is now live on Microsoft’s family of Xbox One consoles.

Apex Legends is a free-to-play video game which means that some of this Season 1 content is available to free players while other content needs to be unlocked through gameplay after purchasing the Season 1 Battle Pass. It’s similar to how Fortnite’s events work.

Free players will be able to unlock one Wild Frontier Legend skin, five Apex Packs, and 18 stat trackers during Season 1 in addition to the new Legend, Octane who launched alongside the event.

Players who buy the Battle Pass (which costs 950 Apex Coins) will continue to unlock new items each time they level up during the course of the event. Up to 100 items can be potentially unlocked including skins, banner frames, and XP boosts. A purchase of the Battle Pass will also immediately unlock 3 Wild Frontier-themed Legend skins, no gameplay required.

Apex Legends has been a massive success story. Launching with next to no pre-launch promotion, the game managed to reach 50 million players in its first month online and has also been well-received by gamers and critics alike.

Are you playing Apex Legends and will you buy the Season 1 Battle Pass? Let us know in the comments below and then follow us on Pinterest for more Xbox gaming content.

Disney Magic Kingdoms video game updates on Windows 10 with new characters and more

The Windows 10 video game, Disney Magic Kingdoms, received an update today that added a variety of new characters, several new attractions, and some new land for players to use for all of their unlocked content.

The main focus of this update was the addition of Dumbo, Timothy Q. Mouse, and The Ringmaster from the classic Dumbo Disney movie. These three characters will now be part of the game’s main continuing story mode which means that players can work towards unlocking them with no time restrictions. The Dumbo-related attractions and concessions such as the Dumbo the Flying Elephant ride, The Barnstormer, Western Arcade, Dumbo Hat Stand, and Peanut Concession are also permanent content additions.

Beauty and the Beast’s LeFou was added to the game with this update, however he’s a limited time character that can only be unlocked in the new Tower Challenge event which begins tomorrow.

Here’s the full official list of all of the new content that was added to Disney Magic Kingdoms:

Characters

Dumbo

Timothy Q. Mouse

The Ringmaster

LeFou

Attractions

Dumbo the Flying Elephant

The Barnstormer

Western Arcade

Concessions

Dumbo Hat Stand

Peanut Concession

Slushies Stand

Cup of Tea Stand

Decorations

Choose Your Costume

Circus Banner

Great Goofini Cannon

Float

Dumbo Float

Disney Magic Kingdoms is a fairly popular Windows 10 game that’s frequently spotlighted in the Microsoft Store and is often pre-installed on new Windows 10 devices in many regions. It’s a free-to-play video game that tasks players with clearing an evil curse from the Disneyland theme park and welcoming new characters from classic and modern Disney films.

Do you play Disney Magic Kingdoms? Let us know what you think of this new content in the comments below and then follow us on Pinterest for more Windows 10 content.

Disney Magic Kingdoms
Developer:
Gameloft SE
Price:
Free

Mozilla Firefox browser adds Windows Hello authentication support

The Mozilla Firefox internet browser updated to Version 66.0 and, with this update, added support for Microsoft’s Windows Hello authentication. This means that after installing the latest update, Firefox users on a compatible Windows 10 device will be able to use their face, fingerprint, and external security keys for authentication on supported websites.

Other noteworthy changes made with the update to Version 66.0 include a new setting that disables autoplay sound on websites, improvements to search, better scrolling on web pages, redesigned certificate error pages, and general performance improvements.

Here’s the full release notes:

New

  • Firefox now prevents websites from automatically playing sound. You can add individual sites to an exceptions list or turn blocking off. To learn more about block autoplay, which will be rolled out gradually to all users, visit the Mozilla blog.
  • Improved search experience:
  • Find a specific webpage faster when you have a lot of tabs open: You can now search within all of your open tabs from the tab overflow menu
  • Easier search via a redesigned new tab in Private Windows
  • Smoother scrolling: Scroll anchoring keeps content from jumping as images and ads load at the top of the page
  • Improved performance and better user experience for extensions:
  • Extensions now store their settings in a Firefox database, rather than individual JSON files, making every site you visit faster
  • A redesigned keyboard shortcuts section in about:addons makes it easier to view and adjust default shortcuts
  • Redesigned certificate error pages help you better understand and resolve issues, including identification of certificate issuers for anti-virus software
  • Added basic support for macOS Touch Bar
  • Experimenting with an improved Pocket experience in New Tab with different layouts and more topical content
  • Improved performance and reduced crash rates by doubling web content loading processes from 4 to 8
  • Easier, passwordless security: Added support for Windows Hello on Windows 10, allowing you to use your face, fingerprint, or external security keys for website authentication

Fixed

  • The Dark and Light Firefox themes now override the system setting for title bar accent color on Windows 10
  • Linux users: Resolved an issue that caused Firefox to freeze when downloading files
  • Various security fixes

Changed

  • System title bar is hidden by default to match Gnome guideline for Linux users

Developer

  • DevTools Inspector is now fully usable when the Debugger is paused
  • Lowered priority of setTimeout and setInterval during page load to improve overall page load performance
  • Fixed: <button> element is no longer special cased in event dispatch, per latest specifications

Do you use Firefox on your Windows 10 device and will you take advantage of Windows Hello? Share your thoughts with the community in the comments below and then follow us on Pinterest for more Windows content.

KB4489890, KB4489888 and KB4489889 bring tens of bug fixes

If you’re running older Windows 10 OS version, you may want to check for updates. Microsoft released new updates for Windows 10 v1709, v1703 and v1607: KB4489890, KB4489888 and KB4489889, respectively.

These three updates bring tens of bug fixes and improvements to the table, fixing some major technical issues affecting the OS.

You can download these patches automatically from Windows Update. Alternatively, you can get the stand-alone update package from the Microsoft Update Catalog website.

Update changelog

These three update share many common fixes and improvements. We’ll list some of them below:

  • Addresses an issue with a Microsoft Access 97 database that stops a requested operation when a table or column has custom properties.
  • Updates time zone information for Buenos Aires, Argentina, Kazakhstan,  São Tomé and Príncipe. 
  • Addresses an issue with Microsoft Office Visual Basic for Applications that fails to use the Japanese Era registry settings for dates in the Japanese format.  […]
  • Addresses an issue with the Group Policy, “Turn off app notifications on the lock screen”. 
  • Addresses an issue that may prevent users from signing in and cause account lockouts when using the App-V client to start applications. […]
  • Addresses an issue that prevents App-V applications from starting and generates error “0xc0000225”. […]
  • Addresses an issue that prevents the authentication credentials dialog from appearing when an enterprise web server attempts to connect to the Internet. […]
  • Addresses an issue that removes the ALLOWCLSIDS policy from the policy XML file when you run the Add-SignerRule for Windows Defender Application Control. 

For more information, you can check out the complete update changelog pages listed below:

Keep in mind that these updates also bring issues of their own. Make sure to check the support pages first before hitting the check for update button.

KB4489894 fixes update install issues and black screen errors

If you’re running Windows 10 v1803, you can now install cumulative update KB4489894 in order to fix a plethora of issues affecting your system.

Windows 10 KB4489894 fixes the annoying Microsoft Office update issues that may prevent you from installing the latest patches on your machine.

At the same time, the update fixes the black screen issues that may occur after you wake up your device from Sleep mode.

It is worth mentioning that KB4489894 also addresses the lock screen issues that may be preventing your from unlocking your device.

Without further ado, let’s see what are some of the most important changes that this update brings.

KB4489894 changelog

  • Addresses an issue with a Microsoft Access 97 database that stops a requested operation when a table or column has custom properties.
  • Addresses an issue that prevents Microsoft Office updates from downloading from the Microsoft Store. […]
  • Addresses a reliability issue that may cause a laptop screen to remain black after resuming from Sleep if you close the lid when disconnecting from a docking station. 
  • Addresses an issue with the Group Policy, “Turn off app notifications on the lock screen”.
  • Addresses an issue that may prevent users from signing in and cause account lockouts when using the App-V client to start applications. […]
  • Addresses an issue with the Windows lock screen that prevents users from unlocking a device after multiple smart card users have used the same device. 
  • Addresses an issue that prevents the authentication credentials dialog from appearing when an enterprise web server attempts to connect to the Internet. […]
  • Adds a new Group Policy setting called “Enable Windows to soft-disconnect a computer from a network”. This determines how Windows will disconnect a computer from a network when it determines that the computer should no longer be connected to the network. […]
  • Addresses an issue that prevents the “Turn off app notifications on the lock screen” policy from working. The path is “Computer Configuration\Administrative Templates\System\Logo”.

These are only some of the most important improvements brought by the latest Windows 10 v1803 update. For more information about the full changelog, you can check out KB4489894’s support page.

Download KB4489894

You can automatically download KB4489894 on your computer via Windows Update. If you want to download the stand-alone package, go to Microsoft’s Update Catalog website.

Have you download KB4489894 on your Windows 10 computer? Tell us more about your experience in the comments below.

RELATED STORIES TO CHECK OUT:

Windows was unable to create a required installation folder [SOLVED]

System Update is an important task that should be done by all Windows users on a regular basis. It is the best way to fix potential vulnerabilities in your Windows OS.

You might have encountered an error that often appears during Windows Updates and is generally caused due to the lack of permissions of file or registry. The full error message you get looks like “Error: 80070005 – Windows was unable to create a required installation folder“. 

If you tend to ignore the error you might have to face system slow down or even crashes. You can easily troubleshoot the issue through these simple solutions. 

What to do if Windows was unable to create a required installation folder

  1. Allow user full control
  2. Use a third-party system repair tool
  3. Configure Windows Update Settings
  4. Windows Update Troubleshooter
  5. Reset the Permission Settings (Windows 7)

1. Allow user full control

Folder permissions might be the reason behind the error if it’s being caused by a specific application.

You can follow the following steps to get rid of the error on your system.

  1. Press Windows key + R to open the Run dialogue box.
  2. Now type the following command and click OK.
    • C:\Users\USERNAME\AppData
      appdata Windows was unable to create a required installation folder
  3. You need to replace USERNAME with the username of your account and replace C: with the letter of your Windows installation drive. 
  4. Find the Local folder right click on it and click Properties.
    local folder Windows was unable to create
  5. Navigate to Security > Edit > Add and then type Everyone in the textbox provided below.
    security permissions Windows was unable to create a required installation folder
  6. Click the Check names button that is available on the right side and click OK.
  7. Click Everyone and set its permissions to allow Full control.
    full control Windows was unable to create a required installation folder
  8. Now just save the changes by clicking OK.
  9. Finally, you have to restart the computer to apply the recent changes.

2. Use a third-party system repair tool

A specialized repair program that scans your PC and repairs your Windows OS without harming the user data is recommended.

This type of software identifies Windows files in critical condition and fixes them right away. Moreover, in case the files have been severely damaged and affect the stability of your system, the program will replace them with healthy ones from an online database. 

These tools can significantly improve the performance of your PC. They come with additional features such as registry repairing utilities, DLL file restore, and more.

You can even use these tools to clean your browser and remove junk files that may slow down your PC.

3. Configure Windows Update Settings

One of the easiest ways to fix the error is to allow automatic updates on your system.  You can configure Windows Update settings by following these steps.

  1. Open the Start menu and type update in the search box.
  2. You will see a list search results below, click Windows Update from the list. It will open Windows Update in the Control Panel.
  3. Now click Change Settings that on the left-hand side. 
  4. You will be navigated to the Choose your Windows Update Settings window. Head towards the Important updates section and select Install updates automatically (recommended). 
  5. You can also set a schedule to install these automatic updates by clicking Updates will be automatically installed during the maintenance window.
  6. Finally hit the OK button to save the changes.

You might face the error if your Windows Firewall Settings are not allowing Windows Update settings to take effect. You can adjust the Windows Firewall Settings by following these steps:

  1.  Click the Start menu and type Firewall in the search box.
  2.  You will see a list of search results, select Windows Firewall from the list.
    firewall Windows was unable to create
  3. On the left-hand side, you will find Allow a program or feature through Windows Firewall click on it and select Allow another program.
    allow another application Windows was unable to create a required folder
  4. Next, click the Browse button and you have to locate the svchost.exe file on the disk.
    browse application Windows was unable to create a required installation folder
  5. After locating the file click the following buttons Open > Add.
  6. Now you will be able to see a new program in the list called Host Process for Windows Services. 
  7. Finally, save the changes by clicking the OK button.

4. Windows Update Troubleshooter

Windows Update Troubleshooter is a handy tool that helps to automatically fix various issues while running Windows Updates. Microsoft offers two separate versions for Windows 7 & 8 and Windows 10. You need to download the version that is compatible with your PC. 

You have to run the downloaded troubleshooter file on your PC. It will automatically perform some fixes and finally, you will have to restart your device. If required, you can again run the troubleshooter to fix some additional issues.

5. Reset the Permission Settings (Windows 7)

This solution is specifically for those who are running a Windows 7 OS. This tool is used to reset the Permission Settings on Windows machine. 

  1. Download the subinacl.msi file on your Desktop and open the downloaded file. 
  2. Once the installation process starts you need to select C:\Windows\System32 as the destination folder. 
  3. Open Notepad by pressing Windows + R key on your keyboard and typing notepad.
    notepad Windows was unable to create a installation folder
  4. After pasting the following commands in your Notepad file and Save it on your Desktop with the name reset.bat.
    • @echo off
    • subinacl /subkeyreg HKEY_LOCAL_MACHINE /grant=administrators=f
    • subinacl /subkeyreg HKEY_CURRENT_USER /grant=administrators=f
    • subinacl /subkeyreg HKEY_CLASSES_ROOT /grant=administrators=f
    • subinacl /subdirectories %SystemDrive% /grant=administrators=f
    • subinacl /subkeyreg HKEY_LOCAL_MACHINE /grant=system=f
    • subinacl /subkeyreg HKEY_CURRENT_USER /grant=system=f
    • subinacl /subkeyreg HKEY_CLASSES_ROOT /grant=system=f
    • subinacl /subdirectories %SystemDrive% /grant=system=f
    • @Echo =========================
    • @Echo Finished.
    • @Echo =========================
    • @pause
  5. Now head to the Desktop,  right-click the reset.bat and select Run as administrator.
  6. It will open a window processing similar to the DOS.
  7. You will wait to wait for a few mins until you see the following message Finished, press any key to continue. 

If the issue is not resolved yet you need to use the Built-in Administrator to run the upgrade.

  1. Navigate to the Start button and locate Command Prompt.
  2. You have to right-click the Command Prompt, select Run as administrator and click Continue. 
  3. Press the Enter key after pasting the following command net user administrator /active:yes.
  4. Now login to the Administrator Account by restarting your system.
  5. Finally, run Windows 7 Upgrade and it is expected to successfully run without any issues. 

If the error still persists, you need to disable your antivirus program for a specified time period. By the end of this post, you must have resolved “Error: 80070005 – Windows was unable to create a required installation folder” by correctly following each step. Let us know in the comments section below if you still face any issues. 

New Sticky Notes version brings multi-desktop support

Last year, Microsoft released an update to Sticky notes (version 3.0). The tech giant introduced various features in that update including an ‘always on top’ option, Microsoft Launcher support and a web client.

Recently, Microsoft launched a new major update to enhance the existing capabilities of the app. The update bumps the current version to 3.6 and brings Image and Multi-Desktop Support.

In other words, the update comes with support for multiple desktops and image embedding. Currently, only the users running the Windows 10 Insider build 18855 and higher can install the update.

Photo embedding support

The photo embedding feature aims to target those Windows users who are interested in importing screenshots, mind-maps and similar important information.
Furthermore, users need to navigate to the Sticky Notes toolbar and right click on the image icon. They will now be able to select the image in Windows Explorer.

Multi-Desktop support

You might not have heard about the multiple desktop feature of Windows 10. If you have multiple desktops. Sticky Notes now reminds you about incomplete tasks by sharing notes across multiple desktops.

In order to use the feature, you need to head towards the Task View to select the note and check the show on all desktops option.

Secondly, the Sticky notes app now supports various hotkeys so that the users can switch to their notes. While using a different application, you can either use Win + Tab or Alt + Tab keys to switch to a specific note.

The multi-desktop support now allows the users to efficiently organize their activities. While toggling between different desktops, they can use the feature to separate personal and work applications.

Microsoft has introduced a couple of other improvements and fixes. Users can enjoy a smoother experience as a result. You will now find icons in the context menu and the text selection is now a lot faster. 

Most of the Windows users find the Sticky Notes to be a pretty useful application. It seems like it will take some time until the update goes live to the Windows 10 users.

RELATED ARTICLES YOU NEED TO CHECK OUT:

How to fix common The Division 2 bugs and errors on PC

Fans of the original title, we’ve got some good news for you. Tom Clancy’s The Division 2, has been freshly launched by Ubisoft.

The game didn’t have a flawless launch, requiring constant internet connection optimization as it makes use of Easy Anti Cheat.

Many players have reported various bugs and technical issues along their playthroughs.

We hope to see Ubisoft addressing them as soon as possible.

Meanwhile, we compiled this list of common bugs and errors and their corresponding workaround to help you out.

How can I to The Division 2 bugs?

1. Game freezes

Many users have reported their game freezing while in the middle of the action, with threads dedidcated to this issue on reddit.

Reporting no sound in the actual game after CC and have trouble completing the prologue due to freezes, occasionally only will unfreeze when alt tab. Very disappointed Ubisoft and not impressed.

How to fix The Division 2 game freezes

With reports coming in on game freezing even on high-end machines, a solution is to reduce your overall graphics settings for the game.

Also keep in mind to have the latest GPU drivers installed. Until the issue is fully addressed it seems that this could work for the time being.

We have a small guide for Nvidia users to tweak their settings to avoid the game freezing up. Here are the steps to follow:

  1. Open Nvidia Control Panel;
  2. Click on Manage 3D settings, and go to Program Settings and locate TheDivision2.exe;
  3. Set Max Pre-Rendered Frames to 1;
  4. Set Monitor Technology to G-Snyc (only if available);
  5. Enable Threaded Optimization;
  6. Set Power Management to Highest Performance;
  7. Set Multi-Display/Mixed GPU Acceleration to Single display performance mode.

2. No In-Game Sound

We all love the kick from a good soundtrack or just avoiding the chaos of gunfights. But when there’s no sound to begin with, we can’t stick to the subtitles alone.

Various users on Ubisoft forums have reported this issue, mostly being associated with Logitech headsets.

My 2 friends that had the problem changed their windows sound standard away from logitech (if you don’t have another device try pluggin out your headset) and it worked for both. So it seems there is definitly something wrong with logitech and the game.

How to fix sound issues in The Division 2

With so many users pointing out to Logitech headsets being the culprit here, we can only suggest testing out different manufacturers.

For good measure, go to the settings of The Division 2 and look for the Audio menu. Switch the Voice Chat option to anything that isn’t related to your Logitech headset and this could do the trick.

Also, we’re gonna leave this tiny tip for disabling Logitech services:

  1. Start Task Manager, select Processes, press the L key, find Logitech Surround Service, and end this process;
  2. In the event this doesn’t work, end the Logitech Game Software process for safe measures;
  3. Restart your PC.

3. The Division 2 Error Messages

Issues related to Echo, Delta, Bravo, are closely tied to connection issues that Uplay faces.

Ubisoft advises re-connecting to your account after you restart your internet connection. With no other fixes being discovered so far, we can only wait.

In the meantime, how do you like The Division 2 so far? We’d like to know.

Have you experienced any bugs or glitches? And what is your solution to them? Let us know.

RELATED STORIES TO CHECK OUT:

Download Microsoft Edge Chromium-based installer on your PC

We have recently spotted the first version of the upcoming Chromium-based Edge browser when a support page was discovered by users. Recently, Microsoft published a new list of add-ons.

All of them are expected to be available in the upcoming version of Windows which should land in April.

As a part of the Edge series, Microsoft also released the installer on its servers. You can now download the installer file but you won’t be able to run the Setup just yet.

The company has restricted the installer to only those users who have Azure Premium accounts and Microsoft employees. The regular user categories won’t be able to run the installer‘s version on their systems.

Microsoft Edge Chromium online installer shows up

The latest developments are an indicator that the upcoming Chromium-based Edge will be released to the public very soon, maybe within the next few months.

It seems like the new installer is going to be similar to Google Chrome’s regular installer as it is 1.5MB in size. The small size makes it clear that the installer is going handle most of the download on its own during the installation process.

However, if you are one of those who likes to use an offline installer, Microsoft has not yet shared any plans to release one. Initially, the installer will be released just for Windows 10 users.

If the browser meets the expectations, it will then be rolled out to the other version of Windows and platforms.

Release expected at Build Developer Conference

It is not clear that either the company will keep its promise to maintain the look and feel of the Edge browser. It is expected that the company plans to remove some of the features as well as add some new ones.

It seems like Microsoft is currently testing the latest version of the browser and users have to wait until the testing phase is done.

Let’s wait until the new Microsoft Edge version is now up and running. According to recent speculations, the new Edge browser might be heading towards its official launch at the Build developer conference that is going to be held in May 2019.

RELATED STORIES TO CHECK OUT:

Got VR problems on Windows 10/11? Here’s how to fix them

Are you experiencing VR problems Windows 10? No doubt, the infusion of Windows Mixed Realities into the VR platform has resulted in a whole lot of expansion. Setting up a virtual reality can spring issues that could be rather frustrating. Hence certain recommendations and suggestions might come in handy when VR problems arise. Whatever the VR issue is, here is a useful guide in resolving some of the most common VR problems in Windows 10.

Best solutions to fix common Virtual Reality problems

  1. PC Troubleshooting
  2. VR Problems with Audio
  3. VR Problems with the Controller
  4. VR Problems with Wireless Receivers
  5. VR Problems with the Headset

1. PC Troubleshooting

VR PC troubleshooting VR problems

All VR problems under this category require the following procedure to optimize PC setting for SteamVR.

  1. The process begins with clicking the Windows key at startup, and then type power to search for the power option. Select the power option and next click on the High performance option.
  2. NVIDIA Power Management should be set to Prefer maximum performance.
  3. Ensure that the latest driver for AMD or NVIDIA graphics is installed.
  4. Default audio playback device should be HTC-VIVE-0 and ensure that Steam is running with administrative privileges.

2. VR Problems with Audio

VR issues windows 10 headphone jack

Audio VR problems in Windows 10 are easily tackled as they do not pose a serious or permanent issue. Follow these steps to solve specific problems:

No sound, even when plugged to the Vive’s headphone jack

  1. First, ensure the headphones are well plugged in.
  2. Test the positioning of the stereo by right-clicking on the volume icon in the tray task. Choose Playback devices and highlight the default audio device- 2-USB-Audio device or the HTC-VIVE-0. Finally, right-click the highlighted device and choose Test. This should take care of the sound issues.

When the sound can’t be heard

Simply do the following:

  • Right-click within the SteamVR and choose the Settings option, select Audio then Audio device. This will help you identify whether the audio device is selected or not.

No sound on USB headphone while connected with Vive’s extra USB port

Ensure that the correct playback device is receiving audio from SteamVR.

  • To check that, go to SteamVR choose Settings > Audio > USB headphone.

Ensure that audio transmission is on-going from the USB headphone device connected to the headset.

  1. Right-click the volume icon at the bottom.
  2. From the menu select the Playback device.
  3. Click on the desired output device and set as default device.
  4. If you can’t see USB headphones on the list, right-click on an Audio device and check the Show Disabled Devices and the Show Disconnected Devices options.

When the audio stops suddenly

  1. Set the default audio device to speaker 2-USB Audio Device.
  2. Ensure that SteamVR is still running.
  3. Ensure that the headset isn’t sleeping. Just move it to correct this.

3. VR Problems with the Controller

VR Headset VR not working

Different problems require appropriate solutions. Here are some controller VR issues that users reported:

Issues with the controller track pad

  1. Ensure the controller firmware is the latest. To check the firmware, go to SteamVR > Devices > Update Firmware.
  2. Hold down the System button to turn off the controller.
  3. Hold down the Trigger and Grip button, and then press the System button.
  4. A different noise other than the power noise would be heard. This is an indication that the controller is on.

Controller LED should be in the right state

LED light VR problems

  • Green color indicates the ready state for Vive (fully charged and on).
  • Blue color indicates the connecting process. Controllers can be paired in this state.
  • Blinking blue indicates paring mode.
  • White indicates the ready state for Vive pre-development kit (fully charged and off).
  • Orange is an indication that the controller is charging.
  • Blinking red indicates low battery

 Unconnected controller issues

  • First, ensure that the controller is charged and turned on.
  • Ensure the controllers are well plugged into the outlet and power adapter.
  • Check the LED colors and make sure that everything is in order.
  • For a solid red light, restart the controller. Hold down all buttons except the System button and plug the controller into the computer with a micro USB cord.
  • Release the buttons after several seconds.

4. VR Problems with Wireless Receivers

The Vive headset comes with two inbuilt wireless receivers. These are necessary for communicating with the controllers. Various issues can arise while using them. See the troubleshooting VR problems windows 10 and the solutions.

Not recognizing USB

  1. For this problem contact Steam support.
  2. Send a copy of the system Report as well.

Wireless receiver not detected

  1. Go to the StreamVR and select Settings, then USB.
  2. Click the Refresh button before the status update.
  3. Ensure that the wireless receiver 1 and 2 is highlighted by checking the appropriate buttons. If not, unplug the device from the PC. Use a different USB port to connect the wireless receiver.
  4. Wait for the device to refresh the status again.

Just reset the USB devices

Sometimes resetting the devices can help take care of some basic setting problems. To do that, follow these steps:

  1. Ensure to unplug all cables from the computer before commencing.
  2. Go to SteamVR > Settings then the Developer.
  3. Click on Yes to uncheck all SteamVR USB Devices.
  4. Connect the cables and re-launch the SteamVR.

5. VR Problems with the Headset

VR not working headset

Like every other device, the headset comes with its problems. These problems range from, headset not being detected, and state of the headset LED and so on. Here are some solutions to these problems on Windows 10 devices.

Headset not detected

  1. Make sure the headset is plugged in.
  2. Connect the three orange headset tethers properly to the orange ports in the Link Box. It should override the problem afterward.

Blurry headset

This might be an issue with the Inter-Pupillary Distance (IPD). Images get blurry when the IPD does not correctly calibrate the distance it has measured between the eyes. To resolve this issue:

  1. Place a ruler on the nose just slightly aligning close to the eyes.
  2. Keep the left eye closed while looking directly through the right eye.
  3. Align the end of the ruler, lined up to the center of the eyes without moving it.
  4. Try to calculate the distance.

Once measured, change the IPD measurement manually in the WMR setting by:

  1. Right-clicking the Right button > Settings > Mixed reality > Headset display.
  2. Click measurement field ( the calibration section) > type the IPD value.

Headset and tracking issues

Headset tracking issues, particularly in a room-scale situation could be quite challenging. To solve the problem of the headset losing track, make sure the light in the VR room is on. This help ensures that the cameras have a good view of what’s around.

When dealing with pop up error messages, the boundary set up should be re-run with this step.

  1. From the start menu or Taskbar > launch the Mixed Reality > click the Boundary button.
  2. Click on the Run Setup > Set me up for all experiences. Follow the on-screen steps.

In the case where the HMD’s display freezes completely simply restart the Mixed Reality portal or the PC.

With the above guide, fixing VR problems Windows 10 shouldn’t be so difficult anymore, so be sure to try all of our solutions.

READ ALSO:

Groove Music OneDrive track streaming ends March 31st

Microsoft has announced that Windows 10 users will no longer be able to use the Groove Music app to stream music from OneDrive. 

The decision will impact Windows 10 Xbox One consoles, phones and PCs along with Forza Horizon 3.

Notably, users were able to play their favorite games while enjoying music through Groove. However, it is worth mentioning that change applies only to music streaming options.

You will be able to enjoy your music files stored on OneDrive if it is synced to your PC. Otherwise, by the end of April, you can continue to play the music through the OneDrive app but you will lose all the data that is stored with Groove services. 

The decision sparked anger among users

Furthermore, as we already know, Microsoft has retired the Groove apps for iOS and Android.

This time. the company moved a step further by removing the streaming ability from OneDrive music folder to Groove. Most users are still concerned about how the change will affect the Xbox users.

They have various questions in mind so it resulted in a conversation in a Reddit thread. 

The decision sparked anger among the users who are used to playing music while playing their favorite games. One of the users stated:

Man this really bugs me. I use this feature all the time. There are certain games i only play while streaming my own music. I dont want to either use or pay for Spotify. It’s not like local streaming works properly like it used to on the Xbox 360, it never behaves itself properly.
Seems dumb that MS is pushing streaming with things like Xcloud but they’re taking streaming options away from people who pay money for Onedrive storage options. Not impressed.

Some of the users even went on to suggest some possible workarounds to continue using the Xbox version of Groove beyond April 2019.

You can stream from PC to Xbox, by finding the files in File Explorer, right-clicking, Play To > Xbox. It will start up Groove on the Xbox and play the songs over your local network.
Not very elegant or intuitive though, because you need to keep the PC on, and use it to select songs. Groove + OneDrive was such a simple and useful solution.

Moreover, another user suggested using Spotify, to listen to the albums you have bought on Amazon via the Prime Music app. 

Groove will continue to work

Groove users don’t need to worry as the app will continue to work normally. Users will just not be able to access the OneDrive music inside the app’s library. You will still be able to access the OneDrive music outside of the Groove app.

It seems like a permanent workaround is on the way as a user has claimed to work on it.

I’m currently playing around with an app that can do local playback, since that’s simple enough to set up. OneDrive playback seems to require a new Graph API, which I am trying to figure out. Ideally I’d like it to handle local, OneDrive, network…

Will put all the code and a download (AppX) on GitHub once it’s mostly functional, and if it works well enough, I’ll look into a Store release, so it can be used on Xbox without dev mode. Can’t offer any sort of ETA, as this is a side project I literally just started, but it’s something I’ll be using myself, so I’ll be sure to get something working.

The users have to wait and watch until a reliable alternative is rolled out to the Windows 10 users.

RELATED ARTICLES YOU NEED TO WORK OUT:

Could Not Find This Item. This is no Longer Located [Fix]

The main question we look forward to answering today is How to delete the undeletable folder or file in Windows. The situation arises when you get the Could not find this item This is no longer located error.

If you’ve bumped into a hurdle and there’s no obvious solution for the problem, make sure to check the steps we provided below. They should help you.

What is the error file not located?

This peculiarity is mostly provoked by, believe it or not, unsupported characters in files’ or folders’ names. Even though it seems like a minor inconvenience, Windows won’t be able to access the files it can’t read.

Therefore, most of the time, the presence of an awkward sign or letter can, so to say, corrupt the path, thus preventing you from deleting the folder or file.

Of course, you can’t use unsupported signs or letters while naming files or folders, but that doesn’t apply to downloaded files or files you transfer from other systems.

How do I delete a file that says no longer located?

1. Rename the folder or file

Simply locate the problematic file or folder, right-click on it, and choose Rename. Alternatively, you can double-click the file name and enter the new one. Make sure not to use any special characters this time.

The GUI method to rename a file works in most cases when you get the Could not find this item This is no longer located error. But if that doesn’t work, use Command Prompt.

2. Rename via Command Prompt

  1. Type cmd in Search bar, right-click on Command Prompt, and select Run an administrator.run command prompt
  2. Find your way to the folder or file location.
  3. Click on the blank space in the address bar and press Ctrl + C to copy the path. We’ll use the following path as an example: C:\Users\LenovoZ570\Downloads 
  4. Don’t forget to replace our path with yours.
  5. In the command line, type the following lines and press Enter after each: cd C:UsersLenovoZ570Downloads dir /xcould not find this item this is no longer located in
  6. You should see the list of all available files stored in the following folder. You should look at DOS names in the first column and locate the troubling folder or file.
  7. Enter the ren command first, then the current name, and afterward, the new name. That should look like this example: ren TEST1~1 TEST2could not find this item this is no longer located in
  8. Press Enter, and you should be good to go.

With that, you should be able to remove the file or folder permanently. Remember that the deleted files aren’t stored in Recycle Bin after the Command Prompt deletion. After that, you should be in the clear.

We know that this second method isn’t exactly what you usually want to do when a file won’t delete. Luckily, there are not many files acting weird and repellent, or it would be quite a drag using Windows, wouldn’t it?

And once done, the Could not find this item This is no longer located error shouldn’t appear again.

Before you leave, find out how to recover deleted files in Windows.

To share additional fixes, drop a comment below.

How to permanently remove Continue to watch message on Netflix

After signing up for a subscription to Netflix, you let yourself get carried away by the excitement and start episodes on episodes. You leave many in the middle, waiting to find that series that could capture your heart and, of course, your attention . After some time, however, you realize that all those unfinished episodes remain there, on the Netflix playback list. They are ready to be resumed by simply pressing the Play button.

You have decided to take the situation in your hands and understand how to remove continue to watch on Netflix. You want those “suggestions” to disappear forever.

In this article, we will explain to you how to complete this operation on both versions of Netflix.

  • based on the browser (for computers)
  • base on the apps available for the various devices.

The steps that you will read in this article do not provide any kind of modification or unofficial procedure. The deletion of content from the lists of vision is a feature already integrated into Netflix.

Delete Continue Watching on Netflix with these solutions

  1. Remove Continue to watch on Netflix from PC
  2. Remove Continue to watch on Netflix from smartphones, tablets and other devices

1. Remove Continue to watch on Netflix from PC

continue watching NETFLIX

As you well know, it is possible to take advantage of Netflix content even from the most modern computer browsers. You have the possibility of using all the features offered by the app, including the management of the profile and of your personal account.

To remove Continue to watch on Netflix using your computer, you need to act on this last aspect. In other words, you have to access the account page from your browser. From there, delete from viewing activities that you want to disable.

  1. Access the main Netflix page from the Internet browser you usually use.
  2. Press the red Login button located in the upper right corner of the page.
  3. Type the credentials associated with your Netflix account in the Email and Password boxes.
  4. Click on the Login button to enter your personal area.

If you no longer remember the password to access the service, follow the next steps:

  1. Click on the link Help us located in the lower right corner of the access box.
  2. Choose the reset option for your password.
  3. Follow the on-screen instructions carefully to proceed.

If you no longer have access to the email or phone number with which you registered, follow the next steps:

  1. Click on the link I do not remember my email address or my phone number.
  2. Specify your name, your surname and your credit card number on Netflix.
  3. Click the Find Accounts button
  4. Follow the on-screen instructions to complete the recovery process.

Once you have access to your account, follow the next steps:

  1. Click on the user from which you want to delete the viewing activity (eg Tom).
  2. Press the image of the profile located at the top right.
  3. From the menu that opens, select the Account item.

When you reach the next window, follow the next steps:

  1. Scroll down to find the My Profile section,
  2. Click on the Content Activity link
  3. Identify, on the next page, the episode to be deleted from the “keep watching” list.
  4. Click on the icon in the form of a bin on the far right, to delete it from the viewing activity. If it is your intention to eliminate from your “keep watching” the entire series, click on the link Hide series? which appears later in the box.

Please note that deleting the episode / series from viewing activity will affect all devices associated with the account. To re-add the episode or series in the “keep watching” section, all you have to do is start playing it again in Netflix.

remove series continue watching


2. Remove Continue to watch on Netflix from smartphones, tablets and other devices

You don’t use Netflix from your computer but instead you rely on apps for smartphones, tablets, consoles or Smart TVs? Do not worry, erasing episodes and entire series from watching is very easy! We will explain it to you in the following steps:

  1. Start the Netflix app from the device you want to act on
  2. Access it by tapping the Login button located at the top right.
  3. Complete this operation, choose the profile on which you intend to operate by tapping the relative image placed on the next screen.
  4. Tap the icon ☰ placed at the bottom right
  5. Choose the item Account from the menu displayed on the screen.
  6. At this point, it should automatically open a default browser window, which shows the account management page. Scroll down the latter, until you find the box My profile.
  7. Touch the entry Watch content and wait for the summary page containing the episodes to be shown on the screen.
  8. Touch the icon in the form of a bin placed next to the episode that you intend to remove from the “keep watching” on Netflix.

Even in this case, the propagation of the change could take up to 24 hours. If your goal is to delete the whole series from the watch list, touch the Hide series link.

You do not have the Netflix app installed but you still want to remove “keep watching on Netflix”? You can follow the next steps:

  1. Browse on this page using the browser that suits you best (eg Google Chrome for Android).
  2. Log in to Netflix.
  3. Press the ☰ button located at the top left.
  4. Select the Account item (located just below the account name and profile picture).
  5. Follow the same instructions we gave you earlier.

We hope that our guide was useful. You can leave us your comments in the “Comments” section below.

HP announces new hardware, including a new Windows Mixed Reality headset at Reinvent conference

HP has announced their new Reverb Virtual Reality Headset as part of their their Reinvent event, which will support Windows Mixed Reality, as well as Steam VR for gaming, both right out of the box. The new devices includes upgraded specs, including the much larger 2160 x 2160 per eye screen resolution and an expanded 114-degree field of view.

HP is offering a Consumer Edition of the device for $599, but given the lack of games and entertainment apps for the Windows Mixed Reality platform as well as its lack of manufacturer support, the more significant device is likely the Professional version—which comes with an additional 2-foot cable and fabric mask. Microsoft has been pushing Windows Mixed Reality for businesses, which is especially clear with the announcement of the upcoming HoloLens 2 headset.

The recently announced headset isn’t the first from HP, with the first generation device having been released over a year back. However, the new device greatly increases the screen resolution and also slightly expands its field of view for a vastly improved viewing experience. It’s expected to released late next month on its website, and will include the same Bluetooth controllers as the previous generation device.

In addition to the VR headset that was revealed, HP has also announced multiple Envy branded laptops for small businesses, with 13- and 17-inch versions of the traditional laptop formfactor powered by either the 2nd generation AMD Ryzen processor or an 8th gen Intel Core i5 processor with an NVIDIA GeForce MX250 graphic card, respectively. If the 2-in-1 formfactor is more your style, the new x360 line of laptops are also available in 13- and 15-inch variants, with both powered by AMD processors, although the latter size has the option of an Intel Core processor instead.

As far as pricing and availability goes, the devices are supposed to go on sale gradually between April and June on HP’s website, with the cheapest model coming with an asking price of $699. The larger 15- and 17-inch devices mentioned are also expected to see their way to Best Buy stores beginning in May.

Microsoft to store native Teams data in France

Microsoft is making a change to Teams users in France, as data from within the app will now be stored within the country for new account holders. The company says that the change will help regulated businesses, such as banks, schools, healthcare agencies and the government to comply with their data residency requirements.

As described in their blog post, Microsoft stores teams data, including chat logs, images, voice messages, contacts, and files in an Azure server from the user’s tenant country, with available locations being the U.S., Canada, U.K., Australia, India, Japan, and others. If the user resides in a country that is not yet available, Microsoft will store most of the data in one of three locations—the U.S., Europe, or the Asia-Pacific region—depending on which is closer to the datacenter.

New customers who sign up will now have the option to store their Teams data in one of two of the French Azure datacenters, either in French Central (Paris) or French South (Marseille). While the change doesn’t yet apply to new users, Microsoft says that current users will soon be able to migrate their data from the old European datacenters over to the local datacenters sometime this year.

Microsoft Teams is the latest of the Microsoft 365 apps to join the French datacenter party, as the company’s other Online services such as Exchange, SharePoint, and Skype for Business already use them. Microsoft says it’s working on making all Office 365 files stored locally in all of the correct countries, with the United Arab Emirates and South Africa (both of which also store data in Europe) coming soon.

Microsoft celebrates half a million organizations using Teams, announces upcoming Microsoft Whiteboard integration and more

Microsoft Teams is celebrating its second anniversary this week, and the software giant has just announced a new milestone for the Slack competitor. There are now more than 500,000 organizations using Microsoft Teams across 181 markets (up from 200K organizations a year ago), including 91 Fortune 500 companies.

The company also said that 150 organizations using Teams have 10,000 or more active users, which shows that the app can fit the needs of both SMBs and very large organisations.

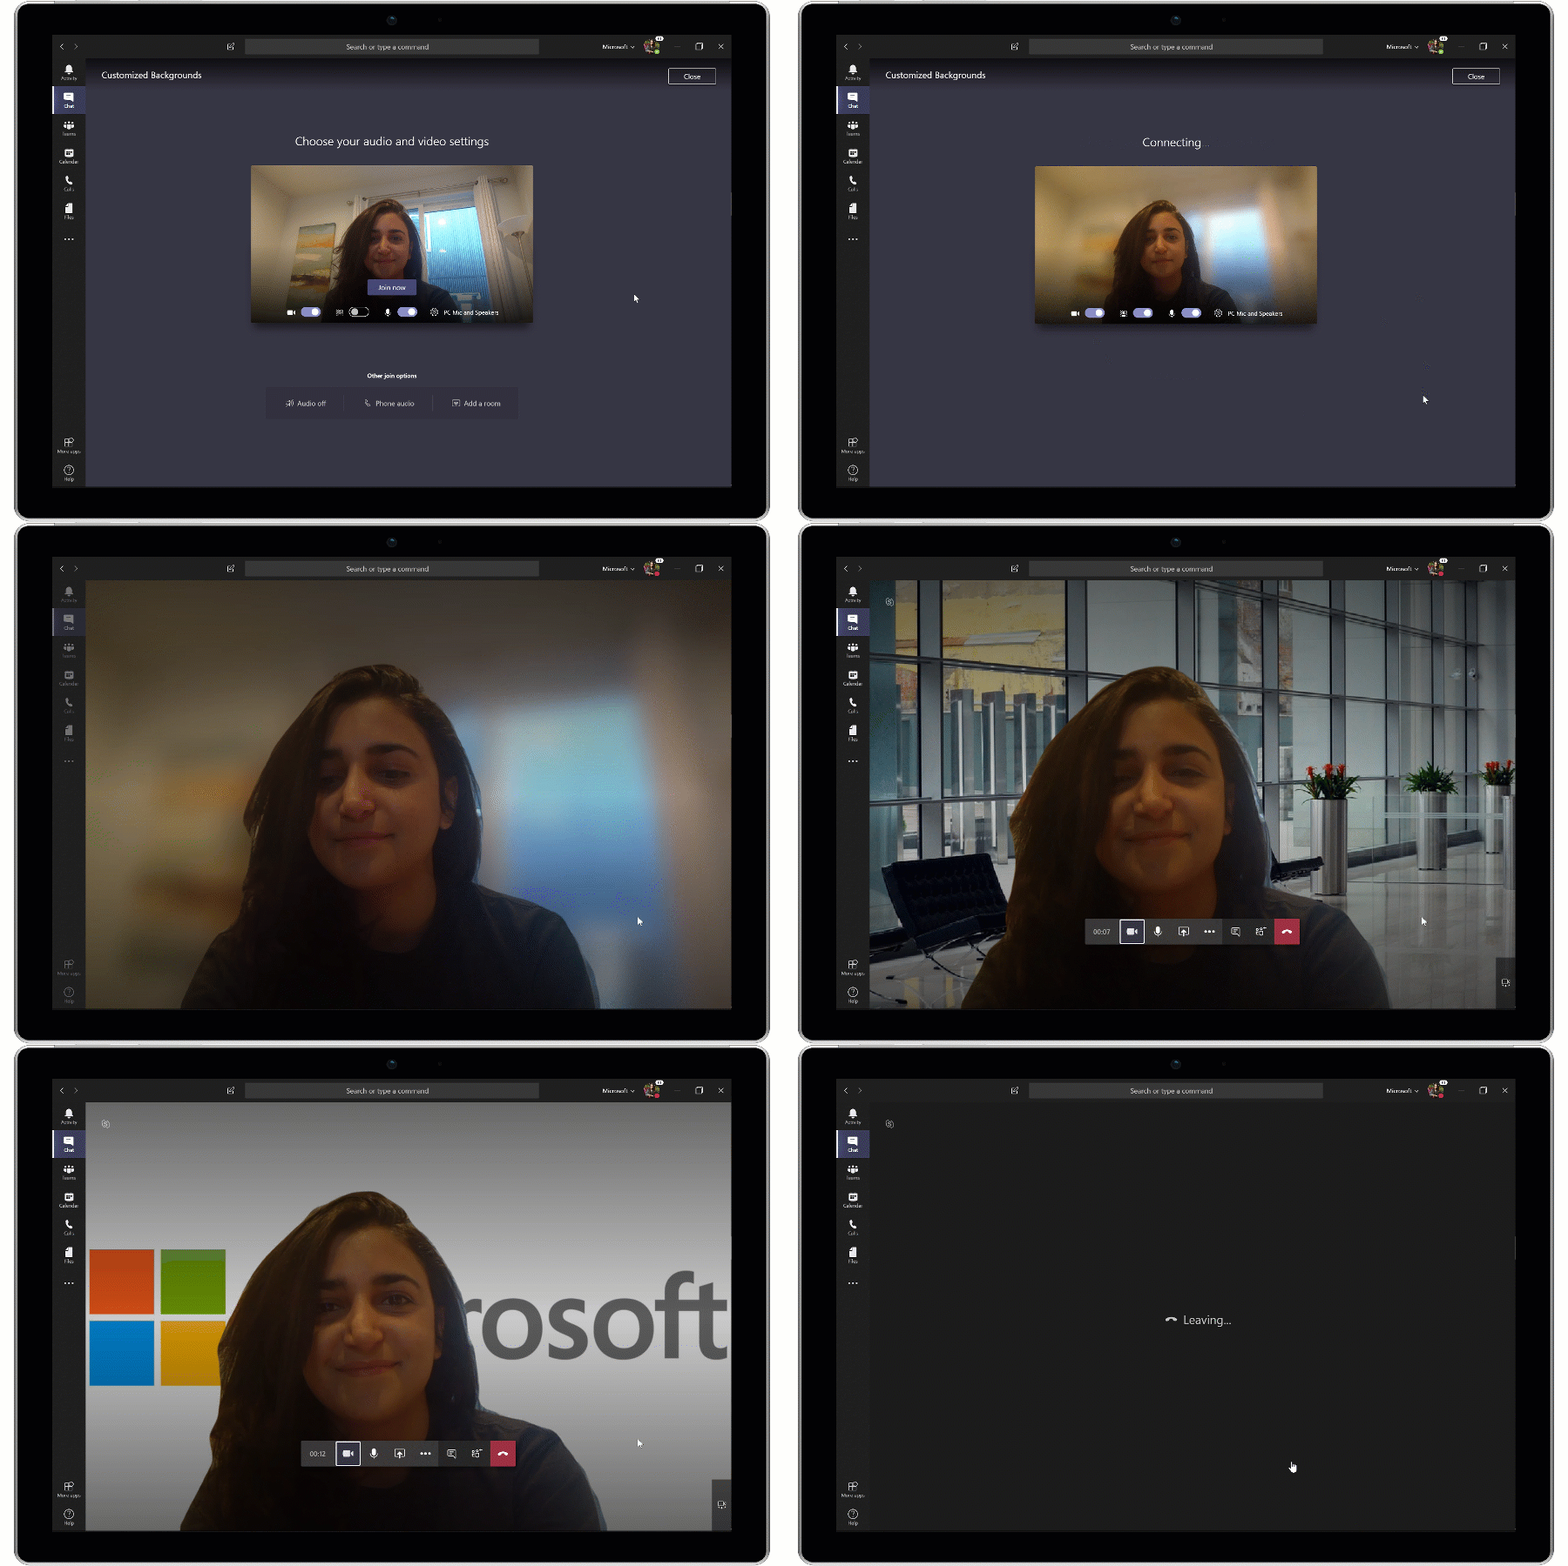
Earlier this year, Microsoft announced some important Teams updates including a customizable mobile Teams experience and a schedule management tool called Shifts. Today, the Redmond giant announced more new capabilities coming later this year, including customized backgrounds for video calls. This is an evolution of the intelligent background blur technology that debuted in Teams last year.

Animated image showing customizable backgrounds utilized in Teams.

Microsoft Teams is also getting live captions and subtitles, a feature that recently launched in both Skype and PowerPoint. “Live captions & subtitles make your Teams meetings more inclusive for attendees who are deaf or hard of hearing, have different levels of language proficiency, or are connecting from a loud location,” the company explained.

Image showing live captions and subtitles utilized in Teams.

Microsoft Teams is already a solid option for conference calls, but Microsoft announced today that the Live events feature that supports up to 10,000 attendees is now generally available. This feature also integrates with other Microsoft 365 tools like Stream or Yammer, and it also uses AI to provide automatic transcriptions.

Microsoft Teams Rooms, the company’s complete meetings and calling solution previously known as Skype Room Systems is also getting a new features. Today’s blog post mentioned an upcoming Microsoft Whiteboard integration, as well as support for additional cameras for capturing content. “Using any USB camera, Microsoft Teams Rooms leverages Microsoft’s new Intelligent Capture processing to capture, focus, resize, and enhance whiteboard images and text, so remote attendees can clearly see whiteboard brainstorming in real-time, even when someone is standing in front of the whiteboard,” the company explained. You can see how it will work in the GIF below.

Animated image showing Intelligent Capture utilized in Teams.

Other updates coming to Microsoft Teams later this year are secure private channels, Data Loss Prevention (DLP) in chats and conversations, as well as Information barriers for preventing conflicts of interest in an organisation. Lastly, Microsoft announced this week that Microsoft Teams now provides data residency for France using to the two data centers that recently opened in the country.

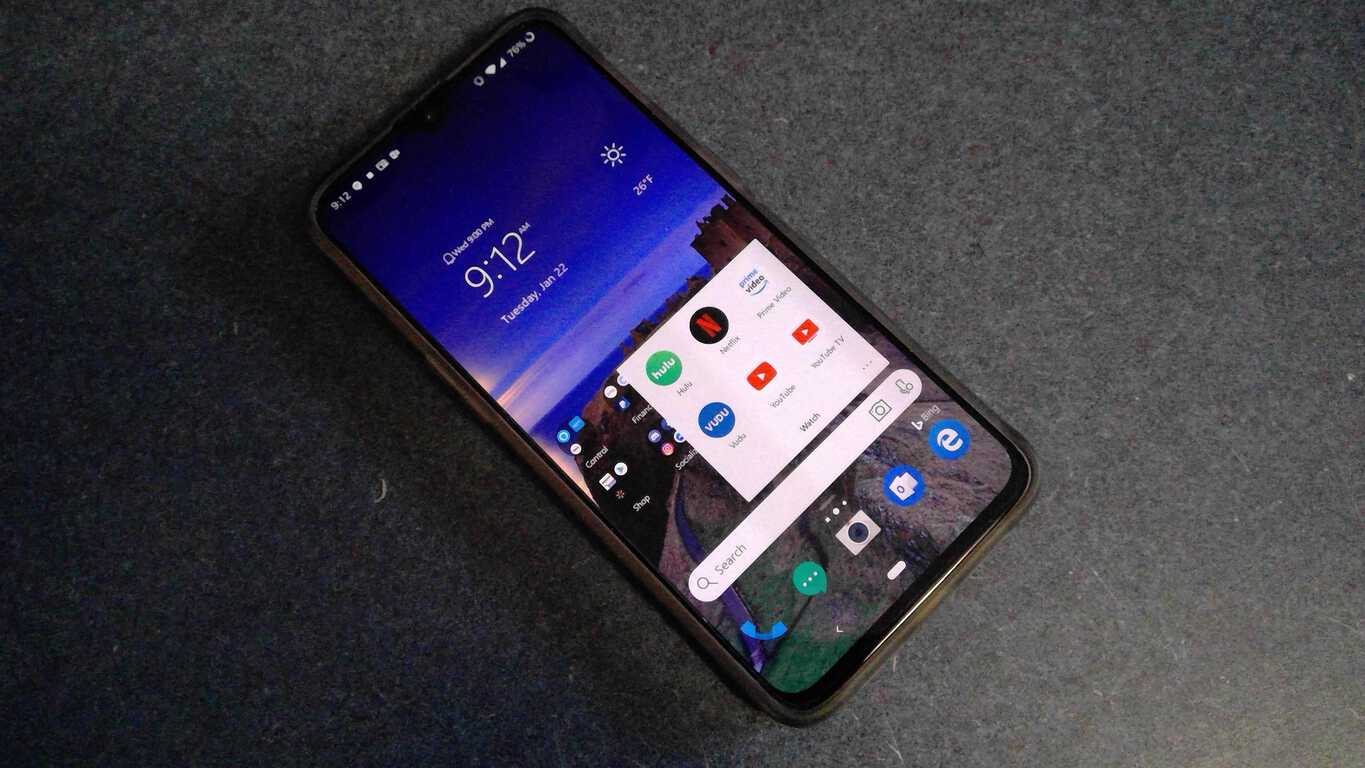
Microsoft Launcher set to unveil 5.3.0 beta with multiple time/weather widgets, work accounts, more

Microsoft Launcher beta testers will be able to enjoy a new update today, as the team behind the app have announced the release of version 5.3 for those who sign up to try early releases. The update seems to mostly focus on aesthetic changes at first glance, with the company redesigning the time/weather widget, replacing the Segoe UI font with Android’s own Roboto font, among other unnamed UI improvements.

Of course, UI improvements aren’t the only new additions, with the new time and weather widget now supporting multiple sizes, and now allows user to place multiple widgets each with a different custom locations. Microsoft has also added support for work accounts to be used, which the company says will give those users access to their work apps. Here’s the full list of changes:

– Time/Weather widget redesign- Now you can have multiple widgets in multiple sizes in multiple styles for multiple locations! Also check out the updated and more detailed L2 page with hourly and 10 day forecast.
– UX refinements to the Home Screen, Dock and Search widget
– Tasks card now supports “My Day” and “Flagged Emails” from Microsoft To Do
– News tab now supports “Technology” as a news interest
– Font type changed from Segoe UI to Roboto
– Work profile customers can now get access to their work apps
– Beta community link in Settings changed to lead to Microsoft Tech Community

Interestingly, with the downfall of the Google+ social media service, the company has moved its official Microsoft Launcher community for the Android app over to the company’s own Tech Community. This means that those beta testing the app and wishing to provide feedback will now need to do so from there, as Google+ will be officially retired from consumers as early as next month.

The beta update will rollout to users gradually, with the launcher’s blog post saying that the update will need “a couple of hours or a day to propagate” before the update will be available for all users. Those who aren’t signed up to test the app can do so from the launcher’s Google Play beta testing page.

Microsoft Launcher
Microsoft Launcher
Price:
Free

Xbox Game Pass’ Twitter is teasing another big video game announcement

The official Xbox Game Pass Twitter account has once again begun teasing video games that are coming to the service in the near future.

In the tweet (see below), readers are told that two new games will be coming to Xbox Game Pass this week. The title of one is teased by the inclusion of two male head emoji.

Over on Reddit, quite a few gamers are speculating that this clue could be hinting at Deus Ex Mankind Divided while others think it could be a reference to the next episode of Life is Strange 2 or A Way Out though.

Of course, the Xbox Game Pass Twitter is known for its sense of humor and this clue could just be one big troll or a hint at a title only vaguely connected to the emoji.

What do you think the game will be? Share your thoughts with the community in the comments below and then follow us on Pinterest for more Xbox gaming content.

Google Drive Access Denied Hacks: 3 Quick Ones

The Access Denied error window in Google Drive states, You need access. Ask for access, or switch to an account with access, and a few quick hacks often help fix things.

This usually happens when signed in with another account that doesn’t have access to the files. But if that’s not the case, it’s usually the misconfigured setting or missing permissions to blame. Keep reading to find out!

How do I bypass Google Drive Access Denied?

Before we head to the complex ones, here are a few quick solutions:

  • Unlocker is a third-party program that tells users what software and processes are holding a lock on another folder or file. Download Unlocker and install the tool. Once done, click the Unlock All button.
  • Restart the computer or just Google Drive. Both work, but we recommend the former.

If none work, move to the fixes listed next.

1. Terminate other software using Google Drive

  1. Press Ctrl + Shift + Esc to open the Task Manager.
  2. Then select any third-party software that may be conflicting with Google Drive, and click on End task.

Another program or process might be using a Google Drive file or subfolder. For example, another utility might be backing up the file or subfolder.

Then, you will come across the Google Drive link access denied error. If so, close all open programs on your taskbar and check other software processes with the Task Manager.

2. Check the Google Drive folder permissions

  1. Firstly, open File Explorer, right-click your Google Drive folder, and select Properties.
  2. Go to the Security tab and click Advanced.
  3. Click the Change option.
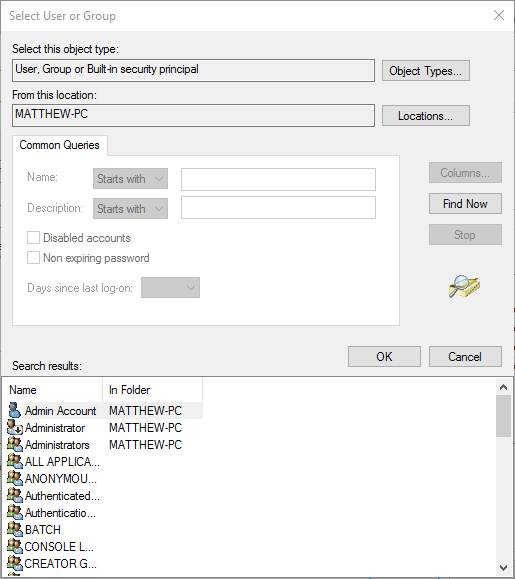
  4. Press the Advanced button on the Select User or Group window.
  5. Next, click Find Now, select your user account from the search results, and click OK.
  6. Click OK and Apply to save the changes.
  7. Then, select the Replace ownership on subcontainers and object checkbox, and click the Add button.
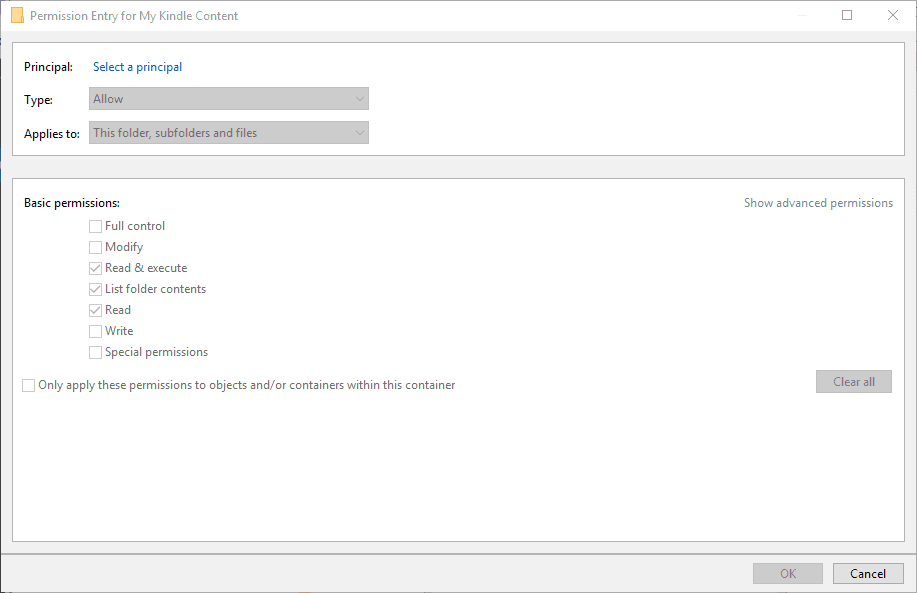
  8. Click the Add button, and click on Select a principal.
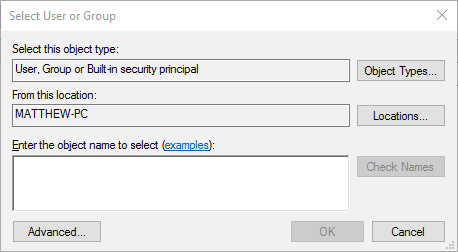
  9. Press the Advanced button, select your user account as before, and click OK.
  10. Your selected user account will now be in the text box. Click OK to save the changes.
  11. Now, select the Full Control checkbox, and again save the changes.

Windows might be denying you folder access because your user account doesn’t have the required Google Drive folder permissions, and subsequently, the Access Denied error appears. So, ensure your user account has full permissions for the Google Drive folder.

3. Set up a Batch File to Take Ownership of the Google Drive Directory

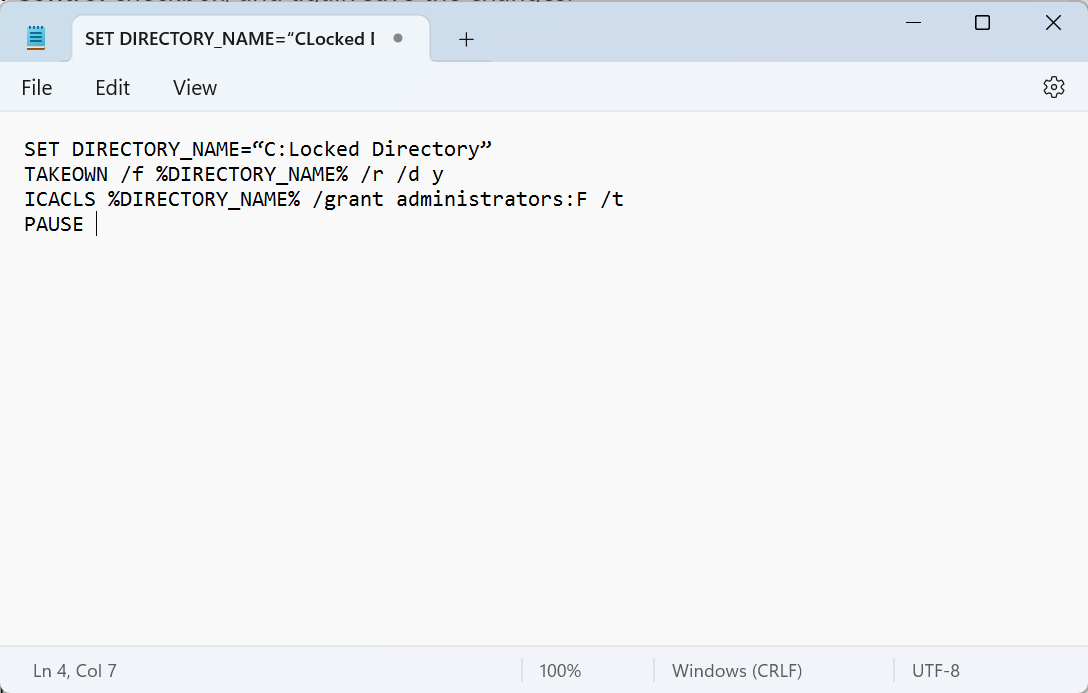
  1. Open Notepad, then copy and paste the following text into Notepad with the Ctrl + C and Ctrl + V hotkeys respectively:
    • SET DIRECTORY_NAME=“C:Locked Directory”
      TAKEOWN /f %DIRECTORY_NAME% /r /d y
      ICACLS %DIRECTORY_NAME% /grant administrators:F /t
      PAUSE
      batch file to fix google drive access denied hack
  2. Erase C:Locked Directory and replace it with the actual path of your Google Drive folder.
  3. Save the file, and name it Take Ownership.bat.
  4. Once done, run the batch file.

There is a slightly quicker way to take ownership of Google Drive when you come across Access Denied Error 403 and Windows doesn’t recognize folder permissions. Just set up a batch file with Notepad that will do the same thing.

So those are a few hacks to fix the access denied error on Google Drive and any other folder or file in Windows.

Before you leave, find out how to increase the Internet speed in Windows and speed up the uploads.

Tell us which fix worked for you in the comments section below.

Get VPN Unlimited for Windows 10/11 to skip geo-restrictions

Most of us are sick of the messages informing us that the content is unavailable when we access Hulu or Netflix apps. This notification appears when the content we’re trying to access is restricted to certain countries.

The VPN Unlimited app has been officially launched in the Microsoft Store to solve all these issues. 

VPN Unlimited lets you access geo-restricted content

VPN Unlimited comes to the rescue in those situations when you have to stream video and other content. You can by-pass any geo-restrictions and freely surf the web in 70+ locations.

The tool allows you to secure your internet traffic from intruders with the help of 256-bit encryption technology. VPN Unlimited basically helps users from restricted regions to access their favorite content on Hulu, Netflix and other similar platforms.

This is done by spoofing your location.


VPN Unlimited claims that it can help the users to:

Get access to the restricted internet content, secure your online activities, and surf anonymously with KeepSolid VPN Unlimited.

VPN Unlimited Key Features

The application offers a bundle of features to Windows users. The VPN Unlimited app is available for both the PC and Surface Hub users.

VPN Unlimited offers the following features to its users:

  • Unrestricted access to web resources in restricted regions
  • Unlimited traffic bandwidth and connection speed
  • More than 400 VPN servers in 70+ locations around the world
  • VPN browser extension for Opera, Chrome, and Mozilla Firefox
  • Protect up to 5 devices including macOS, Linux, Windows, Android and iOS
  • Increases internet speed by bypassing some ISP restrictions
  • Secure your online activity
  • Reliable 24/7 customer support

Pricing & Subscription

VPN Unlimited application offers subscription plans on a one month, three months, one year, three years and lifetime basis. You can enjoy the features free of cost over a 7-day trial period. 

Sr. NoSubscription Pricing
1.1 Month$9,99
2. 3 Months$18,99
3. 1 Year$59,99
4. 3 Years$99,99
5. Lifetime $199,99

You can even enjoy content through the app in those regions where the use of a VPN is blocked. As the application disguises VPN traffic as HTTPS traffic.

RELATED ARTICLES YOU NEED TO CHECK OUT:

How to enable ‘It is now safe to turn off your computer’ on Windows 10

Do you remember the “It is now safe to turn off your computer” message from the good old days? It seems like some users are still interested in having this alert in Windows 10. Just like we used to see the message in Windows 95 in the 90s era.

Those old systems didn’t actually support power management and they had to be turned off manually through a power switch. Power management was considered to be a fancy thing that was supported only by a few computers.

At that point in time, the systems were not ACPI (Advanced Configuration and Power Interface) compatible.

The OS basically uses the ACPI to control power functions. It powers down the motherboard by sending the power-down command. 

Windows 95 users used to see a message after the shutdown was complete and the message is was an indicator that allows you to press the power button and your system files will not be damaged. The message states: It is now safe to turn off your computer.

If you are one of those who want to enable that option on your Windows 10 PC you can follow the steps mentioned below.

Turn on ‘It is now safe to turn off your computer’ screen on Windows 10

Use a Group Policy Setting

Those users who are currently using the Windows 10 Pro edition can enable the feature through a Group Policy setting. If you shut down Windows, the system will not (physically) power down the PC.

  1. Head towards the Start menu and open the Control Panel.
  1. Navigate to the search box that is available at the right hand corner of the Control Panel window and type “group policy“.
  2. You will see a list of search results and click “Edit group policy“.
  3. A new windows “Local group policy Editor” will be opened, select Computer Configuration >> Administrative Templates>>System.
  4. Double click “Do not turn off system power after a Windows system shutdown has occurred”, it will open a new window.
  5. On the left hand side of the screen you will see three options: Not Configured, Enabled, and Disabled.
  1. Select “Enabled” and click “Ok” to save the settings.

Finally, press Win+R key to open Run and type the following command and press Ok:

shutdown -s -t 0

Your system will now shut down and you will see the message “It is now safe to turn off your computer”.

Additionally, enabling the feature will also save you from system errors that you might face in case of any unavoidable situations.

RELATED ARTICLES YOU NEED TO CHECK OUT:

How to change the pagefile.sys file in Windows 10

Pagefile.sys is a special type of file in Windows 10 that stores crash dumps. In addition, this file can also help you achieve better performance by writing the contents of your RAM to it. Pagefile.sys is a rather useful component of Windows, and today we’re going to show you how to use it properly.

What is pagefile.sys and how do we use it?

As we already mentioned, pagefile.sys is a component of Windows that can store contents of your RAM once your RAM is completely used. By doing so, Windows will perform better overall. However, you can also modify pagefile.sys and change its configuration, something we’ll go into in this article.

  1. Changing the size of pagefile.sys
  2. Move pagefile.sys to a different drive
  3. Delete pagefile.sys after every shutdown

1.Changing the size of pagefile.sys

In order to improve your machine’s performance, you can easily change the size of the pagefile.sys file:

  1. Press Windows Key + S and enter advanced. Select View advanced system settings from the menu.
    advanced system settings
  2. When the System Properties window opens, click the Settings button in the Performance section.
    advanced system settings performance settings
  3. Navigate to the Advanced tab. From there, you’ll see the size of the paging file for all drives. To change it, click the Change button in the Virtual memory section.
    advanced performance options change virtual memory
  4. Uncheck Automatically manage paging file size for all drives. Select your system drive from the list. By default, it should be labeled as C. Select the Custom size option and set the Initial and Maximum size. Once you’re done, click Set and OK to save changes.
    set custom virtual memory allocation

As for the maximum size of the paging file, if you have 16GB of RAM you should set it to about 2.5GB. If you have 32GB of RAM, set the paging file to about 5GB.

2. Move pagefile.sys to a different drive

If your pagefile.sys is taking too much space on your system drive, you can move it to another drive easily. To do that, follow these steps:

  1. Open Advanced system settings. Go to the Performance section and click the Settings button. Now, go to Advanced tab and click the Change button. For more information on how to do that, be sure to check our previous section.
  2. Uncheck the Automatically manage paging file size for all drives option.
  3. Select your C drive and then set No paging file option. Now click the Set button.
    disable paging file
  4. Choose the drive that you want to use to store pagefile.sys. Select System managed size option and click the Set button. Click OK to save changes.
    disable paging file
  5. Restart your PC to apply changes.

After doing that, your pagefile.sys will be moved to a different drive. Moving your pagefile can be extremely useful especially if you don’t have enough space on your system drive to store it. We have to mention that some applications require your pagefile.sys to be on the C drive in order to work properly. Therefore, if any issues occur after moving the file, be sure to move it back to your system drive. If you want, you can completely disable pagefile.sys by selecting the No paging file option for all your partitions. Keep in mind that disabling pagefile.sys can lead to certain issues with your PC.

3. Delete pagefile.sys after every shutdown

If you’re working on confidential documents, you might want to delete the pagefile after every shutdown. By doing so, you’ll overwrite the contents of pagefile.sys with zeroes. This will clean the pagefile, but it will also make the shutdown process a bit slower. To enable this option, you need to modify your registry. To do that, follow these steps:

  1. Press Windows Key + R and enter regedit. Press Enter or click OK to start Registry Editor.
    open registry editor
  2. In the left pane, navigate to HKEY_LOCAL_MACHINESYSTEMCurrentControlSetControlSession ManagerMemory Management.
    edit memory management registry
  3. In the right pane, locate ClearPageFileAtShutdown DWORD and double-click it to open its properties.
  4. If this DWORD isn’t available, right-click the empty space in the right pane and choose New > DWORD (32-bit) Value. Enter ClearPageFileAtShutdown as the name of the new DWORD and double-click it.
    change clearpage d-word
  5. When the Properties window opens, set the Value data to 1 and click OK to save changes.
  6. Close Registry Editor.

You can also clean the pagefile.sys on every shutdown by using Group Policy Editor. To do that, follow these steps:

  1. Press Windows Key + R and enter gpedit.msc. Press Enter or click OK.
    open group policy editor
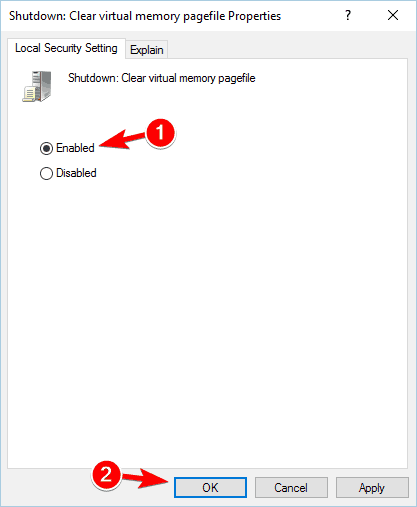
  2. When the Group Policy Editor opens, in the left pane navigate to Computer Configuration > Windows Settings > Security Settings > Local Policies > Security Options. In the right pane, double-click Shutdown: Clear virtual memory pagefile.
  3. When the Properties window opens, select Enabled and click Apply and OK to save changes.
    enable clear virtual memory pagefile properties GPE

After making these changes, pagefile.sys will be cleared every time you turn off your PC. Once again, we have to mention that by enabling this option your shutdown time might increase.

Pagefile.sys is an important component of Windows 10, and you can configure it in order to achieve the best performance. Stability issues can occur if your pagefile.sys is missing or improperly configured, so be cautious if you decide to change your pagefile.

Also, don’t forget to share your thoughts about this in-depth explanation of various methods to tweak the Pagefile.sys file. We look forward to your valuable feedback, as always. The comments section is just below.

READ ALSO:

Change Facebook’s color scheme with Chrome’s FB Color Changer extension

Facebook offers very few customization options and because of that, white and blue are the dominant colors of the social network. If you want to change Facebook’s color scheme, though, there are various apps and browser extensions you can choose from.

Since Google Chrome is the most popular browser among Windows 10 users, we think it’s useful to dedicate a separate article to the FB Color Changer extension.

FB Color Changer for Google Chrome

According to FB Color Changer’s developers, this extension is the most popular color changer tool among Facebook users. Thanks to FB Color Changer, you can now set your favorite color as your Facebook color scheme.

Here’s how to do that:
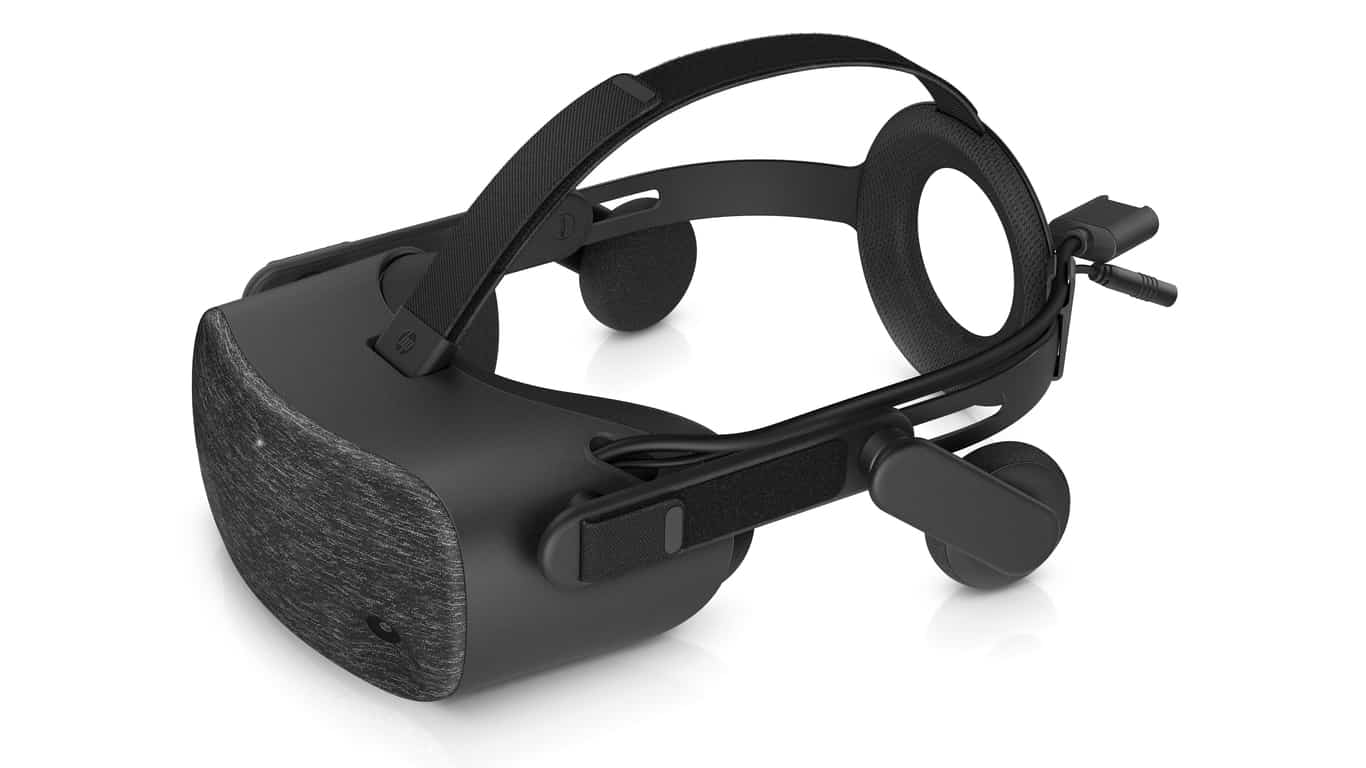
1. Go to the Chrome Web Store and download FB Color Changer
2. Go to the upper right-hand browser corner and confirm the installation
3. Go to Facebook and click on FB’s bar
4. Activate the Color Changer > choose your color
5. Refresh your browser.

FB Color Changer’s developers update the extension regularly to adapt it to Facebook’s design changes. As a result, whenever Facebook implements updates to the social media platform’s UI, you may encounter various bugs until the extension is updated.

There are multiple alternative options you can choose from on the Chrome Store. It seems that this social-website-theming niche gained some traction. Just look for FB changer and you’ll have a variety of similar extensions to choose. Some are better for just a simple color changing, while others are completely changing your usual FB design.

It is worth mentioning that FB Color Changer may collect anonymous data in order for its developers to improve the user experience.

FB Color Changer has over two million users and they simply love it:

I now have a bright orange FB page with purple type! love it!

If you’re bored with Facebook’s blue and white appearance, give this extension a try and set your favorite color as Facebook’s color scheme.

RELATED STORIES YOU NEED TO CHECK OUT:

How to fix Microsoft Treasure Hunt if it won’t start?

Microsoft Treasure Hunt is a UWP game app that expands upon Windows Adventure mode in Minesweeper. However, that game doesn’t always start in Windows 10 for some players. The game might not start after some Windows 10 updates. Players can usually fix Treasure Hunt not launching with the resolutions below.

Try these solutions if Treasure Hunt app doesn’t start on your PC

  1. Open the Windows Store App Troubleshooter
  2. Turn On Universal Account Control
  3. Update Treasure Hunt
  4. Reset the Treasure Hunt App
  5. Reset the MS Store Cache
  6. Reinstall Treasure Hunt

1. Open the Windows Store App Troubleshooter

First, check out the Windows Store App troubleshooter. That troubleshooter can provide fixes for apps that don’t start. Users can open the Windows Store App troubleshooter as follows.

  1. Click the Type here to search button on the Taskbar to expand Cortana.
  2. Input troubleshoot as a search keyword in Cortana’s text box.
  3. Click Troubleshoot to open Settings.
    Microsoft Treasure Hunt hardware troubleshooter
  4. Select Windows Store Apps and click Run the troubleshooter.
    detecting problems Microsoft Treasure Hunt
  5. Then press the Next button to go through the troubleshooter’s suggested resolutions.

2. Turn On Universal Account Control

Note that Universal Account Control needs to be enabled for UWP apps. Treasure Hunt will not start with UAC turned off. This is how users can adjust the UAC settings in Windows 10.

  1. Enter the keyword UAC in Cortana’s search box.
  2. Click Change User Account Control settings to open the window shown directly below.
    user account control settings
  3. Drag the slider up to the notification bar if it’s at never notify. The second-highest UAC notification setting should be sufficient for UWP apps.
  4. Click the OK button.

3. Update Treasure Hunt

Software publishers release updates to fix app bugs. So, Microsoft might have released some updates that fix Treasure Hunt not starting. Users can check for Treasure Hunt and other app updates as follows.

  1. Click the Microsoft Store tile on the Start menu to open that app.
    Microsoft store Microsoft Treasure Hunt
  2. Click the See more button to open the menu shown directly below.
    see more Microsoft Treasure Hunt
  3. Select Downloads and updates to open the window in the snapshot directly below.
    get updates button Microsoft Treasure Hunt not working
  4. Then press the Get updates button.

4. Reset the Treasure Hunt App

Some players have confirmed that resetting Treasure Hunt fixes the app not starting. Resetting the app will erase the game’s data and restore its default configuration. Consequently, players might lose saved games by resetting TH. Follow the guidelines below to reset Treasure Hunt.

  1. Enter the keyword app in Cortana to find Apps & features.
  2. Click Apps & features to open that part of the Settings app.
    Microsoft Treasure Hunt not working apps reset
  3. Select Treasure Hunt and click Advanced options to open the Reset button as shown below.
    reset Microsoft Treasure Hunt won't start
  4. Then click the Reset button.
  5. Select the Reset option on the dialog box that opens to confirm.

5. Reset the MS Store Cache

Some users might need to reset the MS Store cache to get Treasure Hunt. Resetting that cache will ensure MS Store updates all apps. Users can reset the MS Store cache as follows.

  1. First, right-click the Start menu button.
  2. Select Command Prompt (Admin) on the menu to open the command-line window.
  3. Then input wsreset.exe in the Command Prompt as in the snapshot directly below.
    wsreset.exe command prompt
  4. Press the Enter key.

6. Reinstall Treasure Hunt

Reinstalling apps is similar to resetting them, except that will also clear out the old cache. Furthermore, reinstalling Treasure Hunt will also replace its files. So, installing Treasure Hunt again is another potential resolution. Users can reinstall TH as follows.

  1. Open the Cortana search box.
  2. Input the keyword apps in the search box, and click Apps & features to open the app list window.
  3. Select the Treasure Hunt app.
  4. Press the Uninstall button for Treasure Hunt.
    uninstall app Microsoft Treasure Hunt
  5. Restart Windows before reinstalling TH.
  6. Then open the Treasure Hunt MS Store page, and click the Get button.

get microsoft treasure hunt

Those are some of the fixes that will probably kick-start Treasure Hunt. Some of the above resolutions might also fix other MS Store apps that don’t start in Windows 10.

RELATED ARTICLES TO CHECK OUT: 

Windows Media Player is not Finding Album Info [Fix]

Users can usually get album info in Windows Media Player easily, but many reported that Windows Media Player is not finding album info.

In case you’re not familiar, we have a great guide on how to get Windows Media Player on your PC, so you should check it out.

Before we fix this issue, let’s see what causes this issue to appear on your computer.

Why does Windows Media Player not find album info?

  • Issues with the hosts file on your PC can cause this problem.
  • A corrupted Windows Media Player database will also cause this problem.
  • In some cases, corrupted Windows Media Player installation is the cause.

How do I get Windows Media Player to find album info?

1. Edit the hosts file

  1. First, open File Explorer with the Windows key + E keyboard shortcut.
  2. Enter navigate to the following path: C:\Windows\System32\drivers\etc
  3. Right-click hosts.txt and select Open with and choose Notepad.
  4. Then find the line in the hosts file that includes: redir.metaservices.microsoft.com.
    Windows Media Player album info hosts file
  5. If the numbers 0.0.0.0. precede redir.metaservices.microsoft.com, edit them to 2.18.213.82. Thus, the line should then be: 2.18.213.82 redir.metaservices.microsoft.com.
  6. Click File and select Save as to open the window below.
    save as Windows Media Player album info
  7. Select to save the file to the desktop.
  8. Press the Save button.
  9. Right-click the hosts.txt file on the desktop and select Rename.
    hosts file rename Windows Media Player album info
  10. Delete the txt extension from the file title.
  11. Thereafter, right-click the hosts file on the desktop and select Copy.
  12. Open the path C:\Windows\System32\drivers \etc
  13. Then right-click an empty space within the hosts folder and select Paste.
hosts file paste Windows Media Player

In case you encounter problems with this solution, we have a great guide on how to edit hosts file, so be sure to visit it.

Remember that you might encounter access denied when editing hosts, but that can be easily fixed with the right permissions.

This might seem like a complicated solution, but it’s the best option if Windows Media Player can’t find album info.

2. Refresh Windows Media Player’s database

  1. Open Run with its Windows key + R keyboard shortcut.
  2. Enter the following and press OK: %LOCALAPPDATA%\Microsoft\Media Player
    media player directory Windows Media Player album info problems
  3. Select all the files in that folder by holding the Ctrl key. However, do not select subfolders.
  4. Then press the Delete button to erase the selected folder content.
  5. Opening Windows Media Player will then rebuild the database.

This is a quick solution, so be sure to give it a try if Windows Media Player is not finding album info.

3. Reinstall Windows Media Player

  1. Open the Run window.
  2. Enter appwiz.cpl in Run’s Open text box and click OK.
    uninstall application Windows Media Player album info
  3. Click Turn Windows features on or off to open the window in the snapshot directly below.
    windows features window Windows Media Player album info
  4. Expand the Media Features category as shown below.
    windows media player disable Windows Media Player album info
  5. Then deselect the Windows Media Player check box.
  6. Click the OK button.
  7. Restart Windows after turning off WMP.
  8. Thereafter, open the Windows Features window again.
  9. Select the Windows Media Player check box and click OK to reinstall WMP.

Those are three resolutions that will probably help with Windows Media Player not finding album info on your PC.

Unfortunately, this isn’t the only issue you can encounter, and many reported that Windows Media Player won’t open at all. However, we already tackled this issue in a separate guide.

Did you find a different solution for this problem? If so, let us know in the comments below.

Windows 10 news recap: CorelDRAW arrives in the Microsoft Store, Camera app gains Office Lens integration, and more

Welcome back to our Windows 10 news recap, where we go over the top stories of the past week in the world of Microsoft’s flagship operating system.

Microsoft Store gains a new Windows 10 drawing app with CorelDRAW

The Microsoft Store on Windows 10 has added another big name to its roster of apps. CorelDRAW, a graphics suite, is now available from the store, allowing users to easily purchase their graphics suite of choice, while keeping it updated automatically. It comes with support for the Surface Dial.

Windows 10 Camera app is getting Office Lens integration

The Camera app on Windows 10 now has some features of Office Lens integrated into it. Users can now use the Camera app to scan documents and whiteboards, making it easier to convert real-world documents and notes into virtual replicas.

Windows 10 Game bar can now display the battery level of your Xbox One controller

For those who use the Game Bar in Windows 10 while using an Xbox One controller, the bar will now show the battery level of the controller, making it easier to know when you’ll next need to plug-in to keep your gaming session going.

Pausing Windows 10 updates for up to 35 days feature may be coming to Home Edition

When Windows 10 19H1 releases, it’s looking like Microsoft will be giving Home Edition users a little more flexibility over when to install updates. The company could be looking to extend the length of time that users can pause Windows 10 updates for, raising the limit to 35 days. The current limit is 7 days.

That’s it for this week. We’ll be back next week with more Windows 10 news!

Microsoft news recap: Skype to double the number of people in group calls, Bing Ads delivers first ever 3D ad, and more

Microsoft news recap is a weekly feature highlighting the top Microsoft news stories of the past week. Sit back, grab some coffee, and enjoy the read!

Skype will soon double the maximum number of people in group calls to 50

For those who enjoy large group calls, Skype is set to double the number of people that can partake in a call at any one time. Soon, up to 50 people will be able to be in a call at once. It will support audio and video calls, and instead of ringing everyone who has been added to the call, it will instead send a notification, to avoid disturbing those who aren’t available for such a large call.

Microsoft wants to bring its Xbox Live gaming network to iOS and Android games

Microsoft has announced that it is working on bringing Xbox Live gaming to a host of other platforms, including iOS and Android, through its new Game Stack. While some games on those platforms use Xbox Live currently, such as Minecraft, the platform hasn’t been widely available for other developers. Game Stack aims to change that by making Xbox Live accessible for all game developers.

Bing Ads delivers first ever 3D ads to desktop search, for Samsung Galaxy S10

Microsoft’s advertising network, Bing Ads, is working on 3D ad technology which would allow users to see 3D renderings of products within ads. To kick the new feature off, the company has partnered with Samsung to promote its S10 handsets, allowing those who see the ads to rotate, pan, and zoom a 3D rendering of the S10.

Groove Music OneDrive streaming service to be retired at the end of the month

Those who add their own personal collection of music to OneDrive and then stream it via Microsoft’s Groove Music app will soon need to find an alternative app to stream their music. Microsoft has quietly announced that OneDrive music streaming via Groove Music will be discontinued at the end of the month.

That’s it for this week. We’ll be back next week with more Microsoft news.

How to fix common Apex Legends bugs on PC

We’ve been playing the newest title in the popular battle royale formula for a little while. Ever since last month’s launch, Apex Legends wasn’t a flawless experience.

Many users were quick to point out various technical glitches and game breaking bugs.

Apex Legends … what?

The free-to-play game is a fussion of elements, evolving narrative, class based shooting, and let’s not forget elements from Respawn Entertainment’s own Titanfall.

Following the success of its launch, Repawn has announced a cross-platform play system, with future plans for the hand-held device market.

Hero Classes

The current roster features 8 heroes to choose from, each with its own unique abilities. With Mirage and Caustic not being available from the get go to new players.

Being unlockable with in-game currency(Apex Coins) or getting the required XP to acquire them with Legend Tokens.

  1. Bangalore, a professional soldier;
  2. Bloodhound, a technological tracker;
  3. Caustic, a toxic trapper;
  4. Gibraltar, a shielded fortress;
  5. Lifeline,a combat medic;
  6. Mirage, a holographic trickster;
  7. Pathfinder, a forward scout;
  8. Wraith, an interdimensional skirmisher.

Apex Legends bugs

No game can be truly free of bugs and glitches, and Apex Legends is no exception. With users on EA’s forums fighting their own type of battle royale, one seeking answers to their issues.

We hope that EA will patch out these unfortunate bugs, but until then, we made our own list of bugs and fixes based on player feedback.

1. Apex Legends crashes

You’re close to winning, and your team is owning, but victory eludes your grasp as the game crash. Not the best situation to be in, with multiple players pointing this out.

Same here having so much fun on the game just crashes every 3 games or so sometimes more. my pc i5 6700k rx580 8 gig 16 gb ram THAT’S HAPPENED TO ME A LOT TOO. I was about to win a game with my squad but then I crouch slid to a door and then my game froze. I got so mad Frown. Please fix this EA it is VERY FrUStraTiNg.

Update your graphics drivers

The following fix can work for some players out there. But always keep in mind to have your graphics drivers up-to-date all the time.

  1. Reinstall both Origin client and the game;
  2. Lower Graphic Settings;
  3. Repair anti cheat;
  4. Close most of running apps, including Discord if you’re using it.

 Check output devices

One user pointed out to the issue as being related to output devices on your system.

  1. Select sound icon on the bottom right corner of your taskbar, press right click then go to Sound  and select Playback;
  2. Disable any output device not in use at the time.

2.  Apex Legends low FPS issues

Sometimes new games have optimization issues, with Apex not recognizing your main GPU.

Optimize GPU settings

Yes we can, and the fix involves you tweaking your Nvidia control panel.

  1. Acces the Nvidia Control Panel then click on Manage 3D settings;
  2. Select Apex Legends from Program Settings, and change Power management mode to Prefer Maximum Power;
  3. Save and Exit.

3. Can’t download Apex Legends

Sometimes, even the client app refuses to do what it needs to do. With rare instances of users not being able to download Apex through Origin. But we think we may have the  solution for you.

Use a VPV tool

  1. Open your internet browser;
  2. Use a Hotspot shield or any VPN service;
  3. Download the application into your system;
  4. Turn it on and Login when prompted, and change your region to the United States in the VPN;
  5. Now login to Origin Launcher or their website;
  6. Add the game to the library;
  7. Now logout from the Origin launcher and turn off the VPN;
  8. Let the download commence!

Here we have it, folks. These are few fixes that could help you to fix some of the bugs you may have experienced in Apex Legends.

Have you experienced any issues so far with the game? And if so, tell us more about your experience in the comments below.

RELATED GUIDES TO CHECK OUT:

What to do if Windows 10/11 D-Link modem software got blocked


4 solutions to fix Windows 10 D-Link software issues

  1. Activate Windows 10’s Built-in User Account
  2. Run the D-Link Software With the Command Prompt
  3. Turn Off User Account Control With Group Policy Editor
  4. Set up a Cellular Connection

Those users who utilize D-Link modems have stated that a “This app has been blocked for your protection” User Account Control error message pops up when they try to run the D-Link Connection Manager software.

As a result, those users can’t connect to the net with D-Link modems. However, some users have fixed the issue. These are a few resolutions for fixing blocked D-Link software.

How to Fix Blocked D-Link Software

1. Activate Windows 10’s Built-in User Account

Windows started blocking D-Link software after the discovery of private keys within D-Link firmware.

Consequently, Windows 10’s built-in admin account blocks D-Link modem software running, which also blocks the net connections. In addition, Win 10 blocks users installing the software.

Some users have confirmed that they’ve fixed the issue by enabling Windows 10’s admin account. That’s the built-in admin account that blocks the software. Users can activate Win 10‘s built-in admin account as follows.

  • First, press the Windows key + Q hotkey, which opens Cortana.
  • Input ‘Command Prompt’ in the search box.
  • Right-click Command Prompt to select Run as administrator.
  • Then enter ‘net user administrator /active:yes’ in the prompt as shown directly below, and press the Return key.

  • Close the Command Prompt, and restart Windows.
  • Then log in to the new Administrator account you’ll see on the login screen.

— RELATED: Best Windows 10 router software you can configure routers with

2. Run the D-Link Software With the Command Prompt

If the above resolution doesn’t do the trick, try running the D-Link Connection Manager software via the Command Prompt. Numerous users have stated that running D-Link Connection Manager with the Command Prompt fixes the connection. Users can run D-Link software via the Prompt as follows.

  • First, find the path for the D-Link software required for the router connection, which might be D-Link Connection Manager. To do that, enter some D-Link keywords in Cortana’s search box.
  • Right-click the D-Link software listed in Cortana’s search results and select Open file location to open the software’s folder in File Explorer. Note down the path for the software in File Explorer’s address bar.

  • Open the Win + X menu with its Windows key + X keyboard shortcut.
  • Then click Command Prompt (Admin) on the menu.
  • Enter ‘cd [D-Link Connection Manager software path]’ in the Command Prompt, and press the Return key. For example, some users might need to enter something like: cd C:Programs Files(x86)D-Link Connection Manager.

  • Enter the exact exe file name for the D-Link software in the Command Prompt (with exe extension included) and press Return to run the software. The exe file for the D-Link software will be in the software’s folder.
  • With the D-Link software running, users can then browse websites.

3. Turn Off User Account Control With Group Policy Editor

Another way some users can fix blocked D-Link modem software is to turn off User Account Control with Group Policy Editor in Windows 10 Pro and Enterprise. Users can do that by disabling the Run all administrators in Admin Approval Mode policy. Follow the guidelines below to turn off that policy.

  • Press the Windows key + R to launch Run.
  • Input the ‘gpedit.msc’ in the text box, and click the OK button.
  • Click Computer Configuration, Windows Settings, Security Settings, Local Policies, and Security Options on the left of the Group Policy Editor window.
  • Then users can double-click User Account Control: Run all administrators in Admin Approval Mode to open options for that policy.
  • Select the Disabled radio button, and select the Apply option.
  • Then press the OK button.
  • Then restart the desktop or laptop.

— RELATED: How to Install Group Policy Editor on Windows 10 Home

4. Set up a Cellular Connection

  • Users can also set up a cellular connection for D-Link modems without the D-Link application manager on PCs that incorporate SIM cards. To do that in Windows 10, enter ‘network’ in the Cortana search box.
  • Click Network status to open the Settings window as in the snapshot directly below.

  • Click Cellular on the left of the window.
  • Then select an available network, and press the Advanced options button.
  • Select the Add an Internet APN connection.
  • Then enter the required details for the APN profile.
  • Press the Save button.
  • Thereafter, select the Connect automatically option for the selected cellular network.

So, that’s how users can unblock D-Link software in Windows 10. Then D-Link users can browse websites with their restored connections.

RELATED ARTICLES TO CHECK OUT: 

Chrome’s new Privacy Mode relies on DuckDuckGo to protect your data

DuckDuckGo fans, we have a piece of good news for you: the Chrome browser has now got an interesting addition.

Google integrated the pro-privacy DuckDuckGo search engine into its browser. The changes have been rolled out to users in more than 60 countries.

DuckDuckGo was initially launched in 2008, and it has gained huge popularity over the past few years.

As a matter of fact, 30 million daily searches were recorded last year in October. DuckDuckGo responded to the news on its Twitter handle.

Chrome users switch to DuckDuckGo

Most of the users are now preferring the DuckDuckGo search engine because of its privacy protection features. In fact, DuckDuckGo ensures users they will not store your private data and will always block advertising trackers.

Most importantly, the search engine claims that it neither collects your personal information nor shares it with anyone. Keeping in mind the recent Google data leaks, the majority of users are now shifting to DuckDuckGo. 


In case you want to be secure while surfing the internet, you will need to get a full-dedicated tool to secure your network.  Install now Cyberghost VPN and secure yourself. It protects your PC from attacks while browsing, masks your IP address and blocks all unwanted access.


Steps to set DuckDuckGo as Chrome’s default search engine

The DuckDuckGo can be easily set as a default search engine if you are using the Google Chrome browser.

  1. The users need to have the Chrome version 73 or higher, so you need to first make sure that you have the updated Android or iOS version. 
  2. Now open your Google Chrome browser and tap the vertical or horizontal ellipsis (•••) button. You can find the button in the menu bar. 
  3. Tap the following options Settings >> Search Engine >> DuckDuckGo. The iOS users will hit the Done button while if you are using the Android you need to use the Back button. It will set DuckDuckGo as your default Search Engine.
  4. Last but not least, if you are interested in customizing the permissions for DuckDuckGo you can tap Location and notifications are allowed.

Here are the few tips for the users

The settings for alert, sounds and others can be adjusted in the Notifications. Moreover, you can allow or block DuckDuckGo to access your current location from Location access. Sounds can be enabled or disabled from the Sound menu.

However, a recent update to Chrome 73 Stable brought the changes. You might have spotted the changes earlier if you are on the Canary channel. 

Google has been successful in retaining the 90 percent of market share in its domain over the past few years.

With this recent move, it seems like the search giant is still interested to dominate market share with default settings. The Chromium GitHub page shows that Microsoft had outlined the changes in December last year.

RELATED ARTICLES YOU NEED TO CHECK OUT:

Microsoft simplifies game development with Game Stack platform

Microsoft is planning to change the way how games are developed and played. The Redmond giant has recently announced its new Game Stack platform that helps developers to achieve their game development goals much faster than before. 

Various services including Xbox Live, DirectX, App Center, Visual Studio, Havok, and PlayFab are brought together in the form of Game Stack.

As we all know, previously all of these services were available individually. However, game developers can now find all of them in the form of an easier-to-use bundle.

Microsoft claims that game developers can use Game Stack to achieve the following objectives:

  • Aid in the development process by providing easy and much-needed solutions to the problems.
  • Reduces the game development time to increase efficiency.

Microsoft believes that game developers have to focus on various aspects in order to retain the attention of 2 billion gamers around the world.

Irrespective of the device, inspiring and engaging those gamers is the key to success in the gaming community. Microsoft Game Stack has been released to help you to cope-up with these issues.  

Understanding Microsoft Game Stack

microsoft game stack news

As mentioned earlier, Game Stack offers a single package comprising of various services, tools and game-development platforms.

It aids the game developers to learn about the services and tools that they need to develop and operate it.

Azure plays a vital role in the Game Stack and offers a sustainable and secure infrastructure around the globe in 54 regions.

Moreover, it also offers ML and Ai based cloud-native services along with the compute and storage building blocks. The gamers around the world can enjoy the perfect gaming experience, irrespective of their location and device. 

Most of the companies are leveraging Azure to store player data in a safe manner, host multiplayer game servers, avoid DDOS attacks on games, create immersive gameplay by training AI. 

If you remember Microsoft acquired PlayFab last year, the tech giant now plans to add PlayFab to the Azure family. 

PlayFab actually provides real-time analytics, game-development services, and LiveOps capabilities based on Azure. 

Game Stack offers all of Microsoft’s game development technologies under one roof. As a matter of fact, PlayFab+Azure will handle all the complex back-end functionality.

We hope that the collaborative environment can be a game changer in the near future.  

RELATED ARTICLES YOU NEED TO CHECK OUT:

There’s a Problem With This Drive: 5 Ways to Fix it

Are you getting a There’s a problem with this drive. Scan the drive now and fix it error when you insert a USB stick (or flash drive) into your laptop or desktop?

This somewhat cryptic error might stump some Windows users who find the contents of their USB sticks appear to be fine. Keep reading to find out all about it!

Why does Windows always say there is a problem with this drive?

This error usually occurs because you didn’t correctly eject the USB, or other removable media, from a desktop or laptop. Windows expect you to unmount USB drives with their Eject options.

However, many users remove USB drives without selecting the option first. As such, there isn’t usually an error to fix, but you may have to deal with a flash drive with a damaged file system.

How do I fix There’s a problem with this drive error?

Before we move to the slightly complex solutions, here are a few quick ones to try:

  • Connect the drive to a different port. For USB 3.0, find and use the dedicated port on your PC.
  • Restart the computer.

If none work, head to the fixes listed next.

1. Select the USB Stick’s Eject Option

The best way to fix the error is to eject the USB drive before removing it. Simply right-click on the USB in the system tray, and select the Eject option.

safely eject drive

Once done, you can safely remove the USB drive and won’t get the There’s a problem with this drive USB error on subsequent attempts.

2. Select the Quick Removal Option

  1. Press Windows + X and select Device Manager.
  2. Expand Disk drives, then right-click the USB drive, and select Properties. skype error cant access your sound card
  3. Select Properties
  4. Now, go to the Policies tab, and select the Quick removal option.USB device properties
  5. Click OK to apply the setting.

USB drives have a Quick removal option that disables write caching. Selecting this will ensure that you don’t get a There’s a problem with this drive error on iPod or the SD card without unmounting it first.

3. Scan and Fix the Drive

  1. First, press the File Explorer button on Windows 10’s taskbar.
  2. Next, right-click the USB drive on the left and select Properties.
  3. Go to the Tools tab, and click the Check button.disk tools
  4. Now select the Scan and repair drive option there to fix the flash drive.scan drive for errors

If you’re ejecting the USB drive with its Eject option and still getting the error, it might have a corrupted file system. You can scan the USB drive’s file system and fix any disk issues with the tool.

However, if the steps above don’t work in your case, there is a big chance to solve it with a dedicated repair solution.

4. Open the Hardware and Devices Troubleshooter

  1. Press Windows + R to open Run, paste the following, and hit Enter:msdt.exe -id DeviceDiagnostic
  2. Now, follow the on-screen instructions to run the troubleshooter and make the recommended changes.hardware and devices troubleshooter

So long as you correctly unmount USB drives or select the Quick removal option, the There’s a problem with this drive Windows 10 error probably won’t occur.

But if the problem persists, you always have the dedicated Hardware and Devices troubleshooter to fix things.

5. Format the drive

  1. Plug in the drive.
  2. Press Windows + E to open the File Explorer.
  3. Right-click on the drive and select Format from the contextual menu.
  4. Choose the Quick Format checkbox and click on Start.quick format to fix there's a problem with this drive

Finally, if none of the previous steps worked, try formatting the drive. After you format the drive, it should work as before. Of course, there’s always a chance of hardware failure, especially after an extended usage.

One of these solutions should have helped fix the There’s a problem with this drive USB error in Windows. And once you have things up and running, find out how to improve the data transfer speed for USB drives in Windows.

Tell us which fix worked for you in the comments section below.

Fix Windows 10 Intel Management Engine Interface error

Intel Management Engine Interface is a built-in driver that activates a few dedicated/specialized features available for your motherboard. Shortly, if these drivers are functional, you can remotely control your computer even if your PC is turned off or if it isn’t installed with an OS. Of course, the basic functionality is far more complex, but what interests us today is how to fix the issues that are related to the IMEI engine.

So, if you received a system error saying that ‘This device cannot start (Code 10),
STATUS_DEVICE_POWER_FAILURE’ you should follow the troubleshooting solutions from below. Do note that all the steps explained below are compatible with the Windows 10 system, though similar guidelines can be followed and applied for older versions of Windows too.

How to fix the status_device_power_failure Intel error on Windows 10

  1. Apply Windows 10 updates
  2. Update the drivers
  3. Remove and manually reinstall the drivers
  4. Run a system scan
  5. Update BIOS

1. Apply Windows 10 updates

A system update can fix the problems related to the IMEI drivers. So, what you need to do is to verify if there are updates pending for your approval; if there are, you need to follow on-screen prompts and apply these updates as soon as possible. In that respect, you can use these steps:

  1. On your keyboard, press the Win+I dedicated keyboard keys.
  2. The System Settings window will be launched.windows 10 settings
  3. From there choose the Update & Security field.
  4. In the next window switch the Windows Update tab.
  5. Now, if an update patch is available it will be automatically listed in the main window.
  6. Apply these updates and reboot your Windows 10 system in the end.

Note – If you received the ‘Intel Management Engine Interface status_device_power_failure’ error message after a system update was received and applied, you can choose to remove this patch from your computer.

Here is how you can uninstall a recently applied Windows 10 firmware patch:

  1. Go to Windows Update from System Settings as already explained above.
  2. From there click on Advanced options.
  3. Scroll and find the View your update history link; click it.uninstall windows 10 update
  4. Now, all the Windows 10 updates that were applied on your computer will be listed there.
  5. You can, therefore, choose to uninstall a certain patch.
  6. When done, reboot your device and verify if the IMEI error is still there or not.

2. Update the drivers

Usually, a driver error is received because of system incompatibility issues. So, you can address such issues easily, by updating these drivers:

  1. Access Device Manager on your PC: right-click on the Windows Start icon and click on the Device Manager entry.device manager windows 10
  2. From Device Manager extend the System devices field.
  3. Find the Intel Management Engine Interface entry.
  4. Right click on Intel Management Engine Interface and choose ‘update driver software’.
  5. Wait while the driver is updated and close the window in the end.
  6. Also, reboot your device.
  7. That should be all.

Doing manual updating of all the drivers can be a tiresome task. That’s why to speed up and get the best result you may think to use a third-party solution that updates and corrects drivers automatically.

The tool recommended below is especially easy to use and effective so you will get maximum results with little to no effort on your part.

⇒ Get Fortect Driver Updater

3. Remove and manually reinstall the drivers

If updating the drivers isn’t the right solution for you, then a better idea will be to remove these drivers from your PC and manually reinstall them afterward. This should fix the incompatibility issues along with similar other problems such as internal corrupted files. Here is what you need to follow:

  1. Access Device Manager as you did before.
  2. Extend System Devices and right-click on Intel Management Engine Interface.
  3. Choose ‘Uninstall’ and wait while the removal is completed. You can also access the Control Panel in order to uninstall any other related programs or files.
  4. When done, access your manufacturer’s official website and download the drivers for Intel Management Engine Interface.
  5. Run the executable file and follow on-screen prompts for installing the drivers.
  6. That should be all.

4. Run a system scan

General errors can be automatically fixed by initiating a built-in troubleshooter. This is a software troubleshooter that scans for problems within the Windows core system. If problems are found, the software will automatically fix everything – here is what you need to do:

  1. Open an elevated command prompt window – right-click on the Windows Start icon and from the list that will open choose ‘Command Prompt (Admin)’.elevated cmd
  2. The cmd window will be displayed on your computer.
  3. There, type sfc /scannow and press Enter.
  4. A system scan will be initiated – it might take a while so be patience (depending on how many things are saved on your computer).
  5. Restart your device when done and verify if the problems are resolved.

5. Update BIOS

If the troubleshooting steps from above aren’t resolving the Intel Management Engine Interface driver issues you should try to update BIOS. Now, depending on your manufacturer and on your particular motherboard you can complete the update process automatically, through the BIOS interface.

Otherwise, you have to download the updated patches for your BIOS system from your manufacturer’s official website. Hopefully, this last solution is also the method that addresses the IMEI malfunctions.

Conclusions

Those are the methods that should help you fix the Intel Management Engine Interface status_device_power_failure problem. If you are still experiencing the same Windows 10 issues don’t panic; return here and use the comments field from below for describing the malfunction. Afterward, based on the info you provide we will try to find a perfect solution for your particular situation.

How to Fix Common For Honor Bugs and Glitches

We’re sure that For Honor players are very determined to annihilate any bugs that may dare to appear in their way.

Indeed, judging by player feedback, there are a lot of bugs affecting the game, but the good news is that Ubisoft has already published a list of quick workarounds that you can use to fix them.

How can I fix common For Honor bugs?

1. Easy AntiCheat – Impossible to launch the game error

  1. Use the Verify File Integrity option in Uplay PC client.
  2. Open your For Honor game page and click Properties.
  3. In the Local files section, select Verify files.
    verify files

Easy AntiCheat sometimes displays an error message, preventing the game from launching or simply closing it after the intro videos.

2. Easy AntiCheat error 10018

  1. Close For Honor and use Task Manager to end all game processes, then restart the game.
    end task
  2. Close the game and restart Uplay PC client.

The AntiCheat error 10018 is resolved by fully restarting the game and the Uplay desktop client. Once you’ve ‘killed’ their respective processes, start them again, and the error prompt shouldn’t appear.

If it keeps reappearing, consider disabling background programs like VoIP or chat apps.

3. For Honor won’t return to the desktop

Sometimes, after getting a Connection has been lost error message while being idle on matchmaking, you may be unable to quit the desktop. To return to the desktop, restart the game.

You can force-quit the game by pressing Alt + F4 and killing the process from the Task Manager.

4. Gamepads not working

Unplug all other non-necessary peripherals, especially Steering Wheels and Flight Joysticks. If this doesn’t work, follow the troubleshooting steps listed in this Gamepad not recognized article.

5. Controller switches Right & Left Trigger

Usually, this issue is prevalent for Bluetooth controllers. Try connecting your controller through USB. Ubisoft also recommends installing the Windows 10 Anniversary update OS as a workaround.

6. Game stutters when you are hit

Use the exact solutions suggested for fixing controller switch issues. You can also try reducing the graphics and checking your network connection. Since there are no dedicated servers for For Honor, many things fall on the player’s side.

Restarting the game and starting again might help as well.

7. NAT Type Group issues

Groups with more than 1 Strict NAT are not recommended, as they will not be able to reach matchmaking. Preferably invite friends with open or moderate NAT types instead.

8. Mixed Region Group Connectivity issues

Users might encounter connectivity issues when grouping with players from other regions. For this reason, Ubisoft doesn’t recommend creating mixed region groups.

9. Error 0004000008

If error 0004000008 appears on the screen, restart the game. This error was, at a certain point in time, a complete plague for For Honor players, but it seems that’s somewhat resolved or at least significantly reduced these days.

10. For Honor won’t launch

  1. Run Uplay in Admin mode.
  2. Disable your antivirus software or add the game and Uplay as an exception.
  3. If you’re using an Intel-integrated chipset, try forcing the dedicated GPU instead: under the Manage 3D settings tab in the NVIDIA control panel, navigate to your game’s .exe and specify which GPU to use.
    manage 3d
  4. Make sure that the game is installed on your C: drive
  5. Launch the game from an entirely new Windows system profile
  6. Unplug your controller/non-essential peripherals, then launch the game again. Then reconnect your controller. Also, temporarily disable any software linked to the controllers.

We hope these workarounds helped you fix some of the For Honor issues bugging you. If you are experiencing a more serious issue like high ping, latency, and stuttering on For Honor, we have a comprehensive guide to help you fix that.

As always, if you’ve come across other workarounds, you can help the community by listing the troubleshooting steps in the comment section below.

Posted in PC