Microsoft introduces new “Meet Windows 11” video series

If you are intending to transition to Windows 11 or already have, but haven’t quite gotten the hang of it, worry not! Through a blog post, Microsoft has announced that they have released a series of videos dubbed Meet Windows 11 that will help you get up to speed with everything from keyboard shortcuts to learning how to customize your experience based on your preferences.

Meet Windows 11 consists of 3 videos, the first one will help you grasp the basics such as universal search and Microsoft accounts. The second video will help you learn how to enhance and customize your Windows experience. Be sure to also check out our expert guides on how to customize icons, taskbar, and cursor in Windows 11.

And finally, the last video gets a bit more detailed where you will get to explore “new and refreshed apps” such as Microsoft Store and Phone Link. Also, get to learn how to make the most out of Phone Link through our guide.

5 Best Browsers To Watch Sky Go On All Your Devices In 2026

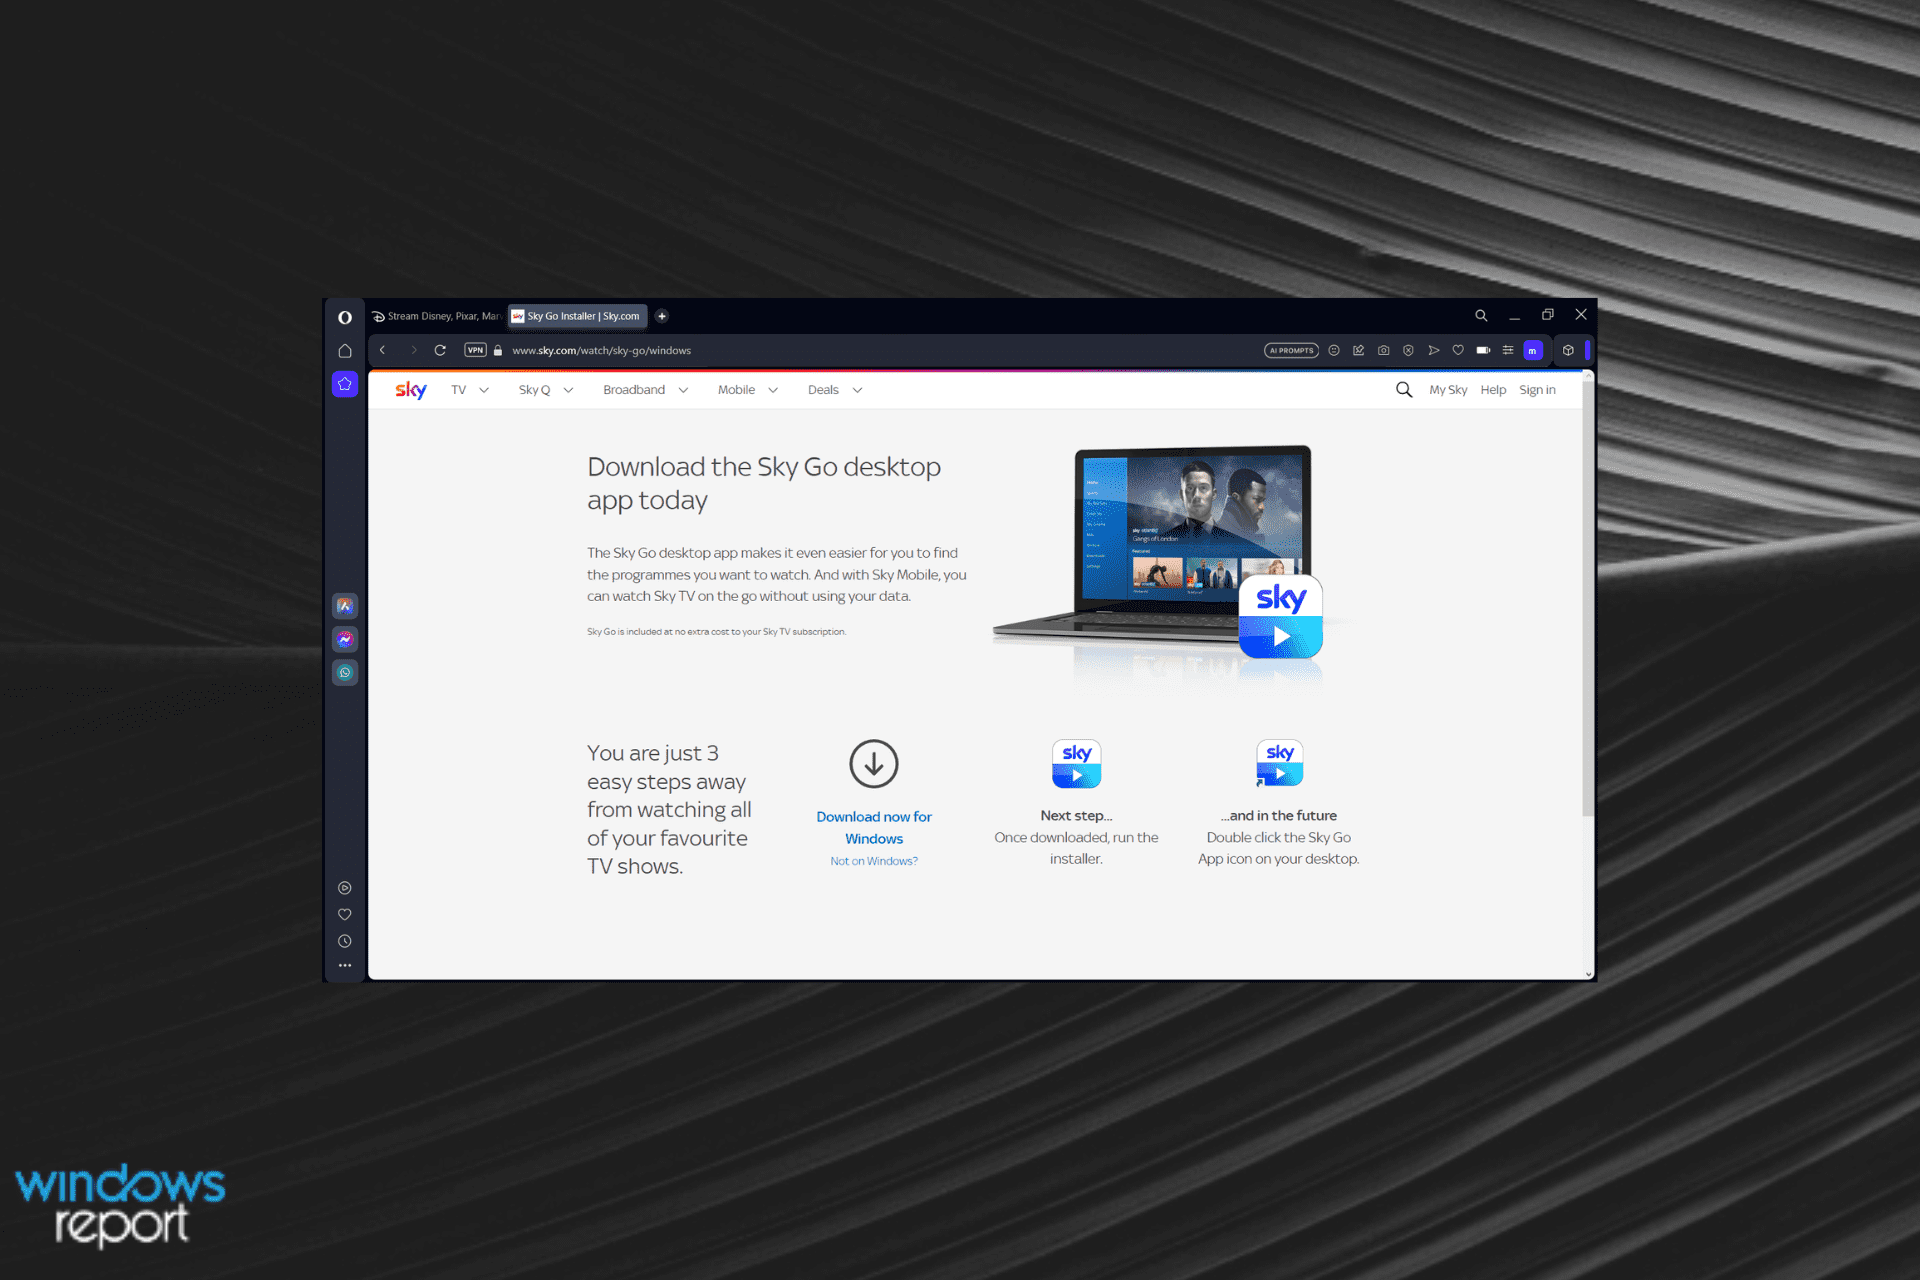
Watching online TV has never been easier in this streaming era, including the Sky Go service from Sky TV. Getting access to your favorite shows at the time that is most convenient for you is a remarkable feat.

If you have a Sky TV subscription and want to use the Sky Go service on your Windows PC to watch your favorite TV channels, you will find that Chrome doesn’t support the website anymore.

This happened because Sky Go requires a plugin called Microsoft Silverlight to work, and Google stopped supporting this app recently.

For these reasons, in this article, we will explore some of the best browsers available on the market that allow you to access Sky Go easily.

Can I watch Sky Go on a browser?

Yes, you can watch Sky Go on all modern browsers. However, as mentioned above, the browser must support the Microsoft Silverlight plugin.

These include Opera One, Firefox, Safari, and Edge. As you can see, there are some issues with Chrome.

There is a workaround to fix the problem on Chrome 42 to 44 versions, but from version 45, there is no solution other than using a different browser.

Does Sky Go work on all browsers?

As we highlighted above, Sky Go won’t work if you have the latest version of Google Chrome because it doesn’t support the Microsoft Silverlight plugin.

That’s terrible news because Chrome is the most popular browser out there, but you will find below a great selection of software you can watch Sky Go online without an app.

What is the best browser to use with Sky Go on PC?

Opera One – Best for streaming

The Opera One browser is a reliable software option for you to use with your Sky Go account. It loads web pages faster than many browsers out there. In the video streaming department, it performs slightly better than the browsers occupying the second and third positions in this article.

The customization options of Opera One are extensive. The interface and menus are intuitive and easy to use, even for new users.

So, if you’re thinking about switching to a new browser but are afraid of the learning curve, rest assured, you will get the hang of Opera One in just a few minutes.

The capabilities of this browser are firm and can be compared to other browsers without any problem. The privacy strength of Opera One is excellent, thanks to its built-in VPN and adblocker.

Using built-in privacy tools, Opera One prevents many cyber-attacks by blocking virtually all access points, making it impossible for hackers to steal your private information while browsing the Internet.

Here are some of the main features:

  • Incorporated VPNs for geo-restricted regions
  • Intuitive and sleek interface
  • Fast web-page loading times
  • Lightweight and efficient
  • Completely free

Opera One

Enjoy the best and fastest streaming of content on Sky GO with the help of this lightweight browser.

UR Browser – Fast and reliable

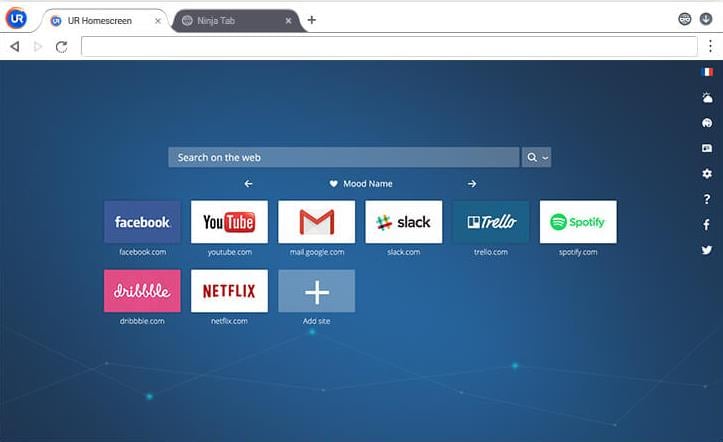
UR Browser is a very versatile and fast browser that allows you to use the Sky Go web player on your PC without any issues.

The speeds clocked by this browser will save you from lags while video streaming, provide crisp audio reproduction, and without any compatibility issues whatsoever.

This software is our top pick for watching online TV with Sky Go because it combines two of its greatest strengths.

UR Browser also contains a built-in VPN service that can be used to get access to video content from restricted countries and also keeps your information safe from prying eyes online.

This tool doesn’t load any ads or pop-ups, and that is extremely useful in a market saturated with commercials.

There have been issues with Sky Go browser blocking cookies, so make sure that you enable them before starting to watch.

UR Browser

The ultimate browser for private and secure streaming of content, even from geo-blocked regions.

Mozilla Firefox – Good for streaming

Firefox is another great option to watch Sky Go on your Windows 10 PC. It gives you the power to customize the way your browser looks and works by being able to add extensions and add-ons.

In the past years, the number of extensions available for Firefox was reduced considerably, and even though this browser is still one of the best options, some users were disappointed with the change.

Since it was revamped as Quantum, Firefox offers relatively decent loading and streaming speeds. Still, it is hardly comparable with the speeds of UR Browser.

The extensions from the Mozilla App Store can help to protect your privacy but are not as efficient. Third-party companies create them, and the risk of stealing your information remains very high.

Another reason for Firefox being placed at this top in the third place is the fact that users have reported streaming issues with Sky Go.

It is still unclear if an internal server issue from Sky caused the problem, but that caused a lot of users to migrate to other software options.

⇒ Get Mozilla Firefox

Safari – Best for Mac users

If you’re a Mac user, the best chance of watching Sky Go on a browser is Safari which still supports Silverlight.

As you know, it’s a decent navigator with plenty of features, and it’s very well blended into the macOS environment.

And although you can still use Safari for Windows, Apple doesn’t recommend it because it doesn’t support the OS anymore.

Safari comes with some excellent privacy protection features like machine learning-powered Tracking Prevention, Password, and anti-phishing protection, and Apple Pay-ready for secure online payments.

Overall, if you want to enjoy Sky Go on your Mac, Safari may be one of the best choices.

⇒ Get Safari

Internet Explorer – Best old-era browser

As we all know, Internet Explorer is one of the slowest and most buggy browsers you could use, but it can be useful in specific situations. In this case, IE works well with Sky Go.

Its successor, Microsoft Edge, doesn’t work with Sky Go even though the Silverlight app is created by Microsoft.

However, it will work if you open the page in Internet Explorer mode from Edge but that is not guaranteed either.

The processing and streaming speeds of Internet Explorer are slower than any of the browsers we mentioned in this article. Regarding the online security this browser offers, the offer is close to none.

You can’t extend the capabilities of this software with too many extensions, but you can download an ad blocker to at least be partially protected from ads.

What devices are compatible with Sky Go?

All devices that can open a browser can stream Sky Go content as long as the software supports Microsoft Silverlight.

As you’ve read above, there is a Sky Go browser compatibility problem because Silverlight has been out of support from October 2021.

However, if you have a mobile device, we recommend using the dedicated app on Google Play Store and Apple’s App Store.

In this article, we explored some of the best browsers available on the market that allow you to watch your favorite TV shows online with the Sky Go service.

By far, the best option for this task comes with Opera One, followed by UR. The speed for both streaming and loading pages of this browser is amazing. Alternatively, you can use the Sky Go Windows 10 application.

These browsers can be a blessing if you can’t watch your favorite channels on your Sky Glass due to stuck at software update in-progress issue or your Sky Glass remote is not working. Many also reported that Sky Glass won’t turn on, but we addressed this issue in a separate guide.

Please feel free to let us know if this guide has helped you watch your favorite shows on Sky Go by using the comments section found below this article.

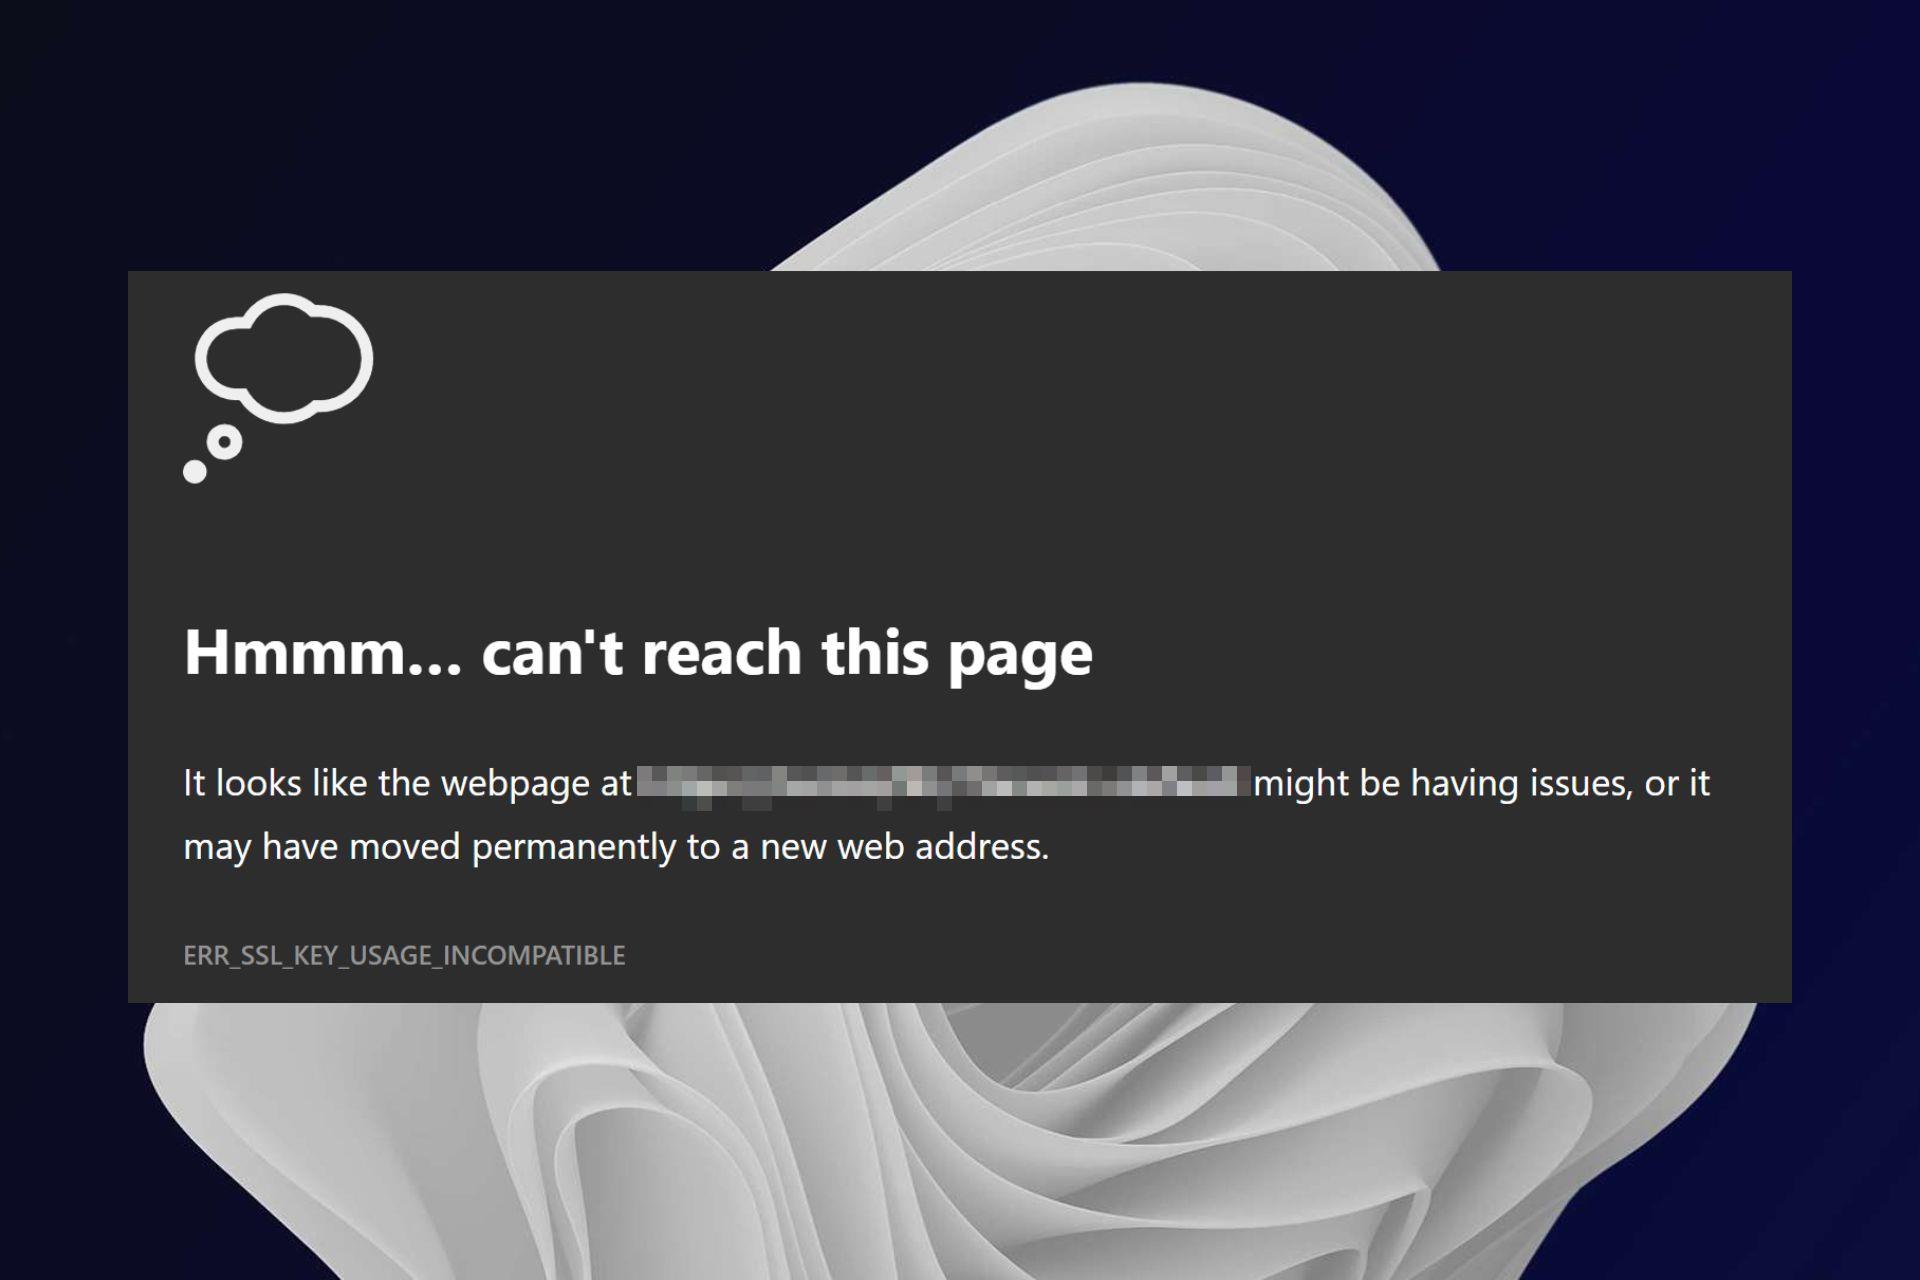
Fix ERR_SSL_KEY_USAGE_INCOMPATIBLE in 4 Ways

The err_ssl_key_usage_incompatible error in Chrome indicates an issue with the SSL certificate, affecting the secure connection to a website.

This error can arise from various factors, including outdated Chrome versions, incorrect system time, or problematic extensions. No matter the cause, here’s how to fix it:

How do I fix ERR_SSL_KEY_USAGE_INCOMPATIBLE in Chrome? 

1. Update Chrome

  1. Launch your Chrome browser and click the three vertical ellipses in the top right corner.
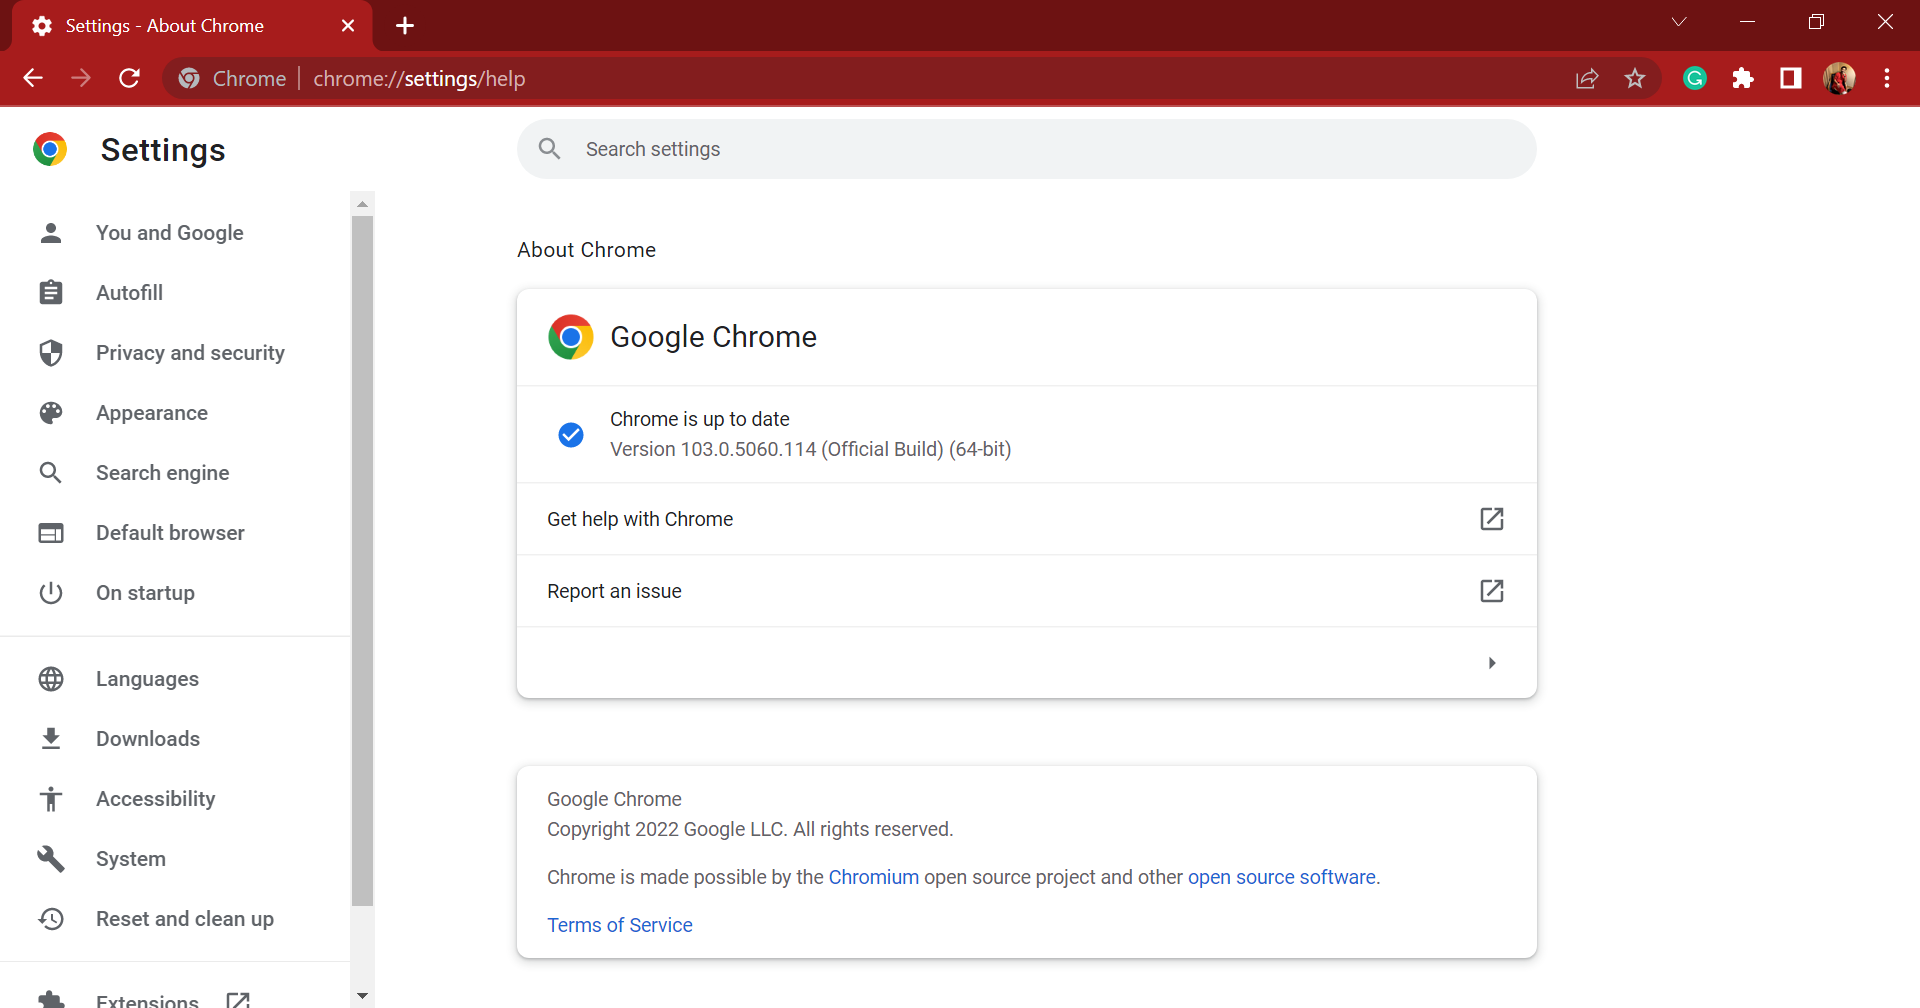
  2. Click Help, then select About Google Chrome.about google chrome
  3. Check if there is an update available.check for chrome update

2. Disable extensions

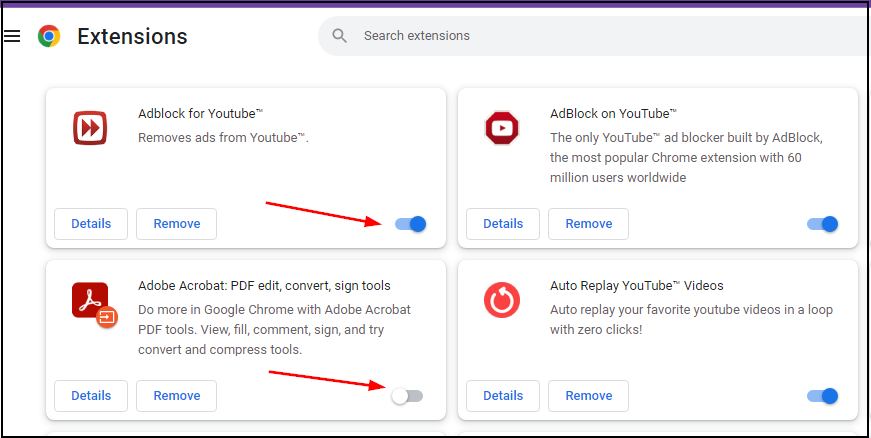
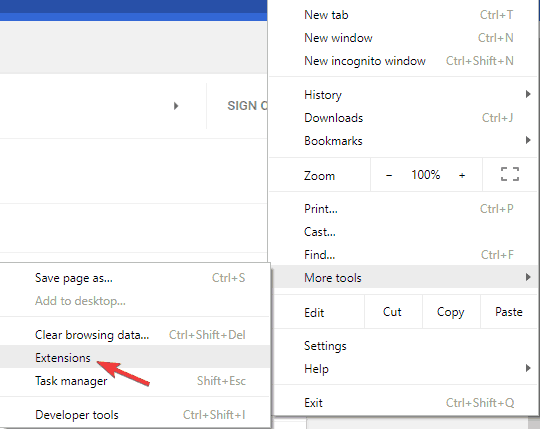
  1. Navigate to your browser and in a new tab, enter the following address: chrome://extensions/
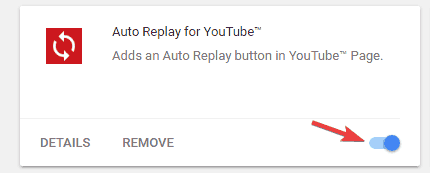
  2. Disable extensions one by one until you find the culprit.disable chrome extensions

3. Use incognito mode

  1. Launch your Chrome browser and click the three vertical ellipses in the top right corner.
  2. Select New incognito window.new incognito window in chrome

4. Try another browser

You should run your SSL certificate through its tests on another browser that supports this validation. Because Opera One is a privacy-focused browser, we suggest testing it out.

You may handle certificates under Opera One’s Advanced settings and add them as needed. We must also note that Opera is Chromium-based and supports a lot of Chrome’s features and extensions.

So if it gives you fewer headaches than Chrome and you want to make a permanent switch, know that doing it is easy and hassle-free.

Opera

Verify the integrity of your SSL certificates and browse the web in a more secure browser.

Other things to try

– Create a New Self-Signed Certificate: If using a self-signed certificate, ensure it includes the DigitalSignature parameter. Use PowerShell to generate a new certificate with the correct parameters:

New-SelfSignedCertificate -Type Custom -DnsName "server", "server.domain.local", '192.168.0.1' -KeyUsage "DigitalSignature","KeyEncipherment","KeyAgreement" -KeyAlgorithm RSA -KeyLength 4096 -CertStoreLocation "cert:\\CurrentUser\\My" -FriendlyName "YourCertName" -NotAfter (Get-Date).AddMonths(36) -Subject "YourSubject"

– Export and Install the Certificate: After creating the certificate, export it and then install it to the Trusted Root Certification Authorities on your machine. This ensures that Chrome recognizes and trusts the certificate.

– Adjust System Time: Ensure your computer’s clock is accurately set, as incorrect time settings can lead to SSL certificate errors.

– Check for Chrome pduates: Always keep Chrome updated to the latest version to avoid compatibility issues with SSL certificates.

Why does Chrome say err_ssl_key_usage_incompatible? 

If you see this message, your web browser has detected a problem with the certificate being used by the website. There are several reasons why this might happen:

  • Expired certificate – The most common reason why Chrome says your certificate is invalid is that the certificate has expired. To fix this, simply renew your certificate.
  • Your computer clock is set incorrectly – Your time will determine the validity of your SSL certificate. Chrome checks whether websites’ SSL certificates are still valid by comparing them against system time; if your computer’s clock is off by too much, then all certificates will appear invalid. 
  • An out-of-date version of Chrome – Ensure your computer is running the latest version. If not, install an update or upgrade your device.
  • Third-party extensions – If you have any third-party extensions or programs installed on your computer that might interfere with Chrome’s ability to verify the certificate, temporarily disable them and see if it helps resolve the problem.

How do I update SSL in Chrome? 

The SSL certificate is one of the most important components of any website. It provides a secure connection between your browser and the website you’re trying to reach. 

Without it, your connection is not secure, and anyone who can intercept your data can see what you’re doing on the Internet.

It is why you need to update it if it is expired. Chrome’s certificate auto-update feature is enabled by default, so you shouldn’t need to change any settings. The browser will automatically download and install new certificates as they become available.

However, you can manually check for updates if you still get the error. If that still doesn’t work, uninstall and reinstall the browser and restart your PC.

You can also secure your certificate if Chrome says it’s not valid to ensure your identity is always protected.

If you have additional thoughts on this topic, feel free to leave them below in the comments section.

2 Ways to Fix no Compatible Source Was Found Error in Firefox

The Mozilla Foundation created Firefox as an open-source and free web browser. But while streaming on your browser, it may have displayed the message no compatible source was found for this video in Firefox. In this article, we will cover all possible fixes.

Despite Firefox’s robustness and impressive feature list, you may often encounter errors streaming videos on the browser. For example, you may have problems playing DRM-protected video from Hulu, Netflix, Disney+, Amazon Prime, and other streaming services.

Additionally, the error code 102630, when videos can not be played is just another common streaming problem you may have.

Firefox’s compatible source error is similar to the non-Chromium browser’s error of where the video file cannot be played.

Quick Tip:

If Firefox keeps giving you trouble, try loading videos using an alternative browser, like Opera. It’s similar in terms of user experience and is praised for its low-error rate.

The browser is lightweight and gets updated frequently, so it should support most formats. Moreover, it includes a built-in VPN that will help you unblock geo-restricted content on VOD platforms.

Opera One

Enjoy media content and fast browsing with no bumps along the way!

What video formats are supported by Firefox?

Because patents control some music and video file formats, third-party programs are essential to use them. However, Firefox can play open as well as patented media natively.

Firefox Open Media

The Firefox browser is able to play uncompressed audio stored in a WAV container format (.wave,.wav file formats).

Additionally, Opus audio, Vorbis audio, VP8 video, and Theora video are open-source audio and video compression standards that are free to use.

These standards are used in the Firefox browser once they are encoded in the WebM (.webm file format) or Ogg container formats (.ogg, .ogv, .oga, .spx, .ogx, .opus).

MP3 playback (.mp3 file type) and FLAC  playback (Free Lossless Audio Codec) are also supported by Firefox.

Patented media

The audio and video reduction formats H.264 or MPEG-4 AVC and AAC are patented. 

But, using the in-built OS libraries, they may be displayed in Firefox. So, if they are incorporated in any MP4 container format, neither Mozilla nor you will have to pay a charge to view them.

How do I fix no compatible source was found for this media?

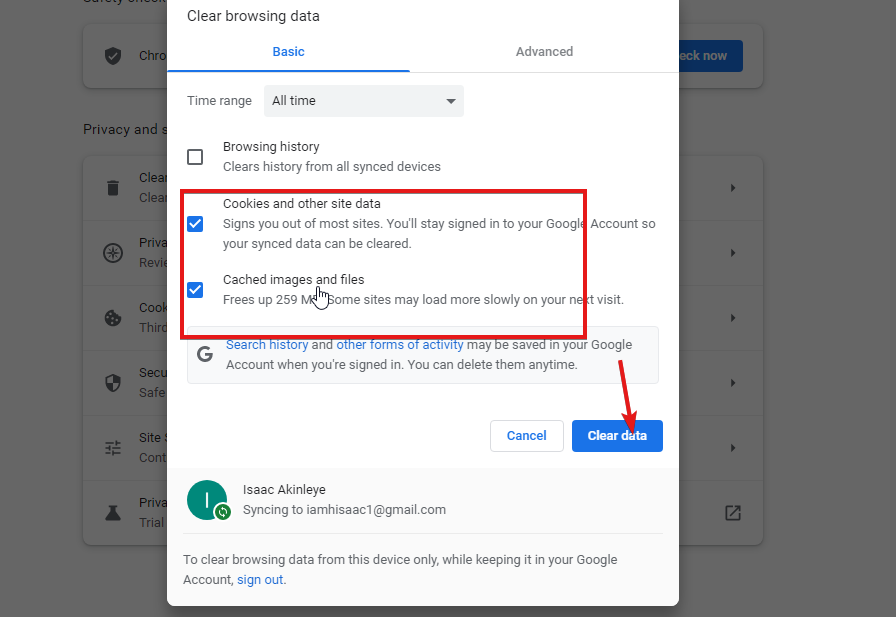
1. Delete cookies and site data

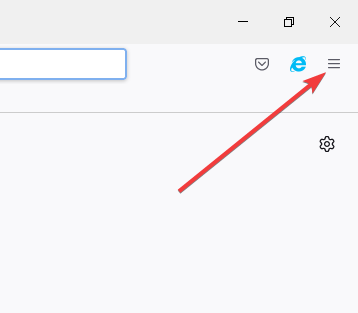
  1. Click on the three horizontal lines at the right top corner of the browser.
    no compatible source was found for this video firefox
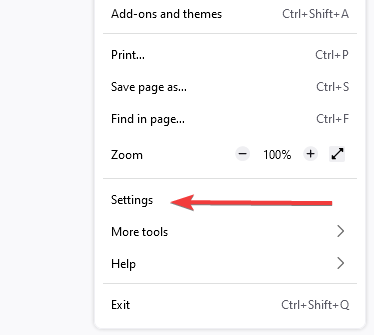
  2. Click on Settings from the options presented.
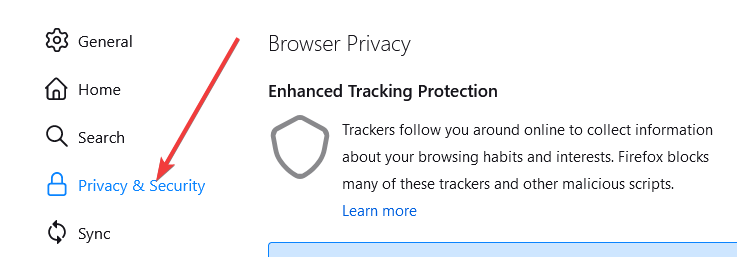
  3. On the left pane, click on Privacy & Security.
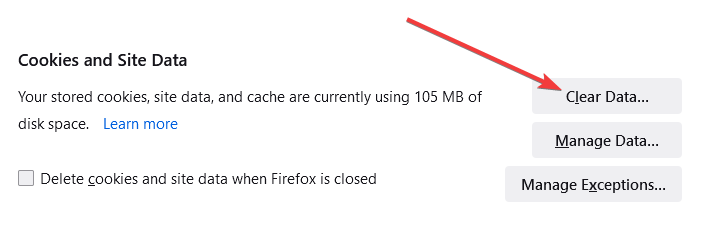
  4. Scroll down to Cookies and Site Data, and hit the Clear Data button.
  5. Restart your browser.

Clearing cookies will also be a solution if you get the no compatible source was found for this media 0x10600003 error in Internet Explorer.

2. Uninstall and Reinstall firefox

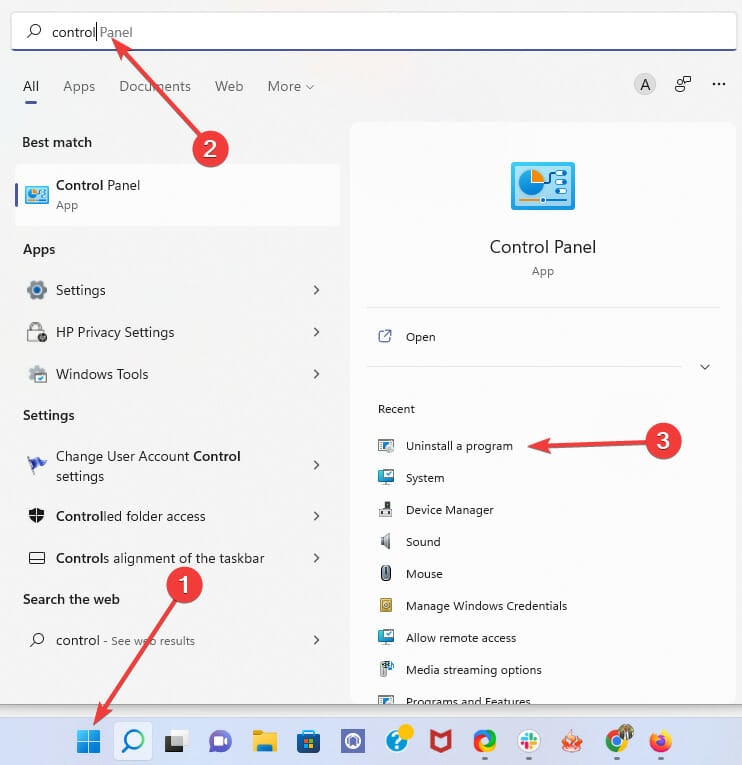
  1. Click on the Start menu, type control panel, and then select Uninstall a program.
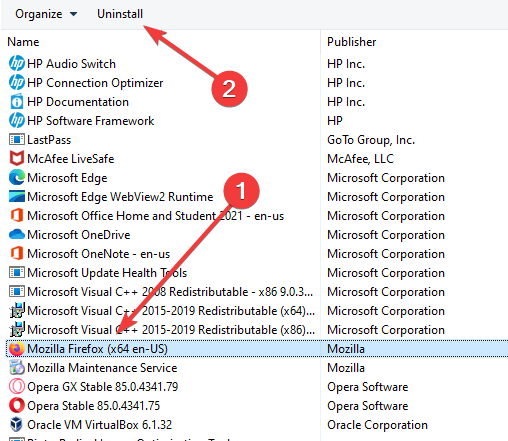
  2. Search Mozilla Firefox, click on it, and select Uninstall at the top of the window.
  3. In the next window, accept the uninstall.
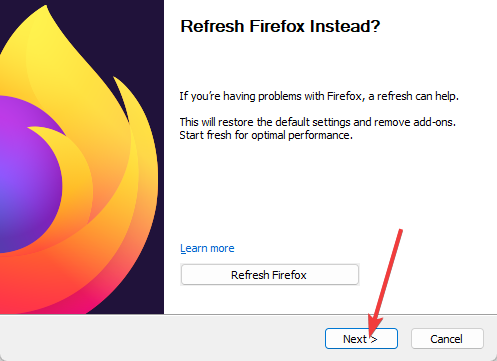
  4. On the Refresh Firefox Instead window that displays, select Next.
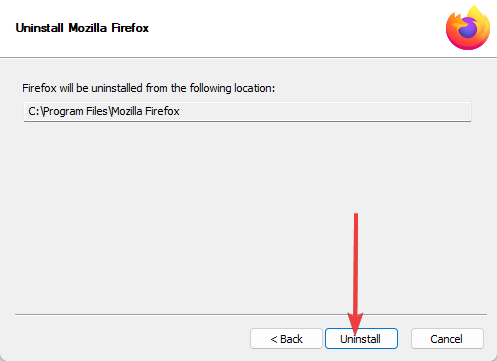
  5. Select Uninstall on the next window.
  6. Restart your computer.
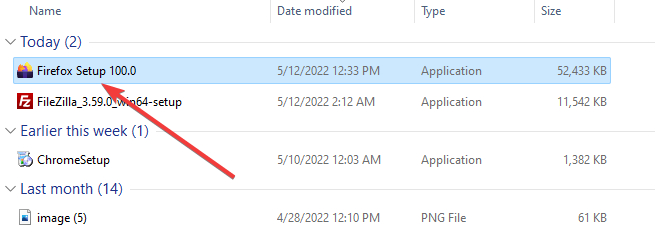
  7. Download the Firefox installer from the official website.
  8. Double-click on the downloaded file to start the installation.
    no compatible source was found for this video firefox
  9. When prompted to allow the app, click Yes.
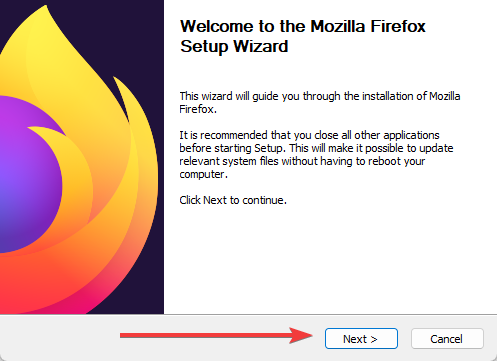
  10. Click Next on the install wizard’s window.
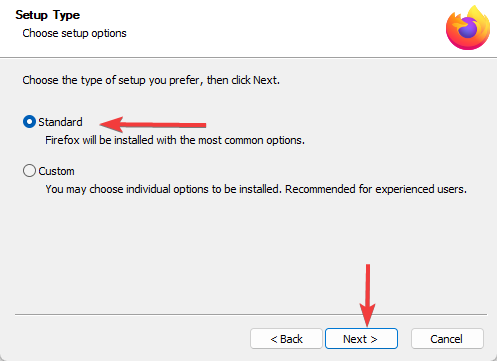
  11. Select Standard and click Next.
    no compatible source was found for this video firefox
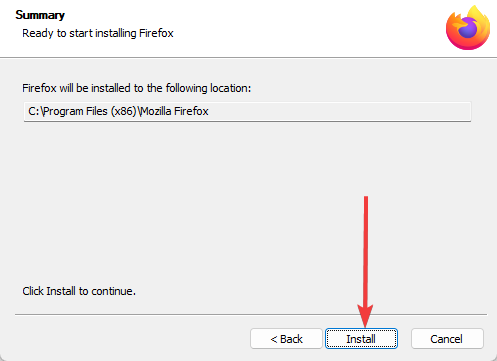
  12. Click on Install.
    no compatible source was found for this video firefox
  13. In the end, click on Finish.

This fix will be effective if no compatible source was found for this media in Chrome or Opera One. The only difference will be that you will be downloading and installing Opera One or Chrome in the place of Firefox.

Firefox is a robust browser, and if you have any video compatibility issues, this article should help you resolve them. While we have not given these fixes in any particular order, we encourage you to opt for totally switching browsers only when other fixes fail.

This and other Firefox issues on Windows 10 & 11 can usually be fixed in a few steps. And there you have it, our fixes for no compatible source was found for this media in Firefox.

We hope you have found this article helpful, and we look forward to hearing from you in the comments.

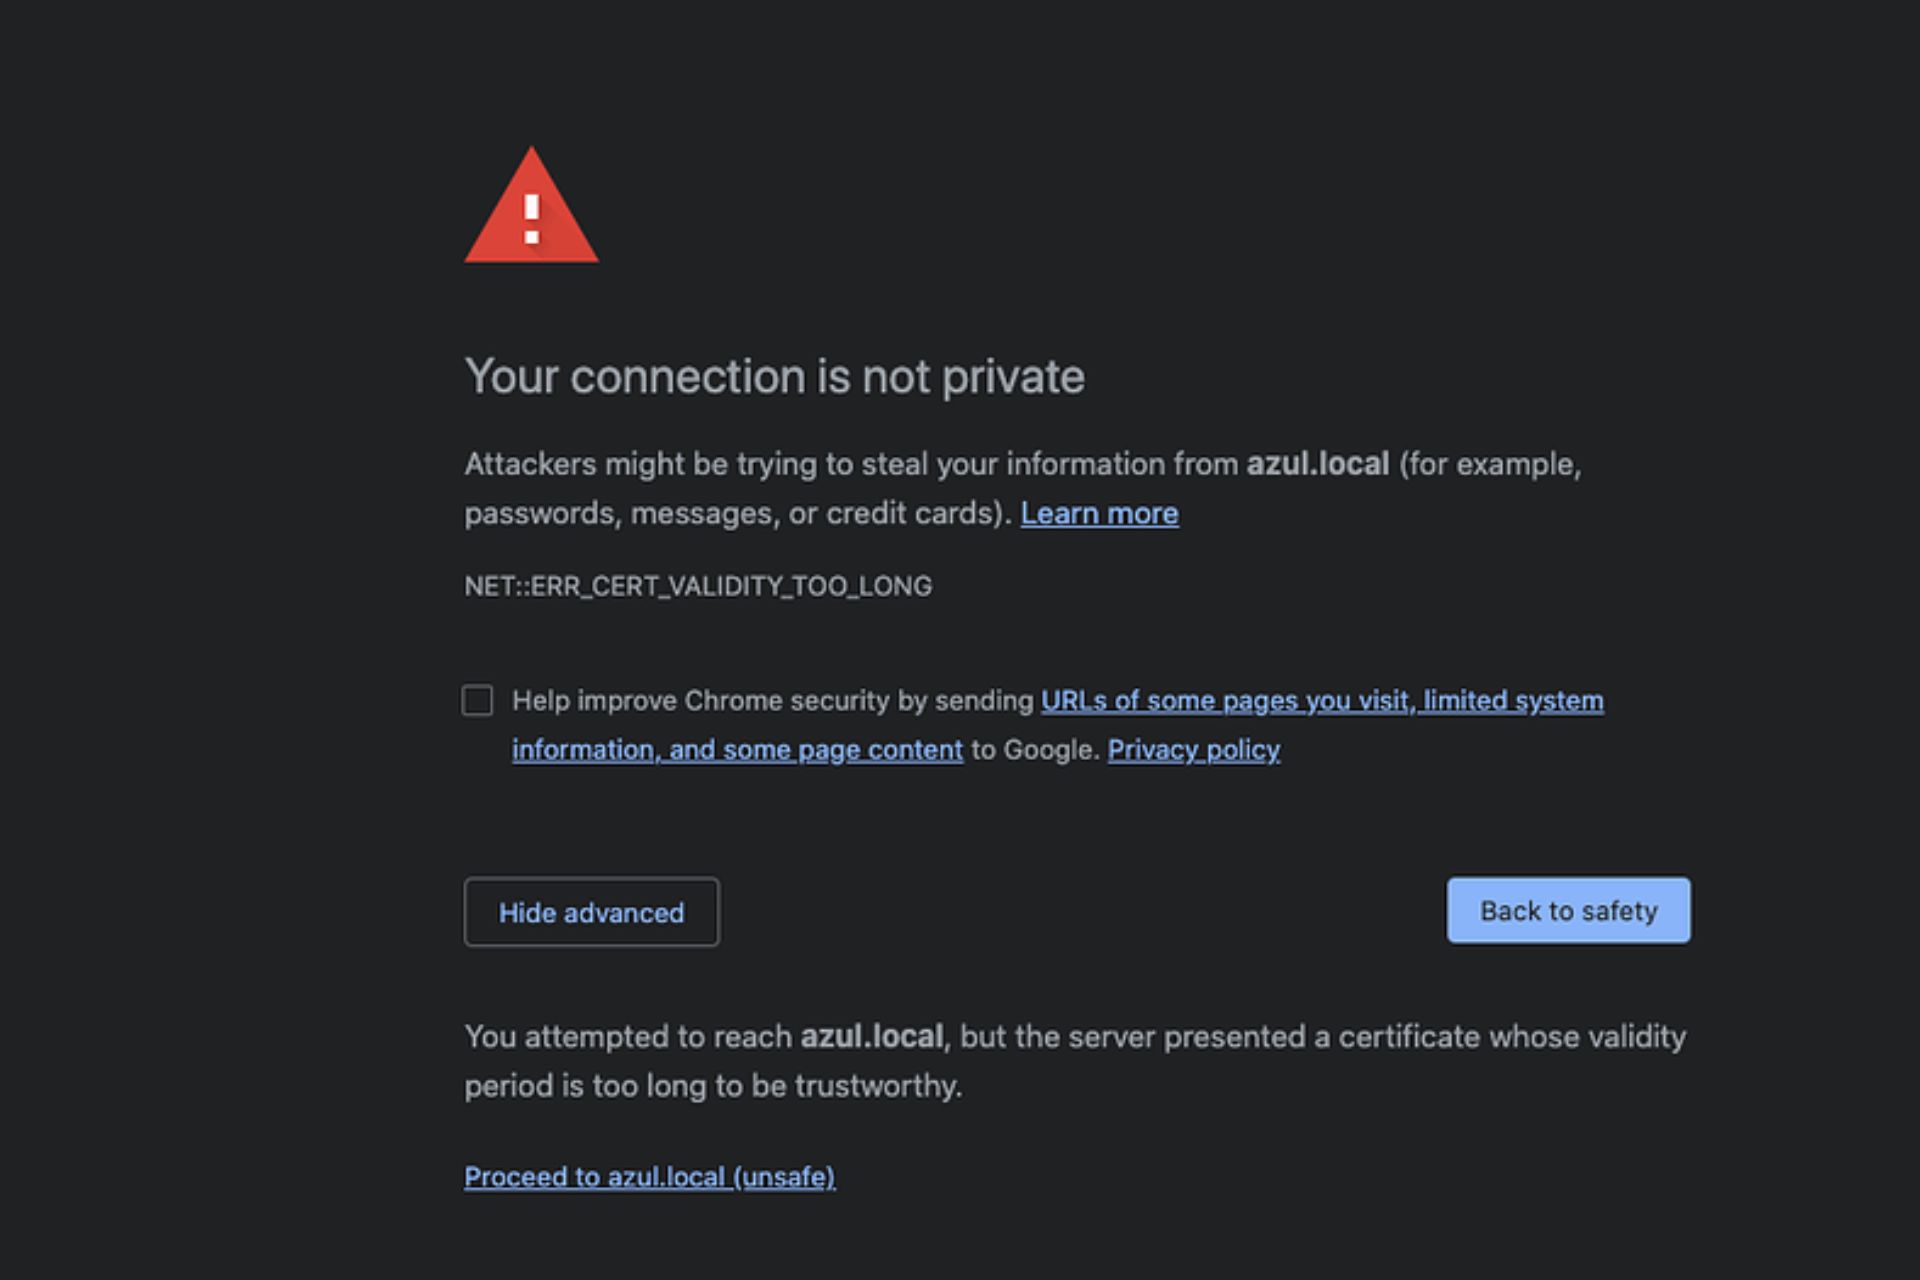
How to Fix the ERR_CERT_VALIDITY_TOO_LONG Error (Quick Guide)

The ERR_CERT_VALIDITY_TOO_LONG error in Chrome appears when an SSL certificate exceeds the maximum allowed validity period. Since September 2020, most browsers limit certificate lifespan to 398 days. Anything beyond that will trigger a net::err_cert_validity_too_long or certificate validity too long error.

This guide shows you how to fix or avoid the issue in both local setups and live websites.

What Causes the Certificate Validity Too Long Error?

  • Browser Policy Change: Modern browsers like Chrome and Safari now enforce stricter certificate policies. Any SSL certificate valid for more than 13 months (398 days) is rejected.
  • Misconfigured SSL Certificates: Some web hosts or self-signed certs may still use 2–3 year durations by default.
  • Local Development with Long Expiry: When generating certificates for local environments (using OpenSSL or mkcert), devs often use long-term validity by mistake.

How can I fix the Chrome certificate validity too long error? 

1. Update your system time

If the clock on your computer is not in sync with the server, it could result in a wrong certificate expiration date. Once Chrome detects your computer’s clock is incorrect, it will display an error message. 

This may have happened if you have traveled recently and not reset your time and date settings to your current time zone. You can manually do so through the control panel.

2. Update your OS/browser

This is probably the easiest solution, but if you haven’t updated your operating system in a while, it might be time to do so. Using an older version of Windows or macOS may bring up bugs and errors with third-party software such as Chrome. 

If you’ve updated your OS and still have issues with Chrome not loading websites properly, it might be time for another update — specifically for Chrome itself. 

This can happen if there are bugs in the browser code itself or if security updates are needed to ensure that users’ data remains safe from hackers trying to steal login information and other sensitive data.

3. Clear SSL cache 

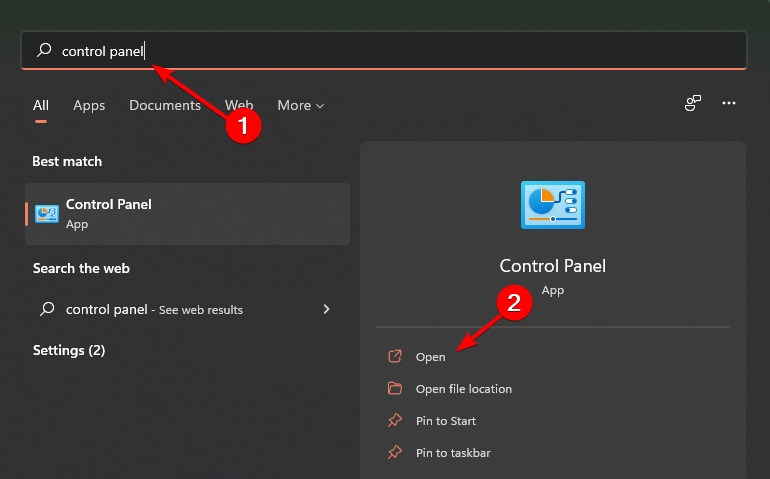
  1. Hit the Windows key, type Control Panel in the search bar and click Open.
  2. Navigate to Network and Internet.
  3. Click on Internet Options.
  4. Go to the Content tab and hit the Clear SSL state button.
  5. Retry your site again.

How to disable certificate check in Chrome?

The SSL certificate check is a security feature that helps protect people who visit your website. It prevents your website from being impersonated and encrypts information sent between you and your visitors.

However, it can easily become a nuisance if it continuously blocks websites that are not harmful. You can disable this feature for development purposes or during testing to allow any site to open in Chrome.

Disabling the certificate check will allow you to access blocked sites and download otherwise inaccessible content. To do so, follow the steps below:

  1. Find the Google Chrome shortcut on your Desktop, right-click on it and select Properties.
  2. Navigate to the Target string and add the following string at the end: --ignore-certificate-errors
  3. Press OK to effect the changes.

Hopefully, you have been able to resolve the Chrome validity certificate too long error with one of our recommended solutions.

You may also experience certificate errors in Microsoft Edge, but you can refer to our detailed guide on how to bypass the issue.

If you have the time, you can also create a self-signed certificate which will go a long way in helping you avoid similar problems in the future.

Let us know of any other solution not mentioned above that may have helped you resolve this issue in the comment section below.

Remote Browser Isolation: What is it & How it Really Works

As technology and the internet gets more advanced, so do the threats that come with it. With so much of our lives and personal information on the web, it’s necessary to have air-tight security to keep it safe. Keep reading to learn more about Remote Browser Isolation and how it works.

Website and PC security are of the utmost importance. Check out our recommendations for the best website security software to add extra protection to your PC.

What is Remote Browser Isolation?

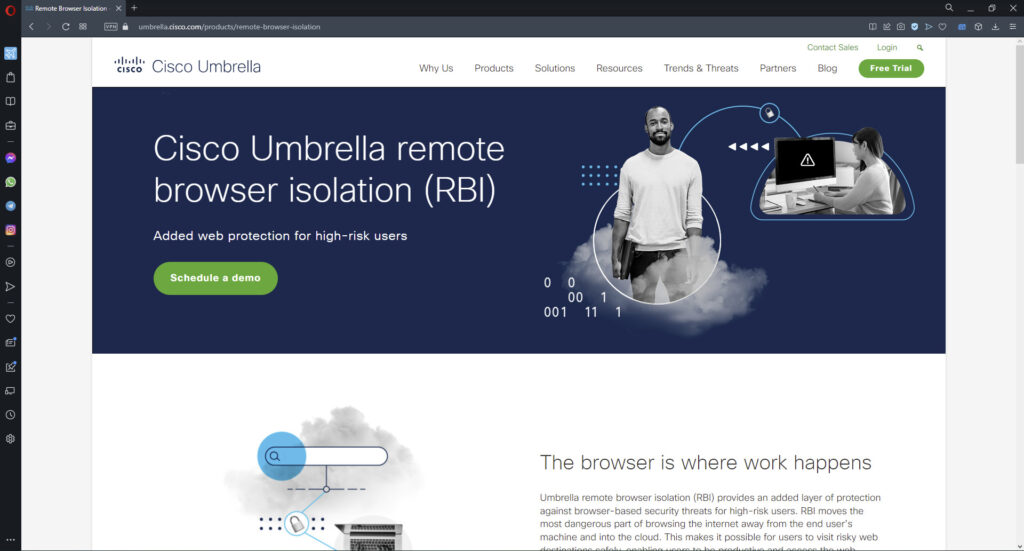
Remote Browser Isolation (RBI) is a security process for web browsing that protects users from internet threats like malware and hacking. RBI differs from local browser isolation, which requires hardware or software elements. RBI is a service from a third-party provider, like Cisco Umbrella.

Cisco Umbrella Remote Browser Isolation service.

One of the most common ways cyber hackers get malware to unsuspecting users is through phishing emails. These are scam emails that contain a link to a website with malicious code that is embedded in the webpage.

This code can steal personal information and invade the user’s computer. RBI is designed to protect users from this.

What are the key benefits of browser isolation?

1. Provides top-notch security

Browser isolation gives users protection from malicious websites and links because any local code and URLs open on a remote server and thus don’t take place on the user’s personal PC. This security also extends to emails to protect against phishing as all web-based emails are rendered on the server.

The isolated browser service also prevents any malicious files from downloading on a computer. All downloads are scanned to detect any threats before they are permitted to be downloaded to a PC.

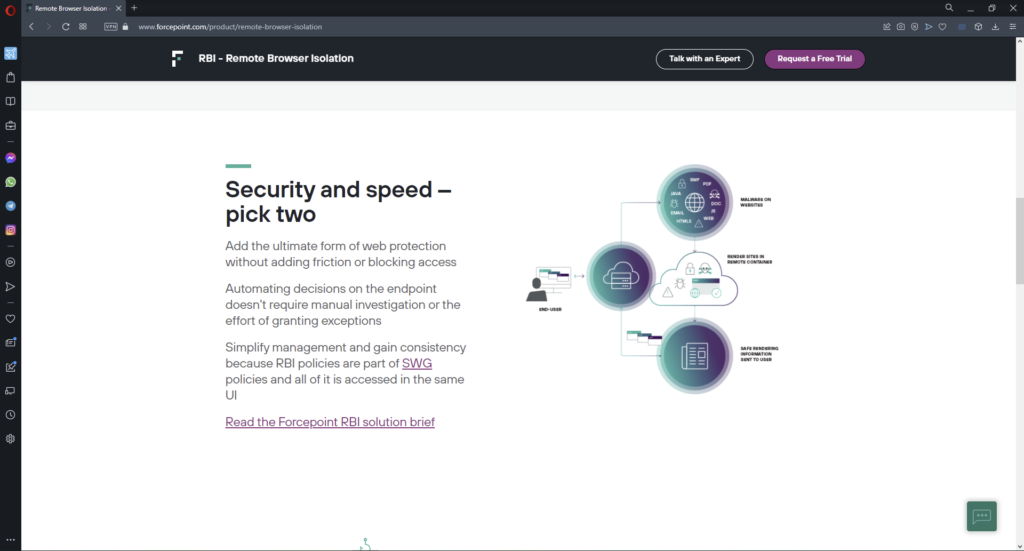
Security features of RBI.

Advanced anonymous browsing features protect users from trackers and hide browsing activity from cybercriminals. It operates like a private browsing window and clears any cookies and history after ending a browsing session.

2. Protects personal information

One of the major key benefits of RBI is the protection of user data like addresses, passwords, identification numbers, etc. Users can have peace of mind when entering their personal or sensitive information online as there is no local data caching.

RBI operates using a Zero Trust security model. This model trusts nothing and no one, including users, applications, and websites. Zero Trust architecture requires strict verification of every entity using a private network.

Zero Trust security model.

3. Uses fewer PC resources

Because the isolation happens remotely rather than locally directly from a user’s PC, it uses up fewer computer resources. All the resources needed come from the remote servers and therefore provide air-tight security while being extremely lightweight on PCs.

Are there any drawbacks to RBI?

One of the main drawbacks to an RBI service is the cost. Detecting malware on webpages and rendering sites in pixels is a resource-heavy task and thus can be expensive. Luckily most services provide free demos for companies to try before they commit.

RBI demo.

Large organizations and companies use these services especially when employees deal with sensitive information and require extra protection.

Because there is no local data caching and RBI operates on a Zero Trust security model, data like usernames, passwords, addresses, etc. are not saved. This means users must manually enter their information on websites each time. Auto-fill makes browsing faster and easier, but it is also a security risk that RBI eliminates.

How many types of browser isolation are there?

There are three main types of browser isolation: client-side, on-premise, and remote. Here’s a closer look at each type.

  • Client-side browser isolation loads web pages and codes directly from a user’s device. Sandboxing keeps code and content separate so any malware doesn’t compromise a PC. This uses up more computer resources than with RBI.
  • On-premise browser isolation operates like RBI but rather than content going through a remote server, it takes place on an internal server managed by your organization.
  • Remote Browser Isolation or sometimes known as cloud-hosted browser isolation creates an isolated environment on a remote server in a cloud. Within RBI, there are two main ways to isolate a device: DOM mirroring and pixel reconstruction.
    • DOM mirroring filters out specific types of content before it reaches a user. This technique prevents content considered dangerous from getting to a user’s device while displaying content deemed safe.
    • Pixel reconstruction, or visual streaming, is when the browser runs entirely on the remote server and only displays the pixels of the page to a user. This isolates the browser entirely and the user receives a visual rendering of the content.

RBI offers the same level of security as local browser isolation but is much more lightweight on user computers. Because webpages and code are executed on a remote cloud server, nothing takes place on your device.

How does Remote Browser Isolation work?

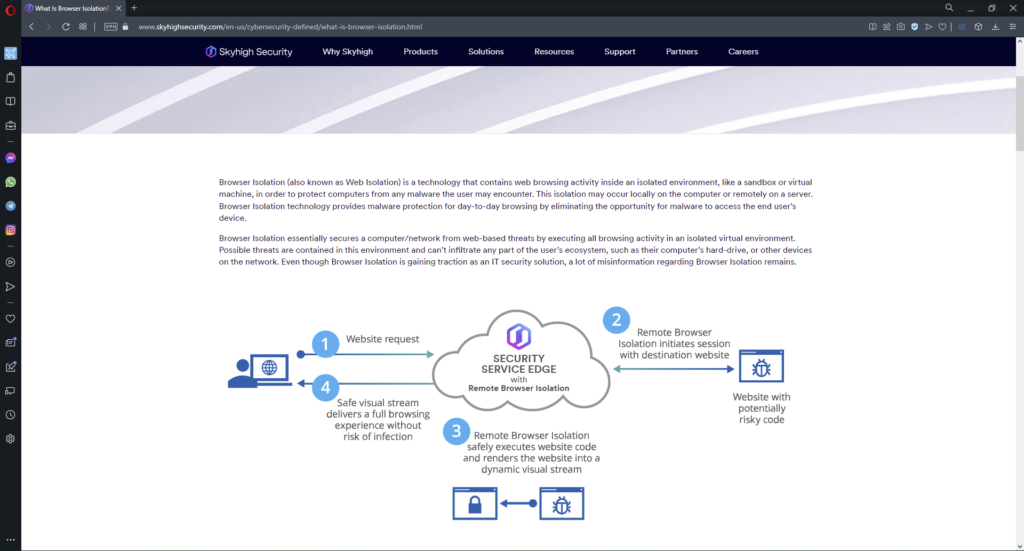
Users fall victim to malicious websites because their browser will run the code thinking it’s legitimate. RBI prevents this code from executing by running in a sandboxed state by rendering the webpage in a cloud-based remote server.

When a user visits a webpage with RBI, the page loads on the remote server and provides a rendering of the page and thus eliminating any malicious code. This doesn’t impact how the page operates or its features so users can browser normally while remaining secure.

How Remote Browser Isolation works.

Not every webpage you visit renders on a remote server. If RBI detects potential malware on a page it will evaluate it to detect anything malicious. If it does detect something wrong, then the webpage will load through the remote isolated browser.

The content that the user sees through their default browser is a collection of pixels on an HTML5 base instead of the code that renders the page.

We hope you enjoyed our guide on Remote Browser Isolation and how it functions. For more information on security tips and tricks, check out our guide on the best security settings for Windows 11 for maximum security. Let us know in the comments what you think of RBI or if you already use it.

[Update, it has been fixed!] Are you having issues with Outlook.com today? Microsoft is looking into it

If you’re having issues with Outlook.com today, then you’re not alone. Microsoft is aware of this problem and is looking into the reason for users being unable to access Exchange.com and Outlook.com services.

Update: Microsoft has declared this issue as fixed. Officially, Microsoft says that users in the North-Eastern United States may have been unable to access Exchange Online. Our original article is still below, and here are the company’s findings, as noted on the Microsoft 365 Admin Center.

Final status: After a period of extended monitoring, we’ve confirmed that the issue is resolved.

Scope of impact: This issue could have impacted any user attempting to access Exchange Online and were located in the North-Eastern United States and surrounding geographical regions.

Start time: Monday, July 18, 2022, 9:02 AM (1:02 PM UTC)

End time: Monday, July 18, 2022, 11:20 AM (3:20 PM UTC)

Preliminary root cause: A network router was performing below acceptable thresholds, resulting in impact. We’ll provide more information within the Post-Incident Report.

——

This problem first started at around 9:34 AM ET this morning on July 18 and as of writing is still ongoing according to the Service health dashboard. According to Bleeping Computer, users also had issues with signing in and accessing and reviewing emails via Outlook.com and Exchange Online.

Microsoft tagged the issue in the Microsoft Admin Center with EX401976 and OL401977. Since initial reports, there have been three updates at the time of publishing. One of the latest indicated that there may be an unexpected drop in network availability, which is contributing to the degraded experience.

As of 11:00 AM ET, Microsoft says that they’ve identified the availability drops within network telemetry and are analyzing network infrastructure to isolate the source of the issue. The next update is due in another hour, and we’ll do our best to keep you posted on the latest.

How to Fix This Content Cannot Be Displayed in a Frame Error

Internet Explorer was discontinued in 2022 and no longer receives updates from Microsoft.

But, if you still use it, via a virtual machine or through the Microsoft Edge IE mode, you might encounter the “This content cannot be displayed in a frame” error.

Today, we’ll guide you through fixing this issue step by step. That said, keep in mind that, for better safety, you should consider switching to a modern browser—we’ll talk more about alternatives below.

How do I fix the content cannot be displayed in a frame error?

1. Change your IE privacy settings

  1. Click on the Start menu, type internet options, and click on the Internet Options app.
    this content cannot be displayed in a frame
  2. Click on the Privacy tab, then click on the Sites button.
    this content cannot be displayed in a frame
  3. In the Address of website text field, type in the name of the website triggering the error, then click on Allow and OK.
    this content cannot be displayed in a frame

If this doesn’t work, you’ll need to go into your Internet Explorer security settings and change them.

2. Reset all the zones to the default level

  1. Click on the Start menu, type internet options, and click on the Internet Options app.
    this content cannot be displayed in a frame
  2. Click on the button labeled Reset all zones to default level.
  3. Select Local intranet from the list of four Internet zones, and click the Sites button.
    this content cannot be displayed in a frame
  4. Click on the button labeled Advanced.
  5. If there are any websites in the Website list, click on them and click the Remove option.
  6. Click on Close and click on OK.
  7. Redo this process again, but this time for Trusted sites and then for Restricted sites in step 3.

Internet Explorer may be displaying this error due to a security breach due to phishing or stolen content.

3. Change the Compatability View settings

  1. Launch IE and navigate to the website with display issues.
  2. Click on the Page menu and then select Compatibility View settings.
  3. Input the name of the website into the Add this website text field, click on Add and then close.
    this content cannot be displayed in a frame

4. Try a better browser

Since Internet Explorer is obsolete at this point, it’s no surprise that it displays errors and bugs. For a better web experience, we highly recommend switching to a modern, reliable browser.

A good alternative that checks all the boxes when it comes to features, performance, and reliability is Opera.

This tool is fast, powerful, modern, has extensive add-on support, and can even be customized to look and feel however you like it. More so, it is far more stable than IE, so errors like the above will not happen.

Opera

Don’t waste time fixing obsolete browsers when you can surf the web faster than ever before!

What does it mean when it says this content Cannot be displayed in a frame?

It simply means that the browser can no longer display embedded views of your files or projects. This sometimes happens after a server update and is known to be caused by the following:

  • HTML code problems
  • Missing .Net framework installations in older PCs
  • Compatibility problems with downloaded web page

This issue is not specific to IE, and a similar problem in Safari is txtag this content cannot be displayed in a frame. On PC, users may also experience an Office online frame error. While this is unrelated to IE, they often have the exact causes.

Nevertheless, we hope you can use this guide to resolve the troublesome error message.

Note that while trying to resolve the issue, if the publisher of this content does not allow it to be displayed in a frame, there may be nothing you can do. Many admins have claimed that this may be disabled to help protect the security of information you enter into the website.

Let us know in the comments if this has been helpful.

Fix: Internet Explorer Blocked Website from Installing ActiveX

If you still use the ancient Microsoft web browser and see popups like Internet Explorer blocked this website from installing an ActiveX control, this article is for you. Here, you will find relevant information and an effective solution.

ActiveX is an increasingly antiquated software framework that is still utilized within Internet Explorer and other Microsoft applications.

It enables some websites to display interactive content, such as toolbars and games. However, in recent years, this technology has been outdated. Even if you depend on it, you may face many problems like IE ActiveX interface marshaling library won’t open or anything else.

In addition, ActiveX controls can also assist malware in installing unwanted software on Windows.

Consequently, IE automatically blocks ActiveX controls installation. That will happen for users who have enabled the ActiveX Filtering setting.

Then, some content might be missing from a page. When filtering isn’t enabled, users might still see prompts at the top of IE requesting permission to install an ActiveX control.

Quick Tip:

You’ve seen how tricky Internet Explorer’s ActiveX Filtering setting really is, and deselecting it or turning it off for specific websites might not necessarily sound like music to your years.

Instead of wasting valuable time on fixing ActiveX-related errors, install Opera One. The first thing to point out is that it never blocks ActiveX controls installation.

Opera One

If Windows 10 is blocking ActiveX install for IE, consider using a reliable alternative.

Does IE 11 support ActiveX?

Yes. Internet Explorer 11 supports ActiveX. Even though there are both pros and cons, this is still supported by the IE11. However, the new Microsoft Edge that has replaced the IE on modern Windows doesn’t support ActiveX.

Where are ActiveX controls stored in windows 10

Not only on Windows 10 but also on any Windows versions, the ActiveX control files are stored in the following location of the system drive:

C:WindowsDownloaded Program Files

How do I run ActiveX on Windows 11?

Windows 11 has not come with Internet Explorer. Instead, it has Microsoft Edge as the one and only default web browser. Fortunately, you can enable IE mode here to access websites and web applications that require IE features to function properly.

The IE mode should automatically run ActiveX without any issue. Here are the steps to enable IE mode on Edge:

  1. Open Microsoft Edge.
  2. Type the following address in the address bar and hit enter: edge://settings/defaultBrowser
  3. Enable the option Allow sites to be reloaded in Internet Explorer mode (IE mode).enabling ie mode microsoft edge
  4. Relaunch Edge.

How can I stop Windows 10/11 blocking ActiveX install for IE?

1. Turn Off ActiveX Filtering for All Websites

  1. On IE, click on the gear icon in the top right corner.clicking gear icon internet explorer
  2. Then, select Safety and deselect a ticked Active X Filtering option.disabling activex filtering ie
  3. Alternatively, you can open the start menu, search for the Internet Options and open it.
  4. Go to the Custom level button on the Security tab.going custom level internet options windows
  5. Then, select Disable for the Allow ActiveX Filtering setting shown in the snapshot directly below.disabling activex filtering internet options

2. Turn Off ActiveX Filtering for a Specific Website

When ActiveX filtering is on, a blue circle, or stop icon, appears on the right side of Internet Explorer’s URL bar.

Users can click on that to open a dialog box window that states, Some content is filtered on this site.

Then users can click the Turn Off ActiveX Filtering button on that dialog box to enable ActiveX controls for a specific website. However, the filter will still block ActiveX controls on other pages.

3. Add Pages to Trusted Sites

  1. Open the Internet Options as shown in method 1.
  2. Go to the Security tab.
  3. Select the Trusted sites option.
  4. Click on Sites.clicking sites trusted websites windows internet properties
  5. Enter the URL that showed the error: internet explorer blocked this website from installing an ActiveX control.
  6. Press the Add button.adding trusted websites windows internet properties
  7. Deselect the Require Server Verification (https:) for all Sites in This Zone option.
  8. Click the Close button.

Windows might also block ActiveX controls from installing when the publisher cannot be verified.

Then, an error message will pop up stating that Windows has blocked this software because it can’t verify the publisher.

Then it might be a good idea not to install ActiveX. Nevertheless, users can still deselect a Require server verification option to install ActiveX even when Windows can’t verify the publisher.

4. Turn Off ActiveX Control Prompts

  1. Go to the Custom level option on Internet Options like before.
  2. Then scroll down to the Automatic prompting for ActiveX controls option and select Disable.
  3. Select Enable for the Run ActiveX controls and plug-ins option.
  4. Select Enable for the Download signed ActiveX controls option.
  5. In addition, select Enable for both the script ActiveX controls settings. Just select Enable for all the ActiveX settings that include Prompt radio buttons.

So, that’s how Internet Explorer users can lift ActiveX control blocks to remove content filtering from pages.

For some users, a warning message like Failed to load popup blocker assistant ActiveX Control may appear after doing the above changes. Ignore it. But, if you don’t want to get this warning, Automatic prompting for ActiveX controls.

5. Enable Turn off blocking of outdated ActiveX controls for Internet Explorer

  1. Open the start menu, type the following command, and press enter: gpedit.msc
  2. Go to Computer Configuration and then Administrative Templates.
  3. Expand Windows Components and then Internet Explorer.
  4. Then, Go to Security Features and then Add-on Management.
  5. Double-click on Turn off blocking of outdated ActiveX controls for Internet Explorer and enable it.double-clicking Turn off blocking of outdated ActiveX controls for Internet Explorer

However, do it only when you need this. It is because enabling this option may make you vulnerable to various malware and online threats. It is always recommended to leave it configured or disabled.

Download signed ActiveX controls grayed out

When you try to enable or disable ActiveX control on Internet Options, you may find that the option Download signed ActiveX controls cannot be enabled or disabled because the option is grayed out. If it happens to you, it means you lack privileges to make some changes on the IE.

To get rid of it, you need to contact the system administrator. However, if you are the admin of the computer, it means you have made some changes in the registry or group policy that should be restored to the previous state. A system restore can help you to achieve it if you have no clue.


These are the ways to fix Internet Explorer blocked this website from installing an ActiveX Control. Remember that ActiveX can compromise your system with unwanted software and content. Apply the fixes only when you need ActiveX badly.

If you have any opinion or know a better solution, feel free to let us know in the comment box.

3 Ways to Fix tModLoader Mod Browser Not Working

Terraria is a game full of entertaining mechanics, but when it comes to the game’s problems tModLoader mod browser not working error can be the most annoying.

Terraria, like many other games, allows users to download different skins and customizations for the in-game assets.

tModLoader is an open-source Terraria modification and expansion that allows players to create and play mods.

But recently, its users have reported errors and problems like the tModLoader mod browser not working, which we will resolve in this article.

Why is my tModLoader mod browser not working?

tModLoader mod browser may not work for a few reasons. Here are the two most common culprits:

  • Heavy loads of mods
  • Server maintenance

Our solutions should be helpful regardless of your browser issue.

What mods to install on tModLoader to make the game interesting?

Calamity introduces a plethora of new weapons (melee, ranged, and magic), armor load-outs, items, accessories, and various new products and accessories.

The Super Terraria World mod turns the main game into a fully realized RPG with detailed quests, skills, NPCs, and everything else a role-playing adventure fun should have.

If you’re experiencing Terraria packet loss, follow this article’s easy steps.

What can I do if the tModLoader mod browser isn’t working?

1. Use the Steam workshop

  1. Open Steam and go to the WORKSHOP section.
    Open workshop
  2. Search for Terraria.
    search terraria in steam workshop
  3. If you see a mod you like, either check the box or click the mod, scroll down and click Subscribe.
    subscribe
  4. Once you’ve subscribed, it’ll be waiting in your Terraria workshop hub to be enabled.

Because of Steam’s excellent assistance, getting the tModLoader from there is strongly recommended to avoid problems where the tModLoader mod browser is not working.

2. Check the forum for any problem reports

The next method is to check the Terraria forums to see if the servers are down.

When the servers are down for maintenance, players cannot view the game mods list or download files from the mod browser. Server maintenance may also lead to tModLoader not opening.

The best solution is to wait a couple of days until the servers are back up.

3. Remove some of the mods

  1. Open your Mode list.
  2. Click the More info icon for every single mod.more info
  3. Press Delete at every single mod.

Installing an excessive number of mods can cause the application to crash and interfere with game files, resulting in various issues such as tModLoader not working. In this case, the tModLoader will be unable to access the Steam workshop.

What are the other services of tModLoader?

tModLoader also provides the means of sharing user-created mods with hundreds of players worldwide.

This modding tool is designed to make updating to future Terraria versions and troubleshooting issues like the tModLoader mod browser is not working as simple as possible.

Server maintenance can be the main issue of this issue; thus, patience is the best solution.

Because many players or developers meet to exchange ideas and solutions, the forums are the ideal area to look for fixes.

While many users have reported that the mod browser encountered an error, there is still no official fix to this problem.

If you can’t connect to the Terraria server, follow the steps outlined in this article.

Let us know if you were able to solve the problem or if you know of another way to resolve tModLoader mod browser is not working in the comments section below.

5 Ways to Fix Checking Your Browser Error on Cloudflare

If you’ve sometimes wondered Why is Cloudflare checking my browser? You’ve come to the right place. In this article, we’ll explain why you get this message in the first place.

Cloudflare offers these services to websites that want to protect their servers from Denial-Of-Service (DDoS) and other types of cyber attacks.

Because of the size and power of Cloudflare, a DDoS attack would not work on their server. This allows other websites to use Cloudflare protection for a fee.

This article will explore the reasons for this happening and answer essential questions.

What is Cloudflare checking your browser?

Similar to Bad Behavior, the Cloudflare BIC (Browser Integrity Check) scans for standard HTTP headers that spammers often misuse and block access to your website if it finds any.

It also presents difficulties for user agents with malicious crawlers, bots, or users.

By default, Browser Integrity Check is turned on. You may deactivate the BIC as an administrator using a firewall bypass rule. Additionally, you may selectively activate or disable this functionality for certain areas of your website using a Page Rule.

Why does it say checking your browser before accessing?

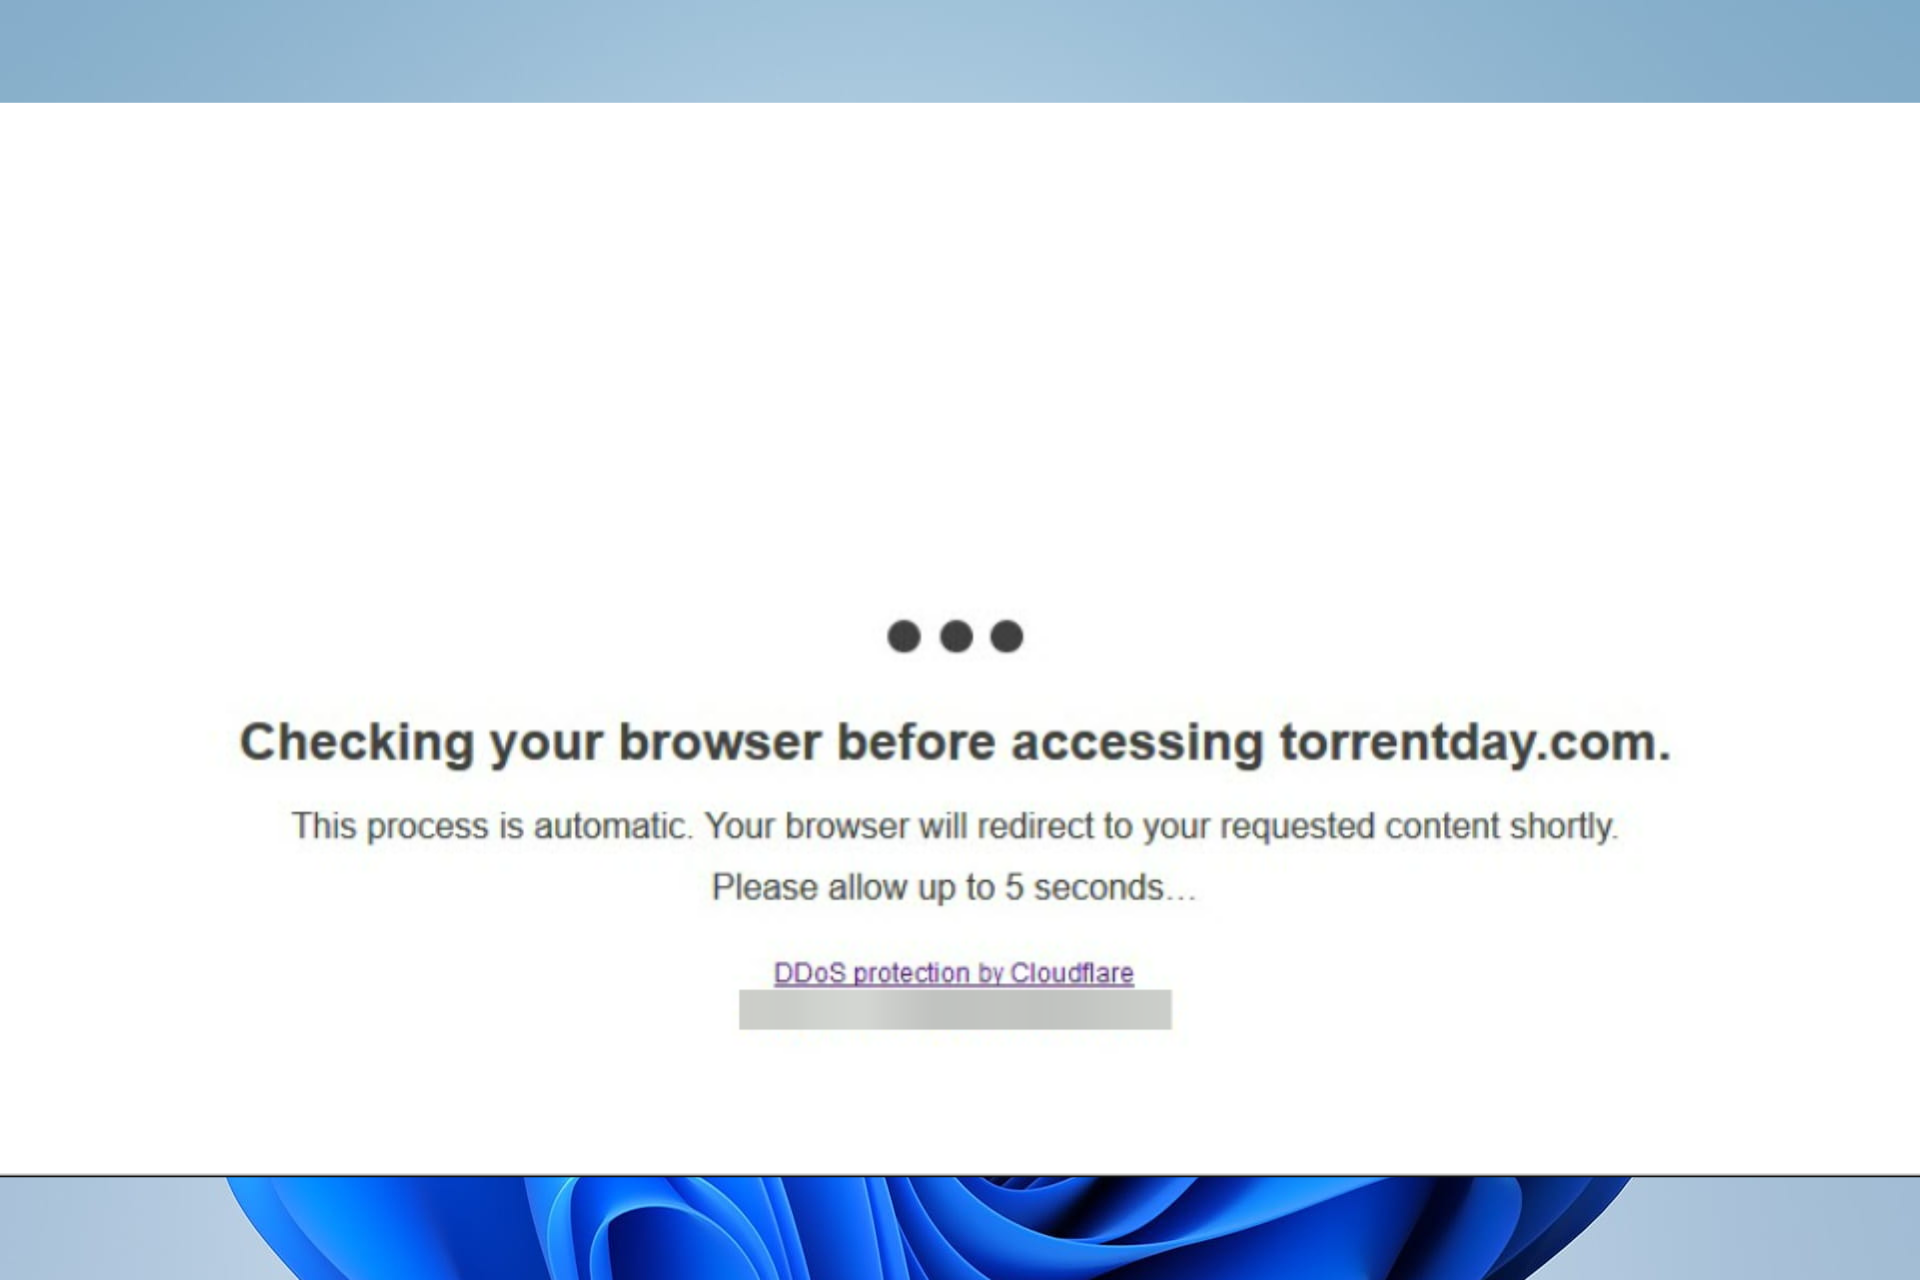
If you see the Checking your browser message, it simply means that the website you’re trying to access hired CloudFlare to protect their page against DDoS attacks.

For this reason, a temporary page will be presented to you containing the message mentioned above, and at the same time, the servers are checking if your PC is genuine.

How do I disable CloudFlare browser check?

1. Use an alternative browser

We recommend downloading and installing Opera One on your device to protect your user data and block cyberattacks.

The sites protect their data by checking your IP, the type of packet sent to the website server, its size, and the rate at which they are received, along with other details. Opera One offers a free and unlimited VPN, which helps mask your IP address.

Moreover, with Opera One, you get a built-in ad blocker so that you can navigate the internet with fewer distractions.

Let’s have a look at some more key functionalities:

  • Data synchronization.
  • Easy to use search function through open tabs.
  • Integrated social media accounts.
  • Free VPN that ensures all your data is kept private.
  • Battery saver function.

Opera One

Enjoy navigating the Internet without having your browser crash multiple times!

2. Scan your PC

  1. Click on the Start menu, type windows security, and then select the Windows Security app.
    cloudflare checking your browser
  2. Click on the Virus & threat protection option.
    cloudflare checking your browser
  3. Select the Scan options menu.
  4. Select Full scan from the list of options, then hit the Scan now button.
  5. Wait for the scan to complete and see if the error message still appears.

3. Disable your browser extensions or add-ons

  1. Launch your browser.
  2. Copy and paste the link below into your Address bar and hit Enter.
    chrome://extensions/
    cloudflare checking your browser
  3. Toggle off the disable switch of your extensions, starting from your most recently installed extensions.
  4. Check to see if the error message still appears.

4. Set your date and time to automatic

  1. Right-click on the date and time icon on your taskbar.
  2. Select Adjust date and time.
  3. Make sure the Set time automatically option is enabled.

Now you should verify if it is still checking the browser before granting website access.

5. Use a VPN

Using a VPN masks your IP address, so you will not be affected if Cloudflare is restricting a specific IP or region.

Virtual Private Networks, or VPNs, are used to link your computer to various locations across the globe safely. Choose one of the best VPNs for Windows if you don’t already use one.

Cloudflare checking your browser loop

You should wait patiently when you are stuck in checking your browser before accessing a website. Most of the time, this will correct itself, and you will not have to take action.

If this becomes a loop, you should try any of the solutions listed in this article. A loop means that something is wrong with your browser or computer, and you will not be allowed access to the website until you resolve the problem.

This article answers the question: Why is Cloudflare checking my browser?

We can conclude that the Cloudflare browser check performed by some websites is not damaging in any way to your PC and is only performed to make sure your PC is real.

8 Ways to Fix the Source File Could Not Be Read Error

You just encountered the error could not be saved because the source file could not be read. This article will show you all you need to know about this error.

First, despite a few errors you may encounter using the Firefox browser, you should know that it is a robust and reliable internet browser.

However, like every browser, you will get the occasional bugs or errors. These errors may stop you from accessing web pages or viewing files. In some cases, you will only need to try again later, while in others, you will need to apply some fixes.

For the error message could not be saved because the source file could not be read, you will have to apply some fixes, and we will recommend the best solutions.

You will be able to resolve most Firefox issues on Windows 10 and 11 by following a few easy steps and the source file error is not much different.

What does Source file Not Read mean?

When users attempt to download a file online and store it in a chosen location using the Firefox browser, an error known as Source file could not be read may appear. This error can be associated with any material, including games, music, etc.

When you get the error message, it is usually because of any of the following reasons:

  • The source file is corrupted
  • You have a bad internet connection
  • Bad browser configuration settings
  • Bad or corrupted extensions

Whatever the case, we will show you how to correct the error.

How do you fix could not be saved because the source file could not be read?

1. Switch to another browser

If you have trouble downloading files in Firefox permanently, you should consider switching to Opera. We think you won’t face the same issues based on the new improvements and features of the browsers.

Opera’s new features overshadow other popular extensions, like Firefox or Chrome. Opera’s main features include the video pop-up, embedded VPN, interactive messaging, and My Flow.

Thanks to the built-in ad blocking, the web pages are loaded quicker, and needless ads or pictures will not disturb you.

The installation requires only a few seconds so switching to Opera is easy.

Opera One

Leave any web errors behind and pick this freshened browser choice.

2. Check your Internet connection

First, check your internet connection hasn’t gone down. The server might have been interrupted when downloading. As such, open a few website pages in your browser.

If they don’t open, then a lost connection is the issue. This article provides further details for fixing network connections.

3. Delete the compreg.dat file

  1. Launch Firefox, paste the address below in the Adress bar, and then hit Enter.
    about:support
    could not be saved because the source file could not be read
  2. Under the Application Basics section, search for Profile Folder and click the Open Folder button.
  3. Close the Firefox browser.
  4. Right-click Compreg.dat and click the delete icon to erase the file.
    could not be saved because the source file could not be read

4. Adjust the network.http.accept-encoding setting

  1. Launch Firefox, paste the address below in the Address bar, and then hit Enter.
    about:
    config
  2. Click the Accept the Risk and Continue button.
    could not be saved because the source file could not be read
  3. Click on the Show all button.
    could not be saved because the source file could not be read
  4. Scroll to the network.http.accept-encoding, then click the edit icon.

  5. Erase all the value text in the text box, and hit Enter.

5. Disable download manager extensions

  1. Launch the browser.
  2. Click the menu icon and select the Add-ons and themes option.
  3. If you have the Download Manager extension, click the switch to disable it.

Try again and see if the error message could not be saved because the source file could not be read has disappeared.

6. Adjust the attribute setting for places.sqlite

  1. Launch Firefox, paste the address below in the Address bar, and then hit Enter.
    about:support

    could not be saved because the source file could not be read
  2. Under the Application Basics section, search for Profile Folder and click the Open Folder button.
  3. Right-click places.sqlite and select Properties.
    could not be saved because the source file could not be read
  4. Uncheck the Read-only checkbox, then click Apply and OK.

7. Reset the Firefox browser

  1. Launch the Firefox browser.
  2. Paste the address below in the Address bar, and then hit Enter.
    about:support

    could not be saved because the source file could not be read
  3. Click the option to Refresh Firefox on the top right side.
  4. Select the Refresh Firefox again.

8. Reinstall the Firefox Browser

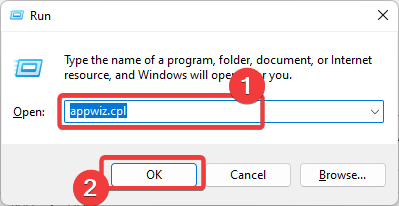
  1. Open Run by pressing the Win key + Rr.
  2. Enter appwiz.cpl in the Run text box, and click the OK button.
  3. Then select Mozilla Firefox, and press the Uninstall button.
  4. Follow the wizard to complete the uninstallation.
  5. Launch a browser and download Firefox.
  6. Double-click on the downloaded file and follow the wizard to complete the installation.

One of those resolutions will probably fix Firefox so that you can download software and documents with the browser once more.

Clearing your download history, selecting an alternative download folder, and switching the anti-virus software off might also help resolve the issue.

We wrote about common fixes in our Troubleshooting Hub so make sure to bookmark it. Firefox is a great browser, but if you have any more issues, be sure to check our Web Browsers Hub for more guides like this one.

If you have read to this point, the error message could not be saved because the source file could not be read and should have been resolved.

If you have further suggestions for fixing this Firefox issue, please share them below.

Best Online Checkers With Friends [Top 5 Websites]

While not as popular as chess, Checkers is also an entertaining board game to play, and when you don’t have an actual board, there are a few good websites where you can try a quick game for free.

For more mobility, you can also find many great apps you can download on your device, be it a PC, tablet, or smartphone.

But right now, we’ll be looking at web-based alternatives to play Checkers online.

Note that you will get the most out of these games by using any of the best browsers for playing online games.

Quick Tip:

Opera GX is one of the best browsers for playing Checkers with a friend online and enjoying customizable built-in features. Change your style, set up limiters for resources, and play Checkers like a pro.

This game-changer browser was created for those who want to have fun while customizing their browsing style. Opera GX has built-in messengers and advanced settings to restrict network traffic as well.

Opera GX

Vivid colors, sleek interface, sidebar messengers integration in one place.

Can you play Checkers with a friend online?

An excellent old Checkers game is always between friends, but with innovation and tech, has that been lost? No!

The best online Checkers are still played with your friends. In some of these games, you may be able to send invitations to specific people to join in the fun or randomly pick new people online.

In this article, most of the Checkers games we share allow you to play with your friends.

Which is the best Checkers app?

247 Checkers – Most feature-rich

247checkers

To sum up this experience in a few words: click and play, no registration or fill-in forms needed, and no intrusive ads.

You can play against a computer or share your device with a friend or family member to play against one another.

The website also has seasonal Checkers boards, adapted for various seasons or seasonal events such as Halloween or Easter.

Additional features:

  • Cross-device compatible
  • Winning prizes (fake money)

⇒ Play Checkers on 247 Checkers

MSN/Zone.com – Best free online Checkers game

msn games

Microsoft offers this classic Checkers game on their unique Game Zone and other classic board games such as bridge, chess, or backgammon.

Accessing the game is pretty simple, and you can opt to log in with a Microsoft account for a more personalized experience. Otherwise, you can play without registering, choose the computer as an opponent, or wait for a real opponent to connect. 

You receive various ratings based on your game experience, which can later help you advance in the leaderboard if you’re into rankings. 

Additional features:

  • Nice game graphics
  • A leaderboard

⇒ Play checkers in the Zone

Checkers365.com – best online Checkers with friends

checkers365.com

Here is another quick-access website to try out your best moves on a Checkers board.

The board design is simple and just what regular Checkers games need. While there’s no background music, there is sound whenever a player makes a move. You can pause anytime just by changing the browser tab and then resume the game by returning to the tab.

The full-screen option allows you to focus on the game completely.

Additional features:

  • Nice board graphics
  • Cool game sounds

⇒ Play Checkers on Checkers365

Mathisfun.com – Best for kids

mathisfun

Math is Fun is an open-source educational website aimed at kids up to 12 years old. It primarily offers Math-related resources according to the current curriculum and free online games that help students train their memory, logic, and valuable strategies.

Checkers is among these games, so this would be an excellent opportunity to play the game with your kid.

You have three boards to choose from, depending on the difficulty level and three expertise levels, if you play against a computer.

Additional features:

  • Practice mode
  • Drag and drop function

⇒ Play Checkers on Mathisfun

Draughts.github.io – Most ad-free

draughts online

Github hosts this website, so it’s safe to use. Once again, no registration is necessary, and no ads will interfere with your game.

You will always play against a computer since there’s no option to choose another partner. Also, the computer will always tell you what to do if the move is wrong – so this might be a very good option for beginner players.

The site is also a good learning material for various variants of Draughts/Checkers throughout the world.

Additional features:

  • Different game levels
  • Simple graphics

⇒ Play Checkers on Github

As you can imagine, these are just some of the most accessible websites where you can play Checkers online. Equipped with your internet browser, you can now play away.

If you’re also curious to know more about online games, visit our separate Online Games Hub. Also, in our Gaming Hub, you’ll find more useful material on this popular topic.

Tell us which is your favorite one in the comments section below.

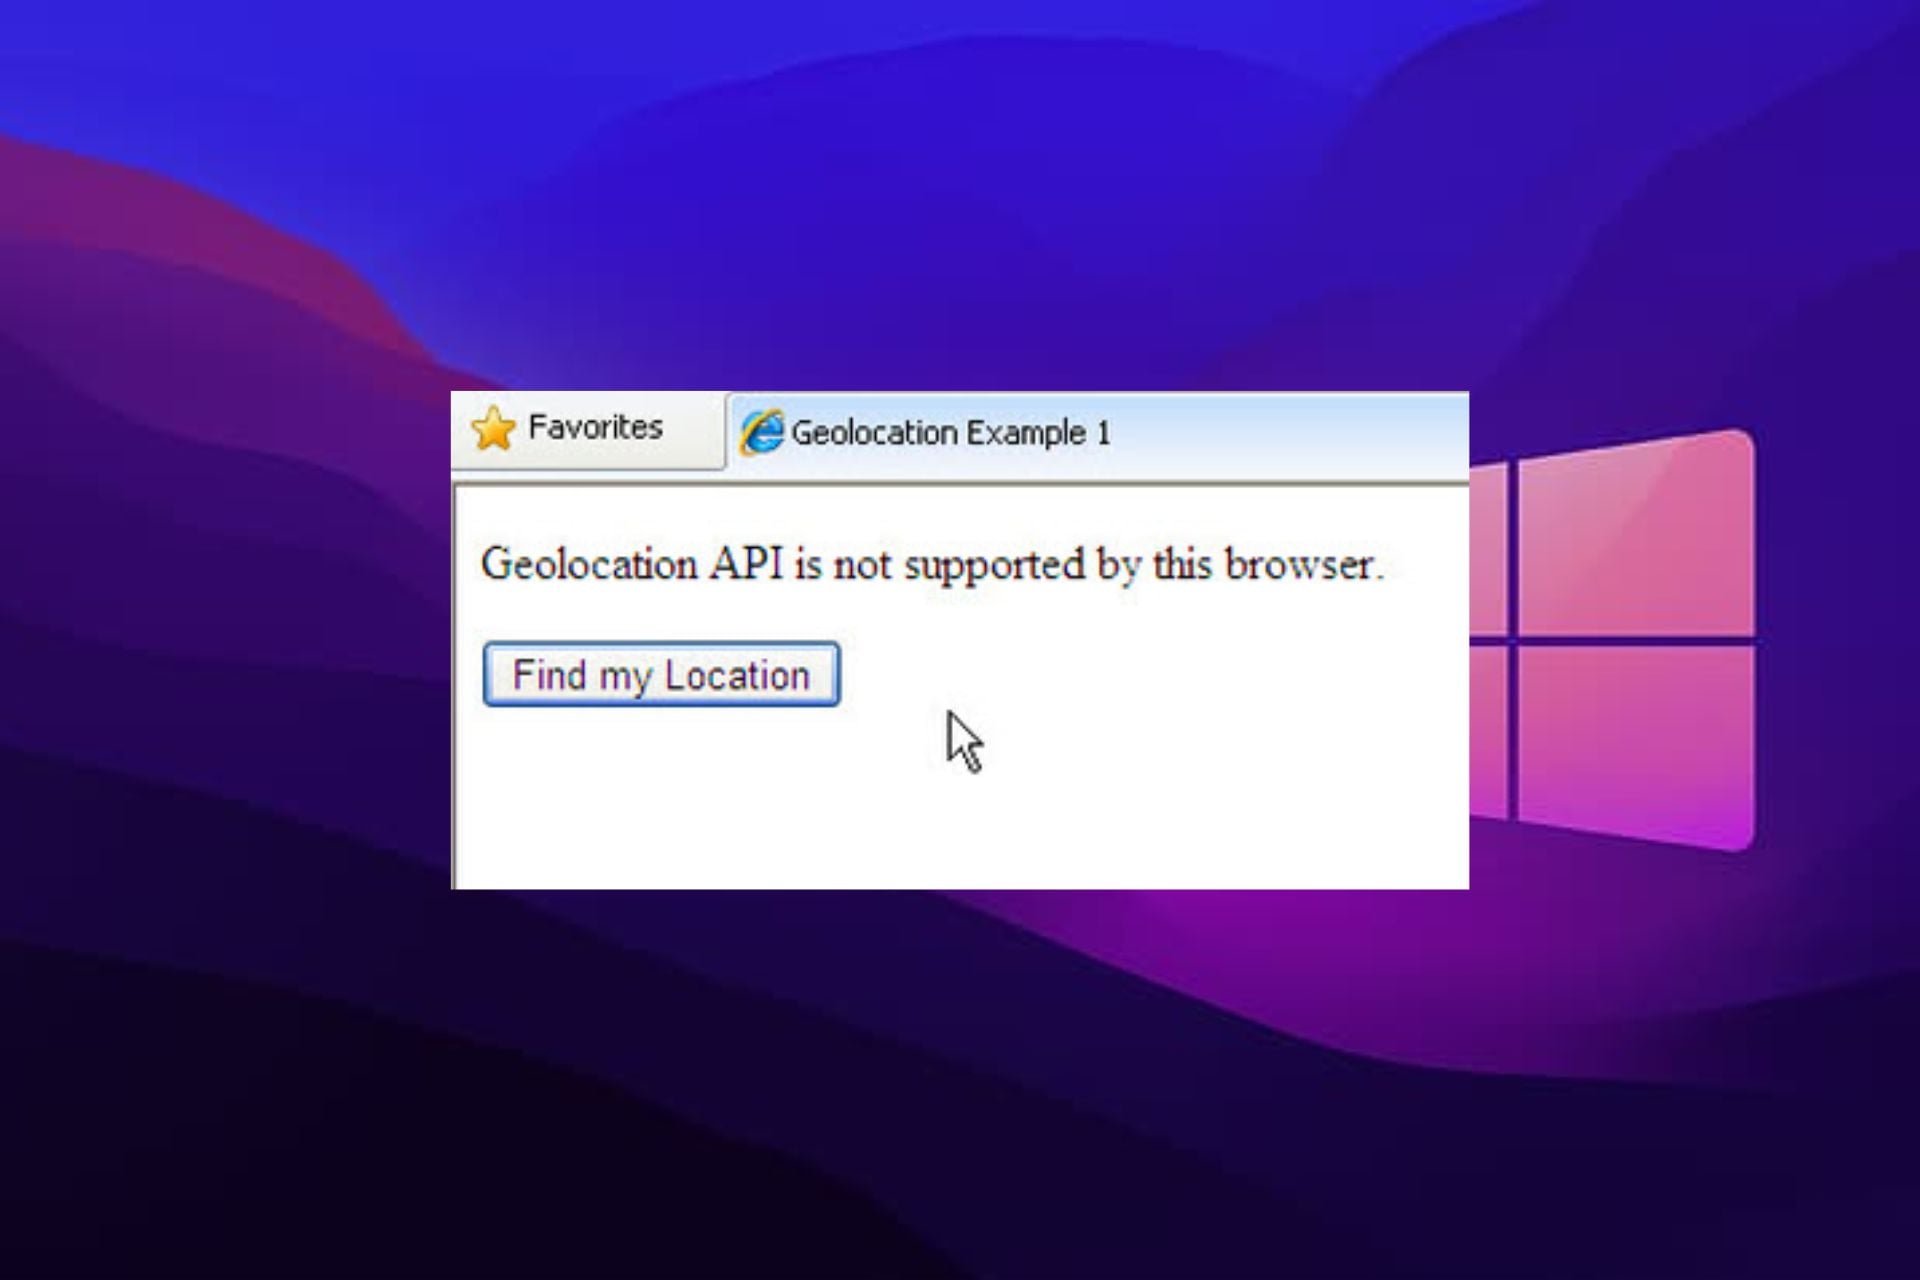
5 Ways to Bypass the Browser does not Support Geolocation Error

How annoyed do you get to see new Windows popping out of nowhere, asking for your location while browsing the internet? However, some people find it normal to allow websites to have their locations.

The new window that pops up is an attempt by the website you are navigating to acquire information about your location. Some browsers give you the option to either allow or deny the location access.

The browser does not support geolocation error is an issue users complain about. Hence, this article will discuss ways to bypass this.

Why is geolocation not working?

1. Geolocation is disabled on your browser

There is a possibility that the geolocation system on your browser is not running, meaning it is disabled. It can cause the current position not working error in Chrome and other browsers.

2. Outdated browser

Most of the issues that affect your browser can occur because it is not up-to-date. Likewise, it prevents it from having the necessary patches it needs to fix the bugs plaguing it. So, running a browser that isn’t up-to-date can cause it not to support geolocation.

3. Location is off on your device

Geolocation can only detect your precise location if the location service on your computer or mobile device is running. To be sure of this, you can check your device settings to see if it is on or not.

4. Third-party app interference

Applications like VPN can cause geolocation issues on your browser. Some VPNs can block websites from accessing your location for some reason. Thus, it can prompt the browser does not support geolocation error.

Furthermore, running an antivirus application on your device can cause a geolocation issue. But, again, it is because it can detect suspicious activity from the client.

Quick Tip:

It’s quite easy to come through this geolocation issue in your browser by choosing the featured one from Opera One.

You can easily bypass geolocation errors on this browser due to its flexible technology, app integrations, or the integrated VPN to switch your servers anytime. Also it comes with it’s own native AI.

Opera One

Never worry about geolocation with this highly secure and customizable browser.
Free Download Visit website

Where is geolocation in the browser settings?

  1. Launch your Chrome browser.
  2. Click on the Menu button in the top-right corner of the screen and click Settings.
  3. Then select Site Settings under Privacy and Security options.
  4. Select Permissions and click on Location from the drop-down.
  5. Toggle On/Off the Ask before accessing the option.

What can I do if my browser doesn’t support geolocation?

1. Adjust the location permission setting

  1. Launch your Chrome browser.
  2. Click on the Menu button in the top-right corner of the screen and click Settings.
  3. Then select Site Settings under the Privacy and Security options.
  4. Select Permissions and click on Location from the drop-down.
  5. Turn on the Sites can ask for your location option.

2. Update your browser

  1. Click the Menu button in the top right corner.
  2. Click Settings, then select Help from the drop-down.
  3. Press About Google Chrome. Chrome will manually check for an update.

Since an outdated browser could cause the browser not to support geolocation, updating it should fix the issue quickly.

3. Turn on your device location

  1. Go to Start on your computer.
  2. Click on Settings and the Privacy and Security option.
  3. Select Location from the option.
  4. Switch the Let apps access your location setting On.

It will give apps access to use your device location and also allow geolocation to navigate your browser.

4. Turn off Windows Defender Antivirus

  1. Click the Start button on your computer.
  2. Type Windows Security in the search box.
  3. Select the Virus & threat protection option.
  4. Click Manage settings, then toggle off the Real-time protection option to turn off Windows Defender Antivirus.

5. Check your internet connection

A poor internet connection can prevent websites from connecting to your location. So, performing a power cycle on your router can fix this.

How accurate is HTML geolocation?

HTML geolocation is more accurate than other location navigators like IP geolocation. Using HTML gives you more precise geolocation. It is easy to understand and best for devices with GPS services.

Consequently, turning on location access for some websites can be dangerous and lead to issues like browser leaks.

These are the best fixes for the browser does not support geolocation error. The location modification settings will likely be the best option from our guide.

In conclusion, we have an article on the best browsers with the highest support for HTML that you can read through. Hence, click on the link above to know more about it.

Windows news recap: Global PC sales fall, Microsoft 365 app support on older Windows being dropped, and more

Welcome back to our Windows news recap, where we go over the top stories of the past week in the world of Microsoft’s flagship operating system.

Global PC sales down, including 12.6% drop in Chromebook sales, says Gartner

According to preliminary data from Gartner, there’s been a large fall in global PC sales, with Chromebooks seeing a particular decrease of 12.6%. The drop in PC sales is being attributed to the conflict in Ukraine, as well as inflationary pressures, and generally lower demand.

Parallels Desktop For Chromebook Enterprise

Microsoft dropping support for Microsoft 365 apps on Windows 7, Windows 8.1 on January 10, 2023

Support for Microsoft 365 apps on several older versions of Windows will cease on January 10, 2023. Affected versions include Windows 8.1, the three-year Extended Security Updates (ESU) paid program for Windows 7 and Windows Server 2008 R2.

Microsoft dropping support for Microsoft 365 apps on Windows 7, Windows 8.1 on January 10, 2023 - OnMSFT.com - July 12, 2022

Xbox Series X|S can now run Windows 98 and classic PC games like Quake, Half-life

Thanks to DOSBox Pure emulator and Retroarch frontend programs, it is now possible to run Windows 98 on an Xbox Series X|S, and subsequently, play classic PC games, such as Quake and Half-life.

That’s it for this week. We will be back next week with more Windows news.

3 Surefire Fixes for the Rec Room Error Code Summer

Rec Room is an excellent online platform built for gamers. It is a complete package where users can interact, play, and create games.

Recently, the users have been complaining about various issues with the Rec Room error code summer, one of the significant problems. This error is devastating as it prevents gamers from accessing the platform.

Like we did with another log-in issue in Valorant’s error 7, we have provided three effective fixes to help solve the problem efficiently in this guide.

Why is my Rec Room showing error code summer? 

The Rec Room error code summer is a temporary issue caused by server downtime. While this is a rare occurrence, it is a well-known culprit.

Another reason for the error code is the interference of antivirus or firewall. 

Lastly, the issue might be due to a technical problem on Rec Room’s part that you can’t trace.

We also have comprehensive guides on how to fix the Rec Room error code Student and Rec Room error code Notebook if you’ve encountered them.

Quick Tip:

The world’s first gaming browser, Opera GX, includes Discord support as well as sidebar integration for fast access to any game room. You just need to log in and search for Rec Room and you are on.

It may also make things easy if one server is down, thanks to the built-in VPN that can change your location. Opera GX Discord integration makes it simple to keep up with chats with online contacts.

Opera GX

Sidebar integration for Discord and quick access for Rec Room and other game-related chats.

How can I fix the Rec Room error code summer?

1. Check Rec Room server status 

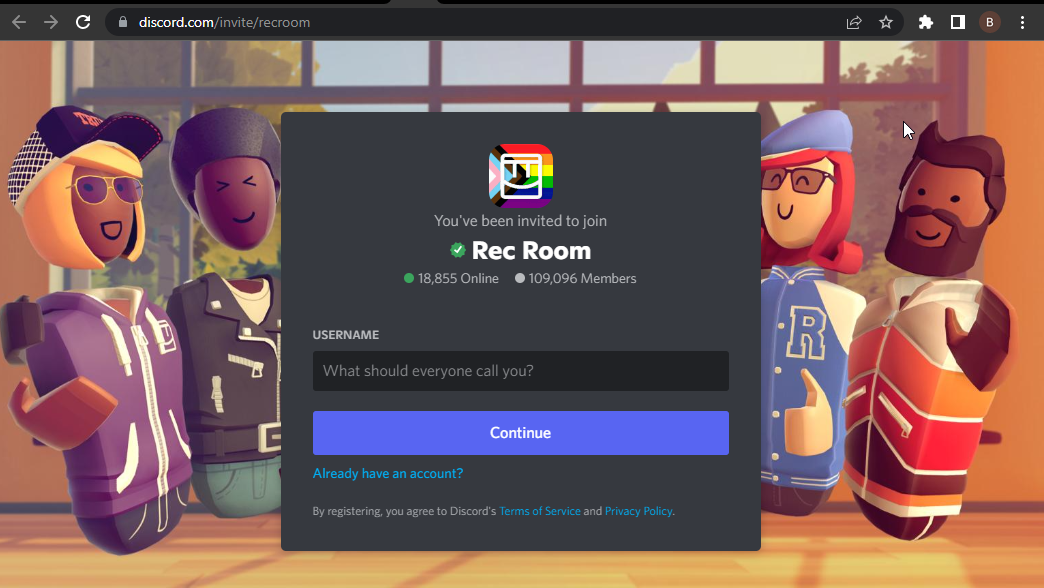
discord

If you see the error code summer when trying to log in to Rec Room, the server is the first thing to check. You can get a live report on the server status from the official Discord channel.

Also, you can check the Rec Room subreddit or the Twitter page for any updates on the server. Unfortunately, if this is the cause of the error code, you have no choice but to wait for it to be resolved.

2. Disable antivirus

If you have an active antivirus or firewall on your PC, it might be blocking Rec Room’s network traffic. In this case, you need to disable the software temporarily to connect to the Rec Room.

After the connection, you can activate it again. However, if the antivirus is too important, you can add an exception for RecRoom_Release.exe on it.

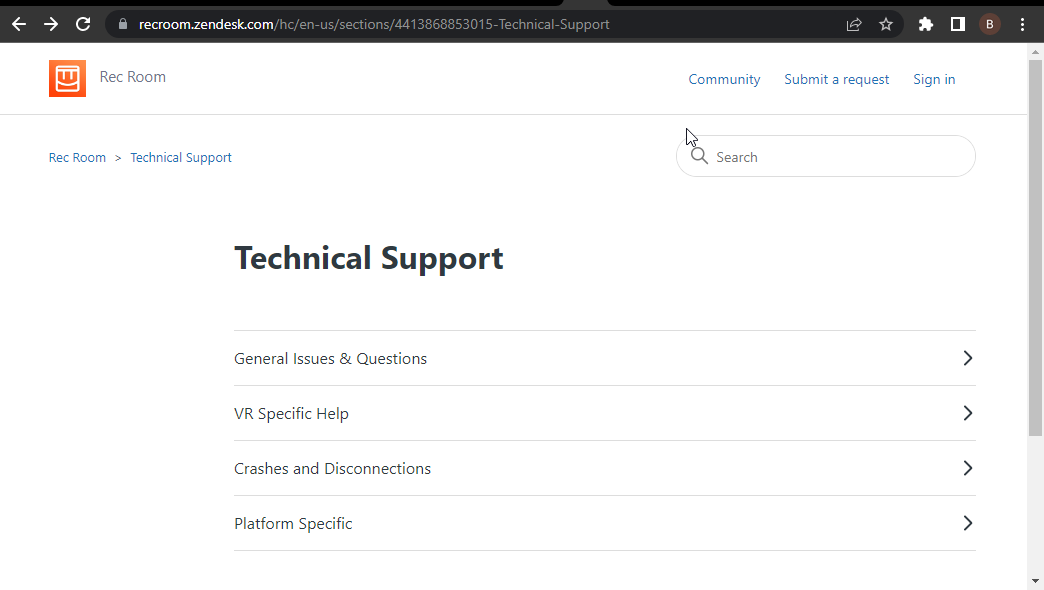
3. Contact support

contact support rec summer room error code

If you still can’t pass the error code, you might need to contact the official Rec Room technical support. This is because the issue might be beyond you and requires the input of an expert.

The Rec Room error code summer can be frustrating as it prevents you from logging in to the platform. Fortunately, it is a temporary issue you can fix in a few steps.

Are you facing issues in other gaming issues like the ESO unexpected internal error? Our article on the topic will show you how to solve the problem quickly.

Feel free to let us know the fix that helped you get back to creating and playing games on Rec Room in the comments below.

5 Best Browsers for Amazon Prime Videos [Streaming Guide]

In determining which browser is best for watching Amazon Prime videos, it is important that you consider important aspects such as speed, battery usage, or support for high-definition.

In general, you can use any browser to watch Amazon Prime, but definitely, the user experience won’t be as good as with a browser that comes with the above-mentioned options.

So, in this article, we will explore some of the best browsers you can use in order to make an informed decision, so make sure to keep reading.

Can you watch Amazon Prime Video on browser?

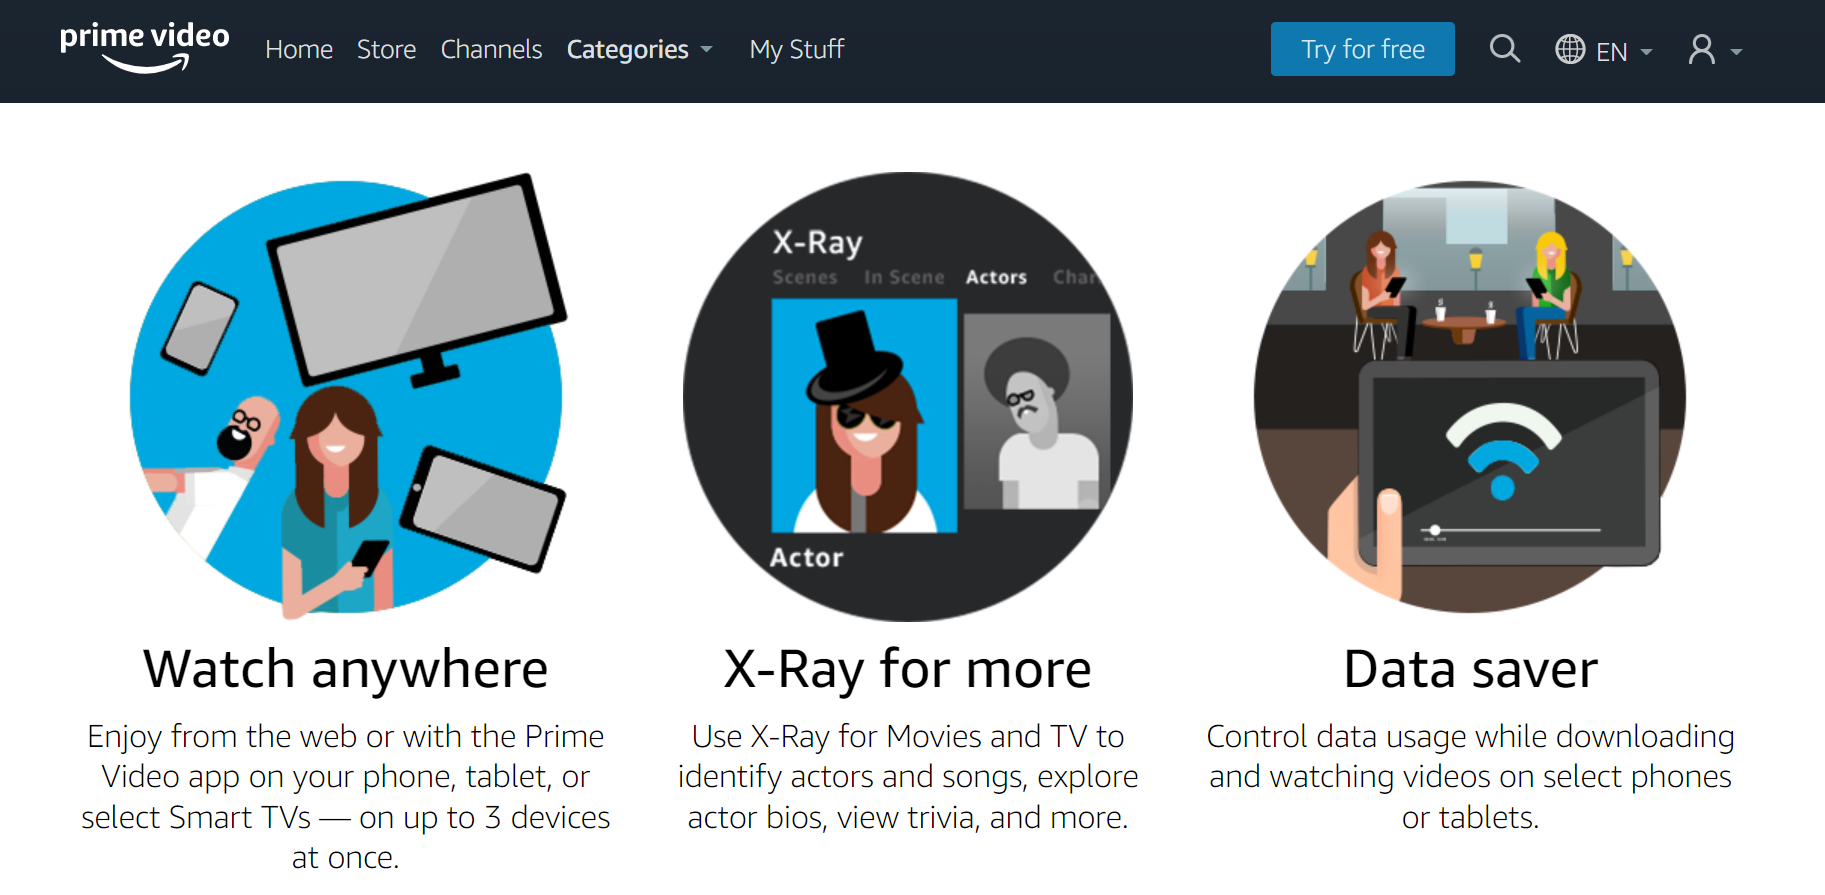
Yes, Prime Video can be accessed on a web browser, and you can easily watch your favorite content. To do that, simply go to Prime Video’s official website, log in with your Amazon Prime credentials, and you are good to go.

Also, Prime Video runs on all major browsers, including Opera One, Chrome, Firefox, Edge, and Safari. In case you face any trouble with it, just install the latest version of the browser.

How do I update my browser for Prime Video?

Almost all the major web browsers have an About option placed under the Help section in the menu, and clicking on it will make the browser automatically download updates. For instance, it’s About Google Chrome for Chrome or About Opera in the Opera One browser.

And, if your browser works fine, it should automatically locate and install the available updates.

Which browser is the best for Amazon Prime?

Opera One – The best streaming experience

Opera One comes with unique video features that are difficult to find in other browsers, which is why it is our first recommendation. It is, undoubtedly, the best browser for Amazon Prime Video.

This browser includes a video pop-out that allows you to move the video from the Opera One page into a separate frame or put it anywhere on the Windows desktop.

Moreover, the turbo mode will save bandwidth when playing videos and speed up your browsing.

This browser comes with a built-in VPN and an ad-blocker that will ensure your online privacy and that you won’t be bothered while watching Amazon Prime videos by annoying commercials.

UR Browser – Lightweight and quick

UR Browser is one of the best browsers to watch online videos, and it has definitely not gotten the deserved praise and attention.

This is a great browser for watching videos on websites, thanks to the fact that it is based on the same Chromium engine as Chrome and Chromium-Edge.

The HTML5 support is comparable with Google’s browser. Moreover, you can utilize Chrome’s video extensions to customize the playback on any website you want.

Additionally, UR Browser comes with a built-in VPN that will allow you to watch content with geographical restrictions.

Edge – Offers decent streaming

Although Edge is included with Windows 10 and is overlooked by many users in favor of other alternatives, this is one of the best browsers to use for playing Amazon Prime videos.

This is the only browser that supports all HTML5 video and audio codecs. Moreover, it is the only browser that can also play 4k resolution videos, thanks to the PlayReady DMR tech.

Edge provides the most battery-efficient video playback on laptops, so you won’t find it as often with a low battery as you would when using other browsers.

Furthermore, you can add Chrome’s YouTube extensions thanks to the existence of the Chromium engine.

⇒ Get Edge

Google Chrome – Streams videos without lag

Google Chrome is one of the most used browsers out there. It is the perfect choice for most things, including being the best browser for Prime Video.

It provides extensive HTML5 support and also incorporates the latest web technologies to ensure a high-quality video playback.

Moreover, Google Chrome is one of the fastest browsers for streaming videos. You can also add any YouTube video extension wanted, such as Magic Action, YouTube Plus, and many more.

With this browser, you can be certain that the streaming will work perfectly and no lag will occur.

⇒ Get Google Chrome

Mozilla Firefox – Advanced and feature-loaded

Mozilla Firefox continues to be a major player in the web browser realm and is also one of the first choices for playing Amazon Prime videos.

Thanks to the Refined Prime Video extension that you can install on Mozilla Firefox, your video experience will be improved significantly.

Thanks to this extension, any previous technical issues that were happenings are solved, and you’ll be thrilled to have used this browser.

Moreover, thanks to the built-in privacy option, Mozilla Firefox is also a safe browser to use that will ensure all your data is protected.

⇒ Get Mozilla Firefox

Which browser is better for streaming video?

All the five browsers listed here would work fine to stream videos, but if you are looking for the best one, we recommend Opera One.

Videos stream without lag on Opera One, even with a decent Internet plan. Additionally, the built-in VR 360 player simply revolutionizes the experience. Besides, the wide range of extensions allows users to modify how Opera One functions and enhance the streaming experience.

These were the best browsers for Prime Video. As you can see, there are some fantastic options to choose from. Also, discover the best browsers for streaming Netflix on your computer.

Please let us know in the comments section below which one you have tried. We would love to hear your thoughts.

Fix: Could Not Move Extension Directory into Profile

Chrome is known for the huge number of extensions it supports. The Google Chrome store is flooded with extensions/plugins across every category.

While installing and using plugins is pretty easy, there are cases where things can get a bit ugly. This is one such case where Chrome users are not allowed to install the browser extension, the following error message appears: Could not move extension directory into profile.

It is most likely to happen when one is reinstalling an old extension. What happens, in this case, is that the browser is not able to move the extension into the profile folder.

Where are Google Chrome extensions stored?

When Chrome extensions are installed, their contents are extracted and placed in the Extensions folder, which can be found at: C:\Users\user_name\AppData\Local\Google\Chrome\User Data\Default\Extensions

extensions could not move extension directory into profile.


Each extension will have its folder titled after its ID, which will be used to store the extension.

How do you move an extension?

To copy an extension, you can right-click on the extension folder and copy it. Then you can paste it inside other Chrome profile folders to have the same extension.

To completely move the extension, you can follow the same procedure, but instead of copying it, you can cut it.

Could not move extension directory into profile message can prevent you from installing new extensions. Speaking of this issue, here are some similar problems that users reported:

  • An error has occurred could not move extension directory into profile. Reload close – This issue can occur due to certain glitches in Chrome. To fix the problem, just restart Chrome or rename its Default directory.
  • Google Chrome could not unzip extension – This is a similar issue, but you should be able to fix it using the solutions from this article.
  • Chrome could not move extension directory into profile – This is similar to the issue above

This being said, let’s jump into the list of solutions you can implement and fix the Could not move extension directory into profile issue. Follow along!

How do you fix an error has occurred could not move extension directory into profile?

1. Restart your browser/PC

restar pc could not move extension directory into profile.

Sometimes these types of problems can appear due to temporary glitches, and one way to fix them is to restart your browser or your PC. If glitches occur, just restart your browser and check if that helps.

If the issue is still there, restart your PC and check if the problem is still present. This is a simple solution, but several users claim that it works, so you might want to try it out.

2. Try another browser

While you are busy troubleshooting Chrome’s extension issues, you may need to use a different browser in the meantime. As such we suggest you choose Opera One as an alternative.

It is made using the Chromium engine, meaning any Chrome extension that exists is also compatible with Opera One.

More so, it is highly customizable, allowing you to easily add and arrange the extensions in your sidebar in whatever manner you need. This ultimately makes it easy for adding and removing them to and from your profile.

Opera One

Relish impressive UI customization features, including the ability to arrange your extensions to better suit your needs.

3. Disable your antivirus

  1. Right-click on the antivirus icon from your Taskbar and click on the Disable for 10 minutes option.avast-shield-off could not move extension directory into profile.
  2. No matter what antivirus software you are using, the steps will be similar.

In some rare instances, it’s possible that your antivirus is causing Could not move the extension directory into profile message. To fix this problem, it’s advised to disable certain antivirus features and check if that helps.

If the issue is still there, you might have to disable your antivirus altogether. In some rare cases, you might even have to remove your antivirus in order to fix this problem.

If removing the recurring antivirus does the trick, you should consider switching to a different antivirus solution.

Nonetheless, after installing a compatible antivirus tool run a full PC scan to comprehend security, privacy, and identify potentially unwanted programs.

4. Clear your cache

  1. Tap the Windows key, then write Chrome and click the first result to open the browser.chrome-search twitch extensions not working
  2. Now use the following keyboard shortcut to open the Clear browsing data menu: Shift + Ctrl + Delete. Select All time as the time range.all-time-chrome images not loading in chrome
  3. Next, checkmark the Cookies other site data and Cached images and files options.cookies-and-cache-chrome images not loading in chrome
  4. Lastly, click Clear Data.clear-data images not loading in chrome

Cookies are little text files that are generated by websites that you visit. They make your time spent online more convenient by preserving the info you browse with.

When you return to a website, the cache will remember specific elements of the page, such as photos, which will allow the pages to load more quickly.

After clearing the cache, check if the problem is still there. In addition to clearing the cache, we recommend using CCleaner to remove the junk files from your PC, so you can do that as well.

Sometimes you might fix Could not move extension directory into profile error simply by clearing the cache, so be sure to try that.

5. Empty the Recycle Bin

According to users, they managed to fix Could not move extension directory into profile in their browser simply by emptying the Recycle Bin.

Several users reported that the issue was completely resolved after cleaning the Recycle Bin, so you might want to try that.

Once you clean your Recycle Bin, the issue should be completely resolved, and you’ll be able to install extensions once again.

6. Create a new Default folder

  1. Press the Windows key + R, enter %localappdata%, and press Enter or click OK.run-local-data could not move extension directory into profile.
  2. Navigate to the Google followed by Chrome and User Data directories.google-directory could not move extension directory into profile.
  3. Locate the Default directory and rename it to Default-backup by clicking once on it.default-backup could not move extension directory into profile.
  4. Now cut the folder by right-clicking on it and tapping on the scissor icon, then paste it somewhere else. Restart Chrome to automatically create a new Default folder and check whether the error is gone.

Once you rename the directory, Google Chrome should recreate it and the Could not move extension directory into profile error will be resolved.

7. Remove the problematic extensions

  1. To fix the Could not move extension directory into profile, open a new Chrome window and click on the three-dot menu followed by More tools and Extensions.extensions-chrome your connection was interrupteda network change was detected. err_network_changed
  2. Lastly, click on the toggle button under your extensions to turn them off.disable-ext your connection was interrupteda network change was detected. err_network_changed

After disabling all extensions, check if the problem is still there. If the issue doesn’t appear anymore, you need to enable extensions one by one until you find the one that is causing this issue.

Once you find the problematic extension, keep it disabled or remove it from Chrome. Many users reported that the HTTPS Everywhere extension was causing this issue, so if you’re using it, be sure to disable it and check if that helps.

8. Reinstall Google Chrome

Sometimes your installation might get corrupted, and that will cause this and many other errors to appear. To fix the issue, users are suggesting reinstalling Google Chrome.

There are several ways to do that, and the most effective one is to use uninstaller software, that removes required files and all cache stored.

In case you’re not familiar, uninstaller software is a special application that will completely remove the selected application along with all of its files and registry entries.

By using uninstaller software, you’ll completely remove Chrome from your PC ensuring that there aren’t any leftover files. Now you just need to install Chrome again and the issue should be resolved.

What to do if I could not move extension directory into profile on Mac?

In the case of Mac users, you can apply all of the above methods to your device. However, if you keep getting Could not move extension directory into profile message, the issue might be related to your version of Chrome.

Although Chrome is a great browser, issues can sometimes appear, and the best way to fix them is to keep your browser up to date.

If your browser is already up to date, we advise you to try Chrome Beta or Chrome Canary. The Beta version usually offers new fixes, and it’s stable for use, for the most part, so you might want to try it out.

On the other hand, the Canary version is an experimental version, and it usually has the latest fixes available that aren’t fully tested.

As a result, the Canary version might not be stable, but it should have the latest fixes installed. To download and install the latest Chrome version, check our Google Chrome installation guide.

Could not move the extension directory into profile message can cause many problems and prevent you from installing extensions in Chrome, but we hope that you managed to fix this problem by using one of our solutions.

Don’t hesitate to leave a comment in the section below and share your thoughts with us. Thanks for reading!

3 Best Browsers To Watch Vivamax On Your PC

Vivamax is an online platform to stream Filipino classics and blockbuster movies, and bench popular television series. Users only need to purchase a single subscription to enjoy all the Pinoy entertainment.

Streaming on Vivamax allows users to catch the premiere of originals and exclusives weekly. In addition, the platform includes Korean, Asian, and Hollywood genre movies with optional Filipino audio.

You can access Vivamax on your web browser without any additional software. All you need to do is open and log in to Vivamax.net and start watching.

So in this post, we have compiled a list of the best Vivamax browsers to use in 2022.

Where is Vivamax available?

Vivamax is currently available in 71 territories. These include the USA, Canada, Hawaii, Guam, middle-east countries, etc. It aims to be accessible to every Filipino around the world.

To use Vivamax, users can directly log in to the website or download its application from the Google Play Store or the Apple app store.

How do I watch Vivamax online?

You need to create an account on Vivamax and choose your subscription to enjoy watching various movies and originals. Once you purchase a subscription, log into your account and watch your favorite movies.

For only PHP 149/month, you may enjoy content from different categories produced by Vivamax and content from its local and worldwide partners. Stream as much as you want.

What are the best browsers for Vivamax?

Opera One – Save and collect web content easily

If you want something as lightweight yet speedy as your Vivamax browser, Opera One is the way to go. This Chrome-powered browser is frequently considered a more sophisticated version of Google Chrome.

One of its distinguishing features is a hotlist that functions as both a web directory and a bookmark file. It may, however, be easily removed based on the user’s preferences.

Aside from that, one of Opera’s features is keyboard and mouse controls. Many plugins are also available, including RealAudio, RealVideo, and ShockWave.

Opera One

Don’t miss any Filipino classics with this fully integrated browser that ensures your Vivamax shows.

Google Chrome – Sync with Google services and accounts

Chrome is one of the most popular Vivamax browsers globally. It provides a refined and private surfing experience and a number of add-ons, privacy settings, as well as a simple user interface.

Because Chrome is cross-platform, it is convenient to sync data across all of your devices. It provides a variety of add-ons to make your browsing experience more convenient.

The Chrome browser uses AES-256 encryption standards to secure local passwords and cookies. It also makes use of the data protection API integrated into the operating system to handle encryption sources.

⇒ Get Google Chrome

Microsoft Edge – Simple privacy controls

vivamax browser

The Edge browser is now offered as an alternative to Internet Explorer. It contains a variety of features and perks that make it a viable alternative to major browsers such as Chrome and Firefox for browsing through Vivamax movie list.

The browser is strong, with built-in anti-phishing and malware protections making it one of the best Vivamax browsers. It now includes password encryption stored in the OS storage space.

Microsoft also improved the browser’s gaming capabilities by adding a customizable gaming home page. It includes exclusive Xbox features and selected content to enhance the gaming experience of users.

Many users have complained about Microsoft Edge keeps crashing error. If you’re among those, read this post to fix it.

⇒ Get Microsoft Edge

Can I watch Vivamax offline?

You can save your data by downloading Pinoy titles on your device. Further, you can watch them offline anytime, anywhere.

You can watch new titles and Filipino-made Originals exclusively on Vivamax. Access the most extensive library of Filipino content with no ad interruptions.

These were the best Vivamax browsers. Among the above-mentioned, Opera and Chrome are the two most recommended browsers you can try.

If this guide was helpful, do let us know in the comments below.

PayPal Bitcoin Scam Email: How to Protect Yourself from It

Scammers are active now more than ever, and they are trying everything they can in this digital world to lure innocent people into handling their personal information so that they can extract money from them.

Although the current state of Bitcoin is not beneficial or interesting, for scammers, it simply doesn’t matter.

You will find several user reports regarding the PayPal Bitcoin scam email on Reddit and official forums. Reportedly, people receive an email saying that they have purchased some amount of Bitcoin and the amount has been debited from their account.

Then there is an attachment or link given in the email, which the users are asked to click or open to check the details. As soon as they click on the link or download the attachment, their PC is injected with a virus and all of your personal data is locked behind a paywall.

This is just one of the many different ways scammers are trying to extract money from PayPal users. In this guide, not only will you learn about this PayPal Bitcoin scam email in-depth, but we will also give you a list of solutions that you can follow to safeguard yourself from such scams.

What is the PayPal Bitcoin scam email?

According to user reports, the PayPal Bitcoin scam email will arrive in your inbox with the subject line having an invoice number, your name, etc. Again, this is just one of the most common examples that have been reported by users. The PayPal Bitcoin scam email that you receive could be in a different format.

The fake email will contain a fake invoice, with the details of the purchase of the Bitcoin. However, do note that although the invoice generated is fake, clicking on the link or attachment might actually transfer payment from your PayPal account to theirs.

As reported by one user, here is a good example of a PayPal Bitcoin scam email:

Thank You for choosing Paypal for placing your Order BITCOIN.
Your order has been successfully placed.
The Payment will be shown soon within the next 5 to 10 hours on PAYPAL
PRODUCT INFORMATION
Memo Id: CAFV365BNA
Item Name: BITCOIN (BTC)
Order Placed Date: 28th JAN 2021
Receiving Date: Day After Place The Order.
Price: 457.25 USD
Charge Mode: PAYPAL

If you Wish to Cancel then please feel free to contact our Billing Department as soon as possible.
You can reach us on: ###########

Some users have reported that when they try to contact the number given in the fake email, the fake customer support member asks them to install software on their PCs.

As soon as you install the software on your PC, you will give access to the scammer, and all of your personal files will be locked behind a paywall, and they will start asking for money in order for you to gain back access to your files.

In the next section, you will learn how you can spot fake emails or messages.

Quick Tip:

To protect yourself against fraud and phishing, we suggest a bulletproof solution. TotalAV’s anti-phishing technology is all about preventing and protecting against zero-day attacks.

They were the first to uncover these phishing attacks on PayPal, thus they developed the most complete anti-phishing solution for emails.

TotalAV

Advanced prevention and protection to keep you away from PayPal phishing attempts.
Free Trial Visit Website

How to identify fake PayPal Bitcoin email?

1. Impersonal greetings

PayPal Bitcoin scam email will always come with generic greetings. Some examples of impersonal greetings are Dear user, Hello, PayPal member, Hello, etc.

If you did not know, then you should now know that every email from PayPal will always use the full name as listed and registered in your PayPal account.

If the email you received comes with any of these impersonal greetings, then you can now understand that the email is fake and is not an official email from PayPal.

2. The email contains an attachment

While official PayPal emails can also contain an attachment, you should not open the attachment linked to an email, unless you are 100% sure that it is from a legit source.

You can go through the above steps to identify fake emails, and the below-mentioned tips will also help you detect fake emails.

3. Contains fake URL

The PayPal Bitcoin scam email that you will receive has a high probability of containing a URL inside it. The scammer will tell you that you need to click a URL to verify your account or purchase.

But before you do that, it is very important to check if the URL is redirecting your official PayPal website or not.

You can easily check it by hovering your mouse cursor over the URL and checking if the URL is redirecting you to a legit website or not.

4. Asks for sensitive info

If the email you have received asks for information such as your credit or debit card number, phone number, or any other account-related information, then this is a red flag.

PayPal will never ask its users for their personal information, let alone sensitive information as mentioned. If the email asks for sensitive information, then you need to stay away from it.

5. Grammatical mistakes

Another super easy way of identifying a fake email is by checking its grammar. Note that an official email will not only have professional greetings but will also be grammatical error free.

If you spot typos, spelling errors, or grammatical mistakes, then understand that it is a fake email, and you should simply delete or report the email spam.

How can I protect myself against the PayPal Bitcoin scam email?

1. Send the email to the PayPal team

  1. Forward the entire email to [email protected].
  2. Do not alter anything in the email that you have received, including the subject line and the message or the attachment.
  3. Once you have sent the entire email to PayPal as it is, delete it from your inbox.

Phishing is an illegal way of getting sensitive information and then using it to manipulate users into giving away their money.

If you ever receive a spoof or fake email just like the PayPal Bitcoin scam email, then you can follow the steps above and send the email to the PayPal team that will track down the activity and will help you protect your account.

2. Don’t rely much on HTTPS

A hacker, by definition, will try to cover as many bases as possible.So, you shouldn’t be surprised to see the website or attachment in the email having HTTPS in it.

An HTTPS certificate doesn’t always mean that the website is legit. Anyone can create an encrypted website and spoof you into believing that it is an official website.

Do your research, and follow the tips above to detect fake emails. And if you aren’t sure about it, you should simply ignore the email.

3. Search for the URL manually

In the event that a URL is mentioned in the PayPal email that you have received, one trick of verifying if the URL mentioned is a legit one is to search for it manually.

If it says that you need to verify your account or purchase, then it is 100% that that information or notification will be available on your personal PayPal account page as well.

Type the official website by yourself, and see if there is any such information available or not.

4. Contact PayPal through the Contact page

In order to make the email look legit, scammers will also include certain phone numbers in the email, making you believe that it is PayPal’s customer care number.

But, you should never contact the number given in such emails. If you wish to contact PayPal customer support, then you can visit the official Contact page of PayPal in the Help Center or use PayPal customer care number 1-888-221-1161.

5. Run a PC scan

antivirus scan

If you opened a link or downloaded the software attached to the fake email, then your PC is at a high risk of being attacked by scammers.

In such a case, you should immediately run a virus scan on your PC. You can also update your computer’s security software.

If you haven’t installed an antivirus on your PC, then you should definitely do it. In case you are confused, you can check out our dedicated guide that lists some of the best antivirus software for Windows PC.

6. Contact customer support

Our advice when you receive an email from PayPal and you have doubts regarding it should be to simply contact customer support.

You can connect with PayPal customer support via phone, email, or message and tell them about the email that you have received.

Customer care will help you by letting you know if there was any transaction done on your account as mentioned in the email or not. You can also ask active community members for a resolution.

Well, that’s it from our side in this guide. We have tried to give you all information regarding the PayPal Bitcoin scam email that several users have reported.

Following the tips mentioned in this guide, we hope that you will now be able to identify a fake email and protect your personal information from scammers.

Let us know in the comments below if this guide helped you in any way, and also do let us know if you have ever received a fake PayPal email or not.

3 Quick Ways to Fix Sundance Now if It Won’t Stop Buffering

If you’re a Sundance Now subscriber, you know what it’s like to be stuck in an endless cycle of buffering just when you are in the middle of an interesting watch.

The Sundance Now app is a streaming service that allows you to watch popular shows on your Apple TV, Roku, Amazon Fire Stick, and more. It is free to download and offers you several free movies and TV shows to stream.

Sundance Now has a variety of shows, but sometimes, it can be frustrating when you are interrupted often. 

You can choose to troubleshoot the error or choose streaming software to make your experience a little more bearable.

Why is my Sundance Now not working? 

There are a few reasons why your Sundance Now is not working. Some of the reasons include:

  • Server issues – If you are having trouble accessing Sundance Now app, it may be due to an outage or server problem. It could be that there is an error with the service. If this is the case, then you should check the website for an update on the issue. 
  • Inadequate bandwidth – The bandwidth required by the Sundance Now app depends on the number of devices streaming simultaneously. If you have multiple devices streaming all at once, you may end up with buffering issues or a Sundance Now error fetching video.
  • Outdated flash player – If you are using a browser to stream Sundance Now, you may experience buffering issues if your Adobe flash player is not up-to-date.
  • Poor internet connection  – Sometimes, the Sundance Now app is just not working because of a poor connection. To ensure your internet connection is working correctly, try watching a video on another device and see if it plays smoothly.

What causes buffering problems? 

The most common cause of buffering problems is slow speeds. The slower your connection, the more likely you’ll experience buffering. 

Another common cause of buffering problems is congestion on the internet itself. If too many people are trying to access the same thing simultaneously (such as a video), it can slow down everyone else’s experience. 

With multiple devices running simultaneously,  there may not be enough bandwidth available for all of them to run smoothly at the same time.

How do I fix Sundance Now if it keeps buffering? 

1. Check your internet connection

The first thing you want to do is make sure that your internet connection is stable and running at optimal speeds. If it’s not, you won’t be able to stream shows without issues. You can use an internet speed tester to test your internet connection to ensure optimal speeds. 

Additionally, you’ll also want to make sure that you have a wired connection if possible. Wi-Fi can be much slower than wired connections in general and cause issues with streaming services like Sundance Now.

2. Change quality settings

When too many people are using the internet, you may want to adjust your quality settings to accommodate everyone and stop the buffering.

If you had set the video to stream in 4K or HD, change the quality setting to a lower resolution, say 480p and reload the page. If it’s still not working properly, try lowering the quality again until it works.

3. Upgrade your router

If you have an older router, it may not be able to handle streaming HD videos. Many older routers simply don’t have enough processing power to handle streaming videos and other online activities.

A good rule of thumb is to replace your router every few years as technology advances and demand for more bandwidth increases. You can check out our recommended selection of routers with stable internet connection if you are in the market for one.

What’s the difference between Sundance and Sundance Now? 

Sundance or Sundance TV is a pay TV package where you can access live TV and all the other shows. You would basically be paying for a package for cable TV.

When it comes to Sundance Now, is a subscription-based streaming service that features dramas, documentaries, comedies, and more. The platform offers access to the complete library of shows you love and exclusive content.

The main difference is that for Sundance Now, you get access to exclusive content, which may be cheaper since you are not paying for cable TV. Since Sundance is available as a national network cable channel, some content must be edited to adhere to certain standards.

Can I watch Sundance Now on my smart TV?

Yes, you can. You can download Sundance Now on your smart TV from the Google Play Store or App Store on Apple, depending on your TV’s OS. Download the Sundance Now app on your smart TV, log in to your Sundance Now account, and start watching.

We hope you have been able to fix any issues with Sundance Now buffering and are back to enjoying uninterrupted streaming.

You may also encounter an issue where Hulu keeps buffering but worry not, as we have adequately covered how to fix the problem.

We also have an excellent recommendation of browsers without buffering if you don’t want to download the standalone app.

Let us know of any other workaround you have successfully tried in the comments section below.

Netio.sys Blue Screen on Windows 11: How to Fix it

The netio.sys blue screen in Windows 11 is a familiar issue users face after installing the latest updates. When this error occurs, your system screen will turn blue and reboot or crash unexpectedly. It is an irritating error code that shows on your screen with some confusing warnings.

This error mainly occurs if the recently installed update file is corrupted. However, there are many other reasons this might happen.

So in this post, we have compiled a list of some troubleshooting methods that may help you fix this issue.

What is Netio.sys?

Netio is a utility that measures a network throughout the TCP/IP. Netio.sys on the other hand is a BSoD error that appears along with several different error messages on your device.

Some of the error messages users generally receive with Netio.sys Blue Screen on Windows 11 are:

  • PAGE_FAULT_IN_NONPAGED_AREA – This indicates that invalid system memory has been referenced. Typically the memory address is wrong or the memory address is pointing at freed memory.
  • SYSTEM_THREAD_EXCEPTION_NOT_HANDLED – This error code indicates that a system thread generated an exception that the error handler did not catch. To interpret it, you must identify which exception was generated.
  • DRIVER_IRQL_NOT_LESS_OR_EQUAL – This error implies that your computer is unable to identify or point out the particular driver that is using an improper address. It usually occurs due to faulty, improperly configured, or corrupted drivers and it shows as a blue screen of death.
  • IRQL_NOT_LESS_EQUAL – This error means that something is wrong with a device driver, your device’s memory, or antivirus software on your device.
  • SYSTEM_SERVICE_EXCEPTION – It indicates that an exception happened while executing a routine that transitions from non-privileged code to privileged code.
  • KMODE_EXCEPTION_NOT_HANDLED – This error occurs in Windows 10 when the different applications overwrite each other’s memory. It can crash the software and the operating system.

If you have received any of these above messages on your device, then try these troubleshooting methods mentioned below to fix the netio.sys blue screen in Windows 11.

How do I fix Netio system blue screen?

1. Restart your device

  1. Press Windows key + F4 to open the Shut Down Windows dialog box.
  2. Select Restart under What do you want the computer to do.
  3. Click on OK to restart your device.
    netio.sys blue screen windows 11

Restart your device before starting with the troubleshooting methods mentioned below to solve this issue. In addition, restarting your device helps get rid of minor bugs and errors.

2. Run SFC Scan

  1. Click on Start and search for Command Prompt.
  2. Click on Run as Administrator.
    Open CMD
  3. Type the following command and press Enter:
    sfc/scannow
    netio.sys blue screen windows 11
  4. Restart your device and check if this error is fixed.

Corrupted files on your device can also be responsible for netio.sys blue screen in Windows 11. Run SFC or System File Checker scan to get rid of these corrupted files.

Several users complain about the fact that they are unable to run SFC scan on their device. Rest assured that our guide shows you what to do in case that happens.

3. Run a DISM scan

  1. Click on Start and search for Command Prompt.
  2. Click on Run as Administrator.
  3. Type the following command one by one and press Enter:
    DISM /Online /Cleanup-Image /CheckHealth
    DISM /Online /Cleanup-Image /ScanHealth
    DISM /Online /Cleanup-Image /RestoreHealth

    Restore health
  4. Restart your device and check if the error message still appears.

System image corruptions are also known to cause netio sys bf02 issue in Windows devices. Running a DISM Scan will find and repair system image corruptions.

4. Disable third-party antivirus

Uninstall Antivirus

The Netio.sys blue screen in Windows 11 can also occur due to third-party antivirus software installed on your device. Disable the antivirus program and check to see if the problem has been resolved.

If deactivating the software does not work, temporarily remove the antivirus software and review for the same.

5. Run CHKDSK Scan

  1. Click on Start and search for Command Prompt and select Run as Administrator.
  2. Type the following command and press Enter:
    CHKDSK C:/f/r/x
  3. The command won’t start running as your device’s root drive is already in use. Instead, it will ask you to begin scanning when you restart your PC.
    netio.sys blue screen windows 11
  4. Type Y, press Enter and then reboot Windows.

CHKDSK is a Windows program that checks and resolves system problems. It verifies that the file’s size, location, and other details match the data on the hard disk. It also checks to see if any areas of the hard disk are corrupted, which might be the source of the problem.

6. Update the Network Adapter

  1. Press Windows key + R to open the Run dialog box.
  2. Type devmgmt.msc and hit Enter.
    Devmgmt
  3. Expand the Network adapters section to see the list of adapters on your device.
  4. Right-click on your Network Adapter and select Update driver.
    netio.sys blue screen windows 11

The netio.sys blue screen in Windows 11 can also occur due to outdated or corrupt network drivers. It’s critical to keep network drivers and adapters in good working order. They’re responsible for connecting your device to the internet.

To resolve this concern on your PC, you can employ driver updating software that will scan your system and detect all outdated drivers to fix them in minutes.

⇒ Get Outbyte Driver Updater

7. Clean Boot your PC

  1. Click on Start, search for system configuration and open it from the search results.
  2. Navigate to the General tab and check the Selective Startup and Load System Services options under it.
    Clean boot General
  3. Now navigate to the Services tab and check the option Hide all Microsoft services.
  4. Now click on Disable all at the bottom right corner and click on OK to save the changes.
    netio.sys blue screen windows 11

Windows will now start with a minimum set of required drivers and programs by performing a clean boot. It will ensure if a third-party or background program is causing netio.sys blue screen in Windows 11.

Many users have also complained about the Netio.sys BSOD Windows 10. If you’re among those, read our post to fix it.

8. Run System Restore in Safe Mode

  1. Long press the power button until the Automatic Repair message appears.
  2. Navigate to Troubleshoot, followed by Advanced options, and select Open System Restore.
    sys-res
  3. Now, select your username and enter your password.
  4. Click on Next, and select a restore point before the Netio.sys BSoD error started. 
  5. Now follow the instructions on the screen to restore your PC.
    sys-restore-next

Changing your computer’s settings or switching on a function can be why netio.sys blue screen in Windows 11 occurs. You’ll have to restore these settings to default to fix this BSOD error.

9. Reset your device

  1. Click on Start and go to Settings.
  2. Next, click on Windows Update and select Advanced Options in the right pane.
  3. Scroll down and click on Recovery.
  4. Finally, click on Reset this PC and follow the instructions on the screen.
    netio.sys blue screen windows 11

If none of those mentioned above steps solved your problem reset your Windows 11 device. Sometimes there is a problem with Windows core files that you cannot verify manually.

This was how you can fix netio.sys blue screen in Windows 11. If the troubleshooting methods didn’t solve this error, try reinstalling Windows. But this should be only a last resort.

If you still have any issues, feel free to drop a comment below. We’re eager to hear from you.

3 Best Browsers To Watch Sonyliv On Your Devices

SonyLIV is a popular over-the-top streaming platform for watching quality shows and programs. It has made a name for itself in streaming the most-followed events, as it is used to watch the Champions league online on PC, among other programs.

While it has a mobile app that you can download on the various app stores, it still does not have a PC version. This leaves users only the option of using the online version on browsers.

Thankfully, the web version of SonyLIV is stunning in itself. When paired with an equally top-notch browser, the result is a lightning-fast, high-quality stream with no lag.

This guide contains the three best browsers you can use to watch SonyLIV on different devices.

Can I watch SonyLIV on my laptop?

SonyLIV does not have a laptop app that you can download. However, there are two methods you can use to watch Sony LIV TV shows on your PC.

One way is to use an Android Emulator to use the mobile app. Another effective method we recommend is watching the web version streaming platform on your browser.

How many devices can use SonyLIV?

The number of devices that can use Sony Liv TV depends on the type of subscription. Some support just a single device; some are two, and the list continues.

To know the number of devices, you can use, make sure to read what your subscription package has to offer before committing to it.

What are the best browsers for SonyLIV?

Opera One – Overall best browser for SonyLIV 

Opera One is undoubtedly the best browser to watch SonyLIV on any device. This is thanks to its built-in feature allowing you to access the website anywhere. 

SonyLIV only works in India and on another website in the United States. To access it from other locations, you need to use a VPN, which is one of the built-in features of Opera One.

This built-in VPN is free and helps you access location-restricted contents without being caught. Also, the free version of SonyLIV is filled with ads at regular intervals.

But with the built-in ad blocker on Opera One, you can easily eliminate these ads and enjoy your shows. What’s more, this browser is fast and ensures you experience no lag or delay.

Other features:

  • Highly secure
  • Built-in anti-tracking and anti-phishing feature
  • Simple and clean interface
  • Built-in AI

Opera One

The VPN and the ad-blocker can significantly increase the quality of streaming SoyLIV.
Free Download Visit website

Chrome – Browser with wide compatibility

chrome

Google’s default browser is the biggest fish in the pond industry, and it is not surprising that it features on this list. It is one of the best browsers to watch SonyLIV, thanks to its availability on almost all devices.

Chrome is one of the fastest browsers, boasting incredible page loading and browsing speed. With this, you can be sure that it will give you a lag-free streaming experience.

Also, while it might not have a strong built-in adblocker like Opera One, you can download an extension from its Web Store. This is to ensure that you are not troubled by ads when watching shows with the free version.

Other features:

  • Intuitive interface
  • Standard security
  • Fast browsing speed

⇒ Get Chrome

Safari – The best browser for SonyLIV on Mac

safari

The default browser for Mac and iOS devices is unsurprisingly ideal for watching SonyLIV on those devices. Safari is an app designed with speed and user security at the top of the priority.

The speed is especially one of its strong points, as it loads pages quickly. Irrespective of the type of shows you are watching, Safari ensures you do not experience lagging, provided your network is strong.

Another impressive feature of this browser is that it can use extensions like most modern browsers. With this, you can extend its features to suit your needs.

Other features:

  • High security
  • Incredible browsing speed
  • Minimalistic design

⇒ Get Safari

What do I do if the SonyLIV browser is not working?

1. Update browser 

  1. Launch your browser and click the Opera icon in the top left corner.
    icon browser sonyliv
  2. Select the Updates and Recovery… option.
    update
  3. It will show if you have any updates to install.
    update check

We have used Opera One as an example, but you can surely apply this fix to other browsers with the problem.

2. Clear browser cache

  1. Launch Opera One and click the Settings icon on the sidebar.
    settings browser sonyliv
  2. Select the Clear browsing data option in the Privacy and security section.
    clear browsing
  3. Click the dropdown next to Time range and select All time.
    all time
  4. Now, check the box for Cached images and files.
  5. Finally, click the Clear data button.
    clear button

The browser cache can prevent SonyLIV from working if they get corrupted. Clearing them and restarting your PC should help fix the issue.

The SonyLIV platform, when accessed on a top-notch browser, takes your streaming to another level. With the options provided in this guide, nothing stops you from watching your best TV shows on different devices.

If you need the best browsers to stream Hulu live TV, check our guide for compatible options with great features.

Feel free to let us know if the fixes provided in the guide helped get SonyLIV working on your browser again.

Browser Not Supported By Apple TV: 5 Ways To Fix It

Users have created endless threads on forums and social media titled browser not supported Apple TV in the hopes of finding a way to install one on Apple TV.

There are a few different approaches that may be taken to resolve this issue, and one of them involves using screen mirroring apps.

Apple has frustrated many by not implanting a browser such as Safari on its devices. However, here are some workarounds to open your desired website on Apple TV.

Can a browser be installed on Apple TV?

Apple TV doesn’t support browser installation on Apple TV devices, meaning there is no Safari to browse the internet with.

However, AirPlay is the best way to share a browser from your phone to Apple TV to launch Google Chrome on Apple’s streaming device.

What can I do if Apple TV says my browser isn’t supported?

1. Use the AirPlay feature

  1. Join the same WiFi network as your iOS device using Apple TV.
  2. Locate a web page that you want to cast.
  3. Select the AirPlay option.
  4. Select your Apple TV and enter the pairing code.selecting Apple Tv from AirPlay options and then entering pairing code.

2. Use a Mac device

  1. You can connect your Mac to the TV using an HDMI port.
  2. If your Mac doesn’t have a display output port, then use AirPlay.
  3. From the menu bar at the top of the screen, select the AirPlay icon.AirPlay on mac
  4. Choose your Apple TV from the available options.
  5. Your Mac’s display may change to accommodate the Apple TV.
  6. There are several ways to configure AirPlay on your Mac and TV screen.

3. Install AirBrowser

  1. Install AirBrowser from the App Store on your iPhone.
  2. Launch the AirBrowser application.
  3. Swipe up and select Screen Mirroring from the Control Panel.mirror screen option in iPhone
  4. Select your Apple TV.selecting Apple tv from mirror screen menu
  5. Enter the name of the site you want to visit.
  6. The website you wanted to visit will appear on the TV screen.

4. Use Web for Apple TV

  1. Install Web for Apple TV from the App Store on your iPhone.
  2. Start the Web for Apple TV app.
  3. Swipe up to the Control Panel and select Screen Mirroring.mirror screen option in iPhone
  4. Choose your Apple TV. selecting Apple tv from mirror screen menu
  5. A URL bar will appear on your iPhone.

5. Instal browser using Xcode

  1. Visit the developer website and create a developer account.
  2. Download Xcode on your Mac.
  3. Follow the instructions to install Safari on Apple TV.

How to install a web browser on Apple TV without Mac?

As mentioned before, browsers can’t be installed directly on the Apple TV unless you have some expertise in coding.

You can use the Airplay and screen mirroring features to cast your phone’s screen onto the TV and use its browser.

Many people are confused by Apple TV because it is not designed to function with a browser.

The gadget may run a web browser, but Apple prefers that customers use their phones to connect to the device and cast/stream material to it.

In the comments section below, tell us if you know of another way to get around the browser not supported by Apple TV problem.

4 Best Browsers to Watch Crave [Ranked by Compatibility]

Crave is a Canadian pay television channel that operates as a premium service with a general entertainment programming format, offering feature films and television series to subscribers. It is available as an app but you can also watch Crave on a web browser.

One downside is that it is only available in Canada. Luckily, you can easily bypass this requirement by using VPNs for streaming that are secure.

If you want more control over how you watch your content, try playing Crave through a web browser. You may also have limited storage space to accommodate the app and its residual files on your device hence the need for a browser.

Can you watch Crave on a browser? 

Yes, you can watch Crave on a web browser, but it’s not as convenient as watching through the app. You will require a VPN that will allow you to hide your IP address and access geo-restricted content from anywhere in the world.

If you are using an older browser version, you may experience some issues with Crave not working as expected. Sometimes, even with an updated browser, you may still experience some issues. Try updating your operating system and check whether the problem persists.

What browser should I use for Crave? 

Opera One – Best navigation and streaming tools

Opera One brings clever functionalities for hyper-fast navigation and enhanced security tools, like an Ad blocker, built-in VPN and AI.

What can be more suited for Crave streaming platform than a free VPN browser? We believe none of them can beat the browsing features from Opera One.

You have faster search results and navigation, useful integrations with 3rd party social apps, plus an integrated player and easy file sharing functionality.

On top of that, you can easily connect to your VPN with 1 click and privately navigate on the Canadian streaming platform Crave.

Thus it’s possible to watch your favorite shows on Crave using a reliable VPN with a no-log policy. Plus, you can utilize it both on your desktop and Android devices.

Additional features:

  • Built-in Ad blocker and VPN
  • Workspaces and Tab Islands
  • Native AI and modular AI-ready design

Opera One

Enjoy the most favorite shows on Crave using smart VPN support and very private navigation.
Free Download Visit website

Firefox Quantum – Fastest of all

Crave is a streaming service, and it’s important that you have a good internet connection accompanied by a fast browser to avoid buffering and lag.

Firefox Quantum includes a number of features that make it ideal for watching Crave. It’s free from tracking, so you don’t have to worry about your personal data being sold to advertisers or other third parties. 

The browser also comes with a host of privacy tools that let you block cookies and scripts, control what information websites can access about you, and more. It is fast and reliable which means less waiting and fewer crashes when watching Crave and better memory management. 

The browser has built-in ad blockers, search and social media plugins, and the ability to sync your bookmarks and passwords across devices. It also has extensions that can block ads and protect you from malware while you’re streaming to prevent any interruptions.

Additional features:

  • Built-in tracking protection
  • Private Browsing feature
  • Premium privacy protection

⇒ Get Firefox Quantum

Google Chrome – Powerful and popular browser

Google Chrome is an extremely popular and powerful browser. It’s easy to use and navigate and has a lot of great features that make it ideal for watching Crave.

One feature is its sync feature. Sync keeps all your bookmarks, passwords, and open tabs in sync across all your devices so you can access them wherever you go. You can even use it on your phone or tablet without having to download the app.

Another feature that makes Google Chrome the ideal Crave web browser is its speed. The faster your computer runs, the better your Internet connection will perform, which means less buffering when you’re watching videos online.

Additional features:

  • Supports privacy features such as Incognito Mode
  • Tabbed browsing feature for multitasking
  • Speedy with Javascript engines enabled

⇒ Get Google Chrome

Microsoft Edge – Lightweight browser

Microsoft Edge is designed to be fast and fluid. The browser uses less memory and battery power, so it can run effortlessly on your device.

With Cortana integration, Microsoft Edge makes it easy to find what you’re looking for on Crave. It loads pages quickly and scrolls smoothly, which makes it an excellent choice for streaming video content.

Another key feature is that it is a rock-solid browser with a high level of stability, which means fewer crashes and lost tabs. With Microsoft Edge, you can play a video in one tab while browsing the rest of your favorite sites in another.

Additional features:

  • Stream videos in HD resolution
  • Choose between video playback settings
  • High contrast mode for people with poor vision

⇒ Get Microsoft Edge

How do I watch Crave on my smart TV?  

Crave is available on a number of smart TVs and set-top boxes. In order to watch Crave on your smart TV, you need to have the Crave app available on your device. 

If your TV is running Android OS, then you can download the app from Google Play Store. You can also find it on the Canadian Roku Store. If it runs on any other OS such as iOS, then you need to download it from the App Store.

It is also available on the Xbox One marketplace, Fire TV, and Firestick. If you have a Samsung TV, it has to be a fairly new model and you will be able to download it from the Samsung Smart Hub.

Crave won’t let me sign in, what can I do?  

If you’re getting a Crave unsupported browser error, it’s likely because you’re using an outdated browser or you have not enabled cookies. The best way to fix this issue is to upgrade your browser. If you don’t want to do that, you can try a different browser.

Should you have problems signing in, the problem could be with VPN interference. You can try turning it off and on again or apply fixes for a slow VPN.

If the problem persists, perhaps you need to try out our recommended VPNs with enhanced security and speed and see whether you can spot a difference.

Alternatively, you can also opt for browsers with built-in VPNs if your VPN client is not stable and is giving you trouble.

Hopefully, you now have an idea of what browser to reach out to when you want to stream Crave without the app.

We also have a rich library of video streaming software that you will find extremely helpful when you want to access social sites and other services.

In case you encounter any video streaming problems, don’t worry as we have a dedicated guide on how to maneuver around the issue. 

Let us know of your preferred browser for streaming Crave in the comments section below.

How to Fix Error Code Torch in Warzone: 4 Easy Fixes

Call of Duty Warzone is a multiplayer video game. It is a free-to-play, first-person shooter, battle royale video game. The game is available on several gaming consoles like the Xbox series, PlayStation 4, and Microsoft Windows.

Warzone has a lot of players, and it records countless numbers of playing daily. However, there are some errors players can encounter with Warzone.

A common one is the ‘error code torch Warzone. Furthermore, numerous things can cause these errors, like router problems, outdated game versions, and Windows. This article will discuss the ‘error code torch Warzone’ and some fixes.

What does error code torch mean in Warzone?

Warzone Error Code Torch is a bug that plagues consoles, particularly the PlayStation. It prevents players from being able to access or play the game.

Whenever this error pops up, it indicates that Warzone is having issues with connecting to its servers. However, the cause of this is the internet connection.

Also, Warzone Error Code Torch can occur if the required files to start it are missing. It means the game can’t start because its files are missing or improperly installed.

Why do I keep getting error codes on Warzone?

1. Poor internet connection

Many players complain about getting the Warzone errors due to poor internet connection. Because Warzone requires an internet connection before you can play, you need a stable network. Also, connecting your console to the router via a cable can cause Warzone error codes.

2. Outdated game version

Running an outdated app can cause errors, and this applies to Warzone. Developers release updates and patches frequently to fix the bugs affecting them. However, if players don’t update their Call of Duty app, the bug will impact your gaming experience.

3. Installation error/corrupt files

If there’s an error with the root file or the installation process of Warzone, it’ll prevent it from working and can prompt some errors. Also, Caches save in the Warzone client file, which sometimes causes problems.

How can I fix the Warzone error code torch?

1. Restart your computer

  1. Click the Start button on the Toolbar and select Power.
  2. Select Restart from the drop-down.
  3. Follow the prompts to complete the restart process.
  4. Then, launch Warzone and see if the error persists

2. Switch from LAN Cable to WLAN

Another solution to the Warzone error code torch is switching from a cable to a Wireless router connection.

Cables can cause issues that prompt the errors you encounter. Then, connect your router to your device wirelessly and see if the issue persists.

3. Delete the Cache folder

  1. Press Ctrl+Shift+Esc to open the Task Manager.
  2. Click the Processes tab, locate agent.exe, and click End Process.
  3. Navigate to the folder containing the cache directory.
  4. Press Windows Key+R and input %ProgramData% into the Run field and press Enter.
  5. If a Blizzard Entertainment folder exists in the directory, right-click it and select Delete.

4. Uninstall and reinstall Call of Duty Warzone

  1. Open the Battle.Net app.
  2. Click the Options button and select Uninstall, wait till the process is complete.
  3. Click the Install button.
  4. Launch Warzone and check if you encounter any errors.

Uninstalling Warzone from your device will clear the corrupt files that are prompting the errors. Although it can delete your settings, and you may end up losing some of your data, it is always effective.

To make sure you prepare the game for a fresh reinstall, use CCleaner. It has its own built-in uninstaller feature as well as a registry cleaner tool to make sure you leave no trace of the CoD Warzone app.

Updating your COD Warzone client can also fix the Warzone error code torch. However, we recommend that you try other solutions listed above before uninstalling COD Warzone.

Not Enough Free Space for Warzone Update is another issue users complain about. In conclusion, you can learn about some other Call Of Duty Warzone errors and how to fix them.

3 Best Browsers to Watch Shahid [Worldwide Access]

Watching online content from the comfort of your home has become the new norm, thanks to the COVID-19 pandemic.

While you have streaming giants like Netflix, Amazon Prime Video, Disney+, etc., there is another platform where you can watch original Arabic content. The streaming platform is known as Shahid VIP.

Shahid VIP contains over 25,000 hours of content, including movies, documentaries, and premieres, along with live access to MBC’s TV channels. It is accessible from across the world.

You can watch commercial-free live broadcast services for the top-watched live TV channels in HD quality and enjoy characters from Disney, Pixar, and Marvel on almost all your devices.

While Shahid TV is available for Samsung TV, Android TV, iPhone, Android, iPad, Apple TV, LG TV, and Hisense TV, if you don’t want to install the app and wish to view it on a browser, then this guide lists down some of the best browsers that support Shahid VIP.

What devices support Shahid?

As mentioned above, you can watch Shahid VIP on almost all devices. However, there is an official list of devices that Shahid VIP supports.

Supported smartphones and tablets

Supported Smartphones/Tablets
OS VersionsLatest Shahid App version Supports 4K
All iOS devices, except iPads 1 and 2 and iPhones 4 and 5iOS 11.0 and above7.15.0–
All Android smartphones and tablets installed with Google Play Services.Android 5.0 and above7.12.0–

Supported Smart TVs

Supported Smart TVsOS VersionsLatest Shahid App versionSupports 4K
SonyAndroid 7.0 and above4.10.0Yes
GoogleAndroid 7.0 and above4.10.0Yes
TCLAndroid 7.0 and above4.10.0Yes
SkyworthDigitalAndroid 7.0 and above4.10.0Yes
SWTVAndroid 7.0 and above4.10.0Yes
SagemcomAndroid 7.0 and above4.10.0Yes
SDMCAndroid 7.0 and above4.10.0Yes
PartnerAndroid 7.0 and above4.10.0Yes
VSAndroid 7.0 and above4.10.0Yes
HaierAndroid 7.0 and above4.10.0Yes
NVIDIAAndroid 7.0 and above4.10.0Yes
PanasonicAndroid 7.0 and above4.10.0Yes
SkyworthAndroid 7.0 and above4.10.0Yes
ChanghongAndroid 7.0 and above4.10.0Yes
SHARPAndroid 7.0 and above4.10.0–
HisenseAndroid 7.0 and above4.10.0–
XiaomiAndroid 7.0 and above4.10.0–
PhilipsAndroid 7.0 and above4.10.0–
PHILIPSAndroid 7.0 and above4.10.0–
TPVAndroid 7.0 and above4.10.0–
ExpressluckAndroid 7.0 and above4.10.0–
SCBCAndroid 7.0 and above4.10.0–
SEI RoboticsAndroid 7.0 and above4.10.0–
Samsung TVTizen 2.4 (2016)
Tizen 3.0 and above (2017 and above)
6.9.1 (for Tizen 2.4)
6.9.2 (for Tizen 3.0)
Yes
LG TVWebOS 3.0 and above (2016+)3.5.2–
HisenseAll Hisense 2019 and above(Vidaa 3.0, Vidaa 4.0 & Vidaa U5)3.9.0–
ToshibaFoxxum3.1.0–
TornadoFoxxum3.1.0–

Supported Set-top Boxes

Supported Set-top BoxesOS VersionsLatest Shahid App versionSupports 4K
Apple TVTvOS 12.0 and above4.9.3Yes
Mi BoxAndroid 7.0 and above4.10.0–
Fire TV Cube (2nd Generation) – AFTRAndroid 7.0 and above4.10.0–
Fire TV Stick 4K – AFTMMAndroid 7.0 and above4.10.0–
Fire TV Stick (3rd Generation)- AFTSSSAndroid 7.0 and above4.10.0–
Fire TV (Gen3)- AFTNAndroid 7.0 and above4.10.0–
Fire TV Cube – ATFAAndroid 7.0 and above4.10.0–
Fire TV Stick Lite- AFTSSSAndroid 7.0 and above4.10.0–
Google Chrome Cast–

How can I watch Shahid in my browser?

  1. Open shahid.mbc.net website on your browser.
  2. Click the Subscribe button at the top, if you are using it for the first time.
  3. Select the package that suits your needs.
  4. Complete the purchase and start streaming.

What are the best browsers for Shahid?

Microsoft Edge – Various customization features

microsoft edge

Microsoft Edge is the default web browser on Windows 11 PC. It is a Chromium-based browser, which is far more advanced and offers customization features.

Being one of the officially supported Shahid browser, it loads the pages quickly, gives you access to all Chrome extensions, provides a clean user interface, etc.

⇒ Get Microsoft Edge

Google Chrome – Popular choice

Google Chrome is the most used web browser across the globe. It is the father of Chromium-based browsers and gives you plenty of options to customize and personalize.

You can enhance the feature list using extensions. For streaming video, you can cast your tab to a TV, automatic captions of video or audio when available, tracking prevention, and much more.

⇒ Get Google Chrome

Mozilla Firefox – Fast load times

If apart from watching content on Shahid, you want to enhance your usage as per your liking then Mozilla Firefox is the browser.

With multiple customization options, faster load times, less data consumption, picture-in-picture feature, etc., the Mozilla browser is a decent browser to watch your favorite content with no hassle.

⇒ Get Mozilla Firefox

These are the three officially supported web browser by Shahid VIP. MacOS users can use the Safari browser to stream content from the platform. They come in handy especially when error code 6009 appears on the app.

Let us know in the comments which browser is your go-to for streaming Shahid VIP.

8 Ways to Fix Yahoo Mail When It’s Not Working in Chrome

Yahoo mail not working in Chrome? It’s fixable. Clearing browsing data and disabling conflicting extensions usually does the trick.

However, if the issue is more serious, we’ve go a lot more tricks down our sleeve.

Just follow the step by step instructions below to regain access to your inbox as quickly as possible.

How do I fix Yahoo mail not working in Chrome?

First, check Yahoo mail’s downdetector page to rule out any possible outage on the company’s end. If there are no reports of recent issues, continue with the steps below. If there are, just wait for Yahoo to fix them.

1. Update your Chrome browser

  1. Launch Chrome and click the three buttons on the top right-hand side of the browser.launch menu yahoo mail not working in chrome
  2. Click on Settings from the drop-down menu. settings - Click on Settings from the drop-down menu.
  3. Select About Chrome on the left-hand side panel of the browser. About - yahoo mail not working in chrome
  4. Chrome will start updating automatically. Updating - yahoo mail not working in chrome

2. Clear Google Chrome’s cache

  1. Launch Chrome and click the three buttons on the top right-hand side of the browser.Chrome menu
  2. Click on History from the drop-down menu. chrome history
  3. Select Clear browsing data on the left-hand side panel. browsing data - yahoo mail not working in chrome
  4. On the window that appears, select the checkboxes next to Cookies and other site data and Cached images and files.
  5. Click on the Clear data button. clear browsing data

3. Restart your computer

  1. Click on the Windows start button.
  2. Select the power button.restart computer
  3. Click on Restart.

4. Remove faulty extensions from Chrome

  1. Launch Chrome and click the three buttons on the top right-hand side of the browser.Chrome menu - yahoo mail not working in chrome
  2. Click on Settings from the drop-down menu. Settings - yahoo mail not working in chrome
  3. Select Extensions on the left-hand-side panel. Extensions - yahoo mail not working in chrome
  4. Remove any extensions that are faulty by clicking the remove button underneath the extension. Remove extensions - yahoo mail not working in chrome

5. Enable JavaScript

  1. Launch Chrome and click the three buttons on the top right-hand side of the browser. chrome menu - yahoo mail not working in chrome
  2. Click on Settings from the drop-down menu. Settings - yahoo mail not working in chrome
  3. Select Privacy and Security on the left-hand side panel on Chrome. Privacy - yahoo mail not working in chrome
  4. Click on Site settings. site settings - yahoo mail not working in chrome
  5. Scroll down the window and select JavaScript. javaScript - yahoo mail not working in chrome
  6. Under the Default behavior, if Don’t allow sites to use JavaScript is enabled, then select Sites can use JavaScript. Use JavaScript - yahoo mail not working in chrome
  1. Restart Chrome.

6. Reset Google Chrome

  1. Launch Chrome and click the three buttons on the top right-hand side of the browser. Chrome Menu - yahoo mail not working in chrome
  2. Click on Settings from the drop-down menu. Chrome settings - yahoo mail not working in chrome
  3. Select Advanced on the left-hand side panel of Chrome.
  4. Click on Reset and clean up under the Advanced drop-down.reseting chrome
  5. Select Restore settings to their original defaults. restore chrome - yahoo mail not working in chrome
  6. Click Reset settings. reset settings - yahoo mail not working in chrome
  1. Restart and sign in to Google Chrome.

7. Deactivate Antivirus

  1. Click the Windows hidden app drawer icon on the taskbar.
  2. Right-click on your antivirus – I am using Avast antivirus. app drawer
  3. Select Avast shields control and then the amount of time you would like the antivirus to stay while disabled. disable avast

8. Try another browser

If all else fails and Chrome seems to not be able to open Yahoo mail, try accessing your inbox from another browser.

A good, up-to-date alternative to Chrome is Opera. We’ve used it extensively and experienced very few errors.

Plus, just like Chrome, it’s built on a Chromium engine – so most addons and extensions you already use will be compatible and there’s practically no learning curve if you make the switch.

This skillful browser is highly customizable and it includes app integrations, improved privacy for Yahoo emails, and more efficient navigation tools.

Opera

Manage your emails on Yahoo Mail without any errors on this flexible browser.

Can I access Yahoo Mail in other browsers?

Yahoo Mail works well in other browsers. Apart from Google Chrome, some other popular browsers you can use without issues include Opera, Mozilla Firefox, Microsoft Edge, and Safari, among others.

As discussed above, all you need to do is to make sure that you are using the latest version of the browser you choose to use.

As you can see, you can solve issues with Yahoo Mail not working in Chrome on your own without any external help. Just follow the solutions discussed above and one of them will surely work for you.

How to Fix ABC iview When It Keeps Buffering or Not Playing

When watching something on ABC iview that keeps buffering, it can be quite the buzz kill, especially when you are in the moment and the suspense is building up.

For many people, ABC iview is the only way to watch some of their favorite TV shows. It’s also an easy way to catch up on missed episodes. So, you need to find a quick solution when it keeps buffering.

Since ABC iview is geo-restricted, your VPN could also be the cause of the issue if you are not in Australia. You can check out our recommended browsers to avoid geo-restrictions to prevent frequent interruptions.

Why does ABC iview keep buffering? 

If the ABC iview becomes unresponsive or stops playing, below are some possible reasons behind the issue:

  • Slow internet connection – If you’re having problems with ABC iview buffering or not playing, you should check your internet connection first. A poor internet connection that isn’t working correctly, may prevent ABC iview from streaming smoothly.
  • Network interference – If you’re using Wi-Fi, ensure your device and router are close together — especially if you’ve recently moved them or changed their position. Also, check that nothing else is using your network simultaneously as ABC iview — this could slow down the stream speed and cause issues during playback.
  • High bandwidth usage – If other apps on your computer or phone are consuming a lot of bandwidth (like streaming music), they will slow down the speed at which ABC iview streams. 
  • Low storage space – If there isn’t enough memory available on your device’s storage space, some apps won’t run properly. The ABC iview app may keep freezing, and you won’t be able to watch anything. Try uninstalling any unnecessary apps and programs and try again.
  • The app is down – Every service experiences crashes from time to time. If you suspect this may be the issue, you can contact ABC iview support to make a report.

How do I stop ABC iview from buffering? 

1. Uninstall unnecessary programs

If you have too many programs running in the background, it can affect your computer’s performance. Try uninstalling any programs that aren’t essential for your everyday use such as games and see if this makes a difference.

In addition, when streaming ABC iview, close all other applications and browser tabs before trying to watch a video. This will ensure that there aren’t any other processes running in the background which could be affecting your experience.

2. Change to a wired connection

If you’re using a wireless connection, it’s possible that you’ll experience buffering and freezing issues when watching ABC iview. This can be annoying when trying to catch up on a show.

Try connecting your computer or smartphone directly to your modem with an Ethernet cable. This will ensure that no wireless connection issues are slowing down your bandwidth or causing buffering issues.

3. Reset your router

If you’ve already tried changing to a wired connection and it’s still not working, it might be worth resetting your router. 

This can often fix problems where there is too much traffic on the network, causing slow internet speeds or even total network collapse for other devices on the same network. 

You can usually find instructions for how to do this on the manufacturer’s website or in the manual for your router.

Why can’t I get ABC iview on my smart TV? 

You can access ABC iview using your PC or Mac, and it is also available on many smart TV sets. However, there are some reasons why you can’t get it on your smart TV. These include:

  • Older TV models – If you’ve got an older model of smart TV, or one that doesn’t have a browser, you may be unable to use this service.
  • Outdated software – To watch ABC iview on your smart TV set, you’ll need to upgrade your software first. If this isn’t possible, you’ll need to get an external device like a Roku or Chromecast dongle.
  • Not enough bandwidth – It is also important to note that not all smart TVs have access to the ABC iview app. You’ll need an internet connection, but it’s not just an internet connection that will do – it needs to be fast enough to stream HD content.
  • Geo-restriction – Geo-restrictions are used by streaming services to prevent users from accessing content from other countries. These restrictions are usually applied for copyright reasons and are imposed by content providers like ABC. Luckily, we have the perfect workaround on how to circumvent geo-blocking.
  • Manufacturer caveat – Some manufacturers block access to third-party apps such as the ABC iview app to promote their own products and services.

Since ABC iview is geo-restricted, we have an excellent VPNs for streaming list that you will find handy if you are outside Australia.

Also, you can check out our expert list of software for uninterrupted streaming so that you can enjoy your shows for longer.

Be sure to let us know which solution worked out for you in the comment section below.

7 Best Cheap Keyboard and Mouse Adapters For Nintendo Switch

The Nintendo Switch is an ever-improving console that has been doing everything to stay up with the competition. It provides users with a stunning interface and different control methods lacking in some consoles.

However, it lacks native support for playing games with a keyboard and mouse. While most people prefer to use modern controllers, you can only get the full experience in some FPS and RTS games using these input devices.

Thankfully, just like the best Xbox One keyboard and mouse adapters, some devices allow you to play games on Nintendo Switch with your two most-used input devices. 

To help add diversity to your gaming control, we have helped gather the best of them available at low cost.

Can you connect a keyboard and mouse to Nintendo Switch?

Nintendo Switch supports many USB keyboards. You only need to plug it into the Switch’s USB port, and you should be ready.

However, this is limited, as you can only use it to enter passwords and text. You will need the best keyboard and mouse adapters for Nintendo Switch to play games.

The factors to consider in a keyboard and mouse adapter for Nintendo Switch varies depending on how you want to use it. The best of them should be portable and easy to set up.

You also need to consider mapping support. Lastly, the adapter should be responsive with no noticeable delay.

What are the best cheap keyboard and mouse adapters for Nintendo Switch?

DOHO Game Adapter – Easy to set up

  • Compatible with different consoles
  • Easy to use
  • Fast and effective
  • It is lightweight
  • Does not support a keyboard with a USB HUB interface

If you are looking for an easy-to-set-up Nintendo Switch adapter at a low cost, this product might be the best you will ever see. It requires no driver installation to get going.

You only need to plug it into your console and start having fun. With the DOHO keyboard and mouse adapter, playing FPS games on different consoles becomes easy, and you can use keyboard shortcuts and hotkeys as you wish.

This product is not just limited to the Nintendo Switch. It works with other consoles like PS4 (Pro and Slim), Xbox One (S and X), and PS3.

Lastly, it allows you to adjust the speed of your mouse on the keyboard in case you need to increase or decrease its responsiveness.

Delta essentials FO202 adapter – Dynamic device

  • Responsive and effective
  • Easy to set up
  • It is portable
  • Does not work if connected with the Pro or Joycon controller

Delta essentials FO202 is one of the best keyboard and mouse adapters for Nintendo Switch that works on different consoles. This product allows you to play almost all types of console games with your keyboard and mouse.

It thrives on the top FPS games like Fortnite and Apex Legends, giving you unrestricted control. Also, it allows you to take advantage of some of the shortcuts and hotkeys in your games. 

Lastly, it works with old and some of the most recent consoles like PS3, PS4, Xbox One, and Xbox 360. It just adds more dynamics to your gaming.

Miacoco Keyboard and Mouse Adapter – Wide compatibility

  • Compatible with different consoles
  • Strong and sturdy
  • Has three USB ports
  • Can be difficult to set up

The Miacoco keyboard and mouse Nintendo Switch adapter is the go-to option if you want a device with high compatibility. It is a strong device that requires no driver installation to work.

Also, it allows you to set the keyboard mapping using the Delta keyboard mapping program. This will enable you to set some in-game essentials like shooting and aiming.

What’s more, the Miacoco adapter uses a wired connection instead of Bluetooth connectivity in some devices. With this, you are sure of strong connectivity throughout your gaming sessions.

arVin Wired Adapter – Unlimited control

  • Custom mapping
  • Plug and play
  • Lightweight and portable
  • Key binds can’t be changed

You should consider this product if you want a cheap keyboard and mouse adapter that gives complete control. The arVin wired adapter effortlessly converts signals from your input devices into controller signals.

This makes the control seamless, as your console wouldn’t be able to tell the difference. What’s more, it is not just limited to Nintendo Switch.

It works effectively with popular consoles like PS3, Xbox 360, and Xbox One. Another standout feature of this device is that it allows you to use your keyboard and mouse to play FPS, TPS, RPG, and other high-level games.

Lastly, it has a custom mapping feature that allows you to set the keyboard controls yourself.

arVin N-Switch adapter – Headphone support

  • High responsiveness
  • Wide compatibility
  • Headphone support
  • Does not work with some of the latest consoles

This is another stunning keyboard and mouse adapter for Nintendo Switch by arVin. It effectively allows you to replace your controllers with your wired keyboard and mouse. 

The arVin N-Switch adapter makes it easy to use your external devices to play games like FPS, RPG, and TPS. What’s more, it supports 3.5mm gaming headphones.

With this, you can play games anywhere without disturbing anybody. It should be noted that this product only works for wired keyboards and mice and not the wireless types.  

Lastly, it has a custom mapping feature and allows you to alter the mouse sensitivity settings.

Dobe TNS-19077 adapter – Device for all wired keyboards and mouse

  • Works with most third-party cable games
  • Easy to use
  • Experiences no delay
  • Configuration buttons are a bit difficult to memorize

The Dobe TNS-19077 adapter is designed to provide gamers with improved manipulation and control with the mouse and keyboard. It works with both Nintendo Switch and the Lite version to great effect.

It is plug and play, as it requires no driver installation to get going. Also, it does not select a keyboard or mouse, as it works with most products available.

Another impressive feature is its custom mapping. This ensures you can easily map some of the in-game features like shooting and aiming.

Mcbazel Adapter – Lightweight device

  • Wide compatibility
  • Comes with OTG Type-C adapter
  • Supports most wired keyboards and mice
  • Does not work with Switch Lite

Last but certainly not least on this list of cheap keyboard and mouse adapters for the Nintendo Switch is a simple yet powerful device. Mcbazel adapter boasts wide compatibility.

With it, you can play games on different consoles using your keyboard and mouse. What’s more, it supports standalone and network modes.

Lastly, it is easy to set up and use. Whether on Xbox, Playstation, or Nintendo Switch, you don’t need to install any driver to get going.

The best keyboard and mouse adapter does not need to be expensive to be effective. The products on this are a testament to that fact. You can pick any of them with the assurance of quality performance.

Do you need the best overwatch PS4 mouse and keyboards? Check our guide on the topic for the most effective options to choose.

Feel free to let us know the product that piques your interest from our list in the comments section below.

Everything you Need to Know About Eversend Scam Verification Email

Since everything is now global, you can work from the comfort of your desk for a company that is not located in your home country.

And in order to receive payments, you have the option of using different money transfer options such as Eversend.

Eversend is one of Africa’s biggest money transfer platforms. It is an all-in-one borderless money app to make money transfers, pay bills, save or exchange currencies, shop online using an Eversend virtual debit card, and much more.

It has a huge userbase, all thanks to claiming to provide the best currency rates compared to other banks and wire transfer methods, Eversend has become hugely popular.

However, in recent times, several people have claimed to have received the Eversend verification email. The strange part is that the people who have received this verification email aren’t even users of the Eversend platform.

After careful research, it was found out that this is all part of the Eversend scam email phishing done by hackers to steal important user information.

But there’s more to it, and that is exactly what we will be discussing in this guide. We will talk about the Eversend scam and how you can take charge and protect yourself from such phishing scams. Let us check out the guide itself.

What is Eversend and how does it work?

Eversend is a money transfer platform. You can use its app and easily transfer money from mobile to mobile, with no fuss.

All you need to do is download the app from either the Play Store or App Store, install it on your phone, get the verification done, and that’s it.

You need to load your Eversend wallet in order to transfer money or pay bills. It supports cards such as Mastercard, Visa, and Maestro.

The best part is that you can send money from Eversend to a person who doesn’t have an Eversend account. You can make use of money accounts such as M-Pesa and Airtel Money to transfer the funds.

However, the main part here is verification. It is very important for a user to verify themselves in order to use Eversend.

Once you have registered with Eversend, below are the details and information you need to provide to verify yourself:

  • You should be 18 years or above.
  • A photo of a valid government-issued ID. This could be your passports, national IDs, or driver’s licenses. You can’t use a hospital card, loan card, or student ID for verification.
  • A video of your face.

What is the Eversend email verification scam?

There are not one or two but several hundreds of user reports regarding Eversend email verification scam. This issue is also not very new and has been reported for quite some time.

Hackers reportedly send a verification email to the target user and ask them for details on opening an Eversend account.

This is a true fact that not everyone is technically sound and knows how to deal with such phishing scams. Affected users also mention that there is a suspicious link in the email that asks them to click so as to input the code.

Upon clicking this link, for some users, it redirects them to a fishy website and steals their account credentials, along with personal and financial information.

While for some users, a malicious website with the same interface as Eversend opens, which bluffs the user into entering their account credentials, and ultimately stealing their money.

The worrying part is that almost all users who have received Eversend scam emails are not users of the platform. This means that someone else, or a hacker, is using the target user’s email ID and scamming them in the hope of getting their financial details.

Some have also reported that the email tricks them into clicking the email to receive a gift, but in reality, it contains viruses, malware, and spyware.

How can I recognize scams or phishing?

Scam or phishing emails or messages most commonly ask you to send in your personal details and financial information.

The email or text may ask for your credit/debit card number, your password, your account number, your Social Security number, etc.

Moreover, phishing or scam texts or emails, like the Eversend scam, may look like they are from a company that you know or trust.

Scam emails offer you a story, which is pretty similar to all scams, and try you into clicking a link or opening an attachment. According to Federal Trade Commission Consumer Advice, the emails may say:

  • They’ve noticed some suspicious activity or log-in attempts
  • Claim there’s a problem with your account or your payment information
  • Say you must confirm some personal information
  • Include a fake invoice
  • Want you to click on a link to make a payment
  • Say you’re eligible to register for a government refund
  • Offer a coupon for free stuff

The above are not all the signs that can help you detect phishing or scam, but are some of the most common practices, hackers do to get hold of your personal details.

Now that you have some idea about how you can recognize scams, like the Eversend scam email verification, let us take a look at how you can safeguard yourself from such scams.

How can I protect myself from Eversend scams?

1. Keep your account passwords different

Often, because of laziness or something else, we always keep the passwords to all of our accounts the same or something very similar.

While this is good practice, you may forget the password if you keep on using a different one for each account. That is where you become more vulnerable to such attacks.

If you can’t remember different passwords for different accounts, then you can make use of password managers that can help you store different passwords for different accounts.

Moreover, they also come with a feature that will generate a different and difficult password for your account, and everything is stored behind a single password. So, all you need to remember is the single password for the password manager, and you can access all of your passwords.

If you are confused about which password manager to go for, we have got you covered. You can check out our guide on the best password managers you can use on your Windows PC.

2. Use a security software

The best way to protect your personal data from being hacked is to use security software. There are tonnes of antivirus software available on the internet.

We have a list of the best security software that you can install and keep yourself protected. Not only the software protects you from security threats but also gives you critical protection updates.

A great alternative would be to install a comprehensive antivirus that will guard you from elaborated phishing attacks or scams.

TotalAV is your key solution for scam protection due to its anti-phishing smart tools, advanced security for banking data, the Exploit Blocker to prevent attacks on your browser, and many more.

Plus, you get a defense against new emerging threats for different devices like Windows, Android, or macOS.

TotalAV

Get this malware and ransomware security and protect sensitive banking data on Eversend platform.
Free Trial Visit Website

3. Keep your system up to date

  1. Press Win + I to open Settings.
  2. From the left pane, select Windows update.
  3. Hit the Check for updates button.
  4. Your system will check its servers for a new update and if found one, will prompt you to install it on your PC.

Whether you use a smartphone or a PC, you should keep your device up to date with the latest available software version installed. The latest updates not only bring new features for the device but also bring critical security features.

3. Use multi-factor authentication

Another way of protecting your accounts and personal data is to make use of 2-factor authentication or multi-factor authentication wherever the feature is available.

There is another layer of protection over your credentials where you are required to enter two or more credentials in order to verify access to your account.

If someone, tries to hack into your account, then it will immediately send you a warning message that someone tried to log in. If that is not you, then you can immediately secure your account.

4. Contact Eversend support

If you have received a Eversend scam email that you are sure is not because of your activity on the platform, then you can immediately contact Eversend customer support.

You can get in touch with Eversend support at [email protected]. In the case of any fake (phishing) emails, purporting to be from Eversend, you can contact Eversend at [email protected].

What can I do if I didn’t get verified the first time?

There is a chance that you have received an Eversend verification email because you weren’t actually verified the first time you performed the process.

After checking the email’s legitimacy, you can do the below mentioned things to get your account verified.

  • Check if the information entered by you matches the uploaded photo ID
  • You can only create an account for yourself and not for a third party
  • One or both photos were blurry; try retaking photos
  • Submit the eligible government ID
  • Follow the KYC instructions carefully

There you have it from us in this guide on Eversend scam. If you have also received a scam email from Eversend, then you can follow the tips mentioned in this guide to safeguard yourself.

How to fix VCI error initializing RCO [Quick Fixes]

A lot of users encounter different issues when they want to stream their favorite shows. One of the most frequent questions users complain about is how to fix VCI error initializing RCO.

The ‘VCI error initializing RCO’ prevents you from being able to stream. As we go further into this article, we’ll discuss the causes of this error and the solutions you can use to fix it.

What causes VCI error initializing RCO?

1. Ad blockers

An ad blocker is a software that blocks ads or online advertisements in web browsers, native apps, or a network. So, whenever an ad blocker wants to block or filter an ad content, it can affect the initializing process between the VCI and the RCO. Hence, it can be a problem and can cause the VCI connection error.

2. Missing IMA SDK

Another cause of this error is a missing IMA SDK. Every software requires certain features and components to function. However, the VCI error initializing RCO pops up when the IMA SDK is not found on your device to help complete the initializing process.

3. Outdated Windows

Most times, running Windows that is not up-to-date can cause lots of issues with your device. So, an outdated Windows can be responsible for the VCI error initializing RCO.

What can I do if I encounter the VCI error initializing RCO?

1. Disable Ad blockers on your browser

  1. Launch Google Chrome on your desktop.
  2. Click the More menu button at the top-right-hand corner of your screen.
  3. Click More Tools from the drop-down.
  4. Select Extensions and select your Ad blocker from the plug-ins and mail extension list.
  5. Click the toggle switch at the front to stop it.

Disabling the Ad blocker will be the most likely option to fix this problem. However, if it fails, proceed to the other options.

2. Update Windows

  1. Click the Windows icon on the left corner of your screen, then select Settings.
  2. Select the Windows Update option.
  3. Click check for updates.
  4. If there’s any update available, download and install it.
  5. Restart your PC.

Since compatibility issues could cause the VCI error initializing RCO, updating the device could help fix the problem also.

3. Check your internet connection

Performing a power cycle on your router is an effective way of getting it to work better. Some users have confirmed that this works for them, so it is worth a trial.

Another resourceful topic you should know about is the 7 Best Free web Browsers for Google TV [Adblock Included]. Also, you can learn about the best browsers with VPN and Adblocker already built-in and their functions.

How to Fix Uniqlo System Error [Quick Guide]

Uniqlo is a Japanese shopping platform that deals with casual wear designing, manufacturing, and retail. It is an online shopping store, a brand of Fast Retailing Co.

Shopping at Uniqlo is simple and convenient, but users encounter some errors while using it. These errors are known as Uniqlo System errors.

Users complain about errors like the Uniqlo payment error, which means the buyer isn’t able to make payments for some reason.

Also, the Uniqlo business address error is another error people encounter. It means buyers can’t check out the order. These errors can occur due to several reasons ranging from website issues, card issues, and lots more.

Why is Uniqlo not loading?

1. Network connection issues

It means Uniqlo cannot connect to the server because your network connection isn’t vital. Hence, it can result in Uniqlo not loading.

2. Problem with browser cache and cookies

Browser cookies and cache help it load websites faster and smoothly. They can become corrupted, causing websites to load slowly. Hence, it can lead to Uniqlo not loading.

3. Traffic load

Uniqlo servers can become jam-packed with activities from different users. and can result in the app or website not loading.

4. Uniqlo server is down

Like most online shopping websites, Uniqlo undergoes maintenance. During this period, their servers are down and won’t be accessible until the process is complete.

Is the Uniqlo app safe?

Uniqlo app users give different reviews about it and its services. However, the app operates with a high-security system that protects its and customers’ information.

For instance, information like card details you use for payment, registration details, and more. Furthermore, all data sent to the servers are encrypted and processed with Adyen. It means that it uses a high level of SSL encryption technology. Thus, Uniqlo is a safe app to use.

What does order being processed mean?

Whenever a user gets an email that contains a message that order being processed, it means your purchase is now in process. It indicates that they know of your order and is being processed.

What can I do if I encounter a Uniqlo system error?

1. Clear browser cache and cookies

  1. Launch the Chrome browser on your device, then click the More button.
  2. Select More Tools and click Clear browsing data.
  3. Tick the boxes next to Cookies and other site data and Cached images and files.
  4. Click Clear data, then OK to initiate the process.

2. Check your internet connection

Before troubleshooting anything else, check if your internet connection is stable. A simple way to do this is by unplugging your router from its power source, leaving it for a while, and plugging it back in.

3. Use a different browser

Another thing you can do if you encounter the Uniqlo system is to change the platform you’re using, like the app or web.

It is easier to do this because Uniqlo is available across different platforms. Also, you can change your browser if you’re using the web version. We’d recommend the Opera One browser.

⇒ Get Opera One

4. Check Uniqlo’s social platforms

Whenever you encounter the Uniqlo system error, check Uniqlo social platforms for updates on the situation. More so, if it is a server error, Uniqlo will make an announcement. However, if it is a server error, all you can do is wait while they resolve the issue.

The last solution you can try if the above fixes don’t work for you is to uninstall the Uniqlo app on your device and reinstall it. It will help you refresh all the settings, and you can log in to your account.

For easy online shopping payments, you can learn about how to link PayPal to a bank account in just a few steps. Also, you can read about the best-automated purchase order software [2022 Guide].

Posted in Fix

How to run Windows XP games on Windows 10

Windows 10 might easily be the latest and greatest operating system Microsoft has ever come up with. And there are solid reasons for it to be so referred to given the excellent set of features it comes with. Unfortunately, even those do not seem to be enough when it comes to expressing our love for the good old Windows XP.

That also is the reason why we might still be hanging on to that old Windows XP game CD that we spent our teen years playing; and will love to relive those moments all over again in the age of Windows 10. Fortunately, that isn’t overtly impossible either though it can be tricky.

Mentioned here are a few steps you can follow to run your old Windows XP games in Windows 10 though it might not be applicable for all games. It’s worth trying though.

How to play Windows XP games on Windows 10

Run as Administrator

This will be a good first step to try, one that also is the simplest. The logic behind it is simple too, since nearly all users were accorded the status of an administrator on Windows XP, try running the Windows XP game as an administrator and see if this works.

The same isn’t applicable by default in Windows 10 what with all the advanced security features it comes with though here is how you can still do it. Simply right-click on the executable file of the Windows XP game and select Run as Administrator.

Follow on-screen instructions thereafter.

Use the Program Compatibility Troubleshooter

— RELATED: 7 free antimalware tools for Windows XP to protect your old PC

This is how you let Windows 10 decide on the best compatibility setting to adopt when attempting to run the file. Here are the steps:

  • Type Run Programs in the Cortana search box. The rest, that is Run programs for previous versions of Windows will appear automatically. Click on it to launch the Program Compatibility Troubleshooter.
  • Click on Advanced > Run as Administrator. Click on Next.
  • You will be led to the Select the program you’re having problems with window. Here, select the program you are having issues with or select Not Listed if you can’t find your applicated already listed. Click on Next.
  • In the next section, you will be required to browse to the .exe file for the particular application. Click on Next.
  • Subsequently, you will reach the Select troubleshooting option window. Here, select the Try recommended settings option.
  • Windows 10 will now try to find the best settings needed for the Windows XP game to run smoothly. Click on test the program.. to see if the application is running properly.

The troubleshooter will ask you if you are able to run the application to your satisfaction.

Selecting Yes, save these settings for this program will mark the end of the troubleshooting process.

However, if the troubleshooting fails and you select No, try again using different settings will land you in a different section where you will be provided with different reasons explaining the cause of the failure. Make your choice and click Next. Follow on-screen instructions thereafter.

— RELATED: 5 PC optimization software for Windows XP to use in 2019

    Run Windows XP games in Compatibility Mode for Windows 10

    Windows 10 comes with yet another option for running outdated programs wherein you can manually change the compatibility settings. Here is how you do it:

  1. 1. Press the Windows key and type your game’s name in the search box.

  2. 2. In the search result shown, right click on the application name and select Open file location.

  3. 3. In the file location, you will see all the files that run the game. Right click on the .exe file and select Properties.

  4. 4. In the Properties window, select Compatibility tab.

  5. 5. Click on the Run this program in compatibility mode check box.

    Run this program in Compatibility mode
  6. 6. Select Windows XP from the drop-down box underneath.

  7. 7. Under the Setting section, there are a few more options to further improve your chances of making the program run effectively. Select those and see if it helps. It is sort of a trial-and-error process and will require several attempts before coming to a stable configuration.

  8. 9. Click on Apply > OK to finish and save changes.

Virtual Machine

This can be considered as a zone within your Windows 10 where you can run programs meant for Windows XP. Or it is like a Windows XP section within Windows 10. However, you will need a valid Windows XP license to successfully create a virtual machine capable of running programs meant for the version of Windows.

For this, you will need to download a virtual machine like VirtualBox or VMware Player and install the same on your PC. Follow on-screen instructions and enter the XP licence when prompted. Try and see if you are able to run the Windows XP game you are so infatuated with.

We hope that you were able to successfully play your beloved games from Windows XP on Windows 10 using our solutions.

Let us know which method worked best for you!

RELATED GUIDES YOU NEED TO CHECK OUT:

5 Best SteamVR Web Browsers to Enjoy Complete Immersion

A Virtual Reality pioneer, SteamVR is a fantastic platform that delivers fully immersive experiences to gamers worldwide. And the best part is that it caters to all major VR equipment manufacturers.

You can easily pair it with headsets such as Valve Index, Oculus, HTC Vive, or Windows Mixed Reality, and the line-up does not stop there.

All nurturing experiences can be traced back to our homes, and SteamVR reflects this principle. Fully interactive, highly customizable, and packed with enticing VR games (out of which many are free to play), SteamVR Home facilitates socialization, trophy collection, in-app purchasing, and more.

You can customize environments, and avatars, set up accurate motion boundaries for your controllers, and browse freely through the SteamVR store and community.

Is there a web browser for VR?

Speaking of browsing, you might be wondering if there is a Steam VR web browser out there. But first, can you browse the Web with a VR headset? You sure can. You can even browse servers on Steam outside a game.

BSO, for that’s a different story. So, let’s focus on this question: How do I view VR in my browser?

That’s easy, and you need a capable browser for Virtual Reality to get in the game (metaphorically, that is). How about a specific SteamVR browser? You wanted to know, and we’re here to serve.

Does SteamVR have a browser?

Yes, SteamVR also includes a browser for you to explore the web without going out of your virtual reality experience. Unfortunately, sometimes that browser stutters and pauses and could cause some nausea.

For a better VR experience, try the browsers mentioned below.

Can you browse the internet on Valve Index?

You can browse the internet on Valve Index, and any software presented below will give you a great experience.

How can I use a Steam VR browser overlay?

Using a Steam VR browser can be quickly done by using OVRdrop, enabling you to attach a specific movement to an action. For example, you could easily have a browser screen appear on your stream when you show your right hand to the camera.

This will allow you to customize how you share information in your live streams, so check it out.

What are the best browsers for SteamVR?

Opera One – Best VR browser with built-in VPN

Once upon a time, Opera One was the first browser to provide an integrated player designed to render 360-degree videos for popular VR headsets.

Embedded VR playback is no longer a novelty. Still, Opera One innovates with nifty features such as video pop-out, the My Flow feature that handles links, videos, and images for you, or the Player feature that plays music in the background.

From content streaming to seamless video viewing with no buffering, Opera One is the go-to instrument that unlocks immersion, allowing users to enjoy VR directly in the browser.

Moreover, Opera One is now rebranded, with a redesigned user interface and an interesting modular design, and tab islands specifically created to ease its users’ browsing experience.

Opera One

Pair Opera One with SteamVR and enjoy seamless VR content just as you want!

Chrome Canary – Developer edition of Chrome that supports VR

The Canary version of Google Chrome is a niche product but no less attractive, an edition reserved mainly for developers.

Boasting web-based VR support, this version will allow you to watch and create 360-degree videos and fully immersive content that can later emulate the display of an Android device, VR headset, and more through an API.

How do I use VR in Chrome?

  1. Download the SteamVR app as well as the Canary Chrome browser.
  2. Next, type the following lines in your browser’s address bar: chrome://flags#enable-webvr, chrome://flags#webxr, and chrome://flags#openvr.
  3. Press Enter after each one and set them to Enabled.
  4. Finally, launch the SteamVR app to check if it is tracking.

⇒ Get Chrome Canary

Firefox Reality – Great UI and fast VR response

Is Firefox VR compatible? It is if you know where to look. But, of course, we are talking about Firefox Reality, the browser at the forefront of hosting new technologies such as mixed reality, VR, and emerging realities.

While Igalia is supposed to continue Firefox’s legacy, you can still enjoy the original browser tailored for standalone VR headsets such as Oculus, HTC, or Windows AR.

Alternatively, you can search for it on your device’s store and use it to enjoy fast, private, and immersive browsing like never before.

⇒ Get Firefox Reality

Wolvic – Secure browser for VR and augmented-reality headsets

Firefox Reality gave its blessing to Igalia, and soon Wolvic was born. Still in its early stages, this open-source browser aims to redefine our interaction with the World Wide Web. It includes animated features such as immersive content support and environments built for XR.

Wolvic brings a fresh and edgy approach, allowing you to access any web part without leaving the immersive environment. It is now available in the Oculus App store and the Huawei AppGallery.

You can also contribute directly to its refinement by testing it on your device and sharing your input via GitHub.

⇒ Get Wolvic

Grove – Great VR experience with the ability to see the mouse cursor

We listed some attractive solutions so far, but we’re sure you’d like to know if SteamVR has its browser to flaunt. So, does SteamVR have a Web browser? And if so, why did it only reach the 5th position?

It does. Grove is the tool that delivers the VR browsing experience on Steam.

While it has some interesting features under its bonnet, such as window management, background customization, and the ability to show your mouse and keyboard in VR, it has a long road ahead until it can catch up with other modern browsers.

Meanwhile, you can get in from the Steam store and give it a go. It should have no problem working on Valve Index, Oculus, or HTC Vive devices.

⇒ Get Grove

How do I use Opera One VR?

As the Opera One VR experience has been designed with the most critical user needs in mind, to start using it, you have to plug the VR headset into your Windows, Linux, or macOS PC and click the Watch in VR button that will appear automatically at the top of any video.

There you have it! Feel free to browse around and pick the best Steam VR web browser to deliver the ultimate immersion experience with great ease.

How to use Chromecast in your browser

Chromecast technology allows you to play multimedia content from your browser, phone, or tablet directly to your Chromecast devices.

This is an amazing feature that usually works out of the box on all browsers, and today we’ll show you how to use Chromecast in your favorite browser.

In addition, you should be aware that it’s possible to cast the screen of your devices simply by using any browser. You may assume that Chrome is the best option, yet there are multiple choices for you to try.

What are the best Chromecast browsers?

If you need to analyze your options carefully before choosing one browser, we provide a handy list of the best ones:

  • Opera One– a full-featured browser that comes with enhanced privacy and lots of integrations, including reliable Chromecast support
  • Google Chrome – a browser that has great navigation features and can sync your devices or use its Cast option
  • Mozilla Firefox – has plenty of browser extensions that you can utilize to connect your Chromecast devices
  • Kiwi Browser – quite a fast and private browser that supports most Chrome extensions
  • TV Bro – reliable browser for Chromecast devices developed for Android TV

How do I use Chromecast in my browser?

1. Opera

  1. Click the Opera One icon in the top-left corner and choose Settings.
  2. Scroll down to the User interface section and check the Enable Chromecast support option.
    opera chromecast setting chromecast browser
  3. To cast a page, simply right-click the currently open tab and choose Cast from the menu.
    cast opera chromecast browser
  4. Select the destination device and you’re good to go.

In addition to native Chromecast support, Opera One is also light on your resources which makes it perfect for all multimedia tasks.

Opera One also has a built-in adblocker that will speed up webpage loading. Lastly, there’s tracking and malware protection as well as a free VPN with unlimited bandwidth for extra security.

Opera One

Before setting up Chromecast, make sure you have the latest version of the web app.

2. Google Chrome

  1. Click the Menu icon.
  2. Select the Cast option from the menu.
  3. Now choose the desired destination device.

To stop casting, just click the Cast icon in the address bar and choose Stop casting. Since Google invented Chromecast, it’s no wonder to see that Chromecast works out of the box with Chrome.

3. Firefox

  1. Download fx_cast extension. You might also need to download Windows Bridge software from the same source.
    firefox extension download chromecast browser
  2. Select Continue to Installation button.
    continue to installation firefox chromecast browser
  3. Now click the Add button to add the extension.

To cast content, do the following:

  1. Click the Cast icon from the page or right-click the multimedia player and choose the Cast option from the menu.
  2. Select the destination device and that’s it.

Bear in mind that this extension is in development, so certain features won’t work properly.

4. Microsoft Edge

  1. Click the Menu icon in the top right corner.
  2. Go to More tools > Cast media to device.
    edge cast media to device chromecast browser
  3. Now select the destination device.

After doing that, your multimedia should start playing.

Chromecast is one of the best and simplest ways to stream multimedia, and now you know how to use it.

To learn more, be sure to check our other Chromecast articles. Also, for more news and guides like this one head over to our Browsers Hub.

Are you using Chromecast, and what is your browser of choice? Share your thoughts with us in the comments section.