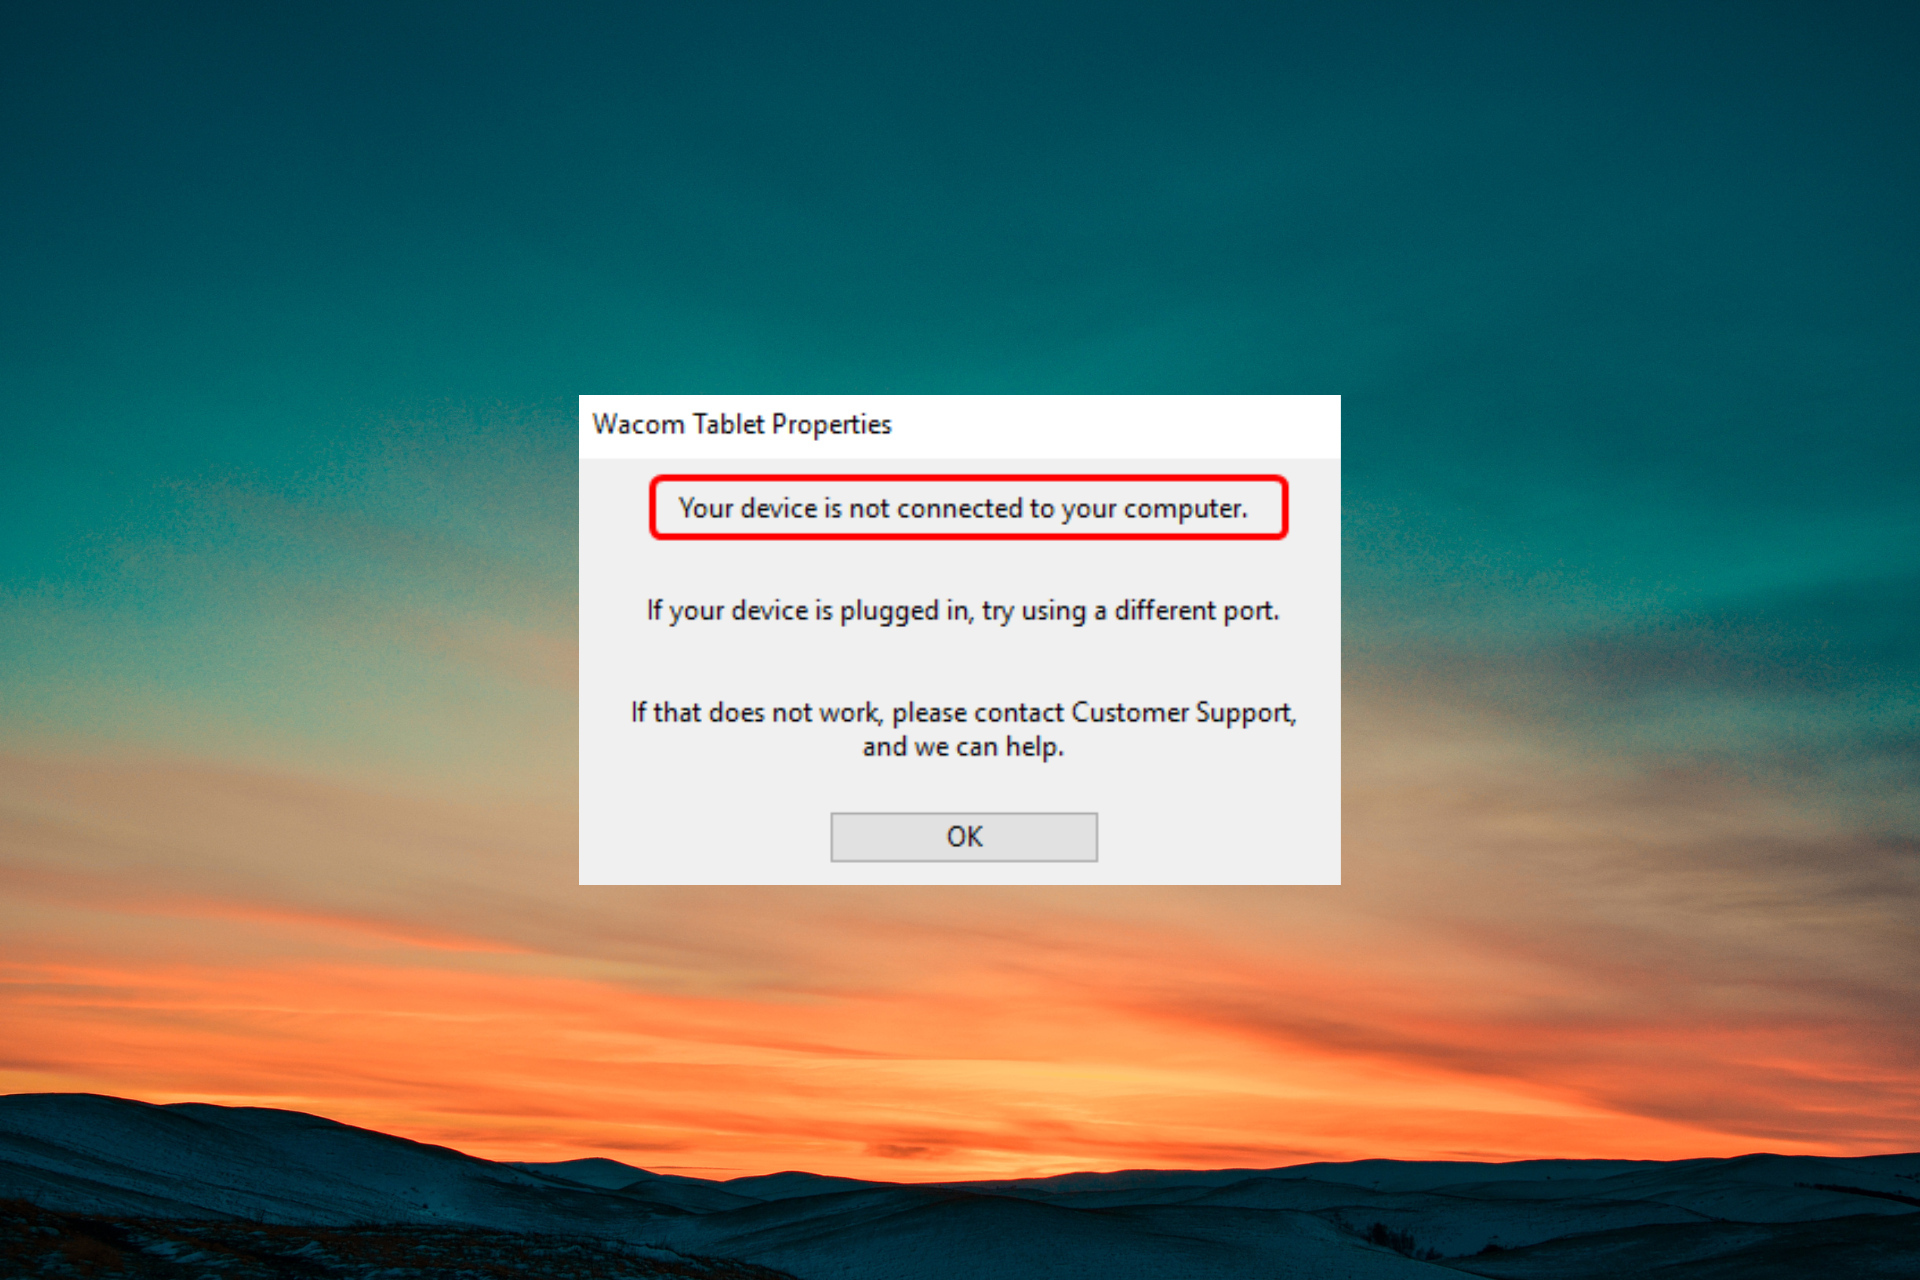
More and more users turn to forums in search of an answer to why the Wacom driver won’t install on their Windows 10 computer.
When trying to perform the procedure, users encounter different kinds of errors like abrupt closing during the installation process, errors while running scripts from the package, or an error saying some files can’t be installed.
Luckily, there’s no need to panic. We have compiled a simple guide to help you fix this error and install the necessary drivers with no problems.
How to successfully install the Wacom driver on Windows 10?
1. Remove all traces of Wacom drivers
1.1 Uninstall the driver from Device Manager
Disconnect your Wacom tablet from the PC.
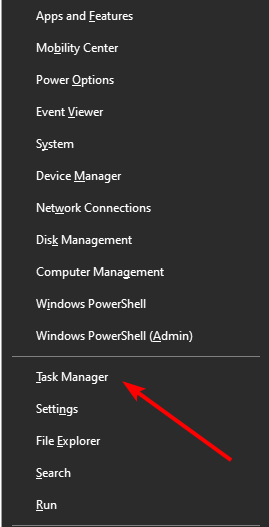
Right-click on Start and select Device Manager.
Locate the Wacom Tablet under Human Interface Devices.
Right-click on it and select Uninstall.
Now, reconnect your tablet and wait for Windows to recognize it and install the right drivers.
1.2 Use a specialized software
Removing the Wacom driver from a Windows computer can be a little tricky, as drivers for tablets have a tendency to hide around the computer once they are installed on it.
This helpful driver solution is the perfect match for every task that involves drivers changes in the system. Whether you have to fix corrupted drivers or backup a driver file, you can do it automatically.
Therefore, with Outbyte Driver Updater you have the most reliable support regarding driver operations, and thus optimize your PC performance using the latest driver versions.
If you have any additional suggestions on how to fix this issue or just a question or two, use the comments section below and we’ll make sure to reply.
As cybercriminals get smarter and even more cunning, more people fall victim to cyber fraud resulting from the theft of passwords and important personal information.
Frighteningly, cybercrime is projected to cost the world around $6 trillion by 2021. Presently, fraud and cybercrime are now so common offenses that one in every ten people is a direct victim.
Much of the problem lies in our online behavior, mainly the way we now switch from one device to another with ease. While not long ago we used to go online from one device, we now have smartphones, iPads, notebooks, and home desktop PCs.
With so many devices, there is a greater risk to expose your passwords.
What should I look for in a password manager?
Using a password manager with a sync feature, you can save your passwords once and the manager will autofill them for you, whatever device you are using.
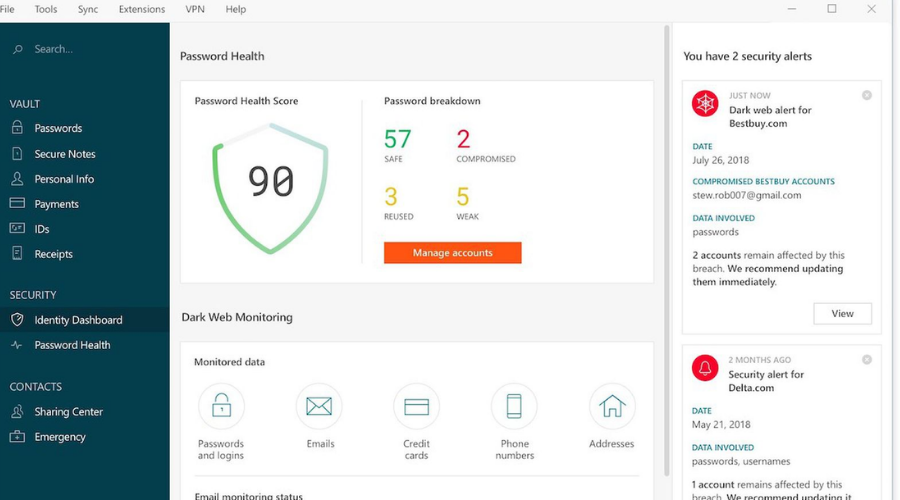
The best password managers even go beyond just syncing your passwords. Their other features include a password generator, password analysis, which shows the number of old, weak, reused and compromised passwords, as well as e-wallets where you can keep a record of your online payments, personal information, and receipts.
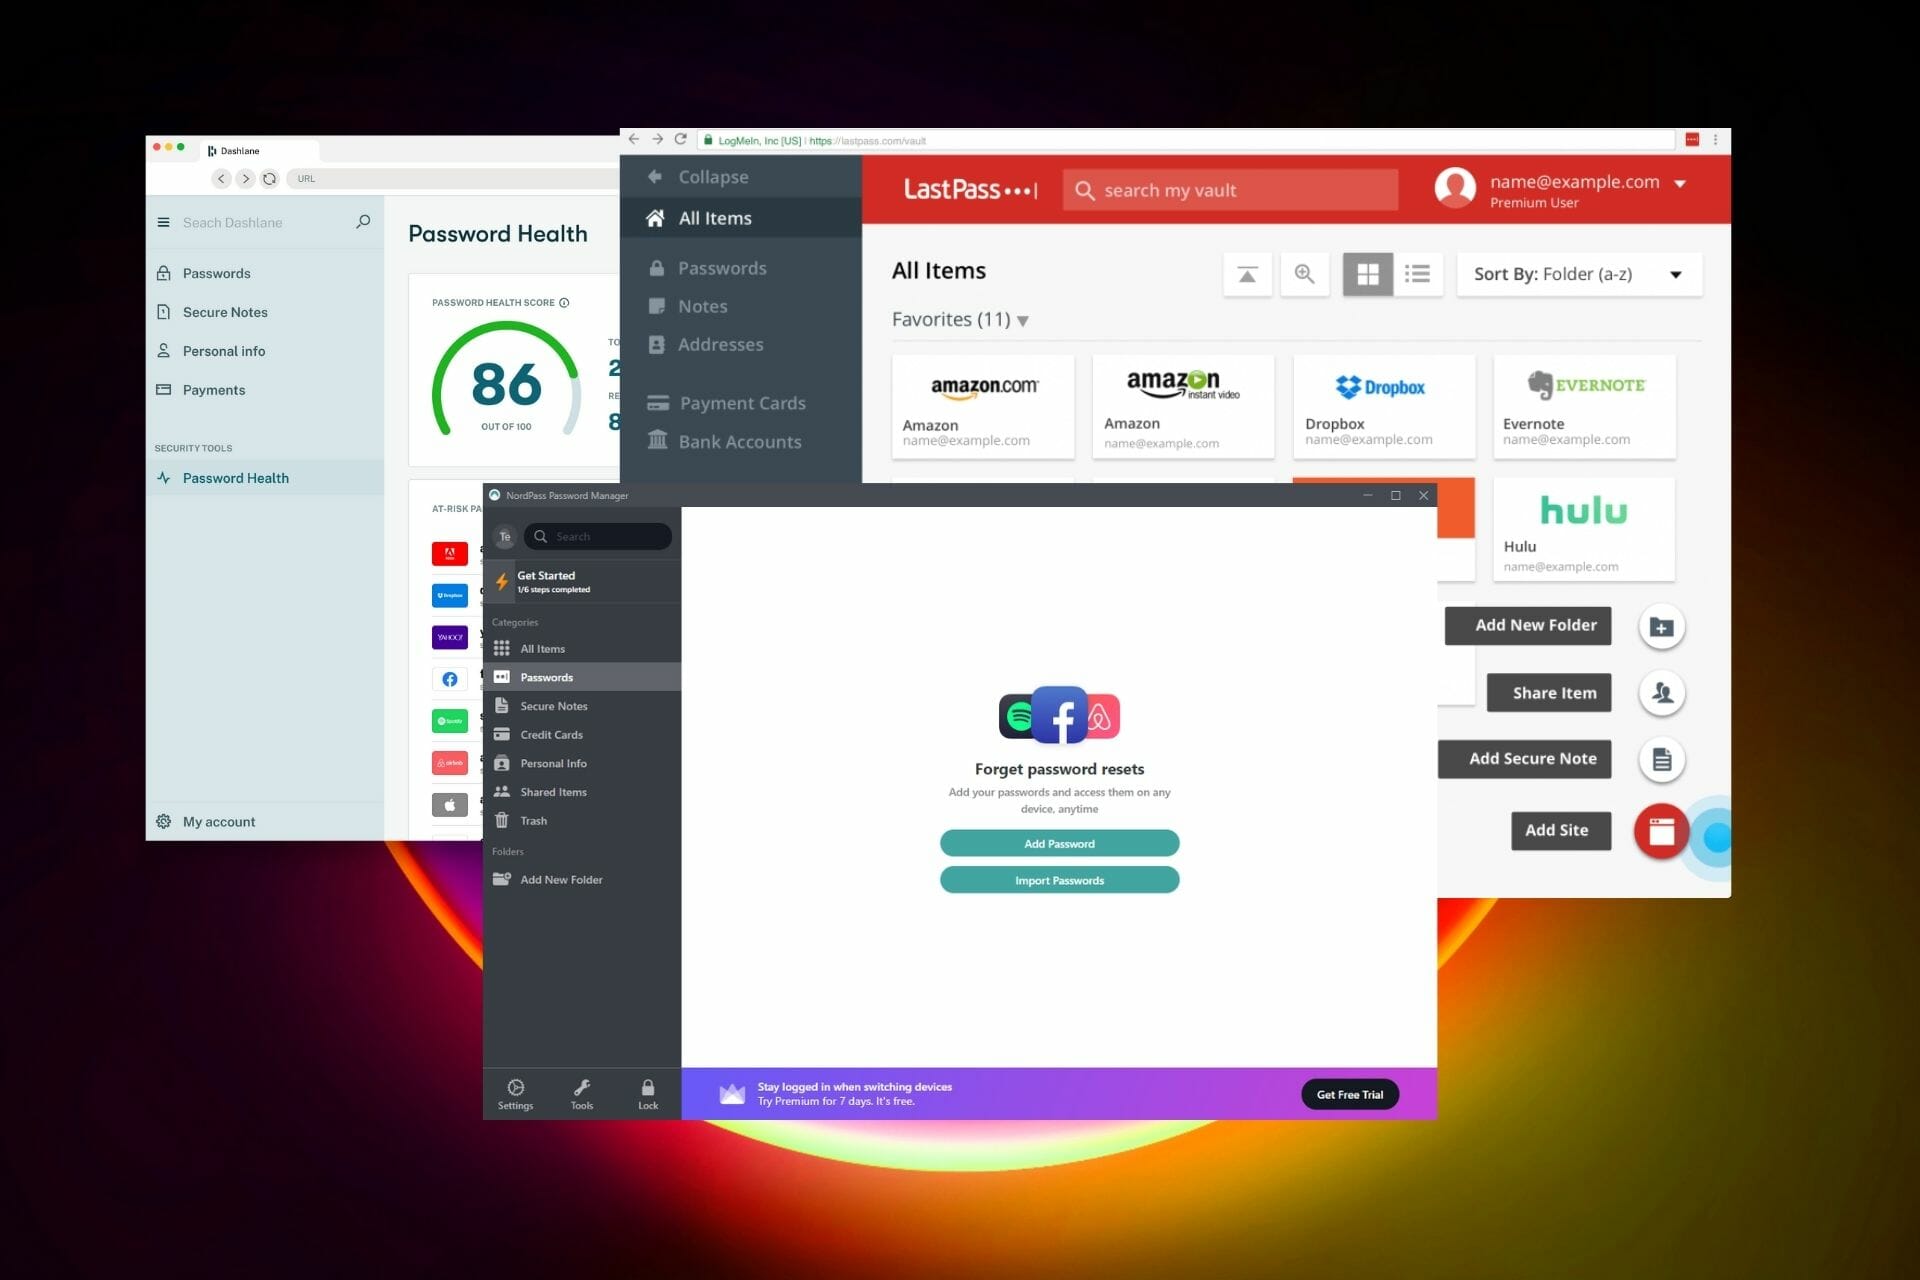
So, let’s see together the pros and cons of the best password managers you can use today.
What are the top password managers with a sync feature?
NordPass entered a crowded industry in 2019, and it only took a year for it to become one of the users’ favorite password managers.
This is hardly unexpected given that the technology was built by NordSec, the same organization that delivered the well-known and trustworthy NordVPN service.
The sync feature supports the upkeep of all information in your NordPass vault. It is always synced across your devices and backed up to the cloud. As a result, regardless of the device or platform you use to access it, it is always immediately available at all times.
Also, your passwords will always be close at hand with NordPass, even when you’re not connected to the internet.
Moreover, NordPass provides these key features to the user:
Storage for unlimited passwords
No limit for devices that use NordPass
Syncs passwords across all devices
Searching for all old/weak passwords and suggesting new powerful ones
Increased security via Multiple Factor Authentification
Switching to or from NordPass will only take moments since it features direct importing or exporting of .csv files. Caution when switching via .csv files since it contains all your passwords for every account.
NordPass
With NordPass’ features, you can access them even when you’re not connected to the internet.
I have used Dashlane for the past year and must confess that I am a big fan of the password manager because of its sleek interface and ease of use.
Not only can I store all of my passwords in one place, but I also don’t have to fill in the passwords every time I log into my social accounts and the many online marketplaces and forums I subscribe to.
Dashlane allows me to sync all my passwords across devices and web browsers so that I won’t have to memorize them even when I switch from my PC to my phone.
The sync feature is however only available to premium account subscribers.
A great feature of the password manager is the master password that I have to manually enter when divulging banking card information.
While the autofill feature is incredibly convenient, saving me lots of time, when I am divulging banking information I will feel safer if I am prompted to manually enter my master password every time, in case my device falls in the wrong hands.
Using cloud storage, Dashlane also vaults my personal details, including usernames and other information for every online account I open.
Every time I fill in personal information for an account for which Dashlane has not saved my credentials, the password manager asks if I would like to save the password information. I can choose not to save the information, which is a choice I sometimes take.
Another cool feature I like on the Dashlane desktop app is the security score, which analyzes all your passwords to pick those you have reused, those that are weak, and, importantly, those that are compromised.
It then works out a percentage security score that you can work to improve by taking the password manager’s suggestions, which include replacing individual passwords with stronger, new ones.
The Dashlane database can be accessed while offline by downloading the desktop app. The password manager is supported on Windows, iOS, macOS, and Android operating systems as well as most web browsers.
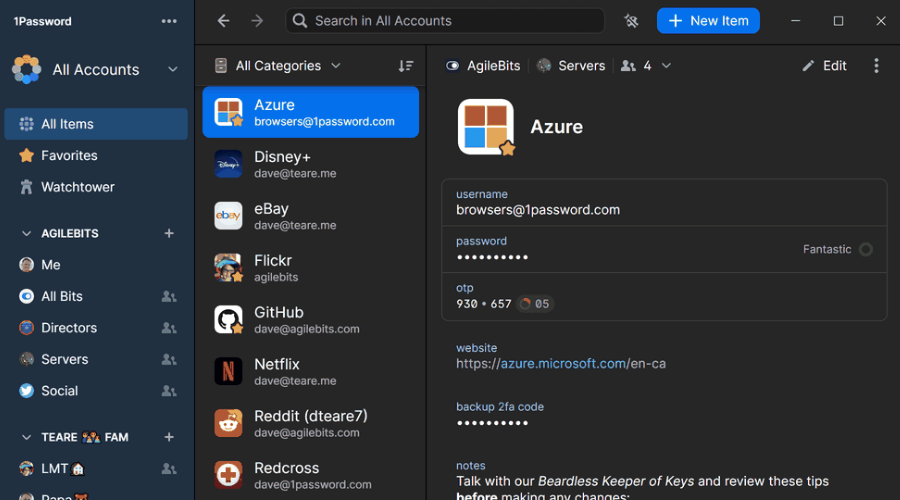
1Password is an excellent password manager. Initially limited only to iOS and macOS devices, in time it’s also become available for Windows, Chrome OS, Linux, and Android.
Some may find the interface of 1Password sleeker than Dashline’s. The password manager is more efficient than those two, often requiring lesser steps or clicks before logging you in.
If you are not comfortable using cloud services to store your passwords, 1Password also has an option for local storage. In the individual plan, for instance, you get 1 GB of cloud space.
Yes, password sync across your devices and browsers is convenient, but there are some sensitive passwords for which you may prefer local over cloud storage.
Even with cloud storage, your master password is never stored in the cloud, which just seems the safest option.
So if you are a fan of all things Apple, 1Password is clearly an upgrade on both Dashline and LastPass.
Unfortunately, 1Paword doesn’t offer a free plan, only a trial period. After one month, you’ll have to switch to one of the subscription plans.
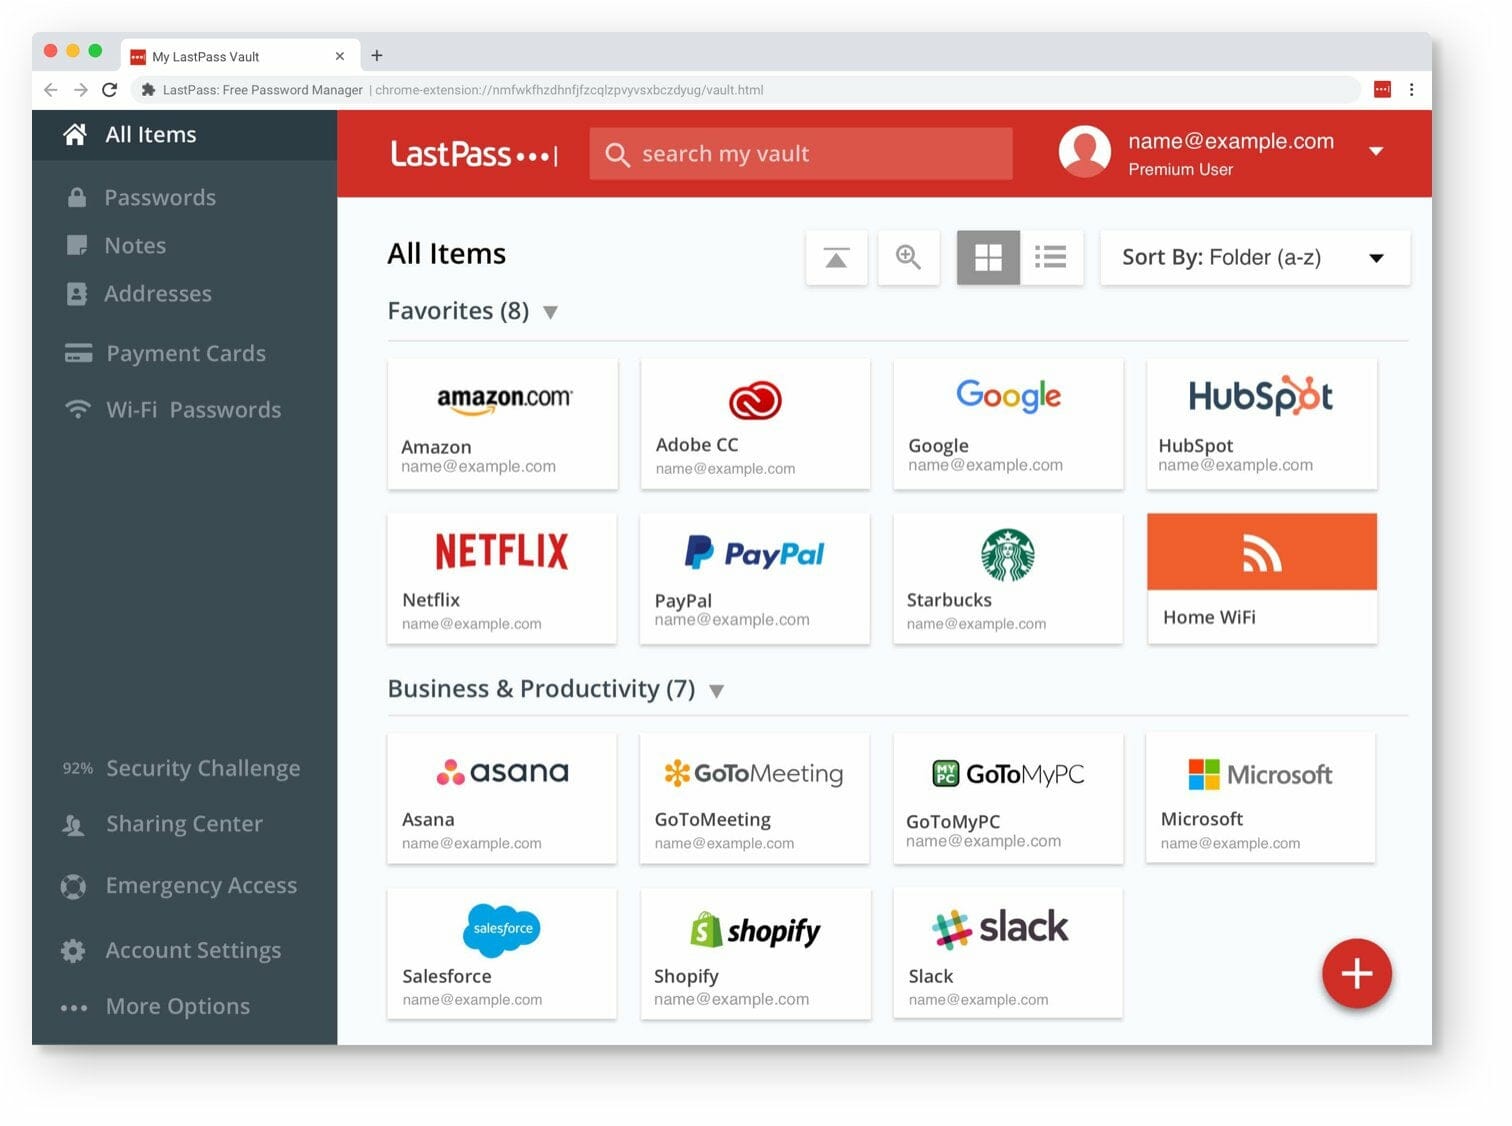
Password sync is a big benefit that even has me considering a switch to LastPass. The ability to sync your passwords across devices, web browsers, and platforms is more important now than ever as most people now use more than one device to access online accounts.
In case something happens to you, you want trusted people to be able to access your accounts. LastPass allows you to do just that with the emergency access feature that shares your password information with the people you choose.
Just like Dashline, LastPass uses your gathered personal information to autofill forms and password fields for the sites you visit. To give you more control, LastPass allows you to disable the autofill feature on a site-by-site basis.
Some may consider it significant that LastPass’ password generator gives an option of up to 100.
But we can’t imagine needing a password that’s 100 characters long. But then again there is no such thing as being too secure. Anything that can keep those pesky hackers locked out of your accounts is always welcome.
LastPass has both free and paid plans. The password manager works on Windows, macOS, Android, iOS platforms, and the major browsers, including Chrome, Firefox, Safari, Microsoft Edge, and even Android wearables, and the Apple Watch.
The browser extension for Microsoft Edge has however been flagged for quite a few glitches.
If you want powerful password sync software, perhaps you might want to consider Keeper. The application comes with 256-bit AES encryption, meaning that your personal data will remain protected and only accessible to you.
Just like any other password manager, Keeper uses a master password in order to protect your account and all your passwords and personal data. The application also supports two-factor authentication which provides another layer of security.
Other standard features include the ability to automatically generate and fill password fields. All generated passwords will be stored in Keeper, and the tool adds them automatically to the input field when you need to log in to certain websites.
Another great feature is the ability to scan your payment cards, so you can use them for faster checkouts in the future. Your personal information is safely stored and the form autofill feature works like a charm.
Keeper is optimized for sharing, so you can easily manage and share your data with family members or even set up emergency access for up to 5 contacts.
It’s also worth mentioning that this application allows you to import your passwords from other password managers or from your browser, so if you decide to switch to Keeper, you can keep all your passwords.
Keeper is a great password sync software, and it’s perfect for both individual and family use. If you’re a business user, there’s a special package with advanced features, so Keeper will be perfect for all your needs.
Enpass – Ideal for syncing your passwords across devices
If you have tried 1Password before, you will find Enpass to be too similar in appearance and features. But perhaps disappointingly, the password manager does not offer anything too compelling to be a viable alternative.
As is standard with the other password managers we have reviewed here, Enpass also enables you to sync your password data across your devices.
There is also no need to copy and paste your usernames and passwords on sites you frequently visit, as the autofill feature is also included in Enpass’ features bundle.
As one of its chief attractions, Enpass is dirt cheap. The desktop pro version is free, while the mobile version has a free trial with a lifetime license that is pegged at just $9.99 per platform.
Enpass saves your passwords locally, on the device itself. For password sync across devices, Enpass requires you to sign up for a cloud service like Dropbox or iCloud, which is a bit of a drawback and an added cost.
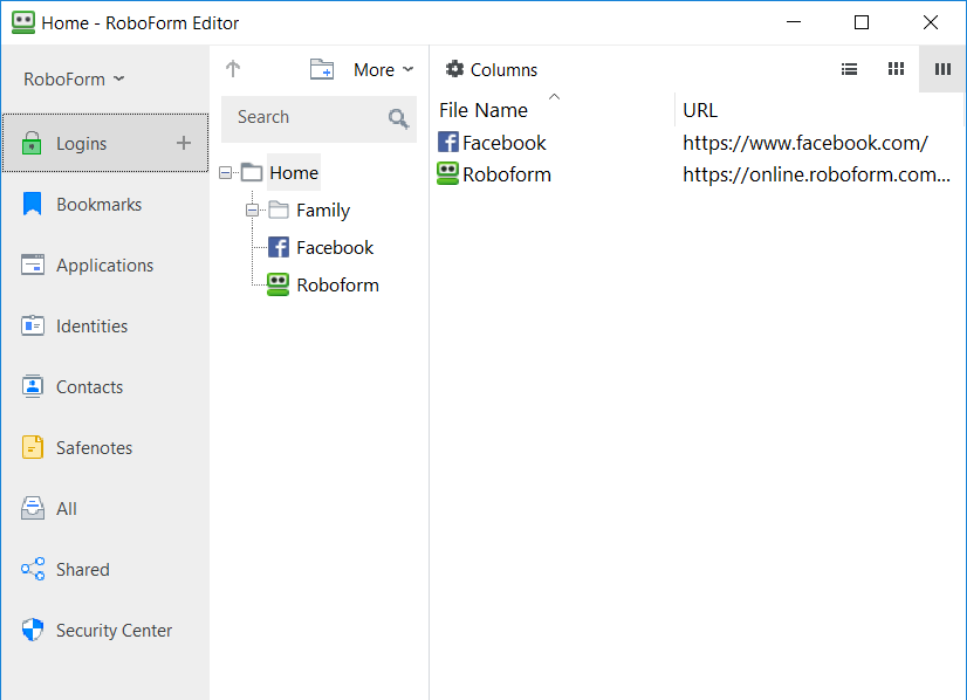
RoboForm is the next software tool on our list, and it does an excellent job when it comes to syncing passwords, regardless of circumstances.
Regardless of whether you are on your PC at one moment, or on your phone halfway around the world, simply log into RoboForm, and your passwords will sync accordingly.
This also applies when you change your passwords from one location since this data is bound to your RoboForm account, and not client-side.
Besides, RoboForm makes for an excellent overall password manager, allowing you to store your credentials and log into any website with just one click, without having to remember complicated passwords.
Speaking of complicated passwords, if you lack the imagination to come up with unbreakable credentials, RoboForm will help you thanks to the random password generator.
Recently, RoboForm has successfully undergone a security audit and penetration test conducted by Secfault Security. That adds a lot of credibility to this tool.
Why do I need a password manager?
You can’t afford to be careless with your passwords and personal information anymore. And everyone who wants to be safe online should be using a password manager.
Choosing one that syncs your passwords across devices and browsers just makes your life that much easier. It also makes your passwords and personal information a lot safer.
Any of the password managers we have reviewed here has enough features to secure your passwords and personal information online.
Furthermore, saves you a lot of time on repetitive tasks like filling in your email address and other personal information.
Choose one that seems the most suitable for your personal circumstances and kick off everyday with an enhanced cybersecurity toolset.
No one wants to have their data leaked and give hackers access to personal information and private files.
Although Windows 10 and Windows 11 do implement powerful security options and have regular updates to keep up with new security requirements, they don’t have a very secure option to secure your passwords.
We use passwords to authenticate to pretty much any type of digital account, many of which we use to communicate and also store sensitive information.
Whilst Windows 10/11 does not have a built-in password manager, there are some third-party solutions that provide great security and ease of use.
For this reason, we tried to find the best password manager for Windows 10/11 and ended up with several noteworthy options, hence the following list.
All these tools come with password storing features and some of them include additional benefits such as a password generator or cloud-based sync.
Some of these tools even include data breach monitoring features and alert you right away in case any of your passwords is compromised.
How do I manage passwords in Windows 11?
Today’s security risk requires us to change passwords frequently and it’s advised we don’t use the same password for all accounts.
This can get overwhelming real quick, so it’s recommended you get a password manager that can securely store all your passwords so you won’t have to memorize them.
Fortunately, many password managers on the market offer free versions, so you will not have to pay in order to benefit from highly secure password storage.
Does Windows 11 save passwords?
The closest thing to a password manager that you can find in Windows 11 is the Credential Manager Menu.
There you can see all the accounts that are saved on your computer. For example, if you use the built-in Microsoft email app, you will get access to your email addresses and their credentials.
It can also store some passwords that you have saved around the web, but it is somewhat updated when compared to the built-in password saving features within browsers.
The Windows credential manager will not be able to autofill web-based passwords. To access the information you will always have to browse around the panel, so it’s not exactly quick and intuitive.
Plus, some users reported having their data leaked when using this feature, so we recommend you try a different tool until the issue is addressed.
How do I choose a password manager?
When you pick a password manager it’s essential to make sure it has the following assets:
Enough storage space for your needs (many offer unlimited)
Powerful encryption algorithms such as AES-256-bit or XCHaCHa20
Data breach monitoring to make sure you’re not at risk
Password assessment to let you know how secure your password is
Cross-platform compatibility so you can access your passwords from all your devices
What are the best password manager apps for Windows 10/11?
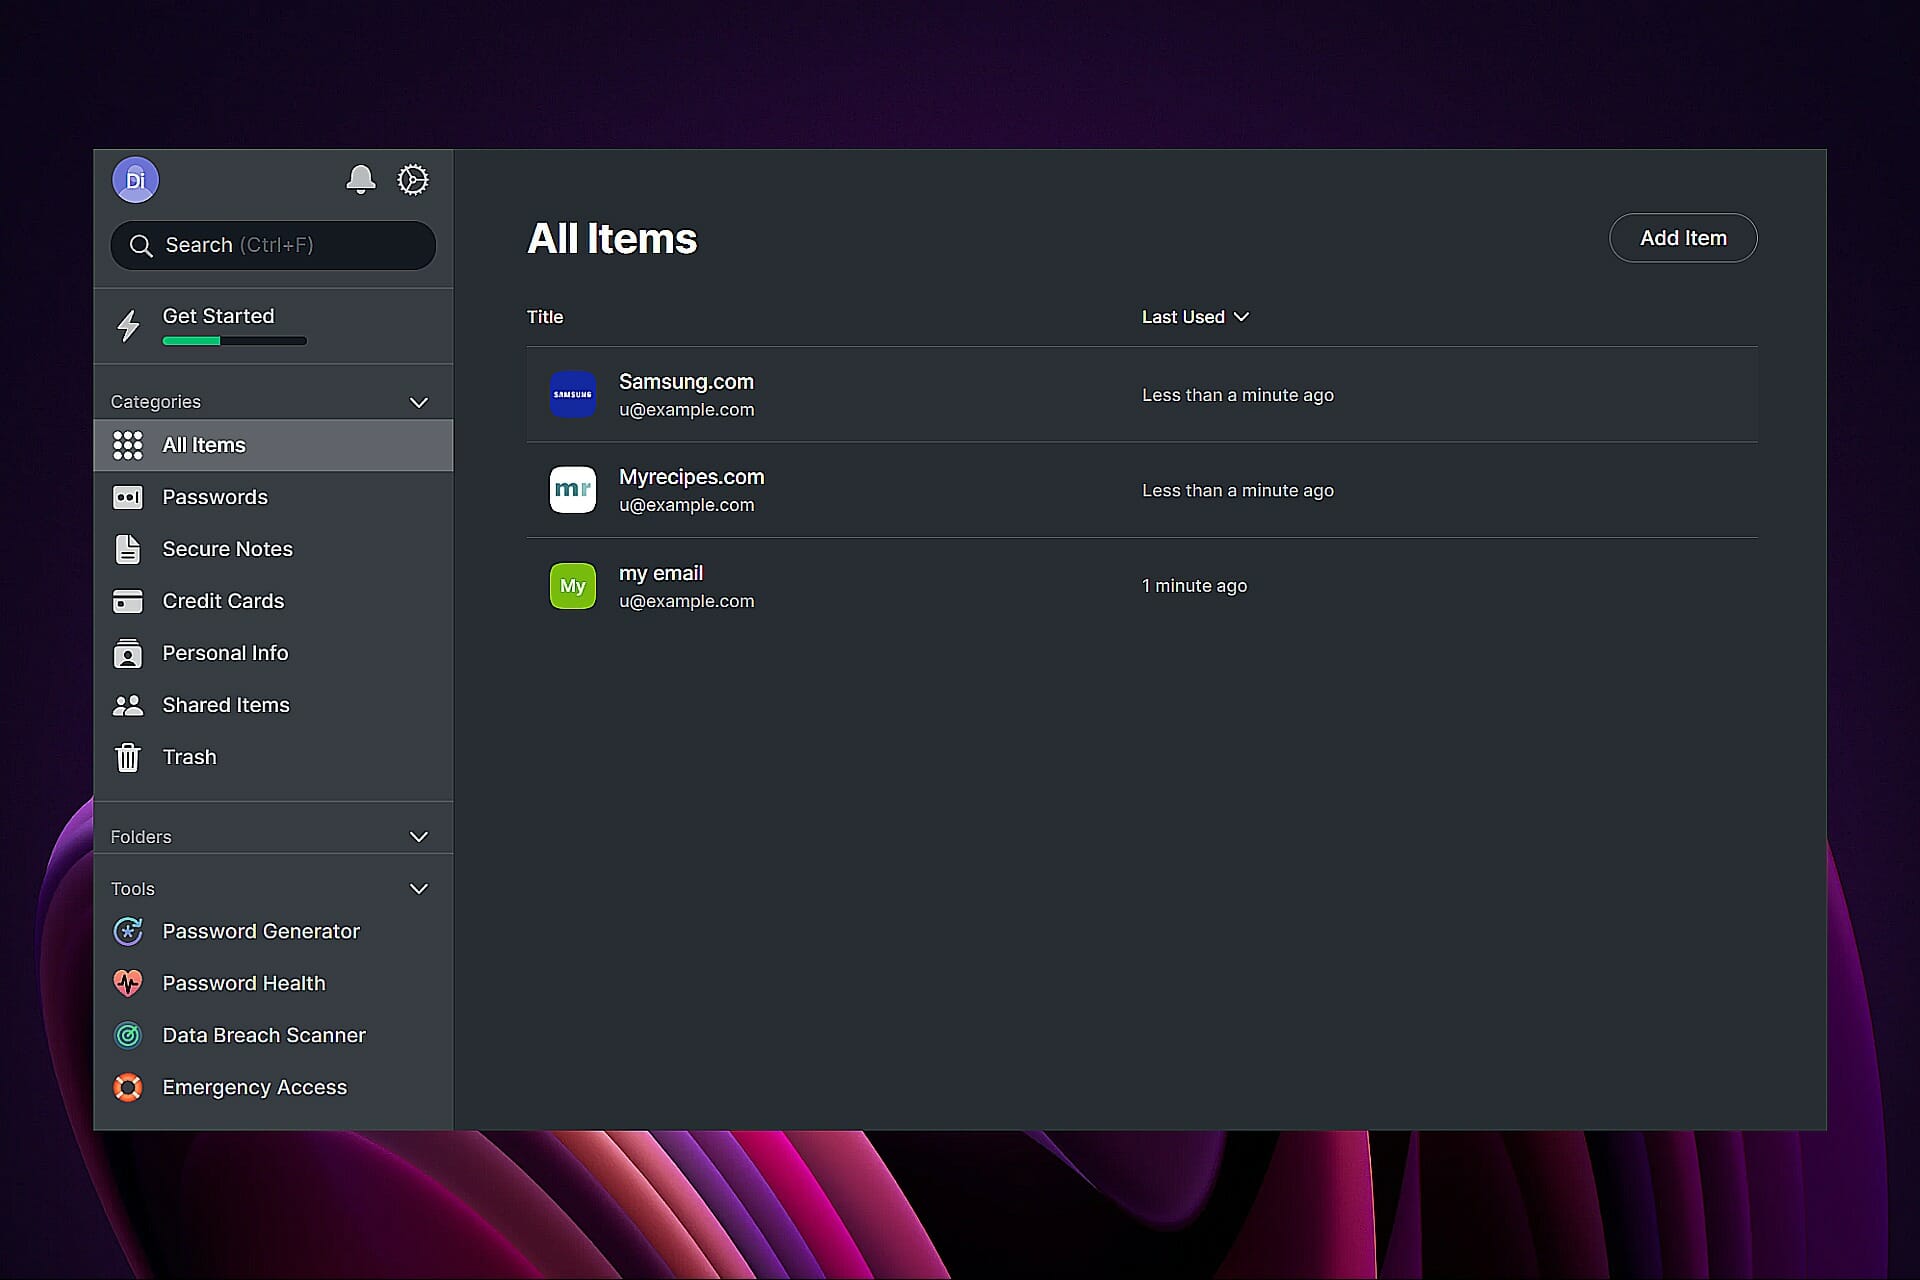
NordPass is a streamlined password manager brought to you by the team that’s behind the highly secure and award-winning service, NordVPN.
Security and convenience are probably some of the most sought-after benefits you want to get from a password generator and NordPass excels in both.
Along with managing your passwords and making them readily available on multiple devices, it also has a strong password generator that gives you sturdy, unbreakable key combinations to keep your accounts safe.
NordPass stores your data in a cloud and uses the zero-knowledge encryption model to make sure it stays private. This means that all decryption of the data only takes place on your devices.
In terms of user experience, NordPass is very easy to navigate. New users are able to adjust to its intuitive interface in no time.
Note: Take advantage of the valuable NordPass plan for businesses, including new perks like the in-house authenticator. The price starts from $3.59 per user/ per month.
Moreover, the key features of NordPass are:
Unlimited saved passwords and devices connected
Autosave password and autofill when needed
Fast and automatic sync across all the devices you use
Find old, weak, and reused passwords and suggest new powerful ones
Stay logged in when switching devices
Family plan for all family members
NordPass has a free version that offers the necessary support to set up and store passwords. However, it offers some amazing features when choosing a subscription plan.
NordPass
Store your passwords with this tool that uses next-level encryption to keep your data secure.
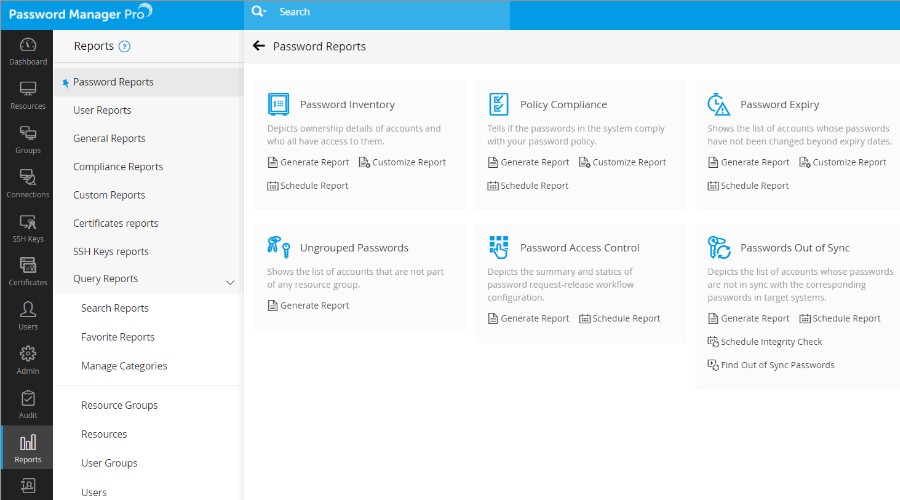
ManageEngine Password Manager Pro is an enterprise-grade password management solution. It helps organizations securely store and control access to sensitive credentials across IT environments.
Rather than acting as a simple password vault, it focuses on privileged account management, making it especially useful for IT teams handling large volumes of system and service accounts.
At its core, the platform provides a centralized, encrypted vault where passwords, documents, and digital identities are securely stored using strong encryption standards.
Administrators can enforce granular access controls, ensuring users only see or use credentials relevant to their role, while automated password resets and policy enforcement help maintain strong security hygiene.
One of its standout capabilities is privileged session management, allowing users to connect to remote systems without exposing credentials, while sessions can be monitored or recorded for auditing purposes.
The platform also offers detailed audit trails and compliance reporting, making it easier to meet regulatory requirements and track all password-related activity.
Overall, Password Manager Pro is a powerful, highly configurable tool best suited to medium and large organizations. It goes beyond basic password storage by combining security, automation, and oversight into a single platform designed to reduce the risks associated with privileged credentials.
Dashlane password manager is a great tool that stands out among its competitors through many features like top security, a user-friendly interface, and competitive pricing plans.
Once installed, Dashlane starts scanning your browsers for any saved passwords and imports them into its database where you can manage them.
The free version allows you to store 50 passwords, but the paid version unlocks a plethora of cool password management features that help you access your accounts.
First of all, it has a simplified VPN that helps you connect faster. Well, it cannot be compared to some of our best VPN choices but it does the job of connecting to the fastest server.
You are also protected in case your personal information appears on the Dark Web. Speaking of security, it comes with 256-bit encryption, a backup of all your passwords, sync across multiple devices, and a password generator.
Dashlane can also keep track of other private data such as your bank credentials.
You can get quick access to all your sensitive information from its secure, unified user interface.
The tool saves you lots of time as it implements an autofill feature. You don’t even have to check and type your password, Dashlane is doing it for you.
It’s also important to mention that Dashlane makes a point to keep your data secure and has a transparent privacy policy that states they don’t sell any user information to third parties.
1Password is another generous password manager with very good reviews from both individuals and businesses using it.
For personal and family use, the tool comes in two paid plans, each with a one-month trial period.
In the simplest version, you can store an unlimited number of passwords and items, plus get a 1 GB storage space for documents.
The Travel Mode can come in handy if you’re a frequent traveler and you need sensitive data to be accessible only within certain territories.
If you want to go for the family version, you’ll get up to 5 accounts, the option to share with other members personal data such as passwords or credit card numbers, and manage what the others can see and do in the app.
1Password has a comprehensive digital vault that you can use to store passwords, login information as well as private data.
You can use it to secure and manage your bank account information, personal documents, identity cards, and more.
It has an automatic form filler so you can log in within seconds. 1Password stores your usernames and their corresponding passwords and automatically fill them in for you when you start typing them.
We’re sure that many of you already heard of LastPass. But if you haven’t used this password manager before, here’s why you should give it a try.
First of all, LastPass is one of the very first password manager apps released for Windows 10 and is kept up to date and compatible with Windows 11 as well. It is very stable and reliable and it comes with a very easy-to-use user interface.
This password manager app also supports fingerprint technology, allowing you to quickly access your information.
The tool also includes some interesting productivity features. For example, you can save important details on your account, including bank account information, your driver’s license, passport information, social security number, and more.
LastPass also includes data breach monitoring so you can rest assured that you’ll be notified in case there are any issues with your current passwords.
The tool even monitors data breach problems that appear on the dark web.
It also has an emergency access feature. With this feature, you can give access to your LastPass account to a trusted friend.
All in all, it’s a performant, secure, and convenient solution. Desktop users can enable the autofill option for quick account logins.
LastPass
Store your passwords across all your devices and favorite websites with this intuitive password manager.
Another great password manager that we want to show you is Efficient Password Manager Pro. Just like another password manager on our list, this one uses a master password to protect all your passwords.
Thanks to the 256-bit encryption, all your passwords will remain protected, and in order to access them, you just need to enter your master password.
This software supports synchronization, so you can access all your passwords across multiple devices. This app is available on PC, Android, and iOS, so you’ll be able to access your passwords at any time.
Efficient Password Manager comes with a built-in search option so you can find the desired password in a matter of moments.
Another notable detail is the ease of use, allowing you to copy your login information simply by right-clicking it. Of course, you can visit any website right from the password manager and quickly enter the required login information.
In order to make sure that you’re using proper security practices, the application also has a built-in password generator, so you can easily generate secure and strong passwords.
Overall, Efficient Password Manager Pro might not be as advanced as other entries on our list, but it will help you organize and create secure passwords, so it’s worth checking out.
Keeper is both a password manager software as well as a password generator.
To decrease the risk of getting hacked, it is important to use different passwords for each of your accounts, and with this software, you can do that in a more organized way.
Not only can Keeper generate strong passwords, but it also stores them and automatically fills them in so you will not have to bother trying to memorize them.
It stores an unlimited number of passwords, so you can rest assured that you’ll be able to secure all your accounts with no worries.
Besides password management and protection, Keeper also offers a very secure digital vault where you can store other sensitive data such as private documents, pictures, and so on.
It uses a proprietary zero-knowledge protocol (ZKP) which means that your data is always encrypted when stored in the vault and the decryption only happens locally, on your device.
Each vault uses the powerful 256-bit AES encryption model which is very much praised by cybersecurity experts.
Keeper is also a convenient software. It syncs the information stored and allow you to access your passwords and vault data across multiple devices. You just have to provide your credentials and log in.
To make sure your data stays safe, you can set a logout timer to prevent account theft. Keeper also includes two-step authentication via SMS or dedicated services such as Google Authenticator, Duo Security, or RSA SecurID.
Keeper comes up with a free version that you can use but with limited possibilities. If you want to use the fully-featured version, you will have to subscribe to the paid plan.
Password Padlock is one of the most popular password managers on our list. It’s very likely that you have heard of it before.
This great password management tool uses efficient AES-256-bit encryption algorithms to keep your data safe.
It works on a similar principle to other software on this list, meaning that it requires you to set up a master password.
That password is not stored anywhere for security reasons, so you need to make sure you will remember just that one password in order to be able to have access to your other data.
The tool has a password generator with pre-defined categories, but you can also create your own passwords yourself.
You also have an option to back up and restore all your passwords to OneDrive, so you’ll never lose or forget any of them. That means you can back up your password on one computer and restore it on another.
Managing passwords is very easy because they’re organized into categories. Besides, Password Padlock has no annoying ads and you can share your data with a Windows phone.
Managing passwords means two things: never having to remember them yourself and having them entered automatically when needed.
Well, RoboForm Password Manager is a software tool that can handle both of these things easily, and much more, all thanks to the one-click convenience that governs its design.
RoboForm securely stores all of your passwords and logs you in with a single click, or tap if you’re using touchscreen devices, thus saving time entering personal and billing information.
The program is available on a wide range of platforms, so you don’t get it just for your PC, but also for your phone and tablet, as well.
Besides, it doesn’t just store passwords, it generates them randomly for you, all so that you never have to worry about creating easy-to-crack passwords without meaning to.
Moreover, recently, RoboForm has successfully undergone a comprehensive security audit and penetration test conducted by Secfault Security. That adds a new level of credibility to this tool.
All being said, take advantage of this multi-functional password manager with its exclusive features like data backup on all devices included in their subscription plans.
RoboForm
Manage your passwords and keep them safe and secure with this platform’s advanced toolset.
This has been our rundown of the best password manager tools. Now you know what the market has to offer and can apply this knowledge to determine which tool fits your specific needs best.
It is very important to make sure you use a reliable tool as data breaches have become regular problems. Hackers invent new ways to access sensitive information about your identity, financial accounts, legal documents, and more.
If you want to know more about the security of the Windows operating system, you should check our article about the top 5 security apps for Windows 10 & 11.
Your feedback is welcome, so drop us a line in the comments section below.
Secure your online accounts thoroghly with leading tools
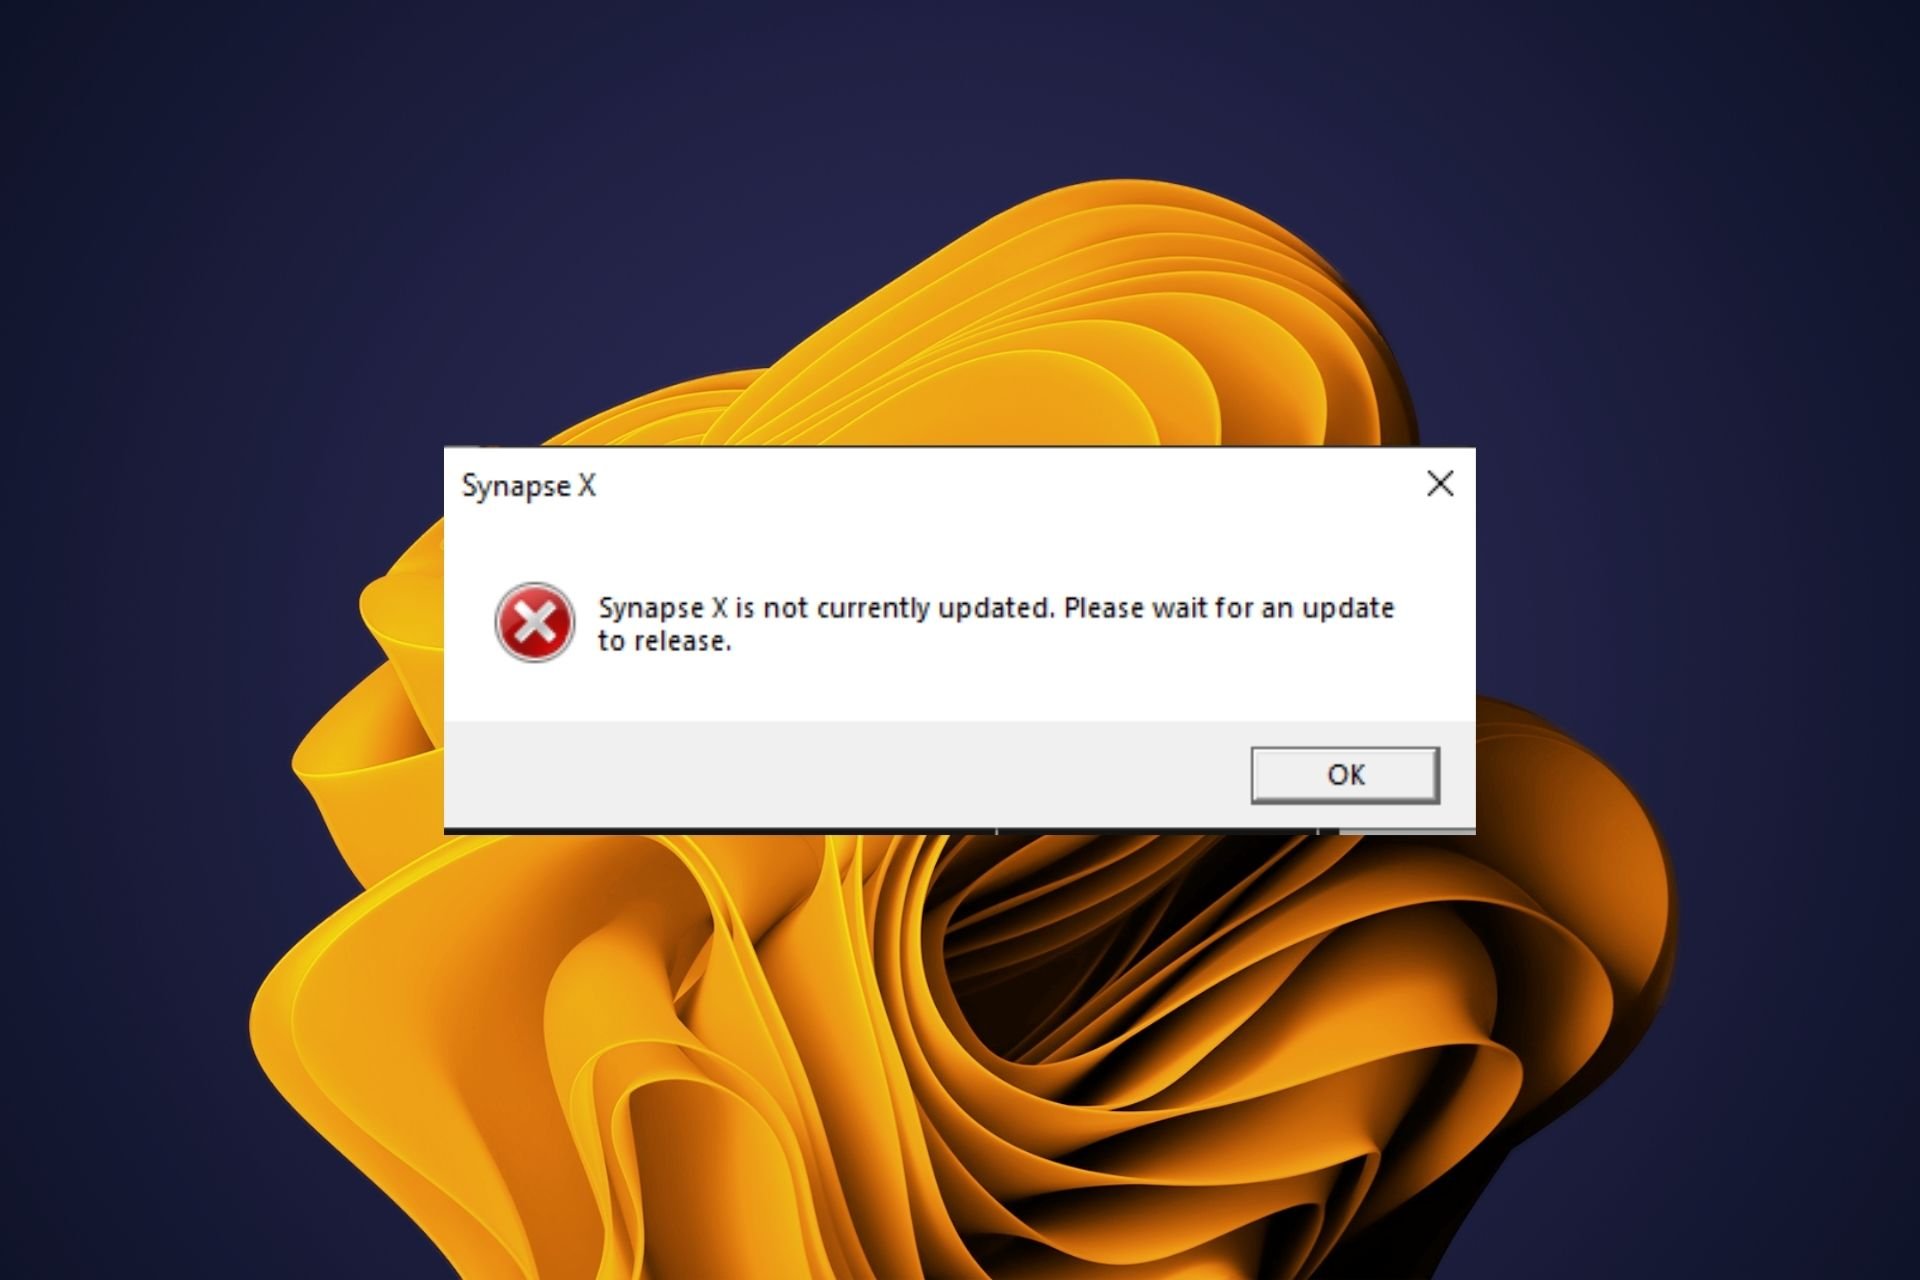
For most people, Synapse X is a trusted tool that helps them get the most out of their gaming experience. However, some users have reported issues as the software fails to update.
In such cases, it can be frustrating especially if you have accustomed yourself to enjoying all the perks that synapse X has to offer when gaming.
Given that it is a third-party program that gives players an unfair advantage, most antivirus programs often flag it as a virus or malware. You can make it an exception so that it never misses any updates.
How long does it take to update Synapse X?
Synapse X is updated on a regular basis with new features, improvements, and bug fixes. These updates are delivered automatically through your product’s software update system.
Other updates depend on the specific game you are playing. If that game has updates, so will the program. The developer usually releases the updates by the hour but sometimes it can take up to six hours.
If the update takes longer, something may be wrong with your Synapse X and you need to check and ensure your firewall is not blocking any notifications.
Does Synapse X auto-update? Yes, once you have whitelisted it in your antivirus, you should receive regular updates as they are released.
How do I manually update Synapse X?
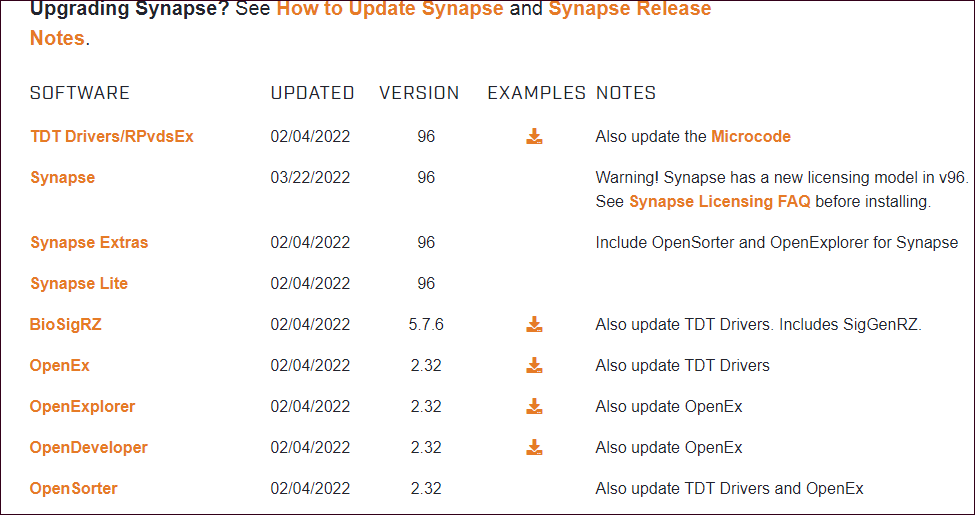
You can manually update Synapse X by going to the official website and downloading the update.
They are categorized by date so that you know which one is the latest. There are also different versions of Synapse X available so you can choose one with features you like.
If Synapse X is not currently updated, it’s probably just a minor glitch, and in a few moments when you try again, the problem will have been resolved. However, if this doesn’t happen, the issue could be in the executable files.
The files may have been corrupted during download. You will have to uninstall and reinstall Synapse X to renew the files.
To uninstall Synapse X, follow the steps below:
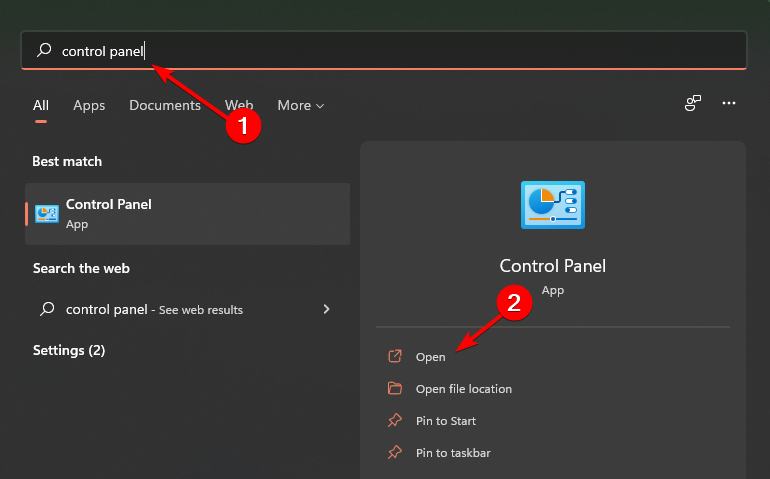
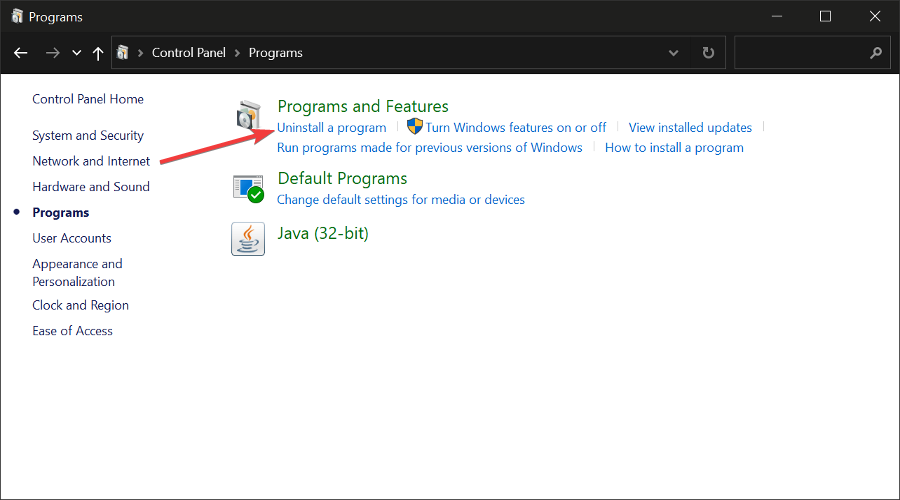
Press the Windows key, type in Control Panel in the search bar and click Open.
Navigate to Programs and Features and select Uninstall a program.
Find Synapse X, right-click on it and click Uninstall.
That brings us to the end of this article. We hope that at this stage you have been able to successfully update Synapse X either manually or automatically.
Should you encounter any other related issues such as Synapse X Discord not working, we have excellent solutions you can try.
Loom is a free screen and video recorder program that is ideal for capturing Skype video chats on Windows 10.
Loom includes internal recording capabilities for both your browser tab and programs on your device through the desktop app.
There are two methods for capturing your Skype conversations when recording with Loom.
With the Loom Chrome extension, you may record the internal audio of a specific browser tab in two ways: capture mode for the tab and audio recording just, without a microphone.
When you use the Loom desktop software, you may record the system audio of any program on your device, including Skype video conference sessions.
You may record your full screen, a selected window, or a custom-size recording region using the Screen and Cam and Screen Only choices.
If you have multiple monitors, you may select which monitor’s screen to record and share over Skype.
If you want to record your camera and audio while recording your screen, you may use any camera or microphone that is connected to your computer.
To stop recording, use the Control Menu’s stop button in the browser or the Loom program on your desktop. From the Control Menu, you may also instantly restart, pause, or erase your recording.
When using Loom you can take advantage of these key features:
Capture any Skype content
Share and embed videos
Trim content and remove background noise
Emoji reactions to shared videos
Drawing tool & mouse emphasis
Loom Screen Recorder
Loom allows you to record your Skype video calls, modify and adjust them, and then share them via a link.
If you here hoping to come across a decent Skype call recording tool, this is definitely not it. Aiseesoft Screen Recorder is the ultimate screen recorder, for both video and audio.
From gameplay to microphone and music, videos, apps, and pretty much anything and everything that’s happening on your screen, you can record flawlessly and enjoy crystal clear playback afterward thanks to Aiseesoft Screen Recorder.
But there is more where that came from – feel free to take snapshots and perform professional edits on your video and/or audio with no need for additional software. You can do it all with one single app.
Skype basically introduced the idea of video calling someone on a large scale, but they never did find a way to also record those calls efficiently.
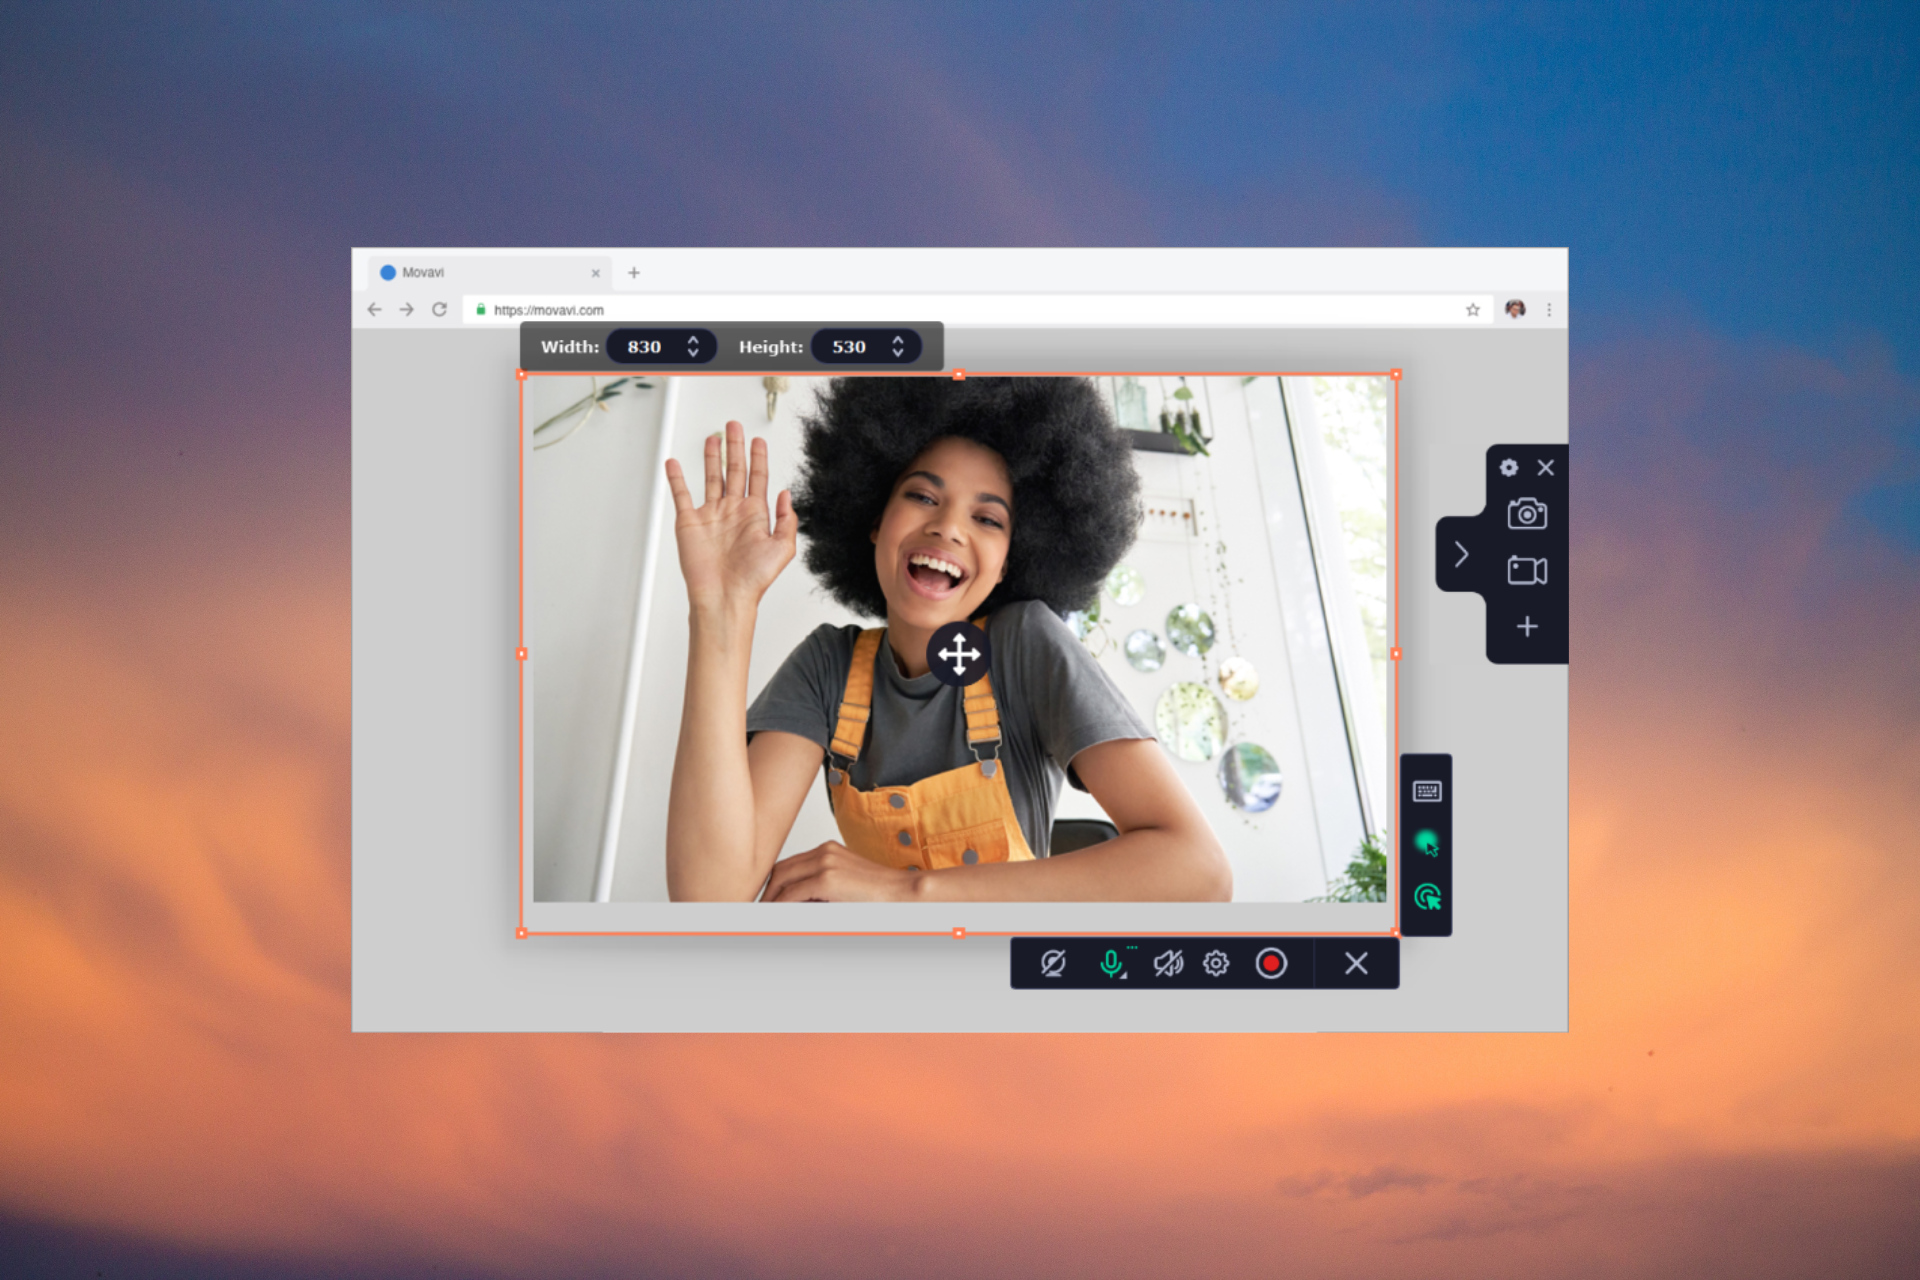
That’s where Movavi Screen Recorder comes into play, as it allows fast and efficient recording of your entire screens, even when you’re in a Skype call.
Of course, you don’t have to limit yourself just to Skype calls, since it can handle Google Meets or Zoom calls just as easily.
Using this tool is equally easy since all you need to do is choose the capture area and adjust recording settings, hit the REC button to start screen recording, and, once you’re done, perform some slight editing to better tweak the recording.
Besides, the program can be downloaded and tested for free, so there’s no reason why you shouldn’t try it.
In fact, the entire premise of this tool is to be used for this purpose, forgoing the usual tools that you would find in a regular screen recorder.
Take a look at its best features:
Capture webinars and online calls
Record video instructions and tutorials
Grab streaming videos and online events
Easy to install and use
basic editing functions
Movavi Screen Recorder
Record your Skype calls in the highest available quality fast and easily with Movavi Screen Recorder.
AthTek Skype Recorder is designed to work with Windows. The tool can serve to answer Skype calls or enable parental control for kids.
The tool combines both audio and video recording features in a single program to launch with Skype and initiate a call from within the app and store the recording output in AVI, MP3, WMA, OGG, and FLAC formats.
The tool also features a Hidden Mode to run in the background as it captures conversations.
Parents can enable the auto start mode for parental control by tweaking the option in advanced settings and activating Hidden Mode.
Let’s quickly look at its key features:
Excellent call quality
Easy user interface
Allows for separate audio tracks selection
Parental control
AthTek Skype Recorder
Launch AthTek with Skype and experience high-quality recording features and more!
Audio Recorder Pro is the go-to software when it comes to recording sounds from a wide variety of sources.
Skype is included on the list, but if you do decide on getting this tool, then you should prepare yourself since it records even from Skype, Yahoo Messenger, Google Talk, and any other VoIP applications.
Of course, conversations aren’t the only things it records, since music from YouTube, Pandora, Spotify, BBC Radio, iTunes Radio and much more are also accessible.
The recordings are top-quality, the only limit in terms of sound clarity being the actual recording source.
Let’s quickly look at its key features:
Intuitive UI
Wide variety of supported recording sources
Easy on the system’s resources
Save conversations as WAV, MP3, or WMA
Gilisoft Audio Recorder Pro
Recording your Skype calls has never been easier – schedule, manage, and customize audio as you seem fit!
The Evaer video recorder is an easy to install software with modern design and features.
Evaer lets users record Skype calls and store the resulting file in HD on the computer. The software requires no configuration after installation and allows for recording in various modes, including Both Sides, Picture In Picture, or Self-Adaptive.
On first use, the tool asks permission to access Skype. Click Allow access when notified, otherwise, Evaer will automatically connect to Skype after a few seconds anyway.
As well as manually setting the tool to start recording a Skype call, Evaer can also automatically capture calls while it runs in the background if you so choose.
For privacy purposes, Evaer notifies users when it starts recording calls.
Evaer video recorder for Skype
While recording a Skype video call, you can preview the recording results and control the recorded video channel in real-time.
TalkHelper is a modern call recorder for Skype that lets users capture audio or video conversations and store the output on PC for future use.
On first use, Skype will ask users to allow the tool access to the conversation in order to initiate recording.
It then displays the time duration of a call in a list form. Users also have the choice to automatically launch the call recorder once a Skype call starts.
There’s an option to pause the recording anytime and edit the output in order to remove the unnecessary parts of the conversation.
Call Graph recording plugin for Skype works to capture audio and video calls on Skype, SkypeIn, SkypeOut, conference calls, podcasts, and phone interviews. The tool saves the output in MP3 or WAV format.
Users can also look for specific conversations through tags, search, sort, and filter options, as well as add time-coded notes to the recording.
It comes with a built-in Flash player to playback Skype recordings.
Surface Go 2 will become available starting on June 7
Yes, you read correctly, you can’t have this laptop right now. That being said, don’t be sad, as it will become available on June 7, but you can preorder now.
It’s true that the Surface Laptop Go 2 is slightly pricier than its predecessor, but the company argues that the price is totally justified by the gadget’s features and power.
With this device, you get 128GB of storage instead of the usual 64GB in the original Surface Laptop Go base configuration.
Microsoft also decided to change the 10th gen Intel Core i5 with the newer 11th gen Intel Core i5-1135G7 and introduced a new version with 16GB of RAM.
Another detail that will surely make you happy is the fact that the Surface Laptop Go 2 comes is four colors, such as Ice Blue, Sandstone, Platinum, and Sage.
Microsoft guarantees an autonomy of up to 13.5 hours, an improved HD camera (720p), and better thermals that make the laptop less noisy.
Those are pretty much all of the changes for the Surface Go 2, which means users have to deal with only 4GB of RAM in the base configuration and no backlit keyboard.
What should really interest you the most is the fact that Microsoft says the Surface Laptop Go 2 is better in terms of sustainability as well.
The device’s replaceable components now include not just SSD but also the keyboard, trackpad, display, battery, and the Surflink cable.
Is this a device you might be willing to buy? Share your thoughts with us in the comments section below.
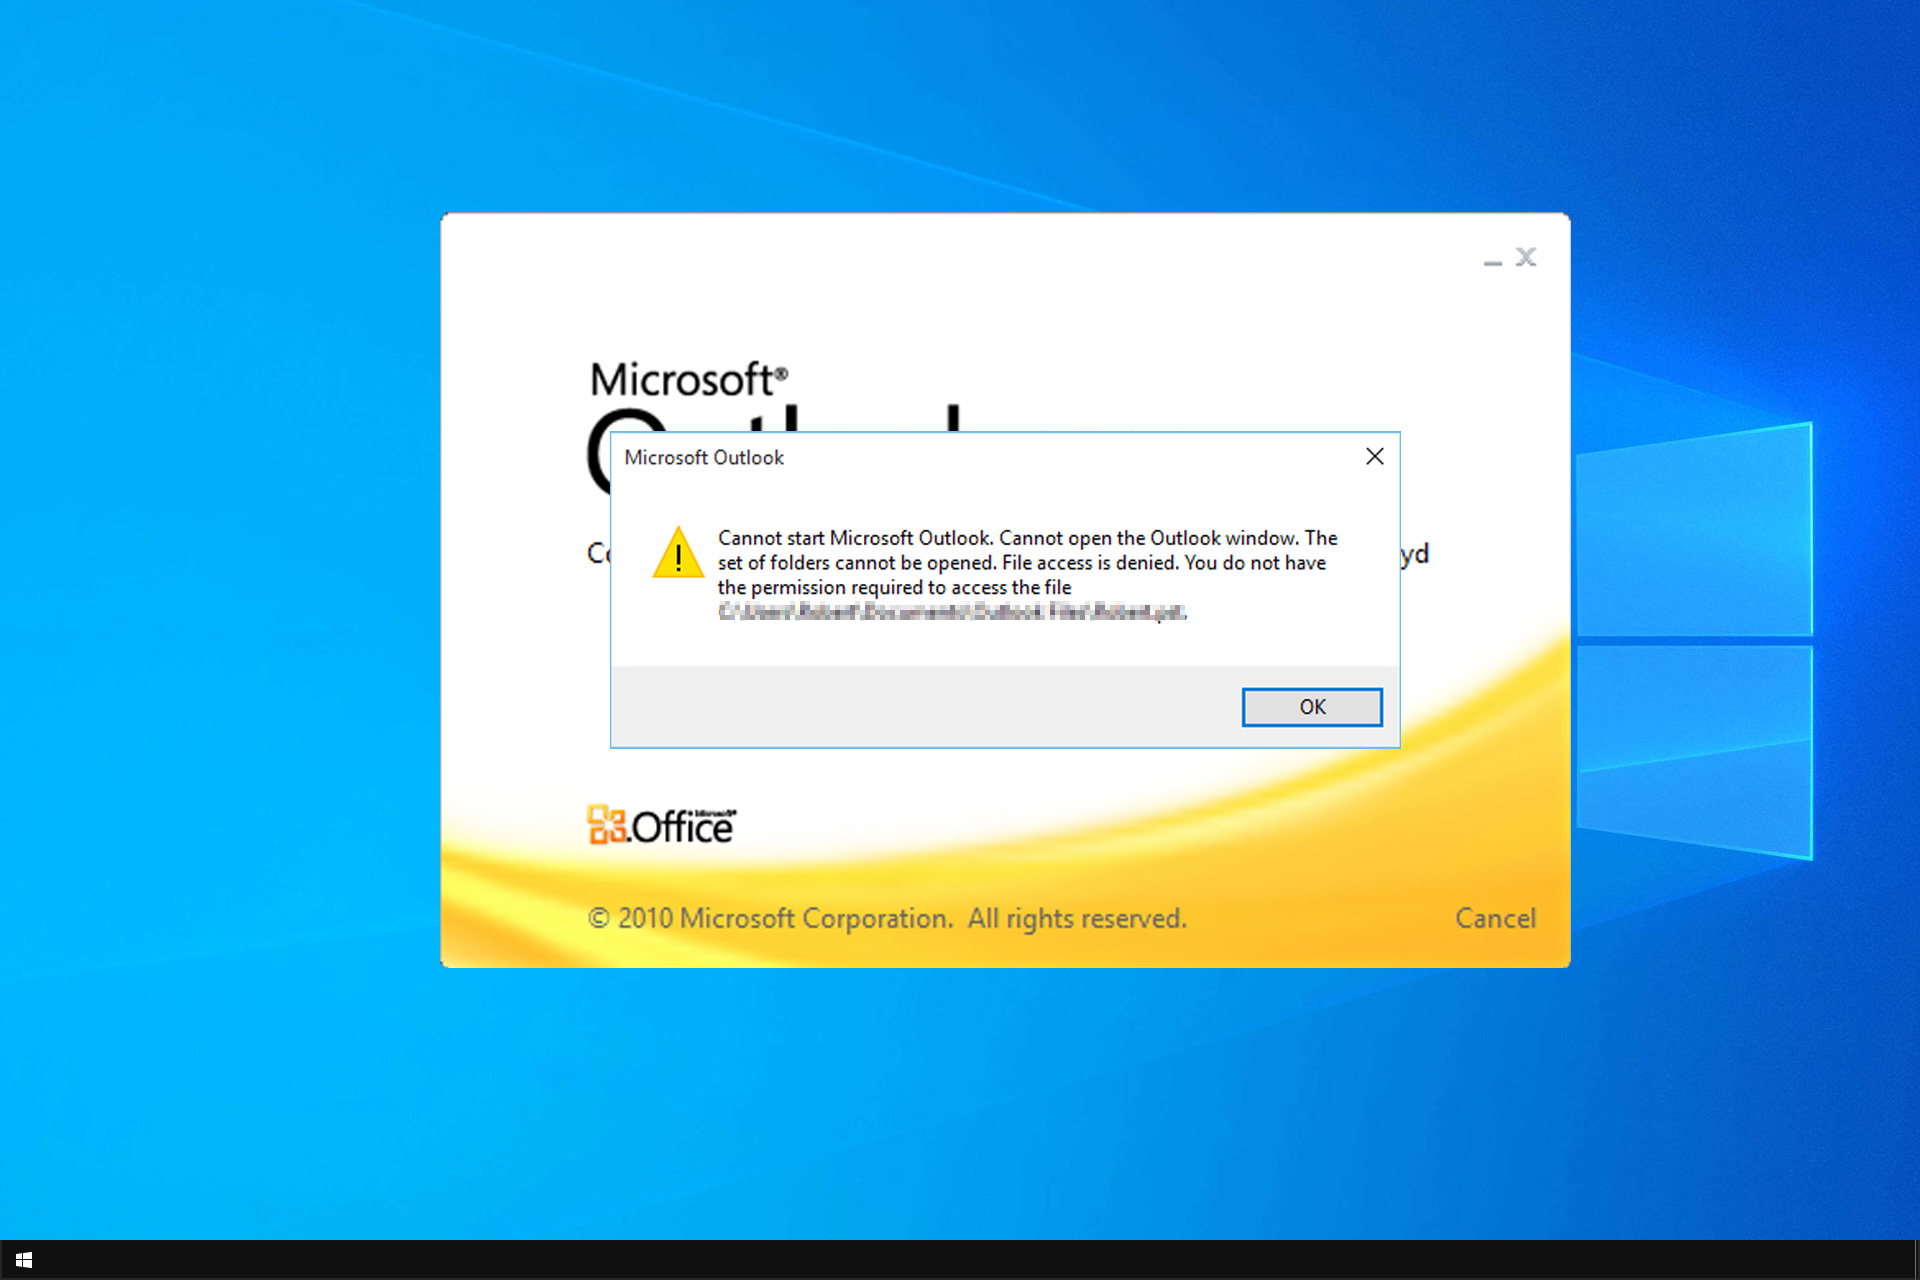
Microsoft Outlook 2010 is a good software program that doesn’t crash easily, but sometimes Outlook 2010 cannot open PST files because it has been corrupted.
This is one of the common Outlook errors, but because it’s so prevalent, it’s also easy to fix, and in this guide, we’ll show you how to do that.
If you’re having this problem with your email client, follow our solutions carefully, and the error message should be gone in no time.
What is the max size of a PST file in Outlook 2010?
By default, the default limit of a PST file is set at 50GB, which should be more than enough for most users. However, you can easily remove the default limitation.
Regarding the maximum size, the technical limitation is 4194304GB or 4096TB, but we doubt that any user will need that much storage for their PST file.
What can I do when Outlook 2010 cannot open a PST file?
1. Close all processes and programs
Right-click on the taskbar and select Task Manager.
Click More details and then select Processes.
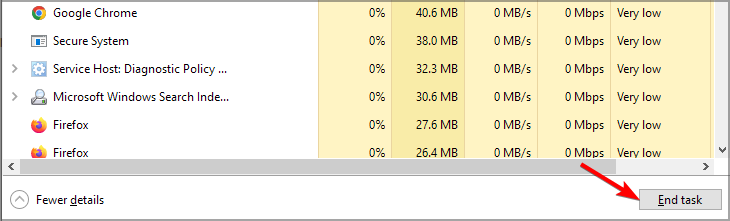
Find Outlook, Lync, UCMAPI, and Communicator processes; click End Task to end them.
Exit Task Manager and restart Outlook 2010.
This is a quick and easy method that can help you if you encounter the Outlook PST is in use and cannot be accessed close any application that is using this file error on your PC.
2. Open MS Outlook 2010 in Safe Mode
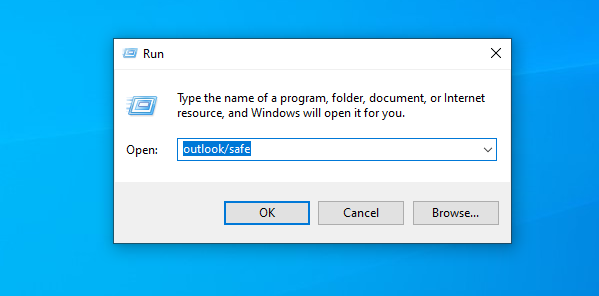
Press Windows + R to open Outlook 2010 in safe mode.
Type outlook.exe /safe and press Enter.
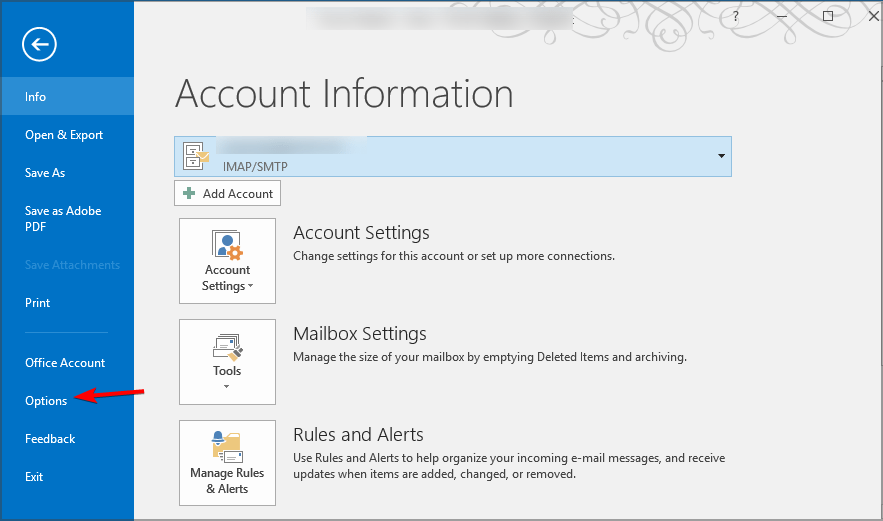
Check if the error disappears. If it does, click File and select Options.
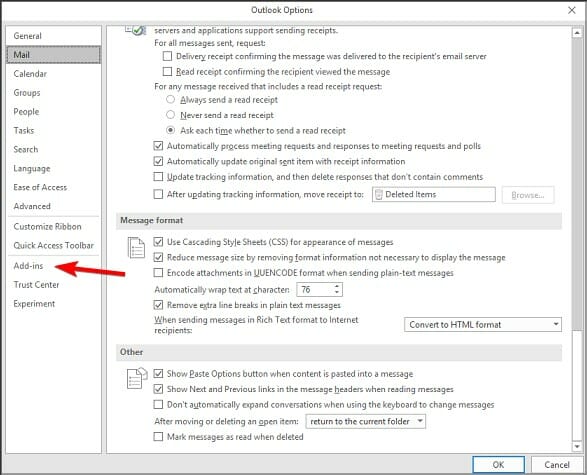
Navigate to Add-ins and disable the third-party add-ins.
Launch Outlook 2010 and gradually enable the add-ins to determine the corrupted one.
This method also works if Outlook data file cannot be opened Office 365, so we encourage you to try it.
3. Use an Inbox Repair Tool
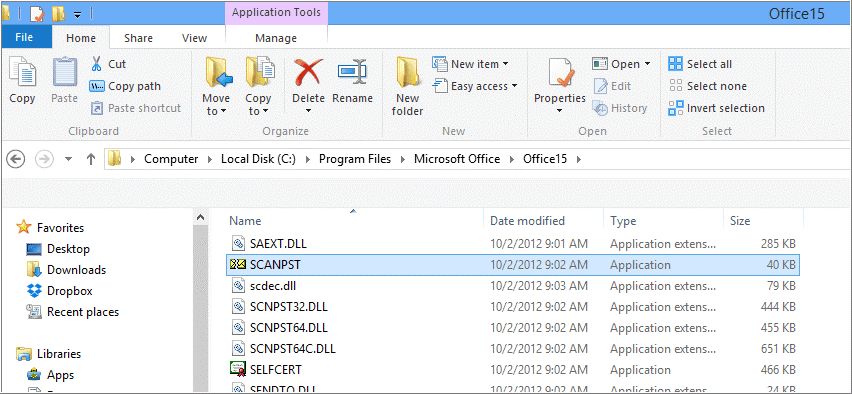
Quit Outlook 2010 and go to MS Office installation directory which should be in one of these locations: C:\Program Files\Microsoft Office\Office14 C:\Program Files\Microsoft Office(x86)\Office14
Find and launch the SCANPST.EXE inbox repair tool.
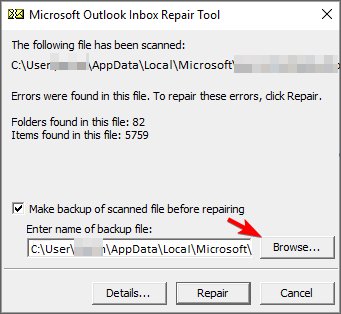
Select Browse and click on the PST file.
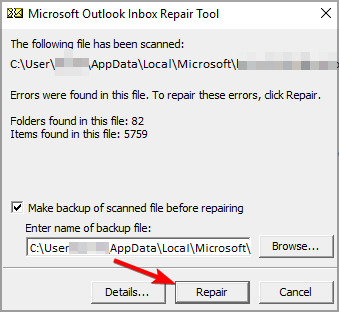
Click Start to scan the file for errors; if there are errors, click Repairand wait for the Repair to complete.
SCANPST.EXE may seem unresponsive; do not close it because it works like that.
If the tool does not remove the Not Responding status or stops working completely, use an advanced repair tool, as detailed in the next fix.
4. Use an advanced PST Repair Tool
If this problem persists, you can try using a specialized PST repair tool. This type of utility can recover corrupt PST files. After you run it, your files will be as good as new.
Click Browse to select the source PST file.
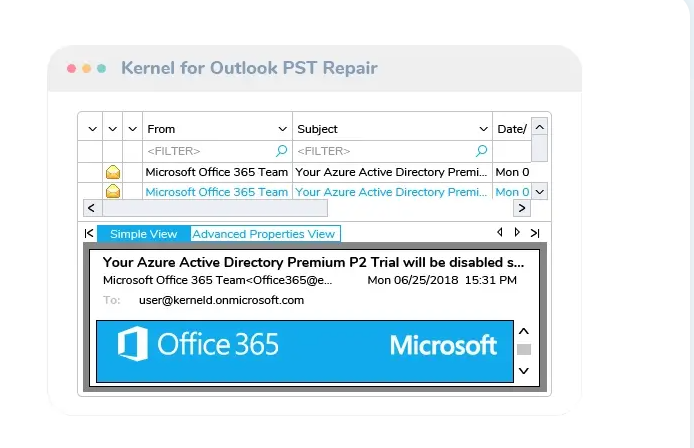
Once the tool has completed the recovery process, it displays a preview of the restored items.
Select mailbox folders and click Save to store the items.
The advanced repair software scans and identifies corrupt PST files. It repairs the files and retrieves all data, so no information is lost in the process.
It displays the data in a tree-like model. Recovering files using Kernel for Outlook PST Recovery software entails the above steps. It can also convert PST files to various formats.
So if you ever wondered how to repair a PST file without scanpst, this is the best way to do it.
5. Create a new data file
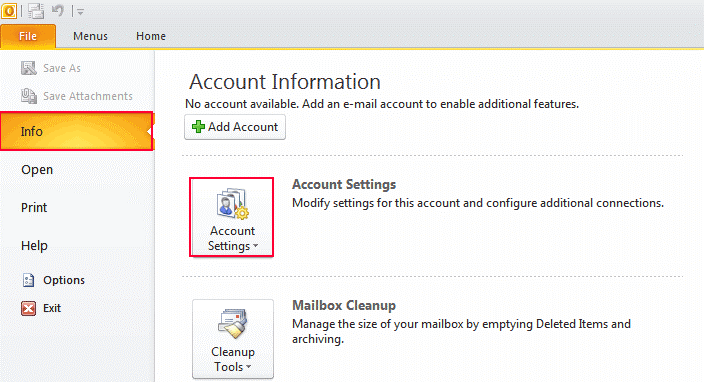
Click File on the ribbon and then select Info from the Menu.
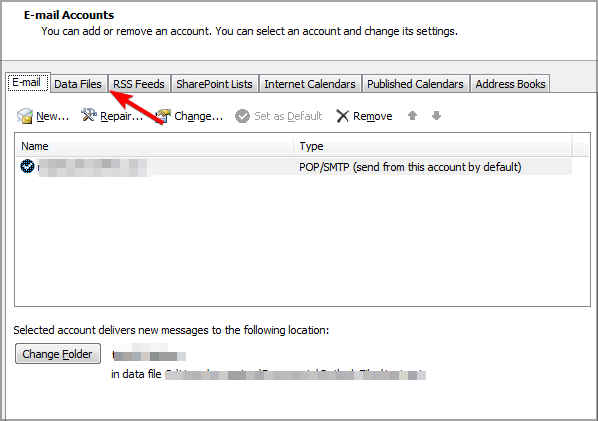
Then, click Account Settings and then select Account Settings again.
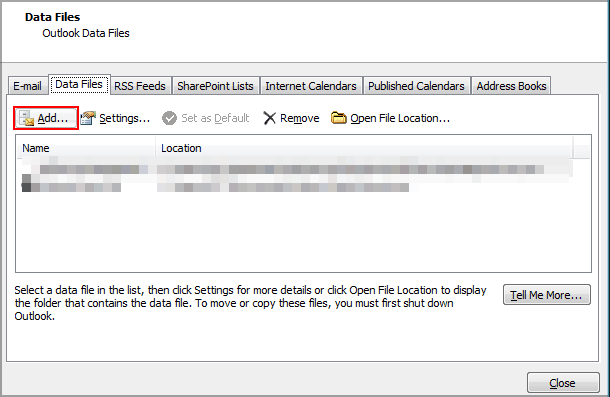
Click on Data Files.
Select Add to open the Create or Open Outlook Data File.
Enter the new Outlook 2010 Data (.pst) file name.
Click OK.
If you’re getting Cannot open PST file Access Denied, It is possible that when creating a PST file in Outlook, it became corrupted, and creating a new data file can help.
6. Recover items from the backup file
After repairing the error, you might recover additional items by opening the Original Outlook Data file.
The inbox repair tool creates a backup file with the same name as the original but with a .bak extension. You may open some files from the backup that the software couldn’t.
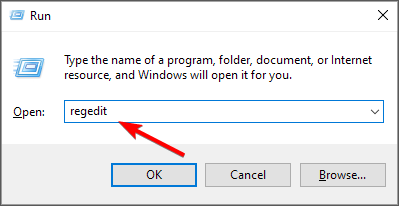
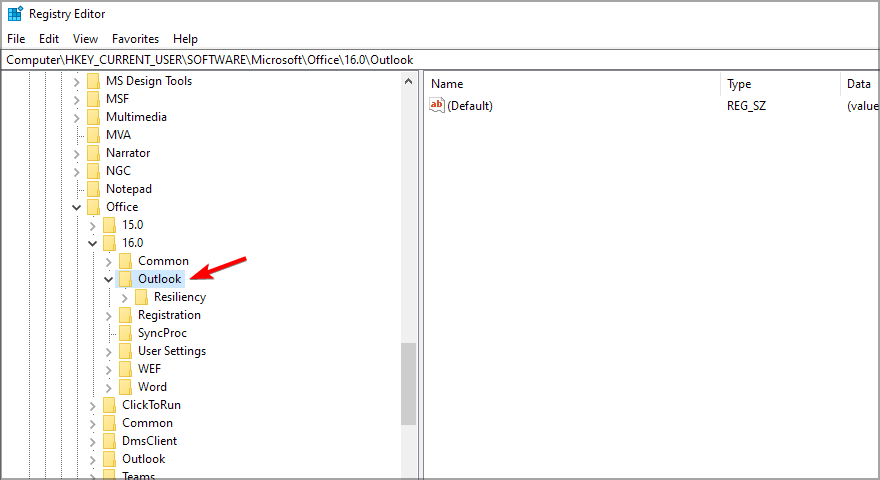
Press Windows key + R. Enter regedit and press Enter.
Navigate to the following key: HKEY_CURRENT_USER\Software\Microsoft\Office\<number>\Outlook
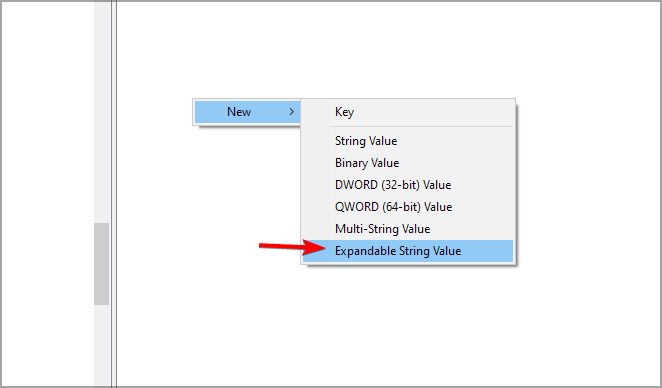
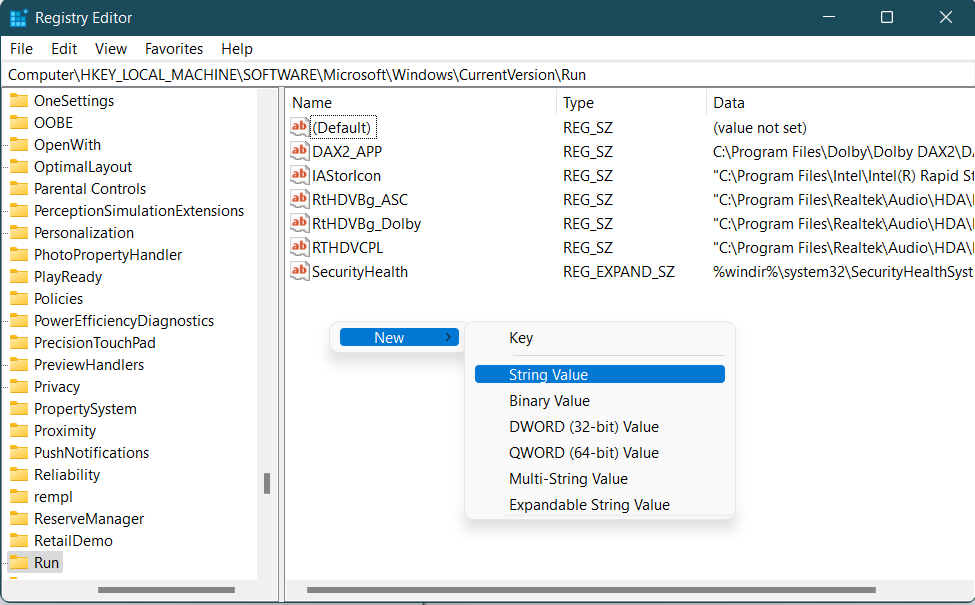
Right-click the right pane and expand the New section. Now select Expandable String Value. Name it ForcePSTPath.
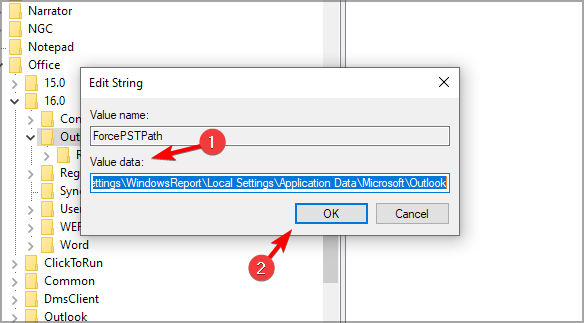
Double-click the ForcePSTPath value that you just created.
Enter the path to the PST file and save changes. This was our example, but it might be different on your PC: C:\Documents and Settings\WindowsReport\Local Settings\Application Data\Microsoft\Outlook
Those are the 7 quick fixes you can follow to solve an Outlook 2010 cannot open PST file error.
Follow the steps to recover your PST files quickly, saving you the stress and disappointment of not accessing them when you need them.
This isn’t the only error that users encountered, and if you’re still having this problem, our Outlook.pst is not valid error guide will help you.
What solution did you use to fix this issue? Let us know in the comments section below.
Bitdefender is one of the best all-around security software to help keep your PC secure. It’s quick and highly effective at identifying and eliminating threats. However, you need to sign in before using Bitdefender and several users reported that the login is not working.
Similar programs that offer these many features generally require a high-end PC but this program works just fine on any system, and you can download Bitdefender and start using it right away.
However, with the Bitdefender login not working, users are left in a lurch and can’t register or use the program. If you too are facing the issue, read the following sections to find out all about it and the best solutions.
Why can’t I log into Bitdefender?
This could be due to Bitdefender’s inability to connect to the servers or problems with the system, though if the problem persists for long, chances are that it’s the latter.
Also, if you face the problem right after installing Bitdefender, it could have to do with an improper installation. In which case, a quick and simple option would be to uninstall the app and then reinstall it.
?️ Quick Tip:
Consider a more stable antivirus app. If Bitdefender keeps causing problems, try TotalAV. Not only does it offer complete protection against malware, viruses, ransomware, and other threats, but it’s also very lightweight and uses up only a few resources both when idle and while scanning.
Click on the Profile icon near the top-right and select Bitdefender Account.
Next, go to the Password and security tab.
Click on 2-Factor Authentication here.
Click on the Turn Off 2-Factor Authentication button.
Finally, enter the verification code received on the email address used to sign up for Bitdefender in the text field, and again click on Turn Off 2-Factor Authentication.
That’s it! From now on, you could only sign in to Bitdefender using the login credentials and will not receive a verification code. Though, remember that the feature is meant to secure your account, and it’s not recommended that you disable it.
Let’s now head to the fixes if the Bitdefender login is not working.
How to fix login problems on Bitdefender?
1. Wait for the servers to respond
This is the very first thing you should do. There are times when the Bitdefender’s servers are down or the program is unable to connect to them due to a high load. The problem here is automatically resolved after a while.
Just wait for a few hours and check if the Bitdefender login now starts working. In case the problem persists even after a day or two, there’s something else that’s causing it. So, try the methods listed next.
2. Run DISM and SFC scan
Press Windows + S to launch the Search menu, enter Terminal in the text field, right-click on the relevant search result, and select Run as administrator from the context menu.
Click Yes on the UAC (User Account Control) prompt that pops up.
Next, click on the downward-facing arrow and select Command Prompt from the list of options. Alternatively, you can hit Ctrl + Shift + 2 to launch it.
Now, paste the following commands one at a time and hit Enter after each to run the DISM (Deployment Image Servicing and Management) tool:dism /online /cleanup-image /scanhealthdism /online /cleanup-image /checkhealthdism /online /cleanup-image /restorehealth
Once it’s done running, execute the following command to run the SFC (System File Checker) scan:sfc /scannow
3. Update the network adapter
Press Windows + S to launch the Search menu, enter Device Manager in the text field, and click on the relevant search result.
Double-click on the Network adapters entry to expand and view the ones under it.
Right-click on the one currently in use, and select Update driver from the context menu.
Next, select Search automatically for drivers from the options in the Update Drivers window.
Wait for Windows to find the best available driver on the system and install it.
Outdated network adapter drivers are likely to cause issues with the connection and lead to Bitdefender login not working. If that’s the case, you can always update the network adapters on your computer.
You can also use an automated tool to make sure your drivers including the network adapters are always updated. We suggest Outbyte Driver Updater because it’s easy, error-free, and very lightweight.
4. Uninstall/disable the third-party firewall
Press Windows + R to launch the Run command, enter appwiz.cpl in the text field, and click OK to launch the Programs and Features window.
Now, locate any installed third-party firewall, select it, and then click on Uninstall at the top.
Next, follow the on-screen instructions to complete the uninstall process.
Third-party firewalls, though, meant to secure your system, can often prevent Bitdefender from connecting to its server and thus the login is not working. You may first try disabling the firewall and if it works, go ahead and uninstall it.
Also, if it was a conflicting firewall behind the issue, you may consider switching to a more reliable Firewall for Windows.
If the login button is not showing up in Bitdefender, it’s most likely that the installation didn’t go through successfully. Also, in some cases, users notice that the interface is not showing, which is also due to an installation issue.
In this case, it’s best that you uninstall Bitdefender and then reinstall it. Make sure to download it from a reliable source, preferably the Bitdefender’s official website. Once the reinstall process is complete, the Bitdefender login not working problem would be fixed.
What do I do if Bitdefender keeps asking me to sign in?
This is another issue often faced by users where Bitdefender keeps sending you prompts to log in, but when you do, the process doesn’t go through and the whole cycle repeats. The solutions are very similar to the ones discussed earlier.
First, wait for a few hours or even a day, in case the BitDefender servers are down. If that’s the case, things should be up and running by then. But, in case the problem persists, you have no option but to reinstall BitDefender using the steps listed earlier.
These are all the ways you can fix the issues behind the Bitdefender login not working. And most likely, you wouldn’t have to try them all since the first few have helped the majority of the users eliminate the problem.
Changing the date and time format in Windows 11 is simple, even with the redesigned interface. Many users are curious about how to adjust these settings, especially those familiar with Windows 10. The good news is that the process remains intuitive and nearly identical. In this guide, we’ll walk you through the exact steps to change the time and date format on Windows 11 quickly and easily.
How do I change the time on Windows 11?
1. Change time settings via the Control Panel
Click the Search button on the taskbar.
Type control and choose Control Panel from the list of results.
Then, click on the Clock and Region option.
Select Date and Time.
Click on the Change date, time.. button.
You will now be able to adjust this parameter as per your liking.
Finally, don’t forget to hit the OK button once you’re done in order to confirm and apply the modifications.
This is the conventional way to change time on Windows 11. As you can see, the procedure is as intuitive and straightforward as always and it works pretty much the same way as for Windows 10.
Now, we all know that evolution works in mysterious ways – to a certain extent – and as a direct consequence, the Redmond giant decided to ditch quite a few features deemed unworthy for the new operating system.
As you can see, the Control Panel is still going strong and you can rely on it for many years to come. Unless a brand-new, breakthrough comes along and Microsoft decides to shake our worlds from the ground, that is.
2. Explore the Widgets Panel
Right-click on the Time and Date widget on the taskbar of your Windows 11 desktop.
From the list, choose Adjust date/time, which will take you to a familiar Date and Time settings screen.
Now, make sure you toggle the Set time automatically option to off.
The next step is to click the Change button under the Set date and time manually section.
Here, you can make all the modifications you want.
As always, don’t forget to hit the Change button to validate your custom settings.
Easy, right? Here’s one more thing that might also interest you when you want to change time on Windows 11: formats.
Let’s say you’re not happy with a particular format or even with the calendar settings on your brand new operating system.
You can also set this parameter to reflect your style and needs, from the Date, Time, and Regional Formatting screen, located in the same widget.
Check out these quick steps to do just that:
Open the Time and Date widget and click the Adjust date/time option, as shown above.
Click the Language and region option.
Select drop-down from the Regional format option, and click Change formats.
The new OS does not just bring new functionalities to the table. While some features did not make the cut, others are restored to former glory. Such is the case of widgets that made a powerful comeback in the new Windows 11.
The Widgets feature, now replacing the old live Tiles, is rather privileged and enjoys a dedicated panel, along with numerous customization options.
Autoplay not working in Windows 11 is a common problem that you may have encountered. This can be caused by a number of problems, such as a bad internet connection or incorrect settings.
When you insert a CD or DVD into your computer the AutoPlay feature will kick in and ask you what to do with it.
It is a feature that detects when you insert different types of media into your PC, such as an audio CD or a memory card, and then automatically takes some kind of action based on the type of media detected.
We have a detailed guide on what to do if AutoPlay is not working on Windows 10 if you face a similar problem on the previous version. If any of the above reasons are the cause of the problem, proceed to try one or more of the solutions below.
Why is Autoplay not working on Windows 11?
Some of the reasons why Autoplay is not working in Windows 11 include:
Autoplay is disabled by default – The Autoplay feature enables a user to insert a CD, DVD, or other removable media in the drive and have it begin playing automatically. Check from Settings to see if it is disabled and enable it.
The external device is corrupted– The device inserted may be corrupted preventing your system from detecting it. Try using a different device and see if the problem persists.
Virus or malware in your system – There’s also a chance that your operating system has been corrupted by a virus or malware and therefore you can no longer use the functionality of certain programs. If this is the case, try running a full scan of your system using your Windows 11 antivirus software.
Interference from third-party programs – Check if any third-party programs could be interfering with them. If you have recently installed a program, try to uninstall it and see if Autoplay works.
What can I do if Autoplay is not working on Windows 11?
1. Turn Autoplay off and on
Press the Windows + I keys simultaneously to open Settings.
Select Bluetooth & deviceson the left pane then Autoplayon the right pane.
Toggle Use Autoplay for all media and devices button off and on again.
For a full step by step walkthrough on setting up this feature, see our guide on how to enable Autoplay in Windows 11 so Windows can react automatically when you plug in a drive or insert a disc.
2. Reset Autoplay settings
Hit the Windows key, type Control Panel in the search bar, and click Open.
Search for Autoplay on the Control Panel search bar and click on it.
Scroll down and select Reset all defaults then click Save.
The AutoPlay dialog box displays a list of actions that are available for each type of media or device.
For example, if you connect a new digital camera to your computer, the actions might include importing pictures from the camera to your computer or opening a photo-editing program so that you can work with your pictures.
You can configure AutoPlay for each type of media or device that you connect to your computer or set Autoplay defaults to all devices so that anytime you connect a device to your PC, the Autoplay dialog box appears. Remember, the Autoplay settings only apply to removable media.
To set Autoplay for all devices, follow the steps below:
Hit the Windows key, type Control Panel in the search bar, and click Open.
Search for Autoplay on the Control Panel search bar and click on it.
Check the box for Use Autoplay for all media and devices then scroll down and Save.
By enabling this feature, you’ll fix the Autoplay dialog box not showing in Windows 10 or 11, so be sure to try it.
If you find yourself annoyed with the Autoplay not working on Windows 11, no need to be frustrated, you only have to apply one or more of the solutions and you are good to go.
You can explore all available configuration options in this guide on Autoplay default settings, which explains how Windows assigns actions for each device type you connect.
If you use virtual desktops on a day-to-day basis, then we have great news for you! After multiple tests on Windows 10 Insider Builds, the ability to apply custom wallpapers on virtual desktops is now part of Windows 11.
While now, on Windows 10, you can open multiple desktops, having a different wallpaper on each one is not possible. With the release of the first Insider Build for Windows 11 next week, you’ll be able to do it with ease.
Usually, virtual desktops are used for specific apps and actions and most of the time are used to keep things organized.
But if you also want to personalize your desktops with custom wallpapers, then your only choice is Windows 11.
How can I change my wallpaper on a virtual desktop?
If you’re not in the Insider Program, the steps for applying are pretty simple:
Go to Settings.
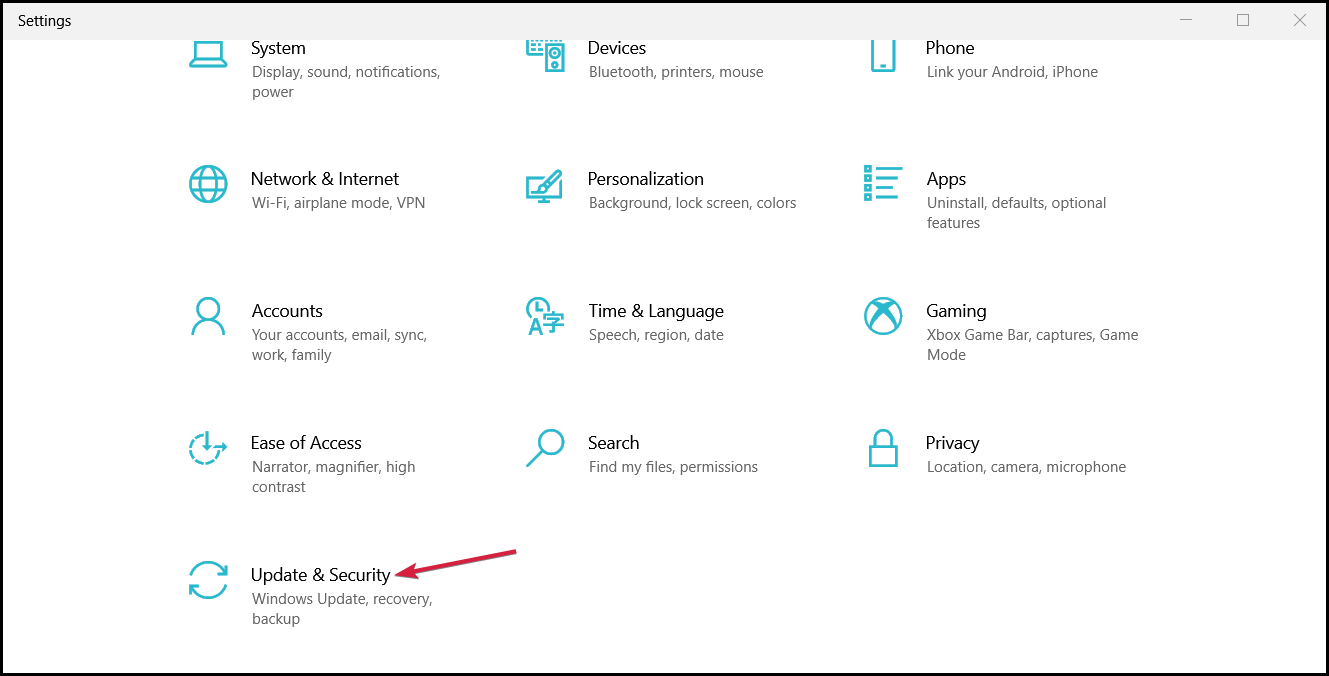
Then head over to Update & Security.
Click on Windows Insider Program.
After that, click on Get started and follow the steps.
After upgrading to Windows 11, if you want to personalize every desktop, follow the steps:
Right-click on an empty area on the desktop that you want to change the wallpaper on.
Under background, select Picture, Solid color, or Slideshow.
Then choose your preferred background.
While this doesn’t seem much of a change, it’s certainly a very welcomed quality-of-life improvement that will make a big difference for users who count on multiple desktops for their workflow.
Are you using virtual desktops on your PC? Leave your answer along with your take on Microsoft’s improvement in the comments section below.
There’s still a lot of mystery surrounding the impending release of the first major update for the latest Microsoft-designed operating system.
The Redmond tech giant already let everyone know that Windows 11 22H2, also known as Sun Valley 2, is ready for mass release, and since then we only heard speculations as to when it will actually become available.
Many still believe that this update will be released this summer, while others are actually hoping for a May rollout, even though the month is all but over.
However, there’s a way you can get this version of Windows 11 on your PC, and we’re about to show you how to do just that.
What can I do to install Windows 22H2 on my device?
In truth, you really don’t have to be a rocket scientist to accomplish this, and this process strictly requires that you are already a Windows Insider.
If you aren’t already a part of the Windows Insider army, you should get started by visiting the official page and enrolling in the program.
Now, provided you were already one or simply just became a part of it, here’s what you need to do in order to get this version of Windows 11 on your device.
Visit the official page and sign in as a Windows Insider.
Click on the dropdown menu, selectBuild 22621, and press the Confirm button.
Choose the language you want.
Download the ISO.
Right-click on the downloaded file and selectMountin File Explorer.
Run the Setup.
What you also have to know is that, once you have installed Windows 11 22H2, you can immediately leave the Windows Insider Program.
Congratulations, now you have installed the first major Windows 11 update (Sun Valley 2) on your device and you can start enjoying all of its features.
Has this process gone smoothly for you? Share your experience with us in the comments section below.
Steam Chat is a free voice and text chat system with rich properties to enhance your gaming experience. However, at times Steam chat may encounteran Image failed to uploaderror.
This error occurs when the user tries to send an image through Steam Chat. Many users reported that Steam failed to send message, so today we’re going to fix that.
The full error reads Steam failed to upload image data to cloud server. If you are facing a similar error, here are a couple of troubleshooting tips to fix it.
Can I also upload videos on Steam?
Yes, you can. As a great tool to express yourself or share content with your gaming buddies, using video opens up an entirely new realm of possibilities.
As Steam is extremely strict when it comes to the type of content they allow on their platform, it is a very good idea to ensure that no issues occur in the upload process.
Here’s how you can do this without too much hassle:
Launch Steam and on the top right, click on your Profile name.
Select Log out of account.
After that, exit Steam and relaunch it.
Login with your Steam credential and see if you can send images via Steam chat.
One way to fix this error is to log out of your Steam account on the Steam client and log back in. It seems to have worked for a lot of users that have encountered Steam failed to start upload a server error occurred issue.
Select your friend and upload the image you want to send.
That’s it! You should be able to send the images through Steam web chat client as long as the Steam desktop client is not fixed.
You can access your Steam account online using the web browser. Do keep in mind that this method won’t work if you’re getting Steam Limited users cannot upload images error.
3. Disable Compact friends list and Chat view
Launch Steam.
Click on Friends and Chat at the bottom right screen.
In the Friends and Chat window, click on the Settings (Cog icon).
In the Settings window, click on the Size and Scaling tab.
Make sure that the Compact friends list and Chat view option is Off.
Close the Settings window. Exit Steam and Relaunch it.
Try to upload the image again and see if that resolves the error.
To offer a better gaming experience while chatting, Steam added a Compact friends list and chat view option to the Chat settings.
However, this feature is also known to cause Failed to commit upload A server error occurred commit 16 error on Steam. This feature is disabled by default. If you have turned it on accidentally or intentionally, try disabling it.
4. Disable the Firewall
Click on Start, and go to Settings.
Select Update and Security.
Click on Windows Security, and select Firewall & network protection.
Select your Network and turn off Firewall.
Also, check your Firewall protection. The firewall may wrongly flag a connection and block the access. Try to turn off the Firewall momentarily to see if Failed to start upload a server error occurred 25 error is gone.
Right-click on Steam and select Run as administrator.
Open Steam Chat and upload an image.
Check for any improvements.
Exit steam and try to launch the Steam client with administrative privilege, by following the above steps.
6. Update Steam and disable the antivirus
Launch Steam and click on Steam.
Select Check for Steam Client Updates.
Wait while the updates are being downloaded.
If your Antivirus software is blocking the connection to the Steam server for any reason, it may result in Steam a server error occurred error. Disable your antivirus temporarily and check for any improvements.
7. Send images via a third-party host
Now, this is not a fix but a workaround till Steam fixes the issue. You can try to upload images to any public image hosting sites like Imgur or Tinypic etc.
Upload the images to the sites and share the Image link in your Chat. This is handy if you want to share an image with your friend urgently.
8. Use an alternative voice chat app
You probably don’t want to hear this, but if you are experiencing this error for a long time now, you may want to give other popular game chat apps a try.
Apps like Discord are among the most popular voice and text chat apps for gamers and gaming communities with exceptional quality servers.
You can read our complete guide on the best VoIP software for gaming to find the best VoIP clients to step up your game.
Can I send videos in Steam Chat?
Any Steam user enjoys sharing gaming experiences with his/her friends or family through the Steam chat.
If you’re in the same situation, keep in mind that this app allows you to send not only images but also videos via this amazing feature and this is how you can do it in specific cases:
Video related to a game that is available on Steam – You’re allowed to upload it to the community page of the game, then send the URL to your friends.
Video doesn’t violate its terms of service – You can also upload it to YouTube, then send your friend the related link.
If you just want your friends to see your videos (and nobody else) – We recommend setting the video in a password-protected .ZIP file, then upload it to any of the hosting sites you want.
We hope that these recommendations from our list were helpful and that you managed to fix the Steam failed to upload image error.
This isn’t the only problem that you can encounter, and many reported that Steam voice chat isn’t working for them, but we tackled this issue in a separate guide.
Did you manage to fix this issue on your PC? Let us know in the comments section below.
It’s June and you know what that means; Pride Month is here. As expected, Microsoft’s Xbox division has gone all-in on the LGBT+ celebrations this year with a number of new Pride-themed initiatives and products released.
Here’s a breakdown of what Microsoft is doing for Pride Month 2022.
Donations to LGBT+ charities. Microsoft is donating $170,000 to LGBT+ non-profits OutRight Action International, African Rainbow Family, National Center for Transgender Equality, Mermaids, Lavender Rights Project, and Fulcrum UA.
New Pride Month 2022 Xbox Gear merch. A variety of new Pride Month 2022 merch is now available to buy on the official Xbox Gear Shop online storefront in addition to a surprisingly large amount of Pride Month merch from last year.
Pride Month Surface skins. Official skins for Surface and Surface Pro devices featuring Microsoft’s 2022 Pride Month design are now available. The 2020 skins are also in stock at a reduced price.
Pride Month 2022 in-game content. Players who log into Halo Infinite, Forza Horizon 5, Forza Horizon 4, and Forza Motorsport 7 will receive free Pride Month-themed cosmetics.
A Pride Month 2022 Xbox controller. An official Pride Month controller for Xbox One and Xbox Series X console generations and Windows PCs will launch on June 9th.
As can be seen with the list of initiatives (and some additional minor ones listed here,) Microsoft has really stepped up its efforts to appeal to LGBT+ minority groups and/or promote itself as a progressive company compared to previous years.
Whether or not this attempt is well received by those in said minority groups will naturally vary from person to person though with some on social media clearly appreciating the extra attention brought to certain causes while others becoming noticeably fatigued by large companies piggybacking off of the same causes.
One thing that’s proven a bit controversial is Microsoft’s Pride Month 2022 logo which, in an attempt to be inclusive by featuring 34 different types of pride flags, has kind of ended up being a bit of an aesthetic mess with so many colors crammed into such a small space.
Pride Month 2022 Xbox Controller
Also noticeable is the absence of the iconic rainbow Pride flag which was commissioned in 1978 by Harvey Milk, the first openly gay man to be elected to public office in California, and designed by Gilbert Baker, an openly gay artist and gay rights activist. (If you’re interested in LGBT+ history and civil rights, reading up on these two is highly recommended.)
The Pride Month 2022 Xbox controller can be ordered via the Xbox Design Lab website in select regions from June 9th. While the Pride design can’t be customized, the colors of the buttons, joysticks, and triggers can be.
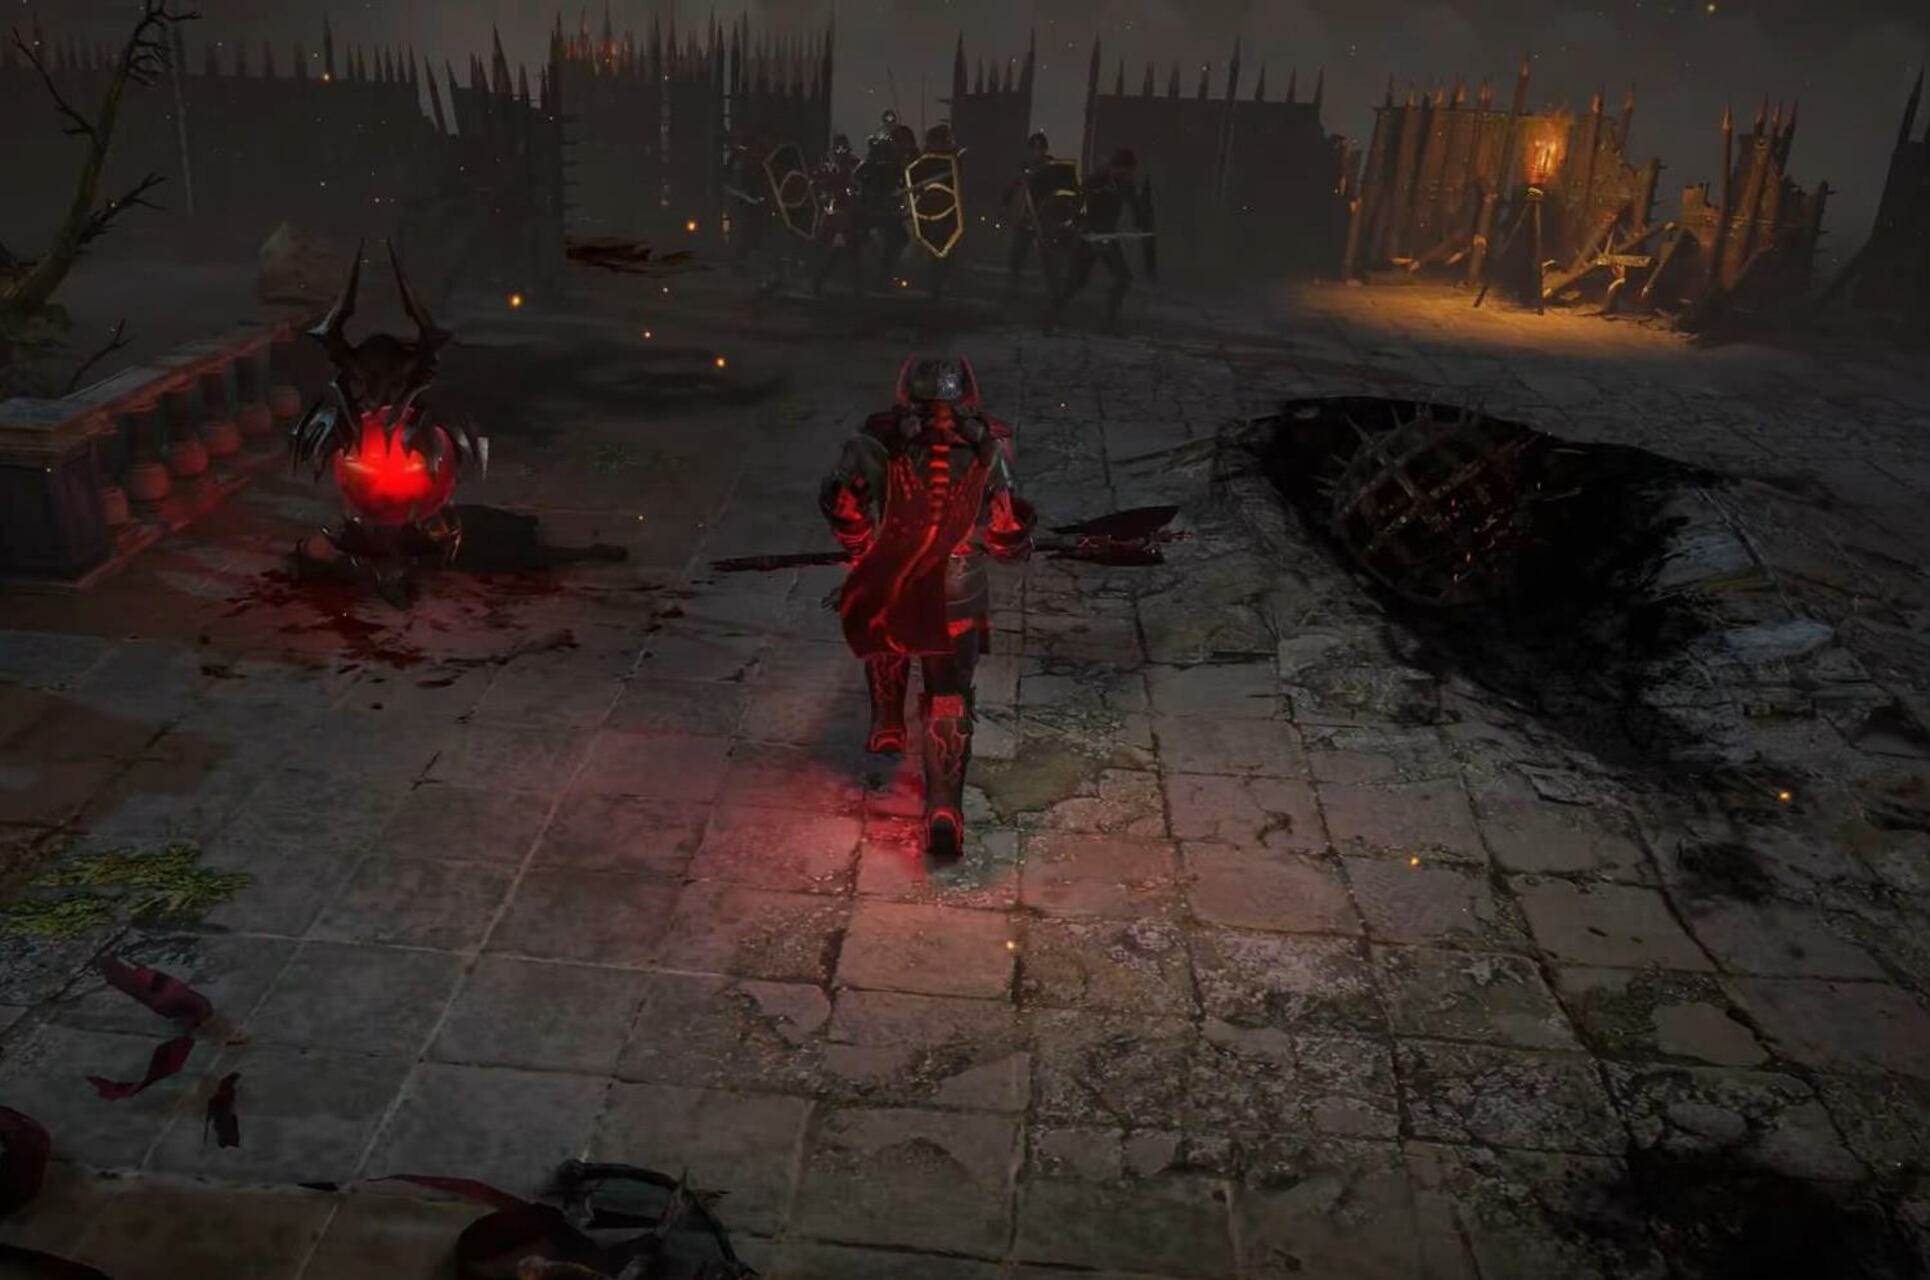
Path of Exile is a Free-to-Play video game developed by Grinding Studio Games. It is one of the best in the genre and offers thrilling gameplay and some captivating graphics. However, several users have reported that Path of Exile is not recognizing the graphics card.
This affects the in-game graphics and the overall experience of users. For a game that boasts of high-end graphics, an issue with the graphics card can be problematic.
So, without further ado, let’s walk through all there is to know about why Path of Exile is not recognizing your graphics card and the most effective solutions for it.
Why is my game not using my graphics card?
This is primarily the case on computers with two sets of graphic cards installed, the integrated and the dedicated one. Here, users often find PoE using integrated graphics rather than dedicated graphics. This could be due to a bug, improper selection, or misconfigured settings.
Other than that, you could have wrongly configured the dedicated Graphics Card settings through its native Control Panel. If that’s the case, you can manually set things such that Path of Exile starts using the integrated graphics.
Also, for some users, when the power-saving mode kicked in on their laptop, the device automatically switched to integrated graphics. So, you will have to check for this as well.
Do you need a good computer for Path of Exile?
You don’t need a computer with high-end specifications to run Path of Exile. A decent one should do the job but you must have a good dedicated graphics card.
In case you are planning to install PoE or believe that your video card does not meet the requirements to run Path of Exile, check the graphic requirements below:
Processor: Quad core 2.6GHz x86-compatible
Graphics: ATI Radeon™ HD 7850 or NVIDIA® GeForce® GTX 650 Ti
RAM: 8 GB
DirectX: DirectX Version 11
What can I do if POE doesn’t recognize my GPU?
1. Manually set Path of Exile to use the dedicated graphics
NOTE
We have listed the steps for Nvidia Control Panel and it should provide you with a basic understanding of the concept. In case you are using another graphics card and are unsure of the process, check its official website for the exact steps.
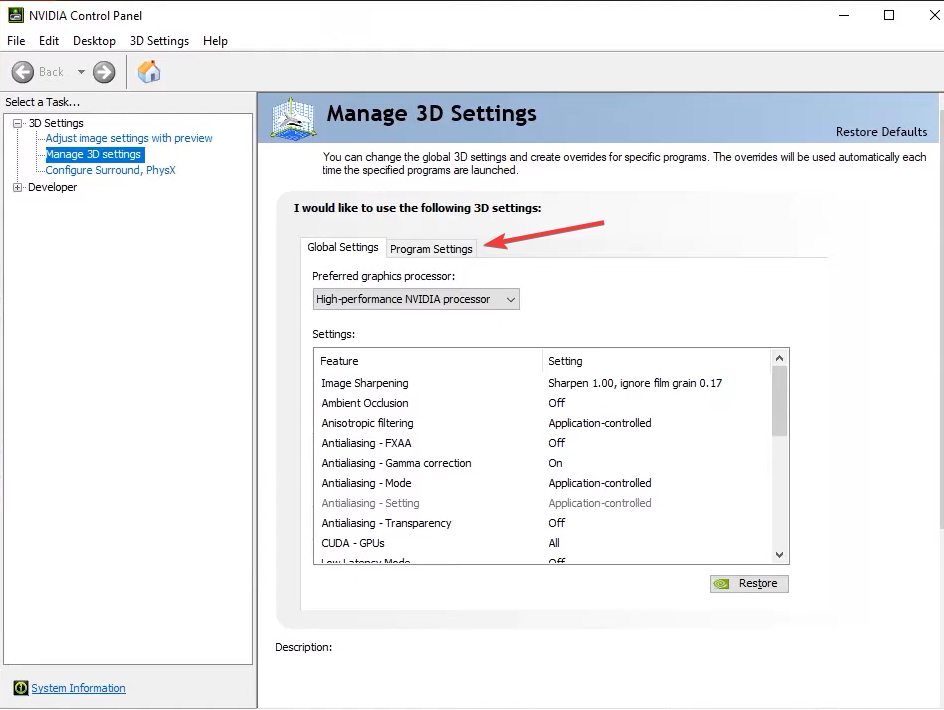
Launch the Nvidia Control Panel, and select Manage 3D settings from the navigation pane on the left.
Go to the Program Settings tab.
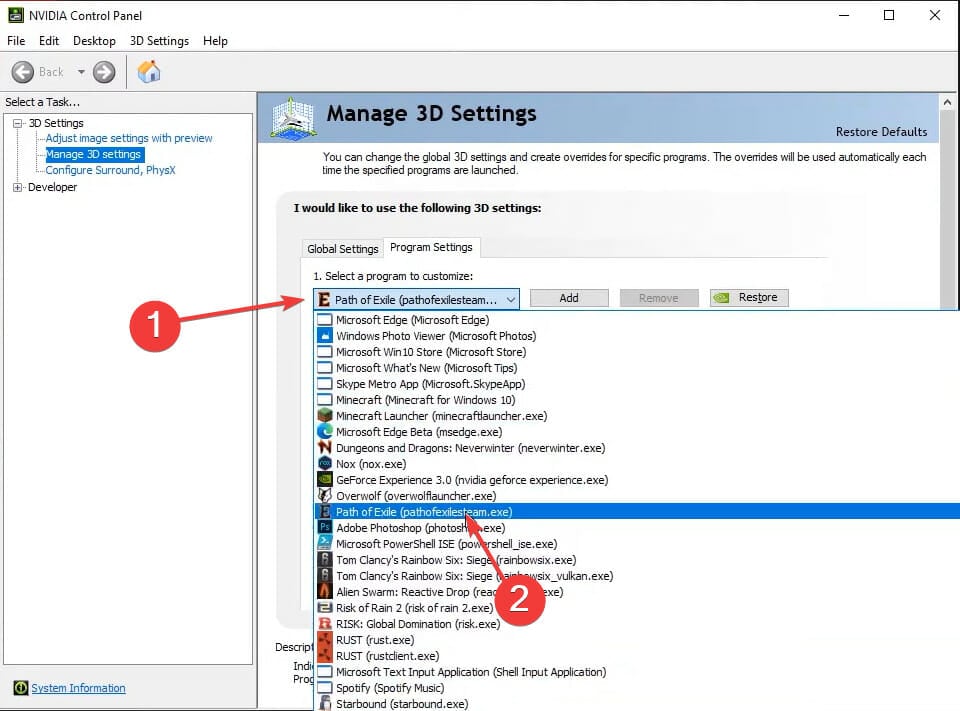
Choose Path of Exile from the Select a program to customize dropdown menu. If it’s not listed there, click on the Add button, locate the game launcher file, and add it.
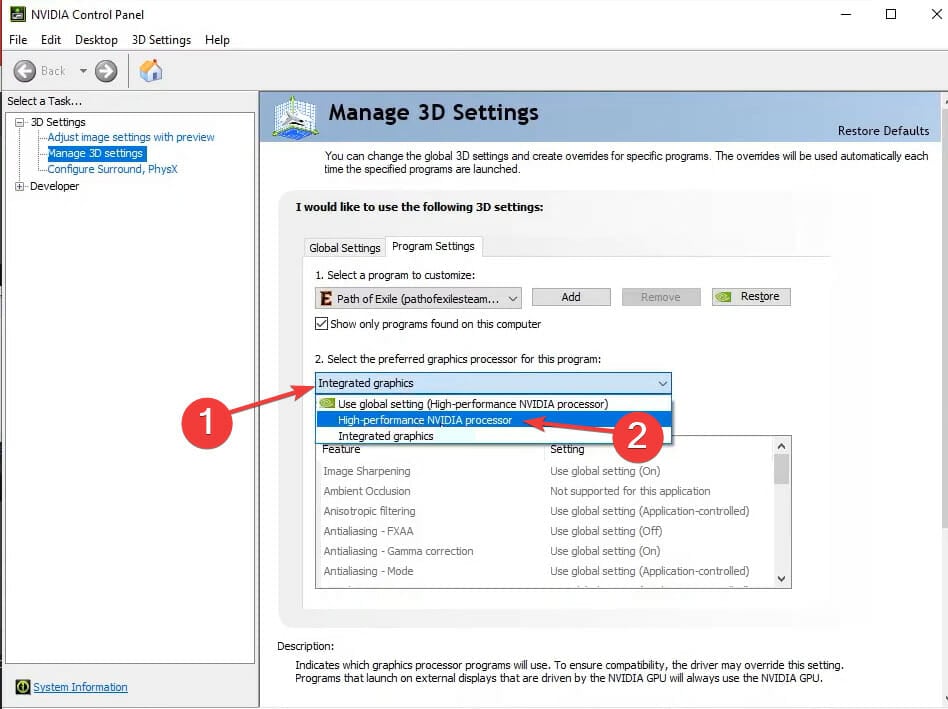
Next, select High-performance Nvidia processor from the Select the preferred graphics processor for this program dropdown menu.
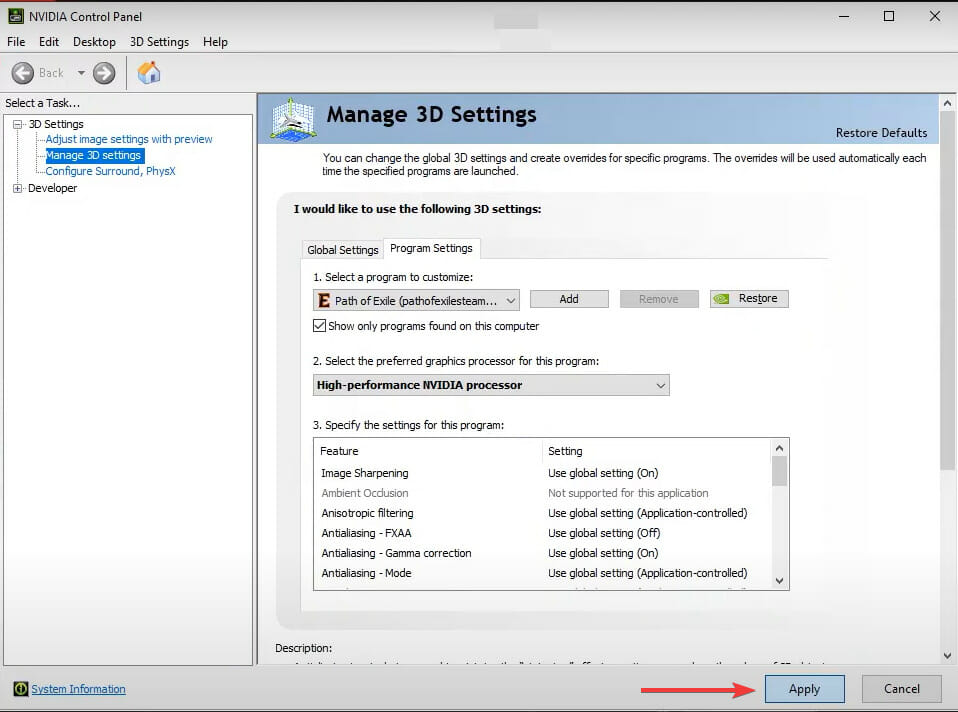
Finally, click on Apply at the bottom to save the changes.
If the dedicated graphics card is not listed in Path of Exile, you can switch it using the dedicated Control Panel. This worked for a lot of users who were wondering how to Disable Intel HD graphics and use Nvidia.
Also, the in-game settings might still show that the integrated graphic card is currently selected, but that’s not the case, and you should notice the change in graphics right away.
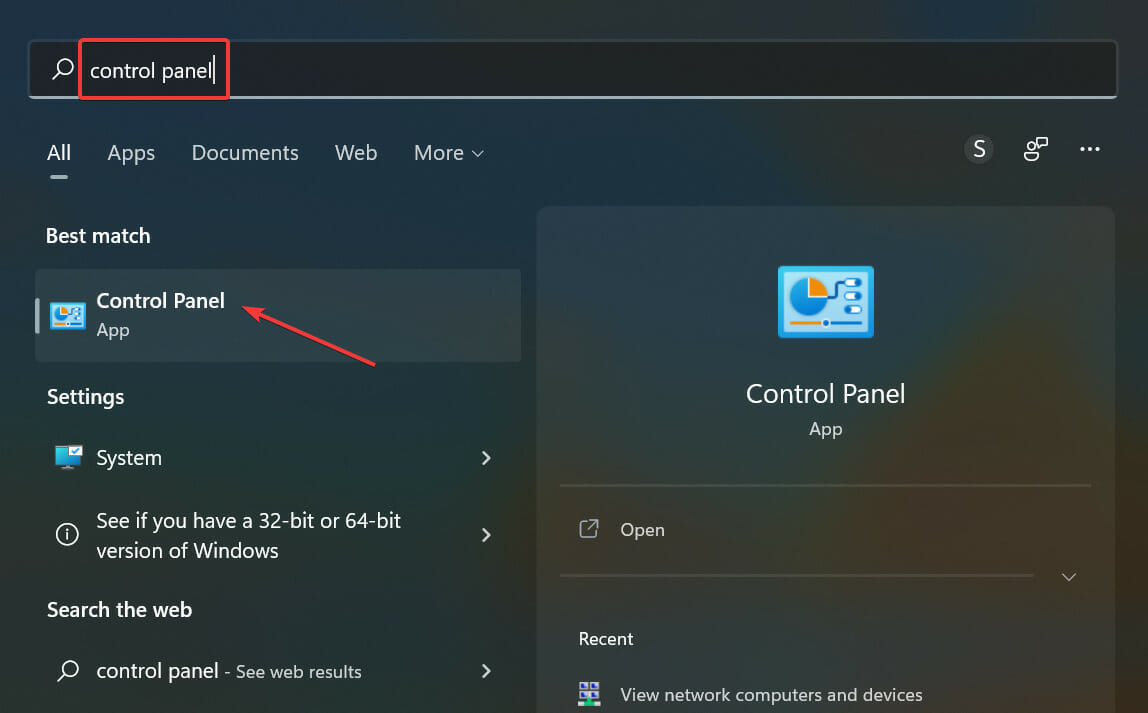
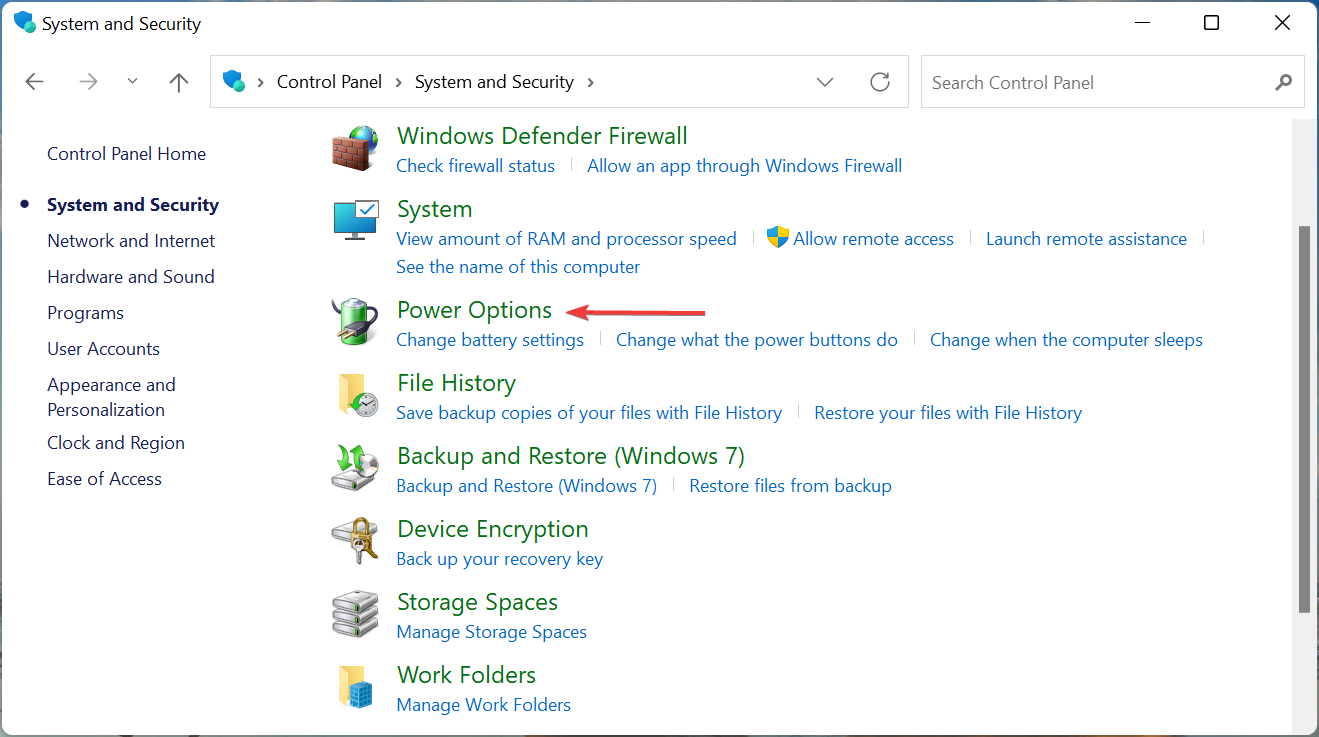
Press Windows + S to launch the Search menu, enter Control Panel in the text field, and click on the relevant search result.
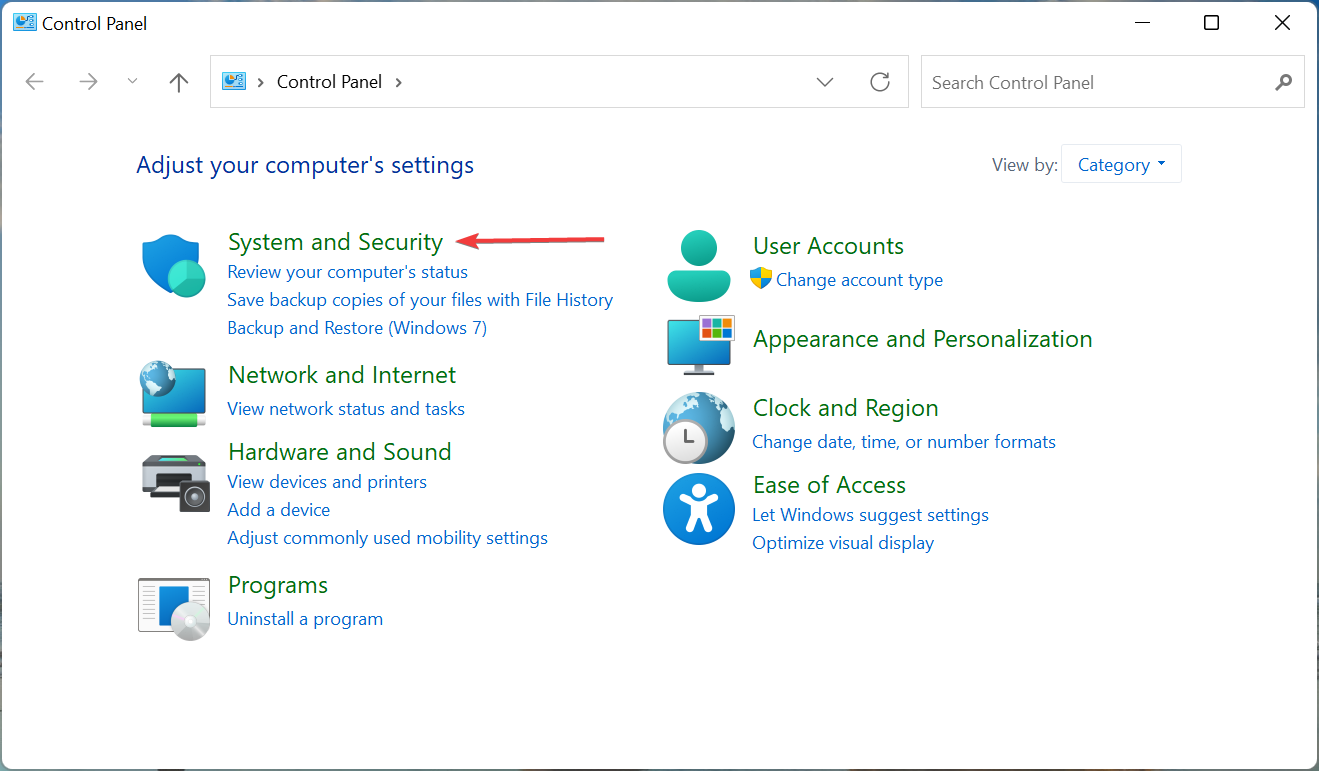
Click on System and Security here.
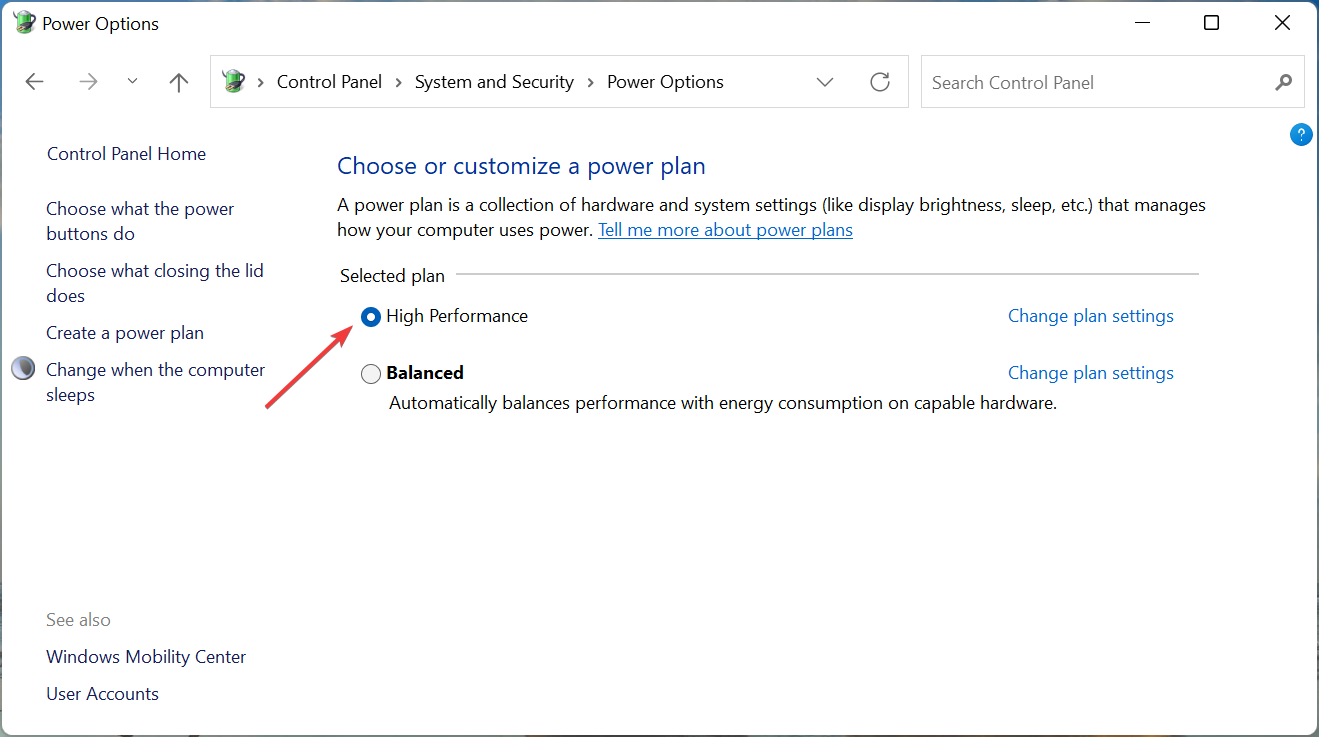
Next, click on Power Options.
Now, select the High Performance power plan from the ones listed here.
Once done, restart the computer for the changes to come into effect, and Nvidia should now start recognizing the graphics card on your computer.
How do I change what graphics card a game uses?
For that, you can either use the in-game settings or the dedicated Control Panel for the graphics card.
However, oftentimes, the in-game settings, due to some issue, do not list all the available graphics cards, which is why you will have to use the dedicated Control Panel.
The changes made through the Control Panel reflect immediately and are far more effective. So this should be your preferred option.
These are all the ways you can fix issues when Path of Exile does not recognize your graphics card. Doing this ensures good performance in the game and avoids related errors like Failed to connect to instance.
Also, these methods would work on other games as well.
Besides, here’s how to fix common issues with Path of Exile, including sudden crashes, or problems with the connection and sound, among others.
Do not forget to tell us which fix worked and your review of Path of Exile, in the comments section below.
Chris Charla, head of ID@Xbox, recently sat down to talk about the state of indie gaming during a GI Live: Online event. During the stream Charla noted that independent games have come a long way since their early days, saying “I date that 2008 launch of Castle Crashers as the beginning of an indie Golden Age. 14 years in and that Golden Age hasn’t stopped.”
He added, “As time’s gone on, what we’ve seen is independent developers start to occupy every niche that has ever been successful in the history of game development.”
Charla noted that indie games started out largely with 2D side scrolling games like Braid and Castle Crashers, that took inspiration from 8- and 16-bit games, and from there indie development slowly expanded to larger teams making more sophisticated games with a higher level of graphical fidelity.
“Now we’re on Gen 9 with our consoles, Xbox Series X, PlayStation 5, and we see small developers, making games that are super competitive,” Charla says in the stream. “It’s amazing to see independent devs have caught up and are producing Gen 9-quality games.” He points to the 2021 snowboarding game Shredders as an independently created title that pushes the boundaries of the current hardware.
Charla also thinks that independent developers have a chance to steer where the gaming industry is heading. One recent example Charla gave was a conversation he had with a AAA developer who stated a desire to make a game like Hades – an award-winning independently developed roguelike dungeon crawler.
“I do think that for independent developers, it’s a great time to think about not just being part of the games industry, but where they help lead the industry next. This is one of the big reasons Xbox is proactively working with indie devs with new technologies and business models. The ID@Azure program is all about this democratization of development and giving indies access to technologies that would typically be reserved for AAA companies.”
“And we know that when we give independent developers access to our tools and technology, right back from Xbox 360 days… no one would have guessed that Castle Crashers was going to be the game on 360. No one could have guessed that a 1930s-style, hand drawn side-scrolling boss rush platformer was going be a thing that people wanted to play. But Cuphead came out it was this amazing success. So when we give developers access to the power of the cloud, I think we’re going to see similar mind blowing things from them. And so we have to do it.”
And what does ID@Xbox get in return for all its support of small and independent developers? Fantastic games. It’s hard to argue that video games industry in general has benefitted from the accompanying influx of creativity that has come with the influx of independent developers making “smaller” games, whereas big studios making massively-budgeted AAA titles that take years to develop can afford little risk with their products. Indie gaming has long been seen as the industry bastion of creativity and innovative game concepts.
“I see the future is really independent developers having the opportunity to lead where the industry is going.”
These days, there’s a chance that you’re not buying a monitor for just work or gaming. You’re probably going to hook it up to a PC for your day-to-day productivity, as well as other devices, maybe a gaming console like an Xbox, or even a streaming stick for multimedia.
Dell has all kinds of monitors that you can choose for each of those tasks, but I was recently sent over the Dell 32 4K UHD Gaming Monitor for review. In two and a half weeks of use, I feel as though even though this is a gaming monitor at heart, it is still perfect for productivity, too. Features like the 4K resolution, 144Hz refresh rate, and 120Hz refresh for supported consoles, support for HDR, all make this one of the best Dell gaming monitors I’ve reviewed.
Specs & Pricing
The Dell 32 4K UHD Gaming Monitor retails for $1,100, but you can find it for closer to $825 when on sale at Dell.com. For that price, you’re getting a lot of bang for your buck. You’re getting a display with a massive 32-inch 3840 x 2160 resolution LCD LED TFT panel with an anti-glare coating. That resolution adds up to 138 pixels per inch. This is actually the only 4K branded monitor in Dell’s Gaming lineup and the first 4K Dell Gaming monitor that supports 144Hz refresh rate and HDMI 2.1
Note that the monitor also supports up to 144Hz refresh rates, across both HDMI 2.1 as well as the DisplayPort 1.4 ports (you must use a compatible cable.) There’s even a picture in picture mode, which I’ll get into later. Of course, you do get AMD Freesync, too, since this is a gaming display.
And what about those numbers behind the display? According to our colorimeter, the monitor supports a peak brightness of 600 cd/m2, with the optional range being around 400. It also hits 95% of the DCI-P3 color gamut and, 99% of the sRGB range. Contrast is rated at 1000:1. There’s also a vertical viewing angle of 178 degrees. Response time is rated at 1ms in the Extreme Mode.
If you’re curious about dimensions, it measures 28.6 inches x 2.7 inches x 16.8 inches. There’s also the support for swiveling and tilting the monitor. You can tilt from -5 degrees to 21 degrees, and swivel from -30 degrees to 30 degrees. Height can go up to 3.9 inches. With the stand the width of the monitor is 28.6 inches, the depth is 9.7 inches, and the height is 18.07 inches to 22.01 inches. Weight comes in at 20.3 pounds.
Setup is simple and easy, as always. Just screw the stand into the base with the pre-inserted screw tab (no tools required) and then snap the display into the back of the stand.
Design
I’ve reviewed Dell’s dedicated non-Alienware-branded gaming monitors in the past. The design across the mainstream Dell Gaming lineup is pretty much standard. Basically, a monitor that has gaming aesthetics, but isn’t over the top, and can fit in with any setup. The Dell 32 4K UHD Gaming Monitor is no different.
Like the others, this one sports a black-colored plastic finish on the front and back end, as well as the stand. It has nice curves and clean angular cuts on the base. There are also the vents in the back, which Dell says can improve the thermal regulation. Not to forget, the single color backlight, which glows in blue and added a nice touch to my white desk when gaming at night. Oh, and there are also the three-sided narrow bezels, which let you fit more on your screen.
Like I’ve said in previous reviews this design feels right at home on my desk. It is definitely clean-looking. I had the monitor right next to my Xbox Series X, and it just blends right in with it, matching the matte-black look of the console. It even contrasts nicely with the silver finish from when my Surface Laptop Studio and Mac Mini sit on my desk.
Ports & Buttons
As we touched on at the top of the review, included on this monitor are a variety of ports. The main port for connectivity includes 2 x HDMI (ver 2.1) and 1 x DisplayPort (ver 1.4.) There are also 2 x SuperSpeed USB 5 Gbps (USB 3.2 Gen1) downstream ports on the front bottom, one with charging capability at 2 amps max.
Other than that, you’ll find 1 X SuperSpeed USB 5 Gbps (USB 3.2 Gen1) upstream port on the rear, and 1 x headphone-out port on the bottom. I really do like the inclusion of the headphone jack. This means that you can plug your favorite speaker into the front of the monitor and make your gaming experience even more immersive. It’s a huge plus, for me in avoiding using headsets or headphones, considering that there are no in-built speakers on this monitor.
For a gaming monitor, this is a great mix of ports. I had my Xbox Series X hooked up on one of the HDMI ports, to get the 120Hz maximum refresh rate supported by the console. Dell says this monitor has a “Console Mode” that can detect the attached console and push out the right refresh rate.
The Display Port, though, (and HDMI, too) can also support up to 144Hz, so if you hook it up on a PC using a cable that supports it, you’ll get an even higher refresh rate, making your content seem fluent and fresh. This is what I did with my Surface Laptop Studio. As I get into later, I enjoyed it for my video editing and productivity.
As far as buttons go, this monitor has the signature joystick controls that are becoming more common on Dell’s products. That’s in addition to the three physical buttons below the stick. A single click on the Joystick brings up the main menu, letting you navigate to the different modes for the Game mode, adjust brightness and contrast, switch input, change display settings, and tweak the PIP mode, audio, and menu. It’s quite simple and easy to use, and I am glad Dell is making this the standard on more displays.
Note that these menus also have a place for you to swap between color spaces and game settings. This builds on the uniformity compensation feature and helps to dynamically balance the screen to offer uniform color and brightness so you can be confident in the quality of your work.
Gaming performance on console and PC
I tested the Dell 32 4K UHD Gaming Monitor in three different ways. For PC gaming, I played Microsoft Flight Simulator 2020, as this is one of the most stressful games on hardware. For console gaming, I played Forza Motorsport 7 on my Xbox Series X, which is optimized for the next-gen console. Outside of that, I also used the monitor day to day for productivity, as well as for video editing.
In PC gaming, the monitor performed well and beyond expectations. Flight Simulator is a very intense game, with scenery always changing. I noticed no lag or tear, even in the Top Gun: Maverick missions, where you need to fly low over ever-changing landscapes. If there’s one way to describe the experience I had there, I’d say as life-like, but without the G-forces and motion sickness from sitting in an actual cockpit.
Over on Forza on my Xbox Console, I felt like I was suddenly a top-tier racer. In taking a Corvette around the Daytona International Speedway, the HDR support, and 120Hz refresh made the scenery feel life-like, down to the reflections of the sun on the car. I’ve never quite felt this immersed when racing before. It even improved my racing skills, as small details that matter in the car like the rear-view mirror and side mirrors were lit up properly, without too many shadows. I definitely see where HDR comes into play here, with increased brightness and detail in otherwise dark scenes.
As far as it comes to productivity, I could not be happier. 4K resolution meant I could fit up to four Microsoft Edge windows side by side. I found myself using my Surface Laptop Studio more in the closed mode because of this. I depended more on the monitor, as I could fit so much more on my screen. The 144Hz refresh rate also meant that Windows felt as lively as ever, including the motions of the Start Menu. And for video editing? It’s a dream, with clips playing super smooth, and my video timeline moving without any stutter. HDR adds to that mix, with text looking super sharp and clear.
All in all, this is my dream monitor as it checks all the boxes that I needed. That’s 120Hz refresh for console gaming, 4K resolution for video editing and gaming and productivity, and 144Hz for PC gaming. Not to forget, the headphone jack for connecting speakers.
PIP & extra feature
I touched on all the “main” features of this monitor, but there are some extras here, too. Of those extra features is the cool picture in picture or picture by picture mode. This lets you have two inputs on your screen at the same time. You can resize the inputs through the menu and make one bigger or smaller to a variety of percentage sizes, and also swap the audio.
I found this useful when gaming, as I had my PC input on one side of the screen, and Xbox on the other. Following guides for the weekly Microsoft Rewards quest was easy because of this, as I could see both the video, as well as my game at the same time. Dell provided me with other scenarios where this could come into play. Examples include keeping up with a stream chat, catching up on podcasts, and more. All that said, this monitor can definitely help you get more done.
Buy it now for the best
There’s no shortage of 32-inch 4K gaming monitors in the market. You can find plenty of these at your local BestBuy and the Gigabyte M32U is a good alternative for the same price. However, the Dell 32 4K UHD Gaming Monitor G3223Q is special. You can use it for both your productivity as well as gaming thanks to the 120Hz and 144Hz support, and when you want to combine the two, there’s an amazing PIP mode that you can use. This is a monitor that I’d love to keep and buy for my own use, I don’t say that very often.
Windows 11 comes up with some new design features that are quite different from what we were used to in the previous OS.
Unlike Windows 10, the newest taskbar is default set on the desktop center. However, one of the most impressive attributes is that Windows 11 allows you to pin apps to the Start menu.
Thus, such an option seems to focus more on the users’ needs and choices. In these terms, you can set the most used apps and access them quickly.
This guide will show you how to easily do it, so make sure you look at our recommendations. But first, let’s see how you can customize the Start menu in Windows 11.
How can I customize the Windows 11 Start menu?
Click the Start button and select Settings.
Now click on the Personalization option from the left pane and select Start from the right.
You can now toggle On or Off the options to see the recently added apps, the most used apps or the recently opened ones.
There is also the Folders option to customize which folders you want to see next to the Power button from the Start menu.
In the next window, you can toggle the desired folders to On.
As you can see, we’ve selected the Network and the Settings folders and now you can get them right near the Power button.
There are not so many options to customize the Start menu in Windows 11 but you’ll surely find the suitable method for the desired result.
How can I easily pin apps to Start menu in Windows 11?
1. Use the general menu
Click on the Start button, then select the All apps button, from the top-right corner.
Search for the app you want to pin, right-click on it, then select the Pin to Start option.
2. Select the Pin to Start option
NOTE
This option is so-called the secondary click, which represents the simplest and the less time-consuming to pin your apps. All you have to do is just perform two clicks and that’s it!
Right-click on the app you want to pin.
Select Pin to Start.
3. Use the Start menu and the Taskbar
Click on the Start button, then select the All apps button, from the top-right corner.
Search for the app you want to pin, right-click on it, select More, then click on Pin to taskbar.
For more visibility, also pin your favorite apps to the Windows taskbar. You can do it both for already pinned apps or for unpinned programs.
How can I customize my pinned apps in Windows 11?
As a first suggestion, if you’re not interested in an app anymore, note that you can unpin it by right-clicking on it and selecting the Unpin from Start option.
Also, consider that the initial view of the Windows 11 Pinned section displays a number of 18 items. However, you can use the pagination control to move through pages of additional pins.
You can see up to 18 apps in the Start menu, but you can add more
Microsoft describes two important available customizations for your pinned apps:
Up to four items on the first page of this section
A maximum of four items at the bottom of the pinned app grid. In these terms, you’ll need to scroll down in the Start menu to see these pins.
For those who need to know how to pin apps to the Start menu or Taskbar in Windows 11, we hope our article helped you.
Pinning the apps can seem like a pointless task but once you get your most frequently used apps there, you will see that the seconds you used in the process will be rewarded.
However, using the same steps, you can’t pin all the items to the Taskbar. In case you want to a batch file to the Taskbar on Windows 11 to access repetitive tasks without any hassle, you need to use a workaround. To learn more, read this guide.
For those of you who miss Xbox Snap: take heart, for it doesn’t look like the feature will be returning anytime soon. That’s according to Xbox engineer lead Eden Marie, who expressed her doubts on Twitter when asked about it. Given Marie’s position she would be the one to know, so it’s safe to say that Snap is gone for good on Xbox consoles.
While we all miss snap, I don't think it's coming back.
For anyone unfamiliar with the snap feature, it launched with the Xbox One console and was later removed in February 2017. The feature basically functioned just like the snap feature on Windows PCs, allowing users to run multiple apps simultaneously on their screen. For instance, you could run a game on one side of screen and open a music player app like Spotify in another corner to DJ your gaming experience. You could even run a game and stream video at the same time.
While many users have reported that they miss Snap, there are still alternatives such as using a second device like a smartphone to achieve the same function.
The Disney Magic Kingdoms video game got a long overdue permanent content update today on Windows and all other supported platforms that introduced characters and items from Disney’s classic The Rescuers animated feature film.
Bernard and Orville are now available to unlock for all players who have unlocked all previous permanent content up to Ratatouille. Bernard can be unlocked for free by getting other characters to collect his tokens while Orville can be obtained by spending 500 gems, Disney Magic Kingdoms’ in-game currency.
The Rescue Aid Society attraction, a new float, and Marsh-mallow Gummy Mug Shake Stand, both also inspired by The Rescuers, are also now available to unlock.
Disney Magic Kingdoms usually gets an update once a month that adds new content but the vast majority of content being added over the past year or so has been tied to limited timed events instead of the game’s main storyline. Players have been begging for new story/permanent content for a while now as passionate players have long since completed all of the main tasks in the regular storyline.
In addition to the new The Rescuers content, a massive number of other changes and adjustments were made with this update. A full list of these changes can be read here.
Today’s update is officially called The Rescuers (Part One) which confirms that more characters from The Rescuers and its (vastly superior) sequel, The Rescuers Down Under, will be added in a future update.
The boot sector is a critical part of the drive that takes over a short while after the computer is turned on. When you encounter issues with it, bootrec comes to your aid. But what do you do if bootrec is not recognized in Windows 11?
The boot sector contains the MBR or Master Boot Record, which helps locate the OS on the drive and load it. And issues with it can prevent you from booting Windows 11 effectively or at all.
Speaking of issues, many reported Bootrec /Fixboot access is denied message, and we covered this problem in detail in a separate guide.
In this case, it’s recommended that you run the bootrec command to eliminate the issue. If you get an error running the command, find out what to do in the following sections.
Why Bootrec is not recognized in Windows 11?
When you launch Command Prompt separately or in the Windows Terminal while logged in to Windows 11 and try to run the bootrec command, it would read, bootrec is not recognized as an internal or external command, operable program or batch file.
You may have searched the web for the underlying cause but wouldn’t have come across any informative results. And honestly, there ain’t many. So, here we are with a solution!
You can’t use bootrec command while logged in to Windows 11 or even the previous iteration, rather it can only be executed from the Windows RE (Recovery Environment).
No matter whether you are unable to boot OS at all or are just encountering a minor error, this guide will help you fix Bootrec /fixmbr not working and similar issues.
Remember that sometimes bootrec is not recognizing Windows installation, but we’ll show you how to fix this issue.
What do I do if the Bootrec is not recognized in Windows 11?
Use Command Prompt
Turn off the computer and press the power button to turn it on. Hold the power button to turn off the system when the display lights up.
Repeat the same process three-four times until you see a blue screen that reads Recovery.
Click on the See advanced repair options button under It looks like Windows hasn’t loaded correctly.
Next, click on Troubleshoot.
Select Advanced options.
Now, select Command Prompt from the six options listed here.
You can now paste the following bootrec commands and hit Enter after each to execute them. Once done, click on the Close icon:bootrec /fixmbrbootrec /fixbootbootrec /scanosbootrec /rebuildbcd
Finally, click on Continue to boot Windows 11 normally.
If you’re getting Bootrec is not recognized in Windows 11 the steps above should be able to help you.
Also, if you can load Windows 11, there’s no need to force shut down the PC to access the Recovery Environment. Rather, you can try other ways to enter recovery mode in Windows 11.
Remember to use the force shutdown method only in emergencies since this could harm the OS if it works fine.
After using this solution, check if the bootrec /fixboot not recognized file system error message remains.
Do we always need to follow such intricate approaches when dealing with boot errors? The answer is No. Microsoft provides built-in tools and utilities that can help identify and eliminate a plethora of errors in Windows 11, such as Bootrec /fixboot the system cannot find error for example.
One such is the Startup Repair utility. You can use this feature to fix issues while booting Windows. It looks for problems with the system files, whether corrupt or missing, and replaces them.
You can open The Startup Repair utility from the Advanced Options screen in the Windows RE. Also, it wouldn’t take too long to run the utility. If it can eliminate the problem, you should have the PC up and running in around 20-40 minutes.
Now that you understand Bootrec properly feel free to try all our solutions.
Also, some users have reported being stuck on the Automatic Repair screen in Windows 11. Problems with MBR are responsible for this issue, so the bootrec command will again come to your aid.
Do not hesitate to tell us which fix worked for you in the comments section below.
Microsoft has revealed some details about the June Xbox Update. This month’s update adds one big new feature, the ability to reveal secret achievements anywhere you play Xbox.
This new feature is all for those who don’t mind story-related spoilers when gaming. To trigger it on an Xbox, click the guide, go to Game Activity and then choose Achievements. When you see a hidden achievement, you’ll be able to reveal the full detail, as well as the Gamerscore value. After you peek, it can be hidden once again. This also works on the Xbox app for Android and iOS, the Xbox app for Windows PC, and Game Bar on your PC, too. Check it out below.
In addition to the achievement-related feature, Microsoft also added a small quality of life fix to Xbox this month. The company mentioned that the June Xbox Update offers improvements to the speed and reliability in two areas. This includes detecting available updates, both in your collection and when you launch a game.
Made for the internet, Chromebook is a powerful machine in the hands of avid web surfers. A lightweight and sleek laptop primed for everything web browsing. And what better than pairing it with a portable browser designed to meet the requirements of Chromebooks.
The Chromebook runs on Google’s proprietary ChromeOS. It comes with the popular Chrome browser pre-installed. With Chrome being an already stunning app, any portable browser recommendation must be equally top-notch.
And that’s exactly what you get on our list of best portable Chromebook browsers. As always, all apps here are tested and trusted.
What are the best portable browsers for Chromebook?
Not a browser tops Opera One on the list for good reasons. However, its high compatibility with chromeOS is one of the reasons it is the leading portable browser for Chromebook.
Like Chrome, Opera One is a Chromium-based browser with lightning-fast speed. In addition, it comes with a free VPN that allows you to browse the internet without restriction.
Thanks to its built-in ad blocker, you can quickly get rid of annoying ads, cookies, and pop-ups. In addition, the incognito tab allows you to browse the internet without the concern of being tracked or monitored.
Only a few browsers can come close to Opera One whenever the argument is on user-centricity.
Other features:
Ads blocker
Liquid browsing buttons
Data saving
Custom feeds
Opera One
Add this to your Chromebook and enjoy high-speed browsing, top-notch security, and practical integrations.
Mozilla has been around for a while and never seized to improve. Nevertheless, it is second only to Chrome as the most-used browser worldwide.
Firefox is an effective ad blocker. Its enhanced privacy features help you keep trackers at bay. You can switch Firefox into private browsing mode to escape all sorts of internet spying.
It is also prominent for its less internet memory consumption. As a result, your Chromebook RAM won’t get overstretched as you browse with this portable browser.
Want to render web pages less cluttered and more readable? No problem. Switching Firefox to reading mode allows you to read content online without distraction.
Despite its late entry, the Brave browser is inarguably one of the best browsers on the web. Launched in 2019, It promised to take browsing speed, privacy, and security to the next level.
Looking at its advanced security functions like firewall, configurable global shield, ad blocker, and more, it’s safe to say that Brave is delivering on its promise. It is also lightweight, making it an ideal portable browser for Chromebook.
Lastly, Brave lets you control the appearance of ads in your browser. Everything privacy and security is down to you, as you can select the settings to implement or neglect.
If you are looking for an easy switch from Chrome, Dolphin Browser is apt but with more catches. It is a one-kind intuitive browser that looks and operates just like Chrome. This similarity in operation and its light-weightiness makes it an excellent portable browser for Chromebook.
Dolphin Browser ticks many functionality boxes. It comes with virus and malware protection features that keep you protected online and offline.
Built-in video downloader, PDF viewer, automatic translation, voice command search, battery saver, and built-in flash player, among others, will make it your favorite in no time.
Bromite is a highly secure open-source browser that’s very suitable for Chromebooks. The browser was initially created for Android, but you can set it up on Chrome OS as well.
Like other mentions on this list, it is Chromium-based. It has a powerful adblocker that uses advanced filtering and blacklists to eliminate annoying ads.
You can even create your own customized settings and block specific types of ads from being displayed when you use Bromite.
It also has impressive anti-tracking features. It disables AMP and click-tracking. It also has DNS over HTTPS support and is always in incognito mode.
There you have it: a list of four portable browsers that fits well with Chromebook. As good as Chrome is as a default browser, your Chromebook can still do with other browsers that do not consume much of its resources.
You can also check out this guide on the best gaming browsers for Chromebook to add more fun to things and take advantage of your device’s superb resources.
Feel free to discuss your pick from this list and why in the comment section below.
The ctfmon.exe file needs to run automatically with Windows 11, but that’s not always the case, so let’s see how we can fix that.
Many want to remove ctfmon.exe, believing that it’s malware, but you can rest assured that this is an authentic file from Microsoft and perfectly safe to use.
So, here’s how to enable it:
How can I enable ctfmon.exe automatically on Windows 11?
1. Use the ctfmon.exe shortcut
Press the Win + R keys to open the Run dialog.
Now you need to enter Ctfmon.exe path in the input filed and press Enter. The path is: C:\Windows\System32
Search for the ctfmon.exe file and right-click on it.
Choose Send to and then select Desktop (create shortcut).
Open the Run dialog again.
Execute the below command. shell:common startup
You will be redirected to the location of the startup folder mentioned below. C:\ProgramData\Microsoft\Windows\Start Menu\Programs\StartUp
Copy the ctfmon.exe file from the desktop and paste it into the startup folder opened in the above step.
Restart your PC and check if the ctfmon.exe file is starting automatically in Windows 11 or not.
2. Use the Registry Editor
Open the Start menu.
Search for Registry Editor and open it.
Navigate to the below-mentioned path: HKEY_LOCAL_MACHINE\SOFTWARE\Microsoft\Windows\CurrentVersion\Run
On the right empty space, right-click and select New and then choose String value.
Name the new string ctfmon.
Double-click on it and set the Value to C:\Windows\System32\ctfmon.exe
Restart your PC and it will resolve your problem.
3. Use the Task Scheduler
Open the Start menu.
Search Task Scheduler and open it.
Expand Microsoft.
Expand Windows.
Select on TextServicesFramework.
On the right-side, right-click on MsCtfMonitor and select Enable.
Close the Task Scheduler.
Restart your PC and check if ctfmon.exe runs automatically at startup or not.
How can I fix ctfmon.exe not starting automatically error?
1. Run SFC Scan
Open the Start menu.
Search for Command Prompt, right-click it and choose Run as administrator.
Type the below command and press Enter: sfc /scannow
Your PC will start scanning and possibly fix the issue as well.
Reboot your PC.
As an alternative, you can always rely on specialized software to help you repair your system files in no time. Plus, this kind of software can be easily used as a maintenance tool in the future.
2. Check for Windows updates
Press the Win + I buttons to open Settings.
Select Windows Update from the left pane.
Click on Check for updates button.
Your system will now check for any latest update available, and if it detects one, it will install it automatically.
After doing that, check if the ctfmon.exe is still not working.
Search for Touch Keyboard and Handwriting Panel Service.
Right-click on it and choose Properties.
Select Startup Type as Disabled.
Click Stop.
Click Apply and OK.
Restart your PC.
Once the PC restarts, repeat the steps from above, but this time enable the service.
If none of the above solutions help you fix the problem at hand, then as a last resort you can opt for resetting your Windows 11 PC.
But before you do that, you need to take a complete backup of your data because resetting the PC can remove all of your data. You can follow our comprehensive guide on how you can always perform Windows 11 factory reset.
Let us know in the comments section below if this guide helped you fix the ctfmon.exe error on Windows 10 and 11.
As per usual, a couple of entries are set to make their way to Xbox Game Pass in June. Gamers should also look out for the Xbox and Bethesda’s Game showcase which is set to take place on June 12, where we expect a ton of games to make their way to Xbox Game Pass.
Coming soon to Xbox Game Pass
First on the list is For Honor: Marching Fire Edition (Cloud, Console, and PC) which is set to make its way to Xbox Game Pass come June 1, followed by Ninja Gaiden: Master Collection and Assassin’s Creed Origins which are set to be available on June 2 and June 7 respectively.
Gamers are expected to get For Honor: Marching Fire Edition on their devices quicker courtesy of the enhancements that Microsoft has been laying on the Xbox App. As such, gamers will now be able to search for and install Ubisoft games via Ubisoft Connect.
The Ninja Gaiden will feature all of the previously released game modes and DLC costumes which will provide gamers with a wide array of choices before getting to the battleground.
Be sure to also look out for Chorus, Disc Room, and Spacelines from the Far Out which are set to come to Xbox Game Pass on June 7. Get to enjoy Spacelines from the Far Out which is packed with “unlockable spaceships, upgrades, characters and customizations, randomly-generated challenges, trips, and itineraries”. It will be available on day one with Game Pass.
Entries getting updates in June
Besides the entries making their way to Xbox Game Pass in June, Microsoft is also rolling out a couple of updates with the aim of enhancing the gameplay experience. Here are the titles are set to receive updates:
Assassin’s Creed Origins: Deluxe Pack – June 7
Madden NFL 22: MUT MVP Bundle – Available now
Eternal Return: Skins and Boosts Premium Bundle – Available now
Smite: Slipknot Starter Pass – Available now
Leaving Xbox Game Pass
Be sure to make the most out of the following entries as they are set to leave Xbox Game Pass soon. However, you can choose to purchase the entries at a 20% discount which will allow you to access them from your library whenever you want.
Darkest Dungeon (Cloud, Console, and PC)
Dungeons & Dragons: Dark Alliance (Cloud, Console, and PC)
Greedfall (Cloud, Console, and PC)
Limbo (Cloud, Console, and PC)
Worms Rumble (Cloud, Console, and PC)
They have further indicated that you should look out for more announcements in June, as well as the Xbox and Bethesda game showcase.
If you’ve ever worked late at night you probably understand the problems with light mode. Your screen is way too bright, and there’s a particular strain on your eyes. That is why Microsoft is now adding a dark mode to Word for the Web, helping make it easier for you to focus on your document when the lights are turned out (via Neowin.)
As with most of these incoming features for Microsoft 365 apps, mention of this one is on the Microsoft 365 roadmap. It has the feature ID of 93328 with the appropriate title “Word: Dark Mode.” Microsoft doesn’t dive into many details, but mentions that it hopes Dark Mode in Word on the web will “provide a modern look for documents while giving users the ability to reduce eye strain and accommodate light sensitivity from long hours at a computer screen.”
Other than that, Microsoft says it is targeting a May 2022 release for this dark mode feature. But seeing as though the month of May is now over, we think June could be a better bet. We also aren’t sure of how the dark mode might work, but it can be expected to automatically respect your system’s light or dark theme, as well as your web browser’s settings. A possible toggle switch could also be added under the settings gear, too, but we’ll have to wait and see.
Several features are being removed from the Microsoft 365 subscription-based versions of Microsoft Excel next month in June. Spotted by Thurrott.com, the list includes Money in Excel, Wolfram Data Types in Excel, as well as several offers from Microsoft’s partners.
If you recall, Money in Excel was first introduced back in June of 2020, and we even went hands-on with it. The feature was designed to help you track your finances. Unfortunately, though, come June 30, 2023, Microsoft will disconnect your financial institutions from any Money in Excel workbooks you have, and you won’t be able to refresh transitions. The data in the workbook will stay in place, however, and you even can take advantage of an offer from Tiller to enjoy a 60-day of personal finance spreadsheet service.
As for Wolfram Data Types in Excel, this too was introduced in June 2020. Yet come June 11, 2023, you’ll no longer be able to add new Wolfram data types. This means you won’t be able to refresh data, follow links, view new images, or download templates with Wolfram data.
The last of the features removed in Excel isn’t really an Excel feature. Rather, it’s a partner feature. Typically you’d be able to go to an offers website and enjoy discounts on things like Shutterfly, Pocket, and Experian ID protection. But come June 30, these will no longer be available. So, you might want to redeem these as they last if you’re a Microsoft 365 subscriber.
To ignore Chrome certificate errors, you’ll have to tweak your security settings. Once you do this, you’ll be able to access sites that don’t use encryption.
This gives you more freedom for web surfing, but be warned: ⚠️ this is only recommended if you 100% trust the site you want to access⚠️. Otherwise, you’ll cause more harm than good.
Chrome requires SSL certificates to encrypt data transmitted between a user’s web browser and a website. This encryption ensures that sensitive information like payment details remains secure, providing visitors with a safer browsing experience.
Sites using SSL display HTTPS in the URL and a padlock icon, indicating encryption. Without SSL, sites risk lower conversion rates and traffic due to being marked insecure and avoided by most internet users.
Most common certificate errors
Below are a few common certificate errors and why you may see them.
NET::ERR_CERTIFICATE_TRANSPARENCY_REQUIRED – When you access an HTTPS site with SSL/TLS Certificate problems, you could trigger this Chrome browser error message.
ERR_SSL_VERSION_OR_CIPHER_MISMATCH – When website browsers and website servers don’t support the same SSL protocol edition, you will get this error message.
NET::ERR_CERT_WEAK_SIGNATURE_ALGORITHM – This error occurs when the server and your computer do not have a secure SSL connection or when the SSL certificate is expired, not correctly configured, or doesn’t correspond to the domain you are attempting to access.
ERR_SSL_PROTOCOL_ERROR – You are getting this message because you have an incorrect date configuration on your computer.
NET::ERR_CERT_AUTHORITY_INVALID – Issues with the network, your device, or a browser may be causing the error by preventing the SSL certificate from being correctly read.
ERR_CERT_SYMANTEC_LEGACY – This error commonly arises because a Symantec SSL / TLS certificate issued before June 1, 2016 is no longer recognized by Google Chrome.
NET::ERR_CERT_COMMON_NAME_INVALID (this occurs when the certificate does not match the domain)
ERR_CONNECTION_REFUSED – This is usually due to a server-side issue and not the individual connection attempt.
The above solutions will be valuable ways of avoiding SSL certificate warning messages. As we mentioned earlier, the errors you get can be caused by various factors.
We also recommend you keep your device and browser updated, get rid of old cookies and cache and make sure you have the correct time and date set up on your machine.
If you need more assistance to ignore Chrome certificate errors, don’t hesitate to ask in the comments below.
Microsoft has just announced the launch of Entra, the latest entry to its family of products. Entra brings together Microsoft’s identity and access capabilities in one place. It includes Microsoft Azure Active Directory (Azure AD), as well as Cloud Infrastructure Entitlement Management (CIEM) and decentralized identity.
Per Microsoft, Entra comes at a time when there’s a need for trust in a hyperconnected world. The company sees that it is important to help address attack surfaces and vulnerabilities as more organizations are advancing their digital activities. It’s not always a straightforward task to do this, so Entra helps fill the gap in these core ways:
Protect access to any app or resource for any user.
Secure and verify every identity across hybrid and multicloud environments.
Discover and govern permissions in multicloud environments.
Simplify the user experience with real-time intelligent access decisions.
“Microsoft Entra embodies our vision for what modern secure access should be. Identity should be an entryway into a world of new possibilities, not a blockade restricting access, creating friction, and holding back innovation. We want people to explore, to collaborate, to experiment—not because they are reckless, but because they are fearless,” explains Microsoft.
As pointed out by Mary Jo Foley, Entra will help provide “identity and access management, cloud infrastructure management, as well as identity verification,” Entra works with most clouds, including Azure, AWS, Google Cloud, and other Microsoft apps and websites.
Microsoft is testing an interesting new productivity-first feature for the Edge browser. As spotted by Neowin, the Canary version of Edge now has a new feature dubbed as “Drop,” where you can leave select files, notes, or other content and visit it again on your other computers, tablets, or phones.
Currently, it looks as though this new “Drop” feature is still in A/B testing with Edge Canary 104, as we’re not seeing it on our end just yet. However, you’ll know when it is available for you when you see a new envelope icon at the top of your web browser, near the other icons for collections, and favorites. You also can toggle it by going to Settings and then Appearance and scrol down the list to look for the icon.
Image via Neowin
Once you enable and then click on that icon, you’ll get a new sidebar, where you can attach a file, or a note, and leave it in the space. It looks as though the feature is depending on OneDrive to work, as you’ll see a message showing you the total space used in your OneDrive account. Microsoft even will prompt you to scan a QR code to download Edge on mobile, too.
Overall, this can prove to be a useful feature for storing PDFs you might want to see across devices. It even can replace Sticky Notes for some people, which can already be accessed via the Outlook.com experience. We’re hoping that this feature is one that eventually rolls out to everyone, but for now, it is best to hold your breath. Not all features seen in Edge Canary make it down to the final, stable version of Edge.
Windows 11 features a Video Editor in the Photos app that functions similar to the Windows Movie Maker. The Windows integrated video editor can be used to edit and trim videos and create slideshows, clips, and movies.
The Windows integrated video editor exists as a part of the Photos app and can be accessed either through the Photos app or directly using the search bar.
One of the many features of the Windows integrated video editor is its ability to automatically create videos from your photos. You can also edit or create new videos manually by using the available tools in the app.
The problem with the custom audio in the video editor may be linked to your windows audio service, in which case restarting the audio service should fix the problem. If you’ve had any of these issues with your Windows Video Editor, here are some recommended steps to fix them. But first, let’s look more closely into the Photos app.
Is Microsoft’s video editor any good in Windows 11?
The Photos app’s inbuilt video editor features various video-making and editing tools such as motion, effects, music, graphics, and text.
The video editor follows the movie maker and offers easier ways to create and edit videos and images. The Windows video editor allows users to add audio to their videos either by selecting from the music provided by the video editor or by adding custom music or audio.
How do I use custom audio in Windows video editor?
Open the Photos app.
Open the Video Editor.
Click on New video projectto start creating or editing a new video.
Click on Add and select new video from this PC.
Add your project to the storyboard.
Click on the top right-hand corner icon and select custom audio.
Select add audio file.
Select the audio of your choice and adjust it as required to suit your video.
Click done to add the audio to your video.
Quick Tip:
You can use the integrated video editor on Windows 11 for basic editing, but you have to upgrade to professional software for better quality.
Adobe Premiere Pro has cutting-edge film editing tools that will improve your videos. Plus, there are skilled audio features for a smooth sound without errors.
From the playback section, right-click on your audio device.
Select properties.
Go to the advanced tab.
Uncheck allow applications to take exclusive control of this device.
Apply changes.
Windows Video Editor custom audio not playing
The Digital Theatre System (DTS) is another audio output provided by the Windows utility. Although the DTS is useful for certain projects, it may be the reason why custom audio is not responding or playing in the Windows Video Editor.
Turning off this service is a sure way to fix the custom audio problem.
Windows Video Editor custom audio not extending
Restarting the Windows Audio Service works perfectly for the Windows Video Editor custom audio is not extending error. However, if you’re still experiencing the issue, you can convert the audio file from one version to another, switching one codec to another, e.g AAC to MP3.
Unable to trim/expand the custom audio file in video editor
Users have also experienced issues where the custom audio file (represented by a long bar) added to a project cannot be trimmed or expanded. Here, the bar simply won’t stretch, meaning that you can’t edit the custom audio for the video editing project.
In this case, the best solution is to change the format of the video file as the issue may result from the incompatibility of the video file format.
You can also turn off the exclusive mode from your computer’s sound settings to solve the audio problem with your video editor.
Which is the best video editing software for Windows 11?
The Windows operating system has a variety of video editing software that you can use, depending on your needs and the features they offer. One of the best video editing software for Windows 11 is Adobe Premiere Pro.
Its user interface and creative features set the software at the top of the list of video editing software for Windows. Other software for video editing in Windows 11 includes the Davinci Resolve, Shotcut, Light Works, VSDC video editor, Open Shot, etc.
Finally, if you’re having issues exporting videos with the Photos app, here are three step-by-step fixes.
Thank you for reading this piece! Your comments are welcome in the section below.
Google Drive and YouTube are both great platforms to store and share videos. The former is relatively intimate when compared to the latter. However, on both these platforms, several users reported encountering We’re processing this video. please check back later error.
This is the case when you try to access a video uploaded on either of these platforms, and there are a bunch of factors behind it. The problem could have to do with the Internet speed or the platform’s server, amongst other factors.
But, as is the case with other issues, We’re processing this video. please check back later error too is easily fixable with some quick methods.
How long does a video take to process on Google Drive?
There is no definite answer to this question. It is very similar to asking how long it would take to reach from one place to another. There are several factors involved and if all these play out in our favor, we could come up with a figure, but that too would be an approximate one.
For instance, processing a 50MB video should take around 2-5 minutes while a 1 GB video would take, on average, 10-15 minutes. Processing a bunch of large videos could take hours. This gives you a fair idea of how long We’re processing this video. please check back later error would be present.
But again, it’s not definite. Google Drive makes several changes to the video before uploading and processing in order to make it accessible across devices. And if there are a lot of changes to be made over a poor connection, you might witness a higher processing time.
Another critical factor here is your device’s performance. If the one you are using to access Google Drive is all hogged up, it will take a longer time. So, make sure to boost your computer’s performance in order to reduce the video processing time on Google Drive.
This should provide you with a basic idea of the video processing time on Google Drive. Not, let’s see the most effective solutions for We’re processing this video. please check back later error.
How do you fix We’re processing this video. Please check back later?
NOTE
All the browser-related fixes listed below would be for Google Chrome and should provide you with a basic understanding of the concept. In case you have a different browser, check its official website for the exact steps.
1. On Google Drive
1.1 Re-login to your Google Account
Click on your Profile icon near the top-right corner, and then click on the Sign out button.
After you have logged out, re-enter your login credentials to sign back in.
After you have logged back into Google Drive, check if you can access the video that earlier showed the We’re processing this video. please check back later error.
1.2 Clear browser cache and cookies
Press Ctrl + H to launch the History section in your browser.
Next, click on the Clear browsing data option on the left.
Now, select the desired option from the Time range dropdown menu, untick the option for Browsing history, and then click on Clear data at the bottom.
After the data is cleared, restart the browser for the changes to come into effect.
In most cases, We’re processing this video. please check back later error should now be eliminated, if it was caused by a corrupt browser cache.
1.3 Download the video
Right-click on the video throwing the error, and select the Get link option from the context menu.
Now, click on the Copy link button, choose the required sharing settings from the dropdown menu, and click on Done.
Paste the link you copied in a new tab, and click on the Download icon at the top-right to get the video.
If you are trying to view the video that is throwing the We’re processing this video. please check back later error, a simple workaround would be to download it. Also, with the right sharing settings in place, others can download it too even if it’s not completely processed by Google Drive.
If these three methods didn’t work, you can use reliable video compression software, and once the size of the video is reduced, it should get quickly processed on Google Drive.
The size of the video is one of the three critical factors that affect the processing time, the other two being Internet speed, and the performance of the device.
So, from now on, you should be able to eliminate the We’re processing this video. please check back later error, and if not, at least be able to view the video.
Click on the ellipsis near the top-right, hover the cursor over Help, and select About Google Chrome from the flyout menu.
Now, if an update is available for the browser, it will automatically be downloaded.
Once the browser is updated, click on the Relaunch button for the changes to come into effect.
2.2 Use a reliable VPN
If you are using a VPN, it could be the reason behind encountering the We’re processing this video. Please check back later error. You can verify that by uninstalling it, and then getting a reliable and effective VPN.
Several VPNs are known to throttle the Internet speed which is one of the likely reasons behind the issue. Switch to a VPN that helps maintain optimal Internet speed while changing servers, to eliminate the error.
If you’re not sure where to begin your search for a trustworthy open-source VPN provider, we recommend Private Internet Access (PIA).
It is designed to fit into the award-winning VPN service since it employs the WireGuard tunnel protocol and is completely open-source.
You can set up a WireGuard tunnel to connect automatically at startup, opening a port and forwarding it to transmission, for a steady and fast connection.
2.3 Disable upload-related browser extensions
Click on the Extensions icon in the browser’s toolbar and select Manage extensions.
Now, click on the Remove button under the upload-related extension.
Again, click Remove in the confirmation prompt that pops up.
If any of the extensions added to the browser deal with uploads, it’s time you remove these to fix the We’re processing this video. please check back later error on YouTube. Some of these are known to conflict with the upload process on YouTube, and it’s best to disable all similar ones.
How do I speed up Google Drive processing?
Click on the ellipsis near the top-right corner, and select Settings from the menu.
Next, click on the Advanced option to view the tabs under it.
Select the System tab.
Make sure that the Use hardware acceleration when available option is enabled. If not, click on the toggle to do that.
This is one of the simplest, amongst the many, ways to speed up the Google Drive processing. Apart from this, you can try the methods listed earlier, for instance, compressing the video, removing conflicting extensions, or clearing the browser cache.
These are all the ways you can fix We’re processing this video. lease check back later error while accessing recently uploaded videos on Google Drive and YouTube.
Also, do not hesitate to find out the best Google Drive alternatives with low processing time to quickly and safely back up your data.
Do not forget to tell us which fix worked and the platform you were facing the issue on, in the comments section below.
Are you failing to link your Bethesda account to Steam? If so, you aren’t alone because many other people are experiencing this issue and cannot connect their Bethesda accounts to Steam.
Fortunately, this guide will help you fix the Bethesda account not linking to the Steam issue.
Bethesda is a big name in the gaming industry and is an American video game publisher. It is known for publishing multiple triple-A gaming titles, including Fallout and The Elder Scrolls series.
However, the Bethesda game launcher is not the best, and users have reported multiple issues. For instance, the Bethesda account not linking to Steam is one of the most common problems users have faced for quite a while.
Linking your Bethesda account with Steam is excellent for cross-platform play. But connecting your Bethesda account to Steam is crucial for cross-platform playing between the two clients.
This guide will provide you with some solutions that will help you fix the Bethesda account not linking to the Steam issue. So let us check it out.
How can I fix the Bethesda account not linking to the Steam error?
If you have followed the above steps carefully and tried to connect your Steam account to Bethesda, you are getting an error message saying Account linking failed. Please retry or contact Customer Support. Then you might have the Steam Client already installed on your PC.
You might have installed the Steam Client and have played a Bethesda game before, such as Doom Eternal. Steam must have automatically linked itself to the Bethesda account in such a case. And if the Steam account isn’t the correct one, you will face issues connecting the Bethesda account to Steam.
What can you do in such a scenario? To get around this, you need to unlink any current Steam account linked to your Bethesda account. You can also contact customer support to remove any automatic linkage.
Alternatively, you can also follow the below procedure to unlink your Steam account from your Bethesda account.
After successfully logging in to Bethesda, under Account Settings, select Linked Accounts.
On the next page, you will see all of your linked accounts.
If you see a trash icon next to the Steam account, click on it.
You will be prompted to answer a security question.
Once you enter the correct answer, the Steam account will be unlinked from Bethesda account.
If you do not see a trash icon next to the Steam account, you need to raise a ticket to customer support to remove your Steam account from Bethesda.
You can submit a ticket here by providing the below information:
What is the Steam Username / ID that you linked?
What is the Bethesda.net account ID that you linked?
An important point to note here is that not all accounts are eligible to unlink Steam accounts. However, it’s worth trying to follow the above method to unlink the Steam accounts from Bethesda.
Once you have successfully unlinked your Steam account from Bethesda, all you need to do is link it back again. For that, you can follow the steps mentioned in the next section.
After successfully logging in to Bethesda, under Account Settings, select Linked Accounts.
Click the Plus (+) sign inside an empty box and select Steam from the menu.
Now, log in to your Steam account.
Confirm the Bestheda and Steam linking.
Once linked, you will see the Steam logo in the Linked Accounts section.
There are options to link other accounts, such as Twitch, Facebook, Xbox Live, PlayStation, and Amazon. Once you link your Bestheda account with Steam or any of the accounts mentioned earlier, you can access promotional discounts from these accounts on any of the Bethesda games.
Besides, to link another account, you need to head over to the Linked Accounts page, click on the Plus (+) button, and click on Add a Platform, Social Media, or Game Account.
After successfully logging in to Bethesda, under Account Settings, select Linked Accounts.
Click the Plus (+) sign inside an empty box and select Steam from the menu.
Now, log in to your Steam account.
Confirm the Bethesda and Steam linking.
Once linked, you will see the Steam logo in the Linked Accounts section.
Go back to your Account Settings and select Transfer Library.
Now on the right side, you will be displayed plenty of information on what will be moved and what will not be moved.
Here, under the Transfer, Your Games section, click on the green START STEAM TRANSFER button.
Next, you will be asked to confirm the transfer. Press YES, TRANSFER TO THIS ACCOUNT button.
You will see a TRANSFER IN PROGRESS page.
After the process completes, you will see all games visible in your Steam account.
Below we have mentioned some burning questions you might have while making up your mind to transfer your Bethesda games to Steam.
➡ Do save files and progress transfer?
The answer to this is yes. However, you may want to check out this page to get information about specific games. For example, some games may automatically transfer save files and progressions, whereas some may require different processes.
➡Are the games still playable on Bethesda?
Unfortunately, no. Once you have completed the transfer process, you won’t be able to access the games on the Bethesda launcher. Because the transfer process completely copies all information and deletes the game from Bethesda’s database.
Let us know if the above solution helped resolve the Bethesda account not linking to the Steam problem. You can also share any other solution that fixed the situation at your end.
Google Drive is a file storage service provided by the tech giant Google that allows people to save on the company’s cloud. Drive also synchronizes those files across various devices for both Windows and macOS.
You can upload a document onto your PC and then grab it on your iPhone or Android tablet. In addition, Drive incorporates other apps like Docs, Sheets, and Slides, which are all a part of Google’s office suite.
These apps allow for collaboration among many. A big group can edit documents, spreadsheets, presentations, drawings, etc. Google Drive has effectively revolutionized work collaboration.
It isn’t easy to imagine a world without it. Seeing Google Drive crash before you while working on a project is a gut-wrenching feeling.
This resource guide won’t go through how to fix Google Drive but rather share 20 facts about the service that you didn’t know.
Does Google Drive have analytics?
Google does have analytics for its Drive service, but it’s only for your account. A lot of the information and the fact that you will see come from a wide variety of sources.
Google rarely publishes information and analytics on its services; it prefers to keep them under wraps. It’s unknown why they don’t share everything about the website. It may have to do with some business concern.
Whatever the case may be, the information is scattered. Everything had to be collected from news articles discussing previous Google events, while some came from the tech giant.
Although sheepish with numbers and data, Google has been kind enough to loosen its grip on certain aspects. As a result, all you have is information on your side of things; analytics for your Google Drive account.
You may be asking yourself, “how do I track user activity on Google Drive?” Google has provided many tools to its users so people can track information.
If you’re the administrator of a Google Drive account, you can utilize the audit and investigation page to search for information connected to specific log events. For example, you can see what other people in your business/organization are doing in Drive.
The log events include whatever people create in Docs, Sheets, or other Drive apps, plus whatever is uploaded to the account. There’s also the Activity API for developers.
The Activity API allows apps to obtain information about a group’s Google Drive activity. It displays information on user activity and file changes. There’s also an option for a browser extension.
It’s called Drive Insights, and it was created by a third-party developer known as Clasefi. You can download it from the Google Workspace Marketplace, where you can get other Drive-specific apps.
With Drive Insights, you can see data about the files stored on your Google Drive. It’s displayed in an easy-to-understand user interface. For example, you’ll see how much is stored, recent activity, and the collaborators who have access.
And then there’s Google’s own Analytics web page. Typically, it just provides you information on your website, but Zapier has a way to connect Analytics to Drive so you can send data between the two.
It’s a convenient way to see data without downloading an extra app or extension.
20 mind-blowing Google Drive statistics and facts
1. One billion users as of 2018
In 2018, Google announced that it had reached a billion users during the Google Cloud Next conference in San Francisco. However, the company hasn’t said how many users it has currently.
However, the number as of this writing is, in no doubt, much higher. It’s probably nowhere near two billion, though. So it may be a while until Drive reaches that benchmark.
2. It hosts over two trillion files
Around the same time that Google announced that Drive had a billion users, it also told that it had over two trillion files in its databases. This includes things like text documents, images, and videos.
This far exceeds what rivals like Microsoft and Apple have. Other services like Dropbox and iCloud come pretty close, but neither overtakes Drive.
3. One Google doc can hold 1.02 million characters
4. 31,255 companies use Google Drive
This data comes from Enlyft, a software developer who collects information on other companies’ behalf. It helps B2B sales and marketing teams seek out new customers.
Some of the companies include Finn Partners, Inc and Zendeck Inc, having revenue of around a billion dollars a year.
5. Google Drive takes up 36.81 percent of the file-hosting industry
Google, without a doubt. Takes up a portion of the file hosting service industry. According to Enlyft again, the next biggest is Dropbox with 25.78 percent, then Microsoft OneDrive at 14.08 percent.
Last place is WebDrive at 7.33 percent, and then it’s everything else in the industry.
Credit: Lukas Blazek/Unsplash
6. American companies take up 23,588 out of the total 31,255
This means that 76 percent of Google Drive users are in the United States. Followed by the 1,809 United Kingdom users, who make up 6 percent. From there, it just goes down.
Canada is third, followed by India, Australia, France, Germany, the Netherlands, Spain, and Italy.
7. The maximum size a Google Docs page can be is 50 MB
8. Google Drive has around 800 million monthly active users
This information comes from an old Google Cloud Next event that the company held back in 2017. It was part of a more prominent announcement to make Google Workspace (then G Suite) more competitive against similar services.
9. Google Drive has over five billion downloads
This information comes from the official Google Drive page on the Google Play Store. It effectively retains most of its users, making it one of Google’s top products.
10. One Google Sheet can hold 10 million cells
Holding 10 million cells is a recent update. Google added this feature on March 14, 2022. The company states it did this further to help users with their data on a bigger scale.
Google has been slowly increasing the Sheets limit over the years. Back in 2019, it grew to five million, up from two million. This makes Sheets bigger than Microsoft Excel.
11. One Google Sheet can hold 18,278 individual columns at once; the final column is titled ZZZ
As a result of the cell increase, Google added more columns to house everything. The final column at the far end of Sheets is now ZZZ.
Credit: PhotoMIX-Company/Pixabay
12. One Google Slide presentation can hold 100 MB of data
13. Six million businesses pay for Google Drive
Google Drive is a part of the Google Workspace collection (formerly known as G Suite). It’s a bunch of productivity apps that include Google Drive, among others. What’s unique about this version of Drive is that it expands its storage.
The free version of Google Drive offers 15 GB of storage. The paid version of Google Drive offers an unlimited amount of space and access to Vault for Drive so you can manage users and files.
The pricing for businesses varies, but other plans have a set price. Those plans still offer a considerable amount of space, such as five terabytes worth of storage.
14. Google Drive supports over 50 different file formats
Looking at the Google Drive Help page, the service supports various formats. You have the shared DOC and JPEG files, but Drive also supports WebM and SVG (scalable vector graphics) formats.
Apple-specific files are limited to a few editor files, but hopefully, this gets expanded.
15. Many third-party apps work with Google Drive
Back in 2013, Google released the Google Drive Realtime API. To make it simple, it’s a way for developers to incorporate Google Drive into their apps.
The API handles storage, communication between users, and other essential app features. It’s unknown just how many apps work with Drive because of this API. Unfortunately, there are so many out there that it’s impossible to count them all.
But rest assured, Google Drive compatibility is more common than not.
16. some countries block Google Drive
Google Workspace is banned in various countries, to be precise. It’s unknown just how many blocks Workspace, but the tech giant does provide a shortlist.
According to Google, the countries that block Workspace include Crimea, Iran, Syria, and the Donetsk People’s Republic.
Credit: Tima Miroshnichenko/ Pexels
17. Google Drive helped Alphabet earn $10 billion
Alphabet is Google’s parent company, and they reported back in late 2020 that its Cloud services raked in $10 billion. So, of course, Google Drive is included in that entire package.
2021 saw less money rolling in, but it’s still a massive amount. In 2021, Google Cloud brought in $5 billion; again, Drive is a part of that.
Google Drive will actively scan your files to ensure they’re not infected with malware or some phishing scam. You can control what other people see, and it uses reCAPTCHA to protect against fraud.
19. Google Drive has a 99.9 percent uptime reliability
In an old Google for Work Help page, the company states it makes sure its services have a 99.9 percent availability with no scheduled downtime. That means Google Drive is rarely unavailable.
The last time Google Drive was down was back in December 2020.
20. Google Drive has been around for over 10 years
And the last shocking fact is that Google Drive has been around for a little over a decade. The original version launched on April 24, 2012, and has gone through many changes.
New features keep getting added, and Google always makes it easier to access Drive’s files. For example, in 2021, Drive for desktop was replaced with Backup and Sync to make it easy to grab files from any device.
Photo and video management have been made more straightforward over the years. And just recently, Google made it possible to move files with special keyboard shortcuts.
What are the benefits of Google Drive?
As briefly alluded to earlier, the main benefit of Google Drive is just how useful it is. It has an easy-to-use interface that clicks for many people, for starters.
Creating a new document is straightforward, and you have a great navigation bar on the left-hand side. Plus, the service is compatible with lots of different services and apps.
For example, it works perfectly with all of the apps on Microsoft Office. However, you may run into syncing problems sometimes with Drive. Fortunately, fixing syncing problems on Drive is also super easy to do.
A common problem with the Drive desktop app is that it can clash with your computer’s firewall program. You’ll have to turn it off or give the Drive app permissions to work. If all else fails, use the browser version.
Also, Drive on Windows 10 and 11 are identical to each other, so you won’t have to worry about a big difference, at least for now. Google might add Windows 11-specific changes, but that’s unlikely.
Another boon to Google Drive is that you can access files and documents from anywhere on any device. So as quickly as you can sign in to Drive, you can grab whatever you got on there.
This level of access is great, but you must make sure your security is top-notch. Luckily, Google has tons of tools at your disposal to protect yourself. For example, you can scan Google Drive for viruses, and it’s highly recommended that you do so.
Windows Security has a feature just for that. Google may also block email attachments from infecting your Drive account. This is a great feature but can be annoying when you know the attachment is safe.
Feel free to leave a comment below if you have any questions on other Windows 11 apps or if you have some that you recommend. Also, feel free to leave comments about guides that you’d like to see or information on other Windows 11 features.
Bethesda has had its own unique launcher for a while now where you can play all of their popular games. It’s a handy way to keep some of your favorite games under one location.
However, there have been issues in the past concerning the Bethesda launcher. Unfortunately for fans, it’s one among many other problems plaguing the game studio.
What are the problems with the Bethesda launcher?
There are a wide variety of problems plaguing the Bethesda launcher, but just to give an example, people have dealt with the app not loading or updating.
Some of our readers have also complained about the launcher appearing as a white screen.
This guide will show you how to fix the seven most common problems plaguing the Bethesda launcher.
What can I do if the Bethesda launcher is not working?
1. Bethesda launcher stuck loading – Task Manager
Open the Search bar and search for the Task Manager, then click on the app from the results.
Under the Processes tab, right-click Bethesda.net Launcher and select End Task.
Hover over the Bethesda.net Launcher and right-click it.
Select Properties.
In the Properties window, click the Compatibility tab.
Check the box next to Run this program as an administrator.
Click Apply then OK to save these changes.
Closing the service and opening the Bethesda app as an administrator can fix the launcher problem so it’s the first thing to try.
2. Bethesda launcher stuck loading – Drivers
Bring up the Search bar by clicking on the magnifying glass icon.
Search for the Device Manager and click on the entry that appears.
Click on the Display adapters to expand its category.
Right-click the graphics card and select Update driver.
In the new pop-up window, select Search automatically for drivers.
Your computer will begin to search for any missing drivers and update instantly.
If the best drivers are already installed, a new window will appear telling you so.
Open the Bethesda Launcher and see if the issue has been resolved.
Updating your drivers will fix the problem most of the time. If nothing else works, default to updating drivers.
Driver updates make the routes used by the Graphics Card perform their functions quicker by reducing needless operations or better dividing the workload.
It is essential that you use the most recent versions of your drivers. If you find this procedure complicated and time-consuming, there are third-party tools that can do it for you automatically.
Outbyte Driver Updater, which has a large database of drivers for all types of PCs, is one of the best tools our software experts tested for finding and replacing old graphic card drivers. Try it out and do let us know if it found your missing drivers.
6. Bethesda launcher is not connecting to the Internet
Click on the magnifying glass icon and search for Windows Defender Firewall.
Click the entry that appears. Make sure it’s not the Advanced Security version.
In the Defender Firewall, select Allow an app or feature through Windows Defender Firewall.
Select Change settings in the upper right corner.
Then click the Allow another app button.
In the small window that appears, select Browse.
Locate where the Bethesda Launcher sits on your computer and click Open.
Select Add to give the Bethesda launcher Firewall permissions.
Click OK at the bottom of the Firewall to save the changes.
If the launcher isn’t connecting to the Internet, this solution helps you add it as an exception to Windows Firewall.
7. Bethesda launcher not opening
Open the Bethesda launcher and go to the problematic game.
Click on Game Options.
Select Scan and Repair.
Give the launcher time to finish validating. Afterwards, you’ll see a message appear at the top when it’s finished.
If the launcher itself is having problems with opening, you can either run the app as an administrator, run it in compatibility mode, or reinstall it.
However, if you run into a problem with a particular game not launching, you’ll need to verify it just as you see in our solution above.
Are there other game fixes or tips that I should be aware about?
You may be interested in learning about games that you can play right now without a single download. Games like Forge of Empires and Slither.io are all browser-based, so that’ll save valuable space.
Feel free to leave a comment below if you have any questions about other gaming apps. Also, leave comments about reviews that you’d like to see or information on anything video game-related.
Morgen simplifies demanding schedules, time-blocking to get work done, and facilitates booking time with others.
You will ask why it’s important to have a separate calendar app when you already have one in Windows.
Because this is not just your average calendar. In fact, this is a calendar that consolidates all calendars and comes with powerful scheduling tools that will immensely boost your productivity.
That’s why we tested the Morgen calendar app and here we’re going to talk about its best features and how to set it up for Windows PCs.
How can Morgen help me organize my schedule?
Morgen calls their product the Superhuman of personal time management, and that’s because it performs most of the tasks of a real personal assistant, except for the calls, of course.
First of all, it integrates personal and professional calendars including Google Calendar, iCloud, Office 365, Exchange, and a lot more.
It then integrates tasks from major productivity platforms including Todoist, Google Tasks, Microsoft ToDo, Outlook, and others.
Morgen streamlines scheduling right in the calendar app, making it easy to book time with others and avoiding conflicting commitments from both your personal and professional calendars.
What are Morgen’s best features?
1. Clean, slick, and fast UX
Calendars are only helpful if they are clear, comprehensive, and easy to read at a glance, otherwise, they will confuse rather than help.
And Morgen’s interface is right on the spot because at any moment, you can clearly see your schedule on a single page, without any glitter or special effects.
You can also select and change your view at any time, be it seeing all calendars consolidated or viewing a subset.
Of course, it’s possible to color-code every type of task, meeting, list, and whatnot to differentiate them easily.
2. Task management integration
Few calendars available to Microsoft users offer as many task management integrations as Morgen.
You can add all your to-do lists and tasks from Todoist, Google Tasks, Microsoft To Do and Outlook, and they promise to add more soon.
And connecting to all these services is simply a matter of signing into the third-party app accounts and granting Morgen data permissions.
After that, all will be imported right into your calendar to plan, schedule, and block time for getting tasks done.
3. Video conferencing connectivity
Include meeting rooms for all your virtual meetings right in Morgen. When you integrate your Zoom, Teams, and/or Google Meet accounts, you can create a new dynamic room for each meeting you book. Or set a static virtual room to be used when others book meetings with you.
Morgen makes it easy to launch virtual meetings right from your calendar, even prompting with a Join button as a meeting approaches.
We haven’t seen too many calendars with this feature and Morgen does it seamlessly. You can also set a static virtual room to be used when others book meetings with you.
4. Streamlined scheduling
Gone are the days of lengthy back-and-forth coordinating meeting times. Morgen facilitates scheduling in 2 ways, using a scheduling link or a personal booking page.
A scheduling link is a great tool for sharing availabilities for a specific meeting. Just mark your availability in your calendar, share the link, and others can choose when works best for them.
Once they select one of your suggested times, an invite is sent. Alternatively, you can set up your personal booking page to share your availabilities broadly for anyone to book.
Create your personal booking page by simply sharing available times, setting constraints such as meeting length and buffer time, and adding an optional message. You can then share your booking page URL or embed it on your website.
People can then book time with you in one of your available slots and that’s it. The meeting will immediately show up on your calendar.
In the next window, click the Download .exe button to get the Windows 10 & 11 compatible version. As you can see, there are also versions for Linux and Mac available.
Download the installer and initiate the setup process. First, type in your email address and verify it by entering a code they send.
The next step is to link your calendars from Google, Office, Exchange or Outlook, iCloud and more. Don’t worry, you can add more from the app itself later.
Now, select the task managers you use and of course, you can add more later.
The next step is all about choosing a video conferencing service. You can do that later as well.
Next, select your time zone, a regional format, and the first day of the week.
And that’s it, as we opted for the free trial, we’ve got 14 days to test it, more than enough to see if it meets our requirements.
As we’ve mentioned before, you can tweak all the settings and add more integrations just by clicking the Plus sign.
From the Settings menu, you can add accounts and integrations, create virtual rooms, change your profile data, and a lot more.
As you can see, it’s really simple to install and set up Morgen and after that, the menus are all straightforward on a clean and modern interface.
We also love that Morgen consolidates calendars across platforms. For the Windows/iPhone users, integrating with iCal is a huge plus. What’s more, Morgen’s iPhone app is in development.
Morgen’s calendar synchronization is in real-time. When you update your calendar, be it in Morgen directly or in one of your integrated calendars, it will immediately synchronize across calendars.
When it comes to bookings, Morgen goes beyond scheduling tools like Calendly to give you options for how you schedule meetings.
Create personalized scheduling links to send to individuals for specific meetings or create a personal booking page to share your availabilities broadly.
However, the best thing about it is that you can test Morgen for 14 days before committing to any license so don’t take our word for it, just try it!
Unmatched third-party integrations of task management tools
Compatible with Windows, Mac, and Linux
Video conferencing connectivity right from the calendar
Realtime calendar synchronization
Cons
A white-labeled booking page is not available in the free trial
The free plan allows you to synch only one calendar account
Final notes
We were definitely impressed with this tool on all levels and most of all because it removes the clutter from the daily scheduling and task management.
The setup procedure, after you install the tool, is simply excellent because it guides you through the whole process.
As we’ve learned from the developer, Morgen is constantly evolving, adding new integrations, and the Android and iPhone apps are already in development.
While we’re on the subject of organizing, you might also be interested in our selection of the best weekly planner software.
Have you already tried Morgen? Tell us all about your experience in the comments section below.