If you find that SharePoint keeps asking you for your password whenever you try to use it, you are not the only one encountering this issue.
Many users with different configurations have complained that they can’t access their Sharepoint documents normally because of password requirements. This process should usually happen only when you first log into your software.
Because this issue can make you lose precious time, we will look at the best methods to try when dealing with this issue in today’s article.
What can I do to stop Sharepoint from asking for password at every log-in?
1. Add the website to your Local Intranet Zone
Open Internet Explorer.
Click on the Cogwheel button found in the top-right side of your screen -> select Internet Options.
Inside the Security tab -> select Local Intranet -> Sites -> Advanced.
Copy-paste the URL of your SharePoint site -> click Add.
Uncheck the Require server verification (https:) for all sites in this zone box -> click Close.
2. Add SharePoint to Trusted Sites
Open Internet Options again.
Click on the Security tab -> navigate to Trusted Sites -> Sites.
Copy-paste the URL of your SharePoint site -> click Add.
Un-tick the box next to the option Require server verification (https:) for all sites in this zone -> click the Closebutton.
Click the Custom Levelbutton -> scroll down.
Under User Authentication -> Logon -> choose the Automatic logon with current user name and passwordoption -> click Ok.
Press Win+R keys on your keyboard to open the Run dialog.
Type control keymgr.dll -> press Enter.
Select Windows Credentials -> click the option Add a generic credential.
Copy-paste your SharePoint site URL, login, and also password.
Click Ok and restart your PC.
4. Create a new registry entry
Note: In the case that you don’t feel comfortable editing registry values, it is recommended that you don’t try this step. Getting any step wrong when using this method could cause your PC to become un-operatable. Please follow this method at your own risk.
Press Win+R keys on your keyboard to open the Run dialog.
Type regedit -> press Enter.
Inside the Registry Editor window -> navigate to the following location by using the right-side menu: HKEY_LOCAL_MACHINE\SYSTEM\CurrentControlSet\Services\WebClient\Parameters
Click on the Parameters subkey -> select Edit.
Click New -> choose Multi-String Value.
Type AuthForwardServerList -> press Enter.
Right-click the value you just created -> click on Modify.
Inside the Value data box -> add the URL for your Sharepoint website -> click Ok.
Exit Registry Editor and check to see if the issue persists.
In today’s article, we explored some of the best methods to deal with Sharepoint keep asking for a password issue. This isn’t the only password issue you can encounter, and many reported that the Windows command line generates random password, but we covered that in a separate guide.
Please let us know if any of these methods helped you log into your Sharepoint account without any trouble. You can do so in the comment section below this article.
If you see the error Your printer failed to join the wireless network, you are not the only one. A good number of HP printer users have reported encountering the same error.
This issue can become extremely annoying over time, as the entire purpose of investing in a wireless printer is to use it without any cables.
Hi, I cannot remember since I had to use the cable to print and why. The fact is that I was determined to repair the wireless connection on the printer now as I wanted to join the ink cartridges monthly plan and I cannot do it as I am unable to connect wireless. Please help me. I really like to use my printer wireless.
If your printer cannot connect to a wireless network, you cannot subscribe to the HP Instant Ink plan which allows you to print.
Please follow each potential method described in this guide until you come across a fix that manages to fix the issue. Read on to find out how to do it.
What to do if your printer failed to join Wi-Fi network?
1. Restart your PC, printer, and router
Restarting all your devices will allow you to make sure the error is not caused by a conflict that happened while the printer was being set up.
If this method doesn’t solve the above error message, please try the next methods.
2. Disconnect and reconnect all your devices
Disconnect the power cord of the router.
Turn off the printer.
Close and save all running software on your PC -> shut down the computer.
Reconnect your router’s power cord and wait for the green light indicating that your Wi-fi network is online.
Turn on your printer.
Turn on your PC.
Try to see if this method solves your issue. If it didn’t, please try the next solution.
3. Completely uninstall and reinstall your HP printer driver and software
To uninstall:
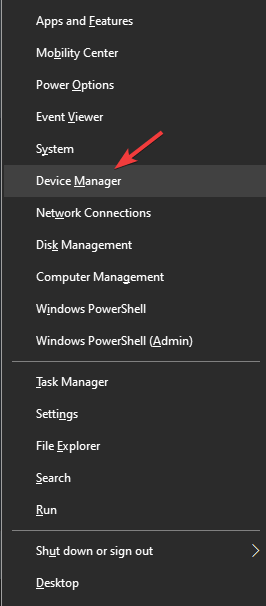
Press Win+X keys on your keyboard -> choose Device Manager.
Inside the Device Manager window -> select your printer device.
Right-click on it -> select Properties.
Inside the Driver tab -> click on Uninstall and follow the on-screen instructions.
To reinstall:
Press Win+X keys on your keyboard -> select Device Manager.
Inside the Device Manager window -> select your printer device.
Right-click on it -> select Update driver -> Search automatically for the best driver online.
Wait for the process to complete, and follow the on-screen instructions to install the latest HP printer driver.
4. Use the HP Printer Diagnostic Tool
If all of the above methods fail to solve the error, your printer failed to join the wireless network. You can try another option: get help from the official HP support webpage.
To do so, you must navigate to this link and follow the on-screen instructions to identify the possible issues with your printer.
In today’s fix article, we explored the best methods to try when dealing with the error Your printer failed to join the wireless network.
Because you bought a wireless printer for a reason, we hope this guide helped you sort out this issue.
Please let us know if this article helped by using the comment section below.
Are you a software developer or programmer? Do you need a reliable Java bytecode interpreter? This article is especially for you.
In this piece, we’ll be looking into some of the most durable software that interprets Java bytecode.
Java is obviously one of the most important aspects of programming, as a good number of programs/apps are written in Java code. The instruction set that makes up Java is what is known as bytecode, which is a set of machine codes (typically in form of .class files) given to a JVM – Java virtual machine. Java virtual machines are colloquially termed Java bytecode interpreters.
As a programming function, getting reliable software that interprets Java bytecode is hard to come by. However, we have made some research and compiled for you a comprehensive list of the best Java bytecode interpreters in the market, specifically those compatible with the Windows operating system.
Read on, as we bring you a comprehensive outline of the top 5 software that interprets Java bytecode.
Top software that interprets Java bytecode
HotSpot
HotSpot, from Oracle, is the leading choice of most developers across the globe. And it tops our list of software that interprets Java bytecode.
The program, which is originally known as the Java HotSpot Performance Engine, is written in C++ and Assembly language. And it hosts cross-platform support for Windows, Mac, Linux and Solaris operating systems.
HotSpot hosts a powerful set of features, most notably the “adaptive optimization” and the “just-in-time compilation” functions.
Furthermore, HotSpot supports only instruction set architectures (ISAs) like x86-84, IA-32, ARMv7 VFP, SPARC (exclusive to Solari computers) and ARMv8. This ISA support system is generally the best you can get in the market.
Other notable features of HotSpot include Java bytecode interpreter, Dual virtual machine (Client and Server compiler), Tiered compiler, Java classloader, Garbage collectors, Runtime libraries, JVM flags, Cross-platform compatibility and many more.
HotSpot Java bytecode interpreter and the virtual machine is licensed under GNU’s General Public License (GPL). As such, it is available for free.
OpenJ9, from Eclipse Foundation IBM, is widely regarded as the closest competitor of HotSpot. And like HotSpot, it is also a versatile Java bytecode interpreter and Java virtual machine.
The software is compatible with all major computer operating systems, notably Windows, AIX, macOS, Linux, and lots more. There is dedicated support – inbuilt OpenJDK binary – for the 3 prominent computer OS i.e. Windows, Linux, and macOS.
This software interpreter offers an optimized setup, which is adequately equipped to, not only interpret java bytecode but also buffs up the overall performance of your Java program.
Furthermore, the software offers a customizable platform that allows you to build an OpenJDK yourself, provided you have the required expertise.
Other noteworthy features of OpenJ9 virtual machine/Java bytecode interpreter include memory footprint, swift startup, and runtime, extensive configuration, Eclipse OMR (embedded program), Just-in-time (JIT) & Ahead of time (AOT) compilers, Java dumps, system dumps, online resources and many more.
OpenJ9 is an open source application, which is being financed by donations from across the globe. Aptly put, OpenJ9 is available for free download.
JRockit is one of the most widely used Java virtual machines, and it stands out as one of the best software that interprets Java bytecode. The software, which was originally developed by Appeal Virtual Machine, is now owned and managed by Oracle.
It is supported on Windows and other notable operating systems. Also, the software is supported on only systems with the following ISAs: SPARC (for Solaris), x86-64 and x86.
JRockit is written in C and Java codes, and it serves as an all-round JVM – Java Virtual Machine – solution, which is aptly designed for high performance, monitoring, interpretation, and diagnosis of Java programs.
Furthermore, JRockit is optimized to guarantee the swift execution of Java apps. Other notable features of Oracle JRockit include Java bytecode interpretation, garbage collection, soft configuration, program analysis, the swift response time (in microseconds) and more.
JRockit became free software in 2011, shortly after it was acquired by Oracle. And you can now download it for free.
Squawk virtual machine is a prominent JVM, which is designed for building simple Java apps. It is a micro edition JVM, specially designed for simplicity, with little external interference.
Hence, it is best adapted for small devices and micro-embedded systems. The Java bytecode interpreter is cross-compatible with all prominent operating systems, basically Windows, Linux, and macOS.
Squawk, just like most Java bytecode interpreters/virtual machines, is written in low-grade programming languages like C++ and Assembly. However, the core aspects of the software are written in Java, which makes it a “meta-circular interpreter”.
Other key features of Squawk include low memory footprint, bytecode interpretation, a simplified interface, easy debugging, cross-platform support, simple integration, and more.
Squawk is licensed under the GNU’s General Public License (GPL), and it is available for free.
Apache Harmony, from Apache Software, is another popular software that interprets Java bytecode. Although the software’s development stopped in 2011, it still remains one of the best Java bytecode interpreters and virtual machines out there.
Apache Harmony is supported on Windows, Linux, and macOS. There is also mobile support for Android, which now runs basically on OpenJDK libraries, rather than as a full VM.
Harmony is written in C++ and Java. And prior to official retirement in 2011, the software was only about 2% short of completeness.
Consequently, the incomplete library resulted in the termination of certain Java programs like Vuze, Geronimo (from Apache) and ArgoUML.
Nevertheless, despite the abrupt termination and near-completeness, a number of apps are still supported on Harmony. These apps include JUnit, Tomcat, Apache Velocity, Apache Ant and many more.
Other features of Apache Harmony include Java bytecode interpreter, Class library, JIT compiler, Virtual machine core, Porting layer, Thread manager, Garbage collector and many more.
Apache Harmony was retired (its development was stopped) in November 2011. However, it is still available for download, albeit with no technical support or the likes.
In conclusion, Java bytecode interpreters are essential components in the development of Java programs. And to help inform your choice, we have reviewed five of the best Java bytecode interpreters in the market.
These Java bytecode interpreters have been selected and ranked based on their relative popularity and durability, compared to others.
I went to gamescom in Cologne, Germany, earlier this week to check out the latest games shipping later this Fall, and my first stop was the Xbox booth which was bigger than what I expected. There I got the chance to check out the Xbox Elite Controller Series 2, Project xCloud, as well as new Xbox Game Studios titles currently in the pipeline.
There wer definitely a lot of people at the Xbox booth when I visited it on Tuesday, and I didn’t have the time to try some upcoming games such as Wasteland 3, Bleeding Edge, or the new Battletoads. I chose to focus on Microsoft game franchises I’m quite familiar with: Gears of War, Halo, Age of Empires, and Minecraft. With Gears 5 releasing in early September, this is the first game I went hands on with, testing the new Horde mode on a high-end gaming PC.
Gears 5 Horde mode
Three years ago, Gears of War 4 marked a reboot of the Gears of War franchise, as this was also the first game in the series to be developed in-house by a brand new studio called The Coalition. The game was also one of the first Xbox Play Anywhere titles for Microsoft, shipping on both Xbox One and Windows 10 with support for cloud saves and cross-platform multiplayer.
Gears of War 4 was a very solid third-person shooter, but the absence of a Steam release probably prevented it to reach a much bigger audience. Fortunately, that won’t be the case with Gears 5 as the game will be available on Steam on day one, with cross-play support with the Xbox One and Windows 10 Microsoft Store versions.
So far, Microsoft hasn’t shared a lot of details about Gears 5, which is a bit surprising as it will go head-to-head with Borderlands 3 in September, a true heavy-hitter that has been hyped to death since its March 2019 announcement. Microsoft revealed Gears 5’s new Escape mode back at E3 2019, then there was multiplayer tech test in July, and the new Horde mode was available for testing for the first time at gamescom. We still don’t know much about the Campaign, except that it will support 3 players co-op and be the franchise’s biggest campaign to date.
If you already played Gears of War 4’s Horde mode, the Gears 5 version will feel instantly familiar. You’re still fighting wave of enemies with 4 teammates, earning money killing monsters you can spend on new weapons and fortifications. I went through the first 10 waves with four other players, and we had no trouble dispatching robots, Swarm creatures, and a new type of robot/swarm hybrid enemies.
The biggest change in Gears 5 Horde mode is that each character now has a passive and Ultimate ability. Kait Diaz, the lead character, has a unique Camouflage ability that makes her invisible for a brief amount of time. I also played with Emile from the newly announced Halo: Reach Character Pack, and the powerful Spartan’s Ultimate Ability is a dome shaped Shield that will temporarily protect you and your teammates from all bullets.
Gears 5 ran flawlessly on the gaming PCs available on the Xbox booth, and it looks like The Coalition has really mastered the Unreal Engine 4 that was already used for Gears of War 4. Just like its predecessor, Gears 5 also supports spatial sound technologies including Dolby Atmos and Microsoft’s own Windows Sonic platform, and this really helps to make the experience more immersive.
I’m not a big Horde mode fan myself, but the core Gears 5 gameplay felt really solid. I really liked the campaign in Gears of War 4, and I can’t wait to see if the Gears 5 campaign will live up to Gears fans’ high expectations.
Unfortunately, I’m afraid Microsoft chose the worst release date possible for Gears 5, as the game will ship three days before Borderlands 3, a game that was also present in full force at gamescom. I hope Gears 5’s Steam and Xbox Game Pass release will shake things up, but there’s still a high risk of the game being overshadowed by Gearbox’s much anticipated loot shooter in September.
Halo: Reach on PC
Microsoft announced earlier this year that Halo: The Master Chief Collection would finally be released on Windows, and the first game that will ship on PC is a remastered version of Halo: Reach. The “Tip of the Spear” level was the subject of the first PC Insider flight a couple of weeks ago, and this same level was playable at E3 2019 and gamescom.
As someone who finds Halo’s Master Chief character quite uncharismatic and dull, Halo: Reach, a prequel to Halo: Combat Evolved with no Master Chief is one of my favorite Halo games ever. Halo: Reach was also Bungie’s last Halo game that shipped on the Xbox 360 back in 2010, and it’s great that it will finally get the remaster treatment and join the Halo: MCC anthology on both PC and Xbox One.
The Halo: Reach remaster still has no release date on PC and console, but the PC build that I got to play at gamescom was solid. Playing Halo with a mouse and keyboard feels great and intuitive, and you’ll really need the increased precision to fight off challenging Covenant enemies. Halo: Reach is a bit more difficult than other Halo games as your character isn’t as resilient as Master Chief, especially since you need to use health packs to heal yourself when your shield goes down.
I’m really excited about this Halo: Reach remaster, though it seems that porting all Halo games to Windows is a much more ambitious project than expected. Microsoft has yet to announce a release date for Halo: Reach on PC and Xbox One, and I doubt we’ll see it this year. Worse, the console version has apparently being delayed as the developers are currently dealing with memory issues on Xbox One.
Still, I’m very enthusiastic about Halo: MCC finally coming to PC, as these classic shooters really deserve to be available on Windows. Halo remains one of Microsoft’s biggest game franchises to date, and the company is probably right to take its time to make it right. It took years for 343 Industries to fix the various issues that plagued the Xbox One version of Halo: MCC since launch, and Microsoft better not to the same mistake with the PC version.
Announced at E3, delivered at gamescom. Fans are getting their first look at Halo: The Master Chief Collection on PC. pic.twitter.com/0hibBa1JAh
I didn’t expect Age of Empires II Definitive Edition to be playable at gamescom, so this was a really nice surprise. Microsoft announced on Monday that the remaster will ship on Windows 10, Xbox Game Pass on Steam on November 14, and the company will also add Age of Empires: Definitive Edition to Xbox Game Pass on the same day.
As you may know, Age of Empires: DE didn’t really meet fans’ expectations when it was released on the Microsoft Store back in February 2018. The game was quite buggy at launch, and even after the release of several patches there are still some issues with pathfinding or the AI acting weirdly.
I hope Age of Empires II: DE won’t suffer from the same launch issues, but the PC build I played at gamescom looked really good. Age of Empires II was one of my favorite RTS games back in the day (my favorite remains Age of Mythology), introducing a lot more different civilizations to play, interesting campaigns, and various gameplay improvements. I felt right at home playing the short tutorial, and I was also quite impressed by all the details on this 4K screen.
I love the work Forgotten Empires has done on the graphics in general, and the remastered audio is also a very welcome addition. The Definitive Edition will include 4 new civilizations, a whole new campaign named The Last Khans, and it will also support crossplay between Windows 10 and the Steam version. Fingers crossed for it to be as good as what Age of Empires fans really deserve.
Minecraft Dungeons
The last Microsoft game I tried at the Xbox booth was Minecraft Dungeons, which seems to be Mojang’s take on Diablo III. I’m a big fan of the latter, though I have to admit I’m not really into Minecraft. But as it turns out, a Minecraft-themed dungeon crawler hack-and-slash game is probably what Microsoft needs to bring gamers like me into the Minecraft universe.
I just played the demo for five minutes, and it was a co-op session with someone from the Xbox booth who guided me through a procedurally-generated dungeon filled with monsters. Just like in Diablo, you can use short-range and long-range attacks, you can also roll to avoid traps and enemy attacks, and you’ll earn some loot by killing monsters and opening treasure chests.
There doesn’t seem to be any crafting, mining mechanisms, or class system in Minecraft Dungeons: this is just you and your friends fighting monsters and getting increasingly powerful loot in an artistically pixelated world. I feel like the game has a lot of potential, especially since it will be released on Windows 10, Xbox One, PlayStation 4, and Nintendo Switch. Minecraft Dungeons will also support 4-player local and online coop, and crossplay support in the cards between Windows 10 and Xbox One.
Minecraft Dungeons is expected to be released on Spring 2020, and it will be available on Xbox Game Pass on launch day. Overall, 2020 should be a great year for Minecraft with the upcoming release of Minecraft Earth on iOS and Android, Minecraft Dungeons on PC and consoles, as well as Ray Tracing support on Windows 10 and a new rendering engine for all Bedrock versions of Minecraft.
Microsoft has often received criticism about the quality of its first-party games during this console generation, but I feel like this is finally about to change. The fact that new first-party games are now shipping on Xbox Game Pass on day one really helps to put Xbox Game Studios in the spotlight, as does Microsoft finally embracing Steam. Microsoft still has several exciting new games in the pipeline including a new Flight Simulator, Halo Infinite, Age of Empires IV, as well as a rumored new Fable game developed by Forza Horizon developer Playground Games. I feel like Microsoft is finally back as an AAA game developer, and Gears 5 will be the first big test for me. Stay tuned for our full review of the game in early September.
The built-in Windows Photos app allows you to edit photos as well as play videos of multiple formats apart from viewing images. Sometime, the app may not work as it should and end up showing “try opening this file in another app” error when you try to edit a photo or play a video file. This is a common issue and has been reported multiple times in the Microsoft Community Forums.
I upgraded to windows 10 yesterday and all my videos were appearing normally in the photo app and playing fine, but today they aren’t.
It says “try opening this file in another app. We are having trouble reading it” The videos are .mp4, and were all working yesterday.
If you are also troubled by this error, here are a couple of troubleshooting tips to help you resolve this error in Windows 10.
How to Fix Try opening this file in another app
1. Run App Troubleshooter
Windows OS comes with a built-in Windows apps troubleshooter. It allows you to fix any issues with the built-in apps without taking any extra step.
Click on Start and select Settings.
Select Update and Security.
Click the Troubleshoot tab.
Scroll down and click on Windows Store apps.
Select Run the Troubleshooter button under “Windows Store Apps“.
Click Next and wait for the troubleshooter to scan and fix any issues with the apps. Click on Apply when prompted with a fix.
Now try to open the video file with the Photos app and check for any improvements.
If the issue persists, you may try resetting the app to factory default. This will remove any temporary issues with the Photos app.
Click on Start and select Settings.
Select on Apps.
Click on Apps and Features.
Search for the Photos app in the search bar.
Click on the Photos app and select Advanced Options.
Scroll down and click on the Terminate button.
Scroll down and click on the Reset button.
Click on Reset button once again when asked to confirm.
Reboot the computer. Try to play the video file and check if “try opening this file in another app” error is resolved.
3. Uninstall and Reinstall Photos App
If the issue persists, you can try to uninstall the Photos app using a PowerShell command.
Right-click on the Start button and select PowerShell (admin).
In the PowerShell window, type the following command and press enter to execute. get-appxpackage *Microsoft.Windows.Photos* | remove-appxpackage
You should see a “Deployment operation progress” message on the screen. If the message disappears, it means the Photos app has been uninstalled.
Restart the computer.
To install the Photos app again, open the Windows Store app.
Search for Photos and install it.
By following the steps in this article you can fix try opening this file in another app error in Windows 10. Do let us know which fix helped you resolve the error.
Some times while trying to access data from excel, sqlserver, and oracle to general visuals you may encounter Power bi datasource.errors. These errors can have multiple messages depending on the user’s situation. The two most common error messages are ” power bi data source.error access denied and power bi datasource.error web.contents failed to get contents from” as reported by the users in the Power Bi community forums.
Hi For Data Refresh, I installed PowerBI Personal and On Premises Gateway, for configuring Gateway when i am opeing Pwersonal BI Gateway it is showing “Access Denied Error” and is not allowing me to proceed. Any Idea?
If you are also troubled by this error, here are a couple of troubleshooting tips you can try to resolve the error.
Fix Power Bi datasource.errors
1. Power Bi data source.error access denied
Check for Power Bi Update
If you haven’t already tried, check the current version of your Power Bi desktop app. Check if a new version of the app is available for download.
Download and install the app if available. After installing the update check if the issue occurs again. Power Bi supposedly has released an update to fix the issue.
Create New Pbix File and Clear Permission
If the issue exists even after updating the Power Bi app, you may need to create a new Pbix file.
So, start with creating a new Pbix file. After that clear the Permission data source of SharePoint that you have used before.
To clear Permission data source, go to Edit > Queries.
Select Data Source Settings > Global Permissions.
Now find the Sharepoint source and click on Clear Permissions.
Relaunch Power Bi Dekstop app and check if the issue is resolved.
Reinstall Power Bi Desktop
If the issue persists, as a last resort you can try reinstalling Power Bi desktop to resolve the issue. Reinstalling the app has helped several users to resolve the error.
Press Windows Key + R to open Run.
Type control and click OK to open the Control Panel.
In the Control Panel, go to Programs > Programs and Features.
Select Power Bi Desktop app and click on Uninstall.
Reboot the systems.
Now download the latest version of Power Bi Dekstop from the official website.
Install the app and check if the datasource.errors access denied still occurs.
Many users have reported seeing the error message Windows has encountered a problem communicating with a device.
This issue can stop you from being able to install new devices on your PC, and also seems to affect devices that were already installed.
This can cause a lot of problems for you, especially if you get this error message on your work PC, or if you have a deadline to finish your projects.
For these reasons, in today’s article, we will explore the best troubleshooting methods you can apply to solve this issue. Please follow the methods carefully to avoid causing any more complications.
If your PC doesn’t recognize your devices try these methods
1. Unplug your external devices one by one
To try this method, you will need to remove each of the external devices connected to your Windows 10 PC and restart your PC after each one of them.
This will allow you to identify which of your external devices is causing the issue (if any).
2. Restart your PC in Safe mode
To fix the Windows has encountered a problem communicating with a device problem, click on the Start button -> click on the Power button.
Choose Restart from the list.
Immediately after your computer is starting the reboot process -> press the F8 key on your keyboard.
This will open the Boot Menu.
Use the arrow keys on your keyboard to selectSafe Mode inside the Windows Advanced Options menu.
Press Enter.
Check to see if the issue persists in Safe Mode as well.
Right-click each of the options Sound Card, Video Adapter, Network Adapter -> choose Disable.
Restart your PC and re-enable the options mentioned above one by one.
After enabling an option -> check to see if the issue persists.
After identifying the problem hardware, you can solve the issue by installing the latest driver, or replacing the device.
Conclusion
In this guide, we explored some of the best proven troubleshooting methods to deal with the problem caused by your Windows 10 operating system not being able to communicate with a device.
We would love to know if this guide helped you solve your issue. Please feel free to let us know if it did by using the comment section found below.
There are instances in which Power BI uses a lot of memory, especially when it comes to old PCs. So, to minimize memory and also CPU usage, it is crucial to disable certain queries.
By default, all queries load in the Query Editor. Today we will show you how to disable this function.
What I am trying to buildup is appending 10 individual queries together (10 excel files, regularly updated on the sharepoint) into 1 table, which is than going to be loaded into the report. I do not need those 10 source files to be loaded as I will not buildup any visuals around those. Therefore I thought unchecking “Enable load to report” field in the Query Properties and keeping the “Include in report refresh” checked would work. What I found out is that the second checkbox is always automatically unchecked when I try to disable the load to report option. This would basically mean that data won’t refresh at all in my opinion, right?
So, the OP can’t uncheck Enable load to report box while checking Include in report refresh box. However, the issue can be solved quickly.
Steps to disable load in Power BI
This problem affects only the current query and the option to disable the load is found in the query pane, not in the query properties.
Go to Edit Queries. It will open a new window.
There, right-click on your query (Sales in this case) and then click on Enable load.
A box will appear with the following message: “Disabling load will remove the table from the report, and any visuals that use its columns will be broken.”. This is not a problem since you don’t use the data in any visualization, so click Continue.
Now, the query will appear in Italic font and the Enable load feature is not selected.
Working in Power BI will be like a walk in the park after reading this guide!
Conclusion
Disabling the load for queries is simpler than it seems. Make sure you don’t use that query in any of your visualizations.
If you do, it will automatically remove the query once you uncheck the Enable load option.
Did you find our method useful? Do let us know in the comments section below.
The PBIX file extension belongs to Microsoft Power BI, the enterprise solution for data virtualization. Thus, the best way to open it is, you guess, with Microsoft Power BI Desktop version, which is free to use. Alternatively, if you are unable to open the file with Power BI, check some alternative options below.
How can I open a PBIX file on my PC?
1. Install Microsoft Power Bi
As a PBIX file is primarily created by Microsoft Power Bi, it’s necessary to have Power Bi installed on your computer to open a PBIX file. While installing Power Bi, ensure that you are using the latest version of Power Bi. Otherwise, it may not open the file. You can get Power BI Desktop, here.
2. Set File Association Correctly
At times, an incorrect program is set to default for opening a particular type of file. It is as if you set Windows Media Player to open the.JPEG files, which will never work. To fix this, follow the steps given below:
Open the Control Panel.
Search for Default Programs.
Go into Set Associations.
Set Microsoft Power Bi as the default program to open .pbix extension files.
To view the content of the file you can rename the extension to .zip. It will not allow you to modify or change the content within the file. But it will give you access to the content in the file.
4. Opening a PBIX File in Excel
Although you cannot open a PBIX file directly in Excel, yet you can export data from Power Bi and import it into Excel to pursue your task.
Open your PBIX file in Microsoft Power Bi.
Open your Power Bi desktop model.
Now you have to choose the Data view by clicking on the Data tab.
You get two options to copydata;
Go to the table you want to copy, right-click on it, and click Copy Table.
Click on the table you want to copy data from, right-click on the data area, and click the Copy Table.
If your Office 365 group members are not receiving emails, then your entire company’s communication path is flawed. This can cause a lot of issues, and could even cause people to get into trouble at work.
This problem seems to happen most commonly when using the Office 365 groups with the Microsoft Outlook email provider.
Here is what one user had to say about this issue on Microsoft Answers:
I have an Office 365 group with 23 users. All members receive emails sent to the group except one. I have tried deleting the member from the group and then adding her back in. They still do not receive any email sent to the group. Any ideas?
Encountering this issue means that either your Office 365 group admin didn’t use the right settings when creating the group, or that the users don’t have the required settings activated so this option works.
Because a large number of companies are starting to use the Shared Mailbox option found inside Office 365 groups, and move away from the Distribution lists, this issue becomes more and more common.
It is worth mentioning that using the Shared Mailbox ( Group conversations) feature doesn’t mean that all the members will get an email sent to their personal mailbox.
In today’s fix article will discuss the best troubleshooting methods you can apply to solve this situation once and for all. Please follow the steps presented here carefully to avoid causing any other issues to your group settings.
Try these methods if your group members are not receiving emails
1. Make sure you’re subscribed to the group conversations
Each of the members of the group inside Office 365, will need to follow these steps to make sure their settings are right:
Open the Microsoft Outlook client (web version works as well).
Open the group.
Click on the Joined option at the top of your screen to activate the drop-down the menu.
Select Subscribe.
2. Modify the settings of the group
If you’re creating a new group:
During the process of creation, you can activate the option to Send copies of all group messages and events to members inboxes.
This will automatically send all group messages to each of the member’s email addresses.
If you’re using an existing group:
Select the group you want to apply changes to.
Click Edit group inside the Outlook client or in the Web version.
Check the box next to the option Subscribe new members so they receive group conversation in their inbox option.
Conclusion
In today’s fix article we explored the best solutions for solving the issue caused by your Office 365 group members not receiving emails.
Because this issue can cause you to lose access to important information shared with your group, we hope this guide helped you understand the process better.
Please feel free to let us know if you have any suggestions by using the comment section found below.
MS Word and Google Docs are two of the foremost word-processing applications. Both those word processors include numbered bullet list formatting options. However, Word and Docs automatically apply numbered bullet points when users enter 1. and press the Space key.
This is not always ideal as users don’t always want to add numbered lists when they enter 1. in a document. Thus, some Microsoft Word and Doc users might need to turn off the automatic numbering.
How can I turn off Auto Numbering in Word and Docs?
1. Turn Off Auto Numbering in MS Word
To turn off automatic number formatting in Word, click the File tab.
Click Options to open the window in the shot directly below.
Click the Proofing tab on the left of the window.
Press the Autocorrect Options button.
Click the Autoformat as You Type tab shown directly below.
Deselect the Automatic numbered list check box.
Then uncheck the Automatic bulleted list option.
Click the OK button to exit the AutoCorrect window.
Then press the OK button the Word Options window.
2. Turn Off Auto Numbering in Google Docs
To turn off automatic numbering in Google Docs, click the Tools menu in Docs.
Select the Preferences option to open the window shown directly below.
Deselect the Automatically detect lists check box.
Neither Word or Docs will automatically detect lists after deselecting the options specified above. So, users can then enter 1. without automatically adding numbered bullet point lists to their documents. Users can also turn off other automatic formatting by deselecting other settings in Word’s AutoFormat As You Type tab and Doc’s Preferences window.
One common Power BIerror is The base version must not be negative. Most users report that they failed to save the modification to the server because of this error. Furthermore, they encounter this error while trying to add another table to their project.
There are different ways to fix this error. Follow the steps over to solve the issue quickly.
The base version must not be negative error in Power BI
1. Turn-on Autodetection of Data Load
Turning on ‘Auto-detection of the relationship after data load’ can help you to avoid this error. Sometimes, this issue can reoccur even if you have autodetection on. Then follow these steps:
Go to the Options.
In the Current File section, select the Data Load.
There you shall see many other options. Under Relationship, there will be an option of autodetection. Uncheck the option shown.
Apply the settings.
Again repeat the above steps if you are directed to 1st step.
Recheck the option “Auto-detect new relationship after data is loaded”.
Apply the settings again.
Alternatively, after this, you can disable Autodetect and look for improvements.
This Power bierror also occurs while updating data. As mentioned above, a message appears that your base version should not be negative. Many users don’t pay heeds to match headers exactly same with the corresponding column of the cube to which they are connecting.
Name the column Identical to each other, in the source file and the cube.
Sometimes, the new relationship does not get load automatically. In that case, you have to load it manually.
Apply the changes and close.
3. Deleting Rows and Columns
Go to the last line of data in the table.
Delete all the rows under the last line of the data in the table.
Go to the last column of data in the right of the table.
Delete all columns to the right of the last column.
By following the above-mentioned methods, you can easily fix this Power bierror The base version must not be negative.
Windows Hello is a vital security feature that allows users more secure ways to sign in to their PC. But often, when configuring things, users reported getting the Sorry, something went wrong. Close Windows Hello, and then try going through the setup again error.
Here are a few reasons Windows Hello is not working:
Outdated, corrupt, or incompatible drivers: In most cases, it turned out to be an outdated driver, or a corrupt or incompatible one installed on the PC.
Misconfigured power settings: The power settings, too, play a critical role in the effective functioning of a device, and even a slight misconfiguration can cause it to stop working.
Running a buggy version of Windows: Oftentimes, a bug in the current version of the OS may trigger several issues with Windows Hello and other features.
How can I fix close Windows Hello and then try going through the setup again?
Before we proceed to the slightly intricate fixes, here are a few quick ones to try first:
Restart the computer and then try adding the biometric sign-in.
Clean the fingerprint sensor or the camera, depending on which biometric method is throwing the error, with a soft piece of cloth.
Check for any pending Windows updates and install them. Once done, verify whether the Close Windows Hello, and then try going through the setup again error goes away.
If none work, move to the solutions listed next.
1. Change power management settings
Press Windows + X to open the Power User menu, and select Device Manager from the options.
Expand Biometric devices, right-click on the problematic one, and select Properties.
Navigate to the Power Management tab, untick the checkbox for Allow the computer to turn off this device to save power, and click on OK to save the changes.
2. Reinstall the biometric driver
Press Windows + R to open Run, type devmgmt.msc in the text field, and hit Enter.
Double-click on Biometric devices, then right-click on the relevant entry, and choose Uninstall device.
Tick the checkbox for Delete the driver software for this device, and click Uninstall.
Now, restart the computer.
Most users who got the Close Windows Hello, and then try going through the setup again error reported that reinstalling the driver did the trick for them. So, make sure you give it a try.
3. Update the biometric driver
Press Windows + S to open Search, type Device Manager, and click on the relevant result.
Expand Biometric devices, right-click on the relevant one, and choose Update driver.
Choose Search automatically for drivers and wait for Windows to install the best one.
Oftentimes, updating the biometrics driver can fix things when it’s the outdated driver version to blame for the problem. Also, for some users, a newer version for available on the manufacturer’s website, one that Windows couldn’t find. So, make sure to try manually installing the driver.
Once done, verify whether the Close Windows Hello, and then try going through the setup again error disappears, and you can finally set up a biometric sign.
The BIOS interface, as well as the name of features and settings, may be different for each manufacturer. So check the official website for the exact steps in case of any doubt.
Turn off the computer, hold the power button to turn it on, and repeatedly press F10, F12, or Esc, depending on the system manufacturer, as soon as the display lights up.
Once in the BIOS, navigate to the Security tab, enable Fingerprint Reset on Reboot, and click on Save.
5. Create a new user account
Press Windows + I to open Settings, and click on Accounts.
Navigate to the Family & other users tab and click on Add someone else to this PC.
Click on Add a user without a Microsoft account.
Now, click on I don’t have this person’s sign-in information.
Enter the username and password (if required), and click on Next.
After creating the account, choose it, and click on Change account type.
Select Administrator from the dropdown menu, and click on OK.
Log in to the new accounts and check whether the error persists.
If not, use it as the primary account, move all the files from the previous account here, and finally, delete the earlier one.
Creating a new account helps when the user profile is corrupt, and the previous solutions don’t work. To transfer the files, you could use something as simple and handy as a USB drive.
It happens that after installing a new SSD and changing the boot drive, while booting the computer you may encounter some issues. One such issue is SSD reset port error that occurs during the boot process. Although, the user is able to boot into Windows and access the system the error may eventually lead to system crashes.
The SSD port reset error can occur due to several reasons including a faulty SATA cable, bad boot configuration, etc. If you are also troubled by this error, here is how to troubleshoot port reset error in Windows system.
Fix SSD reset port error with these easy solutions
1. Set BIOS to Boot from SSD
If you haven’t already, it is important that you change the boot drive in the BIOS from the hard drive to the newly installed SSD after cloning the drive. Here is how to do it.
Shutdown the computer if it is on.
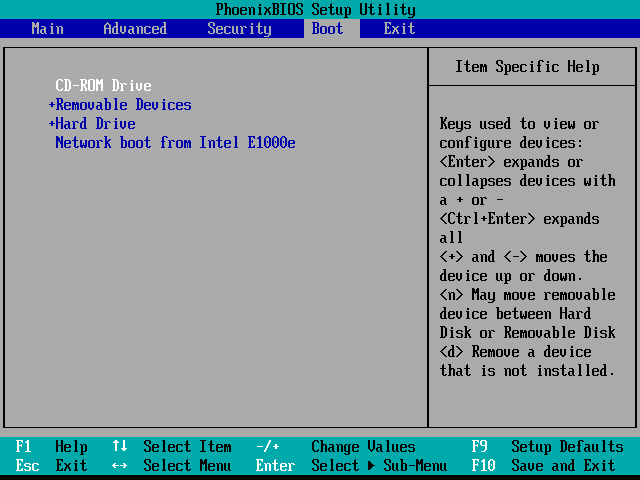
Start the computer and start pressing ESC, F1, F2, F8, or F10. One of these keys should help you get to the BIOS screen depending on the PC manufacturer.
Enter the BIOS setup and wait for the BIOS setup page to appear.
Open the Boot tab. Use the arrow key on the keyboard to navigate.
Now move your SSD drive to the priority position.
Save and exit the BIOS setup utility.
Restart the computer and check if the error is resolved.
If the issue persists or if BIOS is not detecting the SSD in the boot menu, the problem could be with the SATA port or the connector.
First, remove the SSD from the current SATA Port and connect it to any other SATA port.
Reboot the system and check if the issue is resolved.
If the issue persists, remove the SSD and try connecting to any other computer that you have access to. This would allow you to check if the SSD is defective.
If the SSD is working fine with another computer, you may want to check if the SATA cable is faulty. You can get a new SATA cable from a computer hardware shop.
3. Update the BIOS
Another issue that can be creating an issue with the SSD resulting in reset port error could be the outdated BIOS.
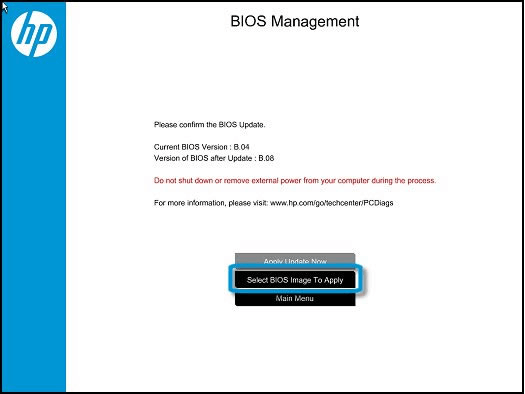
The best way to check for BIOS update is to visit your laptop manufacturer and log in. Run the Scanner that checks for any updates and finds if any update is for the BIOS.
Download and install the BIOS update and reboot the system.
After the reboot check if the error is resolved.
Also, check for faulty power Supply and video cards. Remove the graphics card and reboot the system.
The SSD reset port error is usually caused by faulty SATA cables or the incorrect boot configuration. Do let us know which of the steps in this article helped you resolve the error in the comments.
Irrespective of how fast your new computer was, it tends to get slower over time. This can be because your hardware is dated and does not meet the requirement for the new software or because the old uncleaned junk is creating conflict with other software.
System Optimization software can help you to deal with the second issue. Be sure that the System Optimization software won’t help to boost the performance of your computer if you are experiencing hard disk and memory issues. That is for the SSD and more RAM sticks to resolve.
However, the system optimization software comes packed with a bunch of tools that allow you to clean your system with one click.
While you can do this work manually using system maintenance tools, this third-party software speeds up the process.
In this article, we take a look at the best software that can help you coordinate the resources on your computer for better optimization.
Optimize and clean your PC for maximum performance
The latest version of the IObit Advanced SystemCare tool is familiar in many ways and the latest version comes with some new and improved features.
The software can improve your system’s performance noticeably and the automated cleaning process will relieve you from the regular maintenance task of your PC.
The new version of IObit Advanced SystemCare detects more types of junk files than previous versions. The Pro version comes with an additional set of features including schedule cleaning, internet optimization, and a real-time system monitoring system.
The interface of IObit Advanced SystemCare is intuitive and comes with decent customization options.
One neat feature offered by the software is the performance widget at the top of your screen which shows the current and RAM and CPU usage in the comments.
WiseCleaner is another system security and software optimization software company that offers Wise Care 365. The software cleans your registry and removes junk files from your PCs.
It also comes with features to protect your privacy and make your PCs more secure.
Wise Care 365 comes in two versions, the standard Wise Care 365 and Pro. The standard version is free and the Pro version costs $36.
The free version of the tool offers one Click PC Checkup, Clean and Speed-up computer, and hardware inventory information.
With the premium version, you get privacy protection features, Real-time system protection, the auto clean system in Silent Mode, faster boot-up speed and free up more disk space features.
The primary task of Wise Care 365 is to remove invalid Windows registry entries. After that, it can easily back up and restore the Windows registry as well, just in case anything goes wrong.
To resolve software issues, Wise Care 365 allows you to clean temporary files, clean browser cache, cookies, and history, and also delete useless files created by a third-party application.
You can also use the tool to keep a tab on the background tasks as well as defrag hard disk to resolve hard disk related errors.
Wise Care 365 is an effective tool. However, to make the most out of the software you need to buy the premium version that costs more or less equal to Iolo System Mechanic.
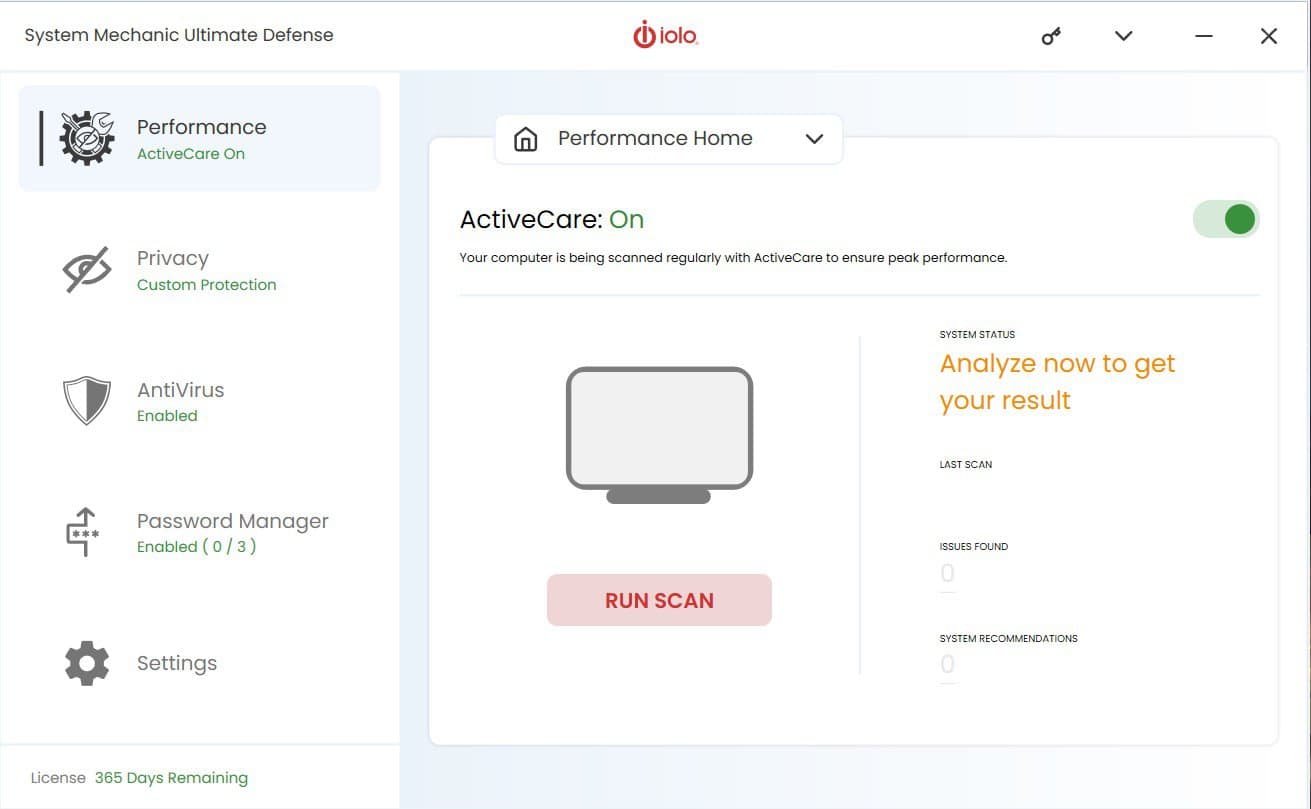
System Mechanic Ultimate Defense is one of the most popular PC optimization tools in the market. It scans the system for junk files and other issues that might slow your computer and repairs them with a few clicks.
System Mechanic Ultimate Defense offers a simple and effective way to perform basic system cleanup. The tool scans the system and suggests the areas where you can free up the disk space as well as remove the old and unused software programs.
System Mechanic Ultimate Defense is available in both free and paid versions. However, some features are exclusively available in the premium version only.
On the brighter side, System Mechanic Ultimate Defense does not come bundled with the bloatware out of the box.
After the installation, the user can select from two modes of the scan, Quick and Deep. The Deep scan check for system vulnerabilities, data sharing services, and the potential for CPU optimization.
Iolo System Mechanics comes with a host of features and depending on the free or premium version in use, the users can make the most out of this tool to keep their PC optimized.
System Mechanic Ultimate Defense
Secure your data and coordinate computer activities with this professional software.
So these are the best PC optimization software that can help you to coordinate resources on your computer. Do let us know which optimization software you prefer the most.
We perform many tasks on the Internet through a browser. So, these tools should run smoothly. However, browsers are affected by many issues.
In this article, we will talk about a scary issue in Google Chrome. Many users encountered the “Managed by your organization” message in Google Chrome when they opened the 3-dots menu.
One user reported the following on the official forum:
So this message popped up last week on all my google chrome’s for no reason. I have not made any changes, im still logged in with the same account as i have been for 5 years, and this hasn’t happened before. It is a totally normal @gmail account, so this “Your browser is managed by your organization” message creeps me out. How do i get rid of it / fix it?
So, the user didn’t make any changes and has had the same account for 5 years. This is a very creepy problem and today we will show you how to solve the issue.
How to fix Your browser is managed by your organization message
1. Use the Chrome flags option
Type chrome://flags/ in the address bar.
Type “manage” in the Search box.
Disable Show managed UI for managed users.
Click on Relaunch now if you want the new option to take effect immediately.
2. Edit the registry
Press Windows Key + R to open the Run program.
Type “regedit” and click OK to open Registry Editor.
Go to HKEY_LOCAL_MACHINE\SOFTWARE\Policies\ and delete GoogleChrome key in the left pane.
Restart Chrome to see if the issue persists.
3. Use another browser
This creepy message can be removed permanently if you change your browser. We recommend Opera One Browser for enhanced privacy and protection.
It is a lightweight and user-friendly tool to surf the Internet without any worries. Thanks to the free built-in VPN, Opera One has always been significantly faster than Chrome and less intrusive to privacy.
It also saves battery and power usage, and the user interface is elegant and intuitive; in fact, the design is very modern.
Opera One’s tracker blocker disables well-known online trackers like analytic scripts, tracking pixels, and other data collection methods.
The trusted and proven security features of Opera One are built right into the browser. The browser also comes with unique features, such as it’s built-in AI.
If you are still concerned about being tracked through ads or spyware, it’s a good idea to go over all of your privacy settings and check any options that can enhance your safety.
So, things are not as scary as they seem. You can solve the issue quickly with our solutions. Change a Chrome setting or tweak the registry. It is all up to you!
Also, we recommend always updating your browser or changing to UR Browser if you don’t want to encounter a “This browser is managed by a company” type of message ever again.
Did our solutions help you? Do let us know in the comments section below!
If your projector is not displaying anything after a power outage or normal restart, it can be due to many reasons. Most of the time the issue can be with the projector and the source device’s connection, however, the reason can be more as reported by the users in the Reddit community forum.
We are bringing you a detailed troubleshooting list to help you out address this problem accordingly. Check them below.
Projector screen won’t go back up after restart/power outage
1. Troubleshoot Projector Connection
Make sure the projector lens cover is open all the way up. This is a very obvious yet the most common issue.
If the projector remote has A/V Mute button, check if the image and video are muted. Press the Mute button and check again.
Check if your computer is in the standby or sleep mode. You may also want to change the sleep mode cycle of your PC if it goes to sleep even when the projector is on.
Check the cables once again and make sure it is connected firmly and power is on for the projector and connected source device (your computer).
Press the Menu button on the projector and check if the Menu appears. If the Menu appears, the issue can be with the source device.
Adjust the brightness settings or select the Normal Power Consumption setting to check if the power saving mode is causing the issue.
Check the settings on Signal Menu to make sure that the configuration is correct for the current video source.
Make sure the Messages is set to On in the Display settings.
Make sure the projector is unlocked by pressing the button.
Try to disable Windows DirectX if the application on the source device uses DirectX.
Try to reset the projector settings to factory default using the Reset menu.
The overhead projector and digital projector requires a lamp to create an image for display.
It is important that you clean the projector bulb/lamp periodically to keep the projection clean. However, if the projector has finished its claimed projector hours, you may need to replace the lamp to continue to use the projector.
Check the LEDs on the projector for Lamp status warning, to see if the bulb requires replacement.
3. Check the Projector/Source Screen Resolution
On your source device (computer) make sure the screen resolution is set to what is supported by the projector.
Click on Start and select Settings.
Go to System > Display.
Under “Screen and Layout“, set the screen resolution to your projector native resolution.
Microsoft Power Bi is a collection of software services, apps, and connectors that work in combination to convert your unrelated data sources into coherent, visually immersive and interactive insights. If you are new to Power Bi and asking yourself “Can I use Power Bi for free?”, this article will help you understand this topic in detail.
We have covered Power Bi in the past, however, this post will focus on its pricing plan, the free plan, and its limitations.
Is there a free version of Power BI?
Yes, Power Bi offers a free version of the service named Power Bi desktop. Power Bi Desktop is the installable version of the software and requires you to install it on your system.
The free offering can be used by any single user with access to data cleaning and preparations, the ability to publish to the Power Bi services as well as custom data visualization.
You can download the Power Bi Dekstop from the official website. Make sure you download the correct version of the Power Bi desktop depending on your language preferences.
Power Bi Desktop Free Limitations
Although free to use, the Power Bi free license has several limitations. To begin with, let’s talk about Power Bi service. While Power Bi Desktop allows you to create data models and build reports, to share the report with others or export it to PowerPoint you need a Power BI account in the cloud. You can get the Power Bi license for free, which again comes with limitations.
The Free Power Bi license allows you to sing up for one user per account. It also comes with 10 GB of free storage in the cloud that can be used for hosting Power Bi Reports. Each Power Bi report cannot exceed the limit of 1GB and can only be refreshed 8 times a day with a minimum of 30 minutes gap between each refresh.
Other limitations of Power Bi free license are listed below:
User cannot share a report or dashboard with other users.
User cannot view the report or dashboard shared by other Pro users.
Although you can share the reports on the web using app.powerbi.com app, all the data is publically available. Which makes it a no-go for sharing sensitive and confidential information.
The free license of Power Bi does not allow integration with Office 365 apps like PowerPoint for exporting the data.
Power Bi Pro and Premium
If you want to remove the limitations of Power Bi free license, you can opt for any of the two premium plans offered by Microsoft.
While Pro License costs $9.99 per user per month, the Premium plan does not come with user limitations. The organization can share it with all their employees depending on the size.
The Pro users get similar benefits as free users with 10 GB storage space and 1GB per report limitation. Additional features include the ability to share the data reports and dashboard with other pro users.
So to answer your question (Can I use Power Bi for free?), you can use it for free but with some limitations. Do let us know which version of Power Bi you use in the comments below.
As more and more businesses are moving into online territories, it has become increasingly important to offer great user experience to the users who are also potential customers needless to say.
If you are an aspiring front-end developer, you must pick the best front-end development tool available.
Angular and React are among the popular front-end development technologies that you can find today and probably have heard the front-end developers recommend the same. But, there are plenty of other front-end developer tools apart from the two mentioned above.
With so many options on offer, how do you find the best software for front-end development? Well, you don’t need to.
We have taken the time and trouble to find the best front-end development tools that are used by the top web development companies across the globe. So that you can spend your time making the web a more secure and beautiful place.
In this article, we will take a look at the best software for front-end development that is not only in trend but also used by software and social media giants like Microsoft, Google, and Facebook. Let’s get started.
What is the best software for front-end development for pros and newbies?
Angular
GitHub starts: 43k+ **
Angular is a structural JavaScript framework that allows you to create web apps (single-page applications) that are responsive and adapt to any screen size irrespective of the device the users are using to browse the web page.
Be it web and mobile web apps or native desktop and native mobile apps, by learning Angular you can deploy the applications to any target.
Angular comes with features like enhanced RXJS, a faster compilation ( by fast we mean fast, some compilations will take only 3 seconds), and HttpClient launch which is a simplified client HTTP API and offers an efficient, up-to-date package implementation on the client side.
On the official website, the developers have made sure to provide a well-organized and detailed set of documentation providing all the necessary information that you may require as a developer to learn and master Angular.
To minimize the risk of errors, Angular offers two-way data binding enabling singular behavior for the apps. You can also work with MVVM (Model-View-ViewModel) which allows you to work on the same app separately using the same set of data for improved testability and transparent communication.
Angular also offers Angular CLI, a command line interface to create new projects, add files, and perform testing, debugging, deployment, and updates.
If you want to get into front-end development or further hone your development skills, Angular is one of the in-demand frameworks that you can learn and not regret.
ReactJS is a JavaScript library for building huge web applications and user interfaces. It was made open-source by the social network giant Facebook in 2013.
Despite making a late entry into the front-end development scene in 2013 (three years after Angular was released), React is currently trending on par with Angular if we analyze the Google search trend showing its popularity among the developers. However, Angular is still more popular if we consider the Stack Overflow 2018 developer survey.
React is comparatively easy to learn because of its simple syntax. If you know HTML coding, you will be comfortable with React in no time.
The high level of flexibility and responsiveness is another core feature that gives React JS an advantage over Angular. React JS is lightweight but can manage high-load applications when combined with ES6 (ECMAScript) efficiently.
The document object model (Virtual DOM) allows you to arrange documents in HTML, XHTML, and XML format into a tree making it easy for the web browsers to parse elements of the web application.
Facebook offers code mods that allow you to update React APIs making it easier to upgrade between the versions.
While React is easy to learn, the ever-developing JavaScript library means the documentation takes its own time before making it into the official website. As a result, you may need to refer to some third-party website or ask a colleague for help if the situation arises.
Vue (pronounced like view) was first released in 2013, and since then it has become one of the most popular JavaScript frameworks used by developers across the world. Some of the major companies that work with Vue.js include Alibaba, Xiaomi, Adobe, Reuters, and more.
If you already know HTML, CSS, and JavaScript, congratulations, you already have a head start! You can now put your skills to work and get started with web application development using Vue.js and start building things in no time.
Vue.js is a powerful JavaScript framework yet one of the lightest in the segment that requires minimal optimization efforts. The fast Virtual DOM helps in increasing the speed and efficiency of DOM Updates.
If you already have an existing infrastructure built on JavaScript, Vue allows you to easily integrate smaller interactive parts without having to redesign the entire structure.
Apart from the Virtual DOM feature, React, and Vue share many similarities that include providing reactive and composable view components, similar runtime performances, robust solutions for scaling up and down, and support for MobX with a nearly identical reactivity system.
Vue probably has one of the most comprehensive documentation on its website along with video tutorials that are useful for beginners with little knowledge of JavaScript and HTML.
Npm is the default package manager for Node.js and the world’s largest software registry. It is a package manager for JavaScript that helps you borrow reusable codes and reassemble them to be used with your web application.
Some notable features offered by Npm include over 470000 free code packages in the registry, the code can be used with multiple web applications without having to re-write it again and again, and lock file support.
Using Npm, you can find libraries and components from frameworks such as Ember and jQuery, Bootstrap, React, and Angular. You can discover packages (JavaScript plugins) for mobile, front-end and back-end development, and IoT to start building amazing applications.
Some of the popular packages installed using Npm package manager are Browserify, grunt-cli (CLI – command line interface), bower, gulp, and more.
To install Npm, you need to install Node.js. If you have Node.js already installed, you probably also have the Npm command line tool installed.
WebPack is a module bundler. However, it is also used as a replacement for Gulp or Grunt ( JavaScript task automation tools). It is a powerful utility that gives the developers control over how to split the modules and adjust the builds as per the requirement.
You can use WebPack to bundle JavaScript Modules with dependencies into files. WebPack is relatively new but has gained popularity quickly.
WebPack is ideal if you are building a complex Front-end application with many assets (Except codes) that includes CSS, images, and fonts.
WebPack is certainly not the tool recommended for a beginner because of the learning curve. For small front-end projects, you can use Gulp or Grunt automation tools which don’t have the concept of a dependency graph.
Sublime Text is a cross-platform source code editor. Sublime Text natively supports many programming languages out of the box. Some front-end developers swear by it while some may consider it as just another code editor.
Goto Anything feature in the editor allows you to jump to symbols, lines, and words without having to browse through the entire code. If you want to make changes to multiple lines of codes, the Multiple Selection feature can be triggered using Ctrl + Shift + L and Ctrl + D to select the next occurrence of the selected word.
It is a highly customizable tool and allows you to customize key binding, menus, snippets, macros and more with a simple JSON file. Other notable features offered by Sublime Text include split editing, Command Palette, and instant project switch.
Sublime Text is free to download. Although it comes with a free trial, you can continue using it without purchasing a license even after the trial expires. If you use it for commercial purpose, consider making a purchase.
These are our picks for the top 6 best front-end development tools that you can learn and use to create stunning web applications.
For a front-end developer, it is all about convenience. Depending on their knowledge and preference, they choose the framework. However, for beginners, Angular, Vue.js, and React all three frameworks are excellent choices.
If you aspire to work for a particular company in the software field, find out what JavaScript framework the company uses and you can start working on your skills after defining your goals.
It is always recommended that you master the basics of JavaScript before using any of the JavaScript frameworks. When you have the JS basics right, you can learn to use even new frameworks that will be released in the future.
Are you planning to learn any of these tools or have experience with any of the above-mentioned frameworks before? Do let us know in the comments.
Sometimes, your web browser may not work properly with the VMRC resulting authentication or connection error. This issue can occur due to several reasons including incompatible web browser, outdated Adobe Flash Player or Java, Firewall Rules, etc.
If you are also troubled this browser does not support launching a console to a VM error, here are a couple of troubleshooting tips to resolve the issue.
Why can’t I launch a console to a VM with a browser?
1. Check Internet Security Settings
Type Internet Options in the search bar and open it.
In the Internet Properties window, click on the Security tab.
Select the Internet content zone for the VCloud Direct Server.
Click on the Custom Level button.
Now enable the following options one by one: Download signed ActiveX controls Run ActiveX controls and plug-ins Allow META REFRESH Active scripting of Microsoft web browser control
Click OK to save the changes.
2. Check Extension for Compatibility
If you have recently installed any browser extension, check if the extension is creating conflict with the VM remote console.
If you using Google Chrome, launch the web browser.
Click on the Menu and go to More Tools > Extensions.
Now try to disable the most recently installed extension.
Relaunch the browser and check if the Remote Console in VM is working.
If the issue persists, disable all the extensions one by one and until you find the problematic extension.
Amharic is a Semitic language from the family of Afro-Asiatic languages. It is spoken mainly by the Amharas of Ethiopia with approximately 30,000,000 speakers.
The language is however not left behind where technology is concerned, and in this article, we’re going to show you some of the best Amharic typing software for Windows.
What’s the best Amharic typing software?
Amharic Keyboard
The Amharic keyboard was developed by Snack Apps and available on Microsoft Store. The app was released on the 15th of May 2016, and it should work on both your phone and desktop PC.
The keyword works like any other virtual keyboard allowing you to add various symbols and punctuation marks, and it’s incredibly simple to use.
The Keyman Desktop application allows Windows users type in multiple languages including the Amharic. Keyman Desktop is an open-source application that automatically re-configures Windows OS to accept and understand the Amharic language.
The application is available on Android, iOS, Windows, macOS, and Linux, and there’s also a web version available as well. Overall, the Keyman Amharic should work on any device, regardless of the platform you’re using.
Lexilogos is a web service that works as an Amharic Keyboard. The service allows you to letters simply by clicking them with your mouse, or you can type certain combinations of letters in order to generate specific characters. The service is quite simple to use, and there are dozens of other languages available, which makes Lexilogos a web-based virtual keyboard.
Windows Servers, up to Windows Server 2016, don’t include support for the Bluetooth. However, some Windows 7 users seem to be running into the Windows Server does not support Bluetooth error, despite Windows 7 fully supports the Bluetooth connectivity. If you are troubled by the said error and Bluetooth won’t work on your system, follow the steps below to fix it.
How do I connect Bluetooth to Windows Server?
1. Make Sure Your Bluetooth Button Is ON
Many branded laptops like HP Pavilion and TouchSmart have a Bluetooth button in the keyword, which can be used to start or stop the Bluetooth connectivity. moreover, in some Laptops this button is situated at the sides.
Sometimes, users forget to use this button. If this button is OFF, you will not have Bluetooth connectivity on your laptop. Before jumping onto the software troubleshooting of this Bluetooth problem, make sure that your Bluetooth connectivity is enabled.
PerfLogs (short for Performance Log) is a system-generated folder in Windows 10. It stores the system issues and other reports regarding performance.
You can find the folder in C:, but you can remove it or relocate it in another partition or directory.
It is not recommended to remove this folder (or any system file for that matter), because it might affect your computer.
However, many people want to relocate this folder to another directory, as one userreported on a forum:
I would like to know what is the proper way to move the PerfLogs folder to a location other than the Windows 10 root install directory. Is ti done through Performance Monitor’s data collector set settings or maybe the ones for traces? I looked there but I couldn’t find such an option. Tried stopping some of the traces temporarily to see if that will make the file path fields editable. It didn’t… Or maybe we’re supposed to edit a config file somewhere?
So, this user wants to remove the folder from the Windows 10 root install directory. He already tried to edit the file paths field but to no avail.
When it comes to removing or relocating this system folder, things are not so simple as they seem, and today we will show you how to remove the PerfLogs folder in Windows 10.
How to remove the PerfLogs folder in Windows 10?
Use Command Prompt
You can move C:\PerfLogs folder into the C:\Windows folder by using the commands below, but first, you need to open Command Prompt.
Press the Windows key and type Command Prompt.
Right-click on it and select Run as administrator.
Java is one of the most important software needed to run Windows 8 and Windows 8.1, so if you are wondering what are the exact and safe download links for your 32 and 64-bit system, follow the information below to learn all about it.
First of all, before rushing to the download links at the end of the article, you need to understand that you might already be running Java, so the best way would be to first check for that and then install it.
Also, Java won’t run in the Modern interface, meaning you won’t be able to verify if you currently have Java installed if you’re not on the Desktop mode. For those who aren’t aware, Java won’t work on Windows RT devices, either.
Java has recently received quite a big overhaul, as it has reached version 8 on March 18, 2014.
The last update was on July 28, 2011, and this new version comes with big improvements. Briefly, here are the most important improvements that Java 8 is bringing to the table:
enables the Internet of Things
reduced code clutter
modernized apps
will enable impressive graphics capabilities
integrated with JavaScript
However, we won’t be providing links to the 8th version of Java, since it’s currently available for developers only in early access mode.
We will provide links once it goes public, but for now you can follow the download links from below to download it on your Windows 8 and Windows 8.1, 10 32 and 64 bit systems.
To access the Java Control Panel in Windows 8 and Windows 8.1, 10 you just need to go to search and type there “Java Control Panel”.
Before downloading the latest Java version, you need to make sure that the old one has been uninstalled.
You can just go to the Control Panel and uninstall it like any other software, or you can choose to use the Java uninstall tool.
Also, before the installation process, don’t forget to disable your Internet firewalls, as they might be blocking it.
Update – Windows 10 is just around the corner and we’ll make sure to release a standalone guide in order to help you get the latest version of Java on there, as well, so stay tuned.
Java Version 8 Update 66
This update was released on November 16, 2015, and while it doesn’t bring any major new features or options, it contains fixes for security vulnerabilities, so it’s required to download and install this version to minimize risks in your environment.
A recent release of Java for Windows 8, 10 contains fixes for security vulnerabilities, but the links from below will still work, so follow them safely.
Download Java for Windows 8, 8.1, 10 – 32 bit Download Java for Windows 8, 8.1, 10 – 64 bit
UPDATE: With Windows 10 well established as the main operating system from Microsoft, we recommend reading this detailed guide to learn everything there is to know about downloading Java 10 to your PC.
Windows 10’s May 2019 Update overhauled the search experience by separating it from the Cortana assistant interface. As part of this change, Microsoft also revised search itself, adding a new “enhanced” mode which is more effective at finding files.
Previously, the taskbar searchbar would only search through files on your desktop and in your libraries. The new enhanced mode lets you search all the files on your device, irrespective of where they’re located. This means search is more likely to deliver a result, especially if you store files in non-standard locations.
Because enhanced search has a much broader scope, you might notice slightly reduced performance and battery life when lots of new files are being indexed. Nonetheless, if you use search a lot, the benefits of the new system should significantly outweigh the few caveats.
Enabling Enhanced Search
To enable Enhanced search, open the Settings app (Win+I keyboard shortcut) and then click the new “Search” category. Choose the “Searching Windows” page from the left sidebar. Next, click the “Enhanced” radio button option under “Find My Files.”
Enhanced search will now be turned on. If this the first time you’ve used it, Windows will commence indexing your files. You can track the progress under the “Indexing Status” heading.
Indexing might take a long time, especially on low-end devices. The process automatically pauses if you’re running on battery power. Until the index is complete, some files might not appear in search results, so it’s best to connect your device to power and wait for the procedure to finish.
Excluding folders from Search
You can stop folders from showing up in search using the “Add an excluded folder” button further down the Searching Windows page. Use the filepicker to browse for the folder to exclude. Any files within the location will be removed from the index, so you won’t see them in search.
Generally, you should exclude all root directories which don’t contain your own files. Some locations, such as the Windows system directory, are excluded by default as you’re unlikely to ever search them. Excluding folders which only contain system files reduces the index size and improves performance, so spend the time to blacklist any locations you’ll never need to search.
With the configuration complete and the index built, you can now press Win+S to search all the indexed files on your PC. You should find many more results display, compared with the libraries-only search of previous Windows 10 releases.
Microsoft Power Bi is a business analytics tool that helps to formulate strategies and commercial reports. Users often encounter Power Bi binding errors. If you are one of them, do not worry. We have brought you a guide to fix this error.
How to deal with the Power BI Binding error
There are two easy ways to get rid of this Power Bi binding error. You can use each of these two.
1. Try Debugging
Debug Visual Visual debugging helps to get rid of Power Bi Binding error. If you can’t find the debug visual in the visualizations tab, please enable it by going into Power Bi settings.
Upgrade NodeJS If you are facing an error that says ‘Pbiviz’ command not found then run Pbiviz in terminal’s command line. If you do not see help screen after running it, it is due to an incorrect or older version of NodesJS. Upgrade your NodeJS to NodesJs version 4.0 or above.
Reinstall SSL Certificates If you are getting an error that says ‘Can’t connect visual server’, please make sure that your SSL certificates are valid and properly installed.
This error is usually caused if the column names are changed in the wrong way.
Solution
Binding Error of Visual data can be fixed by avoiding ‘&’ variable. Many users report that the error in visual data is due to this variable in table visuals.
Power Bi binding error is quite frustrating for most users. Nevertheless, it can easily be resolved in a very short time. Also by using the above-mentioned ways, you can tackle almost all common errors regarding Microsoft Power Bi.
Microsoft Outlook 2016 does not support manual setup for an Exchange account directly from the add accounts interface. The add account now has only two options, i.e. Outlook.com or Exchange ActiveSync compatible service or POP or IMAP. While you can add the Exchange account directly from the Outlook app’s Add account section, Outlook client does not support manual setup for exchange.
In this article, we have created a detailed guide to help you resolve Outlook 2016 does not support manual setup for exchange problem.
How do I set up my Exchange email in Outlook 2016?
1. Setup Exchange for Outlook Manually
Press Windows Key + R to open Run.
Type control and click OK.
In the Control Panel, search for Mail.
Click on “Mail (Microsoft Outlook 2016) (32-bit)” option.
In the pop-up window, click on Show Profiles button under the Profiles section.
Click on the Add button.
Enter a name for your profile and click OK.
Select “Manual setup or additional server types” option and click Next.
Select “Microsoft Exchange Server or compatible Services” option and click Next.
Now enter the Server Settings as follow: Server: outlook.office365.com User Name: Your Office 365 complete email address
Click More Settings.
Open the Security tab.
Uncheck “Always prompt for logon credentials” under User Identification.
Click the drop-down menu under “Logon Network Security” and select “Anonymous Authentication“.
Click OK to save the changes.
Open the Connection tab.
Check the “Connect to Microsoft Exchange using HTTP” option.
Click on Exchange Proxy Settings and enter the following details:
Use this URL to connect to my proxy server for Exchange – outlook.office365.com.
Check “Connect using SSL Only” box. Then, check “On fast networks, connect using HTTP first, then connect using TCP/IP ” box. Check “On slow networks, connect using HTTP first, then connect using TCP/IP” box.
Under the Proxy Authentication, select Basic Authentication.
Click OK to save the changes.
Click Next. In the Window Security window, enter your Office 365 email address and password. Also, check “Remember my credentials” box.
Click Finish.
Click OK when the “You must restart Outlook for these changes to take effect” window appears.
Close and relaunch Outlookclient. Outlook will automatically load the profile and ask you to enter the password to log in.
That’s it. You have successfully added your Exchange account manually for Outlook.
Sometimes, while trying to connect with a 32-bit access database from Power BI-64bit Dekstop, you may encounter not registered error. The error can occur with different messages depending on the user. The Power Bi error the provider is not registered can also occur when refreshing on service as reported by the users in the Power Bi community forum.
I built a report using PBI Desktop – the source is an Excel file on a public website (not OneDrive). When I publish it and then try to use the Power BI site to refresh the dataset, I get this error: Data source errorExcel Workbook: The ‘Microsoft.ACE.OLEDB.12.0’ provider is not registered on the local machine. The 64-bit version of the Access Database Engine 2010 Access Database Engine OLEDB provider is required to connect to read this type of file
Follow the steps in this article to fix Power Bi error the provider is not registered issues with Power Bi desktop and service.
How to fix Power Bi error the provider is not registered
1. Install the 64-bit version of the Microsoft Access Database Engine
If the error specifically states issues with the Microsoft Access Database Engine 2010 and asks you to install the 64-bit version of the software, then do the following.
Go to Microsoft Access Database Engine 2010 Redistributable page.
Select the language and click the Download button.
Install the software on the machine where Power Bi is installed.
After the software is installed, try to connect access DB from the Power BI desktop. Check if installing the 64-bit version of the software has resolved the error.
Install the app and check if the not registered Power Bi error is resolved.
4. Other Solutions to Try
Power Bi doesn’t support ApiKeyName. So, if you are trying to use ApiKeyname with Power Bi service, you may want to switch to basic authentication and try to refresh again.
Verify your Excel file format and make sure you are using .xlsx or .xlsm file type. Also, make sure that the file size is under 1 GB. If the file format is not in the aforementioned file type, make sure you change it and republish the file.
Conclusion
We have tried to include all the possible solutions to fix Power Bi error the user is not registered by the provider in this article. Do let us know which one worked for you in the comments.
Many users encountered an interesting option in Google Chrome. It is a button beside the bookmark star in the right part of the address bar.
If you hover over it, the message “this page wants to install a service handler” will appear. Very few people know what that means. One user asked the following question on the official Google forum:
why is gmail requesting to install a service handler?
In this case, we can say that Google Chrome is making the request and not Gmail.
But what does this button stands for? In this article, we will explain what it means and how to disable or enable it.
What is this page that wants to install a service handler message?
When you open a page, some links can open certain programs. These links are called logs and they use handlers as programs. For example, web services, such as Gmail and Google Calendar use handlers.
When you click on the button, it will show you a small box with three options: Use, No, and Ignore. The Ignore option is set as default.
If you click on Manage handler settings, it will take you to the Privacy section of the Chrome settings.
It is worth mentioning that “this page wants to install a service handler” message can be ignored. There’s no danger to your computer or your privacy.
Still, if you want to disable or enable the option, follow the steps below.
1. Disable the option
Type chrome://settings/content in the address bar.
Go to Handlers.
Choose Do not allow any site to handle protocols.
2. Enable the option
Follow the same steps to open Handlers, but choose Allow sites to ask to become default handlers for protocols (recommended).
Conclusion
So, there is not much to say about the message “this page wants to install a service handler”. It is just a simple option in Google Chrome regarding some actions in your email client.
You can enable, disable, or simply ignore the option. It is entirely up to you.
Firefox is usually the best replacement for users who are troubled by Chrome. However, Mozilla Firefox isn’t based on Chromium and thus it might have limitations. There are other efficient browsers that have all the Chrome features, plus integrated apps and high security. The one we recommend is Opera One.
Did our explanations help you? What do you do when the “this page wants to install a service handler” message appears? Do let us know in the comments section below!
Windows 10 has a built-in Disk Cleanup utility that lets you maintain the disk by removing unwanted files from the hard drive. Sometimes, while running the Disk Cleanup utility, it may get stuck while scanning or cleaning up the files.
Windows 10 freeing up space stuck is a common issue as users with similar issues are looking for help in the Microsoft Community Forums.
Windows “free up space” stuck on cleaning up windows update files – was this ever resolved?this yet another botched feature from Msft? I see a lot of older questions about this but no real answers and obviously Msft has done nothing to address the problem they created. This is on a W10 machine updated from W7. I’ve tried troubleshooting W update but that does nothing
Follow the troubleshooting tips in this article to fix the issue in your Windows computer.
What can I do when Free Up Space is stuck in Windows 10?
1. Turn off Storage Sense
Click on Start and select Settings.
Click on System.
From the left pane, click on Storage.
Scroll down to Storage Sense section.
Turn off Storage Sense if it is turned on.
When turned on, Storage Sense allows the Windows to automatically free up space by deleting unwanted files. However, at times it may create conflict with the Disk Cleanup utility.
Try to run the Disk Cleanup tool manually after disabling Storage Sense and check if the issue is resolved.
If the issue persists, run the built-in System File Checker utility to scan for system file corruption and fixes.
Type cmd in the search bar.
Right-click on Command Prompt and select Run as Administrator.
In the Command Prompt type, the following command and press Enter. sfc /scannow
Wait for the System File Checker to scan the system and fix any issues.
Reboot the system and check for any improvements.
If this option doesn’t seem to work out for you, there is specialized repair software. These tools will run deep scans on your PC and fix the corrupted files automatically.
4. Manually Delete Windows Update Files
If the Windows 10 Disk Cleanup utility is stuck while trying to clean Windows 10 update files, you can abort the current cleanup process and try to delete the files manually.
A major reason why your Epson projector won’t turn off lies in its configuration. This can be a minor problem and it’s not as serious as when your projector is not showing computer screen.
Nevertheless, this can be an issue and cause some inconvenience along the way, so it’s important to fix it, and this guide will show you how to properly do it.
Why won’t my Epson projector turn off?
You’re not turning it off properly. Some models require you to press the Power button twice to turn off.
Temporary glitches with the projector can cause this problem.
Sometimes outdated firmware can cause this issue on your projector.
In the worst-case scenario, hardware damage can cause this issue.
How do I turn off my Epson projector?
1. Double-press the Power button
Some projectors are configured to avoid accidental power-offs/shutdown and require the users to press the Power key or the power button on the remote twice to turn off.
So, if you haven’t tried, already, try to press the Power button on the projector or on the remote twice and check if that helps.
If that doesn’t work, press and hold the power button on the projector for 30 sec to turn off the projector forcefully.
Forcing your project by long-pressing the power key won’t have any adverse effects.
2. Force shutdown the projector
If the issue persists, to diagnose the projector you need to reboot it again. To do that, you probably need to force turn off the projector by pulling the power plug from the projector.
While this process should not have any adverse on your projector, do it at your own risk.
Once the projector is off and you have pulled off all the plugs, make sure you let the projector lamp/bulb cool down for about 30 minutes.
After 30 minutes, turn on the projector and check if you can turn it off using the power button.
If the projector is turning off normally, you need not do anything else as it was a temporary glitch.
If the issue persists, it is possible that the projector has internal hardware issues. Contact the projector maker to get better troubleshooting ideas for your projector.
Check if the projector has any pending firmware updates which may include bug fixes. So, try to update the projector to the latest version of the firmware available and check for any improvements.
You can perform the firmware update on your own using the computer or send it to the projector manufacturer’s authorized dealer. The failed projector firmware update is not covered under warranty. So do it at your own risk.
These are some of the solutions that you can try if the Epson projector won’t turn off. Most of these solutions are general, so they should work on other brands as well.
Many users reported a different issue and stated that their projector is not turning on. This is a more serious issue, and we covered it in detail in a separate guide.
What solution did you use to fix this problem? Share it with us in the comments section below.
The computing sector has seen its fair share of programming languages ever since the advent of modern computer decades back. However, not all have survived to this day though what applies to all languages is that they were built to a purpose.
Most were a success too until changes in technology or people’s approach towards computers forced the advent of new programming languages.
As things stand at the moment, the entire computing landscape can be described by a handful of platforms. Needless to say, focus turned towards programming languages that could support the development of applications compatible with most platforms, if not all.
Mentioned here are a few such programming languages that are well suited for writing cross-platform applications.
What also needs to be mentioned here is that there is no one programming language that can be deemed the best here. Rather, it depends on the project on hand which dictates the sort of programming language to be used.
What’s the best cross-platform GUI language?
C#
If its performance that happens to be the primary criteria, then C# is one of the best languages you can use to code your app. For instance, if the app has to do with image manipulation and/or audio/video processing, then it’s almost imperative that you go for C# for the code work.
Thanks to the various frameworks, you can use C# on a wide range of platforms.
Here’s a list of frameworks for specific platforms:
.NET core – used for Linux, Windows, Mac
Unity – used for game development
Xamarin – Used for native mobile apps
C/ C++
This is another powerful language that can be used to create a wide variety of apps, both basic as well as those with higher performance rating.
However, you will need to use Android NDK to make the code suitable for use on Android while a Swift wrapper will make the code iOS ready.
The great thing about C++ is that you can write and compile it any platform, but in order to use the compiled application, you’ll need to use certain wrappers.
If you need to have an app ready really fast, JavaScript should be your best bet. With React Native, a JavaScript framework, you can make the app suited for use on both Android and iOS.
This is possible thanks to React Native using the same basic UI elements as can be found on both iOS and Android. This will also make the app have the look and feel as native iOS and Android apps.
While JavaScript can allow you to create web apps, you’ll still require some knowledge of HTML/CSS in order to create a GUI.
Python
If it’s a simple app that you are working on then Python can be the best coding choice. Python again is one of the simplest languages to code, which means you can get your job done really fast if you have a talented team at your disposal.
With tools such as PyMob, you can convert the Python code into the source code used for other platforms.
Again, it must be mentioned the choice of programming language to be used has a lot to do with the type of project you are faced with. Nonetheless, the above can be a healthy guide for you to get started.
Each language has its own set of pros and cons and it is upon the developer to make his choice depending on what exactly is the requirement.
Meanwhile, here are some related resources for you to browse.
The Radeon Software: Host Application has stopped working error arises for some users with AMD Radeon graphics cards. That error message generally appears when users play games, but there are other instances of it.
The problem was widely reported after a driver update, with AMD users across the globe reporting critical issues with it, which sometimes even led to a crash. So, let’s find out all about it.
Why did my Radeon software stop working?
Here are a few reasons you may get the radeonsettings.exe application error:
A buggy driver update: Since the problem was widely reported by many at the same time, it’s likely a bug in the driver to blame.
Corrupt user profile: In some cases, it was a corrupt user profile that triggered the crash, and creating a new one did the trick.
High CPU usage: Though an after-effect of the update, the resulting high CPU usage when running the Radeon software could also lead to the error.
What can I do if Radeon Software Host Application has stopped working?
Before we start with the slightly complex changes, try these quick ones:
Restart the PC and check whether the crash takes place again. In many cases, it was a one-time thing.
Check the computer’s temperature and take the necessary measures to reduce overheating.
Make sure the PC is not overclocked.
If these don’t work, move to the solutions listed next.
1. Terminate processes in the Task Manager
Press Ctrl + Shift + Esc to open the Task Manager.
Select the Radeon Host Application process and click End task.
Similarly, terminate the Radeon Desktop Overlay process here.
One of the simplest ways to get things up and running when you have the Radeon Software Host application has stopped working error is to terminate both the Radeon processes in the Task Manager. You can then relaunch the program.
2. Reinstall the driver
Press Windows + X to open the Power User menu, and select Device Manager.
Expand the Display adapters entry, right-click on the graphics adapter, and choose Properties.
Go to the Drivers tab, and note the value next to Driver Version.
Now, right-click on the AMD adapter, and choose Uninstall device.
Untick the checkbox for Attempt to remove the driver for this device and click Uninstall.
Once done, restart the computer and again launch the Device Manager.
Right-click on the AMD adapter, and select Properties.
Head to the Drivers tab and check whether the previous version is now installed. If not, you may have to repeat the steps a few times.
A user suggested reinstalling the previous graphics driver version when you persistently get the Radeon Software Host application has stopped working error. Remember, it may take a couple of attempts, and make sure to restart the computer after uninstalling the current driver.
For this purpose, you can manage your PC drivers with a reliable driver updating tool that will find graphics driver and install them right away.
3. Clean install the latest Radeon Graphics Card Driver
First, download the installer for the latest AMD graphics card driver from AMD Drivers and Support.
Press Windows + R to open Run, type services.msc, and hit Enter.
Double-click on the Windows Update service to open its Properties.
Select Disabled from the Startup type dropdown menu, and click the Stop button.
Click the Apply and OK buttons.
Press Windows + E to open File Explorer, paste the following path in the address bar, and then hit Enter:C:\AMD
Press Ctrl + A to select all the files here and then hit Delete to clear them.
Again, press Windows + R to open Run, type appwiz.cpl, and hit Enter.
Select the AMD Software from the list and click Uninstall.
Follow the on-screen instructions to complete the process.
Similarly, remove any other AMD software listed here.
Press Windows + R to open Run, type msconfig, and click OK.
Navigate to the Boot tab, select Safe boot, and then choose Minimal under it.
Click on Apply and OK.
Click Restart in the prompt that appears.
There shouldn’t be any third-party antivirus utilities running in Safe Mode. However, double-check that third-party antivirus utilities are disabled.
Uninstall the Radeon Graphics Card driver with Display Driver Uninstaller, which will thoroughly remove the driver. To do that, select the AMD option on DDU’s drop-down menu, and click the Clean and restart button.
Now, install the AMD driver you downloaded earlier using the setup.
Finally, relaunch System Configuration, uncheck the Safe boot option, click Apply and OK, and restart the computer.
That’s it! Removing the problematic driver and installing the latest one using the DDU should get things running when you are continuously getting the Radeon Software Host application has stopped working error.
Press Windows + I to open Settings, and click on Accounts.
Go to the Family & other users tab, and click on Add someone else to this PC on the right.
Click on I don’t have this person’s sign-in information.
Select the Add a user without a Microsoft account option.
Enter the account name and password, and click Next.
Once the account is created, choose it, and click on Change account type.
Select Administrator from the dropdown menu, and click on OK.
If the solutions listed previously didn’t work and you still get Radeon Software Host application has stopped working message, creating a new user profile should do the trick. After creating the new account, transfer the data between the two.
Do I need Radeon Settings Host application on startup?
The Radeon Settings Host Application, though helps in optimizing the performance of the graphics card, is not an essential requirement. So, you can disable the startup app.
Disabling it won’t have any untoward effect, but the gaming performance might be slightly affected. For that, you can always check our expert tips to optimize the PC for gaming.
Also, before you leave, check some quick tricks and changes to make Windows faster.
Tell us which fix worked for you in the comments section below.
Windows 10 OS by default comes with the Snipping Tool installed and enabled. However, for some users, the Snipping Tool gets blocked by a software restriction policy.
If you haven’t disabled the tool manually and still getting Windows cannot open this program because it has been prevented by a software restriction policy error, here is how to fix it in Windows 10.
Follow the steps in this article to enable the snipping tool in Windows 10 to fix the Snipping tool blocked by software restrictions policy issue.
Type gpedit.msc and click OK to open the Group Policy Editor.
In the Group Policy Editor, navigate to the following location: User Configuration > Administrative Templates > Windows Components > Tablet PC > Accessories.
From the right-pane, double-click on “Do not allow Snipping Tool to Run“.
In the Properties window, select the Disabled / Not Configured option.
Click Apply and OK to save the changes.
Close the Group Policy Editor and launch the Snipping Tool.
If the error occurs, reboot the system and check again for any improvements.
If you are running an older version of Windows such as Windows 7, you can enable the Snipping Tool feature from the Windows Features On or Off section.
Press Windows Key + R to open Run.
Type control and click OK.
In the Control Panel, click on Programs > Programs and Features.
From the left pane, click on “Turn Windows Features On or Off” link.
In the Windows Features window, scroll down and check the “Tablet PC Options Components” option.
Click OK to save the changes.
Reboot the system and check if the Snipping Tool software restriction error is resolved.
Microsoft has just announced the release of the Windows 10 20H1 build 18965 for Fast Ring Insiders. This is a minor update that introduces a new app restart setting that will give users more control over restarting apps at sign-in. This new setting will be turned off by default, but turning it on will automatically save your restartable apps when you sign out and then restart them after you sign in.
Microsoft is also rolling out some UI changes for its Feedback Hub app that are based on Insider Feedback, and the Windows Insider Achievements page has also been refreshed to make achievements more discoverable. These updates to the Feedback Hub are apparently rolling out to all Fast Ring Insiders, not just those who will install the build 18965 today.
You can learn more about what’s new in this build in the release notes below:
What’s new in Build 18965
Control over restarting apps at sign-in
As some of you already know, apps have the ability to register for restart, which helps in a few situations, including enabling you to get back to what you were doing if you need to restart your PC. Previously this option was tied to the “Use my sign-in info to automatically finish setting up my device” option under Sign-in options in accounts settings. We’ve heard feedback that some of you would prefer more explicit control over when Windows automatically restarts apps that were open when you restart your PC, and with 20H1 we’re bringing that option to you.
Windows now puts you in control with a new app restart setting. When turned on, Windows automatically saves your restartable apps when signing out, restarting, or shutting down Windows, and restarts them next time you sign in. This setting is off by default and you can change it any time in Settings > Accounts > Sign-in options, and can find it by searching for “restart apps” in Start or the search box.
Other updates for Insiders
Feedback Hub updates
The Feedback Hub team has been hard at work lately to bring you some app updates based on your feature requests, and we have a few changes and improvements to share about the latest version that’s currently rolling out to Insiders in the Fast ring.
Feedback Search UI updates
On the Feedback section of the app, you will now be able to more clearly see the differentiation between Problems and Suggestions, with each showing an icon, color, and labels Problem or Suggestion displayed above each feedback entry. We also have updated iconography and displays for Adding similar feedback to problems, upvoting suggestions, and adding comments to feedback.
Adding similar feedback
In the past, Feedback Hub allowed two kinds of participation on feedback: upvoting and adding more details. The notion of voting on Suggestions makes a lot of sense – engineers at Microsoft want to know which features the community wants us to build next, and voting on feature suggestions is a great way to see where your interest lies.
However, voting on Problems was trickier – roblems are not a matter of popularity, and what helps engineers here resolve problems is having clear descriptions of how the issue arose. Feedback is especially helpful if it includes a reproduction of the problem, diagnostics that help our teams pinpoint what went wrong so they can fix issues faster. Voting on the search page often did not provide enough detail as to what was happening, and we saw that few people went into existing feedback to add their personal reproductions of the issues.
With the new Add similar feedback feature, selecting a problem with symptoms that match your own will take you to the feedback form, with the title pre-filled. You edit the title or add your own description to let us know exactly what was happening when you encountered the problem. We’ll already have your category selected to ensure the right feature team sees your feedback, and in our new Similar Feedback section, the feedback you selected will already be selected. As usual, the last step involves optionally adding your own reproduction of the issue or any attachments you like.
Windows Insiders Achievements
We are excited to announce a refresh of the Windows Insider Achievements page. We’ve made achievements more discoverable by moving them from your profile page to their own landing page, and we added additional features that allow you to categorize and track your progress. Be sure to check it out today and begin unlocking badges. We would love to hear your feedback on social media by using the hashtag #Builds4Badges.
The information previously found in your profile (Device ID and User ID) is now located in the settings section of Feedback Hub.
As always, we appreciate your feedback – if you have any suggestions or problems to report, you can share them in the Feedback Hub under Apps > Feedback Hub.
There are also a couple of bug fixes in this build, and Microsoft has fixed an issue that could result in background tasks not working in certain apps. You can learn more about other changes and known issues in this build in our separate post.
With all the news coming out of Gamescom 2019 this week, one question begs an answer; Should Microsoft make an Xbox Phone? Imagine Windows 10 Mobile coming back but with ridiculous specs similar to the Asus ROG Phone 2. But instead of being another attempt at Windows Phone, you use your phone to play Xbox games. No need for game streaming to your phone from the Xbox One, just sign directly into your Xbox Live account from your phone and start playing games.
ASUS ROG Phone 2 (screenshot from Unbox Therapy)
An Xbox Phone is likely an idea that will never come to fruition; instead, Microsoft may look to release their own mobile gaming device similar to the Nintendo Switch. Provided the phone specifications are there, Xbox Phone would be a better choice for gamers if they want to experience Project xCloud and play Xbox games natively, without the need for using another app or mobile operating system. Don’t get me wrong, the Nintendo Switch is a great gaming platform, but I think people would love to have the regular features of a smartphone too.
Even if Windows Phone is dead, Microsoft could decide to release an Android phone with a focus on Microsoft apps. While there are endless rumors about the Surface Phone, it appears doubtful that such a phone would ever be released. Microsoft has made it clear that Windows Phone is dead, as Microsoft continues to push out their apps on Android and iOS. Microsoft wants people playing Xbox games. Microsoft keeps buying developers left and right and makes Xbox more accessible to everyone with Xbox Game Pass Ultimate, Xbox Play Anywhere, and Project xCloud. Microsoft makes it easier to play games on your Windows 10 PC, Xbox One, and your smartphone.
Project xCloud
We’ve seen what Project xCloud can do on Android and iOS, but what if Microsoft could find a way to make happen with an Xbox Phone? While Microsoft already has a patented gaming controller, I believe Microsoft and Xbox could work together and quickly figure out a way to integrate its own unique controller scheme into their own phone. I think Microsoft can figure out a way to make an Xbox Phone without the need to carry around extra accessories.
As we found out with our hands-on comparison of Project xCloud, playing Xbox games on a phone is weird. Personally, I think the logical next step for Microsoft is to make an Xbox Phone. I doubt there are many people out there that want to carry a controller with them any time they want to play games on their phone using Project xCloud. What do you think? Take our poll below