Lcore.exe Network Usage Problems [Fix]

Some gaming peripherals come with a dedicated software that allows you to customize its settings. However, sometimes the software can cause problems on your Windows 10 PC. Users reported high network usage by lcore.exe, and today we’re going to show you how to fix this problem.

Lcore.exe high network usage, how to fix it?

  1. Stop Arx Control
  2. Block Lcore.exe in Windows Firewall
  3. Reinstall the software

Solution 1 – Stop Arx Control

Some Logitech devices support Arx Control feature. This feature allows you to see additional game information on your smartphone or tablet. In addition to showing in game information, this tool also allows you to configure your peripherals. For example, you can change the DPI or use a certain macro simply by using your smartphone. In addition, the application also allows you to monitor your hardware and check the GPU or CPU temperature and usage. The application also allows you to control media playback or to launch certain games with a single tap.

Arx Control is quite useful, but it can increase the network usage of Lcore.exe process. To fix this problem, you need to completely stop Arx Control. After closing Arx Control, network usage of Lcore.exe should come back to normal. Some users are also suggesting to disable Mobile Service in Arx Control tab. After doing that, the issue will be completely resolved.

Solution 2 – Block Lcore.exe in Windows Firewall

If you’re concerned by Lcore.exe network usage, you can block the application from accessing the Internet. To do that, you need to configure your firewall. To block Lcore.exe you need to do the following:

  1. Press Windows Key + S and enter windows firewall. Select Windows Firewall from the list.
    windows firewall
  2. When Windows Firewall opens, click on Advanced settings in the left pane.
    windows firewall advanced settings
  3. Windows Firewall with Advanced Security window will now open. In the left pane, click on Outbound rules.
    Outbound Rules Windows Firewall
  4. In the right pane, click on New Rule.
    Add New outbound rule for Windows Firewall
  5. New Outbound Rule Wizard will now start. Select Program from the list and click Next.
    choose program for outbound rule in Windows Firewall
  6. Select This program path and click Browse button. Now locate and select Lcore.exe. After you’re done, click the Next button.
    choose application for outbound rule windows firewall
  7. Select Block the connection option and click on Next.
    block the connection for outbound rule windows defender
  8. Check Domain, Private and Public and click the Next button.
    make outbound rule apply to domain, private, and public networks
  9. Lastly, enter the Name and Description for the new rule. Once you’re done, click Finish.
    block lcore.exe windows firewall

After doing that, Lcore.exe won’t be able to access Internet anymore. If you’re using a third-party firewall, we advise you to use it instead of Windows Firewall to block this application. It’s worth mentioning that blocking this application can cause certain issues with Logitech software, so keep that in mind.

Solution 3 – Reinstall the software

Finally, if the Arx Control application went rogue for some reason (file corruption, system conflicts, being outdated), we suggest reinstalling it and acquiring the latest iteration from the official support website. Just navigate to Control Panel and remove it from there. You might as well uninstall the driver. After that, just navigate to the official Logitech website and download software again.

If Lcore.exe has high network usage on your PC, you can easily fix that problem simply by disabling Arx Control. If the issue still persists, you might have to completely block Lcore.exe from accessing the Internet.

READ ALSO:

Windows 10/11 can’t find Wi-Fi adapter: 7 quick fixes to use

A Wi-Fi adapter is a device that adds wireless connectivity to your laptop or PC, and can be available as an external USB, PCI or PCI express card, which you plug into a USB port or empty slot on your computer’s motherboard.

The adapter lets you connect to a wireless network whether you’re at home, at the office, or in a public place.

You can use the connection from a Wi-Fi adapter for fast and high quality internet connections, or to access shared files on a network, devices, and documents.

Here are the solutions you can use when Windows 10 can’t find Wi-Fi adapter.

FIX: Windows 10 can’t find Wi-Fi adapter

  1. Troubleshoot network adapter
  2. Update network adapter driver
  3. Roll back the network adapter driver
  4. Temporarily turn off firewalls and any antivirus or malware prevention software
  5. Uninstall the network adapter driver then restart
  6. Reinstall network devices

1. Troubleshoot Network Adapter

This is an automated, built-in Windows tool that finds and fixes common Network Adapter settings issues on your computer. It also checks if adapter’s drivers are updated or not, and give clues on the hardware failures related to it.

Take these steps to run the troubleshooting on Network Adapter and see if it identifies the issue:

  1. Click Start
  2. Go to the search field box and type Troubleshooting
  3. Select Troubleshooting from the search results
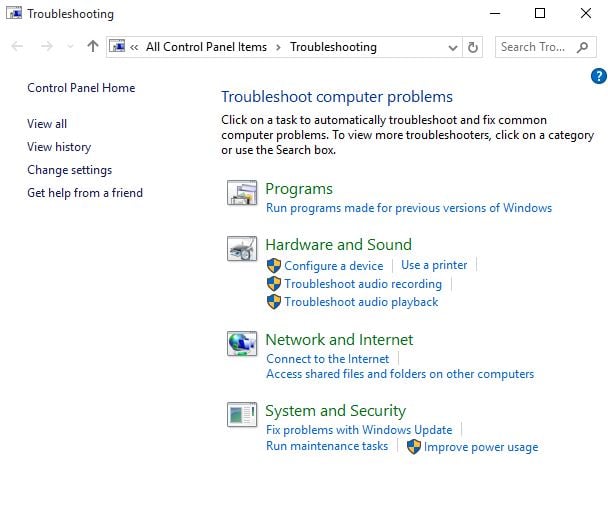
  4. Click View all on the left panecontrol panel troubleshooting
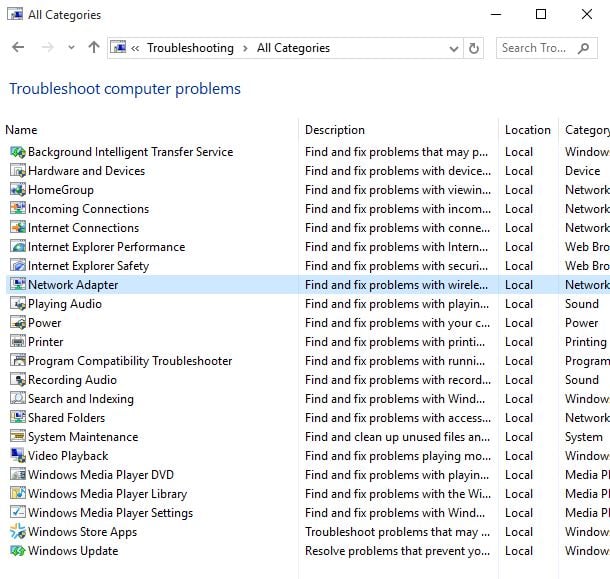
  5. Click Network Adapter
  6. Click Next
  7. The detection process to identify any issues will begin
  8. Select the network adapter to diagnose
network adapter troubleshooting control panel


If that didn’t work, try the next solution.

2. Update network adapter driver

When your network adapter driver is incompatible or outdated, then Windows 10 cannot find Wi-Fi adapter. A recent Windows 10 upgrade driver could have been designed for a previous version of Windows.

Update the adapter driver using these steps:

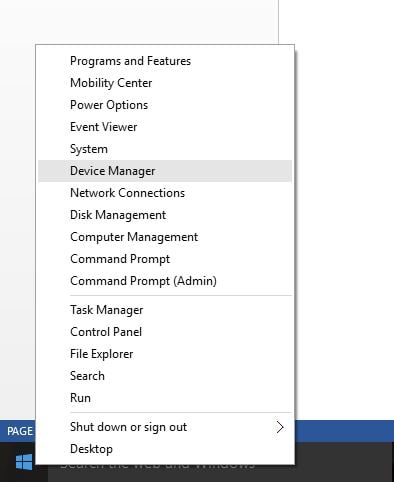
  1. Right click Start
  2. Select Device Manageropen device manager
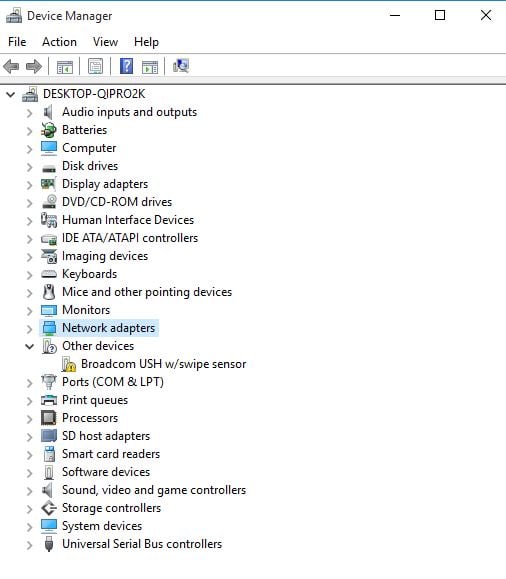
  3. Select Network Adaptersdevice manager network adapters
  4. Click on the network adapter name
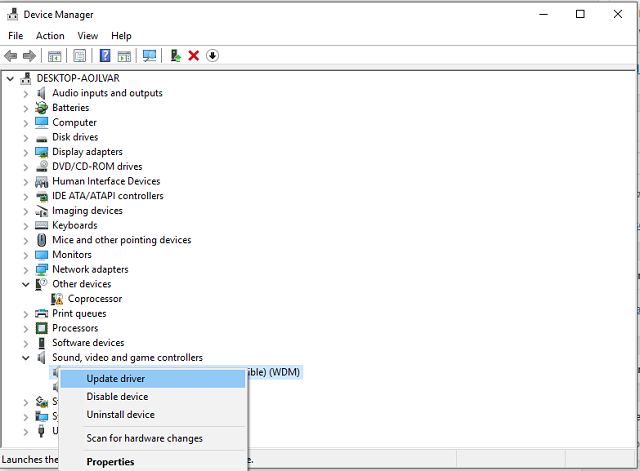
  5. Right click the network adapterupdate network adapter's driver
  6. Select Update driver
  7. Click Search automatically for updated driver software
  8. Once the steps are complete, click Close
  9. After installing the updated driver, click Start>Power>Restart
Note icon NOTE
If Windows doesn’t find a new driver, visit the device’s manufacturer website and download the latest network adapter driver from there.

If your computer cannot connect to the internet, download a driver from a different computer, save it to a USB flash drive, then manually install it on your own computer.

How to manually install the network adapter driver

Depending on the file you downloaded from the manufacturer’s website, do the following:

  1. For a .exe (executable) file, double click on it to run the file then install the drivers
  2. For individual files, check a file with .inf extension and another with .sys extension then do the following:
  3. Go to the search box and type Device Manager
  4. Click Device Manager from the search resultsWindows 10 can’t find Wi-Fi adapter
  5. Select Network adapters and go to the network adapter name (you can also check under Other Devices if yours isn’t listed here)Windows 10 can’t find Wi-Fi adapter
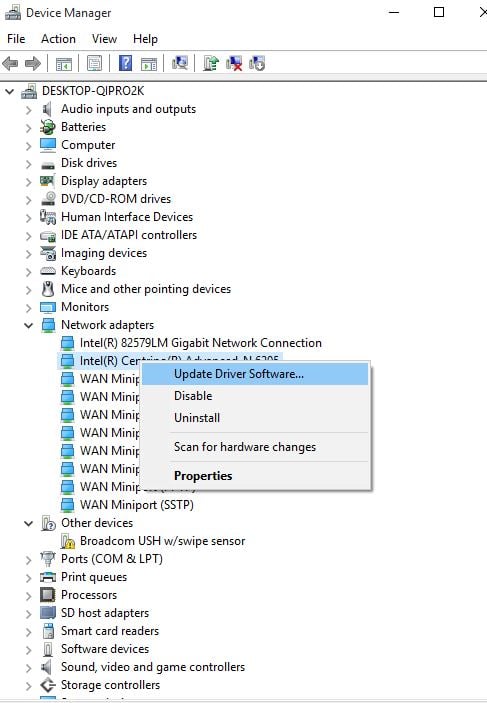
  6. Right click the network adapter and select Update driver softwareWindows 10 can’t find Wi-Fi adapter
  7. Click Browse my computer for driver software
  8. Select Browse then the location where the driver files are stored
  9. Click Ok
  10. Click Next
  11. Once installation is complete, click Close

After installing the updated driver, click Start>Power>Restart

3. Roll back the network adapter driver

If you were previously connected to the internet and installed a new network adapter driver, try to roll it back to a previous version and check if it helps.

Here’s how to do this:

  1. Right click Start
  2. Select Device Managerdevice manager
  3. Select Network Adapters then click on the network adapter name
  4. Right click on the network adapter
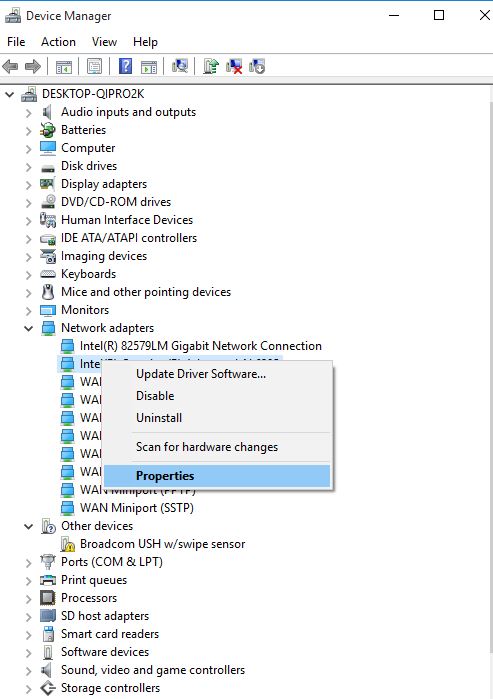
  5. Select Propertieswi-fi network adapter properties
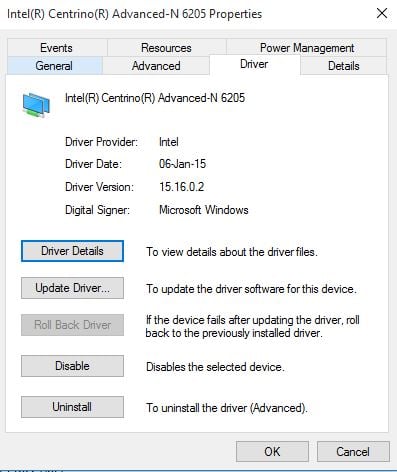
  6. Select Driver tabwi-fi network adapter driver properties
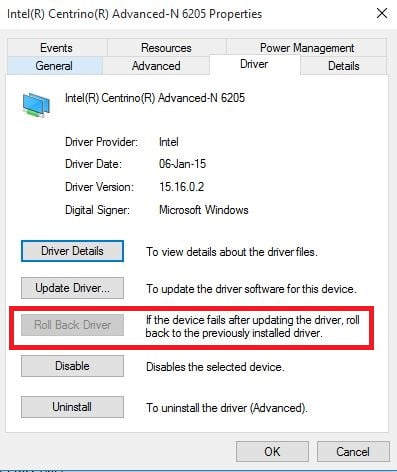
  7. Select Roll Back Driver. If the button is unavailable, then there’s no driver to roll back to.roll back network adapter driver
  8. After rolling back to the previous version of the driver, select Start>Power>Restart
Note icon NOTE
If Windows doesn’t find a new driver, visit the device’s manufacturer website and download the latest network adapter driver from there.

If your computer cannot connect to the internet, download a driver from a different computer, save it to a USB flash drive, then manually install it on your own computer.

4. Temporarily turn off firewalls and any antivirus or malware prevention software

A firewall, antivirus or anti-malware program, may at times prevent you from finding your Wi-Fi adapter. If this is the cause of the issue, turn either of the three off temporarily then try to connect again.

Ensure you turn these programs back on immediately after you’re done to prevent hackers, viruses and worms from damaging your system.

5. Uninstall the network adapter driver then restart

This approach works if your connection was interfered with after a recent update or upgrade. Before uninstalling, ensure you have drivers available as a backup, then visit your PC manufacturer’s website for the latest driver. You need to know the manufacturer, and model name or number to do this.

Here are the steps to take:

  1. Right click Start
  2. Select Device Manager
  3. Click Network adapters then the adapter namenetwork adapter device manager
  4. Right click on the network adapter
  5. Click Uninstall device>Delete the driver software for this device check box>Uninstall
  6. Once you uninstall the driver, click Start>Power>Restart

After your computer restarts, Windows will automatically search for and install the network adapter driver. If it doesn’t, try installing the backup driver you saved prior to uninstalling.

6. Reinstall network devices

This should be used as a final resort, and can help solve connection problems after an upgrade to Windows 10, plus fix issues where you can connect to the internet but not to shared network drives.

Do the following to use network reset and reinstall network devices:

  1. Click Start
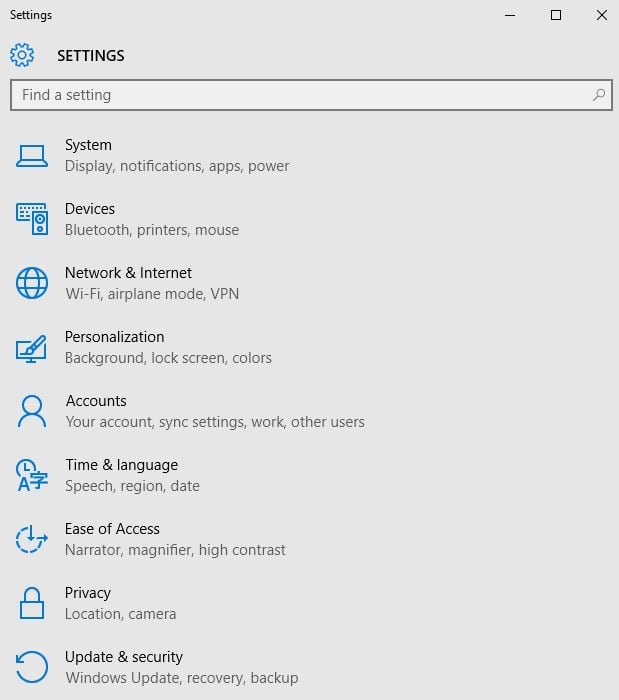
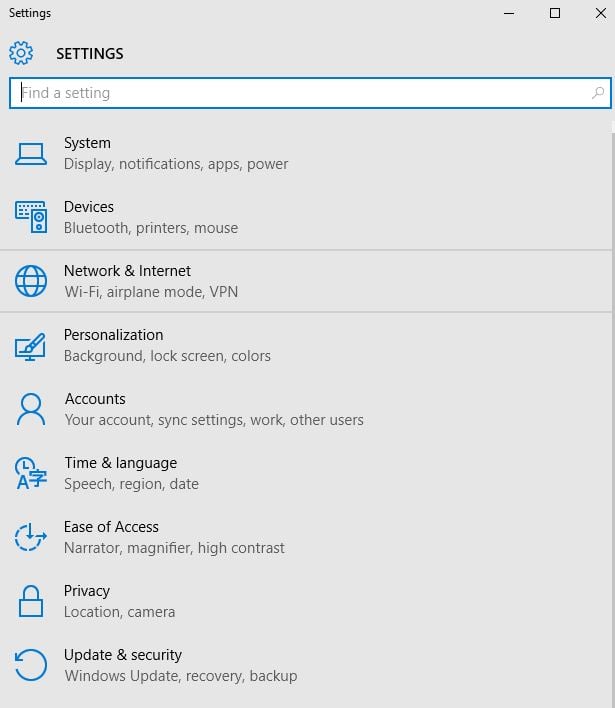
  2. Select Settingssettings windows 10
  3. Click Network & Internetnetwork & internet settings windows 10
  4. Select Status
  5. Click Network Reset
  6. In the network reset screen, select Reset Now then click Yes to confirm

Wait for your computer to restart and check if it fixes the problem.

Let us know if any of the solutions we shared worked for you.

Remove default apps from Windows 10/11 Image with this script

Windows 10 comes with a series of default apps that cannot be deleted. Some of these apps include the Xbox app, OneNote, the apps for Mail, Music, Movies and TV and Calendar, Groove Music, etc.

The problem is that not all users need these apps and they end up occupying space. Having the option to quickly delete them would make many users happy.

Unfortunately, when you install the next major OS version on your computer, these unwanted apps and programs return alongside other bloatware.

The good news that you can avoid bloatware by downloading the Windows 10 Bloatware-free edition. If you prefer tweaking your PC, you can also use dedicated PowerShell scripts to delete the unwanted apps.

Remove Windows 10 bloatware with this PowerShell script

One resourceful Reddit user recently published an interesting script that allows Fall Creators Update users to quickly and easily remove default apps.

First, run Powershell in administrator mode, and then launch the command Set-ExecutionPolicy RemoteSigned to run your own scripts.
Save your script with a .ps1 extension, and then simply execute it.

Here are the instructions to save:

$AppsList = ‘Microsoft.3DBuilder’,
‘Microsoft.BingFinance’,
‘Microsoft.BingNews’,
‘Microsoft.BingSports’,
‘Microsoft.MicrosoftSolitaireCollection’,
‘Microsoft.People’,
‘Microsoft.Windows.Photos’,
‘Microsoft.WindowsCamera’,
‘microsoft.windowscommunicationsapps’,
‘Microsoft.WindowsPhone’,
‘Microsoft.WindowsSoundRecorder’,
‘Microsoft.XboxApp’,
‘Microsoft.ZuneMusic’,
‘Microsoft.ZuneVideo’,
‘Microsoft.Getstarted’,
‘Microsoft.WindowsFeedbackHub’,
‘Microsoft.XboxIdentityProvider’,
‘Microsoft.MicrosoftOfficeHub’

ForEach ($App in $AppsList){
$PackageFullName = (Get-AppxPackage $App).PackageFullName
$ProPackageFullName = (Get-AppxProvisionedPackage -online | where {$_.Displayname -eq $App}).PackageName
write-host $PackageFullName
Write-Host $ProPackageFullName
if ($PackageFullName){
Write-Host “Removing Package: $App”
remove-AppxPackage -package $PackageFullName
}
else{
Write-Host “Unable to find package: $App”
}
if ($ProPackageFullName){
Write-Host “Removing Provisioned Package: $ProPackageFullName”
Remove-AppxProvisionedPackage -online -packagename $ProPackageFullName
}
else{
Write-Host “Unable to find provisioned package: $App”
}
}

You can also use another dedicated PowerShell script available on GitHub. Windows10Debloater removes bloatware and disables Cortana without breaking the search function. Albeit, this is quite a safe procedure, we still suggest creating a restore point on your PC prior to running the script.

RELATED STORIES TO CHECK OUT:

How to download Windows 10 Icon Packs

Even if Windows 8, Windows 10 look much better than older versions of Windows, some of us still want to customize our devices to make them look different than the default layout.

One way to do this is to change the themes, change fonts or other elements. A great way to customize our Windows 8, Windows 10 computers is to change the default icons and add some custom designs.

While in the past this was easily done with icon packs and customization software, in Windows 8, Windows 10, these programs are no longer available.

There might be some Transformation Packs that work on Windows 10, Windows 8, but I don’t recommend using them, as they are oftentimes riddled with bugs and they make your system unstable.

How to download icon packs for Windows and replace default Windows icons?

Customizing your Windows 10 installation is rather simple with icon packs, and in this article we’re going to cover the following topics:

  • Windows 10 folder icons pack – The best way to change your icons is to download an icons pack. In this article we’ll show you in detail how to download an icon pack, extract it and change your icons.
  • Icon pack Windows replacement – Using an icon pack you can easily replace almost all Windows icons. However, if you want to replace all system icons, you might want to use a third-party application to do so.
  • Windows icons too big, too small – One problem that many users encountered is that their icons are too big or too small. We already wrote an article on how to fix large icons in Windows 10, so be sure to check it out.
  • Windows icons not showing, flashing – According to some users, their icons aren’t showing. We already covered how to fix missing icons on Windows 10, so you might want to check that article for detailed solutions.
  • Windows icons white boxes – This is another issue caused by missing icon files. Many users reported that they are getting white boxes instead of icons on their PC.
  • Windows icons won’t open, load – Another problem that users reported is the inability to open or load their icons. This issue can be caused by missing icon files, but you can easily replace them.
  • Windows icons rearrange themselves – Several users reported that icons keep rearranging themselves. This is a minor problem and it can be fixed by changing your settings.
  • Windows icons upside down – This is an unusual problem that can sometimes appear. According to users, sometimes their icons can be upside down. This is most likely related to your graphics configuration.
  • Windows Taskbar icons missing, not showing – Several users reported that icons on their PC are missing or not showing at all. However, you should be able to fix that issue by following our guide.

Downloading icons for Windows 10, Windows 8

Icon files are found pretty much everywhere. Also, you can download entire icon packs that are dedicated for using with other programs and select from them the .ico files.

These are the icon files which can be swapped for the default ones. I’ll give you a few examples of icon packs, but there are lots other on the web and all you need to do is search for them.

IconArchive, IconFinder and FindIcons are the biggest icon databases on the web, and they store pretty much any icon you might want. These icon search engines are your best bet in finding any particular icon you want.

To find a certain icon, you just have to follow these simple steps:

  1. Visit any website that hosts icons.
  2. In the search bar enter the desired term.
    Windows icons white boxes
  3. Now you’ll see the list of icons that meet your search criteria. Select the desired icon.
    Windows icons won't open
  4. You should be presented with several download options. Select to download your icon in .ico format.
    Windows icons rearrange themselves

As you can see, downloading new icons is rather simple, and many website support various filters allowing you to sort your icons by color or size.

Finding new icons is rather simple, but if you want to change multiple icons on your PC, you’ll have to download each icon individually.

Apart from searching icon websites, users can download icon packs and extract the icon files.

I’ll show you in a few minutes how to change the default icons with .ico or .icl files. For now, here are a few icon packs that you might want to take a look at:

Keep in mind that other image files do not work as icon files, and if you want to create your own icons from images, you might want to look for some image converters that offer this option.

We already covered some of the best tools to convert icons in Windows 10, so be sure to check them out.

If you try to add a regular image as an icon, Windows 8, Windows 10 will not let you, so be sure to keep this in mind when you are downloading icon packs.

Some of them have other formats because they are used by dedicated programs that install them on other versions of Windows.

If you download an icon pack, all icons will be placed inside of a .zip archive. Windows can work with zip archives without using a third-party solution, so there’s no need to install anything.

However, if you frequently work with .zip and other archives, we recently wrote an article on best file archivers for Windows, so be sure to check it out.

Once you download an icon pack, you just need to do the following:

  1. Double click the downloaded archive to open it.
    Windows icons white boxes
  2. Once the archive opens, simply extract all the files to the desired location. You can also quickly extract files simply by dragging and dropping them.

Using an icon pack has its advantages, since you’ll download multiple icons in an archive, but before you can actually use them, you’ll need to extract the files by following the instructions above.


Changing the Default Icons

Changing an icon is very simple, and you can do it in just a couple of clicks. To change an icon of any application or shortcut, you just need to do the following:

  1. Locate the shortcut or application whose icon you wish to change and right click it. Choose Properties from the menu.
    Windows 10 folder icons pack
  2. When Properties window opens, you need to click on Change Icon button.
    Icon pack Windows replacement
  3. When Change Icon window opens click on Browse button.
    Windows icons too big
  4. Now select the folder that has your downloaded icons.
  5. Once you go back to Change Icon window the list of available icons should be updated. Now select the desired icon and click on OK.
    Windows icons not showing

After doing that, the shortcut icon should be updated.

You can also change the icon for any folder on your PC. This process is slightly different for folders, but you can change the icon by doing the following:

  1. Right click the directory whose icon you wish to change. Choose Properties from the menu.
    Windows 10 folder icons pack
  2. Navigate to Customize tab. Now in the Folder icons section click on Change Icon button.
    Icon pack Windows replacement
  3. List of icons will now appear. If you want to use a custom icon, click on Browse button.
    Windows icons too small
  4. Select the desired icon. Now go back to Change Icon window and click on OK to save changes.
    Windows icons flashing

Keep in mind that these changes only apply for the file or folder you selected, so if you want to change multiple icons, you must do it one at a time.

Changing the icons is one of the easiest and simplest ways to customize Windows 10, and after reading our guide you should be able to change any icon on your PC with ease.


READ ALSO:

Windows 10 Creators update causes battery drain [Fix]

For Windows-powered portable devices, the battery endurance has always been a touchy subject. Some users were satisfied, others, well, not so much. With Windows 10 Creators Update, the battery life should be improved or at least you’ll get to be more in control over main battery consumers.

However, it seems that some users encountered sudden battery leaks or reduced battery life after the upgrade. We certainly hope that some of the upcoming patches will address that. But, while we are at it, there are ways to troubleshoot battery issues and, at least temporarily, resolve battery drains.

So, if you have any battery issues in the Creators Update, look no further. We prepared a few workarounds below.

How to fix battery drain on Windows 10 Creators Update

  1. Check your Power plan
  2. Enable Battery Saver
  3. Disable large consumers
  4. Use 3rd-party tool to improve battery life
  5. Update drivers
  6. Reinstall Windows 10

1. Check your Power plan

The first thing you should check are Power Settings. On some occasions, Windows Update may change your custom settings. For example, your Power plan may be changed to High Performance instead of Power saver. And that is not only related to brightness or display settings, but covers a lot of advanced power options that impact battery life drastically.

So, what you need to do is to retrieve your old settings before moving on with additional steps. And this is how to do that:

  1. Right-click on Battery icon in the Notification area and open Power Options.
  2. Now, you can select either Balanced or Power saver plan.
  3. Select one and open Change plan settings.
  4. Click on Restore default settings for this plan.battery power plan
  5. When prompted, click Yes and that should restore your settings to default.

Moreover, you can change the Advanced power settings to decrease battery drainage.

2. Enable Battery Saver

Another feature that is important but can somehow get displaced after the update is Battery Saver. Namely, this feature was one of the notable changes years ago. Battery Saver is Windows 10’s built-in feature that helps you manage your battery consumption while monitoring apps/programs.

This is how to enable Battery Saver:

  1. Open Settings app.
  2. Click on System.
  3. Select Battery Saver.battery settings
  4. Here you can turn Battery Saver on immediately or set an automatic start when battery level falls below designated percentage.
  5. Save your settings.

This should improve your battery life, at least marginally. But, it’s a good start, nonetheless.

3. Disable large consumers

Besides Battery Saver, you can use a specific tool that analyzes your system and list the programs/apps that are the largest consumers. That should give you the valuable insight and help you reduce the battery drain. Moreover, you can set the monitoring from last 24 hours up to 1 week.

With that detailed information, you’ll be able to find the possible culprits for battery drainage and stop their respective processes.

This is how you can use ‘Battery Use’ to your advantage:

  1. Open Settings app.
  2. Open System.
  3. Select Battery Saver.
  4. Click on Battery Use.
  5. There you can prevent the apps from working in the background. Have in mind that this works only with Windows 10 universal apps and not with the standard, desktop programs.
  6. Scroll down to find a list of apps and programs usage of battery.
  7. Click on the individual app to access the detailed application of battery usage.

That should give you enough insight to find and terminate power-hogging apps and programs.

4. Use 3rd-party tool to improve battery life

If you’re not satisfied with the built-in power-saving and monitoring tool, you can always try 3rd-party alternatives. Some of those are quite advanced in real-time monitoring, while others will control your system and offer automatic power saving features. Some OEMs offer their own solutions, like Samsung Life Extender, so if you own a Samsung laptop, you’re already good to go.

We have an article with a detailed explanation of tools that should help you to drastically reduce battery drainage. You can find it here.

5. Update drivers

One thing we can’t stress enough is an impact a faulty driver can have on all around PC performance. And, in this case, the unstoppable battery drainage. So, make sure that all of your drivers are up-to-date and functioning.

You can check and update your drivers this way:

  1. Right-click the Start menu and open the Device Manager.
  2. If you find any drivers with an exclamation point, make sure to update them. Right-click and choose Update Driverdevice manager
  3. However, if you’re unable to update drivers trough Windows Update, you should right-click the faulty device and open Properties.
  4. Now, open Details list and locate DriversId in the drop-down menu.
  5. Copy the first line of the driver’s identification and paste it in a web browser.
  6. Once you’ve found appropriate driver, download and install it.

We strongly advise you to use only trusted, official drivers issued by manufacturers. That should keep you off the malware and other possible issues.

6. Reinstall Windows 10

If you’re not sure what’s the culprit for this issue after all previous steps, your best bet to resolve the battery drainage is reinstallation. Namely, if your hardware (in this case battery) is in the good condition and the problems started after an upgrade to the Creators Update, you should easily resolve it by reinstalling the system and starting from the scratch.

To reinstall the system you’ll need the Media Creation Tool and USB/DVD for installation setup. You can get Media Creation tool here.

If you’re not sure how to perform a reinstallation, we have an explanatory article with the detailed step-by-step procedure. You can find it here.

After going through the list of workarounds, you should be relieved of any battery issues inflicted by the latest update. But, if there’s something you’ll add to the list of solutions or maybe a question regarding the subject, we look forward to hearing from you.

The comments section is just below.

RELATED STORIES YOU NEED TO CHECK OUT:

Windows 10 20H1 build 18875 fixes screen flickering issues

Windows 10 20H1 build is now available to Fast and Skip Ahead Insiders. As a quick reminder, Microsoft is merging these two Insiders rings starting next month.

This means that Fast and Skip Ahead Insiders will receive the same preview builds in the future. Slow and Release Preview rings can still access Windows 10 May 2019 Update builds until Microsoft release the OS to the general public.

The company plans to launch the next feature update later this year. However, 20H1 is expected to launch in the first half of 2020.

Now, getting back to Windows 10 build 18875, let’s have a look at the list of general fixes and improvements. 

Windows 10 build 18875 improvements and fixes

1. Lock Screen freezing issues fixed

Microsoft finally fixed the lock screen freezing issues that were affecting Windows 10 PCs. Previously, users reported experiencing this bug while interacting with the touch keyboard and switching keyboard layouts.

2. Settings crashing bug fix

Windows 10 users reported quite frequently that the Settings app crashed. Windows 10 build 18875 fixed this issue for affected users.

3. Device Setup message bug fix

Windows 10 was continuously prompting some Insiders to setup their devices on every restart. Thankfully, this recent release fixed this issue too.

4. Applications flickering fix

Microsoft resolved another issue that was responsible for flickering issues in some applications.

5. Unexpected battery drain bug

Finally, Windows 10 build 18875 resolved the annoying battery drain issues. This bug was potentially caused by pinning Photos tile to Start menu.

Windows 10 build 18875 known issues

This build brings three known issues to the table. An update to the latest 19H1 Insider Preview builds can trigger system crashes for users who are running older versions of anti-cheat software.

Furthermore, Microsoft did not resolve the functionality issues in Creative X-Fi sound cards and some Realtek SD card readers. 

Download Windows 10 build 18875

The ISO files for Windows 10 build 18875 are not available yet. However, you can grab this update through Fast and Skip Ahead rings.

If you enrolled in the Fast and Skip Ahead rings, then the update will automatically download on your system. Insiders can manually download the update from Settings >> Update & security >> Windows Update and navigating to Check for updates.

You can expect to encounter other issues as well due to the fact that this version is an early development build.

RELATED ARTICLES YOU NEED TO CHECK OUT:

Fix: Hulu Plus PB4 Error in Windows 10

Hulu Plus is one of the best Windows 10 and Windows 8.1 streaming apps currently available in the Windows Store.

However, many Hulu Plus users have been reporting the PB4 error.

I am not able to enjoy Hulu Plus services on Windows 8/Windows 8.1 myself because I’m based out of the United States.

Many of our readers have sent in this question, asking how to solve the annoying PB4 error that they are having while running on Windows 8 or Windows 8.1.

Some have been experiencing PB3 errors, as well, but the nature of these two problems is the same, so we’ll try to apply the same fixes, which you’ll see that are very simple and straightforward.

Some basic tips to get rid of PB4 error in Hulu Plus

Hulu Plus PB4 error can cause many problems, and in this article we’re going to cover the following issues:

  • Hulu app not working Windows 10 – This error message can be serious and it can prevent your Hulu app from working on Windows 10. However, you should be able to fix the problem by using one of our solutions.
  • Hulu plus PB4 error Windows 8 – This error can appear on older versions of Windows as well, and you might experience it even if you’re using Windows 8 or 8.1.
  • Hulu Windows 10 PB4 – This error can also appear on Windows 10. This is most likely a driver-related issue and it can be easily resolved.
  • Hulu plus unable to start – Sometimes you might not be able to start Hulu due to this error. If you have this problem, try reinstalling the Hulu app and check if that solves the issue.

This problem is only affecting Windows 8 and Windows 8.1 users, and it seems that with the release of Windows 8.1, some of these issues have been taken care off.

So, you also need to make sure that you make the jump to Windows 8.1, despite the fact that there are many who’d like to see it uninstalled. If you are running Windows 8.1 already, then follow the below mentioned steps.

How can I fix Hulu Plus PB4 errors?

  1. Edit your registry
  2. Update your drivers
  3. Set your speakers as the default audio device
  4. Reinstall and reset the application

1. Edit your registry

If you’re getting Hulu Plus PB4 error, you might be able to solve it simply by modifying your registry.

According to users, this problem occurs because a set of older drivers made some incorrect changes to the registry.

To fix the problem, you need to manually edit your registry by doing the following:

  1. Press Windows Key + R to open the Run dialog. Enter regedit and press Enter or click OK.
    regedit run window Hulu app not working Windows 10
  2. When Registry Editor opens, navigate to
    • HKEY_LOCAL_MACHINESOFTWAREMicrosoftWindowsCurrentVersionAudio
  3. In the right pane, double click on DisableProtectedAudioDG. If this DWORD isn’t available, you can create it by right clicking the right pane and choosing New > DWORD (32-bit) Value from the menu.
    disableprotectedaudioDG dword Hulu plus PB4 error Windows
  4. Set the Value data to 0 and click on OK to save changes. If using Value data 0 doesn’t fix the problem, you might want to set it to 1 and check if that solves the issue.
    edit value data Hulu Windows 10 PB4

Many users reported that modifying this DWORD fixed the problem for them, so be sure to try it out.

2. Update your drivers

  1. Right-click the Start button and select Device Manager from the list.
  2. Click on the Network adapters section to expand it.
  3. Right-click the network adaptor and select Update driver in the options list.
  4. If there’s a better driver, the system will install it and you will have to restart your PC.

If you don’t want to install the drivers yourself, we suggest you use dedicated driver update software that will do this for you.

A professional driver update tool will help you update drivers automatically and most importantly prevent damage caused by installation of incorrect driver versions.  

All you have to do is select the drivers you want to upgrade and leave the rest for the automated software.

3. Set your speakers as the default audio device

Several users claim that you can fix Hulu Plus PB4 simply by disabling default HDMI sound and setting Speakers as the default audio device.

According to them, this issue occurs after connecting the second display with their PC via HDMI.

This causes the HDMI sound channel to become the default device and this error to appear. To fix the issue, you just need to set your speakers as the default audio device.

This is rather simple and you can do it by following these steps:

  1. Right click the sound icon in the bottom right corner and choose Playback devices from the menu.
    playback devices Hulu plus unable to start
  2. Right click the empty space and make sure that both Show Disabled Devices and Show Disconnected Devices options are checked.
    show disabled devices Hulu app not working Windows 10
  3. Right click Speakers and choose Set as Default Device.
    sound window set as default device Hulu plus PB4 error Windows 8
  4. Now locate HDMI device on the list, right click it and choose Disable from the menu.
    disable audio device Hulu Windows 10 PB4

4. Reinstall and reset the application

According to users, sometimes you can fix this problem simply by reinstalling the application. It seems that Hulu Plus PB4 error occurs if you change your audio settings.

In order to fix this problem, you need to remove Hulu and install it again. To do that, follow these steps:

  1. Press Windows Key + I to open the Settings app.
  2. When Settings app opens, go to Apps section.
    Hulu plus unable to start apps settings app
  3. Now select the Hulu app and click on Uninstall.
    uninstall app Hulu app not working Windows 10

After removing the app, you need to download it again from Windows Store and check if that solves the problem.

If reinstalling the application doesn’t help, you can always reset it by doing the following:

  1. Open the Settings app and go to Apps section.
  2. Select Hulu app from the list and click on Advanced options.
    advanced options Hulu plus PB4 error Windows 8
  3. Now click on Reset button.
    reset app Hulu Windows 10 PB4
  4. Click on Reset button again to confirm.
    reset app Hulu plus unable to start

After resetting the application to default, check if the problem still appears.

If you are running Windows 8 through a virtual machine, like VMware or Parallels or maybe using this device through a partitioned computer such as a Macbook, chances on getting the PB4 error are much higher.

So just make sure that you’re running the latest version and that your software is legit.

If you know of other solutions, then let us know by leaving your comment below.

READ ALSO:

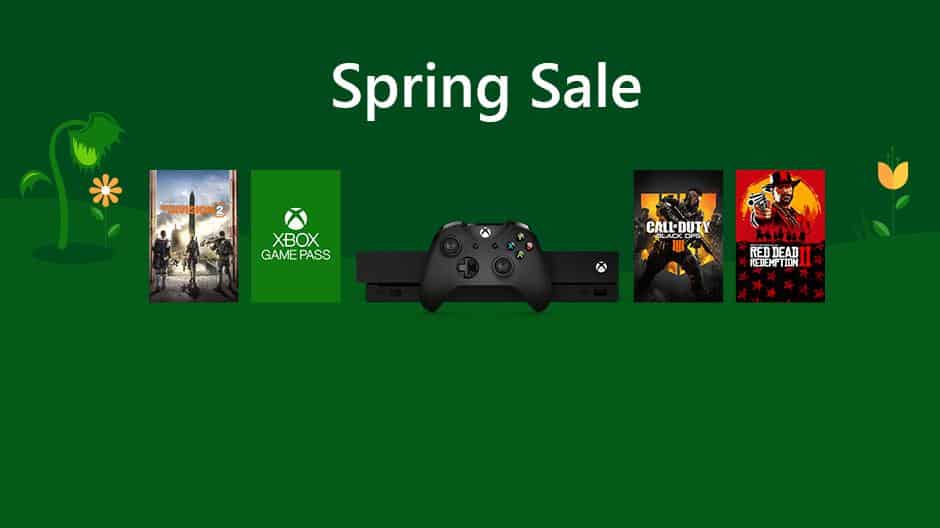
Microsoft kicks off massive Xbox’s Spring Sale with console and game savings

Microsoft has just kicked off a massive Xbox Spring Sale today. More than 500 digital games and add-ons for Xbox One and 360 are up to 65% off through April 22, and you can save up to 10% more with an Xbox Live Gold subscription.

Here are some of the most interesting games in the list, please notes that all prices include the additional discount for Xbox Live Gold members.

  • Ace Combat 7: Skies Unknown – $35.99
  • Assassin’s Creed Odyssey – $24
  • Battlefield V – $30
  • Call of Duty: Black Ops 4 – $30
  • Crash Bandicoot N. Sane Trilogy – $20
  • Fallout 76 Standard Edition – $40.19
  • Far Cry New Dawn – $20
  • Forza Horizon 4 Standard Edition – $35.99
  • Madden NFL 19 – $9
  • Metro Exodus – $44.99
  • Red Dead Redemption 2 – $40.19

In addition to all these game discounts, Microsoft is also offering 3 months of Xbox Game Pass for just $1, a limited-time offer only available for new members. If you’re not an Xbox Live Gold subscriber already, you can also get one month of Gold plus 1,000 couns of Apex Legends virtual currency for just $1.

If you’re considering upgrading to the Xbox One X, we remind you that the cool-looking Robot White Special Edition 1TB console with Fallout 76 is still priced at $399 ($100 off), and it’s the same price for the same bundle with a black Xbox One X. Lastly, you can also save $5 US ($10 CA) on Xbox Design Lab controllers starting tomorrow, April 13 through April 22. You can learn more about all Spring Sale deals on Major Nelson’s blog.

Is Microsoft planning a big consumer push with Cortana@Home?

Microsoft had a real chance to lead the pack when it comes to digital assistants, but Cortana’s slow pace of evolution relegated it as a me-too product that doesn’t have much to stand out. The main problem with Cortana has always been its limited market availability, with Microsoft focusing mostly on consumers in the US and the UK.

We’ve already seen a couple of Cortana-powered products such as the Harman Kardon Invoke speaker, the Glas smart thermostat, and Microsoft’s Surface headphones. But truth be told, these three devices are definitely not much compared to the much bigger ecosystems of connected appliances using Amazon’s Alexa or Google Assistant.

As it turns out, it does seem that Microsoft had a plan to make a bigger consumer push with Cortana-powered devices. Microsoft watcher WalkingCat recently discovered the existence of a Cortana@Home engineering team within Microsoft. The team is still mentioned on the LinkedIn profile of a Microsoft employee named Craig Miller.

https://twitter.com/h0x0d/status/1116509145492930565

In February 2018, Miller became Engineering Manager for Cortana@Home, and the exec wrote in his job description that his team was “building up a plan to go after the Consumer market like never before.” Moreover, Miller wrote that he was “excited to also lead up our Devices engineering team which is responsible for lots of new IoT devices over the next 12-24 months.”

We have yet to see the result of these ambitious plans, but it seems that Miller’s job has since evolved into something bigger, but still related to digital assistants. Back in January 2019, Miller was promoted to Director of Engineering, Assistant Experiences and Devices at Microsoft, and his new job description on LinkedIn no longer explicitly mentions Cortana: The key word is probably “voice-first experiences,” something that now includes Alexa on both Windows 10 PCs and Xbox One consoles.

As you may now, the upcoming May 2019 Update for Windows 10 will separate Cortana from Windows Search, a change that seems like a retreat. Five years after its launch on Windows Phone, Cortana still has far less skills compared to Alexa, which is probably why Microsoft teamed up with Amazon to make the two digital assistants talk to each other. Cortana still has a lot of value as a gateway to Office 365 data, but its consumer future seems increasingly complicated.

Katie Bouman, the woman behind the black hole photo was a Microsoft intern

Unless you’ve been living under a rock, you’ve probably come across the new black hole image at least a couple times this week. Black holes have historically been impossible to observe because of their nature of swallowing every bit of light that tries to escape it.

Katie Bouman, a computer scientist who was a student studying at MIT, is the person who is credited with coming up with the algorithm that made the capturing of the image possible. What’s especially interesting is that she also used to be an intern at Microsoft, as pointed out by Xbox’s Major Nelson.

More than 55 million light years from earth and centered inside of the Messier 87 galaxy, the black whole was captured by using the Event Horizon Telescope. EHT for short, it’s actually a network of eight telescopes across the globe that detect radiation from the particles that surround the beast.

Of course, Bouman isn’t taking all of the credit for the image, explaining that: “We’re a melting pot of astronomers, physicists, mathematicians and engineers, and that’s what it took to achieve something once thought impossible.”

Windows 10 version 1809 features many gaming improvements inspired by user feedback

Microsoft is big these days on collecting user feedback, and that includes Xbox and Gaming on Windows 10. Yesterday the PC Gaming team posted on some ideas, inspired by user feedback in the Xbox Idea Hub, a subreddit of the Xbox Insider Reddit group, that made it all the way in to shipping Windows 10 code, and are now part of the Windows 10 1809 update.

Because of your feedback, Windows can now disable processes while playing a game, the most requested feature on the Idea Hub with 5,115 votes. Just go to Settings > Gaming > Game Mode, and toggle the feature on to delay Windows Update driver installs and restart dialogs. Windows Notifications are now also hidden by default when playing a PC game, but you can control what notifications are still visible by going to Settings > System > Focus Assist.

Users providing feedback have also influenced the introduction of a battery indicator for connected Xbox controllers, the ability to automatically adjust power profiles to emphasize performance when a game is launched, and share screenshots to Twitter while playing a game.

Feedback is important, and who knows, maybe your favorite suggestion will make it in to the next version of Windows!

Sling TV adds support for the Microsoft Edge web browser

Sling TV has finally added support for Microsoft’s Edge browser with a service update earlier today. This means that Windows 10 users can now view Sling TV media directly from within Microsoft Edge without having to open the Sling TV app.

“At Sling TV, we continue to bring your favorite live and on-demand TV to all your devices, whether it’s on your big screen at home or mobile phone when you’re on the go,” Sling TV’s vice president of product management, Jimshade Chaudhari said in an official statement. “Today, we’ve expanded our device platforms by launching on the Microsoft Edge browser, giving you another option to instantly watch Sling TV on your computer. Windows 10 users now don’t have to leave their Edge browser to watch Sling TV; simply visit sling.com to start streaming.”

Sling TV added support for the Google Chrome web browser back in 2017 so this Microsoft Edge functionality is long overdue.

How do you watch Sling TV content? Do you prefer an app or a web browser? Share your thoughts with the community in the comments below and then follow us on Pinterest for more tech content.

Here’s how to fix Windows 10/11 needs GPT partition error

So you’re trying to upgrade your Windows, or perform a clean installation, but suddenly you get Windows 10 needs GPT partition error. Things don’t look so good, but in order to understand what’s happening, let’s delve deeper into this.

GPT stands for GUID Partition Table, serving as the default partition structure on newer machines for managing sub-partitions on your drive. GPT is part of the Unified Extensible Firmware Interface or UEFI, which means that any system based on UEFI should be installed on a GPT drive. But that’s enough for introduction, so let’s see what solutions are at hand.

How do I fix Windows 10 needs GPT partition error?

  1. Boot in UEFI Mode
  2. Change GBT to MBR
  3. Switch from UEFI to Legacy

1. Boot in UEFI Mode

In order to fix Windows 10 needs GPT partition error, you should first make sure that your motherboard supports UEFI. If it does, follow these steps:

  1. Reboot your machine and enter BIOS.
  2. Select Enable UEFI boot, and then select Save settings and exit BIOS.
  3. Continue with your Windows installation.

2. Change GPT to MBR

If you’re getting Windows 10 needs GPT partition error, you might want to consider switching to MBR. Master Boot Record or MBR, can be considered the better option to boot from. In order to do this, follow these steps:
command prompt Windows 10 needs GPT partition

  1. Firstly, press Win + R to open your Run box, then type: cmd and press Enter to bring up Command Prompt.
  2. Now type: diskpart.exe and press Enter to start the DiskPart.
  3. Next, type: list disk and press Enter.
  4. Next, you will type: select disk, followed by the drive letter or your disk that you want to change.
  5. Now type in: convert MBR and press Enter.
  6. To finish up, type: exit to finish the task.

Bear in mind that diskpart is an incredibly powerful and somewhat advanced tool, so be extra cautious while using it. If you’re not careful, you can cause permanent file loss.


3. Switch from UEFI to Legacy

This is a good alternative if the Windows 10 needs GPT partition error still appears. To switch to legacy boot, simply follow these steps:

  1. Shut down your computer.
  2. Power up your system, and as soon as the first logo screen appears, immediately press F2 to enter the BIOS menu.
  3. Now select Boot.
  4. With Boot Mode selected, press Enter, and then use the down arrow to select Legacy BIOS.
  5. Press Enter again.
  6. Press F10, and select Yes to save the change and exit the BIOS.

Your hard drive partition style must be set up to support either UEFI mode or the legacy BIOS-compatibility mode.

Some users are also suggesting to create a boot partition. In order to do that, follow these steps:

  1. Start Windows 10.
  2. Open the Start Menu.
  3. Type diskmgmt.msc to access Disk Management, and press Enter.
    create and format hard disk partitions GPT partition
  4. Make sure that you have any unallocated space available on your hard disk. If you do, right-click on that unallocated space and click New Simple Volume.
    new simple volume GPT partition
  5. Follow the on-screen instructions.

There you go, these are some solutions that might help you fix Windows 10 needs GPT partition so be sure to try them all.

RELATED STORIES TO CHECK OUT:

Xbox One’s Prey and The Golf Club 2 are now available on Xbox Game Pass

The Golf Club 2 and Prey are the two latest Xbox One video games to join the Xbox Game Pass library. Each of these titles are now available to download and play for free by anyone with an active Xbox Game Pass subscription and an Xbox One console.

Prey is a first-person Sci-Fi action video game that’s considered to be a reboot of the franchise instead of a sequel to the original Prey video game. It launched on the Xbox One in 2017 and was generally well-received by critics with many enjoying its atmosphere and action.

The Golf Club 2 is a sequel to The Golf Club which is also currently playable as part of Xbox Game Pass (though will be leaving at the end of the month). The Golf Club 2, as its name suggests, is a golf video game. It originally launched on the Xbox One back in mid-2017 and features a solid single-player career mode and realistic graphics and gameplay.

Prey and The Gold Club 2 aren’t the only new titles joining Xbox Game Pass this month. Monster Hunter: World and The Walking Dead: A New Frontier will come to the service on April 18th, Life is Strange 2: Ep. 2 on April 24th, and Resident Evil 5 will join Xbox Game Pass on April 25th.

Xbox Game Pass is a paid subscription services that gives members full access to around 100 video games on Xbox One. New titles are added to the services each month while others are rotated out.

Are you an Xbox Game Pass subscriber? Let us know which games you’ll be playing this month in the comments below and then follow us on Pinterest for more Xbox gaming content.

Prey
Prey
Developer:
Bethesda Softworks
Price:
Free


The Golf Club 2™
The Golf Club 2™
Developer:
Maximum Games
Price:
Free

Windows 10 Twitter app has a very cool hidden #sakura animation that you need to try

Cherry blossom viewing, also called hanami, is incredibly popular in Japan and it’s happening right now.

In celebration of this national pastime, Twitter has added the cherry blossom emoji next to all instances of the #cherryblossom, #sakura, #桜 (the Japanese kanji for sakura), #花見 / #お花見 (hanami, the Japanese word for cherry blossom viewing), and #벚꽃 (cherry blossom in Korean) hashtags on the platform regardless of region.

What’s particularly cool is that when a user likes a tweet that contains any of these hashtags, an impressive cherry blossom animation appears in place of the usual heart one. Check out the above image to see it in action.

Both the emoji and animation currently only work within the Windows 10 Twitter app and on the web version of the social network. It’s unclear how long this little feature will work for so it’s worth checking it out now in case it’s removed as quickly cherry blossoms fade after a full bloom.

Have you noticed this cherry blossom Easter egg? Do you like it? Let us know in the comments below and then follow us on Twitter for more Windows news.

Edit: This feature is also functional on the Android Twitter app. Cheers, Robert for the info!

Disney+ streaming service is coming to Xbox One consoles and Windows devices

During the company’s 2019 Investor Day presentation this morning, The Walt Disney Company unveiled a host of information relating to its upcoming video streaming service, Disney+.

Disney+ will launch in the United States, this year, on November 12th and will cost $6.99 a month. It was confirmed that the streaming service would expand to all major markets outside of the US but this rollout will happen over the course of the next two years, not in the immediate future.

Like Netflix and Hulu, official apps are planned for smart devices, smart TVs, and video game consoles. Interestingly, it was said that Disney is currently in the process of securing deals with video game console companies to release Disney+ apps on their hardware. No consoles were specifically mentioned but a visual (see above) was shown featuring the Nintendo Switch, Sony’s PlayStation 4, and Microsoft’s Xbox One which suggests that an official Disney+ app will be launching on all three popular platforms.

An image of a Windows 10 laptop was also shown in the graphic which means that Disney+ will be accessible for Windows users as well. Whether this will be via an app or simply through a web browser remains to be seen.

It’s unclear if the Windows 10 and Xbox One Disney+ apps will be available on November 12th or if they’re planned to launch soon afterwards.

“Disney+ marks a bold step forward in an exciting new era for our company—one in which consumers will have a direct connection to the incredible array of creative content that is The Walt Disney Company’s hallmark,” Bob Iger said in a statement. “We are confident that the combination of our unrivaled storytelling, beloved brands, iconic franchises, and cutting-edge technology will make Disney+ a standout in the marketplace, and deliver significant value for consumers and shareholders alike.”

Disney+ will provide users with access to literally hundreds of Disney, Marvel, Pixar, Star Wars, and National Geographic films and television series. A collection of Fox titles will also be available on the streaming service including all 30 seasons of The Simpsons which will be exclusive to Disney+.

Are you excited for Disney+ and would you prefer to watch it on a Xbox One console or Windows device? Share your thoughts with the community in the comments below and then follow us on Pinterest for more geeky content.

KB4493464 triggers invalid Wi-Fi IP errors on some PCs

KB4493464 seems to be a stable update, as users reported very few bugs so far. Furthermore, Microsoft also acknowledged two bugs in this update.

You can check out Microsoft’s official update page for more information about the complete changelog,

Today, we are going to list some of the issues that you might experience after installing KB4493464. Let’s have a quick look at these bugs.

KB4493464 reported issues

1. Wi-Fi doesn’t have a valid IP configuration

One of the users reported that his PC is having problems while connecting to Wi-Fi. The bug started appearing after the installation of Windows updates KB4493464 and KB4493478 (Windows 10 Version 1803).

“Wi-Fi” doesn’t have a valid IP configuration’ error

You can try one of the following workarounds to resolve the issue.

Click Start, and type “cmd”. 
– Right-click Command Prompt and run it as administrator. 
– Copy and paste the below one line at a time, pressing enter each time: 
netsh winsock reset – and press Enter. 
netsh int ip reset – and press Enter. 
ipconfig /release – and press Enter. 

ipconfig /renew – and press Enter. 

ipconfig /flushdns – and press Enter.
You could also try resetting your DNS service.

Alternatively, if the problem is not resolved, you can uninstall and block the problematic updates.

2. Application startup bugs 

Microsoft acknowledged another bug that affects Internet Explorer. Microsoft states that some corresponding applications for Internet Explorer’s trusted and local sites may not be started by Custom URI Schemes for Application Protocol handlers. 

Microsoft is working to resolve the issue but Microsoft has suggested a temporary fix to the problem.

Enable Protected Mode in Internet Explorer for local intranet and trusted sites.

  1. Go toTools>>Internet options >>Security.
  2. WithinSelect a zone to view or change security settings, selectLocal intranetand then selectEnable Protected Mode.
  3. SelectTrusted sitesand then selectEnable Protected Mode.
  1. Select OK.

Keep in mind that a system reboot is required so that the changes can be applied.

As you can see, KB4493464 is a pretty stable update and technical issues are a rare thing.

RELATED ARTICLES YOU NEED TO CHECK OUT:

How to fix Totally Accurate Battle Simulator bugs on PC

Totally Accurate Battle Simulator or T.A.B.S. is, as the title states a battle simulation game.

It features ragdoll physics, and the tactical matters are left to the player, to place his troops on the battlefield.

T.A.B.S. is currently in public alpha on Steam, and it features a 20 mission campaign and a sanbox mode. With more content to be added in the near future.

Even though the game is in early access, numerous users were quick to point to bugs in-game on various Steam threads. With some instances of crashes, or lock-ups during gameplay.

Other key aspects of things that need to be polished in the game are game units that don’t function as intended. We’ve created a list of common bugs discovered so far, so let’s begin.

Common TABS bugs

  1. Ranged units bugs
  2. Loading error 3:0000065432
  3. Game crashing
  4. Slow framerate

1. Ranged units bugs

Many have pointed out that ranged units do not fire normally, leading to some very weird situations, where the archers are shooting above other units heads but dealing no damage.

i tested this with Muskets and Poachers I seen the archers shoot arrows over there heads, after a while they would hit but it would take a while. Also I seen 2 Muskets take out 6 Archers because of this, so please fix this error.

2. Loading error 3:0000065432

Some users have reported this type of error occurring during their playthroughs. It seems to be related to the Steam client not working properly.

i got the same thing after the new update. i tried a couple things, but it still doesn’t work.

3. Game crashing

There have been reports that the game crashes at various intervals during gameplay. For some it crashes during exiting, for some it crashes when in the midst of battle.

For me, the game ALWAYS crashes on exit. This is a new problem since the last patch. But OTOH, the patch did solve a lot of random crashes during play, so now nearly the only crashes I get are on exit.

4. Slow framerate

Nobody likes it when a game begins to drop frames. Not the most ideal situation, but some players have experienced this.

I opened the game as usual but when i started playing something went wrong, the game was stuck on slow motion. I have reinstalled the game couple of times already and et the game is still buged.

Now that we’ve had a look at the bugs at hand, let’s go ahead and try some fixes, shall we?

How to fix TABS game issues

Fix T.A.B.S game crashes

If you experience lock up or the occasional freeze, you may try to force the game in running in DirectX 11. To do this, follow these steps:

  1. Go to your Steam Library.
  2. Find the game and right-click it, then select Properties.
  3. Under the General Tab, click Set Launch Options and a dialog box will appear.
  4. Type in the dialox box at the end of the target string -force-d3d11 and click OK;
  5. Close the Properties window;
  6. Run the game.

Fix TABS error 3:0000065432

This error might be related to corrupted files in your Steam library. This solution works just as fine for glitching units that you might be encountering in the game. In order to do the check-up, follow these steps:

  1. Launch Steam;
  2. From your Library section, right-click on the game and select Properties from the menu;
  3. Select the Local files tab and click the Verify integrity of game files button;
  4. Steam will now verify your game‘s files;
  5. Once it’s done launch T.A.B.S.

TABS Framerate drop fix

Try updating your graphic card with the latest drivers. Another good solution is disabling the vertical sync, since it can reduce graphical tearing.

If after this, you are facing tearing while playing T.A.B.S., we suggest you toggle vertical sync to back on in your game settings. Or alternately, you can switch from a higher detail setting to a lower one.

We hope that these fixes were of some help to you. We know that the game is in early alpha, but we would love to know on your feelings related to T.A.B.S. in the comment section down below.

RELATED STORIES TO CHECK OUT:

KB4495666 gets your PC ready for Windows 10 May 2019 Update

Microsoft recently rolled out a new cumulative update for Windows 10 v1903. Update KB4495666 takes this OS version to build number 18362.53.

The Windows 10 May 1903 Update is currently available in the Preview ring. Microsoft is expected to roll it out to the general public next month.

In other words, this new update is also only available to Insiders enrolled in the preview ring who are using Build 18362.30 of the Windows 10 May 2019 Update.

KB4495666 changelog

This new update adds only security fixes and it’s a part of the April Patch Tuesday edition. As the company confirmed, “This update also includes security updates that come as part of the normal monthly Patch Tuesday release cycle.”

Moreover, Microsoft also highlighted an issue that users may encounter after installing this update. The company explained why this issue occurs and how users can fix it.

After installing this update (KB4495666), users may experience error “0x800705b4” when launching Windows Defender Application Guard or Windows Sandbox. As a workaround, you can enable the following registry keys on the Host OS and reboot:

[HKEY_LOCAL_MACHINE\SOFTWARE\Microsoft\Windows NT\CurrentVersion\Containers\CmServicePolicy]
“DisableClone”=dword:00000001
“DisableSnapshot”=dword:00000001
If you are in the preview ring, you can check for this new update by going through Settings > Update & Security > Windows Update > Check for updates.

So, if you’re an Insider and you already installed this update on your machine, do tell us more about your experience in the comments below.

RELATED STORIES TO CHECK OUT:

KB4493509 fails to install for some, triggers BSOD errors and more

April Patch Tuesday is here and Microsoft already started rolling out KB4493509 to Windows 10 v1809 systems. This update brought many bug fixes that will make your OS more stable and less prone to technical issues.

As Microsoft explained, the update addresses many security vulnerabilities and app launch problems. However, it also brings four new bugs to the table including system functionality and installation issues.

KB4493509 reported issues

1. System not working correctly

One of the users reported that his system didn’t work as desired after installing KB4493509. However, the user managed to fix this issue by uninstalling the update.

This issue seems to affect all the systems that have been updated to KB4493509.

One of the quick workarounds is blocking the update by using the Show/Hide Updates tool.

2. Installation failure

Other users also reported that the installation failed to advance beyond 94%. Running the update troubleshooter did not fix the issue. If you are one of those users who are experiencing this issue, you can manually download the updates. 

3. Custom URI Schemes bug

Microsoft already acknowledged this bug. The tech giant states that the corresponding application for local intranet and trusted sites on IE might fail to start by Custom URI Schemes for Application Protocol handlers. 

Microsoft suggested a temporary fix but its engineers are also working on a permanent fix.

Enable Protected Mode in Internet Explorer for local intranet and trusted sites.

  1. Go toTools>Internet options>Security.
  2. WithinSelect a zone to view or change security settings, selectLocal intranetand then selectEnable Protected Mode.
  3. SelectTrusted sitesand then selectEnable Protected Mode.
  4. SelectOK.

You must restart the browser after making these changes.

4. WDS server connection termination issues

The is the second bug acknowledged by Microsoft. Users may experience issues while starting a device from a Windows Deployment Services (WDS) server configured to use Variable Window Extension. This device startup issue triggers by using the Preboot Execution Environment (PXE).

Microsoft suggests the users to disable the Variable Window Extension on WDS server using one of the following workarounds:

Option 1:
Open an Administrator Command prompt and type the following:

Wdsutil /Set-TransportServer /EnableTftpVariableWindowExtension:No

Option 2:
Use the Windows Deployment Services UI.

  1. Open Windows Deployment Services from Windows Administrative Tools.
  2. Expand Servers and right-click a WDS server.
  3. Open its properties and clear the Enable Variable Window Extension box on the TFTP tab.

RELATED ARTICLES YOU NEED TO CHECK OUT:

Windows 10 v1607 KB4493470 fixes BSOD errors and app launch issues

Windows 10 v1607 users received cumulative update KB4493470 on April  Patch Tuesday. The release took the existing OS to build to version 14393.2906.

At the same time, this patch put an end to Windows 10 v1607’s delta updates. 

Additionally, Microsoft also added quality updates for all the other Windows 10 versions.

The complete update package is available for download through Windows Update section. You can also manually install the update by navigating to Settings, Update & Security and then Windows Update.

In this post, we are going to discuss some general improvements and fixes you will get after installing this update. KB4493470 bring many quality updates to Windows 10 systems and we’ll list them below.

KB4493441 key changes and improvements

Let’s discuss some of the key changes available in this update.

  1. Windows 10 v1607 systems now meet GB18030 standard certificate requirements.
  2. Microsoft resolved the issue for certain apps that use MSXML6. These apps reportedly stop responding when an exception is thrown during node operations.
  3. Another issue that caused the group policy editor to stop responding has also been fixed.
  4. The company has also fixed a BSOD issue that affected some PC configuratons.
  5. The big M added some security updates to Windows & Microsoft Graphics, Microsoft Scripting Engine and Filesystems, Windows Server, and Windows Input and Composition.
  6. The company resolved an issue that causes authentication issues for apps using WININET.DLL such as Internet Explorer 11. The issue was restricting two or more people use the same user account.

Before downloading the update, you need to install KB4485447 on your system so as to enjoy a smooth update process. If you have already installed the update on your system, you can go ahead with KB4493470.

RELATED STORIES TO CHECK OUT:

FTP is Not Working in Windows 10: How to Fix it

Whenever you find the Windows 10 FTP Client not working, it could be brought about by several reasons. One of these is when you don’t have permission from the owner of the FTP site.

No matter the reason, you can always get things up and running. Keep reading to find out the solutions!

What can I do if FTP is not working in Windows 10?

Before we start with the slightly complex solutions, here are a few quick tricks to try:

  • Disable the configured firewall or security software.
  • Restart the computer and the modem/router.

If none work, move to the solutions listed next.

1. Use passive FTP

  1. Open Internet Explorer, click the Tools menu, and select Internet Options.
  2. Go to the Advanced tab, and tick the checkbox for Enable FTP folder view.enable folder view
  3. Similarly, tick the checkbox for Use Passive FTP, and save the changes.

When FTP is not working in Windows 10, your primary approach should be to make sure that it’s enabled in Internet Options.

2. Open in Compatibility View

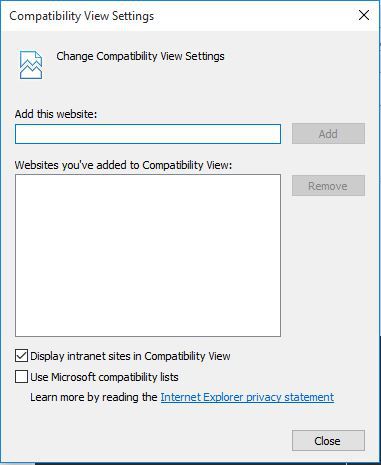
  1. Launch Internet Explorer, select Tools, and click on the Compatibility View settings.
  2. Go to Add this website.
    Windows 10 ftp client not working
  3. Enter the URL of the website you want to add.
  4. Click Add.

If you do this and the problem persists, it may not be compatible, in which case you can remove the site from the list.

Sometimes the problem could persist due to a compatibility hitch between Internet Explorer and the website you are on. This could be solved by adding the site to your Compatibility view list.

3. Reset Internet Explorer

  1. Open Internet Options.
  2. Select the Advanced tab.

    Windows 10 ftp client not working

  3. Select Reset.
  4. Go to Reset Internet Explorer Settings.
  5. Select Close once default settings have been applied.
  6. Click OK.

If the FTP is not working in Windows 10, you can try resetting Internet Explorer.

This action, however, is irreversible and may reset security or privacy settings added to the list of Trusted Sites, including parental control settings, so note the sites before you do the reset.

4. Allow FTP connections

  1. Right-click Start, and select Control Panel.
  2. Click System and Security.
  3. Now, click Windows Firewall.
    Windows 10 ftp client not working
  4. Click Change Setting.
  5. Go to the Exceptions tab.
  6. Add a checkmark next to FTP port 21 to allow connections to FTP sites.
  7. Click OK on firewall settings, then close other windows.
  8. Restart your PC.

5. Disable unwanted add-ons on Internet Explorer

  1. Open Internet Explorer.
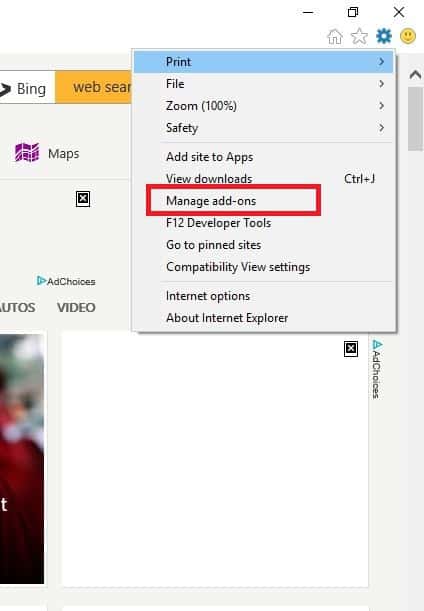
  2. Select Tools and choose Manage add-ons.
    Windows 10 ftp client not working
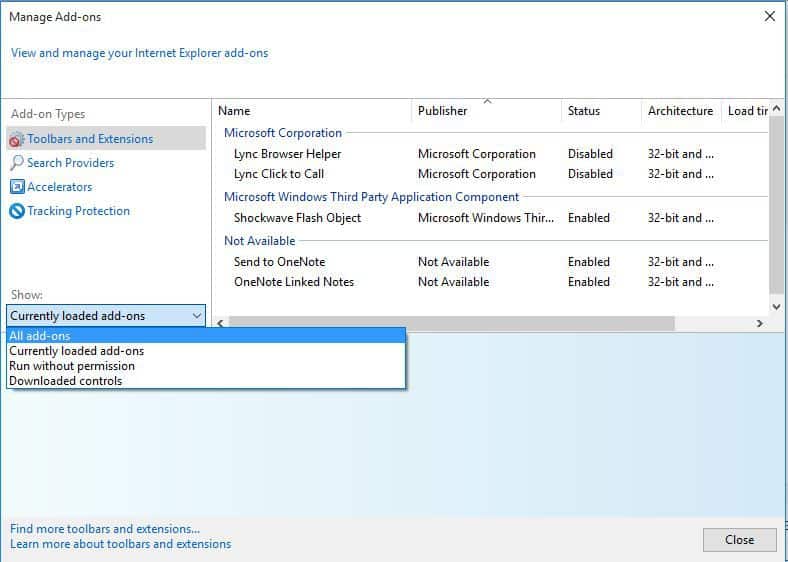
  3. Under the Show tab, select All add-ons.
    Windows 10 ftp client not working
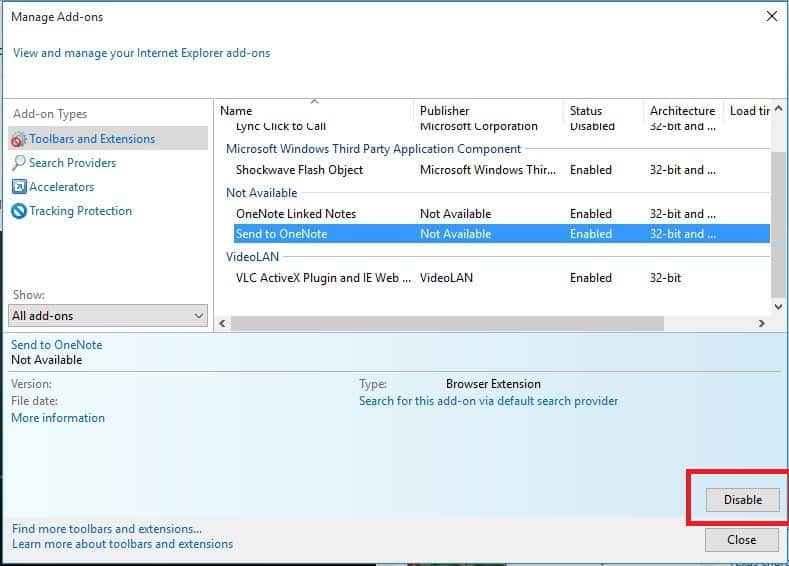
  4. Now, select the add-on you want to turn off.
  5. Select Disable.
    Windows 10 ftp client not working
  6. Click Close.

Add-ons are apps used by Internet Explorer to interact with web content, such as games or videos, and these apps can be toolbars and extensions, like Adobe Flash or Quicktime Player. However, you can only install and use add-ons in Internet Explorer for desktop computers.

Add-ons can sometimes cause the FTP client not to work in Windows 10 and pose a security or compatibility risk. You can turn off specific ones if you suspect they’re causing the Windows 10 FTP client not to work.

Before you leave, find out how to speed up the Internet in Windows.

KB4493441 is the last Windows 10 v1709 update, install it now

Patch Tuesday has arrived, and Windows 10 v1709 systems received cumulative update KB4493441 which takes the OS build to version 16299.1087.

Multiple improvements have been added in order to fix Group Policy editor issues, stop error for SSH client programs, and many other fixes.

Microsoft also confirmed it’s working on a resolution to fix one known issue regarding Custom URI Schemes.

You can download KB4493441 automatically via Windows Update. You can also visit the Microsoft Update Catalog to download the standalone package.

KB4493441 changelog

The update adds the following improvements:

  1. Microsoft fixed the issue for certain apps that use MSXML6. These apps reportedly stop responding when an exception is thrown during node operations.
  2. Another issue that caused the group policy editor to stop responding has also been resolved now. It occurred during an editing session for a GPO that contains policy preferences for Internet Explorer 10.
  3. The company also fixed a BSOD issue generated by the use of per font EUDC.
  4. Windows & Microsoft Graphics, Microsoft Scripting Engine and Filesystems, Windows Server, and Windows Input and Composition have got security updates. Microsoft has updated core apps such as Windows MSXML, Windows App Platforms & Frameworks, Windows kernel, and Microsoft JET database engine.
  5. Microsoft fixed a stop error associated with running the Secure Shell (SSH) client program. This error has been reported with the use of a configuration setting or a command line switch (ssh –A).

KB4493441  known problems

Microsoft lists that some appropriate local intranet application and trusted Web sites in Internet Explorer cannot be launched with custom application log handler URI schemes.

You can resolve the problem by trying this workaround.

Right-click on the URL link to open it in a new window or tab. 
Or 
Enable Protected Mode in Internet Explorer for the local intranet and trusted sites. 
Go to Tools> Internet Options> Security. 

Under Select a zone to view or change security settings, select Local intranet and then Enable protected mode. 
Select Trusted Sites, and then select Enable Protected Mode. 
Choose OK. 
After these changes you have to restart the browser. 
Microsoft is working on a solution and will release an update in an upcoming release.

As a quick reminder, Microsoft officially ended support for Windows 10 v1709 this month. So, hurry up and get this update as soon as possible.

RELATED STORIES TO CHECK OUT:

Here’s how to fix slow performance on Xbox Live

Xbox Live is a gaming community that unites gamers across Xbox One and Windows 10. Microsoft proudly boasts that Xbox Live is the best gaming network in terms of speed and reliability, offering the fastest multiplayer experience possible with cross-device multiplayer allowing users to play the latest games with others.

Xbox Live is indeed a powerful gaming platform, but it’s not a bug-free one. Sometimes, Xbox Live is affected by slow performance issues and users experience lag when playing games.

Fix Xbox Live slow performance

If you’re experiencing slow performance issues when playing Xbox One games on Xbox Live, you can use Microsoft’s dedicated troubleshooting tree. Start the troubleshooting process, answer the questions and perform the suggested actions.

1. Check the status of Xbox Live services

The first step is to check the status of Xbox Live services. There’s this dedicated website with the real-time status report about Xbox Live. There you can find out about network status and other related online features. Navigate here to find out about those.

2. Run the Xbox speed test

  1. Press the Menu button on the Xbox One controller
  2. Select Settings > Network > Detailed Network Statistics
  3. The results should appear in a few seconds. The troubleshooting tree will then ask you if your internet speed meets the necessary requirements.

xbox live internet speed connection troubleshooter

3. Select the type of connection you use: Wired or wireless.

fix xbox live connection wired or wireless connection troubleshooting xbox

4. If you use a wired connection, try a different cable or port.

If you use a wireless connection, you should disconnect third-party headsets and check for other devices causing wireless interference.

5. Power cycle your console and network hardware

  1. Unplug the power cable from the back of the router, modem, or gateway
  2. Restart your Xbox One console
  3. Wait for five minutes
  4. Plug in the router and the rest of your hardware

6. Change your firewall settings

You may experience connection issues if your firewall restricts necessary traffic, which blocks your Xbox One from connecting to Xbox Live.

7. Enable perimeter network (DMZ) to remove restrictions to the internet.

8. Try a direct-to-modem connection

Connect your Xbox One console directly to your modem instead of connecting it to your router in order to detect the cause of the issue.

9. Contact your internet service provider to solve this problem because there may be an issue with your ISP’s network.

fix xbox live troubleshooting

10. Contact Xbox Support.

For more information on how to fix slow performance on Xbox Live, launch Microsoft’s dedicated troubleshooting tree.

RELATED STORIES YOU NEED TO CHECK OUT:

How to enable Reading View in Microsoft Edge Insider

Microsoft’s current Insider build of its upcoming Chromium-powered Edge release has a number of missing features compared to the existing EdgeHTML browser. One such absentee is the fairly popular Reading View, which makes it easier to read webpages by cutting down the clutter.

Reading View is actually already present in Edge Insider. It’s hidden behind an experimental flag, so you need to enable it manually before use.

Enabling Reading View in Edge Insider

Navigate to “edge://flags” in the Dev or Canary build of Edge. Search for “edge-reading-view” and then set the flag which appears to “Enabled.” You’ll be prompted to restart Edge. If you run into any issues with this process, you can refer to our complete guide on setting flags in Edge Insider.

With the browser reopened, Reading View will now be available. To try it out, head to a page where Reading View can enable, such as an article on a news site. If Reading View is compatible with the page, you should see its icon appear in the address bar within a few seconds of page load.

Enabling Reading View in Edge Insider

Click the book icon to open Reading View. The page will reload in Reading View, with all extraneous elements stripped away.

At present, this is still an unfinished and experimental implementation. It’s clear there’s more work to do before feature parity is achieved with EdgeHTML’s reading view. There’s currently just the one sepia theme and no font options, so you’re restricted when it comes to reading style preferences. We expect to see Microsoft implement more settings here before Reading View is enabled by default in Edge Insider.

[Updated] Xbox One to get another system update in May

If the Xbox One 1904 system update should now be pretty close to public release, the Xbox team revealed yesterday that there will be a 1905 update for the console in May. According to Xbox Insider Program Manager Brad Rossetti, the first Xbox One 1905 build will ship to Xbox Insiders on the Alpha ring later today.

The Xbox One 1904 update finally hit the Preview Omega ring last week, but Microsoft has continued to ship additional fixes to Xbox Insiders on the Preview Beta, Delta and Omega rings this week. As usual, Microsoft will start testing the 1905 Update with Preview Alpha Insiders before expanding the pool of testers to other rings.

We still don’t know what’s in the pipeline for the Xbox One 1905 system update, but this will likely be a minor update following the April (1904) update. The latter is the first major update for the Xbox One in 2019, and it will bring a new virtual mini keyboard, improvements to Xbox Live Messaging, as well as a new Suggested Uninstall feature to help you save space on your console.

As a reminder, the Xbox team has also started testing the Xbox One 1910 update with Insiders on the Preview Alpha Skip Ahead ring, but the first 1910 preview builds didn’t bring any new features so far. To our knowledge, this will be the first time that Microsoft is testing three separate Xbox One system updates with Xbox Insiders, but this shouldn’t last long as the 1904 update should be released to the public very soon.

Update: The first Xbox One 1905 preview build will be available to download on April 12 at 6:00PM PDT, and the release notes only mention a fix for a bug related to media apps such as Youtube/Hulu. “This first update is meant to lay the groundwork for what’s to come in 1905,” the Xbox team said, adding that new features announcements will be made in future preview releases.

Microsoft Edge Insider will use Fluent Design for form controls (and you can enable it today)

Microsoft has now released the first public builds of its Chromium-based Edge browser remake. Although this early preview doesn’t deviate too far from Chromium’s default design, there’s evidence that Microsoft is planning to further differentiate the look and feel of its implementation.

Enabling Fluent Controls in Edge Insider

Buried in Edge Insider’s flags menu is a “Fluent Controls” option. Per its label,

If enabled, form elements will be rendered using an alternative style to align with Microsoft’s design language to improve touch and keyboard accessibility.

Evidently, Microsoft is planning to bring its Fluent Design language into the browser, making forms in Edge look more like their counterparts in Universal Windows apps. Currently, Edge Insider uses Chromium’s built-in, silver-tinted controls (pictured below) for all form components.

Chromium's default controls

You can enable the flag today (it’s called “Fluent Controls”) to get a first look at the Fluent-themed inputs. However, we wouldn’t recommend it, as it seems the implementation is far from finished. Only a handful of controls are changed by enabling the flag, with most retaining Chromium’s built-in styles.

Enabling Fluent controls in Edge Insider currently makes things look a little broken... (April 2019)

Those that do change (pictured above) still look nothing like Fluent Design’s Windows controls. Overall, the flag tends to make things look broken, with select boxes in particular gaining an odd silver background colour.

Enabling Fluent controls in Edge Insider currently makes things look a little broken... (April 2019)

None of this can be criticised at this stage – Edge Insider is still a long way off release, and it’s clear the implementation of Fluent Design within Chromium has only just begun. This flag will be one to watch in the next Edge Dev builds, as Microsoft begins to bring Chromium into visual parity with EdgeHTML.

How to Access the “Edge://flags” Menu in Edge Insider builds

Microsoft introduced Microsoft Edge Dev and Canary Channels, which are the Microsoft Edge browser builds based on Chromium. Eventually, a combination of these two new incarnations of Edge will replace the current version of Edge that is installed by default on Windows 10. These Edge Insider builds are more similar to the way that Google Chrome functions and the Edge Insider builds include support for Chrome extensions too.

These two new Edge Insider builds also include a “flags” settings page, which is normally hidden from regular users, but can be easily accessed by more advanced users by typing “Edge://flags” in the address bar. For the uninitiated, the flags settings are another way to refer to developer settings. Similarly, if you type “Chrome://flags” in the address bar on Google Chrome, you will be able to access the developer settings. The flags menu allows you to enable or disable experimental features, as well as add or remove functionalities to the Edge Insider build you use.

However, it’s important to note that these features may disappear or be changed by updates to the Edge Insider builds without notice. Microsoft may decide to permanently integrate the feature or functionality in the final version of Microsoft Edge. While Microsoft tunes the Edge Insider builds, you will find a list of developer settings and experimental features within the flags menu.

If you want to take a look at the flags menu for yourself, follow these steps:

  1. Open the Edge Insider browser (Beta, Dev, or Canary Channel).
  2. Go to the address bar and enter (or copy and paste) Edge://flags
  3. Press Enter to load the flags menu.

Once you enter Edge://flags, you will find the following menu as seen in the screenshot below.

Microsoft, Edge Insider, Windows 10
Edge Insider Canary (left) and Dev (right) flags menu

There is not much of a difference visually in what is displayed in the flags menu for both Edge Insider Canary and Dev Channels. At the time of this writing, there are too many settings to list, but you have control to enable and disable settings, and you will notice some settings are marked as default for the Edge Insider browser, when using either the Edge Insider Canary or Dev builds, but that is to be expected as they are different browsers that have different testing purposes.

You can change the settings as you wish, but be warned, any changes you make in the flag menu, may cause unexpected errors or crashes in the web browser. There is an option at the top of the screen to search through the different settings, as well as an option to reset the settings back to default. If you are unable to reset any changes you made, you may be forced to uninstall the Edge Insider Dev or Canary build if you are unable to access the flags menu to reset the changes you made.

It’s important to keep in mind that the features and functionality in flags are constantly changing, and even the version of Windows 10 may effect how the Edge Insider builds behave. Both Edge Insider builds are working well for me, but I am not on a Windows Insider Preview build, so I can’t speak on if that changes how the flags in the Edge Insider browsers behave.

Microsoft, Edge Insider, Windows 10

The Microsoft Edge Insider FAQ is growing, with new topics appearing almost daily. If you have something that you want to add to the FAQ, you can submit a request to Microsoft. Overall, the Microsoft Edge Insider support website is still in its infancy as far as official documentation is concerned. The Microsoft Edge Insider community forum is the best resource to connect with other users, and to “join the conversation and make your voice heard” as Microsoft wants you to share your opinions, ask questions, and find answers to questions about the new Edge Insider builds.

Hybrid sleep missing after Windows 10 update [EXPERT FIX]

While Windows 10 major updates brought many various improvements, they also caused quite a stir in the Windows community due to the many faulty features and bugs that emerged after the update. It seems that Hybrid sleep is missing in Windows 10 after an update.

As you’re probably aware, this feature is a symbiosis of Sleep and Hibernation. It surpasses Sleep in power saving and Hibernation in loading speed by storing everything in RAM so you can continue from the same point.

If the Hybrid sleep feature is missing from your Windows options, make sure to check the list of possible fixes below.

How to reclaim missing Hybrid sleep in Windows 10

  1. Check BIOS and support
  2. Update drivers
  3. Restore default settings in Power Plan
  4. Tweak Registry
  5. Use recovery options

1. Check BIOS and support

Sadly, certain motherboards and notebooks/2-in-1s don’t support the Hybrid sleep feature. Older motherboards are produced and optimized feature-wise to Sleep and Hibernate, but not for the mix of those two. So, the first step you should take is to check for the availability of a given sleep state. That can be done by following these instructions:

  1. Right-click Start and open Comand Prompt (Admin).
  2. In the command line, type the following command and press Enter:
    • powercfg –availablesleepstatesHybrid sleep missing
  3. If the Hybrid state is available but still missing, you should check other steps.

However, if it’s not, you won’t be able to use Hybrid sleep state. Additionally, there may be some options hidden within the BIOS that you should take into consideration.

This will allow you to see if your motherboard does support Hybrid sleep but has certain related functions disabled by default. In order to enable these features, you’ll need to navigate to BIOS settings and look for the ”Suspend to RAM” feature. Make sure that it’s enabled before you continue with additional steps.

2. Update drivers to restore Hybrid sleep

In addition, drivers, including an up-to-date version of your BIOS, are indispensable. It doesn’t always matter if the issue at hand isn’t exclusively related to drivers. For all-around system stability and functionality, it’s vital to have proper software support.

Hybrid sleep missing

Because of that, make sure that all of your drivers are properly installed and up-to-date. Right-click Start and open the Device Manager. There, you can check each driver individually and update them.

Moreover, you should check your BIOS version and update it, if needed. But, keep in mind that flashing a BIOS is a complex operation, and quite risky too. So, act with caution and fully inform yourself before you start the procedure.

Another effective method to update any driver safely is by using dedicated software. With driver update software, your hardware devices can be optimized by automatically updating drivers in your PC.

⇒ Get Fortect Driver Updater

3. Restore default settings in Power Plan

There are multiple reports that the Windows Update changed some of the default/custom settings, affecting certain system features. The same goes for Power options, including the Hybrid sleep state. So, for that purpose, we advise you to navigate to Power plan settings and reset those to default values.

If you’re not sure how to do it, follow the instructions below:

  1. Right-click the Start menu and open Control Panel.
  2. Open Hardware and Sound in the Category View.
  3. Select Power Options.
  4. Highlight your active Power Plan.
  5. Click Change Plan Settings.
  6. At the bottom, click Restore default settings for this plan.Hybrid sleep missing
  7. Confirm changes.
  8. Now you can click Change advanced power settings > expand Sleep > expand Allow hybrid sleep and set it On for both Battery and Plugged In options.

This is the standard way of retrieving Hybrid sleep on the available sleep state list. However, people who are still unable to resolve the issue this way may turn to some minor registry tweaks.

4. Tweak GPE to restore Hybrid sleep

As we mentioned above, updates tend to change some of the vital system’s settings. As seen above, some of those can be restored by simply resetting to factory settings. But, occasionally, you’ll need to utilize a more advanced approach. Namely, you’ll need to navigate to the registry and make sure that the Hybrid sleep state is enabled.

In order to do so, follow the instructions below:

  1. In the Windows Search bar, type Policy and open Edit group policy.
  2. Navigate to Computer Configuration > Administrative Templates > System > Power Management > Sleep settings.
  3. Open the Turn off hybrid sleep (on battery) option and confirm that’s either disabled or not configured. If it’s enabled, disable it.Hybrid sleep missing

However, if this wasn’t enough to get the Hybrid sleep state option back and you’re quite fond of that power-saving mode, your only remaining options are drastic.

5. Use recovery options

In the end, you may want to turn to recovery options and get rid of the latest update. Yes, while it may be feature-rich or even better optimized to some extent, this or similar problems were enough for some users to make some decisive moves.

We advise you to use some of the restore/reset functions before you finally decide to perform a clean reinstall. For that purpose, we’ll lead you through the Reset this PC procedure, retaining your data and resetting just your settings.

  1. Press Windows key + I to open the Settings app.
  2. Open Update & Security option.
  3. Choose Recovery from the left pane.
  4. Click Get Started under the Reset this PC.reset this pc
  5. Choose Keep my files.

Some users are quite disappointed that Hybrid sleep is missing after Windows 10 update, and we hear them. The Hybrid sleep state option is amazing, especially for laptop users who require as much battery life as possible. However, it’s occasionally difficult to resolve update-instigated issues and as such, may be forced to use old sleep state features Sleep and Hibernate.

Don’t forget to tell us about your experience or post any subject-related questions. The comments section is below!

KB4493474 fixes some nasty Windows 10 v1703 bugs

The April Patch Tuesday updates are here. Cumulative update KB4493474 for Windows 10 version 1703 is now available for download. The update bumps the OS build to version 15063.1747.

The Redmond giant released this patch to enhance the security and overall functionality of the OS.

A quick note for users of version 1703 is that all the editions, except the Education and Enterprise editions have reached their end of service deadline.

To receive the updates, you must upgrade to the latest version as soon as possible.

KB4493474 improvements and fixes

Major Security updates 

As Microsoft explains, KB4493474 brings some important security updates for Windows Server, Windows Storage and Filesystems, Microsoft Scripting Engine, Windows Virtualization, Windows Kernel, Windows Graphics, and more.

Applications not responding 

KB4493474 addresses another important issue related to MSXML6 some applications that stopped responding and threw exception errors.

Blue Screen of Death bug fix

Microsoft fixed a bug that affected previous released and caused blue screen of death errors. As a result, computers would stop working. Update KB4493474 fixed this issue and you should no longer get BSOD errors.

KB4493474 known issues

Surprisingly, unlike other Windows 10 cumulative updates, KB4493474 brings only one known issue to the table. The install process may take longer than expected or stall altogether.

Microsoft is working on a permanent solution to fix this problem. Meanwhile, you can try some of the temporary workarounds mentioned on Microsoft’s Blog.

RELATED ARTICLES YOU NEED TO CHECK OUT:

You can now unplug USB devices without hitting Safely Remove Hardware

Most PC users get annoyed when they have to safely remove a USB drive from their system — me included.

Sometimes, we simply don’t care about losing data and we unplug USB drives without letting Windows about our intention.

However, experts have always been warning users about unexpected transfer termination issues as you might end up losing your data. Even if you disagree, there really is a genuine risk attached to it.

Microsoft also noticed that users don’t care about that risk. As a result, the tech giant finally decided to change Windows 10’s default USB settings.

New Windows 10 versions now feature the Better Performance option aimed at increasing data transfer speed. It does this by allowing Windows 10 to cache write operations to the external device. 

You can remove USB drives without safely removing them

The Safely Remove Hardware option actually protects your data by making sure Windows has finished all cached operations.

However, this option has been removed now and disk write operations are no longer cached by the system. This has been made possible by changing the default settings for USB drives so that users don’t need any mouse actions.

The quick removal feature has been implemented in the October 2018 Update (1809).

It will somehow reduce PC performance but it is still unclear to what extend. It won’t affect low data transfer speeds, but you might notice the change as far as the big data transfers are concerned. 

How to revert the changes for better performance

If you want to revert these changes, you can still enjoy better performance on your own USB drive. You can simply follow these steps:

  1. Open Disk Management, select your USB drive and right click on it.
  2. Go to Properties>>Hardware>>Properties, now switch to the Policies tab.quick hardware removal option
  3. Here you can change the default removal settings for that particular USB drive.

This feature was initially rolled out as a part of October 2018 update last year. However, most of users had no idea it existed. That might be the reason why the Redmond giant has now decided to notify users about i on a large scale.

RELATED ARTICLES YOU NEED TO CHECK OUT:

Windows 10 KB4493509 fixes some Blue Screen of Death issues

This month’s Patch Tuesday Edition came with a new round of Windows 10 cumulative updates. Microsoft released tens of cumulative updates for all the Windows server and Windows 10 versions currently supported.

If you’re running Windows 10 version 1809 also known as the October 2018 Update, you can now download KB4493509 to boost your PC‘s performance.

Microsoft has been working really hard to get rid of the bugs annoying Windows 10 v1809 users. The tech giant didn’t introduced any new features, In other words, KB4493509 brings only fixes and improvements. 

KB4493509 changelog

Blue Screen of Death error fix

Microsoft fixed a bug related to per font end-user-defined characters in KB4493509. It appeared when per font end-user-defined characters (EUDC) were enabled by users.

This issue caused Blue Screen of Death errors and made systems completely unresponsive.

IE 11 authentication bug fix

Windows 10 users reported they were experiencing authentication issues with WININET.DLL based applications including Internet Explorer 11 and few other.

The bug was triggered as soon as users attempted to use one Windows Server machine for multiple, concurrent login sessions.

Security updates

KB4493509 brings some important security updates for Windows App Platform and Frameworks, Windows Server, Windows Input and Composition, Windows Storage and Filesystems, Microsoft Scripting Engine, Windows Virtualization, Windows Kernel, Windows Graphics, Microsoft JET Database Engine and Windows MSXML.

Microsoft also listed some known issues affecting KB4493509. Windows 10 users who are running IE might experience browsing issues on specific sites.

The good news is that Microsoft is working to fix these bugs. However, it seems that users will have to wait for the bug fix to be released with the upcoming updates. You can expect a fix in the May 2019 Patch Tuesday release.

RELATED ARTICLES YOU NEED TO CHECK OUT:

Windows 10 KB4493464 comes with a bunch of security updates

Microsoft recently rolled out a new cumulative update, KB4493464, as part of the Windows 10 April 2018 Update. The update takes the existing OS version to build 17134.706.

As a quick reminder, the company already announced this OS version would no longer receive new delta updates in the future. However, Microsoft promised it would keep on offering quality and security updates. 

The big M didn’t introduce any new system features this time but KB4493464 came with a handful of improvements alongside some bug fixes.

If you’re interested in updating your system, follow the download link below.

And now let’s take a look at what’s new in KB4493464.

KB4493464 improvements and fixes

A bundle of security updates 

KB4493464 brings some important security updates for the Windows App Platform and Frameworks, Windows Server, Windows Storage, Windows Virtualization, Windows Kernel, Windows Graphics, and other system components.

Fix for unresponsive apps

KB4493464 addresses another important issue related to MSXML6 applications. Previously, applications that were using MSXML6 were not responding in a few situations. This issue usually occurred during node operations as a result of an exception.

Stop error fixes

A stop error has also been fixed in KB4493464 that was introduced by the previous builds. Users experienced this error when they tried to start the Secure Shell (SSH) client program from Windows Subsystem for Linux (WSL).

IE 10 bug fix

Users reported an issue regarding the Group Policy editor. When a user attempted to edit a Group Policy Object (GPO) that specifically contained  Group Policy Preferences (GPP) for Internet settings of IE10, an error occurred. You should no longer experience such issues after installing KB4493464.

KB4493464 known issues

Furthermore, Microsoft also listed some known issues related to KB4493464. For example, users might experience some launch issues for custom URI schemes for application protocol controllers.

Other users might also experience a premature disruption issues in connection to the WDS server.

RELATED ARTICLES YOU NEED TO CHECK OUT:

You can now read Outlook desktop app messages in dark mode

Microsoft has finally integrated dark mode in Office 2019 Edition. You can now enable dark mode in your desktop Outlook app.

The Dark mode feature was previously available to Outlook UWP app and Outlook Web app users. Microsoft confirmed that the feature is now available to Microsoft Office users who are running Office 2019 and Office 365 on their systems.

The desktop application informs the user about the change in the form of a pop-up note when you open the Office app.

In Black Theme you can now read your messages with a dark background.

The change was identified and then shared by a Windows user Florian B on his Twitter account.

When another user inquired about the build, Florian responded by sharing more screenshots and adding this was an internal dogfood build. He further added that the build would be available to Fast Ring insiders starting May 15.

It seems like Windows users are big fans of the dark theme, that is the reason Microsoft is expanding the dark theme to other applications. The company recently introduced dark mode to File Explorer to comply with the built-in dark mode of Windows 10.

Additionally, dark mode support is also available on Google Chrome.

The built-in dark mode basically adds a shadow effect to each and every UI component. Text and icons on your screen are changed to lighter colors and your windows are turned to black.

This feature is perfect for users who like contrasting appearance and enjoy working with darker UI tones.

If you are not a dark mode fan and you want to switch between both modes from time to time, there is an option for you as well. Similar to the UWP app users, you can use the Sun and Moon button to switch from dark to light and light to dark mode as per your requirements.

All the Office 2019 users out there! Are you excited about the new dark mode? Let us know in the comments below.

RELATED STORIES TO CHECK OUT:

How to reset World of Warcraft’s user interface

World of Warcraft is a fun game to play, but sometimes your adventure may be interrupted by various technical issues. If you’re looking for a quick fix to solve simple WoW bugs, you can first try to reset the game‘s user interface and see if this action alone solves your problem.

Here’s how to reset WOW’s user interface

Resetting your UI to default settings will fix a series of WoW issues in no time. This solution also allows users to fix corrupted game settings. Here are the steps to follow to reset WoW’s UI:

  1. Exit World of Warcraft
  2. In the Battle.net desktop app > go to Options > select Show in Explorer
  3. Open the World of Warcraft folder
  4. Rename the Cache, Interface, and WTF folders to CacheOld, InterfaceOld, and WTFOld
  5. Launch World of Warcraft again so as to enable the changes
  6. Uninstall add-on managers to make sure they’re not causing any unwanted game interference
  7. Delete specific files in the Virtual Store directory
    1. Set Windows to show hidden files and folders
    2. Go to C:Users%username%AppDataLocalVirtualStoreProgram FilesWorld of Warcraft
    3. Delete the Cache, Interface, and WTF folders >close Windows Explorer > restart your system
    4. Launch WoW again.

Speaking of WoW’s UI, many players choose to customize their interface, highlighting the elements that are useful to them. Blizzard’s UI offers limited features and the overall design leaves a little to be desired. As a result, gamers prefer to use different user interfaces that support more functions.

ElvUI is one of the most popular WoW UIs among gamers, is highly customisable, allowing users to turn off any feature they don’t want and use a separate addon.

Using mods is a great way to improve on the overall experience by customizing it in any way you deem the best. However, some of them, especially after a major game update, might get broken. If that’s the case, make sure to navigate to UI mod developer’s page and update the add-on accordingly.

RELATED STORIES YOU NEED TO CHECK OUT:

How to improve Hollow Knight performance in Windows 10

Hollow Knight is one of those beautiful indie games that draws as much attention as some major titles. The game is beautiful in design, very playable, and the first critics are overwhelmingly positive.

Even though you don’t need a beast computer to play Hollow Knight, some players have recently reported certain performance problems. Mostly on Windows 10 laptops. That’s not a major issue, as everything can get in its place with a few corrections.

In this article, we’ve collected a few useful tips that should help you improve the overall performance of Hollow Knight, in order to provide you the best possible experience while playing this artistic masterpiece.

How to improve Hollow Knight performance

  1. Use your dedicated graphics card
  2. Disable Vsync
  3. Run the game in D3D9 mode
  4. Update the game

1. Use your dedicated graphics card

If you have a computer/laptop with two graphic cards (an integrated GPU and a dedicated GPU), make sure to always use the dedicated AMD/nVidia card for playing Hollow Knight.

In case of a nVidia card, to use your dedicated card, do the following:

  1. Right-click the Hollow Knight icon on your Desktop
  2. Choose Run with graphics processor > High-performance NVIDIA processor (default)

As for AMD cards, follow these instructions:

  1. Open Catalyst Control Center
  2. Now, go to the Switchable Graphics tab, and browse for seratovideo.exe
  3. Set it for High Performance
  4. Do the same for – Scratch Live, Serato DJ or ITCH

2. Disable Vsync

You’ve certainly heard about this one before. Vysnc can cause various issues like stuttering and lags, especially on Windows 10 computers. You can turn Vsync off in the game settings.

It’s also recommended to use a software like RivaTuner to limit FPS manually, in order to avoid overheating and more potential problems. To find out how to limit FPS with RivaTuner, check out this article (section: Locking framerate with V-Sync off).

3. Run the game in D3D9 mode

Another thing you can try is switching from the D3D11 mode to the D3D9 mode. The game is designed to work in D3D11 mode by default, so changing modes will likely result in performance changes. On the other hand, that change isn’t positive every time, as you can easily end up with even worse performance. However, if performance doesn’t get any better, you can always revert to original settings.

To run the game in the D3D9 mode, do the following:

  1. Open your Steam Library, and locate Hollow Knight
  2. Right-click Hollow Knight select Properties and click Launch Options
  3. Paste the following: -force-d3d9
  4. Start the game

In case you don’t notice any performance improvements, just negate the above-mentioned command, to revert your settings back to D3D11.

4. Update the game

Finally, a lot of users reported a significant update to graphics and much better optimization for low-specs PCs after an update. So, make sure your game is up to date. We already said that Hollow Knight is, by no means, a demanding game. However, with these updates, the things should get even better for gamers with underwhelming PC configurations.

That’s about it, we hope at least one of these tricks helped you to improve the performance of Hollow Knight, because this game certainly deserves your attention. If nothing, the future updates and patches are ahead, so maybe the problem will get fixed by itself.

RELATED STORIES YOU NEED TO CHECK OUT: