Windows 10 update KB4038788 fixes a bunch of issues and bugs

Another month, another Patch Tuesday. This time, Microsoft released the new cumulative update KB4038788 for Windows 10 version 1703.

This is a regular cumulative update for the system, which means it brings no new features. Its main focus is improving the overall stability, and of course, fixing some of the known issues caused by previous updates. And this time, cumulative update KB4038788 indeed brings a handful of bug fixes.

Here’s the complete changelog of update KB4038788 for Windows 10:

  • “Addressed issue where the color profiles do not revert to the user-specified settings after playing a full-screen game.

  • Updated HDR feature to be turned off by default in the OS.

  • Addressed issue where you can’t open the Start menu when you add a third-party IME.

  • Addressed issue with scanners that rely on inbox driver support.

  • Addressed issue in a Mobile Device Manager Enterprise feature to allow headsets to work correctly.

  • Addressed issue where some machines fail to load wireless WAN devices when they resume from Sleep.

  • Addressed issue where Windows Error Reporting doesn’t clean up temporary files when there is a redirection on a folder.

  • Addressed issue where revoking a certificate associated with a disabled user account in the CA management console fails. The error is “The user name or password is incorrect. 0x8007052e (WIN32: 1326 ERROR_LOGON_FAILURE)”.

  • Addressed issue where LSASS is leaking large amounts of memory.

  • Addressed issue where enabling encryption using syskey.exe renders the system unbootable.

  • Updated the BitLocker.psm1 PowerShell script to not log passwords when logging is enabled.

  • Addressed issue where saving a credential with an empty password to Credential Manager causes the system to crash when attempting to use that credential.

  • Updates to Internet Explorer 11’s navigation bar with search box.

  • Addressed issue in Internet Explorer where undo is broken if character conversion is canceled using IME.

  • Addressed issue with the EMIE where Microsoft Edge and Internet Explorer repeatedly switched between each other.

  • Addressed issue where a device may stop responding for several minutes and then stop working with error 0x9F (SYSTEM_POWER_STATE_FAILURE) when a USB network adapter is attached.

  • Addressed issue where some apps cannot be opened because the IPHlpSvc service stops responding during the Windows boot procedure.

  • Addressed issue where spoolsv.exe stops working.

  • Addressed issue where the Get-AuthenticodeSignature cmdlet does not list TimeStamperCertificate even though the file is time stamped.

  • Addressed issue where, after upgrading to Windows 10, users may experience long delays when running applications hosted on Windows Server 2008 SP2.

  • Addressed RemoteApp display issues that occur when you minimize and restore a RemoteApp to full-screen mode.

  • Addressed issue that sometimes causes Windows File Explorer to stop responding and causes the system to stop working.

  • Addressed issue that causes the Export-StartLayout cmdlet to fail when exporting the layout of tiles at startup.

  • Addressed issue where the option to join Azure AAD is sometimes unavailable during the out-of-box experience.

  • Addressed issue where clicking the buttons on Windows Action Center notifications results in no action being taken.

  • Re-release of MS16-087- Security update for Windows print spooler components.

  • Security updates to Microsoft Graphics Component, Windows kernel-mode drivers, Windows shell, Microsoft Uniscribe, Microsoft Edge, Device Guard, Windows TPM, Internet Explorer, Microsoft Scripting Engine, Windows Hyper-V, Windows kernel, and Windows Virtualization.”

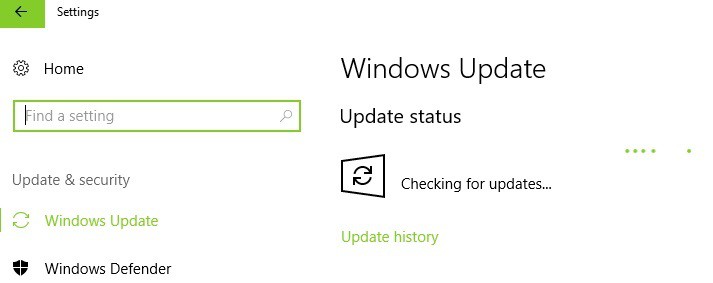
To download this update, simply go to Settings > Updates & security, and check for updates.

Besides KB4038788 for Windows 10 version 1703, Microsoft also released cumulative updates for all other supported versions of Windows 10: KB4038782 for Windows 10 version 1607; KB4038783 for Windows 10 version 1511; KB4038781 for Windows 10 1507 (initial July 2015 release).

For more info about Windows 10 cumulative update KB4038788, as well as all other updates released this Patch Tuesday, visit Microsoft’s Windows 10 Update History page.

Have you already installed this update? Are there any issues already? Let us know in the comments below.

RELATED STORIES YOU NEED TO CHECK OUT:

What’s new in Windows 10 build 16362 for Skip Ahead Insiders: Improved Boot Experience, Narrator Improvements

After releasing build 16288 for Fast Ring Insiders yesterday, Microsoft is once again pushing out a new build, this time for Windows Insiders who have chosen to Skip Ahead. Build 16362 comes with an improved boot experience and narrator improvements. As always, you can read up on what’s new in this build by checking below.

What’s new in Build 16362:

  • Only available on PCs that are not managed by enterprises: Improved Boot Experience: Use sign-in info to apply settings after a restart or update: Building on our work seen in Build 16251, if you stay on the lock screen for a few seconds before signing in, you will now see your lock screen personalization (such as Windows Spotlight, and/or status information from Cortana, Calendar, Mail, and more). As always, you can customize your lock screen experience using the settings listed under Settings > Personalization > Lock screen.
  • Opt-out: Under the Privacy section of the Sign-in options page of your Settings, you can disable and re-enable the feature.
  • Narrator Improvements: You can now select the desired audio channel for Narrator speech output! Simply go to Settings > Ease of Access > Narrator and you’ll find a new option to do this at the top of the “Sounds you hear” section.

As always, you should be finding this build now under Windows Update if you’re a Fast Ring Windows Insider who has opted to Skip Ahead. We wish you well in your downloading, and remind you to keep your feedback coming to Microsoft!

Skype leverages Microsoft’s Family feature to easily connect you with family members

Microsoft’s Family feature, which was recently improved with a shared Family Calendar on Outlook.com has just received some Skype love today. If you’re already a part of a Microsoft Family, all your family members who are on Skype will automatically be added to your Skype contact list. Additionally, a “My Family” Group chat will also appear in the messaging app to make it easier to reach out.

“This new Skype feature creates a central location for everyone to send a quick message or jump on a group video call,” the Skype team explained, highlighting the fact that there is no setup required. “Family members will receive a notification when the group is created, and that group will appear in everyone’s conversation history on whatever device they’re using Skype.” If you’re wondering, you can leave this family group or remove family members anytime, without any impact on family membership.

If you have yet to create a Microsoft Family, you can do so on this page. Sound off in the comments if you think this is a nice complement to the Family Calendar on Outlook.com.

Poll: Were you able to install build 16288?

Yesterday, Microsoft released Windows 10 build 16288 to the PCs of Fast Ring Insiders across the world. Unfortunately, things did not go as planned, and the Windows Insider team later followed up on Twitter to reveal that there was an issue where some Insiders were unable to download the build.

It was not shared exactly what was causing the issue, but the Windows Insider team provided an update late last night, telling Insiders that a fix has been deployed, and each variant of the build will go live as it finishes publishing. An initial 2 hour time period was given for the build to become available after the fix was deployed, but as of this morning, some Insiders have still not received the build.

So, did you receive build 16288? Or are you still seeing an error code? Did you try anything complex or registry changes to see if the build would download to your PC? Check out this week’s poll and let us know.

Dona Sarkar has said that Insiders should wait until the end of the day today for the fix to update the issue, so if you’re not able to download or install the build now, you might be able to soon. Be sure to vote in the poll above, and let us know your thoughts on this situation in the comments below.

Windows Template Studio updated to version 1.3

In addition to fresh new Windows 10 Insider builds, Microsoft also released the version 1.3 of Windows Template Studio yesterday. The company’s new UWP app creation tool now supports in app scheme launch, and it also introduces several Template, Wizard and Process improvements. You can find a summary of everything that’s new below, and we invite you to check the dedicated GitHub page for more details about this new release:

New Feature:

  • Scheme to launch app (aka myAwesomeApp://myDeepLinksIntoMyApp?foo=bar)

Template improvements:

  • Default Windows theme support added to template
  • Files are now UTF-8 with BOM to make sure all cultures are supported
  • Accessibility support in templates

Improvements to the Wizard:

  • Accessibility support in Wizard drastically improved
  • Lots of under the hood bug fixes and code improvements
  • All needed parts for localization are built-in now (looks like we missed window to get actual localized files)
  • Initial VB engine work was added in.
  • Bug fixes

Process improvements:

  • StyleCop enforcements across Template and Wizard code bases
  • Appveyor added for pull requests to be sure we have proper continuous integration checks
  • Required work for .NET Foundation

If you already installed it in Visual Studio 2017, the Windows Template Studio extension should be automatically updated on your PC, but you can force the update by going to Tools->Extensions and Updates. Otherwise, you can download the Windows Template Studio extension on this page. According to Microsoft, Fluent Design in the templates, Visual Basic Support and more are coming in future releases, and you submit your ideas or feature requests on the dedicated GitHub.

How to boost Windows 10 low FPS for AMD PCs

Some AMD graphics cards might be among the best cards for Windows desktops. However, that doesn’t guarantee that games running on updated AMD systems will always have a higher FPS (frames per second) rate. Major updates for Windows can reduce FPS rates, and AMD released a dedicated driver update for the Creators update. This is how you can raise low frame rates on AMD desktops and laptops.

1. Increase the FPS Rate with Frame Rate Target Control

The AMD Catalyst Control Center includes a Frame Rate Target Control (FRTC) setting. That enables you to set a target frame rate of up to 95 FPS for most DirectX games. As such, the FRTC is the first control center setting to check as you can increase frame rates with it.

  • First, right-click the Windows desktop and select AMD Catalyst Control Center from the context menu.
  • Click the Performance tab, and then select Frame Rate to open the FRTC.
  • Select the Maximum Target Frame Rate check box.
  • If the FRTC bar is at a low frame rate, drag it further right. You can drag it up to 95 FPS.
  • Press the Apply button on the AMD window.

2. Lower the Resolution

Lowering graphical settings can enhance FPS rates, so consider reducing the display resolution. This will reduce the graphical detail, but lower resolutions can either dramatically or marginally increase FPS rates dependent on hardware. A lower resolution will, at least, certainly speed up the gameplay. It might be better to adjust the resolution with the games’ graphics settings. However, you can also configure the overall resolution in the AMD control center as follows.

  • Open the AMD graphics control panel by right-clicking the desktop and selecting AMD Catalyst Control Center.
  • Select Desktop Management > Desktop Properties to open resolution settings.
  • Now select a resolution listed under Desktop area.
  • Click Apply to confirm the new settings.

3. Configure the Vertical Sync Setting

Vertical sync is AMD’s equivalent of G-sync that matches FPS with a VDU’s refresh rate to eliminate tearing. If your FPS has dropped to something like 10-20 frames per second, it might be better to switch Vertical sync on as most VDUs have higher refresh rates than 20Mhz. However, Vsync can also restrict frame rates that could be somewhat higher than 60Mhz. So switching Vsync off, if it’s currently on, could boost your frame rate.

  • To switch Vertical sync on or off, open the AMD control panel.
  • Click the Gaming tab on the left of the AMD window.
  • Select 3D Applications under Gaming to open 3D options.
  • Scroll down to the Frame Rate Control settings, which include a Wait for Vertical Refresh option.
  • If Vsync is restricting your FPS rate, select Always off from the Wait for Vertical Refresh drop-down menu.
  • Press the Apply button at the bottom right of the control center window.

4. Update the AMD Graphics Card Driver

4.1 Update drivers manually

Low FPS rates can be due to outdated AMD drivers. AMD releases driver updates to fix graphic card issues, which might include low FPS rates. That’s especially the case after big Windows updates. AMD even has its own software for you to update drivers with. This is how you can update them with AMD Driver Autodetect.

  • Press the Download button on this website page.
  • Click Run on the browser’s web prompt. Then the AMD Catalyst AutoDetect window will open automatically after download.
  • The software scans your system and tells you what the best graphics card driver for it is. Press the Download Now button to save the new driver to Windows.
  • Thereafter, the driver’s installer will automatically open. Press the Install button to open the Install Manager window.

Alternatively, you can manually download a graphics card driver from the AMD website and then install it. Open this website page, and select graphics card and platform details from the drop-down menus there. The Device Manager window, which you can open from the Win + X menu, includes graphics card details under Display adapters. You can also find the 32 or 64-bit platform detail required by selecting System from the Win + X menu.

4.2 Update drivers automatically

However, you should consider using advanced tools that will simplify the operation and prevent PC damage that might appear when installing the incorrect version of the driver. 

In addition, once you have selected the correct driver version for your device, the application will update them individually or in groups at a glance.

⇒ Get Fortect Driver Updater

5. Reinstall the AMD Graphics Card Driver

Your graphics card driver might be corrupted if your FPS rate has dropped down by a substantial margin. Then you’ll need to reinstall the driver. You can delete the AMD driver with the AMD Clean Uninstall Utility.

  • To add AMD Clean Uninstall Utility to Windows, open this website page. Click the AMD Clean Uninstall Utility link there to download the software.
  • When you run the software, a window opens stating, “This will remove all AMD driver and application components.”
  • Press the OK button to confirm and uninstall the driver.
  • An AMD CleanUninstall Utility window opens after the uninstallation. Press the Finish button on that window.
  • Press the Yes button on the CleanUninstall Utility window to restart Windows.
  • Windows will automatically reinstall a graphics card driver after restart.

6. Optimize system resources for games

Finally, always close background software to ensure you get more RAM for the game to maximize the FPS rate. This will, at the very least, speed up the gameplay a little. Remove a software from the Windows startup to make sure it never automatically open. Task Manager is the best utility in Windows to close programs and third-party software services with.

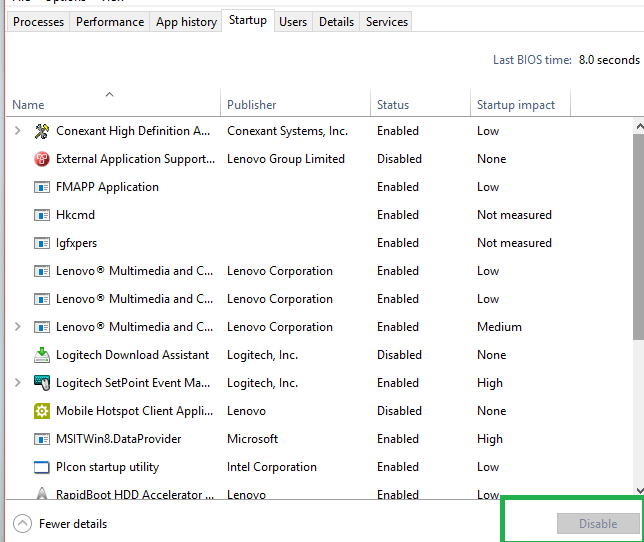
  • Press the Win key + X hotkey, and select Task Manager from the Win + X menu.
  • First, click the Start-up tab. Select some programs listed there and press the Disable button to remove them from the Windows startup.
  • Thereafter, click the Processes tab to open a list of apps and background processes.
  • Select all the listed apps and press the End task button to close them.
  • You can close background processes much the same. However, don’t terminate any Windows processes.
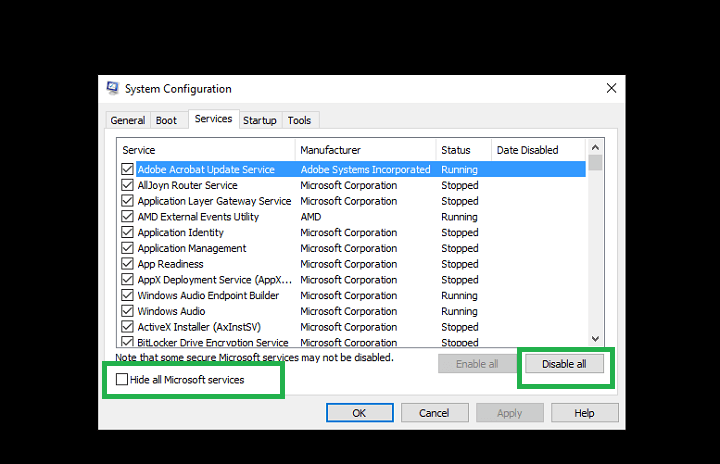
  • You can also disable services with MSConfig. Press the Win key + R hotkey to open Run.
  • Enter ‘MSConfig’ in Run to open the window below.
  • Click the Services tab to open a list of background services.
  • Select the Hide all Microsoft services check box to exclude more essential OS services.
  • Deselect the selected service check boxes, and press the Apply button.
  • Click OK to close MSConfig. Then you can also select a Restart option to reboot the OS.

Raising the FRTC frame rate target, adjusting the Vsync setting, lowering the resolution, and optimizing system resources will probably boost FPS rates for AMD desktops or laptops. Update or reinstall the AMD driver if your frame rate has dropped by a considerable margin. Moreover, you can also overclock hardware with overclocking software to boost FPS.

Fix: The System Cannot Find the Device Specified 20 (0x14)

If you’re getting the ERROR_BAD_UNIT code with 20 (0x14) The system cannot find the device specified, it would lead to trouble identifying a device.

And though it seems complex, things are easy to troubleshoot. Keep reading to find out!

What is error 20 0x14?

The system cannot find the device specified error message, also known as error 20 (0x14), occurs when PCs fail to detect external devices connected to the system.

Sometimes, not all Windows utilities fail to detect the device. There are cases when Computer Management shows details of the respective device, yet when users right-click it in Disk Management, they get the message 20 (0x14) The system cannot find the device specified.

There are various elements triggering this issue, including corrupted files and folders, broken EXE, DLL errors, or SYS files, malware infection, outdated software versions, faulty external devices, and more. Let’s find out how to fix things!

How do I fix error the system cannot find the device specified?

Before we head to the slightly complex solutions, here are a few quick ones to try:

  • Restart the computer.
  • Plug the device into another port on the PC.
  • Install any pending Windows updates.

If none work, move to the fixes listed next.

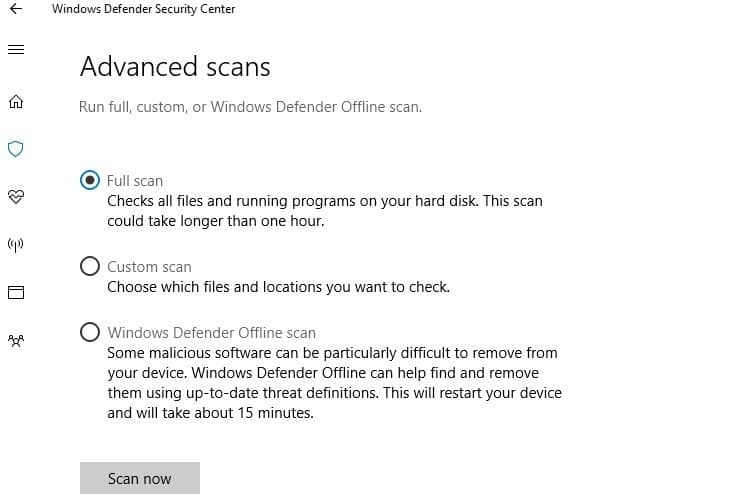
1. Run a full system malware scan

Malware may cause various issues on your computer, including errors. Perform a full system scan to detect any malware running on your computer.

Running a Full Scan in Windows Security

You can use Windows’ built-in antivirus, Windows Defender, or third-party antivirus solutions.

2. Repair your registry

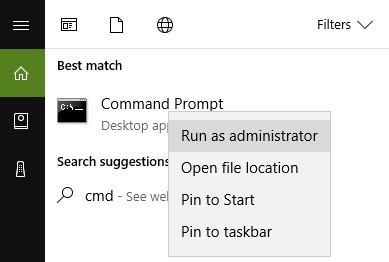
1. Go to Start, type cmd, right-click Command Prompt, and select Run as administrator.

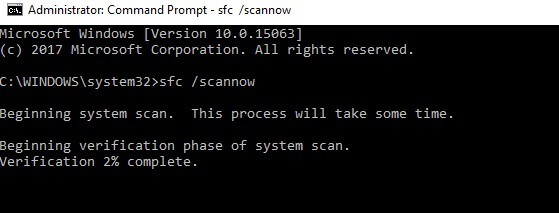
2. Now type the following command and hit Enter:sfc /scannow

3. Wait for the scanning process to complete, and then restart your computer. All corrupted files will be replaced on reboot.

Another way to repair your registry is to use a dedicated tool. If you haven’t installed any registry cleaner on your computer, check out the best registry cleaners to use.

3. Run the Hardware Troubleshooter

1. Go to Settings, click on Update & Security, and select Troubleshoot in the left-hand pane

2. Select Hardware and Devices, and run the troubleshooter.

4. Use diskpart

  1. Go to Start, type Diskpart, right-click the relevant search result, and click on Run as administrator.
  2. Type this command to identify all the available devices:list disk
  3. Your external device should be visible, but there is no drive letter assigned to it
  4. Type the following command and hit Enter (replace X with the volume number assigned to the device):select volume X
  5. Execute this command (replace Y with the letter that you want to assign to the device):assign letter Y

There are cases when the external device no longer appears listed on your PC after 20 (0x14) The system cannot find the device specified error message was triggered. In this case, you can use the diskpart command. 

Diskpart is a powerful tool for hard drive management, and using it can cause damage to your system. Be extra cautious when using this command, and keep in mind that you’re using it at your own risk.

5. Run System Restore

  1. Go to Search, type System Properties, and open it.
  2. Go to System Protection and click on System Restore.
  3. Click Next, and choose the preferred restore point in the new window.
  4. Once you’ve selected your preferred restore point, click Next, and then Finish.
  5. Your PC will restart, and the restoring process will start.

If the problem started recently, run System Restore. Also, if this issue occurred after you installed new software on your computer, try uninstalling the recently added apps and programs. Restart your PC and see if the issue persists.

The System Restore option allows you to restore the previous well-performing system configuration without losing any files, except for a few customizable features and settings.

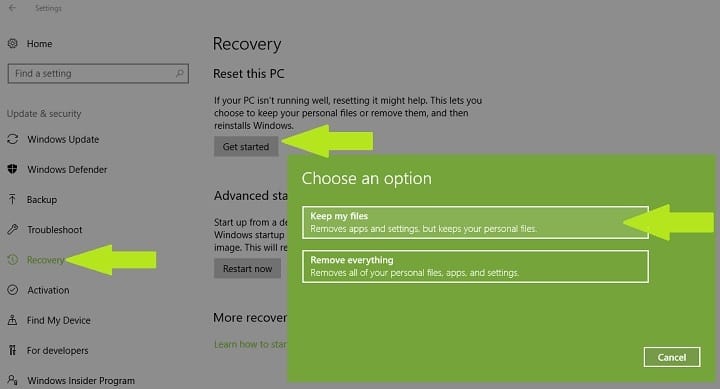
6. Reset the PC

  1. Go to Settings, click on Update & Security, and then select Recovery under the left pane.
  2. Click on Get Started under Reset this PC, and choose to Keep your files.
  3. Follow the on-screen instructions to complete the reset.

Windows 10 offers a series of advanced recovery option allowing users to clean install the OS. If you’re a Windows 10 user, you can also use the Reset this PC recovery option.

There you go. We hope the solutions listed above helped you fix 20 (0x14) The system cannot find the device specified error code. 

Before you leave, find out how to make Windows run faster.

If you’ve come across other workarounds to fix this problem, you can help the Windows community by listing the troubleshooting steps in the comments below.

Ronggolawe malware: what it is, how it works, how to prevent it

A few years ago, ransomware was scarce and not that big of a threat as it’s nowadays. After Petya and WannaCry crisis, we saw what potential it has and people suddenly started caring. Ronggolawe is not as widespread as Petya and WannaCry, but it’s still an immense threat for all web-based companies and web sites.

But, what’s Ronggolawe and how to protect from it? We’ll try to provide a valuable insight below so make sure to check it out.

What it is and how to protect from Ronggolawe ransomware

What is Ronggolawe and how it works

Ronggolawe or Ronggolawe.A (”A” refers to a variation of malicious software) is ransomware firstly introduced a year ago. It was introduced as an open-source code and uploaded to GitHub by an alleged cyber security company from Jakarta, Indonesia. No one can be sure what they intended to do with it, but you can guess that cyber criminals find it quite handy. Since it’s easily obtainable and requires minimal effort for adaptation to malicious purposes, it’s one of the most common ransomware tools nowadays.

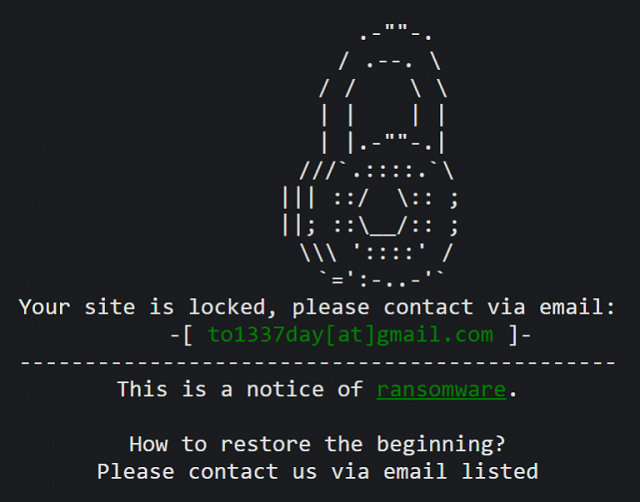
Ronggolawe’s main use is to target files stored on web servers and look for a security loophole of a kind. Once it gains the control over users’ data, it encrypts it and then, the perpetrators ask for money in order to decrypt it again. Then, they’ll offer a ”fair trade” and prompt you to contact them via the listed e-mail address. Obviously, even though you pay, there’s a risk that you’ll never see your data again.

It can come in various ways, but mostly via third-party plug-ins for supported sites, like WordPress, Magento, Blogger and similar web sites. Alternatively, it spreads via spam e-mails and links. In order to get in, Ronggolawe ransomware changes .htaccess file and reconfigures the service. Once it’s in, it produces an interface for attacker where he is able to encrypt and decrypt your files by choice. You’re immediately prompted with this pop-up web page:

That’s the moment you’ll know that the problem is real. There’s nothing you can do in the aftermath, except to pay. And still, no one can guarantee that you’ll get your data back. However, there are some ways you can protect yourself from Ronggolawe.

How to protect from Ronggolawe and ransomware in general

”Better safe than sorry” should be the mantra for all that have even the slightest chance to be affected by ransomware. Modernized hijackers have tools and knowledge to take your valuable data without too much effort. Ronggolawe is just one of the threats you can expect in everyday use, so you need a proper protection 24/7. These are some precautionary measures you should take into consideration:

  • Install and keep up-to-date anti-malware software at all times. Either Windows Defender or a third-party solution.
  • Keep Windows Firewall always ON.
  • Enable the Cloud-based protection ON.
    1. Open Windows Defender.
    2. Choose Virus & threat protection.
    3. Select Virus & threat protection settings.
    4. Enable Cloud-based protection.
  • Don’t install plug-ins from unknown sources.
  • Don’t open spam e-mail. Delete it right away.

That should conclude this article. We hope you found what you were looking for. Don’t forget to tell us about your experience with Ronggolawe in the comments section below.

RELATED STORIES YOU NEED TO CHECK OUT:

The drive cannot locate a specific area or track on the disk [FIX]

If you’re getting ERROR_SEEK with the ‘The drive cannot locate a specific area or track on the disk‘ description, follow the troubleshooting steps listed in this article to fix it.

ERROR_SEEK: What it is and why it occurs?

ERROR_SEEK occurs when users try to copy, move or delete data from their drives. In rare cases, this error also occurs when users try to access and launch various apps located on the respective drive.

Microsoft explains that ERROR_SEEK occurs mainly because the disk may be damaged, unformatted, or simply not compatible with the operating system.

Fix the ‘The drive cannot locate a specific area or track on the disk’ error

Solution 1 —Unplug and re-plug the external drive

If you’re getting this error with removable storage, unplug the storage device. Close all software on your taskbar and plug the external storage back in. You can also restart Windows before you plug the external HDD back in. Then, retry the action that triggered the ERROR_SEEK error.

Solution 2 — Reinstall external hard drives

Reinstalling the storage device might also fix this issue. Of course, you can’t do that for HDDs with Windows on them, but you can reinstall external storage drives with the ERROR_SEEK error.

  1. Go to Start > type ‘device manager’ to launch Device Manager.
  2. Click Disk drives to expand that section > right-click the external disk drive to fix.
  3. Select the Uninstall option on the context menu.
  4. Press the Scan for hardware changes button to reinstall the disk drive.

Solution 3— Check your disk for errors

On Windows 10, you can run a disk check using Command Prompt.

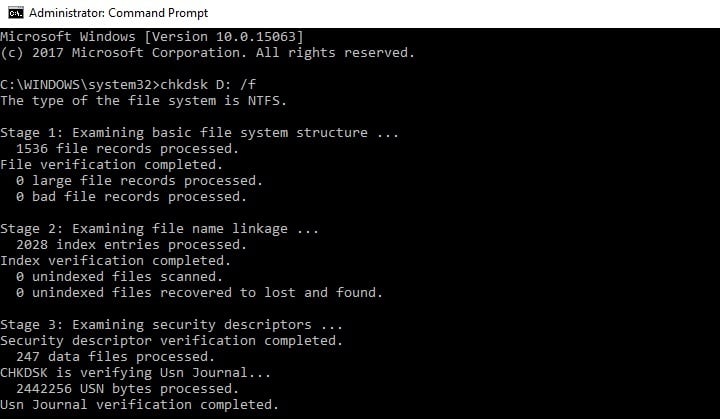
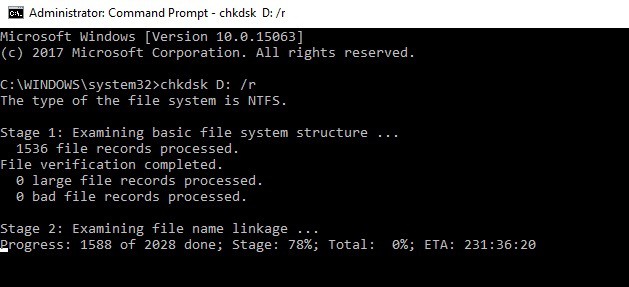
Start Command Prompt as administrator and type the chkdsk C: /f command followed by Enter. Replace C with the letter of your hard drive partition.

As a quick reminder, if you do not use the /f parameter, chkdsk displays a message that the file needs to be fixed, but it does not fix any errors. The chkdsk D: /f command detects and repairs logical issues affecting your drive. To repair physical issues, run the /r parameter as well.

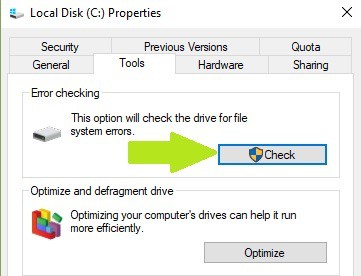
On Windows 7, go to hard drives > right-click the drive that you want to check  > select Properties > Tool. Under the ‘Error checking’ section, click Check and check the ‘Automatically fix system file errors’ option.

Solution 4— Clean your temporary files and folders

The simplest and quickest manner to delete your temporary files and folders is to use Disk Cleanup. As you use your computer or browse the Internet, your PC accumulates various unnecessary files.

These so called junk files may affect your computer’s performance and also trigger various error codes, including the ERROR_SEEK error code. Clean your temporary files and then try to use your drive again.

Here’s how to use Disk Cleanup on Windows 10:

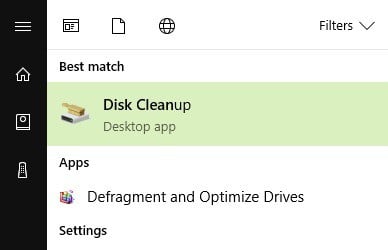
1. Go to Start > type Disk Cleanup > launch the tool

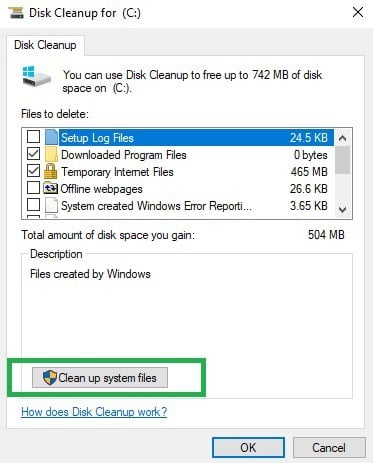
2. Select the disk that you want to clean > the tool will them tell you how much space you can free up

3. Select “Clean up system files”.

Here’s how to use Disk Cleanup on Windows 7:

  1. Go to Start > type Disk Cleanup > open Disk Cleanup.
  2. In Disk Cleanup’s description section, select Clean up system files and select the drive that you want to clean up > click OK.
  3. On the Disk Cleanup tab, select the check boxes for the file types that you want to delete > click OK > select Delete files.

Solution 5 — Use the previous drive letter/ change the drive letter

If the ERROR_SEEK error code occurred after you changed the letter of your drive, try restoring the previous letter.

1. Go to Search > type “disk management” > select the first result > launch the tool
2. Select the problematic drive > right-click it > select Change driver letters and paths

3. Click on the Change button > restore the previous driver letter > click OK.

Solution 6 — Run a full system scan

Malware may cause various issues on your computer, including errors. Perform a full system scan in order to detect any malware running on your computer. You can use Windows’ built-in antivirus, Windows Defender, or third-party antivirus solutions.

Here’s how to run a full system scan on the latest Windows 10 version:

  1. Go to Start > type ‘defender’ > double click Windows Defender to launch the tool
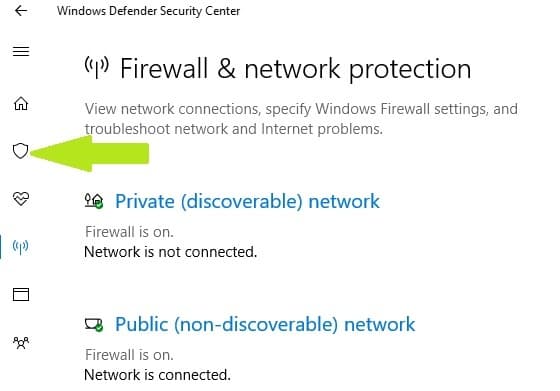
  2. In the left hand pane, select the shield icon
  3. In the new window, click the Advanced scan option
  4. Check the full scan option to launch a full system malware scan.

Solution 8 — Repair your registry

The simplest way to repair your registry is to use a dedicated tool, such as CCleaner. Don’t forget to first backup your registry in case anything goes wrong.

You can also use Microsoft’s System File Checker to check for system file corruption. The utility verifies the integrity of all protected system files and repairs files with problems when possible. Here’s how to run an SFC scan:

1. Go to Start > type cmd > right-click Command Prompt > select Run as Administrator

2. Now type the sfc /scannow command

3. Wait for the scanning process to complete and then restart your computer. All corrupted files will be replaced on reboot.

Solution 9— Format your hard drive

If the solutions above didn’t work, try formatting the problematic drive. Formatting and restoring the default drive settings should fix this error. Keep in mind that formatting your drive means deleting all the files and folders stored on the respective drive.

You can format your drive using Command Prompt:

1. Go to Start > type cmd > right-click the cmd search result > select “Run as administrator”
2. Type format C: /FS:exFAT > hit Enter to begin formatting the C drive as exFAT. Replace C: with the letter of the problematic drive.

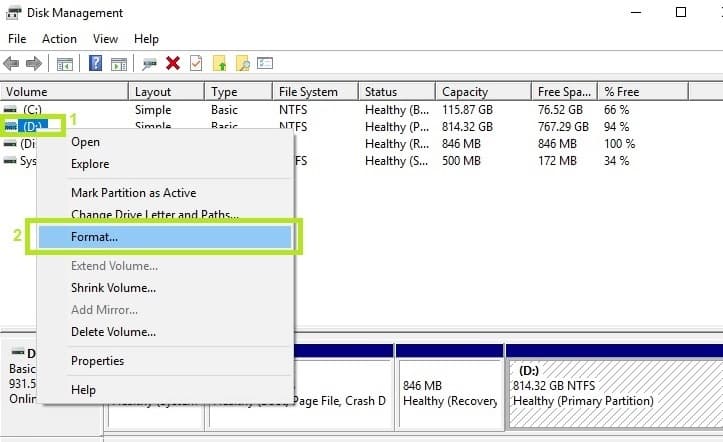
You can also format your drive using the Disk Management utility:

1. Go to Start > type ‘disk management‘ > select the Disk Management utility

2. Right-click the drive that you want to format > select the Format option

3. Follow the on-screen instructions to further customize the format process > click OK on the warning window.

4. Once the format process finishes, you can use your drive. Try to install the updates again to see if this action fixed the problem.

We hope that the solutions listed above helped you fix the ERROR_SEEK error code. As always, if you’ve come across other workarounds to fix this problem, you can help the Windows community by listing the troubleshooting steps in the comments below.

RELATED STORIES YOU NEED TO CHECK OUT:

Here’s how to remove Genius Box adware from your PC

Genius Box is a potentially harmful program developed by TGF Interactive. It is an adware that displays advertisements in the form of banners and pop-ups with the label “Ad by GeniusBox” or “TGF Interactive”. The developers of this program claim that it is a “downloadable app”, but most often the program gets installed in your system unknowingly, without your prior consent.

The developers of this application say that it is a perfectly legit and safe application to install, and even go on to claim that it will actually enhance your search experience. Here’s the full description by TGF Interactive:

Genius Box is a downloadable application that is designed to enhance your search experience. With Genius Box installed, you can quickly and easily view the most relevant search results from all your favorite websites and search engines without having to open additional windows / tabs, or going to multiple sites and then performing the same searches on each of them. To enable its features, GeniusBox installs as a local proxy and interprets content from encrypted web pages.

Although it hasn’t been labeled as a virus, experts throughout the Internet label Genius Box as a potentially harmful application, owing to the deceitful nature of its installation and the discomfort it creates later. Right after it has been installed in your system, you will start getting too many intrusive ads on your web browsers.

These ads may appear as banners in your search results or as pop-ups. Furthermore, this application may redirect you to sponsored links and unknown websites, making your web browsing experience a nightmare. Furthermore, the pop-ups and redirects created by Genius Box may get you involved with other adwares or actual malwares that can do harm to your system.

It is recommended that you take the necessary steps to remove this application as soon as you get the early signs of its presence. Early removal can prevent future damages to your system. In order to completely remove Genius Box and its components from your computer, you’ll have to follow the two stage procedure listed below.

Remove Genius Box from your PC

Step 1 : Uninstall Genius Box from Windows

The quickest and easiest way to uninstall Genuis Box from Windows is via the Control Panel. Follow these steps:

Add or remove program genius box

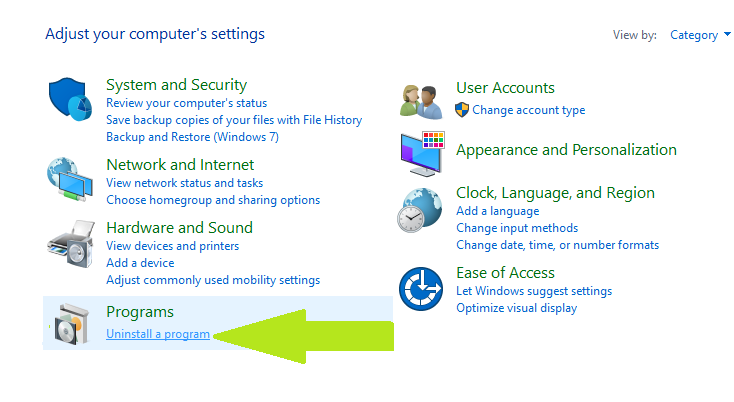
  1. Press the Windows key and on the search bar type Control Panel, and click on it,
  2. Under programs, click on Uninstall a program,
  3. You will be taken to the Uninstall or change a program window,
  4. Find Genius Box, click on it and select Uninstall,
  5. Follow the on-screen instructions,
  6. Also do the same for any suspicious/unfamiliar programs that were recently installed (will appear on the top of the list).

Step 2 : Reset Your Web Browsers

Chances are, your web browser’s search settings and homepage were modified by Genius Box. To remove these changes, you will have to reset your web browsers.

2.1. Reset Google Chrome

  1. Open Google Chrome, and navigate to the Chrome menu,
  2. Click on Settings,
  3. Scroll down to the Search section, and click on Manage search engine,
  4. The search engine of your choice should be on the top of the list of default search engines,
  5. If not, click on the three dots next to your preferred search engine and select Make default,
  6. Also click on the three dots next to any suspicious looking/unfamiliar search engine and select Remove from list,
  7. Back on the Settings page, scroll up to the Appearance section, and click on Show Home button
  8. If a web address appears below, remove it and select New Tab Page,
  9. Restart Chrome to apply changes.

2.2. Reset Mozilla Firefox

  1. On the top of the window, find the Firefox button, and navigate to the Help sub menu,
  2. Select Troubleshooting Information,
  3. Click on Refresh Firefox, and then again in the confirmation window,
  4. The window will close, and Firefox will reset,
  5. A window will reappear and display a list of information that were imported,
  6. Click on Finish and Firefox will reopen.

2. 3. Reset Microsoft Edge

If you’ve got Windows 10 Fall Creators Update, you can reset Edge from the Settings app. Follow these steps:

  1. Open Settings, and go to Apps > Apps & features,
  2. Find Microsoft Edge on the right side and select it,
  3. The Advanced Options link will show up, click on it,
  4. On the newly opened dialogue, click on the Reset button to reset Edge,
  5. Edge should now be reset to its default settings.

2.4. Reset Microsoft Internet Explorer

For those of you still sticking to the old favorite MicrosoftInternet Explorer, follow these steps to remove Genius Box components:

  1. On Internet Explorer, select the Tools button and click on Internet options,
  2. Select the Advanced tab,
  3. Click on Reset,
  4. Also select the Delete personal settings check box,
  5. Once the default settings have been applied, click on Close, and then on OK,
  6. Restart Internet Explorer to apply changes.

We hope that the solution listed above helped you remove Genius Box from your PC. As always, if you’ve come across other solutions to completely uninstall Genius Box, you can list the steps to follow in the comments below.

RELATED STORIES YOU NEED TO CHECK OUT:

Your PC might register preview 16288 as the Fall Creators Update, it’s not warns the Windows team

As Fast Ring Insiders complete the download of preview build 16288 the Windows team would like to issue as word of caution:

On Build 16288, you will notice that the watermark at the lower right-hand corner of the desktop has disappeared. You will also see that the OS now reports as “Version 1709” which is the official version number for the Windows 10 Fall Creators Update release. However, this is NOT the final build as we’re not done yet. We’re just now beginning the phase of checking in final code to prepare for the final release. So we will have more builds to release to Windows Insiders between now and then. And the desktop watermark may re-appear in these builds.

For those attempting to read the Windows 10 tea leaves, it would seem the engineering team would rather be blunt and clear. Be there no confusion about it, there will be at least another build hitting devices before Windows 10 Fall Creators Update is said and done.

On a side note, there does appear to be an issue with the download of preview 16288 that users should be aware of.

Visit the link here for more details.

XCOM 2 War of the Chosen issues: Crashes, sound problems, and more

The latest big expansion pack for XCOM 2, War of the Chosen was released some time ago. This is not a minor patch, as the new update actually brings a lot of new features and content to the game. Therefore, it’s considered a huge and significant expansion by fans and experts.

However, even though War of the Chosen brings so many new features to the game, it also brings a lot of issues along. Over the course of last few days, a lot of players have been reporting various issues caused by the latest XCOM 2 expansion.

We’ve wandered Steam forums, in search for these problems, and the hunt was (un)successful. So, keep reading this article to find out what bothers players who recently installed XCOM 2 War of the Chosen.

XCOM 2 War of the Chosen problems roundup

Unable to install the DLC

The very first problem (literally the first one) players encountered is the issue that prevents XCOM 2 War of the Chosen from downloading. Namely, a few players experienced the same problem. Here’s what some of them said on the Steam forums:

I bought the DLC yesterday and so far I can’t play it. Here are my problems; when I try to install it, it takes way too long. Installing 30 GBs aparently takes anywhere from 3 hours to “over a year.” Before you ask its not my internet, I’ve reset the router and updates for other games complete much quicker. Other posts I read suggested changing the download region from Washington DC to somewhere foreign. I tried Sweden, Veitnam, West Africa, all places people recommended and all had the same result,” said PMBoz on Steam forums.

Unfortunately, we don’t have a confirmed solution for this problem. So, if you know something more, please let us know in the comments. Because you can’t even get to experience other issues without actually installing the game.


Unable to install the DLC on Xbox One

As it appears, Xbox One players are actually most affected by this issue. As a lot of people complain on Reddit about not being able to download the game.

“The DLC was supposed to release at midnight, however me and so far a lot of other people can’t access it. We have it downloaded but the dlc file is only 17MB and the game doesn’t even recognize that we own the dlc. Can anyone please help?”


Can’t load the DLC

Problems of accessing the game continue even for those who managed to install it. Namely, some players reported that they’re unable to load the game using the official launcher:

“I choose War of the Chosen DLC when the launcher start, but it send me to the vanilla one instead WotC one. no features from WotC available. what should I do,” said Synsky1412 on the Steam forums.

“Hey all, xcom 2 has always worked fine on my PC, but the expansion simply does not launch. I get the splash screen, switch to war of the chosen, and press PLAY, and then nothing happens. After a few seconds steam no longer displays me as ingame. Anyone else get this and how did you fix it?” said Freelancer.


Possible memory leaks

There are some users who noticed that the new expansion actually causes memory leaks. Here’s what one of them said on the forums:

“Anyone know why WOTC plays fine for an hour or so and then loses performance until it’s a choppy jerky unplayable game? I was thinking perhaps a memory leak? If no one else is experiencing this perhaps it’s a problem specific to my setup – Ryzen CPU, 16BG ram, R9 GPU. Anyone else suffer this?”

Although the issue was never confirmed, a lot of people actually think that XCOM 2 causes memory leaks in general, not just after installing the new expansion. If you want to know more about memory leaks, and how to deal with them, we have an article about that.


Controller issues

Another player says that he’s unable to use his Xbox 360 controller in the game, after installing War of the Chosen:

“Hello I just started the new x com 2 game war of the chosen. I usually play with controller. But seems is not working right. In xcom 2 it supported the controller fine. Now with war of the chosen is just emulate the Mouse and Keyboard. I have 360 controller. Any help or infos appreciated.”


Game crashes

The game also appears to be crashing for some players after installing the expansion. One player said on the Steam forum that the game crashes for him as soon as he starts a mission:

“I’ve started a war of the chosen iron man campaign and got a strange bug. The game crashes as I just started a mission and tried rotating the soldiers to take difference actions to no avail. Am I screwed?”

Unfortunately, nobody from the forums had a proper solution for this issue.


Sound problems

Another problem that appears to be quite widespread is the sound issue. Namely, many players reported this problem on the forums. Here’s what some of them say:

“Since I started playing the expansion, the sound in the game crashes at random and i can only have it back by restarting the game. Did anyone has the same problem,” said Steam user Kindredblades.

“This happened with the base Xcom and its expansion Enemy Within, but there isnt any sound coming out from the game. Before you ask, sound is turned on and there is no headphones plugged in(was just playing Xcom 2 and didnt realize you had to choose a different option for War of the Chosen), so does anyone know what the trick was to get the sound to start working,” said templar0122.

One user said that the problem can be solved by disabling all unused sound devices. So, go to Sound settings, and disable each sound device, except the one you’re using. Hopefully, that will solve the problem.


Black screen

And finally, there are also many users who reported sudden black screens during the gameplay. Here’s what some of them said on the forums:

“So I’ve disabled all my mods, uninstalled them to be sure, yet the game loads all the logos fine but rather than loading the main menu a black screen comes up. Music plays in the background but it just stays black for a few minutes before it goes white. Ive moved XCOM files out of documents, verified game cache and still nothing works. Any ideas?”

Unfortunately, nobody had a proper solution for this issue.


That’s about it. As you can see, the list of issues is actually quite long for an expansion. And if it continues like this, developers will probably have to think about following the expansion release with a fixing update.

Have you experienced any issues while playing XCOM 2 War of the Chosen yet? Let us know in the comments below. 

RELATED STORIES YOU NEED TO CHECK OUT:

[Updated] Windows 10 Insider build 16288 is apparently “not quite ready yet,” won’t download

Shortly after unleashing Windows 10 Insider build 16288 for Fast Ring (not Skip Ahead) Insiders, the build has apparently run into some problems. The Windows Insider team just tweeted on the issue:

When trying to access the latest build on a Surface Pro 4 currently on 16281.rs3_release here, Windows Update sees the new build, begins initializing for just a few seconds, and then bails out to this message:

Windows 10 Insider 16288 not ready

Not sure whether this message is the cause of the concern, or if the build has been pulled while the team investigates. Have you been able to successfully download and install build 16288?

9/12/13 9:22 PM PT Update: Microsoft has revealed that a fix for this issue has been dispatched. Each of today’s build variants will go live as it finishes publishing, and an estimated time of launch for the variants is about 2 hours. or 10:30 PM PT Microsoft time.

Patch Tuesday September 2017: Download the latest Windows updates

Microsoft is expected to release a series of new Patch Tuesday updates today — get ready to install them. As usual, these updates won’t bring new features to the table, focusing instead on improving the overall system stability and patching the existing bugs.

UPDATE — Microsoft finally released this month’s Patch Tuesday updates. Here are the most important updates:

You can read the original story below.

For the time being, there is no information available regarding the change log of the upcoming updates. As is Microsoft’s habit, the company will most likely roll out the updates first, and publish the patch notes a few hours afterwards.

Patch Tuesday September edition: What we expect to see

First off, some of the previous updates bring a few issues of their own. For example, installing KB4034674 on Windows 10 PCs may change Czech and Arabic languages to English for Microsoft Edge as well as other apps. We expect Microsoft to fix this problem in this months’ Patch Tuesday edition.

On the other hand, Windows 7 users who installed KB4034664 have experienced a series of issues. For example, if your PC has more than one monitor connected, some apps may be affected by rendering issues. Also, the WordPad application can sometimes crash on launch after installing KB4025341. Of course, these bugs are affecting only a limited number of users, but they’ve been around for about one month now and it’s time that Microsoft fixed them once and for all.

Speaking of issues, Microsoft recently acknowledged the gaming issues in Windows 10 Creators Update. The company also confirmed that it has a fix for one of them in the Windows Insider build. Hopefully, the Redmond giant will release it as soon as possible and thus put at end to gamers’ suffering.

However, it’s highly unlikely that Microsoft fixes these Windows 10 gaming issues on this Patch Tuesday edition. The bugs have been affecting players ever since the Creators Update landed, and seem too complex for Microsoft to fix them that quickly. But you know what they say: hope dies last.

In order to install the latest Patch Tuesday updates, make sure you’ve enabled automatic Windows Update. Don’t forget to check for updates from time to time.

Speaking of updates, what are your expectations in terms of fixes? What issues do you hope that Microsoft will fix today? Let us know in the comments below.

Editor’s note – We will update this article as soon as new information is available.

RELATED STORIES YOU NEED TO CHECK OUT:

PLAYERUNKNOWN’S BATTLEGROUND: Host closed the connection [FIX]

PLAYERUNKNOWN’S BATTLEGROUND is an online multiplayer battle royale game for Windows and Xbox One. Recently, the game has been facing issues that prevent players from immersing themselves in the game. Multiple players have reported being abruptly kicked out of matches with a cryptic “host closed the connection” error. Here, we’ll take a broader look at the error, what causes it, and how to avoid it.

Host closed the connection — Why does this error occur?

PLAYERUNKNOWN’S BATTLEGROUND is the hottest game on Steam right now. At the time of this writing, it is #1 on Steam’s Top Sellers list; it has more than 500,000 players online and in-game at any given moment. As you may have guessed, those huge number of players really puts a strain on the companies online servers.

Many gamers have started to complain about the “host closed the connection” error that logs the player out unexpectedly. Here’s what one player wrote on Steam:

im not sure if they are being DDOS’d or if the servers just cant handle it. please player unknown or bluehole [the company behind the game] do something about this cos its getting really annoying playing up till the last 10/20 people alive after killing a few people, getting the adrenaline rush you play this game for and end up getting booted for server issues, im gonna lose a keyboard and mouse to this

While there is nothing you can do to make their servers more stable and reliable, there are a few steps you can take from your side to make sure your connection is more reliable. This will hopefully help you have a better experience with the game and a longer play session without any interruptions.

PUB: Host closed the connection [FIX]

Improve your connection stability

Improving connection is the best way to not … lose connection when playing a game. Here are some methods you can apply to do just that.

Opt for a wired connection

If you are using Wi-Fi to connect to the Internet and play video games, you might want to change that and start using an Ethernet connection. Aside from being more reliable, Ethernet will also help you achieve a lower latency, which is vital for gaming. Latency, for those who don’t know, is how fast your network sends requests to the server and the server replies.

A gamer had this to say when asked if he preferred WIFI or Ethernet, “Nothing beats ethernet, Wifi is unstable even the best ones. After I played using my ethernet I never went back to wifi, the difference is huge“.

Close background applications

Closing background applications when playing games is a good habit to acquire. Not only will it help you achieve higher FPS, it will also make your connection more stable. By closing all the background applications, you’ll be saving both CPU cycles and bandwidth that those applications consumed.

This will, in turn, translate into a better and more reliable gaming experience. Of course, you can manually close all background applications using Task Manager, but an easier way would be using an application named Razer Cortex. It automatically closes all the background and useless processes for you when gaming and restarts them when you are finished, and the best part, it is free. You can download it here.

Give priority to the game’s connection

We all know that a lot of programs are racing for bandwidth on our computers, from the notorious Windows Update to Good ol’ games. Typically, your internet connection gives equal priority to all of those programs. Your background and often less vital Windows Update will be an equal citizen when it comes to Internet bandwidth to your fast-paced game where every second and every byte of data count.

Thankfully, most new routers have a feature named Quality of Service (QoS). This feature will let you prioritize certain demands for bandwidth over others, for example,  you think gaming should take priority over updates? Simple, just configure your router and whenever games make requests to the internet, the router gives them a priority. We’d love to provide detailed step by step guide on how to enable QoS on your router, but every router is different. You should look up if your router supports this feature and how to activate it.

For those of us who are not so lucky to have a router with QoS, not all is lost. We’ve compiled a list of all the programs that will help you prioritize certain connections over others for you. You can access it here. Of course, prioritizing on the router level is better, but this is a close second. They are all easy to setup and configure.

Conclusion

We looked at ways you can make your connection more stable so you hopefully get to play PLAYERUNKNOWN’S BATTLEGROUND without interruption and errors. Tell us in the comment sections if you’ve had this error had a really terrible timing for you, and if you broke your mouse or keyboard because of it.

RELATED STORIES YOU NEED TO CHECK OUT:

How to watch Microsoft’s Edge Web Summit tomorrow Sept 13th

Microsoft’s third annual Edge Web Developer Summit is coming up tomorrow, September 13th, and the company would like you to know that you can watch all the action from the summit all day long on Channel 9! The summit features 15 jam-packed technical sessions and is perfect for web developers who want to get an inside look at the development of Microsoft Edge, and what’s in store for the future of the Windows 10 web browser.

The live stream will be available here on Channel 9 beginning at 9:00 AM Pacific time tomorrow. The summit will kick off with a look at what’s new in Microsoft Edge in EdgeHTML16, and there are plenty of sessions planned afterward. Developers can expect to hear more about accessibility, performance, test guidance, and the new tools that can use in Microsoft Edge.

Our own Kip Kniskern will be at the Edge Summit in Seattle, so be sure to keep it locked into OnMSFT all day long tomorrow for all the news and information.

Windows Update begins hosting Windows on ARM files

Windows Update has begun hosting Windows on ARM files (via MSPU). Microsoft briefly mentioned Windows 10 on ARM at IFA 2017, with a possible release date in late 2017, possibly early 2018. The MSPU story notes that there were some files supporting Windows 10 ARM64 build 16281 were spotted by one of their tipsters on Windows Update servers.

Interestingly enough, the ARM64 files have different SKUs that are separated by different Windows 10 operating systems, including separate files for Windows 10 S, Enterprise, Pro, and others. Unfortunately, these builds are not individual ISO files, so you can’t just download and install the ISO files. Rather, there are files that are a part of Microsoft’s Windows 10 Unified Update Platform (UUP), so you would have to have all the different UUP files together to be able to make the full ISO file for each individual Windows 10 OS.

Since the files were spotted on the Windows Update server, they might be able to be used as part of the Windows Insider program, just like on Windows Phones and Windows 10 PCs. Of course, Microsoft has already said that current Windows Phones will not be getting Windows 10 on ARM.

Per the MSPU story, here’s a list of the ARM64 file names:

  • arm64fre_Client_en-us_lp.esd
  • Microsoft-Windows-EditionPack-Enterprise-arm64arm-Package.ESD
  • Microsoft-Windows-EditionSpecific-Cloud-arm64arm-Package.ESD
  • Microsoft-Windows-EditionSpecific-CoreSingleLanguage-arm64arm-Package.ESD
  • Microsoft-Windows-RegulatedPackages-arm64arm-Package.ESD
  • Microsoft-Windows-WowPack-CoreARM-arm64arm-Package.ESD

As we already know, the Windows 10 Fall Creators Update is coming October 17, 2017. It is possible that Microsoft is planning to release Windows 10 on ARM around the same time. Panos Panay will be delivering the keynote at Future Decoded in London in October and probably announcing a new Surface device too. Hopefully, Windows 10 on ARM devices won’t be far behind.

Microsoft’s Surface Hub now available in Hong Kong

Microsoft is launching its Surface Hub digital whiteboard in Hong Kong today, which will be the first area in the Greater China region where businesses can get the company’s digital whiteboard (via the South China Morning Post). In addition to Surface Hub, Microsoft is also launching Microsoft 365 in Hong Kong today, its new enterprise offering including Office 365, Windows 10 and Enterprise Mobility + Security.

In a press release, Alain Crozier, chairman and CEO of Microsoft Greater China shared some interesting facts about Surface Hub adoption:

Surface Hub is as transformative to group productivity as the PC was for individuals. More than 50% of Fortune 100 companies now use Surface Hub to capture new ideas and improve collaboration and productivity. In Hong Kong, companies including conglomerates, utility companies and international tech consultancy firms are early adopters of the Surface Hub.

Back in May, Microsoft revealed that Surface Hub was currently being used by more than 2,000 customers in 24 markets across the world, up from 500 customers in July 2016. “Microsoft recognizes the demand for a modern workplace that is digitally-connected, inclusive and engaging, yet secure,” explained Crozier. So far, it seems that Surface Hub is delivering exactly that to businesses around the world.

HP announces new Windows 10-powered EliteBooks, all-in-one

Along with a series of new displays and accessories, HP today announced new Windows 10-powered EliteBooks and a new Windows 10 all-in-one PC. The devices are built with businesses in mind and feature light design, optimized performance, and more. We’ve divided up the products for you below, so without further ado, here is what you need to know.

HP Elite 1000 Series:

  • Certified for Skype for Business.
  • Features built in keys to easily manage calls at the touch of a button
  • Noise cancellation for optimized audio and video.

HP EliteBook x360 1020 G2: Available September starting at $1,379

  • Can be used in five different modes for maximum productivity
  • Optional HP SureView for privacy when using display
  • 700-nit brightness on display
HP EliteBook x360 1020 G2

HP EliteBook 1040 G4: Available in September starting at $1,379

  • Ultra slim design
  • 14 inch dispay
  • Intel Core i7 Quad Core Processor with vPro technology
  • Long battery Life

HP EliteOne 1000 AiO: Available in September starting at $1,259

  • 2 MP dual-facing pop-up webcam
  • 7th Gen Intel Core i7 65W processors
  • Optional Intel Optane memory (cache)
  • 3.8-inch FHD, or 27-inch 4k display, or a 34-inch diagonal curved display
HP EliteOne 1000

Although these devices are aimed at businesses, consumers looking to buy new PCs still have a lot to look forward to. At IFA 2017, Dell, Lenovo, and many other laptop and PC manufacturers revealed Windows Mixed Reality headsets and new PCs and hardware for the upcoming holiday season. You can catch up on the news from IFA 2017 by checking our news hub here.


Minecraft Xbox Controllers are now available

Last month at Gamescom, Microsoft launched a new limited edition Xbox One S Minecraft themed bundle. The Xbox One S bundle featured a custom designed console, a Creeper Xbox controller, a vertical stand, and a transparent underside, and custom Minecraft themed sounds.

While the console is an option for those who are just purchasing a new Xbox, existing owners and fans of Minecraft might have felt a little left out. Well, no need to worry, as Mojang has announced that Minecraft Xbox Controllers are now available for purchase!

As revealed by Major Nelson, specifically, the Creeper Controller (bundled with the special edition console) is now available for purchase separately for the price of $74.99. There is also a “Pig Pad” controller which can also be purchased for $74.99 as well, complete with a cool Pink color scheme, perfect for the female Minecraft fan.

It’s great to see that Microsoft is always adding more controller options for fans of the Xbox One to enjoy and customize their console with. Which controller do you use with your Xbox One? Let us know in the comments below!

How to try Microsoft’s upcoming Timeline feature today (sort of)

At Build 2017, Microsoft introduced some interesting new features coming to Windows 10 in the Fall Creators Update. One of these features, Timeline, is available to start using now for Android users through the Cortana beta Program. Well, not exactly. You can use Timeline, but it is not as refined as Microsoft intends it to be.

Microsoft knows people have multiple devices and wants to continue those experiences throughout Windows 10. Microsoft wants Timeline to fill that void. Timeline allows your content and activities to move seamlessly from one device to another using the power of Microsoft Graph.

Timeline will be a major replacement update to the current Task View for Windows 10. Timeline will give you a visual on what projects you are working on in Windows 10 represented by cards showing your recent activity, along with the date and time where you left off, and what device you were using.

Microsoft, Windows 10
Timeline with date and device information.

Timeline reminds me of how OneDrive works when syncing media content between devices. Timeline also reminds me of Outlook’s “Journal” feature. Although Microsoft has not highlighted Outlook’s Journal feature in the past, Outlook Journal has been a part of Outlook for years, and kind of does what Timeline will do.

However, Timeline excels with its integration with Cortana. From what I can surmise, Cortana is the missing piece of the puzzle that is able to sync experiences between devices. Microsoft knows that not all users will be using a Windows 10 PC; they might switch from a Windows 10 device to an Android phone, ChromeBook, iPhone, or macOS device. However, by prompting users to install Cortana on their devices, they will have also the option to use “Pick Up Where You Left Off.”

If you have an Android or iOS device, Microsoft will allow you to continue your Windows 10 PC experience on your phone or other device. As we already know, Timeline will be not be available in the upcoming Windows 10 Fall Creators Update on October 17, 2017. Instead, Timeline will be available in the next Windows 10 feature update coming sometime in early 2018.

Android users can start trying some of the features of Timeline now. It is important to note that this is not a new Android feature that was just released today, it is something that has been available for a while now. No word yet when iOS users will be able to start using these features, yet but I assume it will be sometime soon. While Timeline is not the full-featured version that Microsoft intends, it is still interesting to test out Microsoft’s vision. Of course, there are a few things that you’ll need first to get started:

  1. An Android device
  2. A Windows 10 PC running latest Insider Preview build
  3. Join the Cortana beta Program on Android

Once you sign up for the Cortana beta Program on Android or and get the latest update, you will also need to link your phone to your Windows 10 PC running the latest Insider Preview build. It’s quick and easy, just go to Settings>Phone>Add a phone. From there, you enter your phone number and Microsoft will prompt you to install the Microsoft Apps app for your Android device.

Microsoft, Windows 10

Once your phone is linked to your Windows 10 PC, you can use another feature that was announced at Build 2017 the “Pick Up Where You Left Off” feature to continue your browser activities on Google Chrome to Microsoft Edge on Windows 10.

No matter what browser you use on your phone, Windows 10 will automatically open to Microsoft Edge. This is also not contingent on any browser you choose to use by default in Windows 10 either. Microsoft Edge will automatically supersede any browser that you chose by default in Windows 10.

Timeline is a great feature and it’s a shame that it won’t be included in the Windows 10 Fall Creators Update coming October 17, 2017. At least you can still try out Timeline on your Android device in the Cortana beta Program. It’s not the best experience, but it gives you a little bit of a preview of what’s to come with Microsoft Timeline.

Get Cortana for Android today to start testing out Timeline on your Windows 10 PC. Just be sure that you are registered for the Cortana beta Program.

Robocraft Infinity to launch on Xbox One with 4K and 60 FPS support

In the sea of upcoming video games to be enhanced for the Xbox One X, not all titles will be able to run in both 4K and 60 FPS. But today, we can add Robocraft Infinity to the list of games that will reach that sweet spot, which already includes Forza Motorsport 7, Middle-earth: Shadow of War, FIFA 18 and more.

Speaking with GamingBolt, Robocraft Infinity producer Phil Davidson shared that “we aim to support both 4k and 60fps when we launch on Xbox One X. This obviously presents new challenges to the team as we’re updating the core game code that is now almost 5 years old but we think you’ll be pleasantly surprised with just how good Robocraft Infinity will look running at 4k.”

For those unfamiliar, Robocraft Infinity will be an enhanced version of the robot building game Robocraft released on Windows a couple of years ago. Indie developer Freejam Games plan to release Robocraft Infinity on Xbox One and Windows 10 in Q1 2018, with special enhancements for the Xbox One X as well as Xbox Play Anywhere support.

“Robocraft Infinity has been based off the original Robocraft code base with numerous improvements made to it, both in terms of performance, usability and features,” explained Davidson. “The core game will run on a dual-core i3 so the more power have had to play with the faster we can make it run. We’re still able to support the low-end machines that will potentially run it on the Windows 10 version while the Xbox One X allows us to support 4K,” said Davidson.

The original Robocraft game already has over 10 million registered players worldwide, and the upcoming Xbox One and Windows 10 release is great news for fans of robot combat. If you’re interested in the game, you can sign up for updates on the dedicated website.

The File is Currently Checked Out or Locked for Editing [Fix]

Though the Office suite has improved tremendously over the years, there remain a few issues. One that has bothered many is This file is checked out or locked for editing by another user message.

This is a minor error, and today we’re going to show you how to fix it on Office apps in all iterations and versions of Windows.

What can I do if This file is locked for editing by another user?

Before moving to the slightly complex solutions, try these quick ones first:

  • It seems that if a user chooses Edit in option in SharePoint, there’s a 10-minute delay before the write lock is released. So wait for 10-15 minutes and things should work.
  • Connect to SharePoint Designer and check out the document. After doing that, check in the document and verify whether The file is currently checked out or locked for editing by another user error is fixed.

If none work, head to the solutions listed next.

1. Change Document library settings

  1. Go to Library Tools, select Library, choose Library Settings, and click on Permissions and Management.
  2. Now select Manage files which have no checked in version.Manage files which have no checked in version
  3. If you see any files available, take ownership of them and publish them to the major version.

According to users, this error usually appears while using SharePoint. To fix this problem, you need to change the Permissions and Management settings. After doing that, the problem should be completely resolved.

2. Change site actions

  1. In SharePoint, go to Site Actions.site actions
  2. Navigate to Site Settings, and then click on Content and Structure.
  3. Select the problematic files and click on Take Ownership of Selection.

After performing these steps, The file is currently checked out or locked for editing by another user error message will disappear, and everything will start working normally.

3. Clean the browsing history and cache

Note icon NOTE
The steps listed here are for Chrome, though the process is similar for all browsers.
  1. In your browser, click the Menu button in the top right corner and choose Settings from the menu.
  2. Scroll all the way down and click on the Advanced button.
  3. Click on Clear browsing data.
  4. Check Browsing history, Cached images and files, Cookies and other site data, and Hosted app data, then click on the Clear browsing data button.
  5. Wait for your browser to clear the cache.

SharePoint is a web application, and sometimes issues can occur due to problems with your cache. To fix This file is checked out or locked for editing by another user message, you need to clear the browsing data.

Before you leave, find out some quick tips to make Office applications run faster than ever.

Tell us which fix worked for you in the comments section.

Xbox One’s EA Sports NHL 18 Young Stars Edition is now live and ready to play

EA Sports NHL 18 launched today on Microsoft’s Xbox One game console. This latest video game in the EA Sports franchise brings several new features to help it stand apart from its predecessors. Among the new features are new creative attack controls, a new expansion draft, several new multiplayer modes, and three-on-three matches.

EA SPORTS™ NHL 18 delivers the speed, creativity and action of today’s young NHL superstars with new Creative Attack controls and an all-new Defensive Skill Stick. Play the fast-paced, arcade-inspired 3-on-3 NHL THREES mode, or create your own custom 32nd NHL team with the new Expansion Draft. Do it all with the most co-op and competitive multiplayer options ever in an EA SPORTS NHL game.

No other sports game allows you to team up with friends and hit the ice like NHL 18. Whether you’re playing cooperatively or competitively, offline on the couch or online with up to 12 players, NHL 18 delivers more than 64 combinations to team up with – or against – friends locally and online. It no longer matters if your friends are on the couch, online, or both. However you want to play, NHL 18 offers more ways to play multiplayer with your friends or against your rivals than any other sports videogame.

Buy EA Sports NHL 18 on Xbox One

There are two special editions of EA Sports NHL 18 available for digital purchase right now; the Young Stars Edition and the Young Stars Deluxe Edition. The former features the main game and one Gold Plus Pack per week for 20 weeks after purchase, one Rookie HUT item, one Adidas Custom HUT Jersey, and an EASHL McDavid celebration while the latter features the same but comes with two Gold Plus Packs instead of one.

Did you buy EA Sports NHL 18? Let us know which version you grabbed in the comments below.

Ringtone making apps you can download on Windows 10/11

Looking for a unique ringtone for your computer or phone just got easier thanks to ringtone making apps.

A ringtone making app is an audio editor that comes with fewer editing features so that you can easily create a ringtone for your phone from your favorite track, with a few clicks.

Some of the benefits of using a ringtone making app include:

  • Creating custom ringtones
  • Modify, edit and cut tracks to size
  • Easy to use as it has no complicated features

If you’re using a Windows 10 phone, here are five ringtone making apps you can use to create your desired tune.

Ringtone making apps for PC

Ringtone Maker by Microsoft

Ringtone Maker by Microsoft

The Ringtone Maker was designed to be a universal app. However, this free app works only on Windows 10 smartphones at the moment, and can be downloaded from the app store to your phone.

It is 3.52 MB in size so it won’t take up much of your storage space. What’s more, you can install it on multiple devices when signed in to your Microsoft account.

With this app, you can create a unique ringtone tailored to your tastes and preferences, by selecting a song from your playlist, and creating a ringtone out of it.

How to create a ringtone using Ringtone Maker

  1. Open the Ringtone Maker app from the app store
  2. Choose your favorite track or song from your music folder
  3. Save the song as a ringtone
  4. Use the editing controls to choose the start, end and length of your ringtone

You can also create notification alerts for messages, emails, alarms, and calendar reminders.

Pros

  • Takes up little space on your phone
  • Supports more than 20 different languages
  • Uses your device network services
  • Uses your saved playlists
  • Can be installed on up to 10 devices

Cons

  • Users have reported a few glitches and bugs

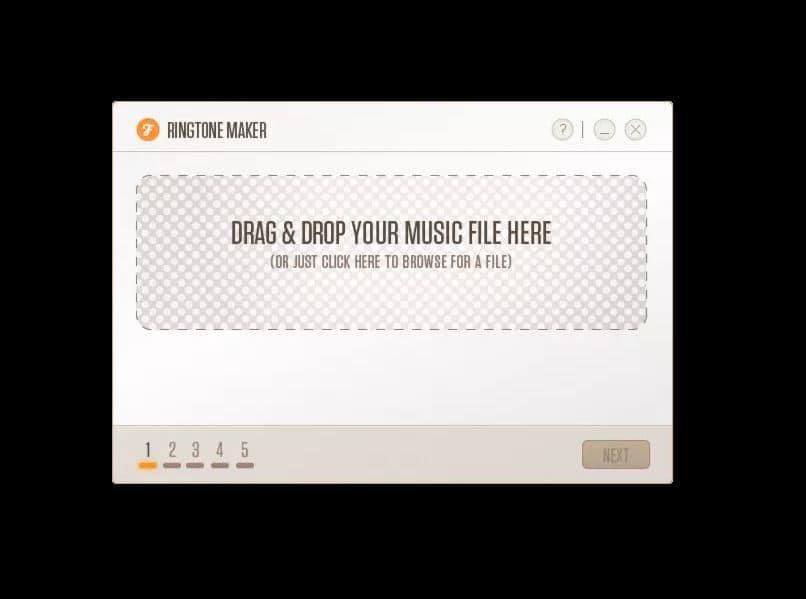
Ringtone Maker by Fried Cookie

Ringtone Maker by Fried Cookie

This free app converts your MP3 tracks into ringtones within a short time.

The downside though, is that the app has limited editing control, such as no fade in/out options, and no options to zoom to a specific part of the MP3 file. This can be frustrating for the user as the ringtone starts abruptly if not carefully selected.

How to create a ringtone using Ringtone Maker by Fried Cookie

  1. Drag and drop an MP3 file onto the window
  2. The app will show your track and time indicators. Adjust by dragging to where you want the track to start and end
  3. Preview the edited track
  4. Select where you want to save and you’re good to go

Note: the app exports your new ringtone to your mobile device whether it is Windows, iPhone, or Android.

Pros

  • Creates a ringtone within seconds
  • Minimal and snappy
  • Easy drag and drop
  • Uses little storage space (about 390 kb)
  • Supports commonly used phone platforms

Cons

  • You can only make a ringtone of 30 seconds (maximum)
  • Has limited track editing control options
  • Doesn’t support other file formats except MP3
  • Doesn’t transfer ringtone to device

READ ALSO: Ringtone creation tool for Windows 10 mobile is on the way


Metro Ringtones by Ashtech

Just like the Ringtone Maker app by Microsoft, this free app lets you create personalized ringtones by downloading your favorite song, then selecting the section you want to set as your ringtone. The app is used on the phone, so you need not clip the song on your Windows PC then transfer it to your phone.

Pros

  • Uses little storage space (about 1.69 MB)
  • Supports Windows devices
  • Uses your device network services
  • Uses your media library
  • Can be installed on up to 10 devices

Cons

  • Supports only one language (English – US)
  • Doesn’t transfer ringtone to device

Relax Melodies by Ipnos

Relax Melodies ringtone making app

Most ringtone making apps are usually for fun and personal enjoyment, but this app is for people who value quality relaxation, and sleep time. With this free app you can mix your favorite sounds and create your own personal melody. It comes with 41 high quality sounds, and a timer system that stops the melodies once you sleep. The app derives its unique advantage from its ability to help people relax, meditate, and sleep. It’s like having your own personal harp player at your bedside.

Pros

  • Wide range of melodies for better sleep and relaxation
  • Uses your device network services
  • Uses your media library
  • Can be installed on up to 10 devices

Cons

  • Takes up storage space (about 66 MB)
  • Supports two languages only (English and French)

Fun Sounds by Ozan

Fun Sounds ringtone making app by Ozan

This is one of the free ringtone making apps that boasts of having four times more sounds than any other app in the Windows Store. With this app, you can create your own personal sounds then adjust the tempo and pitch according to your tastes.

If you’re a lover of silly, animated, or weird, this app comes with a variety of sounds in 13 categories ranging from fun, animals, instruments, cartoons, robots, and silly sounds among others. To use it, simply click on the buttons to play the sounds then share with your contacts.

Pros

  • Variety of 182 sounds available
  • Ringtones you create can be shared with others via SMS or email

Cons

  • Supports only one language (English – US)
  • Takes up storage space (7.59 MB)
  • Some users have noted that it has poor sound quality

Have you tried any of these ringtone making apps? Share with us your experience in the comments section.

RELATED STORIES YOU NEED TO CHECK OUT:

Skype for Business is out; Microsoft Teams is in

In what may have first came out as an accidental leak, Microsoft is now letting users know that it will be letting go of the Skype for Business name and combining this business communications solution with its Microsoft Teams offering.

The two had once been separate and used for different reasons, but it seems the giant is working to bring the two functionalities together to offer business users features like messaging, video conferencing with multiple attendees, and more.

Microsoft Teams is a chat-based workspace app used to increase collaboration across organizations and competes directly with other services like Slack.

There hasn’t been an official announcement or details on how combining both will work, but business users are already getting antsy thinking about how this move may help or hinder their communications needs.

Business communications are critical today thanks to the internet. Remote communications have limited boundaries and made it possible to communicate easily across borders without having to be in the same physical location. Microsoft took a giant piece of this communications pie when it purchased Skype back and changed it the service’s name from Lync.

Since Skype for Business has become a huge force in the business communications space for its UC capabilities and security, it was only a matter of time before we’d see a new name come around and new capabilities from Microsoft. This latest move will change the name to a more fitting description that highlights the technologies ability to foster collaboration and teamwork and communications across business users.

Only time will tell how long this name sticks around and how well the added capabilities are received. Which feature are you most excited about? Tell us in the comments below.

See also:

The previous ownership of this semaphore has ended

If you’re getting the ‘ERROR_SEM_OWNER_DIED 105 (0x69)’ error code with ‘The previous ownership of this semaphore has ended‘, follow the troubleshooting steps below to fix it.

Just as same as with all related semaphore system errors, this error refers to owned Windows processes. This exact error can cause crashes while using a system-related programs or services. It can occur mostly due to failed code, but there are some other things that can affect your system and inflict this or similar errors. These are alternative factors that can cause this error:

  • Faulty or outdated drivers and BIOS
  • Missing EXE, DLL or SYS files.
  • Corrupted registry.
  • The presence of malware.
  • Failed installation of the system-related program.

The ‘105 error’ appears on most Windows platforms, including Windows 10. Because of that, your approach might differ, but, in general, you should be able to resolve the issue at hand with a few simple workarounds. Another thing that’s worth mentioning is that the occurrence timing is essential for the further troubleshooting.

So, if you’ve experienced this error, we advise you to pay a close attention and follow the instructions below. Hopefully, together, we’ll resolve the problem at hand.

Fix ‘The previous ownership of this semaphore has ended’ error

also known as ERROR_SEM_OWNER_DIED 105 (0x69)

Solution 1 — Check the drivers

Drivers are the essential link that connects the software and hardware on your PC. You can be sure that, without the proper drivers, your system won’t function as intended, and that includes the occasional appearance of various system errors. Including the system error 105. So, it’s paramount to download and install proper drivers before we move to more delicate steps.

In addition, with the introduction of Windows 7, drivers are automatically installed via the Windows Update feature. Things even get more extreme with Windows 10 mandatory updates. Now, don’t get us wrong, that can be a nice feature, but it’s occasionally erratic and might change already working drivers to a faulty alternative. For that purpose, we advise you to follow the steps below and confirm that everything is working as it should:

  1.  Right-click the Start menu and, from the contextual menu, open Device Manager.
  2. If you locate any driver with the yellow exclamation sign, right-click and click Update Driver Software.
  3. In addition, you can navigate to the OEM’s site and download the drivers for various devices.

For major devices that are essential for system seamless performance, we advise you to download drivers exclusively from the official site or trusted sources. If you’re not sure what’s the exact name of the device at hand, follow the instructions below:

  1. Right-click Start and choose Device Manager.
  2. Right-click the device and open Properties.
  3. Under the Details tab, from the drop-down menu choose HardwareId.
  4. Copy the values from the box and paste them into the preferred browser.
  5. You should see the exact name of your device and act accordingly.

That should do it when it comes to drivers. Now we can move on to system errors.


Solution 2 — Scan system with SFC

System errors are often inflicted by the corruption of system files. There are multiple reasons for that, and most common is a virus infection. As you’re probably aware, viruses tend to infiltrate the system and corrupt files that are of utmost importance for the system overall performance.

Besides the timely deep scan with the antimalware software, you can use various command line tools to resolve this problem. One of the best-known tools must be the SFC tool. System File Checker will, once you run it, check for the corruption of system files and repair them.

If you’re uncertain how to utilize this nifty command and get rid of the error code 105, follow the instruction below:

  1. Right-click the Start button and open Command Prompt (Admin) in the contextual menu.
  2. In the command line, type or copy-paste the following command and press Enter:
    • sfc/scannow
  3. After the procedure is finished, restart your PC.

The tool should check for the files integrity and repair them accordingly.


Solution 3 — Use DISM

If the issue is still persistent, and you’re encountering the error again in various occasions, you can take the troubleshooting to a next level and turn to DISM. The Deployment Image Servicing and Management tool is an advanced command-line tool that is a step further in front of the SFC when it comes to resolving the corruption of system files.

This tool can be run in a standard manner, trough the system resources, but you can use an external installation media as a source, as well. Follow the instructions below to resolve the problem with the DISM tool:

  1. Right-click Start and, from the contextual menu, run Command Prompt (Admin).
  2. In the command line, type the following command and press Enter:
      • DISM /Online /Cleanup-Image /RestoreHealth
  3. Wait until the scan is performed It can take about five to ten minutes.
  4. After DISM has finished scanning, restart your computer.

After the procedure is finished, any system error should be resolved. However, if the error keeps occurring frequently, you should turn to alternative steps.


Solution 4 — Reinstall the troubled program

After multiple retries, you should take into consideration a complete reinstallation of the troubled program. It’s imperative to use a CCleaner or similar 3rd-party cleaning tool and erase a registry inputs. Moreover, don’t forget to backup your registry before you move on to cleaning procedure.

Finally, some programs offer a repair option, which is a plain better than a reinstallation. If you have a chance to repair an installation, do so. On the other hand, if you’re forced to reinstall the program, so be it. Follow the instructions below and you should be good to go in just a few minutes, depending on the program size:

  1. Right-click Start menu and, from administrative options, open Control Panel.
  2. While in the Category view, choose to Uninstall a program in the bottom left corner.
  3. Navigate to troubled, Windows-related program that inflicted the error dialog box.
  4. Right-click and Uninstall it.
  5. Delete remaining folders and clean the registry (make sure to back it up before you run the cleanup tool).
  6. Restart your PC.
  7. Install the program and look for changes.

That should prevent future occurrence of the system error with the code 105. However, if you’re still prompted with the ”ERROR_SEM_OWNER_DIED 105 (0x69)” warning message, there’s still something you might do.


Solution 5 — Restore system

This workaround goes for all system versions produced by the Redmond giant, except Windows 10. While using Windows 10, there’s  always a chance that something will go terminally wrong. Is it due to a faulty driver, system corruption, malware infection or just a simple misuse. Luckily, you can always use a specific time-travel function and restore your system to a previously saved restore point.

Of course, if you’ve previously disabled the system protection for the system partition, there’s a chance that you won’t be able to restore to a preferred restore point. Follow the instructions below to restore your system to a previous, errorless restore point:

  1. In Windows Search, type system properties and open System Properties.
  2. In the System Properties, open the System Protection tab.
  3. Click on the System Restore button.
  4. Click Next and, from the next dialog box, choose the preferred restore point.
  5. You can inform of applicable changes that will occur after the restore by clicking on Scan for affected programs.
  6. Once you’re certain to which date you want to restore your PC, highlight the restore point and click Next.
  7. Finally, click Finish.
  8. Your PC will restart and the restoring procedure will start.

Solution 6 — Use alternative recovery options

On the other hand, with the introduction of the Windows 10 OS, users are able to perform a more thorough troubleshooting steps with the addition of the advanced recovery options. One of those is the ”Reset this PC” recovery option that lets you preserve your data while restoring the system to default values.

If you’re unsure how to run the ”Reset this PC” recovery mode in Windows 10, follow closely the steps below:

  1. Press Window key + I to open the Settings app.
  2. Open Update & Security section from the menu.
  3. Click on Recovery under the left pane.
  4. Click on Get Started under Reset this PC.
  5. Choose to Keep your files.
  6. Follow the instructions until the reset is completed

After that, your PC will restart and you can move with the seamless use. However, if the problem is persistent and the core system error 105 appears again, we advise you to take a clean reinstallation into consideration.


Solution 7 — Reinstall the system

Finally, we get ourselves to the proper solution for even the most resilient system errors. With the clean reinstall, you should be safe that every previous, awkwardly inflicted error, will succumb. However, we’re aware that this isn’t a likable solution for many reasons. Firstly, you’ll lose all installed programs and customized settings. Secondly, the procedure can be time-consuming and, occasionally, too complex.

If you’re not sure how to do it, we advise you to take a look at this article. There you can find a thorough explanation of the reinstallation procedure.

With the clean reinstallation, we conclude this article. We hope you’ll find it informative and helpful. And don’t forget to share your experience with this errors, including questions or suggestions. Thank you for reading.

RELATED STORIES YOU NEED TO CHECK OUT:

Set Webcam as Desktop Background: How to do it

With Windows, the possibilities are endless. If, for some peculiar reason, you want to, let’s say, mirror yourself on the desktop background and follow the constant motion with a webcam, you can do it. In simple terms, you can set webcam output as the desktop background.

That’s the next-level live background we’re talking about, and below, we’ll instruct you on how to make it work.

How do I set the webcam as a desktop background in Windows?

Use VLC Media Player

  1. Download VLC and install the media player.
  2. Once done, launch VLC Media Player.
  3. Press Ctrl+ C to launch the Open Media window.
  4. Under the Capture Device tab, set the following options like this:
    • Capture mode -> Direct Show
    • Video Device Name -> Your camera name
    • Audio Device Name -> Nonechange settings to set webcam as desktop background
  5. After that, open Advanced Options and change Aspect Ratio to counter the display’s aspect ratio.aspect ratio
  6. Click OK to confirm, and finally, click Play.
  7. Now, in the menu bar, open Video and click Set as Wallpaper.set as wallpaper

And that’s all! You should be able to see yourself on the desktop background, with the webcam’s output being projected to it. Just make sure to let VLC work in the background.

Also, remember that you won’t be able to see icons, but you can always create a multi-display. That way, you’ll always have the webcam’s output on one desktop background, and the main display can maintain the same look.

If you have questions or alternative ways to use a webcam as the desktop background, tell us in the comments section below.

Fix Your PC did not start correctly error in Windows 10

Booting problems are pretty common for Windows 10 users. These distinctive errors are hard to resolve and can affect your PC in multiple ways. Some users will get sudden performance drops, others won’t even be able to access the system.

Moreover, the exact cause of these problems can differ. Sometimes it can be a sudden shutdown, which can be resolved with a simple restart.

On the other hand, sometimes your boot sectors and configurations can be damaged, and that’s the worst-case scenario. Either way, it’s not a refreshing feeling to see this error screen.

For that purpose, we’ll provide you with multiple solutions for the various scenarios. All you need to do is locate the culprit and perform the workarounds we presented in the article below.

So, if you have any issues with the Your PC did not start correctly error, these should help you resolve them.

How do I fix Windows 10 booting errors?

1. Boot in Safe mode

  1. Press Windows key + R to open the elevated Run command line.
  2. In the command line, type the msconfig.exe and press Enter.
  3. Under the Boot tab > Boot Options, check the Safe Boot box.
  4. Press OK and restart your PC when prompted.
  5. Your PC should boot in Safe mode.
  • If the system won’t start, within Advanced options.
  1. Open Advanced Options on the error screen.
  2. Click Startup Settings.
  3. Click Restart.
  4. After your PC restarts, you should see the boot menu.
  5. Press F4 to start in standard Safe Mode, or F5 / F6 for Safe Mode with Networking or Command Prompt, respectively.
  6. Your PC should boot in the Safe Mode.

If you’re unsure about the cause of the problem, the safe mode should help you determine it. Namely, if you’re prompted with the Your PC did not start correctly error on the standard startup, but everything works fine when the system starts in the safe mode, we’re on a good track.

In that scenario, you can be almost certain that the drivers or hardware changes invoke startup errors.

Once you’ve managed to boot into Safe Mode, you can easily locate faulty drivers and uninstall them. Moreover, we advise you to restore previous hardware configurations and unplug recently acquired hardware in order to resolve your issues. As simple as that.

You’re unable to boot into Safe Mode on Windows 10? Follow the steps from this article to do it with ease.

2. Use sfc/scannow to repair system files

  1. Open Advanced Options on the error screen.
  2. Click Startup Settings.
  3. Click Restart.
  4. After your PC restarts, you should see the boot menu.
  5. Press F6 to start in Safe Mode with the Command Prompt.
  6. Once the Windows 10 starts, right-click Start and open Command Prompt (Admin).
  7. In the command line, type the following command and press Enter:
    sfc/scannowsfc scan command prompt
  8. SFC should locate system errors and resolve them within minutes.
  9. After the procedure is finished, restart your PC and look for changes.

In addition, you can run Safe Mode with Command Prompt and use various repairing tools like SFC or DISM.

Another effective method to repair system files is with specialized support for Windows errors occurring. Hence, replace corrupted files easily using a dedicated tool, Fortect.

3. Restore registry

  1. In the Windows Search bar, type regedit, right-click regedit and run as administrator.
  2. Click on File and choose Import.
  3. Navigate to a working registry backup file, select it and click OK.
  4. After the procedure is finished, restart your PC and look for changes.

Registry is a risky place for those who aren’t aware of their surroundings. Please note that configuration files for important system resources are stored there. One small change and might create additional issues.

This is why before applying the steps above, make sure to back up your registry accordingly, as you can always restore previous settings and resolve the emerged problems.

So, if you’ve already exported registry values, you can restore them in a simple way and, hopefully, resolve your problems.

Have in mind that some registry values can’t be exported/imported. So, if you tweaked in the forbidden area, there’s a chance that you can’t undo changes. Luckily, there are more than several ways to fix a startup error.

If you’re looking for the best registry cleaners for Windows 10, check out this awesome list.

4. Restore system

  1. Right-click the Start menu and open Control Panel.
  2. In the Category view, open System and Security.
  3. Click File History.
  4. Open Recovery from the bottom left.
  5. Click on Open System Restore.
  6. Click Next until you can see the list of the available Restore Points.
  7. Confirm the selection and start with the restoring procedure.
  • If the system won’t start, try within Advanced Options
  1. Open Advanced Options on the error screen.
  2. Click System Restore.
  3. Choose the Restore Point and continue with the procedure.
  4. After the system restores, Windows 10 should boot just like before.

If you need to rewind your system to a previous working version, system restore is the most logical solution. If you have a proper restore point it won’t take too much time to perform a time-traveling procedure in Windows 10.

System Restore is not working on your Windows 10 PC? Follow the simple steps from this guide.

5. Rebuild Boot Configuration Data

  1. Open Advanced Options on the error screen.
  2. Choose Command Prompt.
  3. In the command line, type the following command and press Enter:
    • bootrec /rebuildbcd
  4. Now there are two scenarios you can encounter:
    1. Total identified Windows installations: 0. Continue to Step 5.
    2. Total identified Windows installations: 1. Type Y, press enter and restart your PC.
  5. In the command line, type the following commands and press Enter after each:
    • bcdedit /export c:bcdbackup
    • attrib c:bootbcd -h -r -s
    • ren c:bootbcd bcd.old
    • bootrec /rebuildbcd
  6. Insert Y or Yes and press Enter.
  7. Reset the PC and you should be good to go.

If you’re unable to boot even though you’ve performed previous steps, there’s a chance that the Boot Configuration Data is corrupted.

Also, some essential files may get deleted or the system update can cause issues on its own. One way or another, you’ll need to rebuild the Boot Configuration Data in order to resolve this problem.

6.  Fix corrupted Master Boot Record

  1. Open Advanced Options on the error screen.
  2. Open Command Prompt.
  3. In the command line, type chkdsk /r and wait for the repairs to finish.
  4. If the problem is still there, you may need to insert additional commands to make it work.
  5. In the command line, type the following commands and press Enter after each:
    • bootrec /RebuildBcd
    • bootrec /fixMbr
    • bootrec /fixboot
  6. Reset your PC and look for changes.

Master Boot Record (MBR) is a special boot sector that saves the boot configuration and information on your HDD. If it’s corrupted or incomplete, you won’t be able to boot.

There’s a large variety of errors that can occur because of the faulty Master Boot record, and it’s not exactly easy to resolve it, especially without the installation or recovery media.

7. Restore system to the previous build

  1. Press Windows key + I to open the Settings app.
  2. Open Update & Security.
  3. Choose Windows Update.
  4. Open Advanced Options.
  5. Choose to View your update history.
  6. Uninstall the latest updates and restart your PC.
  • Steps for cumulative updates
  1. Press Windows key + I to open the Settings app.
  2. Open Update & Security.
  3. Open Recovery from the left pane.
  4. Under the Go back to an earlier build option, click Get Started.
  5. Follow the instructions and you should roll back to a previous build.
  • Steps for Builds and major updates within the system:
  1. Open Advanced Options.
  2. Click on Go back to the previous build.
  3. Follow the instructions and wait for the procedure to finish.

8. Perform a clean reinstallation

And finally, if none of the above solutions managed to resolve the problem, clean reinstallation is the only remaining option. In order to perform it, you’ll need installation media, either USB or DVD.

If you’re able to access the system, make sure to backup your data. If not, you’ll lose all data from the system partition.

You can find the instructions on how to create bootable media and perform a clean reinstallation in this handy article.

That should do it. We hope that, with these workarounds, you’ll be able to resolve the matter at hand. In addition, don’t forget to post questions or suggestions in the comments. The comments section is just below.

Fix: ”An update is required. To continue using OneDrive you need to update it”

OneDrive is an omnipresent part of Windows 10. Like it or not, it can compete with the opposition in many regards and it’s one of the best cloud applications you can use. At least, until it starts misbehaving. There are bugs and then there are errors like ”An update is required. To continue using OneDrive you need to update it” in Windows 10.

If we already know that OneDrive gets updates via Windows Update, this pop-up looks like something suspicious at the very least. Add an unofficial link to this equation and things get even stranger. Luckily, we’re there to help you in distress.

In case you’ve experienced this issue with OneDrive, make sure to check the solutions below with a thorough explanation.

How to deal with the ”An update is required. To continue using OneDrive you need to update it.” prompt in Windows 10

Solution 1 – Download and install Windows Updates

First, let’s get this out of the table: you can update OneDrive solely via Windows Update. Any OneDrive pop-up that appears and asks for an update is an error. Not a virus, not a legit update – just an error, and omission Microsoft is responsible for.

A lot of users reported that, after they click on Update OneDrive button, they’re led to a strange link and redirected to OneDrive main page. Microsoft leased this suspicious domain so you don’t need to worry about malware intrusion or similar wrongdoings. However, we can agree it’s unexpected that Microsoft is using third-party sources (in this case, Akamai servers) for official updates.

This misconception created quite a stir in Windows community and it’s still there because, before Windows 10, OneDrive wasn’t the built-in part of the system and updates were deployed in a different manner. Somehow that remained to be the case for certain Windows 10 users. Take this with a pinch of salt, since Microsoft support never provided the relevant answer and we can only guess.

In conclusion, make sure to install Windows Updates timely and your OneDrive should be up to date.


Solution 2 – Reinstall OneDrive

Creators Update brought positive changes to OneDrive and users are now able to uninstall it just like any other third-party application. If we take into consideration how annoying it was with all those pop-ups and prompts, these are good news. Moreover, with that change, the troubleshooting is now easier, since you can reinstall OneDrive and start from a scratch.

Therefore, if you’re still seeing this odd update prompt, make sure to follow the instructions below and reinstall OneDrive:

  1.  In the Search bar, type Control and open Control Panel.
  2. In Category view, open Uninstall a program.
  3. Uninstall OneDrive and restart your PC.
  4. Navigate to this location:
    • C:  Users  :Your Username:  AppData  Local > MicrosoftOneDrive  Update  OneDriveSetup.exe
  5. Run the OneDriveSetup.exe to install OneDrive. In case the setup won’t start, right-click on the EXE file and run it as an administrator.
  6. After the installation, you can insert your email and start the synchronization.

In case there’s no installation file in the mentioned path, you can always download it here.

Either one of these steps should help you to overcome this error.

How do you rate OneDrive in comparison to other cloud applications? Don’t forget to tell us in the comments section below.

RELATED STORIES YOU NEED TO CHECK OUT:

The program stopped because an alternate diskette was not inserted

If you’re getting the ‘ERROR_DISK_CHANGE 107 (0x6B)’ error code with ‘The program stopped because an alternate diskette was not inserted‘, follow the troubleshooting steps below to resolve the issue.

This error might refer to various problems, so it’s not exactly easy to address it. However, once you’ve learned about the exact way it occurs, and it mostly occurs once the troubled program is run, we can easily apply some of the available workarounds.

Most of the time, this error occurs due to:

  • Missing EXE, DLL or SYS files.
  • Malware.
  • Registry corruption.
  • Corrupted installation of the program.
  • Outdated or even faulty drivers.
  • Outdated BIOS version.

ERROR_DISK_CHANGE 107 (0x6B) might appear on every known Windows PC platform, and, consequently, the troubleshooting steps may differ. However, we provided you with a list of valuable workarounds that should help you overcome the issue at hand. For that purpose, we advise you to check the solutions below, and hopefully, get rid of this critical system error.

Fix ‘The program stopped because an alternate diskette was not inserted’ error

also known as ERROR_DISK_CHANGE 107 (0x6B)

Scan for malware presence

The first thing you should do is to perform a thorough cleanup regarding the viruses. Various users reported critical system errors inflicted by the virus. Once they are safe to roam trough your computer, they tend to navigate to system folders and corrupt or delete essential system files. Moreover, they can damage the installation of a certain program which will, eventually, cause crashes led by errors.

For that purpose, we strongly advise you to install a 3rd-party antimalware software or use Windows Defender to scan and get rid of the possible virus infections on your system partition. Additionally, it’s recommended to use a deep scan for better locating and identification of malicious software. The procedure varies on various 3rd-party tools, but we’re sure that you’ll find your way around it.

When it comes to Windows Defender, this is how to perform a deep scan:

  1. Click on the Windows Defender icon from the Notification area.
  2. Open Settings.
  3. Save everything before you start, to prevent the data loss since the PC will restart.
  4. Locate Windows Defender Offline and click Scan Offline.
  5. Your PC will restart and the scanning procedure will last for approximately 15-20 minutes.

This should be enough to get the malware out of the equation. Now, if the problem is still there, we should turn to additional steps.


Update/reinstall drivers

For the seamless and coherent system performance, you’ll need to create an optimal state in which the software and hardware can function without issues. That link, or bond if you wish, depends on drivers. There’s more than one case where the system freezes or works with flaws, just because a certain driver isn’t properly installed. The same goes for the critical system errors, like the one with the error code 107 which we’re addressing today.

For that purpose, we advise you to check the driver status and install latest, functioning drivers. If you’re unsure how to do so, these instructions should help you substantially:

  1. Right-click on the Start button and, from the Administrative Tools menu, open Device Manager.
  2. If you locate any driver with the yellow exclamation sign, right-click and click Update Driver Software.
  3. In addition, you can navigate to the OEM’s site and download the drivers for various devices.

Moreover, if you’re unable to locate and install a proper driver trough the Windows Update feature, you can always turn to an official manufacturer’s site and find the appropriate driver. Some users have problems with the identification of the device, but there’s a simple way to find out the exact name and traits of the device at hand.

  1. Right-click the Start button and, from the Administrative tools list, choose Device Manager.
  2. Right-click the device and open Properties.
  3. Open the Details tab
  4. From the drop-down menu choose HardwareId.
  5. Copy the values from the box and paste them into the preferred browser.
  6. You should see the exact name of your device and act accordingly.

Reinstall troubled program

If the problem is related just to a single program, you can always turn to a reinstallation. Some users resolved the problem and got rid of the system error 107, simply by reinstalling the troubled program. On some occasions, the problem can be resolved by repairing, but there’s just so many programs that offer that procedure.

One thing that’s of utmost importance is a registry. So make sure to, after the program is uninstalled, use a 3rd-party tool and clean the remaining registry values. Moreover, you should navigate to the installation folder and delete the remaining files from there. Follow these steps to reinstall the troubled program and resolve the issue at hand:

  1. Right-click Start menu and, from the contextual menu, open Control Panel.
  2. While in the Category view, choose to Uninstall a program in the bottom left corner.
  3. Locate the program that inflicted the error dialog box in the list.
  4. Right-click and Uninstall it.
  5. Delete remaining folders and clean the registry (make sure to back it up before you run the cleanup tool).
  6. Restart your PC.
  7. Install the program and look for changes.

However, if the error occurrence isn’t program-related, you should move to the additional steps.


Scan system with SFC and DISM

The bare name of the critical system error says enough. The corruption of system files can cause all kinds of errors. system instability or large performance drops. For that purpose, it’s advised to use one or even both elevated command-line tools. System File Checker or SFC is the repair tool that checks the integrity of the system files. If they’re incomplete or corrupted, SFC will restore them to original values.

Follow the instructions below to use the SFC tool and restore the possibly corrupted files:

  1. Right-click the Start button and open Command Prompt (Admin).
  2. In the command line, copy-paste the following command and press Enter:
    • sfc/scannow
  3. After the procedure is finished, restart your PC.

However, if the SFC wasn’t able to find and fix problems, you should turn to Deployment Image Servicing and Management tool or DISM. This is a bit more advanced tool and it can be utilized in various ways.

Follow the instructions below to resolve the problem with DISM:

  1. Right-click Start and, from the Administrative menu, run Command Prompt (Admin).
  2. In the command line, type the following command and press Enter:
      • DISM /Online /Cleanup-Image /RestoreHealth
  3. Wait until the scan is performed It can take about five to ten minutes.
  4. After DISM has finished scanning, restart your computer.

With DISM, you’ll safely resolve the problems and, possibly, relieve yourself of errors.


Use recovery options

If all of the previous steps fell short and you’re still experiencing the same error in various scenarios, we have to inform you that your options are kind of limited. For the pre-Windows 10 systems, you can turn to System Restore. This procedure will restore your system to a latest properly functioning point so you can move on with a smooth PC use. Follow the steps below to restore your system to earlier restore point:

  1. In Windows Search, under the Start Menu, type system properties and open System Properties.
  2. In the System Properties dialog box, open System Protection.
  3. Click on System Restore.
  4. Click Next and, from the next window, choose the preferred restore point.
  5. You can inform of applicable changes that will occur after the restore by clicking on Scan for affected programs.
  6. Once you’re certain to which date you want to restore your PC, highlight the restore point and click Next.
  7. Click Finish.
  8. Your PC will restart and the restoring procedure will start.

However, you have some other Recovery options that were introduced with Windows 10. One of those is ”Reset this PC” wich restores your PC to default values while keeping your files. Follow the steps below to use a Reset this PC and, after the procedure is done, you should be in a clear when it comes to system errors:

  1. Press Window key + I to open Settings.
  2. Open Update & Security.
  3. Click on Recovery under the left pane.
  4. Click on Get Started under Reset this PC.
  5. Choose to Keep your files.
  6. Follow the instructions until everything is done.

With that, we’re concluding this article. We certainly hope that you’ll find it helpful. If you have any questions or suggestions regarding the system error we addressed today, post them in the comments section below.

RELATED STORIES YOU NEED TO CHECK OUT:
Microsoft Network Realtime Inspection Service: How to validate and disable the module

Microsoft Network Realtime Inspection Service (NisSrv.exe) is a module of Microsoft security software. If you open the Task Manager on a device running a recent version of Windows, you will notice the module as one of the tasks running on the PC. This module is a legit process if it is located in the right directory of Windows.

How to validate the NisSrv.exe module

The easiest way to find out if the module is legit is to right-click on it and select Open file location from the context menu.

The location that will open should read C:Program FilesWindows Defender and the file’s name should be NisSrv.exe on systems running Windows 10.

On earlier versions of the operating system, the location is different. For instance, on Windows 7 it will be C:Program FilesMicrosoft Security ClientAntimalwareNisSrv.exe.

Additional methods to validate the NisSrv.exe module

In case you’re not sure if the module is legit or not, you can run additional verification checks.

  1. You can upload it to Virustotal.com to have it scanned for malicious content.
  2. You can use the data offered by the Windows Services Manager to check the legitimacy of the process and the file.
    1. Tap on the Windows key, type services.msc, and press Enter.
    2. Find Windows Defender Antivirus Network Inspection Service and double-click on it.
    3. Open Properties.
    4. The info listed here should include the following:

Service Name: WdNisSvc
Display Name: Windows Defender Antivirus Network Inspection Service
Path to executable: C:Program FilesWindows DefenderNisSrv.exe
Description: “Helps guard against intrusion attempts targeting known and newly discovered vulnerabilities in network protocols.”

How to disable the Microsoft Network Realtime Inspection Service

The module is linked to Windows Defender’s real-time protection, and you may turn off the module by turning off the real-time protection. This will only be a temporary solution because it will turn back on automatically.

There is no direct method to disable the Microsoft Network Realtime Inspection Service using Windows Defender’s settings.

You cannot, therefore, disable the service and it is recommended to keep it activated.

RELATED STORIES TO CHECK OUT:

How to use net user command in Windows 10,8,7

Many advanced users and administrators use Command Prompt to perform various actions. Speaking of which, today we’re going to explain how net user command works and what you can do with it on Windows 10.

What is net user command and how does it work?

Net user command was first introduced in Windows Vista, and it has been a part of Windows ever since. The command allows you to create and modify user accounts on your PC. To use this command, you need to start Command Prompt as an administrator. The fastest way to do that is to press Windows Key + X to open Win + X menu and then choose Command Prompt (Admin) from the menu.

When you enter net user in Command Prompt, you’ll see a list of available accounts on your PC.

Of course, you can view detailed information regarding available user accounts on your PC. To do that, simply enter net user desired_username and press Enter. By using this command you can see the full name of the user account as well as additional information. You can see if the account is protected by a password and even the time when the password was set. In addition, you can see to which groups the selected user account belongs to.

Using this command you can also set passwords for accounts on your PC. To do that, you just have to enter net user desired_username *. Now you’ll be prompted to enter the desired password and retype it to confirm the change.

If you want to set an account password more quickly, you just need to enter net user desired_username yournewpassword

In addition to changing passwords, you can also easily add new accounts to your PC using the net user command. To do that, you just have to enter net user name_of_the_new_account /add.

If needed, you can add password to your account while creating it using the net user name_of_the_new_account mypassword /add command. Of course, you can also use the net user new_user_name * /add command to create a new user account with a password.

Using this command you can also set your account to active or inactive. Basically, if you set your account to inactive other users won’t be able to see it or access it without using net user command. To hide an account, you just have to enter net user account_name /active:no. After doing that, the selected account will become hidden and you won’t be able to access it.

Of course, you can always make account accessible by entering net user account_name /active:yes command. Net user also allows you to assign comments to user accounts. Thanks to this feature, you can add a 48-character comment to any account in order to differentiate it from others. If you’re a system administrator and you’re managing several accounts, this can be incredibly useful. To add a comment, just enter net user account_name /comment:”Comment message”.

Using this command you can also set a country code for any account on your PC. This means you can change the language for Help and error messages on any user account. All users have 000 country code as default, but you can easily change it with this command. To change the country code of a specific user, enter net user user_name /countrycode:123 and press Enter. Of course, be sure to replace 123 with an actual country code.

It’s also worth mentioning that you can set any account to expire by using this command. The base structure for this command is net user user_name /expires:MM/DD/YYYY, but you can also use DD/MM/YYYY format as well. It’s worth mentioning that you can use three types of values for months. You can use the full name of the month, a three letter abbreviation or just a number. As for year, you can use two-digit or four-digit values.

Of course, you can also set your account to never expire by using the /expire:never parameter.

You can also set a full name for any user on your PC. If you’re managing several users, this command will allow you to differentiate them using their real name. To assign a full name to a user, you just have to enter net user user_name /fullname:”User’s full name”.

Since many users tend to use passwords to protect their accounts, as a system administrator you can allow or prevent users from changing their account password. Thanks to this feature you’ll prevent users from changing their password without your knowledge. To prevent a specific user from changing its password you need to use net user user_name /passwordchg:no command.

If you want to allow users to change their password, you need to use net user user_name /passwordchg:yes command instead.

As we already mentioned, using a password is important if you want to protect your account, and with net user command you can force individual users to use a password. By doing that you’ll minimize the chance for unauthorized access. To force a user to use a password on his account, you need to use net user user_name /passwordreq:yes command. Of course, you can use net user user_name /passwordreq:no command to remove this requirement.

Net user command also allows you to specify the time period in which the user can use its account. This feature is especially useful if you want to set time restrictions for specific users. To restrict access for a specific user, you need to specify time frame for each day.

You can enter the full name of the day or use the abbreviation. As for the time, you can use 12-hour or 24-hour format. To set a time restriction for a user, you need to use net user user_name /time:M-F,08:00-17:00. Of course, you can use a different format so your command will look like net user user_name /time:M-F,8AM-5PM.

If needed, you can also set different time frame for different days by using net user user_name /time:M,4AM-5PM;T,1PM-3PM;W-F,8:00-17:00.

You can prevent users from permanently logging to their account on specific days simply by leaving the value blank. If you want to remove all time restrictions for a specific account, simply enter net user user_name /time:all. As you can see, this is a rather powerful command, but it only works with one hour increments and that’s its biggest flaw. Nevertheless, this command is extremely useful if you want to restrict computer usage.

Using this command you can also add a user comment for the account in order to differentiate it from others. To do that, use net user user_name /usercomment:”Your comment” command.

Net user command also allows you to set a home directory for your account by using /homedir parameter. You can also set a logon script for a user using the /scriptpath option. If needed, you can also specify profile path using /profilepath parameter.

Net user command is rather powerful and it allows you to manage user accounts on your PC. The command is relatively simple to use and we hope that our article helped you understand it a bit better.

READ ALSO:

Destiny 2 Xbox One issues roundup: Connection issues, freezes, and more

Destiny 2was released a few days ago for PlayStation 4 and Xbox One. Since this is one of the most anticipated games of the year, the excitement from players around the world was expected.

However, ever since the game was released, players from various regions of the world have reported problems. In fact, some players faced problems minutes after the game was released when they weren’t able to download it at all.

But that’s not where the list of issues ends. Keep reading this article to find out the rest:

Destiny 2 reported issues on Xbox One

Lost connection to servers

Losing connection to Bungie servers is a problem that a couple of users reported recently. Apparently, they’re prompted with the following error message:

“You have lost connection to the destiny 2 servers. Your permissions to access online multiplayer gameplay may have changed or your profile may be signed in elsewhere.”

According to some other users on the forums, this is a longstanding issue that can affect just about any game, not just Destiny 2. So, the solution would be to simply disconnect your network cable, and put it back in after a few minutes. But we don’t know if this will surely solve the problem, though.

Connection issues

There are even more internet connection issues that occurred. One user reported on the forums that he’s not able to finish the first mission as the game constantly disconnects:

“Ive been trying to complete the first mission for about 3 hours as of now. It started out with me not being able to get out of the first room in the very first mission without being kicked to the choose character screen. Finally after deleting the game and reinstalling it I finally got out of the room and to the part where you have to defend from 3 attacks. Now I can’t connect to the destiny servers and I keep on getting an error every time I take 10 steps into the room. I am starting to get really frustrated with this game as I have taken off work to play this game that I spent $100 on, just to be disappointed. I know that the connection issue isn’t on my end as I my internet is working perfectly, I even reinstalled al l 35gb of the game in just over an hour.”

Game freezes during matchmaking

Another player reported the game freezing during matchmaking:

“Entire game freezes when I get to 4 out of 8 guardians in matchmaking for crucible quickplay on xbone. At this rate I’ll never get into crucible! I have open NAT and all connection is good. I’ve been trying for over an hour!!!”

But apparently, that’s not the only case one player said that the game tends to freeze even during the regular gameplay. However, he also confirmed that reinstalling the game solved the problem, so if you experience freezes, maybe reinstalling will get the job done.

Emblems not unlocking

And finally, one player reported a strange bug that stopped emblems from unlocking in the vault:

“I qualified for all veteran awards but two of them didn’t unlock, They’re Young Wolf and Saladin’s Pride both of them have to do with the age of triumph book, and I completed the book months before August 1, I even have the shirt to prove it. found out recently a few of my friends and at least 10 people with the same problem posted on the form. I Just want to know if this is going to get fixed and if Anyone else have this problem?”

We expect even more issues to be reported in the coming days since the game is just a few days old, so be aware.

Have you experienced any issues while playing Destiny 2 on your Xbox One? Let us know in the comments below.

RELATED STORIES YOU NEED TO CHECK OUT:
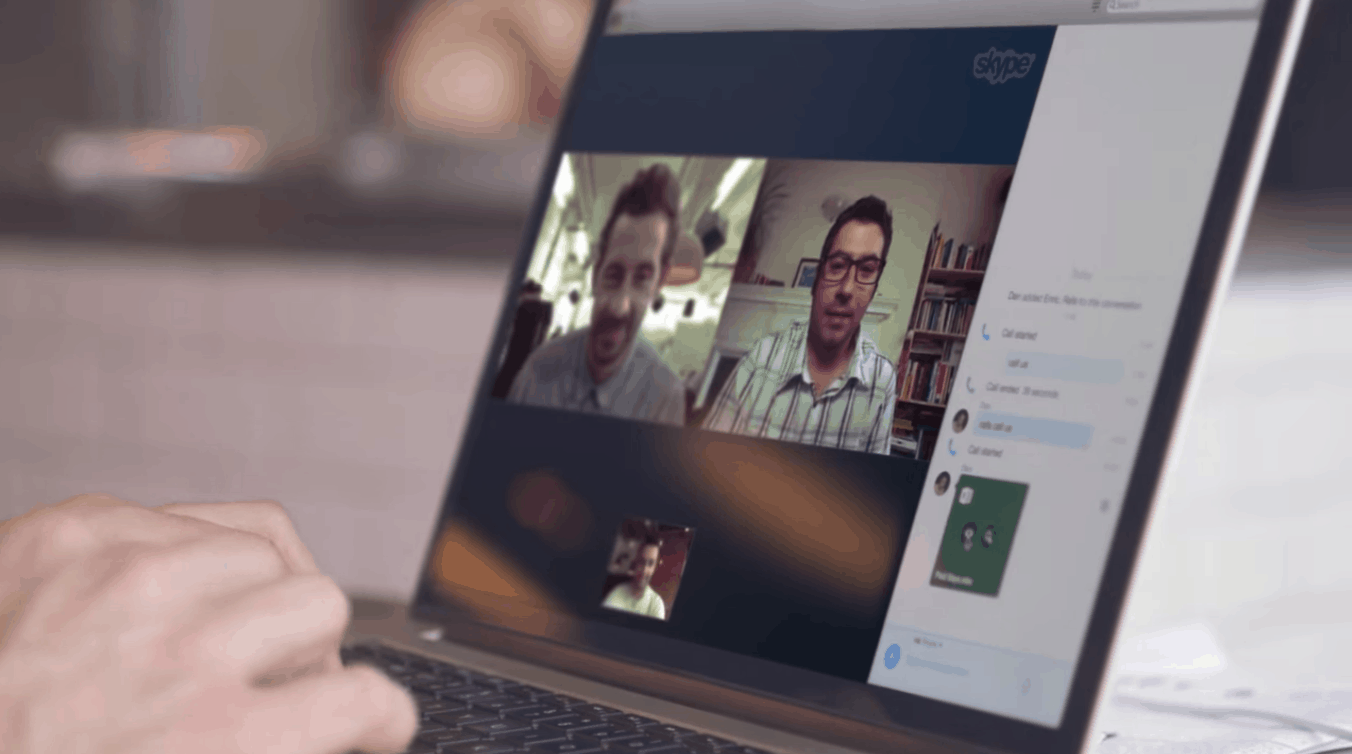
How to Add a USB-C Port to your Laptop

Most laptop owners almost always have two or more devices, such as a tablet or smartphone, and these gadgets also rely on USB  ports to perform common tasks such as data transfer or charging.

For such users, a laptop may not offer much in terms of connectivity owing to the limited number of ports it comes with.  There is a need for something extra that ensures everything is in one place without the hassle of carrying extra cables, adapters, and finding extra power sources.

Unlike the usual USB-A and USB-B ports found on most PCs and laptops, the USB-C port is gaining more popularity because it enables faster data transmission and quick charging for different devices.

How can I add a USB-C port to my laptop?

If you’re looking to add a USB-C port to your laptop, don’t fret. Computer networking hubs, or simply USB hubs, are designed with users like you in mind.

A USB hub is a gadget with multiple USB ports on it, which you can plug into your laptop’s USB port, then use with up to eight devices connected to the hub.

These hubs come with anywhere between three to eight ports, so you have the freedom and convenience of moving around with your laptop and other devices as you so wish.

When it comes to a USB hub, you need to look for the following:

  • Ports that work whenever anything is plugged into them (and an indicator that shows they’re working)
  • Well-arranged ports that keep the desk organized and do not suck up much space
  • Minimum of three data ports
  • Speeds that do not drop off
  • A good price

What you need if you have multiple devices is the powered hub, which must be plugged into the computer to get power, then supply power to your other USB devices.

It is important to note that not all devices can run from USB hubs, so you’ll have to plug it directly into your laptop’s ports. However, your laptop will give you a warning message prompt in such a case and recommend what to do when this happens.

If you have a small laptop case or bag, don’t worry. There are many small USB hubs available in the market that can comfortably meet your needs.

Like a Swiss Army knife, a multi-port hub has several extended ports that offer a variety of functions.

Some of the tasks you can fulfill while using this hub include:

  • Charging your phone
  • Fast data transfer
  • Charging your laptop (if you have a type-C connector)
  • Connect your keyboard, mouse, flash drive, or hard disk
  • Stream HDTV, as the hub also has an HDMI port
  • SD and Micro SD memory card readers

The compact design of multi-port USB hubs effectively takes up little desk space and supports high-power devices when connected to an external power source.

If you’re looking for a USB-C port hub that matches your connectivity needs, remember to check out our list of the best USB hubs for your laptop.

Tell us if you managed to add the USB-C port to your laptop in the comments section below.

There are no more files’ Windows 10/11 error fix

If you’re getting the ‘ERROR_NO_MORE_FILES’ error code with the ‘There are no more files‘ description, follow the troubleshooting steps listed in this article to fix it.

There are no more files: Error background

The ‘ERROR_NO_MORE_FILES’ error code, also known as error 18 (0x12), usually occurs when users try to save or copy files. There are various elements triggering this issue:

  • Damaged or corrupted files and folders.
  • Folder lock and other such programs.
  • Missing EXE, DLL or SYS files.
  • Malware infection.
  • Outdated software versions.
  • Incompatible software, etc.

How to fix the error code ‘ERROR_NO_MORE_FILES 18 (0x12)’

Solution 1 — Remove folder lock

Folder lock and other such programs are known to cause this error code. Uninstall any such programs running on your computer, and see if that fixes the issue.

If you don’t want to uninstall your folder lock program, try updating it. Many users reported that the error disappeared after they updated the folder lock program.

Solution 2 – Repair your registry

You can use Microsoft’s System File Checker to check for system file corruption. However, this utility is only available on Windows 10. Here’s how to run an SFC scan:

1. Go to Start > type cmd > right-click Command Prompt > select Run as Administrator

2. Now type the sfc /scannow command

3. Wait for the scanning process to complete and then restart your computer. All corrupted files will be replaced on reboot.

The simplest way to repair your registry is to use a dedicated tool. Don’t forget to first backup your registry in case anything goes wrong. If you haven’t installed any registry cleaner on your computer, check out our article on the best registry cleaners to use on PC.

As mentioned before, we recommend using third-party software that performs this action automatically.

So the most reliable way to fix registry cleaner troubles is by using robust specialized software that is capable of restoring corrupted files and repairing Windows errors.

Firstly, these tools will entirely scan the system for damaged files and thus repair the broken files from your registry. Then they can replace them with new functional Windows files in no time.

Solution 3 — Run a full system scan

Malware may cause various issues on your computer, including errors. Perform a full system scan in order to detect any malware running on your computer. You can use Windows’ built-in antivirus, Windows Defender, or third-party antivirus solutions.

Solution 4 — Update your OS

Make sure that you’re running the latest Windows OS updates on your machine. As a quick reminder, Microsoft constantly rolls out Windows updates in order to improve the system’s stability and fix various issues.

Go to Windows Update, check for updates and install the available updates. To access the Windows Update section, you can simply type “update” in the search box. This method works on all Windows versions.

If you’re looking for a particular update, go to Microsoft’s Update Catalog website. Simply type the KB number of the respective update, hit Enter, and then click on the download button.

Solution 5 — Remove recently installed software

If you recently installed new software on your computer, try uninstalling it. Go to Start > type Control Panel > select the program(s) recently added > click Uninstall.

Then restart your computer, and try to save or copy the problematic files again.

Solution 6 — Uninstall Comodo Cleaner/ ASUS security data manager

Many users confirm that the Comodo Cleaner/ ASUS security data manager may sometimes cause this error code. If you installed these programs on your computer, try uninstalling them and see if that solves the problem.

Solution 7 — Boot into Safe Mode

You can also try to save or copy the problematic files while in Safe Mode.

1. Hold down the shift key and click the on-screen power button

2. Select the restart option while holding the shift key

3. Select Troubleshoot > Advanced options > Startup Settings > hit Restart

4. Wait until Windows 10 reboots, and select Safe Mode.

5. Save/ copy the files > restart your computer > check if the problem still persists.

If you are able to save or copy the files in safe mode, this means that there is a conflict between various programs or applications. Try troubleshooting this issue using Clean Boot in order to identify the program or driver that could be causing this issue.

Here’s how to clean boot your Windows 10 computer:

  1. Type System Configuration in the search box > hit Enter
  2. On the Services tab >  select the Hide all Microsoft services check box > click Disable all.
hide all microsoft services windows 10

3. On the Startup tab > click on Open Task Manager.

4. On the Startup tab in Task Manager > select all items > click Disable.

disable start up items windows 10

5. Close the Task Manager.

6. On the Startup tab of the System Configuration dialog box >click OK > restart your computer.

Here’s how to clean boot your Windows 7 PC:

  1. Go to Start > type msconfig > hit ENTER.
  2. Go to the General tab > click Selective Startup.
  3. Clear the Load Startup items check box.
  4. Go to the Services tab > select the Hide All Microsoft Services check box > click Disable all > hit OK.
  5. Restart the computer when prompted > check if the issue still persists.

 Solution 7 — Deactivate iSCSI Initiator

If you own a computer running Windows 7, and you can’t save or copy files, try deactivating the iSCSI Initiator.
Go to Control Panel >Administrative Tools > deactivate iSCSI Initiator. Many users reported that this simple solution solves the problem.

Solution 8 — Check your disk for errors

On Windows 10, you can run a disk check using Command Prompt. Start Command Prompt as administrator and type the chkdsk C: /f command followed by Enter. Replace C with the letter of your hard drive partition.

On Windows 7, go to hard drives > right-click the drive that you want to check  > select Properties > Tool. Under the ‘Error checking’ section, click Check.


Solution 9 — Use system recovery options

The System Restore option allows you to restore the previous well-performing system configuration without losing any files, except for a few customizable features and settings.

If System Restore is enabled, follow the instructions listed below:

  1. Go to Search > type system properties > open System Properties.
  2. Go to System Protection > click on System Restore.
  3. Click Next > choose the preferred restore point in the new window.
  4. Once you’ve select your preferred restore point, click Next > click Finish.
  5. Your PC will restart and the restoring process will start.

After the restore process completes, try to copy or save some files to see if the problem still persists.

Windows 10 offers a series of advanced recovery option that allows users to clean install the OS. If you’re a Windows 10 user, you can also use ‘Reset this PC’ recovery option.

  1. Go to Settings > Update & Security > click on Recovery under the left pane.
  2. Click on Get Started under Reset this PC > choose to Keep your files.
  3. Follow the on-screen instructions to complete the reset.

We hope that the solutions listed above helped you fix this annoying ‘There are no more files‘ error message. If you’ve come across other workarounds to fix this problem, you can help the Windows community by listing the troubleshooting steps in the comments below.