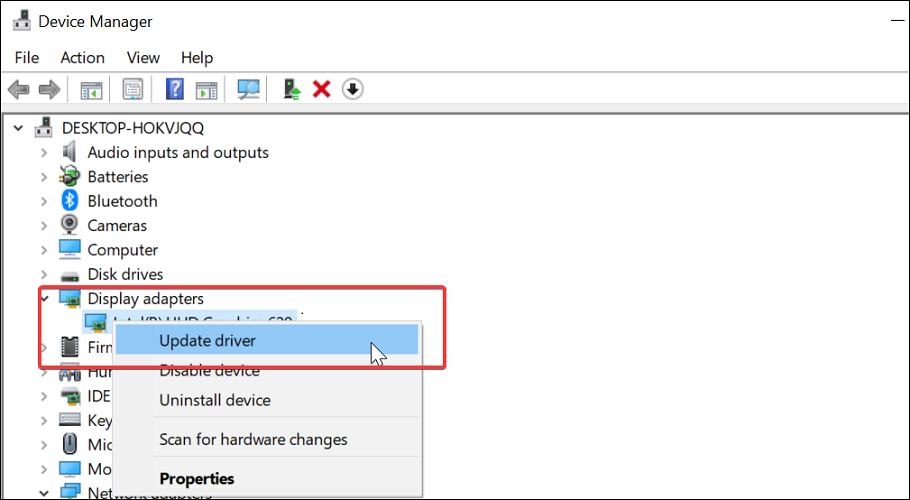
Need to know how to update AMD drivers in Windows 11? Updating your AMD Radeon drivers ensures peak performance, stable visuals, and better compatibility with the latest games and apps. Here’s a step-by-step guide, complete with screenshots, to walk you through every method.
Best Ways to Update AMD Graphics Drivers on Windows 11
The AMD Auto-Detect and Install utility is perfect for users unsure of their GPU details.
Simply download it from AMD’s website, run it, and let it scan your system. It will find and install the appropriate AMD graphics drivers for Windows 11.
If you already have AMD Software: Adrenalin Edition installed:
Open the app from your desktop or taskbar.
Navigate to Settings > System.
Click Check for Updates and install if a new version is found.
Adrenalin includes tools for tuning, overlays, and gaming enhancements. If you’re also running NVIDIA hardware, see how to update NVIDIA drivers on Windows 11.
5. Use a Driver Updater Tool
Want to automate the entire process? Tools like Outbyte Driver Updater will scan your system for outdated drivers, including AMD, and install them in one click—no manual steps needed.
What Happens If I Delete AMD Software?
Removing AMD Radeon Software won’t uninstall your drivers, but you’ll lose access to gaming tools, overlays, and tuning features.
It’s recommended to uninstall Radeon Software before installing new drivers to avoid conflicts. Your screen may go black during this process—this is normal and temporary.
FAQs
How do I check for AMD driver updates in Windows 11?
Use AMD Adrenalin, the auto-detect tool, Device Manager, or AMD’s official website.
Is AMD software necessary after updating drivers?
Not required, but it adds useful features like Game Advisor, overlays, and performance tuning.
Can I update AMD laptop drivers the same way?
Yes, but OEMs may offer custom versions, so check both the AMD site and your laptop manufacturer’s support page.
Twitch users can link their game as well as consoles to their Twitch profile. However, some users have reported that they are unable to link their EA account to twitch.
The error “Something went wrong linking EA account to Twitch” occurs when they try to connect Twitch with EA account.
A closer look in the search results suggests that it is not an isolated incident as many users have reported similar errors.
Every time I try to add the account, it gives me a <invalid request> instead of successfully linking the account. On my connections tab, it shows that I am connected, but I know I am not due to the fact that I haven’t received any of the in-game rewards that would come with it. Any help would be appreciated.
If you are also looking for a way to resolve Something that wentwrong by linking your EA account to Twitch error, this troubleshooting guide is for you.
Why something went wrong linking the EA account to Twitch?
Temporary glitches – Like any other digital process, linking the EA account to Twitch can be corrupted by several random and temporary errors. So, disconnecting and reconnecting EA from Twitch might actually help.
Browser related problems – In this case, we suggest trying to use another browser and see if the issue perssits.
Cache and cookies are blocking the linking – These ones can cause a lot of troubles, so it is always recommended to constantly clear them.
Now, let’s see what you can do to easily solve each of the listed issues before.
What can I do if something went wrong linking EA account to Twitch?
Click on the Log in button from the upper-right corner of the window, then enter your credentials.
In the top-right corner of the page, click on your profile image.
Go to Settings.
Open the Connections tab.
Look for Electronic Arts connection, then click on Disconnect.
Now, click again on your Twitch profile image, then choose to Log Out.
Enter your credentials and click on the Log in button.
Try to link to your EA account and check for any improvements.
2. Use a different browser
Many users have reported that switching their browser has resolved the error. If the issue persists, try to access Twitch from another web browser.
If you are using Google Chrome, try to access the Twitch profile using another browser. For great performance for Twitch, we recommend you try Opera GX.
This browser is specifically designed to perform well on streaming and gaming platforms. It lets you set limits on resource usage and provides quick access to Discord and Twitch, directly from the sidebar.
Opera GX also has a built-in game hub- the GX Corner. There you can browse and download free games, get information about new releases and other relevant gaming news.
Opera GX
Access Twitch directly from the sidebar and benefit from top performance on streaming and gaming platforms!
Hit the Windows key, type Chrome, then click on the first result.
Use the following keyboard shortcut to open the Clear browsing data menu:Shift + Ctrl + Delete.
Select All time as the time range.
Checkmark the Cookies other site data and Cached images and files sections.
Click on the Clear Data button.
3.2 Mozilla Firefox
Press on the Windows key, type Firefox, and open the first result.
Click on the 3 horizontal lines button from the top right corner.
Navigate to History.
Click on Clear Recent History.
Click on the Time range dropdown menu and select Everything.
Checkmark the History and Data sections, then hit the OK button.
Now, go again to the Firefox general menu.
Navigate to Settings.
From the left window pane, choose Privacy & Security.
Scroll down to Cookies and site data, then click on the Clear Data… button.
4. Server Issues at Twitch / EA
If nothing seems working, it could be an issue at Twitch’s side as it is refusing to link your EA account.
The support staff may not be very good at acknowledging if it is at their end. However, you should get an ETA or a workaround from the support staff.
Make sure you contact Twitch support through Social Media or Reddit Community forums as the support is usually active in these places.
What other Twitch related issues should I be aware of?
Many users prefer using the Xbox for playing EA games. Some of them actually need to link Twitch with their Xbox. However, it seems like some possible errors can occur. If you want to discover them, check the list below:
Error 0x20b31181 on Xbox – This error means that your account is restricted from broadcasting. In addition, rememeber that you must be an adult to broadcast using Xbox One
Twitch won’t broadcast on Xbox One – It seems like this problem is extremely popular among users. Fortunately, we’ve also compiled a series of methods to fix it.
These are the best solutions to use if something went wrong linking the EA account to Twitch. We guarantee that at least one of them will work for your particular situation.
If it’s happening to have additional questions or curiosities related to this subject, feel free to use the comment section listed below.
The days of painful plain-text log management are long gone. It’s true that plain-text data is still useful in particular cases when it comes to extended analysis to gather essential infrastructure data it really pays to have reliable log monitoring software.
Log monitoring software will monitor the log files generated by security devices, networks, servers, and apps.
All errors and issues are saved for deeper analysis. System admins can then set up a monitor on the generated logs to detect problems.
These monitors will scan the log files and search for known patterns and rules that show important events. After such events are discovered, the monitoring software will send an alert to the user or another system.
The main advantage of using log monitoring software is that it can help you quickly pinpoint the cause of an error within a single query.
When you are choosing the perfect tool, you first need to evaluate your current business operation.
You’ll have to decide whether you need basic data out of your logs or you require more powerful and efficient tools for a larger scale log management.
All these being said, we have put together a list of the best log monitoring tools for robust solutions. Check them out and pick your favorite tool that will meet your needs.
Which are the best log monitoring software for PC?
ManageEngine OpManager is a dedicated tool for server and network management that takes log monitoring to another level.
It’s a professional-level software that not only analyzes your entire network architecture but also VMware-virtualized servers to provide IT administrators complete situation awareness.
OpManager monitors Host, VMs, and Storage Repositories of Citrix XenServer and offers complete visibility regarding their performance.
The solution offers agent-based log file monitoring to supervise the system and application logs. The agent deployed on the end Windows system monitors the text log files in real-time.
Apart from the network components, OpManager also provides file and folder monitoring that helps you instantly detect storage subsystem problems, an unexpected steep increase in disk utilization, and more such events.
Its script monitoring feature supports Powershell, Linux shell script, VBscript, Perl, and Python scripts out-of-the-box.
It even provides a strong 24×7 monitoring of your website for availability and performance to identify any problems before they cause any damage.
ManageEngine OpManager best features:
Over 70 workflow checks and actions grouped under 9 different categories
Monitors Host, VMs, and Storage Repositories of Citrix XenServer
24×7 website management
Failover and failback functionality
Bandwidth monitoring, network configuration management, firewall management, IP address management, and switch port management
ManageEngine OpManager
Monitor all your network devices and servers from a single, powerful console with this premium tool!
Instead of collecting a ton of logs and only accessing them when things go bad, use PRTG as a centralized tool to see all your logs and also set up alarms to be notified immediately.
Once you receive a notification, you access the dashboard to detect the time frame when an issue occurred and spot the problem quickly.
PRTG is equipped with multiple sensors used for data collection and there are also a lot of filters you can customize.
There’s a Windows API sensor and a WMI sensor to collect Windows Event Logs and a Syslog Receiver Sensor for monitoring and collecting Syslog messages sent by devices from your network.
Next, create alarms and customize them for your particular situation. The dashboard is also customizable so that you can integrate data from other log tools.
What’s more, PRTG Network Monitor also comes with a lot of other tools to spot network problems or even prevent them from happening.
PRTG Network Monitor best features:
Windows API and WMI sensors
Centralized dashboard
Identifies potential network disruptions and issues notifications
Detailed graphical reports
Advanced network logging features
PRTG Network Monitor
Use PRTG as a centralized tool to collect all your logs and monitor the entire network.
SentryPC is a modern platform for logging, managing, and aggregating all potential errors from your software and within your applications.
The tool’s high-class algorithm can help out teams to detect any possible errors within the application infrastructure that could be critical to production operations.
Its real-time error reporting takes place as you deploy a new version of your application so that all errors can be monitored as they happen and eventually prevented before it’s much too late to do anything else.
SentryPC provides support for avoiding the hassle of having to deal with problems that are much too late to be fixed anymore.
The tool uses its technology to help inform teams about all potential fixes and rollbacks that would be able to sustain healthy software.
SentryPC best features:
Detailed error reporting for URLs, header information, and used parameters
The graphical interface is perfect for understanding the nature of particular errors and their origin to fix them
Dynamic alerts and notifications involve SMS, chat services, and email
Real-time error reporting
User-feedback system for comparing any potential error reporting
SentryPC
Every recorded action contains the precise day and time the event happened, as well as the length of the activity.
Logz.io uses predictive analytics and machine learning to make the process of finding critical events and data generated by logs from servers, apps, and network environments much easier.
This SaaS platform has a cloud-based back end built with the help of ELK Stack – Elasticsearch, Logstash & Kibana. The environment offers you real-time insight into any log data that you are trying to understand or analyze.
Logs.io best features:
Analyze logs in the cloud and use ELK stack as a Service
Critical log events before they even reach production
Splunk focuses its log monitoring services around enterprise customers who need very concise software for searching, diagnosing, and reporting all events that surround data logs.
The software is built in such a way to entirely support the process of indexing and deciphering logs of all kinds. It will work with structured, unstructured, and complex applications logs based on a multi-line approach.
Splunk understands machine data of all kinds including networks, servers, web servers, exchanges, security devices, mainframes, and so on.
The software offers a robust monitoring and alerting system for keeping an eye on all important actions and events.
Splunk best features:
Analyzes networks, servers, web servers, exchanges, security devices, mainframes, and more
Versatile and flexible user interface for searching and analyzing data in real-time
Drilling algorithm for finding all kinds of anomalies and familiar patterns across log files
Robust monitoring and alerting system
Visual reporting using an automated dashboard input
Coudlytics is a SaaS startup created to enhance the quality of the analysis of billing data, log data, and cloud services. The tool is aimed at AWS Cloud services in particular, such as CloudFront and S3 CloudTrial.
Using the software, customers can get in-depth insights and pattern discovery based on the data provided by the services.
Cloudlytics features three management modules, and it offers its users the flexibility to choose from monitoring resources in their environment, to analyzing AWS logs and monthly bills.
Cloudlytics best features:
R real-time alerts of errors as soon as they pop up
The billing analytics lets you watch closely over the consumption of your resources
Sophisticated user interface for an in-depth view of all your data
Apache Flume is a service that helps its users stream data straight into Hadoop. The service’s core architecture is based on streaming data flows.
They are used to ingest data from a variety of sources to directly link up with Hadoop for deeper analysis and storage purposes.
Flume’s Enterprise customers use the service to stream data into Hadoop’s HDFS. This data usually includes machine data, data logs, geodata, and social media data.
Flume best features:
Multi-server support for ingesting data from multiple sources
The collection can be done in real-time or another variant is to use batch modes
Ingestion of large data sets from conventional social and eCommerce networks for analysis in real-time
Scalable by adding more machines to transfer more events
Reliable back end built with durable storage and failover protection
NetIQ is an enterprise software company that focuses more on products that are related to application management software operations and security and log management resources.
The Sentinel Log Manager is a pack of software apps that provide businesses the opportunity to take advantage of features such as the effortless log collector, secure storage units, and analysis services, to keep your data safe and accessible.
Sentinel’s cost-effective and flexible log management platforms make it very easy for businesses to audit their logs in real-time for any possible security risks or app threats that could disturb the production software.
Sentinel Log Manager best features:
Distributed search to find comprehensive details about events from your local or your global Sentinel Log Manager servers
Common regulatory reporting; the predefined reports reduce the time you have to spend on compliance
One-click reports based on your search queries
Choose from traditional text-oriented search or built custom, and more complex search queries yourself
Support for non-proprietary storage systems
Log encryption over the network to provide another layer of security for your log data
The modern environment of IT departments can provide a layer of challenges when it comes to a truly in-depth understanding of the reasons for which events occur and what logs are reporting.
Entries are collected from multiple sources. With the demand for analyzing logs in real-time, some difficulties can arise regarding data management in a centralized environment.
NXLog focuses on providing the necessary tools for a concise analysis of logs from a variety of platforms, formats, and sources.
Note that it can collect logs from files in lots of formats and it can receive logs from the network remotely on all supported platforms.
NXLog best features:
Multi-platform support for GNU, Linux, Solaris, Android, BSD, and Windows
Pluggable plugins offer modularization
Ability to collect logs as 500,000 EPS or even more
Buffer and prioritize logs so that they will not get lost in the pipeline
Log rotation and task schedule
Secure network transport over SSL
Offline log processing capabilities for transfers, conversions, and general post-processing
We’ll end our list here. Before downloading one of the tools listed above, write down your needs and expectations in terms of log monitoring software and then select the tool that best suits your needs.
Log monitoring tools automatically track logs from servers, networks, apps, and security devices. They detect errors, unusual patterns, and performance issues, then generate alerts so admins can respond quickly.
What are the key features of a good log monitoring tool?
Important features include real-time monitoring, customizable alerts, centralized dashboards, advanced search filters, reporting, and support for multiple log formats or platforms.
What is the best free log monitoring software?
Popular free options include NXLog (multi-platform log collection), Apache Flume (for Hadoop environments), and Nagios Log Server (open-source). PRTG also has a free version with limited sensors.
Can log monitoring tools improve security?
Yes. Tools like ManageEngine OpManager, Splunk, and Sentinel Log Manager can detect anomalies, failed login attempts, and potential intrusions. They help prevent breaches by alerting admins before damage occurs.
Do log monitoring tools work on Windows 10/11?
Yes. Most modern log monitoring tools such as PRTG, NXLog, OpManager, and Splunk support Windows environments and can also integrate with Linux, cloud services, and hybrid infrastructures.
Have you already picked the best solution for yourself? Let us know about your experience in the comments section below.
Through a new Minecraft Preview build exclusive to Xbox Insiders, it seems that Microsoft is on the verge of incorporating ray tracing support for Minecraft on Xbox Series X|S consoles However, even with an original tease of the feature dating back two years, it is still in the early testing phase and not yet widely available in an easy way. (via The Verge)
At the moment, Xbox Insiders that have been able to access the feature, say that Ray Tracing feature is enabled through additional resources packs. That means it is difficult for most gamers to install and download these in the Xbox version of the game. Some gamers have been able to access ray tracing on the Xbox Series X|S by either taking part in a multiplayer game with a device that comes with the additional resource packs and has already enabled the feature. Alternatively, some have accessed it by creating a new world and found the feature in the settings.
Minecraft with raytracing on Xbox? The latest Minecraft Preview is optimized for Xbox Series S / X and has early raytracing support ???? pic.twitter.com/cqH0cuGbtS
This could be an indication that Mojang Studios working on an upgrade for both Xbox Series X and Xbox Series S. Besides, the latest build is marked as optimized for Xbox Series X|S, which is an indication that the next-gen patch s set to be released in the near future.
As a reminder, ray tracing is a unique lighting technique that enhances the appearance of a game by making it more realistic. The feature helps mirror how light is reflected and refracted in real life and replicates it in the game. Be sure to test out this feature if you are an Xbox Insider and share your thoughts and experience with us in the comment section below.
Can you contain your excitement?! Today, Microsoft released another servicing pipeline update for the Windows 11 Beta and Dev channels, upticking the build numbers to 22581.200. The blog post has been updated:
UPDATE 3/29: We are starting to roll out Cumulative Update Build 22581.200 (KB5013296). This update does not include anything new and is designed to test our servicing pipeline for builds in the Dev and Beta Channels.
If you’re in the Beta or Dev channels, be sure to update your installs to help Microsoft test the servicing pipeline. And don’t forget, if you’re in the Dev Channel and want to move back to the Beta Channel, now’s the time to do it. Once the Dev Channel begins bumping the build numbers up again to introduce new features for possible inclusion in upcoming releases, you won’t be able to get off the Dev channel without a clean install
Windows 11 Taskbar, like its predecessors, can be easily customized. But despite Microsoft’s best efforts to make this more customizable and accessible, it is still some ways short of what the dock offers.
The dock’s compactness, organization, and ease of access cannot be replicated by the Windows 11 Taskbar.
As usual, third-party software has benefitted from these shortcomings by releasing some of the best Windows 11 dock apps with striking Mac Dock resemblance.
And as always, we have curated the best of them for you to choose from.
Winstep Nexus is a stunning dock app that recreates that unique Mac-style Dock on your Windows 11 PC. Although it has been around for a while, it still works admirably on Windows 11.
It has freeware and a paid version. The free version houses some incredible features, like shortcuts for System Tray, Start menu, and Search bar.
There are also shortcuts that can’t be found on the macOS Dock and Windows 11 taskbar on this dock. This includes a recycle bin, a live CPU and RAM meter, and a real-time weather icon. Aside from programs, files, and folders, you can also add internal command lines to minimize all open windows, hide Taskbar, etc.
XWindows Dock is a top-notch app that looks exactly like the Mac Dock. The design is simple yet packs in a series of icons neatly. It does well to fit nicely in any window you are working on.
This dock was built for the Windows 11 predecessors but upgraded to work with the latest OS. XWindows Dock is highly customizable and allows you to tweak the appearance to be as fanciful as you want it to be.
Furthermore, you can add your favorite applications, folders, programs, links. It also comes with a plug-in manager for adding plug-ins. Lastly, this app is well-known to be stable and fast.
The Circle Dock is a unique app in its design and mode of operation. It lives up to its name, incorporating a rare but effective and powerful circle design.
Unlike most docks, the Circle Dock does not stay on the screen all the time. It automatically hides, and you will need to initiate it to use it. This can be done by pressing the Windows keys + Ctrl, and you can create a custom hotkey.
More importantly, this app can be customized to fit your desired shortcuts, apps, and folders. Also, you can also personalize the background with an image of your choice. Finally, the spinning feature of the dock makes it easy to pick an app from it irrespective of its position on the list.
This is an interesting Windows11 dock that can be placed in any corner, edge, or angle of the screen. It comes with some customizable features, such as appearance customization through themes and custom icons.
It is an ideal taskbar replacement app with a simple design. You can add shortcuts of your frequently used files, programs, and folders to its list. While it is not the most eye-catching app, it is no slouch either, thanks to its various themes.
RocketDock is a free app for optimal organization. It incorporates some frequently used folders, apps, and the recycle bin. It allows you to add folder shortcuts and customize them with icons.
RocketDock has 30 themes that give you full customization control. One of the nadirs of this dock is the difficulty of adding apps. It requires you to create a shortcut for the app before dragging it to the dock.
Lastly, part of its full customization is that you can customize the icons to be bigger or smaller. This makes it a good fit for people with visual impairments.
The Appetizer is a free, open-source dock with powerful organization. While this is not a fancy and colorful dock, it is lightweight and also effective in what it does.
You can easily resize this app and add your favorite shortcuts to it. What’s more, it allows you to import shortcuts with the help of wizards.
Appetizer automatically adds your frequently used programs from the Start menu and Taskbar during its installation.
Icons are neatly organized in this app. Finally, you can hide and show the dock by pressing a preset hotkey.
How to make Windows 11 Taskbar resemble the Mac Dock?
The only physical similarity the Windows 11 Taskbar shares with the macOS Dock is centralization. But with a third-party software called the TaskbarXI, you can shrink the Taskbar to make it compact, just like the dock.
Note that this app is still in the testing stage and can only customize the appearance of the Taskbar. Below are the steps to follow to make your Windows 11 Taskbar look like Mac Dock
Select the Taskbar exe file to download. Ignore the prompt from your PC stating that the file could be dangerous.
Now, run the application, and it will customize your Taskbar to resemble a dock!
Unlike the Taskbar, docks offer you more customization and control. The best Windows 11 dock apps boast unique combinations of adaptability, compactness, and ease of access.
All the apps listed above offer these features in abundance and some can even replace your Taskbar if you wish. Feel free to test them and discuss the ones you found more customizable in the comments section.
But if you only want to use a dock because of Windows 11 Taskbar issues such as Taskbar not working, the linked article and some of our detailed guides will help you solve those issues.
Whichever you decide on, we have certainly got you covered!
If you’re looking to get add and remove items to the File Explorer context menu to launch a frequently used application, you’re not alone. You can add and remove applications, add quick actions, and add and remove any apps you want with a simple registry hack on Windows. Here’s what to do.
Adding Applications to File Explorer context menu on Windows
This technique will work if you are using Windows 11, but can also work on PCs running Windows 7 and up.
Using this simple registry hack, you can add any application you want, with the ability to launch straight into a game of Forza Horizon 5. Here’s what to do.
2. Navigate to the following location to add and remove items from the File Explorer context menu:
If you’re an administrator: HKEY_CLASSES_ROOT\Directory\Background\shell
If you’re a normal user: HKEY_CURRENT_USER\Software\Classes\directory\Background\shell
3. Once completed, right-click on the “shell” key and click New > Key from the menu.
4. Give the new key a name as you want it to show up in the Windows desktop and File Explorer context menu. For this example, I will use Forza Horizon 5.
5. Under the new key you just created, create another new key by clicking New > Key from the menu. Rename this key command.
The command key will hold the command used to launch the application you want to use in the File Explorer context menu.
6. Next, you will need to copy and paste the full path of the Windows application that you want to use. Find the application you want to use, right-click and choose the Copy as path.
7. Copy and paste the file path into the command key value and click OK. Close the Registry Editor when you are finished adding applications to the File Explorer context menu.
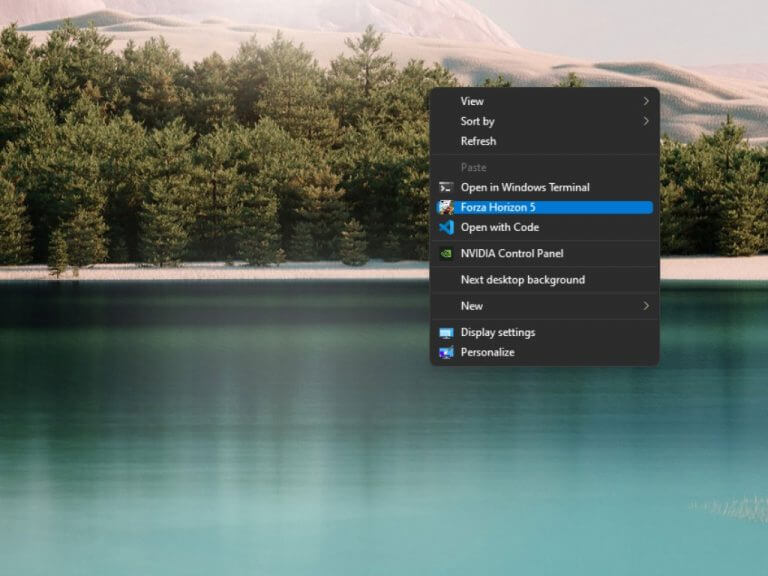
No need to restart your PC for the changes to take effect, they are ready as soon as you complete these steps. Now, you can access the application you just added by right clicking anywhere on the desktop.But what if you want to add an icon to your application? Here’s what to do.
Add an icon to the File Explorer context menu
One extra step that I discovered is that you can use a custom icon next to your new context menu application. Here’s what to do.
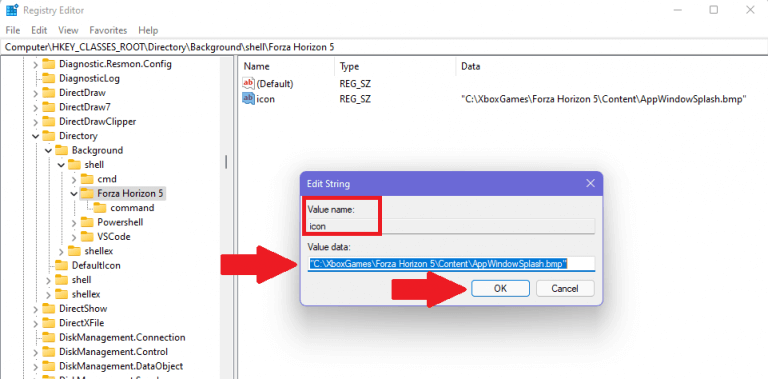
1. In the new context menu application that you created, add a string value name icon for the new application key you just created.
2. Copy and paste the path name for any icon on your PC.
3. Click OK and close the Registry Editor when you are finished.
Now, I can hop in and out of whatever applications and games I want with a simple right click on my mouse. This is the fastest way to play any Xbox game you want, at will. Sure, it’s not practical, but that doesn’t mean it’s not useful.
What applications will you add and remove from your Windows File Explorer context menu on Windows 11? Let us know in the comments!
One of the most annoying things about Windows 11 has been the changes to the way users set a default browser. In previous versions of the OS, changing from Edge (or before that, Internet Explorer), was a simple process of choosing a preference for your browsers, often done by settings from the likes of Chrome or Firefox with a “make this your default browser” button.
That changed in Windows 11, and users were forced to go through a long list of file type associations, setting each one individually, a cumbersome process to say the least. Whether this was due to an incomplete new Windows 11 user experience, or something more sinister is hard to say, but the good news is that it’s now once again much easier to set your default browser to something other than Edge (via Neowin). The changes came to Windows 11 Insider users last December, and now with this latest update they’re available for all Windows 11 users.
To set your default browser in the production version of Windows 11, first make sure that you have installed the latest Cumulative Update for Windows 11, KB5011563, bringing your OS to version 22000.593. Check Windows Update and you should find the CU.
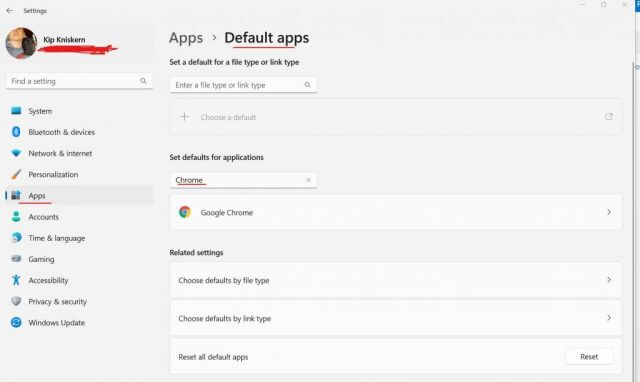
Then, to set your default browser to Chrome or Firefox or …., open the Settings app (you can use Windows key + i), click on Apps, then Default Apps, and under “Set defaults for applications,” type in the name of your preferred browser (making sure that you have it installed). Click on the listing for the browser, and choose Set default.
Windows 11 will then change all the main browser app defaults, and show you a list of what’s changed. Note that some settings like the default app for PDF files, will remain set to Edge, and Edge will still be used to open links in widgets and the desktop search, etc.
The rumors were indeed true. Sony has come out and officially announced a competitor to Xbox Game Pass. Yet, rather than launch an all new service, it’s merging existing ones together as one to take on Microsoft and offer PlayStation gamers more choice and value for their money.
Coming in June, the all new PlayStation Plus subscription service will have a couple of different tiers. Sony hopes that the new tiers will “provide more choice to customers,” as well as “high-quality, curated content with a diverse portfolio of games.”
Unfortunately, though, this still won’t include first-party games at launch, which is what makes Xbox Game Pass so unique. The new PlayStation Plus will be divided into Essential, Extra, and Premium. Essential is the bare minimum, Extra falls in between, and Premium is at the top. Here’s what each tier costs and gets gamers.
Essential: $10 a month, $60 a year: Same as current PlayStation Plus. Includes two monthly downloadable games, discounts, cloud storage for saves, and online multiplayer.
Plus Extra: $15 a month $100 a year: All benefits of Essential, plus 400 PS4 and PS5 games that can be downloaded to play. Includes games from PlayStation Studios, and third-party games, too.
Premium: $18 a month $120 a year: Everything in Essential, Extra, plus 340 additional games, PS3 games via the cloud, PS2 and PSP classics via the cloud. Trials on this tier to try games before buying. Customers can stream games using PS4 and PS5 and also on PC.
In addition to the three main tiers, Sony is also planning to launch PlayStation Plus Deluxe in select markers. This is for markets without cloud streaming, and it will be offered at a lower cost to Premium with the ability to download and play classic PlayStation, PS2, and PSP games.
At launch, Sony will include titles such as Death Stranding, God of War, Marvel’s Spider-Man, Marvel’s Spider-Man: Miles Morales, Mortal Kombat 11, and Returnal. Once the service is fully rolled out, PlayStation Now will transition to PlayStation Plus and will be phased out. PlayStation Now customers will also get PlayStation Plus Premium with no increase.
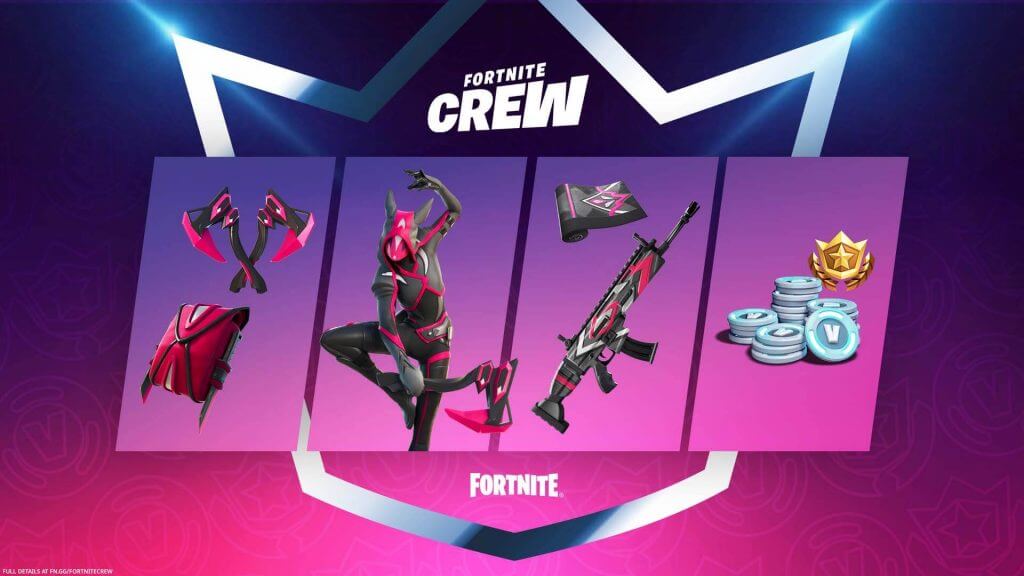
The Fortnite Crew Pack for April has been officially revealed ahead of its release later this week on April 1st.
The April Crew Pack will contain the new skin, Sayara, who looks to be some type of rat or mouse ninja character. Sayara doesn’t appear to have any alternative appearances but she does come with a back bling, pickaxe, and a weapon wrap.
As is usual with the Fortnite Crew Pack, all subscribers will also receive 1,000 V-Bucks (Fortnite’s in-game currency) on their renewal date and access to the current Battle Pass content.
Fortnite Crew April 2022 Pack
All subscribers who are charged for their Fortnite Crew membership renewal before April 3rd will also help support those affected by Russia’s invasion of Ukraine as Epic Games and Microsoft’s Xbox division have announced that all funds made by Fortnite purchases before that date will be donated.
Choosing the best game might be one of the hardest decisions you have to make and it seems like tons of worldwide users are struggling with this kind of situation.
Our research indicated that many players are interested in discovering what is the best option between Horizon Forbidden West and Breath of the Wild 2.
Some users are not interested in investing in two different games. Plus, it seems like a wide range number of them also do not have sufficient time to spend on two masterpieces.
We’re here to present everything you should consider about Horizon Forbidden West vs Breath of the Wild 2. So, at the end of this guide, you’ll definitely know what to choose.
Horizon Forbidden West vs Breath of the Wild 2: General approach
Horizon Forbidden West
This game was recently released, but it is no longer a surprise that it offers a one-of-a-kind experience every time gamers decide to access the action open-world of Aloy.
For those of you who already tried the Horizon Zero Dawn version, keep in mind that Forbidden West is no more than the second part of Aloy’s journey.
If you’re not already familiarized with Horizon scenarios, keep in mind that the protagonist is Aloy, a Nora brave, seeker, and machine hunter of unparalleled skill.
She leads enormous companions groups and the game places you in a dying land, with vicious storms, and different impressive battles, making your experience one of the best you’ve ever had.
Post-apocalyptic California, Utah, and Nevada create an awesome video-game experience, where players are able to explore wider and deeper into a huge and well-organized map.
You can also engage in strategic battles against dangerous machines and mounted human enemies by using weapons, gear, and traps.
Breath of the Wild 2
The Legend of Zelda: Breath of the Wild 2 is the in-development Nintendo Switch exclusive any gamer wants to experience as soon as possible.
However, Nintendo doesn’t seem to be in any great hurry to lay all its cards on the table. In this matter, we’re still waiting for confirmation of its official title and the specific release date.
For the moment, all we know related to that highly-anticipated release date are rumors that it could be in the latter half of the year.
Keep in mind that Internet users already came up with some fan theories based on The Legend of Zelda: Breath of the Wild 2 E3 trailers.
So, going back in time is one of the speculations. The music at the start of the 2019 BotW 2 trailer sounds reversed, which led some to believe that this is a clue, perhaps the BotW 2 story starts by going back in time.
The two Links are other aspects you should consider. This theory is strongly related to the 2021 BotW 2 trailer.
There we can see Link in the normal Hyrule wearing his traditional clothing and hairstyle. However, Link in the floating island realm is wearing a new set of clothes and loose hair.
In these terms, many gamers are wondering if he just changes his look or if floating island Link actually Links from the past.
The Secret Zelda is another important theory. Again, floating island Link could not be Link at all. The loose hair is not too long, and we already saw Zelda with shorter loose hair in the 2019 trailer. It’s not unlikely that BotW 2 will feature both Link and Zelda as playable characters.
Horizon Forbidden West vs Breath of the Wild 2: Main Differences
1. Supported devices and platforms
Horizon Forbidden West
Keep in mind that Horizon Forbidden West is only available to play on the latest PlayStation versions, like PS4 and PS5.
Unfortunately, if you’re looking for a game that would work on PC, you should go for another masterpiece.
Breath of the Wild 2
When it comes to Breath of the Wild 2, worldwide players will only be able to run it on Nintendo Switch.
2. Size requirements
Horizon Forbidden West
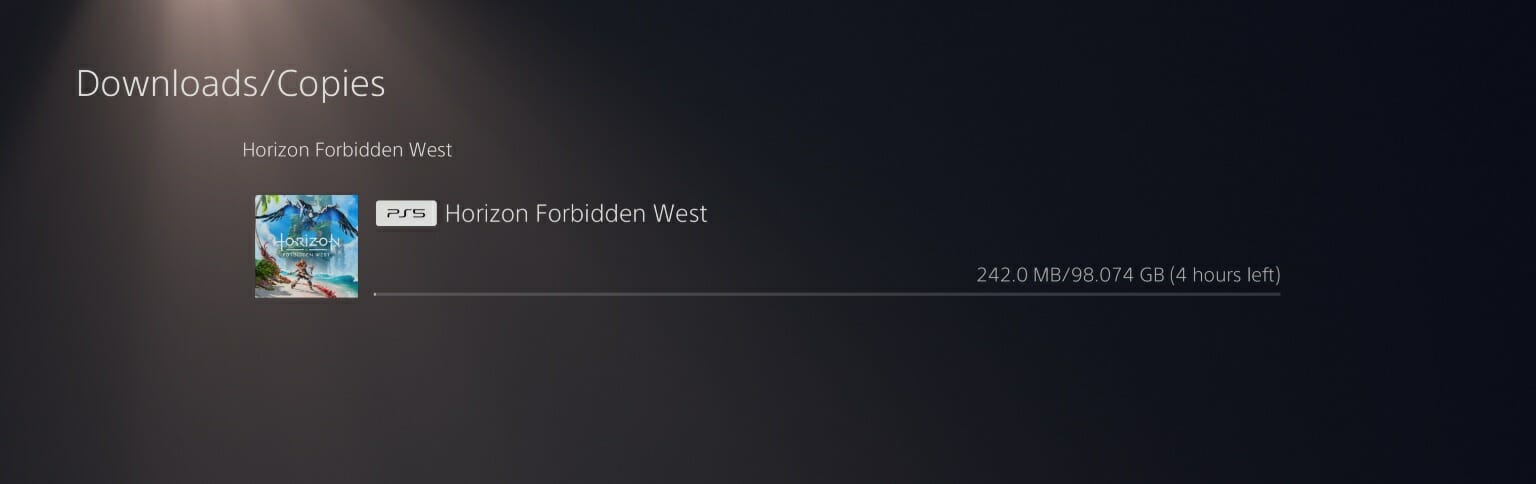
If you’re wondering what are the Horizon Forbidden West size requirements, do not forget that it will take around 90 GB on PS5.
However, there are variations depending on the region. In the US, the PS5 edition is around 87 GB with the day one patch installed.
Breath of the Wild 2
The Legend of Zelda: Breath of the Wild will require around 14GB of free space if you wish to download the game to your Nintendo Switch.
Horizon Forbidden West vs Breath of the Wild 2: Reported issues
Horizon Forbidden West
It is no longer a surprise that any game or software might sometimes generate specific problems. We’re here to highlight the most popular issues that you can encounter while running Horizon Forbidden West, as follows:
Horizon Forbidden West is not working at all – This one can appear if our console is outdated or the disk space is full. If you ever face this error, check out some useful solutions to easily fix it.
Can’t install Horizon Forbidden West – This problem is usually related to insufficient disk space on your device. Thus, you’ll have to make sure to have enough space to install the game.
Of course, similar to Horizon Forbidden West, even if Breath of the Wild 2 is a newly released game, it can also run into some troubles:
Breath of the Wild’s lack of traditional dungeons – When worldwide gamers are asked about their BOTW 2 complaints, the lack of traditional Zelda–style dungeons is the first thing that comes up.
Breath Of The Wild’s Unimaginative Boss Fights – In other terms, keep in mind that it is a similar complaint to the lack of variety found in BOTW‘s Divine Beasts. However, the game’s boss fights are an even more egregious example of a lack of creativity.
So, we hope that this guide helped you with choosing between Horizon Forbidden West vs Breath of the Wild 2.
Are you still questioning which is the best option? Feel free to leave a comment in the section below and we will come up with any detail you need.
First, you could consider installing a driver updater that will automatically take care of all of your drivers without any complicated methods or steps.
Keep in mind that faulty GPU drivers can mainly cause FPS drops, but you can easily fix that with just a couple of clicks. So, ensuring everything is updated is helpful before trying the steps below.
What are the best FPS settings for a better gaming experience on Windows 11?
1. Enable Game mode
Press Windows + I keys to open the Settings app.
Select Gaming from the left sidebar then go to the Game mode.
Now, enable the toggle from the following menu.
When you enable Game Mode, Windows will prioritize the gaming experience on PC and disable background tasks, Windows update services, driver installation, etc.
It is worth noting that the Game mode wasn’t effective before, but Microsoft has improved this feature significantly. This option will help to stabilize the frame rate.
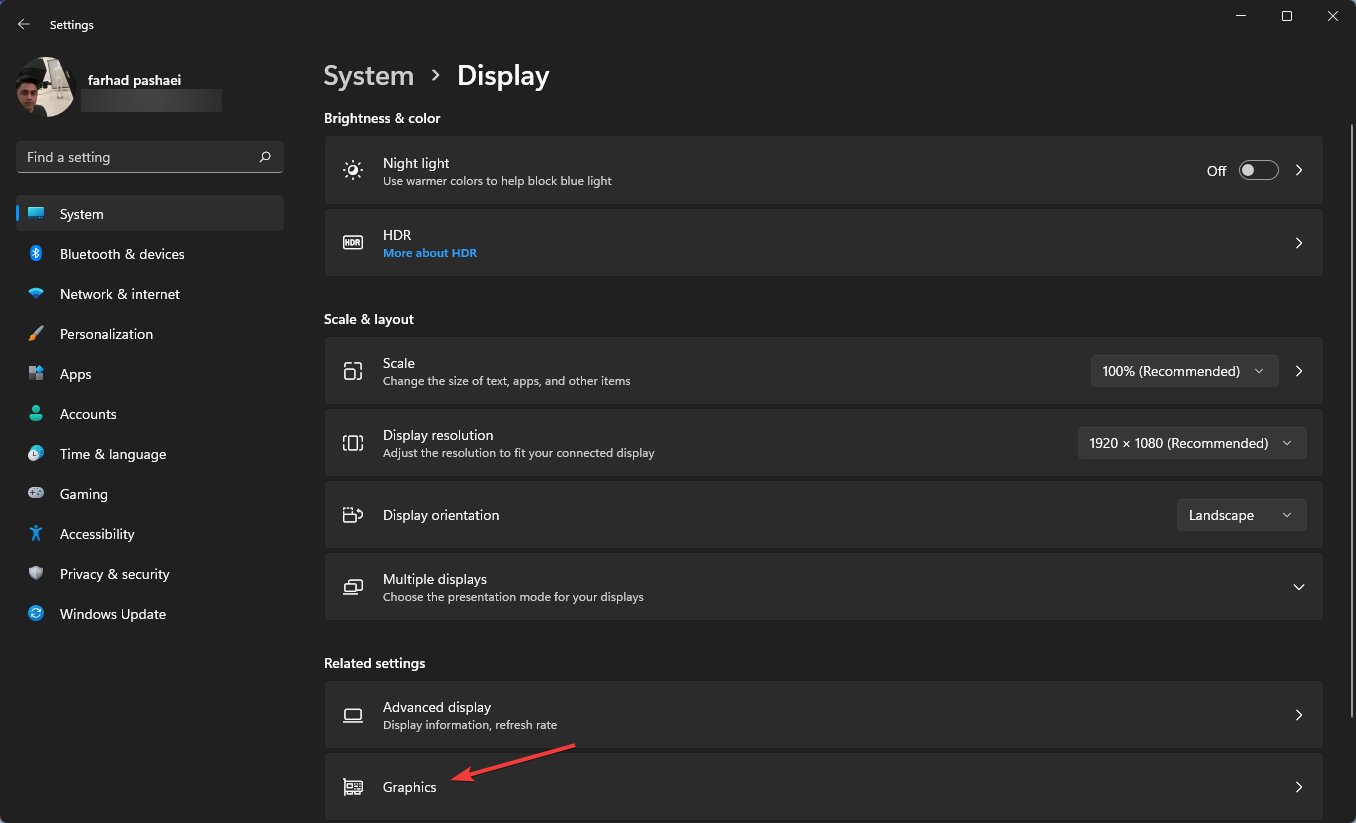
2. Set a GPU priority for a specific game
Go to Settings by pressing Windows + I keys.
From the left pane, choose System, then Display from the right pane.
After that, scroll down and select Graphics option.
Select a game and click on Options.
Now, choose the High Performance option and click Save.
Using the Windows 11 Settings app, you can assign a specific application to a certain graphics card.
In order to get the best performance out of your computer, you can select which apps exclusively use the discrete GPU instead of the integrated GPU.
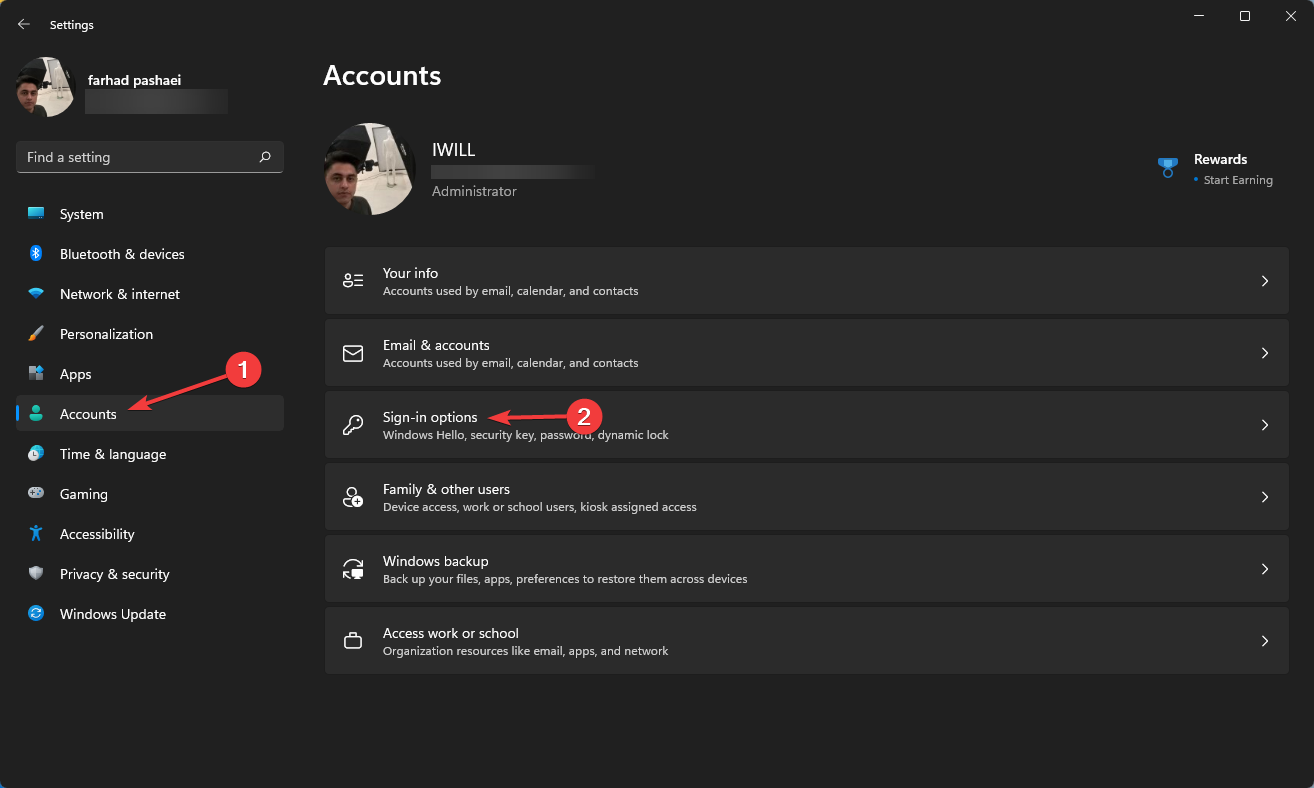
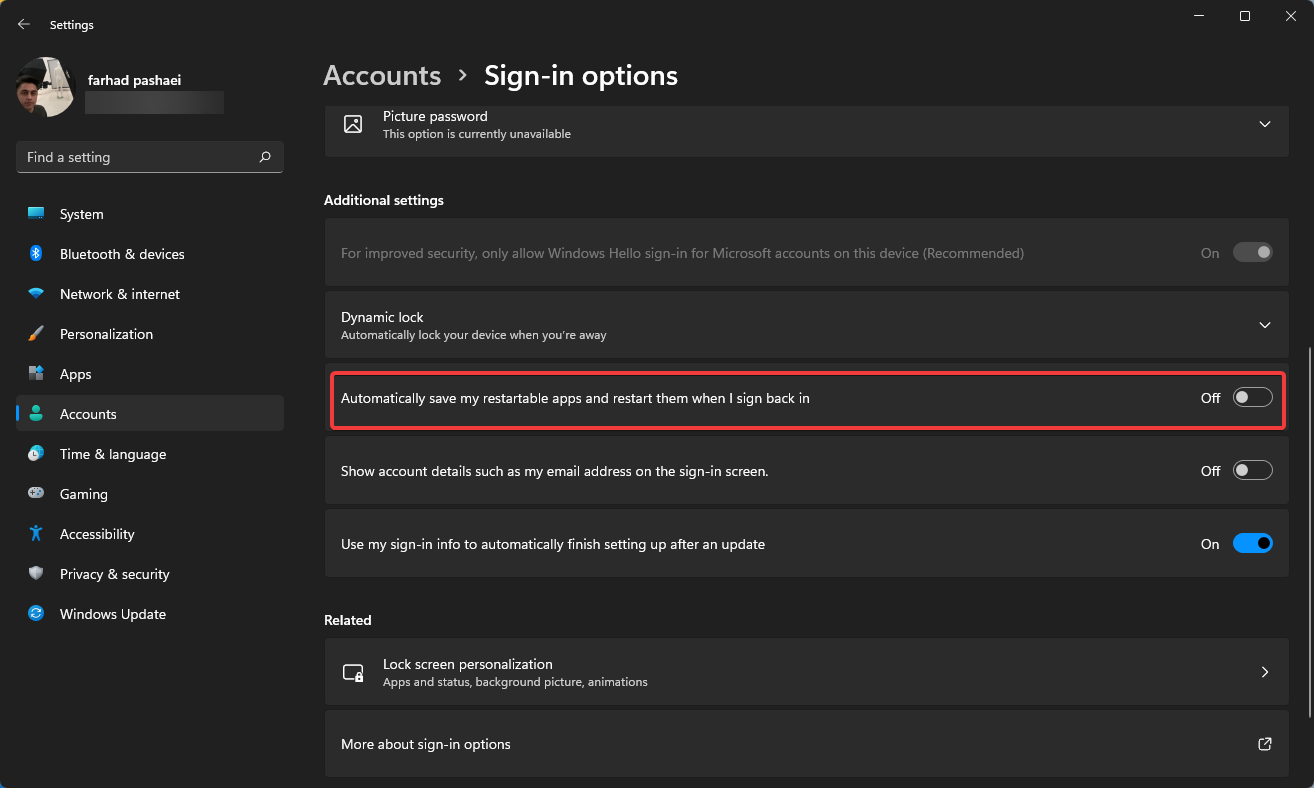
3. Disable restartable apps
Open the Settings app by pressing Windows + I keys.
Click Accounts then select Sign-in options.
Now, disable Automatically save my restartable apps and restart them when I sign back in.
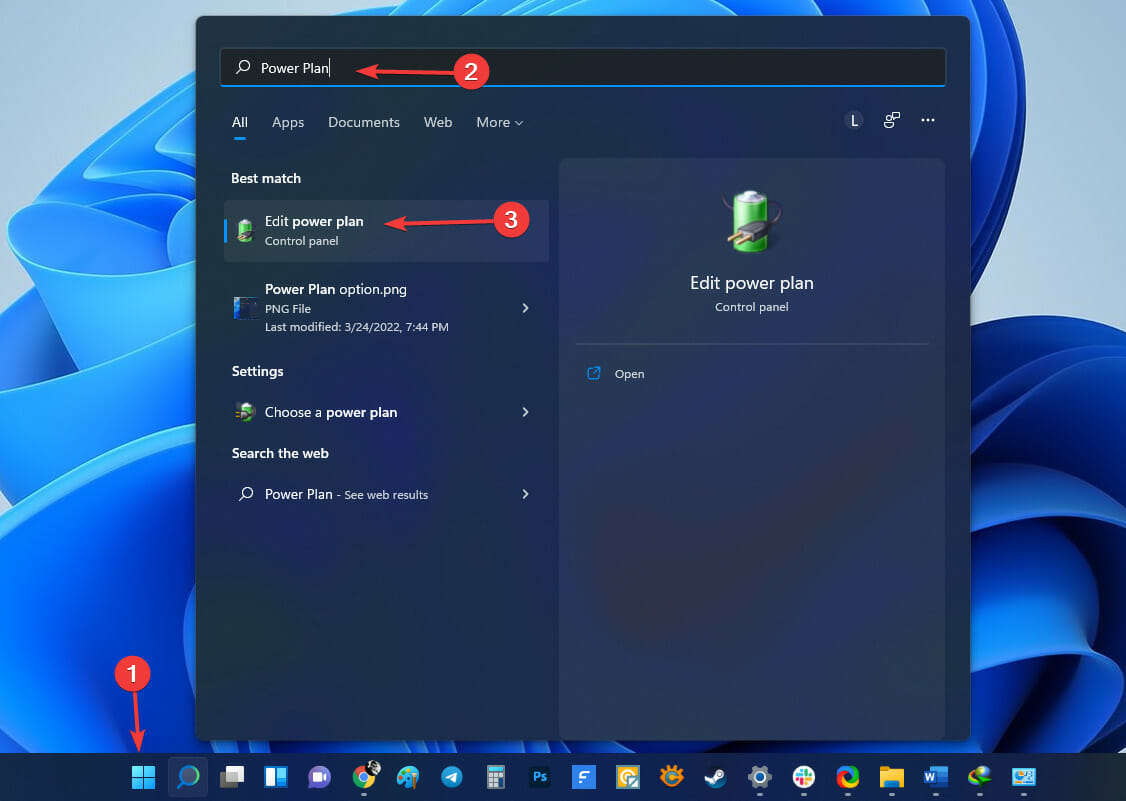
Go to the Start menu, type Power Plan then select Edit Power Plan.
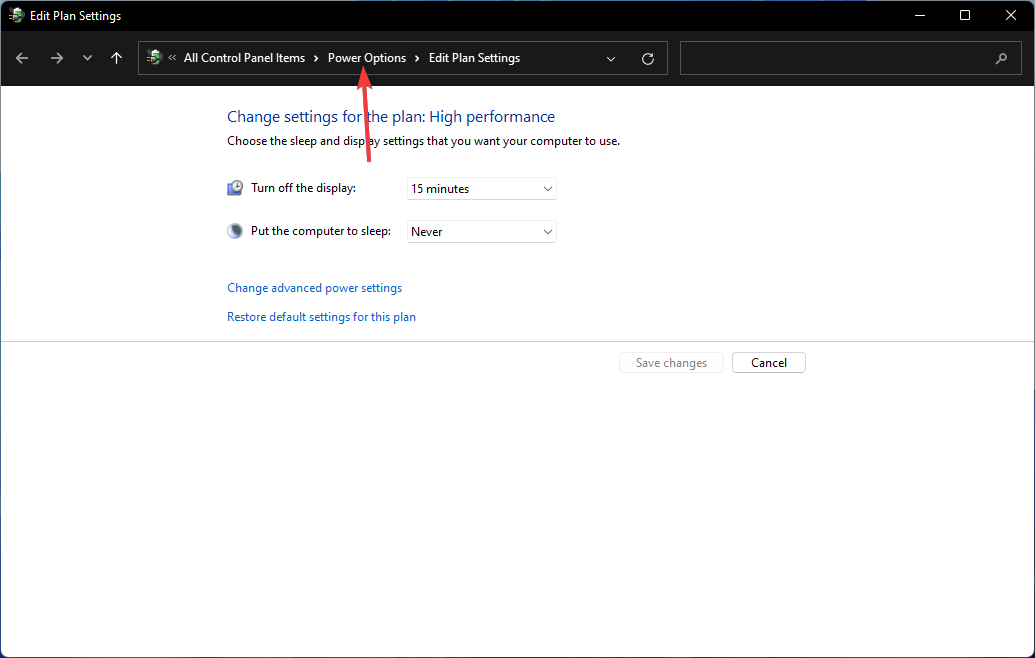
Once the window opens, select Power Options.
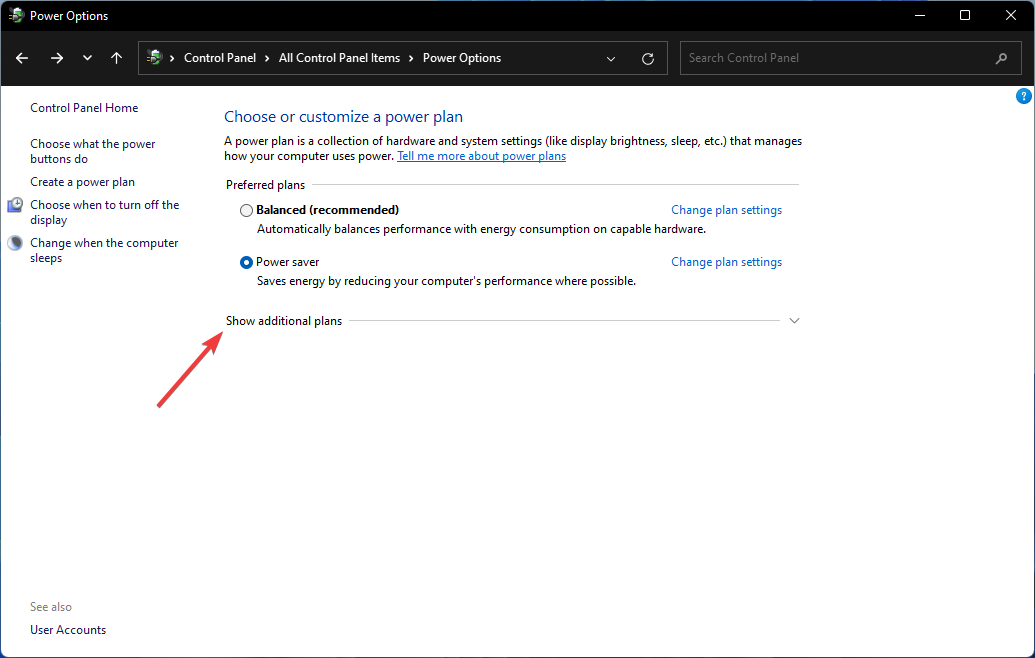
Click Show the additional plans if High Performance isn’t visible.
Select High Performance from the list.
The difference between Power Saving and High-Performance modes is noticeable, as the latter will burn through your laptop’s battery at speeds you may never expect.
However, it’s always the recommended option if you want to achieve higher FPS numbers.
NOTE
This setting is mainly for laptops, as PCs won’t need internal batteries to run.
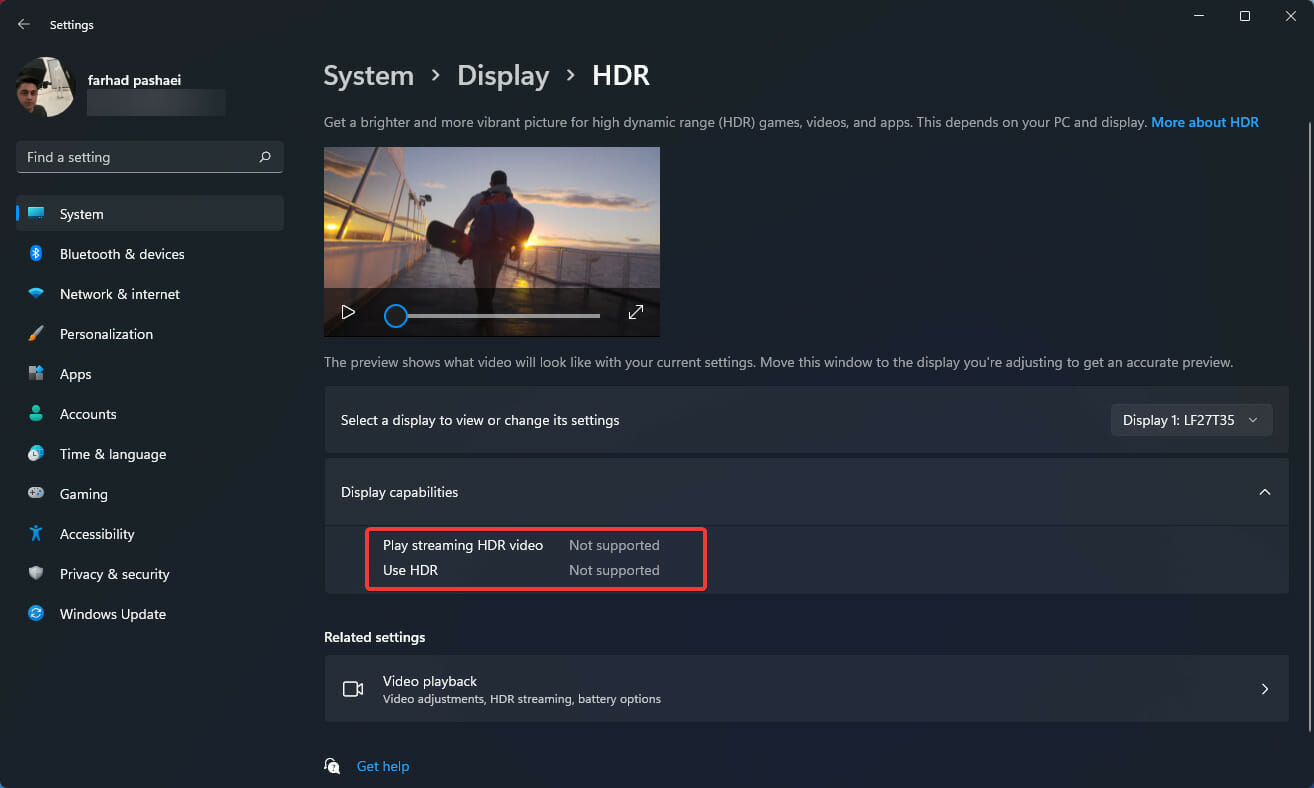
5. Enable Auto HDR
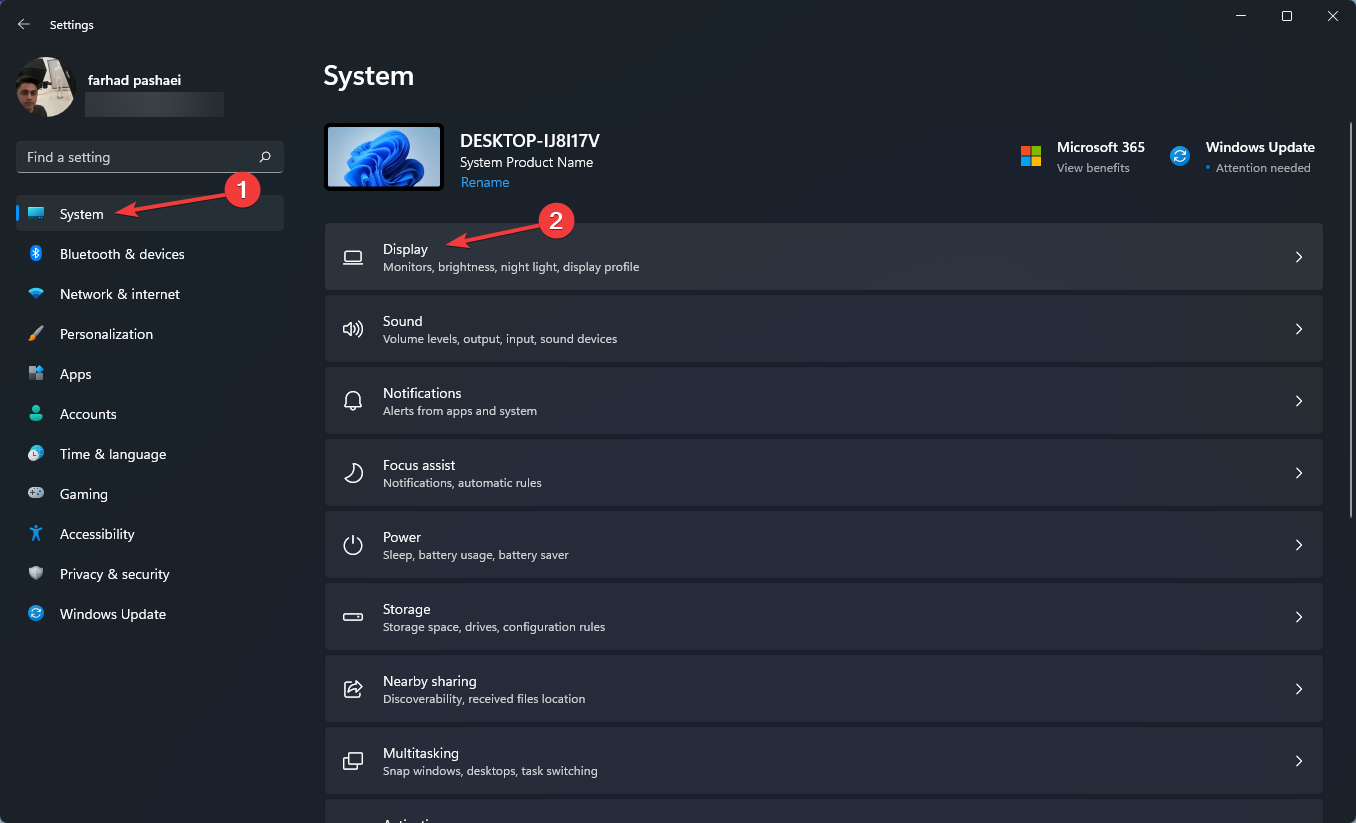
Open the Settings app by pressing Windows + I, then select Display option on the System tab.
Ensure Use HDR is enabled.
Click Use HDR to open the HDR settings menu.
Ensure Auto HDR is enabled. If your monitor doesn’t support HDR, you will not have this option.
For a more lifelike gaming experience, you’ll want to choose a monitor with HDR capabilities. A wide color range, excellent brightness, and high resolution are advantages of an HDR-supported monitor.
Even if you don’t compare them side by side, the difference between SDR and HDR is noticeable.
This option improves your gaming experience, but as previously stated, it requires an HDR-supported monitor, which is highly recommended for gamers.
Having the best FPS is essential for gaming because lower FPS, besides causing a less smooth game experience, can also put you at a disadvantage against your gaming opponents.
Remember many factors determine the FPS rate, such as computer hardware (graphics card, motherboard, CPU, memory), graphics and resolution settings within the game, and how well the game code is optimized and developed for graphics performance.
Therefore, make sure that you have all the right equipment and other settings, such as in-game settings, checked for optimum performance. Also, be careful on what settings you enable as V-Sync can lower your game’s FPS.
File Manager on Windows 11 is great but can lack certain advanced features that users need. You’re in the right place if you’re looking for the best File Explorer on alternative Windows 11.
WinZip is a renowned Zip utility. It is not just your regular File Manager, as it incorporates astonishing features that put it in a league of its own.
It carries out all file management tasks with relative ease. It does it all with aplomb, whether it is a file edit, search, transfer, or organization.
WinZip also offers a level of security not seen in other File Managers. To protect your data, you can easily encrypt your files as you Zip them. This app also helps you Unzip all major formats with just a mouse click.
As impressive as WinZip is, it constantly evolves with new features to provide a better user experience. A recent upgrade saw a ribbon look-and-feel feature that adapts the software to whatever you are doing. It is indeed the complete package you can get.
Other features:
Can create Pdf with watermark.
Can share files anywhere, including email, cloud, social media.
Auto cleaning and management of computer.
WinZip
Manage files easily and take care of all your archiving needs with this powerful software.
FreeCommander is a classy app that offers two customizable panes for easy access when working on multiple files. If you don’t need the dual pane, you can switch to single pane mode.
It is a high-level manager that allows you to use tabs when working on multiple folders simultaneously. It also has a tree feature for effortless file organization.
FreeCommander is a freeware package that boasts Windows integration and allows you to access the DOS command line, Start menu, control panel, and system folders.
Lastly, it has an intuitive and customizable interface that can be set to your taste.
One Commander is an excellent file manager with unmatched portability. Unlike most other file managers, you don’t necessarily have to install this software.
You can save it on an external drive and take your files wherever you go. This eliminates delays and gives the versatility of using it on multiple devices.
Furthermore, this app allows you to switch between two panes. This makes your work easier and increases productivity when working on multiple files.
This app is right up there in terms of organization. You can use its seven colors to tag your files and organize them into specific patterns. It is just a blend of style and effectiveness.
Total Commander is a household name in the third-party file manager industry. It is a paid app with a 30-day free trial to get a sneak peek into what you will be getting.
It packs in some excellent features and powerful utilities. One of its endearing features is the intuitive and customizable interface that is easy to use.
It has extensible plugins and addons for premium experience and customization. This makes it suitable for advanced file organization and file management.
What’s more, it is ideal for large file transfers as you can set the file transfer speed limits. It is indeed one of the best Windows 11 file managers out there.
This is a premium paid file manager with extensive features. It has two versions – The professional edition and the Ultimate edition – both available on a 21-day free trial.
Xplorer² is a modern-looking file manager with two horizontal panes for multitasking. It features a tree along the left that can be customized for file organization and management and its tab feature.
Another nice feature is the stick selection. This feature makes sure the files you have selected will not be accidentally unselected when you click other parts of the screen.
Also, it allows you to use color code to organize your files. It is a fully packed app with style and substance.
6. TagSpaces – Comes with advanced tagging support
This is an open-source app known for high-level organization and coordination. It is suitable for people that seldom use file managers but cherish neat and well-organized files.
TagSpaces allows you to add tags like photos and colors to files to organize them into groups and patterns.
Another impressive feature of this app is that it allows you to separate the files you have worked on from the others when using multiple files.
Finally, it gives you the option of adding file descriptions for easy identification and location of files.
Altap Salamander is a highly secure file manager. It has a built-in password manager that allows you to protect your sensitive files and folders.
Compared to Windows File Explorer, this app features an extensive list of networking tools for file transfer. It supports FTPS, FTP, SCP, and SFTP to make your online file transfer effortless.
Also, the built-in SFTP and FTP clients give you total control of your file history. Altap Salamander boasts a file comparator that makes it easy to compare two or more files you are working on.
If you are looking for a file manager that gives you peak Windows experience, Explorer++ is everything you want and more.
It is a free, open-source app packed with features that rival some of the best-paid file managers. It incorporates a fully customizable interface that can be tweaked to your taste.
Also, it is endowed with two panes for browsing. This makes it easy to sort and split your files as you wish. There is also the Onedrive integration that cannot be found in the Windows File Explorer.
With this, you can create a sync to save and manage your files on the cloud platform.
This is another free, open-source file manager with impressive features that complement Windows 11 perfectly.
It has a neat, user-friendly interface that is easy to navigate. One feature that quickly sets it apart from the Windows 11 File Explorer is its access to cloud storage, such as Google Drive and OneDrive.
With this feature, you can easily access your files from this cloud storage without a browser.
Files also give you access to your PC’s partitions. This software provides just about everything you need for file management and organization.
Directory Opus is a paid app similar to Total Commander in design, albeit with a more modern feel. This excellent third-party app can completely replace the Windows 11 File Explorer.
It does everything Explorer does and more. Interestingly, it can also be launched with the Windows + E hotkeys used for File Explorer.
What’s more, Directory Opus features folder tabs that make it easy to keep multiple folders open at a time. Its search feature is as fast as they come, allowing deep searches in seconds.
Lastly, it has an easily configurable interface that allows you to tweak it to suit your preferences.
Q-dir is a free file manager especially suitable for users who frequently transfer files. It is unique because it displays four file management panes by default.
This app uses the native Windows 11 icons for Download, Desktop, Desktop directories to give users a more familiar feel.
It is lightweight and has a portable version that can be installed. The Q-dir file manager allows you to organize your files in a pattern of your choice.
Also, you can customize the folder tab to suit your multitasking needs. Lastly, it makes file transfer easy thanks to its Quad (Q in Q-dir) panes.
RX Explorer is more than just a file manager. It is a paid all-rounder app that packs in excellent features and capabilities.
RX Explorer allows you to create file tabs when working on multiple files for easy access. It also allows tabbed browsing for top-level file organization.
It has a fully customizable interface. You can switch the navigation menu to the left and customize fonts, colors, transitions, animations, and backgrounds, among other things.
Lastly, it has powerful in-app tools like video and image editors and encryption features.
Does installing third-party software affect my PC?
No, installing third-party software from this list won’t affect your PC in any way. To be on the safe side, you might want to use your antivirus software to scan third-party software and ensure that it’s not malicious.
File Explorer ticks just a few of those boxes, making this list of the best Windows 11 File Managers all the more important.
Before you leave, you might want to check our guide on the best file manager for Windows 10, for more alternatives.
This list is not arranged in any particular order. Let us know which of the apps you find particularly useful in the comments section and if there is any product you would like us to add.
A distorted or glitchy display can be quite problematic, especially for gamers or those into graphic editing. And most of the time, it’s the video driver issues to be blamed in Windows 11.
The three terms, graphics, display, or video are used interchangeably when it comes to drivers, and they have all got to do with the display adapter on your PC.
So, in case you are facing problems with the display clarity or running into issues with the driver, you know where to head to.
Here are the most effective fixes for video driver issues in Windows 11. Just follow them in the listed sequence and you should have the problem resolved real quick.
How do I fix video driver issues in Windows 11?
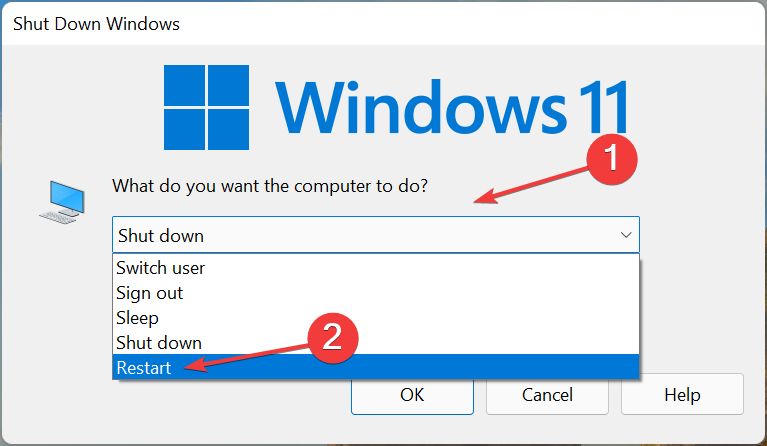
1. Restart the PC
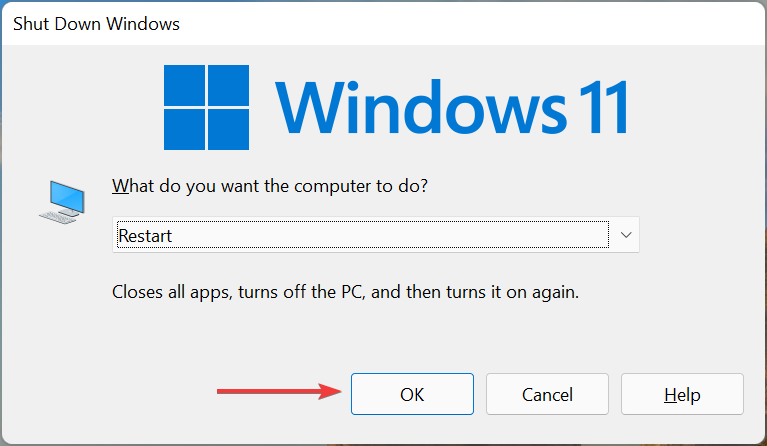
Go to the desktop, press Alt + F4 to launch the Shut Down Windows box, click on the dropdown menu and select Restart.
Next, click on OK.
Whenever troubleshooting an error, you should first restart the computer. In many cases, it’s a trivial bug or a background process behind video driver issues in Windows 11. And, a simple restart should help eliminate that.
2. Update the video driver
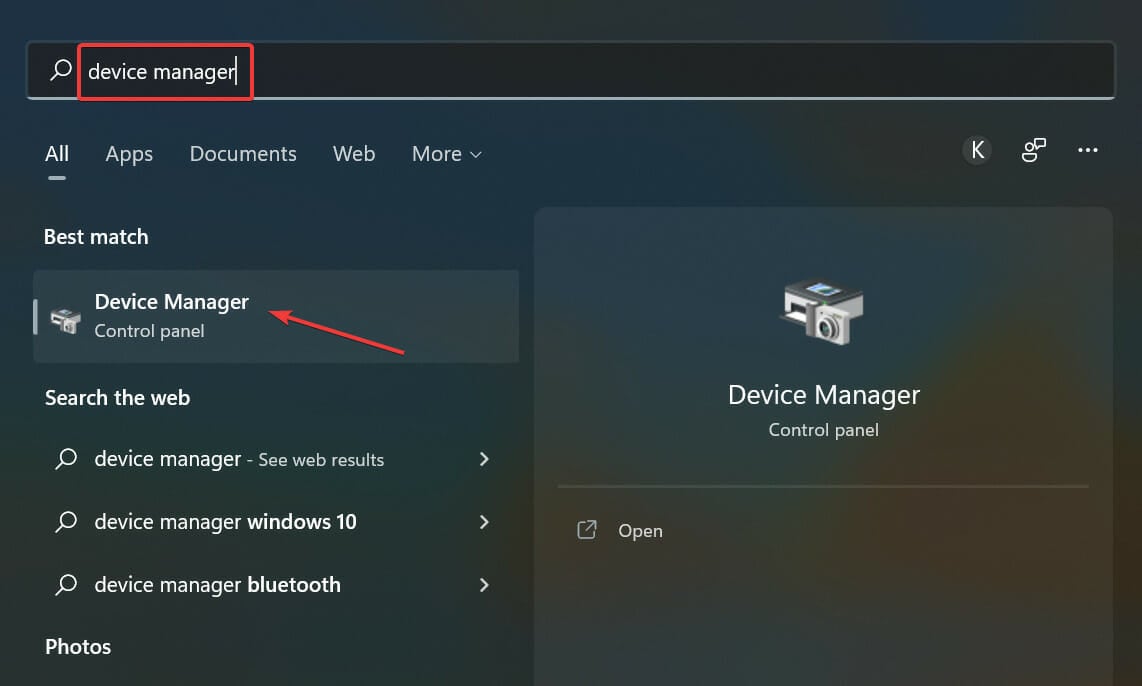
Press Windows + S to launch the Search menu, enter Device Manager in the text field at the top, and click on the relevant search result that appears.
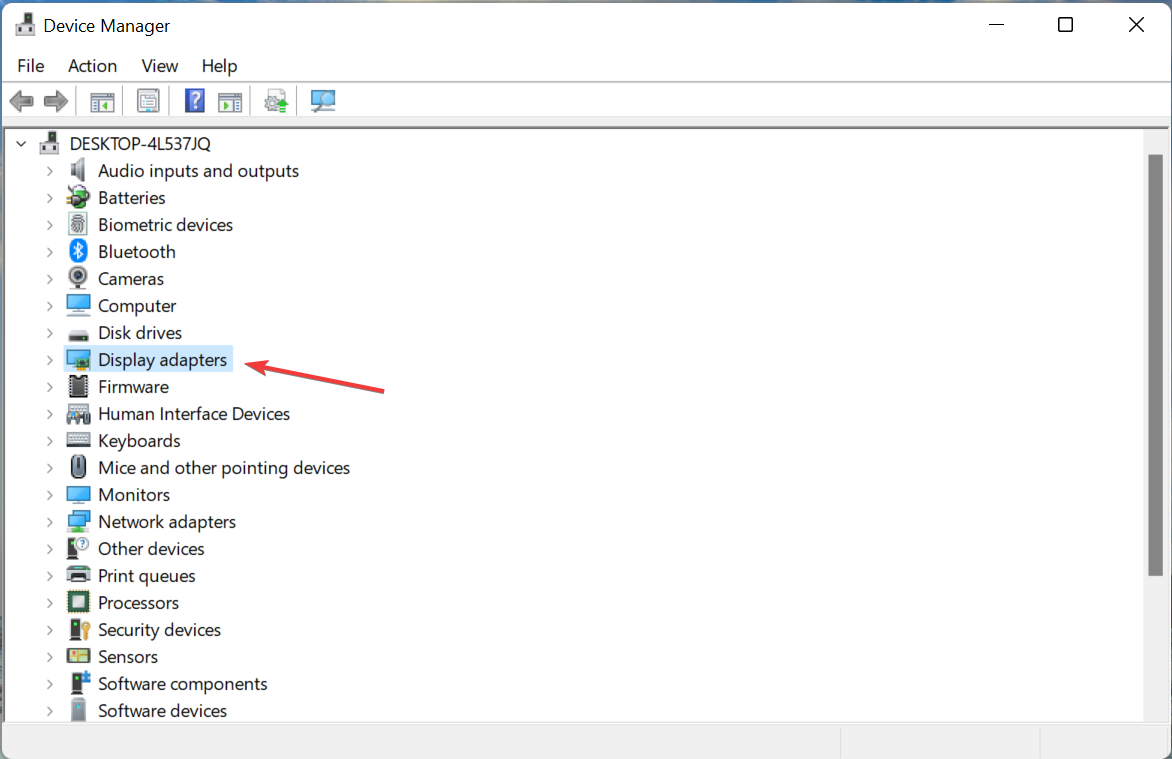
Double-click on the Display adapters entry here to expand and view the devices under it.
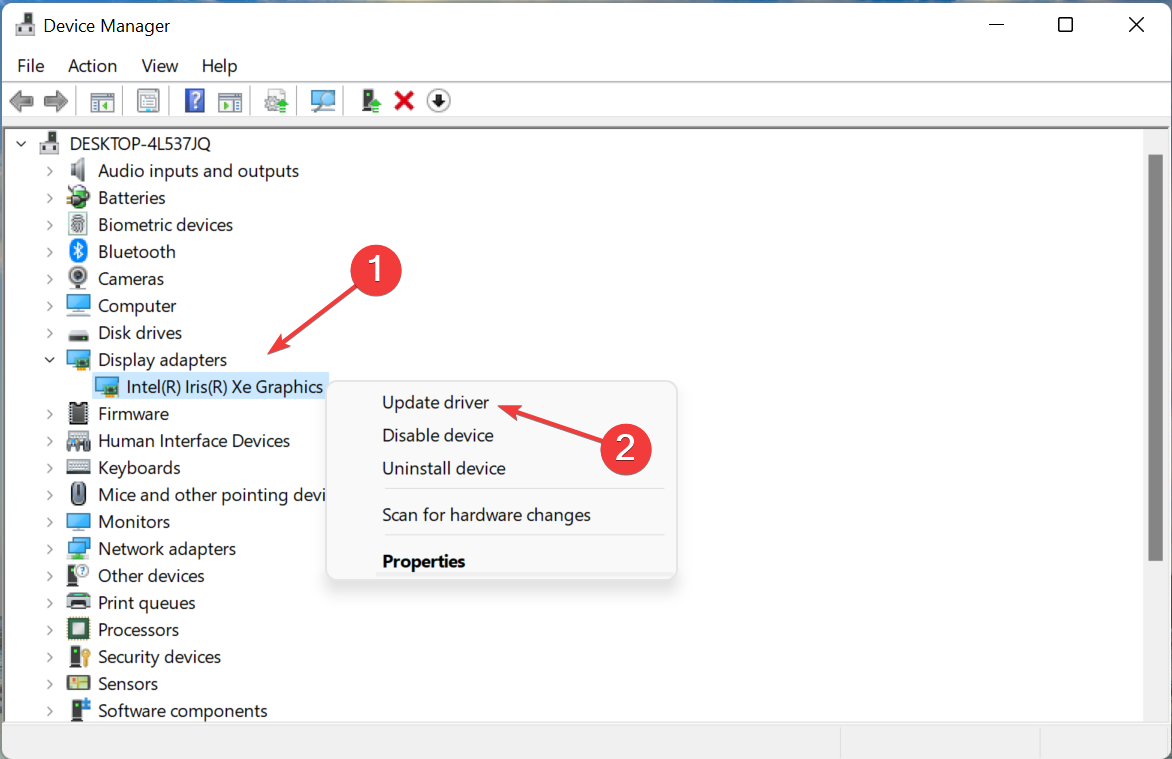
Right-click on the graphics card, and select Update driver from the context menu.
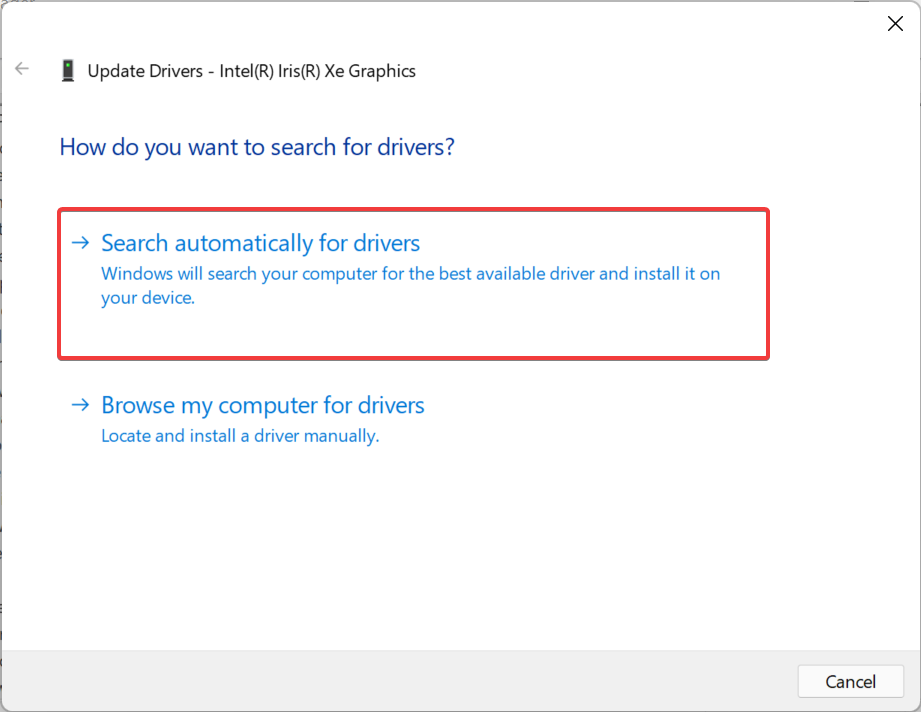
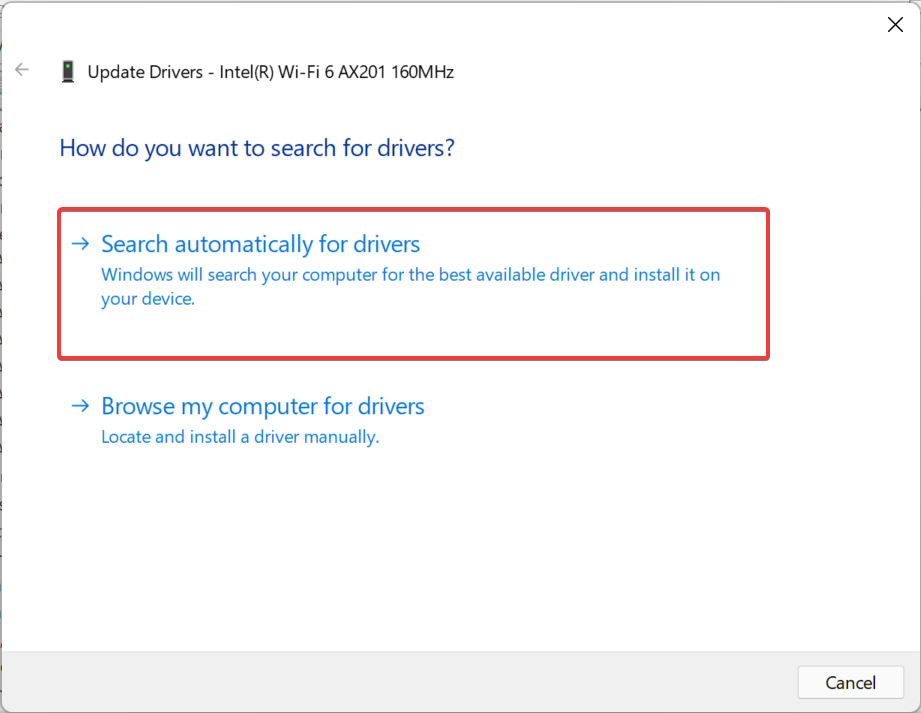
Now, select Search automatically for drivers from the options listed in the Update Drivers window.
Your computer will now scan for the best available video driver on the system and install it.
Another common reason behind issues with the graphics is an outdated video driver in Windows 11. Most manufacturers release regular updates, some through Windows Update while others make it available directly on their official website.
With each update, you get better driver performance, some new features, and patches for previously known bugs.
If you couldn’t update it with the method listed above, try the other ways to update a driver in Windows 11. There are a bunch of them, including manually downloading and installing from the manufacturer’s website.
But, there’s also an easy way out, use a reliable third-party app. We recommend using Outbyte Driver Updater, a dedicated tool that automatically scans the web for newer versions of the drivers on your PC, and installs them, thus keeping them all up-to-date.
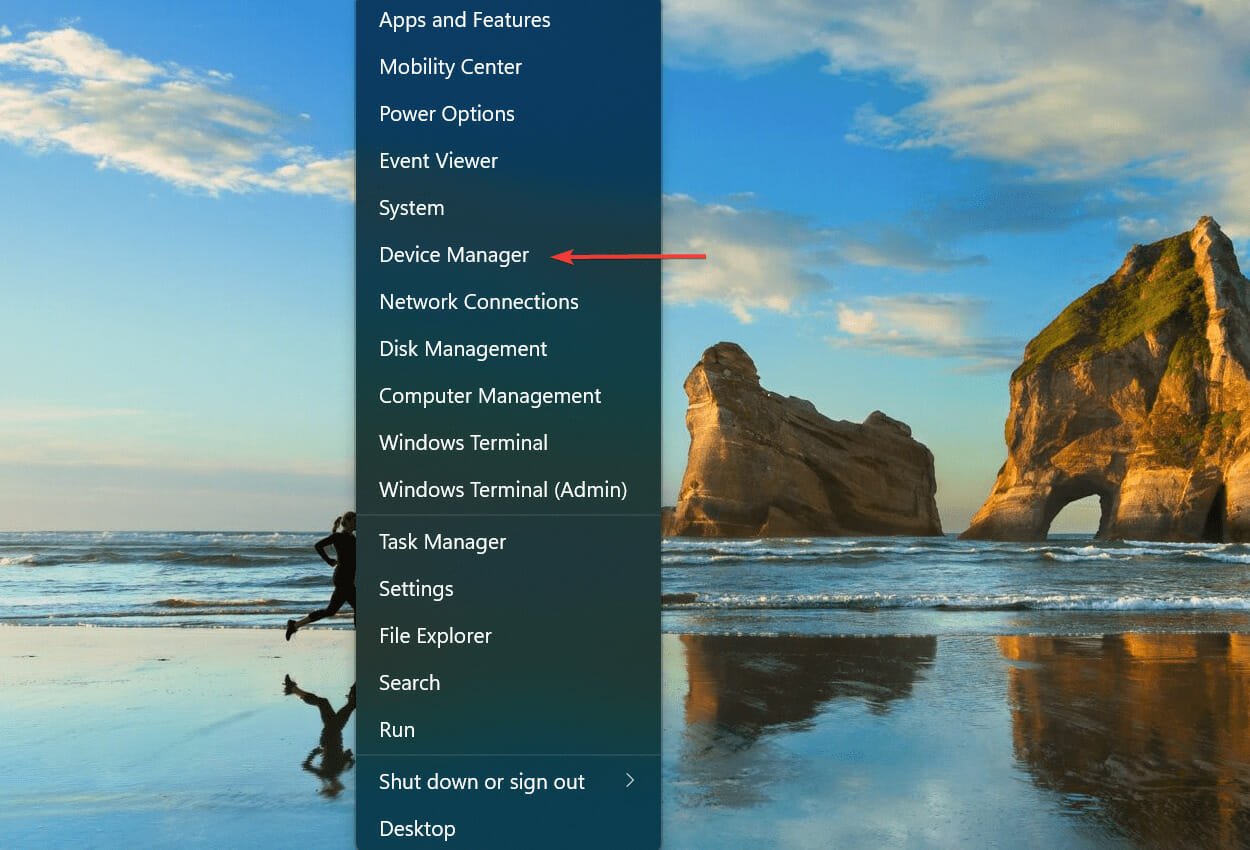
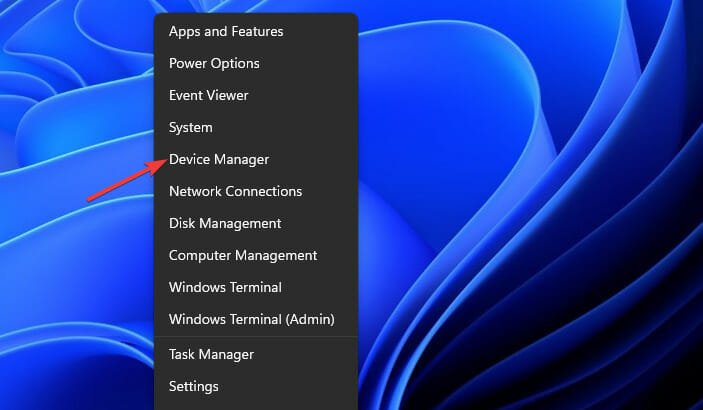
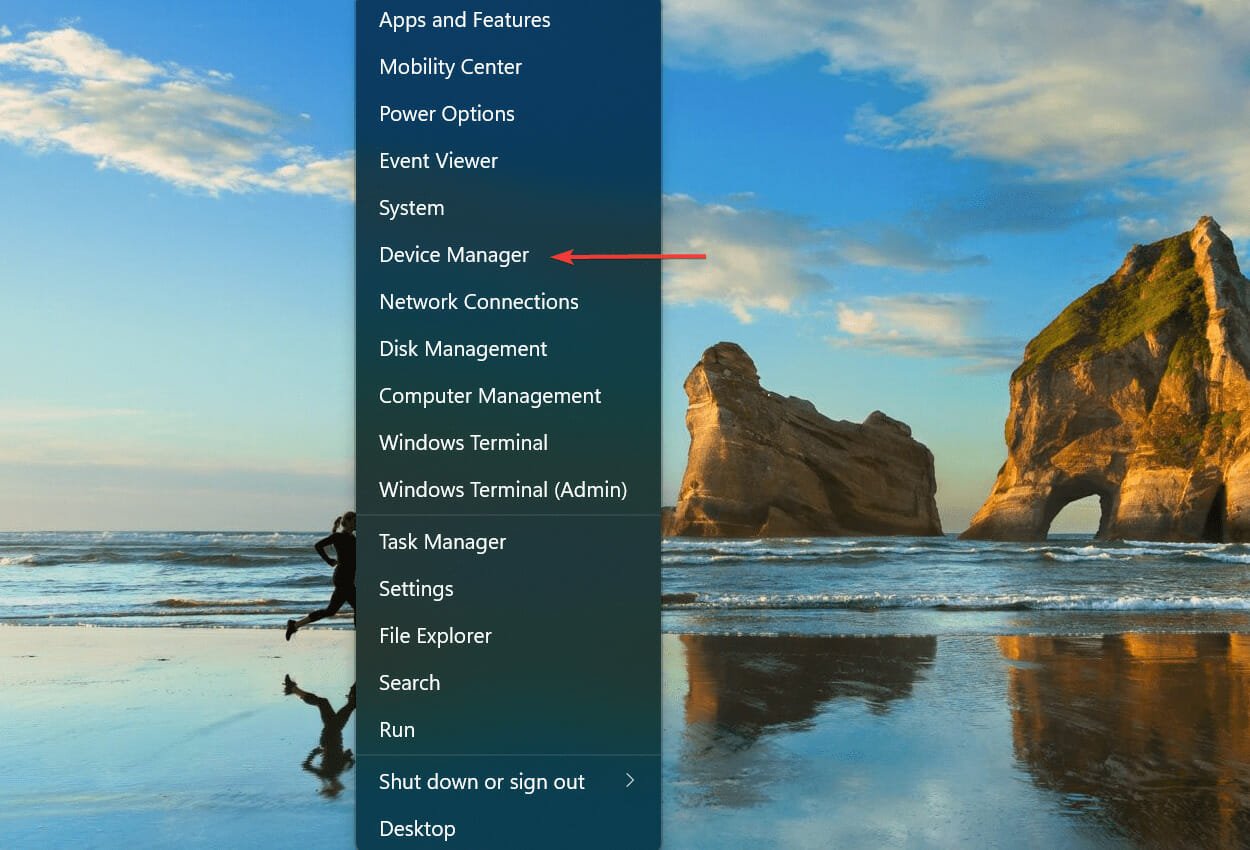
Press Windows + X to launch the Quick Access menu, and select Device Manager from the list of options.
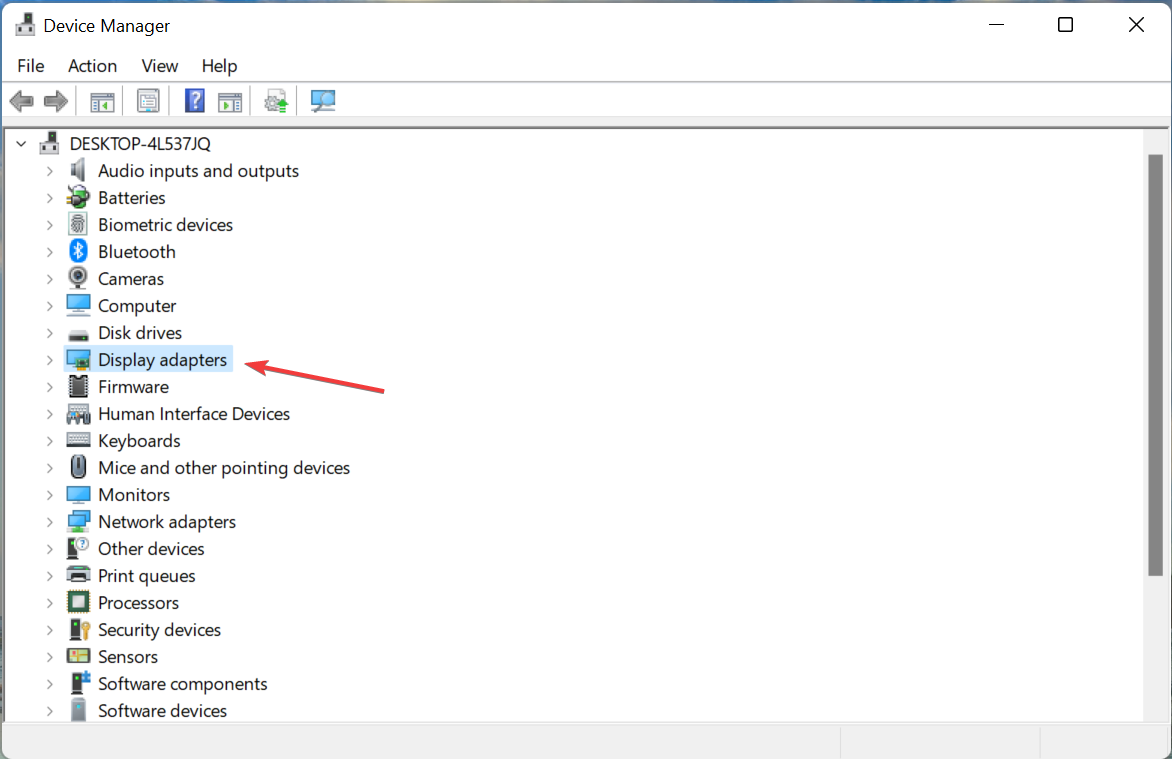
Double-click on the Display adapters entry.
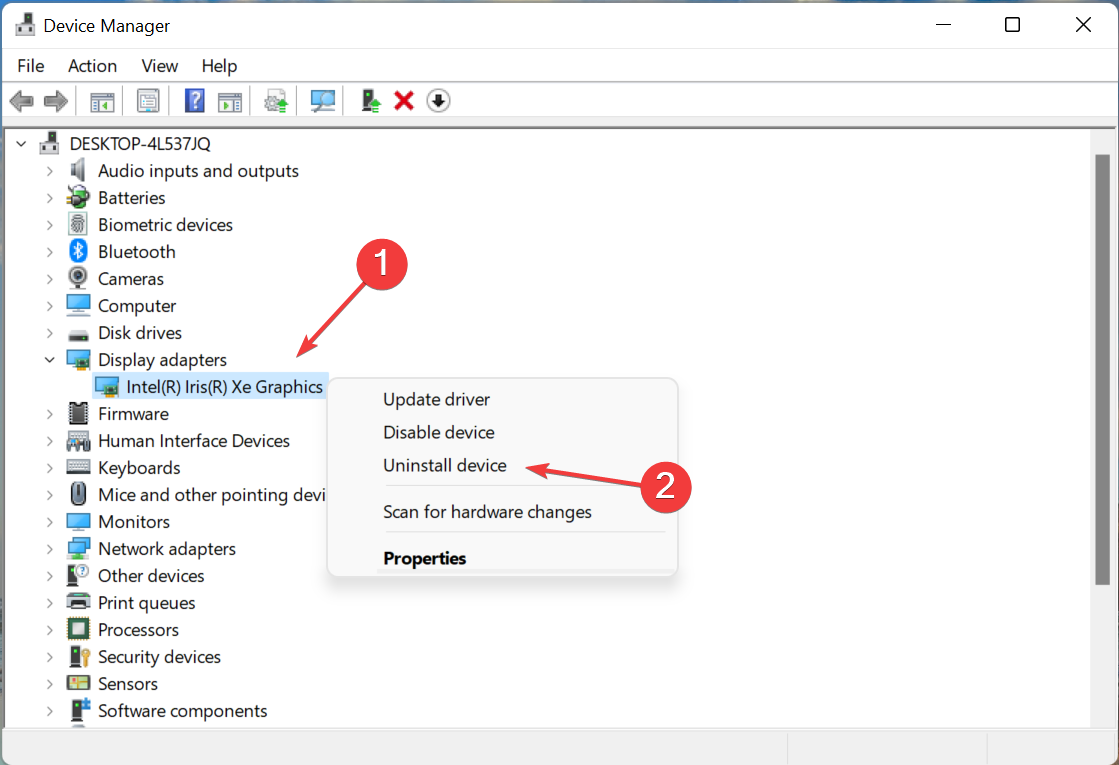
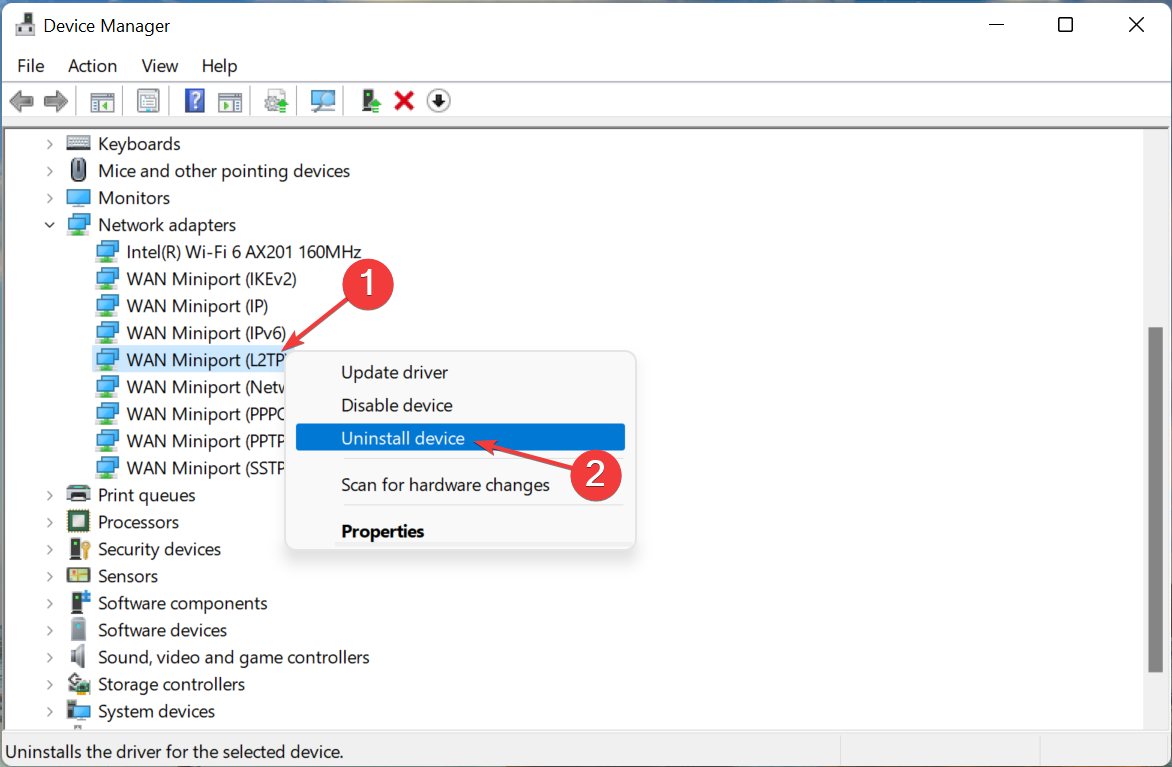
Right-click on the graphics card, and select Uninstall device from the context menu.
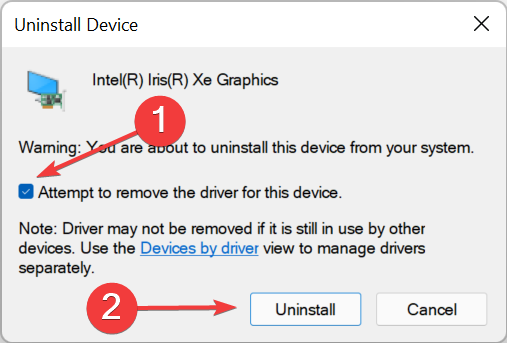
Tick the checkbox for Attempt to remove the driver for this device, and click on Uninstall.
Once done, restart the computer and Windows will automatically install a fresh driver.
If you find a warning sign at the corner of the driver icon in the Device Manager, it denotes that the driver is corrupt, and this could be leading to Windows 11 video driver issues. In this case, reinstalling the driver should fix the problem.
4. Roll back the video driver
Press Windows + R to launch the Run command, enter devmgmt.msc in the text field, and either click OK or hit Enter to launch the Device Manager.
Next, double-click on Display adapters.
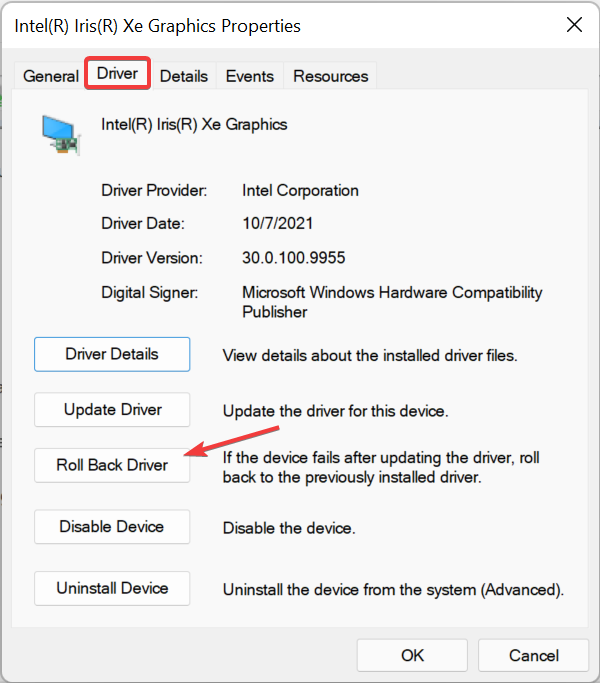
Right-click on the graphics card, and select Properties from the context menu.
Now, go to the Driver tab from the top.
If the Roll Back Driver button is not greyed out, click on it.
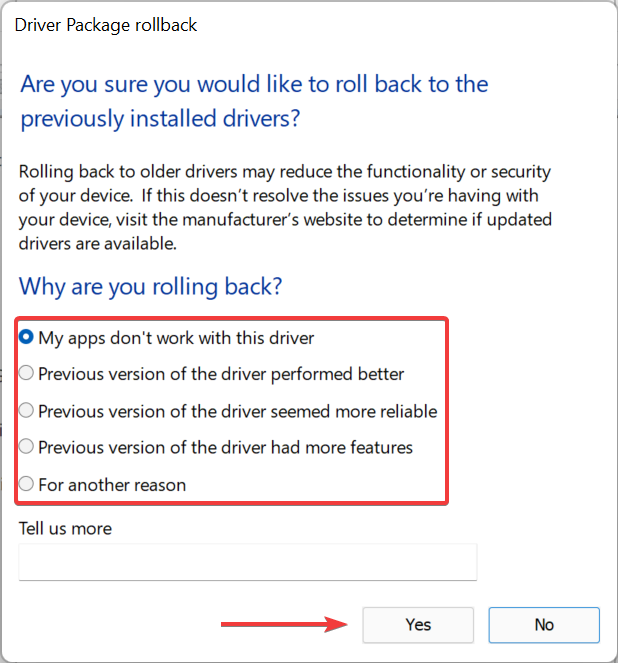
Select a reason from the ones listed here, and then click on Yes at the bottom.
If you started encountering issues with the video driver in Windows 11 after installing an update, it could well be a bug in that. Instead of manually installing the previous version, you can simply roll back the driver and get the one that you had earlier.
Windows generally stores the files for the previous version, in case you start to encounter issues with the one installed and intend to roll back.
If the roll back driver option is greyed out, either it was not updated or the driver files were not kept by Windows 11, which is when you will have to manually install the graphics driver.
These are all the ways you can fix the Windows 11 video driver issues and get the best display output from the installed graphics card.
Also, several users have reported facing the outdated driver error in Windows 11, which, as the name suggests, is encountered when the installed drivers are not updated in a while. Check the linked guide for more on that.
Tell us which fix worked and the graphics card installed on your computer, in the comments section below.
Microsoft Photos is a simplistic and intuitive photo viewer designed to be used as a Windows 10 default photo viewer app.
However, some users have been reporting on Microsoft’s forums that Photo Viewer in Windows 10 is rotating their raw photos.
[…] lately any vertical photos will flip sideways automatically. When I try to rotate it, I now get “That didn’t work, RAW files don’t rotate. Select edit to rotate and save it as a different file type.” This has never happened before. I work with multiple photos and I really don’t want to have to change.
The problem seems quite common, as people with a wide variety of Windows 10 versions and cameras are having similar issues. More so, it would seem that uninstalling and reinstalling the app did not solve the problem.
How do I fix the rotating RAW photos issue?
1. Update Photo Viewer to the latest version
Store apps don’t update themselves by default unless you open the Microsoft Store. Once you do that, they will start automatically updating. However, there are cases when you have to force a store app to update manually.
You can do this by following these steps:
Press Windows
Type in Microsoft Store
Press the 3 dots in the upper-right corner of the window, next to Search
Select Downloads and updates from the dropdown menu
A list of all of the Store apps you have installed will appear, and when it does, press Get updates
2. Update Windows 10 to the latest version
Sometimes an old Windows 10 version can come in conflict with a newer version of Photo Viewer.
Third-party photo viewer software may be the quickest fix to this issue. As a bonus, most alternative solutions have more photo library management features than Microsoft Photos.
There are multiple options available. You can get a plain and simple photo viewer, or you can get specialized software built for handling any type of file, such as FileViewer Plus.
FileViewer Plus is compatible with over 400 format files, including RAW images.
You will be able not only to open and rotate the images but also take advantage of FileViewer Plus’s editing features, such as resizing, cropping, adjusting brightness and colors, plus many more.
FileViewer Plus
Never worry about not being able to open any files with this powerful software.
Select the Windows Store apps option, and choose Run the troubleshooter.
Follow further on-screen instructions to finish the process.
Reboot your computer.
The finest feature of Windows is that it includes a troubleshooter for almost every tool, even programs acquired from the Microsoft Store.
So, if the Photos app or any other program isn’t operating correctly, you may try running the app troubleshooter on Windows.
5. Make sure Photo Viewer supports the file format you are trying to open
You can find a file’s format either through the name (if it has an extension) or by right-clicking it and looking at the file properties.
Once you see the file’s format, head to Photo Viewer’s download page or look into the help documentation to see if that format is supported.
Although there is no save option in Windows Photo Viewer, when you quit the program after rotating an image, you will see the Saving message show briefly on the app.
Normally, Windows Photo Viewer encounters issues only when there is a problem with the file being viewed. It’s primarily a straightforward program that works well.
The only exception is if the program cannot read EXIF data, which contains information about the orientation of the file. In that scenario, switching to a different app is an excellent option.
Professional image editors like Adobe Photoshop are excellent for opening RAW photos, as well as fixing any issues related to them. More troubleshooting guides can be found on our Windows 10 Fix page as well.
By following these steps, you should no longer have issues with your PC rotating RAW photos. Let us know which solution helped you by leaving us a message in the comments section below.
AMD offers drivers for its GPUs and CPUs through its proprietary software. Using the software, you can update existing drivers to install updates or set up new hardware on a new computer.
However, what if you want to find out how to install the Radeon driver without Adrenalin software? You may require to install the Radeon driver this way if you determine the utility to be causing system instability or crashes.
Fortunately, AMD and Windows make it easy and offer multiple ways to update the driver. In this article, we show you how to install AMD drivers without Adrenalin software on your PC.
Keep in mind that regular methods won’t work, so to update AMD Radeon drivers, you’ll need to use a different approach.
To learn how to do it, you might want to visit our guide and learn how to install older AMD drivers, or you can just follow the solutions listed in this guide.
How do I install the Radeon driver without software?
1. Install drivers with Device Manager
Make sure to close any AMD programs that are running. Use the Task Manager to end the process.
Next, go to the AMD download centre and download the ADM driver package you want to install.
Next, download the AMD clean-up tool. Double-click on the AMDCleanupUtility.exe file to run the tool. When the Safe Mode prompt appears, click Yes. Wait for the computer to boot into Safe Mode.
In Safe Mode, click OK to remove AMD drivers and applications from your computer. This will remove all the AMD drivers, including the graphics card, audio, and Radeon software.
Follow on-screen instructions to reboot your computer.
Install new drivers
Open Device Manager. To do this, press the Windows key + R to open Run.
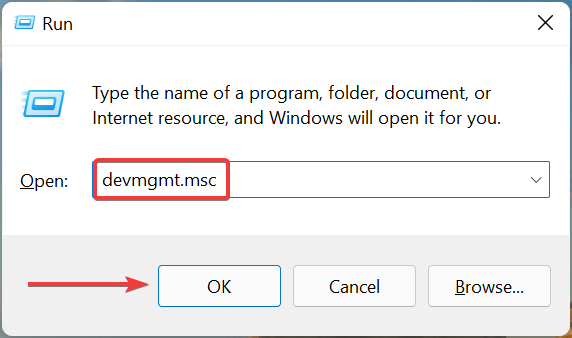
Type devmgmt.msc and click OK.
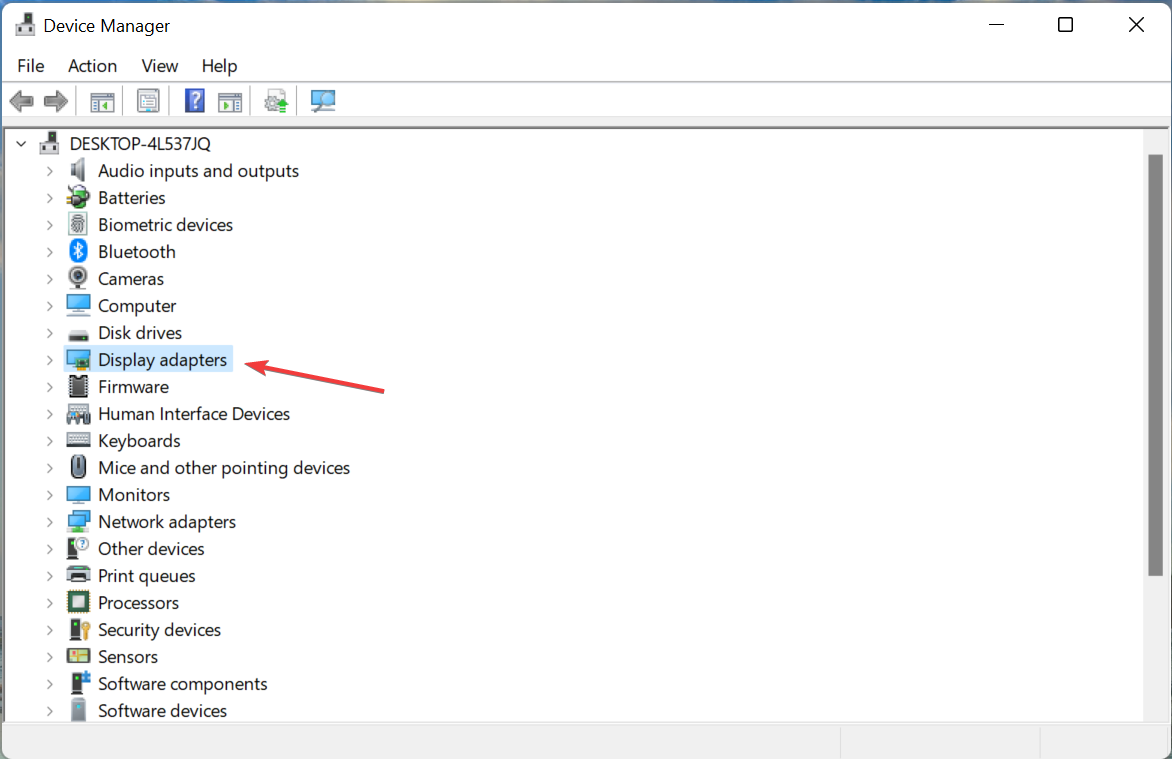
In Device Manager, expand the Display Adapters section.
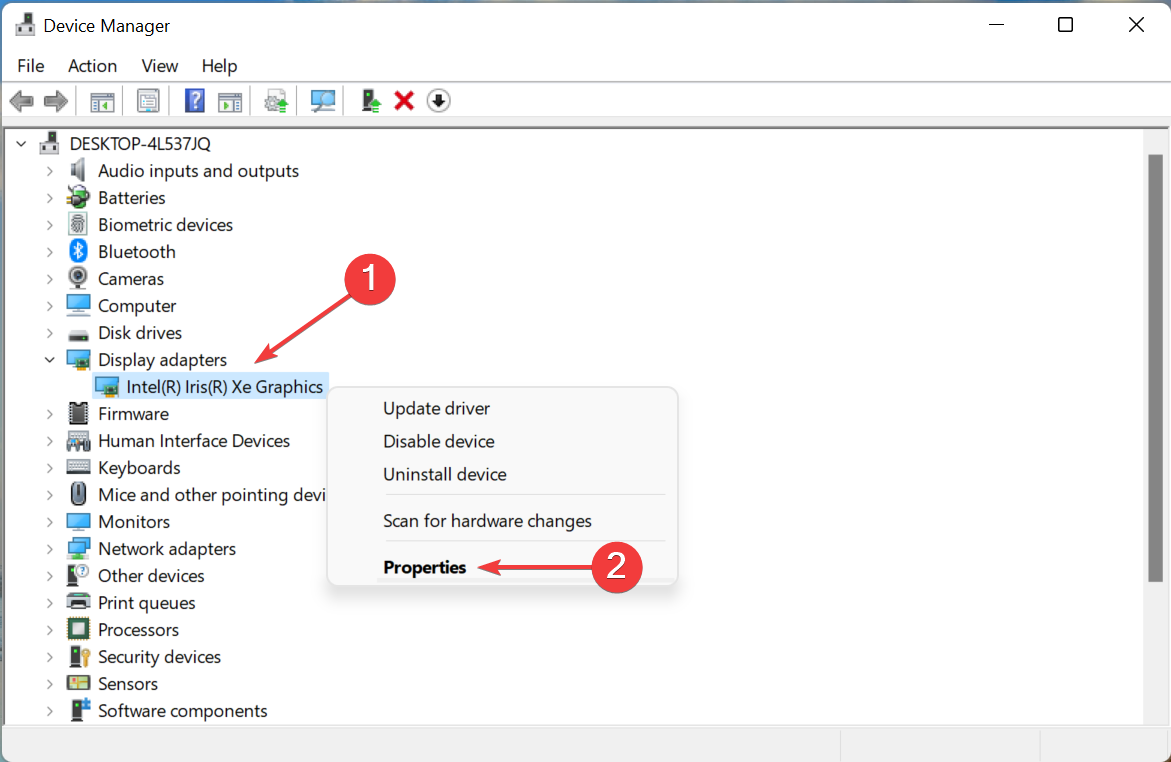
Right-click on your AMD GPU and choose Update Driver.
Choose Browser my computer for driver software.
Next, click on Let me pick from a list of available drivers on my computer.
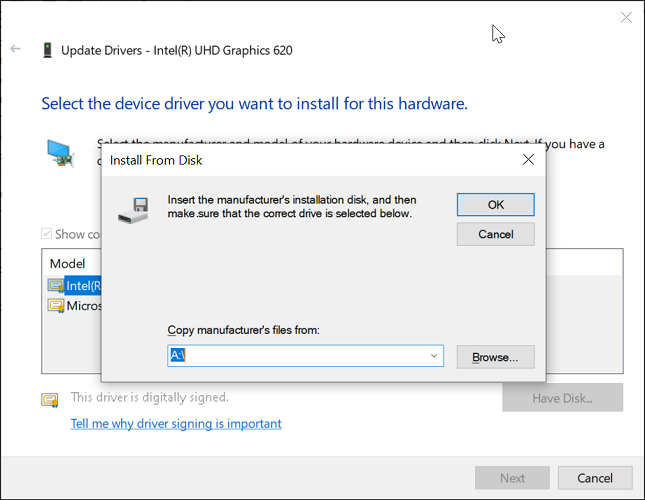
Click the Have Disk button.
Navigate to the following location depending on where you have stored the download driver package. C:AMDWin10-64Bit-Radeon-Software-Adrenalin-XXXXXPackagesDriversDisplayWT6A_INF
Select the C0XXXXXX.inf file. XXX is the file version, so it could change depending on when you update the driver.
Click OK, choose a card from the list, then click Next.
Windows will now install the driver from the selected package without installing the Radeon software.
If this method did not work for you or if you want to install some drives from the Adrenalin 2020/2021, you can do it from the Device Manager.
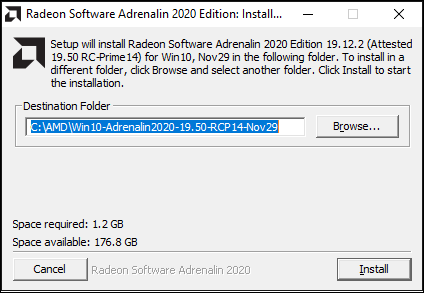
Run the Adrenalin package and copy the installation path that is shown on the screen. Save the file path in a notepad file just in case you clear your clipboard.
Click on Install. This will not install the tool yet but will begin the extraction process.
Once extraction is complete, an Adrenalin screen will appear. Click the Cancel button on the left corner to abort the installation. Click Yes to confirm the action.
Next, open Device Manager and expand the Display adapters section.
Right-click Microsoft Basic Display Adapter and choose Update Driver.
Click on Browser for drivers on your computer.
In the location field, paste the copied location from the Adrenalin installation setup.
Click Next and proceed with the on-screen instructions to complete the installation.
Up next, launch any hardware information tool to check if you have the latest version of the AMD Radeon drivers installed.
You can have many reasons for not installing the AMD Radeon software to install the drivers. The additional tools such as benchmarking, gaming, and social media tools that come with the Radeon software could be useless to some users.
While you will not have access to any of the Radeon software tools, you can install the AMD Radeon driver without software by following the steps in this article.
For simplicity, sometimes it’s better to use specialized software such as Outbyte Driver Updater. Doing so will make the whole process faster, and fully automated, so you might want to try it out.
Let us know if you managed to do so in the comments area below.
Looking for the best calculator for Windows 11 PCs? Whether you’re after scientific functions, unit conversions, or the old classic calculator for Windows 11, there’s a perfect tool for you. Below are the top free calculator apps you can download and use on your Windows 11 PC.
What are some of the best Windows 11 calculator apps?
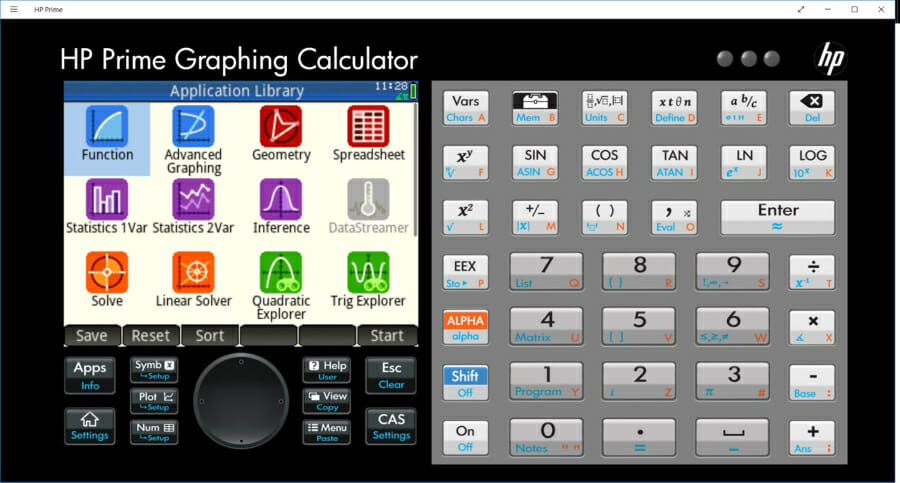
The HP Prime Pro is an advanced calculator that comes with an extensive range of functions. It is best suited for professionals and even students who wish to solve problems.
The calculator can be used to perform various graphical calculations, along with the option to trace or build tables of points.
There are other features such as pinch-to-zoom features to view graphs clearly, offering units and base conversions, a fully-featured programming language, and more.
It also offers easy toggles to change between special values and allows users to solve single equations and systems of equations.
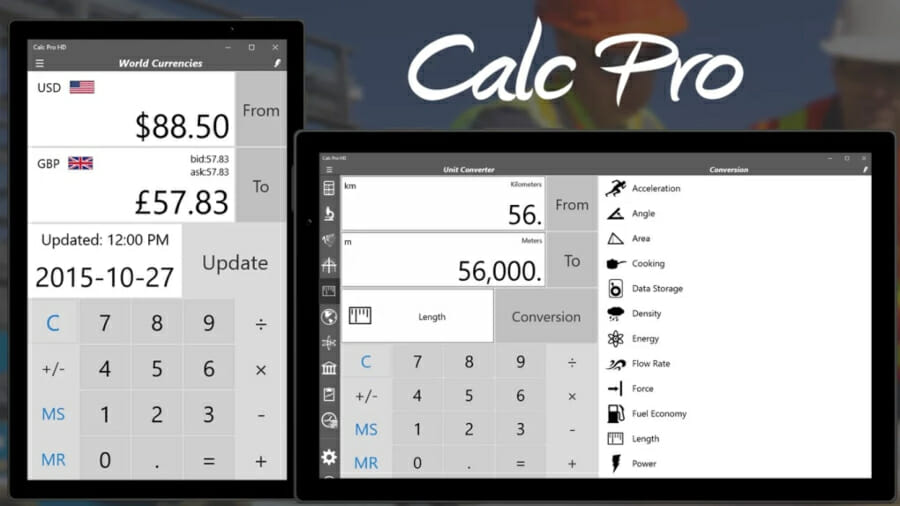
Calc Pro HD Free comes with all the basic features of a calculator along with some additional features.
One of the best things about Calc Pro HD Free is that it lets you customize the calculator. You can do that by simply purchasing only those calculators which you need.
There are a total of eight calculators to choose from. You can use this calculator to convert between eight different number bases. It offers advanced graphing functions and can perform 3,000 conversions in 19 categories as well.
Moreover, there is a world currency converter that can convert 150+ currencies, and it is updated on a daily basis.
You can tweak multiple in-app settings such as button style, button color, change sounds, change language, and much more.
Here are some of the key features of the Calc Pro HD Free calculator:
Offers up to 8 calculators to purchase.
The interface is clean.
Has currency, units, constants, statistics, and many more calculators.
The free version includes the standard and scientific calculators.
Calc Pro HD Free
Offer multiple calculators with the option to convert 150+ currencies.
If you are looking for an advanced calculator that can solve differentiation, integration, and simplification queries, then you can check out Calculator+.
You can use this calculator to plot graphs, complex numbers, matrices, and more. It also offers the option to solve calculations in bin, oct, and hex modes.
As far as the interface is concerned, you can switch between light and dark modes and match it with the theme of your Windows 11 PC.
It is free to use, and all of your past calculations can be viewed under the History section. Overall, a feature-packed mathematical calculation tool.
Here are some of the best features of Calculator+:
Ability to solve calculations related to mathematical, trigonometrical, hyperbolic, and special functions.
Supports light and dark themes.
Use it to solve differentiation, integration, and simplification problems.
Calculator² or Calculator Square is another alternative to the Windows 11 calculator app that can be used by anyone, including professionals and students.
It comes with a currency converter that can convert over 150 currencies. Moreover, there is a unit converter as well that can handle the conversion of 200+ units.
Calculator² includes multiple calculators, including a scientific calculator, a programmer calculator, a financial calculator, a unit and currency converter, along with the basic calculator.
In order to unlock the financial calculator and currency converter, you need to make an in-app purchase.
Some of the best features of Calculator² are:
Comes with a scientific, programmer, and financial calculator.
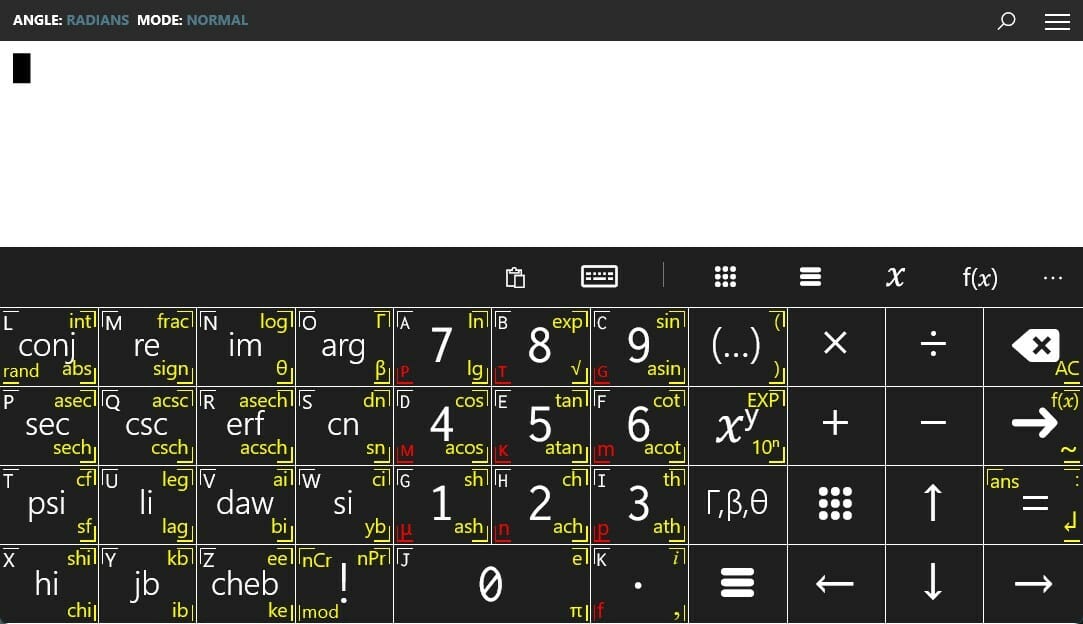
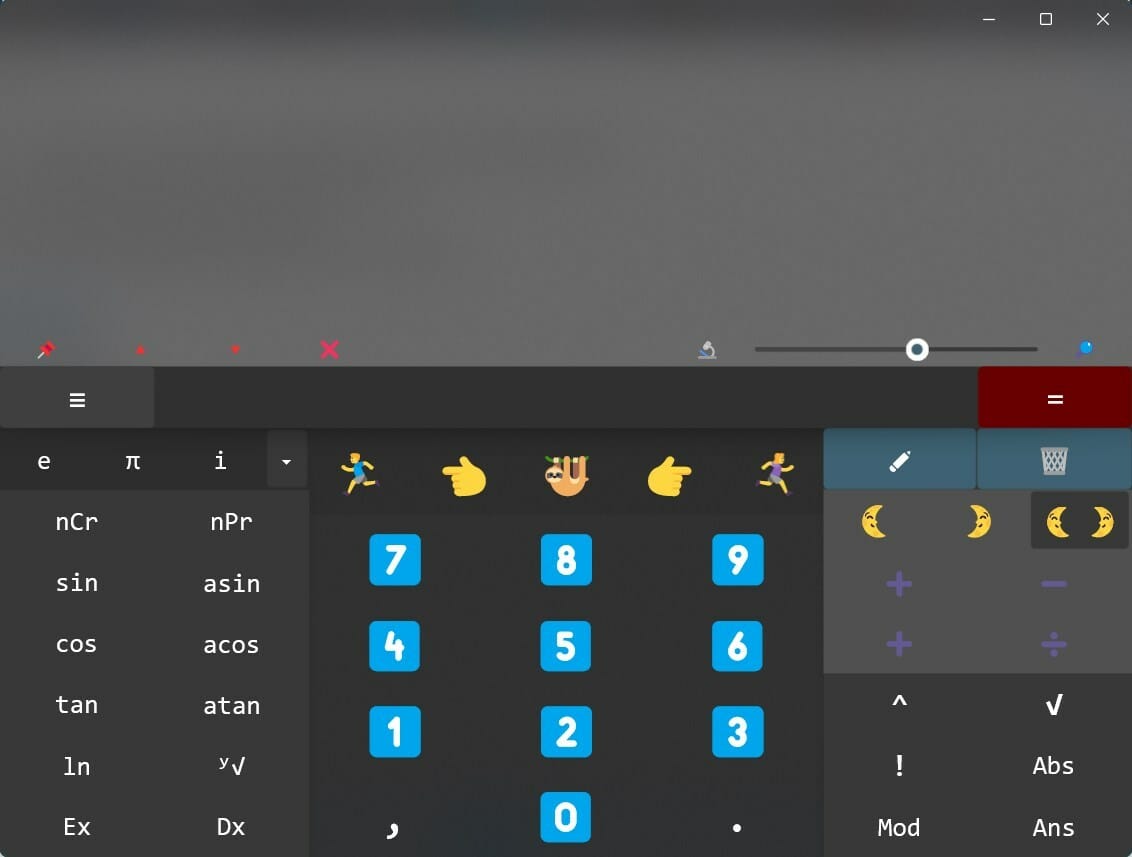
Naturplay is a free calculator that can not only handle all the general calculations but can also solve formula-embedded expressions as well.
It lets you do step-by-step calculations and write line by line until the answer is reached. Moreover, in order to input powerful functions, you do not need to press the Shift button and enter them.
The integrated panel itself contains all the functions, and matrix, statistics, and complex number operations can also be implemented using this panel. The emoji interface is pretty fun to use as it depicts certain actions with emojis.
The Naturplay calculator also negates the need to use the equal key. Other features include the option to save results as pictures, showing your last calculation as a live tile, integrated Cortana command, and more.
Check out the best features of the Naturplay calculator:
Option to zoom into your complex calculations.
Store results as images.
Does not require you to press the Equals key to generate results.
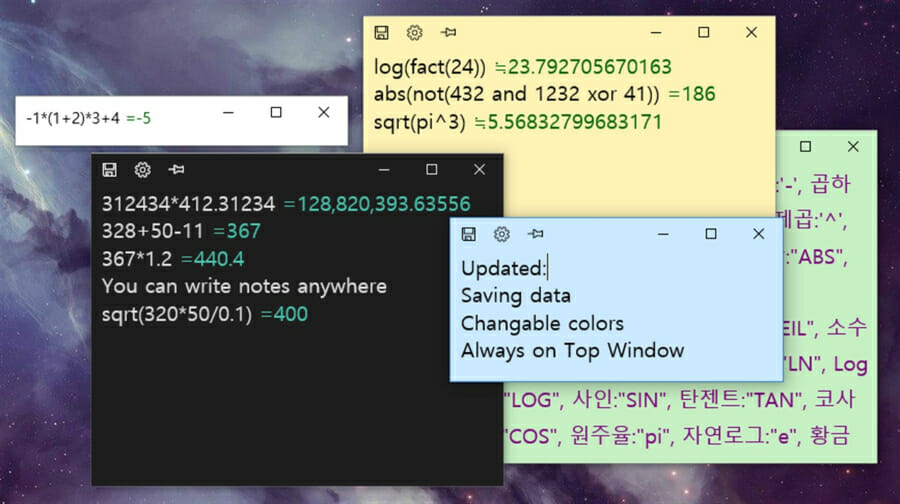
A different calculator that brings together the option to type the entire expression that you want to solve directly from your keyboard.
The window size is pretty small since there is no Numpad. Moreover, you can also write notes while carrying out calculations, which makes it an awesome option to take notes while calculating.
The Sticky Calculator app is free to download. The supported features include Plus, Minus/Negative, Multiplication, Division, Modulus, Exponent, Root, Parenthesis, etc. functions.
Check out some of the best features of Sticky Calculator:
If the calculator is missing or disabled, you can enable the Calculator in Windows 11 through these steps:
Press Windows + I to open Settings.
Go to Apps > Installed Apps.
Search for Calculator.
If missing, click Optional Features > Add a Feature.
Search for “Windows Calculator” and install it.
How to use a keyboard shortcut to open Windows 11 Calculator?
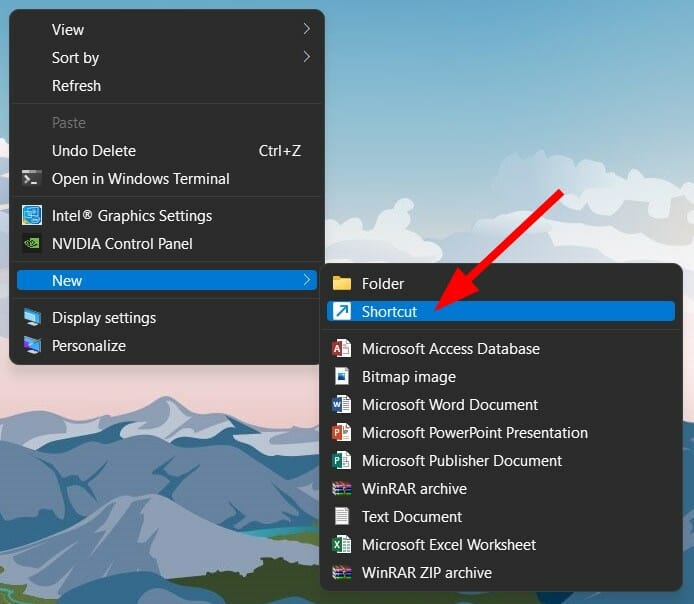
Right-click on the blank space on your desktop.
Select New > Shortcut.
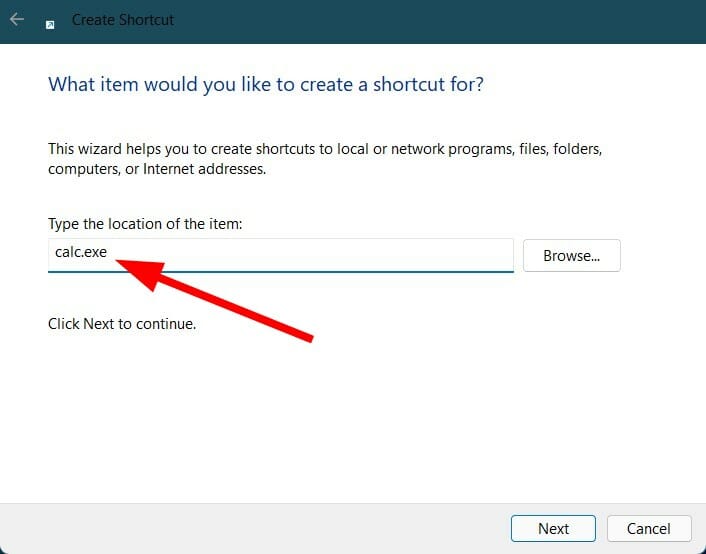
In the text field, type calc.exe and click the Next button.
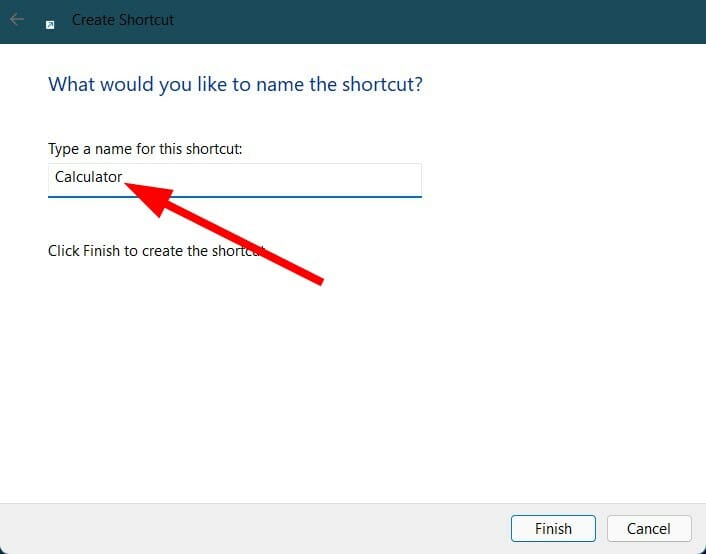
Name the shortcut as Calculator and hit the Finish button.
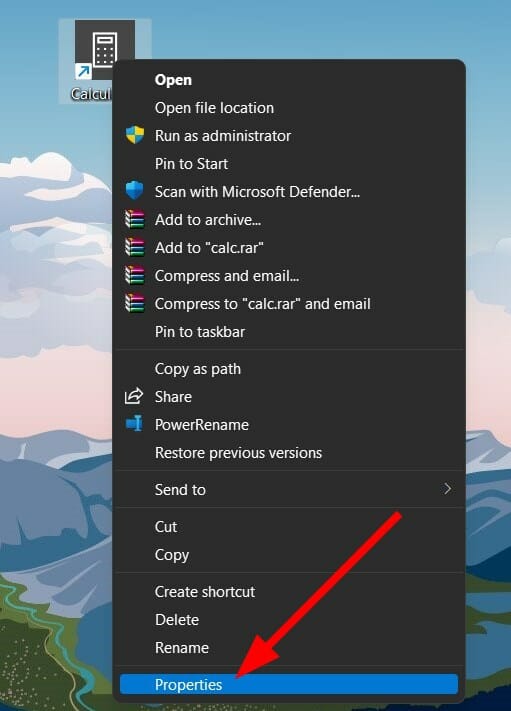
Now, right-click on the shortcut you created and select Properties.
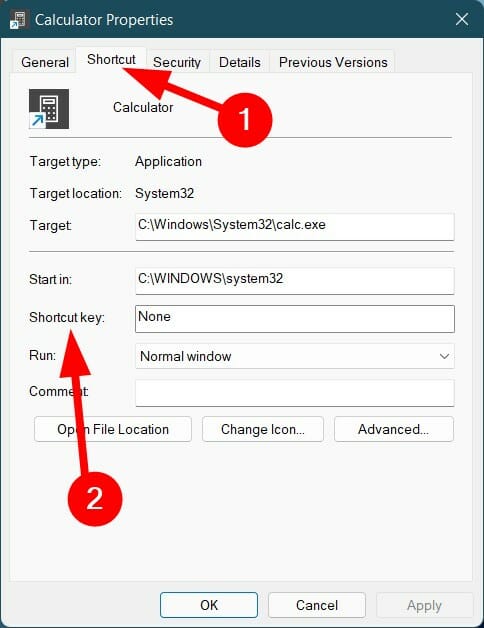
Switch to the Shortcut tab.
Click the Shortcut key field.
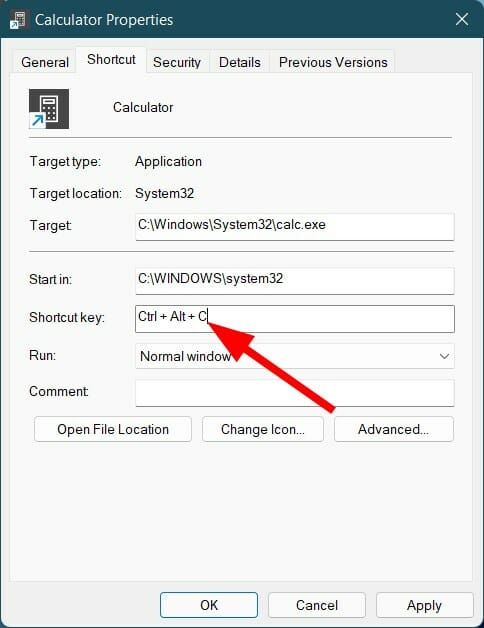
Type in the shortcut key you wish to assign to open the Calculator app.
NOTE
Do note that Windows will automatically add Ctrl + Alt to the selected shortcut. So, for example, if you choose C as the shortcut key, then Windows 11 will make the keyboard shortcut as Ctrl + Alt + C.
Once you are happy with the keyboard shortcut, simply hit the Apply button and OK button to save the changes.
From now on, pressing the Ctrl + Alt + C buttons on your keyboard will launch the Windows 11 Calculator app.
If you are in a profession that requires calculations to be at your fingertips, then you should consider checking out the list of calculators above.
What’s new in the Windows 11 calculator app?
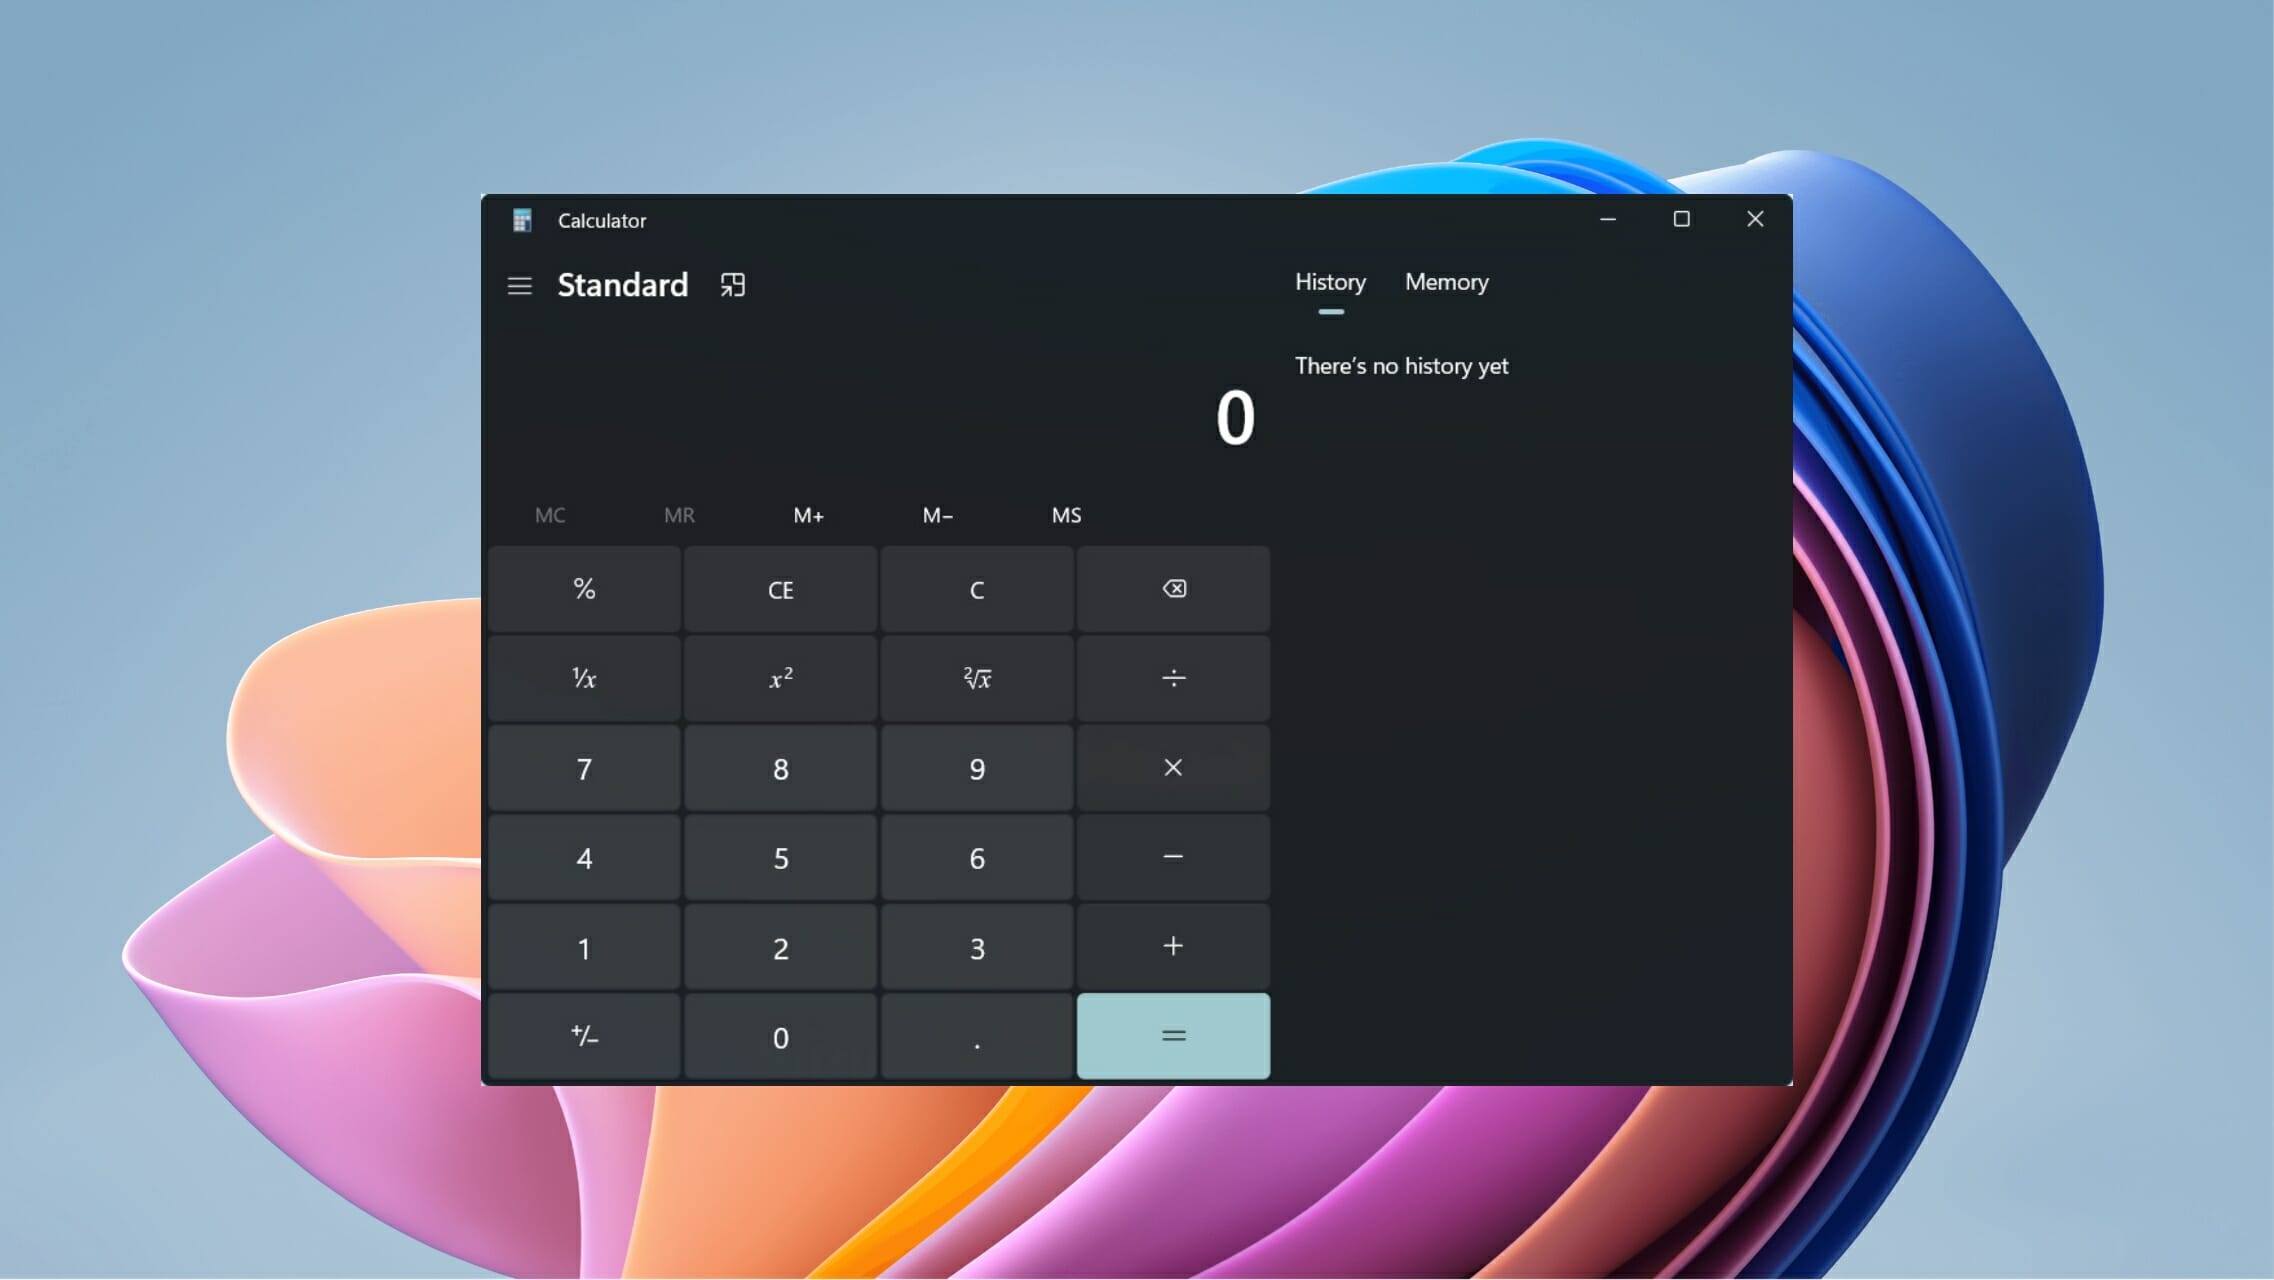
When Microsoft released the preview build of the Windows 11 OS, most details about the new calculator app were out.
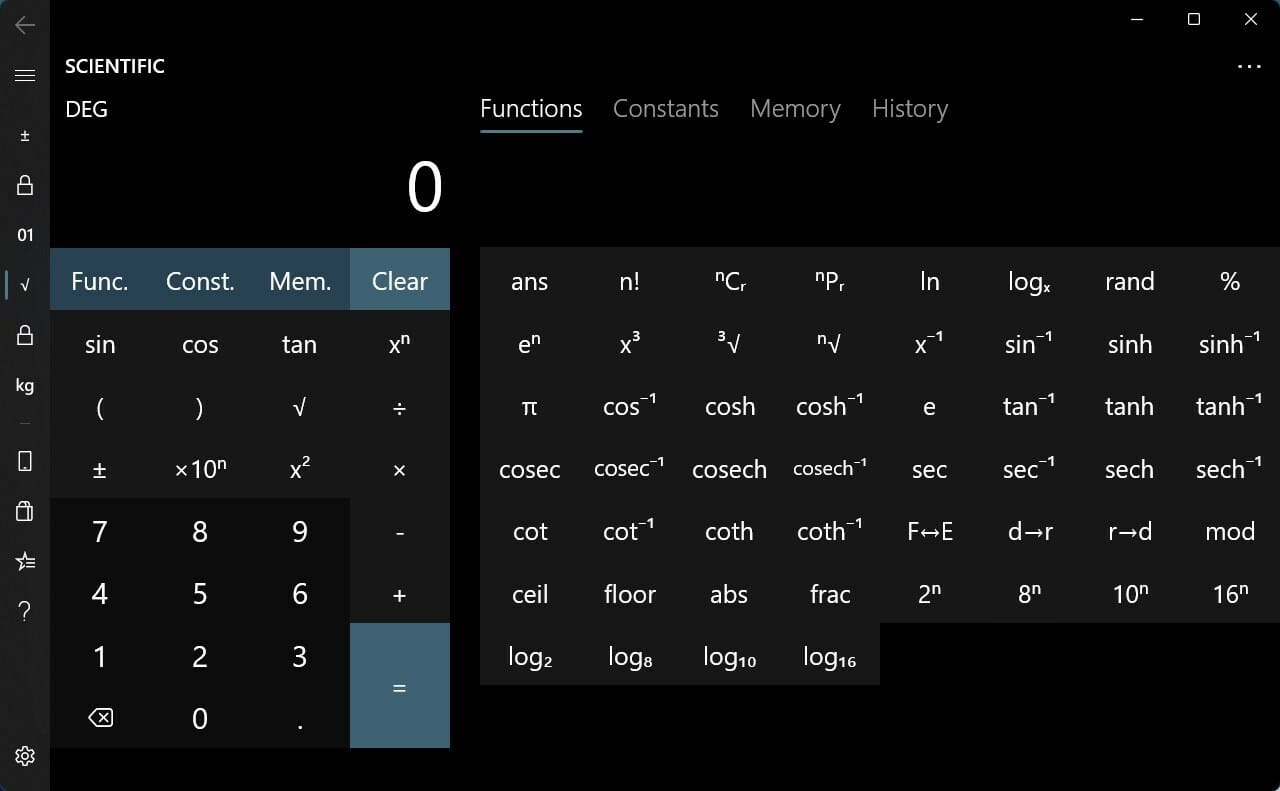
Speaking of features, the new calculator app looks pretty powerful. Notably, it gets the Windows 11 theme treatment, which makes it look modern and appealing to use.
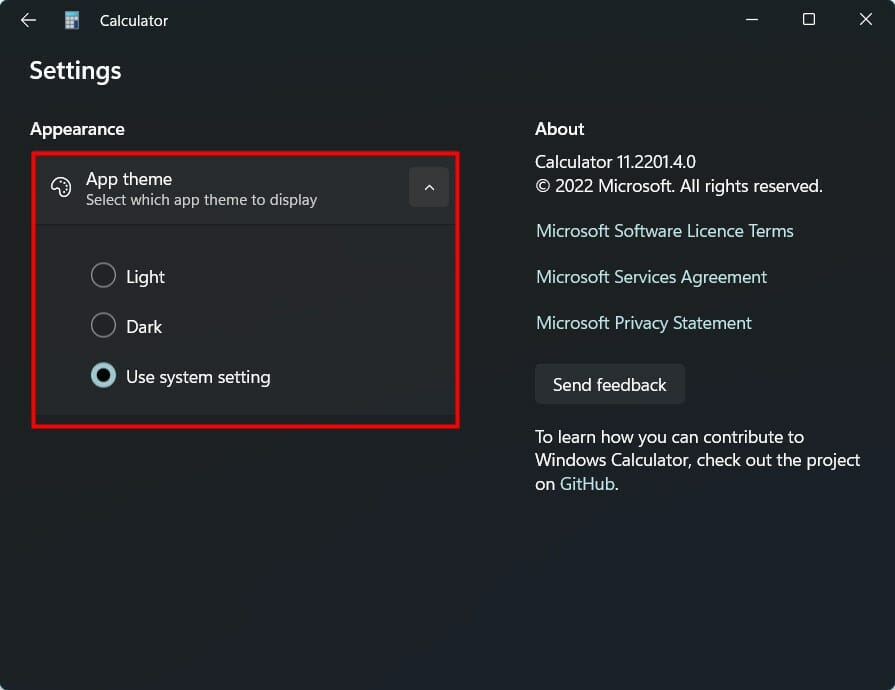
Moreover, it also supports Microsoft’s app theme settings, allowing you to set light or dark themes or use the system settings to automatically detect the mode.
Additionally, the Windows 11 calculator features a standard calculator, along with a feature-packed scientific calculator as well.
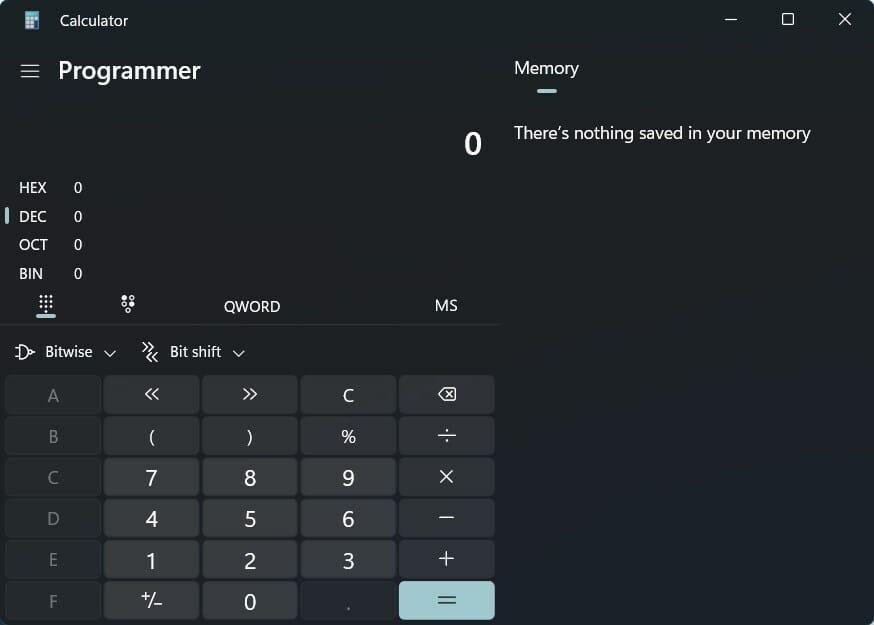
There is even a Programmer mode as well. This mode is specifically designed to handle complex programming and engineering calculations.
There are other modes as well in the Windows 11 calculator, namely, a graphing mode that lets you visualize a graph.
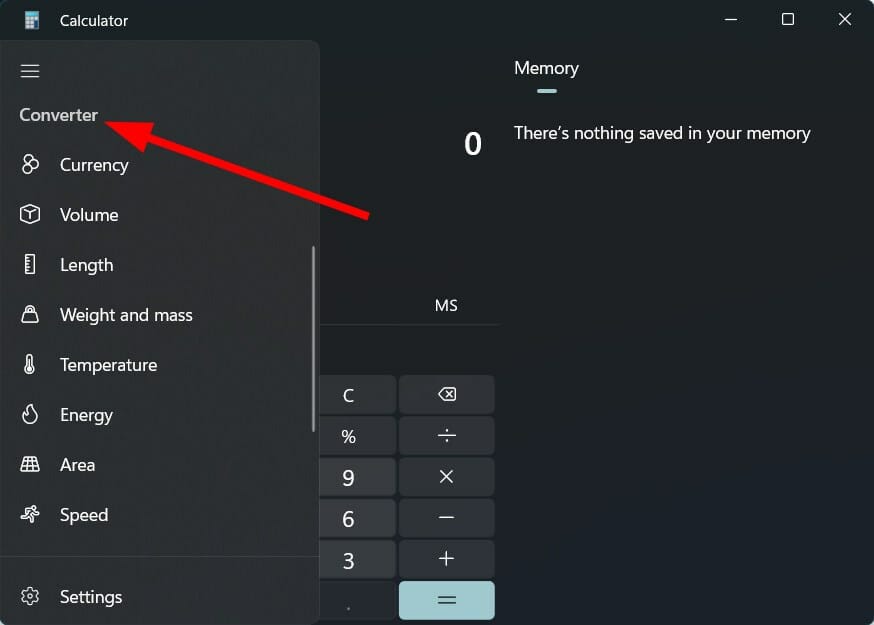
Furthermore, the Windows 11 calculator also has converter features that can convert 100 different units and currencies.
The Windows 11 calculator is a powerful calculation tool. However, if you are looking for more options, then check out the list below of some of the best Windows 11 calculator apps that you can download.
Frequently Asked Questions
How to reinstall Calculator app in Windows 11?
Go to the Microsoft Store, search for Windows Calculator, and click Install. You can also run the command Get-AppxPackage *windowscalculator* | Reset-AppxPackage in PowerShell.
Why is my Calculator app not working in Windows 10 or 11?
It may be due to corrupted app files. Try resetting the app via Settings > Apps > Installed Apps > Calculator > Advanced options > Reset, or reinstall it from the Store.
Is the Calculator app missing from Windows 11 by default?
No, it’s included by default. But if removed, it can be easily reinstalled via the Microsoft Store or Optional Features in Settings.
Wrapping up
The above-listed calculators make your tasks, especially calculations, pretty easy, as we have created a curated list that can help you solve standard calculations as well as complex calculations, including formulas and expressions.
Let us know which of the above-mentioned calculator apps you liked in the comments section. You can also share other calculator apps that you use in the comments section below.
It’s safe to say that every self-respecting gamer has already played, seen a gameplay video, or at least heard about Gorilla Games’ new Horizon Forbidden West title.
Many say this is a gaming masterpiece but, like all the other games in existence, it too came with a wide array of bugs and glitches since launch.
However, before playing and observing all these bugs, you must first preload and install the game. There are some that said they can’t preload Horizon Forbidden West.
Don’t worry, we’ll show you some workarounds that did the trick for a large number of people that purchased the title and ran into the same issue.
What can I do if I can’t preload Horizon Forbidden West?
1. Power cycle your PlayStation
Most of the time, such peculiar behavior can be caused by some minor system errors that could end up preventing your game from preloading.
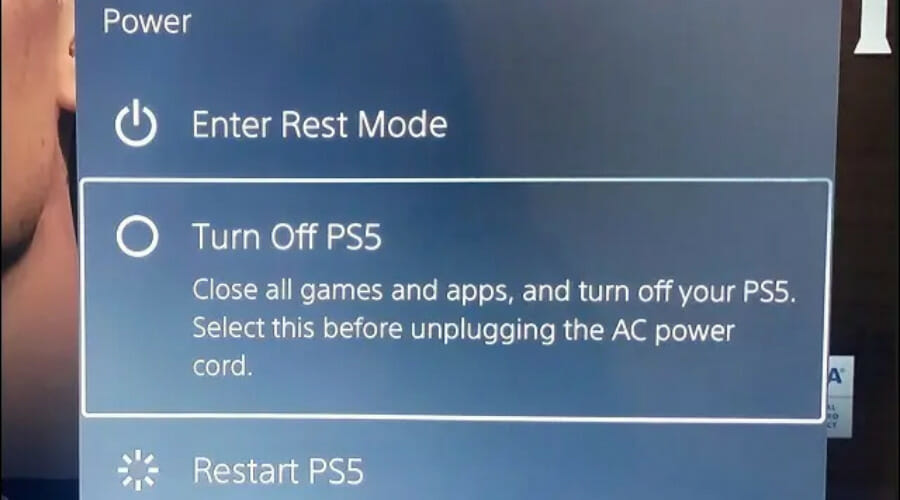
The safest way to move past this is to shut down and then restart your PlayStation console. Whether you have a PS4 or a PS5, simply select Turn Off PlayStation, give it a few minutes, and turn it back on.
2. Update your console
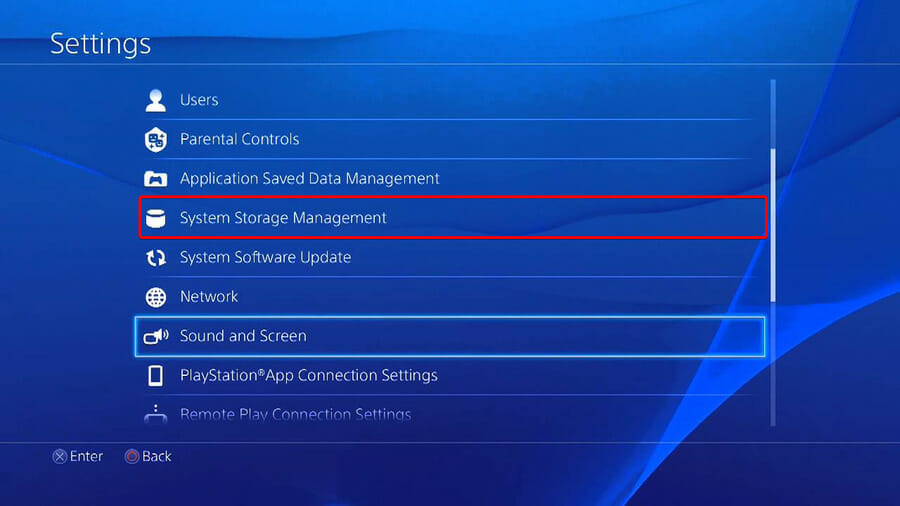
1.1 PS4
Make sure that the connection between your PS4 and Internet is stable.
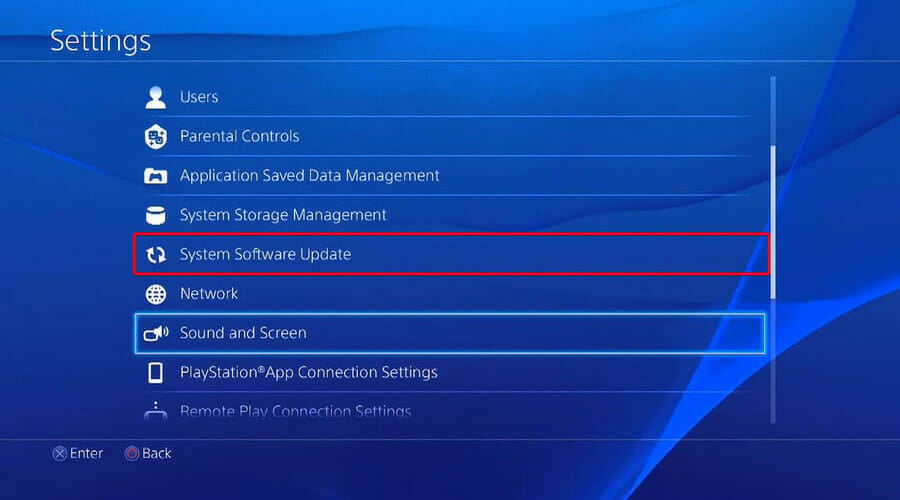
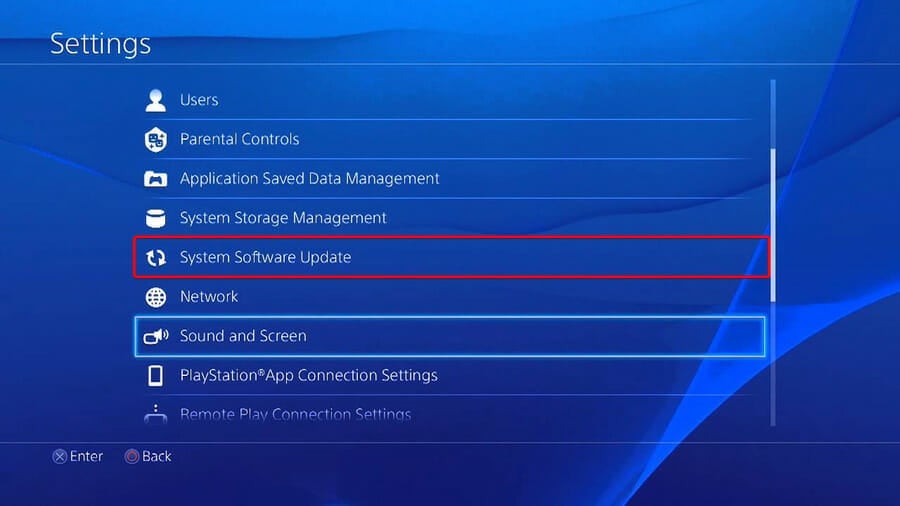
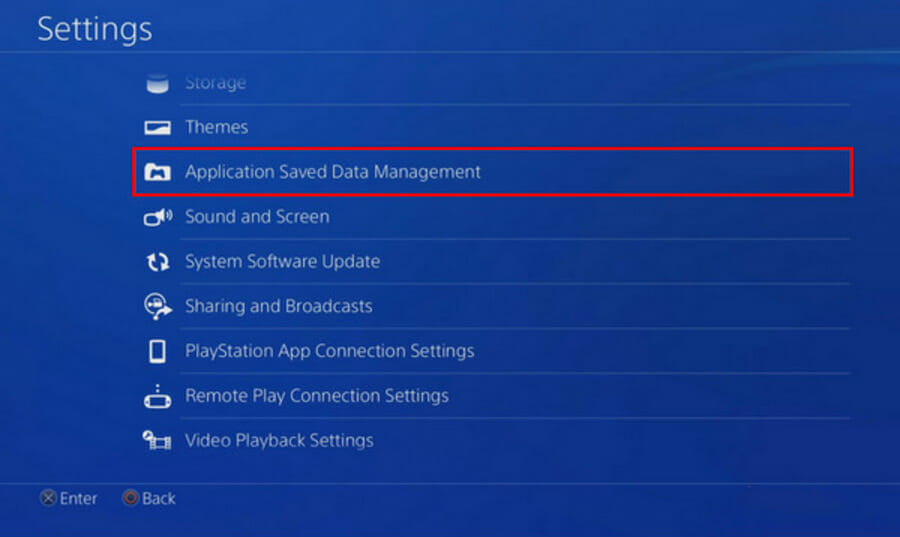
Now, navigate to PS4 Settings.
Click on System Software Update.
Press on the X button.
You’ll get a message that informs you if the latest version of your system console has already been installed.
Otherwise, the message will let you know that you should upgrade your system. To install it, click on Upgrade now.
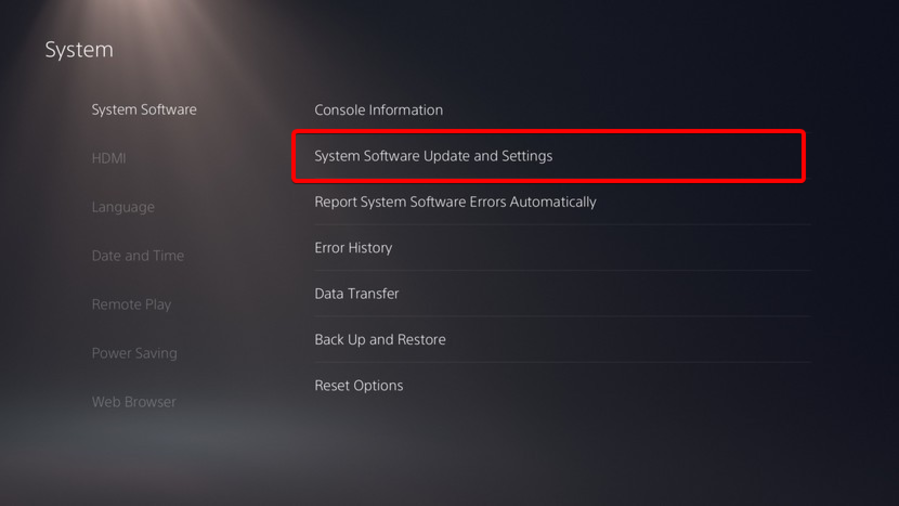
1.2 PS5
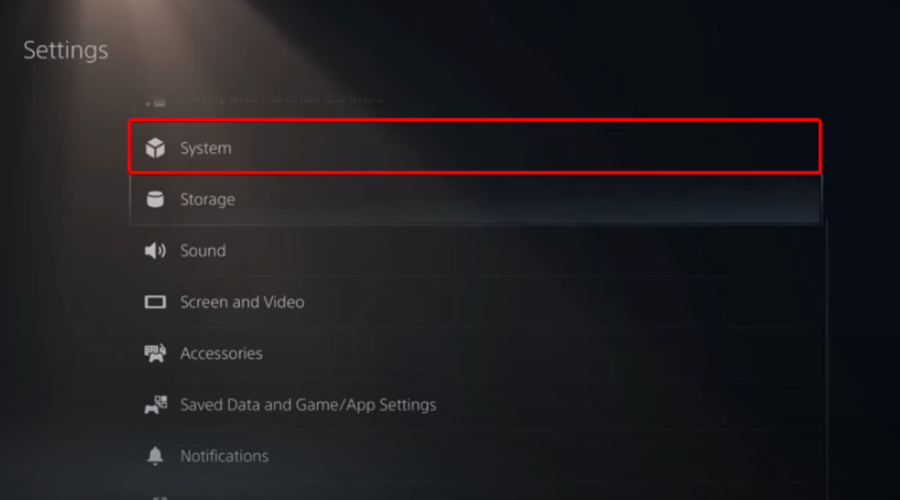
Open Settings.
Go to System.
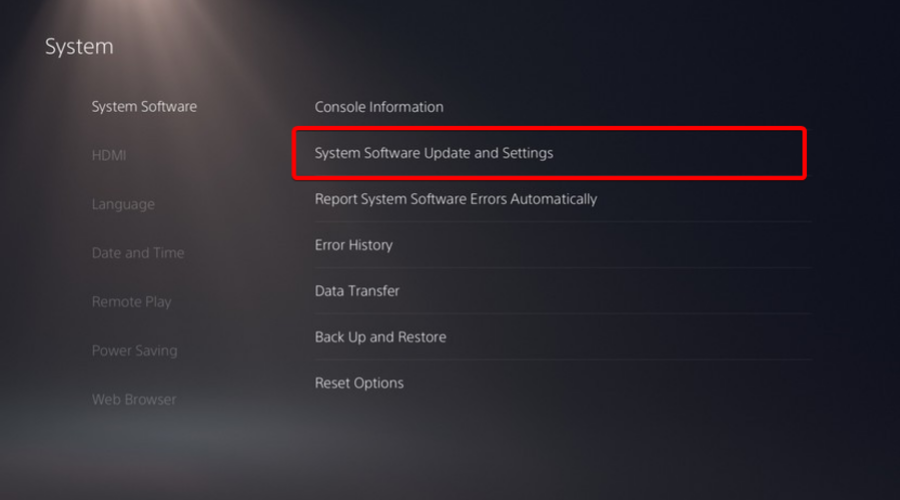
In the System Software section, click on System Software Updates and Settings.
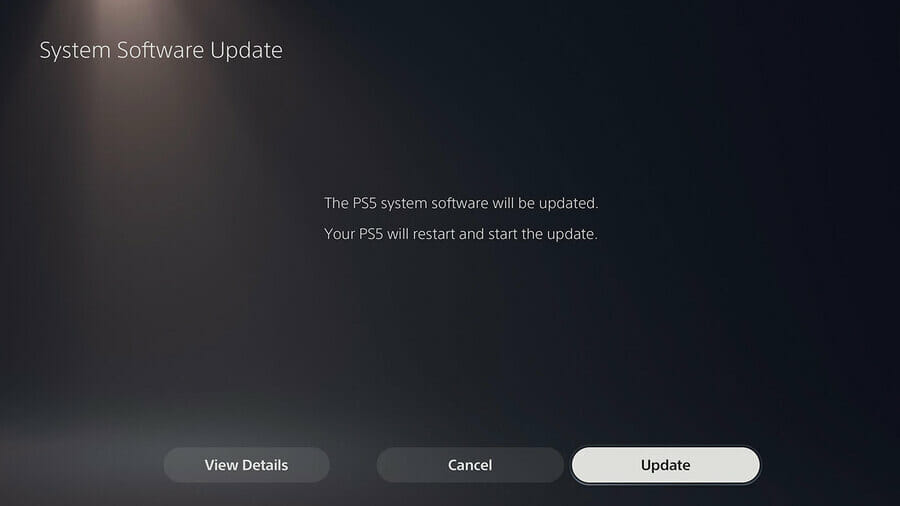
Choose the type of update you want to perform.
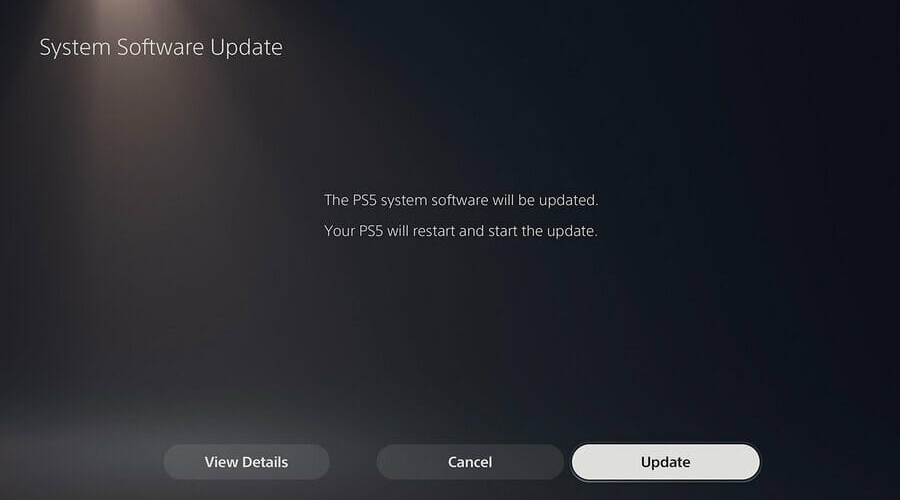
Click on the Update button, then wait until your console is updated and restarted.
3. Clear your console’s cache
Completely turn off your PS4or PS5 (Keep in mind that the Rest Mode won’t work).
Wait until the indicator light stops blinking and goes black.
Do not unplug your PS4 while in the Rest Mode.
Disconnet the PlayStation 4 or PlayStation 5 power cord from the back of your device.
Wait one minute, then plug the cord back into the PS4/PS5 and turn it on.
Now, you’ve power cycled your PS4/PS5 and you should’ve cleared the cache.
4. Free up some storage space
3.1 PS4
Go to Settings.
Scroll down to System Storage Management.
On the opened page you’ll see how the disk space is distributed and how much free space you have.
Make sure that you have enough to download Horizon Forbidden West.
If not, delete you should delete other saved data.
To do so, go back to your Settings menu, and choose the Application Saved Data Management section.
Choose what you want to clear.
Click on Delete.
3.2 PS5
Open PS5 Settings.
Scroll down to Storage.
There, you’ll be able to view both the Console Storage and the Extended Storage.
Click on each of them and check the free disk space.
If you don’t have enough, make sure you delete other saved data.
To do so, go back to your PS5 Settings, navigate to Saved Data and Game/App Settings.
Choose from Saved Data (PS5) or Saved Data (PS4).
Select Console Storage.
Click on Delete.
Tick the box next to the files you want to delete and select Delete.
If Horizon Forbidden West is not downloading, you’ll probably need to free up some disk space. However, if this solution seems not working, we have one more option you can try.
These are the solutions that other players in the same situation said worked. Thus, if you are facing the same odds, don’t be discouraged, follow our guide and all will be well.
It’s true that there are other exciting options out there, so we’ve compared them for you, in case you need a little bit more info before making a choice.
This isn’t the only issue that you can encounter and many have reported that Microsoft Word has stopped working, so you might have to check your installation.
How can I fix the Word experienced an error to open the file?
1. Use specialized repair software
This issue can occur if your Word file is corrupted, and if that’s the case, you might have to repair it with a specialized software such as Stellar Repair for Word.
Using this tool you can repair multiple documents simultaneously, and preview the recovered files before saving them. Regarding compatibility, the software works with all versions of Word.
As for the recovery process, there are three methods available, so you can easily recover any corrupted Word document.
Stellar Repair for Word
Try using this program to repair your files without modifying the original content.
Click the Open button’s small arrow to open the submenu in the shot directly below.
Select the Open and Repair option.
For more details on how to repair MS Word documents, you can always check out this thorough guide.
6. Open the document with an alternative word processor
This resolution is more of a workaround than a fix. However, your MS Word document might open fine with other software that supports its file format.
Lots of word processors support MS Word file formats. So, try opening the file the issue arises with alternative software.
Then you can view and edit the document as required if it opens ok in alternative word processors.
The above resolutions will probably fix the Word experienced an error issue for most users, and if you are included in that group, feel free to share you experience with us.
You can do so by using the comment section below this guide.
Numerous surveys have shown that more than 70% of consumers search online before visiting a business or making a purchase.
Search engine optimization (SEO), also known as organic search marketing, is simply a process that sends signals to search engines that your site is the best, most trusted, and most authoritative in your industry.
What is the best way to do local SEO?
They’re a great source for targeted traffic, so to prove that yours is the best site worth showing to your target audience, you can do either of two things:
Get an SEO specialist to ensure you rank at the top of search engine results
Get an SEO software tool that can analyze your site and help you rank better.
A specialist will analyze, review, and implement changes to your site to optimize it for search engines – in short, they know which buttons to press to get you to the top.
They understand site requirements such as keyword research, SEO copywriting, website layouts, internal and external links, as well as search engine marketing and advertising techniques for SEO.
Identifying and implementing the right local SEO software and implementing it can make all the difference in a local business’s online visibility.
What parameters should I look for in local SEO software?
An effective keyword tool research includes competition analysis and insights into strategies you employ to get a higher position and a clear outcome.
Consider the local SEO software provider’s ability to offer you a website audit with suggestions for improvement in search engines, depending on your location.
Online businesses that use current, scalable search engine optimization best practices as part of their overall digital marketing strategy may gain a major competitive advantage and become the best answer when it matters the most.
SEO execution on several platforms, including social, mobile, and desktop, with change tracking and monitoring data, is a cornerstone of an active online presence and a consumer trust builder.
Lastly, customer support with ongoing expert coaching is essential when selecting a local SEO software provider.
Remember that in such a competitive industry, you should only get the service from a trustworthy vendor, through the company’s official website to avoid scams or money waste.
Now that you know what SEO software can do for you and what to consider as you look for one, the next step is to find a reliable tool.
What is the best local SEO software to boost my rankings?
This tool offers comprehensive keyword research, domain analytics, backlink tracking, as well as search breakdowns on desktop and mobile platforms.
Although it is not as compact as Moz Pro, this tool has a fantastic feature called SEO ideas, which gives it a competitive edge over other tools.
The SEO ideas feature lets you identify your site’s high-value pages so you can optimize based on click-through rates (CTRs) and impressions, among other page metrics. Once you select the pages, SEMrush lets you know how to prioritize them, and how much traffic you can get based on this alignment.
It also comes with Trello integration, which means you can create a task and delegate to your team.
Why we like SEMrush:
Its SEO ideas feature offers unique value
Identifies high-probability ranking pages
Hyper-local SEO targeting
Keyword Suggestions
Proactive SEO recommendations
Custom business solutions for special marketing needs, such as on-site training, add-on features, and custom keyword databases
Position tracking tool checks which keywords trigger different SERP features, both owned by you and those owned by your competitors
SEMrush
All the tools and reports your business needs nowadays to stay ahead of the competition and attract growth.
This tool is revered for its exceptional web crawling capabilities (over 6 billion pages on a daily basis), comprehensive domain monitoring and analysis, as well as in-depth SERP analysis.
Ahrefs comes with a dashboard that displays everything you need to execute your SEO activities, both in summarized and detailed formats.
This SEO software tool meets all your SEO needs by providing comprehensive reports, competitor analysis, keyword research, backlink checks, research on what content works for your niche, keyword rank tracking, and monitoring your niche through alerts.
It also comes highly recommended by leading marketing and SEO names such as Neil Patel (KissMetrics), Brian Dean (Backlinko), and Jon Cooper (Pointblankseo), among others.
Why we like Ahrefs:
Displays exact words competitors rank for
Has a 240+ million keyword database in the US and in more than 100 other countries
Mammoth database of 3 billion keywords
Covers all your bases in keyword research and ongoing monitoring
Exceptional domain analysis
Provides insights on searcher behavior
Runs the world’s largest, top-notch index of live backlinks (over 12 trillion)
Crawls over 4 billion web pages every 24 hours, with fresh data updates every 15 minutes
Site explorer feature helps you see all backlinks and SEO metrics for any website
Content explorer feature helps you know which sites don’t link back to you, which best-performing content, and search traffic
You can set up keyword alerts related to your business and the tool sends you an email notification of this (helps you get new opportunities to serve your audience)
It’s important to access the core metrics of your website quickly, and CWVIQ (pronounced Quick), is a free web service that will help you with the numbers on the spot.
In essence, it is a free email notification system for website speeds. All you need to do is to enter a URL you need to monitor and your email address, and in just a few seconds, you will get a message with its metrics.
You will find out the speed metrics, the time needed until interaction, the first CPU idle time, the time for the first contentful print, and the first meaningful paint.
Upon our request for the Windows Report website, we found a speed index of 0.85 and 0.6 seconds of access time, which is very good. Anything over 5 s means that the website is pretty slow, and you need to take action.
CWVIQ is very good for monitoring your website but is also a great way to find out if the website you’re trying to access has any problems.
Why we like CWVIQ:
It is 100% free for everyone to use
Provides the core metrics of any website in seconds
You have access to the data directly on your e-mail address, where you can forward it to any other recipient
It’s extremely easy to use from any device with a browser
CWVIQ
Get the core metrics for any website in seconds with this smart free web app!
This toolkit has four sections that are jam-packed with features that make it appropriate for your SEO requirements, which include SEO Rank Tracker, Website Auditor, SpyGlass, LinkAssistant.
The Rank Tracker allows you to monitor your search rankings by tracking your keywords and checking them within a specified time schedule.
Within the Rank Tracker are features such as keyword suggestions, results comparisons, and reports that can be exported, all at the click of a button.
This feature lets you see where you rank based on keywords, and the best part is that its interface is user-friendly, while providing accurate data and additional insights for decision making.
Why we like SEO PowerSuite:
Unlimited free trial option (but with limited features)
If you get this tool, you can opt to get its four elements separately (if you don’t need all of them)
Helps track your site’s rankings
Helps you optimize your site, posts, and pages
Helps you identify link-building opportunities
Detailed reporting with customizable templates
With SEO SpyGlass you may take a peek at your competitors’ backlinks, and in turn, help you identify viable or suitable link-building opportunities for your site.
It also helps you identify possible harmful domains, gives detailed statistics for your backlinks, offers multiple backlink data information/sources, and generates useful reports for decision-making.
The Website auditor lets you optimize your website to rank well based on keywords.
It literally does all the legwork, giving you helpful analysis of your content, an overview of your domain, and generates a full audit of your site thus, you’re able to identify what’s wrong and take the necessary measures to correct and/or optimize your site.
The Link Assistant allows you to identify what sites you can approach, manage your emails, and still track links you may have earned in the long run.
It also comes with Google Analytics integration and helps you identify link-building opportunities you otherwise wouldn’t have seen.
SEO Power Suite
It includes everything necessary for the SEO field, such as SEO analysis tools, keyword research tools, backlink checkers, content editors, and PPC ad optimization.
You cannot search for SEO software tools without coming across Moz Pro.
This tool helps you improve your search engine visibility and rankings by deciphering the volumes of data online, to give you the highest quality of data and actionable insights for decision-making.
Salient features include keyword rankings, keyword research, link analysis, site crawling, page optimization, and comprehensive reporting with action-based recommendations.
Why we like Moz Pro:
It is an all-in-one SEO software tool combining all elements of the perfect SEO tool into one single suite
It is user-friendly, no need for expert technical knowledge on SEO to operate it
Ties SEO data directly to business outcomes
Access to SEO metrics for every page you visit online
Identifies outreach opportunities for rich backlinks
Benchmarks your site versus those of competitors
Identifies helpful, valuable, and strategic content topics for your site
Monitors the web for mentions of your brand, products, and competitors
After you have done an SEO analysis with one of the above-mentioned SEO tools, you absolutely need to go hands-on and start working to improve your web pages in order to gain more traffic.
WordLift focuses on semantic SEO and it will help you reach a wider audience, unleashing the power of artificial intelligence to enrich your content.
This tool analyzes the content of your articles and pages, detects the content through natural language processing, and then adds a layer of schema.org metadata.
In this way, WordLift turns your web texts into an open book for search engines, which can finally unambiguously understand your pages and serve them to users looking for that exact information.
There is even more: WordLift is like a smart librarian that will help you organize your content. In fact, it improves the information architecture of your website and offers your readers relevant internal links and, ultimately an engaging user experience.
Why we like WordLift:
Offers a unique and comprehensive approach to semantic SEO
Adds to your content the schema.org markup, allowing search engines to best index and display your website
Organizes your content, building a publicly available knowledge graph of your website
Extends the average dwell time of your website, keeps readers engaged with relevant content recommendations
Enriches your content with a meaningful internal linking
Supports your writing process with trustworthy and contextual facts
Expands your website with an internal vocabulary, which adds a great value in terms of SEO, because it helps search engines understand the semantic domain of your website.
There are several plans, to meet the needs and expectations of businesses and websites of any size. WordLift Business Subscription also includes full access to WooRank, an SEO platform that analyzes your website and allows you to measure your progress in terms of SEO rankings.
WordLift is available both as a plugin for WordPress and as a Cloud service, that can be used on any CMS thanks to an easy-to-install javascript library.
Google Search Console is a free SEO tool provided by Google that allows you to monitor, maintain, and troubleshoot the visibility of your website in Google Search results.
You don’t have to sign up for Search Console to appear in Google Search results, but it can help you understand and improve how Google perceives your site.
The primary difference between Search Console and the other tools we’ve reviewed is that it only provides statistics on your own domain, not your competitors’.
To activate it, you must first authenticate that you own the website by connecting it to your Google Analytics account or submitting a file or meta tag to it. By doing so, you have access to a wealth of helpful and free data from Google.
Let’s see the main features of Google Search Console:
Detects coverage issues
Identifies crawl errors
Offers sitemap information
Detects mobile compatibility issues
Scans for security issues
The Google Search Console message system will notify you if the website’s health is threatened by malware or hacking. The messaging system also notifies you if vital pages have been deleted or if robots.txt has blacklisted key pages.
Google Analytics is an excellent free SEO tool for a variety of reasons, the most important of which is its zero cost.
Another significant benefit for site owners is the ease with which it can be set up. You can track the majority of your website’s visitors in just a few easy steps.
You may track a plethora of information about site visits by signing up for an account and inserting a little bit of tracking code to every page.
Let’s take a look at the main benefits of Google Analytics:
Browser report for device compatibility
Visitor purchase report
Customer behavior report
Mobile performance report
Page timing report
The website report is the most essential component to consider when considering improvements to the website. A well-planned and stated report may help you increase visitors to your website while also increasing conversion rates.
When you operate an online business, you will want to employ Google Analytics for your website to get a better understanding of your customers and their behavior on your website.
Google Trends is a free SEO tool that allows you to explore which cities or sub-regions look for specific keywords or search phrases over time. This is an important asset for your local business since it works perfectly in parallel with Google Analytics.
You may explore people’s search interests and discover extra information such as the most relevant articles, interest over time, interest by location, trending searches, and related topics.
Let’s have a look at the main benefits of Google Trends:
Geographical keyword-related data reports
Frequency of a search term in Google
Comparative keyword research for event-triggered spikes
Popular and rising keywords per industry
When you search for a phrase, you will get a map that indicates the world’s regions where the term is most popular.
You may also travel back in time and compare distinct phrases from 2006 for example, to the recent 36 hours to better comprehend the relationship between them.
The free SEO tool Google Ads Keyword Planner assists you in researching keywords for your search campaigns and is such a great tool to use especially for local campaigns.
You can use this asset to find new keywords linked to your business and obtain estimates of the number of searches they receive as well as the cost to target them.
Google Ads Keyword Planner is one of the top keyword research tools for finding blogging keywords. As they always have been, the most essential factors are relevancy and search intent.
To accomplish this, type the search word into Google and observe who and what is ranking. You must have monitored your ad with Google Analytics to access statistics from previous ad campaigns.
Let’s have a look at the main benefits of GoogleAds Keyword Planner:
Discover new keywords
See monthly searches
Determine the cost for ads
Organize keywords
Create new campaigns
Google Ads Keyword Planner also allows you to create search campaigns based on in-depth keyword research. You need to have a Google Ads account to utilize the Google Keyword Planner. If you don’t already have an AdWords account, you can create one in a matter of minutes.
We recommend that you use this free Google Ads tool to generate keyword ideas anytime you optimize your website. This can help significantly in the ranking of your website on search engines as well as keyword research.
What is the difference between traditional SEO and local SEO?
Both traditional and local SEO services seek to enhance your rankings in internet search results so that more people can find, contact, and purchase from your e-business.
Traditional SEO focuses on improving your site’s exposure on a national or global scale, whereas local SEO assists you in capturing local search territory and interacting with local customers.
Furthermore, local SEO solutions employ tailored strategies to help you connect with customers in your specific geographic region in a detailed and more focused niched market.
Why is local SEO software good for me?
Keyword research, backlink tracking, and trend analysis give insights into your pages so you can track the results in a search engine.
You can select the most effective strategies for increasing your site’s search relevance, offering information based on your geographic position above your competition.
As background information, industry analysis provides recommendations on elements on your website that may be improved; thus, reports on optimization metrics are easily generated.
Some e-businesses are opt-in for paid search optimization tools that look at pay-per-click advertising, conversion metrics, and ad placement.
The SEO software market is constantly getting new tools, so if you’re confused about which tool to pick for your site, you can also read about automatic SEO software that can give you a glance at the best-optimizing practice with an all-in-one assistant.
Hopefully, now you are on a secure path of ranking and optimizing your local business with these great tools that can greatly impact your visibility and e-commerce sales.
Please leave a comment below if you have questions on the topic.
As we all know, Guild Wars 2: End of Dragons is the third expansion for the award-winning and critically acclaimed MMORPG Guild Wars 2.
This time around, the dragon cycle that has sustained and blighted Tyria for ages is collapsing, leaving mortal hearts and choices to define this moment in history, and echo in the future forever.
And, just as with any other game, Guild Wars 2 also needs to constantly receive a constant flow of updates that are designed to fix known bugs and improve gameplay.
We are about to take a look at the latest Patch Notes released for Guild Wars 2: End of Dragons and find out what’s new.
What’s new in Guild Wars 2: End of Dragons?
You should know that the last patch issued by ArenaNet for Guild Wars 2: End of Dragons was on March 17th, and it brought quite a few fixes to the game.
Although players deem the experience stable enough, there were still some problems that needed to be sorted out in order to improve the title as a whole.
As such, let’s take a look at the latest Patch Notes for this beloved game:
Updated the defiance bar mechanic of the final encounter in the Battle for the Jade Sea meta-event to be more consistent and not reliant on chance. This change should ensure more opportunities for players to engage with the defiance bar mechanic and allow for additional damage phases.
Reduced the amount of control effects needed to break the defiance bar of whirlpools in the final boss encounter of the Battle for the Jade Sea meta-event.
Fixed an issue that could cause the Igne Mossheart event chain to stall.
All light refuges while fighting Igne Mossheart will now correctly protect players.
Fixed a rare crash in the Seitung Province meta-event.
We’re pretty much looking at a wide array of game-breaking and server failure fixes, so we can breathe a sigh of relief that we won’t have to deal with those anymore.
Outbyte Driver Updater is a valuable option that you should definitely try, as it will scan for new drivers and update the older ones just like an expert.
With this tool, you’ll be able to keep your drivers up to date with just a simple click. Plus, you’ll have complete access to a huge database, so the processes don’t limit to graphics components.
This software will also provide a detailed report of all of your out-of-date device drivers, in order to know where the issues may come from.
All these changes were a part of Build 126,713. Have you discovered any other issues that might need a quick fix? Share your experience with us in the comments section below.
Everything looks nice and attractive on Windows 11. New wallpapers and themes of the highest quality matched with a modern-day interface and glossy texture.
However, the diversity of the built-in themes is limited – just five of them. This limitation is more noticeable when you need a customizable dark theme for a change, only to be stuck with its less dynamic dark mode.
With the visuals of Windows 11, you sure deserve more attractive options than its dark mode offers. And this is exactly what the best dark Windows 11 themes offer at exceptional levels.
When these themes are matched with impressive features of the new OS, the possibilities of attractiveness will be endless while keeping your young eyes safe.
Does applying new themes affect my battery life?
An installed theme contains files that majorly determine the appearance of your PC. It has nothing to do with power consumption. Even third-party themes only make changes to your system files.
However, it should be noted that you need to create a restore point before you start installing a new theme. This will allow you to restore the original files and configurations if there is a problem during or after installation.
This is a great theme to protect your eyes if you use your PC for long hours. Unlike dark themes that do not clearly show text, the Grey Eve skin creates a nice balance between a classy black mode and clarity.
It has a friendly interface that can be customized as much as possible. Also, it has a high-contrast theme with quality viewing. But this can make some features look different from what you are used to.
This is a fantastic theme that adds some Ubuntu flair to Windows 11. With orange hues and many flat iconographies, it is safe to say that its inspiration is from the well-known Linux distro.
Another good thing about this theme is that it is completely ad-free. It does bring any unnecessary notifications and recommendations.
Moreover, you can customize the Ubuntu dark theme to any length to suit your needs. Note that you should run the UxThemePatcher before installing this theme for a smooth and error-free installation.
This is one of the best dark Windows 11 themes, thanks to its special abstract images. It is available for free on the Microsoft Store. It incorporates a camo design that adds a cool hue diversity to your visuals.
The Nightfall Camo Special Edition packs in 9 amazing images. These images are different variations of dark blue colors. They are all eye-catching and do not strain the eyes after long-term use.
If you love the view of the northern lights, then you will surely appreciate this dark theme. It packs in a nice collection of wallpapers that gives your PC a unique style and an interface that looks like the night.
Night Skies Premium has a total of 20 premium 4k wallpapers. These wallpapers include stars, moons, the Milky Way, and many more eye-catching views.
Note that this theme is not a complete package. It lacks all the special icons and other tools in the complete theme packages. But its excellent wallpaper collection alone is enough to make you consider it.
The Everforest is a night-only theme with some outstanding features. It includes three-night themes for Windows 11 and 10, which allow you to change between them as you wish.
There are many Wallpapers for you to choose from. It also features a much-heralded dock for easy file access.
There is also the StartIsBack and StartAllBack custom start menu, start orbs and taskbar for full customization. Add the endless tools and extras, and you have a well-packaged and effective Windows 11 dark theme.
Right-click on any space on the desktop and select the Personalize option.
Click the Themes option on the left pane.
Select any theme of choice.
Changing the Windows 11 theme is as straightforward as it can be, as shown above. And if you are looking for darker options, use the built-in high-contrast themes in Windows 11 instead of downloading one.
Aside from this list of best Windows 11 dark themes, you can also check out our selection of the best Windows 11 themes containing magnificent picks to diversify your theme collections.
In the comments section below, let us know if any themes pique your interest. Also, you can suggest some other stunning dark skins missing from this list.
Looking for the best Windows 11 wallpaper app to refresh your desktop? Whether you want dynamic backgrounds, daily auto-rotation, or high-res visuals, these apps help you customize your experience easily.
The Windows 11 operating system has a built-in feature that allows you to change the desktop background periodically – Slideshow. Unfortunately, when it comes to animation, this feature is not available. However, with the help of third-party software, you can enable it.
You might be wondering why you would want to change your wallpaper, but there are some good reasons for doing so. For example, if you’re using Windows 11 on a laptop or tablet, you may find that it doesn’t have much screen real estate.
It may also be difficult to see what’s going on in the background because it’s too dark or too light. By changing your wallpaper, you can make it easier for yourself to see what’s happening in the background without having to squint or strain your eyes.
In addition, changing your wallpaper can make you more productive as it breaks the monotony of seeing one similar image throughout the day.
To customize your Windows 11 desktop, you’ll need to get some cool wallpapers. Below, we explore some of the top wallpaper apps that will upgrade the look and feel of your Windows 11 PC.
What are some of the best Windows 11 wallpaper apps?
While Windows 11 has decent wallpaper options, you can’t set live wallpapers on your desktop. A live wallpaper is not a novelty anymore. Rocksdanister is the brains behind this amazing app. Not only is this app free but it is also compatible with most Windows PCs.
The best part is that it doesn’t eat a lot of resources. A lot of people are skeptical about having a live wallpaper as it can affect the PC’s performance but not this app – as long as you meet the recommended 8GB memory requirement.
It’s more efficient than using the default Windows 11 wallpaper slideshow. Lively Wallpaper supports multiple video formats.
Before setting a video as your live wallpaper, Lively Wallpaper will show you a preview of what it would look like on your desktop. If everything looks good, go ahead and set it.
Some of the additional benefits of using this app include:
Supports both dark and light themes.
Puts minimal strain on PC to avoid lagging.
Lightweight to avoid taking up too much space on your PC.
Supports multiple displays so you don’t have to worry about getting stuck with one monitor.
Has excellent display scaling that fits your display resolution without compromising on quality.
Developed by Stardock, this is yet another live wallpaper app you’ll want to get your hands on. Although it is a paid app – $3.99, you get a grace period of 30 days for trial.
The app is feature-packed you’ll want to move to the paid version once the trial period is over. Unlike other apps that come with pre-determined live wallpapers, you have the option to create your own!
The app also has its own set of live wallpapers but with the next-level customization capabilities, you may not find time to use them. You also have up to 60 effects to choose from and can add videos directly from the Internet.
Some of the additional benefits of using this app include:
You can create a playlist of your favorite wallpapers to be on rotation.
If you are using multiple monitors, you can create a different background for each one.
You can select the type of information displayed on your desktop with different fonts, sizes, and text color.
This is yet another paid app with no free-trial period but for $3.99, you get to experience a wide range of graphics. Created by the Wallpaper Engine Team, this app boasts of one of the largest collections of live wallpapers.
You can select videos from your library, use downloaded videos, or even use websites as wallpaper.
If you are big on gaming, you are going to appreciate that it automatically pauses during games so that you don’t experience a slowed-down performance.
Some of the additional benefits of using this app include:
Supports multi-monitor mode.
Has mouse-interaction support.
Supports multiple video formats.
You can block unwanted websites from being set as wallpapers.
Rainysoft is the developer behind this awesome live wallpaper app. Although the developer isn’t updating the app anymore, it does work on Windows 11. If you are looking for more customization options absent in other live wallpaper apps, then RainWallpaper is an excellent choice.
The free trial version comes with all of these features but if you want to remove the watermark from wallpapers and get rid of ads, then you will have to upgrade to the pro version for $3.99.
It offers a nice collection of animated and 3D live wallpapers which you can save as videos or set as your desktop background. The best part about RainWallpaper is that it also supports GIF image files, allowing you to use them as your desktop background.
Some of the additional benefits of using this app include:
RainWallpaper offers support for multiple monitors.
It supports animated backgrounds, sound effects, and weather effects, and it only takes a few clicks to customize the look of your desktop.
It has minimal CPU and RAM usage. The battery consumption for RainWallpaper is also extremely low during runtime.
DesktopHut is a great resource for finding awesome wallpaper backgrounds for your computer or laptop. It’s easy to use, and you can search by categories.
The app has hundreds of backgrounds and wallpapers categorized by genre: anime, sci-fi, and games. There is something here for everyone. You can also find a pretty cool collection of themes and icons packs as well.
With DesktopHut, you can customize your home screen with different themes, icons packs, fonts & colors. You can also create your own customizable theme within the app itself.
There are many animation effects available in the app. The animation effects include water ripples effect, snowflakes effect, and raindrop effect. You can also set the speed of the animation effects according to your liking (slow/normal/fast).
Some of the additional benefits of using this app include:
The UI is smooth and easy to navigate through all the customization options.
DesktopHut has over a thousand video wallpapers all available for free in HD resolution.
The app is lightweight on your PC so you don’t have to worry about storage space.
If you are someone who likes to have a beautiful wallpaper on your Windows desktop and you spend a lot of time at the computer, you are probably looking for something that does not become boring or annoying.
The program can be configured to change the desktop wallpaper automatically at a specified time interval. In addition, it is also possible to replace the standard Windows screen saver with an animated screen saver that displays the current weather conditions.
WinDynamicDesktop has a ton of options for you to play around with, and it lets you set different images for each time of the day. You can also create your own themes from scratch, and share them with other users.
Some of the additional benefits of using this app include:
Supports virtual desktops.
Lightweight so you don’t have to worry about apps competing for resources.
Has macOS wallpapers available for Windows users.
You can set up a slideshow of your favorite wallpapers.
With PUSH Video Wallpaper you can greatly enhance your desktop by playing any video as a background wallpaper.
The PUSH Wallpaper app has a simple interface with a ton of features that makes it easy to select the video of your choice and set it as your background.
If you are looking for something that’s more visually appealing as opposed to being highly optimized and full of features, then this app is definitely worth checking out.
Some of the additional benefits of using this app include:
A wide range of Wallpaper categories is available to choose from such as 3D and 2D animations, websites, videos, and even your personal photos.
Doubles up as a screensaver when your screen is idle.
If you’re wondering where the wallpapers come from, there’s a pretty wide selection. Windows has a lot of beautiful wallpapers built-in, but you can get more online from other sites.
Finding the perfect wallpaper takes time since there are a ton of amazing sources for 4K wallpapers out there. Luckily for you, we have already done the hard work and listed only the best sources for Windows 11 4K wallpapers that you can find on the Internet right now.
If you are looking for the best Windows 4K wallpapers, then WallHaven is the place to be. Featuring an awesome collection of high-resolution images that can be downloaded very easily, this wallpaper website is a must-visit.
Searching through all its options will take some time since there are so many choices. The only thing that can help you here is the active community that keeps on rating and commenting on every wallpaper, so you can easily find what might be interesting for you.
DeviantArt is an online community in which people share artwork, writing, media, and other user-generated content.
This website is a heaven for designers, artists, or photographers who want to share their work with the world or even make some money by selling it. It is one of the most-visited websites in the world, and it’s easy to see why.
HDwallpapers is the best possible source to find out the latest and quality wallpapers for your desktops.
The website has a huge collection of wallpapers ranging from almost every category. Moreover, it provides you with various interesting options like editing, cropping, merging, etc.
After having chosen an image, you get the option to choose from a wide range of formats that are custom-designed for a device.
Given the rich list we’ve just shared, you’ll definitely be spoilt for choice when it comes to customizing your desktop with lively wallpapers.
Looking for the best software that auto changes wallpaper? Check out our auto change wallpaper guide to find top-rated tools that keep your desktop fresh with stunning visuals.
Let us know in the comment section which wallpaper app you are currently enjoying or share any we have not mentioned in the list above.
Users reported their RAM was occupied by an unknown process, thus today we’ll look at Windows 11’s vmmem high memory usage issue and see what to do about it.
Vmmem is a Windows memory management tool that not everyone is familiar with. If you open the Task Manager, you may notice that this process is running without many details.
Follow along as we will first see in more detail why vmmem is using high memory in Windows 11 and then address the problem with the three solutions we found to be the most helpful.
How can I fix vmmem high memory usage in Windows 11?
1. Restart Windows Subsystem for Linux
Open the Windows search function and type cmd inside it. Right-click on the top result and choose Run as administrator.
Next, type or paste the following command in order to restart Windows Subsystem for Linux and press Enter: wsl --shutdown
However, if the command threw an error, head to File Explorer and enter the following path in the search bar: C:\Users\your-username.wslconfig
Now add the following text to the file and save it:[wsl2] guiApplications=false
Restart your computer to ensure that WSL will restart. Please keep in mind that if you make this modification, you will not be able to utilize Linux GUI applications until you remove the added lines from the file. Now the Windows 11 vmmem high memory issue should be resolved.
The Windows Subsystem for Linux (WSL) is a component of the Windows operating system that allows you to run a Linux file system, as well as Linux command-line tools and graphical user interface (GUI) applications, directly on the OS.
Open File Explorer and enter the following path inside the search bar: C:\Users\your-username.wslconfig
Now type in the following commands and save the file. This will limit the amount of RAM vmmem will use, thus fixing the vmmem high memory usage problem: [wsl2] memory=2GB
3. Use a third-party tool
PC problems will always arise, and resolving them is not always as simple as it appears. However, there are specialized repair programs available, that may help you resolve these issues.
These tools allow you to perform in-depth scans of your computer and deploy the correct fix based on the results of that scan.
Why is vmmem using high memory in Windows 11?
Computer memory is one of the most critical components of a PC. RAM (Random Access Memory), ROM (Read Only Memory), and cache are the three forms of memory.
To put it another way, when the computer is in use, the CPU will transport the data that needs to be operated into memory for operation and then communicate the result after the operation is finished.
WSL (Windows Subsystem for Linux) reserves a large amount of RAM even when it is not required. It can consume up to 80% of your available memory. This has been lowered to 50% in current iterations of Windows, up to a maximum of 8GB.
The interaction between vmmem in Windows 11 and Docker is also problematic. According to some, Docker eats up to 70% of available RAM, causing their machine to slow substantially.
Vmmem is in charge of virtual machine processes and memory management. This means that the process is the virtual machine’s beating heart, where all of the VM’s activities and applications take place.
In our daily lives, virtual machines (VMs) are commonly employed, and they need the use of host system resources such as the CPU, memory, storage, and network.
Users setting virtual machines with a large amount of memory and CPU is the major reason for vmmem demanding a large amount of memory since this typically results in their consuming all of the resources available.
In order to prolong your computer’s life, you need to perform regular maintenance check-ups. We’ve gone through the most relevant solutions that can solve the Windows 11 vmmem high memory usage issue.
What can be said about Microsoft’s antivirus solution? Well, even though it’s not as popular as other similar software out there, it is still ranked pretty high, efficiency-wise.
There still are a lot of people that rely on Defender for protection and it seems to be pretty stable. At least, it seemed to, until Microsoft released the latest Windows 11 Beta build.
Things going haywire isn’t something new on the tech giant’s plate, but having issues with the one software that is supposed to keep you safe isn’t something to take lightly.
MKV files seem to be the victims, but other video container formats may also be affected, as ISOs are apparently also facing this delayed execution problem.
This caught many off-guard, as this issue isn’t listed among the known problems for the build which means it probably went undetected during testing.
However, not all is lost, as with every problem, there is bound to be a solution, even if we are talking about a temporary one, for the time being.
A simple workaround for this issue is disabling the Check apps and files option under SmartScreen settings.
Users trying this were able to resolve the issue. But before proceeding to apply this workaround, make sure the file type is actually trustworthy.
Have you also encountered this issue with Defender on Windows 11’s latest Beta build 22581? Let us know in the comments section below.
Find below the best photo app tools for professional-level outcomes that don’t break the bank. Some use vector graphics, cropping, distortions, masks and other advanced editing features.
Others are a bit more straightforward, with presets, filters, and quick-edit features. Whatever your needs are, you’ll find a good pick below.
Picsart Photo Editor is one of the most commonly used photo editors with over 100 million users. It’s available free on the Microsoft app store.
It offers different features that work well with the templates. They provide quick results and blend with the rest of the features like stickers, collages, filters, effects, etc.
Some of the key features of the editor include:
Using photo effects and filters like double exposure edits, cartooning yourself, driparts, canvas
Ability to add over stickers that are more than 50 million during editing
You may add collages to the photos
Adding and cropping photos
Adding geometric shapes to the images
Layering images
Picsart Photo Editor
Enjoy editing your materials by benefiting from all of Picsart’s great features.
Movavi is a free photo editing tool good for all skill levels from beginners, to intermediates, and experts.
It includes sharpness adjustments to remove blur and improve the texture of a photo. It’s easier to achieve a natural look with the use of an object removal tool.
Movavi also improves productivity and creativity by providing many tools, e.g., support of raw images, text insertion, color correction, cropping, rotating, flipping, etc.
Some of the other key features include:
Use AI to provide excellent results by optimizing and improving contrast in images
Easier to remove and change image backgrounds
Easy to restore the old images by removing stains and scratches
More than 100 effects and filters to change the outlook of the photos
Movavi Photo Editor
Increase your productivity and creativity by using Movavi’s unique features.
Canva is a web-based editor and has a desktop application that you can install on your Windows 11 PC. It has over 20 million users worldwide. It doesn’t require any experience to use it, and it’s user-friendly.
It promotes teamwork as you can create a team on the app and collaborate. Also, it saves business owners and professionals time as it takes less than five minutes to do a photo edit.
Some of the other key features Canva has include:
It has drag and drop that enables users to change elements and effects in a short period
Over 10,000 prebuilt templates that you can choose from and work with
Basic editing effects – grids, cropping, adding text that you can use on your project
A lot of fonts that you select that fit your project
GIMP, popularly known as GNU Image Manipulation Program, it’s free to download and open source, making it work well with the community, and everyone can work on the source codes.
It helps in the transformation of images into unique photos. It has a lot of elements that make producing mockups, interfaces, icons easier and faster.
The majority of the users who use it have basic knowledge of photo editing skills, so it might not be the best option for complete beginners.
Some of the important features of the GIMP editor include:
It works with programming languages like Python, Perl, C, C++ to manipulate images
Has high color management features used in workflows to produce high-quality print media
Easier to customize with its large number of scripts and plugins
It gives the users to customize the interface to meet their desired look
KVADPhoto+ 2 is a free Microsoft photo editor found on the app store. It has a lot of effects, colors, shapes, tools, and many others that help in image processing.
It has filters that get categorized into categories – black and white, cold tones, Vintage, Warm tones, giving you many options to choose from.
Some of the other features include:
Many photo adjustment tools i.e color, brightness, hues, sharpening, blur
It offers farmers on special days, i.e. Valentine’s Day, Mothers Day, Christmas Day
Choosing the best photo editing software gives you more power and control over the result you want. The majority of these editors have little weight making them serve you better on your PC. Some of these tools lack features, forcing professionals to seek paid alternatives.
If you have more free photo editing software that you would like us to discuss, drop a comment below.
.NET 5 will reach end of support in just a couple of months. After the May update, this version of .NET won’t see any more servicing, security updates or receive technical support. Thankfully upgrading to .NET 6 to remain supported is not a huge deal.
Now with that said, this doesn’t mean apps built on .NET 5 will suddenly stop working come May. However since .NET 5 is not an LTS release, it was only to be officially supported for 18 months or 6 months after the next release ships, in this case .NET 6.
Upgrading to .NET 6.0
As always, before doing any upgrade I recommend checking for breaking changes. You can check your apps compatibility by going to Microsoft’s official documentation on the subject.
The next thing I like to do is make sure my development environment and tools are updated and ready. Check out the links below for more information and links on how to get up to date.
The last step would be to make sure you have a backup of your code before you go forward with the upgrade. Once you’ve made sure you have something to go back to in case of a problem, the process is very simple!
Open your project file, change .net5 to .net6. and you’re off to get started with .net6 on your existing app.
It might seem impossible to keep your applications up to date, the biggest reason my team keeps up with these are security threats. Your best bet at staying safe and secure is to be on the latest supported version. You never want to be in a situation where you are rushing an upgrade because the patch you need is not available in the version of the framework you are running.
The rumor mill is churning once again, and the latest bit of speculation to come out of it is that the critically acclaimed horror game Resident Evil Village will be coming to Xbox Game Pass sometime in the not-too-distant future.
This rumor is based on a Polish website XGP has a screenshot taken from the Polish version of the Xbox Store, showing the game’s listing featuring the “Included in Game Pass” badge. The badge has since been removed, and at this point that seems to be all the rumor has to go by.
(Rumor) Resident Evil Village maybe coming soon to #XboxGamePass
Polish website https://t.co/ax9K15nkpf have noticed that Resident Evil Village had a "included in Game Pass" badge on the Xbox Store. It has since been removed.
Of course, it’s entirely possible that it was just a temporary glitch on the storefront and nothing more, so at this point the story shouldn’t be taken too seriously. Although it wouldn’t be too surprising if there didn’t turn out to be some truth to it, for Xbox seems to be on a mission to bolster the Game Pass service here of late, and they haven’t been shy about adding high-profile, AAA games to Game Pass.
Resident Evil Village released last year to wild success both commercially and critically. Could the game join other great horror titles on Xbox Game Pass like Dead by Daylight and The Evil Within? We may soon find out.
Microsoft has been working with the US Government to provide Secret and Top Secret Azure clouds for use by the Department of Defense and other critical government agencies, and today it’s announcing that it will soon provide an Office 365 Government Secret cloud, which is currently pending review, and is expected to become available later this year.
Microsoft has built out both Azure and Office 365 to meet a full spectrum of government needs for secure cloud environments, serving everything from State and local governments to Federal Government Partners who need to meet security compliance restrictions, all the way up to the Department of Defense. Microsoft is working closely with the government to provide a secure infrastructure:
This new environment will run the latest enterprise-grade Office 365 Government productivity, security, compliance, and collaboration applications. We have a comprehensive approach to build, test, onboard, and audit our products to be compliant with government regulations, which will help ensure security and compliance for the environments. We work to drive efficiencies internally and with government regulatory bodies to help improve the timeliness of products to market.
Microsoft was embroiled in a fight with Amazon over a winner take all JEDI contract with the Department of Defense, with the DoD ultimately pulling back and rethinking its cloud strategies after awarding the company the contract only to have Amazon loudly complain about improprieties. Still, the company continues to build out its offerings for government and defense as it competes head to head with Amazon.
Logitech G Hub is software for users to manage their Logitech peripheral devices. That software is compatible with Windows 11.
However, some users have reported Logitech G Hub doesn’t work for them in Windows 11. Our readers reported that the software gets stuck loading when they try to launch it. Consequently, they can’t utilize that software when it doesn’t open for them.
Are you also trying to fix Logitech G Hub not working in Windows 11? If yes, the potential resolutions below might kick-start Logitech G Hub.
Why Logitech G Hub isn’t working in Windows 11?
Some of our readers signaled that the LGHUB Updater Service for the Logitech G Hub software is the culprit. When you open the app, it tries to update continuously because it doesn’t find any reply from the server, it remains stuck.
That may be caused by a bug within the app or a local connectivity problem. And if there’s nothing wrong with your connectivity, we’re leaning on the first probable cause.
Of course, there might be other possible reasons for this issue:
Corrupt or missing files – The software might not work correctly because it has one or more corrupt files. In this case, reinstalling Logitech G Hub will be a likely solution.
Faulty drivers – Problematic or outdated device drivers on your PC can be another potential factor behind this issue. Thus, you might need to update some device drivers on your PC to fix it.
Now that we know what the problem is all about, let’s try to fix it using the solutions below.
What can I do if Logitech G Hub not working in Windows 11?
1. Stop the LGHUB Updater Service
Start Logitech G Hub and while it is stuck in the loading screen, right-click the Start button and select Task Manager from the list.
Now, go to the Details tab, and look for lghub_updater.exe.
End the task and return to the Logitech G Hub to see if it is working.
This is a tested solution that worked for some of our readers so you should definitely try it.
However, note that after configuring all the Logitech peripherals and mapping their keys, save the configurations, close the app, and start it again.
2. Run Logitech G Hub as an administrator
Click Start on the taskbar, and select All apps on the menu.
Right-click the Logitech G Hub software on the Start menu to select More, and choose Open file location.
Then right-click the lghub.exe file to select the Properties option for it.
Click Compatibility to view that tab’s settings.
Select the checkbox for the Run this program as administrator setting on that tab.
Press the Apply button on the Logitech G Hub Properties window.
The Compatibility tab also includes a Run compatibility troubleshooter option. Clicking that troubleshooter option might also help you fix Logitech G Hub not working in Windows 11.
3. Update faulty or outdated device drivers
To generally update outdated or faulty device drivers, it’s best to run a scan with reputable third-party driver updater software.
Fortect Driver Updater is one such utility with which you can scan your PC’s device drivers. Its scan report will list all faulty and outdated drivers that need updating.
The software includes the option to run automatic scans, so you will get notified when your drivers are going out of date.
To restore the original boot settings, open MSConfig again. Select Load startup items on the General tab. Click Enable all on the Services tab. Then press Apply to save your selected options.
7. Reinstall Logitech G Hub
Press the Windows key + R to start a Run console, type appwiz.cpl and press Enter or click OK.
Select Logitech G Hub in the Programs and Features applet.
Click the Uninstall option for Logitech G Hub to remove the software.
Press the Windows key + R to open Run again, then input the following command and click OK: %appdata%
Select the leftover LGHUB folder and click the Delete button on your keyboard.
Press the Windows key + E to start File Explorer, then navigate to the following folder: C:\ProgramData
Select the LGHUB folder and hit the Delete button on your keyboard.
Then reinstall Logitech G Hub with the setup wizard you just downloaded.
To uninstall Logitech G Hub more thoroughly, check out the freeware IObit Uninstaller.
IObit Uninstaller is a third-party uninstaller utility that you can select to eradicate all leftover residual files and registry entries after uninstalling the software.
Those potential resolutions will help you kick-start Logitech G Hub in Windows 11 and restore it to working conditions.
If you still can’t start the software after applying those resolutions, consider contacting Logitech support.
You can discuss the issue with a support agent by clicking Chat on Logitech’s Contact Support page. Alternatively, you can post about the issue on Logitech’s support forum.
You’re also welcome to discuss Logitech G Hub not working in Windows 11 in the comments section for this page.
That’s an excellent place to add questions or even share other potential fixes for Logitech G Hub not working.
For many gamers the Xbox Series X has proved an elusive item to find. Restocks pop up here and there, only to see supplies get scooped up as soon as they appear.
The ongoing pandemic is largely to thank for this situation, creating a heightened demand for home entertainment devices while at the same time creating the conditions that have lead to a component shortage for such devices (such as the semiconductor chip famine).
One option which gamers hankering for the latest gaming hardware might consider is buying a refurbished Series X directly from Microsoft. While some may be loathe to buy refurbished, it presents a viable option if you can’t find one anywhere else.
But it is worth emphasizing the point that if you want to go this route, it’s best to buy directly from the source and avoid places like eBay. Buying a Series X from Microsoft eliminates much of the risk in buying from the second-hand market, as these units undergo professional quality tests and repairs. They also come with 12 month warranties, and extended warranties are also available with the Microsoft Complete program. Refurbished unites usually come at a discount – normally around 5 or 6%. It should be noted that the U.S. Microsoft Store requires you to buy a bundle with a game and controller. Similar deals are available for the Series S as well, for those interested in that console.
It’s been nearly a year and a half since the most powerful Xbox in existence was unleashed on world. If you haven’t been able to find one and are tired of the wait, buying a refurbished unit might just be your best bet.
Have you connected your scanner to your Windows 11 PC only to find out that your PC is not being detected by it?
If you are facing Windows 11 scanner not detected problem, then you aren’t alone. There are multiple users who have reported this issue with Microsoft’s latest operating system, Windows 11.
Be it HP, Canon, EPSON, or any other scanner, Windows 11 throws up compatibility issues when you connect a scanner to it.
Scanners are devices that have helped users that help you scan documents or anything and bring them to their PC. You can scan your drawing and load it on your PC to view it digitally. The same is the case with documents.
Corporates and workplaces make use of scanners and fax machines in high volumes. Imagine the chaos if the scanner stopped working in Windows 11 in a corporate or workplace.
Notably, the Windows 11 scanner not detected problem isn’t anything new. This issue has been consistent with older Windows OS versions as well.
If you are looking for solutions to fix the Windows 11 scanner not detected issue, then you have landed in the right place.
In this guide, we will give you a curated list of solutions that will help you fix the Windows 11 scanner not detected error. Let us check them out.
Why is my Windows 11 PC showing scanner not detected errors?
Device driver compatibility issues aren’t something new for Windows operating systems. When hardware fails to communicate with the PC, your PC will show an error message.
If the scanner is connected via USB or a serial port and it is still not detected by the PC, then the reason behind this could be outdated drivers, corrupt system files, or the presence of a bug in the installed version of Windows.
The Windows 11 scanner not detected error can take various forms. It affects scanners from not only one brand, but all major brands, including Epson, Canon, HP, Image Access, Panasonic, etc.
Here are the possible reasons behind Windows 11 scanner not detected error:
The Windows 11 system files are corrupt
Damaged USB port
Presence of bug in the version of Windows installed
Due to virus or malware
A third-party app is conflicting with the scanner driver
Outdated scanner drivers
Registry issues
Well, these are only a few reasons why you are experiencing a scanner not detecting an error on your Windows 11 PC.
There are multiple versions of this error, but the below-listed solutions will definitely help you cure and resolve this issue. Let us take a look at the solutions, one by one.
How can I fix Windows 11’s scanner not detected issue?
1. Restart your PC
Open the Start menu.
Click on the Power button.
Select Restart.
When you restart your PC, all the unnecessary files or processes are put to sleep, and when the system boots up again, important system files are re-loaded.
There is a chance that some important scanner-related files did not load during the previous installation. Try restarting your PC, connecting your scanner back again, and checking if this fixes the issue or not.
2. Reinstall scanner drivers
Right click on the Start menu icon.
Select Device Manager.
Expand the Imaging devices section.
Right-click on the problematic scanner and select Uninstall.
Reboot your PC.
Visit the official website of your scanner’s manufacturer’s website.
Download the appropriate scanner driver.
Install it and see if this fixes the issue or not.
During your previous installation, the scanner software might have failed to load some important communication files. That may be the reason you are experiencing the Windows 11 scanner not detected issue.
A simple solution to this would be to uninstall the current scanner driver installed on your PC, and reinstall it. This time, make sure not to interrupt the installation process.
Now, instead of making efforts to visit the scanner manufacturer’s website and download the update, you can make use of professional driver updating software.
Outbyte Driver Updater is a one-stop solution for all your driver-related needs. With just a simple click, it will scan for all outdated drivers, show you the result, and prompt you to install all the updates, all from within the software itself.
It can help you fix errors related to faulty or broken driver files, update old device drivers, locate missing drivers, and much more.
3. Repair corrupt system files
Open Start menu.
Search for Command Prompt.
Select Run as administrator.
Type the below command and press Enter:sfc /scanow
You PC will start scanning and possibly fix the issue as well.
Reboot your PC.
The SFC Scan is a very powerful in-built Windows troubleshooting tool that scans all of your system files and replaces all the corrupted ones.
All you need to do is execute a command in the CMD, and everything else will be done automatically. You can try using the SFC Scan tool and see if this fixes the Windows 11 scanner not detected error.
Otherwise, you can use trusted third-party repair software. It can help you fix multiple errors on your PC. If you think the Windows 11 scanner not detected error is caused by corrupt system files, then this tool can come in handy.
4. Set scanner services to open automatically
Open the Start menu.
Search for services and openit.
Locate Windows Image Acquisition (WIA) on the right-side and double-click on it.
Under Startup type, select Automatic.
Click Start.
Select Apply and OK.
5. Scan your PC for virus
Click on the upward arrow located in the bottom-right taskbar.
Select Windows Security.
Click on Virus & threat protection.
Choose Quick Scan and let Windows Security scan your PC for virus and malware.
You can also select the Scan options button.
Under Scan Options, you can also choose Full scan to deeply scan your PC for virus or malware.
We made use of Windows Security Defender to show the steps to scan your PC for viruses, as we don’t have any third-party antivirus applications installed on our Windows 11 PC.
But the above steps would give you an idea that you need to perform a scan to check for any viruses or malware present on your PC.
The presence of a virus or malware not only causes several issues, such as the Windows 11 scanner not detected issue, but it will also affect the smooth functioning of your PC.
Viruses and malware are of different types. So, they can trigger different problems, and it would be a safe bet to check your PC for viruses.
6. Check for Windows updates
Press Win + I buttons to open Windows Settings.
Select Windows Update from the left-pane.
Click on Check for updates button.
There are chances that due to a bug present in the previous version of the Windows update, the scanner isn’t able to communicate properly with your PC.
It is recommended that you keep your PC up-to-date as Microsoft rolls out new updates that not only bring new features but bug fixes for such errors as well.
7. Check for faulty cables
Scanner not detected error is caused by more than just faulty drivers or system files. It is also caused if the wire connecting your scanner to the PC is damaged.
We advise you to check if the scanner cable is free from damage. You can check if the cable is working or not by connecting it to a different PC and see if this works on it or not.
8. Reset Windows 11
Press Win + I buttons to open Windows Settings.
Click on Recovery from the right-side.
Under Recovery options, press the Reset PC button.
Select the type of factory reset your want to perform.
Choose the option how you would like to reinstall Windows.
Click Next.
Hit the Reset button.
You should reset your PC only if the above solutions did not help you fix the Windows 11 scanner not detected issue. This is one of the different ways via which you can reset your PC.
Do note that your PC may reboot multiple times during the reset process. But that is normal and nothing to worry about as it is a part of the reset procedure.
What else can I do to fix the Windows 11 scanner not detected error?
Well, there are few chances that the above-mentioned solutions won’t help you fix the Windows 11 scanner not detected issue.
However, if you are having a tough time fixing this problem, there are a few other solutions that you can apply and hopefully fix the problem at hand.
➡ Run scanner in compatibility mode
If your scanner isn’t working on any of the Windows 11 PCs, then we would recommend running it in compatibility mode.
Simply right-click on your scanner icon and select Properties. Switch to the Compatibility tab and select the option Run this program in compatibility mode. Finally, hit the OK button to activate.
➡ Run the troubleshooter
You can also make use of the Windows Troubleshooter tool to fix issues related to your hardware. Simply navigate to the troubleshooter page and press the Run button next to Printer.
The troubleshooter will identify the reasons that are triggering the issue and also prompt you to do what is necessary to fix it.
Let us know in the comments below which one of the above solutions helped you fix the Windows 11 scanner not detected issue.
Feel free to share any other solution that you applied and resolved the problem so that others experiencing the issue can try that as well.
A VPN (Virtual Private Network) is a tool that can be used to gain access to another network. It could be used to access resources or even mask your identity over the web. But, several users have reported getting the VPN error 720 in Windows 11.
This will prevent you from establishing a VPN connection. The error message that accompanies it reads: A connection to the remote computer could not be established. You might need to change the network settings for this connection.
There isn’t much in the error message to help you troubleshoot the issue. So, if you are encountering the Windows 11 VPN error 720, just try the fixes listed in the following sections to eliminate it.
Why am I encountering the VPN error 720 in Windows 11?
There are a bunch of reasons that could lead to this error. Issues with Internet connectivity or slow speed could be the cause. Also, the Windows Firewall or other similar third-party applications could be blocking the connection.
Other than that, corrupt or outdated network drivers too are known to cause the Windows 11 VPN error 720. A corrupt one can be easily be identified by the warning sign near the driver icon in the Device Manager.
Issues with the WAN Miniport driver are just as likely to cause the error. Also, make sure that you are entering the correct credentials and that the network you are trying to connect to is working fine since problems with either of these are a probable reason.
With a basic understanding of the underlying causes, you are now in a far better position to troubleshoot. So, let’s walk through the most effective fixes for Windows 11 VPN error 720.
How do I fix the Windows 11 VPN error 720?
1. Check if the VPN IP address is correct
Press Windows + S to launch the Search menu, enter Control Panel in the text field, and click on the relevant search result that appears.
Click on the Network and Internet option here.
Next, click on Network and Sharing Center.
Click on Change adapter settings from the list of options on the left.
Now, right-click on the VPN you are trying to connect to, and select Properties from the context menu.
Next, navigate to the Networking tab from the top.
Select the Internet Protocol Version 4 (TCP/IPv4) and click on the Properties button.
Tick the Use the following IP address option and enter the correct IP address and DNS server in the designated fields, and click on OK at the bottom to save the changes.
After you have made the changes, restart the computer and check if the Windows 11 VPN error 720 is fixed.
2. Disable the firewall
Press Windows +S to launch the Search menu, enter Windows Defender Firewall in the text field at the top, and click on the relavnt search result.
Next, select Turn Windows Defender Firewall on or off from the options listed on the left.
Now, tick the option for Turn Windows Defender Firewall off under both Private network settings and Public network settings, and click on OK at the bottom.
Oftentimes, the Windows Defender Firewall may block you from establishing a VPN connection. So, it’s best that you disable it and check if the Windows 11 VPN error 720 is fixed.
Also, if you use a third-party antivirus or firewall, make sure to disable it from there as well, or you can simply uninstall the app.
3. Reinstall the WAN Miniport driver
Press Windows + X or right-click on the Start icon to launch the Quick Access/Power User menu, and select Device Manager from the options listed here.
Double-click on the Network adapters entry to expand and view the devices under it.
Right-click on the WAN Miniport entry here, and select Uninstall device from the context menu.
Click Uninstall in the prompt that pops up.
Now restart the computer, and Windows will automatically install a fresh driver for the device.
Repeat the same steps for all entries here that read WAN Miniport.
Press Windows + S to launch the Search menu, enter Device Manager in the text field at the top, and click on the relevant search result.
Now, double-click on the Network adapters entry.
Locate the network adapter driver, right-click on it and select Update driver from the context menu.
Select Search automatically for drivers from the two options that appear in the Update Drivers window.
If it was a bug in the current version of the driver or it was simply malfunctioning, there’s a chance of you encountering a bunch of errors. After the network driver is updated, the Windows 11 VPN error 720 should be fixed.
However, there’s a chance that you may not be able to install the latest version using the Device Manager. In which case, you can try the other methods to update the network driver.
But there’s an easy way to keep all the drivers on your system up-to-date, use a reliable third-party app. We recommend using Outbyte Driver Updater, a dedicated tool that automatically scans for the latest driver version and installs it on your computer.
5. Reset network settings
Press Windows + S to launch the Search menu, enter Windows Terminal in the text field, right-click on the relevant search result, and select Run as administrator from the context menu.
Click Yes on the UAC (User Account Control) prompt that pops up.
Click on the downward-facing arrow at the top, and select Command Prompt from the options. Alternatively, you can hit Ctrl + Shift + 2 to launch Command Prompt in a new tab.
Now, paste each of the following commands one a time, and hit Enter after each to flush the DNS and reset Winsock:ipconfig /flushdnsipconfig /registerdnsipconfig /releaseipconfig /renewNETSH winsock reset catalogNETSH int ipv4 reset reset.logNETSH int ipv6 reset reset.log
Once done, restart the computer for the changes to come into effect.
After making these changes, the Windows 11 VPN error 720 should be fixed, and you can now establish a connection.
6. Use a premium VPN
If nothing else works, you always have the option to use a reliable VPN. And, we recommend using the PIA (Private Internet Access) VPN. This one actually walks the talk, they don’t store your data in any form, it’s open-source, and offers 24×7 support.
Apart from that, you can use it on up to 10 devices at no extra cost with a dedicated app for each. Once you have it up and running, the Windows 11 VPN error 720 should be fixed, and you would no more face trouble establishing a VPN connection.
That’s it! With the error finally solved, you can try some of the best VPNs for Windows 11 for better connectivity and enhanced privacy. Also, find out how to fix other issues with the VPN, in case there’s no specific error code.
Tell us which solution worked and if you are using a third-party VPN, in the comments section below.
We all know Wmic as a command-line and scripting interface that simplifies the use of Windows Management Instrumentation (WMI) and systems managed through WMI.
Wmic actually operates in two modes. The first one is interactive, which allows commands to be entered one line at a time, and non-interactive, which allows commands to be scripted for use in batch files.
You should know that Microsoft removed WMIC from Windows 10 and Windows 11, but you can add the functionality back to your PC if that’s what you choose.
However, users that did add Wmic back to their Windows 11 machines are reporting dealing with the Wmic is not recognized as an internal or external command error.
Don’t worry, we can show you how to fix that in just a few minutes by going through our simple but effective troubleshooting process.
How do I add Wmic to Windows 11?
Starting with Windows 11 build 22572, WMIC is only available as an optional feature that can be uninstalled or reinstalled.
This process is extremely simple and it only requires you to make a few adjustments in the Settings menu of your Windows 11 device.
Before we start, keep in mind that you must be signed in as an administrator to add and remove this optional feature.
Open the Start menu and access Settings.
Select Apps and then click on Optional features.
Press the View feature button.
Search for Wmic, check the box next to it and press Next.
Click the Install button.
Now that we’ve successfully added Wmic to Windows 11, its time to take a look at the error users have been flagging.
How do I fix Wmic not being recognized by Windows 11?
When you get the Wmic is not recognized as an internal or external command error, it means that the utility’s directory is not found on your Path.
We can easily fix this and here is what you need to do in order to solve this matter once and for all.
Opem the Start menu and open Command Prompt.
Run the following command: SET PATH=C:\Windows\System32\wbem\;%PATH%;
After setting the path variable using the command above, run the following command to confirm whether Wmic is picked properly:
where wmic
If the results come back as C:\Windows\System32\wbem\WMIC.exe, you have done your job admirably and we can move on.
However, Path Environment variable set by using the above SET command will be available only for the active cmd session and has to be done every time, when new command prompt session is launched.
To make this change permanent, all you have to do is:
Open the Start menu and access Settings.
Select System and click on About.
Click on Advanced system settings.
Press the Environment Variables button.
Under System variables, select Path and press the Edit button.
Add %SystemRoot%\System32\Wbem and press Ok.
That’s it! Now your Windows 11 operating system will recognize Wmic and you can resume your hard work, knowing that if it happens again, you will be on top of the situation.
Was this guide helpful to you? Let us know in the comments section below.
With increased remote work, it is clear why you may need to access your office computer from your home at some point. Remote access means you can use processes and applications as if you were physically on that computer.
This is a fascinating feature of the windows OS powered by software, including the Remote Desktop Protocol (RDP). This software is handy for technical support, collaborative work, and demonstrations.
This article looks at the very best free-to-use remote desktop applications and tells you why they may be your best options.
How does remote access work?
Remote access requires a stable internet connection. In most cases, you’ll have to install and activate the software on both devices that will be connected. For example, you may install this software on your office and home computers.
You can use Windows inbuilt Remote Desktop Connection (RDC) app or a third-party application for the connection. You will have to give access and exchange credentials between the RDC on the connecting devices.
Is it safe to use remote desktop software?
While remote desktop software has many use cases and advantages, does it also make you vulnerable to cybercriminals? It could.
Hackers can use the remote desktop protocol to gain access to your computer. We recommend that this feature be disabled on Windows 11 when you are not deliberately trying to establish a remote connection.
You should have no worries once you use strong passwords and do not leave this feature enabled when not in use.
Like many we will discuss, this software was created to help with the maintenance of PCs and other devices. It was released in 2005 and has consistently increased in functionality.
Even though it is proprietary software, it does not require user registration and offers free services for non-commercial use.
This software is user-friendly and includes features for remote windows control, desktop and screen share, and remote launching of applications. All the features of this remote desktop software are available on the Windows 11 installation.
One great functionality of this software is that it allows interconnectivity between different operating systems. For example, you can connect from your Windows 11 to a macOS.
It maintains a high standard for the security of your information by using an RSA private/public key between connected devices. This implies that nonauthorized devices will not be able to participate in a session.
There is AES (256-bit) end-to-end encryption during Windows remote sessions to eliminate the risk of data interception.
This free and powerful remote desktop software is distributed under General Public License (GNU) terms. It allows you to take control of a second PC using your keyboard and mouse as you would on your computer.
It uses VNC, a Frame buffer protocol, to remotely view and command desktops over the internet. To establish a remote session, you must run a VNC client on the PC that will be controlling and a VNC server on the PC that will be accessed.
It is backward compatible with Windows editions and is cross-platform compatible with other operating systems.
A downside to this tool is the steep learning curve and a slow innovative pace compared with others on this list.
For free software, Remote Utilities has a competitive set of functionality. Once the pairing is done using the Internet ID, you can access as many as ten remote computers.
For connection, Remote Utilities provides a viewer for the controlling PC and Hosts for the remote computers. The Hosts guarantees you can connect with unattended access. It also has a run-only agent that allows spontaneous access and a feature to route remote connections.
The many features of this tool make it an excellent option for enterprise and personal use. The controlling computer will be able to access a task manager, control the power, transfer files, and chat. This tool is great for Windows 11 but will not be able to work on other operating systems.
Unlike other remote connection software on this list, Zoho Assist is cloud-based. Even though you do not need an installation on your computer, it is one of the best ways to connect with Windows 11 remotely. It takes just a few seconds to be set up and render remote assistance to customers.
The Zoho Assist web-based console offers a range of features, including adjusting the remote screen’s quality, switching between monitors, chatting, and file transfers.
You will like the unattended feature that allows the management of PCs anywhere around the world, even without someone present at the computer being accessed.
The name gives it away. It is the Remote Desktop owned by Microsoft. It will be the first try for many since it should be most compatible with Microsoft software and Windows 11.
This remote desktop app offers basic features and may have a few limitations, but it is totally free. You will be able to access Windows computers from mobile devices, Macs, and other Windows computers.
You, however, will not be able to gain access to a Mac from your Windows computer, it is not bidirectional. It is backward compatible down to the Enterprise, Ultimate, and Professional editions of Windows 7.
If you connect to your PC, it does not require authorization, but essential features like file sharing are not supported.
Additional features:
High quality audio and video streaming
Rich multi-touch experience with support for Windows gestures
How can I stay protected when using remote desktop software?
How you stay safe while using remote desktop software is similar to how you protect yourself while connected to the internet.
These are a few precautions you should take:
Always use strong passwords
Set an account lockout policy on your computer
Use a trusted Virtual Private Network (VPN)
Limit the number of users with remote access
Regularly update your software
This list is in no particular order. All these windows 11 free RDPs discussed may vary in features but will help you successfully remotely access another desktop.
More and more people are experiencing the new and improved Microsoft operating system, but it seems like some of them still prefer the old school design.
There is no doubt that the new context menu brings up impressive consistency to Windows 11.
If we think about Windows 10, the fact that each application had its own context menu elements created a serious mess for some people.
From the Windows 11 transparent taskbar to round corners, this OS is a masterpiece. In this matter, worldwide users are interested in discovering how to quickly disable the Windows 11 Show More Options menu.
The process is pretty simple, so if you’re in the same boat, make sure you check this guide entirely because it is dedicated only to you!
How can I disable the Windows 11 Show More Options Menu?
Disable show more options using Command Prompt
Command Prompt is a very handy and helpful built-in app on your OS that helps you communicate with it. You can use cmd to disable the show more options menu on Windows 11 in just a few simple steps:
1. Hit the Windows key to open the Start Menu.
2. Type cmd in the search box to search for Command Prompt.
3. Right click on the first result and select Run as Administrator.
4. In the opened window, input the following command: reg add HKCU\Software\Classes\CLSID\{86ca1aa0-34aa-4e8b-a509-50c905bae2a2}\InprocServer32 /ve /d "" /f
5. Press Enter. Command Prompt will now execute your command.
6. Restart your PC.
Revert File Explorer to the old look
Use the following keyboard shortcut to open Windows 11 File Explorer: Windows + E.
Click on the 3-dots menu at the top, then choose Options.
Once you’re inside theFolder Optionsmenu, navigate to theViewtab.
Now, scroll down through the options and check the box associated with Launch folder options in a separate process.
Click Apply to save the changes, then on OK.
Restart your PC for the changes to take effect.
So, these are the already tested methods you can try to disable the Windows 11 Show More Options menu. As you can see, both processes are pretty simple and don’t consume time.



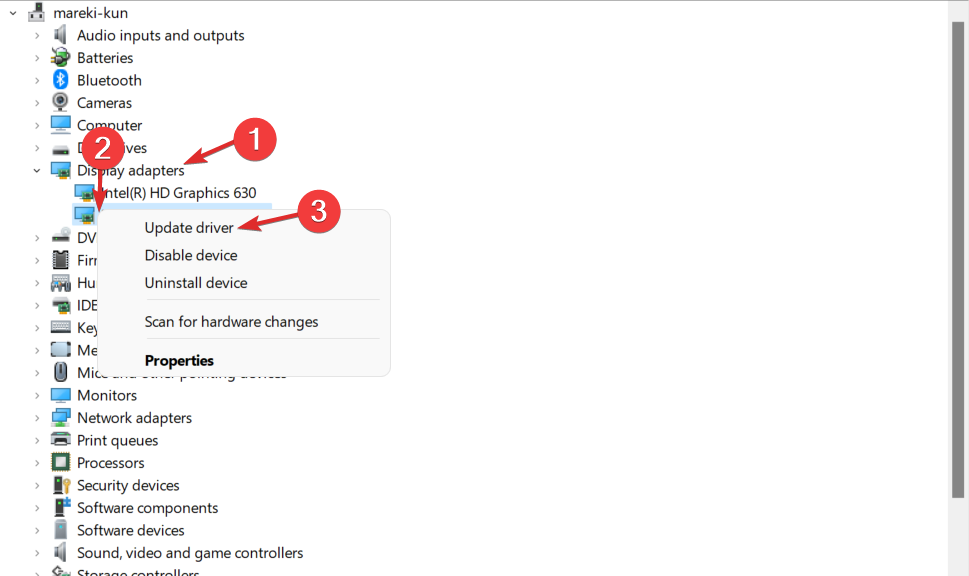



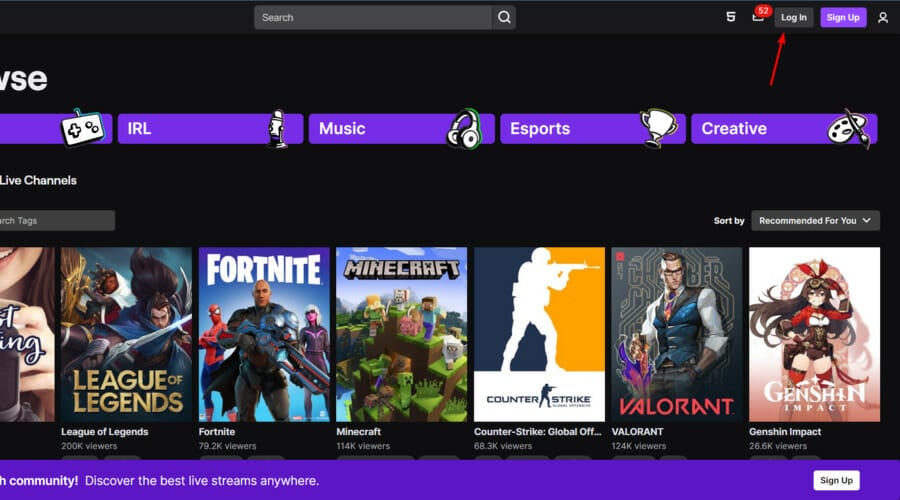
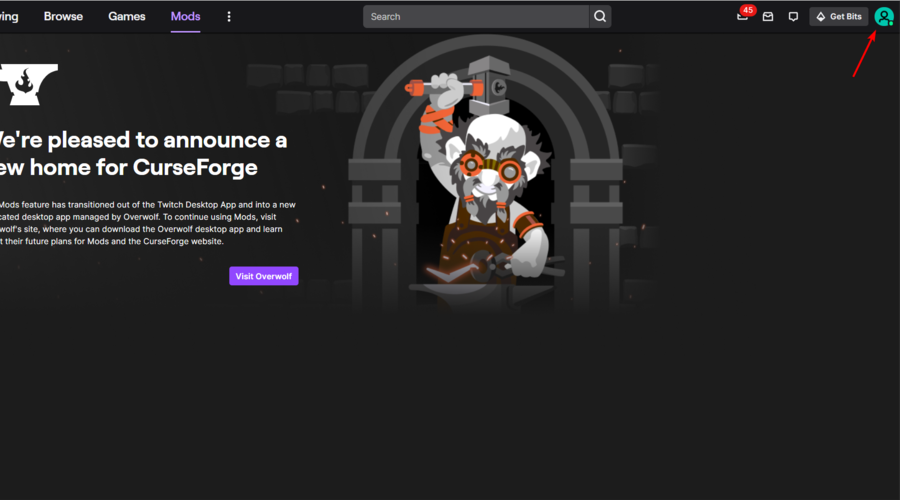
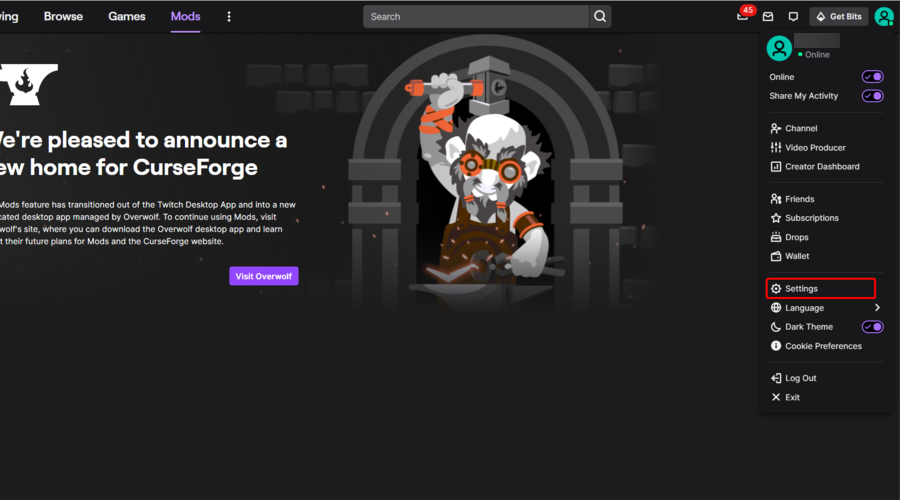


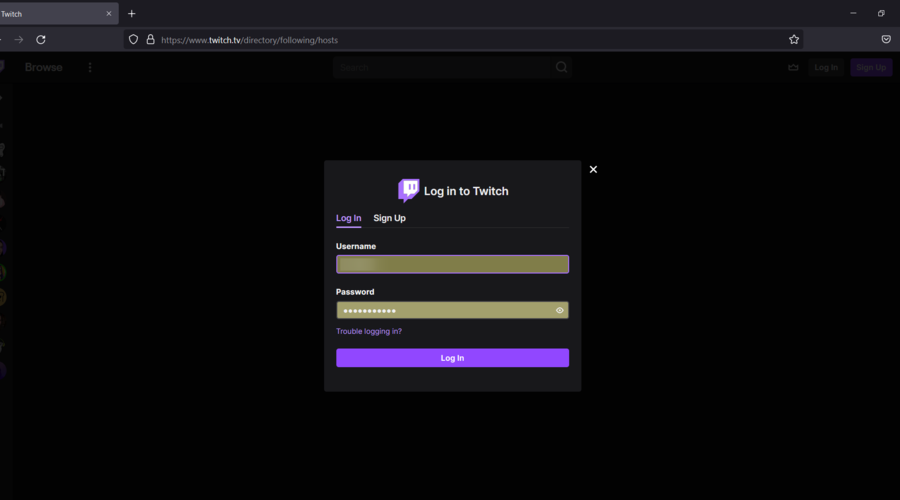


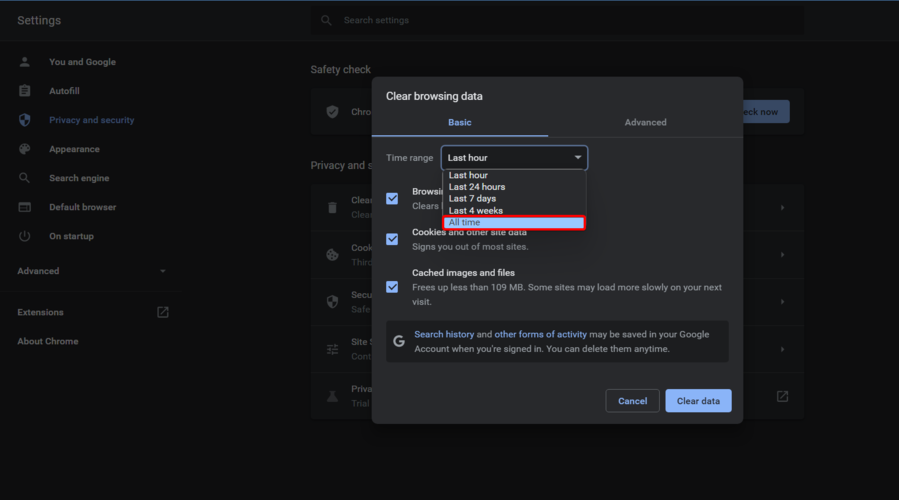
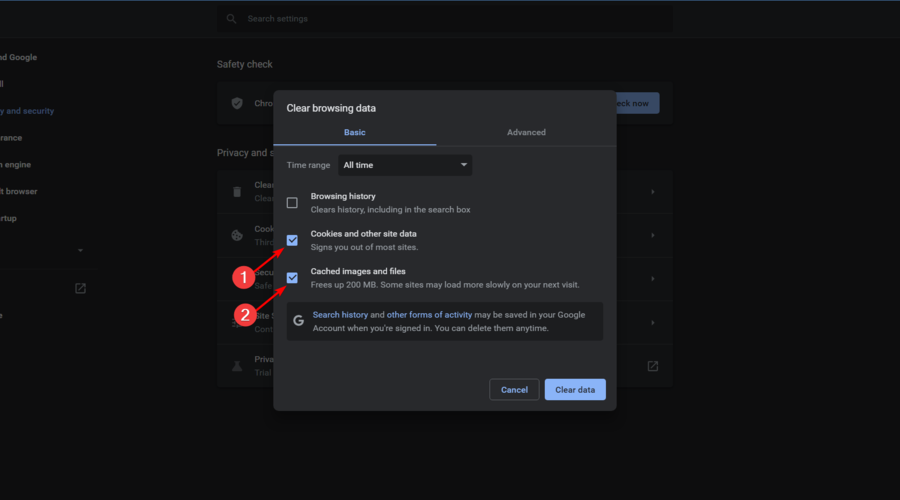


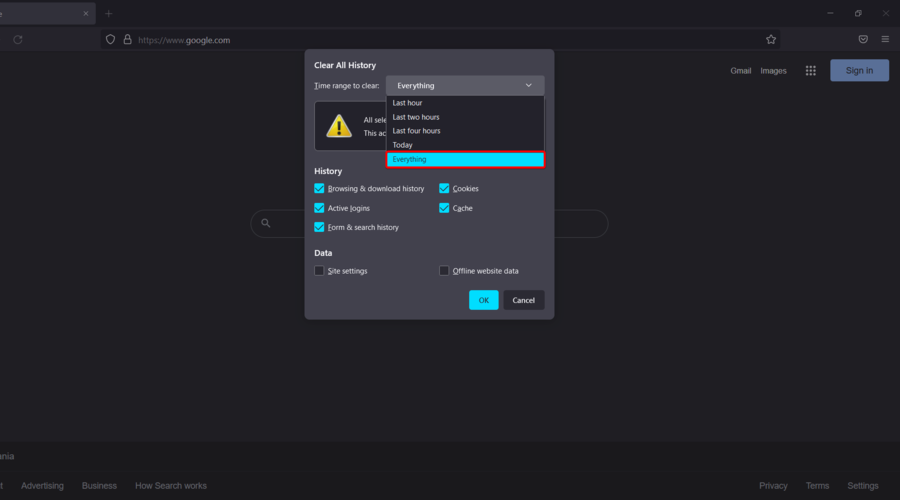


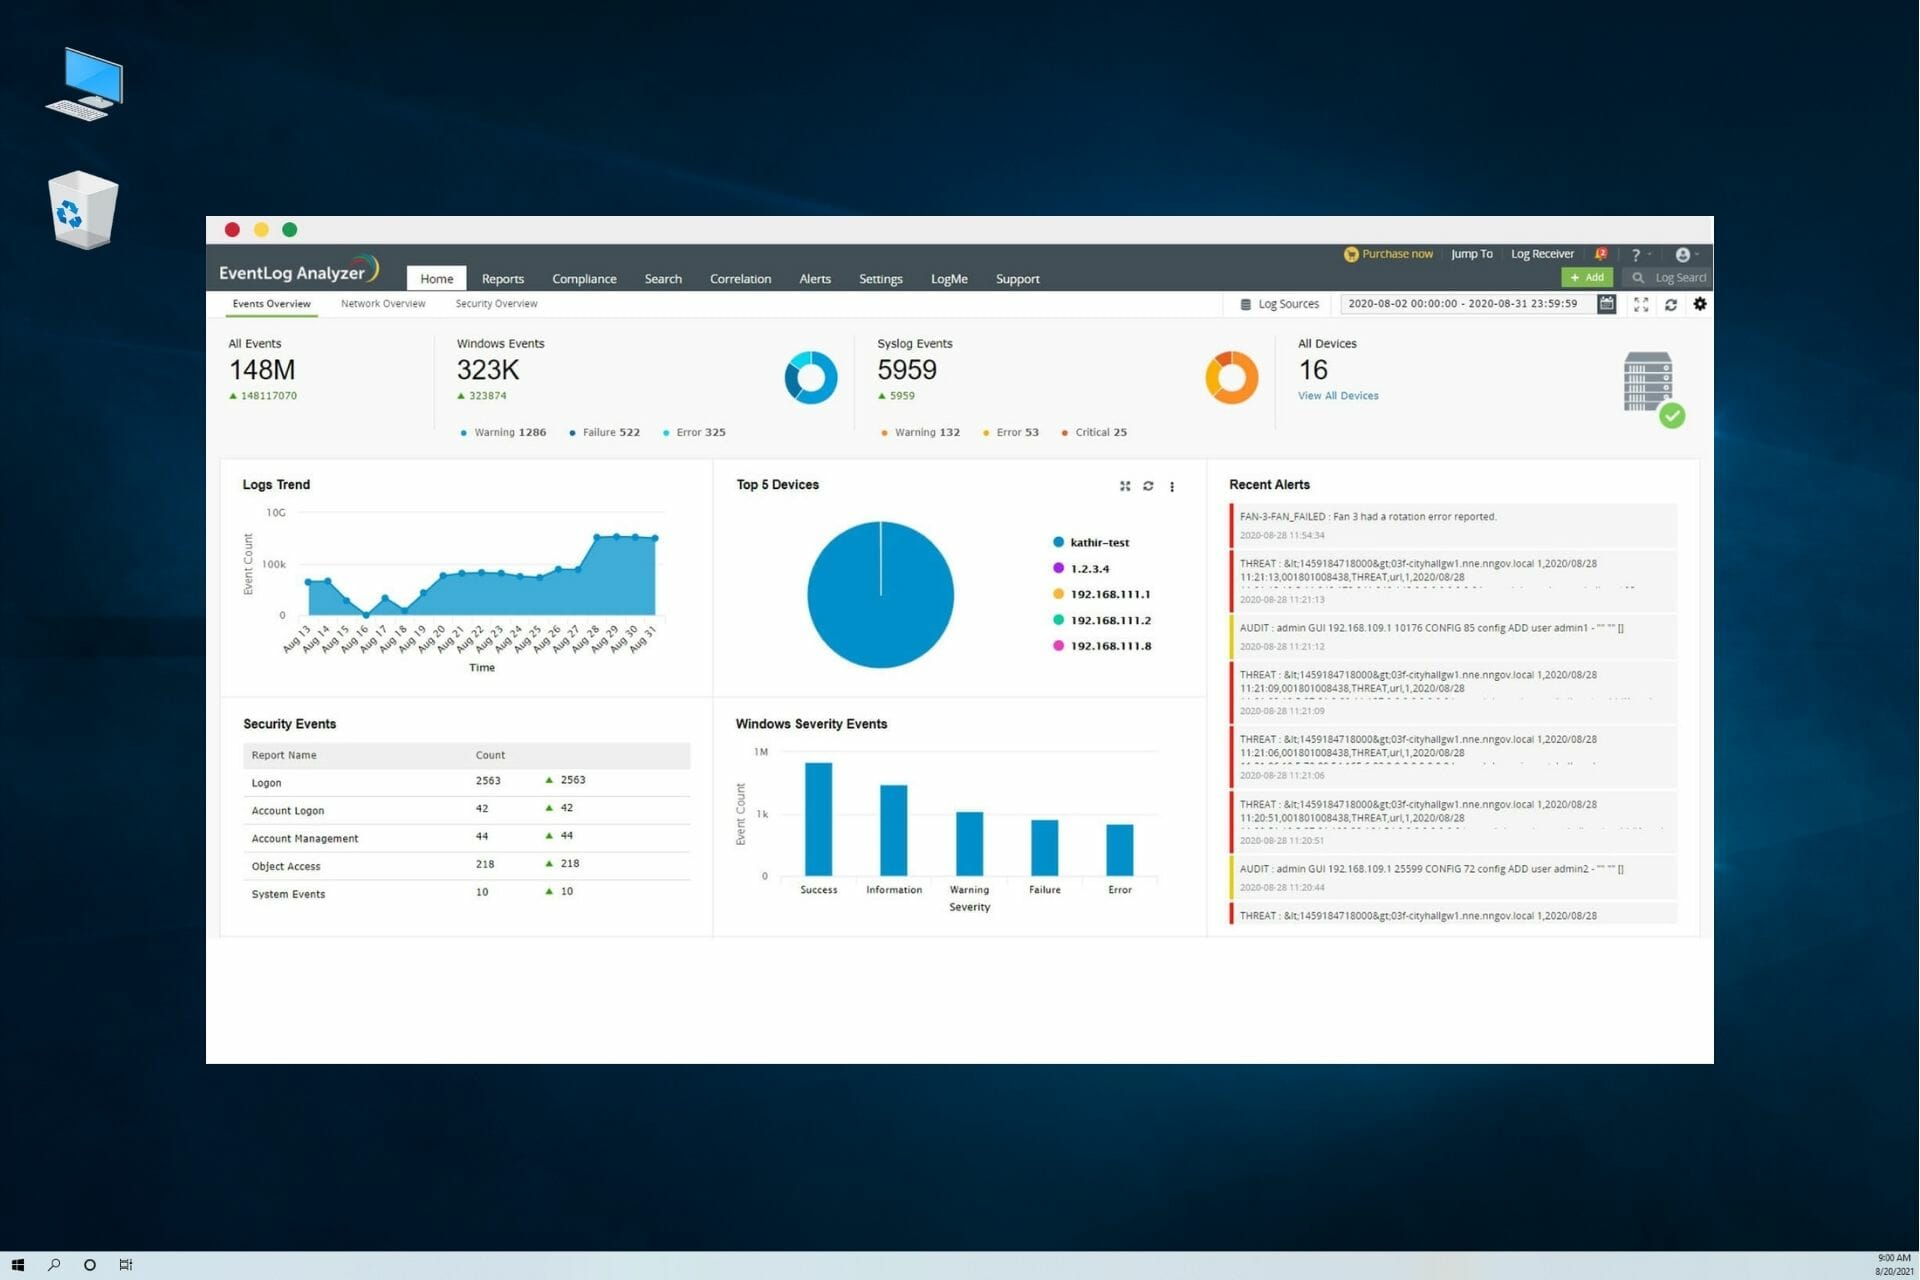
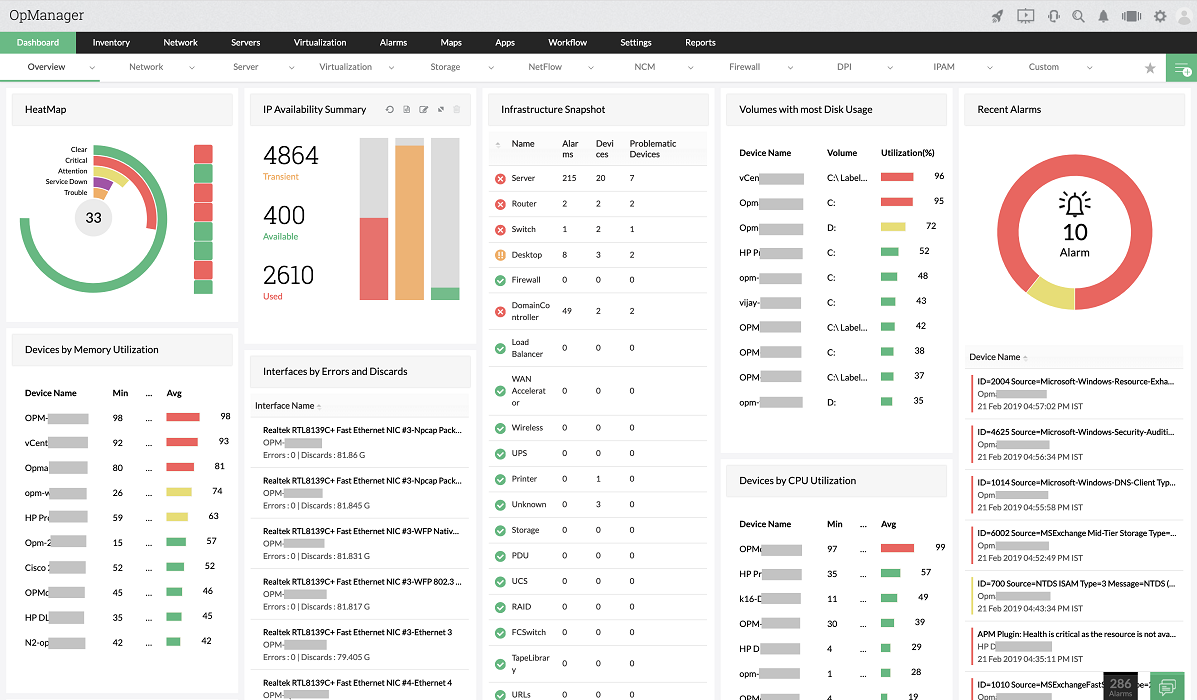

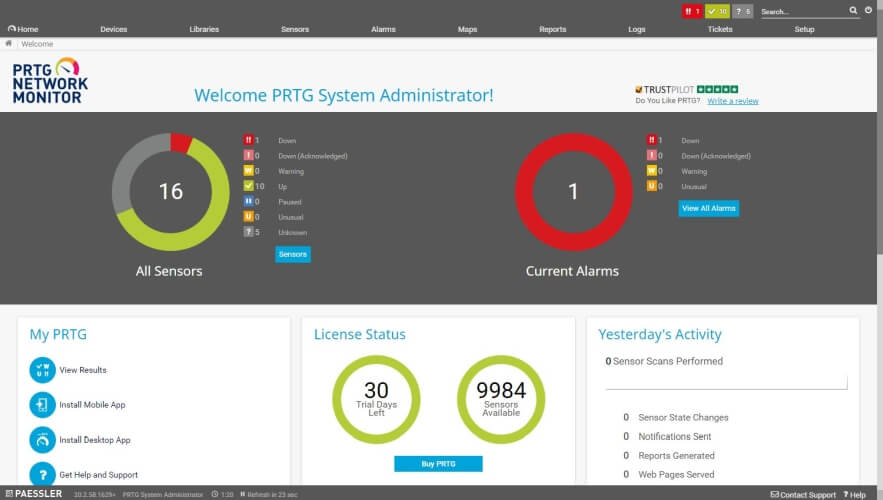

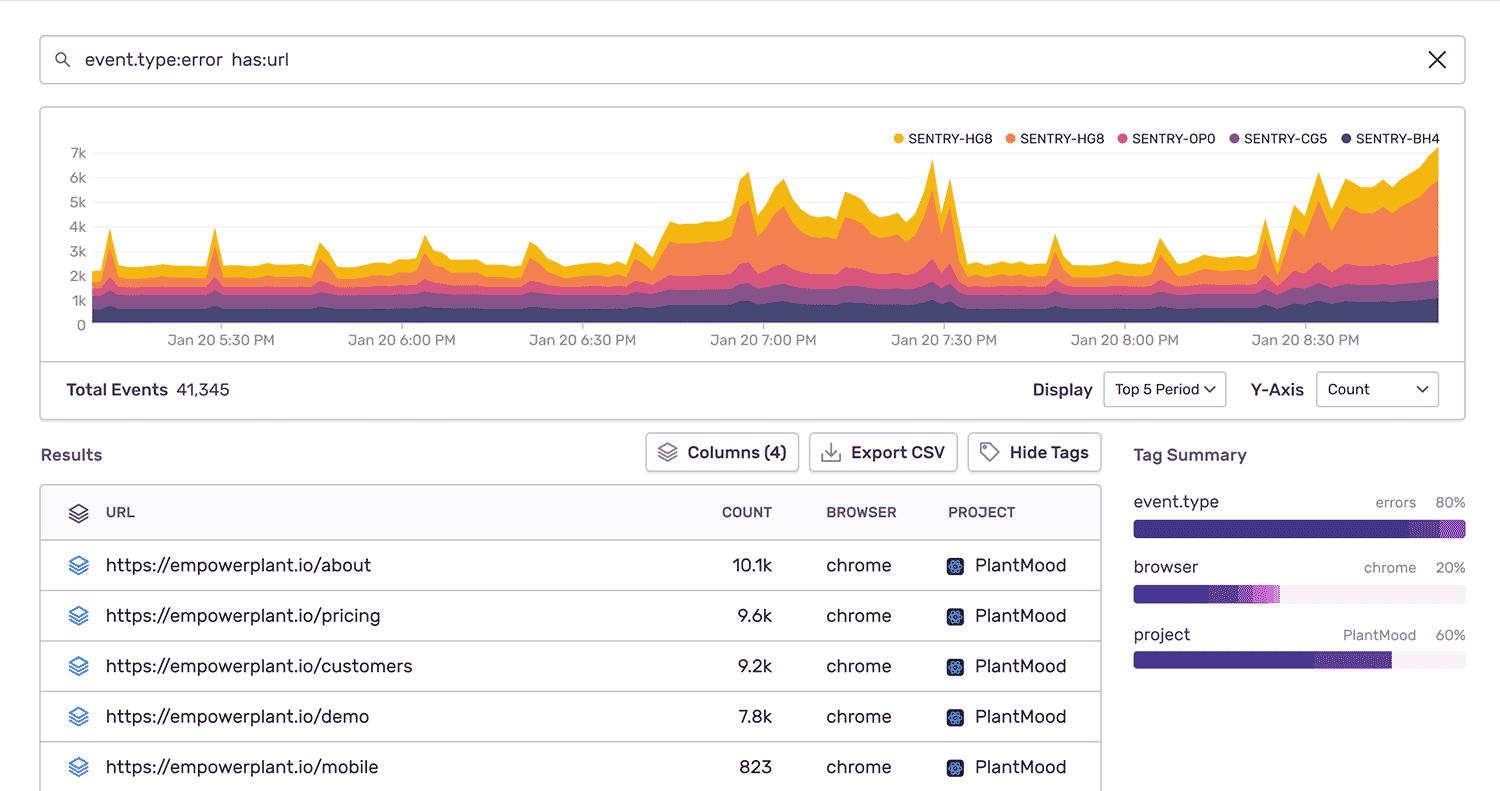

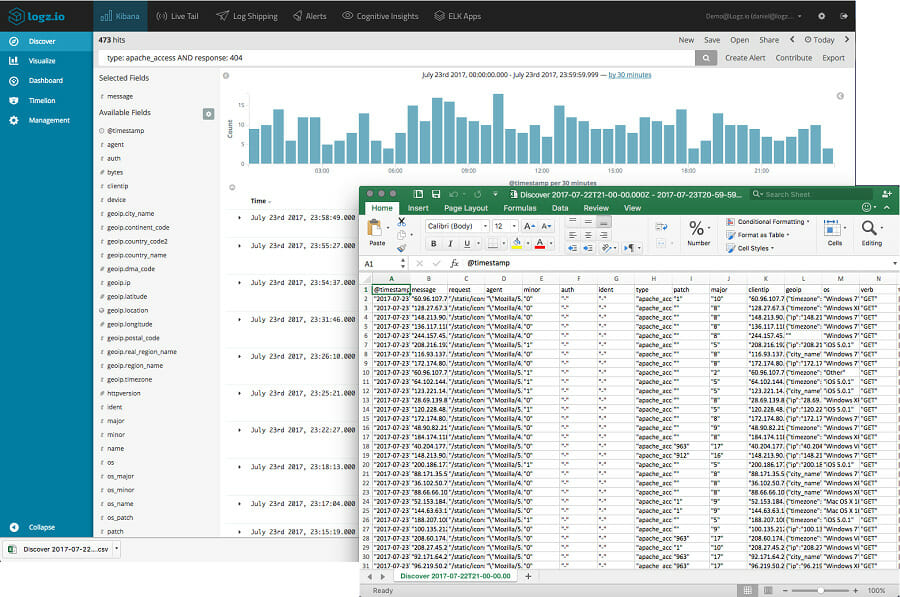
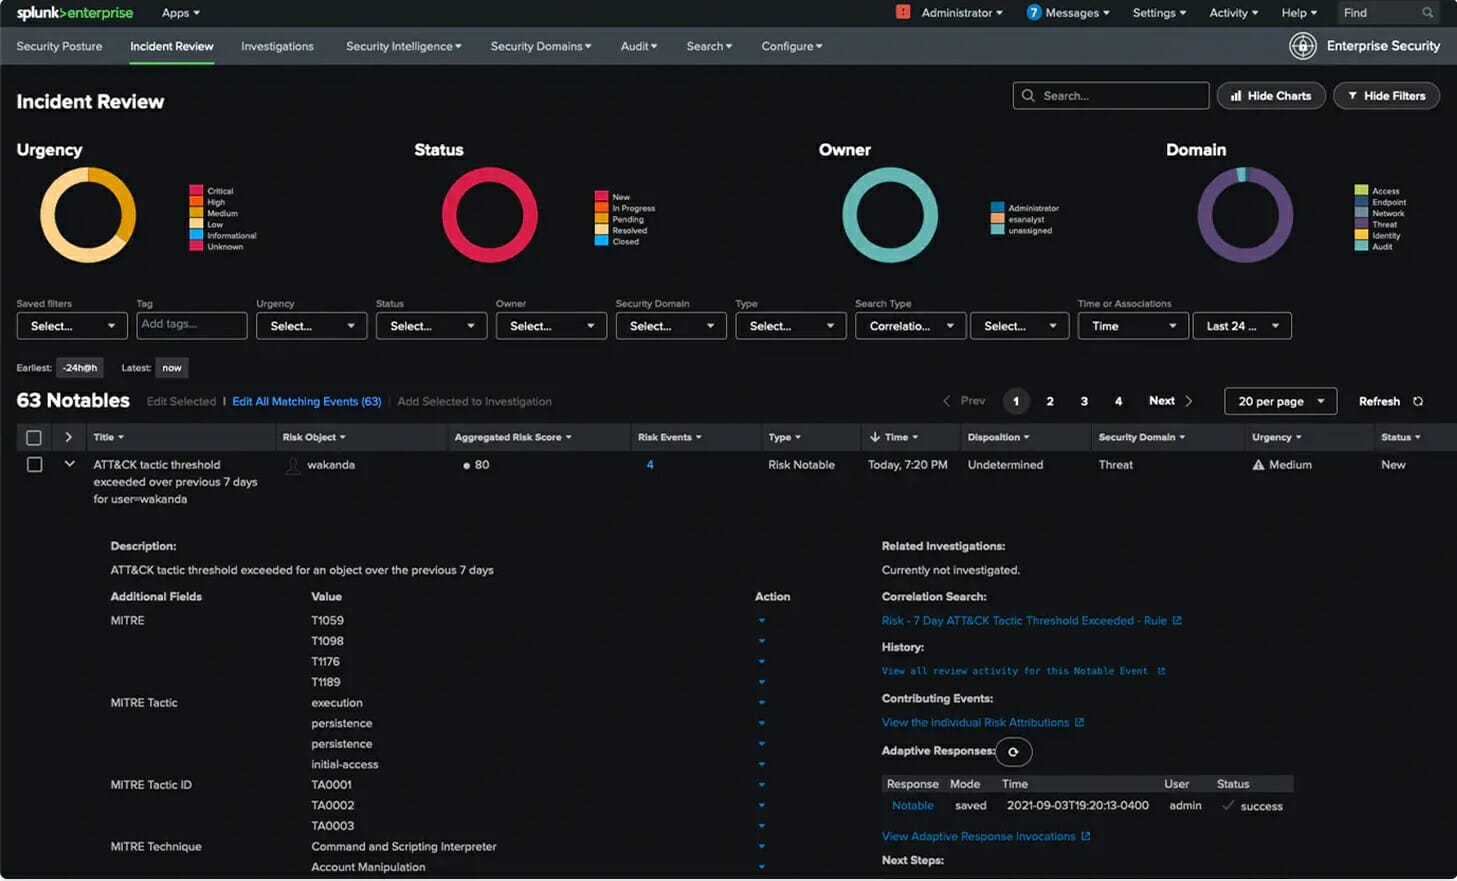

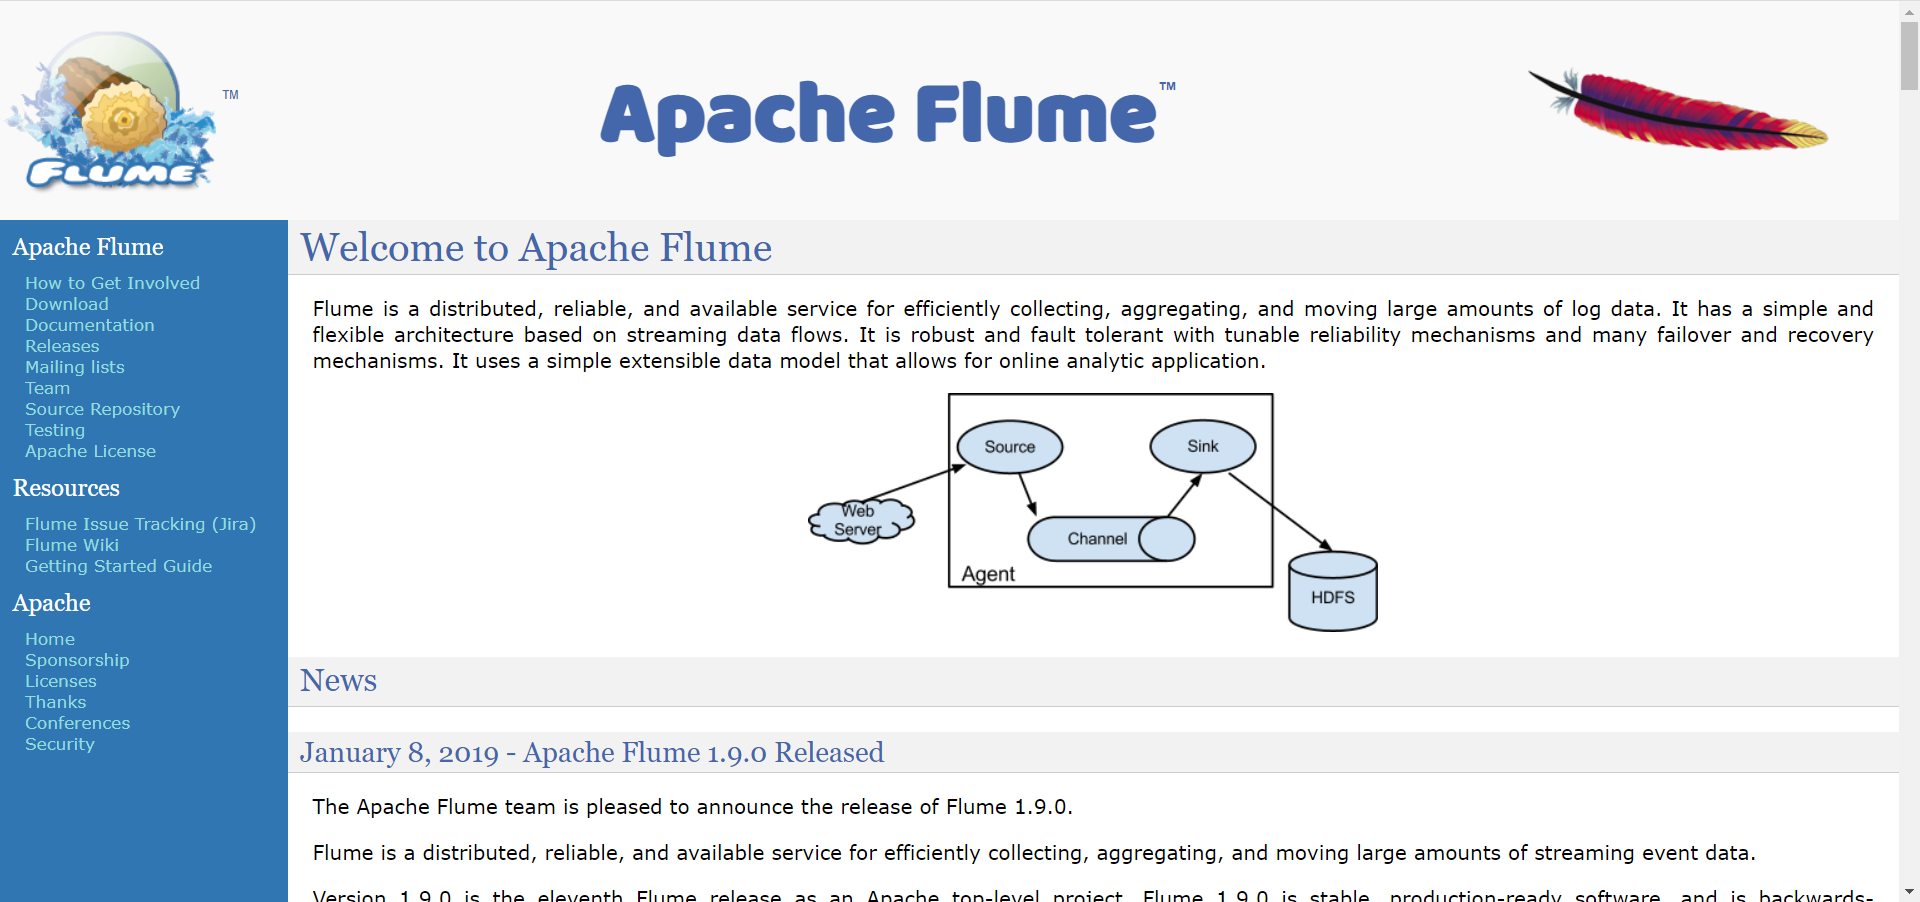
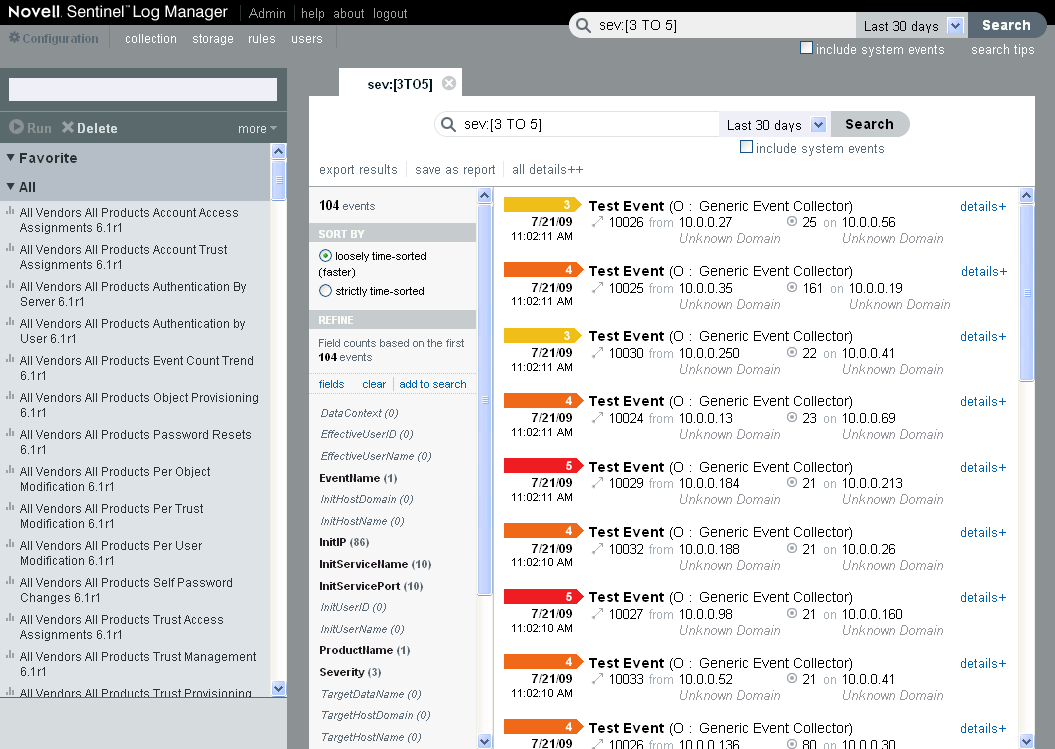
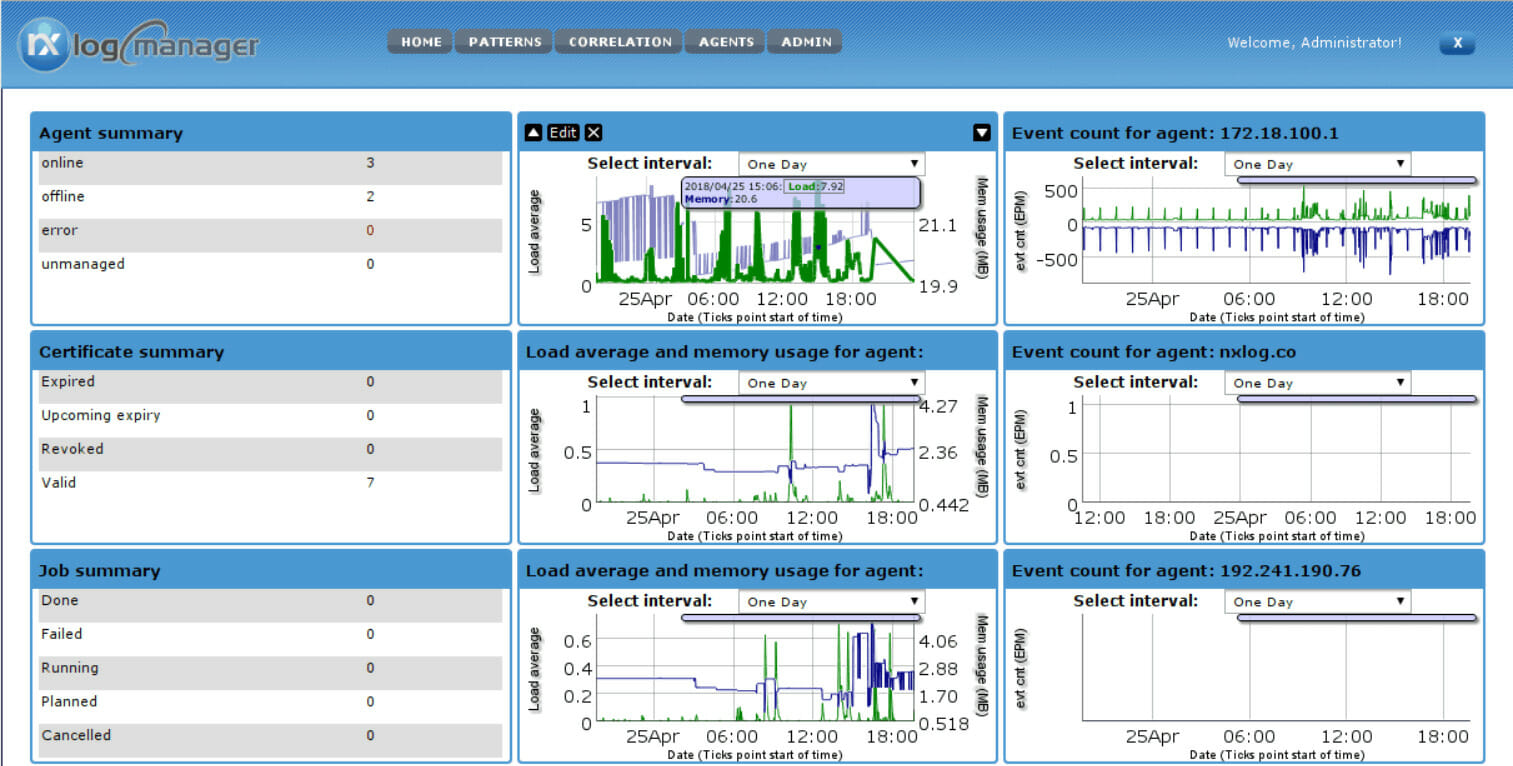





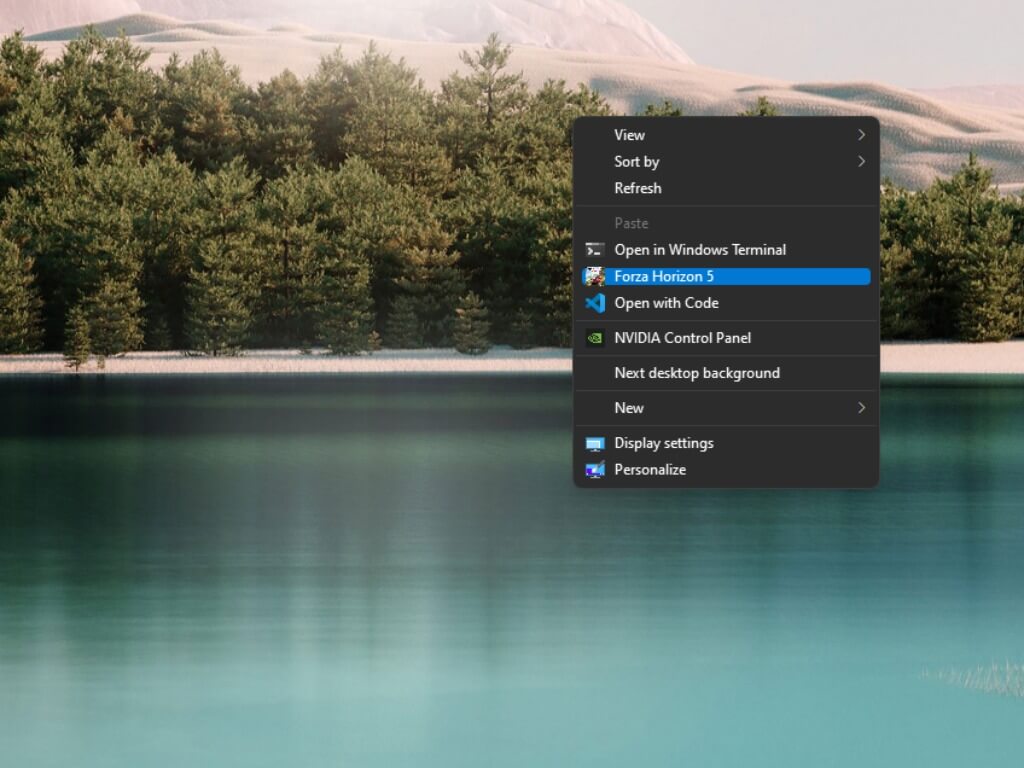
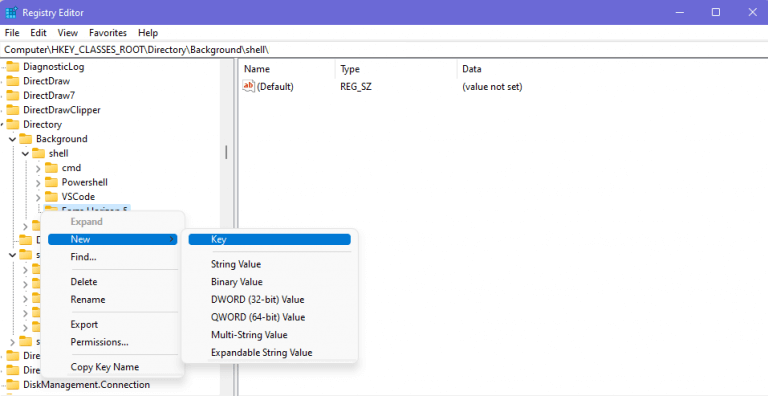
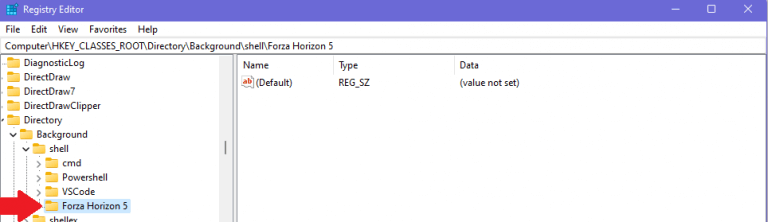
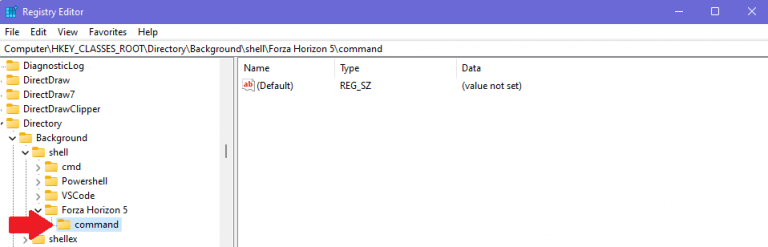
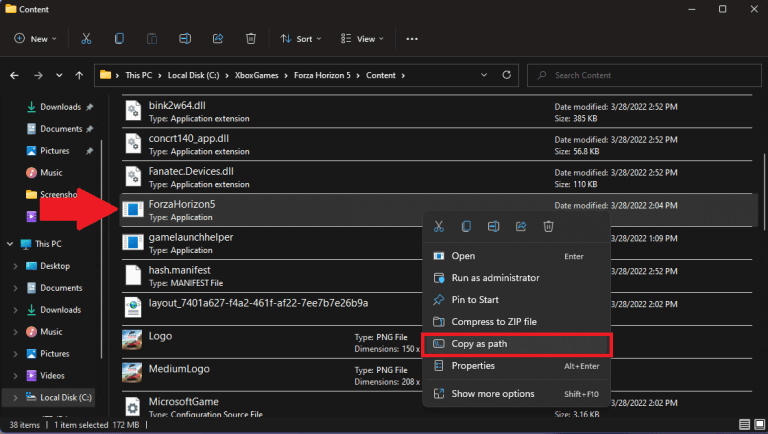
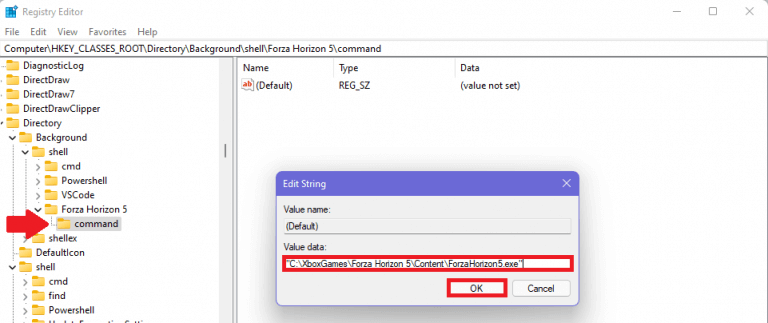 Close the Registry Editor when you are finished adding applications to the File Explorer context menu.
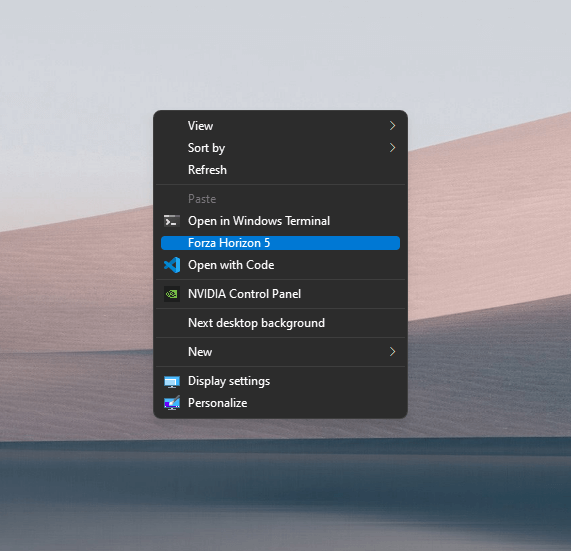 But what if you want to add an icon to your application? Here’s what to do.