Fix: Bluetooth not working after Windows 10 Update

The Windows 10 Update usually contains much-needed improvements, especially for desktop users, but it sometimes generates annoying issues.

Some of the elements that are affected in this process happen to be the Bluetooth drivers.

Sometimes Windows 10 users may encounter problems with Bluetooth connectivity which could be caused by various factors. Speaking of issues, let’s have a closer look at what our readers reported.

When does this error occur and what to expect?

  • Bluetooth disappeared from Windows 10/Bluetooth driver missing after Windows 10 update
  • Bluetooth is not available on this device
  • Windows Update broke/removed Bluetooth
  • Bluetooth not working after BIOS update/Sleep/installing ScpToolkit
  • Bluetooth doesn’t work after you upgrade to Windows 10 from Windows 8.1 or Windows 7
  • Also, Bluetooth not working after Windows 11 update (Fortunately, we have all the tested fixes for when Bluetooth is not working in Windows 11).

In this article, we’re presenting you with some solutions that you can try when Bluetooth is not working after Windows 10 update.

How do I fix Bluetooth not working?

1. Set Bluetooth service startup type to Automatic

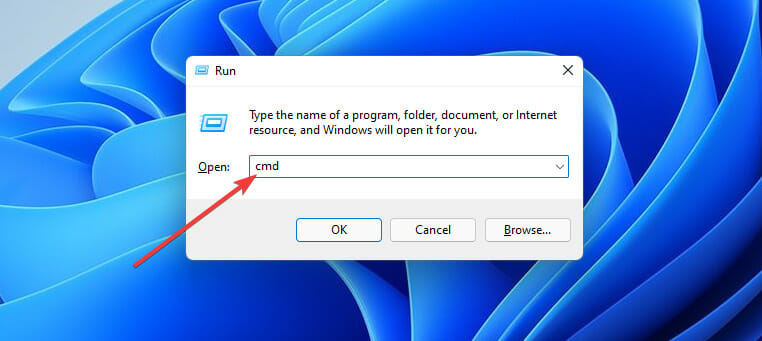
1. Press Windows Logo + R, type services.msc, and press Enter.

bluetooth not working windows 8.1 update

2. Double click on Bluetooth Support Service.

bluetooth not working windows 8.1 update 2


3. Go to General Tab and change the startup type from Manual to Automatic.

bluetooth not working windows 8.1 update 3


4. Click on Log On Tab and mark on This Account.

bluetooth not working windows 8.1 update 4

5. Type your account name or browse to find your account name.
6. Now remove your both hidden password and restart Windows 10.

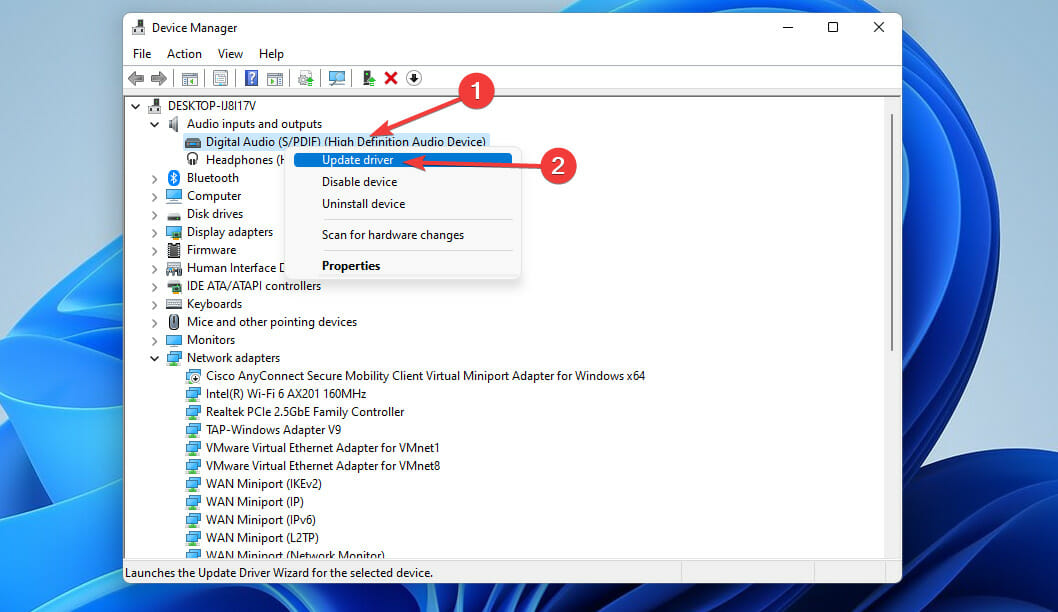
2. Use a Driver Updater

Updating your drivers has never been easier than this because third-party solutions offer the security you need at optimum speed.

In addition, with such powerful software, you can resolve the Bluetooth trouble or any other driver without causing more serious errors.

3. Reinstall Bluetooth drivers

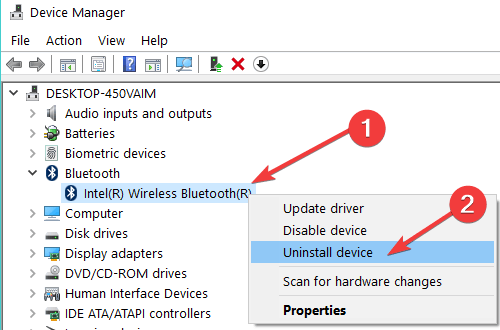
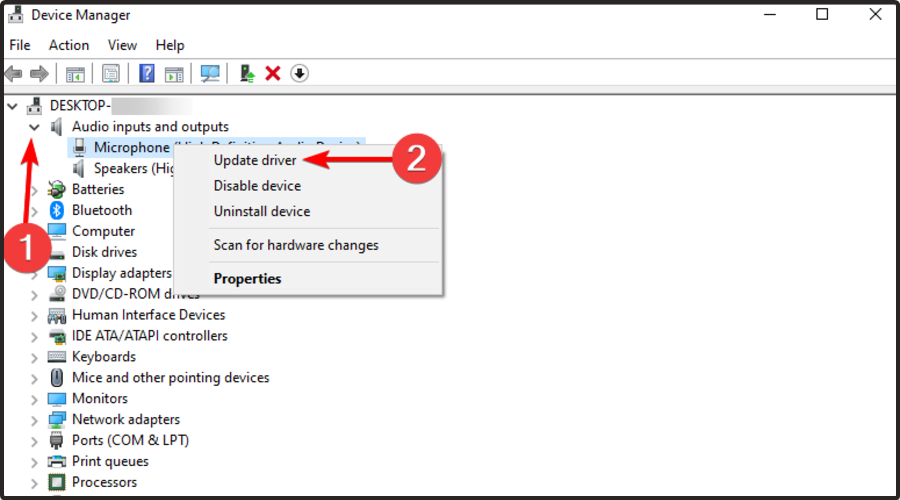
  1. Simply select your Bluetooth driver, then right-click on it and select Uninstall device.
  2. Go to Action and select Scan for hardware changes in order to reinstall the latest Bluetooth drivers.
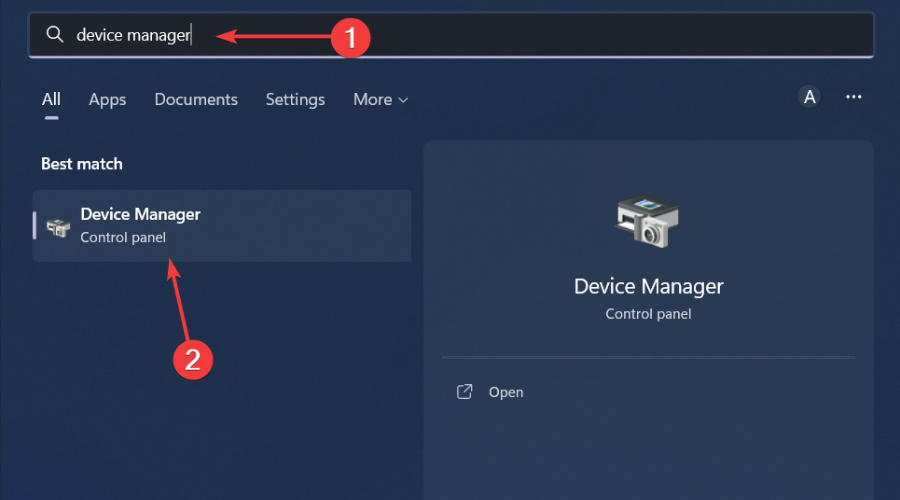
uninstall bluetooth drivers device manager

Proceed with the reinstall of your Bluetooth drivers by going on the developer’s website. Leave your comment with the exact model if you need help.

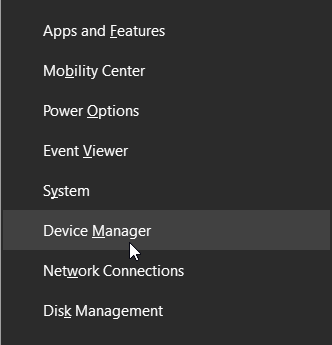
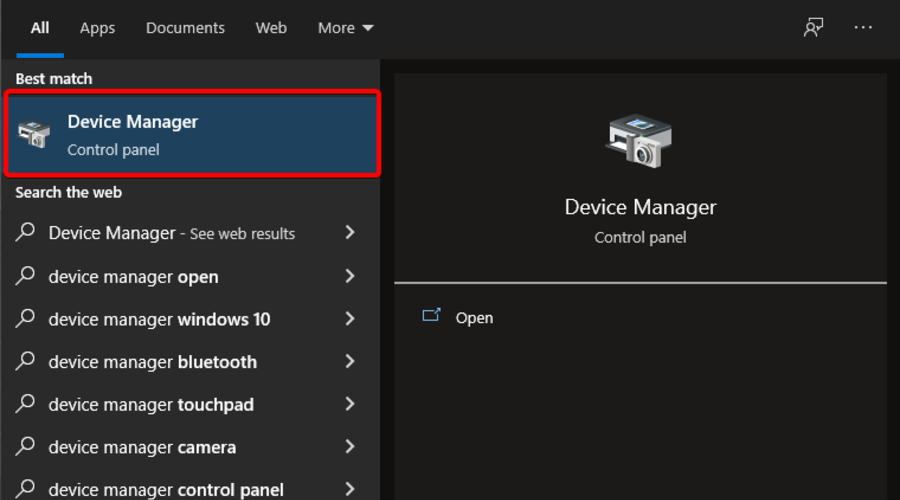
If you don’t want to visit your manufacturer’s website to download the latest drivers, you can also launch Device Manager and uninstall the drivers from there.

4. Check for updates

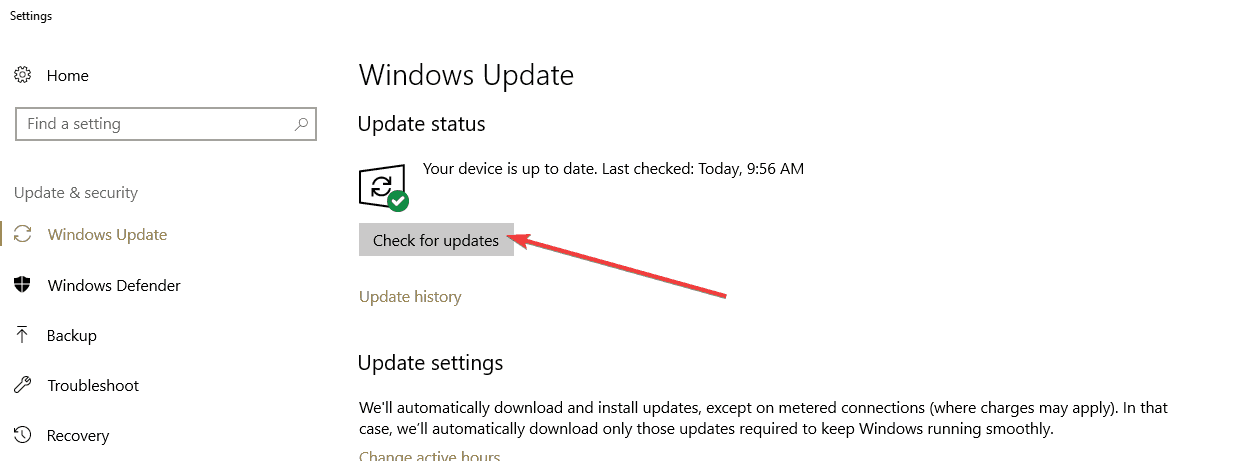
  1. Go to Settings,
  2. Select Update & Security.
  3. Click Update and hit the Check for updates button.
check for updates

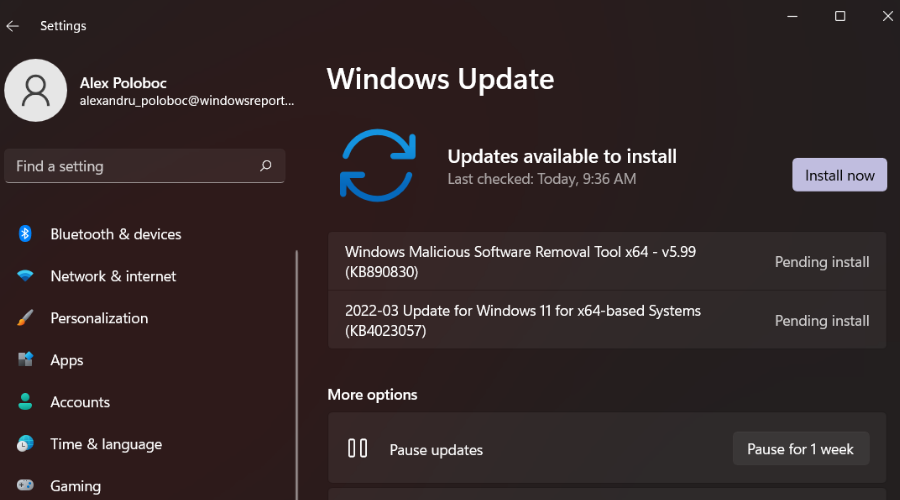
If you’re still having trouble with your Bluetooth drivers not working even after the reinstall, then maybe you need to perform a check on the Windows Update tool, as Microsoft usually releases fixes for such situations.

5. Roll back Bluetooth drivers

If it still doesn’t work, go to the Device Manager and see whether you have an exclamation mark there, if so, then try to roll back and then download the latest version from the website of your manufacturer.

6. Run the built-in Bluetooth troubleshooter

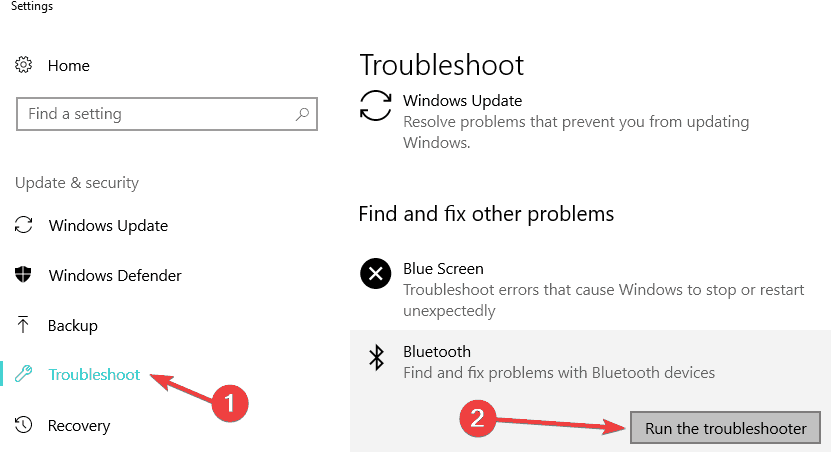
  1. Go to Settings.
  2. Click Update & Security and select Troubleshoot.
  3. Run the Bluetooth troubleshooter.
bluetooth troubleshooter windows 10


7. Additional solutions

If the issue persists, you can follow the instructions listed in the following troubleshooting guides:

As you can see the information we offered about Bluetooth not working after Windows 10 Update is complex and thoroughly documented.

Every solution is meant for a particular cause that generates the error and we are sure that our guide will fix your Bluetooth problem. We want to hear from you on this topic so drop us a comment in the comment section below.

File Explorer will soon show ads in Windows 11

Everybody keeps wondering what new and interesting features will Microsoft add to its latest operating system in the near future.

We got some more details on this subject recently when we had a look at what’s coming through the new Dev Channel Insider build.

However, you might want to sit down for this one, as we are sure not everyone will agree with the tech giant’s most recent choice.

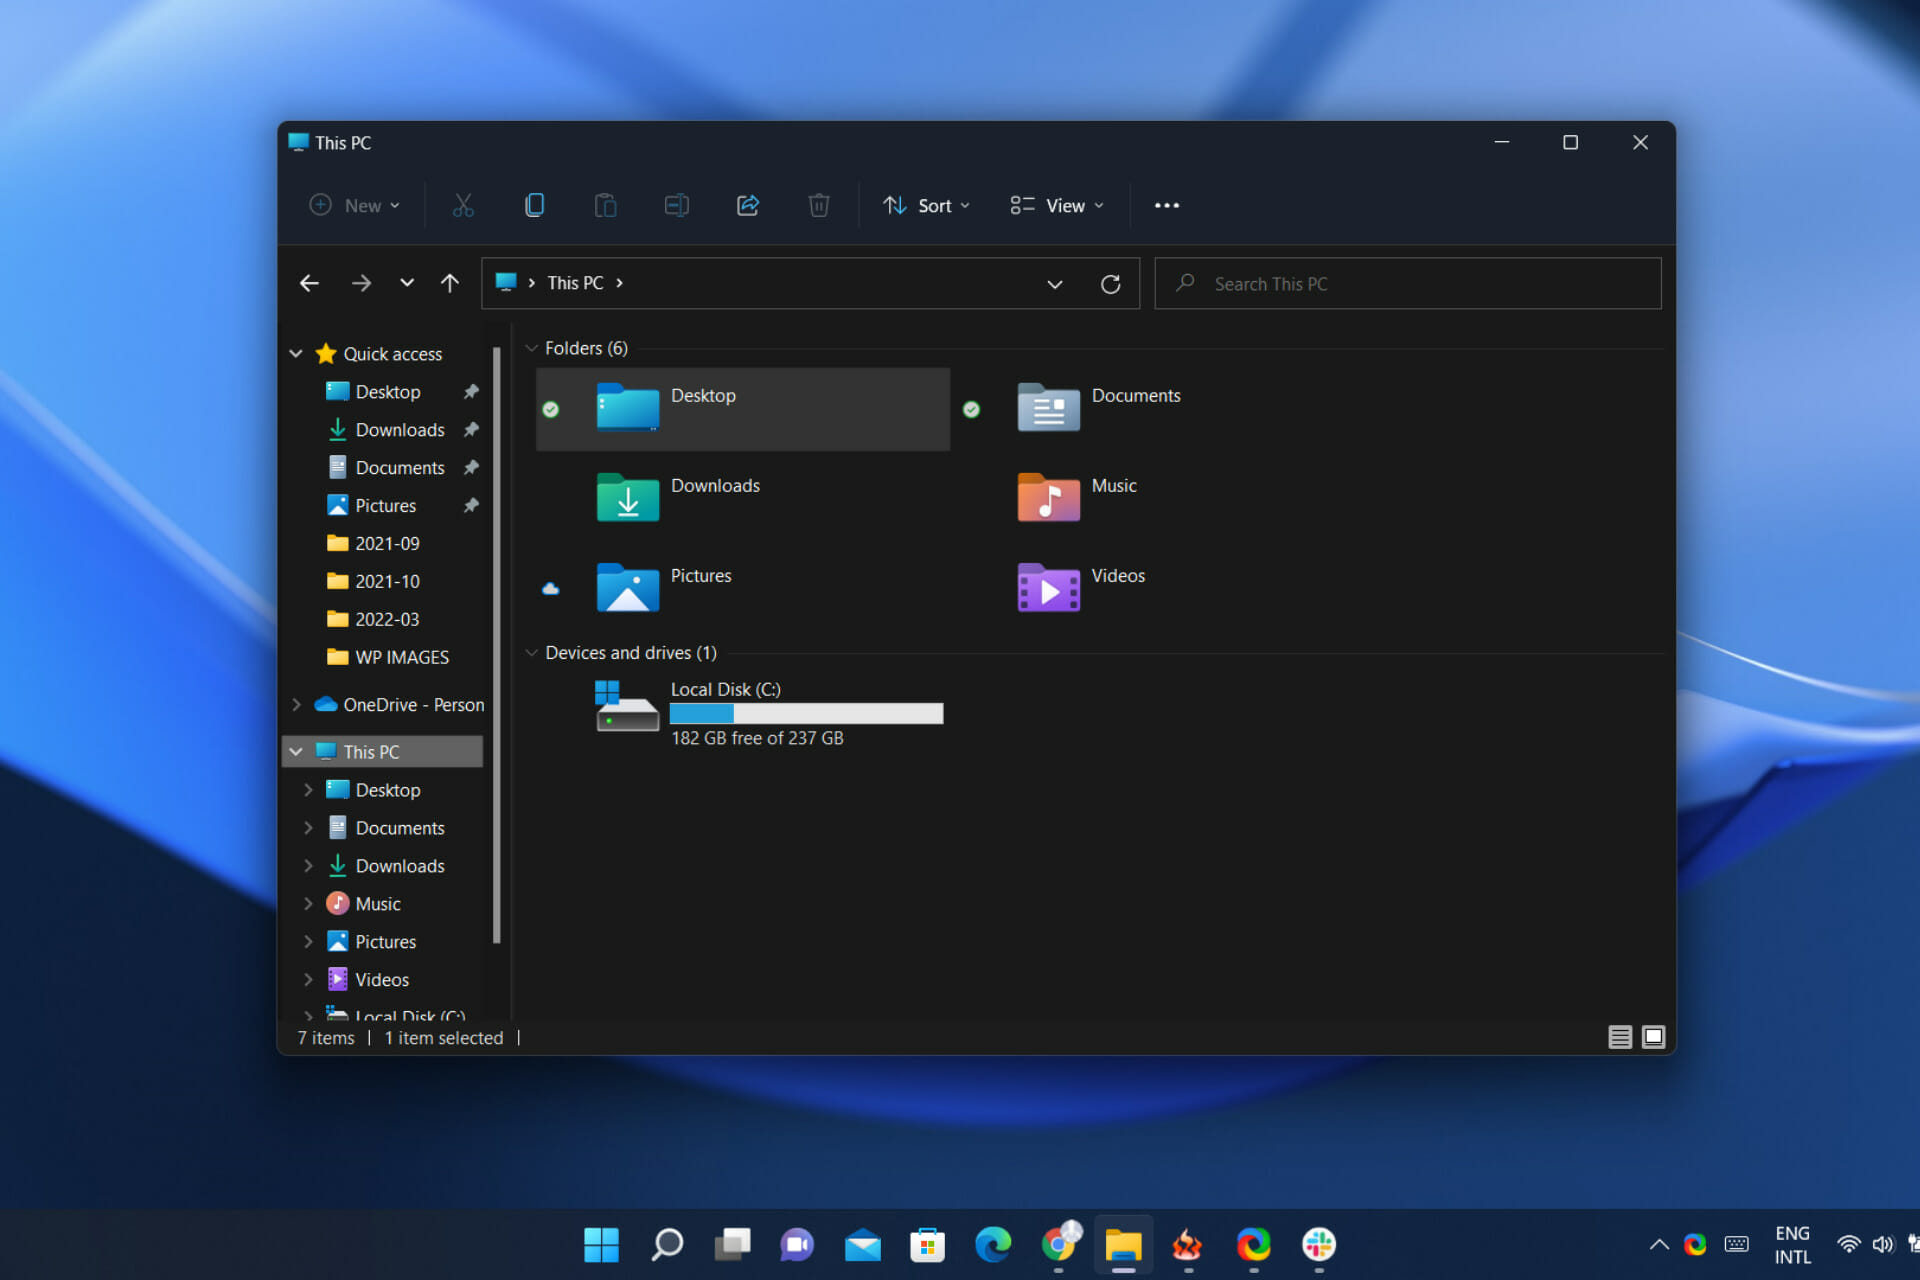
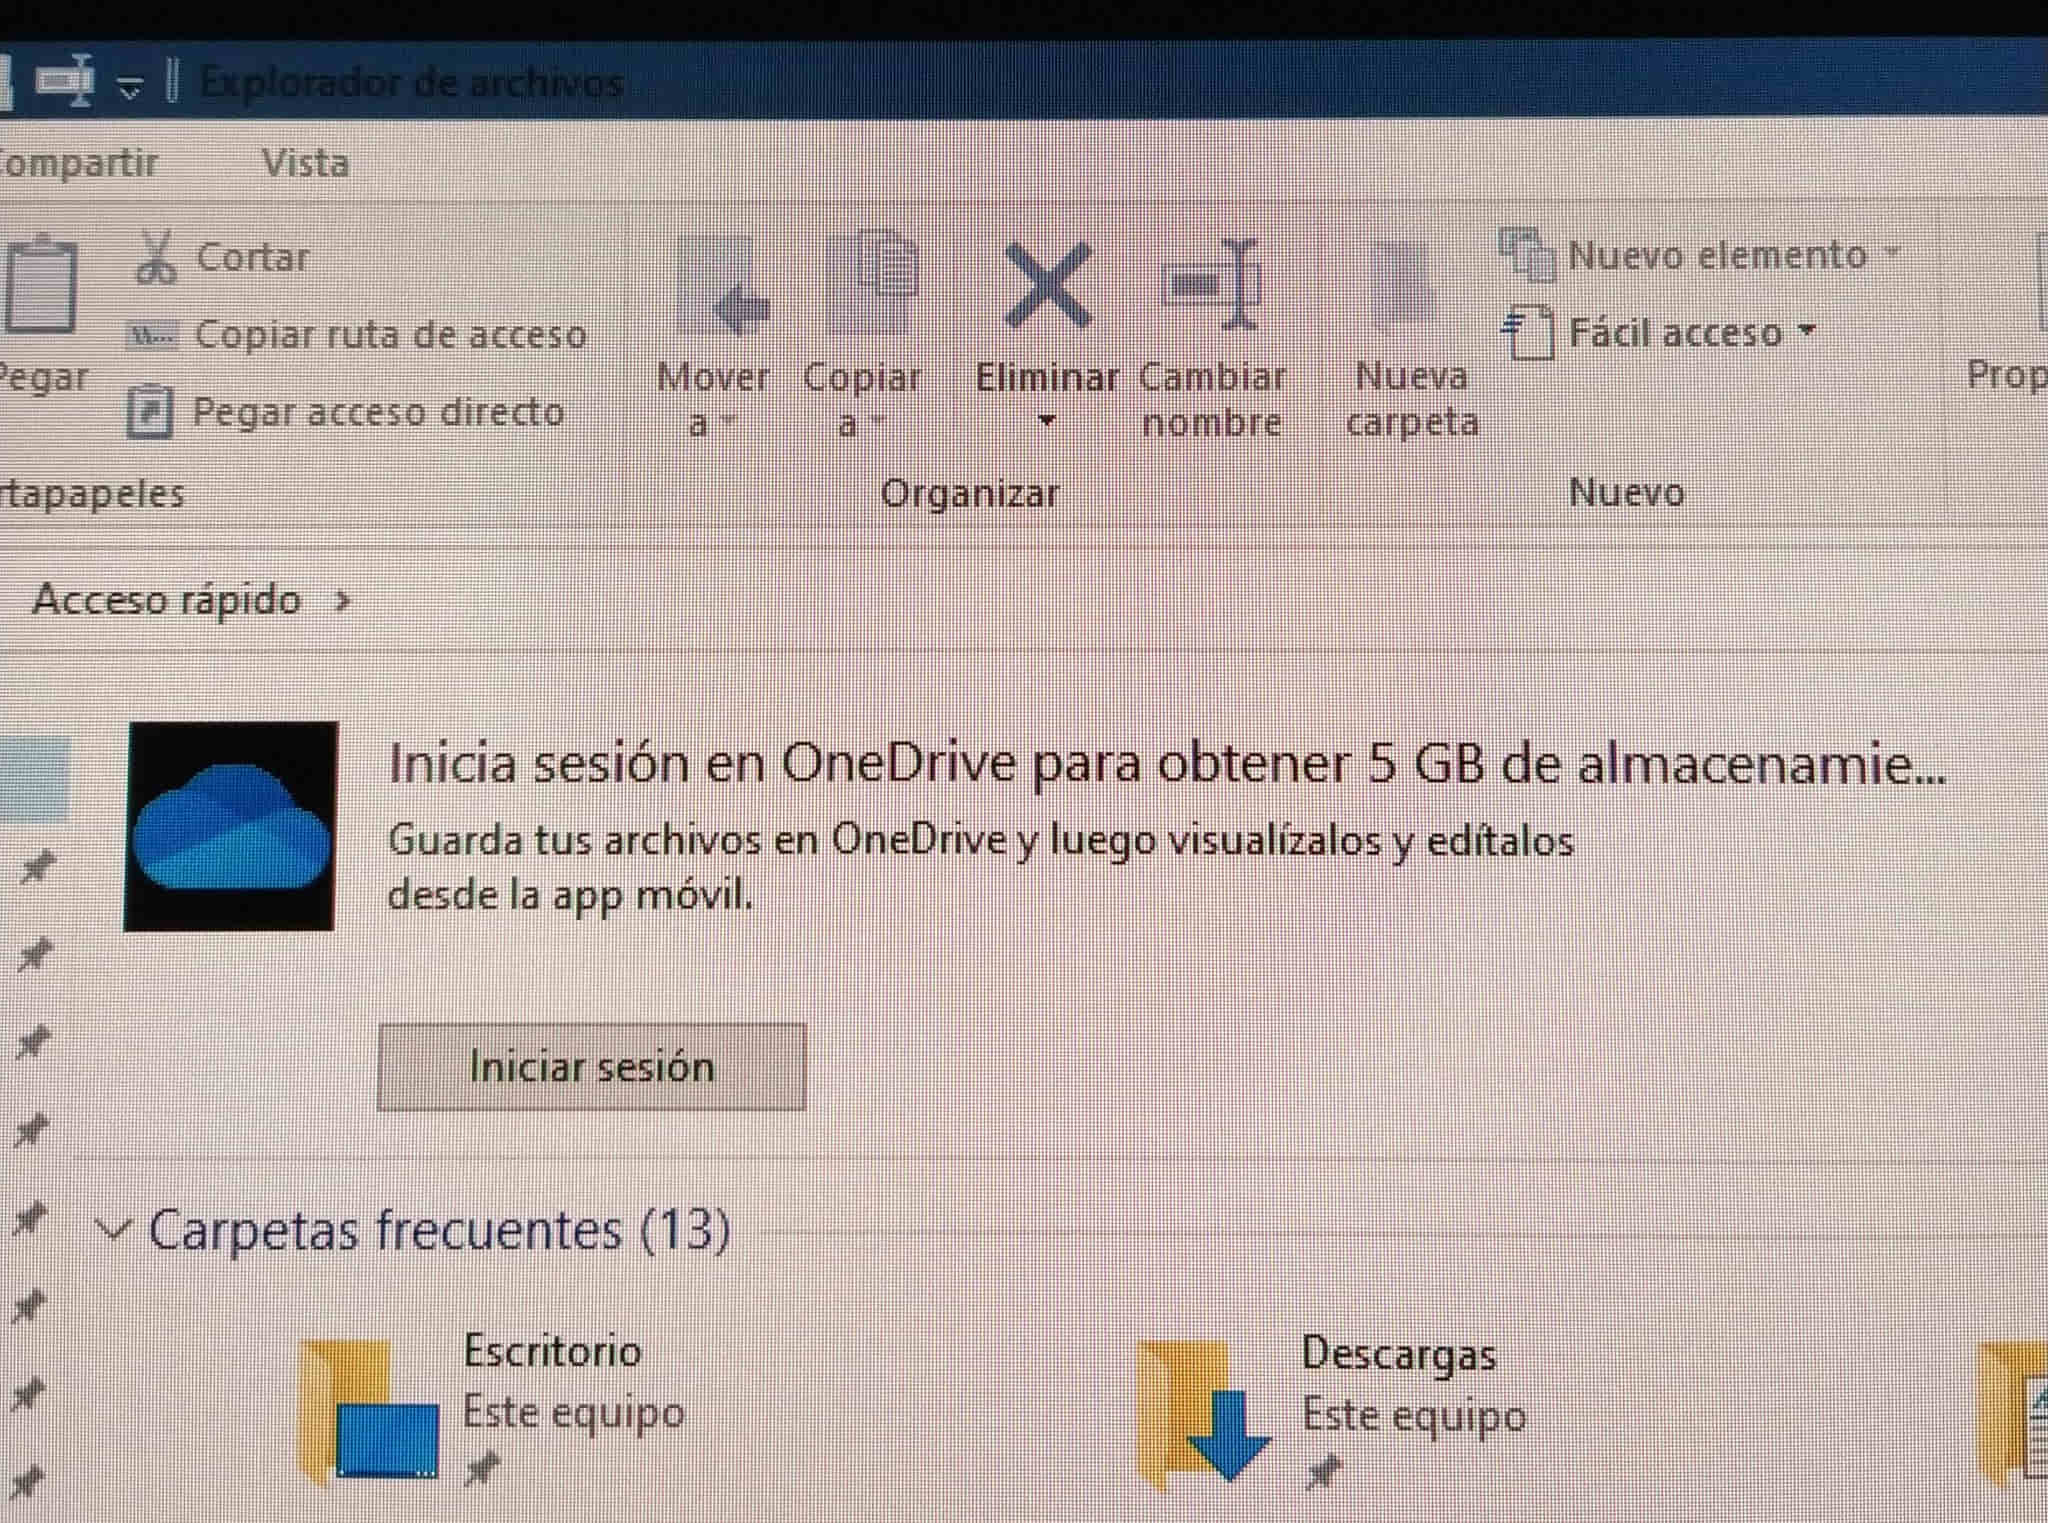
You might want to know that Insiders have now received ads for the Windows 11 File Explorer, which isn’t that bad but will surely put off many users.

The new File Explorer now shows ads for Insiders

Spotted by Insiders and shared with the rest of the community via Twitter, this change quickly caught the attention of a lot of Windows users.

Not necessarily in a good way, as most who already heard about this are hoping its only a mistake or a bad dream they desperately want to wake from.

By the way, this new attempt at cross-promoting Microsoft products in Windows is not the first run at displaying ads in File Explorer.

If we remember correctly, back in 2017, the Redmond-based tech company started to advertise its OneDrive service in File Explorer on Windows 10.

In fact, Windows 11 and 10 systems show ads by default and Microsoft has different names for these, including sync provider notifications or tips and suggestions.

And there are ways in which you can turn off both these features if you don’t wish them to be activated.

How do I turn off sync provider notifications?

  1. Open File Explorer.file explorer 1
  2. Click on the See more button.file explorer 2
  3. Select Options.file explorer 3
  4. Uncheck the Show sync provider notifications box.file explorer 4

How can I deactivate tips & suggestions?

  1. Open Settings.settings 1
  2. Select System.settings 2
  3. Click on Notifications.settings 3
  4. Untick the box next to Get tips and suggestions when I use Windows.settings 4

Remember that these advertisements were spotted only in recent Insider builds of Windows 11.

There is a possibility that these features won’t even make it to stable release, but we will just have to wait and see what the future holds for us.

Have you also spotted these changes on your device? Share your experience with us in the comments section below.

Microsoft’s next Windows event will be on April 5 & is centered on “future of hybrid work”

Microsoft has confirmed a Windows event for April 5. The event will feature Windows chief Panos Panay, and is focused on how “Windows Powers the Future of Hybrid Work.”

A webpage for the event is already up and the stream is set to kick off at 8:00 AM P.T on April 5. According to Mary Jo Foley at ZDNet, the event is mainly aimed at commercial customers. That’s hinted at in the footnote on the event webpage. It mentions “find out how Windows propels the business of our customers forward from the client to the cloud.”

What can you expect then? Well, for consumers, there might be some “so-far undisclosed features coming to Windows 11,” per Mary Jo Foley. Also in the works for the event could be some updates for Microsoft 365 services. This includes news around the One Outlook client, or more news about Microsoft Defender. Given some recent Microsoft hires from companies in the consumer space, Teams for consumer might also make the event, too, as well as Windows 365 Cloud PC.

Microsoft’s webpage for the event mentioned that there will be three break-out sessions to demon Windows tools for productivity, collaboration, management, and security. OnMSFT will be watching live, and we’ll be here to cover. So, be sure to follow us on Twitter, so you don’t miss a minute of the news.

Get ready for the Halo show premiere on March 24

There’s no shortage of Halo fans out there, and this one is for each and every one of them. Paramount just revealed that the new Halo show will launch exclusively on its streaming service starting March 24, 2022.

Many were anxiously expecting this game-inspired series, so news that it’s coming so soon is definitely music to everyone’s ears.

Furthermore, Paramount+ is also expected to become available in Europe this year, thus expanding the reach of the popular service.

Master Chief and Cortana partake in a different take on Halo

UPDATE: Today, Paramount+ released a new trailer for the upcoming Halo show. Unlike the past video, this one gives us a better understanding of the story.

It seems like there will be a lot of other characters who impact Master Chief and Cortana’s journey to find the Halo ring, but there may be other stories told in the show too.

The trailer features much more action this time around and recreates some of the most iconic scenes from the acclaimed games.


Halo fans beware, as this series will only briefly follow the events of the games, as it takes place in an alternate timeline. 

In the series, Master Chief and Cortana don’t just randomly stumble upon the Halo ring, a relic that has the power to destroy all life in the galaxy.

What a way to kick off 2022 for Halo fans everywhere, with this blockbuster series that focuses on a totally different approach to the whole plot of the franchise itself.

From the first look we all got, the action will be focused around the Halo ring and the war with the Covenant. However, the video also approaches the SPARTAN-II program that kidnaped children and raised them as soldiers.

And, just like the games, episodes will be set in the 26th century, when humanity is entangled in an intergalactic war against the alien menace. T

In order to win the war, the brilliant scientist Dr. Halsey has created the Spartans, super-soldiers genetically and technologically enhanced to improve their physical and mental capabilities.

Of course, this highly anticipated series follows the story of Master Chief Spartan John-117, the commander of a Spartan unity.

The Halo franchise already had other spin-off media, such as novels and comic books, the TV series is the first product to be placed in a different timeline.

We’re all excited to explore this new take on Halo and see what incredible adventures master Chief will lead us through.

Steam client goes offline randomly [Step-by-step guide]

Many Steam users experienced issues with Valve’s online gaming platform. A frustrating issue forcing the Steam client to go offline randomly left gamers in the dust.

Usually, this issue could be caused by different connectivity factors or system conflicts, but several other reasons can also explain why it appears.

If you also face this problem, don’t worry! We managed to come up with a few solutions in an attempt to stop Steam from randomly putting you offline.

What is the difference between invisible and offline on Steam?

In case you don’t already know, between the invisible and offline status are some huge differences.

The Invisible mode will show you as offline to other players, but you’ll still be able to view your friends’ list, send and receive messages. Plus, you can also join the community.

When it comes to the Offline status, it will actually sign you out of the Steam community. This mode allows you to play games through Steam without having an active connection to the Steam Network.

So, it is undoubtedly that this feature is pretty useful if you have limited or no Internet access.

Now, let’s see what you can do if Steam still goes offline when you’re trying to start a game.

Why does Steam goes offline when I start a game?

1. Check your Internet connection

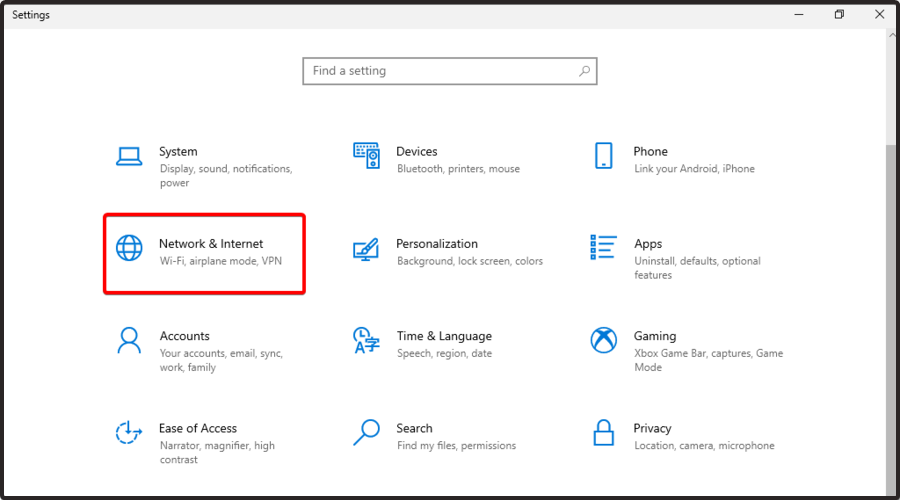
  1. Hit the Windows key and the I key simultaneously to open Windows Settings.
  2. Navigate to Network & Internet.
  3. Now, in the right window pane, check if You’re connected to the Internet.

Even if some users forget to test it, it is important to check and try out your Internet in your browser.

Thus, after you verified that your connection is stable, access some websites and see if they load quickly, without interruptions.

If Steam still randomly goes offline, you can also try to reboot your router/modem will probably fix it.

2. Allow Steam through Windows Firewall

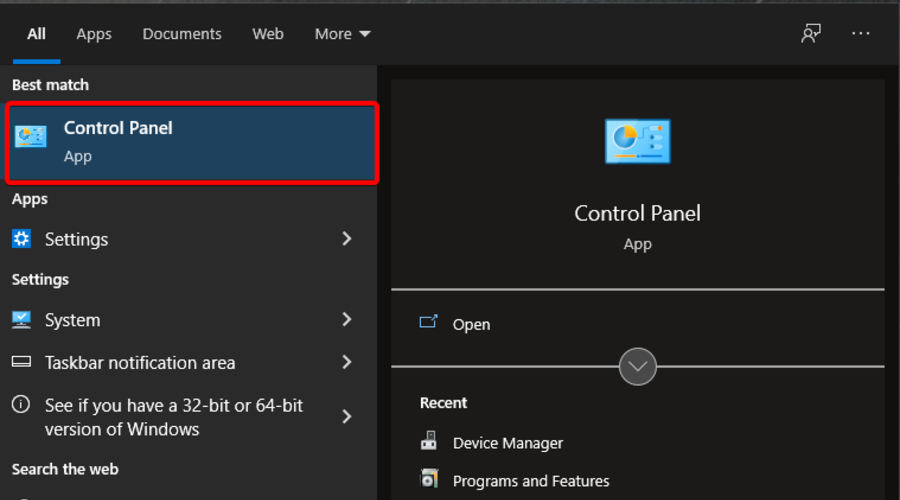
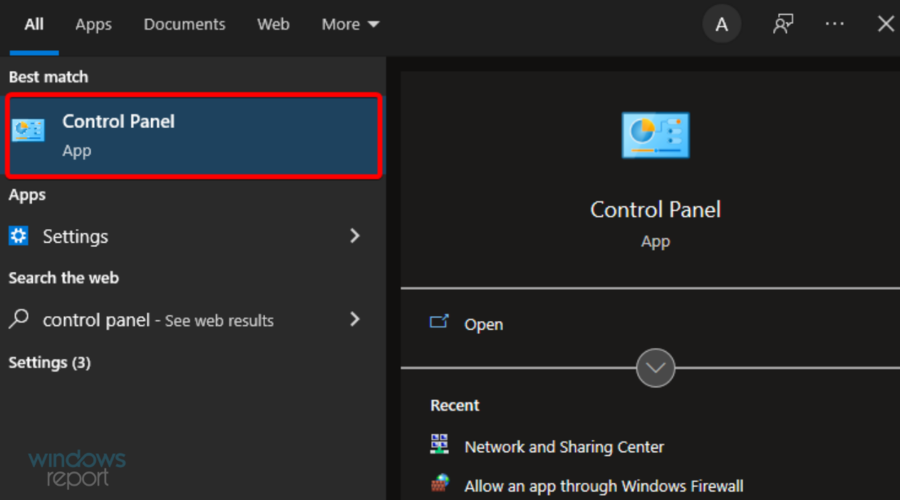
  1. Press on the Windows key, type Control Panel, then open the first result.
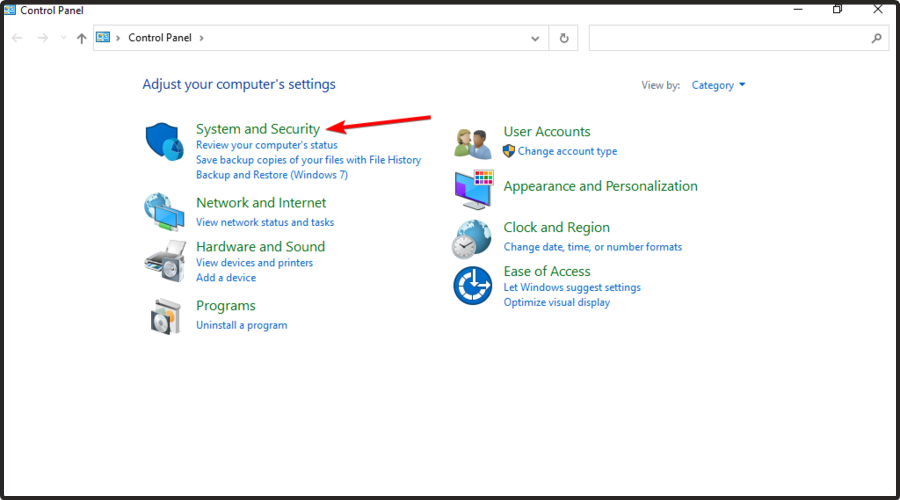
  2. Navigate to System & Security.
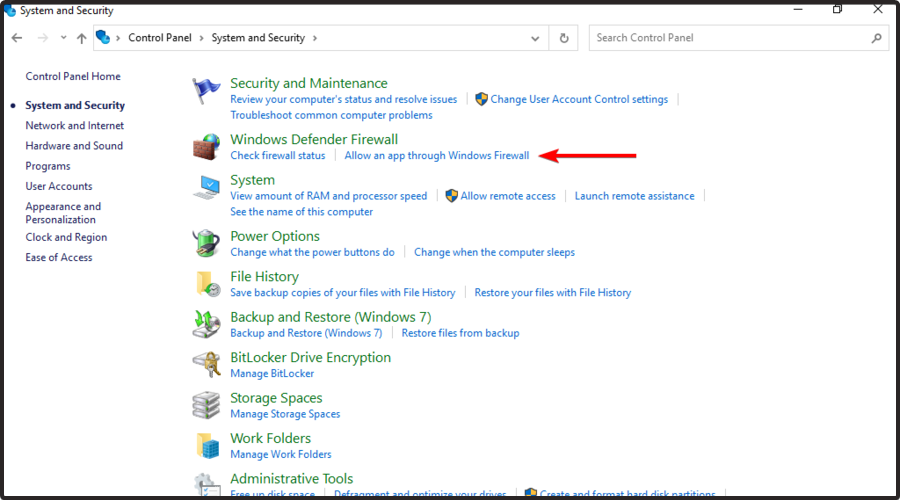
  3. Under Windows Defender Firewall, choose to Allow an app through Windows Firewall.
  4. Click Change settings.
  5. Find the Steam app and make sure it has both Public and Private boxes ticked.
  6. Press on OK.
  7. Try reloading Steam and see if it works.

3. Temporarily disable your antivirus software

  1. Hit Windows, type Control Panel, then open the first result.
  2. Navigate to System and security.
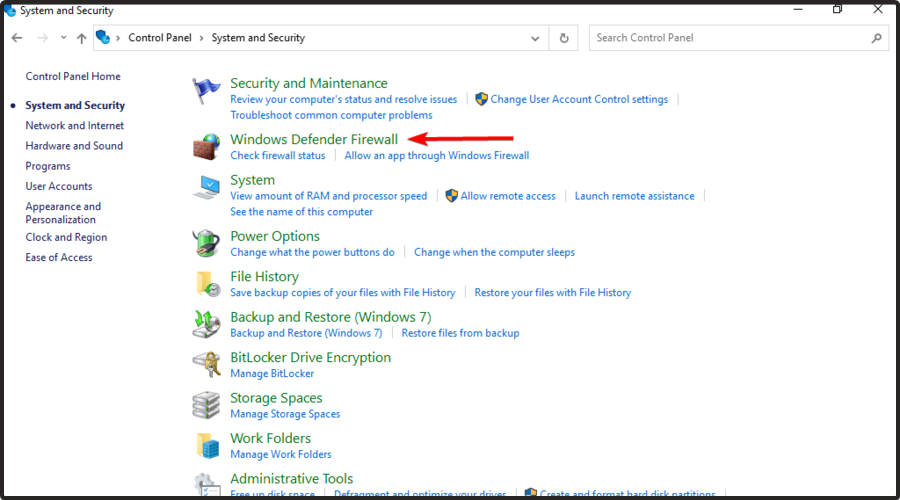
  3. Go to Windows Defender Firewall.
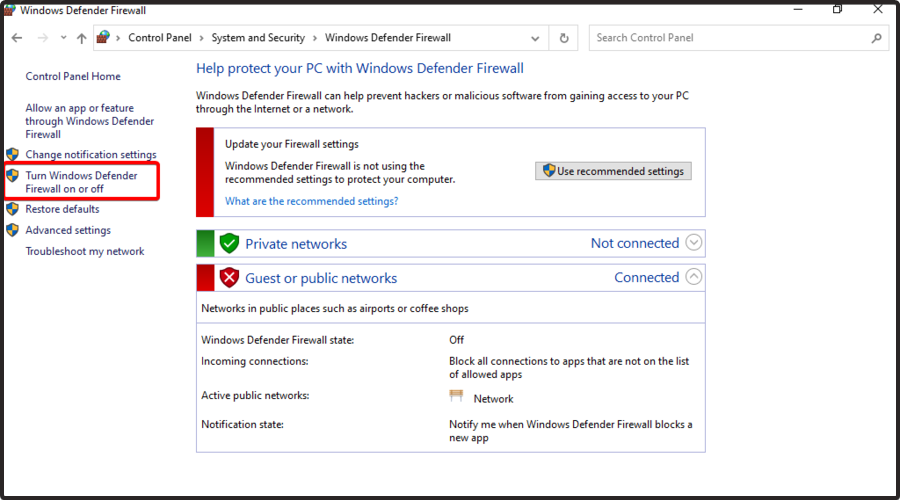
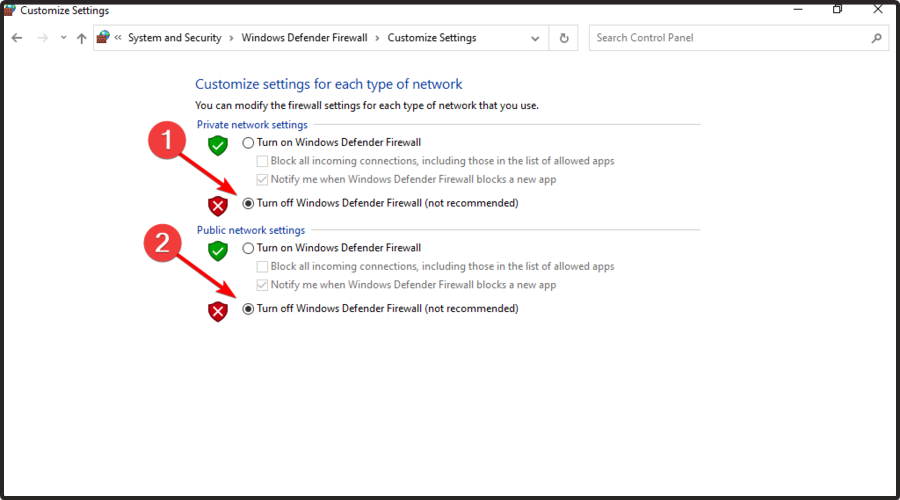
  4. Now, from the left window pane, choose to Turn Windows Defender Firewall on or off.
  5. Make sure you checkmark the two boxes shown directly below.

In addition, you may consider changing your current antivirus with a better option that will not block your Steam application.

If we were in your shoes, we would definitely go for TotalAV, as it provides legendary antivirus technology.

With this software, you’ll be able to secure your data and money against digital fraud (with the anti-phishing feature), enjoy the full power of your PC without interruptions, especially when you run your favorite Steam games, and explore the great online, safe from all types of malware threats.

In case you need some more options to choose from, we strongly recommend checking the best antivirus software with low CPU usage, but TotalAV still remains on the top of the list.

4. Reinstall the client

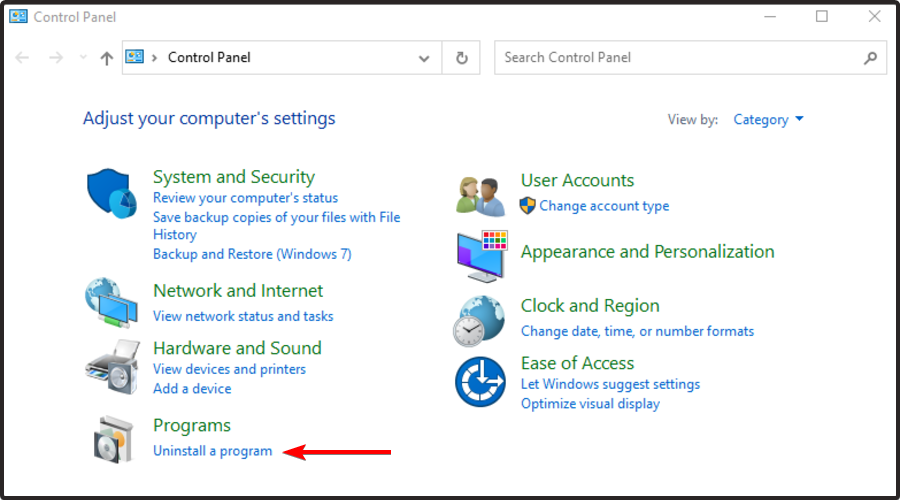
  1. Press on the Windows key, type Control Panel, and open it.
  2. Click on Uninstall a program.
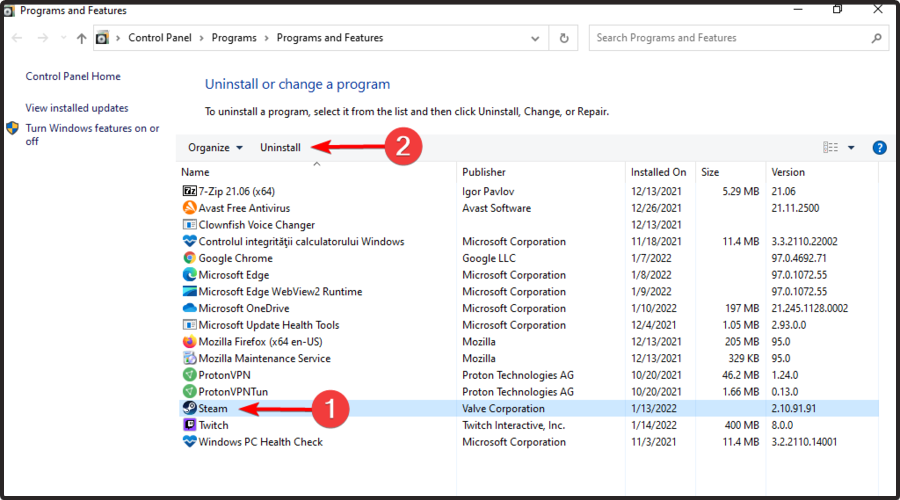
  3. Search for Steam, click on it, then choose to Uninstall it.
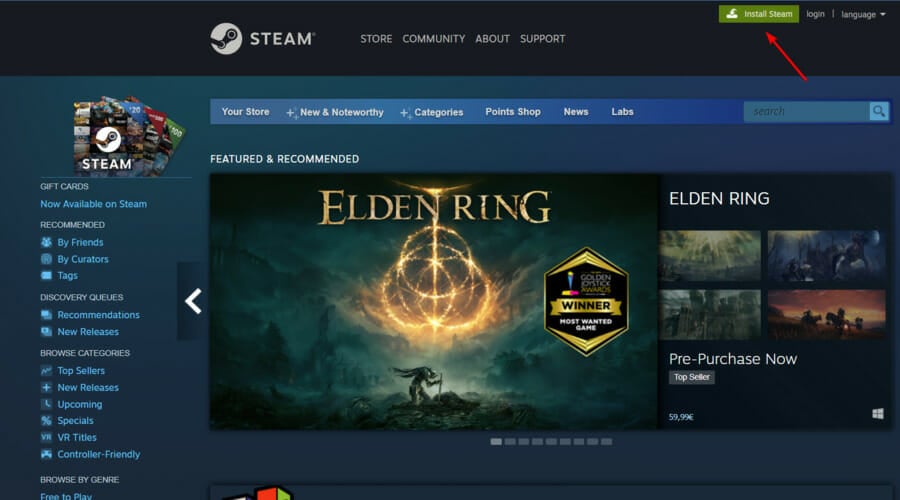
  4. Navigate to the Steam download page.
  5. From the top-right corner of the window, click on the green Install Steam button.
  6. Follow the on-screen instructions to reinstall the app.
  7. Log in and check for improvements.

What Steam games can you play offline?

As mentioned before, the Steam Offline mode allows you to play specific games and we considered properly to deliver some of the most popular masterpieces you can try:

  • Hades – A one-of-a-kind roguelike action dungeon crawler video game developed and published by Supergiant Games.
  • Final Fantasy 12: The Zodiac Age – This is a high-definition remaster of the Japanese-only International Zodiac Job System for the PlayStation 4.
  • Valheim – In short terms, this is a brutal exploration and survival game for 1-10 players set in a procedurally-generated world inspired by Norse mythology.
  • Grim Dawn – If you choose to play it, you’ll enter an apocalyptic fantasy world where humanity is on the brink of extinction.
  • Stellaris – This game allows you to explore a galaxy full of wonders, interact with diverse alien races and many more impressive features that are meant to take you out of this world.
  • Divinity: Original Sin 2 – Divinity: Original Sin II is a role-playing video game with near-limitless possibilities, where you can explore the vast world of Rivellon alone or in a party of up to 4 players.

We hope that our quick guide on how to stop Steam from going offline was of help for you. If you liked this article, leave a comment in the comment section below.

Run the Steam alert when a game goes on sale [Tutorial]

Many Steam users seem to be interested in discovering how to get notified when a game goes on sale. If you’re in the same boat, you should definitely use the Steam alert feature.

Steam is one of the biggest online gaming platforms. Millions of gamers use this app on a daily basis, in an attempt to download and play games through the platform.

Knowing when it is the right time to buy their favorite game is very important for gamers. Steam offers serious game discounts through Summer and Winter Sales, but they also offer smaller daily discounts.

Valve’s gaming platform came up with an option, in an attempt to get you notified when you’re favorite games are offered discounts.

We made a quick guide on how to add games to Steam‘s Wishlist. Check the instructions below.

What are the Steam games sale alerts?

Keep in mind that a Steam game sale alert is nothing more than a Wishlist Notification.

In case you choose to enable it, you’ll be notified via email or through the mobile app when the games on your wishlist are on sale.

So, whether you’re riding the bus, walking the dog, or stuck in a meeting, you’ll know when there’s a deal!

Also, do not forget that if you’d prefer not to be notified, it’s easy to opt-out of email or turn off mobile notifications.

How can I enable game sale alerts on Steam?

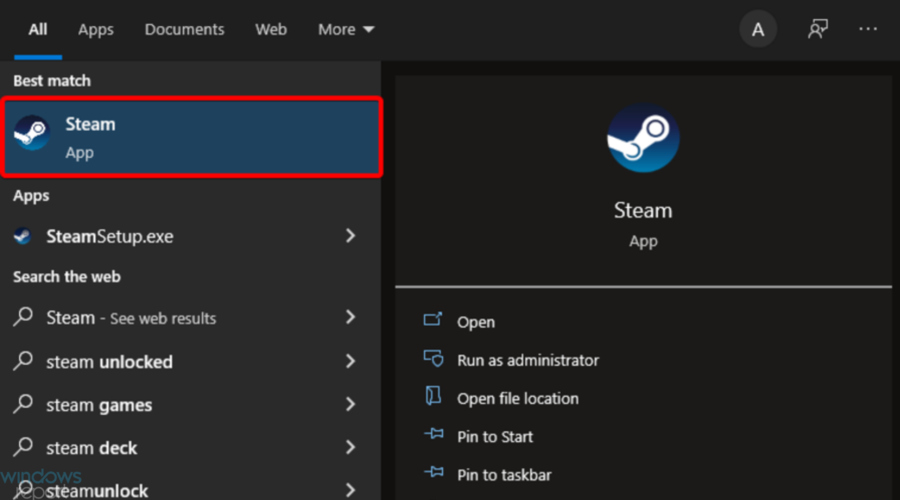
  1. Hit the Windows key, type Steam, then open the app.
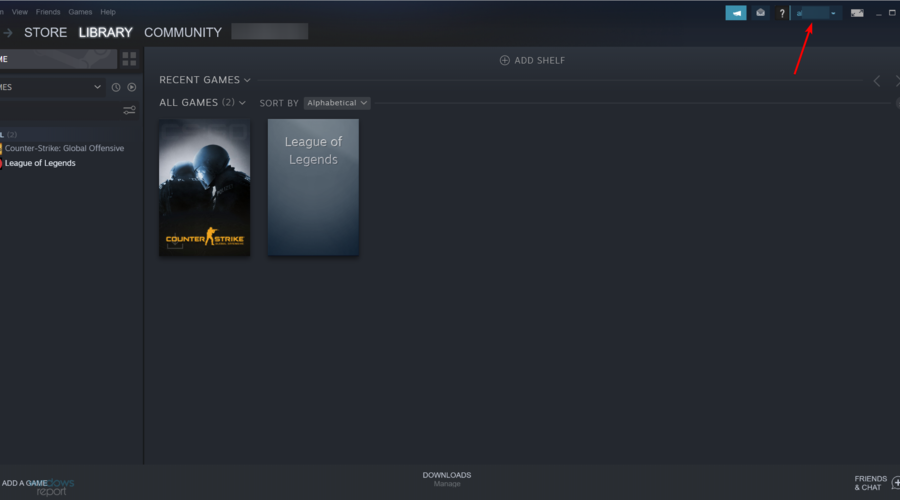
  2. Click on your Steam name in the top right corner of the window.
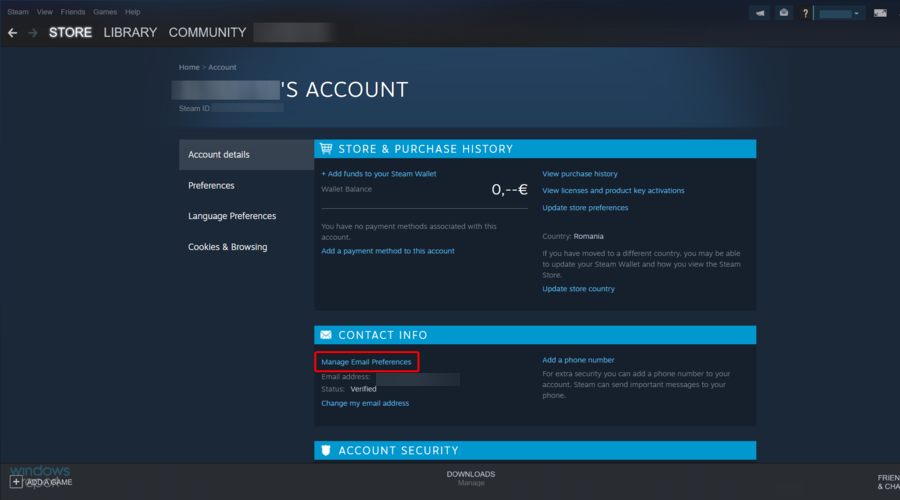
  3. Navigate to Account Details.
  4. Under the Contact Info section, choose Manage Email Preferences.
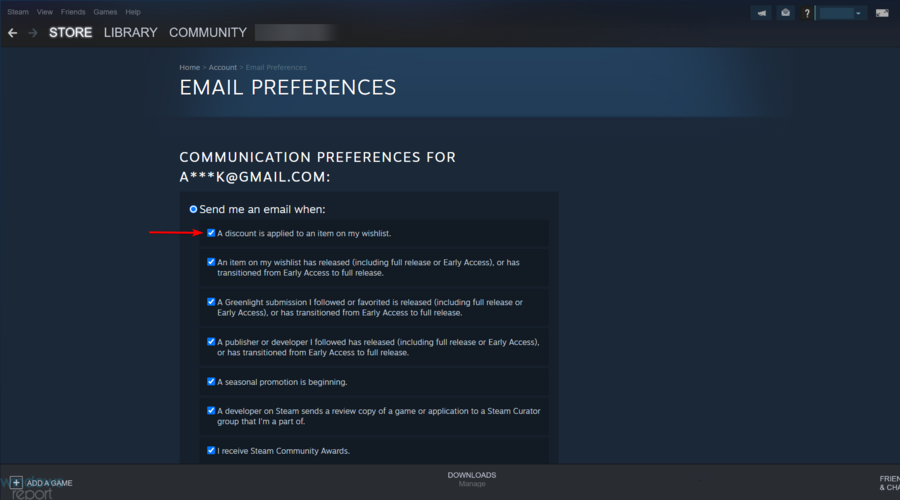
  5. Make sure to have the box next to A discount is applied to an item on my Wishlist ticked.
  6. After enabling this option, make sure to have your desired game added to the wishlist.

When a discount is applied to the game, you will receive notifications via the email linked with your Steam account.

How can I change where my Steam notifications appear?

If you’re wondering whether or not you can change where your Steam alerts appear, keep in mind that there is only one way to do it.

In this matter, you should install a third-party skin. Skins come with custom steam. styles files that are not overwritten by the software.

As a consequence, you’ll be allowed to modify the file to set the position of the popup to a different screen corner.

In order to know when Steam sales take place, you need to enable the notification alerting you of the discounts applying to the games placed on your Wishlist.

Make sure to be aware of Steam Winter and Summer sales, as well as Mid-week, Weekend, and Daily sales. Always make sure to constantly check your email for Steam notifications.

Also, you have to know that some users reported that the Steam game doesn’t show up in the library. In case you ever face this issue, make sure you check some useful solutions to fix it.

If you found our quick guide on how to enable Steam notifications helpful, leave a comment in the comment section below.

Major performance improvements come to Xbox Cloud Gaming on iOS and Android

Earlier this month, there were indications that Microsoft was working on a keyboard and mouse that supports Xbox Cloud Gaming. And now, in an attempt to provide a better iOS experience for its users based on the feedback that they have been receiving, Xbox Cloud Gaming is enhancing its support on iOS devices, that is the iPad and iPhone. Essentially, these enhancements will aid in providing a better and seamless gameplay experience.

The engagement with these new enhancements has been received positively by gamers and the performance improvements seem to also be working because of the higher engagement as compared to before, which translates to 35% longer playtimes.

To try out these new enhancements get on your supported iOS device and navigate to Xbox.com/play using the Safari browser, where you will need to sign in to your Microsoft Account. Then to play, you will need to pin the website on your home screen by launching the browser and going to Xbox.com/play. Then, click on the Share button, then select Add to Home Screen. Xbox Cloud Gaming is set to continue making these enhancements based on the feedback that they receive.


Directstorage for Windows 11: How to Enable and Use

Remember when we told you that DirectStorage was coming to Windows 11? Well, the time has come, and DirectStorage is available to Windows PCs. DirectStorage is a method of storing data on a disk that bypasses the file system.

It can be used as a substitute for buffering video frames, audio samples, or other media data in memory before writing them out to disk. If you’re still under a rock and don’t know what DirectStorage is, we unpack what it’s all about here.

Does my PC support DirectStorage?

Since DirectStorage is an API, the Windows 11 requirements are minimal. DirectStorage is compatible with machines running Windows 11 and above, but you’ll need to ensure your computer supports the required hardware. 

The first step is to check whether your PC has an NVMe storage device. NVMe drives are typically found in modern laptops and high-end desktops. However, if you’re unsure whether yours has one, it’s best to contact your computer’s manufacturer or read their documentation for more information.

Here are some things to consider when determining if your PC supports DirectStorage:

  • Fast processor – If you plan on using DirectStorage for video editing, streaming, and other similar tasks, you’ll need a fast processor.
  • SSD card – Many of the benefits of DirectStorage require that you use an SSD for storage.
  • A PC that supports DirectStorage – DirectStorage is compatible with Windows 10 devices, but Windows 11 has the latest storage optimizations built-in and is our recommended path for gaming.

Since DirectStorage is mainly used in compressing data, gamers are the main beneficiaries of this API. As such, you may wonder whether any games use DirectStorage. Given that it is fairly new, developers are still coming up with their versions to ensure they are compatible.

However, Forspoken has released its first DirectStorage game for Windows PCs and PlayStation. Given that it is a roleplaying game, a lot of data is involved when streaming, but with DirectStorage, you can expect significantly improved load times.

How do I turn on DirectStorage in Windows 11?

One of the key benefits of upgrading to Windows 11 is that you don’t need to do anything to enable DirectStorage. The feature already comes shipped with the OS and is enabled by default.

All you have to do is download a game that supports the feature, ensure your OS is up-to-date, and update your drivers regularly.

Still, you can check whether your Windows 11 supports DirectStorage by:

  1. Hit the Windows key, type Device Manager in the search bar, and click Open.device manager w11
  2. Navigate to Storage controllers and click to expand.
  3. If Microsoft Storage Spaces Controllers is available, your PC supports the feature.
  4. You can update the driver and restart your PC to ensure it is working.

What are the benefits of DirectStorage?

After telling you about all the requirements and how to enable DirectStorage on your Windows 11. One significant question we are yet to answer is whether it is worth it. Does it have any benefits? 

If you want to make your game stand out from the crowd, you must ensure a good storage system. This will help to ensure that the game loads quickly and runs smoothly. The storage system should also be robust enough to not crash during gameplay.

Some of the benefits of DirectStorage include:

  • Reduced workload on servers by reducing the number of requests for data
  • Faster loading times for games
  • Improved user experience, especially when using streaming services 
  • The ability to handle larger file sizes than before

While you may see benefits on any storage device, installing games to an NVMe SSD will maximize your IO performance and help you more fully experience the benefits of DirectStorage.

This release of DirectStorage provides developers with everything they need to move to a new model of IO for their games. There’s still work to be done on even more ways to offload work from the CPU but this is a great start.  

Windows 11 has previously been rated the best OS yet for gaming, and with features like DirectStorage, it is easy to see why.

Still, you can tweak some settings to optimize your Windows 11 for the best gaming performance and experience.

Have you gotten a chance to experience DirectStorage with any game on your PC? What is your verdict? Let us know in the comment section below.

Fix: Elden Ring failed to acquire parental control information

Elden Ring is the latest hardcore RPG by From Software and comes up with an impressively developed narrative and open-world map to explore.

Even if its mixture of features works surprisingly well, like any other app or program, this game might sometimes give you headaches.

In this matter, it seems like some users reported that Elden Ring failed to acquire parental control information.

According to them, this problem usually occurs when they want to run the game on PS5. This is what one user had to say about it:

Anyone got the Unable to acquire parental control information on PS5? Cant play online anymore because of this. I have the parental control disabled and yet it keeps giving me this, anyone else got it and managed to fix it?

Fortunately, if you’re struggling with this annoying issue, you can always try the fixing option listed below, as many players claimed that it manage to solve their situations.

What can I do if Elden Ring failed to acquire parental control information?

Customize your DNS servers

  1. Use the following keyboard shortcut to open the Windows run dialog box: Windows + R
  2. Type ncpa.cpl, then hit Enter.
  3. In the opened window, right-click on your network adapter, then choose Properties.
  4. Now, look for Internet Protocol Version 4 (TCP / IPv4), click on it, then select Properties.
  5. Make sure you checkmark the Use the following DNS server addresses.
  6. In the Preferred DNS server box, input 1.1.1.1, then in the Alternate DNS server section, type 1.0.0.1.

As you can see, if Elden Ring failed to acquire parental control information you can easily change the DNS servers and you’ll get rid of this annoying issue.

So, no matter if you’re playing this game on Steam, Epic, or in any other way, be sure that the above solution will help you.

Also, some worldwide gamers reported that Elden Ring is not opening, so if you face the same issue, make sure you check our useful solutions.

Because your opinion is always important for us, do not hesitate to share it by leaving a comment in the section below.

[Fix] Assassin’s Creed Valhalla AMD driver timeout

Sure, video games most of the time come with some pretty annoying and unbelievable errors and glitches that completely ruin our experience.

But sometimes, rarely, it isn’t the game’s fault for not being able to properly boot or run, as other areas of the OS will require your immediate attention.

Assassin’s Creed Valhalla players actually reported not being able to enjoy their favorite title because of an AMD driver error.

In case you were thinking about it, yes, we are talking about the AMD drivers timing out and leaving fans not being able to launch and play Ubisoft’s latest creation.

But it isn’t the end of the world because, like most problems, this too has a solution. And given the fact that you came to the right place to fix it, we’re about to show you how to.

Why does this keep happening?

First of all, it’s important to understand that this can happen even while you are playing other games, not just Assassin’s Creed Valhalla.

One of the most common errors an AMD user may have to face is the driver timeout message box. This issue is reported nearly on all types of AMD cards with different games and programs. Updating your drivers to the latest version with the help of specialized software like Outbyte Driver Updater is recommended due to its huge library of drivers.

For some users, the game or program crashes and shows the desktop with the error message, while others find themselves in need of force restarting their systems.

This can happen for numerous reasons, including outdated operating systems, less size of virtual memory allocated, or outdated, corrupt, or incompatible drivers.

How can I fix the AMD driver timing out when playing Valhalla?

Now that we know why this happens, let’s see how we can actually fix the issue. Carefully follow these steps and you should be done in no time.

  1. Update Windows to the latest version. update windows 11
  2. Reinstall AMD driver.update amd
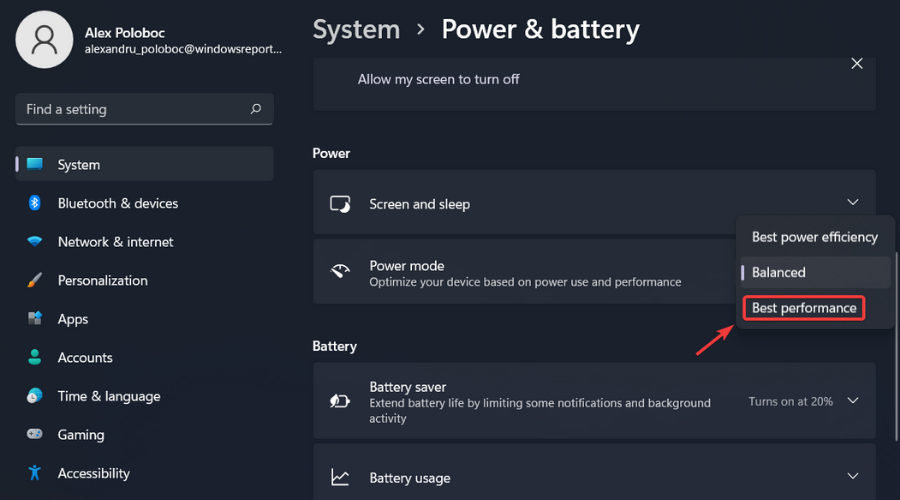
  3. Set Power Plan to Best Performance.power plan
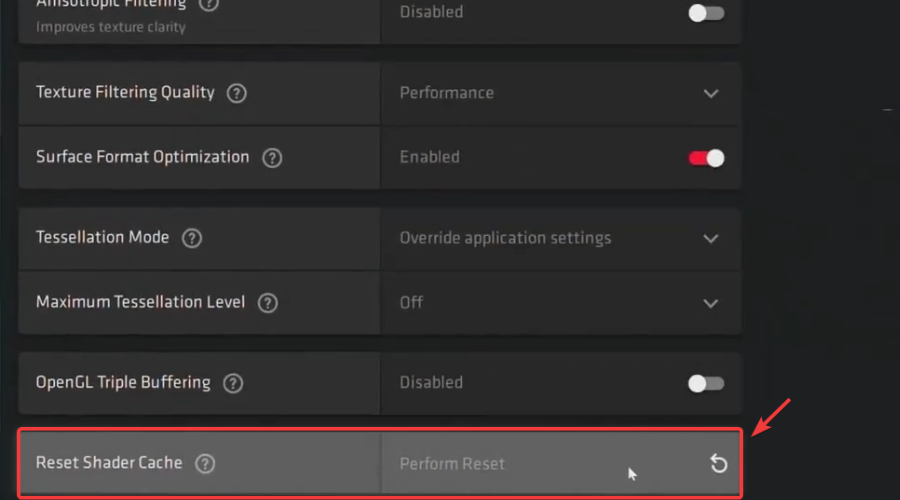
  4. Clear AMD’s card Shader cache.shader cache
  5. Increase virtual memry on your system.increase virtual memory windows 11
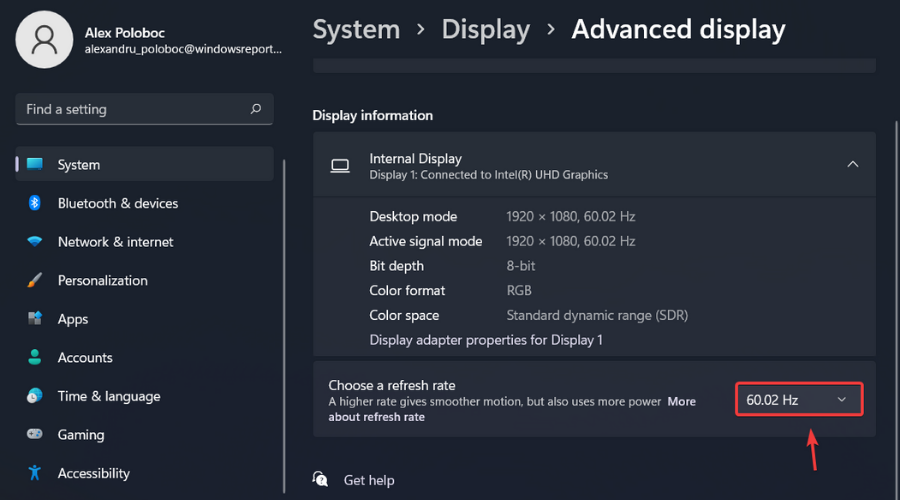
  6. Decrease the refresh rate of your display.screen refresh rate

Now that you know how to fix this more than annoying issue, you can get back to playing your favorite game and forget about this nasty affair.

Next time one of your friends reports an AMD Assassin’s Creed Valhalla driver crash you will be on top of the situation and save them a lot of time.

Have you managed to fix this ugly issue using this guide? Share your experience with us in the comments section below.

Yet another servicing update hits the Windows Insider Dev Channel, this time it is build 22572.201

Microsoft has released a new Windows Insider Dev Channel build. This is a small servicing update, bumping the latest Windows 11 build up to 22572.201 and there are no new changes.

This is the second servicing release for build 22572 in the Dev Channel. and you should see it as KB5012886. The first came back on March 11, and it was Cumulative Update Build 22572.100, also known as KB5012817. Again, keep in mind there are no new features, and this is rather for Microsoft to test the servicing pipeline for builds in the Dev Channel. Happy downloading, Windows Insiders!

Microsoft Family for Windows 11: How to Download & Install

Last week, when the Windows 11 Dev Channel build 22572 was officially released by Microsoft, we presented you with a detailed view of everything that is coming.

Through this new build, we found out that the Redmond tech giant actually added native support for File Explorer tabs.

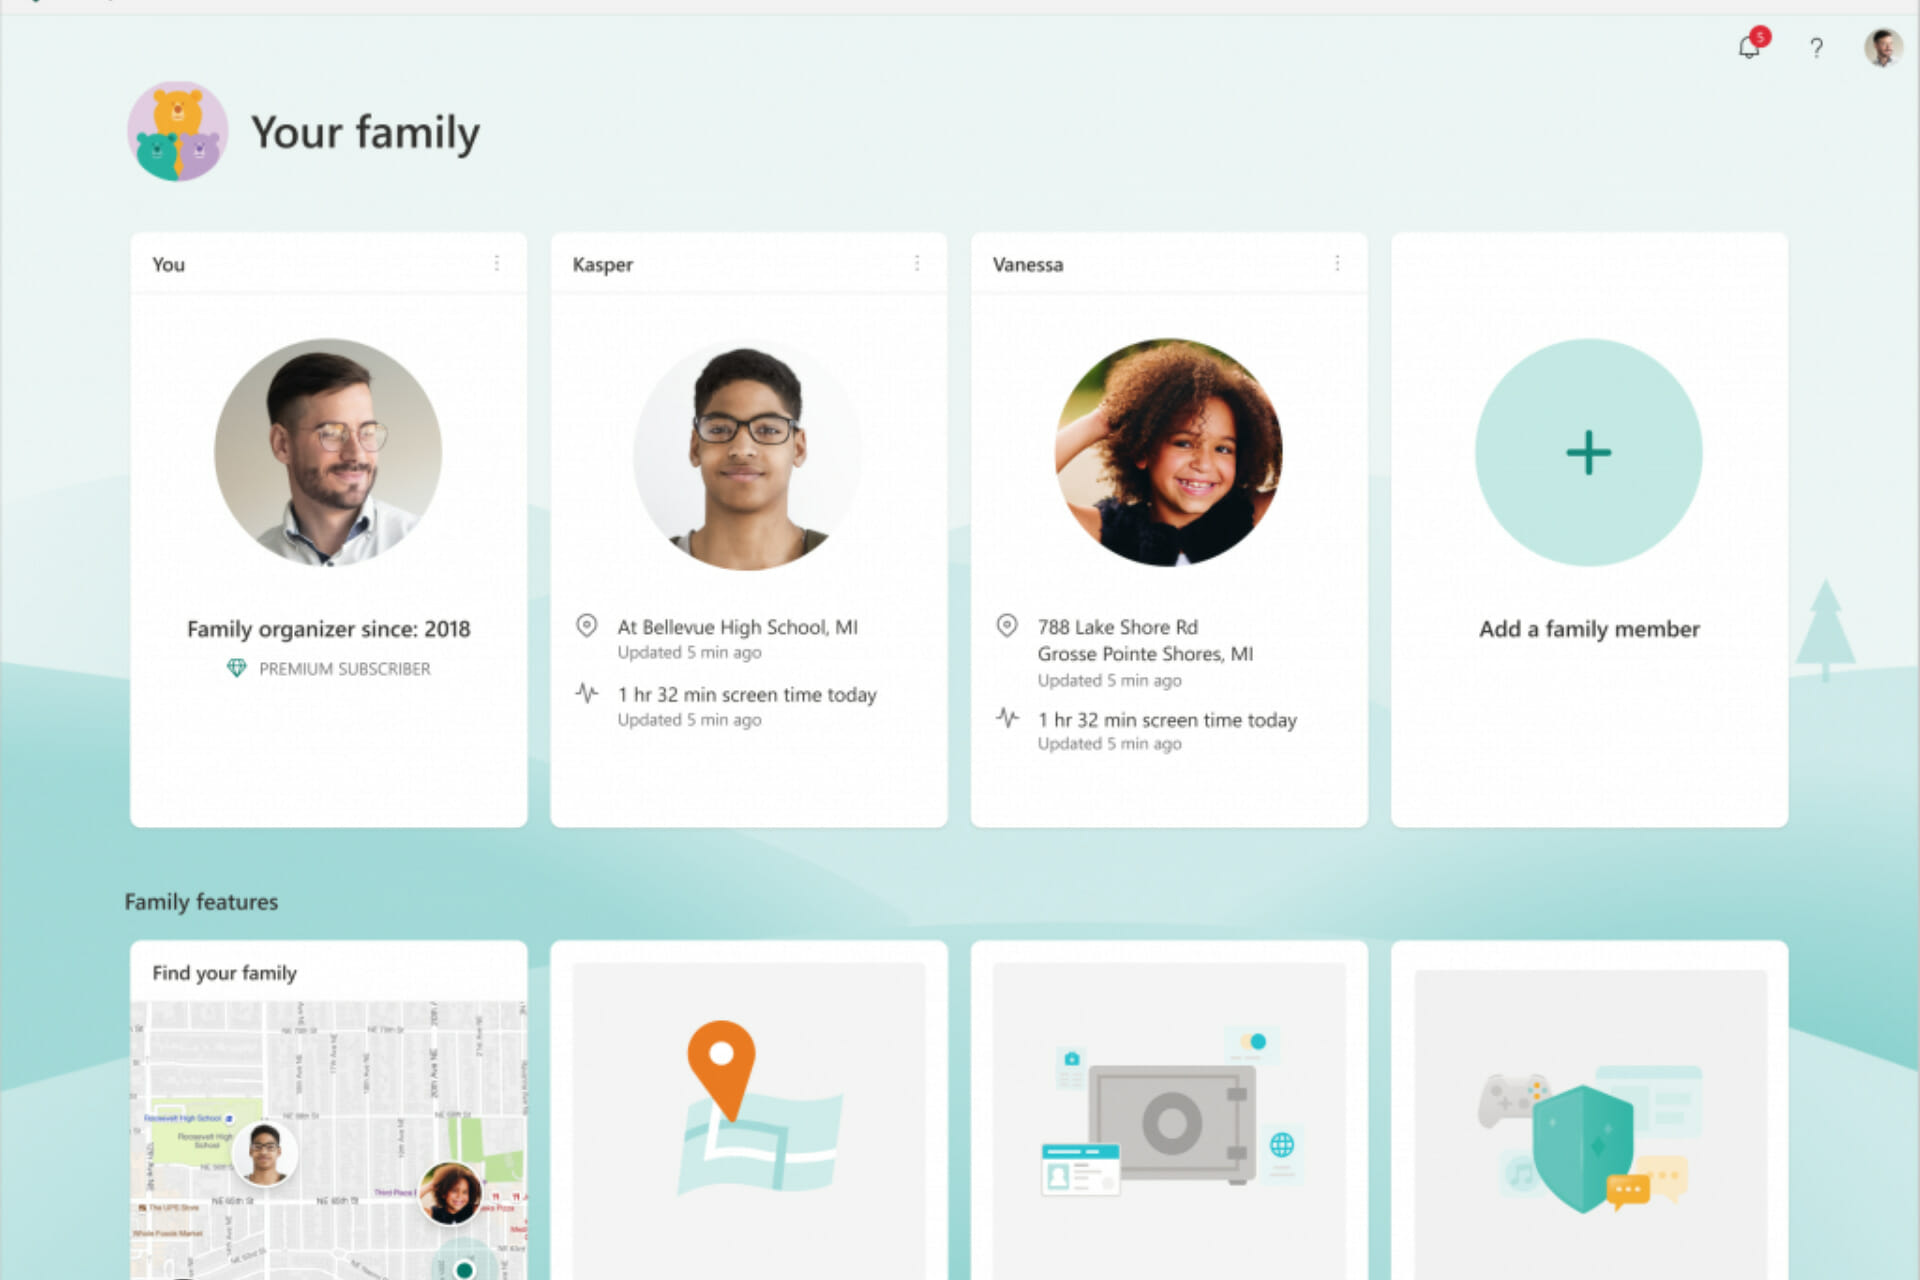
The Microsoft Family app will only be an inbox app on the Windows 11 Home edition and will be updated via the Microsoft Store.

Family safety features you use on the web and mobile are now available on Windows 11 starting with this build.

For those of you that didn’t know, the Microsoft Family Safety app helps empower you and your family to create healthy habits and protect the ones you love with digital and physical safety.

Many of you are now probably wondering how to get this app on your device and we are about to show you just that.

How do I install the Microsoft Familly app on Windows 11?

You know when they say that many things are easier said than done? Well, this is an exception, as it is just as easy to talk about it, as it is actually installing it.

And we’re about to start this process where all Microsoft apps begin their journey, the company’s Store.

  1. Open the Microsoft Store.open MS Store
  2. Search for the Microsoft Family app.MS Family 1
  3. Press the Get button.MS Family 2
  4. Open the Microsoft Family app.MS Family 3

Now you have successfully installed the Microsoft Family app on your Windows 11-powered device and you can start using all of its interesting features.

Many more functionalities will surely be added to this software in the near future, especially after the new app version goes through public rollout.

Until then, the above-mentioned features are limited to Dev Channel Insiders for testing, but it will make its way to all of us really soon.

Was this guide helpful to you? Share your experience in the comments section below.

Rotoscoping Software: 6 Best We Tested in 2026

Searching for which software is best for rotoscoping will definitely present prospective users with a variety of choices to pick from. But the search can stop here with this list of the best software for rotoscope.

Rotoscoping software is a VFX software used to create an animated version of movie footage showing a person or object in motion.

This animation technique is widespread in order to create motion and build a captivating story. Apart from the fact that is necessary for the animation/VFX industry, it’s also a time-consuming process. Luckily, there are automated tools you can employ.

It involves tracing the object or person frame by frame in creating realistic action using the PC. So, which software is best for rotoscoping these days? Let’s take a look at our top picks.

Which software is best for rotoscoping?

Adobe After Effect CS3

Adobe After Effect CS3 is definitely an industry leader when it concerns 3D visual effects and animation. It comes with so much versatility for producing exceptional motion graphics.

Adobe systems CS3 software makes motion graphics for compositing, tracking, keying, and animation for the post-production of movies.

It allows users to re-create motion images for different transitions with capabilities to import from Photoshop under the mask.

Users can rotoscope with much speed and precision even with interpolation and alpha channels into animated masks using vector.

Even more, keep in mind that Adobe After Effect CS3 software is compatible with over 300 software and Adobe applications.

Therefore, you can best use this solution and create life-like animation projects or VFX productions without too much effort.

Adobe After Effect CS3

There’s nothing you can’t really do with After Effects. Try it now and enjoy amazing results!
Free trial Visit website

Daz 3D

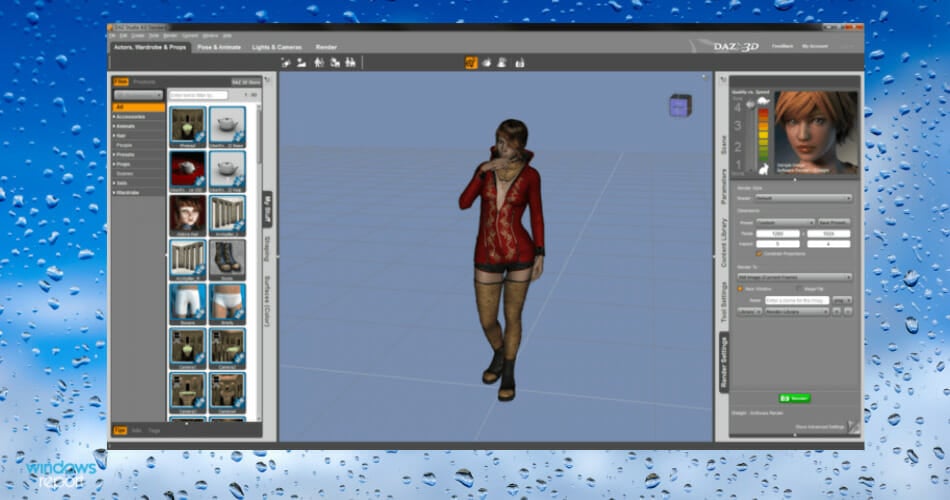
DAZ 3D stands for Digital Art Zone. Their website is full of information for digital artists, and it’s an amazing software that provides multiple features in rotoscoping. 

It includes the quality assets you need to build your 3D environment, whether you are a beginner or a pro. Premier characters, material, and photo-realistic renderings are ready to use, regardless of where you work.

With an Animate 3D feature from DeepMotion in collaboration with Daz 3D, rotoscoping feels pretty much lively. 

Animate 3D makes full-body motion capture simple and accessible, allowing you to create animations in minutes. Aside from speed, the service gives access to genuine human movements.

If you have a Daz 3D character, you can import Animate 3D animations and use all of the Daz 3D creator tools, such as Genesis 2, Genesis 3, and Genesis 8 figures.

When you’re working on a project, browse the online store for ready-made materials. The Daz 3D shop includes animals, buildings, spacecraft, and settings in addition to body and face forms, clothing, and postures.

Daz 3D

Daz 3D

Mix, match, combine, and fine-tune your ideal character and scenario!
Free trialVisit website

Silhouette FX

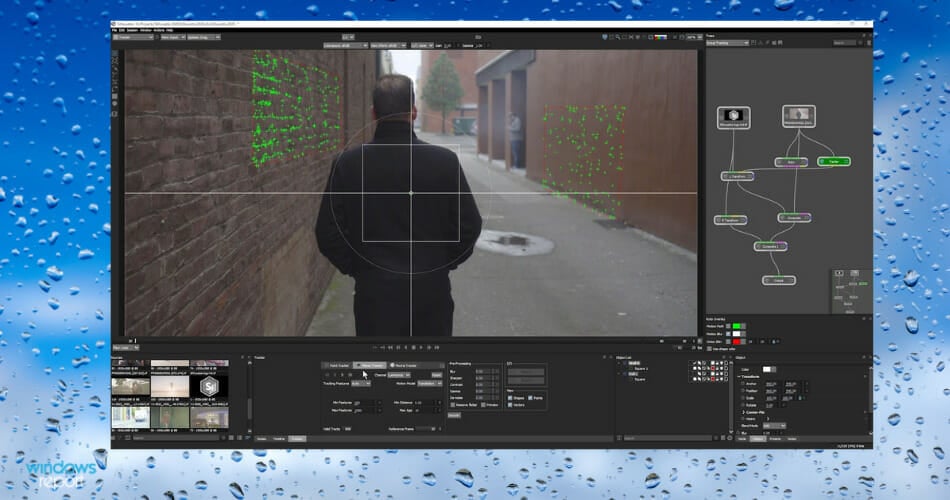
Silhouette Roto software provides users with a stand-alone application working on the basis of roto spline for visual effects.

The tool contains a layering palette including several splines for creating intriguing paintings and motion pictures.

With Silhouette roto, it’s possible to warp, morph, composite, matte, and convert from 2D to 3D animation.

The user gets a Silhouette VFX download for trial or the full version to utilize as a plug-in or a stand-alone app. An example of plug-ins for Silhouette roto is the Apple Final Cut Pro or Adobe After Effects for Windows or Mac.

It works with multiple file formats such as bitmap for exporting, OpenEXR or Cineon for Smoke, inferno, flint, discreet fire, Apple Shake, etc. Silhouettes allow users to create or edit existing spline or add feathering.

⇒ Get Silhouette FX

Nuke by Foundry

Nuke by Foundry is a digital node compositing software tool developed to give users the edge when it comes to motion tracking.

To achieve exceptional post-production for TV programs and motion pictures Nuke, Nuke X, and Nuke Studio come with both trial or full versions.

Do note that Nuke is an advanced VFX software suitable for more experienced users for reviews and editorials.

The Nuke software is compatible with Windows OS, with easy to create, edit, and customizable options. Even more, it requires low hardware or memory space and is very easy to install.

⇒ Get Nuke by Foundry

Fusion

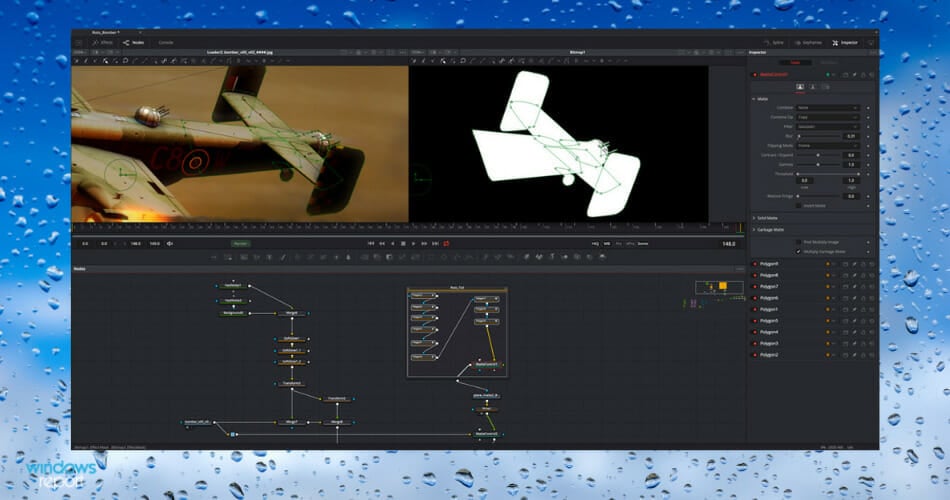
Fusion is one of the most effective software for rotoscoping and has over three decades in the rotoscoping VFX software business.

Developed by Blackmagic Design, the Fusion boasts several unique features for post-production compositing of images.

Fusion was initially developed by the Eyeon Fusion and Maya Fusion respectively and works perfectly with Windows OS.

The Fusion offers over 40 exceptional new features. They include the Delta Keyer, Planar tracking, camera tracking, virtual reality, studio player, GPU acceleration, planar rotoscoping, clean plate, new formats, etc.

Fusion is arguably one of the best 2D to 3D animation software for motion images.

⇒ Get Fusion

Blender

When trying to spot which software is best for rotoscoping, especially for 3D animation for rotoscoping at reasonable rates then the blender comes in.

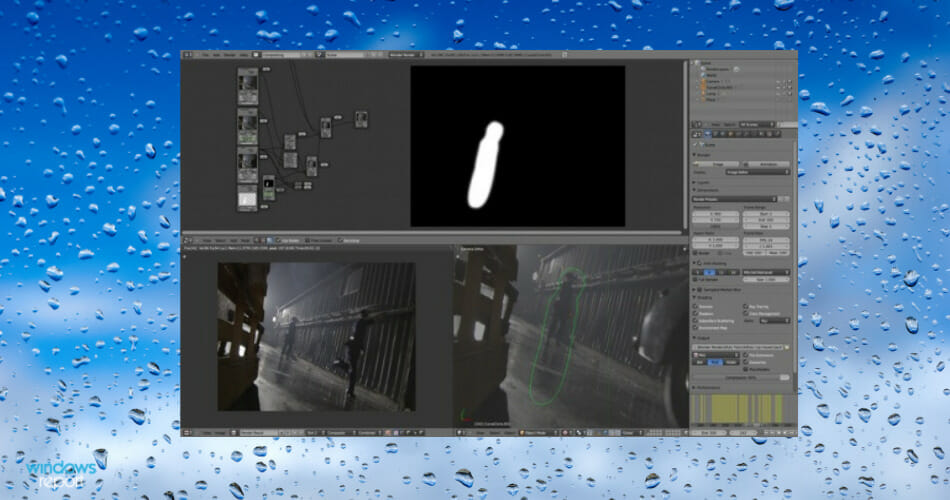
Blender avails beginner 3D designers an exceptional graphic user interface for creating and editing for film post-production.

Blender users can shatter objects, create style VFX using anime, electrical effects, customized sculpting brushes for visual effects, or rotoscoping.

It is open-source; free 3D VFX software for video games, 3D printed models, interactive applications, 3D animations, etc.

Developed using C++ and Python makes Blender easy to install. It combines perfectly with other software and operating systems for greater motion graphics rendering.

To identify the best pick in terms of which software is best for rotoscoping it all depends on the user’s needs, budget and preferences. Rotoscoping involves intricate activities and each software comes with peculiar features suitable for different users.

Therefore, it is necessary to identify one’s needs before committing or purchasing a license for VFX download.

A user can start up with the free or trial version to explore before taking the important decision to purchase a full version. Whichever rotoscoping software one settles for, the target should be one that works with much speed and efficiency.

The best rotoscoping software should create precise mattes always without hitches.

⇒ Get Blender

Which one of these rotoscoping software tools is your choice? Let us know by using the comments area below.

The process of rotoscoping has changed with the appearance of computers which now get the results done, although the process is still named after the original device.

Happy fifth birthday, Microsoft Teams!

If you’re a Microsoft fan, you might remember the day March 14, 2017. This was when Microsoft Teams hit general availability, after a preview phase, and just a few months after took the tech industry by surprise with the November 2016 announcement of the product in New York City. The world has changed a lot since then, but to mark the moment, Microsoft has put together a fun celebratory blog post looking at the past.

Written by Corporate Vice President Jeff Teper, the blog post offers insider insight into how Teams evolved ever since it was first launched. Teper looks at how Microsoft took feedback from customers using Teams features like meetings, channels, and documents to help make Teams better. He spends a lot of time talking about how Teams is unique as both a “async” and “sync” collaboration product, and how Teams hit the unprecedented level of 20 million users in two year since launch.

There’s also his personal side of him taking charge of Teams, too. Not to mention how Microsoft moved Azure cores to support the boost in Teams usership, and how Microsoft met with customers to hear their feedback on what was needed in the security, reliability, scalability, performance, and functionality.

In all these five years, Teams has picked up a lot of new features to bring it up to speed with Zoom and Slack. We’ve seen things like Together Mode, background blur, custom backgrounds, and so much more. Operations here at OnMSFT.com have also been powered by Microsoft Teams, ever since 2017. Congrats, Microsoft for hitting five years of Teams! With Teams on the boom with 270 million monthly active users, we look forward to many more years to come!

Total War: Warhammer 3 not having enough disk space? Fix it now

Developed by Creative Assembly and published by Sega, Total War: Warhammer 3 is one of the most popular based-strategy games worldwide.

Even if Steam just updated it with a 4 GB patch, some users claimed that Total War: Warhammer 3 is not having enough disk space.

In order to make it more clear for those of you who are also facing this issue, make sure you check the game system minimum requirements below:

  • CPU: Intel i3/Ryzen 3 series
  • RAM: 6 GB
  • OS: Windows 7 64-bit
  • Video Card: Nvidia GTX 900/AMD RX 400 series | Intel Iris Xe Graphics
  • Pixel Shader: 5.1
  • Vertex Shader: 5.1
  • Free Disk Space: 120 GB
  • Dedicated Video Ram: 2048 MB

However, it is always recommended to run the game on a computer that provides more than the minimum specs.

In this matter, we’ve compiled a list of useful aspects you should look for when checking your system characteristics:

  • CPU: Intel i5/Ryzen 5 series
  • RAM: 8 GB
  • GPU RAM: 6 GB
  • OS: Windows 10 64-bit
  • Diskspace: 120 GB

Now, let’s see what you can do if there is not enough disk space error while trying to run Total War: Warhammer 3.

What can I do if Total War: Warhammer 3 isn’t having enough disk space?

1. Move the game from SSD to HDD

In order to move Total War: Warhammer 3 from SSD to HDD, all you have to do is cut/copy then paste it into the new drive or reinstall your software to the new drive.

After that, go into Settings and change your default location for files to be saved if your SSD is your C drive.

However, you have to keep in mind that games installed on SSD will load quicker than those on HDD.

2. Remove large & useless unnecessary programs

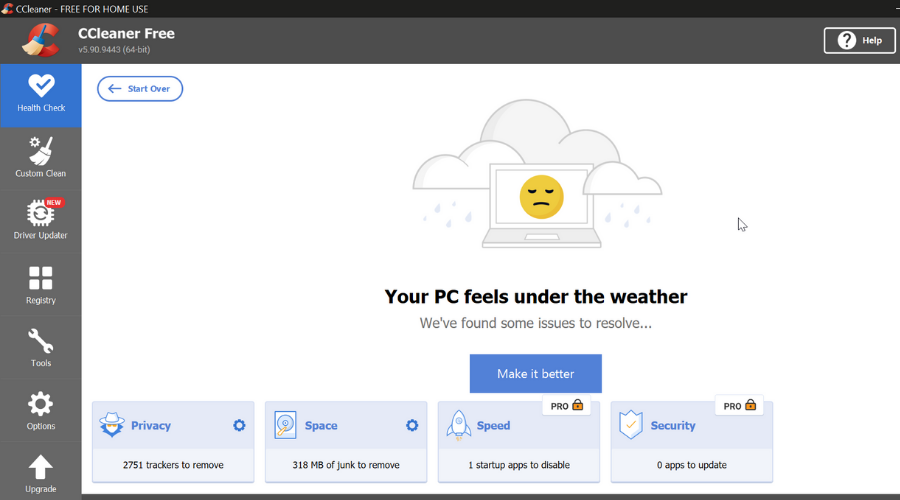
A great method to get rid of extra programs and files from your PC and free up disk space is with an efficient cleaning tool like CCleaner.

This software offers reliable support to erase useless Windows applications or browsing data that takes significant storage space.

It’s possible to resolve Warhammer 3 disk storage issue by eliminating duplicate files, different browser add-ons or extensions, or junk files that take up much memory.

Using the Custom Clean tab, you can select which files and programs to delete and analyze the entire system to find additional files.

There is a registry cleaning functionality that helps users to restore broken registry keys or remove leftovers from uninstalled programs.

In addition, you have a disk analyzer tool useful to detect large files that takes up too much disk space on your drive.

CCleaner

This famous cleaning tool efficiently deletes unwanted programs, junk files, or leftovers so you can enjoy every gameplay.
Check price Visit website

So, here you are, with two great options to try if Total War: Warhammer 3 isn’t having enough disk space.

Even more, the Failed to host Total War: Warhammer 3 error is encountered by several players. If you happen to be one of them as well, check out our article and apply the quickest solutions to solve it for good.

Was this guide helpful for your situation? Make sure you share the experience with us, by leaving a comment in the dedicated section below.

WWE 2K22 not connecting to the server? Here’s how to fix the issue

What can be even more fun than proving your friends, or WWE 2K22’s AI opponents that there really isn’t anyone that can actually defeat you?

Proving it to other online players that feel the same way about themselves. But, sometimes, establishing a connection to the game’s server can prove impossible for some players.

The last few WWE games have quite a reputation for their extremely rocky launch, with tons of bugs, glitches, and connectivity issues.

You might think that WWE 2K22 is different, but it’s actually not. If you also encounter server errors or online features aren’t working, follow these tricks to help you fix the connection problems.

How can I fix the game not connecting to the online server?

You might think that such a problem requires a complicated troubleshooting process and it could take hours to get the game working again.

Nothing further from the truth actually, as what you need do to in order to fix this annoying issue is more accurately measured in minutes.

The process itself isn’t at all hard, as it requires only tweaking some settings or granting some permissions, so the title can function properly.

Thus, if you too are having online trouble while trying to play WWE 2K22, here’s what you need to do:

  1. Restart your PC.
  2. Check the server status.2k22 server check
  3. Check your device’s internet connection.check internet connection
  4. Allow WWE 2K22 through Windows Firewall.firewall exception
  5. Change DNS address.
    change dns
  6. Verify game file integrity.lost ark steam game files
  7. Use different Internet connection.
  8. Restart router.

These eight easy steps have proven useful for other WWE 2K22 users that unfortunately found themselves facing similar odds.

As the first step says, before you start searching for fixes and tweaking all sorts of settings, the safest thing to do is to first check whether WWE 2K22‘s servers are currently running or not.

If everything proves to be up and running, this TBS process will surely help you restore game functionality and carry on inspiring future wrestling fans. If nothing helps, we recommend giving a try to a VPN service like Private Internet Access and change your location and try accessing another server.

Remember that the match isn’t over until someone yields, so be sure to always be the last man standing, no matter the circumstances.

Have you managed to fix the online mode not working for WWE 2K22? Share your experience with us in the comments section below.

WWE 2K22 not launching, crashing, or freezing [Fixed]

One of the most popular franchises in the world, WWE, has captivated the imagination of both young and mature fans for many years now.

You can’t really talk about the US sports landscape without mentioning WWE, the organization that brought us Dwayne The Rock Johnson, Rey Misterio, The Undertaker, or Big Show.

And, of course, wrestling fans have the chance to take some of that excitement home with them, in the form of the new WWE 2K22 video game.

It’s available on PlayStation, Xbox, and PC, in order to appeal to a wider range of fans. However, PC players are reporting major problems with this title.

How can I fix these WWE 2K22 problems on my Windows PC?

The first step is to don’t panic and take a few seconds to assess the situation. If your PC version of WWE 2K22 doesn’t launch, crashes, or has black screen errors, we can help you.

There are some workarounds that will help you restore your game’s functionality within only a few minutes, the quickest method we recommend is an update of your drivers with specialized software like Outbyte Driver Updater that will scan your PC for missing or outdated drivers and replace them.

Let’s go through the troubleshooting process together and fix these annoying issues once and for all, so you can go back to owning your opponents in RAW or Wrestlemania.

  1. Restart PC.
  2. Change screen/monitor refresh rate to 60Hz.screen refresh rate
  3. Launch WWE 2K22 in windowed mode.windowed mode
  4. Run the game on your dedicated graphics card.high performance
  5. Check System Requirements.wwe 2k22 system requirements
  6. Run the game as an Administrator.run as admin
  7. Verify Integrity of Game Files.lost ark steam game files
  8. Update Microsoft Visual C++ Redistributable.update c++
  9. Update DirectX.update directX
  10. Update GPU.update geforce gpu
  11. Disable Overlay Apps.discord overlay
  12. Install All Pending Windows Updates.update windows 11
  13. Disable Antivirus and Firewall Program.
  14. Close Background Processes
  15. Reinstall WWE 2K22

WWE 2K22 users reported the game working properly, without any hiccups, after going through the same troubleshooting process.

make sure you take into consideration all of the aspects that can contribute to the game not launching or constantly crashing, to eliminate future threats.

Has this guide been useful to you in your quest to fix WWE 2K22 not working? Share your experience with us in the comments section below.

Fix: Audio Latency in Windows 10/11

The proper sound output shouldn’t be something we should break our back for. But, even though Windows 10, with every iteration, brings in something new, the essentials are seemingly suffering.

A lot of users report audio lagging in Windows 10, falling behind the video. This audio lag in Windows 10 completely ruins the playback experience, so we showed you how to fix the audio lag below.

Why do I get audio delay in Windows 10?

We use streaming platforms and browsers to get movies and videos on demand to keep ourselves entertained. It is possible, however, that our entertainment experience would be hampered if the audio and visuals were not in sync.

On many occasions, you may notice the audio is playing before the video and vice versa, or even get an audio delay in software applications such as Skype. If you experience image issues, we recommend you look at how to fix Skype video lags behind audio on Windows 10 & 11.

A faulty or outdated audio driver can cause a sound delay like it does in many other situations. We have two options for dealing with this: either manually or with the assistance of a driver updater program.

In other cases, the audio or video may lag if the internet connection speed is slower than required, which we have addressed in the following list of methods that you can try to fix the Windows 10 audio delay in software issue.

How can I fix audio lag in Windows 10?

1. Run the Sound troubleshooter

  1. Right-click Start and open Settings.
  2. Choose Update & Security.
  3. Select Troubleshoot from the left pane.
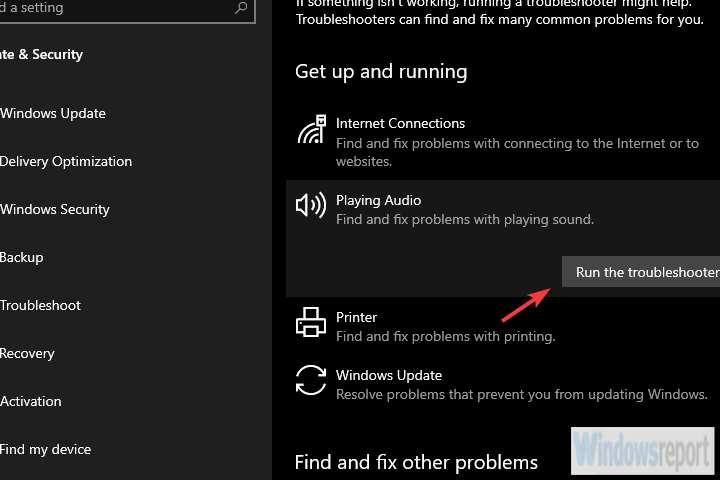
  4. Expand the Playing Audio troubleshooter and click Run the troubleshooter.playing audio troubleshooter

Let’s start by running the built-in Sound troubleshooter. Windows 10 comes with a set of dedicated troubleshooters and one of those deals with audio issues.

This includes playback issues so many users experience, like sound distortion, delay, or even complete absence of the system sound.

Once run, the troubleshooter should either deal with the problem or, at least, show you what’s causing audio lag.

2. Reinstall Realtek audio driver or replace it with a generic driver

  1. Right-click Start and open Device Manager.
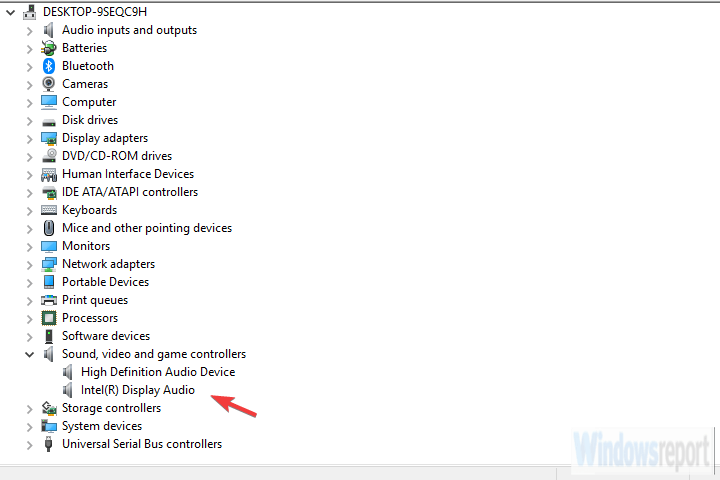
  2. Expand the Sound, video, and game controllers section.device manager audio driver
  3. Right-click on the Realtek/Intel sound driver and uninstall it.
  4. Restart your PC and the driver should install automatically.

The majority of sound issues start with a bad set of drivers. And there are so many possible combinations so we can’t say with certainty what’s exactly the issue. Some users resolved issues with driver reinstallation.

Others, completely remove the Realtek onboard sound driver and stick with the generic Windows driver (High Definition Audio Device).

Finally, the third group uses a manual approach for installing an official Realtek driver. We suggest trying all 3 and looking for improvements.

Also, in case you’re using USB headphones, make sure to download the proper driver. The generic driver provided by Windows won’t work most of the time.

And you can find the official sound driver on the Realtek website.

The easiest solution we recommend is a dedicated driver updater program that will automatically search for drivers and update them for you safely and fast.

3. Disable Exclusive control and Exclusive applications priority

  1. Right-click the Sound icon in the Notification area and open Sounds.
  2. Select the Playback tab.
  3. Right-click on your default playback device and open Properties.
  4. Choose the Advanced tab.
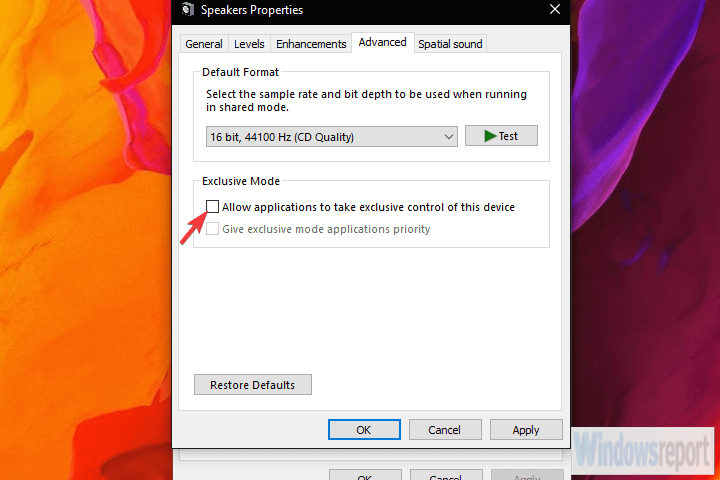
  5. Under the Exclusive mode, uncheck both Allow applications to take exclusive control of this device and Give exclusive mode applications priority boxes.disable exclusive control over playback device
  6. Save changes and exit.

There are a dozen built-in options that allow you to tweak sound controls. For the sake of troubleshooting the audio lag issue, we’ll start by disabling two of them. Those are Exclusive control and Exclusive applications priority.

Once off, some users have seen improvements. Exclusive prioritizes program’s sound settings over system ones, while Exclusive applications priority to reduce sound latency for a variety of applications.

For some reason, both seem to cause audio lag for some users.

4. Restore Playback device to defaults

  1. Right-click Sound icon in the Notification area and open Sounds.
  2. Select the Playback tab.
  3. Right-click on your default playback device and open Properties.
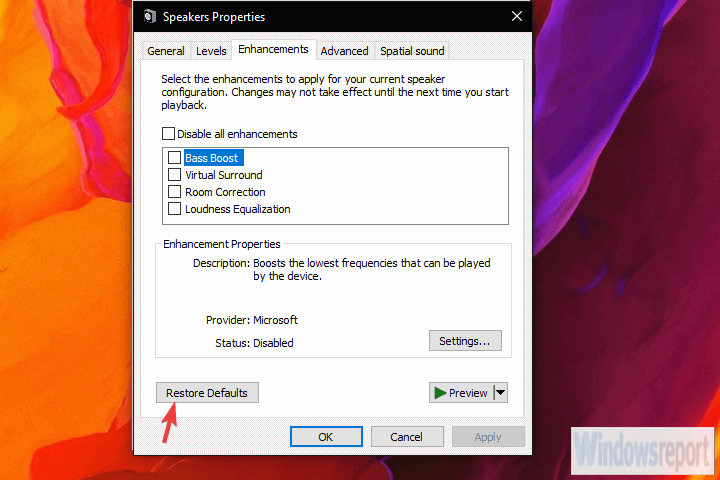
  4. Under Enhancements and Advanced tabs, click Restore Defaults.reset defaults playback device settings
  5. Save changes.

If you’ve recently made some changes to your default playback device (speakers or headphones), try restoring it to default values. If you’re not sure what you’ve tweaked, restoring all values to factory should do the job.

Finally, if you’re still experiencing issues afterward, continue with the steps above.

5. Change the audio format and disable enhancements

  1. Right-click the Sound icon in the Notification area and open Sounds, open the Playback tab, right-click on your default device, and open Properties.
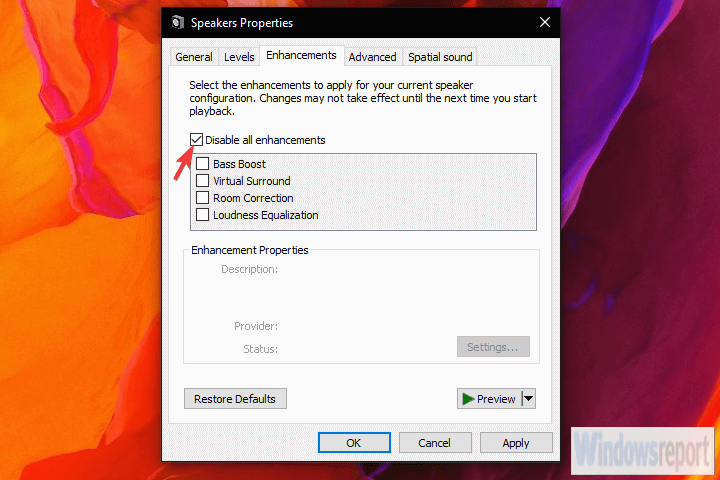
  2. Under the Enhancements tab, check the Disable all enhancements box.audio enhancements
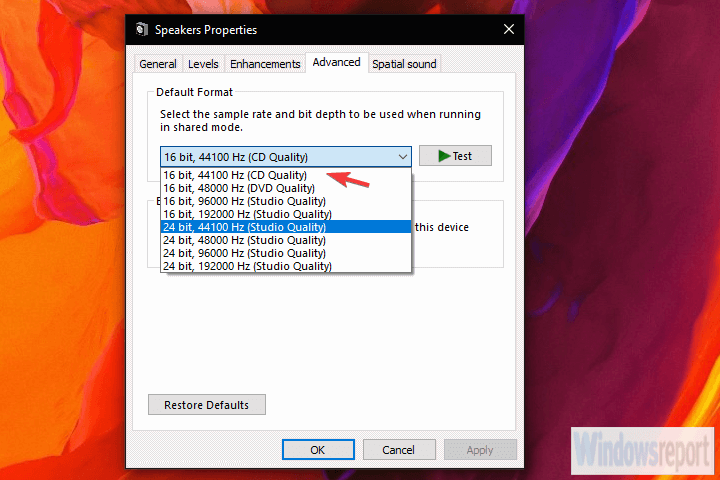
  3. Now, under the Advanced tab, change the current default audio format to CD or DVD quality. The bitrate values are under the contextual menu.audio bitrate format
  4. Save changes and restart your PC.

In the previous step, we explained how to restore defaults. However, that might not help and there are still some things you can change to, hopefully, reduce or even completely fix audio lag or latency.

The two remaining options in Sound settings worth considering are Audio format and Enhancements. The first option, Default audio format, might be running on a too high sample rate quality.

The latter option, Enhancements, should be completely disabled.

6. Disable ErP and/or HPET in BIOS

  1. Press Windows key + I to open Settings.
  2. Choose Update & Security.
  3. Select Recovery from the left pane.
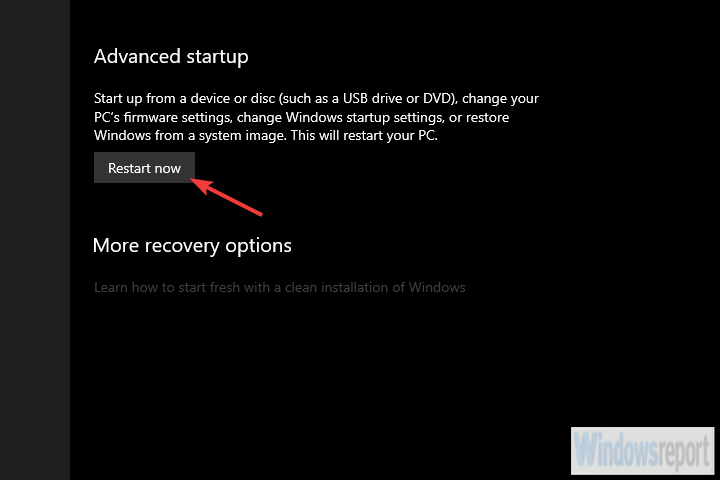
  4. Under the Advanced startup, click Restart now.advanced reboot
  5. Choose Troubleshoot.
  6. Select Advanced options.
  7. Choose UEFI Firmware Settings and click Restart.
  8. Once there, disable ErP or HPET and save changes.
  9. Exit and reboot your PC.

If the previous system-based changes haven’t helped you, we need to move to UEFI/BIOS settings. Another two options you need to disable in order to fix the audio lag.

Hardly both options will be available in settings, but if there’s no ErP, HPET usually is and vice versa.

Just boot into BIOS and disable ErP/HPET and, hopefully, the playback audio lag shouldn’t bother you anymore. If you’re not sure how to boot into BIOS on Windows 10, follow the steps above.

7. Install the Flash player if the problem occurs in a browser

Nowadays, most browsers don’t require Flash player installation in order to successfully stream media. They usually come with a preinstalled flash player and everything should work as intended from the get-go.

Except, for some users, it doesn’t. What we suggest in that case is to either switch to an alternative browser or install Adobe Flash Player.

Either way, the browser-related audio lag, latency, and similar playback issues are usually resolved that way. Also, don’t forget to disable the Hardware Acceleration under the browser settings menu.

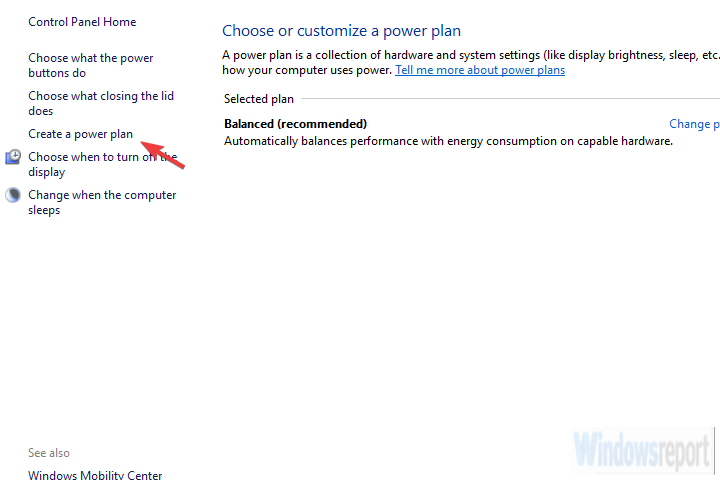
8. Change Power plan to High Performance

  1. Right-click on the Battery icon and open Power Options.
  2. Select the High-Performance plan from the list.
  3. If it’s not available, click on the Create a power plan link in the left pane.create a power plan
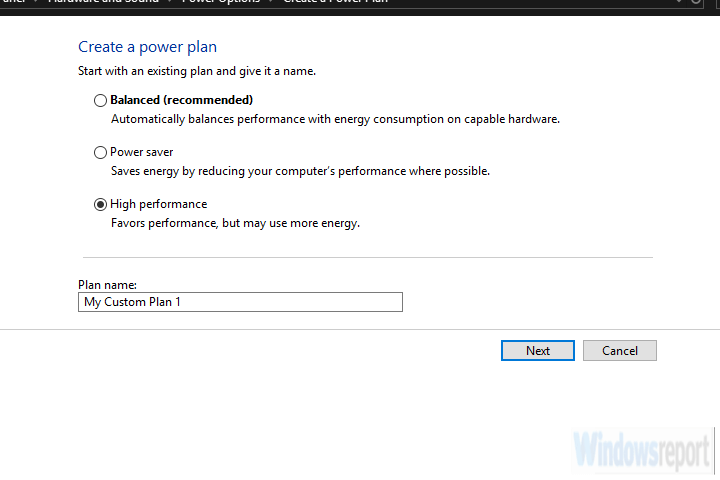
  4.  Choose High performance and name the plan.change power plan
  5. Click Next, select preferred settings, and click Create.
  6. Set it as your default plan and look for changes.

Another possible reason for the audio lag in Windows 10 is the set of advanced power-saving options which kick in if you use Power Saving or even Balanced mode.

What we want to do is switch to a High-Performance plan and stick with it.

That way, nothing no power-saving options would affect the audio playback. This applies to laptops mostly, but you can follow it through on desktop PCs as well.

9. Update Windows or uninstall updates

  1. Press Windows key + I to open Settings.
  2. Choose Update & Security.
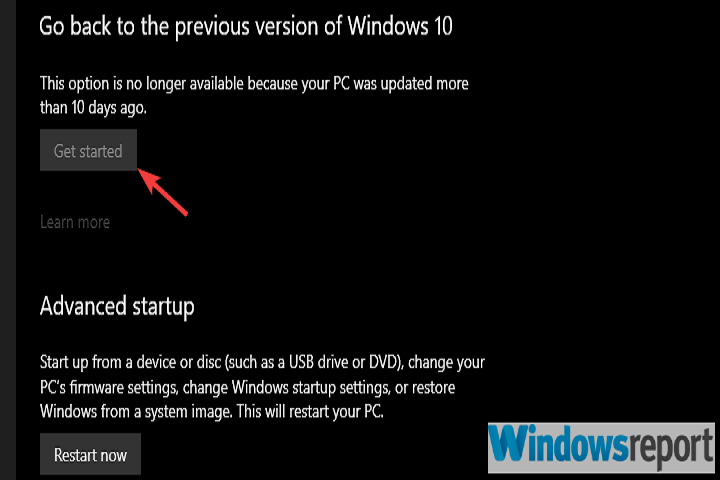
  3. Select Recovery from the left pane.
  4. Click Get started under the Go back to the previous version of Windows 10 section.rollback windows 10

Windows 10 is sometimes just breaking itself, without any foreign impact. Enforced updates are, as many of us have experienced, sometimes starting issues instead of fixing them.

Every transition to a next major update bears the risk of emerging issues. And, in this case, some users who have had perfect sound output on earlier Windows 10 iterations, suddenly run into a debilitating audio lag after an update.

What we suggest is to update Windows firstly. Yes, Microsoft usually needs some time to fix bugs on an unpolished major update. If that doesn’t help, consider rolling back to a previous release.

10. Reinstall Windows

Finally, if none of the steps helped, the only remaining thing that falls on my mind is a clean reinstallation. This, of course, doesn’t have to be a solution, as there are so many additional factors in play.

However, you’ll at least remove the system as a possible culprit for the audio lag.

If you don’t know how to do it, we have an excellent guide on how to reinstall Windows 10 that will get you through with it. Also, you can create an audio balance between the left and right channels if the sound is too quiet.

And, with that said, we can wrap it up. Don’t forget to share your thoughts in the comments section below. If you have an alternative solution or question, consider sharing them with us and our readers.

Windows 11 ISO Error: 3 Quick Ways to Fix it

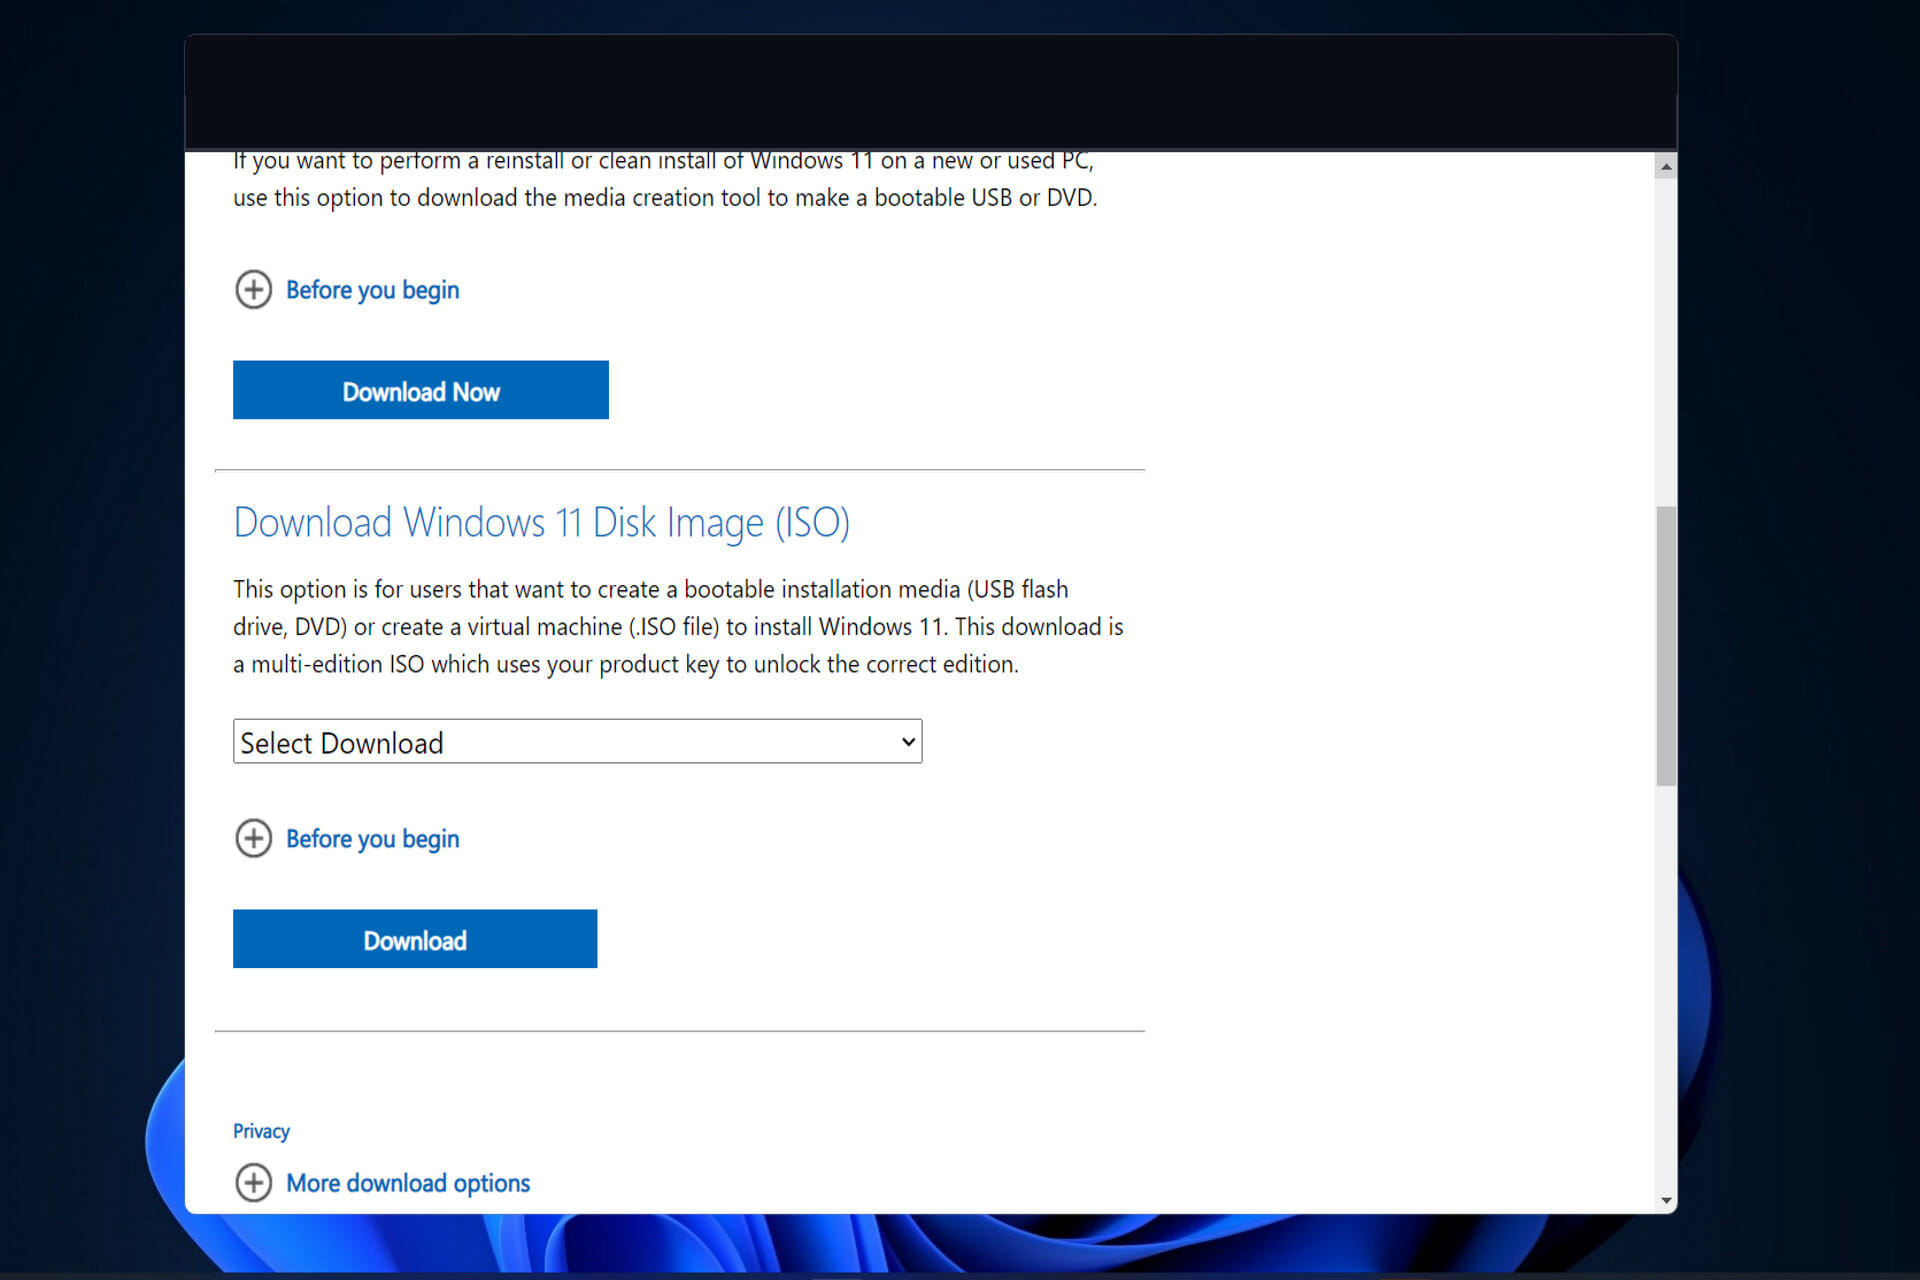
Obtaining a legal Windows 10 ISO was difficult, but Microsoft appears to have learned its lesson by releasing Windows 11. Today, we will show you how to fix any Windows 11 ISO error that can occur during the process.

Suppose you require an ISO for installation or maintenance purposes. In that case, obtaining a legal and up-to-date copy of Windows 11 is straightforward and quick, as it is possible to download an ISO image directly from Microsoft’s website or use the Media Creation Tool.

Follow along as we will show you how to troubleshoot any Windows 11 ISO error that pops up right after we see what a disk image is and does in more detail. Keep up with us!

What does a disk image do?

A disk image is a single huge file that accurately reproduces the contents and capabilities of a hard disk, optical disk, or other storage devices on a computer’s hard drive.

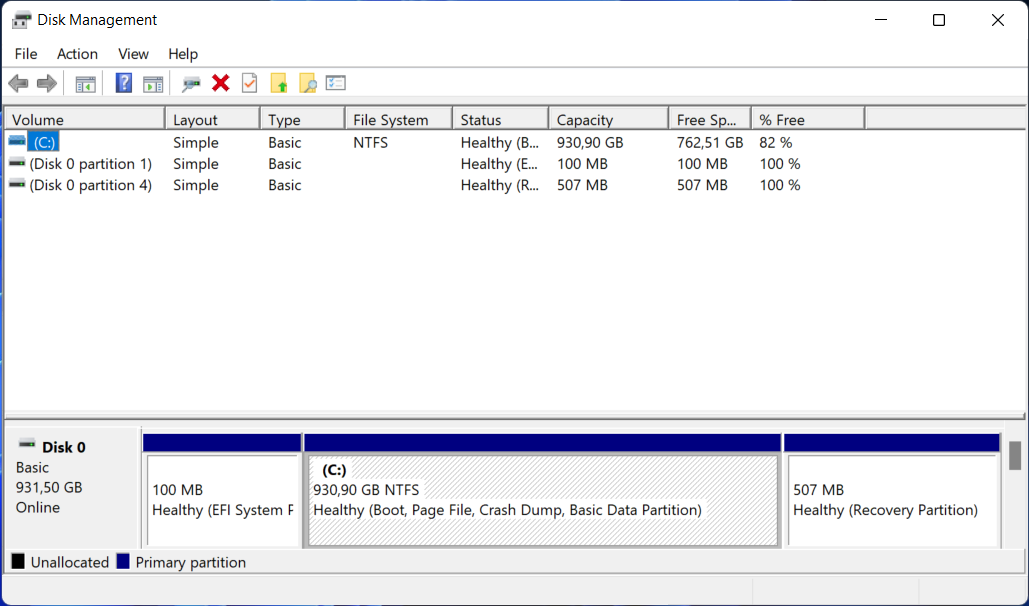
disk management windows 11 iso error


Numerous file extensions can be used to identify the file size, which ranges from a few megabytes to several gigabytes.

The file will conclude with one of several endings, such as .iso, .cue, .bin, or .img. As a note, modern image files for Macintosh machines will have an extension of.dmg.

This concept of making a disk image on a hard drive is undoubtedly already recognizable to everyone who has cloned his or her favorite music CDs or DVDs or downloaded an OS. Although this is not the only method of making duplicates, it is the most convenient.

How can I fix Windows 11’s ISO error?

1. Check your Internet connection

Let’s start with the easier solutions and causes. The Media Creation Tool, which allows you to download the Windows 10 ISO file, will, of course, necessitate the use of an Internet connection to function.

What matters is that you have a steady connection that supports direct downloads from the Microsoft servers, regardless of how slow your bandwidth is.

In light of this, we recommend you inspect your network and troubleshoot any potential problems. Don’t hesitate to use one of the following links to solve the Internet problem. This will also fix the We are unable to complete your request at this time error.

2. Run Disk Cleanup

  1. Press Windows and R to open a Run box and enter the following command: cleanmgr /VERYLOWDISKrun-disk-cleanup windows 11 iso download failed
  2. The completion of the command will result in a report outlining the amount of space you have managed to clear up.
  3. In order to pick and choose which files to clean, type the following command into the Run search box and press Enter to begin the cleaning process: cleanmgr /LOWDISKcleanmgr windows 11 iso error
  4. While the following command will wipe less data from your disk than the command provided in our previous stages, it is an alternative method of cleaning up your disk: cleanmgr /sageset:1sageset windows 11 iso error

However, it will start with the very minimum of settings selected, and you will be able to customize the application after it has been launched by selecting the choices you want from the menu.

If you are interested in creating a WinPE bootable disk for Windows 11, read this guide to learn the detailed steps.

3. Use another method to install Windows 11

The Windows 11 ISO option is intended for users who want to generate a bootable installation medium (USB flash drive, DVD) or a virtual machine to install Windows 11 on a computer or a laptop.

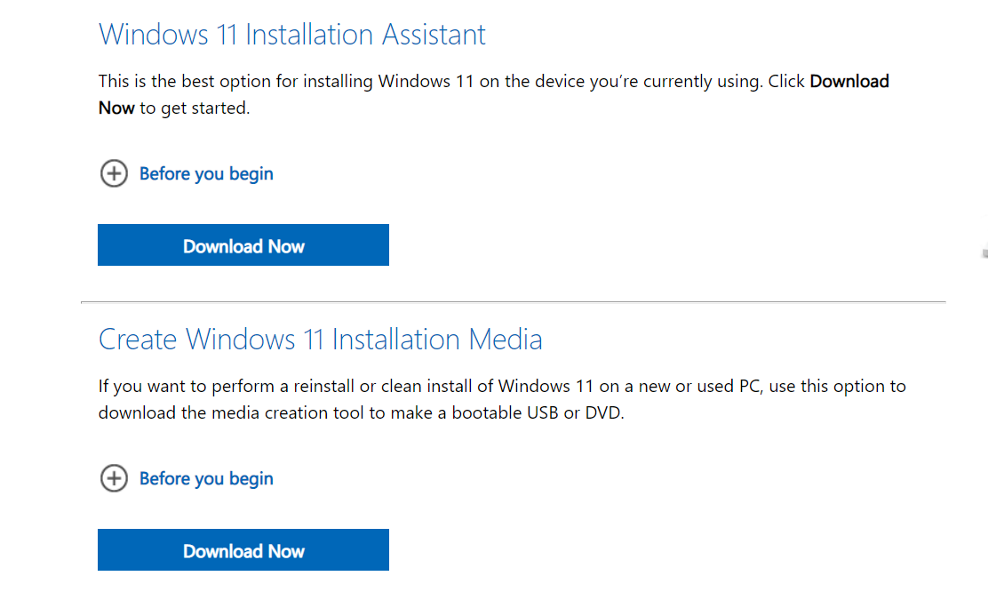
assistant windows 11 iso error


However, there are other ways in which you can install the operating system, such as using the Installation Assistant. Thus, we recommend that you check our article on how to upgrade to Windows 11 using the Installation Assistant.

Alternatively, you can use Media Creation Tool to install Windows 11, and don’t miss out on our guide to make sure that you follow the correct order of the steps involved.

For further information and potential solutions to this error, you should take a look at our post on Windows 11 ISO download failure and continue with the troubleshooting process.

Alternatively, another article on Windows 10 ISO file download issues might save you some time and tears.

Let us know in the comments section below if this guide was helpful for you and whether you have any more solutions in mind.

Windows news recap: Windows 10 on Steam Deck, Apple’s Studio Display may support Windows, and more

Welcome back to our Windows news recap, where we go over the top stories of the past week in the world of Microsoft’s flagship operating system.

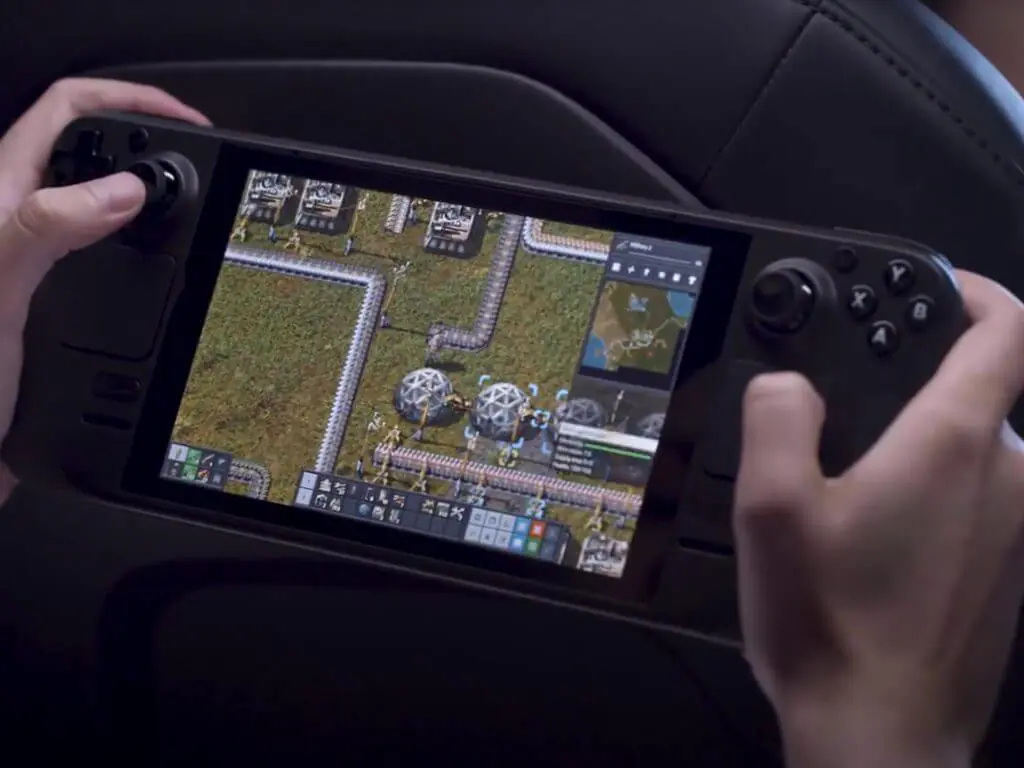
You can now run Windows 10 on the Steam Deck, with some limits

If you’ve been lucky enough to get hold of a Steam Deck, it’s now possible to install Windows 10 on it. Whilst there are some limits, there’s no big issues.

You can now run Windows 10 on the Steam Deck, with some limits - OnMSFT.com - March 10, 2022

Apple’s fancy new Studio Display will work on Windows — webcam, speakers, and all

Apple’s new display, Studio Display, may work on Windows PCs as well, not just Apple’s Mac lineup, including the webcam and speakers.

Apple's fancy new Studio Display will work on Windows — webcam, speakers, and all - OnMSFT.com - March 9, 2022

AMD details intermittent system stutter issue with Ryzen processors in Windows 10 & Windows 11

PCs with Ryzen processors may experience intermittent system stuttering on Windows 10 and 11, according to AMD. The issue exists on PCs with Firmware Trusted Platform Module (fTPM).

AMD details intermittent system stutter issue with Ryzen processors in Windows 10 & Windows 11 - OnMSFT.com - March 7, 2022

That’s it for this week. We’ll be back next week with more Windows news.

How to Enable Windows 11’s Amazon Appstore if it’s Greyed Out

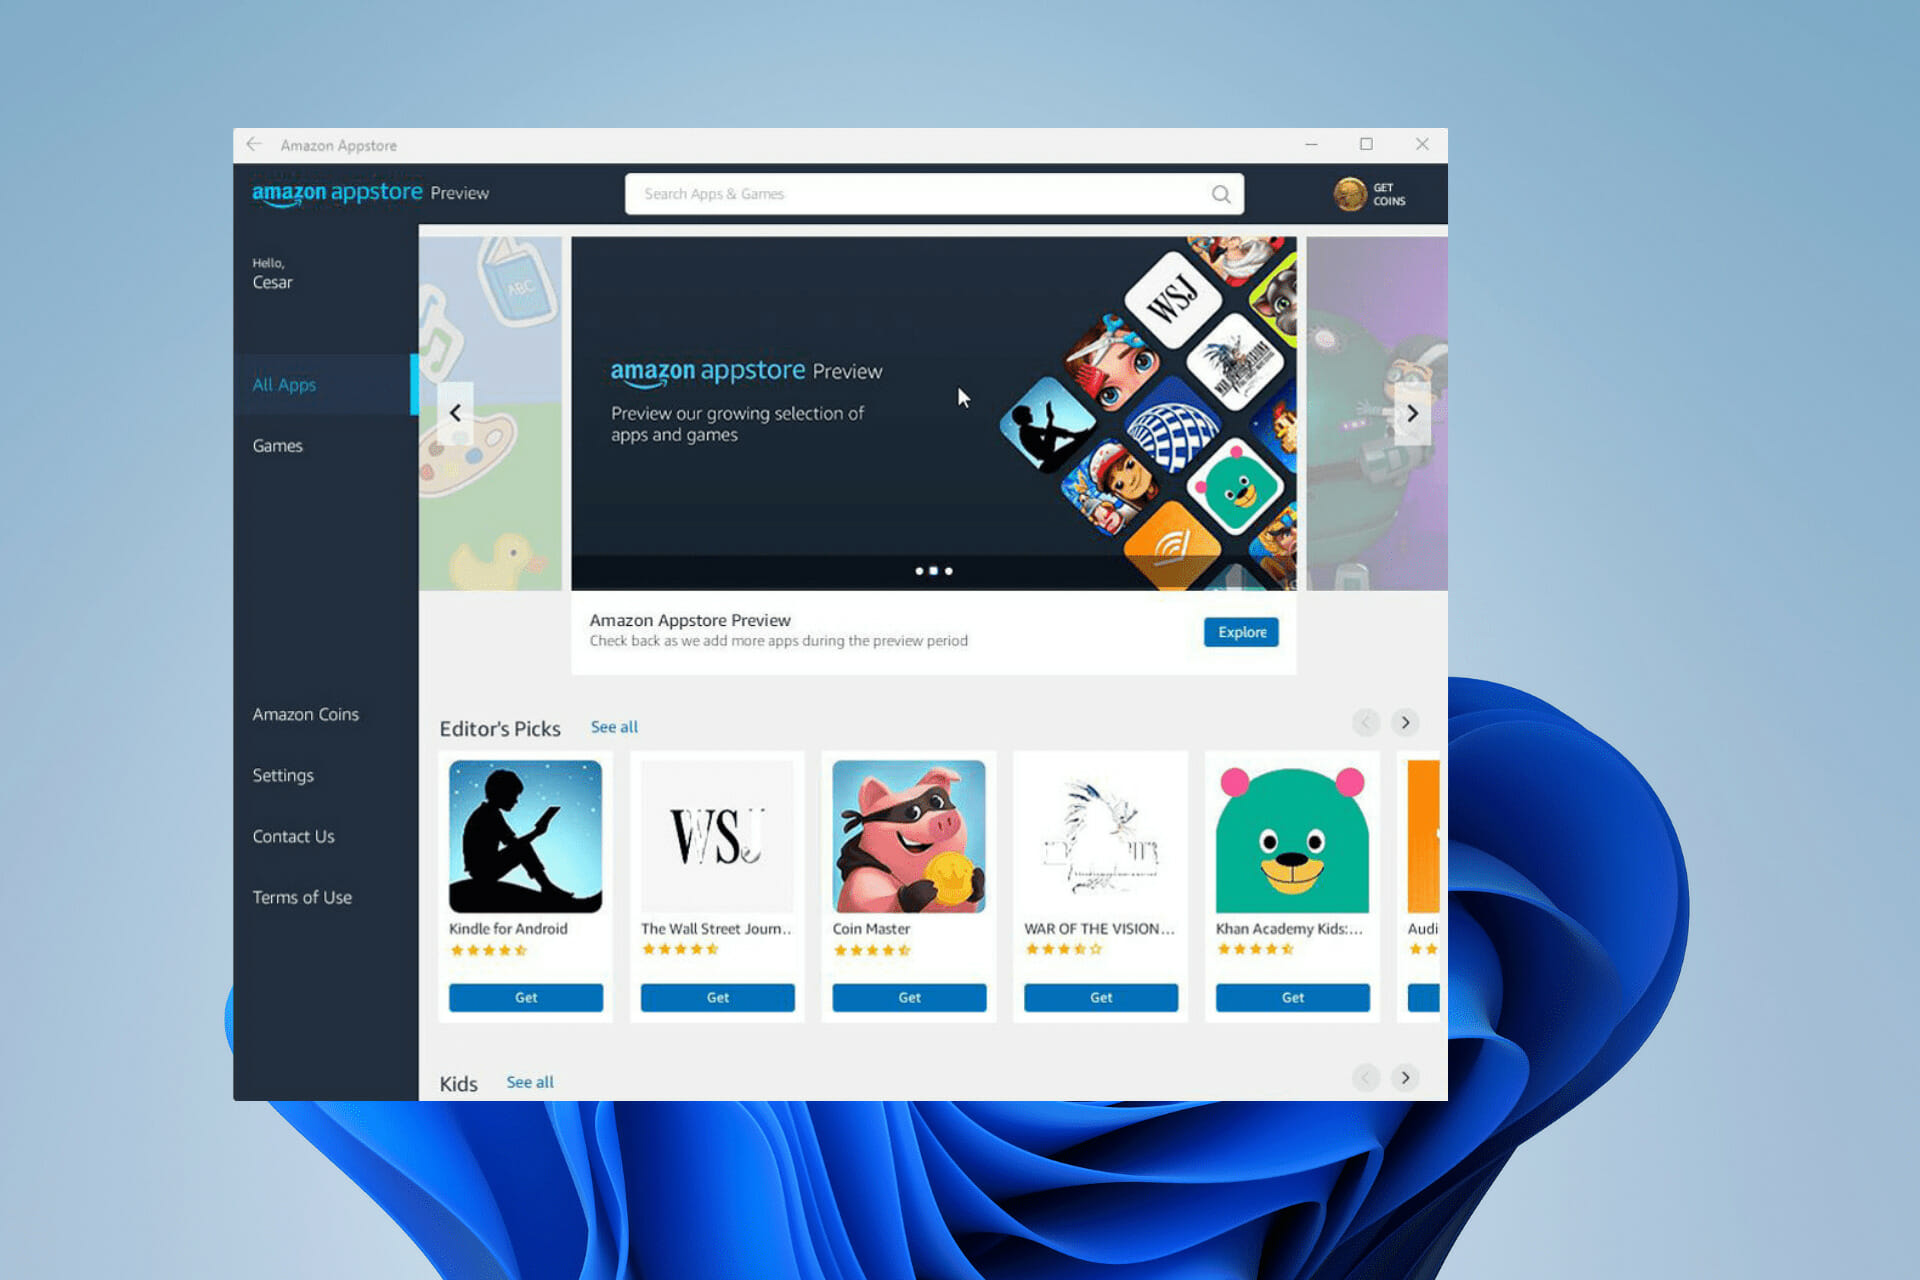
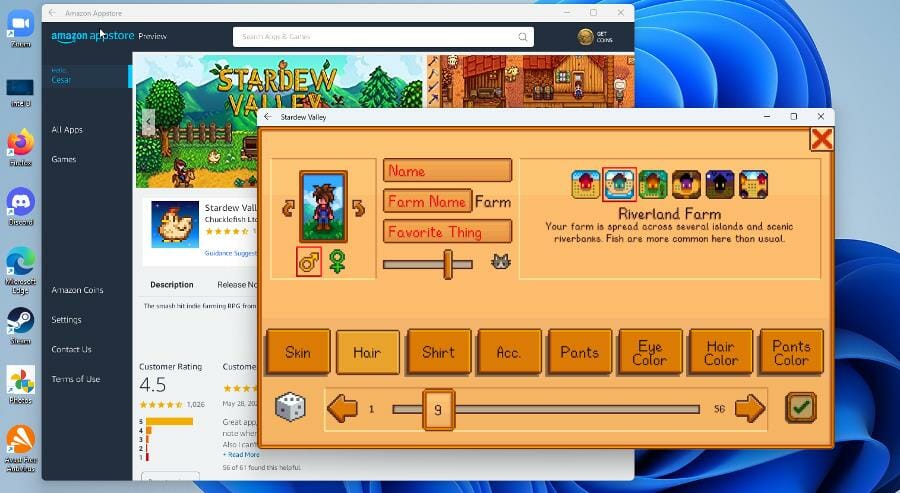
The new Amazon Appstore on Windows 11 allows you to run Android apps on your computer. Many different kinds of apps are available through Amazon, from video games to fitness apps and even TikTok.

Although the feature has finally been released in an official capacity, it may be missing on your computer. For a while, the Amazon Appstore was exclusive to Windows Insider Program’s beta channel or had its feature locked away.

Are there any requirements my computer should meet?

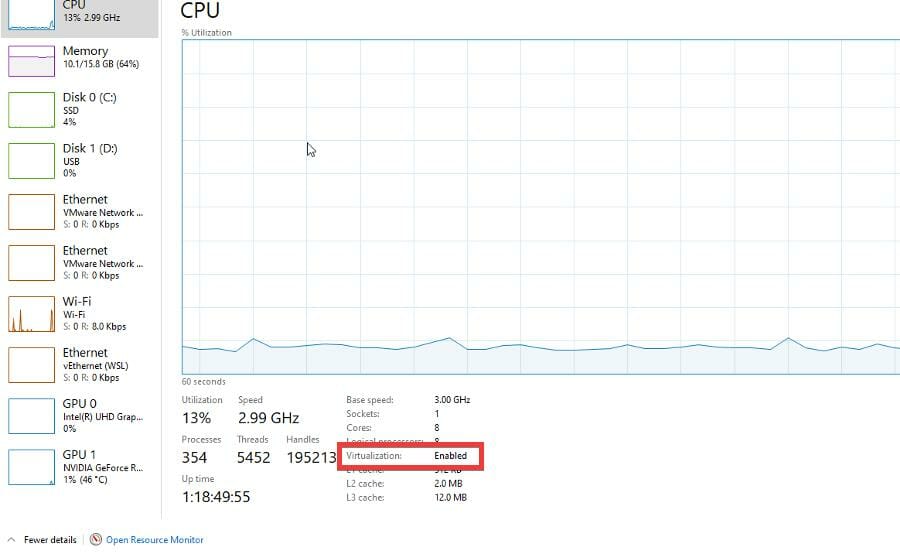
For the most part, not really. As long as your computer can run Windows 11, it should be able to run Android apps from the Amazon Appstore. But if there is one thing that your computer must have is to have virtualization enabled. This is a hardware function that the Android apps need to run.

You can check if your computer has virtualization enabled by going to the Performance tab of the Task Manager and checking under CPU. If it’s disabled, you’ll have to contact your computer’s manufacturer as every PC manufacturer has its way of enabling this function.

How do I enable the Amazon Appstore?

1. Changing location

  1. The feature is only available in the United States. If you’re a user who lives in the US, you can skip this section.
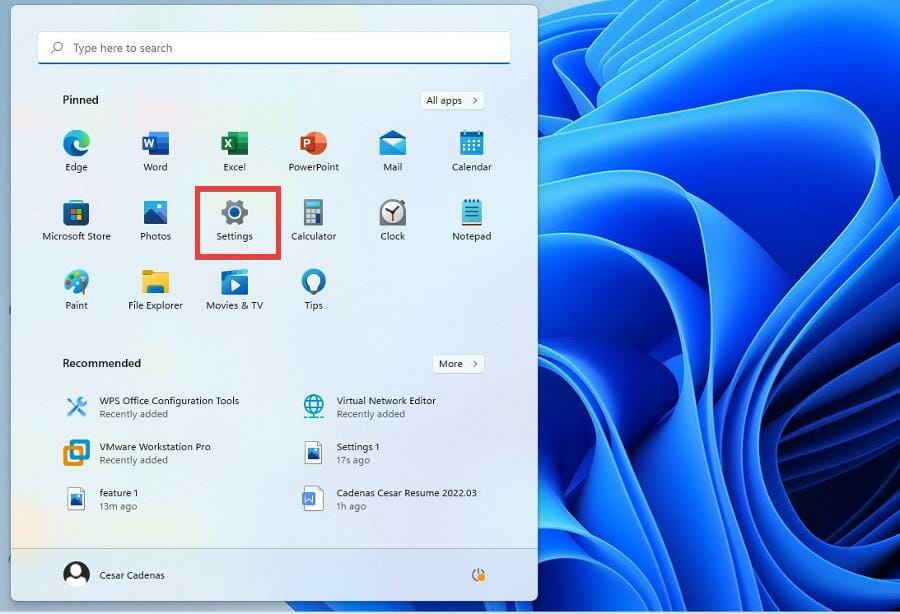
  2. Bring up the Start menu and click on the Settings icon.
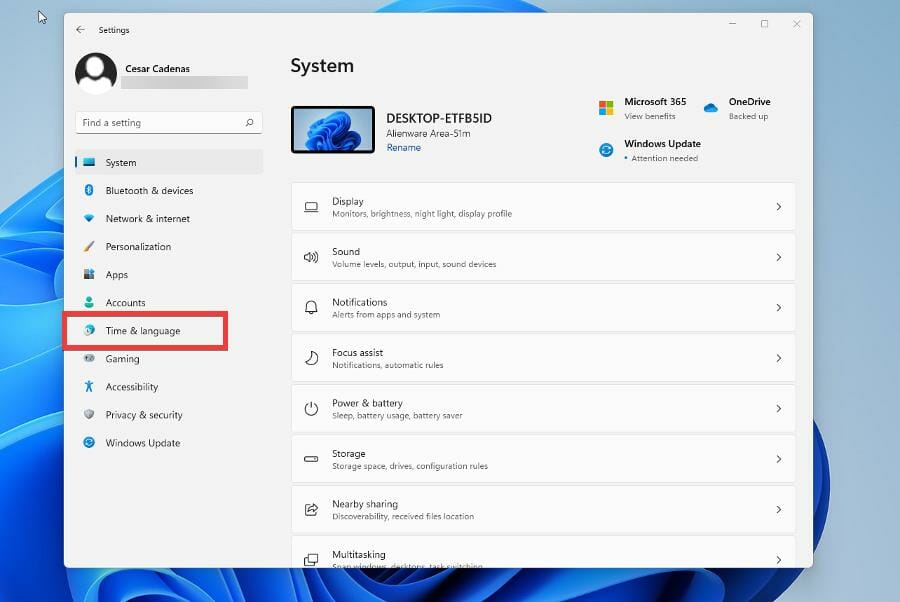
  3. In the Settings menu, click Time & language on the left hand menu.
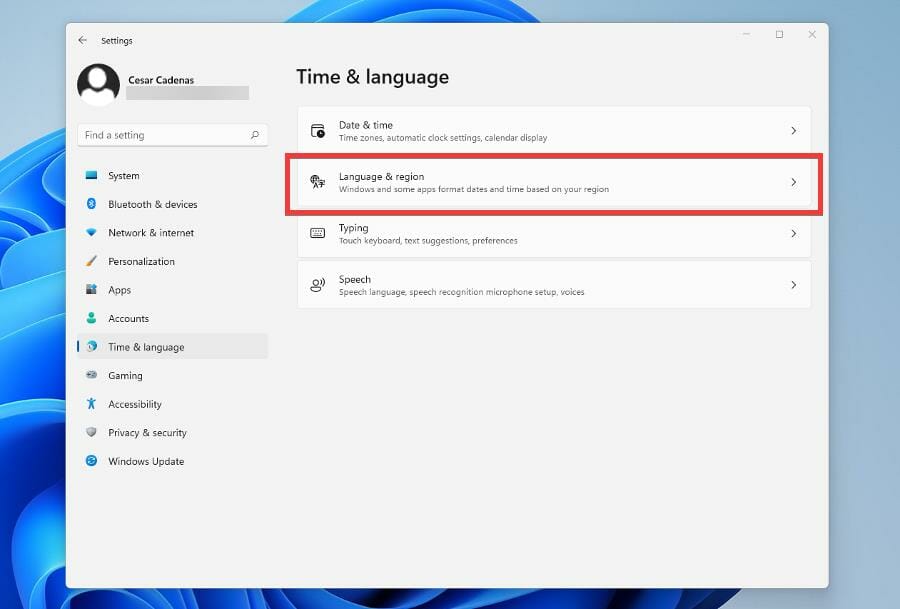
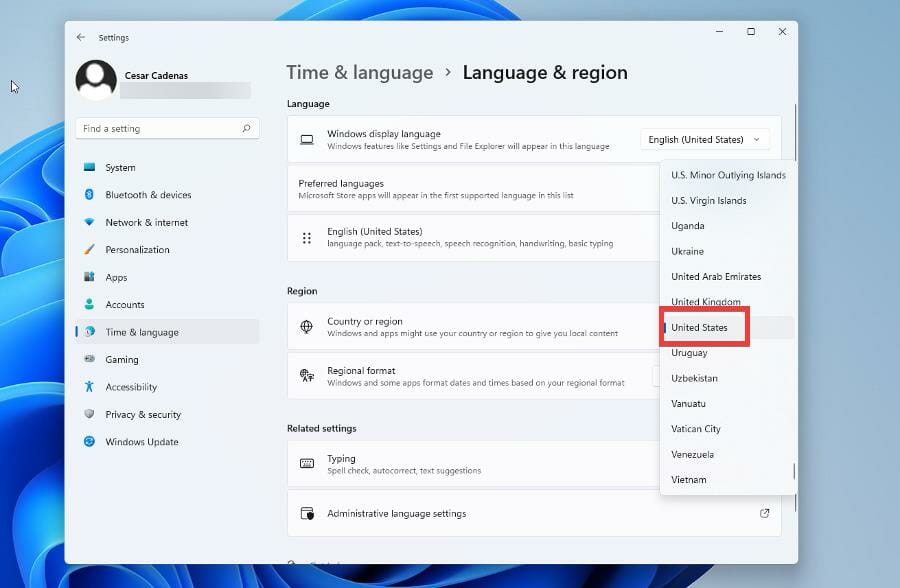
  4. In this next window, select Language & region.
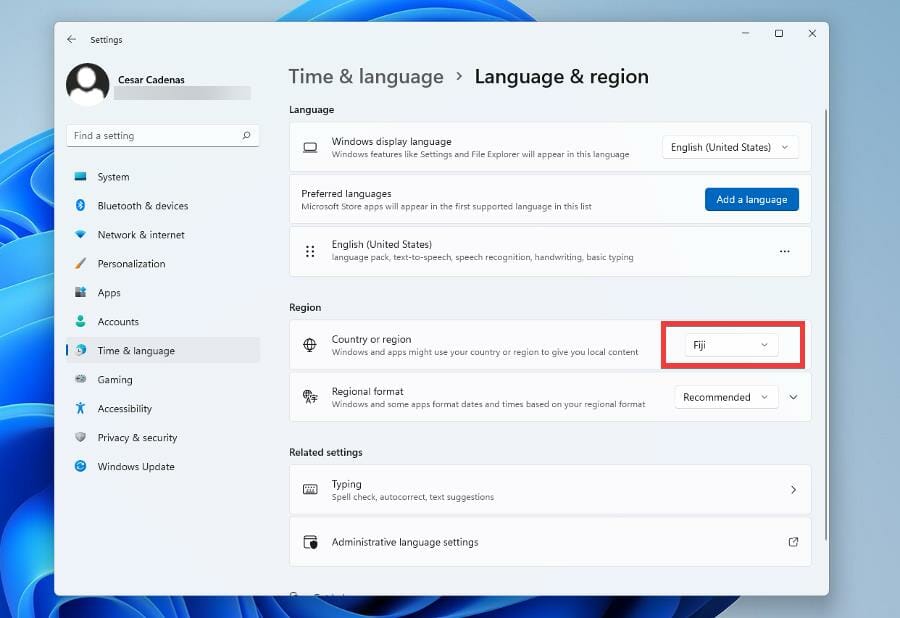
  5. Under the Region section, click the drop-down menu next to Country or region.
  6. Locate and select the United States.

If you want to keep your privacy as you change regions, VPN software like Private Internet Access will keep your information safe.

⇒ Get Private Internet Access

2. Enabling Virtual Machine Platform

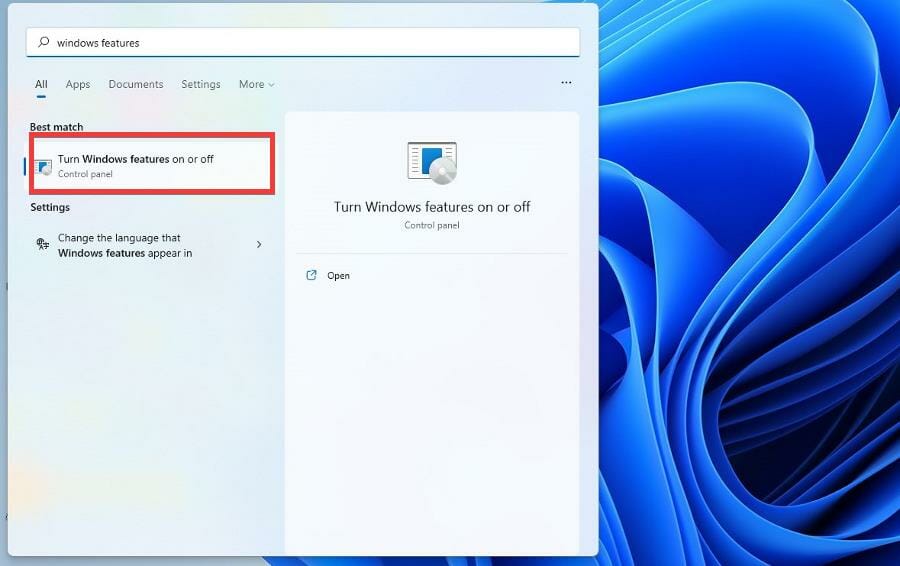
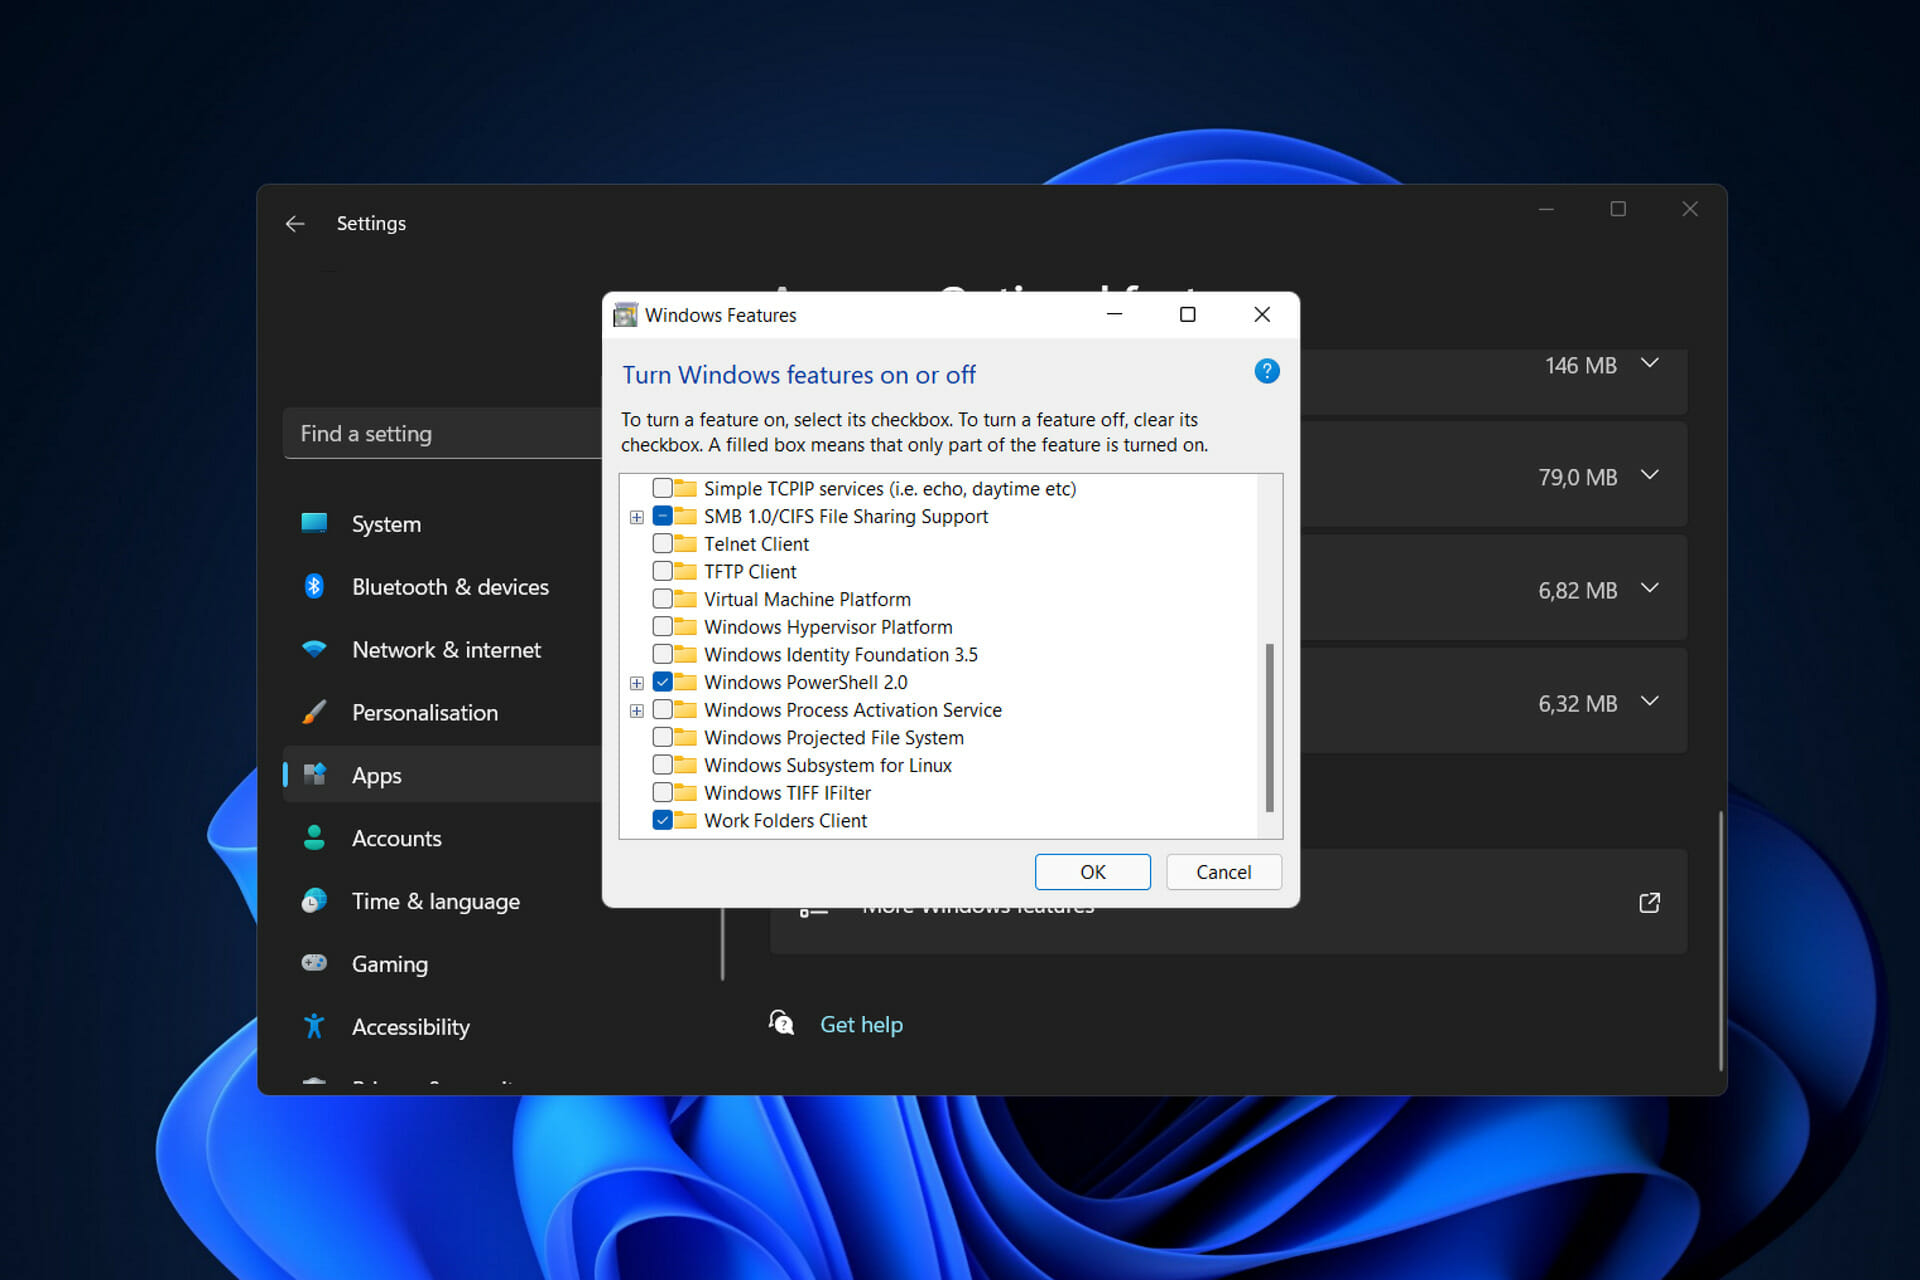
  1. Open your Search bar and search for Windows Features.
  2. Click on the entry that reads Turn Windows fearures on or off.
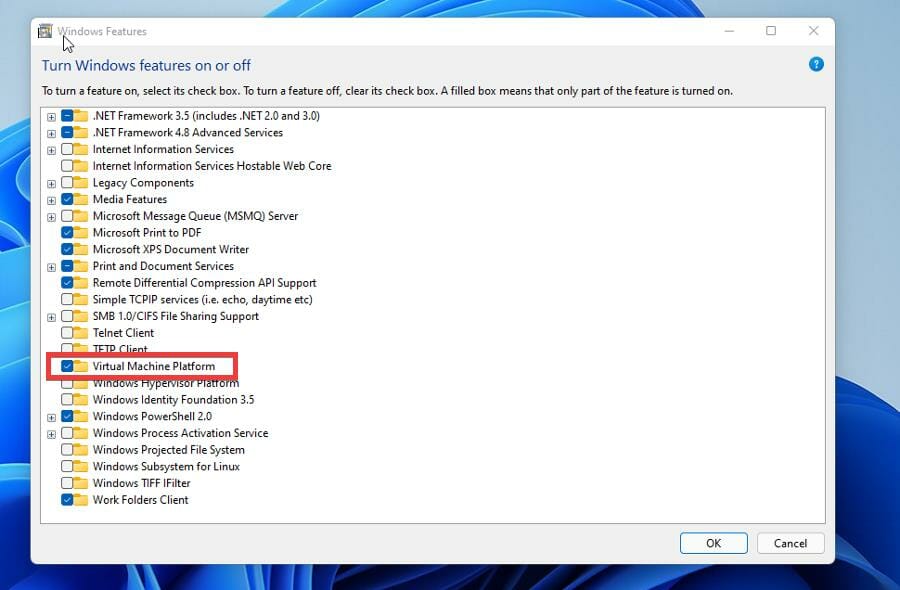
  3. In the new window, locate and click Virtual Machine Platform to enable it.
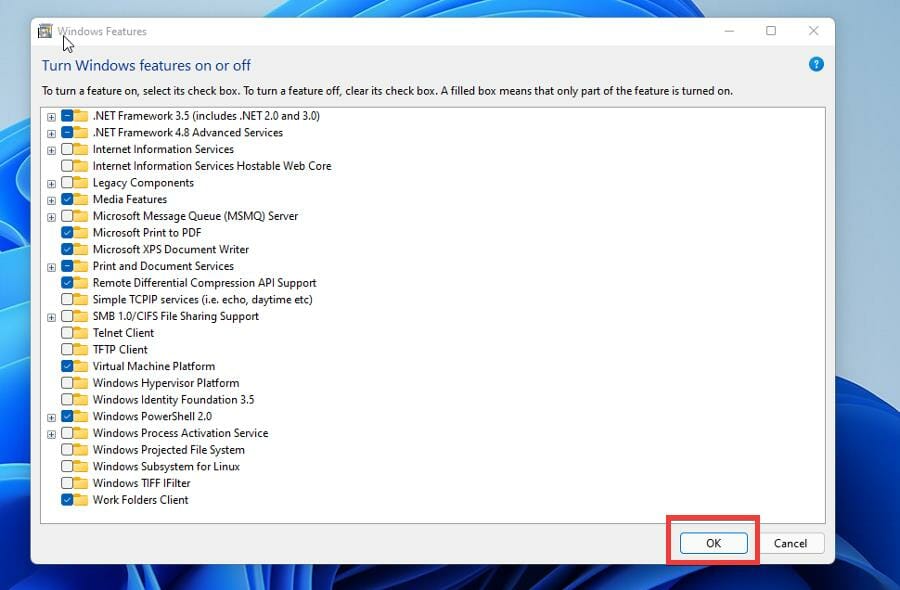
  4. Click OK.
  5. Windows Features will look for files pertaining the Virtual Machine Platform. After finishing, click Restart now to apple the changes.

3. Updating the Microsoft Store

  1. Once you’ve change your system’s location and enabled the Virtual Machine Platform, click on the Start menu.
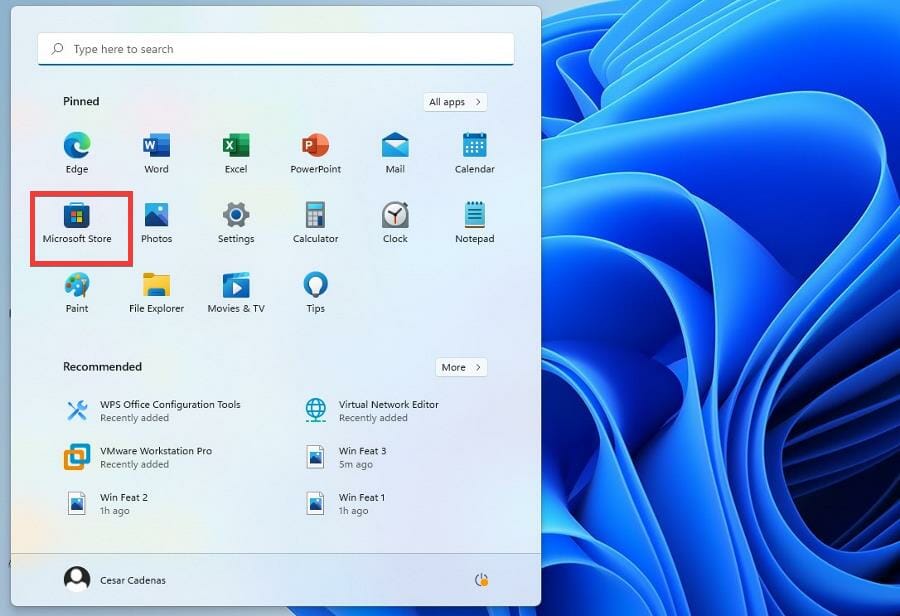
  2. Click the Microsoft Store icon.
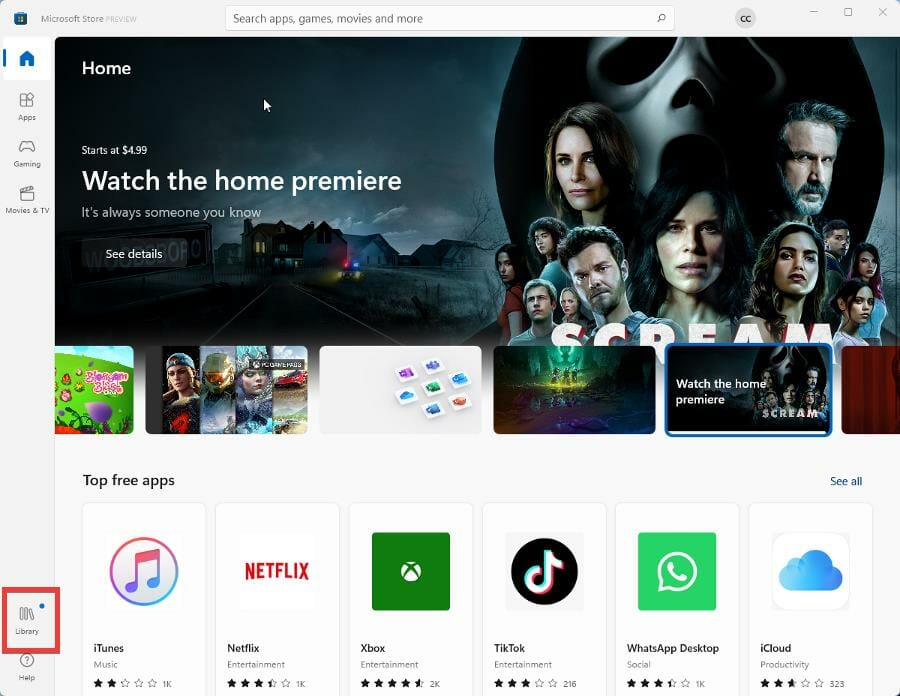
  3. In the Microsoft Store, click Library in the bottom left hand corner.
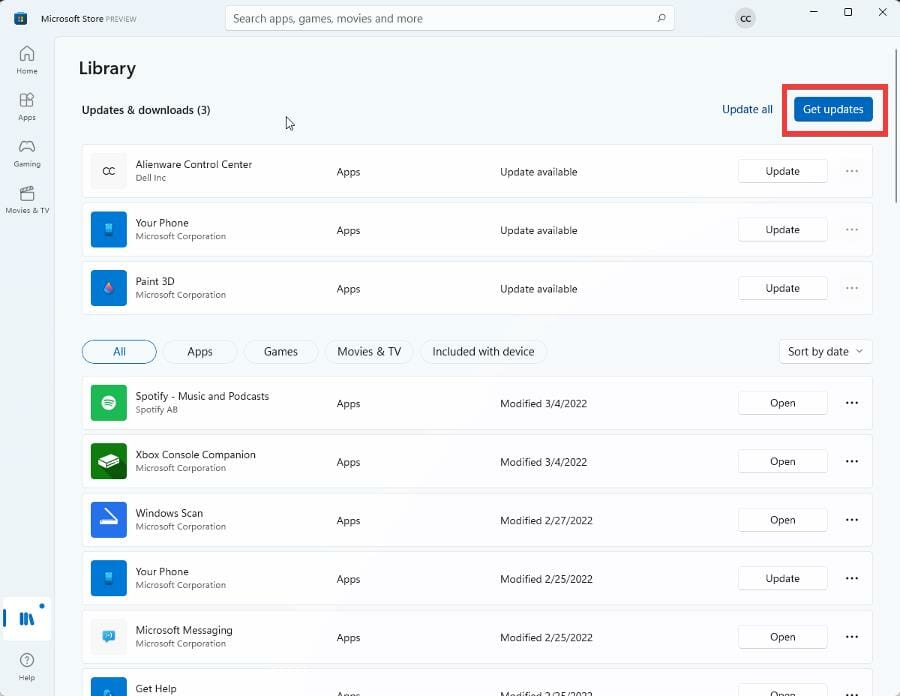
  4. You should see a Microsoft Store update. If there isn’t any, click Get Updates.
  5. The Microsoft Store will automatically update.

4. Downloading Amazon Appstore

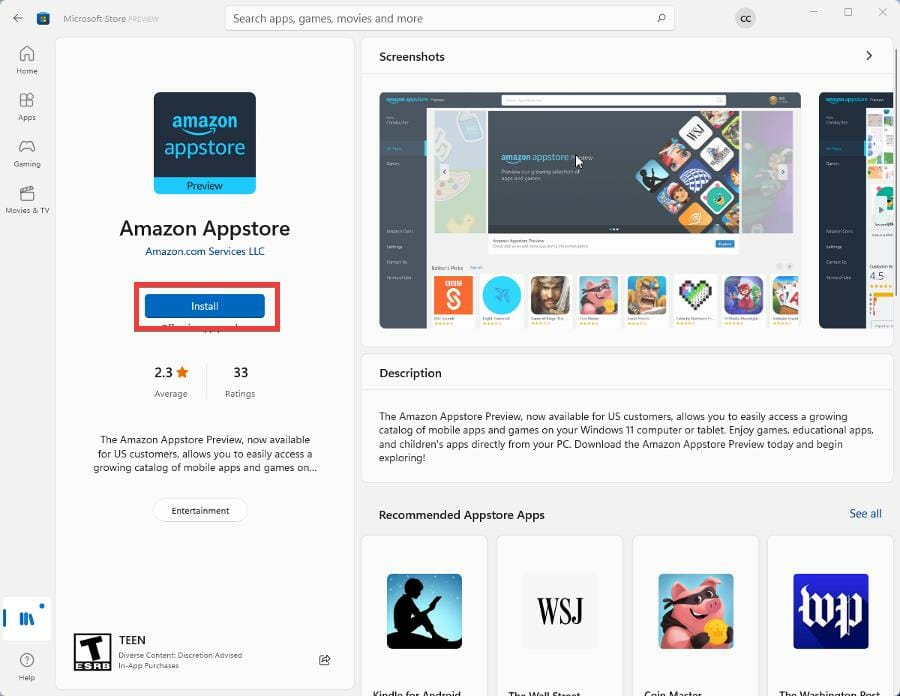
  1. Search for the Amazon Appstore in the bar above.
  2. Click the entry that appears.
  3. Click Install to install the Appstore.
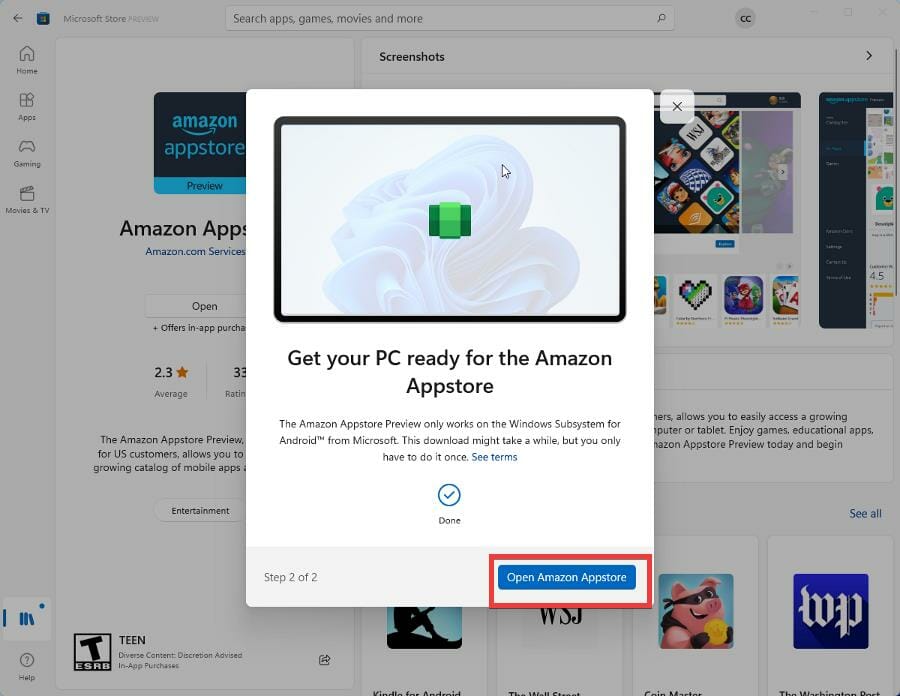
  4. Give installation a few minutes to finish and click Open Amazon Appstore.
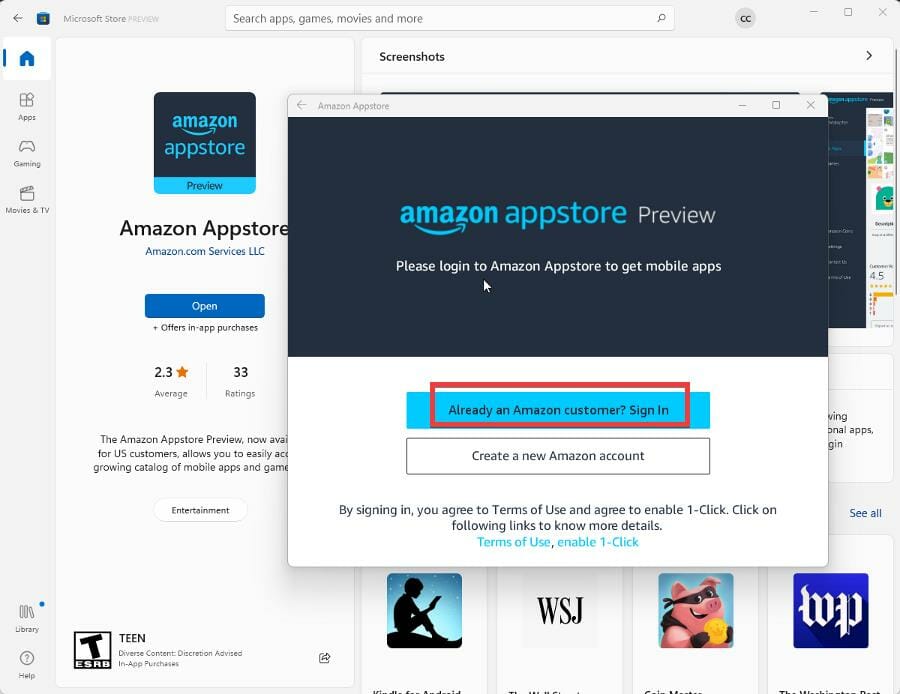
  5. Sign into your Amazon account to gain access to the store.

Are there any tips regarding the Microsoft Store and Amazon Appstore?

First, it’ll be helpful to know about all the different kinds of Android apps available. There are video games, language-learning tools, and music players just to give you an idea of what you can expect.

It’s also recommended that you learn how to fix Microsoft Store updates if they ever get stuck on pending. Solving this problem can be as simple as checking your internet connection or something more complex like clearing the software distribution folder.

Total War Warhammer 3 Can’t Join Multiplayer: 3 Fixes to Use

Total War: Warhammer 3 is one of the most impressive strategy games on the market.

Although its single-player campaign is the main draw for many fans, Total War: Warhammer 3 continues the series’ tradition of having a multiplayer component.

Manufacturers extended your game possibilities. In these terms, players will enjoy various multiplayer battle types such as land, free-for-all, ambush, chokepoint, subterranean, quest battles, etc.

Even if it offers many stunning features and allows you to enjoy fascinating experiences, the multiplayer property is sometimes not working as users might expect.

Fortunately, in today’s guide, you will find the best ways to fix this annoying issue in no time, so you and your teammates can take advantage of the co-op Total War scenarios.

Why can I not join multiplayer in Total War Warhammer 3?

There could be several reasons why you cannot join multiplayer in Total War Warhammer 3. Here are a few:

  • Poor or unstable internet connection – A poor or unstable internet connection can prevent you from connecting to other players’ games or hosting your own. Slow internet speeds or high latency can cause delays, lags, or disconnections.
  • Corrupted or missing game files – If game files are corrupted or missing, this can cause errors or prevent the game from launching correctly. This can result in difficulties joining multiplayer games.
  • Outdated game version – If the version is outdated or not patched, it may not be compatible with the multiplayer servers or other players’ games. This can cause issues when trying to join multiplayer games.
  • Firewall or antivirus – Firewall or antivirus software may block the game’s multiplayer connections, preventing you from connecting to other players or hosting your own game.
  • Incorrect in-game settings – Incorrect settings in the game’s options menu can also cause multiplayer connection issues. For example, if the wrong network settings are selected or multiplayer is not enabled, you can be prevented from joining or hosting games.
  • Server maintenance or downtime – The game’s multiplayer servers may be undergoing maintenance or experiencing downtime, which can prevent players from connecting to multiplayer games.
  • Network congestion or high latency – Network congestion or high latency can cause connection issues or delays when connecting to multiplayer games. This can be caused by high internet traffic or distance between players.

Regardless of the trigger, it would be best to resolve using any of the solutions below.

What can I do if Total War: Warhammer 3 multiplayer is not working?

Before exploring any suggestions below, ensure you have a stable internet connection, as a bad network is one of the primary triggers for this error.

You should also confirm that the server is not down, which may also be why multiplayer would not work on the game. In this case, all you have to do is wait it out.

1. Use Steam Friends List

  1. Make sure that you’ve completely closed Total War: Warhammer 3.
  2. Now, hit the Windows key, type Steam, then open the app. Or simply navigate to the Steam official page, and log in with your credentials.
  3. From the top menu, click on Friends, then navigate to View Friends List.
  4. Right-click on the nickname of one of your Total War: Warhammer 3 teammates, then choose to Join Game.
  5. Make sure that your friend is already running the game.

If you’re one of those Steam players who can’t connect to multiplayer Total War Warhammer 3, remember that the Steam Friends List is a great alternative to joining the online session directly.

Note icon NOTE
If the game can’t connect you immediately, you may need to try the above method a few times.

2. Re-login on Game Pass

  1. First, try to log out and log-in back again, then connect to the multiplayer games.
  2. Repeat this if needed (Some gamers claimed that changing their profile icons in Xbox app helped them connect to online sessions, so you should try it.).
  3. Now, you should temporarily disable Windows Firewall; to do this, just hit the Windows key, type Control Panel, then navigate to the first result.
  4. Navigate to System and security.
  5. Choose to Allow an app through Windows Firewall from the right window pane.
  6. Now, on the right side of the window, select Turn Windows Defender Firewall on or off.
  7. Make sure you turn off both sections shown below.

3. Verify game files

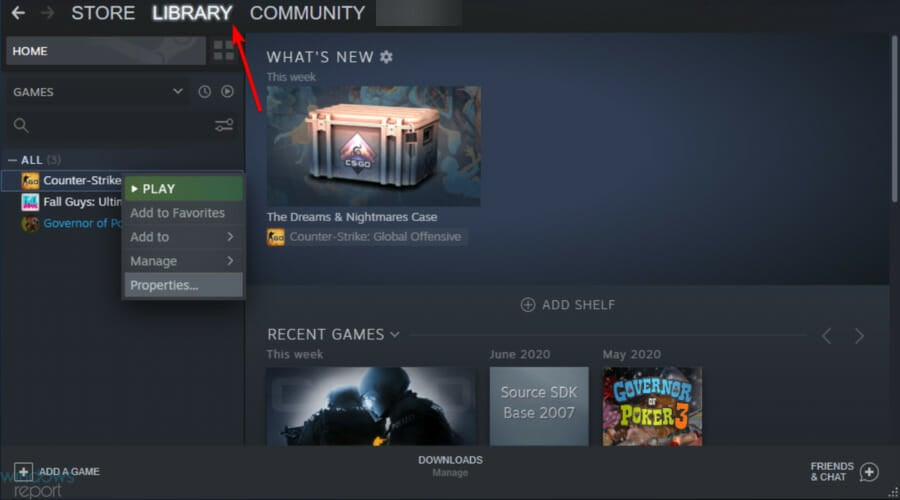
  1. Launch the Steam client and go to your Library.
    total war warhammer 3 can't join multiplayer
  2. Right-click on Total War: Warhammer 3 and select Properties.
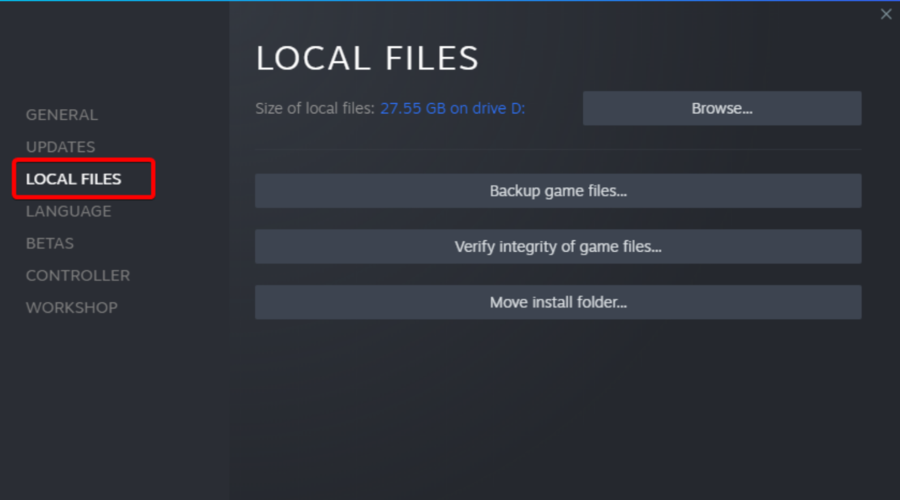
    total war warhammer 3 can't join multiplayer
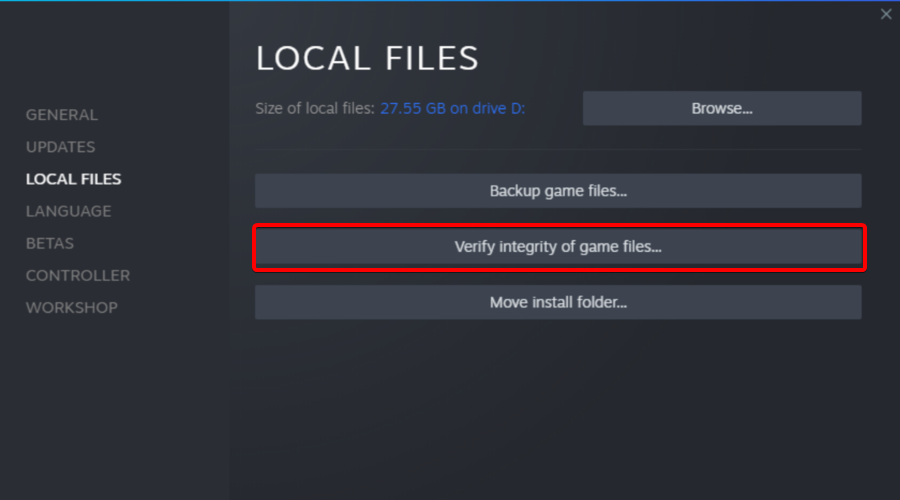
  3. In the Properties window, select the Local Files tab and select Verify Integrity of Game Files button.
  4. Wait for Steam to verify the game files. This process may take several minutes.
  5. Once the verification is complete, restart the Steam client and try relaunching the game.

As you can see, you don’t have to worry if the Total War: Warhammer 3 multiplayer is not working. There are always reliable solutions you can try to fix in a matter of time.

The Failed to host game error is also encountered by Total War: Warhammer 3 players worldwide. If you are no stranger to this issue, look at the linked article and solve it immediately.

Feel free to comment in the section below for any related questions or curiosities.

Total War Warhammer 3 Crash on Campaign Load: 3 Ways to Fix

It is no wonder that Total War: Warhammer 3 caught the attention of many professional worldwide gamers. Manufacturers released an exciting campaign, diverse races, legendary lords, and much more starting on 17th February 2022. 

Even if it seems like the game runs great, there are still some annoying bugs that might give you headaches. Speaking of problems, some users recently reported that Total War: Warhammer 3 sometimes crashes on the campaign load.

Why does Total Warhammer 3 keep crashing?

From what we gather from players, a few factors may cause the game to crash on campaign load. At the top of the list are the following:

  • Driver issues – These usually are incompatible or outdated graphics card drivers. Since drivers play an essential role in the smooth running of devices, you may expect crashes when you do not have them in their proper state.
  • Overheating – Overheating the PC’s vital components, like your GPU and CPU, would often lead to a game crash and sometimes a general system crash.
  • Inadequate system resources – These could be insufficient storage or little system memory (RAM) for most users.
  • Corrupted game files – It is only expected that once your game files have become corrupt, the game will start to bug. A crash is just one symptom of this.
  • Program conflicts – Background programs are often the culprits, but you may also have conflicts with your antivirus. We recommend using only the most compatible antivirus software for your OS.

Any of the above will trigger the problem, and in addition to the campaign load crash, users often experience Warhammer 3 crashing on campaign start and Total War: Warhammer 3 crashing.

How can I fix Total War Warhammer 3 crash on campaign load?

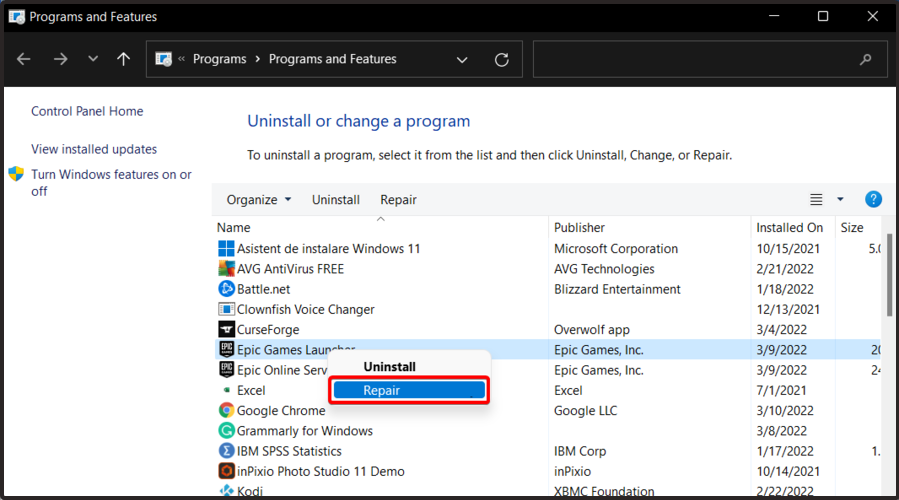
1. Repair your gaming app (Steam and Epic)

  1. Use the following keyboard shortcut to open the Windows run dialog box: Windows + R.
  2. Type appwiz.cpl, then hit Enter.
  3. Search for the Steam/Epic Games apps, right-click on the one you use, then choose to Repair it.

2. Update your graphics card drivers

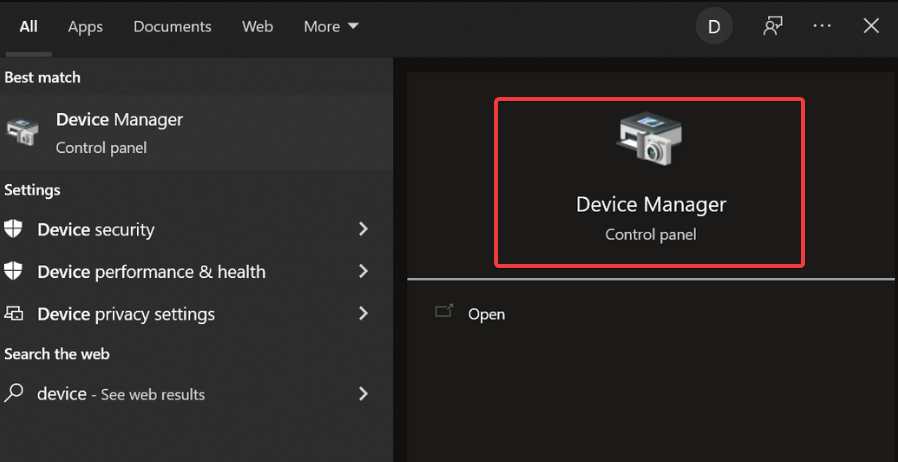
2.1 Use Device Manager

  1. Type device in the taskbar and open Device Manager.
    total war warhammer 3 crash on campaign load
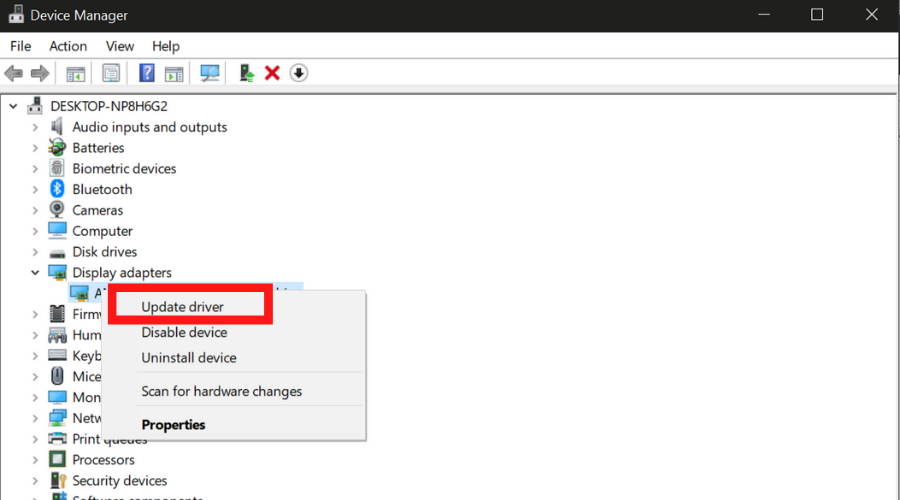
  2. Locate the Display adapters section and find your graphics card.
  3. Right-click on your graphics card and select update.
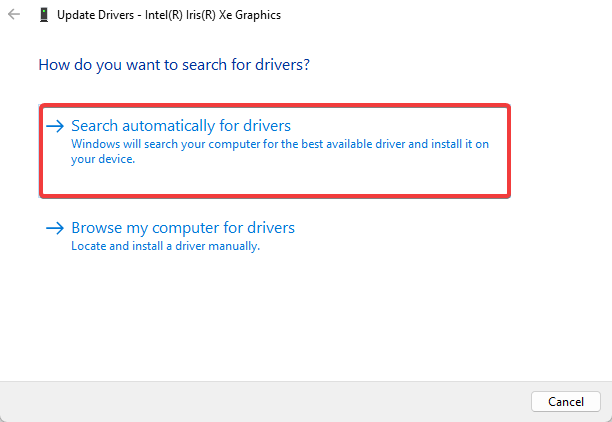
  4. Choose Search automatically for drivers.
    total war warhammer 3 crash on campaign load

Note that sometimes Windows may not detect the latest version of your graphics driver, so you should check directly on the manufacturer’s website.

2.2 Update drivers manually

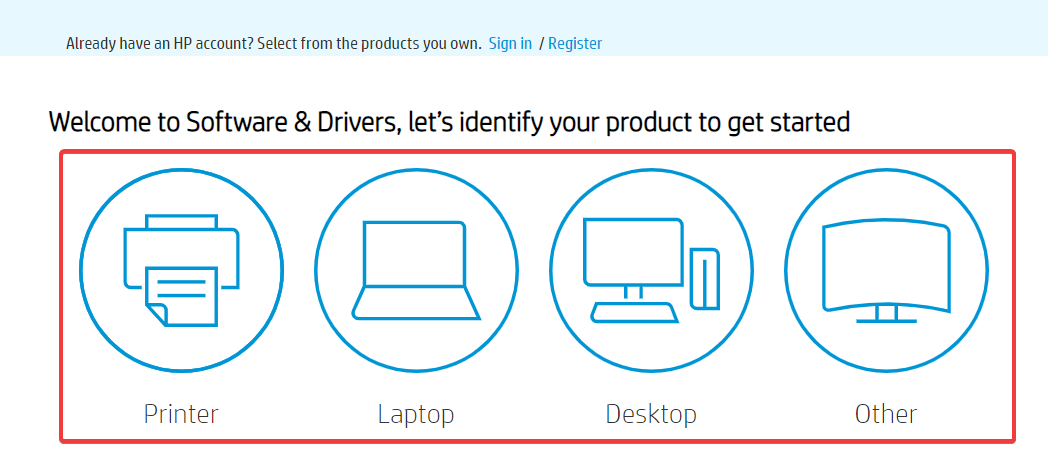
  1. Visit the manufacturer’s website. We use HP for this example.
  2. Select your type of device.
    total war warhammer 3 crash on campaign load
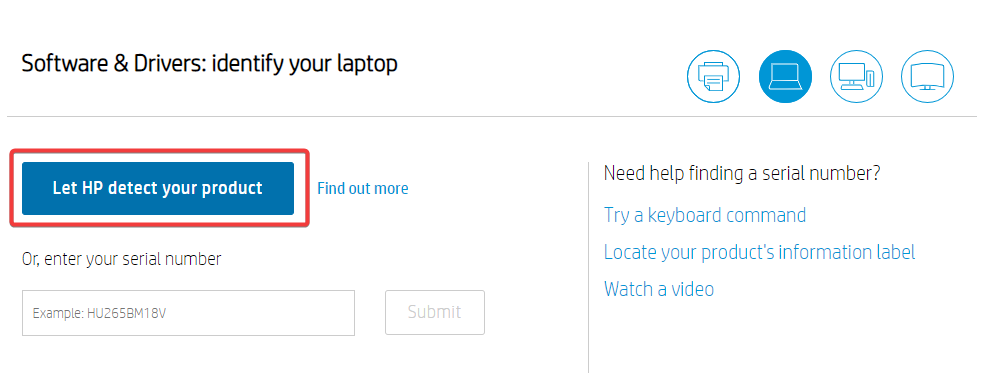
  3. Click Let HP detect your product, then click on the detected product.
    total war warhammer 3 crash on campaign load
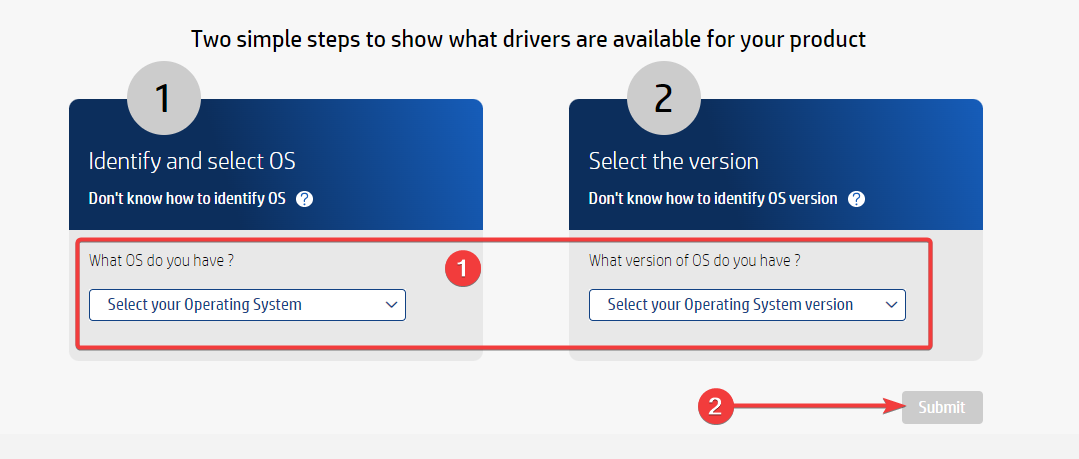
  4. Input your OS type and version, then click Submit.
    total war warhammer 3 crash on campaign load
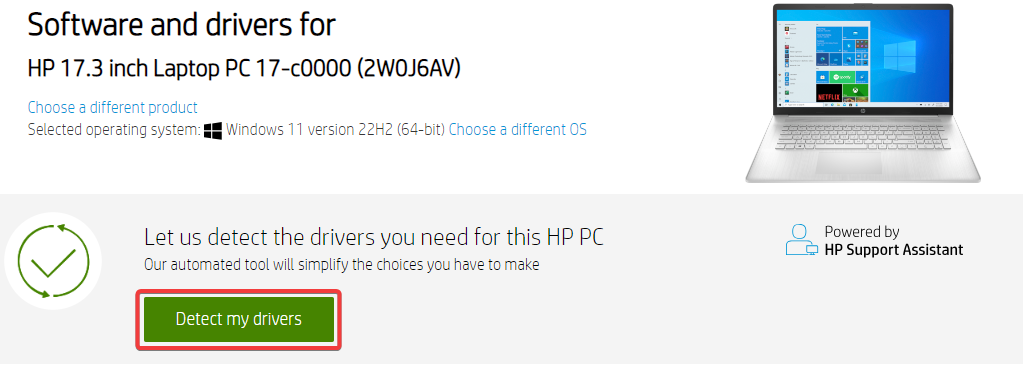
  5. Select the button for Detect my drivers.
    total war warhammer 3 crash on campaign load
  6. Click Download to get the required driver, double-click on the downloaded file, and follow the wizard to complete the installation.

For this game to function correctly, users should have at least the following graphic cards: AMD Radeon HD 5770 1024MB, NVIDIA GTS 460 1024 MB, or Intel HD4000 @720p.

It is essential to ensure that the version of your drivers matches your hardware. If you install mismatched driver versions, you risk facing significant system errors.

2.3 Use dedicated software

If you do not want to risk or are unsure what exact driver version you have, you can use an automated solution such as Outbyte Driver Updater.

The tool will automatically identify the best driver version for your hardware and run the installation in just a few minutes.

Outbyte Driver Updater

Get the latest GPU driver version from this tool’s official database and fix your game.
Check price Visit website

3. Stop overclocking

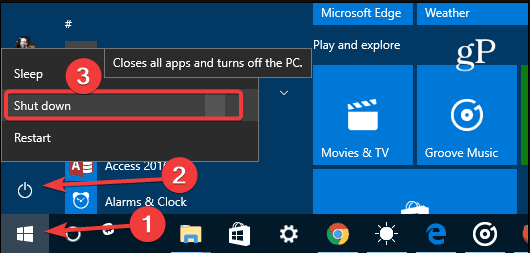
  1. Hit the Start menu, select the Power icon, and choose Shut down to turn off the computer.
  2. Once off, detach every peripheral device, and disconnect your AC adapter.
  3. Press and hold your power button for about 15 seconds, then reconnect the AC adapter and restart the computer.

The method described above works on HP, but it should be a similar process with other manufacturers and a handy way to stop the Total War: Warhammer 3 crash on campaign load.

For other brands, navigate to the manufacturer’s official site and check how to reset the CPU or the graphics card from the recommended specifications.

If you’re using software like MSI Afterburner, AMD Overdrive, GIGABYTE Easy Tune, etc., you may need to disable them first.

If none of the above options worked for you, try temporarily disabling your antivirus software, as it might sometimes become overprotective and interfere with the game. You can also try reinstalling the game, which should only be performed in the last instances.

As you can see, the Total War: Warhammer 3 crash on the campaign load issue can be quickly solved.

Also, the Failed to host game error is currently bothering Total War: Warhammer 3 players worldwide. Check out the linked article and solve it in no time if that’s your case.

Was this guide helpful? Share the solution that worked for you by leaving a comment below.

Windows 11 Dev build 22572: Everything you need to know

Were you wondering when the next Dev Channel Insider build was going to be made available by the Redmond tech giant?

Well, build 22572 has arrived today and it brings with it several changes to File Explorer changes, a new Sandbox icon, and much more.

Microsoft has also prepared a surprise for its loyal community, as through this build it also announces a new Search highlights feature.

What new features does build 22572 bring?

Maybe we can start with the fact that Microsoft Family is now an Inbox app. The family safety features you use on the web and mobile are now available on Windows 11 starting with this build.

The Microsoft Family app will only be an inbox app on the Windows 11 Home edition and will be updated via the Microsoft Store.

Remember a while back when we told you that Microsoft bought Clickchamp and was planning on adding it to the latest operating system?

It seems that the software will be added with this Insider build, as the tech giant clearly mentioned that Clickchamp is now an inbox app, in the official blog post.

In Clipchamp, users are said to discover more unique offerings, like a stock library filled with more than a million royalty-free videos, audio tracks, and images that can be added to videos.

There’s even an Azure-powered text-to-speech generator capable of creating voiceovers in more than 70 languages.

Clipchamp also connects with OneDrive, meaning you can import files and save videos quickly and securely.

Also, starting early next week, Microsoft will begin rolling out an update for Search in Windows 11 that highlights interesting moments in time. 

Of course, you can still type to start searching for your apps, files, settings, and quick answers on the web.

Search highlights will present notable and interesting moments such as holidays, anniversaries, and other educational moments in time both globally and in your region.

Changes and Improvements

[General]

  • The new Print Queue has an updated design to align with Windows 11 design principles, allow you to easily identify your desired print job, see the status, and manage it. The feature is designed with simplicity in mind, and to allow you better access to your print jobs. To get started, just click print and watch the Print Queue pop up.
A print job showing in the new Print Queue in dark theme.
  • Quick Assist now has a new Fluent-style icon.
The new Fluent-style Quick Assist icon.

[Focus]

  • Building off the Focus changes announced in Build 22557, we have updated the icon for Notification Center when do not disturb is set to on.
Updated icon for Notification Center when do not disturb is on.

[File Explorer]

  • Shift + Right-clicking in File Explorer and the Desktop will now open the “Show more options” context menu.

[Narrator]

  • Narrator natural voices are now available for all English languages.

[Terminal]

  • Windows Terminal is now called Terminal under Start.

[Settings]

  • WMIC is now available as an optional feature that can be uninstalled or reinstalled via Settings > Apps > Optional Features.
  • Switched the touch keyboard icon option under Settings > Personalization > Taskbar from being a toggle to now being a dropdown where you can select Never, Always, or When no keyboard attached.

[Windows Sandbox]

  • Windows Sandbox now has a new Fluent-style icon.
New Fluent-style icon for Windows Sandbox.

[Other]

  • The legacy version of Windows Media Player available in Windows Tools has been renamed to Windows Media Player Legacy.

Fixes

[General]

  • Fixed an issue for Enterprise edition devices going through the setup experience (OOBE) where the network add screen was skipped on the first attempt.
  • Addressed an issue which was causing some Insiders to see a bugcheck with a CRITICAL_PROCESS_DIED error in the previous build while attempting to do various things including logging in, opening Outlook, and accessing network shares in File Explorer.
  • Mitigated an underlying issue that was leading to audio stutters and touchpad issues in the previous flight.
  • Addressed an explorer.exe crash Insiders were seeing in recent builds when attempting to use Windows Mixed Reality.
  • Fixed an issue with scroll bars not rendering appropriately on some Win32 applications.
  • Fixed another issue where users weren’t hearing the startup sound.
  • Images should no longer be backwards when using a lock screen slideshow with an Arabic or Hebrew display language.

[Taskbar]

  • We fixed the issue that was causing explorer.exe to crash if you right clicked on the Start button or used WIN + X.
  • Mitigated an explorer.exe hang that could happen in the last few flights related to the visual indicator in the taskbar when sharing a window in Microsoft Teams.
  • Adjusted the sensitivity so quickly sliding your mouse across the widgets icon on the path to an open flyout or menu will no longer make it dismiss.
  • Made a change to help address a memory leak in Shell Experience Host when repeatedly opening and closing the Notification Center.
  • Addressed a scenario where the Notification Center might not light dismiss if it was opened on top of certain apps.
  • Fixed an underlying issue when the display scaling was greater than 100% which was causing drag and drop in the taskbar to unexpectedly show that it wasn’t available.

[Tablet-optimized taskbar]

Note icon NOTE
These fixes will only show if tablet-optimized taskbar is enabled on your device, which is beginning to roll out to Windows Insiders and not yet available for everyone.
  • Touch gestures are restored on all device types, as we resolved the issue that broke several of the new touch gestures announced as part of Build 22557 on non-tablet devices.
  • Improved reliability of taskbar auto-collapsing after launching an app.
  • Fixed several bugs related to the taskbar state change when disconnecting or reconnecting your keyboard.
  • Addressed positioning issues with the hidden icons button and flyout when using the Arabic or Hebrew display language.

[Start menu]

  • Improved how the “Pinned” header name is rendered in the Arabic display language.

[File Explorer]

  • Made some more improvements to help with context menu invocation performance.
  • Using the Filter option in Quick Access should work for images now.
  • Fixed an underlying issue causing the title bar in File Explorer when colored to not visually occupy the full area it was supposed if you maximized the File Explorer window.
  • Fixed an issue where if you had a folder selected in the navigation pane and right clicked another folder, options like Open in Windows Terminal would unexpectedly open the first folder.
  • “Pin to Quick Access” is now available in the command bar when a file in Recent Files in Quick Access is selected.

[Input]

  • Mitigated an issue where clicking hyperlinks in RichTextBlocks wasn’t working when performed with touch or pen.
  • Addressed an issue where custom mouse pointers might revert to the default Windows one after rebooting.
  • Fixed an issue where voice typing might display “there is a connection issue” when that wasn’t the cause of the error.
  • Addressed an issue where voice typing might not launch after unlocking your PC.
  • Fixed a touch keyboard crash that could happen on the login screen when there were multiple accounts on the PC.
  • Mitigated an issue impacting pen sensitivity in recent flights.
  • Fixed a rendering issue causing the screen to have small freezes in recent flights when trying to ink in certain apps.
  • Made some refinements to help improve detection of the pinch to zoom gesture on touchpads.
  • Addressed an issue leading to IME toolbar options being unresponsive in some cases for the Chinese (Simplified) IMEs.

[Search]

  • Did some work to address a high hitting search crash.

[Settings]

  • Fixed an issue causing a hang when trying to access Personalization > Taskbar > Taskbar behaviors.
  • Addressed an issue where font previews under Personalization > Fonts might not be visible when a contrast mode was enabled.
  • Improved performance when switching between the different available views on Apps > Installed apps.
  • Uninstalling an update via Windows Update > Update History > Uninstall Updates should show a confirmation now before it proceeds.

[Windowing]

  • An acrylic area should no longer get stuck on the screen if you press WIN + D while interacting with snap layouts at the top of the screen.
  • Fixed an issue where if you used snap assist to snap a window that had been minimized, it might not fill the entire available space.
  • Fixed a few animation stutters when using 3-finger on screen gestures.
  • Addressed an explorer.exe crash that could happen if you attempted to use 3-finger on screen gestures while no windows were visible on screen.
  • Addressed an underlying issue which could impact the animations and performance when invoking Task View.
  • Mitigated an underlying issue which was causing you to unexpectedly see an X when attempting to rearrange Desktops in Task View in certain scenarios.
  • Tweaked the logic to help further reduce the number of sounds heard when connecting and disconnecting monitors and docks.
  • Mitigated a recent issue where windows for minimized apps weren’t launching on the expected monitor upon undocking and redocking.
  • The title bar should no longer peek out onto secondary monitors when maximizing certain apps.
  • Fixed an issue which was causing certain windows to show an unexpected white rectangle poking out from underneath, spanning the top of the window.
  • Updated the new full screen gripper for edge gestures to use acrylic.

[Narrator]

  • Fixed an issue preventing Narrator from reading in the Run dialog correctly in scan mode.
  • Narrator in scan mode will now read error messages in the Error List correctly in Visual Studio.
  • Errors while setting up a PIN in device setup (OOBE) will now be read out by Narrator.
  • Pitch range for Narrator natural voices has been adjusted to provide more levels of control.
  • Addressed an underlying issue which was leading to the pitch not changing when adjust Narrator’s speed in the 0 to 5 and 15 to 20 ranges in Narrator settings.

[Task Manager]

  • Improved visibility of content when a contrast mode is enabled.
  • Fixed an issue where critical system processes were unexpectedly displaying as background processes.
  • Addressed an issue that was causing random rows in the processes list to be unexpectedly written in black text when using dark mode.
  • Right clicking the Task Manager icon in the system tray should now actually show the context menu rather than a blank box.
  • Pressing Esc should no longer unexpectedly close Task Manager.
Note icon NOTE
Some fixes noted here in Insider Preview builds from the active development branch may make their way into the servicing updates for the released version of Windows 11 that became generally available on October 5th, 2021.

Known issues

[General]

  • Users running Windows 10 who try to upgrade directly to build 22563 or higher in the Dev Channel may encounter an install failure with error code 0x8007007f. To bypass, please join the Beta Channel, install the offered Windows 11 build there, and then switch to the Dev Channel to receive the current Dev Channel update. This issue is understood and will be fixed in an upcoming build.

[Tablet-optimized taskbar]

  • The taskbar doesn’t always automatically collapse after launching an app or tapping outside of the expanded taskbar on 2-in-1 devices.
  • Some areas of the OS are not yet tracking the height of the expanded taskbar on 2-in-1 devices so you may see overlapping components, such as Widgets overlapping with the taskbar.

[File Explorer]

  • Opening suggested results shown while entering search terms in File Explorer’s search box may not work.
  • We’re working fixing issues regarding icon sizing, visual bugs, and text clipping in the flyout showing OneDrive storage.

[Widgets]

  • Sometimes when pinning from the Feed, the pinned widget is placed at the top instead of below other pinned widgets. If this happens this will autocorrect within 30 minutes, moving the recently pinned widget to the expected default location. Or you can sign out of your Widgets board and immediately signing back in should correct the problem.
  • After rearranging widgets in the widgets board, some users experience problems with widgets in the pinned section rendering incorrectly. If this happens, signing out of your widgets board and immediately signing back in should correct the problem.

[Focus]

  • The Clock app does not yet update Windows Focus state when configuring focus sessions within the app. This will be addressed in a future app update.

[Narrator]

  • Narrator natural voices sounds garbled and will not read out text accurately. This happens when doing quick navigation, typing or pitch changes. As a workaround, you can switch back to the older voices such as Microsoft David, Mark or Zira.

[Live captions]

  • Certain apps in full screen (e.g., video players) prevent live captions from being visible.
  • Certain apps positioned near the top of the screen and closed before live captions is run will re-launch behind the live captions window positioned at top. Use the system menu (ALT + Spacebar) while the app has focus to move the app’s window further down.
  • The very top of maximized apps (e.g., title bar window management buttons) can’t be reached with touch while live captions is positioned at the top.

[Task Manager]

  • Some tooltips do not accurately display the preferred visual setting when Task Manager is configured for dark mode.

The Dev channel release is now known as the NI_RELEASE or Nickel branch in preparation for the major feature update to Windows 11 later this year.

Any thoughts on the features and changes brought by this latest Dev build? Share your opinions with us in the comments section below.

Fix: Windows 10/11 Desktop Icons are Too Wide

The first thing many users notice about Windows 10 soon after they install it is that desktop icons are too large.

Fortunately, this issue can easily be fixed by customizing the display settings.

Before customizing the settings for the desktop and taskbar icons, make sure you’re using the right display resolution, and you’re running the latest graphics driver.

Why are my desktop icons so big?

When Windows updates itself, it can cause different miscommunications between the old settings and the new ones, as well as between drivers.

For example, your scaling settings might have been changed or misinterpreted by the system, thus, you will need to go back and reset your preferences as you would want them to be.

Icons are an integral part of the Windows interface, but some users seem to have issues with their icons. Speaking of issues, these are some of the most common problems that users encounter:

  • Desktop icons are huge Windows 10 – If you’re having problems with the size of desktop icons, you can fix the problem simply by changing their size from the View menu.
  • Windows 10 everything is huge – If everything on your screen is huge, it’s possible that you don’t have the necessary drivers installed. Visit your graphics card manufacturer and download the latest drivers for your device.
  • Windows 10 icons very large, too enlarged, got bigger – According to users, sometimes their icons can become very large. If that’s the case, you can try to change their size simply by pressing Ctrl and scrolling your mouse wheel.
  • Windows 10 text and icons too big – Sometimes this issue can occur due to your scaling settings. If that’s the case, try adjusting your scaling settings and check if that helps.
  • Windows 10 Taskbar icons too big – If your Taskbar icons are too big, you can change their size simply by modifying your Taskbar settings.
  • Icons too big on second monitor – Fortunately, the solutions we have listed below for your native monitor will be applicable to any secondary monitor as well.
  • Icons chnage their position – Don’t hesitate to refer to our other articles where you can learn what to do if your Windows 10/11 icons don’t stay in place and solve this issue for good.

In order to quickly fix the problem of icons that are too big on your Windows 10 desktop, you need to follow the solutions and steps below, so keep reading.

What can I do if the icons are too big on my Windows 10 PC?

1. Change the icon size

  1. Right-click on your desktop.
  2. Select View.
  3. Choose the icon size you want.
    Windows 10 icons too enlarged

This is one of the quickest solutions you’ll ever have on hand to get rid of the problem of overly large icons on your Windows 10 PC desktop, so be sure not to miss it.

We have a complete guide on how to change icon size on Windows 10 that will provide more information.

2. Update your drivers

If your Windows 10 icons are too big, the issue might be your drivers. If your graphics card drivers are out of date, you’ll be limited to a certain resolution and your icons will appear bigger.

However, you can easily fix this problem by updating your graphics card driver, and no method is much faster at doing so than with a driver updater.

3. Change your resolution

  1. Right-click on your desktop, and select Display Settings.
    Windows 10 text and icons too big
  2. Set the recommended resolution.
    Windows 10 Taskbar icons too big

Some users have reported that by changing the resolution to the recommended one in the display settings, they got rid of the problem of too large desktop icons, so be sure to try it out now.

4. Install the missing updates

  1. Press the Windows Key + I to open the Settings app.
  2. Now navigate to the Update & Security section.
    Windows 10 icons very large
  3. Click on the Check for updates button.
    Windows 10 text and icons too big

If your icons are too big, the issue might be the missing updates. Sometimes certain glitches can appear on Windows 10, and that can cause this and many other issues to appear.

However, you can easily fix most of those issues simply by installing the missing updates.

In most cases, your operating system will automatically install the missing updates, but sometimes, you can miss an update or two.

If any updates are available, Windows 10 will download them automatically in the background and install them once you restart your PC. Once your PC is up-to-date, check if the problem is resolved.

Also, if you don’t know which is the latest version of your OS, you can find out from our constantly updated guide, so be sure to check it out.

5. Change the size of Taskbar icons

  1. Right-click on the Taskbar, and select Taskbar settings.
    Desktop icons are huge Windows 10
  2. Now enable Use small taskbar buttons.
    Windows 10 everything is huge

It also helps you a lot if you go into the taskbar settings, and choose to use small taskbar buttons. Make sure you don’t miss this simple solution!

6. Personalize the font size on the desktop

  1. Go to the Settings app, navigate to System, and select Advanced display settings.
  2. Choose Advanced sizing of text and other items.
  3. Select Set a custom scaling level.
    Desktop icons are huge Windows 10
  4. Click on Custom sizing option, and choose Scale to this percentage of normal size.
    Windows 10 everything is huge
  5. Click OK, and restart your PC.
  6. Go back to the Settings app, and navigate to System.
  7. On the Advanced display settings select Advanced sizing of text and other items.
  8. Select Change only the text size, and personalize the settings.
    Windows 10 everything is huge
  9. Restart your PC.

By making the correct adjustments in the Advanced display settings section, you can fix the problem with large desktop icons, so try it out now!

7. Use keyboard shortcuts

Changing the icon size is rather simple, and if your icons are too big on Windows 10, you might be able to solve this problem simply by changing their size.

To change the icon size, simply press and hold the Ctrl key and scroll with the mouse wheel.

Alternatively, you can use Ctrl and dash (-) key to make your icons smaller. If you are a laptop user and you don’t have a mouse, you can simply press the Ctrl key and perform the pinching gesture on your touchpad.

All these methods should make your icons smaller, so feel free to try any of them.

In our experience, the simplest and the best way to change the size of your icons is to use Ctrl + mouse wheel, so be sure to try this method first.

Everything you need to know about using keyboard shortcuts in Windows 10 is in our detailed guide, so be sure to take a closer look.

8. Rollback the older graphics driver

  1. Press the Windows Key + X, and select Device Manager from the list. Windows 10 text and icons too big
  2. Locate your graphics card, and double-click it to open its Properties.
    Windows 10 Taskbar icons too big
  3. Go to the Driver tab, and click Roll Back Driver.
    Desktop icons are huge Windows 10

If your icons are too big on Windows 10, the issue might be caused by your graphics driver.

According to users, they managed to fix the problem simply by rolling back their graphics driver to the older version.

After doing that, your driver will be reverted to the older version. If the problem is resolved, it means that the driver was causing this issue.

It’s worth mentioning that Windows 10 will automatically update your drivers, so in order to prevent this issue from reappearing, you’ll need to prevent Windows from updating your graphics card driver.

To see how to do that, be sure to check our guide on how to prevent driver updates on Windows 10.

If you don’t have the Roll Back option available, you can try installing the older driver manually. This is rather simple and you can do it by following these steps:

  1. Open Device Manager, locate your display adapter, right-click it, and choose to Update driver.
    Windows 10 Taskbar icons too big
  2. Choose to Browse my computer for driver software.
    Desktop icons are huge Windows 10
  3. Now select Let me pick from a list of available drivers on my computer.
    Windows 10 everything is huge
  4. Locate the older driver and install it.

After doing that, the issue should be completely resolved.

If rolling back to the older driver doesn’t help, you can always uninstall your driver and use the default driver instead.

To do that, just select the Uninstall option in Device Manager and restart your PC. After doing that, your PC will install the default driver once it restarts.

9. Change your scaling settings

  1. Press the Windows Key + I to open the Settings app.
  2. Now navigate to the System section.
    Desktop icons are huge Windows 10
  3. Set the scaling to 125%, and log out of your PC.
  4. Now log back in and set scaling to 100%.
  5. You need to log out and log back in.

According to users, your Windows 10 icons can become too big due to your scaling settings. Sometimes this problem can occur due to a certain bug with Windows.

After doing that, the problem with large icons should be resolved, and everything should start working again.

This is a simple workaround, and it works great according to users, so we advise you to try it out.

What to do if Windows 11 desktop icons are too wide?

Windows 11 is similar to Windows 10 as far as settings go, and changing icon size makes no exception:

  1. Right-click on your desktop.
  2. Select View.
  3. Pick the size of icons you want.

As you can see in the screenshot, you can also use hotkeys. For small icons: Ctrl+Shift+4 , for larger icons Ctrl+Shift+3, and for large icons Ctrl+Shift+4.

We have written extensively in our detailed guide on Windows 10 resolution issue, so be sure to take a closer look.

Problems with large icons can be annoying, but we hope that you fixed them by using one of our solutions. If you have more suggestions or other questions, please access the comments section below.

SteamVR Error 208: 5 Solutions for Your HTC Vive

Some less fortunate HTC users have had difficulty dealing with a strange error that involves uninstalling VR drivers each time they give SteamVR a new boot. Unfortunately, this issue is accompanied by a SteamVR error 208.

This can be frustrating, as it renders their device useless. Fortunately, there are ways to solve this problem, as shown in this detailed guide.

What causes HTC Vive error 208?

The following are some of the factors that can cause SteamVR error 208:

  • Outdated graphics driver: In some cases, the Valve index error 208 can be caused by a broken or outdated graphics driver. The solution to this is to reinstall or update your graphics driver.
  • Wrong settings: If you have Direct Mode disabled on SteamVR, you are likely to get the HTC Vive error 208 with a red light. You need to enable this feature to solve the problem.

How can I fix SteamVR error 208?

Below are some basic troubleshooting steps to perform before delving into the more sophisticated fixes in this section:

  • Restart your PC
  • Check video port functionality and GPU connection.
  • Push HDMI all the way in
  • Plug the headset directly into your GPU
  • Change the USB port

1. Update your graphics drivers

  1. Press the Windows key + X and select Device Manager.
    device manager steamvr error 208
  2. Click the arrow next to the Display adapters section to expand it, and right-click your GPU device.
  3. Next, select Update driver.
    update driver
  4. Finally, click the Search automatically for drivers option.
    search auto

According to users, your drivers can sometimes cause the SteamVR error 208 if outdated. The solution is to update your graphics driver to the latest version.

If you don’t want to use the Windows driver updater, go to the manufacturer’s website. Depending on your GPU, go to AMD or NVIDIA’s website and download the latest drivers.

However, to ensure you don’t make any mistakes by choosing the wrong drivers for your needs, you can use software that automatically does this for you.

This is where Outbyte Driver Updater comes into play. It is light and easy to use and provides all driver management features a PC user may need.

It can scan and update all your drivers in bulk, but you can also select any specific driver you want to take care of. In addition, you can set it up to regularly scan and update your drivers so you won’t have to worry about this issue in the future.

Outbyte Driver Updater

Try Outbyte Driver Updater to update all your drivers at once with up-to-date options effortlessly.
Free Trial Download now

2. Enable Direct Mode on SteamVR

  1. Go to the Start menu, and launch Steam.
  2. Start SteamVR by clicking the VR button.
  3. Click the dropdown arrow, go to Settings, and select Developer.
    developer steamvr error 208
  4. Make sure that Direct Mode is enabled, and restart your PC.

Some users have reported that by enabling Direct Mode on SteamVR, they no longer get the HTC Vive 208 error on Windows 10, so be sure to try it out.

3. Select the beta version of SteamVR

  1. Launch Steam and click the Library option.
  2. Search for steamvr, right-click it, and select Properties.
  3. Now, select the BETAS option in the left pane.
  4. Finally, choose the beta option and restart Steam and VR.
    beta

Sometimes if you select the beta version of SteamVR, HTC Vive error 208 in Windows 10 also disappears, so follow the steps above to ensure you enjoy the VR experience.

Also, read our complete guide if SteamVR Home has stopped working and fix the error quickly.

4. Reinstall your SteamVR USB devices

  1. Unplug all cables from your PC, and launch Steam.
  2. Open SteamVR, go to Settings, and select Developer.
  3. Click on Remove all SteamVR USB Devices.
    remove all
  4. Select Yes, and Continue.
  5. Restart your PC.

After the restart, you should plug the cables back in, but be sure to use a different port for your HDMI. Launch SteamVR and set up the device if required. Check for any improvements.

5. Fresh install SteamVR

  1. Launch Steam, go to Library, and select Tools.
  2. Right–click on SteamVR, select Uninstall, and click Delete.
  3. Now, go to the Steam Store.
  4. Search for SteamVR and select the relevant result.
  5. Now, click the Play Game button.
    play game steamvr error 208

Many Windows 10 users have reported that uninstalling and reinstalling SteamVR helped them eliminate the HTC Vive 208 error.

Although error 208 was addressed through some beta updates from SteamVR, it persists on some systems. Try out some of our quick solutions to fix the problem in no time.

Also, check out our comprehensive guide if you’re having problems with VR on Windows 10.

Feel free to let us know the solution that helped you fix this issue in the comments below.

Intel dual-band wireless-ac 7260 disconnecting? [Easy Fix]

Windows 7 or 8 users seem to have a lesser share of the Intel Wireless 7260 AC driver issues until they upgrade to Windows 10. However, Windows 10 users seem to have the greatest trouble in wireless networking due to Intel’s 7260 Wi-Fi driver.

Playing online games like Counter-Strike can often turn into a nightmare due to the distress experienced in connecting to the internet.

The most common problems relating to the Intel Wireless AC 7260 driver are:  slow speed/limited connection, Wi-Fi won’t connect, frequent disconnections.

We have identified the issues and come up with solutions to fix each Intel Wireless 7260 AC driver bug.

Why does Intel dual-band wireless-ac 720 keep disconnecting?

If the driver for Intel dual-band wireless-ac 7260 is incompatible, obsolete, or corrupt, the device may continue to disconnect as it is dependent on the driver’s functionality.

And this is no exception for users who have asked us where they can download the Intel dual-band wireless-ac 7260 driver for Lenovo specifically. As per usual, you can install drivers from their official website.

lenovo support


Furthermore, incorrect configuration of network adapter settings (such as HT Mode or U-APSD) may potentially be a contributing factor to the current problem.

Make sure to check out our post on what to do if Wireless drivers are missing on your PC if you can’t seem to find them all together.

You’ll most likely resolve the annoying connectivity issues by attempting the methods listed below, but before doing so, check to see whether deactivating and re-enabling the 7260 adapter in the Device Manager fixes the problem.

What can I do if Intel wireless-ac 7260 keeps disconnecting?

1. Keep your drivers up to date with a dedicated software

Outdated drivers can lead to computer issues, hardware not communicating correctly and you can even notice that your computer is running slower.

When drivers are updated, your computer will have no performance problem. However, keeping them up to date, might be time-consuming if you are doing it manually. 

A professional tool is the best solution to automatically update all your drivers.

2. Enable Continuously Aware Mode (CAM)

Network control panel applet (NCPA)

  1. From the Windows search bar, type Control Panel and hit the Enter key.
  2. From the right upper side, select View by Small icons. 
  3. Here, select Network and sharing center.
  4. Select Change adapter settings from the left side.
  5. Right-click over the wireless adapter and select Properties.
  6. Hence, click Configure.intel wireless 7260 AC driver issues
  7. Click the Advanced tab.
  8. Select Transmit Power, change the value to 5 which is the highest.intel wireless 7260 AC driver issues

Note: This procedure above fixes the Intel Wireless 7260 AC driver Wi-Fi issues for the following Intel Wireless adapter models:

Intel Centrino Advanced-N + WiMAX 6250Intel Centrino Wireless-N 2230
Intel Centrino Advanced-N 6200Intel Dual Band Wireless-AC 3160
Intel Centrino Advanced-N 6205Intel Dual Band Wireless-AC 7260
Intel Centrino Advanced-N 6205 For DesktopIntel Dual Band Wireless-AC 7260 for Desktop
Intel Centrino Advanced-N 6230Intel Dual Band Wireless-N 7260
Intel Centrino Advanced-N 6235Intel PRO/Wireless 2200BG Network Connection
Intel Centrino Ultimate-N 6300Intel PRO/Wireless 2915ABG Network Connection
Intel Centrino Wireless-N + WiMAX 6150Intel PRO/Wireless 3945ABG Network Connection
Intel Centrino Wireless-N 100Intel PROSet/Wireless Software
Intel Centrino Wireless-N 1000Intel Wi-Fi Link 1000
Intel Centrino Wireless-N 1030Intel Wi-Fi Link 5300 and Intel Wi-Fi Link 5100 products
Intel Centrino Wireless-N 130Intel WiMAX/Wi-Fi Link 5350 and Intel WiMAX/Wi-Fi Link 5150 products
Intel Centrino Wireless-N 2200Intel Wireless Wi-Fi Link 4965AGN
Intel Centrino Wireless-N 2200 For DesktopIntel Wireless-N 7260

Intel PROSet/Wireless Wi-Fi Connection Utility

  1. Launch the Intel PROSet/Wireless Wi-Fi Connection Utility.
  2. Click on the Advanced option from the menu.
  3. Select Adapter Settings and proceed to the Advanced tab.intel wireless 7260 AC driver issues
  4. Like above, select Transmit Power and change Value to 5 which is the highest value.

Note: These methods involve setting the Wi-Fi adapter of your PC to Continuously Aware Mode (CAM). This would disable the PSP ( Power save Polling ) feature.

When you enable the CAM feature, it can hinder Bluetooth functionality in some models. However, enabling the CAM feature fixes the Wi-Fi issues in Intel Wireless AC 7260 driver.

Another alternative to these methods is to update the firmware of your Intel Wireless AC 7260 driver card from the manufacturer or purchase the latest release and have a computer engineer replace it for you.

3. Configure the Intel Wireless 7260 AC driver 

  1. Follow steps 1-7 from the above solution, to open the driver properties window.
  2. Modify the settings using:
    1. 802.11n channel Width for 2.4Ghz connections to 20mhz ONLY (Default is Auto).
    2. Preferred Band to 2.4Ghz (Default is Auto).
    3. Roaming Aggressiveness set to 1. Lowest (Default is 3. Medium).
    4. Wireless mode select 802.11b/g (Default is 802.11a/b/g).
    5. Set HT mode to VHT mode.
  3. Login into your router settings and disable P2P settings and Enable CAM.

Note: You need to switch off Bluetooth if you are not using any Bluetooth device from the Windows 10 settings. Also, you need to disable Game DVR if you play Xbox or any app that requires a wireless connection from the game settings.

This method should help you fix the Intel Wireless AC 7260 driver slow speed/limited connection problem.

4. Run the Network Adapter Troubleshooter

  1. Right-click over the Wi-Fi icon from the right bottom side and select Troubleshoot problems.
  2. Select the network adapter you want to troubleshoot. You should select Wi-fi or all.
  3. After selecting, click the Next button.
  4. Follow the on-screen instructions to complete the troubleshooting process.

Note: Network Adapter Troubleshooter is an automated inbuilt tool in Windows 10 that finds and fixes the common issues and checks if the network adapter drivers are up to date.

Try out the suggestions given by the Network Adapter Troubleshooter so you can fix the Intel Wireless AC 7260 driver connection issue. 

5. Reinstall the Network Card

  1. Firstly, download the latest Intel Wireless 7260 AC driver from the manufacturer’s website here.
  2. Right-click on the Start menu and select Device Manager.
  3. In the Device Manager window, expand Network Adaptor and then right click on Network Card.
  4. Then, click on Uninstall and restart your PC.intel wireless 7260 AC driver issues
  5. Follow steps 1-2 from the second solution to open Control Panel menu.
  6. Select Programs and Features.
  7. From the program list, if it is present, select and uninstall the Intel Wireless AC 7260 driver.
  8. Restart the computer.
  9. Install the latest Intel Wireless 7260 AC driver that you have previously downloaded.  

Note: Also, consider downloading and installing an older Intel Wireless 7260 AC driver if the latest version did not work. Make sure you download the driver from either Intel’s official download site or your PC manufacturer’s official website to prevent downloading malicious executable files.

We hope that the solutions above fixed all the Intel Wireless AC 7260 driver issues. Now you can use your Windows PC to connect to wireless networks without experiencing any technical mishap.

You can comment below if you know of any solution that we did not mention.

Windows 11 Can’t Mount ISO? How to Enable it in 3 Steps

Windows 11 includes mounting ISO disk images as well as VHD virtual HDD image files.

When attempting to mount a file on Windows Server 11, several users report getting the Sorry, there was a problem mounting the file message. The problem has only been reported with the built-in ISO file mount in Windows.

If you’re one of those who have experienced such difficulties and want to learn how to fix ISO issues on Windows 11, you’re in the right place.

You can view or extract the contents of an ISO image without using third-party software, and this article will show you how to do so on Windows 11.

How do I fix the ISO file mount error on Windows 11?

1. Open the ISO file with Windows Explorer

  1. Locate the ISO file through File Explorer.
  2. Right-click the file and choose Open with and Chose another app from the menu.
  3. Select Windows Explorer from the list. Check Always use this app to open .iso files and click OK.

2. Use a third-party repair tool

Another method we tested to restore corrupted ISO files was to use a third-party repair software that’s both reliable and practical.

The recommended solution is to use professional Windows repair software, which does a deep scan of your Windows system, identifying and automatically repairing system files and components that are causing  Sorry, there was an error mounting the file error message.

3. Unmount all drives

  1. Type in Search bar This PC and click on it.
  2. Expand Devices and Drives.
  3. Right-click on individual virtual drives and click Eject. windows 10 error mounting iso / windows 10 couldn't mount file
  4. Restart your computer and retry to mount the desired ISO file in any open slot.

That virtual drive appears in File Explorer with its drive letter and functions exactly like a DVD. You can, for example, copy files from the virtual DVD to any other disk drive.

Copy the VHD file from one location to another, rather than cut and paste, and you’ll be able to mount it. This is also a workaround to fix Sorry, there’s was a problem mounting the file error message.

Last but not least, there’s always the alternative of using third-party software to automate the process of mounting an ISO file on your Windows 11 PC if doing it manually overwhelms you.

To have an extra layer of security, we recommend using a compatible antivirus solution for Windows 11 PC, so you can be on the safe side when mounting ISO files.

If you encountered other issues and errors while mounting ISO files in Windows 10, in the article we covered more troubleshooting steps to help you resolve them.

Furthermore, having the most recent security upgrades should keep you safe from mounting a damaged ISO file, avoiding any issues. Leave us a comment and tell us if this easy fix resolved your issue.

Total War: Warhammer 3 has no sound? Here’s what to do

It’s no longer a surprise that Total War: Warhammer 3 is an incredible experience that is worth to be tried by each worldwide gamer.

The digital armies can hop between realities where daemons and ogres clash, and where troops are led by flying monstrosities – including one that’s as customizable as an RPG protagonist. 

In these terms, sound plays a primordial role that will improve your overall experience, and according to many users, Total War: Warhammer 3 comes with impressive sound features.

Dragon roars have deep baritone, really like that they’re not high-pitched shrieks. They sound like the sound a massive animal would make.

If you think about Athel Loren’s tree spirit language, it sounds like how a tree might talk.

Plus, gamers reported that The Helstorm Rocket Battery’s whistling noise makes the perfect impending doom noise.

However, some users claimed that Total War: Warhammer 3 has no sound and it can be extremely annoying, especially when you want to play a game with breathtaking audio attributes.

Thankfully, we have the perfect steps you should try to fix this irritating problem in no time.

What can I do if Total War: Warhammer 3 has no sound?

1. Repair game files

1.1 Steam users

  1. Hit the Windows key, type Steam, then open the app.
  2. From the main menu showed, click on Library.
  3. In the All games section, right-click on Total War: Warhammer 3, then choose Properties.
  4. Now, go to Local Files.
  5. Click on the Verify integrity of game files…
  6. This process will start verifying and it may take some time to be completed.
  7. Once done, close the Steam client, and restart your computer to apply changes.

1.2 Epic users

  1. Press on the Windows key, type Epic, then open the app.
  2. Navigate to Library.
  3. Click on Total War: Warhammer 3, then choose the 3-dots icon.
  4. Once opened, select Verify in the drop-down navigation.
  5. After it completes click Launch to start your game. 

2. Update audio drivers

2.1 Manually

  1. Press on the Windows key, type Device Manager, then open the first result.
  2. In the opened window, expand the Audio inputs and outputs section, right-click on the driver that is giving you headaches, then choose to Update driver.
  3. Now, select to Search automatically for drivers.
  4. If any options are found, you’ll be notified.

2.2 Automatically

Of course, manually updating the related drivers might be extremely time-consuming and we all know how important it is to streamline any day-to-day process.

It seems like Total War: Warhammer 3 sound can cause serious problems in tons of worldwide cases. Fortunately, our recommended steps above will easily solve this issue.

We are also aware of the fact that the Failed to host game error is encountered by more and more Total War: Warhammer 3 players. If you happen to be one of them as well, do not hesitate to check out the linked article.

In case you face any additional questions regarding today’s subject, use the comments section listed below.

How to fix the RAVCpl64.exe system error

RAVCpl64.exe is a workable file that is part of Realtek Semiconductor Corp.’s Realtek HD X-Fi software. Typically, the software is 36.26 MB in size.

Note that RAVCpl64.exe system errors are typically caused by an infected, corrupt, or missing executable file, and they frequently occur during the starting of the Realtek ALC3861 audio driver.

This .exe file is a process that corresponds to the audio control component of RealTek’s sound card drivers, similar to Rthdcpl.exe.

Additionally, this process allows you to configure, alter, and change sound card settings using the HD audio control panel, therefore it’s a crucial file, considering how significant sound control is to you.

The RAVCpl64.exe file is not harmful. The usual idea is that if the process is present on your computer, it indicates that you have a RealTek audio device installed. 

Since RAVCpl64.exe is not a system process, you can delete it without causing any problems with your operating system.

Disabling it does not depend largely on your system; nonetheless, disabling/removing certain processes might free up valuable system resources.

What are the causes of RAVCpl64.exe system errors?

Some of the possible causes of RAVCpl64.exe errors are as follows:

  • The registry keys for RAVCpl64.exe are invalid or corrupted
  • RAVCpl64.exe file is corrupted by a virus, malware, or spyware
  • Another application maliciously deleted (or mistakenly deleted) RAVCpl64.exe (not Realtek ALC3861 Audio Driver)
  • Realtek ALC3861 audio driver and its shared referenced files conflict with another program
  • Realtek ALC3861 audio driver software is corrupted or incompletely installed

Fortunately, there are several things you can do to fix the RAVCpl64.exe system error, as well as the great majority of other processes on your computer.

However, the strategy that ultimately works for you will be highly dependent on the causes, so it’s always a good idea to keep track of when and how the error(s) originally appeared.

To eliminate ravcpl64.exe system error, first, you must know common errors you may encounter.

  • RAVCpl64.exe program error
  • RAVCpl64.exe not valid
  • RAVCpl64.exe encountered a problem and will close
  • Cannot find RAVCpl64.exe
  • RAVCpl64.exe can’t be found
  • Problem starting application: RAVCpl64.exe
  • RAVCpl64.exe is not running
  • RAVCpl64.exe quit
  • Software Path Fault: RAVCpl64.exe

How do I know if RAVCpl64.exe is a safe file or a malicious one?

  1. Right-click on the Start menu and select Task Manager from the menu.Go to Task Manager
  2. If you aren’t currently on the Process tab, click on it.
  3. After that, select the Name tab to sort the processes by their names.Click on Name Tab on task manager
  4. Now look for RAVCpl64.exe. If there are multiple instances of the same process usually indicates a viral infection.

We should point out that the RAVCpl64.exe file is completely safe, and as previously said, it was developed by Realtek Semiconductor Corp. As a result, the RAVCpl64.exe system error may be caused by a legitimate issue with your computer.

However, one thing to bear in mind is that, while the vast majority of files on your computer are in their default places, many of them may easily be moved or altered, and some of them can even include viruses, malware, or spyware.

On the other hand, it is common for computer criminals to disguise their malicious files as normal files like RAVCpl64.exe.

Meanwhile, one of the best methods for spotting a malicious .exe file running in the background on Windows is to follow the instructions listed above.

Aside from that, knowing where the executable is located will help you figure out whether or not a particular file is a legitimate Windows process or a malicious infection.

A process like RAVCpl64.exe, for example, should execute from: C:\Program Files\realtek\audio\hda\rtlupd64.exe

So, if you want to know where your RAVCpl64.exe file is placed so you can determine whether it is safe or dangerous, follow these steps:

  1. Right-click on the Start menu and select Task Manager from the menu.Go to Task Manager
  2. Right-click on Name tab then select Command line from the menu to see the process location. Alternatively, you can just right-click on the process and select Open file location.Enable Command Line in Task manager
  3. Each process location is now displayed in a new column.Command Line in Task manager to fix RAVCpl64.exe system error in Windows

Microsoft’s Process Explorer is another tool that can help you spot problematic processes. 

  1. First download Process Explorer.Download and install Process to fix RAVCpl64.exe system error in WindowsExplorer
  2. Right-click the downloaded file and select Extract All.Extract Process Explorer
  3. Select Verify Image Signatures from the Options menu.Verify Image Signatures in Task processor
  4. A column for Verified Signer will now be added.Check Verified Signer to know the issue and fix RAVCpl64.exe system error in Windows

If a process Verified Signer is Verified, it is almost certainly safe; if it is Unable to Verify, it is usually a suspicious file that you should investigate further.

Note icon NOTE
Not all legitimate Windows processes have a Verified status, but none of the rogue ones do.

The most important facts about RAVCpl64.exe are as follows:

  • Located in this subfolder: C:\Program Files\Realtek\Audio\HDA
  • Publisher: Realtek Semiconductor Corp
  • Full Path: C:\Program Files\realtek\audio\hda\rtlupd64.exe
  • Publisher URL
  • Known to be up to 36.26 MB in size on Windows PC

Assuming that you suspect your computer has been infected, you should immediately download and install a reliable all-in-one security application.

The longer you delay, the more drivers and files you allow to become infected, exacerbating the situation.

How can I fix the RAVCpl64.exe system error?

1. Update drivers

  1. Right-click on Start menu, then select Device Manager.
  2. Now, right-click the first driver and select Update Driver from the menu that appears.Updating driver
  3. Choose Search automatically for drivers in the pop-up window.Search automatically for drivers
  4. Then follow the on-screen instructions.
  5. Repeat the procedure for each of the remaining drivers one at a time.

Because RAVCpl64.exe is a Realtek driver file, if the problem isn’t caused by malware, updating the driver will fix it. There are a number of ways to update a driver, but the most straightforward is to use software like Outbyte Driver Updater.

Simply download and run the software to begin scanning your computer. After that, it will generate a report containing outdated and up-to-date drivers. If an outdated Realtek driver was found between the reports, update it and restart your computer.

⇒ Get Outbyte Driver Updater

2. Re-register RAVCpl64.exe

  1. To open Run, press the Windows + R key combination.
  2. Now, to access Command Prompt, type cmd and hit Enter.Access command prompt by typing CMD to re-register and to fix RAVCpl64.exe system error in Windows
  3. When the Command Prompt window appears, type this command and press Enter: regsvr32 ravcpl64.exe

Based on the intensity of the issue, the cause could simply be a missing registry entry rather than a damaged or corrupted registry item.

In this scenario, getting the system to re-register the component in the registry should be enough to fix the issue you’re experiencing.

Fortunately, this is a rather straightforward procedure that may be carried out by following the steps above.

3. Perform a registry scan

RAVCpl64.exe is a non-system process that is easily corrupted by the registry. The registry is the section of the operating system where all hardware and software configuration data are saved.

An error can and usually does occur when a registry reference is damaged in some way. The type of error is determined by the type of corrupted reference.

This leads us to the RAVCpl64.exe component, which, while not part of the operating system, is nonetheless a component that relies on registry entries to execute and function properly. As a result, registry corruption could be the source of the issue.

4. Update Windows

  1. Right-click on Start menu and select Settings.
  2. In the left pane, select Windows Update, then click Resume updates. Follow the onscreen instructions.fix RAVCpl64.exe system error in Windows

Not every error you see on your computer is caused by software you installed or viruses that have found their way onto your system. Instead, these issues can sometimes be caused by weaknesses in the operating system.

Microsoft and other OS developers are constantly on the lookout for vulnerabilities, which they do everything they can to address via service packs and security upgrades.

As a result, you might want to check the Windows Update server for any available updates.

5. Perform a malware scan

Hackers like to use legitimate processes to hide their harmful files. So if you’re getting a RAVCpl64.exe system error, there’s a significant probability it’s a virus.

Viruses can spread quickly, infecting, corrupting, and ruining system files as they move through your computer. As a result, you must do everything you can to get rid of these files from your system.

We recommend using an anti-malware tool to delete malware threats in real-time and crush ransomware like corrupted RAVCpl64.exe to fix the problem.

6. Reinstall Windows

If the techniques above have failed, the next easiest and most reliable way to fix this mistake is to reinstall Windows as described in our guide.

Note icon NOTE
Reinstalling Windows means losing all of the data currently on the hard drive where Windows is installed, so make a backup beforehand.

Is it safe to remove RAVCpl64.exe?

You should not delete a safe executable file unless you have a good reason for doing so, as this may damage the performance of any programs that use it. This includes RAVCpl64.exe system error.

To avoid future difficulties caused by corrupted files, make sure your software and programs are up to date.

In terms of software functioning difficulties, check driver and software updates more frequently to ensure that such issues do not arise.

According to several web sources, 11% of users delete the RAVCpl64.exe file, therefore it may be safe. However, it is recommended that you evaluate the executable’s trustworthiness yourself to establish whether it is safe or a virus.

A comprehensive system examination using different apps is the best diagnostic for these questionable files. These apps will destroy RAVCpl64.exe and any related malware if the file is classed as harmful.

If you’ve established that RAVCpl64.exe isn’t a virus but still need to get rid of it, use the uninstaller for Realtek HD X-Fi, which is found at: C:\Program Files\Realtek\Audio\HDA\RtlUpd64.exe -r -m -nrg2709

Assuming you can’t find the uninstaller, you’ll have to uninstall Realtek HD X-Fi to get rid of the RAVCpl64.exe system error. The Programs and Features option in the Windows Control Panel can be used.

How to uninstall Realtek HD X-Fi to Delete RAVCpl64.exe? 

  1. Go to Start menu, then type Control Panel and press Enter.
  2. In Control Panel, click on Program and features option.Go to Program and Features to find RAVCpl64.exe system error
  3. Scroll down until you see Realtek HD X-Fi, then right-click it and choose Uninstall.
  4. To uninstall the software, following the on-screen instructions.

Although you may have successfully fixed the RAVCpl64.exe system error, it is critical to understand how to prevent similar errors from occurring in the future.

Many computer problems, including errors, are caused by computer user negligence or incorrect operation, both of which are completely avoidable.

The most important thing is to keep your PC components up to date, such as the operating system, software, and device drivers, by installing the most recent Windows updates, patches, drivers, and so on. 

When connected to the Internet, a computer is a vulnerable machine that is readily attacked by dangerous viruses and threats.

To avoid these viruses on your PC, use a professional security application, and be sure to turn on real-time protection and keep it up to date.

Many Windows system errors are caused by a lack of system maintenance and optimization. Regular computer system maintenance will considerably reduce the number of errors and difficulties, and an advanced system optimizer will be a valuable ally.

Which solution worked in your case? Tell us in the comments section below.

How to Keep Your Smartphone Safe from Cyber Threats

Smartphones have become an essential part of our daily lives, handling everything from personal communication to financial transactions. While their convenience is undeniable, the increased use of smartphones also brings heightened risks of cyberattacks. 

Hackers are constantly finding new ways to breach the security of mobile devices, making it crucial for users to understand how to protect their smartphones from cyber threats. In this article, we will explore why smartphone security is more important than ever, the best practices to keep your device safe, and how to secure your data when using real money casino apps.

Why Smartphone Security is More Important Than Ever

With the growing dependence on smartphones for accessing sensitive information, such as bank accounts, personal emails, and even health records, the potential risks of cyberattacks are higher than ever. 

Hackers are targeting smartphones because they know that many users do not take the necessary steps to protect their devices. A compromised phone can result in stolen data, identity theft, or unauthorized access to financial accounts.

Additionally, mobile malware is becoming increasingly sophisticated. Hackers can infect your device through malicious apps, unsafe websites, or even phishing messages disguised as legitimate communication. For these reasons, it’s critical to take smartphone security seriously and stay updated on the latest methods to safeguard your data.

Best Practices for Keeping Your Smartphone Safe

There are several key steps you can take to protect your smartphone from cyber threats. By following these best practices, you can greatly reduce the risk of being targeted by hackers:

  1. Install updates regularly: Software updates are not just for adding new features; they also fix security vulnerabilities. Ensure that your operating system and apps are up to date.
  2. Use strong passwords: Create complex passwords for your phone, apps, and online accounts. Avoid using easily guessed passwords like “123456” or “password.” Password managers can help generate and store secure passwords.
  3. Enable device encryption: Encrypting your phone ensures that your data is unreadable if your device is stolen. Most modern smartphones come with built-in encryption settings that can be activated.
  4. Download apps from trusted sources: Only download apps from official app stores like Google Play or the Apple App Store. Be cautious of apps from third-party sources, as they may contain malware.
  5. Be wary of public Wi-Fi: Avoid using public Wi-Fi for sensitive activities like banking or online shopping. If you must use public Wi-Fi, consider using a Virtual Private Network (VPN) to encrypt your connection.
  6. Disable Bluetooth and NFC when not in use: Leaving Bluetooth and NFC (Near Field Communication) on can make your phone more vulnerable to attacks. Turn these features off when you don’t need them.

Protecting Your Data When Using Real Money Casino Apps

Many users enjoy playing real money casino games, so click here to see the full list on their smartphones. However, these apps can pose additional risks if not used safely. Real money casino apps often require sensitive financial information, making them attractive targets for cybercriminals. To keep your data safe while enjoying online gambling, Austin Reynolds, the Senior Editor of the review website Casino Bonuses Now  with more than ten years of experience in the online gambling sector, recommends taking the following precautions:

  1. Use trusted real money casino apps: Only download casino apps from legitimate sources, such as official app stores or reputable casino websites. Check for reviews and ratings to ensure the app’s authenticity.
  2. Ensure the app uses encryption: Before entering any personal or financial information, verify that the app or website uses encryption (look for “https” in the URL). This ensures that your data is securely transmitted.
  3. Set spending limits: Many real money casino apps allow you to set spending limits. This not only helps you manage your finances but also minimizes your exposure in case your account is compromised.
  4. Monitor your transactions: Regularly check your financial statements for any suspicious or unauthorized transactions related to the casino app. If you notice anything unusual, report it to your bank or the app’s support team immediately.
  5. Log out after each session: Always log out of your real money casino account after playing, especially if you are using a shared or public device. This reduces the risk of unauthorized access to your account.

How Two-Factor Authentication Helps Protect Your Smartphone

Two-factor authentication (2FA) adds an extra layer of security to your accounts by requiring not just a password but also a second form of identification. This could be a one-time code sent to your phone, a fingerprint scan, or a security question. 2FA makes it much more difficult for hackers to gain access to your accounts, even if they manage to steal your password.

Here’s how two-factor authentication can improve your smartphone’s security:

  1. Prevents unauthorized access: Even if someone manages to steal your password, they won’t be able to log into your account without the second authentication factor.
  2. Supports multiple apps and services: Many services, including email, social media, and banking apps, offer 2FA. Enabling it across all your accounts adds an additional layer of protection.
  3. Adds security to financial transactions: For real money casino apps and other financial services, 2FA is crucial in protecting your sensitive information and ensuring your transactions are secure.

By enabling 2FA on your smartphone and important apps, you can significantly reduce the chances of becoming a victim of cyberattacks.

Conclusion

In today’s digital age, keeping your smartphone safe from cyber threats is more important than ever. By following best practices like enabling encryption, using strong passwords, and regularly updating your phone, you can protect your data from hackers. 

Additionally, when using real money casino apps, it’s crucial to ensure the app is trusted and uses encryption for secure transactions. 

Finally, enabling two-factor authentication is a simple yet effective way to further safeguard your personal and financial information. Taking these steps will help you stay safe and enjoy the convenience of your smartphone without compromising your security.

Windows 11 L2TP VPN Not Working: How to Fix it

VPNs are excellent services to provide an encrypted connection over the Internet. Unfortunately, L2TP VPN not working on Windows 11 has become a prevalent problem recently, and many users encountered the Can’t connect to VPN. The L2TP connection attempt failed error when they tried to connect to VPN.

This error occurs just after installing the new Microsoft KB5009543 update patch. In this case, Windows VPN fails to establish a secured connection to the server through Layer Two Tunneling Protocol (L2TP). ISPs use this protocol to trigger VPN connections.

The error arises from both VPN and Windows. So, it is vital to check the errors’ sources and causes before taking any measure. This guide shows you how to troubleshoot this problem.

Why does the L2TP connection error message appear?

This error message is one of the most common errors when connecting to L2TP. The main reason why this error appears is that you haven’t configured the connection properly to connect to the L2TP server.

Correspondingly, the server fails to respond. Another possible cause is that CHAP v2 Protocol is disabled. The L2TP connection error message also appears due to the following reasons:

This error is reported by many users when they try connecting their VPN. If you set the VPN configuration manually, check that you use a pre-shared key.

So, make sure that you enable L2TP configurations in the router. If none of them works, we provide you with solutions to fix Windows 11 L2TP VPN not working. Let’s get started.

Several users complain that this error message appears when they recently used a built-in Microsoft VPN, after Microsoft’s update pack.

So, the solutions to resolve this issue are straightforward. In fact, there are six methods to fix this issue. Let’s dive into them.

What can I do if Windows 11’s L2TP VPN is not working?

1. Uninstall the KB5009543 update pack

Note icon NOTE
Uninstalling updates would remove previous vulnerability patches. So, take necessary security actions before doing so.
  1. First, open the Settings by pressing Windows + I keys or by right-clicking on the Start menu and selecting the Settings.
  2. Now opt for Windows Update then select Update history.Update history in Windows Update
  3. By selecting this option, you will see a list of Windows updates. Scroll down the list and click on Uninstall updates.Unistalling updates to fix windows 11 l2tp vpn not working
  4. Right-click on the KB5009543 update pack and select Uninstall.Uninstalling KB5009543
  5. Reboot your computer.

Because the issue arises from the latest update that Windows offers for security updates, this method is the simplest way to fix L2TP VPN not working issues.

2. Reinstall the VPN Network Adapter

  1. Open the Run dialogue box by pressing Windows + R shortcut keys.
  2. To open Device Manager, type devmgmt.msc into the box and click OK.Go to Device Manager in Windows 11
  3. Look for your VPN Network Adapter in the Network Adapters list, then right-click on it and choose Uninstall device.Uninstalling Device
  4. Restart your computer.
  5. Reinstall your VPN.

The network adapter is one of the causes of the L2TP connection attempt failed error. You can fix this issue simply by reinstalling the Network Adapter drivers. Now check to see if the problem has been resolved. If not, proceed to the next solution.

3. Activate the Microsoft MS-CHAP v2 Protocol

  1. Press Windows + R hotkeys to open Run dialogue box.
  2. Then, type ncpa.cpl and press the Enter key.Go to ncpa cpl
  3. On Network Connections window, right-click your VPN connection and select the Properties option.Go to VPN properties
  4. Go to the Security tab and select the Allow these protocols option, then tick the Microsoft-CHAP Version 2 box.tick the Microsoft-CHAP Version 2 box to fix L2TP error in Windows 11
  5. Select OK and reconnect to your VPN.

Challenge-Handshake Authentication Protocol (CHAP) is an authentication protocol that verifies users or hosts to prevent network replay attacks. Sometimes activating this protocol would enable us to resolve Windows 11 L2TP VPN not working issue.

4. Use a third party VPN

Private Internet Access (PIA) is a VPN with a number of key features, one of which is compatibility with every operating system and platform. This compatibility has allowed PIA customers to use the software without encountering Windows-related errors such as L2TP on Windows 11.

Not to mention that it has a no-logs policy, which means it does not collect data or keep any browsing history from customers, making it one of the safest VPNs available.

Furthermore, the PIA software has a very simple user interface that is easy to configure. Last but not least, this VPN includes a kill switch, split tunneling, torrenting support, and other features that ensure that the user can use it without any concern.

5. Create a new UDP registry key

  1. Open Run by pressing Windows + R key combination.
  2. After that, type Regedit and select OK to open the Windows Registry.Go to registry by typing Regedit in Run
  3. When the Registry Editor window pops up go to the following directory: HKEY_LOCAL_MACHINE\SYSTEM\CurrentControlSet\Services\PolicyAgent
  4. Now, click the Edit menu, select New, and then opt for DWORD (32-bit) Value.Craete new key in registry
  5. After that, rename the value to AssumeUDPEncapsulationContextOnSendRule and press the Enter key.AssumeUDPEncapsulationContextOnSendRule
  6. Now double click on the value you just created, set Value data to 2, and hit Enter.Set Value to 2 to fix L2TP VPN not working in Windows 11
  7. Restart your computer.

Sometimes VPN cannot connect because of the registry key. This is because all essential information and settings related to VPN are stored in registry keys.

So, the solution is to modify them by creating a new UDP Encapsulation registry. Now check to see if the L2TP VPN not working error in your Windows 11 PC has been fixed.

6. Disable vendor ID

When your computer installs the Windows KB5009543 package, IPSEC connections no longer work. Microsoft recommends disabling Vendor ID in the server-side setting to fix this issue.

Depending on which VPN you use, disabling Vendor ID varies from one server to another.

7. Enable the LCP protocol extensions

  1. Press the Windows + R key combination to open Run, then type ncpa.cpl and click OK.Open ncpa cpl
  2. Now, on the Network connection window, right-click on your VPN connection and select Properties.Go to VPN Properties
  3. In this step, navigate to the Option tab and click the PPP settings button.Go to PPP Settings to fix L2TP VPN not working in Windows 11
  4. Check Enable LCP Extensions box then click OK and head for the final step.Enable LCP extentions to address L2TP VPN not working in Windows 11
  5. Reconnect to your VPN and check whether the problem is resolved.

Link Control Protocol (LCP) is used to establish, configure, and test data in the PPP setting. However, sometimes due to reasons such as third-party, L2TP connection fails.

How does L2TP work?

Layer 2 Tunneling Protocol connects VPN client to VPN server by assigning an IP address to every user. It uses two endpoints to establish a tunnel.

Once the connection between the two endpoints is established, the PPP layer is encapsulated to transmit multi-protocol data. Next, ISP triggers a PPP connection.

After initiation of the PPP connection, one endpoint accepts the connection. Then a slot is allocated in the tunnel. So, the connection waits for the other endpoint to respond.

Meanwhile, the connection is verified, and a virtual PPP interface is made. When this process is finished, the link frames move through the tunnel. Finally, the other endpoint accepts the frames and removes L2TP encapsulation.

Windows 11 latest cumulative update KB5009543 stops VPN from establishing a connection and shows users The L2TP connection attempt failed error message.

Hopefully, there are some workarounds to solve this issue. However, the fastest way to fix Windows 11 L2TP VPN not working is by uninstalling the KB5009543 update pack.

Note that if you’re having trouble with L2TP on Windows 10, the solutions might be slightly different. Let us know which one worked for you in the comments area below.

Best Equalizer for Windows 11 [Top 6 for 2026 Ranked]

Listening to music or watching movies on a PC or laptop with a decent sound quality requires software to boost sound quality. A specialized Windows 11 equalizer software can help you achieve the best results.

Windows 11 has a built-in audio equalizer that helps you improve your sound quality. However, it may not provide the highest sound quality you want for different genres of music.

What does an audio equalizer exactly do?

An audio equalizer is a tool that reduces or enhances the frequencies of a sound. It uses parametric, bass, treble, high, and low pass filters for each tone.

Each filter specifies what frequency range. For instance, the bass tone frequency is between 16 to 256 Hz. For treble tone, the frequency ranges from 2 to 16.38 kHz.

An audio equalizer, in general, is an audio enhancer that adjusts output sound for a better experience, and tuning an equalizer software for a better output is simple.

What are the best equalizer software tools for Windows 11?

Boom 3D

Boom 3D app

Boom 3d is a powerful tool that comes with multi-channel 3D surrounding audio. There is no need to buy expensive hardware or speaker boosters when using this software. With its 3D surround technology, you no longer use headphones, headsets, or sound boosters.

One of the features that Boom3D offers is a 31-band equalizer that gives you countless choices. Moreover, this software provides you with different presets to enjoy listening to any music genres you love.

Never miss the joy of watching the latest movies on Netflix! Boom3D built-in volume booster allows you to watch movies and feel the natural surround sounds in the film. This software is not entirely free, and you have to purchase the premium plan after the 30-day free trial expires.

It has other key features as below:

  • Magical 3D surround sound
  • Nifty audio player
  • Strong audio booster
  • 31-band equalizer presets
  • More than 20,000 Radio Stations
Boom 3D

Boom 3D

Boom 3D is one of the best equalizers for Windows 11 that can output media content in stunning 3D effects. Get Boom 3D today!
Check price Visit website

Equalizer APO

Equalizer APO app

APO (Audio Processing Object) is one of the most common equalizers for Windows 11. It comes with various features such as low PC usage and 3D sound support.

It also supports both 32 and 64-bit versions. In addition, this software has astonishing audio filters such as low-pass and band-pass to adjust low and high frequencies.

Additionally, it has a user-friendly interface that provides you with an analysis panel. This feature can alter sound properties such as peak gain and latency. Also, it supports the VST plugin to add extra effects to sound.

Here are some key features that APO offers:

  • Operates on multiple channels
  • Unlimited filters
  • Easy to use interface
  • It has a support community that provides users with supplementary apps
  • It consumes low CPU usage

⇒ Get Equalizer APO

FXSound

fxsound app best equalizer software for windows 11

This equalizer is one of the best free equalizer software solutions compatible with any hardware and we recommend it for Windows 11. It boosts sound quality without any damage to the hearing.

It is an excellent audio-enhancing tool with diverse sound profiles designed for different applications such as movies, gaming, streaming videos, and transcription.

Moreover, you can use a mouse wheel to increase or decrease the frequencies with a simple GUI design. Furthermore, it boosts video games’ surround sounds, creating an insanely beautiful game experience. For ease of use, you can import or export your own presets.

The presets will enable you to decrease background noises in voices and podcasts. The main drawback of this software is that customizable presets won’t be available in the demo version.

Let’s look at other features that FXSound has:

  • Many customised presets
  • Many sound effects
  • boosts sound clarity
  • Visualizer
  • Completely free

⇒ Get FXSound

Viper4Windows

Viper4Windows one of the best free equalizer software for windows 11

Viper4Windows is a freeware software designed for any audio mixing project. The unique feature of this software is its Post Volume function. This feature allows users to boost the instant message sound of programs such as YouTube, Skype, and even video games.

Furthermore, the same as FXSound, it has multiple sound effects presets. It also offers 18 incredibly diverse bands, adjusting frequencies from 20 kHz to 65 Hz.

Viper4Windows offers you ViPER Clarity and XHiFi modules to personalize your sound tones if you are highly enthusiastic about treble tones. The main downside of this software is its bugs for updates because its developers no longer upgrade it.

Also, in rare situations, it may accidentally lose some of its effects. So, it is up to you to weigh its pros and cons before installing.

This software has other features listed as below:

  • Customized audio configuration
  • IRS Power controller
  • ViPER XBass
  • ViPER XClarity
  • Field Surround, Differential Surround (Haas Effect), and Virtual Headphone Surround+

⇒ Get Viper4Windows

Breakaway Audio Enhancer

Breakaway Audio Enhancer

This all-in-one audio enhancement software automatically adjusts the output audio. It means that whenever you want to change your streaming media services, for example, from YouTube to Spotify, it automatically sets you the best sound quality suited for Spotify.

Breakaway audio enhancer lets you modify your sound, whether Hi-Fi or LOFI. For example, if you want to hear a louder harsh sound, it acts as a subwoofer to produce high-quality audio.

It employs the same technology used for DJs and webcasters, which gives you an extraordinary audio aura.

This software also has the following key features:

  • Multi-band processing
  • Louder high-quality sounds
  • Song-to-song volume shift correction
  • Many look-ahead peak limiters
  • Adjusts loudness shifts from song to song

⇒ Get Breakaway Audio Enhancer

Realtek HD Audio Manager

Realtek HD Audio Manager one of the best equalizer software for windows 11

It is one of the well-known equalizer software used in previous Windows versions. Its simple UI allows users to adjust sound control via accessing a panel.

Moreover, Realtek HD Audio Manager supports Dolby and DTS audio coding. For better sound quality, it tests your speakers’ output sounds.

Besides, it provides additional supports including the following key features:

  • Compatible with many sound cards
  • Supporting home theater systems
  • Simple and user-friendly design
  • Many environment effects
  • Headphone Virtualization feature

⇒ Get Realtek HD Audio Manager

Why do we need audio equalizer software for Windows 11?

We can say that it goes back to the listening experience to answer this question. If you care about the quality of music or movie sound, we suggest you install audio equalizer software.

Also, when you use this tool in Windows 11, you can adjust the sound to be appropriate for every environment. For example, if you listen to a piece of upbeat music such as dance or pop in a room, you can easily change the frequency.

Additionally, in some situations, the Windows 11 built-in audio enhancer won’t give the sound quality that you want. In this case, you need a better audio enhancer to boost sound quality. If you haven’t yet upgraded to Windows 11, we suggest downloading the Windows 10 equalizers.

There are various free equalizer software solutions for Windows 11, such as Realtek HD Audio Manager and Viper4Windows. However, if you are an audiophile who looks for much more customized sound effects, Boom 3D is the number one choice you can attempt to find.

And do not forget to read about music.ui.exe in Windows, a process often responsible for high CPU usage.

Do not hesitate to let us know your choice in the comments area below.

How to Completely Uninstall WSL in Windows 11

It is feasible to uninstall the WSL in Windows 11, but this involves a series of actions that must be completed in the correct order.

Although Microsoft has simplified the installation of WSL2 by allowing it to be done with a single command or through the Microsoft Store, uninstalling the platform is not as straightforward as clicking the Uninstall button from the Apps & features settings page in Windows.

If you want to totally remove WSL from your computer, you must first uninstall the Linux distributions, followed by the uninstallation of any additional components, and finally, disable the platform itself.

Follow along as we will walk you through the uninstallation process right after we see in more detail what WSL 2 is all about. Keep up with us!

What does WSL 2 do?

A GNU/Linux environment, including most command-line tools, utilities, and applications, may be run directly on Windows using the Windows Subsystem for Linux, saving developers time and money by eliminating the need for a standard virtual machine or dual-boot configuration.

WSL 2 is a new version of the Windows Subsystem for Linux architecture that enables the Windows Subsystem for Linux to run ELF64 Linux binaries. It is built on a completely new architecture that benefits from the use of a genuine Linux kernel as its operating system.

It is the successor to WSL 1, which was released in 2008. Its key objectives are to improve file system performance while also enabling complete system call compatibility with other programs.

This new design alters the way in which these Linux binaries interface with Windows and your computer’s hardware, but it retains the same user experience as in the previous version, in terms of functionality.

Individual Linux distributions can be run on either the WSL 1 or WSL 2 architecture, depending on their configuration. The distributions can be run side by side, and each distribution can be upgraded or lowered at any point in time.

How can I uninstall WSL in Windows 11?

  1. Press Windows and I simultaneously then access Apps followed by Apps & features.apps-features-section uninstall wsl windows 11
  2. Inside the search box type Ubuntu then click on the three dot menu and choose Uninstall.uninstall-settings uninstall wsl windows 11
  3. Now type Linux and click on the three dot menu next to Windows Subsystem for Linux WSLg Preview followed by Uninstall.
  4. Repeat the step for Windows Subsystem for Linux Update.
  5. Now go back and access Optional features inside the Apps section.optionalfeatures uninstall wsl windows 11
  6. Click on More Windows features under the Related settings section.more uninstall wsl windows 11
  7. Now, uncheck the Virtual Machine Platform as well as Windows Subsystem for Linux. That’s it! Restart your computer to apply the changes made. virtual-off uninstall wsl windows 11

WSL will be completely removed from your computer at this point, just as you wanted.

What are the advantages of using WSL?

Because most developers do not have access to several computers, it is typical for programs to be developed across many platforms.

As a result of the Windows Subsystem for Linux (WSL) functionality provided by Microsoft, it is now quite straightforward to set up a Linux development environment on a machine that is running the Windows operating system.

command uninstall wsl windows 11

Until Microsoft released WSL (Windows Subsystem for Linux) in 2016, the only means to develop Linux applications on Windows machines were through remote host connections or virtual machines.

When you use WSL, you may install and run Linux distributions on 64-bit Windows 10 (starting with version 1607) PCs. Initially, it only supported the Ubuntu Linux distribution, but it currently supports a large number of additional Linux distributions.

Using WSL, one can run Windows applications and tools alongside Linux command-line tools while using fewer resources (such as CPU, memory, and storage) than running a full virtual machine on the same computer.

It offers substantial performance advantages over virtual machines (VMs) for developers who use Windows computers to develop Linux applications.

For more information on WSL, check out our post on WSL being available on the Windows 11 Store, and find out what’s new about it.

You might as well be interested in Linux Oracle as it is now available on the Microsoft Store. Don’t miss out on the article linked.

And lastly, take a look at our Windows 11 vs Linux in-depth comparison to make a choice between the two operating systems.

Was this guide helpful? Do let us know in the comments section below. Thanks for reading!
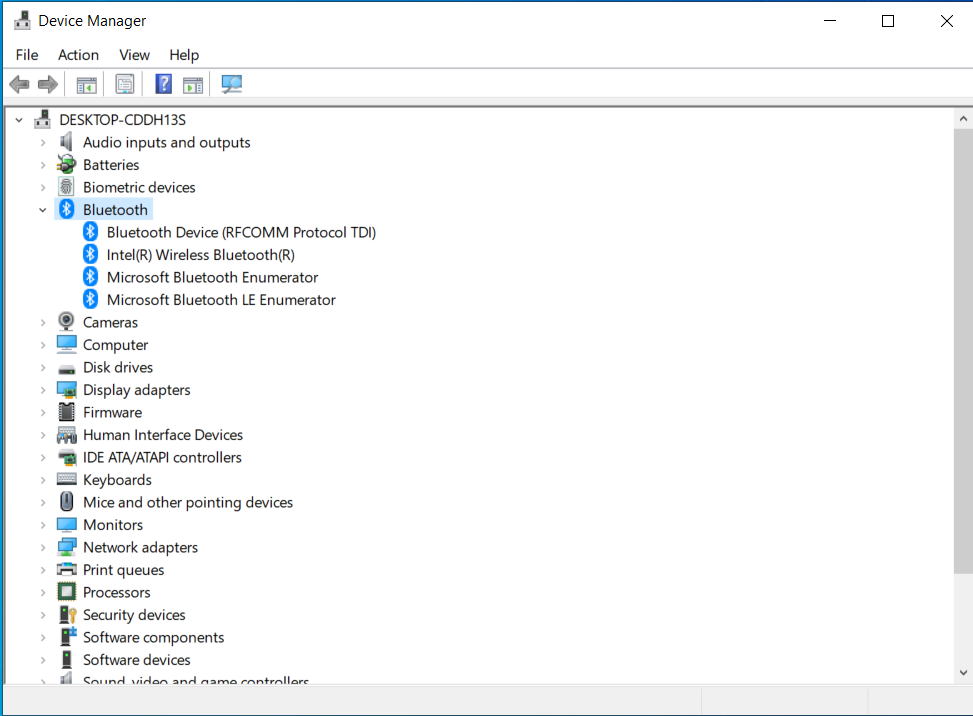
Assassin’s Creed Valhalla Online Service error [Fixed]

A lot has been said about Ubisoft’s latest Assassin’s Creed title, but most players still agree that it’s a masterpiece worth trying at least once.

However, as good as others claim it might be, Valhalla still came with a lot of bugs that absolutely ruined gameplay and made a lot of users uninstall and forget about it.

Among other problems, gamers reported Uplay errors, DirectX 12 errors, and the game constantly minimizing after being booted.

Another dreaded issue that can push most of us past the breaking point is the Online Service error, one that many gamers had to deal with.

There’s no need to be alarmed because every problem, no matter how serious, always has a solution, and we’re here to give it to you.

How can I fix the Assassin’s Creed Valhalla Online Serice error?

Fortunately, as the AC Valhalla Norse gods would have it, this isn’t one of those cases where the solution is easier said than done.

You might be pleased to know that the fix for this problem is pretty straightforward and will only take up a couple of minutes of your time.

If you are ready to proceed and want to quickly restore the game’s functionality, carefully follow these easy steps.

  1. Open your Windows Firewall settings pannel.firewall
  2. Click on Change Settings.online service error
  3. Press the Allow another app… button.online service error 2
  4. Click on Browse.online service error 3
  5. Navigate to where your AC Valhalla game is installed and add every service there to the Windows Firewall exception list.online service error 4
  6. Restart your PC.

This should help you get rid of the nasty Online Service error once and for all, allowing you to play AC Valhalla unhindered.

However, if for whatever reason, you still get the error even after going through the troubleshooting process, you should definitely try this as well.

Open Ubisoft Play, navigate to Settings, select the General tab and check the box next to Enable in-game overlay for supported games.

After this, simply restart Ubisoft Play and open Assassin’s Creed Valhalla, which should totally work by now.

has this guide been helpful to you? Let us know in the comments section below.